Information Design Tool User Guide - SAP Help Portal
442
Information Design Tool User Guide ■ SAP BusinessObjects Business Intelligence platform 4.1 Support Package 1 2013-08-03
-
Upload
khangminh22 -
Category
Documents
-
view
0 -
download
0
Transcript of Information Design Tool User Guide - SAP Help Portal
Information Design Tool User Guide■ SAP BusinessObjects Business Intelligence platform 4.1 Support Package 1
2013-08-03
© 2013 SAP AG or an SAP affiliate company. All rights reserved. No part of this publication may bereproduced or transmitted in any form or for any purpose without the express permission of SAP AG.
Copyright
The information contained herein may be changed without prior notice. Some software productsmarketed by SAP AG and its distributors contain proprietary software components of other softwarevendors. National product specifications may vary. These materials are provided by SAP AG and itsaffiliated companies ("SAP Group") for informational purposes only, without representation or warrantyof any kind, and SAP Group shall not be liable for errors or omissions with respect to the materials.The only warranties for SAP Group products and services are those that are set forth in the expresswarranty statements accompanying such products and services, if any. Nothing herein should beconstrued as constituting an additional warranty. SAP and other SAP products and services mentionedherein as well as their respective logos are trademarks or registered trademarks of SAP AG inGermany and other countries. Please seehttp://www.sap.com/corporate-en/legal/copyright/index.epx#trademark for additional trademarkinformation and notices.
2013-08-03
Contents
What's new in the Information Design Tool User Guide.......................................................15Chapter 1
Getting started with the information design tool...................................................................19Chapter 2
About the information design tool...........................................................................................192.1About resources in the information design tool.......................................................................202.2Starting the information design tool........................................................................................232.3About the information design tool interface............................................................................232.4Resetting the user interface display........................................................................................252.4.1Setting preferences in the information design tool..................................................................252.5Setting preferences for the Business Layer Editor..................................................................272.5.1Setting preferences for check integrity ..................................................................................282.5.2Setting connection display preferences for the Data Foundation Editor..................................282.5.3Setting display preferences for the data foundation view........................................................292.5.4Setting table and join detection options..................................................................................302.5.5Setting performance-related options for the data foundation view..........................................322.5.6Setting languages used by the information design tool...........................................................322.5.7Setting a link for online tutorials.............................................................................................332.5.8Setting middleware for secured relational connections...........................................................332.5.9Setting preferences for showing values..................................................................................342.5.10How to get help using the information design tool..................................................................342.6Wizards in the information design tool....................................................................................352.7
Creating Universes...............................................................................................................37Chapter 3
How to create a universe with the information design tool .....................................................373.1Using SAP NetWeaver BW data sources...............................................................................403.2How InfoProvider objects are mapped in a universe...............................................................413.2.1Refreshing universes based on SAP Netweaver BW..............................................................453.2.2Using SAP HANA data sources.............................................................................................453.3Creating relational resources on SAP HANA information models...........................................473.3.1Using SAP ERP data sources.................................................................................................483.4Using Microsoft Analysis Services (MSAS) data sources......................................................493.5Using Essbase data sources..................................................................................................513.6
2013-08-033
Using SAS data sources........................................................................................................533.7Multilingual universes.............................................................................................................543.8Translating universe metadata................................................................................................553.8.1About the New Universe wizard.............................................................................................563.9Select or create a project in the New Universe wizard...........................................................563.9.1Select the data source type in the New Universe wizard........................................................573.9.2Select or create a relational connection in the New Universe wizard......................................573.9.3Select or create an OLAP connection in the New Universe wizard.........................................573.9.4Select or create a data foundation in the New Universe wizard..............................................583.9.5
Converting .unv universes....................................................................................................59Chapter 4
About .unv and .unx universes................................................................................................594.1About converting .unv universes ...........................................................................................594.2Features supported when converting .unv universes..............................................................614.3Tips for resolving check integrity errors after converting .unv universes.................................664.4Converting a .unv universe in a repository..............................................................................674.5Converting a locally-stored .unv universe...............................................................................684.6
Retrieving published universes.............................................................................................71Chapter 5
Retrieving a published universe from the local file system......................................................715.1Retrieving a published universe from a repository..................................................................715.2
Migrating universes to SAP HANA.......................................................................................73Chapter 6
About Universe Landscape Migration.....................................................................................736.1Universe Landscape Migration requirements and limitations...................................................746.1.1Migrating a universe to SAP HANA: Pre-Migration.................................................................756.2Migrating a universe to SAP HANA: Migration.......................................................................766.3Migrating a universe to SAP HANA: Post-Migration...............................................................776.4
Working with projects...........................................................................................................79Chapter 7
About local projects and resources........................................................................................797.1Creating a local project..........................................................................................................807.1.1About resource names...........................................................................................................807.1.2Finding universe resources in the local file system.................................................................817.1.3Opening a local project...........................................................................................................817.1.4Deleting a local project...........................................................................................................827.1.5Backing-up and recovering universe resources in local projects.............................................827.1.6Searching for and filtering resources in the Local Projects View.............................................837.1.7About shared projects............................................................................................................837.2Creating a shared project from a local project........................................................................847.2.1
2013-08-034
Contents
Working in a shared project....................................................................................................847.2.2Renaming a shared project.....................................................................................................857.2.3Deleting a shared project.......................................................................................................857.2.4About project synchronization................................................................................................867.3Opening the Project Synchronization View.............................................................................897.3.1Synchronizing a project..........................................................................................................897.3.2Locking a resource.................................................................................................................907.3.3Unlocking a resource.............................................................................................................917.3.4Merging changes to shared resources...................................................................................917.3.5Saving resources as reports..................................................................................................927.4
Working with repository resources.......................................................................................93Chapter 8
About managing repository resources....................................................................................938.1About session management...................................................................................................948.2Opening a session.................................................................................................................958.2.1Closing a session...................................................................................................................968.2.2Running a query on a universe published in a repository.........................................................968.3
Working with connections....................................................................................................97Chapter 9
About connections.................................................................................................................979.1About local connections.........................................................................................................989.1.1About secured connections....................................................................................................999.1.2About connection shortcuts.................................................................................................1009.1.3About the Connection Editor................................................................................................1009.2Creating a relational connection...........................................................................................1019.3Name a connection..............................................................................................................1029.3.1Select a middleware driver...................................................................................................1029.3.2Set the connection parameters............................................................................................1039.3.3Creating an OLAP connection..............................................................................................1259.4Select an OLAP middleware driver.......................................................................................1269.4.1Set login parameters for OLAP data sources.......................................................................1279.4.2Select an OLAP cube ..........................................................................................................1329.4.3Creating a connection shortcut............................................................................................1339.5Editing local and secured connections..................................................................................1339.6Editing connection shortcuts................................................................................................1349.7Showing values in a relational connection.............................................................................1349.8Showing values in an OLAP connection...............................................................................1359.9
Working with data foundations...........................................................................................137Chapter 10
About data foundations........................................................................................................13710.1
2013-08-035
Contents
About data foundation types................................................................................................13710.1.1About single-source data foundations...................................................................................13810.1.2About multisource-enabled data foundations........................................................................13810.1.3About the Data Foundation Editor........................................................................................14110.2How to build a data foundation.............................................................................................14210.3About connections in the data foundation.............................................................................14510.4Adding connections to a data foundation..............................................................................14610.4.1Changing a connection in a data foundation.........................................................................14710.4.2Selecting delimitation overrides to keep...............................................................................14810.4.3Searching for tables in the Connection pane........................................................................14810.4.4Filtering the tables in the connection by table type...............................................................15010.4.5Filtering tables in an SAP HANA connection by information model.......................................15010.4.6About tables in the data foundation......................................................................................15110.5Inserting tables into the data foundation...............................................................................15310.5.1Editing table properties.........................................................................................................15510.5.2Setting case of table names.................................................................................................15610.5.3Hiding and unhiding table columns........................................................................................15610.5.4Changing column data types................................................................................................15710.5.5Changing qualifiers and owners............................................................................................15710.5.6Changing table and column delimitation................................................................................15810.5.7About table keys..................................................................................................................15810.6Setting and detecting table keys..........................................................................................15910.6.1About table row counts........................................................................................................16010.7About joins...........................................................................................................................16110.8Inserting and editing a join....................................................................................................16210.8.1Detecting joins.....................................................................................................................16410.8.2Inserting a column filter........................................................................................................16510.8.3About cardinality..................................................................................................................16510.9Detecting and setting cardinalities........................................................................................16610.9.1Inserting a calculated column................................................................................................16710.10Inserting a time column........................................................................................................16810.11About derived tables............................................................................................................16810.12Inserting a derived table based on a data foundation table....................................................16910.12.1Merging tables.....................................................................................................................16910.12.2Inserting and editing a derived table ....................................................................................17010.12.3About alias tables.................................................................................................................17110.13Inserting alias tables.............................................................................................................17210.13.1Detecting alias tables...........................................................................................................17310.13.2Highlighting aliases...............................................................................................................17310.13.3Highlighting the original table of an alias...............................................................................17410.13.4About contexts.....................................................................................................................17410.14
2013-08-036
Contents
Detecting contexts...............................................................................................................17510.14.1Inserting and editing contexts...............................................................................................17510.14.2Resolving loops....................................................................................................................17610.15About input columns in the data foundation..........................................................................17710.16Editing input columns...........................................................................................................17810.16.1About parameters and lists of values in the data foundation.................................................17910.17About data foundation properties.........................................................................................17910.18Editing SQL options in the data foundation...........................................................................18010.18.1Setting SQL generation parameters in the data foundation...................................................18010.18.2Showing a data foundation summary....................................................................................18110.18.3Editing the data foundation description and comments.........................................................18210.18.4Showing SAP HANA variable information.............................................................................18210.18.5Showing table values...........................................................................................................18310.19Showing values in a data source..........................................................................................18310.19.1Showing column values........................................................................................................18410.20Profiling column values.........................................................................................................18510.21Showing local dependencies in the data foundation..............................................................18510.22About refreshing a data foundation.......................................................................................18610.23Synchronizing tables............................................................................................................18710.23.1Inserting a custom data foundation view...............................................................................18710.24Searching for tables and columns in the data foundation......................................................18810.25Inserting a comment into the data foundation view...............................................................18910.26Centering the view on a selection........................................................................................18910.27Changing the display of objects in the data foundation.........................................................19010.28Auto-arranging tables in the data foundation view.................................................................19010.28.1Changing table display.........................................................................................................19110.28.2Grouping tables using families..............................................................................................19110.28.3
Working with the federation layer.......................................................................................193Chapter 11
About the federation layer....................................................................................................19311.1Building the federation data flow..........................................................................................19311.2About federated tables.........................................................................................................19411.3Adding a federated table manually........................................................................................19611.3.1Adding a federated table from a data source........................................................................19611.3.2Editing a federated table.......................................................................................................19711.3.3About input tables and joins.................................................................................................19711.4Adding input tables to a mapping..........................................................................................19811.4.1Joining input tables..............................................................................................................19911.4.2Configuring meanings of input table joins using core tables..................................................20011.4.3About mappings in the federation layer.................................................................................20211.5Mapping columns from the input table to columns of the federated table.............................20211.5.1
2013-08-037
Contents
Editing a mapping formula.....................................................................................................20311.5.2About the SQL Expression Editor.........................................................................................20311.5.3Adding a mapping.................................................................................................................20411.5.4Activating and deactivating mappings...................................................................................20511.5.5About distinct rows on input tables......................................................................................20511.6Activating and deactivating distinct rows..............................................................................20511.6.1About pre-filters and post-filters...........................................................................................20511.7Adding and editing pre-filters................................................................................................20611.7.1Editing post-filters................................................................................................................20711.7.2Showing values in a federated table.....................................................................................20711.8Checking integrity of the federation layer.............................................................................20811.9Inserting a federated table into the data foundation..............................................................20811.10Refreshing the structure of the federation layer....................................................................20911.11
Working with business layers.............................................................................................211Chapter 12
About business layers..........................................................................................................21112.1About business layer objects...............................................................................................21112.2How to build a relational business layer................................................................................21412.3Specifying the type of data source for a business layer........................................................21612.3.1Naming a business layer......................................................................................................21712.3.2Selecting a data foundation for a business layer...................................................................21712.3.3How to build an OLAP business layer...................................................................................21812.4Selecting an OLAP connection and cube for a business layer..............................................21912.4.1Selecting an Essbase Accounts dimension...........................................................................22012.4.2Selecting objects from an OLAP cube for a business layer...................................................22012.4.3About the Business Layer Editor..........................................................................................22112.5Changing display options of the business layer tree view.....................................................22212.5.1About business layer properties...........................................................................................22212.6OLAP data source properties...............................................................................................22412.6.1About query stripping...........................................................................................................22512.6.2Editing the business layer name, description, and comments...............................................22612.6.3Editing query limits and options in the business layer............................................................22712.6.4Changing the data source of a business layer......................................................................22712.6.5Setting SQL generation parameters in the business layer....................................................22812.6.6Displaying a business layer summary...................................................................................22912.6.7About index awareness........................................................................................................22912.7About aggregate awareness.................................................................................................23012.8Setting up aggregate awareness..........................................................................................23112.8.1Setting aggregate navigation................................................................................................23112.8.2Working with business layer objects....................................................................................23212.9Inserting a folder..................................................................................................................23212.9.1
2013-08-038
Contents
Inserting and editing dimensions...........................................................................................23312.9.2Inserting dimensions directly from the data foundation.........................................................23612.9.3Defining keys for dimensions and dimension attributes........................................................23712.9.4Turning an attribute or measure into a dimension.................................................................23812.9.5Inserting and editing measures.............................................................................................23812.9.6Turning a dimension or attribute into a measure...................................................................24112.9.7Inserting and editing attributes.............................................................................................24212.9.8Turning a dimension or measure into an attribute.................................................................24412.9.9Inserting and editing filters....................................................................................................24412.9.10Inserting and editing analysis dimensions.............................................................................24612.9.11Inserting and editing hierarchies...........................................................................................24812.9.12Inserting and editing hierarchy levels....................................................................................24912.9.13Inserting and editing named sets..........................................................................................25112.9.14Inserting and editing calculated members.............................................................................25212.9.15Defining the SQL expression for an object...........................................................................25412.9.16Defining the MDX expression for an object..........................................................................25512.9.17Associating extra tables.......................................................................................................25512.9.18Changing the state of an object: Active, Hidden, or Deprecated...........................................25612.9.19Setting object access levels.................................................................................................25612.9.20Setting where objects can be used......................................................................................25712.9.21Setting options for the default list of values..........................................................................25812.9.22Creating and editing display formats for business layer objects............................................25912.9.23About source information for business layer objects ...........................................................26612.9.24Inserting and editing custom properties................................................................................26712.9.25Showing associated objects.................................................................................................26712.9.26Showing business layer object values..................................................................................26812.9.27Searching for business layer objects....................................................................................26812.9.28About business layer views..................................................................................................26912.10Creating and editing a business layer view...........................................................................26912.10.1Filtering by business layer view............................................................................................27012.10.2About parameters ...............................................................................................................27012.11Inserting and editing a parameter..........................................................................................27212.11.1Creating an index-aware prompt...........................................................................................27212.11.2About lists of values ............................................................................................................27312.12Inserting or editing a list of values .......................................................................................27412.12.1List of values column properties...........................................................................................27612.12.2Associating a list of values with a business object................................................................27712.12.3Associating a list of values with a prompt defined in the business layer................................27812.12.4About navigation paths for objects.......................................................................................27912.13Inserting a navigation path object into a business layer.........................................................27912.13.1About queries in a business layer.........................................................................................28012.14
2013-08-039
Contents
Inserting and editing a query in the business layer................................................................28012.14.1Reordering objects in the Business Layer Editor..................................................................28112.15About refreshing business layers.........................................................................................28112.16Refreshing an OLAP business layer ....................................................................................28212.16.1Inserting candidate objects...................................................................................................28312.16.2About computing statistics for optimized query execution ...................................................28412.17Computing statistics for a multisource-enabled universe......................................................28412.17.1
Using the Query Panel........................................................................................................287Chapter 13
How to build a query............................................................................................................28713.1About the Member Selector.................................................................................................28813.2About selecting hierarchy members.....................................................................................28913.2.1Opening the Member Selector in the Query Panel ..............................................................29013.2.2Selecting hierarchy members...............................................................................................29013.2.3Selecting members by hierarchy relationship .......................................................................29113.2.4Selecting hierarchy members by level..................................................................................29213.2.5Selecting named sets...........................................................................................................29313.2.6Selecting calculated members..............................................................................................29313.2.7Searching for hierarchy members.........................................................................................29313.2.8Excluding hierarchy members...............................................................................................29413.2.9Defining a prompt to select members...................................................................................29513.2.10Showing selected members in the Member Selector...........................................................29513.2.11Sorting hierarchy members..................................................................................................29613.2.12Setting display options.........................................................................................................29613.2.13Showing estimated child count.............................................................................................29613.2.14Filtering data in the Query Panel...........................................................................................29713.3How to build a business filter................................................................................................29713.3.1Filtering data using prompts.................................................................................................29913.3.2Setting query properties.......................................................................................................30113.4Viewing and editing the query script.....................................................................................30313.5Profiling column values in the query panel............................................................................30413.6
Checking integrity...............................................................................................................305Chapter 14
Running check integrity........................................................................................................30514.1Reviewing check integrity problems.....................................................................................30614.2
Showing dependencies between resources........................................................................307Chapter 15
About resource dependencies..............................................................................................30715.1Showing local dependencies................................................................................................30915.2Showing repository dependencies........................................................................................31015.3
2013-08-0310
Contents
Publishing resources..........................................................................................................311Chapter 16
About publishing resources..................................................................................................31116.1Publishing a universe............................................................................................................31216.2Selecting a repository folder................................................................................................31316.2.1Selecting a local folder.........................................................................................................31316.2.2Publishing a local connection to the repository.....................................................................31316.3Publishing a local universe to the repository.........................................................................31416.4
Managing security...............................................................................................................315Chapter 17
About universe security........................................................................................................31517.1About securing resources in the information design tool......................................................31617.2CMC rights for information design tool users.......................................................................31717.3About the Security Editor.....................................................................................................31917.4How to secure a universe using security profiles..................................................................32017.5Opening the Security Editor.................................................................................................32217.6Inserting and editing a Data Security Profile.........................................................................32217.7Data Security Profile settings...............................................................................................32317.7.1Data Security Profile Connections settings..........................................................................32417.7.2Data Security Profile Controls settings................................................................................32517.7.3Data Security Profile SQL settings.......................................................................................32517.7.4Data Security Profile Rows settings.....................................................................................32617.7.5Data Security Profile Tables setting......................................................................................32717.7.6Changing Security Profile priority.........................................................................................32817.8Inserting and editing a Business Security Profile..................................................................32817.9Business Security Profile settings........................................................................................32917.9.1Business Security Profile Connections settings...................................................................33017.9.2Business Security Profile Create Query settings..................................................................33117.9.3Business Security Profile Display Data settings...................................................................33217.9.4Business Security Profile Filters settings..............................................................................33317.9.5Security profile aggregation..................................................................................................33417.10Aggregation of Connections settings...................................................................................33517.10.1Aggregation of Controls settings..........................................................................................33617.10.2Aggregation of SQL settings................................................................................................33617.10.3Aggregation of Rows settings..............................................................................................33717.10.4Aggregation of Tables settings.............................................................................................33817.10.5Aggregation of Create Query settings..................................................................................33817.10.6Aggregation of Display Data settings...................................................................................34017.10.7Aggregation of Filters settings..............................................................................................34117.10.8Changing security profile aggregation options......................................................................34217.11
2013-08-0311
Contents
Assigning Security Profiles to users.....................................................................................34217.12Displaying profiles assigned to a user and previewing net profiles........................................34217.13
SQL and MDX reference.....................................................................................................345Chapter 18
About the SQL/MDX Expression Editor...............................................................................34518.1SAP BusinessObjects SQL function reference for multisource-enabled universes ..............34718.2Aggregation functions..........................................................................................................34818.2.1ASCII Code (ascii)...............................................................................................................35118.2.2Absolute (abs)......................................................................................................................35118.2.3Angle Tangent 2 (atan2).......................................................................................................35218.2.4Arc Tangent (atan)...............................................................................................................35218.2.5Arc Cosine (acos)................................................................................................................35318.2.6Arc Sine (asin).....................................................................................................................35318.2.7Case....................................................................................................................................35418.2.8Cast.....................................................................................................................................35518.2.9Catalog................................................................................................................................35618.2.10Ceil (ceiling).........................................................................................................................35618.2.11Character (char)...................................................................................................................35718.2.12Charindex (pos) (locate).......................................................................................................35718.2.13Concat.................................................................................................................................35818.2.14Contains Only Digits............................................................................................................35918.2.15Convert................................................................................................................................35918.2.16Cosine (cos)........................................................................................................................36018.2.17Cotangent (cot)....................................................................................................................36018.2.18Current Date (curDate)........................................................................................................36118.2.19Current Time (curTime)........................................................................................................36118.2.20Database.............................................................................................................................36118.2.21Day Name............................................................................................................................36218.2.22Day Of Month......................................................................................................................36218.2.23Day Of Week.......................................................................................................................36318.2.24Day Of Year.........................................................................................................................36318.2.25Decrement Days..................................................................................................................36318.2.26Degrees...............................................................................................................................36418.2.27Exp.......................................................................................................................................36418.2.28Floor....................................................................................................................................36518.2.29Hexa To Int...........................................................................................................................36518.2.30Hour.....................................................................................................................................36618.2.31If Else...................................................................................................................................36618.2.32If Null (nvl)............................................................................................................................36718.2.33Increment Days....................................................................................................................36718.2.34Int To Hexa...........................................................................................................................36818.2.35
2013-08-0312
Contents
Is Like..................................................................................................................................36818.2.36LPad....................................................................................................................................36918.2.37Left......................................................................................................................................37018.2.38Left Remove (ltrim)..............................................................................................................37018.2.39Length..................................................................................................................................37118.2.40Log......................................................................................................................................37118.2.41Log10..................................................................................................................................37218.2.42Lowercase (lcase)................................................................................................................37218.2.43Minute.................................................................................................................................37318.2.44Mod.....................................................................................................................................37318.2.45Month Name........................................................................................................................37418.2.46Now.....................................................................................................................................37418.2.47Number of the Month (month)..............................................................................................37518.2.48Number of the Week (week)................................................................................................37518.2.49Permute...............................................................................................................................37618.2.50Pi.........................................................................................................................................37718.2.51Power..................................................................................................................................37718.2.52Quarter................................................................................................................................37818.2.53Radians................................................................................................................................37818.2.54Random (rand).....................................................................................................................37918.2.55Replace................................................................................................................................37918.2.56Replace String Exp...............................................................................................................38018.2.57Replicate (repeat).................................................................................................................38018.2.58Rightpart (right)....................................................................................................................38118.2.59Round..................................................................................................................................38118.2.60Rpad....................................................................................................................................38218.2.61Rpos....................................................................................................................................38218.2.62Rtrim....................................................................................................................................38318.2.63Schema................................................................................................................................38418.2.64Second................................................................................................................................38418.2.65Sign.....................................................................................................................................38418.2.66Sine (sin)..............................................................................................................................38518.2.67Space..................................................................................................................................38518.2.68Sqrt......................................................................................................................................38518.2.69Stuff (insert).........................................................................................................................38618.2.70Substring.............................................................................................................................38718.2.71Tangent (tan)........................................................................................................................38818.2.72Timestamp Add....................................................................................................................38818.2.73Timestamp Diff.....................................................................................................................38918.2.74To Boolean...........................................................................................................................39018.2.75To Date................................................................................................................................39118.2.76
2013-08-0313
Contents

To Decimal...........................................................................................................................39218.2.77To Double............................................................................................................................39218.2.78To Integer............................................................................................................................39318.2.79To Null.................................................................................................................................39318.2.80To String..............................................................................................................................39418.2.81To Time................................................................................................................................39418.2.82To Timestamp......................................................................................................................39518.2.83Trim.....................................................................................................................................39618.2.84Trunc....................................................................................................................................39718.2.85Uppercase (ucase)...............................................................................................................39718.2.86User.....................................................................................................................................39818.2.87Year.....................................................................................................................................39818.2.88About @Functions................................................................................................................39918.3About @Aggregate_Aware...................................................................................................39918.3.1About @DerivedTable...........................................................................................................39918.3.2About @Execute...................................................................................................................40018.3.3About @Prompt....................................................................................................................40218.3.4About @Select.....................................................................................................................40818.3.5About @Variable..................................................................................................................40918.3.6About @Where.....................................................................................................................41118.3.7About SQL Generation Parameters......................................................................................41118.4SQL generation parameters reference.................................................................................41218.4.1SQL generation parameters set in the extended PRM..........................................................42718.4.2
More Information.................................................................................................................439Appendix A
Index 441
2013-08-0314
Contents
What's new in the Information Design Tool User Guide
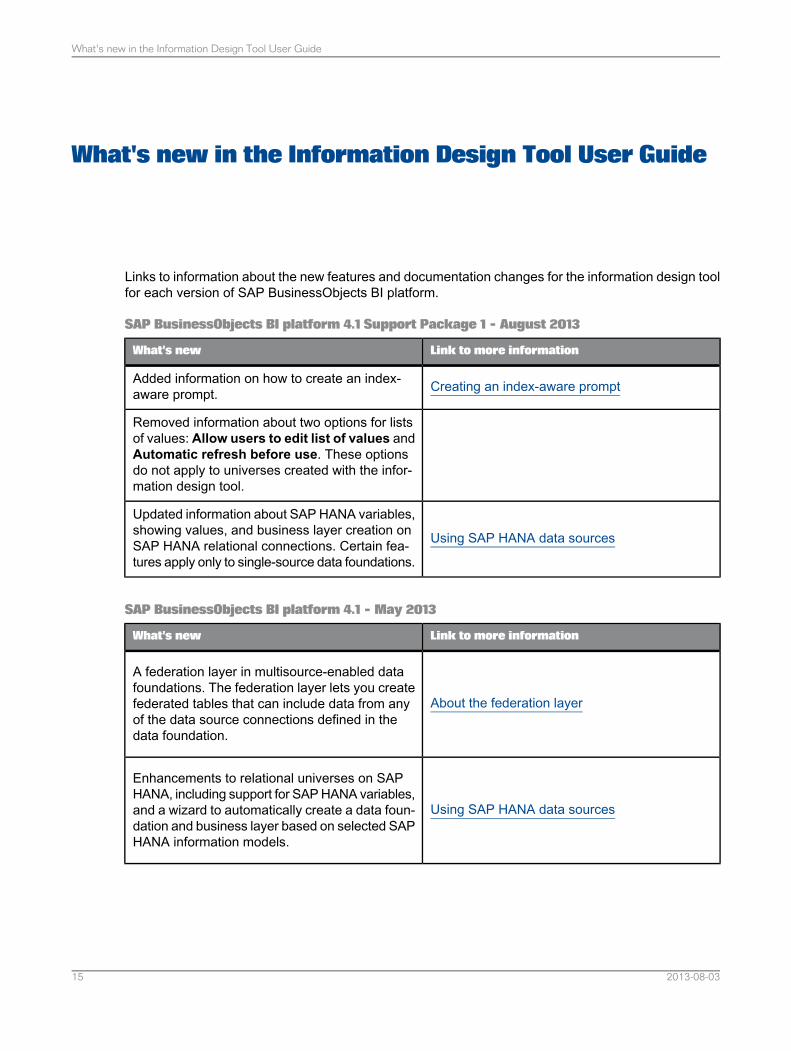
Links to information about the new features and documentation changes for the information design toolfor each version of SAP BusinessObjects BI platform.
SAP BusinessObjects BI platform 4.1 Support Package 1 - August 2013
Link to more informationWhat's new
Creating an index-aware promptAdded information on how to create an index-aware prompt.
Removed information about two options for listsof values: Allow users to edit list of values andAutomatic refresh before use. These optionsdo not apply to universes created with the infor-mation design tool.
Using SAP HANA data sources
Updated information about SAP HANA variables,showing values, and business layer creation onSAP HANA relational connections. Certain fea-tures apply only to single-source data foundations.
SAP BusinessObjects BI platform 4.1 - May 2013
Link to more informationWhat's new
About the federation layer
A federation layer in multisource-enabled datafoundations. The federation layer lets you createfederated tables that can include data from anyof the data source connections defined in thedata foundation.
Using SAP HANA data sources
Enhancements to relational universes on SAPHANA, including support for SAP HANA variables,and a wizard to automatically create a data foun-dation and business layer based on selected SAPHANA information models.
2013-08-0315
What's new in the Information Design Tool User Guide
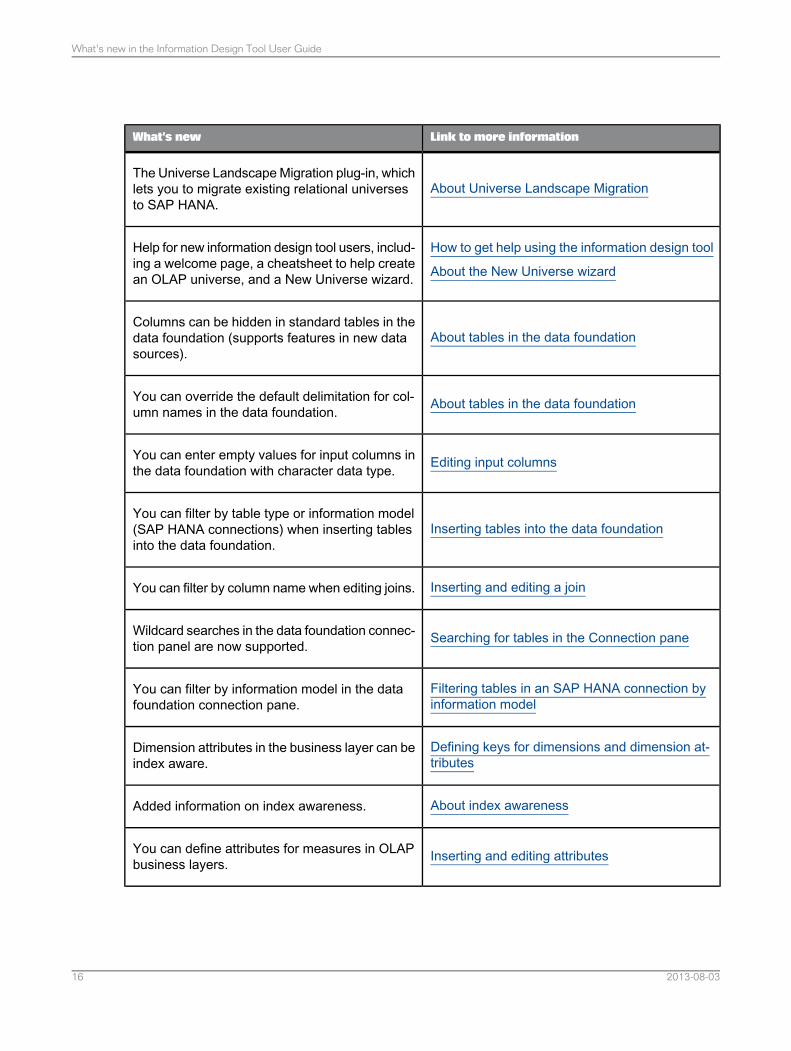
Link to more informationWhat's new
About Universe Landscape MigrationThe Universe Landscape Migration plug-in, whichlets you to migrate existing relational universesto SAP HANA.
How to get help using the information design tool
About the New Universe wizard
Help for new information design tool users, includ-ing a welcome page, a cheatsheet to help createan OLAP universe, and a New Universe wizard.
About tables in the data foundationColumns can be hidden in standard tables in thedata foundation (supports features in new datasources).
About tables in the data foundationYou can override the default delimitation for col-umn names in the data foundation.
Editing input columnsYou can enter empty values for input columns inthe data foundation with character data type.
Inserting tables into the data foundationYou can filter by table type or information model(SAP HANA connections) when inserting tablesinto the data foundation.
Inserting and editing a joinYou can filter by column name when editing joins.
Searching for tables in the Connection paneWildcard searches in the data foundation connec-tion panel are now supported.
Filtering tables in an SAP HANA connection byinformation model
You can filter by information model in the datafoundation connection pane.
Defining keys for dimensions and dimension at-tributes
Dimension attributes in the business layer can beindex aware.
About index awarenessAdded information on index awareness.
Inserting and editing attributesYou can define attributes for measures in OLAPbusiness layers.
2013-08-0316
What's new in the Information Design Tool User Guide
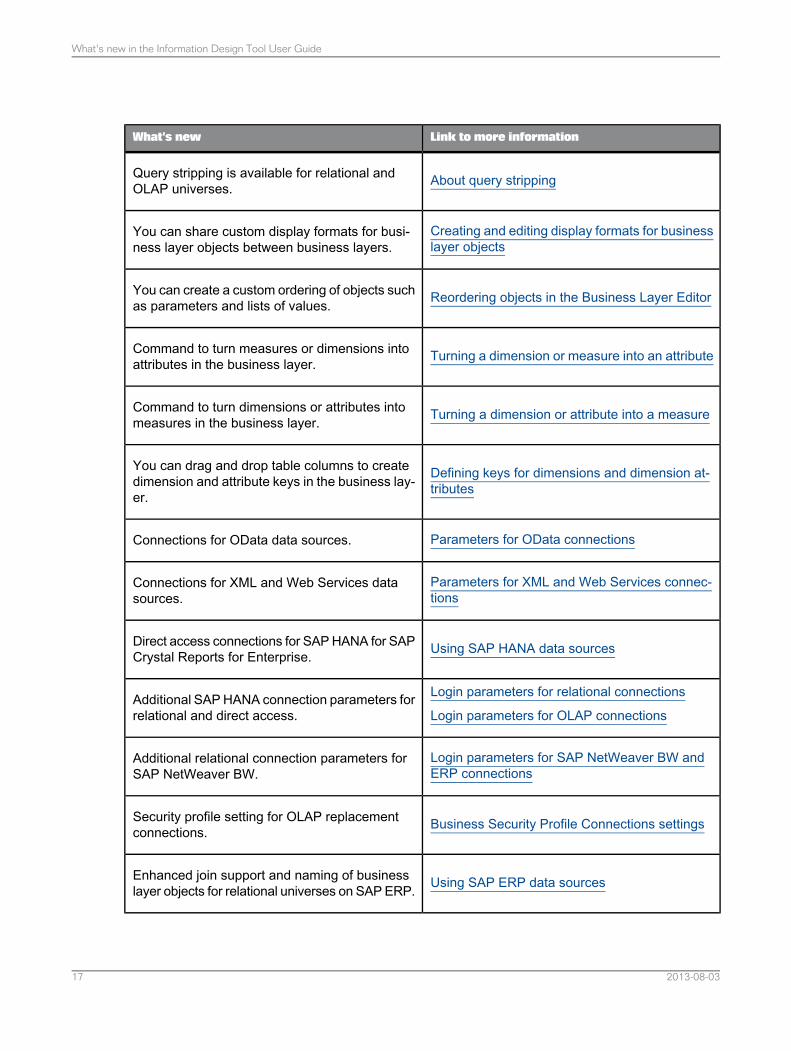
Link to more informationWhat's new
About query strippingQuery stripping is available for relational andOLAP universes.
Creating and editing display formats for businesslayer objects
You can share custom display formats for busi-ness layer objects between business layers.
Reordering objects in the Business Layer EditorYou can create a custom ordering of objects suchas parameters and lists of values.
Turning a dimension or measure into an attributeCommand to turn measures or dimensions intoattributes in the business layer.
Turning a dimension or attribute into a measureCommand to turn dimensions or attributes intomeasures in the business layer.
Defining keys for dimensions and dimension at-tributes
You can drag and drop table columns to createdimension and attribute keys in the business lay-er.
Parameters for OData connectionsConnections for OData data sources.
Parameters for XML and Web Services connec-tions
Connections for XML and Web Services datasources.
Using SAP HANA data sourcesDirect access connections for SAP HANA for SAPCrystal Reports for Enterprise.
Login parameters for relational connections
Login parameters for OLAP connectionsAdditional SAP HANA connection parameters forrelational and direct access.
Login parameters for SAP NetWeaver BW andERP connections
Additional relational connection parameters forSAP NetWeaver BW.
Business Security Profile Connections settingsSecurity profile setting for OLAP replacementconnections.
Using SAP ERP data sourcesEnhanced join support and naming of businesslayer objects for relational universes on SAP ERP.
2013-08-0317
What's new in the Information Design Tool User Guide

2013-08-0318
What's new in the Information Design Tool User Guide
Getting started with the information design tool
2.1 About the information design tool
The information design tool is an SAP BusinessObjects metadata design environment that enables adesigner to extract, define, and manipulate metadata from relational and OLAP sources to create anddeploy SAP BusinessObjects universes.
A universe is an organized collection of metadata objects that enable business users to analyze andreport on corporate data in a non-technical language. These objects include dimensions, measures,hierarchies, attributes, pre-defined calculations, functions, and queries. The metadata object layer,called the business layer, is built on a relational database schema or an OLAP cube, so the objectsmap directly to the database structures via SQL or MDX expressions. A universe includes connectionsidentifying the data sources so queries can be run on the data.
The role of the universe is to provide the business user with semantically understandable businessobjects. The user is free to analyze data and create reports using relevant business language regardlessof the underlying data sources and structures.
Universes created using the information design tool can be used by the following SAP data analysisand reporting applications starting with version BI 4:
• SAP BusinessObjects Web Intelligence• SAP Crystal Reports for Enterprise• SAP BusinessObjects Explorer• SAP BusinessObjects Dashboard Design• SAP Visual Intelligence• SAP Predictive Analysis
Note:Check the documentation for an application for any restrictions on accessing universes.
To enable the designer to create universes, the information design tool provides the resources necessaryto do the following:• Create connections to data sources.• Extract a complete OLAP cube schema.• Extract tables and joins to build a relational schema called a data foundation.• Create metadata objects from the cube or the data foundation. These objects are contained and
organized in a business layer. The SQL and MDX expressions within objects can be validated andqueries run against the target databases to test the business layer.
• Share resources to allow multiple designers to work on the same resources concurrently.
2013-08-0319
Getting started with the information design tool
• Publish a universe, which compiles the business layer, the data foundation, and the connectionsinto a single universe file (.unx):• Publish a universe to a repository to be implemented in deployments of SAP BusinessObjects
data analysis and reporting applications.• Publish a universe locally, to be implemented by client applications in standalone mode (for
example Web Intelligence Rich Client).• Create security profiles to define user access to universe data and metadata.
Who uses the information design tool?The universe designer may be a database administrator, an applications manager or developer, aproject manager, or a report creator who has acquired enough technical skills to create universes forother users. A security administrator also uses the information design tool to define universe securityprofiles.
There can be more than one universe designer in a company. The number of universe designersdepends on the company's data requirements. For example, one universe designer could be appointedfor each application, project, department or functional area.
Related Topics• About resources in the information design tool• Starting the information design tool• How to create a universe with the information design tool
2.2 About resources in the information design tool
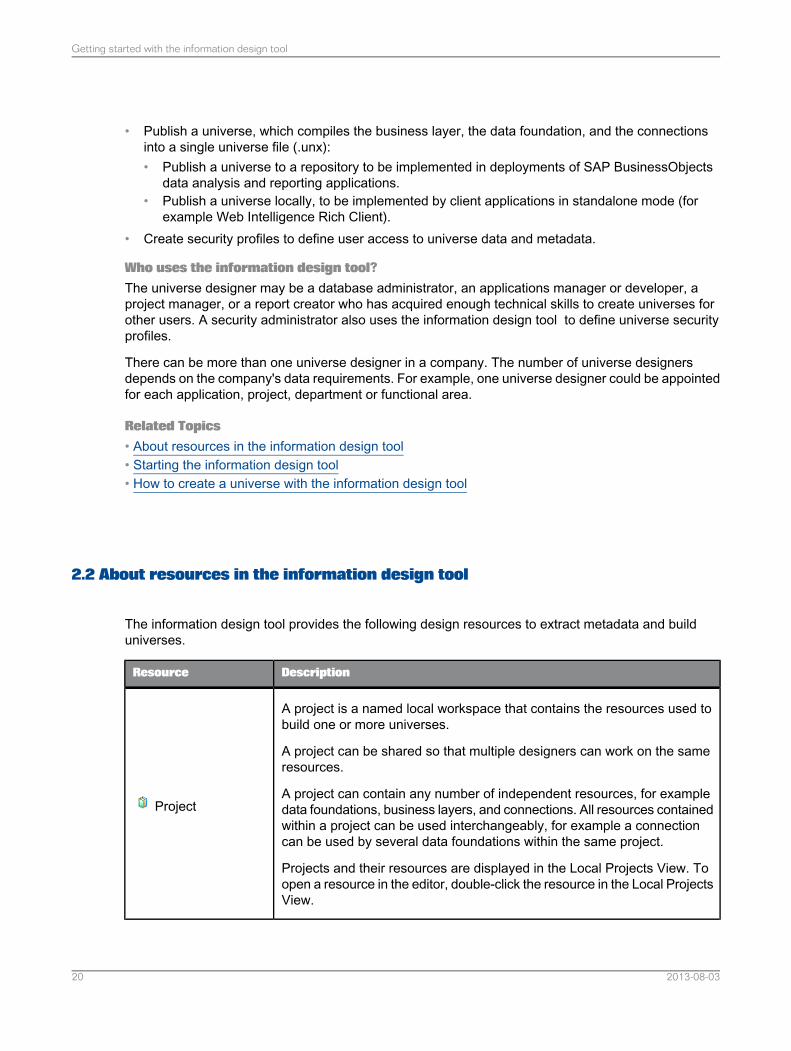
The information design tool provides the following design resources to extract metadata and builduniverses.
DescriptionResource
A project is a named local workspace that contains the resources used tobuild one or more universes.
A project can be shared so that multiple designers can work on the sameresources.
A project can contain any number of independent resources, for exampledata foundations, business layers, and connections. All resources containedwithin a project can be used interchangeably, for example a connectioncan be used by several data foundations within the same project.
Projects and their resources are displayed in the Local Projects View. Toopen a resource in the editor, double-click the resource in the Local ProjectsView.
Project
2013-08-0320
Getting started with the information design tool
DescriptionResource
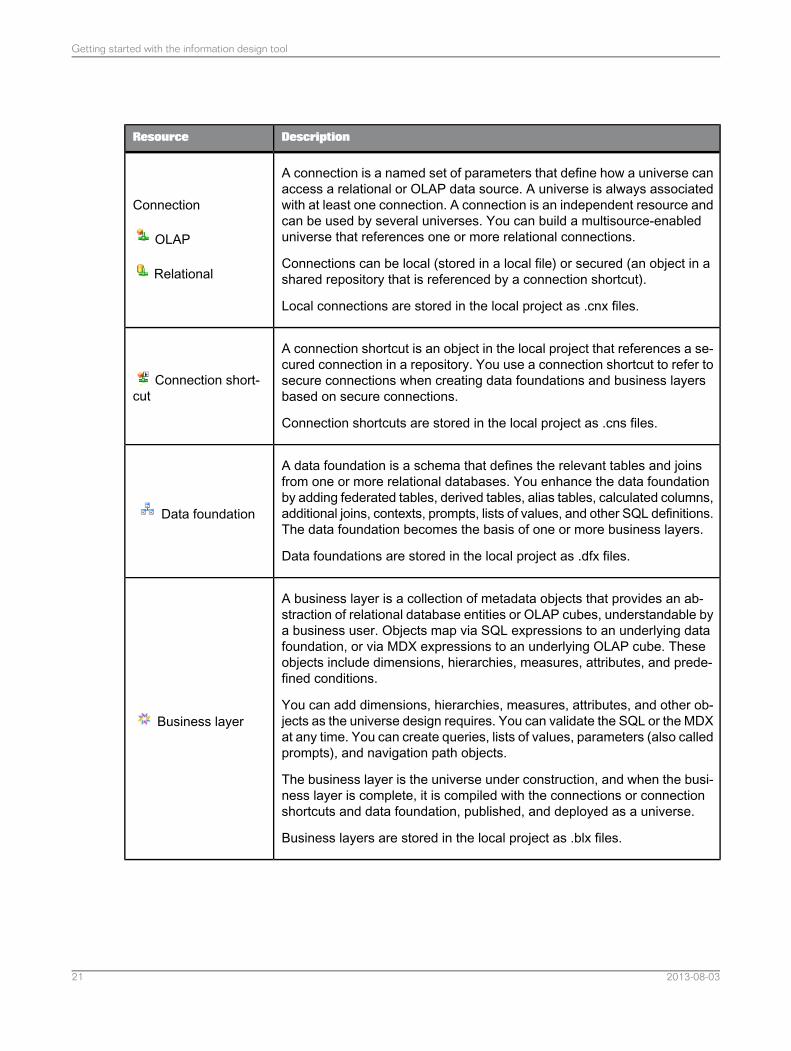
A connection is a named set of parameters that define how a universe canaccess a relational or OLAP data source. A universe is always associatedwith at least one connection. A connection is an independent resource andcan be used by several universes. You can build a multisource-enableduniverse that references one or more relational connections.
Connections can be local (stored in a local file) or secured (an object in ashared repository that is referenced by a connection shortcut).
Local connections are stored in the local project as .cnx files.
Connection
OLAP
Relational
A connection shortcut is an object in the local project that references a se-cured connection in a repository. You use a connection shortcut to refer tosecure connections when creating data foundations and business layersbased on secure connections.
Connection shortcuts are stored in the local project as .cns files.
Connection short-cut
A data foundation is a schema that defines the relevant tables and joinsfrom one or more relational databases. You enhance the data foundationby adding federated tables, derived tables, alias tables, calculated columns,additional joins, contexts, prompts, lists of values, and other SQL definitions.The data foundation becomes the basis of one or more business layers.
Data foundations are stored in the local project as .dfx files.
Data foundation
A business layer is a collection of metadata objects that provides an ab-straction of relational database entities or OLAP cubes, understandable bya business user. Objects map via SQL expressions to an underlying datafoundation, or via MDX expressions to an underlying OLAP cube. Theseobjects include dimensions, hierarchies, measures, attributes, and prede-fined conditions.
You can add dimensions, hierarchies, measures, attributes, and other ob-jects as the universe design requires. You can validate the SQL or the MDXat any time. You can create queries, lists of values, parameters (also calledprompts), and navigation path objects.
The business layer is the universe under construction, and when the busi-ness layer is complete, it is compiled with the connections or connectionshortcuts and data foundation, published, and deployed as a universe.
Business layers are stored in the local project as .blx files.
Business layer
2013-08-0321
Getting started with the information design tool
DescriptionResource
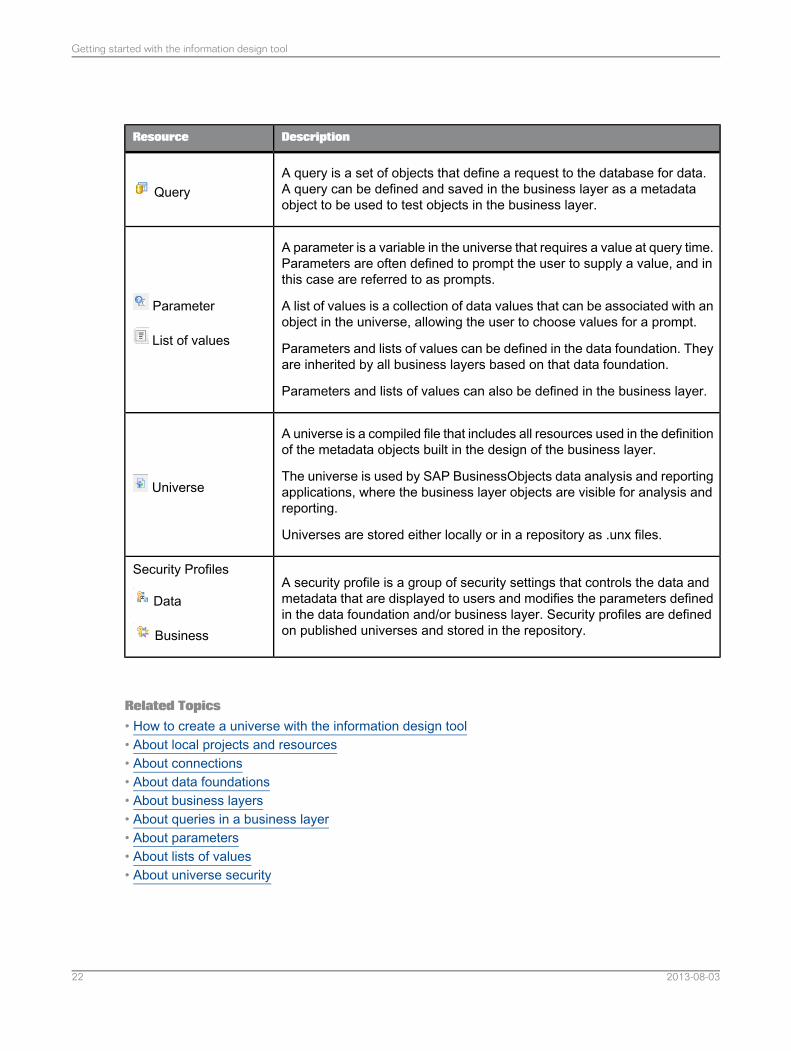
A query is a set of objects that define a request to the database for data.A query can be defined and saved in the business layer as a metadataobject to be used to test objects in the business layer.
Query
A parameter is a variable in the universe that requires a value at query time.Parameters are often defined to prompt the user to supply a value, and inthis case are referred to as prompts.
A list of values is a collection of data values that can be associated with anobject in the universe, allowing the user to choose values for a prompt.
Parameters and lists of values can be defined in the data foundation. Theyare inherited by all business layers based on that data foundation.
Parameters and lists of values can also be defined in the business layer.
Parameter
List of values
A universe is a compiled file that includes all resources used in the definitionof the metadata objects built in the design of the business layer.
The universe is used by SAP BusinessObjects data analysis and reportingapplications, where the business layer objects are visible for analysis andreporting.
Universes are stored either locally or in a repository as .unx files.
Universe
A security profile is a group of security settings that controls the data andmetadata that are displayed to users and modifies the parameters definedin the data foundation and/or business layer. Security profiles are definedon published universes and stored in the repository.
Security Profiles
Data
Business
Related Topics• How to create a universe with the information design tool• About local projects and resources• About connections• About data foundations• About business layers• About queries in a business layer• About parameters• About lists of values• About universe security
2013-08-0322
Getting started with the information design tool
2.3 Starting the information design tool
The information design tool is installed with the SAP BusinessObjects Business Intelligence platformClient Tools. For more information on installing the BI platform Client Tools, see the SAP BusinessObjectsBusiness Intelligence Suite 4.0 Master Guide, or the SAP Crystal Server 2011 Getting Started Guide.
Once the client tools are installed on your machine, for example in a Windows installation of the BIplatform, you can start the information design tool with the command: Start > All programs > SAPBusiness Intelligence > SAP BusinessObjects BI platform 4 Client Tools > Information DesignTool.
No authentication is required to use the information design tool in offline mode (not connected to arepository). You can begin creating and editing local resources.
Note:When you double-click a resource file in the local file system (for example a .blx, .dfx, or .cnx file), theinformation design tool opens without opening the specific resource editor. You must open the editorfrom the Local Projects View.
Related Topics• About the information design tool interface• About resources in the information design tool• How to create a universe with the information design tool• About securing resources in the information design tool
2.4 About the information design tool interface
Welcome pageThe first time you start the information design tool, you see the Welcome page. From the Welcomepage you can access all the resource creation wizards, open existing resources, and link to help andtraining materials.
You can close the Welcome page to display the information design tool interface. To re-open theWelcome page, select Help > Welcome.
Views and editorsThe information design tool interface is composed of views and editors that let you navigate and workon different resources. For more information about each view, see the Related Topics.
2013-08-0323
Getting started with the information design tool
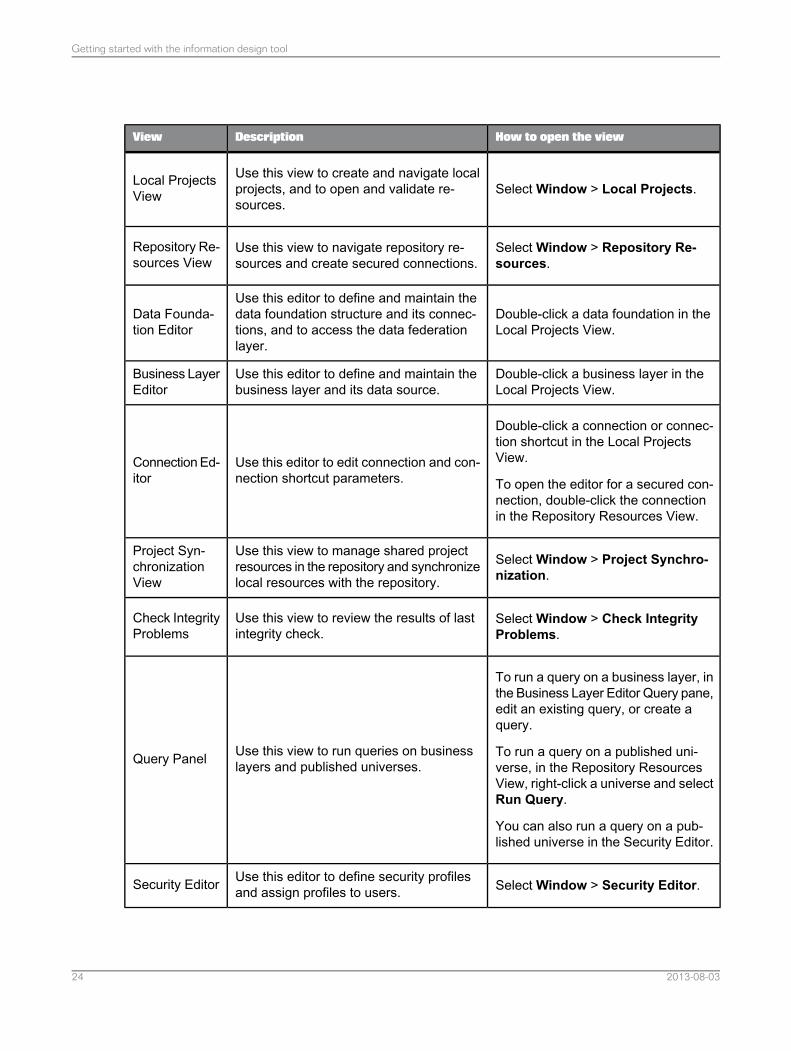
How to open the viewDescriptionView
Select Window > Local Projects.Use this view to create and navigate localprojects, and to open and validate re-sources.
Local ProjectsView
Select Window > Repository Re-sources.
Use this view to navigate repository re-sources and create secured connections.
Repository Re-sources View
Double-click a data foundation in theLocal Projects View.
Use this editor to define and maintain thedata foundation structure and its connec-tions, and to access the data federationlayer.
Data Founda-tion Editor
Double-click a business layer in theLocal Projects View.
Use this editor to define and maintain thebusiness layer and its data source.
Business LayerEditor
Double-click a connection or connec-tion shortcut in the Local ProjectsView.
To open the editor for a secured con-nection, double-click the connectionin the Repository Resources View.
Use this editor to edit connection and con-nection shortcut parameters.
Connection Ed-itor
Select Window > Project Synchro-nization.
Use this view to manage shared projectresources in the repository and synchronizelocal resources with the repository.
Project Syn-chronizationView
Select Window > Check IntegrityProblems.
Use this view to review the results of lastintegrity check.
Check IntegrityProblems
To run a query on a business layer, inthe Business Layer Editor Query pane,edit an existing query, or create aquery.
To run a query on a published uni-verse, in the Repository ResourcesView, right-click a universe and selectRun Query.
You can also run a query on a pub-lished universe in the Security Editor.
Use this view to run queries on businesslayers and published universes.Query Panel
Select Window > Security Editor.Use this editor to define security profilesand assign profiles to users.Security Editor
2013-08-0324
Getting started with the information design tool
Related Topics• Resetting the user interface display• About local projects and resources• About managing repository resources• About the Data Foundation Editor• About the Business Layer Editor• About the Connection Editor• About project synchronization• Running check integrity• Using the Query Panel• About the Security Editor
2.4.1 Resetting the user interface display
The information design tool user interface can be customized by dragging and dropping editor tabs andviews, minimizing views, and hiding and splitting panels within the views.
To reset the user interface to the default configuration, select Window > Reset to Default Display.
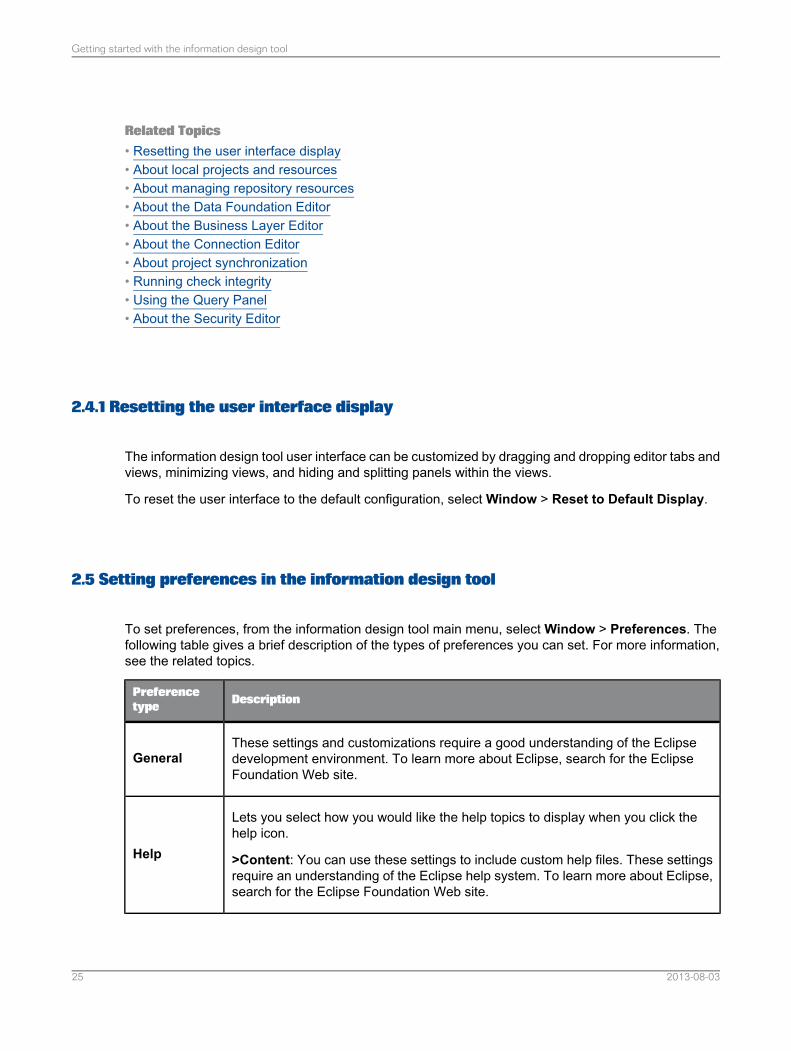
2.5 Setting preferences in the information design tool
To set preferences, from the information design tool main menu, select Window > Preferences. Thefollowing table gives a brief description of the types of preferences you can set. For more information,see the related topics.
DescriptionPreferencetype
These settings and customizations require a good understanding of the Eclipsedevelopment environment. To learn more about Eclipse, search for the EclipseFoundation Web site.
General
Lets you select how you would like the help topics to display when you click thehelp icon.
>Content: You can use these settings to include custom help files. These settingsrequire an understanding of the Eclipse help system. To learn more about Eclipse,search for the Eclipse Foundation Web site.
Help
2013-08-0325
Getting started with the information design tool
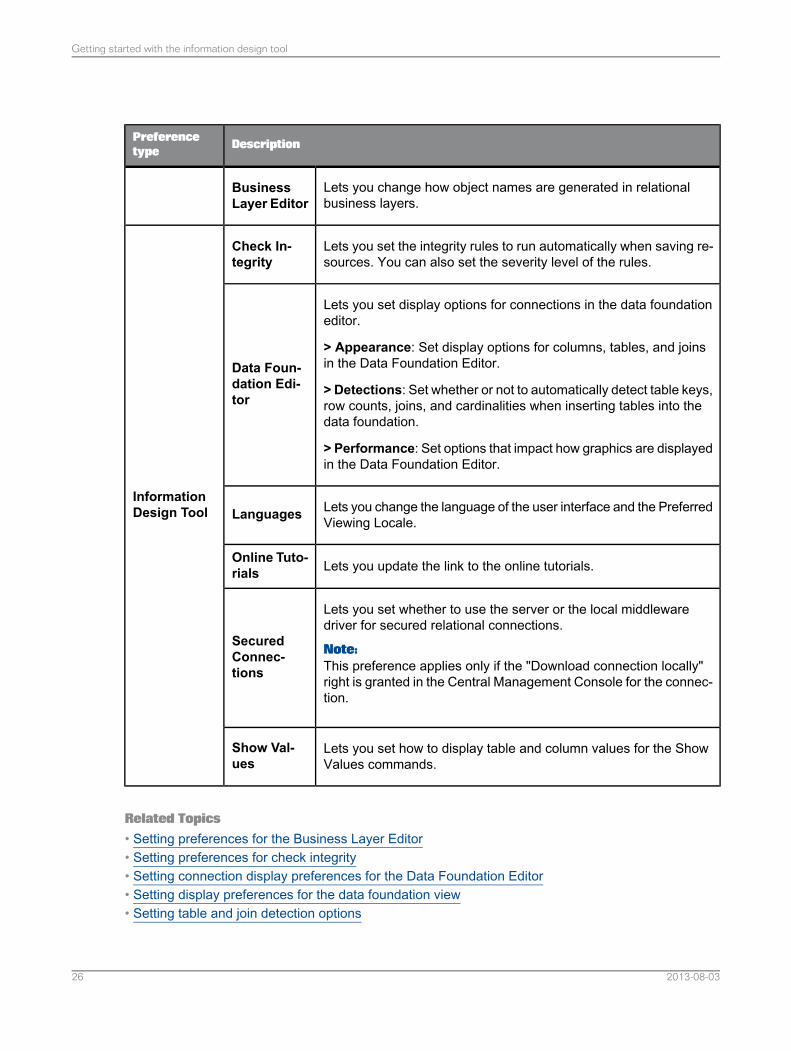
DescriptionPreferencetype
Lets you change how object names are generated in relationalbusiness layers.
BusinessLayer Editor
Lets you set the integrity rules to run automatically when saving re-sources. You can also set the severity level of the rules.
Check In-tegrity
InformationDesign Tool
Lets you set display options for connections in the data foundationeditor.
> Appearance: Set display options for columns, tables, and joinsin the Data Foundation Editor.
> Detections: Set whether or not to automatically detect table keys,row counts, joins, and cardinalities when inserting tables into thedata foundation.
> Performance: Set options that impact how graphics are displayedin the Data Foundation Editor.
Data Foun-dation Edi-tor
Lets you change the language of the user interface and the PreferredViewing Locale.Languages
Lets you update the link to the online tutorials.Online Tuto-rials
Lets you set whether to use the server or the local middlewaredriver for secured relational connections.
Note:This preference applies only if the "Download connection locally"right is granted in the Central Management Console for the connec-tion.
SecuredConnec-tions
Lets you set how to display table and column values for the ShowValues commands.
Show Val-ues
Related Topics• Setting preferences for the Business Layer Editor• Setting preferences for check integrity• Setting connection display preferences for the Data Foundation Editor• Setting display preferences for the data foundation view• Setting table and join detection options
2013-08-0326
Getting started with the information design tool
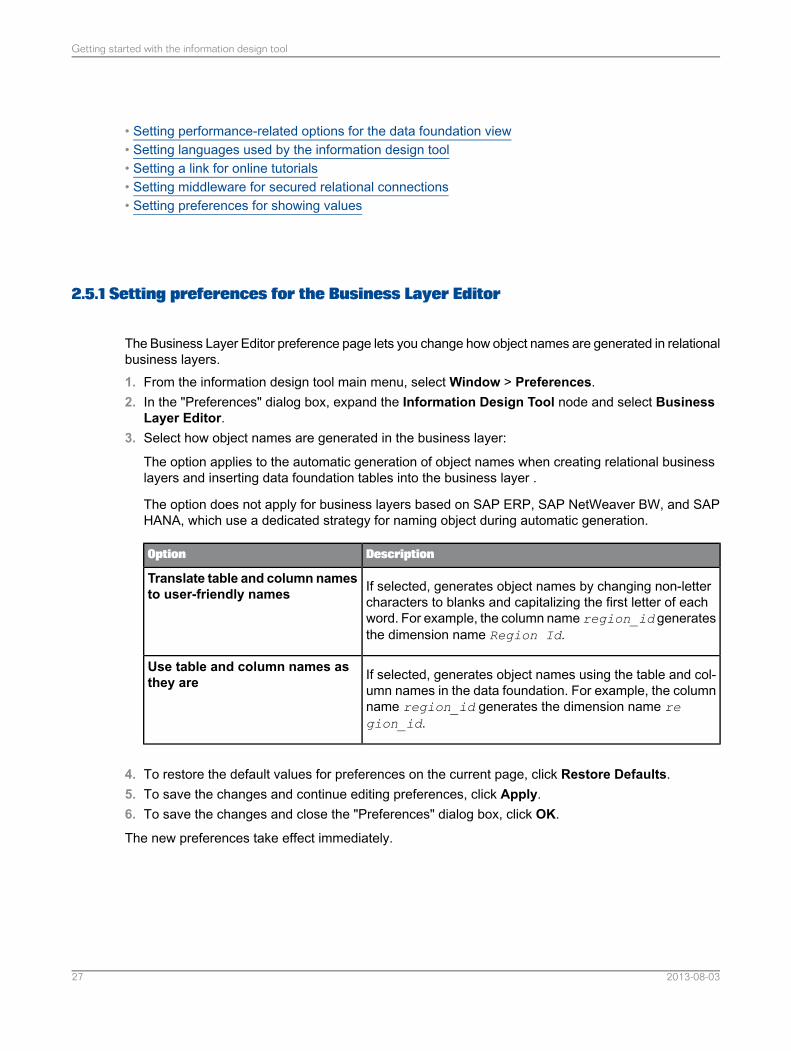
• Setting performance-related options for the data foundation view• Setting languages used by the information design tool• Setting a link for online tutorials• Setting middleware for secured relational connections• Setting preferences for showing values
2.5.1 Setting preferences for the Business Layer Editor
The Business Layer Editor preference page lets you change how object names are generated in relationalbusiness layers.1. From the information design tool main menu, select Window > Preferences.2. In the "Preferences" dialog box, expand the Information Design Tool node and select Business
Layer Editor.3. Select how object names are generated in the business layer:
The option applies to the automatic generation of object names when creating relational businesslayers and inserting data foundation tables into the business layer .
The option does not apply for business layers based on SAP ERP, SAP NetWeaver BW, and SAPHANA, which use a dedicated strategy for naming object during automatic generation.
DescriptionOption
If selected, generates object names by changing non-lettercharacters to blanks and capitalizing the first letter of eachword. For example, the column name region_id generatesthe dimension name Region Id.
Translate table and column namesto user-friendly names
If selected, generates object names using the table and col-umn names in the data foundation. For example, the columnname region_id generates the dimension name region_id.
Use table and column names asthey are
4. To restore the default values for preferences on the current page, click Restore Defaults.5. To save the changes and continue editing preferences, click Apply.6. To save the changes and close the "Preferences" dialog box, click OK.
The new preferences take effect immediately.
2013-08-0327
Getting started with the information design tool
2.5.2 Setting preferences for check integrity
In the check integrity preference page, you can select rules to be run automatically whenever you savea resource. You can also change the severity of the messages returned by each rule.1. From the information design tool main menu, select Window > Preferences.2. In the "Preferences" dialog box, expand the Information Design Tool node and select Check
Integrity.3. To select rules to be run automatically when you save a resource:
a. Select the Enable background check integrity on save option.b. Select the rules to include in the background check.
The Cost column indicates the relative processing time required to execute the rule.
4. To change the severity of the messages returned by a rule, click in the Severity column for the rule.Select a severity from the list.
5. To restore the default values for check integrity preferences, click Restore Defaults.6. To save the changes and continue editing preferences, click Apply.7. To save the changes and close the "Preferences" dialog box, click OK.
The background check takes effect immediately.
Related Topics• Running check integrity
2.5.3 Setting connection display preferences for the Data Foundation Editor
The Data Foundation Editor preference page lets you to change how connections are displayed in theData Foundation Editor. For information on other preferences for the Data Foundation Editor, see theRelated Topics.1. From the information design tool main menu, select Window > Preferences.2. In the "Preferences" dialog box, expand the Information Design Tool node and select Data
Foundation Editor.3. Set or clear options for how connections are displayed in the data foundation:
2013-08-0328
Getting started with the information design tool
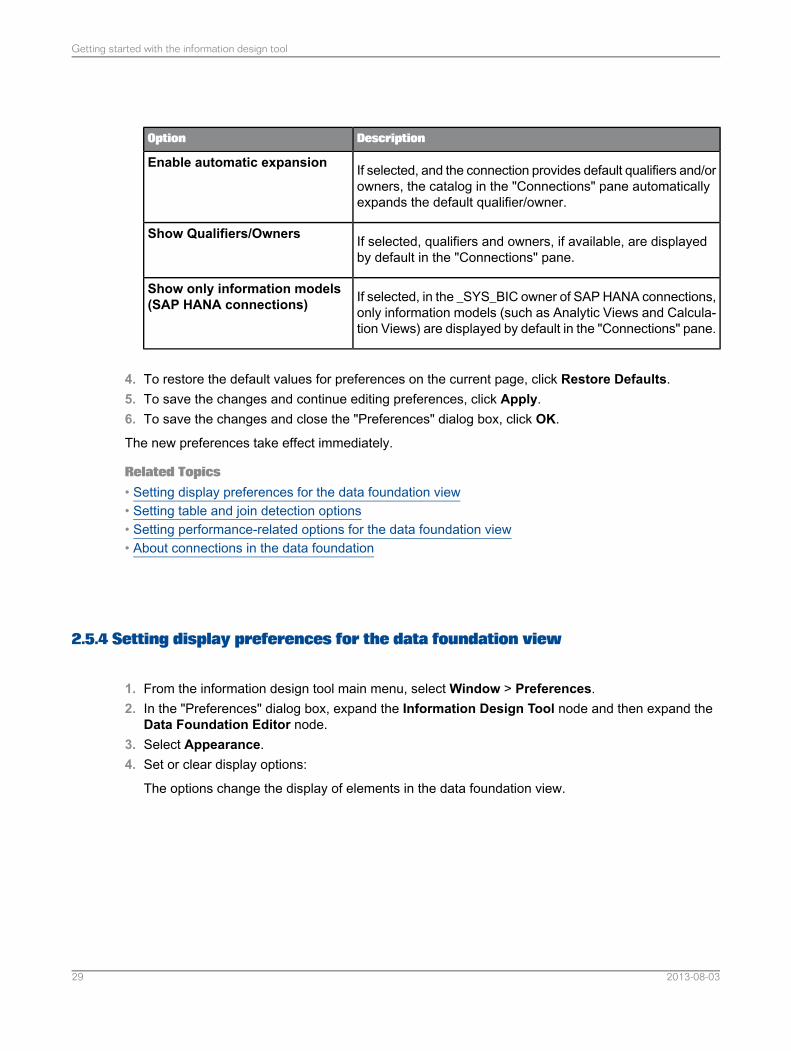
DescriptionOption
If selected, and the connection provides default qualifiers and/orowners, the catalog in the "Connections" pane automaticallyexpands the default qualifier/owner.
Enable automatic expansion
If selected, qualifiers and owners, if available, are displayedby default in the "Connections" pane.
Show Qualifiers/Owners
If selected, in the _SYS_BIC owner of SAP HANA connections,only information models (such as Analytic Views and Calcula-tion Views) are displayed by default in the "Connections" pane.
Show only information models(SAP HANA connections)
4. To restore the default values for preferences on the current page, click Restore Defaults.5. To save the changes and continue editing preferences, click Apply.6. To save the changes and close the "Preferences" dialog box, click OK.
The new preferences take effect immediately.
Related Topics• Setting display preferences for the data foundation view• Setting table and join detection options• Setting performance-related options for the data foundation view• About connections in the data foundation
2.5.4 Setting display preferences for the data foundation view
1. From the information design tool main menu, select Window > Preferences.2. In the "Preferences" dialog box, expand the Information Design Tool node and then expand the
Data Foundation Editor node.3. Select Appearance.4. Set or clear display options:
The options change the display of elements in the data foundation view.
2013-08-0329
Getting started with the information design tool

DescriptionOption
If selected, an icon showing the data type of the column is dis-played in front of the column name. For example, AB indicates astring data type, and 12 indicates numeric.
Show data types
If selected, column names are centered in the table display. Oth-erwise, column names are left-justified.
Centered
If selected, tables display with a shadow border.Shadow border
If selected, a row count displays for each table.Show row counts
If selected, the original table name for an alias table is displayedin parentheses after the alias table name.
Postfix alias names with orig-inal table name
If selected, the owner and qualifier names are displayed in frontof the table name.
Prefix table nameswith ownerand qualifier
Select the type of join line from the list.Join Lines
This option is not currently used.Show full table names in joinexpressions
If selected, when you select an element in the view, the view au-tomatically scrolls and zooms to better center the element in theviewing area.
Auto scroll and zoom to selec-tion
5. To restore the default values for preferences on the current page, click Restore Defaults.6. To save the changes and continue editing preferences, click Apply.7. To save the changes and close the "Preferences" dialog box, click OK.
The new preferences take effect immediately.
2.5.5 Setting table and join detection options
Set whether or not to automatically detect table keys, row counts, joins, and cardinalities when insertingtables into the data foundation.1. From the information design tool main menu, select Window > Preferences.2. In the "Preferences" dialog box, expand the Information Design Tool node and then expand the
Data Foundation Editor node.
2013-08-0330
Getting started with the information design tool
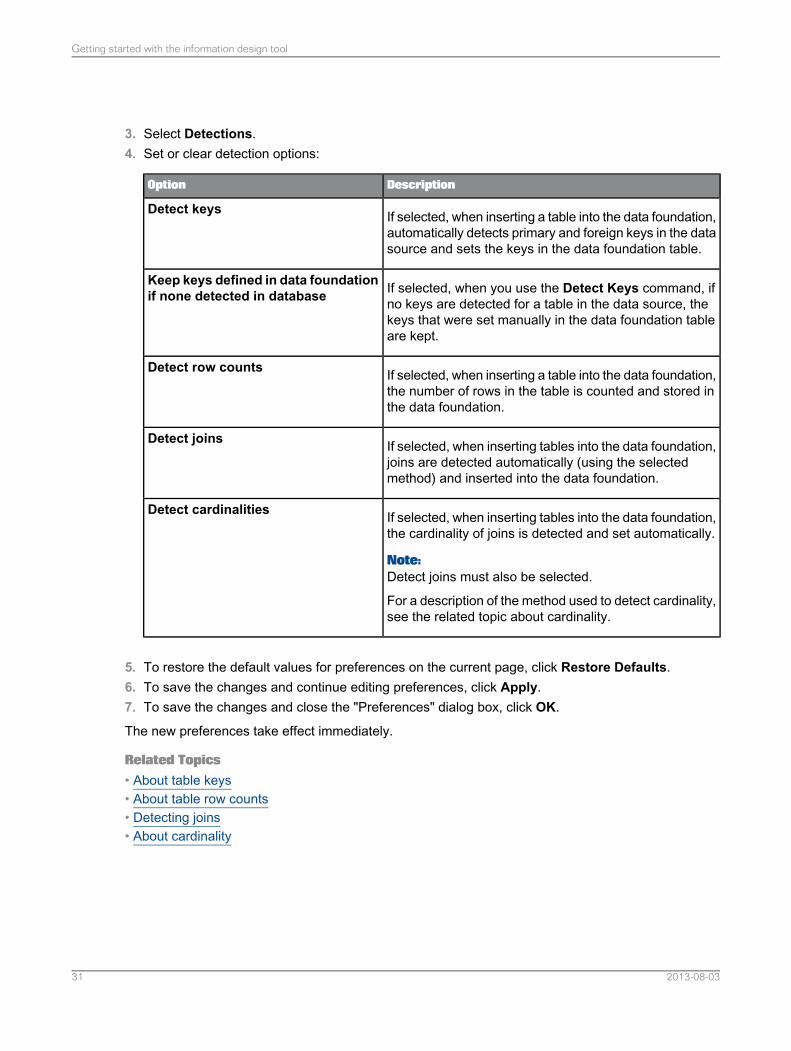
3. Select Detections.4. Set or clear detection options:
DescriptionOption
If selected, when inserting a table into the data foundation,automatically detects primary and foreign keys in the datasource and sets the keys in the data foundation table.
Detect keys
If selected, when you use the Detect Keys command, ifno keys are detected for a table in the data source, thekeys that were set manually in the data foundation tableare kept.
Keep keys defined in data foundationif none detected in database
If selected, when inserting a table into the data foundation,the number of rows in the table is counted and stored inthe data foundation.
Detect row counts
If selected, when inserting tables into the data foundation,joins are detected automatically (using the selectedmethod) and inserted into the data foundation.
Detect joins
If selected, when inserting tables into the data foundation,the cardinality of joins is detected and set automatically.
Note:Detect joins must also be selected.
For a description of the method used to detect cardinality,see the related topic about cardinality.
Detect cardinalities
5. To restore the default values for preferences on the current page, click Restore Defaults.6. To save the changes and continue editing preferences, click Apply.7. To save the changes and close the "Preferences" dialog box, click OK.
The new preferences take effect immediately.
Related Topics• About table keys• About table row counts• Detecting joins• About cardinality
2013-08-0331
Getting started with the information design tool
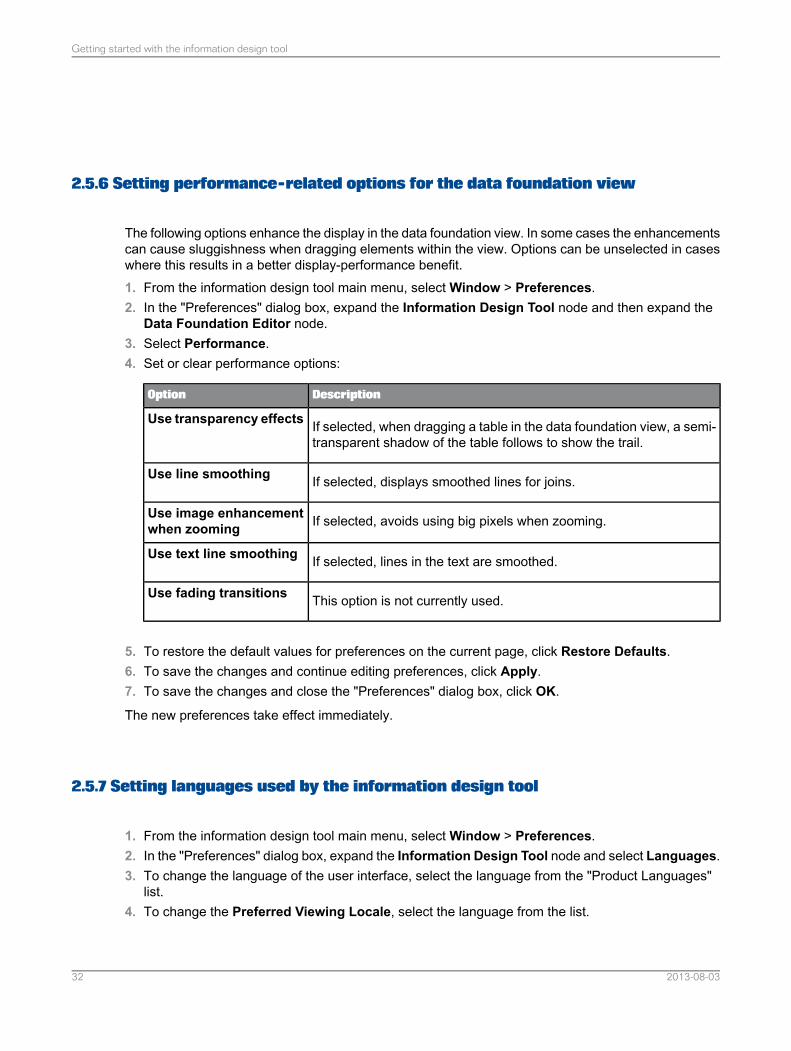
2.5.6 Setting performance-related options for the data foundation view
The following options enhance the display in the data foundation view. In some cases the enhancementscan cause sluggishness when dragging elements within the view. Options can be unselected in caseswhere this results in a better display-performance benefit.1. From the information design tool main menu, select Window > Preferences.2. In the "Preferences" dialog box, expand the Information Design Tool node and then expand the
Data Foundation Editor node.3. Select Performance.4. Set or clear performance options:
DescriptionOption
If selected, when dragging a table in the data foundation view, a semi-transparent shadow of the table follows to show the trail.
Use transparency effects
If selected, displays smoothed lines for joins.Use line smoothing
If selected, avoids using big pixels when zooming.Use image enhancementwhen zooming
If selected, lines in the text are smoothed.Use text line smoothing
This option is not currently used.Use fading transitions
5. To restore the default values for preferences on the current page, click Restore Defaults.6. To save the changes and continue editing preferences, click Apply.7. To save the changes and close the "Preferences" dialog box, click OK.
The new preferences take effect immediately.
2.5.7 Setting languages used by the information design tool
1. From the information design tool main menu, select Window > Preferences.2. In the "Preferences" dialog box, expand the Information Design Tool node and select Languages.3. To change the language of the user interface, select the language from the "Product Languages"
list.4. To change the Preferred Viewing Locale, select the language from the list.
2013-08-0332
Getting started with the information design tool
For information about the Preferred Viewing Locale and how it impacts the language display, seethe related topic about multilingual universes.
5. To save the changes and continue editing preferences, click Apply.6. To save the changes and close the "Preferences" dialog box, click OK.7. Exit and restart the information design tool for the language change to take effect.
Related Topics• Multilingual universes
2.5.8 Setting a link for online tutorials
You can access online tutorials about the information design tool from the Help menu. The "OnlineTutorials" preferences page allows you to update the URL address to the tutorials.1. From the information design tool main menu, select Window > Preferences.2. In the "Preferences" dialog box, expand the Information Design Tool node and select Online
Tutorials.3. Enter the new URL address in Online Tutorial Address.4. To save the change and continue editing preferences, click Apply.5. To save the change and close the "Preferences" dialog box, click OK.
The new address takes effect immediately.
Related Topics• How to get help using the information design tool
2.5.9 Setting middleware for secured relational connections
The secure connections middleware preference applies only if the "Download connection locally" rightis granted in the Central Management Console for the connection.
When running queries on secured relational connections in the information design tool, you can chooseto run queries on the server using the server middleware driver, or locally using the local middlewaredriver.1. From the information design tool main menu, select Window > Preferences.2. In the "Preferences" dialog box, expand the Information Design Tool node and select Secured
Connections.3. Select the middleware to use:
2013-08-0333
Getting started with the information design tool

DescriptionOption
To use the middleware driver on the repository server.Server middleware
To use the middleware driver on the local machine.Local middleware
4. To restore the default value, click Restore Defaults.5. To save the changes and continue editing preferences, click Apply.6. To save the changes and close the "Preferences" dialog box, click OK.
Related Topics• About secured connections
2.5.10 Setting preferences for showing values
For the show values commands in the data foundation and business layer editors, you can select howto display values.1. From the information design tool main menu, select Window > Preferences.2. In the "Preferences" dialog box, expand the Information Design Tool node and select ShowValues.3. Select how you want the values to display.4. To save the change and continue editing preferences, click Apply.5. To save the change and close the "Preferences" dialog box, click OK.
The new display option takes effect immediately.
Related Topics• Showing values in a data source
2.6 How to get help using the information design tool
The Help menu in the information design tool lets you link to different types of user assistance for theapplication.
DescriptionHelp menu command
From the Welcome page you can access all the resource creationwizards, open existing resources, and link to help and training materials.Welcome
2013-08-0334
Getting started with the information design tool
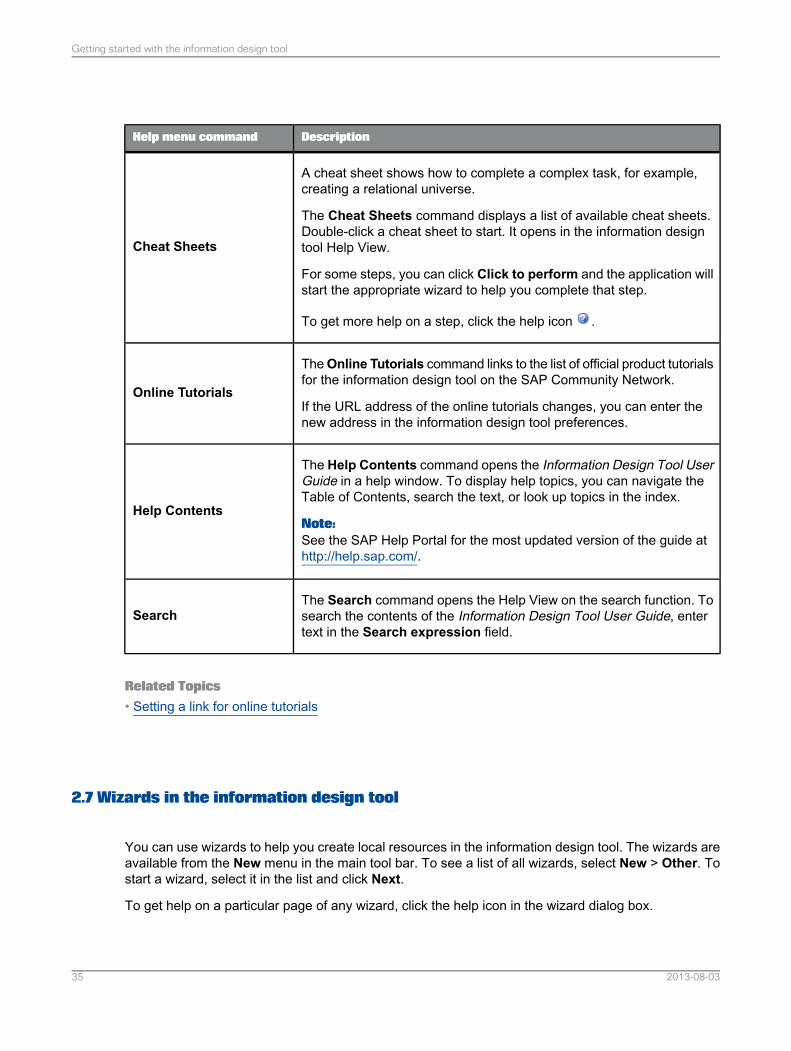
DescriptionHelp menu command
A cheat sheet shows how to complete a complex task, for example,creating a relational universe.
The Cheat Sheets command displays a list of available cheat sheets.Double-click a cheat sheet to start. It opens in the information designtool Help View.
For some steps, you can click Click to perform and the application willstart the appropriate wizard to help you complete that step.
To get more help on a step, click the help icon .
Cheat Sheets
TheOnline Tutorials command links to the list of official product tutorialsfor the information design tool on the SAP Community Network.
If the URL address of the online tutorials changes, you can enter thenew address in the information design tool preferences.
Online Tutorials
The Help Contents command opens the Information Design Tool UserGuide in a help window. To display help topics, you can navigate theTable of Contents, search the text, or look up topics in the index.
Note:See the SAP Help Portal for the most updated version of the guide athttp://help.sap.com/.
Help Contents
The Search command opens the Help View on the search function. Tosearch the contents of the Information Design Tool User Guide, entertext in the Search expression field.
Search
Related Topics• Setting a link for online tutorials
2.7 Wizards in the information design tool
You can use wizards to help you create local resources in the information design tool. The wizards areavailable from the New menu in the main tool bar. To see a list of all wizards, select New > Other. Tostart a wizard, select it in the list and click Next.
To get help on a particular page of any wizard, click the help icon in the wizard dialog box.
2013-08-0335
Getting started with the information design tool

Related Topics• About resources in the information design tool• How to create a universe with the information design tool
2013-08-0336
Getting started with the information design tool
Creating Universes
3.1 How to create a universe with the information design tool
Before you begin:• Make sure the middleware drivers are configured for the data sources to which you want to connect.
For more information about middleware configuration, see the Data Access Guide.
For information about supported data sources, see the Supported Platforms documentation availableat the SAP BusinessObjects Support site at http://service.sap.com/bosap-support.
• Make sure you have the appropriate rights defined in the Central Management Console (CMC). Seethe related topic about CMC rights for information design tool users.
• Decide if the data foundation type should be single-source or multisource-enabled. The type andnumber of connections available, as well as the SQL syntax that is used to define SQL structuresdepends on the data foundation type. For more information, see the related topic about datafoundation types.
Connections for multisource-enabled data foundations must be secured, relational connections, andare managed by the data federation service. Information about tuning the data federation servicecan be found in the Data Federation Administration Tool Guide.
• Refer to the additional information available if you are creating a universe on one of the followingdata sources:• Using SAP NetWeaver BW data sources• Using SAP HANA data sources• Using SAP ERP data sources• Using Microsoft Analysis Services (MSAS) data sources• Using Essbase data sources• Using SAS data sources• Multilingual universes
Note:For OLAP universes, you do not need to create a data foundation. The business layer is built directlyfrom the objects you select in the source cube.
You can use the "New Universe" wizard to create the resources you need to publish a local universe:either a single-source relational or OLAP universe. If you want to base your universe on secured
2013-08-0337
Creating Universes
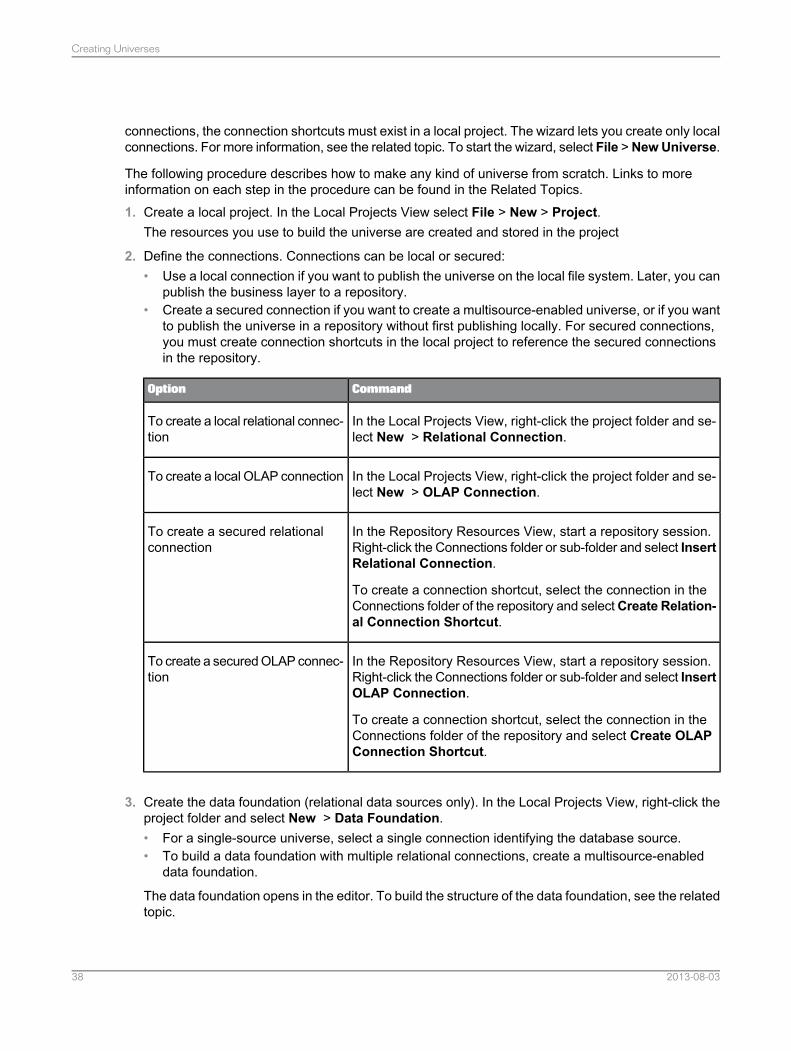
connections, the connection shortcuts must exist in a local project. The wizard lets you create only localconnections. For more information, see the related topic. To start the wizard, select File >NewUniverse.
The following procedure describes how to make any kind of universe from scratch. Links to moreinformation on each step in the procedure can be found in the Related Topics.1. Create a local project. In the Local Projects View select File > New > Project.
The resources you use to build the universe are created and stored in the project
2. Define the connections. Connections can be local or secured:• Use a local connection if you want to publish the universe on the local file system. Later, you can
publish the business layer to a repository.• Create a secured connection if you want to create a multisource-enabled universe, or if you want
to publish the universe in a repository without first publishing locally. For secured connections,you must create connection shortcuts in the local project to reference the secured connectionsin the repository.
CommandOption
In the Local Projects View, right-click the project folder and se-lect New > Relational Connection.
To create a local relational connec-tion
In the Local Projects View, right-click the project folder and se-lect New > OLAP Connection.
To create a local OLAP connection
In the Repository Resources View, start a repository session.Right-click the Connections folder or sub-folder and select InsertRelational Connection.
To create a connection shortcut, select the connection in theConnections folder of the repository and selectCreate Relation-al Connection Shortcut.
To create a secured relationalconnection
In the Repository Resources View, start a repository session.Right-click the Connections folder or sub-folder and select InsertOLAP Connection.
To create a connection shortcut, select the connection in theConnections folder of the repository and select Create OLAPConnection Shortcut.
To create a secured OLAP connec-tion
3. Create the data foundation (relational data sources only). In the Local Projects View, right-click theproject folder and select New > Data Foundation.• For a single-source universe, select a single connection identifying the database source.• To build a data foundation with multiple relational connections, create a multisource-enabled
data foundation.
The data foundation opens in the editor. To build the structure of the data foundation, see the relatedtopic.
2013-08-0338
Creating Universes
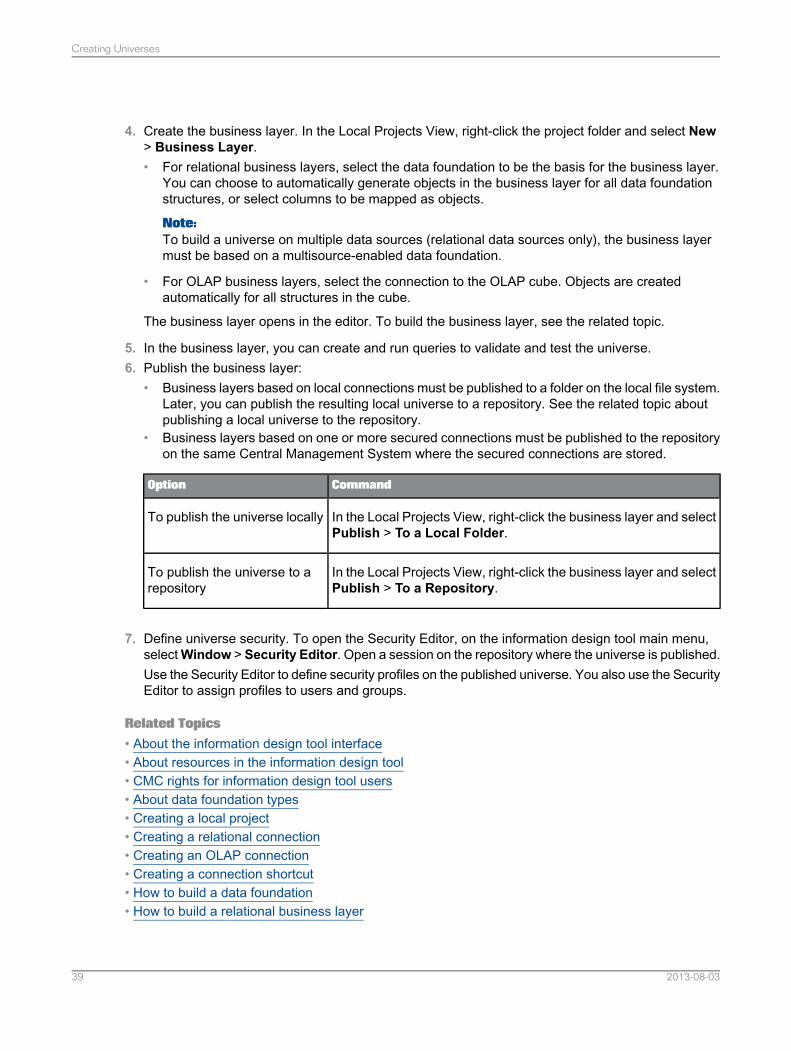
4. Create the business layer. In the Local Projects View, right-click the project folder and select New> Business Layer.• For relational business layers, select the data foundation to be the basis for the business layer.
You can choose to automatically generate objects in the business layer for all data foundationstructures, or select columns to be mapped as objects.
Note:To build a universe on multiple data sources (relational data sources only), the business layermust be based on a multisource-enabled data foundation.
• For OLAP business layers, select the connection to the OLAP cube. Objects are createdautomatically for all structures in the cube.
The business layer opens in the editor. To build the business layer, see the related topic.
5. In the business layer, you can create and run queries to validate and test the universe.6. Publish the business layer:
• Business layers based on local connections must be published to a folder on the local file system.Later, you can publish the resulting local universe to a repository. See the related topic aboutpublishing a local universe to the repository.
• Business layers based on one or more secured connections must be published to the repositoryon the same Central Management System where the secured connections are stored.
CommandOption
In the Local Projects View, right-click the business layer and selectPublish > To a Local Folder.
To publish the universe locally
In the Local Projects View, right-click the business layer and selectPublish > To a Repository.
To publish the universe to arepository
7. Define universe security. To open the Security Editor, on the information design tool main menu,selectWindow > Security Editor. Open a session on the repository where the universe is published.Use the Security Editor to define security profiles on the published universe. You also use the SecurityEditor to assign profiles to users and groups.
Related Topics• About the information design tool interface• About resources in the information design tool• CMC rights for information design tool users• About data foundation types• Creating a local project• Creating a relational connection• Creating an OLAP connection• Creating a connection shortcut• How to build a data foundation• How to build a relational business layer
2013-08-0339
Creating Universes
• How to build an OLAP business layer• About queries in a business layer• Publishing a universe• Publishing a local universe to the repository• How to secure a universe using security profiles
3.2 Using SAP NetWeaver BW data sources
Direct access to BEx QueriesSAP BusinessObjects query and reporting applications can use direct access to access data in a singleBEx Query. You do not need to build a universe. Define an OLAP connection to SAP NetWeaver BWthat uses the SAP BICS Client middleware driver. When defining the connection, select the option tospecify a cube in the connection and select the BEx Query.
Universes on SAP NetWeaver BWTo build a universe on SAP NetWeaver BW, you must create a multisource-enabled data foundationbased on a secured relational connection to SAP NetWeaver BW. You then build the business layeron this data foundation. For detailed steps on how to build a universe, see the related topic.
Note:For information on the authorizations needed to allow users of query and reporting applications toaccess multisource-enabled universes on SAP NetWeaver BW, see SAP Note #1465871.
Relational connections to SAP NetWeaver BW are managed by the data federation service. Forinformation about optimizing queries, see the Data Federation Administration Tool Guide.
When you add an SAP NetWeaver BW connection to a data foundation, by default tables and joins areautomatically inserted. When you create a business layer on the data foundation, by default objectsare automatically inserted into the business layer.
To turn off automatic insertion, unselect the Detect tables option in the advanced properties of theconnection when you are adding the connection into the data foundation. To turn off automatic insertionof business layer objects, unselect theAutomatically create folders and objects option when selectingthe data foundation in the New Business Layer wizard.
See the related topic for information on how the objects in an InfoProvider map to the objects that areautomatically inserted into the data foundation and business layer in the information design tool.
Refreshing universes based on SAP NetWeaver BWWhen objects are added to the underlying InfoProvider, several commands exist to help you updatethe data foundation and business layer with the changes. The recommended procedure is describedin the related topic
Related Topics• Creating an OLAP connection
2013-08-0340
Creating Universes
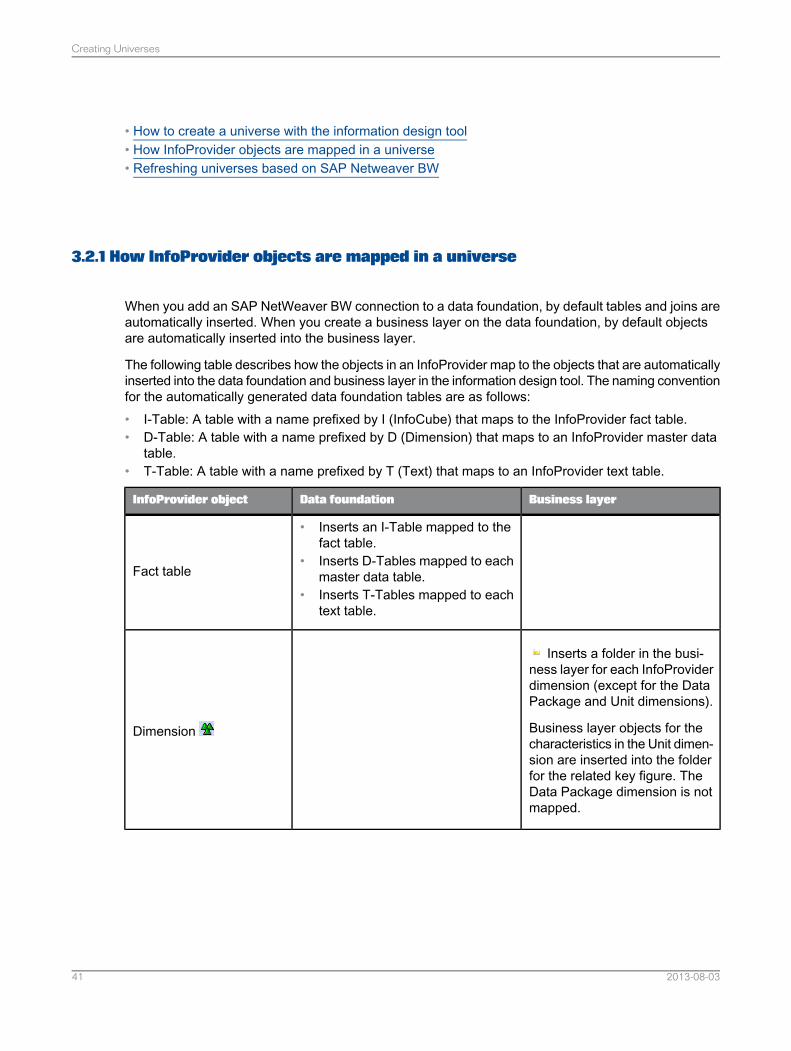
• How to create a universe with the information design tool• How InfoProvider objects are mapped in a universe• Refreshing universes based on SAP Netweaver BW
3.2.1 How InfoProvider objects are mapped in a universe
When you add an SAP NetWeaver BW connection to a data foundation, by default tables and joins areautomatically inserted. When you create a business layer on the data foundation, by default objectsare automatically inserted into the business layer.
The following table describes how the objects in an InfoProvider map to the objects that are automaticallyinserted into the data foundation and business layer in the information design tool. The naming conventionfor the automatically generated data foundation tables are as follows:• I-Table: A table with a name prefixed by I (InfoCube) that maps to the InfoProvider fact table.• D-Table: A table with a name prefixed by D (Dimension) that maps to an InfoProvider master data
table.• T-Table: A table with a name prefixed by T (Text) that maps to an InfoProvider text table.
Business layerData foundationInfoProvider object
• Inserts an I-Table mapped to thefact table.
• Inserts D-Tables mapped to eachmaster data table.
• Inserts T-Tables mapped to eachtext table.
Fact table
Inserts a folder in the busi-ness layer for each InfoProviderdimension (except for the DataPackage and Unit dimensions).
Business layer objects for thecharacteristics in the Unit dimen-sion are inserted into the folderfor the related key figure. TheData Package dimension is notmapped.
Dimension
2013-08-0341
Creating Universes
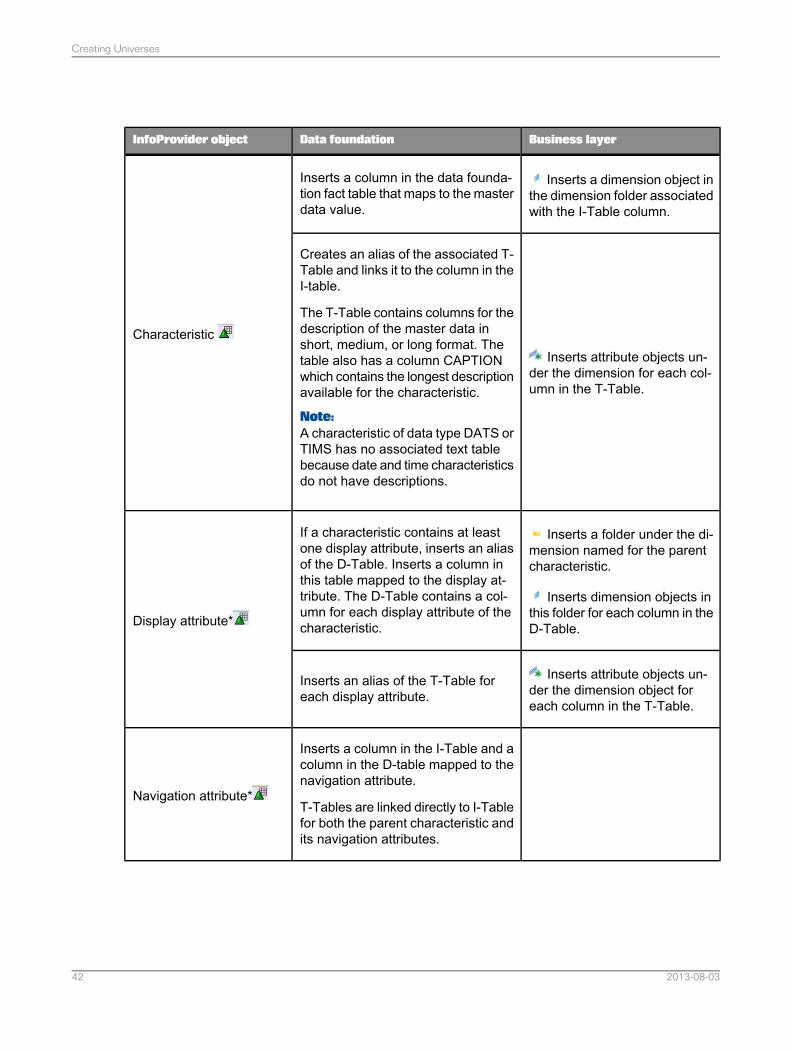
Business layerData foundationInfoProvider object
Inserts a dimension object inthe dimension folder associatedwith the I-Table column.
Inserts a column in the data founda-tion fact table that maps to the masterdata value.
CharacteristicInserts attribute objects un-
der the dimension for each col-umn in the T-Table.
Creates an alias of the associated T-Table and links it to the column in theI-table.
The T-Table contains columns for thedescription of the master data inshort, medium, or long format. Thetable also has a column CAPTIONwhich contains the longest descriptionavailable for the characteristic.
Note:A characteristic of data type DATS orTIMS has no associated text tablebecause date and time characteristicsdo not have descriptions.
Inserts a folder under the di-mension named for the parentcharacteristic.
Inserts dimension objects inthis folder for each column in theD-Table.
If a characteristic contains at leastone display attribute, inserts an aliasof the D-Table. Inserts a column inthis table mapped to the display at-tribute. The D-Table contains a col-umn for each display attribute of thecharacteristic.Display attribute*
Inserts attribute objects un-der the dimension object foreach column in the T-Table.
Inserts an alias of the T-Table foreach display attribute.
Inserts a column in the I-Table and acolumn in the D-table mapped to thenavigation attribute.
T-Tables are linked directly to I-Tablefor both the parent characteristic andits navigation attributes.
Navigation attribute*
2013-08-0342
Creating Universes
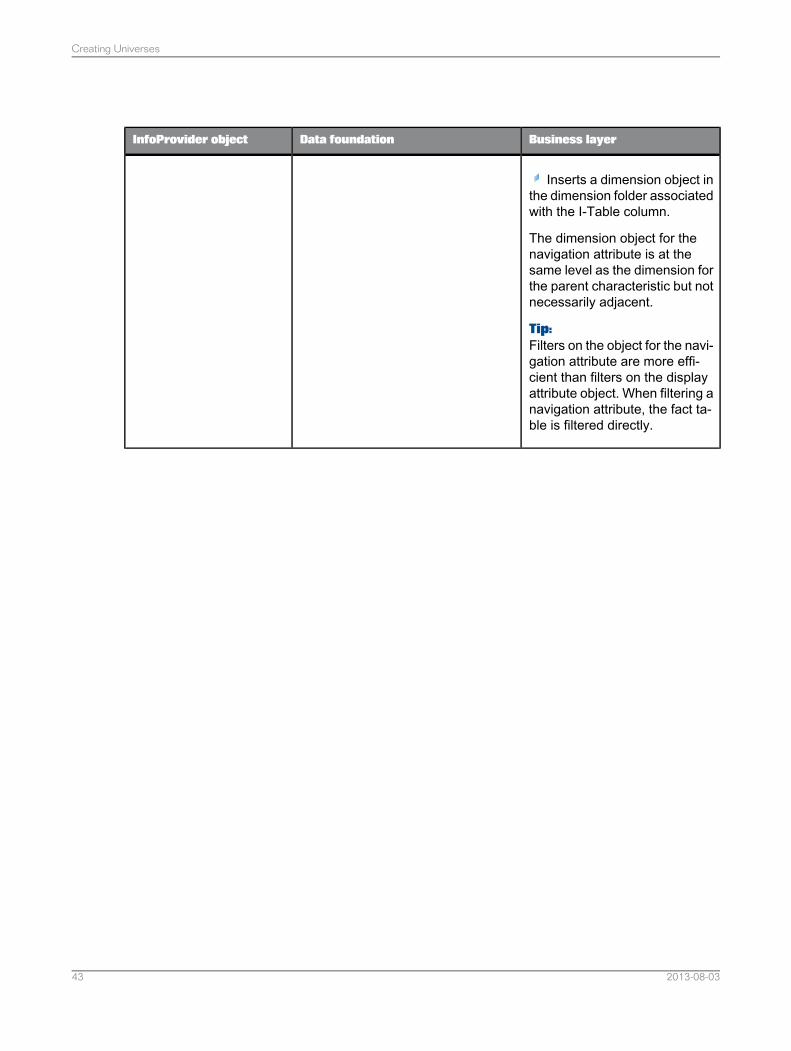
Business layerData foundationInfoProvider object
Inserts a dimension object inthe dimension folder associatedwith the I-Table column.
The dimension object for thenavigation attribute is at thesame level as the dimension forthe parent characteristic but notnecessarily adjacent.
Tip:Filters on the object for the navi-gation attribute are more effi-cient than filters on the displayattribute object. When filtering anavigation attribute, the fact ta-ble is filtered directly.
2013-08-0343
Creating Universes
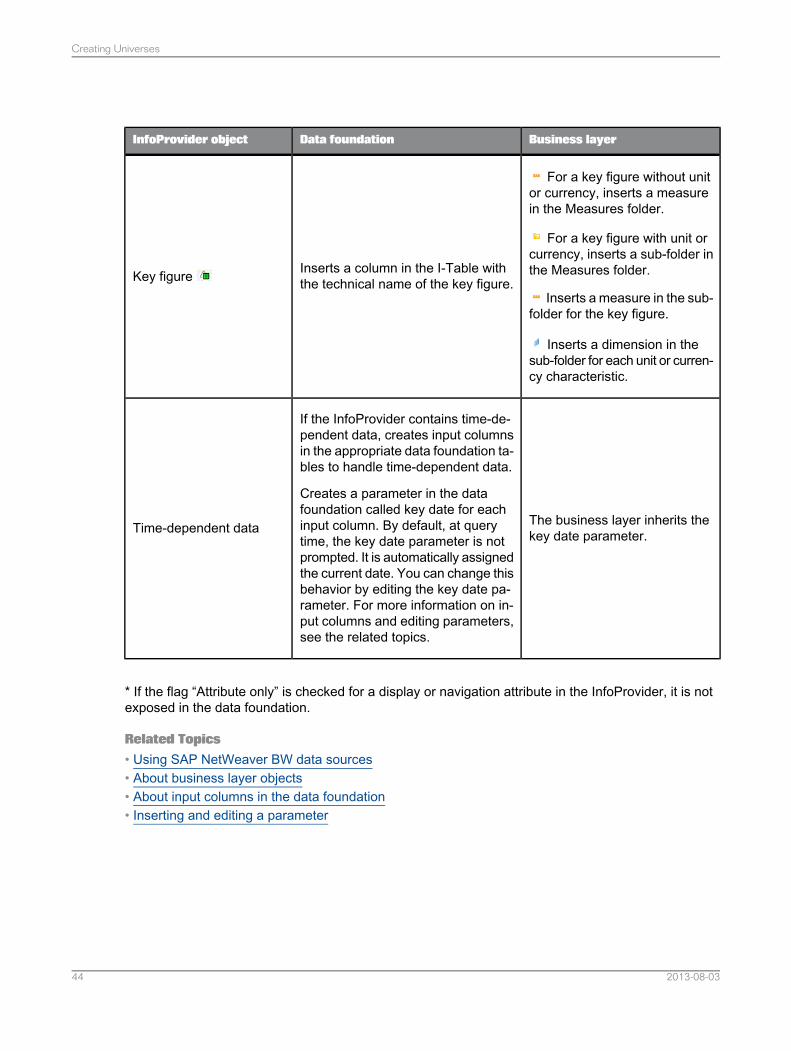
Business layerData foundationInfoProvider object
For a key figure without unitor currency, inserts a measurein the Measures folder.
For a key figure with unit orcurrency, inserts a sub-folder inthe Measures folder.
Inserts a measure in the sub-folder for the key figure.
Inserts a dimension in thesub-folder for each unit or curren-cy characteristic.
Inserts a column in the I-Table withthe technical name of the key figure.Key figure
The business layer inherits thekey date parameter.
If the InfoProvider contains time-de-pendent data, creates input columnsin the appropriate data foundation ta-bles to handle time-dependent data.
Creates a parameter in the datafoundation called key date for eachinput column. By default, at querytime, the key date parameter is notprompted. It is automatically assignedthe current date. You can change thisbehavior by editing the key date pa-rameter. For more information on in-put columns and editing parameters,see the related topics.
Time-dependent data
* If the flag “Attribute only” is checked for a display or navigation attribute in the InfoProvider, it is notexposed in the data foundation.
Related Topics• Using SAP NetWeaver BW data sources• About business layer objects• About input columns in the data foundation• Inserting and editing a parameter
2013-08-0344
Creating Universes
3.2.2 Refreshing universes based on SAP Netweaver BW
Use this procedure when objects change in the InfoProvider of an SAP NetWeaver BW data sourceand you want to reflect the changes in the universe. You can link to more information about each stepin the Related Topics.1. Refresh the structure of the data foundation.
Refreshing the data foundation compares the existing tables in the data foundation with those indata source and proposes updates to the data foundation tables: deletes obsolete tables and columns,inserts missing columns, and updates changed columns.
2. Synchronize the tables in the data foundation.
Synchronizing tables searches the data source for new tables (using the SAP NetWeaver BWstrategy), and inserts the new tables and joins into the data foundation.
3. Save the data foundation.4. Refresh the business layer by inserting candidate objects.
Inserting candidate objects searches the data source for new objects (using the SAP NetWeaverBW strategy) and updates the business layer.
Inserting candidate objects does not detect obsolete objects in the business layer. You must findand delete obsolete objects manually.
Note:Inserting candidate objects updates the business layer independently of the data foundation. If you donot also refresh the structure and synchronize tables in the data foundation, you can introduceinconsistencies between the data foundation and business layer.
Related Topics• About refreshing a data foundation• Synchronizing tables• Inserting candidate objects• Using SAP NetWeaver BW data sources
3.3 Using SAP HANA data sources
Direct access to SAP HANA information modelsSAP Crystal Reports for Enterprise can use direct access to access data in a single information model(such as an Analytic View or Calculation View). You do not need to create a universe. Define an OLAPconnection to SAP HANA that uses the SAP HANA Client middleware driver. In the connection, you
2013-08-0345
Creating Universes
can choose to not specify a cube. In this case, the user is prompted to select an information model atquery run time. You can also specify an information model in the connection so that all queries areassociated with that information model.
Building universes on SAP HANAUniverses on SAP HANA are based on relational connections. There are two ways to create resourcesto build a universe on SAP HANA:• Use the New Data Foundation and New Business Layer wizards to create a data foundation and
business layer separately.
This method allows you to include tables as well as information models in the data foundation. Createa single-source data foundation unless you need to federate data from multiple sources. Amultisource-enabled data foundation is necessary if you need to access data in more than one SAPHANA server or instance.
Select the tables or information models that you want to include in the data foundation. Any columnshidden in an SAP HANA view are also hidden in the data foundation table. It is not recommendedto create joins between tables representing SAP HANA views as this can impact performance.
The New Business Layer wizard automatically creates the dimensions and attributes in eachinformation model in a business layer folder. For single-source data foundations, the wizard usesmetadata from the SAP HANA view to create measures in the business layer with the appropriateaggregation function.
For more information, see the related topic on how to build a universe.
• Use the New SAP HANA Business Layer wizard to automatically create a single-source datafoundation and business layer based on selected SAP HANA information models.
This wizard creates the data foundation tables for the selected SAP HANA views. Any columnshidden in an SAP HANA view are also hidden in the data foundation table. The wizard then createsthe dimensions and measures (with appropriate aggregation functions) defined in the SAP HANAviews.
The advantage of this method is that for any dimensions and attributes that are common to differentviews, the wizard creates a single business layer object.
The wizard also creates contexts in the data foundation and aggregate awareness in the businesslayer so that when you run a query on the universe, the experience is the same as accessing astandard relational universe:• For all measures and dimensions common to the SAP HANA views accessed in the query, results
display in a single block.• For dimensions that are not common to the SAP HANA views accessed in the query, results
display in separate blocks.
For more information, see the related topic on creating relational resources on SAP HANA informationmodels.
Browsing SAP HANA connectionsWhen browsing the connection in the data foundation, different views are identified by table types eachwith its own icon. You can filter the tables in the connection by table type. There is also a filter, set by
2013-08-0346
Creating Universes
default, to show only tables representing information models. For more information, see the relatedtopics about filtering tables in the connection.
Note:An Analytic View sometimes appears as a Calculated View table type in the connection. This happenswhen the Analytic View contains a calculated measure in the SAP HANA model.
Showing values in a data foundation based on SAP HANAIn single-source data foundations, when showing table and column values for a table corresponding toan Analytic View, the information design tool aggregates the values in columns that represent measuresby using the aggregation function defined in the model. The measure values are grouped by the selectedcolumns that represent attributes. For example, if you show values for Product and Sales in anAnalytic View where Sales is aggregated with the sum function, the results show Sales by Product.
SAP HANA variables in the data foundationIn single-source data foundations, variables and input parameters in SAP HANA information modelsare associated with the corresponding tables in the data foundation.
When showing values in the data foundation or running a query in the Query Panel, you are promptedto enter values for the variables and parameters.
You can get information about variables and parameters in the data foundation properties Variablestab. Also, when refreshing the structure of the data foundation, any variables in the view that are added,deleted, or modified are taken into account.
You may want to enhance the data foundation by creating derived objects: derived tables, calculatedcolumns, or custom SQL lists of values. Since the SAP HANA variables are hidden, you need to managethe variables directly in the SQL expressions for the objects that you create.
Related Topics• Creating an OLAP connection• How to create a universe with the information design tool• Creating relational resources on SAP HANA information models• Filtering the tables in the connection by table type• Filtering tables in an SAP HANA connection by information model• Showing SAP HANA variable information
3.3.1 Creating relational resources on SAP HANA information models
The New HANA Business Layer wizard automatically creates a data foundation and business layerbased on selected SAP HANA information models.
The wizard creates a single-source data foundation referring to the local connection to SAP HANA thatyou provide. The data foundation contains a table for each view. The tables are not joined.
2013-08-0347
Creating Universes
The wizard creates a business layer that contains the dimensions and measures defined in the SAPHANA views. Dimensions and attributes that are common to different views are bound to a singlebusiness layer object.
Before you begin, you need a local project that contains a local connection to SAP HANA.1. In the Local Projects View, right-click the project and select New > SAP HANA Business Layer.2. Enter a name for the business layer and data foundation.
By default, the data foundation has the same name. You can change the data foundation name.
3. Optionally enter a description for the business layer and click Next.4. Select a connection and click Next.
Only local, relational connections to SAP HANA in the local project are listed.
5. Select one or more activated views to be the basis of the business layer and click Finish.A data foundation and business layer are created in the local project. The business layer opens inthe editor.
You can publish the business layer to a local folder. If you want to publish the universe to a repository,see the related topic.
Related Topics• Publishing a local connection to the repository• Changing a connection in a data foundation• Publishing a universe• Publishing a local universe to the repository• Using SAP HANA data sources
3.4 Using SAP ERP data sources
To build a universe on SAP ERP, you must create a data foundation on a relational ERP connection.Then build the business layer on this data foundation. For detailed steps on building a universe, seethe related topic.
When you create a relational connection to the SAP ERP data source, the InfoSets, SAP Queries, andABAP functions in the data source are exposed as tables in the connection. For more information abouthow ERP data sources are mapped in the connection, see the Data Access Guide.
The data foundation can be single-source to support local connections. Single-source data foundationssupport joins between tables, with the following restrictions:• You can detect joins only based on database keys in the ERP data source. You must first detect
database keys in the data foundation.• You cannot insert joins manually, insert calculated columns, or insert column filters.
2013-08-0348
Creating Universes
For support of calculated columns, filters, and manual joins, create a multisource-enabled data foundationon a secured connection.
When you insert a table into the data foundation, the table type of InfoSet, SAP Query, or ABAP Functionis saved as a table property in the data foundation.
When you insert an ABAP Function table, one data foundation table is created to map the main function.The table contains input columns for the input parameters of the function. These parameters can bemandatory or optional. To assign a value to mandatory parameters, you need to edit the input columns.To do this, see the related topic.
When creating the business layer, the object names are automatically generated from the columndescriptions in the data foundation, rather than from the column names. For reference, the columnnames are saved as the description of the business layer object.
Restriction:Measures containing aggregate functions cannot be used as filters in the Query Panel. This limitationis due to the fact that the resulting SQL expression contains the HAVING clause, which is not supportedby the SAP ERP connection. If you add a measure containing an aggregation function as a filter, anerror occurs when you refresh the query.
Related Topics• How to create a universe with the information design tool• Editing input columns• About parameters and lists of values in the data foundation• About multisource-enabled data foundations
3.5 Using Microsoft Analysis Services (MSAS) data sources
When you create a business layer on an MSAS data source, the business layer objects are generatedautomatically.
The business layer can be refreshed to reflect changes in the underlying cube using the RefreshStructure command in the Business Layer Editor Actions menu.
The table below gives details about how certain objects in the MSAS cube are mapped in the businesslayer.
2013-08-0349
Creating Universes
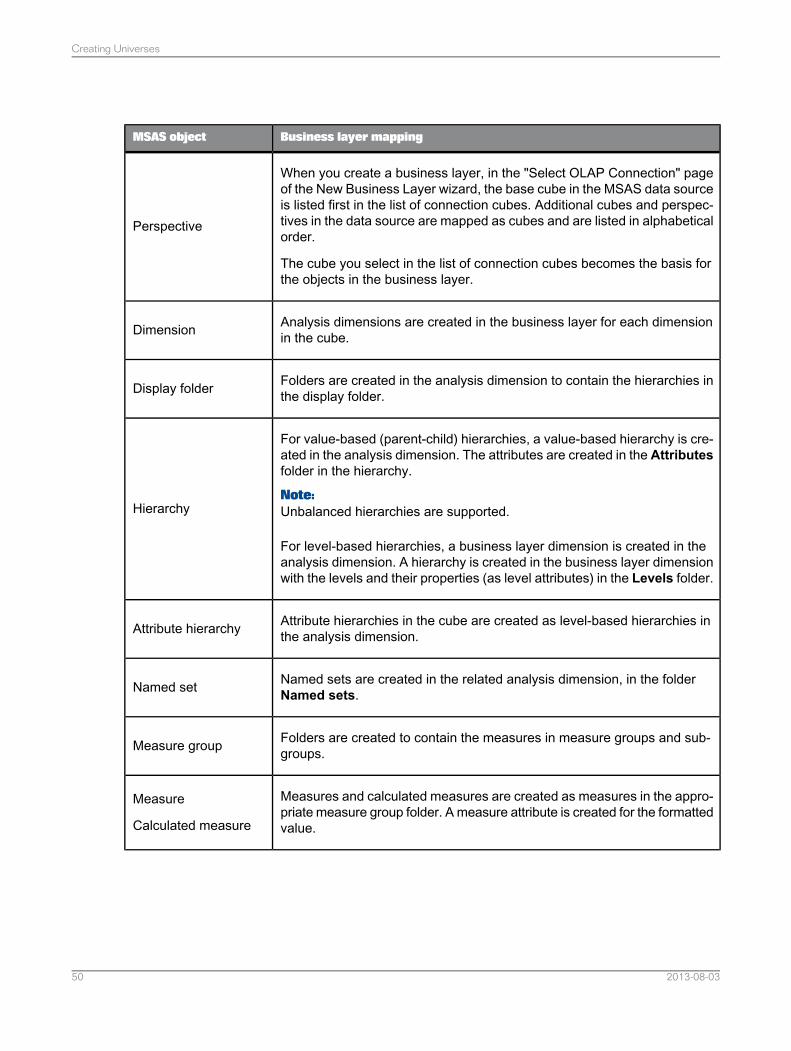
Business layer mappingMSAS object
When you create a business layer, in the "Select OLAP Connection" pageof the New Business Layer wizard, the base cube in the MSAS data sourceis listed first in the list of connection cubes. Additional cubes and perspec-tives in the data source are mapped as cubes and are listed in alphabeticalorder.
The cube you select in the list of connection cubes becomes the basis forthe objects in the business layer.
Perspective
Analysis dimensions are created in the business layer for each dimensionin the cube.Dimension
Folders are created in the analysis dimension to contain the hierarchies inthe display folder.Display folder
For value-based (parent-child) hierarchies, a value-based hierarchy is cre-ated in the analysis dimension. The attributes are created in the Attributesfolder in the hierarchy.
Note:Unbalanced hierarchies are supported.
For level-based hierarchies, a business layer dimension is created in theanalysis dimension. A hierarchy is created in the business layer dimensionwith the levels and their properties (as level attributes) in the Levels folder.
Hierarchy
Attribute hierarchies in the cube are created as level-based hierarchies inthe analysis dimension.Attribute hierarchy
Named sets are created in the related analysis dimension, in the folderNamed sets.Named set
Folders are created to contain the measures in measure groups and sub-groups.Measure group
Measures and calculated measures are created as measures in the appro-priate measure group folder. A measure attribute is created for the formattedvalue.
Measure
Calculated measure
2013-08-0350
Creating Universes
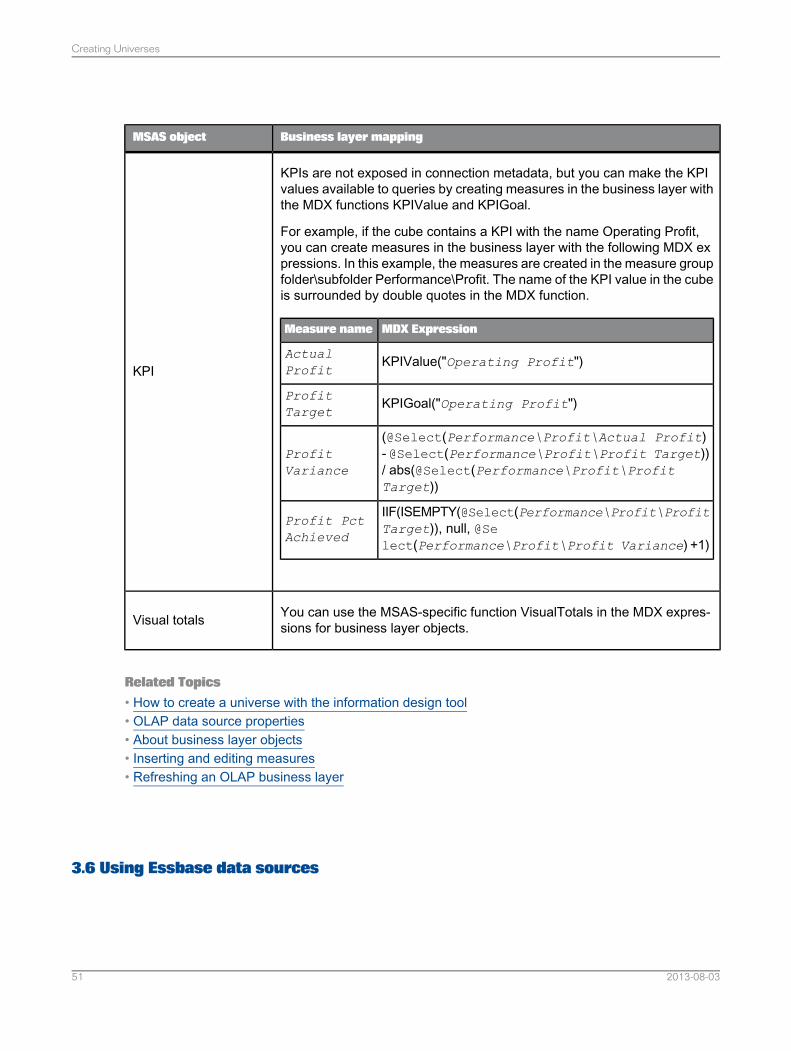
Business layer mappingMSAS object
KPIs are not exposed in connection metadata, but you can make the KPIvalues available to queries by creating measures in the business layer withthe MDX functions KPIValue and KPIGoal.
For example, if the cube contains a KPI with the name Operating Profit,you can create measures in the business layer with the following MDX expressions. In this example, the measures are created in the measure groupfolder\subfolder Performance\Profit. The name of the KPI value in the cubeis surrounded by double quotes in the MDX function.
MDX ExpressionMeasure name
KPIValue("Operating Profit")ActualProfit
KPIGoal("Operating Profit")ProfitTarget
(@Select(Performance\Profit\Actual Profit)- @Select(Performance\Profit\Profit Target))/ abs(@Select(Performance\Profit\ProfitTarget))
ProfitVariance
IIF(ISEMPTY(@Select(Performance\Profit\ProfitTarget)), null, @Select(Performance\Profit\Profit Variance) +1)
Profit PctAchieved
KPI
You can use the MSAS-specific function VisualTotals in the MDX expres-sions for business layer objects.Visual totals
Related Topics• How to create a universe with the information design tool• OLAP data source properties• About business layer objects• Inserting and editing measures• Refreshing an OLAP business layer
3.6 Using Essbase data sources
2013-08-0351
Creating Universes
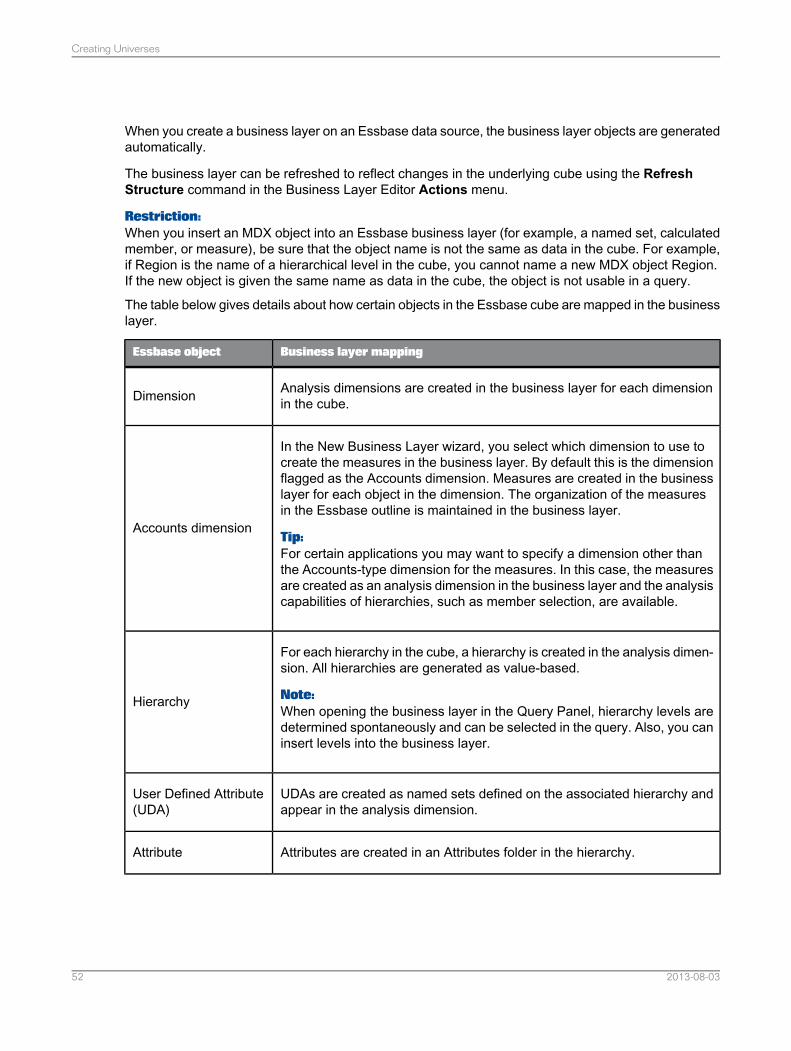
When you create a business layer on an Essbase data source, the business layer objects are generatedautomatically.
The business layer can be refreshed to reflect changes in the underlying cube using the RefreshStructure command in the Business Layer Editor Actions menu.
Restriction:When you insert an MDX object into an Essbase business layer (for example, a named set, calculatedmember, or measure), be sure that the object name is not the same as data in the cube. For example,if Region is the name of a hierarchical level in the cube, you cannot name a new MDX object Region.If the new object is given the same name as data in the cube, the object is not usable in a query.
The table below gives details about how certain objects in the Essbase cube are mapped in the businesslayer.
Business layer mappingEssbase object
Analysis dimensions are created in the business layer for each dimensionin the cube.Dimension
In the New Business Layer wizard, you select which dimension to use tocreate the measures in the business layer. By default this is the dimensionflagged as the Accounts dimension. Measures are created in the businesslayer for each object in the dimension. The organization of the measuresin the Essbase outline is maintained in the business layer.
Tip:For certain applications you may want to specify a dimension other thanthe Accounts-type dimension for the measures. In this case, the measuresare created as an analysis dimension in the business layer and the analysiscapabilities of hierarchies, such as member selection, are available.
Accounts dimension
For each hierarchy in the cube, a hierarchy is created in the analysis dimen-sion. All hierarchies are generated as value-based.
Note:When opening the business layer in the Query Panel, hierarchy levels aredetermined spontaneously and can be selected in the query. Also, you caninsert levels into the business layer.
Hierarchy
UDAs are created as named sets defined on the associated hierarchy andappear in the analysis dimension.
User Defined Attribute(UDA)
Attributes are created in an Attributes folder in the hierarchy.Attribute
2013-08-0352
Creating Universes
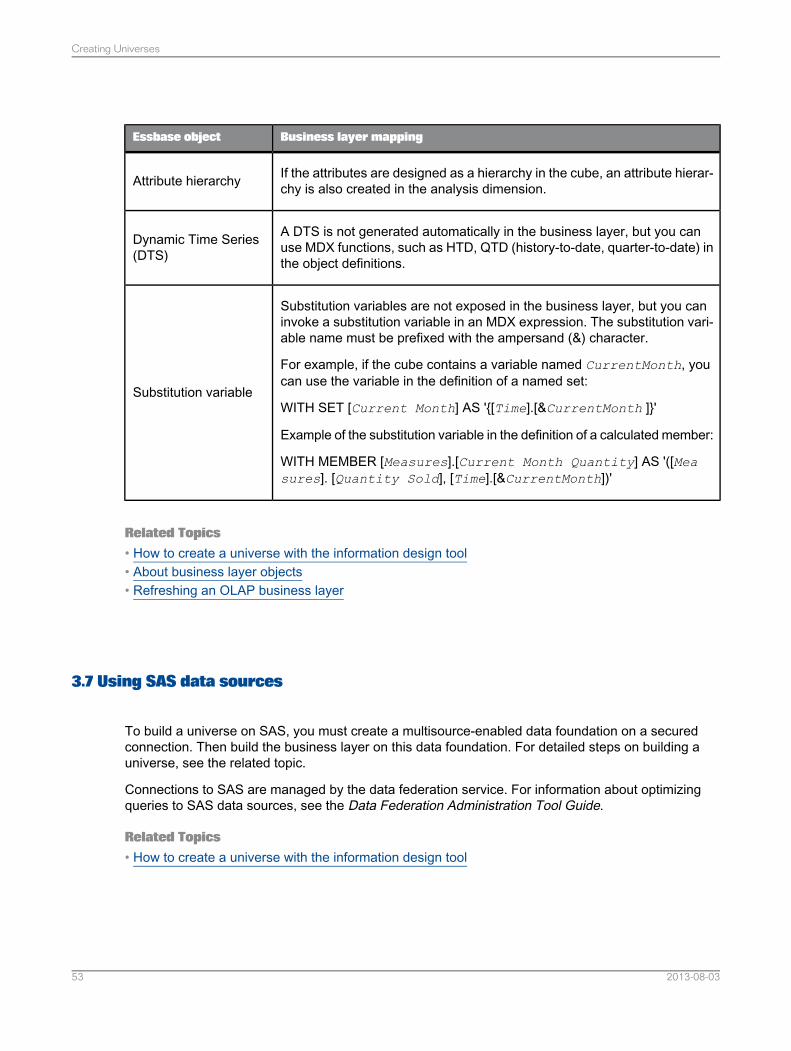
Business layer mappingEssbase object
If the attributes are designed as a hierarchy in the cube, an attribute hierar-chy is also created in the analysis dimension.Attribute hierarchy
A DTS is not generated automatically in the business layer, but you canuse MDX functions, such as HTD, QTD (history-to-date, quarter-to-date) inthe object definitions.
Dynamic Time Series(DTS)
Substitution variables are not exposed in the business layer, but you caninvoke a substitution variable in an MDX expression. The substitution vari-able name must be prefixed with the ampersand (&) character.
For example, if the cube contains a variable named CurrentMonth, youcan use the variable in the definition of a named set:
WITH SET [Current Month] AS '{[Time].[&CurrentMonth ]}'
Example of the substitution variable in the definition of a calculated member:
WITH MEMBER [Measures].[Current Month Quantity] AS '([Measures]. [Quantity Sold], [Time].[&CurrentMonth])'
Substitution variable
Related Topics• How to create a universe with the information design tool• About business layer objects• Refreshing an OLAP business layer
3.7 Using SAS data sources
To build a universe on SAS, you must create a multisource-enabled data foundation on a securedconnection. Then build the business layer on this data foundation. For detailed steps on building auniverse, see the related topic.
Connections to SAS are managed by the data federation service. For information about optimizingqueries to SAS data sources, see the Data Federation Administration Tool Guide.
Related Topics• How to create a universe with the information design tool
2013-08-0353
Creating Universes
3.8 Multilingual universes
The information design tool supports the creation of multilingual universes. This feature enables amultilingual solution using a single universe metadata model:• The designer creates the universe in the source language in the information design tool.• Translators translate the metadata in the data foundation and business layer using the translation
management tool. For more information about translating metadata, see the related topic.• Report designers can then build reports once from the same universe that can be displayed in several
languages based on user preferences.
Three language parameters impact how labels, metadata, and data are displayed in the informationdesign tool:• The Product Language determines the language of the user interface of the information design tool.
This parameter is set in the information design tool preferences.• The Preferred Viewing Locale is the user's preferred language for viewing report and query objects
in an application. This parameter is set in the information design tool preferences.
A locale defines a language and a geographical area. Locale abbreviations consist of the languageabbreviation followed by the country abbreviation, for example, fr_FR. A locale also defines the waydata is sorted and how dates and numbers are formatted. Data is displayed in a fallback locale whenviewing a translated document and no translation in the user's Preferred Viewing Locale is available.The fallback locale can be defined (in the translation management tool), or defaults to the dominantlocale that is automatically defined for every locale.
• Connection Language: For data sources that support a language parameter, the language parameteris entered when you create or edit a connection. This determines the language of the data.
Metadata source language in the information design toolThe metadata of the data foundation (table and column names) is created in the language of themetadata in the data source. The metadata that you insert into the data foundation can be entered inany language.
For SAP NetWeaver BW connections, the data foundation can be generated automatically in thelanguage specified in the connection language parameter.
The metadata of a relational business layer is created in the language of the data foundation metadata.For OLAP business layers, the metadata is created in the language of the connection languageparameter. The metadata that you insert into the business layer can be entered in any language.
Once the business layer is generated, the metadata (when viewed in the Business Layer Editor) remainsin that language, even if you change the connection language parameter.
When designing the universe, with the @Variable function, you can use thePREFERRED_VIEWING_LOCALE and the DOMINANT_PREFERRED_VIEWING_LOCALE variablesto customize the universe in order to filter multilingual data and retrieve only data in the user's PreferredViewing Locale at query time.
2013-08-0354
Creating Universes
Multilingual display in the information design toolThe Preferred Viewing Locale (defined in the information design tool preferences) determines thelanguage of the metadata and data in the Query Panel, as long as two conditions are met:• Translations are available in the language (metadata)• The connection supports the language parameter (data)
When displaying values from the data source in the Connection Editor, the metadata and data displaysin the language of the data source according to the current value of the connection language parameter.
Related Topics• Translating universe metadata• How to create a universe with the information design tool• Setting languages used by the information design tool
3.8.1 Translating universe metadata
Before you begin, the universe you want to translate must be created in the source language, andpublished to a repository or local folder.
This procedure presents how to translate the data foundation and business layer metadata using localfiles. You can also translate metadata in shared projects by accessing the metadata files in the sharedproject in the repository from the translation management tool. For details on the procedures in thetranslation management tool, see the Translation Management Tool User Guide.1. In the information design tool, create a local project if you do not already have one.
When creating the project, note the file path to the directory where the project files are saved in thefile system. The default root directory for all projects is workspace.
2. Retrieve the universe into the local project.
The information design tool saves the .dfx and .blx files in the local project. These files correspondto the data foundation and business layer definitions. These are the files that are used as the sourcefor the translations.
Note:For OLAP universes, only a .blx file is saved.
3. In the translation management tool, translate the data foundation metadata (for relational universes):a. Import the .dfx file from project folder in the local file system.b. Translate the metadata.c. Export the translated content to the local file system.For details on these workflows, see the Translation Management Tool User Guide.
4. Follow the same procedure as in previous step to translate the .blx file.5. In the information design tool, to see the translations:
2013-08-0355
Creating Universes
a. In the application language preferences, select translated language as the Preferred ViewingLanguage. Exit and restart the information design tool for the language change to take effect.
b. Open the business layer by double-clicking it in the Local Projects View. You can see the translatedmetadata in the Query Panel. To open the Query Panel, select theQueries pane and click InsertQuery.
6. Re-publish the business layer so that translations are available to universe users.For universes published to a repository, you can open the Query Panel on the published universeby right-clicking the universe the Repository Resources View and selecting Run Query.
Related Topics• Creating a local project• Retrieving a published universe from a repository• Retrieving a published universe from the local file system• Showing values in a data source• Inserting and editing a query in the business layer• Setting languages used by the information design tool• Publishing a universe• Running a query on a universe published in a repository
3.9 About the New Universe wizard
You can use the New Universe Wizard to create the resources you need to publish a local universe:either a single-source relational or OLAP universe.
You can also select existing resources. At each step of the process, you can choose to create a resourceor select an existing resource.
For more information on each step of the wizard, click the help icon.
To start the wizard, from the information design tool main menu, select File > New Universe.
Once you have completed the wizard, publish the universe to a local folder or repository.
Related Topics• Publishing a universe• Publishing a local universe to the repository
3.9.1 Select or create a project in the New Universe wizard
2013-08-0356
Creating Universes
Create a project if you want to build all the resources for your universe from scratch. All the resourcesused to build the universe must be located in the same local project.
If you want to base the universe on existing resources, choose the project that contains these resources.
Related Topics• About local projects and resources
3.9.2 Select the data source type in the New Universe wizard
A universe is based on a relational or an OLAP data source.• Relational universes are based on a data foundation that defines the relevant tables and joins from
one or more relational databases. The objects in the business layer map to the database structuresvia SQL expressions. In the next step, you will select or create a relational connection on which tobase the data foundation.
• OLAP universes are based on a connection to an OLAP cube. The objects in the business layermap directly to the cube via MDX expressions. In the next step, you will select or create an OLAPconnection on which to base the business layer.
3.9.3 Select or create a relational connection in the New Universe wizard
The wizard lets you to create only local connections. If you want to base your data foundation on asecured connection, do one of the following:• Select an existing secured connection.• Cancel the wizard and use the New Relational Connection wizard to create a secured connection.• Continue with the wizard and create a local connection. You can publish the connection and re-publish
the business layer to a repository later.
Related Topics• Creating a relational connection• Publishing a local universe to the repository• About local connections
3.9.4 Select or create an OLAP connection in the New Universe wizard
2013-08-0357
Creating Universes
The wizard lets you to create only local connections. If you want to base your universe on a securedconnection, do one of the following:• Select an existing secured connection.• Cancel the wizard and use the New OLAP Connection wizard to create a secured connection.• Continue with the wizard and create a local connection. You can publish the connection and re-publish
the business layer to a repository later.
Related Topics• Creating an OLAP connection• Publishing a local universe to the repository• About local connections
3.9.5 Select or create a data foundation in the New Universe wizard
The wizard lets you to create only single-source data foundations. If you want to create amultisource-enabled data foundation on a secured connection, do one of the following:• Select an existing multisource-enabled data foundation. In the previous step you must select one
of the secured connections referenced in the data foundation.• Cancel the wizard and use the New Data Foundation wizard to create a multisource-enabled data
foundation.
To learn more about single-source and multisource-enabled data foundations, see the related topics.
Related Topics• About single-source data foundations• About multisource-enabled data foundations• How to build a data foundation
2013-08-0358
Creating Universes
Converting .unv universes
4.1 About .unv and .unx universes
You can use the Convert .unv Universe command in the information design tool to convert a universecreated with other SAP BusinessObjects universe design tools, and universes created in previousversions. You can then work on the converted universe in a local project as you would a universecreated with the information design tool.
What is a .unv universe?A .unv universe refers to a universe created with any SAP Business Objects XI 3 design tool, for exampleUniverse Designer.
The following SAP Business Objects BI 4 design tools create .unv universes:• The universe design tool (new name for Universe Designer)• The universe design tool desktop edition (new name for Universe Designer Personal)
The universe is stored with a file name of universe name.unv in a local folder, or in a repository.
What is a .unx universe?When you publish a universe using the information design tool, the universe is stored with a file nameof universe name.unx. This is called a .unx universe. TheConvert .unv Universe command convertsa .unv universe to the .unx universe format.
Related Topics• About converting .unv universes
4.2 About converting .unv universes
Before working with .unv universes in the information design tool, you must convert them.
What .unv universes can be converted?You can convert the following types of .unv universes:
2013-08-0359
Converting .unv universes
• Relational universes created using the SAP BusinessObjects BI 4 tools universe design tool oruniverse design tool desktop edition.
• Relational universes created using SAP BusinessObjects Enterprise XI 3 design tools.
Note:Before you can convert universes created in version XI 3 that are saved in a repository, you mustupgrade the universes using the upgrade management tool. For more information, see the SAPBusinessObjects Business Intelligence platform Upgrade Guide.
You cannot convert the following types of .unv universes:• OLAP universes• Stored procedure universes• Universes based on a Data Federator data source• Javabean universes
Note:It is not possible to convert Business Views created with Business View Manager XI 3 to a formatcompatible with version BI 4 reporting tools.
How to convert .unv universesHow you convert .unv files depends on the software version of the tool that was used to create theuniverse, and whether the universe is stored locally or in a repository. The following table describesthe steps to follow for different conversion scenarios. For details of the conversion procedures, see theRelated Topics.
WorkflowUniverse to convert
First upgrade the universe in the repository to the latestversion using the upgrade management tool.
In the information design tool, follow the procedure forconverting a .unv universe in a repository.
The conversion creates an equivalent .unx universe inthe repository with the associated universe and connec-tion rights.
A .unv universe that has been saved in arepository using XI 3 design tools.
In the information design tool, follow the procedure forconverting a .unv universe in a repository.
The conversion creates an equivalent .unx universe inthe repository with the associated universe and connec-tion rights.
A .unv universe that has been saved in arepository using the universe design toolrelease BI 4.0 or later.
2013-08-0360
Converting .unv universes
WorkflowUniverse to convert
In the information design tool, follow the procedure forconverting a locally-stored .unv universe.
The conversion creates the equivalent universe re-sources (data foundation, business layer, and localconnection) in a local project.
Publish the business layer to create the .unx universe.
Any locally-stored .unv universe that hasbeen created using version XI 3 or laterdesign tools.
Note:A locally-stored universe refers to a non-secured universe that was saved for allusers.
After converting .unv universesWhen converting a .unv universe, the .unv universe is preserved. Documents in SAP BusinessObjectsquery and reporting tools based on the universe are still linked to the .unv universe. This gives you theopportunity to check and test the converted universe before changing the documents that depend onit.
Some features of .unv universes are implemented differently in the .unx universe. Once you haveconverted a universe, you can edit the universe resources in a local project in the information designtool to check and correct inconsistencies; and to take advantage of new universe features. For adescription of the supported features and how they are implemented in .unx universes, see the relatedtopic.
After converting the universe, it is recommended to refresh the structure of the data foundation and runa check integrity on the universe. For tips on resolving check integrity errors on converted universes,see the related topic.
Related Topics• Converting a .unv universe in a repository• Converting a locally-stored .unv universe• Features supported when converting .unv universes• Tips for resolving check integrity errors after converting .unv universes• About .unv and .unx universes
4.3 Features supported when converting .unv universes
When converting a .unv universe with the information design tool, the conversion process createsequivalent features in the converted universe. The table below indicates which .unv universe featuresare supported and how they are implemented in the .unx universe. For certain features, tips are describedfor obtaining best conversion results.
2013-08-0361
Converting .unv universes
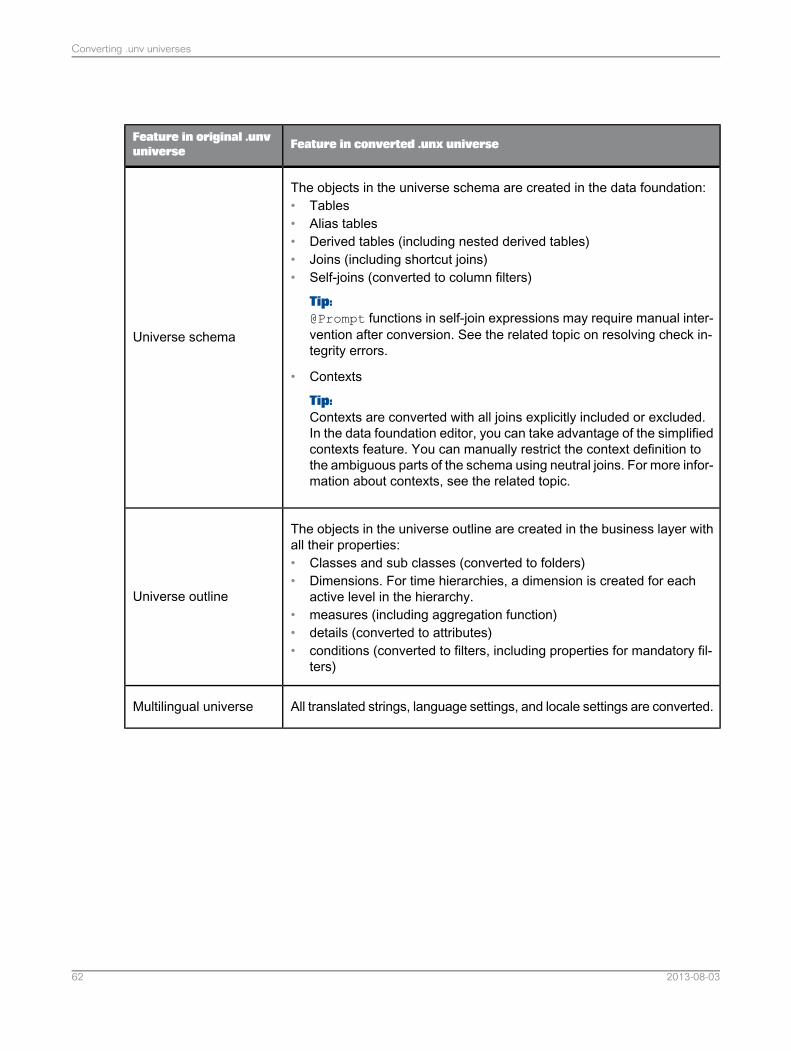
Feature in converted .unx universeFeature in original .unvuniverse
The objects in the universe schema are created in the data foundation:• Tables• Alias tables• Derived tables (including nested derived tables)• Joins (including shortcut joins)• Self-joins (converted to column filters)
Tip:@Prompt functions in self-join expressions may require manual inter-vention after conversion. See the related topic on resolving check in-tegrity errors.
• Contexts
Tip:Contexts are converted with all joins explicitly included or excluded.In the data foundation editor, you can take advantage of the simplifiedcontexts feature. You can manually restrict the context definition tothe ambiguous parts of the schema using neutral joins. For more infor-mation about contexts, see the related topic.
Universe schema
The objects in the universe outline are created in the business layer withall their properties:• Classes and sub classes (converted to folders)• Dimensions. For time hierarchies, a dimension is created for each
active level in the hierarchy.• measures (including aggregation function)• details (converted to attributes)• conditions (converted to filters, including properties for mandatory fil-
ters)
Universe outline
All translated strings, language settings, and locale settings are converted.Multilingual universe
2013-08-0362
Converting .unv universes
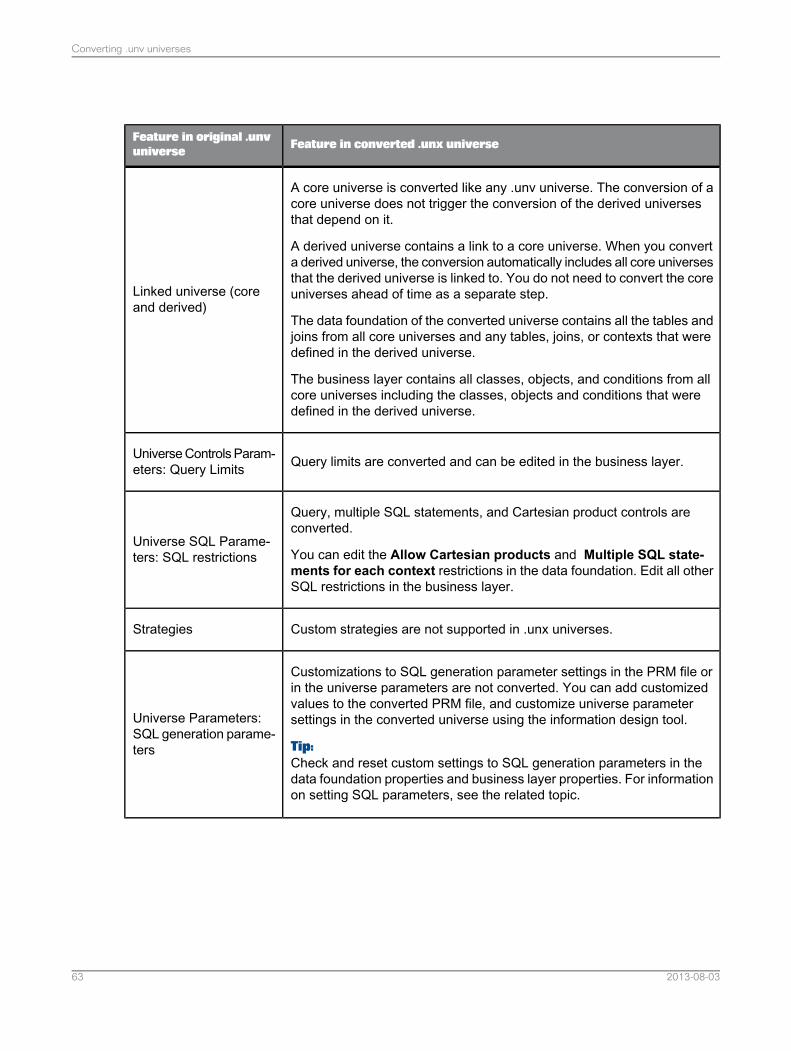
Feature in converted .unx universeFeature in original .unvuniverse
A core universe is converted like any .unv universe. The conversion of acore universe does not trigger the conversion of the derived universesthat depend on it.
A derived universe contains a link to a core universe. When you converta derived universe, the conversion automatically includes all core universesthat the derived universe is linked to. You do not need to convert the coreuniverses ahead of time as a separate step.
The data foundation of the converted universe contains all the tables andjoins from all core universes and any tables, joins, or contexts that weredefined in the derived universe.
The business layer contains all classes, objects, and conditions from allcore universes including the classes, objects and conditions that weredefined in the derived universe.
Linked universe (coreand derived)
Query limits are converted and can be edited in the business layer.Universe Controls Param-eters: Query Limits
Query, multiple SQL statements, and Cartesian product controls areconverted.
You can edit the Allow Cartesian products and Multiple SQL state-ments for each context restrictions in the data foundation. Edit all otherSQL restrictions in the business layer.
Universe SQL Parame-ters: SQL restrictions
Custom strategies are not supported in .unx universes.Strategies
Customizations to SQL generation parameter settings in the PRM file orin the universe parameters are not converted. You can add customizedvalues to the converted PRM file, and customize universe parametersettings in the converted universe using the information design tool.
Tip:Check and reset custom settings to SQL generation parameters in thedata foundation properties and business layer properties. For informationon setting SQL parameters, see the related topic.
Universe Parameters:SQL generation parame-ters
2013-08-0363
Converting .unv universes

Feature in converted .unx universeFeature in original .unvuniverse
The following @functions are converted:• @Aggregate_Aware• @Prompt• @DerivedTable• @Select• @Variable• @Where
The syntax for all functions is supported.
Tip:The @Prompt function has a new alternative syntax to take advantage ofnamed parameters. For more information, see the related topic.
@Functions
@Prompt functions in dimension and measure expressions in the businesslayer, and in SQL expressions in the data foundation are supported.
When converting, you have the option to automatically create a namedparameter for the prompt in the business layer.
@Prompt expressions in the data foundation are not converted. @Promptfunctions in self-join expressions may require manual intervention afterconversion. See the related topic on resolving check integrity errors.
Tip:Parameters and lists of values in the information design tool can be de-fined independently from the objects that they reference. You can thereforereference a named parameter or list of values in more than one businesslayer object.
Prompts
Named lists of values are created in the business layer for dimension andmeasure objects that specify a list of values.Lists of values
2013-08-0364
Converting .unv universes
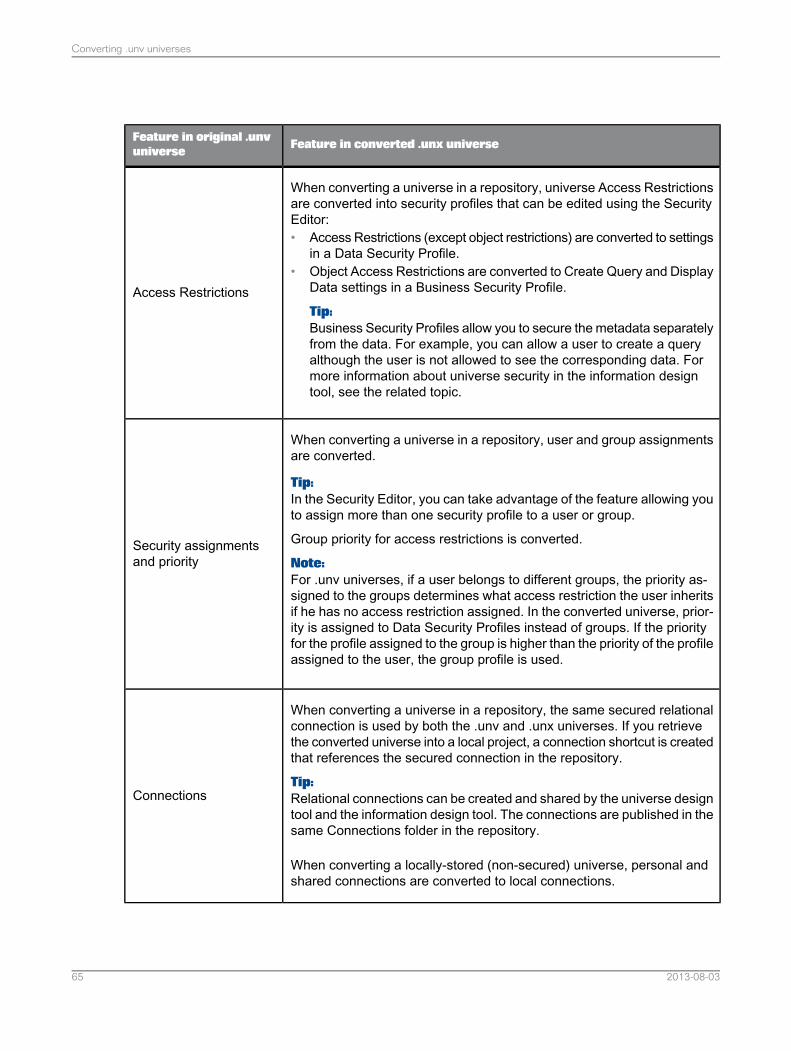
Feature in converted .unx universeFeature in original .unvuniverse
When converting a universe in a repository, universe Access Restrictionsare converted into security profiles that can be edited using the SecurityEditor:• Access Restrictions (except object restrictions) are converted to settings
in a Data Security Profile.• Object Access Restrictions are converted to Create Query and Display
Data settings in a Business Security Profile.
Tip:Business Security Profiles allow you to secure the metadata separatelyfrom the data. For example, you can allow a user to create a queryalthough the user is not allowed to see the corresponding data. Formore information about universe security in the information designtool, see the related topic.
Access Restrictions
When converting a universe in a repository, user and group assignmentsare converted.
Tip:In the Security Editor, you can take advantage of the feature allowing youto assign more than one security profile to a user or group.
Group priority for access restrictions is converted.
Note:For .unv universes, if a user belongs to different groups, the priority as-signed to the groups determines what access restriction the user inheritsif he has no access restriction assigned. In the converted universe, prior-ity is assigned to Data Security Profiles instead of groups. If the priorityfor the profile assigned to the group is higher than the priority of the profileassigned to the user, the group profile is used.
Security assignmentsand priority
When converting a universe in a repository, the same secured relationalconnection is used by both the .unv and .unx universes. If you retrievethe converted universe into a local project, a connection shortcut is createdthat references the secured connection in the repository.
Tip:Relational connections can be created and shared by the universe designtool and the information design tool. The connections are published in thesame Connections folder in the repository.
When converting a locally-stored (non-secured) universe, personal andshared connections are converted to local connections.
Connections
2013-08-0365
Converting .unv universes
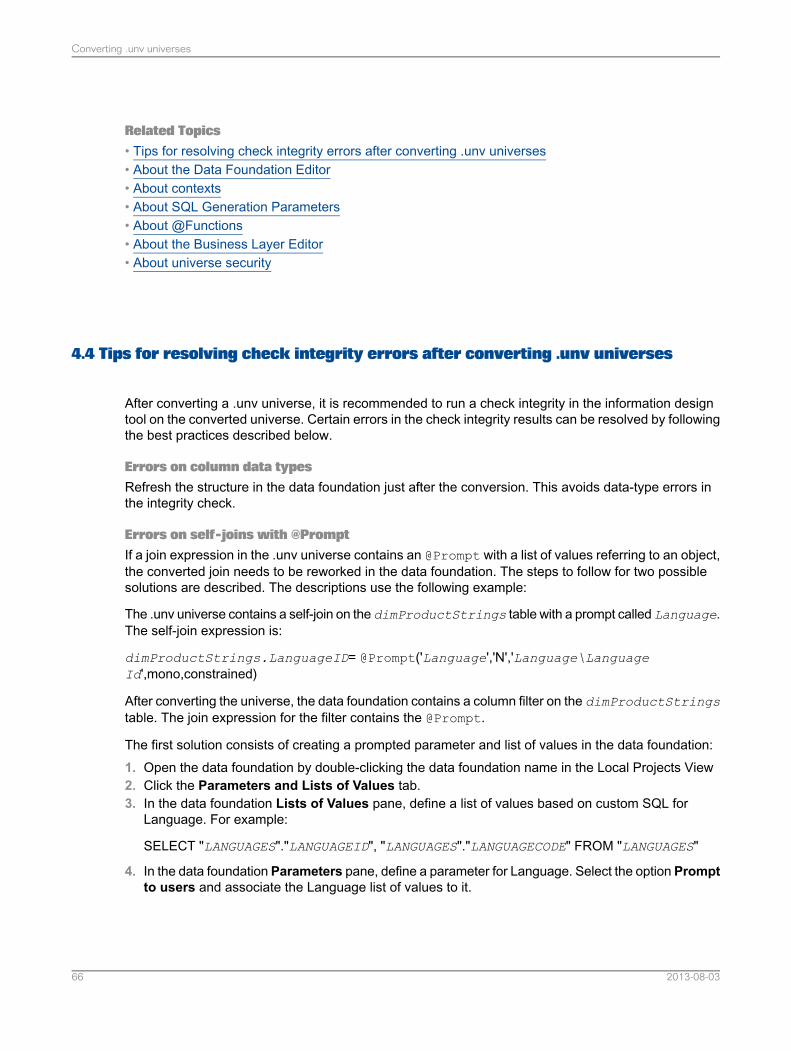
Related Topics• Tips for resolving check integrity errors after converting .unv universes• About the Data Foundation Editor• About contexts• About SQL Generation Parameters• About @Functions• About the Business Layer Editor• About universe security
4.4 Tips for resolving check integrity errors after converting .unv universes
After converting a .unv universe, it is recommended to run a check integrity in the information designtool on the converted universe. Certain errors in the check integrity results can be resolved by followingthe best practices described below.
Errors on column data typesRefresh the structure in the data foundation just after the conversion. This avoids data-type errors inthe integrity check.
Errors on self-joins with @PromptIf a join expression in the .unv universe contains an @Prompt with a list of values referring to an object,the converted join needs to be reworked in the data foundation. The steps to follow for two possiblesolutions are described. The descriptions use the following example:
The .unv universe contains a self-join on the dimProductStrings table with a prompt called Language.The self-join expression is:
dimProductStrings.LanguageID= @Prompt('Language','N','Language\LanguageId',mono,constrained)
After converting the universe, the data foundation contains a column filter on the dimProductStringstable. The join expression for the filter contains the @Prompt.
The first solution consists of creating a prompted parameter and list of values in the data foundation:1. Open the data foundation by double-clicking the data foundation name in the Local Projects View2. Click the Parameters and Lists of Values tab.3. In the data foundation Lists of Values pane, define a list of values based on custom SQL for
Language. For example:
SELECT "LANGUAGES"."LANGUAGEID", "LANGUAGES"."LANGUAGECODE" FROM "LANGUAGES"
4. In the data foundation Parameters pane, define a parameter for Language. Select the option Promptto users and associate the Language list of values to it.
2013-08-0366
Converting .unv universes

5. In the data foundation, edit the column filter in the dimProductStrings table. Change the joinexpression to reference the new prompted parameter, for example:
dimProductStrings.LanguageID = @Prompt(Language)
6. Save and close the data foundation.
The second solution consists of using a mandatory filter in the business layer:1. Open the data foundation in the editor and delete the column filter on the dimProductStrings
table that contains the @Prompt.2. Save and close the data foundation.3. Open the business layer in the editor.4. In the business layer Lists of values pane, define a list of values based on custom SQL for Language.
For example:
SELECT "LANGUAGES"."LANGUAGEID", "LANGUAGES"."LANGUAGECODE" FROM "LANGUAGES"
5. In the business layer Parameters pane, define a parameter for Language. Keep the default optionto Prompt to users and associate the Language list of values to it.
6. In the business layer, in the folder associated with Product, create a filter with an expression thatrefers to the Language prompted parameter, for example:
dimProductStrings.LanguageID = @Prompt(Language)
7. In the Properties tab of the filter definition, select the Use filter as mandatory in the query option.Select the Filter scope of Apply on Folder.
8. Save and close the business layer.
Related Topics• About refreshing a data foundation• About the Data Foundation Editor• About parameters and lists of values in the data foundation• Inserting a column filter• About the Business Layer Editor• About parameters• About lists of values• Inserting and editing filters
4.5 Converting a .unv universe in a repository
The .unv universe to be converted must be stored in a repository compatible with the information designtool. If the .unv universe was created with a design tool version earlier than SAP BusinessObjects BI4.0, you must first upgrade the universe using the upgrade management tool. For more informationabout upgrading universes, see the SAP BusinessObjects Upgrade Guide.
2013-08-0367
Converting .unv universes
If you want to retrieve the converted .unx universe into a local project in order to work on it, you mustfirst have a local project folder in the Local Projects View.1. In the information design tool, select File > Convert .unv Universe.2. In the "Convert a .unv Universe" dialog box, click the Select .unv universe from a repository icon
.3. Open a session on the repository where the .unv universe is saved, select the universe, and click
OK.4. Click the Browse button next to the Destination Repository Folder field, and then select a folder
in the repository where you want to save the converted .unx universe.5. If you want to retrieve the converted .unx universe into a local project in order to work on it, click the
Browse button next to the Destination Local Project Folder field, select a project folder, and clickOK.
6. If you want the conversion to create named parameters for prompts, select the Automaticallyconvert @Prompt expressions into universe named parameters option. For more informationabout named parameters, see the related topic.
7. If you are retrieving the converted universe into a local project and want remove the local securityrequirement so that any user can open the universe resources without entering repositoryauthentication, select the Save for all users option.
8. Click OK to start the conversion.
After conversion, it is recommended to refresh the structure of the data foundation, then run a checkintegrity on the universe to detect problems in the conversion. For tips on resolving check integrityerrors, see the related topic.
Related Topics• Features supported when converting .unv universes• Opening a session• Creating a local project• About parameters• About refreshing a data foundation• Running check integrity• Tips for resolving check integrity errors after converting .unv universes
4.6 Converting a locally-stored .unv universe
You need to define a local project folder in the Local Projects View in which to save the resources ofthe converted universe.1. In the information design tool, select File > Convert .unv Universe.2. In the "Convert a .unv Universe" dialog box, click the Select .unv universe from the local file
system icon , and select the universe you want to convert.
2013-08-0368
Converting .unv universes
3. Click the Browse button next to the Destination Local Project Folder field, select a project folder,and click OK.
4. If you want the conversion to create named parameters for prompts, select the Automaticallyconvert @Prompt expressions into universe named parameters option. For more informationabout named parameters, see the related topic.
5. Click OK to start the conversion.
The conversion creates the equivalent universe resources (data foundation, business layer, andlocal connection) in the specified local project folder.
At this point, it is recommended to refresh the structure of the data foundation.
You can now publish the business layer to create the .unx universe file. This creates a local universe.To publish the universe to the repository, continue with the next step.
6. Publish the local connection to a repository.7. Edit the data foundation and change the connection to use the secured connection published in the
last step.8. Publish the business layer to the repository.
The Publishing Wizard allows you to run a check integrity on the universe (recommended). For tips onresolving check integrity errors, see the related topic.
Related Topics• Features supported when converting .unv universes• Creating a local project• About parameters• About refreshing a data foundation• Publishing a local connection to the repository• Changing a connection in a data foundation• Publishing a universe• Running check integrity• Tips for resolving check integrity errors after converting .unv universes
2013-08-0369
Converting .unv universes

2013-08-0370
Converting .unv universes
Retrieving published universes
5.1 Retrieving a published universe from the local file system
To retrieve a published universe, you must have a project in the Local Projects View where the businesslayer and referenced resources are to be saved.1. In the Local Projects View, right-click the project folder and select Retrieve Universe > from Local
Folder.2. Follow the instructions on the wizard pages. For more information about what to do on a particular
page, click the help button.
When the wizard finishes, the business layer and its dependent resources (connections, connectionshortcuts, and data foundation) are created in the local project and are ready to be edited.
Related Topics• Creating a local project
5.2 Retrieving a published universe from a repository
To retrieve a published universe, you must have a project in the Local Projects View where the businesslayer and referenced resources are to be saved.1. You can retrieve a universe from a repository in two ways:
2013-08-0371
Retrieving published universes
CommandOption
Right-click the project folder in the Local Projects View and select Re-trieve Universe > from a Repository.
From the Local ProjectsView
Right-click the universe in the Repository Resources View and selectRetrieve Universe.
From the Repository Re-sources View
Note:
By default, the resources are retrieved into the local project and are secured locally by requiring youto enter your repository system authentication when opening a retrieved data foundation or businesslayer.
To remove the local security requirement, select the Save for all users option when selecting theuniverse in the repository.
2. Follow the instructions on the wizard pages. For more information about what to do on a particularpage, click the help button.
When the wizard finishes, the business layer and its dependent resources (connections, connectionshortcuts, and data foundation) are created in the local project and are ready to be edited.
Related Topics• Opening a session• Selecting a repository folder• Creating a local project
2013-08-0372
Retrieving published universes
Migrating universes to SAP HANA
6.1 About Universe Landscape Migration
Universe Landscape Migration is an add-in to the information design tool that lets you migrate a relational,single-source universe created with the information design tool to a universe that connects to a databaseon SAP HANA. You can migrate universes based on the following types of relational connections:Oracle, Teradata, Microsoft SQL Server, and Sybase Adaptive Server Enterprise.
The universe's dependent reports (Web Intelligence and Crystal Reports) are also migrated. The securitydefined on the source universe and reports are applied to the SAP HANA universe and migrated reports.
The Universe Landscape Migration add-in is selected when installing the SAP Business IntelligenceClient Tools and the information design tool. For more information, see the Business Intelligence PlatformInstallation Guide for Windows.
For a detailed list of requirements and limitations when using Universe Landscape Migration, see therelated topic.
Universe Landscape Migration does the following:
In the pre-migration step:• Analyzes the source universe and provides a pre-migration report showing universe objects that are
impacted during the migration.• Provides an ATL script file if tables are missing from the SAP HANA database. This script can be
used by the Data Services administrator to generate the missing tables.
In the migration step:• Creates the resources (data foundation and business layer) in a local project for the migrated
universe. The data foundation is based on a secured relational connection to SAP HANA that youprovide.
• Translates database-specific functions to the equivalent SAP HANA functions.• Publishes the migrated universe to the repository.• Migrates the corresponding universe security profiles.
In the post-migration step:• Migrates the dependent reports that you select and publishes them in the repository.• Provides a tool to check the differences in results generated by the migrated report versus the original
report.
For details on how to migrate a universe to SAP HANA, see the related topics.
2013-08-0373
Migrating universes to SAP HANA
Related Topics• Universe Landscape Migration requirements and limitations• Migrating a universe to SAP HANA: Pre-Migration• Migrating a universe to SAP HANA: Migration• Migrating a universe to SAP HANA: Post-Migration
6.1.1 Universe Landscape Migration requirements and limitations
Note the following requirements and limitations when migrating universes to SAP HANA:• The source universe must be single-source and relational. Multisource-enabled and OLAP universes
are not supported.• For proper migration and data comparison, the database schemas, tables, and views used in the
source universe should exist in the destination SAP HANA database.• The user who performs the migration should not have any security profiles assigned to his user
name on the universe to be migrated.
• Data foundation tables in the source universe that are based on system tables (for example, DUALtables in Oracle databases) are not migrated.
• Any SQL function which is not supported by SAP HANA is not migrated.• Derived tables that use database-specific SQL will not migrate completely. You need to update these
tables manually in the migrated universe.• The schema mapping in the data foundation is done in the order defined in the source database.• By default user and table names are created in the SAP HANA database in uppercase. If the source
database contains two schemas with the same user name, one in uppercase and the other inlowercase, any tables that exist in the lowercase schema are mapped to the uppercase schema inSAP HANA. After migration, tables belonging to the lowercase schema need to be modified in thedata foundation. Select these tables and change the schema using the Change Qualifier/Ownercommand.
Note the following requirements and limitations when migrating dependent reports to SAP HANA:• Only Crystal Reports and Web Intelligence documents are migrated. Dashboards and Explorer
documents are not supported.• When comparing Web Intelligence documents in the report check, if the document has contexts,
the check is done by answering the first applicable context for both the documents. This is becauseWeb Intelligence does not remember the previously selected context.
• The report check for Web Intelligence reports having multiple queries is not supported.• In Web Intelligence documents containing contexts, the first available context is chosen for the
migrated report.• Crystal Reports documents containing contexts are not migrated.• Crystal Reports documents containing prompts are migrated as blank documents. The user needs
to answer the prompt once to provide data for the report.
2013-08-0374
Migrating universes to SAP HANA
The following limitations apply to the use of the ATL script file to generate missing tables in the SAPHANA database:• Use only the following clients for the respective databases:
• Oracle 10 Oracle Client• MS SQL Server 2005 ODBC• Teradata 13 ODBC• Sybase Adaptive Server Enterprise 15 Sybase Open Client• SAP HANA ODBC
• Provide a password in the source and target in Data Services after importing the ATL.• Tables from mutiple databases are not supported.• Views are created as tables.
6.2 Migrating a universe to SAP HANA: Pre-Migration
Use this procedure to create the pre-migration reports to help you plan your migration.
Before you begin, you need:• The universe that you want to migrate. This must be a relational, single-source universe created
using the information design tool. The universe must be published in a repository. For a list of theconnection types supported for migration, see the related topic about Universe Landscape Migration.
• A secured, relational connection to the SAP HANA server hosting the database. This connectionmust be published in the same repository as the universe to migrate.
1. In the Repository Resources View, open a session on the repository where the universe to bemigrated is published.
2. Right-click the universe in the repository, and select Migrate to SAP HANA.If this is the first time you have migrated a universe, the wizard creates a Migration folder in theLocal Projects View to contain the migrated resource files.
3. Select a secured connection to SAP HANA:•
Click the icon to browse the connections in the repository.• Click to select a connection shortcut from a local project.
4. Once you have selected a connection, click Next.
The wizard creates a connection shortcut in the Migration folder.
The migration preview page shows the following information:• Any missing items, including missing tables in the SAP HANA database.• The objects that will change in the migration, including impacted business layer objects.• The list of impacted documents that can be migrated after the universe migration.
5. To generate a report of the pre-migration information, click Export Report.You are prompted for a file path and file name in which to save the PDF report.
2013-08-0375
Migrating universes to SAP HANA
6. If tables are missing in the SAP HANA database, click Replicate Tables.You are prompted for a file path and file name in which to save the ATL report. This report containsan ATL script that the Data Services administrator can use to generate the missing tables in theSAP HANA database.
7. Review the pre-migration information and decide if want to continue with the migration.• If you have errors in the pre-migration report, clickCancel. Work with your database administrator
to prepare your universe for migration.• If you have no errors, you can continue with the migration now. ClickNext. Details on the migration
step of the procedure are in the related topic.
Related Topics• Migrating a universe to SAP HANA: Migration• Opening a session• About Universe Landscape Migration
6.3 Migrating a universe to SAP HANA: Migration
Use this procedure to migrate your universe after you have performed the pre-migration step.
If you are continuing from the pre-migration step without cancelling the wizard, start this procedure atstep 3.1. Right-click the business layer in the Migration folder in the Local Projects View and select Migrate
to SAP HANA.2. Select the connection to SAP HANA: Browse the Migration folder in the Local Projects View, select
the connection shortcut and click Next.3. In the SAP HANA migration preview page, select Next.
You will be asked to confirm the migration.
The migration summary page shows the following information:• Objects that changed in the migration.• An error log listing errors encountered during the migration.
4. To generate a report of the migration information, click Export Report.5. To run an integrity check on the migrated resources, click Check Integrity.6. Review the migration information and decide if you want to publish the migrated universe.
• If you want to correct errors in the migrated resources, click Cancel and edit the migratedresources (the data foundation and business layer) in the Migration folder. Once you have madecorrections, restart this procedure.
• If you want to publish the universe, click Next.
2013-08-0376
Migrating universes to SAP HANA
The universe is published in the Migrated SAP HANA Universes subfolder in the repository. Thesubfolder tree of the source universe is duplicated in the Migrated SAP HANA Universes folder.
Once the migrated universe is published in the repository, you can migrate reports now, or exitthe wizard and migrate reports later. Details on the post-migration step of the procedure (reportmigration) are in the related topic.
Related Topics• Migrating a universe to SAP HANA: Post-Migration• Migrating a universe to SAP HANA: Pre-Migration• Running check integrity• About the Data Foundation Editor• About the Business Layer Editor• About Universe Landscape Migration
6.4 Migrating a universe to SAP HANA: Post-Migration
Use this procedure to migrate your reports after you have performed the pre-migration and migrationsteps, and the migrated universe is published to the repository.
If you are continuing from the migration step without cancelling the wizard, start this procedure at step4.1. Open a session in the Repository Resources View on the repository where the migrated universe
is published.2. In the repository, right-click the migrated universe in the Migrated HANA Universes folder, and select
Post-Migration.3. Select the migrated universe and click Next.4. In the Reports page, select the reports you want to migrate.
To generate a report listing all the reports that can be migrated, click Export Report.
5. Click Next to migrate the selected reports.
The Summary of Migrated reports shows the following information:• A list of reports that were migrated, including the report type, and the path to where the migrated
report is published.• An error log listing errors encountered during the migration.
6. To run a comparison of the results of a migrated report with the original report results, select thereport and click Check.The status of the comparison appears in the status column of the list of reports. Click the Errorstatus to see the details of the errors encountered while comparing the report.
7. When you are finished checking the migrated reports, click Finish.
2013-08-0377
Migrating universes to SAP HANA

You can restart the post-migration procedure at any time to migrate other reports.
Related Topics• Migrating a universe to SAP HANA: Migration• About Universe Landscape Migration
2013-08-0378
Migrating universes to SAP HANA
Working with projects
7.1 About local projects and resources
The first step in creating resources in the information design tool is to create a local project in the LocalProjects View. You create and edit all resources (except secured connections and security profiles) ina local project.
The resources and folders in a local project are stored as physical files and folders in the local filesystem. The Local Projects View lets you to navigate local projects and open resources in the informationdesign tool.
Once you have created a local project, there are several ways you can populate it with resources:• Create universe resources using the wizards available on the New menu.• Convert a .unv universe that was created with the universe design tool, or migrated from an earlier
version.• Retrieve a published universe.• Create folders to organize resources within the project.• Create file resources by entering a file name and extension.
You edit the resources using the information design tool editors by double-clicking the resource namein the local project. To open a resource from a list of resources recently opened, select File > RecentResources.
You can get information on the resources you create by right-clicking the resource name and selectingProperties. The properties displayed include the path to the resource in the local file system and thedate the resource was last modified.
You can also perform the following tasks on resources from the Local Projects View:• Create a shared project so that you can share resources with other designers.• Check integrity of data foundations and business layers.• Edit and test local connections.• Change and test the connection referenced by a connection shortcut.• Publish a business layer as a universe to the local file system or a repository.• Publish a connection to a repository.• Show dependent resources.• Save a resource as a report.
When you copy resources, it is best to copy the entire folder so that all the references between theresources are maintained. This is because the paths to referenced resources are relative, not absolute.
2013-08-0379
Working with projects
The information design tool assumes that all resources that reference each other are in the same folder.If you copy a single resource to a location outside of the folder without copying the resources it references,the references are broken.
You can delete a project from the Local Projects View. The project files remain in the local file systemuntil you explicitly delete them. Open the project to make it available again in the Local Projects View.
Related Topics• Creating a local project• Deleting a local project• Opening a local project• About resources in the information design tool• Finding universe resources in the local file system• About converting .unv universes• Retrieving a published universe from a repository• About shared projects• Running check integrity• About publishing resources• About resource dependencies• Saving resources as reports
7.1.1 Creating a local project
1. From the information design tool main menu, select File > New > Project.2. Give the project a unique name.3. In Project Location, the file path to the default root directory for all projects (workspace) displays.
To select a different local folder to contain the project, click the browse button .4. Click Finish.
The project is created in the local file system and displayed in the Local Projects View.
Related Topics• About local projects and resources
7.1.2 About resource names
Resource names identify the connections, data foundations, and business layers in the local project.You give a name to the resource when you create it. The name must be unique within the local project.
2013-08-0380
Working with projects
Note:If you use the same name for resources in different projects, when publishing the resources to the samerepository you may have naming conflicts because the names are not unique.
You can optionally enter a description of the resource.
Related Topics• About resources in the information design tool• About resource dependencies
7.1.3 Finding universe resources in the local file system
1. In the Local Projects View, open the project that contains the universe resources.2. Right-click a resource (for example, a data foundation, connection, or business layer) and select
Properties.The properties displayed include the path to the resource in the local file system and the date theresource was last modified.
Related Topics• About local projects and resources
7.1.4 Opening a local project
Information design tool projects saved on the file system can be opened in the Local Projects View.1. From the information design tool main menu, select File > Open Project.2. Select the Select root directory option and click Browse.
The "Browse for Folder" dialog box opens with the default root directory for all projects (workspace)already selected.
3. Click OK to select the default directory, or browse to the folder containing the project you want toopen.All projects not already open in the Local Projects View are listed in Projects and are selected bydefault.
4. Clear the checkbox for any projects you do not want to open and click Finish.
Related Topics• About local projects and resources
2013-08-0381
Working with projects
7.1.5 Deleting a local project
1. Right-click the project in the Local Projects View and select Delete.2. If you want to permanently delete the project from the Local Projects View and the local file system,
select the Delete project contents on disk option in the "Confirm Project Delete" dialog box.
Note:If you select this option, the deletion is permanent and cannot be undone.
3. Click Yes to confirm the deletion.
If you did not delete the project contents permanently, you can open the project to make it availableagain in the Local Projects View.
Related Topics• Opening a local project
7.1.6 Backing-up and recovering universe resources in local projects
Sometimes when the information design tool ends unexpectedly, the local workspace becomes corruptedand you are unable to restart the information design tool. Use this procedure to recreate the workspaceand recover your local projects.1. On the local file system, navigate to the folder %USERPROFILE%\.businessobjects\bimodel
er_14\. For example:
C:\Documents and Settings\Administrator\.businessobjects\bimodeleter_14\
2. Rename the workspace folder to workspace.bak.3. Start the information design tool.
A new workspace folder is created automatically.
4. Select File > Open Project from the main menu.5. In the "Import Existing Projects" dialog box, select the root directory and browse to the path of the
workspace.bak folder created in step 2.6. Select the projects you want to restore.7. Select the Copy projects into workspace option and click Finish.
2013-08-0382
Working with projects
7.1.7 Searching for and filtering resources in the Local Projects View
1. To filter the types of resources displayed in the Local Projects View, click the filter icon in theicon bar of the view. Select the types to include or exclude.The Local Projects View displays only resources of the types selected.
2.To search the list, click the Show/Hide search bar icon .
3. In the search text box, enter the text and press the Enter key to start the search.The first resource name that contains the search text is highlighted in the view. The total number ofresource names containing the search text displays in the search text box.
Note:The search does not highlight resource types that are unselected in the filter.
4. To highlight the next resource found, press the Enter key again. Use the Enter key to browse throughall resource names that match the search text.
7.2 About shared projects
A shared project is a project in a repository whose resources are available to other designers. Youcreate a shared project in a repository from an existing local project in the Local Projects View.
To start working on shared resources, you use the following tasks in the Project Synchronization View:• Synchronize the project to copy resources between the local and shared projects.• Lock and unlock resources in the shared project to inform other designers when you are working
on them.• Synchronize a shared project created by another designer. This creates a local project associated
with the shared project so that you can start working on the shared resources.
Related Topics• Creating a shared project from a local project• Working in a shared project• Synchronizing a project• Locking a resource• Unlocking a resource• Merging changes to shared resources
2013-08-0383
Working with projects
7.2.1 Creating a shared project from a local project
The shared project will automatically be given the same name as the local project. A project with thisname cannot already exist in the repository. If you need to rename an existing shared project, use therename command in the Project Synchronization View. To do this, see the related topic.1. In the Local Projects View, right-click the project you want to share and select New Shared Project.2. In the "Open Session" dialog box, select the repository system session you want to open and enter
your system authentication.The Project Synchronization View opens showing a shared project with the same name as the localproject. At this point, the shared project is empty.
3. In the Project Synchronization View, synchronize the resources you want to save in the sharedproject.
Related Topics• Renaming a shared project• Opening a session• Synchronizing a project
7.2.2 Working in a shared project
Use this procedure to work on resources in an existing shared project.1. Open the Project Synchronization View with a session on the repository system where the shared
project is saved.2. Select the shared project from the Shared Project list.3. In the selected shared project, lock the resources you want to work on.
Locks are available as a communication tool between designers. When other designers open theProject Synchronization View, your lock informs them that you are making changes. It also preventsother designers from updating these resources in the shared project while you have them locked.However, any designer can unlock the resource if necessary.
4. Synchronize the project to update the resources in the local project with the latest changes savedon the server.
If you do not already have a local version of the project, one is created in the Local Projects View.
You may want to review the changes made on the server before updating them in the local project.For more information, see the related topic on merging changes in shared resources.
2013-08-0384
Working with projects

5. Once you have made your changes, in the Project Synchronization View, synchronize the projectto save your changes on the server.
6. Unlock the resources.
Related Topics• Opening the Project Synchronization View• Locking a resource• Synchronizing a project• Merging changes to shared resources• Unlocking a resource
7.2.3 Renaming a shared project
Use this procedure to rename a shared project that exists in the repository.1. Open the Project Synchronization View with a session on the repository system where the shared
project is saved.2. Select the shared project from the Shared Project list.3. Click the Rename Shared Project icon .4. Enter a new name that is unique in the repository.5. To create a local project with the new name in the Local Projects View, synchronize the project.
Local projects with the original name are no longer associated with the shared project with the newname. The resources in those local projects can no longer be synchronized with the newly namedshared project.
Related Topics• Opening the Project Synchronization View• Synchronizing a project
7.2.4 Deleting a shared project
1. Open the Project Synchronization View with a session on the repository system where the sharedproject is saved.
2. Select the shared project from the Shared Project list.3. Click the Delete Shared Project icon .
2013-08-0385
Working with projects
Note:Deleting a shared project cannot be undone.
The shared project is deleted from the repository. Resources in the local projects associated with thedeleted shared project are not affected, however synchronization statuses of the local project are lost.
7.3 About project synchronization
Synchronizing a project starts with comparing the resources in a project in the Local Projects View withan associated shared project on the repository server. Synchronization detects added resources, deletedresources, and differences between the resources. Based on the differences detected, you can updatethe local and shared resources.
Use the Project Synchronization View to synchronize a project. The view displays synchronizationinformation in two panes:• The Shared Project pane lists the resources in the shared project on the server. A lock icon appears
next to the resource if it is locked. Other information about the resources on the server is given: theuser who last modified the resource and on what date, the user who locked the resource and onwhat date.
• The Synchronization Status pane lists the status of each resource. The status is determined bycomparing the resources in the local and shared projects.
The different synchronization statuses and what they mean are listed in the table.
DescriptionStatus
The resource was added in the local project, but not in theshared project.Added Locally
The resource was changed in the local project, but not in theshared project since the last synchronization.Changed Locally
The resource was deleted in the local project but still exists inthe shared project.Deleted Locally
The resource is not in the local project but exists in the sharedproject.Added on Server
The resource was changed in the shared project, but not inthe local project since the last synchronization.Changed on Server
The resource exists in the local project, but was deleted in theshared project.Deleted on Server
2013-08-0386
Working with projects
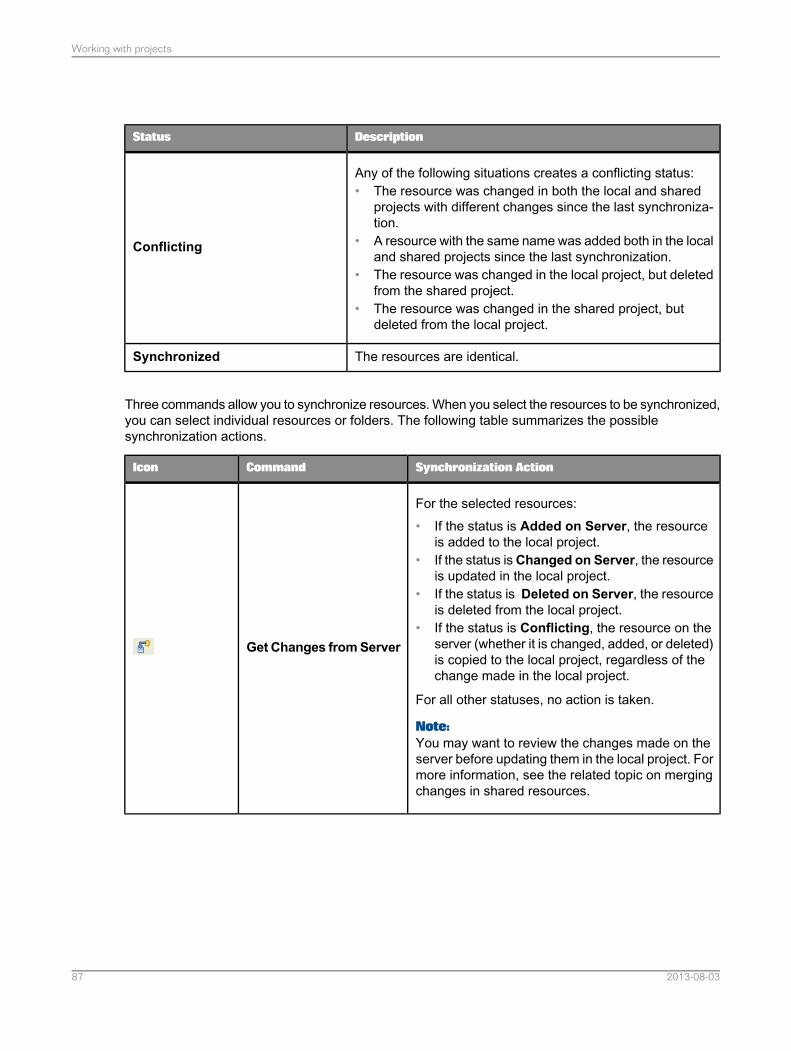
DescriptionStatus
Any of the following situations creates a conflicting status:• The resource was changed in both the local and shared
projects with different changes since the last synchroniza-tion.
• A resource with the same name was added both in the localand shared projects since the last synchronization.
• The resource was changed in the local project, but deletedfrom the shared project.
• The resource was changed in the shared project, butdeleted from the local project.
Conflicting
The resources are identical.Synchronized
Three commands allow you to synchronize resources. When you select the resources to be synchronized,you can select individual resources or folders. The following table summarizes the possiblesynchronization actions.
Synchronization ActionCommandIcon
For the selected resources:• If the status is Added on Server, the resource
is added to the local project.• If the status isChanged on Server, the resource
is updated in the local project.• If the status is Deleted on Server, the resource
is deleted from the local project.• If the status is Conflicting, the resource on the
server (whether it is changed, added, or deleted)is copied to the local project, regardless of thechange made in the local project.
For all other statuses, no action is taken.
Note:You may want to review the changes made on theserver before updating them in the local project. Formore information, see the related topic on mergingchanges in shared resources.
Get Changes fromServer
2013-08-0387
Working with projects
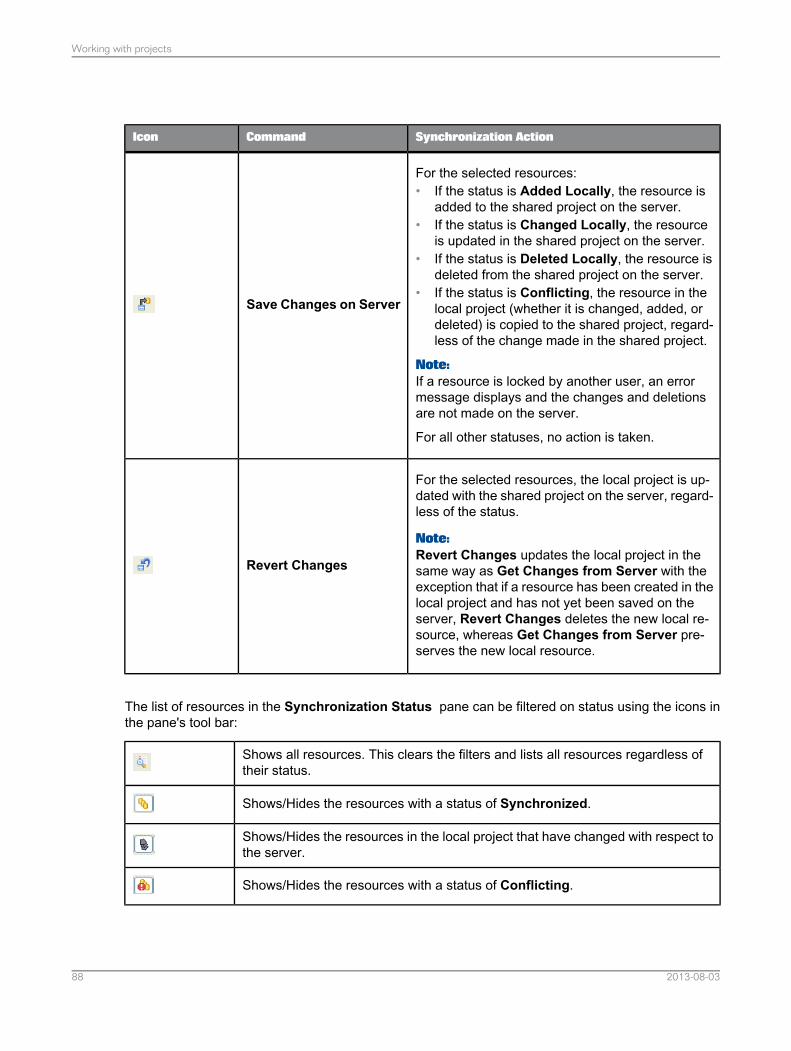
Synchronization ActionCommandIcon
For the selected resources:• If the status is Added Locally, the resource is
added to the shared project on the server.• If the status is Changed Locally, the resource
is updated in the shared project on the server.• If the status is Deleted Locally, the resource is
deleted from the shared project on the server.• If the status is Conflicting, the resource in the
local project (whether it is changed, added, ordeleted) is copied to the shared project, regard-less of the change made in the shared project.
Note:If a resource is locked by another user, an errormessage displays and the changes and deletionsare not made on the server.
For all other statuses, no action is taken.
Save Changes on Server
For the selected resources, the local project is up-dated with the shared project on the server, regard-less of the status.
Note:Revert Changes updates the local project in thesame way as Get Changes from Server with theexception that if a resource has been created in thelocal project and has not yet been saved on theserver, Revert Changes deletes the new local re-source, whereas Get Changes from Server pre-serves the new local resource.
Revert Changes
The list of resources in the Synchronization Status pane can be filtered on status using the icons inthe pane's tool bar:
Shows all resources. This clears the filters and lists all resources regardless oftheir status.
Shows/Hides the resources with a status of Synchronized.
Shows/Hides the resources in the local project that have changed with respect tothe server.
Shows/Hides the resources with a status of Conflicting.
2013-08-0388
Working with projects
Shows/Hides the resources on the server that have changed with respect to thelocal project.
Related Topics• Synchronizing a project• Locking a resource• Unlocking a resource• Merging changes to shared resources
7.3.1 Opening the Project Synchronization View
1. To open the Project Synchronization View, from the main menu, select Window > ProjectSynchronization.
2.Click the Change Session icon in the Project Synchronization View to open a session on therepository system where the shared projects are saved.
After entering your authentication information, you can manage shared projects, and select a projectto synchronize in the Shared Project list.
Related Topics• Opening a session• About project synchronization
7.3.2 Synchronizing a project
To synchronize a project, the project must be shared.
Synchronize a project when you want do the following tasks:• Update local resources with changes stored in the shared project.• Save in the shared project the changes you made to local resources.• Revert local resources to the copy stored in the shared project.• Create a local copy of a shared project.1. Open the Project Synchronization View with a session on the repository system where the shared
project is saved.2. Select the shared project from the Shared Project list.
2013-08-0389
Working with projects
3. To see the latest synchronization status of the resources in the project, in the pane labeledSynchronization status (Local Project Compared to Shared Project), expand the project andclick the refresh icon .For more information about synchronization status and possible actions, see the related topic aboutproject synchronization.
4. Synchronize the project:• To update the local project with resources that have changed in the shared project, select the
resources in the list and click the Get Changes from Server icon .
If no project exists in the Local Projects View with the name of the shared project, a local projectis created.
Note:You may want to review the changes made on the server before updating them in the local project.For more information, see the related topic on merging changes in shared resources.
• To update the shared project with changes made locally, select the resources in the list and click
the Save Changes on Server icon. .
Note:
Resources that are locked by another user cannot be updated on the server. However, if needed,any user can unlock the resource.
If you are updating the server with resources that you have locked, synchronizing updates theresources, but does not unlock them. You must explicitly unlock the resources on the server.
• To revert resources in the local project to the copy stored on the server, select the resources
and click the Revert Changes icon .
Related Topics• About project synchronization• Opening the Project Synchronization View• Locking a resource• Unlocking a resource• Merging changes to shared resources
7.3.3 Locking a resource
To lock a resource, the resource must be in a shared project.
Lock a resource when you want to inform other designers that you are working on the resource whenthey open the Project Synchronization View.
2013-08-0390
Working with projects
1. Open the Project Synchronization View with a session on the repository system where the sharedproject is saved.
2. Select the shared project from the Shared Project list.3. In the Shared Project pane, expand the project.4. Right-click the resource and select Lock.
Note:The lock action does not update the resource contents in either the local or shared project. To saveany changes, synchronize the resource.
Related Topics• Opening the Project Synchronization View• About project synchronization
7.3.4 Unlocking a resource
Unlock a resource once you have updated your changes on the server and you want to inform otherdesigners that you have finished. Once you have unlocked the resource, other designers can lock itand/or update the server version with changes.
Note:If necessary, you can unlock a resource locked by another user.
1. Open the Project Synchronization View with a session on the repository system where the sharedproject is saved.
2. Select the shared project from the Shared Project list.3. In the Shared Project pane, expand the project.4. Right-click the resource and select Unlock.
Note:The unlock action does not update the resource on the server with any changes made in the localproject. To save any changes, synchronize the resource.
Related Topics• Opening the Project Synchronization View• About project synchronization
7.3.5 Merging changes to shared resources
2013-08-0391
Working with projects
When synchronizing a shared resource, before getting changes from the server, you may want to reviewthe changes and decide which changes to apply to the local resource. This procedure presents a wayto manually merge changes between differing resources.
For example, you are working on a resource called NewDatafoundation in a local project. This projectis shared in a repository. When you synchronize the project, NewDatafoundation has a synchronizationstatus of Changed on Server, or Conflicting.
To review and manually merge the changes:1. In the local project, right-click NewDatafoundation and select Copy.2. Right-click again (in the local project) and select Paste.
A copy of NewDatafoundation is saved in the local project.
3. In the Project Synchronization View, select NewDatafoundation and synchronize by selecting GetChanges from Server.
4. Open both NewDatafoundation and Copy of NewDatafoundation in the Data Foundation Editor bydouble-clicking each resource name in the local project.Each copy will open in a separate tab of the editor.
5. Compare the changes from the server in NewDatafoundation to your local changes in Copy ofNewDatafoundation.
6. In the editor tab with NewDatafoundation open, delete any server changes you do not want to keep,and add any changes that you made locally that you want to keep.
7. Save the changes to NewDatafoundation in the editor.8. In the Project Synchronization View, refresh the synchronization. Update the server by selecting
NewDatafoundation and then selecting Save Changes on Server.
Eventually, once you have verified the merged changes, you can delete Copy of NewDatafoundationfrom the local project.
7.4 Saving resources as reports
You can save any resource in a local project as a report in a local file.1. Right-click the resource name in the Local Projects View, and select Save As.2. In the Report Location box, enter a file path, file name, and file type for the report. The file type
can be .pdf, .html, or .txt.
To browse the local file system to find a file path, click the browse button .
3. For larger resources (data foundations and business layers), you can select which metadata elementsto include in the report in the Metadata Elements box.
4. Click Generate to create the report.
2013-08-0392
Working with projects
Working with repository resources
8.1 About managing repository resources
Repository resources are the universes and connections that have been secured in a repository on aCentral Management System (CMS). The Repository Resources View lets you navigate and interactwith the folders and resources in repositories.
The Connections folder contains the secured connections created using the information design tooland universe design tool.
Note:A CommonConnections sub-folder sometimes appears in the Connections folder. TheCommonConnections folder contains OLAP connections created in the Central Management Consolefor use in SAP BusinessObjects Advanced Analysis.
The Universe folder contains universes published with the information design tool (.unx universes), aswell as universes created and exported with the universe design tool or migrated from earlier versions(.unv universes).
To navigate a repository, open a session on the CMS where the repository is stored. For more informationabout sessions, see the related topic.
The following sections summarize the tasks you can do from the Repository Resources View.
Folder managementWith appropriate rights, you can insert, rename, and delete sub-folders in the Connections and Universesfolders.
Secured Connection management• Edit an existing connection.• Insert a new secured relational or OLAP connection in the repository.• Create a connection shortcut in a local project from an existing secured connection.• Delete a secured connection from the repository.
Universe managementYou can do the following tasks on .unx universes (published using the information design tool):• Run a check integrity.• Run a query. This command opens the Query Panel. The security settings defined in the security
profiles for the universe are applied according to the username in the session.
2013-08-0393
Working with repository resources
• Retrieve a universe. This command saves the business layer and its referenced resources in a localproject so that you can edit them.
• Rename a universe. This command renames only the universe, and not the underlying businesslayer.
• Delete a universe from the repository.
You can do the following tasks on .unv universes (created using the universe design tool or migratedfrom earlier versions):• Convert a universe. You can save the converted resources in a local project, or publish the converted
.unx universe in the repository.• Delete a universe from the repository.
Related Topics• About session management• About the Connection Editor• Creating a relational connection• Creating an OLAP connection• About connection shortcuts• Running check integrity• Running a query on a universe published in a repository• Retrieving a published universe from a repository• About converting .unv universes
8.2 About session management
A session contains the Central Management Server (CMS) system name and authentication informationneeded to access resources stored in a repository. You need at least one session defined to connectto a repository. You can define additional sessions that connect to the same repository as a differentuser.
Workflows in the information design tool that require access to secured resources prompt you with the"Open Session" dialog box. If you have not already defined a session for the repository you want toaccess, you can select New Session from the Sessions list. You can also define a session with theInsert Session command in the Repository Resources View.
Once the session is defined, it is retained in the Repository Resources View, and also on the Sessionslist. The next time you open the session, you will only need to enter the password.
Once a session is opened it stays open until you exit the information design tool. To explicitly close asession, you must do so from the Repository Resources View.
Several sessions can be open at the same time, as long as the sessions are on different CMS systems.If you need to open a session with a different username and password on a CMS that has anothersession open, you must first close the open session.
2013-08-0394
Working with repository resources
If you no longer need a session and want to delete it from the list, use the Delete Session commandin the Repository Resources View.
Related Topics• CMC rights for information design tool users• Opening a session• Closing a session
8.2.1 Opening a session
Different workflows require you to open a session. If you are prompted to open a session, a list ofpredefined sessions is available. The Sessions list is organized in the following order:• Open sessions in alphabetical order• Closed sessions in alphabetical order• New Session
To open a session on a repository already defined in the information design tool:1. Do one of the following:
• In the Repository Resources View, right-click the repository name and select Open Session.• Select the session in the Sessions list.
2. The authentication information for the CMS is filled in for you. If the session is not already open,enter your Password.
Note:If you try to open a session on a repository which has another session already open, an error messagedisplays. To change sessions on a repository, you must first close the open session in the RepositoryResources View.
3. Depending on the workflow, click OK, Next, or Connect.
To open a session on a repository not already defined in the information design tool:1. Do one of the following:
•In the Repository Resources View, from the Insert menu, select Insert Session.
• Select New Session from the Sessions list.2. In the System box, enter the name of the Central Management System where the repository is
located.
Note:
To insert a session for a repository that is hosted on a machine in a different domain than the clienthosting the application, you need to provide the host information in a hosts file on the client. Updatethe hosts file is in the following location:
2013-08-0395
Working with repository resources
C:\WINDOWS\system32\drivers\etc\hosts
3. Enter your User Name and Password.
Note:For Authentication type Windows AD, specify the complete domain name in the User Name. Forexample, enter [email protected] instead of myuser@domain.
4. In the Authentication list, select the authentication method to use.5. Depending on the workflow, click OK, Next, or Connect.
The session remains open until you explicitly close it in the Repository Resources View, or exit theinformation design tool.
Related Topics• Closing a session
8.2.2 Closing a session
All open sessions close when you exit the information design tool. To explicitly close a session:1. In the Repository Resources View, select the session you want to close.2. Right-click and select Close Session.
8.3 Running a query on a universe published in a repository
When you run a query on a universe published in a repository, the Query Panel applies the settingsdefined in the security profiles for the universe according to the user name defined in the session.1. In the Repository Resources View, select the universe. Select .unx universes only.2. Right-click the universe name and select Run Query.
The Query Panel opens with a list of views and objects granted for your user name.
Related Topics• How to build a query
2013-08-0396
Working with repository resources
Working with connections
9.1 About connections
A connection is a named set of parameters that define how one or more SAP BusinessObjectsapplications can access relational or OLAP data sources. The connection can be a local file, or a remoteobject in a repository that is referenced by a local shortcut in the information design tool.
You use connections for the following purposes:
DescriptionPurpose
You associate one or more relational connections to a datafoundation, and build a business layer on the data foundation.
When you publish the business layer as a universe, the con-nections and data foundation are integrated in the universeand provide the data for queries run against the universe.
Relational data source for a datafoundation
For an OLAP data source, you associate a business layer di-rectly to a connection. The business layer is published as auniverse, but the connection provides direct access to thecube.
OLAP data source for a businesslayer
You define SAP NetWeaver BW connections that use the SAPBICS Client middleware driver to provide access to a BExQuery. SAP BusinessObjects query and reporting applicationsconnect directly to the BEx Query. You cannot use theseconnections as a source for business layers or universes. Forinformation on how to build a universe on SAP NetWeaverBW, see the related topic on using SAP NetWeaver BW datasources.
Direct access to an SAP NetWeaverBW BEx Query
2013-08-0397
Working with connections
DescriptionPurpose
You define SAP HANA connections that use the SAP HANAClient middleware driver to provide direct access to a singleinformation model (such as an Analytic View or CalculationView). SAP BusinessObjects query and reporting applicationsconnect directly to the cube representing the informationmodel. You cannot use these connections as a source forbusiness layers or universes. For information on how to builda universe on SAP HANA, see the related topic on using SAPHANA data sources.
Direct access to an SAP HANA infor-mation model
Connections can be either local or secured.
Related Topics• About local connections• About secured connections• Using SAP NetWeaver BW data sources• Using SAP HANA data sources• Creating a relational connection• Creating an OLAP connection• About the Connection Editor
9.1.1 About local connections
You create local connections in the information design tool local project. Local connections are savedas independent objects on the local file system as .cnx files.
Local connections are used for the following purposes:• To access relational data sources when authoring a data foundation and relational business layer.
Note:To create a multisource-enabled data foundation, you must reference secured connections.
• To access an OLAP cube when authoring an OLAP business layer.• To run queries on a target database to test modifications in the business layer, or to build lists of
values.
Local connections have limited or no security as they can be used by any user with access to themachine running the information design tool.
To secure a local connection, you publish the connection to a repository.
2013-08-0398
Working with connections

Related Topics• Publishing a local connection to the repository• About secured connections• Creating a relational connection• Creating an OLAP connection• Editing local and secured connections
9.1.2 About secured connections
A secured connection is a connection that has been created in, or published to, a repository. It is storedin a dedicated Connections folder in the repository. You can create subfolders in the Connections folderto organize the storage of connections in the repository.
When a connection is published, a connection object containing the same parameters as the localconnection is created in the Connections folder or subfolder in the repository.
You can also create secured connections directly in the repository using the Insert RelationalConnection and Insert OLAP Connection commands from the Repository Resources View.
Secured connections cannot be copied to the local file system, but are made available in the LocalProjects View as connection shortcuts. The shortcut can be used in the same way as a local connection.However, the connection properties can only be modified by connecting to the repository system.
Secured connections and connection shortcuts are used for the following purposes:• To retrieve data for universes published to a repository.• To retrieve data for SAP BusinessObjects reporting products directly accessing database middleware.• As a data source when creating a data foundation or OLAP business layer.
A secured connection is subject to the following general security constraints in the repository:• Users must be authenticated.• User rights can be defined at the user level to grant or deny access to connections or connection
properties.• Connections can only be shared and used by authenticated users.
Downloading relational connections locallyTo maintain confidentiality, some sensitive secured connection parameters, for example username andpassword, remain stored in the repository.
In order to edit the connection in the information design tool, the "Download connection locally" rightmust be granted in the Central Management Console (in addition to the "Create, modify, or deleteconnections" application right and the "Edit objects" connection right).
If the "Download connection locally" right is granted, you can choose to run queries on the server usingthe server middleware driver, or locally using the local middleware driver. To use the local middleware,
2013-08-0399
Working with connections
select the local middleware option in the information design tool preferences. If this right is denied, theinformation design tool uses the server middleware.
Related Topics• About connection shortcuts• Publishing a local connection to the repository• CMC rights for information design tool users• Setting middleware for secured relational connections• Editing local and secured connections
9.1.3 About connection shortcuts
A connection shortcut is an object that references a secured connection in a repository. The shortcutis saved as a .cns file on the local file system. The shortcut contains the repository address and portnumber, the type of connection (OLAP or relational), and an ID that identifies the connection on theserver.
You use a connection shortcut when authoring, or modifying any data foundation or business layer thatuses a connection stored in the repository.
You can create a connection shortcut in two ways:
• Publish a local connection to the repository.• Create a shortcut from an existing secured connection in the Repository Resources View.
Related Topics• Publishing a local connection to the repository• Creating a connection shortcut• Editing connection shortcuts
9.2 About the Connection Editor
Use the Connection Editor to do the following tasks. For more information, see the related topics.• Edit connection properties and parameters, and change the middleware driver.• Edit the properties of connection shortcuts, and change the referenced connection.• Browse the values in the tables referenced by a relational connection.• Browse the objects in an OLAP cube and run an MDX query on the cube.
2013-08-03100
Working with connections
Related Topics• Editing local and secured connections• Editing connection shortcuts• Showing values in a relational connection• Showing values in an OLAP connection
9.3 Creating a relational connection
You use the New Relational Connection wizard to create local and secured connections to a relationaldata source.
Before you create a local connection, you must have a project available in the Local Projects View. Formore information on creating local projects, see the related topic.
Note:You must create relational connections to SAP NetWeaver BW and SAS sources directly in the repositoryas secured connections.
1. Do one of the following:• To create a local connection, select the project folder in the Local Projects View. Select File >
New > Relational Connection.• To create a secured connection, in the Repository Resources View, open a session on the
repository where you want to create the secured connection. Right-click the Connections folderor subfolder in the repository, and select Insert Relational Connection.
2. Follow the steps in the New Relational Connection wizard to enter the following information:• Name for the connection• Middleware for the target database• Login parameters to connect to the relational data source• Configuration and custom parameters to optimize the connection
If you need help on a particular step, click the help icon in the wizard dialog box.
Related Topics• Creating a local project• About managing repository resources• Name a connection• About connections
2013-08-03101
Working with connections
9.3.1 Name a connection
This section describes the Resource name page of the New Relational Connection wizard.
You name a connection and can enter a description of the data source. The name and description areavailable as properties of the connection and can be edited at any time.
DescriptionProperties
Connection name. This field is mandatory.Resource name
Information describing data source. This information can be useful whenthe connection is used for multiple data foundations. This is optional infor-mation.
Description
When you have entered name information, click Next to continue the wizard.
Related Topics• Select a middleware driver
9.3.2 Select a middleware driver
You select a connection driver to connect to the correct middleware version for the target database.The connection driver is the SAP BusinessObjects driver that maps information in the middleware tothe user interface of the SAP BusinessObjects application.
Expand the database and middleware node for the target database and select the connection driver.Click Next to continue the wizard.
Note:
• SAP NetWeaver BW and SAS connections are only listed if you are creating the connection directlyin the repository.
• If you are using the information design tool from a Crystal Server 2011 installation, SAP middlewaredrivers are not available.
Related Topics• Set the connection parameters
2013-08-03102
Working with connections
9.3.3 Set the connection parameters
The connection parameters vary depending on the type of data source for which you are defining theconnection. Select from the related topics the link to more information about the connection parameters.
Related Topics• Login parameters for relational connections• Login parameters for SAP NetWeaver BW and ERP connections• Login parameters for SAS connections• Login parameters for Oracle EBS connections• Login and schema parameters for CSV file connections• Parameters for OData connections• Parameters for XML and Web Services connections• Configuration parameters for relational connections• Custom parameters for relational connections
9.3.3.1 Login parameters for relational connections
The following login parameters apply to most relational connections.
Follow the links for a description of login parameters for the following types of connections:• Login parameters for SAP NetWeaver BW and ERP connections• Login parameters for SAS connections• Login parameters for Oracle EBS connections• Parameters for OData connections• Parameters for XML and Web Services connections
2013-08-03103
Working with connections
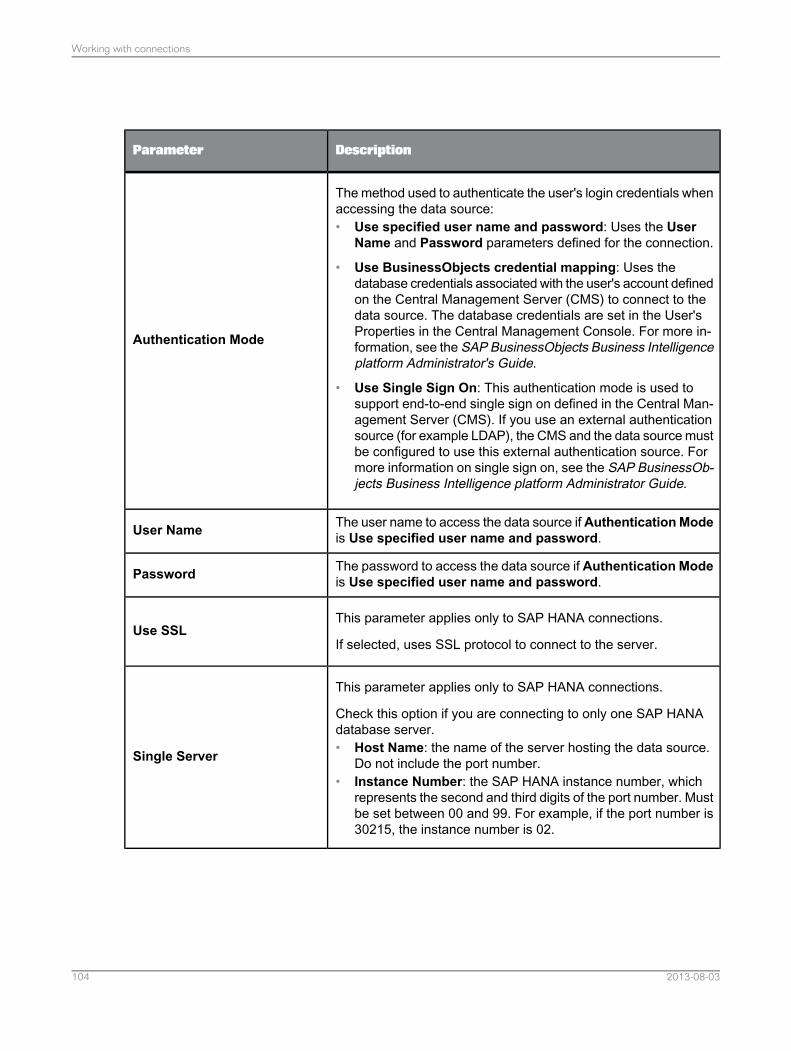
DescriptionParameter
The method used to authenticate the user's login credentials whenaccessing the data source:• Use specified user name and password: Uses the User
Name and Password parameters defined for the connection.
• Use BusinessObjects credential mapping: Uses thedatabase credentials associated with the user's account definedon the Central Management Server (CMS) to connect to thedata source. The database credentials are set in the User'sProperties in the Central Management Console. For more in-formation, see the SAP BusinessObjects Business Intelligenceplatform Administrator's Guide.
• Use Single Sign On: This authentication mode is used tosupport end-to-end single sign on defined in the Central Man-agement Server (CMS). If you use an external authenticationsource (for example LDAP), the CMS and the data source mustbe configured to use this external authentication source. Formore information on single sign on, see the SAP BusinessOb-jects Business Intelligence platform Administrator Guide.
Authentication Mode
The user name to access the data source ifAuthenticationModeis Use specified user name and password.User Name
The password to access the data source if Authentication Modeis Use specified user name and password.Password
This parameter applies only to SAP HANA connections.
If selected, uses SSL protocol to connect to the server.Use SSL
This parameter applies only to SAP HANA connections.
Check this option if you are connecting to only one SAP HANAdatabase server.• Host Name: the name of the server hosting the data source.
Do not include the port number.• Instance Number: the SAP HANA instance number, which
represents the second and third digits of the port number. Mustbe set between 00 and 99. For example, if the port number is30215, the instance number is 02.
Single Server
2013-08-03104
Working with connections
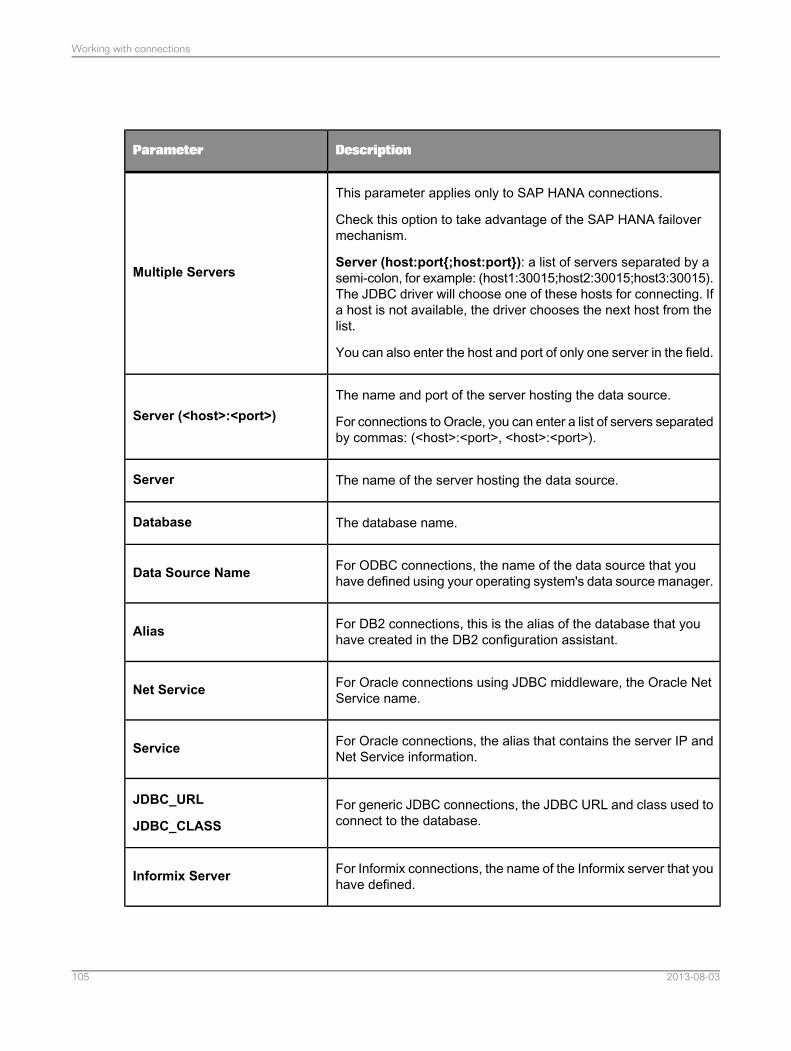
DescriptionParameter
This parameter applies only to SAP HANA connections.
Check this option to take advantage of the SAP HANA failovermechanism.
Server (host:port{;host:port}): a list of servers separated by asemi-colon, for example: (host1:30015;host2:30015;host3:30015).The JDBC driver will choose one of these hosts for connecting. Ifa host is not available, the driver chooses the next host from thelist.
You can also enter the host and port of only one server in the field.
Multiple Servers
The name and port of the server hosting the data source.
For connections to Oracle, you can enter a list of servers separatedby commas: (<host>:<port>, <host>:<port>).
Server (<host>:<port>)
The name of the server hosting the data source.Server
The database name.Database
For ODBC connections, the name of the data source that youhave defined using your operating system's data source manager.Data Source Name
For DB2 connections, this is the alias of the database that youhave created in the DB2 configuration assistant.Alias
For Oracle connections using JDBC middleware, the Oracle NetService name.Net Service
For Oracle connections, the alias that contains the server IP andNet Service information.Service
For generic JDBC connections, the JDBC URL and class used toconnect to the database.
JDBC_URL
JDBC_CLASS
For Informix connections, the name of the Informix server that youhave defined.Informix Server
2013-08-03105
Working with connections
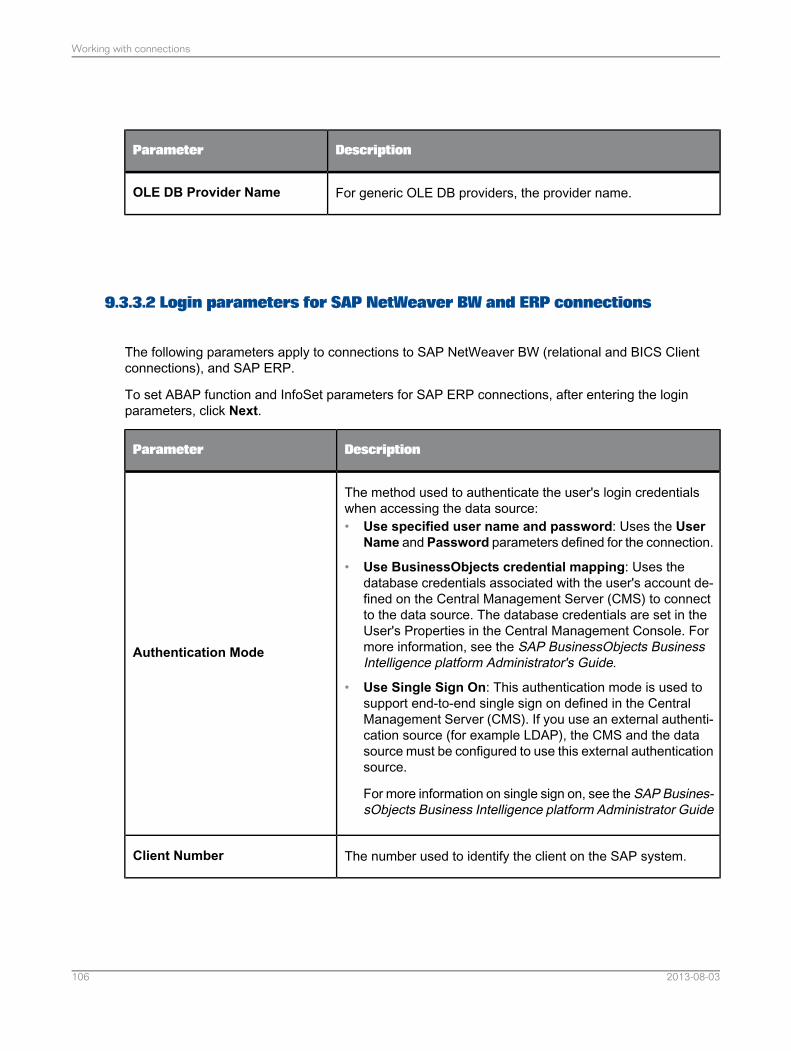
DescriptionParameter
For generic OLE DB providers, the provider name.OLE DB Provider Name
9.3.3.2 Login parameters for SAP NetWeaver BW and ERP connections
The following parameters apply to connections to SAP NetWeaver BW (relational and BICS Clientconnections), and SAP ERP.
To set ABAP function and InfoSet parameters for SAP ERP connections, after entering the loginparameters, click Next.
DescriptionParameter
The method used to authenticate the user's login credentialswhen accessing the data source:• Use specified user name and password: Uses the User
Name and Password parameters defined for the connection.
• Use BusinessObjects credential mapping: Uses thedatabase credentials associated with the user's account de-fined on the Central Management Server (CMS) to connectto the data source. The database credentials are set in theUser's Properties in the Central Management Console. Formore information, see the SAP BusinessObjects BusinessIntelligence platform Administrator's Guide.
• Use Single Sign On: This authentication mode is used tosupport end-to-end single sign on defined in the CentralManagement Server (CMS). If you use an external authenti-cation source (for example LDAP), the CMS and the datasource must be configured to use this external authenticationsource.
For more information on single sign on, see the SAP Busines-sObjects Business Intelligence platform Administrator Guide
Authentication Mode
The number used to identify the client on the SAP system.Client Number
2013-08-03106
Working with connections

DescriptionParameter
The user name to access the data source if AuthenticationMode is Use specified user name and password.User Name
The password to access the data source ifAuthenticationModeis Use specified user name and password.Password
The 2-character ISO language code for the language to be usedfor the connection to the data source. For example, EN for En-glish.
Note:In some cases, select the language from the list.
Language
Specifies which language to use for the connection:• If you select the Save Language option, the value from the
Language parameter is used.• If you clearSave Language, the value from the user's session
(Preferred Viewing Locale) is used.
Save Language
The 3-character SAP system ID.
Note:Required for both application and message server types.
Note:
For a successful connection to the message server, you needto add the message server system ID to the following file on themachine hosting the application:
C:\WINDOWS\system32\drivers\etc\services
At the end of the existing file, add the line:
sapmsXXX <tab> 3601/tcp
where sapms means SAP message server, xxx is the is theSystem ID of the server that is used, and 3601/tcp is the defaultTCP port used for communication.
System ID
• Select Application Server to connect directly to the SAPserver without using load balancing.
• Select Message Server to benefit from SAP load balancingcapabilities.
Server type
2013-08-03107
Working with connections
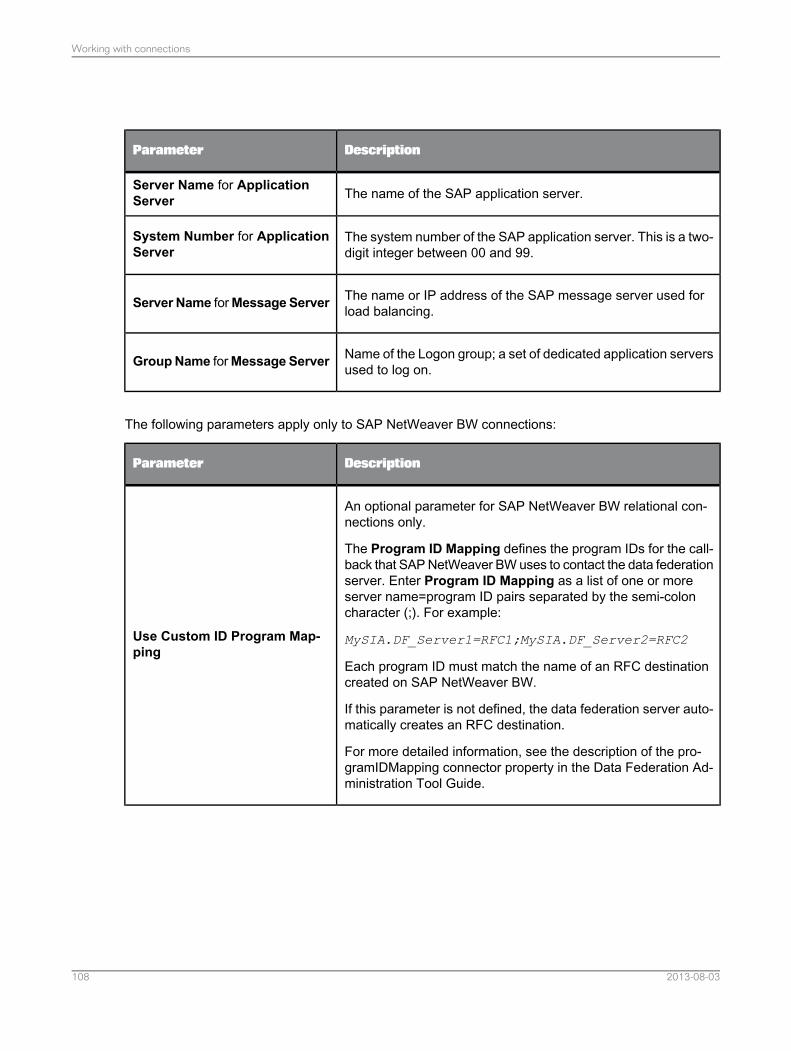
DescriptionParameter
The name of the SAP application server.Server Name for ApplicationServer
The system number of the SAP application server. This is a two-digit integer between 00 and 99.
System Number for ApplicationServer
The name or IP address of the SAP message server used forload balancing.Server Name forMessageServer
Name of the Logon group; a set of dedicated application serversused to log on.GroupName forMessage Server
The following parameters apply only to SAP NetWeaver BW connections:
DescriptionParameter
An optional parameter for SAP NetWeaver BW relational con-nections only.
The Program ID Mapping defines the program IDs for the call-back that SAP NetWeaver BW uses to contact the data federationserver. Enter Program ID Mapping as a list of one or moreserver name=program ID pairs separated by the semi-coloncharacter (;). For example:
MySIA.DF_Server1=RFC1;MySIA.DF_Server2=RFC2
Each program ID must match the name of an RFC destinationcreated on SAP NetWeaver BW.
If this parameter is not defined, the data federation server auto-matically creates an RFC destination.
For more detailed information, see the description of the pro-gramIDMapping connector property in the Data Federation Ad-ministration Tool Guide.
Use Custom ID Program Map-ping
2013-08-03108
Working with connections
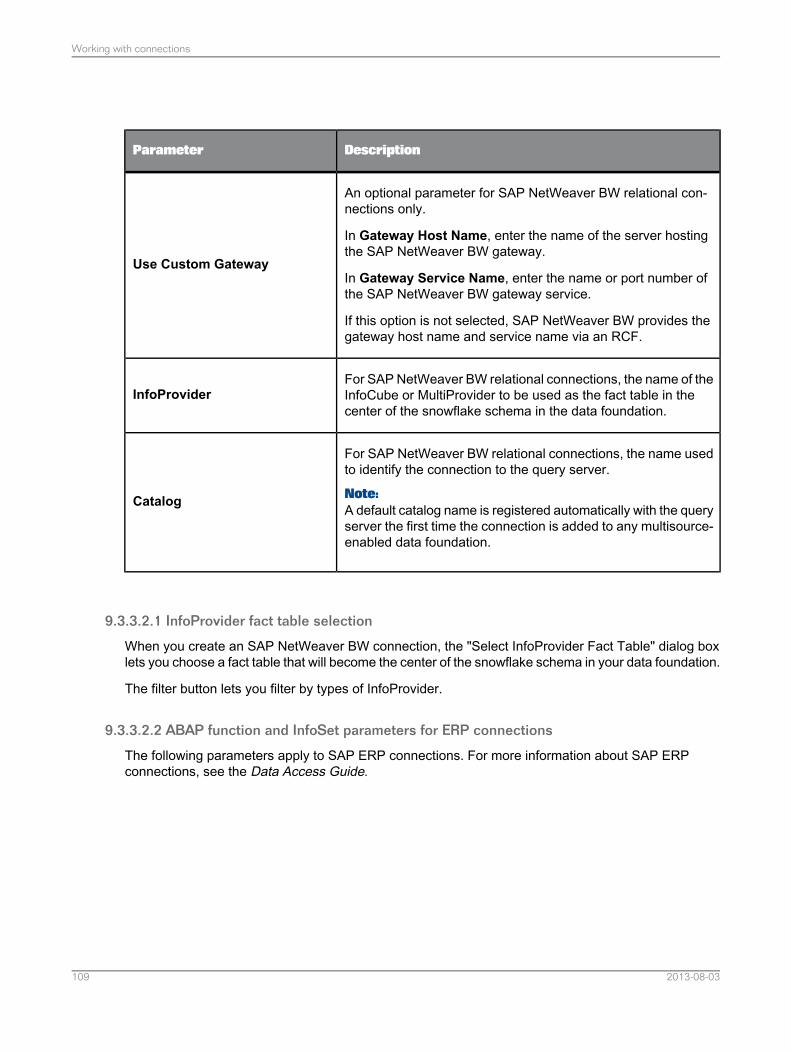
DescriptionParameter
An optional parameter for SAP NetWeaver BW relational con-nections only.
In Gateway Host Name, enter the name of the server hostingthe SAP NetWeaver BW gateway.
In Gateway Service Name, enter the name or port number ofthe SAP NetWeaver BW gateway service.
If this option is not selected, SAP NetWeaver BW provides thegateway host name and service name via an RCF.
Use Custom Gateway
For SAP NetWeaver BW relational connections, the name of theInfoCube or MultiProvider to be used as the fact table in thecenter of the snowflake schema in the data foundation.
InfoProvider
For SAP NetWeaver BW relational connections, the name usedto identify the connection to the query server.
Note:A default catalog name is registered automatically with the queryserver the first time the connection is added to any multisource-enabled data foundation.
Catalog
9.3.3.2.1 InfoProvider fact table selection
When you create an SAP NetWeaver BW connection, the "Select InfoProvider Fact Table" dialog boxlets you choose a fact table that will become the center of the snowflake schema in your data foundation.
The filter button lets you filter by types of InfoProvider.
9.3.3.2.2 ABAP function and InfoSet parameters for ERP connections
The following parameters apply to SAP ERP connections. For more information about SAP ERPconnections, see the Data Access Guide.
2013-08-03109
Working with connections
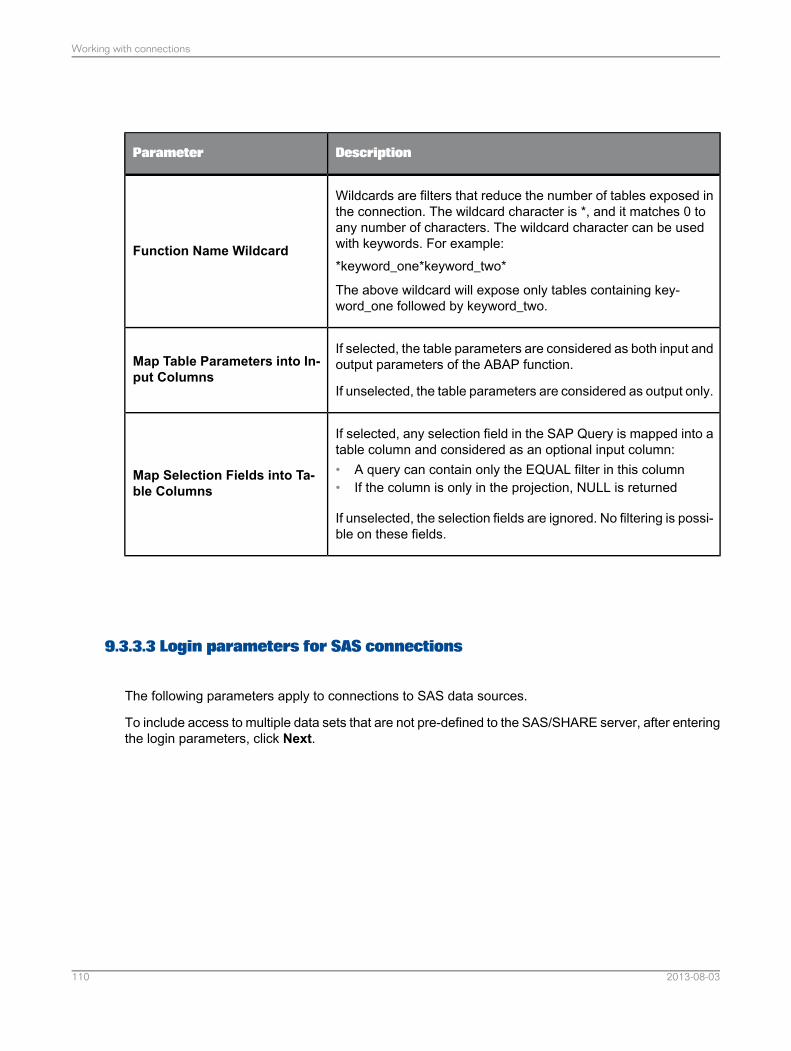
DescriptionParameter
Wildcards are filters that reduce the number of tables exposed inthe connection. The wildcard character is *, and it matches 0 toany number of characters. The wildcard character can be usedwith keywords. For example:*keyword_one*keyword_two*
The above wildcard will expose only tables containing key-word_one followed by keyword_two.
Function Name Wildcard
If selected, the table parameters are considered as both input andoutput parameters of the ABAP function.
If unselected, the table parameters are considered as output only.
Map Table Parameters into In-put Columns
If selected, any selection field in the SAP Query is mapped into atable column and considered as an optional input column:• A query can contain only the EQUAL filter in this column• If the column is only in the projection, NULL is returned
If unselected, the selection fields are ignored. No filtering is possi-ble on these fields.
Map Selection Fields into Ta-ble Columns
9.3.3.3 Login parameters for SAS connections
The following parameters apply to connections to SAS data sources.
To include access to multiple data sets that are not pre-defined to the SAS/SHARE server, after enteringthe login parameters, click Next.
2013-08-03110
Working with connections
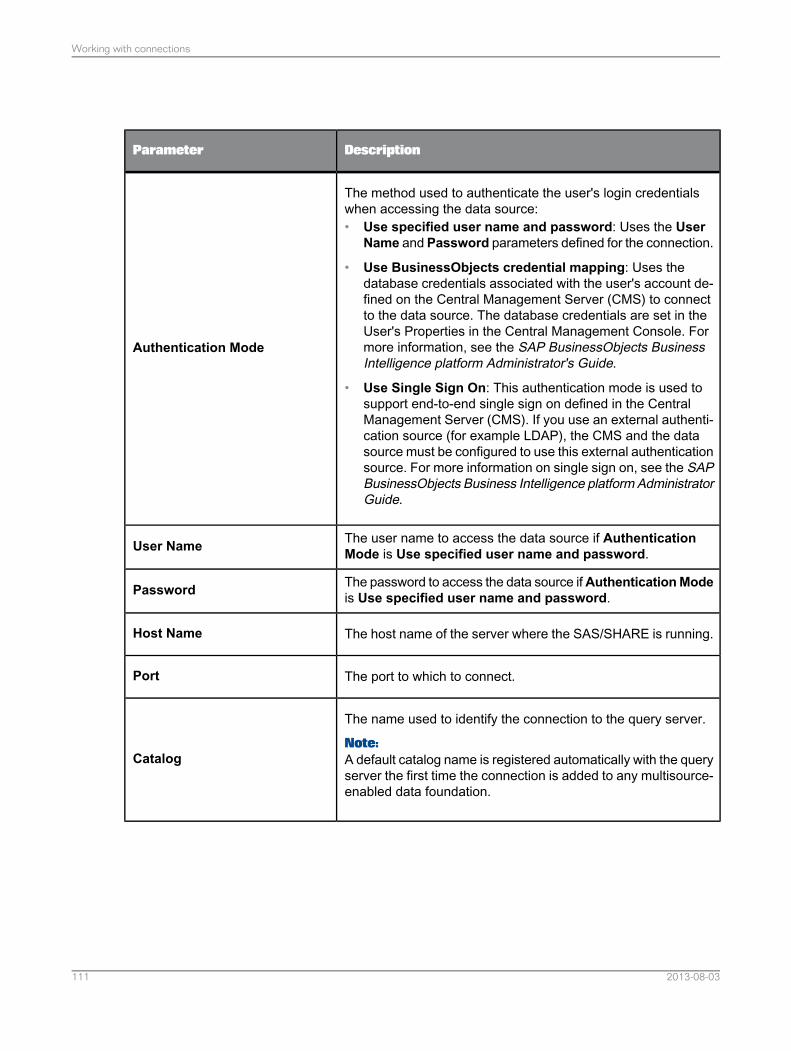
DescriptionParameter
The method used to authenticate the user's login credentialswhen accessing the data source:• Use specified user name and password: Uses the User
Name and Password parameters defined for the connection.
• Use BusinessObjects credential mapping: Uses thedatabase credentials associated with the user's account de-fined on the Central Management Server (CMS) to connectto the data source. The database credentials are set in theUser's Properties in the Central Management Console. Formore information, see the SAP BusinessObjects BusinessIntelligence platform Administrator's Guide.
• Use Single Sign On: This authentication mode is used tosupport end-to-end single sign on defined in the CentralManagement Server (CMS). If you use an external authenti-cation source (for example LDAP), the CMS and the datasource must be configured to use this external authenticationsource. For more information on single sign on, see the SAPBusinessObjects Business Intelligence platform AdministratorGuide.
Authentication Mode
The user name to access the data source if AuthenticationMode is Use specified user name and password.User Name
The password to access the data source ifAuthenticationModeis Use specified user name and password.Password
The host name of the server where the SAS/SHARE is running.Host Name
The port to which to connect.Port
The name used to identify the connection to the query server.
Note:A default catalog name is registered automatically with the queryserver the first time the connection is added to any multisource-enabled data foundation.
Catalog
2013-08-03111
Working with connections
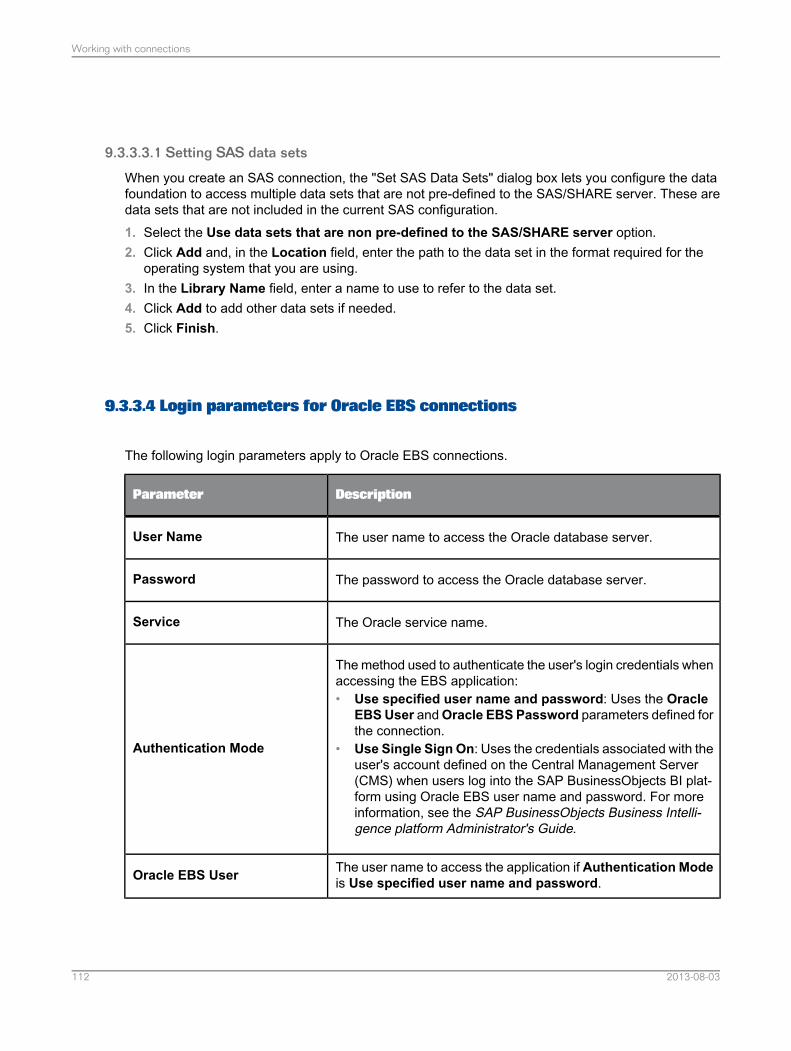
9.3.3.3.1 Setting SAS data sets
When you create an SAS connection, the "Set SAS Data Sets" dialog box lets you configure the datafoundation to access multiple data sets that are not pre-defined to the SAS/SHARE server. These aredata sets that are not included in the current SAS configuration.1. Select the Use data sets that are non pre-defined to the SAS/SHARE server option.2. Click Add and, in the Location field, enter the path to the data set in the format required for the
operating system that you are using.3. In the Library Name field, enter a name to use to refer to the data set.4. Click Add to add other data sets if needed.5. Click Finish.
9.3.3.4 Login parameters for Oracle EBS connections
The following login parameters apply to Oracle EBS connections.
DescriptionParameter
The user name to access the Oracle database server.User Name
The password to access the Oracle database server.Password
The Oracle service name.Service
The method used to authenticate the user's login credentials whenaccessing the EBS application:• Use specified user name and password: Uses the Oracle
EBSUser andOracle EBS Password parameters defined forthe connection.
• Use Single Sign On: Uses the credentials associated with theuser's account defined on the Central Management Server(CMS) when users log into the SAP BusinessObjects BI plat-form using Oracle EBS user name and password. For moreinformation, see the SAP BusinessObjects Business Intelli-gence platform Administrator's Guide.
Authentication Mode
The user name to access the application if Authentication Modeis Use specified user name and password.Oracle EBS User
2013-08-03112
Working with connections
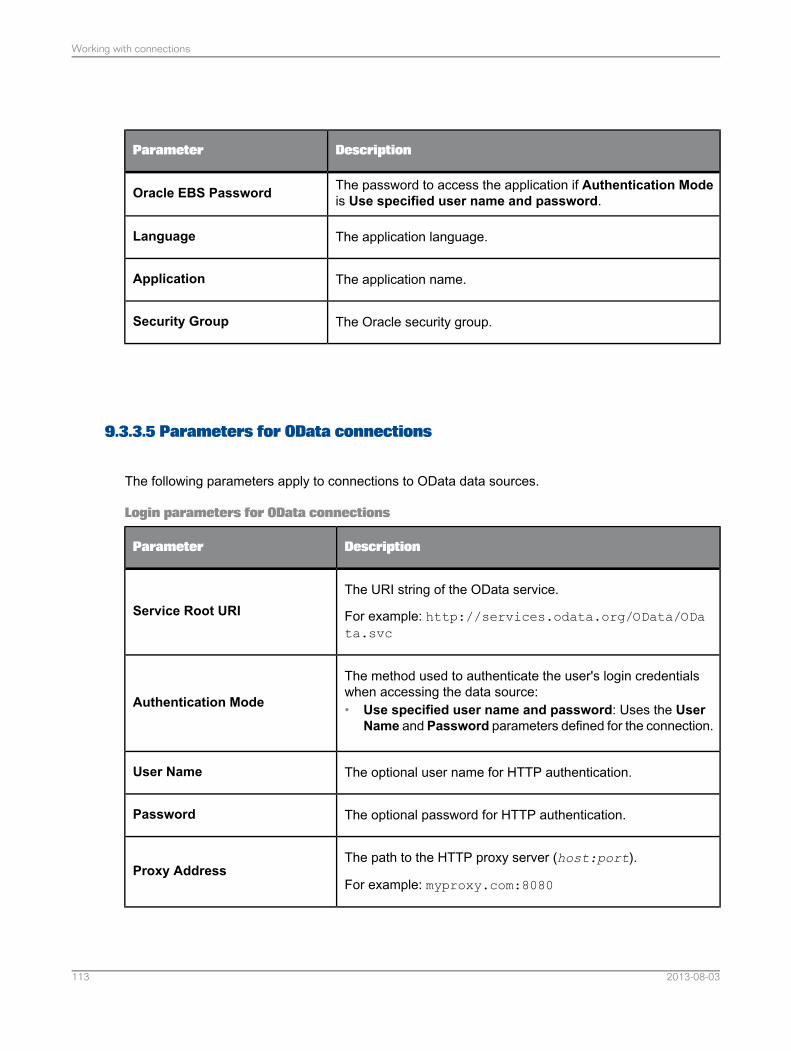
DescriptionParameter
The password to access the application if Authentication Modeis Use specified user name and password.Oracle EBS Password
The application language.Language
The application name.Application
The Oracle security group.Security Group
9.3.3.5 Parameters for OData connections
The following parameters apply to connections to OData data sources.
Login parameters for OData connections
DescriptionParameter
The URI string of the OData service.
For example: http://services.odata.org/OData/OData.svc
Service Root URI
The method used to authenticate the user's login credentialswhen accessing the data source:• Use specified user name and password: Uses the User
Name and Password parameters defined for the connection.
Authentication Mode
The optional user name for HTTP authentication.User Name
The optional password for HTTP authentication.Password
The path to the HTTP proxy server (host:port).
For example: myproxy.com:8080Proxy Address
2013-08-03113
Working with connections
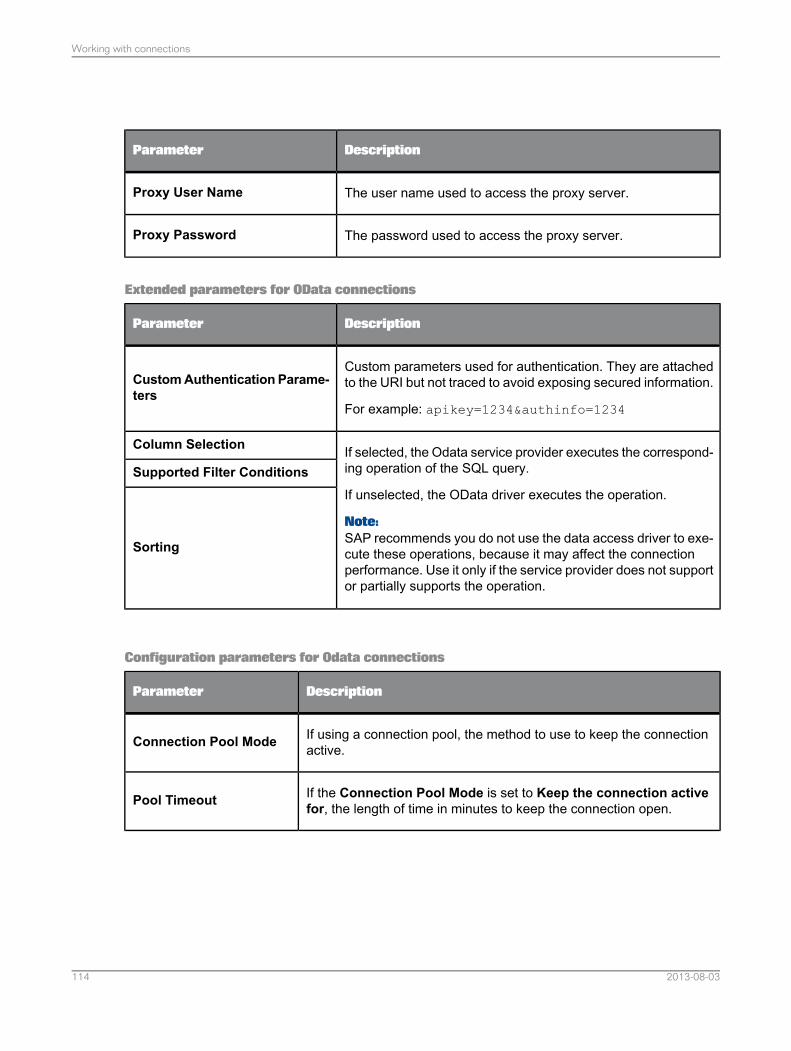
DescriptionParameter
The user name used to access the proxy server.Proxy User Name
The password used to access the proxy server.Proxy Password
Extended parameters for OData connections
DescriptionParameter
Custom parameters used for authentication. They are attachedto the URI but not traced to avoid exposing secured information.
For example: apikey=1234&authinfo=1234
CustomAuthentication Parame-ters
If selected, the Odata service provider executes the correspond-ing operation of the SQL query.
If unselected, the OData driver executes the operation.
Note:SAP recommends you do not use the data access driver to exe-cute these operations, because it may affect the connectionperformance. Use it only if the service provider does not supportor partially supports the operation.
Column Selection
Supported Filter Conditions
Sorting
Configuration parameters for Odata connections
DescriptionParameter
If using a connection pool, the method to use to keep the connectionactive.Connection Pool Mode
If the Connection Pool Mode is set to Keep the connection activefor, the length of time in minutes to keep the connection open.Pool Timeout
2013-08-03114
Working with connections

DescriptionParameter
Restriction:Specific to HTTP connections to OData and Web Service data sources.
The time in seconds a connection remains active in case of no responsefrom the data source. Default value is 10.
The connection remains active indefinitely if Connection Timeout isset to 0.
Connection Timeout
If selected, caches the metamodel in the connection so that the modeldoes not need to be parsed and recreated for each connection call.
Note:SAP recommends you do not use the data access driver to executethis operation, because it may affect the connection performance.
Cache Metamodel
9.3.3.6 Parameters for XML and Web Services connections
The following parameters apply to connections to XML data sources and web services.
DescriptionParameter
If Location Type is set to Local, the protocol and login credentialparameters are grayed.
If Location Type is set to Remote, select a Protocol to makethe appropriate login parameters available.
Note:Schema files can be local even if Location Type is set to Re-mote. If the schema file is remote, the Protocol applies to boththe data source and schema files.
Location Type
Protocol
2013-08-03115
Working with connections
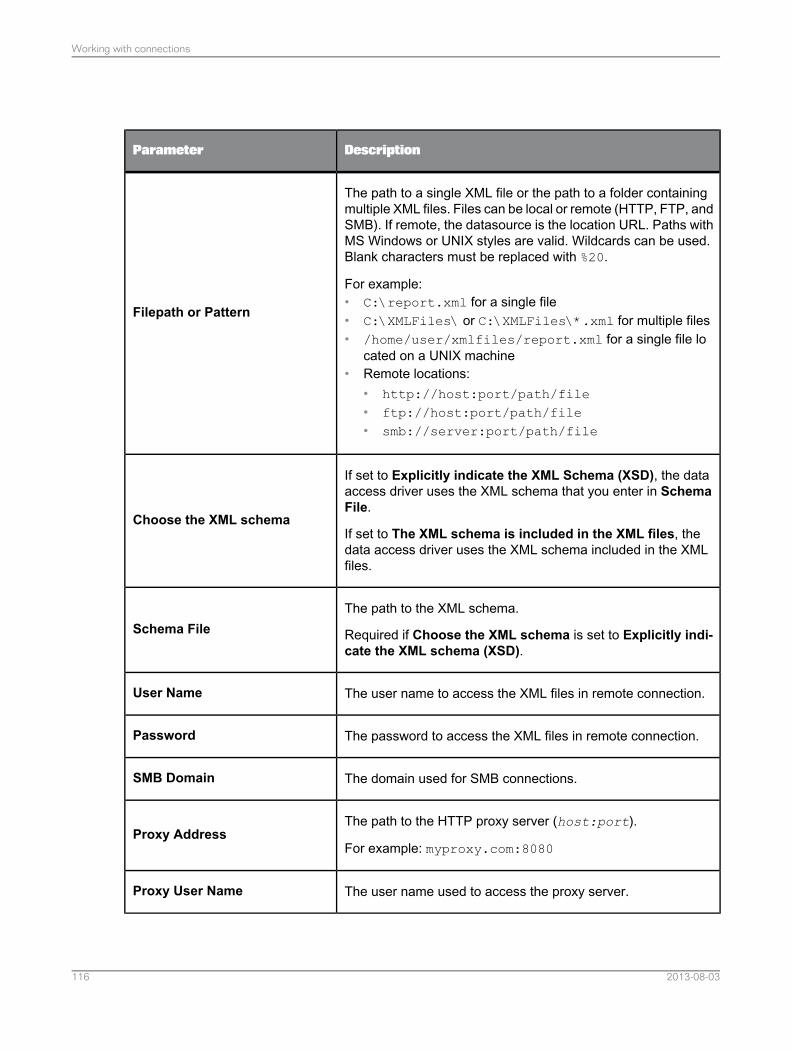
DescriptionParameter
The path to a single XML file or the path to a folder containingmultiple XML files. Files can be local or remote (HTTP, FTP, andSMB). If remote, the datasource is the location URL. Paths withMS Windows or UNIX styles are valid. Wildcards can be used.Blank characters must be replaced with %20.
For example:• C:\report.xml for a single file• C:\XMLFiles\ or C:\XMLFiles\*.xml for multiple files• /home/user/xmlfiles/report.xml for a single file lo
cated on a UNIX machine• Remote locations:
• http://host:port/path/file• ftp://host:port/path/file• smb://server:port/path/file
Filepath or Pattern
If set to Explicitly indicate the XML Schema (XSD), the dataaccess driver uses the XML schema that you enter in SchemaFile.
If set to The XML schema is included in the XML files, thedata access driver uses the XML schema included in the XMLfiles.
Choose the XML schema
The path to the XML schema.
Required if Choose the XML schema is set to Explicitly indi-cate the XML schema (XSD).
Schema File
The user name to access the XML files in remote connection.User Name
The password to access the XML files in remote connection.Password
The domain used for SMB connections.SMB Domain
The path to the HTTP proxy server (host:port).
For example: myproxy.com:8080Proxy Address
The user name used to access the proxy server.Proxy User Name
2013-08-03116
Working with connections
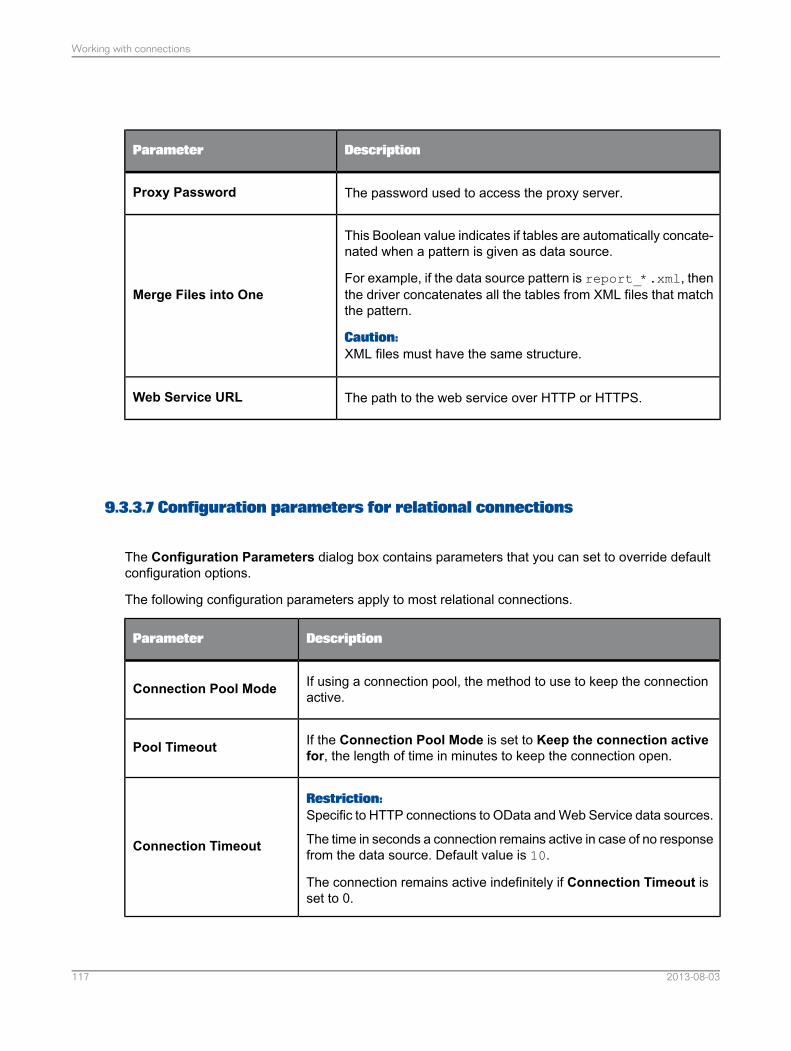
DescriptionParameter
The password used to access the proxy server.Proxy Password
This Boolean value indicates if tables are automatically concate-nated when a pattern is given as data source.
For example, if the data source pattern is report_*.xml, thenthe driver concatenates all the tables from XML files that matchthe pattern.
Caution:XML files must have the same structure.
Merge Files into One
The path to the web service over HTTP or HTTPS.Web Service URL
9.3.3.7 Configuration parameters for relational connections
The Configuration Parameters dialog box contains parameters that you can set to override defaultconfiguration options.
The following configuration parameters apply to most relational connections.
DescriptionParameter
If using a connection pool, the method to use to keep the connectionactive.Connection Pool Mode
If the Connection Pool Mode is set to Keep the connection activefor, the length of time in minutes to keep the connection open.Pool Timeout
Restriction:Specific to HTTP connections to OData and Web Service data sources.
The time in seconds a connection remains active in case of no responsefrom the data source. Default value is 10.
The connection remains active indefinitely if Connection Timeout isset to 0.
Connection Timeout
2013-08-03117
Working with connections
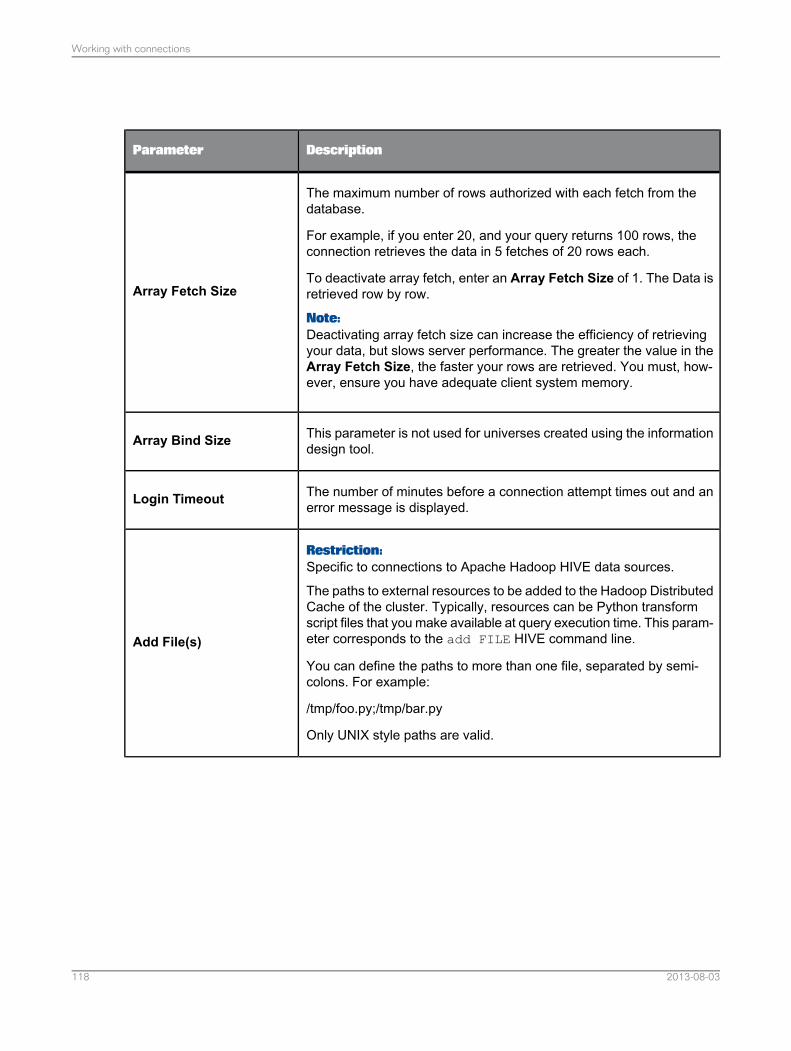
DescriptionParameter
The maximum number of rows authorized with each fetch from thedatabase.
For example, if you enter 20, and your query returns 100 rows, theconnection retrieves the data in 5 fetches of 20 rows each.
To deactivate array fetch, enter an Array Fetch Size of 1. The Data isretrieved row by row.
Note:Deactivating array fetch size can increase the efficiency of retrievingyour data, but slows server performance. The greater the value in theArray Fetch Size, the faster your rows are retrieved. You must, how-ever, ensure you have adequate client system memory.
Array Fetch Size
This parameter is not used for universes created using the informationdesign tool.Array Bind Size
The number of minutes before a connection attempt times out and anerror message is displayed.Login Timeout
Restriction:Specific to connections to Apache Hadoop HIVE data sources.
The paths to external resources to be added to the Hadoop DistributedCache of the cluster. Typically, resources can be Python transformscript files that you make available at query execution time. This param-eter corresponds to the add FILE HIVE command line.
You can define the paths to more than one file, separated by semi-colons. For example:
/tmp/foo.py;/tmp/bar.py
Only UNIX style paths are valid.
Add File(s)
2013-08-03118
Working with connections
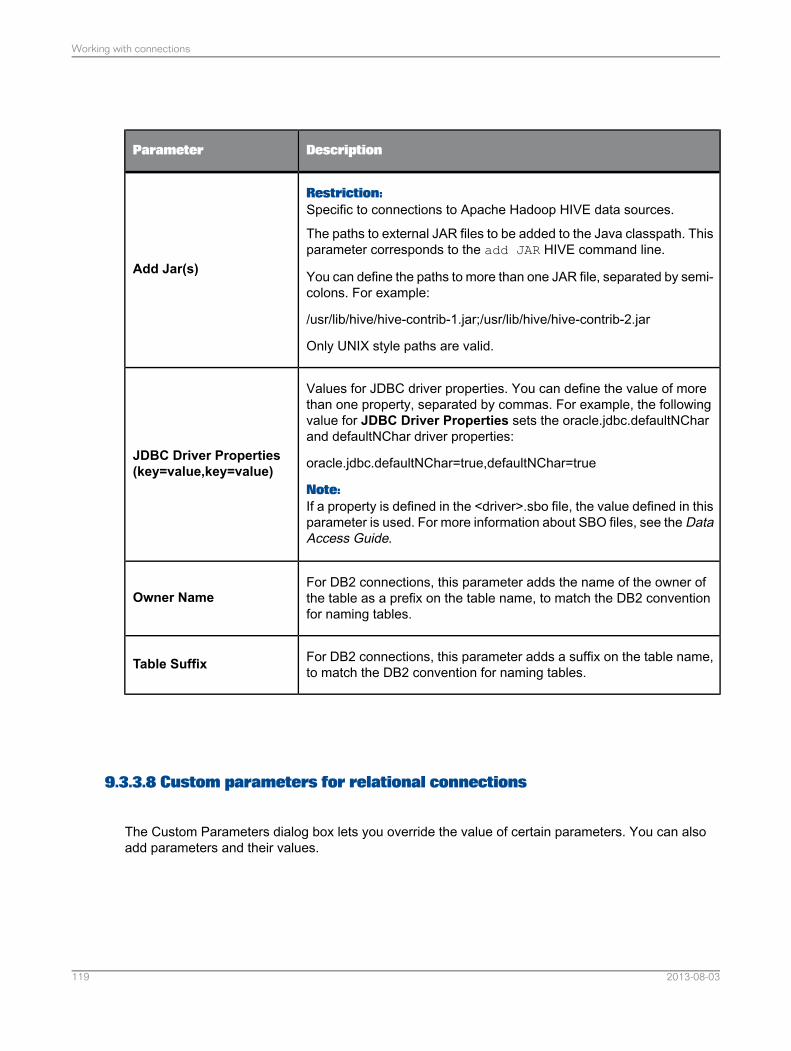
DescriptionParameter
Restriction:Specific to connections to Apache Hadoop HIVE data sources.
The paths to external JAR files to be added to the Java classpath. Thisparameter corresponds to the add JAR HIVE command line.
You can define the paths to more than one JAR file, separated by semi-colons. For example:
/usr/lib/hive/hive-contrib-1.jar;/usr/lib/hive/hive-contrib-2.jar
Only UNIX style paths are valid.
Add Jar(s)
Values for JDBC driver properties. You can define the value of morethan one property, separated by commas. For example, the followingvalue for JDBC Driver Properties sets the oracle.jdbc.defaultNCharand defaultNChar driver properties:
oracle.jdbc.defaultNChar=true,defaultNChar=true
Note:If a property is defined in the <driver>.sbo file, the value defined in thisparameter is used. For more information about SBO files, see the DataAccess Guide.
JDBC Driver Properties(key=value,key=value)
For DB2 connections, this parameter adds the name of the owner ofthe table as a prefix on the table name, to match the DB2 conventionfor naming tables.
Owner Name
For DB2 connections, this parameter adds a suffix on the table name,to match the DB2 convention for naming tables.Table Suffix
9.3.3.8 Custom parameters for relational connections
The Custom Parameters dialog box lets you override the value of certain parameters. You can alsoadd parameters and their values.
2013-08-03119
Working with connections
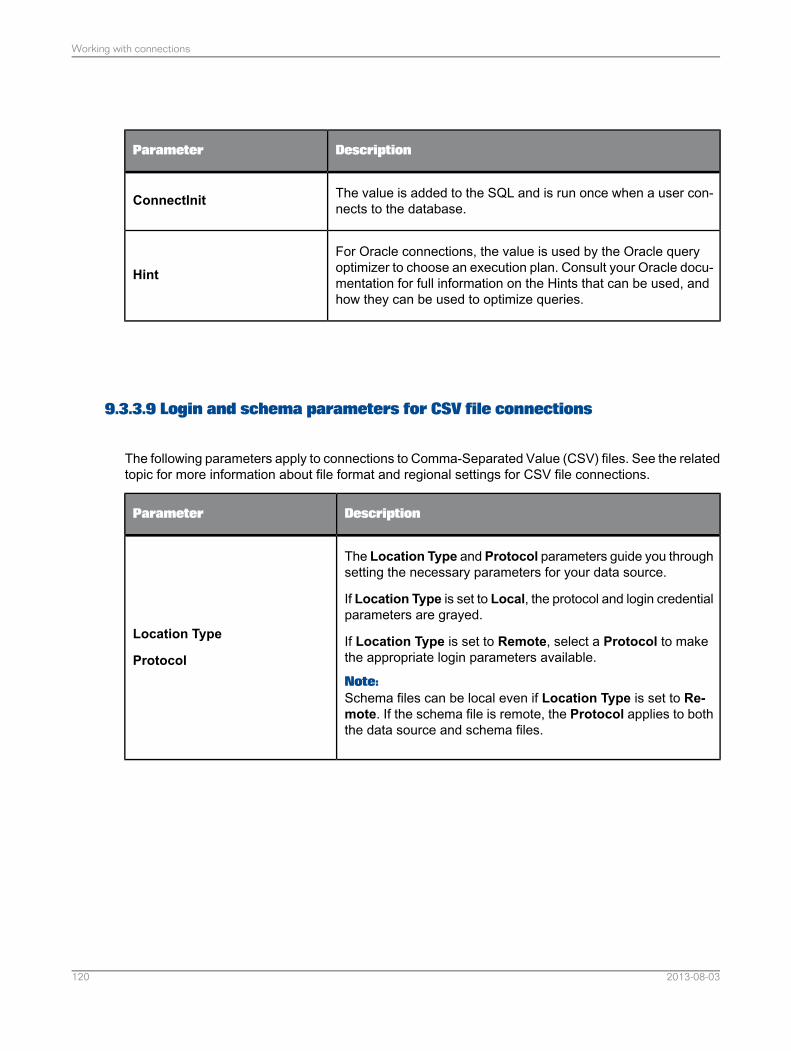
DescriptionParameter
The value is added to the SQL and is run once when a user con-nects to the database.ConnectInit
For Oracle connections, the value is used by the Oracle queryoptimizer to choose an execution plan. Consult your Oracle docu-mentation for full information on the Hints that can be used, andhow they can be used to optimize queries.
Hint
9.3.3.9 Login and schema parameters for CSV file connections
The following parameters apply to connections to Comma-Separated Value (CSV) files. See the relatedtopic for more information about file format and regional settings for CSV file connections.
DescriptionParameter
The Location Type and Protocol parameters guide you throughsetting the necessary parameters for your data source.
If Location Type is set to Local, the protocol and login credentialparameters are grayed.
If Location Type is set to Remote, select a Protocol to makethe appropriate login parameters available.
Note:Schema files can be local even if Location Type is set to Re-mote. If the schema file is remote, the Protocol applies to boththe data source and schema files.
Location Type
Protocol
2013-08-03120
Working with connections
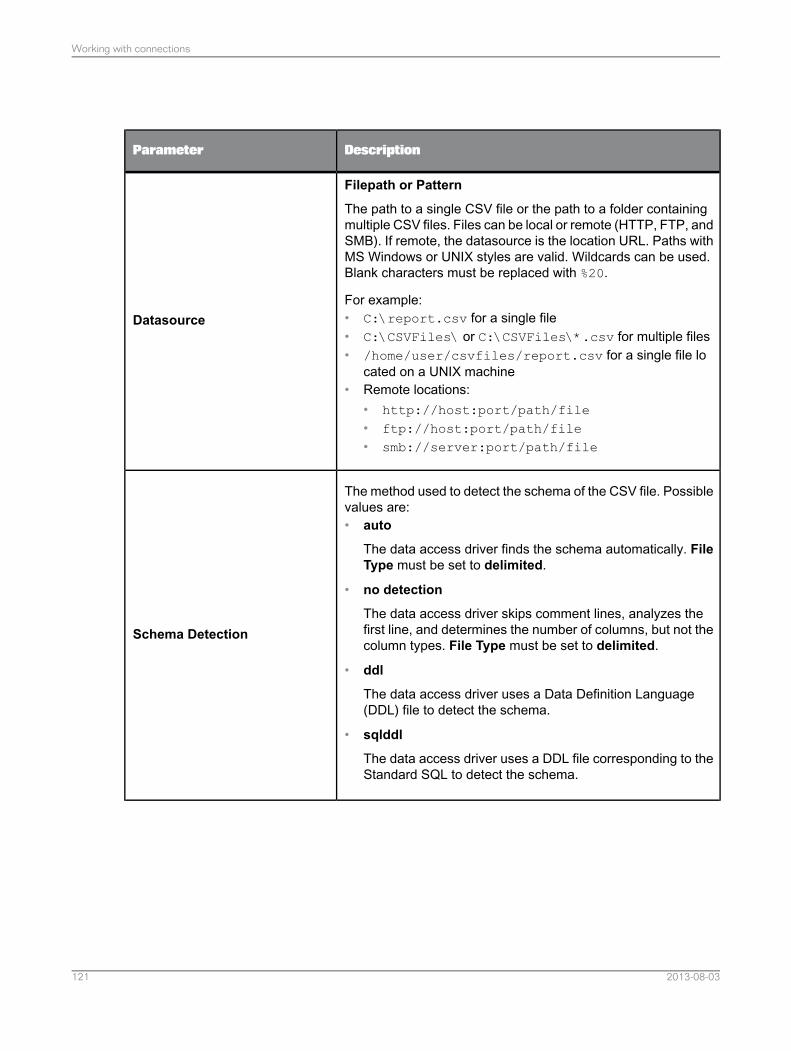
DescriptionParameter
Filepath or Pattern
The path to a single CSV file or the path to a folder containingmultiple CSV files. Files can be local or remote (HTTP, FTP, andSMB). If remote, the datasource is the location URL. Paths withMS Windows or UNIX styles are valid. Wildcards can be used.Blank characters must be replaced with %20.
For example:• C:\report.csv for a single file• C:\CSVFiles\ or C:\CSVFiles\*.csv for multiple files• /home/user/csvfiles/report.csv for a single file lo
cated on a UNIX machine• Remote locations:
• http://host:port/path/file• ftp://host:port/path/file• smb://server:port/path/file
Datasource
The method used to detect the schema of the CSV file. Possiblevalues are:• auto
The data access driver finds the schema automatically. FileType must be set to delimited.
• no detection
The data access driver skips comment lines, analyzes thefirst line, and determines the number of columns, but not thecolumn types. File Type must be set to delimited.
• ddl
The data access driver uses a Data Definition Language(DDL) file to detect the schema.
• sqlddl
The data access driver uses a DDL file corresponding to theStandard SQL to detect the schema.
Schema Detection
2013-08-03121
Working with connections
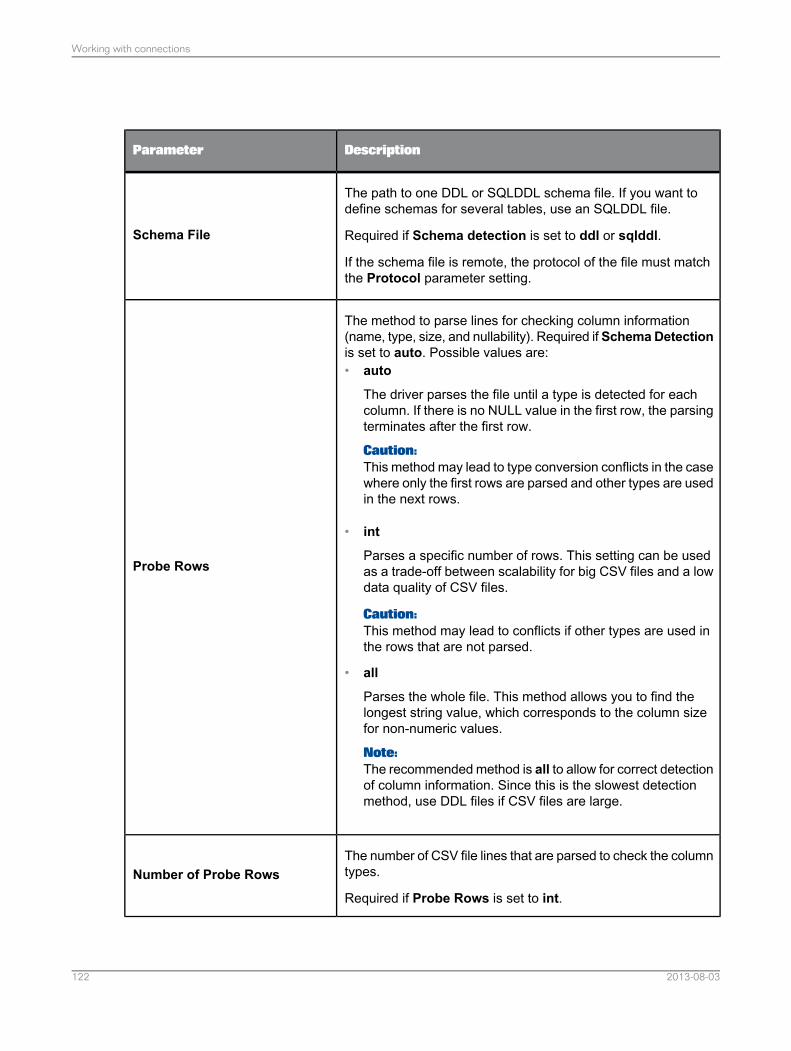
DescriptionParameter
The path to one DDL or SQLDDL schema file. If you want todefine schemas for several tables, use an SQLDDL file.
Required if Schema detection is set to ddl or sqlddl.
If the schema file is remote, the protocol of the file must matchthe Protocol parameter setting.
Schema File
The method to parse lines for checking column information(name, type, size, and nullability). Required if SchemaDetectionis set to auto. Possible values are:• auto
The driver parses the file until a type is detected for eachcolumn. If there is no NULL value in the first row, the parsingterminates after the first row.
Caution:This method may lead to type conversion conflicts in the casewhere only the first rows are parsed and other types are usedin the next rows.
• int
Parses a specific number of rows. This setting can be usedas a trade-off between scalability for big CSV files and a lowdata quality of CSV files.
Caution:This method may lead to conflicts if other types are used inthe rows that are not parsed.
• all
Parses the whole file. This method allows you to find thelongest string value, which corresponds to the column sizefor non-numeric values.
Note:The recommended method is all to allow for correct detectionof column information. Since this is the slowest detectionmethod, use DDL files if CSV files are large.
Probe Rows
The number of CSV file lines that are parsed to check the columntypes.
Required if Probe Rows is set to int.
Number of Probe Rows
2013-08-03122
Working with connections
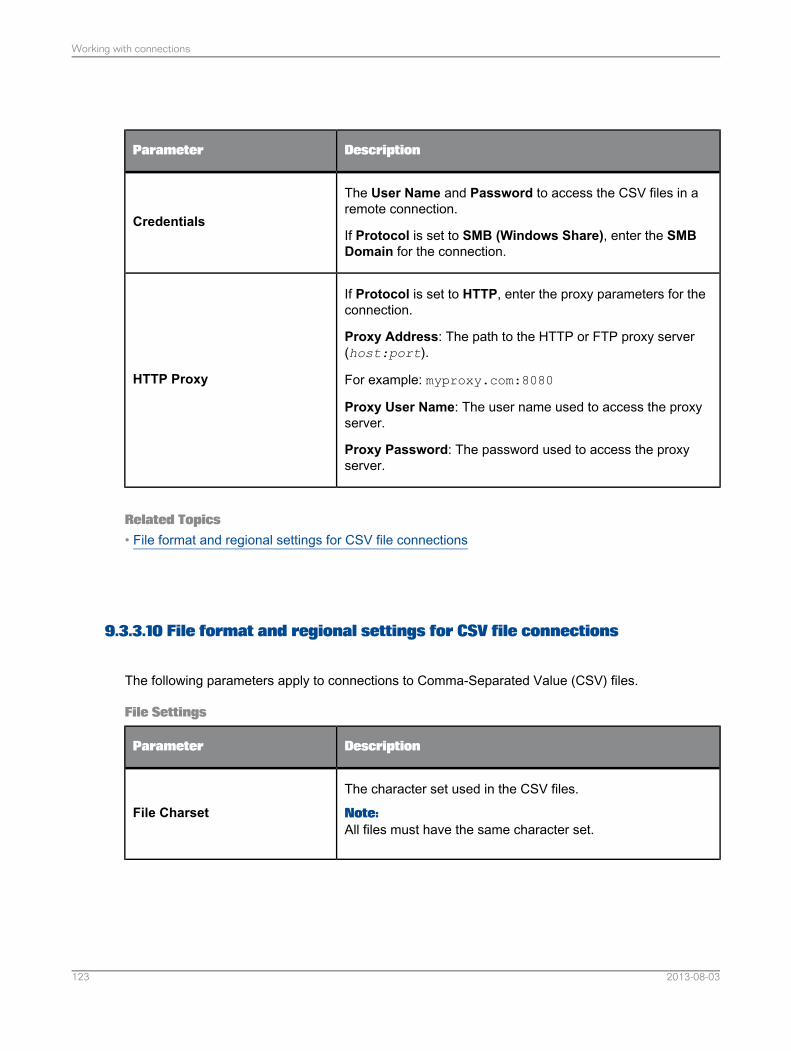
DescriptionParameter
The User Name and Password to access the CSV files in aremote connection.
If Protocol is set to SMB (Windows Share), enter the SMBDomain for the connection.
Credentials
If Protocol is set to HTTP, enter the proxy parameters for theconnection.
Proxy Address: The path to the HTTP or FTP proxy server(host:port).
For example: myproxy.com:8080
Proxy User Name: The user name used to access the proxyserver.
Proxy Password: The password used to access the proxyserver.
HTTP Proxy
Related Topics• File format and regional settings for CSV file connections
9.3.3.10 File format and regional settings for CSV file connections
The following parameters apply to connections to Comma-Separated Value (CSV) files.
File Settings
DescriptionParameter
The character set used in the CSV files.
Note:All files must have the same character set.
File Charset
2013-08-03123
Working with connections
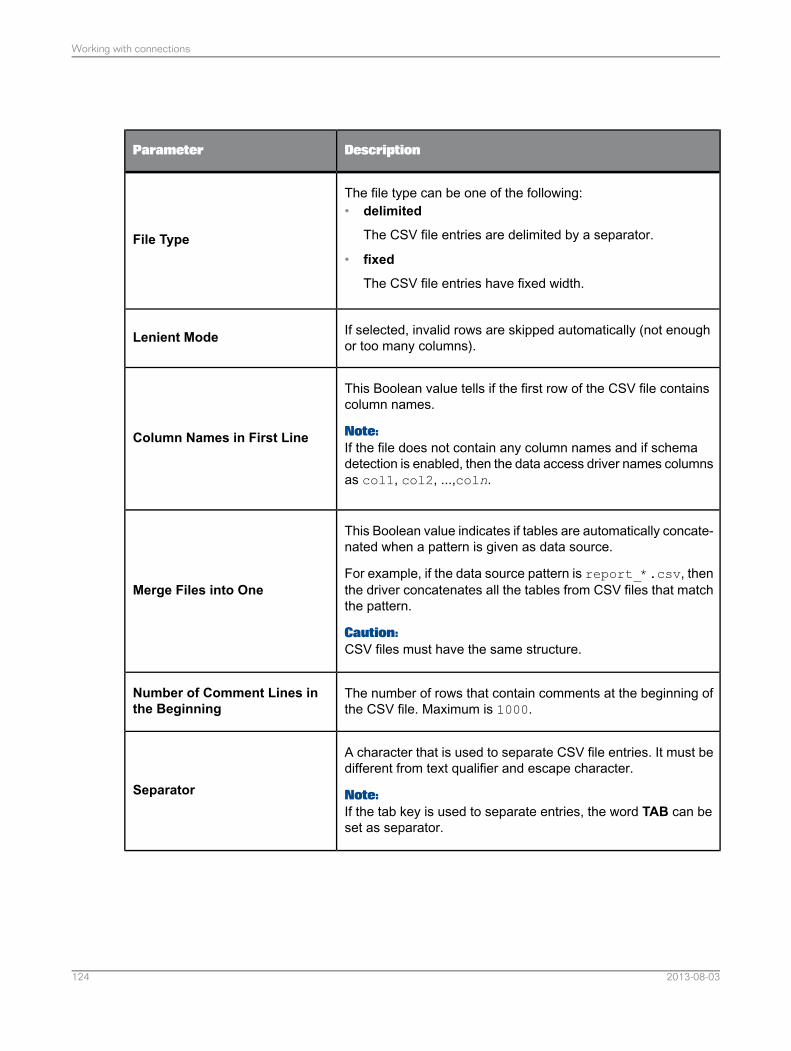
DescriptionParameter
The file type can be one of the following:• delimited
The CSV file entries are delimited by a separator.
• fixed
The CSV file entries have fixed width.
File Type
If selected, invalid rows are skipped automatically (not enoughor too many columns).Lenient Mode
This Boolean value tells if the first row of the CSV file containscolumn names.
Note:If the file does not contain any column names and if schemadetection is enabled, then the data access driver names columnsas col1, col2, ...,coln.
Column Names in First Line
This Boolean value indicates if tables are automatically concate-nated when a pattern is given as data source.
For example, if the data source pattern is report_*.csv, thenthe driver concatenates all the tables from CSV files that matchthe pattern.
Caution:CSV files must have the same structure.
Merge Files into One
The number of rows that contain comments at the beginning ofthe CSV file. Maximum is 1000.
Number of Comment Lines inthe Beginning
A character that is used to separate CSV file entries. It must bedifferent from text qualifier and escape character.
Note:If the tab key is used to separate entries, the word TAB can beset as separator.
Separator
2013-08-03124
Working with connections
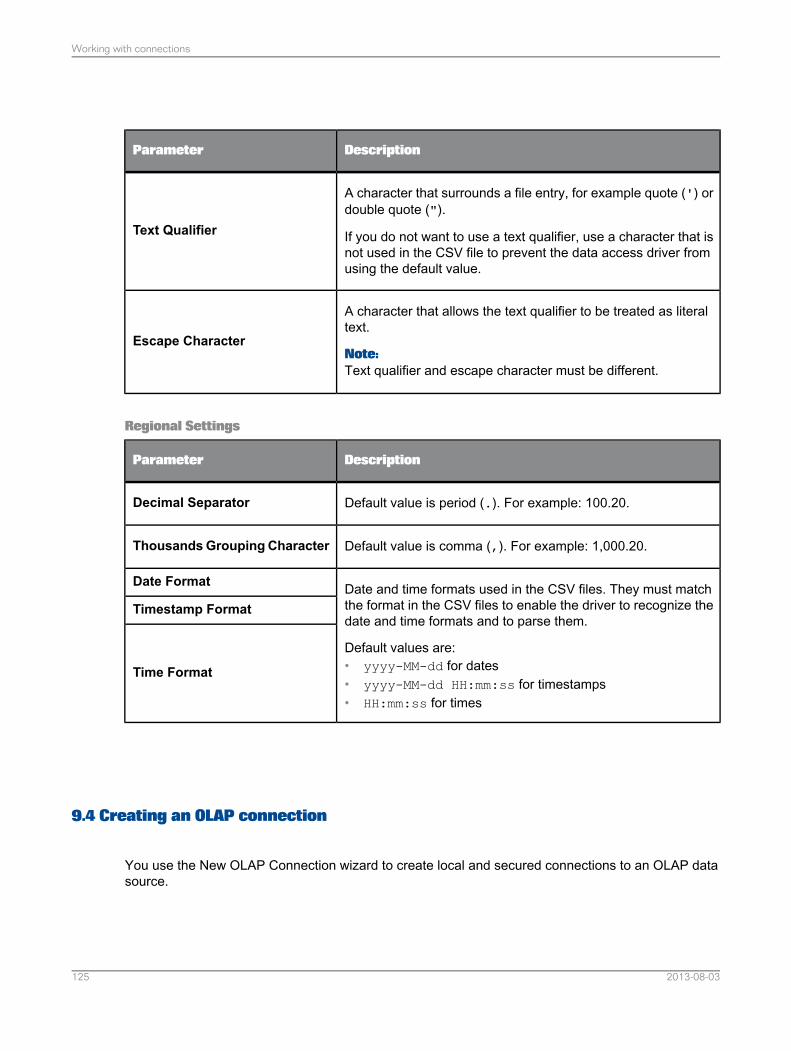
DescriptionParameter
A character that surrounds a file entry, for example quote (') ordouble quote (").
If you do not want to use a text qualifier, use a character that isnot used in the CSV file to prevent the data access driver fromusing the default value.
Text Qualifier
A character that allows the text qualifier to be treated as literaltext.
Note:Text qualifier and escape character must be different.
Escape Character
Regional Settings
DescriptionParameter
Default value is period (.). For example: 100.20.Decimal Separator
Default value is comma (,). For example: 1,000.20.ThousandsGrouping Character
Date and time formats used in the CSV files. They must matchthe format in the CSV files to enable the driver to recognize thedate and time formats and to parse them.
Default values are:• yyyy-MM-dd for dates• yyyy-MM-dd HH:mm:ss for timestamps• HH:mm:ss for times
Date Format
Timestamp Format
Time Format
9.4 Creating an OLAP connection
You use the New OLAP Connection wizard to create local and secured connections to an OLAP datasource.
2013-08-03125
Working with connections
Before you create a local connection in the information design tool, you must have a project availablein the Local Projects View. For more information on creating local projects, see the related topic.
Note:The OLAP connections you create in the information design tool are not supported by the universedesign tool. Also, OLAP connections created in the universe design tool are not available for buildinguniverses in the information design tool.
1. Do one of the following:• To create a local connection, select the project folder in the Local Projects View. Select File >
New > OLAP Connection.• To create a secured connection, in the Repository Resources View, open a session on the
repository where you want to create the secured connection. Right-click the Connections folderor subfolder in the repository, and select Insert OLAP Connection.
2. Follow the steps in the New OLAP Connection wizard to enter the following information:• Name for the connection• Middleware driver for the target database• Authentication parameters to connect to the OLAP data source• OLAP cube to connect to
If you need help on a particular step, click the help icon in the wizard dialog box.
Related Topics• Creating a local project• Select an OLAP middleware driver• About connections
9.4.1 Select an OLAP middleware driver
This section describes the OLAP driver selection page of the New OLAP Connection wizard.
You select an OLAP driver to connect to the OLAP server. The OLAP driver maps information from theOLAP server middleware to the user interface of the SAP BusinessObjects application.
Depending on your target OLAP server, expand the middleware node, and select the target driver.
Note:If you are using the information design tool from a Crystal Server 2011 installation, SAP middlewaredrivers are not available.
2013-08-03126
Working with connections
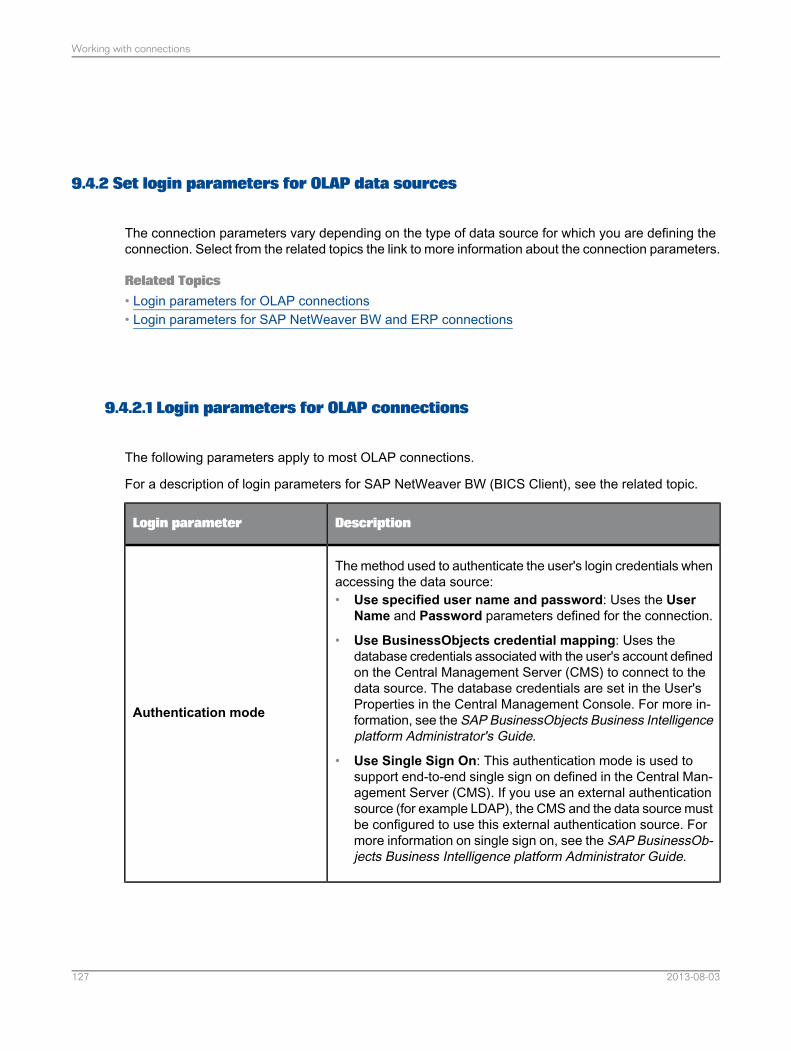
9.4.2 Set login parameters for OLAP data sources
The connection parameters vary depending on the type of data source for which you are defining theconnection. Select from the related topics the link to more information about the connection parameters.
Related Topics• Login parameters for OLAP connections• Login parameters for SAP NetWeaver BW and ERP connections
9.4.2.1 Login parameters for OLAP connections
The following parameters apply to most OLAP connections.
For a description of login parameters for SAP NetWeaver BW (BICS Client), see the related topic.
DescriptionLogin parameter
The method used to authenticate the user's login credentials whenaccessing the data source:• Use specified user name and password: Uses the User
Name and Password parameters defined for the connection.
• Use BusinessObjects credential mapping: Uses thedatabase credentials associated with the user's account definedon the Central Management Server (CMS) to connect to thedata source. The database credentials are set in the User'sProperties in the Central Management Console. For more in-formation, see the SAP BusinessObjects Business Intelligenceplatform Administrator's Guide.
• Use Single Sign On: This authentication mode is used tosupport end-to-end single sign on defined in the Central Man-agement Server (CMS). If you use an external authenticationsource (for example LDAP), the CMS and the data source mustbe configured to use this external authentication source. Formore information on single sign on, see the SAP BusinessOb-jects Business Intelligence platform Administrator Guide.
Authentication mode
2013-08-03127
Working with connections
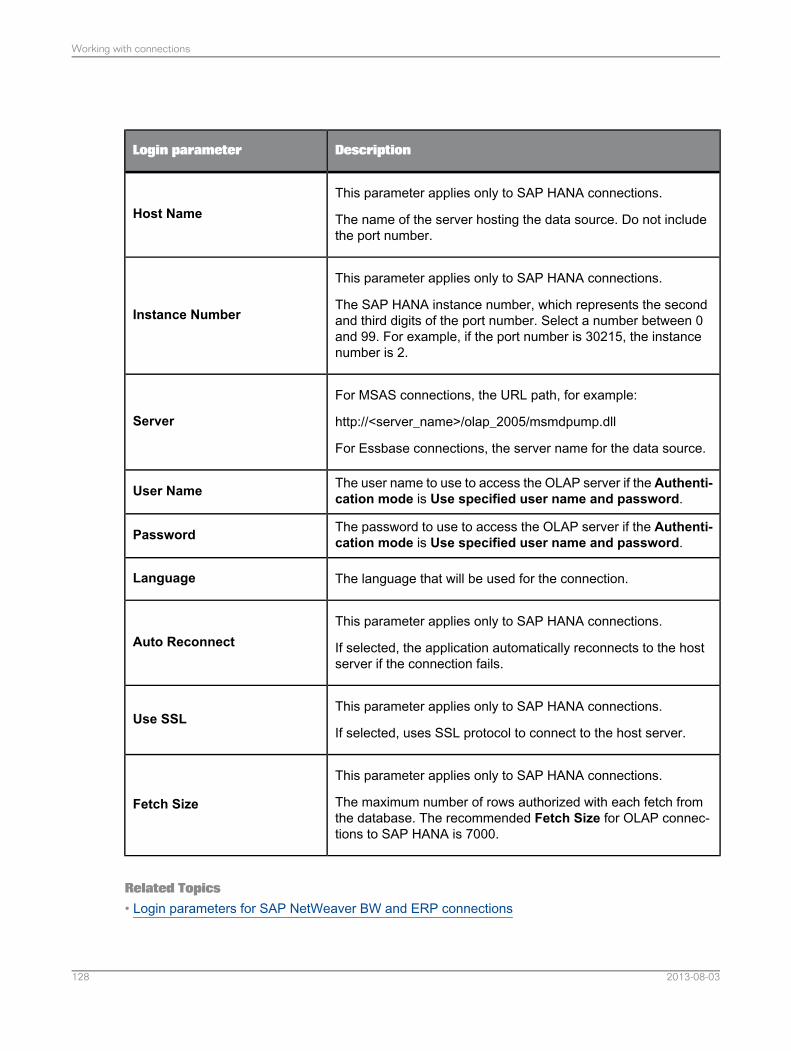
DescriptionLogin parameter
This parameter applies only to SAP HANA connections.
The name of the server hosting the data source. Do not includethe port number.
Host Name
This parameter applies only to SAP HANA connections.
The SAP HANA instance number, which represents the secondand third digits of the port number. Select a number between 0and 99. For example, if the port number is 30215, the instancenumber is 2.
Instance Number
For MSAS connections, the URL path, for example:
http://<server_name>/olap_2005/msmdpump.dll
For Essbase connections, the server name for the data source.
Server
The user name to use to access the OLAP server if the Authenti-cation mode is Use specified user name and password.User Name
The password to use to access the OLAP server if the Authenti-cation mode is Use specified user name and password.Password
The language that will be used for the connection.Language
This parameter applies only to SAP HANA connections.
If selected, the application automatically reconnects to the hostserver if the connection fails.
Auto Reconnect
This parameter applies only to SAP HANA connections.
If selected, uses SSL protocol to connect to the host server.Use SSL
This parameter applies only to SAP HANA connections.
The maximum number of rows authorized with each fetch fromthe database. The recommended Fetch Size for OLAP connec-tions to SAP HANA is 7000.
Fetch Size
Related Topics• Login parameters for SAP NetWeaver BW and ERP connections
2013-08-03128
Working with connections
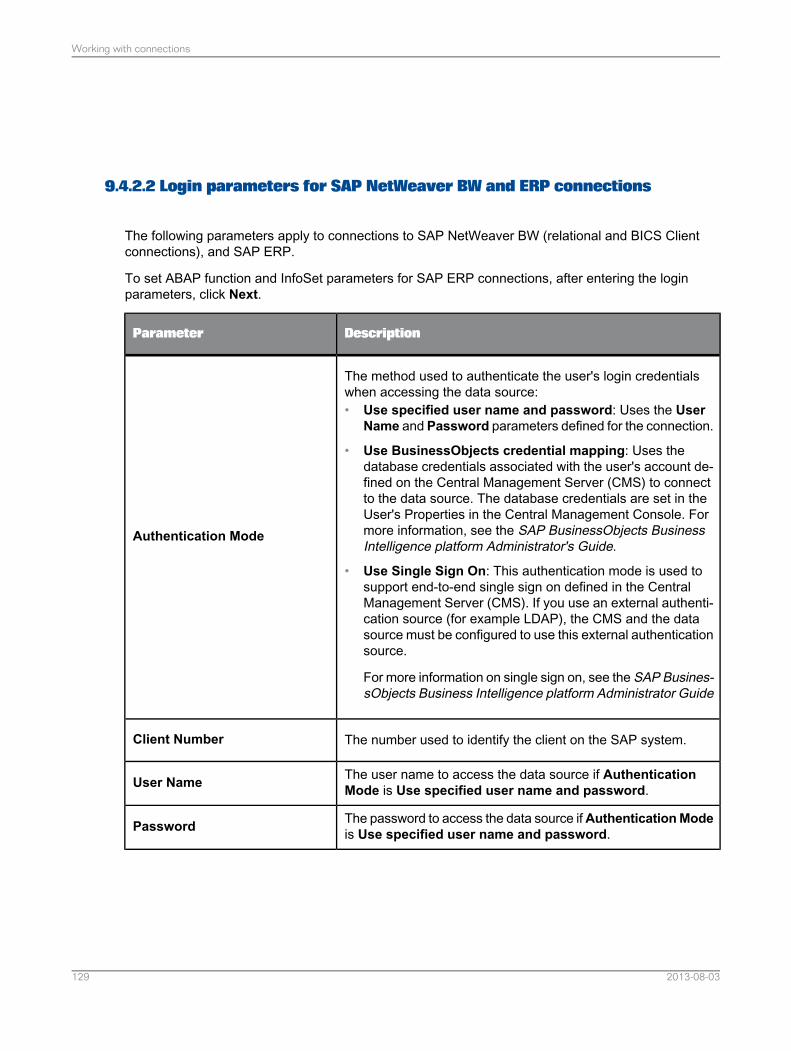
9.4.2.2 Login parameters for SAP NetWeaver BW and ERP connections
The following parameters apply to connections to SAP NetWeaver BW (relational and BICS Clientconnections), and SAP ERP.
To set ABAP function and InfoSet parameters for SAP ERP connections, after entering the loginparameters, click Next.
DescriptionParameter
The method used to authenticate the user's login credentialswhen accessing the data source:• Use specified user name and password: Uses the User
Name and Password parameters defined for the connection.
• Use BusinessObjects credential mapping: Uses thedatabase credentials associated with the user's account de-fined on the Central Management Server (CMS) to connectto the data source. The database credentials are set in theUser's Properties in the Central Management Console. Formore information, see the SAP BusinessObjects BusinessIntelligence platform Administrator's Guide.
• Use Single Sign On: This authentication mode is used tosupport end-to-end single sign on defined in the CentralManagement Server (CMS). If you use an external authenti-cation source (for example LDAP), the CMS and the datasource must be configured to use this external authenticationsource.
For more information on single sign on, see the SAP Busines-sObjects Business Intelligence platform Administrator Guide
Authentication Mode
The number used to identify the client on the SAP system.Client Number
The user name to access the data source if AuthenticationMode is Use specified user name and password.User Name
The password to access the data source ifAuthenticationModeis Use specified user name and password.Password
2013-08-03129
Working with connections
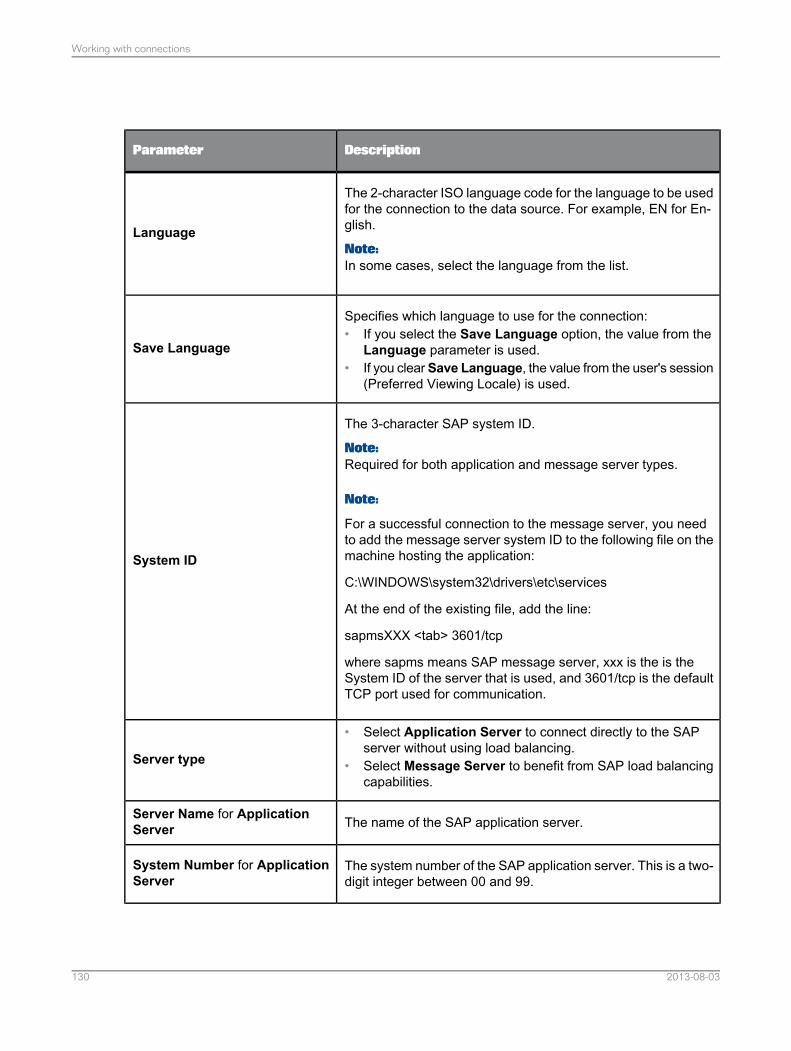
DescriptionParameter
The 2-character ISO language code for the language to be usedfor the connection to the data source. For example, EN for En-glish.
Note:In some cases, select the language from the list.
Language
Specifies which language to use for the connection:• If you select the Save Language option, the value from the
Language parameter is used.• If you clearSave Language, the value from the user's session
(Preferred Viewing Locale) is used.
Save Language
The 3-character SAP system ID.
Note:Required for both application and message server types.
Note:
For a successful connection to the message server, you needto add the message server system ID to the following file on themachine hosting the application:
C:\WINDOWS\system32\drivers\etc\services
At the end of the existing file, add the line:
sapmsXXX <tab> 3601/tcp
where sapms means SAP message server, xxx is the is theSystem ID of the server that is used, and 3601/tcp is the defaultTCP port used for communication.
System ID
• Select Application Server to connect directly to the SAPserver without using load balancing.
• Select Message Server to benefit from SAP load balancingcapabilities.
Server type
The name of the SAP application server.Server Name for ApplicationServer
The system number of the SAP application server. This is a two-digit integer between 00 and 99.
System Number for ApplicationServer
2013-08-03130
Working with connections
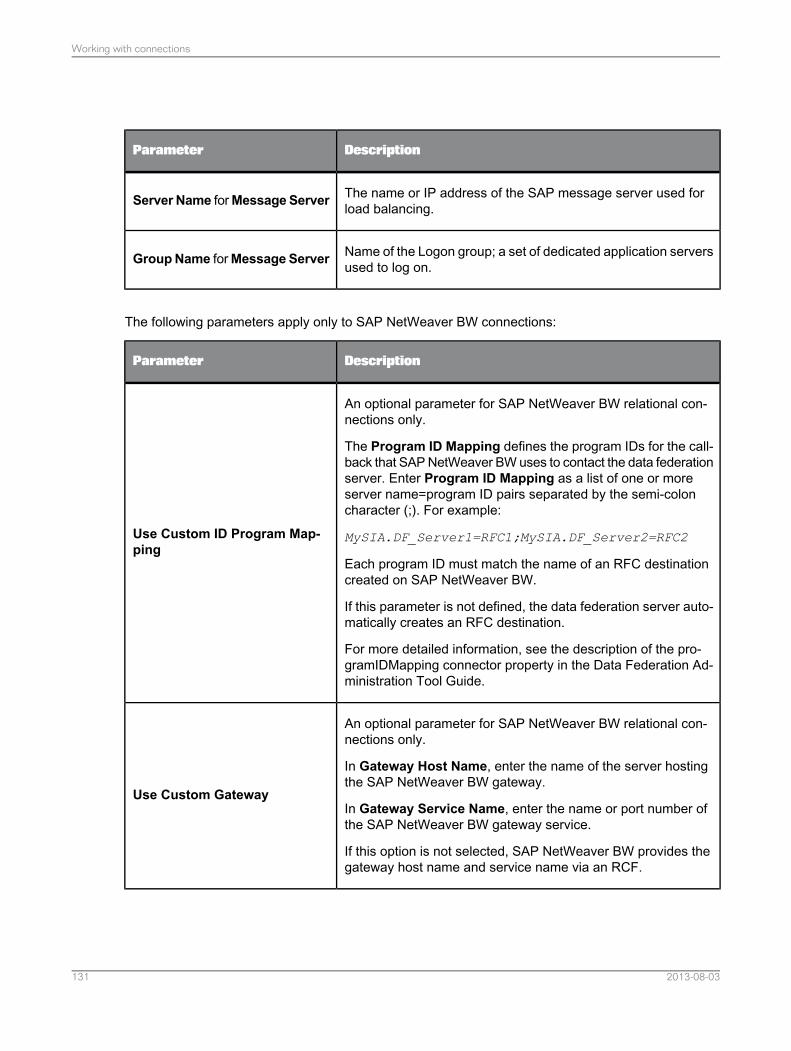
DescriptionParameter
The name or IP address of the SAP message server used forload balancing.Server Name forMessageServer
Name of the Logon group; a set of dedicated application serversused to log on.GroupName forMessage Server
The following parameters apply only to SAP NetWeaver BW connections:
DescriptionParameter
An optional parameter for SAP NetWeaver BW relational con-nections only.
The Program ID Mapping defines the program IDs for the call-back that SAP NetWeaver BW uses to contact the data federationserver. Enter Program ID Mapping as a list of one or moreserver name=program ID pairs separated by the semi-coloncharacter (;). For example:
MySIA.DF_Server1=RFC1;MySIA.DF_Server2=RFC2
Each program ID must match the name of an RFC destinationcreated on SAP NetWeaver BW.
If this parameter is not defined, the data federation server auto-matically creates an RFC destination.
For more detailed information, see the description of the pro-gramIDMapping connector property in the Data Federation Ad-ministration Tool Guide.
Use Custom ID Program Map-ping
An optional parameter for SAP NetWeaver BW relational con-nections only.
In Gateway Host Name, enter the name of the server hostingthe SAP NetWeaver BW gateway.
In Gateway Service Name, enter the name or port number ofthe SAP NetWeaver BW gateway service.
If this option is not selected, SAP NetWeaver BW provides thegateway host name and service name via an RCF.
Use Custom Gateway
2013-08-03131
Working with connections
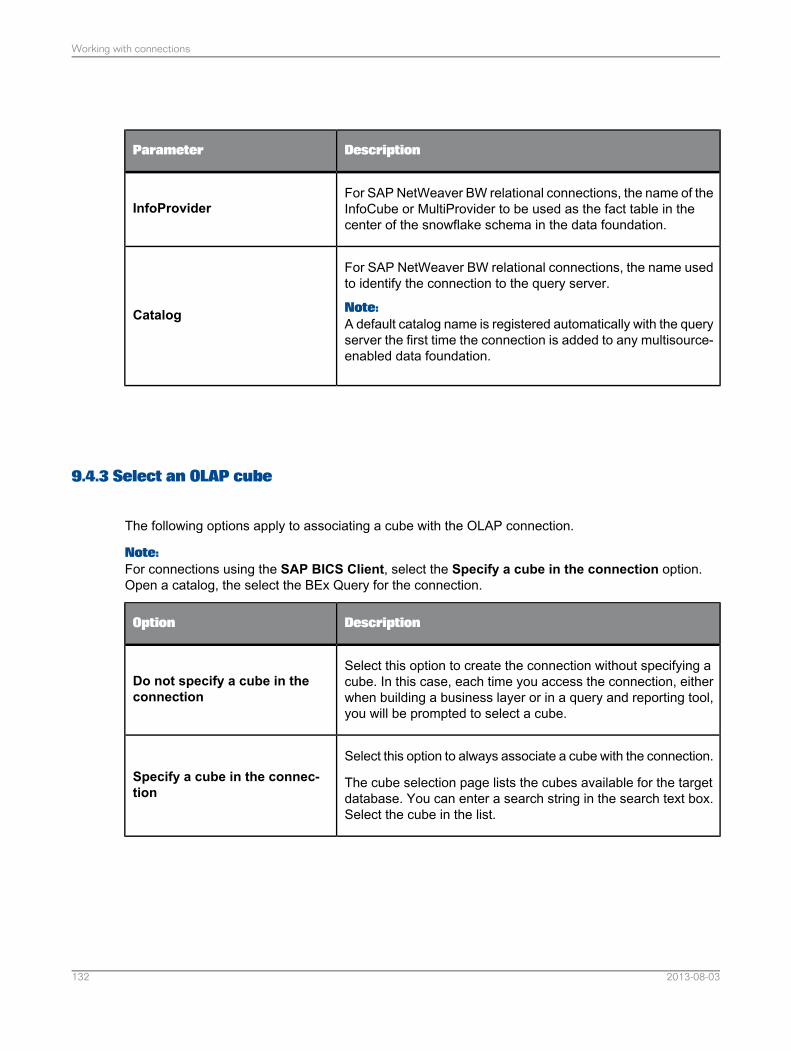
DescriptionParameter
For SAP NetWeaver BW relational connections, the name of theInfoCube or MultiProvider to be used as the fact table in thecenter of the snowflake schema in the data foundation.
InfoProvider
For SAP NetWeaver BW relational connections, the name usedto identify the connection to the query server.
Note:A default catalog name is registered automatically with the queryserver the first time the connection is added to any multisource-enabled data foundation.
Catalog
9.4.3 Select an OLAP cube
The following options apply to associating a cube with the OLAP connection.
Note:For connections using the SAP BICS Client, select the Specify a cube in the connection option.Open a catalog, the select the BEx Query for the connection.
DescriptionOption
Select this option to create the connection without specifying acube. In this case, each time you access the connection, eitherwhen building a business layer or in a query and reporting tool,you will be prompted to select a cube.
Do not specify a cube in theconnection
Select this option to always associate a cube with the connection.
The cube selection page lists the cubes available for the targetdatabase. You can enter a search string in the search text box.Select the cube in the list.
Specify a cube in the connec-tion
2013-08-03132
Working with connections
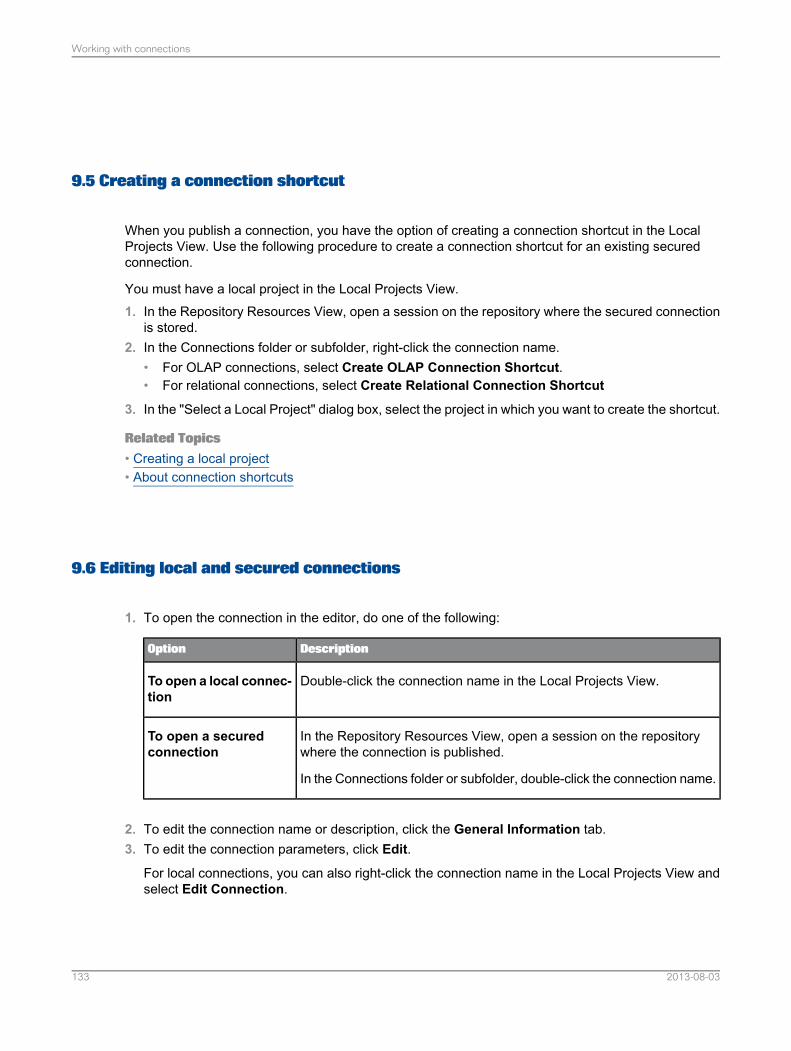
9.5 Creating a connection shortcut
When you publish a connection, you have the option of creating a connection shortcut in the LocalProjects View. Use the following procedure to create a connection shortcut for an existing securedconnection.
You must have a local project in the Local Projects View.1. In the Repository Resources View, open a session on the repository where the secured connection
is stored.2. In the Connections folder or subfolder, right-click the connection name.
• For OLAP connections, select Create OLAP Connection Shortcut.• For relational connections, select Create Relational Connection Shortcut
3. In the "Select a Local Project" dialog box, select the project in which you want to create the shortcut.
Related Topics• Creating a local project• About connection shortcuts
9.6 Editing local and secured connections
1. To open the connection in the editor, do one of the following:
DescriptionOption
Double-click the connection name in the Local Projects View.To open a local connec-tion
In the Repository Resources View, open a session on the repositorywhere the connection is published.
In the Connections folder or subfolder, double-click the connection name.
To open a securedconnection
2. To edit the connection name or description, click the General Information tab.3. To edit the connection parameters, click Edit.
For local connections, you can also right-click the connection name in the Local Projects View andselect Edit Connection.
2013-08-03133
Working with connections
4. To change the middleware driver for relational connections, select Change Driver. Select a newdriver and enter the new connection parameters.
5. To test the availability of the database server, click Test Connection.
You can also right-click the connection or shortcut name in the Local Projects View and select TestConnection.
6. Save the connection information by clicking the Save icon in the main tool bar.
Related Topics• Showing values in a relational connection• Showing values in an OLAP connection• About connections
9.7 Editing connection shortcuts
You can edit the name and description of a connection shortcut. You can also change the shortcut toreference a different connection in the same repository where the existing connection is published.1. Open the connection shortcut in the editor by double-clicking the shortcut name in the Local Projects
View.2. You can enter or change text in Shortcut Name and Description.3. To change the connection that the shortcut references, click Change Connection.
You can also right-click the shortcut name in the Local Projects View and selectChange Connection.
4. To test the referenced connection, click Test Connection.
You can also right-click the shortcut name in the Local Projects View and select Test Connection.
5. Save the shortcut by clicking the Save icon in the main tool bar.
Related Topics• About connection shortcuts
9.8 Showing values in a relational connection
1. Open the connection in the editor:
2013-08-03134
Working with connections
DescriptionOption
Double-click the connection name in the Local Projects View.To open a local connec-tion
In the Repository Resources View, open a session on the repositorywhere the connection is published.
In the Connections folder or subfolder, double-click the connection name.
To open a securedconnection
2. Click the Show Values tab.3. In the Catalog pane, double-click the table name (to show all columns), or double-click a column
name.To see what you can do in the pane where values are displayed, see the related topic.
Related Topics• Showing values in a data source
9.9 Showing values in an OLAP connection
1. Open the connection in the editor:
DescriptionOption
Double-click the connection name in the Local Projects View.To open a local connec-tion
In the Repository Resources View, open a session on the repositorywhere the connection is published.
In the Connections folder or subfolder, double-click the connection name.
To open a securedconnection
2. To browse the objects in the cube and their properties, click the Browse Metadata tab.Select an object to display its properties in the properties pane.
3. To run an MDX query on the cube, select the Query tab.
Note:MDX querying is not available for OLAP connections used for direct access (such as direct accessto a BEx Query or SAP HANA information model).
2013-08-03135
Working with connections
4. Build an MDX query in the MDX Query pane by dragging and dropping objects from the OLAPMetadata pane and entering MDX statements.
5. To validate the MDX, click Parse.6. To run the query, click Run.
2013-08-03136
Working with connections

Working with data foundations
10.1 About data foundations
A data foundation contains a schema of relevant tables and joins from one or more relational databasesthat are used as a basis for one or more business layers.
You reference relational connections in the data foundation. You insert tables and joins from thedatabases referenced in the connections.
Using the Data Foundation Editor, you can enhance the data foundation by adding federated tables(designed in the federation layer), derived tables, alias tables, calculated columns, additional joins,contexts, prompts, and lists of values. The availability of some features depends on the data foundationtype. See the related topic for more information about data foundation types.
You can build any number of business layers on the same data foundation. In this case the datafoundation becomes the basis for multiple universes.
Related Topics• About data foundation types• About the federation layer• How to build a data foundation
10.1.1 About data foundation types
Single-source and multisource-enabled are two types of data foundations that allow you to take advantageof different data foundation features.
Related Topics• About single-source data foundations• About multisource-enabled data foundations
2013-08-03137
Working with data foundations

10.1.2 About single-source data foundations
Single-source data foundations support a single connection. The connection can be local or secured,which means you can publish universes based on the data foundation either locally or to a repository.
Single-source data foundations support database-specific SQL syntax for derived tables, calculatedcolumns, and join expressions. Database-specific SQL syntax allows functions or operators that areoffered by a specific database and not by standard SQL-92 (for example, Oracle analytical functions).You must select single-source if you want to publish to a local folder the universes that are based onthis data foundation.
Single-source data foundations are recommended for the following situations:• You want to work exclusively with database-specific SQL syntax.• You want to publish the universe locally and work outside of a repository.
Related Topics• About multisource-enabled data foundations• How to build a data foundation• Changing a connection in a data foundation
10.1.3 About multisource-enabled data foundations
Multisource-enabled data foundations support one or more connections. You can add connectionswhen you create the data foundation and anytime later. Multisource-enabled data foundations onlysupport secured connections, and universes based on this type of data foundation can only be publishedto a repository.
Multisource-enabled data foundations support most relational connections supported in single-sourcedata foundations. In addition, multisource-enabled data foundations support the following relationalconnections that are not supported in single-source data foundations:• SAP NetWeaver BW connections• SAS connections
Connections for multisource-enabled data foundations are managed by the data federation service.For information about tuning the data federation service, see the Data Federation Administration ToolGuide.
The federation layer is available in multisource-enabled data foundations. It allows you to create federatedtables that you can then include in the data foundation.
2013-08-03138
Working with data foundations
SQL-92 standard syntax is the default for calculated columns, derived tables, and join expressions. Inaddition, the SAP BusinessObjects SQL database functions are available. You can use database-specificSQL syntax in a multisource-enabled data foundation by defining a database-specific derived table orcalculated column. Database-specific SQL syntax allows functions or operators that are offered by aspecific database and not by standard SQL-92 (for example, Oracle analytical functions).
Note:For database functions, the SAP BusinessObjects syntax can be different from the syntax of the samefunction provided by database-specific SQL.
Multisource-enabled data foundations are required in the following situations:• You want to insert tables and joins from more than one relational data source, or create federated
tables.• You want to use SAP NetWeaver BW or SAS connections.• You want to use SQL-92 standard syntax and SAP BusinessObjects SQL functions.
For more information on these situations, see the related topics.
Related Topics• Data foundations with multiple connections• About the federation layer• SQL expressions in multisource-enabled data foundations• About single-source data foundations• How to build a data foundation• Using SAP NetWeaver BW data sources
10.1.3.1 Data foundations with multiple connections
To be able to add multiple connections to a data foundation, you must select the multisource-enabledtype when you create the data foundation.
You can select multiple connections when you create the data foundation. You can also add connectionsto an existing multisource-enabled data foundation. Connections must be secured, and thereforeavailable in a repository. The connections are represented by a connection shortcut in the local project.
The connections in a multisource-enabled data foundation have the following additional properties:• A short name used to identify the connection in the data foundation and to modify the table name
in SQL expressions. You specify the short name when adding the connection. This name must beunique within the data foundation and is limited to forty characters. If you change the short namefor the connection, the SQL expressions are automatically updated with the new name.
• A color for the connection. This color is used in the table header in data foundation views. You selectthe color when adding the connection. You can change the color for a connection at any time.
2013-08-03139
Working with data foundations
• A catalog used to identify the connection to the query server. A default catalog name is registeredautomatically with the query server the first time the connection is added to any multisource-enableddata foundation.
• For SAP NetWeaver BW connections, properties related to the automatic insertion of tables andjoins. For more information on these properties, see the related topic.
In a multisource-enabled data foundation, the table name as it appears in SQL expressions has theformat:
@catalog(short name)."database _qualifier.database_owner"."table_name"
A multi-source join can be created between tables from different connections. You can use the DetectJoins command to detect joins between tables referenced in different connections, or explicitly definethem with the Insert Join command.
Related Topics• Using SAP NetWeaver BW data sources• About connections in the data foundation• Changing a connection in a data foundation
10.1.3.2 SQL expressions in multisource-enabled data foundations
SQL expressions that define joins, calculated columns, and derived tables in a multisource-enableddata foundation use SQL-92 AINSI standard syntax.
In SQL-92 expressions, you can include SAP BusinessObjects database functions. The SQL syntaxcan be different from the syntax of the same function provided by database-specific SQL. For moreinformation, see the related topic.
In SQL-92 expressions, you can include @functions. Which @functions you can include depends onthe type of expression. For more information, see the related topic.
In order to use functions or operators that are offered by the database and not by SQL-92 (for example,Oracle analytical functions), you define database-specific calculated columns and derived tables. Anoption in the SQL Expression Editor allows you to use database-specific SQL.
Database-specific calculated columns and derived tables support the SQL syntax of the associatedconnection. The following rules apply to database-specific SQL expressions:• You can reference only standard tables and database-specific derived tables in a single connection.• You cannot reference tables in SAS or SAP NetWeaver BW connections.• You can include @functions with certain restrictions. For more information, see the related topic.
Related Topics• SAP BusinessObjects SQL function reference for multisource-enabled universes• About @Functions
2013-08-03140
Working with data foundations

10.2 About the Data Foundation Editor
This topic describes how to navigate the Data Foundation Editor. For steps to help you build the structureof your data foundation, see How to build a data foundation.
The Data Foundation Editor is divided into a data foundation view pane, a properties pane, and browsingpanes.
The data foundation view is a graphical representation of the tables and joins. TheMaster view containsall tables and joins and cannot be deleted. You can define custom views that contain subsets of thetables. Access the views by the tabs at the bottom of the view pane. For more information about customviews, see the related topic.
The properties pane displays the properties of the data foundation object that is currently selected (theentire data foundation, a table, a column, or a join). To edit properties that apply to the entire datafoundation, see the related topic.
In the data foundation view, you can work on tables and joins using commands in the Insert andDetect menus, or by clicking objects directly in the view.
The browsing panes allow you to work with different elements of the data foundation. Access the panesby clicking the corresponding tab:• Connections• Data Foundation (displays a tree view of the tables and joins)• Aliases and Contexts• Parameters and Lists of Values• Federation Layer
For more information about what you can do in each of the browsing panes, see the related topic.
Navigating the data foundation viewTo access a menu of commands that are available on tables, right-click the table header in the datafoundation view. To select multiple tables, click the table headers while holding down the CTRL key.
To access commands that are available on columns, right-click the column name in the table in thedata foundation view.
Several commands in the table right-click menu are available to help you locate related tables in thedata foundation:• Select Related Tables automatically selects all tables linked by joins to the selected table.• Highlight Related Tables grays any table that is not linked to the selected table by a join.• Highlight Aliases grays all tables except the selected original table and its alias tables.• Highlight Original Table grays all tables except the selected alias table and the original table it is
based on.
2013-08-03141
Working with data foundations
• Center on Selection lets you temporarily change the zoom on the data foundation display so thatall the tables in a selection are visible in the display window.
You can use the search panel to perform advanced searches on the data foundation. To open the
search panel, click .
For information on commands you can use to change the display of objects in the data foundation view,see the related topic.
Related Topics• Inserting a custom data foundation view• About connections in the data foundation• About contexts• About parameters and lists of values in the data foundation• About the federation layer• About data foundation properties• Searching for tables and columns in the data foundation• Centering the view on a selection• Changing the display of objects in the data foundation
10.3 How to build a data foundation
Before you begin:• You need a local project in which to create the data foundation.• In the local project, you need the relational connection or connection shortcuts to secured relational
connections. Multisource-enabled data foundations require connection shortcuts.
For links to more detailed information on each step, see the Related Topics.1. To start the "New Data Foundation" wizard, do one of the following:
• Right-click a relational connection or connection shortcut in the Local Projects View and selectNew > Data Foundation.
• Right-click the project folder in the Local Projects View and select New > Data Foundation.
The data foundation is created in a .dfx file in the local project. It opens automatically in the DataFoundation Editor.
2. If you want use federated tables in your data foundation (multisource-enabled data foundationsonly), create the federated tables in the Federation Layer.
3. In the Data Foundation Editor, insert tables into the data foundation:
2013-08-03142
Working with data foundations
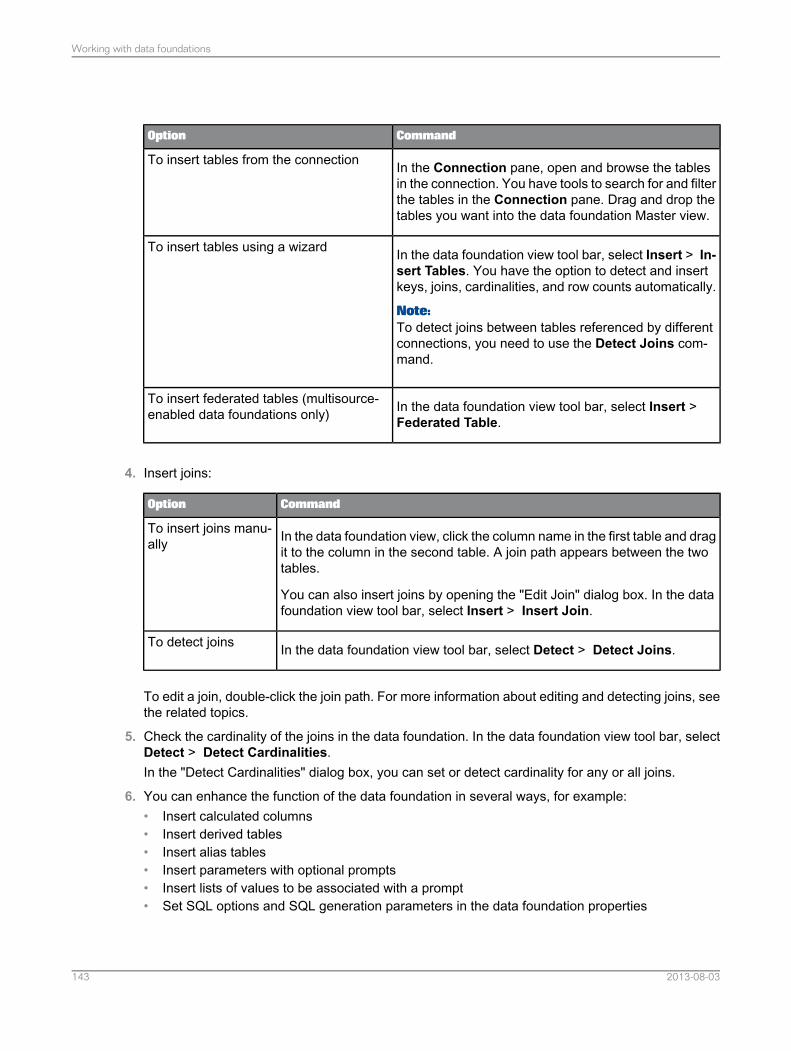
CommandOption
In the Connection pane, open and browse the tablesin the connection. You have tools to search for and filterthe tables in the Connection pane. Drag and drop thetables you want into the data foundation Master view.
To insert tables from the connection
In the data foundation view tool bar, select Insert > In-sert Tables. You have the option to detect and insertkeys, joins, cardinalities, and row counts automatically.
Note:To detect joins between tables referenced by differentconnections, you need to use the Detect Joins com-mand.
To insert tables using a wizard
In the data foundation view tool bar, select Insert >Federated Table.
To insert federated tables (multisource-enabled data foundations only)
4. Insert joins:
CommandOption
In the data foundation view, click the column name in the first table and dragit to the column in the second table. A join path appears between the twotables.
You can also insert joins by opening the "Edit Join" dialog box. In the datafoundation view tool bar, select Insert > Insert Join.
To insert joins manu-ally
In the data foundation view tool bar, select Detect > Detect Joins.To detect joins
To edit a join, double-click the join path. For more information about editing and detecting joins, seethe related topics.
5. Check the cardinality of the joins in the data foundation. In the data foundation view tool bar, selectDetect > Detect Cardinalities.In the "Detect Cardinalities" dialog box, you can set or detect cardinality for any or all joins.
6. You can enhance the function of the data foundation in several ways, for example:• Insert calculated columns• Insert derived tables• Insert alias tables• Insert parameters with optional prompts• Insert lists of values to be associated with a prompt• Set SQL options and SQL generation parameters in the data foundation properties
2013-08-03143
Working with data foundations
7. Verify the join paths and resolve any loops. Use the commands in the Aliases and Contexts paneto detect aliases and contexts automatically.
8. Run an integrity check to validate the tables, columns, and joins in the data foundation. Right-clickthe data foundation name in the Data Foundation pane, and select Check Integrity.
9. Save the data foundation by clicking the Save icon in the main tool bar.
Some commands to help you maintain the data foundation are listed below.• If you change tables or columns, use Show Local Dependencies to find the business layers and
objects that might be impacted by the changes.• Refresh the structure to update the data foundation with changes that have occurred to the databases
referenced in the connections.• You can change a connection, or for multisource-enabled data foundations, add or remove a
connection.• You can enhance the ease of maintenance by creating custom views, grouping tables using families,
arranging the table display, and inserting comments.
Related Topics• About data foundation types• Creating a local project• Creating a relational connection• Creating a connection shortcut• About the Data Foundation Editor• Inserting tables into the data foundation• Searching for tables in the Connection pane• Filtering the tables in the connection by table type• About the federation layer• Inserting and editing a join• Detecting and setting cardinalities• Inserting a calculated column• About derived tables• About alias tables• About parameters and lists of values in the data foundation• About data foundation properties• Resolving loops• Running check integrity• Showing local dependencies in the data foundation• About refreshing a data foundation• Changing a connection in a data foundation• Adding connections to a data foundation• Inserting a custom data foundation view• Grouping tables using families• Auto-arranging tables in the data foundation view• Inserting a comment into the data foundation view
2013-08-03144
Working with data foundations
10.4 About connections in the data foundation
Connections in the data foundation are listed in the "Connection" pane of the Data Foundation Editor.Some connections allow for multiple databases (called qualifiers), with different owners:• Some data sources provide both qualifiers and owners (for example, MS SQL Server)• Some data sources only provide qualifiers (for example, MySQL and text files)• Some data sources only provide owners (for example, Oracle, SAP HANA, DB2, and Teradata)
For single-source data foundations, the "Connection" pane display is as follows:• Qualifiers, if available, are listed under the connection
• Owners, if available, are listed under each qualifier• Tables are listed under each owner
• Columns are listed under each table
For multisource-enabled data foundations, the "Connections" pane display is as follows:• Qualifier.Owners, known as the schema, are listed under the connection (or owners only, if the
data source does not provide qualifiers).• Tables are listed under each schema
• Columns are listed under each table
The list of tables is sorted alphabetically.
By default, tables are listed for all qualifiers and owners. To list only tables for the currently used
qualifier/owner, click the "Show Qualifiers and Owners" icon to deselect it.
When the connection contains more than 1000 qualifier/owners or tables, the qualifier/owners or tablesare grouped in packages of 1000. The packages are listed with the first several letters of the first andlast qualifier/owner or table names in the package surrounded by brackets, for example:• [AAAA....] - [MMMM]• [NNNN...] - [ZZZZZ]
For tables that are already inserted into the data foundation, the table icon displays a green check mark:. You can insert a table into the data foundation by double-clicking the table name in the "Connections"
pane.
Navigating the list of tables in the "Connection" pane
The Show/Hide Table Search icon, lets you search for tables in a connection to obtain a filteredlist of tables.
2013-08-03145
Working with data foundations
Some connections have different table types (for example, in an SAP HANA connection, you can haveseveral table types, including Analytic View and Calculation View). The Filter by Table Type icon
lets you select table types to filter the list of tables displayed in the connection.
For SAP HANA connections, the Filter Information Models icon by default filters the list to showonly tables representing information models.
The table search, filter by table type, and filter on information models can be used in combination. Formore information on searching and filtering, see the related topics.
Operations on connectionsYou can do the following tasks on connections from the "Connection" pane:• Change lets you change the connection and its associated properties. For more information about
this task, see the related topic.• Open opens the connection or connection shortcut properties in the Connection Editor.• Test lets you test if the database referenced by the connection is available.
In addition, for multisource-enabled data foundations, you can do the following tasks from the"Connections" pane:• Add Connections lets you add connections to the data foundation. For more information about this
task, see the related topic.• Remove lets you remove a connection from the data foundation. The connection itself remains in
the repository and registered with the catalog name.
Related Topics• Searching for tables in the Connection pane• About tables in the data foundation• Filtering the tables in the connection by table type• Filtering tables in an SAP HANA connection by information model• Changing a connection in a data foundation• Adding connections to a data foundation• About the Connection Editor• Setting connection display preferences for the Data Foundation Editor
10.4.1 Adding connections to a data foundation
To add connections to the data foundation, the following conditions are required:• The data foundation type must be multisource-enabled.• The connections to add must be relational, secured connections.• For each connection to add, you must create a connection shortcut in the local project where the
data foundation is stored.
2013-08-03146
Working with data foundations
1. Double-click the data foundation name in the local project to open the Data Foundation Editor.2. In the Data Foundation Editor, click the Connections tab.3.
In the "Connections" pane, click the Add Connections icon .The "Add Connections" dialog box lists the available connections, including the connections currentlydefined in the data foundation.
4. Select the connection shortcut name of each connection you want to add, and click Next.5. In the "Connections Properties" dialog box, you can define additional connection properties. A dialog
box opens for every connection added.For more information about multisource-enabled connection properties, see the related topic.
6. When you have finished defining the properties for additional connections, click Finish.7. Save the data foundation by clicking the Save icon in the main tool bar.
Related Topics• Creating a connection shortcut• Data foundations with multiple connections
10.4.2 Changing a connection in a data foundation
The connection you change to must be a relational connection. For multisource-enabled data foundations,the connection must also be secured.
Before you can change to a connection, you must create the local connection or connection shortcutin the local project where the data foundation is stored.1. Double-click the data foundation name in the local project to open the Data Foundation Editor.2. In the Data Foundation Editor, click the Connections tab.3. In the "Connections" pane, right-click the connection and select Change....4. Select a new connection. How to do this depends on the data foundation type:
• If the data foundation is single-source, the "Change Connection" dialog box lists the availableconnections, including the currently defined connection. Select the connection you want to changeto, and click OK.
If you have delimitation overrides set, you will be prompted for the delimitations you want to usein the new connection. For more information, see the related topic.
• If the data foundation is multisource-enabled, the "Change Connection" dialog box displays theconnection properties for the currently defined connection. Click the browse button in theConnection text box. A dialog box lists the available connections. Select the connection youwant to change to, and click Finish.
5. Save the data foundation by clicking the Save icon in the main tool bar.
2013-08-03147
Working with data foundations
Related Topics• Selecting delimitation overrides to keep
10.4.3 Selecting delimitation overrides to keep
When you change the connection in a data foundation, the delimitation requirements for the newconnection are automatically detected. Any delimitation overrides made for the previous connectionmay or may not apply. The "Select Delimitation Overrides to Keep" dialog box displays so that you canindicate which overrides to keep.
Only tables with delimitation overrides for the table name, qualifier, or owner are listed. The overridevalue is shown in the column under Name, Qualifier, or Owner.1. For each override:
• To keep the delimitation value set for the previous connection, leave the check box selected.• To remove the delimitation override and use the newly detected delimitation value, unselect the
check box.
Note:A tool tip for each override gives you the following information:
• The table name, qualifier, or owner in the previous connection with the previous delimitation.• The new table name, qualifier, or owner in the new connection with the previous delimitation.• The new table name, qualifier, or owner in the new connection with the newly detected delimitation.
2. When you are finished selecting overrides to keep, click Finish to complete the connection change.
For all other tables in the data foundation (without previous delimitation overrides) the automaticallydetected delimitation for the new connection applies.
Related Topics• About tables in the data foundation
10.4.4 Searching for tables in the Connection pane
You can create a filtered list of tables in the Connection pane using a search string. You can inserttables into the data foundation from the filtered list.1. In the Connection pane of the Data Foundation Editor, click the Show/Hide Table Search icon,
.
2013-08-03148
Working with data foundations
The Connection pane splits. The top pane continues to display all tables in all connections. Thelower pane (Search pane) displays only the tables matching the search string in the selectedconnection.
2. In the Connection pane, select the part of the connection catalog that you want to search. You canselect:• The entire connection• A qualifier (if available)• An owner (if available)
Note:For data foundations with multiple connections you can search only one connection at a time. Youmust select a connection. You can select the entire connection or a schema.
3. In the Search pane, enter the string you want to search for.
Note:
• The wildcard character is allowed. In your search string, you must enter the wildcard characterthat is defined for the data source.
• Many data sources use the percent sign (%) as a wildcard, where the percent sign matches oneor more characters. To enable the automatic insertion of wildcard characters (%), click the Enable
Automatic Wildcards icon . When automatic wildcards are enabled, if, for example, youenter the search text 2012, the application searches for %2012%.
• The search is case-sensitive when searching connections in multisource-enabled data foundations.
4.Click the search icon in the Search pane.The tables with names matching the search string are listed in the Search pane. You can double-clicka table in the Search pane to insert it into the data foundation.
5. To start a new search, change the search string, or select a different part of the catalog in theConnections pane to search, and click the search icon in the Search pane again.
Note:
You can also filter the list of tables by table type using the icon, or, in SAP HANA connections,
by information model using the . If the list of tables in the Connection pane is filtered, the filterapplies in both the Connection pane and the Search pane. For more information about filtering, seethe related topics.
Related Topics• About connections in the data foundation• Filtering the tables in the connection by table type• Filtering tables in an SAP HANA connection by information model
2013-08-03149
Working with data foundations

10.4.5 Filtering the tables in the connection by table type
In the Connection pane of the Data Foundation Editor, you can filter the list of tables in the connectionby table type.1. Select the connection you want to filter, and open the qualifier and/or owner until tables are listed.
The application discovers table types in the connection as tables of each type are listed in the"Connection" pane. Once the first table type is discovered, the Filter by Table Type icon is available.
2. Click the down arrow next to the Filter by Table Type icon .All table types discovered so far are listed. When a table type is discovered, it is automaticallyselected to be displayed in the connection.
3. To stop displaying a table type, unselect it in the list.The tables are filtered in both the Connection pane and the table search results pane. For moreinformation on table search, see the related topic.
4. To redisplay a table type, open the Filter by Table Type list and select the table type in the list.
Note:
The table filter only affects the display. When you close the Data Foundation Editor, or when you changethe connection, the filter selection is reset.
You can also filter the list of tables in the connection with a search string using the icon to open theSearch pane. The table type filter applies in both the Connection pane and the Search pane. For moreinformation about searching for tables, see the related topic.
Related Topics• About connections in the data foundation• Searching for tables in the Connection pane• Filtering tables in an SAP HANA connection by information model
10.4.6 Filtering tables in an SAP HANA connection by information model
In the Connection pane of the Data Foundation Editor, the list of tables in an SAP HANA connection(owner _SYS_BIC) is filtered by default to only tables representing information models (such as anAnalytic View or Calculation View). You can toggle the filter off or on.
You can also set an application preference to change the default state for the information model filter.For more information, see the related topic.
2013-08-03150
Working with data foundations
1. Select the connection you want to filter and open the node for the _SYS_BIC owner.2. To show only information models, make sure the Filter Information Models icon is selected.3. To show all tables in the _SYS_BIC owner, unselect the Filter Information Models icon.
Note:
You can also filter the list of tables by table type using the icon.
You can search the list of tables in the connection with a search string using the icon to open theSearch pane. The information model and table type filters apply in both the Connection pane and theSearch pane.
Related Topics• Setting connection display preferences for the Data Foundation Editor• Filtering the tables in the connection by table type• Searching for tables in the Connection pane
10.5 About tables in the data foundation
A standard table is a graphical representation in the data foundation of a physical database table. Youcreate standard tables when you insert database tables into the data foundation. The table and columnnames are inherited from the data source.
Note:The information design tool does not support any table or column names that are the same as an SQLreserved word. Rename these objects in the data source before inserting them into the data foundation.
Some data sources have tables of different types. The table type is inherited from the data source andstored as a table property in the data foundation.
Once you have inserted a standard table, you can modify it in the following ways:• Edit table properties (name and description)• Set the case of the table name• Hide and unhide columns• Change the data type of columns• Set columns as primary and foreign keys
Tables in the data foundation can also be federated, derived, or alias tables. For more information, seethe related topics.
About hidden columnsSome connections specify that certain columns in the data source are not for querying and are thereforehidden when the table is inserted into the data foundation. You can hide and unhide columns in standardtables.
2013-08-03151
Working with data foundations
Hidden columns are ignored in most workflows. For example, they do not appear in the data foundationtable display, when showing table values, or when dragging and dropping the table into the businesslayer pane to create the related business layer objects.
If a table is joined on a hidden column, in the data foundation display, the join line points to the tableheader. The column is displayed when editing the join.
Hidden columns are taken into account during a refresh structure on the data foundation.
About qualifiers and ownersSome connections allow for multiple databases (called qualifiers), with different owners. Standard tablesand their columns inherit the current qualifier and owner from the database. The syntax for a standardtable name is as follows:• A single-source standard table name, if the table is inserted from the current qualifier and owner,
has the syntax:
"table_name"
• A single-source standard table name, if the table is inserted from a different qualifier or owner, hasthe syntax:
"database_qualifier"."database_owner"."table_name"
• A multisource-enabled standard table name has the syntax:
@catalog('short_name')."database_qualifier.database_owner"."table_name"
Note:Qualifier and owner are not relevant for some connections, in which case they do not appear in thedata foundation connection pane and are not inherited by tables.
About delimitationWhen you insert a table into the data foundation, the database requirements for delimited names isdetermined and the information is stored with the data foundation table properties. If the table or columnnames need to be delimited, the names are surrounded by double quotes in the display of the table inthe data foundation.
The table, column, qualifier, and owner names that need to be delimited are surrounded by doublequotes when used in an SQL expression.
In single-source data foundations, you can override the default delimitation requirements as follows:• For standard tables you can override the delimitation on table names, column names, qualifiers,
and owners.• For alias tables you can override the delimitation on table names only. The overrides on the columns
are inherited from the original table.• For derived tables you can override the delimitation on table names only.
To override the default delimitation for tables and columns, use the Delimit command. For qualifiersand owners, use the Change Qualifier/Owner command.
When you change the connection in the data foundation, if you have delimitation overrides set, you willbe prompted for the delimitations you want to use in the new connection.
2013-08-03152
Working with data foundations
Related Topics• Inserting tables into the data foundation• Editing table properties• Setting case of table names• Hiding and unhiding table columns• Changing column data types• About table keys• About federated tables• About derived tables• About alias tables• Changing qualifiers and owners• Changing table and column delimitation• Selecting delimitation overrides to keep• Changing the display of objects in the data foundation
10.5.1 Inserting tables into the data foundation
Before you begin, verify that table and column names in the data source are not the same as an SQLreserved word. If so, rename these objects in the data source before inserting them in the data foundation.
This procedure describes inserting tables from the data source. To insert a federated table, see therelated topic.1. Open the data foundation in the editor by double-clicking the data foundation name in the Local
Projects View.2. Select Insert Tables from the Insert menu in the data foundation view.
The "Insert Tables" dialog box lists the connections defined in the data foundation.
3. Expand the connection to see the database tables referenced in the connection.
By default, tables are listed for all qualifiers and owners. To list only tables for the currently used
qualifier/owners, click the Show Qualifiers and Owners icon .
You can filter the list of tables in the connection by table type using the Filter by Table Type icon
. The application discovers table types in the connection as tables of each type are listed inthe pane. Once the first table type is discovered, the Filter by Table Type icon is available. Clickthe down arrow next to the Filter by Table Type icon to select a table type.
For SAP HANA connections, the list of tables (owner _SYS_BIC) is filtered by default to only tablesrepresenting information models (such as an Analytic View or Calculation View). Click the Filter
Information Models icon to toggle the filter off and on.
4. Select a table name to insert it and all its columns into the data foundation.
2013-08-03153
Working with data foundations
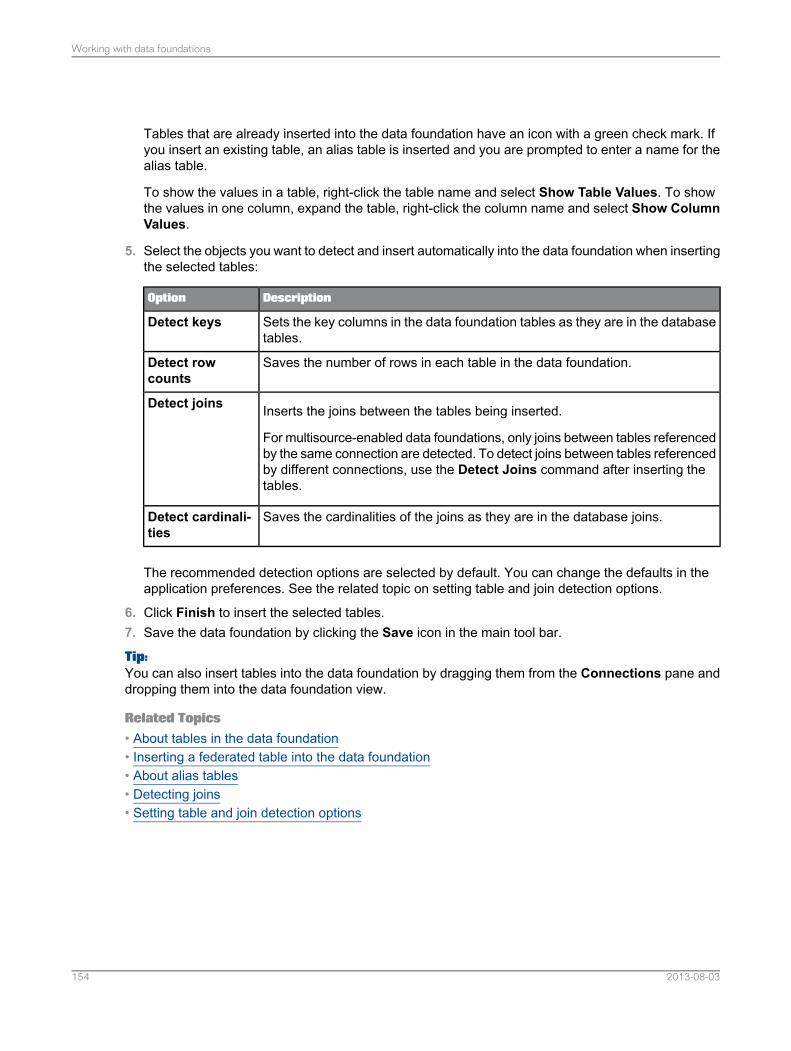
Tables that are already inserted into the data foundation have an icon with a green check mark. Ifyou insert an existing table, an alias table is inserted and you are prompted to enter a name for thealias table.
To show the values in a table, right-click the table name and select Show Table Values. To showthe values in one column, expand the table, right-click the column name and select Show ColumnValues.
5. Select the objects you want to detect and insert automatically into the data foundation when insertingthe selected tables:
DescriptionOption
Sets the key columns in the data foundation tables as they are in the databasetables.
Detect keys
Saves the number of rows in each table in the data foundation.Detect rowcounts
Inserts the joins between the tables being inserted.
For multisource-enabled data foundations, only joins between tables referencedby the same connection are detected. To detect joins between tables referencedby different connections, use the Detect Joins command after inserting thetables.
Detect joins
Saves the cardinalities of the joins as they are in the database joins.Detect cardinali-ties
The recommended detection options are selected by default. You can change the defaults in theapplication preferences. See the related topic on setting table and join detection options.
6. Click Finish to insert the selected tables.7. Save the data foundation by clicking the Save icon in the main tool bar.
Tip:You can also insert tables into the data foundation by dragging them from the Connections pane anddropping them into the data foundation view.
Related Topics• About tables in the data foundation• Inserting a federated table into the data foundation• About alias tables• Detecting joins• Setting table and join detection options
2013-08-03154
Working with data foundations
10.5.2 Editing table properties
For alias and standard tables you can edit the table name and description.
For standard tables, you can also remove columns from the table display, edit the column data types,and set or unset primary and foreign keys. The column changes you make are also made to any relatedalias tables.
Edit federated tables in the Federation Layer.1. Open the data foundation in the editor by double-clicking the data foundation name in the Local
Projects View.2. Right-click the table header in the data foundation view and select Edit.
If you are editing a derived table, the "Edit Derived Table" dialog box appears. For information onediting derived tables, see the related topic.
3. To change the table name, enter a new Name.
Note:When you change the name of a standard table, you break the link with the database table. Forinformation about renaming tables using aliases, see the related link about alias tables.
4. To remove columns from the table display, unselect the columns that you want to hide and click OK.This only affects the display in the data foundation view. The columns remain visible when showingtable values or inserting the table into the business layer.
5. To change the data type of a column, select a data type in the list in the Data Type column.The next time you refresh the data foundation structure, the original data type of the column in thedatabase is proposed.
6. To set or unset keys, select None, Primary, or Foreign from the list in the Keys column.
The next time you use the Detect Keys command, the keys defined in the database tables overridethe keys set manually for a table. You can set an application preference so that if no keys aredetected, the keys that you set manually in a data foundation table are kept.
7. Optionally, enter or edit the table Description.8. Click OK to save the changes.9. Save the data foundation by clicking the Save icon in the main tool bar.
Related Topics• About derived tables• About alias tables• Editing a federated table• About table keys• Setting table and join detection options• About tables in the data foundation
2013-08-03155
Working with data foundations
• About refreshing a data foundation
10.5.3 Setting case of table names
Some databases require that table names be all upper case or all lower case. Use the Set case tocommand to change the case of table names.
You cannot set the case of a federated table in the data foundation. You need to edit the table namein the Federation Layer.1. Open the data foundation in the editor by double-clicking the data foundation name in the Local
Projects View.2. Right-click the table header in the data foundation view and select Set case to. Then select Upper
case or Lower case.To select multiple tables, click the table headers while holding down the CTRL key.
3. Save the data foundation by clicking the Save icon in the main tool bar.
Related Topics• Editing a federated table
10.5.4 Hiding and unhiding table columns
Hiding columns applies only to standard tables. For more information on the impact of hiding columns,see the related topic.1. Open the data foundation in the editor by double-clicking the data foundation name in the Local
Projects View.2. Right-click the table header in the data foundation view and select Edit.3. Unselect the columns that you want to hide, select columns that you want to unhide, and click OK.
Note:Hidden columns are ignored in most workflows. For example, they do not appear in the display,when showing table values, or when dragging and dropping the table into the business layer paneto create the related business layer objects. You can hide a column that is involved in a join. In thiscase, the column appears when editing the join.
4. Save the data foundation by clicking the Save icon in the main tool bar.
Related Topics• About tables in the data foundation
2013-08-03156
Working with data foundations
10.5.5 Changing column data types
You can change column data types for standard tables in the data foundation.1. Open the data foundation in the editor by double-clicking the data foundation name in the Local
Projects View.2. Right-click the table header in the data foundation view and select Edit.3. In the list of columns, select a data type in the list in the Data Type column.
Note:The next time you refresh the data foundation structure, the original data type of the column in thedatabase is proposed.
4. Click OK to save the changes.5. Save the data foundation by clicking the Save icon in the main tool bar.
10.5.6 Changing qualifiers and owners
You can change the qualifiers and owners for standard tables in the data foundation. For tables insingle-source data foundations, you can also change whether to delimit the qualifier and owner names.1. Open the data foundation in the editor by selecting it in the Local Projects View.2. Right-click the table header in the data foundation view and select Change Qualifier/Owner.
To select multiple tables, click the table headers while holding down the CTRL key.
3. In the "Change Qualifier/Owner" dialog box, click the browse button in the Qualifier field andselect a new qualifier.If the qualifier name is delimited by default, the Delimit option is selected. To override the defaultdelimitation, select or unselect Delimit.
4. To change the owner, click the browse button in the Owner field and select a new owner.If the owner name is delimited by default, the Delimit option is selected. To override the defaultdelimitation, select or unselect Delimit.
5. When you are finished changing the qualifier and owner information, click OK.6. Save the data foundation by clicking the Save icon in the main tool bar.
Related Topics• About tables in the data foundation
2013-08-03157
Working with data foundations
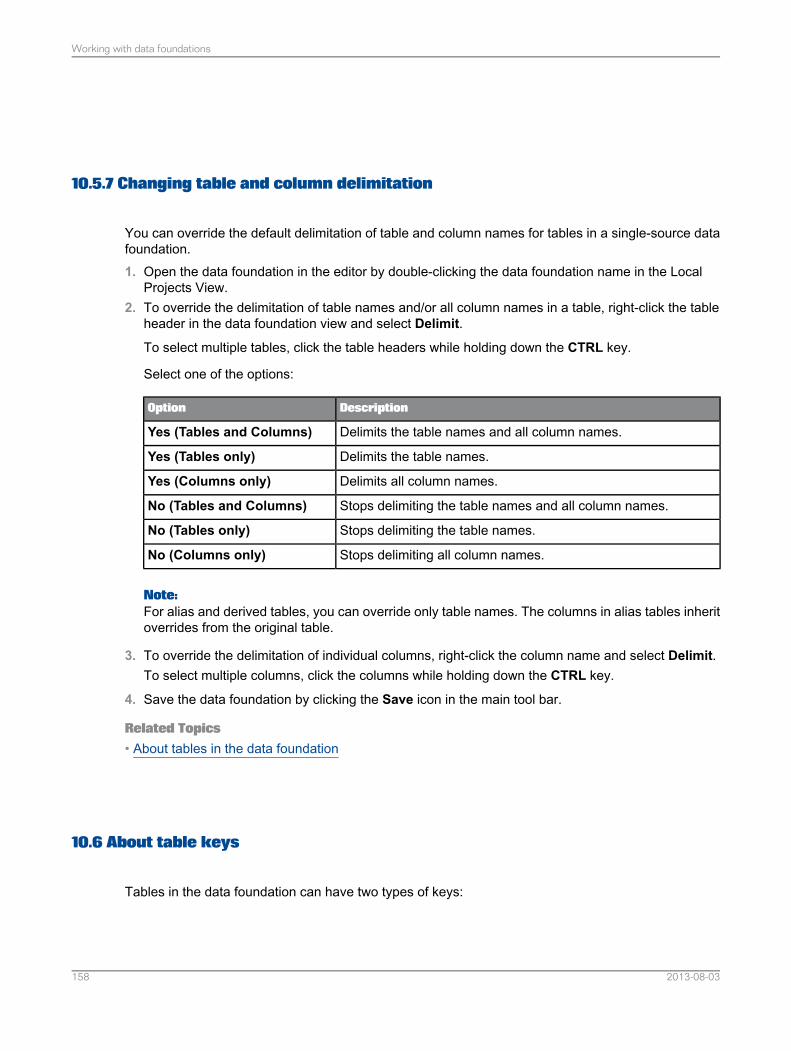
10.5.7 Changing table and column delimitation
You can override the default delimitation of table and column names for tables in a single-source datafoundation.1. Open the data foundation in the editor by double-clicking the data foundation name in the Local
Projects View.2. To override the delimitation of table names and/or all column names in a table, right-click the table
header in the data foundation view and select Delimit.
To select multiple tables, click the table headers while holding down the CTRL key.
Select one of the options:
DescriptionOption
Delimits the table names and all column names.Yes (Tables and Columns)
Delimits the table names.Yes (Tables only)
Delimits all column names.Yes (Columns only)
Stops delimiting the table names and all column names.No (Tables and Columns)
Stops delimiting the table names.No (Tables only)
Stops delimiting all column names.No (Columns only)
Note:For alias and derived tables, you can override only table names. The columns in alias tables inheritoverrides from the original table.
3. To override the delimitation of individual columns, right-click the column name and select Delimit.To select multiple columns, click the columns while holding down the CTRL key.
4. Save the data foundation by clicking the Save icon in the main tool bar.
Related Topics• About tables in the data foundation
10.6 About table keys
Tables in the data foundation can have two types of keys:
2013-08-03158
Working with data foundations
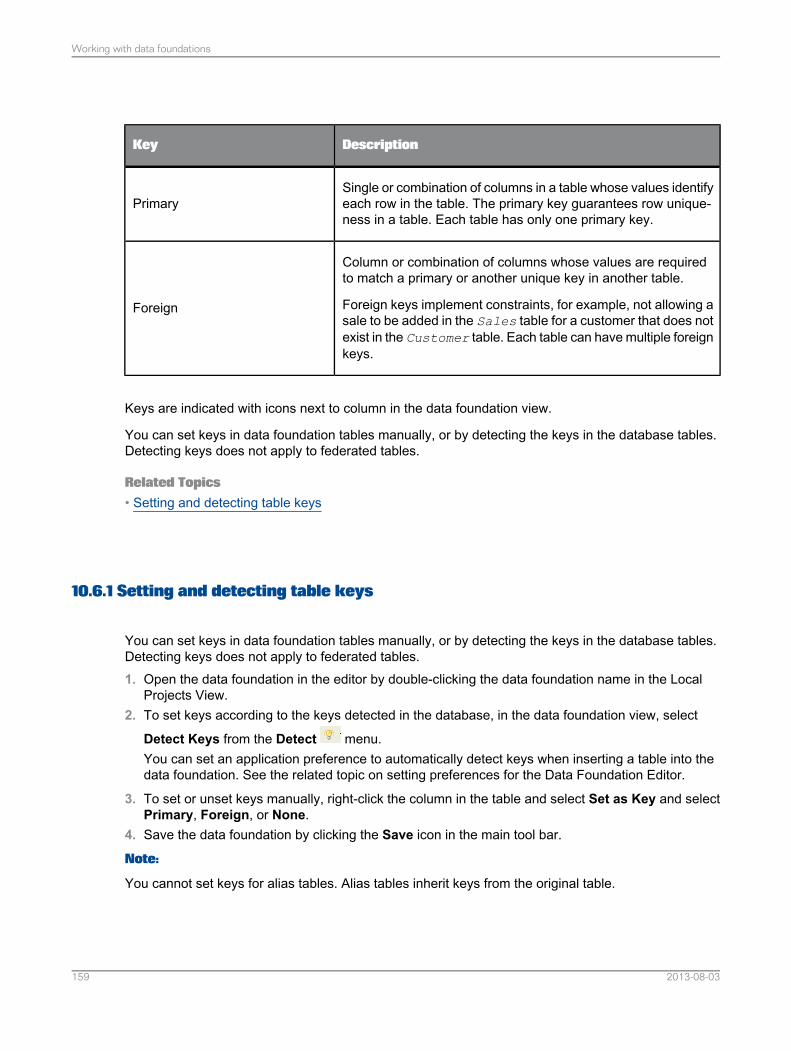
DescriptionKey
Single or combination of columns in a table whose values identifyeach row in the table. The primary key guarantees row unique-ness in a table. Each table has only one primary key.
Primary
Column or combination of columns whose values are requiredto match a primary or another unique key in another table.
Foreign keys implement constraints, for example, not allowing asale to be added in the Sales table for a customer that does notexist in the Customer table. Each table can have multiple foreignkeys.
Foreign
Keys are indicated with icons next to column in the data foundation view.
You can set keys in data foundation tables manually, or by detecting the keys in the database tables.Detecting keys does not apply to federated tables.
Related Topics• Setting and detecting table keys
10.6.1 Setting and detecting table keys
You can set keys in data foundation tables manually, or by detecting the keys in the database tables.Detecting keys does not apply to federated tables.1. Open the data foundation in the editor by double-clicking the data foundation name in the Local
Projects View.2. To set keys according to the keys detected in the database, in the data foundation view, select
Detect Keys from the Detect menu.You can set an application preference to automatically detect keys when inserting a table into thedata foundation. See the related topic on setting preferences for the Data Foundation Editor.
3. To set or unset keys manually, right-click the column in the table and select Set as Key and selectPrimary, Foreign, or None.
4. Save the data foundation by clicking the Save icon in the main tool bar.
Note:
You cannot set keys for alias tables. Alias tables inherit keys from the original table.
2013-08-03159
Working with data foundations
The next time you use the Detect Keys command, the keys defined in the database tables overridethe keys set manually for a table. You can set an application preference so that if no keys are detected,the keys that you set manually in a data foundation table are kept.
Related Topics• About table keys• Setting table and join detection options
10.7 About table row counts
Detect row countsThe number of rows in database tables can be detected and stored in the data foundation. Row countsare used to detect cardinalities in the absence of table keys.
When you detect rows counts, the number of rows for the selected tables is counted and stored.
Note:Column filters are not applied when detecting row counts.
You can also set estimated row counts for tables. This can be useful if you are working with a reducedsample of data, but want queries to be optimized for the size of the production data. The row count thatyou set is replaced by the detected row count when you do a detect row count for that table.
The Detect Row Count command on the Detect menu lists the current row counts for all tablesin the data foundation. From this list, you can set row counts and detect row counts for a selection oftables.
To detect row count for one table, right-click the table header in the data foundation view and selectDetect > Row Count. The row count for the selected table is updated. To select multiple tables, clickthe table headers while holding down the CTRL key.
You can set an application preference to detect row counts automatically every time a table is insertedinto the data foundation. See the related topic on setting table and join detection options.
Count rowsUse the Count Rows command on multiple tables linked by joins to see the number of rows returnedby the resulting query. Column filters are applied.
To count rows returned in a query, select tables in the data foundation view in one of the following ways:• Right-click a table and select Select Related Tables.• Click the table headers while holding down the CTRL key.
Then right-click a table in the selection and select Count Rows.
2013-08-03160
Working with data foundations

Related Topics• Setting table and join detection options
10.8 About joins
A join is a condition that links tables in the data foundation. A join restricts the data returned when thetwo tables are queried.
Tables that are joined usually have a parent-child relationship. If tables are not joined, then a query runon the two tables can return a result set that contains all possible row combinations. Such a result setis known as a Cartesian product and is rarely useful.
Joins are defined by linking a column in one table to a column in a second table. You can insert joinsinto the data foundation, or detect joins automatically.
The following sections describe the types of joins you can create.
Equi-joinsAn equi-join is the join type created by default between two tables. An equi-join links tables based onthe equality between the values in the column of one table and the values in the column of a secondtable. In a normalized database, the columns used in an equi-join are often the primary key from onetable and the foreign key in the other.
Self-restricting joinsA self-restricting join is when the two tables are the same. Self-restricting joins are used to define columnfilters. For more information on column filters, see the related topic.
Theta joinsWhen there is no obvious direct column to column relationship between two tables, you can use a thetajoin. A theta join links tables based on a relationship other than equality between two columns. It isused to link a value to a range of values. For example, an order date in one table is joined to a datebetween start date and end date in a second table.
Outer joinsAn outer join can be used to link tables when one table contains rows that do not have a match in thecommon column of the other table. Unlike an equi-join, an outer join returns all rows, regardless ofwhether or not there is a matching value in the joined table.
A left outer join returns all rows in the first (or left-hand side) table, even if they have no match in thesecond table.
A right outer join returns all rows in the second (or right-hand side) table, even if they have no matchin the first table.
A full outer join returns all rows from both tables, with null values when there is no match.
2013-08-03161
Working with data foundations
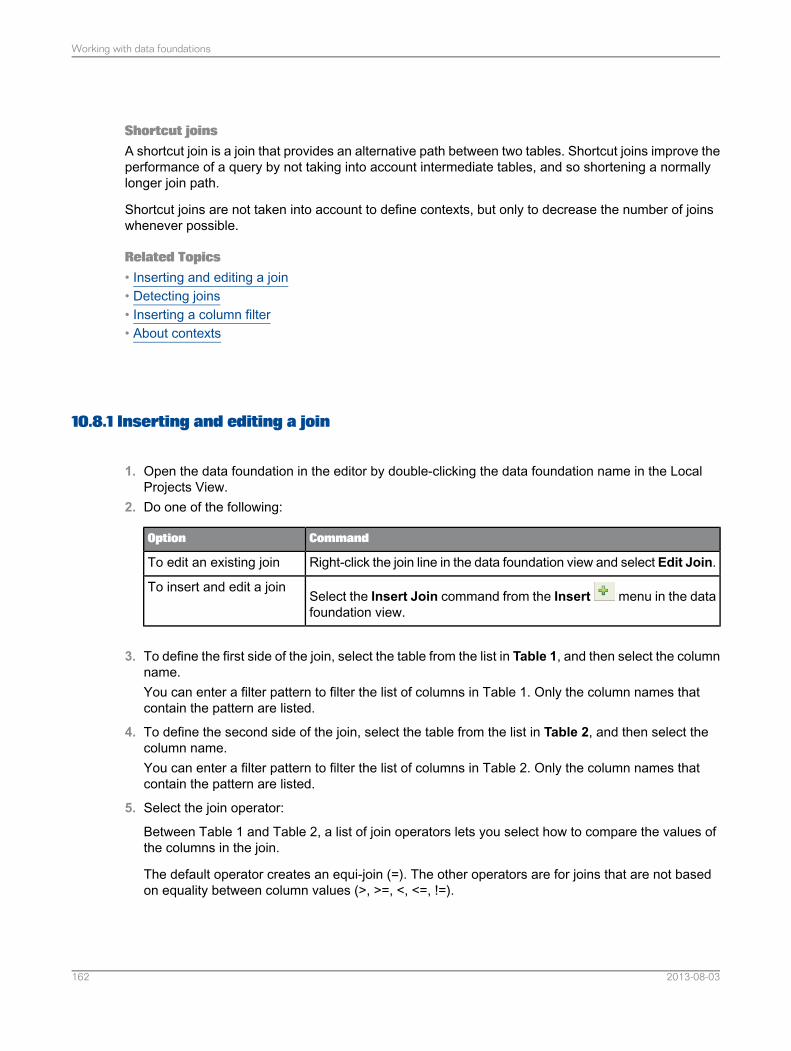
Shortcut joinsA shortcut join is a join that provides an alternative path between two tables. Shortcut joins improve theperformance of a query by not taking into account intermediate tables, and so shortening a normallylonger join path.
Shortcut joins are not taken into account to define contexts, but only to decrease the number of joinswhenever possible.
Related Topics• Inserting and editing a join• Detecting joins• Inserting a column filter• About contexts
10.8.1 Inserting and editing a join
1. Open the data foundation in the editor by double-clicking the data foundation name in the LocalProjects View.
2. Do one of the following:
CommandOption
Right-click the join line in the data foundation view and select Edit Join.To edit an existing join
Select the Insert Join command from the Insert menu in the datafoundation view.
To insert and edit a join
3. To define the first side of the join, select the table from the list in Table 1, and then select the columnname.You can enter a filter pattern to filter the list of columns in Table 1. Only the column names thatcontain the pattern are listed.
4. To define the second side of the join, select the table from the list in Table 2, and then select thecolumn name.You can enter a filter pattern to filter the list of columns in Table 2. Only the column names thatcontain the pattern are listed.
5. Select the join operator:
Between Table 1 and Table 2, a list of join operators lets you select how to compare the values ofthe columns in the join.
The default operator creates an equi-join (=). The other operators are for joins that are not basedon equality between column values (>, >=, <, <=, !=).
2013-08-03162
Working with data foundations
To create a theta join using the BETWEEN operator, select the = operator. While holding down theCTRL key, select a second column in Table 2.
For more information about the types of joins possible, see the related topic about joins.
6. To create a shortcut join, select the Shortcut join option.A shortcut join is a join that provides an alternative path between two tables. Shortcut joins improvethe performance of a query by not taking into account intermediate tables, and so shortening anormally longer join path.
7. To create an outer join, select the Outer join options.
An outer join allows rows to be returned even when there is no matching row in the joined table.Select the options as follows:
To create a left outer join, select the Outer join option below Table 1. This join will return all rowsin Table 1, even if they have no match in Table 2.
To create a right outer join, select the Outer join option below Table 2. This join will return all rowsin Table 2, even if they have no match in Table 1.
To create a full outer join, select the Outer join option below both tables. This join returns all rowsfrom both tables, with null values when there is no match.
8. Select the cardinality for the join from the Cardinality list. You can also click the Detect button toautomatically detect the cardinality defined for the join in the database.
For more information about cardinality, see the related topic.
9. Optionally, edit and validate the join expression.
Based on the columns and operators you select, an SQL expression is automatically generated todefine the join. You can type a custom expression for the join. To get help editing the join expression,
click the SQL Assistant icon .
Note:If you change the table or column names when editing the join expression, the changes are notimmediately reflected in the Table 1 and Table 2 lists. The changes are reflected in the lists whenyou save and re-edit the join.
10. Click OK to save the join.11. Save the data foundation by clicking the Save icon in the main tool bar.
Related Topics• About joins• About cardinality• Inserting a column filter
2013-08-03163
Working with data foundations
10.8.2 Detecting joins
Join detection looks at the data foundation tables and proposes appropriate joins. The following methodsare used:• Join detection based on column name. This method looks for identical column names in different
tables. It also checks that the data type of the two columns is the same. If more than one columnmatches between two tables, joins are proposed for each column. Joins between a table and itsalias are not proposed.
• Join detection based on database keys. This method looks for relationships defined in the databasebetween primary keys and foreign keys.
• For data foundations with an SAP NetWeaver BW connection, join detection is based on the joinsin the database schema referenced in the connection.
Before you begin, set or detect keys in the data foundation if you want to use join detection based ondatabase keys.1. Open the data foundation in the editor by double-clicking the data foundation name in the Local
Projects View.2. Select Detect Joins from the Detect menu in the data foundation view.3. Select the join detection method.
For a multisource-enabled data foundation, select a method for each connection. This method isused to detect joins between tables referenced by the connection. You can also detect joins betweentables from different connections. In this case, the method used is by column name.
4. From the detected joins proposed in the dialog box, select the joins to be inserted into the datafoundation.To automatically detect cardinalities for the selected joins, select the Detect cardinalities option.
5. Save the data foundation by clicking the Save icon in the main tool bar.
Note:You can set an application preference to detect and insert joins automatically every time a table isinserted into the data foundation. See the related topic on setting table and join detection options.
Related Topics• Setting and detecting table keys• About joins• About cardinality• Setting table and join detection options
2013-08-03164
Working with data foundations
10.8.3 Inserting a column filter
A column filter, also called a self-restricting join, lets you restrict the values returned whenever the tableis used in a query.
The following rules apply to column filters:• Only one filter per column is allowed.• You can insert a filter on a calculated column.• The expression can contain sub-queries.• The following @Functions are allowed in the expression: @Prompt and @Variable.• If you insert a filter into a standard table, and then create an alias from the table, the filter is not
inserted into the alias table.• If you insert a filter into an alias tables, the filter is not automatically inserted into the original standard
table.• When you merge tables that include filters, the filters are not included in the resulting derived table.1. Open the data foundation in the editor by double-clicking the data foundation name in the Local
Projects View.2. Right-click the column name in the table in the data foundation view and select Insert Filter.
A self-join on the column is proposed in the "Edit Join" dialog box. For example, if you insert a filteron the age column in the Customer table, the following self-join is proposed:"Customer"."age"="Customer"."age"
3. Edit the second part of the self join (the expression to the right of the equal sign) to filter the column
values. To get help editing the join expression, click the SQL Assistant icon .
Related Topics• About joins
10.9 About cardinality
Cardinality further describes how tables are joined by stating how many rows in one table match rowsin another table. Cardinalities are needed when detecting aliases and contexts to resolve loops in thedata foundation.
Cardinality of a table is expressed as a pair of numbers: the number of rows in one table that matchthe number of rows in the joined table. The number of rows that match can be none (0), one (1), ormany (n) for each table.
2013-08-03165
Working with data foundations
For example, the tables Customer and Reservations are linked by a join.• For each customer, there can be one or more reservations, so the cardinality of the Customer table
is one-to-many, or 1,n.• For each reservation, there can be one and only one customer, so the cardinality of the Reserva
tions table is one-to-one, or 1,1.
Cardinality of the join is also expressed as a pair of numbers: the maximum number of rows in thesecond table that match one row in the first table, and the maximum number of rows in the first tablethat match one row in the second table.
In the example, the cardinality of the Customer-Reservations join is n,1, because the maximumrows that can match a row in Customer is n, and the maximum rows that can match a row in Reservations is 1.
Cardinalities can be detected for joins automatically and stored in the data foundation. The detectionmethod first detects primary and foreign keys. Cardinalities are set according to the key status of thecolumn in the two tables as follows:
CardinalitySecond table columnFirst table column
1, nForeign keyPrimary key
n,1Primary keyForeign key
If no keys are detected, the cardinality is set using table row counts.
Related Topics• Detecting and setting cardinalities• About joins• About table keys• About table row counts
10.9.1 Detecting and setting cardinalities
1. Open the data foundation in the editor by double-clicking the data foundation name in the LocalProjects View.
2. Select Detect Cardinalities in the Detect menu.The "Detect Cardinalities" dialog box lists the current cardinalities for all joins in the data foundation.
3. Select the joins for which you want to detect cardinalities and click Detect Cardinalities.4. To set the cardinality of a join manually, select the cardinality from the list in the Cardinality column
for the join.5. Click Finish to save the changes.
2013-08-03166
Working with data foundations
Note:You can set an application preference to detect and insert cardinality automatically every time a join isinserted into the data foundation. See the related topic on setting table and join detection options.
Related Topics• About cardinality• Setting table and join detection options
10.10 Inserting a calculated column
A calculated column is a new column in a data foundation table that is the result of a calculation basedon one or more columns of the same table.
Note:Inserting a calculated time column based on a column with a time-related data type is a special caseof a calculated column. For the procedure to insert a time column, see the related topic.
The following rules apply to calculated columns:• You can insert calculated columns into standard tables only.• You can include only columns from the same table in the SELECT statement.• Sub-queries are not allowed.1. Open the data foundation in the editor by double-clicking the data foundation name in the Local
Projects View.2. Right-click the table header in the data foundation view and select Insert Calculated Column.3. If the data foundation is multisource-enabled and you want to use database-specific SQL to define
the calculated column, select the Database-specific option.
Note:Some data sources do not support database-specific SQL for defining calculated columns. In thiscase, the Database-specific option is unavailable.
For more information about SQL expressions in multisource-enabled data foundations, see therelated topic.
4. Build the SQL SELECT statement that defines the column by dragging and dropping columns andfunctions into the SELECT pane.For more information about using the SQL expression editor, see the related topic.
5. Click Validate to check the validity of the SQL expression.6. Click OK.
The column is inserted into the table and appears in the data foundation view with a special icon. Atool tip displays the SQL expression of the calculated column when you pass the cursor over thecolumn name.
2013-08-03167
Working with data foundations
7. To check the results of the calculated column, right-click the column and select Show ColumnValues.
8. Save the data foundation by clicking the Save icon in the main tool bar.
To edit the definition, right-click the column name in the table in the data foundation view and selectEdit Calculated Column.
Related Topics• Inserting a time column• About the SQL/MDX Expression Editor• SQL expressions in multisource-enabled data foundations
10.11 Inserting a time column
A time column is a calculated column that contains a date part (for example, month, quarter, or year)based on a column with a time-related data type.1. Open the data foundation in the editor by double-clicking the data foundation name in the Local
Projects View.2. Right-click a column with a time-related data type and select Insert Time Column.
Columns with time-related data types have a special icon that resembles a calendar.
3. Select a date part from the list.A calculated column is inserted into the table and appears in the data foundation view with a specialicon. A tool tip displays the SQL expression of the calculated column when you pass the cursor overthe column name.
4. To check the results of the calculated column, right-click the column and select Show ColumnValues.
5. Save the data foundation by clicking the Save icon in the main tool bar.
To edit the definition, right-click the column name in the table in the data foundation view and selectEdit Calculated Column.
Related Topics• Inserting a calculated column
10.12 About derived tables
2013-08-03168
Working with data foundations
A derived table is a virtual table in the data foundation that combines other tables using calculationsand functions. You can create objects in the business layer on a derived table in the same way thatyou do for a standard table. Use derived tables in the following situations:• To create a table with columns from other tables. The column definitions can include complex
calculations and functions.• To create a single table that combines two or more tables (called merging tables).• To create a table that contains a selection of columns from different tables.
Related Topics• Inserting a derived table based on a data foundation table• Merging tables• Inserting and editing a derived table
10.12.1 Inserting a derived table based on a data foundation table
1. Open the data foundation in the editor by double-clicking the data foundation name in the LocalProjects View.
2. Right-click the table header of the table to be the basis for the derived table, and select Insert >Derived Table.
3. Enter a name for the derived table that is unique in the data foundation, and click OK.
A derived table with the new name and all the columns from the original table is inserted into the datafoundation.
Edit the derived table to make the desired modifications.
Related Topics• Inserting and editing a derived table• About derived tables
10.12.2 Merging tables
Merging tables inserts a derived table into the data foundation that consists of the combined columnsfrom two or more tables linked by joins. Federated tables cannot be merged.1. Open the data foundation in the editor by double-clicking the data foundation name in the Local
Projects View.2. In the data foundation view select the tables you want to merge:
2013-08-03169
Working with data foundations
CommandOption
Right-click the table and select Select Related Ta-bles.
To select a table and all tables related to itby joins
Click the table headers while holding down theCTRLkey.
To select tables manually
3. Right-click the selection of tables and select Merge.4. Enter a name for the table that is unique within the data foundation and click OK.
The merged table is inserted as a derived table. The new table is joined to any tables that the originaltables were joined to.
5. Select if you want to delete the original tables.The original tables become obsolete and you have the choice of deleting them. If you choose tokeep the original tables, the joins linking those tables are deleted, however the tables stay in thedata foundation.
Note:In a multisource-enabled data foundation, a derived table that is the result of a merge creates expressionsusing SQL-92 standard syntax. To use database-specific SQL, you must edit the derived table andexplicitly select database-specific syntax.
To edit the merged table, right-click the table header and select Edit.
Related Topics• Inserting and editing a derived table• About derived tables• SQL expressions in multisource-enabled data foundations
10.12.3 Inserting and editing a derived table
1. Open the data foundation in the editor by double-clicking the data foundation name in the LocalProjects View.
2. Do one of the following:
2013-08-03170
Working with data foundations
CommandOption
Right-click the table header in the data foundation view and selectEdit.
To edit an existing derivedtable
Select the Insert Derived Table command from the Insert menuin the data foundation view.
To insert and edit a derivedtable
3. Give the derived table a unique name within the data foundation.4. In a multisource-enabled data foundation, if you want to include database-specific functions in the
definition of the derived table, select the Database-specific option.For more information about SQL syntax in multisource-enabled data foundations, see the relatedtopic.
5. Enter or edit the SQL expression for the derived table in Expression.
Note:
To build an expression for the first time, you can use the SQL Builder. The SQL Builder works likethe query panel. You drag and drop tables and columns to be included in the derived table. TheSQL expression is generated automatically.
For more information on using the SQL Expression Editor, see the related topic.
6. Click Validate to check the validity of the SQL expression.7. Click OK.8. Link the derived table to other tables in the data foundation by inserting the appropriate joins.9. To check the results of the derived table, right-click the table and select Show Table Values.10. Save the data foundation by clicking the Save icon in the main tool bar.
Related Topics• SQL expressions in multisource-enabled data foundations• About the SQL/MDX Expression Editor• Inserting and editing a join
10.13 About alias tables
An alias table is a reference to a standard, derived, or federated table in the data foundation. It is anidentical duplicate of the original table (except for column filters), but has a different name. The data inthe table is exactly the same as the original table, but the different name "tricks" the SQL of a query toaccept that you are using two different tables.
2013-08-03171
Working with data foundations
You use alias tables to break loops in the join paths in the data foundation. TheDetect Aliases commandanalyzes the join paths and proposes alias tables to break any loops detected in the data foundation.For more information about resolving loops, see the related topic.
You also use alias tables to rename a table. The link between the data foundation and database isbased on the table name. If you create an alias to give the table a new name, the link to the databasetable is preserved, but the alias table name is used in the data foundation.
To find alias tables already inserted into the data foundation, you can do a data foundation search.There are also commands to highlight the alias tables of an original table, and highlight the original foran alias table. For more information, see the related topics.
Related Topics• Detecting alias tables• Inserting alias tables• Resolving loops• Searching for tables and columns in the data foundation• Highlighting aliases• Highlighting the original table of an alias
10.13.1 Inserting alias tables
1. Open the data foundation in the editor by double-clicking the data foundation name in the LocalProjects View.
2. In the data foundation view, select the table to be the basis of the alias.You can create aliases for more than one table at a time. Click the table headers while holding downthe CTRL key.
3. Right-click the selection and select Insert > Alias Table.4. In the "Insert Alias Tables" dialog box, unselect any aliases you do not want to insert.5. Edit the names for the alias tables in the Alias Name column, and click OK.
The selected alias tables are inserted into the data foundation. The original table name is listed inparentheses in the table header.
To edit the name and description of an alias table, click the table header in the data foundation viewand select Edit.
Related Topics• About alias tables
2013-08-03172
Working with data foundations
10.13.2 Detecting alias tables
1. Open the data foundation in the editor by double-clicking the data foundation name in the LocalProjects View.
2. Select Detect Aliases from the Detect menu in the data foundation view.You can also detect aliases from the Aliases and Contexts pane in the Data Foundation Editor.
Click the Detect Aliases icon .The command analyzes the join paths and proposes alias tables to break any loops detected in thedata foundation.
3. If alias tables are proposed, select which aliases you want to insert automatically.
The selected alias tables are inserted into the data foundation. The original table name is listed inparentheses in the table header.
To edit the name and description of an alias table, click the table header in the data foundation viewand select Edit.
Related Topics• About alias tables
10.13.3 Highlighting aliases
Use this command to highlight the alias tables associated with a standard or derived table in the datafoundation.1. Open the data foundation in the editor by double-clicking the data foundation name in the Local
Projects View.2. Right-click the table header of the original table and select Highlight Aliases.
The original and any associated alias tables are highlighted. All other tables are grayed.
Note:Some alias tables may be off the visible area of the data foundation view. You can quickly checkfor hidden highlighted tables by clicking the Fit to Window icon at the bottom of the data foundation
view . To undo the Fit to Window, click the Reset Zoom icon .
3. To return to the normal data foundation view display, click anywhere in the view.
2013-08-03173
Working with data foundations
10.13.4 Highlighting the original table of an alias
Use this command to highlight the original table in the data foundation of an alias table.1. Open the data foundation in the editor by double-clicking the data foundation name in the Local
Projects View.2. Right-click the table header of the alias table and select Highlight Original Table.
The original and alias tables are highlighted. All other tables are grayed.
Note:The original table may be off the visible area of the data foundation view. You can quickly check for
a hidden table by clicking the Fit to Window icon at the bottom of the data foundation view . Toundo the Fit to Window, click the Reset Zoom icon .
3. To return to the normal data foundation view display, click anywhere in the view.
10.14 About contexts
A context is a collection of joins which provide a valid query path. The most common use of contextsis to resolve loops in the data foundation when the loop cannot be resolved by creating an alias table.Another use of contexts is when multiple fact tables share a dimension table. In this case, a context iscreated for each fact table.
In the information design tool, a context resolves a loop by identifying a set of joins that define onespecific join path through the tables in the loop. The user is prompted for the context to use at querytime. The context ensures that joins are not included from different paths within the same SQL query.
A context is defined by setting states for the joins involved in the ambiguity. In a context, a join has oneof three states:• Included joins: In a part of the schema that is ambiguous, the context solves the loop by defining a
path with the included joins.• Excluded joins: In a part of the schema that is ambiguous, the excluded joins define the path that
context will never take.• Neutral joins are in a part of the schema that is not ambiguous, and are always included in the query
path of the context. Any join that is not explicitly included or excluded is neutral.
When a new join or table is inserted into the data foundation, it is neutral by default. Contexts will notneed to be updated unless the new table or join is explicitly involved.
You can insert contexts into the data foundation manually, or by detecting contexts. The detect commandanalyzes the join paths and proposes contexts to resolve any loops that cannot be resolved by aliastables.
2013-08-03174
Working with data foundations
Related Topics• Detecting contexts• Inserting and editing contexts• Resolving loops
10.14.1 Detecting contexts
Before detecting contexts, you need to set cardinalities and detect aliases. See the related topic aboutresolving loops for the prerequisite tasks.1. Open the data foundation in the editor by double-clicking the data foundation name in the Local
Projects View.2. From the Aliases and Contexts pane, select the Detect Contexts icon .
The command analyzes the join paths and proposes contexts to resolve any loops that cannot beresolved by alias tables.
Note:You may get a message that the loop can be resolved using aliases. See the related topic on resolvingloops.
3. In the "Detect Contexts" dialog box, select the contexts you want to insert.
To see the context highlighted in the data foundation view, click the proposed context name. A join
that is included in the context is shown by an included icon . A join that is excluded is shown by
the excluded icon .
4. Click OK to insert the selected contexts into the data foundation.The new contexts are listed in the Aliases and Contexts pane in the Contexts folder.
5. Save the data foundation by clicking the Save icon in the main tool bar.
Related Topics• About contexts• Resolving loops
10.14.2 Inserting and editing contexts
2013-08-03175
Working with data foundations
1. Open the data foundation in the editor by double-clicking the data foundation name in the LocalProjects View.
2. Select the Aliases and Contexts pane.3. Do one of the following:
CommandOption
Select the context in the Contexts folder.To edit an existing context
Select the Insert Context icon .To insert and edit an context
The properties of the context are displayed in the Context Properties pane:• Context name• All joins in the data foundation• The state of the join in this context: whether the join is included, excluded, or neutral
4. Edit the context name in Name.5. To include or exclude a join, or to set the join to neutral, click the join expression in Join Expression
list. The state toggles each time you click.
You can also toggle the state by clicking the join line in the data foundation view.
A join that is included in the context is shown by an included icon . A join that is excluded is
shown by the excluded icon .
6. Save the data foundation by clicking the Save icon in the main tool bar.
Related Topics• About contexts
10.15 Resolving loops
Loops occur when multiple paths join tables. The rows that are returned from the query are theintersection of the results for each path, so fewer rows are returned than expected.
An alias table breaks a loop by using the same table twice in the query, once for each path. That way,the rows returned in the query are the union of the results for each path.
A cycle is a loop that occurs when the tables joined by the loop all have a cardinality of (1,n). In thiscase, the Detect Aliases command cannot determine which table to create an alias for.
When loops cannot be resolved with an alias table, contexts are used. You use contexts to resolve theambiguity by explicitly directing the query as to which join path to use.
2013-08-03176
Working with data foundations
1. Open the data foundation in the editor by double-clicking the data foundation name in the LocalProjects View.
2. Detect and insert all the joins in the data foundation.3. Detect or set the cardinalities for the joins.4. Make sure there are no cycles in the data foundation. You can do this by examining the cardinalities
of any loops, or by refreshing the loop resolution status (see the following steps in this procedure).5. Make sure none of the joins have a cardinality of (n,n). Aliases and contexts cannot be detected.
Set the cardinality manually for (n,n) joins.6. From the Aliases and Contexts pane, detect aliases.7. Detect contexts. It is recommended to insert all proposed contexts.8. In the Loops box, click the Visualize Loops icon to check if all the loops have been resolved.
Possible loops are listed in Loops. To check if the loops are resolved, click the Refresh LoopResolution Status icon .
A message appears suggesting what to do about unresolved loops.
A loop is resolved when you see a green check mark next to the loop name.
Related Topics• Detecting joins• Detecting and setting cardinalities• Detecting alias tables• Detecting contexts
10.16 About input columns in the data foundation
An input column is a parameter in the data source that expects a value. The parameter is representedin a table column in the data foundation.
For each input column, you can provide a static value, or a parameter defined in the data foundation.The parameter can prompt the user for a value and be associated with a list of values. For some inputcolumns, providing a value is optional.
Following are examples of input columns in the data foundation:• SAP NetWeaver BW key date variables. An input column is inserted into each table in the data
foundation that handles time-dependent data. To resolve these input columns at query time, aparameter is inserted into the data foundation called key date. Because SAP NetWeaver BW keydate variables are mandatory, by default, at query time, the key date parameter is not prompted. Itis automatically assigned the current date. You can edit the prompt parameters in the data foundation.
• SAP ERP ABAP function input parameters. One data foundation table is created to map the mainfunction. It contains input columns for the input parameters of the function. These parameters can
2013-08-03177
Working with data foundations
be mandatory or optional. For mandatory parameters, you enter either a static value or a datafoundation parameter for the associated input column.
Related Topics• Editing input columns• Using SAP NetWeaver BW data sources
10.16.1 Editing input columns
To assign a parameter to an input column, you must first define the parameter in the data foundation.For SAP NetWeaver BW key date variables, a data foundation parameter is automatically inserted. Formore information on parameters, see the related topic.1. You can list input columns to edit in three ways:
CommandOption
Right-click the table header in the data foundation view and selectEdit Input Columns.
To list input columns for a table
Right-click anywhere in the data foundation view and select EditInput Columns.
To list input columns for all ta-bles
Right-click the column name in the data foundation view and selectEdit Input Column.
To edit a single input column
If no input columns exist in the table or data foundation, the Edit Input Column command is notavailable.
2. To assign a value to an input column, in the "Edit Input Columns" dialog box, select the column inthe list.• No assignment is selected by default and means that no value or parameter is assigned to the
column.• To assign a static value, select Value and enter a value in the text box. You can enter blanks or
leave the text box empty to assign a blank value to a column with character data type.
• To assign a parameter, select Parameter. Click the icon to select from a list of parametersdefined in the data foundation.
Note:The Values column indicates mandatory input columns as [mandatory], and optional input columnsas [optional].
3. To assign the values you entered, click OK.4. Save the data foundation by clicking the Save icon in the main tool bar.
2013-08-03178
Working with data foundations
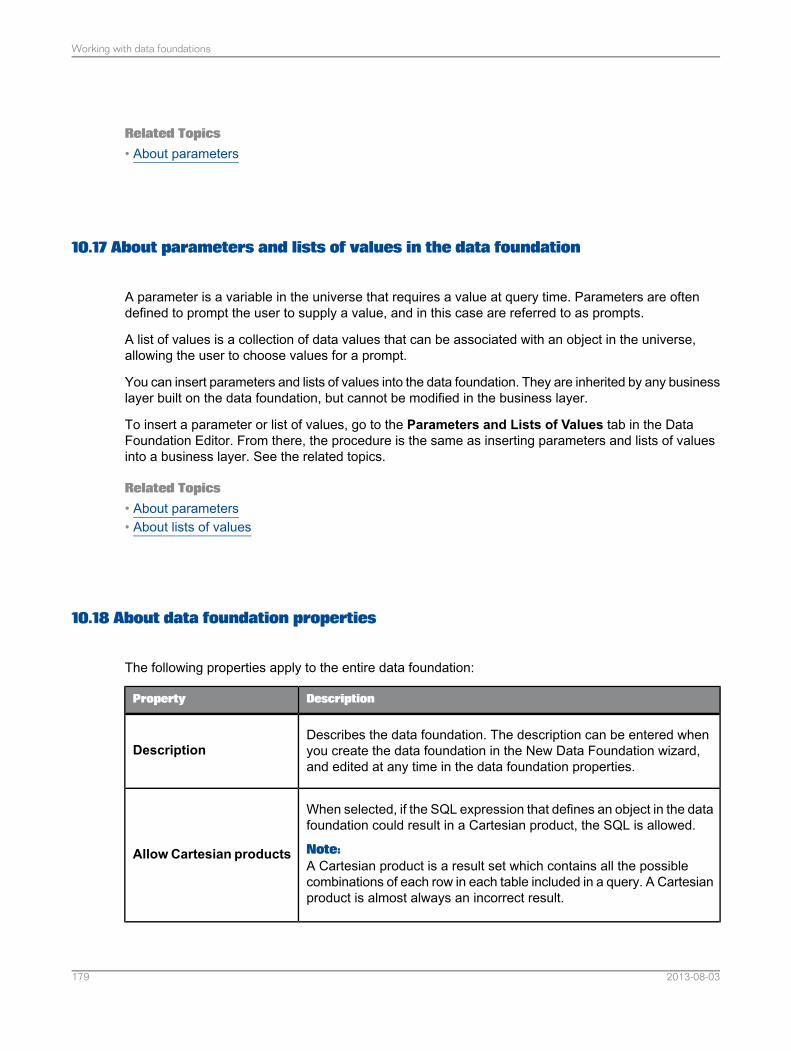
Related Topics• About parameters
10.17 About parameters and lists of values in the data foundation
A parameter is a variable in the universe that requires a value at query time. Parameters are oftendefined to prompt the user to supply a value, and in this case are referred to as prompts.
A list of values is a collection of data values that can be associated with an object in the universe,allowing the user to choose values for a prompt.
You can insert parameters and lists of values into the data foundation. They are inherited by any businesslayer built on the data foundation, but cannot be modified in the business layer.
To insert a parameter or list of values, go to the Parameters and Lists of Values tab in the DataFoundation Editor. From there, the procedure is the same as inserting parameters and lists of valuesinto a business layer. See the related topics.
Related Topics• About parameters• About lists of values
10.18 About data foundation properties
The following properties apply to the entire data foundation:
DescriptionProperty
Describes the data foundation. The description can be entered whenyou create the data foundation in the New Data Foundation wizard,and edited at any time in the data foundation properties.
Description
When selected, if the SQL expression that defines an object in the datafoundation could result in a Cartesian product, the SQL is allowed.
Note:A Cartesian product is a result set which contains all the possiblecombinations of each row in each table included in a query. A Cartesianproduct is almost always an incorrect result.
AllowCartesian products
2013-08-03179
Working with data foundations
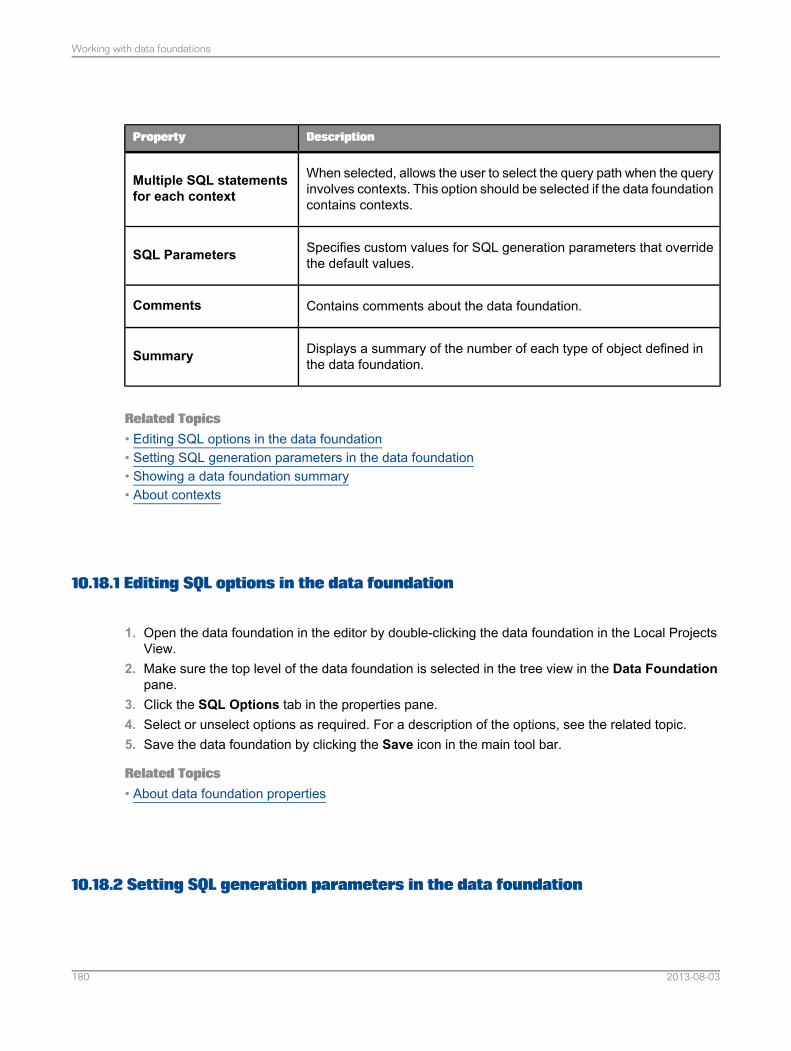
DescriptionProperty
When selected, allows the user to select the query path when the queryinvolves contexts. This option should be selected if the data foundationcontains contexts.
Multiple SQL statementsfor each context
Specifies custom values for SQL generation parameters that overridethe default values.SQL Parameters
Contains comments about the data foundation.Comments
Displays a summary of the number of each type of object defined inthe data foundation.Summary
Related Topics• Editing SQL options in the data foundation• Setting SQL generation parameters in the data foundation• Showing a data foundation summary• About contexts
10.18.1 Editing SQL options in the data foundation
1. Open the data foundation in the editor by double-clicking the data foundation in the Local ProjectsView.
2. Make sure the top level of the data foundation is selected in the tree view in the Data Foundationpane.
3. Click the SQL Options tab in the properties pane.4. Select or unselect options as required. For a description of the options, see the related topic.5. Save the data foundation by clicking the Save icon in the main tool bar.
Related Topics• About data foundation properties
10.18.2 Setting SQL generation parameters in the data foundation
2013-08-03180
Working with data foundations
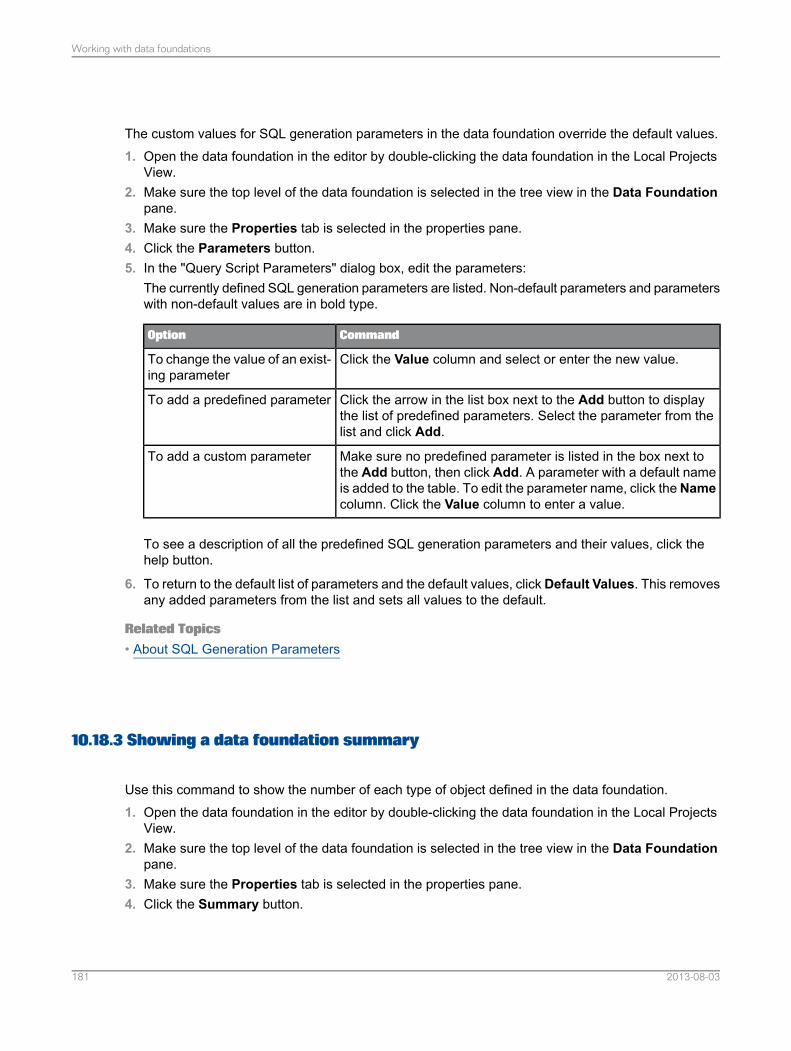
The custom values for SQL generation parameters in the data foundation override the default values.1. Open the data foundation in the editor by double-clicking the data foundation in the Local Projects
View.2. Make sure the top level of the data foundation is selected in the tree view in the Data Foundation
pane.3. Make sure the Properties tab is selected in the properties pane.4. Click the Parameters button.5. In the "Query Script Parameters" dialog box, edit the parameters:
The currently defined SQL generation parameters are listed. Non-default parameters and parameterswith non-default values are in bold type.
CommandOption
Click the Value column and select or enter the new value.To change the value of an exist-ing parameter
Click the arrow in the list box next to the Add button to displaythe list of predefined parameters. Select the parameter from thelist and click Add.
To add a predefined parameter
Make sure no predefined parameter is listed in the box next tothe Add button, then click Add. A parameter with a default nameis added to the table. To edit the parameter name, click theNamecolumn. Click the Value column to enter a value.
To add a custom parameter
To see a description of all the predefined SQL generation parameters and their values, click thehelp button.
6. To return to the default list of parameters and the default values, click Default Values. This removesany added parameters from the list and sets all values to the default.
Related Topics• About SQL Generation Parameters
10.18.3 Showing a data foundation summary
Use this command to show the number of each type of object defined in the data foundation.1. Open the data foundation in the editor by double-clicking the data foundation in the Local Projects
View.2. Make sure the top level of the data foundation is selected in the tree view in the Data Foundation
pane.3. Make sure the Properties tab is selected in the properties pane.4. Click the Summary button.
2013-08-03181
Working with data foundations
The data foundation summary displays in a new dialog box.
10.18.4 Editing the data foundation description and comments
1. Open the data foundation in the editor by double-clicking the data foundation name in the LocalProjects View.
2. Make sure the top level of the data foundation is selected in the tree view in the Data Foundationpane.
3. To enter or edit a description, click the Properties tab in the properties pane.4. To enter or edit comments, click the Comments tab in the properties pane.
The comments apply to the entire data foundation. You can also enter comments in the datafoundation display. For more information, see the related link.
5. Save the data foundation by clicking the Save icon in the main tool bar.
Related Topics• About data foundation properties• Inserting a comment into the data foundation view
10.18.5 Showing SAP HANA variable information
Variables and input parameters in SAP HANA information models are automatically associated withthe corresponding tables in the data foundation. You can see variable information in the propertiespane.1. Open the data foundation in the editor by double-clicking the data foundation in the Local Projects
View.2. Make sure the Data Foundation pane is selected.3. Select the table in the data foundation that corresponds to the information model for which you want
to see the variables.4. Select the Variables tab in the properties pane.
Related Topics• Using SAP HANA data sources
2013-08-03182
Working with data foundations
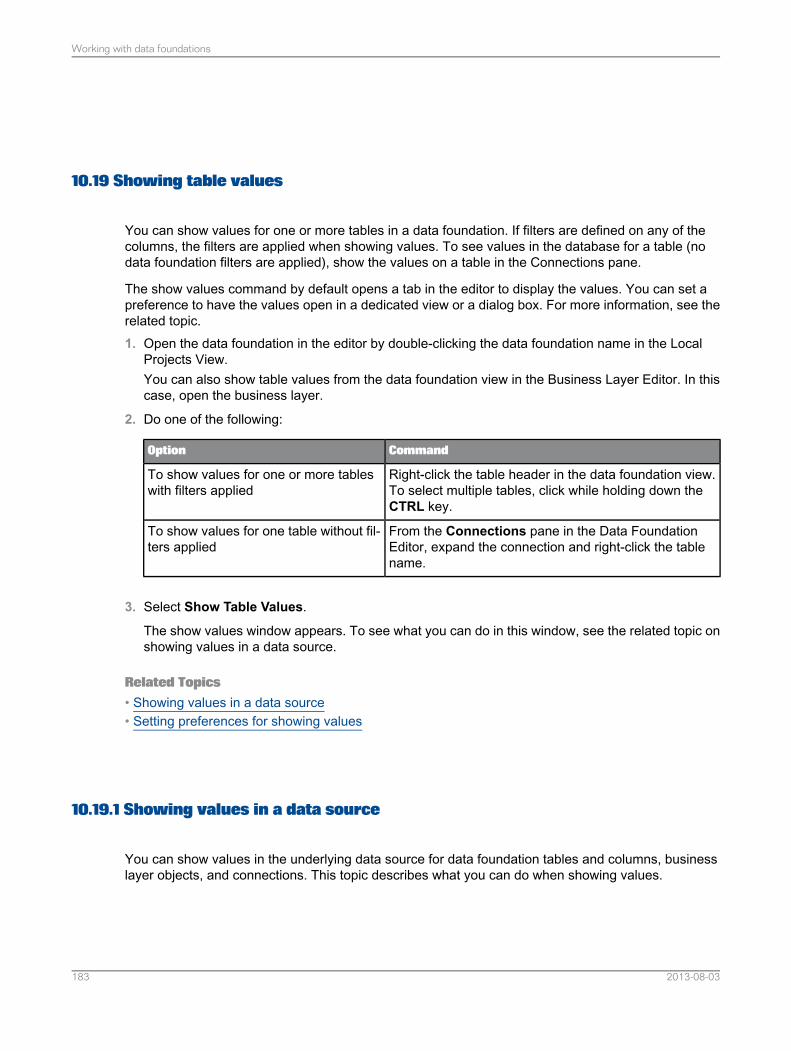
10.19 Showing table values
You can show values for one or more tables in a data foundation. If filters are defined on any of thecolumns, the filters are applied when showing values. To see values in the database for a table (nodata foundation filters are applied), show the values on a table in the Connections pane.
The show values command by default opens a tab in the editor to display the values. You can set apreference to have the values open in a dedicated view or a dialog box. For more information, see therelated topic.1. Open the data foundation in the editor by double-clicking the data foundation name in the Local
Projects View.You can also show table values from the data foundation view in the Business Layer Editor. In thiscase, open the business layer.
2. Do one of the following:
CommandOption
Right-click the table header in the data foundation view.To select multiple tables, click while holding down theCTRL key.
To show values for one or more tableswith filters applied
From the Connections pane in the Data FoundationEditor, expand the connection and right-click the tablename.
To show values for one table without fil-ters applied
3. Select Show Table Values.
The show values window appears. To see what you can do in this window, see the related topic onshowing values in a data source.
Related Topics• Showing values in a data source• Setting preferences for showing values
10.19.1 Showing values in a data source
You can show values in the underlying data source for data foundation tables and columns, businesslayer objects, and connections. This topic describes what you can do when showing values.
2013-08-03183
Working with data foundations
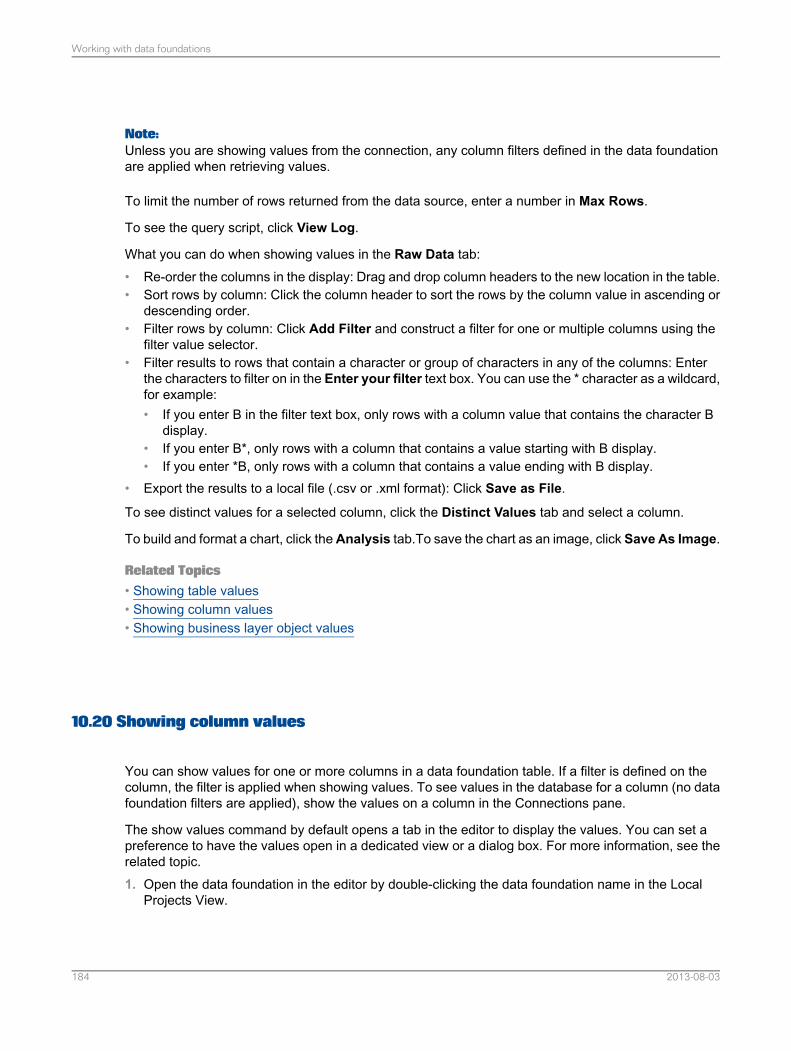
Note:Unless you are showing values from the connection, any column filters defined in the data foundationare applied when retrieving values.
To limit the number of rows returned from the data source, enter a number in Max Rows.
To see the query script, click View Log.
What you can do when showing values in the Raw Data tab:• Re-order the columns in the display: Drag and drop column headers to the new location in the table.• Sort rows by column: Click the column header to sort the rows by the column value in ascending or
descending order.• Filter rows by column: Click Add Filter and construct a filter for one or multiple columns using the
filter value selector.• Filter results to rows that contain a character or group of characters in any of the columns: Enter
the characters to filter on in the Enter your filter text box. You can use the * character as a wildcard,for example:• If you enter B in the filter text box, only rows with a column value that contains the character B
display.• If you enter B*, only rows with a column that contains a value starting with B display.• If you enter *B, only rows with a column that contains a value ending with B display.
• Export the results to a local file (.csv or .xml format): Click Save as File.
To see distinct values for a selected column, click the Distinct Values tab and select a column.
To build and format a chart, click theAnalysis tab.To save the chart as an image, click Save As Image.
Related Topics• Showing table values• Showing column values• Showing business layer object values
10.20 Showing column values
You can show values for one or more columns in a data foundation table. If a filter is defined on thecolumn, the filter is applied when showing values. To see values in the database for a column (no datafoundation filters are applied), show the values on a column in the Connections pane.
The show values command by default opens a tab in the editor to display the values. You can set apreference to have the values open in a dedicated view or a dialog box. For more information, see therelated topic.1. Open the data foundation in the editor by double-clicking the data foundation name in the Local
Projects View.
2013-08-03184
Working with data foundations
You can also show column values from the data foundation view in the Business Layer Editor. Inthis case, open the business layer.
2. Do one of the following:
CommandOption
Right-click the column name in the data foundation view.To select multiple columns, click while holding down theCTRL key.
To show values for one or more columnswith filters applied
From the Connections pane in the Data FoundationEditor, expand the connection and right-click the columnname.
To show values for one column withoutfilters applied
3. Select Show Column Values.The show values window appears. To see what you can do in this window, see the related topic onshowing and profiling values in a data source.
Related Topics• Showing values in a data source• Setting preferences for showing values
10.21 Profiling column values
You can profile the values for a column in a data foundation table. Profiling shows graphically (in a pieor bar chart) the number of occurrences of each value of a column. If the column has a filter defined,the filter is applied.1. You can profile column values from the data foundation view in either the data foundation or business
layer editor. Open the editor by double-clicking the resource in the Local Projects View.2. In the data foundation view, right-click the column name in the table display and select Profile
Column Values.The profiled data is shown in a table.
3. To see the profiled data as a chart, select the Pie Chart or Bar Chart option.
10.22 Showing local dependencies in the data foundation
Use the Show Local Dependencies command when you plan to change tables and columns in thedata foundation. The command will find the business layers and their objects that depend on the tableor column.
2013-08-03185
Working with data foundations
1. Right-click the table header or column name in the data foundation view and select Show LocalDependencies.You can select several tables and/or columns by holding down the CTRL key.The business layers that depend on the selected tables and columns are listed.
2. Select the business layer for which you want to see the dependent objects.A dialog box lists the data foundation tables and columns, and the business layer objects that dependon them.
3. To edit a business object, double-click the object name in the Business layers and objects box.The Business Layer opens with the focus on the selected object.
Related Topics• About resource dependencies
10.23 About refreshing a data foundation
Refreshing the structure of a data foundation compares the existing tables in the data foundation withthose in data source and proposes updates to the data foundation tables: deletes obselete tables andcolumns, inserts missing columns, and updates changed columns.
To start the Refresh Structure Wizard, in the Data Foundation Editor, select Refresh Structure from
the Detect menu.
The wizard detects the following changes and lists them each in their own dialog box. In each case,you select which of the proposed changes to make in the data foundation.• Tables in the data foundation that were deleted in the database. The wizard proposes to delete
these tables and any related joins from the data foundation.• Columns in data foundation tables that were deleted in the database tables. The wizard proposes
to update each corresponding table in the data foundation to delete these columns and the joinsthat use these columns.
• Columns added in the database. The wizard proposes to update each corresponding table in thedata foundation to add these columns.
• Column data types changed in the database. The wizard proposes to update the data type of eachcolumn in the data foundation that is different from the database column type.
• For connections to SAP HANA, variables in the data source that are added, deleted, or modified.
The wizard lists your selected changes in a summary dialog box and asks for confirmation beforecontinuing with the refresh.
After refreshing the structure, save the data foundation by clicking the Save icon in the main tool bar.
Note:For data foundations based on SAP NetWeaver BW connections, you can detect new tables and joinsin the data source and insert them into the data foundation using the Synchronize Tables command.
2013-08-03186
Working with data foundations
Related Topics• Synchronizing tables
10.23.1 Synchronizing tables
Before synchronizing tables, refresh the data foundation structure to make sure all existing datafoundation tables are updated with any new columns in the data source.
Synchronizing tables applies only to multisource-enabled data foundations based on SAP NetWeaverBW data sources.
Synchronizing tables searches the data source for new tables (using the SAP NetWeaver BW strategy),and inserts the new tables and joins into the data foundation.1. Open the data foundation in the editor by double-clicking the data foundation name in the Local
Projects View.2. Click the "Connections" pane.3. Right-click the connection in the "Connections" pane and select Synchronize Tables.4. You are prompted to optionally detect new joins.5. Save the data foundation by clicking the Save icon in the main tool bar.
The insertion can be undone using the Edit > Undo command on the main menu.
Refresh the business layer with new objects in the data source using the Insert Candidate Objectscommand.
Related Topics• About refreshing a data foundation• Inserting candidate objects• Refreshing universes based on SAP Netweaver BW
10.24 Inserting a custom data foundation view
A custom data foundation view is a subset of the data foundation Master view. Use views when youare editing a data foundation that contains many tables, and you are interested in working with a subsetof tables. You can define multiple custom views for the data foundation.
Table operations are allowed from all views. Any changes to a table, for example assigning the tableto a family, are propagated to all views in the data foundation.
2013-08-03187
Working with data foundations
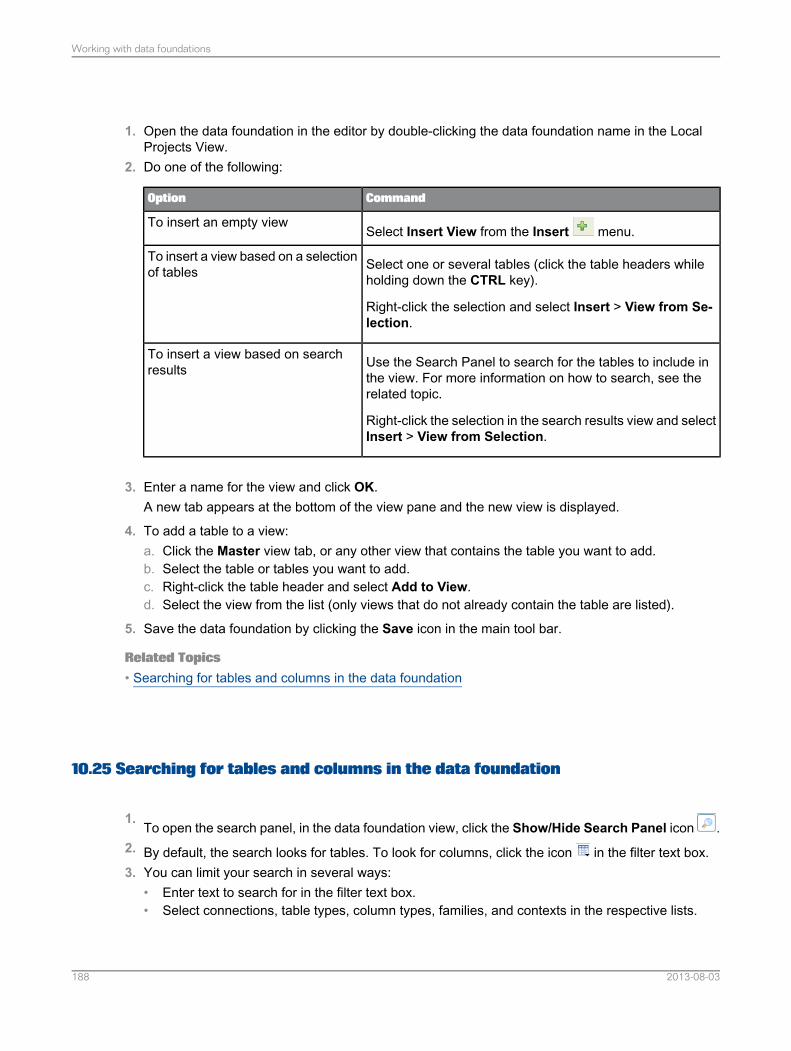
1. Open the data foundation in the editor by double-clicking the data foundation name in the LocalProjects View.
2. Do one of the following:
CommandOption
Select Insert View from the Insert menu.To insert an empty view
Select one or several tables (click the table headers whileholding down the CTRL key).
Right-click the selection and select Insert > View from Se-lection.
To insert a view based on a selectionof tables
Use the Search Panel to search for the tables to include inthe view. For more information on how to search, see therelated topic.
Right-click the selection in the search results view and selectInsert > View from Selection.
To insert a view based on searchresults
3. Enter a name for the view and click OK.A new tab appears at the bottom of the view pane and the new view is displayed.
4. To add a table to a view:a. Click the Master view tab, or any other view that contains the table you want to add.b. Select the table or tables you want to add.c. Right-click the table header and select Add to View.d. Select the view from the list (only views that do not already contain the table are listed).
5. Save the data foundation by clicking the Save icon in the main tool bar.
Related Topics• Searching for tables and columns in the data foundation
10.25 Searching for tables and columns in the data foundation
1.To open the search panel, in the data foundation view, click the Show/Hide Search Panel icon .
2. By default, the search looks for tables. To look for columns, click the icon in the filter text box.3. You can limit your search in several ways:
• Enter text to search for in the filter text box.• Select connections, table types, column types, families, and contexts in the respective lists.
2013-08-03188
Working with data foundations
The tables that match the search criteria are highlighted in the data foundation view.
4. To modify the view to display only the matching tables, click the Search Options icon at the topof the search panel, and select Auto arrange search results.
Tip:You can also use the Center on Selection command to change the zoom on the data foundationdisplay so that all the tables in a selection are visible in the display window.
5. Click Reset to clear the search criteria and start a new search.
Note:Certain operations on tables are not possible when the Search Panel is active, for example insertingalias and derived tables, detecting joins, or checking integrity. The data foundation commands that arenot available when using the Search Panel are grayed. To use these commands, close the Search
Panel by clicking the Show/Hide Search Panel icon .
Related Topics• Centering the view on a selection
10.26 Inserting a comment into the data foundation view
A comment is a note that you can place anywhere in a data foundation view.1. Open the data foundation in the editor by double-clicking the data foundation in the Local Projects
View.2.
Select Insert Comment from the Insert menu.3. In the "Edit Comment" dialog box, define the display parameters of the note, and enter the comment
text.The comment is inserted into top left corner of current view.
4. Drag the comment to the location in the view where you want it to appear.5. Save the data foundation by clicking the Save icon in the main tool bar.
10.27 Centering the view on a selection
The Center on Selection command lets you temporarily change the zoom on the data foundation viewdisplay so that all the tables in a selection are visible in the display window.1. In the data foundation editor, make a selection of tables.
For example, using the Search Panel, select all tables in a particular family.
2013-08-03189
Working with data foundations
2. Right-click the table header of one of the selected tables and select Center on Selection.
The data foundation display zooms so that all the selected tables appear in the display window. Toreset the display, close the Search Panel if it is open, or click the Reset Zoom icon in the lowertoolbar of the data foundation view.
Tip:You can also center the display on a table or join by selecting the table or join name in the tree view inthe Data Foundation panel to the left of the display.
Related Topics• Searching for tables and columns in the data foundation
10.28 Changing the display of objects in the data foundation
The following commands let you change the display of objects (tables, columns, and joins) in the datafoundation view. You can also set application preferences that affect the display of data foundationobjects. For more information on any topic, click the link.• Auto-arranging tables in the data foundation view• Changing table display• Grouping tables using families• Setting display preferences for the data foundation view• Setting performance-related options for the data foundation view
10.28.1 Auto-arranging tables in the data foundation view
Once you have inserted tables and joins into the data foundation view, you can automatically arrangethe tables according to the flow of joins from one to many.
To change the display of individual tables, see the related links.1. Open the data foundation in the editor by double-clicking the data foundation name in the Local
Projects View.2.
Click the Auto Arrange Tables icon in the data foundation view.The tables are arranged in the view.
3. Save the data foundation by clicking the Save icon in the main tool bar.
Related Topics• Changing table display
2013-08-03190
Working with data foundations
• Hiding and unhiding table columns• Grouping tables using families
10.28.2 Changing table display
For each table in the data foundation, you can select how much table information to display in the view.1. Open the data foundation in the editor by double-clicking the data foundation name in the Local
Projects View.2. Right-click the table header in the data foundation view and select Display.3. Select a display mode:
DescriptionOption
Displays only the table header.Collapsed
Displays the table header and any columns that are part of a join.Joins only
Displays the table header and all columns.Expanded
You can also toggle through the different display modes by clicking the arrow icon on the right sideof the table header.
4. Save the data foundation by clicking the Save icon in the main tool bar.
10.28.3 Grouping tables using families
A family is a set of display parameters that can be used to visually group tables of the same type. Forexample, you might define different families for fact and dimension tables.
The display parameters include background color, text color and font.1. Open the data foundation in the editor by double-clicking the data foundation name in the Local
Projects View.2. Click the Edit Families icon in the data foundation view.3. In the "Edit Families" dialog box, create a family for each table group:
a. Click Add to define a new family.b. Enter a name for the family in Name.c. Edit the table color, background, and font for the family.d. Click Apply to save the family definition.
2013-08-03191
Working with data foundations
You can export and import family definitions. Export creates a file in a local folder that can be sharedbetween different users of the information design tool.
4. When you have added all families, click OK.5. Assign tables to families. For each family:
a. Select the tables to be assigned to one family. Click the table headers while holding down theCTRL key.
b. In the Families list in the data foundation view tool bar, select the family.
Note:When you assign a table to a family, the table acquires the display attributes of the family in thecurrent view and all data foundation views where the table is present.
6. To remove a table from a family, select the table, and in the Families list, select No family.7. Save the data foundation by clicking the Save icon in the main tool bar.
2013-08-03192
Working with data foundations
Working with the federation layer
11.1 About the federation layer
The federation layer is available only in multisource-enabled data foundations. It lets you create federatedtables that can include data from any of the data source connections defined in the data foundation.Federated tables can be inserted into the data foundation and used to define the schema on which theuniverse is built.
At design time, you use the federation layer to define a data flow composed of data source tables andfederated tables. You define the data flow graphically without needing to write a lot of detailed SQLstatements. You can specify complex transformations of data within the flow, and build multi-level dataflows by using a federated table as input to another federated table.
The federation layer lets you maintain a coherent set of federated tables. From this set, you selectivelyinsert federated tables into the data foundation.
Related Topics• Building the federation data flow
11.2 Building the federation data flow
Before you can build the federation data flow, you must have a multisource-enabled data foundationbased on at least one valid connection.
Building the federation data flow is a matter of designing the input flow into a coherent set of federatedtables that your applications will query.
In a top-down approach to the design, you start with the final schema of federated tables. You definethese federated tables, then define the inputs and mapping for each column.
In a bottom-up approach, you start with the data source tables. You add federated tables from a datasource table, and then modify the mappings.
The following procedure describes the steps to build a federation data flow. Links to more informationon each step in the procedure can be found in the Related Topics.
2013-08-03193
Working with the federation layer
1. You build the federation data flow using the Data Foundation Editor. Open the data foundation inthe editor by double-clicking the data foundation name in the Local Projects View.
2. To open the Federation Data Flow view, click Federation Layer.3. Add a federated table either manually, or from a data source table.4. Define the input to the federated table. An input table can be a data source table, or a federated
table.• If you added a federated table manually, add one or more input tables and join them.• If you added a federated table from a data source, you can add other input tables and join them.
5. Map the columns from the input tables to the federated table.6. You can further refine the mapping by editing the mapping formulas, adding pre-filters and post-filters,
and specifying distinct rows for input tables.7. Optionally, you can define additional mappings for the federated table.
Mappings can be activated and deactivated. When more than one mapping is activated, the effectivemapping is a union of all activated mappings.
8. Repeat the steps to add other federated tables to your data flow.9. To save the data flow in the federation layer, save the data foundation by clicking the Save icon in
the main tool bar.
Check the integrity of the federation layer often during the design of federated tables. After you havecreated and validated a federated table, you can insert it into the data foundation.
Related Topics• About the Data Foundation Editor• Adding a federated table manually• Adding a federated table from a data source• About input tables and joins• Mapping columns from the input table to columns of the federated table• Editing a mapping formula• About pre-filters and post-filters• Adding a mapping• Activating and deactivating mappings• Checking integrity of the federation layer• Inserting a federated table into the data foundation• About distinct rows on input tables
11.3 About federated tables
Federated tables are the tables that you create to present data in the correct format for your datafoundation. A federated table may be the end result, or a table that contributes to a federated table ata higher level.
2013-08-03194
Working with the federation layer
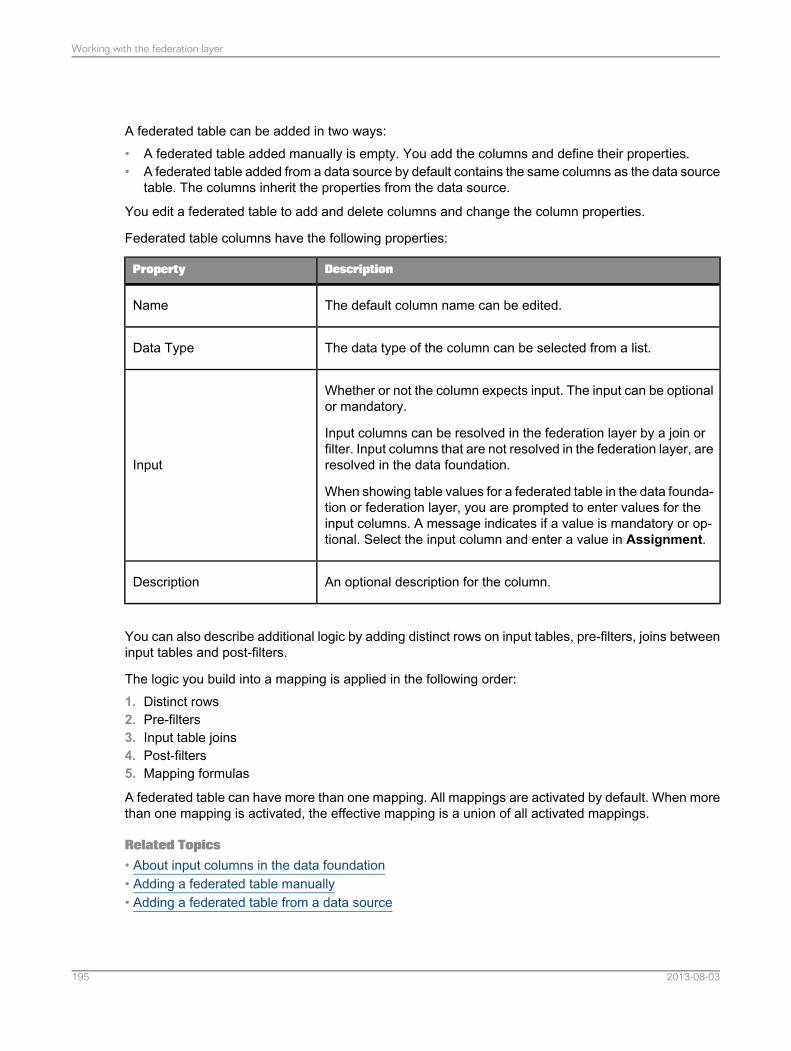
A federated table can be added in two ways:• A federated table added manually is empty. You add the columns and define their properties.• A federated table added from a data source by default contains the same columns as the data source
table. The columns inherit the properties from the data source.
You edit a federated table to add and delete columns and change the column properties.
Federated table columns have the following properties:
DescriptionProperty
The default column name can be edited.Name
The data type of the column can be selected from a list.Data Type
Whether or not the column expects input. The input can be optionalor mandatory.
Input columns can be resolved in the federation layer by a join orfilter. Input columns that are not resolved in the federation layer, areresolved in the data foundation.
When showing table values for a federated table in the data founda-tion or federation layer, you are prompted to enter values for theinput columns. A message indicates if a value is mandatory or op-tional. Select the input column and enter a value in Assignment.
Input
An optional description for the column.Description
You can also describe additional logic by adding distinct rows on input tables, pre-filters, joins betweeninput tables and post-filters.
The logic you build into a mapping is applied in the following order:1. Distinct rows2. Pre-filters3. Input table joins4. Post-filters5. Mapping formulas
A federated table can have more than one mapping. All mappings are activated by default. When morethan one mapping is activated, the effective mapping is a union of all activated mappings.
Related Topics• About input columns in the data foundation• Adding a federated table manually• Adding a federated table from a data source
2013-08-03195
Working with the federation layer

• Editing a federated table• About input tables and joins• About distinct rows on input tables• About pre-filters and post-filters• About mappings in the federation layer
11.3.1 Adding a federated table manually
Before you begin, you must have a multisource-enabled data foundation based on at least one validconnection.1. Open the data foundation by double-clicking the data foundation name in the Local Projects View.2. From the Federation Layer pane, click Add Federated Table.3. In the Add Federated Table dialog box, click the Add Row icon to add columns to the table.4. For each column, edit the name, select a data type, and select whether or not input is needed.
Optionally, you can enter a description of the column.
5. Optionally, you can add a description for the federated table.6. To save the federated table, click OK.7. To save the data flow in the federation layer, save the data foundation by clicking the Save icon in
the main tool bar.
Next you need to define a mapping for the federated table just added.
Related Topics• How to build a data foundation• About federated tables• Adding a mapping
11.3.2 Adding a federated table from a data source
Before you begin, you must have a multisource-enabled data foundation based on at least one validconnection.1. Open the data foundation by double-clicking the data foundation name in the Local Projects View.2. Click Federation Layer to open the "Federation Layer" pane, then click Connections.3. From the Connections pane, select the table from the data source and drag it to the Federation
Data Flow pane.
2013-08-03196
Working with the federation layer
A federated table is automatically added with the same name and columns as the data souce table.A default mapping is added that maps one-to-one the data source columns to the federated tablecolumns.
4. To save the data flow in the federation layer, save the data foundation by clicking the Save icon inthe main tool bar.
Next you need to further define the input to the federated table by changing the mappings.
Related Topics• How to build a data foundation• About federated tables
11.3.3 Editing a federated table
1. Open the data foundation by double-clicking the data foundation name in the Local Projects View.2. In the Federation Layer pane, right-click the federated table that you want to edit and select Edit.3. In the Edit Federated Table dialog box, you can perform the following operations:
• Edit the table name.• Add or delete columns.• Change the order of columns.• Edit column names and descriptions.• Change the data type of a column.• Change whether or not a column needs input.• Edit the table description.
4. To save the updates to the table, click OK.5. To save the data flow in the federation layer, save the data foundation by clicking the Save icon in
the main tool bar.
Related Topics• About federated tables
11.4 About input tables and joins
Input tables define the input to a federated table. They can be data source tables or other federatedtables.
2013-08-03197
Working with the federation layer
The input tables are mapped to the federated table using mappings. In a mapping, a column in an inputtable is mapped to a column in the federated table. You can define the mapping formula so that onefederated table column depends on one or more input table columns.
You can add multiple input tables to a mapping. In this case, you need to join the input tables.
To join input tables, first distinguish between core tables and non-core tables:• Use a core table to choose the set of rows that will populate your federated table (the result set).When
you set two or more tables as core, the result set is defined by the join of all the core tables. Thecore tables are joined using an inner join.
• Use non-core tables to extend the attributes of each row in the result set. A non-core table is joinedusing an outer join with core tables. If a row exists in the core table that doesn't match a non-coretable row, it will return a row with nulls for the non-core columns.
The following restrictions apply to input tables and joins:• Direct joins between two non-core input tables are not allowed.• Cycles are not allowed (for example, if input table A is joined with B is joined with C, C cannot join
to A.)
Note:When a table is a core table, the table name in the input tables pane in the mapping is in bold.
Related Topics• Adding input tables to a mapping• Joining input tables
11.4.1 Adding input tables to a mapping
1. Open the data foundation by double-clicking the data foundation name in the Local Projects View.2. In the Federation Layer pane, select the federated table.
The mapping tabs appear in the Properties pane.
3. If the federated table has more than one mapping, select the appropriate mapping tab.4. Do one of the following:
2013-08-03198
Working with the federation layer
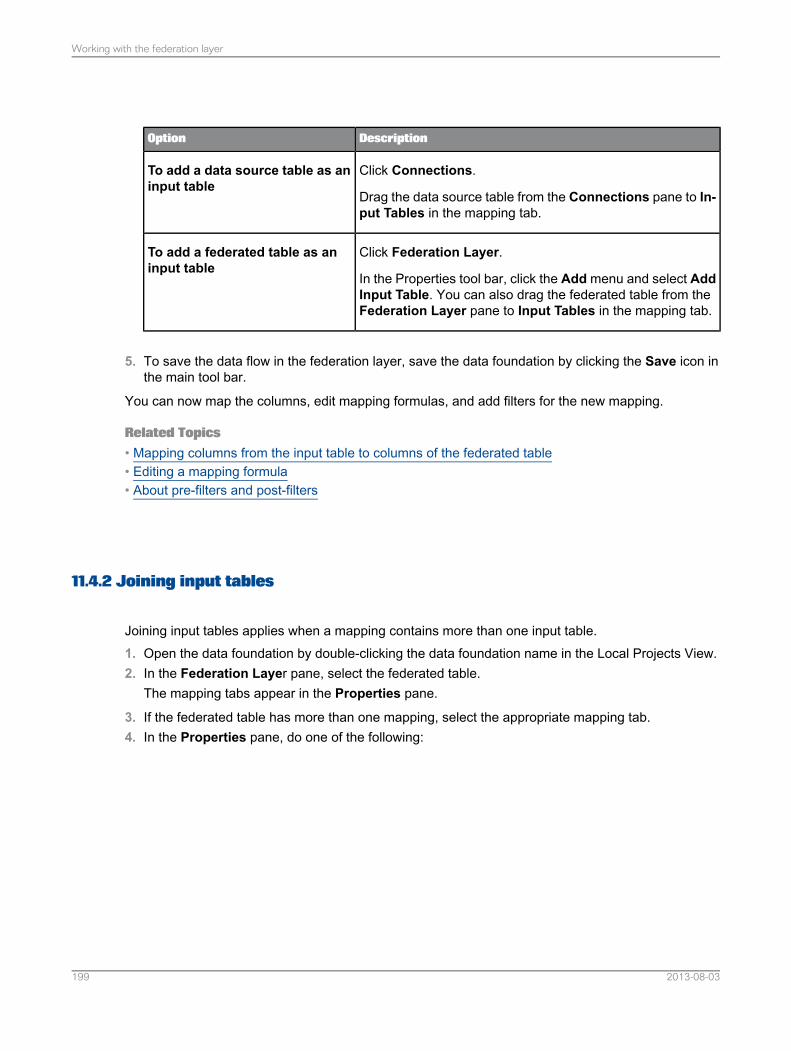
DescriptionOption
Click Connections.
Drag the data source table from the Connections pane to In-put Tables in the mapping tab.
To add a data source table as aninput table
Click Federation Layer.
In the Properties tool bar, click the Add menu and select AddInput Table. You can also drag the federated table from theFederation Layer pane to Input Tables in the mapping tab.
To add a federated table as aninput table
5. To save the data flow in the federation layer, save the data foundation by clicking the Save icon inthe main tool bar.
You can now map the columns, edit mapping formulas, and add filters for the new mapping.
Related Topics• Mapping columns from the input table to columns of the federated table• Editing a mapping formula• About pre-filters and post-filters
11.4.2 Joining input tables
Joining input tables applies when a mapping contains more than one input table.1. Open the data foundation by double-clicking the data foundation name in the Local Projects View.2. In the Federation Layer pane, select the federated table.
The mapping tabs appear in the Properties pane.
3. If the federated table has more than one mapping, select the appropriate mapping tab.4. In the Properties pane, do one of the following:
2013-08-03199
Working with the federation layer
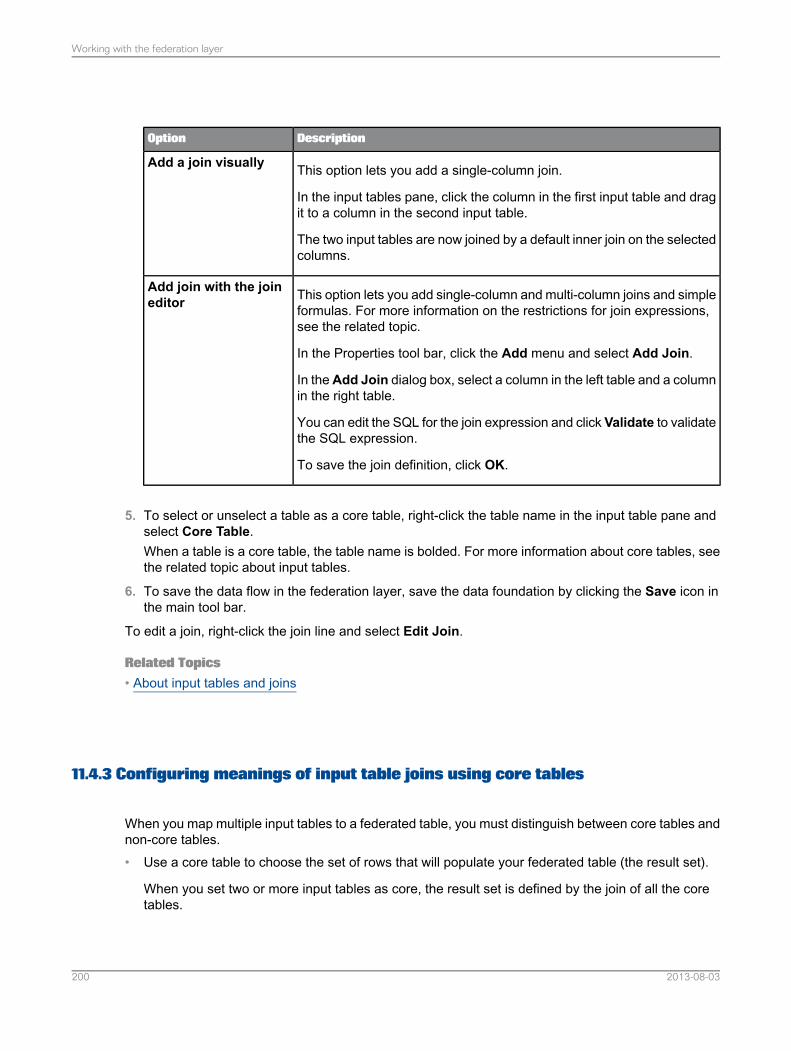
DescriptionOption
This option lets you add a single-column join.
In the input tables pane, click the column in the first input table and dragit to a column in the second input table.
The two input tables are now joined by a default inner join on the selectedcolumns.
Add a join visually
This option lets you add single-column and multi-column joins and simpleformulas. For more information on the restrictions for join expressions,see the related topic.
In the Properties tool bar, click the Add menu and select Add Join.
In theAdd Join dialog box, select a column in the left table and a columnin the right table.
You can edit the SQL for the join expression and click Validate to validatethe SQL expression.
To save the join definition, click OK.
Add join with the joineditor
5. To select or unselect a table as a core table, right-click the table name in the input table pane andselect Core Table.When a table is a core table, the table name is bolded. For more information about core tables, seethe related topic about input tables.
6. To save the data flow in the federation layer, save the data foundation by clicking the Save icon inthe main tool bar.
To edit a join, right-click the join line and select Edit Join.
Related Topics• About input tables and joins
11.4.3 Configuring meanings of input table joins using core tables
When you map multiple input tables to a federated table, you must distinguish between core tables andnon-core tables.• Use a core table to choose the set of rows that will populate your federated table (the result set).
When you set two or more input tables as core, the result set is defined by the join of all the coretables.
2013-08-03200
Working with the federation layer
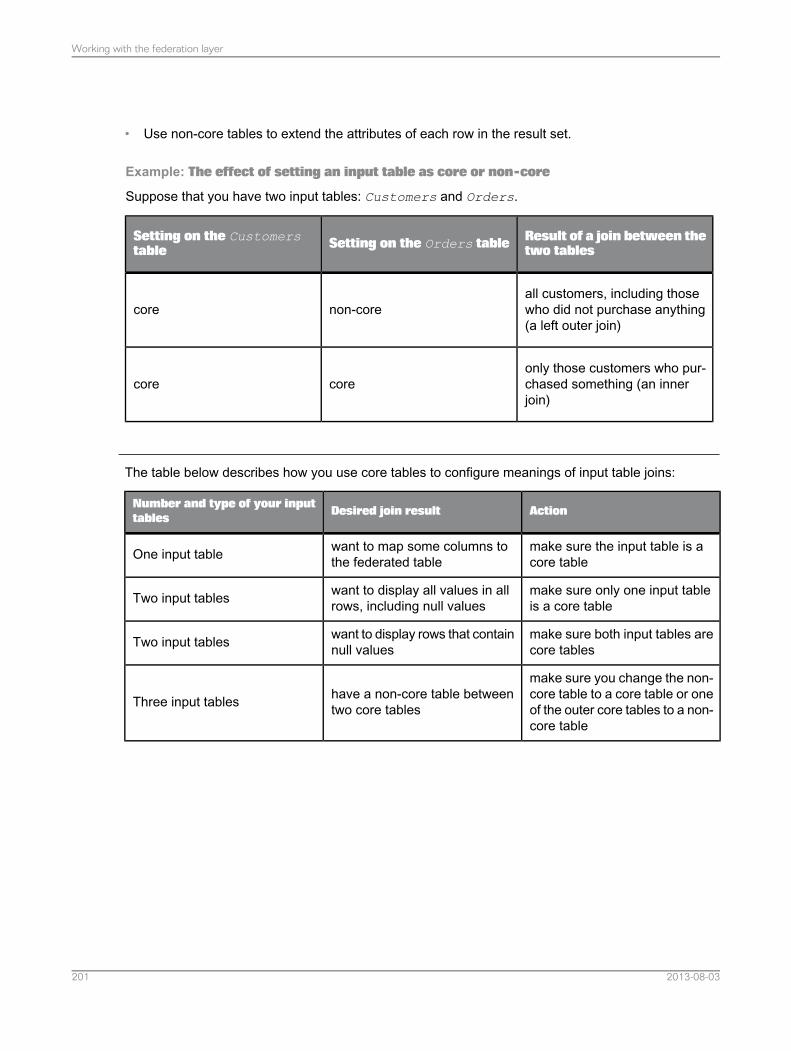
• Use non-core tables to extend the attributes of each row in the result set.
Example: The effect of setting an input table as core or non-core
Suppose that you have two input tables: Customers and Orders.
Result of a join between thetwo tablesSetting on the Orders tableSetting on the Customers
table
all customers, including thosewho did not purchase anything(a left outer join)
non-corecore
only those customers who pur-chased something (an innerjoin)
corecore
The table below describes how you use core tables to configure meanings of input table joins:
ActionDesired join resultNumber and type of your inputtables
make sure the input table is acore table
want to map some columns tothe federated tableOne input table
make sure only one input tableis a core table
want to display all values in allrows, including null valuesTwo input tables
make sure both input tables arecore tables
want to display rows that containnull valuesTwo input tables
make sure you change the non-core table to a core table or oneof the outer core tables to a non-core table
have a non-core table betweentwo core tablesThree input tables
2013-08-03201
Working with the federation layer
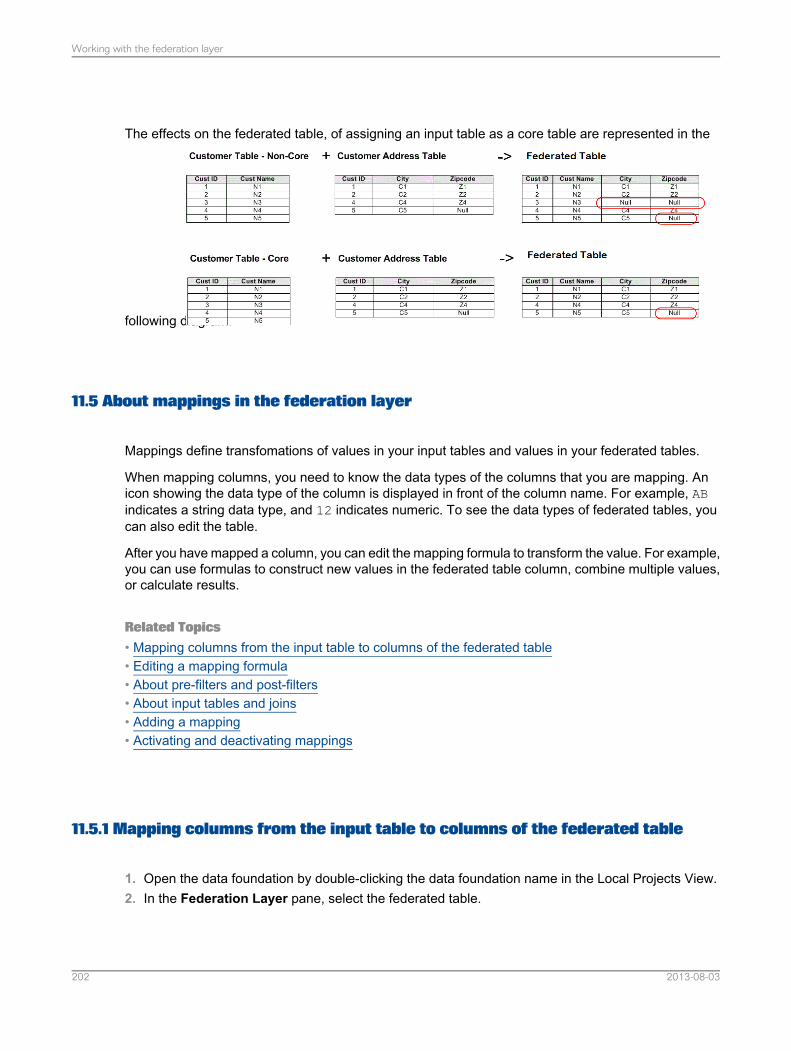
The effects on the federated table, of assigning an input table as a core table are represented in the
following diagram:
11.5 About mappings in the federation layer
Mappings define transfomations of values in your input tables and values in your federated tables.
When mapping columns, you need to know the data types of the columns that you are mapping. Anicon showing the data type of the column is displayed in front of the column name. For example, ABindicates a string data type, and 12 indicates numeric. To see the data types of federated tables, youcan also edit the table.
After you have mapped a column, you can edit the mapping formula to transform the value. For example,you can use formulas to construct new values in the federated table column, combine multiple values,or calculate results.
Related Topics• Mapping columns from the input table to columns of the federated table• Editing a mapping formula• About pre-filters and post-filters• About input tables and joins• Adding a mapping• Activating and deactivating mappings
11.5.1 Mapping columns from the input table to columns of the federated table
1. Open the data foundation by double-clicking the data foundation name in the Local Projects View.2. In the Federation Layer pane, select the federated table.
2013-08-03202
Working with the federation layer
The mapping tabs appear in the Properties pane.
3. If the federated table has more than one mapping, select the appropriate mapping tab.4. Select a column in an input table and drag it to a column in the federated table.
A mapping line appears between the columns.
Edit the mapping formula for the column.
Related Topics• Editing a mapping formula• About mappings in the federation layer
11.5.2 Editing a mapping formula
1. Open the data foundation by double-clicking the data foundation name in the Local Projects View.2. In the Federation Layer pane, select the federated table.
The mapping tabs appear in the Properties pane.
3. If the federated table has more than one mapping, select the appropriate mapping tab.4. Right-click the column in the federated table and select Edit Mapping Formula.5. Edit and validate the SQL expression for the mapping formula in the SQL Expression Editor, and
when you are finished, click OK.6. To save the data flow in the federation layer, save the data foundation by clicking the Save icon in
the main tool bar.
Related Topics• About the SQL Expression Editor
11.5.3 About the SQL Expression Editor
The SQL Expression Editor helps you write valid SQL expressions.
You can type SQL directly into the "Expression" box, drag and drop table or column names from theSources pane, and drag and drop operators and database functions from the Functions pane. Thesepanes are described in the following table. To display a resource pane, click the icon in the tool bar ofthe Expression pane.
Click the Validate icon in the tool bar of the Expression pane to check if the expression you havedefined is valid SQL.
2013-08-03203
Working with the federation layer
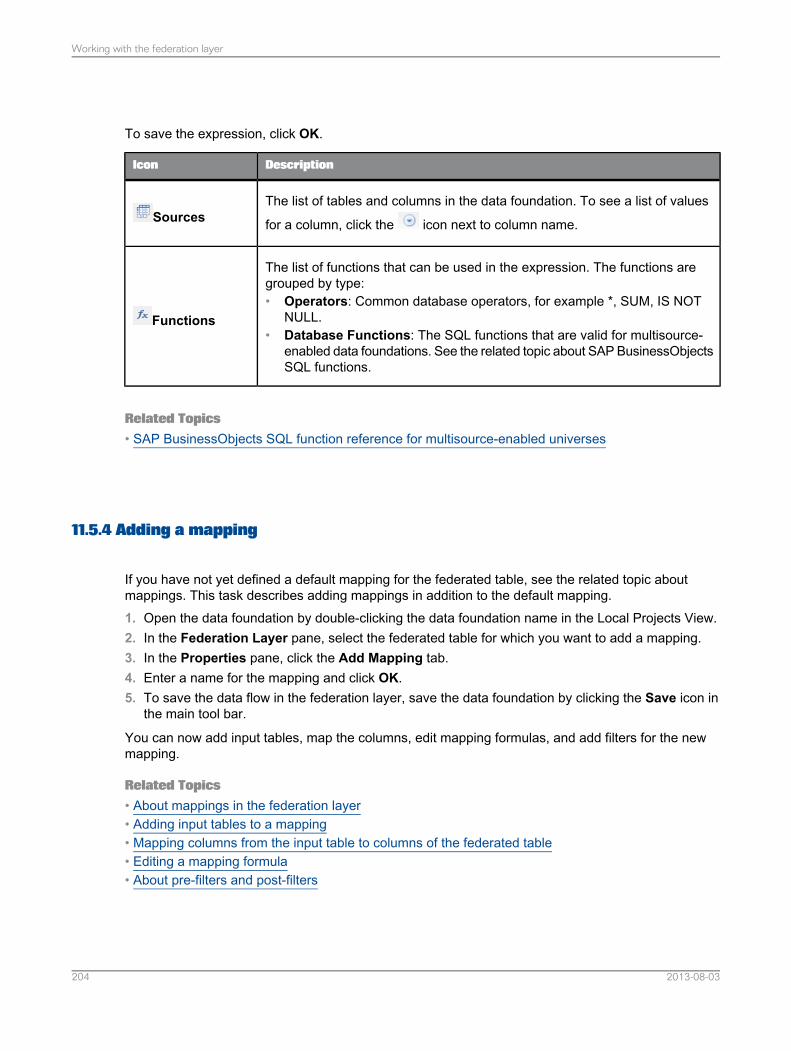
To save the expression, click OK.
DescriptionIcon
The list of tables and columns in the data foundation. To see a list of values
for a column, click the icon next to column name.Sources
The list of functions that can be used in the expression. The functions aregrouped by type:• Operators: Common database operators, for example *, SUM, IS NOT
NULL.• Database Functions: The SQL functions that are valid for multisource-
enabled data foundations. See the related topic about SAP BusinessObjectsSQL functions.
Functions
Related Topics• SAP BusinessObjects SQL function reference for multisource-enabled universes
11.5.4 Adding a mapping
If you have not yet defined a default mapping for the federated table, see the related topic aboutmappings. This task describes adding mappings in addition to the default mapping.1. Open the data foundation by double-clicking the data foundation name in the Local Projects View.2. In the Federation Layer pane, select the federated table for which you want to add a mapping.3. In the Properties pane, click the Add Mapping tab.4. Enter a name for the mapping and click OK.5. To save the data flow in the federation layer, save the data foundation by clicking the Save icon in
the main tool bar.
You can now add input tables, map the columns, edit mapping formulas, and add filters for the newmapping.
Related Topics• About mappings in the federation layer• Adding input tables to a mapping• Mapping columns from the input table to columns of the federated table• Editing a mapping formula• About pre-filters and post-filters
2013-08-03204
Working with the federation layer
11.5.5 Activating and deactivating mappings
The effective mapping for a federated table is the implicit union of all activated mappings.1. Open the data foundation by double-clicking the data foundation name in the Local Projects View.2. In the Federation Layer pane, select the federated table in the Federation Data Flow pane.3. Right-click the mapping that you want to activate or deactivate and select Activate.
When a mapping is deactivated, the mapping name is crossed-out in the table view.
4. To save the data flow in the federation layer, save the data foundation by clicking the Save icon inthe main tool bar.
11.6 About distinct rows on input tables
The distinct rows feature lets you specify whether the rows coming from an input table should be distinct.You can turn on the distinct rows feature on each input table.
11.6.1 Activating and deactivating distinct rows
1. Open the data foundation by double-clicking the data foundation name in the Local Projects View.2. In the Federation Layer pane, select the federated table.
The mapping tabs appear in the Properties pane.
3. If the federated table has more than one mapping, select the appropriate mapping tab.4. Right-click the input table name and select Distinct Row.
Note:If there is a checkmark before the Distinct Rows menu item, it indicates that the feature is activeand if there is not one, it means the feature is not active.
5. To save the data flow in the federation layer, save the data foundation by clicking the Save icon inthe main tool bar.
11.7 About pre-filters and post-filters
2013-08-03205
Working with the federation layer
Filters let you transform data in mappings in two ways:• Pre-filters let you limit the source data that is queried in the mapping. For example, you can use a
filter to limit customer data to those customers who are born after a certain date.
You can use a pre-filter on each input table that is used in a mapping.
• Post-filters let you limit the data after it has been treated by table joins. Use post-filters when thefilter definition depends on columns from more than one input table. For example, to limit the ordersto customers who were 18 years old or older on the order date.
You can use one post-filter per mapping.
Pre-filters are applied before the table joins. Post-filters are applied after the table joins. Mappingformulas are applied after the post-filters.
11.7.1 Adding and editing pre-filters
1. Open the data foundation by double-clicking the data foundation name in the Local Projects View.2. In the Federation Layer pane, select the federated table.
The mapping tabs appear in the Properties pane.
3. If the federated table has more than one mapping, select the appropriate mapping tab.4. Select the input table and do one of the following:
DescriptionOption
Right-click the input table name and select Add Pre-filter.To add a pre-filter
Right-click the input table name and select Edit Pre-filter.To edit and existing pre-fil-ter
Note:One pre-filter is allowed per input table.
5. Edit and validate the SQL expression for the pre-filter in the SQL Expression Editor, and when youare finished, click OK.
6. To save the data flow in the federation layer, save the data foundation by clicking the Save icon inthe main tool bar.
Related Topics• About the SQL Expression Editor• About pre-filters and post-filters
2013-08-03206
Working with the federation layer
11.7.2 Editing post-filters
1. Open the data foundation by double-clicking the data foundation name in the Local Projects View.2. In the Federation Layer pane, select the federated table for which you want to add a mapping.3. If the federated table has more than one mapping, select the appropriate mapping tab.4. Click the Edit Post-Filter icon .
Note:One post-filter is allowed per mapping.
5. Edit and validate the SQL expression for the post-filter in the SQL Expression Editor, and when youare finished, click OK.
6. To save the data flow in the federation layer, save the data foundation by clicking the Save icon inthe main tool bar.
Related Topics• About the SQL Expression Editor• About pre-filters and post-filters
11.8 Showing values in a federated table
The show values command applies the pre-filters, joins, post-filters, and mapping formulas. If thefederated table contains an input column, you are prompted for a value.
By default, show values opens a tab in the editor to display the values. You can set a preference tohave the values open in a dedicated view or a dialog box. For more information, see the related topic.1. Open the data foundation by double-clicking the data foundation name in the Local Projects View.2. In the Federation Layer pane, right-click the federated table and select Show Table Values.
The show values window appears. To see what you can do in this window, see the related topic onshowing values in a data source.
Related Topics• Showing values in a data source• Setting preferences for showing values
2013-08-03207
Working with the federation layer

11.9 Checking integrity of the federation layer
1. Open the data foundation by double-clicking the data foundation name in the Local Projects View.2. Do one of the following:
DescriptionOption
Click Federation LayerTo check integrity of the federation layeronly
Click Data Foundation and select the top level of thedata foundation in the tree view.
To check integrity of the data founda-tion, including the federation layer
3.From the main tool bar, select the Check Integrity icon .
Note:For more information about check integrity rules and the results of an integrity check, see the relatedtopic.
Related Topics• Running check integrity
11.10 Inserting a federated table into the data foundation
Before you can insert a federated table into the data foundation, you must define the federated tableand data flow in the federation layer.1. Open the data foundation by double-clicking the data foundation name in the Local Projects View.2. Select Insert Federated Table from the Insert menu in the Data Foundation view.3. In Insert Federated Tables, select the federated tables you want to insert, and click OK.4. Save the data foundation by clicking the Save icon in the main tool bar.
Related Topics• Building the federation data flow
2013-08-03208
Working with the federation layer
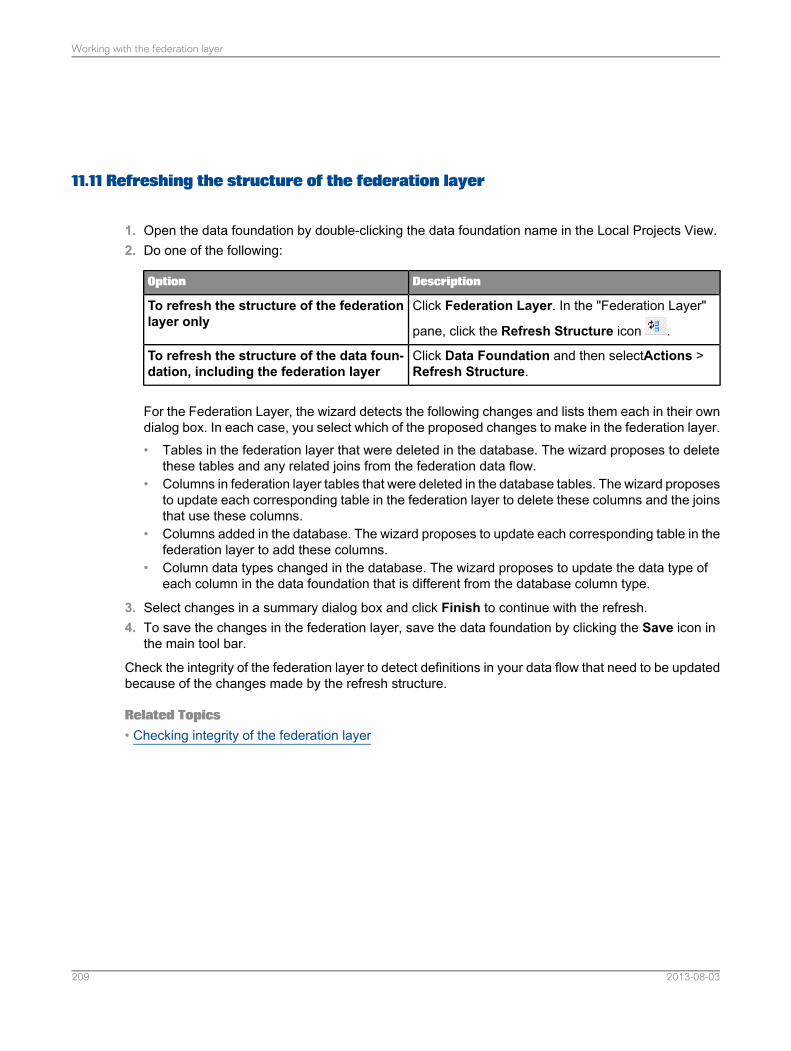
11.11 Refreshing the structure of the federation layer
1. Open the data foundation by double-clicking the data foundation name in the Local Projects View.2. Do one of the following:
DescriptionOption
Click Federation Layer. In the "Federation Layer"
pane, click the Refresh Structure icon .
To refresh the structure of the federationlayer only
Click Data Foundation and then selectActions >Refresh Structure.
To refresh the structure of the data foun-dation, including the federation layer
For the Federation Layer, the wizard detects the following changes and lists them each in their owndialog box. In each case, you select which of the proposed changes to make in the federation layer.• Tables in the federation layer that were deleted in the database. The wizard proposes to delete
these tables and any related joins from the federation data flow.• Columns in federation layer tables that were deleted in the database tables. The wizard proposes
to update each corresponding table in the federation layer to delete these columns and the joinsthat use these columns.
• Columns added in the database. The wizard proposes to update each corresponding table in thefederation layer to add these columns.
• Column data types changed in the database. The wizard proposes to update the data type ofeach column in the data foundation that is different from the database column type.
3. Select changes in a summary dialog box and click Finish to continue with the refresh.4. To save the changes in the federation layer, save the data foundation by clicking the Save icon in
the main tool bar.
Check the integrity of the federation layer to detect definitions in your data flow that need to be updatedbecause of the changes made by the refresh structure.
Related Topics• Checking integrity of the federation layer
2013-08-03209
Working with the federation layer

2013-08-03210
Working with the federation layer
Working with business layers
12.1 About business layers
A business layer is a collection of metadata objects that map to SQL or MDX definitions in a database,for example, columns, views, database functions, or pre-aggregated calculations. The metadata objectsinclude dimensions, hierarchies, measures, attributes, and predefined conditions. Each objectcorresponds to a unit of business information that can be manipulated in a query to return data. Businesslayers can be created directly on an OLAP cube, or on a data foundation that is built on a relationaldatabase.
When a business layer is complete, it is published to a repository or a local folder as a universe. Auniverse is a published .unx file that includes a business layer and its connection to an OLAP cube, ora business layer and its corresponding data foundation. The universe is available in the repository toSAP BusinessObjects data analysis and report creation applications.
The principle role of the business layer is to define and organize metadata before it is published as auniverse. An alternative way to understand the business layer is to think of it as a metadata workbenchthat a designer uses to assemble and modify a metadata set before publishing as a universe for dataanalysis and report creation applications.
Related Topics• About business layer objects• About business layer properties• How to build a relational business layer• How to build an OLAP business layer
12.2 About business layer objects
The Business Layer objects pane contains the metadata objects that make up the business layer.
Every object in the business layer has a name that can be edited. When naming objects, use businessvocabulary familiar to the users who will be using the universe for querying, analysis, and reporting.
Objects can have three states:• Active: Object is visible in the Query Panel. This is the default state.
2013-08-03211
Working with business layers
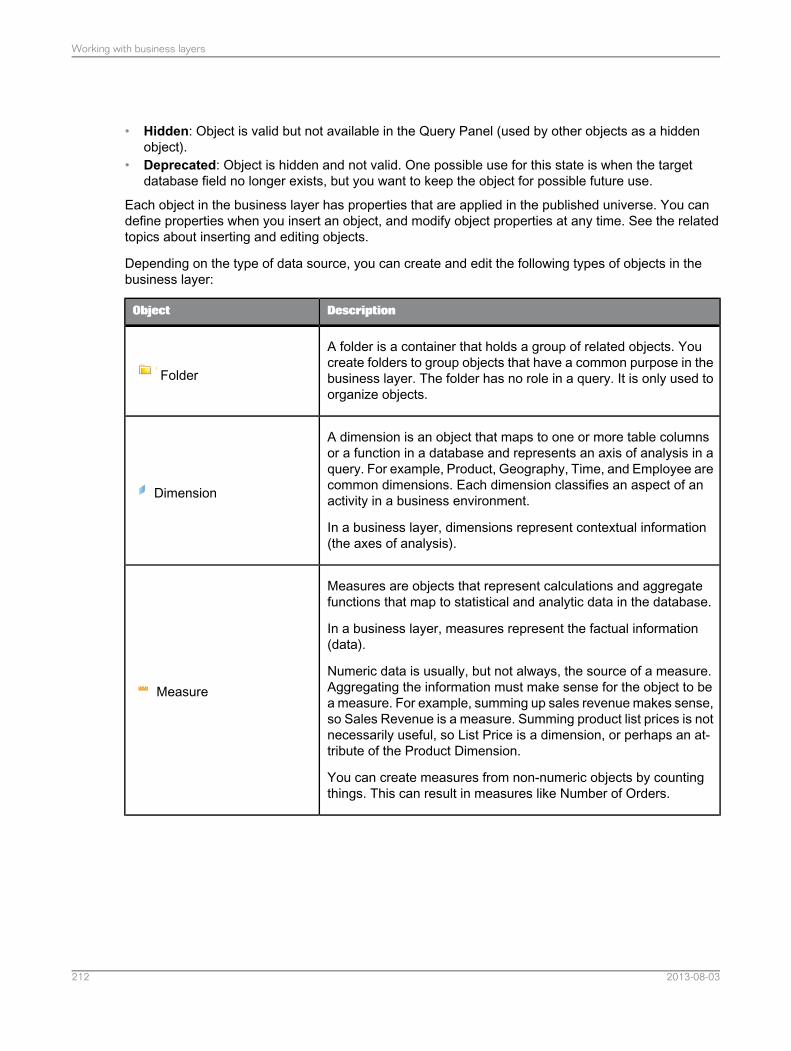
• Hidden: Object is valid but not available in the Query Panel (used by other objects as a hiddenobject).
• Deprecated: Object is hidden and not valid. One possible use for this state is when the targetdatabase field no longer exists, but you want to keep the object for possible future use.
Each object in the business layer has properties that are applied in the published universe. You candefine properties when you insert an object, and modify object properties at any time. See the relatedtopics about inserting and editing objects.
Depending on the type of data source, you can create and edit the following types of objects in thebusiness layer:
DescriptionObject
A folder is a container that holds a group of related objects. Youcreate folders to group objects that have a common purpose in thebusiness layer. The folder has no role in a query. It is only used toorganize objects.
Folder
A dimension is an object that maps to one or more table columnsor a function in a database and represents an axis of analysis in aquery. For example, Product, Geography, Time, and Employee arecommon dimensions. Each dimension classifies an aspect of anactivity in a business environment.
In a business layer, dimensions represent contextual information(the axes of analysis).
Dimension
Measures are objects that represent calculations and aggregatefunctions that map to statistical and analytic data in the database.
In a business layer, measures represent the factual information(data).
Numeric data is usually, but not always, the source of a measure.Aggregating the information must make sense for the object to bea measure. For example, summing up sales revenue makes sense,so Sales Revenue is a measure. Summing product list prices is notnecessarily useful, so List Price is a dimension, or perhaps an at-tribute of the Product Dimension.
You can create measures from non-numeric objects by countingthings. This can result in measures like Number of Orders.
Measure
2013-08-03212
Working with business layers
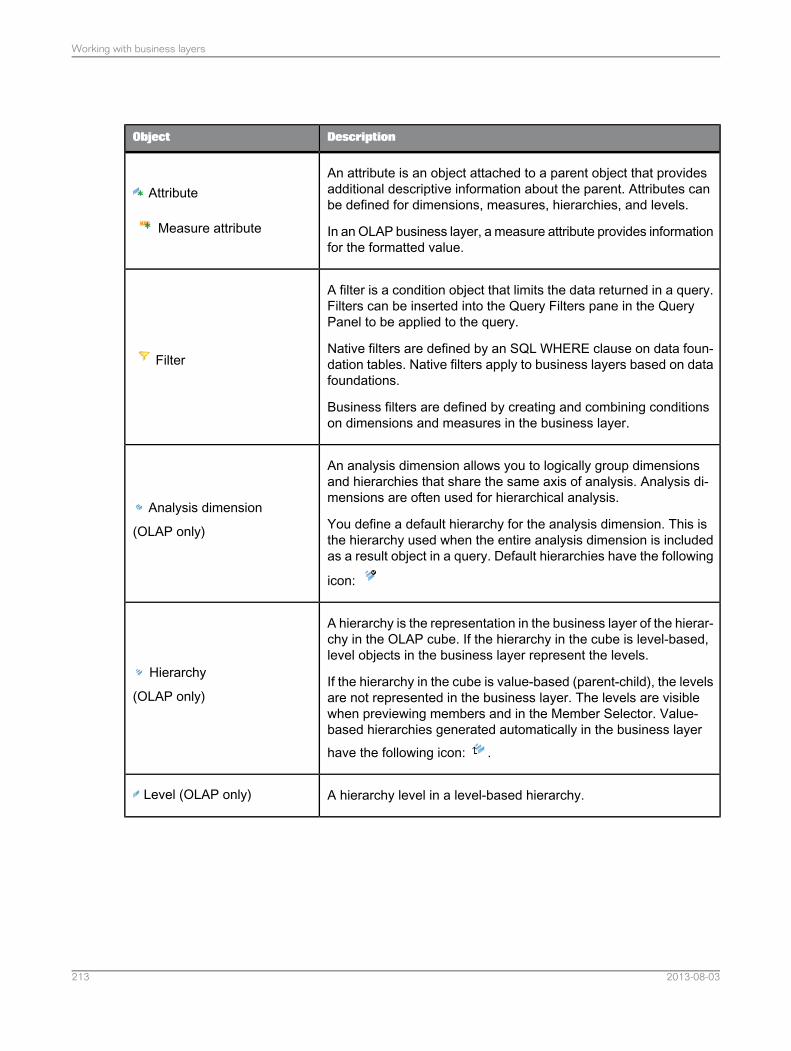
DescriptionObject
An attribute is an object attached to a parent object that providesadditional descriptive information about the parent. Attributes canbe defined for dimensions, measures, hierarchies, and levels.
In an OLAP business layer, a measure attribute provides informationfor the formatted value.
Attribute
Measure attribute
A filter is a condition object that limits the data returned in a query.Filters can be inserted into the Query Filters pane in the QueryPanel to be applied to the query.
Native filters are defined by an SQL WHERE clause on data foun-dation tables. Native filters apply to business layers based on datafoundations.
Business filters are defined by creating and combining conditionson dimensions and measures in the business layer.
Filter
An analysis dimension allows you to logically group dimensionsand hierarchies that share the same axis of analysis. Analysis di-mensions are often used for hierarchical analysis.
You define a default hierarchy for the analysis dimension. This isthe hierarchy used when the entire analysis dimension is includedas a result object in a query. Default hierarchies have the following
icon:
Analysis dimension
(OLAP only)
A hierarchy is the representation in the business layer of the hierar-chy in the OLAP cube. If the hierarchy in the cube is level-based,level objects in the business layer represent the levels.
If the hierarchy in the cube is value-based (parent-child), the levelsare not represented in the business layer. The levels are visiblewhen previewing members and in the Member Selector. Value-based hierarchies generated automatically in the business layerhave the following icon: .
Hierarchy
(OLAP only)
A hierarchy level in a level-based hierarchy.Level (OLAP only)
2013-08-03213
Working with business layers
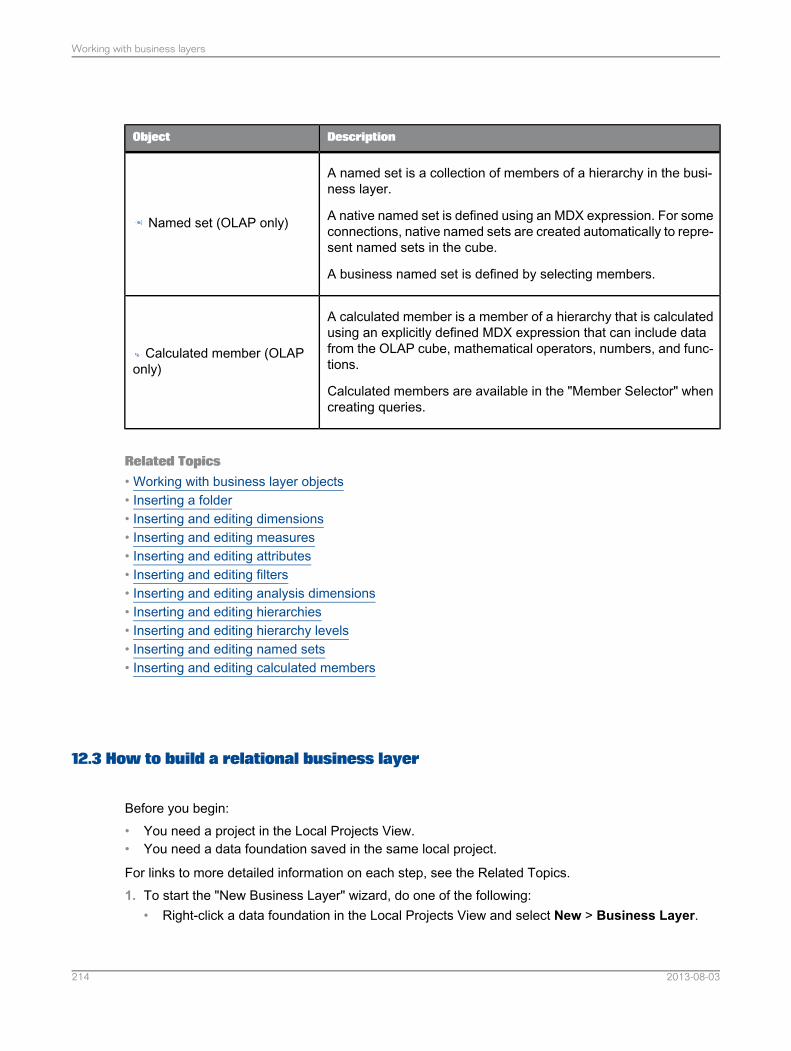
DescriptionObject
A named set is a collection of members of a hierarchy in the busi-ness layer.
A native named set is defined using an MDX expression. For someconnections, native named sets are created automatically to repre-sent named sets in the cube.
A business named set is defined by selecting members.
Named set (OLAP only)
A calculated member is a member of a hierarchy that is calculatedusing an explicitly defined MDX expression that can include datafrom the OLAP cube, mathematical operators, numbers, and func-tions.
Calculated members are available in the "Member Selector" whencreating queries.
Calculated member (OLAPonly)
Related Topics• Working with business layer objects• Inserting a folder• Inserting and editing dimensions• Inserting and editing measures• Inserting and editing attributes• Inserting and editing filters• Inserting and editing analysis dimensions• Inserting and editing hierarchies• Inserting and editing hierarchy levels• Inserting and editing named sets• Inserting and editing calculated members
12.3 How to build a relational business layer
Before you begin:• You need a project in the Local Projects View.• You need a data foundation saved in the same local project.
For links to more detailed information on each step, see the Related Topics.1. To start the "New Business Layer" wizard, do one of the following:
• Right-click a data foundation in the Local Projects View and select New > Business Layer.
2013-08-03214
Working with business layers
• Right-click the project folder in the Local Projects View and select New > Business Layer andselect Relational data foundation as the data source.
The business layer is created in a .blx file in the local project folder. It opens automatically in theBusiness Layer Editor.
2. Build the business layer:
If you created the business layer with theAutomatically create folders and objects option selected(default), all objects are created in the business layer as dimensions. You need to specify themeasures explicitly using the Turn into Measure with Aggregation Function command.
Otherwise, insert the business layer objects:a. Insert folders and subfolders to organize the business layer.
Note:When you drag a table into the business layer from the data foundation, a folder is automaticallyinserted.
b. Drag and drop tables and columns into the desired folders and rename the objects if needed.c. Specify the measures using the Turn into Measure with Aggregation Function command.
3. You can enhance the function of the business layer in several ways, for example:• Insert attributes to provide descriptive information for dimensions and measures• Insert additional measures• Insert pre-defined filters (mandatory or optional) that can limit data returned in queries• Insert parameters with optional prompts• Insert custom lists of values to be associated with a prompt• Insert navigation paths to define drill paths• Create business layer views to restrict the objects seen in the Query Panel• Set SQL options and SQL generation parameters in the business layer properties• Set up aggregate awareness to improve query performance
4. Run an integrity check to validate the dependencies, object expressions, and parameters and listsof values. Right-click the business layer name in the Business Layer pane, and select CheckIntegrity.
5. Save the business layer by clicking the Save icon in the main tool bar.
Some commands to help you maintain the business layer are listed below.• If you change object definitions, use Show Local Dependencies to find the other business layer
objects and data foundation objects that might be impacted by the changes.• If the related data foundation is modified, you must refresh the business layer manually. The related
topic describes commands to help you do this.• Use Change Data Foundation to change the source data foundation for the business layer.• For multisource-enabled business layers, use Compute Statistics to improve query performance.
Related Topics• Creating a local project• How to build a data foundation• About the Business Layer Editor• About business layer objects
2013-08-03215
Working with business layers
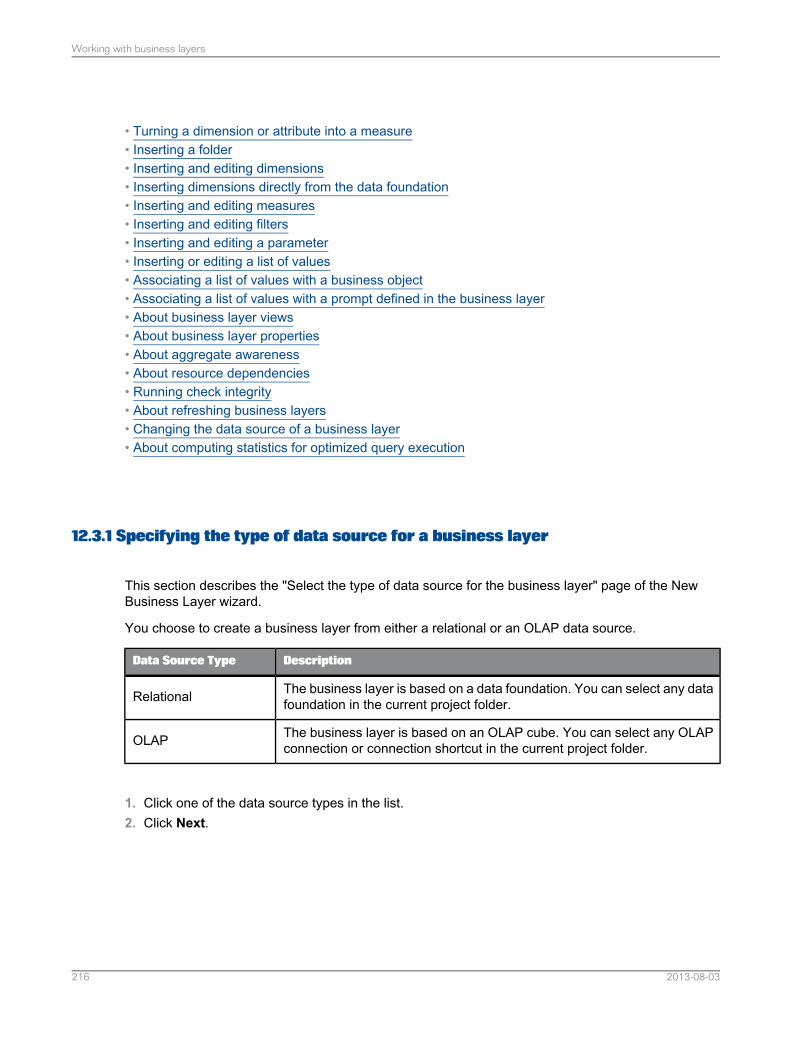
• Turning a dimension or attribute into a measure• Inserting a folder• Inserting and editing dimensions• Inserting dimensions directly from the data foundation• Inserting and editing measures• Inserting and editing filters• Inserting and editing a parameter• Inserting or editing a list of values• Associating a list of values with a business object• Associating a list of values with a prompt defined in the business layer• About business layer views• About business layer properties• About aggregate awareness• About resource dependencies• Running check integrity• About refreshing business layers• Changing the data source of a business layer• About computing statistics for optimized query execution
12.3.1 Specifying the type of data source for a business layer
This section describes the "Select the type of data source for the business layer" page of the NewBusiness Layer wizard.
You choose to create a business layer from either a relational or an OLAP data source.
DescriptionData Source Type
The business layer is based on a data foundation. You can select any datafoundation in the current project folder.Relational
The business layer is based on an OLAP cube. You can select any OLAPconnection or connection shortcut in the current project folder.OLAP
1. Click one of the data source types in the list.2. Click Next.
2013-08-03216
Working with business layers
12.3.2 Naming a business layer
This section describes the "Resource Name" page of the New Business Layer wizard.
You enter a name and description of the business layer. This is the name of the universe that is publishedfrom the business layer.
Related Topics• Selecting a data foundation for a business layer• Selecting an OLAP connection and cube for a business layer
12.3.3 Selecting a data foundation for a business layer
This section describes the "Select Data Foundation" page of the New Business Layer wizard.Select a data foundation as the data source for the new business layer. You can choose to do one ofthe following:• Automatically create the business layer objects from the tables and columns in the data foundation.• Create an empty business layer. You must manually add the objects from the data foundation after
creation.1. Click the browse button at the end of the Data Foundation text field.
A list of available data foundations appears.
2. Select a data foundation in the list and click OK.
The data foundation name appears in the name field. TheAutomatically create folders and objectsoption is selected by default.
Business layer object names are generated based on table and column names (except for datafoundations based on SAP ERP and SAP NetWeaver BW, which use a dedicated strategy for namingobjects). You can set an application preference to determine how names are generated. For moreinformation, see the related topic about setting preferences for the Business Layer Editor.
3. Do one of the following:• If you want to automatically populate the business layer with objects and folders, click Finish.• If you do not want to automatically populate the business layer, unselect the option and click
Finish.
The new business layer opens in an editing tab. You can now insert and edit the business layer objects.
2013-08-03217
Working with business layers
The Automatically create folders and objects option creates all objects in the business layer asdimensions. Specify the measures explicitly using the Turn into Measure with Aggregation Functioncommand. For more information, see the related topic.
Related Topics• How to build a relational business layer• Turning a dimension or attribute into a measure• About business layer objects• Setting preferences for the Business Layer Editor
12.4 How to build an OLAP business layer
Before you begin:• You need a project in the Local Projects View.• You need an OLAP connection or connection shortcut saved in the same local project.
For links to more detailed information on each step, see the Related Topics.1. To start the "New Business Layer" wizard, do one of the following:
• Right-click an OLAP connection or connection shortcut in the Local Projects View and selectNew > Business Layer.
• Right-click the project folder in the Local Projects View and select New > Business Layer andselect OLAP connection as the data source.
The business layer is created in a .blx file in the local project folder. It opens automatically in theBusiness Layer Editor.
2. Objects in the business layer are inserted automatically based on the cube. You can enhance thefunction of the business layer in several ways, for example:• Insert analytical dimensions, hierarchies, and attributes• Insert named sets• Insert calculated members• Insert measures and their formatted value attributes• Insert pre-defined filters (mandatory or optional) to limit data returned in queries• Insert parameters with optional prompts• Insert custom lists of values to be associated with a prompt• Create business layer views to restrict the objects seen in the Query Panel
3. Run an integrity check to validate the dependencies, object expressions, and parameters and listsof values. Right-click the business layer name in the Business Layer pane, and select CheckIntegrity.
4. Save the business layer by clicking the Save icon in the main tool bar.
Some commands to help you maintain the business layer are listed below.
2013-08-03218
Working with business layers

• If you change object definitions, use Show Local Dependencies to find the other business layerobjects that might be impacted by the changes.
• If the underlying data source is modified, use Refresh Structure to refresh the business layer.• Use Change OLAP Connection to change the connection for the business layer and to edit the
OLAP data source properties.
Related Topics• Creating a local project• Creating an OLAP connection• About business layer objects• Inserting and editing analysis dimensions• Inserting and editing hierarchies• Inserting and editing hierarchy levels• Inserting and editing attributes• Inserting and editing named sets• Inserting and editing calculated members• Inserting and editing measures• Inserting and editing filters• Inserting and editing a parameter• Inserting or editing a list of values• Associating a list of values with a business object• Associating a list of values with a prompt defined in the business layer• About business layer views• Running check integrity• Refreshing an OLAP business layer• Changing the data source of a business layer
12.4.1 Selecting an OLAP connection and cube for a business layer
This section describes the "Select OLAP Connection" page of the New Business Layer wizard.
Select an OLAP connection and the OLAP cube as the data source for the new business layer.
Note:You cannot build a business layer on an SAP BICS Client connection although these connectionsappear in the list. Use SAP BICS Client connections in SAP BusinessObjects query and reportingapplications to connect directly to the BEx query. No business layer or universe is required to accessBEx queries. For information on building a universe on an SAP NetWeaver BW connection, see therelated topic.
2013-08-03219
Working with business layers
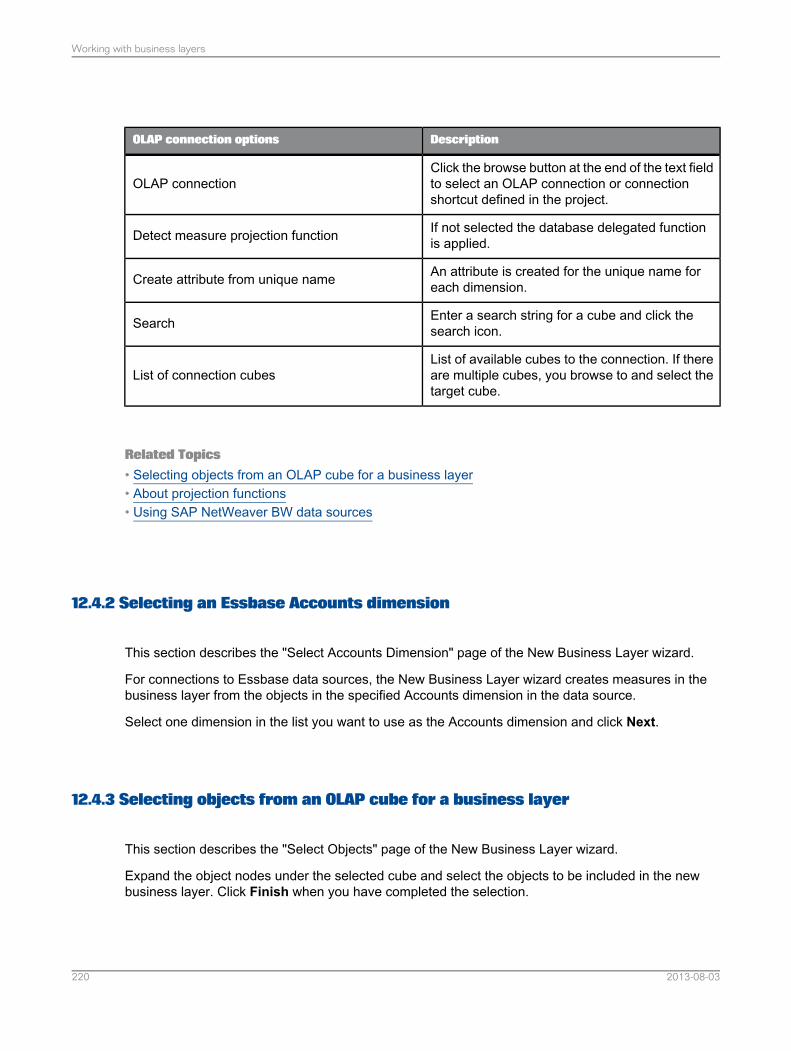
DescriptionOLAP connection options
Click the browse button at the end of the text fieldto select an OLAP connection or connectionshortcut defined in the project.
OLAP connection
If not selected the database delegated functionis applied.Detect measure projection function
An attribute is created for the unique name foreach dimension.Create attribute from unique name
Enter a search string for a cube and click thesearch icon.Search
List of available cubes to the connection. If thereare multiple cubes, you browse to and select thetarget cube.
List of connection cubes
Related Topics• Selecting objects from an OLAP cube for a business layer• About projection functions• Using SAP NetWeaver BW data sources
12.4.2 Selecting an Essbase Accounts dimension
This section describes the "Select Accounts Dimension" page of the New Business Layer wizard.
For connections to Essbase data sources, the New Business Layer wizard creates measures in thebusiness layer from the objects in the specified Accounts dimension in the data source.
Select one dimension in the list you want to use as the Accounts dimension and click Next.
12.4.3 Selecting objects from an OLAP cube for a business layer
This section describes the "Select Objects" page of the New Business Layer wizard.
Expand the object nodes under the selected cube and select the objects to be included in the newbusiness layer. Click Finish when you have completed the selection.
2013-08-03220
Working with business layers
The new business layer appears in the Business Layer pane.
12.5 About the Business Layer Editor
You use the Business Layer Editor to create and edit business layer objects and properties. This topicdescribes how to navigate the editor. For steps to help you build the structure of your business layer,see How to build a relational business layer or How to build an OLAP business layer.
The Business Layer Editor is divided into browsing panes on the left, an editing pane on the upper right,and a data source pane on the lower right.
The browsing panes allow you to work with different elements of the business layer. Access the panesby clicking the corresponding tab:• Business Layer• Queries• Parameters and Lists of Values• Navigation Paths
For more information about what you can do in each of the browsing panes, see the related topic.
The Business Layer is the default browsing pane. It displays a tree view of the objects in the businesslayer. The following options are available for displaying and navigating the business layer tree view:• Filter by business layer view• Search for an object• Change display options: Show or hide objects, show unique names
The editing pane lets you edit the properties of the object or element selected in the browsing pane.
The data source pane displays the data foundation or the OLAP connection information:• The data foundation master view containing all tables and joins displays by default. Tabs for other
data foundation views, if defined, appear at the bottom of the data source pane. To change views,click the tab.
• The OLAP metadata in the connection displays in the left side of the data source pane. Select ametadata object to display its properties in the right side of the pane.
Related Topics• About business layer properties• About business layer objects• About queries in a business layer• About parameters• About lists of values• About navigation paths for objects• About business layer views• Filtering by business layer view
2013-08-03221
Working with business layers

• Searching for business layer objects• Changing display options of the business layer tree view
12.5.1 Changing display options of the business layer tree view
When editing a business layer, the Business Layer browsing pane displays a tree view of the objectsin the business layer. Use this procedure to change the display mode of the business layer objects.1. Click the Display options icon at the top of the Business Layer browsing pane.2. For business layers based on an OLAP connection, select one of three options:
• Display caption to display the object names.• Display unique name to display the unique object name from the cube.• Display caption and unique name
3. To show only active objects in the business layer tree view, select Hide non-active objects.
The display options remain in effect until you close the editor.
Related Topics• Changing the state of an object: Active, Hidden, or Deprecated
12.6 About business layer properties
The following properties and options are defined for the entire business layer. The restrictions areapplied in the published universe.
DescriptionProperty
Identifies the business layer and also the universe whenthe business layer is published.Name
Describes the universe purpose and content. This de-scription is available to display in the query and report-ing tools that use the published universe.
Description
2013-08-03222
Working with business layers
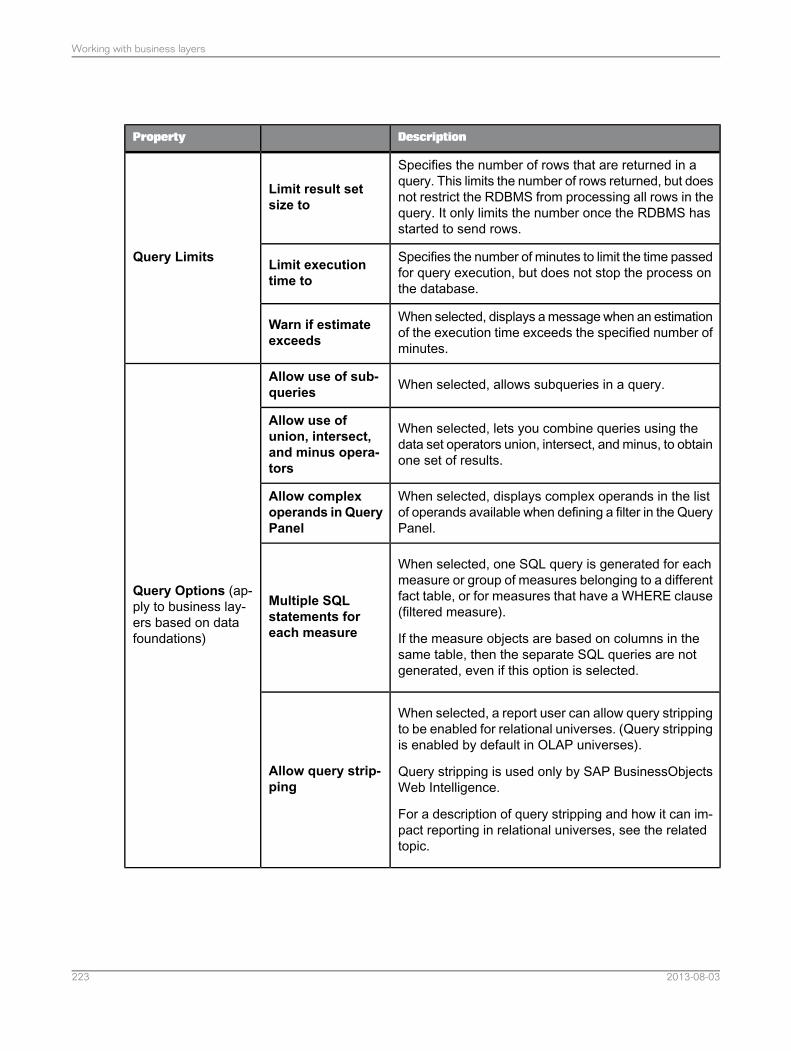
DescriptionProperty
Specifies the number of rows that are returned in aquery. This limits the number of rows returned, but doesnot restrict the RDBMS from processing all rows in thequery. It only limits the number once the RDBMS hasstarted to send rows.
Limit result setsize to
Query Limits Specifies the number of minutes to limit the time passedfor query execution, but does not stop the process onthe database.
Limit executiontime to
When selected, displays a message when an estimationof the execution time exceeds the specified number ofminutes.
Warn if estimateexceeds
When selected, allows subqueries in a query.Allow use of sub-queries
Query Options (ap-ply to business lay-ers based on datafoundations)
When selected, lets you combine queries using thedata set operators union, intersect, and minus, to obtainone set of results.
Allow use ofunion, intersect,and minus opera-tors
When selected, displays complex operands in the listof operands available when defining a filter in the QueryPanel.
Allow complexoperands in QueryPanel
When selected, one SQL query is generated for eachmeasure or group of measures belonging to a differentfact table, or for measures that have a WHERE clause(filtered measure).
If the measure objects are based on columns in thesame table, then the separate SQL queries are notgenerated, even if this option is selected.
Multiple SQLstatements foreach measure
When selected, a report user can allow query strippingto be enabled for relational universes. (Query strippingis enabled by default in OLAP universes).
Query stripping is used only by SAP BusinessObjectsWeb Intelligence.
For a description of query stripping and how it can im-pact reporting in relational universes, see the relatedtopic.
Allow query strip-ping
2013-08-03223
Working with business layers
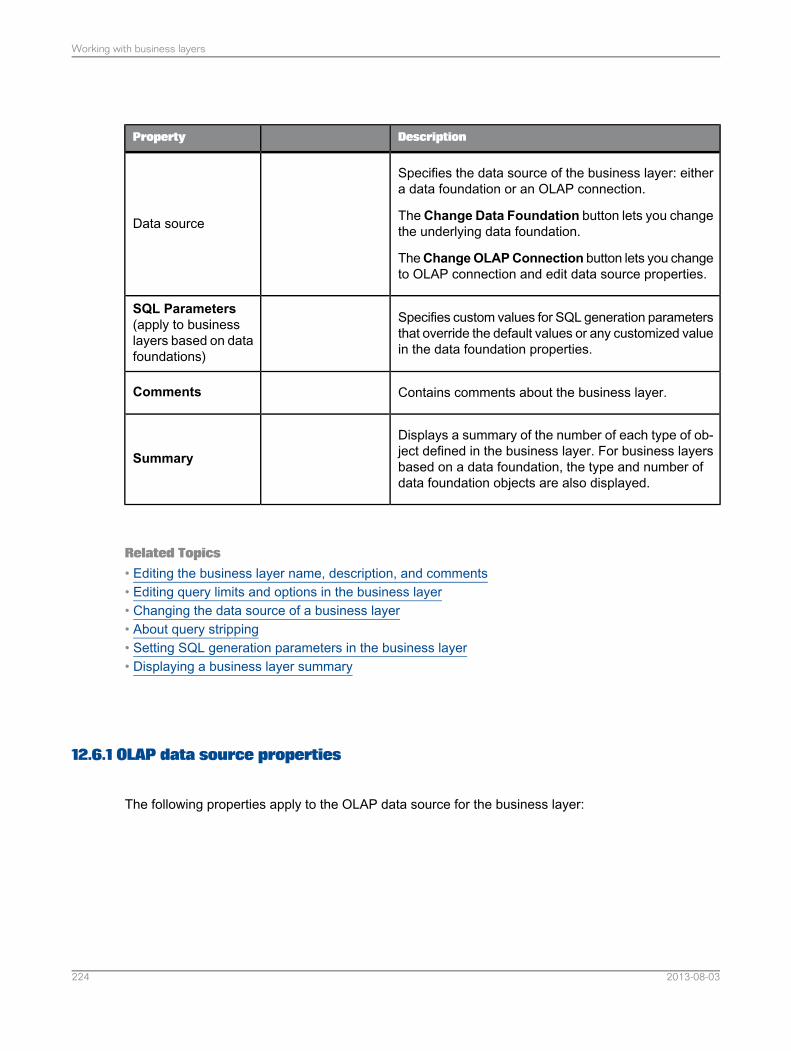
DescriptionProperty
Specifies the data source of the business layer: eithera data foundation or an OLAP connection.
TheChange Data Foundation button lets you changethe underlying data foundation.
TheChangeOLAPConnection button lets you changeto OLAP connection and edit data source properties.
Data source
Specifies custom values for SQL generation parametersthat override the default values or any customized valuein the data foundation properties.
SQL Parameters(apply to businesslayers based on datafoundations)
Contains comments about the business layer.Comments
Displays a summary of the number of each type of ob-ject defined in the business layer. For business layersbased on a data foundation, the type and number ofdata foundation objects are also displayed.
Summary
Related Topics• Editing the business layer name, description, and comments• Editing query limits and options in the business layer• Changing the data source of a business layer• About query stripping• Setting SQL generation parameters in the business layer• Displaying a business layer summary
12.6.1 OLAP data source properties
The following properties apply to the OLAP data source for the business layer:
2013-08-03224
Working with business layers
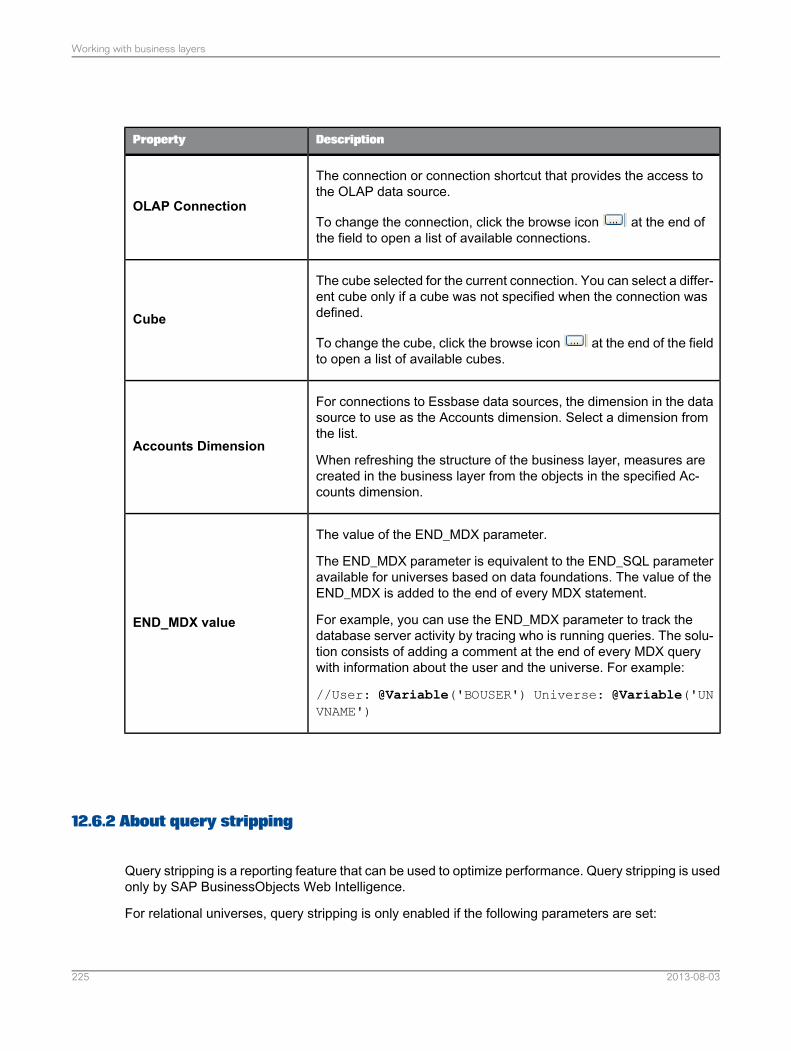
DescriptionProperty
The connection or connection shortcut that provides the access tothe OLAP data source.
To change the connection, click the browse icon at the end ofthe field to open a list of available connections.
OLAP Connection
The cube selected for the current connection. You can select a differ-ent cube only if a cube was not specified when the connection wasdefined.
To change the cube, click the browse icon at the end of the fieldto open a list of available cubes.
Cube
For connections to Essbase data sources, the dimension in the datasource to use as the Accounts dimension. Select a dimension fromthe list.
When refreshing the structure of the business layer, measures arecreated in the business layer from the objects in the specified Ac-counts dimension.
Accounts Dimension
The value of the END_MDX parameter.
The END_MDX parameter is equivalent to the END_SQL parameteravailable for universes based on data foundations. The value of theEND_MDX is added to the end of every MDX statement.
For example, you can use the END_MDX parameter to track thedatabase server activity by tracing who is running queries. The solu-tion consists of adding a comment at the end of every MDX querywith information about the user and the universe. For example:
//User: @Variable('BOUSER') Universe: @Variable('UNVNAME')
END_MDX value
12.6.2 About query stripping
Query stripping is a reporting feature that can be used to optimize performance. Query stripping is usedonly by SAP BusinessObjects Web Intelligence.
For relational universes, query stripping is only enabled if the following parameters are set:
2013-08-03225
Working with business layers
• The Allow query stripping option is selected in the business layer properties in the informationdesign tool (unselected by default).
• The Enable query stripping option is selected in the Document Properties in Web Intelligence(unselected by default).
• The Enable query stripping option is selected for the data provider in the Query Properties in WebIntelligence (selected by default).
For OLAP universes, query stripping is enabled by default.
When query stripping is enabled, the query is rewritten to reference only objects that are used in thereport. Let's take for example a query that contains three result objects: Country, City, and Revenue.A report based on this query may contain only City and Revenue. If query stripping is enabled, whenthe report is refreshed, the query will only retrieve the data for City and Revenue.
In relational universes, a report with query stripping enabled may return different data (usually morerows) than when query stripping is disabled, depending on the schema of the data foundation. Querystripping rewrites the query to contain only the objects referenced in the report and any joins concernedby those objects. For this reason, it is recommended to disable query stripping in the following situations:• The data foundation contains outer joins.• The data foundation contains self-restricting joins (column filters).• The data foundation contains shortcut joins.• Aggregate awareness is defined in the business layer (using the @Aggregate_aware function in the
definition of business layer objects).
Let's look again at the example of a query that contains Country, City, and Sales Revenue. In thedata foundation, there is a self-restricting join on the Country table that restricts the country to the US.
With query stripping disabled, the report on City and Revenue returns revenue for only cities in theUS.
With query stripping enabled, the report returns revenue for cities in all countries, because the Countrytable was stripped out of the query.
Related Topics• Editing query limits and options in the business layer
12.6.3 Editing the business layer name, description, and comments
1. Open the business layer in the editor by double-clicking the business layer in the Local ProjectsView.
2. Make sure the top level of the business layer is selected in the tree view in the Business Layerpane.
3. Change the business layer properties in the editing pane:• To change the business layer name, edit Name.• To enter or edit the business layer description, click the Properties tab.
2013-08-03226
Working with business layers
• To enter or edit comments for the business layer, click the Comments tab.
4. Save the business layer by clicking the Save icon in the main tool bar.
Related Topics• About business layer properties
12.6.4 Editing query limits and options in the business layer
1. Open the business layer in the editor by double-clicking the business layer in the Local ProjectsView.
2. Make sure the top level of the business layer is selected in the tree view in the Business Layerpane.
3. Click the Query Options tab in the editing pane.4. Select or unselect options and edit limit values as required. For a description of the options, see the
related topic.5. Save the business layer by clicking the Save icon in the main tool bar.
Related Topics• About business layer properties
12.6.5 Changing the data source of a business layer
To change the data source for a business layer, the new data source (data foundation, OLAP connectionor connection shortcut) must be saved in the same local project folder as the business layer.1. Open the business layer in the editor by double-clicking the business layer name in the Local Projects
View.2. Make sure the top level of the business layer is selected in the tree view in the Business Layer
pane.3. Make sure the Properties tab is selected in the editing pane.4. Do one of the following depending on the type of data source for the business layer:
2013-08-03227
Working with business layers
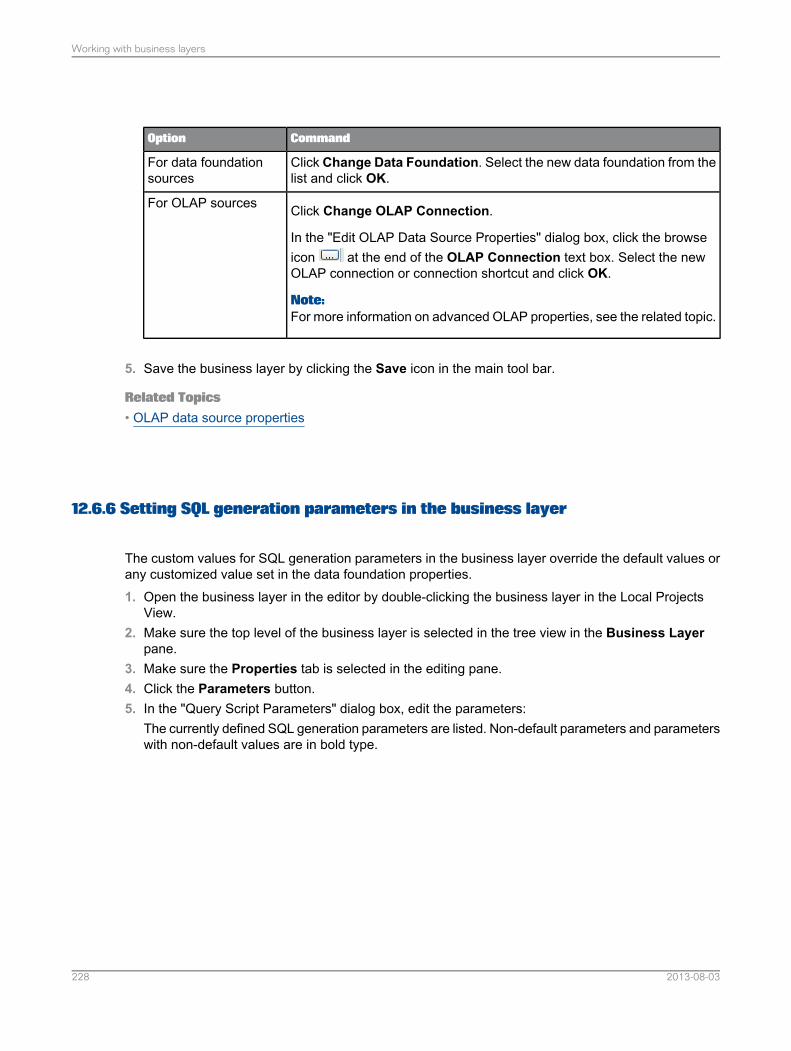
CommandOption
Click Change Data Foundation. Select the new data foundation from thelist and click OK.
For data foundationsources
Click Change OLAP Connection.
In the "Edit OLAP Data Source Properties" dialog box, click the browseicon at the end of the OLAP Connection text box. Select the newOLAP connection or connection shortcut and click OK.
Note:For more information on advanced OLAP properties, see the related topic.
For OLAP sources
5. Save the business layer by clicking the Save icon in the main tool bar.
Related Topics• OLAP data source properties
12.6.6 Setting SQL generation parameters in the business layer
The custom values for SQL generation parameters in the business layer override the default values orany customized value set in the data foundation properties.1. Open the business layer in the editor by double-clicking the business layer in the Local Projects
View.2. Make sure the top level of the business layer is selected in the tree view in the Business Layer
pane.3. Make sure the Properties tab is selected in the editing pane.4. Click the Parameters button.5. In the "Query Script Parameters" dialog box, edit the parameters:
The currently defined SQL generation parameters are listed. Non-default parameters and parameterswith non-default values are in bold type.
2013-08-03228
Working with business layers
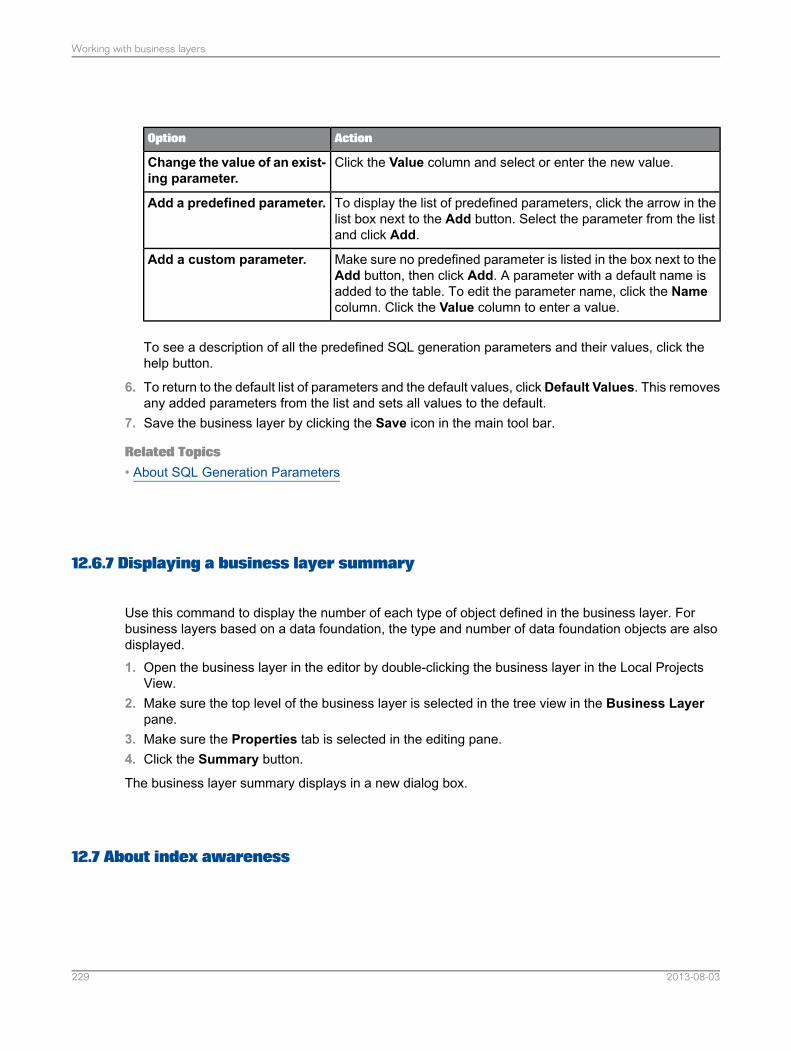
ActionOption
Click the Value column and select or enter the new value.Change the value of an exist-ing parameter.
To display the list of predefined parameters, click the arrow in thelist box next to the Add button. Select the parameter from the listand click Add.
Add a predefined parameter.
Make sure no predefined parameter is listed in the box next to theAdd button, then click Add. A parameter with a default name isadded to the table. To edit the parameter name, click the Namecolumn. Click the Value column to enter a value.
Add a custom parameter.
To see a description of all the predefined SQL generation parameters and their values, click thehelp button.
6. To return to the default list of parameters and the default values, click Default Values. This removesany added parameters from the list and sets all values to the default.
7. Save the business layer by clicking the Save icon in the main tool bar.
Related Topics• About SQL Generation Parameters
12.6.7 Displaying a business layer summary
Use this command to display the number of each type of object defined in the business layer. Forbusiness layers based on a data foundation, the type and number of data foundation objects are alsodisplayed.1. Open the business layer in the editor by double-clicking the business layer in the Local Projects
View.2. Make sure the top level of the business layer is selected in the tree view in the Business Layer
pane.3. Make sure the Properties tab is selected in the editing pane.4. Click the Summary button.
The business layer summary displays in a new dialog box.
12.7 About index awareness
2013-08-03229
Working with business layers
In a relational business layer, index awareness is the ability to take advantage of the indexes on keycolumns to improve query performance.
The objects in the business layer are based on database columns that are meaningful for queryingdata. For example, a Customer object retrieves the value in the customer name column of the customertable. In many databases, the customer table has a primary key (for example an integer) to uniquelyidentify each customer. The key value is not meaningful for reporting, but it is important for databaseperformance.
When you set up index awareness, you define which database columns are primary and foreign keysfor the dimensions and attributes in the business layer. The benefits of defining index awareness includethe following:• Joining and filtering on key columns are faster than on non-key columns.• Fewer joins are needed in a query, therefore fewer tables are requested. For example, in a star
schema database, if you build a query that involves filtering on a value in a dimension table, thequery can apply the filter directly on the fact table by using the dimension table foreign key.
• Uniqueness in filters and lists of values is taken into account. For example, if two customers havethe same name, the application retrieves only one customer unless it is aware that each customerhas a separate primary key.
For details on how to define primary and foreign keys on business layer objects, see the related topic.
Related Topics• Defining keys for dimensions and dimension attributes• Creating an index-aware prompt
12.8 About aggregate awareness
Aggregate awareness is the ability of a relational universe to take advantage of database tables thatcontain pre-aggregated data (aggregate tables). Setting up aggregate awareness accelerates queriesby processing fewer facts and aggregating fewer rows.
If an aggregate aware object is included in a query, at run time the query generator retrieves the datafrom the table with the highest aggregation level that matches the level of detail in the query.
For example, in a data foundation there is a fact table for sales with detail on the transaction level, andan aggregate table with sales summed by day. If a query asks for sales details, then the transactiontable is used. If a query asks for sales per day, then the aggregate table is used. Which table is usedis transparent to the user.
Setting up aggregate awareness in the universe has several steps. See the related topic for moreinformation.
Related Topics• Setting up aggregate awareness
2013-08-03230
Working with business layers
12.8.1 Setting up aggregate awareness
This topic outlines the steps to set up aggregate awareness in a relational universe. For links to moredetailed information on each step, see the Related Topics.1. The first step is done at the database level. The database administrator must define and load the
aggregate tables into the database.
The reliability and usefulness of aggregate awareness in a universe depends on the accuracy ofthe aggregate tables. They must be refreshed at the same time as all the fact tables.
2. Insert the aggregate tables into the data foundation.3. Define aggregate aware objects. These are objects in the business layer for which you want queries
to use the aggregate tables when possible instead of performing aggregation using non-aggregatetables.
In the SQL expression for the object, define the SELECT statement to use the @Aggregate_Awarefunction:
@Aggregate_Aware(sum(Aggregate table 1), ... sum(Aggregate table n))
In the @Aggregate_Aware function, Aggregate table 1 is the aggregate table with the highestlevel of aggregation, and Aggregate table n is the aggregate table with the lowest level (thedetailed fact table).
4. Specify the incompatible objects for each aggregate table in the universe. In the business layer, usethe Set Aggregate Navigation command.
5. Resolve any loops in the data foundation using contexts if needed.
Related Topics• About aggregate awareness• Inserting tables into the data foundation• Defining the SQL expression for an object• About @Aggregate_Aware• Setting aggregate navigation• Resolving loops
12.8.2 Setting aggregate navigation
1. Open the business layer in the editor by double-clicking the business layer name in the Local ProjectsView.
2. From the information design tool main menu, select Actions > Set Aggregate Navigation.
2013-08-03231
Working with business layers
In the "Aggregate Navigation" dialog box, you specify which tables contain objects that are notcompatible with aggregate tables containing objects optimized for aggregate awareness:• · If the object is at the same level of aggregation or higher, it is compatible with the aggregate
table.• · If the object is at a lower level of aggregation, it is incompatible.• · If the object is unrelated to the aggregate table, it is incompatible.
Note:A measure summed by year is at a higher level of aggregation than a measure summed by quarter.
3. Click an aggregate table in the left pane.4. In the right pane, select all incompatible objects.5. Repeat the above steps for each aggregate table in the data foundation.
Note:The dialog box also features a Detect Incompatibility button that can guide you in the process ofspecifying incompatible objects. When you click a table and then click this button, objects consideredas incompatible are automatically selected. Consider the incompatible objects proposed by DetectIncompatibility as suggestions, not final choices.
6. When all incompatible objects for all the tables are specified Click OK.7. Save the business layer by clicking the Save icon in the main tool bar.
Related Topics• About aggregate awareness
12.9 Working with business layer objects
The following topics describe how to insert, edit, display, and search for business layer objects.
12.9.1 Inserting a folder
1. Open the business layer in the editor by double-clicking the business layer name in the Local ProjectsView.
2. In the Business Layer pane, select the folder or analysis dimension in which you want to insert thefolder.To insert a folder at the top level, select the top node (business layer name) in the tree.
3.Click the Insert object icon at the top of the Business Layer pane and select Folder.
2013-08-03232
Working with business layers
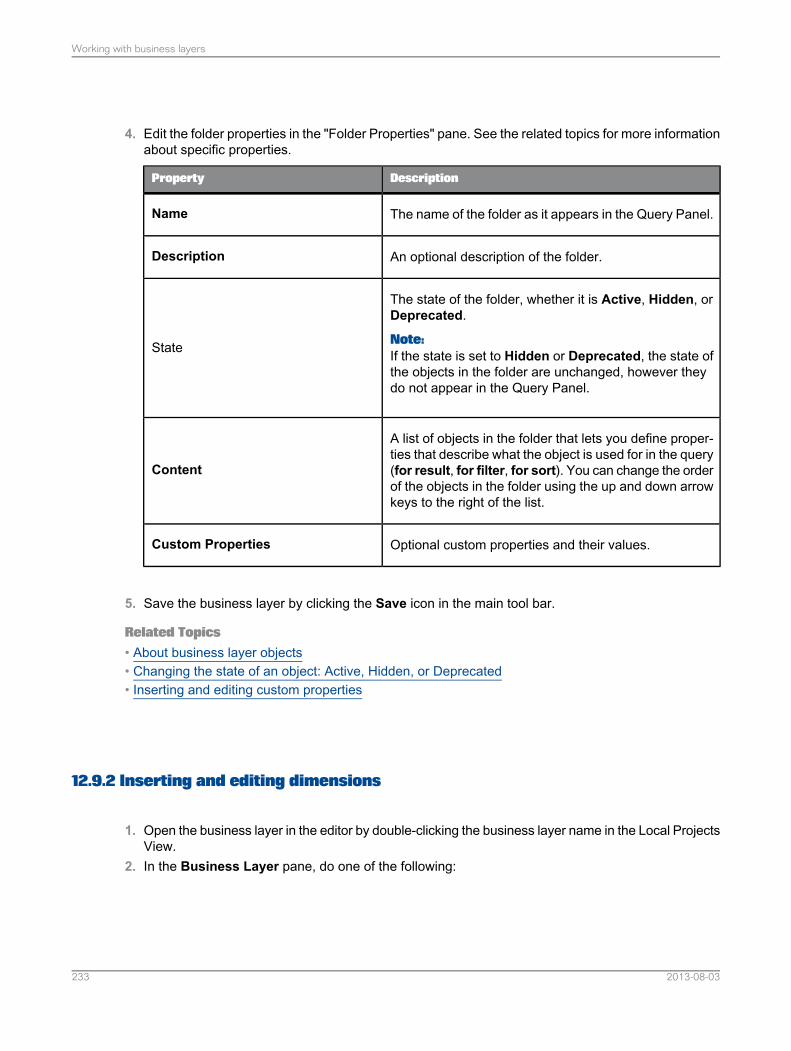
4. Edit the folder properties in the "Folder Properties" pane. See the related topics for more informationabout specific properties.
DescriptionProperty
The name of the folder as it appears in the Query Panel.Name
An optional description of the folder.Description
The state of the folder, whether it is Active, Hidden, orDeprecated.
Note:If the state is set to Hidden or Deprecated, the state ofthe objects in the folder are unchanged, however theydo not appear in the Query Panel.
State
A list of objects in the folder that lets you define proper-ties that describe what the object is used for in the query(for result, for filter, for sort). You can change the orderof the objects in the folder using the up and down arrowkeys to the right of the list.
Content
Optional custom properties and their values.Custom Properties
5. Save the business layer by clicking the Save icon in the main tool bar.
Related Topics• About business layer objects• Changing the state of an object: Active, Hidden, or Deprecated• Inserting and editing custom properties
12.9.2 Inserting and editing dimensions
1. Open the business layer in the editor by double-clicking the business layer name in the Local ProjectsView.
2. In the Business Layer pane, do one of the following:
2013-08-03233
Working with business layers
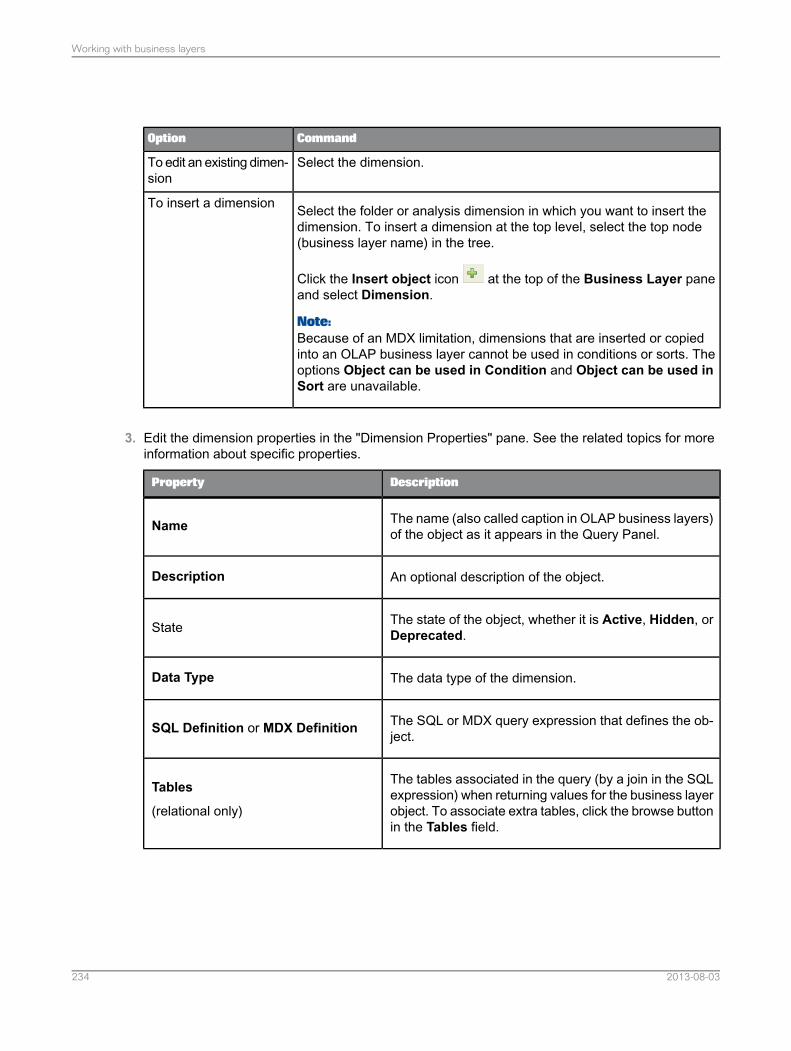
CommandOption
Select the dimension.To edit an existing dimen-sion
Select the folder or analysis dimension in which you want to insert thedimension. To insert a dimension at the top level, select the top node(business layer name) in the tree.
Click the Insert object icon at the top of the Business Layer paneand select Dimension.
Note:Because of an MDX limitation, dimensions that are inserted or copiedinto an OLAP business layer cannot be used in conditions or sorts. Theoptions Object can be used in Condition and Object can be used inSort are unavailable.
To insert a dimension
3. Edit the dimension properties in the "Dimension Properties" pane. See the related topics for moreinformation about specific properties.
DescriptionProperty
The name (also called caption in OLAP business layers)of the object as it appears in the Query Panel.Name
An optional description of the object.Description
The state of the object, whether it is Active, Hidden, orDeprecated.State
The data type of the dimension.Data Type
The SQL or MDX query expression that defines the ob-ject.SQL Definition or MDX Definition
The tables associated in the query (by a join in the SQLexpression) when returning values for the business layerobject. To associate extra tables, click the browse buttonin the Tables field.
Tables
(relational only)
2013-08-03234
Working with business layers
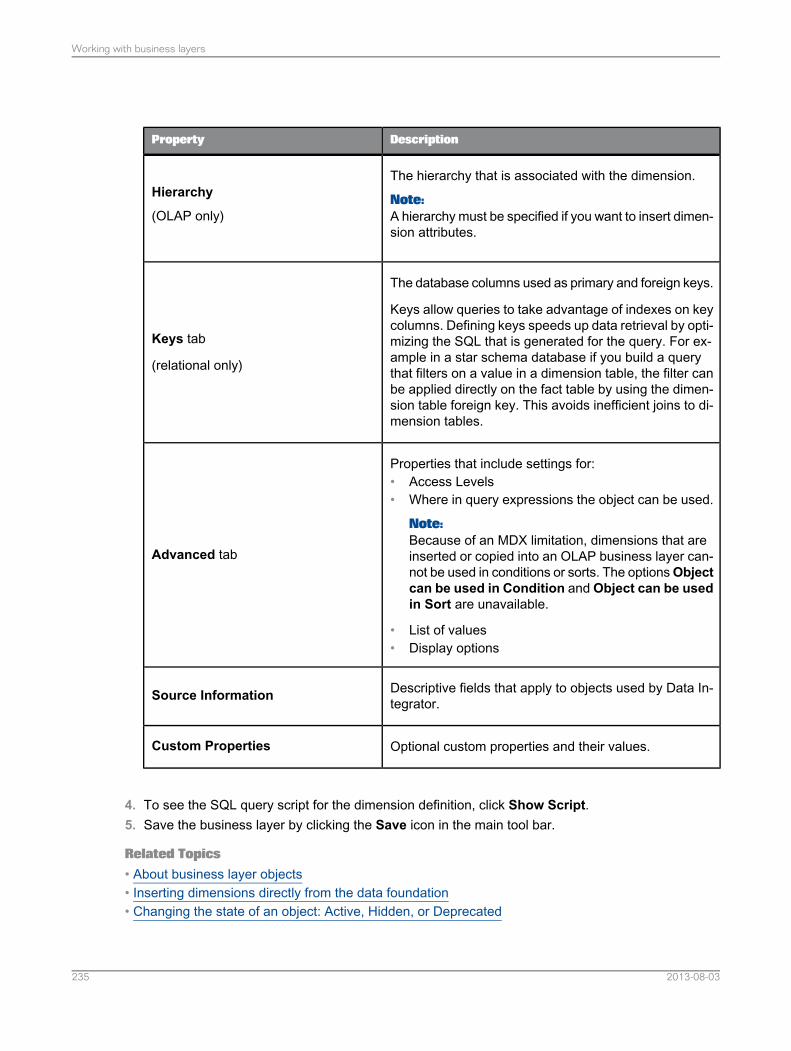
DescriptionProperty
The hierarchy that is associated with the dimension.
Note:A hierarchy must be specified if you want to insert dimen-sion attributes.
Hierarchy
(OLAP only)
The database columns used as primary and foreign keys.
Keys allow queries to take advantage of indexes on keycolumns. Defining keys speeds up data retrieval by opti-mizing the SQL that is generated for the query. For ex-ample in a star schema database if you build a querythat filters on a value in a dimension table, the filter canbe applied directly on the fact table by using the dimen-sion table foreign key. This avoids inefficient joins to di-mension tables.
Keys tab
(relational only)
Properties that include settings for:• Access Levels• Where in query expressions the object can be used.
Note:Because of an MDX limitation, dimensions that areinserted or copied into an OLAP business layer can-not be used in conditions or sorts. The optionsObjectcan be used in Condition and Object can be usedin Sort are unavailable.
• List of values• Display options
Advanced tab
Descriptive fields that apply to objects used by Data In-tegrator.Source Information
Optional custom properties and their values.Custom Properties
4. To see the SQL query script for the dimension definition, click Show Script.5. Save the business layer by clicking the Save icon in the main tool bar.
Related Topics• About business layer objects• Inserting dimensions directly from the data foundation• Changing the state of an object: Active, Hidden, or Deprecated
2013-08-03235
Working with business layers
• Defining the SQL expression for an object• Defining the MDX expression for an object• Associating extra tables• Defining keys for dimensions and dimension attributes• Setting object access levels• Setting where objects can be used• Associating a list of values with a business object• Defining custom display formats• About source information for business layer objects• Inserting and editing custom properties
12.9.3 Inserting dimensions directly from the data foundation
For business layers based on a data foundation, you can drag and drop objects from the data foundationinto the business layer.1. Open the business layer in the editor by double-clicking the business layer name in the Local Projects
View.The data foundation on which the business layer is based displays in the data source pane on thelower right side of the editing tab.
2. Select the objects in the data foundation view that you want to insert:• To select a table, click the table header.• To select multiple tables, click the table headers while holding down the CTRL key.• To select a column, click the column name in the table.• To select multiple columns, click the column names while holding down the CTRL key.
3. Drag the selection to the Business Layer pane and drop the selection into the desired folder in thebusiness layer. To insert the dimensions at the top level, drop the selection into the top node (businesslayer name) of the tree.
When you drag and drop a table, a folder is automatically inserted into the business layer. The foldercontains a dimension for every column.
The SQL expression for each dimension is automatically defined.
4. Save the business layer by clicking the Save icon in the main tool bar.
If necessary, turn any of the inserted dimensions into measures using the Turn into Measure withAggregation Function command. For more information, see the related topic.
Related Topics• Turning a dimension or attribute into a measure• Inserting and editing dimensions
2013-08-03236
Working with business layers
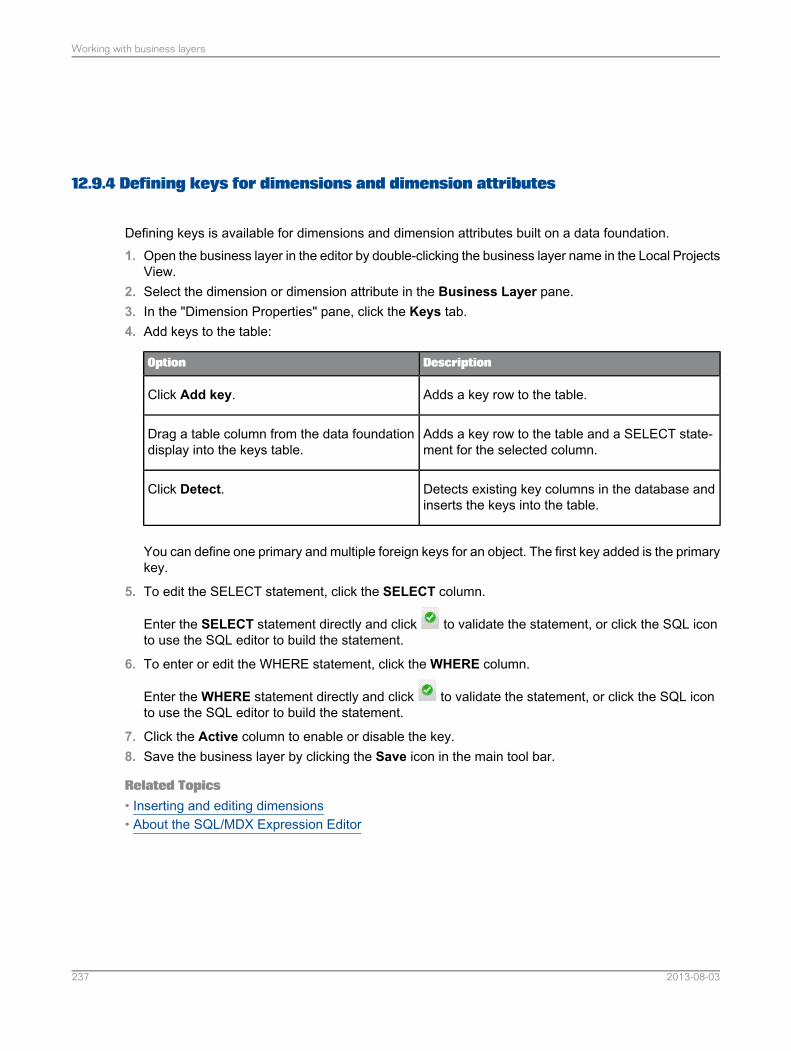
12.9.4 Defining keys for dimensions and dimension attributes
Defining keys is available for dimensions and dimension attributes built on a data foundation.1. Open the business layer in the editor by double-clicking the business layer name in the Local Projects
View.2. Select the dimension or dimension attribute in the Business Layer pane.3. In the "Dimension Properties" pane, click the Keys tab.4. Add keys to the table:
DescriptionOption
Adds a key row to the table.Click Add key.
Adds a key row to the table and a SELECT state-ment for the selected column.
Drag a table column from the data foundationdisplay into the keys table.
Detects existing key columns in the database andinserts the keys into the table.
Click Detect.
You can define one primary and multiple foreign keys for an object. The first key added is the primarykey.
5. To edit the SELECT statement, click the SELECT column.
Enter the SELECT statement directly and click to validate the statement, or click the SQL iconto use the SQL editor to build the statement.
6. To enter or edit the WHERE statement, click the WHERE column.
Enter the WHERE statement directly and click to validate the statement, or click the SQL iconto use the SQL editor to build the statement.
7. Click the Active column to enable or disable the key.8. Save the business layer by clicking the Save icon in the main tool bar.
Related Topics• Inserting and editing dimensions• About the SQL/MDX Expression Editor
2013-08-03237
Working with business layers
12.9.5 Turning an attribute or measure into a dimension
This task applies to relational business layers.1. Open the business layer in the editor by double-clicking the business layer name in the Local Projects
View.The business layer objects appear in the Business Layer pane and the properties in the editingpane on the right.
2. Select the attribute or measure in the Business Layer pane.You can select several attributes or several measures. Click the objects while holding down theCTRL key. The command applies to all objects selected.
3. Right-click the selection and select Turn into Dimension.Each dimension is created in the folder of the original object.
4. Save the business layer by clicking the Save icon in the main tool bar.
Related Topics• Inserting and editing dimensions
12.9.6 Inserting and editing measures
1. Open the business layer in the editor by double-clicking the business layer name in the Local ProjectsView.
2. In the Business Layer pane, do one of the following:
CommandOption
Select the measure.To edit an existingmeasure
Select the folder or analysis dimension in which you want to insert themeasure. To insert a measure at the top level, select the top node (busi-ness layer name) in the tree.
Click the Insert object icon at the top of the Business Layer paneand select Measure.
To insert a measure
3. Edit the measure properties in the "Measure Properties" pane. See the related topics for moreinformation about specific properties.
2013-08-03238
Working with business layers
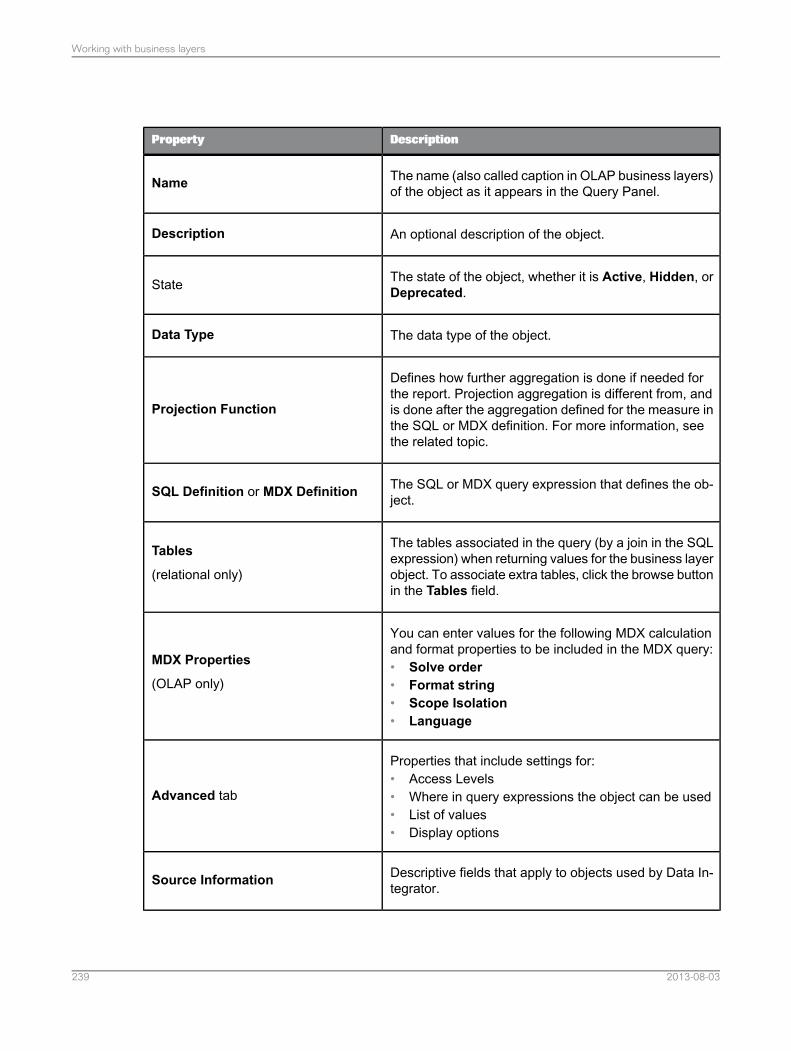
DescriptionProperty
The name (also called caption in OLAP business layers)of the object as it appears in the Query Panel.Name
An optional description of the object.Description
The state of the object, whether it is Active, Hidden, orDeprecated.State
The data type of the object.Data Type
Defines how further aggregation is done if needed forthe report. Projection aggregation is different from, andis done after the aggregation defined for the measure inthe SQL or MDX definition. For more information, seethe related topic.
Projection Function
The SQL or MDX query expression that defines the ob-ject.SQL Definition or MDX Definition
The tables associated in the query (by a join in the SQLexpression) when returning values for the business layerobject. To associate extra tables, click the browse buttonin the Tables field.
Tables
(relational only)
You can enter values for the following MDX calculationand format properties to be included in the MDX query:• Solve order• Format string• Scope Isolation• Language
MDX Properties
(OLAP only)
Properties that include settings for:• Access Levels• Where in query expressions the object can be used• List of values• Display options
Advanced tab
Descriptive fields that apply to objects used by Data In-tegrator.Source Information
2013-08-03239
Working with business layers
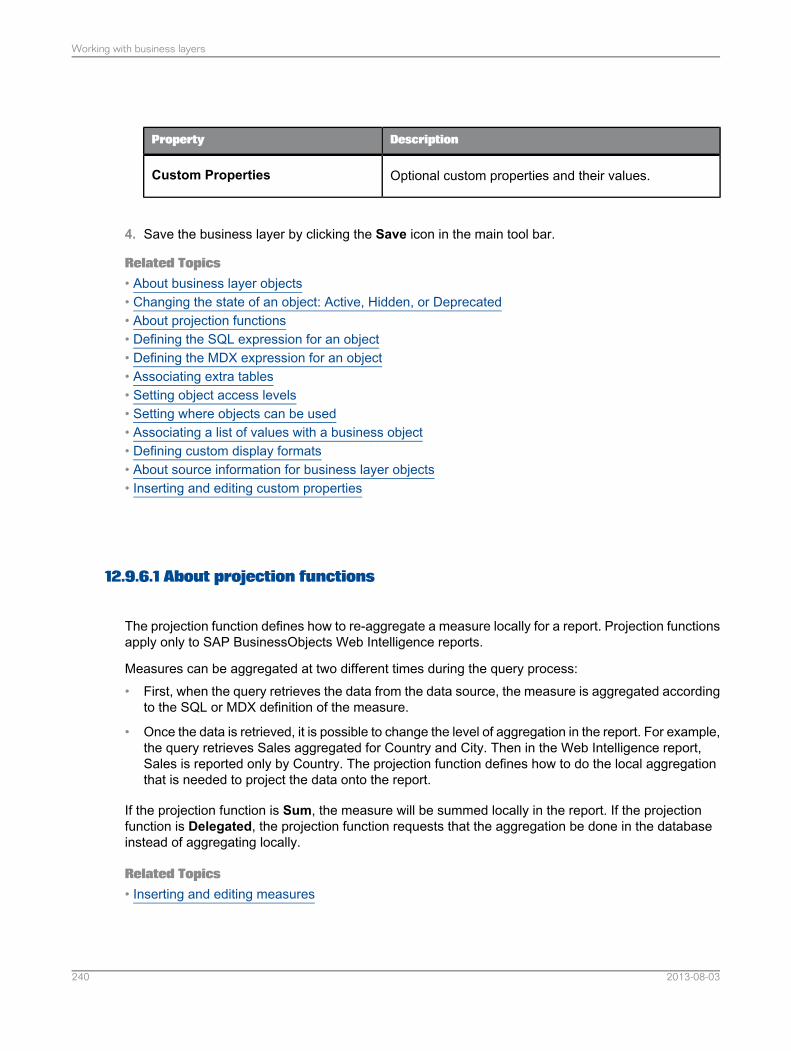
DescriptionProperty
Optional custom properties and their values.Custom Properties
4. Save the business layer by clicking the Save icon in the main tool bar.
Related Topics• About business layer objects• Changing the state of an object: Active, Hidden, or Deprecated• About projection functions• Defining the SQL expression for an object• Defining the MDX expression for an object• Associating extra tables• Setting object access levels• Setting where objects can be used• Associating a list of values with a business object• Defining custom display formats• About source information for business layer objects• Inserting and editing custom properties
12.9.6.1 About projection functions
The projection function defines how to re-aggregate a measure locally for a report. Projection functionsapply only to SAP BusinessObjects Web Intelligence reports.
Measures can be aggregated at two different times during the query process:• First, when the query retrieves the data from the data source, the measure is aggregated according
to the SQL or MDX definition of the measure.
• Once the data is retrieved, it is possible to change the level of aggregation in the report. For example,the query retrieves Sales aggregated for Country and City. Then in the Web Intelligence report,Sales is reported only by Country. The projection function defines how to do the local aggregationthat is needed to project the data onto the report.
If the projection function is Sum, the measure will be summed locally in the report. If the projectionfunction is Delegated, the projection function requests that the aggregation be done in the databaseinstead of aggregating locally.
Related Topics• Inserting and editing measures
2013-08-03240
Working with business layers
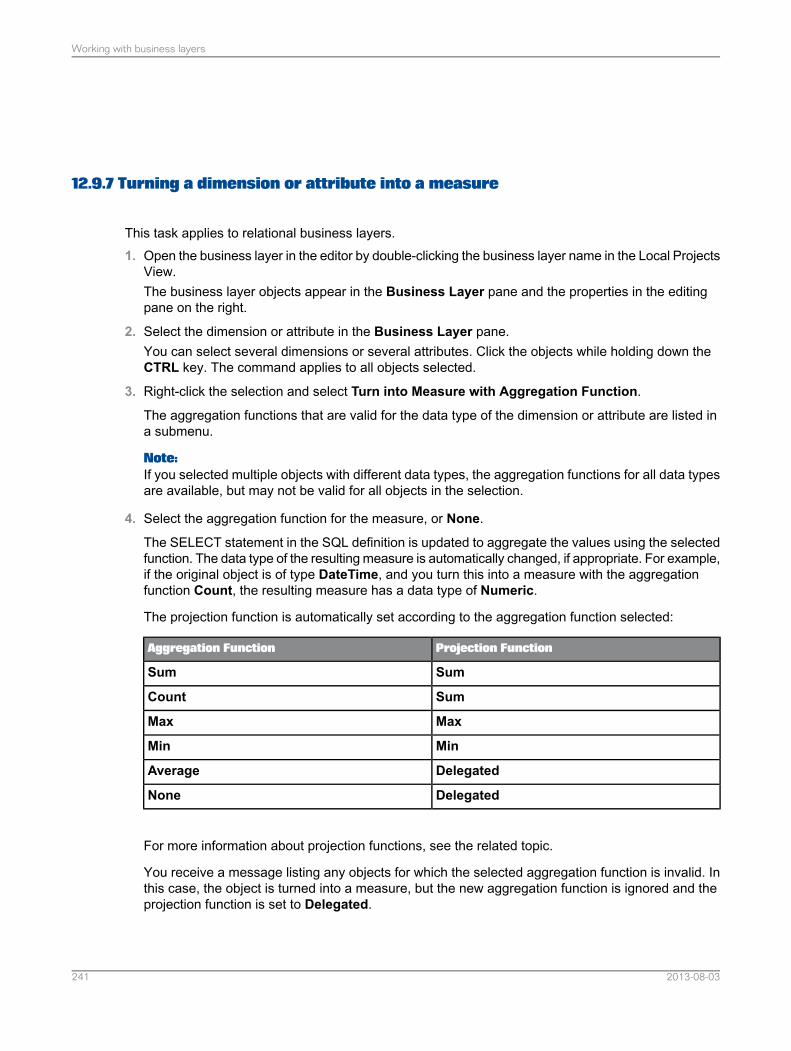
12.9.7 Turning a dimension or attribute into a measure
This task applies to relational business layers.1. Open the business layer in the editor by double-clicking the business layer name in the Local Projects
View.The business layer objects appear in the Business Layer pane and the properties in the editingpane on the right.
2. Select the dimension or attribute in the Business Layer pane.You can select several dimensions or several attributes. Click the objects while holding down theCTRL key. The command applies to all objects selected.
3. Right-click the selection and select Turn into Measure with Aggregation Function.
The aggregation functions that are valid for the data type of the dimension or attribute are listed ina submenu.
Note:If you selected multiple objects with different data types, the aggregation functions for all data typesare available, but may not be valid for all objects in the selection.
4. Select the aggregation function for the measure, or None.
The SELECT statement in the SQL definition is updated to aggregate the values using the selectedfunction. The data type of the resulting measure is automatically changed, if appropriate. For example,if the original object is of type DateTime, and you turn this into a measure with the aggregationfunction Count, the resulting measure has a data type of Numeric.
The projection function is automatically set according to the aggregation function selected:
Projection FunctionAggregation Function
SumSum
SumCount
MaxMax
MinMin
DelegatedAverage
DelegatedNone
For more information about projection functions, see the related topic.
You receive a message listing any objects for which the selected aggregation function is invalid. Inthis case, the object is turned into a measure, but the new aggregation function is ignored and theprojection function is set to Delegated.
2013-08-03241
Working with business layers
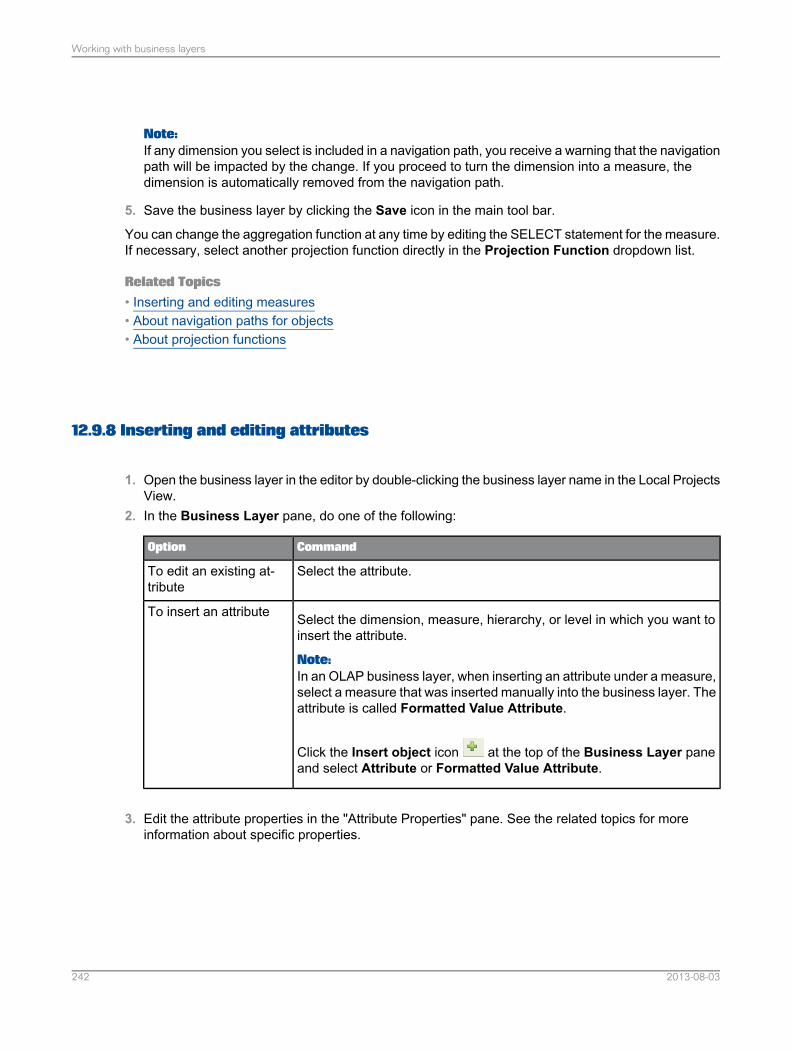
Note:If any dimension you select is included in a navigation path, you receive a warning that the navigationpath will be impacted by the change. If you proceed to turn the dimension into a measure, thedimension is automatically removed from the navigation path.
5. Save the business layer by clicking the Save icon in the main tool bar.
You can change the aggregation function at any time by editing the SELECT statement for the measure.If necessary, select another projection function directly in the Projection Function dropdown list.
Related Topics• Inserting and editing measures• About navigation paths for objects• About projection functions
12.9.8 Inserting and editing attributes
1. Open the business layer in the editor by double-clicking the business layer name in the Local ProjectsView.
2. In the Business Layer pane, do one of the following:
CommandOption
Select the attribute.To edit an existing at-tribute
Select the dimension, measure, hierarchy, or level in which you want toinsert the attribute.
Note:In an OLAP business layer, when inserting an attribute under a measure,select a measure that was inserted manually into the business layer. Theattribute is called Formatted Value Attribute.
Click the Insert object icon at the top of the Business Layer paneand select Attribute or Formatted Value Attribute.
To insert an attribute
3. Edit the attribute properties in the "Attribute Properties" pane. See the related topics for moreinformation about specific properties.
2013-08-03242
Working with business layers
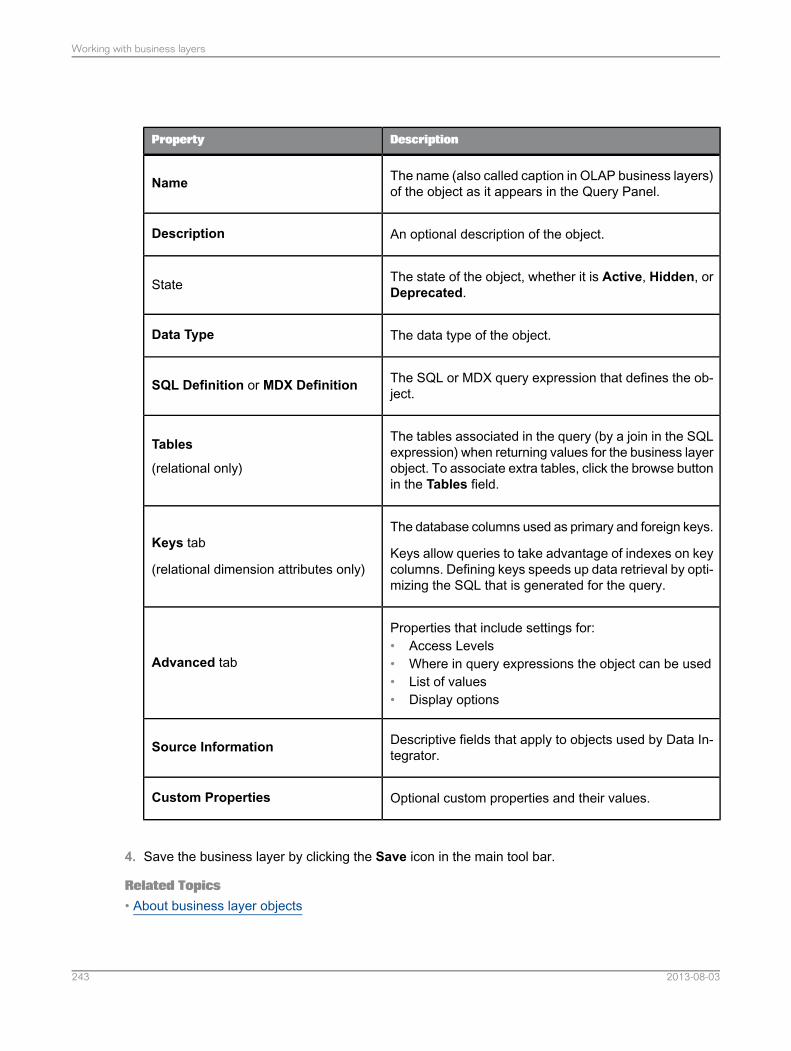
DescriptionProperty
The name (also called caption in OLAP business layers)of the object as it appears in the Query Panel.Name
An optional description of the object.Description
The state of the object, whether it is Active, Hidden, orDeprecated.State
The data type of the object.Data Type
The SQL or MDX query expression that defines the ob-ject.SQL Definition or MDX Definition
The tables associated in the query (by a join in the SQLexpression) when returning values for the business layerobject. To associate extra tables, click the browse buttonin the Tables field.
Tables
(relational only)
The database columns used as primary and foreign keys.
Keys allow queries to take advantage of indexes on keycolumns. Defining keys speeds up data retrieval by opti-mizing the SQL that is generated for the query.
Keys tab
(relational dimension attributes only)
Properties that include settings for:• Access Levels• Where in query expressions the object can be used• List of values• Display options
Advanced tab
Descriptive fields that apply to objects used by Data In-tegrator.Source Information
Optional custom properties and their values.Custom Properties
4. Save the business layer by clicking the Save icon in the main tool bar.
Related Topics• About business layer objects
2013-08-03243
Working with business layers
• Changing the state of an object: Active, Hidden, or Deprecated• Defining the SQL expression for an object• Defining the MDX expression for an object• Associating extra tables• Defining keys for dimensions and dimension attributes• Setting object access levels• Setting where objects can be used• Associating a list of values with a business object• Defining custom display formats• About source information for business layer objects• Inserting and editing custom properties
12.9.9 Turning a dimension or measure into an attribute
This task applies to relational business layers.1. Open the business layer in the editor by double-clicking the business layer name in the Local Projects
View.The business layer objects appear in the Business Layer pane and the properties in the editingpane on the right.
2. Select the dimension or measure in the Business Layer pane.You can select several dimensions or several measures. Click the objects while holding down theCTRL key. The command applies to all objects selected.
3. Right-click the selection and select Turn into Attribute.4. In the "Select a Parent Dimension or Measure" dialog box, select the dimension or measure to which
the attributes belong.5. Save the business layer by clicking the Save icon in the main tool bar.
Related Topics• Inserting and editing attributes
12.9.10 Inserting and editing filters
1. Open the business layer in the editor by double-clicking the business layer name in the Local ProjectsView.
2. In the Business Layer pane, do one of the following:
2013-08-03244
Working with business layers
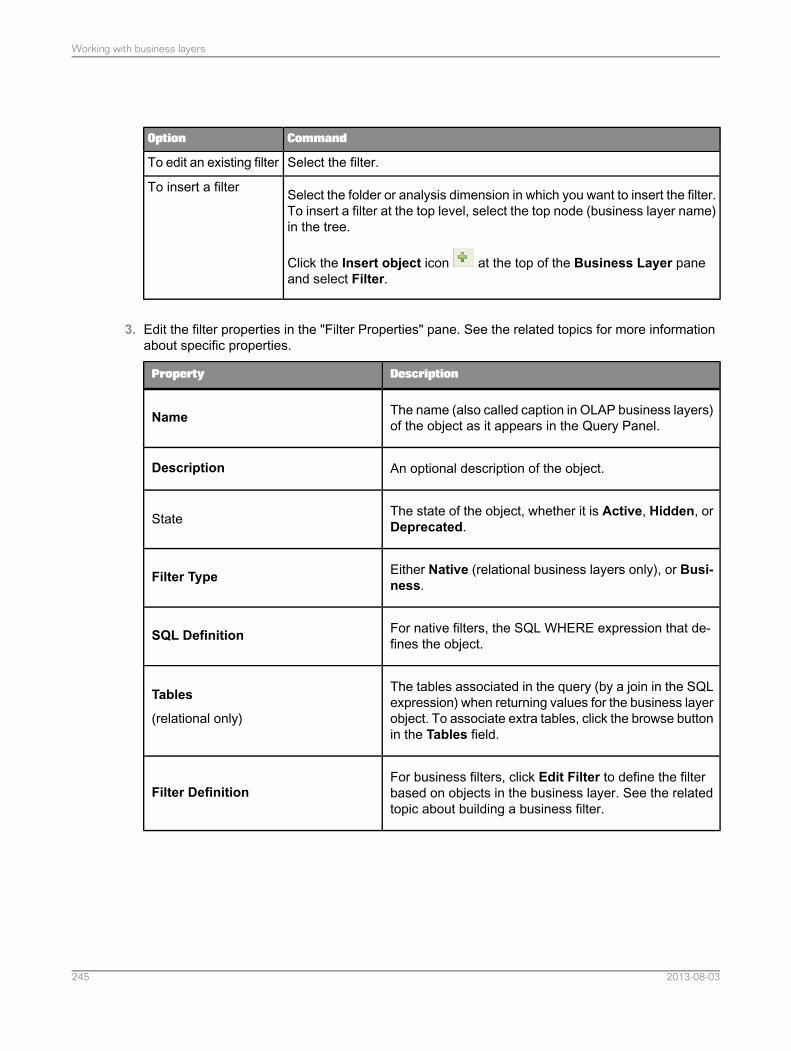
CommandOption
Select the filter.To edit an existing filter
Select the folder or analysis dimension in which you want to insert the filter.To insert a filter at the top level, select the top node (business layer name)in the tree.
Click the Insert object icon at the top of the Business Layer paneand select Filter.
To insert a filter
3. Edit the filter properties in the "Filter Properties" pane. See the related topics for more informationabout specific properties.
DescriptionProperty
The name (also called caption in OLAP business layers)of the object as it appears in the Query Panel.Name
An optional description of the object.Description
The state of the object, whether it is Active, Hidden, orDeprecated.State
Either Native (relational business layers only), or Busi-ness.Filter Type
For native filters, the SQL WHERE expression that de-fines the object.SQL Definition
The tables associated in the query (by a join in the SQLexpression) when returning values for the business layerobject. To associate extra tables, click the browse buttonin the Tables field.
Tables
(relational only)
For business filters, click Edit Filter to define the filterbased on objects in the business layer. See the relatedtopic about building a business filter.
Filter Definition
2013-08-03245
Working with business layers
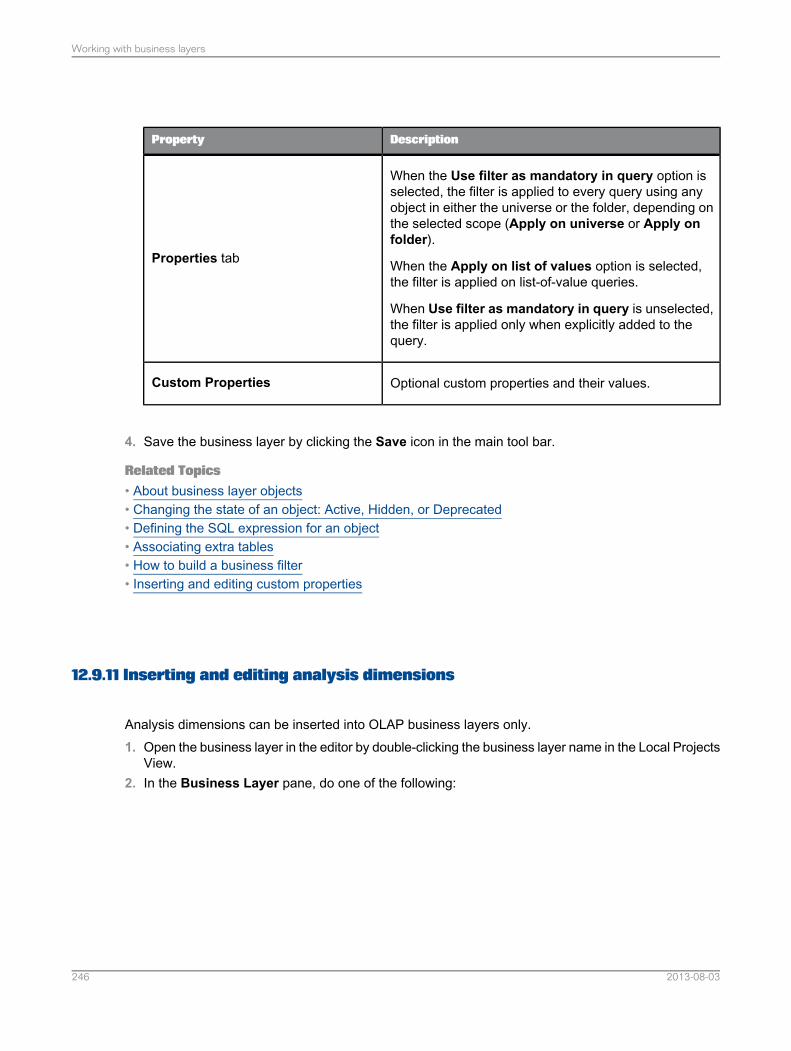
DescriptionProperty
When the Use filter as mandatory in query option isselected, the filter is applied to every query using anyobject in either the universe or the folder, depending onthe selected scope (Apply on universe or Apply onfolder).
When the Apply on list of values option is selected,the filter is applied on list-of-value queries.
When Use filter as mandatory in query is unselected,the filter is applied only when explicitly added to thequery.
Properties tab
Optional custom properties and their values.Custom Properties
4. Save the business layer by clicking the Save icon in the main tool bar.
Related Topics• About business layer objects• Changing the state of an object: Active, Hidden, or Deprecated• Defining the SQL expression for an object• Associating extra tables• How to build a business filter• Inserting and editing custom properties
12.9.11 Inserting and editing analysis dimensions
Analysis dimensions can be inserted into OLAP business layers only.1. Open the business layer in the editor by double-clicking the business layer name in the Local Projects
View.2. In the Business Layer pane, do one of the following:
2013-08-03246
Working with business layers
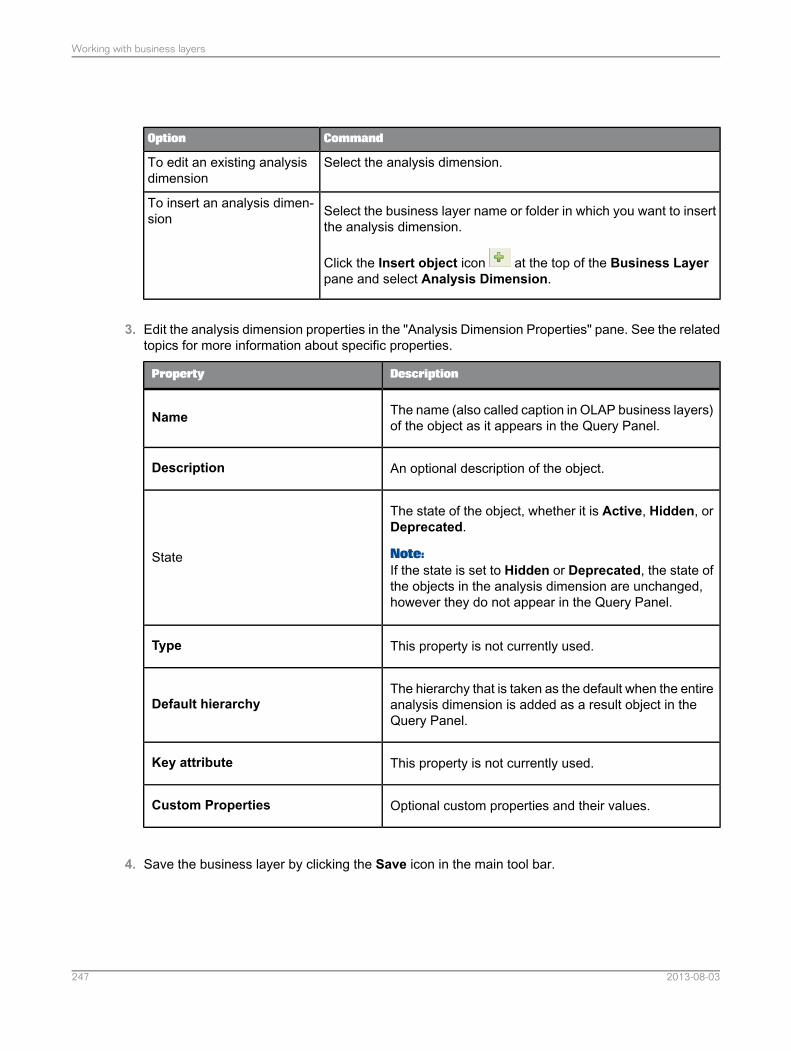
CommandOption
Select the analysis dimension.To edit an existing analysisdimension
Select the business layer name or folder in which you want to insertthe analysis dimension.
Click the Insert object icon at the top of the Business Layerpane and select Analysis Dimension.
To insert an analysis dimen-sion
3. Edit the analysis dimension properties in the "Analysis Dimension Properties" pane. See the relatedtopics for more information about specific properties.
DescriptionProperty
The name (also called caption in OLAP business layers)of the object as it appears in the Query Panel.Name
An optional description of the object.Description
The state of the object, whether it is Active, Hidden, orDeprecated.
Note:If the state is set to Hidden or Deprecated, the state ofthe objects in the analysis dimension are unchanged,however they do not appear in the Query Panel.
State
This property is not currently used.Type
The hierarchy that is taken as the default when the entireanalysis dimension is added as a result object in theQuery Panel.
Default hierarchy
This property is not currently used.Key attribute
Optional custom properties and their values.Custom Properties
4. Save the business layer by clicking the Save icon in the main tool bar.
2013-08-03247
Working with business layers
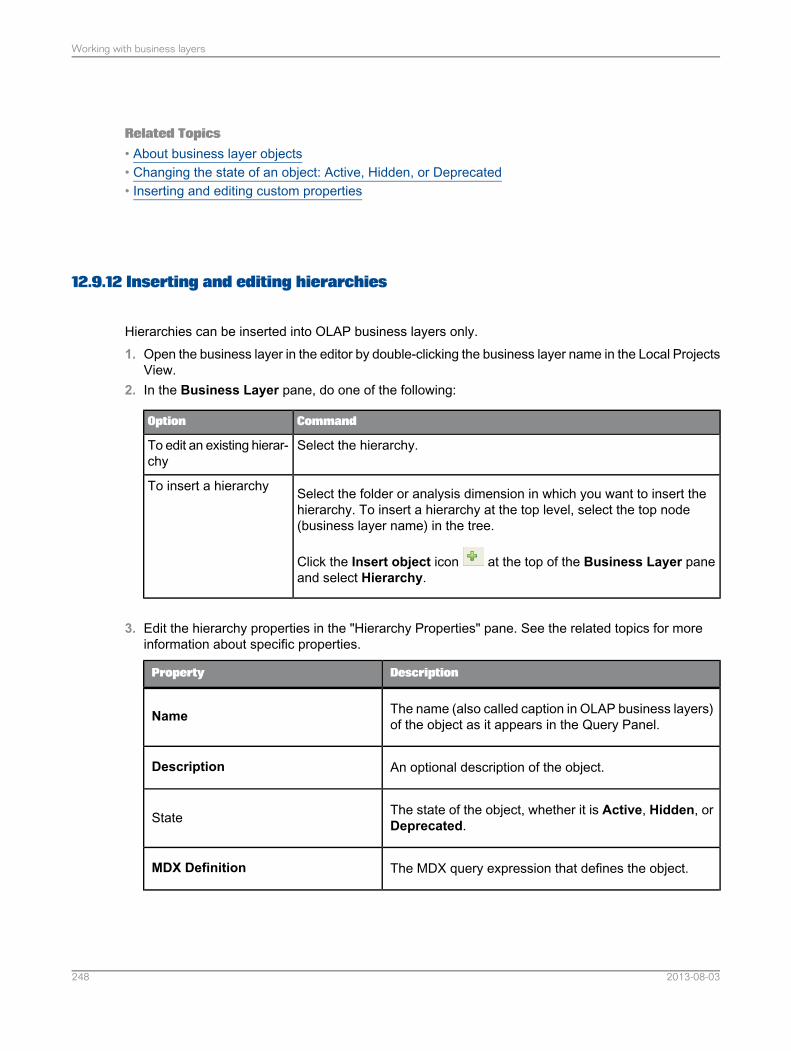
Related Topics• About business layer objects• Changing the state of an object: Active, Hidden, or Deprecated• Inserting and editing custom properties
12.9.12 Inserting and editing hierarchies
Hierarchies can be inserted into OLAP business layers only.1. Open the business layer in the editor by double-clicking the business layer name in the Local Projects
View.2. In the Business Layer pane, do one of the following:
CommandOption
Select the hierarchy.To edit an existing hierar-chy
Select the folder or analysis dimension in which you want to insert thehierarchy. To insert a hierarchy at the top level, select the top node(business layer name) in the tree.
Click the Insert object icon at the top of the Business Layer paneand select Hierarchy.
To insert a hierarchy
3. Edit the hierarchy properties in the "Hierarchy Properties" pane. See the related topics for moreinformation about specific properties.
DescriptionProperty
The name (also called caption in OLAP business layers)of the object as it appears in the Query Panel.Name
An optional description of the object.Description
The state of the object, whether it is Active, Hidden, orDeprecated.State
The MDX query expression that defines the object.MDX Definition
2013-08-03248
Working with business layers
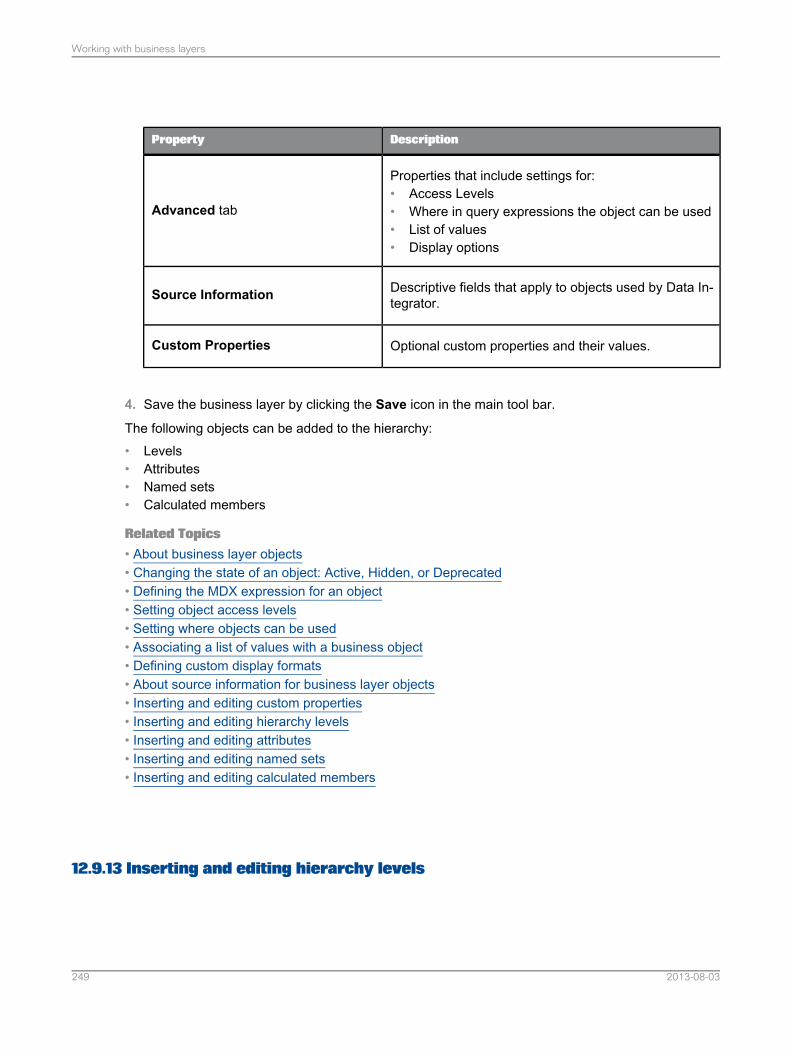
DescriptionProperty
Properties that include settings for:• Access Levels• Where in query expressions the object can be used• List of values• Display options
Advanced tab
Descriptive fields that apply to objects used by Data In-tegrator.Source Information
Optional custom properties and their values.Custom Properties
4. Save the business layer by clicking the Save icon in the main tool bar.
The following objects can be added to the hierarchy:• Levels• Attributes• Named sets• Calculated members
Related Topics• About business layer objects• Changing the state of an object: Active, Hidden, or Deprecated• Defining the MDX expression for an object• Setting object access levels• Setting where objects can be used• Associating a list of values with a business object• Defining custom display formats• About source information for business layer objects• Inserting and editing custom properties• Inserting and editing hierarchy levels• Inserting and editing attributes• Inserting and editing named sets• Inserting and editing calculated members
12.9.13 Inserting and editing hierarchy levels
2013-08-03249
Working with business layers
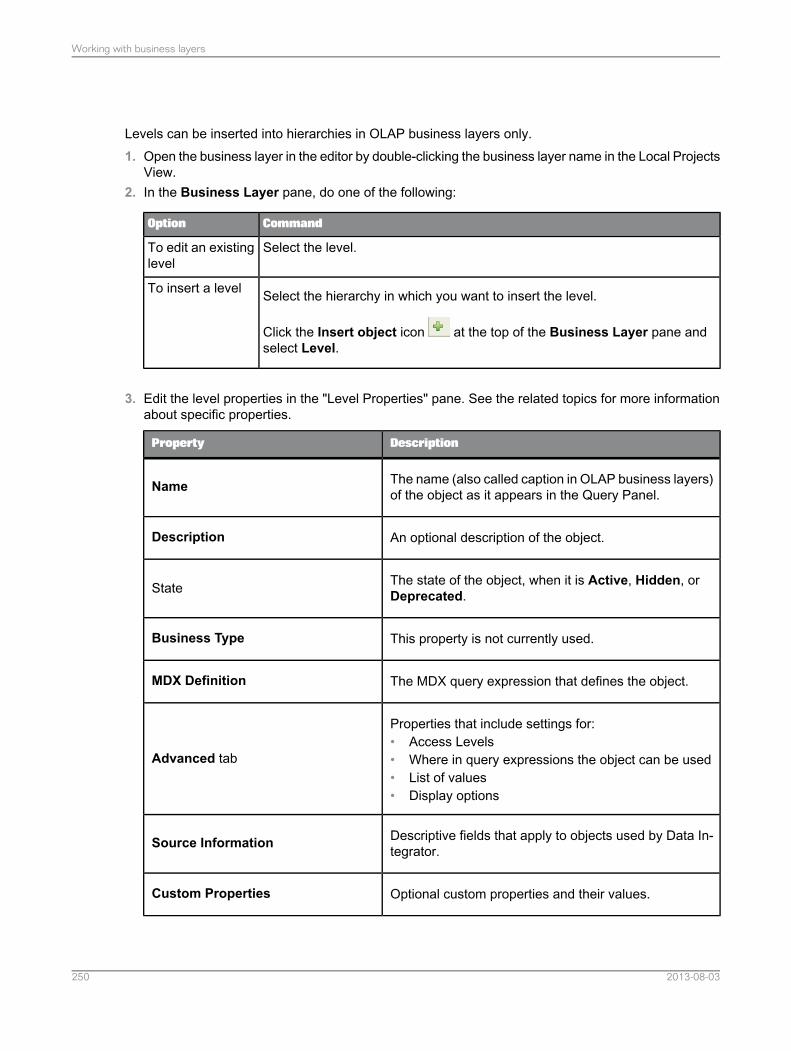
Levels can be inserted into hierarchies in OLAP business layers only.1. Open the business layer in the editor by double-clicking the business layer name in the Local Projects
View.2. In the Business Layer pane, do one of the following:
CommandOption
Select the level.To edit an existinglevel
Select the hierarchy in which you want to insert the level.
Click the Insert object icon at the top of the Business Layer pane andselect Level.
To insert a level
3. Edit the level properties in the "Level Properties" pane. See the related topics for more informationabout specific properties.
DescriptionProperty
The name (also called caption in OLAP business layers)of the object as it appears in the Query Panel.Name
An optional description of the object.Description
The state of the object, when it is Active, Hidden, orDeprecated.State
This property is not currently used.Business Type
The MDX query expression that defines the object.MDX Definition
Properties that include settings for:• Access Levels• Where in query expressions the object can be used• List of values• Display options
Advanced tab
Descriptive fields that apply to objects used by Data In-tegrator.Source Information
Optional custom properties and their values.Custom Properties
2013-08-03250
Working with business layers
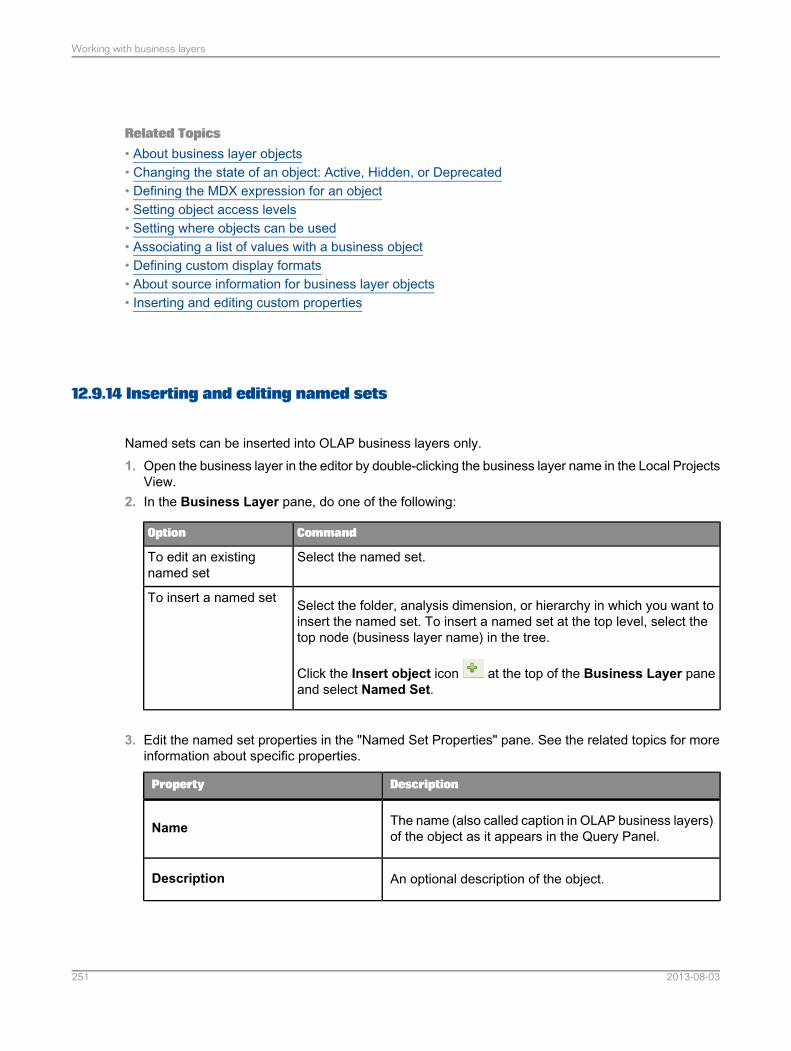
Related Topics• About business layer objects• Changing the state of an object: Active, Hidden, or Deprecated• Defining the MDX expression for an object• Setting object access levels• Setting where objects can be used• Associating a list of values with a business object• Defining custom display formats• About source information for business layer objects• Inserting and editing custom properties
12.9.14 Inserting and editing named sets
Named sets can be inserted into OLAP business layers only.1. Open the business layer in the editor by double-clicking the business layer name in the Local Projects
View.2. In the Business Layer pane, do one of the following:
CommandOption
Select the named set.To edit an existingnamed set
Select the folder, analysis dimension, or hierarchy in which you want toinsert the named set. To insert a named set at the top level, select thetop node (business layer name) in the tree.
Click the Insert object icon at the top of the Business Layer paneand select Named Set.
To insert a named set
3. Edit the named set properties in the "Named Set Properties" pane. See the related topics for moreinformation about specific properties.
DescriptionProperty
The name (also called caption in OLAP business layers)of the object as it appears in the Query Panel.Name
An optional description of the object.Description
2013-08-03251
Working with business layers
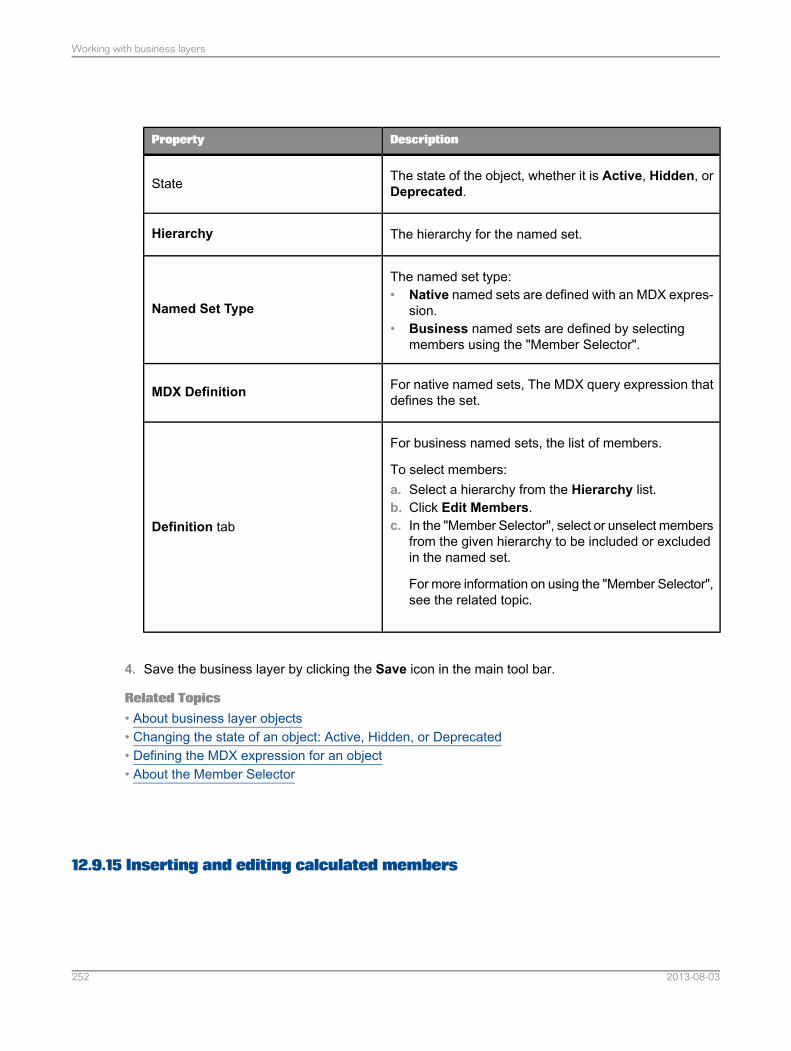
DescriptionProperty
The state of the object, whether it is Active, Hidden, orDeprecated.State
The hierarchy for the named set.Hierarchy
The named set type:• Native named sets are defined with an MDX expres-
sion.• Business named sets are defined by selecting
members using the "Member Selector".
Named Set Type
For native named sets, The MDX query expression thatdefines the set.MDX Definition
For business named sets, the list of members.
To select members:a. Select a hierarchy from the Hierarchy list.b. Click Edit Members.c. In the "Member Selector", select or unselect members
from the given hierarchy to be included or excludedin the named set.
For more information on using the "Member Selector",see the related topic.
Definition tab
4. Save the business layer by clicking the Save icon in the main tool bar.
Related Topics• About business layer objects• Changing the state of an object: Active, Hidden, or Deprecated• Defining the MDX expression for an object• About the Member Selector
12.9.15 Inserting and editing calculated members
2013-08-03252
Working with business layers
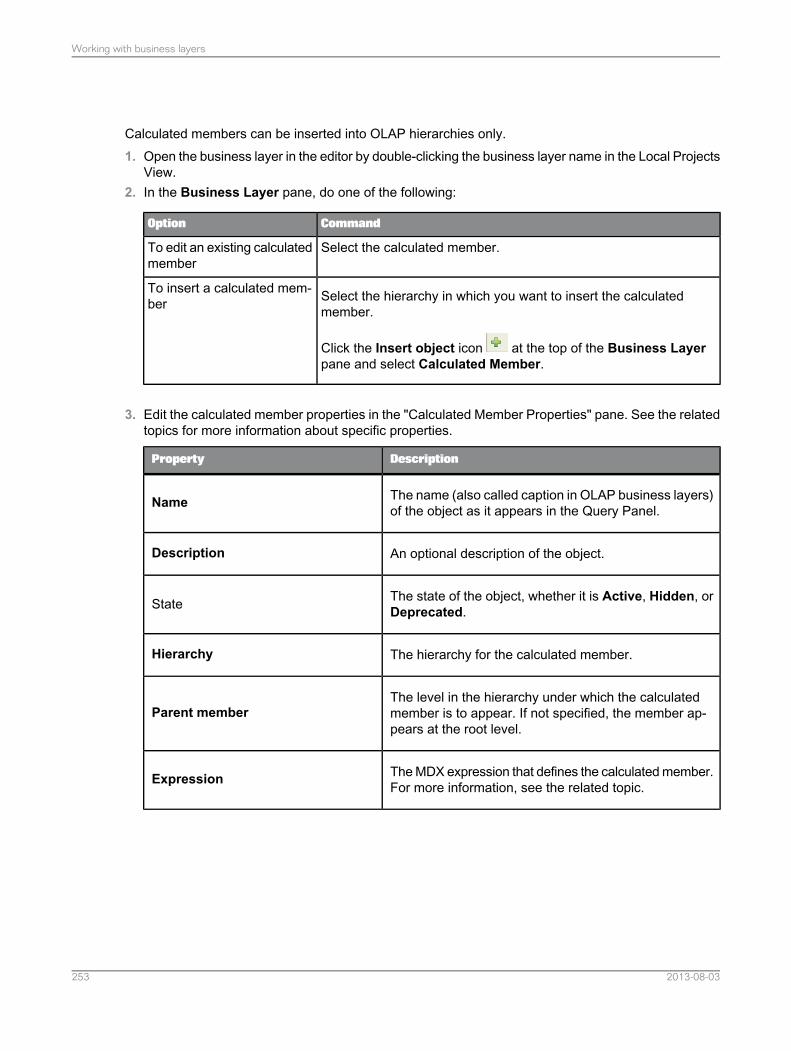
Calculated members can be inserted into OLAP hierarchies only.1. Open the business layer in the editor by double-clicking the business layer name in the Local Projects
View.2. In the Business Layer pane, do one of the following:
CommandOption
Select the calculated member.To edit an existing calculatedmember
Select the hierarchy in which you want to insert the calculatedmember.
Click the Insert object icon at the top of the Business Layerpane and select Calculated Member.
To insert a calculated mem-ber
3. Edit the calculated member properties in the "Calculated Member Properties" pane. See the relatedtopics for more information about specific properties.
DescriptionProperty
The name (also called caption in OLAP business layers)of the object as it appears in the Query Panel.Name
An optional description of the object.Description
The state of the object, whether it is Active, Hidden, orDeprecated.State
The hierarchy for the calculated member.Hierarchy
The level in the hierarchy under which the calculatedmember is to appear. If not specified, the member ap-pears at the root level.
Parent member
The MDX expression that defines the calculated member.For more information, see the related topic.Expression
2013-08-03253
Working with business layers
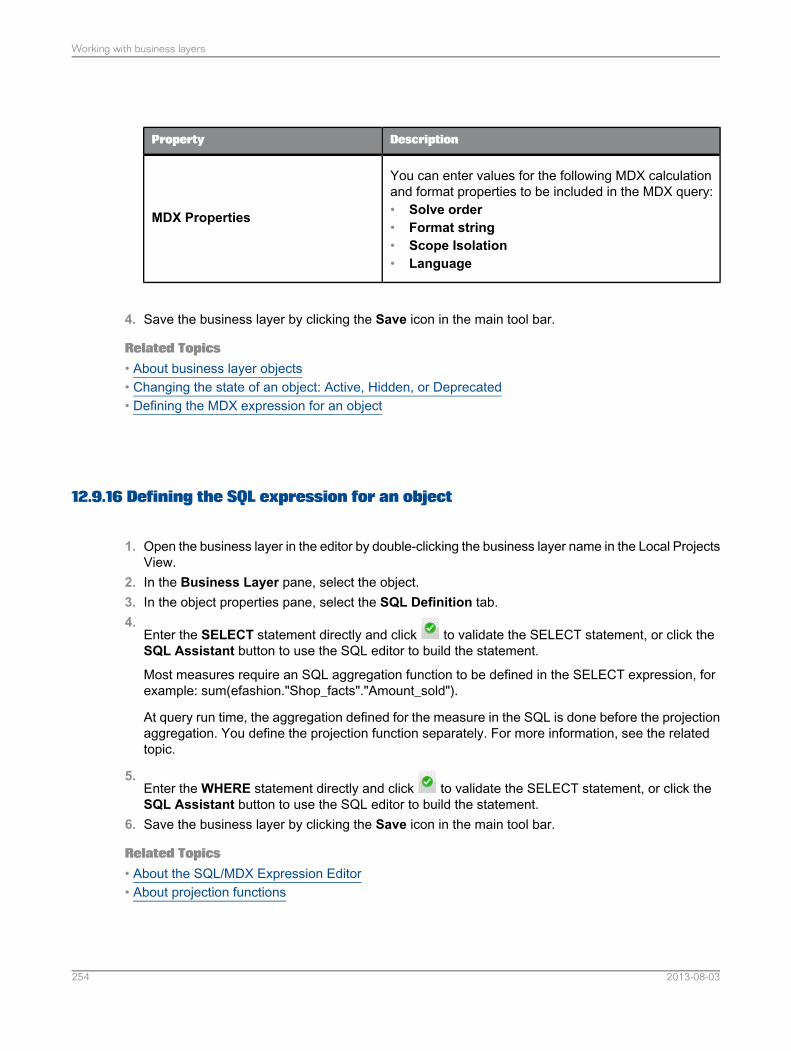
DescriptionProperty
You can enter values for the following MDX calculationand format properties to be included in the MDX query:• Solve order• Format string• Scope Isolation• Language
MDX Properties
4. Save the business layer by clicking the Save icon in the main tool bar.
Related Topics• About business layer objects• Changing the state of an object: Active, Hidden, or Deprecated• Defining the MDX expression for an object
12.9.16 Defining the SQL expression for an object
1. Open the business layer in the editor by double-clicking the business layer name in the Local ProjectsView.
2. In the Business Layer pane, select the object.3. In the object properties pane, select the SQL Definition tab.4.
Enter the SELECT statement directly and click to validate the SELECT statement, or click theSQL Assistant button to use the SQL editor to build the statement.
Most measures require an SQL aggregation function to be defined in the SELECT expression, forexample: sum(efashion."Shop_facts"."Amount_sold").
At query run time, the aggregation defined for the measure in the SQL is done before the projectionaggregation. You define the projection function separately. For more information, see the relatedtopic.
5.Enter the WHERE statement directly and click to validate the SELECT statement, or click theSQL Assistant button to use the SQL editor to build the statement.
6. Save the business layer by clicking the Save icon in the main tool bar.
Related Topics• About the SQL/MDX Expression Editor• About projection functions
2013-08-03254
Working with business layers
12.9.17 Defining the MDX expression for an object
You can edit the MDX expression for objects inserted into the business layer. If you want to edit thedefinition of a native object (an object generated automatically from the cube when the business layerwas created), copy the native object and edit the copy.1. Open the business layer in the editor by double-clicking the business layer name in the Local Projects
View.2. In the Business Layer pane, select the object.3. In the object properties pane, select the MDX Definition tab.4.
Enter the Expression directly and click to validate the expression, or click the MDX Assistantbutton to use the MDX editor to build the statement.
Note:
When inserting a dimension or level, the best practice is to include .members in the MDX expression.For example, following is the expression if you insert the dimension Category in the Categoryhierarchy in the Product analysis dimension:
[Product].[Category].[Category].members
For some data sources, it is necessary to add .members in order to preview members.
5. Save the business layer by clicking the Save icon in the main tool bar.
Related Topics• About the SQL/MDX Expression Editor
12.9.18 Associating extra tables
The "Associated SQL Tables" dialog box lets you associate tables with an object in the business layer.
All associated tables are included in the query (by a join in the SQL expression) when returning valuesfor the business layer object. For example, if the object is based on City in table City, when you associateRegion and Country as extra tables, the City values from Region and Country are included when valuesare returned for the business object.
Tables that can be associated in the SQL are proposed in the list.1. To include values from an associated table, check the box next to the table name.2. To stop including values from a table, uncheck the box next to the table name.
2013-08-03255
Working with business layers
Note:The table on which the business object is based is displayed in bold and cannot be unchecked.
Related Topics• Inserting and editing dimensions• Inserting and editing measures• Inserting and editing attributes
12.9.19 Changing the state of an object: Active, Hidden, or Deprecated
Objects in the business layer can have three states:• Active: Object is visible in the Query Panel. This is the default state.• Hidden: Object is valid but not available in the Query Panel (used by other objects as a hidden
object).• Deprecated: Object is hidden and not valid. One possible use for this state is when the target
database field no longer exists, but you want to keep the object for possible future use.1. Open the business layer in the editor by double-clicking the business layer name in the Local Projects
View.The business layer objects appear in the Business Layer pane and the properties in the editingpane on the right.
2. Select the object in the Business Layer pane.To select several objects, click while holding down the CTRL key.
3. Right-click the selection and select Change State.4. Select the new state.
The new state is applied to all the objects in the selection. If the state is set toHidden orDeprecatedfor a folder or analysis dimension, the state of the objects in the folder are unchanged, however theydo not appear in the Query Panel.
5. Save the business layer by clicking the Save icon in the main tool bar.
12.9.20 Setting object access levels
The security access level of an object restricts use of the object to users with the appropriateobject-access level granted. You can assign the following access levels to an object:• Public• Private
2013-08-03256
Working with business layers
• Controlled• Restricted• Confidential
If you assign Public then all users can see and use the object. If you assign Restricted, then onlyusers that are granted the object-access level of Restricted or higher can see and use the object inthe Query Panel.
Universe object-access levels are granted to users and groups in the Central Management Console.For more information, see the SAP BusinessObjects Business Intelligence platform Administrator'sGuide.1. Open the business layer in the editor by double-clicking the business layer name in the Local Projects
View.2. In the Business Layer pane, select the object for which you want to set the access level. To select
multiple objects, click while holding down the CTRL key.3. Right-click the selection and select Change Access Level and select the new access level from
the list.You can also set the access level for an object on the Advanced tab of the object properties.
4. Save the business layer by clicking the Save icon in the main tool bar.
12.9.21 Setting where objects can be used
1. Open the business layer in the editor by double-clicking the business layer name in the Local ProjectsView.
2. In the Business Layer pane, select the object.3. In the object properties pane, click the Advanced tab.4. Select or deselect where the object can be used:
2013-08-03257
Working with business layers
DescriptionOption
When selected, the object can be used in a query.Results
When selected, the object can be used to set in a condition.
Note:Because of an MDX limitation, this option is not available for dimensions thatare inserted or copied in an OLAP business layer.
Conditions
When selected, returned values can be sorted.
Note:Because of an MDX limitation, this option is not available for dimensions thatare inserted or copied in an OLAP business layer.
Sort
5. Save the business layer by clicking the Save icon in the main tool bar.
12.9.22 Setting options for the default list of values
Dimensions, measures, attributes, and hierarchies are associated with a default list of values. You canset options for the default list of values, or associate a custom list of values with the object.1. Open the business layer in the editor by double-clicking the business layer name in the Local Projects
View.2. In the Business Layer pane, select the object.3. In the object properties pane, click the Advanced tab.4. Select or deselect list of values options:
DescriptionOption
If selected, the user running a query using this list of values is requiredto enter search criteria before getting filtered values for the list of values.Only the values that match the search criteria are returned in the listof values. Characters used to define the matching criteria are:• * - Matches any number of characters, even zero characters.• ? - Matches exactly one character.• \ - Escapes the next character allowing you to search for a wildcard
character.
Force users to filtervalues before use
If selected, the user running a query using this list of values can searchfor a value in the database. This option is useful when the user performsa search on partial list of values results.
Allow users to searchvalues in the database
2013-08-03258
Working with business layers
5. To associate a custom list of values, see the related topic. The options defined in the custom list ofvalues apply.
6. Save the business layer by clicking the Save icon in the main tool bar.
Related Topics• Associating a list of values with a business object
12.9.23 Creating and editing display formats for business layer objects
You can customize display formats for business layer objects with data types of DateTime and Numeric.There are pre-defined formats available to choose from, or you can create your own custom formatusing the Format Editor.
Note:
When you save the business layer, the custom formats you created for objects in that business layerare saved in the Custom category in the Format Editor. The formats are available to other businesslayers currently open in the information design tool.
When opening a new information design tool session, to make custom formats available to other businesslayers, open the business layer in which the formats were defined.
Display formats can be created, edited, and deleted for multiple business layer objects at once.
To create a display format1. Open the business layer in the editor by double-clicking the business layer name in the Local Projects
View.2. In the Business Layer pane, select one or more objects, right-click the selection and select Create
Display Format.
If a display format was already created for an object, the available command is Edit Display Format.
3. To select a pre-defined format for the objects, select a Format Category (Date-Time, Numeric, orCustom) and select an available format in the list.
4. To define a custom format, follow the task in the related topics.5. Click OK to use the selected format for the objects.6. Save the business layer by clicking the Save icon in the main tool bar.
Deleting display formatsThe Delete Display Format command is available for objects with a display format already created.Use this command to unselect the display format previously selected for the object.
Note:Deleting the display format in the business layer does not delete a custom format definition. You mustdelete a custom format from the Format Editor.
2013-08-03259
Working with business layers

Related Topics• Defining custom display formats
12.9.23.1 Defining custom display formats
1. In the Format Editor, select an available format to use as a basis for the custom format and clickCustom Format.
A custom format consists of text and tokens. A token is a pre-formatted part of a number or date.For example, Day: 1-31 is a token that displays the day part of the date as a number between 1 and31. For more information about tokens, see the related topics.
The Custom Format Editor lists the token categories. Open the categories to see the list of tokens.
2. Drag tokens from the Tokens list into the Format Definition.
Tokens appear in the format definition with a rectangle border and a gray background. You can alsotype text directly into the Format Definition.
When defining a numeric format, you can enter a different format to be displayed when the value isnegative or equal to zero. If you do not enter a format, the format defined for positive values is used.
3. In the Undefined box, you can enter text to display if no value is returned at reporting time. Bydefault, in the case of an undefined value, no text is displayed.
4. To define a display color for a format, click the color choice box at the end of the format definition.5. To save the custom format, click OK.
Related Topics• Date and time format tokens• Number format tokens• Creating and editing display formats for business layer objects
12.9.23.1.1 Date and time format tokens
Example: Date and time format display
This example shows how the date, Wednesday March 5th 2008, is displayed using different formatsdefined in the Custom Format Editor.
2013-08-03260
Working with business layers

Preview display:Format defined with tokens:
Wednesday, March 05 2008[Day name] , [Month name] [Day 01-31] [Year0000-9999]
03/05/2008[Month 01-12] / [Day 01-31] / [Year 0000-9999]
Wed 05 Mar[Capitalized short day name] [Day 01-31][Capitalized short month name]
Wednesday, week 10[Day name], week [Week of year 01-53]
The current date is Wednesday, March 05 2008.Day Name is WEDNESDAY. Month name ismarch. The year is 08.
The current date is [Day name], [Month name][Day 01-31] [Year 0000-9999] . Day name is[Upper case day name] . Month name is [Lowercase month name]. The year is [Year 00-99] .
List of date and time tokens
DescriptionTokenCategory
Day in the month with two digits from 01 to 31.Day 01-31
Day
Day in the month with one or two digits from 1 to31.Day 1-31
Day name according to the locale, for example,Monday.Day name
Short day name with capitalization according tothe locale, for example, Mon.Short day name
Day in the year with three digits from 001 to 366.Day of year 001-366
Day in the year with two or three digits from 01 to366.Day of year 01-366
Day in the year with one, two, or three digits from1 to 366.Day of year 1-366
Day of the week in the month according to thelocale, for example, 3 for the 3rd Monday of June.Day of week in month
Day name in upper case, for example, MONDAY.Upper-case day name
Day name in lower case, for example, monday.Lower-case day name
Capitalized day name, for example, Monday.Capitalized day name
Short day name in upper case, for example, MON.Upper-case short day name
2013-08-03261
Working with business layers
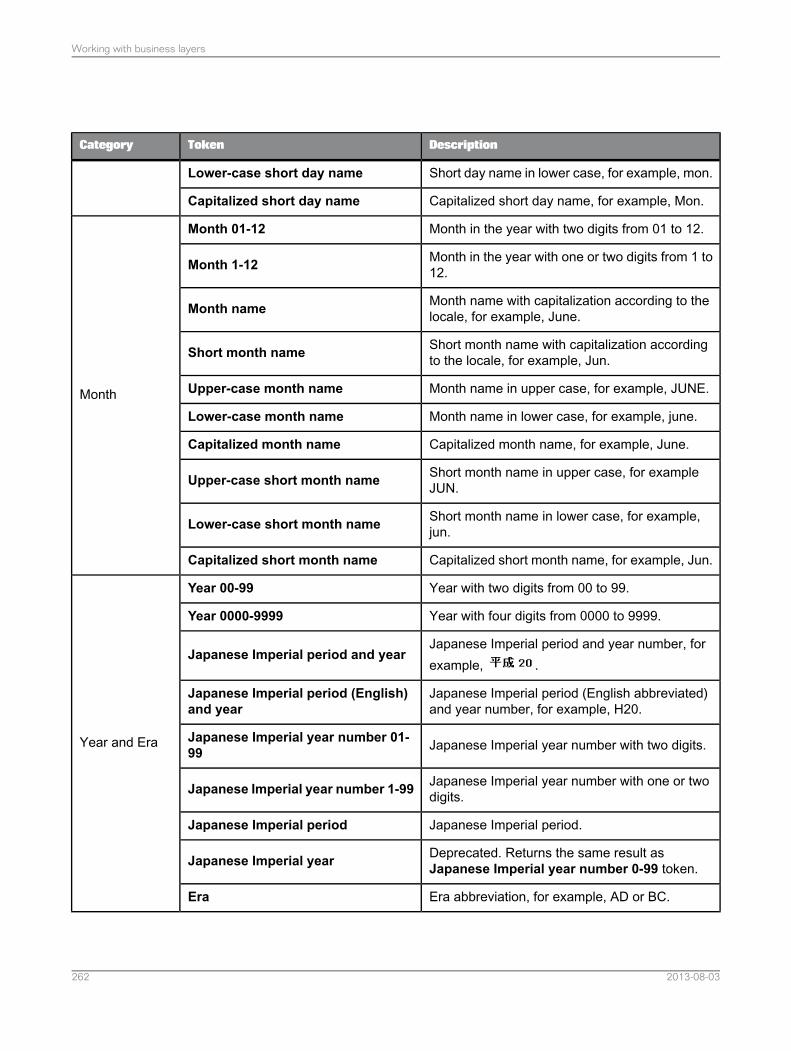
DescriptionTokenCategory
Lower-case short day name Short day name in lower case, for example, mon.
Capitalized short day name, for example, Mon.Capitalized short day name
Month in the year with two digits from 01 to 12.Month 01-12
Month
Month in the year with one or two digits from 1 to12.Month 1-12
Month name with capitalization according to thelocale, for example, June.Month name
Short month name with capitalization accordingto the locale, for example, Jun.Short month name
Month name in upper case, for example, JUNE.Upper-case month name
Month name in lower case, for example, june.Lower-case month name
Capitalized month name, for example, June.Capitalized month name
Short month name in upper case, for exampleJUN.Upper-case short month name
Short month name in lower case, for example,jun.Lower-case short month name
Capitalized short month name, for example, Jun.Capitalized short month name
Year with two digits from 00 to 99.Year 00-99
Year and Era
Year with four digits from 0000 to 9999.Year 0000-9999
Japanese Imperial period and year number, forexample, .
Japanese Imperial period and year
Japanese Imperial period (English abbreviated)and year number, for example, H20.
Japanese Imperial period (English)and year
Japanese Imperial year number with two digits.Japanese Imperial year number 01-99
Japanese Imperial year number with one or twodigits.Japanese Imperial year number 1-99
Japanese Imperial period.Japanese Imperial period
Deprecated. Returns the same result asJapanese Imperial year number 0-99 token.Japanese Imperial year
Era abbreviation, for example, AD or BC.Era
2013-08-03262
Working with business layers
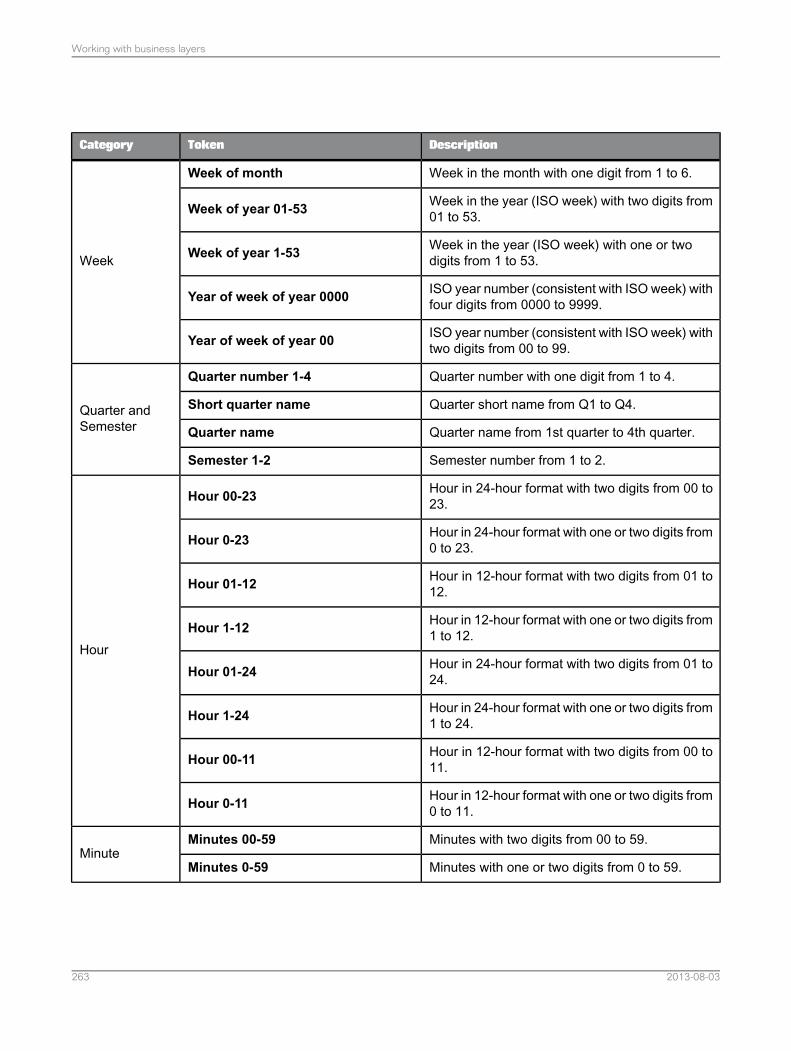
DescriptionTokenCategory
Week in the month with one digit from 1 to 6.Week of month
Week
Week in the year (ISO week) with two digits from01 to 53.Week of year 01-53
Week in the year (ISO week) with one or twodigits from 1 to 53.Week of year 1-53
ISO year number (consistent with ISO week) withfour digits from 0000 to 9999.Year of week of year 0000
ISO year number (consistent with ISO week) withtwo digits from 00 to 99.Year of week of year 00
Quarter number with one digit from 1 to 4.Quarter number 1-4
Quarter andSemester
Quarter short name from Q1 to Q4.Short quarter name
Quarter name from 1st quarter to 4th quarter.Quarter name
Semester number from 1 to 2.Semester 1-2
Hour in 24-hour format with two digits from 00 to23.Hour 00-23
Hour
Hour in 24-hour format with one or two digits from0 to 23.Hour 0-23
Hour in 12-hour format with two digits from 01 to12.Hour 01-12
Hour in 12-hour format with one or two digits from1 to 12.Hour 1-12
Hour in 24-hour format with two digits from 01 to24.Hour 01-24
Hour in 24-hour format with one or two digits from1 to 24.Hour 1-24
Hour in 12-hour format with two digits from 00 to11.Hour 00-11
Hour in 12-hour format with one or two digits from0 to 11.Hour 0-11
Minutes with two digits from 00 to 59.Minutes 00-59Minute
Minutes with one or two digits from 0 to 59.Minutes 0-59
2013-08-03263
Working with business layers
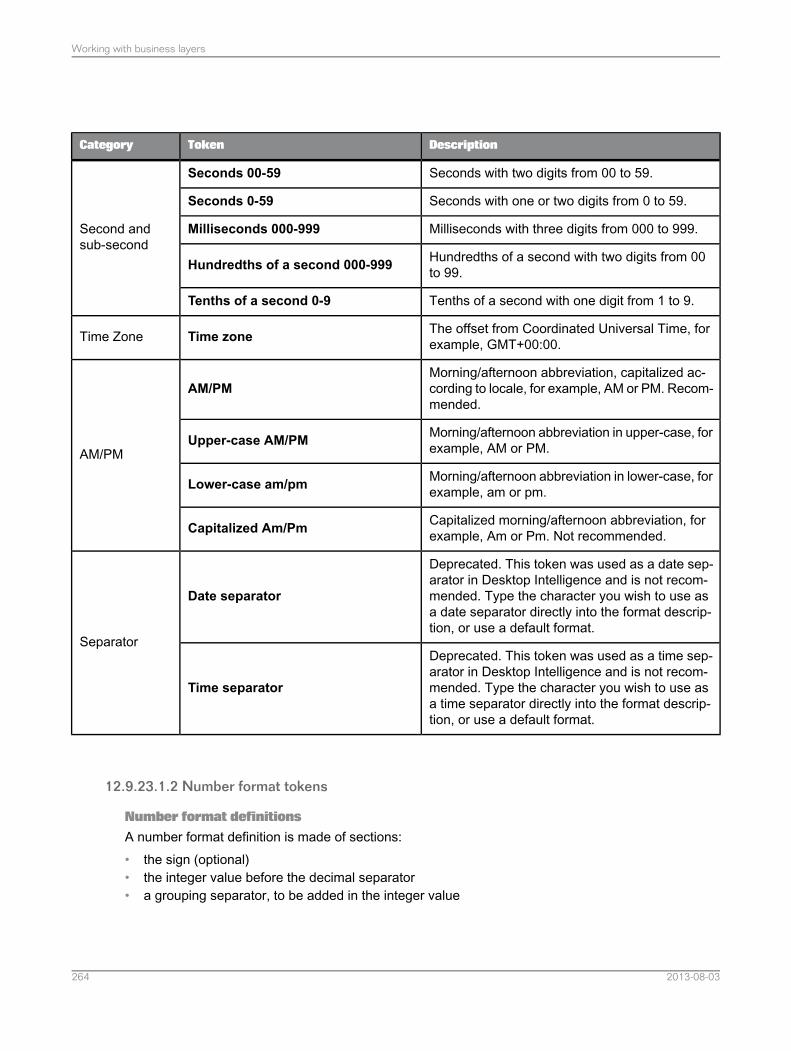
DescriptionTokenCategory
Seconds with two digits from 00 to 59.Seconds 00-59
Second andsub-second
Seconds with one or two digits from 0 to 59.Seconds 0-59
Milliseconds with three digits from 000 to 999.Milliseconds 000-999
Hundredths of a second with two digits from 00to 99.Hundredths of a second 000-999
Tenths of a second with one digit from 1 to 9.Tenths of a second 0-9
The offset from Coordinated Universal Time, forexample, GMT+00:00.Time zoneTime Zone
Morning/afternoon abbreviation, capitalized ac-cording to locale, for example, AM or PM. Recom-mended.
AM/PM
AM/PMMorning/afternoon abbreviation in upper-case, forexample, AM or PM.Upper-case AM/PM
Morning/afternoon abbreviation in lower-case, forexample, am or pm.Lower-case am/pm
Capitalized morning/afternoon abbreviation, forexample, Am or Pm. Not recommended.Capitalized Am/Pm
Deprecated. This token was used as a date sep-arator in Desktop Intelligence and is not recom-mended. Type the character you wish to use asa date separator directly into the format descrip-tion, or use a default format.
Date separator
SeparatorDeprecated. This token was used as a time sep-arator in Desktop Intelligence and is not recom-mended. Type the character you wish to use asa time separator directly into the format descrip-tion, or use a default format.
Time separator
12.9.23.1.2 Number format tokens
Number format definitionsA number format definition is made of sections:• the sign (optional)• the integer value before the decimal separator• a grouping separator, to be added in the integer value
2013-08-03264
Working with business layers
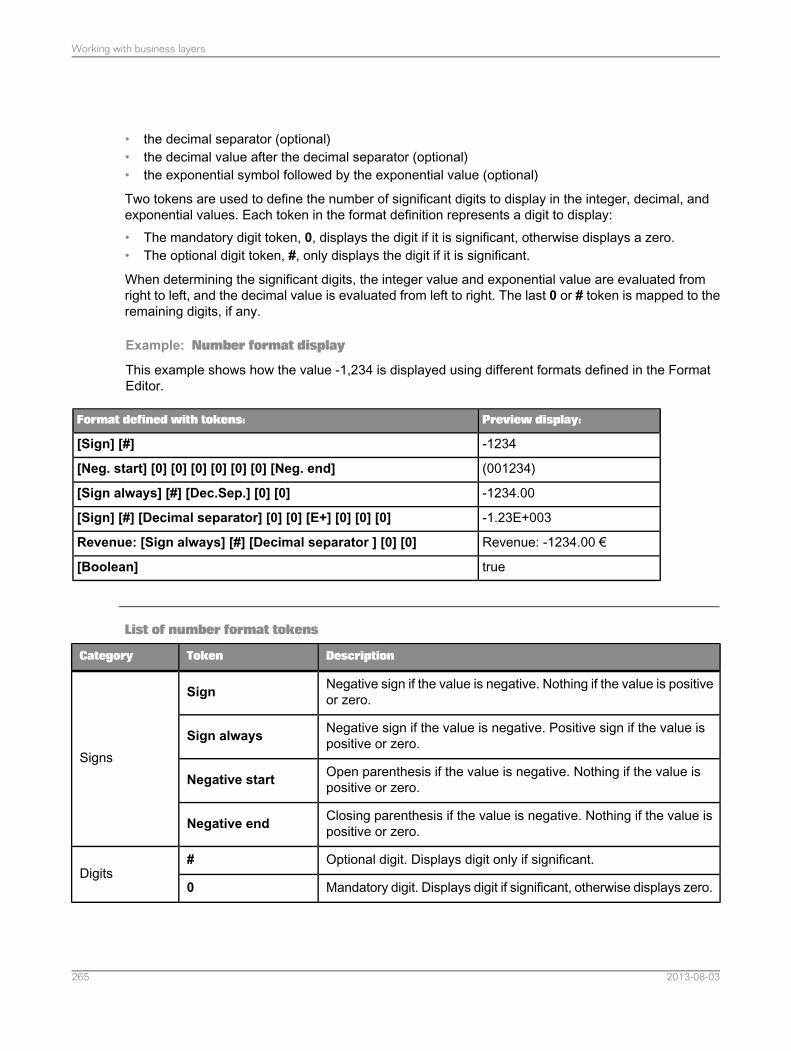
• the decimal separator (optional)• the decimal value after the decimal separator (optional)• the exponential symbol followed by the exponential value (optional)
Two tokens are used to define the number of significant digits to display in the integer, decimal, andexponential values. Each token in the format definition represents a digit to display:• The mandatory digit token, 0, displays the digit if it is significant, otherwise displays a zero.• The optional digit token, #, only displays the digit if it is significant.
When determining the significant digits, the integer value and exponential value are evaluated fromright to left, and the decimal value is evaluated from left to right. The last 0 or # token is mapped to theremaining digits, if any.
Example: Number format display
This example shows how the value -1,234 is displayed using different formats defined in the FormatEditor.
Preview display:Format defined with tokens:
-1234[Sign] [#]
(001234)[Neg. start] [0] [0] [0] [0] [0] [0] [Neg. end]
-1234.00[Sign always] [#] [Dec.Sep.] [0] [0]
-1.23E+003[Sign] [#] [Decimal separator] [0] [0] [E+] [0] [0] [0]
Revenue: -1234.00 €Revenue: [Sign always] [#] [Decimal separator ] [0] [0]
true[Boolean]
List of number format tokens
DescriptionTokenCategory
Negative sign if the value is negative. Nothing if the value is positiveor zero.Sign
Signs
Negative sign if the value is negative. Positive sign if the value ispositive or zero.Sign always
Open parenthesis if the value is negative. Nothing if the value ispositive or zero.Negative start
Closing parenthesis if the value is negative. Nothing if the value ispositive or zero.Negative end
Optional digit. Displays digit only if significant.#Digits
Mandatory digit. Displays digit if significant, otherwise displays zero.0
2013-08-03265
Working with business layers
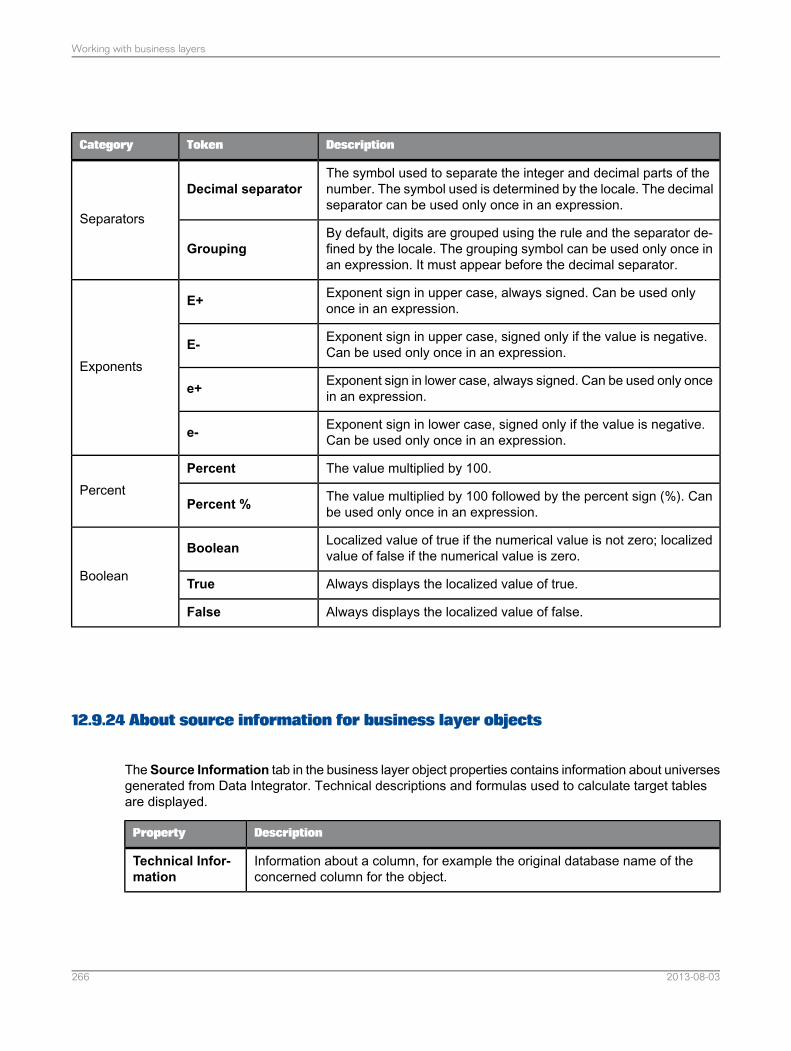
DescriptionTokenCategory
The symbol used to separate the integer and decimal parts of thenumber. The symbol used is determined by the locale. The decimalseparator can be used only once in an expression.
Decimal separator
SeparatorsBy default, digits are grouped using the rule and the separator de-fined by the locale. The grouping symbol can be used only once inan expression. It must appear before the decimal separator.
Grouping
Exponent sign in upper case, always signed. Can be used onlyonce in an expression.E+
Exponents
Exponent sign in upper case, signed only if the value is negative.Can be used only once in an expression.E-
Exponent sign in lower case, always signed. Can be used only oncein an expression.e+
Exponent sign in lower case, signed only if the value is negative.Can be used only once in an expression.e-
The value multiplied by 100.PercentPercent The value multiplied by 100 followed by the percent sign (%). Can
be used only once in an expression.Percent %
Localized value of true if the numerical value is not zero; localizedvalue of false if the numerical value is zero.Boolean
Boolean Always displays the localized value of true.True
Always displays the localized value of false.False
12.9.24 About source information for business layer objects
The Source Information tab in the business layer object properties contains information about universesgenerated from Data Integrator. Technical descriptions and formulas used to calculate target tablesare displayed.
DescriptionProperty
Information about a column, for example the original database name of theconcerned column for the object.
Technical Infor-mation
2013-08-03266
Working with business layers
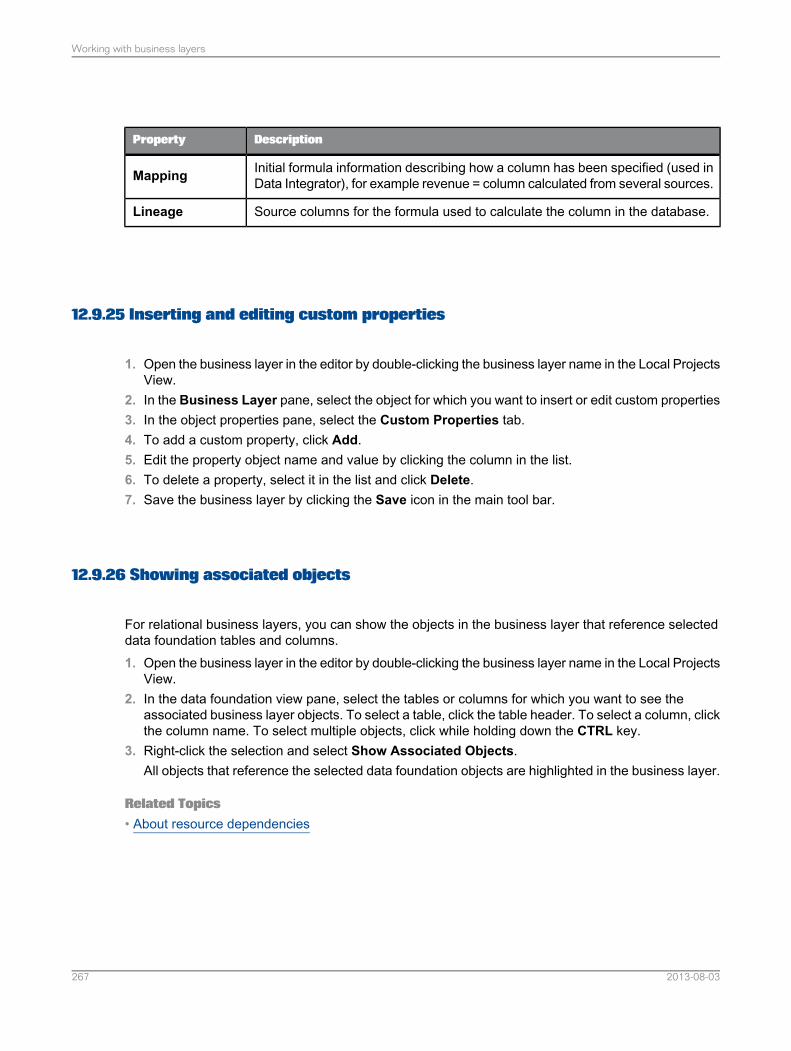
DescriptionProperty
Initial formula information describing how a column has been specified (used inData Integrator), for example revenue = column calculated from several sources.Mapping
Source columns for the formula used to calculate the column in the database.Lineage
12.9.25 Inserting and editing custom properties
1. Open the business layer in the editor by double-clicking the business layer name in the Local ProjectsView.
2. In the Business Layer pane, select the object for which you want to insert or edit custom properties3. In the object properties pane, select the Custom Properties tab.4. To add a custom property, click Add.5. Edit the property object name and value by clicking the column in the list.6. To delete a property, select it in the list and click Delete.7. Save the business layer by clicking the Save icon in the main tool bar.
12.9.26 Showing associated objects
For relational business layers, you can show the objects in the business layer that reference selecteddata foundation tables and columns.1. Open the business layer in the editor by double-clicking the business layer name in the Local Projects
View.2. In the data foundation view pane, select the tables or columns for which you want to see the
associated business layer objects. To select a table, click the table header. To select a column, clickthe column name. To select multiple objects, click while holding down the CTRL key.
3. Right-click the selection and select Show Associated Objects.All objects that reference the selected data foundation objects are highlighted in the business layer.
Related Topics• About resource dependencies
2013-08-03267
Working with business layers

12.9.27 Showing business layer object values
You can show the values in the underlying data source for a business layer object.
Note that for relational business layers:• If the object references columns in the data foundation for which a filter is defined, the filters are
applied.• You can also show table and column values from the data foundation view in the Business Layer
Editor.
The show values command by default opens a tab in the editor to display the values. You can set apreference to have the values open in a dedicated view or a dialog box. For more information, see therelated topic.1. Open the business layer in the editor by double-clicking the business layer name in the Local Projects
View.2. Right-click an object in the Business Layer pane and select Show Values.
The show values window appears. To see what you can do in this window, see the related topic onshowing values in a data source.
Related Topics• Showing values in a data source• Showing table values• Showing column values• Setting preferences for showing values
12.9.28 Searching for business layer objects
The search panel in the Business Layer pane displays the results of a search. All object-contextualcommands available in the Business Layer pane are also available in the search panel.1. Open the business layer in the editor by double-clicking the business layer name in the Local Projects
View.The Business Layer browsing pane displays a tree view of the objects in the business layer.
2. Click the Show/Hide Search Panel icon at the top of the Business Layer browsing pane.The Search Objects panel opens below the tree view of the business layer.
3. Select the object types to include in the search. Click the filter icon in the Search Objects panel.Select the types to include or exclude.
2013-08-03268
Working with business layers
The Search Objects panel displays only objects of the types selected.
4.To search the list, click the Show/Hide search bar icon .
5. In the search text box, enter the text and press the Enter key to start the search.The first object that contains the search text is highlighted in the Search Objects and BusinessLayer panels. The total number of objects containing the search text displays in the search text box.
6. To highlight the next object found, press the Enter key again. Use the Enter key to browse throughall objects that match the search text.
7. When you have finished searching, click the Show/Hide Search Panel icon again to hide theSearch Objects panel.
12.10 About business layer views
You can modify the display of business layer objects by using business layer views to restrict the numberof objects displayed in the Business Layer pane. Use business layer views to group objects that sharea business relationship.
Business layer views can be selected in the Query Panel. You can use business layer views to definesecurity to grant or deny the use of business layer objects to certain users or groups. For more informationon defining security using business layer views, see the related topic on Business Security ProfileCreate Query settings.
You can also filter the Business Layer pane in the editor by business layer view.
Related Topics• Creating and editing a business layer view• Filtering by business layer view• Business Security Profile Create Query settings
12.10.1 Creating and editing a business layer view
1. Open the business layer in the editor by double-clicking the business layer name in the Local ProjectsView.
2. Click the Manage Business Layer Views icon at the top of the Business Layer pane.The "Edit Business Layer View" dialog box opens.
3. Do one of the following:• To add a view, click New.
2013-08-03269
Working with business layers
• To edit an existing view, select the view in the list.
Note:You cannot edit the Master view.
4. Edit the view name in the Name text box.5. In the Objects in view box, select or clear the check boxes next to objects in the business layer to
include or exclude them from the view.To work with only the objects already included in the view, select Show selected objects only.
6. Enter or edit a description for the view in the Description text box.7. Click OK to save the changes.
Related Topics• About business layer views
12.10.2 Filtering by business layer view
By default all the folders and objects in the business layer are displayed in the Business Layer paneof the editor. You can filter what you see in the Business Layer pane using a business layer view.
You must have at least one business layer view defined.1. Open the business layer in the editor by double-clicking the business layer name in the Local Projects
View.2. Select the business layer view in the list at the top of the Business Layer pane.
To return to the display of all objects in the business layer, select Master from the list.
Related Topics• Creating and editing a business layer view• About business layer views
12.11 About parameters
A parameter is a variable in the business layer or data foundation that requires a value at run time. Aparameter can have two input types:• User input as a response to a prompt. The prompt is a question or directive that requires a user to
set one or more values to restrict a result set.• Pre-defined input that specifies a fixed value for the parameter at run time.
2013-08-03270
Working with business layers
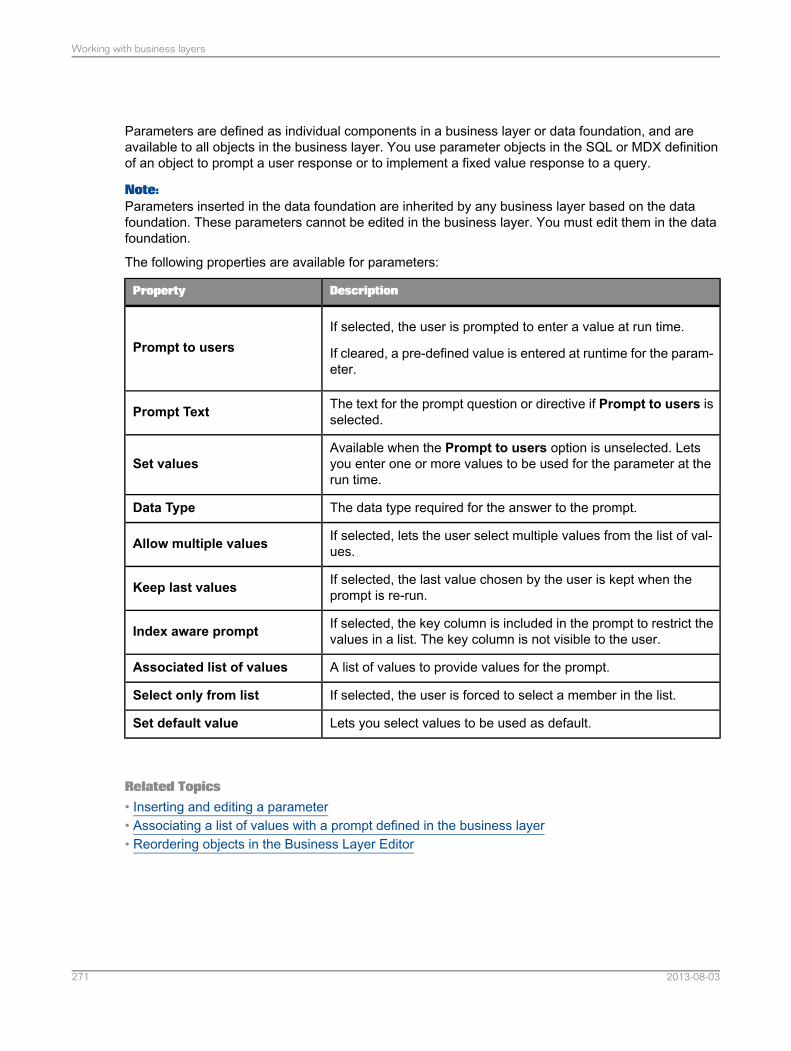
Parameters are defined as individual components in a business layer or data foundation, and areavailable to all objects in the business layer. You use parameter objects in the SQL or MDX definitionof an object to prompt a user response or to implement a fixed value response to a query.
Note:Parameters inserted in the data foundation are inherited by any business layer based on the datafoundation. These parameters cannot be edited in the business layer. You must edit them in the datafoundation.
The following properties are available for parameters:
DescriptionProperty
If selected, the user is prompted to enter a value at run time.
If cleared, a pre-defined value is entered at runtime for the param-eter.
Prompt to users
The text for the prompt question or directive if Prompt to users isselected.Prompt Text
Available when the Prompt to users option is unselected. Letsyou enter one or more values to be used for the parameter at therun time.
Set values
The data type required for the answer to the prompt.Data Type
If selected, lets the user select multiple values from the list of val-ues.Allow multiple values
If selected, the last value chosen by the user is kept when theprompt is re-run.Keep last values
If selected, the key column is included in the prompt to restrict thevalues in a list. The key column is not visible to the user.Index aware prompt
A list of values to provide values for the prompt.Associated list of values
If selected, the user is forced to select a member in the list.Select only from list
Lets you select values to be used as default.Set default value
Related Topics• Inserting and editing a parameter• Associating a list of values with a prompt defined in the business layer• Reordering objects in the Business Layer Editor
2013-08-03271
Working with business layers
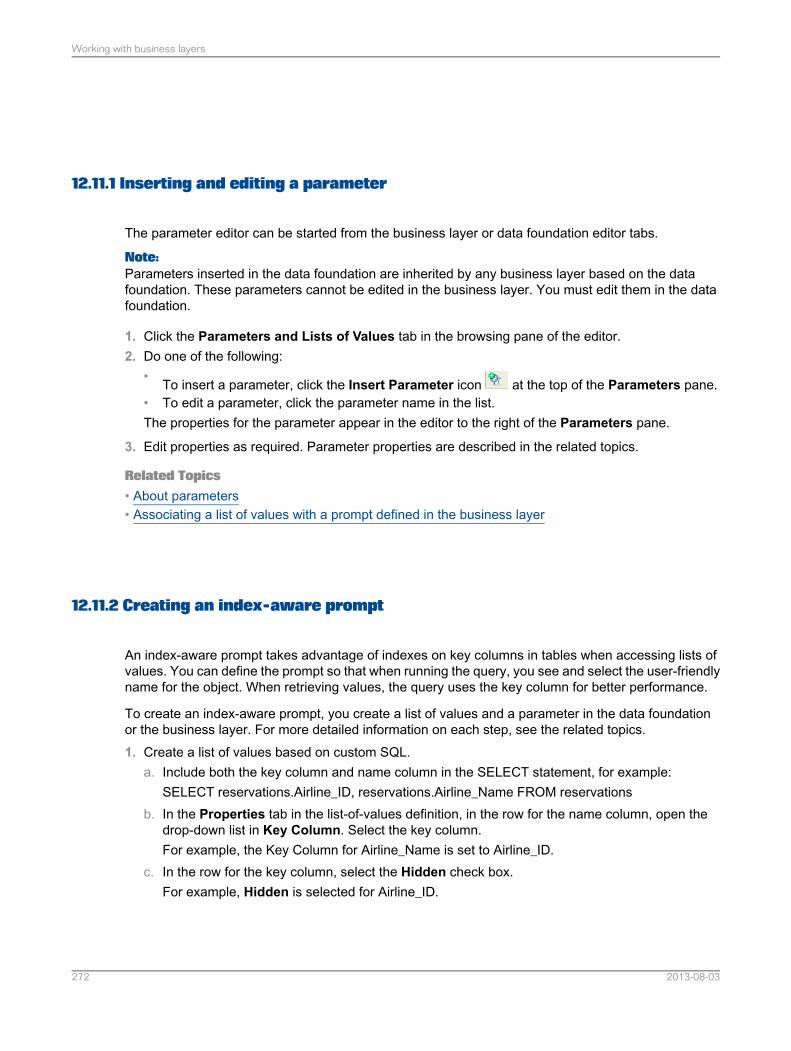
12.11.1 Inserting and editing a parameter
The parameter editor can be started from the business layer or data foundation editor tabs.
Note:Parameters inserted in the data foundation are inherited by any business layer based on the datafoundation. These parameters cannot be edited in the business layer. You must edit them in the datafoundation.
1. Click the Parameters and Lists of Values tab in the browsing pane of the editor.2. Do one of the following:
• To insert a parameter, click the Insert Parameter icon at the top of the Parameters pane.• To edit a parameter, click the parameter name in the list.The properties for the parameter appear in the editor to the right of the Parameters pane.
3. Edit properties as required. Parameter properties are described in the related topics.
Related Topics• About parameters• Associating a list of values with a prompt defined in the business layer
12.11.2 Creating an index-aware prompt
An index-aware prompt takes advantage of indexes on key columns in tables when accessing lists ofvalues. You can define the prompt so that when running the query, you see and select the user-friendlyname for the object. When retrieving values, the query uses the key column for better performance.
To create an index-aware prompt, you create a list of values and a parameter in the data foundationor the business layer. For more detailed information on each step, see the related topics.1. Create a list of values based on custom SQL.
a. Include both the key column and name column in the SELECT statement, for example:SELECT reservations.Airline_ID, reservations.Airline_Name FROM reservations
b. In the Properties tab in the list-of-values definition, in the row for the name column, open thedrop-down list in Key Column. Select the key column.For example, the Key Column for Airline_Name is set to Airline_ID.
c. In the row for the key column, select the Hidden check box.For example, Hidden is selected for Airline_ID.
2013-08-03272
Working with business layers
2. Create a parameter.a. In the Options tab in the parameter definition, select Prompt to users and enter a Prompt Text.b. In Associated List of Values, select the list of values that you created in step 1.c. Select the Select only from list check box.d. Make sure that the Index aware prompt check box is selected.
3. If you want to use the parameter in a query filter in the Query Panel, you need to make thecorresponding dimension index aware in the business layer by defining a key on the dimension.
Example:
Following is an example of how you might use the index-aware prompt in a WHERE clause (forexample in the SQL expression for a derived table, calculated column, or an object in the businesslayer).
WHERE reservations.Airline_ID= @Prompt(parameter name)
Related Topics• Inserting or editing a list of values• Inserting and editing a parameter• Defining keys for dimensions and dimension attributes• About index awareness
12.12 About lists of values
A list of values is a list that contains the data values associated with an object. A list of values allowsa user to choose values as a response to a prompt when an associated object is included in a query.The list of values allows a data set to be restricted to the selected values.
A list of values is an independent component in the business layer or data foundation and is availableto all business objects in the business layer. A list of values can be associated with an object at anytime.
Note:Lists of values inserted in the data foundation are inherited by any business layer based on the datafoundation. These lists of values cannot be edited in the business layer. You must edit them in the datafoundation.
You can define the following types of lists of values:
2013-08-03273
Working with business layers
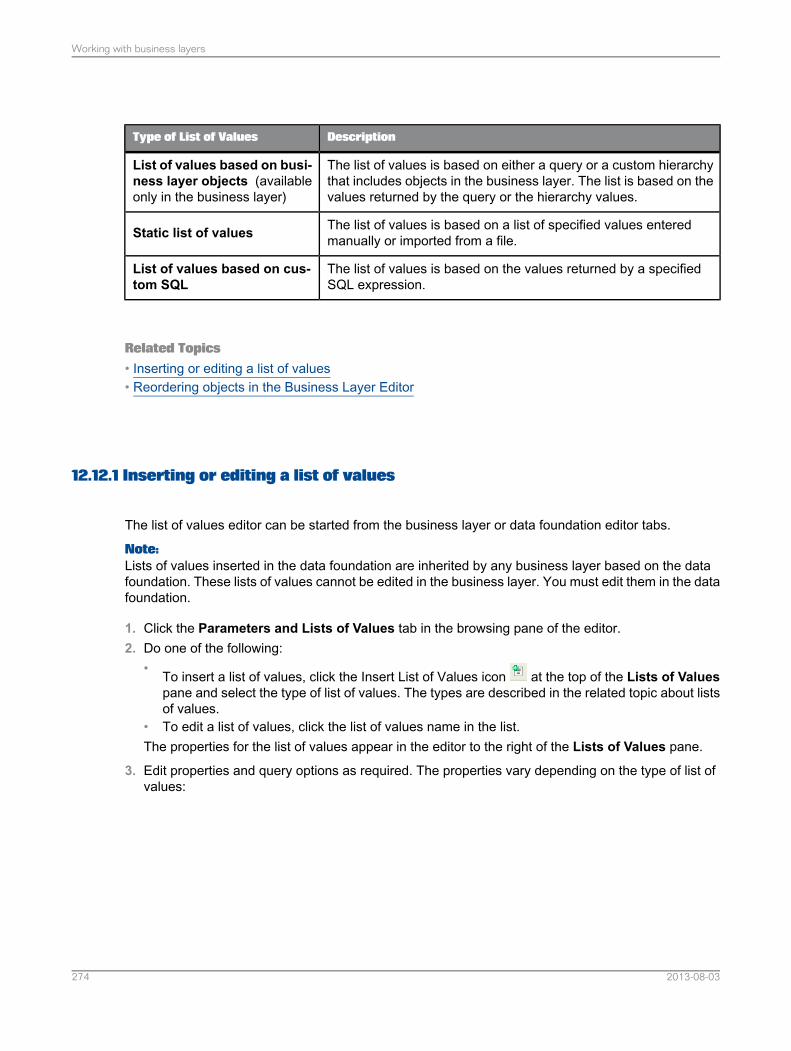
DescriptionType of List of Values
The list of values is based on either a query or a custom hierarchythat includes objects in the business layer. The list is based on thevalues returned by the query or the hierarchy values.
List of values based on busi-ness layer objects (availableonly in the business layer)
The list of values is based on a list of specified values enteredmanually or imported from a file.Static list of values
The list of values is based on the values returned by a specifiedSQL expression.
List of values based on cus-tom SQL
Related Topics• Inserting or editing a list of values• Reordering objects in the Business Layer Editor
12.12.1 Inserting or editing a list of values
The list of values editor can be started from the business layer or data foundation editor tabs.
Note:Lists of values inserted in the data foundation are inherited by any business layer based on the datafoundation. These lists of values cannot be edited in the business layer. You must edit them in the datafoundation.
1. Click the Parameters and Lists of Values tab in the browsing pane of the editor.2. Do one of the following:
• To insert a list of values, click the Insert List of Values icon at the top of the Lists of Valuespane and select the type of list of values. The types are described in the related topic about listsof values.
• To edit a list of values, click the list of values name in the list.The properties for the list of values appear in the editor to the right of the Lists of Values pane.
3. Edit properties and query options as required. The properties vary depending on the type of list ofvalues:
2013-08-03274
Working with business layers
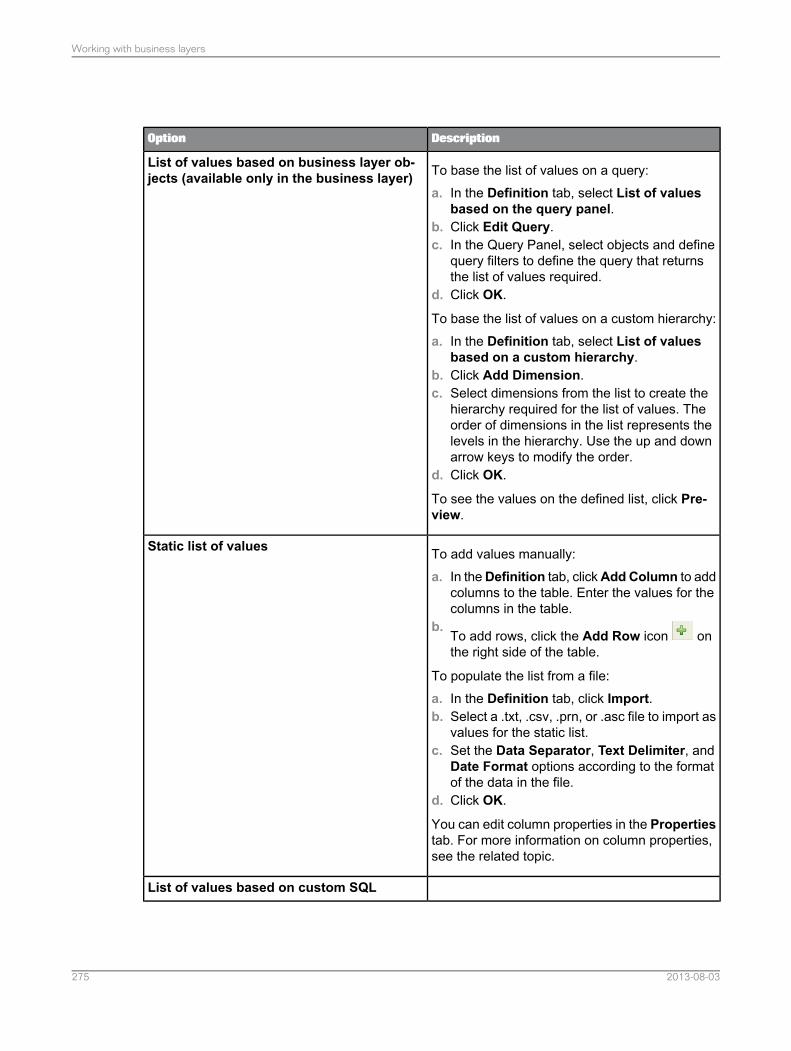
DescriptionOption
To base the list of values on a query:a. In the Definition tab, select List of values
based on the query panel.b. Click Edit Query.c. In the Query Panel, select objects and define
query filters to define the query that returnsthe list of values required.
d. Click OK.
To base the list of values on a custom hierarchy:a. In the Definition tab, select List of values
based on a custom hierarchy.b. Click Add Dimension.c. Select dimensions from the list to create the
hierarchy required for the list of values. Theorder of dimensions in the list represents thelevels in the hierarchy. Use the up and downarrow keys to modify the order.
d. Click OK.
To see the values on the defined list, click Pre-view.
List of values based on business layer ob-jects (available only in the business layer)
To add values manually:a. In theDefinition tab, clickAddColumn to add
columns to the table. Enter the values for thecolumns in the table.
b.To add rows, click the Add Row icon onthe right side of the table.
To populate the list from a file:a. In the Definition tab, click Import.b. Select a .txt, .csv, .prn, or .asc file to import as
values for the static list.c. Set the Data Separator, Text Delimiter, and
Date Format options according to the formatof the data in the file.
d. Click OK.
You can edit column properties in the Propertiestab. For more information on column properties,see the related topic.
Static list of values
List of values based on custom SQL
2013-08-03275
Working with business layers
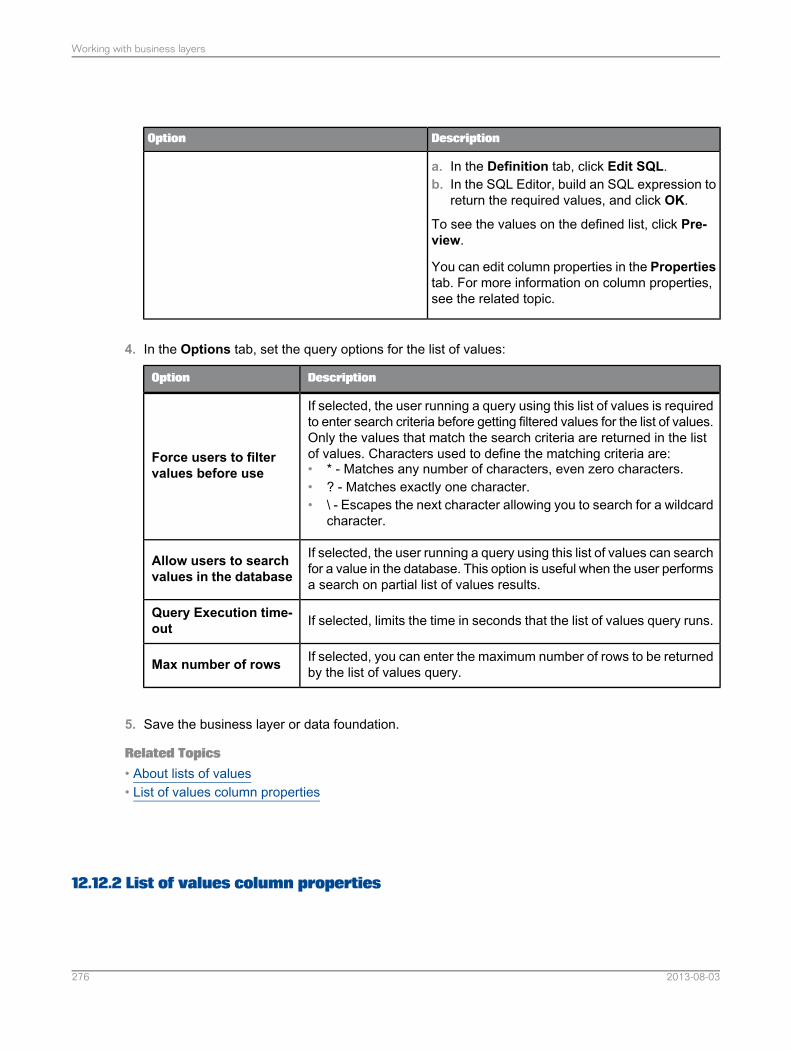
DescriptionOption
a. In the Definition tab, click Edit SQL.b. In the SQL Editor, build an SQL expression to
return the required values, and click OK.
To see the values on the defined list, click Pre-view.
You can edit column properties in the Propertiestab. For more information on column properties,see the related topic.
4. In the Options tab, set the query options for the list of values:
DescriptionOption
If selected, the user running a query using this list of values is requiredto enter search criteria before getting filtered values for the list of values.Only the values that match the search criteria are returned in the listof values. Characters used to define the matching criteria are:• * - Matches any number of characters, even zero characters.• ? - Matches exactly one character.• \ - Escapes the next character allowing you to search for a wildcard
character.
Force users to filtervalues before use
If selected, the user running a query using this list of values can searchfor a value in the database. This option is useful when the user performsa search on partial list of values results.
Allow users to searchvalues in the database
If selected, limits the time in seconds that the list of values query runs.Query Execution time-out
If selected, you can enter the maximum number of rows to be returnedby the list of values query.Max number of rows
5. Save the business layer or data foundation.
Related Topics• About lists of values• List of values column properties
12.12.2 List of values column properties
2013-08-03276
Working with business layers
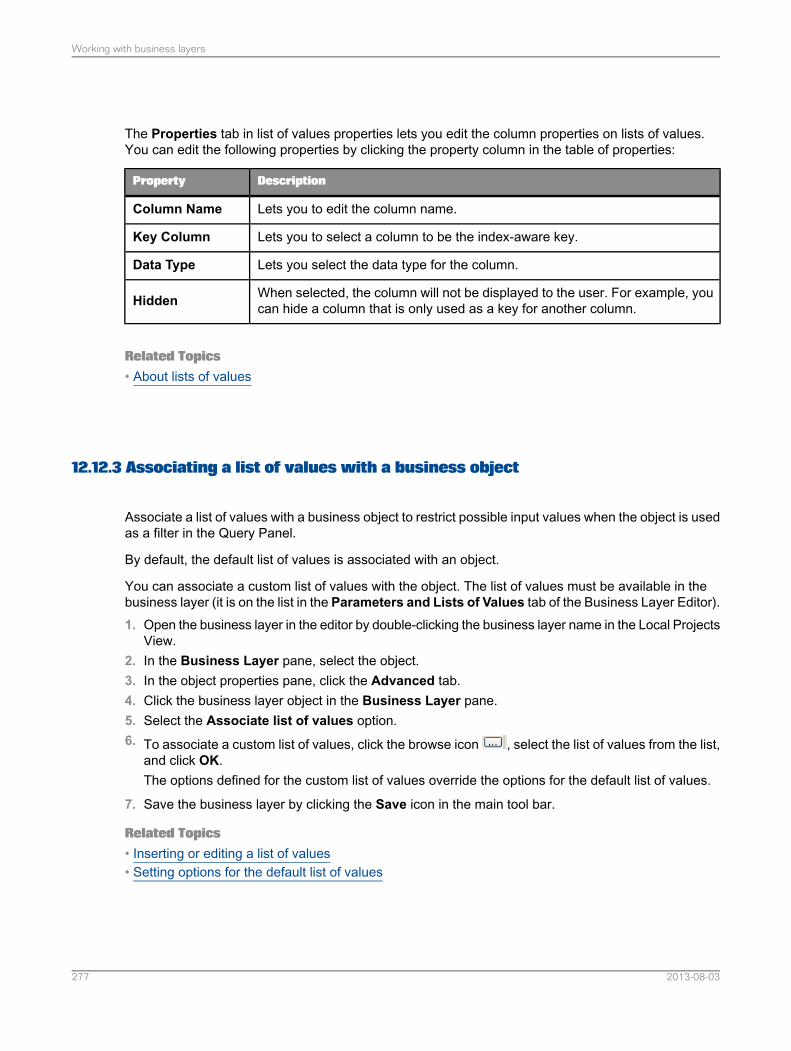
The Properties tab in list of values properties lets you edit the column properties on lists of values.You can edit the following properties by clicking the property column in the table of properties:
DescriptionProperty
Lets you to edit the column name.Column Name
Lets you to select a column to be the index-aware key.Key Column
Lets you select the data type for the column.Data Type
When selected, the column will not be displayed to the user. For example, youcan hide a column that is only used as a key for another column.Hidden
Related Topics• About lists of values
12.12.3 Associating a list of values with a business object
Associate a list of values with a business object to restrict possible input values when the object is usedas a filter in the Query Panel.
By default, the default list of values is associated with an object.
You can associate a custom list of values with the object. The list of values must be available in thebusiness layer (it is on the list in the Parameters and Lists of Values tab of the Business Layer Editor).1. Open the business layer in the editor by double-clicking the business layer name in the Local Projects
View.2. In the Business Layer pane, select the object.3. In the object properties pane, click the Advanced tab.4. Click the business layer object in the Business Layer pane.5. Select the Associate list of values option.6. To associate a custom list of values, click the browse icon , select the list of values from the list,
and click OK.The options defined for the custom list of values override the options for the default list of values.
7. Save the business layer by clicking the Save icon in the main tool bar.
Related Topics• Inserting or editing a list of values• Setting options for the default list of values
2013-08-03277
Working with business layers
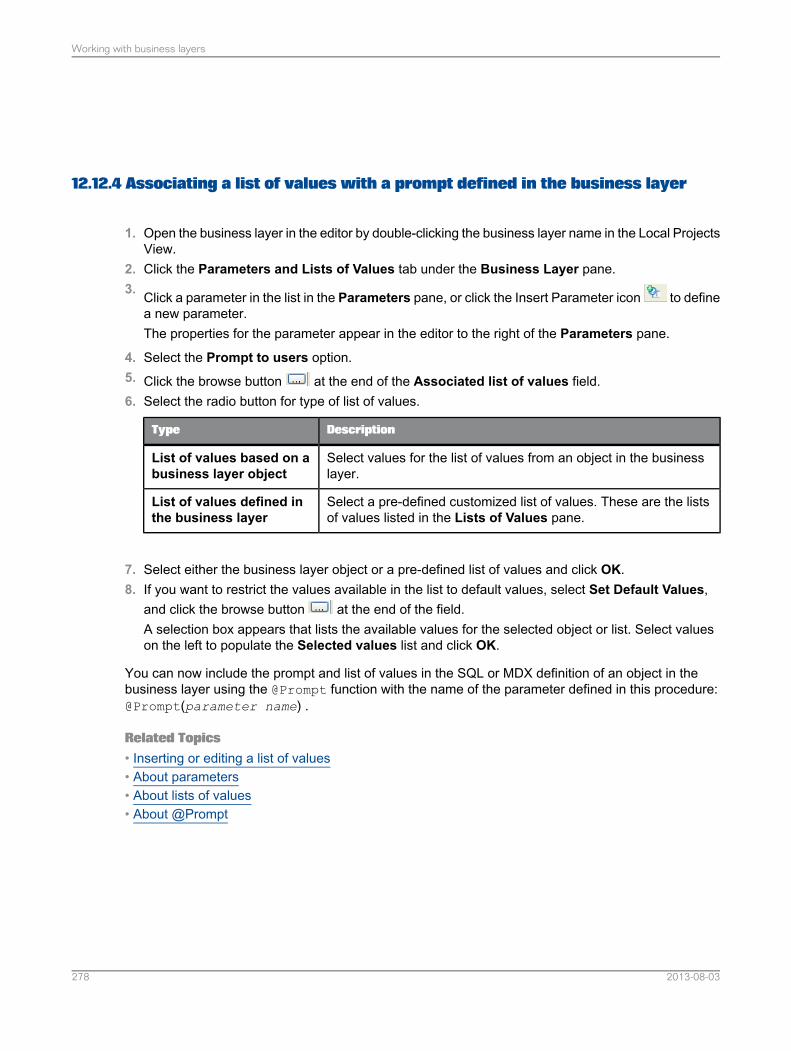
12.12.4 Associating a list of values with a prompt defined in the business layer
1. Open the business layer in the editor by double-clicking the business layer name in the Local ProjectsView.
2. Click the Parameters and Lists of Values tab under the Business Layer pane.3. Click a parameter in the list in the Parameters pane, or click the Insert Parameter icon to define
a new parameter.The properties for the parameter appear in the editor to the right of the Parameters pane.
4. Select the Prompt to users option.5. Click the browse button at the end of the Associated list of values field.6. Select the radio button for type of list of values.
DescriptionType
Select values for the list of values from an object in the businesslayer.
List of values based on abusiness layer object
Select a pre-defined customized list of values. These are the listsof values listed in the Lists of Values pane.
List of values defined inthe business layer
7. Select either the business layer object or a pre-defined list of values and click OK.8. If you want to restrict the values available in the list to default values, select Set Default Values,
and click the browse button at the end of the field.A selection box appears that lists the available values for the selected object or list. Select valueson the left to populate the Selected values list and click OK.
You can now include the prompt and list of values in the SQL or MDX definition of an object in thebusiness layer using the @Prompt function with the name of the parameter defined in this procedure:@Prompt(parameter name) .
Related Topics• Inserting or editing a list of values• About parameters• About lists of values• About @Prompt
2013-08-03278
Working with business layers
12.13 About navigation paths for objects
A Navigation path is an object that defines the drill path used in SAP BusinessObjects reporting tools.A drill path is a list of drillable business objects that allow a report analyst to drill down on a dimension.
A navigation path object can be one of two types:
DescriptionNavigation pathtype
The path is defined by the hierarchical organization of the business objects in thebusiness layer. If the business layer contains analysis dimensions, the navigationpaths include the dimensions under each analysis dimension. Otherwise, thenavigation paths are the dimensions under each folder.
You can view the default navigation path in the Navigation Paths tab of the busi-ness layer editor. The default path cannot be edited.
Default
You define the path based on the available dimensions.Custom
Related Topics• Inserting a navigation path object into a business layer• Reordering objects in the Business Layer Editor
12.13.1 Inserting a navigation path object into a business layer
1. Open the business layer in the editor by double-clicking the business layer name in the Local ProjectsView.
2. Click the Navigation Paths tab under the Business Layer pane.3. Select Custom at the top of the Navigation Paths pane.4.
Click the Insert Navigation Path icon .5. Enter a Name and optionally a Description for the path.
The name and description are available to display in the query and reporting tools that use thepublished universe.
6. Click Add to select dimensions for the path. Use the up and down arrow keys to change the orderof dimensions in the list.
2013-08-03279
Working with business layers
7. Save the business layer.
Related Topics• About navigation paths for objects
12.14 About queries in a business layer
A query object is a query that is saved and associated with the business layer. You use the Query Panelto create queries. Queries are cataloged in the Query pane of the editor.
Note:Queries can be used within the information design tool to test the business layer and to preview queries.Query objects are not available to reporting and analysis products using the published universe.
Related Topics• Inserting and editing a query in the business layer• Reordering objects in the Business Layer Editor
12.14.1 Inserting and editing a query in the business layer
1. Open the business layer in the editor by double-clicking the business layer name in the Local ProjectsView.
2. Click the Queries tab under the Business Layer pane.3. In the Queries pane, do one of the following:
CommandOption
Select the query.
Edit the Name and Description in the Query Properties pane.
To edit the query results and filters in the Query Panel, click Edit Query.
To edit an existingquery
Click the Insert Query icon .To insert a query
4. In the Query Panel, build or edit the query and click OK.The new query is available in the Queries pane.
2013-08-03280
Working with business layers
Related Topics• How to build a query
12.15 Reordering objects in the Business Layer Editor
You can reorder lists of values, parameters, queries, and custom navigation paths in the business layereditor. The order is saved in the business layer and the universe outline in the Query Panel. For example,when selecting a parameter to drag it to the Filter Objects pane, the parameter objects are presentedin the custom order. The custom order in the business layer does not affect the order of prompts whenquerying.1. Open the business layer in the editor by double-clicking the business layer name in the Local Projects
View.2. Click the tab in theBusiness Layer pane depending on the objects you want to reorder: Parameters
and Lists of Values, Queries, or Navigation Paths.To reorder navigation paths, select Custom.
3. Drag and drop the objects into the order that you want them to be listed.
For example, in the Parameters pane, drag and drop the parameter names into the desired order.
Inherited lists of values and parameters cannot be reordered in the Business Layer Editor. You mustreorder them in the Data Foundation Editor. The inherited objects are listed after the business layerobjects in their custom order.
4. Save the business layer by clicking the Save icon in the main tool bar.
Note:The A-Z sort direction affects the display only in the editor and is lost if you disable sort or close theeditor. By contrast, the custom order that you establish by dragging and dropping objects is kept evenafter you have closed the editor. To restore the custom sort order, click the Sort direction icon andselect Disable sort.
12.16 About refreshing business layers
Refreshing an OLAP business layerFor business layers based on an OLAP cube, the "Refresh Business Layer" wizard detects changesin the OLAP cube and applies the changes to the business layer.
On the "Select Options" page, you can select which types of changes the wizard should detect in thecube.
2013-08-03281
Working with business layers
Based on the detections, the wizard lists possible update actions in the "Select Actions" page. You canselect which update actions you want to apply to the business layer.
Before applying the changes, the wizard displays a summary of update actions on the "Refresh Summary"page. You can save the summary to a file. You can go back and modify your selection before finishingthe wizard.
A summary list is shown with the changes that are proposed in the business layer based on the changesin the cube structure. You can clear and select proposed changes before applying the update.
Note:A refresh can be undone using the undo action. Undo will recover the business layer to its state beforethe refresh. To undo, from the information design tool main menu, select Edit > Undo.
Refreshing an SAP NetWeaver BW multisource-enabled business layerWhen objects are added to the InfoProvider of an SAP NetWeaver BW data source, the procedure toupdate the universe involves several steps. First, you refresh the structure and synchronize tables inthe data foundation. You refresh a business layer with new objects from the data source using theInsert Candidate Objects command.
Refreshing relational business layersTo update the business layer with changes to the underlying data foundation, you must manually deleteand insert objects. To insert objects for new tables, in the Business Layer Editor, you can drag anddrop tables from the data foundation view to the business layer browsing pane.
To identify objects based on tables that have been deleted from the data foundation, follow these steps:1. In the Local Projects View, right-click the business layer and select Refresh.2. Open the business layer in the editor. If an object in the business layer is based on a table that was
deleted from or changed in the data foundation, in the SQL Definition tab of the object properties,the Tables field label is in red and the field contains the message [Unresolved table].
Related Topics• Refreshing an OLAP business layer• Refreshing universes based on SAP Netweaver BW• Inserting candidate objects• Inserting dimensions directly from the data foundation
12.16.1 Refreshing an OLAP business layer
Use the "Refresh Business Layer" wizard to update a business layer based on changes in the OLAPcube since the business layer was created, or since the last refresh.1. Open the business layer by clicking the business layer name in the Local Project View.2. From the information design tool main menu, select Actions > Refresh Structure.
2013-08-03282
Working with business layers
3. Follow the instructions on the wizard pages. For more information about what to do on a particularpage, click the help icon.
Related Topics• About refreshing business layers
12.16.2 Inserting candidate objects
Before inserting candidate objects, first run a refresh structure and then synchronize tables in the datafoundation.
Inserting candidate objects applies only to business layers that are based on multisource-enabled datafoundations on SAP NetWeaver BW connections. The Insert Candidate Objects command detectsobjects that have been added to the data source since the business layer was created, or since thebusiness layer was last updated with the Insert Candidate Objects command. The command detectsnew objects using the SAP NetWeaver BW strategy.
Inserting candidate objects updates the business layer independently of the data foundation. If you donot also refresh the structure and synchronize tables in the data foundation, you can introduceinconsistencies between the data foundation and business layer.1. Open the business layer by double-clicking the business layer name in the Local Projects View.2. Right-click the business layer name in the Business Layer pane and select Insert Candidate Objects.
A list of business layer objects displays. The objects are grouped in folders based on the sourcetables. Candidate objects are highlighted and pre-selected.
3. Select the objects in the list to insert into the business layer.
You can select objects that exist in the business layer. In this case, the definitions from the datasource will overwrite the existing business object definitions.
4. To insert the selected objects into the business layer, click Finish, and save the business layer.
The insertion can be undone using the Edit > Undo command on the main menu.
Inserting candidate objects does not detect obsolete objects in the business layer. You must find anddelete obsolete objects manually.
Related Topics• About refreshing a data foundation• Synchronizing tables• Refreshing universes based on SAP Netweaver BW
2013-08-03283
Working with business layers
12.17 About computing statistics for optimized query execution
For queries on multisource-enabled universes, you can obtain the best performance if accurate tableand columns statistics are available for the data federation service. The cost-based optimizer of thedata federation service uses these statistics to determine the optimal join method and order.
The Compute statistics command optimizes query execution because it allows you to compute andstore statistics in the repository for the universe.
You should compute statistics periodically for tables that might change in volume or for which columnvalues are changing frequently.
The following statistics are generated for the optimization process:• The table row count• The number of distinct values for the columns
You set the following options:• Select all tables and columns that were computed before a certain date• Select all tables and columns that were never computed• Select every table and column• Unselect every table and column
Related Topics• Computing statistics for a multisource-enabled universe
12.17.1 Computing statistics for a multisource-enabled universe
You can compute statistics only for universes based on a multisource-enabled data foundation.1. Do one of the following:
2013-08-03284
Working with business layers
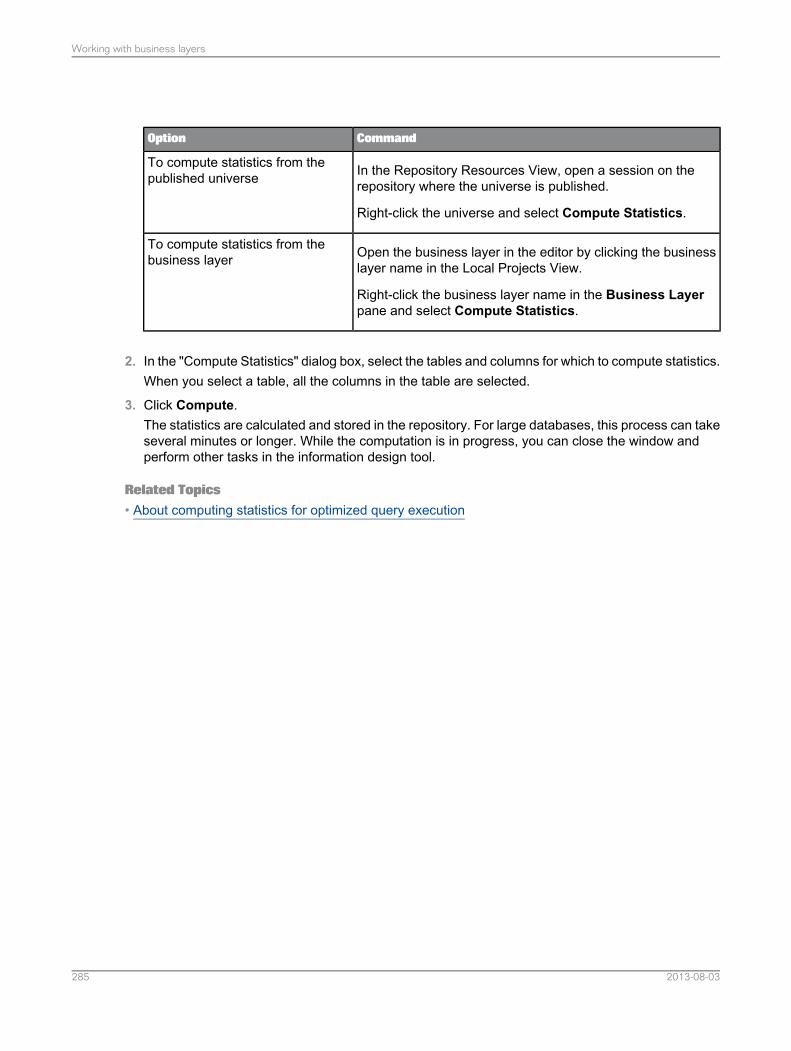
CommandOption
In the Repository Resources View, open a session on therepository where the universe is published.
Right-click the universe and select Compute Statistics.
To compute statistics from thepublished universe
Open the business layer in the editor by clicking the businesslayer name in the Local Projects View.
Right-click the business layer name in the Business Layerpane and select Compute Statistics.
To compute statistics from thebusiness layer
2. In the "Compute Statistics" dialog box, select the tables and columns for which to compute statistics.When you select a table, all the columns in the table are selected.
3. Click Compute.The statistics are calculated and stored in the repository. For large databases, this process can takeseveral minutes or longer. While the computation is in progress, you can close the window andperform other tasks in the information design tool.
Related Topics• About computing statistics for optimized query execution
2013-08-03285
Working with business layers

2013-08-03286
Working with business layers
Using the Query Panel
Use the Query Panel to build, test, and preview the results of queries on a business layer or publisheduniverse.
In the information design tool, you can start the Query Panel in the following ways:• To insert a query into the business layer.• To open an existing query in the business layer.• To run a query on a universe published in a repository.
Related Topics• Inserting and editing a query in the business layer• Running a query on a universe published in a repository• How to build a query
13.1 How to build a query
This procedure assumes that you have opened the Query Panel on a business layer or publisheduniverse. See the related topic on Using the Query Panel.
You can use this procedure to run queries on published universes, but to save the query you must startthe Query Panel from the Business Layer Editor Queries pane.
For links to more detailed information about each step, see the Related Topics.1. To select the objects you want to include in the query, drag objects from the business layer on the
right into the Result Objects pane.2. For hierarchy result objects, select members to include or exclude in the results. To open the Member
Selector, click the arrow to the right of the hierarchy object name: .3. To filter the results of the query, drag objects from the business layer into the Filter Objects pane.
If a mandatory filter is defined on an object, the filter is triggered when you add the object to theResult Objects pane. The mandatory filter is visible in the query script, but not in the Filter Objectspane.
Non-mandatory pre-defined filters are listed in the business layer. You can drag these pre-definedfilters into the Filter Objects pane to limit the results. The filter is visible in the query script.
2013-08-03287
Using the Query Panel
You can also build business filters, including filters that use prompts. For detailed information, seethe related topics.
4. For relational universes, you can build combined queries. To open the Combined Queries pane,
click the icon.5.
To set query properties, click the icon.6. To see or edit the query script, click View Script.7. To preview the query results, click the refresh button in the Data Preview pane.
You can profile the values in the result columns. In the Data Preview pane, click the Advanced
Preview icon .
To change the layout of hierarchical data, click the Result set display options icon and selectan option from the list:
DescriptionOption
Displays repeated values for a level in every row.Flat layout
Displays repeated values once for a level.Hierarchical layout
8. To save the query, click OK.The OK button is only available when running the Query Panel from the Business Layer Editor. Thequery is saved in the business layer and can be executed or edited from the Queries pane.
Related Topics• Using the Query Panel• About the Member Selector• How to build a business filter• Filtering data using prompts• Setting query properties• Viewing and editing the query script• Profiling column values in the query panel
13.2 About the Member Selector
The Member Selector lets you visualize and select members in a hierarchy. Use the Member Selectorto:• Select the members you want to appear in the query result set.• Define members that will be excluded from queries.
2013-08-03288
Using the Query Panel
• Define prompts to allow the selection of members to appear in the query each time you run thequery.
• Select the members for a named set.• Select the members when defining a Business Security Profile filter.
You open the Member Selector from hierarchy objects that you include in queries in the Query Panel.The Member Selector opens automatically when you edit named sets or filters for a Business SecurityProfile on a hierarchical business layer.
Related Topics• Selecting hierarchy members• About selecting hierarchy members
13.2.1 About selecting hierarchy members
In the Member Selector, you can select members in several ways:• Select members explicitly in the hierarchy. For example, explicitly select the [California] and [Los
Angeles] members of the [Geography] hierarchy.• Select members implicitly using hierarchy relationships. For example, to select US states, you can
select the child members of the [US] member.• Select members included in a named set, for example Top Cities by Revenue, to include the cities
that generate the most revenue.• Select all members in a hierarchy level.• Select all members up to a certain level in the hierarchy.• Select calculated members.
The Member Selector contains three tabs:
DescriptionTab
Displays the members arranged hierarchically. Use this tab to select membersexplicitly, by hierarchical relationships, and by specifying all members up to agiven level.
Members
Shows the hierarchy levels (if the hierarchy supports named levels), named sets,and calculated members.
Metadata
Lets you define and modify prompts.Prompts
For information on how to select, display, search for, and sort hierarchy members, see the relatedtopics.
2013-08-03289
Using the Query Panel
Related Topics• Selecting hierarchy members• Selecting members by hierarchy relationship• Selecting hierarchy members by level• Selecting named sets• Selecting calculated members• Searching for hierarchy members• Excluding hierarchy members• Defining a prompt to select members• Showing selected members in the Member Selector• Sorting hierarchy members• Setting display options• Showing estimated child count
13.2.2 Opening the Member Selector in the Query Panel
1. In the Query Panel, add the hierarchy object to the Result Objects pane.2. To open the Member Selector, click the arrow to the right of the hierarchy object name: .3. You can now select members in the hierarchy for inclusion or exclusion in a query. For descriptions
of different ways to select members, see the related topic.
Related Topics• About selecting hierarchy members
13.2.3 Selecting hierarchy members
1. In the Member Selector, click the Members tab to display the hierarchy members.2. Select members in the hierarchy display.3.
To select all members in the hierarchy, click the Select icon , and select Select All.4.
To select all members up to a specified level in the hierarchy, click the Select icon . You canidentify the level in two ways:
2013-08-03290
Using the Query Panel
DescriptionOption
This option is only available if the hierarchy has named levels.Select Select All Members until Named Level and select thelevel from the submenu.
Select a named level
Select Select All Members until and select the number of levelsfrom the submenu.
Select a number of levels be-low the root
5. When you complete your selection, click OK.
The selected members appear below the hierarchy object in the Result Objects pane of the QueryPanel. When you run the query, only those members are included in the query result.
Related Topics• Opening the Member Selector in the Query Panel
13.2.4 Selecting members by hierarchy relationship
1. In the Member Selector, click the Members tab to display the hierarchy members.2. In the hierarchy, right-click the member for which you want to define the hierarchy relationship.3. Select the relationship function from the menu:
Note:Children/Descendants and Parents/Ancestors are mutually exclusive pairs. You cannot selectboth the children and the descendants of a member, and you cannot select both the parents andthe ascendants of a member.
DescriptionRelationship Function
Includes only the selected member. This is the default setting.Self
Includes members one level below the selected member that have theselected member as their parent. The selected member is not included.
Children
Includes all members at all levels below the selected member. The selectedmember is not included.
Descendants
Includes the members at levels below the selected member until the namedlevel you select. This option is only available if the hierarchy has namedlevels.
Descendants untilNamed Level...
2013-08-03291
Using the Query Panel
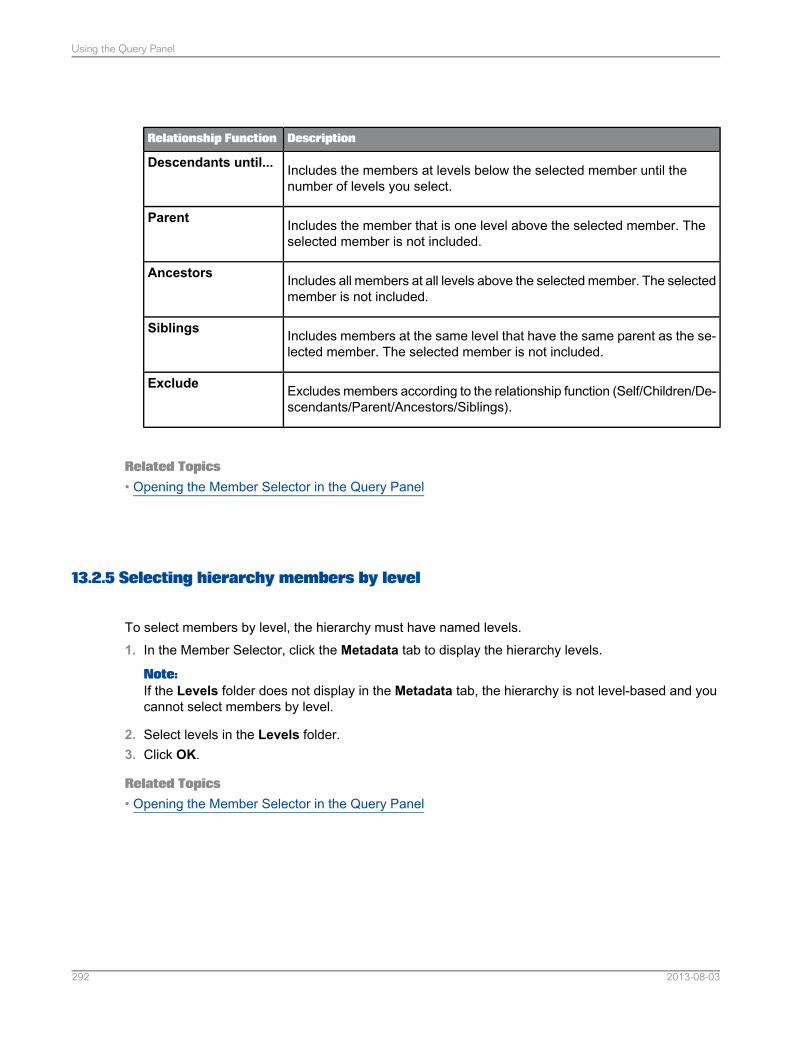
DescriptionRelationship Function
Includes the members at levels below the selected member until thenumber of levels you select.
Descendants until...
Includes the member that is one level above the selected member. Theselected member is not included.
Parent
Includes all members at all levels above the selected member. The selectedmember is not included.
Ancestors
Includes members at the same level that have the same parent as the se-lected member. The selected member is not included.
Siblings
Excludes members according to the relationship function (Self/Children/De-scendants/Parent/Ancestors/Siblings).
Exclude
Related Topics• Opening the Member Selector in the Query Panel
13.2.5 Selecting hierarchy members by level
To select members by level, the hierarchy must have named levels.1. In the Member Selector, click the Metadata tab to display the hierarchy levels.
Note:If the Levels folder does not display in the Metadata tab, the hierarchy is not level-based and youcannot select members by level.
2. Select levels in the Levels folder.3. Click OK.
Related Topics• Opening the Member Selector in the Query Panel
2013-08-03292
Using the Query Panel
13.2.6 Selecting named sets
To select members by named set, the hierarchy must have at least one named set defined. Namedsets are defined in the business layer of the universe.1. In the Member Selector, click the Metadata tab to display the named sets.
Note:If the Named Sets folder does not display in the Metadata tab, the hierarchy has no named setsdefined.
2. Select named sets in the Named Sets folder.3. Click OK.
Related Topics• Opening the Member Selector in the Query Panel• Inserting and editing named sets
13.2.7 Selecting calculated members
To select calculated members, the hierarchy must have at least one calculated member defined.Calculated members are defined in the business layer of the universe.1. In the Member Selector, click the Metadata tab to display the calculated members.
Note:If the Calculated Members folder does not display in the Metadata tab, the hierarchy has nocalculated members defined.
2. Select calculated members in the Calculated Members folder.3. Click OK.
Related Topics• Opening the Member Selector in the Query Panel• Inserting and editing calculated members
13.2.8 Searching for hierarchy members
2013-08-03293
Using the Query Panel
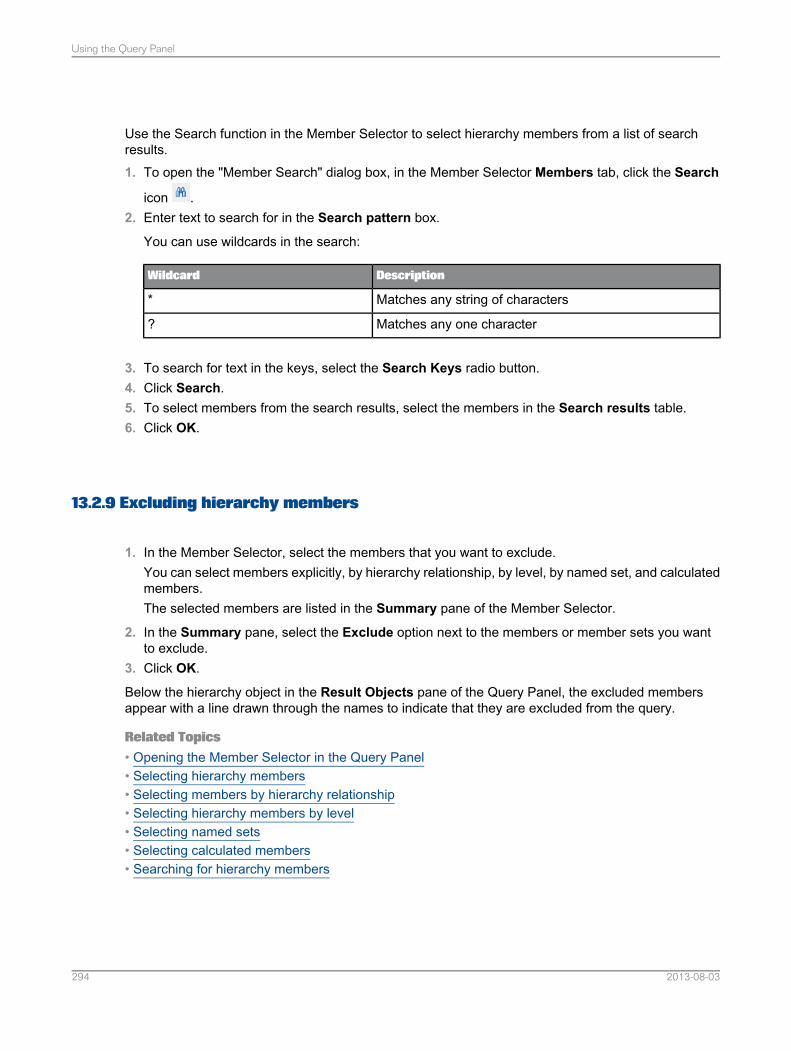
Use the Search function in the Member Selector to select hierarchy members from a list of searchresults.1. To open the "Member Search" dialog box, in the Member Selector Members tab, click the Search
icon .2. Enter text to search for in the Search pattern box.
You can use wildcards in the search:
DescriptionWildcard
Matches any string of characters*
Matches any one character?
3. To search for text in the keys, select the Search Keys radio button.4. Click Search.5. To select members from the search results, select the members in the Search results table.6. Click OK.
13.2.9 Excluding hierarchy members
1. In the Member Selector, select the members that you want to exclude.You can select members explicitly, by hierarchy relationship, by level, by named set, and calculatedmembers.The selected members are listed in the Summary pane of the Member Selector.
2. In the Summary pane, select the Exclude option next to the members or member sets you wantto exclude.
3. Click OK.
Below the hierarchy object in the Result Objects pane of the Query Panel, the excluded membersappear with a line drawn through the names to indicate that they are excluded from the query.
Related Topics• Opening the Member Selector in the Query Panel• Selecting hierarchy members• Selecting members by hierarchy relationship• Selecting hierarchy members by level• Selecting named sets• Selecting calculated members• Searching for hierarchy members
2013-08-03294
Using the Query Panel
13.2.10 Defining a prompt to select members
You can define a prompt to defer member selection to the time the query is run.
Note:When selecting members in response to a prompt, you can only select members explicitly. You cannotselect members by hierarchy relationship.
1. In the Member Selector, click the Prompt tab.2. Select Enable Parameter to defer member selection to when the query is run.
You cannot access the other tabs in the Member Selector when the Enable Parameter option isselected.
3. Enter text for the prompt in the Prompt Text box.4. If you want the prompt to select the previously-selected values by default when it displays, select
Keep last values selected.5. To define default values for the prompt, select Set default values and click Edit. In the "Select
Parameter Values" dialog box, select default values for the prompt and click OK.6. Click OK.
Related Topics• Opening the Member Selector in the Query Panel
13.2.11 Showing selected members in the Member Selector
In the Member Selector Members tab, you can click the Expand tree to show selections icon toshow the selected members in the hierarchy display.
The display automatically expands to show the following members:• Explicitly selected members.• Members used to select related members. The related members implicitly selected are not necessarily
shown. For example, if the member called France was used to select its children, the tree viewexpands to show France. If the node France contains no explicitly selected members, the node isnot expanded the show the implicitly selected children.
Tip:The Expand tree to show selections command does not collapse nodes that are already expanded.To reduce the length of the display, close all open nodes in the hierarchy display before clicking theicon.
2013-08-03295
Using the Query Panel

Related Topics• Opening the Member Selector in the Query Panel
13.2.12 Sorting hierarchy members
By default in the Member Selector, hierarchy members are displayed sorted in the order they are storedin the database. To help find members in the hierarchy, you can sort the display in ascending ordescending alphabetical order.
In the Member Selector Members tab, click the Sort order icon and select the desired sort order.
The members are sorted locally in the Member Selector. Display of members in the query is not affected.
Related Topics• Opening the Member Selector in the Query Panel
13.2.13 Setting display options
By default, the Member Selector displays hierarchy member captions. You can set the display optionsto display unique names, or both captions and unique names.
In the Member Selector Members tab, click the Member display options icon and select thedesired display option.
13.2.14 Showing estimated child count
The Member Selector estimates the number of children for each member. By default, the estimates arehidden. You can show the estimated child count in the hierarchy display.
In the Member Selector Members tab, click the Show/Hide estimated child count icon to togglethe display of child counts.
2013-08-03296
Using the Query Panel
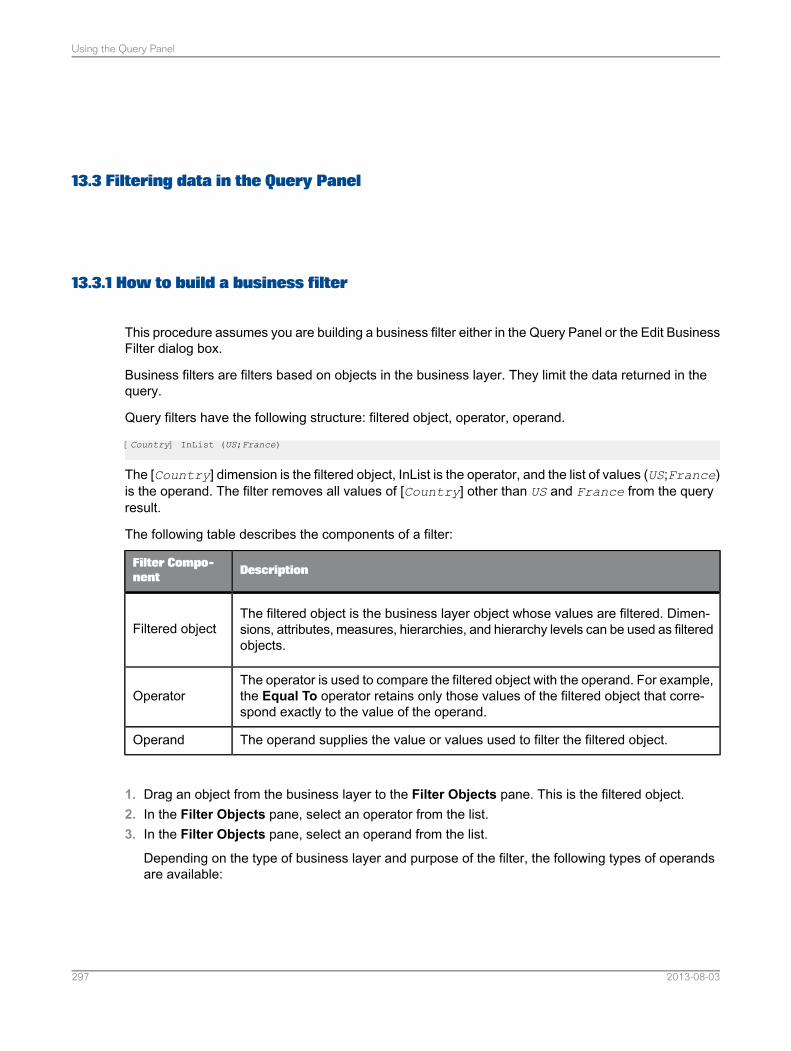
13.3 Filtering data in the Query Panel
13.3.1 How to build a business filter
This procedure assumes you are building a business filter either in the Query Panel or the Edit BusinessFilter dialog box.
Business filters are filters based on objects in the business layer. They limit the data returned in thequery.
Query filters have the following structure: filtered object, operator, operand.
[Country] InList (US;France)
The [Country] dimension is the filtered object, InList is the operator, and the list of values (US;France)is the operand. The filter removes all values of [Country] other than US and France from the queryresult.
The following table describes the components of a filter:
DescriptionFilter Compo-nent
The filtered object is the business layer object whose values are filtered. Dimen-sions, attributes, measures, hierarchies, and hierarchy levels can be used as filteredobjects.
Filtered object
The operator is used to compare the filtered object with the operand. For example,the Equal To operator retains only those values of the filtered object that corre-spond exactly to the value of the operand.
Operator
The operand supplies the value or values used to filter the filtered object.Operand
1. Drag an object from the business layer to the Filter Objects pane. This is the filtered object.2. In the Filter Objects pane, select an operator from the list.3. In the Filter Objects pane, select an operand from the list.
Depending on the type of business layer and purpose of the filter, the following types of operandsare available:
2013-08-03297
Using the Query Panel
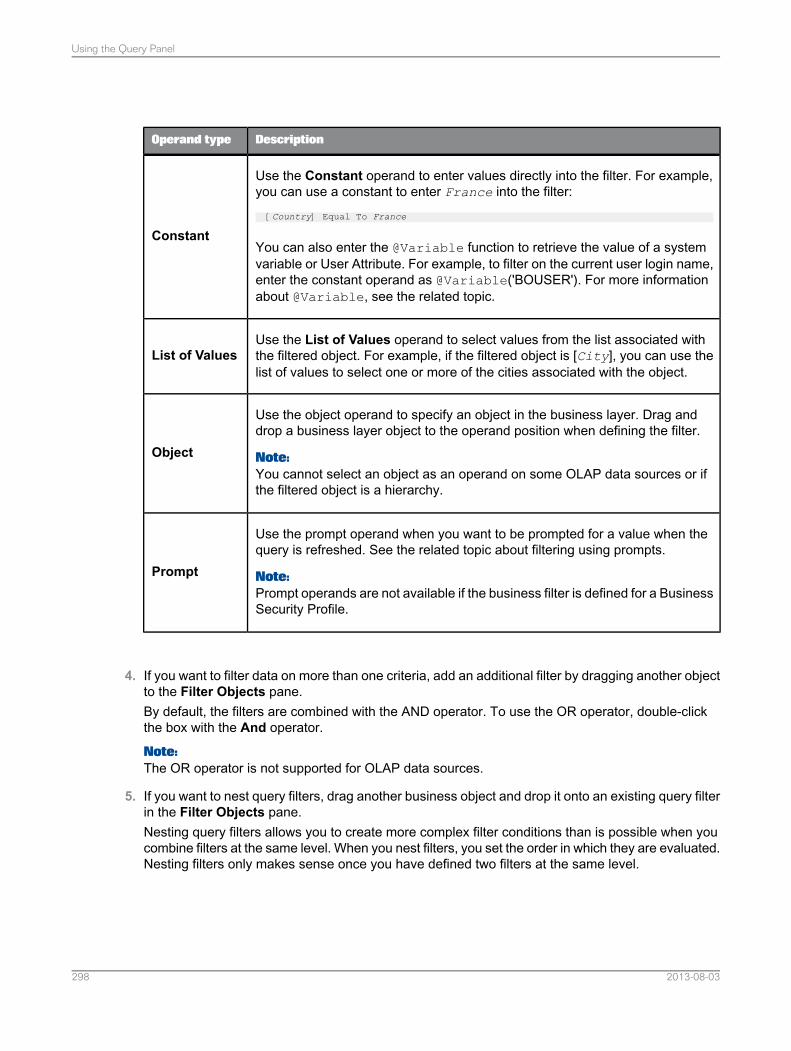
DescriptionOperand type
Use the Constant operand to enter values directly into the filter. For example,you can use a constant to enter France into the filter:[Country] Equal To France
You can also enter the @Variable function to retrieve the value of a systemvariable or User Attribute. For example, to filter on the current user login name,enter the constant operand as @Variable('BOUSER'). For more informationabout @Variable, see the related topic.
Constant
Use the List of Values operand to select values from the list associated withthe filtered object. For example, if the filtered object is [City], you can use thelist of values to select one or more of the cities associated with the object.
List of Values
Use the object operand to specify an object in the business layer. Drag anddrop a business layer object to the operand position when defining the filter.
Note:You cannot select an object as an operand on some OLAP data sources or ifthe filtered object is a hierarchy.
Object
Use the prompt operand when you want to be prompted for a value when thequery is refreshed. See the related topic about filtering using prompts.
Note:Prompt operands are not available if the business filter is defined for a BusinessSecurity Profile.
Prompt
4. If you want to filter data on more than one criteria, add an additional filter by dragging another objectto the Filter Objects pane.By default, the filters are combined with the AND operator. To use the OR operator, double-clickthe box with the And operator.
Note:The OR operator is not supported for OLAP data sources.
5. If you want to nest query filters, drag another business object and drop it onto an existing query filterin the Filter Objects pane.Nesting query filters allows you to create more complex filter conditions than is possible when youcombine filters at the same level. When you nest filters, you set the order in which they are evaluated.Nesting filters only makes sense once you have defined two filters at the same level.
2013-08-03298
Using the Query Panel
Related Topics• Using the Query Panel• Inserting and editing filters• About @Variable• Building a new prompt to filter data
13.3.2 Filtering data using prompts
A prompt is a special type of query filter. It is a dynamic filter that displays a question every time yourefresh the data in a query. You answer prompts by either typing or selecting the values you want toview before you refresh the data. The query then returns only the values you specified.
Prompts allow multiple users viewing a single document to specify a different sub-set of the databaseinformation and display it in the same report tables and charts. Prompts also reduce the time it takesfor the data to be retrieved from the database.
When you define a prompt query filter, you can either build a new prompt, or use an existing promptdefined as a parameter in the business layer.
If you define more than one prompt in a query, you can change the order in which prompts are presented.Change prompt order in the query properties.
Merged PromptsWhen querying a business layer or universe, similar prompts are merged. For prompts to be merged,the following rules must be true:• The prompts have the same prompt text.• The prompts expect answers having the same data type.• The prompts expect the same number of answers. (The number of answers to be given depends
on the operator used to reference the prompt. For example, Equal To expects one answer.Betweenexpects multiple answers.)
A single prompt message appears for merged prompts. The list of values displayed by the mergedprompt is the list associated with the prompt that has the most display property constraints.
Note:
All prompts in the query are candidates for merging: parameters defined in the business layer or datafoundation, prompts defined as query filters, and prompts defined in the query expression of a businesslayer object with the @Prompt function.
Related Topics• Building a new prompt to filter data• Using an existing prompt to filter data• Setting query properties
2013-08-03299
Using the Query Panel
• About parameters
13.3.2.1 Building a new prompt to filter data
This procedure assumes you are building a business filter either in the Query Panel or the Edit BusinessFilter dialog box.1. Drag the object you want to filter with a prompt and drop it onto the Query Filters pane.
The query filter appears in outline in the Query Filters pane. The outline shows the filtered object,the operator and the type of filter applied to the object. (By default the filter is a constant.)
2. Select the filter operator from the list.
Note:The list of available operators depends on the type of filtered object.
3. Click the arrow at the right of the outline query filter and select Prompt from the menu to filter theobject using a prompt.The Edit Prompt dialog box appears and the New Prompt option is selected by default.
4. Edit the prompt question in the Prompt Text box.5. Select Prompt with List of Values to allow the user to select from a list of values when answering
the prompt.
The option is only available if the filtered object has an associated list of values in the universe.
6. Select Select only from list to restrict the user choice to values from the list of values.
You can select this option only if the Prompt with List of Values option is selected.
7. Select Keep last values if you want the prompt to propose the last value that the user selected onthe previous refresh. The first time the query is run, the default value (if set) is proposed.
8. Select Optional prompt to make the prompt optional. If the user does not supply a value for anoptional prompt, the prompt is ignored.
9. Select Set default values if you want the prompt to propose values by default when it displays.a. To enter or select the default values, click Edit.b. If the filter object has an associated list of values, select the default values from the list.c. If the filter object has no associated list of values, enter default values.d. Click OK to save the default values.
10. Click OK to save the new prompt definition.
Related Topics• How to build a business filter• About lists of values
2013-08-03300
Using the Query Panel
13.3.2.2 Using an existing prompt to filter data
This procedure assumes you are building a business filter either in the Query Panel or the Edit BusinessFilter dialog box.1. Drag the object on which you want to apply a prompt and drop it onto the Query Filters pane.
The query filter appears in outline in the Query Filters pane.
2. Select the filter operator from the list.
Note:The list of available operators depends on the type of filtered object.
3. Click the arrow at the right of the Query Filter and select Prompt from the menu.4. In the Edit Prompt dialog box, select the Use Universe Parameter option.5. Select an existing parameter.
The list displays only those universe prompts that are compatible with the object you are filtering.For example, the filtered object and the universe prompt must have the same data type.
6. Click OK to save the prompt definition.
Related Topics• How to build a business filter• About parameters
13.4 Setting query properties
1.In the Query Panel, click the Query properties toolbar button .
2. Edit the query property settings as required.
2013-08-03301
Using the Query Panel
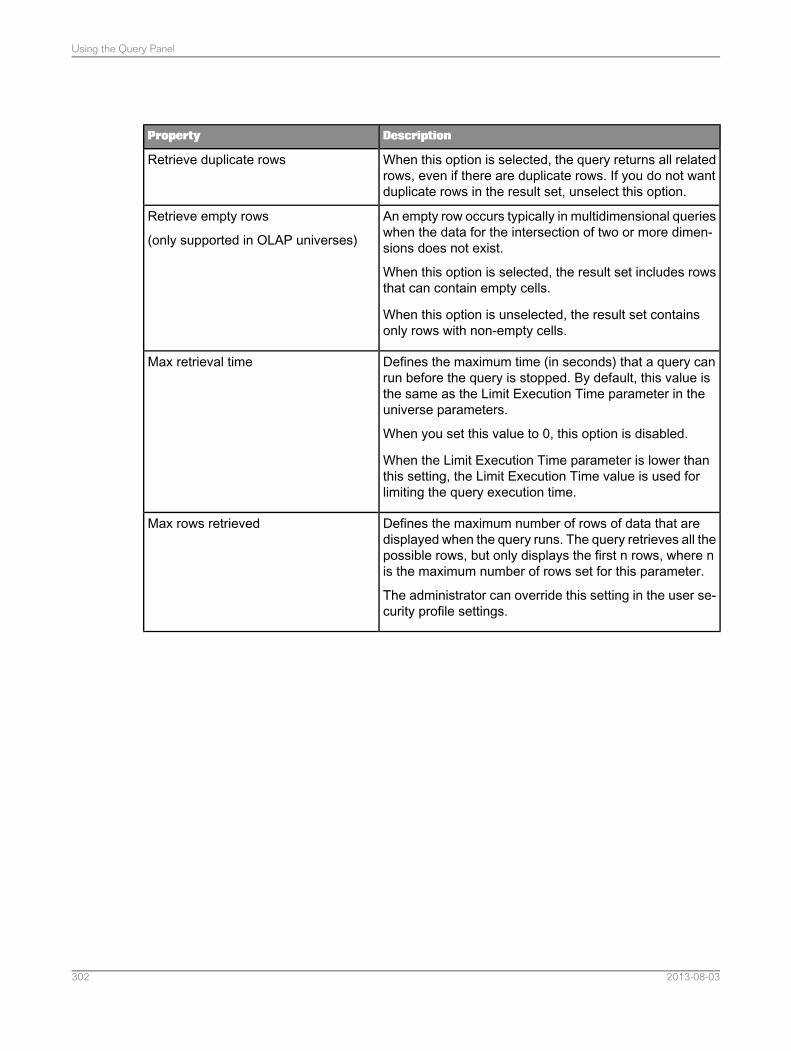
DescriptionProperty
When this option is selected, the query returns all relatedrows, even if there are duplicate rows. If you do not wantduplicate rows in the result set, unselect this option.
Retrieve duplicate rows
An empty row occurs typically in multidimensional querieswhen the data for the intersection of two or more dimen-sions does not exist.
When this option is selected, the result set includes rowsthat can contain empty cells.
When this option is unselected, the result set containsonly rows with non-empty cells.
Retrieve empty rows
(only supported in OLAP universes)
Defines the maximum time (in seconds) that a query canrun before the query is stopped. By default, this value isthe same as the Limit Execution Time parameter in theuniverse parameters.
When you set this value to 0, this option is disabled.
When the Limit Execution Time parameter is lower thanthis setting, the Limit Execution Time value is used forlimiting the query execution time.
Max retrieval time
Defines the maximum number of rows of data that aredisplayed when the query runs. The query retrieves all thepossible rows, but only displays the first n rows, where nis the maximum number of rows set for this parameter.
The administrator can override this setting in the user se-curity profile settings.
Max rows retrieved
2013-08-03302
Using the Query Panel
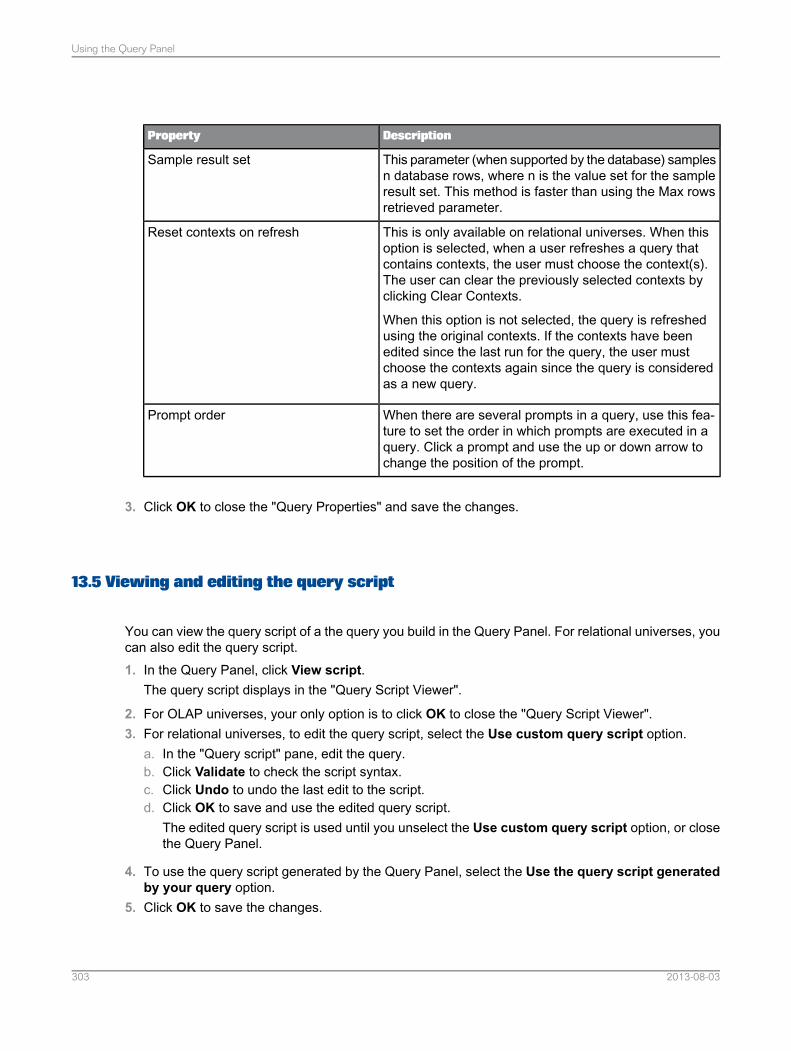
DescriptionProperty
This parameter (when supported by the database) samplesn database rows, where n is the value set for the sampleresult set. This method is faster than using the Max rowsretrieved parameter.
Sample result set
This is only available on relational universes. When thisoption is selected, when a user refreshes a query thatcontains contexts, the user must choose the context(s).The user can clear the previously selected contexts byclicking Clear Contexts.
When this option is not selected, the query is refreshedusing the original contexts. If the contexts have beenedited since the last run for the query, the user mustchoose the contexts again since the query is consideredas a new query.
Reset contexts on refresh
When there are several prompts in a query, use this fea-ture to set the order in which prompts are executed in aquery. Click a prompt and use the up or down arrow tochange the position of the prompt.
Prompt order
3. Click OK to close the "Query Properties" and save the changes.
13.5 Viewing and editing the query script
You can view the query script of a the query you build in the Query Panel. For relational universes, youcan also edit the query script.1. In the Query Panel, click View script.
The query script displays in the "Query Script Viewer".
2. For OLAP universes, your only option is to click OK to close the "Query Script Viewer".3. For relational universes, to edit the query script, select the Use custom query script option.
a. In the "Query script" pane, edit the query.b. Click Validate to check the script syntax.c. Click Undo to undo the last edit to the script.d. Click OK to save and use the edited query script.
The edited query script is used until you unselect the Use custom query script option, or closethe Query Panel.
4. To use the query script generated by the Query Panel, select the Use the query script generatedby your query option.
5. Click OK to save the changes.
2013-08-03303
Using the Query Panel
13.6 Profiling column values in the query panel
You can profile the values for a columns in the query results. Profiling shows graphically (in a pie orbar chart) the number of occurrences of each value of a column. If the column has a filter defined, thefilter is applied.1. Open a query in the Query Panel and refresh the results.2.
In the Data Preview pane, click the Advanced Preview icon .The Profile Column Values window appears. To see what you can do in this window, see the relatedtopic.
Related Topics• Showing values in a data source• Using the Query Panel
2013-08-03304
Using the Query Panel
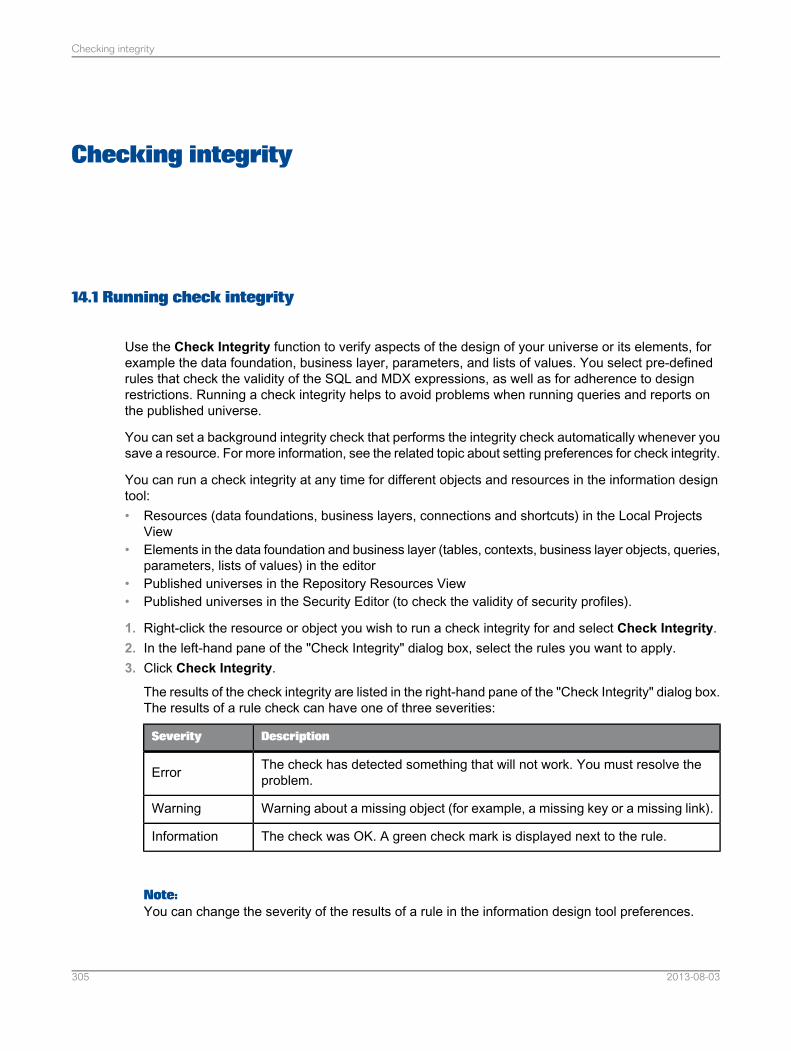
Checking integrity
14.1 Running check integrity
Use the Check Integrity function to verify aspects of the design of your universe or its elements, forexample the data foundation, business layer, parameters, and lists of values. You select pre-definedrules that check the validity of the SQL and MDX expressions, as well as for adherence to designrestrictions. Running a check integrity helps to avoid problems when running queries and reports onthe published universe.
You can set a background integrity check that performs the integrity check automatically whenever yousave a resource. For more information, see the related topic about setting preferences for check integrity.
You can run a check integrity at any time for different objects and resources in the information designtool:• Resources (data foundations, business layers, connections and shortcuts) in the Local Projects
View• Elements in the data foundation and business layer (tables, contexts, business layer objects, queries,
parameters, lists of values) in the editor• Published universes in the Repository Resources View• Published universes in the Security Editor (to check the validity of security profiles).
1. Right-click the resource or object you wish to run a check integrity for and select Check Integrity.2. In the left-hand pane of the "Check Integrity" dialog box, select the rules you want to apply.3. Click Check Integrity.
The results of the check integrity are listed in the right-hand pane of the "Check Integrity" dialog box.The results of a rule check can have one of three severities:
DescriptionSeverity
The check has detected something that will not work. You must resolve theproblem.Error
Warning about a missing object (for example, a missing key or a missing link).Warning
The check was OK. A green check mark is displayed next to the rule.Information
Note:You can change the severity of the results of a rule in the information design tool preferences.
2013-08-03305
Checking integrity
4. To save the results in a text file, click Export.5. When you are finished reviewing the results, click OK.
After closing the "Check Integrity" dialog box, the results of the check integrity can be reviewed in theCheck Integrity Problems View until you run the next check integrity. For more information, see therelated topic.
Related Topics• Setting preferences for check integrity• Reviewing check integrity problems
14.2 Reviewing check integrity problems
1. From the information design tool main menu, select Window > Check Integrity Problems.The Check Integrity Problems View opens with a list of the results of the latest check integrity.
Note:If check integrity results are available for more than one resource, the Problems view displays theresults of the resource that is currently active in the editor.
2. To correct a problem, double-click the result in the list.The editor opens for the object concerned in the result. For example, if the result concerns a problemwith table Customer, the Data Foundation Editor opens with the table Customer highlighted.
The list of results remains in the Check Integrity Problems View until you close the view, or run anothercheck integrity.
Related Topics• Running check integrity
2013-08-03306
Checking integrity
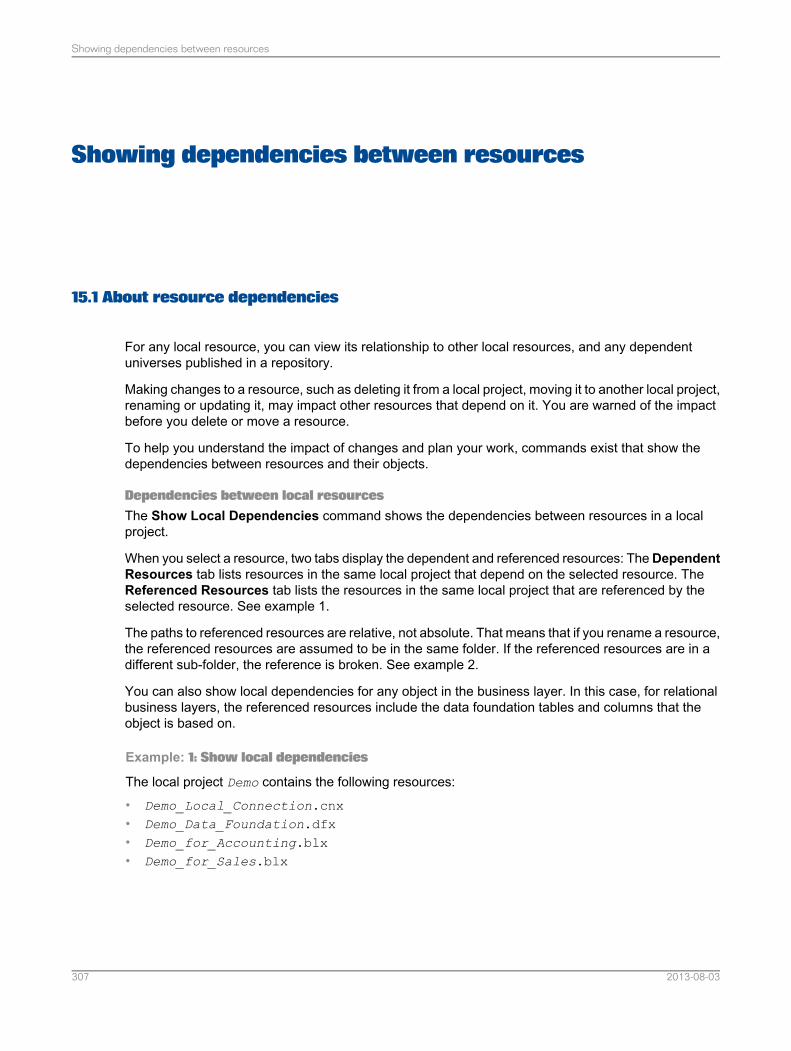
Showing dependencies between resources
15.1 About resource dependencies
For any local resource, you can view its relationship to other local resources, and any dependentuniverses published in a repository.
Making changes to a resource, such as deleting it from a local project, moving it to another local project,renaming or updating it, may impact other resources that depend on it. You are warned of the impactbefore you delete or move a resource.
To help you understand the impact of changes and plan your work, commands exist that show thedependencies between resources and their objects.
Dependencies between local resourcesThe Show Local Dependencies command shows the dependencies between resources in a localproject.
When you select a resource, two tabs display the dependent and referenced resources: TheDependentResources tab lists resources in the same local project that depend on the selected resource. TheReferenced Resources tab lists the resources in the same local project that are referenced by theselected resource. See example 1.
The paths to referenced resources are relative, not absolute. That means that if you rename a resource,the referenced resources are assumed to be in the same folder. If the referenced resources are in adifferent sub-folder, the reference is broken. See example 2.
You can also show local dependencies for any object in the business layer. In this case, for relationalbusiness layers, the referenced resources include the data foundation tables and columns that theobject is based on.
Example: 1: Show local dependencies
The local project Demo contains the following resources:• Demo_Local_Connection.cnx• Demo_Data_Foundation.dfx• Demo_for_Accounting.blx• Demo_for_Sales.blx
2013-08-03307
Showing dependencies between resources
You want to list all the resources that would be impacted if you change the Demo_Data_Foundation.In the Local Projects View, you select theShowLocal Dependencies command on Demo_Data_Foundation.dfx. The following dependencies are displayed:
Referenced ResourcesDependent Resources
\Demo\Demo_Local_Connection.cnx
\Demo\Demo_for_Accounting.blx
\Demo\Demo_for_Sales.blx
The two business layers contain references to the data foundation and might contain invalid referencesif you delete or change Demo_Data_Foundation, so they are listed in the Dependent Resourcestab.
The data foundation references the connection. Any changes to Demo_Local_Connection couldimpact Demo_Data_Foundation and its dependent resources.
Now you want to show the dependencies for Demo_Local_Connection:
Referenced ResourcesDependent Resources
\Demo\Demo_Data_Foundation.dfx
• \Demo\Demo_for_Accounting.blx• \Demo\Demo_for_Sales.blx
Notice that Demo_Data_Foundation and its two dependent business layers are listed as dependentresources. Since a connection is the first resource created when building a universe, no resourcesreference the connection.
Example: 2: Renaming resources
The local project OLAP_Demo contains a folder with the following resources:
Folder_One
• OLAP_Local_Connection.cnx• OLAP_Business_Layer.blx
Rename OLAP_Business_Layer.blx to OLAP_New_Business_Layer.blx and show localdependencies. In the Local Projects View, you select the Show Local Dependencies command onOLAP_New_Business_Layer.blx. The following dependencies are displayed:
2013-08-03308
Showing dependencies between resources
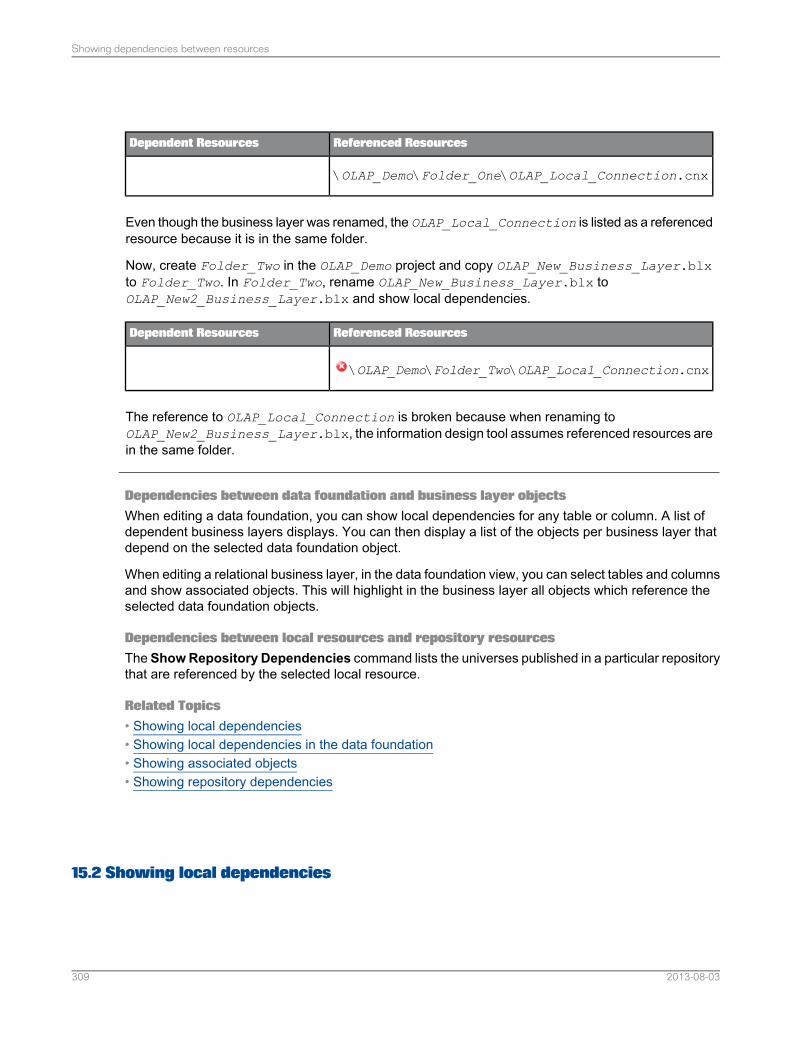
Referenced ResourcesDependent Resources
\OLAP_Demo\Folder_One\OLAP_Local_Connection.cnx
Even though the business layer was renamed, the OLAP_Local_Connection is listed as a referencedresource because it is in the same folder.
Now, create Folder_Two in the OLAP_Demo project and copy OLAP_New_Business_Layer.blxto Folder_Two. In Folder_Two, rename OLAP_New_Business_Layer.blx toOLAP_New2_Business_Layer.blx and show local dependencies.
Referenced ResourcesDependent Resources
\OLAP_Demo\Folder_Two\OLAP_Local_Connection.cnx
The reference to OLAP_Local_Connection is broken because when renaming toOLAP_New2_Business_Layer.blx, the information design tool assumes referenced resources arein the same folder.
Dependencies between data foundation and business layer objectsWhen editing a data foundation, you can show local dependencies for any table or column. A list ofdependent business layers displays. You can then display a list of the objects per business layer thatdepend on the selected data foundation object.
When editing a relational business layer, in the data foundation view, you can select tables and columnsand show associated objects. This will highlight in the business layer all objects which reference theselected data foundation objects.
Dependencies between local resources and repository resourcesThe ShowRepository Dependencies command lists the universes published in a particular repositorythat are referenced by the selected local resource.
Related Topics• Showing local dependencies• Showing local dependencies in the data foundation• Showing associated objects• Showing repository dependencies
15.2 Showing local dependencies
2013-08-03309
Showing dependencies between resources
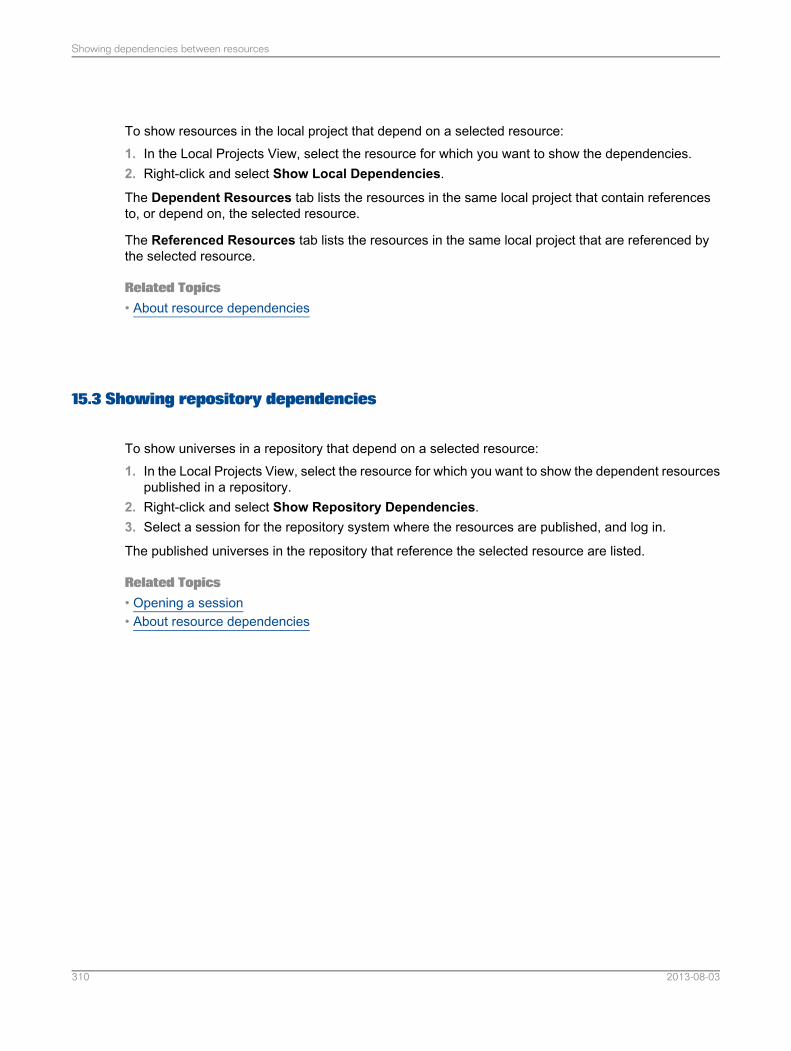
To show resources in the local project that depend on a selected resource:1. In the Local Projects View, select the resource for which you want to show the dependencies.2. Right-click and select Show Local Dependencies.
The Dependent Resources tab lists the resources in the same local project that contain referencesto, or depend on, the selected resource.
The Referenced Resources tab lists the resources in the same local project that are referenced bythe selected resource.
Related Topics• About resource dependencies
15.3 Showing repository dependencies
To show universes in a repository that depend on a selected resource:1. In the Local Projects View, select the resource for which you want to show the dependent resources
published in a repository.2. Right-click and select Show Repository Dependencies.3. Select a session for the repository system where the resources are published, and log in.
The published universes in the repository that reference the selected resource are listed.
Related Topics• Opening a session• About resource dependencies
2013-08-03310
Showing dependencies between resources
Publishing resources
16.1 About publishing resources
Publication is the last step in the universe creation process. Using the Publish Universe Wizard, youpublish a business layer to either your local file system or a repository.
When you publish a business layer, the wizard exports the business layer and the resources it references(local connection, connection shortcuts, and data foundation), and creates a universe which is thenavailable to users of query, reporting and analysis tools.
Publishing locallyOnly business layers built on local connections can be published locally. This can be a business layerbased on a local OLAP connection, or a business layer based on a single-source data foundation witha local connection.
The published universe is saved in the local file system folder that you specify.
Publishing to a repositoryTo secure a universe, you must publish it first to a repository on a Central Management Server (CMS).The universe inherits the object-level security and user security rights defined for the CMS. The dataand metadata in the universe are secured by defining security profiles in the information design toolSecurity Editor.
When you create a connection in a local project, it is an unsecured local connection and must bepublished before you can publish a business layer that references the connection. To secure aconnection, publish it to a repository on a CMS. The Publish Connection Wizard creates the securedconnection and provides a connection shortcut for the local project.
To browse and manage resources once they are published to a repository, use the Repository ResourcesView.
Editing published resourcesYou cannot edit a published universe directly in the information design tool. To work on it, you mustretrieve it using the Retrieve Universe Wizard. The wizard retrieves the universe from the local folderor the repository, separates it into the business layer and the resources it references (local connection,connection shortcuts, data foundation), and creates these resources in a local project where they canbe edited.
Connections can only be published to a repository. To edit a published connection, you must edit itfrom the Repository Resources View.
2013-08-03311
Publishing resources
Related Topics• Publishing a universe• Retrieving a published universe from a repository• Publishing a local connection to the repository• Publishing a local universe to the repository• About universe security• About managing repository resources
16.2 Publishing a universe
To publish a universe to a repository, the business layer must reference one or more secured connectionshortcuts. All shortcuts must reference connections defined in the repository where the universe is tobe published.
Note:If the business layer references a local connection and you want to publish to a repository, first publishthe connection and change the connection reference in the data foundation (relational), or in the businesslayer (OLAP) to use the connection shortcut. See the related topics for more information.
To publish a universe locally, the business layer must reference only a local connection that is notsecured in any repository.
Recommended actions before publishing a universe:• Save the business layer and all the resources it references.• If the business layer references resources that are shared, synchronize the project to ensure that
all changes are taken into account in the published universe.• Check integrity of the business layer and, if applicable, the data foundation. The Publish Universe
Wizard gives you the option to run a check integrity before publishing.1. Start the Publish Universe Wizard:
• To publish to a repository, select the business layer in the Local Projects view, right-click thebusiness layer and select Publish > To a Repository.
• To publish to a local folder, select the business layer in the Local Projects view , right-click thebusiness layer and select Publish > To a Local Folder.
2. Follow the instructions on the wizard pages. For more information about what to do on a particularpage, click the help icon in the lower left corner.
In the Local Projects View, select the business layer and select Publish > To a Local Folder.
The universe is created as a .unx file in the local folder or the repository.
Related Topics• Publishing a local connection to the repository• Changing a connection in a data foundation
2013-08-03312
Publishing resources
• Changing the data source of a business layer• Running check integrity• Opening a session• About publishing resources
16.2.1 Selecting a repository folder
When publishing or retrieving resources on a repository, the wizard displays the folders in the repositoryin the left-hand pane. The table in the right-hand pane lists the resources in the folder.
When publishing a resource to a repository, navigate to the repository folder in the navigation tree inthe left-hand pane. You can insert a folder.
When retrieving a published universe, navigate to the repository folder in the left-hand pane, and selectthe universe in the universe list in the right-hand pane.
Note:
By default, the resources are retrieved into the local project and are secured locally by requiring you toenter the CMS authentication when opening a retrieved data foundation or business layer.
To remove the local security requirement, select the Save for all users option.
16.2.2 Selecting a local folder
When publishing or retrieving a resource in a local folder, the wizard prompts you for a local folder.1. Enter the path to a folder accessible from your local machine.2. To browse the file system and select a folder, click Browse.
16.3 Publishing a local connection to the repository
1. To start the Publish Connection Wizard, select the connection in the Local Projects View, right-clickthe connection and select Publish Connection to a Repository.
2. Follow the instructions on the wizard pages. For more information about what to do on a particularpage, click the help icon in the lower left corner.
2013-08-03313
Publishing resources
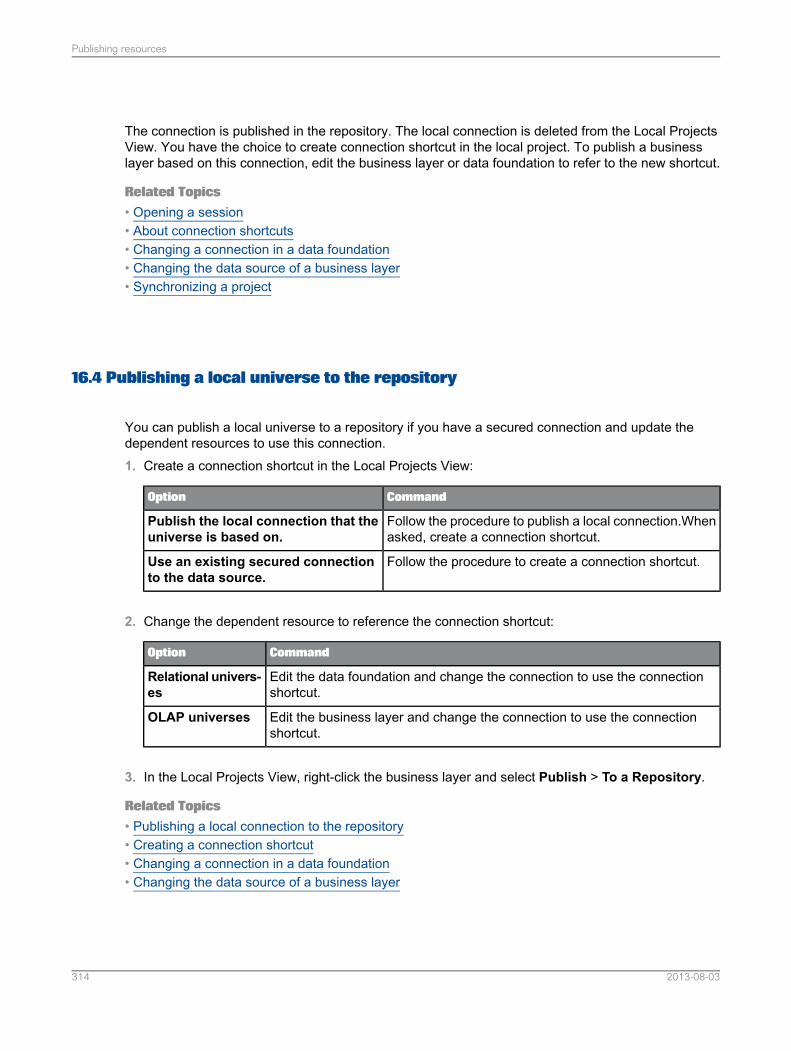
The connection is published in the repository. The local connection is deleted from the Local ProjectsView. You have the choice to create connection shortcut in the local project. To publish a businesslayer based on this connection, edit the business layer or data foundation to refer to the new shortcut.
Related Topics• Opening a session• About connection shortcuts• Changing a connection in a data foundation• Changing the data source of a business layer• Synchronizing a project
16.4 Publishing a local universe to the repository
You can publish a local universe to a repository if you have a secured connection and update thedependent resources to use this connection.1. Create a connection shortcut in the Local Projects View:
CommandOption
Follow the procedure to publish a local connection.Whenasked, create a connection shortcut.
Publish the local connection that theuniverse is based on.
Follow the procedure to create a connection shortcut.Use an existing secured connectionto the data source.
2. Change the dependent resource to reference the connection shortcut:
CommandOption
Edit the data foundation and change the connection to use the connectionshortcut.
Relational univers-es
Edit the business layer and change the connection to use the connectionshortcut.
OLAP universes
3. In the Local Projects View, right-click the business layer and select Publish > To a Repository.
Related Topics• Publishing a local connection to the repository• Creating a connection shortcut• Changing a connection in a data foundation• Changing the data source of a business layer
2013-08-03314
Publishing resources
Managing security
17.1 About universe security
Universe security starts when the universe is published to a repository on a Central Management Server(CMS). Published universes are stored in the Universes folder and secured connections are stored inthe Connections folder.
You secure universes based on the users and groups that are defined in the system repository usingthe Central Management Console (CMC).
As a first level of security, using the CMC, you grant the right to access specific folders, resources,universes, and connections in the repository to specific users and groups. How to define these rightsis described in the SAP BusinessObjects Business Intelligence platform Administrator's Guide.
You define another level of security using the information design tool Security Editor. You can restrictthe data that is returned in a query using query limits and controls, filters, and row restrictions. You canalso grant or deny access to objects and views in the business layer. To create this level of security,you define security profiles for the universe and assign these profiles to users and groups. The basicsof how security profiles work are presented in this topic.
Security profilesA security profile is a group of security settings that apply to a universe published in the repository. Thesettings control the data that is displayed and modify the parameters defined in the data foundationand/or business layer. Once the profile is assigned to a user or a group, the settings in the profiledetermine what objects, data, and connections the user sees when connecting to the universe. Thereare two types of profiles:• Data Security Profiles have security settings defined on objects in the data foundation and on
relational connections.
• Business Security Profiles have security settings defined on objects in the business layer and onOLAP connections.
Multiple profiles can be defined for each universe. The profiles are saved in the repository.
How profiles workA user of query and reporting tools who has been granted access to a universe using the CMC, andwho has no security profiles assigned or inherited, can see all the objects in the universe and all thedata returned by those objects.
2013-08-03315
Managing security
When you assign a profile to the user, the security settings defined in the profile are applied wheneverthe user runs a query on the universe.
In the information design tool, security profiles are applied when you run a query from the RepositoryResources View or the Security Editor. They are applied according to the user name you used to openthe repository session. When you run a query from the Business Layer Editor, security profile settingsdo not apply.
How multiple profiles are handledYou can assign more than one profile to a user or group. A user might be assigned a profile and alsoinherit profiles from groups. When more than one profile is assigned to a user, the profiles are aggregatedto produce a single group of settings called the net profile.
Aggregation follows priority and restriction levels that you can modify in the Security Editor. You canalso see which profiles a user or group inherits, and preview net profiles for a user or group.
Profile maintenanceProfiles are stored independently from the universe itself: changes in the data foundation or businesslayer of the universe do not affect the profiles when the universe is republished. Similarly, changes ina profile are independent of assignments, so you do not have to reassign a profile when it is modified.It remains assigned, including any changes.
If you republish a universe, run a check integrity on the universe to flag any discrepancies between theuniverse and its security profiles.
Profiles created for a universe are deleted when the universe is deleted.
Related Topics• Data Security Profile settings• Business Security Profile settings• Security profile aggregation• Displaying profiles assigned to a user and previewing net profiles• Running a query on a universe published in a repository• About the Security Editor
17.2 About securing resources in the information design tool
No authentication is required to start the information design tool.
A user can create and edit unsecured resources (data foundations, business layers, connections) inthe Local Projects view. The resources are saved in a local project.
Resources are secured when a user shares a local project and its resources, or publishes universesor connections to a repository. Shared projects and published resources are stored securely in arepository on the Central Management Server (CMS).
2013-08-03316
Managing security
Application rights are granted in the Central Management Console (CMC). How to define these rightsis described in the SAP BusinessObjects Business Intelligence platform Administrator's Guide.
A user with appropriate rights can retrieve a published universe from the repository for editing. Resourcescan also be retrieved from a shared project during project synchronization. In both cases, the resourcesare retrieved into the local project and are secured locally by requiring the user to enter the CMSauthentication when opening a retrieved data foundation or business layer.
When you start the information design tool, it reopens any resources that were open when you lastclosed the tool. If secured resources are open, you need to enter your CMS authentication to start thetool.
Note:To remove the local security requirement, you must have the "Save for all Users " right granted in theCMC. When a resource is saved for all users, any user can open the resource without entering CMSauthentication.
Secured connections cannot be retrieved from the repository and stored locally in the information designtool. Instead, a shortcut to the connection in the repository is stored in the local project. Securedconnections must be edited directly in the repository from the Repository Resources View. To be ableto access data from a secured connection (for example, show table values or run a query), the usermust enter the CMS authentication for the repository where the connection is published. The systemuses the authentication to determine what rights the user has for that connection.
Related Topics• About local projects and resources• About connection shortcuts
17.3 CMC rights for information design tool users
The application, universe, and connection rights necessary to do tasks in the information design toolare summarized in this topic.
Rights are granted in the Central Management Console (CMC). How to define these rights is describedin the SAP BusinessObjects Business Intelligence platform Administrator's Guide.
To open a session on the repository system and do all secured tasks in the information design tool:• You must have a username and password configured by the system administrator in the CMC for
the CMS where the repository is stored.• You must have the right "Connect the CMS with Information design tool and view this object in the
CMC" granted in the CMC.
Additional rights needed are listed in the table by task.
2013-08-03317
Managing security
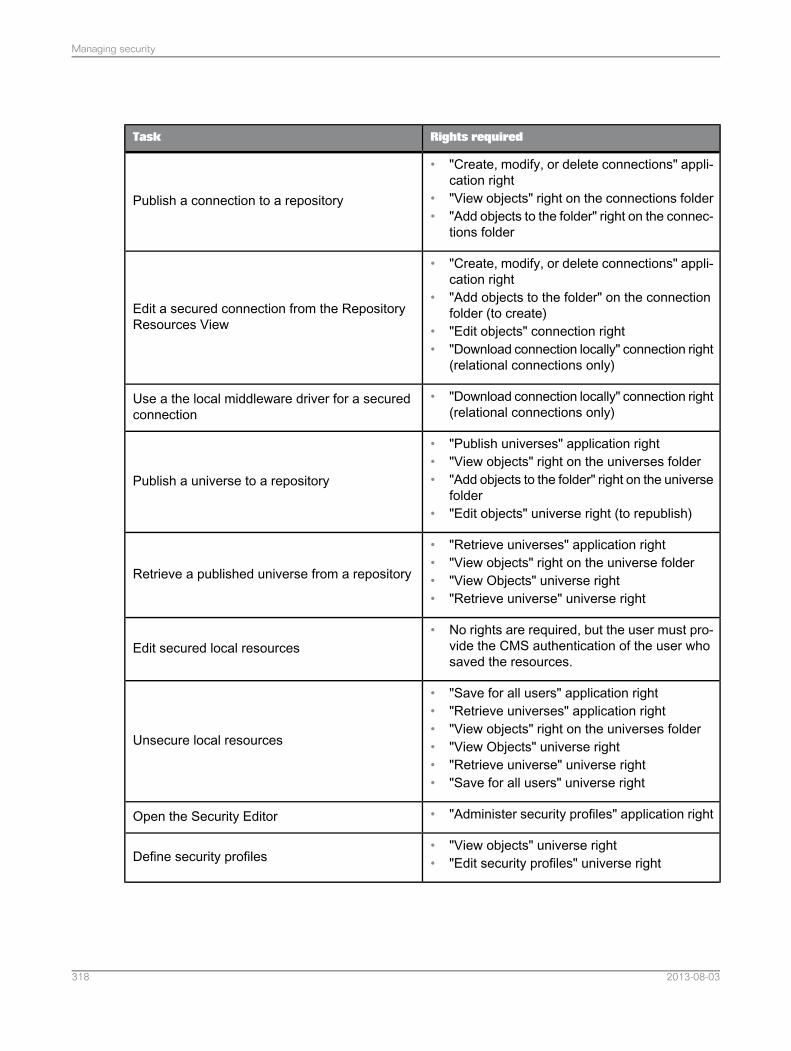
Rights requiredTask
• "Create, modify, or delete connections" appli-cation right
• "View objects" right on the connections folder• "Add objects to the folder" right on the connec-
tions folder
Publish a connection to a repository
• "Create, modify, or delete connections" appli-cation right
• "Add objects to the folder" on the connectionfolder (to create)
• "Edit objects" connection right• "Download connection locally" connection right
(relational connections only)
Edit a secured connection from the RepositoryResources View
• "Download connection locally" connection right(relational connections only)
Use a the local middleware driver for a securedconnection
• "Publish universes" application right• "View objects" right on the universes folder• "Add objects to the folder" right on the universe
folder• "Edit objects" universe right (to republish)
Publish a universe to a repository
• "Retrieve universes" application right• "View objects" right on the universe folder• "View Objects" universe right• "Retrieve universe" universe right
Retrieve a published universe from a repository
• No rights are required, but the user must pro-vide the CMS authentication of the user whosaved the resources.
Edit secured local resources
• "Save for all users" application right• "Retrieve universes" application right• "View objects" right on the universes folder• "View Objects" universe right• "Retrieve universe" universe right• "Save for all users" universe right
Unsecure local resources
• "Administer security profiles" application rightOpen the Security Editor
• "View objects" universe right• "Edit security profiles" universe rightDefine security profiles
2013-08-03318
Managing security
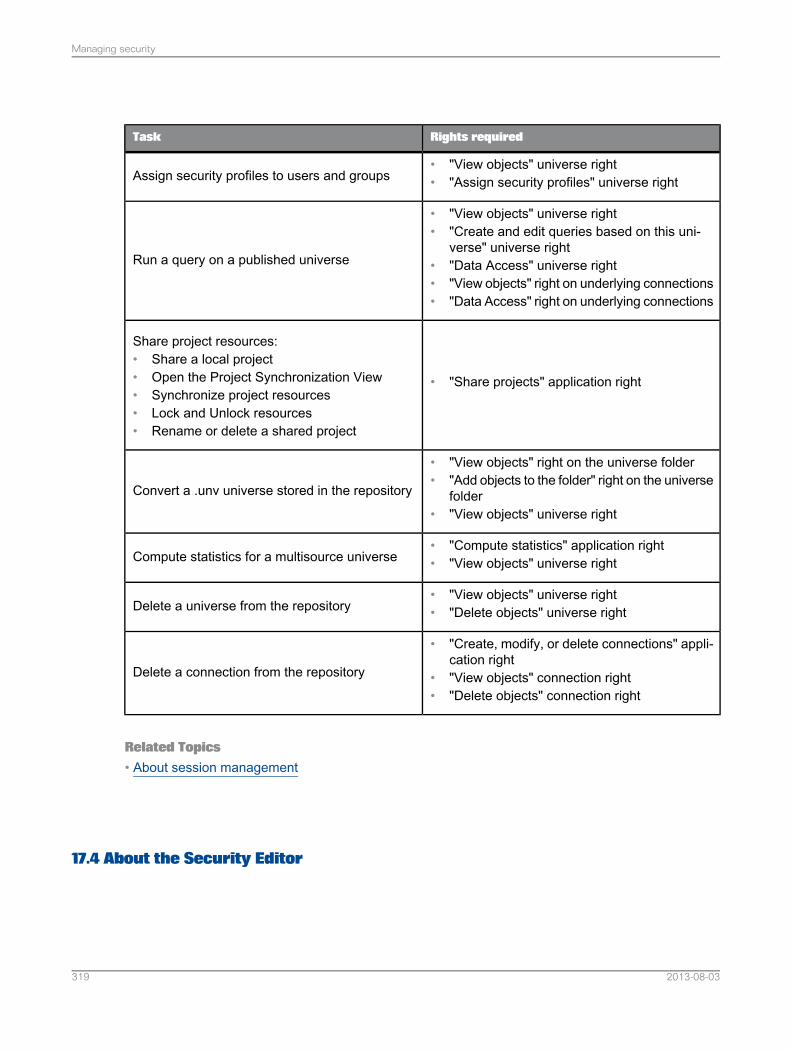
Rights requiredTask
• "View objects" universe right• "Assign security profiles" universe rightAssign security profiles to users and groups
• "View objects" universe right• "Create and edit queries based on this uni-
verse" universe right• "Data Access" universe right• "View objects" right on underlying connections• "Data Access" right on underlying connections
Run a query on a published universe
• "Share projects" application right
Share project resources:• Share a local project• Open the Project Synchronization View• Synchronize project resources• Lock and Unlock resources• Rename or delete a shared project
• "View objects" right on the universe folder• "Add objects to the folder" right on the universe
folder• "View objects" universe right
Convert a .unv universe stored in the repository
• "Compute statistics" application right• "View objects" universe rightCompute statistics for a multisource universe
• "View objects" universe right• "Delete objects" universe rightDelete a universe from the repository
• "Create, modify, or delete connections" appli-cation right
• "View objects" connection right• "Delete objects" connection right
Delete a connection from the repository
Related Topics• About session management
17.4 About the Security Editor
2013-08-03319
Managing security
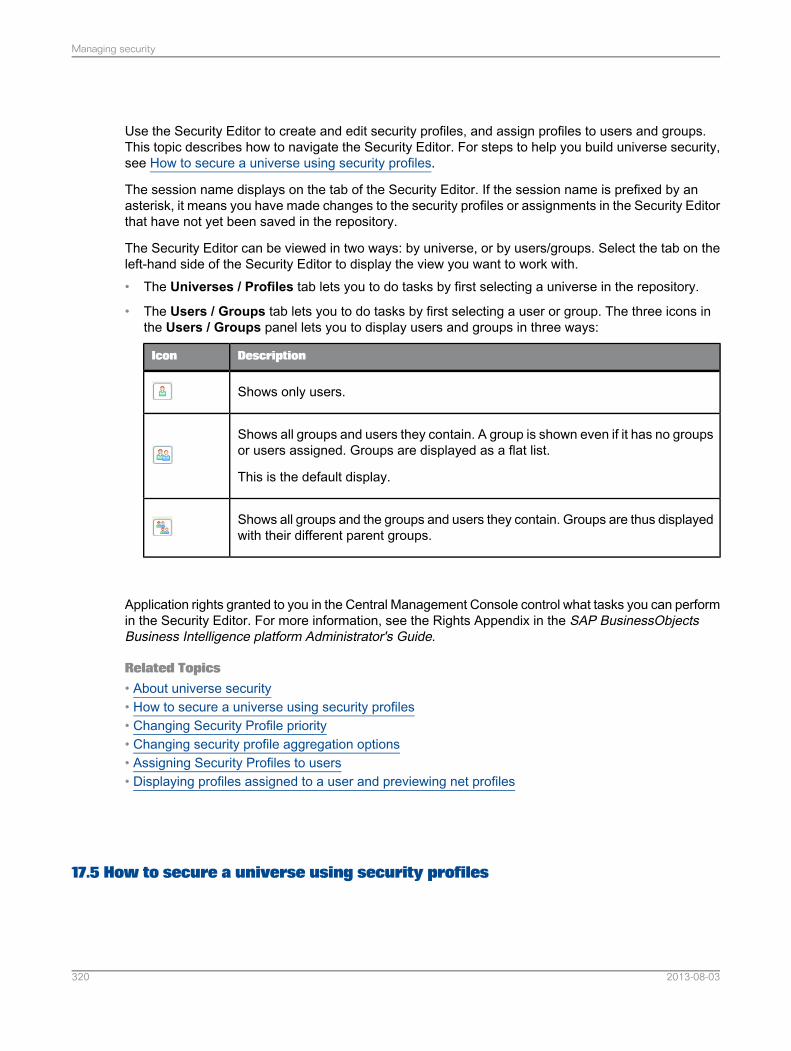
Use the Security Editor to create and edit security profiles, and assign profiles to users and groups.This topic describes how to navigate the Security Editor. For steps to help you build universe security,see How to secure a universe using security profiles.
The session name displays on the tab of the Security Editor. If the session name is prefixed by anasterisk, it means you have made changes to the security profiles or assignments in the Security Editorthat have not yet been saved in the repository.
The Security Editor can be viewed in two ways: by universe, or by users/groups. Select the tab on theleft-hand side of the Security Editor to display the view you want to work with.• The Universes / Profiles tab lets you to do tasks by first selecting a universe in the repository.
• The Users / Groups tab lets you to do tasks by first selecting a user or group. The three icons inthe Users / Groups panel lets you to display users and groups in three ways:
DescriptionIcon
Shows only users.
Shows all groups and users they contain. A group is shown even if it has no groupsor users assigned. Groups are displayed as a flat list.
This is the default display.
Shows all groups and the groups and users they contain. Groups are thus displayedwith their different parent groups.
Application rights granted to you in the Central Management Console control what tasks you can performin the Security Editor. For more information, see the Rights Appendix in the SAP BusinessObjectsBusiness Intelligence platform Administrator's Guide.
Related Topics• About universe security• How to secure a universe using security profiles• Changing Security Profile priority• Changing security profile aggregation options• Assigning Security Profiles to users• Displaying profiles assigned to a user and previewing net profiles
17.5 How to secure a universe using security profiles
2013-08-03320
Managing security
Before you begin:• The universe for which you want to create security must be published to a repository. You can create
security for .unx universes only.• Make sure you have the necessary rights defined in the Central Management Console (CMC). See
the related topic about CMC rights.
For links to more detailed information on each step, see the Related Topics.1. Open the Security Editor with a session in the repository where the universe is published.2. Select the universe in the Universes / Profiles pane to define security profiles.3. For relational universes, insert a Data Security Profile to define the following types of security:
• Define replacement connections to override the connections defined in the universe.• Define overrides for the query options and query limits defined in the universe.• Restrict data returned to specific rows using a WHERE clause.• Define replacement tables.
Note:You can create more than one Data Security Profile for a universe.
4. Insert a Business Security Profile to define the following types of security:• Define a replacement connection to override the connection defined in the universe.• Restrict objects that appear in the Query Panel to create queries.• Restrict objects for which data is returned.• Filter data returned in queries.
Note:You can create more than one Business Security Profile for a universe.
5. Save the changes to the security settings in the repository by clicking the save icon in the main toolbar.
6. Select the Users / Groups pane to assign the profiles to users and groups.7. If more than one profile is assigned to a user (either directly or by inheritance), preview the net
results of the aggregated profiles.8. If modifications to the way profiles are aggregated is needed, in the Universes / Profiles pane,
change profile priority and profile aggregation options.9. Save the changes to the security settings in the repository by clicking the save icon in the main tool
bar.10. Test the security profiles for a particular user:
a. Open the Security Editor using the login information for the user who is being assigned thesecurity profiles.
b. In the Universes / Profiles pane, right-click the universe and select Run Query.
The Query Panel opens. The security profiles assigned to the user are applied.
Note:Because a user needs the "Administer security profiles" application right granted in order to openthe Security Editor, this method of testing profiles is limited. The security profile for a user canbe tested in a query application, for example Web Intelligence.
2013-08-03321
Managing security
If you republish a universe, run a check integrity on the universe to flag any discrepancies between theuniverse and its security profiles. In the Universes / Profiles pane, right-click the universe and selectCheck Integrity.
Related Topics• CMC rights for information design tool users• Opening the Security Editor• Inserting and editing a Data Security Profile• Inserting and editing a Business Security Profile• Assigning Security Profiles to users• Displaying profiles assigned to a user and previewing net profiles• Changing Security Profile priority• Changing security profile aggregation options• How to build a query• Running check integrity
17.6 Opening the Security Editor
1.On the information design tool toolbar, click the Security Editor icon .
2. In the "Open Session" dialog box, select the session you want to open.3. If you are not already logged into the selected session, enter the required information.
The Security Editor opens in a new tab.
Note:You can open more than one session of the Security Editor at one time. The sessions must be ondifferent repositories.
Related Topics• Opening a session• About the Security Editor
17.7 Inserting and editing a Data Security Profile
Caution:Changes to security profiles overwrite any previous changes. In the event that more than one user isediting the same universe profiles at the same time, the changes saved last overwrite changes donepreviously by others.
2013-08-03322
Managing security
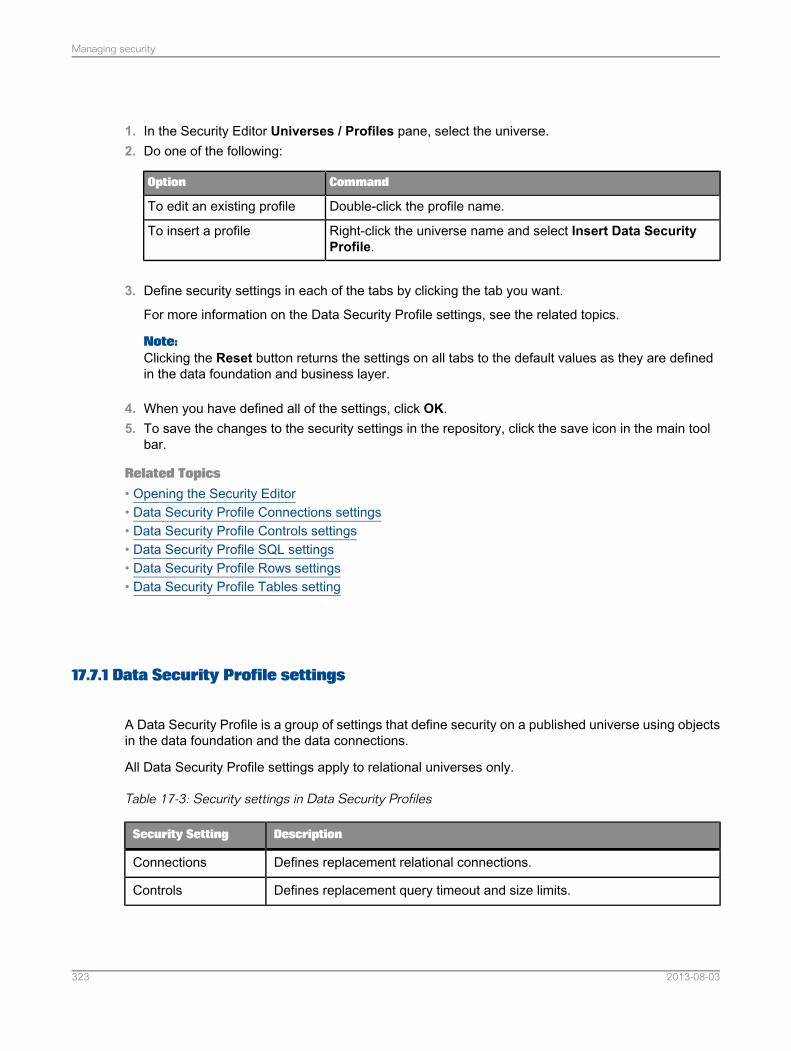
1. In the Security Editor Universes / Profiles pane, select the universe.2. Do one of the following:
CommandOption
Double-click the profile name.To edit an existing profile
Right-click the universe name and select Insert Data SecurityProfile.
To insert a profile
3. Define security settings in each of the tabs by clicking the tab you want.
For more information on the Data Security Profile settings, see the related topics.
Note:Clicking the Reset button returns the settings on all tabs to the default values as they are definedin the data foundation and business layer.
4. When you have defined all of the settings, click OK.5. To save the changes to the security settings in the repository, click the save icon in the main tool
bar.
Related Topics• Opening the Security Editor• Data Security Profile Connections settings• Data Security Profile Controls settings• Data Security Profile SQL settings• Data Security Profile Rows settings• Data Security Profile Tables setting
17.7.1 Data Security Profile settings
A Data Security Profile is a group of settings that define security on a published universe using objectsin the data foundation and the data connections.
All Data Security Profile settings apply to relational universes only.
Table 17-3: Security settings in Data Security Profiles
DescriptionSecurity Setting
Defines replacement relational connections.Connections
Defines replacement query timeout and size limits.Controls
2013-08-03323
Managing security
DescriptionSecurity Setting
Defines replacement query options.SQL
Defines an SQL WHERE clause to restrict rows returned in the query.Rows
Defines replacement tables.Tables
Each type of Data Security Profile setting is described in a related topic.
Related Topics• Data Security Profile Connections settings• Data Security Profile Controls settings• Data Security Profile SQL settings• Data Security Profile Rows settings• Data Security Profile Tables setting• Security profile aggregation• Inserting and editing a Data Security Profile
17.7.2 Data Security Profile Connections settings
Connections settings are defined in the Data Security Profile for relational universes only. Definereplacement connections for OLAP universes in the Business Security Profile.
Use the Data Security Profile Connections setting to define replacement connections that can overridethe connections defined in the universe. Once a user is assigned or inherits a profile that contains areplacement connection, when the user runs a query on the universe, the replacement connection isused instead of the connection defined in the universe.
Only secured connections can be defined as replacement connections. Relational connections fall intoone of three types, listed below. The replacement connection must be of the same type as the originalconnection.• SAP NetWeaver BW relational databases• SAS relational databases• Other relational databases
To define a replacement connection, select the original connection in the table and click Edit.
Select a connection in the Connections folder and sub-folders for which you have the "View objects"right granted for the repository where you are defining the security profiles.
For multisource universes that rely on multiple connections, you can define a replacement for eachconnection.
2013-08-03324
Managing security
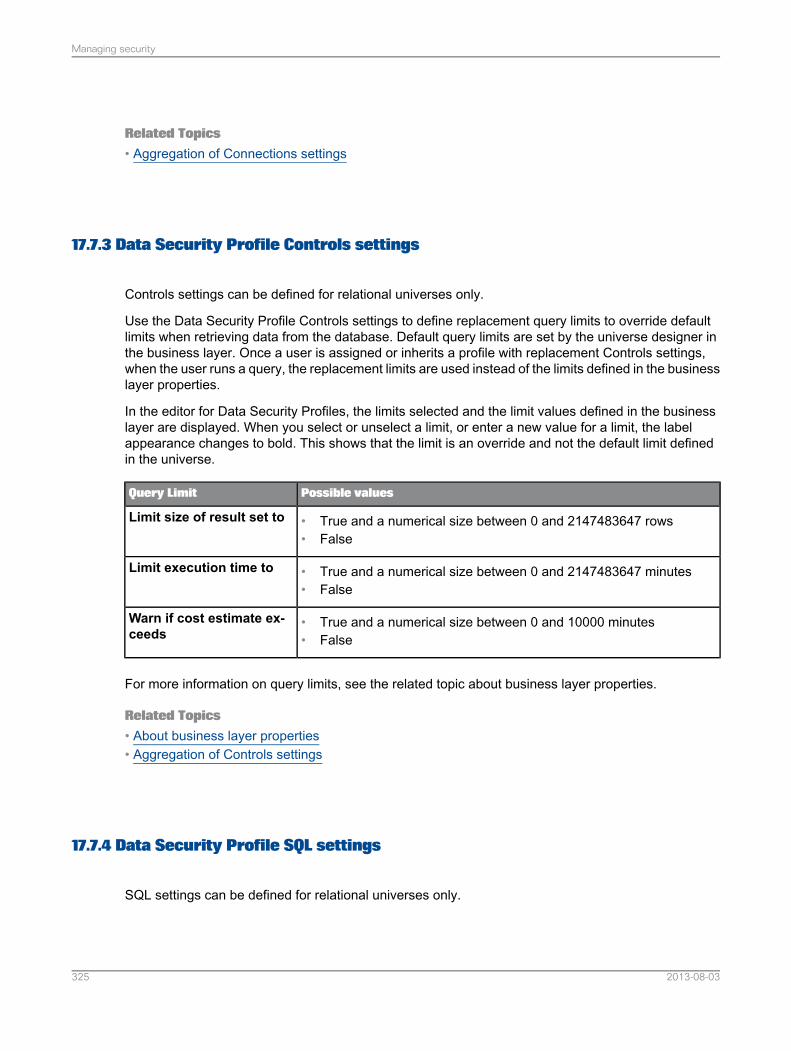
Related Topics• Aggregation of Connections settings
17.7.3 Data Security Profile Controls settings
Controls settings can be defined for relational universes only.
Use the Data Security Profile Controls settings to define replacement query limits to override defaultlimits when retrieving data from the database. Default query limits are set by the universe designer inthe business layer. Once a user is assigned or inherits a profile with replacement Controls settings,when the user runs a query, the replacement limits are used instead of the limits defined in the businesslayer properties.
In the editor for Data Security Profiles, the limits selected and the limit values defined in the businesslayer are displayed. When you select or unselect a limit, or enter a new value for a limit, the labelappearance changes to bold. This shows that the limit is an override and not the default limit definedin the universe.
Possible valuesQuery Limit
• True and a numerical size between 0 and 2147483647 rows• False
Limit size of result set to
• True and a numerical size between 0 and 2147483647 minutes• False
Limit execution time to
• True and a numerical size between 0 and 10000 minutes• False
Warn if cost estimate ex-ceeds
For more information on query limits, see the related topic about business layer properties.
Related Topics• About business layer properties• Aggregation of Controls settings
17.7.4 Data Security Profile SQL settings
SQL settings can be defined for relational universes only.
2013-08-03325
Managing security
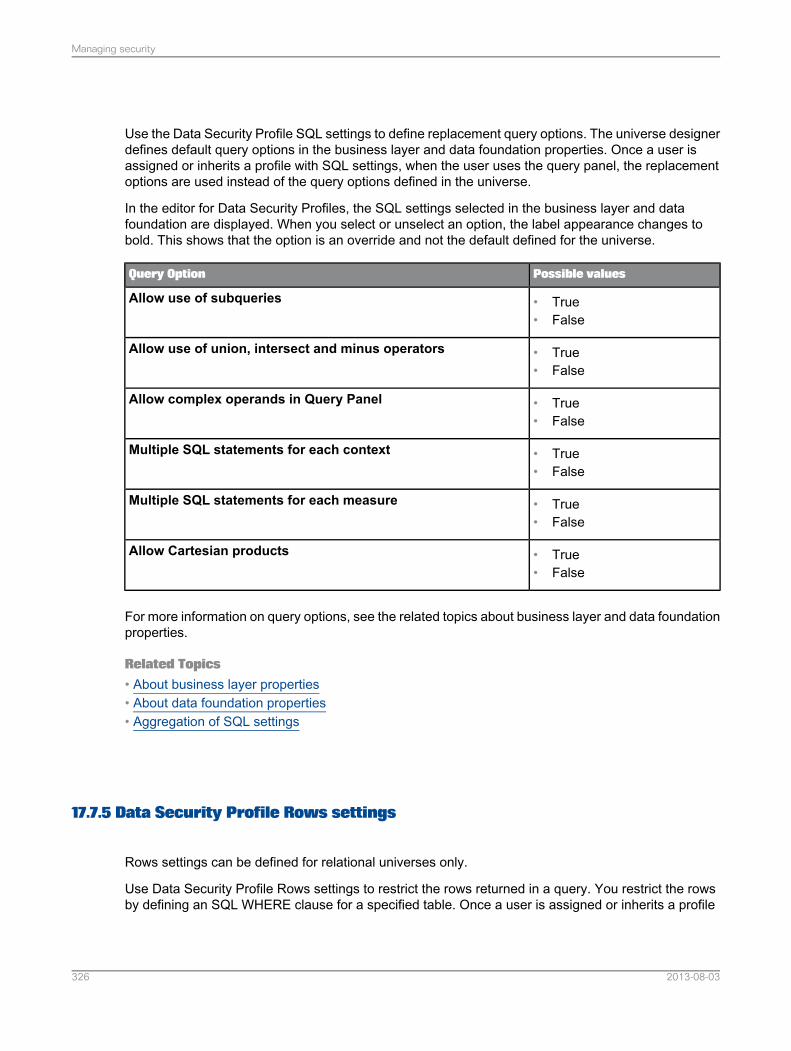
Use the Data Security Profile SQL settings to define replacement query options. The universe designerdefines default query options in the business layer and data foundation properties. Once a user isassigned or inherits a profile with SQL settings, when the user uses the query panel, the replacementoptions are used instead of the query options defined in the universe.
In the editor for Data Security Profiles, the SQL settings selected in the business layer and datafoundation are displayed. When you select or unselect an option, the label appearance changes tobold. This shows that the option is an override and not the default defined for the universe.
Possible valuesQuery Option
• True• False
Allow use of subqueries
• True• False
Allow use of union, intersect and minus operators
• True• False
Allow complex operands in Query Panel
• True• False
Multiple SQL statements for each context
• True• False
Multiple SQL statements for each measure
• True• False
Allow Cartesian products
For more information on query options, see the related topics about business layer and data foundationproperties.
Related Topics• About business layer properties• About data foundation properties• Aggregation of SQL settings
17.7.5 Data Security Profile Rows settings
Rows settings can be defined for relational universes only.
Use Data Security Profile Rows settings to restrict the rows returned in a query. You restrict the rowsby defining an SQL WHERE clause for a specified table. Once a user is assigned or inherits a profile
2013-08-03326
Managing security
with a Rows setting, when the user runs a query on the universe, the defined WHERE clause is addedto the SQL generated if the table is referenced in the query.
Note:A user who has the right to edit the generated SQL in the reporting tool can change the WHERE clausegenerated by the Rows setting. Remember to manage the user's rights in the reporting tool to preventthe user from modifying the SQL.
You can define the WHERE clause for any standard table in the data foundation. The SQL for theWHERE clause can include:• @Functions such as @Variable and @Prompt• For multisource enabled universes, references to other tables in any connection defined for the
universe• For multisource-enabled universes, SAP BusinessObjects SQL functions
The SQL for the WHERE clause cannot include:• Calculated columns• Derived tables
Related Topics• Aggregation of Rows settings
17.7.6 Data Security Profile Tables setting
Tables settings can be defined for relational universes only.
Use the Data Security Profile Tables setting to define replacement tables. Once a user is assigned orinherits a profile with a Tables setting, when the user runs a query that references the original table,the replacement table is used instead.
Note:A user who has the right to edit the generated SQL in the reporting tool can change the replacementtable name. Remember to manage the user's rights in the reporting tool to prevent the user frommodifying the SQL.
You can replace a standard table in the data foundation with a database table in any connection definedfor the universe, or another standard table in the data foundation.
Note:If you want to specify an owner and qualifier for the replacement table, you must enter these in thefields provided, and not as part of the table name. For more information about data foundation tablenames, see the related topic.
Related Topics• About tables in the data foundation• Aggregation of Tables settings
2013-08-03327
Managing security
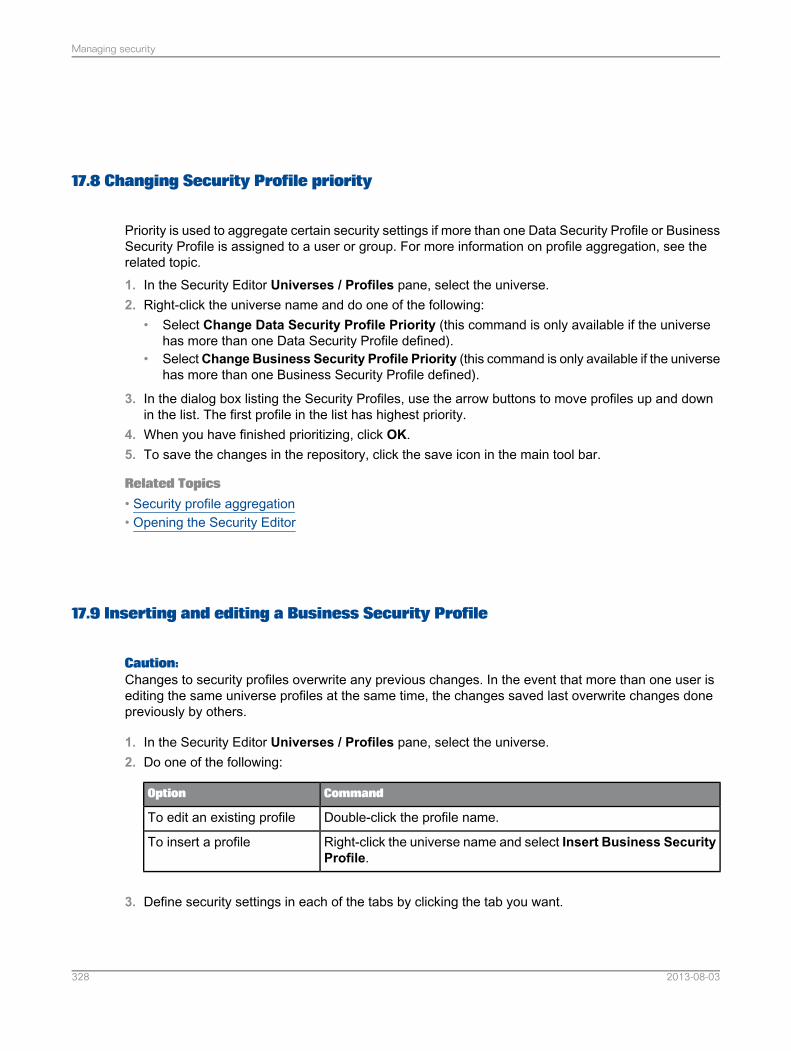
17.8 Changing Security Profile priority
Priority is used to aggregate certain security settings if more than one Data Security Profile or BusinessSecurity Profile is assigned to a user or group. For more information on profile aggregation, see therelated topic.1. In the Security Editor Universes / Profiles pane, select the universe.2. Right-click the universe name and do one of the following:
• Select Change Data Security Profile Priority (this command is only available if the universehas more than one Data Security Profile defined).
• SelectChange Business Security Profile Priority (this command is only available if the universehas more than one Business Security Profile defined).
3. In the dialog box listing the Security Profiles, use the arrow buttons to move profiles up and downin the list. The first profile in the list has highest priority.
4. When you have finished prioritizing, click OK.5. To save the changes in the repository, click the save icon in the main tool bar.
Related Topics• Security profile aggregation• Opening the Security Editor
17.9 Inserting and editing a Business Security Profile
Caution:Changes to security profiles overwrite any previous changes. In the event that more than one user isediting the same universe profiles at the same time, the changes saved last overwrite changes donepreviously by others.
1. In the Security Editor Universes / Profiles pane, select the universe.2. Do one of the following:
CommandOption
Double-click the profile name.To edit an existing profile
Right-click the universe name and select Insert Business SecurityProfile.
To insert a profile
3. Define security settings in each of the tabs by clicking the tab you want.
2013-08-03328
Managing security

For more information on the Business Security Profile settings, see the related topics.
Note:Clicking the Reset button returns the settings on all tabs to the default values as they are definedin the data foundation and business layer.
4. When you have defined all of the settings, click OK.5. To save the changes to the security settings in the repository, click the save icon in the main tool
bar.
Related Topics• Business Security Profile Connections settings• Business Security Profile Create Query settings• Business Security Profile Display Data settings• Business Security Profile Filters settings
17.9.1 Business Security Profile settings
A Business Security Profile is a group of settings that define security on a published universe usingobjects in the business layer.
Table 17-4: Security settings for Business Security Profiles
DescriptionSecurity Setting
Defines a replacement OLAP connection.Connections
Defines the universe views and business layer objects available to the userin the query panel.
Note:Create Query settings secure metadata only.
Create Query
Grants or denies access to the data retrieved by objects in the businesslayer when the user runs a query.Display Data
Defines filters using objects in the business layer.Filters
Each type of Business Security Profile setting is described in a related topic.
2013-08-03329
Managing security
In the business layer, designers can set the status of objects to Active, Hidden, or Deprecated. Whendefining profile settings, you have access to all active objects in the business layer. Objects that arehidden or deprecated in the business layer never appear in the query panel or on reports.
Related Topics• Business Security Profile Connections settings• Business Security Profile Create Query settings• Business Security Profile Display Data settings• Business Security Profile Filters settings• Security profile aggregation• Inserting and editing a Business Security Profile
17.9.2 Business Security Profile Connections settings
Connections settings are defined in the Business Security Profile for OLAP universes only. Definereplacement connections for relational universes in the Data Security Profile.
Use the Business Security Profile Connections setting to define a replacement connection that canoverride the connection defined in the universe. Once a user is assigned or inherits a profile that containsa replacement connection, when the user runs a query on the universe, the replacement connection isused instead of the connection defined in the universe.
The replacement connection has the following requirements:• It must be a secured OLAP connection.• It must refer to the same database type as the original connection (for example MSAS or Essbase).• It must specify the catalog and the cube in the connection definition.
Restriction:
• SAP NetWeaver BW OLAP connections (BICSClient) cannot be used as replacement connections.• A replacement connection cannot use prompted authentication.
When applying the security setting, the catalog and the cube defined in the replacement connectionare used.
To define a replacement connection, select the original connection in the table and click Edit.
Select a connection in the Connections folder and sub-folders for which you have the "View objects"right granted for the repository where you are defining the security profiles.
Related Topics• Aggregation of Connections settings
2013-08-03330
Managing security
17.9.3 Business Security Profile Create Query settings
Use the Business Security Profile Create Query setting to grant or deny the use of business layer objectsin the query panel.
By default, a user with access to the universe granted in the repository can see all universe objects inthe query panel. Once the user is assigned or inherits a profile with a Create Query setting, only theviews and objects granted by the setting are displayed and can be selected for a query.
If an object is not granted and not denied explicitly, it is denied by default. Unlike objects that are explicitlydenied, objects that are denied by default could be granted by inheritance after aggregating BusinessSecurity Profiles to determine the net profile for a user. For more information about aggregating profiles,see the related topic.
There are two ways to grant or deny objects:• By business layer view: Grants or denies all objects in a view. The All business layer views option
allows you to grant or deny all views defined for the universe.• By object: You can grant or deny the objects listed below. The All objects option allows you to grant
or deny all objects in the business layer.• Dimensions• Attributes• Measures• Calculated members• Filters• Prompts• Named sets• Folders: Grants or denies all objects in the folder.• Analysis dimensions: Grants or denies all objects in the dimension.• Hierarchies: Grants or denies all objects in the hierarchy.
Note:It is not possible to grant or deny a hierarchy level.
Tip:If most views are allowed, it is easiest to grant all views, and then deny the ones that are not allowed.Using the All business layer views and All objects options has the advantage that any new view orobject defined in the business layer is automatically included in the Create Query setting when theuniverse is published.
If the All business layer views or All objects option is used, the settings are aggregated to determinethe net setting for this profile, for example:• If All business layer views are denied and one view is granted, this profile denies all views except
the one granted.
2013-08-03331
Managing security
• If All business layer views are granted and one view is denied, this profile grants all views exceptthe one denied.
• If All objects are denied and one object is granted, any parent folders in the path to access theobject are granted, but only to access the object. The other objects in the parent folders are denied.
• If All objects are granted and one object is denied, the parent folders in the path to access theobject are denied, but only to prevent access to this object. The other objects in the parent foldersare granted.
The objects in a granted view are granted in that view only. If the same object is contained in anotherview, it is not automatically granted.
Whether or not a user sees a particular object in the query panel is determined after aggregating theCreate Query settings in all profiles assigned to the user, and taking into consideration object accesslevel. For more information about aggregating profiles, see the related topic.
Related Topics• Aggregation of Create Query settings
17.9.4 Business Security Profile Display Data settings
Use the Business Security Profile Display Data settings to grant or deny access to the data retrievedby objects in the business layer.
By default, a user with access to the universe granted in the repository can see the data retrieved byall universe objects. Once the user is assigned or inherits a profile with a Display Data setting, only thedata corresponding to the objects granted by the setting is displayed.
If an object is not granted and not denied explicitly, it is denied by default. Unlike objects that are explicitlydenied, objects that are denied by default could be granted by inheritance after aggregating BusinessSecurity Profiles to determine the net profile for a user. For more information about aggregating profiles,see the related topic.
The following objects can be granted or denied. The All objects option allows you to grant or deny allobjects in the business layer.• Dimensions• Attributes• Measures• Calculated Members• Named Sets• Folders: Grants or denies all the objects in the folder.• Hierarchies
Using the All objects option has the advantage that any new object defined in the business layer isautomatically included in the display data setting when the universe is published.
2013-08-03332
Managing security
If the All objects option is used, the settings are aggregated to determine the net setting for this profile,for example:• If All objects are denied and one object is granted, any parent folders in the path to access the
object are granted, but only to access the object. The other objects in the parent folders are denied.• If All objects are granted and one object is denied, the parent folders in the path to access the
object are denied, but only to prevent access to this object. The other objects in the parent foldersare granted.
A user who is denied an object by a Display Data setting might refresh a report containing the deniedobject. You can specify what the refresh should do in this case by setting the SQL generation parameterAUTO_UPDATE_QUERY in the business layer.• If this parameter is set to No, then refreshing the report generates an error message.• If this parameter is set to Yes, then the denied objects are removed from the query and from any
filters defined in the business layer. Data for other granted objects is retrieved and displayed to theuser in a partial report.
Whether or not a user sees data for a particular object is determined after aggregating the Display Datasettings in all profiles assigned to the user, and taking into consideration object access level. For moreinformation about aggregating profiles, see the related topic.
Related Topics• Business Security Profile Display Data settings
17.9.5 Business Security Profile Filters settings
Use the Business Security Profile Filters setting to define a filter using objects in the business layer, ornamed member sets. You create and edit filters explicitly for the Business Security Profile using theSecurity Editor. Filters in the Business Security Profile are not accessible in the business layer. If theBusiness Security Profile is deleted, the filter or named set is also deleted.
Once the user is assigned or inherits a profile with a Filters setting, the filter is added to the query script(and therefore combined with any filters defined in the business layer) to restrict the data displayed.
Relational universesFor relational universes, you define filters on dimensions and measures in the business layer. You candefine compound filters that are linked by the AND and OR operators. You can also define multiplefilters to apply to the query.
When a user runs a query, the filters are always applied to the query and to the returned data. This isdifferent from the Data Security Profile Rows setting which only applies if a defined table is referencedin the query.
2013-08-03333
Managing security
OLAP universesFor OLAP universes, you define a named set of members. You can include or exclude members forany dimension in the business layer. The excluded members are removed from the query when datais retrieved from the cube.
Note:The filter does not impact the aggregation of values in the report. Only the display of members is filtered.
You can include or exclude members from multiple dimensions. You can also define multiple namedsets to apply to the query.
Related Topics• How to build a business filter• About the Member Selector• Aggregation of Filters settings
17.10 Security profile aggregation
More than one Data Security Profile or Business Security Profile defined for a universe may be assignedto the same user. Multiple profiles can be directly assigned to a user or group, and be inherited fromparent groups. When this happens, the security settings in the different profiles are aggregated to resultin one effective Data Security Profile, and one effective Business Security Profile, called net profiles.The settings in the net profiles are applied when the user creates a query or views a report.
Two methods are used for aggregating security settings: priority and restriction level.
Priority is determined by the order that the Security Profiles appear under the universe in the SecurityEditor. Use theChange Data Security Profile Priority andChange Business Security Profile Prioritycommands to set the priority.
Restriction levels (very restrictive, moderately restrictive, less restrictive) define which operators (forexample AND, OR) to use to aggregate profiles. You can change these restriction levels in the SecurityEditor to affect how the profiles are aggregated.• The less restrictive level is appropriate when security is designed with roles, each role granting new
rights to the user.• The most restrictive level is appropriate when each profile is used to restrict what the user can see.• The moderately restrictive level uses the most restrictive level for inherited profiles and the less
restrictive level for merged profiles.
The rules for inheriting or merging profiles are as follows:• If the user or group is assigned Profile A and belongs to a group that is assigned Profile B, Profile
A and Profile B are inherited.• If the user or group belongs to a group assigned Profile A and another group assigned Profile B,
Profile A and Profile B are merged.
2013-08-03334
Managing security
• If the user or group is assigned both Profile A and Profile B, Profile A and Profile B are merged.
The method and operators used to aggregate profile settings vary for the different settings. For detailedinformation about aggregation for each type of setting, see the related topic.
The Data Security Profile Rows setting and Business Security Profile Filters setting both generate aWHERE clause to filter the query. The Rows setting is applied first. The WHERE clause in the Filterssetting is then applied to the results of the first query. In effect, the two WHERE clauses are aggregatedwith the AND operator.
Related Topics• Aggregation of Connections settings• Aggregation of Controls settings• Aggregation of SQL settings• Aggregation of Rows settings• Aggregation of Tables settings• Aggregation of Create Query settings• Aggregation of Display Data settings• Aggregation of Filters settings• Changing Security Profile priority• Changing security profile aggregation options
17.10.1 Aggregation of Connections settings
If more than one Security Profile for a universe is assigned to or inherited by the same user, theconnection defined in the Security Profile with the highest priority is used.
Note:Connections settings for relational universes are in Data Security Profiles and for OLAP universes, inBusiness Security Profiles. Therefore Data and Business Security Profiles are never prioritized together.
If the relational universe has multiple connections, aggregation of the Connections setting is done foreach connection independently.
Related Topics• Changing Security Profile priority• Business Security Profile Connections settings• Data Security Profile Connections settings
2013-08-03335
Managing security
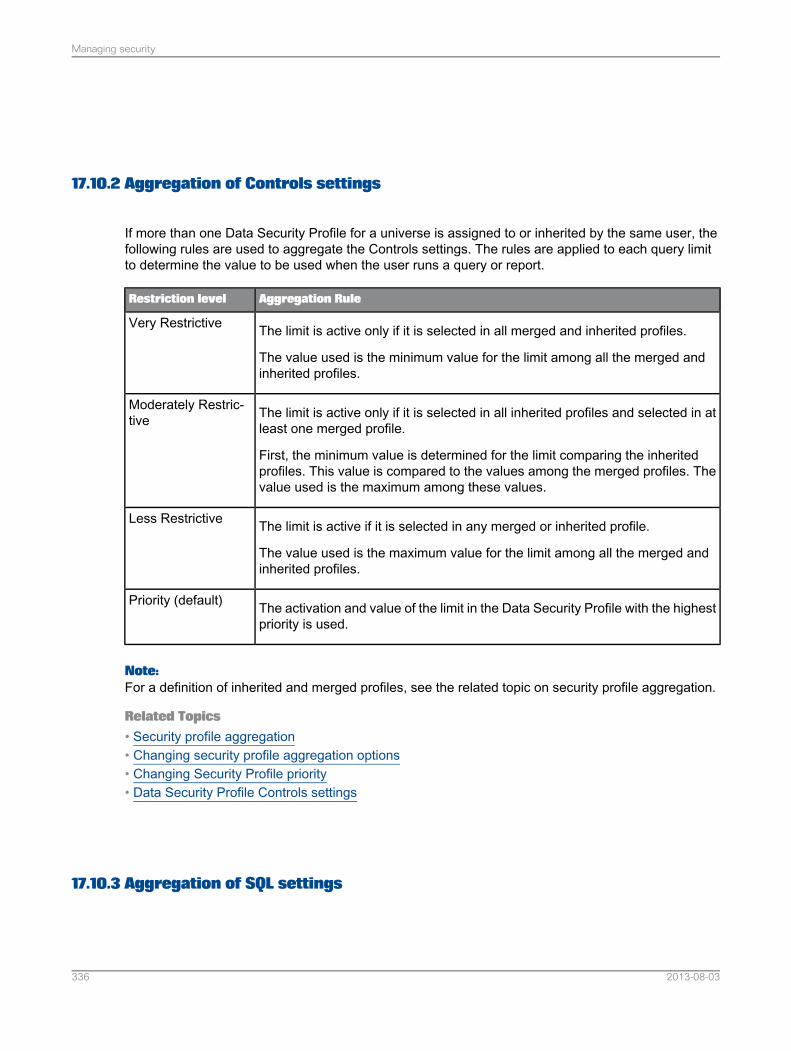
17.10.2 Aggregation of Controls settings
If more than one Data Security Profile for a universe is assigned to or inherited by the same user, thefollowing rules are used to aggregate the Controls settings. The rules are applied to each query limitto determine the value to be used when the user runs a query or report.
Aggregation RuleRestriction level
The limit is active only if it is selected in all merged and inherited profiles.
The value used is the minimum value for the limit among all the merged andinherited profiles.
Very Restrictive
The limit is active only if it is selected in all inherited profiles and selected in atleast one merged profile.
First, the minimum value is determined for the limit comparing the inheritedprofiles. This value is compared to the values among the merged profiles. Thevalue used is the maximum among these values.
Moderately Restric-tive
The limit is active if it is selected in any merged or inherited profile.
The value used is the maximum value for the limit among all the merged andinherited profiles.
Less Restrictive
The activation and value of the limit in the Data Security Profile with the highestpriority is used.
Priority (default)
Note:For a definition of inherited and merged profiles, see the related topic on security profile aggregation.
Related Topics• Security profile aggregation• Changing security profile aggregation options• Changing Security Profile priority• Data Security Profile Controls settings
17.10.3 Aggregation of SQL settings
2013-08-03336
Managing security
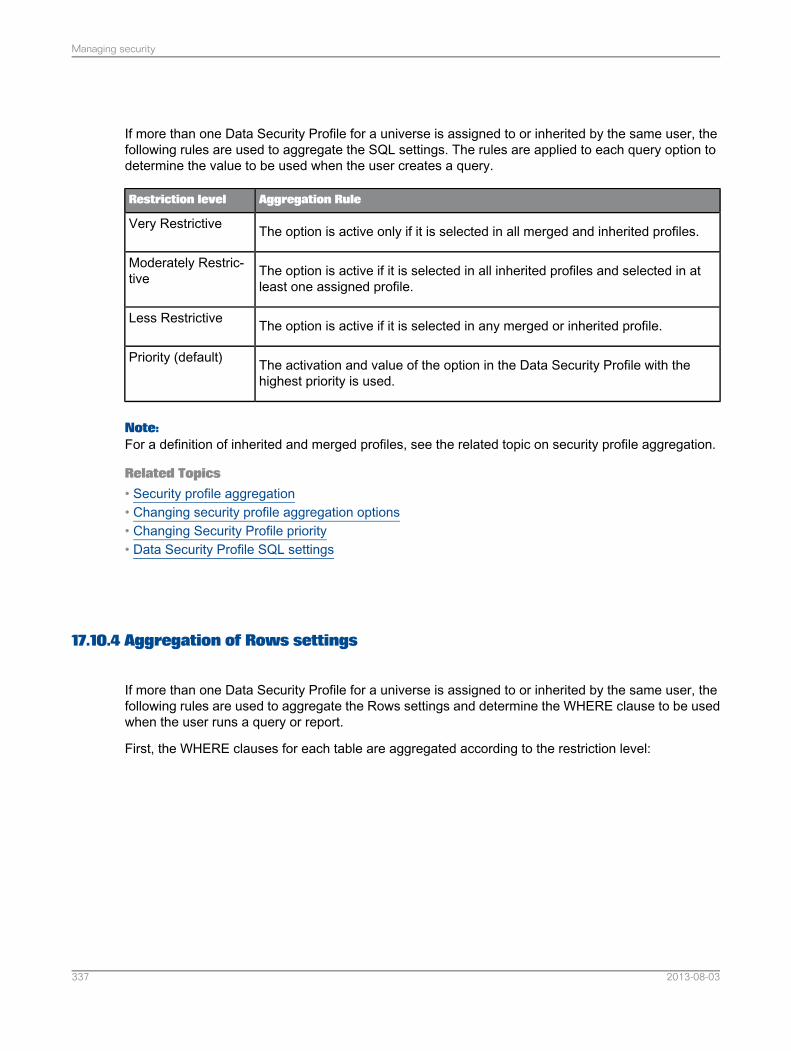
If more than one Data Security Profile for a universe is assigned to or inherited by the same user, thefollowing rules are used to aggregate the SQL settings. The rules are applied to each query option todetermine the value to be used when the user creates a query.
Aggregation RuleRestriction level
The option is active only if it is selected in all merged and inherited profiles.Very Restrictive
The option is active if it is selected in all inherited profiles and selected in atleast one assigned profile.
Moderately Restric-tive
The option is active if it is selected in any merged or inherited profile.Less Restrictive
The activation and value of the option in the Data Security Profile with thehighest priority is used.
Priority (default)
Note:For a definition of inherited and merged profiles, see the related topic on security profile aggregation.
Related Topics• Security profile aggregation• Changing security profile aggregation options• Changing Security Profile priority• Data Security Profile SQL settings
17.10.4 Aggregation of Rows settings
If more than one Data Security Profile for a universe is assigned to or inherited by the same user, thefollowing rules are used to aggregate the Rows settings and determine the WHERE clause to be usedwhen the user runs a query or report.
First, the WHERE clauses for each table are aggregated according to the restriction level:
2013-08-03337
Managing security
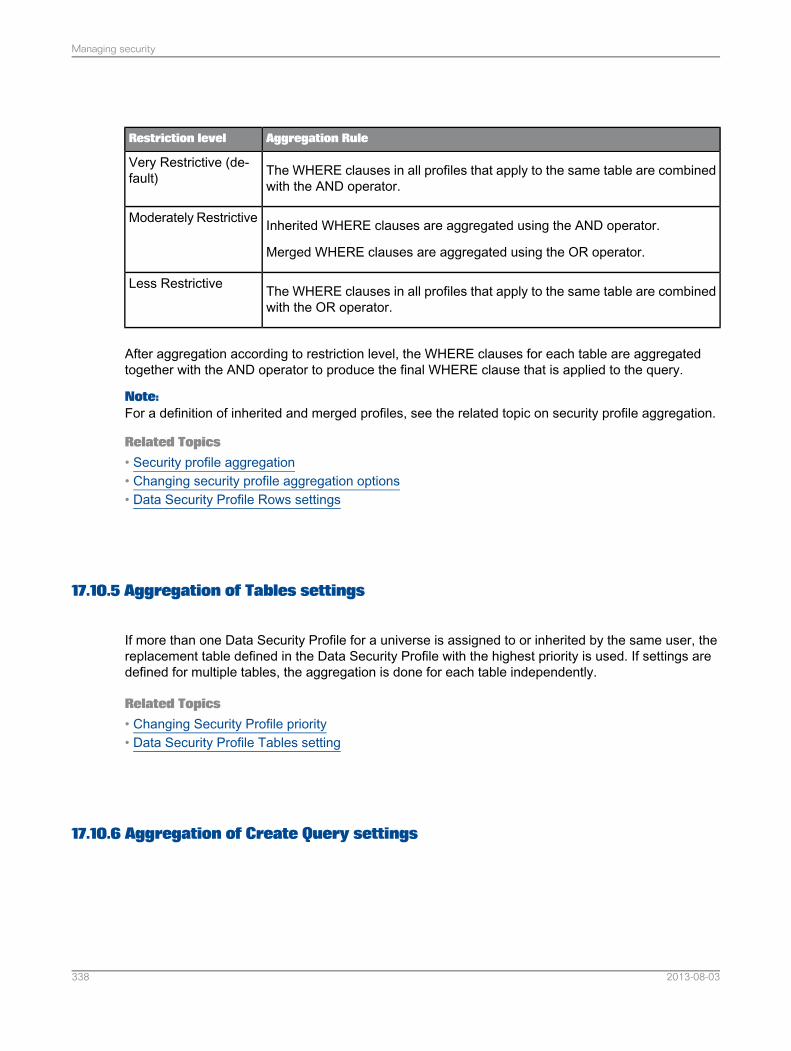
Aggregation RuleRestriction level
The WHERE clauses in all profiles that apply to the same table are combinedwith the AND operator.
Very Restrictive (de-fault)
Inherited WHERE clauses are aggregated using the AND operator.
Merged WHERE clauses are aggregated using the OR operator.
Moderately Restrictive
The WHERE clauses in all profiles that apply to the same table are combinedwith the OR operator.
Less Restrictive
After aggregation according to restriction level, the WHERE clauses for each table are aggregatedtogether with the AND operator to produce the final WHERE clause that is applied to the query.
Note:For a definition of inherited and merged profiles, see the related topic on security profile aggregation.
Related Topics• Security profile aggregation• Changing security profile aggregation options• Data Security Profile Rows settings
17.10.5 Aggregation of Tables settings
If more than one Data Security Profile for a universe is assigned to or inherited by the same user, thereplacement table defined in the Data Security Profile with the highest priority is used. If settings aredefined for multiple tables, the aggregation is done for each table independently.
Related Topics• Changing Security Profile priority• Data Security Profile Tables setting
17.10.6 Aggregation of Create Query settings
2013-08-03338
Managing security
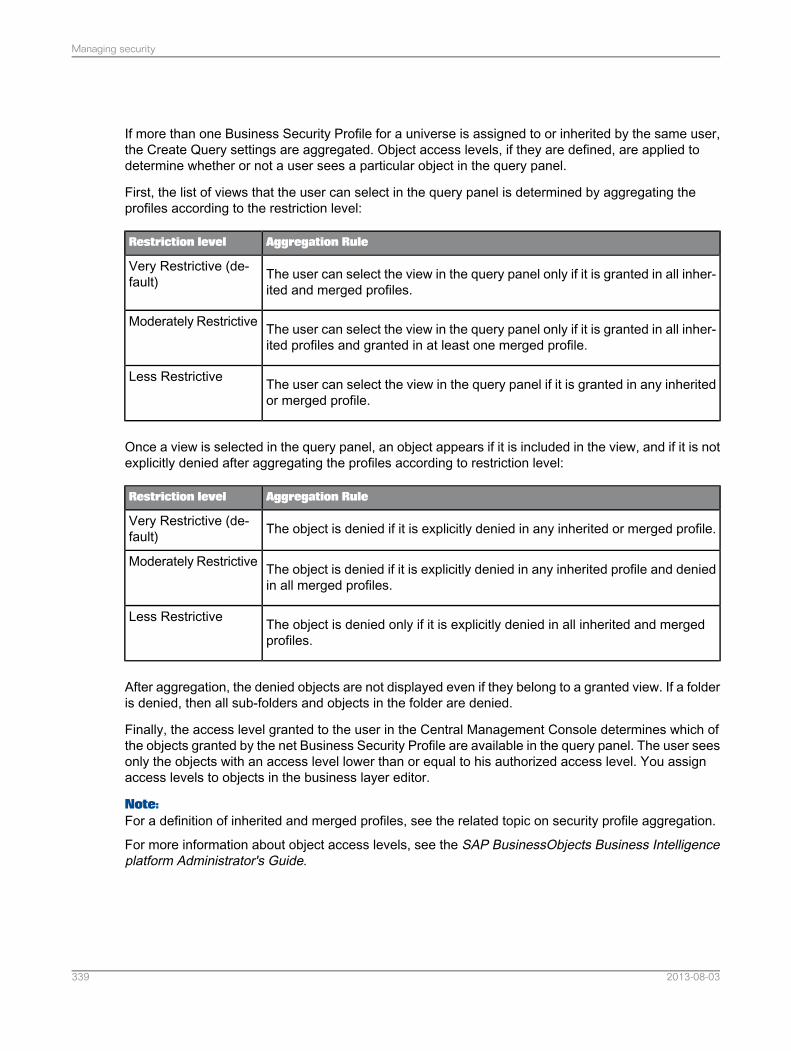
If more than one Business Security Profile for a universe is assigned to or inherited by the same user,the Create Query settings are aggregated. Object access levels, if they are defined, are applied todetermine whether or not a user sees a particular object in the query panel.
First, the list of views that the user can select in the query panel is determined by aggregating theprofiles according to the restriction level:
Aggregation RuleRestriction level
The user can select the view in the query panel only if it is granted in all inher-ited and merged profiles.
Very Restrictive (de-fault)
The user can select the view in the query panel only if it is granted in all inher-ited profiles and granted in at least one merged profile.
Moderately Restrictive
The user can select the view in the query panel if it is granted in any inheritedor merged profile.
Less Restrictive
Once a view is selected in the query panel, an object appears if it is included in the view, and if it is notexplicitly denied after aggregating the profiles according to restriction level:
Aggregation RuleRestriction level
The object is denied if it is explicitly denied in any inherited or merged profile.Very Restrictive (de-fault)
The object is denied if it is explicitly denied in any inherited profile and deniedin all merged profiles.
Moderately Restrictive
The object is denied only if it is explicitly denied in all inherited and mergedprofiles.
Less Restrictive
After aggregation, the denied objects are not displayed even if they belong to a granted view. If a folderis denied, then all sub-folders and objects in the folder are denied.
Finally, the access level granted to the user in the Central Management Console determines which ofthe objects granted by the net Business Security Profile are available in the query panel. The user seesonly the objects with an access level lower than or equal to his authorized access level. You assignaccess levels to objects in the business layer editor.
Note:For a definition of inherited and merged profiles, see the related topic on security profile aggregation.
For more information about object access levels, see the SAP BusinessObjects Business Intelligenceplatform Administrator's Guide.
2013-08-03339
Managing security
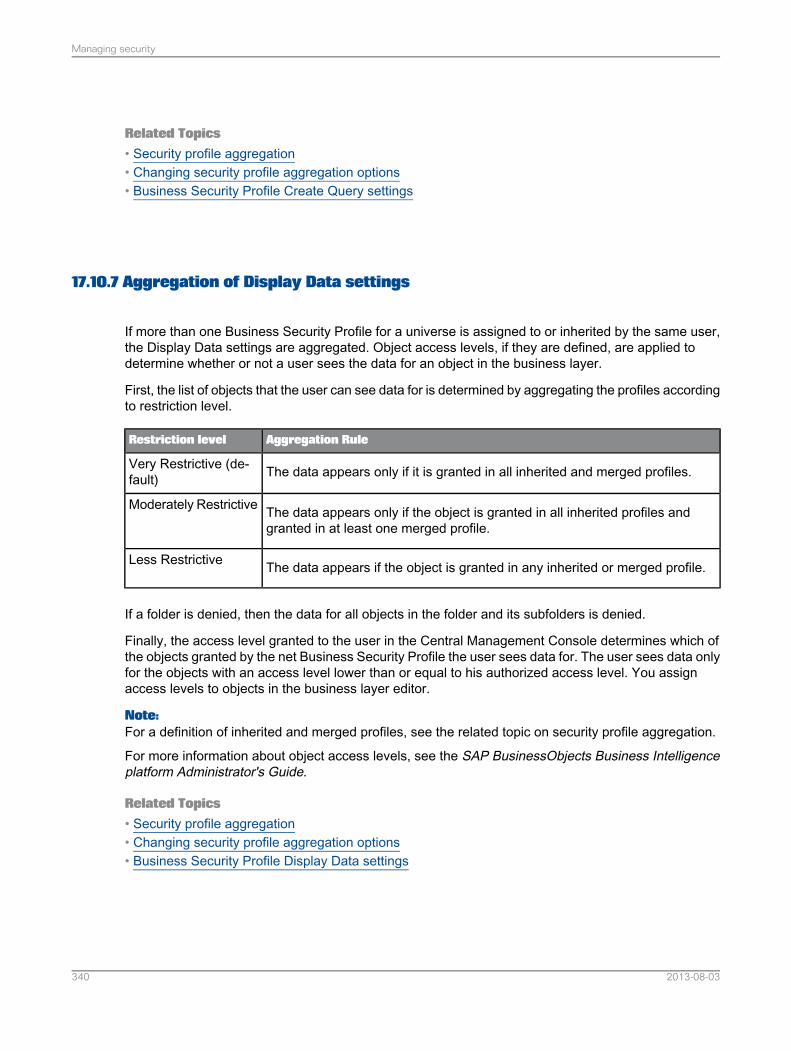
Related Topics• Security profile aggregation• Changing security profile aggregation options• Business Security Profile Create Query settings
17.10.7 Aggregation of Display Data settings
If more than one Business Security Profile for a universe is assigned to or inherited by the same user,the Display Data settings are aggregated. Object access levels, if they are defined, are applied todetermine whether or not a user sees the data for an object in the business layer.
First, the list of objects that the user can see data for is determined by aggregating the profiles accordingto restriction level.
Aggregation RuleRestriction level
The data appears only if it is granted in all inherited and merged profiles.Very Restrictive (de-fault)
The data appears only if the object is granted in all inherited profiles andgranted in at least one merged profile.
Moderately Restrictive
The data appears if the object is granted in any inherited or merged profile.Less Restrictive
If a folder is denied, then the data for all objects in the folder and its subfolders is denied.
Finally, the access level granted to the user in the Central Management Console determines which ofthe objects granted by the net Business Security Profile the user sees data for. The user sees data onlyfor the objects with an access level lower than or equal to his authorized access level. You assignaccess levels to objects in the business layer editor.
Note:For a definition of inherited and merged profiles, see the related topic on security profile aggregation.
For more information about object access levels, see the SAP BusinessObjects Business Intelligenceplatform Administrator's Guide.
Related Topics• Security profile aggregation• Changing security profile aggregation options• Business Security Profile Display Data settings
2013-08-03340
Managing security
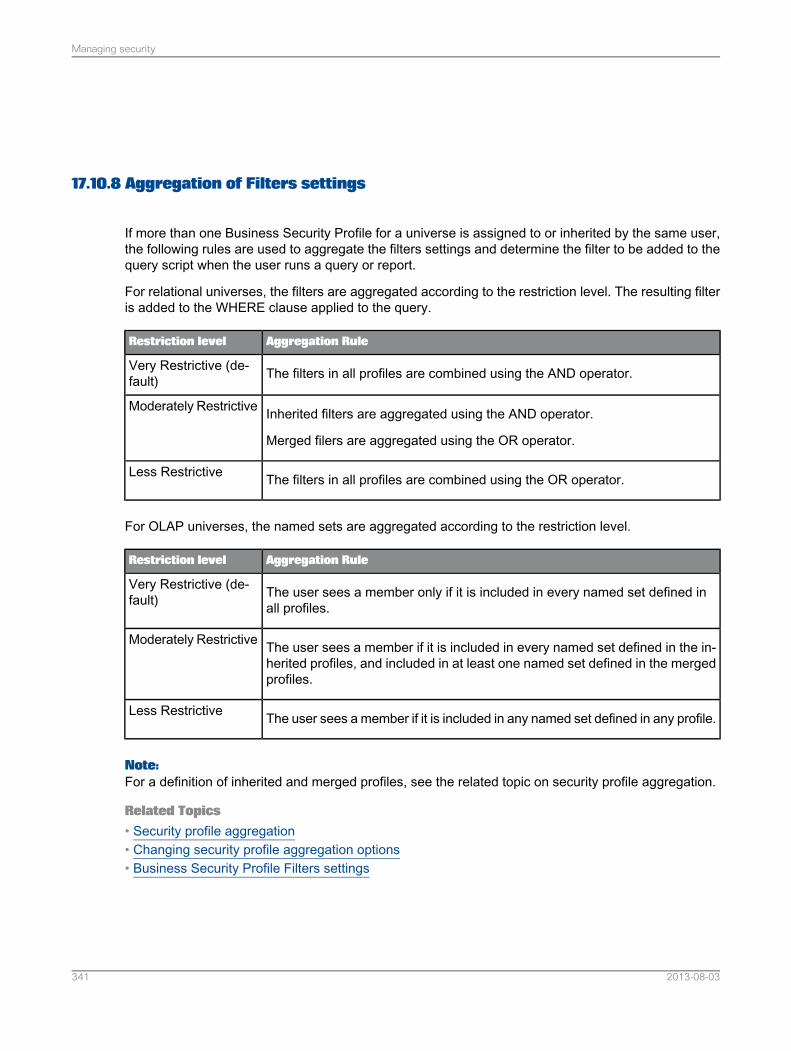
17.10.8 Aggregation of Filters settings
If more than one Business Security Profile for a universe is assigned to or inherited by the same user,the following rules are used to aggregate the filters settings and determine the filter to be added to thequery script when the user runs a query or report.
For relational universes, the filters are aggregated according to the restriction level. The resulting filteris added to the WHERE clause applied to the query.
Aggregation RuleRestriction level
The filters in all profiles are combined using the AND operator.Very Restrictive (de-fault)
Inherited filters are aggregated using the AND operator.
Merged filers are aggregated using the OR operator.
Moderately Restrictive
The filters in all profiles are combined using the OR operator.Less Restrictive
For OLAP universes, the named sets are aggregated according to the restriction level.
Aggregation RuleRestriction level
The user sees a member only if it is included in every named set defined inall profiles.
Very Restrictive (de-fault)
The user sees a member if it is included in every named set defined in the in-herited profiles, and included in at least one named set defined in the mergedprofiles.
Moderately Restrictive
The user sees a member if it is included in any named set defined in any profile.Less Restrictive
Note:For a definition of inherited and merged profiles, see the related topic on security profile aggregation.
Related Topics• Security profile aggregation• Changing security profile aggregation options• Business Security Profile Filters settings
2013-08-03341
Managing security
17.11 Changing security profile aggregation options
1. In the Security Editor Universes / Profiles pane, select the universe.The current aggregation options for the universe display on the lower, right-hand side of the editor.
2. For each security setting, select a new aggregation option from the list.The options apply only to the universe currently selected.
3. To save the changes in the repository, click the save icon in the main tool bar.
Related Topics• Security profile aggregation• Opening the Security Editor
17.12 Assigning Security Profiles to users
1. In the Security Editor Universes / Profiles pane, select the universe.Any currently assigned users or groups appear in the Assigned Users list.
2. To assign, select the user or group in the list of users on the right-hand side of the editor, and clickthe arrow that points to the Assigned Users list.
3. To unassign, select the user or group in the Assigned Users list and click the arrow that points tothe list of all users.
Caution:
The double-arrow icon unassigns all users and groups whether they are selected or not.
4. To save the changes in the repository, click the save icon in the main tool bar.
Related Topics• Opening the Security Editor
17.13 Displaying profiles assigned to a user and previewing net profiles
1. In the Security Editor, click the Users / Groups pane on the left-hand side of the editor.2. In the Users / Groups pane, select the user or group.
2013-08-03342
Managing security
3. In the Universes / Profiles pane in the upper right-hand side of the editor, select the universe.
Tip:You can change the display to list only universes that have profiles assigned to the selected useror group by selecting the Display only universes assigned to the selected user/group option.
Once you have selected a user and a universe, the assigned profiles appear in the profiles list onthe lower right-hand side of the editor.
4. To preview the net Data Security Profile or net Business Security Profile, click Preview Net Profilebelow the corresponding profile list.
The Data Security Profile or Business Security Profile editor opens in read-only mode. The settingson each tab represent the settings that will be used after aggregation of all the profiles assigned tothe user is taken into account.
Related Topics• Security profile aggregation• Opening the Security Editor
2013-08-03343
Managing security

2013-08-03344
Managing security
SQL and MDX reference
18.1 About the SQL/MDX Expression Editor
The SQL/MDX Expression Editor helps you write valid SQL/MDX expressions.
You can type SQL/MDX directly into the "Expression" box, or drag and drop table names, columnnames, business objects, functions, and parameters from the resource panes available in the editor.These panes are described in the following table. To display a resource pane, click the icon in the toolbar of the "Expression" pane. Different icons are available depending on the type of expression youare editing.
2013-08-03345
SQL and MDX reference
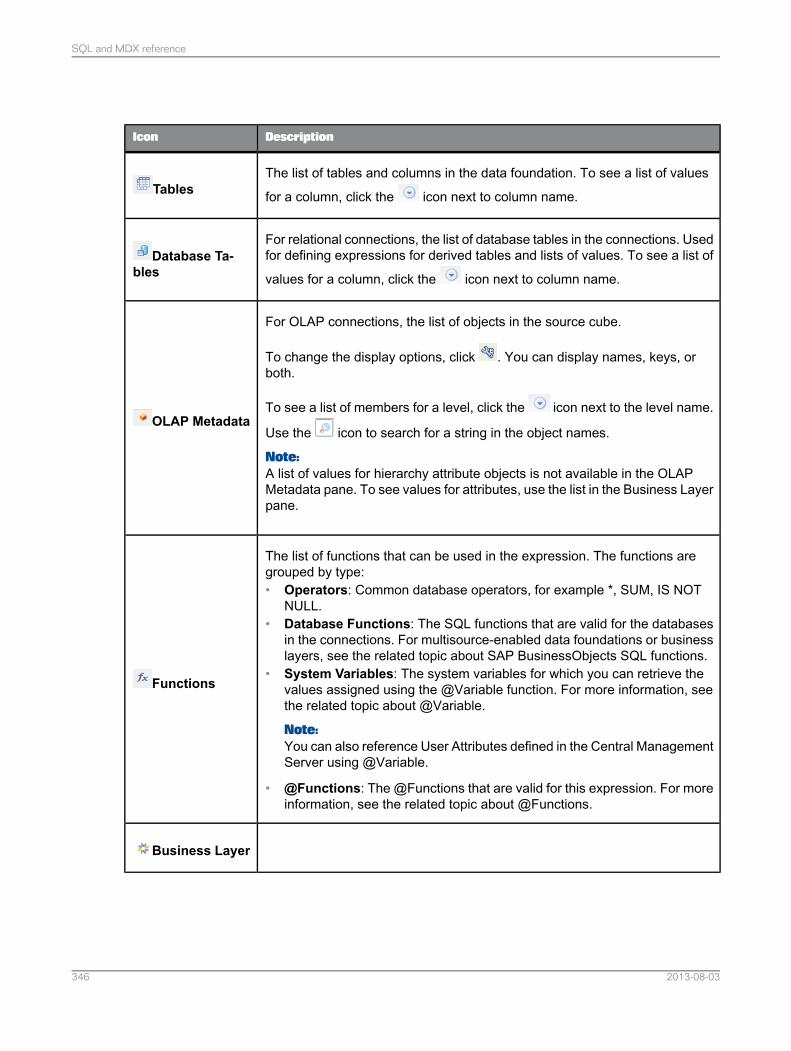
DescriptionIcon
The list of tables and columns in the data foundation. To see a list of values
for a column, click the icon next to column name.Tables
For relational connections, the list of database tables in the connections. Usedfor defining expressions for derived tables and lists of values. To see a list of
values for a column, click the icon next to column name.Database Ta-
bles
For OLAP connections, the list of objects in the source cube.
To change the display options, click . You can display names, keys, orboth.
To see a list of members for a level, click the icon next to the level name.
Use the icon to search for a string in the object names.
Note:A list of values for hierarchy attribute objects is not available in the OLAPMetadata pane. To see values for attributes, use the list in the Business Layerpane.
OLAP Metadata
The list of functions that can be used in the expression. The functions aregrouped by type:• Operators: Common database operators, for example *, SUM, IS NOT
NULL.• Database Functions: The SQL functions that are valid for the databases
in the connections. For multisource-enabled data foundations or businesslayers, see the related topic about SAP BusinessObjects SQL functions.
• System Variables: The system variables for which you can retrieve thevalues assigned using the @Variable function. For more information, seethe related topic about @Variable.
Note:You can also reference User Attributes defined in the Central ManagementServer using @Variable.
• @Functions: The @Functions that are valid for this expression. For moreinformation, see the related topic about @Functions.
Functions
Business Layer
2013-08-03346
SQL and MDX reference
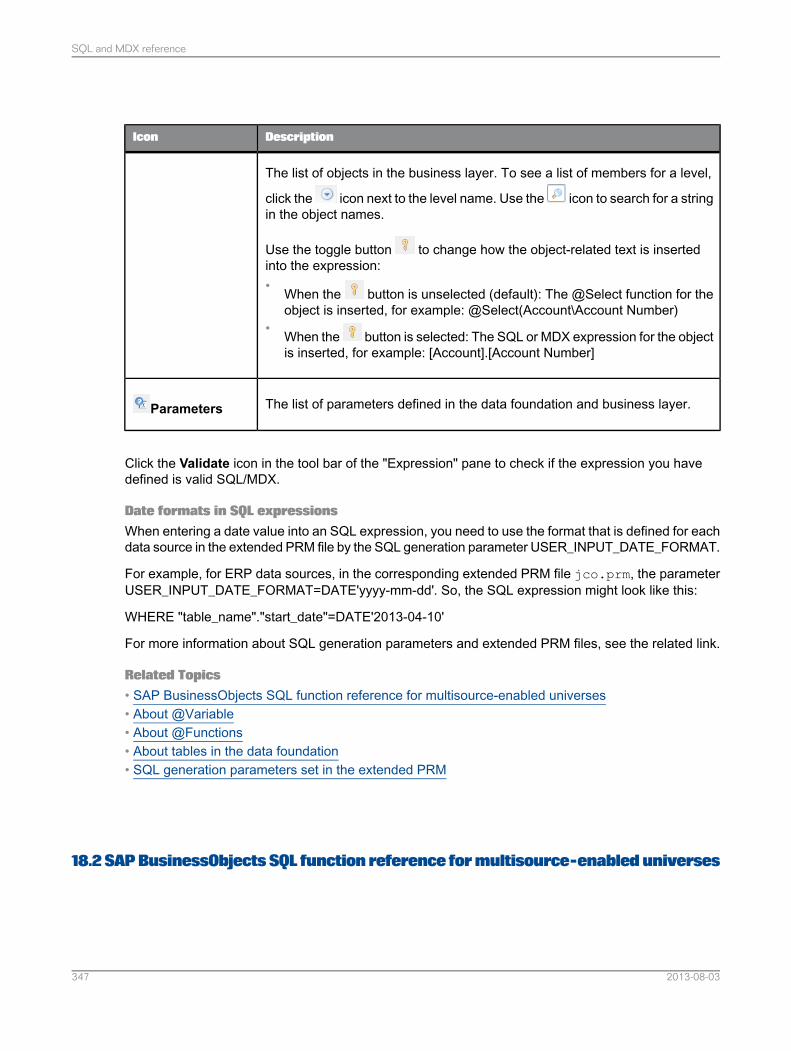
DescriptionIcon
The list of objects in the business layer. To see a list of members for a level,
click the icon next to the level name. Use the icon to search for a stringin the object names.
Use the toggle button to change how the object-related text is insertedinto the expression:• When the button is unselected (default): The @Select function for the
object is inserted, for example: @Select(Account\Account Number)• When the button is selected: The SQL or MDX expression for the object
is inserted, for example: [Account].[Account Number]
The list of parameters defined in the data foundation and business layer.Parameters
Click the Validate icon in the tool bar of the "Expression" pane to check if the expression you havedefined is valid SQL/MDX.
Date formats in SQL expressionsWhen entering a date value into an SQL expression, you need to use the format that is defined for eachdata source in the extended PRM file by the SQL generation parameter USER_INPUT_DATE_FORMAT.
For example, for ERP data sources, in the corresponding extended PRM file jco.prm, the parameterUSER_INPUT_DATE_FORMAT=DATE'yyyy-mm-dd'. So, the SQL expression might look like this:
WHERE "table_name"."start_date"=DATE'2013-04-10'
For more information about SQL generation parameters and extended PRM files, see the related link.
Related Topics• SAP BusinessObjects SQL function reference for multisource-enabled universes• About @Variable• About @Functions• About tables in the data foundation• SQL generation parameters set in the extended PRM
18.2 SAP BusinessObjects SQL function reference for multisource-enabled universes
2013-08-03347
SQL and MDX reference
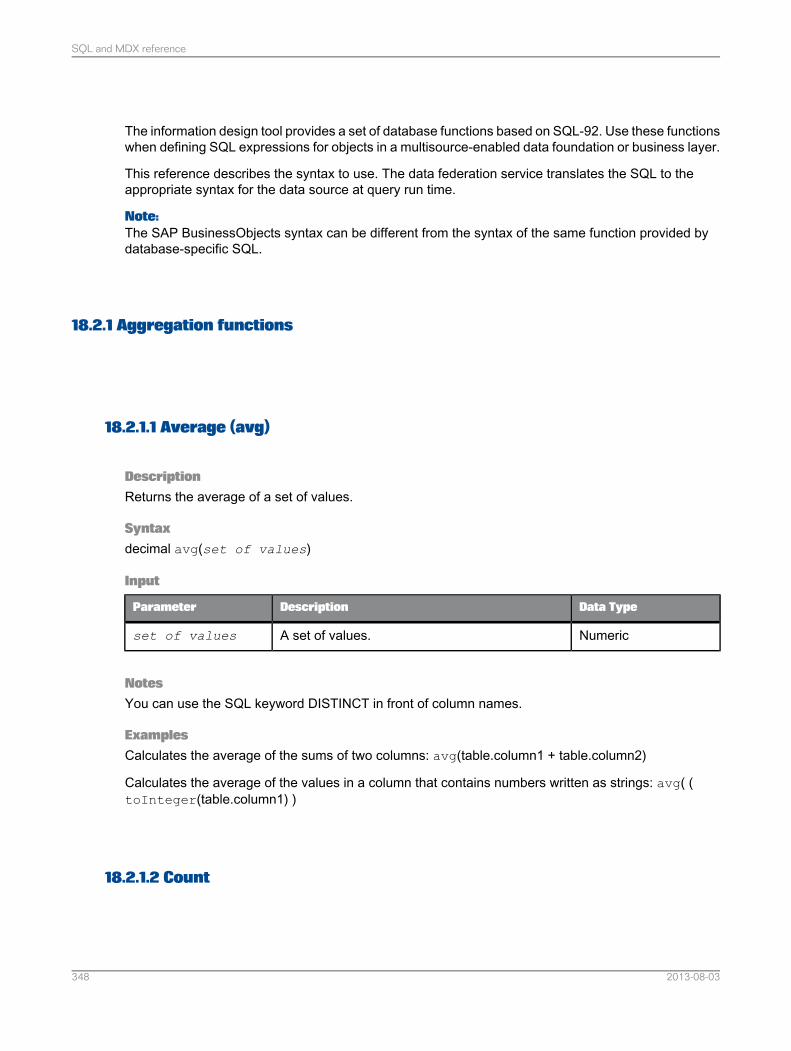
The information design tool provides a set of database functions based on SQL-92. Use these functionswhen defining SQL expressions for objects in a multisource-enabled data foundation or business layer.
This reference describes the syntax to use. The data federation service translates the SQL to theappropriate syntax for the data source at query run time.
Note:The SAP BusinessObjects syntax can be different from the syntax of the same function provided bydatabase-specific SQL.
18.2.1 Aggregation functions
18.2.1.1 Average (avg)
DescriptionReturns the average of a set of values.
Syntaxdecimal avg(set of values)
Input
Data TypeDescriptionParameter
NumericA set of values.set of values
NotesYou can use the SQL keyword DISTINCT in front of column names.
ExamplesCalculates the average of the sums of two columns: avg(table.column1 + table.column2)
Calculates the average of the values in a column that contains numbers written as strings: avg( (toInteger(table.column1) )
18.2.1.2 Count
2013-08-03348
SQL and MDX reference

DescriptionCounts the number of values in a set.
Syntaxinteger count(set of values)
Input
Data TypeDescriptionParameter
All data types (Numer-ic, String, Boolean,DateTime, Date).
A set of values.set of values
NotesYou can use the SQL keyword DISTINCT in front of column names.
ExamplesCounts the number of values in a column: count(table.column1)
18.2.1.3 Maximum (max)
DescriptionReturns the maximum value in a set.
Syntaxvalue max(set of values)
Input
Data TypeDescriptionParameter
All data types (Numer-ic, String, DateTime,Date).
A set of values.set of values
NotesYou can use the SQL keyword DISTINCT in front of column names.
ExamplesReturns the maximum value of a column: max(table.column1)
2013-08-03349
SQL and MDX reference
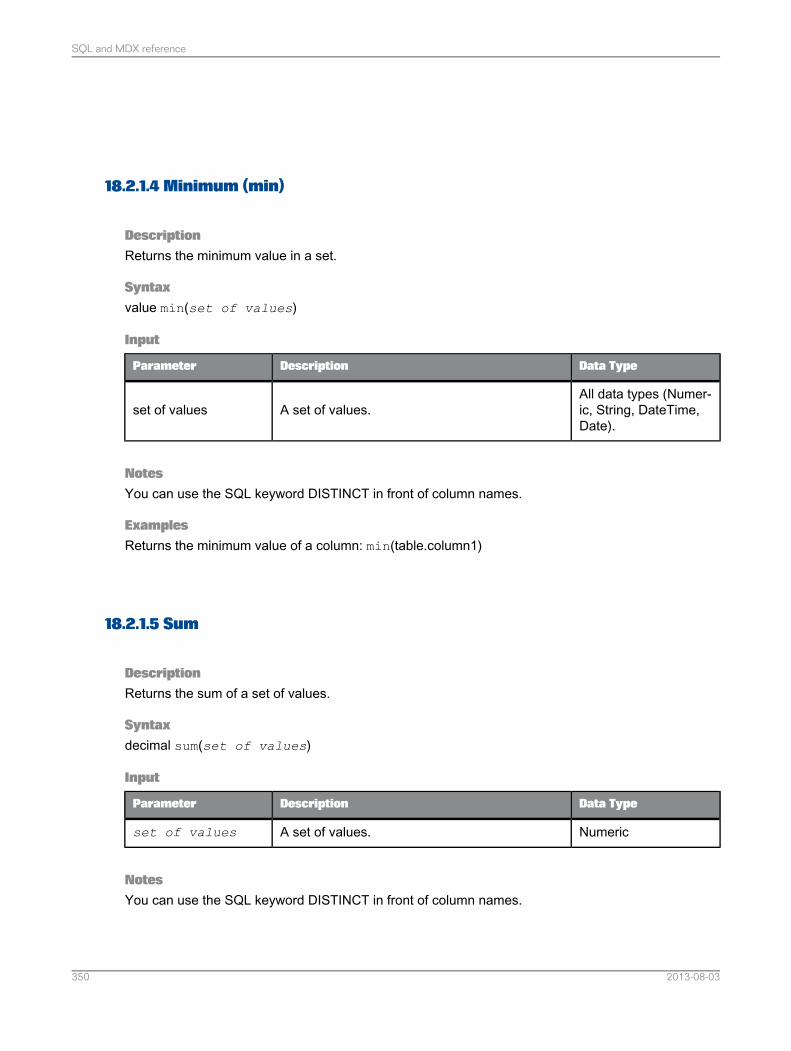
18.2.1.4 Minimum (min)
DescriptionReturns the minimum value in a set.
Syntaxvalue min(set of values)
Input
Data TypeDescriptionParameter
All data types (Numer-ic, String, DateTime,Date).
A set of values.set of values
NotesYou can use the SQL keyword DISTINCT in front of column names.
ExamplesReturns the minimum value of a column: min(table.column1)
18.2.1.5 Sum
DescriptionReturns the sum of a set of values.
Syntaxdecimal sum(set of values)
Input
Data TypeDescriptionParameter
NumericA set of values.set of values
NotesYou can use the SQL keyword DISTINCT in front of column names.
2013-08-03350
SQL and MDX reference
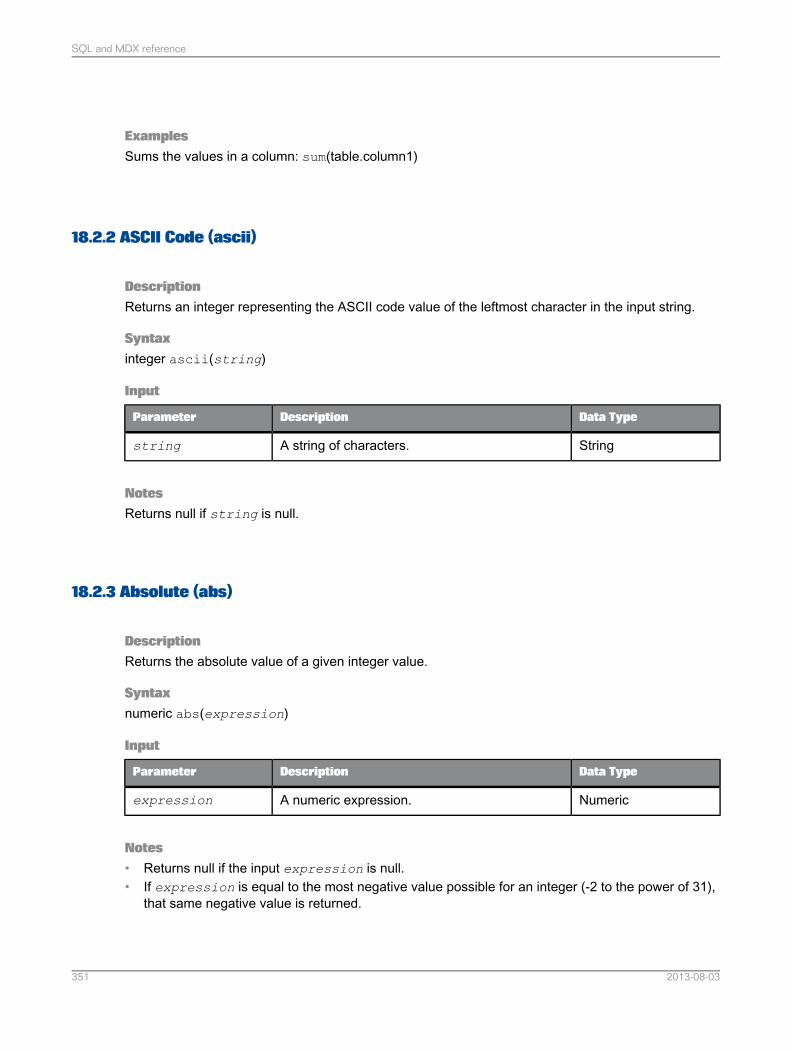
ExamplesSums the values in a column: sum(table.column1)
18.2.2 ASCII Code (ascii)
DescriptionReturns an integer representing the ASCII code value of the leftmost character in the input string.
Syntaxinteger ascii(string)
Input
Data TypeDescriptionParameter
StringA string of characters.string
NotesReturns null if string is null.
18.2.3 Absolute (abs)
DescriptionReturns the absolute value of a given integer value.
Syntaxnumeric abs(expression)
Input
Data TypeDescriptionParameter
NumericA numeric expression.expression
Notes• Returns null if the input expression is null.• If expression is equal to the most negative value possible for an integer (-2 to the power of 31),
that same negative value is returned.
2013-08-03351
SQL and MDX reference
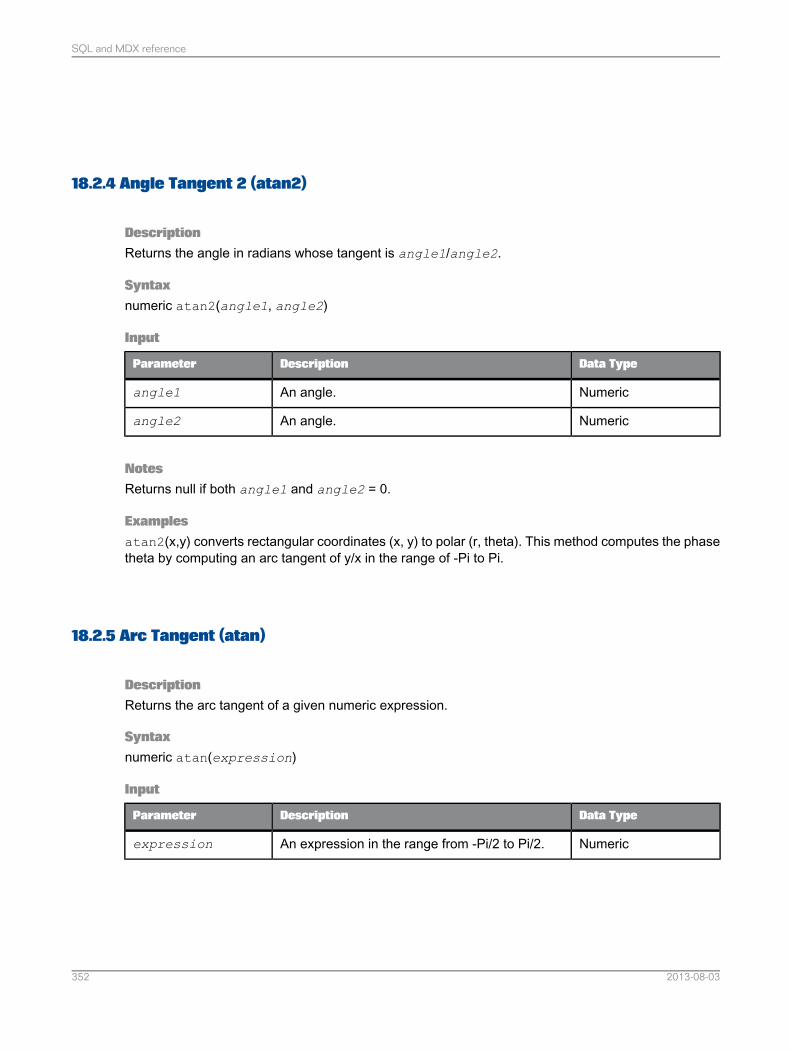
18.2.4 Angle Tangent 2 (atan2)
DescriptionReturns the angle in radians whose tangent is angle1/angle2.
Syntaxnumeric atan2(angle1, angle2)
Input
Data TypeDescriptionParameter
NumericAn angle.angle1
NumericAn angle.angle2
NotesReturns null if both angle1 and angle2 = 0.
Examplesatan2(x,y) converts rectangular coordinates (x, y) to polar (r, theta). This method computes the phasetheta by computing an arc tangent of y/x in the range of -Pi to Pi.
18.2.5 Arc Tangent (atan)
DescriptionReturns the arc tangent of a given numeric expression.
Syntaxnumeric atan(expression)
Input
Data TypeDescriptionParameter
NumericAn expression in the range from -Pi/2 to Pi/2.expression
2013-08-03352
SQL and MDX reference
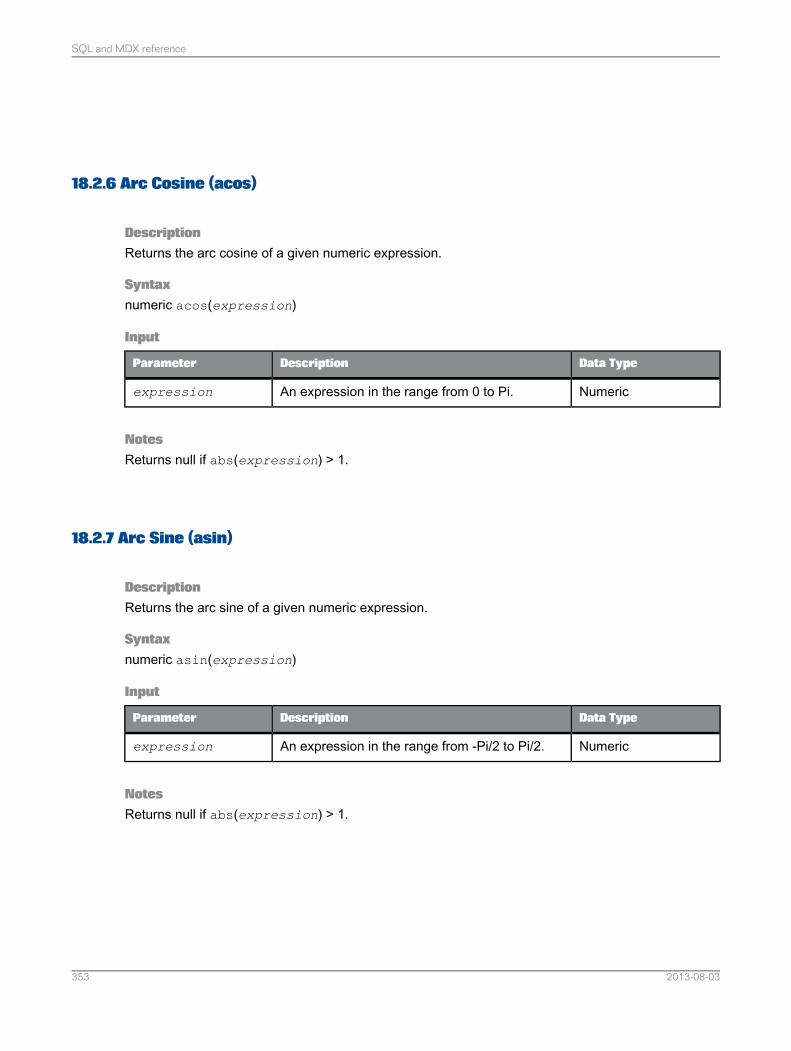
18.2.6 Arc Cosine (acos)
DescriptionReturns the arc cosine of a given numeric expression.
Syntaxnumeric acos(expression)
Input
Data TypeDescriptionParameter
NumericAn expression in the range from 0 to Pi.expression
NotesReturns null if abs(expression) > 1.
18.2.7 Arc Sine (asin)
DescriptionReturns the arc sine of a given numeric expression.
Syntaxnumeric asin(expression)
Input
Data TypeDescriptionParameter
NumericAn expression in the range from -Pi/2 to Pi/2.expression
NotesReturns null if abs(expression) > 1.
2013-08-03353
SQL and MDX reference
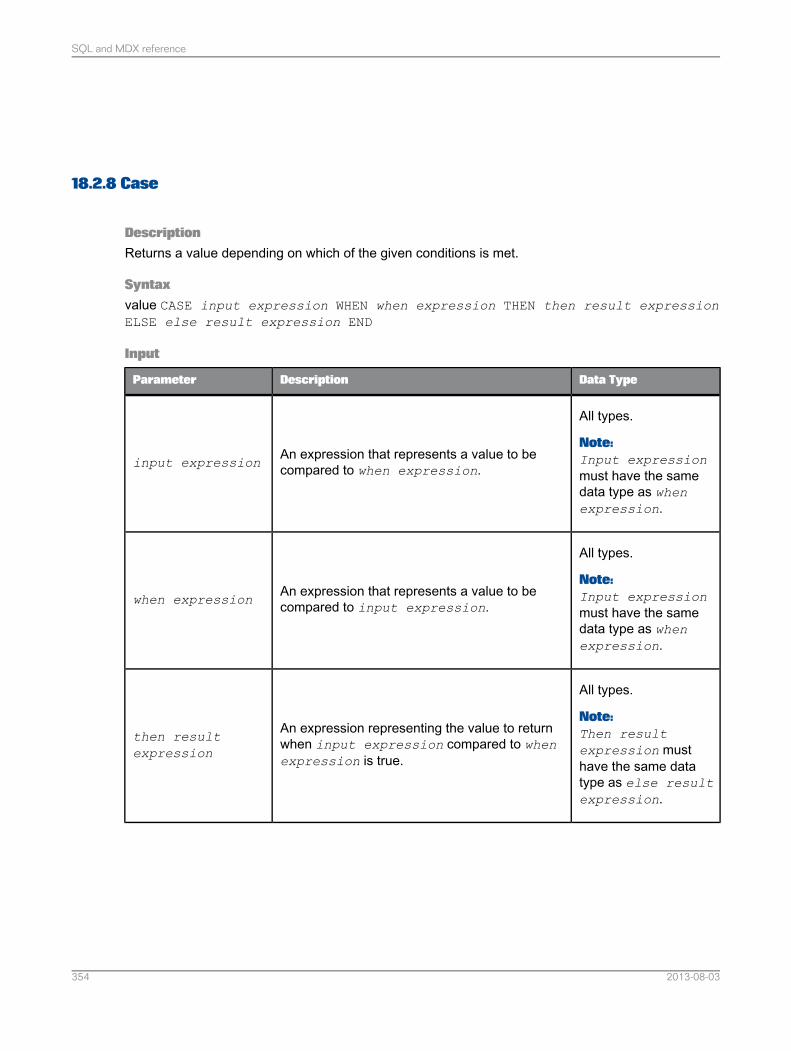
18.2.8 Case
DescriptionReturns a value depending on which of the given conditions is met.
Syntaxvalue CASE input expression WHEN when expression THEN then result expressionELSE else result expression END
Input
Data TypeDescriptionParameter
All types.
Note:Input expressionmust have the samedata type as whenexpression.
An expression that represents a value to becompared to when expression.input expression
All types.
Note:Input expressionmust have the samedata type as whenexpression.
An expression that represents a value to becompared to input expression.when expression
All types.
Note:Then resultexpression musthave the same datatype as else resultexpression.
An expression representing the value to returnwhen input expression compared to whenexpression is true.
then resultexpression
2013-08-03354
SQL and MDX reference
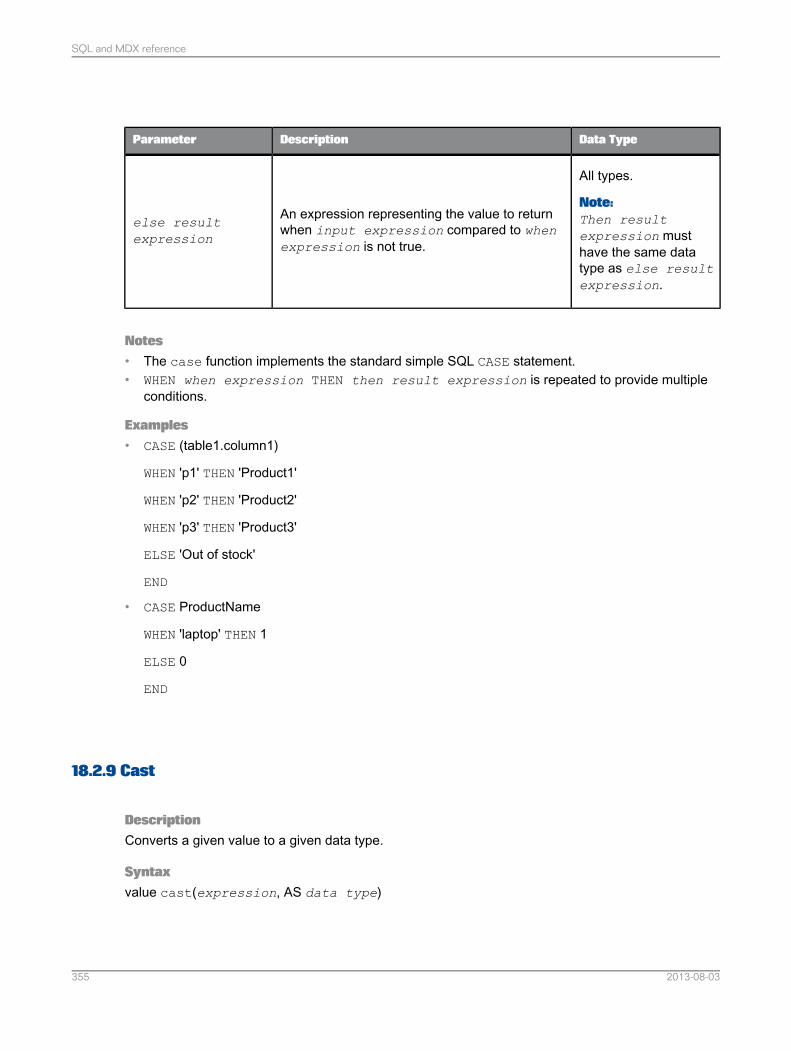
Data TypeDescriptionParameter
All types.
Note:Then resultexpression musthave the same datatype as else resultexpression.
An expression representing the value to returnwhen input expression compared to whenexpression is not true.
else resultexpression
Notes• The case function implements the standard simple SQL CASE statement.• WHEN when expression THEN then result expression is repeated to provide multiple
conditions.
Examples• CASE (table1.column1)
WHEN 'p1' THEN 'Product1'
WHEN 'p2' THEN 'Product2'
WHEN 'p3' THEN 'Product3'
ELSE 'Out of stock'
END
• CASE ProductName
WHEN 'laptop' THEN 1
ELSE 0
END
18.2.9 Cast
DescriptionConverts a given value to a given data type.
Syntaxvalue cast(expression, AS data type)
2013-08-03355
SQL and MDX reference
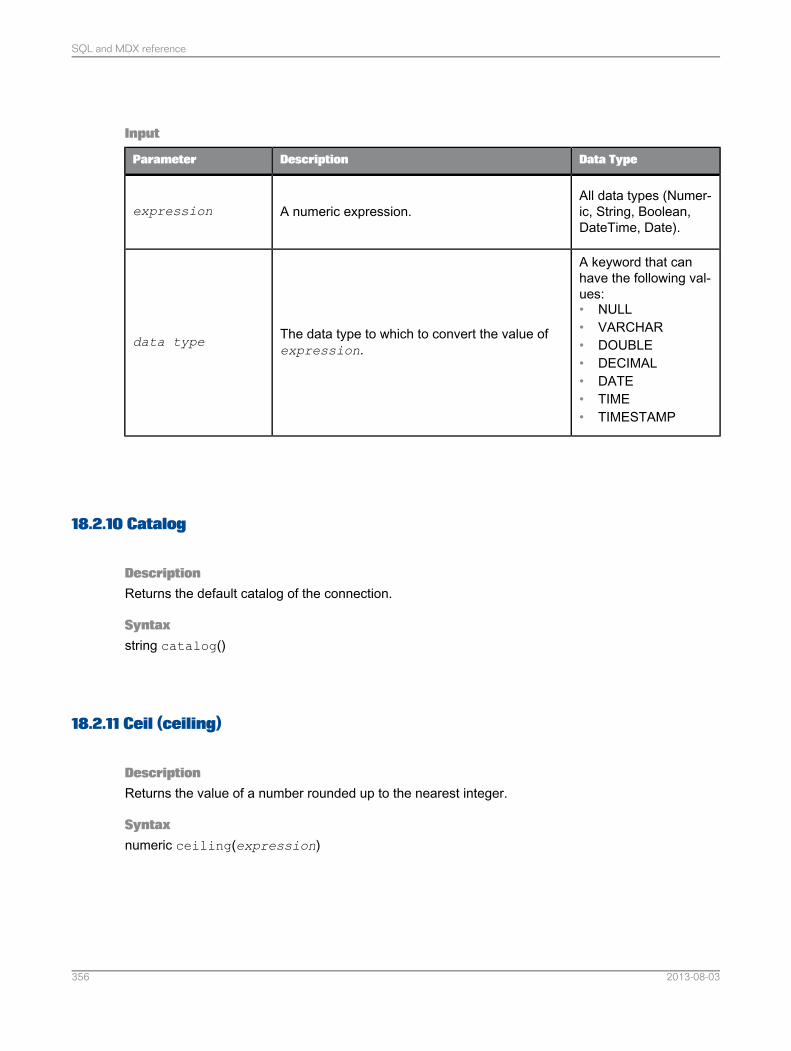
Input
Data TypeDescriptionParameter
All data types (Numer-ic, String, Boolean,DateTime, Date).
A numeric expression.expression
A keyword that canhave the following val-ues:• NULL• VARCHAR• DOUBLE• DECIMAL• DATE• TIME• TIMESTAMP
The data type to which to convert the value ofexpression.data type
18.2.10 Catalog
DescriptionReturns the default catalog of the connection.
Syntaxstring catalog()
18.2.11 Ceil (ceiling)
DescriptionReturns the value of a number rounded up to the nearest integer.
Syntaxnumeric ceiling(expression)
2013-08-03356
SQL and MDX reference
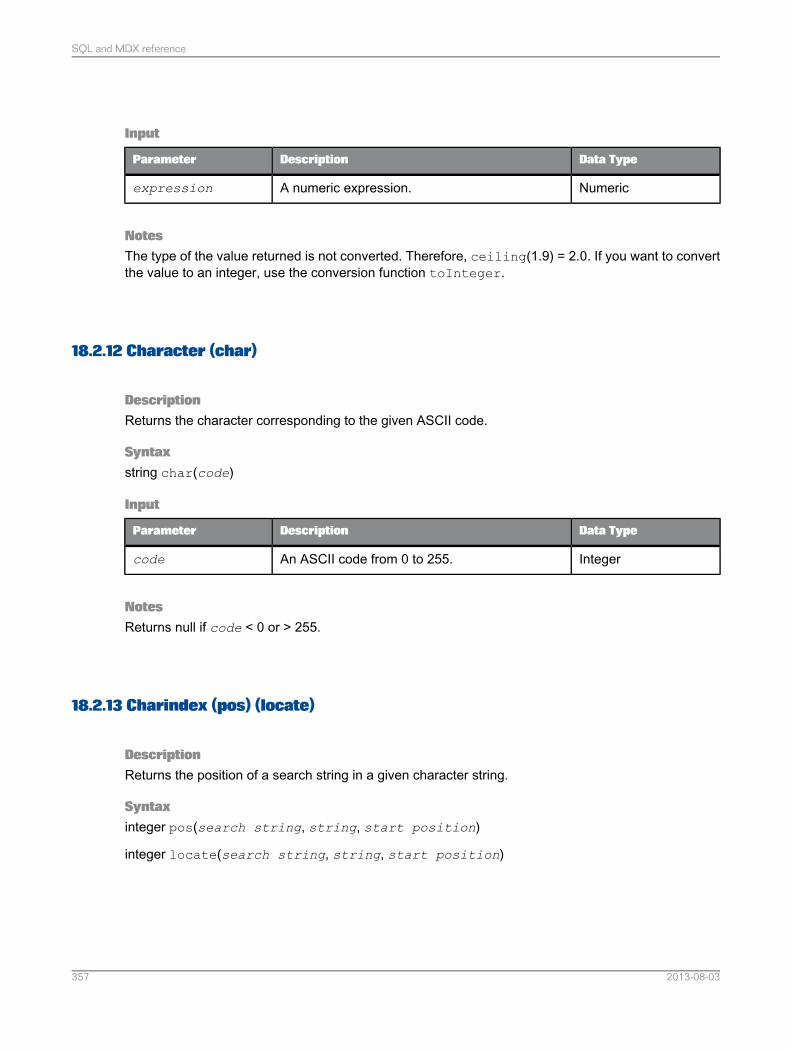
Input
Data TypeDescriptionParameter
NumericA numeric expression.expression
NotesThe type of the value returned is not converted. Therefore, ceiling(1.9) = 2.0. If you want to convertthe value to an integer, use the conversion function toInteger.
18.2.12 Character (char)
DescriptionReturns the character corresponding to the given ASCII code.
Syntaxstring char(code)
Input
Data TypeDescriptionParameter
IntegerAn ASCII code from 0 to 255.code
NotesReturns null if code < 0 or > 255.
18.2.13 Charindex (pos) (locate)
DescriptionReturns the position of a search string in a given character string.
Syntaxinteger pos(search string, string, start position)
integer locate(search string, string, start position)
2013-08-03357
SQL and MDX reference
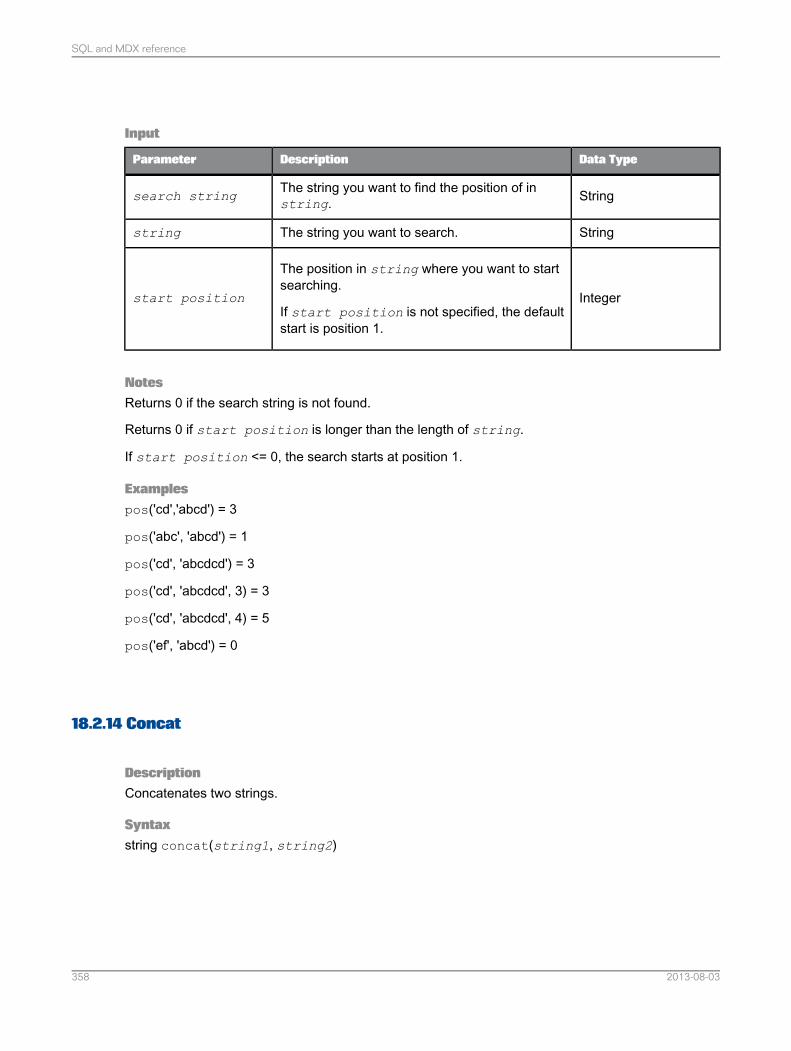
Input
Data TypeDescriptionParameter
StringThe string you want to find the position of instring.search string
StringThe string you want to search.string
Integer
The position in string where you want to startsearching.
If start position is not specified, the defaultstart is position 1.
start position
NotesReturns 0 if the search string is not found.
Returns 0 if start position is longer than the length of string.
If start position <= 0, the search starts at position 1.
Examplespos('cd','abcd') = 3
pos('abc', 'abcd') = 1
pos('cd', 'abcdcd') = 3
pos('cd', 'abcdcd', 3) = 3
pos('cd', 'abcdcd', 4) = 5
pos('ef', 'abcd') = 0
18.2.14 Concat
DescriptionConcatenates two strings.
Syntaxstring concat(string1, string2)
2013-08-03358
SQL and MDX reference
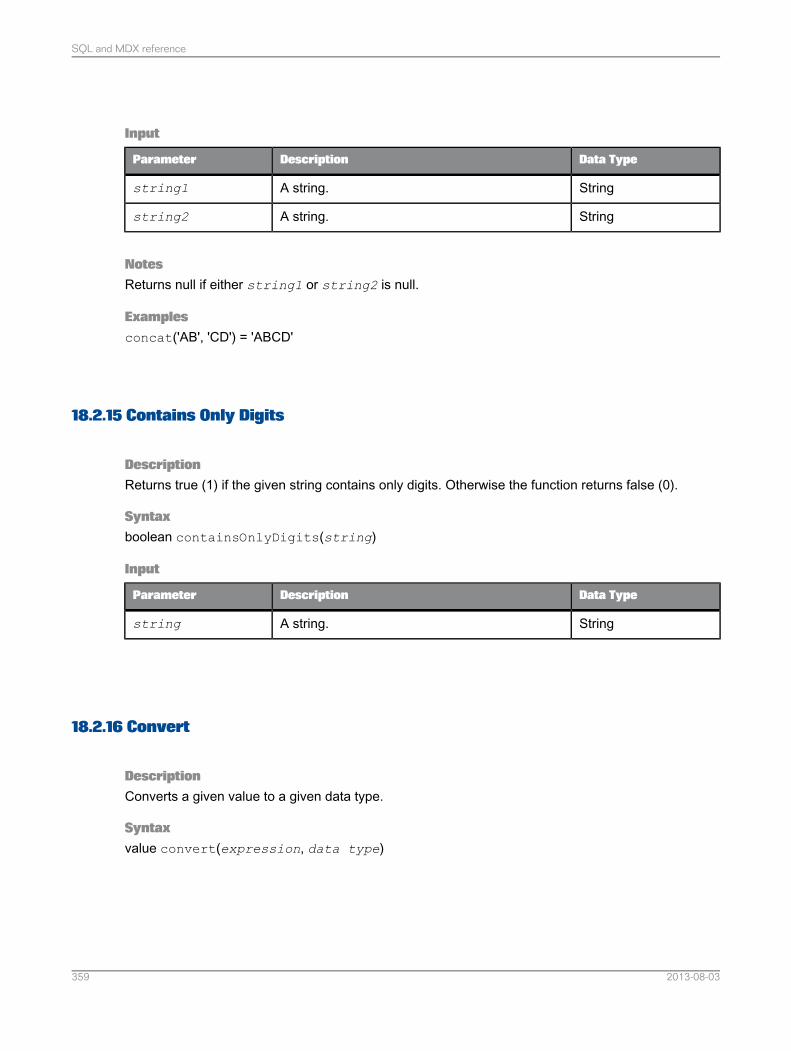
Input
Data TypeDescriptionParameter
StringA string.string1
StringA string.string2
NotesReturns null if either string1 or string2 is null.
Examplesconcat('AB', 'CD') = 'ABCD'
18.2.15 Contains Only Digits
DescriptionReturns true (1) if the given string contains only digits. Otherwise the function returns false (0).
Syntaxboolean containsOnlyDigits(string)
Input
Data TypeDescriptionParameter
StringA string.string
18.2.16 Convert
DescriptionConverts a given value to a given data type.
Syntaxvalue convert(expression, data type)
2013-08-03359
SQL and MDX reference

Input
Data TypeDescriptionParameter
All data types (Numer-ic, String, Boolean,DateTime, Date).
A value or expression.expression
A string that can havethe following values:• NULL• INTEGER• DOUBLE• DECIMAL• DATE• TIME• TIMESTAMP
The data type to which to convert the value.data type
18.2.17 Cosine (cos)
DescriptionReturns the cosine of an angle.
Syntaxnumeric cos(angle)
Input
Data TypeDescriptionParameter
NumericAn angle in radians.angle
18.2.18 Cotangent (cot)
DescriptionReturns the cotangent of an angle in radians.
2013-08-03360
SQL and MDX reference
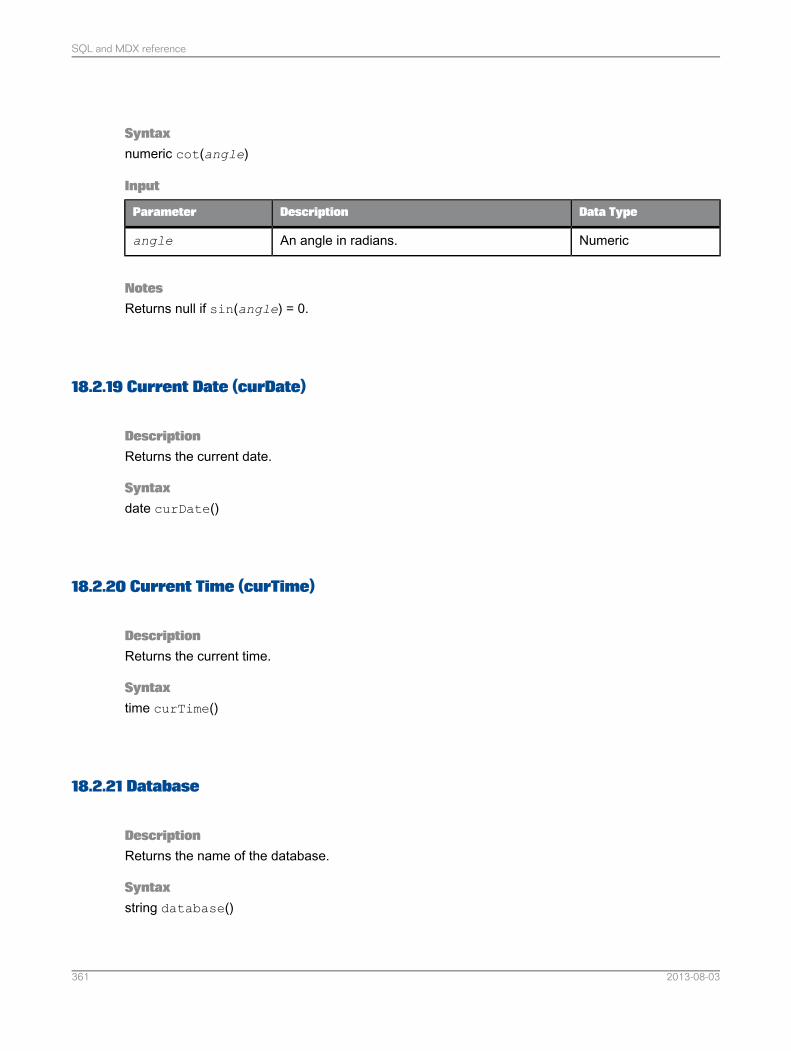
Syntaxnumeric cot(angle)
Input
Data TypeDescriptionParameter
NumericAn angle in radians.angle
NotesReturns null if sin(angle) = 0.
18.2.19 Current Date (curDate)
DescriptionReturns the current date.
Syntaxdate curDate()
18.2.20 Current Time (curTime)
DescriptionReturns the current time.
Syntaxtime curTime()
18.2.21 Database
DescriptionReturns the name of the database.
Syntaxstring database()
2013-08-03361
SQL and MDX reference
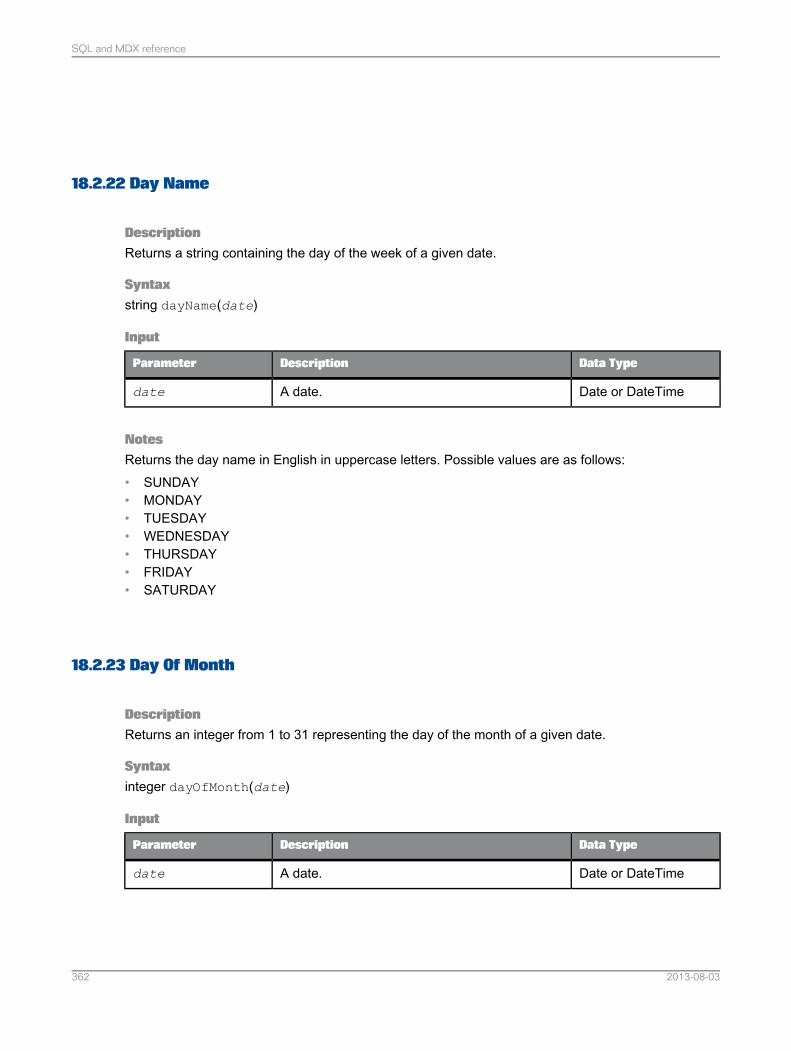
18.2.22 Day Name
DescriptionReturns a string containing the day of the week of a given date.
Syntaxstring dayName(date)
Input
Data TypeDescriptionParameter
Date or DateTimeA date.date
NotesReturns the day name in English in uppercase letters. Possible values are as follows:• SUNDAY• MONDAY• TUESDAY• WEDNESDAY• THURSDAY• FRIDAY• SATURDAY
18.2.23 Day Of Month
DescriptionReturns an integer from 1 to 31 representing the day of the month of a given date.
Syntaxinteger dayOfMonth(date)
Input
Data TypeDescriptionParameter
Date or DateTimeA date.date
2013-08-03362
SQL and MDX reference
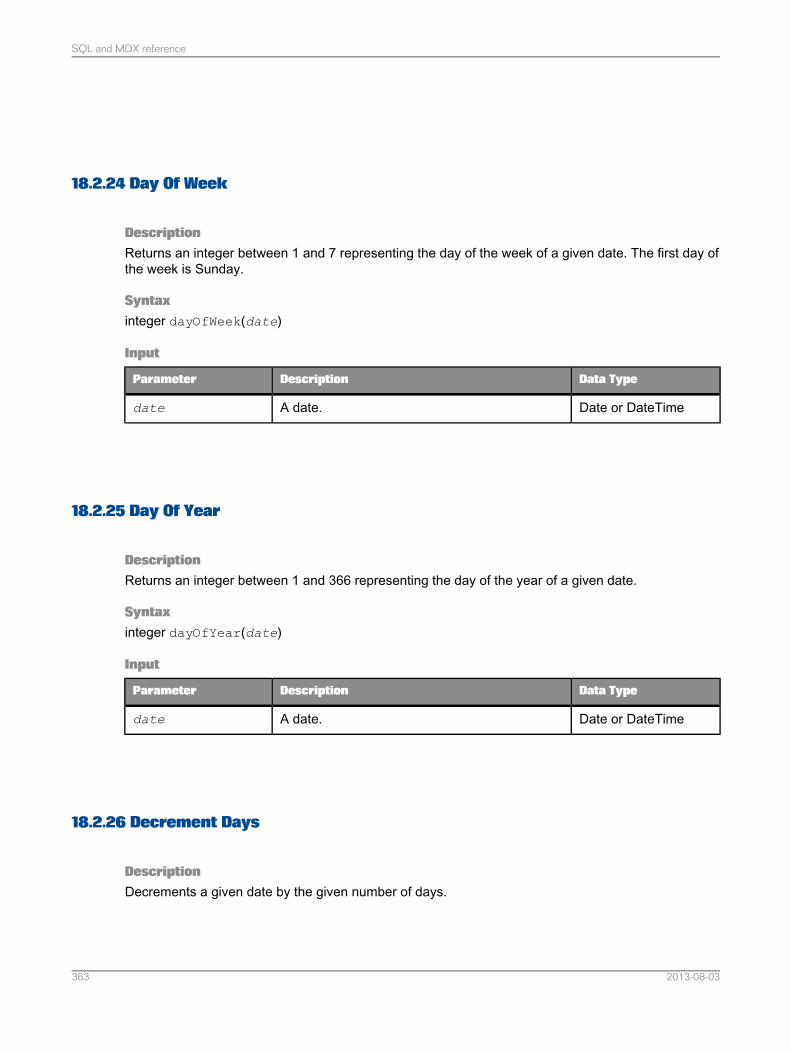
18.2.24 Day Of Week
DescriptionReturns an integer between 1 and 7 representing the day of the week of a given date. The first day ofthe week is Sunday.
Syntaxinteger dayOfWeek(date)
Input
Data TypeDescriptionParameter
Date or DateTimeA date.date
18.2.25 Day Of Year
DescriptionReturns an integer between 1 and 366 representing the day of the year of a given date.
Syntaxinteger dayOfYear(date)
Input
Data TypeDescriptionParameter
Date or DateTimeA date.date
18.2.26 Decrement Days
DescriptionDecrements a given date by the given number of days.
2013-08-03363
SQL and MDX reference
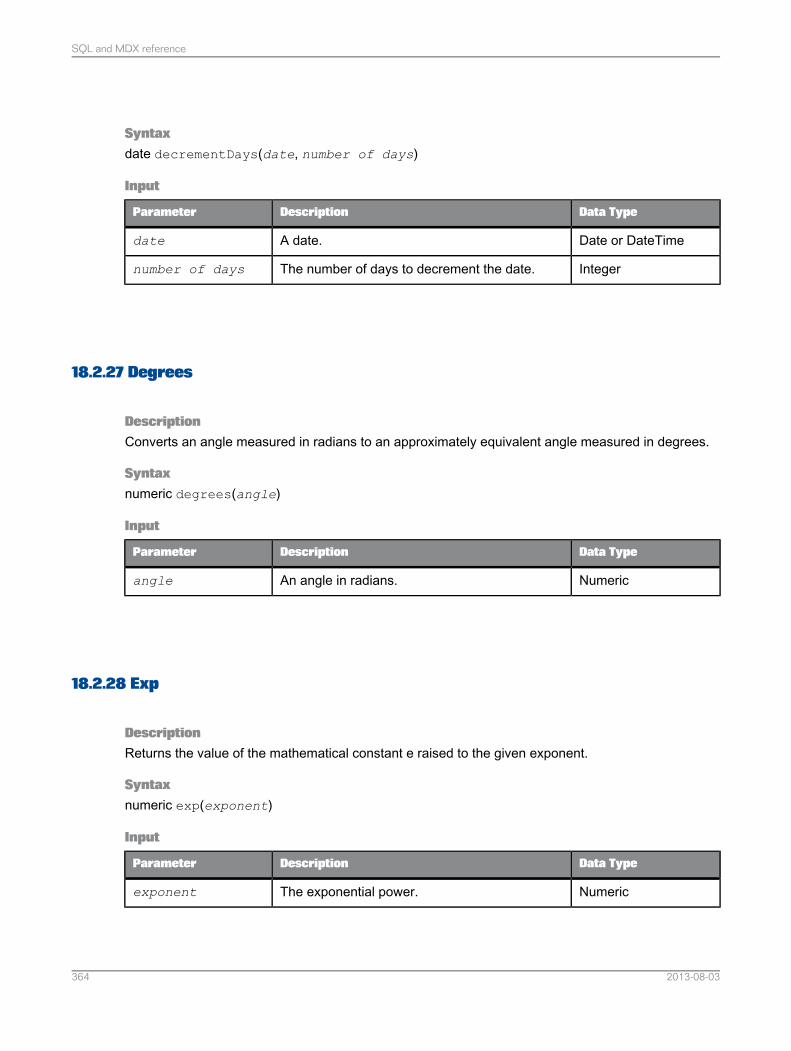
Syntaxdate decrementDays(date, number of days)
Input
Data TypeDescriptionParameter
Date or DateTimeA date.date
IntegerThe number of days to decrement the date.number of days
18.2.27 Degrees
DescriptionConverts an angle measured in radians to an approximately equivalent angle measured in degrees.
Syntaxnumeric degrees(angle)
Input
Data TypeDescriptionParameter
NumericAn angle in radians.angle
18.2.28 Exp
DescriptionReturns the value of the mathematical constant e raised to the given exponent.
Syntaxnumeric exp(exponent)
Input
Data TypeDescriptionParameter
NumericThe exponential power.exponent
2013-08-03364
SQL and MDX reference
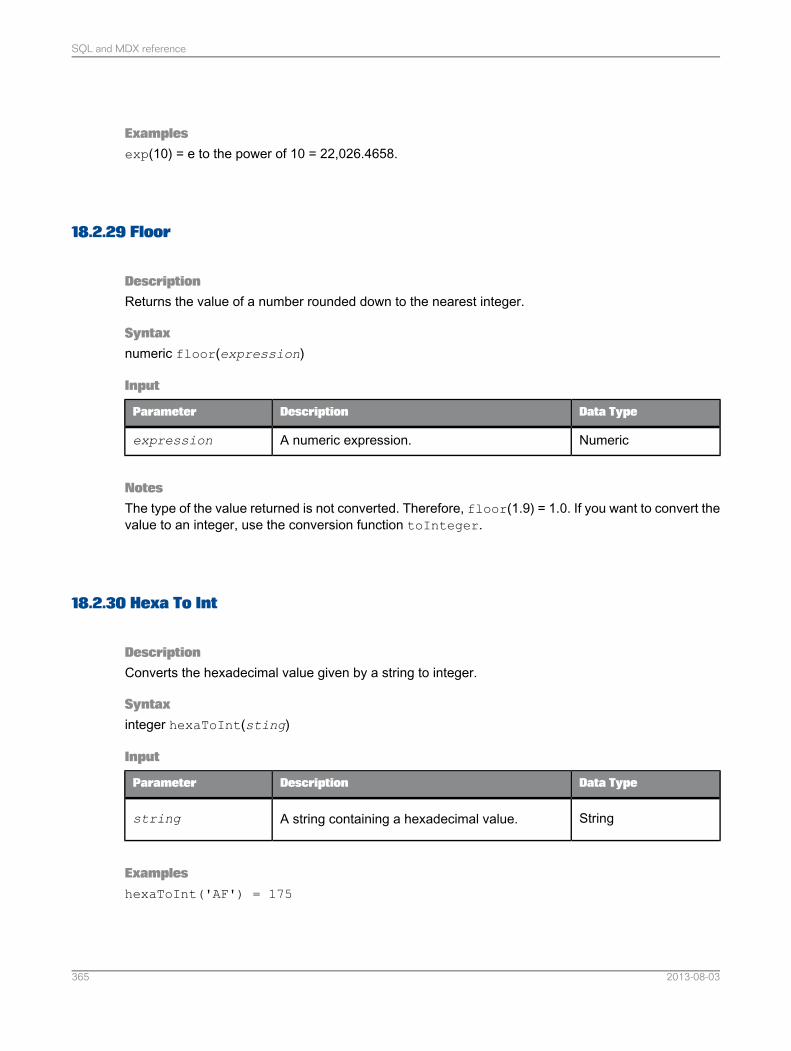
Examplesexp(10) = e to the power of 10 = 22,026.4658.
18.2.29 Floor
DescriptionReturns the value of a number rounded down to the nearest integer.
Syntaxnumeric floor(expression)
Input
Data TypeDescriptionParameter
NumericA numeric expression.expression
NotesThe type of the value returned is not converted. Therefore, floor(1.9) = 1.0. If you want to convert thevalue to an integer, use the conversion function toInteger.
18.2.30 Hexa To Int
DescriptionConverts the hexadecimal value given by a string to integer.
Syntaxinteger hexaToInt(sting)
Input
Data TypeDescriptionParameter
StringA string containing a hexadecimal value.string
ExampleshexaToInt('AF') = 175
2013-08-03365
SQL and MDX reference
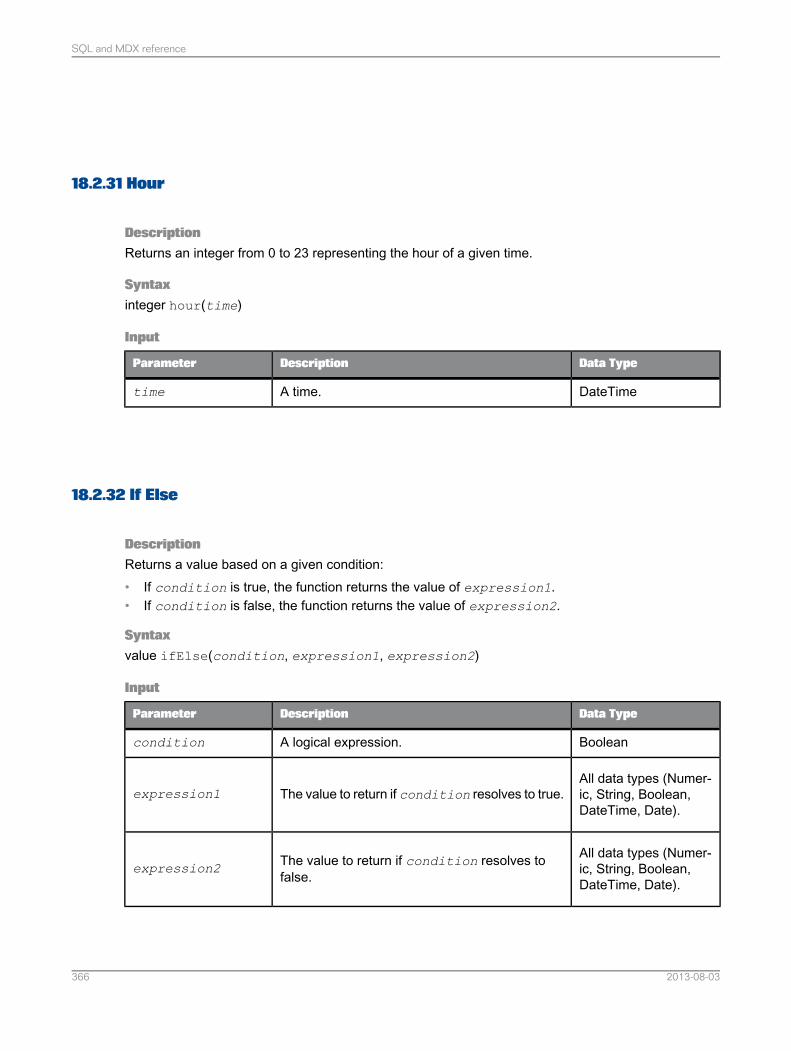
18.2.31 Hour
DescriptionReturns an integer from 0 to 23 representing the hour of a given time.
Syntaxinteger hour(time)
Input
Data TypeDescriptionParameter
DateTimeA time.time
18.2.32 If Else
DescriptionReturns a value based on a given condition:• If condition is true, the function returns the value of expression1.• If condition is false, the function returns the value of expression2.
Syntaxvalue ifElse(condition, expression1, expression2)
Input
Data TypeDescriptionParameter
BooleanA logical expression.condition
All data types (Numer-ic, String, Boolean,DateTime, Date).
The value to return if condition resolves to true.expression1
All data types (Numer-ic, String, Boolean,DateTime, Date).
The value to return if condition resolves tofalse.expression2
2013-08-03366
SQL and MDX reference
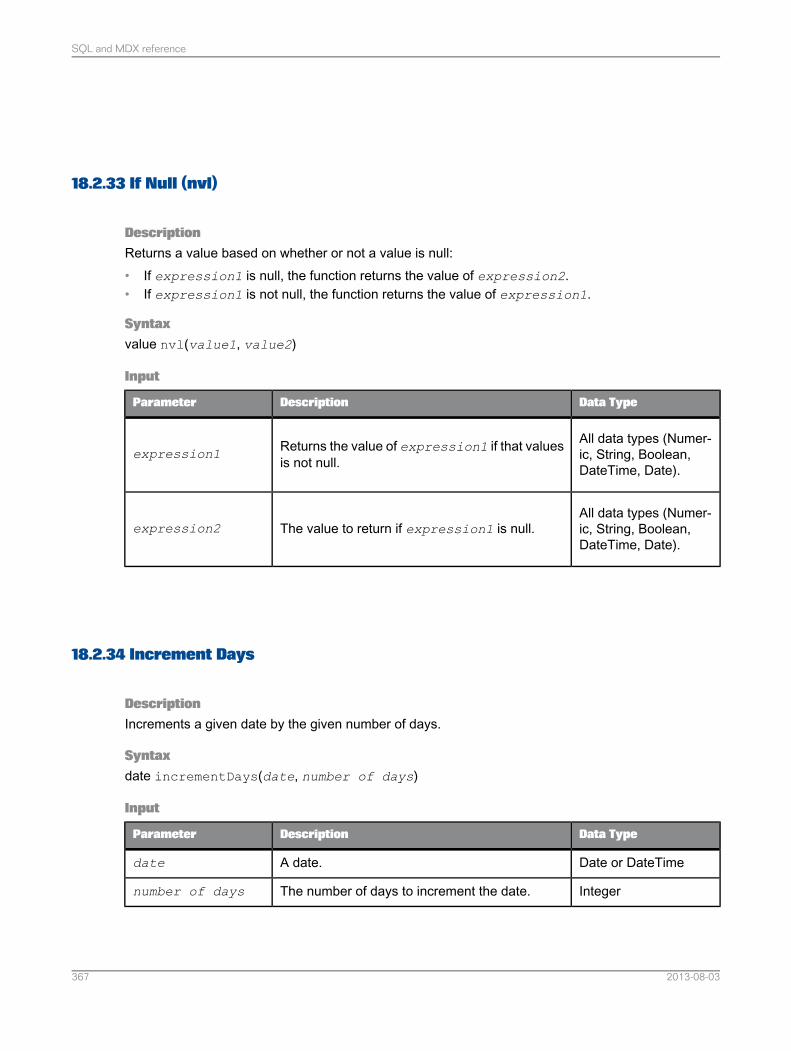
18.2.33 If Null (nvl)
DescriptionReturns a value based on whether or not a value is null:• If expression1 is null, the function returns the value of expression2.• If expression1 is not null, the function returns the value of expression1.
Syntaxvalue nvl(value1, value2)
Input
Data TypeDescriptionParameter
All data types (Numer-ic, String, Boolean,DateTime, Date).
Returns the value of expression1 if that valuesis not null.expression1
All data types (Numer-ic, String, Boolean,DateTime, Date).
The value to return if expression1 is null.expression2
18.2.34 Increment Days
DescriptionIncrements a given date by the given number of days.
Syntaxdate incrementDays(date, number of days)
Input
Data TypeDescriptionParameter
Date or DateTimeA date.date
IntegerThe number of days to increment the date.number of days
2013-08-03367
SQL and MDX reference
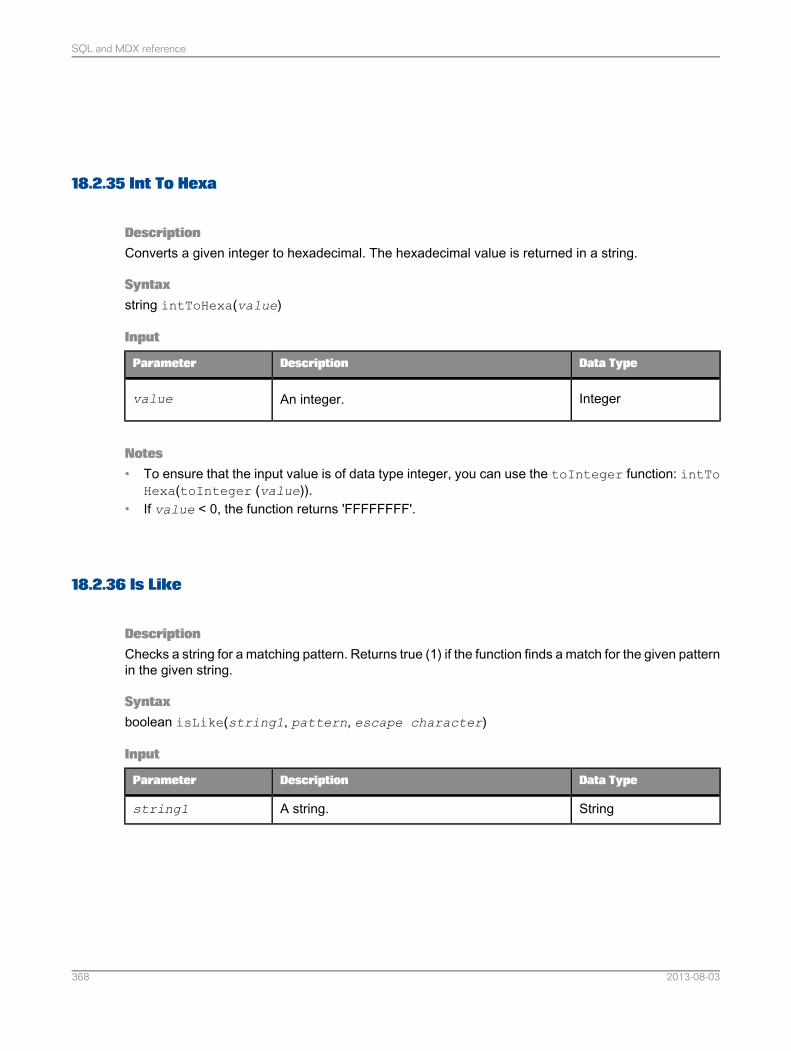
18.2.35 Int To Hexa
DescriptionConverts a given integer to hexadecimal. The hexadecimal value is returned in a string.
Syntaxstring intToHexa(value)
Input
Data TypeDescriptionParameter
IntegerAn integer.value
Notes• To ensure that the input value is of data type integer, you can use the toInteger function: intTo
Hexa(toInteger (value)).• If value < 0, the function returns 'FFFFFFFF'.
18.2.36 Is Like
DescriptionChecks a string for a matching pattern. Returns true (1) if the function finds a match for the given patternin the given string.
Syntaxboolean isLike(string1, pattern, escape character)
Input
Data TypeDescriptionParameter
StringA string.string1
2013-08-03368
SQL and MDX reference
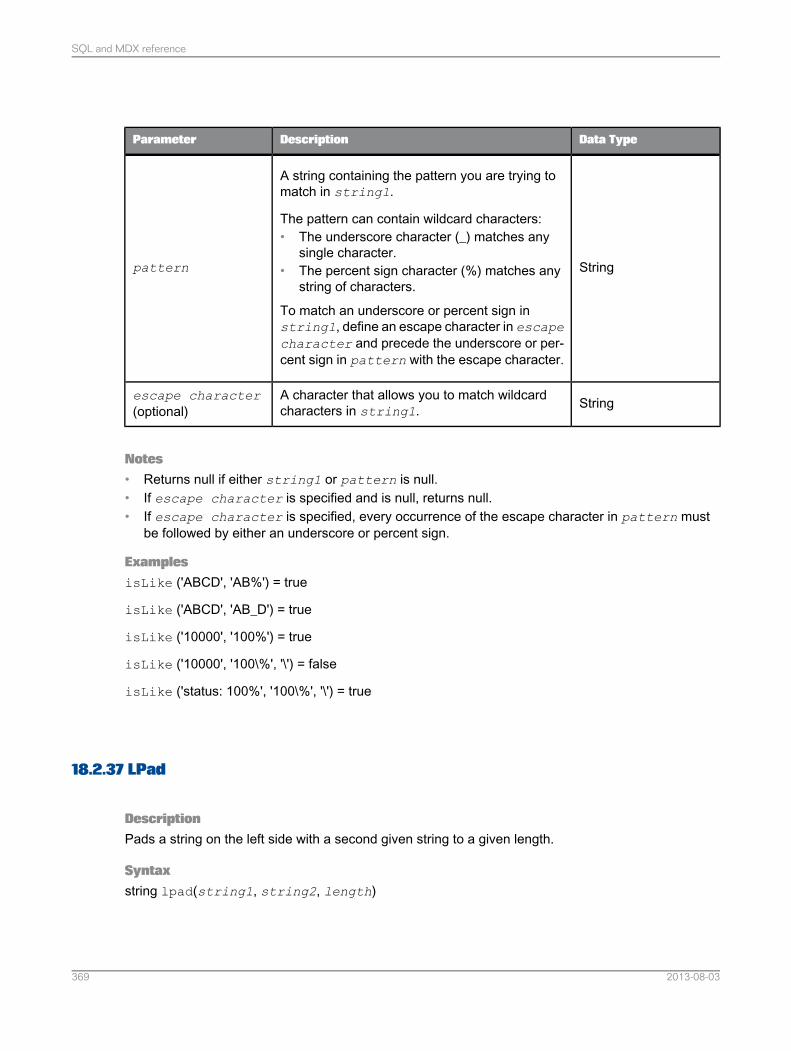
Data TypeDescriptionParameter
String
A string containing the pattern you are trying tomatch in string1.
The pattern can contain wildcard characters:• The underscore character (_) matches any
single character.• The percent sign character (%) matches any
string of characters.
To match an underscore or percent sign instring1, define an escape character in escapecharacter and precede the underscore or per-cent sign in pattern with the escape character.
pattern
StringA character that allows you to match wildcardcharacters in string1.
escape character(optional)
Notes• Returns null if either string1 or pattern is null.• If escape character is specified and is null, returns null.• If escape character is specified, every occurrence of the escape character in pattern must
be followed by either an underscore or percent sign.
ExamplesisLike ('ABCD', 'AB%') = true
isLike ('ABCD', 'AB_D') = true
isLike ('10000', '100%') = true
isLike ('10000', '100\%', '\') = false
isLike ('status: 100%', '100\%', '\') = true
18.2.37 LPad
DescriptionPads a string on the left side with a second given string to a given length.
Syntaxstring lpad(string1, string2, length)
2013-08-03369
SQL and MDX reference
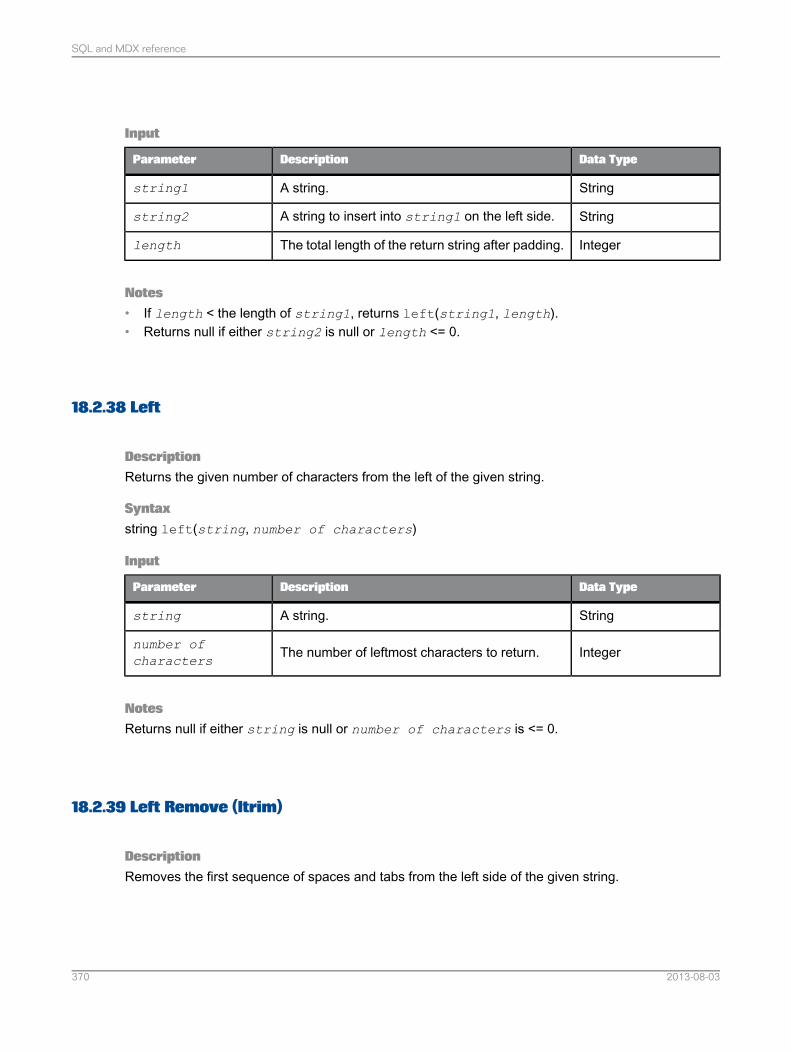
Input
Data TypeDescriptionParameter
StringA string.string1
StringA string to insert into string1 on the left side.string2
IntegerThe total length of the return string after padding.length
Notes• If length < the length of string1, returns left(string1, length).• Returns null if either string2 is null or length <= 0.
18.2.38 Left
DescriptionReturns the given number of characters from the left of the given string.
Syntaxstring left(string, number of characters)
Input
Data TypeDescriptionParameter
StringA string.string
IntegerThe number of leftmost characters to return.number ofcharacters
NotesReturns null if either string is null or number of characters is <= 0.
18.2.39 Left Remove (ltrim)
DescriptionRemoves the first sequence of spaces and tabs from the left side of the given string.
2013-08-03370
SQL and MDX reference
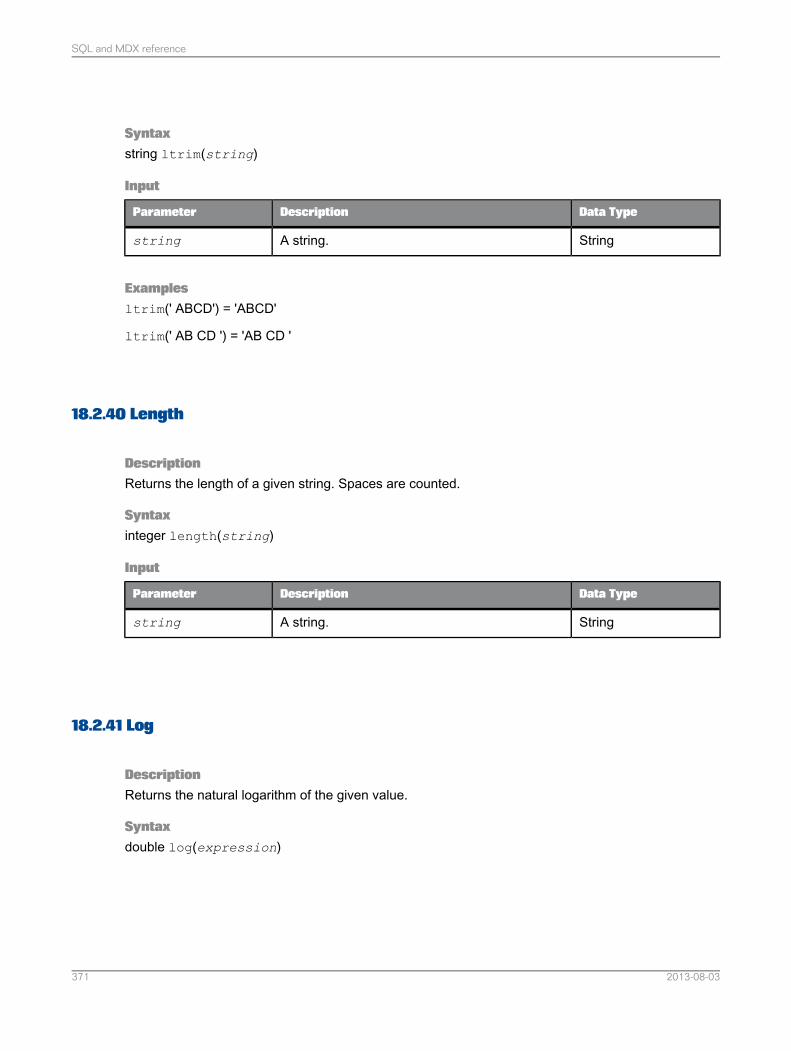
Syntaxstring ltrim(string)
Input
Data TypeDescriptionParameter
StringA string.string
Examplesltrim(' ABCD') = 'ABCD'
ltrim(' AB CD ') = 'AB CD '
18.2.40 Length
DescriptionReturns the length of a given string. Spaces are counted.
Syntaxinteger length(string)
Input
Data TypeDescriptionParameter
StringA string.string
18.2.41 Log
DescriptionReturns the natural logarithm of the given value.
Syntaxdouble log(expression)
2013-08-03371
SQL and MDX reference
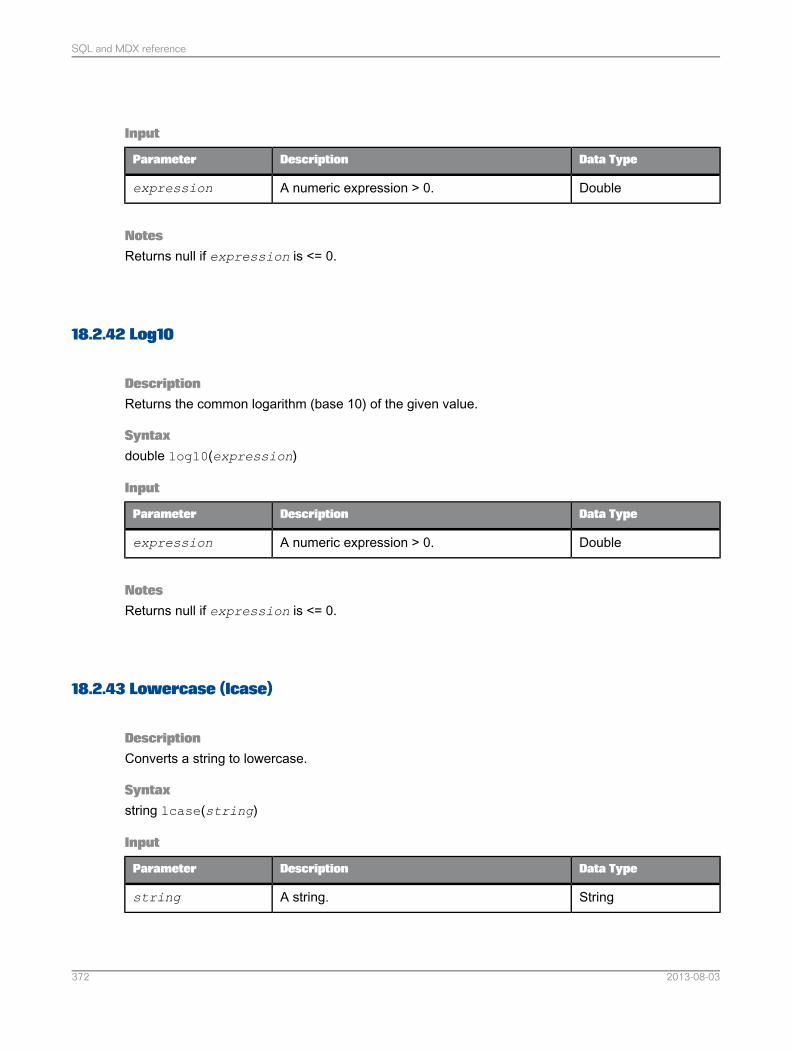
Input
Data TypeDescriptionParameter
DoubleA numeric expression > 0.expression
NotesReturns null if expression is <= 0.
18.2.42 Log10
DescriptionReturns the common logarithm (base 10) of the given value.
Syntaxdouble log10(expression)
Input
Data TypeDescriptionParameter
DoubleA numeric expression > 0.expression
NotesReturns null if expression is <= 0.
18.2.43 Lowercase (lcase)
DescriptionConverts a string to lowercase.
Syntaxstring lcase(string)
Input
Data TypeDescriptionParameter
StringA string.string
2013-08-03372
SQL and MDX reference
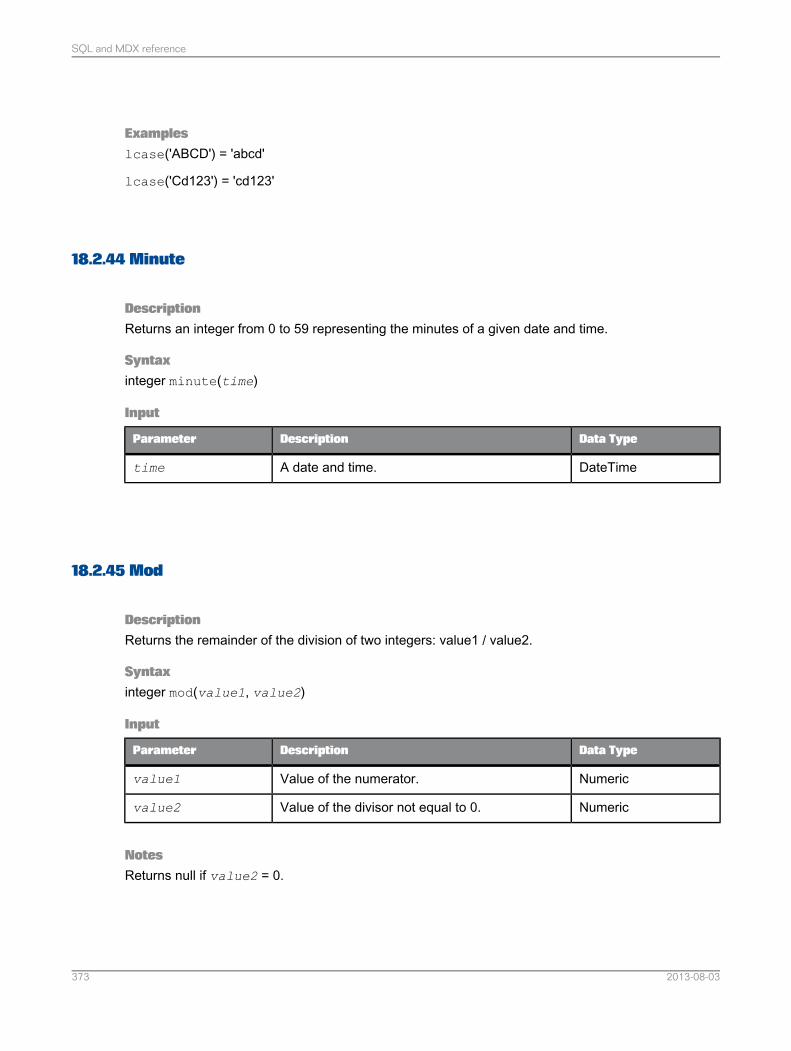
Exampleslcase('ABCD') = 'abcd'
lcase('Cd123') = 'cd123'
18.2.44 Minute
DescriptionReturns an integer from 0 to 59 representing the minutes of a given date and time.
Syntaxinteger minute(time)
Input
Data TypeDescriptionParameter
DateTimeA date and time.time
18.2.45 Mod
DescriptionReturns the remainder of the division of two integers: value1 / value2.
Syntaxinteger mod(value1, value2)
Input
Data TypeDescriptionParameter
NumericValue of the numerator.value1
NumericValue of the divisor not equal to 0.value2
NotesReturns null if value2 = 0.
2013-08-03373
SQL and MDX reference
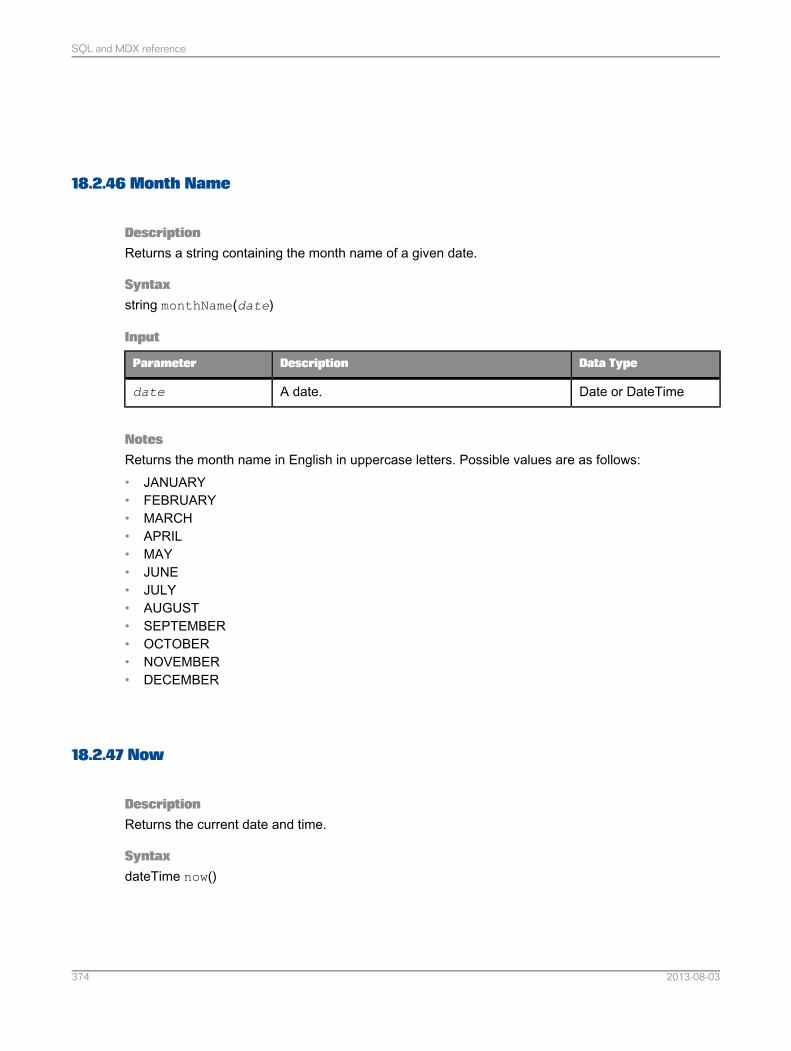
18.2.46 Month Name
DescriptionReturns a string containing the month name of a given date.
Syntaxstring monthName(date)
Input
Data TypeDescriptionParameter
Date or DateTimeA date.date
NotesReturns the month name in English in uppercase letters. Possible values are as follows:• JANUARY• FEBRUARY• MARCH• APRIL• MAY• JUNE• JULY• AUGUST• SEPTEMBER• OCTOBER• NOVEMBER• DECEMBER
18.2.47 Now
DescriptionReturns the current date and time.
SyntaxdateTime now()
2013-08-03374
SQL and MDX reference
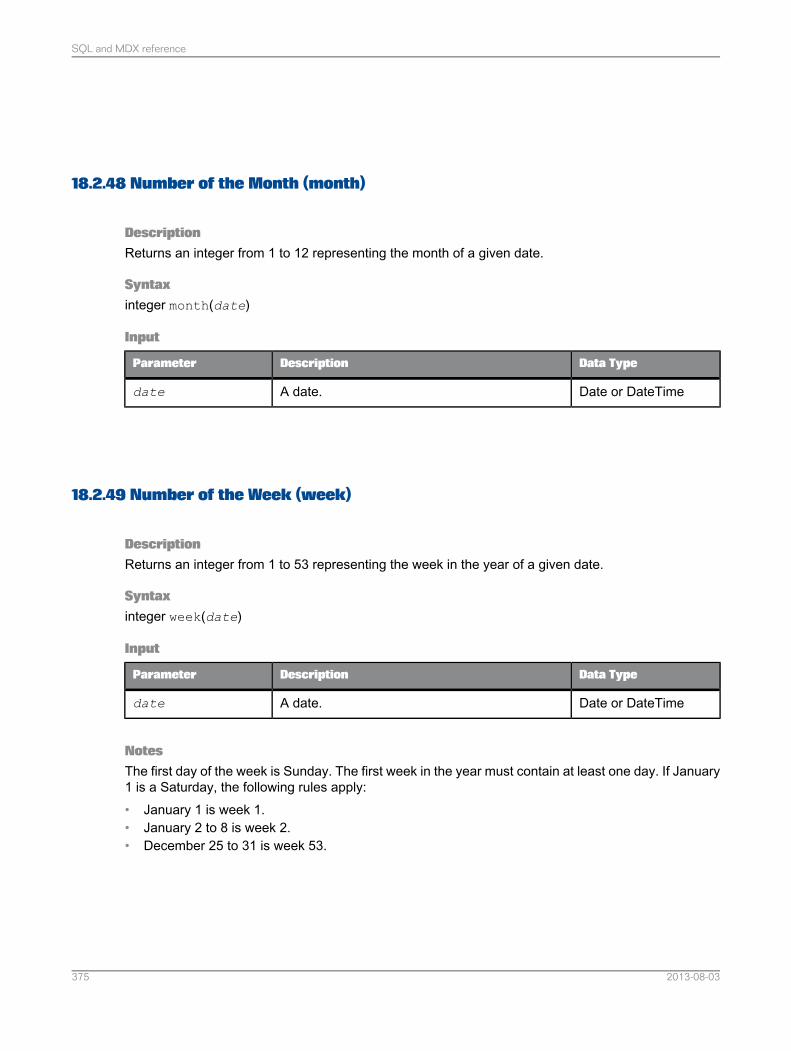
18.2.48 Number of the Month (month)
DescriptionReturns an integer from 1 to 12 representing the month of a given date.
Syntaxinteger month(date)
Input
Data TypeDescriptionParameter
Date or DateTimeA date.date
18.2.49 Number of the Week (week)
DescriptionReturns an integer from 1 to 53 representing the week in the year of a given date.
Syntaxinteger week(date)
Input
Data TypeDescriptionParameter
Date or DateTimeA date.date
NotesThe first day of the week is Sunday. The first week in the year must contain at least one day. If January1 is a Saturday, the following rules apply:• January 1 is week 1.• January 2 to 8 is week 2.• December 25 to 31 is week 53.
2013-08-03375
SQL and MDX reference
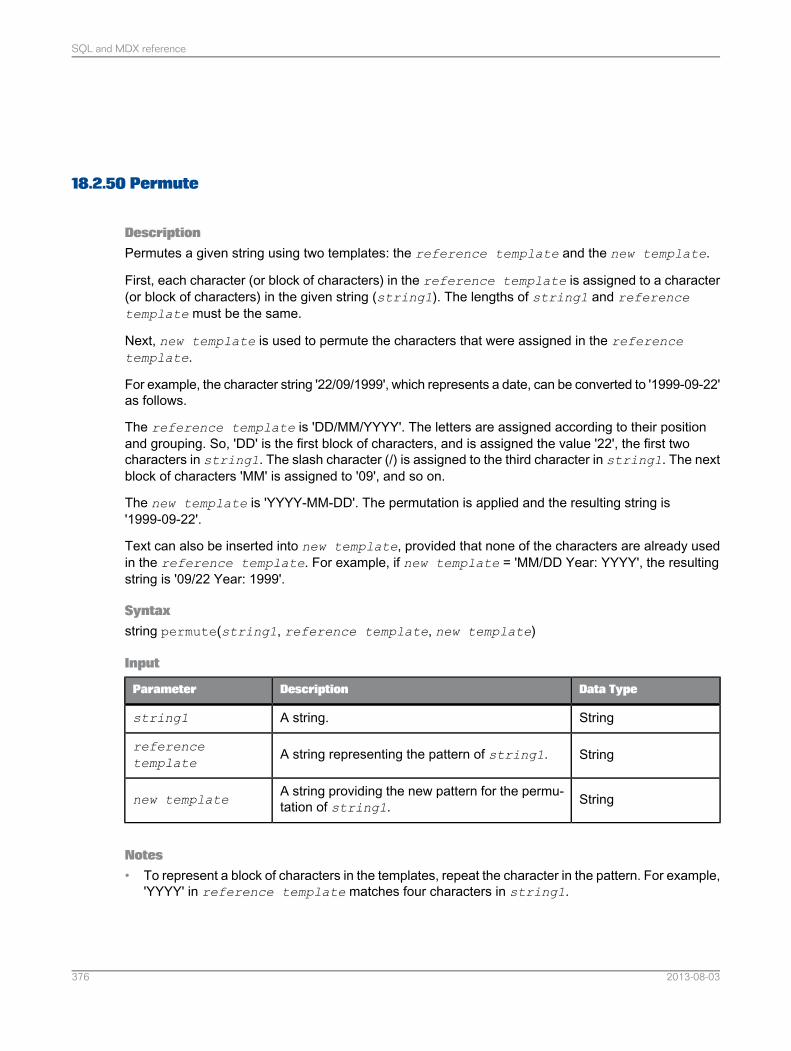
18.2.50 Permute
DescriptionPermutes a given string using two templates: the reference template and the new template.
First, each character (or block of characters) in the reference template is assigned to a character(or block of characters) in the given string (string1). The lengths of string1 and referencetemplate must be the same.
Next, new template is used to permute the characters that were assigned in the referencetemplate.
For example, the character string '22/09/1999', which represents a date, can be converted to '1999-09-22'as follows.
The reference template is 'DD/MM/YYYY'. The letters are assigned according to their positionand grouping. So, 'DD' is the first block of characters, and is assigned the value '22', the first twocharacters in string1. The slash character (/) is assigned to the third character in string1. The nextblock of characters 'MM' is assigned to '09', and so on.
The new template is 'YYYY-MM-DD'. The permutation is applied and the resulting string is'1999-09-22'.
Text can also be inserted into new template, provided that none of the characters are already usedin the reference template. For example, if new template = 'MM/DD Year: YYYY', the resultingstring is '09/22 Year: 1999'.
Syntaxstring permute(string1, reference template, new template)
Input
Data TypeDescriptionParameter
StringA string.string1
StringA string representing the pattern of string1.referencetemplate
StringA string providing the new pattern for the permu-tation of string1.new template
Notes• To represent a block of characters in the templates, repeat the character in the pattern. For example,
'YYYY' in reference template matches four characters in string1.
2013-08-03376
SQL and MDX reference
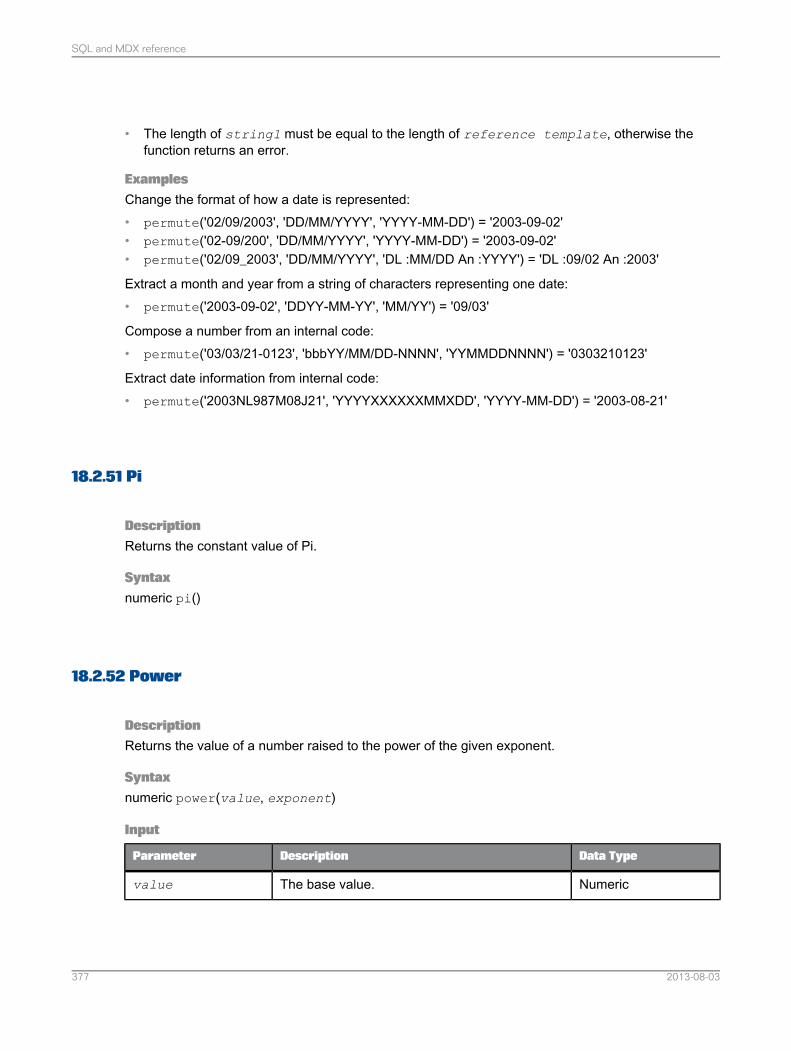
• The length of string1 must be equal to the length of reference template, otherwise thefunction returns an error.
ExamplesChange the format of how a date is represented:• permute('02/09/2003', 'DD/MM/YYYY', 'YYYY-MM-DD') = '2003-09-02'• permute('02-09/200', 'DD/MM/YYYY', 'YYYY-MM-DD') = '2003-09-02'• permute('02/09_2003', 'DD/MM/YYYY', 'DL :MM/DD An :YYYY') = 'DL :09/02 An :2003'
Extract a month and year from a string of characters representing one date:• permute('2003-09-02', 'DDYY-MM-YY', 'MM/YY') = '09/03'
Compose a number from an internal code:• permute('03/03/21-0123', 'bbbYY/MM/DD-NNNN', 'YYMMDDNNNN') = '0303210123'
Extract date information from internal code:• permute('2003NL987M08J21', 'YYYYXXXXXXMMXDD', 'YYYY-MM-DD') = '2003-08-21'
18.2.51 Pi
DescriptionReturns the constant value of Pi.
Syntaxnumeric pi()
18.2.52 Power
DescriptionReturns the value of a number raised to the power of the given exponent.
Syntaxnumeric power(value, exponent)
Input
Data TypeDescriptionParameter
NumericThe base value.value
2013-08-03377
SQL and MDX reference
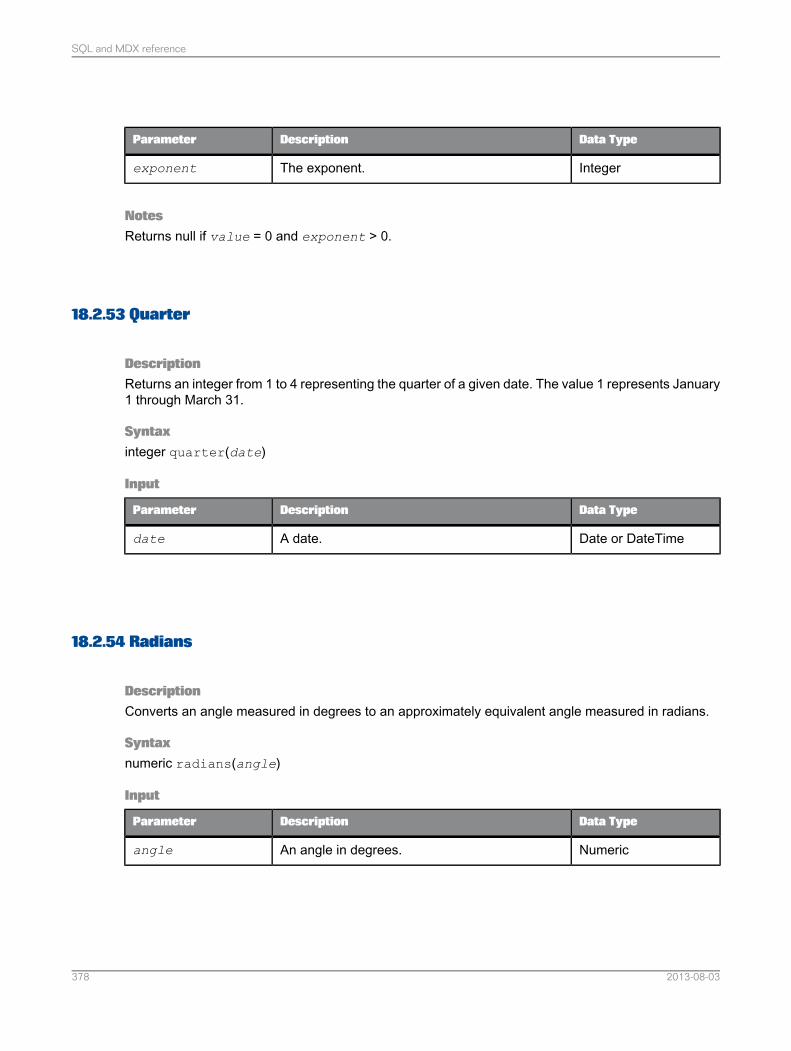
Data TypeDescriptionParameter
IntegerThe exponent.exponent
NotesReturns null if value = 0 and exponent > 0.
18.2.53 Quarter
DescriptionReturns an integer from 1 to 4 representing the quarter of a given date. The value 1 represents January1 through March 31.
Syntaxinteger quarter(date)
Input
Data TypeDescriptionParameter
Date or DateTimeA date.date
18.2.54 Radians
DescriptionConverts an angle measured in degrees to an approximately equivalent angle measured in radians.
Syntaxnumeric radians(angle)
Input
Data TypeDescriptionParameter
NumericAn angle in degrees.angle
2013-08-03378
SQL and MDX reference

18.2.55 Random (rand)
DescriptionReturns a random number between 0 and 1. You can optionally provide a seed integer to initialize therandom number generator.
Syntaxnumeric rand(value)
Input
Data TypeDescriptionParameter
IntegerSeed value for the random number generator.value (optional)
18.2.56 Replace
DescriptionReplaces in a given string the occurrences of the pattern with a replacement string.
Syntaxstring replace(string, pattern, replacement string)
Input
Data TypeDescriptionParameter
StringA string.string
StringThe string of characters to search for and replacein string.pattern
StringThe string to replace the pattern in stringreplacementstring
Notes• If pattern is null, returns string.• Does not return null if replacement string is null.
2013-08-03379
SQL and MDX reference

Examplereplace('rar', 'a', 'ada') = 'radar'
18.2.57 Replace String Exp
DescriptionReplaces in a given string all occurrences of the pattern with a replacement string following the syntaxof a Java regular expression. For more information, refer to the Pattern documentation for Java regularexpressions at http://java.sun.com/j2se/1.4.2/docs/api/java/util/regex/Pattern.html.
Syntaxstring replaceStringExp(string, pattern, replacement string)
Input
Data TypeDescriptionParameter
StringA string.string
StringThe string of characters to search for and replacein string.pattern
StringThe string to replace the pattern in stringreplacementstring
18.2.58 Replicate (repeat)
DescriptionReturns a string formed by repeating a given character string a given number of times.
Syntaxstring repeat(string, number of replications)
Input
Data TypeDescriptionParameter
StringA string.string
2013-08-03380
SQL and MDX reference
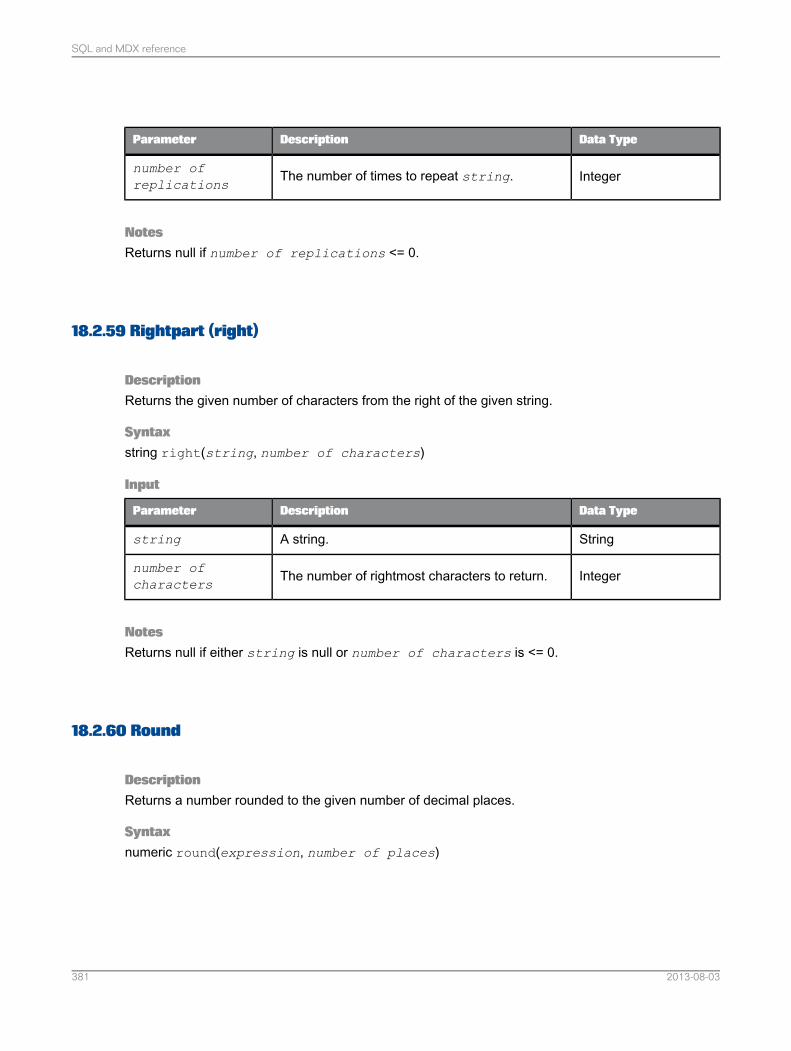
Data TypeDescriptionParameter
IntegerThe number of times to repeat string.number ofreplications
NotesReturns null if number of replications <= 0.
18.2.59 Rightpart (right)
DescriptionReturns the given number of characters from the right of the given string.
Syntaxstring right(string, number of characters)
Input
Data TypeDescriptionParameter
StringA string.string
IntegerThe number of rightmost characters to return.number ofcharacters
NotesReturns null if either string is null or number of characters is <= 0.
18.2.60 Round
DescriptionReturns a number rounded to the given number of decimal places.
Syntaxnumeric round(expression, number of places)
2013-08-03381
SQL and MDX reference
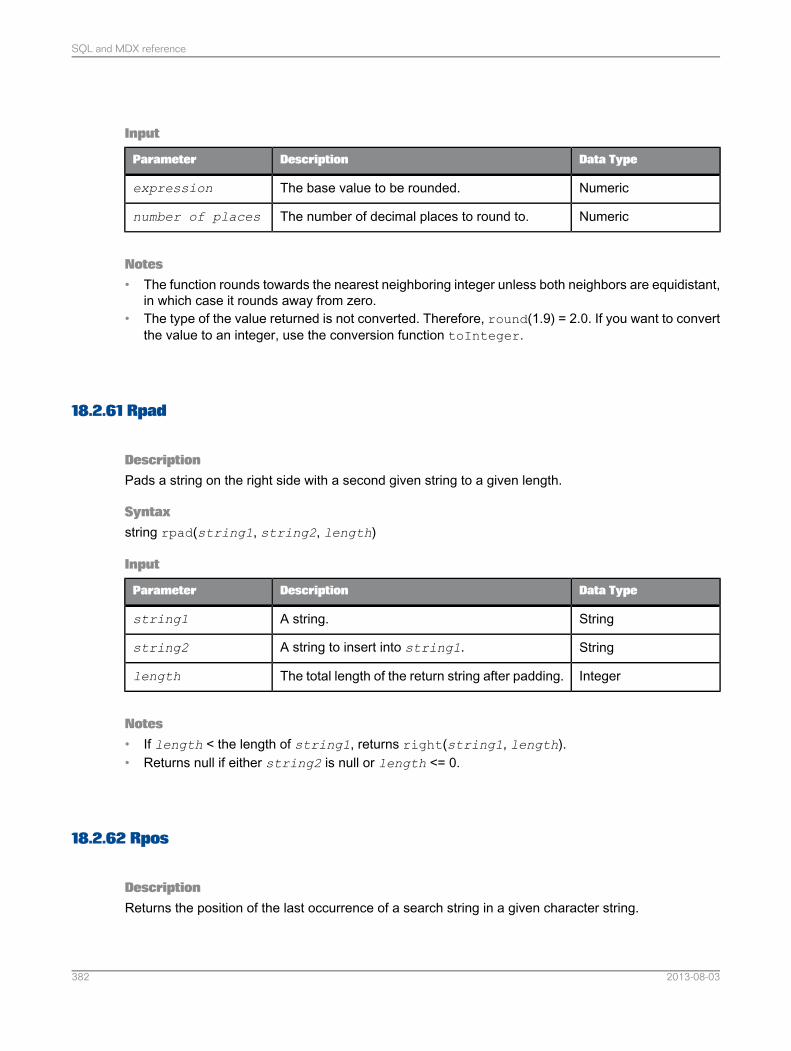
Input
Data TypeDescriptionParameter
NumericThe base value to be rounded.expression
NumericThe number of decimal places to round to.number of places
Notes• The function rounds towards the nearest neighboring integer unless both neighbors are equidistant,
in which case it rounds away from zero.• The type of the value returned is not converted. Therefore, round(1.9) = 2.0. If you want to convert
the value to an integer, use the conversion function toInteger.
18.2.61 Rpad
DescriptionPads a string on the right side with a second given string to a given length.
Syntaxstring rpad(string1, string2, length)
Input
Data TypeDescriptionParameter
StringA string.string1
StringA string to insert into string1.string2
IntegerThe total length of the return string after padding.length
Notes• If length < the length of string1, returns right(string1, length).• Returns null if either string2 is null or length <= 0.
18.2.62 Rpos
DescriptionReturns the position of the last occurrence of a search string in a given character string.
2013-08-03382
SQL and MDX reference
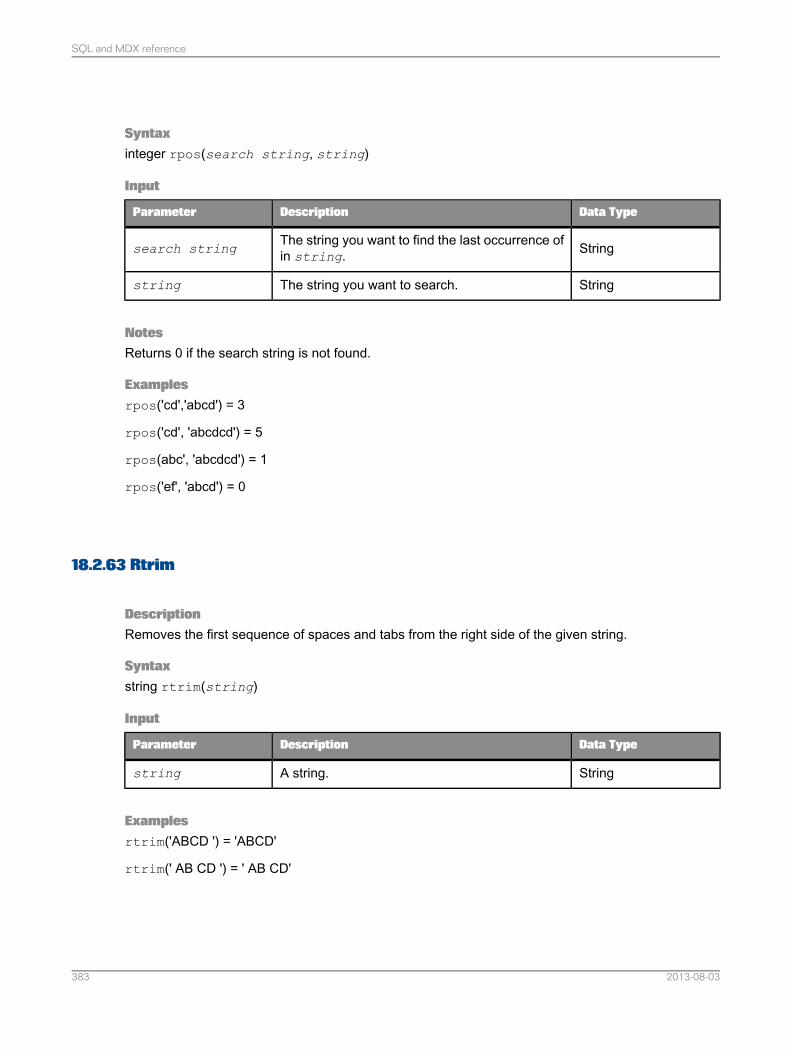
Syntaxinteger rpos(search string, string)
Input
Data TypeDescriptionParameter
StringThe string you want to find the last occurrence ofin string.search string
StringThe string you want to search.string
NotesReturns 0 if the search string is not found.
Examplesrpos('cd','abcd') = 3
rpos('cd', 'abcdcd') = 5
rpos(abc', 'abcdcd') = 1
rpos('ef', 'abcd') = 0
18.2.63 Rtrim
DescriptionRemoves the first sequence of spaces and tabs from the right side of the given string.
Syntaxstring rtrim(string)
Input
Data TypeDescriptionParameter
StringA string.string
Examplesrtrim('ABCD ') = 'ABCD'
rtrim(' AB CD ') = ' AB CD'
2013-08-03383
SQL and MDX reference
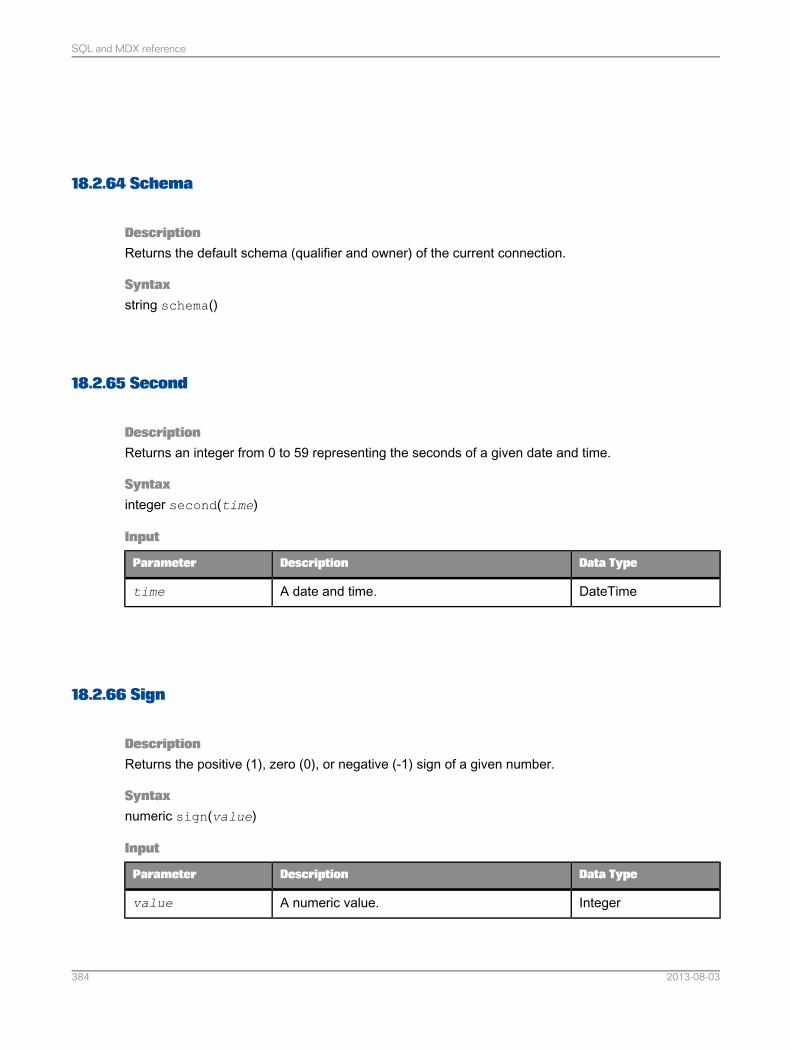
18.2.64 Schema
DescriptionReturns the default schema (qualifier and owner) of the current connection.
Syntaxstring schema()
18.2.65 Second
DescriptionReturns an integer from 0 to 59 representing the seconds of a given date and time.
Syntaxinteger second(time)
Input
Data TypeDescriptionParameter
DateTimeA date and time.time
18.2.66 Sign
DescriptionReturns the positive (1), zero (0), or negative (-1) sign of a given number.
Syntaxnumeric sign(value)
Input
Data TypeDescriptionParameter
IntegerA numeric value.value
2013-08-03384
SQL and MDX reference
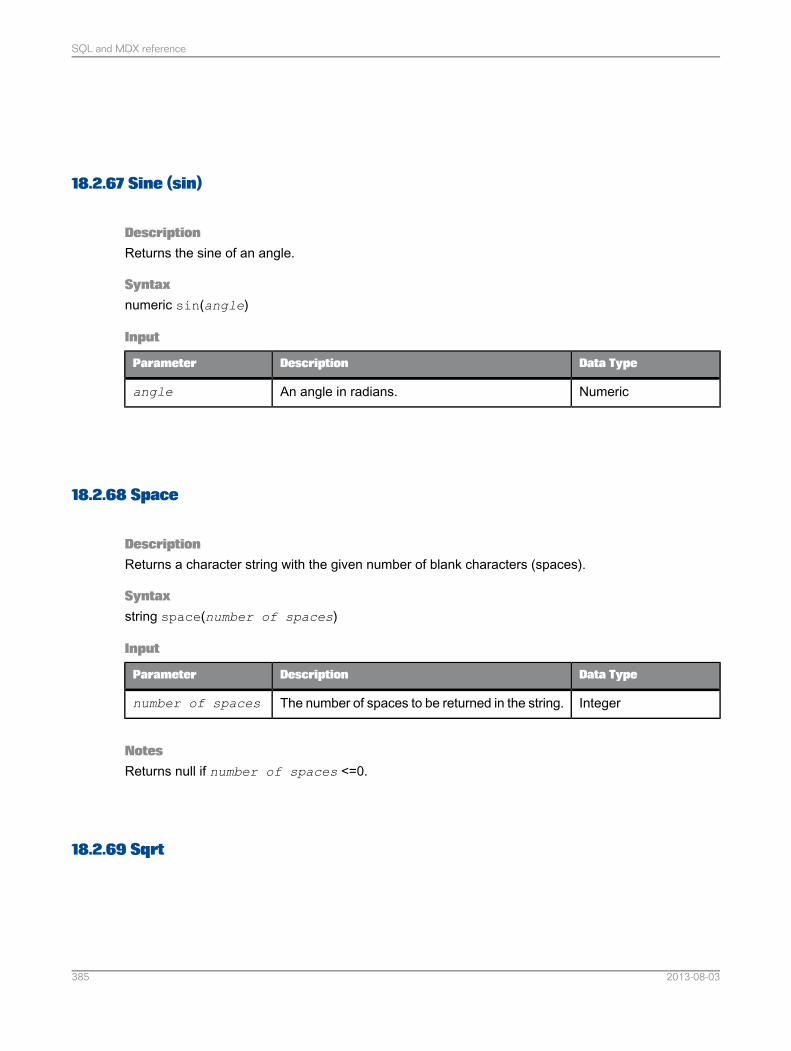
18.2.67 Sine (sin)
DescriptionReturns the sine of an angle.
Syntaxnumeric sin(angle)
Input
Data TypeDescriptionParameter
NumericAn angle in radians.angle
18.2.68 Space
DescriptionReturns a character string with the given number of blank characters (spaces).
Syntaxstring space(number of spaces)
Input
Data TypeDescriptionParameter
IntegerThe number of spaces to be returned in the string.number of spaces
NotesReturns null if number of spaces <=0.
18.2.69 Sqrt
2013-08-03385
SQL and MDX reference
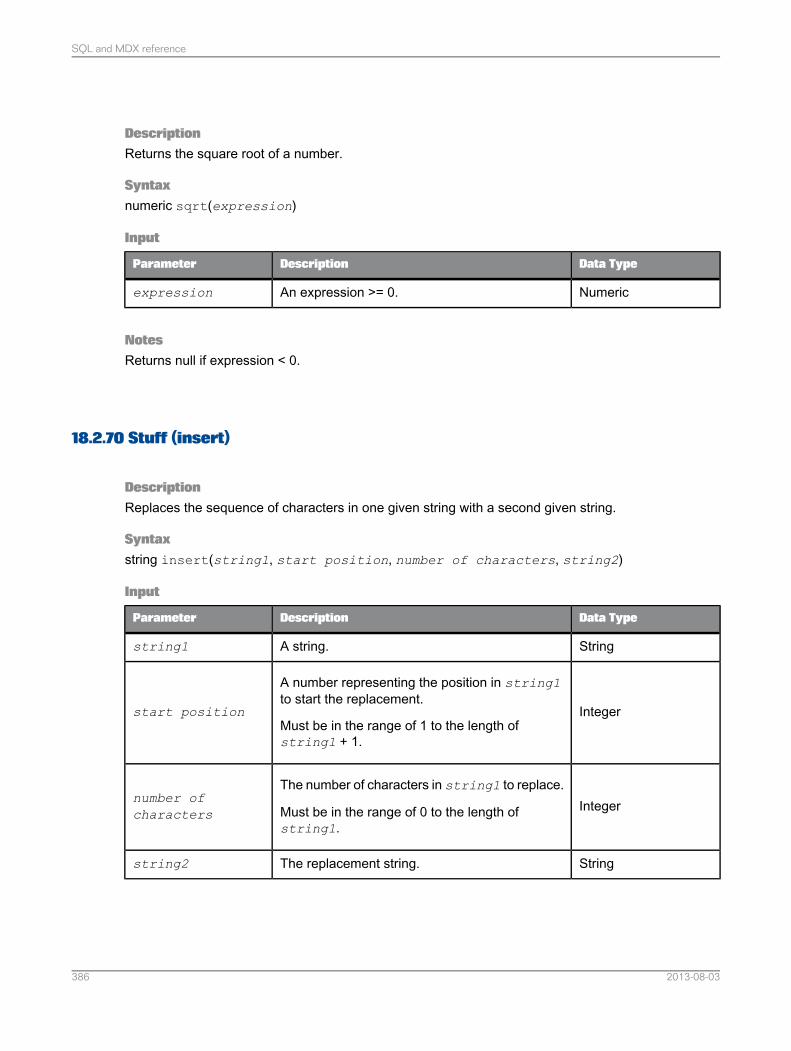
DescriptionReturns the square root of a number.
Syntaxnumeric sqrt(expression)
Input
Data TypeDescriptionParameter
NumericAn expression >= 0.expression
NotesReturns null if expression < 0.
18.2.70 Stuff (insert)
DescriptionReplaces the sequence of characters in one given string with a second given string.
Syntaxstring insert(string1, start position, number of characters, string2)
Input
Data TypeDescriptionParameter
StringA string.string1
Integer
A number representing the position in string1to start the replacement.
Must be in the range of 1 to the length ofstring1 + 1.
start position
IntegerThe number of characters in string1 to replace.
Must be in the range of 0 to the length ofstring1.
number ofcharacters
StringThe replacement string.string2
2013-08-03386
SQL and MDX reference
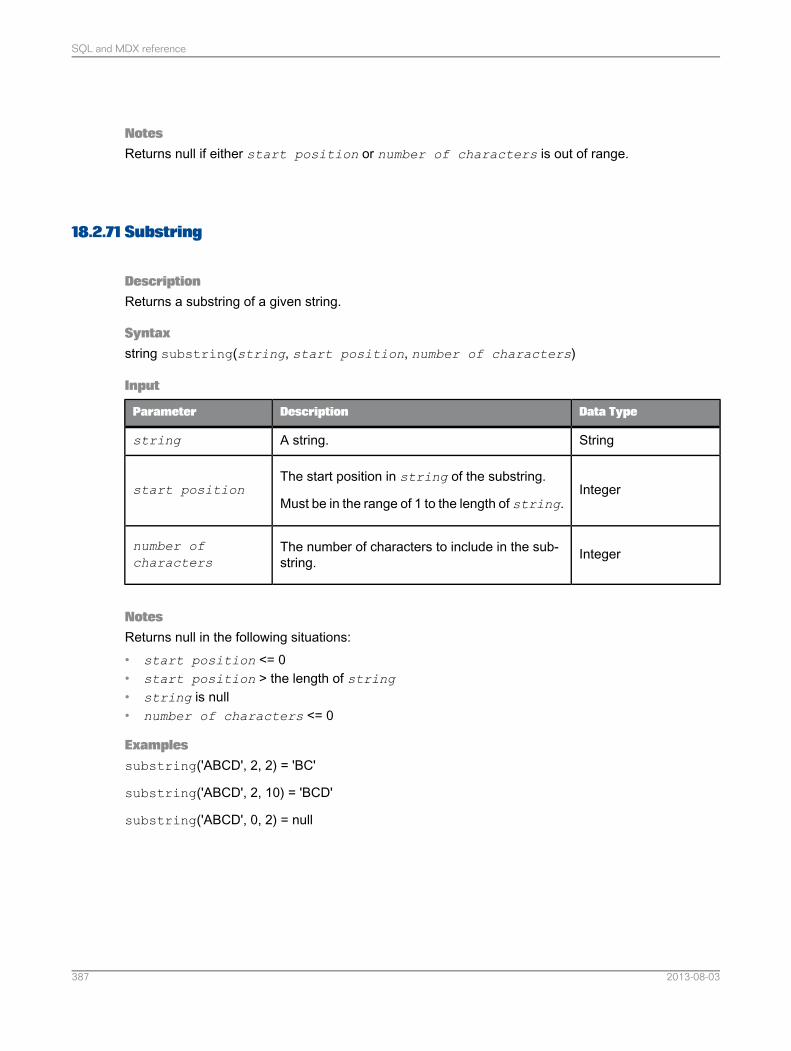
NotesReturns null if either start position or number of characters is out of range.
18.2.71 Substring
DescriptionReturns a substring of a given string.
Syntaxstring substring(string, start position, number of characters)
Input
Data TypeDescriptionParameter
StringA string.string
IntegerThe start position in string of the substring.
Must be in the range of 1 to the length of string.start position
IntegerThe number of characters to include in the sub-string.
number ofcharacters
NotesReturns null in the following situations:• start position <= 0• start position > the length of string• string is null• number of characters <= 0
Examplessubstring('ABCD', 2, 2) = 'BC'
substring('ABCD', 2, 10) = 'BCD'
substring('ABCD', 0, 2) = null
2013-08-03387
SQL and MDX reference
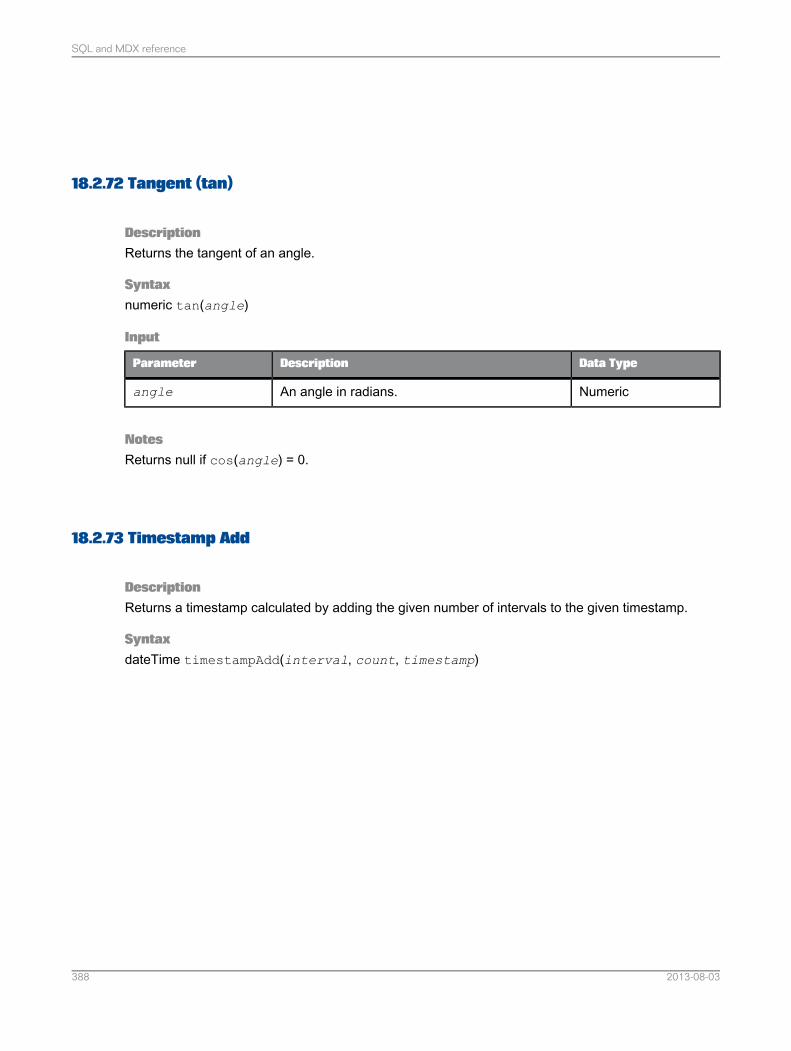
18.2.72 Tangent (tan)
DescriptionReturns the tangent of an angle.
Syntaxnumeric tan(angle)
Input
Data TypeDescriptionParameter
NumericAn angle in radians.angle
NotesReturns null if cos(angle) = 0.
18.2.73 Timestamp Add
DescriptionReturns a timestamp calculated by adding the given number of intervals to the given timestamp.
SyntaxdateTime timestampAdd(interval, count, timestamp)
2013-08-03388
SQL and MDX reference
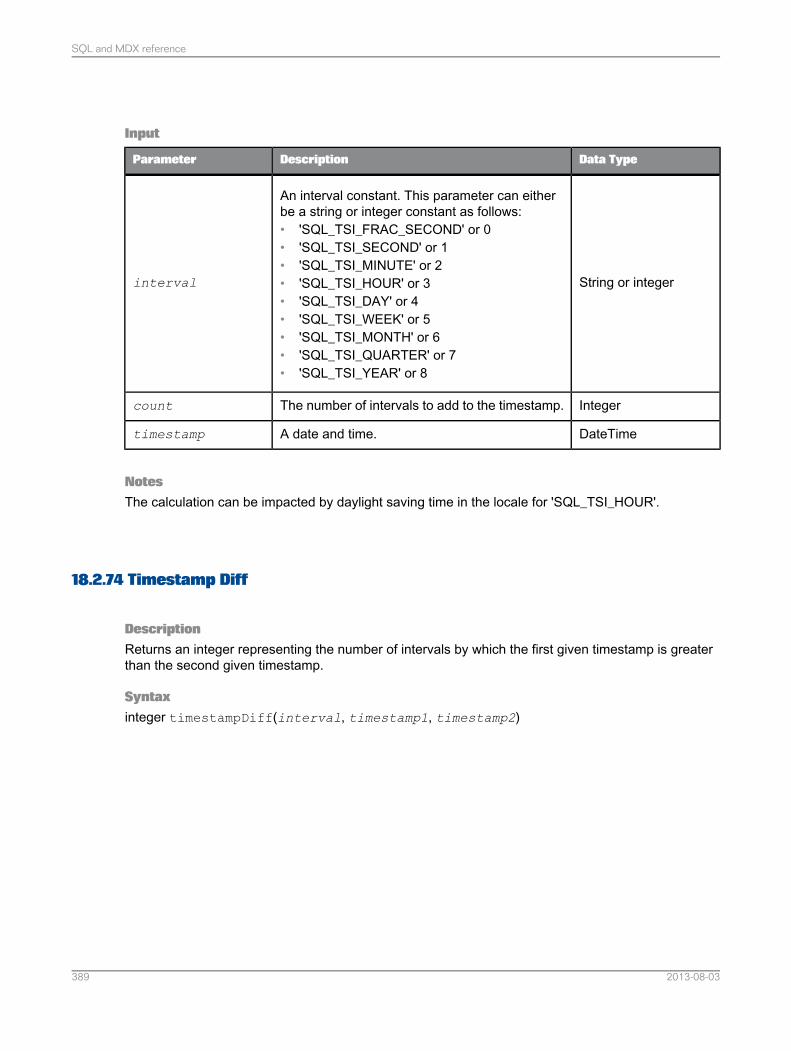
Input
Data TypeDescriptionParameter
String or integer
An interval constant. This parameter can eitherbe a string or integer constant as follows:• 'SQL_TSI_FRAC_SECOND' or 0• 'SQL_TSI_SECOND' or 1• 'SQL_TSI_MINUTE' or 2• 'SQL_TSI_HOUR' or 3• 'SQL_TSI_DAY' or 4• 'SQL_TSI_WEEK' or 5• 'SQL_TSI_MONTH' or 6• 'SQL_TSI_QUARTER' or 7• 'SQL_TSI_YEAR' or 8
interval
IntegerThe number of intervals to add to the timestamp.count
DateTimeA date and time.timestamp
NotesThe calculation can be impacted by daylight saving time in the locale for 'SQL_TSI_HOUR'.
18.2.74 Timestamp Diff
DescriptionReturns an integer representing the number of intervals by which the first given timestamp is greaterthan the second given timestamp.
Syntaxinteger timestampDiff(interval, timestamp1, timestamp2)
2013-08-03389
SQL and MDX reference
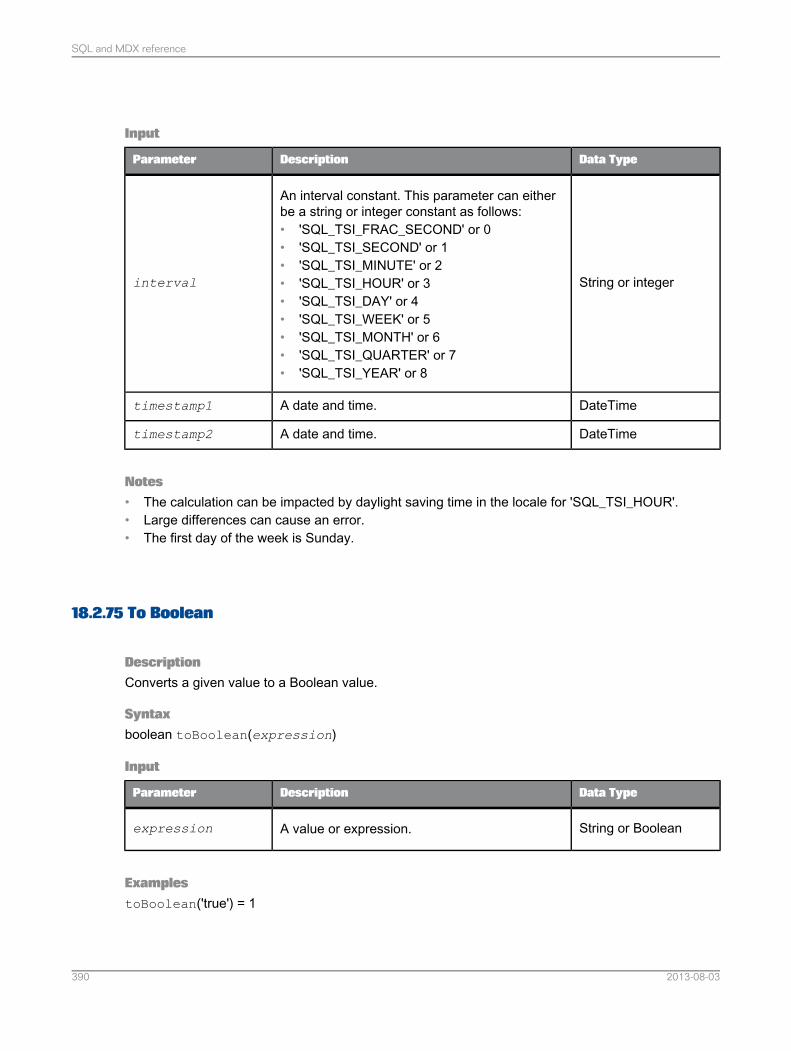
Input
Data TypeDescriptionParameter
String or integer
An interval constant. This parameter can eitherbe a string or integer constant as follows:• 'SQL_TSI_FRAC_SECOND' or 0• 'SQL_TSI_SECOND' or 1• 'SQL_TSI_MINUTE' or 2• 'SQL_TSI_HOUR' or 3• 'SQL_TSI_DAY' or 4• 'SQL_TSI_WEEK' or 5• 'SQL_TSI_MONTH' or 6• 'SQL_TSI_QUARTER' or 7• 'SQL_TSI_YEAR' or 8
interval
DateTimeA date and time.timestamp1
DateTimeA date and time.timestamp2
Notes• The calculation can be impacted by daylight saving time in the locale for 'SQL_TSI_HOUR'.• Large differences can cause an error.• The first day of the week is Sunday.
18.2.75 To Boolean
DescriptionConverts a given value to a Boolean value.
Syntaxboolean toBoolean(expression)
Input
Data TypeDescriptionParameter
String or BooleanA value or expression.expression
ExamplestoBoolean('true') = 1
2013-08-03390
SQL and MDX reference
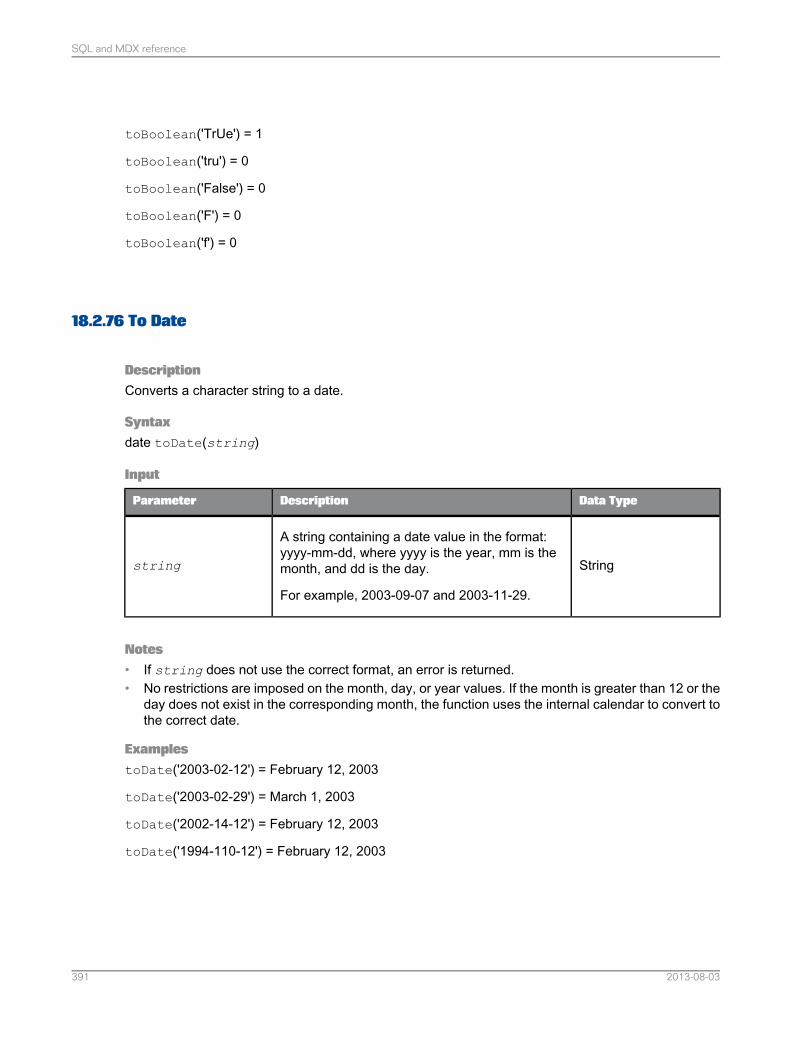
toBoolean('TrUe') = 1
toBoolean('tru') = 0
toBoolean('False') = 0
toBoolean('F') = 0
toBoolean('f') = 0
18.2.76 To Date
DescriptionConverts a character string to a date.
Syntaxdate toDate(string)
Input
Data TypeDescriptionParameter
String
A string containing a date value in the format:yyyy-mm-dd, where yyyy is the year, mm is themonth, and dd is the day.
For example, 2003-09-07 and 2003-11-29.
string
Notes• If string does not use the correct format, an error is returned.• No restrictions are imposed on the month, day, or year values. If the month is greater than 12 or the
day does not exist in the corresponding month, the function uses the internal calendar to convert tothe correct date.
ExamplestoDate('2003-02-12') = February 12, 2003
toDate('2003-02-29') = March 1, 2003
toDate('2002-14-12') = February 12, 2003
toDate('1994-110-12') = February 12, 2003
2013-08-03391
SQL and MDX reference
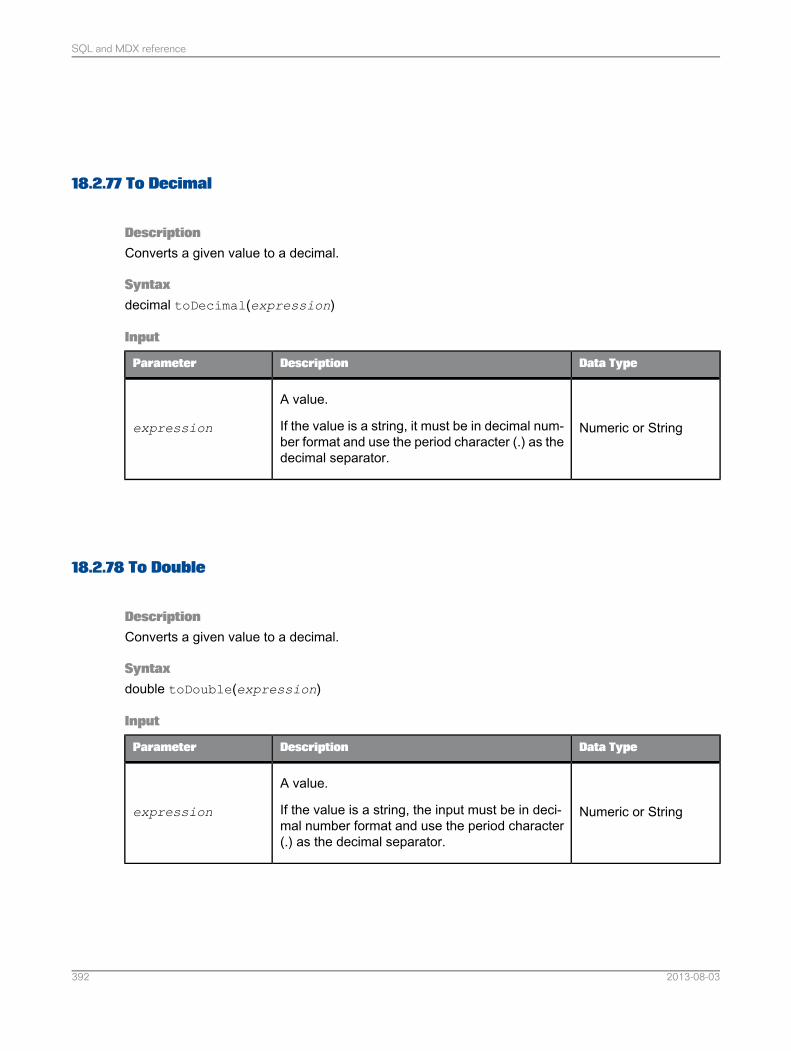
18.2.77 To Decimal
DescriptionConverts a given value to a decimal.
Syntaxdecimal toDecimal(expression)
Input
Data TypeDescriptionParameter
Numeric or String
A value.
If the value is a string, it must be in decimal num-ber format and use the period character (.) as thedecimal separator.
expression
18.2.78 To Double
DescriptionConverts a given value to a decimal.
Syntaxdouble toDouble(expression)
Input
Data TypeDescriptionParameter
Numeric or String
A value.
If the value is a string, the input must be in deci-mal number format and use the period character(.) as the decimal separator.
expression
2013-08-03392
SQL and MDX reference
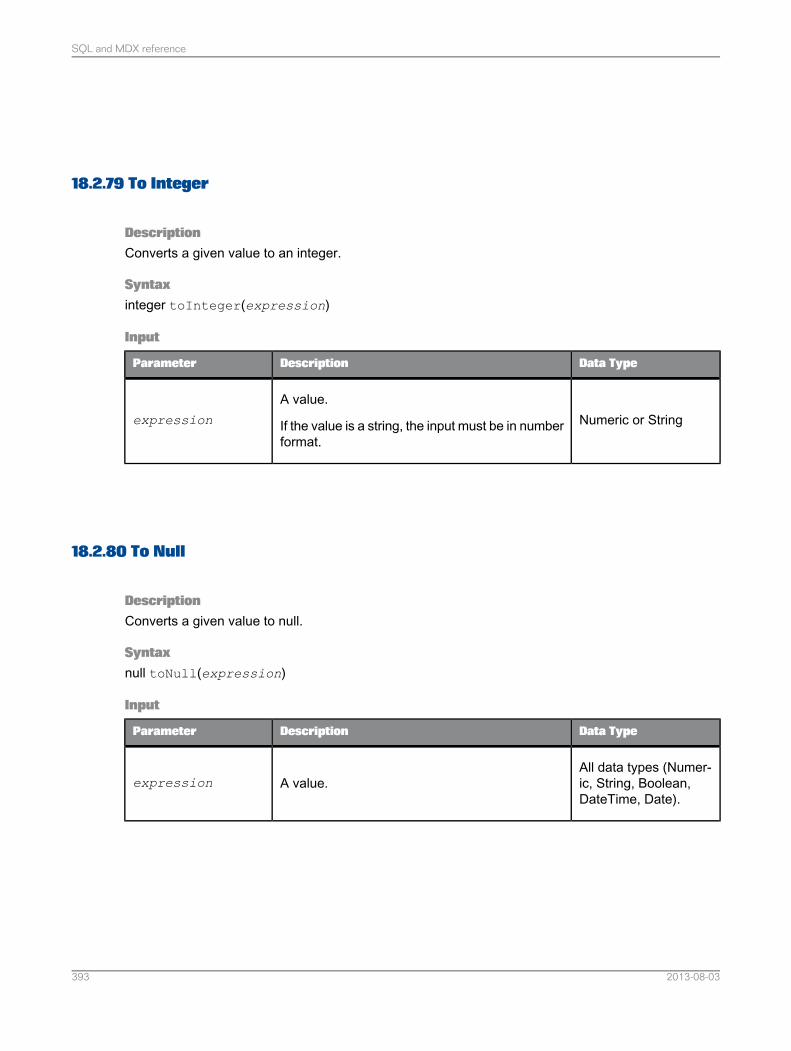
18.2.79 To Integer
DescriptionConverts a given value to an integer.
Syntaxinteger toInteger(expression)
Input
Data TypeDescriptionParameter
Numeric or StringA value.
If the value is a string, the input must be in numberformat.
expression
18.2.80 To Null
DescriptionConverts a given value to null.
Syntaxnull toNull(expression)
Input
Data TypeDescriptionParameter
All data types (Numer-ic, String, Boolean,DateTime, Date).
A value.expression
2013-08-03393
SQL and MDX reference
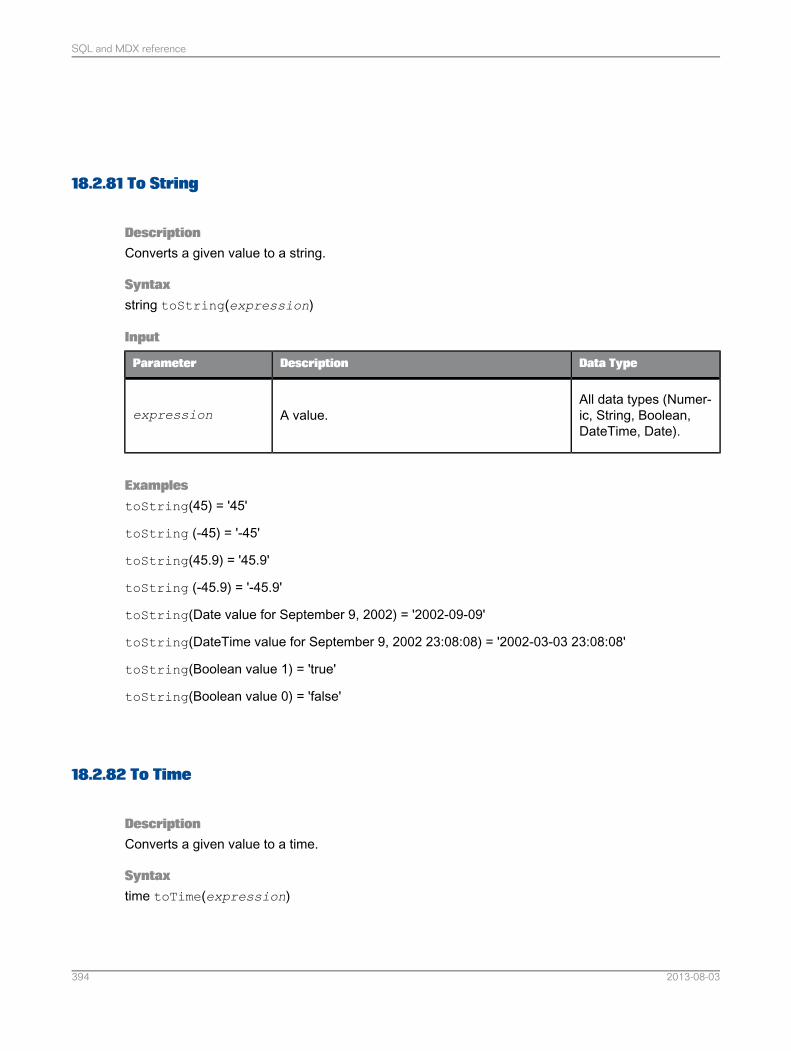
18.2.81 To String
DescriptionConverts a given value to a string.
Syntaxstring toString(expression)
Input
Data TypeDescriptionParameter
All data types (Numer-ic, String, Boolean,DateTime, Date).
A value.expression
ExamplestoString(45) = '45'
toString (-45) = '-45'
toString(45.9) = '45.9'
toString (-45.9) = '-45.9'
toString(Date value for September 9, 2002) = '2002-09-09'
toString(DateTime value for September 9, 2002 23:08:08) = '2002-03-03 23:08:08'
toString(Boolean value 1) = 'true'
toString(Boolean value 0) = 'false'
18.2.82 To Time
DescriptionConverts a given value to a time.
Syntaxtime toTime(expression)
2013-08-03394
SQL and MDX reference
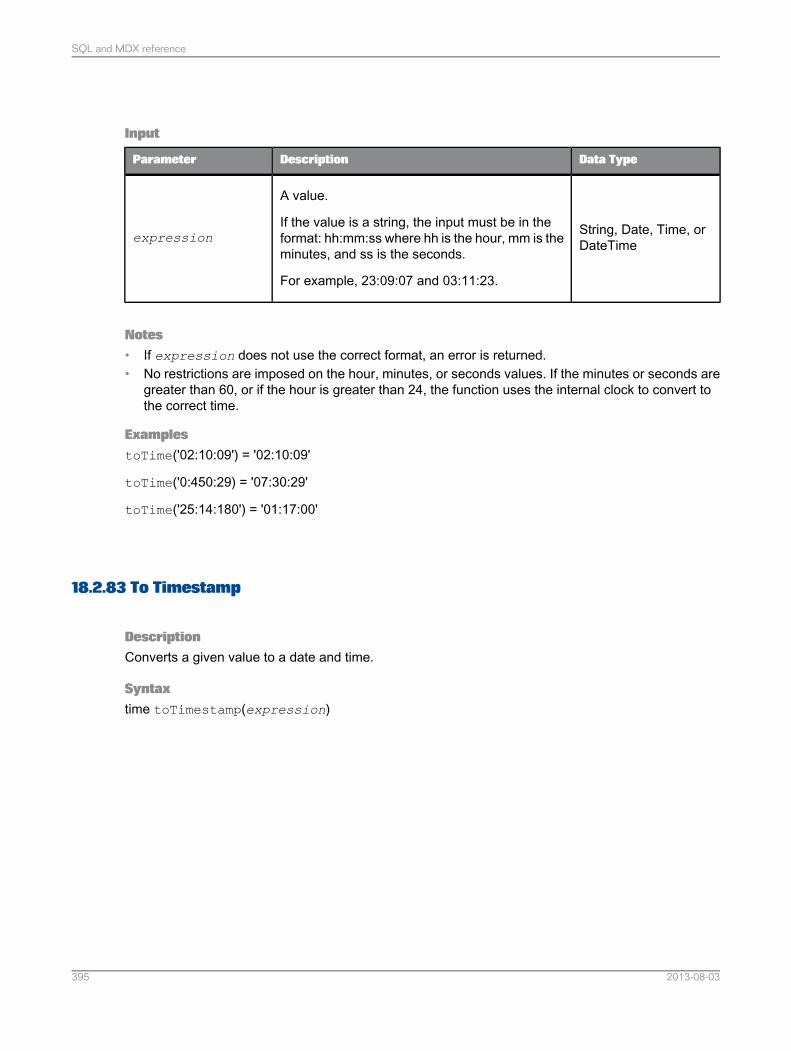
Input
Data TypeDescriptionParameter
String, Date, Time, orDateTime
A value.
If the value is a string, the input must be in theformat: hh:mm:ss where hh is the hour, mm is theminutes, and ss is the seconds.
For example, 23:09:07 and 03:11:23.
expression
Notes• If expression does not use the correct format, an error is returned.• No restrictions are imposed on the hour, minutes, or seconds values. If the minutes or seconds are
greater than 60, or if the hour is greater than 24, the function uses the internal clock to convert tothe correct time.
ExamplestoTime('02:10:09') = '02:10:09'
toTime('0:450:29) = '07:30:29'
toTime('25:14:180') = '01:17:00'
18.2.83 To Timestamp
DescriptionConverts a given value to a date and time.
Syntaxtime toTimestamp(expression)
2013-08-03395
SQL and MDX reference

Input
Data TypeDescriptionParameter
String, Date, Time, orDateTime
A value.
If the value is a string, the input must be in theformat: yyyy-mm-dd hh:mm:ss.ssss, where yyyyis the year, mm is the month, dd is the day, hh isthe hour, mm is the minutes, ss is the seconds,and ssss is the milliseconds (optional).
For example, 2003-09-07 23:09:07 and 2003-11-29 03:11:23.0.
expression
Notes• If expression does not use the correct format, an error is returned.• No restrictions are imposed on the month, day, or year values. If the month is greater than 12 or the
day does not exist in the corresponding month, the function uses the internal calendar to convert tothe correct date.
• No restrictions are imposed on the hour, minutes, or seconds values. If the minutes or seconds aregreater than 60, or if the hour is greater than 24, the function uses the internal clock to convert tothe correct time.
ExamplestoTimestamp('2003-02-12 02:10:09') = '2003-02-12 02:10:09.0'
toTimestamp('2003-02-29 02:10:09') = '2003-03-01 02:10:09.0'
toTimestamp('2002-14-12 02:10:09') = '2003-02-12 02:10:09.0'
toTimestamp('1994-110-12 02:10:09') = '2003-02-12 02:10:09.0'
toTimestamp('2003-02-12 0:450:29') = '2003-02-12 07:30:29.0'
toTimestamp('2002-09-09 25:14:180') = '2002-09-09 01:17:00.0'
18.2.84 Trim
DescriptionRemoves the spaces and tabs from the left and right sides of the given string.
Syntaxstring trim(string)
2013-08-03396
SQL and MDX reference
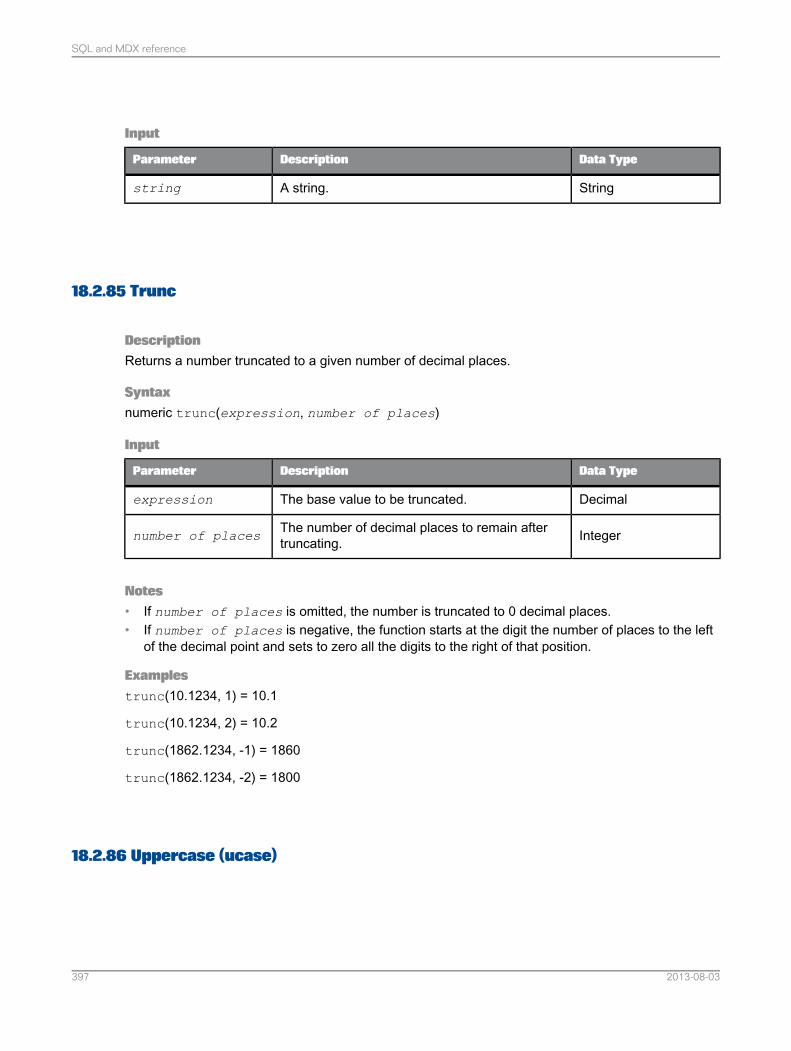
Input
Data TypeDescriptionParameter
StringA string.string
18.2.85 Trunc
DescriptionReturns a number truncated to a given number of decimal places.
Syntaxnumeric trunc(expression, number of places)
Input
Data TypeDescriptionParameter
DecimalThe base value to be truncated.expression
IntegerThe number of decimal places to remain aftertruncating.number of places
Notes• If number of places is omitted, the number is truncated to 0 decimal places.• If number of places is negative, the function starts at the digit the number of places to the left
of the decimal point and sets to zero all the digits to the right of that position.
Examplestrunc(10.1234, 1) = 10.1
trunc(10.1234, 2) = 10.2
trunc(1862.1234, -1) = 1860
trunc(1862.1234, -2) = 1800
18.2.86 Uppercase (ucase)
2013-08-03397
SQL and MDX reference
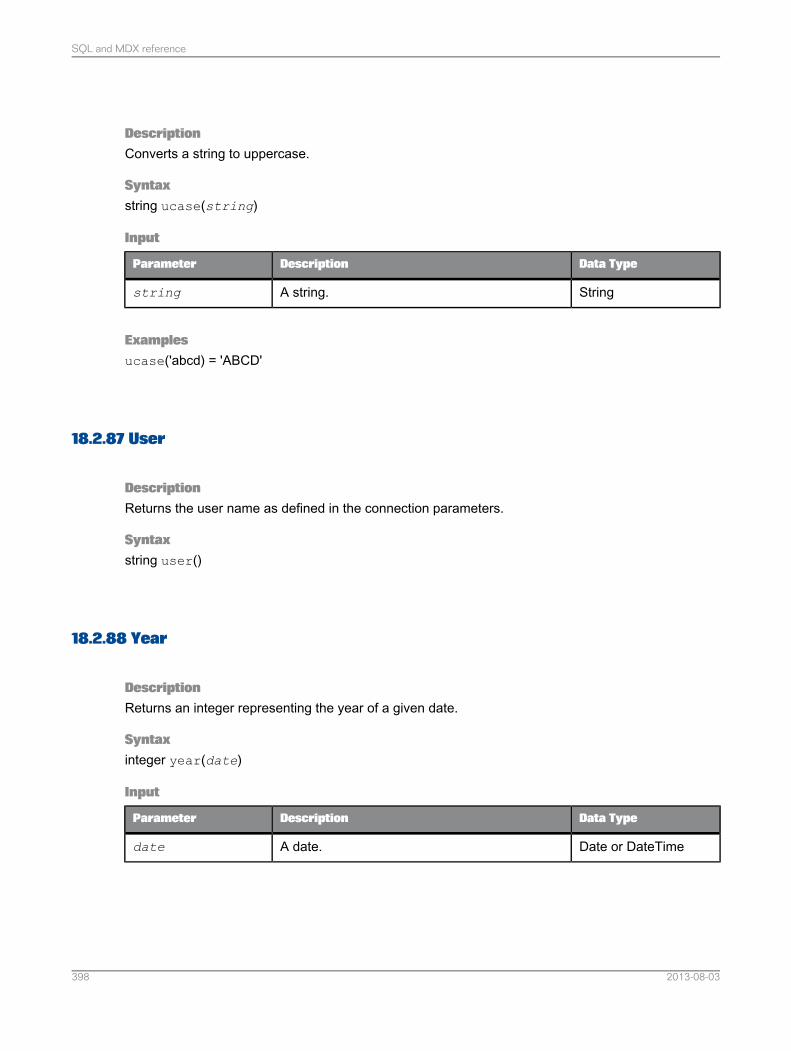
DescriptionConverts a string to uppercase.
Syntaxstring ucase(string)
Input
Data TypeDescriptionParameter
StringA string.string
Examplesucase('abcd) = 'ABCD'
18.2.87 User
DescriptionReturns the user name as defined in the connection parameters.
Syntaxstring user()
18.2.88 Year
DescriptionReturns an integer representing the year of a given date.
Syntaxinteger year(date)
Input
Data TypeDescriptionParameter
Date or DateTimeA date.date
2013-08-03398
SQL and MDX reference
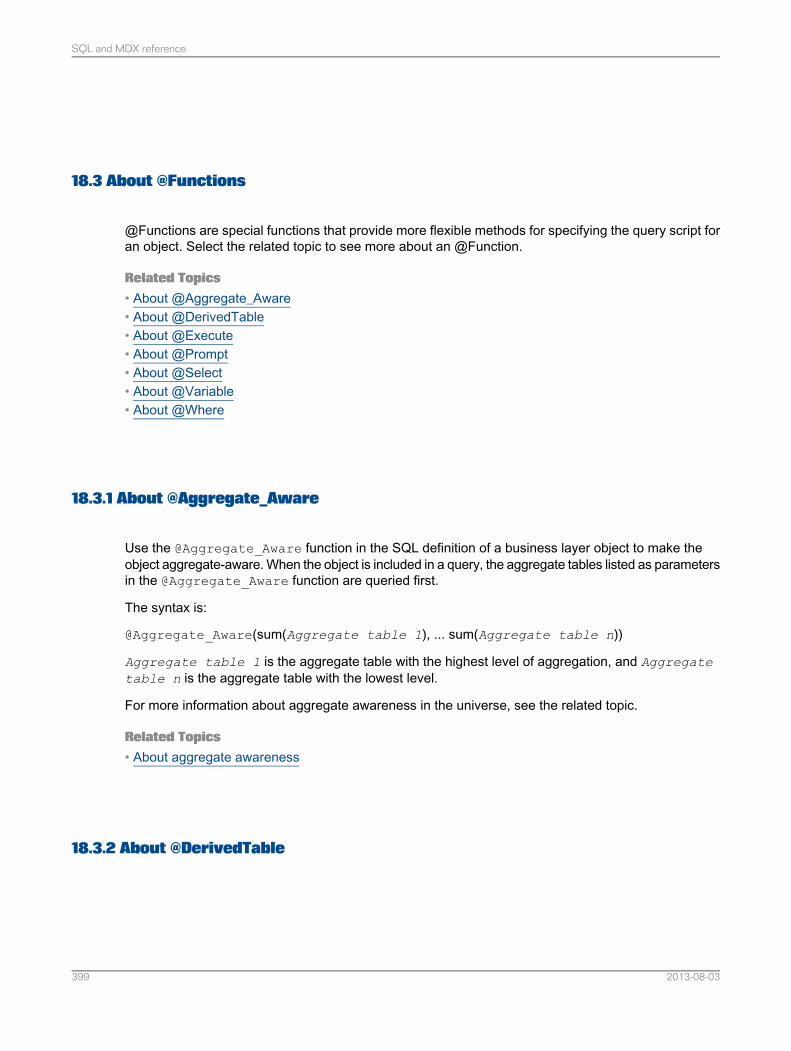
18.3 About @Functions
@Functions are special functions that provide more flexible methods for specifying the query script foran object. Select the related topic to see more about an @Function.
Related Topics• About @Aggregate_Aware• About @DerivedTable• About @Execute• About @Prompt• About @Select• About @Variable• About @Where
18.3.1 About @Aggregate_Aware
Use the @Aggregate_Aware function in the SQL definition of a business layer object to make theobject aggregate-aware. When the object is included in a query, the aggregate tables listed as parametersin the @Aggregate_Aware function are queried first.
The syntax is:
@Aggregate_Aware(sum(Aggregate table 1), ... sum(Aggregate table n))
Aggregate table 1 is the aggregate table with the highest level of aggregation, and Aggregatetable n is the aggregate table with the lowest level.
For more information about aggregate awareness in the universe, see the related topic.
Related Topics• About aggregate awareness
18.3.2 About @DerivedTable
2013-08-03399
SQL and MDX reference
Use the @DerivedTable function in the definition of nested derived tables. A nested derived table(also known as a 'derived table on a derived table') is a table that is derived from at least one existingderived table.
The syntax of the @DerivedTable function is:
@DerivedTable(Derived table name)
Derived table name is the name of the derived table you want to reference. The @DerivedTablefunction is only used in the definition of derived tables in the data foundation.
Note:In database-specific SQL (multisource-enabled data foundations), all tables referenced must be fromthe same connection.
18.3.3 About @Execute
The @Execute function lets you define a preliminary query that provides a list of values in a SELECTpredicate to be included in the main query. The @Execute function is based on standard SQL and soapplies to relational data sources. The syntax of the @Execute function is:
@Execute(List of values)
List of values is a list of values pre-defined in the business layer or data foundation. The list ofvalues definition provides the preliminary query. Most often the @Execute function is then included ina filter or WHERE clause to apply the preliminary query to limit the values returned in the main query.
The list of values can be any of the following types:• List of values based on custom SQL• Static list of values• List of values based on a query that includes business layer objects
The following limitations apply:• The list of values cannot be based on a custom hierarchy.• The list of values can contain only objects that are active in the business layer (not hidden or
deprecated).• The SQL defining the list of values cannot contain the @Execute function.• The @Execute function cannot be used in the definition of an @Prompt function.
For more information on inserting a list of values, see the related topic.
Example: Filter on products
This example creates a query filter that limits query results to products with sales that are two timesabove the product category average.
2013-08-03400
SQL and MDX reference
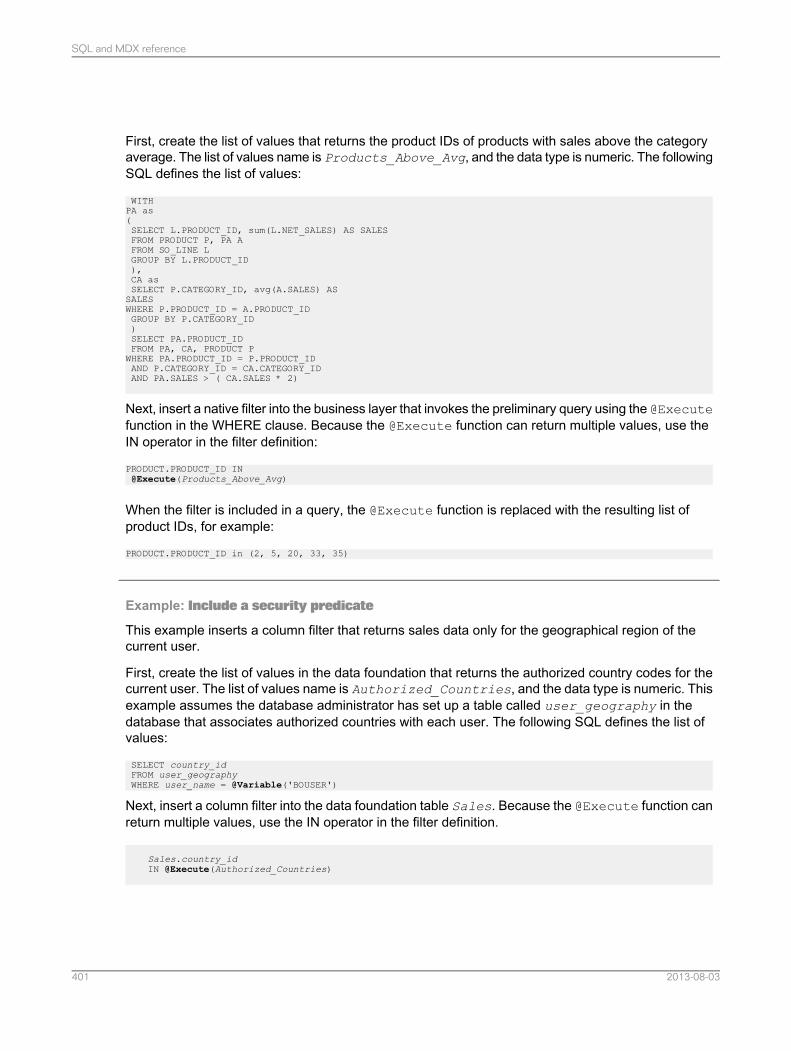
First, create the list of values that returns the product IDs of products with sales above the categoryaverage. The list of values name is Products_Above_Avg, and the data type is numeric. The followingSQL defines the list of values:
WITHPA as(SELECT L.PRODUCT_ID, sum(L.NET_SALES) AS SALESFROM PRODUCT P, PA AFROM SO_LINE LGROUP BY L.PRODUCT_ID),CA asSELECT P.CATEGORY_ID, avg(A.SALES) ASSALESWHERE P.PRODUCT_ID = A.PRODUCT_IDGROUP BY P.CATEGORY_ID)SELECT PA.PRODUCT_IDFROM PA, CA, PRODUCT PWHERE PA.PRODUCT_ID = P.PRODUCT_IDAND P.CATEGORY_ID = CA.CATEGORY_IDAND PA.SALES > ( CA.SALES * 2)
Next, insert a native filter into the business layer that invokes the preliminary query using the @Executefunction in the WHERE clause. Because the @Execute function can return multiple values, use theIN operator in the filter definition:
PRODUCT.PRODUCT_ID IN@Execute(Products_Above_Avg)
When the filter is included in a query, the @Execute function is replaced with the resulting list ofproduct IDs, for example:
PRODUCT.PRODUCT_ID in (2, 5, 20, 33, 35)
Example: Include a security predicate
This example inserts a column filter that returns sales data only for the geographical region of thecurrent user.
First, create the list of values in the data foundation that returns the authorized country codes for thecurrent user. The list of values name is Authorized_Countries, and the data type is numeric. Thisexample assumes the database administrator has set up a table called user_geography in thedatabase that associates authorized countries with each user. The following SQL defines the list ofvalues:
SELECT country_idFROM user_geographyWHERE user_name = @Variable('BOUSER')
Next, insert a column filter into the data foundation table Sales. Because the @Execute function canreturn multiple values, use the IN operator in the filter definition.
Sales.country_idIN @Execute(Authorized_Countries)
2013-08-03401
SQL and MDX reference
When a user includes the Sales table in a query, the @Execute function in the column filter is replacedby the list of authorized country codes for that user.
Related Topics• Inserting or editing a list of values• Inserting and editing filters• Inserting a column filter
18.3.4 About @Prompt
Use the @Prompt function to insert a prompt into a query. Prompts can be used to restrict the datawhen a user creates a report. You use the @Prompt function in the SQL SELECT statement or WHEREclause, or in the MDX expression for an object. It forces a user to enter one or more values (or selectfrom a list of values) for a restriction when that object is used in a query. When the user runs the query,a prompt box appears asking for a value to be entered or selected.
Prompts are useful when you want to force a restriction in the query script, but do not want to presetthe value of the condition.
The @Prompt function is allowed in the following expressions:• Joins• Calculated columns (except in database-specific SQL in multisource-enabled data foundations)• Derived tables• Business objects in the business layer
You can insert a @Prompt definition in the following ways:• Define a named parameter for the prompt and reference the parameter in the @Prompt function,
for example:
@Prompt(Parameter name)
Parameter name is a parameter pre-defined in the data foundation or business layer. For moreinformation, see the related topic about parameters.
• Type the prompt definition into the SQL or MDX expression of the object. For more information onthe syntax and parameters of the @Prompt function, see the related topic.
Related Topics• About parameters• @Prompt syntax
2013-08-03402
SQL and MDX reference
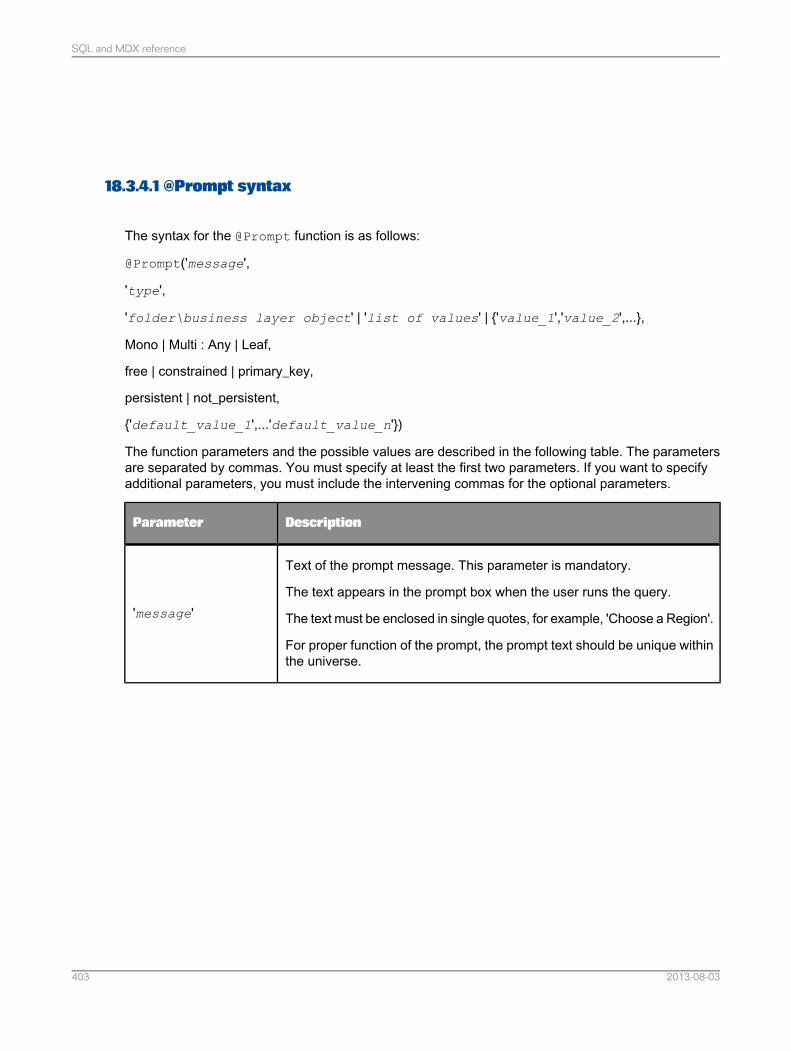
18.3.4.1 @Prompt syntax
The syntax for the @Prompt function is as follows:
@Prompt('message',
'type',
'folder\business layer object' | 'list of values' | {'value_1','value_2',...},
Mono | Multi : Any | Leaf,
free | constrained | primary_key,
persistent | not_persistent,
{'default_value_1',...'default_value_n'})
The function parameters and the possible values are described in the following table. The parametersare separated by commas. You must specify at least the first two parameters. If you want to specifyadditional parameters, you must include the intervening commas for the optional parameters.
DescriptionParameter
Text of the prompt message. This parameter is mandatory.
The text appears in the prompt box when the user runs the query.
The text must be enclosed in single quotes, for example, 'Choose a Region'.
For proper function of the prompt, the prompt text should be unique withinthe universe.
'message'
2013-08-03403
SQL and MDX reference

DescriptionParameter
The data type of the prompt. This parameter is mandatory.
The user's response is interpreted with the data type you specify. The listof values and default values also have this data type. It can be one of thefollowing:• 'A' for alphanumeric string.
• 'K' for keyword. This type is also an alphanumeric string, however theresponses to the prompt will be not be surrounded by quotes in thequery script at run time.
• 'N' for number.
• 'D' for date.
• 'DT' for date-time.
The specified type must be enclosed in single quotes.
The type parameter can be a pair of data types to indicate a name andkey. The syntax is 'name_type:key_type', for example: 'A':'N' where thefirst type is the data type of the name that the user sees in the list of values,and the second type is the data type of the primary key that is used by thequery. Both the name_type and the key_type can be any of the availabledata types.
Note:
To use this option, you must make sure the object and the prompt are indexaware:• Define a primary key for the object in the business layer.• Specify primary key for the fifth parameter in the @Prompt function.
In this case, if the list of values or default values parameters are used, theymust contain a list of pairs of values.
'type'
2013-08-03404
SQL and MDX reference
DescriptionParameter
'folder\businesslayer object' |
'list of values' |
{'value_1','value_2',...}
2013-08-03405
SQL and MDX reference
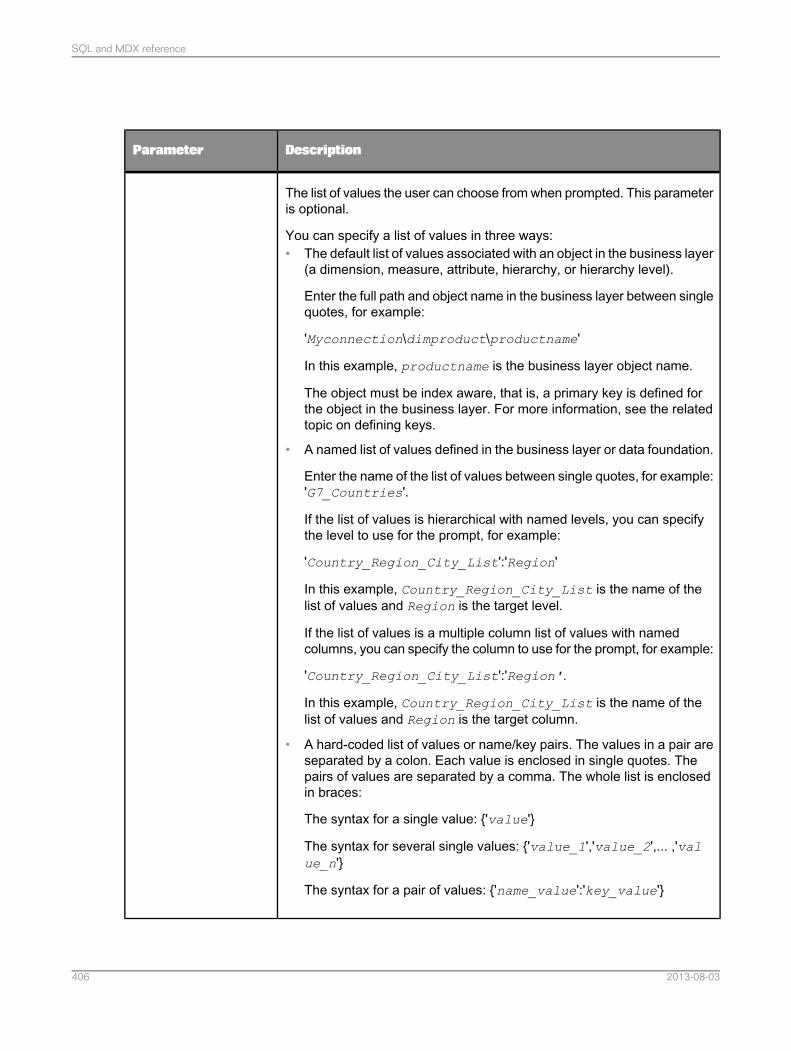
DescriptionParameter
The list of values the user can choose from when prompted. This parameteris optional.
You can specify a list of values in three ways:• The default list of values associated with an object in the business layer
(a dimension, measure, attribute, hierarchy, or hierarchy level).
Enter the full path and object name in the business layer between singlequotes, for example:
'Myconnection\dimproduct\productname'
In this example, productname is the business layer object name.
The object must be index aware, that is, a primary key is defined forthe object in the business layer. For more information, see the relatedtopic on defining keys.
• A named list of values defined in the business layer or data foundation.
Enter the name of the list of values between single quotes, for example:'G7_Countries'.
If the list of values is hierarchical with named levels, you can specifythe level to use for the prompt, for example:
'Country_Region_City_List':'Region'
In this example, Country_Region_City_List is the name of thelist of values and Region is the target level.
If the list of values is a multiple column list of values with namedcolumns, you can specify the column to use for the prompt, for example:
'Country_Region_City_List':'Region'.
In this example, Country_Region_City_List is the name of thelist of values and Region is the target column.
• A hard-coded list of values or name/key pairs. The values in a pair areseparated by a colon. Each value is enclosed in single quotes. Thepairs of values are separated by a comma. The whole list is enclosedin braces:
The syntax for a single value: {'value'}
The syntax for several single values: {'value_1','value_2',... ,'value_n'}
The syntax for a pair of values: {'name_value':'key_value'}
2013-08-03406
SQL and MDX reference
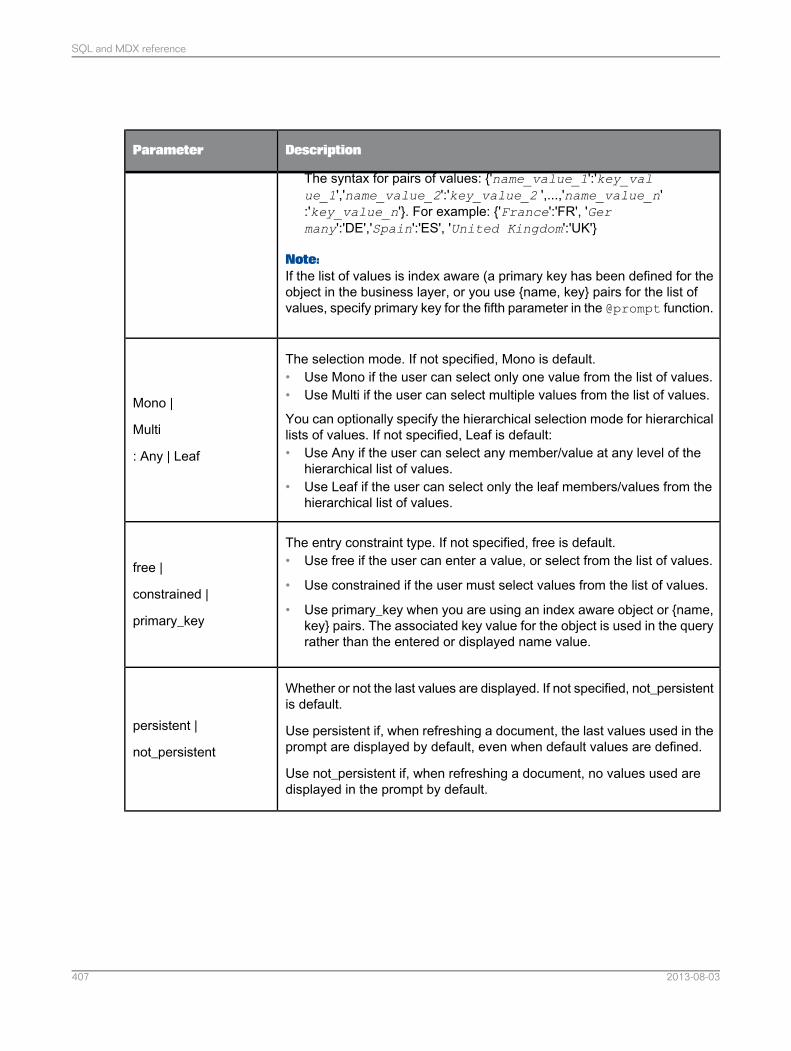
DescriptionParameter
The syntax for pairs of values: {'name_value_1':'key_value_1','name_value_2':'key_value_2 ',...,'name_value_n':'key_value_n'}. For example: {'France':'FR', 'Germany':'DE','Spain':'ES', 'United Kingdom':'UK'}
Note:If the list of values is index aware (a primary key has been defined for theobject in the business layer, or you use {name, key} pairs for the list ofvalues, specify primary key for the fifth parameter in the @prompt function.
The selection mode. If not specified, Mono is default.• Use Mono if the user can select only one value from the list of values.• Use Multi if the user can select multiple values from the list of values.
You can optionally specify the hierarchical selection mode for hierarchicallists of values. If not specified, Leaf is default:• Use Any if the user can select any member/value at any level of the
hierarchical list of values.• Use Leaf if the user can select only the leaf members/values from the
hierarchical list of values.
Mono |
Multi
: Any | Leaf
The entry constraint type. If not specified, free is default.• Use free if the user can enter a value, or select from the list of values.
• Use constrained if the user must select values from the list of values.
• Use primary_key when you are using an index aware object or {name,key} pairs. The associated key value for the object is used in the queryrather than the entered or displayed name value.
free |
constrained |
primary_key
Whether or not the last values are displayed. If not specified, not_persistentis default.
Use persistent if, when refreshing a document, the last values used in theprompt are displayed by default, even when default values are defined.
Use not_persistent if, when refreshing a document, no values used aredisplayed in the prompt by default.
persistent |
not_persistent
2013-08-03407
SQL and MDX reference

DescriptionParameter
One or more default values presented to the user. This parameter is op-tional.
Enter default values in the following ways:• For a single value: {'France'}• For a pair of values: {'France':'FR'}• For two pairs of values: {'France':'FR','Germany':DE'}• For hierarchical values, use \ to separate the hierarchy level values:
{'Europe':'2'\'France'\'Marseille'\'CSP Systems','Europe':'2'\'Germany'\'Berlin'}
When refreshing a document, these values are displayed by default, butif the persistent option is set, then the last values used in the prompt areused instead of the default values.
If you specify the primary_key parameter in the prompt definition, you mustprovide the key values.
{'default value' }
Related Topics• Defining keys for dimensions and dimension attributes
18.3.5 About @Select
Use the @Select function in the definition of an object in the business layer to re-use the SELECTstatement of another object. The syntax of the @Select function is:
@Select(Folder name\Object name)
Folder name\Object name specifies the full path of another object in the business layer.
For example, you define a business layer object Promotional_Service_Line as @Select(Resort\Service_Line). The SELECT statement defined for Service_Line is used for the definitionof Promotional_Service_Line.
Using the @Select function lets you maintain only one instance of the SQL or MDX expression, andensures the consistency of related object definitions in the business layer. However, @Select createsan object dependency. If you delete the source object, you must manually update the object that usesthe @Select function.
2013-08-03408
SQL and MDX reference
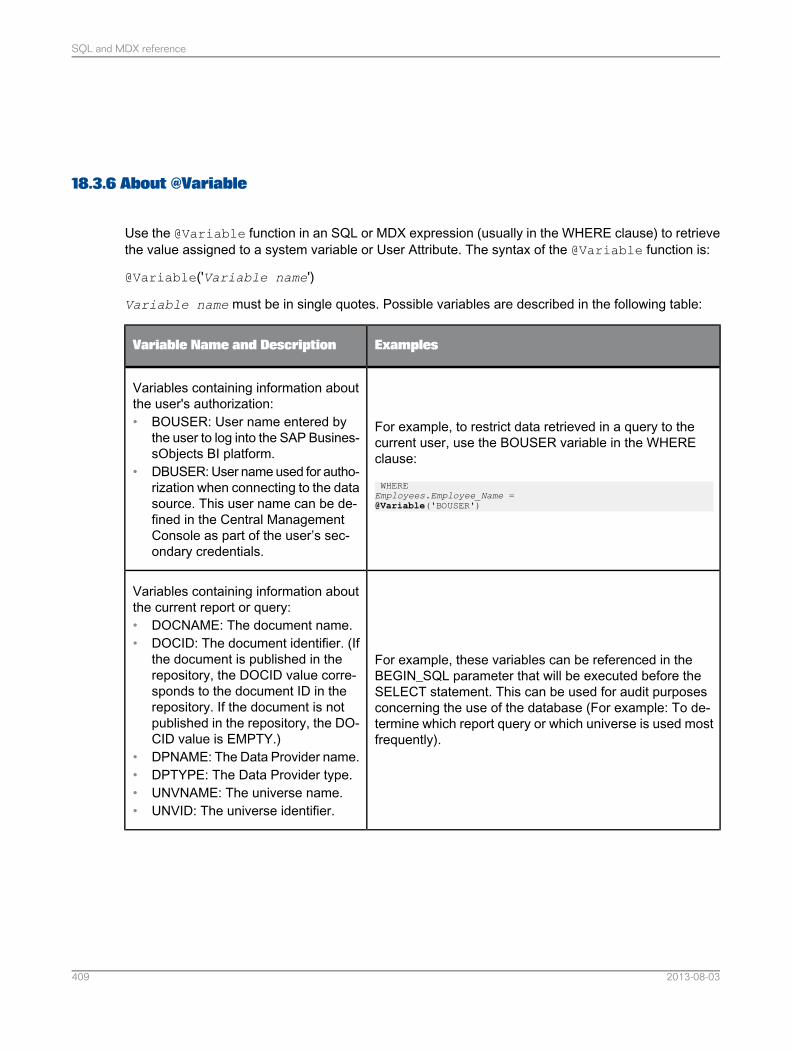
18.3.6 About @Variable
Use the @Variable function in an SQL or MDX expression (usually in the WHERE clause) to retrievethe value assigned to a system variable or User Attribute. The syntax of the @Variable function is:
@Variable('Variable name')
Variable name must be in single quotes. Possible variables are described in the following table:
ExamplesVariable Name and Description
For example, to restrict data retrieved in a query to thecurrent user, use the BOUSER variable in the WHEREclause:
WHEREEmployees.Employee_Name =@Variable('BOUSER')
Variables containing information aboutthe user's authorization:• BOUSER: User name entered by
the user to log into the SAP Busines-sObjects BI platform.
• DBUSER: User name used for autho-rization when connecting to the datasource. This user name can be de-fined in the Central ManagementConsole as part of the user’s sec-ondary credentials.
For example, these variables can be referenced in theBEGIN_SQL parameter that will be executed before theSELECT statement. This can be used for audit purposesconcerning the use of the database (For example: To de-termine which report query or which universe is used mostfrequently).
Variables containing information aboutthe current report or query:• DOCNAME: The document name.• DOCID: The document identifier. (If
the document is published in therepository, the DOCID value corre-sponds to the document ID in therepository. If the document is notpublished in the repository, the DO-CID value is EMPTY.)
• DPNAME: The Data Provider name.• DPTYPE: The Data Provider type.• UNVNAME: The universe name.• UNVID: The universe identifier.
2013-08-03409
SQL and MDX reference
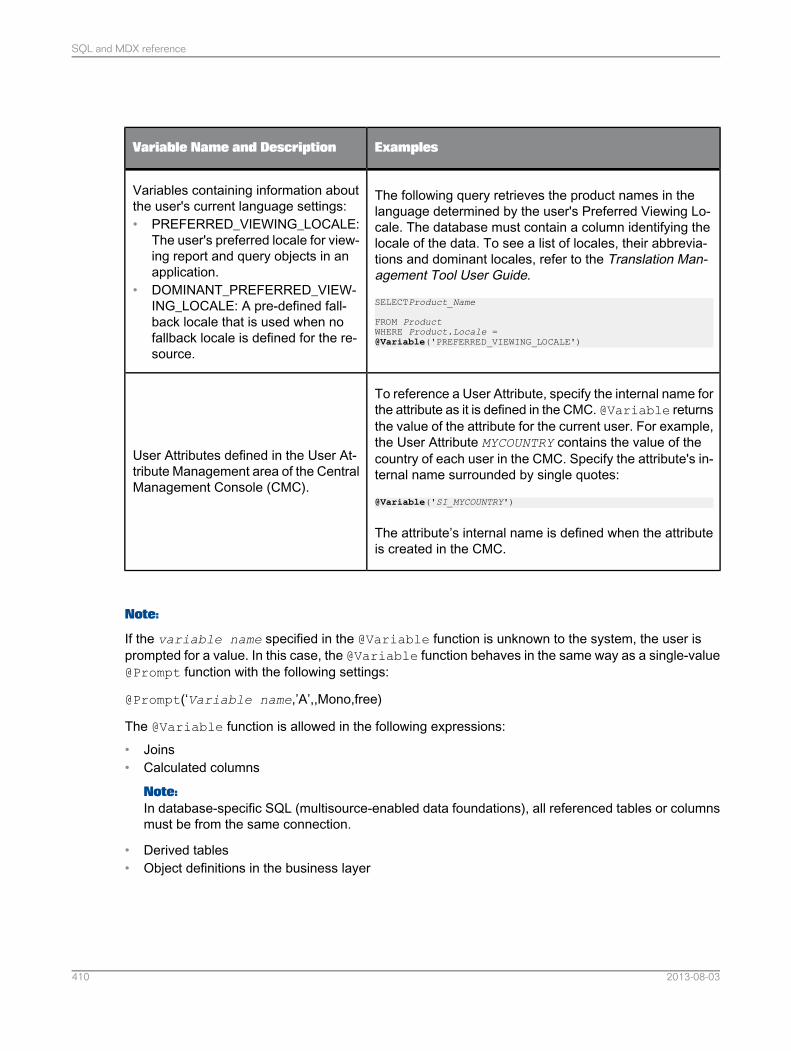
ExamplesVariable Name and Description
The following query retrieves the product names in thelanguage determined by the user's Preferred Viewing Lo-cale. The database must contain a column identifying thelocale of the data. To see a list of locales, their abbrevia-tions and dominant locales, refer to the Translation Man-agement Tool User Guide.
SELECTProduct_Name
FROM ProductWHERE Product.Locale =@Variable('PREFERRED_VIEWING_LOCALE')
Variables containing information aboutthe user's current language settings:• PREFERRED_VIEWING_LOCALE:
The user's preferred locale for view-ing report and query objects in anapplication.
• DOMINANT_PREFERRED_VIEW-ING_LOCALE: A pre-defined fall-back locale that is used when nofallback locale is defined for the re-source.
To reference a User Attribute, specify the internal name forthe attribute as it is defined in the CMC. @Variable returnsthe value of the attribute for the current user. For example,the User Attribute MYCOUNTRY contains the value of thecountry of each user in the CMC. Specify the attribute's in-ternal name surrounded by single quotes:
@Variable('SI_MYCOUNTRY')
The attribute’s internal name is defined when the attributeis created in the CMC.
User Attributes defined in the User At-tribute Management area of the CentralManagement Console (CMC).
Note:
If the variable name specified in the @Variable function is unknown to the system, the user isprompted for a value. In this case, the @Variable function behaves in the same way as a single-value@Prompt function with the following settings:
@Prompt(‘Variable name,’A’,,Mono,free)
The @Variable function is allowed in the following expressions:• Joins• Calculated columns
Note:In database-specific SQL (multisource-enabled data foundations), all referenced tables or columnsmust be from the same connection.
• Derived tables• Object definitions in the business layer
2013-08-03410
SQL and MDX reference
18.3.7 About @Where
Use the @Where function in the SQL definition of an object in the business layer to re-use the WHEREclause of another object. The syntax of the @Where function is:
@Where(Folder name\Object name)
Folder name\Object name specifies the full path of another object in the business layer.
For example, you define the WHERE clause of business layer object Resort_Service_Line as@Where(dimResort\Resort). The WHERE statement defined for the object Resort is used for thedefinition of Resort_Service_Line.
Using the @Where function lets you maintain only one instance of the SQL WHERE clause, and ensuresthe consistency of related object definitions in the business layer. However, @Where creates an objectdependency. If you delete the source object, you must manually update the object that uses the @Wherefunction.
18.4 About SQL Generation Parameters
SQL generation parameters affect the generation of the query script. The parameters all have defaultvalues. Default values can be overridden in the data foundation properties. Some parameters (concerninglists of values) can also be overridden in the business layer properties. At query time, the query serverwill use the values it finds in the following order:1. The value in the business layer, if it is set.2. The value in the data foundation, if it is set.3. The default value.
The following reference describes the parameters that affect the generation of the query script. Theparameters are listed alphabetical order in two groups:• SQL parameters that you set in the user interface of the information design tool. These are SQL
parameters that are common to most data access drivers. Each parameter is valid for the universein which it is set.
• SQL parameters that you set in the extended data access parameter (PRM) files. These areconnection-specific parameters that are listed in the extended PRM file for the target data accessdriver.
Related Topics• SQL generation parameters reference• SQL generation parameters set in the extended PRM• About data foundation properties
2013-08-03411
SQL and MDX reference
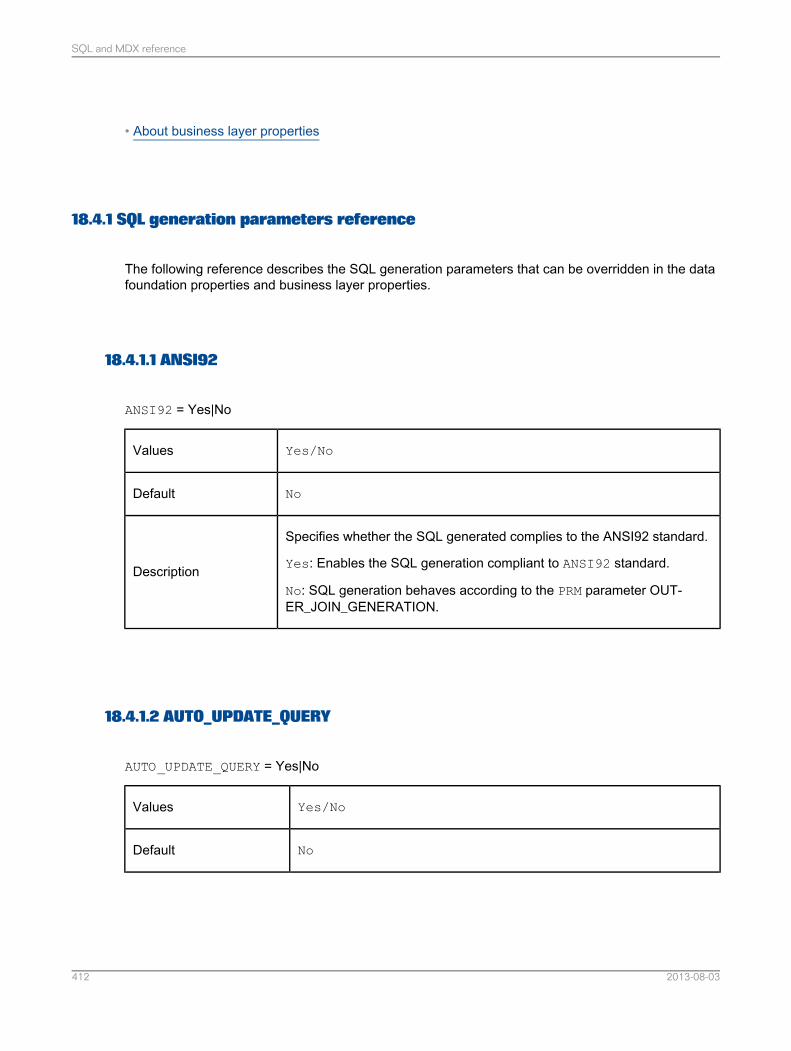
• About business layer properties
18.4.1 SQL generation parameters reference
The following reference describes the SQL generation parameters that can be overridden in the datafoundation properties and business layer properties.
18.4.1.1 ANSI92
ANSI92 = Yes|No
Yes/NoValues
NoDefault
Specifies whether the SQL generated complies to the ANSI92 standard.
Yes: Enables the SQL generation compliant to ANSI92 standard.
No: SQL generation behaves according to the PRM parameter OUT-ER_JOIN_GENERATION.
Description
18.4.1.2 AUTO_UPDATE_QUERY
AUTO_UPDATE_QUERY = Yes|No
Yes/NoValues
NoDefault
2013-08-03412
SQL and MDX reference
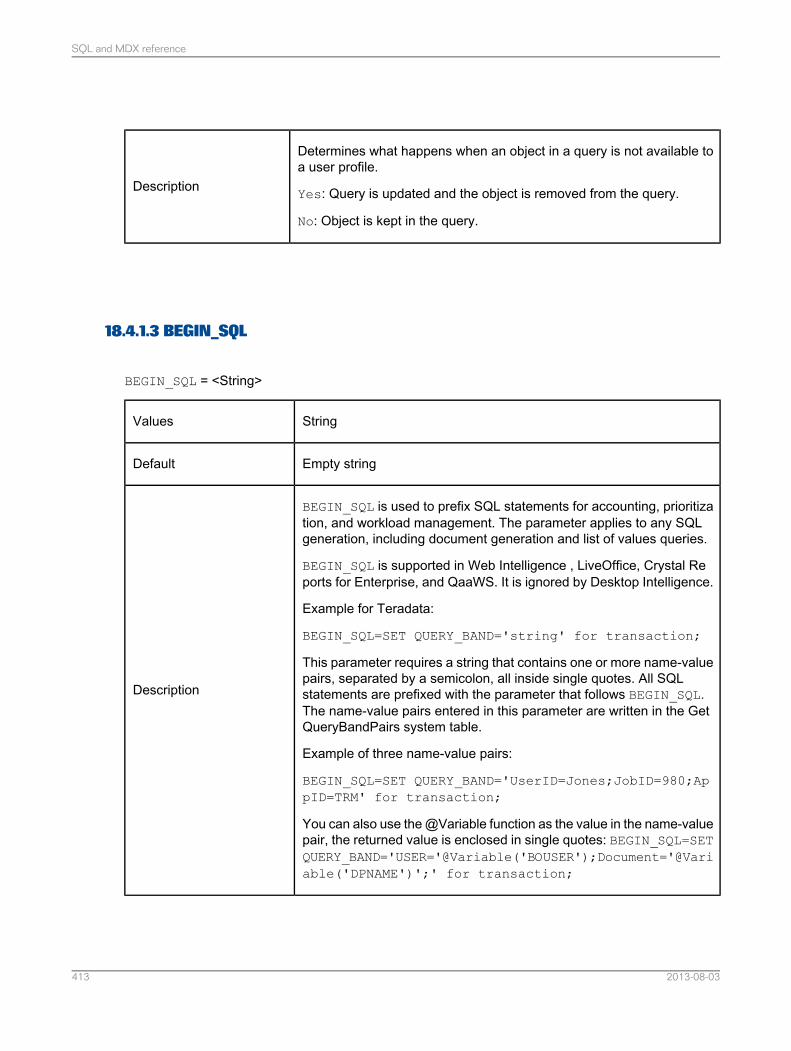
Determines what happens when an object in a query is not available toa user profile.
Yes: Query is updated and the object is removed from the query.
No: Object is kept in the query.
Description
18.4.1.3 BEGIN_SQL
BEGIN_SQL = <String>
StringValues
Empty stringDefault
BEGIN_SQL is used to prefix SQL statements for accounting, prioritization, and workload management. The parameter applies to any SQLgeneration, including document generation and list of values queries.
BEGIN_SQL is supported in Web Intelligence , LiveOffice, Crystal Reports for Enterprise, and QaaWS. It is ignored by Desktop Intelligence.
Example for Teradata:
BEGIN_SQL=SET QUERY_BAND='string' for transaction;
This parameter requires a string that contains one or more name-valuepairs, separated by a semicolon, all inside single quotes. All SQLstatements are prefixed with the parameter that follows BEGIN_SQL.The name-value pairs entered in this parameter are written in the GetQueryBandPairs system table.
Example of three name-value pairs:
BEGIN_SQL=SET QUERY_BAND='UserID=Jones;JobID=980;AppID=TRM' for transaction;
You can also use the @Variable function as the value in the name-valuepair, the returned value is enclosed in single quotes: BEGIN_SQL=SETQUERY_BAND='USER='@Variable('BOUSER');Document='@Variable('DPNAME')';' for transaction;
Description
2013-08-03413
SQL and MDX reference
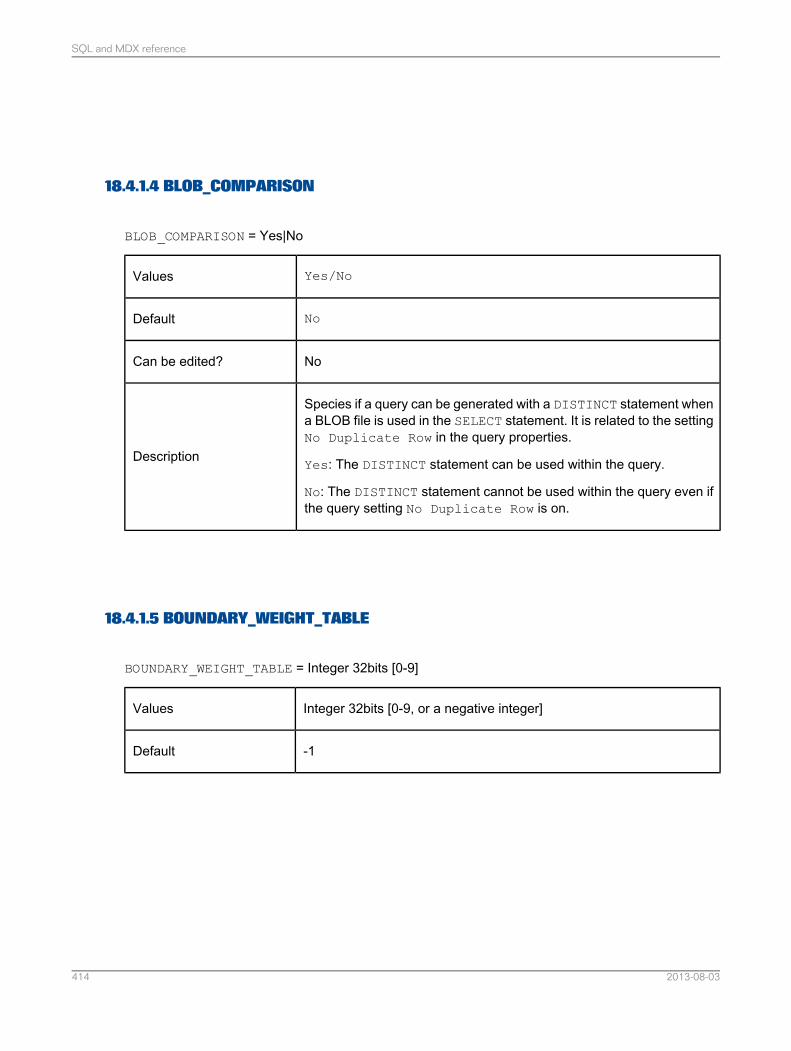
18.4.1.4 BLOB_COMPARISON
BLOB_COMPARISON = Yes|No
Yes/NoValues
NoDefault
NoCan be edited?
Species if a query can be generated with a DISTINCT statement whena BLOB file is used in the SELECT statement. It is related to the settingNo Duplicate Row in the query properties.
Yes: The DISTINCT statement can be used within the query.
No: The DISTINCT statement cannot be used within the query even ifthe query setting No Duplicate Row is on.
Description
18.4.1.5 BOUNDARY_WEIGHT_TABLE
BOUNDARY_WEIGHT_TABLE = Integer 32bits [0-9]
Integer 32bits [0-9, or a negative integer]Values
-1Default
2013-08-03414
SQL and MDX reference
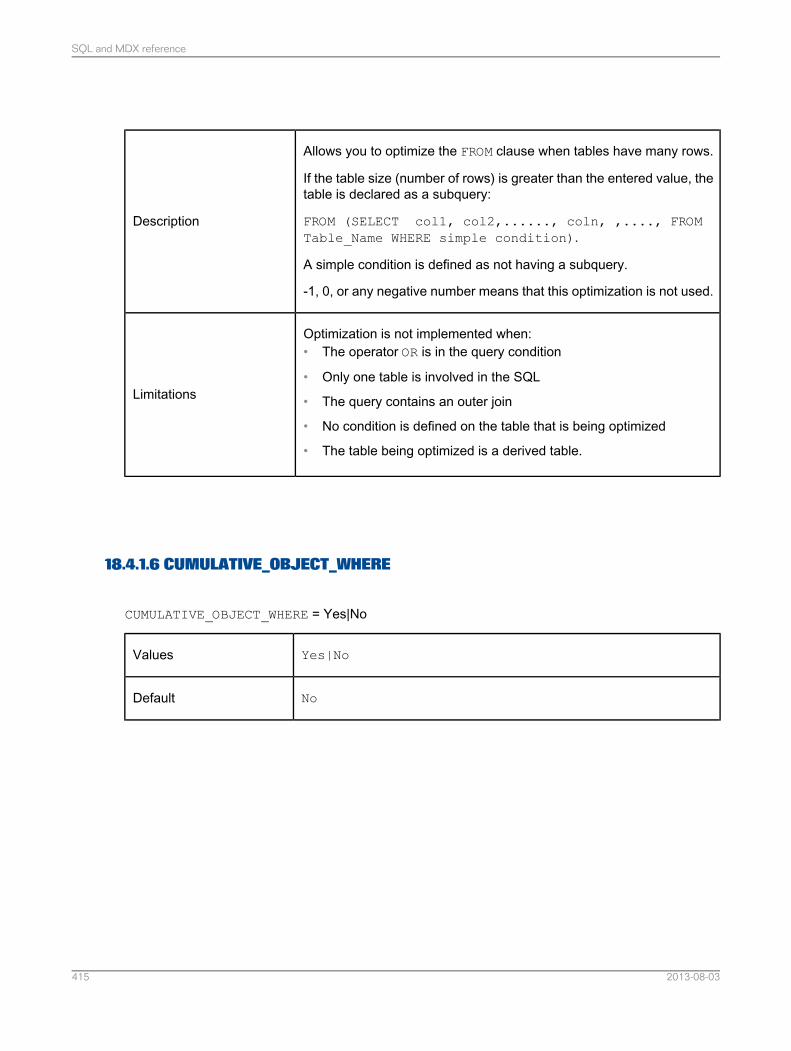
Allows you to optimize the FROM clause when tables have many rows.
If the table size (number of rows) is greater than the entered value, thetable is declared as a subquery:
FROM (SELECT col1, col2,......, coln, ,...., FROMTable_Name WHERE simple condition).
A simple condition is defined as not having a subquery.
-1, 0, or any negative number means that this optimization is not used.
Description
Optimization is not implemented when:• The operator OR is in the query condition
• Only one table is involved in the SQL
• The query contains an outer join
• No condition is defined on the table that is being optimized
• The table being optimized is a derived table.
Limitations
18.4.1.6 CUMULATIVE_OBJECT_WHERE
CUMULATIVE_OBJECT_WHERE = Yes|No
Yes|NoValues
NoDefault
2013-08-03415
SQL and MDX reference
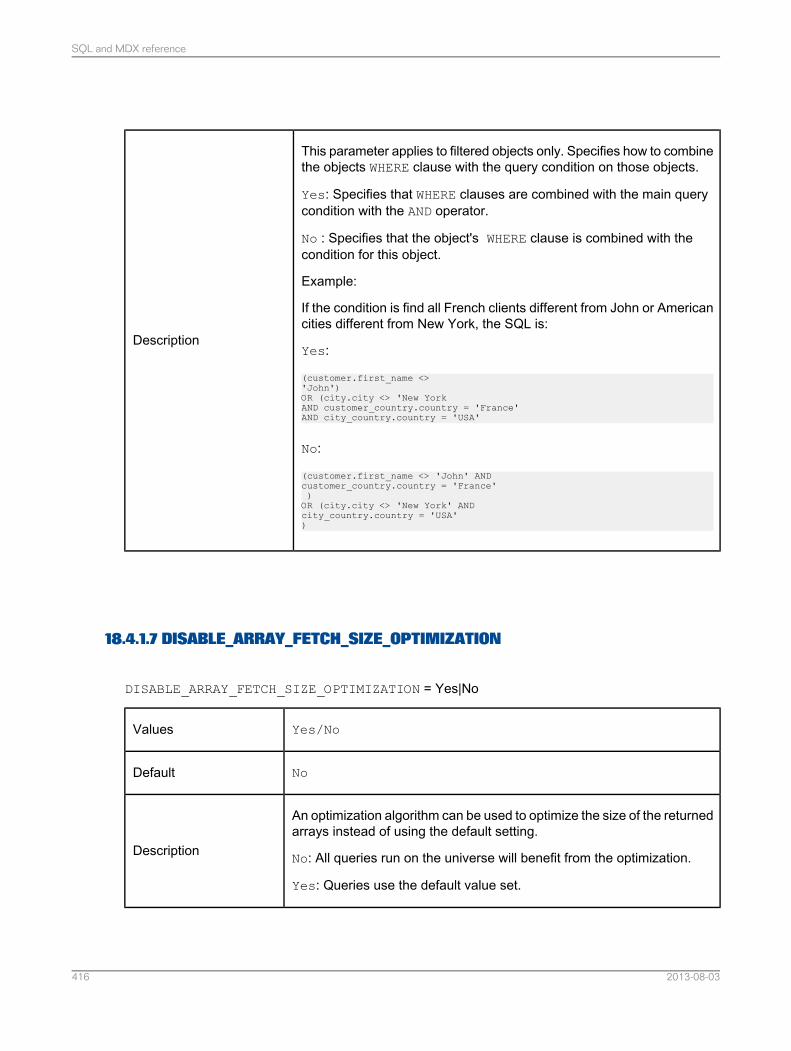
This parameter applies to filtered objects only. Specifies how to combinethe objects WHERE clause with the query condition on those objects.
Yes: Specifies that WHERE clauses are combined with the main querycondition with the AND operator.
No : Specifies that the object's WHERE clause is combined with thecondition for this object.
Example:
If the condition is find all French clients different from John or Americancities different from New York, the SQL is:
Yes:
(customer.first_name <>'John')OR (city.city <> 'New YorkAND customer_country.country = 'France'AND city_country.country = 'USA'
No:
(customer.first_name <> 'John' ANDcustomer_country.country = 'France')OR (city.city <> 'New York' ANDcity_country.country = 'USA')
Description
18.4.1.7 DISABLE_ARRAY_FETCH_SIZE_OPTIMIZATION
DISABLE_ARRAY_FETCH_SIZE_OPTIMIZATION = Yes|No
Yes/NoValues
NoDefault
An optimization algorithm can be used to optimize the size of the returnedarrays instead of using the default setting.
No: All queries run on the universe will benefit from the optimization.
Yes: Queries use the default value set.
Description
2013-08-03416
SQL and MDX reference
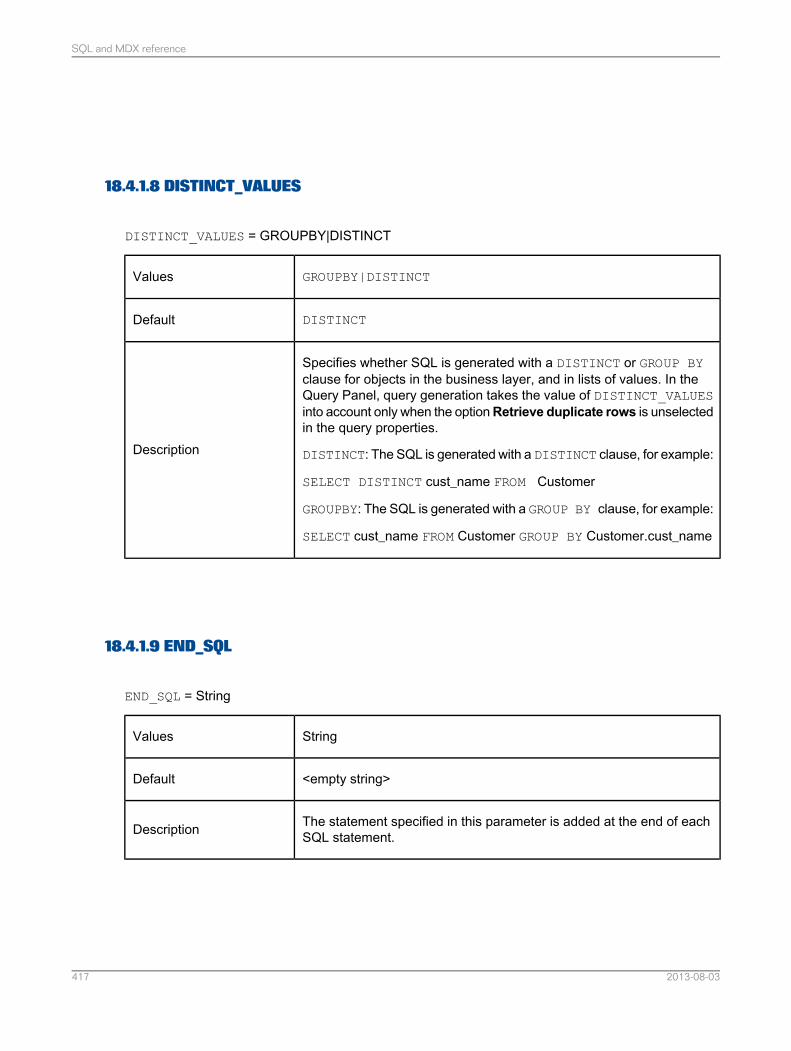
18.4.1.8 DISTINCT_VALUES
DISTINCT_VALUES = GROUPBY|DISTINCT
GROUPBY|DISTINCTValues
DISTINCTDefault
Specifies whether SQL is generated with a DISTINCT or GROUP BYclause for objects in the business layer, and in lists of values. In theQuery Panel, query generation takes the value of DISTINCT_VALUESinto account only when the optionRetrieve duplicate rows is unselectedin the query properties.
DISTINCT: The SQL is generated with a DISTINCT clause, for example:
SELECT DISTINCT cust_name FROM Customer
GROUPBY: The SQL is generated with a GROUP BY clause, for example:
SELECT cust_name FROM Customer GROUP BY Customer.cust_name
Description
18.4.1.9 END_SQL
END_SQL = String
StringValues
<empty string>Default
The statement specified in this parameter is added at the end of eachSQL statement.Description
2013-08-03417
SQL and MDX reference
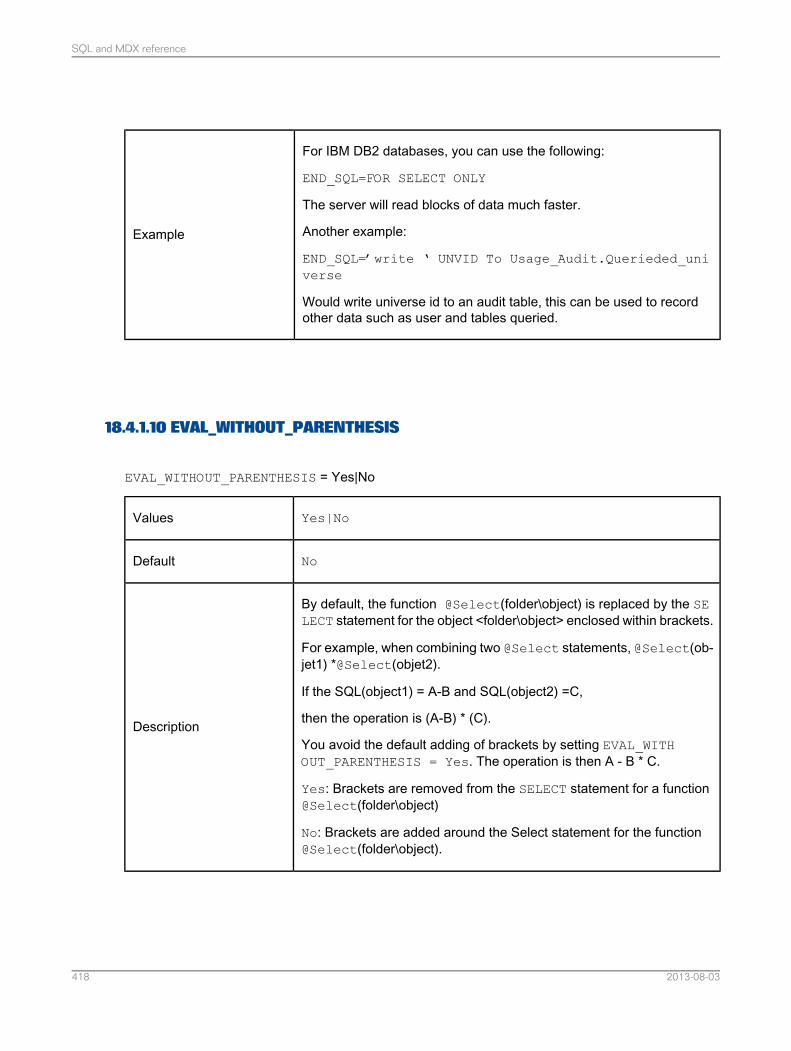
For IBM DB2 databases, you can use the following:
END_SQL=FOR SELECT ONLY
The server will read blocks of data much faster.
Another example:
END_SQL=’write ‘ UNVID To Usage_Audit.Querieded_universe
Would write universe id to an audit table, this can be used to recordother data such as user and tables queried.
Example
18.4.1.10 EVAL_WITHOUT_PARENTHESIS
EVAL_WITHOUT_PARENTHESIS = Yes|No
Yes|NoValues
NoDefault
By default, the function @Select(folder\object) is replaced by the SELECT statement for the object <folder\object> enclosed within brackets.
For example, when combining two @Select statements, @Select(ob-jet1) *@Select(objet2).
If the SQL(object1) = A-B and SQL(object2) =C,
then the operation is (A-B) * (C).
You avoid the default adding of brackets by setting EVAL_WITHOUT_PARENTHESIS = Yes. The operation is then A - B * C.
Yes: Brackets are removed from the SELECT statement for a function@Select(folder\object)
No: Brackets are added around the Select statement for the function@Select(folder\object).
Description
2013-08-03418
SQL and MDX reference

18.4.1.11 FILTER_IN_FROM
FILTER_IN_FROM = Yes|No
Yes/NoValues
NoDefault
Determines if the generated SQL includes query filters in the FROMclause whenever possible.
Note:This setting is only applicable if the SQL generation parameter ANSI92is set to Yes.
This parameter is useful when querying tables that have outer joins de-fined. For example, an outer join on tables Customer and Reservationsreturns all customers, even those without reservations. A query filter inthe WHERE clause might filter out customers without reservations. If theFILTER_IN_FROM parameter is set to Yes, the generated SQL includesquery filters in the FROM clause whenever possible in order to preservethe null values returned by the outer join.
Yes: When SQL is generated, query filters are put in the FROM clausewhenever possible.
No: When SQL is generated, query filters are put in the WHERE clause.
Description
18.4.1.12 FORCE_SORTED_LOV
FORCE_SORTED_LOV = Yes|No
Yes|NoValues
NoDefault
2013-08-03419
SQL and MDX reference
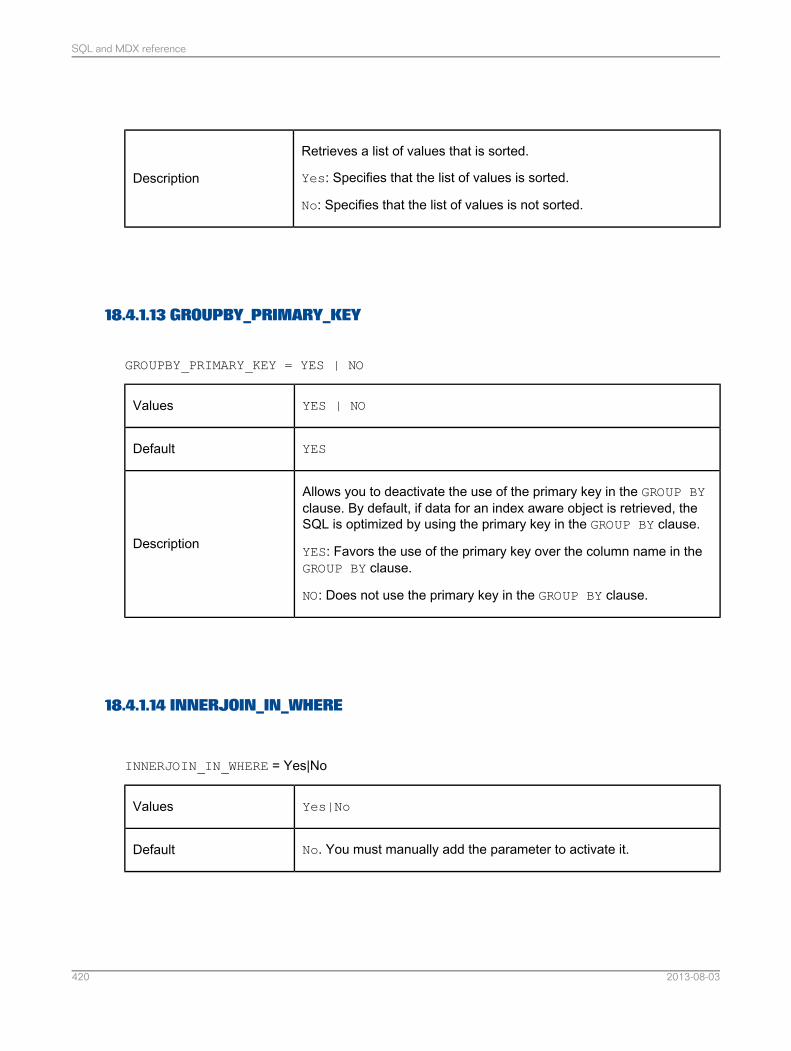
Retrieves a list of values that is sorted.
Yes: Specifies that the list of values is sorted.
No: Specifies that the list of values is not sorted.
Description
18.4.1.13 GROUPBY_PRIMARY_KEY
GROUPBY_PRIMARY_KEY = YES | NO
YES | NOValues
YESDefault
Allows you to deactivate the use of the primary key in the GROUP BYclause. By default, if data for an index aware object is retrieved, theSQL is optimized by using the primary key in the GROUP BY clause.
YES: Favors the use of the primary key over the column name in theGROUP BY clause.
NO: Does not use the primary key in the GROUP BY clause.
Description
18.4.1.14 INNERJOIN_IN_WHERE
INNERJOIN_IN_WHERE = Yes|No
Yes|NoValues
No. You must manually add the parameter to activate it.Default
2013-08-03420
SQL and MDX reference
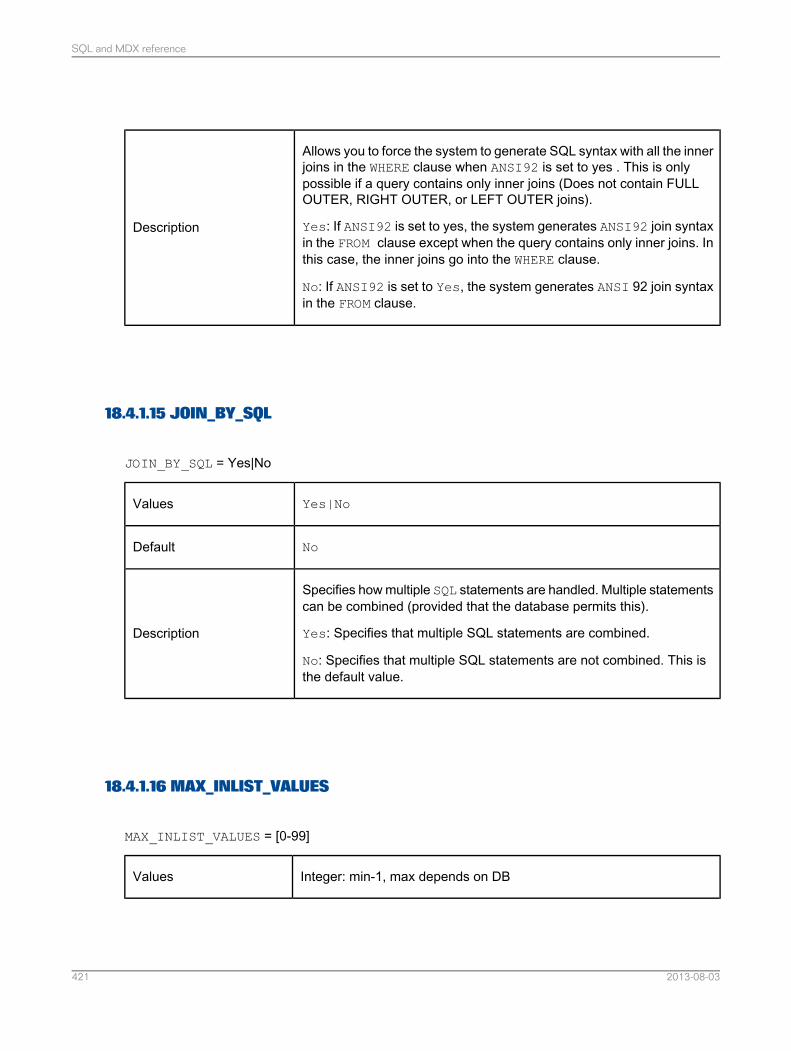
Allows you to force the system to generate SQL syntax with all the innerjoins in the WHERE clause when ANSI92 is set to yes . This is onlypossible if a query contains only inner joins (Does not contain FULLOUTER, RIGHT OUTER, or LEFT OUTER joins).
Yes: If ANSI92 is set to yes, the system generates ANSI92 join syntaxin the FROM clause except when the query contains only inner joins. Inthis case, the inner joins go into the WHERE clause.
No: If ANSI92 is set to Yes, the system generates ANSI 92 join syntaxin the FROM clause.
Description
18.4.1.15 JOIN_BY_SQL
JOIN_BY_SQL = Yes|No
Yes|NoValues
NoDefault
Specifies how multiple SQL statements are handled. Multiple statementscan be combined (provided that the database permits this).
Yes: Specifies that multiple SQL statements are combined.
No: Specifies that multiple SQL statements are not combined. This isthe default value.
Description
18.4.1.16 MAX_INLIST_VALUES
MAX_INLIST_VALUES = [0-99]
Integer: min-1, max depends on DBValues
2013-08-03421
SQL and MDX reference
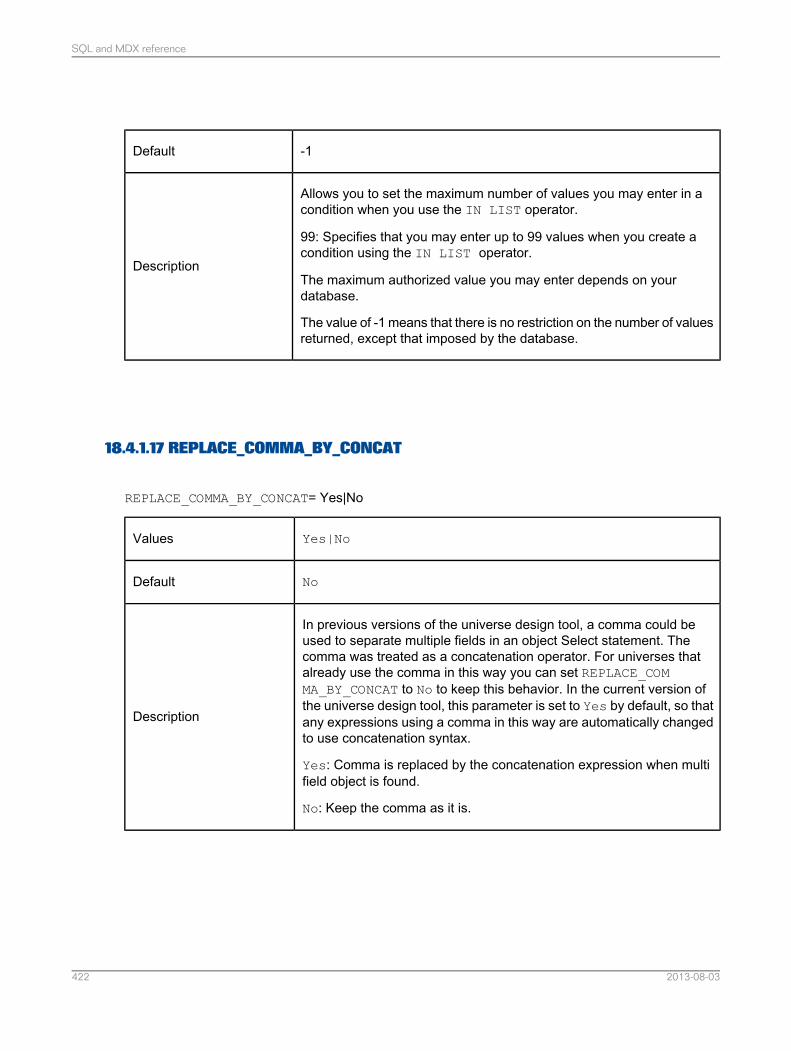
-1Default
Allows you to set the maximum number of values you may enter in acondition when you use the IN LIST operator.
99: Specifies that you may enter up to 99 values when you create acondition using the IN LIST operator.
The maximum authorized value you may enter depends on yourdatabase.
The value of -1 means that there is no restriction on the number of valuesreturned, except that imposed by the database.
Description
18.4.1.17 REPLACE_COMMA_BY_CONCAT
REPLACE_COMMA_BY_CONCAT= Yes|No
Yes|NoValues
NoDefault
In previous versions of the universe design tool, a comma could beused to separate multiple fields in an object Select statement. Thecomma was treated as a concatenation operator. For universes thatalready use the comma in this way you can set REPLACE_COMMA_BY_CONCAT to No to keep this behavior. In the current version ofthe universe design tool, this parameter is set to Yes by default, so thatany expressions using a comma in this way are automatically changedto use concatenation syntax.
Yes: Comma is replaced by the concatenation expression when multifield object is found.
No: Keep the comma as it is.
Description
2013-08-03422
SQL and MDX reference

18.4.1.18 SELFJOINS_IN_WHERE
SELFJOINS_IN_WHERE = Yes|No
Yes|NoValues
NoDefault
Self-joins are usually included in the FROM clause. This allows you toforce the system to generate SQL syntax with all the conditions of aself-join in the WHERE clause. The ANSI92 parameter must be set toYes for this parameter to be taken into account.
You must manually add the parameter to the list to activate it.
Yes: The conditions of a self-join go in the WHERE clause of the SQLquery.
No: The syntax for self-joins is generated according to the ANSI 92convention, and conditions for a self-join go in the ON clause of the tablejoin definition in the FROM clause of the SQL query.
Description
18.4.1.19 SHORTCUT_BEHAVIOR
SHORTCUT_BEHAVIOR = ShortestPath|Global|Successive
ShortestPath|Global|SuccessiveValues
ShortestPathDefault
2013-08-03423
SQL and MDX reference
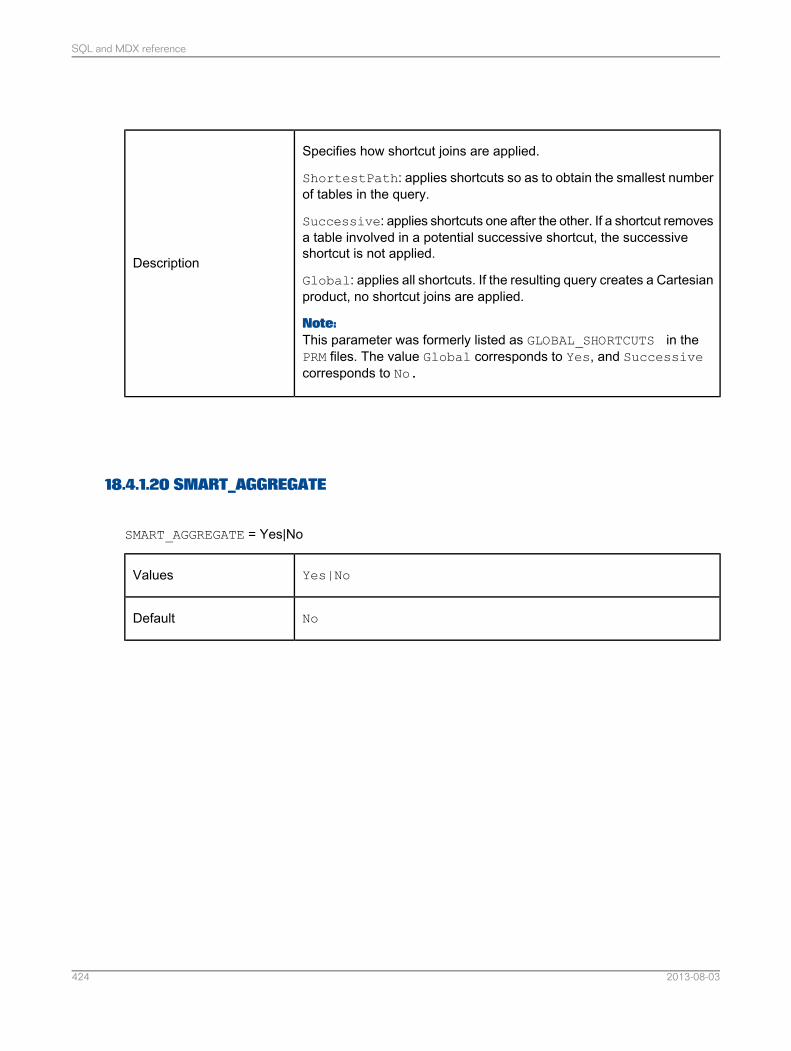
Specifies how shortcut joins are applied.
ShortestPath: applies shortcuts so as to obtain the smallest numberof tables in the query.
Successive: applies shortcuts one after the other. If a shortcut removesa table involved in a potential successive shortcut, the successiveshortcut is not applied.
Global: applies all shortcuts. If the resulting query creates a Cartesianproduct, no shortcut joins are applied.
Note:This parameter was formerly listed as GLOBAL_SHORTCUTS in thePRM files. The value Global corresponds to Yes, and Successivecorresponds to No.
Description
18.4.1.20 SMART_AGGREGATE
SMART_AGGREGATE = Yes|No
Yes|NoValues
NoDefault
2013-08-03424
SQL and MDX reference
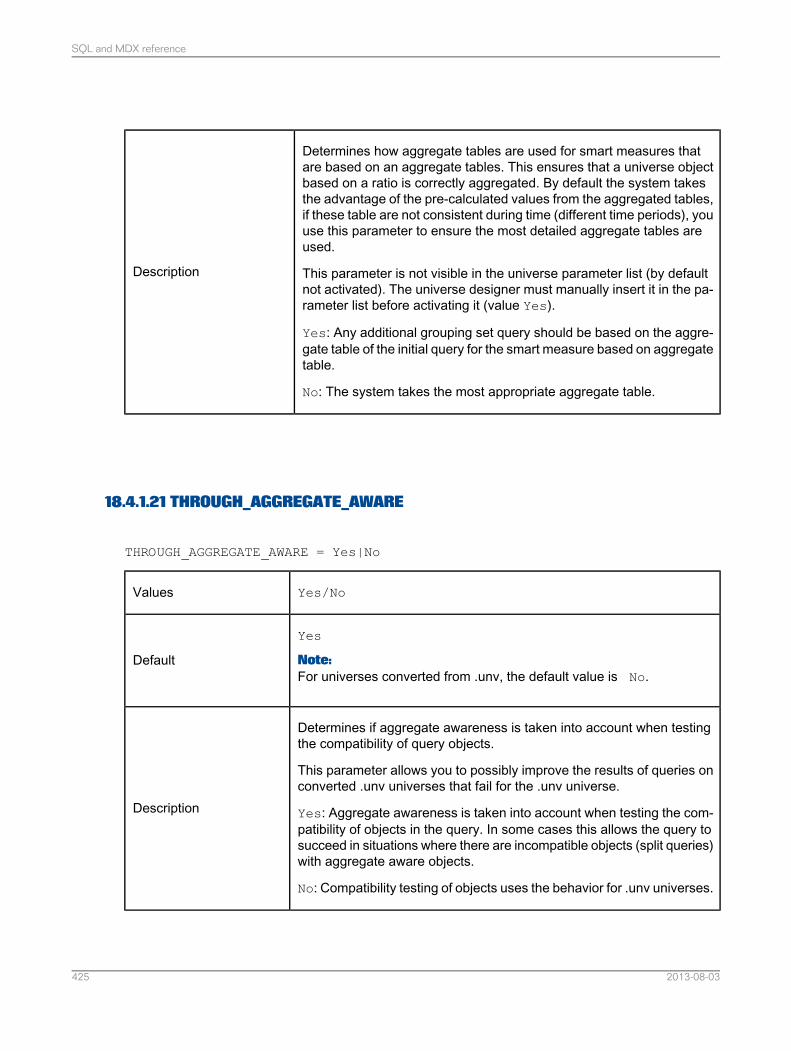
Determines how aggregate tables are used for smart measures thatare based on an aggregate tables. This ensures that a universe objectbased on a ratio is correctly aggregated. By default the system takesthe advantage of the pre-calculated values from the aggregated tables,if these table are not consistent during time (different time periods), youuse this parameter to ensure the most detailed aggregate tables areused.
This parameter is not visible in the universe parameter list (by defaultnot activated). The universe designer must manually insert it in the pa-rameter list before activating it (value Yes).
Yes: Any additional grouping set query should be based on the aggre-gate table of the initial query for the smart measure based on aggregatetable.
No: The system takes the most appropriate aggregate table.
Description
18.4.1.21 THROUGH_AGGREGATE_AWARE
THROUGH_AGGREGATE_AWARE = Yes|No
Yes/NoValues
Yes
Note:For universes converted from .unv, the default value is No.
Default
Determines if aggregate awareness is taken into account when testingthe compatibility of query objects.
This parameter allows you to possibly improve the results of queries onconverted .unv universes that fail for the .unv universe.
Yes: Aggregate awareness is taken into account when testing the com-patibility of objects in the query. In some cases this allows the query tosucceed in situations where there are incompatible objects (split queries)with aggregate aware objects.
No: Compatibility testing of objects uses the behavior for .unv universes.
Description
2013-08-03425
SQL and MDX reference
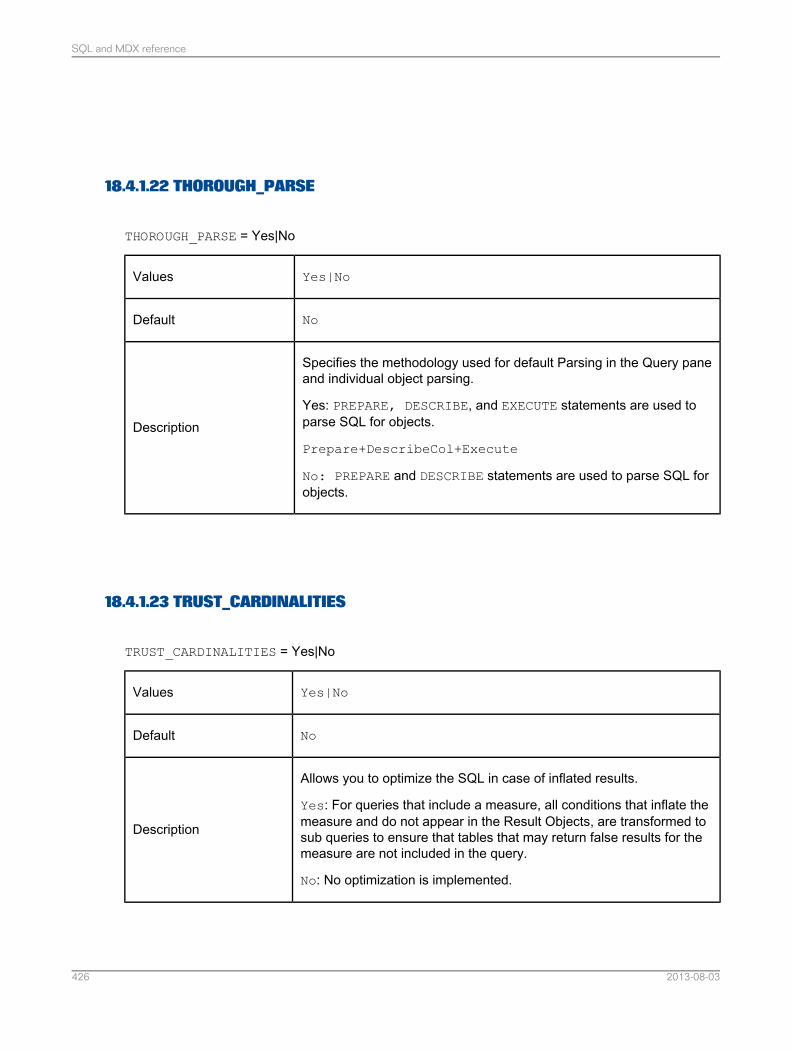
18.4.1.22 THOROUGH_PARSE
THOROUGH_PARSE = Yes|No
Yes|NoValues
NoDefault
Specifies the methodology used for default Parsing in the Query paneand individual object parsing.
Yes: PREPARE, DESCRIBE, and EXECUTE statements are used toparse SQL for objects.
Prepare+DescribeCol+Execute
No: PREPARE and DESCRIBE statements are used to parse SQL forobjects.
Description
18.4.1.23 TRUST_CARDINALITIES
TRUST_CARDINALITIES = Yes|No
Yes|NoValues
NoDefault
Allows you to optimize the SQL in case of inflated results.
Yes: For queries that include a measure, all conditions that inflate themeasure and do not appear in the Result Objects, are transformed tosub queries to ensure that tables that may return false results for themeasure are not included in the query.
No: No optimization is implemented.
Description
2013-08-03426
SQL and MDX reference
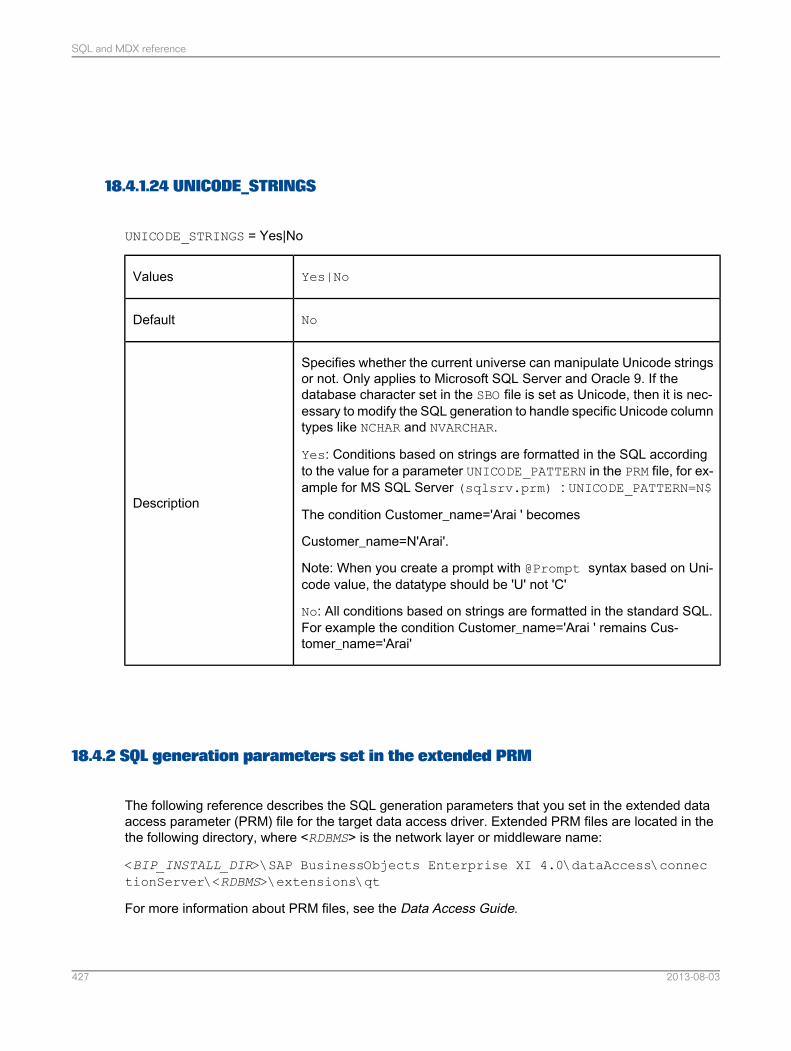
18.4.1.24 UNICODE_STRINGS
UNICODE_STRINGS = Yes|No
Yes|NoValues
NoDefault
Specifies whether the current universe can manipulate Unicode stringsor not. Only applies to Microsoft SQL Server and Oracle 9. If thedatabase character set in the SBO file is set as Unicode, then it is nec-essary to modify the SQL generation to handle specific Unicode columntypes like NCHAR and NVARCHAR.
Yes: Conditions based on strings are formatted in the SQL accordingto the value for a parameter UNICODE_PATTERN in the PRM file, for ex-ample for MS SQL Server (sqlsrv.prm) : UNICODE_PATTERN=N$
The condition Customer_name='Arai ' becomes
Customer_name=N'Arai'.
Note: When you create a prompt with @Prompt syntax based on Uni-code value, the datatype should be 'U' not 'C'
No: All conditions based on strings are formatted in the standard SQL.For example the condition Customer_name='Arai ' remains Cus-tomer_name='Arai'
Description
18.4.2 SQL generation parameters set in the extended PRM
The following reference describes the SQL generation parameters that you set in the extended dataaccess parameter (PRM) file for the target data access driver. Extended PRM files are located in thethe following directory, where <RDBMS> is the network layer or middleware name:
<BIP_INSTALL_DIR>\SAP BusinessObjects Enterprise XI 4.0\dataAccess\connectionServer\<RDBMS>\extensions\qt
For more information about PRM files, see the Data Access Guide.
2013-08-03427
SQL and MDX reference
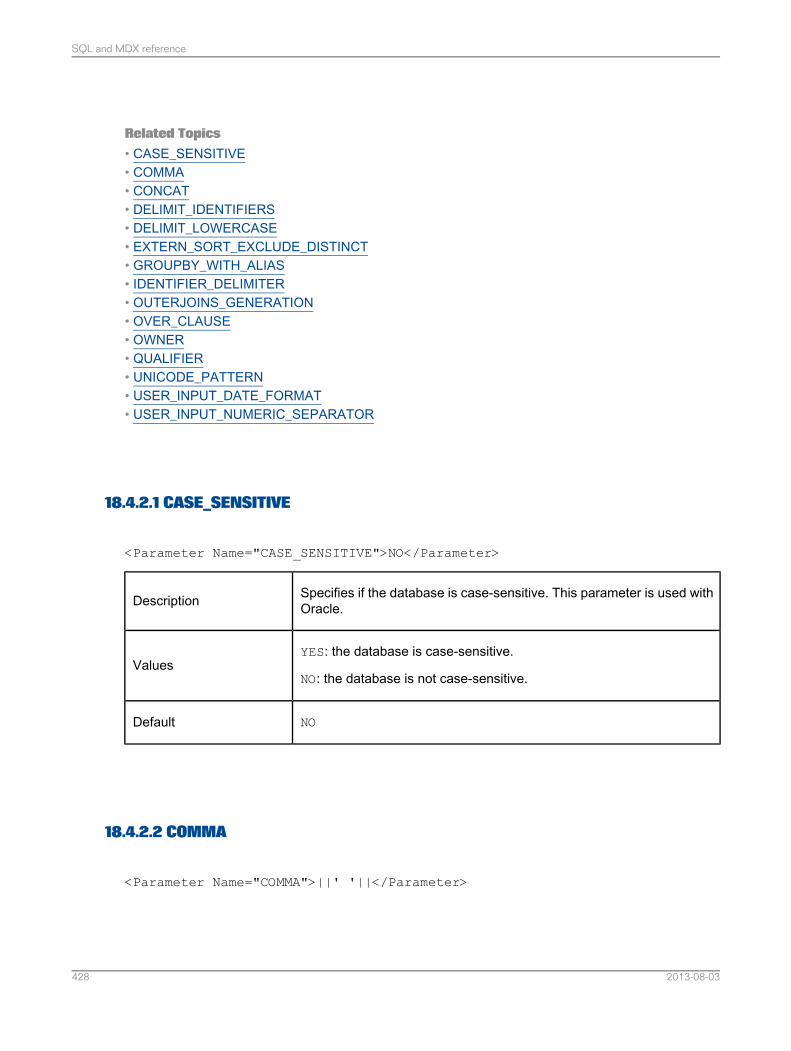
Related Topics• CASE_SENSITIVE• COMMA• CONCAT• DELIMIT_IDENTIFIERS• DELIMIT_LOWERCASE• EXTERN_SORT_EXCLUDE_DISTINCT• GROUPBY_WITH_ALIAS• IDENTIFIER_DELIMITER• OUTERJOINS_GENERATION• OVER_CLAUSE• OWNER• QUALIFIER• UNICODE_PATTERN• USER_INPUT_DATE_FORMAT• USER_INPUT_NUMERIC_SEPARATOR
18.4.2.1 CASE_SENSITIVE
<Parameter Name="CASE_SENSITIVE">NO</Parameter>
Specifies if the database is case-sensitive. This parameter is used withOracle.Description
YES: the database is case-sensitive.
NO: the database is not case-sensitive.Values
NODefault
18.4.2.2 COMMA
<Parameter Name="COMMA">||' '||</Parameter>
2013-08-03428
SQL and MDX reference
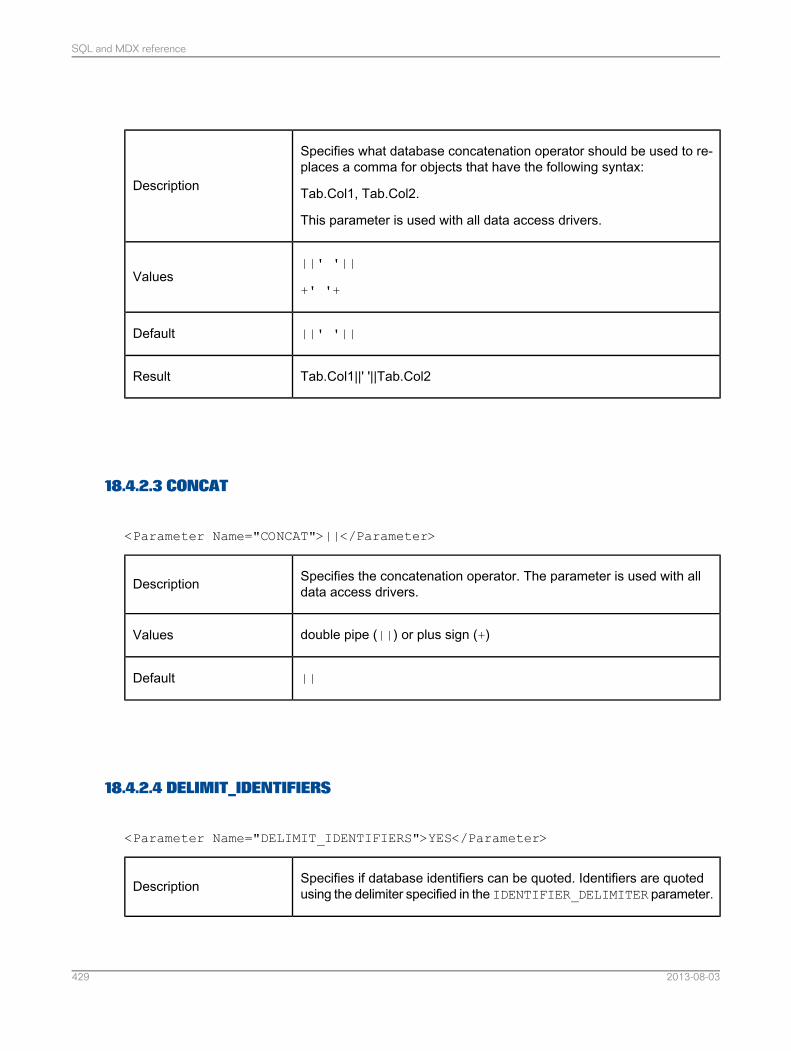
Specifies what database concatenation operator should be used to re-places a comma for objects that have the following syntax:
Tab.Col1, Tab.Col2.
This parameter is used with all data access drivers.
Description
||' '||
+' '+Values
||' '||Default
Tab.Col1||' '||Tab.Col2Result
18.4.2.3 CONCAT
<Parameter Name="CONCAT">||</Parameter>
Specifies the concatenation operator. The parameter is used with alldata access drivers.Description
double pipe (||) or plus sign (+)Values
||Default
18.4.2.4 DELIMIT_IDENTIFIERS
<Parameter Name="DELIMIT_IDENTIFIERS">YES</Parameter>
Specifies if database identifiers can be quoted. Identifiers are quotedusing the delimiter specified in the IDENTIFIER_DELIMITER parameter.Description
2013-08-03429
SQL and MDX reference
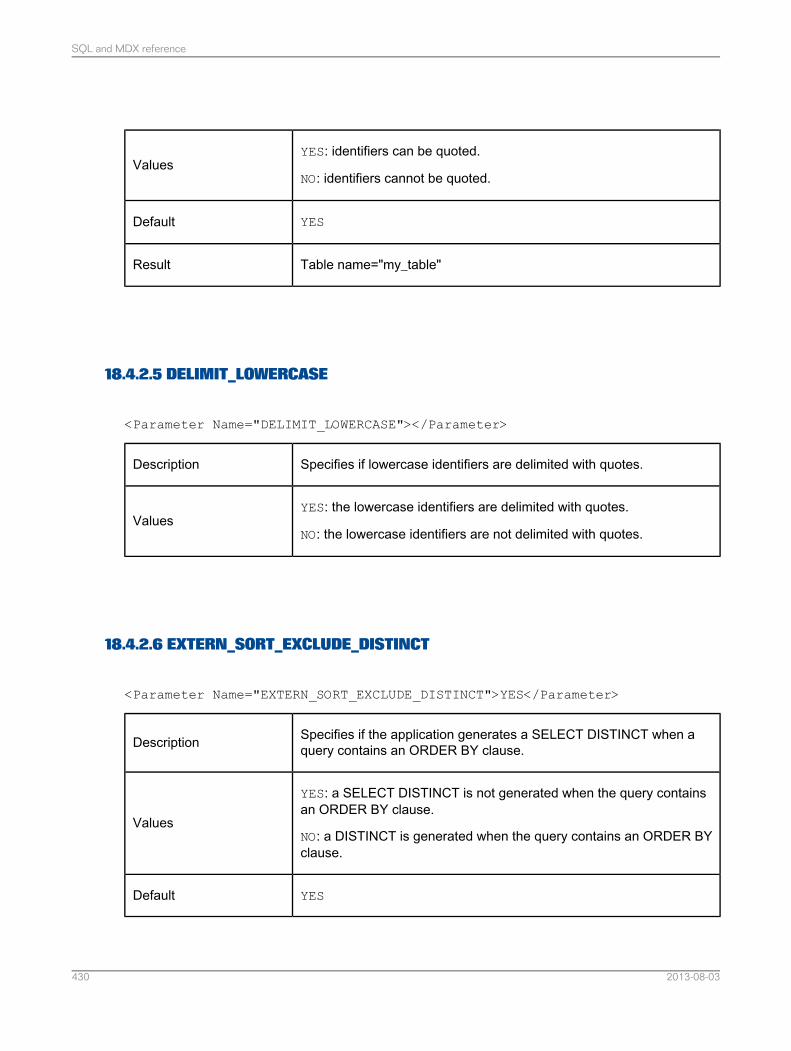
YES: identifiers can be quoted.
NO: identifiers cannot be quoted.Values
YESDefault
Table name="my_table"Result
18.4.2.5 DELIMIT_LOWERCASE
<Parameter Name="DELIMIT_LOWERCASE"></Parameter>
Specifies if lowercase identifiers are delimited with quotes.Description
YES: the lowercase identifiers are delimited with quotes.
NO: the lowercase identifiers are not delimited with quotes.Values
18.4.2.6 EXTERN_SORT_EXCLUDE_DISTINCT
<Parameter Name="EXTERN_SORT_EXCLUDE_DISTINCT">YES</Parameter>
Specifies if the application generates a SELECT DISTINCT when aquery contains an ORDER BY clause.Description
YES: a SELECT DISTINCT is not generated when the query containsan ORDER BY clause.
NO: a DISTINCT is generated when the query contains an ORDER BYclause.
Values
YESDefault
2013-08-03430
SQL and MDX reference
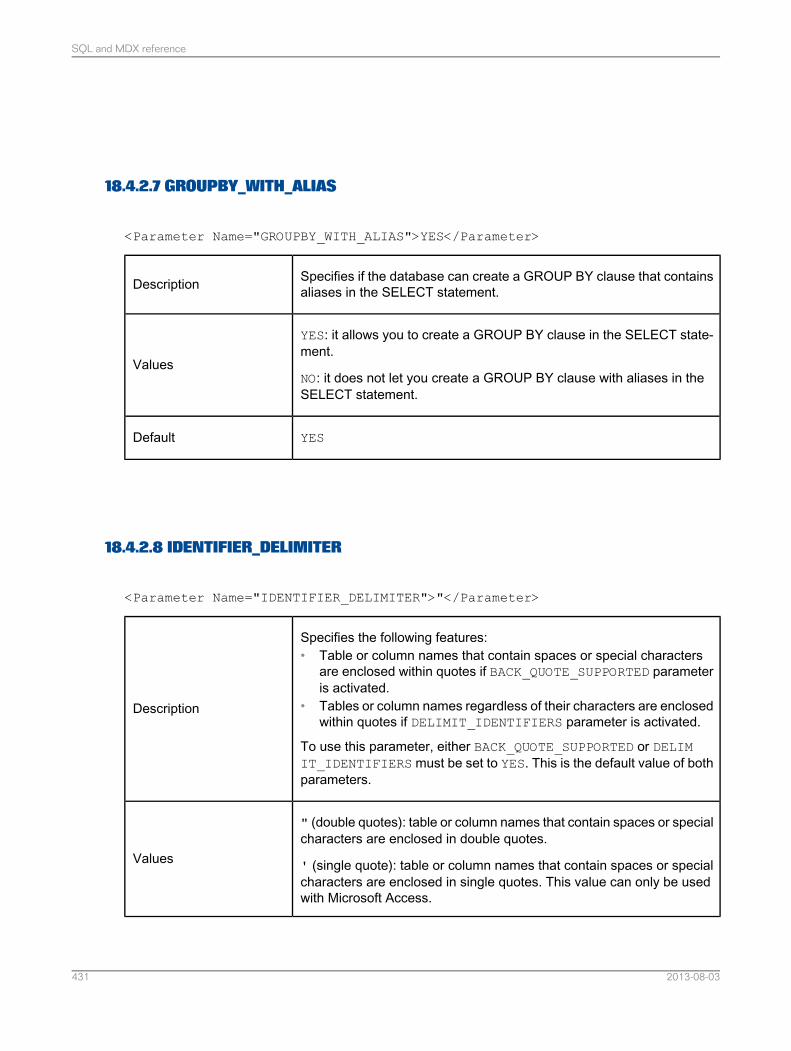
18.4.2.7 GROUPBY_WITH_ALIAS
<Parameter Name="GROUPBY_WITH_ALIAS">YES</Parameter>
Specifies if the database can create a GROUP BY clause that containsaliases in the SELECT statement.Description
YES: it allows you to create a GROUP BY clause in the SELECT state-ment.
NO: it does not let you create a GROUP BY clause with aliases in theSELECT statement.
Values
YESDefault
18.4.2.8 IDENTIFIER_DELIMITER
<Parameter Name="IDENTIFIER_DELIMITER">"</Parameter>
Specifies the following features:• Table or column names that contain spaces or special characters
are enclosed within quotes if BACK_QUOTE_SUPPORTED parameteris activated.
• Tables or column names regardless of their characters are enclosedwithin quotes if DELIMIT_IDENTIFIERS parameter is activated.
To use this parameter, either BACK_QUOTE_SUPPORTED or DELIMIT_IDENTIFIERS must be set to YES. This is the default value of bothparameters.
Description
" (double quotes): table or column names that contain spaces or specialcharacters are enclosed in double quotes.
' (single quote): table or column names that contain spaces or specialcharacters are enclosed in single quotes. This value can only be usedwith Microsoft Access.
Values
2013-08-03431
SQL and MDX reference

"Default
Table name="My Table"Result
18.4.2.9 OUTERJOINS_GENERATION
<Parameter Name="OUTERJOINS_GENERATION">ANSI92</Parameter>
Specifies the SQL syntax for outer joins.
The value ANSI 92 generates an outer join in the FROM clause. Othervalues generate the outer join in the WHERE clause.
When you modify this setting, you should check join properties to verifythat the outer join expression is valid, and that the cardinalities are cor-rect. ANSI92 does not support any manual customization in the joinsyntax.
Note:The PRM file OUTERJOINS_GENERATION parameter relates to theuniverse ANSI92 setting in the following way:• If the PRM file OUTERJOINS_GENERATION parameter is set to AN
SI_92 and the universe ANSI92 parameter is set to NO, the PRMparameter overrides the universe setting and outer joins conform toANSI92 behavior.
• If the PRM file OUTERJOINS_GENERATION parameter is set toUSUAL, then the universe ANSI92 setting takes precedence, andouter joins conform to ANSI92 depending on whether the universeANSI92 setting is YES or NO.
Description
2013-08-03432
SQL and MDX reference
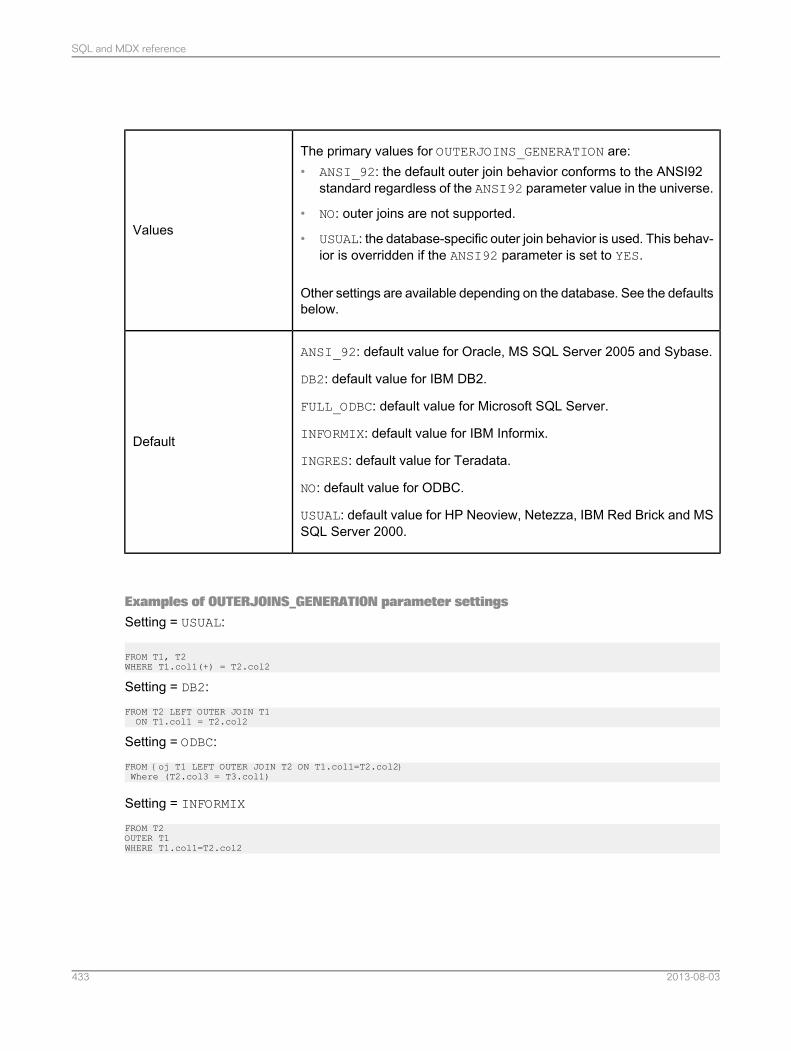
The primary values for OUTERJOINS_GENERATION are:• ANSI_92: the default outer join behavior conforms to the ANSI92
standard regardless of the ANSI92 parameter value in the universe.
• NO: outer joins are not supported.
• USUAL: the database-specific outer join behavior is used. This behav-ior is overridden if the ANSI92 parameter is set to YES.
Other settings are available depending on the database. See the defaultsbelow.
Values
ANSI_92: default value for Oracle, MS SQL Server 2005 and Sybase.
DB2: default value for IBM DB2.
FULL_ODBC: default value for Microsoft SQL Server.
INFORMIX: default value for IBM Informix.
INGRES: default value for Teradata.
NO: default value for ODBC.
USUAL: default value for HP Neoview, Netezza, IBM Red Brick and MSSQL Server 2000.
Default
Examples of OUTERJOINS_GENERATION parameter settingsSetting = USUAL:
FROM T1, T2WHERE T1.col1(+) = T2.col2
Setting = DB2:FROM T2 LEFT OUTER JOIN T1ON T1.col1 = T2.col2
Setting = ODBC:FROM {oj T1 LEFT OUTER JOIN T2 ON T1.col1=T2.col2}Where (T2.col3 = T3.col1)
Setting = INFORMIX
FROM T2OUTER T1WHERE T1.col1=T2.col2
2013-08-03433
SQL and MDX reference
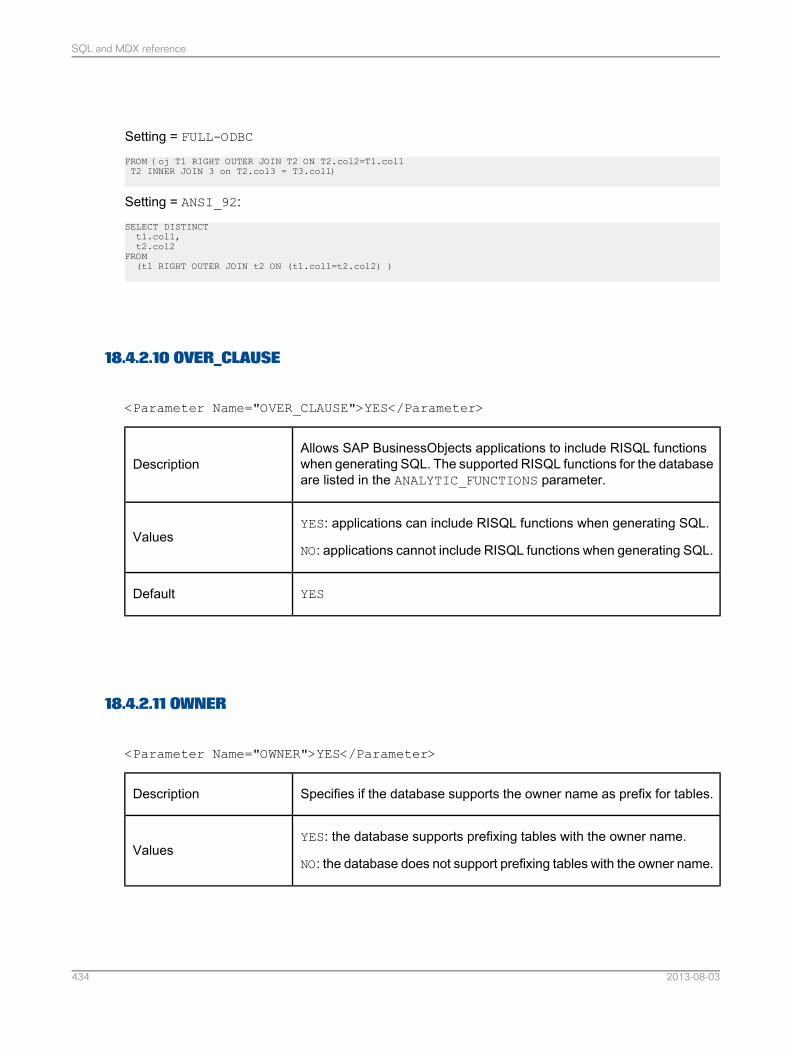
Setting = FULL-ODBC
FROM {oj T1 RIGHT OUTER JOIN T2 ON T2.col2=T1.col1T2 INNER JOIN 3 on T2.col3 = T3.col1}
Setting = ANSI_92:SELECT DISTINCTt1.col1,t2.col2
FROM(t1 RIGHT OUTER JOIN t2 ON (t1.col1=t2.col2) )
18.4.2.10 OVER_CLAUSE
<Parameter Name="OVER_CLAUSE">YES</Parameter>
Allows SAP BusinessObjects applications to include RISQL functionswhen generating SQL. The supported RISQL functions for the databaseare listed in the ANALYTIC_FUNCTIONS parameter.
Description
YES: applications can include RISQL functions when generating SQL.
NO: applications cannot include RISQL functions when generating SQL.Values
YESDefault
18.4.2.11 OWNER
<Parameter Name="OWNER">YES</Parameter>
Specifies if the database supports the owner name as prefix for tables.Description
YES: the database supports prefixing tables with the owner name.
NO: the database does not support prefixing tables with the owner name.Values
2013-08-03434
SQL and MDX reference
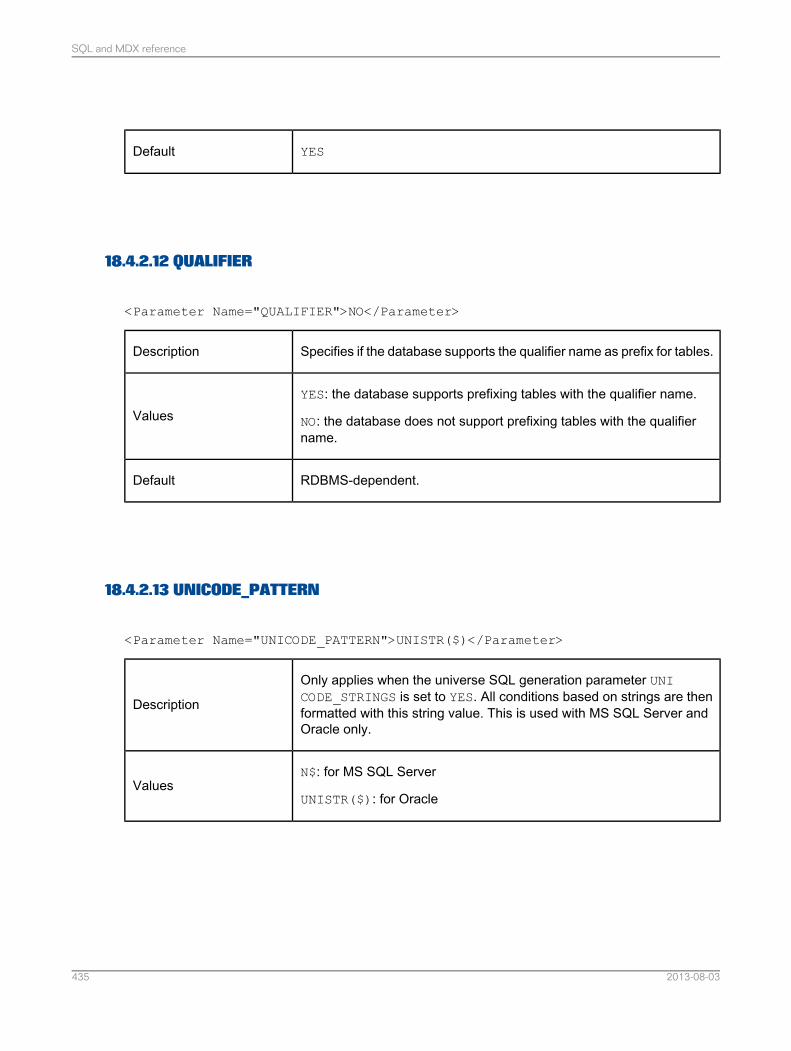
YESDefault
18.4.2.12 QUALIFIER
<Parameter Name="QUALIFIER">NO</Parameter>
Specifies if the database supports the qualifier name as prefix for tables.Description
YES: the database supports prefixing tables with the qualifier name.
NO: the database does not support prefixing tables with the qualifiername.
Values
RDBMS-dependent.Default
18.4.2.13 UNICODE_PATTERN
<Parameter Name="UNICODE_PATTERN">UNISTR($)</Parameter>
Only applies when the universe SQL generation parameter UNICODE_STRINGS is set to YES. All conditions based on strings are thenformatted with this string value. This is used with MS SQL Server andOracle only.
Description
N$: for MS SQL Server
UNISTR($): for OracleValues
2013-08-03435
SQL and MDX reference
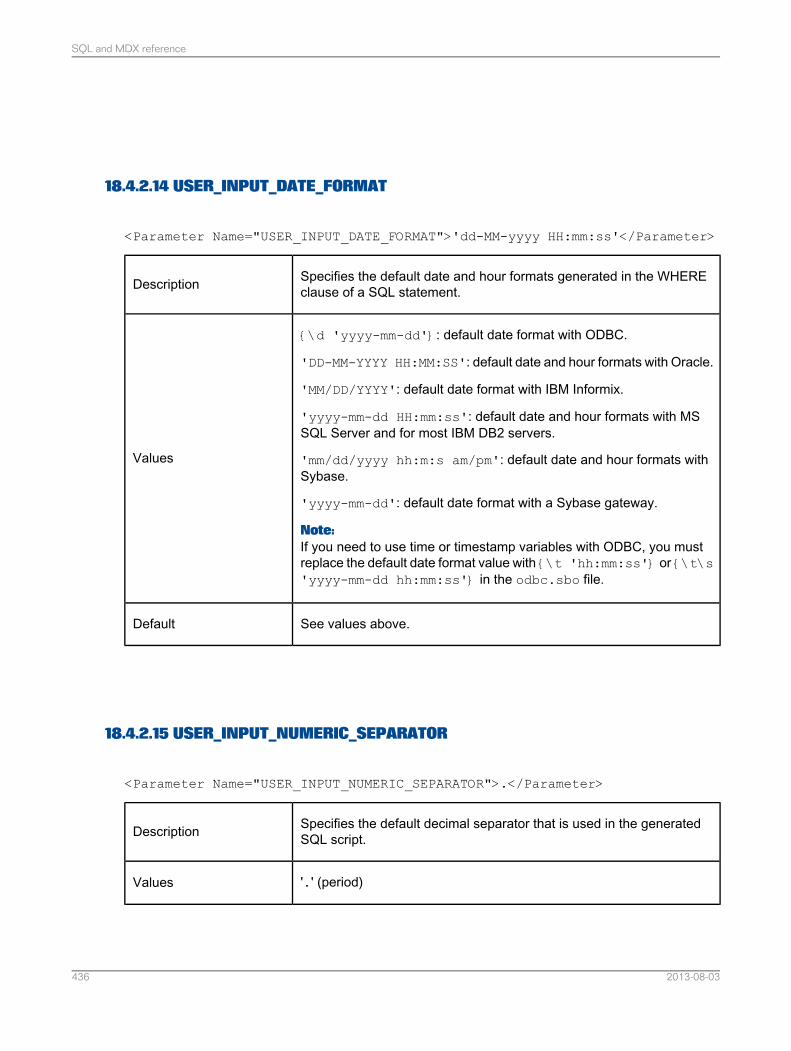
18.4.2.14 USER_INPUT_DATE_FORMAT
<Parameter Name="USER_INPUT_DATE_FORMAT">'dd-MM-yyyy HH:mm:ss'</Parameter>
Specifies the default date and hour formats generated in the WHEREclause of a SQL statement.Description
{\d 'yyyy-mm-dd'}: default date format with ODBC.
'DD-MM-YYYY HH:MM:SS': default date and hour formats with Oracle.
'MM/DD/YYYY': default date format with IBM Informix.
'yyyy-mm-dd HH:mm:ss': default date and hour formats with MSSQL Server and for most IBM DB2 servers.
'mm/dd/yyyy hh:m:s am/pm': default date and hour formats withSybase.
'yyyy-mm-dd': default date format with a Sybase gateway.
Note:If you need to use time or timestamp variables with ODBC, you mustreplace the default date format value with {\t 'hh:mm:ss'} or {\t\s'yyyy-mm-dd hh:mm:ss'} in the odbc.sbo file.
Values
See values above.Default
18.4.2.15 USER_INPUT_NUMERIC_SEPARATOR
<Parameter Name="USER_INPUT_NUMERIC_SEPARATOR">.</Parameter>
Specifies the default decimal separator that is used in the generatedSQL script.Description
'.' (period)Values
2013-08-03436
SQL and MDX reference

'.'Default
2013-08-03437
SQL and MDX reference

2013-08-03438
SQL and MDX reference
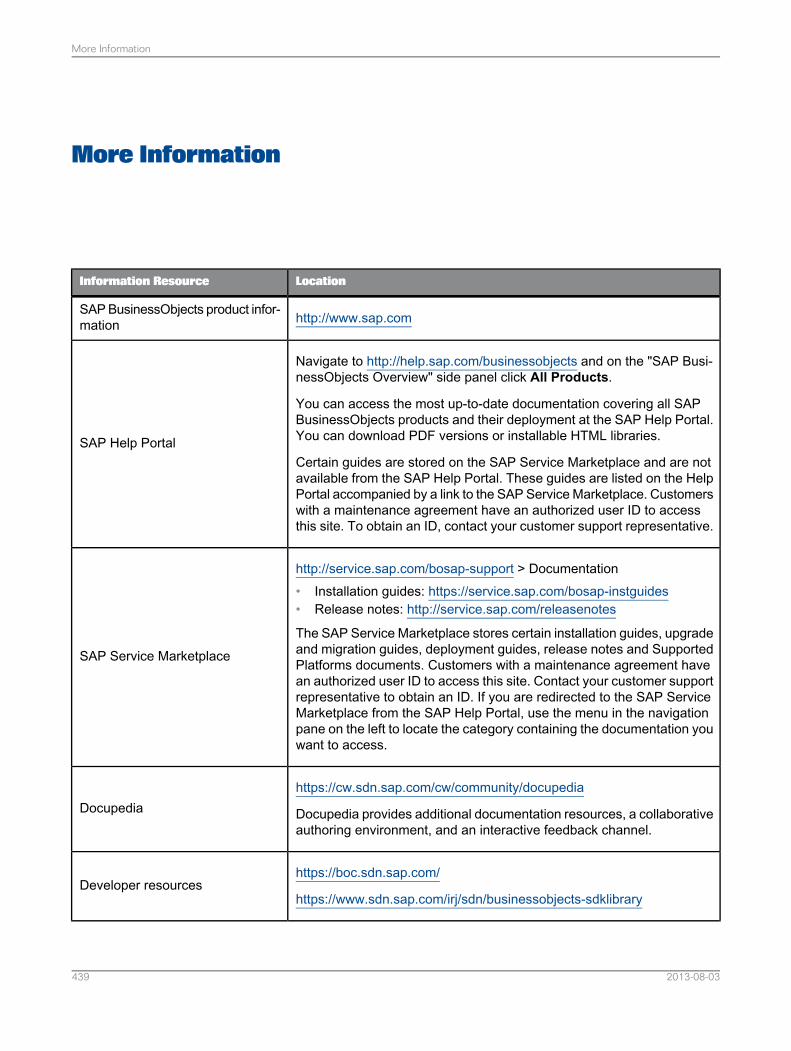
More Information
LocationInformation Resource
http://www.sap.comSAP BusinessObjects product infor-mation
Navigate to http://help.sap.com/businessobjects and on the "SAP Busi-nessObjects Overview" side panel click All Products.
You can access the most up-to-date documentation covering all SAPBusinessObjects products and their deployment at the SAP Help Portal.You can download PDF versions or installable HTML libraries.
Certain guides are stored on the SAP Service Marketplace and are notavailable from the SAP Help Portal. These guides are listed on the HelpPortal accompanied by a link to the SAP Service Marketplace. Customerswith a maintenance agreement have an authorized user ID to accessthis site. To obtain an ID, contact your customer support representative.
SAP Help Portal
http://service.sap.com/bosap-support > Documentation• Installation guides: https://service.sap.com/bosap-instguides• Release notes: http://service.sap.com/releasenotes
The SAP Service Marketplace stores certain installation guides, upgradeand migration guides, deployment guides, release notes and SupportedPlatforms documents. Customers with a maintenance agreement havean authorized user ID to access this site. Contact your customer supportrepresentative to obtain an ID. If you are redirected to the SAP ServiceMarketplace from the SAP Help Portal, use the menu in the navigationpane on the left to locate the category containing the documentation youwant to access.
SAP Service Marketplace
https://cw.sdn.sap.com/cw/community/docupedia
Docupedia provides additional documentation resources, a collaborativeauthoring environment, and an interactive feedback channel.
Docupedia
https://boc.sdn.sap.com/
https://www.sdn.sap.com/irj/sdn/businessobjects-sdklibraryDeveloper resources
2013-08-03439
More Information
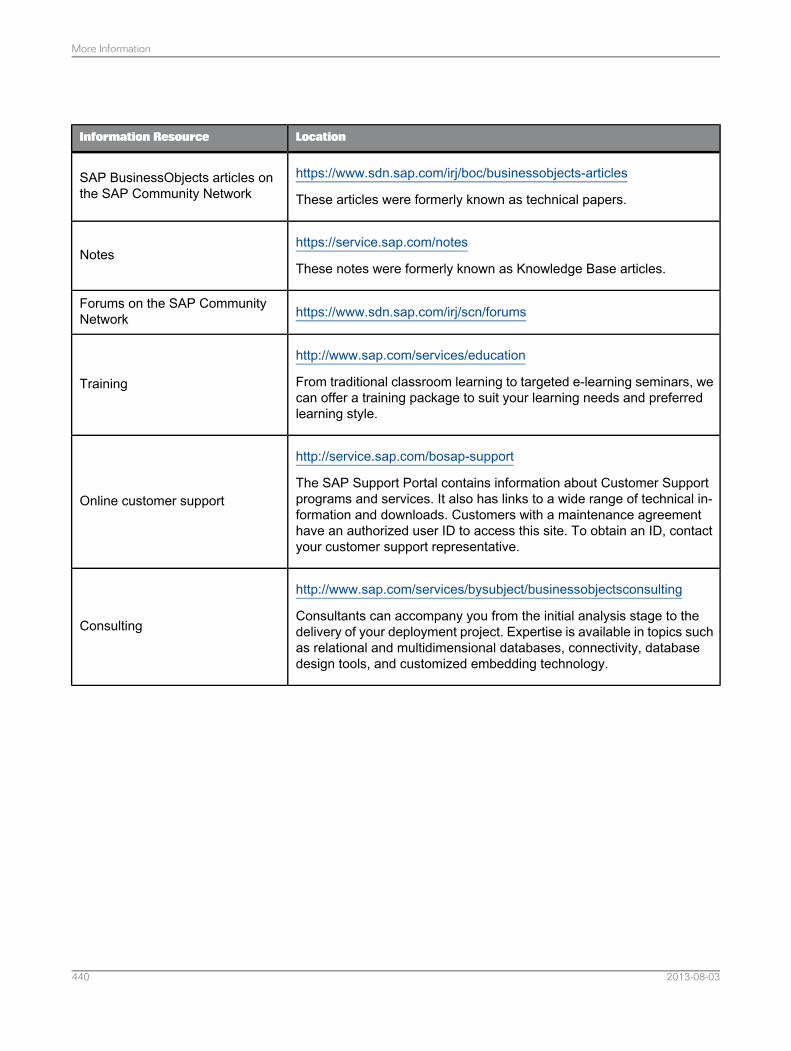
LocationInformation Resource
https://www.sdn.sap.com/irj/boc/businessobjects-articles
These articles were formerly known as technical papers.SAP BusinessObjects articles onthe SAP Community Network
https://service.sap.com/notes
These notes were formerly known as Knowledge Base articles.Notes
https://www.sdn.sap.com/irj/scn/forumsForums on the SAP CommunityNetwork
http://www.sap.com/services/education
From traditional classroom learning to targeted e-learning seminars, wecan offer a training package to suit your learning needs and preferredlearning style.
Training
http://service.sap.com/bosap-support
The SAP Support Portal contains information about Customer Supportprograms and services. It also has links to a wide range of technical in-formation and downloads. Customers with a maintenance agreementhave an authorized user ID to access this site. To obtain an ID, contactyour customer support representative.
Online customer support
http://www.sap.com/services/bysubject/businessobjectsconsulting
Consultants can accompany you from the initial analysis stage to thedelivery of your deployment project. Expertise is available in topics suchas relational and multidimensional databases, connectivity, databasedesign tools, and customized embedding technology.
Consulting
2013-08-03440
More Information
IndexA
ANSI92universe parameter 412
AUTO_UPDATE_QUERYuniverse parameter 412
B
BLOB_COMPARISONuniverse parameter 414
BOUNDARY_WEIGHT_TABLEuniverse parameter 414
C
CASE_SENSITIVE 428COMMA 428CONCAT 429CUMULATIVE_OBJECT_WHERE
universe parameter 415
D
date-time format 260DELIMIT_IDENTIFIERS 429DELIMIT_LOWERCASE 430domain names 95
E
END_SQLuniverse parameter 417
EVAL_WITHOUT_PARENTHESISuniverse parameter 418
extension PRM 431CASE_SENSITIVE 428COMMA 428CONCAT 429DELIMIT_IDENTIFIERS 429DELIMIT_LOWERCASE 430EXTERN_SORT_EXCLUDE_DISTINCT
430GROUPBY_WITH_ALIAS 431OVER_CLAUSE 434OWNER 434QUALIFIER 435UNICODE_PATTERN 435USER_INPUT_DATE_FORMAT 436
extension PRM (continued)USER_INPUT_NUMERIC_SEPARATOR
436EXTERN_SORT_EXCLUDE_DISTINCT
430
F
FORCE_SORTED_LOVuniverse parameter 419
formatsdate-time tokens 260number tokens 264
G
GROUPBY_WITH_ALIAS 431
I
IDENTIFIER_DELIMITER 431INNERJOIN_IN_WHERE
universe parameter 420
J
JOIN_BY_SQLuniverse parameter 421
M
MAX_INLIST_VALUESuniverse parameter 421
N
number format 264
O
OVER_CLAUSE 434OWNER 434
P
PRM filesCASE_SENSITIVE 428COMMA 428CONCAT 429
PRM files (continued)DELIMIT_IDENTIFIERS 429DELIMIT_LOWERCASE 430EXTERN_SORT_EXCLUDE_DISTINCT
430GROUPBY_WITH_ALIAS 431IDENTIFIER_DELIMITER 431OVER_CLAUSE 434OWNER 434QUALIFIER 435UNICODE_PATTERN 435USER_INPUT_DATE_FORMAT 436USER_INPUT_NUMERIC_SEPARATOR
436
Q
QUALIFIER 435
R
REPLACE_COMMA_BY_CONCATuniverse parameter 422
S
SELFJOINS_IN_WHEREuniverse parameter 423
SHORTCUT_BEHAVIOR 423Show dependencies 142SMART_AGGREGATE
universe parameter 424
T
THOROUGH_PARSEuniverse parameter 426
tokens 260, 264TRUST_CARDINALITIES
universe parameter 426
U
UNICODE_PATTERN 435UNICODE_STRINGS
universe parameter 427USER_INPUT_DATE_FORMAT 436USER_INPUT_NUMERIC_SEPARATOR
436
2013-08-03441

2013-08-03442
Index