Integration Guide - SAP Help Portal
89
Integration Guide Document Version: 3.0 – 31-Jul-2017 CUSTOMER SAP Complex Assembly Manufacturing 7.2 SPS 4
-
Upload
khangminh22 -
Category
Documents
-
view
7 -
download
0
Transcript of Integration Guide - SAP Help Portal

Integration Guide Document Version: 3.0 – 31-Jul-2017
CUSTOMER
SAP Complex Assembly Manufacturing 7.2 SPS 4

SAP Complex Assembly Manufacturing 7.2 SPS 4
Typographic Conventions
Integration Guide
© 2017 SAP SE or an SAP affiliate company. All rights reserved. 2
Typographic Conventions
Type Style Description
Example Words or characters quoted from the screen. These include field names, screen titles,
pushbuttons labels, menu names, menu paths, and menu options.
Textual cross-references to other documents.
Example Emphasized words or expressions.
EXAMPLE Technical names of system objects. These include report names, program names, transaction
codes, table names, and key concepts of a programming language when they are surrounded
by body text, for example, SELECT and INCLUDE.
Example Output on the screen. This includes file and directory names and their paths, messages,
names of variables and parameters, source text, and names of installation, upgrade and
database tools.
Example Exact user entry. These are words or characters that you enter in the system exactly as they
appear in the documentation.
<Example> Variable user entry. Angle brackets indicate that you replace these words and characters with
appropriate entries to make entries in the system.
EXAMPLE Keys on the keyboard, for example, F2 or ENTER .

SAP Complex Assembly Manufacturing 7.2 SPS 4
Document History
Integration Guide
© 2017 SAP SE or an SAP affiliate company. All rights reserved. 3
Document History
Version Date Change
3.0 31 July 2017 Updated the supported SAP NetWeaver and SAP Manufacturing Integration
and Intelligence (SAP MII) versions; added a missing message in section 12;
and corrected the table under step 14 in section 15.1.
2.0 20 July 2016 Updated the supported Oracle versions
1.2 13 August 2015 Corrected the IDoc Basic Type for the INVCON IDoc message type on page
37; and updated the parameter information for the Component Serial/Lot
service in step 17 of section 14.
1.1 15 July 2015 Updated the supported SAP NetWeaver release
1.0 1 June 2015 Initial release

SAP Complex Assembly Manufacturing 7.2 SPS 4
Table of Contents
Integration Guide
© 2017 SAP SE or an SAP affiliate company. All rights reserved. 4
Table of Contents
1 Introduction ..................................................................................................................................................... 6 1.1 Before You Start .................................................................................................................................................... 6 1.2 Assumptions .......................................................................................................................................................... 7 1.3 Scalability/Availability .......................................................................................................................................... 8 1.4 Variables................................................................................................................................................................. 8 1.5 Useful Links ............................................................................................................................................................ 9 1.6 SAP Notes .............................................................................................................................................................. 9
2 Configure Environment Variables for the Server ........................................................................................... 10
3 Modify File Permissions ................................................................................................................................. 12
4 Configure Database Connection to the SAP Complex Assembly Manufacturing Database .......................... 13
5 Configure Users and Roles within SAP NetWeaver ....................................................................................... 17
6 Deploy CAMS-INTws to SAP NetWeaver ....................................................................................................... 21
7 Allocate CAMS-INTws Actions to Roles......................................................................................................... 22
8 Deploy CAMS-INT to SAP MII ........................................................................................................................ 24
9 Configure SAP MII Connectivity to SAP ......................................................................................................... 26
10 Configure SAP to Send Messages to SAP MII................................................................................................ 28 10.1 Create an RFC Destination in SAP ..................................................................................................................... 28 10.2 Creating an IDoc Listener in SAP MII ................................................................................................................. 30 10.3 Testing the IDoc Listener Connection ............................................................................................................... 32 10.4 Defining a Logical Port ........................................................................................................................................ 33 10.5 Defining a Partner for the RFC Destination ....................................................................................................... 34 10.6 Creating a Partner Profile ................................................................................................................................... 35 10.7 Creating a Distribution Model ............................................................................................................................ 38 10.8 Placing a Document on a Queue ........................................................................................................................ 38 10.9 Standard Service Transactions.......................................................................................................................... 40
10.9.1 StandardWebService (SAP/Manufacturing/ CAMS/framework/helpers) ................................... 41 10.9.2 StandardBAPIService (SAP/Manufacturing/ CAMS/framework/helpers) .................................. 41 10.9.3 TransactionBAPIService (SAP/ Manufacturing/CAMS/framework/helpers) ............................. 41
10.10 MessageValidationService (SAP/ Manufacturing/CAMS/framework/test)................................................ 42
11 Configure SAP MII Connection to the SAP Complex Assembly Manufacturing Database ............................ 43
12 Configure SAP MII Message Listeners for the Message Types ..................................................................... 44 12.1 Enable Message Cleanup Rules ......................................................................................................................... 48

SAP Complex Assembly Manufacturing 7.2 SPS 4
Table of Contents
Integration Guide
© 2017 SAP SE or an SAP affiliate company. All rights reserved. 5
13 Configure SAP MII Credentials to Be Used by CAMS-INT ............................................................................. 51
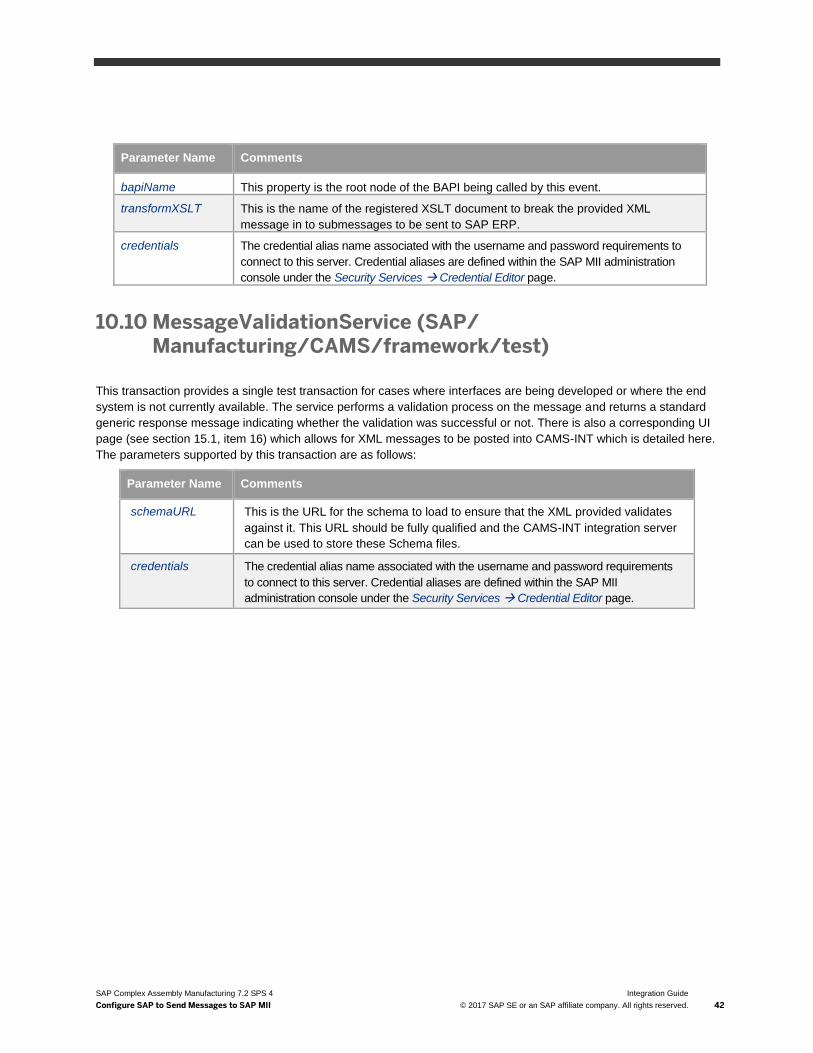
14 Configure Schedule Tasks Used by CAMS-INT ............................................................................................. 53
15 Configure CAMS-INT ..................................................................................................................................... 59 15.1 Menu Creation ..................................................................................................................................................... 59 15.2 Global Configuration ........................................................................................................................................... 62 15.3 Email Notifications .............................................................................................................................................. 63 15.4 Supported Plants................................................................................................................................................. 64 15.5 Workflow Configuration ...................................................................................................................................... 65
15.5.1 Standard Workflow ......................................................................................................................... 65 15.5.2 Correlation Workflow ...................................................................................................................... 65 15.5.3 Split Workflow ................................................................................................................................. 66 15.5.4 Creating a Workflow ........................................................................................................................ 67
15.6 Configuration Import/Export ............................................................................................................................. 68 15.7 Defining Integration Server Configuration ........................................................................................................ 70 15.8 SAP Complex Assembly Manufacturing ERP Interface Configuration .......................................................... 72
16 Post Installation Tests ................................................................................................................................... 75 16.1 Integration Server Tests ..................................................................................................................................... 75 16.2 SAP to SAP MII Interface Test ............................................................................................................................ 76 16.3 SAP MII to SAP Interface Test ............................................................................................................................ 78
17 Monitoring Capabilities .................................................................................................................................. 79 17.1 Queue Monitor ..................................................................................................................................................... 79
17.1.1 Tracing............................................................................................................................................. 81 17.2 Archive Queue Monitor ....................................................................................................................................... 82 17.3 Message Statistics .............................................................................................................................................. 82 17.4 BOM Holding Queue ............................................................................................................................................ 82 17.5 Change Masters .................................................................................................................................................. 83

SAP Complex Assembly Manufacturing 7.2 SPS 4
Introduction
Integration Guide
© 2017 SAP SE or an SAP affiliate company. All rights reserved. 6
1 Introduction
This document describes the procedures for the installation and configuration of the components to allow SAP
Complex Assembly Manufacturing 7.2 Support Package Stack 4 (SPS 4) to interface to external systems or
applications. Throughout this document, CAMS-INT is used to refer to these capabilities.
It defines and explains how to do the following:
Configure environment variables for the server
Modify the file permissions to allow CAMS-INTws to work
Configure the database connection to the SAP Complex Assembly Manufacturing database
Configure users and roles in SAP NetWeaver
Deploy CAMS-INTws to SAP NetWeaver
Allocate CAMS-INTws actions to roles
Deploy CAMS-INT to SAP Manufacturing Integration and Intelligence (SAP MII)
Configure SAP MII connectivity to SAP
Configure SAP to be able to send messages to SAP MII
Configure SAP MII connectivity to the SAP Complex Assembly Manufacturing database
Configure SAP MII Message Listeners for the message types
Configure SAP MII credentials to be used by CAMS-INT
Configure schedule tasks used by CAMS-INT
Configure CAMS-INT
Run post-installation tests
Use the monitoring capabilities
1.1 Before You Start
Before you start the integration and installation, you should do the following:
1. Complete the steps for installation or upgrade of the SAP Complex Assembly Manufacturing software
components as described in the Installation Guide, which is available in the Documentation folder of the SAP
Complex Assembly Manufacturing delivery or on the SAP Support Portal (see section 1.5, Useful Links).
2. Refer to the Master Guide for a technical overview of SAP Complex Assembly Manufacturing. You can find this
guide in the Documentation folder of the SAP Complex Assembly Manufacturing delivery or on the SAP
Support (see section 1.5, Useful Links).
3. Ensure that you have downloaded the 64-bit package for SAP Complex Assembly Manufacturing 7.2 SPS 4
(titled CAMSINT 7.2) from the SAP Software Download Center at http://support.sap.com/swdc. This
package includes the SAPTCLIntegration_CAMS_7.2.4.##.zip file, which includes three files:

SAP Complex Assembly Manufacturing 7.2 SPS 4
Introduction
Integration Guide
© 2017 SAP SE or an SAP affiliate company. All rights reserved. 7
o CAMS-INT-7.2.4.zip
o CAMS-INT-Actions-7.2.4.jar
o CAMSINTws724_##.sca (with ## representing a build number; see the Variables section for details)
4. Extract the SAPTCLIntegration_CAMS_7.2.4.##.zip to install all the files to the
<SAP_CAMS_7.2_PI\CAMS-INT> directory for your SAP Complex Assembly Manufacturing installation.
5. As the 64-bit version of SAP Complex Assembly Manufacturing used to support CAMS-INT needs to use the
same database configuration as the 32-bit version, copy the camsDBInfo file that is created when completing
the steps in the Installation Guide into the same location for the 64-bit <SAP_CAMS_7.2_PI> directory for it to
use. The RunCAMS.bat file can also be configured on the CAMS-INT server as a way to ensure the SAP
Complex Assembly Manufacturing installation is running and connecting to the database.
6. Java is required to view the forms in CAMS-INT. Please ensure that you have the Java version specified in the
SAP MII documentation.
1.2 Assumptions
This document assumes the following:
If a CustomerDiscriminator in SAP MII is used, the expanded functionality from the base 7.2 version of the
SimpleDocumentDiscriminator must be merged with the existing custom code.
That, at a minimum, SAP NetWeaver 7.3, EHP 1, Support Package (SP) 12, Patch 3 and SAP MII 14.0, SP 05,
Patch 6 are installed on the server to be used by CAMS-INT. However, SAP recommends SAP NetWeaver 7.5,
SPS 07 and SAP MII 15.1, SP 05.
Note
The instructions in this document assume use of the SAP NetWeaver and SAP MII versions noted above. If you
are using a version other than those stated, you may see a slightly different user interface than that described
here. Please refer to the SAP NetWeaver and SAP MII documentation for your version as needed.
o Both the SAP MII and MII administration modules must have been deployed. Refer to the SAP MII
documentation for instructions.
That, at a minimum, the SAP ECC system being connected to is ECC 6.0 EHP4. While a minimum value is
stated, SAP encourages using the latest versions.
That an Oracle Client installation has been done:
o SAP Complex Assembly Manufacturing supports Oracle 11g Release 2 or Oracle Database 12c. For client
installations of SAP Complex Assembly Manufacturing, the Oracle client must be the 32-bit Windows release.
For CAMS-INT on Microsoft Windows Server 2008, 2012, or 2016 the Oracle client must be the 64-bit Windows
release.
o The following must be set:
NLS_NCHAR_CHARACTERSET UTF8 (the default is AL16UTF16 so be sure to change it)
NLS_CHARACTERSET AL32UTF8
NLS_LANG See section 4.2 in the Installation Guide for instructions on setting this

SAP Complex Assembly Manufacturing 7.2 SPS 4
Introduction
Integration Guide
© 2017 SAP SE or an SAP affiliate company. All rights reserved. 8
That the Oracle Transparent Network Substrate (TNS) names are defined on the server to allow connection to
the main SAP Complex Assembly Manufacturing database.
That the x64 VC++ redistribution file (vcredist_x64.exe) has been downloaded from Microsoft® and installed,
which is available from Microsoft.com at:
http://www.microsoft.com/downloads/en/details.aspx?familyid=ba9257ca-337f-4b40-8c14-
157cfdffee4e&displaylang=en. (This link was valid as of May 2015.) Note: if this redistributable is installed after
SAP NetWeaver is installed, it may be necessary to re-install SAP NetWeaver's version of this redistributable
after installing the version downloaded from Microsoft.
This guide assumes that both a basis and SAP Complex Assembly Manufacturing administrator will be available as
this document covers requirements handled by these roles. Communication between the two roles needs to active to
allow a successful install. By way of a guide, the following parts of the document may be applicable to these roles:
o Basis role:
Installation of SAP MII (not covered in this document)
Sections 2 – 10 as a general guide, though there are some SAP Complex Assembly Manufacturing
administrator functions in these sections; however, for the most part they are more for a basis person.
o SAP Complex Assembly Manufacturing administrator role:
Section 11 and up
1.3 Scalability/Availability
CAMS-INT can be installed on an installation of SAP NetWeaver that has been installed in any of the supported
installation configurations whether it is for High Availability (https://cw.sdn.sap.com/cw/docs/DOC-115886) or Cluster
Failover (https://cw.sdn.sap.com/cw/docs/DOC-115730).
Ensure that the installation of SAP NetWeaver and SAP MII are completed before the installation of CAMS-INT. As all
SAP MII instances will be sharing the same database, configuration at the SAP MII layer is only required to be
performed on a single server as all servers will get the same data.
1.4 Variables
Variable Description
<SAP_CAMS_7.2> For purposes of this documentation, indicates the high-level directory structure in which
the SAP Complex Assembly Manufacturing commercial off-the-shelf (COTS) application
files are installed
<SAP_CAMS_7.2_PI> For purposes of this documentation, indicates the high-level directory structure in which
the SAP Complex Assembly Manufacturing configuration files are installed
## This designation in file names represents a build number for the package being
delivered. When the files described in this document are ready for download, an integer
will replace the ## in the file names. For example, if the
SAPTCLIntegration_CAMS_7.2.4 zip file had to be built four times during the test
and validation cycle prior to release, then the file posted on the SAP Service
Marketplace would be SAPTCLIntegration_CAMS_7.2.4.4.zip.

SAP Complex Assembly Manufacturing 7.2 SPS 4
Introduction
Integration Guide
© 2017 SAP SE or an SAP affiliate company. All rights reserved. 9
1.5 Useful Links
Content Location on the SAP Support Portal
Information about creating customer incidents http://support.sap.com/message
SAP Notes search http://support.sap.com/notes
SAP Software Download Center (software download and
ordering of software)
http://support.sap.com/swdc
SAP Complex Assembly Manufacturing documentation http://help.sap.com/cams.
1.6 SAP Notes
Please read the following note before starting the integration.
Make sure that you have up-to-date versions of the SAP Note, which you can find in the SAP Support Portal on SAP
Service Marketplace at http://support.sap.com/notes.
SAP Note Number Title Description
2110441 Enable adding custom properties for
2.0 DataSources with object factory
available in Application Resources
Information on resolving an error when adding a
custom JDBC 2.0 DataSource.

SAP Complex Assembly Manufacturing 7.2 SPS 4
Configure Environment Variables for the Server
Integration Guide
© 2017 SAP SE or an SAP affiliate company. All rights reserved. 10
2 Configure Environment Variables for the Server
In order to prepare SAP NetWeaver to have access to the SAP Complex Assembly Manufacturing software for
CAMS-INTws, you must define some environment variables so that SAP NetWeaver knows where to locate it.
From the Environment Variables dialog box in Windows, you need to define two new variables. The first determines
where the SAP Complex Assembly Manufacturing root software is located and the second is a required to enable a
specific element of SAP Complex Assembly Manufacturing to be located. You also need to add some folders to the
system path.
To define the first variable, the SAP Complex Assembly Manufacturing software location:
1. Click the Start button and select Control Panel.
2. In the Control Panel, double-click on System.
3. Click Advanced System Settings to open the System Properties dialog box.
4. Click the Advanced tab and then click the Environment Variables button.
5. In the Environment Variables dialog box, click the New button in the System variables area.
6. In the New System Variable dialog box, enter CAMS_ROOT for the Variable name and set the Variable value to
the name of the folder where the SAP Complex Assembly Manufacturing 64-bit software is installed (this folder
should contain bin, capp, shop, lib, publiclib, etc). Make sure the variable name and variable value
are entered correctly and completely.
7. Click OK.
To define the second variable, a specific location in the SAP Complex Assembly Manufacturing software distribution:
1. In the Environment Variables dialog box, click the New button in the System variables area.
2. In the New System Variable dialog box, enter TCL_LIBRARY for the Variable name and enter
%CAMS_ROOT%\lib\tcl8.5 for the Variable value.
3. Click OK.
Next, you need to update the system path variable to add several paths:
1. In the Environment Variables dialog box, select the Path variable in the System variables area.
2. Click the Edit button. The Edit System Variable dialog box appears.
3. In the Variable value field, add each of the items below to the path using a semicolon to delineate the items:
%CAMS_ROOT%\bin
%CAMS_ROOT%\lib
%CAMS_ROOT%\lib\tcl8.5
%CAMS_ROOT%\lib\tclblend
%CAMS_ROOT%\publiclib

SAP Complex Assembly Manufacturing 7.2 SPS 4
Configure Environment Variables for the Server
Integration Guide
© 2017 SAP SE or an SAP affiliate company. All rights reserved. 11
4. Click OK.
5. You must now reboot the server where SAP NetWeaver is installed for these changes to take effect.

SAP Complex Assembly Manufacturing 7.2 SPS 4
Modify File Permissions
Integration Guide
© 2017 SAP SE or an SAP affiliate company. All rights reserved. 12
3 Modify File Permissions
SAP NetWeaver runs the Microsoft Windows service modules as the internal LocalSystem user or a service specific
user to ensure that the server is not running with elevated permissions. Since CAMS-INTws needs access to the
Oracle Client area to interact with the OCI libraries and the SAP Complex Assembly Manufacturing software, you
need to either change this user to a new service user that has similar permissions but has read/execute access to the
Oracle and SAP Complex Assembly Manufacturing folders, or you need to add the user that is running the services to
these folders and files. This permission should be on the root and all sub-folders to allow access to the required
libraries by the SAP Service user.
To locate the services look in the Services application in Windows for services that start with SAP and are followed by
the instance ID, e.g., _00 and _01:
1. Click the Start button and select Control Panel.
2. In the Control Panel, double-click on Administrative Tools.
3. In the Administrative Tools window, double-click on Services.
OR
1. Click the Start button and select Run.
2. In the Run dialog box, type services.msc in the Open field.
3. Click OK.

SAP Complex Assembly Manufacturing 7.2 SPS 4
Configure Database Connection to the SAP Complex Assembly Manufacturing Database
Integration Guide
© 2017 SAP SE or an SAP affiliate company. All rights reserved. 13
4 Configure Database Connection to the SAP Complex Assembly Manufacturing Database
A database connection must be established from the SAP NetWeaver installation to the SAP Complex Assembly
Manufacturing database. This is used both by SAP MII and the CAMS-INT Integration server to interact with the
database.
Before you do this task, it is important that you have the ojdbcxx.jar file for Oracle available to you (it is in the
<Oracle_Home>/jdbc/lib folder of the Oracle installation and is not provided as part of the SAP Complex
Assembly Manufacturing distribution). Which JDBC driver, e.g., ojdbc6.jar, ojdbc7.jar or ojdbc8.jar, you
use depends on your Oracle database and Java virtual machine (JVM) versions. For more information, see
http://www.oracle.com/technetwork/database/features/jdbc/index-091264.html.
The first thing you need to do is to deploy this ojdbcXX.jar file so that SAP NetWeaver is aware of the library and
will allow the database connection process to occur. To do this:
1. Log onto the SAP NetWeaver Administration console.
2. Navigate to the Application Resources screen by selecting the Configuration tab, then the Infrastructure tab, and
then clicking the Application Resources link as shown below.
3. Once you are on the Application Resources: Overview screen, click the Create New Resource button and select
the Deploy New JDBC Driver option.
4. In the screen that appears, provide a JDBC Driver Name and then click the Add New Driver File button.
5. A file upload dialog box appears. Browse and select the ojdbcXX.jar file and click the OK button to upload the
file. The name provided is not important, but will be required in the next steps; for our example, we use Oracle
JDBC as the driver name.
Note
If one is already deployed then there is no need to perform this step.

SAP Complex Assembly Manufacturing 7.2 SPS 4
Configure Database Connection to the SAP Complex Assembly Manufacturing Database
Integration Guide
© 2017 SAP SE or an SAP affiliate company. All rights reserved. 14
6. Click the Save button.
Once the driver has been installed, you need to create a new JDBC Custom DataSource. To do this:
1. On the Application Resources: Overview screen, click the Create New Resource button and select the New
JDBC Custom DataSource option. The following screen appears.
2. The following table lists the required data for the fields on this screen. These items are case sensitive, so please
ensure that the case is correct.
Property Value
Application Name CAMS-INT
DataSource Name CAMSINTBaseDataSource
Driver Name As named when the JDBC driver was deployed. For our example, this is
Oracle JDBC (selection is from a drop-down list; if it is not visible,
recheck the deployment of the jar).
SQL Engine Vendor SQL
Isolation Level Default
JDBC Version 2.0 (with XA support)
Object Factory oracle.jdbc.pool.OracleDataSourceFactory
DataSource Type XA DataSource
XADS Class Name oracle.jdbc.xa.client.OracleXADataSource
Description Description of JDBC data source
3. Optional: The connection pooling can be adjusted as required by clicking the Connection Pooling tab. You can
configure the initial, maximum, and wait times as required. The defaults are suitable for the installation, however,
so changes to the connection pooling are not required.

SAP Complex Assembly Manufacturing 7.2 SPS 4
Configure Database Connection to the SAP Complex Assembly Manufacturing Database
Integration Guide
© 2017 SAP SE or an SAP affiliate company. All rights reserved. 15
4. You will also need to specify the username, password, and URL for the data source. To do so, click the
Additional Properties tab.
5. Click the Add New Property button to create three new entries as follows (depending on the version of Oracle,
you may need to use the uppercase version rather than the lowercase version. Unfortunately, the only way to
know is if the database connection does not work):
Property Value
user or User The HMS schema user for SAP Complex Assembly Manufacturing
password or Password The HMS schema user’s password
url The URL takes the form:
jdbc:oracle:thin:@<host>:<port>:<sid>
where:
<host> is the server where the Oracle database is running;
<port> is the listener port number (usually 1521 though it may be
different); and
<sid> is the Oracle service, or SID, name for the database instance
where the SAP Complex Assembly Manufacturing schemas reside.
If you are running an Oracle Real Application Clusters (RAC) database,
see the Oracle documentation for differences in the URL definition.
If you are using SAP NetWeaver 7.3 including EHP1 Support Package
(SP) 13 or higher, you make selections from a drop-down list.
Note
Please see SAP Note 2110441 for information on resolving an
error when adding a custom JDBC 2.0 DataSource.
6. Once all the information is defined, click the Save button.
Finally, you need to create a JDBC DataSource Alias so that this JDBC connection will be available for CAMS-INT to
use:
1. From the Application Resources: Overview screen, click the Create New Resource button and choose New
JDBC DataSource Alias from the list. The following screen appears.

SAP Complex Assembly Manufacturing 7.2 SPS 4
Configure Database Connection to the SAP Complex Assembly Manufacturing Database
Integration Guide
© 2017 SAP SE or an SAP affiliate company. All rights reserved. 16
2. The following table lists the required data for the fields on this screen.
Property Value
DataSource Alias Name CAMSINTDataSource
DataSource Name Select CAMSINTBaseDataSource from the drop-down list. If this is
not visible in the list, please validate that the creation of the
DataSource as described above was completed successfully.
Isolation Level Leave blank
Maximum Connections -1
3. Click the Save button.

SAP Complex Assembly Manufacturing 7.2 SPS 4
Configure Users and Roles within SAP NetWeaver
Integration Guide
© 2017 SAP SE or an SAP affiliate company. All rights reserved. 17
5 Configure Users and Roles within SAP NetWeaver
In order to support running CAMS-INT under SAP NetWeaver, you need to establish a minimum of two new users:
To provide visibility to the general CAMS-INT menus (no administrator access) requires CAMS_INT_USER
To include or provide only the Administration section of CAMS-INT in the visible menus requires
CAMS_INT_ADMIN
Each user requires that certain roles be assigned to it to provide the correct permissions to access the various
aspects of CAMS-INT.
To configure the roles:
1. Log onto the SAP NetWeaver Administration console.
2. Navigate to the Identity Management screen by selecting the Configuration tab, then the Security tab, and then
clicking the Identity Management link as shown below.
3. The Identity Management: Overview screen appears. In the Search Criteria drop-down, select Role.

SAP Complex Assembly Manufacturing 7.2 SPS 4
Configure Users and Roles within SAP NetWeaver
Integration Guide
© 2017 SAP SE or an SAP affiliate company. All rights reserved. 18
4. The screen refreshes. Click the Create Role button to expand the screen and see the Details area as shown
below.
5. To create the first role, enter the data listed in the first row of the table below for the Unique Name and the
Description. Click the Save button.
6. To create the second role, click the Create Role button. Enter the data listed in the second role of the table below
for the Unique Name and the Description. Click the Save button.
Unique Name Description
CAMS_INT_ADMIN Admin Role for the CAMS-INT application
CAMS_INT_USER User for the CAMS-INT application
Next, you must verify that the SAP_XMII_Administrator has the XMII_PersonalizationService action. Without
this, the user cannot login to SAP MII. To assign the action:
1. Select the SAP_XMII_Administrator role.
2. Select the Assigned Actions tab and click the Modify button.
3. In the Get field, enter XMII and click the Go button.
4. Select XMII_PersonalizationService in the Available Actions table and click the Add button.
5. Click the Save button.

SAP Complex Assembly Manufacturing 7.2 SPS 4
Configure Users and Roles within SAP NetWeaver
Integration Guide
© 2017 SAP SE or an SAP affiliate company. All rights reserved. 19
Now you need to create the required users, which you can also do from the Identity Management: Overview screen:
Recommendation
This integration guide recommends creating individual users. To minimize the system impact in the event
there is a problem with a user, such as password expiration, SAP suggests creating a second user.
1. In the Search Criteria drop-down, select User.
2. The screen refreshes. Click the Create User button to expand the screen and see the General Information tab
with the fields shown below.
3. On the General Information tab enter the information for the first user:
o Enter the Logon ID as noted in the first row of the table below.
o Make sure the Define Initial Password option is selected. Enter the required password in the Define
Password field and confirm it as required in the Confirm Password field.
o Complete the Last Name and First Name fields as noted in the first row of the table below.
4. Select the Assigned Roles tab and assign the applicable roles to this user as defined in the table below.
5. Once the data is entered, click the Save button.
6. Create the second user: Click the Create User button. Repeat steps 3–5 for the second user, using the data from
the second row of the table below.
7. Create the third user: Click the Create User button. Repeat steps 3–5 for the second user, using the data from
the second row of the table below.

SAP Complex Assembly Manufacturing 7.2 SPS 4
Configure Users and Roles within SAP NetWeaver
Integration Guide
© 2017 SAP SE or an SAP affiliate company. All rights reserved. 20
Logon ID Last
Name
First Name Assigned Roles
tcl_outbound_user User Inbound CAMS_INT_USER
Roles defined by SAP MII to run transactions – refer
to SAP MII documentation for the specifics.
SAP_XMII_User
cams_int_runner User Schedule SAP_XMII_User
camsadm User CAMSAdmin CAMS_INT_ADMIN
CAMS_INT_USER
Roles defined by SAP MII for full Admin access –
refer to SAP MII documentation for the specifics.
To allow admin access to CAMS-INT, you will need to assign the CAMS_INT_ADMIN role as well as CAMS_INT_USER
role to all applicable users. These roles control what is displayed within CAMS-INT and what features the end user
will have access to. The CAMS_INT_ADMIN role is required to make any configuration change items visible to the
user. For general access, the CAMS_INT_USER is all that is required.
To provide user access to CAMS-INT, the SAP NetWeaver user also needs the SAP_XMII_User permission.

SAP Complex Assembly Manufacturing 7.2 SPS 4
Deploy CAMS-INTws to SAP NetWeaver
Integration Guide
© 2017 SAP SE or an SAP affiliate company. All rights reserved. 21
6 Deploy CAMS-INTws to SAP NetWeaver
CAMS-INTws, the SAP Complex Assembly Manufacturing integration server side of CAMS-INT, needs to be
deployed in SAP NetWeaver using the SAP Software Update Manager.
Please download the latest version of the Software Update Manager from the SAP Support Portal on SAP Service
Marketplace at:
http://support.sap.com/swdc > Support Packages and Patches > A – Z Alphabetical List of Products > S > SL
Toolset > SL Toolset <release> > Entry by Component > Software Update Manager (SUM)
See the Updating SAP System Using Software Update Manager 1.0 SP010 document for details on using this tool.
You can download this guide and other documentation at:
http://support.com/documentation> Products > S > software logistics toolset > Software Logistic Toolset
(under Useful Links) > Software Logistics Toolset 1.0

SAP Complex Assembly Manufacturing 7.2 SPS 4
Allocate CAMS-INTws Actions to Roles
Integration Guide
© 2017 SAP SE or an SAP affiliate company. All rights reserved. 22
7 Allocate CAMS-INTws Actions to Roles
The roles created in section 5 now need to have the CAMS-INTws actions assigned to them. These actions were
created as the result of the deployment of CAMS-INTwsX_X.sca and so you cannot do the steps in this section until
the sca file has successfully been deployed.
To allocate actions to roles:
1. Log onto the SAP NetWeaver Administration console.
2. Navigate to the Identity Management screen by selecting the Configuration tab, then the Security tab, and then
clicking the Identity Management link as shown below.
3. The Identity Management: Overview screen appears. In the Search Criteria drop-down, select Role.
4. The screen refreshes. Enter CAMS* in the search field and click the Go button to retrieve all the roles starting
with CAMS defined in the system.
5. In the results table, select the CAMS_INT_ADMIN record. The screen expands to show the Details of the Role section.
6. Select the Assigned Actions tab and click the Modify button.
7. In the Get field, enter CAMS* and click the Go button. The screen should look as follows:

SAP Complex Assembly Manufacturing 7.2 SPS 4
Allocate CAMS-INTws Actions to Roles
Integration Guide
© 2017 SAP SE or an SAP affiliate company. All rights reserved. 23
8. Select both the CAMS-INT_ADMIN and CAMS-INT_USER actions in the Available Actions table by clicking the
grey square to select the row and pressing and holding the SHIFT key to multi-select.
9. Click the Add button to assign these actions to the CAMS_INT_ADMIN role.
10. Click the Save button.
11. In the results table, select the CAMS_INT_USER and repeat steps 6–10 for this role. This time however, only
select the CAMS-INT_USER action in step 8 as this is the only one needed for this role.

SAP Complex Assembly Manufacturing 7.2 SPS 4
Deploy CAMS-INT to SAP MII
Integration Guide
© 2017 SAP SE or an SAP affiliate company. All rights reserved. 24
8 Deploy CAMS-INT to SAP MII
You now need to deploy CAMS-INT to SAP MII. This involves installing a custom action file and a single SAP MII
project. To do this:
1. Log onto SAP MII with an Administration account and navigate to the System Resources menu area.
2. Select the Custom Actions menu item.
3. Click the Upload drop-down arrow and select Upload Assembly.
4. In the Custom Actions Archive for Upload dialog box, use the browse button to navigate to
<SAP_CAMS_7.2_PI\CAMS-INT> and select the CAMS-INT-Actions-7.2.4.jar file.
5. Click the OK button to upload the file.
6. Select the box in the first column next to the CAMS-INT-Actions-7.2.4.jar file and then click the DeployAll
button to deploy the file.
Next, you need to deploy the CAMS-INT project:
1. From the main System Management menu area, select Projects.
2. Click the Import button. The Import Project dialog box appears.

SAP Complex Assembly Manufacturing 7.2 SPS 4
Deploy CAMS-INT to SAP MII
Integration Guide
© 2017 SAP SE or an SAP affiliate company. All rights reserved. 25
3. Click the Browse button and navigate to <SAP_CAMS_7.2_PI\CAMS-INT> and select the file CAMS-INT-
7.2.4.zip file.
4. Click the OK button to upload the project.
Finally, you must modify the SAP MII system properties:
1. From the main System Management menu area, select System Properties.
2. On the SAP MII: System Properties screen, click the Edit button.
3. There is a default value in the Default File Path field. Remove the default value and leave the field blank. This
allows the SAP MII files to be read.
4. Click the Save button.

SAP Complex Assembly Manufacturing 7.2 SPS 4
Configure SAP MII Connectivity to SAP
Integration Guide
© 2017 SAP SE or an SAP affiliate company. All rights reserved. 26
9 Configure SAP MII Connectivity to SAP
This section explains the procedures for configuring SAP MII to be able to connect to SAP ERP.
Before you start, you need the following information about the SAP system:
SAP System Number Use the SAP Logon application to locate this information
SAP Client Number Use the SAP Logon application to locate this information
SAP Server Use Transaction SMGW to locate this information
You also need to define the following information for use within these configuration steps:
SAP ERP User Valid SAP ERP User
SAP ERP Password Applicable password for the SAP User
1. Logon to the XMII main application as Administrator or as a user with Administration access.
2. Under the Data Services menu panel, select Connections. The SAP MII: Connections screen appears.
3. Click Create. The Connections – Create dialog box appears. Create a new connection named xMII_SAP_JCO
(case is important) and define the Connection Type as JCO. Click OK.
4. In the Settings tab (lower part of the screen), enter the ECC information as required.
5. Once done, click the Save button.
While in this configuration area of SAP MII, create the connection alias for the Mail server to support e-mail
notification of failed messages.
1. Click Create. The Connections – Create dialog box appears. Create a new connection named CAMSINTMail
(case is important) and enter in the specific mail server name. Change the Connection Type to Mail and click the
OK button.
2. In the Settings tab, ensure that that the port is updated from -1 to the applicable port for your mail server (the
default would normally be 25).
3. As we will be using SMTP to send mail, ensure the Protocol is changed to smtp.
4. Once done, click the Save button. The screen should now look as shown below.

SAP Complex Assembly Manufacturing 7.2 SPS 4
Configure SAP MII Connectivity to SAP
Integration Guide
© 2017 SAP SE or an SAP affiliate company. All rights reserved. 27

SAP Complex Assembly Manufacturing 7.2 SPS 4
Configure SAP to Send Messages to SAP MII
Integration Guide
© 2017 SAP SE or an SAP affiliate company. All rights reserved. 28
10 Configure SAP to Send Messages to SAP MII
10.1 Create an RFC Destination in SAP
This section explains the procedure for configuring the SAP MII IDoc Listener as a registered RFC Destination on the
SAP server.
Note
These steps assume that you have the correct authorizations for SAP to add RFC Destinations. If not, you
will need to have the SAP administrator perform this procedure.
Before you start, you need the following information about the SAP system:
SAP System Number Use the SAP Logon application to locate this
information
SAP Message Server Name Use the SAP Logon application to locate this
information
SAP Client Number Use the SAP Logon application to locate this
information
SAP Gateway Host Use Transaction SMGW to locate this information
SAP Gateway Service Use Transaction SMGW to locate this information
You will also need to define the following information for use within these configuration steps:
RFC Destination Name Used when creating the RFC Destination
Logical Port Name
Used when creating the Logical Port. The
recommendation is that it is the same as the RFC
Destination
Partner Profile Name
Used when creating the Partner Profile. The
recommendation is that it is the same as the RFC
Destination
To configure:
1. Log into SAP and enter transaction SM59 or use the following path: Tools Administration Administration
Network SM59 RFC Destinations.
SAP Complex Assembly Manufacturing 7.2 SPS 4
Configure SAP to Send Messages to SAP MII
Integration Guide
© 2017 SAP SE or an SAP affiliate company. All rights reserved. 29
2. Select TCP/IP Connections.
3. Click Create ( ). A screen similar to the following appears.
4. In the RFC Destination field, enter a meaningful name that identifies the SAP MII Listener you are establishing.
This name will be entered several times through this process and so it is prudent to keep it simple and
memorable. As case is important, we recommend that it is entered in all capital letters.
5. Ensure that the Connection Type field contains a T (for TCP/IP).
6. Click the Save icon ( ) in the toolbar or select the Connection Save menu.
7. Select the Technical Settings tab:
a. Select the Registered Server Program option.
b. In the Program ID field (which appears when Registered Server Program is enabled) enter the name of your
RFC Destination exactly as you entered it before.
Note
Your program ID can only be used for a single RFC Destination. Using the same Program ID for multiple
destinations will cause errors.

SAP Complex Assembly Manufacturing 7.2 SPS 4
Configure SAP to Send Messages to SAP MII
Integration Guide
© 2017 SAP SE or an SAP affiliate company. All rights reserved. 30
c. Click the Save icon in the toolbar or select the Connection Save menu.
8. Scroll down to the Gateway Options section and enter the SAP Gateway Host and SAP Gateway Service values.
9. Click the Save icon in the toolbar or select the Connection Save menu.
10. Select the MDMP & Unicode tab and select (check) the Unicode option. When this is selected, you will be asked
to run a Unicode test. Click the Close button ( ) in the message window to skip the test as more configuration
steps must be done before this will work.
11. Click the Save icon in the toolbar or select the Connection Save menu.
10.2 Creating an IDoc Listener in SAP MII
To enable IDocs to be sent to SAP MII, the IDoc listener needs to be defined. This is performed within the SAP
NetWeaver web-based administration. SAP MII is shipped with 10 predefined IDoc resources that can be used to
connect to multiple SAP instances. The configuration process is the same for them all, but CAMS-INT requires only
one be defined. To configure one of these, do the following:
1. Log into the SAP NetWeaver system where SAP MII is installed. The account used for this must have the
permissions to modify the default SAP MII listeners in SAP NetWeaver and start the Resource.
2. Select the Configuration tab and then the Infrastructure tab.
3. Select the Application Resources link on the Infrastructure page. A screen similar to the following appears.
4. In the blank line at the top of the table:

SAP Complex Assembly Manufacturing 7.2 SPS 4
Configure SAP to Send Messages to SAP MII
Integration Guide
© 2017 SAP SE or an SAP affiliate company. All rights reserved. 31
a. Enter the IDoc Listener you wish to use in the Resource Name column (the example in the figure below
shows XMIIIDOC01, but it can be any unused one).
b. Enter Resource Adapter in the Resource Type column.
c. Press RETURN.
5. Select the XMIIIDOCxx item you wish to configure. The screen updates to show the IDoc Listeners that can be
used for configuration as shown below.
6. In the Resource Details section in the lower part of the page, select the Properties tab.
a. In the Value column, enter the following specific information for the SAP system (these are the SAP ECC
login credentials; you can find the values from the RFC connection transaction SM59):
A unique Program ID
Note
Your Program ID can only be used for a single Listener. Using the same Program ID in multiple
Listeners or for multiple SAP MII Instances will cause errors.
SAPClient
UserName
Password
Language
ServerName (fully qualified)

SAP Complex Assembly Manufacturing 7.2 SPS 4
Configure SAP to Send Messages to SAP MII
Integration Guide
© 2017 SAP SE or an SAP affiliate company. All rights reserved. 32
PortNumber (System Number)
BindingKey
b. Ensure that the MaxReaderThreadCount property is set to a minimum value of 1 from the default value of 0.
c. Enter any notes or comments in the Description column.
d. Click the Save button.
10.3 Testing the IDoc Listener Connection
Once the configuration above has been defined, the RFC Destination can be tested to make sure the connectivity is
correct:
1. Log into SAP and go to transaction SM59 (RFC Destination).
2. Expand the TCP/IP folder and double-click on the row for the RFC Destination you created earlier.
3. Click the Connection Test button to perform a test to make sure the connectivity is verified.
A process runs and then the screen updates to show the results of the transfer tests. If any errors are listed, then
you will need to review all the previous steps to make sure that there are no mistakes in the configuration. You
can run the test as many times as needed, and if other errors are found, repeat the steps until the test is
successful. A successful result looks something like the following (the result times will vary).

SAP Complex Assembly Manufacturing 7.2 SPS 4
Configure SAP to Send Messages to SAP MII
Integration Guide
© 2017 SAP SE or an SAP affiliate company. All rights reserved. 33
10.4 Defining a Logical Port
Now that an RFC Destination has been established, a system port number needs to be associated with it to ensure
the low level networking requirements are met. This logical port will be used to send the IDocs to CAMS-INT from
within SAP. This step can only be done once the RFC Destination is complete as it makes use of it.
To create a Logical port:
1. Log into SAP and go to transaction WE21 or use the following path: Tools ALE ALE Administration
Runtime Settings Port Maintenance.
2. Select Transactional RFC and click the Create icon ( ) or select the Port Create menu.
3. Select the own port name option button.
4. Enter the RFC Destination name you created earlier in the Port field and provide a Description for it.
5. Select the IDoc version required—for CAMS-INT this should be IDoc record types SAP Release 4.x.
6. Enter the RFC destination value as previously defined.
7. Click the Save icon ( ) in the toolbar or select the Port Save menu.

SAP Complex Assembly Manufacturing 7.2 SPS 4
Configure SAP to Send Messages to SAP MII
Integration Guide
© 2017 SAP SE or an SAP affiliate company. All rights reserved. 34
10.5 Defining a Partner for the RFC Destination
A partner (logical system) manages one or more RFC destinations:
1. Log into SAP and enter transaction SPRO_ADMIN or use the following path: Tools Customizing IMG
Project Administration.
2. Choose SAP Reference IMG from the Go to menu or click the SAP Reference IMG button.
3. Expand the following nodes using the gray arrows as shown in the following figure:
SAP NetWeaver Application Server IDoc Interface/Application Link Enabling (ALE) Basic
Settings Logical Systems Define Logical System. Click the clock icon to use the Define
Logical System item.
Note
You can also use transaction SALE and follow the path above starting at IDoc Interface/Application Link
Enabling (ALE).

SAP Complex Assembly Manufacturing 7.2 SPS 4
Configure SAP to Send Messages to SAP MII
Integration Guide
© 2017 SAP SE or an SAP affiliate company. All rights reserved. 35
4. View the list and select a receiving logical system. The receiving logical system cannot be the same as the
transmitting logical system (the current system + client you are logged into). For example, if you are logged into
QEG (003), then choose the logical system QEGCLNT004 and not QEGCLNT003. You will also need to make
sure that the selected system does not already have a partner profile assigned. You can check partner profiles
following the instructions under Creating a Partner Profile just below.
Note
It is assumed that you do not have rights to create a logical system. Just view the list and make a note for
use in the next step.
If you have the rights to create a logical system, you can create one for this purpose. SAP recommends that
you make the name consistent with the Listener. For our example, we are using XMIIIDOC01, so the name
we would choose for our logical system (partner) would also either be XMIIIDOC01 or something similar that
identifies which of the 10 IDoc Listeners we are using.
10.6 Creating a Partner Profile
To create a partner profile:
1. Log into SAP and enter transaction WE20 or use the following path: Tools ALE ALE Administration
Runtime Settings Partner Profiles).

SAP Complex Assembly Manufacturing 7.2 SPS 4
Configure SAP to Send Messages to SAP MII
Integration Guide
© 2017 SAP SE or an SAP affiliate company. All rights reserved. 36
Note
If a change is made to the partner profile good practice would be to log into SAP MII and re-save the listener
configuration. This ensures that the configuration is propagated correctly. This can be done in the same
screen as the listener was defined (see section 9 of this document).
2. Click on Partner Type LS (just select it, do not expand it).
3. Click the Create icon ( ) or select the Partners Create menu.
4. In the Partner No. field, enter the logical system recorded earlier.
5. In the Partn. Type field, enter LS.
6. On the Post processing: permitted agent tab:
a. In the Ty. field, enter C.
b. In the Agent field, enter the required job identifier or search for the required entry. If a job identifier does not
exist then please create one using the tcode PPOME and then use this here.
c. In the Lang. field, enter EN.
7. Click the Save icon ( ) in the toolbar or select the Partners Save menu.
8. Just below the Outbound parmtrs. (parameters) table, click the Add Row icon ( ) to add a row. The Partner
profiles: Outbound parameters screen appears.
9. Enter the Message Type as MATMAS.

SAP Complex Assembly Manufacturing 7.2 SPS 4
Configure SAP to Send Messages to SAP MII
Integration Guide
© 2017 SAP SE or an SAP affiliate company. All rights reserved. 37
10. On the Outbound Options tab:
a. In the Receiver port field, enter the name of the logical port you created earlier.
b. Select the Transfer IDoc Immed. option button.
c. Enter MATMAS04 in the Basic type field.
11. Click the Save icon in the toolbar.
12. Repeat steps 9 – 11 for the following IDoc types:
IDoc Message Type IDoc Basic Type
HRMD_A HRMD_A06
INVCON INVCON01
LOIPRO LOIPRO01
SYNCH SYNCHRON
LOIWCS LOIWCS02

SAP Complex Assembly Manufacturing 7.2 SPS 4
Configure SAP to Send Messages to SAP MII
Integration Guide
© 2017 SAP SE or an SAP affiliate company. All rights reserved. 38
10.7 Creating a Distribution Model
Once you have defined a Partner and a Partner Profile, you need to create a distribution model that triggers the
creation of a communication IDocs:
1. Log into SAP and enter transaction BD64 or use the following path: Tools Customizing IMG Execute
Project SAP Reference IMG SAP NetWeaver Application Server IDoc Interface/Application Link
Enabling (ALE) Modeling and Implementing Business Processes Maintain Distribution Model and Distribute
Views.
2. Click the Edit icon ( ).
3. Click the Create model view button.
4. Enter a Short text string and a Technical name for your new model view.
5. Save your Distribution Model by clicking the green arrow icon ( ).
6. Select your new model view in the Distribution Model tree and click the Add message type button.
7. In the dialog box that appears, enter the Sender (for example, the logical system you are currently logged onto –
QPTCLNT004). Enter the Receiver (for example, the logical system you previously created). Enter the Message
Type (for example, LOIPRO or MATMAS).
You must do an Add message type for each of the message types you recorded previously (with the exception of
SYNCH).
10.8 Placing a Document on a Queue
Messages can be placed into the CAMS-INT queue through three different mechanisms. The first is via a message
listener configured in SAP MII to route messages from SAP-ERP (specifically IDocs) into the queue by configuring a
message listener for each message root node, setting the Message Type options buttons to IDoc for this mode, and

SAP Complex Assembly Manufacturing 7.2 SPS 4
Configure SAP to Send Messages to SAP MII
Integration Guide
© 2017 SAP SE or an SAP affiliate company. All rights reserved. 39
then configuring SAP MII to call the following transaction (note another of the three methods, the last one
documented here, calls this transaction directly):
SAP/Manufacturing/CAMS/services/RegisterDocumentService
This service has the following parameter requirements (not shown in any particular order):
Parameter Name Comments
ProcessKeyData This must be set to 1 or 0. A setting of 1 causes CAMS-INT to parse the XML
message with the KeyData XSLT to obtain a data string which is intended to identify
the key information in the XML data. For example, if this is an order create request,
the Key Data XSLT could return “Order No: 0123456789,” which would then show on
the queue to help locate a specific message more easily. It is dependent on there
being an applicable template in the Key Data XSLT otherwise an undesirable result
will occur.
QueueName This is the queue where this message should be recorded. These queues are user
definable (by entering a different value here) and can be controlled via a Scheduled
event to process the messages in the queue.
ParentMessageID This is used if multiple messages need to be related to a single message. Normally,
however, this would be left blank and this value handled by CAMS-INT
XMLMessage The actual XML message to be processed.
The second mechanism would be to use the Web Service interface of SAP MII to get the message into the queue. In
this mode you still create a message listener within SAP MII but this time setting the Message Type option button to
Web Service and registering the transaction in the same manner as with the IDoc one above. To send messages to
this configuration, the XML is sent to SAP MII via the URL:
http://<server>:<port>/XMII/Illuminator?service=WSMessageListener&mode=
WSMessageListenerServer&NAME=<xml_root_node>
The call requires at least basic authentication defined in the HTTP header along with defining the Content-Type to
include ‘application/soap+xml’, and the XML message should be the content of the http message. SAP MII takes this
and submits it to the message listener defined and this causes the XML message to be registered as required.
The third and final approach is to send the message directly to the transaction in SAP MII using the
TransactionRunner servlet in SAP MII. This method differs from the other two because no message listener needs to
be defined for the XML message. Due to there being no listener defined, the parameters specified in the table above
have to be defined as part of the URL. The URL needed is as follows:
http://<server>:<port>/XMII/Runner?Transaction=SAP/Manufacturing/CAMS/services/RegisterDocument
Service&ProcessKeyData=<key_data>&QueueName=<queue_name>&OutputParameter=*&
XMLMessage=<xml_message>
The result of calling the transaction in this manner will result in an XML message being returned to the caller. This
XML message contains information about the registered message including the internal message ID so that this
message status can be programmatically monitored (as can any transaction) using another service within SAP MII.
The result XML is as follows:
<?xml version="1.0" encoding="UTF-8" ?>
<Rowsets DateCreated="2010-07-16T16:24:16" EndDate="2010-07-16T16:24:16"
StartDate="2010-07-16T16:24:16" Version="12.1.5 Build(92)" TransactionID="2177">
<Rowset TrxID="2177">
<Columns>

SAP Complex Assembly Manufacturing 7.2 SPS 4
Configure SAP to Send Messages to SAP MII
Integration Guide
© 2017 SAP SE or an SAP affiliate company. All rights reserved. 40
<Column Description="" MaxRange="0.0" MinRange="0.0" Name="Status"
SQLDataType="1" SourceColumn="Status" />
<Column Description="" MaxRange="0.0" MinRange="0.0" Name="MessageID"
SQLDataType="1" SourceColumn="MessageID" />
<Column Description="" MaxRange="0.0" MinRange="0.0" Name="MessageKeyData"
SQLDataType="1" SourceColumn="MessageKeyData" />
</Columns>
<Row>
<Status>PASSED</Status>
<MessageID>40970bb0-9131-11df-ae44-fede0a042d5c</MessageID>
<MessageKeyData>Order/Oper: 00121221 / 0020</MessageKeyData>
</Row>
</Rowset>
</Rowsets>
The main information is the Status and MessageID, and if Key Data had been requested, this is shown in the
MessageKeyData field. The MessageID can be used to query the system programmatically by using the method
detailed next.
To query the status of a message, the transaction is called GetMessageStateById, and can be called as follows:
http://<server>:<port>/XMII/Runner?Transaction=SAP/Manufacturing/CAMS/services/GetMessageState
ById&RecordId=<record_id>&OutputParameter=result
Again, this call requires that basic authentication is added into the header of the request with an applicable SAP
NetWeaver user to access this resource.
The following XML message is returned:
<?xml version="1.0" encoding="UTF-8" ?>
<CAMSINT_MESSAGE>
<ID>0a9f70b0-7f1b-11df-9bc7-d4600a042d5c</ID>
<MESSAGE_SEQUENCE>1</MESSAGE_SEQUENCE>
<MESSAGE_NAME>Z_MATMAS04</MESSAGE_NAME>
<CATEGORY>GeneralInbound</CATEGORY>
<MESSAGE_TYPE>Initial</MESSAGE_TYPE>
<STATUS>Passed With Message</STATUS>
<RECEIVED_DATE_TIME>2010-06-23T18:59:56</RECEIVED_DATE_TIME>
<START_DATE_TIME>2010-06-23T19:29:45</START_DATE_TIME>
<END_DATE_TIME>2010-06-23T19:29:47</END_DATE_TIME>
<RETRY_COUNT>0</RETRY_COUNT>
<PARENT_ID>---</PARENT_ID>
<CORRELATION_KEY>---</CORRELATION_KEY>
<KEY_DATA>---</KEY_DATA>
<RESPONSE_MESSAGE>TEST</RESPONSE_MESSAGE>
<HISTORY>
<RECORD seq="1" type="request">Request Successful</RECORD>
<RECORD seq="2" type="response">TEST</RECORD>
</HISTORY>
</CAMSINT_MESSAGE>
10.9 Standard Service Transactions
CAMS-INT comes with three main out-of-the-box services for the workflows. These services allow for a Web Service
call and two variants for BAPI calls – one that supports transactional capability for multiple calls and one that is a

SAP Complex Assembly Manufacturing 7.2 SPS 4
Configure SAP to Send Messages to SAP MII
Integration Guide
© 2017 SAP SE or an SAP affiliate company. All rights reserved. 41
single BAPI call. Each one of these transactions requires a set of parameters to be provided in the form
Param1=Value1;Param2=Value2 – named value pairs, delimited with a semicolon.
10.9.1 StandardWebService (SAP/Manufacturing/ CAMS/framework/helpers)
This transaction takes an XML message and wraps it with a SOAP envelope and then makes the HTTP call to the
endpoint. The XML message sent to this transaction must be the actual payload for the SOAP envelope’s body
element. The parameters supported by this transaction are as follows:
Parameter Name Comments
serviceURL This is the URL for the web service endpoint, without the server part specified. This
value is concatenated with the MES Server value defined in the Supported Plants
configuration screen as it is configurable by Plant code.
credentials The credential alias name associated with the username and password requirements to
connect to this server. Credential aliases are defined within the SAP MII administration
console under the Security Services Credential Editor page.
10.9.2 StandardBAPIService (SAP/Manufacturing/ CAMS/framework/helpers)
This transaction takes an XML message and handles sending it into SAP ERP via the RFC connection. The
expectation for this transaction is that the actual XML message sent into the transaction can be sent directly to SAP
ERP without modification. The parameters supported by this transaction are as follows:
Parameter Name Comments
bapiName This property is the root node of the BAPI being called by this event.
credentials The credential alias name associated with the username and password requirements to
connect to this server. Credential aliases are defined within the SAP MII administration
console under the Security Services Credential Editor page.
10.9.3 TransactionBAPIService (SAP/ Manufacturing/CAMS/framework/helpers)
This transaction takes an XML message and handles sending it into SAP ERP via the RFC connection. The
expectation for this transaction is that the actual XML message sent into the transaction will be broken up into
separate messages and sent into SAP ERP one at a time within a single transaction. This ensures that any one item
failing will cause all updates within this transaction to fail. There is an assumption that the split messages are all for
the same BAPI call and that the structure of the XML message is such that a single XSLT can convert the message
segment into the required BAPI message. The parameters supported by this transaction are as follows:
SAP Complex Assembly Manufacturing 7.2 SPS 4
Configure SAP to Send Messages to SAP MII
Integration Guide
© 2017 SAP SE or an SAP affiliate company. All rights reserved. 42
Parameter Name Comments
bapiName This property is the root node of the BAPI being called by this event.
transformXSLT This is the name of the registered XSLT document to break the provided XML
message in to submessages to be sent to SAP ERP.
credentials The credential alias name associated with the username and password requirements to
connect to this server. Credential aliases are defined within the SAP MII administration
console under the Security Services Credential Editor page.
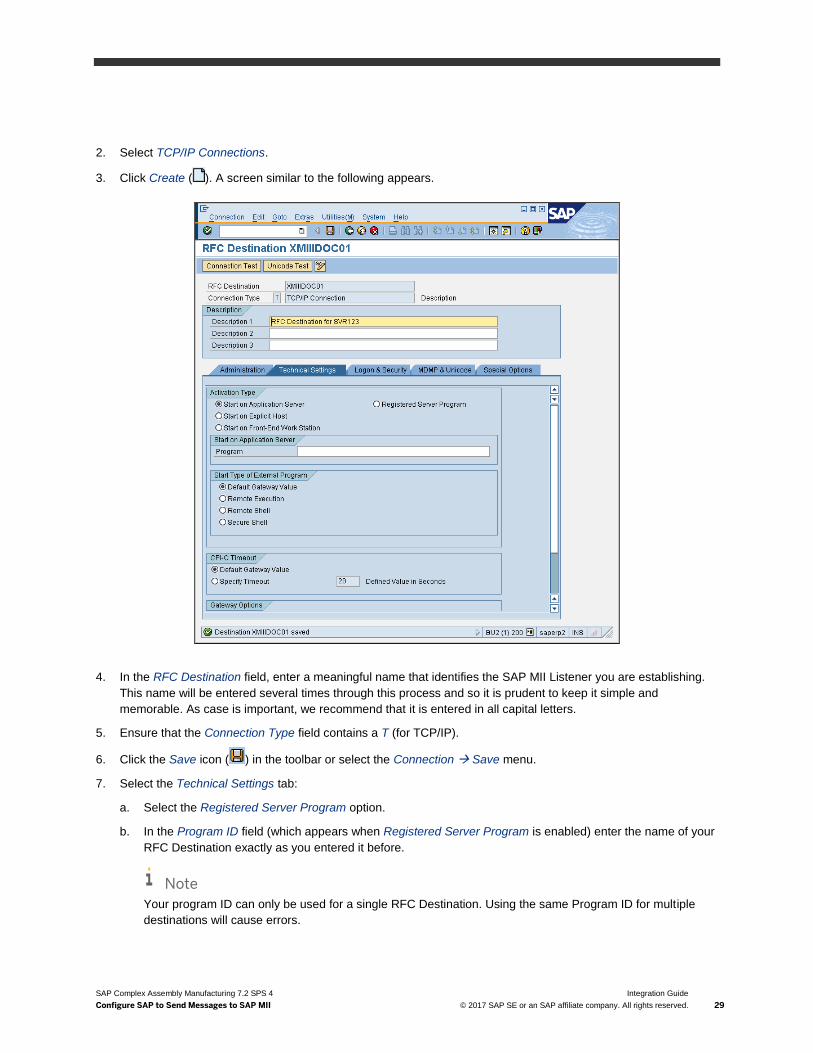
10.10 MessageValidationService (SAP/ Manufacturing/CAMS/framework/test)
This transaction provides a single test transaction for cases where interfaces are being developed or where the end
system is not currently available. The service performs a validation process on the message and returns a standard
generic response message indicating whether the validation was successful or not. There is also a corresponding UI
page (see section 15.1, item 16) which allows for XML messages to be posted into CAMS-INT which is detailed here.
The parameters supported by this transaction are as follows:
Parameter Name Comments
schemaURL This is the URL for the schema to load to ensure that the XML provided validates
against it. This URL should be fully qualified and the CAMS-INT integration server
can be used to store these Schema files.
credentials The credential alias name associated with the username and password requirements
to connect to this server. Credential aliases are defined within the SAP MII
administration console under the Security Services Credential Editor page.

SAP Complex Assembly Manufacturing 7.2 SPS 4
Configure SAP MII Connection to the SAP Complex Assembly Manufacturing Database
Integration Guide
© 2017 SAP SE or an SAP affiliate company. All rights reserved. 43
11 Configure SAP MII Connection to the SAP Complex Assembly Manufacturing Database
To enable CAMS-INT to connect to the SAP Complex Assembly Manufacturing database, a data server needs to be
defined. To create this connection:
1. Logon to the XMII main application as Administrator or as a user with Administration access.
2. Navigate to Data Services menu and select Data Servers.
3. In the Connector Type drop-down, select DataSource.
4. Click the Create button.
5. This will change the UI to show a data collection screen where you enter the name, connector type, and
description. Complete the fields on this screen using the values from the following table. You may need to use
the right scroll bar to see all these fields:
Property Name Value
Server Name CAMS-INT
Connector Type DataSource
Description CAMS Database Connection
6. Click the Finish button.
7. To complete the configuration, you will need to enter the following information into the Connection tab.
Property Name Value
Data Source jdbc/CAMSINTDataSource
Date Prefix TO_DATE'
Date Suffix ','MM/DD/YYYY HH24:MI:SS')
Retention Days 7
Internal Date Format yyyy-MM-dd HH:mm:ss
Max Retry Count 5
Retry Interval 60000
8. Go back to the Settings tab:
a. Enable the connection by selecting the Enabled field.
b. Enable dynamic queries by selecting the Allow Dynamic Query check box.
9. Click the Save button.

SAP Complex Assembly Manufacturing 7.2 SPS 4
Configure SAP MII Message Listeners for the Message Types
Integration Guide
© 2017 SAP SE or an SAP affiliate company. All rights reserved. 44
12 Configure SAP MII Message Listeners for the Message Types
To enable messages to be sent and processed by CAMS-INT, message listeners need to be created to enable the
hand off to CAMS-INT from SAP MII:
1. Logon to the XMII main application as Administrator or as a user with Administration access.
2. Navigate to Message Services menu and then select Message Processing Rules.
3. Click the Create button. The screen shown appears.

SAP Complex Assembly Manufacturing 7.2 SPS 4
Configure SAP MII Message Listeners for the Message Types
Integration Guide
© 2017 SAP SE or an SAP affiliate company. All rights reserved. 45
4. You need to generate a message processing rule for the following XML documents (see step 5). You also will
need to know the Message Listener value used in the previous section when connecting SAP NetWeaver to SAP
for some of the configuration steps.
Note
Comments must not exceed 100 characters. If you enter more than that, an error appears and the message
processing rule is not saved.
NAME Message Name Type Key
Data
Queue Name Comments
BOM_DATA BOM_DATA Web
Service
1 GeneralQueue Supports the
Manufacturing Bill of
Material (MBOM)
message being sent to
SAP ERP
BOMMAT03 BOMMAT IDoc 1 GeneralQueue Supports Engineering
Bill of Material (EBOM)
records being sent from
SAP ERP to SAP
Complex Assembly
Manufacturing
CHANGE_MASTER_REQUEST CHANGE_MASTER_REQUEST Web
Service
1 GeneralQueue Supports the creation
of the Model/Unit
effectivity change
master in SAP (used in
conjunction with the
BOM_DATA message)
CREATE_INSTLSTEPPLAN_001 CREATE_INSTLSTEPPLAN_001 Web
Service
1 GeneralQueue Supports the Routing
message being sent to
SAP ERP (only if using
installation documents
with steps). This
message in the CAMS
INT Queue is
CREATE_SAPROUTING
RELEASE_001.
CREATE_FABPLAN_001 CREATE_FABPLAN_001 Web
Service
1 GeneralQueue Supports the Routing
message being sent to
SAP ERP (only if using
fabrication documents
without steps) .This
message in the CAMS
INT Queue is
CREATE_SAPROUTING
RELEASE_001.

SAP Complex Assembly Manufacturing 7.2 SPS 4
Configure SAP MII Message Listeners for the Message Types
Integration Guide
© 2017 SAP SE or an SAP affiliate company. All rights reserved. 46
NAME Message Name Type Key
Data
Queue Name Comments
CREATE_FABSTEPPLAN_001 CREATE_FABSTEPPLAN_001 Web
Service
1 General Queue Supports the Routing
message being sent to
SAP ERP (only if using
fabrication documents
with steps). This
message in the CAMS
INT Queue is
CREATE_SAPROUTING
RELEASE_001.
CREATE_INSTLPLAN_001 CREATE_INSTLPLAN_001 Web
Service
1 GeneralQueue Supports the Routing
message being sent to
SAP ERP (only if using
installation documents
without steps). This
message in the CAMS
INT Queue is
CREATE_SAPROUTING
RELEASE_001.
CREATE_SAPROUTINGRELEASE_001 CREATE_SAPROUTINGRELEASE_001 Web
Service
1 GeneralQueue Supports the Routing
message being sent to
SAP ERP
HRMD_A06 HRMD_A IDoc 1 GeneralQueue Supports User
Certifications being sent
from SAP ERP to SAP
Complex Assembly
Manufacturing
INVCON01 INVCON IDoc 1 CompPartQueue Supports Goods Movements
being sent from SAP ERP to
SAP Complex Assembly
Manufacturing to support
component Lot/Serial
number assignment
LOIPRO01 LOIPRO IDoc 1 GeneralQueue Supports Order
Creation requests from
SAP ERP to SAP
Complex Assembly
Manufacturing
LOIWCS02 LOIWCS IDoc 1 GeneralQueue Supports Work Center
creation or updates
sent from SAP ERP to
SAP Complex
Assembly
Manufacturing

SAP Complex Assembly Manufacturing 7.2 SPS 4
Configure SAP MII Message Listeners for the Message Types
Integration Guide
© 2017 SAP SE or an SAP affiliate company. All rights reserved. 47
NAME Message Name Type Key
Data
Queue Name Comments
MATMAS04 MATMAS IDoc 1 GeneralQueue Supports Material
Records being sent
from SAP ERP to SAP
Complex Assembly
Manufacturing
PLAN_HOLD
Note
See the Appendix for
some SAP ECC tasks that
also must be done for the
plan hold interface.
PLAN_HOLD Web
Service
GeneralQueue Supports
Holding/Releasing via
Task List
WIP_ORDER WIP_ORDER Web
Service
1 GeneralQueue Supports the Operation
Confirmation message
being sent to SAP ERP
5. For each of the XML documents listed above, create a message rule as follows:
a. In the Name field, enter the XML document name using the table above.
b. Enter a Description.
c. For XML documents where the Type is:
Web Service, set the Server Name field to XMIIMESSAGELISTENER.
IDoc, set the Server Name field to the Message Listener value used previously (XMIIIDOC01 for example).
Note
When configuring for an IDoc, you will need to set the Message Name to be the XML Document name
without the trailing numbers – for example, MATMAS not MATMAS04.
d. For Message Type, select the option that matches the Type column above, i.e., Webservice or IDoc.
e. Select the Transaction option for the Processing Type.
f. For the Transaction value, click the … button and navigate to SAP Manufacturing CAMS Services
and select RegisterDocumentService or RegisterDocumentServiceWithPlant for BOMMAT03. Click OK.
g. Select Never in the Persist Transaction drop-down. To aid in debugging issues, you may want to temporarily
set this to Always to see the issues generated in SAP MII. Once resolved, however, it is strongly
recommended that you reset this to Never.
h. Select None in the Log Level drop-down or select Info for the plan hold rule.

SAP Complex Assembly Manufacturing 7.2 SPS 4
Configure SAP MII Message Listeners for the Message Types
Integration Guide
© 2017 SAP SE or an SAP affiliate company. All rights reserved. 48
i. In the Parameters table:
i. Select (check) the XMLMessage check box. This will set the value to ReceivedMessageXML
meaning the actual XML message is being sent in with this message.
Caution
Do not select (check) any field other than XML Message as doing so will cause configuration and
data issues.
ii. For BOMMAT03, enter the default plant
iii. Leave ParentMessageID blank.
iv. Set the QueueName to the value in the Queue Name column in the table above.
v. Set ProcessKeyData to the value in the Key Data column in the table above.
6. Click the Save button.
12.1 Enable Message Cleanup Rules
For every message processing rule, you also need to define a message cleanup rule. These cleanup rules ensure
that records are kept for as long as necessary and are then deleted. You will need to know many of the same values
used for the message processing rule to create the cleanup rule.
To create a message cleanup rule:
1. Logon to the XMII main application as Administrator or as a user with Administration access.
2. Navigate to Message Services menu and then select Message Cleanup Rules. The screen shown appears.
3. Click the Create button.

SAP Complex Assembly Manufacturing 7.2 SPS 4
Configure SAP MII Message Listeners for the Message Types
Integration Guide
© 2017 SAP SE or an SAP affiliate company. All rights reserved. 49
4. Complete the fields in the Details for area as noted in the table below.
Property Value
Name A unique name for the entry. It should be the same as the Name field for the processing
rule.
Description A descriptive name for the entry.
Message
Listener
The message listener value. It should be the same as the Message Listener field for the
processing rule.
Message Type WebService or IDOC. It should be the same as the Message Type field for the
processing rule.
Message Name This is the XML message name. It should be the same as the Message Name field for
the processing rule.
Messages Older
Than
Enter the number of hours to keep the message in the MII_MESSAGE table before
deleting it. This can be set to any value – SAP suggests 24 or 48 hours.
Processing
Status
Select Success. This means only messages successfully pushed through into CAMS-
INT are cleaned up. These records are not needed unless something catastrophic
occurs and you need to resend the messages from the Message Monitor. Any other
messages will stay in the MII_MESSAGE table.
Enabled Select the check box to make the rule active.
5. Click the Save button.
6. Repeat these steps for every message defined in the processing rules.
Once a rule is created, you can invoke it manually by selecting the rule in the table and clicking the Run button.
Otherwise, the rules are triggered by SAP MII based on the setting in the XLBL_MESSAGE_CLEANUP_INTERVAL
[Hours] field on the System Properties screen. The default value is 1, which means the rule is run every hour. You
can adjust this value as needed by selecting System Management > System Properties. This is an interval value; you
cannot define when it actually runs so this needs to be considered when changing this value.

SAP Complex Assembly Manufacturing 7.2 SPS 4
Configure SAP MII Message Listeners for the Message Types
Integration Guide
© 2017 SAP SE or an SAP affiliate company. All rights reserved. 50
With the configuration done as noted above, all messages that are successfully passed into CAMS-INT will be
removed from SAP MII after they have been stored for longer than the interval specified. This will exclude any
messages that failed to be passed from SAP MII to CAMS-INT or were in some status other than Success.
Select Message Services > Message Monitor to go to the Message Monitor screen where you can view failed
messages or messages in a status other than Success and disposition them as needed. You will also see successful
messages in the Message Monitor, but only up to the current time interval.

SAP Complex Assembly Manufacturing 7.2 SPS 4
Configure SAP MII Credentials to Be Used by CAMS-INT
Integration Guide
© 2017 SAP SE or an SAP affiliate company. All rights reserved. 51
13 Configure SAP MII Credentials to Be Used by CAMS-INT
Credentials need to be created for the JCO connector (xMII_SAP_JCO), the Mail connection, and CAMS-INTws to
support all the capabilities of CAMS-INT.
To configure these credentials:
1. Logon to the XMII main application as Administrator or as a user with Administration access.
2. Navigate to Security Services menu panel and select Credential Stores. The screen shown appears.
3. First, create the required entry for JCO connector:
a. Click the Create button
b. In the Name field, enter xMII_SAP_JCO.
c. Enter the User Name and Password needed for the ECC server to allow the required connectivity to occur.
d. Re-enter the password in the Confirm Password field.
e. Click the Save button.
4. Next, create the required entry for email notification:
a. Click the Create button
b. In the Name field, enter CAMSINTMail.
c. Enter the User Name and Password needed for the SMTP server to allow sending of mail from the internal
mail server.
d. Re-enter the password in the Confirm Password field.
e. Click the Save button.

SAP Complex Assembly Manufacturing 7.2 SPS 4
Configure SAP MII Credentials to Be Used by CAMS-INT
Integration Guide
© 2017 SAP SE or an SAP affiliate company. All rights reserved. 52
5. Next, create the required entry to allow connectivity between SAP Complex Assembly Manufacturing and CAMS-
INTws:
a. Click the Create button.
b. In the Name field, enter tcl_outbound_user (defined in section 5).
c. Enter the User Name and Password you created for that user.
d. Re-enter the password in the Confirm Password field.
e. Click the Save button.
6. Next, create the required entry to allow connectivity between CAMS-INT and CAMS-ws:
a. Click the Create button.
b. In the Name field, enter MES_CREDENTIALS.
c. Enter the User Name and Password you created for the tcl_outbound_user user in section 5 above.
d. Re-enter the password in the Confirm Password field.
e. Click the Save button.
7. Next, create the required entry cams_int_runner:
a. Click the Create button.
b. In the Name field, enter cams_int_runner.
c. Enter the User Name and Password you created for the tcl_outbound_user user in section 5 above.
d. Re-enter the password in the Confirm Password field.
e. Click the Save button.
If additional credentials are required during the implementation because of connectivity requirements to other
systems, these should be defined in this area within SAP MII and referenced in the CAMS-INT workflow.

SAP Complex Assembly Manufacturing 7.2 SPS 4
Configure Schedule Tasks Used by CAMS-INT
Integration Guide
© 2017 SAP SE or an SAP affiliate company. All rights reserved. 53
14 Configure Schedule Tasks Used by CAMS-INT
Recommendation
SAP recommends that you regularly examine your message loads and the average processing time and use
that information to adjust the pattern intervals and the count settings discussed below to maximize the
number of records per scheduler. Also be sure to capture your settings for reference.
CAMS-INT makes use of the scheduler in SAP MII to perform tasks for processing data. To create these schedule
tasks:
1. Logon to the XMII main application as Administrator or as a user with Administration access.
2. Navigate to System Management and select Scheduler. The SAP MII: Scheduler screen appears.
3. Click the Create button. The Create Scheduler dialog box appears:
a. Enter GeneralQueueMessageDispatcher in the Name field.
b. Leave the Scheduler Type as Transaction.
c. Click OK.
4. Select the job in the table.

SAP Complex Assembly Manufacturing 7.2 SPS 4
Configure Schedule Tasks Used by CAMS-INT
Integration Guide
© 2017 SAP SE or an SAP affiliate company. All rights reserved. 54
5. To create a general message dispatcher, complete the fields on the Transaction Scheduler tab in the lower part
of the screen using the values from the following table:
Property Name Value
Description General Queue Message Processor
Enabled Selected (checked)
Transaction Click the icon and select the transaction -
SAP/Manufacturing/CAMS/services/StandardWorkflowService. Click OK.
User Name cams_int_runner (as defined in Section 13)
Password Password for cams_int_runner (as defined in Section 5)
Pattern Click the icon and select the desired run interval. It is advised that
the duration be set to every 10 seconds within the hour – or (*/10 * * * *
*). The format of this entry is as per the UNIX Cron Pattern.
Persist Transaction Never
Log Level Error
Parameters Category GeneralQueue
Count 20
RetryLimit 2
6. Click the Save button.
7. To enable the Data Resend service (this is used to pull failed and stored data from SAP Complex Assembly
Manufacturing into CAMS-INT), click the Create button. The Create Scheduler dialog box appears:
a. Enter ResendDataService in the Name field.
b. Leave the Scheduler Type as Transaction.
c. Click OK.
8. Select the job in the table.
9. Complete the fields on the Transaction Scheduler tab in the lower part of the screen using the values from the
following table:
Property Name Value
Description Resend Data From CAMS to CAMS-INT Processor
Enabled Selected (checked)
Transaction Click the icon and select the transaction -
SAP/Manufacturing/CAMS/services/ResendDataService. Click OK.
User Name cams_int_runner (as defined in Section 13)
Password Password for cams_int_runner (as defined in Section 5)
Pattern Click the icon and select the desired run interval. It is advised that
the duration be set to every 5 minutes within the hour – or (0 5 * * * *).
The format of this entry is as per the Unix Cron Pattern.

SAP Complex Assembly Manufacturing 7.2 SPS 4
Configure Schedule Tasks Used by CAMS-INT
Integration Guide
© 2017 SAP SE or an SAP affiliate company. All rights reserved. 55
Property Name Value
Persist Transaction Never
Log Level Error
Parameters CredentialAlias MES_CREDENTIALS
ResendDataType CHANGEMASTER;BOM;ROUTING
Server http://<server>:<port>/
URI CAMS-ws/ResendDataService
10. Click the Save button.
11. To enable the Material Correlation service, click the Create button. The Create Scheduler dialog box appears:
a. Enter Material Correlation in the Name field.
b. Leave the Scheduler Type as Transaction.
c. Click OK.
12. Select the service in the table.
13. Complete the fields on the Transaction Scheduler tab in the lower part of the screen using the values from the
following table:
Property Name Value
Description Correlation process for Material Records
Enabled Selected (checked)
Transaction Click the icon and select the transaction -
SAP/Manufacturing/CAMS/services/CorrelationWorkflowService. Click OK.
User Name cams_int_runner (as defined in Section 13)
Password Password for cams_int_runner (as defined in Section 5)
Pattern Click the icon and select the desired run interval. It is advised that the
duration be set to every 10 seconds within the hour – or (*/10 * * * * *). The
format of this entry is as per the UNIX Cron Pattern.
Persist Transaction Never
Log Level Error
Parameters Category MaterialQueue
CorrelationXSLT MaterialMasterCorrelation
Count How many messages to process with each run
DestinationCategory GeneralQueue
MergeTransaction
NewDocumentName Z_MATMAS04
NumberOfDocuments 3
WaitTimeLimit 10
SAP Complex Assembly Manufacturing 7.2 SPS 4
Configure Schedule Tasks Used by CAMS-INT
Integration Guide
© 2017 SAP SE or an SAP affiliate company. All rights reserved. 56
14. Click the Save button.
15. To enable the Component Serial/Lot service, click the Create button. The Create Scheduler dialog box appears:
a. Enter ComponentSerialNumberService in the Name field.
b. Leave the Scheduler Type as Transaction.
c. Click OK.
16. Select the service in the table.
17. Complete the fields on the Transaction Scheduler tab in the lower part of the screen using the values from the
following table:
Property Name Value
Description Component Serial Number Processor
Enabled Selected (checked)
Transaction Click the icon and select the transaction -
SAP/Manufacturing/CAMS/services/SplitWorkflowService. Click OK.
User cams_int_runner (as defined in Section 13)
Password Password for cams_int_runner (as defined in Section 5)
Pattern Click the icon and select the desired run interval. It is advised that
the duration is set to every 10 seconds within the hour – or (*/10 * * * *
*). The format of this entry is as per the UNIX Cron Pattern.
Persist Transaction Never
Log Level Error
Parameters Category CompPartQueue
Count How many messages to process
with each run
DestinationCategory GeneralQueue
EnrichmentParameters RemoveOrderLeadingZeros=1
EnrichmentTransaction SAP/Manufacturing/CAMS/enr
ichment/ComponentSerialNum
berRetriever
PlantXPath /INVCON01/IDOC/E1ICHD0/E1I
CIT0/WERKS
SplitXSLT SerialNumberSplit
18. Click the Save button.
19. To enable archiving (mandatory) to archive messages out of the main CAMS-INT table and into an archive table
for reference, click the Create button. The Create Scheduler dialog box appears:
a. Enter ArchiveData in the Name field.
b. Leave the Scheduler Type as Transaction.
c. Click OK.

SAP Complex Assembly Manufacturing 7.2 SPS 4
Configure Schedule Tasks Used by CAMS-INT
Integration Guide
© 2017 SAP SE or an SAP affiliate company. All rights reserved. 57
Note
The archive process is based on days in the active queue as an indicator as to whether the record should be
archived or not. The archive process moves all record types and is not configured to a specific record type.
20. Select the service in the table.
21. Complete the fields on the Transaction Scheduler tab in the lower part of the screen using the values from the
following table:
Property Name Value
Description Archive Data, for example
Enabled Selected (checked)
Transaction Click the icon and select the transaction -
SAP/Manufacturing/CAMS/archive/ArchiveDataProcess. Click OK.
User Tcl_outbound_user (or equivalent; as defined in Section )
Password Password for Tcl_outbound_user (as defined in Section 5)
Pattern Click the icon and select the desired run interval. SAP recommends
that this be set to run during down times as it uses resources and will
impact any live interface currently running. It should also be set to run
daily.
Persist Transaction Never
Log Level Error

SAP Complex Assembly Manufacturing 7.2 SPS 4
Configure Schedule Tasks Used by CAMS-INT
Integration Guide
© 2017 SAP SE or an SAP affiliate company. All rights reserved. 58
Property Name Value
Parameters NoOfDaysFromToday Defaults to 150, but should be set
to the number of days a message
should stay in the queue. As the
transaction transfers all messages,
this needs to be large enough to
allow issue resolution but low
enough to maintain a reasonable
number of records in the active
table.
NoOfRecords How many records to process
when triggered. This value should
be set to a low number when you
are bringing the number of records
in the live queue down to the
desired level and then increased to
pull more records when it is in a
maintenance state (this would
typically be aligned with a change
in run duration. Shorter time
interval with a lower number, higher
number with a longer time frame.)
Caution
Care should be taken when initially setting up the archive
process as running this transaction with live data passing through
the interface will cause a slowdown. SAP recommends that the
archive process is put into the system with a more frequent
runtime and lower message count until the records are
transferred and then move into a larger record count with a lower
frequency to maintain a normal run condition. These numbers
can be altered at any time and will take effect the next time the
task is run.
Note
To remove from this archive table, you will need to create a database script to clean out the records as
needed. SAP does not provide a task for doing this.
22. Click the Save button.

SAP Complex Assembly Manufacturing 7.2 SPS 4
Configure CAMS-INT
Integration Guide
© 2017 SAP SE or an SAP affiliate company. All rights reserved. 59
15 Configure CAMS-INT
Before CAMS-INT can be used, some configuration is required. Initially, the CAMS-INT functionality needs to be
exposed through a series of menus that appear on the left hand side of the screen. Once the menu is defined,
additional configuration needs to be done as explained in this section.
15.1 Menu Creation
CAMS-INT functionality can be broken into two distinct categories: Administration and Monitoring/Configuration. The
Administration items relate to configuration that, if changed, could cause functional issues to occur.
Monitoring/Configuration relates to day-to-day monitoring tasks and notification configuration—things that will not
prevent process issues.
To provide this separation, the menu items will be split between the two roles created earlier: CAMS_INT_ADMIN
and CAMS_INT_USER.
For the CAMS_INT_ADMIN menu structure, do the following:
1. Logon to XMII and navigate to the following menu entry: Content Development Wortkbench. This will start a
Java Web Start application. If a dialog appears asking whether to block potentially unsafe components from
being run, select No otherwise the application will not run.
2. When the application starts, from the Tools menu, select Navigation Editor. The following screen appears:

SAP Complex Assembly Manufacturing 7.2 SPS 4
Configure CAMS-INT
Integration Guide
© 2017 SAP SE or an SAP affiliate company. All rights reserved. 60
3. First, we need to add the roles we want to assign access rights to. Click the Add button (lower left of the screen)
and enter CAMS_INT* in the search field. Click the Search button. Select both the CAMS_INT_ADMIN and
CAMS_INT_USER items returned.
4. In the ROLE data list, select CAMS_INT_ADMIN.
5. With the NavigationItems folder selected, click the Add Child button.
6. In the Name field, enter CAMS_INT.
7. Click OK, and then on the main screen click the Save button to save the change.
8. With CAMS_INT selected, click the Add Child button.
9. In the Name field, enter Administration.
10. Click OK, and then on the main screen click the Save button to save the change.
11. With CAMS_INT selected, click the Add Child button.
12. In the Name field, enter Configuration.
13. Click OK, and then on the main screen click the Save button to save the change.
You now have the first level menu structure defined.
14. With Configuration selected, click the Add Child button:
o Using the table data below, enter the corresponding data in the appropriate screen. Leave the Target value
(as defaulted by the application) as Open Link in Home Page. Once entered, click OK, and then on the main
screen click the Save button to save the change. Repeat this step until all items are defined.
Name Link
Workflow
Configuration
/XMII/CM/SAP/Manufacturing/CAMS/framework/ui/Workflow/Workflow
ConfigurationView.irpt
Supported
Plants
/XMII/CM/SAP/Manufacturing/CAMS/framework/ui/Configuration/
SupportedPlantsView.irpt
E_Mail
Notifications
/XMII/CM/SAP/Manufacturing/CAMS/framework/ui/Notification/
NotificationConfigurationView.irpt
Global
Configuration
/XMII/CM/SAP/Manufacturing/CAMS/framework/ui/Configuration/
GlobalConfigurationView.irpt
Integration
Server
/XMII/CM/SAP/Manufacturing/CAMS/framework/ui/Configuration/ServerPropertie
sView.irpt
15. With Administration selected, click the Add Child button:
o Using the table data below, enter the corresponding data in the appropriate screen (as defaulted by the
application) as Open Link in Home Page. Once entered, click OK, and then on the main screen click the
Save button to save the change.
Name Link
Configuration
Import Export
/XMII/CM/SAP/Manufacturing/CAMS/framework/ui/Configuration/ConfigurationIm
portExportView.irpt

SAP Complex Assembly Manufacturing 7.2 SPS 4
Configure CAMS-INT
Integration Guide
© 2017 SAP SE or an SAP affiliate company. All rights reserved. 61
16. This next step is only required if you wish to expose the test UI page to allow posting of XML messages to the
CAMS-INT queue (as discussed in section 10.10) – effectively bypassing either the RFC or web service
connections used by SAP ECC and SAP Complex Assembly Manufacturing. This allows for unit testing of
CAMS-INT to ensure connectivity between the required systems. If this is required, then you need to add an
additional item to the Administration menu, so with Administration selected, click the Add button:
o Using the table data below, enter the corresponding data in the appropriate screen (as defaulted by the
application) as Open Link in Home Page. Once entered, click OK, and then on the main screen click the
Save button to save the change.
Name Link
Post Test XML /XMII/CM/SAP/Manufacturing/CAMS/framework/ui/Test/PostXMLtoQueue.irpt
For the CAMS_INT_USER menu structure:
1. In the ROLE data list, select CAMS_INT_USER.
2. With the NavigationItems folder selected, click the Add Child button.
3. In the Name field, enter CAMS_INT.
4. Click OK, and then on the main screen click the Save button to save the change.
5. With CAMS_INT selected, click the Add Child button.
6. In the Name field, enter Queues.
7. Click OK, and then on the main screen click the Save button to save the change.
8. With CAMS_INT selected, click the Add Child button.
9. In the Name field, enter Reports.
10. Click OK, and then on the main screen click the Save button to save the change.
You now have the first level menu structure defined.
11. With Queues selected, click the Add Child button:
o Using the table data below, enter the corresponding data in the appropriate screen. Leave the Target value
(as defaulted by the application) as Open Link in Home Page. Once entered, click OK, and then on the main
screen click the Save button to save the change. Repeat this step until all items are defined.
Name Link
Queue Monitor /XMII/CM/SAP/Manufacturing/CAMS/framework/ui/Queues/
QueueMonitorView.irpt
Archive Queue
Monitor
/XMII/CM/SAP/Manufacturing/CAMS/framework/ui/Queues/
ArchiveQueueMonitorView.irpt
12. With Reports selected, click the Add Child button:
o Using the table data below, enter the corresponding data in the appropriate screen. Leave the Target value
(as defaulted by the application) as Open Link in Home Page. Once entered, click OK, and then on the main
screen click the Save button to save the change. Repeat this step until all items are defined.

SAP Complex Assembly Manufacturing 7.2 SPS 4
Configure CAMS-INT
Integration Guide
© 2017 SAP SE or an SAP affiliate company. All rights reserved. 62
Name Link
Message Statistics /XMII/CM/SAP/Manufacturing/CAMS/framework/ui/statistics/MessageStatisti
csView.irpt
BOM Holding
Queue
/XMII/CM/SAP/Manufacturing/CAMS/framework/ui/BomHolding
Queue/BomHoldingQueueView.irpt
Routing Holding
Queue
/XMII/CM/SAP/Manufacturing/CAMS/framework/ui/PlanHolding
Queue/PlanHoldingQueueView.irpt
Change Masters /XMII/CM/SAP/Manufacturing/CAMS/framework/ui/ChangeMaster/
ChangeMasterView.irpt
To enable the menu items for the active user, log out and back in to XMII. To enable the menus for users, please
ensure that the applicable role is defined for them. Apply the role or roles to each required user as needed through
the SAP NetWeaver administration module as per section 5, Configure Users and Roles within SAP NetWeaver.
15.2 Global Configuration
CAMS-INT has a set of global properties that allow the underlying application to function. These items need to be
checked and updated as required for the implementation.
To go to the CAMS-INT Global Configuration screen shown below, under the CAMS-INT menu item, navigate to
Configuration Global Configuration. If you do not see this menu item, please ensure that your user account has
been assigned the CAMS_INT_ADMIN role.
Caution
The Discriminator_TX value shown is an example only. The value will vary by customer.
The main customer configurable item is the SMTP_FROM_ADDRESS, which is the from address used in all email
notifications. The other properties should only be changed after consultation with SAP. To change the value:
1. Select SMTP_FROM_ADDRESS in the table. The data is copied to the Parameter Name and Parameter Value
fields at the top of the window.
2. Make the change to the Parameter Value field.
3. Click Save to record this change.

SAP Complex Assembly Manufacturing 7.2 SPS 4
Configure CAMS-INT
Integration Guide
© 2017 SAP SE or an SAP affiliate company. All rights reserved. 63
15.3 Email Notifications
To support sending notification messages upon a failed message, CAMS-INT needs to know which email address or
addresses to send the email to. The configuration is made based upon the message name (the XML root node) and
can only be set when this message name has been made known to CAMS-INT through the workflow configuration.
To go to the CAMS-INT Notification Configuration screen shown below, under the CAMS-INT menu, navigate to
Configuration E-Mail Notifications. If you do not see this menu item, please ensure that your user account has
been assigned the CAMS_INT_ADMIN role.
All message names made available to CAMS-INT through the Workflow Configuration are selectable from the XML
Root Node Name drop-down.
To configure the notification:
1. Select an XML Root Node Name value.
2. In the E-Mail Address field, enter the email address of the recipient for this message type. This can be a group
email address or a single account. You can also have multiple emails assigned to one XML Root Node Name—
repeat these steps for each address.
3. Choose whether this notification is for Application Errors or System Errors by selecting the appropriate check box.
Application errors are hard errors for which a retry cannot be performed; system errors are subject to retry.
4. Click the Save button to record this data.

SAP Complex Assembly Manufacturing 7.2 SPS 4
Configure CAMS-INT
Integration Guide
© 2017 SAP SE or an SAP affiliate company. All rights reserved. 64
15.4 Supported Plants
Note
This section assumes that plants have already been created in SAP ERP.
CAMS-INT supports routing of messages between multiple CAMS-ws and SAP ERP based upon a plant or site code.
You can define the mapping in the Supported Plants screen. Even if the configuration is one-to-one, all applicable
plants have to be configured to allow the messages to be sent through CAMS-INT.
To go the Supported Plants screen shown below, under the CAMS-INT menu navigate to Configuration Supported
Plants. If you do not see this menu item, please ensure that your user account has been assigned the
CAMS_INT_ADMIN role.
To configure a new plant:
1. Enter the Plant value
2. Enter the ERP Server—for SAP this will be the JCo connection; for other ERP entries this can be the HTTP
address for the endpoint.
3. Enter the ERP Credential (if needed). This is the name of the credentials defined in the Credential store within
SAP MII as defined in section 13, Configure SAP MII Credentials to Be Used by CAMS-INT.
4. Enter the MES Host URL.
5. Enter the MES Credential (if needed). This is the name of the credential defined in the Credential store within
SAP MII as defined in section 13, Configure SAP MII Credentials to Be Used by CAMS-INT.
6. Click Save to store the new record.
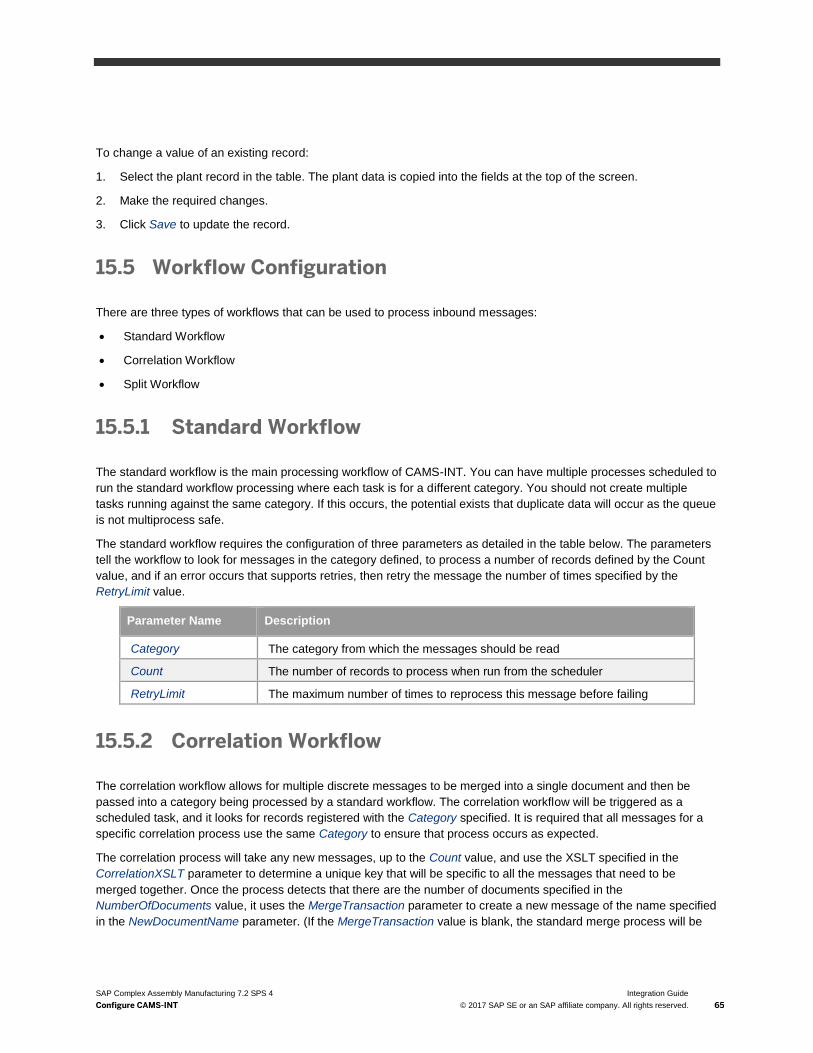
SAP Complex Assembly Manufacturing 7.2 SPS 4
Configure CAMS-INT
Integration Guide
© 2017 SAP SE or an SAP affiliate company. All rights reserved. 65
To change a value of an existing record:
1. Select the plant record in the table. The plant data is copied into the fields at the top of the screen.
2. Make the required changes.
3. Click Save to update the record.
15.5 Workflow Configuration
There are three types of workflows that can be used to process inbound messages:
Standard Workflow
Correlation Workflow
Split Workflow
15.5.1 Standard Workflow
The standard workflow is the main processing workflow of CAMS-INT. You can have multiple processes scheduled to
run the standard workflow processing where each task is for a different category. You should not create multiple
tasks running against the same category. If this occurs, the potential exists that duplicate data will occur as the queue
is not multiprocess safe.
The standard workflow requires the configuration of three parameters as detailed in the table below. The parameters
tell the workflow to look for messages in the category defined, to process a number of records defined by the Count
value, and if an error occurs that supports retries, then retry the message the number of times specified by the
RetryLimit value.
Parameter Name Description
Category The category from which the messages should be read
Count The number of records to process when run from the scheduler
RetryLimit The maximum number of times to reprocess this message before failing
15.5.2 Correlation Workflow
The correlation workflow allows for multiple discrete messages to be merged into a single document and then be
passed into a category being processed by a standard workflow. The correlation workflow will be triggered as a
scheduled task, and it looks for records registered with the Category specified. It is required that all messages for a
specific correlation process use the same Category to ensure that process occurs as expected.
The correlation process will take any new messages, up to the Count value, and use the XSLT specified in the
CorrelationXSLT parameter to determine a unique key that will be specific to all the messages that need to be
merged together. Once the process detects that there are the number of documents specified in the
NumberOfDocuments value, it uses the MergeTransaction parameter to create a new message of the name specified
in the NewDocumentName parameter. (If the MergeTransaction value is blank, the standard merge process will be

SAP Complex Assembly Manufacturing 7.2 SPS 4
Configure CAMS-INT
Integration Guide
© 2017 SAP SE or an SAP affiliate company. All rights reserved. 66
used.) This new message will then be placed into the category defined by the DestinationCategory parameter. If for
some reason not enough messages are received, the system processes the merge once the WaitTimeLimit has been
exceeded so as not to leave them in the queue.
Parameter Name Description
Category The category from which the messages should be read
CorrelationXSLT The transformation to handle creating the correlation ID from the message
Count How many messages to process with each run
DestinationCategory The category to place the correlated message into for further processing
MergeTransaction (Optional) Custom merge transaction name (fully qualified)
NewDocumentName The name of the merged document that will result from a correlation process
NumberOfDocuments The maximum number of documents to wait for
WaitTimeLimit The number of seconds to wait before processing regardless of whether the
number of documents has been reached
15.5.3 Split Workflow
The split workflow allows for a single message received into the system to be broken up into smaller messages and
then posted into a category being processed by a standard workflow. The split process is performed by the SplitXSLT
parameter and it is its responsibility to generate a new XML document with a root node of DOCS and then merge all
the new messages as children under it. Each child element under DOCS will become a new message placed into the
DestinationCategory. The process will process a number of records defined by the Count parameter.
You also have the ability to enrich the incoming message before the split takes place. If this is needed, then a
transaction is specified in the EnrichmentTransaction parameter and it will be run before the split takes place. If this
transaction needs any configuration parameters, then these should be set in EnrichmentParameters.
Parameter Name Description
Category The category to read the messages from
Count How many messages to process with each run
DestinationCategory The category to place the correlated message into for further processing
SplitXSLT The transformation to handle the split
EnrichmentTransaction An SAP MII transaction to enrich the XML message before performing the
split
EnrichmentParameters The parameters needed for the enrichment process
PlantXPath The XPath statement to determine the plant data for this XML message

SAP Complex Assembly Manufacturing 7.2 SPS 4
Configure CAMS-INT
Integration Guide
© 2017 SAP SE or an SAP affiliate company. All rights reserved. 67
15.5.4 Creating a Workflow
CAMS-INT processes messages based upon a workflow definition for that message name. The workflow for the pre-
configured interfaces will be delivered and so you do not need to manually configure them.
If new message types are required, you need to create a new workflow:
1. To go the CAMS-INT Workflow Configuration screen shown below, under the CAMS-INT menu navigate to
Configuration Workflow Configuration. If you do not see this menu item, please ensure that your user account
has been assigned the CAMS_INT_ADMIN role.
2. Specify the XML Root Node value. This is the root node of the XML message that will be processed with this
workflow.
3. Specify the Plant XPath statement. This value is the path into the XML document where the plant data is located.
This will be used as a lookup into the supported plants configuration to determine the ERP and MES server
location and any credentials to support connectivity. The ERP and MES servers will be used in the Main
Transaction (see step 7) as needed.
4. Specify the Enrichment transaction (click the icon to browse for it) for this workflow if required. The
Enrichment transaction is a custom transaction used to add in additional information to the XML message to
support processing.
5. Specify the Enrichment Params (parameters). These will be any external configuration for the Enrichment
transaction and whether there is any, or what they are, will be specific to the Enrichment transaction.
6. Specify the Pre Transform XSL. This XSLT file is required if and when the XML message needs to be converted
before being sent to the Main Transaction (see step 7). If the XML being sent into CAMS-INT is as needed by the
Main Transaction, then this field is not required.
7. Specify the Main Transaction. This is the SAP MII transaction that will be doing the actual reason for this
workflow. CAMS-INT comes with three basic Main Transactions to support sending web service requests and
communication to SAP. Custom Main Transactions can be created to perform other tasks.
8. Specify the Main Transaction Params (parameters). The parameters and definition of the parameters will be
dependent upon the Main Transaction requirements.

SAP Complex Assembly Manufacturing 7.2 SPS 4
Configure CAMS-INT
Integration Guide
© 2017 SAP SE or an SAP affiliate company. All rights reserved. 68
9. Specify the Post Transform XSL. This XSLT is used to interpret the response from the Main Transaction—which
should be an XML message—to report back to the CAMS-INT framework whether the call was successful or not,
and if not whether a retry is required.
10. Specify the Pass Handler. If additional work needs to be done after the Main Transaction has successfully
completed, then the SAP MII transaction performing this task would be defined here.
11. Specify the Pass Handler Params (parameters). These will be any external configuration for the Pass Handler
transaction and whether there is any, or what they are, will be specific to this Pass Handler.
12. Specify the Fail Handler. If additional work needs to be done after the Main Transaction has unsuccessfully
completed, then the SAP MII transaction performing this task would be defined here.
13. Specify the Fail Handler Params (parameters). These will be any external configuration for the Fail Handler
transaction and whether there is any, or what they are, will be specific to this Fail Handler.
14. Click the Save button to store this data.
If modifications need to be made to the workflow:
1. Select the required XML Root Node in the drop-down. The existing data appears in the fields.
2. Make the required changes.
3. Click the Save button to store the changes.
15.6 Configuration Import/Export
Once the configuration is complete or a change has been made, it is advisable to export the settings so that you can
use them to recover an instance or provide a baseline for another instance of CAMS-INT. All configuration settings
will be lost if the CAMS-INT SAP MII project is deleted or updated, so it is imperative that you export the configuration
before performing such a task.
To export the configuration:
1. Go the CAMS-INT Import/Export Configuration screen shown below. Under CAMS-INT menu navigate to
Administration Configuration Import Export. If you do not see this menu item, please ensure that your user
account has been assigned the CAMS_INT_ADMIN role.

SAP Complex Assembly Manufacturing 7.2 SPS 4
Configure CAMS-INT
Integration Guide
© 2017 SAP SE or an SAP affiliate company. All rights reserved. 69
2. Ensure you are running the configuration directly on the SAP MII server.
3. Select the items you want to export by selecting the check box next to the item. You must select at least one item
to export.
4. In the Filename field, specify the file you want to export the data to. You can create an empty file in the location
required and the configuration data will be written to this file. The file can also be on a shared folder that is visible
from the SAP MII server.
5. Click the Export button. The data is extracted to this file.
6. If you are not able to get to the SAP MII machine, click the View button and the XML will be displayed in the
browser. Use the browser Save-As function to write this file to the client machine.
To import the configuration, which will overwrite existing values:
1. At the end of the Filename field, click the Browse button and select the configuration file
WorkflowConfiguration.xml from the <SAP_CAMS_7.2>\CAMS-INT-Config\ directory. Please note the
trailing backslash is required.
2. Click the Import button.
3. The data is imported and overwrites the existing values.
The CAMS-INT Import/Export Configuration screen can also be used to update the Key Data XSLT. This XSLT is
used by CAMS-INT to allow human readable text from the XML message and have it displayed in the queue. This is
to aid in locating the actual message of interest rather than checking all messages of a given type for a given
timeframe. To use this feature:
1. At the end of the Key Data Filename field, click the Browse button to locate the XSLT file for the Key Data
process.
2. Once selected, click the Upload Key Data button to load the XSLT into CAMS-INT.
Finally CAMS-INT Import/Export Configuration screen supports uploading the main XSLT files needed by CAMS-INT.
A configuration file is provided as part of the CAMS-INT distribution called InterfaceXSLTConfiguration.xml.
This file should be used as the entry to the Main XSLT Filename:
1. At the end of the Main XSLT Filename field, click the Browse button to locate the
InterfaceXSLTConfiguration.xml file.
2. In the Main XSLT directory path, enter the directory where the XSLT files are located, <SAP_CAMS_7.2>\CAMS-
INT\XSLT\. Please note the trailing backslash is required. This needs to be a folder that is visible on the SAP
MII server as the server will try to read from this location.
3. Once the data is entered, click the Update XSLT button to upload and populate CAMS-INT with the data.

SAP Complex Assembly Manufacturing 7.2 SPS 4
Configure CAMS-INT
Integration Guide
© 2017 SAP SE or an SAP affiliate company. All rights reserved. 70
15.7 Defining Integration Server Configuration
The web service part of CAMS-INT requires configuration in a similar manner to the main CAMS application.
To go the Server Configuration screen shown below, under the CAMS-INT menu navigate to Configuration
Integration Server. If you do not see this menu item, please ensure that your user account has been assigned the
CAMS_INT_ADMIN role.
This screen allows for the configuration of the environment variables required by the application. These
configurations are very close to the requirements for running SAP Complex Assembly Manufacturing and should
match. The properties to match are related to the parameters that start with env. These represent the environment
parameters and the environment variables defined in the batch file. The simplest way to obtain these values is to look
at the batch file that starts SAP Complex Assembly Manufacturing (RunCAMS.bat). For each active parameter in the
batch file, there should be an env.xxx equivalent. The user ID and modified data are added automatically.
For a SAP Complex Assembly Manufacturing preconfigured implementation (PI), the following items will need to be
modified but a complete check between the RunCAMS.bat and the configuration here needs to be performed once
SAP Complex Assembly Manufacturing is up and running.
Parameter Name Comments
args.cfile Replace the <ENTER LOCATION> with the path to the PI code installation.
Please use the forward slash (/) character as a file delimiter.

SAP Complex Assembly Manufacturing 7.2 SPS 4
Configure CAMS-INT
Integration Guide
© 2017 SAP SE or an SAP affiliate company. All rights reserved. 71
Parameter Name Comments
env.DBINFOFILENAME This needs to be set to the name of the DB authentication file as created
when SAP Complex Assembly Manufacturing was installed.
env.TNSNAME This is the TNS Name entry for the connection to the SAP Complex
Assembly Manufacturing database.
env.HMS_HOME Replace <ENTER_LOCATION> with the path to the SAP_CAMS_7.2
installation.
If the SAP NetWeaver installation to be used with CAMS-INT uses an Oracle database, it is possible that the Oracle
installation supporting SAP NetWeaver and the Oracle client providing the connection to the SAP Complex Assembly
Manufacturing Oracle database will each have their own set of sqlnet and tnsname files. If the server does not have
the environment variable ORACLE_HOME set by default, then it will be necessary to add a new property called
env.ORACLE_HOME to force the Oracle installation used to connect to the SAP Complex Assembly Manufacturing
database to use the correct sqlnet and tnsname files. In order to determine if this additional environment variable is
required, attempt to connect to the SAP Complex Assembly Manufacturing database from the server using the Oracle
application, SQL Plus. If you are sure that the connection information for the SAP Complex Assembly Manufacturing
database is correct and you still receive a TNS error, then attempt to connect to the SAP Complex Assembly
Manufacturing database using SQL Plus from the ORACLE_HOME/Network/Admin directory. If that connection is
successful, then you will need to set the env.ORACLE_HOME property.
After the configuration is complete, if the interpreters are not starting correctly (the smoke test cannot be successfully
performed) an additional parameter called args.errorlog can be added to the configuration. The value for this property
should be a fully qualified filename (for example, C:/Temp/CAMS_INT_ErrorLog.log), which will be used to write
out logging information to aid in obtaining the solution to the problem. Any error reported during startup of the
interpreter will be written to this file. It is not advised to keep this property present once the issue(s) have been
resolved.
To create a new property:
1. Enter the Environment value.
2. Enter the Parameter value. This is basically the environment property from the batch file prefixed with env. So if
the property was TEMP, the parameter would be env.TEMP.
3. Enter a Description for this property.
4. Enter the Value required.
5. Click the Save button to store the changes.
To edit an existing property:
1. Select the required record in the table. The values are added to the fields at the top of the screen.
2. Modify the required items. If you change the Environment or Parameter, a new item is written to the database.
3. Click the Save button to store the changes.
When a change has occurred:
1. Open a web browser and go to http://<server>:<port>/CAMS-ws.
2. At the login prompt enter the username and password of a user with the CAMS_INT_ADMIN role.

SAP Complex Assembly Manufacturing 7.2 SPS 4
Configure CAMS-INT
Integration Guide
© 2017 SAP SE or an SAP affiliate company. All rights reserved. 72
3. From the main menu screen, click on the Purge Interpreter Pools link (used for SAP Complex Assembly
Manufacturing patch installations). This will clear out any existing interpreters and restart them with the new
configurations.
15.8 SAP Complex Assembly Manufacturing ERP Interface Configuration
For the interfaces to be functional, you must enable them in the Shop Floor Management (SFM) Control Parameters
dialog box. If the interfaces are disabled, calls into CAMS-INT will not be processed completely and each call will
result in a warning message in the Queue Monitor saying that the applicable interface is not enabled.
To enable the interfaces:
1. Log into SFM using an account with administrator privileges.
2. Select the System Configuration Parameter menu.
3. The Control Parameters dialog box appears. Click the ERP Interface bar to expand the section as shown.
4. To enable the configuration parameters, set ERP Interface Active to Yes.
5. Next, ensure that SAP Complex Assembly Manufacturing knows where CAMS-INT is located by entering the
CAMS-INT URL in the URL for SAP CAMS-INT field using the format:
http://<server>:<port>/XMII/Illuminator.
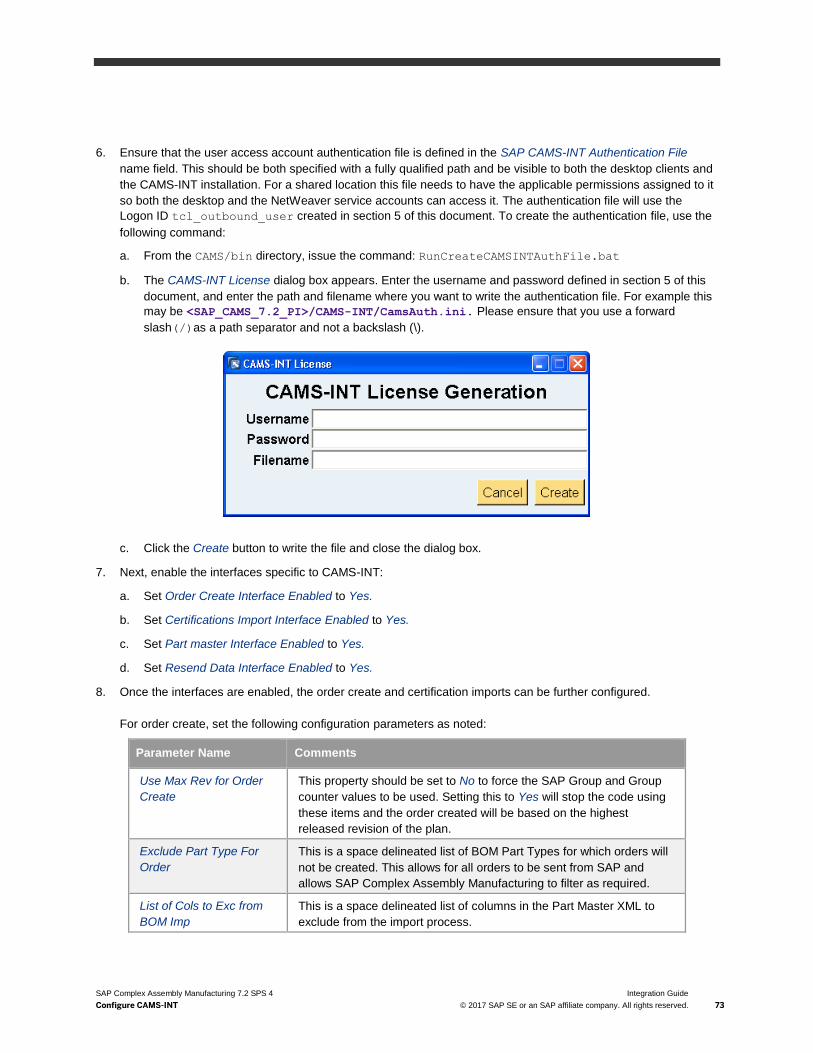
SAP Complex Assembly Manufacturing 7.2 SPS 4
Configure CAMS-INT
Integration Guide
© 2017 SAP SE or an SAP affiliate company. All rights reserved. 73
6. Ensure that the user access account authentication file is defined in the SAP CAMS-INT Authentication File
name field. This should be both specified with a fully qualified path and be visible to both the desktop clients and
the CAMS-INT installation. For a shared location this file needs to have the applicable permissions assigned to it
so both the desktop and the NetWeaver service accounts can access it. The authentication file will use the
Logon ID tcl_outbound_user created in section 5 of this document. To create the authentication file, use the
following command:
a. From the CAMS/bin directory, issue the command: RunCreateCAMSINTAuthFile.bat
b. The CAMS-INT License dialog box appears. Enter the username and password defined in section 5 of this
document, and enter the path and filename where you want to write the authentication file. For example this
may be <SAP_CAMS_7.2_PI>/CAMS-INT/CamsAuth.ini. Please ensure that you use a forward
slash(/)as a path separator and not a backslash (\).
c. Click the Create button to write the file and close the dialog box.
7. Next, enable the interfaces specific to CAMS-INT:
a. Set Order Create Interface Enabled to Yes.
b. Set Certifications Import Interface Enabled to Yes.
c. Set Part master Interface Enabled to Yes.
d. Set Resend Data Interface Enabled to Yes.
8. Once the interfaces are enabled, the order create and certification imports can be further configured.
For order create, set the following configuration parameters as noted:
Parameter Name Comments
Use Max Rev for Order
Create
This property should be set to No to force the SAP Group and Group
counter values to be used. Setting this to Yes will stop the code using
these items and the order created will be based on the highest
released revision of the plan.
Exclude Part Type For
Order
This is a space delineated list of BOM Part Types for which orders will
not be created. This allows for all orders to be sent from SAP and
allows SAP Complex Assembly Manufacturing to filter as required.
List of Cols to Exc from
BOM Imp
This is a space delineated list of columns in the Part Master XML to
exclude from the import process.

SAP Complex Assembly Manufacturing 7.2 SPS 4
Configure CAMS-INT
Integration Guide
© 2017 SAP SE or an SAP affiliate company. All rights reserved. 74
For the certifications import, set the following configuration parameters as noted:
Parameter Name Comments
Create Certs as needed This property should be set to Yes only if the desire of the certification
import is to generate unknown certifications as needed. If set to No, the
interface will skip any certifications assigned to a user that SAP Complex
Assembly Manufacturing SFM does not know about.
For explanations of the remaining ERP Interface configuration parameters, right-click on a parameter and select
What’s This to see the parameter description. You can also refer to the ERP Interface Parameters section in the
Configuration Guide.

SAP Complex Assembly Manufacturing 7.2 SPS 4
Post Installation Tests
Integration Guide
© 2017 SAP SE or an SAP affiliate company. All rights reserved. 75
16 Post Installation Tests
Once the entire configuration is complete, there are some basic checks that you can do to ensure that all the
connections and the configuration are correct. These checks will ensure that SAP can send IDocs successfully to
SAP MII and that SAP MII can talk back to SAP and that the integration server is operating correctly.
16.1 Integration Server Tests
The easiest way to verify that the integration server is configured and working correctly is to perform the following
steps:
1. Open a web browser and navigate to the URL http://<server>:<port>/CAMS-ws (replacing <server>:<port> with
your server and port).
2. At the login prompt enter a username and password for a user with the CAMS_INT_ADMIN role.
3. The main menu screen shown appears.

SAP Complex Assembly Manufacturing 7.2 SPS 4
Post Installation Tests
Integration Guide
© 2017 SAP SE or an SAP affiliate company. All rights reserved. 76
4. Select the Run TCL Command (Test Page) link. The following screen appears.
5. In the Command field, enter info.
6. In the Arguments field, enter commands.
7. Click the Execute Command button. If all is configured correctly, a Command Result screen appears. If this
screen does not appear, double-check that the integration server properties are correctly defined.
16.2 SAP to SAP MII Interface Test
The simplest way to check the connectivity between SAP and SAP MII is to push an IDoc from SAP to SAP MII. You
can use the Material Master (MATMAS) as a test case as it can easily be sent to SAP MII from the SAP-ERP
transaction BD10. You will need a valid material number with an applicable plant value.
To run the interface test:
1. Log into SAP-ERP and go to transaction BD10.
2. In the Material field, enter a valid material number.

SAP Complex Assembly Manufacturing 7.2 SPS 4
Post Installation Tests
Integration Guide
© 2017 SAP SE or an SAP affiliate company. All rights reserved. 77
3. In the Logical System field, enter the Logical System value defined in section 10.5.
4. Select the Send material in full check box.
5. Click the Execute icon ( ) to send the IDoc. Pop-up messages will notify you that the IDoc was setup and
generated.
6. Log into SAP MII and navigate to Message Services Message Monitor.
7. Enter MATMAS in the Find field and then click the Go button to query the recent messages received from SAP-
ERP. A screen similar to the following should appear showing the MATMAS message as received.
o There may be more than the one MATMAS record if the material specified has classifications or revisions as
these come through as separate IDoc messages.
o If there is no message, check the configuration of SAP MII for that Logical System.

SAP Complex Assembly Manufacturing 7.2 SPS 4
Post Installation Tests
Integration Guide
© 2017 SAP SE or an SAP affiliate company. All rights reserved. 78
16.3 SAP MII to SAP Interface Test
To check that SAP MII is connected to SAP:
1. Navigate to Message Services Message Listeners. The following screen appears.
2. Select the entry used to connect to SAP (the above example shows it was XMIIIDOC01). The data fields to the
right list the SAP Server and Client information.
3. Click on the Status tab to see if the connection is present.
4. The system will open a dialog box with either Server Connected or Server Not Connected.
o If you see Server Not Connected, check the SAP MII settings to ensure they are correct.

SAP Complex Assembly Manufacturing 7.2 SPS 4
Monitoring Capabilities
Integration Guide
© 2017 SAP SE or an SAP affiliate company. All rights reserved. 79
17 Monitoring Capabilities
CAMS-INT provides a number of forms to allow messages and data to be monitored. This section outlines these
capabilities.
17.1 Queue Monitor
To enable visibility into the messages being processed by CAMS-INT, there is a Queue Monitor screen where you
can search for, examine, and manipulate messages.
To get to the CAMS-INT Queue Monitor screen shown below, under the CAMS-INT menu item, navigate to Queues
Queue Monitor. If you do not see this menu item, please ensure that your user account has been assigned the
CAMS_INT_USER role.
The upper area of the screen (the area with the blue background) includes the filter controls, which you can use to
filter the data that appears by status, category, key data, etc. It is important to note that regardless of the filter
settings, the table will only show the top 100 records. Once you define your filter criteria, click the Search button to
see records that match your criteria.

SAP Complex Assembly Manufacturing 7.2 SPS 4
Monitoring Capabilities
Integration Guide
© 2017 SAP SE or an SAP affiliate company. All rights reserved. 80
On the screen, the first column is static so as the table is scrolled left to right this is always visible. The remaining
columns contain specific information about the record. The column name and the purpose are as follows (not all
columns are shown in the figure above):
Column Name Description
Status Visual indicator showing the status of the message. The colors are as follows:
White: Queued. Message received and waiting to be processed.
Black: Correlation has occurred on the message.
Green: Message has been successfully processed with no response message.
Cyan: Message has been successfully processed and has a response message.
Red: Message has failed.
Message Name The root node of the message.
Received The date/time when the message was received into CAMS-INT.
Finished The date/time when the message processing was completed.
Category The queue name where this message was posted.
Key Data If a key data transformation was defined for a message type then it is shown in this
column.
Attempts Number of attempts to process the message.
Response Message Any response message returned from the service. This could be an error or
informational text depending upon whether the message was successful or failed.
Parent ID If the message was posted from a correlation or split workflow process, this contains
the ID of the resulting message.
Correlation Key For correlation messages, this shows the key generated for this message.
ID The unique ID generated for the message when inserted into the CAMS-INT queue.
The icon in the lower left corner of the table ( ) can also be used to refresh the data currently listed in the table.
The icon to the right of it ( ) can be used to enable auto refresh of the data.
Function buttons available on the Queue Monitor screen are:
Button Name Description
Search Used to refresh the table data based on the filter criteria specified.
Retry Used to resend a failed message. Select one or more failed messages in the queue
list and click this button. The status of the selected items is set back to Queued.
Remove Used to remove a specific message from the queue. Select one or more messages
then click this button to delete the data. Once deleted, the message data is not
recoverable.
Trace Used to see the processing stages of the selected message. See the Tracing section
on the next page for details.
Clear Dates Used to remove the data from the filter date fields.

SAP Complex Assembly Manufacturing 7.2 SPS 4
Monitoring Capabilities
Integration Guide
© 2017 SAP SE or an SAP affiliate company. All rights reserved. 81
Button Name Description
Clear Form Used to reset all the filter data fields.
17.1.1 Tracing
The Queue Monitor provides the ability to view the XML message through the workflow. If a message fails and you
want to know how this message changed through the workflow:
1. Select that failed message and click the Trace button. The Document Trace screen appears.
The content of this screen is dependent upon the number of retries that have occurred with the message. In this
example, no retries occurred; therefore, it shows the three stages, which are the initial message, the request
message (shown as [2] Message), and the response message (shown as [3] Message). The request message is
the XML provided to the Main Transaction and consequently used in the process; the response message is the
XML provided by the Main Transaction once the applicable process took place.
2. To view the XML message, either the initial message or one of the request/response messages, select the
applicable node in the tree where the text starts with [..] and click the View button.
3. A new window appears showing the XML recorded for this message.
4. Click Cancel to close the Document Trace screen.

SAP Complex Assembly Manufacturing 7.2 SPS 4
Monitoring Capabilities
Integration Guide
© 2017 SAP SE or an SAP affiliate company. All rights reserved. 82
17.2 Archive Queue Monitor
CAMS-INT has a mechanism to archive messages from the main queue into an archive queue after a certain number
of days. Once archived, the messages are no longer visible in the main Queue Monitor and they must be viewed from
the Archive Queue Monitor.
To go to the Archive Queue Monitor screen, under the CAMS-INT menu item, navigate to Queues Archive Queue
Monitor. If you do not see this menu item, please ensure that your user account has been assigned the
CAMS_INT_USER role.
The functionality of the Archive Queue Monitor is exactly the same as the Queue Monitor. The only difference is that
you cannot retry a message so there is no Retry button.
17.3 Message Statistics
You can view some basic statistics on the messages being processed by CAMS-INT in the CAMS-INT Message
Statistics screen. For each message in the CAMS-INT queue, this screen shows the number of messages, the
maximum and minimum queue time, and the minimum and maximum processing time. The time is quoted in
seconds.
To go to CAMS-INT Message Statistics screen shown below, under the CAMS-INT menu item, navigate to Reports
Message Statistics. If you do not see this menu item, please ensure that your user account has been assigned the
CAMS_INT_USER role.
17.4 BOM Holding Queue
The CAMS-INT BOM Holding Queue Enquire screen is a view screen for the Bill of Material Management (BOMM)
SAP-ERP interface. When a message cannot be sent to CAMS-INT it is placed into a holding queue where a resend
process from CAMS-INT ensures that it gets processed.

SAP Complex Assembly Manufacturing 7.2 SPS 4
Monitoring Capabilities
Integration Guide
© 2017 SAP SE or an SAP affiliate company. All rights reserved. 83
To view the contents of this queue you can either use the SAP Complex Assembly Manufacturing application or
CAMS-INT. Both provide the same capabilities. To go to this screen in CAMS-INT, under the CAMS-INT menu item,
navigate to Reports BOM Holding Queue. If you do not see this menu item, please ensure that your user account
has been assigned the CAMS_INT_USER role.
The upper table shows all the records in this queue; the lower table shows the change masters for the message,
which allows you to investigate any change master issue that is holding up sending the message.
Not all messages will have change master issues. Some may be present because of communication issues or simply
because a previous revision is present in the queue as well. To see if there are change masters outstanding, select
the row in the upper table and the lower table will be populated with any change master items. Change masters will
have one of the following statuses:
Rejected indicates a failed change master request.
Pending indicates the change master has not made it through to SAP yet.
Passed means there is no issue with the change master.
17.5 Change Masters
The CAMS-INT Change Master Enquire screen allows an SAP MII user to query the status of any given Change
Master in the system generated in SAP Complex Assembly Manufacturing. It provides visibility into the change
masters that have been requested by SAP Complex Assembly Manufacturing. The status of the change master is
also included to allow visibility into whether the change master has been processed and is available in SAP.

SAP Complex Assembly Manufacturing 7.2 SPS 4
Monitoring Capabilities
Integration Guide
© 2017 SAP SE or an SAP affiliate company. All rights reserved. 84
To view the contents of this queue, you can either use the SAP Complex Assembly Manufacturing application or
CAMS-INT. Both provide the same capabilities. To go to this screen in CAMS-INT, under the CAMS-INT menu item,
navigate to Reports Change Masters. If you do not see this menu item, please ensure that your user account has
been assigned the CAMS_INT_USER role.
To query a change master, enter the required value in the Change Number field and click the Search button. The
percent sign (%) can be used as a wildcard character to return multiple records that match your query.

SAP Complex Assembly Manufacturing 7.2 SPS 4
Monitoring Capabilities
Integration Guide
© 2017 SAP SE or an SAP affiliate company. All rights reserved. 85
Appendix
Planning Hold Interface
In addition to creating the processing rule for the plan hold interface as explained in section 12, you must do the following
tasks in SAP ECC and you must set up some configuration parameters in SAP Complex Assembly Manufacturing.
Note
There is also a PLAN_HOLD workflow (see section 15.5) that is delivered as part of core SAP Complex
Assembly Manufacturing.
Create Task List Status
In order to create a new Task List Status, you must go to transaction code OP46. Create a CAMS Hold status that will
only be used by the SAP CAMS application. In the case below, a Task List Status of 6 has been created. This is the
value you will use for the Plan Hold: Hold Status configuration parameter described later in this section.
Verify Task List Status – Released
When a Task List is first created in SAP ECC (via SAP CAMS), it is typically created with a Task List Status of 4 –
Released (general). This is the value you will use for the Plan Hold: Released Status configuration parameter
described later in this section. To verify the Task List Status:
1. Save a plan complete in SAP CAMS.
2. In SAP MII, look at the Routing Release XML (message 1) for that saved plan. Use the
<TASK_LIST_GROUP> and <GROUP_COUNTER> tag values.
3. In SAP ECC, go to transaction code SE16N. In the Table field, enter PLKO. For the group, enter the
<TASK_LIST_GROUP> value from above into both the Fr. Value and To Value fields.
4. Execute the query by clicking .
You should now see a screen similar to the one shown below. As you can see, the Stat (Status) is 4.

SAP Complex Assembly Manufacturing 7.2 SPS 4
Monitoring Capabilities
Integration Guide
© 2017 SAP SE or an SAP affiliate company. All rights reserved. 86
Create Change Master
In order to create a new change master, you must go to transaction code CC01. Create an SAP CAMS change master
that will only be used by the SAP CAMS application. In the example below, CAMS_CM1 has been created. This is the
value you will use for the Plan Hold: Change Master configuration parameter described later in this section.
On the Create Change Master: Initial Screen:
1. Enter the desired Change Number.
2. Click (Enter) to continue to the next screen.
3. Enter change number description.
4. Enter a Valid From date of 1/1/1901.
5. Ensure Change no. status is 01 (i.e., active).
6. Click to continue to the next screen.

SAP Complex Assembly Manufacturing 7.2 SPS 4
Monitoring Capabilities
Integration Guide
© 2017 SAP SE or an SAP affiliate company. All rights reserved. 87
7. For the Task List item, ensure the Actv., Object, and MgtRec boxes are selected as below.
8. Click (Save). The change master is now created.
Create Work Area
In order to create a new work area, you must go to transaction code OP77. Create an SAP CAMS work area that will
only be used by the SAP CAMS application. In the example below, CAMS_WA1 has been created. This is the value
you will use for the Plan Hold: Work Area configuration parameter described later in this document.
1. In the Change View “Engineering Workbench: Working area”: Overview screen, select New Entries.
2. On the New Entries: Details of Added Entries screen, enter a Working Area name and a description. This
working area should only be used by SAP CAMS.
3. Ensure all the check boxes that are selected in the figure below are selected for your new work area.
4. Click .

SAP Complex Assembly Manufacturing 7.2 SPS 4
Monitoring Capabilities
Integration Guide
© 2017 SAP SE or an SAP affiliate company. All rights reserved. 88
Configuration Parameters
A new set of ERP Interface configuration parameters were created to support plan holds. These plan hold
configuration parameters must be configured on site after all of the steps above have been successfully performed.
The Plan Hold Interface Enabled configuration parameter must be set to Yes. Based on the examples used above,
the other plan hold configuration parameters would look as shown. To set these configuration parameters, in SFM
select System > Configuration Parameters and click the ERP Interface bar.

www.sap.com/contactsap
© 2017 SAP SE or an SAP affiliate company. All rights reserved.