SAP BusinessObjects Business Intelligence ... - SAP Help Portal
Upload
khangminh22Category
view
2download
0
USER GUIDE | CONFIDENTIALDocument Version: 1.0 – 2019-11-30
Application Help for SAP Entitlement Management
© 2
019
SAP
SE o
r an
SAP affi
liate
com
pany
. All
right
s re
serv
ed.
THE BEST RUN

Content
1 Application Overview. . . . . . . . . . . . . . . . . . . . . . . . . . . . . . . . . . . . . . . . . . . . . . . . . . . . . . . . . 41.1 Workflow Summary for Configuring SAP Entitlement Management. . . . . . . . . . . . . . . . . . . . . . . . . . 61.2 Operations and System Administration Overview. . . . . . . . . . . . . . . . . . . . . . . . . . . . . . . . . . . . . . .9
2 Business Configuration. . . . . . . . . . . . . . . . . . . . . . . . . . . . . . . . . . . . . . . . . . . . . . . . . . . . . . . 112.1 Configuration Cockpit. . . . . . . . . . . . . . . . . . . . . . . . . . . . . . . . . . . . . . . . . . . . . . . . . . . . . . . . . 12
Maintaining Basic Configurations. . . . . . . . . . . . . . . . . . . . . . . . . . . . . . . . . . . . . . . . . . . . . . .13Model New Entitlement. . . . . . . . . . . . . . . . . . . . . . . . . . . . . . . . . . . . . . . . . . . . . . . . . . . . . 23Assign Entitlements to Offerings. . . . . . . . . . . . . . . . . . . . . . . . . . . . . . . . . . . . . . . . . . . . . . . 48Maintaining Entitlement Generation Rules. . . . . . . . . . . . . . . . . . . . . . . . . . . . . . . . . . . . . . . . 52
2.2 Explore Entitlement Model for Offerings. . . . . . . . . . . . . . . . . . . . . . . . . . . . . . . . . . . . . . . . . . . . 582.3 Folder Configuration. . . . . . . . . . . . . . . . . . . . . . . . . . . . . . . . . . . . . . . . . . . . . . . . . . . . . . . . . . 60
Creating a Home Folder. . . . . . . . . . . . . . . . . . . . . . . . . . . . . . . . . . . . . . . . . . . . . . . . . . . . . 61Adding a Sub-Folder. . . . . . . . . . . . . . . . . . . . . . . . . . . . . . . . . . . . . . . . . . . . . . . . . . . . . . . . 61Deleting Customer Folders. . . . . . . . . . . . . . . . . . . . . . . . . . . . . . . . . . . . . . . . . . . . . . . . . . . 62Editing Customer Folder Names. . . . . . . . . . . . . . . . . . . . . . . . . . . . . . . . . . . . . . . . . . . . . . . 62Moving a Customer Sub-Folder. . . . . . . . . . . . . . . . . . . . . . . . . . . . . . . . . . . . . . . . . . . . . . . . 63
3 Customer Data and Offerings. . . . . . . . . . . . . . . . . . . . . . . . . . . . . . . . . . . . . . . . . . . . . . . . . .643.1 Customer Accounts. . . . . . . . . . . . . . . . . . . . . . . . . . . . . . . . . . . . . . . . . . . . . . . . . . . . . . . . . . 653.2 Offerings. . . . . . . . . . . . . . . . . . . . . . . . . . . . . . . . . . . . . . . . . . . . . . . . . . . . . . . . . . . . . . . . . . 66
4 Entitlements Overview. . . . . . . . . . . . . . . . . . . . . . . . . . . . . . . . . . . . . . . . . . . . . . . . . . . . . . . 684.1 Customer Insights. . . . . . . . . . . . . . . . . . . . . . . . . . . . . . . . . . . . . . . . . . . . . . . . . . . . . . . . . . . 694.2 Entitlements. . . . . . . . . . . . . . . . . . . . . . . . . . . . . . . . . . . . . . . . . . . . . . . . . . . . . . . . . . . . . . . 69
Creating an Entitlement. . . . . . . . . . . . . . . . . . . . . . . . . . . . . . . . . . . . . . . . . . . . . . . . . . . . . 71Creating an Associated Entitlement. . . . . . . . . . . . . . . . . . . . . . . . . . . . . . . . . . . . . . . . . . . . . 72Editing an Entitlement. . . . . . . . . . . . . . . . . . . . . . . . . . . . . . . . . . . . . . . . . . . . . . . . . . . . . . 73Splitting an Entitlement. . . . . . . . . . . . . . . . . . . . . . . . . . . . . . . . . . . . . . . . . . . . . . . . . . . . . 75Merging an Entitlement. . . . . . . . . . . . . . . . . . . . . . . . . . . . . . . . . . . . . . . . . . . . . . . . . . . . . 76Transferring an Entitlement. . . . . . . . . . . . . . . . . . . . . . . . . . . . . . . . . . . . . . . . . . . . . . . . . . .77Changing the Status of an Entitlement. . . . . . . . . . . . . . . . . . . . . . . . . . . . . . . . . . . . . . . . . . . 77Editing Entitlement Consumption Records. . . . . . . . . . . . . . . . . . . . . . . . . . . . . . . . . . . . . . . . 78Reassigning Groups. . . . . . . . . . . . . . . . . . . . . . . . . . . . . . . . . . . . . . . . . . . . . . . . . . . . . . . . 79
4.3 Reports and Analytics. . . . . . . . . . . . . . . . . . . . . . . . . . . . . . . . . . . . . . . . . . . . . . . . . . . . . . . . . 80Entitlements per Customer. . . . . . . . . . . . . . . . . . . . . . . . . . . . . . . . . . . . . . . . . . . . . . . . . . . 81Entitlements per Customer per Entitlement Model. . . . . . . . . . . . . . . . . . . . . . . . . . . . . . . . . . 84Entitlements Expiring in a Given Period. . . . . . . . . . . . . . . . . . . . . . . . . . . . . . . . . . . . . . . . . . 86
2 C O N F I D E N T I A LApplication Help for SAP Entitlement Management
Content
Entitlements (Report). . . . . . . . . . . . . . . . . . . . . . . . . . . . . . . . . . . . . . . . . . . . . . . . . . . . . . 88
Entitlements with Different Statuses. . . . . . . . . . . . . . . . . . . . . . . . . . . . . . . . . . . . . . . . . . . . 90
Entitlements per Offering. . . . . . . . . . . . . . . . . . . . . . . . . . . . . . . . . . . . . . . . . . . . . . . . . . . . 92
Entitlements by Business Category. . . . . . . . . . . . . . . . . . . . . . . . . . . . . . . . . . . . . . . . . . . . . 94
Entitlements by Reference Document. . . . . . . . . . . . . . . . . . . . . . . . . . . . . . . . . . . . . . . . . . . 96
Audit Trail for Entitlement Records. . . . . . . . . . . . . . . . . . . . . . . . . . . . . . . . . . . . . . . . . . . . . 98
4.4 Deletion Logs. . . . . . . . . . . . . . . . . . . . . . . . . . . . . . . . . . . . . . . . . . . . . . . . . . . . . . . . . . . . . . 100
5 Operations. . . . . . . . . . . . . . . . . . . . . . . . . . . . . . . . . . . . . . . . . . . . . . . . . . . . . . . . . . . . . . . 1015.1 Inbound and Outbound Data Monitoring. . . . . . . . . . . . . . . . . . . . . . . . . . . . . . . . . . . . . . . . . . . 102
Reprocessing an Outbound Process. . . . . . . . . . . . . . . . . . . . . . . . . . . . . . . . . . . . . . . . . . . . 103
Downloading Payload. . . . . . . . . . . . . . . . . . . . . . . . . . . . . . . . . . . . . . . . . . . . . . . . . . . . . . 104
Simulating an Inbound Process. . . . . . . . . . . . . . . . . . . . . . . . . . . . . . . . . . . . . . . . . . . . . . . 105
5.2 Background Jobs. . . . . . . . . . . . . . . . . . . . . . . . . . . . . . . . . . . . . . . . . . . . . . . . . . . . . . . . . . . 105
Creating a Background Job to Change Status. . . . . . . . . . . . . . . . . . . . . . . . . . . . . . . . . . . . . 107
Creating a Background Job to Send Entitlement. . . . . . . . . . . . . . . . . . . . . . . . . . . . . . . . . . . 108
Creating a Background Job to Update Entitlement. . . . . . . . . . . . . . . . . . . . . . . . . . . . . . . . . . 110
Creating a Background Job to Trigger Event. . . . . . . . . . . . . . . . . . . . . . . . . . . . . . . . . . . . . . . 111
Creating a Background Job to Send Event Notification. . . . . . . . . . . . . . . . . . . . . . . . . . . . . . . 112
Creating a Background Job to Delete Data of Invalid Customers. . . . . . . . . . . . . . . . . . . . . . . . 113
Editing a Background Job. . . . . . . . . . . . . . . . . . . . . . . . . . . . . . . . . . . . . . . . . . . . . . . . . . . 114
Deleting Background Jobs. . . . . . . . . . . . . . . . . . . . . . . . . . . . . . . . . . . . . . . . . . . . . . . . . . . 115
5.3 Events. . . . . . . . . . . . . . . . . . . . . . . . . . . . . . . . . . . . . . . . . . . . . . . . . . . . . . . . . . . . . . . . . . . 115
Configuring Events. . . . . . . . . . . . . . . . . . . . . . . . . . . . . . . . . . . . . . . . . . . . . . . . . . . . . . . . 116
5.4 Event Monitoring. . . . . . . . . . . . . . . . . . . . . . . . . . . . . . . . . . . . . . . . . . . . . . . . . . . . . . . . . . . . 118
6 System Administration. . . . . . . . . . . . . . . . . . . . . . . . . . . . . . . . . . . . . . . . . . . . . . . . . . . . . . 1196.1 System Settings. . . . . . . . . . . . . . . . . . . . . . . . . . . . . . . . . . . . . . . . . . . . . . . . . . . . . . . . . . . . 120
6.2 User Management. . . . . . . . . . . . . . . . . . . . . . . . . . . . . . . . . . . . . . . . . . . . . . . . . . . . . . . . . . . 122
6.3 Data Migration. . . . . . . . . . . . . . . . . . . . . . . . . . . . . . . . . . . . . . . . . . . . . . . . . . . . . . . . . . . . . 123
Importing Data. . . . . . . . . . . . . . . . . . . . . . . . . . . . . . . . . . . . . . . . . . . . . . . . . . . . . . . . . . .124
Exporting Data. . . . . . . . . . . . . . . . . . . . . . . . . . . . . . . . . . . . . . . . . . . . . . . . . . . . . . . . . . . 125
6.4 Transport. . . . . . . . . . . . . . . . . . . . . . . . . . . . . . . . . . . . . . . . . . . . . . . . . . . . . . . . . . . . . . . . . 126
6.5 Communication Channel. . . . . . . . . . . . . . . . . . . . . . . . . . . . . . . . . . . . . . . . . . . . . . . . . . . . . . 127
Creating a Communication Channel. . . . . . . . . . . . . . . . . . . . . . . . . . . . . . . . . . . . . . . . . . . . 128
Copying a Communication Channel. . . . . . . . . . . . . . . . . . . . . . . . . . . . . . . . . . . . . . . . . . . . 129
6.6 Interfaces - Inbound and Outbound. . . . . . . . . . . . . . . . . . . . . . . . . . . . . . . . . . . . . . . . . . . . . . .130
Exporting an Interface. . . . . . . . . . . . . . . . . . . . . . . . . . . . . . . . . . . . . . . . . . . . . . . . . . . . . . 131
Extending Entitlement Generation Inbound Interface. . . . . . . . . . . . . . . . . . . . . . . . . . . . . . . . 132
7 Glossary. . . . . . . . . . . . . . . . . . . . . . . . . . . . . . . . . . . . . . . . . . . . . . . . . . . . . . . . . . . . . . . . . 134
Application Help for SAP Entitlement ManagementContent C O N F I D E N T I A L 3

1 Application Overview
SAP Entitlement Management provides a central entitlement repository with which you can manage and track the entire lifecycle of the entitlements including entitlement generation, operation, and consumption.
SAP Entitlement Management gives you the ability to manage all customer entitled offerings, including M&A business or new business models. There are three key terms to understand before working with the SAP Entitlement Management: entitlement, entitlement model, and attributes.
An entitlement is a combination of:
● Types (license, support, subscription, and so on)● Rights (right to support, right to access, right to run, and so on)● Offerings (commercial offerings, services, memberships, and so on)● Customers (organization, set of users)
An entitlement model serves as a container to maintain all necessary attributes to fulfill and manage entitlements and to define the consumption structure and unique instances of licenses. The entitlement model lets you configure various necessary attributes (terms and conditions required for fulfillment or provisioning), along with all the necessary attributes for the entitlements.
Since many offerings are monetized under the same license-model, you can define such models and assign them to offerings. Each entitlement model has its own set of attributes and, for each, you define the rules required for fulfillment or provisioning domain.
Attributes are properties or characteristics of an entitlement type, representing a value or information, depending on the particular entitlement.
The following graphic shows the main steps in the SAP Entitlement Management system:
4 C O N F I D E N T I A LApplication Help for SAP Entitlement Management
Application Overview
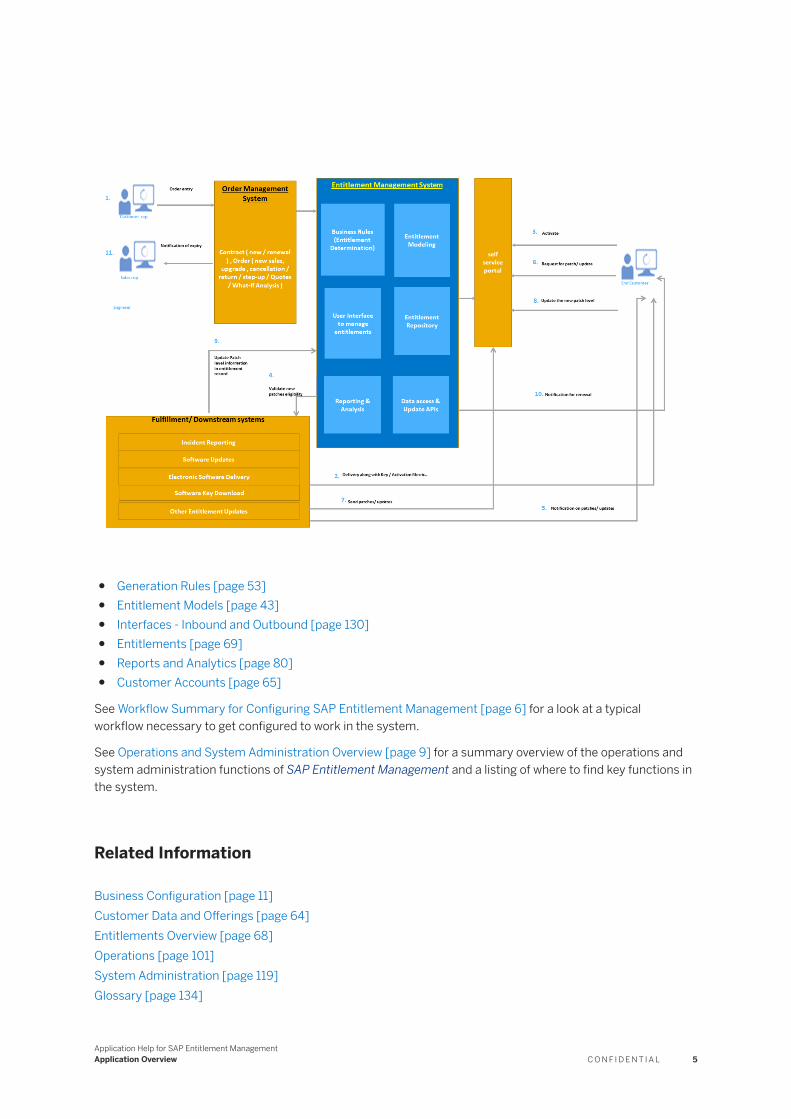
● Generation Rules [page 53]● Entitlement Models [page 43]● Interfaces - Inbound and Outbound [page 130]● Entitlements [page 69]● Reports and Analytics [page 80]● Customer Accounts [page 65]
See Workflow Summary for Configuring SAP Entitlement Management [page 6] for a look at a typical workflow necessary to get configured to work in the system.
See Operations and System Administration Overview [page 9] for a summary overview of the operations and system administration functions of SAP Entitlement Management and a listing of where to find key functions in the system.
Related Information
Business Configuration [page 11]Customer Data and Offerings [page 64]Entitlements Overview [page 68]Operations [page 101]System Administration [page 119]Glossary [page 134]
Application Help for SAP Entitlement ManagementApplication Overview C O N F I D E N T I A L 5
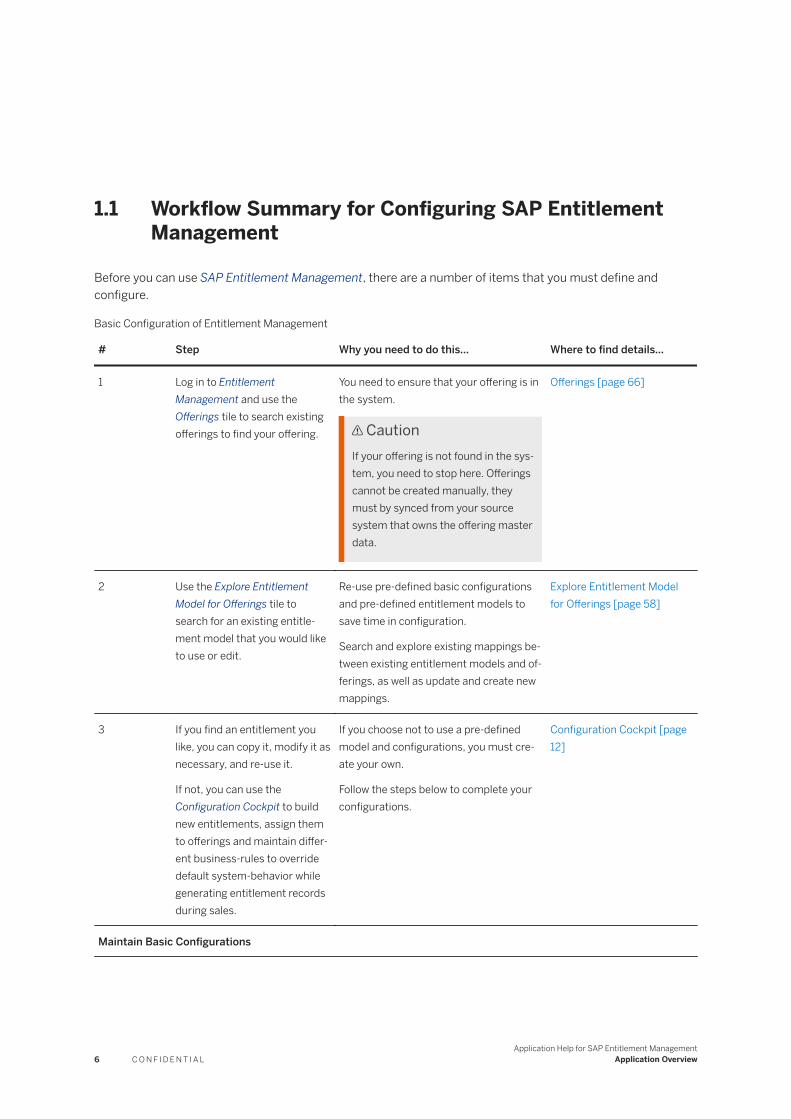
1.1 Workflow Summary for Configuring SAP Entitlement Management
Before you can use SAP Entitlement Management, there are a number of items that you must define and configure.
Basic Configuration of Entitlement Management
# Step Why you need to do this... Where to find details...
1 Log in to Entitlement Management and use the Offerings tile to search existing offerings to find your offering.
You need to ensure that your offering is in the system.
CautionIf your offering is not found in the system, you need to stop here. Offerings cannot be created manually, they must by synced from your source system that owns the offering master data.
Offerings [page 66]
2 Use the Explore Entitlement Model for Offerings tile to search for an existing entitlement model that you would like to use or edit.
Re-use pre-defined basic configurations and pre-defined entitlement models to save time in configuration.
Search and explore existing mappings between existing entitlement models and offerings, as well as update and create new mappings.
Explore Entitlement Model for Offerings [page 58]
3 If you find an entitlement you like, you can copy it, modify it as necessary, and re-use it.
If not, you can use the Configuration Cockpit to build new entitlements, assign them to offerings and maintain differ-ent business-rules to override default system-behavior while generating entitlement records during sales.
If you choose not to use a pre-defined model and configurations, you must create your own.
Follow the steps below to complete your configurations.
Configuration Cockpit [page 12]
Maintain Basic Configurations
6 C O N F I D E N T I A LApplication Help for SAP Entitlement Management
Application Overview

# Step Why you need to do this... Where to find details...
4 Select Business Category to create your business categories based on your different business divisions.
Every entitlement model needs to be assigned to a business category.
Classification enables you to report on entitlements by business category.
Business Category [page 14]
5 Select The Right to create new rights for your offering or selected from pre-defined rights.
Every entitlement model needs to have a “right” maintained.
Rights let you define what an entitlement gives or awards the owner of that particular entitlement.
Rights can also be used to make provisioning and fulfillment domain understand boundaries (what’s allowed and what’s not allowed)
The Right [page 15]
6 Select Distribution Channel to select or create a distribution channel for your offering.
With distribution channels, you can group entitlement models under different distribution methods.
You can maintain a different entitlement model for a product that is sold via differ-ent channel.
Distribution Channel [page 17]
7 Select Unit of Measurement to define the entitlement quantity unit.
You must define the unit of measurement for the entitlement quantity that needs to be shipped to the customer.
Each entitlement model can have its own defined unit of measurement.
Unit of Measurement [page 18]
8 (Optional step) Select Geolocation to define a hierarchy of geolocations to be assigned to the entitlement model.
Geolocation configuration allows you to group entitlement models under different geolocations.
You can set this up to restrict entitlement usage in a particular geolocation only.
Geolocation Configuration [page 20]
Model New Entitlement
After you set up the basic configuration items, you need to identify the different entitlement models you will require. You will define new entitlement models to maintain different sets of attributes.
If the core attributes are not sufficient to enforce and track the entitlement, then you can model your own entitlement. The next five steps show you the basics of modeling a new entitlement.
Application Help for SAP Entitlement ManagementApplication Overview C O N F I D E N T I A L 7

# Step Why you need to do this... Where to find details...
9 Select Attribute Value Lists to define the values that are displayed in a drop-down list to give users of the system the option to select between different values as content of an entitlement attribute.
These values are used to provide additional output fields for displaying the entitlement's details.
Attribute Value Lists [page 31]
10 Select Entitlement Attributes to define the characteristics of the entitlement.
Entitlement attributes are used to provide additional output fields for displaying the entitlement's details.
You can create different entitlement attributes for each entitlement type, if desired.
Entitlement Attributes [page 35]
11 Select Status Models to define status change processes which are associated with the status transition and which can be used in the entitlement model.
The lifecycle of an entitlement depends on the status model.
Status Models [page 27]
12 Select Status to create a new entitlement status or select a pre-defined status.
This indicates the state of the entitlements. You can trigger a status change manually or it can be triggered by background jobs in the system.
Status [page 24]
13 Select Entitlement Model to create and define your entitlement model.
You will use entitlement models to classify the entitlement and determine the entitlement repository structure.
You will be able to define and assign new attributes for an entitlement model to manage the entitlement lifecycle per entitlement model.
Entitlement Models [page 43]
Maintain Entitlement Generation Rules
14 Select Generation Rules to define custom rules conditions, based on attributes of your entitlement model,
You need to determine how the entitlement should be generated.
This allows you to handle variations of sales scenarios and their impact on entitlements.
Generation Rules [page 53]
15 Select the Rule Set option to define your generation rule sets.
You need to define the conditions and parameters for processing the entitlement generation rules.
Rule Sets [page 53]
8 C O N F I D E N T I A LApplication Help for SAP Entitlement Management
Application Overview

# Step Why you need to do this... Where to find details...
Assign Entitlement to Offerings
16 After you model all the entitlements, you need to select Assign Entitlements to Offerings to assign the newly created entitlement models to your offer-ings.
This ensures that whenever the offering is sold, the appropriate entitlement documents are generated in SAP Entitlement Management.
You will be able to map offerings from multiple order systems to entitlement models.
Assign Entitlements to Offer-ings [page 48]
1.2 Operations and System Administration Overview
This table provides a summary overview of the operations and system administration functions of SAP Entitlement Management.
Operations and System Administration Functions
This tile... Is used to... Where to find details...
Inbound and Outbound Data Monitoring
● analyze issues and try to find root causes
● view logs to see detailed inbound and outbound data information
● reprocess an outbound process rather than sending the data again
● download a payload● change the payload for a simula
tion of an inbound process
Inbound and Outbound Data Monitoring [page 102]
Background Jobs ● display and maintain all background jobs
● change an entitlement’s status according to your business processes, allowing you to define the conditions for changing your status
● send entitlements to the system, defining which type of entitlements to send as well as to which communication channel to send it
Background Jobs [page 105]
Application Help for SAP Entitlement ManagementApplication Overview C O N F I D E N T I A L 9

This tile... Is used to... Where to find details...
System Settings View and maintain general system settings and the terms of use for the Entitlement Management system
System Settings [page 120]
User Management View the user list and maintain the user validity within the system.
User Management [page 122]
Data Migration Import or export data using a data template based on the structure defined by the entitlement model.
Data Migration [page 123]
Transport Transport all of your configurations from the source system to a target system.
Transport [page 126]
Communication Channel Set up and define Communication Channels that will determine which API will be triggered by the background job and to where the data will be sent.
Communication Channel [page 127]
Interfaces View the defined interfaces and extend the Entitlement Generation Inbound Interface based on your business model in the SAP Entitlement Management system.
Extend attributes in Entitlement Generation Inbound interface.
Interfaces - Inbound and Outbound [page 130]
10 C O N F I D E N T I A LApplication Help for SAP Entitlement Management
Application Overview

2 Business Configuration
The Business Configuration section of the Entitlement Management System launch pad contains the system tiles that link to the necessary configuration features of the system.
Use the tiles in the Business Configuration section to set up and maintain basic configurations, entitlement models and mappings, and customer folders. The tiles included in this section are:
● Configuration Cockpit● Explore Entitlement Model for Offerings● Folders
The following diagram shows the basic configuration flow.
See the appropriate topic for details on the features and functions available from each tile.
Configuration Cockpit [page 12]The Configuration Cockpit tile of the Entitlement Management system offers users a shortcut to the options for the configuration of all basic items, entitlement models, and Generation Rules.
Explore Entitlement Model for Offerings [page 58]An Offering is a product or service from which Entitlements are derived. Use the Explore Entitlement Model for Offerings tile to access the list of offerings and their mappings to Entitlement models.
Folder Configuration [page 60]Use the Folders tile to view and manipulate customer folders and sub-folders. You can group entitlements into folders. A top-level folder is called a Home Folder. You can create a Home Folder, add a sub-folder, delete, edit, or move a customer folder using this tile.
Application Help for SAP Entitlement ManagementBusiness Configuration C O N F I D E N T I A L 11

Related Information
Application Overview [page 4]Customer Data and Offerings [page 64]Entitlements Overview [page 68]Operations [page 101]System Administration [page 119]Glossary [page 134]
2.1 Configuration Cockpit
The Configuration Cockpit tile of the Entitlement Management system offers users a shortcut to the options for the configuration of all basic items, entitlement models, and Generation Rules.
Click the Configuration Cockpit tile in the Business Configuration setion of the Entitlement Management launch pad to open the cockpit.
When you open the Configuration Cockpit, the default view is the Cockpit Overview. To go to any of the configuration options, simply select one from the menu in the left panel. By using the Configuration Cockpit, you can move from one option to another without having to go back and forth to the launch pad.
TipTo maximize the available workspace, you can hide the menu of options. To do this, click the menu icon at the top left of the Cockpit Overview screen. Click the icon again to re-display the menu.
Use the Configuration Cockpit to obtain quick access to perform the following functions:
● Maintain Basic Configurations● Model New Entitlements● Assign Entitlements to Offerings● Maintain Entitlement Generation Rules
The following diagram shows the detailed list of the things you can do from the Configuration Cockpit.
Maintaining Basic Configurations [page 13]From the Maintain Basic Configurations section of the Configuration Cockpit, you can view and maintain the basic elements of the Entitlement Management System.
12 C O N F I D E N T I A LApplication Help for SAP Entitlement Management
Business Configuration

Model New Entitlement [page 23]From the Model New Entitlement section of the Configuration Cockpit, you can view and maintain the basic elements of entitlements.
Assign Entitlements to Offerings [page 48]You use the Offering-to-Entitlement Mapping option of the Assign Entitlements to Offerings section of the Configuration Cockpit to create a connection between the offering and the entitlement.
Maintaining Entitlement Generation Rules [page 52]From the Maintain Entitlement Generation Rules section of the Configuration Cockpit, you can create and maintain Generation Rules and Rules Sets.
Parent topic: Business Configuration [page 11]
Related Information
Explore Entitlement Model for Offerings [page 58]Folder Configuration [page 60]
2.1.1 Maintaining Basic Configurations
From the Maintain Basic Configurations section of the Configuration Cockpit, you can view and maintain the basic elements of the Entitlement Management System.
From this section, you can choose to define the following:
● Business Category - you can group entitlements for your business needs by defining business categories, for example, cloud division, embedded SW division, sports, movies, TV series, and so on
● The Right - you can define the permission of actions for an entitlement that determine how the entitlement should integrate with the fulfillment system
● Entitlement Type - you can maintain your own entitlement type here if you do not want to use the pre-defined entitlement types
● Distribution Channel - you can group different entitlement models under a distribution channel through which the customer receives the entitlement
● Unit of Measurement - you can define the unit of measure for an entitlement as a value list● Business Event - you can define business operations that affect the entitlement record● Geolocation Configuration - you can group different entitlement models under a specific geolocation● Entitlement Source System - if the sales system is not the same as the master data system, you can
configure the allowed sales system
See the appropriate topic for full details on access and usage of the functions.
Business Category [page 14]Choose the Business Category option from the Maintain Basic Configurations section of the Configuration Cockpit to create, view, and maintain business categories.
The Right [page 15]
Application Help for SAP Entitlement ManagementBusiness Configuration C O N F I D E N T I A L 13

Choose the The Right option from the Maintain Basic Configurations section of the Configuration Cockpit to create, view, and maintain rights.
Entitlement Type [page 16]Use the Entitlement Type option from the Maintain Basic Configurations section of the Configuration Cockpit to create, view, and maintain your own entitlement types.
Distribution Channel [page 17]Use the Distribution Channel option from the Maintain Basic Configurations section of the Configuration Cockpit to create, view, and maintain distribution channels.
Unit of Measurement [page 18]Choose the Unit of Measurement option from the Maintain Basic Configurations section of the Configuration Cockpit to create, view, and maintain entitlement units.
Business Event [page 19]Choose the Business Event option from the Maintain Basic Configurations section of the Configuration Cockpit to create, view, and maintain business events related to the entitlement.
Geolocation Configuration [page 20]The Geolocation Configuration page allows you to view, define, and edit the full Geolocation Hierarchy.
Entitlement Source System [page 21]Choose the Entitlement Source System option from the Maintain Basic Configurations section of the Configuration Cockpit to create, view, and maintain source system related to the entitlement.
Parent topic: Configuration Cockpit [page 12]
Related Information
Model New Entitlement [page 23]Assign Entitlements to Offerings [page 48]Maintaining Entitlement Generation Rules [page 52]
2.1.1.1 Business Category
Choose the Business Category option from the Maintain Basic Configurations section of the Configuration Cockpit to create, view, and maintain business categories.
You can group entitlements under a business category for your business needs, for example, cloud division, embedded SW division, sports, movies, TV series and so on. The business category for an entitlement is displayed in the drop-down selection list while creating an entitlement model. Classifying different entitlement models under different categories also helps you to analyze entitlements based on business categories.
Click the Edit button in the footer toolbar to open the Edit Business Category screen. In this screen, using the and buttons you can add or delete a business category.
When adding a category, you must enter a value (the value can only contain letters, numbers, and underscores and cannot be longer than 50 characters) and a name. You can optionally enter a description.
14 C O N F I D E N T I A LApplication Help for SAP Entitlement Management
Business Configuration

Click Save and you are returned to the Business Category page and the new category displays in the list.
NoteYou cannot delete a category that been used in an entitlement model or delivered by SAP.
The following Administration Data information is also displayed for the business category list:
● Created By● Created At● Last Changed By● Last Changed At● Predefined (Yes/No)
Parent topic: Maintaining Basic Configurations [page 13]
Related Information
The Right [page 15]Entitlement Type [page 16]Distribution Channel [page 17]Unit of Measurement [page 18]Business Event [page 19]Geolocation Configuration [page 20]Entitlement Source System [page 21]
2.1.1.2 The Right
Choose the The Right option from the Maintain Basic Configurations section of the Configuration Cockpit to create, view, and maintain rights.
Rights are permission of actions for an entitlement that determine how the entitlement should integrate with the fulfillment system. Rights give you a way to classify different entitlement models. Each entitlement has a corresponding right. Rights pre-delivered by SAP include the basics such as To Access, To Run, To Use, and so on. You can create your own customized rights and assign them to the entitlement models.
Click the Edit button in the footer toolbar of The Right list page to open the Edit The Right page. In this screen, using the and buttons, you can add or delete a right.
When adding a right, you must enter a value (the value can only contain letters, numbers, and underscores and cannot be longer than 50 characters) and a name. You can optionally enter a description.
Click Save and you are returned to The Right page and the new right displays in the list.
NoteYou cannot delete a right that been used in an entitlement model or delivered by SAP.
Application Help for SAP Entitlement ManagementBusiness Configuration C O N F I D E N T I A L 15

The following Administration Data information is also displayed for rights list:
● Created By● Created At● Last Changed By● Last Changed At● Predefined (Yes/No)
Parent topic: Maintaining Basic Configurations [page 13]
Related Information
Business Category [page 14]Entitlement Type [page 16]Distribution Channel [page 17]Unit of Measurement [page 18]Business Event [page 19]Geolocation Configuration [page 20]Entitlement Source System [page 21]
2.1.1.3 Entitlement Type
Use the Entitlement Type option from the Maintain Basic Configurations section of the Configuration Cockpit to create, view, and maintain your own entitlement types.
The system is delivered with pre-defined entitlement types. If you prefer not to use the pre-define types, you can create and maintain your own entitlement types.
When you select the Entitlement Type option from the Maintain Basic Configurations section of the Configuration Cockpit, you will see a list page of all entitlement types. The Entitlement Type list table lists the following information for each entitlement type:
● Name● Predefined (Yes/No)● Last Changed At
Create a New Entitlement Type
To create a new entitlement type, click Create at the bottom right of the page. A dialog will display and you must enter a Name and Code for the new entitlement type. You can optionally enter a Description as well.
Edit, copy, or Delete an Entitlement Type
You can edit, delete, and copy custom entitlement types. Select the entitlement type from the list and click Edit.
Note
16 C O N F I D E N T I A LApplication Help for SAP Entitlement Management
Business Configuration
Parent topic: Maintaining Basic Configurations [page 13]
Related Information
Business Category [page 14]The Right [page 15]Distribution Channel [page 17]Unit of Measurement [page 18]Business Event [page 19]Geolocation Configuration [page 20]Entitlement Source System [page 21]
2.1.1.4 Distribution Channel
Use the Distribution Channel option from the Maintain Basic Configurations section of the Configuration Cockpit to create, view, and maintain distribution channels.
Distribution channels allow you to group different entitlement models under a single channel through which the customer receives the entitlement. The distribution channels that are pre-defined by SAP are Direct and Indirect. You can create customized distribution channels and assign them to the entitlement models.
Click the Edit button in the footer toolbar of the Distribution Channel list page to open the Edit Distribution Channel page. In this screen, using the and buttons you can add or delete a distribution channel.
When adding a channel, you must enter a value (the value can only contain letters, numbers, and underscores and cannot be longer than 50 characters) and a name. You can optionally enter a description.
Click Save and you are returned to the Distribution Channel page and the new distribution channel displays in the list.
NoteYou cannot delete a distribution channel that been used in an entitlement model or delivered by SAP.
The following Administration Data information is also displayed for the distribution channel list:
● Created By● Created At● Last Changed By● Last Changed At● Predefined (Yes/No)
Parent topic: Maintaining Basic Configurations [page 13]
Application Help for SAP Entitlement ManagementBusiness Configuration C O N F I D E N T I A L 17

Related Information
Business Category [page 14]The Right [page 15]Entitlement Type [page 16]Unit of Measurement [page 18]Business Event [page 19]Geolocation Configuration [page 20]Entitlement Source System [page 21]
2.1.1.5 Unit of Measurement
Choose the Unit of Measurement option from the Maintain Basic Configurations section of the Configuration Cockpit to create, view, and maintain entitlement units.
You must define the unit of measurement for the entitlement quantity that needs to be shipped to the customer. While creating an entitlement model, the unit is displayed as the value list which can be used by any number of attributes.
You can add a new unit, make changes to an existing unit or delete it.
NoteYou cannot delete a unit that been used in an entitlement model.
To add a new unit of measurement click on the Edit button in the footer toolbar. In the next screen, using the and buttons you can add or delete a unit of measurement.
When adding a unit, you must enter a value (the value can only contain letters, numbers, and underscores and cannot be longer than 50 characters) and a name. You can optionally enter a description.
Click Save and you are returned to the Unit page and the new unit of measurement displays in the list.
The following Administration Data information is also displayed for the unit of measurements list:
● Created By● Created At● Last Changed By● Last Changed At● Predefined (Yes/No)
Parent topic: Maintaining Basic Configurations [page 13]
Related Information
Business Category [page 14]
18 C O N F I D E N T I A LApplication Help for SAP Entitlement Management
Business Configuration
The Right [page 15]Entitlement Type [page 16]Distribution Channel [page 17]Business Event [page 19]Geolocation Configuration [page 20]Entitlement Source System [page 21]
2.1.1.6 Business Event
Choose the Business Event option from the Maintain Basic Configurations section of the Configuration Cockpit to create, view, and maintain business events related to the entitlement.
You can define business operations that will affect the entitlement record. Then you can assign those business events to the entitlement through the entitlement update interface.
Click the Edit button in the footer toolbar to open the Edit Business Event screen. In this screen, using the and buttons you can add or delete a business event.
When adding a business event, you must enter a value (the value can only contain letters, numbers, and underscores and cannot be longer than 50 characters) and a name. You can optionally enter a description.
Click Save and you are returned to the Business Event page and the new event displays in the list.
NoteYou cannot delete a business event that has been used in an entitlement model or delivered by SAP.
The following Administration Data information is also displayed for the Business Event list:
● Created By● Created At● Last Changed By● Last Changed At● Predefined (Yes/No)
Parent topic: Maintaining Basic Configurations [page 13]
Related Information
Business Category [page 14]The Right [page 15]Entitlement Type [page 16]Distribution Channel [page 17]Unit of Measurement [page 18]Geolocation Configuration [page 20]Entitlement Source System [page 21]
Application Help for SAP Entitlement ManagementBusiness Configuration C O N F I D E N T I A L 19
2.1.1.7 Geolocation Configuration
The Geolocation Configuration page allows you to view, define, and edit the full Geolocation Hierarchy.
The Geolocation Configuration page displays your full geolocation hierarchy, including the Geolocation Name and Geolocation Code for all levels of the list.
To access this page, select the Configuration Cockpit tile from the Business Configuration section of the Entitlement Management System launch pad and then select the Geolocation Configuration option from the Maintain Basic Configurations section of the menu.
You have the option to expand or collapse the full hierarchy or just segments of the hierarchy.
The Administration Data tab allows you to view the date and time of the last change that was made to the hierarchy and the name of the user who made the change.
Editing the Geolocations [page 20]Use the Geolocation Configuration option from the Configuration Cockpit menu to make any changes to the geolocation hierarchy.
Parent topic: Maintaining Basic Configurations [page 13]
Related Information
Business Category [page 14]The Right [page 15]Entitlement Type [page 16]Distribution Channel [page 17]Unit of Measurement [page 18]Business Event [page 19]Entitlement Source System [page 21]
2.1.1.7.1 Editing the Geolocations
Use the Geolocation Configuration option from the Configuration Cockpit menu to make any changes to the geolocation hierarchy.
Procedure
1. Click on the Configuration Cockpit tile from the Business Configuration section of the SAP Entitlement Management System launch pad.
2. Open the Geolocation Configuration option from the Maintain Basic Configurations section of the menu and click Edit on the bottom toolbar.
20 C O N F I D E N T I A LApplication Help for SAP Entitlement Management
Business Configuration

The Edit Geolocation page displays.
3. To add a location to the hierarchy, click at the top right of the page.
A new text box is added to the bottom of the hierarchy list.
TipIf your hierarchy is very long and detailed, before you add a new location, you should click Collapse All and then expand just the top item. This way, you will avoid long scrolling to see the new text box.
4. Add the new location in the new, blank Geolocation Name text box.
The Geolocation Code is automatically filled in.5. Click in the first empty column next to your new location to select the row and then use the Move Up, Move
Down, Move Indent, and Move Outdent icons to place the new location where you want it in your hierarchy.
If you select Move Indent, a pop-up displays prompting you to select the target location. Select a location from the drop-down menu and click OK.
6. Click Save to save all your changes to the geolocation hierarchy, or click Cancel to exit the page without making any changes.
If you have made changes to the page and click Cancel, a warning displays informing you that your changes will be lost. Click Leave Page to leave the Edit Geolocation page without making your changes or click Cancel to return to the page to continue editing or to select Save to keep your changes.
Task overview: Geolocation Configuration [page 20]
2.1.1.8 Entitlement Source System
Choose the Entitlement Source System option from the Maintain Basic Configurations section of the Configuration Cockpit to create, view, and maintain source system related to the entitlement.
The Entitlement Management system allows you to have master data and sales documents from different systems. If the sales system is not the same as the master data system, you must configure the allowed system using the Entitlement Source System option of the Maintain Basic Configurations section of the Cockpit.
CautionWhen the system checks the incoming data, it checks if it is coming from a configured source system or from the master data system. If the data is coming from a sourse system that has not been configured here, the entitlement record will not be generated.
When you first open the Source System page, a list of defined systems is displayed, showing the followig information for each system:
● Source System name● Description● Last Changed By● Last Change At
You can modify a source system's description, delete a source system, or add a new source system.
Application Help for SAP Entitlement ManagementBusiness Configuration C O N F I D E N T I A L 21
Modifying an Entitlement Source System Description
You can modify only the description of existing source systems, you cannot modify a system name.
To make a change, do the following:
1. Click Edit from the main Source System page.2. Touch down in the Description field for the system you want to modify and make the desired change.3. When you have finished, click Save.
Deleting an Entitlement Source System
To delete a source system, do the following:
1. Click Edit from the main Source System page.2. Select the system you want to delete and click the trash can icon (Delete) at the top right of the Items list.3. Click Save to save your change and return to the main screen.
NoteIf you do not click Save when leaving the screen, any systems that you deleted will still remain in the Source System list.
Creating a New Entitlement Source System
To create a source system, do the following:
1. Click Edit from the main Source System page.2. Click the plus sign (Add) icon at the top right of the Items list. A blank line is added to the bottom of the
source system list.3. Enter a name and a description for the new system.4. Click Save to save the new source system and return to the main screen.
NoteThe source system name cannot contain spaces, commas, dollar sign, asterisks, or colons ( , $ * : ).
Parent topic: Maintaining Basic Configurations [page 13]
Related Information
Business Category [page 14]The Right [page 15]
22 C O N F I D E N T I A LApplication Help for SAP Entitlement Management
Business Configuration

Entitlement Type [page 16]Distribution Channel [page 17]Unit of Measurement [page 18]Business Event [page 19]Geolocation Configuration [page 20]
2.1.2 Model New EntitlementFrom the Model New Entitlement section of the Configuration Cockpit, you can view and maintain the basic elements of entitlements.
From this section, you can choose to create and maintain the following:
● Status - define the lifecycle phase or processing status of an entitlement● Status Model - define the status change processes associated with an entitlement model● Attribute Value Lists - define values which are displayed in a drop-down list as content of an entitlement
attribute● Attribute - define additional output fields that are displayed in the entitlement details● Consumption Form - determines which attributes should be recorded for an entitlement model and track
consumption● Entitlement Model - create an entitlement model based on each entitlement type and manage the
entitlement lifecycle per entitlement model
See the appropriate topic for full details on access and usage of the functions.
Status [page 24]Choose the Status option from the Model New Entitlement section of the Configuration Cockpit to create, view, and maintain entitlement statuses.
Status Models [page 27]Status models are used to define status change processes which are associated with the status transition and which can be used in the entitlement model.
Attribute Value Lists [page 31]Use the Attribute Value List option of the Model New Entitlement section of the Configuration Cockpit to define values that are displayed in a drop-down list to give users of the system the option to select between different values as content of an entitlement attribute.
Entitlement Attributes [page 35]You use the Attribute option of the Model New Entitlement section of the Configuration Cockpit to define the characteristics of an entitlement.
Consumption Forms [page 39]Use the Consumption Form option of the Model New Entitlement section of the Configuration Cockpit to define different consumption forms that you can use to log the consumption record from external systems.
Entitlement Models [page 43]Use the Entitlement Model option of the Model New Entitlement section of the Configuration Cockpit to create and maintain entitlement models to classify the entitlement and determine the entitlement repository structure.
Application Help for SAP Entitlement ManagementBusiness Configuration C O N F I D E N T I A L 23
Parent topic: Configuration Cockpit [page 12]
Related Information
Maintaining Basic Configurations [page 13]Assign Entitlements to Offerings [page 48]Maintaining Entitlement Generation Rules [page 52]
2.1.2.1 Status
Choose the Status option from the Model New Entitlement section of the Configuration Cockpit to create, view, and maintain entitlement statuses.
When you open the Status option, a Status List is displayed with the following fields for each status:
● <Name>● <Predefined> - if a status is predefined, meaning it has come pre-configured with the system, it cannot
be edited● <Last Changed At>
From the Status List page, you can choose to copy or delete an existing status, or create a new status. See the appropriate topics for details on each of these actions.
Creating a New Entitlement Status [page 25]You can create a new entitlement status using the Create option from the Status list screen.
Copying an Entitlement Status [page 26]You can copy the data from an existing entitlement status and make changes as required.
Deleting Entitlement Statuses [page 26]You can only delete an existing entitlement status if it is not used in a status model and if it is not predefined.
Parent topic: Model New Entitlement [page 23]
Related Information
Status Models [page 27]Attribute Value Lists [page 31]Entitlement Attributes [page 35]Consumption Forms [page 39]Entitlement Models [page 43]
24 C O N F I D E N T I A LApplication Help for SAP Entitlement Management
Business Configuration
2.1.2.1.1 Creating a New Entitlement Status
You can create a new entitlement status using the Create option from the Status list screen.
Procedure
1. On the Status list screen, click Create in the footer toolbar.
The system navigates to the New Status screen.2. Enter the Name and Description in the appropriate fields. Note that it is mandatory to enter data in the
fields marked with an asterisk. The Code field is automatically populated with the Name you enter, with any spaces converted to underscores.
3. Click Save to publish the new status and open its details screen or click Save and New to save the new status and create another status..
The system navigates to the details screen if you clicked Save.4. Check the header data under the title bar.
The system displays the data for the status under two tabs.○ Usage
Displays where this entitlement status is used.○ Administration Data
Displays the administrative data of the entitlement status.5. You can copy, delete and edit an existing entitlement status. A Predefined status can not be deleted or
changed.
CautionThe Code of an existing entitlement status cannot be changed.
Task overview: Status [page 24]
Related Information
Copying an Entitlement Status [page 26]Deleting Entitlement Statuses [page 26]
Application Help for SAP Entitlement ManagementBusiness Configuration C O N F I D E N T I A L 25
2.1.2.1.2 Copying an Entitlement Status
You can copy the data from an existing entitlement status and make changes as required.
Procedure
1. On the Status screen, choose an existing entitlement status and select Copy in the footer toolbar.2. Check the data in the Copy Status screen.
The data from the source entitlement status is copied into the new status. The system appends the prefix Copy to the name and code of the status.
3. Make the necessary changes and save the new entitlement status.4. Publish the entitlement status. The new status is now available in the list of items in the list screen.
Task overview: Status [page 24]
Related Information
Creating a New Entitlement Status [page 25]Deleting Entitlement Statuses [page 26]
2.1.2.1.3 Deleting Entitlement Statuses
You can only delete an existing entitlement status if it is not used in a status model and if it is not predefined.
Procedure
On the Status list screen, select an existing status and click Delete in the footer toolbar.
CautionYou cannot delete a entitlement status if it is used in a status model or if it is predefined.
The entitlement status is deleted.
Task overview: Status [page 24]
26 C O N F I D E N T I A LApplication Help for SAP Entitlement Management
Business Configuration

Related Information
Creating a New Entitlement Status [page 25]Copying an Entitlement Status [page 26]
2.1.2.2 Status Models
Status models are used to define status change processes which are associated with the status transition and which can be used in the entitlement model.
All entitlements under a given entitlement model will follow the status change process defined in the corresponding status model. The lifecycle of an entitlement depends on the status model. Status changes can be manually triggered by the system administrator or can be triggered by background jobs defined in the system.
Choose the Status Model option from the Model New Entitlement section of the Configuration Cockpit to create, view, and maintain status models.
You create a new status model by defining a Name and a Code, and selecting an Initial Status. You can also add an optional Description. Once defined, you can add new transitions to the model and later delete the transitions no longer in use by the entitlement model. You can create, copy, edit, and delete status models.
In the Detail view, you can see a flowchart representation of the status model's process and its transitions between multiple statuses.
For full details about using and managing models, see the appropriate topics.
Creating a Status Model [page 28]You create a set of statuses and status model and assign it to and entitlement model so that the entitlements under this entitlement model will follow the status change process defined in the corresponding status model.
Copying a Status Model [page 29]You can create a new status model by copying data from an existing model, and change it as per your requirement.
Editing a Status Model [page 30]After a status model is created, you can manually modify the transitions between statuses, which is displayed in a flowchart view for ease of understanding.
Deleting Status Models [page 31]You can delete an existing status model only if it is not used by any entitlement model or event, it is not predefined, and you have the corresponding role.
Parent topic: Model New Entitlement [page 23]
Related Information
Status [page 24]
Application Help for SAP Entitlement ManagementBusiness Configuration C O N F I D E N T I A L 27

Attribute Value Lists [page 31]Entitlement Attributes [page 35]Consumption Forms [page 39]Entitlement Models [page 43]
2.1.2.2.1 Creating a Status Model
You create a set of statuses and status model and assign it to and entitlement model so that the entitlements under this entitlement model will follow the status change process defined in the corresponding status model.
Procedure
1. Choose the Status option from the Model New Entitlement section of the Configuration Cockpit.2. On the Status Models list screen, click Create in the footer toolbar.
The system navigates to the Create New Status Model screen.3. Enter the data in the fields. Note that it is mandatory to enter the Name, Code and Initial Status. The Code
is automatically generated from the Name you enter, converting any spaces to underscores.
4. Click to add a transition.5. Select the Current Status and Next Status for each transition and enter a description for each transition.
Note that you can define any number of transitions for a status model.
Before you save the status model, you can adjust the preview diagram of this model to make sure that the diagram is properly positioned. Once you have the diagram positioned the way you want it, continue with the next step.
6. Click Save to save the new status model or click Save and New to save the status model and create another.
A new status model is created.7. Check the header data under the title bar.
The system displays the details of the status model under three tabs.○ Detail
Displays the transitions in the form of relationship diagram.○ Usage
Displays the entitlement types where the status model has been used.○ Administration Data
Displays the administrative data for the status model.8. You can copy, edit, or delete the status model using the buttons in the footer toolbar.
CautionYou cannot delete or change a status model that has been used by any entitlement model or if it is predefined.
28 C O N F I D E N T I A LApplication Help for SAP Entitlement Management
Business Configuration
Task overview: Status Models [page 27]
Related Information
Copying a Status Model [page 29]Editing a Status Model [page 30]Deleting Status Models [page 31]
2.1.2.2.2 Copying a Status Model
You can create a new status model by copying data from an existing model, and change it as per your requirement.
Procedure
1. Choose the Status option from the Model New Entitlement section of the Configuration Cockpit.2. On the Status Models list screen, choose an existing status model and click Copy in the footer toolbar. You
can also select the Copy option directly from the Detail page of an existing status model.3. Check the data in the Copy Status Model screen.
The data from the source status model is copied into the new one.4. Make the necessary changes and click Save to save the new status model.
The new status model is now available in the list of items in the Status Models list screen.
Task overview: Status Models [page 27]
Related Information
Creating a Status Model [page 28]Editing a Status Model [page 30]Deleting Status Models [page 31]
Application Help for SAP Entitlement ManagementBusiness Configuration C O N F I D E N T I A L 29

2.1.2.2.3 Editing a Status Model
After a status model is created, you can manually modify the transitions between statuses, which is displayed in a flowchart view for ease of understanding.
Context
NoteOnly users with a configuration administrator role can edit status models.
Procedure
1. Choose the Status option from the Model New Entitlement section of the Configuration Cockpit.2. On the Status Models list page, select and click on the name of the model you want to edit.
The status model is opened to its Details section, showing the current model in flowchart view.3. Click Edit in the footer toolbar.
The Edit Status Model screen is displayed.4. You can edit the basic information: Name, Description, Initial Status.5. You can add one or more transitions to the model.
To add a transition, click and select the Current Status from the drop-down menu and then select the desired Next Status from its drop-down menu, and add a description of the transition.
As you add each new transition, it is added to the flowchart. You can manually change the layout of the flowchart, optionally adjusting the position of each block.
6. When you have completed all of your changes, click Save.
Once you click Save, the transition descriptions are added to the flowchart.
Task overview: Status Models [page 27]
Related Information
Creating a Status Model [page 28]Copying a Status Model [page 29]Deleting Status Models [page 31]
30 C O N F I D E N T I A LApplication Help for SAP Entitlement Management
Business Configuration

2.1.2.2.4 Deleting Status Models
You can delete an existing status model only if it is not used by any entitlement model or event, it is not predefined, and you have the corresponding role.
Procedure
1. Choose the Status option from the Model New Entitlement section of the Configuration Cockpit.2. On the Status Models list screen, choose an existing status model and click Delete in the footer toolbar.
CautionYou cn not delete a status model if it is used in an entitlement model or if it is predefined.
3. At the confirmation prompt, click Delete.
The status model is deleted.
Task overview: Status Models [page 27]
Related Information
Creating a Status Model [page 28]Copying a Status Model [page 29]Editing a Status Model [page 30]
2.1.2.3 Attribute Value Lists
Use the Attribute Value List option of the Model New Entitlement section of the Configuration Cockpit to define values that are displayed in a drop-down list to give users of the system the option to select between different values as content of an entitlement attribute.
All entitlement attributes created can be used and will be displayed in the entitlement repository. Entitlement attributes are used to provide additional output fields for displaying the entitlement's details. Each Entitlement Type can have its own specified entitlement attributes.
The Attribute Value Lists page displays is a list of user defined values which display as drop-down lists in the Entitlement Management System. For example, the attribute value list is used in entitlement attributes.
For each value list, you choose a Data Type. The attribute type can be a list value, single value, or a table value.
Defined Data Types can be one of five types:
● Boolean
Application Help for SAP Entitlement ManagementBusiness Configuration C O N F I D E N T I A L 31
● Date● Decimal● Integer● String
The following value lists are Predefined and delivered with the Entitlement Management system. Note that you cannot edit the existing data in these value lists, but you can add more values to the list.
● Business Category● Distribution Channel● Provisioning Route● Right● Unit
For details on creating and maintaining the value lists, see the appropriate related link.
Creating a Value List [page 32]You can create a new value list and define values as per requirement.
Copying a Value List [page 34]You can copy the data from an existing value list and make changes as required.
Deleting Value Lists [page 34]You can delete an existing value list if it is not in use.
Parent topic: Model New Entitlement [page 23]
Related Information
Status [page 24]Status Models [page 27]Entitlement Attributes [page 35]Consumption Forms [page 39]Entitlement Models [page 43]
2.1.2.3.1 Creating a Value List
You can create a new value list and define values as per requirement.
Procedure
1. Choose the Attribute Value List option from the Model New Entitlement section of the Configuration Cockpit.
32 C O N F I D E N T I A LApplication Help for SAP Entitlement Management
Business Configuration

2. On the Attribute Value Lists list screen, click Create in the footer toolbar.
The system navigates to the Create New Attribute Value List screen.3. Enter the Name, Code, Data Type, and Description in the appropriate fields. Note that it is mandatory to
enter data in the fields marked with an asterisk.4. You can add values in the Value List table which will be displayed in the drop-down list.5. Click Save to save the new attribute value list or click Save and New to save the new list and to create
another list.6. If you clicked Save, the details are displayed for the new attribute value list. Check the header data under
the title bar.
The system displays the data for the value list under three tabs.○ Attribute Value List
Displays the list of attribute values to be included in the drop-down list.○ Usage
Displays where this value list is used.○ Administration Data
Displays the administrative data of the value list.7. You can copy, delete, and edit an existingattribute value list. Note that a Predefined value list cannot be
deleted or changed.
NoteYou can edit the values in an existing atrtibute value list with the following restrictions:○ If an attribute value list is not used by any configuration, you can change all attributes except the
Code of the value list.○ If a value list is used by a configuration, you can only change the name and description in the
general information section.
Task overview: Attribute Value Lists [page 31]
Related Information
Copying a Value List [page 34]Deleting Value Lists [page 34]
Application Help for SAP Entitlement ManagementBusiness Configuration C O N F I D E N T I A L 33
2.1.2.3.2 Copying a Value List
You can copy the data from an existing value list and make changes as required.
Procedure
1. Choose the Attribute Value List option from the Model New Entitlement section of the Configuration Cockpit.
2. On the Value Lists entry screen, choose an existing value list and select Copy in the footer toolbar.3. Check the data in the Copy Value List screen.
The data from the source value list is copied into the new value list.4. Make the necessary changes and save the new value list.
Task overview: Attribute Value Lists [page 31]
Related Information
Creating a Value List [page 32]Deleting Value Lists [page 34]
2.1.2.3.3 Deleting Value Lists
You can delete an existing value list if it is not in use.
Procedure
1. Choose the Attribute Value List option from the Model New Entitlement section of the Configuration Cockpit.
2. On the Value Lists entry screen, choose an existing value list and click Delete in the footer toolbar.
CautionYou can not delete a Predefined value list or if it is used in any other configuration.
The value list is deleted.
Task overview: Attribute Value Lists [page 31]
34 C O N F I D E N T I A LApplication Help for SAP Entitlement Management
Business Configuration
Related Information
Creating a Value List [page 32]Copying a Value List [page 34]
2.1.2.4 Entitlement Attributes
You use the Attribute option of the Model New Entitlement section of the Configuration Cockpit to define the characteristics of an entitlement.
All entitlement attributes created can be used and will be displayed in the entitlement repository. Entitlement attributes are used to provide additional output fields for displaying the entitlement's details.
For each attribute, you can define a data type and an attribute type.
Defined attributes can store one of three Attribute Types:
● List value - a single column with multiple rows● Single Value - a single entry attribute and can map to only one node● Table Value - a complex value list with multiple columns and multiple rows
Defined Data Types can be one of five types:
● Boolean● Date● Decimal● Integer● String
NoteThere is an upper limit on the number of attributes you can define per data type:
● String: 200 attributes (doesn't include lists and tables)● List: 100 attributes● Table: 100 attributes● Number: 100 attributes (includes integers and decimals)● Date: 30 attributes● Boolean: 30 attributes
These are the maximum allowed attributes in the whole system, and not per entitlement model.
Attributes are language dependent. You can maintain the supported languages (EN and DE) for the attribute name and label name to be displayed as field labels.
For details on creating and maintaining the entitlement attributes, see the appropriate related link.
Creating an Entitlement Attribute [page 36]You can create a new attribute and define values as required by your business rules.
Copying an Entitlement Attribute [page 38]You can copy the data from an existing entitlement attribute and make changes as required.
Application Help for SAP Entitlement ManagementBusiness Configuration C O N F I D E N T I A L 35
Deleting Entitlement Attributes [page 38]You can delete an existing entitlement attribute if it is not in use.
Parent topic: Model New Entitlement [page 23]
Related Information
Status [page 24]Status Models [page 27]Attribute Value Lists [page 31]Consumption Forms [page 39]Entitlement Models [page 43]
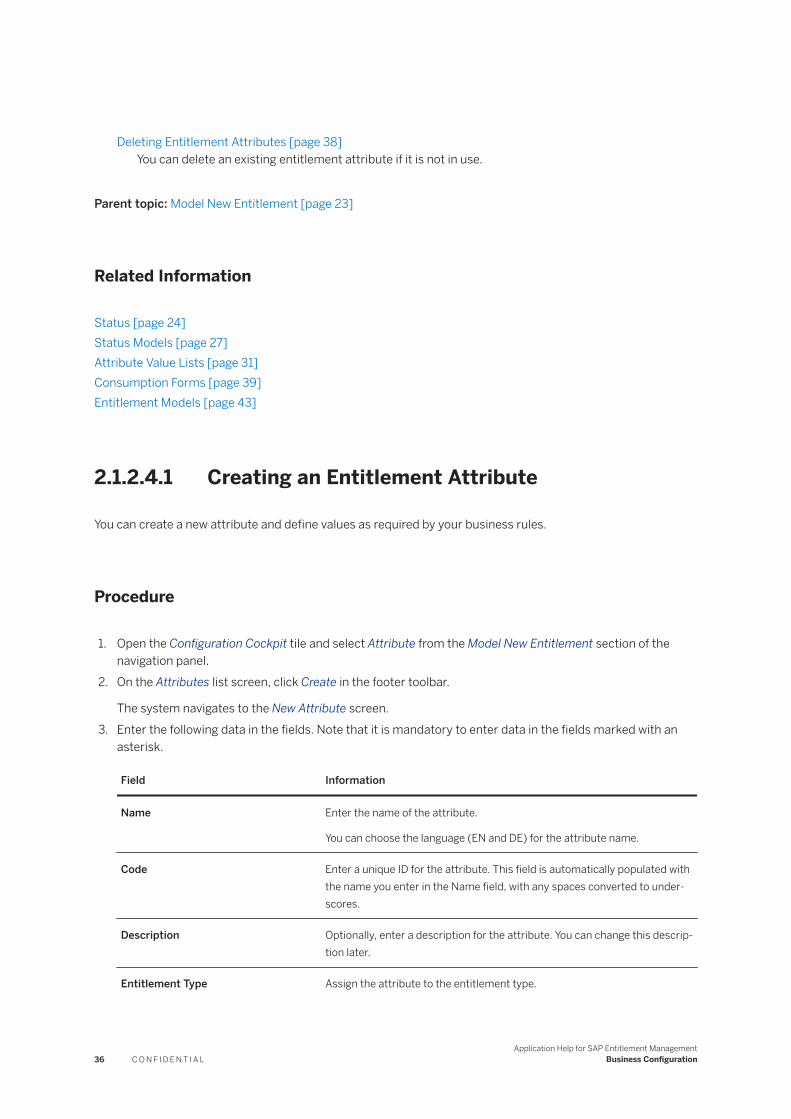
2.1.2.4.1 Creating an Entitlement Attribute
You can create a new attribute and define values as required by your business rules.
Procedure
1. Open the Configuration Cockpit tile and select Attribute from the Model New Entitlement section of the navigation panel.
2. On the Attributes list screen, click Create in the footer toolbar.
The system navigates to the New Attribute screen.3. Enter the following data in the fields. Note that it is mandatory to enter data in the fields marked with an
asterisk.
Field Information
Name Enter the name of the attribute.
You can choose the language (EN and DE) for the attribute name.
Code Enter a unique ID for the attribute. This field is automatically populated with the name you enter in the Name field, with any spaces converted to underscores.
Description Optionally, enter a description for the attribute. You can change this description later.
Entitlement Type Assign the attribute to the entitlement type.
36 C O N F I D E N T I A LApplication Help for SAP Entitlement Management
Business Configuration

Field Information
You can select multiple entitlement types for each attribute.
Attribute Type Select the attribute type from the following options:○ List - The default Data Type for this selection is String. A preview of the
structure is displayed.○ Single Value - This selection allows you to select the Data Type and a
Value List.○ Table - The default Data Type for this selection is String You can define
one or multiple labels for each field and choose the language (EN and DE) for the label . A preview of the structure is displayed.
Data Type You select the data type only if the attribute type is Single Value. Based on this selection, you must choose the corresponding values.○ Boolean - Value List○ Date○ Decimal Number - Unit, Value List○ Integer - Unit, Value List○ String - Value List
4. Click Save to save the new attribute and open its details page or click Save and New to save the attribute and create another attribute.
5. Check the header data under the title bar.
The system displays the details of the attribute under two tabs.○ Usage
Displays where this attribute is used.○ Administration Data
Displays the administrative data of the attribute.6. You can copy, edi,t or delete the attribute using the buttons in the footer toolbar. Note that a standard
attribute can not be deleted or changed.
NoteYou can edit the data in an existing entitlement attribute with the following restrictions:○ If an attribute is not used by any configuration, you can change all attributes except the ID.○ If an attribute is used by a configuration, you can only change the name and description of the
attribute.
Task overview: Entitlement Attributes [page 35]
Related Information
Copying an Entitlement Attribute [page 38]Deleting Entitlement Attributes [page 38]
Application Help for SAP Entitlement ManagementBusiness Configuration C O N F I D E N T I A L 37

2.1.2.4.2 Copying an Entitlement Attribute
You can copy the data from an existing entitlement attribute and make changes as required.
Procedure
1. Open the Configuration Cockpit tile and select Attribute from the Model New Entitlement section of the navigation panel.
2. On the Attributes liat screen, choose an existing attribute and select Copy in the footer toolbar.3. Check the data in the Copy Attribute screen.
The data from the source attribute is copied into the new attribute. The system appends the prefix Copy_ to the name and ID of the attribute.
4. Make the necessary changes and save the new attribute.5. Save the attribute.
The new attribute is now available in the list of items in the entry screen.
Task overview: Entitlement Attributes [page 35]
Related Information
Creating an Entitlement Attribute [page 36]Deleting Entitlement Attributes [page 38]
2.1.2.4.3 Deleting Entitlement Attributes
You can delete an existing entitlement attribute if it is not in use.
Procedure
1. Open the Configuration Cockpit tile and select Attribute from the Model New Entitlement section of the navigation panel.
2. On the Attributes list screen, choose an existing attribute and select Delete in the footer toolbar.
CautionYou cannot delete a predefined entitlement attribute or if it is used in an entitlement model.
38 C O N F I D E N T I A LApplication Help for SAP Entitlement Management
Business Configuration
3. At the confirmation prompt, click Delete.
The entitlement type is deleted.
Task overview: Entitlement Attributes [page 35]
Related Information
Creating an Entitlement Attribute [page 36]Copying an Entitlement Attribute [page 38]
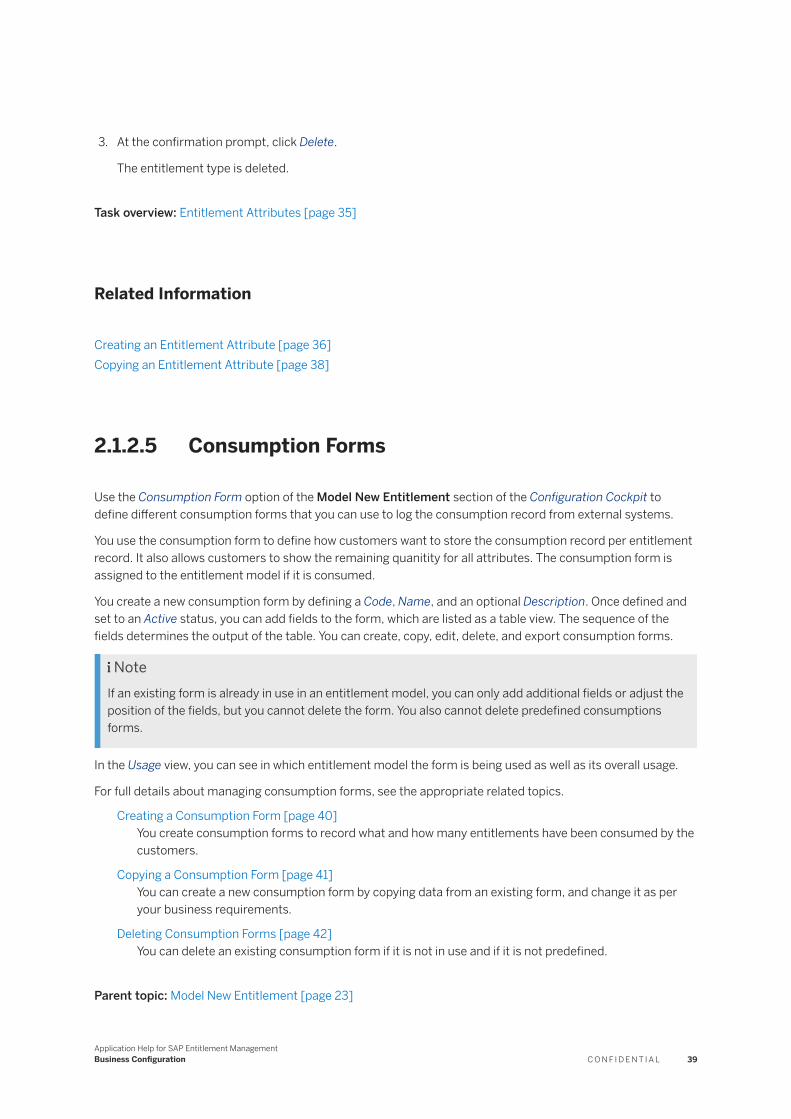
2.1.2.5 Consumption Forms
Use the Consumption Form option of the Model New Entitlement section of the Configuration Cockpit to define different consumption forms that you can use to log the consumption record from external systems.
You use the consumption form to define how customers want to store the consumption record per entitlement record. It also allows customers to show the remaining quanitity for all attributes. The consumption form is assigned to the entitlement model if it is consumed.
You create a new consumption form by defining a Code, Name, and an optional Description. Once defined and set to an Active status, you can add fields to the form, which are listed as a table view. The sequence of the fields determines the output of the table. You can create, copy, edit, delete, and export consumption forms.
NoteIf an existing form is already in use in an entitlement model, you can only add additional fields or adjust the position of the fields, but you cannot delete the form. You also cannot delete predefined consumptions forms.
In the Usage view, you can see in which entitlement model the form is being used as well as its overall usage.
For full details about managing consumption forms, see the appropriate related topics.
Creating a Consumption Form [page 40]You create consumption forms to record what and how many entitlements have been consumed by the customers.
Copying a Consumption Form [page 41]You can create a new consumption form by copying data from an existing form, and change it as per your business requirements.
Deleting Consumption Forms [page 42]You can delete an existing consumption form if it is not in use and if it is not predefined.
Parent topic: Model New Entitlement [page 23]
Application Help for SAP Entitlement ManagementBusiness Configuration C O N F I D E N T I A L 39

Related Information
Status [page 24]Status Models [page 27]Attribute Value Lists [page 31]Entitlement Attributes [page 35]Entitlement Models [page 43]
2.1.2.5.1 Creating a Consumption Form
You create consumption forms to record what and how many entitlements have been consumed by the customers.
Procedure
1. Choose the Consumption Form option of the Model New Entitlement section of the Configuration Cockpit.2. On the Consumption Forms list screen, click Create in the footer toolbar.
The system navigates to the Create New Consumption Form screen.3. Enter the data in the appropriate entry fields. Note that it is mandatory to enter the Name and Code. The
Code will be automatically generated based on the Name you enter, converting any spaces to underscores.
NoteBy default, the status of the consumption form is Active. If you deactivate the form, you cannot assign it to an entitlement model anymore.
4. Define the consumption fields in the Consumption Form Fields table.
TipWhen you add a field into the consumption form, you can indicate whether the field is editable or not. If you define a field as editable, later in the entitlement records, the user can manually change the field value or can change the field value using an API.
a. Click Create above the table to create a new consumption field.b. In the pop-up dialog, enter the consumption field Name, Code (this must have the prefix "Cons_"),
Description, Data Type, and Unit.c. Click Save and Assign. The newly created consumption field will be assigned to the consumption form.
Note that there is an upper limit to the number of consumption fields that you can define, per data type. These maximum allowed limits are for the whole system, not per consumption form.
d. Click Assign to add existing entitlement attributes or consumption fields to the consumption form. A pop-up window will display with two tabs: From Entitlement Attributes and From Consumption Fields.
5. Click Save to save the consumption form and display its details or click Save and New to save the form and create another.
40 C O N F I D E N T I A LApplication Help for SAP Entitlement Management
Business Configuration

6. Check the header data under the title bar.
The system displays the details of the consumption form under three tabs.○ Details
Displays the list of consumption fields to be displayed on the form.○ Usage
Displays where the consumption form has been used.○ Administration Data
Displays the administrative data for the consumption form.7. You can copy, edit or delete the consumption form using the buttons in the footer toolbar. Note that a
predefined consumption form can not be deleted or changed.
NoteYou can change the data in an existing consumption form with the following restrictions:○ If the consumption form is not used in any entitlement model, you can change all attributes except
the code.○ If the consumption form is used in an entitlement model, you can change the name, description,
and status and you can add new fields.
Task overview: Consumption Forms [page 39]
Related Information
Copying a Consumption Form [page 41]Deleting Consumption Forms [page 42]Entitlement Models [page 43]
2.1.2.5.2 Copying a Consumption Form
You can create a new consumption form by copying data from an existing form, and change it as per your business requirements.
Procedure
1. Choose the Consumption Form option of the Model New Entitlement section of the Configuration Cockpit.2. On the Consumption Forms list screen, choose an existing consumption form and click Copy in the footer
toolbar.3. Check the data in the Copy Consumption Form screen.
The data from the source consumption form is copied into the new form. The system appends the prefix Copy_ to the name and code of the form.
Application Help for SAP Entitlement ManagementBusiness Configuration C O N F I D E N T I A L 41
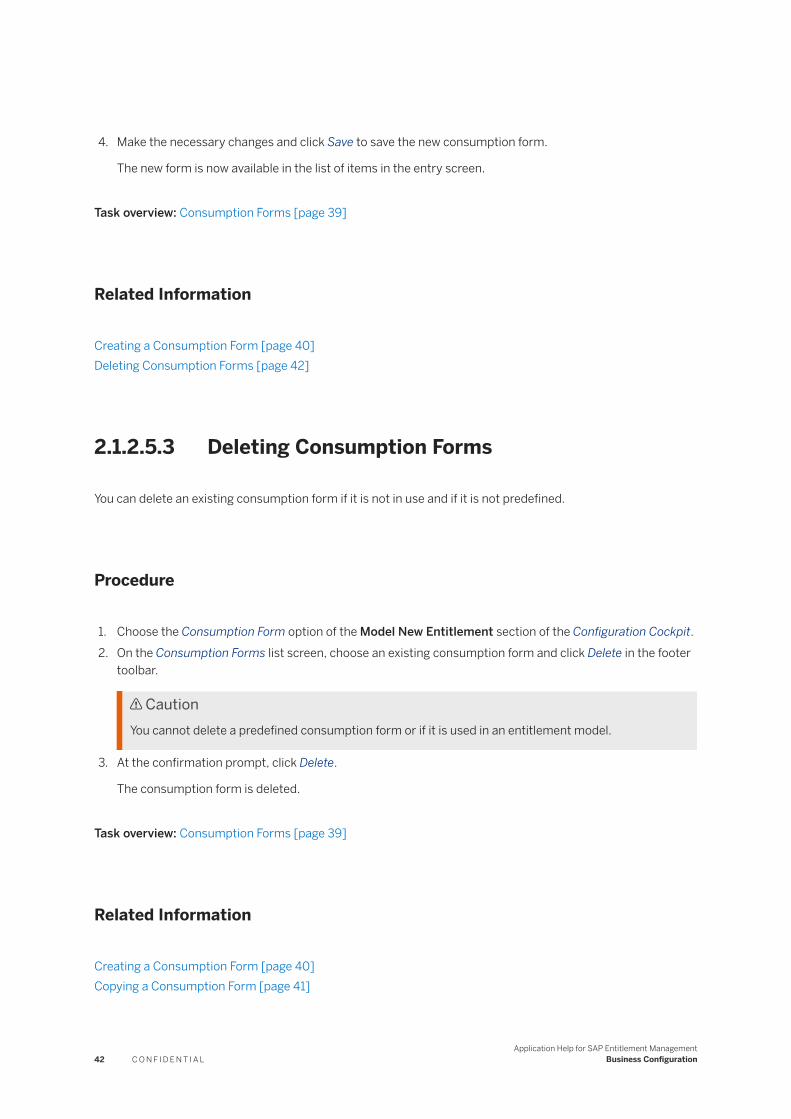
4. Make the necessary changes and click Save to save the new consumption form.
The new form is now available in the list of items in the entry screen.
Task overview: Consumption Forms [page 39]
Related Information
Creating a Consumption Form [page 40]Deleting Consumption Forms [page 42]
2.1.2.5.3 Deleting Consumption Forms
You can delete an existing consumption form if it is not in use and if it is not predefined.
Procedure
1. Choose the Consumption Form option of the Model New Entitlement section of the Configuration Cockpit.2. On the Consumption Forms list screen, choose an existing consumption form and click Delete in the footer
toolbar.
CautionYou cannot delete a predefined consumption form or if it is used in an entitlement model.
3. At the confirmation prompt, click Delete.
The consumption form is deleted.
Task overview: Consumption Forms [page 39]
Related Information
Creating a Consumption Form [page 40]Copying a Consumption Form [page 41]
42 C O N F I D E N T I A LApplication Help for SAP Entitlement Management
Business Configuration

2.1.2.6 Entitlement Models
Use the Entitlement Model option of the Model New Entitlement section of the Configuration Cockpit to create and maintain entitlement models to classify the entitlement and determine the entitlement repository structure.
Entitlement models are used to classify the entitlement and determine the entitlement repository structure. The user can freely manage the entitlement lifecycle per entitlement model by defining and assigning new attributes for an entitlement model.
You create a new entitlement model by defining an Entitlement Model Name and an Entitlement Model Code, and then selecting an Entitlement Type, Lifecycle Status Model, and Unit and so on. You can optionally add a Description and select a consumption form to track the consumptions of the entitlement. You need to specify the Activation Date and Expiration Date of the entitlement model. Only an active entitlement model can be used to generate corresponding entitlement records.
You create or assign existing attributes to the entitlement model to provide additional output fields for displaying the entitlement's details.
You can create, copy, edit, and delete entitlement models.
NoteYou can only delete an entitlement model if it is not in use by any configuration or transaction.
In the Usage view, you can see where the entitlement model has been used for the configuration as well as its overall usage.
Creating an Entitlement Model [page 44]You can create a new entitlement model and define values as per requirement.
Copying an Entitlement Model [page 47]You can copy the data from an existing entitlement model and make changes as required.
Deleting Entitlement Model [page 48]You can delete an existing entitlement model if it is not in use.
Parent topic: Model New Entitlement [page 23]
Related Information
Status [page 24]Status Models [page 27]Attribute Value Lists [page 31]Entitlement Attributes [page 35]Consumption Forms [page 39]
Application Help for SAP Entitlement ManagementBusiness Configuration C O N F I D E N T I A L 43

2.1.2.6.1 Creating an Entitlement Model
You can create a new entitlement model and define values as per requirement.
Procedure
1. Open the Configuration Cockpit tile and select Entitlement Model from the Model New Entitlement section of the navigation panel.
2. On the Explore Entitlement Models list screen, choose Create in the footer toolbar.
The system navigates to the Create New Entitlement Model screen.3. Click the plus icon ( + ) above the attribute table to display a pop-up window that shows all attributes under
selected categories. Enter the following data in the appropriate fields. Note that it’s mandatory to enter data in the fields marked with an asterisk.
Field Information
Name Enter the name of the entitlement model.
Code Enter an ID for the entitlement model. This field is automatically populated with the name you enter in the Name field, with any spaces converted to underscores.
Description Optionally, enter a description for the entitlement model. You can change this description later.
Entitlement Type Choose an entitlement type to determine how many attributes can be used for the entitlement model.
NoteIf you choose the entitlement type as License or Warranty, you must also define if it’s device-dependent or not. During mapping creation, if the mapped entitlement model is a device-dependent license model, the system displays a list of device-dependent warranty models. The user can choose if any of them need to be mapped to the same offering.
If you select Support, you can add one or more entitlements in the Supported Licenses table. During mapping creation, if the mapped entitlement model is a support model, the system displays a list of its supported license models. The the user can choose if any of them need to be mapped to the same offering.
44 C O N F I D E N T I A LApplication Help for SAP Entitlement Management
Business Configuration

Field Information
Based on the entitlement type chosen, the system displays the free-defined attributes in ascending order.
Activation Date The date on which the entitlement model is activated.
NoteAn inactive entitlement model can be used in a config-uration, but it cannot generate an entitlement record, therefore the default value is the creation date.
Expiration Date The date on which the entitlement model expires.
NoteExpired entitlement model cannot be used in a config-uration and it also cannot generate entitlement records. The date of expiration must always be later than the activation date.
Lifecycle Status Model Choose a lifecycle status model. It’s used to define the entitlement process with status.
Unit Select a delivery unit in which the entitlement is going to be shipped.
Consumption If you select the consumption checkbox, you can select one of preconfigured consumption forms and track the usage of the entitlement.
The Right Choose from the list of eligible rights.
Business Category Select the business category under which the entitlement model is to be classified.
Distribution Channel Choose the channel through which the customer receives the entitlement.
Geolocation Relevant Choosing this checkbox allows you to store all geolocations in which the customer can access the entitlement.
Third-Party Fulfillment If this checkbox is checked, the entitlement created under this model has an additional attribute “Third Party”, which represents the third-party business partner responsible for entitlement fulfillment.
Under the chosen category, the system displays all free defined attributes included into this entitlement model
4. Click on above the items table.
Application Help for SAP Entitlement ManagementBusiness Configuration C O N F I D E N T I A L 45
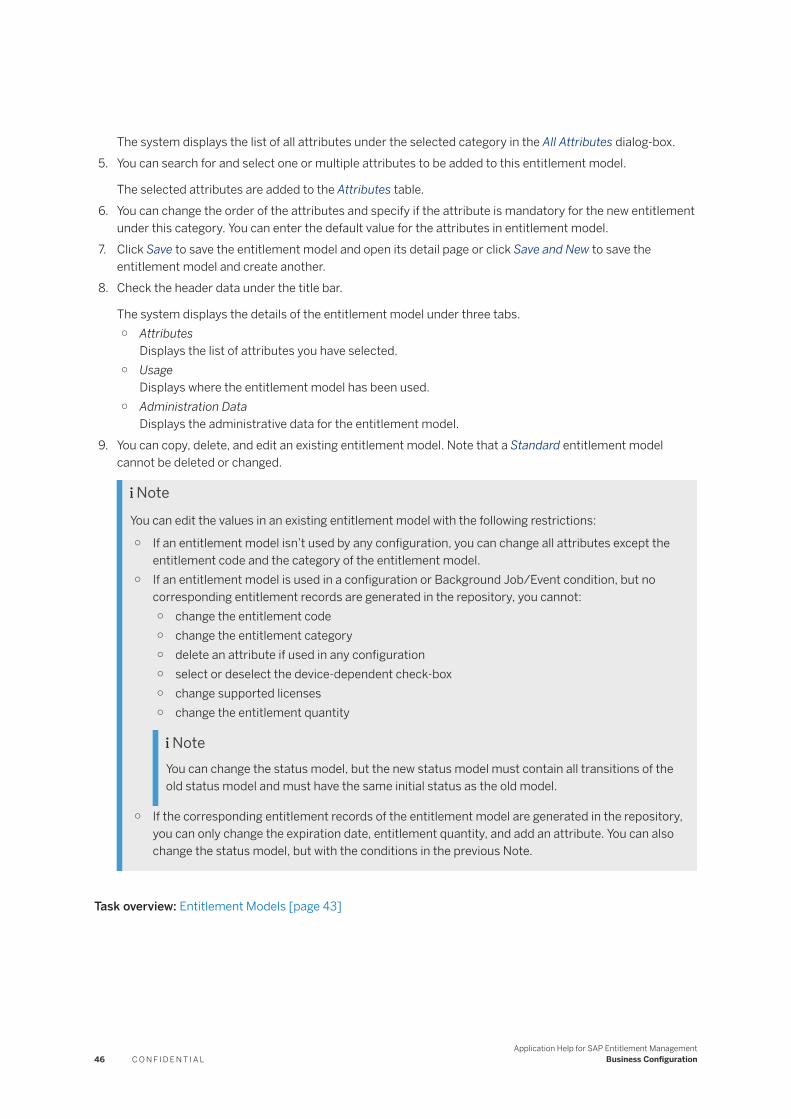
The system displays the list of all attributes under the selected category in the All Attributes dialog-box.5. You can search for and select one or multiple attributes to be added to this entitlement model.
The selected attributes are added to the Attributes table.6. You can change the order of the attributes and specify if the attribute is mandatory for the new entitlement
under this category. You can enter the default value for the attributes in entitlement model.7. Click Save to save the entitlement model and open its detail page or click Save and New to save the
entitlement model and create another.8. Check the header data under the title bar.
The system displays the details of the entitlement model under three tabs.○ Attributes
Displays the list of attributes you have selected.○ Usage
Displays where the entitlement model has been used.○ Administration Data
Displays the administrative data for the entitlement model.9. You can copy, delete, and edit an existing entitlement model. Note that a Standard entitlement model
cannot be deleted or changed.
NoteYou can edit the values in an existing entitlement model with the following restrictions:
○ If an entitlement model isn’t used by any configuration, you can change all attributes except the entitlement code and the category of the entitlement model.
○ If an entitlement model is used in a configuration or Background Job/Event condition, but no corresponding entitlement records are generated in the repository, you cannot:○ change the entitlement code○ change the entitlement category○ delete an attribute if used in any configuration○ select or deselect the device-dependent check-box○ change supported licenses○ change the entitlement quantity
NoteYou can change the status model, but the new status model must contain all transitions of the old status model and must have the same initial status as the old model.
○ If the corresponding entitlement records of the entitlement model are generated in the repository, you can only change the expiration date, entitlement quantity, and add an attribute. You can also change the status model, but with the conditions in the previous Note.
Task overview: Entitlement Models [page 43]
46 C O N F I D E N T I A LApplication Help for SAP Entitlement Management
Business Configuration

Related Information
Copying an Entitlement Model [page 47]Deleting Entitlement Model [page 48]
2.1.2.6.2 Copying an Entitlement Model
You can copy the data from an existing entitlement model and make changes as required.
Procedure
1. Open the Configuration Cockpit tile and select Entitlement Model from the Model New Entitlement section of the navigation panel.
2. On the Explore Entitlement Models list screen, choose an existing entitlement model and select Copy in the footer toolbar.
The system navigates to the Copy Entitlement Model screen.3. You can edit the information in all the fields. You can also select different attributes and delete the existing
ones.
NoteYou cannot change the Entitlement Type of the entitlement model.
4. Save the entitlement model.
Task overview: Entitlement Models [page 43]
Related Information
Creating an Entitlement Model [page 44]Deleting Entitlement Model [page 48]
Application Help for SAP Entitlement ManagementBusiness Configuration C O N F I D E N T I A L 47
2.1.2.6.3 Deleting Entitlement Model
You can delete an existing entitlement model if it is not in use.
Procedure
1. Open the Configuration Cockpit tile and select Entitlement Model from the Model New Entitlement section of the navigation panel.
2. On the Explore Entitlement Models list screen, choose an existing entitlement model and click Delete in the footer toolbar.
CautionYou cannot delete an entitlement model if it is used in any other configuration or transaction.
3. At the conrimation screen, click Delete.
The entitlement model is deleted.
Task overview: Entitlement Models [page 43]
Related Information
Creating an Entitlement Model [page 44]Copying an Entitlement Model [page 47]
2.1.3 Assign Entitlements to Offerings
You use the Offering-to-Entitlement Mapping option of the Assign Entitlements to Offerings section of the Configuration Cockpit to create a connection between the offering and the entitlement.
Assigning entitlements to offerings allows you to bridge company business and entitlements. You can map offerings from multiple order systems to entitlement models. The rule to determine which entitlement models should be generated is based on the mapping configuration.
Entitlement to offering mapping is important to maintain the following relationships:
● maintains the mapping between commercial offerings and the entitlement model● maintains the static or variable value for entitlement● supports calculations for number attributes● sets the rule to determine which entitlement models whould be generated, based on the mapping
configuration
48 C O N F I D E N T I A LApplication Help for SAP Entitlement Management
Business Configuration

In the entitlement mapping entry screen, you can switch between the offering view or the entitlement model view. Based on your selection, the entitlement mapping content page displays the information for the offering or the entitlement model.
● <Offering ID> and <Name> - this represents the offering that the customers order from the upstream order system (SKU, Material, Provided Contracts, Master Agreement, and so on). This information is displayed in the Entitlement Models view only.
● <Source System> - this represents the order system from where the offering orders are received; each source system has a unique ID
● <Entitlement Model> - in the configuration, this is used to derive the entitlement and to determine which value (include constant value or dynamic value) should be maintained for the corresponding attributes
● <Status> - this can be Active or Inactive● <Last Change By>● <Last Changed At>● <Entitlement Model Code> and <Entitlement Model Name> - this represents the offering for which
the customer is entitled. This information is displayed in the Offerings view only.
You can search for a specific offering or entitlement model. You can sort the list in each column of the table. You have the option to create, copy, edit, and delete entitlement mappings.
CautionYou can only delete an entitlement mapping if no existing entitlement has been based on the mapping configuration.
For details on creating and maintaining entitlement mappings, see the appropriate related topic.
Creating an Offering-to-Entitlement Mapping [page 50]You create a new entitlement mapping to map the commercial offerings with the entitlement model.
Copying an Offering-to-Entitlement Mapping [page 51]You can easily create a new entitlement mapping by copying data from an existing mapping, and change it as per your requirement.
Deleting Offering-to-Entitlement Mappings [page 52]You can delete an existing entitlement mapping if no entitlement has been created based on the mapping configuration.
Parent topic: Configuration Cockpit [page 12]
Related Information
Maintaining Basic Configurations [page 13]Model New Entitlement [page 23]Maintaining Entitlement Generation Rules [page 52]
Application Help for SAP Entitlement ManagementBusiness Configuration C O N F I D E N T I A L 49

2.1.3.1 Creating an Offering-to-Entitlement Mapping
You create a new entitlement mapping to map the commercial offerings with the entitlement model.
Procedure
1. On the Offering-to-Entitlement Mapping screen, click Create on the left side of the footer toolbar to create a new entitlement mapping.
The system navigates to the New Offering-to-Entitlement Mapping screen.2. Select an Offering Code using the value help.3. Choose one or multiple entitlement models using the value help.
The system displays all the standard and additional attributes for each entitlement model.4. Select and maintain the appropriate standard and additional attributes.
You can choose between the following two types of attributes:○ Static Value
In this case you either select a value or manually enter it, depending upon the type of attribute.○ Mapping from the Inbound Interface
In this case, you choose a value from the drop-down list that comes from the pre-defined inbound interface.
5. The default status of each entitlement model is Active. However, you can deactivate the entitlement model.6. Click Save to save the entries and continue or click Save and New to save the mapping and start a new
mapping.
The system navigates to the entitlement mapping content page if you chose Save.7. Check the header data under the title bar.
The system displays the mapped entitlement models and the corresponding data for each model under three tabs:○ Details
Displays the status and the attributes for each entitlement model.○ History
Displays the creation record of the entitlement mapping.○ Administration Data
Displays the administrative data for the entitlement mapping.8. You can copy, delete, and edit an existing entitlement mapping.
NoteWhile editing an entitlement mapping, you can change all values except Offering Code, Source System, and Entitlement Model.
From this screen, you can also choose to Download Template, Upload Contents, or Download All Contents.
50 C O N F I D E N T I A LApplication Help for SAP Entitlement Management
Business Configuration
Task overview: Assign Entitlements to Offerings [page 48]
Related Information
Copying an Offering-to-Entitlement Mapping [page 51]Deleting Offering-to-Entitlement Mappings [page 52]
2.1.3.2 Copying an Offering-to-Entitlement Mapping
You can easily create a new entitlement mapping by copying data from an existing mapping, and change it as per your requirement.
Procedure
1. On the Offering-to-Entitlement Mapping entry screen, choose an existing product or an entitlement model and click Copy in the left side of the footer toolbar.
2. Check the data in the Copy Offering-to-Entitlement Mapping screen.
The data from the source mapping is copied into the new mapping screen.3. Make the necessary changes and click Save to save the new mapping.
The new entitlement mapping is now available in the list of items in the entry screen.
Task overview: Assign Entitlements to Offerings [page 48]
Related Information
Creating an Offering-to-Entitlement Mapping [page 50]Deleting Offering-to-Entitlement Mappings [page 52]
Application Help for SAP Entitlement ManagementBusiness Configuration C O N F I D E N T I A L 51

2.1.3.3 Deleting Offering-to-Entitlement Mappings
You can delete an existing entitlement mapping if no entitlement has been created based on the mapping configuration.
Procedure
1. On the Offering-to-Entitlement Mapping entry screen, choose an existing product or an entitlement model and click Delete in the footer toolbar.
CautionYou cannot delete a entitlement mapping if an entitlement has been created based on this mapping.
2. At the confirmation prompt, click Delete.
The entitlement mapping is deleted.
Task overview: Assign Entitlements to Offerings [page 48]
Related Information
Creating an Offering-to-Entitlement Mapping [page 50]Copying an Offering-to-Entitlement Mapping [page 51]
2.1.4 Maintaining Entitlement Generation Rules
From the Maintain Entitlement Generation Rules section of the Configuration Cockpit, you can create and maintain Generation Rules and Rules Sets.
Generation Rules define how entitlements should be generated. The Entitlement Management System provides three standard Generation Rules: Direct Creation, Query for Creating or Updating an Entitlement Process, and Query for Updating an Entitlement Process. You can select one of the three standard generation rules delivered by SAP or define your own based on your business needs.
Use the Generation Rules option of this section to view the list and the details of all generation rules in the Entitlement Management System.
Use the Rule Set option of this section to define conditions and parameters for entitlement generation Rule Sets. Define conditions that incoming data must fulfill in order for the rule to be processed and select the entitlements for which the rule is applicable.
For details on defining and mainting Generation Rules and Rule Sets, see the appropriate topic.
Generation Rules [page 53]
52 C O N F I D E N T I A LApplication Help for SAP Entitlement Management
Business Configuration

Use the Generation Rule option of the Maintain Entitlement Generation Rules section of the Configuration Cockpit to view the list and the details of all generation rules in the Entitlement Management System.
Rule Sets [page 53]Use the Rule Set option of the Maintain Entitlement Generation Rules section of the Configuration Cockpit to define conditions and parameters for entitlement Generation Rule Sets.
Parent topic: Configuration Cockpit [page 12]
Related Information
Maintaining Basic Configurations [page 13]Model New Entitlement [page 23]Assign Entitlements to Offerings [page 48]
2.1.4.1 Generation Rules
Use the Generation Rule option of the Maintain Entitlement Generation Rules section of the Configuration Cockpit to view the list and the details of all generation rules in the Entitlement Management System.
The entitlement Generation Rule is triggered whenever Entitlement Generation APIs are invoked. For example, it is triggered after the sales order item has been broken down into temporary entitlement and the commercial offering is mapped to the entitlement type. A Generation Rule will be executed if the variant conditions in the Configure Variant app are passed.. Attributes of draft entitlements and repository entitlements are affected by the parameters defined in Rule Set.
Parent topic: Maintaining Entitlement Generation Rules [page 52]
Related Information
Rule Sets [page 53]
2.1.4.2 Rule Sets
Use the Rule Set option of the Maintain Entitlement Generation Rules section of the Configuration Cockpit to define conditions and parameters for entitlement Generation Rule Sets.
When the incoming data matches the defined condition, the Rule Set will be triggered by this condition to process the entitlement Generation Rule.
Application Help for SAP Entitlement ManagementBusiness Configuration C O N F I D E N T I A L 53
In the Rule Sets list screen, the list of all the Rule Sets is displayed in a table. You can filter the Rule Sets based on List View, Rule Set name, Generation Rules, Entitlement Model, or Priority.
You can sort the list in each column of the table. You have the option to create, copy, and delete rule sets.
Creating a Rule Set is a three step process. You maintain the information in the following sections:
● General Information: You define the Rule Set code and name for the new Rule Set. Set the priority (from 0 to 5) so that the conditions that can not be met simultaneously, can be placed at a priority level. Priority 5 is the highest and 0 is the lowest. If the data matches the higher priority Rule Set, the Rule Set with the lower priority is not selected.Select the Generation Rule based on which rule tasks are determined.
● Rule Set Conditions: You define the scenario in which this Rule Set is used while generating entitlements. When the incoming data matches the defined condition, this Rule Set will be triggered to process the entitlement Generation Rule.
● Rule Tasks: A Generation Rule contains multiple steps or tasks with parameters and output data. Once the Generation Process ID is selected, the corresponding process tasks are displayed. There are four types of tasks:○ Query task: used to query existing Entitlements to be updated or to be associated with other
Entitlements.○ Decision task: used to determine the next step of the process.○ Relationship task: used to create new Entitlements associated with existing Entitlements. Association
in Entitlement Management is a 1: n Parent-Child relationship. The system allows for up to five levels of associations.
○ Script task: used to configure how to update an existing Entitlement.The process tasks cannot be changed.
For details on creating and maintaining entitlement mappings, see the appropriate related topic.
Creating a Rule Set [page 55]You configure a Rule Set to define conditions and parameters for the entitlement Generation Rule.
Copying a Rule Set [page 56]You can copy the data from an existing Rule Set and make changes as required.
Deleting a Rule Set [page 57]You can delete an existing Rule Set only if it is not in use.
Parent topic: Maintaining Entitlement Generation Rules [page 52]
Related Information
Generation Rules [page 53]
54 C O N F I D E N T I A LApplication Help for SAP Entitlement Management
Business Configuration
2.1.4.2.1 Creating a Rule Set
You configure a Rule Set to define conditions and parameters for the entitlement Generation Rule.
Prerequisites
You must have created your Generation Rule before you can configure a Rule Set.
Procedure
1. On the Rule Sets list screen, click Create in the footer toolbar.
In the next screen, the system outlines the three steps to create a new Rule Set.2. In the General Information section, enter the Rule Set Name and the Rule Set Code. Select the Priority and
the Generation Rule Name. Note that it is mandatory to enter data in the fields marked with an asterisk.3. Add Entitlement Model for which the Rule Set is configured. Click Next.
The system displays the Conditions table.4. Select the entitlement model and define the conditions under which the Rule Set should be used when the
upstream data passes through the mapping configuration. Click Next.
Based on the Generation Rule you have selected, the system displays the Process Tasks.
NoteIf you choose the Generation Rule as Direct Creation, the workflow is not triggered for existing entitlements. It will use the incoming data to create a new entitlement. Therefore, no process tasks can be defined.
5. Select and maintain the task parameters for each of the following types of tasks:○ Query Task: Choose the Query Type, Query Entitlement Model and define the Query Conditions which
are used to query existing or pending entitlements.○ Value Merge Task: Choose the Attributes and define the entitlement fields which should be replaced or
updated when writing the script.
NoteIf the entitlement model is not maintained in the query task, you can only maintain standard attributes. Otherwise, you can maintain additional attributes assigned to the corresponding entitlement model. If there are several entitlement models, only the same attributes can be updated.
6. Save the new Rule Set.
The system navigates to the Rule Sets details screen.7. Check the header data under the title bar.
The system displays the data for the Rule Set under five tabs.
Application Help for SAP Entitlement ManagementBusiness Configuration C O N F I D E N T I A L 55
○ Entitlement ModelsDisplays the entitlement model for which the Rule Set is configured.
○ RuleDisplays the process diagram with multiple steps and flow logic among these steps when the upstream data passes through mapping configuration.
○ ConditionsDisplays the scenario in which this Rule Set is used while generating entitlements.
○ Rule TasksDisplays the parameters in the Query and Value Merge tasks which are used to query existing or pending entitlements.
○ Administration DataDisplays the administrative data of the configured Rule Set.
8. You can copy, edit, and delete an existing Rule Set.
NoteYou can edit the data for an existing Rule Set based on the following restrictions:○ For a Rule Set with standard delivery Generation Rule, you can edit the Rule Set name, conditions,
and parameters for both types of tasks.○ For a Rule Set with a customized Generation Rule, you can edit only the Rule Set name and
conditions.
Task overview: Rule Sets [page 53]
Related Information
Copying a Rule Set [page 56]Deleting a Rule Set [page 57]
2.1.4.2.2 Copying a Rule Set
You can copy the data from an existing Rule Set and make changes as required.
Procedure
1. On the Rule Sets list screen, choose an existing Rule Set and select Copy in the footer toolbar.2. Check the data in the General Information section.
The data from the source Rule Set is copied into the new Rule Set.3. Make the necessary changes and save the new Rule Set.
56 C O N F I D E N T I A LApplication Help for SAP Entitlement Management
Business Configuration

Task overview: Rule Sets [page 53]
Related Information
Creating a Rule Set [page 55]Deleting a Rule Set [page 57]
2.1.4.2.3 Deleting a Rule Set
You can delete an existing Rule Set only if it is not in use.
Procedure
1. On the Rule Sets list screen, choose an existing Rule Set and click Delete in the footer toolbar.
CautionYou cannot delete a Rule Set if an entitlement has been created based on this Rule Set.
2. At the confirmation prompt, click Delete.
The Rule Set is deleted.
Task overview: Rule Sets [page 53]
Related Information
Creating a Rule Set [page 55]Copying a Rule Set [page 56]
Application Help for SAP Entitlement ManagementBusiness Configuration C O N F I D E N T I A L 57

2.2 Explore Entitlement Model for Offerings
An Offering is a product or service from which Entitlements are derived. Use the Explore Entitlement Model for Offerings tile to access the list of offerings and their mappings to Entitlement models.
Viewing the Offerings
Open the Explore Entitlement Model for Offerings tile from the Business Configuration section of the Entitlement Management System launch pad to display the Explore Offerings page. There, you can see the full list of offerings and their current mappings.
The panel on the left lists the total number of offerings and then displays the offerings list. For each offering in the list, the following information is displayed:
● Offering name● Offering code● Source system● Number of different mappings
You can search the offerings list by Name or Code. Enter a full or partial term into the Search box and press Enter or click the Search icon (magnifying glass); the revised list is displayed.
To clear the search list and go back to the full list of offerings, clear the Search box.
Viewing the Mappings
To view the mappings for an offering, select it from the list. The mapping diagram displays in the Mapping section on the right side of the screen.
The following is displayed for the offering:
● <Name>● <Code>● <Source System>
The following is displayed for each mapped entitlement model:
● <Mapping Name>● <Status>● <Entitlement Model> (name)
Click on a mapping to see the full details. When you click on a mappings, a pop-up window displays with the following information:
● Mapping Overview○ <Name>○ <Status>
58 C O N F I D E N T I A LApplication Help for SAP Entitlement Management
Business Configuration
○ <Quantity>○ <Valid From>○ <Valid To>
● Entitlement Model Overview○ <Entitlement Type>○ <Activation Date>○ <Expiration Date>○ <Consumed>○ <Lifecycle Status Model>○ <Delivery Unit>
● Rule Sets○ The number of rules sets is displayed
To open and view complete details for any of these sections, click the appropriate View Detail link and another, view only, window opens.
Editing the Mappings
To edit or remove a mapping, with the mappings displayed, click Edit. Once in edit mode, you can do several things:
● Remove a mapping - to remove a mapping, select it, click Remove on the pop-up detail display and click Save on the Mapping screen.
● Edit the details of a mapping - to edit the details, select the mapping and click Edit Detail in the Mapping Overview section.
● Add a mapping - click in the placeholder box of the diagram that says "Please select an Entitlement Model" and choose either Select to select from the list of existing entitlement models or select Create to create a new Entitlement Model to map to this offering. Then, follow the screen prompts.
Parent topic: Business Configuration [page 11]
Related Information
Configuration Cockpit [page 12]Folder Configuration [page 60]
Application Help for SAP Entitlement ManagementBusiness Configuration C O N F I D E N T I A L 59
2.3 Folder Configuration
Use the Folders tile to view and manipulate customer folders and sub-folders. You can group entitlements into folders. A top-level folder is called a Home Folder. You can create a Home Folder, add a sub-folder, delete, edit, or move a customer folder using this tile.
Viewing and Sorting the List
To access the Folders list page, select the Folders tile from the Business Configuration section of the Entitlement Management System launch pad.
The Folders list displays the following columns of data:
● <Folder Name>● <Folder Code>● <Entitlements>● <Last Changed By>● <Last Changed At>
To sort the list by folder name, click on the column title and then select either Sort Ascending or Sort Descending.
You can search the list by customer or by folder. Simply enter your search criteria into the appropriate search text box and click Go.
From the main Folders list page, you can also Upload Contents, Download All Contents as a .csv file contained in a .zip file, or Download Template. Select the appropriate option from the More button ("….") at the bottom right of the footer toolbar.
To create a Home Folder, add a sub-folder, delete a folder, or edit or move sub-folders, see the appropriate topic.
Parent topic: Business Configuration [page 11]
Related Information
Configuration Cockpit [page 12]Explore Entitlement Model for Offerings [page 58]
Creating a Home Folder [page 61]Adding a Sub-Folder [page 61]Deleting Customer Folders [page 62]Editing Customer Folder Names [page 62]Moving a Customer Sub-Folder [page 63]
60 C O N F I D E N T I A LApplication Help for SAP Entitlement Management
Business Configuration

2.3.1 Creating a Home Folder
You can group entitlements into manageable folders using the Folders tile. A top-level folder is called a Home Folder.
Context
NoteIf an entitlement is generated without first creating a customer folder, the customer folder is generated automatically.
Procedure
1. Select the Folders tile from the Business Configuration section of the application launch pad.2. From the Folders list page, click Create Home Folder from the footer toolbar.3. On the Create Home Folder page, select one or more customers from the list and click OK. If you select
multiple items, multiple Home Folders will be created. Note that you can sort the list by Customer Name, Customer ID, or Source System.
The item or items you selected are added to the Folders list. Your user name will be displayed in the Last Changed By column and the current date and time will be displayed in the Last Changed At column.
2.3.2 Adding a Sub-Folder
To help manage your customer folders, you can create one or more sub-folders below your Home Folders or even other sub-folders.
Procedure
1. Select the Folders tile from the Business Configuration section of the application launch pad.2. On the Folders list page, select the Home Folder or sub-folder for which you want to create a new sub-
folder.3. Click Add Sub-Folder from the footer toolbar.4. On the Add Sub-Folder page, enter a Sub-folder Name. The Sub-folder Code field is automatically
populated with the name you entered; all spaces are converted to underscores. Note that sub-folder name can only contain alphanumeric characters and underscores and cannot be longer than 50 characters, so make any necessary modifications to the generated sub-folder code.
Application Help for SAP Entitlement ManagementBusiness Configuration C O N F I D E N T I A L 61
The new sub-folder is displayed below the selected Home Folder and any other sub-folders in the Folders list. Your user name will be displayed in the Last Changed By column and the current date and time will be displayed in the Last Changed At column.
2.3.3 Deleting Customer Folders
You can easily delete a customer folder from the Folders page.
Context
NoteYou cannot delete a folder or sub-folder that contains entitlements.
Procedure
1. Select the Folders tile from the Business Configuration section of the application launch pad.2. On the Folders list page, select one or more folders or sub-folders that you want to delete.3. Click Delete from the footer toolbar.4. At the confirmation prompt, click Delete to immediately delete all selected folders. Click Cancel to cancel
the action and return to the Folders list.
The selected folders are removed from the Folders list.
2.3.4 Editing Customer Folder Names
Use the Folders screen to easily edit a sub-folder name.
Context
NoteYou cannot edit the name of Home Folders, even if they have no sub-folders associated with them.
62 C O N F I D E N T I A LApplication Help for SAP Entitlement Management
Business Configuration
Procedure
1. Select the Folders tile from the Business Configuration section of the application launch pad.2. On the Folders list page, select the sub-folder you want to rename.3. Click Edit from the bottom toolbar.4. On the Edit Sub-Folder page, edit the existing name or enter a new Sub-folder Name. Note that name
cannot be longer than 100 characters. The Sub-folder Code field remains unchanged.
The renamed folder is displayed in the Folders list. Your user name will be displayed in the Last Changed By column and the current date and time will be displayed in the Last Changed At column.
2.3.5 Moving a Customer Sub-Folder
Use the Folders page to rearrange sub-folders below your Home Folders, for easier management.
Context
NoteYou can only move one sub-folder at a time. The Move option is not available for Home Folders as their order is determined by the column on which you choose to sort the list.
Procedure
1. Select the Folders tile from the Business Configuration section of the application launch pad.2. On the Folders list page, select the sub-folder you want to move.3. Click Move from the footer toolbar.4. On the Move page, the Home Folder to which the sub-folder belongs is displayed, along with all associated
sub-folders. Use the Up/Down arrows to move the sub-folder you selected to the desired location. Note that even though all sub-folders are listed, the movement arrows will only move the sub-folder that you initially selected.
5. Click Save.
The new order of the sub-folders is displayed in the Folders list. Your user name will be displayed in the Last Changed By column and the current date and time will be displayed in the Last Changed At column for the applicable sub-folder.
Application Help for SAP Entitlement ManagementBusiness Configuration C O N F I D E N T I A L 63

3 Customer Data and Offerings
The Customer Data and Offerings section of the Entitlement Management System launch pad contains the system tiles that allow you to access and view all customer accounts and offerings.
Use the tiles in the Customer Data and Offerings section to view and sync customer accounts and offerings. You can also add extension fields to both. The tiles included in this section are:
● Customer Accounts● Offerings
See the appropriate topic for details on the features and functions available from each tile.
Customer Accounts [page 65]Use the Customer Accounts tile to access the full Customer Accounts list in the Entitlement Management System. The list is view only and can by synced to the system but cannot be manually updated, with the exception of the customer validity date.
Offerings [page 66]Use the Offerings tile to access the full Offerings list in the Entitlement Management System. The list is display only. Offerings cannot be created manually in the system and can only be synced with the Source System that owns the offering master data.
Related Information
Application Overview [page 4]Business Configuration [page 11]Entitlements Overview [page 68]Operations [page 101]System Administration [page 119]Glossary [page 134]
64 C O N F I D E N T I A LApplication Help for SAP Entitlement Management
Customer Data and Offerings

3.1 Customer Accounts
Use the Customer Accounts tile to access the full Customer Accounts list in the Entitlement Management System. The list is view only and can by synced to the system but cannot be manually updated, with the exception of the customer validity date.
Viewing and Sorting the List
The Customer Accounts list displays the following columns of data:
● <Customer ID>● <Customer Name>● <Group> - allows you to manage authorizations from a Group point of view● <Source System>● <Valid To> - this field addresses data privacy; when the Valid To date is reached, the system will run a
background job to delete the corresponding customer data.● <Deletion>
To sort the list, click on the column by which you want to sort and then select either Sort Ascending or Sort Descending.
You can search the list by customer name or ID or by the source system. Simply enter your search criteria into the appropriate search text box and click Go.
Changing the Validation Dates
You can change the validity date (Valid To field) for each customer if they choose not to keep their data in the Entitlement Management System. When the validity date is reached, the system will run a background job to delete the customer data.
To change a validity date, select the appropriate customer from the list and click Change Validity in the footer bar.
Syncing the Customer Accounts List
To sync the Customer Accounts list with the system, click Sync in the footer bar.
Application Help for SAP Entitlement ManagementCustomer Data and Offerings C O N F I D E N T I A L 65
Adding Extension Fields
With the Maintain Customized Field option at the bottom of the page, you can add extension fields for both customers and offerings. Take the following notes into account for the extension fields:
● You can add a maximum of three extension fields per customer/offering.● Each extension field contains the following: Name, Code, Data Type, and Value List. Value List is not
mandatory.● You can select the data type: String, Date, Integer, Decimal, or Boolean.● If there is any value stored in an extension field, you can't delete it.● If the extension field is configured in an Event condition or Background Job condition, you can't delete it.● You can maintain multi-language for the label of the extension fields.● Once the extension field is created, it is shown in the List page of the Customer/Offering records.
Parent topic: Customer Data and Offerings [page 64]
Related Information
Offerings [page 66]
3.2 Offerings
Use the Offerings tile to access the full Offerings list in the Entitlement Management System. The list is display only. Offerings cannot be created manually in the system and can only be synced with the Source System that owns the offering master data.
Viewing and Sorting the List
Upon data synchronization, the offerings that are created in the source system are displayed here. You can search the list by commercial offering name or ID or by the source system.
The Offerings list displays the following columns of data:
● <Commerical Offering ID>● <Commerical Offering Name>● <Category> - used to manage authorizations from a category point of view● <Source System>● <Deletion>
To sort the list, click on the column by which you want to sort and then select either Sort Ascending or Sort Descending.
66 C O N F I D E N T I A LApplication Help for SAP Entitlement Management
Customer Data and Offerings

You can search the list by commercial offering name or ID or by the source system. Simply enter your search criteria into the appropriate search text box and click Go.
Syncing the Offerings List
To sync the Offerings list with the system, click Sync in the footer bar.
Adding Extension Fields
With the Maintain Customized Field option at the bottom of the page, you can add extension fields for both customers and offerings. Take the following notes into account for the extension fields:
● You can add a maximum of three extension fields per customer/offering.● Each extension field contains the following: Name, Code, Data Type, and Value List. Value List is not
mandatory.● You can select the data type: String, Date, Integer, Decimal, or Boolean.● If there is any value stored in an extension field, you can't delete it.● If the extension field is configured in an Event condition or Background Job condition, you can't delete it.● You can maintain multi-language for the label of the extension fields.● Once the extension field is created, it is shown in the List page of the Customer/Offering records.
Parent topic: Customer Data and Offerings [page 64]
Related Information
Customer Accounts [page 65]
Application Help for SAP Entitlement ManagementCustomer Data and Offerings C O N F I D E N T I A L 67

4 Entitlements Overview
The Entitlements section of the Entitlement Management launch pad contains the system tiles that link to the features and analytics related to entitlements.
Use the tiles in the Entitlements section to view and maintain entitlements, view customer details, and access analytics via a number of customizable reports. The tiles included in this section are:
● Customer Insights● Entitlements● Reports● Deletion Logs
See the appropriate topic for details on the features and functions available from each tile.
Customer Insights [page 69]Use the Customer Insights tile to access full details for a single customer at a time. Upon the selection of a customer, the system displays a summary of the customer details and the list of entitlements based on your selection criteria.
Entitlements [page 69]You can use the Entitlements tile to view and manage the entitlements. Using this tile, you can create, view, edit, split, change status, reassign (move) folders of entitlement records, or export a filtered entitlements list.
Reports and Analytics [page 80]The Entitlement Management System provides a number of pre-defined reports that display the balance of entitlements based on various criteria such as by customer, by offering, by business category, and so on. Administrators can customize both the data selection and report views for their own business purposes.
Deletion Logs [page 100]Use the Deletion Logs tile to check the log of deleted entitlements.
Related Information
Application Overview [page 4]Business Configuration [page 11]Customer Data and Offerings [page 64]Operations [page 101]System Administration [page 119]Glossary [page 134]
68 C O N F I D E N T I A LApplication Help for SAP Entitlement Management
Entitlements Overview

4.1 Customer Insights
Use the Customer Insights tile to access full details for a single customer at a time. Upon the selection of a customer, the system displays a summary of the customer details and the list of entitlements based on your selection criteria.
From the Entitlements section of the Entitlement Management System launch pad, click the Customer Insights tile. A pop-up window is displayed as you to enter the customer or select from the provided drop-down list. Select the customer whose information you want to view and click OK.
NoteYou can only view data for one customer at a time.
The Customer Insights page displays, with a summary banner across the top that shows the number of:
● <Entitlements>● <Number of Reference Documents>● <Offerings>
You can sort and list the entitlements for the selected customer by the following:
● Business Category● Offering● Entitlement Type
You can also choose to see the list of entitlements by expiration date and can choose to display entitlements due to expire in 15, 30, 60, or 90 days.
Parent topic: Entitlements Overview [page 68]
Related Information
Entitlements [page 69]Reports and Analytics [page 80]Deletion Logs [page 100]
4.2 Entitlements
You can use the Entitlements tile to view and manage the entitlements. Using this tile, you can create, view, edit, split, change status, reassign (move) folders of entitlement records, or export a filtered entitlements list.
Each entitlement is based on one type of entitlement model. The entitlement model determines all attributes of an entitlement and assigns a status model to this entitlement by default. In addition, some entitlement models include attributes to describe the consumption of the related entitlements. Most of the entitlements
Application Help for SAP Entitlement ManagementEntitlements Overview C O N F I D E N T I A L 69
stored in the SAP Entitlement Management System are generated and updated by inbound data from the integrated systems.
In the Entitlements list screen, you can enter the filter criteria to search for entitlements. Use the Adapt Filters button to define your own filters in addition to the existing, pre-defined filters.
In the entitlement list table, you can select and append appropriate columns and define multiple sort filters using the icon on the right side. After making the selection, you can also define the order of the columns using the up and down arrow icons () on the columns page on the left side of the View setting.
To export the entitlement list, select one, multiple, or all entitlements in the list and click Export at the bottom right of the screen.
NoteYou can export up to 10,000 records from the Entitlements list as an Excel file.
In addition to these functions, you can perform multiple actions regarding the entitlement, including: create, edit, change status, and split entitlement. In addition, you can also edit the entitlement consumption records from the page. For more details, see the appropriate related topics.
Creating an Entitlement [page 71]With the proper authorization, you can manually create an entitlement from the Entitlements list page from the Entitlements tile.
Creating an Associated Entitlement [page 72]With the proper authorization, you can manually create a new entitlement associated to a current entitlement.
Editing an Entitlement [page 73]You can edit an entitlement from the Entitlements list page from the Entitlements tile.
Splitting an Entitlement [page 75]You can split an entitlement into two parts and assign a group for each of them.
Merging an Entitlement [page 76]Entitlement merges are accomplished via API.
Transferring an Entitlement [page 77]Entitlement transfers are accomplished via API.
Changing the Status of an Entitlement [page 77]You can change the status of an entitlement type through the Entitlements tile.
Editing Entitlement Consumption Records [page 78]You can edit the consumption records of an entitlement from the Entitlements list page from the Entitlements tile.
Reassigning Groups [page 79]You can reassign an entitlement to a different group other than the one to which it is already assigned.
Parent topic: Entitlements Overview [page 68]
70 C O N F I D E N T I A LApplication Help for SAP Entitlement Management
Entitlements Overview

Related Information
Customer Insights [page 69]Reports and Analytics [page 80]Deletion Logs [page 100]
4.2.1 Creating an Entitlement
With the proper authorization, you can manually create an entitlement from the Entitlements list page from the Entitlements tile.
Procedure
1. On the Entitlements list screen, click Create.
The system displays the Create New Entitlement screen.2. On the Create New Entitlement screen, select or enter all required fields, designated with an asterisk (*):
○ <Customer>○ <Customer Source System>○ <Offering>○ <Offering Source System>○ <Entitlement Model>○ <Folder>○ <Distributor> - optional○ <Status>○ <Quantity>○ <Valid From>○ <Valid To>○ <Legacy Entitlement Number> - optional○ <Reason>
3. Click Save to save the new entitlement.
The newly created Entitlement page is displayed.
Task overview: Entitlements [page 69]
Related Information
Creating an Associated Entitlement [page 72]
Application Help for SAP Entitlement ManagementEntitlements Overview C O N F I D E N T I A L 71

Editing an Entitlement [page 73]Splitting an Entitlement [page 75]Merging an Entitlement [page 76]Transferring an Entitlement [page 77]Changing the Status of an Entitlement [page 77]Editing Entitlement Consumption Records [page 78]Reassigning Groups [page 79]
4.2.2 Creating an Associated Entitlement
With the proper authorization, you can manually create a new entitlement associated to a current entitlement.
From the Entitlement Detail page, you can manually create an entitlement associated with a current entitlement. Rules related to associations:
● Association in Entitlement Management is a 1: n Parent-Child relationship.● The system allows for up to five levels of associations.● The entitlements associated with each other must reside under same customer.
Parent topic: Entitlements [page 69]
Related Information
Creating an Entitlement [page 71]Editing an Entitlement [page 73]Splitting an Entitlement [page 75]Merging an Entitlement [page 76]Transferring an Entitlement [page 77]Changing the Status of an Entitlement [page 77]Editing Entitlement Consumption Records [page 78]Reassigning Groups [page 79]
72 C O N F I D E N T I A LApplication Help for SAP Entitlement Management
Entitlements Overview

4.2.3 Editing an Entitlement
You can edit an entitlement from the Entitlements list page from the Entitlements tile.
Procedure
1. Select the Entitlements tile in the Entitlements section of the Entitlement Management System launch pad.
2. On the Entitlements list screen, enter any desired filter criteria and click Go.
The system displays a list of entitlements in the Items table with the default attributes.3. Select an entitlement and click Edit in the footer toolbar.
The system displays a dialog box asking you to specify a reason for the edit.4. Enter a reason, up to 300 characters, for editing the entitlement and click Next.
The system navigates to the selected entitlement details screen.5. Check the header data under the title bar.
The system displays the data for the entitlement under three tabs.
Tab Section Information
Detail General Data Displays data like entitlement type and all the additional attributes.
Involved Parties Displays the IDs and names of the customer and the distributor.
Application Help for SAP Entitlement ManagementEntitlements Overview C O N F I D E N T I A L 73
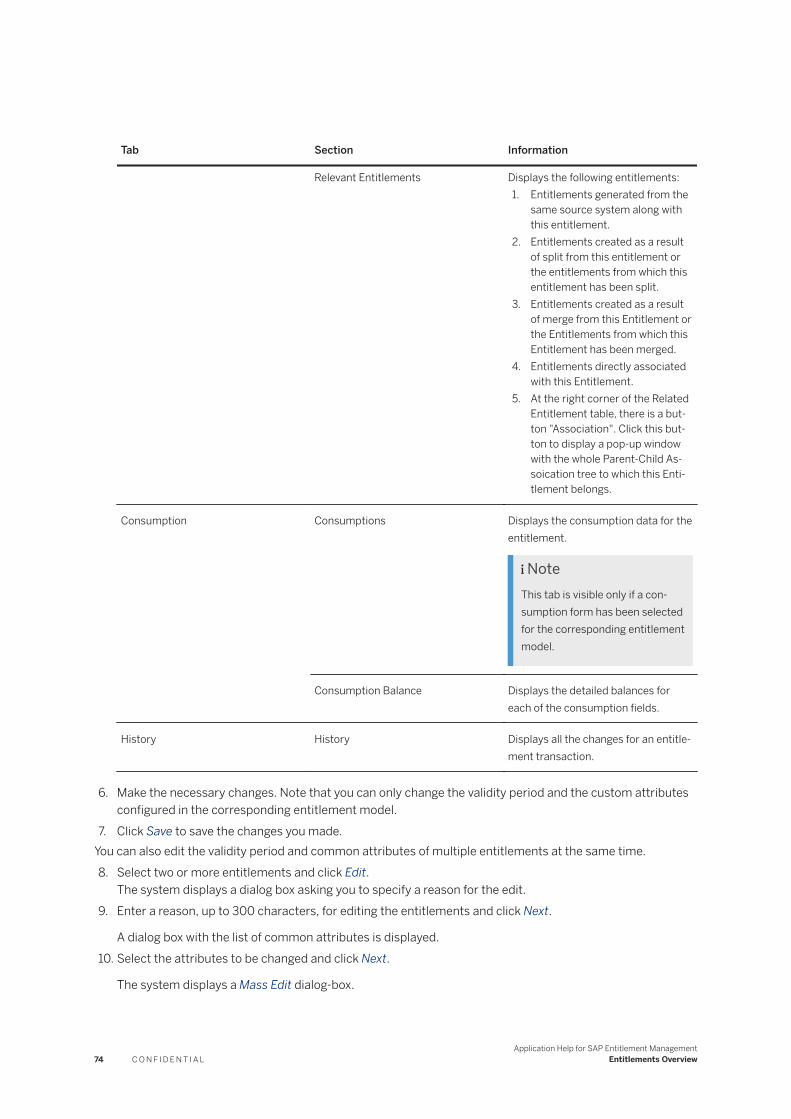
Tab Section Information
Relevant Entitlements Displays the following entitlements:1. Entitlements generated from the
same source system along with this entitlement.
2. Entitlements created as a result of split from this entitlement or the entitlements from which this entitlement has been split.
3. Entitlements created as a result of merge from this Entitlement or the Entitlements from which this Entitlement has been merged.
4. Entitlements directly associated with this Entitlement.
5. At the right corner of the Related Entitlement table, there is a button "Association". Click this button to display a pop-up window with the whole Parent-Child Assoication tree to which this Entitlement belongs.
Consumption Consumptions Displays the consumption data for the entitlement.
NoteThis tab is visible only if a consumption form has been selected for the corresponding entitlement model.
Consumption Balance Displays the detailed balances for each of the consumption fields.
History History Displays all the changes for an entitlement transaction.
6. Make the necessary changes. Note that you can only change the validity period and the custom attributes configured in the corresponding entitlement model.
7. Click Save to save the changes you made.You can also edit the validity period and common attributes of multiple entitlements at the same time.8. Select two or more entitlements and click Edit.
The system displays a dialog box asking you to specify a reason for the edit.9. Enter a reason, up to 300 characters, for editing the entitlements and click Next.
A dialog box with the list of common attributes is displayed.10. Select the attributes to be changed and click Next.
The system displays a Mass Edit dialog-box.
74 C O N F I D E N T I A LApplication Help for SAP Entitlement Management
Entitlements Overview

11. Make the necessary changes and click OK.
Task overview: Entitlements [page 69]
Related Information
Creating an Entitlement [page 71]Creating an Associated Entitlement [page 72]Splitting an Entitlement [page 75]Merging an Entitlement [page 76]Transferring an Entitlement [page 77]Changing the Status of an Entitlement [page 77]Editing Entitlement Consumption Records [page 78]Reassigning Groups [page 79]
4.2.4 Splitting an Entitlement
You can split an entitlement into two parts and assign a group for each of them.
Context
Note that if Entitlement A is associated to Entitlement B, and A is split into A1 and A2, then both A1 and A2 are associated to Entitlement B. However, if Entitlement A is associated by Entitlement B, then Entitlement A cannot be split.
Procedure
1. On the Entitlements list screen, enter any desired filter criteria and click Go.
The system displays a list of entitlements in the items table with the default attributes.2. Click on an entitlement number in the entitlement list table.
The system displays the entitlement details screen.3. Click Split in the footer toolbar.
The system displays a dialog box asking you to specify a reason for the split.4. Enter a reason, up to 300 characters and choose Next.
You can split the entitlement into two separate entitlements.5. Split the quantity between the two entitlements and assign a group for each entitlement. You can assign an
existing group or create a new one using the ( ) button in the dialog box. Choose Next.
Application Help for SAP Entitlement ManagementEntitlements Overview C O N F I D E N T I A L 75

The system navigates to the entitlement details screen.6. Check the data in the Relevant Entitlements table.
The system displays the two entitlements in which this entitlement is split into. The status of the base entitlement changes to Split and this can not be changed.
Task overview: Entitlements [page 69]
Related Information
Creating an Entitlement [page 71]Creating an Associated Entitlement [page 72]Editing an Entitlement [page 73]Merging an Entitlement [page 76]Transferring an Entitlement [page 77]Changing the Status of an Entitlement [page 77]Editing Entitlement Consumption Records [page 78]Reassigning Groups [page 79]
4.2.5 Merging an Entitlement
Entitlement merges are accomplished via API.
The merging of multiple Entitlements into a single Entitlement is supported by the Entitlement Merge API. The following rules apply to merging Entitlements:
● Only Entitlements under the same Entitlement Model can be merged.● The value of new Entitlement needs to be explicitly specified.● If any association exists, only Entitlements under same parent can be merged.● The new, merged, Entitlement will be under same parent as the Entitlements is it comprised of.● Entitlements with child Entitlements cannot be merged.
Parent topic: Entitlements [page 69]
Related Information
Creating an Entitlement [page 71]Creating an Associated Entitlement [page 72]Editing an Entitlement [page 73]Splitting an Entitlement [page 75]Transferring an Entitlement [page 77]
76 C O N F I D E N T I A LApplication Help for SAP Entitlement Management
Entitlements Overview

Changing the Status of an Entitlement [page 77]Editing Entitlement Consumption Records [page 78]Reassigning Groups [page 79]
4.2.6 Transferring an Entitlement
Entitlement transfers are accomplished via API.
The transfer of an Entitlement is supported bye the Entitlement Transfer Inbound Interface API. This API allows you to change the customer, distributor, or third-party of an existing Entitlement.
Parent topic: Entitlements [page 69]
Related Information
Creating an Entitlement [page 71]Creating an Associated Entitlement [page 72]Editing an Entitlement [page 73]Splitting an Entitlement [page 75]Merging an Entitlement [page 76]Changing the Status of an Entitlement [page 77]Editing Entitlement Consumption Records [page 78]Reassigning Groups [page 79]
4.2.7 Changing the Status of an Entitlement
You can change the status of an entitlement type through the Entitlements tile.
Procedure
1. On the Entitlements list screen, enter the filter criteria and click Go.
The system displays a list of entitlements in the Items table with the default attributes.2. Select an entitlement and click Change Status in the footer toolbar.
A change status dialog box is displayed.3. Enter a reason, up to 300 characters, for changing the status of the entitlement type.4. Select the new status from the drop-down list and click Confirm Change.
The new status is updated in the Items table in the entry screen.
Application Help for SAP Entitlement ManagementEntitlements Overview C O N F I D E N T I A L 77
NoteYou can also change the status for a single entitlement from the Entitlement Detail page.
You can select multiple entitlements to do a mass status change if the selected entitlements share the same entitlement model and have the same status.
Task overview: Entitlements [page 69]
Related Information
Creating an Entitlement [page 71]Creating an Associated Entitlement [page 72]Editing an Entitlement [page 73]Splitting an Entitlement [page 75]Merging an Entitlement [page 76]Transferring an Entitlement [page 77]Editing Entitlement Consumption Records [page 78]Reassigning Groups [page 79]
4.2.8 Editing Entitlement Consumption Records
You can edit the consumption records of an entitlement from the Entitlements list page from the Entitlements tile.
Context
NoteThe Consumption tab is visible on the Entitlements list page only if a consumption form has been selected for the corresponding entitlement model.
Procedure
1. Select the Entitlements tile in the Entitlements section of the Entitlement Management System launch pad.
2. On the Entitlements list screen, select a consumption record and click Edit.
78 C O N F I D E N T I A LApplication Help for SAP Entitlement Management
Entitlements Overview

A pop-up dialog displays, allowing you to modify all of the editable fields in the selected consumption record.
3. Make any desired changes and click OK. If you do not want to save your changes or if you have not made any changes, click Cancel.
You are returned to the main Entitlements list page.
Task overview: Entitlements [page 69]
Related Information
Creating an Entitlement [page 71]Creating an Associated Entitlement [page 72]Editing an Entitlement [page 73]Splitting an Entitlement [page 75]Merging an Entitlement [page 76]Transferring an Entitlement [page 77]Changing the Status of an Entitlement [page 77]Reassigning Groups [page 79]
4.2.9 Reassigning Groups
You can reassign an entitlement to a different group other than the one to which it is already assigned.
Procedure
1. On the Entitlements list screen, enter any desired filter criteria and click Go.
The system displays a list of entitlements in the items table with the default attributes.2. Select one or multiple entitlements and click Move in the footer toolbar. Alternatively, click on the
entitlement number and reassign the folder from its details screen. Note that you can reassign an entitlement only to a group that has been created manually.The system displays a dialog box asking you to specify a reason for the reassignment.
3. Enter a reason, up to 300 characters, and click Next.4. Select a group to which you want to reassign the entitlement and choose OK.
The system navigates to the selected entitlement details screen.
In case of multiple selection, all entitlements are assigned to the new group.5. Check theGeneral Data under the title bar.
The system displays the group details to which the entitlement is reassigned.
Application Help for SAP Entitlement ManagementEntitlements Overview C O N F I D E N T I A L 79
Task overview: Entitlements [page 69]
Related Information
Creating an Entitlement [page 71]Creating an Associated Entitlement [page 72]Editing an Entitlement [page 73]Splitting an Entitlement [page 75]Merging an Entitlement [page 76]Transferring an Entitlement [page 77]Changing the Status of an Entitlement [page 77]Editing Entitlement Consumption Records [page 78]
4.3 Reports and Analytics
The Entitlement Management System provides a number of pre-defined reports that display the balance of entitlements based on various criteria such as by customer, by offering, by business category, and so on. Administrators can customize both the data selection and report views for their own business purposes.
There are nine reports that are automatically generated with default data fields selected, but an Administrator can customize these reports to fit the needs of the business. To access the list of reports, select the Reports tile from the Entitlements section of the launch pad.
See the appropriate report topic for report and cusomization details.
Entitlements per Customer [page 81]You can view the number of entitlements and validated entitlements for a customer, entitlement model, business category, and so on, in a bar chart or a tabular form. You choose the characteristics based on which the entitlements are filtered and displayed in the list table and the bar chart.
Entitlements per Customer per Entitlement Model [page 84]You can view the number of entitlements and their quantity for the customers and entitlement models in a bar chart or a tabular form. You choose the characteristics based on which the entitlements are filtered and displayed in the list table and the bar chart.
Entitlements Expiring in a Given Period [page 86]You can view the quantity of entitlements left for the customers and entitlement models in a bar chart or a tabular form. You choose the characteristics based on which the entitlements are filtered and their quantity displayed in the list table and the bar chart.
Entitlements (Report) [page 88]You can view the quantity of entitlements left for the customers, entitlement type, entitlement model, and so on, in a table format. You choose the characteristics based on which the entitlements are filtered and their quantity displayed in the list table.
Entitlements with Different Statuses [page 90]
80 C O N F I D E N T I A LApplication Help for SAP Entitlement Management
Entitlements Overview
You can view the number of entitlements with a specific status in a pie chart or a tabular form. You choose the characteristics based on which the entitlements are filtered and their quantity displayed in the list table and the pie chart.
Entitlements per Offering [page 92]You can view the number of entitlements and their quantity based on the offering and offering category in a bar chart or a tabular form. You choose the characteristics based on which the entitlements are filtered and their quantity displayed in the list table and the bar chart.
Entitlements by Business Category [page 94]You can view the number of entitlements as per the business category in a pie chart or a tabular form. You choose the characteristics based on which the entitlements are filtered and displayed in the list table and the pie chart.
Entitlements by Reference Document [page 96]You can view the number of entitlements and their quantity based on reference document in a bar chart or a tabular form. You choose the characteristics based on which the entitlements are filtered and their quantity displayed in the list table and the bar chart.
Audit Trail for Entitlement Records [page 98]Use the View Audit Trail for Entitlement Records report to view the history and consumption records for selected entitlements.
Parent topic: Entitlements Overview [page 68]
Related Information
Customer Insights [page 69]Entitlements [page 69]Deletion Logs [page 100]
4.3.1 Entitlements per Customer
You can view the number of entitlements and validated entitlements for a customer, entitlement model, business category, and so on, in a bar chart or a tabular form. You choose the characteristics based on which the entitlements are filtered and displayed in the list table and the bar chart.
Customizing the Report View
By default, the report opens with the View options open in the left side panel. From this panel, you can select which row fields and which column fields to display for this report.
<Row Fields> - Click the plus ( + ) icon to open the list of row field options. You can select one or more from the list. Select the checkbox for any field you want to include and uncheck the checkbox to remove the field. Click OK when you have made your selections.
Application Help for SAP Entitlement ManagementEntitlements Overview C O N F I D E N T I A L 81

<Column Fields> - This lets you select the key figures you want to display. Click the greater than sign ( > ) to expand the list of key figures selected. To select more, if available, click the plus ( + ) icon to open the list of key field options. Click OK when you have made your selections.
NoteYou must select at least one column field to display. If you do not have at least one selected, an error message will display.
Once you have seleted the row fields and column fields to display, click Go to refesh the report.
TipYou can rearrange the order of row fields and column fields. Click on the dots ( …. ) to the right of the field you want to move and then select Move Up, Move Down, or Remove, as desired.
For this report, you have the option to display a bar chart, a data table, or both. To change the display view, select the appropriate display icon at the top right of the report page.
Selecting the Report Data
To select which data you want to display in this report, first click the Selection icon in the left panel of the report page. The following list of items displays:
● <Customer Frame>● <Customer Group>● <Customer>● <Folders>● <Entitlement Type>● <Entitlement Model>● <Business Category>● <Status>● <Valid From>● <Valid To>
To display data for a single customer, enter the customer name in the <Customer> field. For all other items, either select from the drop-down menu or the pop-up dialog, as applicable to the field. If you do not make a selection for a given field, all available data is displayed by default.
Once you have made all of your selections, click Go to refresh the report.
Saving the Report
Whenever you make any changes to either the view or the data selection for the report, an asterisk ( * ) displays to the right of the report title at the top of the page to indicate a change has been made since the
82 C O N F I D E N T I A LApplication Help for SAP Entitlement Management
Entitlements Overview
report was opened. To save the view and data selections you made, click on the down arrow to the right of the report title and select from the following:
Save - this option is enabled only if you make a change to a customized view. If you click Save, the customized view with be updated with the changes you made. You cannot save changes to the pre-defined default report view.
Save As - this option allows you to save the new configuration as a new report. When you click Save As, a Save View dialog is displayed. Enter the name of the new report view and, optionally, check the Set as Default checkbox if you want this view to open by default when you open this report. Click OK to save the new report view.
Manage - this option opens a Manage View dialog, displaying all available views for this report. The dialog displays the view name and the user that created it. You can select the Default radio button for whichever view you want to display by default when you open the report. From this dialog, you can also click the circled "x" button to delete any of the custom views.You cannot delete the pre-defined view. If you make any changes in this dialog click OK to save the changes and return to your report. If you do not want to save the changes you made, click Cancel.
NoteIf you make changes to the report view or data selection and navigate away from the report without saving the view, the report will revert back to its default state the next time you open the report
Parent topic: Reports and Analytics [page 80]
Related Information
Entitlements per Customer per Entitlement Model [page 84]Entitlements Expiring in a Given Period [page 86]Entitlements (Report) [page 88]Entitlements with Different Statuses [page 90]Entitlements per Offering [page 92]Entitlements by Business Category [page 94]Entitlements by Reference Document [page 96]Audit Trail for Entitlement Records [page 98]
Application Help for SAP Entitlement ManagementEntitlements Overview C O N F I D E N T I A L 83
4.3.2 Entitlements per Customer per Entitlement Model
You can view the number of entitlements and their quantity for the customers and entitlement models in a bar chart or a tabular form. You choose the characteristics based on which the entitlements are filtered and displayed in the list table and the bar chart.
Customizing the Report View
By default, the report opens with the View options open in the left side panel. From this panel, you can select which row fields and which column fields to display for this report.
<Row Fields> - Click the plus ( + ) icon to open the list of row field options. You can select one or more from the list. Select the checkbox for any field you want to include and uncheck the checkbox to remove the field. Click OK when you have made your selections.
<Column Fields> - This lets you select the key figures you want to display. Click the greater than sign ( > ) to expand the list of key figures selected. To select more, if available, click the plus ( + ) icon to open the list of key field options. Click OK when you have made your selections.
NoteYou must select at least one column field to display. If you do not have at least one selected, an error message will display.
Once you have seleted the row fields and column fields to display, click Go to refesh the report.
TipYou can rearrange the order of row fields and column fields. Click on the dots ( …. ) to the right of the field you want to move and then select Move Up, Move Down, or Remove, as desired.
For this report, you have the option to display a bar chart, a data table, or both. To change the display view, select the appropriate display icon at the top right of the report page.
Selecting the Report Data
To select which data you want to display in this report, first click the Selection icon in the left panel of the report page. The following list of items displays:
● <Customer Group>● <Customer>● <Entitlement Type>● <Entitlement Model>● <Business Category>● <Status>● <Valid From>
84 C O N F I D E N T I A LApplication Help for SAP Entitlement Management
Entitlements Overview

● <Valid To>
To display data for a single customer, enter the customer name in the <Customer> field. For all other items, either select from the drop-down menu or the pop-up dialog, as applicable to the field. If you do not make a selection for a given field, all available data is displayed by default.
Once you have made all of your selections, click Go to refresh the report.
Saving the Report
Whenever you make any changes to either the view or the data selection for the report, an asterisk ( * ) displays to the right of the report title at the top of the page to indicate a change has been made since the report was opened. To save the view and data selections you made, click on the down arrow to the right of the report title and select from the following:
Save - this option is enabled only if you make a change to a customized view. If you click Save, the customized view with be updated with the changes you made. You cannot save changes to the pre-defined default report view.
Save As - this option allows you to save the new configuration as a new report. When you click Save As, a Save View dialog is displayed. Enter the name of the new report view and, optionally, check the Set as Default checkbox if you want this view to open by default when you open this report. Click OK to save the new report view.
Manage - this option opens a Manage View dialog, displaying all available views for this report. The dialog displays the view name and the user that created it. You can select the Default radio button for whichever view you want to display by default when you open the report. From this dialog, you can also click the circled "x" button to delete any of the custom views.You cannot delete the pre-defined view. If you make any changes in this dialog click OK to save the changes and return to your report. If you do not want to save the changes you made, click Cancel.
NoteIf you make changes to the report view or data selection and navigate away from the report without saving the view, the report will revert back to its default state the next time you open the report
Parent topic: Reports and Analytics [page 80]
Related Information
Entitlements per Customer [page 81]Entitlements Expiring in a Given Period [page 86]Entitlements (Report) [page 88]Entitlements with Different Statuses [page 90]Entitlements per Offering [page 92]Entitlements by Business Category [page 94]
Application Help for SAP Entitlement ManagementEntitlements Overview C O N F I D E N T I A L 85

Entitlements by Reference Document [page 96]Audit Trail for Entitlement Records [page 98]
4.3.3 Entitlements Expiring in a Given Period
You can view the quantity of entitlements left for the customers and entitlement models in a bar chart or a tabular form. You choose the characteristics based on which the entitlements are filtered and their quantity displayed in the list table and the bar chart.
Customizing the Report View
By default, the report opens with the View options open in the left side panel. From this panel, you can select which row fields and which column fields to display for this report.
<Row Fields> - Click the plus ( + ) icon to open the list of row field options. You can select one or more from the list. Select the checkbox for any field you want to include and uncheck the checkbox to remove the field. Click OK when you have made your selections.
<Column Fields> - This lets you select the key figures you want to display. Click the greater than sign ( > ) to expand the list of key figures selected. To select more, if available, click the plus ( + ) icon to open the list of key field options. Click OK when you have made your selections.
Note
Once you have seleted the row fields and column fields to display, click Go to refesh the report.
TipYou can rearrange the order of row fields and column fields. Click on the dots ( You must select at least one column field to display. If you do not have at least one selected, an error message will display.…. ) to the right of the field you want to move and then select Move Up, Move Down, or Remove, as desired.
You must select at least one column field to display. If you do not have atFor this report, you have the option to display a bar chart, a data table, or both. To change the display view, select the appropriate display icon at the top right of the report page.
Selecting the Report Data
To select which data you want to display in this report, first click the Selection icon in the left panel of the report page. The following list of items displays:
● <Time Frame>● <Entitlement Type>
86 C O N F I D E N T I A LApplication Help for SAP Entitlement Management
Entitlements Overview
● <Entitlement Model>● <Status>
To display data for a single customer, enter the customer name in the <Customer> field. For all other items, either select from the drop-down menu or the pop-up dialog, as applicable to the field. If you do not make a selection for a given field, all available data is displayed by default.
Once you have made all of your selections, click Go to refresh the report.
Saving the Report
Whenever you make any changes to either the view or the data selection for the report, an asterisk ( * ) displays to the right of the report title at the top of the page to indicate a change has been made since the report was opened. To save the view and data selections you made, click on the down arrow to the right of the report title and select from the following:
Save - this option is enabled only if you make a change to a customized view. If you click Save, the customized view with be updated with the changes you made. You cannot save changes to the pre-defined default report view.
Save As - this option allows you to save the new configuration as a new report. When you click Save As, a Save View dialog is displayed. Enter the name of the new report view and, optionally, check the Set as Default checkbox if you want this view to open by default when you open this report. Click OK to save the new report view.
Manage - this option opens a Manage View dialog, displaying all available views for this report. The dialog displays the view name and the user that created it. You can select the Default radio button for whichever view you want to display by default when you open the report. From this dialog, you can also click the circled "x" button to delete any of the custom views.You cannot delete the pre-defined view. If you make any changes in this dialog click OK to save the changes and return to your report. If you do not want to save the changes you made, click Cancel.
NoteIf you make changes to the report view or data selection and navigate away from the report without saving the view, the report will revert back to its default state the next time you open the report
Parent topic: Reports and Analytics [page 80]
Related Information
Entitlements per Customer [page 81]Entitlements per Customer per Entitlement Model [page 84]Entitlements (Report) [page 88]Entitlements with Different Statuses [page 90]Entitlements per Offering [page 92]
Application Help for SAP Entitlement ManagementEntitlements Overview C O N F I D E N T I A L 87

Entitlements by Business Category [page 94]Entitlements by Reference Document [page 96]Audit Trail for Entitlement Records [page 98]
4.3.4 Entitlements (Report)
You can view the quantity of entitlements left for the customers, entitlement type, entitlement model, and so on, in a table format. You choose the characteristics based on which the entitlements are filtered and their quantity displayed in the list table.
Customizing the Report View
By default, the report opens with the View options open in the left side panel. From this panel, you can select which row fields and which column fields to display for this report.
<Row Fields> - Click the plus ( + ) icon to open the list of row field options. You can select one or more from the list. Select the checkbox for any field you want to include and uncheck the checkbox to remove the field. Click OK when you have made your selections.
<Column Fields> - This lets you select the key figures you want to display. Click the greater than sign ( > ) to expand the list of key figures selected. To select more, if available, click the plus ( + ) icon to open the list of key field options. Click OK when you have made your selections.
NoteYou must select at least one column field to display. If you do not have at least one selected, an error message will display.
Once you have seleted the row fields and column fields to display, click Go to refesh the report.
TipYou can rearrange the order of row fields and column fields. Click on the dots ( …. ) to the right of the field you want to move and then select Move Up, Move Down, or Remove, as desired.
This report only displays as a data table.
Selecting the Report Data
To select which data you want to display in this report, first click the Selection icon in the left panel of the report page. The following list of items displays:
● <Entitlement Number>● <Distributor>
88 C O N F I D E N T I A LApplication Help for SAP Entitlement Management
Entitlements Overview

● <Reference Document Type>● <Reference Document Number>● <The Right>● <Distribution Channel>● <Business Category>● <Status>● <Offering>● <Customer>● <Folders>● <Entitlement Type>● <Entitlement Model>● <Valid From>● <Valid To>
To display data for a single customer, enter the customer name in the <Customer> field. For all other items, either select from the drop-down menu or the pop-up dialog, as applicable to the field. If you do not make a selection for a given field, all available data is displayed by default.
Once you have made all of your selections, click Go to refresh the report.
Saving the Report
Whenever you make any changes to either the view or the data selection for the report, an asterisk ( * ) displays to the right of the report title at the top of the page to indicate a change has been made since the report was opened. To save the view and data selections you made, click on the down arrow to the right of the report title and select from the following:
Save - this option is enabled only if you make a change to a customized view. If you click Save, the customized view with be updated with the changes you made. You cannot save changes to the pre-defined default report view.
Save As - this option allows you to save the new configuration as a new report. When you click Save As, a Save View dialog is displayed. Enter the name of the new report view and, optionally, check the Set as Default checkbox if you want this view to open by default when you open this report. Click OK to save the new report view.
Manage - this option opens a Manage View dialog, displaying all available views for this report. The dialog displays the view name and the user that created it. You can select the Default radio button for whichever view you want to display by default when you open the report. From this dialog, you can also click the circled "x" button to delete any of the custom views.You cannot delete the pre-defined view. If you make any changes in this dialog click OK to save the changes and return to your report. If you do not want to save the changes you made, click Cancel.
NoteIf you make changes to the report view or data selection and navigate away from the report without saving the view, the report will revert back to its default state the next time you open the report
Application Help for SAP Entitlement ManagementEntitlements Overview C O N F I D E N T I A L 89
Parent topic: Reports and Analytics [page 80]
Related Information
Entitlements per Customer [page 81]Entitlements per Customer per Entitlement Model [page 84]Entitlements Expiring in a Given Period [page 86]Entitlements with Different Statuses [page 90]Entitlements per Offering [page 92]Entitlements by Business Category [page 94]Entitlements by Reference Document [page 96]Audit Trail for Entitlement Records [page 98]
4.3.5 Entitlements with Different Statuses
You can view the number of entitlements with a specific status in a pie chart or a tabular form. You choose the characteristics based on which the entitlements are filtered and their quantity displayed in the list table and the pie chart.
Customizing the Report View
By default, the report opens with the View options open in the left side panel. From this panel, you can select which row fields and which column fields to display for this report.
<Row Fields> - Click the plus ( + ) icon to open the list of row field options. You can select one or more from the list. Select the checkbox for any field you want to include and uncheck the checkbox to remove the field. Click OK when you have made your selections.
<Column Fields> - This lets you select the key figures you want to display. Click the greater than sign ( > ) to expand the list of key figures selected. To select more, if available, click the plus ( + ) icon to open the list of key field options. Click OK when you have made your selections.
NoteYou must select at least one column field to display. If you do not have at least one selected, an error message will display.
Once you have seleted the row fields and column fields to display, click Go to refesh the report.
TipYou can rearrange the order of row fields and column fields. Click on the dots ( …. ) to the right of the field you want to move and then select Move Up, Move Down, or Remove, as desired.
90 C O N F I D E N T I A LApplication Help for SAP Entitlement Management
Entitlements Overview

For this report, you have the option to display a pie chart, a data table, or both. To change the display view, select the appropriate display icon at the top right of the report page.
Selecting the Report Data
To select which data you want to display in this report, first click the Selection icon in the left panel of the report page. The following list of items displays:
● <Customer>● <Entitlement Type>● <Status>● <Valid From>● <Valid To>
To display data for a single customer, enter the customer name in the <Customer> field. For all other items, either select from the drop-down menu or the pop-up dialog, as applicable to the field. If you do not make a selection for a given field, all available data is displayed by default.
Once you have made all of your selections, click Go to refresh the report.
Saving the Report
Whenever you make any changes to either the view or the data selection for the report, an asterisk ( * ) displays to the right of the report title at the top of the page to indicate a change has been made since the report was opened. To save the view and data selections you made, click on the down arrow to the right of the report title and select from the following:
Save - this option is enabled only if you make a change to a customized view. If you click Save, the customized view with be updated with the changes you made. You cannot save changes to the pre-defined default report view.
Save As - this option allows you to save the new configuration as a new report. When you click Save As, a Save View dialog is displayed. Enter the name of the new report view and, optionally, check the Set as Default checkbox if you want this view to open by default when you open this report. Click OK to save the new report view.
Manage - this option opens a Manage View dialog, displaying all available views for this report. The dialog displays the view name and the user that created it. You can select the Default radio button for whichever view you want to display by default when you open the report. From this dialog, you can also click the circled "x" button to delete any of the custom views.You cannot delete the pre-defined view. If you make any changes in this dialog click OK to save the changes and return to your report. If you do not want to save the changes you made, click Cancel.
NoteIf you make changes to the report view or data selection and navigate away from the report without saving the view, the report will revert back to its default state the next time you open the report
Application Help for SAP Entitlement ManagementEntitlements Overview C O N F I D E N T I A L 91

Parent topic: Reports and Analytics [page 80]
Related Information
Entitlements per Customer [page 81]Entitlements per Customer per Entitlement Model [page 84]Entitlements Expiring in a Given Period [page 86]Entitlements (Report) [page 88]Entitlements per Offering [page 92]Entitlements by Business Category [page 94]Entitlements by Reference Document [page 96]Audit Trail for Entitlement Records [page 98]
4.3.6 Entitlements per Offering
You can view the number of entitlements and their quantity based on the offering and offering category in a bar chart or a tabular form. You choose the characteristics based on which the entitlements are filtered and their quantity displayed in the list table and the bar chart.
Customizing the Report View
By default, the report opens with the View options open in the left side panel. From this panel, you can select which row fields and which column fields to display for this report.
<Row Fields> - Click the plus ( + ) icon to open the list of row field options. You can select one or more from the list. Select the checkbox for any field you want to include and uncheck the checkbox to remove the field. Click OK when you have made your selections.
<Column Fields> - This lets you select the key figures you want to display. Click the greater than sign ( > ) to expand the list of key figures selected. To select more, if available, click the plus ( + ) icon to open the list of key field options. Click OK when you have made your selections.
NoteYou must select at least one column field to display. If you do not have at least one selected, an error message will display.
Once you have seleted the row fields and column fields to display, click Go to refesh the report.
TipYou can rearrange the order of row fields and column fields. Click on the dots ( …. ) to the right of the field you want to move and then select Move Up, Move Down, or Remove, as desired.
92 C O N F I D E N T I A LApplication Help for SAP Entitlement Management
Entitlements Overview

For this report, you have the option to display a bar chart, a data table, or both. To change the display view, select the appropriate display icon at the top right of the report page.
Selecting the Report Data
To select which data you want to display in this report, first click the Selection icon in the left panel of the report page. The following list of items displays:
● <Offering>● <Offering Category>● <Customer Group>● <Customer>● <Entitlement Type>● <Entitlement Model>● <Status>● <Valid From>● <Valid To>
To display data for a single customer, enter the customer name in the <Customer> field. For all other items, either select from the drop-down menu or the pop-up dialog, as applicable to the field. If you do not make a selection for a given field, all available data is displayed by default.
Once you have made all of your selections, click Go to refresh the report.
Saving the Report
Whenever you make any changes to either the view or the data selection for the report, an asterisk ( * ) displays to the right of the report title at the top of the page to indicate a change has been made since the report was opened. To save the view and data selections you made, click on the down arrow to the right of the report title and select from the following:
Save - this option is enabled only if you make a change to a customized view. If you click Save, the customized view with be updated with the changes you made. You cannot save changes to the pre-defined default report view.
Save As - this option allows you to save the new configuration as a new report. When you click Save As, a Save View dialog is displayed. Enter the name of the new report view and, optionally, check the Set as Default checkbox if you want this view to open by default when you open this report. Click OK to save the new report view.
Manage - this option opens a Manage View dialog, displaying all available views for this report. The dialog displays the view name and the user that created it. You can select the Default radio button for whichever view you want to display by default when you open the report. From this dialog, you can also click the circled "x" button to delete any of the custom views.You cannot delete the pre-defined view. If you make any changes in this dialog click OK to save the changes and return to your report. If you do not want to save the changes you made, click Cancel.
Application Help for SAP Entitlement ManagementEntitlements Overview C O N F I D E N T I A L 93

NoteIf you make changes to the report view or data selection and navigate away from the report without saving the view, the report will revert back to its default state the next time you open the report
Parent topic: Reports and Analytics [page 80]
Related Information
Entitlements per Customer [page 81]Entitlements per Customer per Entitlement Model [page 84]Entitlements Expiring in a Given Period [page 86]Entitlements (Report) [page 88]Entitlements with Different Statuses [page 90]Entitlements by Business Category [page 94]Entitlements by Reference Document [page 96]Audit Trail for Entitlement Records [page 98]
4.3.7 Entitlements by Business Category
You can view the number of entitlements as per the business category in a pie chart or a tabular form. You choose the characteristics based on which the entitlements are filtered and displayed in the list table and the pie chart.
Customizing the Report View
By default, the report opens with the View options open in the left side panel. From this panel, you can select which row fields and which column fields to display for this report.
<Row Fields> - Click the plus ( + ) icon to open the list of row field options. You can select one or more from the list. Select the checkbox for any field you want to include and uncheck the checkbox to remove the field. Click OK when you have made your selections.
<Column Fields> - This lets you select the key figures you want to display. Click the greater than sign ( > ) to expand the list of key figures selected. To select more, if available, click the plus ( + ) icon to open the list of key field options. Click OK when you have made your selections.
NoteYou must select at least one column field to display. If you do not have at least one selected, an error message will display.
94 C O N F I D E N T I A LApplication Help for SAP Entitlement Management
Entitlements Overview

Once you have seleted the row fields and column fields to display, click Go to refesh the report.
TipYou can rearrange the order of row fields and column fields. Click on the dots ( …. ) to the right of the field you want to move and then select Move Up, Move Down, or Remove, as desired.
For this report, you have the option to display a pie chart, a data table, or both. To change the display view, select the appropriate display icon at the top right of the report page.
Selecting the Report Data
To select which data you want to display in this report, first click the Selection icon in the left panel of the report page. The following list of items displays:
● <Customer Group>● <Customer>● <Entitlement Type>● <Entitlement Model>● <Business Category>● <Status>● <Valid From>● <Valid To>
To display data for a single customer, enter the customer name in the <Customer> field. For all other items, either select from the drop-down menu or the pop-up dialog, as applicable to the field. If you do not make a selection for a given field, all available data is displayed by default.
Once you have made all of your selections, click Go to refresh the report.
Saving the Report
Whenever you make any changes to either the view or the data selection for the report, an asterisk ( * ) displays to the right of the report title at the top of the page to indicate a change has been made since the report was opened. To save the view and data selections you made, click on the down arrow to the right of the report title and select from the following:
Save - this option is enabled only if you make a change to a customized view. If you click Save, the customized view with be updated with the changes you made. You cannot save changes to the pre-defined default report view.
Save As - this option allows you to save the new configuration as a new report. When you click Save As, a Save View dialog is displayed. Enter the name of the new report view and, optionally, check the Set as Default checkbox if you want this view to open by default when you open this report. Click OK to save the new report view.
Manage - this option opens a Manage View dialog, displaying all available views for this report. The dialog displays the view name and the user that created it. You can select the Default radio button for whichever view
Application Help for SAP Entitlement ManagementEntitlements Overview C O N F I D E N T I A L 95
you want to display by default when you open the report. From this dialog, you can also click the circled "x" button to delete any of the custom views.You cannot delete the pre-defined view. If you make any changes in this dialog click OK to save the changes and return to your report. If you do not want to save the changes you made, click Cancel.
NoteIf you make changes to the report view or data selection and navigate away from the report without saving the view, the report will revert back to its default state the next time you open the report
Parent topic: Reports and Analytics [page 80]
Related Information
Entitlements per Customer [page 81]Entitlements per Customer per Entitlement Model [page 84]Entitlements Expiring in a Given Period [page 86]Entitlements (Report) [page 88]Entitlements with Different Statuses [page 90]Entitlements per Offering [page 92]Entitlements by Reference Document [page 96]Audit Trail for Entitlement Records [page 98]
4.3.8 Entitlements by Reference Document
You can view the number of entitlements and their quantity based on reference document in a bar chart or a tabular form. You choose the characteristics based on which the entitlements are filtered and their quantity displayed in the list table and the bar chart.
Customizing the Report View
By default, the report opens with the View options open in the left side panel. From this panel, you can select which row fields and which column fields to display for this report.
<Row Fields> - Click the plus ( + ) icon to open the list of row field options. You can select one or more from the list. Select the checkbox for any field you want to include and uncheck the checkbox to remove the field. Click OK when you have made your selections.
<Column Fields> - This lets you select the key figures you want to display. Click the greater than sign ( > ) to expand the list of key figures selected. To select more, if available, click the plus ( + ) icon to open the list of key field options. Click OK when you have made your selections.
96 C O N F I D E N T I A LApplication Help for SAP Entitlement Management
Entitlements Overview

NoteYou must select at least one column field to display. If you do not have at least one selected, an error message will display.
Once you have seleted the row fields and column fields to display, click Go to refesh the report.
TipYou can rearrange the order of row fields and column fields. Click on the dots ( …. ) to the right of the field you want to move and then select Move Up, Move Down, or Remove, as desired.
For this report, you have the option to display a bar chart, a data table, or both. To change the display view, select the appropriate display icon at the top right of the report page.
Selecting the Report Data
To select which data you want to display in this report, first click the Selection icon in the left panel of the report page. The following list of items displays:
● <Customer Group>● <Customer>● <Entitlement Type>● <Entitlement Model>● <Reference Document Type>● <Status>● <Valid From>● <Valid To>
To display data for a single customer, enter the customer name in the <Customer> field. For all other items, either select from the drop-down menu or the pop-up dialog, as applicable to the field. If you do not make a selection for a given field, all available data is displayed by default.
Once you have made all of your selections, click Go to refresh the report.
Saving the Report
Whenever you make any changes to either the view or the data selection for the report, an asterisk ( * ) displays to the right of the report title at the top of the page to indicate a change has been made since the report was opened. To save the view and data selections you made, click on the down arrow to the right of the report title and select from the following:
Save - this option is enabled only if you make a change to a customized view. If you click Save, the customized view with be updated with the changes you made. You cannot save changes to the pre-defined default report view.
Save As - this option allows you to save the new configuration as a new report. When you click Save As, a Save View dialog is displayed. Enter the name of the new report view and, optionally, check the Set as Default
Application Help for SAP Entitlement ManagementEntitlements Overview C O N F I D E N T I A L 97

checkbox if you want this view to open by default when you open this report. Click OK to save the new report view.
Manage - this option opens a Manage View dialog, displaying all available views for this report. The dialog displays the view name and the user that created it. You can select the Default radio button for whichever view you want to display by default when you open the report. From this dialog, you can also click the circled "x" button to delete any of the custom views.You cannot delete the pre-defined view. If you make any changes in this dialog click OK to save the changes and return to your report. If you do not want to save the changes you made, click Cancel.
NoteIf you make changes to the report view or data selection and navigate away from the report without saving the view, the report will revert back to its default state the next time you open the report
Parent topic: Reports and Analytics [page 80]
Related Information
Entitlements per Customer [page 81]Entitlements per Customer per Entitlement Model [page 84]Entitlements Expiring in a Given Period [page 86]Entitlements (Report) [page 88]Entitlements with Different Statuses [page 90]Entitlements per Offering [page 92]Entitlements by Business Category [page 94]Audit Trail for Entitlement Records [page 98]
4.3.9 Audit Trail for Entitlement Records
Use the View Audit Trail for Entitlement Records report to view the history and consumption records for selected entitlements.
Selecting the Report Data
When you first select the report tile, a Selection dialog is displayed with the following list of items:
● <Customer> - select from the drop-down list● <Entitlement Model>● <Entitlement Number>● <Last Changed Date> - select a date range
98 C O N F I D E N T I A LApplication Help for SAP Entitlement Management
Entitlements Overview
Once you have made all of your selections, click OK to display the report.
NoteTo display an audit trail for a different entitltement or for a different date range, modify your entries in the Selection panel on the left side of the page and click Go.
Report Data Fields
The Audit Trail report displays the following fields for the selected criteria:
● <Customer>● <Offering>● <Entitlement Model>● <Number of Entitlements>● <Status>● <Remaining Quantity>● <Valid From>● <Valid To>● <Last Changed At>
NoteThis report is view only and you cannot modify the data.
Exporting the Report
To export the report, click Export at the top right of the screen.
Parent topic: Reports and Analytics [page 80]
Related Information
Entitlements per Customer [page 81]Entitlements per Customer per Entitlement Model [page 84]Entitlements Expiring in a Given Period [page 86]Entitlements (Report) [page 88]Entitlements with Different Statuses [page 90]Entitlements per Offering [page 92]Entitlements by Business Category [page 94]Entitlements by Reference Document [page 96]
Application Help for SAP Entitlement ManagementEntitlements Overview C O N F I D E N T I A L 99

4.4 Deletion Logs
Use the Deletion Logs tile to check the log of deleted entitlements.
All entitlements deleted by the Delete Entitlement API are logged in the Deletion Logs.
Access this log to view by whom and when an entitlement is deleted.
The log is searchable by entitlement number.
Parent topic: Entitlements Overview [page 68]
Related Information
Customer Insights [page 69]Entitlements [page 69]Reports and Analytics [page 80]
100 C O N F I D E N T I A LApplication Help for SAP Entitlement Management
Entitlements Overview
5 Operations
The Operations section of the Entitlement Management System launch pad contains the system tiles that allow you to access and view all backend system oeprations.
Use the tiles in the Operations section to view communication messages for inbound and outbound data, to view and schedule background jobs, and to configure and monitor events. The tiles included in this section are:
● Inbound and Outbound Data Monitoring● Background Jobs● Events● Event Monitoring
See the appropriate topic for details on the features and functions available from each tile.
Inbound and Outbound Data Monitoring [page 102]The Inbound and Outbound Monitoring tile is a communications monitoring tool used to monitor and display all inbound and outbound document logs. You can reprocess the outbound or inbound payload, cancel a process, display the log information and the payload.
Background Jobs [page 105]Use the Background Jobs tile from the Operations section of the Entitlement Management launch pad to set up a background job for a specific kind of work.
Events [page 115]Use the Events tile to view, modify or delele defined events and to create new events.
Event Monitoring [page 118]Use the Event Monitoring tile to view the log of triggered events in the system.
Related Information
Application Overview [page 4]Business Configuration [page 11]Customer Data and Offerings [page 64]Entitlements Overview [page 68]System Administration [page 119]Glossary [page 134]
Application Help for SAP Entitlement ManagementOperations C O N F I D E N T I A L 101

5.1 Inbound and Outbound Data Monitoring
The Inbound and Outbound Monitoring tile is a communications monitoring tool used to monitor and display all inbound and outbound document logs. You can reprocess the outbound or inbound payload, cancel a process, display the log information and the payload.
The communication monitor tracks all outbound interfaces and displays the messages that are sent to other systems. You filter the document logs based on the various search criteria, for example, Direction, Status, Document ID and so on. You can sort the list in each column of the table except the Payload column. In the Inbound and Outbound Data Monitoring screen, you can do the following:
● Export the trace log to JSON format.● Reprocess the inbound or outbound payload to resend payload contents.● Cancel the process if there is an error in processing. You enter a reason for cancellation before you
proceed.● Delete one or multiple messages.● Simulate and execute Entitlement Generation Inbound Interface.● Display the log information on the click of the LogID for each process .● Display and download the payload for one or multiple documents and save it as an XML or JSON.
Besides these functions, you can perform multiple actions. For more details, see the appropriate related topic.
Reprocessing an Outbound Process [page 103]You can reprocess an inbound or an outbound payload if there is an error in processing.
Downloading Payload [page 104]You can display and download the payload for each process which is to be sent or has been sent.
Simulating an Inbound Process [page 105]You can trigger simulation for an inbound process from the Inbound and Outbound Data Monitor.
Parent topic: Operations [page 101]
Related Information
Background Jobs [page 105]Events [page 115]Event Monitoring [page 118]
102 C O N F I D E N T I A LApplication Help for SAP Entitlement Management
Operations

5.1.1 Reprocessing an Outbound Process
You can reprocess an inbound or an outbound payload if there is an error in processing.
Procedure
1. Select the Inbound and Outbound Data Monitoring tile from the Operations section of the application launch pad.
2. On the Communication Messages page, enter the search criteria for the outbound or inbound payload and click Go. To refine your search, you can select or enter one or more of the following criteria:○ <Direction> - Inbound or Outbound○ <Status> - select from the drop-down list of statuses○ <Interface Name> - select from the drop-down list of interfaces○ <Document ID>○ <Executed By> - enter a name or ID○ <Executed At> - select Last 24 Hours, Last 7 Days, or Other
The system displays the requested processes.3. Select a process and click Reprocess in the footer toolbar.
The payload is reprocessed and the content is resent to the target system (for example, CRM, SPC). The new status is visible in the Status column and the log is updated.
4. Similarly, you can cancel a process using the Cancel button in the footer toolbar. Note that you need to specify a reason for cancellation.
The process is canceled and the content is not sent to the target system. The new status is visible in the Status column and the log is updated.
Task overview: Inbound and Outbound Data Monitoring [page 102]
Related Information
Downloading Payload [page 104]Simulating an Inbound Process [page 105]
Application Help for SAP Entitlement ManagementOperations C O N F I D E N T I A L 103

5.1.2 Downloading Payload
You can display and download the payload for each process which is to be sent or has been sent.
Procedure
1. Select the Inbound and Outbound Data Monitoring tile from the Operations section of the application launch pad.
2. On the Communication Messages page, enter the search criteria and click Go. To refine your search enter or select one or more of the following criteria:○ <Direction> - Inbound or Outbound○ <Status> - select from the drop-down list of statuses○ <Interface Name> - select from the drop-down list of interfaces○ <Document ID>○ <Executed By> - enter a name or ID○ <Executed At> - select Last 24 Hours, Last 7 Days, or Other
The system displays the required processes.
3. Click in the Payload column.
The system displays the payload source code which is to be sent or has been sent.4. Click Download and save the file as XML or JSON with the file name logid+DateTime.format. Alternatively,
select one or multiple processes and click Download Payload in the footer toolbar.
The payload is saved as XML or JSON. In case of multiple selection, the files are saved as OutboundDateTime.zip.
Task overview: Inbound and Outbound Data Monitoring [page 102]
Related Information
Reprocessing an Outbound Process [page 103]Simulating an Inbound Process [page 105]
104 C O N F I D E N T I A LApplication Help for SAP Entitlement Management
Operations
5.1.3 Simulating an Inbound Process
You can trigger simulation for an inbound process from the Inbound and Outbound Data Monitor.
Procedure
1. Search for and select one entitlement generation interface inbound record in the Communication Messages list page.
2. Click Simulate in the footer toolbar.
The system displays the inbound payload in the pop up.3. Edit the payload in the pop up and click Execute.
The simulation result is displayed in the JSON format.
Task overview: Inbound and Outbound Data Monitoring [page 102]
Related Information
Reprocessing an Outbound Process [page 103]Downloading Payload [page 104]
5.2 Background Jobs
Use the Background Jobs tile from the Operations section of the Entitlement Management launch pad to set up a background job for a specific kind of work.
One or more processes are started when a background job is triggered. You define a background job to send an entitlement to another system, change the status of an entitlement, trigger an event, or send an event notification. The background job runs in the background and the details are displayed in the log after the job is completed. You can perform the following functions from the Background Jobs page:
● Display all the background jobs● Create a background job and set the frequency● Edit a canceled or released job● Release a canceled background job● Cancel a released job● Delete a job based on your requirement; you can only delete Canceled jobs
NoteYou can define one of the following Background Job Types:
Application Help for SAP Entitlement ManagementOperations C O N F I D E N T I A L 105

● Event Notification● Send Entitlement● Status Change● Invalid Customer Data Clearance● Triggering Event: Entitlement Becomes Invalid● Triggering Event: Entitlement Becomes Valid
For full details about managing background jobs, see the appropriate topics.
Creating a Background Job to Change Status [page 107]You can set up a background job so that the status of an entitlement is changed at a specified frequency.
Creating a Background Job to Send Entitlement [page 108]You set up a background job to send the entitlement to the downstream system at a specified frequency.
Creating a Background Job to Update Entitlement [page 110]You can create a background job to update an entitlement.
Creating a Background Job to Trigger Event [page 111]You can set up a background job to trigger an event either when an entitlement becomes valid or when it becomes invalid.
Creating a Background Job to Send Event Notification [page 112]You can set up a background job to send an event notification.
Creating a Background Job to Delete Data of Invalid Customers [page 113]You can set up a background job to delete data of invalid customers..
Editing a Background Job [page 114]You can edit a background job only if its status is Canceled or Released.
Deleting Background Jobs [page 115]You can only delete background jobs that have been Canceled.
Parent topic: Operations [page 101]
Related Information
Inbound and Outbound Data Monitoring [page 102]Events [page 115]Event Monitoring [page 118]
106 C O N F I D E N T I A LApplication Help for SAP Entitlement Management
Operations

5.2.1 Creating a Background Job to Change Status
You can set up a background job so that the status of an entitlement is changed at a specified frequency.
Procedure
1. Select the Background Jobs tile from the Operations section of the application launch pad.2. On the Background Jobs list screen, click Create in the footer toolbar.
The system navigates to the Create Background Job screen.3. Enter the Background Job Name and select the Background Job Type as Status Change in the Background
Job Information section. Optionally, you can provide a description for the job.4. You must select one of the trigger types, Single Run or Recurrence. Based on your selection, you enter the
relevant details and click Next.○ Single Run: Choose to either Run Immediately or Run at Specific Date/Time.○ Recurrence: Select the recurrence type and frequency, and set a start and end date/time. Note that if
the job start time is earlier than the job creation time, the first execution will run immediately. This applies to all types of background jobs.
5. You can define the selection criteria in the condition table. Entitlement Model is a mandatory condition. You can also set other entitlement standard attributes and master data attributes as condition. Once you define condition of entitlement model, you can also pick up free defined attributes assigned to these models as condition. The allowed free defined attributes are the common attributes of entitlement models set in the condition. If the data type of attribute used in condition is Date, you can involve job execution date in the condition by selecting condition Value Type as Variable. After the conditions are set, click Next.
6. Select business event for the status change operation. Then in the Change Details table, select the Entitlement model, Old Sstatus, and New Status for the change you want to make.
7. Click Save to save your entries.
The system displays the data for the background job under five tabs:
Details
Displays the details of the background job.
Conditions
Displays the configured selection criteria.
Execution Details
Displays the business event, old status, and new status after the completion of the background job.
Job Logs
Displays the log details of the background job.
Administration Data
Displays the administrative data for the job.8. Go back to the Background Jobs list screen.
A new background job is created with the status set as Released.
Application Help for SAP Entitlement ManagementOperations C O N F I D E N T I A L 107

Task overview: Background Jobs [page 105]
Related Information
Creating a Background Job to Send Entitlement [page 108]Creating a Background Job to Update Entitlement [page 110]Creating a Background Job to Trigger Event [page 111]Creating a Background Job to Send Event Notification [page 112]Creating a Background Job to Delete Data of Invalid Customers [page 113]Editing a Background Job [page 114]Deleting Background Jobs [page 115]
5.2.2 Creating a Background Job to Send Entitlement
You set up a background job to send the entitlement to the downstream system at a specified frequency.
Procedure
1. Select the Background Jobs tile from the Operations section of the application launch pad.2. On the Background Jobs screen, click Create in the footer toolbar.
The system navigates to the Create Background Job screen.3. Enter the Background Job Name and select the Background Job Type as Send Entitlement in the
Background Job Information section. Optionally, you can provide a description for the job.4. You must select one of the trigger types, Single Run or Recurrence. Based on your selection, you enter the
relevant details and click Next.○ Single Run: Choose to either Run Immediately or Run at Specific Date/Time.○ Recurrence: Select the recurrence type and frequency, and set a start and end date/time.
5. You can define the selection criteria in the condition table. If the job is running recurrently, you can define whether to send all entitlements under selection criteria or only incremental records since last execution of the job. Incremental data refers to entitlement records which fulfill the condition and whose last change time is later than last execution time of the job. You can set entitlement standard attributes and master data attributes as condition. Once you set the entitlement model as condition, you can also pick up free defined attributes assigned to these models as condition. The allowed free defined attributes are the common attributes of entitlement models set in the condition. If the data type of attribute used in condition is Date, you can involve job execution date in the condition by selecting condition Value Type as Variable. After the conditions are set, click Next.
6. Select the Communication Channel Name to define how to execute the job.
108 C O N F I D E N T I A LApplication Help for SAP Entitlement Management
Operations
NoteAs a prerequisite, you have defined the communication channel in the relevant tile. For more information see Communication Channel [page 127].
The system displays the details of the chosen communication channel.7. Click Save to save your entries.
The system displays the data for the background job under five tabs:
Details
Displays the details of the background job.
Conditions
Displays the selection criteria.
Execution Details
Displays the communication channel and its details.
Job Logs
Displays the log details of the background job.
Administration Data
Displays the administrative data for the job.
Task overview: Background Jobs [page 105]
Related Information
Creating a Background Job to Change Status [page 107]Creating a Background Job to Update Entitlement [page 110]Creating a Background Job to Trigger Event [page 111]Creating a Background Job to Send Event Notification [page 112]Creating a Background Job to Delete Data of Invalid Customers [page 113]Editing a Background Job [page 114]Deleting Background Jobs [page 115]
Application Help for SAP Entitlement ManagementOperations C O N F I D E N T I A L 109

5.2.3 Creating a Background Job to Update Entitlement
You can create a background job to update an entitlement.
Procedure
1. Select the Background Jobs tile from the Operations section of the application launch pad.2. On the Background Jobs screen, click Create in the footer toolbar.
The system navigates to the Create Background Job screen.3. Enter the Background Job Name and select the Background Job Type as Update Entitlement in the
Background Job Information section. Optionally, you can provide a description for the job.4. You must select one of the trigger types, Single Run or Recurrence. Based on your selection, you enter the
relevant details and click Next.○ Single Run: Choose to either Run Immediately or Run at Specific Date/Time.○ Recurrence: Select the recurrence type and frequency, and set a start and end date/time.
5. Define the selection criteria in the condition table. You can set entitlement standard attributes and master data attributes as condition. Once you entitlement model as condition, you can also pick up free defined attributes assigned to these models as condition. The allowed free defined attributes are the common attributes of entitlement models set in the condition. If the data type of attribute used in condition is Date, you can involve the job execution date in the condition by selecting condition Value Type as Variable. After the conditions are set, click Next.
6. Select the Business Event for the operation, add the attributes that are to be updated and their values, and Save the job.
NoteIf in the Condition section, no entitlement model is selected as the condition, only standard attributes can be updated by this job. If the entitlement model is configured as the condition, only attributes that belong to all configured models can be updated by this job.
Task overview: Background Jobs [page 105]
Related Information
Creating a Background Job to Change Status [page 107]Creating a Background Job to Send Entitlement [page 108]Creating a Background Job to Trigger Event [page 111]Creating a Background Job to Send Event Notification [page 112]Creating a Background Job to Delete Data of Invalid Customers [page 113]Editing a Background Job [page 114]Deleting Background Jobs [page 115]
110 C O N F I D E N T I A LApplication Help for SAP Entitlement Management
Operations
5.2.4 Creating a Background Job to Trigger Event
You can set up a background job to trigger an event either when an entitlement becomes valid or when it becomes invalid.
Procedure
1. Select the Background Jobs tile from the Operations section of the application launch pad.2. On the Background Jobs list screen, click Create in the footer toolbar.
The system navigates to the Create Background Job screen.3. Enter the <Background Job Name> and select the <Background Job Type> as Triggering Event:
Entitlement becomes valid or Triggering Event: Entitlement becomes invalid in the Background Job Information section. Optionally, you can provide a <Description> for the job.
4. The Run Type Recurrence with a frequency of Daily is selected and you cannot change it for this Background Job Type. You must also specify a Start Date/Time and an End Date/Time. No other conditions apply.
During runtime, this background job will check if there is any event assigned to this job and detection is switched on. If yes, this background job will select entitlements that match the event relevance condition and check their availability and then trigger an event accordingly.
5. Click Save to save the new background job or click Save and New to save the new job and begin creating another background job.
Task overview: Background Jobs [page 105]
Related Information
Creating a Background Job to Change Status [page 107]Creating a Background Job to Send Entitlement [page 108]Creating a Background Job to Update Entitlement [page 110]Creating a Background Job to Send Event Notification [page 112]Creating a Background Job to Delete Data of Invalid Customers [page 113]Editing a Background Job [page 114]Deleting Background Jobs [page 115]
Application Help for SAP Entitlement ManagementOperations C O N F I D E N T I A L 111

5.2.5 Creating a Background Job to Send Event Notification
You can set up a background job to send an event notification.
Procedure
1. Select the Background Jobs tile from the Operations section of the application launch pad.2. On the Background Jobs list screen, click Create in the footer toolbar.
The system navigates to the Create Background Job screen.3. Enter the <Background Job Name> and select the <Background Job Type> as Event Notification in
the Background Job Information section. Optionally, you can provide a <Description> for the job.
4. The Run Type Recurrence is selected and you cannot change it for this Background Job Type. You must also specify aRecurrence frequency, a Start Date/Time, and an End Date/Time. No other conditions apply.
5. Click Next and select the <Communication Channel> with event notification outbound interface.
When the job is executed, it will look into the event log and find all the logs of events this job is assigned to with a notification status of Open. It then collects these event logs and sends the corresponding event notification to the external system. Later, it will update the event log notification status to Sent or Failed.
6. Click Save to save the new background job or click Save and New to save the new job and begin creating another background job.
Task overview: Background Jobs [page 105]
Related Information
Creating a Background Job to Change Status [page 107]Creating a Background Job to Send Entitlement [page 108]Creating a Background Job to Update Entitlement [page 110]Creating a Background Job to Trigger Event [page 111]Creating a Background Job to Delete Data of Invalid Customers [page 113]Editing a Background Job [page 114]Deleting Background Jobs [page 115]
112 C O N F I D E N T I A LApplication Help for SAP Entitlement Management
Operations

5.2.6 Creating a Background Job to Delete Data of Invalid Customers
You can set up a background job to delete data of invalid customers..
Procedure
1. Select the Background Jobs tile from the Operations section of the application launch pad.2. On the Background Jobs list screen, click Create in the footer toolbar.
The system navigates to the Create Background Job screen.3. Enter the <Background Job Name> and select the <Background Job Type> as Invalid Customer Data
Clearance in the Background Job Information section. Optionally, you can provide a <Description> for the job.
4. You must select one of the trigger types, Single Run or Recurrence. Based on your selection, enter the relevant details and click Next.
Single Run - Select either Run Immediately or Run at Specific Date/Time.
Recurrence - The Run Type Recurrence with a frequency of Daily is selected by default and you cannot change it for this Background Job Type. You must specify a Start Date/Time and and End Date/Time.
5. Click Next and specify the <Retention Period> to identify invalid customers.
During runtime, this background job will look for customers whose <Valid To> date is earlier than the <Job Execution Date> minus <Retention Period> and will delete all relavant data of these invalid customers.
The following data will be adusted by this background job:
○ Invalid Customer Master data: deleted○ Entitlement records under invalid customer: deleted○ Entitlement records with invalid third-party and distributor: The third-party/Distributor ID will be
changed to “Anonymous + GUID”○ Entitlement history contains invalid customer: customer will be changed to “Anonymous”○ Offering to Entitlement Mapping configurations contain invalid third-party or Distributor as mapped
attribute value:○ The invalid third-party and distributor will be cleared in current mapping records○ The invalid third-party and distributor will be changed to “anonymous + GUID” in the mapping
history○ Event/Background job condition contains invalid customer/distributor/3rd-party: the condition value
will be changed to Anonymous GUID. The affected events and background jobs will be listed in the Job Execution Log.
6. Click Save to save the new background job or click Save and New to save the new job and begin creating another background job.
Task overview: Background Jobs [page 105]
Application Help for SAP Entitlement ManagementOperations C O N F I D E N T I A L 113
Related Information
Creating a Background Job to Change Status [page 107]Creating a Background Job to Send Entitlement [page 108]Creating a Background Job to Update Entitlement [page 110]Creating a Background Job to Trigger Event [page 111]Creating a Background Job to Send Event Notification [page 112]Editing a Background Job [page 114]Deleting Background Jobs [page 115]
5.2.7 Editing a Background Job
You can edit a background job only if its status is Canceled or Released.
Procedure
1. Select the Background Jobs tile from the Operations section of the application launch pad.2. On the Background Jobs list screen, filter the jobs based on the status Canceled or Canceled and click Go.
The system displays the relevant background jobs.3. Click on the job name.
The system navigates to the background job details screen.4. Choose Edit in the footer toolbar and make the changes as required. Note that you cannot change the job
type.5. Click Save to save your changes.
The system updates the data for the background job.
Task overview: Background Jobs [page 105]
Related Information
Creating a Background Job to Change Status [page 107]Creating a Background Job to Send Entitlement [page 108]Creating a Background Job to Update Entitlement [page 110]Creating a Background Job to Trigger Event [page 111]Creating a Background Job to Send Event Notification [page 112]Creating a Background Job to Delete Data of Invalid Customers [page 113]Deleting Background Jobs [page 115]
114 C O N F I D E N T I A LApplication Help for SAP Entitlement Management
Operations

5.2.8 Deleting Background Jobs
You can only delete background jobs that have been Canceled.
Procedure
1. Select the Background Jobs tile from the Operations section of the application launch pad.2. On the Background Jobs list screen, enter the search criteria and click Go.
The system displays the relevant background jobs.3. Select a background job and click Delete in the footer toolbar.
NoteYou can only delete canceled background jobs.
The background job is deleted.
Task overview: Background Jobs [page 105]
Related Information
Creating a Background Job to Change Status [page 107]Creating a Background Job to Send Entitlement [page 108]Creating a Background Job to Update Entitlement [page 110]Creating a Background Job to Trigger Event [page 111]Creating a Background Job to Send Event Notification [page 112]Creating a Background Job to Delete Data of Invalid Customers [page 113]Editing a Background Job [page 114]
5.3 Events
Use the Events tile to view, modify or delele defined events and to create new events.
When you click on the Events tile of the Operations section of the Entitlement Management launch pad, you are taken to the Explore Events page. In this page, all defined events are listed with the following information displayed for each:
● <Name>● <Event Type>
Application Help for SAP Entitlement ManagementOperations C O N F I D E N T I A L 115

● <Event Detection> (On/Off)● <Notification>● <Last Changed At>
To see the full details of any event, click on the event name. Once the full details page for an event displays, you have the option to make changes. To make changes to an event, click Edit on its detail page.
To delete events, select one or more on the list page and click Delete. A confirmation dialog will display. Click Delete again to delete the event.
To create a new event, click Create from the events list page. For full details on how to configure a new event, see Configuring Events [page 116].
Parent topic: Operations [page 101]
Related Information
Inbound and Outbound Data Monitoring [page 102]Background Jobs [page 105]Event Monitoring [page 118]
5.3.1 Configuring Events
From the Events tile, you can modify or delete existing events or you can create new events.
Context
There are three main steps to creating a new event:
● Define the Event Name, Code, and Description and select the Event Type● Set the Relevance Condition fields● Select the Event Notification Type
Procedure
1. Select the Events tile from the Operations section of the Entitlement Management launch pad.
The Explore Events page displays with the full list of defined events.2. Click Create at the bottom right of the page.3. The Create New Event page displays.
116 C O N F I D E N T I A LApplication Help for SAP Entitlement Management
Operations
4. Enter a <Name> and <Code> for the event. These are required fields. Optionally, enter a <Description> for the event.
5. Select an <Event Type> from the drop-down menu.
There are four Event Type choices. The event type you choose will determine if any additional fields will be displayed on this screen.○ Entitlement becomes valid
If you select this event type, an additional field displays for you to select the <Background Job to Trigger Event>. All background jobs with the Job Type "Event Triggering: entitlement becomes valid" are displayed in the selection drop-down menu.You then will need to select the <Tolerance - Job Run Date> and <+(-) Days>.The background job will check is the Valid From date equals the Job Execution Date +(-) Tolerance Days. If yes, the event is triggered.
○ Entitlement becomes invalidIf you select this event type, an additional field displays for you to select the <Background Job to Trigger Event>. All background jobs with the Job Type "Event Triggering: entitlement becomes invalid" are displayed in the selection drop-down menu.You then will need to select the< Tolerance - Job Run Date> and <+(-) Day>s.The background job will check is the Valid To date equals the Job Execution Date +(-) Tolerance Days. If yes, the event is triggered.
○ Entitlement Saved○ Consumption Record Saved
6. Select whether< Event Detection> should be On or Off.
7. Configure the corresponding Relevance Conditions. The only required field in this section is <Entitlement Model>.
NoteYou can define the selection criteria in the Condition Table. You can set entitlement standard attributes and master data attributes as condition. Once you select entitlement model as condition, you can also pick up free defined attributes assigned to these models as condition.
The allowed free defined attributes are the common attributes of entitlement models set in the condition. If the event type is Consumption Records Saved, and you select Consumption Form as condition, you see an addition table to configure the condition with consumption form fields. If you select both Entitlement Model and Consumption Form as condition, you see another addition table to configure the condition with the remaining balance.
8. Select the Notification Type. There are two choices:
○ Send Notification ImmediatelyIf you select this, once the event is triggered, the corresponding outbound message will be sent to the configured system. You need to select a <Communication Channel> with the event notifcation outbound interface to indicate where the notifcation is sending to.
○ Send with Periodically Scheduled JobIf you select this, you need to select the <Background Job> from a dropdown list.
9. Click Save to save the new event or click Save and New to save the current event and begin creating a new event.
Application Help for SAP Entitlement ManagementOperations C O N F I D E N T I A L 117
5.4 Event Monitoring
Use the Event Monitoring tile to view the log of triggered events in the system.
Once an event is created and event detection is turned on, the system will capture the event when it is triggered. Events are triggered differently, depending on their defined Event Type. For Event Types "Entitlement Saved" and "Consumption Saved," once the record is saved and the saved data matches the event Relevance condition, the corresponding event is triggered. For Event Types "Entitlement Becomes Valid" and "Entitlement Becomes Invalid," the corresponding assigned background job compares the entitlement Valid From/Valid To dates with the Job Execution date and then triggers the corresponding event that matches the Relevance condition.
To see the list of triggered events, click the Event Monitoring tile in the Operations section of the Entitlement Management launch pad. For each event, the following fields are displayed:
● <Trace ID> - the ID of the triggered event instance● <Event Name> - name of the event● <Event Type> - the corresponding event type● <Event Time> - the time the event was triggered● <Notification Status> - indicates whether the notification was sent to the external system; possible
statuses are New, Sent, or Failed● <Notification Log ID> - the corresponding log ID in monitoring● <Document Number> - for an entitlement event, the Document Number is the entitlement number; for a
consumption event, the Document Number is the entitlement number/serial number
To view full details of an event, click on the <Event Name>. From the event details page, you can click Edit to make any desired changes.
To see the details of the notification, click on the <Notification Log ID>. The Inbound and Outbound Data Monitoring page is displayed with the notification details.
Click on a <Document Number> to open the Entitlement details page.
To delete events, select one or more from the list and click Delete. A confirmation dialog is displayed. Click Delete again to delete the selected events.
Parent topic: Operations [page 101]
Related Information
Inbound and Outbound Data Monitoring [page 102]Background Jobs [page 105]Events [page 115]
118 C O N F I D E N T I A LApplication Help for SAP Entitlement Management
Operations

6 System Administration
The System Administration section of the Entitlement Management System launch pad contains the system tiles that link to the necessary administration features of the system.
Use the tiles in the System Administration section to set up and maintain basic settings and functions of the system. The tiles included in this section are:
● System Settings● User Management● Data Migration● Transport● Communication Channel● Interfaces
See the appropriate topic for details on the features and functions available from each tile.
System Settings [page 120]Use the System Settings tile to view and maintain the general system settings and terms of use for the Entitlement Management system.
User Management [page 122]Use the User Management tile to view the user list and maintain the user validity for the Entitlement Management System.
Data Migration [page 123]Use the Data Migration tile of the System Administration section of the Entitlement Management System launch pad to import or export data using a data template based on the structure defined by the entitlement model.
Transport [page 126]Use the Transport tile from the System Administration section of the launch pad to define the settings to transport the configuration from this system (as a source system) to the target system (productive system).
Communication Channel [page 127]Use the Communication Channel tile to define the details of the outbound processing target of a message.
Interfaces - Inbound and Outbound [page 130]You use the Interfaces tile to view the defined interfaces and extend the Entitlement Generation Inbound Interface based on your business model in the SAP Entitlement Management System.
Related Information
Application Overview [page 4]Business Configuration [page 11]Customer Data and Offerings [page 64]
Application Help for SAP Entitlement ManagementSystem Administration C O N F I D E N T I A L 119

Entitlements Overview [page 68]Operations [page 101]Glossary [page 134]
6.1 System Settings
Use the System Settings tile to view and maintain the general system settings and terms of use for the Entitlement Management system.
Viewing the System General Settings
To access and view the System General Settings, select the System Settings tile in the System Administration section of the Entitlement Management System launch pad.
The System General Settings page displays by default, with the following information:
● <System Title>● <Logo of EMS>● <Industry>● <Default System Language>● <Maximum File Size>● <Corporate Time Zone>● <Trace Enabled> (true/false)
Modifying the System General Settings
To make any changes to these settings, click Edit in the footer toolbar.
Enter your changes or select your choices from the available drop-down lists.
NoteAny changes to the Corporate Time Zone will take effect in about an hour after you make the change due to the system cache.
Once you have made your changes, click Save.
120 C O N F I D E N T I A LApplication Help for SAP Entitlement Management
System Administration
Viewing the Terms of Use
Select Terms of Use from the panel on the left side of the System General Settings page. The Terms of Use page displays the following information:
● <Enable Terms of Use>● <Version>● <Switch Language of Term>● <Term>● <Terms of Use Version Logs> - this is a data display table with the following fields:
○ <Version>○ <Version Detail>○ <Accepted Users>○ <Created By>○ <Created At>
Modifying the Terms of Use
To make any changes to the Terms of Use, select Add New Version, Maintain New Language, orEdit from the footer toolbar.
Enter your changes or select your choices from the available drop-down lists.
Once you have made your changes, click Save.
Clearing Outdated Log Data
To define how you want to clear outdated log data, select Log Clearance from the panel on the left side of the System General Settings page. The Log Clearance page displays the settings for the timeframe for which to clear the data for: Clear Outdated Log for Inbound and Outbound Data and Clear Outdated Log for Event.
To change the timeframe, click Edit and then select one of the following options for each of the settings:
● <Never>● <1 year ago>● <6 months ago>● <3 months ago>
Once you have made your selections, click Save.
Parent topic: System Administration [page 119]
Application Help for SAP Entitlement ManagementSystem Administration C O N F I D E N T I A L 121

Related Information
User Management [page 122]Data Migration [page 123]Transport [page 126]Communication Channel [page 127]Interfaces - Inbound and Outbound [page 130]
6.2 User Management
Use the User Management tile to view the user list and maintain the user validity for the Entitlement Management System.
Viewing the User List
To access and view the full user list, select the User Management tile in the System Administration section of the launch pad.
The User List page displays by default, with the following information displayed in the display table:
● <E-mail>● <First Name>● <Last Name>● <Valid To>● <Sync Date>
To sort the list, click on the header of the column by which you want to sort and then select Ascending or Descending from the drop-down options.
You can search the list by email address or name, using the Search box.
Changing the Validity of a User
To make a change to the Validity To date for one or more users, select the checkbox for all desired users and click Change Validity in the bottom toolbar.
NoteIf you select multple users, the validity date will be changed for all selected users. If you want to assign different validity dates, you need to select the users separately.
Enter or select the new Valid To date in the <New Value> field of the pop-up dialog and click Save. The new Valid To date is displayed in the User List.
122 C O N F I D E N T I A LApplication Help for SAP Entitlement Management
System Administration
Parent topic: System Administration [page 119]
Related Information
System Settings [page 120]Data Migration [page 123]Transport [page 126]Communication Channel [page 127]Interfaces - Inbound and Outbound [page 130]
6.3 Data Migration
Use the Data Migration tile of the System Administration section of the Entitlement Management System launch pad to import or export data using a data template based on the structure defined by the entitlement model.
Before the migration starts, the data is converted into a Microsoft Excel template (.xls) based on the structure defined by the entitlement model. During data transformation, you must provide data for the attributes which are mandatory. After the data is filled in the template, you upload this template file into the Entitlement Management instance using the Import File tile on the Data Migration page. The migrator receives a report after the migration process and can take relevant actions in case of errors.
CautionBefore migrating your existing entitlements to the SAP Entitlement Management System, you must prepare the configurations in the system. You must do the following:
● Maintain basic configuration in cockpit (see Maintaining Basic Configurations [page 13])● Model entitlement (see Model New Entitlement [page 23])● Synchronize Customer Account and Offerings (see Customer Data and Offerings [page 64]● Map Entitlement Model to offerings (see Assign Entitlements to Offerings [page 48])
Once you have completed these prerequisites, you can start to import entitlements into the Entitlement Management System.
Import of entitlements from legacy system
Importing data is a two-step process:
● Generate or download an Excel template that is based on the chosen entitlement model and save it locally.● Enter the data and import the template into the system.
Export (download) of entitlements to the local operating system
You can export entitlements in an Excel format and save it locally. For each entitlement model, a Microsoft Excel file is generated with the structure same as the import template.
Application Help for SAP Entitlement ManagementSystem Administration C O N F I D E N T I A L 123

Importing Data [page 124]You can import data from an entitlement model in a Microsoft Excel template.
Exporting Data [page 125]You can export data from an entitlement model in a Microsoft Excel template.
Parent topic: System Administration [page 119]
Related Information
System Settings [page 120]User Management [page 122]Transport [page 126]Communication Channel [page 127]Interfaces - Inbound and Outbound [page 130]
6.3.1 Importing Data
You can import data from an entitlement model in a Microsoft Excel template.
Procedure
1. Select the Data Migration tile of the System Administration section of the Entitlement Management System launch pad.
2. On the Data Migration screen, click on the Download Template tile.
The system navigates to the Entitlement Model list screen.3. Select one or more entitlement models and choose Download in the footer toolbar.
The data is downloaded into a Microsoft Excel template (.xls) which is based on the structure of the entitlement model chosen.
4. Save the file locally.5. Enter the data in the file and save. Note that it is mandatory to maintain data in the fields are in red marked
with an asterix.
6. Go to the Import File tile and click on . Alternatively, you can drag and drop files from your local folder into the screen.
The system navigates to the templates files saved locally.7. Import the relevant file into the system.
The system checks for data consistency and if all the checks are passed, the file is imported into the system. In case of errors, the system displays the reason for the failure.
124 C O N F I D E N T I A LApplication Help for SAP Entitlement Management
System Administration

8. Click on the View Log tile.
The system displays the list of the migrated records and the corresponding administrative details.
Task overview: Data Migration [page 123]
Related Information
Exporting Data [page 125]
6.3.2 Exporting Data
You can export data from an entitlement model in a Microsoft Excel template.
Procedure
1. Select the Data Migration tile of the System Administration section of the Entitlement Management System launch pad.
2. On the Data Migration screen, click on the Export File tile.
The system navigates to a new screen.3. Enter the selection criteria to search for the relevant entitlement models.
For each entitlement model, a Microsoft Excel file is generated with the structure same as the import template.
4. Save the files locally.
The system displays a message with the number of entitlements exported successfully.
Task overview: Data Migration [page 123]
Related Information
Importing Data [page 124]
Application Help for SAP Entitlement ManagementSystem Administration C O N F I D E N T I A L 125
6.4 Transport
Use the Transport tile from the System Administration section of the launch pad to define the settings to transport the configuration from this system (as a source system) to the target system (productive system).
The Transport page has three tabs: Transport, History, and Maintain Target System.
The Transport tab is displayed by default when you open the Transport tile only if you have authorization to configure and sync system transports.
To define a transport, select the Target System and then set the Configuration From and Configuration To times. Once you select the target system, the Object List is populated. Select one or more objects from the list for transport and then click Sync.
Click the History tab to view the status and other details of the configurations sent to the target system. Click on the Objects to be Transported to view the configurations that have been transported. The number in this column is the number of records selected for this transport. When you click on the number, a pop-up displays showing the detail information of the transported objects and transport status. This applies to both the source and target system.
NoteIf the status is Success, the number under Object to be transported is equal to the number under Transported Objects. If the status is Error, the number under column Transported Objects is always 0.
You can sort the History list in order of Executed At times.
Click the Maintain Target System tab to maintain the target system to where you want the configuration transported. You can edit, add, or delete target systems on this screen.
To add a target system, click the plus ( + ) icon on the screen. In the pop-up dialog, enter the following information:
● Name - Name of the target system to which you want to transport the configuration● Technical User - Technical user account used to connect to the Target System● Technical Password - Password of the technical account● Tenant ID - tenant ID of the Target System● System Type - select from Acceptance, Product, or Test● URL - URL of the Target System
Parent topic: System Administration [page 119]
Related Information
System Settings [page 120]User Management [page 122]Data Migration [page 123]Communication Channel [page 127]Interfaces - Inbound and Outbound [page 130]
126 C O N F I D E N T I A LApplication Help for SAP Entitlement Management
System Administration

6.5 Communication Channel
Use the Communication Channel tile to define the details of the outbound processing target of a message.
The data is exchanged between the Entitlement Management system and external systems using the inbound or outbound interfaces. You use the communication channel to define the relationship of the interface and external target endpoint.
To access the Communication Channels list page, select the Communication Channel tile from the System Administration section of the Entitlement Management System launch pad.
On the Communication Channels list page, you can do the following:
● Search for a communication channel based on its name, ID, interface, and or destination● Create a communication channel for an interface● See the details of an existing communication channel● Copy data from an existing communication channel into a new channel and modify it per your business
requirements● Delete an existing communication channel
Creating a Communication Channel [page 128]You can create a new communication channel and maintain the necessary settings to send data to the external systems.
Copying a Communication Channel [page 129]You can copy the data from an existing communication channel and make changes as required to quickly and easily create a new communication channel.
Parent topic: System Administration [page 119]
Related Information
System Settings [page 120]User Management [page 122]Data Migration [page 123]Transport [page 126]Interfaces - Inbound and Outbound [page 130]
Application Help for SAP Entitlement ManagementSystem Administration C O N F I D E N T I A L 127

6.5.1 Creating a Communication Channel
You can create a new communication channel and maintain the necessary settings to send data to the external systems.
Procedure
1. Select the Communication Channel tile from the System Administration section of the Entitlement Management System launch pad.
2. On the Communication Channels list screen, click Create in the footer toolbar.
The system navigates to the Create New Communication Channel screen.3. Enter the name of the communication channel.4. Optionally, provide a description for the channel.5. Select or enter the interface name or ID from which the data should be sent to the external system.
If you select a response interface, an additional check box displays: Only triggered by specific request system. When you select this check box, an additional mandatory input field displays to allow you to fill in the request system. There is a parameter “sap-ems-req-sys-code” in the inbound interface header to allow users to specify the request system. Only requesst with a value of this parameter configured in “Request System” can trigger the corresponding communication channel to send out a response.
6. Select the destination name to which the outbound data must be sent using the communication channel.
A destination Uniform Resource Locator (URL) is generated to which the data is sent.
Note that the list of Destination Names only displays the configured destinations with the following authentication methods:○ Basic○ No Auth○ OAuth2ClientCredentials
7. Optionally, select the CSRF-Token enabled checkbox.
If you select this checkbox, an additional input field, Path to fetch token displays. This is an optional field.
If CSRF-Token is not enabled, EMS only sends one outbound request to configured destination.
If CSRF-Token is enabled, EMS sends out two requests. The first request fetches the CSRF token. This request will send to the patch configured in Path to Fetch Token. If this field is empty, the firstt request is sent to the same path as the second request.
If CSRF-Token Enabled is checked, no matter if the first request can get the token successfully or not, EMS sends out the second request. The status of the corresponding outbound message is the status of the second request.
8. Specify the end point relative path to host the URL.9. Specify the maximum records that can be sent to the target destination using this channel. Note that the
maximum records should not exceed ten thousand.10. Select either the Active or Inactive Status radio button. If the channel is inactive, no message will be sent
through this channel. You can always update this field, as necessary.
128 C O N F I D E N T I A LApplication Help for SAP Entitlement Management
System Administration

11. Click Save to save the new communication channel and navigate to its details screen or click Save and New to save the communication channel and begin creating another channel.
When you click Save, the system navigates to the details screen of the new communication channel.12. Check the header data under the title bar.
The system displays the data for the status under two tabs:○ Usage
Displays the background job (send entitlement) where this communication channel is used.○ Administration Data
Displays the administrative data for the communication channel.13. You can copy, edit, and delete an existing entitlement status. Note that you cannot edit or delete a
communication channel if it has been used in a background job.
Task overview: Communication Channel [page 127]
Related Information
Copying a Communication Channel [page 129]
6.5.2 Copying a Communication Channel
You can copy the data from an existing communication channel and make changes as required to quickly and easily create a new communication channel.
Procedure
1. Select the Communication Channel tile from the System Administration section of the Entitlement Management System launch pad.
2. On the Communication Channels list screen, select the checkbox of the existing communication channel you want to copy.
3. Click Copy in the footer toolbar.4. Check the data in the Copy Communication Channel screen.
The data from the source communication channel is copied into the new channel. The system appends the prefix Copy_ to the name of the channel.
5. Make any necessary changes and click Save to save the new communication channel.
The new channel is now available in the table on the Communcation Channels list screen.
Task overview: Communication Channel [page 127]
Application Help for SAP Entitlement ManagementSystem Administration C O N F I D E N T I A L 129

Related Information
Creating a Communication Channel [page 128]
6.6 Interfaces - Inbound and Outbound
You use the Interfaces tile to view the defined interfaces and extend the Entitlement Generation Inbound Interface based on your business model in the SAP Entitlement Management System.
Upon integration with upstream (Order system) and downstream system (Fulfillment system), data is exchanged between SAP Entitlement ManagementSsystem and these systems. You can view all the inbound and outbound integration interfaces and the structure for each interface. In addition, Entitlement Generation Inbound Interface can be enhanced by adding attributes to both header and item levels.
The Interface Configuration screen has the following features:
● You can search for an interface using its name or ID.● You can filter the interface by direction, that is Inbound or Outbound.● You can sort interfaces based on each column title.● All interfaces can be exported as XML Schema Definition (XSD). In addition, all inbound interfaces can be
exported as JavaScript Object Notation (JSON) with interfaceid.dataformat as the file name.● Besides predefined attributes, you can extend attributes in Entitlement Generation Inbound interface. New
extended attributes can be deleted if no inbound data has been imported into the Entitlement Management System.
NoteIf you click on the ID of any Inbound Interface rather than the Entitlement Generation, the link of the corresponding SAP API Hub document opens in a new window.
To send the entitlements to the fulfillment system, two entitlement outbound interfaces are available:
1. Entitlement Records Outbound Interface: This outbound interface is used to send out multiple entitlements. You must set a background job of the type Send Entitlement to trigger the process.
2. Entitlement Generation Response Outbound Interface: This outbound interface is triggered automatically once the execution of the entitlement generation interface is complete. You must configure the communication channel for this outbound interface to send the entitlements to the target system.
Besides these functions, you can perform multiple actions. For more details, see the appropriate related topic.
Exporting an Interface [page 131]You can export both inbound and outbound interfaces to different formats.
Extending Entitlement Generation Inbound Interface [page 132]You can extend the Entitlement Generation Inbound Interface by adding attributes as per your business requirements.
Parent topic: System Administration [page 119]
130 C O N F I D E N T I A LApplication Help for SAP Entitlement Management
System Administration

Related Information
System Settings [page 120]User Management [page 122]Data Migration [page 123]Transport [page 126]Communication Channel [page 127]
6.6.1 Exporting an Interface
You can export both inbound and outbound interfaces to different formats.
Procedure
1. On the Interfaces list screen, choose an interface and click Export in the footer toolbar.
The system displays the formats to which the interface can be exported.2. Select the appropriate format.
Note○ All inbound and outbound interfaces can be exported as XML Schema Definition (XSD).○ All inbound interfaces can be exported as JavaScript Object Notation (JSON) with
interfaceid.dataformat as the file name.○ Entitlement Generation Inbound Interface and Entitlement Simulation Inbound Interface can be
exported as XML.
3. Save the file with an appropriate file name.
Task overview: Interfaces - Inbound and Outbound [page 130]
Related Information
Extending Entitlement Generation Inbound Interface [page 132]
Application Help for SAP Entitlement ManagementSystem Administration C O N F I D E N T I A L 131

6.6.2 Extending Entitlement Generation Inbound Interface
You can extend the Entitlement Generation Inbound Interface by adding attributes as per your business requirements.
Procedure
1. In the Interfaces list screen, select and click on an Entitlement Generation Inbound Interface.
The system displays the data under three tabs:○ Details
Displays the structure of the interface and the attributes corresponding to each node in the structure.○ History
Displays the log of all the updates made to the interface.○ Administration Data
Displays the administrative data for the interface.2. Click the Edit button in the bottom of the toolbar.
The system displays the Entitlement Generation Inbound Interface details and the attributes.
3. Expand the Entitlement Generation Inbound Interface structure and the Item sub-node. Click to add a sub-node.
A new sub-node is added. The system displays the attributes of each node on the right side.4. You can change the Name and the Code, as required.
5. To add more attributes, click above the Items table.
A new row is added to the table.6. Enter the Name and Code and select the Data Type. Choose if the attribute is mandatory or not.
NoteIf you set the status of the attribute as mandatory, then interface mapping is required.
7. Save the data.
The new item is added to the interface structure.
NoteOnce the interface is enhanced and the added attributes are in use, you cannot change or delete the added attributes.
Task overview: Interfaces - Inbound and Outbound [page 130]
132 C O N F I D E N T I A LApplication Help for SAP Entitlement Management
System Administration

Related Information
Exporting an Interface [page 131]
Application Help for SAP Entitlement ManagementSystem Administration C O N F I D E N T I A L 133

7 Glossary
Common terms used in the SAP Entitlement Management solution are listed and defined in the Glossary.
Entitlement Management Glossary of Terms
Term Definition
attribute Freely defined property or characteristic of an entitlement, representing a value or information, depending on the particular entitlement.
attribute type There are three attribute types: Single Value, Table, and List. When the Attribute Type is List or Table, the Data Type can only be a string without the value list.
bundle Grouping of offerings or entitlements as a result of a marketing/license strategy to sell entitlements to multiple offerings as a single purchased item. Also called a suite when the offerings are closely related.
business category The classification of different entitlement models under different categories.
business rule A framework to determine eligible entitlements based on defined decision tables.
consumption Recorded usage of an entitlement. Also called usage.
consumption form A form used to define how the entitlements should be recorded, based on charactistics and key figures.
delivery unit An attribute of an entitlement typel used to define how the entitlement offer-ing's quantity is measured.
Entitlement A right to benefits specified by law or contract upon the purchase of hardware, software, support, training, and/or a maintenance program.
entitlement analytics Reporting on various aspects of the entitlement, giving the customer clarity on available entitlements and utilization.
entitlement attribute A characteristic used to define the entitlement. Also called just "attribute".
entitlement document A record of what the customer is entitled to for an entitlement. This includes things such as the status, validation period, quantity, and so on.
entitlement mapping A set of static attributes used to connect the commercial product and the entitlement.
Entitlement Model A categorization of an entitlement, determining the entitlement's structure. It is possible to assign a classification to the entitlement model.
134 C O N F I D E N T I A LApplication Help for SAP Entitlement Management
Glossary

Term Definition
entitlement repository Storage location for all generated entitlement transaction data.
entitlement status The state of an entitlement, used to manage the entitlement document process.
Entitlement Transfer The process of assigning an entitlement to a separate legal entity.
entitlement type A grouping of similarkinds of entitlements.
folder A system-generated grouping of entitlements at the customer level.
generation rule A processing rule that determines how the entitlement should be generated, based on defined workflows and conditions.
geolocation The identification or estimation of the real-world geographic location of an object that is used as an attribute at the entitlement record level.
license Defines the terms of use or boundries and conditions to use a service or product.
offering A complete set of commercial products and services offered by a company to its customers
Right Legal permission to use a service or product.
software entitlement Software license use rights as defined through agreements between a software licensor and a software consumer.
status model A workflow that defines the entitlement process with a status. Customers can customize the status model and assign it to an entitlement type as a means of entitlement management.
suite A grouping of products or entitlements as a result of a marketing/license strategy to sell entitlements to multiple products as a single purchased item. Used for groupsing that are more specific than bundles.
value list Predefined values that are used in the drop-down selection list of attributes.
Related Information
Application Overview [page 4]Business Configuration [page 11]Customer Data and Offerings [page 64]Entitlements Overview [page 68]Operations [page 101]System Administration [page 119]
Application Help for SAP Entitlement ManagementGlossary C O N F I D E N T I A L 135

Important Disclaimers and Legal Information
HyperlinksSome links are classified by an icon and/or a mouseover text. These links provide additional information.About the icons:
● Links with the icon : You are entering a Web site that is not hosted by SAP. By using such links, you agree (unless expressly stated otherwise in your agreements with SAP) to this:
● The content of the linked-to site is not SAP documentation. You may not infer any product claims against SAP based on this information.● SAP does not agree or disagree with the content on the linked-to site, nor does SAP warrant the availability and correctness. SAP shall not be liable for any
damages caused by the use of such content unless damages have been caused by SAP's gross negligence or willful misconduct.
● Links with the icon : You are leaving the documentation for that particular SAP product or service and are entering a SAP-hosted Web site. By using such links, you agree that (unless expressly stated otherwise in your agreements with SAP) you may not infer any product claims against SAP based on this information.
Beta and Other Experimental FeaturesExperimental features are not part of the officially delivered scope that SAP guarantees for future releases. This means that experimental features may be changed by SAP at any time for any reason without notice. Experimental features are not for productive use. You may not demonstrate, test, examine, evaluate or otherwise use the experimental features in a live operating environment or with data that has not been sufficiently backed up.The purpose of experimental features is to get feedback early on, allowing customers and partners to influence the future product accordingly. By providing your feedback (e.g. in the SAP Community), you accept that intellectual property rights of the contributions or derivative works shall remain the exclusive property of SAP.
Example CodeAny software coding and/or code snippets are examples. They are not for productive use. The example code is only intended to better explain and visualize the syntax and phrasing rules. SAP does not warrant the correctness and completeness of the example code. SAP shall not be liable for errors or damages caused by the use of example code unless damages have been caused by SAP's gross negligence or willful misconduct.
Gender-Related LanguageWe try not to use gender-specific word forms and formulations. As appropriate for context and readability, SAP may use masculine word forms to refer to all genders.
Videos Hosted on External PlatformsSome videos may point to third-party video hosting platforms. SAP cannot guarantee the future availability of videos stored on these platforms. Furthermore, any advertisements or other content hosted on these platforms (for example, suggested videos or by navigating to other videos hosted on the same site), are not within the control or responsibility of SAP.
136 C O N F I D E N T I A LApplication Help for SAP Entitlement Management
Important Disclaimers and Legal Information

Application Help for SAP Entitlement ManagementImportant Disclaimers and Legal Information C O N F I D E N T I A L 137
www.sap.com/contactsap
© 2019 SAP SE or an SAP affiliate company. All rights reserved.
No part of this publication may be reproduced or transmitted in any form or for any purpose without the express permission of SAP SE or an SAP affiliate company. The information contained herein may be changed without prior notice.
Some software products marketed by SAP SE and its distributors contain proprietary software components of other software vendors. National product specifications may vary.
These materials are provided by SAP SE or an SAP affiliate company for informational purposes only, without representation or warranty of any kind, and SAP or its affiliated companies shall not be liable for errors or omissions with respect to the materials. The only warranties for SAP or SAP affiliate company products and services are those that are set forth in the express warranty statements accompanying such products and services, if any. Nothing herein should be construed as constituting an additional warranty.
SAP and other SAP products and services mentioned herein as well as their respective logos are trademarks or registered trademarks of SAP SE (or an SAP affiliate company) in Germany and other countries. All other product and service names mentioned are the trademarks of their respective companies.
Please see https://www.sap.com/about/legal/trademark.html for additional trademark information and notices.
THE BEST RUN
Copyright © 2022 FDOKUMEN