IBM Security Identity Manager Version 6.0.0.18 - Your.Org
456
IBM Security Identity Manager Version 6.0.0.18 Administration Topics IBM
-
Upload
khangminh22 -
Category
Documents
-
view
0 -
download
0
Transcript of IBM Security Identity Manager Version 6.0.0.18 - Your.Org

IBM Security Identity ManagerVersion 6.0.0.18
Administration Topics
IBM

IBM Security Identity ManagerVersion 6.0.0.18
Administration Topics
IBM

ii IBM Security Identity Manager Version 6.0.0.18: Administration Topics

Table of contents
Table list . . . . . . . . . . . . . . vii
Chapter 1. User administration . . . . . 1User management . . . . . . . . . . . . 1
Creating user profiles . . . . . . . . . . 2Changing user profiles . . . . . . . . . . 4Deleting user profiles . . . . . . . . . . 5Transferring users . . . . . . . . . . . 6Suspending users . . . . . . . . . . . . 6Restoring users . . . . . . . . . . . . 7Recertifying users. . . . . . . . . . . . 8
Account management . . . . . . . . . . . 9Requesting an account for a user . . . . . . 10Viewing accounts for a user . . . . . . . . 11Viewing or changing account details . . . . . 12Deleting user accounts. . . . . . . . . . 12Suspending user accounts . . . . . . . . 13Restoring user accounts . . . . . . . . . 14
Access management . . . . . . . . . . . 15Requesting access for users . . . . . . . . 16Viewing access for users . . . . . . . . . 17Deleting user access . . . . . . . . . . 17
Password management . . . . . . . . . . 18Changing user passwords . . . . . . . . 18Resetting user passwords . . . . . . . . . 19Changing user passwords for sponsored accounts 20Resetting user passwords for sponsored accounts 21
Delegating activities . . . . . . . . . . . 22Delegating activities for another user . . . . . 23
Chapter 2. Login administration . . . . 25Enabling password expiration . . . . . . . . 25Setting a maximum number of login attempts . . . 25
Chapter 3. Password administration . . 27Enabling password resetting . . . . . . . . . 27
Hiding generated reset passwords . . . . . . 28Showing generated reset passwords . . . . . 28
Enabling password editing and changing . . . . 29Enabling password synchronization . . . . . . 30Setting a password when a user is created . . . . 31Setting a password retrieval expiration . . . . . 32Setting password notification . . . . . . . . 32Creating password strength rules . . . . . . . 33Enabling forgotten password authentication . . . 34
Configuring user-defined forgotten passwordquestions . . . . . . . . . . . . . . 35Configuring administrator-defined forgottenpassword questions. . . . . . . . . . . 35
Excluding specific passwords . . . . . . . . 37Passwords for system users . . . . . . . . . 38
Changing the itimuser user password . . . . 38Changing the db2admin user password forWindows . . . . . . . . . . . . . . 38Changing the ldapdb2 user password . . . . 39
Chapter 4. Organization administration 41Administrator domains . . . . . . . . . . 41Making a user a domain administrator . . . . . 42Creating a node in an organization tree . . . . . 42Changing a node in an organization tree . . . . 43Deleting a node in an organization tree . . . . . 43Transferring a business unit . . . . . . . . . 44
Business unit transfer activity completion mighttake a long time . . . . . . . . . . . . 44
Chapter 5. Security administration . . . 47View management . . . . . . . . . . . . 47
Creating a view . . . . . . . . . . . . 47Changing a view . . . . . . . . . . . 48Deleting a view . . . . . . . . . . . . 48Defining a custom task . . . . . . . . . 49Changing a custom task . . . . . . . . . 51Deleting a custom task . . . . . . . . . 52
Access control item management . . . . . . . 53Default access control items . . . . . . . . 54Creating an access control item . . . . . . . 59Changing an access control item . . . . . . 60Deleting an access control item . . . . . . . 61
Chapter 6. Role administration . . . . 63Role overview . . . . . . . . . . . . . 63Role hierarchy change enforcement . . . . . . 64Creating roles . . . . . . . . . . . . . 64Modifying roles . . . . . . . . . . . . . 65Values and formats for CSV access data (role) . . . 66Exporting access data for a role. . . . . . . . 67Importing access data for a role . . . . . . . 68Classifying roles . . . . . . . . . . . . . 69Specifying owners of a role . . . . . . . . . 70Displaying a role-based access in the user interface 71Role assignment attributes . . . . . . . . . 72
Defining assignment attributes when creating arole . . . . . . . . . . . . . . . . 74Defining assignment attributes for an existingrole . . . . . . . . . . . . . . . . 75Setting assignment attribute values to the usermembers of a role . . . . . . . . . . . 76Configuring access catalog information for a role 77
Deleting roles. . . . . . . . . . . . . . 79Managing users as members of a role . . . . . 79Adding users to membership of a role . . . . . 80Removing users from membership of a role . . . 82Managing child roles . . . . . . . . . . . 83Adding child roles to a parent role . . . . . . 84Removing child roles from a parent role . . . . . 85Creating an access type based on a role . . . . . 86Transferring roles . . . . . . . . . . . . 87
Chapter 7. Services administration. . . 89Service types . . . . . . . . . . . . . . 90
iii

Service status . . . . . . . . . . . . . . 92Creating services . . . . . . . . . . . . 93Creating a service that has manual connection mode 95Enabling connection mode . . . . . . . . . 98Creating manual services . . . . . . . . . . 99Changing services . . . . . . . . . . . . 101Changing connection mode from manual toautomatic . . . . . . . . . . . . . . 102Changing a manual service . . . . . . . . . 103Values and formats for CSV access data (service) 104Exporting access data for a service . . . . . . 105Importing access data for a service . . . . . . 106Configuring access catalog information for aservice. . . . . . . . . . . . . . . . 107Deleting services . . . . . . . . . . . . 108Management of reconciliation schedules . . . . 109
Reconciling accounts immediately on a service 112Creating a reconciliation schedule . . . . . 113Changing a reconciliation schedule . . . . . 114Deleting a reconciliation schedule . . . . . 115Configuring a manual service type to supportgroups. . . . . . . . . . . . . . . 116Reconciling accounts immediately on a service 116Example comma-separated value (CSV) file . . 117
Management of accounts on a service . . . . . 119Displaying accounts on a service . . . . . . 120Requesting accounts on a service . . . . . . 121Changing accounts on a service . . . . . . 122Deleting accounts from a service . . . . . . 123Suspending accounts on a service . . . . . 124Restoring accounts on a service . . . . . . 125Assigning an account to a user . . . . . . 127Orphan accounts . . . . . . . . . . . 128
Management of account defaults on a service . . 130Adding account defaults to a service . . . . 131Changing account defaults for a service . . . 132Removing account defaults from a service . . . 134Using global account defaults for the servicetype . . . . . . . . . . . . . . . 135
Service tagging . . . . . . . . . . . . . 136Adding the tag attribute to the service template 136Adding tags to the service . . . . . . . . 137
Policy enforcement . . . . . . . . . . . 137Configuring policy enforcement behavior . . . 140Configuring compliance alert rules . . . . . 142Enforcing policies . . . . . . . . . . . 143
Account recertification . . . . . . . . . . 144Displaying account recertification status . . . 144Recertifying accounts on a service . . . . . 145
Management of groups or access on a service . . 146Clearing access . . . . . . . . . . . . 148
Chapter 8. Group administration . . . 151Creating groups . . . . . . . . . . . . 151Viewing group membership . . . . . . . . 152Adding members to groups . . . . . . . . 153Removing members from groups . . . . . . . 155Modifying groups . . . . . . . . . . . . 156Values and formats for CSV access data (group) 157Exporting access data for a group . . . . . . 158Importing access data for a group . . . . . . 159
Deleting groups . . . . . . . . . . . . 160Defining access on a group . . . . . . . . . 162Configuring access catalog information for a group 163Recertifying access on a group . . . . . . . 165Enabling automatic group membership . . . . . 166
Chapter 9. Report administration . . . 167IBM Cognos reporting framework . . . . . . 168
IBM Cognos reporting framework overview . . 168Prerequisites for IBM Cognos report server . . 170Installation of IBM Cognos reportingcomponents . . . . . . . . . . . . . 171Configuration of IBM Cognos reportingcomponents . . . . . . . . . . . . . 172Importing the report package . . . . . . . 174Creating a data source . . . . . . . . . 175Enabling the drill-through for PDF format. . . 176Security layer configuration around the datamodel and reports . . . . . . . . . . . 176Globalization overview . . . . . . . . . 183Report models . . . . . . . . . . . . 184Report descriptions and parameters . . . . . 186Query subjects and query items for the reportmodels . . . . . . . . . . . . . . 196References . . . . . . . . . . . . . 277Troubleshooting report problems . . . . . . 283
IBM Security Identity Manager console reports . . 286Types of reports . . . . . . . . . . . 286Generating reports . . . . . . . . . . 289Regular expression notation usage for searching 291Report customization . . . . . . . . . . 291
Data synchronization . . . . . . . . . . . 314Data synchronization for reports . . . . . . 315Incremental data synchronizer overview . . . 318Utility for external report data synchronization 322
Access control items (ACI) for reports . . . . . 325ACI object filters used for reporting . . . . . 325
Chapter 10. Policy administration. . . 327Adoption policies . . . . . . . . . . . . 327
Creating an adoption policy . . . . . . . 328JavaScript examples for writing adoptionpolicies . . . . . . . . . . . . . . 329Changing an adoption policy . . . . . . . 331Deleting an adoption policy . . . . . . . 332Attribute matching . . . . . . . . . . 332Account reconciliation and orphan accounts . . 333
Identity policies . . . . . . . . . . . . 333Identities . . . . . . . . . . . . . . 334Identity policy script example (advancedapproach) . . . . . . . . . . . . . 334Creating an identity policy . . . . . . . . 336Changing an identity policy . . . . . . . 338Deleting an identity policy . . . . . . . . 338
Password policies . . . . . . . . . . . . 339Creating a password policy. . . . . . . . 340Adding targets to a password policy . . . . 341Creating a password policy rule . . . . . . 341Changing a password policy . . . . . . . 342Changing targets for a password policy . . . 343
iv IBM Security Identity Manager Version 6.0.0.18: Administration Topics

Changing a password policy rule. . . . . . 343Deleting a password policy. . . . . . . . 344Customized password rules . . . . . . . 344
Provisioning policies . . . . . . . . . . . 350Policy enforcement . . . . . . . . . . 351Provisioning policy parameter enforcement rules 351Creating a provisioning policy. . . . . . . 352Changing a provisioning policy . . . . . . 353Previewing a modified provisioning policy . . 354Creating a draft of an existing provisioningpolicy . . . . . . . . . . . . . . . 355Committing a draft provisioning policy . . . 356Deleting a provisioning policy. . . . . . . 357Managing provisioning policies by role. . . . 357
Recertification policies . . . . . . . . . . 358Recertification activities . . . . . . . . . 361Recertification message templates and schedule 362Recertification policy results . . . . . . . 363Creating an account recertification policy . . . 365Creating an access recertification policy . . . 366Creating a user recertification policy. . . . . 368Changing a recertification policy . . . . . . 369Deleting a recertification policy . . . . . . 370Recertification default notifications . . . . . 370
Separation of duty policies . . . . . . . . . 372ACI operations for the separation of duty policyprotection category . . . . . . . . . . 373Default ACIs for the separation of duty policy 374Separation of duty approval workflow operation 374Separation of duty policy violations andexemptions . . . . . . . . . . . . . 376Enabling the Manage Separation of DutyPolicies portfolio task. . . . . . . . . . 377Creating separation of duty policies . . . . . 378Modifying separation of duty policies . . . . 380Evaluating separation of duty policies . . . . 381Deleting separation of duty policies . . . . . 382Viewing policy violations and exemptions . . . 383Approving policy violations . . . . . . . 384Revoking policy exemptions . . . . . . . 385
Service selection policies. . . . . . . . . . 386Creating a service selection policy . . . . . 387Changing a service selection policy . . . . . 387Deleting a service selection policy . . . . . 388
Chapter 11. Workflow management 389Adding an entitlement workflow . . . . . . . 389Changing an entitlement workflow . . . . . . 390Deleting an entitlement workflow . . . . . . 391Creating a mail activity template with theworkflow designer . . . . . . . . . . . 391Workflow notification properties . . . . . . . 393
Configuring the workflow escalation period . . 394
Configuring the work item reminder intervaland reminder content. . . . . . . . . . 395Enabling workflow notification . . . . . . 396Disabling workflow notification . . . . . . 396Changing a workflow notification template . . 396Manually applying the email notificationtemplate changes for canceling a request . . . 397
Sample workflows. . . . . . . . . . . . 398Sample workflow: manager approval ofaccounts . . . . . . . . . . . . . . 398Sample workflow: multiple approvals . . . . 399Sample workflow: multiple approvals with loopprocessing . . . . . . . . . . . . . 402Sample workflow: RFI and subprocess . . . . 405Sample workflow: approval loop . . . . . . 406Sample workflow: mail activity . . . . . . 408Sample workflow: sequential approval for userrecertification with packaged approval node . . 409Sample workflow: packaged approval combinedwith simple approval node . . . . . . . . 412Sample workflow: access owner approval . . . 415
Chapter 12. Activity administration 419Viewing activities . . . . . . . . . . . . 419
Viewing activities for a user . . . . . . . 420Locking an activity . . . . . . . . . . . 420
Unlocking an activity. . . . . . . . . . 420Delegating activities . . . . . . . . . . . 421
Creating a delegation schedule . . . . . . 421Changing delegation schedules . . . . . . 422Deleting delegation schedules . . . . . . . 422
Assigning activities to another user . . . . . . 422Requests and activities . . . . . . . . . . 423Escalation . . . . . . . . . . . . . . 423Activity types . . . . . . . . . . . . . 425
Approval activities . . . . . . . . . . 425Request for information activities. . . . . . 426Work order activities . . . . . . . . . . 427Compliance alert activities . . . . . . . . 428Recertification activities . . . . . . . . . 430
Chapter 13. Requests administration 431Requests and activities . . . . . . . . . . 431
Request states . . . . . . . . . . . . 431Viewing all requests . . . . . . . . . . . 433Viewing pending requests of users . . . . . . 433Viewing all requests of users . . . . . . . . 434Viewing pending requests by service . . . . . 435Viewing all requests by service . . . . . . . 436Canceling pending requests . . . . . . . . 437
Index . . . . . . . . . . . . . . . 439
Table of contents v

vi IBM Security Identity Manager Version 6.0.0.18: Administration Topics

Table list
1. Default access control items . . . . . . . 542. CSV fields and values . . . . . . . . . 663. Part 1 of 2: Role access CSV file values,
formats . . . . . . . . . . . . . . 674. Part 2 of 2: Role access CSV file values,
formats . . . . . . . . . . . . . . 675. CSV fields and values. . . . . . . . . 1046. Part 1 of 2: Service access CSV file values,
formats . . . . . . . . . . . . . 1057. Part 2 of 2: Service access CSV file values,
formats . . . . . . . . . . . . . 1058. Default compliance alert settings . . . . . 1409. CSV fields and values. . . . . . . . . 158
10. Part 1 of 2: Group access CSV file values,formats . . . . . . . . . . . . . 158
11. Part 2 of 2: Group access CSV file values,formats . . . . . . . . . . . . . 158
12. Software requirements for IBM Cognos reportserver . . . . . . . . . . . . . . 170
13. Installation and data synchronization process 17214. Configure IBM Cognos reporting components 17315. LDAP advanced mapping values . . . . . 17716. Recertification model namespaces . . . . . 18517. Accounts model namespaces . . . . . . 18518. Provisioning model namespaces . . . . . 18519. Roles model namespaces . . . . . . . . 18520. Separation of duty model namespaces 18621. Access model namespaces . . . . . . . 18622. Reports and the namespaces . . . . . . 18723. Subreports . . . . . . . . . . . . 18724. Filters for access definition report . . . . . 18825. Filters for Account Status Report . . . . . 18926. Audit History subreports . . . . . . . 18927. Filters for access audit history report 19028. Filters for account audit history report 19029. Filters for Entitlements Report . . . . . . 19130. Recertification Definition subreports . . . . 19231. Filters for Recertification Definition Report 19232. Filters for Separation of Duty Policy
Definition Report . . . . . . . . . . 19333. Filters for Separation of Duty Policy Violation
Report . . . . . . . . . . . . . . 19334. Filters for Services Report . . . . . . . 19435. User Access subreports . . . . . . . . 19436. Filters for the User Access report - View by
Access report type . . . . . . . . . . 19437. Filters for the User Access report - View by
User report type . . . . . . . . . . 19538. Filters for User Recertification History Report 19539. Query subjects in the Recertification Audit
namespace for the recertification model . . . 19740. Query items in the Recertification Audit
namespace . . . . . . . . . . . . 19841. Query subjects in the Recertification
Config namespace . . . . . . . . . . 206
42. List of query items in the RecertificationConfig namespace . . . . . . . . . . 207
43. Query subjects in the Account Auditnamespace . . . . . . . . . . . . 213
44. Query items in the Account Audit namespace 21445. Query subjects in the Account Configuration
namespace . . . . . . . . . . . . 21746. Query items in the Account Configuration
namespace . . . . . . . . . . . . 21947. Query subjects in the Provisioning Policy
Audit namespace . . . . . . . . . . 22648. Query items in the Provisioning Policy
Audit namespace . . . . . . . . . . 22849. Query subjects in the Provisioning Policy
Config namespace . . . . . . . . . . 23050. Query items in the Provisioning Policy
Config namespace . . . . . . . . . . 23151. Query subjects in the Role Audit namespace 23352. List of query items in the Role Audit
namespace . . . . . . . . . . . . 23453. Query subjects in the Role Configuration
namespace . . . . . . . . . . . . 23654. List of query items in the Role Configuration
namespace . . . . . . . . . . . . 23855. Query subjects in the Separation of Duty
Audit namespace . . . . . . . . . . 24456. Query items in the Separation of Duty Audit
namespace . . . . . . . . . . . . 24557. Query subjects in the Separation of Duty
Configuration namespace . . . . . . . 24958. Query items in the Separation of Duty
Configuration namespace . . . . . . . 25059. Query subjects in the User Configuration
namespace . . . . . . . . . . . . 25160. List of query items in the User Configuration
namespace . . . . . . . . . . . . 25261. Query subjects in the Service Audit
namespace . . . . . . . . . . . . 25962. List of query items in the Service Audit
namespace . . . . . . . . . . . . 26063. Query subjects in the Access
Audit(Deprecated) namespace . . . . . . 26364. List of query items in the Access
Audit(Deprecated) namespace . . . . . . 26465. Query subjects in the Access Audit
namespace . . . . . . . . . . . . 26866. List of query items in the Access Audit
namespace . . . . . . . . . . . . 26967. Query subjects in the Access Configuration
namespace . . . . . . . . . . . . 27268. List of query items in the Access
Configuration namespace . . . . . . . 27369. Mapping the attributes and entities . . . . 27770. Basic tasks to configure report model 27971. Entities and Attributes . . . . . . . . 29772. Filter conditions . . . . . . . . . . 297
vii

73. Entities and attributes. . . . . . . . . 29874. Filter conditions . . . . . . . . . . 29975. Entities and attributes. . . . . . . . . 30076. Filter conditions . . . . . . . . . . 30177. User input values . . . . . . . . . . 30578. User input filters . . . . . . . . . . 30779. Specifying the location of the Java runtime
environment . . . . . . . . . . . . 32380. System attribute enforcement rules . . . . 35281. Recertification policies and access control
items . . . . . . . . . . . . . . 35982. Node properties: Sample workflow for
manager approval . . . . . . . . . . 39983. Node properties: Sample workflow for
multiple approvals . . . . . . . . . . 40084. Node properties: Sample workflow for
multiple approvals with loop processing . . 40385. Node properties: Sample workflow with an
RFI and a subprocess . . . . . . . . . 405
86. Node properties: Sample workflow with anapproval loop . . . . . . . . . . . 407
87. Node properties: sample workflow forpackaged approvals . . . . . . . . . 410
88. Link properties: sample workflow forpackaged approvals . . . . . . . . . 411
89. Sample workflow node properties: Simpleapproval for user recertification withpackaged approval node . . . . . . . . 412
90. Link properties: Simple approval for userrecertification . . . . . . . . . . . 414
91. Relevant Data . . . . . . . . . . . 41592. Node properties: Sample workflow for access
request. . . . . . . . . . . . . . 41693. States of approval activities . . . . . . . 42694. Descriptions of the states of RFIs . . . . . 42695. Descriptions of the states of work order
requests . . . . . . . . . . . . . 42896. Descriptions of the states of requests 431
viii IBM Security Identity Manager Version 6.0.0.18: Administration Topics
Chapter 1. User administration
You can manage people and their user accounts and access in IBM® SecurityIdentity Manager.
A person is an individual in the system that has a person record in one or morecorporate directories. Because information about a person can exist in the systemwithout a user account, the term user is often used to describe a person that hasprofile information in Security Identity Manager.
A user who has an Security Identity Manager service account is called a SecurityIdentity Manager user. Some people might not require an Security IdentityManager service account. For example, external customers or business partnerswho require access to a specific managed resource might not require an SecurityIdentity Manager account. However, they might be populated into the system aspersons.
Use the Manage Users page for the following tasks:v Create and delete profiles that define a person in the systemv Change a user's personal profilev Suspend or restore a personv Transfer a person to another business unitv Request an access or account for a personv Change or delete an access/account for a personv Change or reset user account passwordsv Delegate activities to a Security Identity Manager userv Recertify a user (Only system administrators can perform this task.)
User managementA user is an individual who uses IBM Security Identity Manager to manage theiraccounts. A person who has an Security Identity Manager account is a resourceuser. Users need different degrees of access to resources for their work. Some usersmust use a specific application, while other users must administer the system thatlinks users to the resources that their work requires.
Person profiles
A profile is a set of attributes that describe a person within the system, such as theuser name and contact information.
The specific information contained in the profile is defined by the systemadministrator.
Attributes
An attribute is a characteristic that describes an entity, such as a user, an account,or an account type.
1

For example, a user is an entity. Some of the attributes that make up a user entityare full name, home address, aliases, and telephone number. These attributes arepresented in the user personal profile. Attribute values can be modified, added,and deleted.
An attribute can be specified in an attribute field, as a filter, during a search for anaccount or user. Several attributes for accounts and account types can becustomized by your system administrator.
Aliases
An alias is an identity name for a user. A user can have multiple aliases to map tothe various user IDs that the user has for accounts.
A user can have several aliases; for example, GSmith, GWSmith, and SmithG.
Roles
Organizational roles are a method of providing users with entitlements to managedresources. These roles determine which resources are provisioned for a user or setof users who share similar responsibilities.
If users are assigned to an organizational role, the managed resources available tothat role then become available to those users. Those resources must be properlyassigned to that role.
A role might be a child role of another organizational role, which then becomes aparent role. The child role inherits the permissions of the parent role. In addition, arole might be a child role of another organizational role in a provisioning policy.The child role also inherits the permissions of provisioning policy.
Security Identity Manager groups
A group is a collection of Security Identity Manager users. Security IdentityManager users can belong to one or more groups. Groups are used to control useraccess to functions and data in Security Identity Manager.
Some users might belong to default groups that Security Identity Managerprovides. Your site might also create additional, customized groups. Each groupreferences a user category, which has a related set of default permissions andoperations, and views that the user can access.
Groups grant specific access to certain applications or other functions. For example,one group might have members that work directly with data in an accountingapplication. Another group might have members that provide help desk assistance.
Creating user profilesYou can create an IBM Security Identity Manager user profile for an individualwho requires one.
Before you begin
Depending on how your system administrator customized your system, you mightnot have access to this task. To obtain access to this task or to have someonecomplete it for you, contact your system administrator.
2 IBM Security Identity Manager Version 6.0.0.18: Administration Topics

If a new user requires a new business unit, create the business unit first. Abusiness unit might be necessary.
Procedure
To create an Security Identity Manager user, complete these steps:1. From the navigation tree, select Manage Users.2. On the Select a User page, click Create.3. On the Select User Type page, select the user type. To place the user under a
different business unit than the default, click Search to search for and select abusiness unit. Then, click Continue.
4. On the Create User page, click each tab and specify the required informationfor the user. The number of tabs that are displayed and the information in eachtab is determined by your system administrator.a. On the Personal Information tab, type information about the user in the
fields. To assign a role for this user, click Search to search and select anorganizational role. Then, click Business Information.
b. On the Business Information tab, type information about the user in thefields. Then, click Contact Information.
c. On the Contact Information tab, type information about the user in thefields. Then, click Assignment Attributes.
d. On the Assignment Attributes tab, specify values for the role assignmentattributes for the user that you are creating. You can specify values forattributes only if you assigned a role to this user, and the role or its parentrole contains assignment attributes.
Note: You cannot specify values in the following cases:v You did not assign a role.v You assigned a role, but either the role or its parent role does not have
assignment attributes.e. Click Continue.
5. On the Create a New Password page, provide a password for the user.6. Choose a time and date to schedule this operation. You can select Immediate,
or you can specify an effective date and time.7. Click Submit. The user is provisioned an Security Identity Manager account
with the password that you provide.8. On the Success page, click Close.9. On the Select a User page, click Refresh. The new user is displayed in the
Users table.
What to do next
You can now do other activities for the new user, such as requesting accounts andaccess.
“Defining assignment attributes when creating a role” on page 74When creating a role, you can optionally define assignment attributes to beassociated with the role.“Defining assignment attributes for an existing role” on page 75When modifying an existing role, you can optionally define assignmentattributes to be associated with the role.
Chapter 1. User administration 3

“Setting assignment attribute values to the user members of a role” on page 76You can set assignment attribute values to the user members of a staticorganizational role if you defined assignment attributes in the role definition.
Changing user profilesYou can change information that is associated with a IBM Security IdentityManager user by updating the user profile.
Before you begin
Depending on how your system administrator customized your system, you mightnot have access to this task. To obtain access to this task or to have someonecomplete it for you, contact your system administrator.
Procedure
To change a user profile, complete these steps:1. From the navigation tree, select Manage Users.2. On the Select a User page, complete these steps:
a. Type information about the user in the Search information field, select anattribute from the Search by list, and then click Search.
b. In the Users table, click the icon ( ) next to the name of the user whosepersonal profile you want to change, and click Change.
3. On the Change User page, click each tab and specify the required informationfor the user. The tabs that are displayed and the information in each tab isdetermined by your system administrator.a. On the Personal Information tab, type information about the user in the
fields. To assign a role for this user, click Search to search for and select anorganizational role. Then, click Business Information.
b. On the Business Information tab, type information about the user in thefields. Then, click Contact Information.
c. On the Contact Information tab, type information about the user in thefields. Then, click Assignment Attributes.
d. On the Assignment Attributes tab, specify values for the role assignmentattributes for the user that you are creating. You can specify values forattributes only if you assigned a role to this user, and the role or its parentrole contains assignment attributes.
Note: You cannot specify values in the following cases:v You did not assign a role.v You assigned a role, but either the role or its parent role does not have
assignment attributes.e. Click Continue.
4. When your changes are done, click Submit Now to save the changes, or clickSchedule Submission to select a date and time to schedule the change.
5. On the Success page, click Close.6. On the Select a User page, click Close.
“Defining assignment attributes when creating a role” on page 74When creating a role, you can optionally define assignment attributes to beassociated with the role.
4 IBM Security Identity Manager Version 6.0.0.18: Administration Topics

“Defining assignment attributes for an existing role” on page 75When modifying an existing role, you can optionally define assignmentattributes to be associated with the role.“Setting assignment attribute values to the user members of a role” on page 76You can set assignment attribute values to the user members of a staticorganizational role if you defined assignment attributes in the role definition.
Deleting user profilesYou can delete an IBM Security Identity Manager user profile. This action affectsall the accounts that are associated with the user.
Before you begin
Depending on how your system administrator customized your system, you mightnot have access to this task. To obtain access to this task or to have someonecomplete it for you, contact your system administrator.
About this task
When you delete a user, all the accounts that are associated with the user becomeorphan accounts. You can optionally choose to delete the individual accounts thatare associated with the user.
To delete a user:
Procedure1. From the navigation tree, select Manage Users.2. On the Select a User page:
a. Type information about the user in the Search information field, select anattribute from the Search by list, and then click Search.
b. In the Users table, select the check mark next to the name of the user youwant to delete. You can select one or more users to delete.
c. You might want to delete all of the individual accounts that are associatedwith the user that you select. Select the Include individual accounts whensuspending, restoring, or deleting users check box.
Note: Only the individual accounts that are associated with the user aredeleted. Sponsored accounts associated with the user are orphaned. For theITIM Service, both individual accounts and sponsored accounts associatedwith this user are deleted.
d. Click Delete.3. On the Confirm page, review the users and their accounts to be deleted.
Optionally, select a date and time to do the request.4. Click Delete to submit your request.5. On the Success page, click Close.6. On the Select a User page, click Close.
What to do next
Assign owners to orphaned accounts. See “Assigning an account to a user” onpage 127. If an account is no longer needed, delete the account. See “Deletingaccounts from a service” on page 123.
Chapter 1. User administration 5

Transferring usersWhen a user moves to a different business unit within the company, you cantransfer the user to another business unit.
Before you begin
Depending on how your system administrator customized your system, you mightnot have access to this task. To obtain access to this task or to have someonecomplete it for you, contact your system administrator.
Procedure1. From the navigation tree, select Manage Users.2. On the Select a User page, complete these steps:
a. Type information about the user in the Search information field, select anattribute from the Search by list, and then click Search.
b. In the Users table, select the check mark next to the full name of the useryou want to transfer. You can select one or more users to transfer.
c. Click Transfer.3. On the Business Unit page, complete the following steps:
a. Type information about the business unit in the Search information field,select an attribute from the Search by list, and then click Search.
b. In the Business Units table, click the radio button next to the business unitto which you want to transfer the user. Click OK.
4. On the Confirm page, review the users and their accounts. Optionally, select adate and time to do the request, and then click Transfer to submit your request.
5. On the Success page, click Close.6. On the Select a User page, click Close.
Suspending usersWhen a user leaves the company and no longer needs access to IBM SecurityIdentity Manager, you can suspend the system access that the user has.
Before you begin
Depending on how your system administrator customized your system, you mightnot have access to this task. To obtain access to this task or to have someonecomplete it for you, contact your system administrator.
About this task
To suspend a user, complete these steps:
Procedure1. From the navigation tree, select Manage Users.2. On the Select a User page, complete these steps:
a. Type information about the user in the Search information field, select anattribute from the Search by list, and then click Search.
b. In the Users table, select the check mark next to the full name of the useryou want to suspend. You can select one or more users to suspend.
6 IBM Security Identity Manager Version 6.0.0.18: Administration Topics

c. To suspend all of the individual accounts that belong to the user that youselected, select the Include individual accounts when suspending,restoring, or deleting users check box.
Note: Sponsored accounts are not affected. You might want to customizethe suspend user operation to handle sponsored accounts. For example,have the operation transfer the sponsored accounts to the service owner orthe manager of the user who is suspended.
d. Click Suspend.3. On the Confirm page, review the users and their accounts to be suspended.
Optionally select a date and time to do the request, and then click Suspend tosubmit your request.
4. On the Success page, click Close.5. On the Select a User page, click Close.
Restoring usersWhen a user is suspended, all the associated user accounts become inactive.Restoring an inactive user returns the user accounts to an active state.
Before you begin
Depending on how your system administrator customized your system, you mightnot have access to this task. To obtain access to this task or to have someonecomplete it for you, contact your system administrator.
About this task
To restore a user, complete these steps:
Procedure1. From the navigation tree, select Manage Users.2. On the Select a User page, complete these steps:
a. Type information about the user in the Search information field, select anattribute from the Search by list, and then click Search.
b. To restore all of the individual accounts that belong to the user that youselected, select the Include individual accounts when suspending,restoring, or deleting users check box.
Note: Sponsored accounts associated with the user are not affected. Asuspended sponsored account must be restored through the account table.
c. In the Users table, click the icon ( ) next to the name of the user you wantto restore.
d. Click Restore.If a password is required to restore the individual accounts of the user, youare prompted to change the password.
If password synchronization is enabled
v Individual accounts use the existing synchronized password. Youare not prompted to change the password for individualaccounts.
v If no synchronized password exists, you are prompted to changethe password. The passwords for all the individual accountsassociated with the user are changed to the new password.
Chapter 1. User administration 7

If password synchronization is disabledYou are prompted to change the password. The passwords for allthe listed individual accounts are changed to the new password.Individual accounts on services that do not require passwordchange on user restore are not affected by the password change.
3. If you want to schedule your change request for a later date and time, selectEffective Date.a. Click the calendar and clock icons to select a date and time.b. Click Submit.
4. On the Success page, click Close.5. Click Refresh to verify that the user is returned to active status.
What to do next
View the accounts for the restored user to ensure that the account status is active.Perform additional user administration tasks on the Select a User page, or clickClose to exit the page.
Recertifying usersYou can select a recertification policy and run that policy for a specific user. Onlyuser recertification policies that are enabled can be located and run.
Before you begin
Only system administrators can perform this task.
About this task
You might need to run a recertification policy for a specific user for one of thefollowing reasons:v The recertification status is erroneous or needs to be changed.v It might be necessary to override the results of one particular recertification
policy with another.
To recertify a user, complete these steps:
Procedure1. From the navigation tree, click Manage Users. The Manage Users page is
displayed.2. On the Manage Users page, complete these steps:
a. Type information about the user in the Search information field, select anattribute from the Search by list, and then click Search. A list of users thatmatch the search criteria is displayed.If the table contains multiple pages, you can:v Click the arrow to go to the next page.v Type the number of the page that you want to view and click Go.
b. In the Users table, click the icon ( ) next to the user that you want torecertify, and then click Recertify. The Select a Recertification Policy page isdisplayed.
3. On the Select a Recertification Policy page, complete these steps:a. Type information about the policy in the Search information field.
8 IBM Security Identity Manager Version 6.0.0.18: Administration Topics
b. In the Search by field, specify whether to search for policy names ordescriptions, and then click Search. A list of policies that match the searchcriteria is displayed.If the table contains multiple pages, you can:v Click the arrow to go to the next page.v Type the number of the page that you want to view and click Go.
c. In the Recertification Policies table, select the policy that you want to run,and then click Run. A confirmation page is displayed.
4. On the Confirm page, click Run.
Results
A Success page is displayed, indicating that you successfully submitted a requestto recertify the user.
What to do next
On the Success page, click Close.
Account managementYou can manage accounts for users in IBM Security Identity Manager.
Accounts
An account is the set of parameters for a managed resource that defines an identity,user profile, and credentials.
An account defines login information (your user ID and password, for example)and access to the specific resource with which it is associated.
In IBM Security Identity Manager, accounts are created on services, whichrepresent the managed resources such as operating systems (UNIX), applications(Lotus Notes®), or other resources.
Accounts, when owned, are either individual or sponsored. Individual accounts arefor use by a single owner and have an ownership type of Individual. Sponsoredaccounts are assigned to owners who are responsible for the accounts, but mightnot actually use them to access resources. Sponsored accounts can have varioustypes of non-Individual ownership types. IBM Security Identity Manager suppliesthree ownership types for sponsored accounts Device, System, and Vendor. Youcan create additional ownership types for sponsored accounts by using theConfigure System utility.
Accounts are either active or inactive. Accounts must be active to log in to thesystem. An account becomes inactive when it is suspended. For example, a requestto recertify your account usage might be declined and the recertification action issuspend. Suspended accounts still exist, but they cannot be used to access thesystem. System administrators can restore and reactivate a suspended account ifthe account is not deleted.
Chapter 1. User administration 9

Account types
An account type represents a managed resource, such as an operating system, adatabase application, or another application that IBM Security Identity Managermanages. For example, an account type might be a Lotus Notes application.
Users access these account types by receiving an account on the managed resource.Contact your system administrator for additional information about the accounttypes that are available in your environment.
Requesting an account for a userYou can request an account for a user.
Before you begin
Depending on how your system administrator customized your system, you mightnot have access to this task. To obtain access to this task or to have someonecomplete it for you, contact your system administrator.
Before you can request an account on a service, you must create that service. Youmust also define appropriate Service ACIs to enable the non-administrative usersto search the services on the Request an Account>Select a Service page.
About this task
To request an account for a user, complete these steps:
Procedure1. From the navigation tree, select Manage Users.2. On the Select a User page, complete these steps:
a. Type information about the user in the Search information field, select anattribute from the Search by list, and then click Search.
b. In the Users table, click the icon ( ) next to the name of the user who youwant to request an account for.
c. Click Request accounts. The Select a Service page is displayed.3. On the Select a Service page, complete these steps:
a. Type information about the service in the Search information field, selectan option in the Search by field, select an attribute from the Service typelist, and then click Search.
Note: Service ACIs must be defined to enable the non-administrative usersto search the services.
b. In the Services table, select the service on which you want to request anaccount.
c. Click Continue. The Select an Ownership Type page is displayed.4. Select the ownership type for the account, and then click Continue. The
number of ownership types is determined by the provisioning policyentitlements for the service. The default provisioning policy entitles accounts tothe Individual ownership type. Any additional ownership types must be addedto the provisioning policy for the service.
10 IBM Security Identity Manager Version 6.0.0.18: Administration Topics

Note: If only one ownership type is entitled, this page is not displayed. Allaccounts are created with that ownership type. For example, if the defaultprovisioning policy is used, all accounts are created as individual accounts.The User page is displayed.
5. On the User page, complete these steps:a. Click each tab and specify the required information for that account. The
tabs that are displayed vary based on the type of service that you selected.For example, for the AIX® service, account information, access information,and administration information pages is displayed.
b. If password editing is disabled, click Submit Now to complete the request,or click Schedule Submission to select a date and time to schedule therequest.
c. If password editing is enabled, click Continue to proceed to the Passwordpage. Create a password for the account you are requesting. To specify apassword for the account, select whether you want to have the systemgenerate the password or to specify the password now. Click Submit Nowto complete the request, or click Schedule Submission to select a date andtime to schedule the request. If you specify a password, the password mustconform to the password strength rules for the account.
6. On the Success page, click Close.7. On the Manage Accounts page, click Close.
Viewing accounts for a userYou can view a list of accounts for users in IBM Security Identity Manager.
Before you begin
Depending on how your system administrator customized your system, you mightnot have access to this task. To obtain access to this task or to have someonecomplete it for you, contact your system administrator.
About this task
To view a list of accounts for a user, complete these steps:
Procedure1. From the navigation tree, select Manage Users.2. On the Select a User page, complete these steps:
a. Type information about the user in the Search information field, select anattribute from the Search by list, and then click Search.
b. In the Users table, click the icon ( ) next to the name of the user whoseaccounts you want to view, and click Accounts.
3. On the Accounts page, complete these steps:a. Type information about the account in the Account information field.b. In the Search by field, specify whether the search is to be done against user
IDs or owners.c. In the Ownership type field, select an ownership type, and then click
Search or Advanced, depending on the type of search you want to do. Theadvanced search option opens a new page where you can specify additionalsearch criteria.
4. On the Accounts page, when you are done viewing accounts, click Close.
Chapter 1. User administration 11
Viewing or changing account detailsYou can view or change account details for user accounts in IBM Security IdentityManager.
Before you begin
Depending on how your system administrator customized your system, you mightnot have access to this task. To obtain access to this task or to have someonecomplete it for you, contact your system administrator.
About this task
To view or change account details for a user, complete these steps:
Procedure1. From the navigation tree, select Manage Users.2. On the Select a User page, complete these steps:
a. Type information about the user in the Search information field, select anattribute from the Search by list, and then click Search.
b. In the Users table, click the icon ( ) next to the name of the user whoseaccounts you want to view or change, and click Accounts.
3. On the Accounts page, complete these steps:a. Type information about the account in the Account information field.b. In the Search by field, specify whether the search is to be done against user
IDs or owners.c. In the Ownership type field, select an ownership type, and then click
Search or Advanced, depending on the type of search you want to do. Theadvanced search option opens a new page where you can specify additionalsearch criteria.
4. On the Accounts page, click the user ID to view or change account details.5. On the Account Information page, view account details, or if you want to
change account details, specify the required information for the user. The tabsthat are displayed and the information in each tab is determined by yoursystem administrator. When your changes are done, click Submit Now to savethe changes, or click Schedule Submission to select a date and time toschedule the change.
Note: When you change account information for the administrator account,such as ITIM Manager, there might be limitations on which information youcan change. If the administrator account is configured to use an authenticationrepository other than ITIM service, you cannot force the account to changepassword at the next login. When the authentication repository is not ITIMService, IBM Security Identity Manager does not manage the password.
6. On the Success page, click Close.7. On the Accounts page, when you are done viewing accounts, click Close.
Deleting user accountsYou can delete accounts for users in IBM Security Identity Manager.
12 IBM Security Identity Manager Version 6.0.0.18: Administration Topics

Before you begin
Depending on how your system administrator customized your system, you mightnot have access to this task. To obtain access to this task or to have someonecomplete it for you, contact your system administrator.
About this task
To delete user accounts, complete these steps:
Procedure1. From the navigation tree, select Manage Users.2. On the Select a User page, complete these steps:
a. Type information about the user in the Search information field, select anattribute from the Search by list, and then click Search.
b. In the Users table, click the icon ( ) next to the name of the user whoseaccounts you want to delete, and click Accounts.
3. On the Accounts page, complete these steps:a. Type information about the account in the Account information field.b. In the Search by field, specify whether the search is to be done against user
IDs or owners.c. In the Ownership type field, select an ownership type, and then click
Search or Advanced, depending on the type of search you want to do. Theadvanced search option opens a new page where you can specify additionalsearch criteria.
4. On the Accounts page, select the check mark next to any accounts you want todelete that are associated with a specific user ID and service name. You canselect one or more user accounts to delete. Click Delete.
5. On the Confirm page, verify that you want to delete the listed accounts,optionally select a date and time to do the request, and then click Delete.
6. On the Success page, click Close.7. On the Manage Accounts page, click Close.
Suspending user accountsYou can suspend user accounts in IBM Security Identity Manager. When yoususpend an account, it becomes inactive.
Before you begin
Depending on how your system administrator customized your system, you mightnot have access to this task. To obtain access to this task or to have someonecomplete it for you, contact your system administrator.
About this task
To suspend user accounts, complete these steps:
Procedure1. From the navigation tree, select Manage Users.2. On the Select a User page, complete these steps:
a. Type information about the user in the Search information field, select anattribute from the Search by list, and then click Search.
Chapter 1. User administration 13

b. In the Users table, click the icon ( ) next to the name of the user whoseaccount you want to suspend, and click Accounts.
3. On the Accounts page, complete these steps:a. Type information about the account in the Account information field.b. In the Search by field, specify whether the search is to be done against user
IDs or owners.c. In the Ownership type field, select an ownership type, and then click
Search or Advanced, depending on the type of search you want to do. Theadvanced search option opens a new page where you can specify additionalsearch criteria.
4. On the Accounts page, select the accounts you want to suspend that areassociated with a specific user ID and service name. You can select one or moreuser accounts to suspend. Click Suspend.
5. On the Suspend Accounts page, verify that you want to suspend the listedaccounts. Optionally, select a date and time to do the request, and then clickSuspend.
6. On the Success page, click Close.7. On the Manage Accounts page, click Close.
Restoring user accountsYou can restore inactive user accounts that were suspended in IBM SecurityIdentity Manager. When you restore an account, it becomes active again.
Before you begin
Depending on how your system administrator customized your system, you mightnot have access to this task. To obtain access to this task or to have someonecomplete it for you, contact your system administrator.
About this task
To restore a user account, complete these steps:
Procedure1. From the navigation tree, select Manage Users.2. On the Select a User page, complete these steps:
a. Type information about the user in the Search information field, select anattribute from the Search by list, and then click Search.
b. In the Users table, click the icon ( ) next to the name of the user whoseaccount you want to restore, and click Accounts.
3. On the Accounts page, complete these steps:a. Type information about the account in the Account information field.b. In the Search by field, specify whether the search is to be done against user
IDs or owners.c. In the Ownership type field, select an ownership type, and then click
Search or Advanced, depending on the type of search you want to do. Theadvanced search option opens a new page where you can specify additionalsearch criteria.
4. On the Accounts page, select the check marks next to the accounts that youwant to restore. The account is associated with a specific user ID and servicename. Click Restore.
14 IBM Security Identity Manager Version 6.0.0.18: Administration Topics

Note: If a password is required to restore the selected accounts, you areprompted to change the password for those accounts.
If password synchronization is enabled
v Individual accounts use the existing synchronized password. You arenot prompted to change the password for individual accounts. If youare restoring sponsored accounts, you are prompted to change thepassword for those listed accounts. The passwords for all listedsponsored accounts are changed to the new password.
v If no synchronized password exists, you are prompted to change thepasswords for all listed accounts regardless of ownership type. Thepasswords for all the listed accounts are changed to the newpassword. If you change the password of an individual account, thepassword change applies to all individual accounts. The passwordsfor individual accounts not listed are synchronized to the newpassword.
If password synchronization is disabledYou are prompted to change the password. The passwords for all listedaccounts regardless of ownership type are changed to the newpassword.
5. On the Restore Accounts page, verify that you want to restore the listedaccount. Optionally select a date and time to do the request. Click Submit.
6. On the Success page, click Close.7. On the Manage Accounts page, click Close.
What to do next
View the accounts of the user to ensure that the account is active.
Access managementYou can manage access to resources for users in IBM Security Identity Manager.Access is your ability to use a specific resource, such as a shared folder or anapplication.
Access
In IBM Security Identity Manager, access can be created to represent access toaccess types such as shared folders, applications (such as Lotus Notes), emailgroups, or other managed resources.
An access differs from an account in that an account is a form of access; an accountis access to the resource itself.
Access is the permission to use the resource. Access entitlement defines the conditionthat grants access to a user with a set of attribute values of a user's account on themanaged resource. In IBM Security Identity Manager, an access is defined on anexisting group on the managed service. In this case, the access is granted to a userby creating an account on the service and assigning the user to the group. Accessentitlement can also be defined as a set of parameters on a service account thatuses a provisioning policy.
When a user requests new access, by default an account is created on that service.If an account exists, the account is modified to fulfill the access entitlement. Forexample, you can assign the account to the group that grants access to an access
Chapter 1. User administration 15

type. If one account exists, the account is associated with the access. If multipleaccounts exist, you must select the user ID of the account to which you want toassociate your access.
An access is often described in terms that can be easily understood by businessusers.
Requesting access for usersYou can request access for a user. Access gives the user the ability to use a specificresource.
Before you begin
Depending on how your system administrator customized your system, you mightnot have access to this task. To obtain access to this task or to have someonecomplete it for you, contact your system administrator.
Before you can request access, you must create an access entitlement for a service.
About this task
Only access associated with entitlements of the ownership type Individual can begranted (request by users). If you request access for a user with a sponsoredaccount, an individual account is automatically created. For example, you requestaccess for a user whose preferred user ID is jdoe. The user account is a sponsoredaccount with the ownership type Vendor. A user ID jdoe1 is created with anindividual account for the requested access.
To request access for a user, complete these steps:
Procedure1. From the navigation tree, select Manage Users.2. On the Select a User page, complete these steps:
a. Type information about the user in the Search information field, select anattribute from the Search by list, and then click Search.
b. In the Users table, click the icon ( ) next to the name of the user who youwant to request access for.
c. Click Request access to display the Select Access page.3. On the Select Access page, complete these steps:
a. Type information about the service in the Access information field, selectan access type from the Access type tree, and then click Search.
b. In the Access table, select the access that you want to request.c. Click Continue.
4. On the Select Accounts page, select one or more accounts that you arerequesting the access for. This page is displayed only if more than oneindividual account exists.
5. Click Submit to complete the request, or click Schedule Submission to select adate and time to schedule the request.
6. On the Success page, click Close.7. On the Select Access page, click Close.
16 IBM Security Identity Manager Version 6.0.0.18: Administration Topics

Viewing access for usersYou can view access for a user.
Before you begin
Depending on how your system administrator customized your system, you mightnot have access to this task. To obtain access to this task or to have someonecomplete it for you, contact your system administrator.
About this task
To view access for a user, complete these steps:
Procedure1. From the navigation tree, select Manage Users.2. On the Select a User page, complete these steps:
a. Type information about the user in the Search information field, select anattribute from the Search by list, and then click Search.
b. In the Users table, click the icon ( ) next to the name of the user for whichyou want to view access.
c. Click Access.3. When you are finished viewing access entitlements, on the Manage Access
page, click Close.
Deleting user accessYou can delete access for users in IBM Security Identity Manager.
Before you begin
Depending on how your system administrator customized your system, you mightnot have access to this task. To obtain access to this task or to have someonecomplete it for you, contact your system administrator.
About this task
To delete access for a user, complete these steps:
Procedure1. From the navigation tree, select Manage Users.2. On the Select a User page, complete these steps:
a. Type information about the user in the Search information field, select anattribute from the Search by list, and then click Search.
b. In the Users table, click the icon ( ) next to the name of the user whoseaccounts you want to delete, and click Access.
3. On the Access page, select the check mark next to the access you want to deletethat is associated with a specified access name. Click Delete.
4. On the Confirm page, verify that you want to delete the listed access,optionally select a date and time to do the request, and then click Delete.
5. On the Success page, click Close.6. On the Access page, click Close.
Chapter 1. User administration 17

Password managementThere are two ways to manage passwords in IBM Security Identity Manager.
When password editing is enabled, you can supply user passwords with theChange Passwords task. When password editing is disabled, you can reset userpasswords with the Reset Passwords task.
Changing user passwordsWhen you have the appropriate authority, you can change the password for one ormore, or all, of the accounts of other users.
Before you begin
Depending on how your system administrator customized your system, you mightnot have access to this task. To obtain access to this task or to have someonecomplete it for you, contact your system administrator.
About this task
If password editing is disabled, you must use the Reset Passwords option tomodify passwords because you do not have access to the Change Passwords task.
If password synchronization is enabled, the password is changed for all of theindividual accounts automatically.
If password synchronization is not enabled, you can choose which accounts youwant to change the password for.
Password synchronization applies only to individual accounts. Sponsored accountsare not affected by password synchronization. A user can specify differentpasswords for sponsored accounts.
To change passwords for other users, complete these steps:
Procedure1. From the navigation tree, select Manage Users.2. On the Select a User page, complete these steps:
a. Type information about the user for whom you are changing passwords inthe Search information field, select an attribute from the Search by list, andthen click Search.
b. In the Users table, click the icon ( ) next to the name of the user whosepasswords you want to change, and click Change Passwords.
3. On the Change Passwords page, complete these steps:a. Select how you want the password to be generated. If you select to type a
new password, type and confirm the password.b. Select the accounts that you want to change the password for.
Note: If password synchronization is enabled and you are changing thepassword for individual accounts, a list of individual accounts is displayed.This list displays the number of accounts up to the maximum search limit.These accounts are not selectable. The password change applies to allindividual accounts. The individual accounts that are not listed are alsochanged.
18 IBM Security Identity Manager Version 6.0.0.18: Administration Topics

c. If you want to schedule your change request for a later date and time, clickthe icon ( ) next to Schedule. Select Effective Date, and click the calendarand clock icons to select a date and time.
d. Click Submit.4. On the Success page, click Close.
“Resetting user passwords”When you have the appropriate authority, you can reset the password for oneor more, or all, of the accounts of other users.“Changing user passwords for sponsored accounts” on page 20When you have the appropriate authority, you can change the password for oneor more, or all, of the accounts of other users.“Resetting user passwords for sponsored accounts” on page 21When you have the appropriate authority, you can reset the password for oneor more, or all, of the accounts of other users.
Resetting user passwordsWhen you have the appropriate authority, you can reset the password for one ormore, or all, of the accounts of other users.
Before you begin
Depending on how your system administrator customized your system, you mightnot have access to this task. To obtain access to this task or to have someonecomplete it for you, contact your system administrator.
About this task
If password editing is enabled, you must use the Change Passwords option tomodify passwords because you do not have access to the Reset Passwords task.
If password synchronization is enabled, the password is changed for all of theindividual accounts automatically.
If password synchronization is not enabled, you can choose which accounts youwant to change the password for.
Password synchronization applies only to individual accounts. Sponsored accountsare not affected by password synchronization. A user can specify differentpasswords for sponsored accounts.
To reset passwords for other users, complete these steps:
Procedure1. From the navigation tree, select Manage Users.2. On the Select a User page, complete these steps:
a. Type information about the user for whom you are resetting passwords inthe Search information field, select an attribute from the Search by list, andthen click Search.
b. In the Users table, click the icon ( ) next to the name of the user whosepasswords you want to reset, and click Change Passwords.
3. On the Reset Passwords page, complete these steps:a. Select the accounts that you want to reset the password for.
Chapter 1. User administration 19

Note: If password synchronization is enabled and you are resetting thepassword for individual accounts, a list of individual accounts is displayed.This list displays the number of accounts up to the maximum search limit.These accounts are not selectable. The password reset applies to allindividual accounts. The individual accounts not listed are also changed.
b. If you want to schedule your change request for a later date and time, clickthe icon ( ) next to Schedule. Select Effective Date, and click the calendarand clock icons to select a date and time.
c. Click Submit.4. On the Success page, click Close.
“Changing user passwords” on page 18When you have the appropriate authority, you can change the password for oneor more, or all, of the accounts of other users.“Changing user passwords for sponsored accounts”When you have the appropriate authority, you can change the password for oneor more, or all, of the accounts of other users.“Resetting user passwords for sponsored accounts” on page 21When you have the appropriate authority, you can reset the password for oneor more, or all, of the accounts of other users.
Changing user passwords for sponsored accountsWhen you have the appropriate authority, you can change the password for one ormore, or all, of the accounts of other users.
Before you begin
Depending on how your system administrator customized your system, you mightnot have access to this task. To obtain access to this task or to have someonecomplete it for you, contact your system administrator.
About this task
If password editing is disabled, you must use the Reset Passwords option tomodify passwords because you do not have access to the Change Passwords task.
Password synchronization applies only to individual accounts. Sponsored accountsare not affected by password synchronization. A user can specify differentpasswords for sponsored accounts.
To change passwords for other users, complete these steps:
Procedure1. From the navigation tree, select Manage Users.2. On the Select a User page, complete these steps:
a. Type information about the user for whom you are changing passwords inthe Search information field, select an attribute from the Search by list, andthen click Search.
b. In the Users table, click ( ) next to the name of the user whose passwordsyou want to change, and click Accounts.
c. On the Accounts page, type information about the account that you arechanging password for in the Search information field. Select an attributefrom the Search by list, and select an ownership type. Click Search.
20 IBM Security Identity Manager Version 6.0.0.18: Administration Topics

d. Click ( ) next to the name of the account, and click Change Password.3. On the Change Passwords page, complete these steps:
a. Select how you want the password to be generated. If you select to type anew password, type and confirm the password.
b. Select the accounts that you want to change the password for.
Note: If password synchronization is enabled and you are changing thepassword for individual accounts, a list of individual accounts is displayed.This list displays the number of accounts up to the maximum search limit.These accounts are not selectable. The password change applies to allindividual accounts. The individual accounts not listed are also changed.
c. If you want to schedule your change request for a later date and time, clickthe icon ( ) next to Schedule. Select Effective Date, and click the calendarand clock icons to select a date and time.
d. Click Submit.4. On the Success page, click Close.
“Resetting user passwords for sponsored accounts”When you have the appropriate authority, you can reset the password for oneor more, or all, of the accounts of other users.“Changing user passwords” on page 18When you have the appropriate authority, you can change the password for oneor more, or all, of the accounts of other users.“Resetting user passwords” on page 19When you have the appropriate authority, you can reset the password for oneor more, or all, of the accounts of other users.
Resetting user passwords for sponsored accountsWhen you have the appropriate authority, you can reset the password for one ormore, or all, of the accounts of other users.
Before you begin
Depending on how your system administrator customized your system, you mightnot have access to this task. To obtain access to this task or to have someonecomplete it for you, contact your system administrator.
About this task
If password editing is enabled, you must use the Change Passwords option tomodify passwords because you do not have access to the Reset Passwords task.
Password synchronization applies only to individual accounts. Sponsored accountsare not affected by password synchronization. A user can specify differentpasswords for sponsored accounts.
Procedure1. From the navigation tree, select Manage Users.2. On the Select a User page, complete these steps:
a. Type information about the user for whom you are resetting passwords inthe Search information field. Select an attribute from the Search by list,and then click Search.
Chapter 1. User administration 21

b. In the Users table, click ( ) next to the name of the user whose passwordsyou want to change, and click Accounts.
c. On the Accounts page, type information about the account that you arechanging password for in the Search information field. Select an attributefrom the Search by list, and select an ownership type. Click Search.
d. Click ( ) next to the name of the account, and click Reset Password.3. On the Reset Passwords page, complete these steps:
a. Select the accounts that you want to reset the password for.
Note: If password synchronization is enabled and you are resetting thepassword for individual accounts, a list of individual accounts is displayed.This list displays the number of accounts up to the maximum search limit.These accounts are not selectable. The password reset applies to allindividual accounts. The individual accounts that are not listed are alsochanged.
b. If you want to schedule your change request for a later date and time, clickthe icon ( ) next to Schedule. Select Effective Date, and click the calendarand clock icons to select a date and time.
c. Click Submit.4. On the Success page, click Close.
“Changing user passwords for sponsored accounts” on page 20When you have the appropriate authority, you can change the password for oneor more, or all, of the accounts of other users.“Changing user passwords” on page 18When you have the appropriate authority, you can change the password for oneor more, or all, of the accounts of other users.“Resetting user passwords” on page 19When you have the appropriate authority, you can reset the password for oneor more, or all, of the accounts of other users.
Delegating activitiesYou can delegate activities for completion.
To delegate activities from one user to another user, the user you are delegating tomust have authorization from the system administrator to manage activities. If youare delegating activities for yourself, you must have both read and write Delegateaccess control item attribute permissions set to Grant. The logged-in user musthave the access control item permission to write the delegate attribute of the userwho is delegated.
You can add or delete delegation schedules for the user whose activities you aredelegating. Adding a delegation schedule requires you to select a user who canmanage activities and specify a time period in which to delegate activities. You canset up multiple delegation schedules for multiple delegates, but time periodscannot overlap. If you already delegated activities and want to turn off delegation,delete the delegation schedule.
Delegation does not affect the escalation period for an activity. That is, it does notrestart the escalation period.
22 IBM Security Identity Manager Version 6.0.0.18: Administration Topics

Delegating activities for another userWhen a user is unavailable to manage activities, you can create a delegationschedule to delegate the to-do items of that user to another user.
Before you begin
Depending on how your system administrator customized your system, you mightnot have access to this task. To obtain access to this task or to have someonecomplete it for you, contact your system administrator.
About this task
To delegate activities, complete these steps:
Procedure1. From the navigation tree, select Manage Users.2. On the Select a User page, complete these steps:
a. Type information about the user for whom you are delegating activities inthe Search information field, select an attribute from the Search by list, andthen click Search.
b. In the Users table, click the icon ( ) next to the name of the user whoseaccounts you want to delegate, and click Delegate Activities.
3. On the Manage Delegation Schedules page, click Add to create a delegationschedule.
4. On the Setup Delegation page, click Search to find a delegate.5. On the Select Delegate Account page, complete these steps:
a. Type information about the delegate in the User ID field and click Search.b. In the Accounts table, select the user whose account you want to delegate
your activities to, and click OK.6. On the Setup Delegation page, click the calendar and clock icons to choose a
date and time for starting and ending the delegation, and click OK.7. On the Success page, click Close.
Chapter 1. User administration 23

24 IBM Security Identity Manager Version 6.0.0.18: Administration Topics

Chapter 2. Login administration
You can configure system login settings to control the interval at which thepassword of an account expires. You can configure the number of times that a usercan attempt to log in before the account is suspended.
Enabling password expirationYou can configure password settings to force users to regularly change their IBMSecurity Identity Manager passwords within a specified time period.
Before you begin
Depending on how your system administrator customized your system, you mightnot have access to this task. To obtain access to this task or to have someonecomplete it for you, contact your system administrator.
Note: If you configured IBM Security Identity Manager to use the default customregistry, you can enable password expiration. If you configured IBM SecurityIdentity Manager to use an external user registry for authentication, you cannotenable password expiration.
Users who are forced to change their password because of an expired passwordperiod are taken to the Expired Password page immediately after login. The usercannot access any features in the system until the password is changed.
About this task
To enable password expiration, complete these steps:
Procedure1. From the navigation tree, select Set System Security > Set Security Properties.2. In the Identity account password expiration period in days field, type a time
period, and then click OK. The default value of 0 indicates that the accountpassword never expires.
3. On the Success page, click Close.
Setting a maximum number of login attemptsYou can set a limit on the number of unsuccessful login attempts that a user canmake. You can also suspend accounts that exceed a specified maximum number oflogin attempts. After the user account is suspended, the user must contact you (thesystem administrator) or a help desk representative. You can then restore theaccount and generate or provide a new temporary password for the user.
Before you begin
Depending on how your system administrator customized your system, you mightnot have access to this task. To obtain access to this task or to have someonecomplete it for you, contact your system administrator.
This task is available only for administrators and cannot be customized.
25

About this task
This task applies only if the ITIM Service user registry is used. If another userregistry is specified, the number of login attempts is managed by the externalrepository.
The login attempts setting also applies to incorrect challenge response answers.
To set a maximum number of login attempts, complete these steps:
Procedure1. From the navigation tree, select Set System Security > Set Security Properties.2. In the Maximum number of incorrect login attempts, type the number of login
attempts you want to allow, and then click OK. The default value of 0 indicatesthat there is no limit to the number of entries that can be attempted.
3. On the Success page, click Close.
26 IBM Security Identity Manager Version 6.0.0.18: Administration Topics

Chapter 3. Password administration
IBM Security Identity Manager controls how passwords can be changed, generated,synchronized, and set throughout the system.
Tasks for managing system-wide password settings include:v Enabling password resetting, including:
– Hiding generated passwords from the administrators who generate them– Showing generated passwords to the administrators who generate them
v Enabling editing and changing passwordsv Synchronizing password changes for all of the individual accounts that are
associated with a userv Setting passwords when the user is createdv Setting an interval in which a user must retrieve a password before it expiresv Creating a password strength rulev Enabling forgotten password authenticationv Excluding specific passwords
Password expiration settings are part of the login account settings.
Depending on the adapters that are used in your site environment, you mightoptionally set reverse password synchronization. The synchronization originatesfrom a master password store other than IBM Security Identity Manager.
A help desk assistant can also request IBM Security Identity Manager to generate apassword. The password is sent in an email to the user.
For information about managing user passwords, including the passwords ofsystem users, see “User management” on page 1.
Enabling password resettingUsers or administrators with the correct permissions can reset users' passwords tonew passwords that are generated by IBM Security Identity Manager. Alternatively,depending on the password settings of Security Identity Manager, users oradministrators might be able to change users' passwords to new passwords. Thenew passwords must be manually specified within the limits of the passwordpolicy.
Before you begin
Depending on how your system administrator customized your system, you mightnot have access to this task. To obtain access to this task or to have someonecomplete it for you, contact your system administrator.
About this task
To reset another user's passwords, you must have the correct access control itempermissions.
27

You must configure your system to use either the Reset Passwords function or theChange Passwords function. The options are not available at the same time.
If you choose to enable the Reset Passwords function, you also have the option ofshowing or hiding the generated password.
To enable password resetting:
Procedure1. From the navigation tree, select Set System Security > Set Security Properties.2. Clear the Enable password editing check box, and click OK.3. On the Success page, click Close.
Hiding generated reset passwordsYou might want to prevent every user or administrator who can reset passwordsfrom seeing the new password that is generated. You can disable password editingand hide generated passwords.
Before you begin
Depending on how your system administrator customized your system, you mightnot have access to this task. To obtain access to this task or to have someonecomplete it for you, contact your system administrator.
About this task
If you do not hide generated passwords, the users or administrators who areresetting a user's password see the password that was generated.
To enable Reset Passwords and hide the generated password from the user oradministrator who requested that the password be reset, complete these steps:
Procedure1. From the navigation tree, select Set System Security > Set Security Properties.2. Select the Hide generated passwords for others check box, and click OK.
Note: If the Enable password editing check box is selected, you cannot selectthe Hide generated passwords for others check box. Clear the Enablepassword editing check box if you want to hide generated passwords.
3. On the Success page, click Close.
Results
A group member who can create accounts, such as a member of the help deskassistant group, can reset a password. However, the group member cannot see thenew password. IBM Security Identity Manager generates the password.
Showing generated reset passwordsYou might want to enable every user or administrator who can reset passwords tosee the new password that is generated. You can disable password editing andclear the hide generated passwords check box.
28 IBM Security Identity Manager Version 6.0.0.18: Administration Topics

Before you begin
Depending on how your system administrator customized your system, you mightnot have access to this task. To obtain access to this task or to have someonecomplete it for you, contact your system administrator.
About this task
If you do not hide generated passwords, the users or administrators who areresetting a user's password see the password that was generated.
To enable the Reset Passwords and show the generated password to the user oradministrator who requested that the password be reset, complete these steps:
Procedure1. From the navigation tree, select Set System Security > Set Security Properties.2. Ensure that the following conditions are true:v The Enable password editing check box is not selected.v The Hide generated passwords for others check box is not selected.
3. Click OK.4. On the Success page, click Close.
Results
A group member who can create accounts, such as a member of the help deskassistant group, can reset a password. The group member can also see the newpassword.
Enabling password editing and changingUsers or administrators with the correct permissions can reset users' passwords tonew passwords that are generated by IBM Security Identity Manager. Alternatively,depending on the password settings of Security Identity Manager, users oradministrators might be able to change users' passwords to new passwords. Thenew passwords are manually specified within the limits of the password policy.
Before you begin
Depending on how your system administrator customized your system, you mightnot have access to this task. To obtain access to this task or to have someonecomplete it for you, contact your system administrator.
About this task
To change another user's passwords, a user or administrator must have the correctaccess control item permissions. When you enable password editing, the user oradministrator with the correct access control permissions can manually specify thepassword.
You must configure your system to use either the Reset Passwords function or theChange Passwords function. The options are not available at the same time.
To enable password editing, complete these steps:
Chapter 3. Password administration 29

Procedure1. From the navigation tree, select Set System Security > Set Security Properties.2. Select the Enable password editing check box, and click OK.3. On the Success page, click Close.
Results
Enabling password editing has these results:v Disables the ability to hide generated passwords for others.v Enables users with the correct authority to select the Change Passwords option
in the navigation tree and then change their own passwords.v Enables a group member who can create accounts to create and set a value for a
password for an account of another user. For example, the group member mightbelong to the help desk assistant group. Because the newly created password isvisible, the help desk assistant can provide the information by telephone to theuser.
What to do next
Note: You must log out and log back in to see the changes that are made to thenavigation tree after you enable password editing.
Enabling password synchronizationPassword synchronization is the process of assigning and maintaining onepassword for all individual accounts that a user owns. Password synchronizationreduces the number of passwords that a user must remember. Passwordsynchronization does not affect sponsored accounts.
Before you begin
Depending on how your system administrator customized your system, you mightnot have access to this task. To obtain access to this task or to have someonecomplete it for you, contact your system administrator.
You must be a system administrator on the to enable password synchronization.
About this task
You can configure the system to automatically synchronize passwords for allindividual accounts that are owned by a user. Then, the user must remember onlyone password. For example, a user might have two individual accounts: a IBMSecurity Identity Manager account and a Lotus Notes account. If the user changesor resets the password for the Security Identity Manager account, the Lotus Notespassword is automatically changed to the same password as the Security IdentityManager password.
Note: When password synchronization is enabled, Security Identity Manager doesthe ACI evaluation for changing password on the person entity. (Before Tivoli®
Identity Manager version 5.0, the ACI evaluation was done on the account entity.)If the person ACI grants the user the change password operation, the user canchange the password for all associated individual accounts. For sponsored accountsor if password synchronization is not enabled, the ACI evaluation is done againstthe account entity instead.
30 IBM Security Identity Manager Version 6.0.0.18: Administration Topics

If password synchronization is enabled, users cannot specify different passwordsfor their individual accounts. Password synchronization does not affect sponsoredaccounts. A user can specify different passwords for sponsored accounts.
Note: When password synchronization is initially enabled, individual accounts ofusers are not automatically synchronized immediately. Accounts are synchronizedwhen users change passwords or create an account.
To enable password synchronization, complete these steps:
Procedure1. From the navigation tree, select Set System Security > Set Security Properties.2. Select the Enable password synchronization check box, and click OK.3. On the Success page, click Close.
What to do next
You can change and synchronize the passwords for the individual accounts thatare associated with a user.
Setting a password when a user is createdYou can enable a password to be generated and set for a user automatically at thetime the user is created.
Before you begin
Depending on how your system administrator customized your system, you mightnot have access to this task. To obtain access to this task or to have someonecomplete it for you, contact your system administrator.
For the collected password to be set to auto-provisioned accounts, the followingcriteria must be met:v An automatic entitlement that entitles the user to the account must exist.v An account default for erpassword must exist at the service or service type level.
About this task
This option is intended to enable prompting for a password when creating usersthrough the user interface. By default, IBM Security Identity Manager satisfiesthese criteria for IBM Security Identity Manager Server login accounts. A user thatis created through the user interface is automatically provisioned an SecurityIdentity Manager Server account with a known password. The password is enteredat the time of user creation.
The system property for setting the password on a user during the user creation isconfigured for use during auto-provisioning of Security Identity Manager accountsonly. When enabled, the "Set password on user..." system property gathers apassword during user creation and stores it in the user record.
Also provided is an account default for the ITIM Service service type that setserpassword during auto-provisioning to the value stored in the person record. Youcan configure another service to use this property by enabling the service forauto-provisioning and adding the necessary account default. Use the followingaccount default script:
Chapter 3. Password administration 31

subject.getAndDecryptPersonPassword();
Note: If auto-provisioning is disabled, or if the account default is removed, disablethe Set password on user during user creation property.
Procedure
To enable a password to be generated and set for a user at the time the user iscreated, complete these steps:
Procedure1. From the navigation tree, select Set System Security > Set Security Properties.2. Select the Set password on user during user creation check box, and click OK.3. On the Success page, click Close.
Setting a password retrieval expirationYou can set a time by which a user must retrieve a password before it expires.
Before you begin
Depending on how your system administrator customized your system, you mightnot have access to this task. To obtain access to this task or to have someonecomplete it for you, contact your system administrator.
About this task
Password retrieval expiration specifies the time in which a user must retrieve apassword. After the new account is created, the user receives an email with theURL link that provides the password. The user must get the password before thispassword retrieval period expires.
This password retrieval expiration property is in effect only when passwordretrieval is enabled.
Note: The shared secret attribute of Person and the notifyPassword property fromenRole.properties file can be used for secured password retrieval.
To set a password retrieval expiration interval, complete these steps:
Procedure1. From the navigation tree, select Set System Security > Set Security Properties.2. Specify an expiration period in hours in the Password retrieval expiration
period in hours field, and click OK.3. On the Success page, click Close.
Setting password notificationAs an administrator you can choose how to send password notifications to usersfor their accounts.
32 IBM Security Identity Manager Version 6.0.0.18: Administration Topics

Before you begin
Depending on how your system administrator customized your system, you mightnot have access to this task. To obtain access to this task or to have someonecomplete it for you, contact your system administrator.
About this task
After creating an account, changing or resetting a password, you can specify howthe password notification is sent to the user.
Procedure1. Obtain the email address of the owner.2. Set the value of the enrole.workflow.notifypassword property in the
enRole.properties file for the notification delivery method.
true
The default is true. Send the recipient an email with the password.
false
Send the recipient a link to a website. The recipient must have an emailaddress and a shared secret specified in the personal profile. On thewebsite, the user is asked for the shared secret. If the value that theuser enters for the shared secret is correct, the user is taken to a Website that shows the new password.
If the user does not specify a shared secret in their personal profile, theuser must leave the field on the website blank when it asks for theshared secret.
If the request is for a manual service, the process sends a work order to theservice owner. You can modify the manual work order, including the manualemail notification activity.
Creating password strength rulesYou can create a password policy that defines the rules to which passwords mustconform. For example, password strength rules might specify that the minimumnumber of characters of a password must be five. The rules might specify that themaximum number of characters must be 10.
Before you begin
Depending on how your system administrator customized your system, you mightnot have access to this task. To obtain access to this task or to have someonecomplete it for you, contact your system administrator.
By default, the Service owner persona can view this task and create passwordpolicies for the services the owner persona owns. Furthermore, users who can viewthis task and have appropriate ACI permissions can create password strength rules.
About this task
To set the password strength rule for a service, complete these steps:
Chapter 3. Password administration 33

Procedure1. From the navigation tree, select Manage Policies > Manage Password Policies.2. Create a password policy or change an existing one. Ensure that you selected a
service on the Targets tab to which you apply the password policy.3. Using the Rules tab for the password policy that you select, specify the rules
that determine whether a password entry is valid.
Enabling forgotten password authenticationWhen a user forgets the IBM Security Identity Manager password and must resetit, the user must verify credentials with the system.
Before you begin
Depending on how your system administrator customized your system, you mightnot have access to this task. To obtain access to this task or to have someonecomplete it for you, contact your system administrator.
About this task
You can configure Security Identity Manager to present eitheradministrator-defined questions or user-defined questions. You can also define howmany questions must be answered.
Note: This task is effective only if a WebSphere® account repository is specified.This field is on the ITIM Service Manage Services > Change a Service > ServiceInformation page. This repository can be ITIM Service or a service managed bythe Security Identity Manager server. If no registry is specified, the forgottenpassword option is not available on the Login page.
Respond to a set of forgotten password challenges with answers that youpreviously specified. Responses are not case-sensitive by default, because theenrole.challengeresponse.responseConvertCase property from the enRole.properties filehas a default value that is lower. The answers are stored in lowercase in thedirectory server. An answer that you entered is converted to lowercase while it iscompared with the stored answers. If you want answers to be case-sensitive,change the value for enrole.challengeresponse.responseConvertCase from lower to none.v If you do not predefine the questions, the user must specify both the forgotten
password challenges and the answers.v If you predefine the forgotten password challenges, the user must specify only
the answers.
If the system configuration changes, for example, from undefined questions topredefined questions, the user must specify answers to the new questions.
Note: The requirement that a user must answer the challenge questions isconfigurable. By default, the user can bypass the challenge questions. You can forcethe user to respond to the challenge questions by modifying the propertyui.challengeResponse.bypassChallengeResponse in the ui.properties file. To force userresponse, set the value to false. For more information, see the ui.properties topicin the Reference > Supplemental property files section.
34 IBM Security Identity Manager Version 6.0.0.18: Administration Topics

Configuring user-defined forgotten password questionsYou can enable and configure forgotten password settings to allow users to supplytheir own questions for challenge response authentication.
Before you begin
Depending on how your system administrator customized your system, you mightnot have access to this task. To obtain access to this task or to have someonecomplete it for you, contact your system administrator.
About this task
To enable and configure user-defined forgotten password settings, complete thesesteps:
Procedure1. From the navigation tree, select Set System Security > Configure Forgotten
Password Settings.2. On the Configure Forgotten Password Settings page, complete these steps:
a. Select the Enable forgotten password authentication check box.b. Under the Login Behavior field, select one of the following login options:v Click Enforce password change and log in to system if you want users
to change the password and log in to the system after they successfullyanswer the challenge response questions. Optionally type in a messagethe user receives if the user fails to enter the correct answers. Type anemail address to which the message is sent.
v Click Reset and e-mail password if you want the system to reset thepassword and email the password to the user after they successfullyanswer the challenge response questions. Optionally type in a messagethe user receives if the user fails to enter the correct answers. Type anemail address to which the message is sent.
v Click Email user a link to change password if you want the system tosend an email to the user with the link to change the password. A usercan click the link in an email that prompts the user to change thepassword.
Note:
– This configuration option is effective only when a user initiates theforgot password flow through the Identity Service Center.
– If a user initiates the forgot password flow through the Self-serviceuser interface, the system prompts the user to change the passwordand then logs in the user to the system.
c. In the Challenge Behavior field, click the radio button next to Users definetheir own questions.
d. Type in the number of questions the user must set up and answer correctlyto successfully authenticate, and click OK.
3. On the Success page, click Close.
Configuring administrator-defined forgotten passwordquestions
You can enable and configure forgotten password settings to set predefinedquestions for challenge response authentication.
Chapter 3. Password administration 35

Before you begin
Depending on how your system administrator customized your system, you mightnot have access to this task. To obtain access to this task or to have someonecomplete it for you, contact your system administrator.
About this task
To enable and configure administrator-defined forgotten password settings,complete these steps.
Procedure1. From the navigation tree, select Set System Security > Configure Forgotten
Password Settings.2. On the Configure Forgotten Password Settings page, complete these steps:
a. Select the Enable forgotten password authentication check box.b. Under the Login Behavior field, select one of the following login options.v Click Enforce password change and log in to system if you want users
to change the password and log in to the system after they successfullyanswer the challenge response questions. Optionally type in a messagethe user receives if the user fails to enter the correct answers. Type anemail address to which the message is sent.
v Click Reset and e-mail password if you want the system to reset thepassword and email the password to the user after they successfullyanswer the challenge response questions. Optionally type in a messagethe user receives if the user fails to enter the correct answers. Type anemail address to which the message is sent. This option is set to defaultin the Identity Service Center.
v Click Email user a link to change password if you want the system tosend an email to the user with the link to change the password. A usercan click the link in an email that prompts the user to change thepassword.
Note:
– The Reset and e-mail password configuration option is effective onlywhen a user initiates the forgot password flow through the IdentityService Center.
– If a user initiates the forgot password flow through the Self-serviceuser interface, the system prompts the user to change the passwordand then logs in the user to the system.
c. In the Challenge Behavior field, click Administrator provides predefinedquestions.
d. Click the arrow icon next to Specify Forgotten Password Question toexpand it.
e. Type in a challenge question, select a locale for the question, and click Add.Repeat this process as necessary when you are adding more than onequestion.
f. Select a choice for whether the user has a choice of predefined questions.These options are displayed:v No, answer all questions - The user must answer all predefined questions
to be authenticated.
36 IBM Security Identity Manager Version 6.0.0.18: Administration Topics

v Yes, user selects which questions to answer - The user can select whichpredefined questions to answer. You are prompted to enter a number forhow many predefined questions the user must set up.
v No, answer a subset of questions that the system provides - Toauthenticate, the user must set up one or more predefined questions froma subset of challenge questions. The user must provide a specified numberof correct answers.
g. Click OK to save your changes.3. On the Success page, click Close.
Excluding specific passwordsYou can configure the system to prevent users from using specific words aspasswords for their accounts.
Before you begin
Depending on how your system administrator customized your system, you mightnot have access to this task. To obtain access to this task or to have someonecomplete it for you, contact your system administrator.
About this task
Specified words are stored in a password dictionary in the LDAP Directory Server.This password dictionary contains a list of words that cannot be used aspasswords.
This dictionary can be modified through an LDAP browser by creatingerDictionaryItem entries under the erDictionaryName=password entry.Alternatively, you can import an LDIF file with the entries listed into the DirectoryServer.
The following is an example of an LDIF file with various words to exclude aspasswords listed:dn: erword=apple, erdictionaryname=password, ou=itim, dc=comobjectClass: topobjectClass: erdictionaryitemerWord: apple
dn: erword=orange, erdictionaryname=password, ou=itim, dc=comobjectClass: topobjectClass: erdictionaryitemerWord: orange
The only value that must be modified is the erword value. The erword valuespecifies the word that is not allowed to be used as a password.
After the password dictionary is populated with the wanted words, the passwordpolicies must be modified to use the dictionary. After importing the LDIF file,select the Do not allow in dictionary check box on the Rules page of passwordpolicies.
Chapter 3. Password administration 37

Passwords for system usersAfter you install IBM Security Identity Manager, three system users are defined.These system users enable IBM Security Identity Manager to communicate with thedatabase and the directory server.
By default, the following systems users are defined:
itimuserThis user is the IBM Security Identity Manager system user. The systemuser is created manually before the IBM Security Identity Managerinstallation program was run.
db2admin or db2inst1These users are the DB2® system users that are created by the DB2installation program. If you installed DB2 on a Windows system, the username is db2admin. If you installed DB2 on a Linux system, the user name isdb2inst1.
ldapdb2This user is the LDAP system user.
Initially, the db2admin or db2inst1 user is created by the DB2 installation processwith a password that is set to never expire. However, the password for the ldapdb2user and itimuser users can expire, based on the password policy of your system.If the passwords for these users expire, or are changed, you must reconfigure IBMSecurity Identity Manager and its associated middleware to use the new passwordvalues.
Changing the itimuser user passwordYou might need to configure IBM Security Identity Manager to use a newpassword for the itimuser user.
Before you begin
Depending on how your system administrator customized your system, you mightnot have access to this task. To obtain access to this task or to have someonecomplete it for you, contact your system administrator.
You must be a system administrator on the IBM Security Identity Manager Serverto have access to this task.
About this task
To change the password of the itimuser user on the system, complete these steps:
Procedure1. From the ISIM_HOME/bin directory, run the runConfig tool.2. From the System Configuration page in the runConfig tool, select the Database
tab.3. On the Database page, in the User Password field, type the new password, and
then click OK.
Changing the db2admin user password for WindowsWhen you change the system user password for db2admin in Windows, you mustalso change the password for any service instances that use db2admin as a service
38 IBM Security Identity Manager Version 6.0.0.18: Administration Topics

account. You must change the password for both the DB2 Universal Database™
service instance and the DB2Admin service instance.
Before you begin
Depending on how your system administrator customized your system, you mightnot have access to this task. To obtain access to this task or to have someonecomplete it for you, contact your system administrator.
You must be a system administrator on the IBM Security Identity Manager Serverto have access to this task.
About this task
To change the password for the db2admin user on the Windows system, completethese steps:
Procedure1. Click Start > Settings > Control Panel > Administrative Tools > Services.2. From the Services page, double-click the DB2 Universal Database instance that
IBM Security Identity Manager uses.3. From the Properties page, click the Log On tab.4. On the Log On page, in the Password field and the Confirm password field,
type the new password, and then click OK.
What to do next
To change the password for the DB2Admin service instance, repeat these steps,selecting the DB2Admin service. For example, select DB2 - DB2Admin.
Changing the ldapdb2 user passwordYou might need to configure IBM Security Identity Manager to use a newpassword for the ldapdb2 user.
Before you begin
Depending on how your system administrator customized your system, you mightnot have access to this task. To obtain access to this task or to have someonecomplete it for you, contact your system administrator.
You must be a system administrator on the IBM Security Identity Manager Serverto have access to this task.
About this task
To change the password for the LDAP database user, complete these steps:
Procedure1. Navigate to the drive:\idsslapd-ldapb2\etc directory.2. Edit the ibmslapd.conf file with a text editor.3. In the ibmslapd.conf file, locate ibm-slapdDbInstance: ldapbdb2.
Chapter 3. Password administration 39

4. Change the password for the ibm-slapdDbUserPW property. The passwordcurrently in the file is encrypted. Replace the old password by typing the newpassword in clear text, and save the change.
40 IBM Security Identity Manager Version 6.0.0.18: Administration Topics

Chapter 4. Organization administration
If you are granted the appropriate authority, you can add, delete, and modifyelements in the organization tree. You cannot delete an element that has dependentunits in it.
The following elements are in the organization tree:
OrganizationIdentifies the top of an organizational hierarchy, which might containsubsidiary entities such as organization units, business partnerorganization units, and locations. The organization is the parent node atthe top of the node tree.
Organization UnitIdentifies a subsidiary part of an organization, such as a division ordepartment. An organization unit can be subordinate to any othercontainer, such as organization, organization unit, location, and businesspartner organization.
Business Partner Organization UnitIdentifies a business partner organization, which is typically a companyoutside your organization that has an affiliation, such as a supplier,customer, or contractor.
LocationIdentifies a container that is different geographically, but contained withinan organization entity.
Admin DomainIdentifies a subsidiary part of an organization as a separate entity with itsown policies, services, and access control items, including an administratorwhose actions and views are restricted to that domain.
Administrator domainsAn administrator domain (admin domain) identifies a subsidiary part of anorganization as a separate entity. The entity has its own policies, services, andaccess control items. The entity also has an administrator whose actions and viewsare restricted to that domain.
Domain administrators can do only the administrative tasks on their domains.They cannot do system configuration tasks, which are configuration settings thataffect the entire system.
An admin domain is considered a type of organization node. To add, change ordelete admin domains, complete the steps for adding, changing, or deleting a nodein an organization tree.
You can specify an Security Identity Manager user as the administrator of anadmin domain. Enter the Security Identity Manager user in the administrator field.The assignment is confirmed. Then, the Security Identity Manager user is grantedthe appropriate privileges (access control items, or ACIs) to do administration tasksin that domain.
41

Any Security Identity Manager user who can add, modify, or delete an admindomain can also specify the administrator for the admin domain. This user iseither an Security Identity Manager administrator or an Security Identity Manageruser. The user has rights to add, modify, or delete an admin domain through ACIs.
Note: Before Security Identity Manager version 5.0, users were not automaticallygranted rights as the administrator of an admin domain. Instead, ACIs wererequired to be added manually. With Security Identity Manager version 5.0 andlater, the default ACIs automatically grant the domain administrator the rights foradministering the admin domain. The domain administrator is a built-in ACIprincipal.
Making a user a domain administratorAs an administrator, you can make a user the administrator for a domain.
About this task
You can specify an IBM Security Identity Manager user as the administrator of anadministrator domain. The IBM Security Identity Manager user is granted theappropriate privileges (access control items, or ACIs) to do administration tasks inthat domain.
Procedure1. From the navigation tree, select Manage Organization Structure.2. Click the icon next to the Organization node, and then click Create Admin
Domain. The Admin Domain Details page is displayed.3. Type the administrator domain name and, optionally, a description.4. Click Search to locate a user.5. On the Select People page, select the check box for the user or users that you
want to make domain administrators for the domain, and click OK.6. Click OK on the Admin Domain Details page.
Creating a node in an organization treeAs an administrator, or if you have access control item to organizations, you cancreate a node in an organization tree.
Before you begin
Determine a model that meets organization needs for service management anduser management.
Depending on how your system administrator customized your system, you mightnot have access to this task. To obtain access to this task or to have someonecomplete it for you, contact your system administrator.
To create a node in the tree structure, complete these steps:
Procedure1. From the navigation tree, select Manage Organization Structure.2. Click the icon next to the node, and then click Create. Nodes that you can
select depend on the position of the specific type of business unit. For example,click Create Location to create a location business unit.
42 IBM Security Identity Manager Version 6.0.0.18: Administration Topics

3. Complete the fields for the node that you create and click OK.4. Click Close.
What to do next
Add any additional nodes that your business model requires for servicemanagement or user management.
Changing a node in an organization treeAs an administrator, or if you have access control item to organizations, you canchange a node in an organization tree.
Before you begin
Depending on how your system administrator customized your system, you mightnot have access to this task. To obtain access to this task or to have someonecomplete it for you, contact your system administrator.
About this task
Nodes that you can select depend on the position or hyperlink of the node thatyou select within the structure.
To change a node in an organization tree, complete these steps:
Procedure1. From the navigation tree, select Manage Organization Structure.2. Click the icon next to the node, and then click Change.3. On the Details page for the node, change the necessary fields and then click
OK.4. Click Close.
Deleting a node in an organization treeAs an administrator, or if you have access control item to organizations, you candelete a node in an organization tree.
Before you begin
Depending on how your system administrator customized your system, you mightnot have access to this task. To obtain access to this task or to have someonecomplete it for you, contact your system administrator.
Remove or migrate any subordinate object that exists in the organization tree,below a node that you intend to delete.
About this task
You cannot delete a higher-level node that contains dependent objects, such asorganizational units or locations, or users.
To delete a node in an organization tree, complete these steps:
Chapter 4. Organization administration 43

Procedure1. From the navigation tree, select Manage Organization Structure.2. Click the icon next to the node, and then click Delete. Nodes that you can
select depend on the position that you select within the structure.3. On the Confirmation page, ensure that the object is your intended target for
deletion, and then click Delete.4. Click Close.
Transferring a business unitAs an administrator, you can transfer a business unit in an organization tree.
Before you begin
You can transfer a business unit to an existing business unit that is under the sameorganization root. Optionally, you can also create a new business unit and thentransfer an existing business unit for people and roles. Following are a fewrestrictions for business unit transfer activity:v Business unit cannot be transferred across different organization hierarchy.v Business unit that contains objects that are related to services and policies cannot
be transferred.v Business unit that contains customized Access Control Item (ACI), cannot be
transferred.v Business unit to be transferred must contain an ACI granted for the Modify
operation.v Business unit cannot be transferred to a child of original business unit to be
transferred.v Business unit that contains a subtree, cannot be transferred.
About this task
IBM Security Identity Manager validates that the selected business unit to transfercontains only people and roles data. Any other objects other than people and rolescannot be transferred. An error message is displayed if any other objects such asservices, policies, or its subtree business units are the part of business unit that isselected to transfer. Follow the steps to transfer a business unit for people androles.
Procedure1. From the navigation tree, select Manage Organization Structure.2. Click the icon next to the node, and then click Transfer.3. Search and then select the organization container to which you want to transfer
the business unit and then click OK.4. On the Confirmation page, select the schedule for transfer, and then click
Transfer.
Business unit transfer activity completion might take a longtime
You might encounter slow performance during transfer of business unit activity. Toimprove performance, you can implement the following solutions.v Add the following indexes:
44 IBM Security Identity Manager Version 6.0.0.18: Administration Topics

– CREATE INDEX "IDSLDAP2"."TESTIDX1" ON "IDSLDAP2"."SN" ("SN" ASC, "EID"DESC) ALLOW REVERSE SCANS COLLECT SAMPLED DETAILED STATISTICS;
– CREATE INDEX "IDSLDAP2"."TESTIDX2" ON "IDSLDAP2"."OBJECTCLASS" ("EID" ASC, "OBJECTCLASS" DESC) ALLOW REVERSE SCANS COLLECT SAMPLEDDETAILED STATISTICS;
– CREATE INDEX "IDSLDAP2"."TESTIDX3" ON "IDSLDAP2"."LDAP_DESC" ("DEID"ASC, "AEID" DESC) ALLOW REVERSE SCANS COLLECT SAMPLED DETAILEDSTATISTICS;
v Update the table statistics by using IBM Security Identity Manager performancetuning scripts.
v Perform the business unit transfer activity during the time of least activity onthe application server.
Chapter 4. Organization administration 45

46 IBM Security Identity Manager Version 6.0.0.18: Administration Topics

Chapter 5. Security administration
After planning system security for IBM Security Identity Manager, you must takeadditional steps to implement specific groups, views, and access control items.
View managementIBM Security Identity Manager provides default views of the tasks that areavailable for each default group.
A view is a set of tasks that a particular type of user can do in the user interface. Ifyou give a user or group a view, you do not give permissions to the user or groupto do the functions within that task. You must also define access control items togive the user or group the necessary permissions for the task.
Creating a viewAs an administrator, you can create a view of tasks that IBM Security IdentityManager provides. For example, you might restrict the set of tasks that groupmembers have.
Before you begin
Depending on how your system administrator customized your system, you mightnot have access to this task. To obtain access to this task or to have someonecomplete it for you, contact your system administrator.
Determine the subset of tasks that group members might see. Determine whetheran access control item might control the tasks that the view makes visible.v View All Requests is only intended for users that have full, unrestricted access to
the audit trail. There is no ACI checking in this view. Use caution whenexposing this task in a user's view.
v View All Requests by Service is intended for service and application owners thatneed in order to view the audit trail related to services they administer. ACIs areapplied only when initially searching for a service. ACIs are not applied to anyof the request data shown as a result of selecting a service.
v View All Requests by User is intended for the help desk administrators andmanagers that need in order to view the audit trail related to specific users.ACIs are applied only when initially searching for a user. ACIs are not appliedto any of the request data shown as a result of selecting a user.
About this task
You can use the Define Views page to create additional views.
To create a view, take these steps:
Procedure1. From the navigation tree, select Set System Security > Manage Views >
Define Views.2. On the Define Views page, in the Views table, click Create.
47

3. In the General tab, type the name and a description of the view. Click Apply tosave your changes and continue.
4. Select the Configure View tab and, in the tree of tasks, select the tasks that theview provides. Click OK to save the changes.
5. On the Success page, click Close.
What to do next
You might create a group that has the view that you created.
Changing a viewAs an administrator, you can change a view of tasks that IBM Security IdentityManager provides. For example, you might restrict or expand the set of tasks thatgroup members have.
Before you begin
Depending on how your system administrator customized your system, you mightnot have access to this task. To obtain access to this task or to have someonecomplete it for you, contact your system administrator.
Before you begin, determine the subset of tasks that group members see.Determine whether changing an access control item is also needed.
About this task
You can use the Define Views notebook to change existing views.
To change a view, complete these steps:
Procedure1. From the navigation tree, select Set System Security > Manage Views >
Define Views.2. On the Define Views page, in the Name field, type information about the view
and click Search.3. In the Views table, select a view and click Change.4. In the General tab, change the name or description of the view. Click Apply to
save your changes and continue. Click OK to save the changes.5. In the Configure View tab, in the tree of tasks, select the tasks that the view
provides. Click OK to save the changes.6. On the Success page, click Close.
What to do next
You might change any associated access control item for the group that has theview that you changed.
Deleting a viewAs an administrator, you can delete a view of tasks that IBM Security IdentityManager provides. For example, you might delete a view after creating analternative view of tasks that group members can use.
48 IBM Security Identity Manager Version 6.0.0.18: Administration Topics

Before you begin
Depending on how your system administrator customized your system, you mightnot have access to this task. To obtain access to this task or to have someonecomplete it for you, contact your system administrator.
Ensure that group members have access to an alternative view of tasks.
About this task
You can use the Define Views page to delete existing views.
To delete a view, complete these steps:
Procedure1. From the navigation tree, select Set System Security > Manage Views >
Define Views.2. On the Define Views page, in the Name field, type information about the view
and click Search.3. In the Views table, select a view and click Delete.4. On the Confirm page, ensure that the view is the one you want to delete, and
then click Delete.5. On the Success page, click Close.
Defining a custom taskAs an administrator, you might want to create a custom task for your business ororganization. You must define these custom tasks before you can assign them to aview.
About this task
A custom task represents an external web application that provides servicesbeyond what is supplied by IBM Security Identity Manager. It is defined by aunique identifier, a URL, and optional parameters. The task can be associated withSecurity Identity Manager views such as Auditor, or Supervisor, and others. Onlyusers that are associated with those views have access to the custom task. Customtasks are defined in the administrative console, and are available in the IdentityService Center if the user is authorized to access the task.
You can select the Start task in new window check box to enable the user to viewthe custom task in a new browser window. By default, this check box is notselected. If you create a custom task without selecting this check box, when theuser starts the task in the Identity Service Center, it is started in the inline frame,or iframe, of the browser window that contains the Identity Service Center.However, if you select the check box, when the user starts the task, it is started ina new browser window or tab, depending on the configuration of the browser.
If you create a custom task that specifies a URL corresponding to the SecurityIdentity Manager administrative console, you must select this check box.
Note:
1. If the web application cannot run custom tasks in a browser iframe, that is,inline frame, you must select the Start task in new window check box.
Chapter 5. Security administration 49

2. You can disable headers on some applications for better integration. Forexample, you might want to create a custom task in the Identity Service Centerfor the Self Service user interface. To turn off headers so that it integrates betterwith the Identity Service Center, see Customizing website layout.
Procedure1. From the navigation tree, select Set System Security > Manage Views.2. On the Define Views page, click Manage Custom Tasks in the Views table.3. In the Manage Custom Tasks table, click Create.4. On the Create Custom Task page, type the task identifier suffix for your task.
The suffix cannot contain spaces, quotation marks, hash tags, or equal signs.The combination of the identifier prefix and the identifier suffix is the namethat identifies your custom task.You can define a label for the custom task by editing the ISIM_HOME/data/CustomLabels.properties file. The name of the property isCUSTOM_<Identifier suffix> (all in capital letters). The value must be whatyou want to display in the Identity Service Center. For example, if theidentifier suffix is consoleui, then the property to add toCustomLabels.properties can be CUSTOM_CONSOLEUI = Identity ManagerConsole UI.
5. Optional: Type information that describes the custom task in the Descriptionfield. To enable the translation of the description, add a prefix $ to thedescription string and provide a translation for that property inISIM_HOME/data/CustomLabels.properties, where ISIM_HOME is the IBMSecurity Identity Manager installation directory.If you want to display Custom task as the description of the task in theIdentity Service Center, you must enter $customTask in the Description field.You must also add an entry in CustomLabels.properties: customTask = Customtask.If you want to translate the description in another language, you must edit theCustomLabels_xx.properties file, where xx is the locale. For example,CustomLabels_fr.properties might have an entry customTask = TâchePersonnalisée.
6. Type the URL that links to your custom task.7. Optional: Type the URL that links to the image you want to display on the
task card.When you specify the URL for the icon, ensure that you review the followingguidelines:v The default icons that are displayed within the "cards" for the Identity
Service Center home page are .png files.None of these icons exceed the following dimensions of 263 x 65 with a32-bit color depth.Use this sizing guideline for custom images so that your custom imagesdisplay correctly in the Identity Service Center.
v The custom image files can be in the following web browser supportedimage formats, such as jpg, gif, or png.
v Before you begin, you must place your custom image files in the followinglocations:– On each application server:
<was_home>/profiles/<appserver profile>/config/cells/<cell>/itim/custom/ui/images
50 IBM Security Identity Manager Version 6.0.0.18: Administration Topics

– On the deployment manager server (for clustered deployments):<was_home>/profiles/<dmgr profile>/config/cells/<cell>/itim/custom/ui/images
v The URL for Icon must be in the following form:custom/ui/images/<your file name>
8. Optional: Specify a menu category for the header. You can also select from thetwo predefined menu categories:
manageAccessrequestStatusTodo
9. Optional: Select the Show on home page check box to display the task cardon the home page.
10. Optional: Select the Start task in new window check box to display thecustom task in a new browser window when the user starts the task in theIdentity Service Center. If the custom task URL corresponds to the SecurityIdentity Manager administrative console, you must select this check box.
11. Optional: Create custom task parameters. Repeat these steps for each customparameter you want to create.a. In the Task Parameters table, click Create.b. Specify a parameter name.c. Specify a parameter valued. Click OK.
12. When you are finished, click OK. The Success page is displayed.13. Select an action or click Close to return to the Define Views page.
What to do next
You can now assign the custom task to a view.
Changing a custom taskAs an administrator, you can change the task parameters that you specified for acustomized task.
About this task
After a task is created, you cannot change the identifier prefix, the identifier suffix,or the console.
Selecting the Start task in new window check box enables the user to view thecustom task in a new browser window. By default, this check box is not selected. Ifyou change a custom task without selecting this check box, when the user startsthe task in the Identity Service Center, it is started in the inline frame, or iframe, ofthe browser window that contains the Identity Service Center. However, if youselect the check box, when the user starts the task, it is started in a new browserwindow or tab, depending on the configuration of the browser.
If you change a custom task that specifies a URL corresponding to the SecurityIdentity Manager administrative console, you must select this check box.
Procedure1. From the navigation tree, select Set System Security > Manage Views.2. On the Define Views page, click Manage Custom Tasks in the Views table.
Chapter 5. Security administration 51

3. In the Manage Custom Tasks table, select a task and click Change.4. Optional: Under Task information, modify the parameters that you want to
change.5. In the Identifier suffix field, if needed, you can define a label for the custom
task by editing the ISIM_HOME/data/CustomLabels.properties file. The nameof the property is CUSTOM_<Identifier suffix> (all in capital letters). Thevalue must be what you want to display in the Identity Service Center. Forexample, if the identifier suffix is consoleui, then the property to add toCustomLabels.properties can be CUSTOM_CONSOLEUI = Identity ManagerConsole UI
6. Optional: In the Description field, to enable the translation of the description,add a prefix $ to the description string and provide a translation for thatproperty in ISIM_HOME/data/CustomLabels.properties, where ISIM_HOME is theIBM Security Identity Manager installation directory.If you want to display Custom task as the description of the task in theIdentity Service Center, you must enter $customTask in the Description field.You must also add an entry in CustomLabels.properties: customTask = Customtask.If you want to translate the description in another language, you must edit theCustomLabels_xx.properties file, where xx is the locale. For example,CustomLabels_fr.properties might have an entry customTask = TâchePersonnalisée.
7. Optional: Create or change custom task parameters.a. In the Task Parameters table, click Create or select a parameter and click
Change.b. Specify a parameter name.c. Specify a parameter valued. Click OK.
8. Optional: Delete custom task parameters.a. In the Task Parameters table, select one or more parameters and click
Delete.b. On the Confirm page, ensure that the parameters are the ones you want to
delete, and then click Delete.
Note: The parameter changes are not saved until you click OK to save theupdates to the custom task.
9. When you are finished, click OK. The Success page is displayed.10. Select an action or click Close to return to the Define Views page.
What to do next
Log in to the Identity Service Center user interface and verify that your changesare applied.
Deleting a custom taskAs an administrator, you can delete fromIBM Security Identity Manager customtasks that you created. For example, you might delete a custom task you no longerneed it or after you create an alternative custom task that group members can use.
52 IBM Security Identity Manager Version 6.0.0.18: Administration Topics

Before you begin
If a custom task is used in any view, you cannot delete it. Ensure that the task isremoved from of all views.
Procedure1. From the navigation tree, select Set System Security > Manage Views.2. On the Define Views page, click Manage Custom Tasks in the Views table.3. In the Manage Custom Tasks table, select one or more tasks and click Delete.4. On the Confirm page, ensure that the custom tasks are the ones that you want
to delete, and then click Delete. The Success page is displayed.5. Select an action or click Close to return to the Define Views page.
What to do next
Navigate back to the Manage Custom Tasks table to verify that the task no longerare displayed in the table.
Access control item managementAn access control item (ACI) is data that identifies the permissions that users havefor a specific type of resource. The system administrator has access to all functionsin the system and is not governed by access control items.
As system administrator, you create an access control item to specify a set ofoperations and permissions. Then, you can identify which groups use the accesscontrol item.
You can create, change, or delete an access control item. A group might bedesignated as the owner of the access control item. Members of the group can alsodo these operations. Members can set up access control items within any branch orsubtree branch in which the owned access control item is specified.
Beginning with IBM Security Identity Manager 6.0.0.3, a Global operation categoryis available when you create an access control item. Users that are assigned to thisaccess control item are granted permission to call the custom operation.
Access control items can apply to:v Entity types such as:
– All account classes (erAccountItem). It controls access to any account.– A specific account class (for example, erPosixLinuxAccount). It controls access
to specific accounts of this class.– A user (for example, erExpressPerson, which is all users). The access control
item controls access to personal profiles.v Operations that users might perform on entity types or global operations.
Custom operations are included with IBM Security Identity Manager 6.0.0.3 andlater.
v Permissions for operations on attributes of an entity type, such as an emailaddress.
v A set of users. This set can include access privileges of a principal. A principal isa predefined relationship that can be granted privileges. For example, the role of
Chapter 5. Security administration 53

a manager might require access to the contact information for immediatesubordinates. You can assign an access control item that grants such access to allusers with a manager relationship.
IBM Security Identity Manager provides default access control items that definepermissions to the user and to members in other groups. For example, a defaultaccess control item for accounts grants permission to all users to search for andmodify a password on their accounts.
Default access control itemsThe following tables list the default access control items (ACIs) for IBM SecurityIdentity Manager.
Table 1. Default access control items
Protection category Name Type Principal
Account Default ACI for Account: Grant All toHelp Desk Group for Non-AdminAccounts
erAccountItem Help Desk Group
Account Default ACI for Account: Grant All toSupervisor/Domain Admin/Sponsor/Service Owner/Access Owner
erAccountItem Supervisor
Domain Admin
Sponsor/ServiceOwner
Access Owner
Account Default ACI for Account: Grant Search,Add, Change Password, and AllgroupMember Operations to Self
erAccountItem Self
Account Default ACI for Account: Grant Search toAuditor Group
erAccountItem Auditor Group
Account Default ACI for Account: Grant Connectto Domain Admin and Account Owner
erAccountItem Domain Admin
Account Owner
Account DefaultTemplate
Default ACI for Account Defaults: GrantAdd/Modify/Search to Service Owner
erAccountTemplate Service Owner
Admin Domain Default ACI for AdminDomain: Grant Allto Domain Admin
SecurityDomain Domain Admin
Admin Domain Default ACI for Admin Domain: GrantSearch to Service OwnerGroup/Auditor/Supervisor/Help Desk
SecurityDomain Service Owner Group
Auditor Group
Supervisor
Help Desk Group
Business PartnerOrganization
Default ACI for BP Org: Grant All toSupervisor/Domain Admin/Sponsor
erBPOrg Supervisor
Domain Admin
Sponsor
Business PartnerOrganization
Default ACI for BP Org: Grant Search toHelp Desk/Auditor/Service OwnerGroups
erBPOrg Help Desk Group
Auditor Group
Service Owner Group
54 IBM Security Identity Manager Version 6.0.0.18: Administration Topics
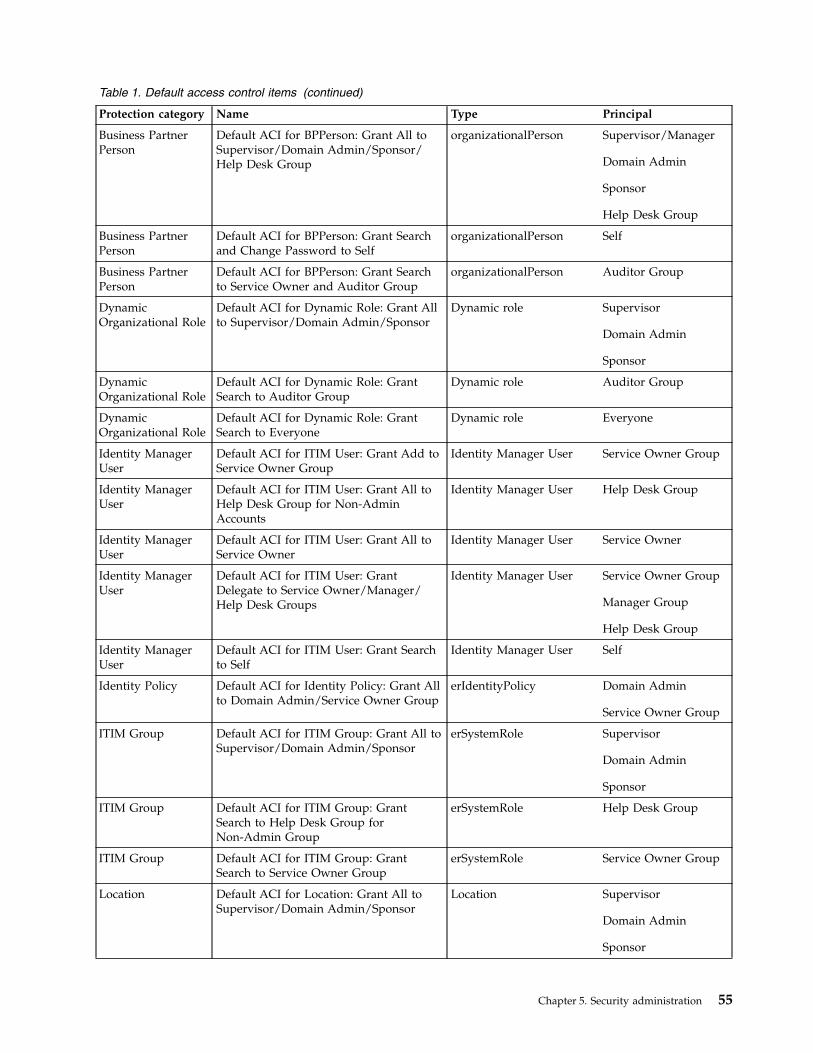
Table 1. Default access control items (continued)
Protection category Name Type Principal
Business PartnerPerson
Default ACI for BPPerson: Grant All toSupervisor/Domain Admin/Sponsor/Help Desk Group
organizationalPerson Supervisor/Manager
Domain Admin
Sponsor
Help Desk Group
Business PartnerPerson
Default ACI for BPPerson: Grant Searchand Change Password to Self
organizationalPerson Self
Business PartnerPerson
Default ACI for BPPerson: Grant Searchto Service Owner and Auditor Group
organizationalPerson Auditor Group
DynamicOrganizational Role
Default ACI for Dynamic Role: Grant Allto Supervisor/Domain Admin/Sponsor
Dynamic role Supervisor
Domain Admin
Sponsor
DynamicOrganizational Role
Default ACI for Dynamic Role: GrantSearch to Auditor Group
Dynamic role Auditor Group
DynamicOrganizational Role
Default ACI for Dynamic Role: GrantSearch to Everyone
Dynamic role Everyone
Identity ManagerUser
Default ACI for ITIM User: Grant Add toService Owner Group
Identity Manager User Service Owner Group
Identity ManagerUser
Default ACI for ITIM User: Grant All toHelp Desk Group for Non-AdminAccounts
Identity Manager User Help Desk Group
Identity ManagerUser
Default ACI for ITIM User: Grant All toService Owner
Identity Manager User Service Owner
Identity ManagerUser
Default ACI for ITIM User: GrantDelegate to Service Owner/Manager/Help Desk Groups
Identity Manager User Service Owner Group
Manager Group
Help Desk Group
Identity ManagerUser
Default ACI for ITIM User: Grant Searchto Self
Identity Manager User Self
Identity Policy Default ACI for Identity Policy: Grant Allto Domain Admin/Service Owner Group
erIdentityPolicy Domain Admin
Service Owner Group
ITIM Group Default ACI for ITIM Group: Grant All toSupervisor/Domain Admin/Sponsor
erSystemRole Supervisor
Domain Admin
Sponsor
ITIM Group Default ACI for ITIM Group: GrantSearch to Help Desk Group forNon-Admin Group
erSystemRole Help Desk Group
ITIM Group Default ACI for ITIM Group: GrantSearch to Service Owner Group
erSystemRole Service Owner Group
Location Default ACI for Location: Grant All toSupervisor/Domain Admin/Sponsor
Location Supervisor
Domain Admin
Sponsor
Chapter 5. Security administration 55

Table 1. Default access control items (continued)
Protection category Name Type Principal
Location Default ACI for Location: Grant Search toHelp Desk/Auditor/Service OwnerGroups
Location Help Desk Group
Auditor Group
Service Owner Group
Organizational Unit Default ACI for Org Unit: Grant All toSupervisor/Domain Admin/Sponsor
Organizational Unit Supervisor
Domain Admin
Sponsor
Organizational Unit Default ACI for Org Unit: Grant Searchto Help Desk/Auditor/Service OwnerGroups
Organizational Unit Help Desk Group
Auditor Group
Service Owner Group
Password Policy Default ACI for Password Policy: GrantAll to Domain Admin/Service OwnerGroup
erPasswordPolicy Domain Admin
Service Owner Group
Person Default ACI for Person: Grant All toSupervisor/Domain Admin/Sponsor/Help Desk Group
inetOrgPerson Supervisor/Manager
Domain Admin
Sponsor
Help Desk Group
Person Default ACI for Person: Grant ChangePassword to Service Owner Group
inetOrgPerson Service Owner Group
Person Default ACI for Person: GrantSearch/Change Password/View andChange Role to Self
inetOrgPerson Self
Person Default ACI for Person: Grant Search toService Owner and Auditor Group
inetOrgPerson Auditor Group
Person Default ACI for Person: Grant Search androle assignment to PrivilegedAdministrator Group
erPersonItem PrivilegedAdministrator Group
Provisioning Policy Default ACI for Provisioning Policy:Grant All to Domain Admin/ServiceOwner Group
erProvisioningPolicy Domain Admin
Service Owner Group
Provisioning Policy Default ACI for Provisioning Policy:Grant Search to Auditor Group
erProvisioningPolicy Auditor Group
RecertificationPolicy
Default ACI for Recertification Policy:Grant All to Service Owner Group
erRecertificationPolicy Service Owner Group
RecertificationPolicy
Default ACI for Recertification Policy:Grant Search to Auditor/ManagerGroups
erRecertificationPolicy Auditor Group
Manager Group
Report Default ACI for Access Control Item(ACI) Report: Grant Run to AuditorGroup
Access Control Item Auditor Group
Report Default ACI for Access Report: GrantRun to Auditor/Service Owner Groups
Access Report Auditor Group
Service Owner Group
Report Default ACI for Account Report: GrantRun to Auditor Group
Account Report Auditor Group
56 IBM Security Identity Manager Version 6.0.0.18: Administration Topics

Table 1. Default access control items (continued)
Protection category Name Type Principal
Report Default ACI for Account Requests by anIndividual Report: Grant Run toAuditor/Manager Groups
Account Operations Doneby an Individual
Auditor Group
Manager Group
Report Default ACI for Account Requests Report:Grant Run to Auditor/Manager Groups
Account Operations Auditor Group
Manager Group
Report Default ACI for Account on a ServiceReport: Grant Run to Auditor/ServiceOwner Groups
Summary of Accounts onService
Auditor Group
Service Owner Group
Report Default ACI for Approval/RejectionReport: Grant Run to Auditor/ManagerGroups
Approvals and Rejections Auditor Group
Manager Group
Report Default ACI for Audit Events Report:Grant Run to Auditor Group
Audit Events Auditor Group
Report Default ACI for Dormant AccountsReport: Grant Run to Auditor/ServiceOwner Groups
Dormant Accounts Auditor Group
Service Owner Group
Report Default ACI for Entitlements Granted toan Individual Report: Grant Run toAuditor Group
Entitlements Granted toan Individual
Auditor Group
Report Default ACI for Individual Access Report:Grant Run to Auditor/Manager/ServiceOwner Groups
Individual Access Auditor Group
Manager Group
Service Owner Group
Report Default ACI for Noncompliant AccountsReport: Grant Run to Auditor Group
Noncompliant Accounts Auditor Group
Report Default ACI for Operation Report: GrantRun to Auditor/Manager Groups
Operation Report Auditor Group
Manager Group
Report Default ACI for Orphan Accounts Report:Grant Run to Auditor/Service OwnerGroups
Orphan Accounts Auditor Group
Service Owner Group
Report Default ACI for Pending ApprovalsReport: Grant Run to Auditor/ManagerGroups
Pending Approvals Auditor Group
Manager Group
Report Default ACI for Pending RecertificationReport: Grant Run toAuditor/Manager/Service Owner Groups
Accounts/Access PendingRecertification Report
Auditor Group
Manager Group
Service Owner Group
Report Default ACI for Policies Governing a RoleReport: Grant Run to Auditor Group
Policies Governing a Role Auditor Group
Report Default ACI for Policies Report: GrantRun to Auditor Group
Policies Auditor Group
Report Default ACI for Recertification HistoryReport: Grant Run toAuditor/Manager/Service Owner Groups
Recertification HistoryReport
Auditor Group
Manager Group
Service Owner Group
Chapter 5. Security administration 57

Table 1. Default access control items (continued)
Protection category Name Type Principal
Report Default ACI for Recertification PoliciesReport: Grant Run toAuditor/Manager/Service Owner Groups
Recertification PoliciesReport
Auditor Group
Manager Group
Service Owner Group
Report Default ACI for Reconciliation StatisticsReport: Grant Run to Auditor/ServiceOwner Groups
Reconciliation Statistics Auditor Group
Service Owner Group
Report Default ACI for Rejected Report: GrantRun to Auditor/Manager Groups
Rejected Report Auditor Group
Manager Group
Report Default ACI for Services Report: GrantRun to Auditor/Service Owner Groups
Services Auditor Group
Service Owner Group
Report Default ACI for Suspended AccountsReport: Grant Run to Auditor Group
Suspended Accounts Auditor Group
Report Default ACI for Suspended User Report:Grant Run to Auditor Group
Suspended Individuals Auditor Group
Report Default ACI for User Accounts by RoleReport: Grant Run to Auditor Group
Individual Accounts byRole associated withProvisioning Policy
Auditor Group
Report Default ACI for User Accounts Report:Grant Run to Auditor/Manager Groups
Individual Accounts Auditor Group
Manager Group
Report Default ACI for User Requests Report:Grant Run to Auditor/Manager Groups
User Report Auditor Group
Manager Group
Separation of DutyPolicy
Default ACI for Separation of DutyPolicy: Grant All to Owner
erSeparationOfDutyPolicy Owner
Separation of DutyPolicy
Default ACI for Separation of DutyPolicy: Grant Search to Auditor Group
erSeparationOfDutyPolicy Auditor Group
Service Default ACI for ITIM Service: Grant Allto Domain Admin
ITIM Domain Admin
Service Default ACI for Service: GrantAdd/Reconcile to Service Owner Group
erServiceItem Service Owner Group
Service Default ACI for Service: Grant All toDomain Admin
erServiceItem Domain Admin
Service Default ACI for Service: Grant Rights toEveryone
erServiceItem Everyone
Service Default ACI for Service: GrantSearch/Modify/Remove/Reconcile/recertOverride/ customizeAccountForm/enforcePolicy/restartService to Owner
erServiceItem Owner
Service Default ACI for Service: Grant Search toAccess Owner/Supervisor/AuditorGroup
erServiceItem Access Owner
Supervisor
Auditor Group
Service Group Default ACI for Service Group: Grant Allto Service Owner
erGroupItem Service Owner
58 IBM Security Identity Manager Version 6.0.0.18: Administration Topics

Table 1. Default access control items (continued)
Protection category Name Type Principal
Service Group Default ACI for Service Group: GrantSearch/View Access to Everyone
erGroupItem Everyone
Service Group Default ACI for Service Group: GrantSearch to Auditor Group/Supervisor
erGroupItem Auditor Group
Supervisor
Service Group Default ACI for Service Group: Grant All(except for Add operation) to AccessOwner
erGroupItem Access Owner
Service SelectionPolicy
Default ACI for Service Selection Policy:Grant All to Domain Admin
erHostSelectionPolicy Domain Admin
StaticOrganizational Role
Default ACI for Org Role: Grant All toSupervisor/Domain Admin/Sponsor
Organizational Role Supervisor
Domain Admin
Sponsor
StaticOrganizational Role
Default ACI for Org Role: GrantSearch/Modify for Everyone
Organizational Role Everyone
StaticOrganizational Role
Default ACI for Org Role: Grant Searchto Help Desk/Auditor Groups
Organizational Role Help Desk Group
Auditor Group
Workflow Design Default ACI for Workflow: Grant All toDomain Admin/Service Owner Group
erWorkflowDefinition Domain Admin
Service Owner Group
Creating an access control itemAs an administrator, you can create an access control item to specify a set ofoperations and permissions. Then, you can apply the access control item to theroles and groups that you want to be governed by the access control item.
Before you begin
Depending on how your system administrator customized your system, you mightnot have access to this task. To obtain access to this task or to have someonecomplete it for you, contact your system administrator.
If you create an access control item that applies to a new group, create the groupfirst.
About this task
You can use the Create access control item wizard to create additional accesscontrol items.
To create an access control item, complete these steps:
Procedure1. From the navigation tree, select Set System Security > Manage Access Control
Items.2. On the Manage Access Control Items page, in the Access Control Items table,
click Create.
Chapter 5. Security administration 59

3. On the Create Access Control Item wizard, on the General page, specify thename of the access control item and a protection category. If you selectedAccount as your protection category, specify an object class. Specify on whichbusiness unit the access control item applies, and whether business subunits arealso controlled. Specify whether to apply protection to all objects, or to a subsetof objects that are selected by a filter statement that you provide. Then, clickNext.
4. On the Operations page, select one or more operations, and set the permissionto Grant, Deny, or None. Then, click Next.
5. On the Permissions page, for each Read or Write field for each attribute, selectGrant, Deny, or None. The table might contain multiple pages of attributes.Click the right arrow button to set permissions for other attributes on the otherpages. Then, click Next.
6. On the Membership page, specify the focus for roles or group membership thatthis access control item governs.
7. Click Finish.8. On the Success page, click Close.
What to do next
You might associate the access control item with a customized group that youpreviously created.
After you create an access control item or change an existing access control item,run a data synchronization to ensure that other Security Identity Managerprocesses, such as the reporting engine, use the new or changed access controlitem.
Changing an access control itemAs an administrator, you can change an access control item if necessary.
Before you begin
Depending on how your system administrator customized your system, you mightnot have access to this task. To obtain access to this task or to have someonecomplete it for you, contact your system administrator.
If you change an access control item, investigate in advance which business unitsand objects are affected by the change.
About this task
You can use the Change access control item notebook to change an existing accesscontrol item.
To change an access control item, complete these steps:
Procedure1. From the navigation tree, select Set System Security > Manage Access Control
Items.2. On the Manage Access Control Items page, type information about the access
control item in the Search information field, and click Search.
60 IBM Security Identity Manager Version 6.0.0.18: Administration Topics

3. In the Access Control Items table, select an access control item, and then clickChange.
4. On the General page, you might change the name of the access control item.You can specify applying protection to all objects. Alternatively, you can specifyapplying protection to a subset of objects that is selected by a filter statementthat you provide. Then, click Apply to save your changes, or click another tab.
5. On the Operations page, change the permissions for one or more operations.Then, click Apply to save your changes, or click another tab.
6. On the Permissions page, change the permissions for one or more attributes.Then, click Apply to save your changes, or click another tab.
7. On the Membership page, change who this access control item governs. Then,click Apply to save your changes, or click another tab.
8. Click OK to save the changes.9. On the Success page, click Close.
What to do next
After you create an access control item or change an existing access control item,run a data synchronization to ensure that other Security Identity Managerprocesses, such as the reporting engine, use the new or changed access controlitem.
Deleting an access control itemAs an administrator, you can delete an access control item if necessary. Forexample, you might create another access control item that replaces the accesscontrol item that you intend to delete.
Before you begin
Depending on how your system administrator customized your system, you mightnot have access to this task. To obtain access to this task or to have someonecomplete it for you, contact your system administrator.
Deleting an access control item revokes any authorization granted to the user(member of the access control item) for a particular protection category. Applyyour organization's process that changes or transfers the membership of an accesscontrol item before deleting the access control item from the system.
About this task
To delete an access control item, complete these steps:
Procedure1. From the navigation tree, select Set System Security > Manage Access Control
Items.2. On the Manage Access Control Items page, type information about the access
control item in the Search information field, and click Search.3. In the Access Control Items table, select an access control item, and then click
Delete. Although you can delete a default access control item that IBM SecurityIdentity Manager provides, you might want to first ensure that an alternativeaccess control item exists.
4. On the Confirm page, ensure that the name of the access control item is correct,and then click Delete.
Chapter 5. Security administration 61

5. On the Success page, click Close.
62 IBM Security Identity Manager Version 6.0.0.18: Administration Topics

Chapter 6. Role administration
Organizational roles are a method of providing users with entitlements to managedresources. Organization roles determine which resources are provisioned for a useror set of users who share similar responsibilities. A role is a job function thatidentifies the tasks that a person can do and the resources to which the person hasaccess.
If users are assigned to an organizational role, managed resources that areavailable to that role then become available to the users in that role. The resourcesmust be properly tied to that role.
You can assign a user to one or more roles. Additionally, roles can themselves bemembers of other roles, in what is termed child roles that contribute to rolehierarchy.
A role might be a child role of another organizational role, which then becomes aparent role. That child role inherits the permissions of the parent role. A role mightbe a child role of another organizational role in a provisioning policy. That childrole also inherits the permissions of provisioning policy.
Activities are often assigned to roles rather than to individuals. This role-basedmodel lowers the risk that individuals might gain more system access thanrequired by their job function. You can also define policies to prevent users fromhaving multiple roles that result in a conflict of interest.
Role overviewA role, also termed an organizational role, is a modeling concept that serves as aconvenience in administering policy.
The descriptive properties of a role, particularly its name, are significant and implythe purpose of the role. For example, a role might be named manager, designer, orauditor. In IBM Security Identity Manager, a role is used to support user andaccess provisioning.
A role can be used to support different provisioning models:v Role-based, to automate and to accelerate the process of granting access to
resources. A role-based model lowers the risk of individuals who might gainmore system access than required by their job or other relationship to acompany.The operational needs of an enterprise determine the assignment of users toroles. For example, a user might have a role as a help desk assistant or auditor.In a role-based model, users receive a specific set of accounts and access rightsbased on role membership. When a user is removed from a role, the entire set ofaccounts and access rights are also removed.The role might be a child role of another organizational role, which thenbecomes a parent role. The child role inherits the permissions of the parent role.
v Request-based provisioning, in which a role represents an access to an ITresource that can be directly searched and requested by a user.
63

The access entitlements of the role are defined by a provisioning policy.Approval processing can be supported for a role request; the user is assigned tothe role after the request is approved. When the user is a member of a role,access rights are granted. Removing a user from that role also removes the entireset of access that the role granted.If a role is a child role of another organizational role in a provisioning policy,then that child role also inherits the permissions of provisioning policy.
Using the processes provided by Security Identity Manager, a user in a businessunit might have a role as illustrated in the simplified diagram in Figure 1:
To enable the user to access one or more resources, a provisioning policy can beconfigured so that the reference role in the policy is granted with the set ofentitlements for the resources.
Security Identity Manager also supports two ways to define an organizational role:static role and dynamic role. For a static organizational role, assigning a person toa static role is a manual process. For a dynamic role, role membership is specifiedas a filter in the role definition that selects role members based on some attribute,such as a business title.
Role hierarchy change enforcementThe people affected by the role hierarchy change operation are evaluated againstall applicable policies in the system. Evaluation includes policies that are notrelated to any of the parent roles. As a result, you might find accounts not relatedto the role hierarchy change that is being enforced.
For example, you might have a group of new users from an HR feed that did nothave workflow enabled. This group of people is entitled to accounts on Service Aautomatically, but the accounts are not created because the HR feed bypassedpolicy evaluation. A role hierarchy change operation might affect the same groupof users so that they are provisioned to Service B. Accounts on both Service A andService B are created.
Creating rolesYou can create roles to allow users to use managed resources, depending on theirmembership in the role.
Figure 1. User access to resources
64 IBM Security Identity Manager Version 6.0.0.18: Administration Topics

Before you begin
Depending on how your system administrator customized your system, you mightnot have access to this task. To obtain access to this task or to have someonecomplete it for you, contact your system administrator.
Determine the range of roles that organization members require to accessresources.
About this task
To create a role, complete these steps:
Procedure1. From the navigation tree, select Manage Roles. The Manage Roles page is
displayed.2. On the Manage Roles page, in the Roles table, click Create. The Create Role
wizard is displayed.3. On the Role Type page, specify the appropriate values and click Next. The
pages vary, depending on whether you specify a static or a dynamic role.Complete each page to specify the necessary information for the role.
Note: On the Access Information page, you can provide owner informationand other access information such access type, name, description, search terms,or badges.
4. Click Finish when you are done specifying all the expected information.5. On the Success page, click Close.
What to do next
You might associate a provisioning policy with the role that you created.
Modifying rolesYou can modify roles that allow users or other roles to use managed resources,depending on their membership in the role.
Before you begin
Depending on how your system administrator customized your system, you mightnot have access to this task. To obtain access to this task or to have someonecomplete it for you, contact your system administrator.
Determine the effects of the change. For example, determine whether changing thescope or the filter definition for a dynamic role correctly limits or expands whichusers can access resources.
About this task
Procedure1. From the navigation tree, click Manage Roles. The Manage Roles page is
displayed.2. On the Manage Roles page, complete these steps:
a. Type information about the role in the Search information field.
Chapter 6. Role administration 65

b. In the Search by field, specify whether to search against role names ordescriptions, or against business units, and then click Search. A list of rolesthat match the search criteria is displayed.If the table contains multiple pages, you can:v Click the arrow to go to the next page.v Type the number of the page that you want to view and click Go.
c. In the Roles table, click the icon ( ) next to the role that you want tomodify, and then click Change. The Change Role wizard is displayed.
3. On the Change Role wizard, edit or modify the existing information on eachcorresponding page for the role. The pages vary, depending on whether youspecify a static or a dynamic role.
Note: On the Access Information page, you can provide owner informationand other access information such access type, name, description, search terms,or badges.
4. Click OK when you are done specifying all the expected information on one orall the pages.
Results
A Success page is displayed, indicating that you successfully updated the role.
What to do next
On the Success page, click Close.
Values and formats for CSV access data (role)A role access CSV file can contain multiple values and supported formats.
Consider these points before you work with any CSV files for a role access:v If you use a custom label for AccessType, specify the key in the CSV file.v If you use a custom label for badge text, add a $ prefix on the key. For example,
$mail.v Define multiple values for search terms and badges with a semicolon (;)
separator.v Define the AccessType hierarchy with a colon (:) separator.v Use the badgeText~badgeStyle format for badges.
Define CSV columns for a role access as follows:
Table 2. CSV fields and values. CSV fields and valuesField name Value
ROLE_DN, ROLE_NAME Not modifiable.
DEFINE_AS_ACCESS TRUE or FALSE. If you do not assign any value, then FALSE is assumed.
ACCESS_NAME Required for services and groups, and contains a maximum length of 240 characters. This field is not available for roles.
ACCESS_TYPE Required. You must specify an access type that is defined in IBM Security Identity Manager.
ACCESS_DESCRIPTION Contains a maximum length of 240 characters.
ICON_URL Provide a valid icon URL value on the access definition.
SEARCH_TERMS Each search term contains a maximum length of 80 characters. You can have multiple search terms.
ADDITIONAL_INFORMATION Contains a maximum length of 1024 characters.
BADGES The maximum length for each badge text is 512 characters. You can have multiple badges. The badge text that is prefixedwith a $ sign cannot contain delimiter characters such as ., ;, =, or white space.
66 IBM Security Identity Manager Version 6.0.0.18: Administration Topics

A role access CSV file for an export or import operation in the IBM SecurityIdentity Manager administration console contains these columns with samplevalues and supported formats:
Table 3. Part 1 of 2: Role access CSV file values, formatsROLE_NAME DEFINE_AS_ACCESS ACCESS TYPE ICON_URL
admin TRUE Application:Role:Manager /itim/ui/custom/ui/images/homepage/RequestAccess.png
AIX Role TRUE Mail:Role http://www-03.ibm.com/ibm/history/exhibits/logo/images/920911.jpg
Default Role FALSE AccessRole /itim/ui/custom/ui/images/homepage/RequestAccess.png
Table 4. Part 2 of 2: Role access CSV file values, formatsROLE_NAME SEARCH_TERMS ADDITIONAL_INFORMATION BADGES SERVICE_DN
admin Application; Role access Role that is used by a client user. $admin~yellow;custom~green erglobalid=5628670506891199803,ou=roles,erglobalid=000000
AIX Role Employee;Role;Role access Used by the customer to deployserver.
Role~grey erglobalid=5628669752130902869,ou=roles,erglobalid=000000
Default Role Mail;Unique ID BVT server that is used to run BVTfrom developer and tester.
$mailrisk~red erglobalid=5628670337030215245,ou=roles,erglobalid=000000
Exporting access data for a roleExport the access data for a role in a comma-separated value (CSV) file format byusing the IBM Security Identity Manager Console.
Before you begin
Depending on how your system administrator customized your system, you mightnot have access to this task. To obtain access to this task or to have someonecomplete it for you, contact your system administrator.
Before you export a role, you must have ACI privileges for Search Operations, andread permissions for the Access Options attribute, on the role that you want toview. If the necessary privileges do not exist, then the role is not exported.
The Export Access Data button is not active until you select some role accesses toactivate it. Only the role access that you selected is exported as access data.
About this task
Export the selected role access data in a CSV file format for your requirements.
Procedure1. From the navigation tree, select Manage Roles. The Manage Roles page is
displayed.2. On the Manage Roles page, in the Roles table, click Export Access Data. The
Export access data page is displayed. After you submit the export request, aprocess status indicates the advancement of the export operation.
3. Optional: Click Cancel to discontinue the export operation.4. Click Download Exported File to download the CSV file on your local system
by using your web browser settings. The exported CSV file contains all the roleaccess data.
Note: Click Download Export Log File to view any error or log informationabout the export operation. This button is displayed only if the submittedexport operation contains any log information or encountered any errors.
Chapter 6. Role administration 67

Results
The exported CSV file contains all the access data for a role. Click Close to exitfrom the Export access data page.
What to do next
Import access data for a role, or you can continue to export access data by clickingExport Access Data in the Manage Roles page.
Importing access data for a roleUse the IBM Security Identity Manager Console to import the role access data froma comma-separated value (CSV) file.
Before you begin
Depending on how your system administrator customized your system, you mightnot have access to this task. To obtain access to this task or to have someonecomplete it for you, contact your system administrator.
The privileged user that uploads the CSV file must have the appropriatepermissions.
Before you import a role, you must have ACI privileges for Search Operation,Modify Operation, and read permissions for the Access Options attribute, on therole that you want to update. If the necessary privileges do not exist, then the roleis not imported.
Before you import a CSV file, verify that the CSV-related conventions are met.They are as follows:v The access type hierarchy is represented in the following format, and each access
type be separated by a colon (:). For example:AccessType1:AccessType2
v The badge information is provided in the following format. For example:badgeText~badgeStyle
v Multiple badges can be assigned to accesses in the following format, and eachbadge must be separated by a semicolon (;). For example:Badge1~red;Badge2~green
v Multiple search terms and access types can be specified by using the semicolon(;) separator.
v The relevant keys must be provided in the CSV file for the customized labelsthat are related to badges and access types.
About this task
Only the accesses with the Define as Access set to True are defined as accesses,and the corresponding data is imported.
Procedure1. From the navigation tree, select Manage Roles. The Manage Roles page is
displayed.2. On the Manage Roles page, in the Roles table, click Import Access Data. The
Import access data page is displayed.
68 IBM Security Identity Manager Version 6.0.0.18: Administration Topics

3. Click Browse in File to Upload (.CSV) to locate and upload a valid CSV filethat contains all the access data for a role.
4. Click Import to import the CSV file. After you submit the import request, aprocess status indicates the advancement of the import operation.
Note: If you click Import with an invalid file format, a message is displayed toinform you that the file format is not valid.If any problems occur when you are importing a CSV file, then close theImport access data page to continue working with the IBM Security IdentityManager Console. The problems might be due to one of the followingconditions:v The access data CSV file does not exist.v The CSV file was renamed.v The CSV file does not contain appropriate separators or delimiters.
5. Optional: Click Cancel to discontinue the import operation.
Note: Click Download Import Log File to view any error or log informationabout the import operation. This button is displayed only if the submittedimport operation contains any log information or encountered any errors.
Results
The imported CSV file contains all the access data for a role. Click Close to exitfrom the Import access data page.
What to do next
Export access data for a role, or you can continue to import access data by clickingImport Access Data in the Manage Roles page.
Classifying rolesYou can assign a classification to a role.
Before you begin
Depending on how your system administrator customized your system, you mightnot have access to this task. To obtain access to this task or to have someonecomplete it for you, contact your system administrator.
About this task
You can classify a role during role creation, or after a role is already created.
Procedure1. From the navigation tree, click Manage Roles. The Manage Roles page is
displayed.2. On the Manage Roles page, complete these steps:
a. Type information about the role in the Search information field.b. In the Search by field, specify whether to search against role names or
descriptions, or against business units, and then click Search. A list of rolesthat match the search criteria is displayed.If the table contains multiple pages, you can:
Chapter 6. Role administration 69

v Click the arrow to go to the next page.v Type the number of the page that you want to view and click Go.
c. In the Roles table, click the icon ( ) next to the role, and then clickChange. The Role Type page is displayed.
3. On the Role Type page, complete these steps:a. Select a role classification, such as Application role or Business role, from
the Role classification list, and then click OK. By default, no roleclassification is selected.
Results
A Success page is displayed, indicating that you successfully updated the role.
What to do next
On the Success page, click Close.
Specifying owners of a roleYou can specify one or more owners of a role. The owners can be users or roles.You can specify owners of a role during role creation, or after a role is alreadycreated.
Before you begin
Depending on how your system administrator customized your system, you mightnot have access to this task. To obtain access to this task or to have someonecomplete it for you, contact your system administrator.
About this task
The result of designating people or roles as a role owner include:v In workflows, role owners can act as participants. In particular, in the approval
workflow for assigning roles to users, role owners can act as participants.v In access control item (ACI) evaluations for management of roles, the role owner
can act as a principal. This capability allows more than one person to share thisdelegated administrative responsibility. A special case of this scenario is whenthe role is an owner of itself. In that case, the members of the role can also bethe administrators. You can set up a structure so that any member of the rolecan add other members.
v In exporting roles, the relationships to the role owners are also exported.Relationships to users that are role owners are exported, but the usersthemselves are not exported. On import, the ownership relationships are createdonly if the users exist in the import.
In any of these scenarios, being a child or member of a child role of a role owner isequivalent to being a child or member of the role itself.
To specify roles and users that have ownership of the role, complete these steps:
Procedure1. From the navigation tree, click Manage Roles. The Manage Roles page is
displayed.2. On the Manage Roles page, complete these steps:
70 IBM Security Identity Manager Version 6.0.0.18: Administration Topics

a. Type information about the role in the Search information field.b. In the Search by field, specify whether to search against role names or
descriptions, or against business units, and then click Search. A list of rolesthat match the search criteria is displayed.If the table contains multiple pages, you can:v Click the arrow to go to the next page.v Type the number of the page that you want to view and click Go.
c. In the Roles table, click the icon ( ) next to the role, and then clickChange. The Role Type page is displayed.
3. Click Access Information.4. On the Access Information page, complete these steps:
a. Click the twisty icon
next to Owners. The Role Owners and UserOwners tables are displayed.
b. Click Add to add owners to a list of role owners or user owners. You canselect role owners, user owners, or a combination of both. The Select Rolesor Select Users page is displayed.
c. On the Select Roles or Select Users page, search for and select the owners tohave ownership of the role, and then click OK.
Results
The Access Information page is displayed, and the list of owners is updated in theRole Owners and User Owners tables.
What to do next
You can continue adding or removing owners of the role, or click OK.
Displaying a role-based access in the user interfaceYou can display an access based on a role to users who request access in the SelfService or the Identity Service Center user interface.
Before you begin
Depending on how your system administrator customized your system, you mightnot have access to this task. To obtain access to this task or to have someonecomplete it for you, contact your system administrator.
About this task
You can use the Manage Roles page to display an access in the Self Service or theIdentity Service Center user interface.
To display an access in the Self Service or the Identity Service Center userinterface, complete these steps:
Procedure1. From the navigation tree, click Manage Roles. The Manage Roles page is
displayed.2. On the Manage Roles page, complete these steps:
a. Type information about the role in the Search information field.
Chapter 6. Role administration 71

b. In the Search by field, specify whether the search is done against rolenames or descriptions, or against business units, and then click Search. Alist of roles that match the search criteria is displayed.If the table contains multiple pages, you can:v Click the arrow to go to the next page.v Type the number of the page that you want to view and click Go.
c. In the Roles table, click the icon ( ) next to the role that you want tomodify, and then click Change to display the Role Type page.
3. Click the Access Information tab.4. On the Access Information page, click Enable access for this role.5. For a static role, click Show this role as a common access to show the role as
an access that a user can select.6. On the Access Information page, select an access type, such as Application in
the Select access type tree. You can also specify other access information suchas description, search terms, more information, or badges.
7. Click OK.
Results
A Success page indicates that you successfully updated the role.
What to do next
On the Success page, click Close.
You might change the provisioning policy that is associated with the role that hasthe access type.
Role assignment attributesYou can define role assignment attributes. The attributes can be associated with aperson-role relationship.
Optional role assignment attributes tasks are:v Defining role assignment attributes when creating or modifying a static role.v Associating a custom label with each assignment attribute.v Specifying assignment attribute values when adding user members to the role.
For example, a static role named Clerk has an assignment attribute defined asCreditLimit. When adding user members to this role, you can specify theCreditLimit value for each user as part of the role assignment.
v Specifying assignment attribute values to the existing user members of the role.
Notes:
1. Only static roles support assignment attributes.2. Only the string type and text widget of assignment attributes are supported.
ACI capabilities for role assignment attributes
Both the default and new ACIs supports attribute-level permissions for roleassignment attributes like other attributes in the role definition. You can nowmodify or create ACIs. You can set attribute-level permissions for granting or
72 IBM Security Identity Manager Version 6.0.0.18: Administration Topics

denying usage of these role assignment attributes within the role definition. Onlyauthorized users can read or write assignment attributes. Additionally, you can:v Set ACIs to read or write assignment attribute values when adding a user to the
role.v Set assignment attribute values to the existing user members.
ACI works the same way as it does for other entities. There is no ACI on specificrole assignment attributes. The following attributes are available:v erRoleAssignmentKey is on the role that dictates the permission to define role
assignment attributes on the role and an attribute.v erRoleAssignments is on the person that dictates the permission to assign values
for the assignment attributes.
To view the role assignment attribute value on a person form, the logged in usermust have read permissions on erRoles, erRoleAssignmentKey anderRoleAssignments.
To edit the role assignment attribute value on a person form, the logged in usermust have read permissions on erRoles, erRoleAssignmentKey and writepermissions on erRoleAssignments.
You cannot define ACI on the assignment attribute that you defined on the role.
JavaScript capabilities for role assignment attributes
You can access these capabilities for role assignment attributes within theJavaScript interface:v The role assignment attributes of the role schema. For example, you can access a
role object inside an entitlement workflow.v The role assignment attributes and their values for users in role membership.
For example, you can access a person object within a JavaScript provisioningpolicy entitlement.
New JavaScript APIs include:v Person
– Person.getAllAssignmentAttributes()– Person.getRoleAssignmentData()– Person.getRoleAssignmentData(String roleAssignedDN)– Person.removeRoleAssignmentData()– Person.updateRoleAssignmentData()– Person.getRemovedRoles()– Person.isInRole()– Person.removeRole()
v Role– Role.getAssignmentAttributes()– Role.getAllAssignmentAttributes()– Role.setAssignmentAttributes()
v RoleAssignmentAttribute– RoleAssignmentAttribute.getName()– RoleAssignmentAttribute.getRoleName()
Chapter 6. Role administration 73

– RoleAssignmentAttribute.getRoleDN()v RoleAssignmentObject
– RoleAssignmentObject.getAssignedRoleDN()– RoleAssignmentObject.getDefinedRoleDN()– RoleAssignmentObject.addProperty()– RoleAssignmentObject.getChanges()– RoleAssignmentObject.getProperty()– RoleAssignmentObject.getPropertyNames()– RoleAssignmentObject.removeProperty()– RoleAssignmentObject.setProperty()
For more information, see the reference pages in the IBM Security Identity ManagerReference Guide.
Role assignment attributes and the Self Service or the IdentityService Center user interface
For more information about adding or modifying role assignment attributes for auser profile in the Self Service or the Identity Service Center user interface, see theIBM Security Identity Manager Support Portal website.
Defining assignment attributes when creating a roleWhen creating a role, you can optionally define assignment attributes to beassociated with the role.
Before you begin
Depending on how your system administrator customized your system, you mightnot have access to this task. To obtain access to this task or to have someonecomplete it for you, contact your system administrator.
You can associate a custom label with an assignment attribute by adding anattribute name prefixed with roleAssignmentAttribute in thecustomLabels.properties resource bundle. This operation provides the displaylabel for the assignment attribute. For example,roleAssignmentAttribute.creditLimit="Credit Limit Value". The key for theassignment attribute of the same role must be unique.
Procedure
To define assignment attributes to be associated with a role, complete these steps:1. From the navigation tree, click Manage Roles. The Manage Roles page is
displayed.2. On the Manage Roles page, click Create and proceed through the wizard
panels until you reach the Assignment Attributes page. If you selected a roletype of Dynamic, the Assignment Attributes page is not displayed.
3. In the Attribute Name field, specify a name for the assignment attribute youwant to add.
Note: You must not enter a space, semi-colon, or both when specifying anassignment attribute name.
4. Click Add.
74 IBM Security Identity Manager Version 6.0.0.18: Administration Topics

The new attribute is displayed in the assignment attributes table. If theattribute has any display label defined in the customLabels.properties resourcebundle, then the assignment attribute table displays the same label.
5. Click Next to continue through the Role Creation wizard.
Results
A Success page is displayed, indicating that you successfully created the role.
Defining assignment attributes for an existing roleWhen modifying an existing role, you can optionally define assignment attributesto be associated with the role.
Before you begin
Depending on how your system administrator customized your system, you mightnot have access to this task. To obtain access to this task or to have someonecomplete it for you, contact your system administrator.
You can associate a custom label with an assignment attribute by adding anattribute name prefixed with roleAssignmentAttribute in thecustomLabels.properties resource bundle. This operation provides the displaylabel for the assignment attribute. For example,roleAssignmentAttribute.creditLimit="Credit Limit Value". The key for theassignment attribute of the same role must be unique.
Procedure
To define assignment attributes to be associated with a role, complete these steps:1. From the navigation tree, click Manage Roles. The Manage Roles page is
displayed.2. On the Manage Roles page, complete these steps:
a. Type information about the role in the Search information field.b. In the Search by field, specify whether to search against role names or
descriptions, or against business units, and then click Search. A list of rolesthat match the search criteria is displayed.If the table contains multiple pages, you can:v Click the arrow to go to the next page.v Type the number of the page that you want to view and click Go.
c. In the Roles table, click the icon ( ) next to the role, and then clickChange. The Role Type page is displayed.
3. Click Assignment Attributes. The Assignment Attributes page is displayed. Ifyou selected a role type of Dynamic, the Assignment Attributes page is notdisplayed.
4. To add an attribute to an existing role, enter a name in the Attribute Namefield for the assignment attribute you want to add.
Note: You must not enter a space, semi-colon, or both when specifying anassignment attribute name.
5. Click Add.
Chapter 6. Role administration 75

The new attribute is displayed in the assignment attributes table. If theattribute has a display label defined in the customLabels.properties resourcebundle, then the assignment attribute table displays the same label.
6. Optionally, you can remove existing assignment attributes if no values are setwith any user member of the role.
Results
A Success page is displayed, indicating that you successfully updated the role.
Setting assignment attribute values to the user members of arole
You can set assignment attribute values to the user members of a staticorganizational role if you defined assignment attributes in the role definition.
Before you begin
Depending on how your system administrator customized your system, you mightnot have access to this task. To obtain access to this task or to have someonecomplete it for you, contact your system administrator.
Procedure
To set assignment attributes to the user members in a static role, complete thesesteps:1. From the navigation tree, click Manage Roles. The Manage Roles page is
displayed.2. On the Manage Roles page, complete these steps:
a. Type information about the role in the Search information field.b. In the Search by field, specify whether to search against role names or
descriptions, or against business units, and then click Search. A list of rolesthat match the search criteria is displayed.If the table contains multiple pages, you can:v Click the arrow to go to the next page.v Type the number of the page that you want to view and click Go.
c. In the Roles table, click the icon ( ) next to the role to which you want toadd members, and then click Manage User Members. The Manage UserMembers and Child Roles page is displayed.
3. On the Manage User Members and Child Roles page, complete these steps:a. Type information about the user in the Search information field.b. In the Search by field, select the attribute on which you want to search, and
then click Search, or click Advanced, depending on the type of search youwant to do. The advanced search option opens a new page where you canspecify additional search criteria. The Users table is displayed, listing theusers that match the search criteria.If the table contains multiple pages, you can:v Click the arrow to go to the next page.v Type the number of the page that you want to view and click Go.
c. In the Users table, select the check box next to one or more user membersthat you want to set assignment attribute values, and then click Set
76 IBM Security Identity Manager Version 6.0.0.18: Administration Topics

Assignment Attributes. Selecting the check box at the top of this columnselects all user members. The Associate Role Assignment Attributes page isdisplayed.
Note: The Associate Role Assignment Attributes page is displayed if youdefined role assignment attributes when creating the role. These conditionsapply:v When the role is a child role to one or more parent roles, the role assignment
attributes includes the attributes from all of the parent roles.v When you select a user member, the existing attribute value is displayed if
you assigned values when adding user members.v The values are not displayed if you have not set any of them in the
assignment attributes when adding user members.v When you select multiple user members, the values for assignment attributes
are joined.4. On the Associate Role Assignment Attributes page, complete these steps:
a. Enter values for the role assignment attributes.In the role assignment attributes table, click the name of the assignmentattribute. The Set Assignment Values page is displayed.
b. Enter a value for the attribute and click Add. You can add more than onevalue. When finished, click OK.
The Associate Role Assignment Attributes table is displayed.c. When finished adding values to attributes, click Continue. A confirmation
page is displayed.5. On the Confirm page, specify the date and time for the user members to be
added with the assignment attribute values. Then click Submit. Click Back toreturn to the previous page.
Results
A Success page is displayed, indicating that you successfully added the usermembers to the role membership.
What to do next
View the status of the request, or click Close.
Configuring access catalog information for a roleConfigure the access catalog information for a role in the Administrator Console soyou can use it in the Identity Service Center Request Access.
Before you begin
Depending on how your system administrator customized your system, you mightnot have access to this task. To obtain access to this task or to have someonecomplete it for you, contact your system administrator.
You can also configure the access catalog information for a new role or for anexisting role.
Chapter 6. Role administration 77

About this task
Configure the access information for a role by defining certain accesses with theuse of a badge. You can highlight certain accesses with badges by attaching textthat contains some formatting such as color and font type.
Procedure
To configure the role access information, complete these steps:1. From the navigation tree, select Manage Roles. The Manage Roles page is
displayed.2. On the Manage Roles page, in the Roles table, click Create to display the
Create Role wizard. Alternatively, select an existing role and click Change toconfigure its access catalog information.
3. Specify the appropriate values on the Role Type page. The pages vary,depending on whether you specified a static or a dynamic role.
4. Specify the appropriate values on the General Information page.5. On the Access Information page, complete these steps to configure the access
information:a. Expand the Owners section to specify the roles or users that are the owners
of the role.b. Select the Enable access for this role check box.c. Expand the Select access type or the Change access type tree to select an
access type. The tree label depends on whether you want to create ormodify a service.
d. Provide a uniform resource identifier (URI) string in the Icon URL field forthe access icon.
e. Specify search strings in the Search terms field to return specific searchterms. Add or delete the search terms to suit your requirements.
f. Specify any free form information about the access item in the Additionalinformation field.
g. Expand the Badges section to specify the badges that are associated withthe role.v Specify a badge text in the Badge text field.v Assign a class from the Badge class list for the badge text.
You can see the preview of your badge specifications in the Preview area.6. Depending on whether you created or modified the role access information,
click OK or Finish when you are done.
Results
The access information is added to the role object and stored in the SecurityIdentity Manager LDAP server.
What to do next
On the Success page, click Close.. You can also do the following actions:v Create or modify another rolev Return to the list of roles that you were working with
78 IBM Security Identity Manager Version 6.0.0.18: Administration Topics

Deleting rolesYou can delete roles that allow users to use managed resources, depending on theirmembership in the role.
Before you begin
Depending on how your system administrator customized your system, you mightnot have access to this task. To obtain access to this task or to have someonecomplete it for you, contact your system administrator.
About this task
You cannot delete a role that has user members or child roles. You must remove allof the user members and child roles from the role before you can delete the role.
You cannot delete a static role that has membership in a policy, such as aprovisioning or separation of duty policy. You must first remove the static rolefrom the policy.
To delete a role, complete these steps:
Procedure1. From the navigation tree, click Manage Roles. The Manage Roles page is
displayed.2. On the Manage Roles page, complete these steps:
a. Type information about the role in the Search information field.b. In the Search by field, specify whether to search against role name or
description, or against business units, and then click Search. A list of rolesthat match the search criteria is displayed.If the table contains multiple pages, you can:v Click the arrow to go to the next page.v Type the number of the page that you want to view and click Go.
c. In the Roles table, select the check box next to the role that you want todelete, and then click Delete. Selecting the check box at the top of thiscolumn selects all roles. A confirmation page is displayed.
3. On the Confirm page, click Delete, or click Cancel.
Results
A message is displayed, indicating that you successfully removed the role.
What to do next
Continue working with roles, or click Close.
Managing users as members of a roleYou can view, add, or remove user members, which are users that are members of arole.
Chapter 6. Role administration 79

Before you begin
Depending on how your system administrator customized your system, you mightnot have access to this task. To obtain access to this task or to have someonecomplete it for you, contact your system administrator.
About this task
To manage user members, complete these steps:
Procedure1. From the navigation tree, click Manage Roles. The Manage Roles page is
displayed.2. On the Manage Roles page, complete these steps:
a. Type information about the role in the Search information field.b. In the Search by field, specify whether to search against role name or
description, or against business units, and then click Search. A list of rolesthat match the search criteria is displayed.If the table contains multiple pages, you can:v Click the arrow to go to the next page.v Type the number of the page that you want to view and click Go.
3. In the Roles table, click the icon ( ) next to the role, and then click ManageUser Members. The Manage User Members and Child Roles page is displayed.
4. On the Manage User Members and Child Roles page, complete these steps:a. Select User member.b. Type information about the user in the Search information field.c. In the Search by field, specify the attribute on which you want to search,
and then click Search or Advanced, depending on the type of search youwant to do. The advanced search option opens a new page where you canspecify additional search criteria.
Results
The Users table is displayed, listing the user members that match the searchcriteria.
If the table contains multiple pages, you can:v Click the arrow to go to the next page.v Type the number of the page that you want to view and click Go.
What to do next
You can add user members to the role or remove user members from the role. Youcan also set assignment attribute values to user members of a role.
Click Close to close the page.
Adding users to membership of a roleYou can add a user to the membership of a static organizational role.
80 IBM Security Identity Manager Version 6.0.0.18: Administration Topics

Before you begin
Depending on how your system administrator customized your system, you mightnot have access to this task. To obtain access to this task or to have someonecomplete it for you, contact your system administrator.
About this task
To add a user to membership in a static role, complete these steps:
Procedure1. From the navigation tree, click Manage Roles. The Manage Roles page is
displayed.2. On the Manage Roles page, complete these steps:
a. Type information about the role in the Search information field.b. In the Search by field, specify whether to search against role names or
descriptions, or against business units, and then click Search. A list of rolesthat match the search criteria is displayed.If the table contains multiple pages, you can:v Click the arrow to go to the next page.v Type the number of the page that you want to view and click Go.
c. In the Roles table, click the icon ( ) next to the role to which you want toadd members, and then click Add User Members. The Add User Memberspage is displayed.
3. On the Add User Members page, complete these steps:a. Type information about the user in the Search information field.b. In the Search by field, select the attribute on which you want to search, and
then click Search, or click Advanced, depending on the type of search youwant to do. The advanced search option opens a new page where you canspecify additional search criteria. The Users table is displayed, listing theusers that match the search criteria.If the table contains multiple pages, you can:v Click the arrow to go to the next page.v Type the number of the page that you want to view and click Go.
c. In the Users table, select the check box next to one or more users that youwant to add to the membership of the role, and then click OK. Selecting thecheck box at the top of this column selects all users. You cannot select auser that is already a member of the role. The Associate Role AssignmentAttributes page is displayed.
Note: The Associate Role Assignment Attributes page is displayed only if youdefined role assignment attributes when creating the role.
4. On the Associate Role Assignment Attributes page, complete these steps:a. Enter values for the role assignment attributes.b. Click Continue. A confirmation page is displayed.
5. On the Confirm page, specify the date and time for the user members and roleassignment attributes to be added. Then click Submit. Click Back to return tothe previous page.
Chapter 6. Role administration 81

Results
A Success page is displayed, indicating that you successfully added the usermembers to the role membership.
What to do next
View the status of the request, or click Close.
Removing users from membership of a roleYou can remove a user from membership in a static role.
Before you begin
Depending on how your system administrator customized your system, you mightnot have access to this task. To obtain access to this task or to have someonecomplete it for you, contact your system administrator.
About this task
To remove a user from membership in a static role, complete these steps:
Procedure1. From the navigation tree, click Manage Roles. The Manage Roles page is
displayed.2. On the Manage Roles page, complete these steps:
a. Type information about the role in the Search information field.b. In the Search by field, specify whether to search against role names or
descriptions, or against business units, and then click Search. A list of rolesthat match the search criteria is displayed.If the table contains multiple pages, you can:v Click the arrow to go to the next page.v Type the number of the page that you want to view and click Go.
c. In the Roles table, click the icon ( ) next to the role, and then clickManage User Members. The Manage User Members and Child Roles pageis displayed.
3. On the Manage User Members and Child Roles page, complete these steps:a. Select User.b. Type information about the user in the Search information field.c. In the Search by field, specify the attribute on which you want to search,
and then click Search, or click Advanced, depending on the type of searchyou want to do. The advanced search option opens a new page where youcan specify additional search criteria. The Users table is displayed, listingthe users that match the search criteria.If the table contains multiple pages, you can:v Click the arrow to go to the next page.v Type the number of the page that you want to view and click Go.
d. In the Users table, select the check box next to the user member that youwant to remove from membership in the role, and then click Remove.Selecting the check box at the top of this column selects all user members. Aconfirmation page is displayed.
82 IBM Security Identity Manager Version 6.0.0.18: Administration Topics

4. On the Confirm page, specify the date and time for the membership removal tooccur, and then click Submit, or click Cancel.
Results
A message is displayed, indicating that you successfully removed the usermembers from the role membership.
What to do next
View the status of the request, view the membership of the role, or click Close.
Managing child rolesYou can view, add, or remove child roles, which are roles that are members ofanother role. This relationship is a parent-child relationship between anorganizational role (a parent role) and its child roles. A child role itself is anorganizational role.
Before you begin
Depending on how your system administrator customized your system, you mightnot have access to this task. To obtain access to this task or to have someonecomplete it for you, contact your system administrator.
About this task
When you add child roles to a parent role, ensure that there is not a separation ofduty policy violation.
To manage child roles, complete these steps:
Procedure1. From the navigation tree, click Manage Roles. The Manage Roles page is
displayed.2. On the Manage Roles page, complete these steps:
a. Type information about the role in the Search information field.b. In the Search by field, specify whether to search against role name or
description, or against business units, and then click Search. A list of rolesthat match the search criteria is displayed.If the table contains multiple pages, you can:v Click the arrow to go to the next page.v Type the number of the page that you want to view and click Go.
3. In the Roles table, click the icon ( ) next to the role, and then click ManageChild Roles. The Manage User Members and Child Roles page is displayed.
4. On the Manage User Members and Child Roles page, complete these steps:a. Select Child role.b. Type information about the role in the Search information field.c. In the Search by field, specify whether to search against role name or
description, or against business units, and then click Search.
Chapter 6. Role administration 83

Results
The Child Roles table is displayed, listing the child roles that match the searchcriteria.
If the table contains multiple pages, you can:v Click the arrow to go to the next page.v Type the number of the page that you want to view and click Go.
What to do next
You can add more child roles to the parent role, or you can remove child rolesfrom the role.
Click Close to close the page.
Adding child roles to a parent roleYou can add a role (child role) to the membership of an organizational role (parentrole). This task defines the roles in a role hierarchy. Circular parent-childrelationships are not permitted.
Before you begin
Depending on how your system administrator customized your system, you mightnot have access to this task. To obtain access to this task or to have someonecomplete it for you, contact your system administrator.
About this task
When you add child roles to a parent role, ensure that there is not a separation ofduty policy violation.
To add a child role to a parent role, complete these steps:
Procedure1. From the navigation tree, click Manage Roles. The Manage Roles page is
displayed.2. On the Manage Roles page, complete these steps:
a. Type information about the role in the Search information field.b. In the Search by field, specify whether to search against role names or
descriptions, or against business units, and then click Search. A list of rolesthat match the search criteria is displayed.If the table contains multiple pages, you can:v Click the arrow to go to the next page.v Type the number of the page that you want to view and click Go.
c. In the Roles table, click the icon ( ) next to the role, and then click AddChild Roles. The Add Child Roles page is displayed.
3. On the Add Child Roles page, complete these steps:a. Type information about the role in the Search information field.
84 IBM Security Identity Manager Version 6.0.0.18: Administration Topics

b. In the Search by field, specify whether to search against role names ordescriptions, or against business units, and then click Search. The Rolestable is displayed, listing the roles that match the search criteria and thatcan be children of another role.If the table contains multiple pages, you can:v Click the arrow to go to the next page.v Type the number of the page that you want to view and click Go.
c. In the Roles table, select the check box next to one or more roles that youwant to add to the membership of the role, and then click Add. Selectingthe check box at the top of this column selects all roles. You cannot select arole that is already a child role.
d. Click OK to add the selected roles as children of the organizational role, orclick Cancel.
4. On the Confirm page, specify the date and time for the membership removal tooccur, and then click Submit, or click Cancel.
Results
A Success page is displayed, indicating that you successfully added a child role.
The roles are added as children of the organizational role, and the Manage Rolespage is displayed.
What to do next
You can continue working with roles, or click Close.
Removing child roles from a parent roleYou can remove a child role from a parent role.
Before you begin
Depending on how your system administrator customized your system, you mightnot have access to this task. To obtain access to this task or to have someonecomplete it for you, contact your system administrator.
Determine how removing the role affects the role hierarchy.
About this task
To remove a child role from a parent role, complete these steps:
Procedure1. From the navigation tree, click Manage Roles. The Manage Roles page is
displayed.2. On the Manage Roles page, complete these steps:
a. Type information about the role in the Search information field.b. In the Search by field, specify whether to search against role names or
descriptions, or against business units, and then click Search. A list of rolesthat match the search criteria is displayed.If the table contains multiple pages, you can:v Click the arrow to go to the next page.
Chapter 6. Role administration 85

v Type the number of the page that you want to view and click Go.3. In the Roles table, click the icon ( ) next to the role, and then click Manage
Child Roles. The Manage User Members and Child Roles page is displayed.4. On the Manage User Members and Child Roles page, complete these steps:
a. Select Child role.b. Type information about the role in the Search information field.c. In the Search by field, specify whether to search against role names or
descriptions, or against business units, and then click Search. The Rolestable is displayed, listing the roles that match the search criteria and thatcan be children of another role.If the table contains multiple pages, you can:v Click the arrow to go to the next page.v Type the number of the page that you want to view and click Go.
d. In the Roles table, select the check box next to the child role that you wantto remove from the parent role, and then click Remove. Selecting the checkbox at the top of this column selects all child roles. A confirmation page isdisplayed.
5. On the Confirm page, click Submit, or click Cancel.
Results
A Success page is displayed, indicating that you successfully removed the childroles from the parent role.
What to do next
You can continue working with roles, or click Close.
Creating an access type based on a roleYou can create role-based access to resources.
Before you begin
Depending on how your system administrator customized your system, you mightnot have access to this task. To obtain access to this task or to have someonecomplete it for you, contact your system administrator.
About this task
You can use the Manage Access Types page to create an access type.
To create an access type that is based on a role, complete these steps:
Procedure1. From the navigation tree, select Configure System > Manage Access Types.
The Manage Access Types page is displayed.2. On the Manage Access Types page, complete these steps:
a. In the Access Types tree, click the icon next to Role, and then click CreateType. The Create Access Type page is displayed.
b. On the Create Access Type page, in the Access type key field, type a uniquename for the access type key that you want to create.
86 IBM Security Identity Manager Version 6.0.0.18: Administration Topics

c. Optional: In the Description field, type a description for the access type keythat you want to create.
d. Click OK.
Results
The Manage Access Types page is displayed, and the new access type is listed inthe Access Types tree.
What to do next
You might need to update the CustomLabels.properties resource bundle toprovide the display label for this new access type.
You might make the new access available to users in the Self Service or theIdentity Service Center user interface. To do so, associate the role with the newlycreated access type.
Transferring rolesAs an administrator, you can transfer static and dynamic roles in an organizationtree.
Before you begin
You can transfer static and dynamic roles to the business unit that is under thesame organization root. Following are a few restrictions for role transfer activity:v Roles cannot be transferred across different organization hierarchy.v Static and dynamic roles cannot be transferred together.v When dynamic roles are transferred, old entitlements might be lost. A user
entitlements or membership is recomputed based on the new business unitunder which the dynamic role is transferred.
v Roles to be transferred must contain an Access Control Item (ACI) granted forthe Modify operation.
Procedure1. From the navigation tree, select Manage Roles.2. On the Manage Roles page, complete these steps:
a. Type information about the role in the Search information field.b. In the Search by field, specify whether to search against role names or
descriptions, or against business units, and then click Search.3. In the Roles table, click the icon next to the role that you want to transfer, and
then click Transfer.4. Search and then select the business unit to which you want to transfer roles
and then click OK.5. On the Confirmation page, complete either of these steps:v For dynamic roles, select the schedule for transfer, and then click Transfer.v For static roles, review the selected roles to transfer and then click Transfer.
Results
A Success page is displayed, indicating that you successfully transferred the roles.
Chapter 6. Role administration 87

88 IBM Security Identity Manager Version 6.0.0.18: Administration Topics

Chapter 7. Services administration
A service represents a user repository for a resource, such as an operating system, adatabase application, or another application that Security Identity Managermanages. For example, a managed resource might be a Lotus Notes application,and a service can be defined for a Lotus Notes User Repository.
Overview
Services are created from service types, which represent a set of managed resourcesthat share similar attributes. For example, there is a default service type thatrepresents Linux systems. These service types are installed by default when IBMSecurity Identity Manager is installed. Service types are also installed when youimport the service definition files for the adapters for those managed resources.
Most services provide an interface for provisioning of accounts to users, whichusually involves some workflow processes that must be completed successfully.Users access these services by using an account on the service.
A service owner identifies the person who owns and maintains a particular servicein IBM Security Identity Manager.
A user's profile is represented as an account.
Service administration tasks
Service administration tasks are done by using Manage Services from thenavigation menu. Service administration tasks include the following tasks:v Creating services and optionally creating provisioning policies for those servicesv Changing or deleting servicesv Scheduling an account reconciliation or initiating an immediate account
reconciliation, including reconciling supporting data only. An immediate accountreconciliation reconciles only the data you need for defining provisioningpolicies and access information for a group.
v Configuring policy enforcement on services, where you define the enforcementaction when an account is noncompliant
v Viewing groups and defining access entitlements on groupsv Requesting accountsv Displaying, changing, removing, suspending, and restoring accountsv Assigning accounts to usersv Viewing account recertification statusv Displaying, creating, changing, and removing account defaults
Service prerequisite
A service might have another service defined as a service prerequisite. Users canreceive a new account only if they have an existing account on the serviceprerequisite. For example, Service B has a service prerequisite of Service A. If auser requests an account on Service B, the user must first have an account onService A to receive an account on Service B.
89

Service typesA service type is a category of related services that share schemas. It defines theschema attributes that are common across a set of similar managed resources.
Service types are profiles, or templates, that create services for specific instances ofmanaged resources. For example, you might have several Lotus® Domino® serversthat users need access to. Create one service for each Lotus Domino server withthe Lotus Domino service type. In previous versions of IBM Security IdentityManager, a service type is called a service profile.
Some service types are installed by default when Security Identity Manager isinstalled. Other service types can be installed when you import the servicedefinition files for adapters for managed resources. A service type definition isprovided by the Security Identity Manager adapter for a managed resource. Thereis a service type for each type of managed resource that Security Identity Managersupports. Some examples are UNIX, Linux, Windows, and IBM Security AccessManager.
A service type is defined in the service definition file of an adapter, which is aJava™ Archive (JAR) file that contains the profile. The service type for an adapter iscreated when the adapter profile (JAR file) is imported. For example, a service typeis defined in the WinLocalProfile.jar file. You can also define a service type withthe interface for Security Identity Manager.
Security Identity Manager supports the following types of service providers:v DAML for Windows Local adapter, Lotus Notes adapterv IDI (IBM Security Directory Integrator for UNIX and Linux adapters)v Custom Java class for defining your own implementation of a service providerv Manual for managing user-defined “manual” activities
Default service types
The following default service types are provided with Security Identity Manager:
Identity feed service types:
DSMLA Directory Services Markup Language (DSML) Identity Feedservice imports user data, with no account data, from a humanresources database or file. The service feeds the information intothe Security Identity Manager directory. The service uses aplacement rule to determine where in the organization a user isplaced. The service can receive the information in one of two ways:a reconciliation or an event notification. This service is based onthe DSML Identity Feed Service Profile.
Note: DSMLv2 is deprecated in Security Identity Manager Version5.0 in favor of the remote method invocation (RMI)-based IDIadapter framework. The use of DSMLv2 continues to be supportedin this release.
AD The AD Identity Feed Service imports user data from WindowsActive Directory. The organizationalPerson objects are fed intoSecurity Identity Manager and add or update users to Security
90 IBM Security Identity Manager Version 6.0.0.18: Administration Topics
Identity Manager. The user profiles that are selected from thisservice must have an objectclass that is derived from theorganizationalPerson class.
CSV The CSV Identity Feed Service imports user data from acomma-separated value (CSV) file and adds or updates users toSecurity Identity Manager. A CSV file contains a set of records thatare separated by a carriage return/line feed (CR/LF) pair (\r\n).Each record contains a set of fields that are separated by a comma.If the field contains either a comma or a CR/LF, the comma mustbe escaped with double quotation marks as the delimiter. The firstrecord in the CSV source file defines the attributes that areprovided in each of the following records. Attributes must be validbased on the class schema for the selected person profile for thisservice.
IDI Data FeedThe IDI Data Feed service type uses the Security DirectoryIntegrator to import user data, with no account data, into SecurityIdentity Manager and to manage accounts in the Security IdentityManager data store on external resources. This service is based onthe IDI Data Feed Service Profile.
INetOrgPersonThe INetOrgPerson Identity Feed imports user data from theLDAP directory. The inetOrgPerson objects are loaded and add orupdate users in Security Identity Manager.
Account service types:
Security Directory Integrator-basedThis service type can be optionally installed during the installationof Security Identity Manager. All of these services are SecurityDirectory Integrator-based adapters; each is a specific service type.Security Directory Integrator is one type of service provider. Therecan be multiple service types that are defined for the same type ofservice provider.
ITIM ServiceThe ITIM service type is used to create accounts in the SecurityIdentity Manager system and represents the Security IdentityManager itself. This type is a standard service with noconfiguration parameters. All users that need access to the SecurityIdentity Manager system must be provisioned with an SecurityIdentity Manager account.
Hosted ServiceThe Hosted Service type is used to create a service that is a proxyto the hosting service that is in the service provider organization.
The hosted service connects to the managed resource targetthrough the hosting service indirectly. The configuration details ofthe hosting service are invisible and protected from administratorsin the secondary organization where the Hosted Service is defined.Administrators can define policies for the hosted service,specifically, without affecting the hosting service.
The primary usage of a Hosted Service is to allow users inbusiness partner organizations to have accounts and access tointernal IT resources of an organization. A Hosted Service allows
Chapter 7. Services administration 91

administrators in the secondary organization to define specificservice policies for the user accounts.
Custom Java classThe custom Java class service type defines your ownimplementation of a service provider.
Manual service typeThe Manual service type is used to create a manual service.
Service statusThe IBM Security Identity Manager server tracks its ability to make remoteconnections and send provisioning requests to adapters on a per service basis. Thisability is reflected in the Status for each service on the Manage Services panel. Onthis panel, you can also search for services with a specific status.
The value options in the Status list contain status values for each service:
All Status values for all services.
Alive Services that are functioning with no known issues.
Failed Services that encountered a problem. For example: a connection test mightfail, or a request was not completed on an endpoint because of a problemwith making a remote connection.
Attempting recoveryServices that encountered a problem and for which the server is attemptingto process a previously blocked request.
LockedServices that are locked because a reconciliation process is running.
UnknownServices that never attempted a connection test or received and processed arequest.
Each status value other than Alive provides an icon that links to more detailedinformation about the state of the service. For example, if the server cannotcomplete a request due to a network or authentication problem, it marks theservice as Failed. Until the service recovers from the Failed status, provisioningrequests cannot be processed. The failing request and any additional accountrequests are blocked until the problem with the service is corrected. Clicking theFailed icon retrieves details about the failure, including the time of the first failure,detailed reason for the failure, and number of blocked requests.
The system periodically checks Failed services and attempts to recover the blockedrequests. If the problem with the service is corrected, blocked requests can becompleted due to this periodic check. The default time interval for the periodicrecovery check is 10 minutes.
Restarting of the blocked requests
Retry Blocked Requests provides an option to immediately restart the blockedrequests from the Manage Services panel. This action tests a service to see whetherthe problem is corrected. If the test is successful, it restarts any blocked requestsfor a failed service. Failures are returned to the user interface so that allconfiguration problems with the service can be corrected.
92 IBM Security Identity Manager Version 6.0.0.18: Administration Topics
When the recovery process is started for a service, the service is placed inAttempting recovery status until all blocked requests are restarted. During thistime, new requests can proceed normally.
Provisioning requests can also be blocked during reconciliation with the lockingfeature enabled. In this case, the service status shows Locked until thereconciliation completes. At that time, the service status is updated to Attemptingrecovery until any blocked requests are processed. When all blocked requests arerestarted, the service returns to the Alive status.
Retry Blocked Requests is controlled by a task in the view definitions defined inSet System Security > Manage Views in the IBM Security Identity Manageradministrative console. To restart the blocked requests of a service immediately,select Manage Services from the IBM Security Identity Manager administrativeconsole. From the Services table and under Service Name, click an arrow to theright of the service and select Retry Blocked Requests.
Creating servicesCreate an instance of a service from a service type, such as the Linux profile oranother adapter profile that you installed.
Before you begin
Depending on how your system administrator customized your system, you mightnot have access to this task. To obtain access to this task or to have someonecomplete it for you, contact your system administrator.
Before you can create a service in IBM Security Identity Manager, you must createa service type. Alternatively, use one of the service types that were automaticallycreated when you installed the IBM Security Identity Manager Server. You cancreate a service type by importing the adapter profile. Alternatively, you can addnew schema classes and attributes for the service to your LDAP directory. Beforeyou can create a service for an adapter, the adapter must be installed, and theadapter profile must be created.
About this task
If you choose to create a provisioning policy as part of this task, the service isautomatically added to the provisioning policy as an entitlement. In addition, amembership of “All” is defined for the provisioning policy. You can later edit theprovisioning policy and change the membership after the service is created.
The service name and description that you provide for each service are displayedon the console. Therefore, it is important to provide values that make sense to yourusers and administrators.
To create a service instance, complete these steps:
Procedure1. From the navigation tree, click Manage Services. The Select a Service page is
displayed.2. On the Select a Service page, click Create. The Create a Service wizard is
displayed.
Chapter 7. Services administration 93

3. On the Select the Type of Service page, click Search to locate a business unit.The Business Unit page is displayed.
4. On the Business Unit page, complete these steps:a. Type information about the business unit in the Search information field.b. Select a business type from the Search by list, and then click Search. A list
of business units that matches the search criteria is displayed.If the table contains multiple pages, you can:v Click the arrow to go to the next page.v Type the number of the page that you want to view and click Go.
c. In the Business Units table, select business unit in which you want tocreate the service, and then click OK. The Select the Type of Service pageis displayed, and the business unit that you specified is displayed in theBusiness unit field.
5. On the Select the Type of Service page, select a service type, and then clickNext.If the table contains multiple pages, you can:v Click the arrow to go to the next page.v Type the number of the page that you want to view and click Go.
6. On either the Service Information or General Information page, specify theappropriate values for the service instance. The content of the GeneralInformation page depends on the type of service that you are creating. Thecreation of some services might require more steps.
7. On the Authentication page, configure authentication (either password-basedor key-based) for the service, and then click Next or Finish. TheAuthentication page is displayed only if you are creating a POSIX serviceinstance.
8. On the Dispatcher Attributes page, specify information about the dispatcherattributes, and then click Next or OK. The Dispatcher Attributes page isdisplayed only for IBM Security Directory Integrator based services.
9. Optional: On the Access Information page, select the Define an Access checkbox to activate the access definition fields. Select the type of access you wantto enable. Specify the expected access information and any other optionalinformation such as description, search terms, more information, or badges.
10. On the Status and Information page, view information about the adapter andmanaged resource, and then click Next or Finish. The adapter must berunning to obtain the information.
11. On the Configure Policy page, select a provisioning policy option, and thenclick Next or Finish. The provisioning policy determines the ownership typesavailable for accounts. The default provisioning policy enables only Individualownership type accounts. Additional ownership types can be added bycreating entitlements on the provisioning policy.
Note: If you are creating a service for an identity feed, the Configure Policypage is not displayed.
12. Optional: On the Reconcile Supporting Data page, either do an immediatereconciliation for the service, or schedule a supporting data reconciliation, andthen click Finish. The Reconcile Supporting Data page is displayed for allservices except for identity feed services.The supporting data only reconciliation option retrieves only the supportingdata for accounts. The supporting data includes groups that are defined onthe service. The type of supporting data is defined in the adapter guide.
94 IBM Security Identity Manager Version 6.0.0.18: Administration Topics

13. Optional: On the Service Information or General Information page, click TestConnection to validate that the data in the fields is correct, and then clickNext or Finish. If the connection fails, contact the analyst who is responsiblefor the computer on which the managed resource runs.
Results
A message is displayed, indicating that you successfully created the serviceinstance for a specific service type.
What to do next
Select another services task, or click Close. When the Select a Service page isdisplayed, click Refresh to refresh the Services table and display the new serviceinstance.
Creating a service that has manual connection modeIf you did not install the adapter for the managed resource, use this task to createan instance of a service. You can use the manual connection mode to manageaccount requests instead of creating a manual service. After you install the adapter,you can change the connection mode from manual to automatic.
Before you begin
Depending on how your system administrator customized your system, you mightnot have access to this task. To obtain access to this task or to have someonecomplete it for you, contact your system administrator.
To create a service in IBM Security Identity Manager, you must create a servicetype. Alternatively, use one of the service types that were automatically createdwhen IBM Security Identity Manager Server was installed. To create a service typeeither:v Import the adapter profile, orv Add the new schema classes and attributes for the service to your LDAP
directory
You must add the erconnectionmode attribute to the customized form for theservice type to enable connection mode. See “Enabling connection mode” on page98.
About this task
This task is for creating a service with manual connection mode before the adapteris installed. After the adapter installation, to create a service with an automaticconnection, select Automatic and follow the task for creating a service. See“Creating services” on page 93.
If you choose to create a provisioning policy as part of this task, the service isautomatically added to the provisioning policy as an entitlement. In addition, amembership of All is defined for the provisioning policy. You can later edit theprovisioning policy and change the membership after the service is created.
Chapter 7. Services administration 95

The service name and description that you provide for each service are displayedon the console. Therefore, it is important to provide values that make sense to yourusers and administrators.
To create a service instance that has manual connection mode, complete thesesteps:
Procedure1. From the navigation tree, click Manage Services. The Select a Service page is
opened.2. On the Select a Service page, click Create. The Create a Service wizard is
opened.3. On the Select the Type of Service page, click Search to locate a business unit.
The Business Unit page is opened.4. On the Business Unit page, complete these steps:
a. Type information about the business unit in the Search information field.b. Select a business type from the Search by list, and then click Search. A list
of business units that matches the search criteria is displayed.If the table contains multiple pages, you can:v Click the arrow to go to the next page.v Type the number of the page that you want to view and click Go.
c. In the Business Units table, select business unit in which you want tocreate the service, and then click OK. The Select the Type of Service pageis opened, and the business unit that you specified is shown in theBusiness unit field.
5. On the Select the Type of Service page, select a service type, and then clickNext.If the table contains multiple pages, you can:v Click the arrow to go to the next page.v Type the number of the page that you want to view and click Go.
6. On either the Service Information or General Information page, specify theappropriate values for the service instance. Then, click Test Connection tovalidate that the data in the fields is correct. If the connection fails, contact theanalyst who is responsible for the computer on which the managed resourceruns.
Note: The content of the Service Information or General Information pagedepends on the type of service that you are creating. The creation of someservices might require more steps.
7. For the Connection mode option, select Manual. Selecting Manual enables theParticipants page, the Messages page, and a different Reconciliation page inthe navigation area.
Note: This option is available only if the erconnectionmode attribute is addedto the service form. Connection mode is not supported on the ITIM Service orany type of identity feed service, hosted service, or manual service types. Forinformation about adding the erconnectionmode attribute, see “Enablingconnection mode” on page 98.
8. On the Users and Groups page, specify user and group information for theservice.
96 IBM Security Identity Manager Version 6.0.0.18: Administration Topics

Note: The Users and Groups page is opened only if you are creating certainservice instances.
9. On the Authentication page, configure authentication (either password-basedor key-based) for the service, and then click Next or Finish.
Note: The Authentication page is displayed only if you are creating a POSIXservice instance.
10. Optional: On the Dispatcher Attributes page, specify information about thedispatcher attributes, and then click Next or Finish.
Note: The Dispatcher Attributes page is displayed only for DirectoryIntegrator-based services.
11. Optional: On the Access Information page, select the Define an Access checkbox to activate the access definition fields. Select the type of access you wantto enable. Specify the expected access information and any other optionalinformation such as description, search terms, more information, or badges.
12. Optional: On the Status and Information page, you can view informationabout the adapter and managed resource, and then click Next or Finish.
13. On the Participants page, specify the users who are involved in completingthe activities for the manual service. Specify the amount of time before theservice is escalated. Click Next.
14. Optional: On the Messages page, complete these steps, and then click Next orFinish:a. Select the default email message that you want to change, and then click
Change. The Change Message page is opened.b. Modify the Subject and Body fields, and then click OK.
15. On the Configure Policy page, select a provisioning policy option, and thenclick Next or Finish. The provisioning policy determines the ownership typesavailable for accounts. The default provisioning policy enables only theIndividual ownership type accounts. Additional ownership types can beadded by creating entitlements on the provisioning policy.
Note: If you are creating a service for an identity feed, the Configure Policypage is not opened.
16. Optional: On the Reconciliation page, click Browse to locate the reconciliationfile, and then click Upload File to load the new reconciliation file. You canalso choose whether to reconcile supporting data only.
Note: The file type that is supported for the reconciliation file is CSV. Formore information, see “Example comma-separated value (CSV) file” on page117.
Results
A message is shown, indicating that you successfully created the service instancefor a specific service type.
What to do next
Select another services task, or click Close. When the Select a Service page isopened, click Refresh to refresh the Services table and display the new serviceinstance.
Chapter 7. Services administration 97

Enabling connection modeUse connection mode to create a service that can function like either an automatedor a manual service.
Before you begin
Depending on how your system administrator customized your system, you mightnot have access to this task. To obtain access to this task or to have someonecomplete it for you, contact your system administrator.
Only individuals who are part of the administrator group can access this feature.
About this task
Before you install the adapter, use connection mode to create a service and tospecify the account request route. The account route can be specified as eitherautomatic or manual.
AutomaticSpecifies to route account requests to a service provider. This selection isthe default setting.
ManualSpecifies to route account requests to a specific user.
Note: Selecting Manual enables the Participants page and a differentReconciliation page in the navigation area of the Create a Service wizard.
The advantage of using connection mode is that you do not need to create andlater remove a manual service. After installing the adapter, to change to anautomated service, change the connection mode from manual to automated. See“Changing connection mode from manual to automatic” on page 102.
Note: Connection mode is not supported on ITIM service or any type of identityfeed service, hosted service, or manual service types. Do not add theerconnectionmode attribute to the forms for those service types.
To enable connection mode, add the erconnectionmode attribute to the serviceform.
Procedure1. From the navigation tree, click Configure System > Design Forms. The form
designer applet is displayed.2. In the left pane, double-click the Service folder to display the profiles for the
service types. Double-click the service type profile to open the template forthat profile. The form template associated with the service type profile isdisplayed in the middle pane.
3. Select the tab to which you want to add the attribute.4. In the Attribute List pane, double-click erconnectionmode. The attribute is
added to the form.5. Right click erconnectionmode. Click Change To > Dropdown Box.6. Click Custom Values. The Select Editor is displayed to design the drop-down
menu.7. Define the menu.
98 IBM Security Identity Manager Version 6.0.0.18: Administration Topics

a. Under Data Value type AUTOMATIC.b. Under Display Value type $automatic.c. Click the Add Row icon.d. Under Data Value type MANUAL.e. Under Display Value type $manual.f. Click OK.
8. Right click erconnectionmode. Click Move Up Attribute or Move DownAttribute to position the field on the form.
9. Click Form > Save Form Template, and then click OK when a message isdisplayed, indicating that the form template is saved successfully.
10. Click Close to exit Form Designer.
What to do next
Verify that connection mode was added to the service form.1. Click Manage Services > Create.2. Select the service type profile that you modified for connection mode. Click
Next.3. Verify that Connection mode is displayed on the form.
Creating manual servicesCreate a manual service instance when IBM Security Identity Manager does notprovide an adapter for the managed resource.
Before you begin
Depending on how your system administrator customized your system, you mightnot have access to this task. To obtain access to this task or to have someonecomplete it for you, contact your system administrator.
Before you can create a manual service in Security Identity Manager, you mustcreate a service type. Add new schema classes and attributes for the manualservice to your LDAP directory.
About this task
A manual service is a type of service that requires manual intervention to completethe request. For example, a manual service might be defined for setting up voicemail for a user. A manual service generates a work order activity that defines themanual intervention that is required.
If you choose to create a provisioning policy as part of this task, the service isautomatically added to the provisioning policy as an entitlement. In addition, amembership of “All” is defined for the provisioning policy. Also, an ownershiptype of “Individual” is defined for the provisioning policy. You can later edit theprovisioning policy and change the membership and ownership types after theservice is created.
The service name and description that you provide for each service are displayedon the console. Therefore, it is important to provide values that make sense to yourusers and administrators.
Chapter 7. Services administration 99

To create a manual service instance, complete these steps:
Procedure1. From the navigation tree, click Manage Services. The Select a Service page is
displayed.2. On the Select a Service page, click Create. The Create a Service wizard is
displayed.3. On the Select the Type of Service page, click Search to locate a business unit.
The Business Unit page is displayed.4. On the Business Unit page, complete these steps:
a. Type information about the business unit in the Search information field.b. Select a business type from the Search by list, and then click Search. A list
of business units that match the search criteria is displayed.If the table contains multiple pages, you can:v Click the arrow to go to the next page.v Type the number of the page that you want to view and click Go.
c. In the Business Units table, select business unit in which you want tocreate the service, and then click OK. The Select the Type of Service pageis displayed, and the business unit that you specified is displayed in theBusiness unit field.
5. On the Select the Type of Service page, select a manual service type, and thenclick Next.If the table contains multiple pages, you can:v Click the arrow to go to the next page.v Type the number of the page that you want to view and click Go.
6. On the General Information page, specify the appropriate values for themanual service instance, and then click Next. The content of the GeneralInformation page depends on the type of service that you are creating. Thecreation of some services might require additional steps.
7. On the Participants page, specify the users who are involved in completingthe activities for the manual service. Specify the amount of time before theservice is escalated. Click Next.
8. Optional: On the Messages page, complete these steps, and then clickReconciliation:a. Select the default email message that you want to change, and then click
Change. The Change Message page is displayed.b. Modify the Subject and Body fields, and then click OK.
9. Optional: On the Access Information page, select the Define an Access checkbox to activate the access definition fields. Select the type of access you wantto enable. Specify the expected access information and any other optionalinformation such as description, search terms, more information, or badges.
10. On the Configure Policy page, select a provisioning policy option, and thenclick Next or Finish. The provisioning policy determines the ownership typesavailable for accounts. The default provisioning policy enables only Individualownership type accounts. Additional ownership types can be added bycreating entitlements on the provisioning policy.
11. Optional: On the Reconciliation page, click Browse to locate the reconciliationfile, and then click Upload File to load the new reconciliation file. You canalso choose whether to reconcile supporting data only.
100 IBM Security Identity Manager Version 6.0.0.18: Administration Topics
Note: The file type that is supported for the reconciliation file is CSV. Formore information, see the topic “Example comma-separated value (CSV) file”in the IBM Security Identity Manager Administration Guide.
12. Click Finish.
Results
A message is displayed, indicating that you successfully created the manual serviceinstance for a specific service type.
What to do next
Select another services task, or click Close. When the Select a Service page isdisplayed, click Refresh to refresh the Services table and display the new serviceinstance.
Changing servicesYou can change the information for a service instance.
Before you begin
Depending on how your system administrator customized your system, you mightnot have access to this task. To obtain access to this task or to have someonecomplete it for you, contact your system administrator.
Before you can change a service in IBM Security Identity Manager, you must createa service instance.
Procedure
To change a service instance, complete these steps:1. From the navigation tree, click Manage Services. The Select a Service page is
displayed.2. On the Select a Service page, complete these steps:
a. Type information about the service in the Search information field.b. In the Search by field, specify whether to search against services or
business units.c. Select a service type from the Search type list.d. Select a status from the Status list, and then click Search. A list of services
that matches the search criteria is displayed.If the table contains multiple pages, you can:v Click the arrow to go to the next page.v Type the number of the page that you want to view and click Go.
3. In the Services table, select the check box next to the service that you want tochange, and then click Change.
4. On the Service Information or General Information page, change theappropriate values for the service instance, and then click OK.
5. On the Access Information page, select the Define an Access check box toactivate the access definition fields. Select the type of access you want toenable. Clearing the check box disables these fields. Change any accessinformation or any other optional information such as description, searchterms, more information, or badges.
Chapter 7. Services administration 101

Results
A message is displayed, indicating that you successfully changed the serviceinstance.
What to do next
Select another services task, or click Close. When the Select a Service page isdisplayed, click Refresh to refresh the Services table.
Changing connection mode from manual to automaticAfter installing the adapter, you can automate the routing of account requests tothe managed resource.
Before you begin
Depending on how your system administrator customized your system, you mightnot have access to this task. To obtain access to this task or to have someonecomplete it for you, contact your system administrator.
Before you can change a service, you must create the service instance withconnection mode. The corresponding adapter for the managed resource must alsobe installed. For more information about enabling connection mode and creating aservice with connection mode, see these topics:v “Enabling connection mode” on page 98v “Creating a service that has manual connection mode” on page 95
About this task
Use connection mode to change the account request routing from manual toautomatic. You do not have to delete a manual service or create a service for theadapter.
Note: If you have pending work orders prior to switching the connection mode, apopup message reminds you. Use the View Activities option to resolve requeststhat are already in the activity list. After the switch to automatic, completereconciliation to sync with the end point. Alternately, use the View Requests byService option to cancel any current requests on the service. You can resolve therequests either before or after changing to automatic connection mode. After thechange to automatic connection mode, the managed resource handles all newaccount requests.
Procedure
To change the connection mode for a service instance, complete these steps:1. From the navigation tree, click Manage Services. The Select a Service page is
displayed.2. On the Select a Service page, complete these steps:
a. Type information about the service in the Search information field.b. In the Search by field, specify whether to search against services or
business units.c. Select a service type from the Search type list.
102 IBM Security Identity Manager Version 6.0.0.18: Administration Topics

d. Select a status from the Status list, and then click Search. A list of servicesthat matches the search criteria is displayed.If the table contains multiple pages, you can:v Click the arrow to go to the next page.v Type the number of the page that you want to view and click Go.
3. In the Services table, select the check box next to the service that you want tochange, and then click Change.
4. On the Service Information or General Information page, change the connectionmode from manual to automatic. Then click Test Connection to validate thatthe data in the fields is correct. If the connection fails, contact the analyst whois responsible for the computer on which the managed resource runs.
Note: The content of the Service Information or General Information pagedepends on the type of service that you are changing.
5. Change any other appropriate values for the service instance, and then clickOK.
Results
A message is displayed, indicating that you successfully changed the serviceinstance. The managed resource handles all account requests.
What to do next
Select another services task, or click Close. When the Select a Service page isdisplayed, click Refresh to refresh the Services table.
Changing a manual serviceChange information for a manual service instance.
Before you begin
Depending on how your system administrator customized your system, you mightnot have access to this task. To obtain access to this task or to have someonecomplete it for you, contact your system administrator.
Before you can change a service in IBM Security Identity Manager, you must createa service instance.
Procedure
To change a manual service instance, complete these steps:1. From the navigation tree, click Manage Services. The Select a Service page is
displayed.2. On the Select a Service page, complete these steps:
a. Type information about the service in the Search information field.b. In the Search by field, specify whether the search must be done against
services or business units.c. Select a service type from the Search type list.d. Select a status from the Status list, and then click Search. A list of services
that matches the search criteria is displayed.If the table contains multiple pages, you can:
Chapter 7. Services administration 103
v Click the arrow to go to the next page.v Type the number of the page that you want to view and click Go.
3. In the Services table, select the check box next to the manual service that youwant to change, and then click Change.
4. On the General Information page, change the appropriate values for the serviceinstance, and then click Participants.
5. On the Participants page, change the participants type, escalation time in days,or escalation participant type.
6. Optional: On the Messages page, complete these steps, and then clickReconciliation:a. Select the email message that you want to change, and then click Change.
The Change Message page is displayed.b. Modify the Subject and Body fields as wanted, and then click OK.
7. Optional: On the Reconciliation page, click Browse to locate the reconciliationfile, and then click Upload File to load the new reconciliation file. You can alsochoose whether to reconcile supporting data only.
Note: The file type supported for the reconciliation file is CSV. For moreinformation, see the topic "Example comma-separated value (CSV) file" in theIBM Security Identity Manager Planning Guide.
8. Click OK to save the changes and to close the page.
Results
A message is displayed, indicating that you successfully changed the serviceinstance.
What to do next
Select another services task, or click Close. When the Select a Service page isdisplayed, click Refresh to refresh the Services table.
Values and formats for CSV access data (service)A service access CSV file can contain multiple values and supported formats.
Consider these points before you work with any CSV files for a service access:v If you use a custom label for AccessType, specify the key in the CSV file.v If you use a custom label for badge text, add a $ prefix on the key. For example,
$mail.v Define multiple values for search terms and badges with a semicolon (;)
separator.v Define the AccessType hierarchy with a colon (:) separator.v Use the badgeText~badgeStyle format for badges.
Define CSV columns for a service, group, or a role access as follows:
Table 5. CSV fields and values. CSV fields and valuesField name Value
SERVICE_DN, SERVICE_NAME Not modifiable.
DEFINE_AS_ACCESS TRUE or FALSE. If you do not assign any value, then FALSE is assumed.
ACCESS_NAME Required for services and groups, and contains a maximum length of 240 characters. This field is not available for roles.
ACCESS_TYPE Required. You must specify an access type that is defined in IBM Security Identity Manager.
104 IBM Security Identity Manager Version 6.0.0.18: Administration Topics

Table 5. CSV fields and values (continued). CSV fields and valuesField name Value
ACCESS_DESCRIPTION Contains a maximum length of 240 characters.
ICON_URL Provide a valid icon URL value on the access definition.
SEARCH_TERMS Each search term contains a maximum length of 80 characters. You can have multiple search terms.
ADDITIONAL_INFORMATION Contains a maximum length of 1024 characters.
BADGES The maximum length for each badge text is 512 characters. You can have multiple badges. The badge text that is prefixedwith a $ sign cannot contain delimiter characters such as ., ;, =, or white space.
A service access CSV file for an export or import operation in the IBM SecurityIdentity Manager administration console contains these columns with samplevalues and supported formats:
Table 6. Part 1 of 2: Service access CSV file values, formatsSERVICE_NAME DEFINE_AS_ACCESS ACCESS_NAME ACCESS TYPE ACCESS_DESCRIPTION ICON_URL
admin TRUE Access Application:Finance This access is for the adminservice.
/itim/ui/custom/ui/images/homepage/RequestAccess.png
AIX Service FALSE AIX Service Application:Finance:Payroll This access is for the AIXService.
http://www-03.ibm.com/ibm/history/exhibits/logo/images/920911.jpg
Default Service TRUE default access MailService This access is a default serviceaccess.
http://www-03.ibm.com/ibm/history/exhibits/logo/images/920911.jpg
Table 7. Part 2 of 2: Service access CSV file values, formatsSERVICE_NAME SEARCH_TERMS ADDITIONAL_INFORMATION BADGES SERVICE_DN
admin Service Access; Manager Service that is used by a client user. admin~green erglobalid=5628670506891199803,ou=services,erglobalid=000000
AIX Service Employee;Service;AccessService Used by the customer to deploy server. $roleaccess~red erglobalid=5628669752130902869.ou=services,erglobalid=000000
Default Service Mail;Unique ID BVT server that is used to run BVT fromdeveloper and tester.
$mail~green;Risky~red erglobalid=5628670337030215245,ou=services,erglobalid=000000
Exporting access data for a serviceExport the access data for a service in a comma-separated value (CSV) file formatby using the IBM Security Identity Manager Console.
Before you begin
Depending on how your system administrator customized your system, you mightnot have access to this task. To obtain access to this task or to have someonecomplete it for you, contact your system administrator.
Before you export a service, you must have ACI privileges for Modify Operationon the service that you want to view. If the necessary privileges do not exist, thenthe service is not exported.
The Export Access Data button is not active until you select some service accessesto activate it. Only the service access that you selected is exported as access data.
About this task
Export the selected service access data in a CSV file format for your requirements.
Procedure1. From the navigation tree, select Manage Services. The Select a Service page is
displayed.2. On the Select a Service page, in the Services table, click Export Access Data.
The Export access data page is displayed. After you submit the export request,a process status indicates the advancement of the export operation.
3. Optional: Click Cancel to discontinue the export operation.
Chapter 7. Services administration 105

4. Click Download Exported File to download the CSV file on your local systemby using your web browser settings. The exported CSV file contains all theservice access data.
Note: Click Download Export Log File to view any error or log informationabout the export operation. This button is displayed only if the submittedexport operation contains any log information or encountered any errors.
Results
The exported CSV file contains all the access data for a service. Click Close to exitfrom the Export access data page.
What to do next
Import access data for a service, or you can continue to export access data byclicking Export Access Data in the Select a Service page.
Importing access data for a serviceUse the IBM Security Identity Manager Console to import the service access datafrom a comma-separated value (CSV) file.
Before you begin
Depending on how your system administrator customized your system, you mightnot have access to this task. To obtain access to this task or to have someonecomplete it for you, contact your system administrator.
The privileged user that uploads the CSV file must have the appropriatepermissions.
Before you import a service, you must have ACI privileges for Search Operationand Modify Operation on the service that you want to update. If the necessaryprivileges do not exist, then the service is not imported.
Before you import a CSV file, verify that the CSV-related conventions are met.They are as follows:v The access type hierarchy is represented in the following format, and each access
type be separated by a colon (:). For example:AccessType1:AccessType2
v The badge information is provided in the following format. For example:badgeText~badgeStyle
v Multiple badges can be assigned to accesses in the following format, and eachbadge must be separated by a semicolon (;). For example:Badge1~red;Badge2~green
v Multiple search terms and access types can be specified by using the semicolon(;) separator.
v The relevant keys must be provided in the CSV file for the customized labelsthat are related to badges and access types.
106 IBM Security Identity Manager Version 6.0.0.18: Administration Topics

About this task
Only the accesses with the Define as Access set to True are defined as accesses,and the corresponding data is imported.
Procedure1. From the navigation tree, select Manage Services. The Select a Service page is
displayed.2. On the Select a Service page, in the Services table, click Import Access Data.
The Import access data page is displayed.3. Click Browse in File to Upload (.CSV) to locate and upload a valid CSV file
that contains all the access data for a service.4. Click Import to import the CSV file. After you submit the import request, a
process status indicates the advancement of the import operation.
Note: If you click Import with an invalid file format, a message is displayed toinform you that the file format is not valid.If any problems occur when you are importing a CSV file, then close theImport access data page to continue working with the IBM Security IdentityManager Console. The problems might be due to one of the followingconditions:v The access data CSV file does not exist.v The CSV file was renamed.v The CSV file does not contain appropriate separators or delimiters.
5. Optional: Click Cancel to discontinue the import operation.
Note: Click Download Import Log File to view any error or log informationabout the import operation. This button is displayed only if the submittedimport operation contains any log information or encountered any errors.
Results
The imported CSV file contains all the access data for a service. Click Close to exitfrom the Import access data page.
What to do next
Export access data for a service, or you can continue to import access data byclicking Import Access Data in the Select a Service page.
Configuring access catalog information for a serviceConfigure the access catalog information for a service in the Administrator Consoleso you can use it in the Identity Service Center Request Access workflow.
Before you begin
Depending on how your system administrator customized your system, you mightnot have access to this task. To obtain access to this task or to have someonecomplete it for you, contact your system administrator.
You must create a service type before you can configure the access cataloginformation for a service in IBM Security Identity Manager.
Chapter 7. Services administration 107

You can also configure the access catalog information for an existing service.
About this task
Configure the access information for a service by defining certain accesses with theuse of a badge. You can highlight certain accesses with badges by attaching textthat contains some formatting such as color and font type.
Procedure
To configure the service access information, complete these steps:1. From the navigation tree, click Manage Services. The Select a Service page is
displayed.2. On the Select a Service page, click Create to display the Create a Service
wizard. Alternatively, select an existing service and click Change to configureits access catalog information.
3. Specify appropriate values in the corresponding tabbed pages.4. On the Access Information page, complete these steps to configure the access
information:a. Select the Define an Access check box to activate the access definition
fields.b. Specify an appropriate name in the Access name field.c. Expand the Select access type or the Change access type tree to select an
access type. The tree label depends on whether you want to create ormodify a service.
d. Provide a uniform resource identifier (URI) string in the Icon URL field forthe access icon.
e. Specify search strings in the Search terms field to return specific searchterms. Add or delete the search terms to suit your requirements.
f. Specify any free form information about the access item in the Additionalinformation field.
g. Expand the Badges section to specify the badges that are associated withthe role.v Specify a badge text in the Badge text field.v Assign a class from the Badge class list for the badge text.
You can see the preview of your badge specifications in the Preview area.5. Depending on whether you created or modified the service access information,
click OK or Finish when you are done.
Results
The access information is added or updated to the service object and stored in theSecurity Identity Manager LDAP server.
What to do next
On the Success page, click Close.. Select another services task, or click Close.
Deleting servicesDelete service instances when necessary. For example, you might delete a serviceinstance for an obsolete application.
108 IBM Security Identity Manager Version 6.0.0.18: Administration Topics

Before you begin
Depending on how your system administrator customized your system, you mightnot have access to this task. To obtain access to this task or to have someonecomplete it for you, contact your system administrator.
Before you can delete a service in IBM Security Identity Manager, a serviceinstance must exist.
Procedure1. From the navigation tree, click Manage Services. The Select a Service page is
displayed.2. On the Select a Service page, complete these steps:
a. Type information about the service in the Search information field.b. In the Search by field, specify whether to search against services or
business units.c. Select a service type from the Search type list.d. Select a status from the Status list, and then click Search. A list of services
that matches the search criteria is displayed.If the table contains multiple pages, you can:v Click the arrow to go to the next page.v Type the number of the page that you want to view and click Go.
3. In the Services table, select the check box next to the service that you want toremove, and then click Delete. Selecting the check box at the top of this columnselects all service instances. A confirmation page is displayed.
4. On the Confirm page, click Delete to remove the selected service instance, orclick Cancel. The services are removed automatically from all provisioningpolicies, identity policies, password policies, adoption policies, andrecertification policies that currently reference them. If all services referenced bya policy are deleted by this operation, the entire policy is also deleted. Allaccounts that are related to that service are also deleted from Security IdentityManager. However, they are not de-provisioned from the managed resource.
Results
A message indicates that you successfully deleted the service instance.
What to do next
Select another services task, or click Close. When the Select a Service page isdisplayed, click Refresh to refresh the Services table.
Management of reconciliation schedulesReconciliation is the process of synchronizing the accounts and supporting data tothe IBM Security Identity Manager Server central data repository from a managedresource. Reconciliation is required when accounts and supporting data can bechanged on the managed resource so that IBM Security Identity Manager Serverdata is consistent and up-to-date with the remote resource.
During the reconciliation process, new accounts created on the managed resourcewill be created in the IBM Security Identity Manager Server repository andassigned to the user based on the adoption policy that is applicable for the service.
Chapter 7. Services administration 109

If there is no user match for the account, the account will be displayed in IBMSecurity Identity Manager Server as an orphan account that can be manuallyassigned to a user by a IBM Security Identity Manager Server administrator.Modified accounts on the managed resource will be updated to the IBM SecurityIdentity Manager Server repository. Removed accounts on the managed resourceare also removed from IBM Security Identity Manager Server.
You can manage schedules for reconciliation, or initiate a reconciliation activityimmediately. To determine an ownership relationship, reconciliation comparesaccount information with existing user data stored on the IBM Security IdentityManager Server by first looking for the existing ownership within the IBM SecurityIdentity Manager Server and, secondly, applying adoption rules configured for thereconciliation.
If there is a match of user login IDs to an account, the IBM Security IdentityManager Server creates the ownership relationship between the account and theperson. The IBM Security Identity Manager Server also verifies that the accounts fitwithin the constraints of a defined policy. If there is not a match, the IBM SecurityIdentity Manager Server lists the unmatched accounts as orphaned accounts.
You run reconciliation to perform the following tasks:v Load accounts and account supporting data information, including groups, into
IBM Security Identity ManagerPromptly after IBM Security Identity Manager is installed, you should submitreconciliation requests for all resources whose accounts are managed by IBMSecurity Identity Manager. Reconciliation inserts accounts from the managedresources into the IBM Security Identity Manager directory.
v Monitor accesses granted outside of IBM Security Identity ManagerDuring reconciliation, records of all accesses granted outside of IBM SecurityIdentity Manager are inserted into the IBM Security Identity Manager directory.You can view these records by user after your data is reconciled.Reconciliation allows you to enable policy checking. In this case, you shouldreconcile your data on a scheduled basis for your organization's ongoingsecurity audits.
Managed service accounts can be excluded from reconciliation on the IBM SecurityIdentity Manager Server and, for some adapters, on the managed service itself. Ifyou filter accounts from reconciliation at the adapter and do not also filter themwhen you define your server-side scheduled or immediate reconciliations, theserver will consider the reconciliation a "full" reconciliation for all accounts andwill remove any accounts from its directory that it does not receive during thereconciliation (because it will appear to the server that they have been removedfrom the managed resource).
Consider the following best practices for using reconciliation:v Perform supporting data reconciliation separately from accounts. The separation
is useful during initial deployment for the service and also useful for sync upchanges of metadata without accounts, which is very time-consuming.Supporting data includes group configuration information, which contains keyinformation about access privileges on the resource. Bringing back the groupdata ahead of time allows policies to be configured promptly before accounts arereconciled, so that the policies can be enforced.
110 IBM Security Identity Manager Version 6.0.0.18: Administration Topics

v Set up reconciliation schedules appropriately based on the frequency of datachanges. Leave enough time between two reconciliations. Avoid unnecessaryreconciliations.
v Queries are used to break reconciliation into smaller packets. Reconcile only thedata that is changed by using Query. Reconciliation is an expensive process,especially when policy checking is enabled.
v If you are working with a large data repository (that is, a large number ofaccounts), consider using Query to segment the data and perform thereconciliation in smaller chunks on different schedules.
v Specify a subset of account attributes to bring back to improve performance.
Overview of the reconciliation process
The following illustration is an overview of the reconciliation process. In thisexample, IBM Security Identity Manager reconciles Windows Server data.
WindowsReconciliation
Request
IBM Security Identity ManagerServer
ReconciliationProcessing
IBM Security IdentityManager Data Directory
Hosted Service 1 Windows Service Exchange Service
Solaris ServiceHosted Service 2
Client TechnologyPlatforms(Services)
1 4
2 3
The numbered steps in the table below correspond to the illustration.
Step Description
1 An administrator submits a reconciliation request to a system whosesecurity is managed by IBM Security Identity Manager.
2 The IBM Security Identity Manager Server sends the reconciliation requestto the selected service.
3 The service collects information from the system and sends the informationto the IBM Security Identity Manager Server.
4 The IBM Security Identity Manager Server reads the information andreconciles the IBM Security Identity Manager directory with accountinformation from the service.
5 The IBM Security Identity Manager Server attempts to find the accountowner.
6 If an owner is found, the changes to the account are evaluated against aprovisioning policy.
7 The account is modified according to configured policy enforcementoptions.
Chapter 7. Services administration 111

Reconciling accounts immediately on a serviceYou can initiate a reconciliation activity immediately on a service, rather thanscheduling the reconciliation.
Before you begin
Depending on how your system administrator customized your system, you mightnot have access to this task. To obtain access to this task or to have someonecomplete it for you, contact your system administrator.
Before you begin this task, you must create a service instance.
To prevent the reconciliation from running again at the scheduled time, change ordelete the scheduled reconciliation.
Procedure
To run a reconciliation now, complete these steps:1. From the navigation tree, click Manage Services. The Select a Service page is
displayed.2. On the Select a Service page, complete these steps:
a. Type information about the service in the Search information field.b. In the Search by field, specify whether to search against services or
business units.c. Select a service type from the Search type list.d. Select a status from the Status list, and then click Search. A list of services
that matches the search criteria is displayed.If the table contains multiple pages, you can:v Click the arrow to go to the next page.v Type the number of the page that you want to view and click Go.
3. In the Services table, click the icon ( ) next to the service to show the tasksthat can be done on the service, and then click Reconcile Now. The tasks thatyou can perform are dependent on the type of service. The Select Query page isdisplayed.
4. Select one of the following options:v None. Select this option to include all accounts in the reconciliation.v Use query from existing schedule. Select this option to view and select
reconciliation from an existing schedule.v Define query. Select this option if you want to allow the reconciliation to
filter accounts that fit the selected attributes, or if you want to perform a“supporting data only” reconciliation.
5. Click Submit to request an immediate reconciliation activity.
Results
A message is displayed, indicating that you successfully submitted a reconciliationrequest to run immediately.
112 IBM Security Identity Manager Version 6.0.0.18: Administration Topics

What to do next
To view the results of the reconciliation, click View the status of the reconciliationrequest, or click Close.
Creating a reconciliation scheduleYou can schedule a reconciliation for account and attribute data, or you canschedule a reconciliation only for supporting data from the managed service.
Before you begin
Depending on how your system administrator customized your system, you mightnot have access to this task. To obtain access to this task or to have someonecomplete it for you, contact your system administrator.
Before you begin this task, you must create a service instance.
Procedure
To create a reconciliation schedule, complete these steps:1. From the navigation tree, click Manage Services. The Select a Service page is
displayed.2. On the Select a Service page, complete these steps:
a. Type information about the service in the Search information field.b. In the Search by field, specify whether to search against services or
business units.c. Select a service type from the Search type list.d. Select a status from the Status list, and then click Search. A list of services
that matches the search criteria is displayed.If the table contains multiple pages, you can:v Click the arrow to go to the next page.v Type the number of the page that you want to view and click Go.
3. In the Services table, click the icon ( ) next to the service to show the tasksthat can be done on the service, and then click Set Up Reconciliation. Thetasks that you can do are dependent on the type of service. The ManageSchedules page is displayed.
4. On the Manage Schedules page, complete the following steps:a. Specify whether a policy evaluates the accounts that the reconciliation
returns.b. Click Create. The Set Up Account Reconciliation notebook is displayed.
5. On the General page, type information about reconciliation schedule.6. On the Schedule page, select a schedule interval for the reconciliation. The
fields displayed depend on the scheduling option that you select.7. Optional: On the Query page, specify that you are doing a "supporting data
only" reconciliation, which brings back only metadata for accounts andexcludes accounts. Alternatively, use the LDAP filter to specify the subset ofaccounts or specific type of support data such as a group to be included in thereconciliation. Specify the subset of account attributes to bring back during thereconciliation. By default, IBM Security Identity Manager brings back allattributes of accounts. By specifying the subset of attributes that is likely to bechanged on the remote resource, you can improve reconciliation performance.
Chapter 7. Services administration 113

8. Click OK to save the new schedule and close the page.
Results
A message is displayed, indicating that you successfully created a reconciliationschedule.
What to do next
Select another services task, or click Close. When the Select a Service page isdisplayed, click Refresh to refresh the Services table.
Changing a reconciliation scheduleAfter you create a reconciliation schedule, you can change it if necessary.
Before you begin
Depending on how your system administrator customized your system, you mightnot have access to this task. To obtain access to this task or to have someonecomplete it for you, contact your system administrator.
A reconciliation schedule must exist.
Procedure
To change a reconciliation schedule, complete these steps:1. From the navigation tree, click Manage Services. The Select a Service page is
displayed.2. On the Select a Service page, complete these steps:
a. Type information about the service in the Search information field.b. In the Search by field, specify whether to search against services or
business units.c. Select a service type from the Search type list.d. Select a status from the Status list, and then click Search. A list of services
that matches the search criteria is displayed.If the table contains multiple pages, you can:v Click the arrow to go to the next page.v Type the number of the page that you want to view and click Go.
3. In the Services table, click the icon ( ) next to the service to show the tasksthat can be done on the service, and then click Set Up Reconciliation. Thetasks that you can do are dependent on the type of service. The ManageSchedules page is displayed.
4. On the Manage Schedules page, complete the following steps:a. Specify whether a policy evaluates the accounts that the reconciliation
returns.b. On the Manage Schedules page, select the check box next to the
reconciliation schedule that you want to modify, and then click Change. TheSet Up Account Reconciliation notebook is displayed.
5. Make the wanted changes on the General, Schedule, and Query pages, andthen click OK.
114 IBM Security Identity Manager Version 6.0.0.18: Administration Topics

Results
A message is displayed, indicating that you successfully updated an existingreconciliation schedule.
What to do next
Select another services task, or click Close. When the Select a Service page isdisplayed, click Refresh to refresh the Services table.
Deleting a reconciliation scheduleAfter you create a reconciliation schedule, you can delete it if necessary.
Before you begin
Depending on how your system administrator customized your system, you mightnot have access to this task. To obtain access to this task or to have someonecomplete it for you, contact your system administrator.
A reconciliation schedule must exist.
Procedure
To delete a reconciliation schedule, complete these steps:1. From the navigation tree, click Manage Services. The Select a Service page is
displayed.2. On the Select a Service page, complete these steps:
a. Type information about the service in the Search information field.b. In the Search by field, specify whether to search against services or
business units.c. Select a service type from the Search type list.d. Select a status from the Status list, and then click Search. A list of services
that matches the search criteria is displayed.If the table contains multiple pages, you can:v Click the arrow to go to the next page.v Type the number of the page that you want to view and click Go.
3. In the Services table, click the icon ( ) next to the service to show the tasksthat can be done on the service, and then click Set Up Reconciliation. Thetasks that you can do are dependent on the type of service. The ManageSchedules page is displayed.
4. On the Manage Schedules page, select the check box next to the reconciliationschedule that you want to delete. Selecting the check box at the top of thiscolumn selects all reconciliation schedules.
5. Click Delete A confirmation page is displayed.6. On the Confirm page, click Delete to delete the selected reconciliation schedule,
or click Cancel.
Results
A message is displayed, indicating that you successfully removed the reconciliationschedule.
Chapter 7. Services administration 115

What to do next
Select another services task, or click Close. When the Select a Service page isdisplayed, click Refresh to refresh the Services table.
Configuring a manual service type to support groupsTo support group assignment, but not group management for manual services, thegroup profile needs to be set up in the manual service type configuration.
Before you begin
Depending on how your system administrator customized your system, you mightnot have access to this task. To obtain access to this task or to have someonecomplete it for you, contact your system administrator.
About this task
To set up a manual service type to support group assignment, but not groupmanagement (which includes create, read, update, delete) for manual services,complete these steps:
Procedure1. Define the group schema as an LDAP objectclass in the IBM Security Identity
Manager LDAP server.2. Define a manual service (complete with service and account objectclasses). The
account objectclass should contain an optional multi-valued attribute that willbe used to store the group membership information. This service type shouldreference the group schema created in the previous step.The Manage Service Types page allows the administrator to select an existingLDAP objectclass for use as the group schema class. If you want to create anew objectclass, you must create it manually and load it directly into the LDAPserver.The mapped Group ID, Group name, and Group description attributes can allreference the same group schema attribute, if desired. You cannot definemultiple groups that use the same group ID. The ID must be unique per group.More than one group schema can be defined for a given service type. Thedefinition of the second and subsequent schemas is performed in the samemanner as the first.
3. Modify service and account forms for the service type using the form designer.This step is required to properly display needed information when creating theservice instance as well as creating accounts.
4. Create a manual service instance using the manual service type that youcreated earlier in this process.
Reconciling accounts immediately on a serviceYou can initiate a reconciliation activity immediately on a service, rather thanscheduling the reconciliation.
Before you begin
Depending on how your system administrator customized your system, you mightnot have access to this task. To obtain access to this task or to have someonecomplete it for you, contact your system administrator.
116 IBM Security Identity Manager Version 6.0.0.18: Administration Topics

Before you begin this task, you must create a service instance.
To prevent the reconciliation from running again at the scheduled time, change ordelete the scheduled reconciliation.
Procedure
To run a reconciliation now, complete these steps:1. From the navigation tree, click Manage Services. The Select a Service page is
displayed.2. On the Select a Service page, complete these steps:
a. Type information about the service in the Search information field.b. In the Search by field, specify whether to search against services or
business units.c. Select a service type from the Search type list.d. Select a status from the Status list, and then click Search. A list of services
that matches the search criteria is displayed.If the table contains multiple pages, you can:v Click the arrow to go to the next page.v Type the number of the page that you want to view and click Go.
3. In the Services table, click the icon ( ) next to the service to show the tasksthat can be done on the service, and then click Reconcile Now. The tasks thatyou can perform are dependent on the type of service. The Select Query page isdisplayed.
4. Select one of the following options:v None. Select this option to include all accounts in the reconciliation.v Use query from existing schedule. Select this option to view and select
reconciliation from an existing schedule.v Define query. Select this option if you want to allow the reconciliation to
filter accounts that fit the selected attributes, or if you want to perform a“supporting data only” reconciliation.
5. Click Submit to request an immediate reconciliation activity.
Results
A message is displayed, indicating that you successfully submitted a reconciliationrequest to run immediately.
What to do next
To view the results of the reconciliation, click View the status of the reconciliationrequest, or click Close.
Example comma-separated value (CSV) fileCreate a CSV file for reconciliation of the manual service instance. The CSV filecontains both accounts and group definitions that exist on the manual service.
Using a CSV file for reconciliation of a manual service
Here is an example CSV file that contains both account and group information:
Chapter 7. Services administration 117

eruid,descriptionbatman,uses technologysuperman,flies through the airspiderman,uses a webghostrider, rides a motorcycle#GROUP_OBJECT_PROFILE#accessgroupGroupProfilecn,descriptiondaredevil,this group represents daredevilssuperhero,this group represents superheroes
The example file creates two groups for this service instance: daredevil andsuperhero. Because cn is used for both the id and name attributes in the groupschema, list it only one time in the CSV file. The example file also creates fouraccounts for this service instance: batman, superman, spiderman, and ghostrider.
Format of the example CSV file
The first line of the example CSV file contains the attribute header list for accounts.The list contains the attributes that are defined in the accounts section of theservice type definition. Be sure to include any required attributes in this line, orelse the reconciliation fails.
The next set of lines (up until the #GROUP_OBJECT_PROFILE# line) represents theaccounts that are to be loaded into IBM Security Identity Manager. Each linerepresents one account. The content of these rows is the values to apply to theattributes defined in the first row. All required attributes must have a value, or elsethe reconciliation of that account fails.
The line that starts with #GROUP_OBJECT_PROFILE# is a line that delineates the startof a new group schema (as defined in the Manage Service Types task). The stringimmediately after #GROUP_OBJECT_PROFILE# is the name of the group schema asstored in IBM Security Identity Manager. The value is alwaysobjectclassGroupProfile. In the example file, the accessgroup objectclass is usedfor the group schema, so the value for this line is accessgroupGroupProfile. If thisline does not reference an existing group profile in IBM Security Identity Manager,the reconciliation fails.
The line immediately following the #GROUP_OBJECT_PROFILE# line is the groupheader line that lists the attributes of the group that is defined on the previousline. This line should contain the three attributes defined on the Groups page ofthe Manage Service Types task.
Following the example, the values are the group id, group name, and groupdescription: cn, cn, description. If these attributes do not exist in the group profile,the reconciliation fails. Include any attribute that exists in the group schemaobjectclass that you defined, but only the group name and group descriptionappear in the IBM Security Identity Manager interface.
The next group of lines represents individual groups of the group schema type.Each line represents one group. The values listed on this line correspond to theattribute list on the line immediately following the #GROUP_OBJECT_PROFILE# line. Ifthe values on this line are not valid, then the creation of that group in IBMSecurity Identity Manager fails when the reconciliation is done.
118 IBM Security Identity Manager Version 6.0.0.18: Administration Topics

Example CSV file for loading two types of group profiles
More than one type of group can be loaded by using the reconciliation file. To doso, repeat the #GROUP_OBJECT_PROFILE# line in the CSV file. Here is an example thatloads two types of group profiles:eruid,descriptionbatman,uses technologysuperman,flies through the airspiderman,uses a webghostrider, rides a motorcycle#GROUP_OBJECT_PROFILE#accessgroupGroupProfilecn,descriptiondaredevil,this group represents daredevilssuperhero,this group represents superheroes#GROUP_OBJECT_PROFILE#aixaccessgroupGroupProfileaixgroupadminlist,ibm-aixprojectnamelist,ergroupdescriptioneadmins,eadmingroup,admins on ephoneeguests,eguestgroup,guests on ephone
The two group schemas used in this example are accessgroup and aixaccessgroup.For the reconciliation to work, both group schemas must be defined on the servicetype.
Reconciling supporting data only
When you do the reconciliation, you can select a check box for supporting data only.If you select the check box, the reconciliation ignores the account information andprocesses only the group information. If you do not select the check box, bothaccount and group information is processed. The CSV file can contain bothaccounts and groups, groups only, or accounts only. The reconciliation ignoresmissing data.
Management of accounts on a serviceAn account is an entity that contains a set of parameters that define theapplication-specific attributes of a user, including the identity, user profile, andcredentials.
An account defines your login information, such as your user ID and password,and your access to the specific resource with which it is associated.
In IBM Security Identity Manager, accounts are created on account types. The typesrepresent the managed resources such as operating systems (such as UNIX),applications (for example, Lotus Notes), or other resources. An account type isdefined as part of the service type for the managed resource. The account typecontains the account profile object that describes the schema of an account andmapping of account attributes to IBM Security Identity Manager-managed accountattributes.
Accounts are either active or inactive. Accounts must be active to log in to thesystem. An account becomes inactive when it is suspended or if a request torecertify your account usage is declined and the recertification action is suspend.Suspended accounts still exist, but they cannot be used to access the system.
If one of your accounts is inactive and you require access to the system, contactyour system administrator to restore the account.
Chapter 7. Services administration 119
Displaying accounts on a serviceYou can display the accounts that are associated with the service instance.
Before you begin
Depending on how your system administrator customized your system, you mightnot have access to this task. To obtain access to this task or to have someonecomplete it for you, contact your system administrator.
Before you can display accounts on a service in IBM Security Identity Manager,you must create a service instance.
Procedure
To display accounts on a service instance, complete these steps:1. From the navigation tree, click Manage Services. The Select a Service page is
displayed.2. On the Select a Service page, complete these steps:
a. Type information about the service in the Search information field.b. In the Search by field, specify whether to search against services or
business units.c. Select a service type from the Search type list.d. Select a status from the Status list, and then click Search. A list of services
that matches the search criteria is displayed.If the table contains multiple pages, you can:v Click the arrow to go to the next page.v Type the number of the page that you want to view and click Go.
3. In the Services table, click the icon ( ) next to the service to show the tasksthat can be done on the service, and then click Accounts. The tasks that youcan do are dependent on the type of service. The Accounts page is displayed.
4. On the Accounts page, complete these steps:a. Type information about the account in the Account information field.b. In the Search by field, specify whether the search is to be done against user
IDs or owners.c. In the Ownership type field, select an ownership type, and then click
Search or Advanced, depending on the type of search you want to do. Theadvanced search option opens a new page where you can specify additionalsearch criteria.
Note: When you select an ownership of type Individual from the list tosearch accounts, the search yields a list of accounts with ownership of typesIndividual and None.
Results
A list of accounts that match the search criteria is displayed.
If the table contains multiple pages, you can:v Click the arrow to go to the next page.v Type the number of the page that you want to view and click Go.
120 IBM Security Identity Manager Version 6.0.0.18: Administration Topics

What to do next
Perform a task on the accounts in the Accounts table, or click Close. When theSelect a Service page is displayed, click Refresh to refresh the Services table.
Requesting accounts on a serviceYou can submit a request for an account on a service or schedule submission of therequest.
Before you begin
Depending on how your system administrator customized your system, you mightnot have access to this task. To obtain access to this task or to have someonecomplete it for you, contact your system administrator.
Before you can request accounts on a service in IBM Security Identity Manager,you must create a service instance. In addition, the user must already beprovisioned for an account on the service.
Procedure
To request an account on a service instance, complete these steps:1. From the navigation tree, click Manage Services. The Select a Service page is
displayed.2. On the Select a Service page, complete these steps:
a. Type information about the service in the Search information field.b. In the Search by field, specify whether to search against services or
business units.c. Select a service type from the Search type list.d. Select a status from the Status list, and then click Search. A list of services
that matches the search criteria is displayed.If the table contains multiple pages, you can:v Click the arrow to go to the next page.v Type the number of the page that you want to view and click Go.
3. In the Services table, click the icon ( ) next to the service to show the tasksthat can be done on the service, and then click Request Accounts. The tasksthat you can do are dependent on the type of service. The Select a User page isdisplayed.
4. On the Select a User page, complete these steps:a. Type information about the user in the Search information field.b. In the Search by list, select the criteria that you want, and then click Search
or Advanced, depending on the type of search you want to do. Theadvanced search option opens a new page where you can specify additionalsearch criteria. A list of users that match the search criteria is displayed.If the table contains multiple pages, you can:v Click the arrow to go to the next page.v Type the number of the page that you want to view and click Go.
5. Select the user that you want to request an account for, and then clickContinue. The Select an Ownership Type page is displayed.
6. Select the ownership type for the account, and then click Continue. TheAccount Information page is displayed.
Chapter 7. Services administration 121

7. Specify information for the account, including whether to change the passwordat the next login, and then click one of the following buttons:v Submit Now. This option submits the account request immediately.v Schedule Submission. This option opens the Schedule page. Specify whether
to schedule the request immediately, or specify the date and time forsubmitting the account request, and then click Submit.
Results
A message is displayed, indicating that you successfully submitted a request tocreate an account on the service.
What to do next
Select another account request task, or click Close. When the Select a Service pageis displayed, click Refresh to refresh the Services table.
Changing accounts on a serviceYou can change an account on an existing service if necessary.
Before you begin
Depending on how your system administrator customized your system, you mightnot have access to this task. To obtain access to this task or to have someonecomplete it for you, contact your system administrator.
Before you can change accounts on a service in IBM Security Identity Manager,you must create a service instance.
In addition, an account must exist, and the account must have an owner. In otherwords, orphan accounts cannot be changed.
Procedure
To change an account on a service instance, complete these steps:1. From the navigation tree, click Manage Services. The Select a Service page is
displayed.2. On the Select a Service page, complete these steps:
a. Type information about the service in the Search information field.b. In the Search by field, specify whether to search against services or
business units.c. Select a service type from the Search type list.d. Select a status from the Status list, and then click Search. A list of services
that matches the search criteria is displayed.If the table contains multiple pages, you can:v Click the arrow to go to the next page.v Type the number of the page that you want to view and click Go.
3. In the Services table, click the icon ( ) next to the service to show the tasksthat can be done on the service, and then click Accounts. The tasks that youcan do are dependent on the type of service. The Accounts page is displayed.
4. On the Accounts page, complete these steps:a. Type information about the account in the Account information field.
122 IBM Security Identity Manager Version 6.0.0.18: Administration Topics

b. In the Search by field, specify whether the search is to be done against userIDs or owners.
c. In the Ownership type field, select an ownership type, and then clickSearch or Advanced, depending on the type of search you want to do. Theadvanced search option opens a new page where you can specify additionalsearch criteria. A list of accounts that match the search criteria is displayed.If the table contains multiple pages, you can:v Click the arrow to go to the next page.v Type the number of the page that you want to view and click Go.
5. In the Accounts table, select the check box next to the account that you want tochange, and then click Change. The Account Information page is displayed.
6. Change information for the account, and then click Submit Now or ScheduleSubmission. The schedule submission option opens a new page where you canspecify the date and time for submitting the changes to the account.
Results
A message is displayed, indicating that you successfully submitted a request tochange an account on the service.
What to do next
Select another account task, or click Close. When the Accounts page is displayed,click Refresh to refresh the Accounts table, or click Close.
Deleting accounts from a serviceYou can delete an account from a service instance if necessary.
Before you begin
Depending on how your system administrator customized your system, you mightnot have access to this task. To obtain access to this task or to have someonecomplete it for you, contact your system administrator.
Before you can delete accounts from a service in IBM Security Identity Manager,you must create a service instance.
Procedure
To delete an account from a service instance, complete these steps:1. From the navigation tree, click Manage Services. The Select a Service page is
displayed.2. On the Select a Service page, complete these steps:
a. Type information about the service in the Search information field.b. In the Search by field, specify whether to search against services or
business units.c. Select a service type from the Search type list.d. Select a status from the Status list, and then click Search. A list of services
that matches the search criteria is displayed.If the table contains multiple pages, you can:v Click the arrow to go to the next page.v Type the number of the page that you want to view and click Go.
Chapter 7. Services administration 123
3. In the Services table, click the icon ( ) next to the service to show the tasksthat can be done on the service, and then click Accounts. The tasks that youcan do are dependent on the type of service. The Accounts page is displayed.
4. On the Accounts page, complete these steps:a. Type information about the account in the Account information field.b. In the Search by field, specify whether the search is to be done against user
IDs or owners.c. In the Ownership type field, select an ownership type, and then click
Search or Advanced, depending on the type of search you want to do. Theadvanced search option opens a new page where you can specify additionalsearch criteria. A list of accounts that match the search criteria is displayed.If the table contains multiple pages, you can:v Click the arrow to go to the next page.v Type the number of the page that you want to view and click Go.
5. In the Accounts table, select the check box next to the account that you want todelete, and then click Delete. Selecting the check box at the top of this columnselects all accounts. A confirmation page is displayed.
6. On the Confirm page, specify the date and time for the deletion to occur, andthen click Delete, or click Cancel.
Results
A message is displayed, indicating that you successfully submitted a request todelete an account from the service.
What to do next
Select another account task, or click Close. When the Accounts page is displayed,click Refresh to refresh the Accounts table, or click Close.
Suspending accounts on a serviceYou can suspend an account on a service. This action makes the account inactive.
Before you begin
Depending on how your system administrator customized your system, you mightnot have access to this task. To obtain access to this task or to have someonecomplete it for you, contact your system administrator.
Before you can suspend accounts on a service in IBM Security Identity Manager,you must create a service instance.
In addition, an account must exist, and the account must have an owner.
Note: Suspension of an account does not automatically terminate active sessionsthat use the suspended account. The account owner is notified when the account issuspended. For privileged accounts that have special privileges to access sensitiveinformation in the system or application, the account owner must follow upmanually to ensure that the suspended account can no longer be used to access thesystem or application immediately after the account is suspended.
124 IBM Security Identity Manager Version 6.0.0.18: Administration Topics

Procedure
To suspend an account on a service instance, complete these steps:1. From the navigation tree, click Manage Services. The Select a Service page is
displayed.2. On the Select a Service page, complete these steps:
a. Type information about the service in the Search information field.b. In the Search by field, specify whether to search against services or
business units.c. Select a service type from the Search type list.d. Select a status from the Status list, and then click Search. A list of services
that matches the search criteria is displayed.If the table contains multiple pages, you can:v Click the arrow to go to the next page.v Type the number of the page that you want to view and click Go.
3. In the Services table, click the icon ( ) next to the service to show the tasksthat can be done on the service, and then click Accounts. The tasks that youcan do are dependent on the type of service. The Accounts page is displayed.
4. On the Accounts page, complete these steps:a. Type information about the account in the Account information field.b. In the Search by field, specify whether the search is to be done against user
IDs or owners.c. In the Ownership type field, select an ownership type, and then click
Search or Advanced, depending on the type of search you want to do. Theadvanced search option opens a new page where you can specify additionalsearch criteria. A list of accounts that matches the search criteria isdisplayed.If the table contains multiple pages, you can:v Click the arrow to go to the next page.v Type the number of the page that you want to view and click Go.
5. In the Accounts table, select the check box next to the account that you want tosuspend, and then click Suspend. A confirmation page is displayed.
6. On the Confirm page, specify the date and time for the suspension to occur,and then click Suspend, or click Cancel.
Results
A message is displayed, indicating that you successfully submitted a request tosuspend an account on the service.
What to do next
Select another account task, or click Close. When the Accounts page is displayed,click Refresh to refresh the Accounts table, or click Close.
Restoring accounts on a serviceYou can restore an inactive account on a service and make the account activeagain.
Chapter 7. Services administration 125

Before you begin
Depending on how your system administrator customized your system, you mightnot have access to this task. To obtain access to this task or to have someonecomplete it for you, contact your system administrator.
Before you can restore accounts on a service in IBM Security Identity Manager, youmust create a service instance.
The account must be inactive, and it must have an owner.
Procedure
To restore an account on a service instance, complete these steps:1. From the navigation tree, click Manage Services. The Select a Service page is
displayed.2. On the Select a Service page, complete these steps:
a. Type information about the service in the Search information field.b. In the Search by field, specify whether to search against services or
business units.c. Select a service type from the Search type list.d. Select a status from the Status list, and then click Search. A list of services
that matches the search criteria is displayed.If the table contains multiple pages, you can:v Click the arrow to go to the next page.v Type the number of the page that you want to view and click Go.
3. In the Services table, click the icon ( ) next to the service to show the tasksthat can be done on the service, and then click Accounts. The tasks that youcan do are dependent on the type of service. The Accounts page is displayed.
4. On the Accounts page, complete these steps:a. Type information about the account in the Account information field.b. In the Search by field, specify whether the search is to be done against user
IDs or owners.c. In the Ownership type field, select an ownership type, and then click
Search or Advanced, depending on the type of search you want to do. Theadvanced search option opens a new page where you can specify additionalsearch criteria. A list of accounts that match the search criteria is displayed.If the table contains multiple pages, you can:v Click the arrow to go to the next page.v Type the number of the page that you want to view and click Go.
5. In the Accounts table, select the check box next to the account that you want tosuspend, and then click Restore. The Schedule page is displayed.
6. On the Schedule page, specify the date and time for the restoration to occur,and then click Submit, or click Cancel.
Results
A message is displayed, indicating that you successfully submitted a request torestore an account on the service.
126 IBM Security Identity Manager Version 6.0.0.18: Administration Topics

What to do next
Select another account task, or click Close. When the Accounts page is displayed,click Refresh to refresh the Accounts table, or click Close.
Assigning an account to a userYou can assign an account to a user.
Before you begin
Depending on how your system administrator customized your system, you mightnot have access to this task. To obtain access to this task or to have someonecomplete it for you, contact your system administrator.
You must create a service instance and do a reconciliation.
Procedure
To assign an account to a user, complete these steps:1. From the navigation tree, click Manage Services. The Select a Service page is
displayed.2. On the Select a Service page, complete these steps:
a. Type information about the service in the Search information field.b. In the Search by field, specify whether to search against services or
business units.c. Select a service type from the Search type list.d. Select a status from the Status list, and then click Search. A list of services
that matches the search criteria is displayed.If the table contains multiple pages, you can:v Click the arrow to go to the next page.v Type the number of the page that you want to view and click Go.
3. In the Services table, click the icon ( ) next to the service to show the tasksthat can be done on the service, and then click Accounts. The tasks that youcan do are dependent on the type of service. The Accounts page is displayed.
4. On the Accounts page, complete these steps:a. Type information about the account in the Account information field.b. In the Search by field, specify whether the search is to be done against user
IDs or owners.c. In the Ownership type field, select an ownership type, and then click
Search or Advanced, depending on the type of search you want to do. Theadvanced search option opens a new page where you can specify additionalsearch criteria. A list of accounts that match the search criteria is displayed.If the table contains multiple pages, you can:v Click the arrow to go to the next page.v Type the number of the page that you want to view and click Go.
5. In the Accounts table, click the icon ( ) next to the account to show the tasksthat can be done on the account, and then click Assign to User. The Select aUser page is displayed.
6. On the Select a User page, complete these steps:
Chapter 7. Services administration 127

a. Type information about the user in the Search information field, select anattribute from the Search by list, and then click Search.
b. In the Users table, select the name of the user that you want to assign theselected account to, and then click Continue. If the provisioning policyentitles more than one ownership type, the Select an Ownership Type pageis displayed. Otherwise a confirmation page is displayed.
7. On the Select an Ownership Type page, choose an ownership type for theaccount. The provisioning policy for the service determines the number ofownership types available. This page is displayed only if more than oneownership type is entitled on the service. A confirmation page is displayed.
8. On the Confirm page, specify the date and time for the account assignment tooccur, and then click Assign to User, or click Cancel.
Results
A message is displayed, indicating that you successfully submitted a request toassign an account to a user.
What to do next
Select another account task, or click Close. When the Accounts page is displayed,click Refresh to refresh the Accounts table, or click Close.
Orphan accountsOrphan accounts are accounts on the managed resource whose owner in the IBMSecurity Identity Manager Server cannot be determined.
Orphan accounts are identified during reconciliation when the applicable adoptionrule cannot successfully determine the owner of an account. You can also make anaccount into an orphan account if the current owner of the account is not correct.
Orphan accounts are included in the list of accounts that are associated with aservice. You can suspend or delete orphan accounts or assign them to users.v When you assign an orphan account to a user, the user becomes the owner of
the account. Also, the policies that are applicable to the users are evaluated andenforced for the account. The owner can manage the account with the SelfService or the Identity Service Center user interface.
v When you suspend an orphan account, it is suspended on the Security IdentityManager Server and on the managed resource.
v When you delete an orphan account, it is deleted on the managed resource.
Making an orphan accountYou can change an account so that it is an orphan account.
Before you begin
Depending on how your system administrator customized your system, you mightnot have access to this task. To obtain access to this task or to have someonecomplete it for you, contact your system administrator.
You must create a service instance and either created an account or done areconciliation on an existing account.
128 IBM Security Identity Manager Version 6.0.0.18: Administration Topics

Procedure
To change an account so that it is an orphan account, complete these steps:1. From the navigation tree, click Manage Services. The Select a Service page is
displayed.2. On the Select a Service page, complete these steps:
a. Type information about the service in the Search information field.b. In the Search by field, specify whether to search against services or
business units.c. Select a service type from the Search type list.d. Select a status from the Status list, and then click Search. A list of services
that matches the search criteria is displayed.If the table contains multiple pages, you can:v Click the arrow to go to the next page.v Type the number of the page that you want to view and click Go.
3. In the Services table, click the icon ( ) next to the service to show the tasksthat can be done on the service, and then click Accounts. The tasks that youcan do are dependent on the type of service. The Accounts page is displayed.
4. On the Accounts page, complete these steps:a. Type information about the account in the Account information field.b. In the Search by field, specify whether the search is to be done against user
IDs or owners.c. In the Ownership type field, select an ownership type, and then click
Search or Advanced, depending on the type of search you want to do. Theadvanced search option opens a new page where you can specify additionalsearch criteria. A list of accounts that match the search criteria is displayed.If the table contains multiple pages, you can:v Click the arrow to go to the next page.v Type the number of the page that you want to view and click Go.
5. In the Accounts table, click the icon ( ) next to the account to show the tasksthat can be done on the account, and then click Orphan. A confirmation page isdisplayed.
6. On the Confirm page, specify the date and time for the orphan operation tooccur, and then click Orphan, or click Cancel.
Results
A message is displayed, indicating that you successfully submitted a request tochange an account to an orphan account.
Note: When an account becomes an orphan account, it no longer has anownership type. Provisioning policies do not apply to orphan accounts.
What to do next
Select another account task, or click Close. When the Accounts page is displayed,click Refresh to refresh the Accounts table, or click Close.
Chapter 7. Services administration 129
Management of account defaults on a serviceYou can define default values for account attributes either on a service or on aservice type.
Note: In previous versions of IBM Security Identity Manager, account defaultswere specified with provisioning policy. Account defaults differ from aprovisioning policy. Account defaults do not define the set of users who areallowed to have accounts or what attribute values are compliant. Defaults definethe default values for a new account. The change of account default configurationdoes not affect the compliance status of user accounts. A service might be grantedfor a subset of users (for example, users who belong to specific organization roles).In this case, these global account defaults might be duplicated in multipleprovisioning policies that are specific for each role. By using account defaults, youavoid duplicated configurations.
The following list highlights the differences between the use of account defaultsand provisioning policies:v Like "default" provisioning parameters, account defaults specify the default
values for account attributes during provisioning.v Unlike "default" provisioning parameters, account defaults are not scoped by
membership. They apply to all users.v Unlike "default" provisioning parameters, account defaults do not have
implications on compliance. A value specified as an account default is notautomatically treated as an "allowed" value.
v Values that are specified as account defaults do not occur within the entitlementparameter list. They are entirely independent from provisioning policy.
v Provisioning parameters take precedence over account defaults. Specifically,mandatory and default provisioning parameters override an account default forthe same attribute.
Here is an example to illustrate the differences. In this example, we want to definedefault values and compliance around the "Local Groups" attribute of WinLocalaccounts.
In one case, Case A, we define the default value as a provisioning parameter. Inthe other case, Case B, we define the default value as an account default.v Case A:
Default provisioning parameterGuests
Allowed provisioning parameterPrint Operators
v Case B:
Account defaultGuests
Allowed provisioning parameterPrint Operators
In both cases, its clear that Print Operators is an allowed value for the attribute. Itis also true that in both cases the default value for the attribute is Guests. Thedifference is that defining the value of Guests as a provisioning parameter in CaseA makes Guests an allowed value. An account with Local Groups = Guests is
130 IBM Security Identity Manager Version 6.0.0.18: Administration Topics

compliant. In Case B, an account with Local Groups = Guests is not compliantbecause account default values do not have any implications on compliance.
Consider the following tips for using Account Defaults instead of ProvisioningPolicy:v Use account default to set up default account values for attributes that do not
affect security concerns. Use provisioning policy to set up account attributeconstraints for security compliance. Avoid using the same attributes for bothpurposes.
v Use default parameters in provisioning policy to set up default values forsecurity sensitive attributes. The defaults can be automatically given to a userwhen the account is created.
v Use allowed parameters or exclude all but the wanted parameters inprovisioning policy to grant access privilege to a user.
v Use mandatory parameters in a provisioning policy to support "required" (musthave) access privilege for a user. IBM Security Identity Manager ensures thatthese values are set for new account. The values are out to an existing accountwhen policy enforcement is set to correct and alert.
Adding account defaults to a serviceYou can add default values for attributes. When you create an account for thisservice, the default values are provided.
Before you begin
Depending on how your system administrator customized your system, you mightnot have access to this task. To obtain access to this task or to have someonecomplete it for you, contact your system administrator.
You must create a service instance before you begin this task.
Consider doing a "supporting data only" reconciliation to sync up accountmetadata before you configure the account defaults.
About this task
If account defaults are already defined on the service type for this service, amessage is displayed. It indicates that account defaults are defined for the servicetype. If you click OK, then the account defaults for the service type are copied tothe service. You can either change the account defaults on the service or removethem from the service. Any changes (including removals) do not affect the accountdefaults on the service type.
Procedure
To add account defaults to a service, complete these steps:1. From the navigation tree, click Manage Services. The Select a Service page is
displayed.2. On the Select a Service page, complete these steps:
a. Type information about the service in the Search information field.b. In the Search by field, specify whether to search against services or
business units.c. Select a service type from the Search type list.
Chapter 7. Services administration 131

d. Select a status from the Status list, and then click Search. A list of servicesthat matches the search criteria is displayed.If the table contains multiple pages, you can:v Click the arrow to go to the next page.v Type the number of the page that you want to view and click Go.
3. In the Services table, click the icon ( ) next to the service to show the tasksthat can be done on the service, and then click Account Defaults. The tasksthat you can do are dependent on the type of service. The Select an AccountAttribute page is displayed.
4. On the Select an Account Attribute page, click Add to add an attribute. TheSelect an Attribute to Default page is displayed.
5. On the Select an Attribute to Default page, select an account attribute, and thenclick one of the following options:v Add, to add a default value for the selected attribute. Complete the
appropriate fields, which vary depending on the type of service, and thenclick OK. The attribute default is added to the list on the Select an Attributeto Default page.
v Add (Advanced), to add a script that specifies a default value for theselected attribute. Type the JavaScript code in the Script field, and then clickOK. The attribute default is added to the list on the Select an Attribute toDefault page.
6. On the Select an Account Attribute page. When you are finished addingattribute defaults to the service instance, click OK to save the changes and toclose the page. For JavaScript APIs that are available for account defaults, seethe JavaScript document and look for JavaScript Extensions for host component"Account Default."
Results
A message is displayed, indicating that you successfully saved the account defaultson the service.
What to do next
Select another account task, or click Close. When the Select a Service page isdisplayed, click Refresh to refresh the Services table.
Changing account defaults for a serviceYou can change the account defaults for a service instance.
Before you begin
Depending on how your system administrator customized your system, you mightnot have access to this task. To obtain access to this task or to have someonecomplete it for you, contact your system administrator.
You must create account defaults for the service or service type before you beginthis task.
132 IBM Security Identity Manager Version 6.0.0.18: Administration Topics

About this task
You can change the default values for attributes. The changed default values willnot affect existing accounts but will be used for new accounts that are created onthe service.
Procedure
To change account defaults for a service, complete these steps:1. From the navigation tree, click Manage Services. The Select a Service page is
displayed.2. On the Select a Service page, complete these steps:
a. Type information about the service in the Search information field.b. In the Search by field, specify whether to search against services or
business units.c. Select a service type from the Search type list.d. Select a status from the Status list, and then click Search. A list of services
that matches the search criteria is displayed.If the table contains multiple pages, you can:v Click the arrow to go to the next page.v Type the number of the page that you want to view and click Go.
3. In the Services table, click the icon ( ) adjacent to the service to show thetasks that can be done on the service, and then click Account Defaults. Thetasks that you can do are dependent on the type of service. The Select anAccount Attribute page is displayed.
4. On the Select an Account Attribute page, select the check box adjacent to theattribute that you want to modify, and then click one of the following options:v Change, which allows you to change the default value for the selected
attribute. Complete the appropriate fields, which vary depending on the typeof service, and then click OK. The template value for the attribute is updatedin the list on the Select an Attribute to Default page.
Note: If you select this option when an attribute currently has a scripteddefault value, the existing script will be overwritten with the template valuethat you specify.
v Change (Advanced), which allows you to add or change a script thatspecifies a default value for the selected attribute. Type the wanted JavaScriptcode in the Script field, and then click OK. The template value for theattribute is updated in the list on the Select an Attribute to Default page.
5. On the Select an Account Attribute page, when you are finished changingattribute defaults for the service instance, click OK to save the changes and toclose the page.
Results
A message is displayed, indicating that you successfully saved the account defaultson the service.
What to do next
Select another account task, or click Close. When the Select a Service page isdisplayed, click Refresh to refresh the Services table.
Chapter 7. Services administration 133

Removing account defaults from a serviceYou can remove account defaults from a service instance.
Before you begin
Depending on how your system administrator customized your system, you mightnot have access to this task. To obtain access to this task or to have someonecomplete it for you, contact your system administrator.
You must create account defaults for the service or service type before you beginthis task.
About this task
Account defaults for the service type are used.
Procedure
To remove account defaults from a service, complete these steps:1. From the navigation tree, click Manage Services. The Select a Service page is
displayed.2. On the Select a Service page, complete these steps:
a. Type information about the service in the Search information field.b. In the Search by field, specify whether to search against services or
business units.c. Select a service type from the Search type list.d. Select a status from the Status list, and then click Search. A list of services
that matches the search criteria is displayed.If the table contains multiple pages, you can:v Click the arrow to go to the next page.v Type the number of the page that you want to view and click Go.
3. In the Services table, click the icon ( ) next to the service to show the tasksthat can be done on the service, and then click Account Defaults. The tasksthat you can do are dependent on the type of service. The Select an AccountAttribute page is displayed.
4. On the Select an Account Attribute page, select the check box next to theattribute that you want to remove, and then click Remove. Selecting the checkbox at the top of this column selects all attributes. The attribute default isremoved from the list on the Select an Attribute to Default page.
5. On the Select an Account Attribute page, finish removing attributes from theservice instance. Click OK to save the changes and to close the page.
Results
A message is displayed, indicating that you successfully removed the accountdefaults from the service.
What to do next
Select another account task, or click Close. When the Select a Service page isdisplayed, click Refresh to refresh the Services table.
134 IBM Security Identity Manager Version 6.0.0.18: Administration Topics

Using global account defaults for the service typeInstead of adding account defaults to a service instance, you can use the globalaccount defaults for the service type.
Before you begin
Depending on how your system administrator customized your system, you mightnot have access to this task. To obtain access to this task or to have someonecomplete it for you, contact your system administrator.
About this task
Selecting this option prevents new account defaults from being created on theservice, and prevents existing account defaults from being changed or removed.The Add, Change, and Remove buttons are disabled when you choose to useglobal account defaults.
Procedure
To use the global account defaults for the service type, complete these steps:1. From the navigation tree, click Manage Services. The Select a Service page is
displayed.2. On the Select a Service page, complete these steps:
a. Type information about the service in the Search information field.b. In the Search by field, specify whether to search against services or
business units.c. Select a service type from the Search type list.d. Select a status from the Status list, and then click Search. A list of services
that matches the search criteria is displayed.If the table contains multiple pages, you can:v Click the arrow to go to the next page.v Type the number of the page that you want to view and click Go.
3. In the Services table, click the icon ( ) next to the service to show the tasksthat can be done on the service, and then click Account Defaults. The tasksthat you can do are dependent on the type of service. The Select an AccountAttribute page is displayed.
4. On the Select an Account Attribute page, select the check box for Use theglobal account defaults for the service type, and then click OK. The buttonsand attributes on the Select an Account Attribute are disabled.
5. On the Select an Account Attribute page, click OK to save the changes and toclose the page.
Results
A message is displayed, indicating that you successfully saved the account defaultson the service.
What to do next
You can choose to use the account defaults instead of using the global accountdefaults by clearing the Use the global account defaults for the service type checkbox on the Select an Account Attribute page.
Chapter 7. Services administration 135

Select another account task, or click Close. When the Select a Service page isdisplayed, click Refresh to refresh the Services table.
Service taggingA service tag is used for grouping services. Security Identity Manager, startingwith Version 6.0, provides an ertag attribute to the service objects. With thisattribute, you can group services of the same type by tagging them together.Because the ertag attribute is a multi-value attribute, a service can have one ormore service tags. Services with the same service tag belong to the same group ofservices.
The provisioning policies are enhanced to support the service tag entitlement. Aservice tag entitlement is a service type entitlement with one or more tags. Itapplies to all services of the specified type with at least one matching tag. Forexample, if a service tag entitlement might be defined for a Linux service type withthe service tag mytag1 and mytag2. Only services of the Linux type that are taggedwith either mytag1 or mytag2 are subject to the provisioning policy entitlement. Or,if two service tag entitlements are defined as mytag1 and mytag2, then a servicewith both tags is subject to both entitlements.
A service type entitlement is different from a service tag entitlement in a way thatit applies to all services of the specified type. For example, when managing aprovisioning policy, you might select POSIX AIX profile as the service type withoutadding any service tags. All AIX services that you create are governed by thisprovisioning policy, regardless of whether they have tags or not.
When the service tag attribute is modified, accounts can become noncompliant.You must use Enforce policy on a service task to reevaluate all policies that governthe service. The policy enforcement gathers all policies that affect the selectedservice, reevaluates the existing accounts, and provisions new accounts.
It is important to understand that the Change service operation does notautomatically start policy enforcement. You must manually enforce policies on theservice.
Adding the tag attribute to the service templateAbout this task
Follow these steps to configure the service template.
Procedure1. Log on to the Security Identity Manager administrative console.2. From the navigation tree, click Configure System > Design Forms. The form
designer applet opens.3. In the left pane, double-click the Service folder to open the object profiles for
the service types available.4. Double-click the wanted object profile. For example, POSIX AIX profile, to open
the template for that profile. The form template that is associated with theobject profile, that is, POSIX AIX profile, is opened in the middle pane.
5. Select the tab to which you want to add the tag attribute. For example,$servicetabgeneral.
6. In the Attribute List pane on the right, double-click the ertag attribute. The tagattribute is added to the form.
136 IBM Security Identity Manager Version 6.0.0.18: Administration Topics

7. To add a multi-value tag attribute, follow these steps:a. Right-click [TextField] of $ertag from the middle pane.b. Select Change to > Editable Text List. [TextField] becomes [Editable Text
List].8. Click Form > Save Form Template > OK to save the new template.
Adding tags to the serviceWhen you have the tag attribute ready in the service template form, you can addtags to the services.
About this task
Follow these steps to add the tags.
Procedure1. Log on to the Security Identity Manager administrative console.2. From the navigation tree, click Manage Services.3. Click Create from the Services table. The Create Service page opens.4. Select the type of the service, for example, POSIX AIX profile, and then click
Next.5. Specify information about a service instance.6. In the Tag field at the bottom of the page, type the name of the tag and click
Add. Add more tags when necessary, for example, mytag1, mytag2.7. Proceed to finish creating a service.
Policy enforcementPolicy enforcement reevaluates accounts to determine whether they violateprovisioning policies.
Provisioning policies govern the access rights of users for specific services.Provisioning enforcement is incorporated into all business processes that managethe identities and access rights of users on a managed resource. Policy enforcementperforms appropriate actions to ensure that user access rights comply with thecorporate policies.
Policy enforcement is automatically triggered when you create, modify, or deletethe provisioning policies. The following table lists the activities that canautomatically start policy enforcement.
Class Operations
Account Create, modify, delete, request account
Service Group Request access
Service Configure policy enforcement, reconcile
Provisioning policy Change policy
Role modify membership
However, you must manually start policy enforcement when:v You create a new service.v You tag a service or change a service tag.
Chapter 7. Services administration 137

These situations can cause accounts to become noncompliant or require newaccounts to be provisioned. The policies governing this service must be reevaluatedto ensure that all accounts are compliant with the provisioning policies. If policyenforcement finds any missing accounts for users who are automatically entitled toan account, it provisions new accounts for them.
You can configure policy enforcement globally or for a specific service. You canchoose these enforcement actions:v Markv Suspendv Correctv Alertv Use Global Enforcement: Mark
All services except DSML Identity Feed services have policy enforcement. You canperform policy enforcement at any time. When you select to enforce a policy,policy enforcement is scheduled to take action.
Policy enforcement actions
To resolve noncompliant accounts on a service, you can take one of these actions:
Mark Flags the disallowed account or an account that has noncompliant attributevalue.
SuspendDeactivates the disallowed account or an account that has noncompliantattribute value.
CorrectReplaces a noncompliant attribute on an account with the correct attribute.
The disallowed accounts from the policy evaluation can be exempt fromthis Correct action. IBM Security Identity Manager provides the defaultexemption handler. This handler uses thecorrect.enforcement.exemption.account.criteria property in theenRole.properties file to determine the matching criteria of exemptaccounts. The accounts that match any of the specified criteria areorphaned instead of being removed. The exempt action is defined by thecorrect.enforcement.exemption.account.action property value specifiedin the enRole.properties file.
You can also plug in your own custom exemption handler. You canimplement thecom.ibm.itim.policy.dynanalysis.ICorrectEnforcementExemptionHandlerJava Interface and specify the implementation class name in thecorrect.enforcement.exemption.account.handler property of theenRole.properties file. For more information about the Java interface andwriting your own exemption handler, see the API documentation.
Alert Notifies the user about a disallowed account or value.
Use Global Enforcement Action: MarkUses the current global enforcement action for a noncompliant accountvalue.
138 IBM Security Identity Manager Version 6.0.0.18: Administration Topics

Policy enforcement alerts
Policy enforcement alerts notify a dedicated user about security complianceviolations so that they can correct them. When an account becomes noncompliant,the person designated in the compliance alert configuration is notified. To make anoncompliant account compliant, a service owner can then create a complianceprocess for Security Identity Manager to bring the account back into compliance.
Depending on the privilege rules defined on the account attributes, accounts areconsidered noncompliant when users:v Possess account privileges for reasons that are no longer valid.
In this situation, you must revoke the privileges to make the accounts compliant.When privileges are revoked, you must define a compliance process for policyenforcement. When the policy enforcement action is set as Alert, the compliancealert process is triggered.
v Do not possess account privileges that they must have.In this situation, you must grant privileges to these users to make the accountscompliant. If an account is noncompliant because additional privileges areneeded, those privileges are granted automatically.
When you define a compliance process to enforce a policy, the noncompliantaccounts are flagged. Separate compliance alert items are generated for eachprivilege to be revoked for each account. For example, if an account has twogroups that violate the provisioning policies, you address these two groupsseparately. You can remove one group while you can add a policy to the othergroup to make it compliant. Different people can perform these corrective actionsat different times.
Two types of operations can trigger policy enforcement:v System-triggered operations, also called indirect operations. They include service
reconciliation, policy change, and identity change operations.v Manually triggered operations, also called direct operations. They include the
operations performed directly or manually on an account.
The following actions might trigger a policy enforcement action:v Changing a policy.v Performing a service reconciliation.v Changing an identity in the user interface or through an identity feed. You can
revoke privileges through dynamic role changes or entitlement parameterrecalculation based on identity information.
v Adding a role to a user.v Removing a role from a user.v Changing the definition for a dynamic role.v Manually modifying an account.
The following table shows the default compliance alert settings.
Chapter 7. Services administration 139
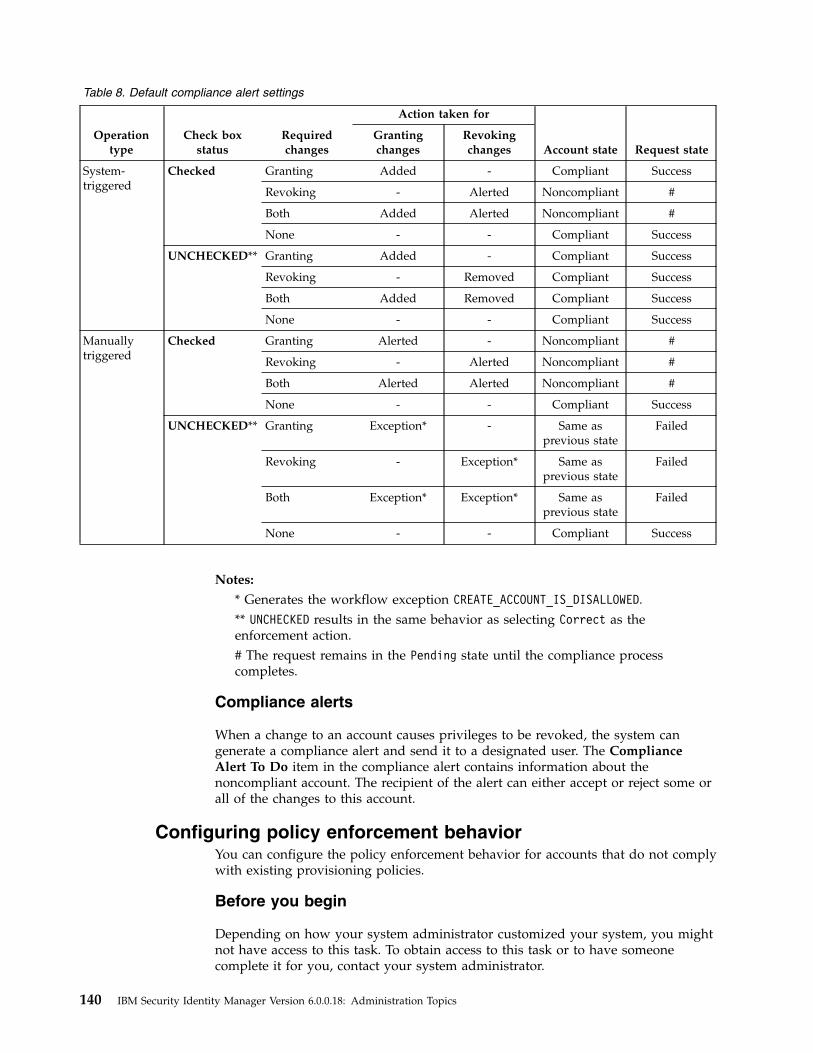
Table 8. Default compliance alert settings
Operationtype
Check boxstatus
Requiredchanges
Action taken for
Account state Request stateGrantingchanges
Revokingchanges
System-triggered
Checked Granting Added - Compliant Success
Revoking - Alerted Noncompliant #
Both Added Alerted Noncompliant #
None - - Compliant Success
UNCHECKED** Granting Added - Compliant Success
Revoking - Removed Compliant Success
Both Added Removed Compliant Success
None - - Compliant Success
Manuallytriggered
Checked Granting Alerted - Noncompliant #
Revoking - Alerted Noncompliant #
Both Alerted Alerted Noncompliant #
None - - Compliant Success
UNCHECKED** Granting Exception* - Same asprevious state
Failed
Revoking - Exception* Same asprevious state
Failed
Both Exception* Exception* Same asprevious state
Failed
None - - Compliant Success
Notes:
* Generates the workflow exception CREATE_ACCOUNT_IS_DISALLOWED.** UNCHECKED results in the same behavior as selecting Correct as theenforcement action.# The request remains in the Pending state until the compliance processcompletes.
Compliance alerts
When a change to an account causes privileges to be revoked, the system cangenerate a compliance alert and send it to a designated user. The ComplianceAlert To Do item in the compliance alert contains information about thenoncompliant account. The recipient of the alert can either accept or reject some orall of the changes to this account.
Configuring policy enforcement behaviorYou can configure the policy enforcement behavior for accounts that do not complywith existing provisioning policies.
Before you begin
Depending on how your system administrator customized your system, you mightnot have access to this task. To obtain access to this task or to have someonecomplete it for you, contact your system administrator.
140 IBM Security Identity Manager Version 6.0.0.18: Administration Topics

Before you can configure policy enforcement behavior on a service in IBM SecurityIdentity Manager, you must create a service instance.
Procedure
To configure the policy enforcement behavior, complete these steps:1. From the navigation tree, click Manage Services. The Select a Service page is
displayed.2. On the Select a Service page, complete these steps:
a. Type information about the service in the Search information field.b. In the Search by field, specify whether to search against services or
business units.c. Select a service type from the Search type list.d. Select a status from the Status list, and then click Search. A list of services
that matches the search criteria is displayed.If the table contains multiple pages, you can:v Click the arrow to go to the next page.v Type the number of the page that you want to view and click Go.
3. In the Services table, click the icon ( ) next to the service to show the tasksthat can be done on the service, and then click Configure Policy Enforcement.The tasks that you can do are dependent on the type of service. The SelectAction page is displayed.
4. On the Select Action page, select an enforcement action:v Select Mark to mark a disallowed account or an account that has a
noncompliant attribute value, and then click Continue.v Select Suspend to suspend an account that is disallowed or that has
noncompliant attribute values, and then click Continue.v Select Correct to remove an account or replace noncompliant attributes on an
account with the correct attributes, and then click Continue. Disallowedaccounts can be exempt from this action if they meet the criteria of exemptaccounts, which is defined in the enRole.properties file. See Policyenforcement actions in “Policy enforcement” on page 137.
v Select Alert to issue an alert for an account that is disallowed or thatdisallows attribute values (revoking attribute values), and then clickContinue.
v Select Use Global Enforcement Action to use the current global enforcementaction for an account that has a noncompliant attribute, and then clickContinue.
5. On the Confirm page, specify the date and time for the enforcement action tooccur, and then click Submit, or click Cancel.
Results
A message is displayed, indicating that you successfully saved the policyenforcement settings for the service.
What to do next
View the status of the request, or click Close. When the Select a Service page isdisplayed, click Refresh to refresh the Services table.
Chapter 7. Services administration 141

Configuring compliance alert rulesConfigure compliance alert rules to specify when compliance alerts are sent.
Before you begin
Depending on how your system administrator customized your system, you mightnot have access to this task. To obtain access to this task or to have someonecomplete it for you, contact your system administrator.
Before you can configure policy enforcement behavior on a service in IBM SecurityIdentity Manager, you must create a service instance.
About this task
Security Identity Manager must make an informed decision about which accountchange operations are granting additional privileges and which are revokingprivileges for noncompliance resolution. This decision allows users to be informedabout accounts that are disallowed or privileges to be revoked before SecurityIdentity Manager removes it from the user. For multi-valued attributes, SecurityIdentity Manager accomplishes this choice through a simple subset relation. Forsingle-valued attributes, Security Identity Manager consults privilege rules todifferentiate between granting and revoking actions.
If no privilege rules are defined for an attribute, then any change in asingle-valued attribute is assumed to be a revoke action that leads to creation of acompliance alert.
Procedure
To configure compliance alert rules, complete these steps:1. From the navigation tree, click Manage Services. The Select a Service page is
displayed.2. On the Select a Service page, complete these steps:
a. Type information about the service in the Search information field.b. In the Search by field, specify whether to search against services or
business units.c. Select a service type from the Search type list.d. Select a status from the Status list, and then click Search. A list of services
that matches the search criteria is displayed.If the table contains multiple pages, you can:v Click the arrow to go to the next page.v Type the number of the page that you want to view and click Go.
3. In the Services table, click the icon ( ) next to the service to show the tasksthat can be done on the service, and then click Configure Policy Enforcement.The tasks that you can do are dependent on the type of service. The SelectAction page is displayed.
4. On the Select Action page, select Alert, and then click Continue. The ConfigurePolicy Enforcement Behavior notebook is displayed.
5. On the General tab of the notebook, complete the following steps:a. In the Alert name field, type a descriptive name for the alert.b. Select the participants to receive the alerts. The participant fields vary,
depending on the type of participants you select.
142 IBM Security Identity Manager Version 6.0.0.18: Administration Topics

c. Specify the time intervals.d. Select the process types for which an alert is generated. If no process type is
selected, the system automatically corrects a noncompliant account for thatprocess type. The correction can modify or delete the account.
6. Optional: On the E-mail tab of the notebook, either use the default template, orprovide text for the alert notification email message.
7. Click Submit. A confirmation page is displayed.8. On the Confirm page, specify the date and time for the enforcement action to
occur, and then click Submit, or click Cancel.
Results
A message is displayed, indicating that you successfully saved the policyenforcement settings for the service.
What to do next
View the status of the request, or click Close. When the Select a Service page isdisplayed, click Refresh to refresh the Services table.
Enforcing policiesWhen a service is tagged or a service tag changes, use this task to reevaluate thegoverning provisioning policies for the service.
Before you begin
Depending on how your system administrator customized your system, you mightnot have access to this task. To obtain access to this task or to have someonecomplete it for you, contact your system administrator.
Reconcile the new service before you enforce policies. Enforcing policies on a newservice without reconciling first might cause enforcement errors.
Procedure
To schedule policy enforcement on a service, complete these steps:1. From the navigation tree, click Manage Services. The Select a Service page is
displayed.2. On the Select a Service page, complete these steps:
a. Type information about the service in the Search information field.b. In the Search by field, specify whether to search against services or
business units.c. Select a service type from the Search type list.d. Select a status from the Status list, and then click Search. A list of services
that matches the search criteria is displayed.If the table contains multiple pages, you can:v Click the arrow to go to the next page.v Type the number of the page that you want to view and click Go.
3. In the Services table, click the icon ( ) next to the service to show the tasksthat you can do on that service.
4. Click Enforce Policy. The tasks that you can do depend on the type of service.The Schedule page is displayed.
Chapter 7. Services administration 143

5. Select either Immediate or Effective date to schedule the policy enforcement.6. Click Submit.
Results
A message indicates that you successfully submitted a request to enforce policy onthe service.
Account recertificationYou can view the status of recertification on accounts, or override therecertification rejection status for accounts.
Account recertification is a process that is used to determine whether accounts arestill needed. If the accounts are still needed, then more justification might berequired. If the accounts are no longer needed, then certain actions need to betaken. System administrators can create recertification policies for all services,while service owners can create recertification policies for services they own.
All services other than the identity feed service are eligible for recertification. Aservice can be a member of only one recertification policy.
Orphaned accounts are not included for recertification targets.
You can view the latest recertification status of accounts by service instance.
The administrator or service owner can override certain recertification rejectionactions by recertifying accounts on a service. Suspended accounts are notreactivated during the recertification process. The override actions are logged inthe recertification log table for reporting.
Displaying account recertification statusYou can display the recertification status for accounts that are associated with theservice instance.
Before you begin
Depending on how your system administrator customized your system, you mightnot have access to this task. To obtain access to this task or to have someonecomplete it for you, contact your system administrator.
Before you can display account recertification status on a service in IBM SecurityIdentity Manager, you must create a service instance.
Procedure
To display the recertification status for accounts on a service instance, completethese steps:1. From the navigation tree, click Manage Services. The Select a Service page is
displayed.2. On the Select a Service page, complete these steps:
a. Type information about the service in the Search information field.b. In the Search by field, specify whether to search against services or
business units.
144 IBM Security Identity Manager Version 6.0.0.18: Administration Topics

c. Select a service type from the Search type list.d. Select a status from the Status list, and then click Search. A list of services
that matches the search criteria is displayed.If the table contains multiple pages, you can:v Click the arrow to go to the next page.v Type the number of the page that you want to view and click Go.
3. In the Services table, click the icon ( ) next to the service to show the tasksthat can be done on the service, and then click Account Recertification Status.The tasks that you can do are dependent on the type of service. The AccountRecertification Status page is displayed.
4. On the Account Recertification Status page, complete these steps:a. Type information about the account in the Account information field.b. In the Search by field, specify whether to search against user IDs or
owners, and then click Search or Advanced, depending on the type ofsearch you want to do. The advanced search option opens a new pagewhere you can specify more search criteria.
Results
A list of accounts that matches the search criteria is displayed.
If the table contains multiple pages, you can:v Click the arrow to go to the next page.v Type the number of the page that you want to view and click Go.
What to do next
Perform a task on the accounts in the Account Recertification Status table, or clickClose. When the Select a Service page is displayed, click Refresh to refresh theServices table.
Recertifying accounts on a serviceYou can manually recertify accounts that are associated with the service instance.You can also override the recertification status of the account on the service.
Before you begin
Depending on how your system administrator customized your system, you mightnot have access to this task. To obtain access to this task or to have someonecomplete it for you, contact your system administrator.
Before you can recertify accounts on a service in IBM Security Identity Manager,you must create a service instance.
About this task
Accounts that have a rejection status or that are not certified and that can beoverridden, have a check box.
Procedure
To recertify the accounts on a service instance, complete these steps:
Chapter 7. Services administration 145
1. From the navigation tree, click Manage Services. The Select a Service page isdisplayed.
2. On the Select a Service page, complete these steps:a. Type information about the service in the Search information field.b. In the Search by field, specify whether to search against services or
business units.c. Select a service type from the Search type list.d. Select a status from the Status list, and then click Search. A list of services
that matches the search criteria is displayed.If the table contains multiple pages, you can:v Click the arrow to go to the next page.v Type the number of the page that you want to view and click Go.
3. In the Services table, click the icon ( ) next to the service to show the tasksthat can be done on the service, and then click Account Recertification Status.The tasks that you can do are dependent on the type of service. The AccountRecertification Status page is displayed.
4. On the Account Recertification Status page, complete these steps:a. Type information about the account in the Account information field.b. In the Search by field, specify whether to search against user IDs or
owners, and then click Search or Advanced, depending on the type ofsearch you want to do. The advanced search option opens a new pagewhere you can specify additional search criteria. A list of accounts thatmatches the search criteria is displayed.If the table contains multiple pages, you can:v Click the arrow to go to the next page.v Type the number of the page that you want to view and click Go.
5. In the Account Recertification Status table, select the check box next to theaccount that you want to recertify, and then click Recertify. Selecting the checkbox at the top of this column selects all accounts. A confirmation page isdisplayed.
6. On the Confirm page, type a reason for the recertification in the Justificationfield, and then click Recertify, or click Cancel.
Results
A message is displayed, indicating that you successfully overrode therecertification status of the account on the service.
What to do next
Select another recertification task, or click Close. When the Account RecertificationStatus page is displayed, click Refresh to refresh the Account RecertificationStatus table, and then click Close.
Management of groups or access on a serviceYou can define access, manage group membership, or view the recertificationstatus for the group. Groups are supported in most services managed by IBMSecurity Identity Manager to allow sets of users to be administered collectively foraccess control purposes.
146 IBM Security Identity Manager Version 6.0.0.18: Administration Topics

Access privileges to IT resources are based on membership of a group. In IBMSecurity Identity Manager Version 4.6, groups were treated as one of thesupporting data on the managed service. Group membership was an attribute onan account. In IBM Security Identity Manager Version 5.0 and there after, groupsare treated as supporting data. Groups are also a new type of entity in the IBMSecurity Identity Manager model. In addition, access that is represented by a groupis made available for users to directly request.
Administrators can do these management functions for groups and accesses:v Review the groups on the managed servicev Assign members to a group or remove members from a groupv Provide business-friendly names, categories, and descriptions of the access
represented by the groupv Expose the access to users so that users can directly request or remove accessv Specify owners of access and specify approval of group access requestsv Define policies to enforce the recertification of group access
When access information for the group is defined and enabled in the access view,group membership affects the access list for a user. When a user is added to agroup, the access that is granted to the user is displayed in the user's access list.When a user is removed from a group, the access is revoked from the user andremoved from the access list.
Approval process for groups and accesses
The approval process might be different for managing groups or accesses,depending on how the request is initiated and submitted. When you managegroup members from the Manage Services task, the request is treated as accountrequest. Therefore, the request goes through the account approval. If the samegroup is exposed as an access and is requested through an access request, then therequest goes through the access approval. The request does not go through accountapproval. Only when there is no access approval defined, the request continues touse account approval.
Define access for a group
A service owner can provide business-friendly names, categories, and descriptionsof the access represented by the group. The service owner can expose the access tousers so that users can directly request or remove access. Service owners canspecify the owner of the access, the approval process for the access, and thenotification options for access provisioning.
Access typesThe following access types are included with IBM Security IdentityManager:v Applicationv Shared Folderv Mail Groupv Role
Groups on a service are defined with supporting data. The relevant targetgroup information is reconciled as supporting data, which uses a filteredreconciliation on the associated service on the target, pulling back only thegroups. The access itself is then defined from groups on a service.
Chapter 7. Services administration 147

The definition of each access is a one-to-one mapping with a group definedfor the adapter type.
After an access is provisioned, the requester effectively becomes a memberof the group who is defined by the access entitlement on the target. Foraccess, this reconciliation of supporting data is critical. After the groups arereconciled, access definitions can be created.
Access ownerAccess owner is a dedicated IBM Security Identity Manager user who isresponsible for the access. ACIs can be set up to grant privileges on theaccess for the owner. The access owner is often involved in the approvalprocess.
Access approvalAccess approval specifies the access request workflow for access request.The access request workflow is defined with the Access Request Workflowtask. Typically, this workflow is used to define the approval process for theaccess request.
Access notificationAccess notification defines whether the email notifications are sent to theuser when access is provisioned or de-provisioned for them.
Clearing accessYou can clear an access from its association with the service instance.
Before you begin
Depending on how your system administrator customized your system, you mightnot have access to this task. To obtain access to this task or to have someonecomplete it for you, contact your system administrator.
Before you can clear access on a service in IBM Security Identity Manager, youmust create a service instance.
About this task
This task allows the service owner to clear the access definition for a group.
Procedure
To clear access from a service instance, complete these steps:1. From the navigation tree, click Manage Services. The Select a Service page is
displayed.2. On the Select a Service page, complete these steps:
a. Type information about the service in the Search information field.b. In the Search by field, specify whether to search against services or
business units.c. Select a service type from the Search type list.d. Select a status from the Status list, and then click Search. A list of services
that matches the search criteria is displayed.If the table contains multiple pages, you can:v Click the arrow to go to the next page.v Type the number of the page that you want to view and click Go.
148 IBM Security Identity Manager Version 6.0.0.18: Administration Topics

3. In the Services table, click the icon ( ) next to the service to show the tasksthat can be done on the service, and then click Manage Groups. The tasks thatyou can do are dependent on the type of service. The Manage Groups onService page is displayed.
4. On the Manage Groups page, complete these steps:a. Type information about the group in the Group information field.b. In the Search by field, specify whether to search against groups or accesses,
and then click Search. A list of groups or access that matches the searchcriteria is displayed.If the table contains multiple pages, you can:v Click the arrow to go to the next page.v Type the number of the page that you want to view and click Go.
c. In the Groups table, select the group that has the access that you want toclear, and then click Change.
5. On the General Information page:a. Click the Access Information tab to display the Access Information page.b. Clear the Define an Access check box to clear the access and all its data.c. Click OK to submit your changes.
Results
A list of groups or access that matches the search criteria is displayed. The accessinformation for the group is cleared, and the group is not exposed in the accessrequest.
If the table contains multiple pages, you can:v Click the arrow to go to the next page.v Type the number of the page that you want to view and click Go.
What to do next
Perform a task on the items in the Group table, or click Close. When the Select aService page is displayed, click Refresh to refresh the Services table.
Chapter 7. Services administration 149

150 IBM Security Identity Manager Version 6.0.0.18: Administration Topics
Chapter 8. Group administration
IBM Security Identity Manager provides predefined groups. You can also createand modify customized groups.
Creating groupsYou can create groups either on the ITIM Service or on managed resources.
Before you begin
Depending on how your system administrator customized your system, you mightnot have access to this task. To obtain access to this task or to have someonecomplete it for you, contact your system administrator.
If a new group requires a new business unit, create the business unit first. To limitgroup activities, you might create an extra view or access control item after youcreate a group. You might create an access control item on the ITIM Service beforecreating a group. If the group does not previously exist, the access control itemdoes not have the intended membership.
You might upgrade from IBM Tivoli Identity Manager version 5.0 to version 5.1and use a service instance that was created with a IBM Tivoli Identity Manager 5.0profile. If so, you must upgrade to the 5.1 adapter before you create groups on theservice.
About this task
You can use the Create Group wizard to create more groups.
Procedure
To create a group, complete these steps:1. From the navigation tree, click Manage Services. The Select a Service page is
displayed.2. On the Select a Service page, complete these steps:
a. Type information about the service in the Search information field.b. In the Search by field, specify whether to search against services or
business units.c. Select a service type from the Search type list.d. Select a status from the Status list, and then click Search. A list of services
that matches the search criteria is displayed.If the table contains multiple pages, you can:v Click the arrow to go to the next page.v Type the number of the page that you want to view and click Go.
3. In the Create Group wizard, complete these steps:a. On the Select Type page, click the radio button next to the type of group
that you want to create, and then click Next. The Select Type page isdisplayed only if the service supports more than one type of group.
151

b. On the General Information page, complete the expected fields. Click Nextto display the Access Information page, or click Finish to complete theoperation without adding access information or any members to the group.
c. Optional: On the Access Information page, select the Define an Accesscheck box to activate the access definition fields. Click the radio button forthe type of access you want to enable. Specify the expected accessinformation and any other information such as access type, description,access owner, search terms, approval workflow, notification options, searchterms, or badges. Click Next to display the Group Membership page, orclick Finish to complete the operation without adding any members to thegroup.
d. Optional: On the Group Membership page, add members to the group, andthen click Next to display the Schedule Add Member Operation page.
e. On the Schedule Add Member Operation page, specify when to add themembers to the group, and then click Finish. The Schedule Add MemberOperation page is displayed only if you chose to add members to the groupon the Group Membership page.
Results
A page is displayed, indicating that the operation was successful. The new groupis created on the service.
What to do next
You can create another group, add or remove members for the new group, or clickClose to close the page.
If the new group is created on the ITIM Service, you can create an access controlitem to associate with this group.
Viewing group membershipYou can view members of groups.
Before you begin
Depending on how your system administrator customized your system, you mightnot have access to this task. To obtain access to this task or to have someonecomplete it for you, contact your system administrator.
Procedure
To view members of a group, complete these steps:1. From the navigation tree, click Manage Services. The Select a Service page is
displayed.2. On the Select a Service page, complete these steps:
a. Type information about the service in the Search information field.b. In the Search by field, specify whether to search against services or
business units.c. Select a service type from the Search type list.d. Select a status from the Status list, and then click Search. A list of services
that matches the search criteria is displayed.
152 IBM Security Identity Manager Version 6.0.0.18: Administration Topics

If the table contains multiple pages, you can:v Click the arrow to go to the next page.v Type the number of the page that you want to view and click Go.
3. On the Select Group page, complete these steps to view the groups that existfor the service:a. Type information about the group in the Search information field.
For ITIM service groupsIn the Search by field, specify whether the search is done againstgroup names or descriptions, or business units, and then clickSearch.
For managed resource groupsIn the Search by field, specify whether the search is done againstgroup names or descriptions, or access name. Select a type of groupfrom the Group type list, and then click Search.
A list of groups that match the search criteria is displayed.If the table contains multiple pages, you can:v Click the arrow to go to the next page.v Type the number of the page that you want to view and click Go.
4. In the Groups table, click the icon ( ) next to the group, and then clickManage Members. The Manage Members page is displayed.
5. On the Manage Members page, complete these steps:a. Type information about the user in the System account information field.b. In the Search by field, specify whether the search is done against users or
user IDs, and then click Search.
Results
A list of users that match the search criteria is displayed.
If the table contains multiple pages, you can:v Click the arrow to go to the next page.v Type the number of the page that you want to view and click Go.
What to do next
You can add or remove group membership.
Adding members to groupsYou can add members to groups.
Before you begin
Depending on how your system administrator customized your system, you mightnot have access to this task. To obtain access to this task or to have someonecomplete it for you, contact your system administrator.
Procedure
To add members to a group, complete these steps:
Chapter 8. Group administration 153

1. From the navigation tree, click Manage Services. The Select a Service page isdisplayed.
2. On the Select a Service page, complete these steps:a. Type information about the service in the Search information field.b. In the Search by field, specify whether to search against services or
business units.c. Select a service type from the Search type list.d. Select a status from the Status list, and then click Search. A list of services
that matches the search criteria is displayed.If the table contains multiple pages, you can:v Click the arrow to go to the next page.v Type the number of the page that you want to view and click Go.
3. On the Select Group page, complete these steps to view the groups that existfor the service:a. Type information about the group in the Search information field.
For ITIM service groupsIn the Search by field, specify whether the search is done againstgroup names or descriptions, or business units, and then clickSearch.
For managed resource groupsIn the Search by field, specify whether the search is done againstgroup names or descriptions, or access name. Select a type of groupfrom the Group type list, and then click Search.
A list of groups that match the search criteria is displayed.If the table contains multiple pages, you can:v Click the arrow to go to the next page.v Type the number of the page that you want to view and click Go.
4. In the Groups table, click the icon ( ) next to the group, and then click AddMembers. The Add Members page is displayed.
5. On the Add Members page, complete these steps:a. Type information about the user in the System account information field.b. In the Search by field, specify whether the search is done against users or
user IDs, and then click Search. A list of users that match the search criteriais displayed.If the table contains multiple pages, you can:v Click the arrow to go to the next page.v Type the number of the page that you want to view and click Go.
c. In the System Accounts table, select one or more users that you want toadd to the group, and then click OK. A confirmation page is displayed.
6. On the Confirm page, specify when you want the users to be added to thegroup, and then click Submit. A page is displayed, indicating that theoperation was successful.
7. On the Success page, click Close.
Results
The members are added to the group.
154 IBM Security Identity Manager Version 6.0.0.18: Administration Topics

What to do next
You can continue working with groups, add or remove more members, or viewyour request.
Removing members from groupsYou can remove members from groups.
Before you begin
Depending on how your system administrator customized your system, you mightnot have access to this task. To obtain access to this task or to have someonecomplete it for you, contact your system administrator.
Procedure
To remove members from a group, complete these steps:1. From the navigation tree, click Manage Services. The Select a Service page is
displayed.2. On the Select a Service page, complete these steps:
a. Type information about the service in the Search information field.b. In the Search by field, specify whether to search against services or
business units.c. Select a service type from the Search type list.d. Select a status from the Status list, and then click Search. A list of services
that matches the search criteria is displayed.If the table contains multiple pages, you can:v Click the arrow to go to the next page.v Type the number of the page that you want to view and click Go.
3. On the Select Group page, complete these steps to view the groups that existfor the service:a. Type information about the group in the Search information field.
For ITIM service groupsIn the Search by field, specify whether the search is done againstgroup names or descriptions, or business units, and then clickSearch.
For managed resource groupsIn the Search by field, specify whether the search is done againstgroup names or descriptions, or access name. Select a type of groupfrom the Group type list, and then click Search.
A list of groups that match the search criteria is displayed.If the table contains multiple pages, you can:v Click the arrow to go to the next page.v Type the number of the page that you want to view and click Go.
4. In the Groups table, click the icon ( ) next to the group, and then clickManage Members. The Manage Member page is displayed.
5. On the Manage Members page, complete these steps:a. Type information about the user in the System account information field.
Chapter 8. Group administration 155

b. In the Search by field, specify whether the search is done against users oruser IDs. Then, click Search. A list of users that match the search criteria isdisplayed.If the table contains multiple pages, you can:v Click the arrow to go to the next page.v Type the number of the page that you want to view and click Go.
c. In the Group Membership table, select one or more users that you want toremove from the group, and then click Remove. A confirmation page isdisplayed.
6. On the Confirm page, specify when you want the users to be removed from thegroup, and then click Remove. A page is displayed, indicating that theoperation was successful.
7. On the Success page, click Close.
Results
The members are removed from the group.
What to do next
You can continue working with groups, add or remove more members, or viewyour request.
Modifying groupsAs an administrator, you can modify the attributes of a group. These attributesdepend upon the type of service that you selected for the group.
Before you begin
Depending on how your system administrator customized your system, you mightnot have access to this task. To obtain access to this task or to have someonecomplete it for you, contact your system administrator.
Determine what expansion or limits to set on the tasks the members see, and,which access control items might also require changes.
You cannot change the predefined System Administrator group.
Procedure
To change a group, complete these steps:1. From the navigation tree, click Manage Services. The Select a Service page is
displayed.2. On the Select a Service page, complete these steps:
a. Type information about the service in the Search information field.b. In the Search by field, specify whether to search against services or
business units.c. Select a service type from the Search Type list.d. Select a status from the Status list, and then click Search. A list of services
that matches the search criteria is displayed.If the table contains multiple pages, you can:
156 IBM Security Identity Manager Version 6.0.0.18: Administration Topics

v Click the arrow to go to the next page.v Type the number of the page that you want to view and click Go.
3. On the Select Group page, to view the groups that exist for the service, type theinformation about the group in the Search information field.
For ITIM service groupsIn the Search by field, specify whether the search is done against groupname or descriptions, or business units and then click Search.
For managed resource groupsIn the Search by field, specify whether the search is done against groupnames or descriptions, or access name. Select a type of group from theGroup type list, and then click Search.
A list of groups that match the search criteria is displayed.If the table contains multiple pages, you can:v Click the arrow to go to the next page.v Type the number of the page that you want to view and click Go.
4. In the Groups table, select the group that you want to modify, and then clickChange. The Change Group page is displayed.
5. On the Change Group page, take the following actions:
ITIM service groupsTo Change the view, select the wanted view from the View menu. Typeor change a description in the Description field. When your changesare made, click OK to complete the operation.
Managed resource groupsThe fields that are displayed and that can be modified depend on thetype of remote service you selected.
Note: Although the Group ID number is a modifiable field, do notchange this number because doing so compromises system security.After you modify the information, click the Access Information tab todisplay the Access Information page, or click OK to complete theoperation without changing access information. On the AccessInformation page, you can modify the information such as access type,description, owner, search terms, approval workflow, notificationoptions, search terms, or badges. Then, click OK to complete theoperation.
Results
A page is displayed, indicating that the group change operation was successful.The changes that you made to the group are now in effect.
What to do next
On the Success page, click Close.
Values and formats for CSV access data (group)A group access CSV file can contain multiple values and supported formats.
Consider these points before you work with any CSV files for a group access:v If you use a custom label for AccessType, specify the key in the CSV file.
Chapter 8. Group administration 157

v If you use a custom label for badge text, add a $ prefix on the key. For example,$mail.
v Define multiple values for search terms and badges with a semicolon (;)separator.
v Define the AccessType hierarchy with a colon (:) separator.v Use the badgeText~badgeStyle format for badges.
Define CSV columns for a group access as follows:
Table 9. CSV fields and values. CSV fields and valuesField name Value
GROUP_DN, GROUP_NAME Not modifiable.
DEFINE_AS_ACCESS TRUE or FALSE. If you do not assign any value, then FALSE is assumed.
ACCESS_NAME Required for services and groups, and contains a maximum length of 240 characters. This field is not available for roles.
ACCESS_TYPE Required. You must specify an access type that is defined in IBM Security Identity Manager.
ACCESS_DESCRIPTION Contains a maximum length of 240 characters.
ICON_URL Provide a valid icon URL value on the access definition.
SEARCH_TERMS Each search term contains a maximum length of 80 characters. You can have multiple search terms.
ADDITIONAL_INFORMATION Contains a maximum length of 1024 characters.
BADGES The maximum length for each badge text is 512 characters. You can have multiple badges. The badge text that is prefixedwith a $ sign cannot contain delimiter characters such as ., ;, =, or white space.
A group access CSV file for an export or import operation in the IBM SecurityIdentity Manager administration console contains these columns with samplevalues and supported formats:
Table 10. Part 1 of 2: Group access CSV file values, formatsGROUP_NAME DEFINE_AS_ACCESS ACCESS_NAME ACCESS TYPE ACCESS_DESCRIPTION ICON_URL
admin FALSE Access Application:Group This access is for the admingroup.
http://www-03.ibm.com/ibm/history/exhibits/logo/images/920911.jpg
AIX Group TRUE AIX Group AccessGroup This access is for the AIXgroup.
/itim/ui/custom/ui/images/homepage/RequestAccess.png
Default Group TRUE default access EmailGroup:Department:Location This access is a default groupaccess.
http://www-03.ibm.com/ibm/history/exhibits/logo/images/920911.jpg
Table 11. Part 2 of 2: Group access CSV file values, formatsGROUP_NAME SEARCH_TERMS ADDITIONAL_INFORMATION BADGES SERVICE_DN
admin Group;Group access Group that is used by a client user. $highrisk~red erglobalid=5628670506891199803,ou=groups,erglobalid=000000
AIX Group Employee;Group;AccessGroup Used by the customer to deploy server. Group~yellow erglobalid=5628669752130902869,ou=groups,erglobalid=000000
Default Group Mail;Unique ID BVT server that is used to run BVTfrom developer and tester.
$mailer~yellow;highrisk~red erglobalid=5628670337030215245,ou=groups,erglobalid=000000
Exporting access data for a groupExport the access data for a group in a comma-separated value (CSV) file formatby using the IBM Security Identity Manager Console.
Before you begin
Depending on how your system administrator customized your system, you mightnot have access to this task. To obtain access to this task or to have someonecomplete it for you, contact your system administrator.
Before you export a group, you must have ACI privileges for Define Access andSearch Operations on the group that you want to view. If the necessary privilegesdo not exist, then the group is not exported.
The Export Access Data button is not active until you select some group accessesto activate it. Only the group access that you selected is exported as access data.
158 IBM Security Identity Manager Version 6.0.0.18: Administration Topics

About this task
Export the selected group access data in a CSV file format for your requirements.
Procedure1. From the navigation tree, select Manage Groups. The Select Group page is
displayed.2. On the Select Group page, in the Groups table, click Export Access Data. The
Export access data page is displayed. After you submit the export request, aprocess status indicates the advancement of the export operation.
3. Optional: Click Cancel to discontinue the export operation.4. Click Download Exported File to download the CSV file on your local system
by using your web browser settings. The exported CSV file contains all thegroup access data.
Note: Click Download Export Log File to view any error or log informationabout the export operation. This button is displayed only if the submittedexport operation contains any log information or encountered any errors.
Results
The exported CSV file contains all the access data for a group. Click Close to exitfrom the Export access data page.
What to do next
Import access data for a group, or you can continue to export access data byclicking Export Access Data in the Select Group page.
Importing access data for a groupUse the IBM Security Identity Manager Console to import the group access datafrom a comma-separated value (CSV).
Before you begin
Depending on how your system administrator customized your system, you mightnot have access to this task. To obtain access to this task or to have someonecomplete it for you, contact your system administrator.
The privileged user that uploads the CSV file must have the appropriatepermissions.
Before you import a group, you must have ACI privileges for Search, DefineAccess, and Modify Operations on the group that you want to update. If thenecessary privileges do not exist, then the group is not imported.
Before you import a CSV file, verify that the CSV-related conventions are met.They are as follows:v The access type hierarchy is represented in the following format, and each access
type be separated by a colon (:). For example:AccessType1:AccessType2
v The badge information is provided in the following format. For example:badgeText~badgeStyle
Chapter 8. Group administration 159

v Multiple badges can be assigned to accesses in the following format, and eachbadge must be separated by a semicolon (;). For example:Badge1~red;Badge2~green
v Multiple search terms and access types can be specified by using the semicolon(;) separator.
v The relevant keys must be provided in the CSV file for the customized labelsthat are related to badges and access types.
About this task
Only the accesses with the Define as Access set to True are defined as accesses,and the corresponding data is imported.
Procedure1. From the navigation tree, select Manage Groups. The Select Group page is
displayed.2. On the Select Group page, in the Groups table, click Import Access Data. The
Import access data page is displayed.3. Click Browse in File to Upload (.CSV) to locate and upload a valid CSV file
that contains all the access data for a group.4. Click Import to import the CSV file. After you submit the import request, a
process status indicates the advancement of the import operation.
Note: If you click Import with an invalid file format, a message is displayed toinform you that the file format is not valid.If any problems occur when you are importing a CSV file, then close theImport access data page to continue working with the IBM Security IdentityManager Console. The problems might be due to one of the followingconditions:v The access data CSV file does not exist.v The CSV file was renamed.v The CSV file does not contain appropriate separators or delimiters.
5. Optional: Click Cancel to discontinue the import operation.
Note: Click Download Import Log File to view any error or log informationabout the import operation. This button is displayed only if the submittedimport operation contains any log information or encountered any errors.
Results
The imported CSV file contains all the access data for a group. Click Close to exitfrom the Import access data page.
What to do next
Export access data for a group, or you can continue to import access data byclicking Import Access Data in the Select Group page.
Deleting groupsYou can delete groups from an ITIM service or from a managed resource.
160 IBM Security Identity Manager Version 6.0.0.18: Administration Topics

Before you begin
Depending on how your system administrator customized your system, you mightnot have access to this task. To obtain access to this task or to have someonecomplete it for you, contact your system administrator.
Before you delete a group, remove the members from the group, and remove thereference to the group from provisioning policy entitlement parameters.
About this task
You cannot delete a group that has members. If you delete a group that isreferenced by provisioning policies, you must remove those references from theprovisioning policy parameters. Otherwise, those references might generatewarnings for the affected accounts. For ITIM Service groups, members who arelogged on during removal from a group continue to have their current tasks. Thechange in group membership takes effect at the next logon.
Procedure
To delete a group, complete these steps:1. From the navigation tree, click Manage Services. The Select a Service page is
displayed.2. On the Select a Service page, complete these steps:
a. Type information about the service in the Search information field.b. In the Search by field, specify whether to search against services or
business units.c. Select a service type from the Search type list.d. Select a status from the Status list, and then click Search. A list of services
that matches the search criteria is displayed.If the table contains multiple pages, you can:v Click the arrow to go to the next page.v Type the number of the page that you want to view and click Go.
3. On the Select Group page, complete these steps to view the groups that existfor the service:a. Type information about the group in the Search information field.
For ITIM service groupsIn the Search by field, specify whether the search is done againstgroup names or descriptions, or business units, and then clickSearch.
For managed resource groupsIn the Search by field, specify whether the search is done againstgroup names or descriptions, or access name. Select a type of groupfrom the Group type list and then click Search.
A list of groups that match the search criteria is displayed.If the table contains multiple pages, you can:v Click the arrow to go to the next page.v Type the number of the page that you want to view and click Go.
4. In the Groups table, select one or more groups that you want to delete, andthen click Delete. A confirmation page is displayed.
Chapter 8. Group administration 161
5. On the Confirm page, click Delete. A page is displayed, indicating that thedelete operation was successful.
Results
The group is deleted from the service.
What to do next
You can continue working with groups, or click Close.
Defining access on a groupDefine an access to be associated with the group.
Before you begin
Depending on how your system administrator customized your system, you mightnot have access to this task. To obtain access to this task or to have someonecomplete it for you, contact your system administrator.
Before you can display groups or access on a service in IBM Security IdentityManager, you must create a service instance. In addition, you must do asupporting data reconciliation on that service.
About this task
This task enables the service owner to define access information for a group.
Procedure
To display the groups or access on a service instance, complete these steps:1. From the navigation tree, click Manage Services. The Select a Service page is
displayed.2. On the Select a Service page, complete these steps:
a. Type information about the service in the Search information field.b. In the Search by field, specify whether to search against services or
business units.c. Select a service type from the Search type list.d. Select a status from the Status list, and then click Search. A list of services
that matches the search criteria is displayed.If the table contains multiple pages, you can:v Click the arrow to go to the next page.v Type the number of the page that you want to view and click Go.
3. On the Select Group page, to view the groups that exist for the service, type theinformation about the group in the Search information field. In the Search byfield, specify whether to search against group names or descriptions, or accessname. Select a type of group from the Group type list, and then click Search.A list of groups that matches the search criteria is displayed.If the table contains multiple pages, you can:v Click the arrow to go to the next page.v Type the number of the page that you want to view and click Go.
162 IBM Security Identity Manager Version 6.0.0.18: Administration Topics

4. In the Groups table, select the group for which you want to define an accessand then click Change. The Change Group page is displayed.
5. On the General Information page, complete these steps:a. Click the Access Information tab to display the Access Information page.b. Select the Define an Access check box to activate the access description
fields.c. Select the radio button for the type of access you want to enable.d. Specify an access name in the Access name field.e. Specify other information such as icon url, search terms, or badges.f. When you are finished, click OK.
Results
A page is displayed, indicating that the group change operation was successful.The access information is added to the group object and stored in the SecurityIdentity Manager LDAP server. If the access is enabled, the user can search andrequest the access.
If the table contains multiple pages, you can:v Click the arrow to go to the next page.v Type the number of the page that you want to view and click Go.
What to do next
On the Success page, click Close.
or you can select to:v Manage groups on a different servicev Return to the list of groups that you were working with
Configuring access catalog information for a groupConfigure the access catalog information for a group in the Administrator Consoleso you can use it in the Identity Service Center Request Access workflow.
Before you begin
Depending on how your system administrator customized your system, you mightnot have access to this task. To obtain access to this task or to have someonecomplete it for you, contact your system administrator.
You must create a service instance before you can configure the access cataloginformation for a group in IBM Security Identity Manager.
You can also configure the access catalog information for an existing group.
About this task
Configure the access information for a group by defining certain accesses with theuse of a badge. You can highlight certain accesses with badges by attaching textthat contains some formatting such as color and font type.
Chapter 8. Group administration 163

Procedure
To configure the group access information, complete these steps:1. From the navigation tree, click Manage Groups. The Select a Service page is
displayed.2. On the Select a Service page, complete these steps:
a. Type information about the service in the Search information field.b. In the Search by field, specify whether to search against services or
business units.c. Select a service type from the Search type list.d. Select a status from the Status list, and then click Search. A list of services
that matches the search criteria is displayed.If the table contains multiple pages, you can:v Click the arrow to go to the next page.v Type the number of the page that you want to view and click Go.
3. Specify appropriate values in the corresponding tabbed pages4. On the Access Information page, complete these steps to configure the access
information:a. Select the Enable access for this group check box.b. Specify the name, access type, access description, owner, approval,
notification options for the group.You can also specify the icon for the access, search terms, additionalinformation, and badges which are used in the Identity Service CenterRequest Access.
c. Expand the Select access type or the Change access type tree to select anaccess type. The tree label depends on whether you want to create ormodify a service.
d. Provide a uniform resource identifier (URI) string in the Icon URL field forthe access icon.
e. Specify search strings in the Search terms field to return specific searchterms. Add or delete the search terms to suit your requirements.
f. Specify any free form information about the access item in the Additionalinformation field.
g. Expand the Badges section to specify the badges that are associated withthe role.v Specify a badge text in the Badge text field.v Assign a class from the Badge class list for the badge text.
You can see the preview of your badge specifications in the Preview area.5. Depending on whether you created or modified the group access information,
click OK or Finish when you are done.
Results
The access information is added or updated to the group object and stored in theSecurity Identity Manager LDAP server.
What to do next
On the Success page, click Close. You can also do the following actions:v Manage groups on a different service
164 IBM Security Identity Manager Version 6.0.0.18: Administration Topics

v Return to the list of groups that you were working withv Create another group, add, or remove members for the new groupv Create an access control item to associate with this group if the new group is
created on the Security Identity Manager service.
Recertifying access on a groupRecertify an access to be associated with the group.
Before you begin
Depending on how your system administrator customized your system, you mightnot have access to this task. To obtain access to this task or to have someonecomplete it for you, contact your system administrator.
Before you can recertify access on a group in IBM Security Identity Manager, youmust create a service instance. In addition, you must do a supporting datareconciliation on that service.
About this task
This task allows the service owner to view the recertification status of user accessfor the selected group. This task also allows the service owner to overwrite therecertification status for access that is either Never Certified or Rejected.
Procedure
To recertify access on a group, complete these steps:1. From the navigation tree, click Manage Services. The Select a Service page is
displayed.2. On the Select a Service page, complete these steps:
a. Type information about the service in the Search information field.b. In the Search by field, specify whether to search against services or
business units.c. Select a service type from the Search type list.d. Select a status from the Status list, and then click Search. A list of services
that matches the search criteria is displayed.If the table contains multiple pages, you can:v Click the arrow to go to the next page.v Type the number of the page that you want to view and click Go.
3. Type information about the group in the Search information field. In theSearch by field, specify whether to search against group names or descriptions,or access name, select a type of group from the Group type list, and then clickSearch. A list of groups that matches the search criteria is displayed.If the table contains multiple pages, you can:v Click the arrow to go to the next page.v Type the number of the page that you want to view and click Go.
4. In the Groups table, click the icon ( ) next to the group for you want tomanage, and then click Access Recertification Status. The AccessRecertification Status page is displayed.
Chapter 8. Group administration 165

5. In the Access Recertification Status table, select the check box next to theaccess that you want to recertify, and then click Recertify. Selecting the checkbox at the top of this column selects all accesses. A confirmation page isdisplayed.
Results
A list of groups or access that matches the search criteria is displayed. After therecertify operation is complete, the access in the list is marked as Certified.
If the table contains multiple pages, you can:v Click the arrow to go to the next page.v Type the number of the page that you want to view and click Go.
What to do next
Perform a task on the items in the Groups table, or click Close. When the Select aService page is displayed, click Refresh to refresh the Services table.
Enabling automatic group membershipYou can set whether automatic membership occurs in a service owner or managergroup.
Before you begin
Depending on how your system administrator customized your system, you mightnot have access to this task. To obtain access to this task or to have someonecomplete it for you, contact your system administrator.
About this task
You can use the Set Security Properties page to automatically put the IBM SecurityIdentity Manager accounts of newly named service owners or managers in theirgroups.
To create a group, complete these steps:
Procedure1. From the navigation tree, select Set System Security > Set Security Properties.2. On the Set Security Properties page, in the Group Settings section, select the
Automatically populate Identity Manager groups check box, and then clickOK. A page is displayed, indicating that the operation was successful.
Results
The automatic action is enabled or disabled immediately. If it is enabled, theSecurity Identity Manager accounts of newly named managers are placed in thedefault Managers group.
You do not need to restart the Security Identity Manager Server.
What to do next
On the Success page, click Close.
166 IBM Security Identity Manager Version 6.0.0.18: Administration Topics

Chapter 9. Report administration
IBM Security Identity Manager provides reports for system activity, resources suchas accounts that users own, and historical data.
Overview
A report is a summary of IBM Security Identity Manager activities and resources.You can generate reports based on requests, user and accounts, services, or auditand security. You can also design custom reports with the report designer.
Report data is staged through a data synchronization process. The process gathersdata from the IBM Security Identity Manager directory information store andprepares it for the reporting engine. Data synchronization can be run on demand,or it can be scheduled to occur regularly.
The generated reports are based on the most recent data synchronization, not oncurrent data. Activities that occur after the last data synchronization was done arecaptured by the next data synchronization. Data in the reports is obtained from theIBM Security Identity Manager database and the directory server.
Access control is available for report management. There are default ACIs for theManager, Service Owner, and Auditor groups. For example, service owners andmanagers can search for all persons that they can access. Managers can see directreports, and service owners can see people on services controlled by ACIs.Auditors can run all reports and see all data. No report access is available for usersor members of the Help Desk group.
To generate a report, you must synchronize data at least one time. The report datais based on the most recent data synchronization and is only as accurate as thereport data from that synchronization.
Reports are displayed in a separate window; therefore, you must disable pop-upblocking in your browser in order for the reports to be displayed. When yougenerate a report, be sure to close the report window in your browser before yougenerate another report. If you do not close the open report window beforegenerating another report, a message displays, instructing you to close the window.Or, the same report might be displayed if it was cached by the browser.
Note: Complex report structures and report query requirements mandate thatrecertification reports are implemented in Java code rather than in StructuredQuery Language (SQL). Complex structures include Recertification History,Accounts/Access Pending Recertification and Recertification Policies reports.
Report formats
You can generate reports as a PDF file or as a comma-separated value (CSV) file.By default, reports are generated in PDF format and can be viewed and printedwith the Adobe Acrobat Reader. In some cases, PDF formatting produces anadditional blank page at the end of the report, which does not indicate that data ismissing. You might select a CSV file for the report output. The report is displayed
167

with the application that is mapped to CSV files (for example, Microsoft Excel). Ifno application is associated with the CSV file type, you are prompted to open orsave the file when the report is created.
A PDF report, by default, can contain up to 5000 records. You can change thisvalue with the enrole.ui.report.maxRecordsInReport property in theUI.properties file. You do not have to restart the server for the changes to takeeffect. Changes can occur between 30 seconds and 10 minutes. You can increasethis value to obtain larger amounts of data in your reports. However, it is possiblethat you might encounter an OutOfMemoryError error by doing so. If this erroroccurs, increase the application server heap size in the WebSphere ApplicationServer and restart IBM Security Identity Manager.
Report accessibilityThe Security Identity Manager reports are accessible in the PDF format.
IBM Cognos reporting frameworkSecurity Identity Manager version 6.0 provides the Cognos® reporting frameworkto create and analyze reports. You can modify the schema and generate reports indifferent formats.
Note:
Security Identity Manager version 6.0.0.6 supports IBM Cognos BusinessIntelligence Server, version 10.2.1 as well as version 10.2.2. By default, the SecurityIdentity Manager version 6.0.0.6 report package is packaged with IBM CognosBusiness Intelligence Server, version 10.2.1.
Reports in the IBM Cognos Business Intelligence Server, version 10.2.1 can run inthe IBM Cognos Business Intelligence Server, version 10.2.2. However, if you workwith IBM Cognos Business Intelligence Server, version 10.2.2, the compatibilitywith an earlier versions of IBM Cognos Business Intelligence Server is notsupported. For more information about installation and configuration of IBMCognos Business Intelligence Server, version 10.2.2, see http://www.ibm.com/support/knowledgecenter/SSEP7J_10.2.2/com.ibm.swg.ba.cognos.cbi.doc/welcome.html?.
Note: Cognos reporting does not support Microsoft SQL Server database. Use DB2database or Oracle database instead.
The IBM Cognos reporting framework includes the following items:
Reporting modelRepresents the business view of Security Identity Manager data. You canuse the models to customize and generate different types of reports thatsuit your requirements.
Static reportsReady-to-use reports that are bundled with the Security Identity Managerreporting packages.
IBM Cognos reporting framework overviewIBM Security Identity Manager Cognos reporting framework customizes the IBMSecurity Identity Manager reports to your specifications.
168 IBM Security Identity Manager Version 6.0.0.18: Administration Topics
http://www.ibm.com/support/knowledgecenter/SSEP7J_10.2.2/com.ibm.swg.ba.cognos.cbi.doc/welcome.html?

This document provides the following information about the IBM Security IdentityManager Cognos report model:v Prerequisite installation and configuration tasks for the report models.v Detailed description of the Recertification, Accounts, Provisioning, Roles,
Separation of duty, Users, Services, and Access models. The descriptionsinclude the namespaces, query subjects, and query items.
v Types of static reports that are created with the report model.v References for mapping the attributes and entities, the common tasks for
configuring any IBM Cognos report model, or scenario that describes how tocustomize the report.
IBM Cognos reporting componentsThe topic describes IBM Cognos 10.2.1 Fix Pack 1 reporting components that youmight use while you work with IBM Security Identity Manager Cognos reportmodels.
Query StudioQuery Studio is the reporting tool for creating simple queries and reportsin IBM Cognos Business Intelligence. To use Query Studio effectively, youmust be familiar with your organization's business and its data. You mightalso want to be familiar with other components of IBM Cognos BusinessIntelligence.
Report StudioReport Studio is a Web-based report authoring tool that professional reportauthors and developers use to build sophisticated, multiple-page,multiple-query reports against multiple databases. With Report Studio, youcan create any reports that your organization requires, such as invoices,statements, and weekly sales and inventory reports.
Your reports can contain any number of report objects, such as charts,crosstabs, lists, and also non-BI components such as images, logos, and liveembedded applications that you can link to other information.
IBM Cognos ConnectionIBM Cognos Connection is the portal to IBM Cognos software. IBMCognos Connection provides a single access point to all corporate dataavailable in IBM Cognos software.
You can use IBM Cognos Connection to create and run reports and cubesand distribute reports. You can also use it to create and run agents andschedule entries.
Framework ManagerFramework Manager is a metadata modeling tool that drives querygeneration for IBM Cognos software. A model is a collection of metadatathat includes physical information and business information for one ormore data sources.
IBM Cognos software enables Performance Management on normalizedand denormalized relational data sources and various OLAP data sources.When you add security and multilingual capabilities, one model can servethe reporting, ad hoc querying, and analysis needs of many groups ofusers around the globe.
Before you do anything in IBM Cognos Framework Manager, you mustthoroughly understand the reporting problem that you want to solve.
Chapter 9. Report administration 169

Prerequisites for IBM Cognos report serverSecurity Identity Manager 6.0.0.10 supports IBM Cognos Business IntelligenceServer, version 10.2.1 Fix Pack 1 as well as IBM Cognos Business IntelligenceServer, version 10.2.2.
You must install the software in the following table to work with IBM SecurityIdentity Manager Cognos reports.
Table 12. Software requirements for IBM Cognos report server
Software For more information, see
IBM Cognos Business Intelligence Server,version 10.2.1 Fix Pack 1
1. Access the IBM Cognos BusinessIntelligence documentation athttp://pic.dhe.ibm.com/infocenter/cbi/v10r2m1/index.jsp.
2. Search for Business IntelligenceInstallation and Configuration Guide10.2.1.
3. Search for the installation informationand follow the procedure.
IBM Cognos Business Intelligence Server,version 10.2.2
1. Access the IBM Cognos BusinessIntelligence documentation athttp://www.ibm.com/support/knowledgecenter/SSEP7J_10.2.2/com.ibm.swg.ba.cognos.cbi.doc/welcome.html.
2. Search for Business IntelligenceInstallation and Configuration Guide10.2.2.
3. Search for the installation informationand follow the procedure.
Web server 1. Access the IBM Cognos BusinessIntelligence documentation athttp://www.ibm.com/support/knowledgecenter/SSEP7J_10.2.1/com.ibm.swg.ba.cognos.cbi.doc/welcome.html.
2. In the right pane of the home page,under Supported hardware andsoftware section, click Supportedsoftware environments 10.2.1.
3. Click 10.2.1 tab.
4. Click Software in the Requirements bytype column under the section IBMCognos Business Intelligence 10.2.1.
5. Click the Web Servers in the SupportedSoftware tab.
Note: Follow the same procedure for IBMCognos Business Intelligence, version 10.2.2by replacing the version number.
170 IBM Security Identity Manager Version 6.0.0.18: Administration Topics
Table 12. Software requirements for IBM Cognos report server (continued)
Software For more information, see
Data sources 1. Access the IBM Cognos BusinessIntelligence documentation athttp://www.ibm.com/support/knowledgecenter/SSEP7J_10.2.1/com.ibm.swg.ba.cognos.cbi.doc/welcome.html.
2. In the right pane of the home page,under Supported hardware andsoftware section, click Supportedsoftware environments 10.2.1.
3. Click 10.2.1 tab.
4. Click Software in the Requirements bytype column under the section IBMCognos Business Intelligence 10.2.1.
5. Click the Data Sorces in the SupportedSoftware tab.
Note: Follow the same procedure for IBMCognos Business Intelligence, version 10.2.2by replacing the version number.
Note: Optionally, you can install IBM Framework Manager, version 10.2.1 Fix Pack1 if you want to customize the reports or models.
Note:
Security Identity Manager version 6.0.0.10 report package is packaged with IBMCognos Business Intelligence Server, version 10.2.1 Fix Pack 1 as well as IBMCognos Business Intelligence Server, version 10.2.2. By default, the Security IdentityManager version 6.0.0.10 uses the IBM Cognos Business Intelligence Server, version10.2.1 Fix Pack 1.
Reports in the IBM Cognos Business Intelligence Server, version 10.2.1 Fix Pack 1can run in the IBM Cognos Business Intelligence Server, version 10.2.2. However, ifyou work with IBM Cognos Business Intelligence Server, version 10.2.2, thecompatibility with an earlier versions of IBM Cognos Business Intelligence Serveris not supported. For more information about installation and configuration of IBMCognos Business Intelligence Server, version 10.2.2, see http://www.ibm.com/support/knowledgecenter/SSEP7J_10.2.2/com.ibm.swg.ba.cognos.cbi.doc/welcome.html?.
Installation of IBM Cognos reporting componentsInstallation of IBM Cognos reporting components is optional. You need thesecomponents only if you use the Cognos based reports. You must complete theinstallation and data synchronization process before you can access and work withIBM Security Identity Manager Cognos reports.
Note: IBM Cognos reporting does not support Microsoft SQL Server database ascontent store. Use DB2 database or Oracle database instead.
The following table describes the installation and synchronization process.
Chapter 9. Report administration 171
http://www.ibm.com/support/knowledgecenter/SSEP7J_10.2.2/com.ibm.swg.ba.cognos.cbi.doc/welcome.html?

Table 13. Installation and data synchronization process
Task For more information
Install Cognos BusinessIntelligence.
1. Access http://www.ibm.com/support/knowledgecenter/SSEP7J_10.2.1/com.ibm.swg.ba.cognos.cbi.doc/welcome.html.
2. Search for Install Cognos BI on one computer.
Install Framework Manager. 1. Access http://www.ibm.com/support/knowledgecenter/SSEP7J_10.2.1/com.ibm.swg.ba.cognos.cbi.doc/welcome.html.
2. Search for Installing Framework Manager.
Complete the datasynchronization.
See “Data synchronization” on page 314.Note: Run the data synchronization before yougenerate the reports to obtain the latest report data.
Cognos reporting
Security Identity Manager Version 6.0 fix pack 6 installs Cognos reports andmodels. To use these new reports and models, see the Cognos reportingdocumentation at IBM Cognos Business Intelligence documentation.
You can find the Cognos reports and models that are specific to Security IdentityManager at:v <isim_home>/extensions/6.0/Cognos/Model/ISIMReportingModel_6.0.0.6.zip
v <isim_home>/extensions/6.0/Cognos/Reports/ISIMReportingPackage_6.0.0.6.zip
Note: You must set the locale to English or to any supported language before yourun any of the reports. See “Setting language preferences” on page 183. Otherwise,you might encounter a "Language not supported" issue.
Configuration of IBM Cognos reporting componentsAfter you install the prerequisites for the IBM Security Identity Manager CognosBusiness Intelligence server, configure the Framework Manager, and create acontent store database. Then, configure the web gateway and web server.
During the database configuration process, ensure that you complete the points inthe following note.
Note:
v IBM Cognos reporting does not support Microsoft SQL Server database ascontent store. Use DB2 database or Oracle database instead.
v Set the JAVA_HOME environment variable to point to the JVM used by theapplication server.
v You must use the enterprise database as IBM Cognos content store.v Delete the existing data source and create a new data source to enable an option
of generating DDL during creation of the content store database. For informationabout data source creation, see “Creating a data source” on page 175.
The following table describes the configuration process.
172 IBM Security Identity Manager Version 6.0.0.18: Administration Topics

Each step requires that you search in the Knowledge Center for IBM CognosBusiness Intelligence, which is at http://www.ibm.com/support/knowledgecenter/SSEP7J_10.2.1/com.ibm.swg.ba.cognos.cbi.doc/welcome.html
Table 14. Configure IBM Cognos reporting components
Task For more information
Configure Framework Manager. Search for Configuring FrameworkManager on a 64-bit computer.
Create a content store in the database. Search for Start IBM Cognos Configuration,complete the steps as per your operatingsystem, then search for Create a contentstore database.
Configure the web gateway. Search for Configure the gateway.
Configure your web server. Search for Configure your web server..
Setting report server execution modeYou must have a report server execution mode that is set to 32-bit mode for thereport packages that do not use dynamic query mode.
Procedure1. Start IBM Cognos Configuration.2. In the Explorer panel, click Environment.3. Click the Value box for Report server execution mode.4. Select 32-bit.5. From the File menu, click Save.
What to do next
Restart the IBM Cognos service. Complete the following steps:1. Access the IBM Cognos Business Intelligence documentation at
http://www.ibm.com/support/knowledgecenter/SSEP7J_10.2.1/com.ibm.swg.ba.cognos.cbi.doc/welcome.html.
2. Search for Restarting the IBM Cognos service to apply configuration settings.
Setting environment variablesYou must set the database environment variables for a user before you start theIBM Cognos processes.
Procedure1. Access the IBM Cognos Business Intelligence documentation at
http://www.ibm.com/support/knowledgecenter/SSEP7J_10.2.1/com.ibm.swg.ba.cognos.cbi.doc/welcome.html.
2. Search for Database environment variables.
What to do next
Start the Cognos service from IBM Cognos Configuration to host the IBM Cognosportal. Complete the following steps:1. Access the IBM Cognos Business Intelligence documentation at
http://www.ibm.com/support/knowledgecenter/SSEP7J_10.2.1/com.ibm.swg.ba.cognos.cbi.doc/welcome.html.
2. Search for Starting or stopping the Cognos service.
Chapter 9. Report administration 173

Editing the ISIM Environment dashboard refresh intervalYou can edit the refresh interval for your software deployment depending on therequirements of your organization.
Procedure1. Open the ISIM Environment Dashboard in the Report Studio.2. Navigate to the Page explore tab in the Report Studio.3. Open the ISIM Environment Dashboard page.4. Look for the <HTML Item> highlighted on the page.5. Double click to edit the page. Specify the interval in seconds and save the
report.
What to do next
You must do the similar task for the dashboard sub report which contains moredashboard details.
Note: All the sub reports are hidden by default. To view all the hidden reports:1. Open the Cognos connection portal.2. Select My Area > My Preferences.3. Select Show hidden entries.
Importing the report packageImport the report package to work with the bundled report models and the staticreports.
Before you beginv Copy the ISIMReportingPackage_6.0.0.6.zip file to the directory where your
deployment archives are saved. The default location is 10_location/deployment.For more information about the reporting packages, see “Installation of IBMCognos reporting components” on page 171.
v To access the Content Administration area in IBM Cognos Administration, youmust have the required permissions for the administration tasks secured feature.
Procedure1. Access the IBM Cognos Gateway URI. For example, https://hostname:port/
ibmcognos/cgi-bin/cognos.cgi. The localhost is the IP address or network hostname where IBM Cognos gateway is configured. The portnumber is the port onwhich the IBM Cognos gateway is configured.
2. Go to Launch.3. In the IBM Cognos Administration window, click the Configuration tab.4. Click Content Administration.5. Clear the history.6. On the toolbar, click New Import icon. The New Import wizard opens.7. In the Deployment Archive box, select ISIMReportingPackage_6.0.0.6.8. Click Next.9. In the Specify a name and description window, you can add the description
and screen tip.10. Click Next.
174 IBM Security Identity Manager Version 6.0.0.18: Administration Topics

11. In the Select the public folders and directory content window, select themodel that is displayed.
12. In the Specify the general options page, select whether to include accesspermissions and references to external namespaces, and an owner for theentries after they are imported.
13. Click Next. The summary information opens.14. Review the summary information. Click Next.15. In the Select an action page, click Save and run once.16. Click Finish.17. Specify the time and date for the run.18. Click Run.19. Review the run time. Click OK.20. When the import file operation is submitted, click Finish.
Results
You can now use the report package to create reports and to run the samplereports. The sample reports are available in the reporting model on the PublicFolders tab in the IBM Cognos portal.
Creating a data sourceTo work with the IBM Security Identity Manager Cognos reports, you must createa data source.
Before you beginv You must use the data source name as ISIM.v If you are working with DB2 database client, copy the file db2cli.dll from the
DB2 client installation directory to the <IBM Cognos installationdirectory>/bin folder.
v The data source must be pointed to the IBM Security Identity Managerenterprise database. For example, IBM DB2. After the data synchronization, thedata is in the IBM Security Identity Manager enterprise database.
Procedure1. Access the IBM Cognos Business Intelligence documentation at
http://www.ibm.com/support/knowledgecenter/SSEP7J_10.2.1/com.ibm.swg.ba.cognos.cbi.doc/welcome.html.
2. Search for Creating a data source and complete the steps.
What to do next
Note: Corrupted attribute names are displayed in the reports for Arabic, Chinese,Hebrew, Japanese, Korean, and Russian languages. Double-byte character set (DBCS)characters appear to be corrupted in the reports. Edit the data source so that thedata flow is in Unicode format. Complete the following steps:1. On the Work with Reports page, click Launch > IBM Cognos Administration.2. Click Configuration to open the data source connection.3. Click ISIM.4. Under the Actions column, click Set properties-ISIM.5. On the Set properties-ISIM window, click Connection.
Chapter 9. Report administration 175

6. In the Connection String field, click the pencil symbol to edit the connectionstring.
7. In the Collation Sequence field, type @UNICODE.8. Click OK.9. Run the report to verify that the text is no longer corrupted.
Enabling the drill-through for PDF formatYou must enable the drill-through functionality to run the drill-through reports inthe PDF format.
Before you begin
Disable any pop-up blocking software in the browser.
Procedure1. Open IBM Cognos Configuration.2. Specify the fully qualified domain name for all the URIs that are defined.3. Save the configuration.4. Restart the IBM Cognos service. Complete the following steps:
a. Access the IBM Cognos Business Intelligence documentation athttp://www.ibm.com/support/knowledgecenter/SSEP7J_10.2.1/com.ibm.swg.ba.cognos.cbi.doc/welcome.html.
b. Search for Restarting the IBM Cognos service to apply configurationsettings.
5. In the Explorer window, click Environment.6. In the Group Properties window, copy the value in the Gateway URI box.7. Paste the copied Gateway URI value in the supported browser.8. Run the report that you want.
Results
The drill-through report is run successfully in the PDF format.
Security layer configuration around the data model andreports
An access to the data model and reports can be restricted to a set of authorizationroles. The users can create the authorization roles and associate them with thereporting entities. Only entitled users can access the data model or reports.
Authentication and authorization for IBM Cognos reportsIBM Cognos Business Intelligence administrators can set up the folders that storethe reports. They can then secure those folders so that only authorized users canview, change, or perform other tasks by using the reports in the folder. To set upaccess control on the reports, administrators can set up the user authentication anddefine the access control for the set of users.
User authentication setup by using LDAPYou can configure IBM Cognos 10.2.1 Fix Pack 1 components to use an LDAPnamespace for authentication when the users are in an LDAP user directory.
176 IBM Security Identity Manager Version 6.0.0.18: Administration Topics

Configuring an LDAP Namespace for IBM Directory Server:
If you configure a new LDAP namespace for use with the IBM Directory Server,you must modify the necessary settings and change the values for all properties ofthe IBM Directory objects.
Procedure
1. Open IBM Cognos Configuration.2. In the Explorer window, under Security, right-click Authentication.3. Click New resource > Namespace.4. In the Name box, type a name for your authentication namespace.5. In the Type list, click LDAP-General default values.6. Click OK. The new authentication namespace resource appears in the Explorer
window, under the Authentication component.7. In the Properties window, for the Namespace ID property, specify a unique
identifier for the namespace.
Tip: Do not use colons (:) in the Namespace ID property.For Host and Port, specify <Hostname>:<port>. For example, localhost:389.
8. Specify the values for all other properties to ensure that IBM Cognos 10.2.1Fix Pack 1 can locate and use your existing authentication namespace.v For Base Distinguished Name, specify the entry for a user search.v For User lookup, specify (uid=${userID}).v For Bind user DN and password, specify cn=root. For example, cn=root as
a user name and secret as a password.
Note: Specify the values if you want an LDAP authentication provider tobind to the directory server by using a specific bind user DN and password.If no values are specified, an LDAP authentication namespace binds asanonymous.
9. If you do not use external identity mapping, use bind credentials to search anLDAP directory server. Complete the following items.v Set Use external identity to False.v Set Use bind credentials for search to True.v Specify the user ID and password for Bind user DN and password.
10. To configure an LDAP advanced mapping properties, see the values that arespecified in the following table.
Table 15. LDAP advanced mapping values
Mappings LDAP property LDAP value
Folder Object class organizationalunit, organization, and container
Description description
Name ou, o, and cn
Group Object class groupofnames
Description description
Member member
Name cn
Account Object class inetorgperson
Chapter 9. Report administration 177
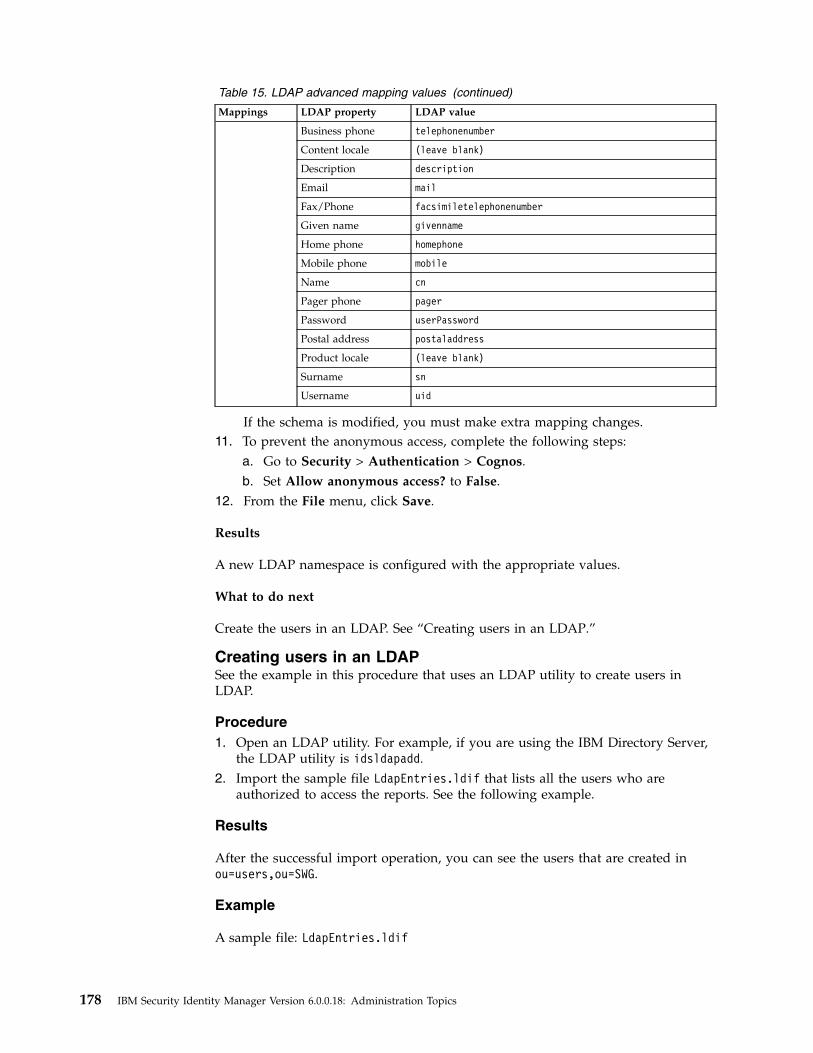
Table 15. LDAP advanced mapping values (continued)
Mappings LDAP property LDAP value
Business phone telephonenumber
Content locale (leave blank)
Description description
Email mail
Fax/Phone facsimiletelephonenumber
Given name givenname
Home phone homephone
Mobile phone mobile
Name cn
Pager phone pager
Password userPassword
Postal address postaladdress
Product locale (leave blank)
Surname sn
Username uid
If the schema is modified, you must make extra mapping changes.11. To prevent the anonymous access, complete the following steps:
a. Go to Security > Authentication > Cognos.b. Set Allow anonymous access? to False.
12. From the File menu, click Save.
Results
A new LDAP namespace is configured with the appropriate values.
What to do next
Create the users in an LDAP. See “Creating users in an LDAP.”
Creating users in an LDAPSee the example in this procedure that uses an LDAP utility to create users inLDAP.
Procedure1. Open an LDAP utility. For example, if you are using the IBM Directory Server,
the LDAP utility is idsldapadd.2. Import the sample file LdapEntries.ldif that lists all the users who are
authorized to access the reports. See the following example.
Results
After the successful import operation, you can see the users that are created inou=users,ou=SWG.
Example
A sample file: LdapEntries.ldif
178 IBM Security Identity Manager Version 6.0.0.18: Administration Topics

In this example, dc=com is the root entry. Specify the entry according to the schemathat you use.dn: ou=SWG, dc=comou: SWGobjectClass: topobjectClass: organizationalUnit
dn: ou=users,ou=SWG, dc=comou: usersobjectClass: topobjectClass: organizationalUnit
dn: uid=steves,ou=users,ou=SWG, dc=comuid: stevesuserPassword:: hello123objectClass: inetOrgPersonobjectClass: topobjectClass: personobjectClass: organizationalPersonsn: Wileycn: Steves
dn: uid=PortalAdmin,ou=users,ou=SWG, dc=comuserPassword:: hello123uid: PortalAdminobjectClass: inetOrgPersonobjectClass: topobjectClass: personobjectClass: organizationalPersonsn: Pooncn: Chuck
dn: uid=william,ou=users,ou=SWG, dc=comuserPassword:: hello123uid: williamobjectClass: inetOrgPersonobjectClass: topobjectClass: personobjectClass: organizationalPersonsn: Hanescn: William
dn: uid=lucy,ou=users,ou=SWG, dc=comuserPassword:: hello123uid: lucyobjectClass: inetOrgPersonobjectClass: topobjectClass: personobjectClass: organizationalPersonsn: Hayecn: Lucy
What to do next
Authenticate IBM Cognos by using an LDAP user. Complete these steps:1. Access the IBM Cognos Gateway URI. For example, http://
localhost:portnumber/ibmcognos/cgi-bin/cognos.cgi. The localhost is the IPaddress or network host name where IBM Cognos gateway is configured. Theportnumber is the port on which the IBM Cognos gateway is configured.
2. Select the configured Namespace, and click OK.3. Enter your LDAP user ID and password.4. Click OK.
Chapter 9. Report administration 179

Access control definition for the reports and reporting packagesYou can define the access control for the LDAP users who are the members of arole that is defined in the IBM Cognos namespace. Access can be granted to thoseusers who are the members of a defined role.
A user who has the system administrator privileges can grant the access.
Initially, all users are the members of the system administrator. Therefore, you canlog in with your LDAP user authentication in IBM Cognos and access theadministration section before you restrict the administration access.
Restricting administration access and adding an LDAP user to systemadministrator role:
You can restrict the IBM Cognos administration access by using the systemadministrators role in IBM Cognos namespace. You can also add an LDAP user tothe system administrator role for IBM Cognos report administration.
Procedure
1. Log in to IBM Cognos with an LDAP user whom you want to assign thesystem administrator role.
2. Go to Launch, and click IBM Cognos Administration.3. Click the Security tab.4. In the Users, Groups, and Roles section, click Cognos.5. Navigate to System Administrator role.6. Click the More link.7. Under Available actions, click Set properties.8. Click the Members tab.9. Click the Add link.
10. Under Available entries section, click an LDAP namespace.11. Select the Show users in the list check box.12. Select the user whom you want to assign the system administrator role and
make it into selected entries list.13. Click OK.14. Select Everyone from the members entry.15. Click the Remove link to ensure that only the added users can have the
system administration access.16. Click OK.17. Click the Permissions tab.18. Verify that the system administrators are listed and they are provided all the
permissions.If no permissions are provided, then select the system administrators andgrant all the permissions. Select the Override the access permissions acquiredfrom the parent entry check box to grant the permissions.
19. Click OK.
Results
An LDAP user is added with the system administrator role.
180 IBM Security Identity Manager Version 6.0.0.18: Administration Topics

What to do next
Create a role and add LDAP users as the members to that role. See “Creating arole and adding LDAP users as members.”
Creating a role and adding LDAP users as members:
The topic describes the procedure to create a role in IBM Cognos and add themembers from an LDAP namespace to it.
Procedure
1. Log in to IBM Cognos with an LDAP user who has the system administratorprivileges. For example, PortalAdmin.
2. Go to Launch, and click IBM Cognos Administration.3. Click the Security tab.4. In the Users, Groups, and Roles section, click Cognos.5. Click the New Role icon from the palette.6. Specify the name for a role. For example, ISIMAuditor.7. Add the description and the screen tip.8. Click Next.9. Under Select the members, click Add.
10. Under Available Entries Directory, click an LDAP namespace.11. Select the Show users in the list check box.12. Select the users whom you want to add as the members to the role and make
it into selected entries list.13. Click OK.14. Click Finish.
Results
A new role is created and LDAP users are added as the members to the new role.
Defining an access to the report by using a role:
You can define an access to the report by using a role. All the members of a rolecan access the report or reports.
Procedure
1. Log in to IBM Cognos with an LDAP user who has the system administratorprivileges. For example, PortalAdmin.
2. Under Public Folders, click the ISIMReportingPackage_6.0.0.4.zip.3. Click the More link on the Actions toolbar that is associated with the report
for which you want to provide the access.4. Under Available actions, click Set properties.5. Click the Permissions tab.6. Select the Override the access permissions acquired from the parent entry
check box.7. Click Add link at the bottom of the list of entries.8. Click Cognos.9. Select the role that you want to add and make it to the selected entries.
Chapter 9. Report administration 181

10. Click OK.11. Select the role and grant the permissions.12. Optional: Remove other roles for which you do not want to provide the
access.13. Click OK.
Results
An access is defined to the report by using a role and all the members of a role canaccess the reports.
Defining an access to the reporting package by using a role:
You can define an access to the report package by using a role. All the members ofa role can access the report package.
Procedure
1. Log in to IBM Cognos with an LDAP user who has the system administratorprivileges. For example, PortalAdmin.
2. Under Public Folders, click the More link on the Actions toolbar that isassociated with the ISIMReportingPackage_6.0.0.4.zip.
3. Under Available actions, click Set properties.4. Click the Permissions tab.5. Select the Override the access permissions acquired from the parent entry
check box.6. Click the Add link at the bottom of the list of entries.7. Click Cognos.8. Select the role that you want to add and make it to the selected entries.9. Click OK.
10. Select the role and grant the permissions.11. Optional: Remove other roles for which you do not want to provide the
access.12. Click OK.
Results
An access is defined for the reporting package by using a role and the members ofa role can access the reporting package.
References for IBM Cognos report security configurationUse the following references that provide information about the topics that arerelated to the security configuration for the IBM Cognos reports.
Access the IBM Cognos Business Intelligence 10.2.1 documentation athttp://www.ibm.com/support/knowledgecenter/SSEP7J_10.2.1/com.ibm.swg.ba.cognos.cbi.doc/welcome.html and search for the following terms.v Security model.v Authentication providers.v Add or remove members of a cognos group or role.v Create a cognos group or role.v Authorization.
182 IBM Security Identity Manager Version 6.0.0.18: Administration Topics

v Access permissions and credentials.
Globalization overviewYou can use the globalization features of IBM Security Identity Manager Cognosreport models to produce the reports in your own language.
Language support overview
IBM Security Identity Manager Cognos reports support the following languages.v cs=Czechv de=Germanv en=Englishv es=Spanishv fr=Frenchv hu=Hungarianv it=Italianv ja=Japanesev ko=Koreanv pl=Polishv pt_BR=Brazilian Portuguesev ru=Russianv zh_CN=Simplified Chinesev zh_TW=Traditional Chinesev nl=Dutchv tr=Turkishv el=Greek - partially supported.
Note:
The IBM Cognos Business Intelligence Server 10.2.1 Fix Pack 1 is not fullytranslated into the Greek language. Only components like Cognos Viewer, CognosConnection, Cognos Administration, and Cognos Workspace support translationin Greek language.
Messages or terms related to the globalization
In the reports, some of the column values might display the term Language notsupported
When you select the language that is not supported by the reportingmodel, the value in the column is displayed as Language not supported.
Setting language preferencesYou can personalize the way data appears in IBM Cognos workspace by changingyour preferences. You can set the product language or content language to get thepreferred output format of the reports.
Before you begin
Install and configure the IBM Cognos Business Intelligence Server.
Chapter 9. Report administration 183

Procedure
1. In the IBM Cognos Connection window, click My Area Options menubutton.
2. Click My Preferences.3. In the Set Preferences window, under the Regional options section, select
Product language. Product language specifies the language that the IBMCognos user interface uses.
4. In the Set Preferences window, under the Regional options section, selectContent language. Content language specifies the language that is used to viewand produce content in IBM Cognos such as data in the reports.
5. Click OK.
Results
You can view the reports or user interface in the language that you specified.
Report modelsUse the following information about the objects and the report model names,namespaces, and entities to work with the report models.
Report model objects and their definitionsUse these definitions to work with IBM Security Identity Manager Cognos reportmodels.
Query ItemsThe smallest piece of the model in a report. It represents a singlecharacteristic of something, such as the date that a product was introduced.
Query subjects or dimensions contain query items. For example, a querysubject that references an entire table contains query items that representeach column in the table.
Query items are the most important objects for creating reports. They usequery item properties of query items to build their reports.
Query SubjectsA set of query items that have an inherent relationship. In most cases,query subjects behave like tables. Query subjects produce the same set ofrows regardless of which columns were queried.
PackagesA subset of the dimensions, query subjects, and other objects that aredefined in the project. A package is published to the IBM Cognos server. Itcreates reports, analyses, and ad hoc queries.
NamespacesUniquely identifies query items, dimensions, query subjects, and otherobjects. You import different databases into separate namespaces to avoidduplicate names.
Recertification modelYou can use the recertification model to customize the reports that are related tothe recertification audit and configuration.
The recertification model for IBM Security Identity Manager consists of thesenamespaces:
184 IBM Security Identity Manager Version 6.0.0.18: Administration Topics

Table 16. Recertification model namespaces
NamespaceFor information about query subjects and query items,see
Recertification Audit “Recertification Audit namespace” on page 196.
Recertification Config “Recertification Config namespace” on page 206.
Accounts modelYou can use the accounts model to customize the account audit and configurationreports.
The accounts model for IBM Security Identity Manager consists of twonamespaces:
Table 17. Accounts model namespaces
Namespace For information about query subjects and query items, see
Account Audit “Account Audit namespace” on page 212.
Account Configuration “Account Configuration namespace” on page 217.
Provisioning modelYou can use the provisioning model to customize the provisioning policy audit andconfiguration reports.
The provisioning model for IBM Security Identity Manager consists of twonamespaces:
Table 18. Provisioning model namespaces
Namespace For information about query subjects and query items, see
Provisioning Policy Audit “Provisioning Policy Audit namespace” on page 226.
Provisioning Policy Config “Provisioning Policy Config namespace” on page 229.
Roles modelYou can use the roles model to create the role audit and configuration reports.
The roles model for IBM Security Identity Manager consists of two namespaces:
Table 19. Roles model namespaces
Namespace For information about query subjects and query items, see
Role Audit “Role Audit namespace” on page 233.
Role Configuration “Role Configuration namespace” on page 236.
Note: If you want to run a Role and Policy Modeler report for the roles with IBMSecurity Identity Manager data, you must rewrite the report or use an existingpredefined report in the IBM Security Identity Manager 6.0 Cognos package.
Separation of duty modelYou can use the separation of duty model to customize the separation of dutypolicy audit and configuration reports.
The separation of duty model for IBM Security Identity Manager consists of twonamespaces:
Chapter 9. Report administration 185

Table 20. Separation of duty model namespaces
NamespaceFor information about query subjects and queryitems, see
Separation of Duty Audit “Separation of Duty Audit namespace” on page243.
Separation of Duty Configuration “Separation of Duty Configuration namespace”on page 249.
Users modelYou can customize the user configuration reports with the users model.
The users model for IBM Security Identity Manager consists of the UserConfiguration namespace. For information about query subjects and query items,see “User Configuration namespace” on page 251.
Services modelYou can customize the audit reports with the services model.
The services model for IBM Security Identity Manager consists of the ServiceAudit namespace. For information about query subjects and query items, see“Service Audit namespace” on page 259.
Access modelYou can customize the audit and configuration reports with the access model.
The access model for IBM Security Identity Manager consists of these namespaces:
Note: The new Access Audit model is developed for Identity Service Center. Anold Access Audit model is renamed to Access Audit(Deprecated).
Table 21. Access model namespaces
NamespaceFor information about query subjects and query items,see
Access Audit(Deprecated) “Access Audit(Deprecated) namespace” on page 262.
Access Configuration “Access Configuration namespace” on page 271.
Access Audit “Access Audit namespace” on page 267.
Report descriptions and parametersThe topics provides information about the IBM Security Identity Manager Cognosstatic reports that are bundled with the package. You can view the list of reportsand the namespaces used to create these reports. Use the parameters and theirdescriptions information while you generate the reports.
Note:
v You must map the attributes to the entities before you work with the followingreports. For more information about mapping the attributes, see “Mapping theattributes and entities” on page 277.
v You must set the locale to English or to any supported language before you runany of the reports. See “Setting language preferences” on page 183. Otherwise,you might encounter a "Language not supported" issue.
v Use the percent symbol (%) as a default search character in all the reports.
186 IBM Security Identity Manager Version 6.0.0.18: Administration Topics

v Any time stamp in the following reports is in Greenwich Mean Time (GMT)format.
v Use the Report Studio to change the column title names in the layout to meetthe specific needs of your company.
You can choose the output format of the reports. For more information about thesupported report format, complete the following steps.1. Access the IBM Cognos Business Intelligence documentation at
http://www-01.ibm.com/support/knowledgecenter/SSEP7J_10.2.1/com.ibm.swg.ba.cognos.cbi.doc/welcome.html.
2. Search for Report Formats.
Note: You can export the report data in plain format if you use formats other thanHTML or PDF. The reports that are generated in such formats do not support someof the IBM Cognos interactive features. For example, charts.
Use HTML or PDF formats for running interactive reports.
The following table lists the reports and the namespaces that generate them.
Table 22. Reports and the namespaces
Reports Namespace used
Access Definition Report v Access Audit
v Access Configuration
Account Status Report Account Audit
Audit History Report Access Audit and Account Audit
Entitlements Report Provisioning Policy Configuration
IBM Security Identity Manager Dashboard Account Configuration, ProvisioningPolicy Configuration, User Configuration,and Service Audit (Entity Name Service)
Recertification Definition Report Recertification Config
Separation of Duty Policy Definition Report Separation of Duty Configuration
Separation of Duty Policy Violation Report Separation of Duty Audit
Services Report Service Audit
User Access Report Access Configuration
User Recertification History Report Recertification Audit
Note: The access that is defined on groups and roles cannot be displayed in theUser Access Report if the access is disabled.
The following table lists the subreports. These reports are the operational reportsand the subsets of the main reports. The subreports are hidden and started fromthe main reports.
Table 23. Subreports
Main report Subreports
Entitlements Report v Entitlements Sub Report
v Entitlements Sub_Sub Report
IBM Security Identity Manager Dashboard Dashboard sub reports
Chapter 9. Report administration 187
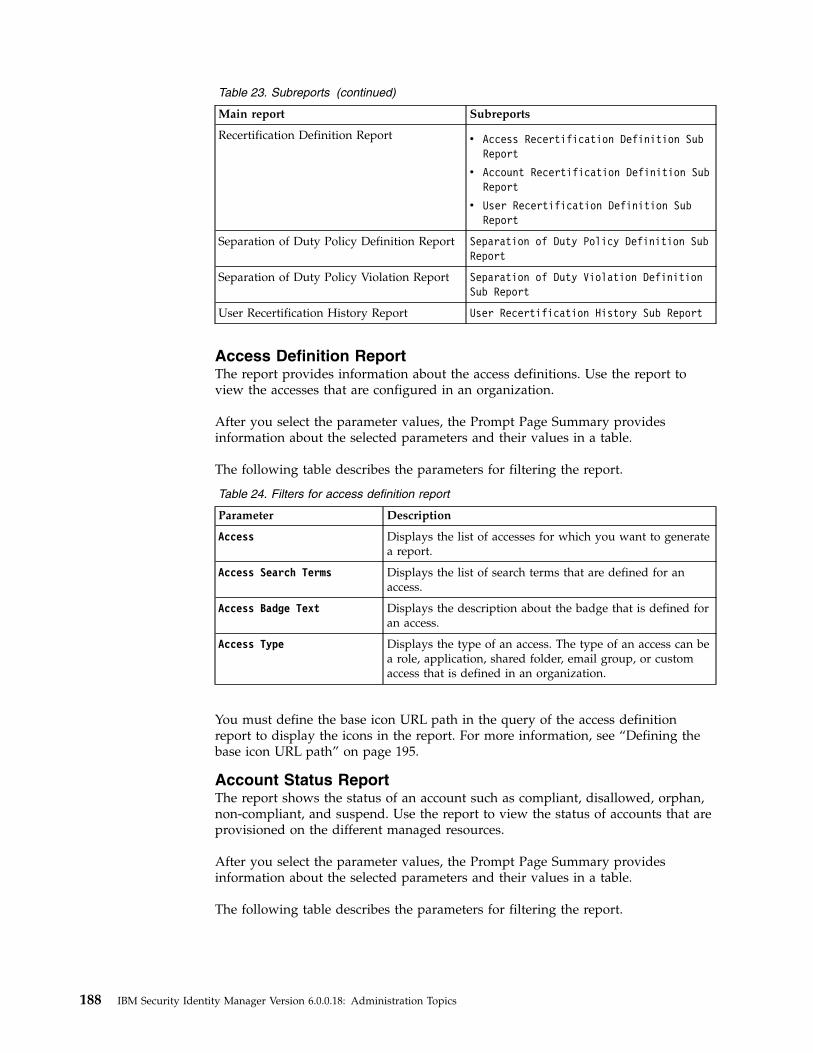
Table 23. Subreports (continued)
Main report Subreports
Recertification Definition Report v Access Recertification Definition SubReport
v Account Recertification Definition SubReport
v User Recertification Definition SubReport
Separation of Duty Policy Definition Report Separation of Duty Policy Definition SubReport
Separation of Duty Policy Violation Report Separation of Duty Violation DefinitionSub Report
User Recertification History Report User Recertification History Sub Report
Access Definition ReportThe report provides information about the access definitions. Use the report toview the accesses that are configured in an organization.
After you select the parameter values, the Prompt Page Summary providesinformation about the selected parameters and their values in a table.
The following table describes the parameters for filtering the report.
Table 24. Filters for access definition report
Parameter Description
Access Displays the list of accesses for which you want to generatea report.
Access Search Terms Displays the list of search terms that are defined for anaccess.
Access Badge Text Displays the description about the badge that is defined foran access.
Access Type Displays the type of an access. The type of an access can bea role, application, shared folder, email group, or customaccess that is defined in an organization.
You must define the base icon URL path in the query of the access definitionreport to display the icons in the report. For more information, see “Defining thebase icon URL path” on page 195.
Account Status ReportThe report shows the status of an account such as compliant, disallowed, orphan,non-compliant, and suspend. Use the report to view the status of accounts that areprovisioned on the different managed resources.
After you select the parameter values, the Prompt Page Summary providesinformation about the selected parameters and their values in a table.
The following table describes the parameters for filtering the report.
188 IBM Security Identity Manager Version 6.0.0.18: Administration Topics

Table 25. Filters for Account Status Report
Parameter Description
Service Displays the list of all the services that have one or moreaccounts provisioned.
Account Status Displays the status and states of the accounts that arecreated in an organization. The states of an account arecompliant, disallowed, orphan, non-compliant, andsuspend.
Audit History ReportThe Audit History Report provides information about the history of audits. Youcan generate the audit history reports for access, account, and a user.
You can generate the following types of subreports from the audit history report.
Note: Use the account audit model and reports to view the details about theaccounts that are associated with a user. Use the access audit model and reports toview the details about the accesses that are associated with a user. If the account ison the service that is defined as an access, the audit details can be seen only in theAccess Audit report.
Table 26. Audit History subreports
Subreport name In the Audit Report Type drop-down list
Access audit report. Select Access. For more information aboutthe access audit report parameters and theirdescriptions, see “Access audit historyreport.”
Account audit report. Select Account. For more information aboutthe account audit report parameters andtheir descriptions, see “Account audithistory report” on page 190.
After you select the values for the parameters, the Prompt Page Summary isgenerated. The Prompt Page Summary provides information about the selectedparameters and their values in a table.
Access audit history report:
Use this report to view the history of actions that are performed on an access inIdentity Service Center.
After you select the values for the following parameters, the Prompt PageSummary is generated. The Prompt Page Summary provides information about theselected parameters and their values in a table.
Note:
v If the account is on the service that is defined as an access, the audit details canbe seen only in the Access Audit history report.
v The parameter filter values are displayed if the access is requested throughIdentity Service Center.
The following table describes the parameters for filtering the report.
Chapter 9. Report administration 189

Table 27. Filters for access audit history report
Parameter Description
Audit Report Type Lists the audit type of reports. Select Access from the list.
Audit Start Date Displays all audited actions and operations on an accessapproved from the specified date.
Audit End Date Displays all audited actions and operations on an accessapproved until the specified date.
Access Business Unit Displays the business unit that is associated with an access.
Access Name Lists the names of all accesses that are available.
Requestee Name Displays the name for whom the access is requested.
Audit Action Displays an action that is performed on an access. Thesupported audit actions are Add Member and Remove Member.
Approver Displays the name of a user who approves the audit.
Approval Status Displays the status of the approval. The supported approvalstatuses are Approved, Rejected, and Pending.
Account audit history report:
Use this report to view the history of actions that are performed on an account.
After you select the values for the following parameters, the Prompt PageSummary is generated. The Prompt Page Summary provides information about theselected parameters and their values in a table.
The following table describes the parameters for filtering the report.
Table 28. Filters for account audit history report
Parameter Description
Audit Report Type Lists the audit type of reports. Select Account from the list.
Audit Start Date Displays all audited actions and operations on accountsapproved from the specified date.
Audit End Date Displays all audited actions and operations on accountsapproved until the specified date.
Account Business Unit Displays the business unit that is associated with anaccount.
Account Service Name Displays the list of all the services that have one or moreaccounts provisioned.
Account Name Displays the list of all the accounts that are created in anorganization. If you want to generate an account auditreport for all the accounts that are deleted, then do notprovide any filter parameter.
Account Owner Displays the user who owns one or more accounts in anorganization.
Audit Action Displays an action that is performed on a person or thebusiness partner person. The supported audit actions areAdd, Adopt, Delete, Orphan, Restore, Suspend, SynchronizePassword, and Change Password.
Approver Displays the name of a user who approves the audit.
Approval Status Displays the status of the approval.
190 IBM Security Identity Manager Version 6.0.0.18: Administration Topics

Entitlements ReportUse the report to view the list of services to which an individual is entitled. Thereport also lists all users and their entitlements.
After you select the parameter values, the Prompt Page Summary providesinformation about the selected parameters and their values in a table.
The following table describes the parameters for filtering the report.
Table 29. Filters for Entitlements Report
Parameter Description
Provisioning Policy Displays the list of provisioning policies.
Entitlement Displays the list of services to which a user is entitled.
After you generate the report, the provisioning policy definition lists theentitlements and configuration information about the members who are entitled tothe provisioning policy.
All UsersAll users in the organization who are entitled to the provisioning policy.
Roles The roles whose members are entitled to the provisioning policy.
All Other UsersAll other users who are not granted to the entitlements that are defined bythis provisioning policy by way of other policies.
To drill-through information about the users and their entitlements, complete thefollowing steps:1. Click the link in the Member column to list all the members who are entitled
to a service.2. Click the link in the User First Name column to list all the entitlements that are
granted for a specified user.
IBM Security Identity Manager DashboardA dashboard is a group of objects, such as charts, indicators, or tables. View thedashboard to access the detailed information about IBM Security Identity Managerenvironment.
The dashboard provides a quick summary about the IBM Security IdentityManager environment to an administrator or business user.
The dashboard shows information about the key activities and size metrics. It ismore intended as the business side of an environment. For example, you can get aglance of how large is the IBM Security Identity Manager environment in yourcompany.
The dashboard provides information about the following entities. You can specifythe scope of the information that is displayed in the dashboard by using theavailable filters in some of the view types.
The dashboard requires that you map the attributes and entities of the followingnamespaces:v Account Configurationv Provisioning Policy Configuration
Chapter 9. Report administration 191

v User Configurationv Service Audit (Entity Name Service)
See “Mapping the attributes and entities” on page 277 for the details.
Environment Overview This view shows the statistical chart of registered accounts, provisioningpolicies, resources, roles, separation of duty policy violations and users inthe IBM Security Identity Manager environment. Information is presentedin a block diagram.
Entity View This view shows the statistical diagram and chart of managed users,managed resources, managed roles, and provisioning policy membershipsfor the selected business units. You select the business units that you wantto view in the dashboard.
Account Status ViewThis view shows the statistical chart of non-compliant accounts, orphanaccounts, suspended accounts, and disallowed accounts for the selectedservices. You select the services that you want to view in the dashboard.
Separation Of Duty Policy ViolationsThis view shows the statistical chart of violations in the organization foreach Separation Of Duty policy.
Recertification Definition ReportUse the report to view the recertification policies and their schedule. Theserecertification policies are filtered by the recertification target type, policy name,and business unit.
You can generate the following types of subreports from the recertificationdefinition report.
Table 30. Recertification Definition subreports
Subreport nameIn the Recertification Target Typedrop-down list
Access recertification definition report Select Access.
Account recertification definition report Select Account.
User recertification definition report Select User.
After you select the values for the following parameters, the Prompt PageSummary is generated. The Prompt Page Summary provides information about theselected parameters and their values in a table.
The following table describes the parameters for filtering the report.
Table 31. Filters for Recertification Definition Report
Parameter Description
Recertification Policy BusinessUnit
Displays the business unit.
Recertification Policy Name Displays the name of the recertification policy.
Recertification Target Type Displays the type of the recertification. The possiblevalues are Access, Account, and User.
192 IBM Security Identity Manager Version 6.0.0.18: Administration Topics

In the Content page, you can view the recertification policies that are filtered bythe recertification target type, policy name, and business unit that you selected.You can view the configuration details by clicking the recertification policy name.
Separation of Duty Policy Definition ReportUse the report to list the separation of duty policies that are filtered by the policyname and business unit. The report provides information about the owners, rules,and roles that are associated with a separation of duty policy. An owner can be aperson, role, or both.
After you select the parameter values, the Prompt Page Summary providesinformation about the selected parameters and their values in a table.
The following table describes the parameters for filtering the report.
Table 32. Filters for Separation of Duty Policy Definition Report
Parameter Description
Separation of Duty Policy Lists the names of the available separation of duty policies.
Business Unit Lists the names of the available business units.
After you generate the report, the report page shows the separation of duty policy,business unit, and whether the policy is enabled or not.
Click the policy name to obtain details such as owners, rules, and roles that areassociated with a separation of duty policy. An owner can be a person, role, orboth.
Separation of Duty Policy Violation ReportThis report contains the person, policy, and rules violated, approval, justification (ifany), and who requested the violating change.
After you select the values for these parameters, the Prompt Page Summary isgenerated. The Prompt Page Summary provides information in tabular formatabout the selected parameters and their values.
The following table describes the parameters for filtering the report.
Table 33. Filters for Separation of Duty Policy Violation Report
Parameter Description
Separation of Duty PolicyBusiness Unit
Displays the name of the business unit.
Separation of Duty Policy Displays name of the separation of duty policy.
Separation of Duty PolicyRule Description
Displays the description of the rule name that is associatedwith the separation of duty policy.
Services ReportThe report lists the services that are defined in IBM Security Identity Manager. Thereport can be filtered by the service business unit, service, and service owner.
After you select the parameter values, the Prompt Page Summary providesinformation about the selected parameters and their values in a table.
The following table describes the parameters for filtering the report.
Chapter 9. Report administration 193

Table 34. Filters for Services Report
Parameter Description
Service Business Unit Lists the business units of the services.
Service Displays the list of all the services that are defined in theIBM Security Identity Manager.
Service Owner Lists the owners of the services.
User Access ReportThe User Access Report provides information about the different users in abusiness unit and their access. The user is entitled to at least one access.
You can generate the following types of subreports from the User Access Report.
Table 35. User Access subreports
Subreport name In the Report Type list
User Access Report - View by Access Select View by Access. For moreinformation about the report parameters andtheir descriptions, see “View by Access.”
User Access Report - View by User Select View by User. For more informationabout the report parameters and theirdescriptions, see “View by User” on page195.
You must define the base icon URL path in the query of the User Access Report todisplay the icons in the report. For more information, see “Defining the base iconURL path” on page 195.
View by Access:
With this report type, the User Access Report focuses on the list of all access. Youhave the option to view the corresponding user for the selected access.
The following table describes the parameters for filtering the report.
Table 36. Filters for the User Access report - View by Access report type
Parameter Description
Access Name Displays the list of accesses for which you want to generatea report.
Access Search Terms Displays the list of search terms that are defined for anaccess.
Access Badge Text Displays the description about the badge that is defined foran access.
Access Type Displays the type of an access. The type of an access can bea role, an application, a shared folder, an email group, or acustom access that is defined in an organization.
Select the values for these parameters, then click Finish to generate the report.
The Prompt Page Summary provides an overview of the report parameters and theselected values. The next page lists all of the access that you filtered, with theirdetails.
194 IBM Security Identity Manager Version 6.0.0.18: Administration Topics
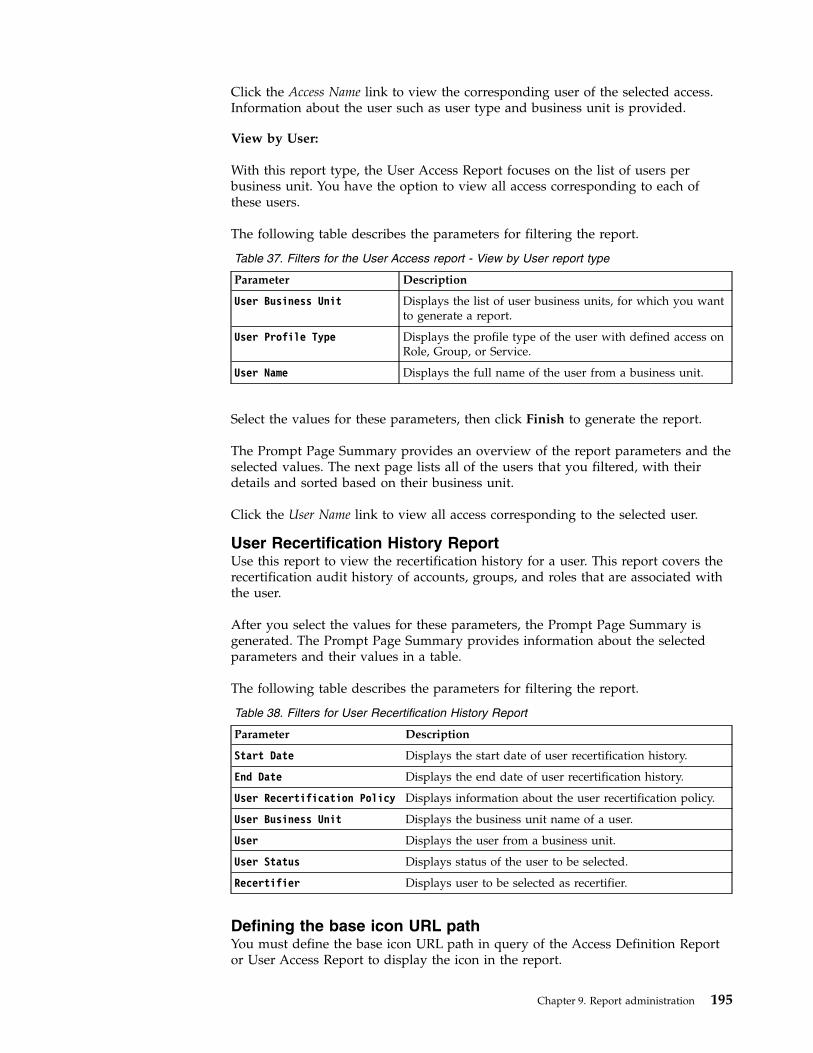
Click the Access Name link to view the corresponding user of the selected access.Information about the user such as user type and business unit is provided.
View by User:
With this report type, the User Access Report focuses on the list of users perbusiness unit. You have the option to view all access corresponding to each ofthese users.
The following table describes the parameters for filtering the report.
Table 37. Filters for the User Access report - View by User report type
Parameter Description
User Business Unit Displays the list of user business units, for which you wantto generate a report.
User Profile Type Displays the profile type of the user with defined access onRole, Group, or Service.
User Name Displays the full name of the user from a business unit.
Select the values for these parameters, then click Finish to generate the report.
The Prompt Page Summary provides an overview of the report parameters and theselected values. The next page lists all of the users that you filtered, with theirdetails and sorted based on their business unit.
Click the User Name link to view all access corresponding to the selected user.
User Recertification History ReportUse this report to view the recertification history for a user. This report covers therecertification audit history of accounts, groups, and roles that are associated withthe user.
After you select the values for these parameters, the Prompt Page Summary isgenerated. The Prompt Page Summary provides information about the selectedparameters and their values in a table.
The following table describes the parameters for filtering the report.
Table 38. Filters for User Recertification History Report
Parameter Description
Start Date Displays the start date of user recertification history.
End Date Displays the end date of user recertification history.
User Recertification Policy Displays information about the user recertification policy.
User Business Unit Displays the business unit name of a user.
User Displays the user from a business unit.
User Status Displays status of the user to be selected.
Recertifier Displays user to be selected as recertifier.
Defining the base icon URL pathYou must define the base icon URL path in query of the Access Definition Reportor User Access Report to display the icon in the report.
Chapter 9. Report administration 195

About this task
IBM Security Identity Manager provides a way to define an icon URL for anaccess. The icon URL can be either a relative path or an absolute path. Assume thata user defined the icon URL "/images/icons/test.gif" in IBM Security IdentityManager. To display the actual image for the icon URL, IBM Cognos applicationmust locate the full path for that image. In such a situation, you must define thebase icon URL path in the query of the access definition report.
Procedure1. Open the report in Report Studio.
a. Access https://hostname:port/ibmcognos/cgi-bin/cognos.cgi.b. In IBM Cognos Connection window, click ISIMReportingModel_6.0.0.3.c. Select the report, which is applicable.v Access Definition Report orv User Access Report
d. Under Actions column, click Open with Report Studio.2. Click View > Queries to open the Query Explorer.3. Double-click Access Query.4. In the Data Items window, double-click Base Icon URL.5. In the Expression Definition window, set the base URL for the icons. For
example, 'http://xyz.com'.6. Click OK.7. Save the report.
What to do next
Run the report to display the icons.
Query subjects and query items for the report modelsUse the query subjects and query items information to customize the IBM SecurityIdentity Manager reports.
Schema mappingBefore you work with the query subjects and query items, you must map theattributes to the entities.
For more information, see “Report schema mapping” on page 303.
To map the attributes and entities, see “Mapping the attributes and entities” onpage 277.
Recertification Audit namespaceThe Recertification Audit namespace provides information about the history ofuser, role, account, and group recertification.
Query subjects for Recertification Audit namespace:
The following table lists the query subjects in the Recertification Auditnamespace.
196 IBM Security Identity Manager Version 6.0.0.18: Administration Topics

Table 39. Query subjects in the Recertification Audit namespace for the recertificationmodel
Query subject Description
User Recertification Policy Represents the recertification policy that recertifies accounts, groupmemberships, and roles memberships through user recertification.IBM Security Identity Manager entities are recertified with therecertification policy. You must use this query subject with the UserRecert History query subject to obtain information about therecertification policy. Do not use this query subject with AccountRecert History and Access Recert History.
User Recert History Represents the recertification audit history for a user. It coversrecertification audit history of accounts, groups, and roles that areassociated with the user.
Person Represents a user entity and some of its configuration attributes. Youmust use this query subject with the User Recert History querysubject to obtain information about the user that is being recertified.
Person Organization Represents an organization that is associated with a user. These usersare being recertified.
User Recert Account Represents the recertification audit history for an account that isrecertified as part of the user recertification. You must use this querysubject with the User Recert History. By doing so, you can obtain theinformation about accounts that are associated with the users that arebeing recertified.
User Recert Group Represents the recertification audit history for a group membershipthat is recertified as part of the user recertification. You must use thisquery subject with the User Recert History. By doing so, you canobtain the information about memberships of the accounts that areassociated with the users that are being recertified.
User Recert Group Service Represents the service that is associated to a group. You must use thisquery subject with the User Recert History to obtain moreinformation about the service for the groups that are recertified as apart of the user recertification.
User Recert Role Represents the recertification audit history for a role membership thatis recertified as part of the user recertification. You must use thisquery subject with the User Recert History. By doing so, you canobtain the information about role memberships of the users that arebeing recertified.
Account Represents an account entity and some of its configuration attributes.You must use this query subject with the Account Recert Historyquery subject. By doing so, you can generate recertification historyreports of accounts.
Account Service Represents service that is associated to an account. These accountsparticipate in the account and access recertification.
Account Owner Represents user owners of the accounts that are participating in theaccount and access recertification.
Account Recert History Represents the recertification audit history for accounts. You must usethis query subject with the Account query subjects. By doing so, youcan find out the accounts in the recertification audit.
Access Represents the group access and some of its configuration attributes.You must use this query subject with the Access Recert Historyquery subject to generate recertification history reports of access.
Access Recert History Represents the recertification audit history for access. You must usethis query subject with the Access query subjects. By doing so, youcan find out the accesses in the recertification audit.
Chapter 9. Report administration 197

Query items for Recertification Audit namespace:
The following table lists the query items in the Recertification Audit namespace.
Table 40. Query items in the Recertification Audit namespace
Query subject Query items and their description
User Recertification PolicyRecertification Policy Name
The name of the recertification policy.
Recertification Policy TypeThe type of an entity that gets recertified by using thispolicy. The valid values are Account, Access, and Identity.
Recertification Policy DescriptionThe description of the policy as specified in the policyconfiguration.
Recertification Policy EnabledShows whether the policy is enabled.
Recertification Policy ScheduledThe recertification scheduling modes. The valid values areCALENDAR and ROLLING.
Recertification Policy Rolling Interval in DaysThe recertification period if the recertification policyscheduling mode is ROLLING. No value in this query itemindicates that the scheduling is not in the ROLLING mode.
Recertification Policy Reject ActionAn action that was taken if the recertification is rejected.
Recertification Policy Timeout Period in DaysThe duration during which a recertifier must act.
Recertification Policy Timeout ActionThe automatic action that must be taken if the recertificationtimes out.
Recertification Policy DNAn LDAP distinguished name for the recertification policy.
Recertification Policy Container DNAn LDAP distinguished name for a business unit to whichthe recertification policy applies.
Recertification Policy Is CustomIndicates whether the recertification policy is customized. Itis defined in the workflow.
Recertification Policy User ClassThe type of a user to which the recertification policy applies.The valid values are All, Person, and Business PartnerPerson.
Recertification Policy ScopeIndicates whether the recertification policy applies to thebusiness unit and its subunits or either of them.
198 IBM Security Identity Manager Version 6.0.0.18: Administration Topics

Table 40. Query items in the Recertification Audit namespace (continued)
Query subject Query items and their description
User Recert HistoryUser Recert History Person Name
The full name of a person.
User Recert History Person EmailThe user email identifier.
User Recert History Person StatusA user status at the end of the recertification workflowprocess. The valid values are Active and Inactive.
User Recert History Person Business Unit NameA business unit to which a user belongs.
User Recert History Recertification Policy NameThe recertification policy that created a user entity.
User Recert History TimeoutShows whether the recertification process is timed out or not.0 represents Not timed out, and 1 represents Timed out.
User Recert History CommentsThe comments that are entered by a user during the userrecertification process.
User Recert History Process CommentsThe comments that are entered by a user during therecertification process.
User Recert History Process Submission timeThe recertification policy submission time.
User Recert History Process Start TimeThe time at which user recertification workflow process wasstarted.
User Recert History Process Completion TimeA user recertification history process completion time.
User Recert History Process Last Modified TimeThe time at which user recertification workflow process waslast modified.
User Recert History Process Requester NameThe name of a user who submitted the request forrecertification.
User Recert History Process Requestee NameThe name of a user entity for whom the request forrecertification was submitted.
User Recert History Process Recertifier NameThe name of a user who is the final approver in therecertification workflow process.
User Recert History Process Result SummaryAn overall summary of a user recertification workflowprocess result.
User Recert History Process ScheduledThe schedule for recertification policy submission.
User Recert History IdA unique ID assigned by the IBM Security Identity Managerto a user recertification audit history.
User Recert History Person DNAn LDAP distinguished name for a user entity in therecertification process.
User Recert History Recertification Policy DNAn LDAP distinguished name for the recertification policythat recertifies a user entity.
Chapter 9. Report administration 199

Table 40. Query items in the Recertification Audit namespace (continued)
Query subject Query items and their description
PersonPerson Full Name
The full name of a user.
Person Last NameThe surname of a user.
Person StatusThe status of a user.
Person DnAn LDAP distinguished name for a user entity.
Person Business Unit DnAn LDAP distinguished name for a business unit to which auser belongs.
Person SupervisorThe name of a user who is the supervisor of a user entity.
Person OrganizationBusiness Unit Name
The name of a business unit to which a user belongs.
Business Unit SupervisorA user supervisor of a business unit.
Business Unit DNAn LDAP distinguished name for the business unit to whicha user belongs.
Business Unit Container DNAn LDAP distinguished name for the parent business unit ofan organization entity.
User Recert AccountUser Recert Account Name
The name of an account in a user recertification.
User Recert Account Service NameThe name of a service to which an account belongs.
User Recert Account Service DescriptionDescribes the service that is associated to an account.
User Recert Account StatusThe status of an account at the end of the recertification. Thevalid values are Approved and Rejected.
User Recert Account Recert IdA unique numeric ID assigned by the IBM Security IdentityManager to an account recertification.
User Recert Account DNAn LDAP Distinguished name for an account entity in therecertification.
User Recert Account Service DNAn LDAP Distinguished name for the service to which anaccount entity belongs.
200 IBM Security Identity Manager Version 6.0.0.18: Administration Topics

Table 40. Query items in the Recertification Audit namespace (continued)
Query subject Query items and their description
User Recert GroupUser Recert Group Name
The name of a group in the user recertification.
User Recert Group DescriptionDescribes the recertification group.
User Recert Group StatusThe status of a group at the end of the recertification. Thevalid values are Approved and Rejected.
User Recert Group Recert IdA unique numeric ID assigned by IBM Security IdentityManager to a group recertification.
User Recert Group DNAn LDAP Distinguished name for a group entity in therecertification.
User Recert Group ServiceGroup Name
The name of a group.
Service NameThe name of a service to which the group belongs.
Service TypeThe service profile type.
Service UrlA URL that connects to the managed resource.
Service DNAn LDAP distinguished name for a service to which thegroup belongs.
Service Container DnAn LDAP distinguished name for a business unit of theservice that is associated with a group.
Service Owner DnAn LDAP distinguished name for a user owner of theservice.
Group DnAn LDAP distinguished name for a group entity in therecertification.
User Recert RoleUser Recert Role Name
The name of a role in the user recertification.
User Recert Role DescriptionThe description of a role.
User Recert Role StatusThe status of a role at the end of the recertification. The validvalues are Approved and Rejected.
User Recert Role Recert IdA unique numeric identifier that is assigned by IBM SecurityIdentity Manager to a role recertification.
User Recert Role DNAn LDAP Distinguished name for a role entity in therecertification.
Chapter 9. Report administration 201

Table 40. Query items in the Recertification Audit namespace (continued)
Query subject Query items and their description
AccountAccount Name
The name of an account.
Account Service DnAn LDAP distinguished name for a service that provisionsan account.
Account StatusThe status of an account. The valid values are Active andInactive.
Account ComplianceThe details about an account compliance. The valid valuesare Unknown, Compliant, Non Compliant, and Disallowed.
Account Ownership TypeThe ownership type of an account. The valid values areIndividual, System, Device, and Vendor.
Account Last Access DateThe last date when an account was accessed.
Account Container DnAn LDAP distinguished name for a business unit to whichan account belongs.
Account ServiceService Name
The name of a service to which an account belongs.
Service DnAn LDAP distinguished name for a service to which anaccount belongs.
Service Container DNAn LDAP distinguished name for a business unit of a servicethat is associated to the accounts.
Service Owner DNAn LDAP distinguished name for a user owner of theservice.
Service UrlA URL that connects to the managed resource.
Service TypeThe service profile type.
Account OwnerPerson Full Name
The full name of a user who owns an account.
Person Last NameThe surname of a user who owns an account.
Person StatusThe status of a user who owns an account.
Person DNAn LDAP distinguished name for an account owner.
Person Business Unit DNAn LDAP distinguished name for a business unit that isassociated to an account owner.
Person SupervisorThe supervisor of an account owner.
202 IBM Security Identity Manager Version 6.0.0.18: Administration Topics

Table 40. Query items in the Recertification Audit namespace (continued)
Query subject Query items and their description
Account Recert HistoryRecert History Service Name
The name of a service to which accounts and groups belong.These accounts and groups are involved with an accountrecertification audit.
Recert History Service ProfileThe profile type of a service.
Recert History StatusAn account status at the end of the recertification workflowprocess. The valid values are Abort, Approved, Timeout,Pending, and Rejected.
Recert History ActionThe action that is taken on an account at the end ofrecertification process as defined by the recertification policy.The valid values are Abort, Certify, Delete, Mark, CertifyAdministrative, and Suspend.
Recert History CommentsThe comments that are entered by a user duringrecertification process.
Recert History Process Start TimeThe time at which an account recertification workflowprocess started.
Recert History Process Submission TimeThe time at which recertification policy was submitted.
Recert History Process Completion TimeThe time at which an account recertification workflowprocess completed.
Recert History Process Last Modified TimeThe last modified time for an account recertificationworkflow process.
Recert History Process CommentsThe comments that are entered by a user duringrecertification process.
Recert History Process Result SummaryThe summary of the recertification process result. The validvalues are Success, Failed, Pending, Escalated, Skipped,Timeout, and Warning.
Recert History Process Requestee NameThe name of a user entity for whom the recertificationrequest is submitted. For example, if the entity forrecertification is an account, then the query item is the nameof the account.
Recert History Process Requester NameThe name of a user who submitted the recertificationrequest. For example, if administrator submits a request forrecertification, then this query item is the name of theadministrator.
Recert History Recertifier NameThe name of a user who is the final approver in therecertification workflow process.
Recert History Activity OwnerAn owner of recertification activity for an account.
Recert History Recertifier IdAn account identifier of the recertifier.
Chapter 9. Report administration 203

Table 40. Query items in the Recertification Audit namespace (continued)
Query subject Query items and their description
AccessGroup ID
An identifier for a group.
Group NameThe name of a group for which an access is defined.
Group TypeThe profile type of a group.
Group Access NameThe name of the access that is defined for a group.
Group Access TypeThe type of the access that is defined for a group.
Group DNAn LDAP distinguished name for a group entity for whichan access is defined.
Group Container DNAn LDAP distinguished name for a business unit that isassociated with a group.
Group Service DNAn LDAP distinguished name for the service that isassociated to a group.
204 IBM Security Identity Manager Version 6.0.0.18: Administration Topics

Table 40. Query items in the Recertification Audit namespace (continued)
Query subject Query items and their description
Access Recert HistoryRecert History Service Name
The name of a service to which accesses and groups belong.These accesses and groups are involved with an accessrecertification audit.
Recert History Service ProfileThe profile type of a service.
Recert History StatusAn access status at the end of the recertification workflowprocess. The valid values are Abort, Approved, Timeout,Pending, and Rejected.
Recert History ActionThe action that is taken on an access at the end ofrecertification process as defined by the recertification policy.The valid values are Abort, Certify, Delete, Mark, CertifyAdministrative, and Suspend.
Recert History CommentsThe comments that are entered by a user duringrecertification process.
Recert History Process Start TimeThe time at which an access recertification workflow processstarted.
Recert History Process Submission TimeThe time at which recertification policy was submitted.
Recert History Process Completion TimeThe time at which an access recertification workflow processcompleted.
Recert History Process Last Modified TimeThe last modified time for an access recertification workflowprocess.
Recert History Process CommentsThe comments that are entered by a user duringrecertification process.
Recert History Process Result SummaryThe summary of the recertification process result. The validvalues are Success, Failed, Pending, Escalated, Skipped,Timeout, and Warning.
Recert History Process Requestee NameThe name of a user entity for whom the recertificationrequest is submitted. For example, if the entity forrecertification is an access, then the query item is the nameof the access.
Recert History Process Requester NameThe name of a user who submitted the recertificationrequest. For example, if administrator submits a request forrecertification, then this query item is the name of theadministrator.
Recert History Recertifier NameThe name of a user who is the final approver in therecertification workflow process.
Recert History Activity OwnerAn owner of recertification activity for an access.
Recert History Recertifier IdAn access identifier of the recertifier.
Chapter 9. Report administration 205

Recertification Config namespaceThe Recertification Config namespace provides information about the definedrecertification policies and target that is defined for those policies.
Query subjects for Recertification Config namespace:
The following table lists the query subjects in the Recertification Confignamespace.
Table 41. Query subjects in the Recertification Config namespace
Query subject Description
Recertification Policy Represents the recertification policy and its components.
Recertification PolicySchedule
Represents the schedule that is used to auto trigger the recertificationpolicy.
Policy Recertifier Represents a user who is a recertifier for the recertification policy.
Recert Policy Business Unit Represents a business unit to which the recertification policy applies.
Recert Policy Role Target Represents the roles that are recertified by the recertification policy.You must use this query subject with the Recertification Policy toobtain information about the roles that are certified and theirconfiguration attributes.
Recert Policy Access Target Represents a group access and group membership that are recertifiedby the recertification policy. You must use this query subject with theRecertification Policy to obtain information about:
v Group access
v Group membership
v Configuration attributes of group access and group membership
v Informative attributes of a service that are associated with a group
Recert Policy Access Owner Represents a group access owner that are recertified by therecertification policy. You must use this query subject with theRecertification Policy to obtain information about the group accessowner name.
Group Members Represents the information about the members of a recertified group.You must use this query subject with the Recert Policy AccessTarget to obtain information about the members of the recertifiedgroup.
Recert Policy Account Target Represents a service on which the accounts are provisioned andrecertified by the recertification policy. You must use this querysubject with the Recertification Policy to obtain more informationabout:
v Account recertified
v Service on which these accounts are provisioned
Account Represents account entity and some of its configuration attributes. Youmust use this query subject with the Recert Policy Account Target toobtain more information about the accounts that are associated withthe service.
Person Represents a user entity and some of its configuration attributes. Youmust use this query subject with the Recert Policy Role Targetquery subject to obtain more information about the members of therole.
Account Owner Represents a user owner of an account. You must use this querysubject with the Account query subject to obtain information about theowners of the accounts.
Query items for Recertification Config namespace:
The following table lists the query items in the Recertification Confignamespace.
206 IBM Security Identity Manager Version 6.0.0.18: Administration Topics

Table 42. List of query items in the Recertification Config namespace
Query subject Query items and their description
Recertification PolicyRecertification Policy Name
The name of the recertification policy.
Recertification Policy TypeThe type of an entity that gets recertified by using thispolicy. The valid values are User, Account, and Access.
Recertification Policy DescriptionThe policy description as specified in the policyconfiguration.
Recertification Policy EnabledShows whether the policy is enabled or not.
Recertification Policy ScheduledThe recertification scheduling modes. The valid values areCALENDAR and ROLLING.
Recertification Policy Rolling Interval in DaysThe recertification period if the recertification policyscheduling mode is ROLLING. No value in this query itemindicates that the scheduling is not in the ROLLING mode.
Recertification Policy Reject ActionAn action that is taken if the recertification is rejected.
Recertification Policy Timeout Period in DaysThe duration during which a recertifier must act.
Recertification Policy Timeout ActionAn automatic action that must be taken if the recertificationtimes out.
Recertification Policy DNAn LDAP distinguished name for the recertification policy.
Recertification Policy Container DNAn LDAP distinguished name for a business unit to whichthe recertification policy applies.
Recertification Policy Is CustomRepresents whether the recertification policy is customized. Itis defined in the workflow.
Recertification Policy User ClassThe type of a user to which the recertification policy applies.The valid values are All, Person, and Business PartnerPerson.
Recertification Policy ScopeIndicates whether the recertification policy applies to thebusiness unit and its subunits or either of them.
Chapter 9. Report administration 207
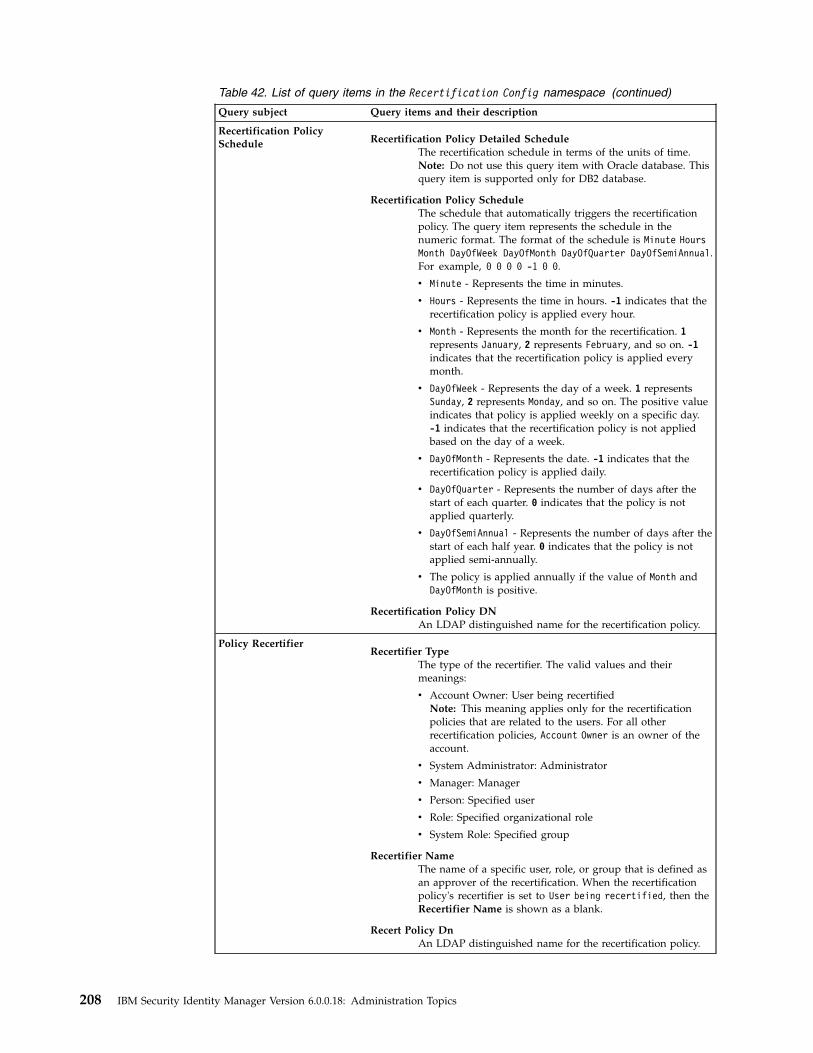
Table 42. List of query items in the Recertification Config namespace (continued)
Query subject Query items and their description
Recertification PolicySchedule Recertification Policy Detailed Schedule
The recertification schedule in terms of the units of time.Note: Do not use this query item with Oracle database. Thisquery item is supported only for DB2 database.
Recertification Policy ScheduleThe schedule that automatically triggers the recertificationpolicy. The query item represents the schedule in thenumeric format. The format of the schedule is Minute HoursMonth DayOfWeek DayOfMonth DayOfQuarter DayOfSemiAnnual.For example, 0 0 0 0 -1 0 0.
v Minute - Represents the time in minutes.
v Hours - Represents the time in hours. -1 indicates that therecertification policy is applied every hour.
v Month - Represents the month for the recertification. 1represents January, 2 represents February, and so on. -1indicates that the recertification policy is applied everymonth.
v DayOfWeek - Represents the day of a week. 1 representsSunday, 2 represents Monday, and so on. The positive valueindicates that policy is applied weekly on a specific day.-1 indicates that the recertification policy is not appliedbased on the day of a week.
v DayOfMonth - Represents the date. -1 indicates that therecertification policy is applied daily.
v DayOfQuarter - Represents the number of days after thestart of each quarter. 0 indicates that the policy is notapplied quarterly.
v DayOfSemiAnnual - Represents the number of days after thestart of each half year. 0 indicates that the policy is notapplied semi-annually.
v The policy is applied annually if the value of Month andDayOfMonth is positive.
Recertification Policy DNAn LDAP distinguished name for the recertification policy.
Policy RecertifierRecertifier Type
The type of the recertifier. The valid values and theirmeanings:
v Account Owner: User being recertifiedNote: This meaning applies only for the recertificationpolicies that are related to the users. For all otherrecertification policies, Account Owner is an owner of theaccount.
v System Administrator: Administrator
v Manager: Manager
v Person: Specified user
v Role: Specified organizational role
v System Role: Specified group
Recertifier NameThe name of a specific user, role, or group that is defined asan approver of the recertification. When the recertificationpolicy's recertifier is set to User being recertified, then theRecertifier Name is shown as a blank.
Recert Policy DnAn LDAP distinguished name for the recertification policy.
208 IBM Security Identity Manager Version 6.0.0.18: Administration Topics

Table 42. List of query items in the Recertification Config namespace (continued)
Query subject Query items and their description
Recert Policy Business UnitBusiness Unit Name
The name of a business unit.
Business Unit SupervisorThe user supervisor of a business unit.
Business Unit DnAn LDAP distinguished name for a business unit.
Business Unit Container DNAn LDAP distinguished name for the parent organization ofa business unit entity.
Recert Policy Role TargetRole Name
The name of the role. If the policy applies to all the roles in abusiness unit, then ALL ROLES WITHIN POLICY ORGANIZATIONis displayed.
Role DescriptionThe description of a role.
Role TypeThe type of a role. The valid values are Static and Dynamic.The value of a role type is empty if the role name ismentioned as ALL ROLES WITHIN POLICY ORGANIZATION.
Role Business Unit NameThe business unit to which the role belongs.
Role Business Unit SupervisorThe user supervisor of a business unit to which the rolebelongs.
Role DNAn LDAP distinguished name for the role.
Role Business Unit DNAn LDAP distinguished name for the business unit to whichrole belongs.
Recert Policy DnAn LDAP distinguished name for the recertification policy.
Chapter 9. Report administration 209

Table 42. List of query items in the Recertification Config namespace (continued)
Query subject Query items and their description
Recert Policy Access TargetGroup Name
The name for a group. If the policy applies to all the groupsin an organization, then ALL GROUPS WITHIN POLICYORGANIZATION is displayed. If the policy applies to all thegroups for a service, then ALL GROUPS ON A SPECIFIEDSERVICE is displayed.
Group DescriptionThe description of a group.
Group TypeThe profile type of a group.
Group Access NameAn access name that is defined for a group entity.
Group Access DescriptionThe description of an access that is defined for a groupentity.
Group Access TypeThe type of an access that is defined for a group entity.
Group Service NameThe name of a service on which the group is provisioned.
Group DnAn LDAP distinguished name for a group.
Group Service DNAn LDAP distinguished name for the service on which agroup is provisioned.
Group Container DNAn LDAP distinguished name for an organization to which agroup belongs.
Group Service Container DnAn LDAP distinguished name for an organization of theservice on which group is provisioned.
Recert Policy DNAn LDAP distinguished name for the recertification policy.
Recert Policy Access OwnerGroup Dn
An LDAP distinguished name for a group.
Group Access Owner DnAn LDAP distinguished name for an access owner that isdefined for a group entity.
Group Access Owner Full NameFull name of an access owner that is defined for a groupentity.
210 IBM Security Identity Manager Version 6.0.0.18: Administration Topics

Table 42. List of query items in the Recertification Config namespace (continued)
Query subject Query items and their description
Group MembersAccount Name
The name of an account that is associated with a credential.
Account Service DnAn LDAP distinguished name for a service that provisionsan account.
Account StatusThe status of an account that indicates whether the accountis active or inactive.
Account ComplianceThe details about an account compliance. The valid valuesare Unknown, Compliant, Non Compliant, and Disallowed.
Account Ownership TypeThe ownership type of the account. The valid values areIndividual, System, Device, and Vendor.
Account Last Access DateThe last accessed date and time of an account.
Account Container DnAn LDAP distinguished name for a business unit of anaccount.
Recert Policy Account TargetAccount Service Name
The name of the service. If the policy applies to all theaccounts in the service, then ALL ACCOUNT WITHIN POLICYORGANIZATION is displayed.
Account Service Business Unit NameThe name of the business unit to which a service belongs.
Account Service Business Unit SupervisorA user supervisor of a business unit that is associated withthe service.
Account Service DNAn LDAP distinguished name for the service.
Account Service DescriptionThe description of a service.
Account Service Business Unit DNAn LDAP distinguished name for a business unit that isassociated with the service.
Account Service TypeThe profile type of the service.
Account Service Owner DNAn LDAP distinguished name for an owner of the service.
Account Service UrlA URL that connects to the service.
Recert Policy DNAn LDAP distinguished name for the recertification policy.
Chapter 9. Report administration 211

Table 42. List of query items in the Recertification Config namespace (continued)
Query subject Query items and their description
AccountAccount Name
The name of an account that is associated with a credential.
Account Service DnAn LDAP distinguished name for a service that provisionsan account.
Account StatusThe status of an account that indicates whether the accountis active or inactive.
Account ComplianceThe details about an account compliance. The valid valuesare Unknown, Compliant, Non Compliant, and Disallowed.
Account Ownership TypeThe ownership type of the account. The valid values areIndividual, System, Device, and Vendor.
Account Last Access DateThe last accessed date and time of an account.
Account Container DnAn LDAP distinguished name for a business unit of anaccount.
PersonPerson Full Name
The full name of a user.
Person Last NameThe surname of a user.
Person StatusThe status of a user.
Person DnAn LDAP distinguished name for a user entity.
Person Business Unit DnAn LDAP distinguished name for a business unit to a userentity.
Person SupervisorThe name of a user for the supervisor of a user entity.
Account OwnerPerson Full Name
The full name of a user who owns an account.
Person Last NameThe surname of a user who owns an account.
Person StatusThe status of a user.
Person DnAn LDAP distinguished name for a user entity.
Person Business Unit DnAn LDAP distinguished name for a business unit to a userentity.
Person SupervisorThe name of a user for the supervisor of a user entity.
Account Audit namespaceThe Account Audit namespace pertains to the audit history of the accounts. Thisnamespace contains query subjects that are related to the audit of accounts,reconciliation, and provisioning policy.
212 IBM Security Identity Manager Version 6.0.0.18: Administration Topics

Use the account audit model and reports to view the details about the accountsthat are associated with a user.
Note: If the account is on the service that is defined as an access, the audit detailscan be seen only in the Access Audit namespace.
Query subjects for Account Audit namespace:
The following table lists the query subjects in the Account Audit namespace.
Table 43. Query subjects in the Account Audit namespace
Query subject Description
Account Audit Represents the audit history for the account entities.
Account Represents an account entity on which the audit actions areperformed. This query subject contains configuration and otherattributes that represent the status of the account. You must use thisquery subject with the Account Audit, Reconciliation Audit, andProvisioning Policy to obtain information about the accounts auditactions and provisioning operations.
Reconciliation Audit Represents the audit history that is associated with the reconciliationoperations.
Provisioning Policy Represents the provisioning policies and their configuration attributes.
Chapter 9. Report administration 213

Query items for Account Audit namespace:
The following table lists the query items in the Account Audit namespace.
Table 44. Query items in the Account Audit namespace
Query subject Query items and their description
Account AuditAudit Account Name
The name of an account on which the audit action is performed.
Audit ActionThe action that is performed on an account. For example, Add,Delete, Modify, and ChangePassword.
Audit CommentsThe comments that are entered by the audit workflow approver.
Audit Account Business UnitThe business unit of an account.
Audit Process SubjectA user who is the owner of an account on which the auditaction is performed.
Audit Process Service ProfileThe profile type of a service to which an account belongs.
Audit Process Subject ServiceThe service on which an account is provisioned.
Audit Initiator NameThe name of a user who initiated the audit action.
Audit Process Requestee NameThe name of an account owner.
Audit Process Recertifier NameThe name of a user who approves the audit process workflow.
Audit Operation Start TimeThe audit operation initiation date and time.
Audit Activity OwnerAn owner who owns the activity. For example, An owner namewho approves the add request for the pending account.
Audit Activity NameThe name of the audit activity.
Audit Activity Start TimeThe audit activity start date and time.
Audit Activity Completion TimeThe audit activity completion date and time.
Audit Process Submission TimeThe audit process submission date and time.
Audit Process Schedule Time The date and time at which an event is scheduled for execution.
Audit Process Completion TimeThe audit process completion date and time.
Audit Activity Result SummaryThe result of the activity within the account audit process.
Audit Process Result SummaryThe result of the account audit process.
214 IBM Security Identity Manager Version 6.0.0.18: Administration Topics

Table 44. Query items in the Account Audit namespace (continued)
Query subject Query items and their description
AccountAccount Name
The name of an account on which the audit action is performed.
Account Service NameThe name of a service on which the account is provisioned.
Account StatusThe account status. The valid values are Active and Inactive.
Account Is OrphanIndicates whether an account is associated with a user or not.The valid values are Yes and No. Yes represents the account isorphaned, and No represents the account is not orphaned.
Account ComplianceIndicates whether an account is compliant or not. The validvalues are Compliant, Non compliant, Unknown, and Disallowed.
Account Last Access DateThe last accessed date and time of an account.
Account Owner First NameThe given name of a user who is the owner of an account.
Account Owner Last NameThe surname of a user who is the owner of an account.
Account DnAn LDAP distinguished name for an account.
Account Service DNAn LDAP distinguished name for the service to which anaccount belongs.
Account Owner Business Unit DnAn LDAP distinguished name for the business unit to which anaccount owner belongs.
Account Owner DnAn LDAP distinguished name for the account owner.
Chapter 9. Report administration 215

Table 44. Query items in the Account Audit namespace (continued)
Query subject Query items and their description
Reconciliation AuditReconciliation User Name
The name of a user to whom an account is associated during thereconciliation operation.
Reconciliation Account NameThe name of the reconciled account.
Reconciliation Processed AccountsThe number of processed accounts that exist during the last runof reconciliation.
Reconciliation TIM User AccountsThe number of processed accounts that belong to IBM SecurityIdentity Manager users.
Reconciliation Local AccountsThe total number of local accounts created. It does not includethe newly created orphan accounts.
Reconciliation Policy ViolationsThe number of policy violations that are found for the accountsduring the reconciliation. This number includes:
v The accounts where an attribute value is different from thelocal account.
v Any attribute value of the account is not compliant with thegoverning provisioning policies.
It does not include the accounts where the attribute values ofthe local and remote accounts are same, even if the values arenoncompliant.
Reconciliation Start TimeThe reconciliation operation initiation date and time.
Reconciliation Completion TimeThe reconciliation operation completion date and time.
Reconciliation Policy Compliance StatusThe reconciliation completion status.
Reconciliation OperationThe operation that is performed for the entry of the serviceinstance. The possible values for an account entry are New Local,New Orphan, Suspended Account, and Deprovisioned Account.
Reconciliation Requester NameThe name of an initiator who initiates the reconciliationoperation on the account for a service.
216 IBM Security Identity Manager Version 6.0.0.18: Administration Topics

Table 44. Query items in the Account Audit namespace (continued)
Query subject Query items and their description
Provisioning PolicyProvisioning Policy Name
The name of a provisioning policy through which an account isprovisioned on the service.
Provisioning Policy DnAn LDAP distinguished name for the provisioning policy.
Provisioning Policy Container DnAn LDAP distinguished name for the business unit to which theprovisioning policy applies.
Provisioning Policy Service NameThe name of a service to which the provisioning policy applies.
Provisioning Policy Service TypeThe profile type of a service to which the provisioning policyapplies.
Provisioning Policy Service Business Unit NameThe business unit of a service to which the provisioning policyapplies.
Account Configuration namespaceThe Account Configuration namespace contains the query subjects and queryitems for configuring the accounts.
Query subjects for Account Configuration namespace:
The following table lists the query subjects in the Account Configurationnamespace.
Table 45. Query subjects in the Account Configuration namespace
Query subject Description
Account Represents an account entity and its configuration attributes. Thequery subject also contains the detailed information about the serviceto which the account belongs.
Account Owner Represents a user who owns an account. You must use this querysubject with the Account query subject to obtain information about theaccounts that are managed by the user.
Account Owner RoleMembership
Represents the role information. You must use this query subject withthe Account Owner query subject to obtain information about the rolemembership of the account owners.
Group Represents the group access and some of its configuration attributes.You must use this query subject with the Account query subject toobtain information about the account members of a group.
Service Business Unit Represents the business unit to which a service belongs. You must usethis query subject with the Account query subject to obtaininformation about the business unit where the service is located.
Credential Represents a credential for an account. You must use this querysubject with the Account query subject to obtain information about thecredential and its configuration attributes.
Credential Pool Represents a pool of credentials for an account. You must use thisquery subject with the Account query subject to obtain informationabout the credential pool and its configuration attributes.
Account ACI Represents the Access Control Item (ACI) that are applicable on theaccounts. You must use this query subject with the Account querysubject to obtain information about the accounts that are managed byan ACI.
Chapter 9. Report administration 217

Table 45. Query subjects in the Account Configuration namespace (continued)
Query subject Description
ACI Operations Represents the operations that are governed by an ACI. You must usethis query subject with the Account ACI query subject to obtaininformation about an ACI associated with the account.
ACI Attribute Permisions Represents the attributes and operations that can be performed on anattribute. You must use this query subject with the Account ACI querysubject to obtain information about an ACI associated with theaccount.
Identity Policy Represents the identity policy and its configuration attributes. Youmust use this query subject with the Account query subject to obtaininformation about the accounts that are managed by the policy.
Provisioning Policy Represents the provisioning policy and some of its configurationattributes. You must use this query subject with the Account querysubject to obtain information about the policy that provisioned theaccount.
Recertification Policy Represents the recertification policy and some of its configurationattributes. You must use this query subject with the Account querysubject to obtain information about the accounts that are recertified bythe policy.
Password Policy Represents the password policy and its configuration attributes. Youmust use this query subject with the Account query subject to obtaininformation about the accounts that are managed by the policy.
218 IBM Security Identity Manager Version 6.0.0.18: Administration Topics

Query items for Account Configuration namespace:
The following table lists the query items in the Account Configuration namespace.
Table 46. Query items in the Account Configuration namespace
Query subject Query items and their description
AccountAccount Name
The name of an account.
Account StatusAn account status. The valid values are Active and Inactive.
Account ComplianceIndicates whether an account is compliant or not. The validvalues are Unknown, Compliant, Non Compliant, and Disallowed.
Account Ownership TypeThe type of the account ownership. The valid values are Device,Individual, System, and Vendor.
Account Last Access DateThe last accessed date and time of an account.
Account Service NameThe name of a service in which the account is located.
Account DnAn LDAP distinguished name for an account.
Account Container DnAn LDAP distinguished name for a business unit to which anaccount belongs.
Account Service DnAn LDAP distinguished name for a service to which theaccounts belong.
Account Service Container DNAn LDAP distinguished name for a business unit of a servicethat is associated with the accounts.
Account Service UrlA URL that connects to a managed resource.
Account Service TypeThe service profile type.
Account OwnerPerson Full Name
The full name of a user who owns an account.
Person Last NameThe surname of a user who owns an account.
Person DnAn LDAP distinguished name for an account owner.
Person Business Unit DnAn LDAP distinguished name for the business unit to which anaccount owner belongs.
Person SupervisorThe user supervisor of the account owner.
Chapter 9. Report administration 219

Table 46. Query items in the Account Configuration namespace (continued)
Query subject Query items and their description
Account Owner RoleMembership Role Name
The name of a role.
Role TypeThe type of a role. The valid values are Static and Dynamic.
Role DnAn LDAP distinguished name for a role.
Role Container DNAn LDAP distinguished name for the business unit that isassociated with a role.
GroupGroup Name
The name of a group for which an access is defined.
Group TypeThe profile type of a group.
Group Access NameThe name of the access that is defined for a group.
Group Access TypeThe type of the access that is defined for a group.
Group SupervisorAn LDAP distinguished name for a group supervisor.
Group DNAn LDAP distinguished name for a group to which an access isdefined.
Group Container DnAn LDAP distinguished name for the business unit that isassociated with a group.
Group Service DnAn LDAP distinguished name for the service that is associatedwith a group.
Service Business UnitBusiness Unit Name
The name of the business unit to which a user belongs.
Business Unit SupervisorThe user supervisor of the business unit.
Business Unit DnAn LDAP distinguished name for the business unit to which auser belongs.
Business Unit Container DnAn LDAP distinguished name for the parent the business unit ofan organization entity.
220 IBM Security Identity Manager Version 6.0.0.18: Administration Topics

Table 46. Query items in the Account Configuration namespace (continued)
Query subject Query items and their description
CredentialCredential Name
The name of a shared credential.
Credential Policy NameThe name of a policy that provides the entitlements for acredential.
Credential DescriptionDescribes a credential as specified in the credentialconfiguration.
Credential Is ExclusiveIndicates whether the credential is exclusive or not. 0 representsYes, and 1 represents No.
Credential Pool Use Global SettingsA flag that indicates whether a credential pool uses the sharedaccess global settings. 0 represents Uses global settings, and 1represents Does not use gloabl settings.
Credential Is SearchableIndicates whether a credential is searchable or not. 0 representsCan be searched, and 1 represents cannot be searched.
Credential Is Password ViewableSpecifies whether a use can view the password on a credential. 0represents password is viewable, and 1 represents password isnot viewable.
Credential Reset PasswordIndicates whether the password of a credential is regenerated onevery check-in action. 0 represents Yes, and 1 represents No.
Credential MAX Checkout TimeThe maximum allowed check-out duration for the credential inhours.
Credential Service NameThe name of a service to which the credential is provisioned.
Credential Service Business Unit NameThe name of the business unit to which the credential servicebelongs.
Credential DnAn LDAP distinguished name for a credential.
Credential Service DnAn LDAP distinguished name for the service on which acredential is provisioned.
Credential Service Business Unit DnAn LDAP distinguished name for the business unit of acredential service.
Credential Shared Access Member Role DnAn LDAP distinguished name for the role who is a member ofthe shared access policy that provides entitlement for thecredential.
Credential Shared Access Policy Ida unique numeric identifier that is assigned to the policy by IBMSecurity Identity Manager.
Chapter 9. Report administration 221

Table 46. Query items in the Account Configuration namespace (continued)
Query subject Query items and their description
Credential PoolCredential Pool Name
The name of the credential pool.
Credential Pool Policy NameThe name of a policy that provides the entitlements for thecredential pool.
Credential Pool Service NameThe name of the service on which the groups corresponding tothe credential pool are provisioned.
Credential Pool Service Business Unit NameThe name of the business unit to which the credential poolservice belongs.
Credential Pool Group NameThe name of the group corresponding to credential pool.
Credential Pool DnAn LDAP distinguished name for the credential pool.
Credential Pool Service DnAn LDAP distinguished name for the service on which thegroups corresponding to the credential pool are provisioned.
Credential Pool Business Unit DnAn LDAP distinguished name for the business unit of acredential pool service.
Credential Pool Shared Access Member Role DnAn LDAP distinguished name for the role who is a member ofthe shared access policy that provides entitlement for thecredential pool.
Credential Pool Shared Access Policy IdA unique numeric identifier that is assigned to the policy byIBM Security Identity Manager system.
222 IBM Security Identity Manager Version 6.0.0.18: Administration Topics

Table 46. Query items in the Account Configuration namespace (continued)
Query subject Query items and their description
Account ACIACI Name
The name of an ACI.
ACI Business Unit NameThe name of a business unit to which an ACI applies.
ACI Protection CategoryThe category of an entity that is protected by an ACI. The valueof this item must be Account.
ACI TargetThe type of selected protection category that is associated withan ACI. The valid values and their meanings:
v erAccountItem - All type of the accounts.
v erLDAPUserAccount - LDAP accounts.
v erPosixAixAccount - POSIX AIX accounts.
v erPosixHpuxAccount - POSIX HP-UX accounts.
v erPosixLinuxAccount - POSIX Linux accounts.
v erPosixSolarisAccount - POSIX Solaris accounts.
ACI scopeThe scope of an ACI. It determines whether an ACI applies tosubunits of a business organization or not. The valid values andtheir meanings:
v single - The policy applies to a business unit and not itssubunits.
v subtree - The policy applies to the subunits of a businessorganization.
ACI Member NameThe members who are governed by an ACI. The valid valuesare:
v All users in the system.
v The account owner.
v The manager of the account owner.
v The owner of the service that the account resides on.
v The owner of any access defined on the service that theaccount resides on.
v The sponsor of the business partner organization inwhich the account resides.
v The administrator of the domain in which the accountresides.
ACI System Group NameRepresents the name of the group whose members are governedby an ACI.
ACI Business Unit DnAn LDAP distinguished name for the business unit.
ACI System Group DnAn LDAP distinguished name for a system group.
ACI OperationsACI Operation Name
The name of an operation that is governed by an ACI.
ACI Operation PermissionThe permission applicable on an ACI operation. The validvalues are grant, deny, and none.
ACI Business Unit DnAn LDAP distinguished name for the business unit.
Chapter 9. Report administration 223

Table 46. Query items in the Account Configuration namespace (continued)
Query subject Query items and their description
ACI Attribute PermisionsACI Attribute Name
The name of an LDAP attribute on which the permissions arecontrolled by an ACI.
ACI Attribute OperationThe name of the operation that can be run on an attribute. Thevalid values are r for read operation, w for write operation, andrw for read and write operations.
ACI Attribute PermissionThe permission applicable on an ACI operation. The validvalues are grant and deny.
ACI Business Unit DnAn LDAP distinguished name for the business unit.
Identity PolicyIdentity Policy Name
The name of an identity policy.
Identity Policy ScopeThe scope of an identity policy. It determines whether the policyapplies to the subunits of a business organization or not. Thevalid values and their meanings:
v single - The policy applies to a business unit and not itssubunits.
v subtree - The policy applies to the subunits of a businessorganization.
Identity Policy EnabledShows whether or not the policy is enabled.
Identity Policy User ClassThe type of a user for which the policy applies. The valid valuesare Person and Business Partner Person.
Identity Policy Target TypeDetermines the type of the service within the policy businessunit on which the identity policy is applied. The valid valuesand their meanings:
v All Services - All the defined services.
v Specific Service - The services that are explicitly added by auser.
v PosixLinuxProfile - All the services of type POSIX Linuxprofile.
v LdapProfile - All the services of type LDAP profile.
v PosixAixProfile - All the services of type POSIX AIX profile.
v PosixSolarisProfile - All the services of type POSIX Solarisprofile.
v PosixHpuxProfile - All the services of type POSIX HP_UXProfile.
v ITIMService - Default service that is used for IBM SecurityIdentity Manager accounts.
Identity Policy DnAn LDAP distinguished name for the identity policy.
Identity Policy Target DnAn LDAP distinguished name for the service on which theidentity policy is applied.
Identity Policy Container DnAn LDAP distinguished name for the business unit where theidentity policy is located.
224 IBM Security Identity Manager Version 6.0.0.18: Administration Topics

Table 46. Query items in the Account Configuration namespace (continued)
Query subject Query items and their description
Provisioning PolicyProvisioning Policy Name
The name of a provisioning policy.
Provisioning Policy Member NameThe name of the entities that is provisioned by a policy. Thevalid values are:
v All users in the organization
v All other users who are not granted to theentitlement(s) defined by this provisioning policy viaother policies.
Provisioning Policy DnAn LDAP distinguished name for the provisioning policy.
Provisioning Policy Container DnAn LDAP distinguished name for a business unit to which theprovisioning policy applies.
Recertification PolicyRecertification Policy Name
The name of the recertification policy.
Recertification Policy TypeThe type of an entity that gets recertified by the policy. Thevalid values are Account, Access, and Identity.
Recertification Policy DescriptionDescribes the policy as specified in the policy configuration.
Recertification Policy EnabledShows whether or not the policy is enabled.
Recertification Policy Scheduling ModeThe recertification scheduling modes. The valid values areCALENDAR and ROLLING.
Recertification Policy Rolling IntervalThe recertification period if the recertification policy schedulingmode is ROLLING. No value in this query item indicates that thescheduling is not in the ROLLING mode.
Recertification Policy Reject ActionAn action that is taken if the recertification is rejected.
Recertification Policy Timeout Period in DaysThe duration during which the recertifier must act.
Recertification Policy Timeout ActionAn automatic action that must be taken if the recertificationtimes out.
Recertification Policy DNAn LDAP distinguished name for the recertification policy.
Recertification Policy Container DNAn LDAP distinguished name for a business unit to which therecertification policy applies.
Recertification Policy IsCustomIndicates whether this recertification policy is customized. It isdefined in a workflow.
Recertification Policy User ClassThe type of a user the recertification policy applies. The validvalues are All, Person, and Business Partner Person.
Chapter 9. Report administration 225

Table 46. Query items in the Account Configuration namespace (continued)
Query subject Query items and their description
Password PolicyPassword Policy Name
The name of a password policy.
Password Policy ScopeThe scope of a password policy. It determines whether thepolicy applies to subunits of a business organization or not. Thevalid values and their meanings:
v single - The policy applies to a business unit and not itssubunits.
v subtree - The policy applies to the subunits of a businessorganization.
Password Policy EnabledShows whether or not the policy is enabled.
Password Policy Target TypeDetermines the type of a service within the policy business uniton which the password policy is applied. The valid values are:
v All Services - All the defined services.
v Specific Service - The services that are explicitly added by auser.
v PosixLinuxProfile - All the services of type POSIX Linuxprofile.
v LdapProfile - All the services of type LDAP profile.
v PosixAixProfile - All the services of type POSIX AIX profile.
v PosixSolarisProfile - All the services of type POSIX Solarisprofile.
v PosixHpuxProfile - All the services of type POSIX HP_UXProfile.
v ITIMService - Default service that is used for IBM SecurityIdentity Manager accounts.
Password Policy DnAn LDAP distinguished name for the password policy.
Password Policy Target DnAn LDAP distinguished name for the service on which thepassword policy is applied.
Password Policy Container DnAn LDAP distinguished name for the business unit where theidentity policy is located.
Provisioning Policy Audit namespaceThe Provisioning Policy Audit namespace pertains to the audit history of theprovisioning policies. You can generate the audit reports for the actions that areperformed on the provisioning policies and automatically provisioned accounts.
Query subjects for Provisioning Policy Audit namespace:
The following table lists the query subjects in the Provisioning Policy Auditnamespace.
Table 47. Query subjects in the Provisioning Policy Audit namespace
Query subject Description
Provisioning Policy Audit Represents a history of the provisioning policies and accounts.
226 IBM Security Identity Manager Version 6.0.0.18: Administration Topics

Table 47. Query subjects in the Provisioning Policy Audit namespace (continued)
Query subject Description
Provisioning Policy Represents the provisioning policies on which the audit actions areperformed. To obtain more information about the policy and accountsthat go through the audit actions, use this query subject with thefollowing query subjects:
v Provisioning Policy Audit
v Provisioning Policy Business Unit
v Provisioning Policy Service
Provisioning Policy BusinessUnit
Represents the business unit to which the provisioning policy applies.
Provisioning Policy Service Represents the managed service to which the provisioning policyapplies.
Query items for Provisioning Policy Audit namespace:
The following table lists the query items in the Provisioning Policy Auditnamespace.
Chapter 9. Report administration 227

Table 48. Query items in the Provisioning Policy Audit namespace
Query subject Query items and their description
Provisioning PolicyAudit Audit Provisioning Policy Name
The name of a provisioning policy.
Audit Provisioning Policy Business UnitThe name of a business unit to which the provisioning policyapplies.
Audit ActionThe action that is performed on the provisioning policy. Forexample, Add, Modify, and EnforceEntirePolicy.
Audit Process SubjectA subject of the automatically provisioned audit action. It can bethe provisioning policy or the accounts that are provisioned.
Audit Subject TypeThe type of the audit subject. For example, Policy and Account.
Audit Process Subject ProfileThe profile type of the accounts that is provisioned by theprovisioning policy. This query item applies only to theaccounts.
Audit Process Subject ServiceThe service on which the accounts are provisioned. This queryitem applies only to the accounts.
Audit Initiator NameThe name of a user who initiated the audit action.
Audit Process Requestee NameThe name of a user on behalf of whom the audit action isinitiated.
Audit CommentsThe comments that are entered by an approver during the auditworkflow approval.
Audit Operation Start TimeThe audit operation start date and time.
Audit Process Submission TimeThe audit process submission date and time.
Audit Process Schedule Time The date and time at which an event is scheduled for execution.
Audit Process Completion TimeThe audit process completion date and time.
Audit Process Result SummaryThe result summary of the account request workflow process.
Activity NameThe name of the audit activity.
Activity Submission TimeThe audit activity submission date and time.
Activity Completion TimeThe audit activity completion date and time.
Audit Activity Result SummaryThe result summary of an activity in the account requestworkflow process.
Audit Process RecertifierThe name of a user who approves the audit process workflow.
Audit provisioning policy DnAn LDAP distinguished name for the provisioning policy onwhich the audit actions are performed.
228 IBM Security Identity Manager Version 6.0.0.18: Administration Topics

Table 48. Query items in the Provisioning Policy Audit namespace (continued)
Query subject Query items and their description
Provisioning PolicyProvisioning Policy Name
The name of a provisioning policy.
Provisioning Policy ScopeThe scope in terms of a hierarchy of the business units to whichthe provisioning policy applies.
Provisioning Policy DnAn LDAP distinguished name for the provisioning policy.
Provisioning Policy Business Unit DnAn LDAP distinguished name for the business unit to which theprovisioning policy applies.
Provisioning PolicyBusiness Unit Business Unit Name
The name of the business unit to which the provisioning policyapplies.
Business Unit SupervisorThe supervisor of a user for the business unit to which theprovisioning policy applies.
Business Unit Container DnAn LDAP distinguished name for the business unit where theprovisioning policy business unit is located.
Business Unit DnAn LDAP distinguished name for the business unit to which theprovisioning policy belongs.
Provisioning PolicyService Service Name
The name of a service to which the provisioning policy applies.
Service TypeThe profile type of a service to which the provisioning policyapplies.
Service Business UnitThe business unit of a service to which the provisioning policyapplies.
Service DnAn LDAP distinguished name for a service to which theprovisioning policy belongs.
Service Business Unit DnAn LDAP distinguished name for the business unit to which theservice belongs.
Service Owner DnAn LDAP distinguished name for the user owner of a service.
Provisioning Policy Config namespaceThe Provisioning Policy Config namespace pertains to the configurationattributes of a provisioning policy. It encompasses the business units, services,policy members, and the ACIs that are related to the provisioning policies. You cangenerate the configuration reports for the provisioning policy.
Query subjects for Provisioning Policy Config namespace:
The following table lists the query subjects in the Provisioning Policy Confignamespace.
Chapter 9. Report administration 229

Table 49. Query subjects in the Provisioning Policy Config namespace
Query subject Description
Provisioning Policy Represents the provisioning policy and its configuration attributes.
Provisioning Policy Parameters Represents the parameters that are defined for the entitlements of aprovisioning policy. You must use this query subject with theProvisioning Policy query subject.
Provisioning Policy RoleMembers
Represents the user members of a role that is a part of theprovisioning policy. You must use this query subject with theProvisioning Policy query Subject.
ACI Attribute Permissions Represents the permissions that are defined on the attributes by anACI. You must use this query subject with the Provisioning PolicyACI query subject.
ACI Operations Represents the permissions that are defined on the class operationsby an ACI. You must use this query subject with the ProvisioningPolicy ACI query subject.
Provisioning Policy ACI Represents an ACI associated with a provisioning policy. You mustuse this query subject with the Provisioning Policy query subject.
Query items for Provisioning Policy Config namespace:
The following table lists the query items in the Provisioning Policy Confignamespace.
Note: The policies that are in the Draft mode cannot be identified. Although thedraft policies are in the list, there is no attribute that can identify the draft policies.
230 IBM Security Identity Manager Version 6.0.0.18: Administration Topics

Table 50. Query items in the Provisioning Policy Config namespace
Query subject Query items and their description
Provisioning PolicyProvisioning Policy Name
The name of a provisioning policy.
Provisioning Policy Business UnitThe name of a business unit to which the provisioning policyapplies.
Provisioning Policy Is EnabledRepresents whether the provisioning policy is enabled or not.The valid values are Enabled and Disabled.
Provisioning Policy PriorityAn integer number greater than zero that indicates the priorityof the provisioning policy.
Provisioning Policy ScopeThe scope in terms of a hierarchy of the business units to whichthe provisioning policy applies. The valid values are Single andSubtree.
Provisioning Policy Member NameThe name of a role or user who is a member of the provisioningpolicy. The valid values are All users in the organization, Allother users who are not granted to the entitlement(s)defined by this provisioning policy via other policies, orthe names of the roles who are the members.
Provisioning Policy DnAn LDAP distinguished name for the provisioning policy.
Provisioning Policy Business Unit DnAn LDAP distinguished name for the business unit to which theprovisioning policy applies.
Provisioning Policy Service NameThe name of a service to which the provisioning policy applies.
Provisioning Policy Service TypeThe profile type of a service to which the provisioning policyapplies.
Provisioning Policy Service UrlA URL of a service to which the provisioning policy applies.
Provisioning Policy Service Business UnitThe business unit of a service to which the provisioning policyapplies.
Provisioning PolicyParameters Provisioning Policy Parameter
A provisioning policy parameter that is defined by the systemadministrator.
Provisioning Policy Parameter ValueThe parameter value.
Provisioning Policy Parameter Enforcement TypeSpecifies the rule for the system to evaluate an attribute valuevalidity. The possible values are Mandatory, Allowed, Default,and Excluded.
Service TargetAn LDAP distinguished name for the service that is associatedwith the provisioning policy.
Chapter 9. Report administration 231

Table 50. Query items in the Provisioning Policy Config namespace (continued)
Query subject Query items and their description
Provisioning Policy RoleMembers Role Member First Name
The given name of a role member.
Role Member Last NameThe surname of a role member.
Role Member StatusThe current state of the role member. The valid values areActive and Inactive.
Role Member DnAn LDAP distinguished name for a role member.
Role Member Business Unit DnAn LDAP distinguished name for the business unit of a rolemember.
Role Member SupervisorThe user supervisor of the role member.
ACI AttributePermissions ACI Attribute Name
The name of an attribute that is controlled by an ACI.
ACI Attribute OperationThe name of an operation that is governed by an ACI.
ACI Attribute PermissionThe permission that applies on an ACI operation. The validvalues are grant, deny, and none.
ACI Business Unit DnAn LDAP distinguished name for the business unit.
ACI OperationsACI Operation Name
The class operation for an ACI. For example, Search, Add, andModify.
ACI Operation PermissionThe permission that is associated with a class operation. Thevalid values are grant, deny, and none.
ACI Business Unit DnAn LDAP distinguished name for the business unit to which anACI applies.
232 IBM Security Identity Manager Version 6.0.0.18: Administration Topics

Table 50. Query items in the Provisioning Policy Config namespace (continued)
Query subject Query items and their description
Provisioning Policy ACIACI Name
The name of an ACI associated with the provisioning policy.
ACI Business UnitThe name of a business unit to which an ACI applies.
ACI ScopeThe hierarchy of the business units to which an ACI applies.
ACI Member NameThe members who are governed by an ACI. The valid valuesare:
v All Users - All users in the system.
v All Group Members - The users who are the members of thesegroups.
v Supervisor - The supervisor of the business unit in which theprovisioning policy resides.
v Sponsor - The sponsor of the business partner organization inwhich the role resides.
v Administrator - The administrator of the domain in which theaccount resides.
ACI System Group NameThe name for IBM Security Identity Manager group that is thepart of an ACI. This query item is valid only when ACI membername is the name of the user members of a specified group.
ACI Business Unit DnAn LDAP distinguished name for the business unit to which anACI applies.
ACI Role DnAn LDAP distinguished name for IBM Security IdentityManager group that is a part of an ACI.
ACI Role Business Unit DnAn LDAP distinguished name for a business unit that isassociated with IBM Security Identity Manager group.
ACI ParentAn LDAP distinguished name for the parent container in whichan ACI is defined.
Role Audit namespaceThe Role Audit namespace pertains to the audit history of the actions that areperformed on the roles. You can generate the audit reports for the role entities.
Query subjects for Role Audit namespace:
The following table lists the query subjects in the Role Audit namespace.
Table 51. Query subjects in the Role Audit namespace
Query subject Description
Role Represents the role entity and its configuration attributes on which theaudit actions are performed.
Role Audit Represents the audit history of the role entities. You must use thisquery subject with the Role query subject.
Role Business Unit Represents the business unit to which a role associated with the auditaction belongs. You must use this query subject with the Role querysubject.
Chapter 9. Report administration 233

Table 51. Query subjects in the Role Audit namespace (continued)
Query subject Description
Role Membership Represents the person who is the member of a role and itsconfiguration attributes. You must use this query subject with the Rolequery subject.
Role Owner Represents an owner of a role that is associated with the audit action.The owner can be a user or role. You must use this query subject withthe Role query subject.
Query items for Role Audit namespace:
The following table lists the query items in the Role Audit namespace.
Table 52. List of query items in the Role Audit namespace
Query subject Query items and their description
RoleRole Name
The name of a role on which the audit actions areperformed.
Role DescriptionThe description of the role.
Role TypeThe type of a role. The valid values are Static and Dynamic.
Role DnAn LDAP distinguished name for the role.
Role Container DnAn LDAP distinguished name for the container of the role.
234 IBM Security Identity Manager Version 6.0.0.18: Administration Topics

Table 52. List of query items in the Role Audit namespace (continued)
Query subject Query items and their description
Role AuditAudit Role Name
The name of a role entity on which the audit action isperformed.
Audit Role Business UnitThe business unit of the role.
Audit ActionThe action that is performed on a role. For example, Add,Modify, Delete, and AddMember.
Audit CommentsThe comments that are entered by the audit workflowapprover.Note: Along with the audit comments, this query item mightcontain the operational data.
Audit Initiator NameThe name of a user who initiated the audit action.
Audit Process Requestee NameThe name of a user who is added to the role. This queryitem is applicable only to AddMember audit action.
Audit Process Recertifier NameThe name of a user who approved the audit action.
Audit Operation Start TimeThe audit operation start date and time.
Audit Process Submission TimeThe audit process submission date and time.
Audit Process Schedule Time The date and time at which an event is scheduled forexecution.
Audit Process Completion TimeThe audit process completion date and time.
Audit Process SubjectThe subject on which the audit action was performed. Itapplies to the cases where the defined workflow mustcomplete before the audit action completion.
Audit Process Subject ProfileThe profile type of an entity that is associated with the auditaction. This query item contains the value only if the AuditProcess Subject contain a value.
Audit Process Subject ServiceThe service to which an entity represented by the AuditProcess Subject query item belongs.
Audit Process Result SummaryThe result of a role audit process.
Activity Result SummaryThe result of an activity within a role audit process.
Audit Activity NameThe name of the activity that corresponds to the auditprocess.
Audit Activity OwnerAn owner who owns the activity. For example: Approve rolemembership or Add request.
Chapter 9. Report administration 235

Table 52. List of query items in the Role Audit namespace (continued)
Query subject Query items and their description
Role Business UnitBusiness Unit Name
The name of a business unit to which the role belongs.
Business Unit SupervisorA person who is the supervisor of a business unit to whichthe role belongs.
Business Unit DnAn LDAP distinguished name for a business unit to whichthe role belongs.
Business Unit Container DNAn LDAP distinguished name for the parent organization ofthe business unit to which the role belongs.
Role MembershipRole Member First Name
The given name of a role member.
Role Member Last NameThe surname of a role member.
Role Member SupervisorThe supervisor of a role member.
Role Member DnAn LDAP distinguished name for a role member.
Role DnAn LDAP distinguished name for a role.
Role Member Business Unit DnAn LDAP distinguished name for the business unit to whicha role member belongs.
Role OwnerRole Owner Name
The name of an owner of the role.
Role Owner TypeIndicates whether the owner is a role or a user. The validvalues are User and Role.
Role Owner Business UnitThe business unit to which the role owner belongs.
Role DnAn LDAP distinguished name for a role.
Role Configuration namespaceThe Role Configuration namespace contains the query subjects and query itemsfor configuring the roles.
Query subjects for Role Configuration namespace:
The following table lists the query subjects in the Role Configuration namespace.
Table 53. Query subjects in the Role Configuration namespace
Query subject Description
Role Represents a role and some of its configuration attributes.
Role Owner Represents an owner of a role that is associated with the audit action.The owner can be a user or role. You must use this query subject withthe Role query subject.
236 IBM Security Identity Manager Version 6.0.0.18: Administration Topics

Table 53. Query subjects in the Role Configuration namespace (continued)
Query subject Description
Parent Roles Represents the parent of a role. You must use this query subject withthe Role query subject to obtain information about the parent of therole.
Role Assignment Attributes Represents an assignment attributes for a role. You must use thisquery subject with the Role query subject to obtain information aboutthe assignment attributes for the role.
Role Members Represents the user members of a role. You must use this querysubject with the Role query subject to obtain information about themembers of the role.
Role ACI Represents an ACI that is applicable on the roles. You must use thisquery subject with the Role query subject to obtain information aboutthe roles that are managed by an ACI.
ACI Operations Represents information about operations that are governed by an ACI.You must use this query subject with the Role ACI query subject toobtain information about an ACI associated with the role.
ACI Attribute Permissions Represents information about the attributes and operations that can beperformed on the attributes. You must use this query subject with theRole ACI query subject to obtain information about an ACI associatedwith a role.
Recertification Policy Represents the recertification policy and some of its configurationattributes. You must use this query subject with the Role query subjectto obtain information about the roles that are recertified by therecertification policy.
Recertification PolicyBusiness Unit
Represents a business unit to which the recertification policy isapplicable.
Provisioning Policy Represents the provisioning policy and some of its configurationattributes. You must use this query subject with the Role query subjectto obtain information about the roles who are member of aprovisioning policy.
Shared Access Policy Represents the shared access policy that provides entitlements for thecredentials and credential pools. You must use this query subject withthe Role query subject to obtain information about the role membersof the shared access policy.
Separation of Duty Policy Represents a separation of duty policy and some of its configurationattributes. You must use this query subject with the Role query subjectto obtain information about the roles to which the policy applies.
Separation of Duty Rule Represents the rule that is defined for a separation of duty policy. Youmust use this query subject with the Separation of Duty Policy andRole query subjects to obtain information about:
v The rules that are defined for a separation of duty policy.
v The roles that are covered by a separation of duty rule.
Chapter 9. Report administration 237
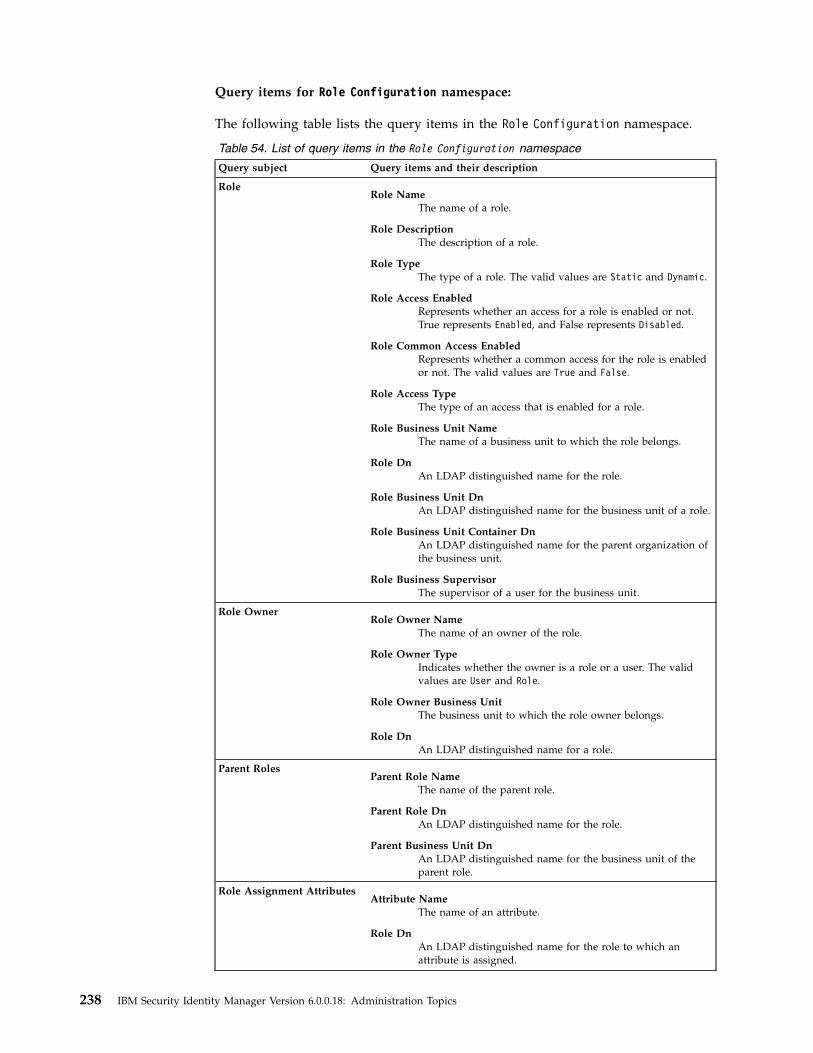
Query items for Role Configuration namespace:
The following table lists the query items in the Role Configuration namespace.
Table 54. List of query items in the Role Configuration namespace
Query subject Query items and their description
RoleRole Name
The name of a role.
Role DescriptionThe description of a role.
Role TypeThe type of a role. The valid values are Static and Dynamic.
Role Access EnabledRepresents whether an access for a role is enabled or not.True represents Enabled, and False represents Disabled.
Role Common Access EnabledRepresents whether a common access for the role is enabledor not. The valid values are True and False.
Role Access TypeThe type of an access that is enabled for a role.
Role Business Unit NameThe name of a business unit to which the role belongs.
Role DnAn LDAP distinguished name for the role.
Role Business Unit DnAn LDAP distinguished name for the business unit of a role.
Role Business Unit Container DnAn LDAP distinguished name for the parent organization ofthe business unit.
Role Business SupervisorThe supervisor of a user for the business unit.
Role OwnerRole Owner Name
The name of an owner of the role.
Role Owner TypeIndicates whether the owner is a role or a user. The validvalues are User and Role.
Role Owner Business UnitThe business unit to which the role owner belongs.
Role DnAn LDAP distinguished name for a role.
Parent RolesParent Role Name
The name of the parent role.
Parent Role DnAn LDAP distinguished name for the role.
Parent Business Unit DnAn LDAP distinguished name for the business unit of theparent role.
Role Assignment AttributesAttribute Name
The name of an attribute.
Role DnAn LDAP distinguished name for the role to which anattribute is assigned.
238 IBM Security Identity Manager Version 6.0.0.18: Administration Topics

Table 54. List of query items in the Role Configuration namespace (continued)
Query subject Query items and their description
Role MembersRole Member First Name
The given name of a role member.
Role Member Last NameThe surname of a role member.
Role Member Attribute NameThe name of the assignment attribute that is associated witha role member.
Role Member Attribute ValueAn assignment attribute value that is associated with a rolemember.
Role Member DnAn LDAP distinguished name for a role member.
Role Member Business Unit DnAn LDAP distinguished name for the business unit of a rolemember.
Role ACIRole ACI Name
The name of an ACI that applies to a role.
Role ACI Protection CategoryThe type of a role that is protected by an ACI. The validvalues are Static Role and Dynamic Role.
Role ACI ScopeThe scope of an ACI. It determines whether an ACI appliesto sub units of a business organization or not. The validvalues and their meanings:
v single - The policy applies to a business unit and not itssubunits.
v subtree - The policy applies to the subunits of a businessorganization.
Role ACI Member NameThe members who are governed by an ACI. The valid valuesare:
v All users in the system.
v The supervisor of the business unit in which the roleresides.
v The owners of the role, The administrator of thedomain in which the role resides.
v The sponsor of the business partner organization inwhich the role resides.
Role ACI System Group NameRepresents the name of the group whose members aregoverned by an ACI.
Role ACI Business Unit DnAn LDAP distinguished name for a business unit.
Role ACI System Group DnAn LDAP distinguished name for a system group.
Chapter 9. Report administration 239
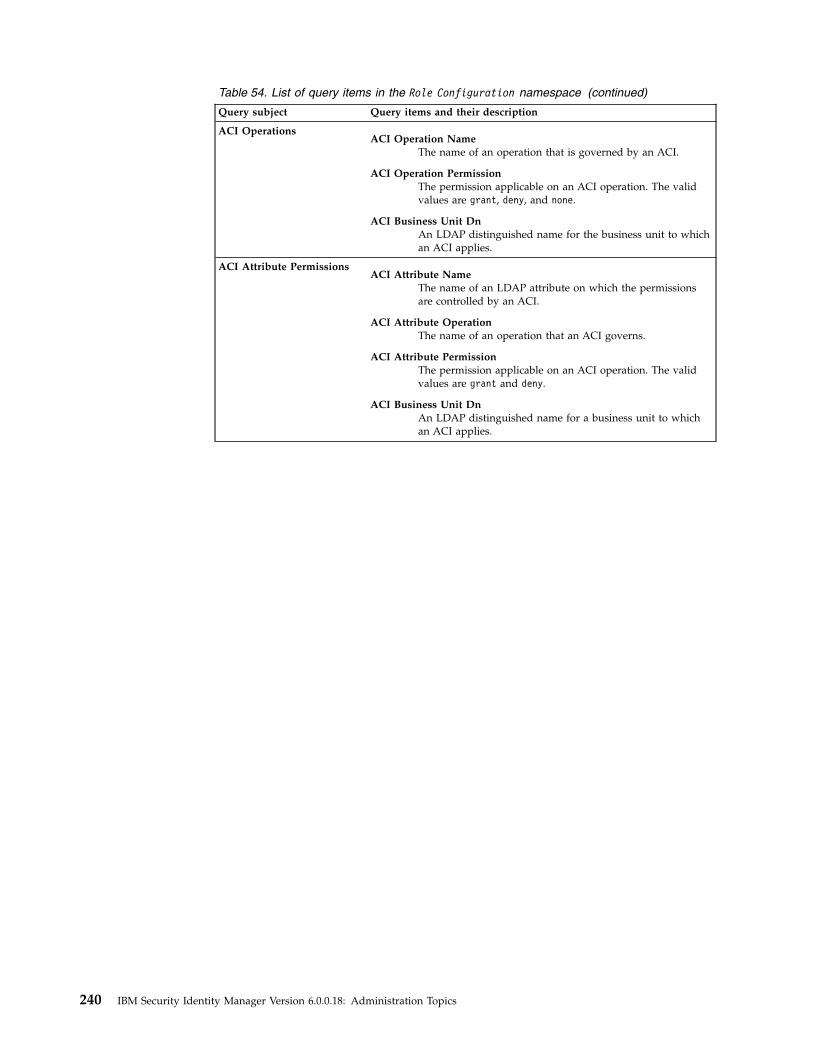
Table 54. List of query items in the Role Configuration namespace (continued)
Query subject Query items and their description
ACI OperationsACI Operation Name
The name of an operation that is governed by an ACI.
ACI Operation PermissionThe permission applicable on an ACI operation. The validvalues are grant, deny, and none.
ACI Business Unit DnAn LDAP distinguished name for the business unit to whichan ACI applies.
ACI Attribute PermissionsACI Attribute Name
The name of an LDAP attribute on which the permissionsare controlled by an ACI.
ACI Attribute OperationThe name of an operation that an ACI governs.
ACI Attribute PermissionThe permission applicable on an ACI operation. The validvalues are grant and deny.
ACI Business Unit DnAn LDAP distinguished name for a business unit to whichan ACI applies.
240 IBM Security Identity Manager Version 6.0.0.18: Administration Topics

Table 54. List of query items in the Role Configuration namespace (continued)
Query subject Query items and their description
Recertification PolicyRecertification Policy Name
The name of the recertification policy.
Recertification Policy TypeThe type of an entity that gets recertified by using thispolicy. The valid values are: Account, Access, and Identity.
Recertification Policy DescriptionDescribes the policy as specified in the policy configuration.
Recertification Policy EnabledShows whether or not the policy is enabled.
Recertification Policy Scheduling ModeThe recertification scheduling modes. The valid values areCALENDAR and ROLLING.
Recertification Policy Rolling IntervalRepresents the recertification period if the recertificationpolicy scheduling mode is ROLLING. No value in this queryitem indicates that the scheduling is not in the ROLLINGmode.
Recertification Policy Reject ActionAn action that is taken if the recertification is rejected.
Recertification Policy Timeout Period in DaysThe duration during which a recertifier must act.
Recertification Policy Timeout ActionThe automatic action that must be taken if the recertificationtimes out.
Recertification Policy DNAn LDAP distinguished name for the recertification policy.
Recertification Policy Container DNAn LDAP distinguished name for a business unit to whichthe recertification policy applies.
Recertification Policy IsCustomIndicates whether the recertification policy is customized ornot. It is defined in the workflow.
Recertification Policy User ClassThe type of a user to which the recertification policy applies.The valid values are All, Person, and Business PartnerPerson.
Recertification PolicyBusiness Unit Business Unit Name
The name of a business unit.
Business Unit SupervisorThe user supervisor of a business unit.
Business Unit DnAn LDAP distinguished name for a business unit.
Business Unit Container DNan LDAP distinguished name for the parent business unit.
Chapter 9. Report administration 241

Table 54. List of query items in the Role Configuration namespace (continued)
Query subject Query items and their description
Provisioning PolicyProvisioning Policy Name
The name of the provisioning policy.
Provisioning Policy Business Unit NameThe name of a business unit to which the provisioning policyapplies.
Provisioning Policy DnAn LDAP distinguished name for the provisioning policy.
Provisioning Policy Business Unit DnAn LDAP distinguished name for the business unit to whichthe provisioning policy applies.
Provisioning Policy Business SupervisorA user supervisor for the provisioning policy business unit.
Shared Access PolicyShared Access Policy Name
The name of a shared access policy.
Shared Access Policy DescriptionThe description the shared access policy.
Shared Access Policy Business Unit NameThe name of a business unit to which the shared accesspolicy applies.
Shared Access Policy ScopeThe scope of a shared access policy in terms of businessunits the policy applies. 1 represents that the policy appliesto the business unit only, and 2 indicates that the policyapplies to the sub business units also.
Shared Access Policy StatusRepresents whether a policy is enabled or not. 0 representsEnabled, and 1 represents Disabled.
Shared Access Business Unit SupervisorA user supervisor for the shared access policy business unit.
Shared Access Policy IDA unique numeric identifier that is assigned to the policy byIBM Security Identity Manager.
Shared Access Policy Business Unit DnAn LDAP distinguished name for the business unit to whicha shared access policy applies.
242 IBM Security Identity Manager Version 6.0.0.18: Administration Topics

Table 54. List of query items in the Role Configuration namespace (continued)
Query subject Query items and their description
Separation of Duty PolicySeparation of Duty Policy Name
The name of the separation of duty policy.
Separation of Duty Policy DescriptionThe description of the separation of duty policy.
Separation of Duty Policy Business Unit NameThe name of the business unit to which the separation ofduty policy applies.
Separation of Duty Policy EnabledRepresents whether the policy is enabled or not. Truerepresents Enabled, and False represents Disabled.
Separation of Duty Policy Owner NameThe name of an owner of the separation of duty policy.
Separation of Duty Policy Owner Typethe type of an owner for the separation of duty policy. Thevalid values are Role and Person.
Separation of Duty Policy Owner Business Unit NameThe name of the business unit that applies to the policyowner.
Separation of Duty Policy IdA unique numeric identifier that IBM Security IdentityManager assigns to the policy.
Separation of Duty Policy Owner DnAn LDAP distinguished name for the policy owner.
Separation of Duty RuleSeparation of Duty Rule Name
The name of the separation of duty rule.
Separation of Duty Rule Max Roles AllowedThe maximum number of roles that are allowed in a rule.
Separation of Duty Rule VersionA numeric identifier for the current version of the rule thatapplies to a policy.
Separation of Duty Rule IdA unique numeric identifier that IBM Security IdentityManager assigns to the rule.
Separation of Duty Policy IdA unique numeric identifier that IBM Security IdentityManager assigns to the policy.
Separation of Duty Role IdA unique numeric identifier that IBM Security IdentityManager assigns to the role.
Separation of Duty Audit namespaceThe Separation of Duty Audit namespace pertains to the audit history, exemptionand violation of the separation of duty policy.
Query subjects for Separation of Duty Audit namespace:
The following table lists the query subjects in the Separation of Duty Auditnamespace.
Chapter 9. Report administration 243

Table 55. Query subjects in the Separation of Duty Audit namespace
Query subject Description
Separation of Duty Policy Represents the separation of duty policy and the rules that areconfigured. You must use this query subject with the following querysubjects to generate the violation and exemption reports:
v Separation of Duty Policy Violation and Exemption History.
v Separation of Duty Policy Violation and Exemption CurrentStatus.
v Separation of Duty Policy Audit.
Separation of Duty PolicyRole
Represents the configuration attributes of a role. The role is a part ofthe rule that is associated with the separation of duty policy. Youmust use this query subject with the Separation of Duty Policyquery subject.
Separation of Duty PolicyViolation and ExemptionCurrent Status
Provides information about the exemption and violation for aseparation of duty policy. You must use this query subject with theSeparation of Duty Policy query subject.
Separation of Duty PolicyViolation and ExemptionHistory
Represents the historical information about exemption and violationfor a separation of duty policy. You must use this query subject withthe Separation of Duty Policy query subject.
Separation of Duty PolicyAudit
Represents the audit history for the separation of duty policy. Theactions that are audited in this query subject are Add, Modify, Delete,Reconcile, and Revoke. You must use this query subject with theSeparation of Duty Policy query subject to generate an audit historyreport.
Separation of Duty PolicyRole Conflict
Provides information about:
v The roles that are involved in a violation.
v The role on the person that is found to be in violation of theseparation of duty policy rule.
You must use this query subject with the Separation of Duty PolicyViolation and Exemption Current Status query subject to obtainmore information about the violation that is occurred.
Query items for Separation of Duty Audit namespace:
The following table lists the query items in the Separation of Duty Auditnamespace.
244 IBM Security Identity Manager Version 6.0.0.18: Administration Topics

Table 56. Query items in the Separation of Duty Audit namespace
Query subject Query items and their description
Separation of Duty PolicySeparation of Duty Policy Name
The name of the separation of duty policy.
Separation of Duty Policy DescriptionThe description of the separation of duty policy.
Separation of Duty Policy Business Unit NameThe name of a business unit to which the separation of dutypolicy applies.
Separation of Duty Policy EnabledIndicates whether or not the policy is enabled. The validvalues are Enabled and Disabled.
Separation of Duty Policy Rule NameThe name of a rule that is associated with the separation ofduty policy.
Separation of Duty Policy Rule Max Roles AllowedThe maximum number of the roles that can be a part of theseparation of duty rule.
Separation of Duty Policy IdA unique numeric identifier for the separation of dutypolicy.
Separation of Duty Policy DnAn LDAP distinguished name for the separation of dutypolicy.
Separation of Duty Rule IdA unique numeric identifier for the separation of duty rulethat is associated with the separation of duty policy.
Separation of Duty PolicyRole Separation of Duty Policy Role Name
The name of the role that is a part of the separation of dutyrule.
Separation of Duty Policy Role DescriptionThe description of the separation of duty policy role.
Separation of Duty Policy Business Unit NameThe name of the business unit to which the separation ofduty policy role applies.
Separation of Duty Policy Role DnAn LDAP distinguished name for the role that is a part ofthe separation of duty policy.
Separation of Duty Policy Role IdA unique numeric identifier for the role that is a part ofseparation of duty policy.
Separation of Duty Policy Rule IdA unique numeric identifier for the separation of duty rulethat is associated with the separation of duty policy.
Chapter 9. Report administration 245

Table 56. Query items in the Separation of Duty Audit namespace (continued)
Query subject Query items and their description
Separation of Duty PolicyViolation and ExemptionCurrent Status
Audit StatusThe status of the separation of duty policy violation orexemption. The possible values are:
v Violation - indicates that the violation occurred.
v Approved - indicates that an approver approved theexempted violation.
Audit Person NameThe name of a person to which the violation refers.
Audit Person Business UnitThe business unit to which a person involved in theviolation belongs.
Audit Approver NameThe name of a person who exempted the violation.
Audit Approver Business UnitThe business unit of the user who exempted the violation.
Audit Approver CommentThe comment that is added by an approver during theviolation exemption process.
Audit Policy Rule NameThe name of a rule that is associated with the separation ofduty policy.
Audit Policy Rule Max Roles AllowedThe maximum number of the roles that can be a part of theseparation of duty rule.
Audit Policy Rule VersionThe separation of duty rule version.
Audit Time StampThe audit action occurrence time stamp.
Audit Exemption Time StampThe time stamp of the last violation occurred duringseparation of duty policy evaluation.
Audit Violation IdA unique numeric identifier for the violation record.
Audit Policy Global IdA unique identifier for the separation of duty policy.
Audit Rule Global IdA unique identifier for the separation of duty policy rule.
Audit Person Global IdA unique identifier for the person against whom theviolation occurred.
246 IBM Security Identity Manager Version 6.0.0.18: Administration Topics

Table 56. Query items in the Separation of Duty Audit namespace (continued)
Query subject Query items and their description
Separation of Duty PolicyViolation and ExemptionHistory
Audit StatusThe status of the separation of duty policy violation orexemption. The possible values are:
v Violation - indicates that the violation occurred.
v Approved - indicates that an approver approved theexempted violation.
Audit Person NameThe name of a person to which the violation refers.
Audit Person Business UnitThe business unit to which a person involved in theviolation belongs.
Audit Approver NameThe name of a person who exempted the violation.
Audit Approver Business UnitThe business unit of the user who exempted the violation.
Audit Approver CommentThe comment that is added by an approver during theviolation exemption process.
Audit Policy Rule NameThe name of a rule that is associated with the separation ofduty policy.
Audit Policy Rule Max Roles AllowedThe maximum number of the roles that can be a part of theseparation of duty rule.
Audit Policy Rule VersionThe separation of duty rule version.
Audit Time StampThe audit action occurrence time stamp.
Audit Violation IdA unique numeric identifier for the violation record.
Audit Policy Global IdA unique identifier for the separation of duty policy.
Audit Rule Global IdA unique identifier for the separation of duty policy rule.
Audit Person Global IdA unique identifier for the person against whom theviolation occurred.
Chapter 9. Report administration 247
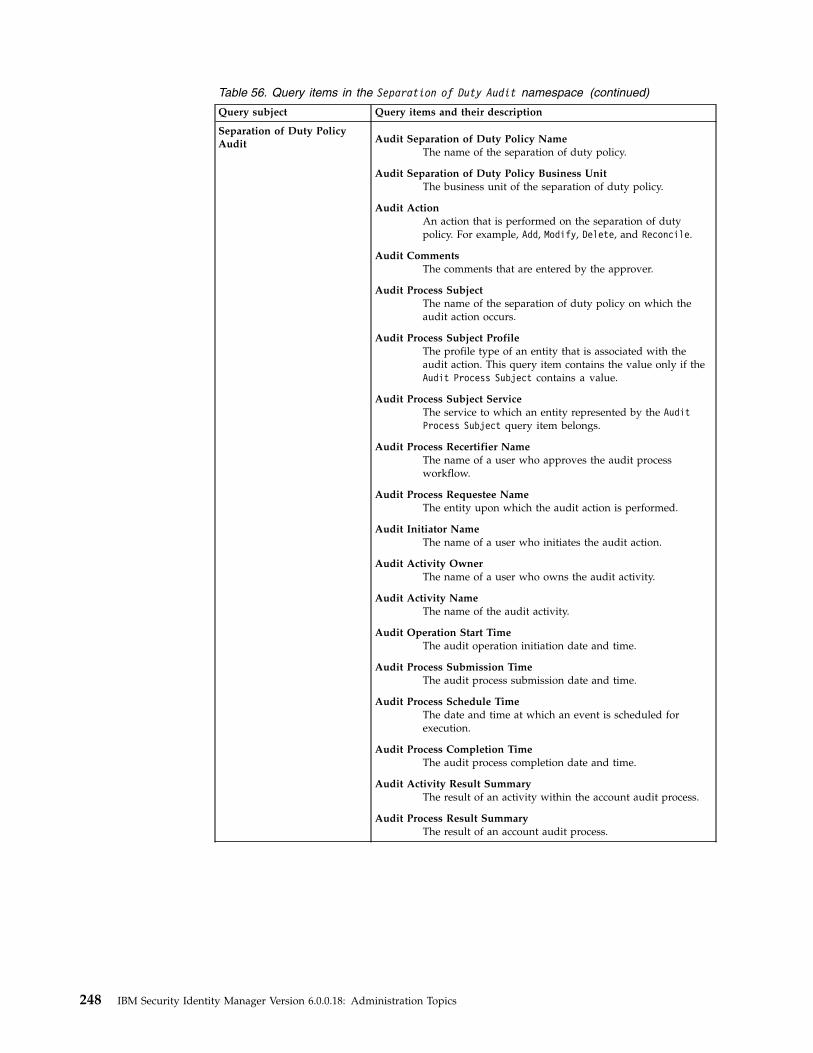
Table 56. Query items in the Separation of Duty Audit namespace (continued)
Query subject Query items and their description
Separation of Duty PolicyAudit Audit Separation of Duty Policy Name
The name of the separation of duty policy.
Audit Separation of Duty Policy Business UnitThe business unit of the separation of duty policy.
Audit ActionAn action that is performed on the separation of dutypolicy. For example, Add, Modify, Delete, and Reconcile.
Audit CommentsThe comments that are entered by the approver.
Audit Process SubjectThe name of the separation of duty policy on which theaudit action occurs.
Audit Process Subject ProfileThe profile type of an entity that is associated with theaudit action. This query item contains the value only if theAudit Process Subject contains a value.
Audit Process Subject ServiceThe service to which an entity represented by the AuditProcess Subject query item belongs.
Audit Process Recertifier NameThe name of a user who approves the audit processworkflow.
Audit Process Requestee NameThe entity upon which the audit action is performed.
Audit Initiator NameThe name of a user who initiates the audit action.
Audit Activity OwnerThe name of a user who owns the audit activity.
Audit Activity NameThe name of the audit activity.
Audit Operation Start TimeThe audit operation initiation date and time.
Audit Process Submission TimeThe audit process submission date and time.
Audit Process Schedule Time The date and time at which an event is scheduled forexecution.
Audit Process Completion TimeThe audit process completion date and time.
Audit Activity Result SummaryThe result of an activity within the account audit process.
Audit Process Result SummaryThe result of an account audit process.
248 IBM Security Identity Manager Version 6.0.0.18: Administration Topics

Table 56. Query items in the Separation of Duty Audit namespace (continued)
Query subject Query items and their description
Separation of Duty PolicyRole Conflict User Roles in Conflict
The name of the role on the person that is found inviolation of the separation of duty policy rule.
User Roles in Conflict Role DnAn LDAP distinguished name for a role on the person thatis found in violation of the separation of duty policy rule.
User Roles in Conflict Business Unit DnAn LDAP distinguished name for the business unit of a roleon the person that is found in violation of the separation ofduty policy rule.
User Roles in Conflict Owner DnAn LDAP distinguished name for an owner of a role. Thereferred role is the role that participates in the separation ofduty policy. This query item might be empty if no ownersare assigned to the role.
Policy Roles in ConflictThe name of the role as referenced in the separation of dutypolicy rule that is involved in the violation.
Policy Roles in Conflict Role DnAn LDAP distinguished name for the role as referenced inthe separation of duty policy rule that is involved in theviolation.
Policy Roles in Conflict Business Unit DnAn LDAP distinguished name for the business unit of a roleas referenced in the separation of duty policy rule that isinvolved in the violation.
Policy Roles in Conflict Owner DnAn LDAP distinguished name for an owner of a role. Thereferred role is the role that associates with a user. Thisquery item might be empty if no owners are assigned to therole.
Separation of Duty Policy Violation IdA unique numeric identifier for the separation of dutyviolation record.
Separation of Duty Configuration namespaceThe Separation of Duty Configuration namespace pertains to the configurationattributes of a separation of duty policy. It encompasses the business units, owner,and roles for the separation of duty policy. You can generate the separation of dutypolicy configuration reports.
Query subjects for Separation of Duty Configuration namespace:
The following table lists the query subjects in the Separation of DutyConfiguration namespace.
Table 57. Query subjects in the Separation of Duty Configuration namespace
Query subject Description
Separation of Duty Policy Represents the separation of duty policy and its configurationattributes. You must us this query subject with the Separation ofDuty Rule query subject.
Separation of Duty Rule Represents the separation of duty rule that is associated with theseparation of duty policy.
Chapter 9. Report administration 249

Table 57. Query subjects in the Separation of Duty Configuration namespace (continued)
Query subject Description
Separation of Duty PolicyRole
Represents the role that is a part of the separation of duty rule. Youmust us this query subject with the Separation of Duty Rule querysubject.
Query items for Separation of Duty Configuration namespace:
The following table lists the query items in the Separation of Duty Configurationnamespace.
Table 58. Query items in the Separation of Duty Configuration namespace
Query subject Query items and their description
Separation of DutyPolicy Separation of Duty Policy Name
The name of the separation of duty policy.
Separation of Duty Policy DescriptionThe description of the separation of duty policy.
Separation of Duty Policy EnabledIndicates whether the policy is enabled or not. True representsEnabled, and False represents Disabled.
Separation of Duty Policy Business Unit NameThe name of a business unit to which the separation of dutypolicy applies.
Separation of Duty Policy Owner Namethe name of the policy owner. The owner can be:
v The single or multiple roles.
v The single or multiple users.
Separation of Duty Policy Owner TypeThe type of an owner for the separation of duty policy. Thevalid values are Role and Person.
Separation of Duty Policy Owner Business Unit NameThe name of a business unit to which the policy owner belongs.
Separation of Duty Policy IdA unique numeric identifier for the separation of duty policy.
Separation of Duty Policy Owner DnAn LDAP distinguished name for an owner of the policy.
Separation of Duty RuleSeparation of Duty Policy Rule Name
The name of a rule that is associated with the separation of dutypolicy.
Separation of Duty Policy Rule Max Roles AllowedThe maximum number of the roles that can be a part of theseparation of duty rule.
Separation of Duty Rule IdA unique numeric identifier for the separation of duty rule thatis associated with the separation of duty policy.
250 IBM Security Identity Manager Version 6.0.0.18: Administration Topics

Table 58. Query items in the Separation of Duty Configuration namespace (continued)
Query subject Query items and their description
Separation of DutyPolicy Role Separation of Duty Policy Role Name
The name of the role that is a part of the separation of duty rule.
Separation of Duty Policy Role DescriptionDescribes the separation of duty policy role.
Separation of Duty Policy Business Unit NameThe name of a business unit to which the separation of dutypolicy role applies.
Separation of Duty Policy Role DnAn LDAP distinguished name for the role that is a part of theseparation of duty policy.
Separation of Duty Policy Role Ida unique numeric identifier for the role that is a part ofseparation of duty policy.
Separation of Duty Policy Rule IdA unique numeric identifier for the separation of duty rule thatis associated with the separation of duty policy.
User Configuration namespaceThe User Configuration namespace contains the query subjects and query itemsfor configuring the user entity.
Query subjects for User Configuration namespace:
The following table lists the query subjects in the User Configuration namespace.
Table 59. Query subjects in the User Configuration namespace
Query subject Description
Person Represents a person entity and its configuration attributes.
Person Aliases Provides information about the user aliases.
Person Manager Provides information about the manager of a user.
Account Represents an account entity and its configuration attributes. Youmust use this query subject with the Person query subject to obtaininformation about the accounts that are owned by the user.
Role Represents the role entity and its configuration attributes. You mustuse this query subject with the Person query subject to obtaininformation about the role membership for a user.
Person ACI Represents an ACI that is applicable to a user. You must use thisquery subject with the Person query subject to obtain informationabout an ACI applicable to the user.
ACI Operations Represents the operations that an ACI governs. You must use thisquery subject with the Person ACI query subject to obtain informationabout an ACI associated with the user.
ACI Attribute Permissions Represents the attributes and operations that can be performed on anattribute. You must use this query subject with the Person ACI querysubject to obtain information about an ACI associated with the user.
ACI Members Provides information about the members of an ACI. You must use thisquery subject with the Person ACI query subject to obtain informationabout the ACI members.
Supervised Business Unit Represents the business unit entity that a user supervises and itsconfiguration attribute. You must use this query subject with thePerson query subject to obtain information about the business unit auser supervises.
Chapter 9. Report administration 251

Table 59. Query subjects in the User Configuration namespace (continued)
Query subject Description
Service Ownership Represents the service entity that a user owns. You must use thisquery subject with the Person query subject to obtain informationabout the services that the user own.
Roles Ownership Represents the role entity that a user owns. You must use this querysubject with the Person query subject to obtain information about theroles that the user own.
Group Ownership Represents the group entities that a user own. You must use thisquery subject with the Person query subject to obtain informationabout the groups that the user owns.
Credential Pool Ownership Represents the credential pool that a user owns. You must use thisquery subject with the Person query subject to obtain informationabout the credential pool that the user owns.
Separation of Duty PolicyOwnership
Represents the separation of duty policies that a user own. You mustuse this query subject with the Person query subject to obtaininformation about the separation of duty policies that the user own.
User Represents all users of type person and business partner person. Use thisquery to get a consolidated view of all users that are defined in theorganization. You can use this query subject with the Person andBusiness Partner Person query subjects to retrieve more specificdetails about the user.
Query items for User Configuration namespace:
The following table lists the query items in the User Configuration namespace.
Table 60. List of query items in the User Configuration namespace
Query subject Query items and their description
PersonPerson Full Name
The full name of a user.
Person Last NameThe surname of a user.
Person Preferred User IDRepresents the name that a user might prefer during anaccount creation.
Person EmailAn email address of a user.
Person StatusThe status of the user entity. The valid values are Active andInactive.
Person Business Unit NameThe name of the business unit to which a user belongs.
Person Administrative Assistant DnAn LDAP distinguished name for the administrativeassistant of a user.
Person DnAn LDAP distinguished name for a user.
Person Business Unit DnAn LDAP distinguished name for the business unit to whicha user belongs.
Person Business Unit SupervisorAn LDAP distinguished name for the supervisor of thebusiness unit to which a user belongs.
252 IBM Security Identity Manager Version 6.0.0.18: Administration Topics

Table 60. List of query items in the User Configuration namespace (continued)
Query subject Query items and their description
Person AliasesPerson Alias Name
The name of a user alias.
Person DnAn LDAP distinguished name for the user to which an aliasbelongs.
Person ManagerPerson Full Name
The full name of the manager.
Person Last NameThe surname of the manager.
Person StatusThe status of the manager entity. The valid values are Activeand Inactive.
Person DnAn LDAP distinguished name for the manager.
Person Business Unit DnAn LDAP distinguished name for the business unit to whicha manager belongs.
Person SupervisorThe user supervisor of the manager.
Chapter 9. Report administration 253

Table 60. List of query items in the User Configuration namespace (continued)
Query subject Query items and their description
AccountAccount Name
The name of an account.
Account StatusThe status of an account. The valid values are Active andInactive.
Account ComplianceThe compliance status of an account. The valid values areUnknown, Compliant, Disallowed, and Non Compliant.
Account Ownership TypeThe ownership type of an account. The valid values areIndividual, System, Device, and Vendor.
Account Last Access DateThe last accessed date of an account.
Account Service NameThe name of the service on which an account is provisioned.
Account Service TypeThe profile of the service on which an account isprovisioned.
Account Service UrlA URL that connects to the service on which an account isprovisioned.
Account Service Business Unit NameAn LDAP distinguished name for the business unit to whicha service belongs.
Account DnAn LDAP distinguished name for an account.
Account Service DnAn LDAP distinguished name for the service on which anaccount is provisioned.
Account Service Business Unit DnAn LDAP distinguished name for the business unit to whicha service belongs.
Account Service Owner DnAn LDAP distinguished name for a user who is the owner ofthe service.
Account Service Business Unit Supervisor DnAn LDAP distinguished name for the supervisor of thebusiness unit to which a service belongs.
Account Owner Business Unit DnAn LDAP distinguished name for the business unit of a userwho owns the account.
254 IBM Security Identity Manager Version 6.0.0.18: Administration Topics

Table 60. List of query items in the User Configuration namespace (continued)
Query subject Query items and their description
RoleRole Name
The name of a role.
Role DescriptionThe description of a role.
Role TypeThe type of a role. The valid values are Static and Dynamic.
Role Access EnabledRepresents whether or not access for a role is enabled. Truerepresents Enabled, and False represents Disabled.
Role Common Access EnabledRepresents whether or not common access for the role isenabled. The valid values are True and False.
Role Access TypeThe type of an access that is enabled for a role.
Role DnAn LDAP distinguished name for the role.
Role Business Unit DnAn LDAP distinguished name for the business unit of a role.
Person ACIACI Name
The name of the Access Control Item (ACI).
ACI Protection CategoryThe category of an entity that an ACI protects. The value ofthis item must be Person.
ACI TargetThe type of the selected protection category that is associatedwith an ACI. The valid values are inetOrgPerson anderPersonItem.
ACI scopeThe scope of an ACI. It determines whether an ACI isapplicable to subunits of a business organization or not. Thevalid values and their meanings:
v single - The policy applies to a business unit and not itssubunits.
v subtree - The policy applies to the subunits of a businessorganization.
ACI Business Unit DnAn LDAP distinguished name for the business unit on whichan ACI is defined.
ACI OperationsACI Operation Name
The name of an operation that an ACI governs.
ACI Operation PermissionThe permission that applies to an ACI operation. The validvalues are grant, deny, and none.
ACI Business Unit DnAn LDAP distinguished name for the business unit.
Chapter 9. Report administration 255

Table 60. List of query items in the User Configuration namespace (continued)
Query subject Query items and their description
ACI Attribute PermissionsACI Attribute Name
The name of an attribute for which an ACI controls thepermissions.
ACI Attribute OperationThe name of an operation that can be run on an attribute.The valid values are r for read operation, w for writeoperation, and rw for read and write operations.
ACI Attribute PermissionThe permission that applies to an ACI operation. The validvalues are grant and deny.
ACI Business Unit DnAn LDAP distinguished name for the business unit.
ACI MembersACI Member Name
The members that an ACI governs. The valid values are:
v All Users - All users in the system.
v Profile Owner - The owner of the profile.
v Manager - The manager of the profile owner.
v Sponsor - The sponsor of the Business Partner organizationin which the person resides.
v Administrator - The administrator of the domain in whichthe person resides.
v Service Owner- The owner of the service.
v Access Owner - The owner of an access.
ACI System Group NameRepresents the name of the group whose members aregoverned by an ACI.
ACI Business Unit DnAn LDAP distinguished name for the business unit.
ACI System Group DnAn LDAP distinguished name for the system group.
Supervised Business UnitBusiness Unit Name
The name of a business unit.
Business Unit SupervisorA user who is the supervisor of a business unit.
Business Unit DnAn LDAP distinguished name for the business unit to whicha user belongs.
Business Unit Container DnAn LDAP distinguished name for the parent business unit ofan organization entity.
256 IBM Security Identity Manager Version 6.0.0.18: Administration Topics

Table 60. List of query items in the User Configuration namespace (continued)
Query subject Query items and their description
Service OwnershipService Name
The name of a service to which the accounts are provisioned.
Service DnAn LDAP distinguished name for the service.
Service Container DnAn LDAP distinguished name for the business unit of aservice.
Service Owner DnAn LDAP distinguished name for a user who owns theservice.
Service UrlA URL that connects to the managed resource.
Service TypeThe service profile type.
Roles OwnershipRole Name
The name of a role.
Role DescriptionThe description of a role.
Role TypeThe type of a role. The valid values are Static and Dynamic.
Role Access EnabledRepresents whether an access for a role is enabled or not.True represents Enabled, and False represents Disabled.
Role Common Access EnabledRepresents whether or not common access for the role isenabled. The valid values are True and False.
Role Access TypeThe type of an access that is enabled for a role.
Role DnAn LDAP distinguished name for a role.
Role Business Unit DnAn LDAP distinguished name for the business unit of a role.
Chapter 9. Report administration 257

Table 60. List of query items in the User Configuration namespace (continued)
Query subject Query items and their description
Group OwnershipGroup Name
The name of a group for which an access is defined.
Group TypeThe profile type of a group.
Group Access NameThe name of an access that is defined for a group.
Group Access TypeThe type of an access that is defined for a group.
Group Service NameThe name of a service on which the group is provisioned.
Group Service TypeThe profile type of a service on which the group isprovisioned.
Group Service UrlA URL that connects to the service to which the group isprovisioned.
Group Service Business Unit NameThe name of a business unit to which the service belongs.
Group DnAn LDAP distinguished name for a group entity to which anaccess is defined.
Group Service DnAn LDAP distinguished name for the service that isassociated to a group.
Group Service Business Unit DnAn LDAP distinguished name for the business unit to whicha service belongs.
Group Service Owner DnAn LDAP distinguished name for a user who owns theservice.
Group Service Business Unit SupervisorAn LDAP distinguished name for the supervisor of abusiness unit to which a service belongs.
Credential Pool OwnershipCredential Pool Name
The name of a credential pool.
Credential Pool Service DnAn LDAP distinguished name for a service to which thegroup associated with a credential pool is provisioned.
Credential Pool Business Unit DnAn LDAP distinguished name for the business unit of acredential pool.
Credential Pool DnAn LDAP distinguished name for the credential pool.
258 IBM Security Identity Manager Version 6.0.0.18: Administration Topics

Table 60. List of query items in the User Configuration namespace (continued)
Query subject Query items and their description
Separation of Duty PolicyOwnership Separation of Duty Policy Name
The name of the separation of duty policy.
Separation of Duty Policy DescriptionThe description of the separation of duty policy.
Separation of Duty Policy EnabledIndicates whether or not the policy is enabled. Truerepresents Enabled, and False represents Disabled.
Separation of Duty Policy Business Unit NameThe name of a business unit to which the separation of dutypolicy applies.
Separation of Duty Policy IdA unique numeric identifier for the separation of duty policy.
UserFull Name
The full name of the user.
Last NameThe surname of the user.
Type The profile type of the user, which is either person or businesspartner person.
Status The status of the user, which is either Active and Inactive.
SupervisorThe supervisor of the user.
Business Unit NameThe name of the business unit to which a user belongs.
Dn An LDAP distinguished name for a user.
Business Unit DnAn LDAP distinguished name for the business unit to whicha user belongs.
Service Audit namespaceThe Service Audit namespace pertains to the audit history of the actions that areperformed on the services. You can generate the audit reports for the various typesof services.
Query subjects for Service Audit namespace:
The following table lists the query subjects in the Service Audit namespace.
Table 61. Query subjects in the Service Audit namespace
Query subject Description
Service Represents the service and its configuration attributes on which theaudit actions are performed.Note: You cannot see the deleted services by using this query subject.
Service Audit Represents the audited actions applicable to the services. You mustuse this query subject with the Service query subject.Note: You can use this query subject alone to report any deletion ofthe previously existing services.
Service Health Represents the status of a resource on which the service is created.You must use this query subject with the Service query subject.
Service Provisioning Policy Represents the provisioning policies that are applied on the service.You must use this query subject with the Service query subject.
Chapter 9. Report administration 259

Query items for Service Audit namespace:
The following table lists the query items in the Service Audit namespace.
Table 62. List of query items in the Service Audit namespace
Query subject Query items and their description
ServiceService Name
The name of a service.
Service TypeThe type of a service. For example, PosixLinuxProfile.
Service DescriptionThe description of the service that is entered during theservice creation or modification.
Service Business Unit NameThe business unit to which a service belongs.
Service UrlThe IP address of the resource on which the service iscreated.
Service TagA tag that logically groups the services. If a service is taggedduring creation or modification, this query item representsthe name of the tag.
Service Owner First NameThe given name of a user who is the service owner.
Service Owner Last NameThe surname of a user who is the service owner.
Service Owner Business Unit DnAn LDAP distinguished name for a business unit to whichthe service owner belongs.
Service DnAn LDAP distinguished name for a service.
260 IBM Security Identity Manager Version 6.0.0.18: Administration Topics

Table 62. List of query items in the Service Audit namespace (continued)
Query subject Query items and their description
Service AuditAudit Service Name
The name of a service on which the audit action is run.
Audit Service Business UnitThe business unit of a service.
Audit ActionRepresents an action that is run on the service. The possiblevalues are:
v Add.
v Delete.
v Modify.
v EnforcePolicyForService.
v UseGlobalSetting.
v CorrectNonCompliant.
v SuspendNonCompliant.
v AlertNonCompliant.
v MarkNonCompliant.
Audit CommentsThe comments that are entered by the audit workflowapprover. Along with the audit comments, this query itemmight contain the operational data.
Audit Initiator NameThe name of a user who initiates the action on the service.
Audit Process Requestee NameThe entity upon which an audit action is run.
Audit Operation Start TimeThe start date and time when the operation on the servicestarted.
Audit Process Submission TimeThe date and time of the audit process submission.
Audit Process Schedule Time The date and time at which an event is scheduled for theexecution.
Audit Process Completion TimeThe date and time of the audit process completion.
Audit Process SubjectThe subject on which the audit action is run. It applies to thecases where the defined workflow must complete before theaudit action is complete.
Audit Process Subject ProfileThe profile type of an entity that is associated with the auditaction. This query item contains a value only if the AuditProcess Subject contains the value.
Audit Process Result SummaryThe result of the audit process on the service that isindicated with the values such as Success or Failed.
Chapter 9. Report administration 261

Table 62. List of query items in the Service Audit namespace (continued)
Query subject Query items and their description
Service HealthResource Dn
An LDAP distinguished name for the service.
Resource StatusIndicates whether or not resource that is represented by theservice is available. The valid values are Success and Failed.
Resource Test StatusIndicates whether or not resource that is represented by theservice is connectable. The valid values are Success andFailed.
Last Response TimeThe date and time of the last received response from theresource that is represented by the service.
Lock ServiceShows if a service is locked. For example, Service is lockedfor the reconciliation.
Last Reconciliation TimeThe last date and time when the reconciliation of the serviceis attempted either by the system or through an explicitrequest of the reconciliation.
Server The application server on which the service that pertains to aresource is created. The details are up to the level of a nodeon which the service is created.
Restart TimeThe time from the last restart of a server.
First Resource Fail TimeThe date and time when the resource fails for the first time.Use this information to analyze the resource failuresituations.
Service Provisioning PolicyProvisioning Policy Name
The name of a provisioning policy that applies to a service.
Provisioning Policy ScopeThe scope in terms of a hierarchy of the business units towhich the provisioning policy applies. The valid values andtheir meanings:
v Single - The policy applies to a business unit and not itssubunits.
v Subtree - The policy applies to the business unit and itssubunits.
Provisioning Policy Is EnabledRepresents whether the provisioning policy is enabled or not.True represents Enabled, and False represents Disabled.
Provisioning Policy DnAn LDAP distinguished name for the provisioning policy.
Provisioning Policy Business Unit DnAn LDAP distinguished name for the business unit to whichthe provisioning policy applies.
Access Audit(Deprecated) namespaceThe Access Audit(Deprecated) namespace pertains to the audit history of theactions that are performed on the access entities. The access audit is supported forthe group, role, and service that is defined as an access.
262 IBM Security Identity Manager Version 6.0.0.18: Administration Topics

Query subjects for Access Audit(Deprecated) namespace:
The following table lists the query subjects in the Access Audit(Deprecated)namespace.
Table 63. Query subjects in the Access Audit(Deprecated) namespace
Query subject Description
Access Audit Represents the audit history of the access entity. You must use thisquery subject with the Access query subject.
Access Represents the access entity on which the audit actions are performed.This query subject also contains the configuration attributes of anaccess.
Access Owner Represents a user who owns the access.
Access Owner Business Unit Represents the business unit to which an access owner belongs. Youmust use this query subject with the Access Owner query subject toobtain the configuration information about the business unit that isassociated with an owner.
Access Service Represents the service on which the access is provisioned. You mustuse this query subject with the Access query subject to obtain theconfiguration information about the access service.
Access Service Business Unit Represents the business unit to which a service belongs. You must usethis query subject with the Access Service query subject to obtain theconfiguration information about the business unit that is associatedwith the service.
Access Members Provides information about the accounts that are the members of anaccess.
Access Member Owner Provides information about the users who own the accounts that aremembers of an access.
Access Member OwnerBusiness Unit
Represents the business unit to which the access member ownerbelongs.
Query items for Access Audit(Deprecated) namespace:
The following table lists the query items in the Access Audit(Deprecated)namespace.
Chapter 9. Report administration 263

Table 64. List of query items in the Access Audit(Deprecated) namespace
Query subject Query items and their description
Access AuditAudit Access Name
The name of an access on which the audit operation is run.
Audit Access Service NameThe name of a service for which the access is defined.
Audit ActionAn action that is run on the access. The valid values are:
v Add.
v Modify.
v Delete.
v AddMember.
v RemoveMember.
Audit Initiator NameThe name of a user who initiates the audit action. For theaudit actions such as AddMember and RemoveMember, theinitiator name represents the name of IBM Security IdentityManager account.
Audit Account NameThe name of an account for which the access is eitherrequested or deleted. This query item applies to onlyAddMember and RemoveMember audit actions.
Audit Process Requestee NameThe name of a user whose account is added to the access.This query item applies to only AddMember and RemoveMemberaudit actions.
Audit Process Recertifier NameThe name of a user who approves the audit action.
Audit Operation Start TimeThe audit operation start date and time.
Audit Activity OwnerIBM Security Identity Manager account user name that ownsthe activity. For example, a user who approves the request toadd an account to the access.
Audit Activity NameThe name of the audit activity.
Audit Activity Start TimeThe audit activity start date and time.
Audit Activity Completion TimeThe audit activity completion date and time.
Audit Process Submission TimeThe audit process submission date and time.
Audit Process Schedule Time The date and time at which an event is scheduled for theexecution.
Audit Process Completion TimeThe audit process completion date and time.
Audit Activity Result SummaryThe result of an activity within a role audit process.
Audit CommentsThe comments that are entered by the audit workflowapprover.
Audit Process Result SummaryThe result of the access audit process.
264 IBM Security Identity Manager Version 6.0.0.18: Administration Topics

Table 64. List of query items in the Access Audit(Deprecated) namespace (continued)
Query subject Query items and their description
AccessGroup Name
The name of a group for which the access is defined.
Group TypeThe profile type of a group.
Group Access NameThe name of an access that is defined for a group.
Group Access TypeThe type of an access that is defined for a group.
Group SupervisorThe name of a user who is the supervisor of a group.
Group DnAn LDAP distinguished name for a group to which theaccess is defined.
Group Container DnAn LDAP distinguished name for the business unit that isassociated with a group.
Group Owner DnAn LDAP distinguished name for a group owner.
Group Service DnAn LDAP distinguished name for the service that isassociated with a group.
Group Access DefinedSpecifies whether or not access is defined for a group. Thepossible values are True and False.
Group Access EnabledSpecifies whether or not access is enabled for a group. Thepossible values are True and False.
Group Common Access EnabledSpecifies whether or not common access is enabled for agroup. The possible values are True and False.
Access OwnerAccess Owner Full Name
The given name of an account owner.
Access Owner Last NameThe surname of an account owner.
Access Owner StatusThe status of a user. The valid values are Active andInactive.
Access Owner DnAn LDAP distinguished name for an account owner.
Access Owner Business Unit DnAn LDAP distinguished name for the business unit to whichan account owner belongs.
Access Owner Manager DnAn LDAP distinguished name for the user supervisor of theaccount owner.
Chapter 9. Report administration 265

Table 64. List of query items in the Access Audit(Deprecated) namespace (continued)
Query subject Query items and their description
Access Owner Business UnitBusiness Unit Name
The name of a business unit.
Business Unit SupervisorThe business unit of a user who is the supervisor.
Business Unit DnAn LDAP distinguished name for the business unit.
Business Unit Container DnAn LDAP distinguished name for the parent business unit.
Access ServiceService Name
The name of a service to which the access belongs.
Service DnAn LDAP distinguished name for a service to which theaccess belongs.
Service Container DnAn LDAP distinguished name for a business unit of a servicethat is associated with the access.
Service Owner DnAn LDAP distinguished name for a user owner of theservice.
Service URLA URL that connects to the managed resource.
Service TypeThe service profile type.
Access Service Business UnitBusiness Unit Name
The name of a business unit.
Business Unit SupervisorA user who is the supervisor of a business unit.
Business Unit DnAn LDAP distinguished name for a business unit.
Business Unit Container DnAn LDAP distinguished name for the parent business unit.
266 IBM Security Identity Manager Version 6.0.0.18: Administration Topics

Table 64. List of query items in the Access Audit(Deprecated) namespace (continued)
Query subject Query items and their description
Access MembersAccount Name
The name of an account that is a member of an access.
Account Ownership TypeThe type of the account ownership. The valid values are:
v Device.
v Individual.
v System.
v Vendor.
Account StatusThe status of an account. The valid values are Active andInactive.
Account ComplianceIndicates whether an account is compliant or not. The validvalues are:
v Unknown.
v Compliant.
v Non Compliant.
v Disallowed.
Account Last Access DateThe last accessed date and time of an account.
Account DnAn LDAP distinguished name for an account.
Account Service DnAn LDAP distinguished name for a service to which theaccount belongs.
Access Member OwnerPerson Full Name
The full name of an account owner.
Person Last NameThe surname of an account owner.
Person DnAn LDAP distinguished name for an account owner.
Person Business Unit DnAn LDAP distinguished name for the business unit to whichan account owner belongs.
Person SupervisorA user who is the supervisor of an account owner.
Access Member OwnerBusiness Unit Business Unit Name
The name of a business unit to which the account ownerbelongs.
Business Unit SupervisorA user who is the supervisor of a business unit.
Business Unit DnAn LDAP distinguished name for a business unit.
Business Unit Container DnAn LDAP distinguished name for the parent business unit ofan organization entity.
Access Audit namespaceUse the access audit model and reports to view the details about the accesses thatare associated with a user.
Chapter 9. Report administration 267

The Access Audit namespace pertains to the audit history of the actions that areperformed on the access entities in Identity Service Center. The access audit issupported for the group, role, and service that is defined as an access.
Note: If the account is on the service that is defined as an access, the audit detailscan be seen only in the Access Audit namespace.
Query subjects for Access Audit namespace:
The table lists the query subjects in the Access Audit namespace.
Table 65. Query subjects in the Access Audit namespace
Query subject Description
Access Audit The audit history of the access entity. You must use this query subjectwith the Access query subject.
Access Audit ObligationAttributes
The obligation attributes of an access and their values. You must usethis query subject with the Access Audit query subject.
Access The access entity on which the audit actions are performed. This querysubject also contains the configuration attributes of an access.
Access Owner A user who owns the access.
268 IBM Security Identity Manager Version 6.0.0.18: Administration Topics

Query items for Access Audit namespace:
The table lists the query items in the Access Audit namespace.
Table 66. List of query items in the Access Audit namespace
Query subject Query items and their description
Access AuditAudit Access Name
The name of an access on which the audit operation is run.
Audit ActionAn action that is run on the access. The valid values are Add, Edit, orDelete.
Audit CommentsThe comments that are entered by the audit workflow approver.
Audit Initiator NameThe name of a user who initiates the audit action. For the audit actionssuch as Add, Edit, or Delete, the initiator name represents the name ofIBM Security Identity Manager account.
Audit Account IDAn account identifier of a user for whom the access is requested.
Audit Access Requestee NameThe name of a user whose account is added to the access.
Audit Access Approver NameThe name of a user who approves the audit action.
Audit Access Approver Account IDAn account identifier of an audit approver.
Audit Access Business UnitThe name of an audit access business unit.
Audit Workflow Process IDA unique identifier for a workflow process that is associated with theaccess request.
Audit Operation Start TimeThe audit operation start date and time.
Access Type CodeThe code for an audit entity type. The possible values are 1, 2, and 3. 1represents service, 2 represents group, and 3 represents role.
Audit Access TypeThe type of an access. For example, Application, Role, Email group, orShared Folder.
Audit Access Badge Text 1, Audit Access Badge Text 2, Audit Access BadgeText 3, Audit Access Badge Text 4, Audit Access Badge Text 5
The badge text that is defined for an access.
Audit Access IDA unique identifier of an access on which the audit operation is run.
Chapter 9. Report administration 269

Table 66. List of query items in the Access Audit namespace (continued)
Query subject Query items and their description
Access Audit (Continued)Audit Access Request Justification
The reason for the access request.
Audit Activity NameThe name of an audit activity.
Audit Activity IDA unique identifier of an audit activity.
Audit Activity Start TimeThe audit activity start date and time.
Audit Activity Due TimeThe date and time when the audit activity is due for an approval.
Audit Activity Escalation TimeThe escalation date and time of an audit activity.
Audit Activity Completion TimeThe audit activity completion date and time.
Audit Access Request Completion TimeThe date and time when an access request is completed.
Audit Access Request StatusThe status of an access request. The possible values are Fulfilled, NotFulfilled, Submitted, or Pending.
Audit Activity Approval StatusAn approval status of an audit activity. For example, Approved,Rejected, or Pending.
Audit Activity Approval ActionThe status of an action that is taken on the activity. For example,Completed or Escalated.
Audit Action CodeA code for the audit action. the possible values are ADD, CHANGE, orDELETE.
Access Audit Obligation IDA unique obligation identifiers of an access. There can be multipleobligation identifiers that are separated by a comma.
Access Audit ObligationAttributes Access ID
A unique identifier of an access on which the audit operation is run.
Access Audit Obligation IDA unique obligation identifier of an access.
Access Account Attribute NameThe attribute name of an account that belongs to the access.
Access Account Attribute Previous ValueThe previous value of an account attribute that belongs to an access. Ifthe attribute is edited for the first time, the previous value is empty ornull.
Access Account Attribute Modified ValueThe modified value of an account attribute that belongs to an access.
270 IBM Security Identity Manager Version 6.0.0.18: Administration Topics

Table 66. List of query items in the Access Audit namespace (continued)
Query subject Query items and their description
AccessAccess Dn
An LDAP distinguished name for an access.
Access NameThe name of an access.
Access TypeThe type of an access. The possible values are Group, Role, or Service.
Access DescriptionThe description of an access.
Access CategoryA category of an access. For example, Application, Role, Email Group,or Shared Folder.
Access Icon URLA URL that is defined for an access icon.
Access Additional InformationAn additional information about the access.
Access EnabledSpecifies whether access is enabled. The possible values are True andFalse.
Access Common EnabledSpecifies whether common access is enabled. The possible values areTrue and False.
Access OwnerAccess Dn
A distinguished name of an access.
Access Owner DnA distinguished name for an access owner.
Access OwnerThe name of an access owner.
Access Owner TypeThe type of an access owner. For example, Person or Role.
Access Owner StatusThe status of an access owner. For example, Active and Inactive.
The access owner status is not applicable if an owner type is a role.
Access Owner Manager DnA distinguished name for a manager of an access owner.
Access Owner Business UnitThe business unit name of an access owner.
Access Owner Business Unit DnA distinguished name for a business unit of an access owner.
Access Configuration namespaceUse the Access Configuration namespace to view access configuration and itsbusiness metadata for the access entities.
Chapter 9. Report administration 271

Query subjects for Access Configuration namespace:
The following table lists the query subjects in the Access Configurationnamespace.
Table 67. Query subjects in the Access Configuration namespace
Query subject Description
Access Represents an access that is defined in an organization. You can usethis query subject with either of the following query subjects to obtainthe business metadata for each access:
v Service Business Meta Data.
v Group Business Meta Data.
v Role Business Meta Data.
Service Represents the services that are defined in an organization with itsconfiguration attributes. You can use this query subject with either ofthe following query subjects to view the service that is defined as anaccess:
v Access.
v Service Business Meta Data.
Service Business Meta Data Represents the business metadata of the service that is defined as anaccess.
Group Represents the groups that are defined in an organization with itsconfiguration attributes. You can use this query subject with either ofthe following query subjects to view the groups that are defined as anaccess:
v Access.
v Group Business Meta Data.
Note: Group information is displayed if group access is set to enabledor common access enabled.
Group Access Owner Represents a user who owns the group access. The query subjectshows a unified view of a Person and Business Partner Person.
Group Business Meta Data Represents the business metadata of the group that is defined as anaccess.
Role Represents the role that is defined in an organization with itsconfiguration attributes.Note: Role information is displayed if role access is set to enabled.
Role Business Meta Data Represents the business metadata of the role that is defined as anaccess.
Business Partner Person Represents the Business Partner person entity and its configurationattributes.
Person Represents a person entity and its configuration attributes.
User Represents all users of type person and business partner person. Use thisquery to get a consolidated view of all users that are defined in theorganization. You can use this query subject with the Person andBusiness Partner Person query subjects to retrieve more specificdetails about the user
272 IBM Security Identity Manager Version 6.0.0.18: Administration Topics
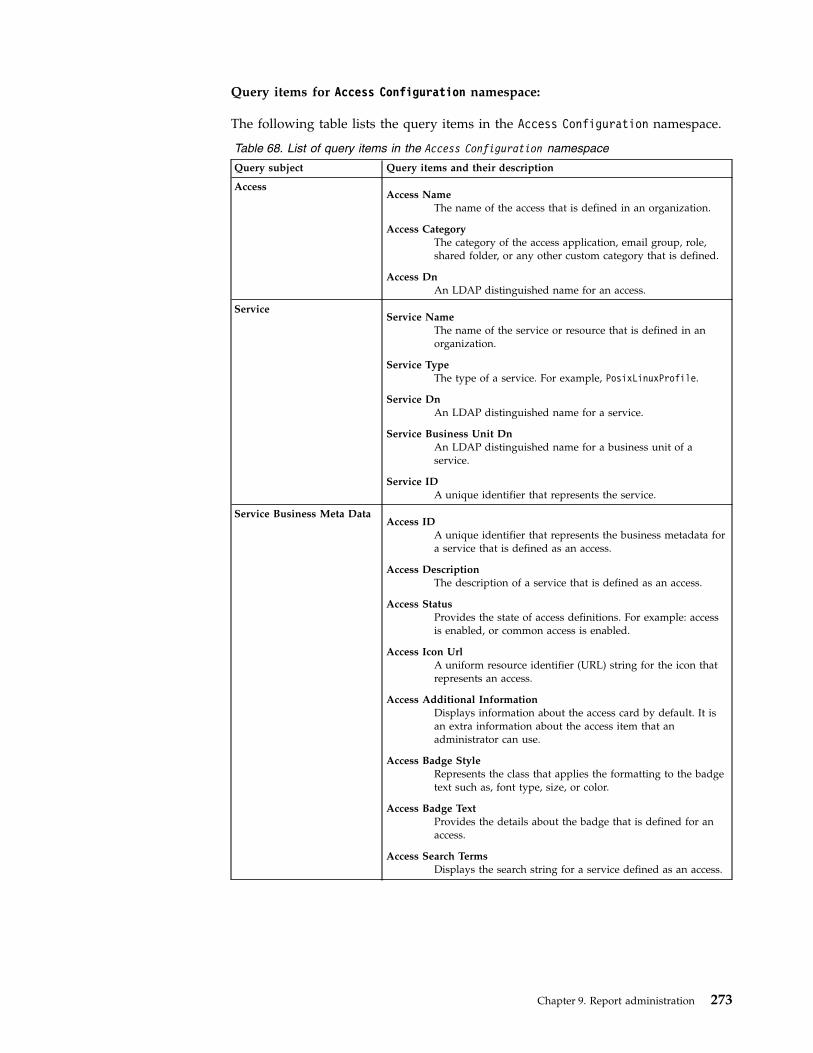
Query items for Access Configuration namespace:
The following table lists the query items in the Access Configuration namespace.
Table 68. List of query items in the Access Configuration namespace
Query subject Query items and their description
AccessAccess Name
The name of the access that is defined in an organization.
Access CategoryThe category of the access application, email group, role,shared folder, or any other custom category that is defined.
Access DnAn LDAP distinguished name for an access.
ServiceService Name
The name of the service or resource that is defined in anorganization.
Service TypeThe type of a service. For example, PosixLinuxProfile.
Service DnAn LDAP distinguished name for a service.
Service Business Unit DnAn LDAP distinguished name for a business unit of aservice.
Service IDA unique identifier that represents the service.
Service Business Meta DataAccess ID
A unique identifier that represents the business metadata fora service that is defined as an access.
Access DescriptionThe description of a service that is defined as an access.
Access StatusProvides the state of access definitions. For example: accessis enabled, or common access is enabled.
Access Icon UrlA uniform resource identifier (URL) string for the icon thatrepresents an access.
Access Additional InformationDisplays information about the access card by default. It isan extra information about the access item that anadministrator can use.
Access Badge StyleRepresents the class that applies the formatting to the badgetext such as, font type, size, or color.
Access Badge TextProvides the details about the badge that is defined for anaccess.
Access Search TermsDisplays the search string for a service defined as an access.
Chapter 9. Report administration 273

Table 68. List of query items in the Access Configuration namespace (continued)
Query subject Query items and their description
GroupGroup Name
The name of the group that is defined in an organization.
Group TypeThe profile type of a group.
Group DnAn LDAP distinguished name for a group.
Group Business Unit DnAn LDAP distinguished name for the business unit of agroup.
Group Owner DnAn LDAP distinguished name of an owner that owns thegroup.
Group Service DnAn LDAP distinguished name of a service to which thegroup belongs.
Group Business Meta DataAccess Name
The name of an access of a type as group.
Access DescriptionThe description of a group that is defined as an access.
Access StatusProvides the state of access definitions. For example: accessis enabled, or common access is enabled.
Access Icon UrlA uniform resource identifier (URL) string for the icon thatrepresents an access.
Access Additional InformationDisplays information about the access card by default. It isan extra information about the access item that anadministrator can use.
Access Badge StyleRepresents the class that applies the formatting to the badgetext such as, font type, size, or color.
Access Badge TextProvides the details about the badge that is defined for anaccess.
Access IDA unique identifier that represents the business metadata fora group that is defined as an access.
Access Search TermsDisplays the search string for a group defined as an access.
274 IBM Security Identity Manager Version 6.0.0.18: Administration Topics

Table 68. List of query items in the Access Configuration namespace (continued)
Query subject Query items and their description
Group Access OwnerFull Name
The full name of the user.
Last NameThe surname of the user.
Type The profile type of the user, which is either person or businesspartner person.
Status The status of the user, which is either Active and Inactive.
SupervisorThe supervisor of the user
Business Unit NameThe name of the business unit to which a user belongs.
Dn An LDAP distinguished name for a user.
Business Unit DnAn LDAP distinguished name for the business unit to whicha user belongs.
RoleRole Name
The name of a role.
Role TypeThe type of a role. The valid values are Static and Dynamic.
Role DnAn LDAP distinguished name for a role.
Role Business Unit DnAn LDAP distinguished name for the business unit of a role.
Role SupervisorThe supervisor of a user for the business unit of a role.
Role Owner DnAn LDAP distinguished name for the role owner.
Chapter 9. Report administration 275

Table 68. List of query items in the Access Configuration namespace (continued)
Query subject Query items and their description
Role Business Meta DataAccess Name
The name of an access of a type as role.
Access DescriptionThe description of a role that is defined as an access.
Access StatusProvides the state of access definitions. For example: accessis enabled, or common access is enabled.
Access Icon UrlA uniform resource identifier (URL) string for the icon thatrepresents an access.
Access Additional InformationDisplays information about the access card by default. It isan extra information about the access item that anadministrator can use.
Access Badge StyleRepresents the class that applies the formatting to the badgetext such as, font type, size, or color.
Access Badge TextProvides the details about the badge that is defined for anaccess.
Access IDA unique identifier that represents the business metadata fora role that is defined as an access.
Access Search TermsDisplays the search string for a role defined as an access.
Business Partner PersonBusiness Partner Person Full Name
The full name of a user.
Business Partner Person Last NameThe surname of a user.
Business Partner Person SupervisorAn LDAP distinguished name for the supervisor of a user.
Business Partner Person StatusThe status of a user entity. The valid values are Active andInactive.
Business Partner Person DnAn LDAP distinguished name for a user.
Business Partner Person Business Unit DnAn LDAP distinguished name for the business unit to whicha user belongs.
Business Partner Person ParentThe name of the parent business partner person.
276 IBM Security Identity Manager Version 6.0.0.18: Administration Topics

Table 68. List of query items in the Access Configuration namespace (continued)
Query subject Query items and their description
UserFull Name
The full name of the user.
Last NameThe surname of the user.
Type The profile type of the user, which is either person or businesspartner person.
Status The status of the user, which is either Active and Inactive.
SupervisorThe supervisor of the user
Business Unit NameThe name of the business unit to which a user belongs.
Dn An LDAP distinguished name for a user.
Business Unit DnAn LDAP distinguished name for the business unit to whicha user belongs.
ReferencesReference information is organized to help you locate particular facts quickly, suchas the mapping attributes, entities, or scenario to configure the report model.
Mapping the attributes and entitiesYou must map the following attributes to the entities to work with the query itemsfor the IBM Security Identity Manager Cognos report models.
Note: After you map the schema by using IBM Security Identity Manageradministration console, it might take some time to reflect the updated data in theCognos report. You must run a successful data synchronization after mapping theattributes. You must restart IBM Cognos Business Intelligence server to reflect theupdated schema in the report.
Table 69. Mapping the attributes and entities
Namespace Entity Attribute Name
Account Audit Business partner person Status
Account Configuration Organizational Role v Access Name
v Object profile name
Identity policy v Policy Name
v Policy Target
v Enabled
v Scope
v UserClass
Password policy v Policy Name
v Policy Target
v Enabled
v Scope
Account Account Ownership Type
Business partner person Status
Chapter 9. Report administration 277
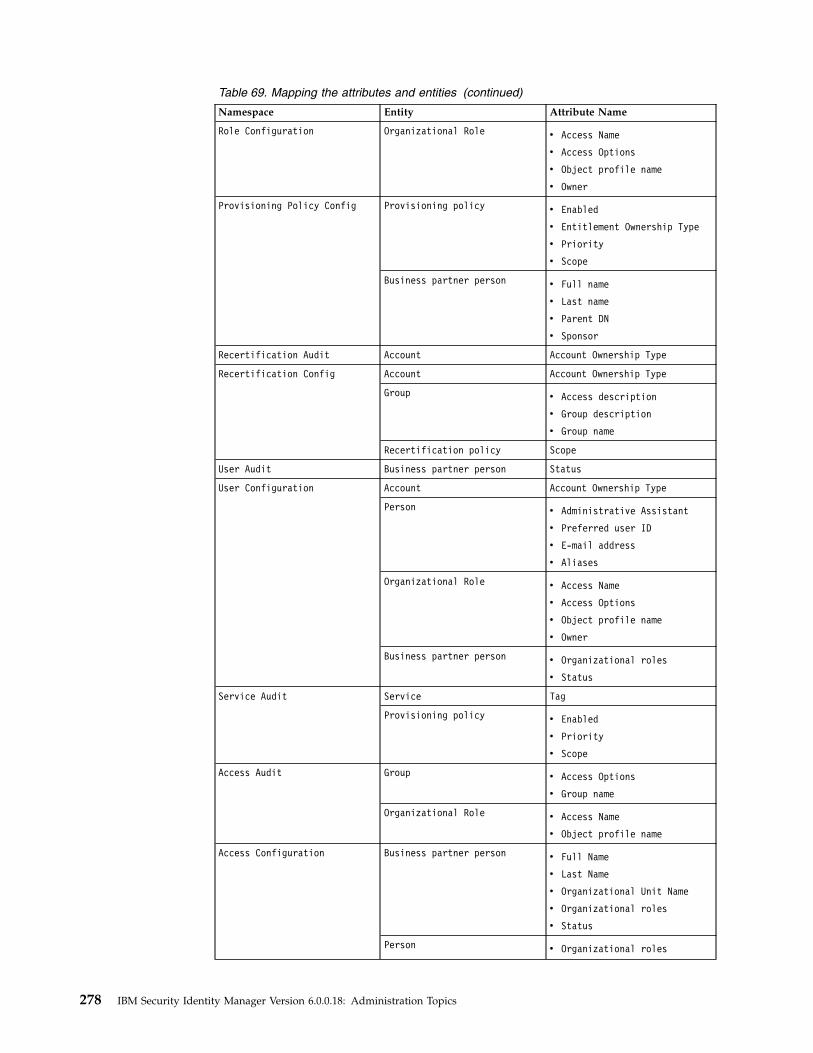
Table 69. Mapping the attributes and entities (continued)
Namespace Entity Attribute Name
Role Configuration Organizational Role v Access Name
v Access Options
v Object profile name
v Owner
Provisioning Policy Config Provisioning policy v Enabled
v Entitlement Ownership Type
v Priority
v Scope
Business partner person v Full name
v Last name
v Parent DN
v Sponsor
Recertification Audit Account Account Ownership Type
Recertification Config Account Account Ownership Type
Group v Access description
v Group description
v Group name
Recertification policy Scope
User Audit Business partner person Status
User Configuration Account Account Ownership Type
Person v Administrative Assistant
v Preferred user ID
v E-mail address
v Aliases
Organizational Role v Access Name
v Access Options
v Object profile name
v Owner
Business partner person v Organizational roles
v Status
Service Audit Service Tag
Provisioning policy v Enabled
v Priority
v Scope
Access Audit Group v Access Options
v Group name
Organizational Role v Access Name
v Object profile name
Access Configuration Business partner person v Full Name
v Last Name
v Organizational Unit Name
v Organizational roles
v Status
Person v Organizational roles
278 IBM Security Identity Manager Version 6.0.0.18: Administration Topics

Report model configuration by using IBM Cognos componentsTo customize reports, you might be required to configure the report model. Thefollowing table provides a list of the basic tasks for configuring any IBM Cognosreport model. It also provides information about the user guide for some IBMCognos components.
Table 70. Basic tasks to configure report model
Tasks
Access the IBM Cognos Business Intelligence 10.2.1documentation at http://www.ibm.com/support/knowledgecenter/SSEP7J_10.2.1/com.ibm.swg.ba.cognos.cbi.doc/welcome.html
Framework Manager user guide. Search for Framework Manager User Guide 10.2.1.
Query Studio user guide. Search for Query Studio User Guide 10.2.1.
Report Studio user guide. Search for Report Studio User Guide 10.2.1.
Cognos Connection user guide. Search for Cognos Connection User Guide 10.2.1.
Import the metadata from the relationaldatabase.
Search for Importing metadata from relational databases.
Create a relationship. Search for Creating relationships.
Modify a relationship. Search for Modifying a relationship.
Create a complex expression for arelationship.
Search for Creating complex expressions for arelationship.
Create a data source query subject. Search for Data source query subjects.
Create a model query subject. Search for Model query subjects.
Update query subjects. Search for Updating query subjects.
Create or modify a package. Search for Creating or modifying packages.
Publish a package. Search for Publishing packages.
Migration of Tivoli Common Reporting reports to IBM CognosreportsYou can use the reference of the following link to convert Tivoli CommonReporting reports to IBM Cognos reports.
The following link provides information about converting the Business Intelligenceand Reporting Tools (BIRT) reports to IBM Cognos reports. You can obtain thereference by using the following link to convert Tivoli Common Reporting reportsto IBM Cognos reports. See http://www.ibm.com/support/knowledgecenter/SSH2DF_2.1.1/ttcr_converting_birt_to_cognos.html.
ScenariosSee the possible scenarios that can be used to customize the IBM Security IdentityManager Cognos report model.
Adding custom tables:
The scenario describes the steps to add or import custom tables in IBM SecurityIdentity Manager Cognos model.
Before you begin
v Install and configure IBM Cognos Business Intelligence server.v Install IBM Framework Manager.v Map the user and its required attributes through schema mapper in IBM
Security Identity Manager Console and run the data synchronization.
Chapter 9. Report administration 279

About this task
You can define the custom types or objects in IBM Security Identity Manager. Bydefault, IBM Security Identity Manager provides the objects Person and BusinessPartner Person for a User entity. You can further define your own object classesthat can be used as the custom person or custom Business Partner person types.For example, JKPerson.
Consider that a custom user JKPerson defined in IBM Security Identity Manager.With this customization in IBM Security Identity Manager, there are two profiles ortypes of a user. The Person is a type that is provided by default and a newcustomized person JKPerson.
Procedure
1. Extract the ISIMReportingModel_6.0.0.6.zip to the local disk.2. Create a project in IBM Cognos Framework Manager and open .cpf file for the
model customization.
Note: Open an existing project if any customization is already done in IBMSecurity Identity Manager metadata model.
3. Navigate to the Database Layer.4. Select the Database Layer.5. Right click, and then select Run Metadata Wizard.6. Select ISIM as a data source from the list that is defined in IBM Cognos, and
then click Next.7. Select the objects that you want to import, and then click Next. For example,
JKPerson, JKPerson_CN, or JKPerson_SN.8. On Generate Relationships panel, clear the Use primary and foreign keys
check box.9. Click Import.
Results
JKPerson, JKPerson_CN, or JKPerson_SN are added to the database layer in metadatamodel. Similarly, you can import the other required tables that you want.
Creating a relationship with the existing tables:
The scenario describes the steps to create a relationship with any existing customtable.
Before you begin
v Install and configure IBM Cognos Business Intelligence server.v Install IBM Framework Manager.v Map the user and its required attributes through schema mapper in IBM
Security Identity Manager Console and run the data synchronization.
About this task
IBM Security Identity Manager Cognos report model is divided into two basicnamespaces: audit and configuration. Audit namespace provides the tables orquery subjects that helps to generate the audit reports. Configuration namespaceprovides the configuration information that helps to generate configuration reports.
280 IBM Security Identity Manager Version 6.0.0.18: Administration Topics

You can define the custom types or objects in IBM Security Identity Manager. Bydefault, IBM Security Identity Manager provides the objects Person and BusinessPartner Person for a User entity. You can further define your own object classesthat can be used as the custom person or custom Business Partner person types.For example, JKPerson.
The JKPerson is of a type User. Therefore, navigate to the User configurationnamespace to merge the JKPerson.
Procedure
1. Extract the ISIMReportingModel_6.0.0.6.zip to the local disk.2. Create a project in IBM Cognos Framework Manager and open .cpf file for
the model customization.
Note: Open an existing project if any customization is already done in IBMSecurity Identity Manager metadata model.
3. Navigate to the Database Layer.4. Hold the Ctrl key, and select the JKPerson and JKPerson_CN tables.5. Right click, and then select Create > Relationship.6. Set the Cardinality, and then click OK.7. Create a relationship between the JKPerson and JKPerson_SN tables8. A common entity such as User lists all types of the users. For example, Person,
Business Partner Person, or JKPerson.To create a common entity, pick the common attributes in them. Assumingthat the cn, sn, businesunit dn, and dn are the attributes that are must, createthe JKPerson Must Attributes query subject that contains the attributes thatare must. Rename an individual item to some business names. For example,CN to Full Name, SN to Last Name.Introduce one more data item as Type. The Type attribute indicates the type ofa user such as JKPerson.a. Navigate to the Database Layer.b. Select the Database Layer.c. Right click, and then select Create > Query subject.d. Select the type as a Model query subject.e. Provide the name to the query subject. For example, JKPerson Must
Attributes.f. Click OK. The Query Subject Definition window is displayed.g. Navigate to the Database Layer.h. Add JKPerson DN, Business Unit Dn from the JKPerson query subject.i. Add JKPerson_CN from the JKPerson_CN and JKPerson_SN from the
JKPerson_SN.j. Add a Type data item to indicate the type of a user.
1) Click Add link.2) Provide the Type as a name to the item.3) In the expression definition, add the JKPerson.4) Click OK.
9. Edit the union definition for the User query subject and include newly addedJKPerson Must Attributes query subject.
10. Select User, right click, and test the results.
Chapter 9. Report administration 281

11. Optional: Create a shortcut of User and use it in the namespace. For example,User Configuration.a. Select a User from the database layer.b. Right click, and select Create > Shortcut.c. Drag the shortcut to User Configuration namespace.d. Rename the shortcut query to JKPerson or some business name and use it
as per the requirement.
Results
The relationship is created with the existing tables.
Adding custom attributes to an existing query subject:
The static report does not show an email address. You can configure the reportmodel to add custom attributes such as, an email address. The scenario describeshow to configure model so that you can view or drag the email addresses of theusers in the reports.
Before you begin
v Install and configure IBM Cognos Business Intelligence server.v Install IBM Framework Manager.
Procedure
1. Add the E-mail property to the ISIM database schema.a. In the IBM Security Identity Manager console, select Reports > Schema
Mapping.b. From the Entities list, select Person entity.c. From the unmapped attribute list, select E-mail address.d. Click Add.
2. Run the data synchronization tool.a. Select Reports > Data Synchronization.b. Click Run Synchronization Now.
3. Add the information about email address in theISIMReportingPackage_6.0.0.6.zip.a. Open the Framework Manager.b. Extract the ISIMReportingModel_6.0.0.6.zip to the local disk.c. Open the .cpf file in the ISIMReportingModel_6.0.0.6 folder.d. Right click the IBM Identity Security Manager (ISIM) namespace and select
Run Metadata Wizard.e. From the Metadata Wizard window, select Data Source and click Next.f. Select ISIM and click Next. You must use the data source name as ISIM.g. Select the ITIMUSER object and click Tables.h. Select the PERSON_MAIL table and click Next.i. Clear the Use primary and foreign keys check box.j. Click Import.k. Click Finish.
4. Create a relationship between the PERSON and PERSON_MAIL table.a. Hold the Ctrl key and select the PERSON and PERSON_MAIL tables.
282 IBM Security Identity Manager Version 6.0.0.18: Administration Topics

b. Right click and select Create > Relationship.c. Set the Cardinality of the following items:v PERSON table to 1..1v PERSON_MAIL table to 0..1
d. Click OK.5. Publish the modified model.
a. In the Framework Manager console, expand Packages.b. Right click the metadata model and click Publish Packages.c. Click Next twice.d. Click Publish.e. If the package was published previously, a message prompts for the
confirmation. Click Yes.f. Click Finish.
Results
You can view the email addresses in the reports.
Troubleshooting report problemsThe following section describes solutions for the IBM Security Identity ManagerCognos report problems.
Problems and their solutions
Unable to view the IBM Security Identity Manager Cognos drill through reportsin Microsoft Internet Explorer version 10
If you are using the Microsoft Internet Explorer version 10 browser, theIBM Security Identity Manager Cognos drill through reports might notwork.
SolutionComplete the following steps:1. Enable the compatibility view.
a. In the Microsoft Internet Explorer 10 menu, go to Tools.b. Select Compatibility View.
2. Add the IBM Cognos website to the trusted sites list.3. In the Microsoft Internet Explorer 10 menu, go to Tools >
Internet Options.4. On the Security tab, click the Trusted sites icon.5. Click Sites.6. In the Add this website to the zone box, add the IBM Cognos
website address.7. Click Add.8. Click Close.
IBM Cognos audit history report does not show the audit of an account that isprovisioned on the managed resource
IBM Cognos audit history for an account does not show the audit of theaccount that is provisioned on the managed resource when "DefaultAccount Request Workflow" is configured with the entitlements that areassociated with the provisioning policy.
Chapter 9. Report administration 283

SolutionTo generate the audit history reports for the accounts with thedefault workflow, clear the Approval Start Date and ApprovalEnd Date check boxes, and then run the report.
IBM Security Identity Manager Cognos report execution fails on Oracle datasource During the report generation on Oracle data source, if you select more than
1000 filter values on the prompt page, the report execution fails.
Solution
1. Open the report in IBM Cognos Report Studio.2. Open the prompt page and edit the property Rows Per Page
for all input widgets.3. Set the value to less than or equal to 1000.
The scope for the default provisioning policy is shown as blank on Oracledatabase.
When you generate the customized IBM Cognos report that includesprovisioning policy scope in it, the scope for the default provisioningpolicy is shown as blank. This issue is specific to Oracle database.
SolutionIf the scope for the default provisioning policy is shown as blankon Oracle database, then, interpret the scope of a provisioningpolicy as Subtree.
No data is displayed in the IBM Security Identity Manager Cognos audit historyreport Account audit is not supported for an account that is added and does not
have a defined workflow. To audit the accounts for an audit history report,the default workflow or custom workflow must be attached to theprovisioning policy that is created.
Long filter values are not shown completely on the prompt pagesFollow the technote link http://www-01.ibm.com/support/docview.wss?uid=swg21341018 to resolve this issue. The information in thetechnote also applies to IBM Cognos Business Intelligence version 10.2.1Fix Pack 1.
Known limitations
The Prompt Page Summary table in the IBM Cognos Report shows "--" as theparameter value when more than 1000 filters per prompt is selected.
IBM Cognos Reports provide the option for multiple selection. You canselect more than one value for each parameter in the prompt page. Whenyou select several values to filter the report, text overflow can occur and '--'is displayed instead in the Prompt Page Summary table.
SolutionAvoid selecting too many values for each parameter in the promptpage.
IBM Cognos Reports do not display the actual values of custom labels that aredefined in the Custom Labels properties file
IBM Security Identity Manager supports the use of custom labels. You canspecify these labels in the CustomLabels_<locale>.properties file. Customlabels are defined in a key-value pair format. This key can be used to setcustom access types, access badges, and others.
For example:
284 IBM Security Identity Manager Version 6.0.0.18: Administration Topics

v Custom access badge label: $OPDData
v Custom access badge label value: Critical
You can view the access catalog information or entitlements from thefollowing IBM Security Identity Manager reports:v Access Definition Reportv User Access Report
These reports list all access that is defined in the IBM Security IdentityManager console. When you define an access badge in the IBM SecurityIdentity Manager console, the value can be:v Derived from the CustomLabels_<locale>.properties file. For example:
$OPDData ORv A regular string value. For example: "Sensitive data"
For custom labels, these reports display the key for the respective label. Forexample: $OPDData. You must see the CustomLabels_<locale>.propertiesfile to get the actual value of the custom label.
Disabled access is not displayed in the User Access ReportThe access that is defined on groups and roles cannot be displayed in theUser Access Report if the access is disabled.
User entitlements are not displayed in Legacy Administrator console reports andin BIRT reports
Both the Legacy Administrator console reports and BIRT reports do notshow the entitlements that are granted to an individual when theprovisioning policy membership is set to "All Other Users". To resolve theproblem, use Cognos-based entitlements granted to an individual report toget the entitlement details.
Audit of the disconnected credentials in the IBM Cognos shared access historyreport In IBM Security Identity Manager, a user can disconnect the shared access
credentials in the credential vault. After the credentials are disconnected,the credentials in the vault do not have a connection with an account.
IBM Cognos shared access history report does not include the check-outand check-in history of the credentials that are not connected to anaccount. The shared access history report does not show the disconnectedcredentials for check-out and check-in audit action.
IBM Cognos entitlements report shows the provisioning policy data that is inthe draft state
The IBM Cognos entitlements report shows the entitlements that aregranted to an individual. It lists all the users and the items for which theyare entitled. The report also shows the provisioning policy information thatincludes the policies that are saved in the draft state.
Cannot truncate the length of the text in the pie chartsAn option or a property that can be set to truncate the length of the text isnot available for the pie charts. You cannot truncate the length of the textin the pie charts.
Languages that are not supported by the IBM Cognos Business IntelligenceServer version 10.2.1 Fix Pack 1
IBM Cognos Business Intelligence Server version 10.2.1 Fix Pack 1 does notsupport the following languages:v ar=Arabicv iw=Hebrew
Chapter 9. Report administration 285

It provides partial support for the following language:v el=Greek
The IBM Cognos Business Intelligence Server 10.2.1 Fix Pack 1 is notfully translated into the Greek language. Only components like CognosViewer, Cognos Connection, Cognos Administration, and CognosWorkspace support translation in the Greek language.
Note: The unsupported languages are not in the Product Language list,although they are displayed in the Content Language list in the Cognosconfiguration of IBM Cognos Business Intelligence Server.
Duplicate entries of the account add operation are observed when you run theaccount audit report
Duplicate entries of the account add operation are observed if theprovisioning policy is configured with the default workflow and an extracustom workflow is created in IBM Security Identity Manager Consoleunder Configure System > Manage Operations.
SolutionRemove the default workflow that is defined in the provisioningpolicy. Therefore, only the custom workflow that is defined wouldbe effective, which would be captured in the account audit report.
Custom workflows that are defined in IBM Security Identity Manager are notsupported for the following type of actions on an account
Only the default workflows are supported for the following actions on anaccount.v Restorev Suspend
Audit of the custom access type is not supported in the access audit historyreport Any custom access type that is defined as access for a role, service, or
group cannot be audited in the access audit history report.
IBM Security Identity Manager console reportsThe section provides information about IBM Security Identity Manager consolereports.
Types of reportsView descriptions of the reports that you can generate for IBM Security IdentityManager.
Requests
Account OperationsA report that lists all account requests. Allows filtering by accountoperation, service, and other fields.
Account Operations Performed by an IndividualA report that lists account requests made by a specific user. Allowsfiltering by the user who made the request in addition to otherfields.
Approvals and RejectionsA report that lists request approval activities that were approved orrejected. Allows filtering by activity approver, service, and otherfields.
286 IBM Security Identity Manager Version 6.0.0.18: Administration Topics
Operation ReportA report that lists all operations submitted in the system. Allowsfiltering by requestee, operations, and the request start date andend date.
Pending ApprovalsA report that lists the request activities submitted but not yetapproved. Allows filtering by service, activity status, and otherfields.
Rejected ReportA report that lists all rejected requests. Allows filtering byrequestee and the request start date and end date.
User ReportA report that lists all requests, shows the set of operations thatwere requested, who the operations were requested for, and whorequested them. Allows filtering by requestor, requestee, and therequest start date and end date.
User and Accounts
Account ReportA report that lists accounts for a business unit. Allows filtering byservice and business unit.
Accounts/Access Pending Recertification ReportA report that lists all pending recertifications for access definitionsand accounts. Allows filtering by account or access owner, servicetype, and service.
Individual AccessA report that lists user access definitions selected by individualaccount owner, business unit, access, or service. Allows filtering bya user that owns accesses, business unit of the user, access definedin the system, and service where access is supported.
Individual AccountsA report that lists the accounts and their owners. Allows filteringby user.
Individual Accounts by RoleA report that lists accounts owned by users of a specific role that isa member of provisioning policy. Allows filtering by role andbusiness unit.
Recertification Change History ReportA report that lists the recertification history of accounts and useraccesses. Allows filtering by account or access owner, recertificationresponse, start date and end date, and other fields.
Suspended IndividualsA report that lists all individuals that are suspended. Allowsfiltering by date.
Services
Reconciliation StatisticsA report that lists the activities that occurred during the lastcompleted reconciliation of a service, regardless of when the reportdata was synchronized. Remote services provide reconciliationstatistics during a reconciliation. This report contains data from the
Chapter 9. Report administration 287

last service reconciliation. Data synchronization is not a reportprerequisite. Allows filtering by service.
ServicesA report that lists services currently defined in the system. Allowsfiltering by service type, service, owner and business unit.
Summary of Accounts on ServiceA report that lists the accounts on a specified service. Allowsfiltering by service and account status.
Audit and Security
Access Control Information (ACIs)A report that lists all access control items in the system. Allowsfiltering by access control item name, protection category, objecttype, scope, and business unit.
Access ReportA report that lists all access definitions in the system. Allowsfiltering by access type, access entitlement, service type, service,and administration owner of an access definition.
Audit EventsA report that lists all audit events. Allows filtering by audit eventcategory, action, initiator, start date, and end date.
Dormant AccountsA report that lists the accounts that have not been used recently.An account that does not have last access information is notconsidered dormant, including new accounts where the last accessdate is blank. These types of accounts are not displayed in adormant report. Allows filtering by service and dormant period.
Entitlements Granted to an IndividualA report that lists all users with the provisioning policies for whichthey are entitled. Allows filtering by user.
Note: This report shows direct entitlements and not inheritedentitlements.
Non-Compliant AccountsA report that lists all accounts that are noncompliant. Allowsfiltering by service and the reason for noncompliance.
Orphan AccountsA report that lists all accounts that do not have an owner. Allowsfiltering by service and account status.
PoliciesA report that lists target and memberships of the provisioningpolicies in the system. Allows filtering by policy name.
Policies Governing a RoleA report that lists all provisioning policies for a specifiedorganization role. Allows filtering by role name.
Recertification Policies ReportA report that lists all recertification policies. Allows filtering bypolicy target type, service type, service, access type, and access.
288 IBM Security Identity Manager Version 6.0.0.18: Administration Topics

Suspended AccountsA report that lists the accounts that are suspended. Allows filteringby user, account, service, and date.
Generating reportsYou can generate reports based on requests, user and accounts, services, or auditand security.
Before you begin
Depending on how your system administrator customized your system, you mightnot have access to this task. To obtain access to this task or to have someonecomplete it for you, contact your system administrator.
About this task
Reports of subsets of information can help you discover trends that can help youidentify ways to improve your business process.
To generate a report, select the type of report you want to generate, and specify thecriteria of the report. The criteria you specify depends on the type of report andcontrols the scope and quantity of the report entries.
To generate a custom report, you must first create the report schema that specifieswhat entities and attributes can be made available for the custom report.
Generating requests reportsGenerate the reports that provide workflow process data.
Before you begin
Depending on how your system administrator customized your system, you mightnot have access to this task. To obtain access to this task or to have someonecomplete it for you, contact your system administrator.
About this task
To run a report, complete these steps:
Procedure1. Click Reports > Requests Reports.2. Select the report that you want to generate.3. Provide filtering criteria by completing the fields on the report page, and then
click OK.
Results
The report is displayed in the format that you specified.
What to do next
Select another reporting task, or click Close.
Generating user and accounts reportsGenerate the reports that provide user and accounts data.
Chapter 9. Report administration 289

Before you begin
Depending on how your system administrator customized your system, you mightnot have access to this task. To obtain access to this task or to have someonecomplete it for you, contact your system administrator.
About this task
To run a report, complete these steps:
Procedure1. Click Reports > User and Accounts Reports.2. Select the report that you want to generate.3. Provide filtering criteria by completing the fields on the report page, and then
click OK.
Results
The report is displayed in the format that you specified.
What to do next
Select another reporting task, or click Close.
Generating services reportsGenerate the reports that provide service data.
Before you begin
Depending on how your system administrator customized your system, you mightnot have access to this task. To obtain access to this task or to have someonecomplete it for you, contact your system administrator.
About this task
To run a report, complete these steps:
Procedure1. Click Reports > Services.2. Select the report that you want to generate.3. Provide filtering criteria by completing the fields on the report page, and then
click OK.
Results
The report is displayed in the format that you specified.
What to do next
Select another reporting task, or click Close.
Generating audit and security reportsGenerate the reports that provide audit and security data.
290 IBM Security Identity Manager Version 6.0.0.18: Administration Topics

Before you begin
Depending on how your system administrator customized your system, you mightnot have access to this task. To obtain access to this task or to have someonecomplete it for you, contact your system administrator.
About this task
To run a report, complete these steps:
Procedure1. Click Reports > Audit and Security Reports.2. Select the report that you want to generate.3. Provide filtering criteria by completing the fields on the report page, and then
click OK.
Results
The report is displayed in the format that you specified.
What to do next
Select another reporting task, or click Close.
Regular expression notation usage for searchingRegular expression notation is a group of symbols and characters that make up asyntax that is used as a template to match patterns of text.
Note: The Report task in the console supports only the wildcard (*) as a regularexpression character. If you select the Search function in the console while you aredoing a report-related task, you can specify only the wildcard as a regularexpression character.
If a regular-expression field displays an asterisk (*) as the default character, thatcharacter is interpreted as a wildcard character that indicates that all string valuesapply. No filtering is done to reduce the number of string values that apply. IBMSecurity Identity Manager supports the set of regular expression characters fromJava (regex4j).
Regular expressions are commonly used on UNIX platforms and in the PERL 5language. A free online tutorial, Using regular expressions, is available on thefollowing IBM developerWorks® website:
http://www.ibm.com/developerworks/java/
Type regular expression in the Search for field when the website is displayed,and then select Using regular expressions from the list of topics. You must registerwith developerWorks to take the tutorial.
Report customizationUse the Design Report task to create report templates. Add them to a table thatcontains a selection of report templates that you can modify or delete.
Chapter 9. Report administration 291

When you, as an administrator, create a custom report, you must also manuallycreate report ACIs and entity ACIs for that custom report. The ACIs allow usersthat are not administrators, such as auditors, to run the custom report and to viewdata in the custom report.
Report templates can apply to one of the following categories. The categorydetermines where the reporting link is displayed in the task portfolio.v Requestsv User and Accountsv Servicesv Audit and Securityv Custom
Report templatesAll reports, including standard reports and custom reports, are generated withreport templates. A report template defines the layout of a report and the filtercriteria that determines the contents of the report. When you select a report to run,you are selecting the report template used to generate the report.
IBM Security Identity Manager provides a large set of standard report templatesthat are designed to help you manage system resources and monitor the status ofvarious activities and accounts. You can keep the standard report templates in theiroriginal form to generate reports. You can also examine them to determine how todesign custom report templates, or modify the standard report templates to meetthe needs of your organization. You modify standard report templates with theDesign Report task in the console.
Custom reports are generated with report templates that you design. Use either thebuilt-in report designer or a third-party report designer.
When you use the Design Report task, you can determine which report designerwas used to create the report template. Use the Report Type column in the reportstable. Designer identifies report templates that were created with IBM SecurityIdentity Manager Design Report task. You can modify these report templates withDesign Report task.
Creating custom report templatesUse the IBM Security Identity Manager report designer to create custom reporttemplates.
Before you begin
Run the data synchronization process before you create a custom report template.See “Data synchronization for reports” on page 315.
Procedure
To create a custom report template, complete these steps:1. From the left navigation pane, select Reports > Design Report to open the
Custom Report Template page.2. Click Create to open the General page.3. In the Report name field, type a unique name for the report.4. Optional: To specify the generation date and time of the report, select the
Include generated date and time check box.
292 IBM Security Identity Manager Version 6.0.0.18: Administration Topics

5. Optional: To specify the user name who generated the report, select theInclude generated by user information check box.
6. Optional: To include page numbers in the report, select the Show paginginformation (Page n of m) check box.
7. Optional: Select a style sheet from the list. The default style sheet is Standard.8. Optional: Retain the default value of the report category in the Report
Category list. The default value is Custom.9. Click Contents and then click Add to open the Report Column Details page.
Important: You must add at least one column to create the report.10. Complete the following steps on this page:
a. From the Apply Case list, select an appropriate option.b. From the Entity list, select an appropriate option. For example, select Role
Assignment Attributes.c. From the Attribute list, select one of the options for adding it as a column
in the report. For example, select Attribute Name.
Note: Attribute list options are mapped with the entity that you selectedearlier.
d. In the Column width field, type the size of the column. The default valueis 5.
e. In the Sort section, complete these steps:v Select one of these options: None, Ascending, or Descending.v From the Sort order list, select an appropriate option. For example, 2.
f. Click OK to add the column in the report.11. Click the Filter tab, and then add or remove rows and columns for the report
according to your requirements. For example, you can add a row in the reportfor a list of roles that have assignment attributes. To do so, complete thesesteps under the Add a New Filter Row area:a. From the Entity list, select Organizational Role.b. From the Attribute list, select DN.c. From the Operator list, select Equals.d. From the Entity list, select Role Assignment Attributes.e. From the Attribute list, select Role Distinguished Name.f. From the Condition list, select one of these options:v None: Indicates that no more filter condition can be added to the report.v AND: Generates results only if all the specified filter conditions meet.v OR: Generates results if either of the specified filter conditions meet.
12. Optional: Click Preview to open a new browser window that contains apreview of the report.
13. Click OK to create the custom report.
Results
A message is displayed, which indicates that you created the custom reporttemplate.
Chapter 9. Report administration 293

What to do next
Generate the custom report that you created either in a PDF or a CSV format. See“Generating custom reports” on page 295.
Modifying custom report templatesUse the report designer to modify custom reports that you created.
Before you begin
Depending on how your system administrator customized your system, you mightnot have access to this task. To obtain access to this task or to have someonecomplete it for you, contact your system administrator.
About this task
To modify a custom report template, complete these steps:
Procedure1. Click Reports > Design Report. The Custom Report Template page is
displayed, which contains a table that lists the standard report templates. Thetable might consist of multiple pages.
2. On the Custom Report Template page, click the name of the report that youwant to modify. The General tab of the Design Report notebook is displayed.
3. On the General tab, modify the fields as wanted, and then click the Contentstab. The Contents tab of the Design Report notebook is displayed.
4. Optional: On the Contents tab, add attributes to the report column as follows:a. Click Add to add an attribute as a column of data in the report. The Report
Column Details page is displayed.b. On the Report Column Details page, complete the fields as wanted, and
then click OK. The new attribute is displayed in the Report Column of theattribute table that is within the Contents tab.
5. Optional: On the Contents tab, remove attributes from the report column asfollows:a. Select the check box next to the attribute that you want to remove. Selecting
the check box at the top of this column selects all attributes.b. Click Remove. The table on the Contents tab is refreshed, and the attribute
is removed.6. Click the Filter tab. The filter for the report template is displayed.7. On the Filter tab, select the row in the list box to view the filter details. Filters
cannot be modified for out-of-box reports. Only the filters of custom-designedreport can be modified.
8. Click Preview to open a new browser window that contains a preview of thereport, or click OK to save the report template.
Results
A message is displayed, indicating that you successfully updated the reporttemplate.
294 IBM Security Identity Manager Version 6.0.0.18: Administration Topics
What to do next
To view the updated report template within the custom report table, click Returnto the Report Design Page. You can also select another reporting task, or clickClose.
Deleting custom report templatesUse the report designer to delete custom report templates that you no longer need.
Before you begin
Depending on how your system administrator customized your system, you mightnot have access to this task. To obtain access to this task or to have someonecomplete it for you, contact your system administrator.
About this task
To delete a custom report template, complete these steps:
Procedure1. Click Reports > Design Report. The Custom Report Template page is
displayed, which contains a table that lists the standard report templates. Thetable might consist of multiple pages.
2. On the Custom Report Template page, select the check box next to the reporttemplate that you want to delete. Selecting the check box at the top of thiscolumn selects all report templates.
3. Click Delete. A confirmation page is displayed.4. On the Confirm page, click Delete to delete the selected report template, or
click Cancel.
Results
A message is displayed, indicating that you successfully deleted the reporttemplate.
What to do next
To view the custom report table, click Return to the Report Design Page. You canalso select another reporting task, or click Close.
Generating custom reportsGenerate the custom reports that are designed with the Design Report task.
Before you begin
Depending on how your system administrator customized your system, you mightnot have access to this task. To obtain access to this task or to have someonecomplete it for you, contact your system administrator.
About this task
Custom reports can be located within any of the report categories and notnecessarily only in Custom Reports.
Chapter 9. Report administration 295

To generate a custom report from the Custom Reports category, complete thesesteps:
Procedure1. Click Reports > Custom Reports.2. Click the name of the report that you want to generate.3. Provide filtering criteria by completing the fields on the report page, and then
click OK.
Results
The report is displayed in the format that you specified.
What to do next
Select another reporting task, or click Close.
Shared access objects for custom reportsYou can generate custom reports by using the shared access objects in IBM SecurityIdentity Manager. Use the shared access entities, such as credential, credential pool,credential lease, and shared access policy to generate the custom reports.
For more information about shared access entities and their correspondingattributes, see Database and Directory Server Schema Reference > Database tablesreference > Shared access tables in the IBM Security Identity Manager productdocumentation.
Example: Creating custom report to view all shared access credentials checkedout:
This topic provides detailed instructions to create custom reports to view all theshared access credentials that are currently checked out with examples.
Before you begin
Run the data synchronization process before you create a custom report to view allthe shared credentials that are currently checked out. See “Data synchronization forreports” on page 315.
Procedure
To create a custom report to view all the shared access credentials that arecurrently checked out, complete these steps:1. From the left navigation pane, select Reports > Design Report to open the
Custom Report Template page.2. Click Create to open the General page.3. In the Report name field, type a unique name for the report.4. Optional: To specify the generation date and time of the report, select the
Include generated date and time check box.5. Optional: To specify the user name who generated the report, select the
Include generated by user information check box.6. Optional: To include page numbers in the report, select the Show paging
information (Page n of m) check box.7. Optional: Select a style sheet from the list. The default style sheet is Standard.
296 IBM Security Identity Manager Version 6.0.0.18: Administration Topics

8. Optional: Retain the default value of the report category in the ReportCategory list. The default value is Custom.
9. Click Contents and then click Add to open the Report Column Details page.
Important: You must add at least one column to create the report.10. Complete the following steps on this page:
a. From the Entity and Attribute lists, select appropriate options. Forexample, to create a custom report for viewing all the credentials that arechecked out, you can map the following entities and attributes.
Table 71. Entities and Attributes
Entity AttributeMapping displayed on theContents page
Credential Name Credential.Name
Credential lease Credential CheckoutExpiration Time
Credential lease.CredentialCheckout Expiration Time
Credential lease Credential Checkout Time Credential lease.CredentialCheckout Time
Note: You can select the entities and attributes based on yourrequirements.
b. In the Column width field, type the size of the column. The default valueis 5.
c. Click OK to add the column in the report.11. Click the Filter tab to specify the data that must be displayed in the report. To
do so, apply the filter conditions in the Add a New Filter Row area:a. Add rows with these filter conditions. Click Add Row after you finish
adding every row.
Table 72. Filter conditions
Row Entity Attribute Operator Entity Attribute Condition
1 Credential Name Like _USERINPUT_ - AND
2 Credential Service name Like _USERINPUT_ - AND
3 Credentiallease
Credential DN Equals Credential DN AND
4 Credentiallease
CredentialLessee
Equals Person DN AND
5 Service Service Name Like _USERINPUT_ - NONE
Note: You can apply filter conditions based on your requirements. Forinformation about entities, attributes, operators, and conditions, see theSecurity Identity Manager online help for the Filter page.
b. Optional: Click Preview to open a new browser window that contains apreview of the report.
c. Click OK after you apply all the filter conditions.12. On the Success page, in the Other Tasks area, click Run Custom Report.13. On the Options page, click the report whose data you want to view.14. Optional: If you selected the _USERINPUT_ entity in the filters that you
specified earlier, narrow down the search scope of the report. For example:
Chapter 9. Report administration 297

a. In the Credential Name Like field, specify * to show all the credentialnames.
b. In the Service Service Name Like field, specify Win* to show all theservices whose service name begins with Win.
15. Select the format of the report. You can select either PDF or CSV format.16. Click OK to generate the report.
Results
A report is generated in a new window that shows all the shared access credentialsthat are currently checked out.
Example: Creating check in audit report:
This topic provides detailed instructions to create a report that displays auditinformation for the checked in credentials.
Before you begin
Run the data synchronization process before you create a check in audit report. See“Data synchronization for reports” on page 315.
Procedure
To create a report that displays audit information for the checked in credentials,complete these steps:1. From the left navigation pane, select Reports > Design Report to open the
Custom Report Template page.2. Click Create to open the General page.3. In the Report name field, type a unique name for the report.4. Optional: To specify the generation date and time of the report, select the
Include generated date and time check box.5. Optional: To specify the user name who generated the report, select the
Include generated by user information check box.6. Optional: To include page numbers in the report, select the Show paging
information (Page n of m) check box.7. Optional: Select a style sheet from the list. The default style sheet is Standard.8. Optional: Retain the default value of the report category in the Report
Category list. The default value is Custom.9. Click Contents and then click Add to open the Report Column Details page.
Important: You must add at least one column to create the report.10. Complete the following steps on this page:
a. From the Entity and Attribute lists, select appropriate options. Forexample, to create a report that displays audit information for the checkedin credentials, you can map the following entities and attributes.
Table 73. Entities and attributes
Entity AttributeMapping displayed on theContents page
Audit Event Entity Name Audit Event.Entity Name
Audit Event Initiator Name Audit Event.Initiator Name
298 IBM Security Identity Manager Version 6.0.0.18: Administration Topics

Table 73. Entities and attributes (continued)
Entity AttributeMapping displayed on theContents page
Audit Event Timestamp Audit Event.Timestamp
Note: You can select the entities and attributes based on yourrequirements.
b. In the Column width field, type the size of the column. The default valueis 5.
c. Click OK to add the column in the report.11. Click the Filter tab to specify the data that must be displayed in the report. To
do so, apply the filter conditions in the Add a New Filter Row area:a. Add rows with these filter conditions. Click Add Row after you finish
adding every row.
Table 74. Filter conditions
Row Entity Attribute Operator Entity Attribute Condition
1 Audit Event Action Like _USERINPUT_ - AND
2 Audit Event Entity Name Like _USERINPUT_ - AND
3 Audit Event Initiator Name Like _USERINPUT_ - AND
4 Audit Event Timestamp Like _USERINPUT_ - NONE
Note: You can apply filter conditions based on your requirements. Forinformation about entities, attributes, operators, and conditions, see theSecurity Identity Manager online help for the Filter page.
b. Optional: Click Preview to open a new browser window that contains apreview of the report.
c. Click OK after you apply all the filter conditions.12. On the Success page, in the Other Tasks area, click Run Custom Report.13. On the Options page, click the report whose data you want to view.14. Optional: If you selected the _USERINPUT_ entity in the filters that you
specified earlier, narrow down the search scope of the report. For example,a. In the Audit Event Action Like field, select Check in from the list to view
audit information for the checked in credentials.b. In the Audit Event Entity Name Like field, specify * to show all the entity
names.c. In the Audit Event Initiator Name Like field, specify * to show all the
initiator names.d. In the Audit Event Timestamp Like field, specify the date for which you
want to view the audit information for the checked in credentials.15. Select the format of the report. You can select either PDF or CSV format.16. Click OK to generate the report.
Results
A report is generated in a new window that shows audit information for thechecked in credentials.
Chapter 9. Report administration 299

Example: Creating role and shared access entitlement report:
This topic provides detailed instructions to create role and shared accessentitlement report by using examples. The report provides you information aboutroles and groups by using which the entitlement is defined and other entitlementdetails.
Before you begin
Run the data synchronization process before you create role and shared accessentitlement report. See “Data synchronization for reports” on page 315.
Procedure
To create role and shared access entitlement report, complete these steps:1. From the left navigation pane, select Reports > Design Report to open the
Custom Report Template page.2. Click Create to open the General page.3. In the Report name field, type a unique name for the report.4. Optional: To specify the generation date and time of the report, select the
Include generated date and time check box.5. Optional: To specify the user name who generated the report, select the
Include generated by user information check box.6. Optional: To include page numbers in the report, select the Show paging
information (Page n of m) check box.7. Optional: Select a style sheet from the list. The default style sheet is Standard.8. Optional: Retain the default value of the report category in the Report
Category list. The default value is Custom.9. Click Contents and then click Add to open the Report Column Details page.
Important: You must add at least one column to create the report.10. Complete the following steps on this page:
a. From the Entity and Attribute lists, select appropriate options. Forexample, to create role and shared access entitlement report, you can mapthe following entities and attributes.
Table 75. Entities and attributes
Entity AttributeMapping displayed on theContents page
Group Group ID Group.Group ID
Organizational Container Name OrganizationalContainer.Name
Organizational Role Name Organizational Role.Name
Shared Access PolicyEntitlement View
Entitlement Name Shared Access PolicyEntitlement View.EntitlementName
Shared Access PolicyEntitlement View
Entitlement Service Name Shared Access PolicyEntitlement View.EntitlementService Name
Shared Access PolicyEntitlement View
Entitlement Target Name Shared Access PolicyEntitlement View.EntitlementTarget Name
300 IBM Security Identity Manager Version 6.0.0.18: Administration Topics

Table 75. Entities and attributes (continued)
Entity AttributeMapping displayed on theContents page
Shared Access PolicyEntitlement View
Entitlement Type Shared Access PolicyEntitlement View.EntitlementType
Note: You can select the entities and attributes based on yourrequirements.
b. In the Column width field, type the size of the column. The default valueis 5.
c. Click OK to add the column in the report.11. Click the Filter tab to specify the data that must be displayed in the report. To
do so, apply the filter conditions in the Add a New Filter Row area:a. Add rows with these filter conditions. Click Add Row after you finish
adding every row.
Table 76. Filter conditions
Row Entity Attribute Operator Entity Attribute Condition
1 Shared AccessPolicyEntitlementView
Shared AccessPolicy DN
Equals Shared AccessPolicy
DN AND
2 Shared AccessPolicy
Parent DN Equals OrganizationalContainer
DN AND
3 Shared AccessPolicyEntitlementView
Entitlement TargetDN
Equals Credential Pool DN AND
4 Credential Pool Groups Equals Group DN AND
5 OrganizationalRole
Name Like _USERINPUT_ - NONE
Note: You can apply filter conditions based on your requirements. Forinformation about entities, attributes, operators, and conditions, see theSecurity Identity Manager online help for the Filter page.
b. Optional: Click Preview to open a new browser window that contains apreview of the report.
c. Click OK after you apply all the filter conditions.12. On the Success page, under the Other Tasks area, click Run Custom Report.13. On the Options page, click the report whose data you want to view.14. Optional: If you selected the _USERINPUT_ entity in the filters that you
specified earlier, narrow down the search scope of the report. For example, inthe Organization Role Name Like field, specify * to show all theorganizational roles.
15. Select the format of the report. You can select either PDF or CSV format.16. Click OK to generate the report.
Chapter 9. Report administration 301

Results
A report is generated in a new window that shows role and shared accessentitlement details.
Creating role custom report templatesUse the IBM Security Identity Manager report designer to create role custom reporttemplates by using the role assignment attributes.
Before you begin
Run the data synchronization process before you create a custom report template.See “Data synchronization for reports” on page 315.
Procedure
To create a role custom report template, complete these steps:1. From the left navigation pane, select Reports > Design Report to open the
Custom Report Template page.2. Click Create to open the General page.3. In the Report name field, type a unique name for the report.4. Optional: To specify the generation date and time of the report, select the
Include generated date and time check box.5. Optional: To specify the user name who generated the report, select the
Include generated by user information check box.6. Optional: To include page numbers in the report, select the Show paging
information (Page n of m) check box.7. Optional: Select a style sheet from the list. The default style sheet is Standard.8. Optional: Retain the default value of the report category in the Report
Category list. The default value is Custom.9. Click Contents and then click Add to open the Report Column Details page.
Important: You must add at least one column to create the report.10. Complete the following steps on this page:
a. From the Entity list, select an appropriate option. For example, select RoleAssignment Attributes.
b. From the Attribute list, select one of the options for adding it as a columnin the report. For example, select Attribute Name.
Note: Attribute list options are mapped with the entity that you selectedearlier.
c. In the Column width field, type the size of the column. The default valueis 5.
d. Click OK to add the column in the report.11. Click the Filter tab, and then add or remove rows and columns for the report
according to your requirements. For example, you can add a row in the reportfor a list of roles that have assignment attributes. To do so, complete thesesteps under the Add a New Filter Row area:a. From the Entity list, select Organizational Role.b. From the Attribute list, select DN.c. From the Operator list, select Equals.
302 IBM Security Identity Manager Version 6.0.0.18: Administration Topics

d. From the Entity list, select Role Assignment Attributes.e. From the Attribute list, select Role Distinguished Name.f. From the Condition list, select one of these options:v None: Indicates that no more filter condition can be added to the report.v AND: Generates results only if all the specified filter conditions meet.v OR: Generates results if either of the specified filter conditions meet.
12. Optional: Click Preview to open a new browser window that contains apreview of the report.
13. Click OK to create the role custom report.
Results
A message is displayed, which indicates that you created the role custom reporttemplate.
What to do next
Generate the role custom report that you created either in a PDF or a CSV format.See “Generating custom reports” on page 295.
Report schema mappingA report schema specifies which entities and attributes can be included in reports.Before an entity and its associated attributes can be specified as reporting criteriaand included in custom report data, a report schema must be defined.
Schemas are installed for all of the standard reports during product installation.The administrator does not define schemas for standard reports.
By default, entities and attributes are not included in custom reports. Theadministrator must define a schema for each custom report template that iscreated, including designer reports. To create a report schema, you must run theDesign Schema task in the console.
Note: Map only the entities and attributes for which you want to generate customreports. These mappings directly affect the performance of IBM Security IdentityManager. The impact occurs because all of the data from the directory server iscopied to the database each time a data synchronization is done.
By defining the schema, you select directory entities that are staged as tables in theIBM Security Identity Managers database. Defining the schema involves mappingattributes. After mapping the entities and attributes, you must synchronize the datato make the data available for reporting.
Mapping attributes:
To create a custom report schema, create an attribute mapping that specifies theentities and entity attributes that can be included in a report.
Before you begin
Depending on how your system administrator customized your system, you mightnot have access to this task. To obtain access to this task or to have someonecomplete it for you, contact your system administrator.
Chapter 9. Report administration 303

About this task
The type of data that can be included in a custom report is determined by thereport schema. You do not create report schemas for standard reports becausethose schemas are already defined. The attributes for a particular entity can beunmapped if all the reports with that entity and attribute are deleted.
To map the attributes for an entity, complete these steps:
Procedure
1. Click Report > Schema Mapping. The Select Entity Attributes page isdisplayed.
2. On the Select Entity Attributes page, select an entity from the list of objects.Both mapped and unmapped attributes for the selected entity are displayed. Ifthey are being used by standard reports, some of the attributes can be mappedby default.
3. Select one or more attributes from the Unmapped attributes list, and then clickAdd.v To select multiple attributes at the same time, press the Ctrl key and click
each attribute that you want to map.v To select continuous, multiple attributes at the same time, press the Shift key
and click each attribute that you want to map.
The attribute is moved to the Mapped attributes list.4. Click OK to save the report schema and close the Select Entity Attributes page.
Results
A message is displayed, indicating that you successfully updated the schemamapping for the entity that you selected.
What to do next
Select another reporting task, or click Close.
Unmapping attributes:
You can unmap previously mapped attributes so that they are no longer availablefor reporting.
Before you begin
Depending on how your system administrator customized your system, you mightnot have access to this task. To obtain access to this task or to have someonecomplete it for you, contact your system administrator.
About this task
Only attributes that are not being used in any reports can be unmapped. Theattributes that you unmap are made unavailable for reporting as soon as you saveyour changes. You do not have to run the data synchronization task for thechanges to take effect.
To unmap the attributes for an entity, complete these steps:
304 IBM Security Identity Manager Version 6.0.0.18: Administration Topics

Procedure
1. Click Report > Schema Mapping. The Select Entity Attributes page isdisplayed.
2. On the Select Entity Attributes page, select an entity from the list of objects.Both mapped and unmapped attributes for the selected entity are displayed. Ifthey are being used by standard reports, some of the attributes can be mappedby default.
3. Select one or more attributes from the Mapped attributes list, and then clickRemove.v To select multiple attributes at the same time, press the Ctrl key and click
each attribute that you want to unmap.v To select continuous, multiple attributes at the same time, press the Shift key
and click each attribute that you want to unmap.
The attribute is moved to the Unmapped attributes list.4. Click OK to save the report schema and close the Select Entity Attributes page.
Results
A message is displayed, indicating that you successfully updated the schemamapping for the entity that you selected.
What to do next
Select another reporting task, or click Close.
User input valuesDetermine which user input values to specify when you run standard reports.
User input values describe:v Fields in standard reports for which you can specify values when you run the
reports.v Types of values that you can specify for each field.v Default values used for each field if you do not specify a value.
Table 77. User input values
Report field name Values that can be specifiedDefault value used if no input isspecified
Access Name Name of an access or a stringexpression that contains one or morewildcards
Any
Access Type Access type from list Any
Account Operation Any of the values displayed in thelist
Any
ACI Context Name of an entity type or the value"any," which is specified with theasterisk (*)
*, indicating any value
ACI Name Name of a policy or a stingexpression that contains one or morewildcards
*, indicating any value
ACI Object Type Name of an object associated withthe entity type, or the value "any"
Any
Chapter 9. Report administration 305
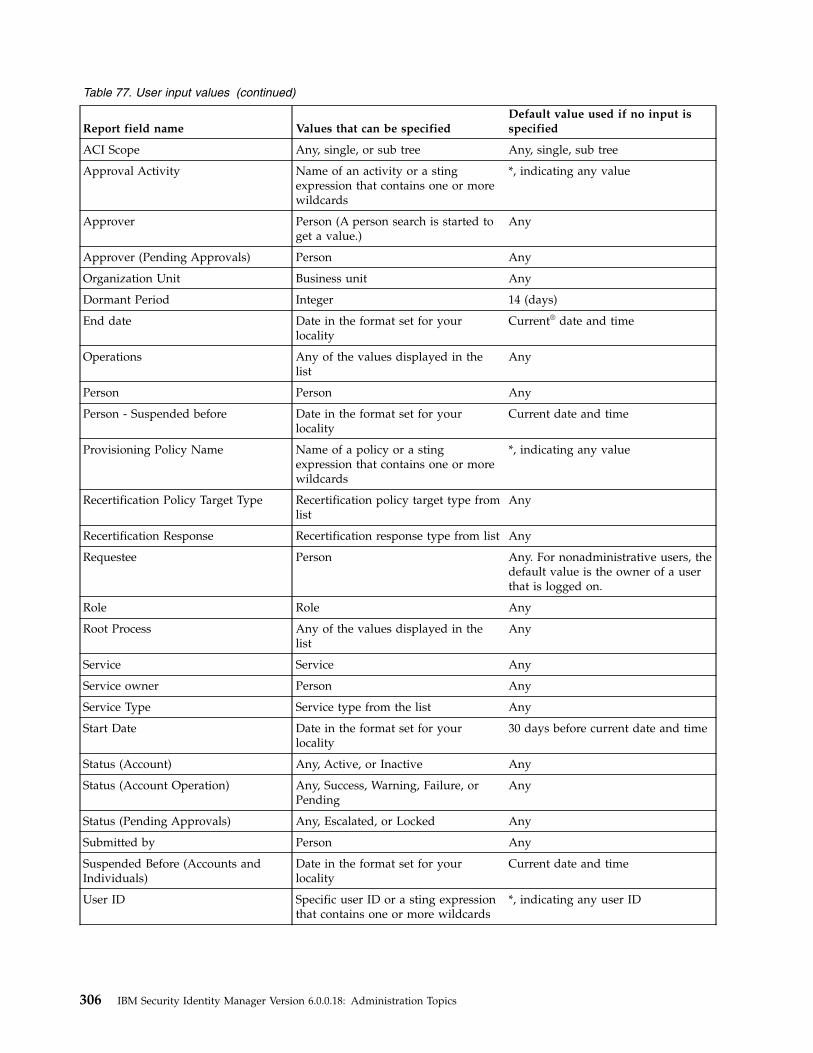
Table 77. User input values (continued)
Report field name Values that can be specifiedDefault value used if no input isspecified
ACI Scope Any, single, or sub tree Any, single, sub tree
Approval Activity Name of an activity or a stingexpression that contains one or morewildcards
*, indicating any value
Approver Person (A person search is started toget a value.)
Any
Approver (Pending Approvals) Person Any
Organization Unit Business unit Any
Dormant Period Integer 14 (days)
End date Date in the format set for yourlocality
Current® date and time
Operations Any of the values displayed in thelist
Any
Person Person Any
Person - Suspended before Date in the format set for yourlocality
Current date and time
Provisioning Policy Name Name of a policy or a stingexpression that contains one or morewildcards
*, indicating any value
Recertification Policy Target Type Recertification policy target type fromlist
Any
Recertification Response Recertification response type from list Any
Requestee Person Any. For nonadministrative users, thedefault value is the owner of a userthat is logged on.
Role Role Any
Root Process Any of the values displayed in thelist
Any
Service Service Any
Service owner Person Any
Service Type Service type from the list Any
Start Date Date in the format set for yourlocality
30 days before current date and time
Status (Account) Any, Active, or Inactive Any
Status (Account Operation) Any, Success, Warning, Failure, orPending
Any
Status (Pending Approvals) Any, Escalated, or Locked Any
Submitted by Person Any
Suspended Before (Accounts andIndividuals)
Date in the format set for yourlocality
Current date and time
User ID Specific user ID or a sting expressionthat contains one or more wildcards
*, indicating any user ID
306 IBM Security Identity Manager Version 6.0.0.18: Administration Topics

User input filtersDetermine which filters to specify when you design custom reports that allow userinput.
User input filters include:v User input filters that you can specify for each type of standard report.v Corresponding filter that is defined in each report template to enable user input
for built-in designer reports.
Use the filters as guidelines to create user input filters for custom reports.
You can specify one or more filter values for a single report, depending on whichuser input filters are available for the report. If you specify multiple values, IBMSecurity Identity Manager determines the entity.attribute to which each valueapplies by the position and type of each value. For example, when you run anaccount report, you can specify a service name and an organization unit name in afield, such as Provide User Input.
Table 78. User input filters
Report name User input Default value Report designer filter
Access Control Item ACI Name Any ACI.name = _USERINPUT_
ACI Context Any ACI.category = _USERINPUT_
Object Type Any ACI.Target = _USERINPUT_
ACI Scope Any ACI.scope = _USERINPUT_
Organization Unit Any Organizational Container.DN =_USERINPUT_
Access Report Access Type Any Access.Type = _USERINPUT_
Access Any Access.DN = _USERINPUT_
Service Type Any Service.servicetype = _USERINPUT_
Service Any Service.DN = _USERINPUT_
Owner Any Person.DN = _USERINPUT_
Account Service Any Service.DN = _USERINPUT_
Organization Unit Any Organizational Container.DN =_USERINPUT_
Account/AccessPendingRecertification Report
Account/Access Owner Any Process.Requestee = _USERINPUT_
Service Type Any Service.Servicetype = _USERINPUT_
Account Operations Root Process Any Process.Type = _USERINPUT_
Account Operation Any Activity.Type = _USERINPUT_
Start Date 30 days beforecurrent date
Process.Completed > _USERINPUT_ ANDProcess.Completed < _USERINPUT_
End Date Current date
Service Type Any Service.servicetype = _USERINPUT_
Service Any Service.DN = _USERINPUT_
User ID Any Activity.Subject = _USERINPUT_
Status Any Activity.Result_ Summary = _USERINPUT_(Any)
Chapter 9. Report administration 307

Table 78. User input filters (continued)
Report name User input Default value Report designer filter
Account OperationsPerformed by anIndividual
Submitted by Any Process.REQUESTER = _USERINPUT_
Account Operation Any Activity.Type = USERINPUT_
Start Date 30 days beforecurrent date
Process.Completed > _USERINPUT_ ANDProcess.Completed < _USERINPUT_
End Date Current date
Service Type Any Service.servicetype = _USERINPUT_
Service Any Service.DN = _USERINPUT_
User ID * Activity.Subject = _USERINPUT_
Status Any Activity.Result_ Summary = _USERINPUT_
Approvals andRejections
Approver Any Person.DN like _USERINPUT_ AND PERSON.CN= PROCESSLOG.REQUESTOR
Start Date 30 days beforecurrent date
Process.Completed > _USERINPUT_ ANDProcess.Completed < _USERINPUT_
End Date Current date
Service Type Any Service.servicetype = _USERINPUT_
Service Any Service.DN = _USERINPUT_
User ID * Process.Subject = _USERINPUT_
Status * PROCESS.RESULT_ SUMMARY like _USERINPUT_
Approval Activity ACTIVITY. DEFINITION_ID like _USERINPUT_
Dormant Accounts Service Any Service.DN = _USERINPUT_
Dormant Period 14 Last Accessed Date = _USERINPUT_
Individual Access Account Owner Any Person.DN =_USERINPUT_
Organization Unit Any OrganizationalContainer.DN =_USERINPUT
Access Any Access.DN =_USERINPUT_
Service Any Service.DN =_USERINPUT_
Individual Accounts Person Any Person.DN = _USERINPUT_
Organization Unit Any OrganizationalContainer.DN = _USERINPUT_
Individual Accountsby Role
Role None (no rolespecified)
Organization Role.DN = _USERINPUT_
Organization Unit Any OrganizationalContainer.DN = _USERINPUT_
Non-CompliantAccounts
Service Any Service.DN = _USERINPUT_
Reason Any Account.eraccountcompliance =_USERINPUT_
Operation Requester Any Process.REQUESTER = _USERINPUT_
Requestee Any Process.REQUESTEE = _USERINPUT_
Operations AccountAdd (asspecified in theproperties file)
Process.Type = _USERINPUT
Start Date 30 days beforethe current date
Process.Completed > _USERINPUT_ ANDProcess.Completed < _USERINPUT_
End Date Current date
308 IBM Security Identity Manager Version 6.0.0.18: Administration Topics

Table 78. User input filters (continued)
Report name User input Default value Report designer filter
Orphan Accounts Service Any Service.DN = _USERINPUT_
Account Status Any Account.eraccountstatus = _USERINPUT_
Pending Approvals Approver Any Person.DN = _USERINPUT_
Start Date 30 days beforecurrent date
Workitem.Created > _USERINPUT_ ANDWorkitem.Created < _USERINPUT_
Service Type Any Service.Servicetype = _USERINPUT_
Service Any Service.DN = _USERINPUT_
User ID * Process.Subject = _USERINPUT_
Status Any Pending_Approval. Result_Summary =_USERINPUT_
Approval Activity Name * Activity.Name = _USERINPUT_
Policies Governing aRole
Role Any Organization Role.DN = _USERINPUT_
Policy Provisioning Policy Name Any ProvisioningPolicy. Policy Name =_USERINPUT_
Recertification ChangeHistory Report
Service Any Recertificationlog. Service =_USERINPUT_
Access Type Any Recertificationlog. Access_Type =_USERINPUT_
Account/Access Owner Any Recertificationlog. Account_Owner =_USERINPUT_
Recertification Response Any Recertificationlog. Recert_Result =_USERINPUT_
Show Last RecertificationOnly
Yes/No
Start Date 30 days beforecurrent date
Recertificationlog. Completed >_USERINPUT_ AND Recertificationlog.Completed < _USERINPUTEnd Date Current date
Recertification PolicyReport
Recertification PolicyTarget Type
Any RecertificationPolicy. GROUPDN LIKE'_USERINPUT_'
Service Type Any RecertificationPolicy. SERVICETYPE =_USERINPUT_
Service Any RecertificationPolicy. SERVICEDN =_USERINPUT_
Access Type Any RecertificationPolicy. ACCESSTYPE =_USERINPUT_
Access Any RecertificationPolicy. ACCESSDN =_USERINPUT_
ReconciliationStatistics
Service None (inputrequired)
Service.DN = _USERINPUT_
Rejected Requester Any Process.REQUESTER = _USERINPUT_ (Any)
Requestee Any Process.REQUESTEE = _USERINPUT_ (Any)
Start Date 30 days beforethe current date
Process.Completed > _USERINPUT_ ANDProcess.Completed < _USERINPUT_
End Date Current date
Chapter 9. Report administration 309

Table 78. User input filters (continued)
Report name User input Default value Report designer filter
Services Service Type Any Service.servicetype = _USERINPUT_
Service Any Service.DN = _USERINPUT_
Owner Any Person.DN = _USERINPUT_
Organization Unit Any Organizational Container.DN =_USERINPUT_
Services Granted to anIndividual
Person Any Person.DN = _USERINPUT_
Summary of Accountson Service
Service Any Service.DN = _USERINPUT_
Account Status Any (as specifiedin the propertiesfile)
Account.Account Status = _USERINPUT_
Suspended Accounts Account Any Account.DN = _USERINPUT_
Person Any Person.DN = _USERINPUT_
Service Type Any Service.servicetype = _USERINPUT_
Service Any Service.DN = _USERINPUT_
Suspended Date Current date Process.Completed < _USERINPUT_
SuspendedIndividuals
Person Any Person.DN = _USERINPUT_
Organization Unit Any Organizational Container.DN =_USERINPUT_
Suspended Before Current date Process.Completed < _USERINPUT_
User Requester Any Process.REQUESTER = _USERINPUT_ (Any)
Requestee Any Process.REQUESTEE = _USERINPUT_ (Any)
Start Date 30 days beforethe current date
Process.Completed > _USERINPUT_ ANDProcess.Completed < _USERINPUT_
End Date Current date
Filter conditions for custom reportsFilter conditions are logical expressions that are parsed as a JOIN condition todetermine what information to include in a report when it is generated.
You can create a simple filter condition with one operator:Account.Service Equals Service.DN
You can also create complex filters with multiple conditions:ACI.DN = ACI Principals.DN
AND ACI.Name = ACI Principals.Name
AND ACI.Target = ACI Principals.Target
Example: Creating filter conditions for accounts:
This example report lists users with accounts of type ITIMService.
Assume that you specified the following entities, attributes, and filters to create thereport template:v Report columns: Account.Userid, ITIM.ServiceNamev Filters: None
310 IBM Security Identity Manager Version 6.0.0.18: Administration Topics

Because no JOIN filter is specified, if there are two users:v User1 with ITIMService1 and ITIMService2v User2 with ITIMService3
The result is:
User1 ITIMService1
User1 ITIMService2
User1 ITIMService3
User2 ITIMService1
User2 ITIMService2
User2 ITIMService3
This result is the Cartesian product of the two tables; it does not display thewanted results. To yield the appropriate result set, specify the appropriate JOINcondition to indicate the relationships between these two tables. The JOINcondition in this case is:Account.Service = ITIM.DN
If you specify this filter, the result is:
User1 ITIMService1
User1 ITIMService2
User2 ITIMService3
Example: Creating filter conditions for persons and organization roles:
This report shows persons associated with an organization role.
Assume that you specified the following entities, attributes, and filters in theconsole to create the report template:v Report columns: Person.FullName, OrganizationRole.Namev Filter: OrganizationRole.Name = '_USERINPUT_'
Assume that there are two users:v Person1 with Role1v Person2 with Role2
If you enter Role1 as user input when you run the report, the result is:
Person1 Role1
Person2 Role1
For this report to generate the correct results, specify the following filter:Person.OrganizationRoles = OrganizationRole.DNAND OrganizationRole.Name = ’_USERINPUT_’
Now, if you enter Role1 as user input when you run the report, the result wouldbe:
Chapter 9. Report administration 311

Person1 Role1
The specified filter condition works because the Organization Roles attribute of thePerson contains the value of the DN of the role to which a user belongs. Also notethat Organization Role is a multi-valued attribute; that is, a person can havemultiple roles in an organization.
Example: Creating filter conditions for persons and accounts:
This report shows accounts associated with persons defined to IBM SecurityIdentity Manager.
Assume that you specified the following entities, attributes, and filters in theconsole to create the report template:v Report column: Person.FullName, Account.AccountStatusv Filters: None
This report returns the Cartesian product of the Person and Account table entries.To yield the correct result, the JOIN condition that specifies the relationshipbetween the Person and Account tables is:Account.owner = Person.DN
Sample JOIN conditions for designing reports:
Review examples of filters that you can use to design custom reports.
The Filters column contains the exact JOIN condition that yields accurate andmeaningful results.
Note: The Serial No. column is included only for referencing by supportpersonnel.
SerialNo.
Entities Filters
1 Person, Account Person.DN = Account.owner
2 Person, OrganizationRole
Person.Organization Roles = Organization Role.DN
3 Person, OrganizationalUnit
Person.ParentDN = Organizational Unit.DNOROrganizational Unit. Supervisor = Person.DN
4 Account, Service Account.Service = Service.DN
5 Location, Person Location.Supervisor = Person.DN
6 Business Partner,Organization, Person
Business Partner Organization.Sponsor = Person.DN
7 Business PartnerPerson, OrganizationRole
Business Partner Person.Organization Roles = Organization Role.DN
8 Organization, Location Organization.DN = Location.Parent DN
312 IBM Security Identity Manager Version 6.0.0.18: Administration Topics

9 Organization,Organizational UnitOrganization, BusinessPartner Organization
Organization.DN = Organizational Unit.ParentDN
Organization.DN = Business Partner
Organization.ParentDN
10 Organizational Unit,Location
Organizational Unit.Parent DN = Location.DNORLocation.Parent DN = Organizational Unit.DN
11 Organizational Unit,Business PartnerOrganization
Organizational Unit.Parent DN = Business Partner Organization DNORBusiness Partner Organization.Parent DN = Organizational Unit.DN
12 Location, BusinessPartner Organization
Location.Parent DN = Business Partner Organization.DNORBusiness Partner Organization.Parent DN = Location.DN
13 Service, Person Service.Account Owner = Person.DN
14 SQL2000Account,Service
SQL2000Account.Service = Service.DN
15 ITIMAccount, ITIMService
ITIMAccount.Service = ITIM.DN
16 Entitlement, Service Service.DN = Entitlement.Service Target Name
17 Provisioning Policy,Entitlement
ProvisioningPolicy.DN = Entitlement.DN
18 ACI, ACI Principals ACI.DN = ACI Principals.DN
AND ACI.Name = ACI Principals.Name
AND ACI.Target = ACI Principals.Target
19 ACI, ACI PermissionClassRight
ACI.DN = ACI Permission ClassRight.DN
AND ACI.Name = ACI Permission ClassRight.Name
AND ACI.Target = ACI Permission ClassRight.Target
20 ACI, ACI PermissionAttributeRight
ACI.DN = ACI Permission AttributeRight.DN
AND ACI.Name = ACI Permission AttributeRight.Name
AND ACI.Target = ACI Permission
AttributeRight.Target
21 ACI, ACI Role DNs ACI.DN = ACI Role DNs.DN
AND ACI.Name = ACI Role DNs.Name
AND ACI.Target = ACI Role DNs.Target
22 ACI, OrganizationalUnit
ACI.DN = Organizational Unit.DN
Customizing the report bannerYou can add a customized banner to your IBM Security Identity Manager reports.
Before you begin
Depending on how your system administrator customized your system, you mightnot have access to this task. To obtain access to this task or to have someonecomplete it for you, contact your system administrator.
Chapter 9. Report administration 313

About this task
Use this task to produce reports that display the logo of your organization in theheader.
To add a customized banner, complete these tasks:
Procedure1. Create your custom banner as a Graphic Interchange Format (GIF) file, with
logo.gif as the file name.2. Place the logo.gif file in the ISIM_HOME/data/adhocreport/logo directory.3. Ensure that the logo.gif file provides read permission that allows the web
application server to access the file.4. To validate that the customized banner is used, generate and view a report. If
the customized banner is not displayed, restart your browser.
Custom report configuration filesYou can modify properties files to change settings that are related to customreports and to add user-defined functions to the custom reports tasks.
adhocreporting.propertiesThis file contains configuration properties related to the custom reportingtasks.
DatabaseFunctions.confYou can specify user-defined database functions when designing customreport templates. For example, to retrieve an attribute from a table columnin the staged data, IBM Security Identity Manager provides two functions,upper and lower. Use these functions to specify that the data is returnedfor display in uppercase or lowercase letters. To make availableuser-defined functions, add the functions to this file.
Data synchronizationIBM Security Identity Manager stores most of its operational data in an LDAPdirectory. Examples of operational data include information about the people andaccounts that are managed by IBM Security Identity Manager, the policies that aredefined in IBM Security Identity Manager, and other information.
IBM Security Identity Manager provides the ability for users to run reports aboutthis operational data. For example:v As an auditor, you might want to run a report that lists all of the people who
are in violation of a corporate policy.v As an administrator, you might want to run a report that lists all of the accounts
that are inactive for the last six months.v As a manager, you might want to run a report that lists all of the accounts that
are owned by people in your department.
The reporting architecture requires that data reside in a database. The IBM SecurityIdentity Manager data synchronization feature copies the operational data from theLDAP directory to a database, making it available to be included in reports.
Running data synchronization
Data synchronization can be run in the following ways:
314 IBM Security Identity Manager Version 6.0.0.18: Administration Topics

Full data synchronizationThis approach synchronizes all of the operational data. That is, the fulldata synchronization process starts by deleting all of the data it previouslycopied into the database. Then, it copies all of the operational data fromthe LDAP directory to the database. The full data synchronization can berun in the following ways:
On demandAs an administrator, you can log in to IBM Security IdentityManager, and run the full data synchronization process.
On a recurring scheduleAs an administrator, you can configure IBM Security IdentityManager to automatically run the full data synchronization processon a specified recurring schedule. For example, you can configureIBM Security Identity Manager to run the full data synchronizationprocess at these times:v Every Sunday night at midnight.v The 15th day of every month.
Incremental data synchronizationThis approach synchronizes only the operational data that changed sincethe last time the data was synchronized. Unlike the full datasynchronization, the incremental data synchronization does not delete all ofthe data it previously copied into the database. Rather, it updates thedatabase to reflect the changes that occurred in the LDAP directory sincethe last time the data was synchronized. Incremental data synchronizationrequires enabling the LDAP change log feature.
Report Data Synchronization UtilityThis approach is identical to the full data synchronization. The onlydifference is that it can be run from a computer that is not part of thedeployed IBM Security Identity Manager environment. That is, the firsttwo approaches must be run on a computer in which IBM Security IdentityManager is installed. The Report Data Synchronization Utility can be runon any computer, provided the computer meets the hardware and softwarerequirements of the utility.
Data synchronization for reportsManage schedules for data synchronization, or initiate a data synchronizationactivity immediately. You can also refresh the synchronization status.
When you initiate a data synchronization activity, the following actions occur:v Directory server data is staged for report processingv Mapping updates that are made with the Schema Mapping task are made
available to the Design Report taskv Data and ACI information is synchronized between the directory server and the
databasev All separation of duty policies defined in the system are evaluated for violations
Data synchronization schedules that you add are run as a background process atthe scheduled time.
In general, schedule the data synchronization task when system load is low.
Chapter 9. Report administration 315

You can initiate a data synchronization activity immediately, or you can schedule atask to run at a specified time or at regular intervals.
You can view the status of the most recent data synchronization.
You can add or modify data synchronization schedules at any time.
You do not need to do a data synchronization task when you modify a report.However, if you change the report schema, reporting ACIs, or the entity data, youmust do a data synchronization for the changes to take effect. For example, youmight add a person to the system and want the name of that person to occur in areport.
The entities and attributes that you map with the Schema Mapping task are madeavailable for the Design Report task only after data is synchronized.
Synchronizing data immediatelyYou can initiate an immediate data synchronization activity.
Before you begin
Depending on how your system administrator customized your system, you mightnot have access to this task. To obtain access to this task or to have someonecomplete it for you, contact your system administrator.
About this task
To initiate a data synchronization activity immediately, complete these steps:
Procedure1. Click Reports > Data Synchronization.2. On the Data Synchronization page, click Run Synchronization Now. A
confirmation page is displayed.3. On the Confirm page, click Run Synchronization Now to run the
synchronization, or click Cancel.
Results
A message is displayed, indicating that you successfully initiated a datasynchronization activity.
What to do next
To view the results of the synchronization, click Return to the DataSynchronization page. You can also select another reporting task, or click Close.
Creating a data synchronization scheduleYou can create a schedule for synchronizing data.
Before you begin
Depending on how your system administrator customized your system, you mightnot have access to this task. To obtain access to this task or to have someonecomplete it for you, contact your system administrator.
316 IBM Security Identity Manager Version 6.0.0.18: Administration Topics

About this task
To create a data synchronization schedule, complete these steps:
Procedure1. Click Reports > Data Synchronization.2. On the Data Synchronization page, click Create. The Synchronization Schedule
page is displayed.3. Select a schedule interval to synchronize data on the system. The fields
displayed depend on the scheduling option that you select.4. Complete any remaining fields as wanted, and then click OK to save the new
schedule.
Results
A message is displayed, indicating that you successfully added the newsynchronization schedule.
What to do next
Select another reporting task, or click Close.
Modifying a data synchronization scheduleYou can modify an existing schedule for synchronizing data.
Before you begin
Depending on how your system administrator customized your system, you mightnot have access to this task. To obtain access to this task or to have someonecomplete it for you, contact your system administrator.
A data synchronization schedule must exist.
About this task
To modify a data synchronization schedule, complete these steps:
Procedure1. Click Reports > Data Synchronization.2. On the Data Synchronization page, click the schedule that you want to modify.
The Synchronization Schedule page is displayed.3. Select a schedule interval to synchronize data on the system. The fields
displayed depend on the scheduling option that you select.4. Complete any remaining fields as wanted, and then click OK to save the
modified schedule.
Results
A message is displayed, indicating that you successfully updated an existingsynchronization schedule.
What to do next
Select another reporting task, or click Close.
Chapter 9. Report administration 317

Deleting a data synchronization scheduleYou can delete one or more schedules for data synchronization.
Before you begin
Depending on how your system administrator customized your system, you mightnot have access to this task. To obtain access to this task or to have someonecomplete it for you, contact your system administrator.
A data synchronization schedule must exist.
About this task
To delete a data synchronization schedule, complete these steps:
Procedure1. Click Reports > Data Synchronization.2. On the Data Synchronization page, select the check box next to the
synchronization schedule that you want to delete. Selecting the check box at thetop of this column selects all synchronization schedules.
3. Click Delete A confirmation page is displayed.4. On the Confirm page, click Delete to delete the selected synchronization
schedule, or click Cancel.
Results
A message is displayed, indicating that you successfully removed thesynchronization schedule.
What to do next
Select another reporting task, or click Close.
Incremental data synchronizer overviewThe Incremental Data Synchronizer is a separately installed utility that providesfast synchronization of data and access control items. Synchronization occursbetween the directory server that IBM Security Identity Manager uses and the IBMSecurity Identity Manager database.
In addition, the Incremental Data Synchronizer can be configured to enforcechanges in the schema entities and attribute mappings that are used in customreport templates.
The Incremental Data Synchronizer synchronizes staged reporting data (entitiesand attributes) and corresponding access control item information for the data.Additionally, it can propagate schema changes. The Incremental Data Synchronizerdoes the following operations:1. Changelog synchronization:
a. Obtain the changelogs from the directory server.b. Analyze the effective operation and attribute values of each modified entry.c. Update the access control item information, if necessary.d. Update all available entry attributes in the staged tables with the changes
recorded in the directory changelog.
318 IBM Security Identity Manager Version 6.0.0.18: Administration Topics

2. Schema enforcement:a. Determine any changes made to the report schema.b. Map or unmap entities, if necessary.c. Map or unmap entity attributes, if necessary.d. Add or remove the access control item information of the newly mapped
and unmapped attributes.
A fully configured Incremental Data Synchronizer does the same functions as thebuilt-in data synchronizer. However, it manages incremental changes to the dataand does the synchronization task only on the changed data. By propagating onlythe changes since the last synchronization task was done, the Incremental DataSynchronizer can update the staged reporting data quickly.
You install and configure the Incremental Data Synchronizer after installing IBMSecurity Identity Manager. Incremental data synchronization is not a prerequisitefor custom reports unless your environment requires a fast synchronization of dataand access control item definitions.
The more often you run the Incremental Data Synchronizer, the less likely you areto have errors in the data. You are less likely to have errors in the accesspermissions to the report data. The accuracy of the custom reporting process isenhanced.
For information about the Incremental Data Synchronizer, search for IncrementalData Synchronizer in the IBM Security Identity Manager documentation.
Directory Server changelogThe Incremental Data Synchronizer uses a mechanism known as changelog, afeature provided by the directory server.
The changelog is a history of changes maintained by the directory. Directoryservers supported by IBM Security Identity Manager can be configured to recorddata changes under a directory node called:cn=changelog
The Incremental Data Synchronizer fetches change entries stored under thecn=changelog directory. The Incremental Data Synchronizer picks up the data andaccess control item change entries needed to synchronize with the staged databasetables.
To enable changelog for the specific directory server used by IBM Security IdentityManager, see the appropriate documentation provided by the vendor of thatdirectory server.
Note: Enabling the IBM Security Identity Manager Server changelog can reducedirectory update performance by 10 to 15 percent.
Definitions for HOME and other directory variablesThe table contains default definitions that represent the HOME directory level fordifferent product installation paths.
Chapter 9. Report administration 319

Path Abbreviation Description
ISIM_HOME INSTALL_DIR/ISIM
INSTALL_DIR is the location of the IBM Security IdentityManager Server installation.
WAS_HOME INSTALL_DIR/WebSphere/AppServer/
INSTALL_DIR is the location of the WebSphere ApplicationServer installation.
WAS_CLIENT_HOME WAS_CLIENT_HOME is the location of the Application Clientfor WebSphere Application Server Version 6.1. For example,WAS_CLIENT_HOME might refer to D:\ProgramFiles\IBM\WebSphere\AppClient on a Windows system.
Starting the incremental data synchronizerStart the IBM Security Identity Manager Server and synchronize the data with theSynchronize Data task in the IBM Security Identity Manager console before youstart the Incremental Data Synchronizer.
Before you begin
Depending on how your system administrator customized your system, you mightnot have access to this task. To obtain access to this task or to have someonecomplete it for you, contact your system administrator.
About this task
You can start the Incremental Data Synchronizer either in graphical user interfacemode or in command-line mode. To access the graphical user interface when theIncremental Data Synchronizer is installed on a UNIX or Linux computer, from aremote Windows computer, you must first connect the Windows computer to theUNIX system with an appropriate X Server-based environment.
You can run the Incremental Data Synchronizer immediately or schedule itsexecution. However, you must run the Incremental Data Synchronizer interactively thefirst time you use it. During the initial session, you can specify the time intervals forrunning the utility in the future. You can set the changelog synchronization andschema enforcement features independently as required.
Starting the Incremental Data Synchronizer user interface:
You can use a graphical user interface to run the Incremental Data Synchronizer.
Before you begin
Depending on how your system administrator customized your system, you mightnot have access to this task. To obtain access to this task or to have someonecomplete it for you, contact your system administrator.
Install the Incremental Data Synchronizer.
Procedure
1. Start Incremental Data Synchronizer:
From UNIX
320 IBM Security Identity Manager Version 6.0.0.18: Administration Topics

v Use XClient to start the Incremental Data Synchronizer.v To start the Incremental Data Synchronizer user interface in the
WebSphere Application Server, run the following script in theISIM_HOME/bin/unix directory:# startIncrementalSynchronizerUI_WAS.sh
From WindowsTo start the Incremental Data Synchronizer user interface in theWebSphere Application Server, run the following script in theISIM_HOME\bin\win directory:startIncrementalSynchronizerUI_WAS.bat
2. To start access control item synchronization, you must first enter thecredentials of the administrator for the IBM Security Identity Manager.
3. Click Login after you enter these credentials.4. Enter the base DN in the LDAP directory server, where the changelog entries
are stored and the time delay between two successive synchronizations. Thetime delay is the interval between the end of one synchronization and thestart of the next synchronization.
5. To set these parameters, click Options.6. Click OK to save the changes.7. Click Start to start the synchronization. The progress of the synchronization
and other details are shown in the text area of the graphical interface.8. To stop the synchronization process, click Stop.9. To clear the text area of the Incremental Data Synchronizer, click Clear.
10. Click Exit to exit from the Incremental Data Synchronizer.
Running a command to start the Incremental Data Synchronizer:
You can use a command to start the Incremental Data Synchronizer.
Before you begin
Depending on how your system administrator customized your system, you mightnot have access to this task. To obtain access to this task or to have someonecomplete it for you, contact your system administrator.
Install the Incremental Data Synchronizer.
See the topic "Installing the Incremental Data Synchronizer" in the chapter"Optional post-installation tasks" in the IBM Security Identity Manager InstallationGuide.
About this task
To start the Incremental Data Synchronizer with a command in WebSphereApplication Server, you run a script, depending on your operating system.Optionally, you can run the Incremental Data Synchronizer in the backgroundwithout any informational messages by specifying runInBackground as the lastargument.
Procedure
1. Access the command-line interface.2. Run one of the following scripts:
Chapter 9. Report administration 321

UNIX
Run the following script in the ISIM_HOME/bin/unix directory:# startIncrementalSynchronizerCMD_WAS.sh itim-manager passwdchglog-base-dn time-int
Windows
Run the following script in the ISIM_HOME\bin\win directory:startIncrementalSynchronizerCMD_WAS.bat itim-manager passwdchglog-base-dn time-int
Where:
Argument Description
itim-manager Login ID of IBM Security Identity Manager systemadministrator
passwd Password for login ID
chglog-base-dn Base DN of Security Identity Manager directory serverchangelog entries, for example, cn=changelog
time-int Time interval between successive synchronizations
runInBackground Runs the Incremental Data Synchronizer in the backgroundwithout any informational messages.
3. To exit the Incremental Data Synchronizer, type system-specific interruptcharacters, such as Ctrl+C on Windows systems.
Example
UNIX:startIncrementalSynchronizerCMD_WAS.sh "itim manager" password "cn=changelog" 1800
Windows: entered as one line:startIncrementalSynchronizerCMD_WAS.bat "itim manager" password"cn=changelog" 1800
Fine-tuning the Incremental Data SynchronizerYou can tune the performance of the Incremental Data Synchronizer by modifyingproperties in the adhocreporting.properties configuration file.
The following three properties can be modified in combination to produce efficientoperation of the synchronization process:v changeLogFetchSize
v maximumChangeLogsToSynchronize
v changeLogsToAnalyzeBeforeSynchronization
For more information, see the IBM Security Identity Manager Performance and TuningGuide.
Utility for external report data synchronizationThe report data synchronization utility is a separately installed utility thatsynchronizes data and access control items between the directory server and theIBM Security Identity Manager database. The synchronized data is used forrunning the reports.
322 IBM Security Identity Manager Version 6.0.0.18: Administration Topics

You can install, configure, and run the utility either on the same computer as IBMSecurity Identity Manager or on a different computer. If you install the utility on adifferent computer, that computer does not require the installation of theWebSphere Application Server, a directory server, or a database.
The utility for external report data synchronization is used for remote or non-IBMSecurity Identity Manager purposes. The IBM Security Identity Manager installerdoes not install the utility. You must manually install it by copying and extractingthe isim_report_data_sync_utility.zip file from the ISIM_HOME/bin directorybefore using it.
For more information, see “Installing the report data synchronization utility” in theIBM Security Identity Manager Installation Guide.
Running the report data synchronization utilityAfter you configure the utility, you can start the synchronization process.
Before you beginv Configure IBM Security Identity Manager report data synchronization utility.v Access the folder in which you extracted the utility.
About this task
To run the report data synchronization utility, complete these steps:
Procedure1. Run one of the following commands:
Microsoft Windows platformsSyncData.cmd [-JAVA_HOME java_home_value]
For example, SyncData.cmd -JAVA_HOME "C:\ProgramFiles\IBM\Java60"
UNIX or Linux platforms./SyncData.sh [-JAVA_HOME java_home_value]
For example, ./SyncData.sh -JAVA_HOME /opt/IBM/Java60
where, -JAVA_HOME is an optional argument that specifies the location of theJava runtime environment. See Table 79 for specifying the location of the Javaruntime environment.
Table 79. Specifying the location of the Java runtime environment
If the -JAVA_HOME argument is IBM Security Identity Manager
v Specified Uses the corresponding Java runtimeenvironment.
v Not specified, and
v The -JAVA_HOME operating system environmentvariable contains a value.
Uses the Java runtime environment correspondingto the -JAVA_HOME operating system environmentvariable.
v Not specified, and
v The -JAVA_HOME operating system environmentvariable either does not exist or does notcontain a value.
Reports a failure for the report datasynchronization utility.
Chapter 9. Report administration 323

2. If you encounter any problem while running the report data synchronizationutility, see the SyncData.log file. This log file is created in the directory whereyou extracted the utility.
What to do nextv See “Report data synchronization utility errors and their workarounds.”
Report data synchronization utility errors and their workaroundsThe following topic describes how to troubleshoot the IBM Security IdentityManager report data synchronization utility errors.
The report data synchronization utility completes the data synchronizationoperation successfully, but with the following exception.
The following exception might get registered into the trace file:Class com.ibm.websphere.cache.DistributedMap NOT FOUND
It might happen because the synchronization time exceeds the cacherefresh timeout interval specified by the enrole.profile.timeout property.This exception does not affect the success of the data synchronization. Youcan ignore this exception message.
Workaround:Increase the timeout interval value for the propertyenrole.profile.timeout in the enRole.properties property file.
The report data synchronization utility completes with a failure with log entriesand indicates that the data synchronization cannot run because datasynchronization is already running.
Follow the steps to end the data synchronization operation process andrerun the data synchronization utility. For more information about how toend the data synchronization operation, see http://www.ibm.com/support/docview.wss?uid=swg21303678.
The report data synchronization utility completes with a failure with log entriesand indicates that the data synchronization failed with an OutOfMemoryErrormessage.
OutOfMemoryError can occur if the Java virtual machine heap is too small.
Workaround:Increase the Java virtual machine heap size by creating anoperating system environment variable:
Microsoft Windows operating systemsset IBM_JAVA_OPTIONS=-Xms1024m -Xmx2048m
UNIX or Linux operating systemsexport IBM_JAVA_OPTIONS=’-Xms1024m -Xmx2048m’
where:-Xms1024m specifies initial heap size of 1024 mb-Xmx2048m specifies maximum heap size of 2048 mb
Note: The numbers mentioned in the instructions are examplesonly. The exact numbers that are required might vary.
324 IBM Security Identity Manager Version 6.0.0.18: Administration Topics

Access control items (ACI) for reportsAccess control item (ACI) definitions govern the availability of reports for all users.The report ACIs grant or deny a group of users the ability to run reports.
A IBM Security Identity Manager administrator can access all reports. In addition,there are default ACIs for the Manager, Service Owner, and Auditor groups. Forexample, service owners and managers can search for all persons that they canaccess. Managers can see direct reports, and service owners can see people onservices controlled by ACIs. Auditors can run all reports and see all data. Noreport access is available for users or members of the Help Desk group, unless anadministrator creates an ACI definition that grants access to a group of which theuser is a member. ACI definitions must be defined for both standard and customreports.
An administrator can create an ACI definition at any time. After an ACI definitionis added, the system immediately applies the ACI. The new ACI affect users whoare logged in to the system and not currently viewing the list of available reports.Those users currently viewing the list of reports are not affected.
Users can view only activities that are specific to their group, either as submittersof the requests or as persons for whom the requests are submitted. For example,managers can view reports for requests that they initiated or for requests that aremade for them. Employees that are not in supervisory or managerial roles canview only reports for requests that are made for them because they cannot initiaterequests. Auditors can see requests generated by other users.
Report ACIs are applicable in only one organization. Therefore, fornon-administrative users of secondary organizations to be able to run reports,report ACIs must also be created in those secondary organizations.
ACI object filters used for reportingObject filters defined in ACIs are used by the reporting engine to stage data andACI information in the database.
The reporting engine requires object filters that meet these conventions:v The supported filters for LDAP to SQL conversion are a subset of filters
mentioned in RFC 2254 for LDAP Filter Specification.v Matching rules, soundex filters, and approximation operators are not supported.v In regular expressions, only the * (asterisk) wildcard character is supported.v Only the following special characters are allowed in LDAP filters:
– $ (dollar sign)– @ (at sign)– _ (underscore)– * (asterisk)– ? (question mark)– / (forward slash)– \ (backward slash)– . (period)– : (colon)– space– tab
Chapter 9. Report administration 325

v The following characters are not supported in LDAP filters. If you use thesecharacters in an object filter, the reporting engine does not consider thecharacters for ACI information staging:– { open curly brace– } close curly brace– [ open box bracket– ] close box bracket– % (percent sign)– & (ampersand)– , (comma)
v As specified within RFC 2254, these special characters can be used as normalcharacters in attribute values:– \2a to use * as a normal character, not as a wildcard– \28 to use ( as a left parenthesis character– \29 to use ) as a right parenthesis character– \5c to use \ as a backslash character
326 IBM Security Identity Manager Version 6.0.0.18: Administration Topics

Chapter 10. Policy administration
For your organization, you can manage policies, which are sets of organizationalrules and logic.
IBM Security Identity Manager supports the following types of policies:v Adoption policiesv Identity policiesv Password policiesv Provisioning policiesv Recertification policiesv Separation of duty policiesv Service selection policies
Note: The installation of IBM Security Identity Manager creates default data suchas default provisioning and default identity policies. Do not delete the default data.When you upgrade IBM Security Identity Manager by applying a fix pack, theldapUpgrade tool restores the default data if the entries are not found in thedirectory server. This action can affect any customized policies that you created.You can modify the default entries or disable the default policies, but do not deletethe default data.
Adoption policiesDuring reconciliation, an adoption policy determines the owner of an account. Anaccount without any owner is an orphan account.
An adoption policy can apply to more than one service of the same service type.An adoption policy applies only to service types that represent adapters andmanual services, not service types that represent identity feeds.
An adoption policy matches the attributes for an account on a managed resourceto the attributes for a Security Identity Manager user.
An adoption policy applies to the following circumstances:v To either the entire system, as a global adoption policy, or to a specific type of
managed resource, as a service-specific adoption policy. The service-specificadoption policy takes precedence over the global adoption policy.
v To more than one service.v Only to service types that represent adapters and manual services, not service
types that represent identity feeds.
Note: You cannot define service instances of different types on the same adoptionpolicy. Account ownership assigned by adoption policies is always of theINDIVIDUAL account ownership type.
JavaScript can define adoption policies. These policies use all standard JavaScriptfunctions and programming constructs, such as loops and conditional branches.The policies also use functions that are designed specifically for creating adoption
327

policies. Specific JavaScript functions that return a person can retrieve personalattribute values to evaluate account owners.
Global adoption policies are defined for a service type or all service types. Globaladoption policies apply to all service instances if no adoption policy is defined forthe specific service. The default global adoption policy assigns an account to a userif the account user ID attribute matches the Security Identity Manager user UIDattribute.
Creating an adoption policyAn administrator can create an adoption policy to use when reconciling accountsfor one or more services. For example, you might create a policy that determinesaccount ownership by attempting to match the family name of a user with theaccount user ID.
Before you begin
Depending on how your system administrator customized your system, you mightnot have access to this task. To obtain access to this task or to have someonecomplete it for you, contact your system administrator.
Before you can create an adoption policy, you must create one or more services toassociate with the policy. If you try to create an adoption policy with a service thatis already the target of an adoption policy, an error message is displayed.
About this task
To create a global adoption policy (for a specific service type), you must navigateto Configure System > Global Adoption policies.
Procedure1. From the navigation tree, select Manage Policies > Manage Adoption Policies.2. On the Work With Adoption Policies page, in the Adoption Policies table, click
Create.3. On the Manage Adoption Policies page, on the General page, type a name for
your adoption policy.4. Click the Services page, and then add one or more specific services to associate
with the policy. To add one or more services:a. Click Add.b. On the Services page, type your search criteria, and then click Search.c. In the Services table, select one or more services.d. Click OK.
5. On the Manage Adoption Policies page, click the Rule page, and then specifythe attributes that the adoption policy uses to match accounts to users.If you want to define matches, click Add a match field to select the accountand user attributes that must match during reconciliation. The user attribute listprovides a few common attribute combinations when defining the match. Sucha combination might be the first letter of a given name plus the family name.The combination might be the given name plus the first letter of the familyname. If your adoption policy is more complex, you can choose the moreadvanced path by selecting Provide a Script. If you defined matches, theassociated scripts are populated for you in the script definition field.
328 IBM Security Identity Manager Version 6.0.0.18: Administration Topics

Important: If you want to provide a script, the IBM Security Identity ManagerServer does not verify that the JavaScript is correct. Verify that the JavaScript iscorrectly coded before using it to define the adoption policy.
6. Click OK to save the changes.7. On the Success page, click Close. On the Work With Adoption Policies page,
you can search to see the new adoption policy displayed in the table. The tablecontrols can be used to change or delete the policy.
JavaScript examples for writing adoption policiesAn administrator of IBM Security Identity Manager, and can use JavaScriptexamples to write adoption policies.
Example 1
The following example shows a simple script that matches the account user ID tothe alias field of the person.var ps = new PersonSearch();return ps.searchByFilter("","(eraliases="+subject.eruid[0]+")",2);
Example 2
This example is a more complicated sample you can use for orphan adoption. Thisscript uses the following three strategies to deduce an owner for an account:1. Locate a single person with an eraliases entry that matches the account eruid
field.2. If this action yields multiple matches and the new entry has a cn field, check
the matching list for one with a cn field that matches the account cn field.3. If no matches are obtained in the first step, check for a matching account (the
same eruid) in the master service, such as a Windows Active Directory Service.If this account has an owner, use that person. If all three strategies fail, returnnull, which causes an orphan.
Note: Log messages are written to the message log with the script category.var entryUid = subject.eruid[0];Enrole.log("script", "Starting script for eruid=" + entryUid);/* change the following value to the name of the master service: *//* var masterServiceName = "Master AD Service";*/var masterServiceName = "NT4 (local)";/* change the following value to the service profile name of the master service:
This change is required only if the profile of master service and profile of theservice for which the adoption policy is defined are different */
/* var serviceProfileNameOfMasterService = "ADProfile";*/var scriptResult = null;var personsearch = new PersonSearch();var filter = "(eraliases=" + entryUid + ")";var psResult = personsearch.searchByFilter("", filter,2);if (psResult.length == 1) {/* found one person with matching alias */Enrole.log("script", "single match for eraliases=" + entryUid);scriptResult = psResult;}else if (psResult.length > 1) {/* more than one person matched alias.* if the account has a "cn" attribute value, see if this matches
the "cn" of one of them*/
Chapter 10. Policy administration 329

Enrole.log("script", "multiple matchs for eraliases=" + entryUid);var entryCn = subject.cn;if (typeof entryCn != "undefined") {Enrole.log("script", "checking cn=" + entryCn[0]);for (idx=0; idx<psResult.length; ++idx) {var cn1 = psResult[idx].getProperty("cn");if (cn1.length != 0 && cn1[0] == entryCn[0]) {/* we found a match for the cn */scriptResult = psResult[idx];break;}}}else {Enrole.log("script", "cn field not defined for eruid=" + entryUid);}}else {/* no person matched specified alias.
See if there is a matching account uid in the company Active Directory */var acctSearch = new AccountSearch();/* Method acctSearch.searchByUidAndService(entryUid, masterServiceName) is used
if the profile of the master service is same as the profile of the servicefor which the adoption policy is defined.If the profile of master service and the profile of the service for which theadoption policy is defined are different then the profile name of the masterservice is passed to the searchByUidAndService() method as follows–var asResult = acctSearch.searchByUidAndService(entryUid, masterServiceName,serviceProfileNameOfMasterService); */
var asResult = acctSearch.searchByUidAndService(entryUid, masterServiceName);if (asResult != null && asResult.length == 1) {/* found a matching AD account -- use this accounts owner,
if it is not an orphan */var owner = asResult[0].getProperty("owner");if (owner.length == 1) {var owner_dn = owner[0];Enrole.log("script", "single match for service " + masterServiceName + " uid="
+ entryUid + ", returning person with dn=" + owner_dn);scriptResult = new Person(owner_dn);}else {Enrole.log("script", "service " + masterServiceName + " uid="
+ entryUid + " is an orphan");}}else {Enrole.log("script", "No match or more than one match for uid=" + entryUid
+ " on master service " + masterServiceName);}}return scriptResult;/* end of script */
Example 3
The following example checks to see whether the name of a person, the gecos fieldin Linux, matches their full name in IBM Security Identity Manager, , and ./** OrphanAdoption JavaScript*/
if (subject["gecos"] == null) {return null;
} else {var buf = "(|";
330 IBM Security Identity Manager Version 6.0.0.18: Administration Topics

for (i = 0; i < subject["gecos"].length; i++) {buf += "(cn=" + subject["gecos"][i] + ")";
}
buf += ")";
var ps = new PersonSearch();/* Have to use sub-tree search type (2) */return ps.searchByFilter("Person", buf, 2);
}
Example 4
This example uses the new JavaScript API ExtendedPerson to adopt a "root"account as a "System" account and adopt other accounts as "Individual" accounts./** OrphanAdoption JavaScript*/
if ((subject[ "eruid"]==null)){return null;
} else if (subject["eruid"]!=null){var buff=’(|’;for (i=0;i<subject["eruid"].length;i++){
buff+=’(uid=’+subject["eruid"][i]+’)’;}buff+=’)’;
var ps = new PersonSearch();var searchResult = ps.searchByFilter("",buff, 2);if (searchResult!=null && searchResult.length==1) {
var person = searchResult[0];
// If it is a "root" account, adopt it as a "System" account;// otherwise, adopt it as an "Individual" account by default.if (subject.eruid[0] == "root") {
return new ExtendedPerson(person, "System");} else {
return person;}
} else if (searchResult!=null && searchResult.length>1) {return searchResult;
} else {return null;
}}
Changing an adoption policyAn administrator can change an adoption policy for specific services. For example,you might change an adoption policy to associate the policy with additionalinstances of a service type.
Before you begin
Depending on how your system administrator customized your system, you mightnot have access to this task. To obtain access to this task or to have someonecomplete it for you, contact your system administrator.
About this task
The effect of changes to an adoption policy can be seen when the nextreconciliation is run. Changing an existing adoption policy does not affect existing
Chapter 10. Policy administration 331
accounts of the specific service or service type. Changes do not affect accounts thatare already adopted. Only new and existing orphan accounts are adopted, basedon the new policy.
Procedure1. From the navigation tree, select Manage Policies > Manage Adoption Policies.
Note: To change a global adoption policy for a specific service type, you mustnavigate to Configure System > Global Adoption policies.
2. On the Work With Adoption Policies page, type information about the adoptionpolicy or service in the Search information field. You can type an asterisk (*) asa wildcard.
3. Select a filter in the Search by field, and then click Search.4. In the Adoption Policies table, locate and select the adoption policy that you
want to change, and then click Change.5. On the Manage Adoption Policies page, modify the information on the General,
Service, and Rule pages.6. Click OK to save the changes.7. On the Success page, click Close.
Deleting an adoption policyAn administrator can delete an adoption policy for specific services.
Before you begin
Depending on how your system administrator customized your system, you mightnot have access to this task. To obtain access to this task or to have someonecomplete it for you, contact your system administrator.
About this task
Deleting an existing adoption policy does not affect existing accounts of thespecific service or service type.
Procedure1. From the navigation tree, select Manage Policies > Manage Adoption Policies.2. On the Work With Adoption Policies page, type information about the adoption
policy or service in the Search information field. You can type an asterisk (*) asa wildcard.
3. Select a filter in the Search by field, and then click Search.4. In the Adoption Policies table, locate and select an adoption policy that you
want to delete, and then click Delete.5. On the Confirmation page, review the adoption policy to delete, and then click
Delete.6. On the Success page, click Close.
Attribute matchingAn adoption policy matches the attributes for an account on a managed resourceto the attributes for an IBM Security Identity Manager user. If the match occurs,the account is assigned to the user so that the user owns the account. For example,the user can change the IBM Security Identity Manager account password.Otherwise, the account is identified as an orphan.
332 IBM Security Identity Manager Version 6.0.0.18: Administration Topics

The default global adoption policy assigns an account to a user if the account userID attribute matches the IBM Security Identity Manager user UID attribute.
Matching can use either single or multi-valued attributes. Matching occurs if thestring value is identical to one of the following attributes:v A single account attribute and a single user attributev Either a single attribute or any multi-valued attribute for either the account
attribute or the user attribute
Account reconciliation and orphan accountsReconciliation uses an adoption policy to determine the owner of an account, or toidentify the account as an orphan.
An adoption policy does not alter the ownership of accounts that are alreadyowned within IBM Security Identity Manager.
Reconciliation uses either a global or a service-specific adoption policy.Reconciliation determines whether the user ID attribute for an account on amanaged resource matches an alias attribute for a IBM Security Identity Manageruser. If no match occurs, the account is identified as an orphan. Later, anadministrator can manually assign orphan accounts to owners.
By default, during reconciliation, the global adoption policy is evaluated todetermine the owner of an account by matching the account UID to the user UID.
Adoption policies can be defined at a global level, for a service type, or for aparticular service instance. If more (or fewer) than one person is evaluated as theowner of the account, the account is orphaned.
Identity policiesAn identity policy defines the characteristics of a user ID used when requesting anew account. An administrator defines the targets and the rule that is used togenerate user IDs automatically for the services to which the rule is applied. Theuser ID can be based on attributes of the user for whom the account is beingcreated.
An identity policy generates a default user ID used when requesting a newaccount. An administrator defines the rule to generate the user ID and specifies theservice targets that apply.
Identity policies can be defined for the following targets:
All servicesThe same policy is used for all services.
Types of servicesThe policy is used for generating user IDs for services of the specifiedtype.
Service instancesThe policy is used for generating user IDs for the specified services.
Note: The default identity policy is used to generate the user ID when creatingusers, when the system is configured to provision Security Identity Manageraccounts automatically to users.
Chapter 10. Policy administration 333

A basic approach requires no scripting. You can define basic rules for an identitypolicy. Basic rules can specify which attributes to use, how many characters areused from each attribute, and what case to use when creating a user ID.
An advanced approach involves scripting, and you can use it to define morecomplex and customized rules. Security Identity Manager provides a default scriptyou can modify. See the example section for an illustration of the advancedapproach, which includes use of JavaScript.
To set a character limit, an identity policy rule defines the number of characters touse from a first and second attribute to form the user ID. Forming the user IDfrom the attributes has the following conditions:v If the number of characters in the attribute is greater than the specified character
limit, only the character limit is used.v If the number of characters in the attribute is less than or equal to the specified
character limit, the entire value of the attribute is used.v If a second attribute is not specified, only the first attribute is used.v If a duplicate user ID exists when Security Identity Manager creates a user ID,
the process appends an integer to the new user ID to create a unique user ID.
An identity policy rule determines whether case modification occurs in forming auser ID. You can set the following conditions:v Lowercase (default)v Existing casev Uppercase
If the identity policy generates a user ID with a null value, Security IdentityManager attempts to form a user ID. Security Identity Manager uses the first letterof the user's given name, concatenated with the value of the user's family name,retaining the existing case.
Name and Business unit are required fields when you are creating an identitypolicy. Business unit is populated with your organization name if you areauthorized to create identity policies at the organization level. If you do not havethat authority, the Business unit field is blank. You must search for a business unitwhere you have the authority to create an identity policy.
IdentitiesAn identity is the subset of profile data that uniquely represents a person in one ormore repositories, and includes additional information related to the person.
For example, an identity might be represented by a unique combination of thegiven, family, and full names of a person, and an employee number. The datamight also contain additional information such as a telephone number, the officenumber, and an email address.
Identity policy script example (advanced approach)Identity policies can be defined dynamically through the use of JavaScript (theadvanced approach). Policies can also be defined with the basic method (whichdoes not require any JavaScript). JavaScript can use all standard functions andprogramming constructs, including loops and conditional branches.
334 IBM Security Identity Manager Version 6.0.0.18: Administration Topics

The values of personal attributes can be retrieved with the IBM Security IdentityManager specific JavaScript functions. The context of the script is a user (person)for whom the identity is being generated. A JavaScript object that represents theperson within the IBM Security Identity Manager data model named subjectrepresents this context.
The following example illustrates the advanced mode of creating user IDs with theuid attribute (or given name, if the uid attribute is empty) for an individual. Thescript also checks whether the user ID is already used. If the user ID is already inuse, the script adds a number to the end of the user ID, making it unique.function createIdentity() {
var EXISTING_CASE = 0;var UPPER_CASE = 1;var LOWER_CASE = 2;var tf = false;var identity = "";var baseidentity = "";var counter = 0;var locale = subject.getProperty("erlocale");var fAttrKey = "uid";var sAttrKey = "";var idx1 = 0;var idx2 = 0;var fCase = 2;var sCase = 2;if ((locale != null) && (locale.length > 0)) {locale = locale[0];
}if (locale == null || locale.length == 0)locale = "";
var firstAttribute = "";var secondAttribute = "";if (((fAttrKey != null) && (fAttrKey.length > 0)) || ((sAttrkey != null)&& (sAttrkey.length > 0))) {if ((fAttrKey != null) && (fAttrKey.length > 0)) {
firstAttribute = subject.getProperty(fAttrKey);if (((firstAttribute != null) && (firstAttribute.length > 0)))firstAttribute = firstAttribute[0];
if (firstAttribute == null || firstAttribute.length == 0)firstAttribute = "";
else {firstAttribute = IdentityPolicy.resolveAttribute(fAttrKey,firstAttribute);if ((idx1 > firstAttribute.length) || (idx1 == 0))
idx1 = firstAttribute.length;firstAttribute = firstAttribute.substring(0, idx1);
}if (fCase == UPPER_CASE)firstAttribute = firstAttribute.toUpperCase(locale);
else if (fCase == LOWER_CASE)firstAttribute = firstAttribute.toLowerCase(locale);
}if ((sAttrKey != null) && (sAttrKey.length > 0)) {
secondAttribute = subject.getProperty(sAttrKey);if (((secondAttribute != null) && (secondAttribute.length > 0)))secondAttribute = secondAttribute[0];
if (secondAttribute == null || secondAttribute.length == 0)secondAttribute = "";
else {secondAttribute = IdentityPolicy.resolveAttribute(sAttrKey,
secondAttribute);if ((idx2 > secondAttribute.length) || (idx2 == 0))
idx2 = secondAttribute.length;secondAttribute = secondAttribute.substring(0, idx2);
}
Chapter 10. Policy administration 335

if (sCase == UPPER_CASE)secondAttribute = secondAttribute.toUpperCase(locale);
else if (sCase == LOWER_CASE)secondAttribute = secondAttribute.toLowerCase(locale);
}baseidentity = firstAttribute + secondAttribute;
}if ((baseidentity == null) || (baseidentity.length == 0)) {var givenname = subject.getProperty("givenname");if (((givenname != null) && (givenname.length > 0)))
givenname = givenname[0];if (givenname == null || givenname.length == 0)
givenname = "";else
givenname = givenname.substring(0, 1);baseidentity = givenname + subject.getProperty("sn")[0];
}tf = IdentityPolicy.userIDExists(baseidentity, false, false);if (!tf) {return baseidentity;
}while (tf) {counter+=1;identity = baseidentity + counter;tf = IdentityPolicy.userIDExists(identity, false, false);
}return identity;
}return createIdentity();
Creating an identity policyAn administrator can create an identity policy for use by all service types, specificservice types, or specific service instances. For example, you can create an identitypolicy that specifies that a user ID is constructed from the family name of a userand a department number.
Before you begin
Depending on how your system administrator customized your system, you mightnot have access to this task. To obtain access to this task or to have someonecomplete it for you, contact your system administrator.
About this task
IBM Security Identity Manager offers two approaches, basic and advanced, forcreating an identity policy. Decide which approach you want to use.
Note: If an identity policy is intended to specify a service instance as a target, thatservice instance must exist.
You can use the Manage Identity Policies notebook to create an identity policy.Identity policies do not change user IDs for accounts that exist. Rather, they areused when creating new accounts through Security Identity Manager.
Note: When you are defining a new identity policy, services that are already thetarget of an identity policy are listed. However, the services are not selectable fromthe services table on the Add Targets page. An error message is generated duringthe save operation if a target service type is already being used in another identitypolicy.
336 IBM Security Identity Manager Version 6.0.0.18: Administration Topics

To create an identity policy, complete these steps:
Procedure1. From the navigation tree, select Manage Policies > Manage Identity Policies.2. On the Work With Identity Policies page, in the Identity Policies table, click
Create.3. On the Manage Identity Policies page, on the General page, type a name and
select a business unit for your identity policy.
Note: On the General Page, you can optionally specify a caption to provideadditional information about the policy and a description of its purpose. Youcan specify keywords to reference the identity policy and a status. The statusvalue is enabled to use the policy and make it active, or disabled to make thepolicy inactive. You can also specify a user type to which the identity policyapplies. You can specify the extent to which the identity policy applies to abusiness unit or to a business unit and subunits.
4. Click the Targets page. Add one or more services or service types to which theidentity policy applies, or specify that the policy applies to all service types:v To specify that the identity policy applies to all service types, select All
service types.v To specify that the identity policy applies to specific service instances:
a. Click Add.b. On the Add Targets page, specify your search criteria, and then click
Search.c. In the Services table, select a service.
Note: If you select the box at the top of the column, all services aretargeted. To apply all service types, select All Service Types. If you selectAll Service Types, you cannot add specific service types or instances. Ifyou want to apply the policy to selected service types or instances, ensurethat All Service Types is not selected.
d. Click OK.v To specify that the identity policy applies to a specific service type:
a. Click Add.b. Select a Target type of Service type.c. Select the service type to which you would like the identity policy to
apply.d. Click OK.
The script field is populated with the default identity policy for the Person usertype.
5. On the Manage Identity Policies page, click the Rule page to specify the schemaattributes that the identity policy uses to create a user ID.v To use a basic input mode that applies a rule with schema attributes, select
Simple - define rule and provide the following details:– A first attribute, its character limit, and its type of case (existing, upper, or
lower)– (Optionally) a second attribute, its character limit, and its type of case
(existing, upper, or lower)
Chapter 10. Policy administration 337

A blank value for character limit means no limit, and the entire attribute isused. If a duplicate user ID exists at the time an account is requested, aninteger is appended to the user ID and incremented until a unique user ID isdetermined.
v For the identity policy that uses JavaScript code, select Advanced - definescript. The script field is populated with the default identity policy for thePerson user type.
6. Click OK to save the changes.7. On the Success page, click Close.
Changing an identity policyAn administrator can change an identity policy to meet your organizationalrequirements for user IDs. For example, you might change an identity policy to usethe office number of a user when a new user ID is created.
Before you begin
Depending on how your system administrator customized your system, you mightnot have access to this task. To obtain access to this task or to have someonecomplete it for you, contact your system administrator.
About this task
Changes to the identity policy affect only new accounts; old accounts are notaffected by these changes.
Procedure1. From the navigation tree, select Manage Policies > Manage Identity Policies.2. On the Work with Identity Policies page, type information about the identity
policy, service, or business unit in the Search information field, or use anempty value. Select a filter in the Search by field and click Search.
3. In the Identity Policies table, locate and select an identity policy, and clickChange.
4. On the Manage Identity Policies page, modify the information on the General,Targets, and Rule pages. The business unit designation cannot be changed foran identity policy that is already created.
5. Click OK to save the changes.6. On the Success page, click Close.
Deleting an identity policyAn administrator can delete an identity policy that is not needed to manage userIDs. Deleting an identity policy causes the services that are using the identitypolicy to use another identity policy. For example, the services use the defaultidentity policy that applies to all services.
Before you begin
Depending on how your system administrator customized your system, you mightnot have access to this task. To obtain access to this task or to have someonecomplete it for you, contact your system administrator.
338 IBM Security Identity Manager Version 6.0.0.18: Administration Topics

About this task
If an applicable identity policy is not defined and the identity policy of a service isdeleted, the user ID field on the corresponding account form is blank.
To delete an identity policy, complete these steps:
Procedure1. From the navigation tree, select Manage Policies > Manage Identity Policies.2. On the Work With Identity Policies page, type information about the identity
policy, service, or business unit in the Search information field, or use anempty value. Select a filter in the Search by field, and click Search.
3. In the Identity Policies table, locate and select an identity policy, and then clickDelete.
4. On the Confirm page, review the identity policy to delete, and then clickDelete.
5. On the Success page, click Close.
Password policiesA password policy defines the password strength rules that are used to determinewhether a new password is valid.
A password strength rule is a rule to which a password must conform. For example,password strength rules might specify that the minimum number of characters of apassword must be 5. The rule might also specify that the maximum number ofcharacters must be 10.
A password policy sets the rules that passwords for a service must meet, such aslength and type of characters allowed and disallowed. Additionally, the passwordpolicy might specify that an entry is disallowed if the term is in a dictionary ofunwanted terms. To select this choice in the user interface, you must first load adictionary.ldif file into the IBM Security Identity Manager.
You can specify the following standards and other rules for passwords:v Minimum and maximum lengthv Character restrictionsv Frequency of password reusev Disallowed user names or user IDsv Specify a minimum password age
Note:
v If password synchronization is enabled, the administrator must ensure thatpassword policies do not have any conflicting password strength rules. Whenpassword synchronization is enabled, Security Identity Manager combinespolicies for all accounts that are owned by the user to determine the passwordto be used. If conflicts between password policies occur, the password might notbe set.You might need to coordinate the password strength rules for the services. Thefirst password strength rule might specify a minimum number of eightcharacters. Another password strength rule might specify a maximum number ofsix characters for a password. You must resolve such conflicts to enable a user tolog on successfully.
Chapter 10. Policy administration 339

v Some sites with a service such as AIX might require longer passwords for userswho have root authority. You might set a value for the minimum length of apassword that is shorter than the default password on the AIX server. Theshorter value might cause some users with root authority to enter a passwordthat is shorter than required, causing authentication failure.
Creating a password policyAn administrator can create a password policy for use with one or more services.For example, you might create a password policy that specifies a rule that acharacter can be repeated no more than three times in a password.
Before you begin
Depending on how your system administrator customized your system, you mightnot have access to this task. To obtain access to this task or to have someonecomplete it for you, contact your system administrator.
Before you create a password policy, create one or more service instances toassociate with the password policy. If your policy uses a dictionary of unwantedterms, create and import the dictionary file also.
About this task
If a password policy exists for all services, other policies can still be added.However, only a single password policy can be specified for each service type oreach instance of a service type. A password policy might exist for a service type.Additionally, password policies might exist for different instances of that servicetype. The more specific password policy overrides all others (for example, apassword policy for a Windows service instance overrides a password policy forthe Windows service).
Procedure1. From the navigation tree, select Manage Policies > Manage Password Policies.2. On the Select Password Policies page, in the Password Policies table, click
Create.3. On the Manage Password Policies page, on the General page, type a name and
select a business unit for your password policy. Optionally, you can addinformation about the scope of the policy, its status, keywords, a caption, and adescription for the password policy.
4. Click the Targets page, and then choose to add all service types or choose oneor more specific services to associate with the policy. To add one or moreservices, complete these steps:a. Click Add.b. On the Add Targets page, type your search criteria, and then click Search.c. In the Services table, select one or more services.d. Click OK.
Note: Service type can also be selected as target for password policy byselecting the target type as Service Type.
5. On the Manage Password Policies page, click the Rules page. Specify thesettings for the password rules that you want to use to determine whether apassword entry is valid.
340 IBM Security Identity Manager Version 6.0.0.18: Administration Topics
Note: If password synchronization is enabled, ensure that password policies donot have any conflicts. When password synchronization is enabled, IBMSecurity Identity Manager combines policies for all accounts that are owned bythe user to determine the password to be used. If conflicts between passwordpolicies occur, the password might not be set.
6. Click OK to save the changes.7. On the Success page, click Close.
Adding targets to a password policyAn administrator can add targets to an existing password policy.
Before you begin
Depending on how your system administrator customized your system, you mightnot have access to this task. To obtain access to this task or to have someonecomplete it for you, contact your system administrator.
Procedure1. From the navigation tree, select Manage Policies > Manage Password Policies.2. On the Select Password Policies page, type information about the password
policy, service, or business unit in the Search information field. You can alsouse an asterisk (*) as a wildcard.
3. Select a filter in the Search by field, and click Search.4. In the Password Policies table, locate and select a policy, and then click
Change.5. Click the Targets page, and either add all service types or select one or more
specific services to associate with the policy.To add one or more specific services:a. Click Add.b. On the Add Targets page, type your search criteria, and then click Search.c. In the Services table, select one or more services.d. Click OK.
Note: A specific Service type can also be selected as a target for passwordpolicy by selecting the target type as Service Type.
6. Click OK to save the changes.7. On the Success page, click Close.
Creating a password policy ruleAs an administrator, you can create a rule for an existing password policy. Forexample, you might create a rule that specifies the minimum number of numericcharacters for a password.
Before you begin
Depending on how your system administrator customized your system, you mightnot have access to this task. To obtain access to this task or to have someonecomplete it for you, contact your system administrator.
Procedure1. From the navigation tree, select Manage Policies > Manage Password Policies.
Chapter 10. Policy administration 341

2. On the Select Password Policies page, type information about the passwordpolicy, service, or business unit in the Search information field, or type anasterisk (*). Select a filter in the Search by field, and click Search.
3. In the Password Policies table, locate and select a policy, and then clickChange.
4. On the Manage Password Policies page, click the Rules page. Specify thesettings for the password rules that you want to use to determine whether apassword entry is valid.
Note: If password synchronization is enabled, ensure that password policies donot have any conflicts. When password synchronization is enabled, IBMSecurity Identity Manager combines policies for all accounts that are owned bythe user to determine the password to be used. If conflicts between passwordpolicies occur, the password might not be set.
5. Click OK to save the changes.6. On the Success page, click Close.
Changing a password policyAn administrator can change a password policy to meet the requirements of yourorganization for passwords. For example, you might change a password policy toset the minimum and maximum characters that are required for the password.
Before you begin
Depending on how your system administrator customized your system, you mightnot have access to this task. To obtain access to this task or to have someonecomplete it for you, contact your system administrator.
About this task
Changes to the password policy affect only new accounts. Old accounts are notaffected by these changes.
Procedure1. From the navigation tree, select Manage Policies > Manage Password Policies.2. On the Select Password Policies page, type information about the password
policy, service, or business unit in the Search information field, or type anasterisk (*). Select a filter in the Search by field, and click Search.
3. In the Password Policies table, locate and select a policy, and then clickChange.
4. On the Manage Password Policies page, modify the information on the General,Targets, and Rules pages.
Note: If password synchronization is enabled, ensure that password policies donot have any conflicts. When password synchronization is enabled, IBMSecurity Identity Manager combines policies for all accounts that are owned bythe user to determine the password to be used. If conflicts between passwordpolicies occur, the password might not be set.
5. Click OK to save the changes.6. On the Success page, click Close.
342 IBM Security Identity Manager Version 6.0.0.18: Administration Topics

Changing targets for a password policyAn administrator can change targets for an existing password policy.
Before you begin
Depending on how your system administrator customized your system, you mightnot have access to this task. To obtain access to this task or to have someonecomplete it for you, contact your system administrator.
Procedure1. From the navigation tree, select Manage Policies > Manage Password Policies.2. On the Select Password Policies page, type information about the password
policy, service, or business unit in the Search information field, or type anasterisk (*). Select a filter in the Search by field, and click Search.
3. In the Password Policies table, locate and select a policy, and then clickChange.
4. Click the Targets page. Add or remove all service types or choose to changeone or more specific services that are associated with the policy. To change oneor more specific services:a. Click Add.b. On the Add Targets page, type your search criteria, and then click Search.c. In the Services table, select or clear one or more services.d. Click OK.
5. Click OK to save the changes.6. On the Success page, click Close.
Changing a password policy ruleAn administrator can change a password policy rule. For example, you mightchange or remove the settings for an existing rule.
Before you begin
Depending on how your system administrator customized your system, you mightnot have access to this task. To obtain access to this task or to have someonecomplete it for you, contact your system administrator.
About this task
To change a password policy rule, complete these steps:
Procedure1. From the navigation tree, select Manage Policies > Manage Password Policies.2. On the Select Password Policies page, type information about the password
policy, service, or business unit in the Search information field, or type anasterisk (*). Select a filter in the Search by field, and click Search.
Note: If the search for password policies is done by Service, the default ServiceOwner ACIs limit the search to the password policies in Services that belong tothe Service Owner. However, these default ACIs do not limit the search bypassword policy name. The default ACIs can be modified, or new ACIs can becreated to change the search scope for the Service Owner.
Chapter 10. Policy administration 343

3. In the Password Policies table, locate and select a policy, and then clickChange.
4. On the Manage Password Policies page, click the Rules page. Change orremove the settings for the password rules that you want to use to determinewhether a password entry is valid.
Note: If password synchronization is enabled, ensure that password policies donot have any conflicts. When password synchronization is enabled, IBMSecurity Identity Manager combines policies for all accounts owned by the userto determine the password to be used. If conflicts between password policiesoccur, the password might not be set.
5. Click OK to save the changes.6. On the Success page, click Close.
Deleting a password policyAn administrator can delete a password policy that is no longer needed to controlpassword entries.
Before you begin
Depending on how your system administrator customized your system, you mightnot have access to this task. To obtain access to this task or to have someonecomplete it for you, contact your system administrator.
About this task
Deleting a password policy causes the services that are using the password policyto use another password policy, such as the default password policy.
Procedure1. From the navigation tree, select Manage Policies > Manage Password Policies.2. On the Select Password Policies page, type information about the password
policy, service, or business unit in the Search information field, or type anasterisk (*). Select a filter in the Search by field, and click Search.
3. In the Password Policies table, locate and select a policy, and then click Delete.4. Click OK to save the changes.5. In the Success page, click Close.
Customized password rulesYou can use IBM Security Identity Manager server to add customized logic forgenerating passwords. To add the logic you can use a customized rule, acustomized generator, or a combination of both.
Adding customized logic for password rules with a customizedruleA customized password rule is used for validating both new passwords that aregenerated by IBM Security Identity Manager Server and existing passwords.
Before you begin
Depending on how your system administrator customized your system, you mightnot have access to this task. To obtain access to this task or to have someonecomplete it for you, contact your system administrator.
344 IBM Security Identity Manager Version 6.0.0.18: Administration Topics

Procedure1. Create a class by implementing com.ibm.passwordrules.Rule interface.2. Register the class in passwordrules.properties by entering a line like the
following one:password.rule.com.ibm.tivoli.itim.CustomPasswordRule1=true
The value of this expression determines the type of interface widget that isused to create a customized rule when you define a password policy. Thefollowing values are valid:v A value of true means that the instantiated rule object requires a parameter.
The widget is a text box. If any value is entered, a customized rule is used. Ifthe value is optional, typing in any printing character marks the rule for use.
v A value of false means that the rule does not require parameters. If the boxis selected, a customized rule is used.
If more than one parameter value is required, a user-defined delimiter mightseparate individual values. Alternatively, the value might contain a structurethat is represented by a user-defined XML document.
3. Optional: Add a label for the customized rule name. The key for the value isthe fully qualified name of the customized class. The specified value isdisplayed on all screens that show the password rulespassword.rule.com.ibm.tivoli.itim.CustomPasswordRule1=Use ComplexityLevel 1. In this example, the required prefix is followed by the fully qualifiedname of the customized rule class. Both parts constitute the entire property keyfor any customized rule.
Note: If the customized label is not defined in CustomLabels.properties, thefully qualified name of the customized Java class is displayed on the interfaceforms.
Adding a customized password generatorYou can add a customized password generator for creating passwords with theIBM Security Identity Manager Server.
Before you begin
Depending on how your system administrator customized your system, you mightnot have access to this task. To obtain access to this task or to have someonecomplete it for you, contact your system administrator.
Procedure1. Create a customized password generator class that implements the
com.ibm.passwordrules.PasswordGenerator interface.2. Register the customized password generator class. The customized password
generator might be used by adding a line to the passwordrules.properties file.For example:generator.ibm.tivoli.itim.CustomGenerator
In this example, generator is the required prefix followed by the fully qualifiedname of the password generator class. Both parts constitute the entire propertykey of a customized generator. Initialization parameters can be passed to thecustomized generator by specifying a value for the property, as in the followingexample:generator.ibm.tivoli.itim.CustomGenerator=value1?value2
Chapter 10. Policy administration 345

This value must be defined in a format that is expected by the initialize()method of the generator. If the author of a customized generator class choosesnot to do any initialization, the property value is ignored by the initializemethod of the generator class.
Note: Any password generator, including the built-in one, has a global scope,and is the only one that generates passwords for accounts of all service types.
Customized logic using customized rules and a customizedgeneratorYou can use a combination of a customized rule and a customized generator toadd customized logic for generating passwords.
Using standard password rules might not always be helpful or even wanted at all.You might prefer a single customized password rule to generate compliantpasswords. You might use a standard set of password rules to define passwordpolicies. When you want to avoid standard rules, that preference must be knownto the IBM Security Identity Manager administrator.
Mixing customized rules with a customized generator might have unforeseenimplications. For example, a customized password generator implementation mightbe sufficient to generate valid passwords, and thus a password policy might not berequired at all.
Using a customized rule might preclude the authors of password policies fromusing some or even all standard password rules that might be incompatible withthe customized rule. However, to achieve the wanted effect, authors of customizedrules or generators might decide to use a combination of both. Such an approachmight be more flexible, because different parameters can be passed to individualrule definitions in password policies for different service types.
Joining rules
Any class that implements a Rule interface is expected to provide logic in its join()method. This logic joins parameters of two rules of the same type defined for twoor more accounts of different service types. If such joins are difficult or evenimpossible to do, parameters of one of the two similar rules can be chosen bycode. The Framework does not provide any mechanism for resolving join conflicts.The author of customized rule classes resolves such conflicts by imposing apreferred mechanism in the join() method itself.
Constraining the password generator
For customized password generators, which are based on an iterative algorithm,limiting the possible number of attempts during which the password might begenerated is a way of ensuring that the maximum limit of iterations is notexceeded before a valid password is produced. A valid password is one thatcomplies with all the rules defined for it in a password policy. Each rule classimplements the constrain() method that tells the generator how to generate thepassword.
Authors of customized rule classes might choose not to implement the constrain()method. These authors must test the process of generating the expected password.They must test with a combination of rules, including the customized rules, whichare expected to be used in production environment. The test must produce anacceptable, large number of consecutive passwords are generated without
346 IBM Security Identity Manager Version 6.0.0.18: Administration Topics

triggering the IterationsExceededException. If the test is successful, the mechanismis acceptable, and can be used in the production environment. Some customizedpassword generators (for example, those generators based on a dictionary) mightnot require constrains at all. In such cases, constraint() methods although alwayscalled, do not affect the way passwords are generated.
Note: The maximum limit of iterations is hardcoded 20,000.
Internationalization
Parameter values passed to the customized generator might include Unicodecharacters. If the passwordrules.properties file contains any Unicode characters,save it in Unicode format. IBM Security Identity Manager automatically detects theformat when the file is read. A file that contains Unicode characters must beviewed and edited with a text editor that can display these characters.
Alternatively, use the hex-encoded format to insert the Unicode characters into thefile: \uXXXX or OxXXXX. This method makes it possible to view and edit the file intext format, but the generator class must interpret these character encodings. TheStandardGenerator class in the password rules framework can generate passwordsusing Unicode characters to the extent supported by the Java virtual machine usedwith the IBM Security Identity Manager server.
The default character set used by the StandardGenerator class is uppercase andlowercase letters from the Latin alphabet. They correspond to Unicode ranges0x0041-0x005a and 0x0061-0x007a, and most special characters such as #, $, and %that are in the ASCII set. You can extend or replace this character set by defining aparameter value for the standard generator class in the passwordrules.propertiesfile. For example:
generator.com.access360.passwordrules.standard.StandardGenerator=\0x0041,0x005a \0x0061,0x007a \0x0104,0x0107 \0x0118,0x0119 \0x00d3\0x00f3 \0x0141,0x0144 \0x015a,0x015b \0x0179,0x017c
The first two ranges are the standard Latin letters. The others are from ExtendedLatin I and II Unicode sets. Customized rule parameter values added to passwordpolicy definitions might also be required to accept Unicode characters. Again, thetwo ways of specifying the Unicode values and ranges of values apply here aswell. XML is used to save all rules within a password policy to the LDAPdirectory. The interface always displays the customized rule parameters exactly asthey were entered.
Configuration of minimum password age ruleAn administrator can configure a minimum password age rule to limit howfrequently users can change the password on their account. This rule is providedin the password policy. By default, the rule is disabled.
The following points describe the limitations, scenarios, and configurationinformation about the minimum password age rule.v The rule accepts only integer values. A user with permissions to define or edit a
password policy can specify the minimum period, in hours, for a passwordchange. A user cannot change the password on that account again within thespecified period.
v IBM Security Identity Manager interprets the specified integer value for the rulein hours. Security Identity Manager does not evaluate the rule when a user
Chapter 10. Policy administration 347

specifies a negative value, 0, or no value. In other words, users can change thepassword on their accounts immediately.
v Security Identity Manager can evaluate the rule only in these conditions:– When users try to change the password on any of the accounts owned by
them.– When the previous password change on those accounts was successfully run
by the same users (owners of the accounts).
In other words, Security Identity Manager does not evaluate the rule if usersother than owners of the accounts made the previous account password change.For example, help desk or system administrators.
v Security Identity Manager does not evaluate the rule when users change thepassword on accounts that are not owned by them. For example, SecurityIdentity Manager does not evaluate the rule when help desk or systemadministrators change the password on some other user accounts. SecurityIdentity Manager does not evaluate the rule if the password change is initiatedby the system. For example, a password change initiated by the lifecycle rule oran automatic provisioning request workflow.
v Security Identity Manager maintains this information in IBM Security DirectoryServer:– Users who ran the last password change on each account object.– Time when the password change was run on each account object.
For some reasons, if this information is corrupted or these attributes are wipedoff from the account object, then Security Identity Manager does not evaluate therule correctly.
v Security Identity Manager stores the password change information only whenthe password change is initiated by using one of these resources:– IBM Security Identity Manager console– IBM Security Identity Manager Self Service or the Identity Service Center user
interface– IBM Security Identity Manager APIs
Therefore, any information about password changes done directly on theresource or by using some other tool is not used to evaluate the rule.
Adding a customized minimum password age rule:
An administrator can add a customized minimum password age rule to limit usersfrom changing the password on their account. For example, you might want tospecify the minimum time, in hours, for a password change on your accountbefore you can change it again.
Before you begin
Depending on how your system administrator customized your system, you mightnot have access to this task. To obtain access to this task or to have someonecomplete it for you, contact your system administrator.
Ensure that IBM Security Identity Manager is installed.
About this task
Run the following procedure to configure and enable this rule in yourenvironment.
348 IBM Security Identity Manager Version 6.0.0.18: Administration Topics

If you are on a clustered environment, then repeat the following procedure on eachnode of the cluster. The procedure configures and enables this rule in yourenvironment.
Note: By default, this rule is disabled.
Procedure
1. Stop WebSphere Application Server.2. Change to the directory where the passwordrules.properties file is located.
For example: $ISIM_HOME/data.3. Uncomment the following property in passwordrules.properties files to
enable the new rule:password.rule.com.ibm.passwordrules.standard.MinAgeConstraint=true
The “Minimum Password Age” label is added in the $ISIM_HOME/data/CustomLabels.properties file.
Note: ISIM_HOME is the directory where Security Identity Manager isinstalled.
4. Optional: Complete these steps if a language pack is installed, or if thecom.ibm.passwordrules.standard.MinAgeConstraint key is not assigned alabel in the CustomLabels_nn.properties file:a. Edit the appropriate $ISIM_HOME/data/CustomLabels_nn.properties file if a
language pack is installed. nn is a two letter language code. For example,en for English.
b. Add the following line at the end of the file with appropriate messages forthat language. Add the line after you replace the text on the right of theequals “=” sign. For example:com.ibm.passwordrules.standard.MinAgeConstraint=Minimum Password Age
Do not change the English text on the left of the equals “=” sign.5. Change to the directory where the tmsMessages.properties file is located. For
example: $ISIM_HOME/data.6. Back up the tmsMessages.properties file.7. Using any text editor, open the tmsMessages.properties file.8. Add the following message at the end of the tmsMessages.properties file. For
example:com.ibm.passwordrules.MinAgeConstraint.MIN_AGE_VIOLATED=Attempting to set the password within minimum age of password.
If you violate the rule, this message displays on the IBM Security IdentityManager Console.
9. Save the tmsMessages.properties file and close the editor.
Note: Repeat Steps 5, 6, 7, 8, and 9 to edit the tmsMessages_nn.properties filefor the language packs that you installed.
10. Start WebSphere Application Server.
Results
The Rule tab on the Manage Password Policies page displays the MinimumPassword Age rule.
Chapter 10. Policy administration 349

What to do next
Specify appropriate values for the minimum password age.
Provisioning policiesA provisioning policy grants access to many types of managed resources, such asIBM Security Identity Manager Server, Windows NT servers, and Solaris servers.
Each provisioning policy consists of the following components:v General Informationv Membershipv Entitlements
A provisioning policy must target one or more service instances, service types, or aservice selection policy. System administrators can use provisioning policyparameters to define attribute values that are required and values that are optional.
A provisioning policy defines the accounts and access that are authorized to usersor automatically provisioned for users by the user's role. When account and accessare authorized to a user by a provisioning policy, they can be requested by theuser. A provisioning policy can be used to support role-based provisioning, inwhich accounts and access are automatically provisioned to a user, based on theuser's roles.
Provisioning policies are important to support security compliance. SecurityIdentity Manager evaluates all account and access requests based on theprovisioning policy to identify accounts and access that are not authorized andtake appropriate actions to handle noncompliant account and access. Based on theenforcement configuration on the service, Security Identity Manager can eithermark the account or access as noncompliant. Security Identity Manager can alsosuspend the account, alert the administrator to revoke disallowed privilege, orautomatically correct the account or access and make it compliant. A provisioningpolicy provides a key part of the framework for the automation of identity lifecyclemanagement.
Security Identity Manager provides APIs that interface to information aboutprovisioning policies defined in Security Identity Manager, and interface to theaccess granted to an individual task. These APIs can be used effectively to generateaudit data.
When two or more provisioning policies are applied to the same user, a joindirective defines how to handle attribute values from different policies. To workwith policy joins or customize them, go to the navigation tree and select ConfigureSystem > Configure Policy Join Behaviors.
Provisioning policies can be mapped to services of a distinct portion or level of theorganizational hierarchy. The business unit to which the provisioning policybelongs determines the services the policy governs. The scope of the provisioningpolicy indicates whether to cover services in the same level of the business unit orthe subtree of the business unit. An entitlement in the provisioning policy supportdifferent types of service targets. Target types include all services, services of sametype, services defined by service selection policy, or a specific service instance. In
350 IBM Security Identity Manager Version 6.0.0.18: Administration Topics

all cases, the services must be within the specified scope of the business unit wherethe policy is defined. A service selection policy enables service selection base onperson attributes.
Policy enforcementPolicy enforcement is the manner in which IBM Security Identity Manager allows ordisallows accounts that violate provisioning policies.
When a provisioning policy, person, account data, or dynamic role is changed, anaccount that was originally compliant with a provisioning policy can becomenoncompliant.
If a role is a member of another organizational role in a provisioning policy, thenthat role member also inherits the permissions of provisioning policy.
When a policy enforcement action is set to Global, the policy enforcement for anyservice is defined by the global or default configuration setting.
You can set the policy enforcement action as Mark, Suspend, Correct, Alert, orUse Global Enforcement Action: Mark. For more information, see Policyenforcement actions in “Policy enforcement” on page 137.
Provisioning policy parameter enforcement rulesThe parameter enforcement types specify the rule for the system to evaluate thevalidity of an account attribute value.
An account that contains an invalid value is considered a noncompliant account.The role of the policy enforcement settings (Mark, Suspend, Correct, and Alert) is tospecify the action the system does when the account becomes noncompliant. ACorrect policy enforcement setting causes the system to take corrective action forthe noncompliant account. Actions, include adding mandatory values to theaccount and removing invalid values from the account.
Use the following key to determine the enforcement type:
M Mandatory
A Allowed
D Default
E Excluded
A mandatory value is added if it is missing from an account. Default attributes areused only during account creation. Afterward, they can be used. Excluded attributevalues are removed only if they are not granted in another policy.
Some adapters such as the Oracle eBS adapter support complex group attributerequests. Support for these requests requires the installation of a serviceprofile-specific handler. For more information about handlers, see your specificadapter guide. For accesses that are related to such complex group values, typicallythe default subattribute values are obtained from the handler plug-in. However, ifthe provisioning policy for the service has a mandatory enforcement on the groupattribute, that value is used instead.
The following table lists the set of valid and mandatory parameter values.
Chapter 10. Policy administration 351

Table 80. System attribute enforcement rules
ALLOWED ACTIONS
M A D E Account creation Account validation (reconciliation)
No action. All valid values.
X Mandatory attributes areset.
Mandatory attributes are set to the defined value, and allother values are not valid.
X No action. All defined attributes are valid, and all others are not valid.
X Default attributes are set. Default attributes defined are defaulted on account creation,and all other values are also valid.
X No action. Excluded attribute values are removed (all other values canbe present or set on the attribute). The valid values are equalto {M + A + D + not(E)}. If a value is not contained in the setof valid values, it is removed.Note: Excluded adds values by negation to the allowed set.It does not remove values from the allowed set.
X X Mandatory attributes areset.
Mandatory attributes are set to the defined value. Validvalues can be present or set on the attribute.
X X X Mandatory and defaultattributes are set.
Mandatory attributes are set to the defined value. Optionaland default values can be present or set on the attribute.
X X X X Mandatory and defaultattributes are set.
Mandatory attributes are set to the defined value. Excludedattribute values are removed. Optional and default valuescan be present or set on the attribute.
X X Mandatory and defaultattributes are set.
Mandatory attributes are set to a defined value. Defaultvalues can be present or set on the attribute.
X X X Mandatory and defaultattributes are set.
Mandatory attributes are set to a defined value. Defaultvalues can be present or set on the attribute. Excludedattribute values are removed.
X X Mandatory attributes areset.
Mandatory attributes are set to defined values. Excludedattribute values are removed (all other values can be presentor set on the attribute).
X X X Mandatory attributes areset.
Mandatory attributes are set to defined values. Optionalattributes are valid, and must be one of the defined values ifa value is set. Excluded attribute values are removed (allother values can be present or set on the attribute).
X X Default attributes are set. Optional attributes are valid and must be one of the definedvalues if a value is set. Default attributes are valid.
X X X Default attributes are set. Optional attributes are valid, and must be one of the definedvalues if a value is set. Default attributes are valid. Excludedattribute values are removed (all other values can be presentor set on the attribute).
X X No action. Optional attributes are valid, and must be one of the definedvalues if a value is set. Excluded attribute values areremoved (all other values can be present or set on theattribute).
X X Default attributes are set. Default attributes are valid. Excluded attribute values areremoved (all other values can be present or set on theattribute).
Creating a provisioning policyAn administrator can create a provisioning policy.
352 IBM Security Identity Manager Version 6.0.0.18: Administration Topics

Before you begin
Depending on how your system administrator customized your system, you mightnot have access to this task. To obtain access to this task or to have someonecomplete it for you, contact your system administrator.
Organizational roles and services that the provisioning policy uses must be inplace before you add the provisioning policy.
If a role is a member of another organizational role in a provisioning policy, thenthat role member also inherits the permissions of provisioning policy.
Procedure1. From the navigation tree, select Manage Policies > Manage Provisioning
Policies.2. On the Manage Provisioning Policies page, in the Provisioning Policies table,
click Create.3. On the Manage Provisioning Policies page, on the General page, type a name
and a priority number, and select a business unit for your provisioning policy.Optionally, you can also specify the scope, a caption, a description, keywords,and the policy status.
4. Click the Members page, and select the member type that you want to associatewith the provisioning policy. If you select Roles specified below, completethese steps to add one or more roles to the Roles table:a. Click Add.b. On the Organizational Role page, specify your search criteria, and then click
Search.c. In the Roles table, select one or more roles.d. Click OK.
5. On the Manage Provisioning Policies page, click the Entitlements page, and addone or more entitlements to the provisioning policy:a. Click Create.b. On the Account Entitlement page, select the provisioning option, ownership
type, target type, and a workflow. Select the service type and service, ifapplicable.
c. Click OK.6. Click Submit to save the policy.7. On the Schedule page, choose to create the provisioning policy immediately or
select a specific date and time. Then, click Submit.8. On the Success page, click Close.
Changing a provisioning policyAs an administrator, you can modify a provisioning policy.
Before you begin
Depending on how your system administrator customized your system, you mightnot have access to this task. To obtain access to this task or to have someonecomplete it for you, contact your system administrator.
Chapter 10. Policy administration 353

About this task
System administrators can modify provisioning policies by changing the policydefinition, membership, or entitlement.
If a role is a member of another organizational role in a provisioning policy, thenthat role member also inherits the permissions of provisioning policy.
Procedure1. From the navigation tree, select Manage Policies > Manage Provisioning
Policies.2. On the Manage Provisioning Policies page, type information about the
provisioning policy in the Policy information field, or type an asterisk (*), andclick Search.
3. In the Provisioning Policies table, locate and select a provisioning policy, andclick Change.
4. On the Manage Provisioning Policies page, modify the information on theGeneral, Members, and Entitlements pages.
5. Click Submit to save the changes.6. On the Schedule page, indicate whether to change the provisioning policy
immediately or select a specific date and time. Then, click Submit. You canindicate to submit changes only, or to submit the entire policy.
7. On the Success page, click Close.
Previewing a modified provisioning policyAn administrator can preview the effect of a provisioning policy on users beforeadding, modifying, or deleting the policy.
Before you begin
Depending on how your system administrator customized your system, you mightnot have access to this task. To obtain access to this task or to have someonecomplete it for you, contact your system administrator.
About this task
Previewing a provisioning policy provides you with a summary of the number ofaccounts that are affected and specific details for each account that the policyimpacts. The provisioning policy preview provides details about the accounts thatare:v Provisionedv Suspendedv Deletedv Modifiedv Marked as noncompliantv Get a changed status from noncompliant to compliant
If the results of the preview are what you expected, you can continue submittingand activating the policy. If the results of the preview are not what you expected,you can revise the policy.
354 IBM Security Identity Manager Version 6.0.0.18: Administration Topics

When you preview a modified policy, you can choose to have IBM SecurityIdentity Manager compute the impact of the entire policy on all users that belongto policy memberships. Alternatively, you can choose to compute only the impactof the changes you made to the policy. For example, you modified an existingprovisioning policy to include a newly defined role. You might want to previewthe results of the modified policy selectively as they apply to users who wereassigned to that role.
If a role is a member of another organizational role in a provisioning policy, thenthat role member also inherits the permissions of provisioning policy.
If you change the ownership type of a service policy entitlement, accounts areevaluated based on that ownership type. Accounts with a different ownership typethan the one specified in the changed entitlement are disallowed on that service.The exceptions are if you change the ownership type to All or the ownership typeis covered by another entitlement on the same policy. In those cases, the accountsare not disallowed.
Procedure1. From the navigation tree, select Manage Policies > Manage Provisioning
Policies.2. On the Manage Provisioning Policies page, type information about the
provisioning policy in the Policy information field, or type an asterisk (*), andclick Search.
3. In the Provisioning Policies table, locate and select a provisioning policy, andclick Change.
4. On the Manage Provisioning Policies page, modify the information about theGeneral, Members, and Entitlements pages, and click Preview.
5. On the Preview Policy Enforcement page, select Enforce changes only orEnforce entire policy.
6. Click Continue.The preview is generated and displayed on the Preview Policy Summary page,which is categorized by the following states:v Disallowed accountsv Noncompliant accountsv Compliant accounts
Click a category of account changes to view the individual accounts that thepolicy changes affect.
7. On the Preview Policy Summary page, click Close.
What to do next
After you determine that the effects of the policy changes are acceptable, thechanges can be submitted to the system.
Creating a draft of an existing provisioning policyAs an administrator, you can modify an existing provisioning policy and save themodified policy as a draft, without committing the changes to the system.
Chapter 10. Policy administration 355

Before you begin
Depending on how your system administrator customized your system, you mightnot have access to this task. To obtain access to this task or to have someonecomplete it for you, contact your system administrator.
You might save an existing provisioning policy as a draft. Both the original and thedraft versions are listed on the Manage Provisioning Policies page in theProvisioning Policies table. When you commit the draft version to the system, itreplaces the original, which is removed from the system, along with the draftversion.
Procedure1. From the navigation tree, select Manage Policies > Manage Provisioning
Policies.2. On the Manage Provisioning Policies page, type information about the
provisioning policy in the Policy information field, or type an asterisk (*), andthen click Search.
3. In the Provisioning Policies table, locate and select a provisioning policy, andclick Change.
4. On the Manage Provisioning Policies page, modify the information on theGeneral, Members, and Entitlements pages.
5. Click Save as Draft.6. On the Success page, click Close.
Committing a draft provisioning policyAs an administrator, you can commit a provisioning policy draft.
Before you begin
Depending on how your system administrator customized your system, you mightnot have access to this task. To obtain access to this task or to have someonecomplete it for you, contact your system administrator.
When you commit a draft version to the system, it replaces the originalprovisioning policy, which is removed from the system, along with the draftversion.
Procedure1. From the navigation tree, select Manage Policies > Manage Provisioning
Policies.2. On the Manage Provisioning Policies page, type information about the
provisioning policy in the Policy information field, or type an asterisk (*), andclick Search.
3. In the Provisioning Policies table, locate and select a provisioning policy draft,and click Change.
4. On the Manage Provisioning Policies page, click Submit to commit the draft.5. On the Schedule page, indicate whether to change the provisioning policy
immediately or select a specific date and time. Then, click Submit.6. On the Success page, click Close.
356 IBM Security Identity Manager Version 6.0.0.18: Administration Topics

Deleting a provisioning policyAn administrator can delete a provisioning policy. Deleting a provisioning policyremoves all accounts that this policy created.
Before you begin
Depending on how your system administrator customized your system, you mightnot have access to this task. To obtain access to this task or to have someonecomplete it for you, contact your system administrator.
Before you delete a provisioning policy, confirm that you want to delete all thememberships and entitlements that are contained in that policy. If a role is a childrole of another organizational role in a provisioning policy, then that child role alsoinherits the permissions of provisioning policy. Therefore, when you delete aprovisioning policy, the permissions of the child roles might be deleted orsuspended.
Procedure1. From the navigation tree, select Manage Policies > Manage Provisioning
Policies.2. On the Manage Provisioning Policies page, type information about the
provisioning in the Search information field, or type an asterisk (*) and clickSearch.
3. In the Provisioning Policies table, locate and select a provisioning policy, andclick Delete.
4. On the Confirm page, review the provisioning policy to be deleted, choose adate and time for the deletion to occur, and click Delete.
5. On the Success page, click Close.
Managing provisioning policies by roleAs an administrator, you can manage provisioning policies that are associated withroles.
Before you begin
Depending on how your system administrator customized your system, you mightnot have access to this task. To obtain access to this task or to have someonecomplete it for you, contact your system administrator.
About this task
System administrators can manage provisioning policies that are associated withroles.
If a role is a member of another organizational role in a provisioning policy, thenthat role member also inherits the permissions of provisioning policy.
Procedure1. From the navigation tree, select Manage Roles. The Manage Roles page is
displayed.2. On the Manage Roles page, complete these steps:
a. Type information about the role in the Search information field.
Chapter 10. Policy administration 357

b. In the Search by field, specify whether to search against role name ordescription, or against business units, and then click Search. A list of rolesthat match the search criteria is displayed.If the table contains multiple pages, you can:v Click the arrow to go to the next page.v Type the number of the page that you want to view and click Go.
3. In the Roles table, click the icon ( ) next to the role, and then click ManageProvisioning Policies. The Work With Provisioning Policies page is displayed.
4. On the Work With Provisioning Policies page, you can create, change, or deleteprovisioning policies.
5. When you are finished managing the provisioning policies, click Close to closethe page.
Recertification policiesRecertification simplifies and automates the process of periodically revalidating atarget type (account or access) or a membership (role or resource group). Therecertification process validates whether the target type or membership is stillrequired for a valid business purpose. The process sends recertification notificationand approval events to the participants that you specify. A recertification policyincludes activities to ensure that users provide confirmation that they have a valid,ongoing need for a specified resource or membership.
A recertification policy defines how frequently users must certify their need for aresource or membership. The policy also defines the operation that occurs if therecipient declines or does not respond to the recertification request. Recertificationpolicies use a set of notifications to initiate workflow activities that are involved inthe recertification process.
There are three recertification target types:v Userv Accountv Access
A user recertification, unlike an account or access recertification, allows you tocertify roles, accounts, and groups (which include accesses) for the specified userwithin a single activity.
A recertification policy is implemented as a workflow. A default workflow isautomatically built for simple policies. A recertification policy can prompt arecipient, such as a manager or system administrator to certify periodically thatusers still need to use accounts. The workflow generates an e-mail notification ofthe work item to be completed for recertification and generates To Do activities torequest that the participant accept or reject the recertification.
A service owner can create a recertification policy for services and accesses that areadministered by the user. A system administrator can create a recertification policyfor all users, services, and accesses. For example, as an administrator, you candefine a recertification policy that sets a 90-day interval for account recertification.If the recipient of the recertification request declines recertification, the account issuspended. The owner of the account that was rejected during recertification isnotified by email based on the message template configured in the policy.
358 IBM Security Identity Manager Version 6.0.0.18: Administration Topics

The recertification policy access control item (ACI) controls what a user can viewor do with recertification policies. IBM Security Identity Manager provides defaultaccess control items that target recertification policies. The following table showshow changes to the default ACIs affect what you can see or do with the policies.
Table 81. Recertification policies and access control items
Who is permittedTarget object and accesscontrol item Effect
Service owner group Recertification policy - add,modify, remove, or search
Allows service owners tomanage recertificationpolicies.
Auditor or manager group Recertification policy - search Allows members of theauditor group or managergroup to search or viewrecertification policies.
Auditor, manager, or serviceowner groups
Reports (recertificationpending, history, andpolicies) run operation
Allows members of thesegroups to view these reports.
Audits that are specific to recertification are created for use by several reports thatare related to recertification:
Accounts or access pending recertificationProvides a list of recertifications that are not completed.
Recertification change history (for accounts and accesses)Provides a historical list of recertifications.
Recertification policies (for accounts and accesses)Provides a list of all account and access recertification policies.
User recertification history reportProvides a historical list of user recertifications.
User recertification policy definition reportProvides a list of user recertification policies.
Resource selection for recertification
Security Identity Manager does not select accounts for recertification in thefollowing circumstances:v The ITIM Service account of the ITIM administrator (the actual name of the
account and service inside Security Identity Manager) is not selected forrecertification so that it is not deleted or suspended inadvertently. Any otherITIM account can be selected.
v Orphan accounts, which are accounts with no owners, are not selected forrecertification.
v Account and access recertification policies do not select resources if the rejectionof the resource results in the same operation. For example, if the rejection actionis to suspend the accounts, the recertification policy does not select accounts thatare already suspended because the rejection of the recertification would suspendthe accounts, which has already occurred. If the rejection action is to delete theaccounts after the accounts are suspended, the accounts are selected forrecertification because a different action, such as deleting the suspendedaccounts, had not already occurred.
Chapter 10. Policy administration 359

Recertification policy targets
Recertification policies can target various resources and memberships. Accountrecertification policies target accounts on specific services. Access recertificationpolicies target specific accesses. User recertification policies can target acombination of role memberships, accounts on services, and groups on services(including groups defined as access).
There is a restriction with account and access policies:v A service can be a member of only one account recertification policyv An access can be a member of only one access recertification policy
These restrictions do not apply to user recertification policies. A user recertificationpolicy might include services or accesses that are already part of another policy.
Recertification policy configuration modes
The configuration mode determines how you build the policy. The followingmodes are available:
SimpleIf you use the simple mode, a workflow is automatically built, using theoptions that are selected on the Policy page.
AdvancedIf you use the advanced mode, the workflow designer is launched with asimple workflow defined as the base configuration, using the optionsselected on the Policy page. The workflow can be further customized forbusiness needs.
Note: If a policy is changed from simple to advanced mode, the policy cannotrevert to a simple state without losing changes. The policy reverts to the defaultsimple recertification workflow.
Viewing recertification status
Recertification requests can be viewed in View Requests. To find recertificationrequests, select the View All Requests By Service view or View All Requestsview.
For services, see the option in the task list by service to view AccountRecertification Status, and navigate to Manage Services > Select a Service. Clickthe icon adjacent to a service name and select Account Recertification Status toget to the status page.
For group access entitlements, to view Access Recertification Status, navigate toManage Groups > Select a Service. Select the service and click OK. Then, click theicon adjacent to the group for the accesses and select Access Recertification Status.
Note: On the service protection category for ACIs is a new operation calledRecertification Override that specifies which users can view and override therecertification status of an account. A similar ACI exists on the group protectioncategory to specify which users can view and override the recertification status ofan access.
360 IBM Security Identity Manager Version 6.0.0.18: Administration Topics

Recertification policies and reports
Recertification reports can be requested by system administrators, service owners,managers, and auditors, based on ACIs. Included are reports of the followingtypes:v Accounts/Access Pending Recertification Reportv Recertification Change History Reportv Recertification Policies Reportv User Recertification History Reportv User Recertification Policy Definition Report
The actions taken during an account or access recertification policy run are storedin a database table RECERTIFICATIONLOG that is referenced by the recertificationhistory report.
The actions taken during a user recertification policy run are stored in databasetables named USERRECERT_HISTORY, USERRECERT_ROLE,USERRECERT_ACCOUNT, and USERRECERT_GROUP, which are referenced bythe user recertification history report.
Note: Recertification audit events are generated from recertification policyworkflows only, rather than from operational workflows.
Recertification activitiesA recertification activity is displayed in the to-do list, and you can use it to approveor reject a user's need for a membership or access to a resource.
While recertification is underway, the user can continue to use the target type inquestion. If recertification is rejected, the account, access, group membership, orrole membership might be marked, suspended, or deleted based on theconfiguration of the policy. The recertification approval activity does notnecessarily go to the account owner. The participant can be specified using theWho approves recertification field in the Policy tab. Approvers can be the accountowner, administrator, service owner, manager, user, organizational role, group, oraccess owner, depending on the specific type of recertification policy.
Depending on the policy configuration, the to-do task does not necessarily requirecompletion. For example, the policy can be configured to take the positive path forapproving recertification, so that if no action is taken on the to-do task, continueduse is approved.
Note: You can set the Timeout action on the Policy tab to dictate the behavior.
Based on provisioning policy configuration, certain accounts and groups might beomitted from a user recertification activity even when the accounts and groups arewithin the scope of the user recertification policy. For example, groups that aremandatory on an account are always omitted from the activity. Accounts that areautomatically provisioned for the user are also omitted from the activity as long asthe user does not have additional accounts on the same service. If the user hasmultiple accounts on an automatically provisioned service, all the accounts aredisplayed in the user recertification activity. The recertifier must recertify at leastone of the accounts on the service to submit the activity. Some accounts might bedisplayed in the activity for display purposes only if the accounts themselves donot require recertification, but have groups that require recertification.
Chapter 10. Policy administration 361

Run option
You can click Run on the recertification policy management interface to cause therecertification policy to be evaluated on demand.
Note: Any schedule that is defined inside the policy remains intact if you clickRun. The scheduled evaluation occurs regardless of whether Run was recentlyperformed on demand. If you want to run the policy on demand only, disable thepolicy so that the scheduled evaluation does not occur.
Recertification message templates and scheduleA recertification policy defines the content of an email notification to participantsand the interval that triggers a request for recertification.
The email notification alerts you to recertify a need for a specified membership oraccess to a resource. The action to be taken when the user does not complete therequest by the due date is specified using the Timeout Action setting, which is setto Approve by default.
Note: If the recertification is approved or rejected, you can provide optional textfor justifying the rejection. The text that is entered in the to-do list is audited, andcan be seen in the Recertification Change History report or the User RecertificationHistory report, depending on the type of policy.
You can create customized message templates for the recertification email and therejection email.
The recertification email goes to the person who is responsible for recertificationand approves recertification. You can modify the email template to providerecertification notices to participants. The recertification email table contains the listof templates that can be used for notification of rejected recertification. The table,which can be sorted, contains Select, Name (such as Delete Access or RemoveAccount), and Subject columns.
The Rejection email template can be customized to provide rejection notices toparticipants. The Rejection email table contains the list of templates that can beused for notification of rejected recertification. The table, which can be sorted,contains Select, Name (such as Delete Access or Remove Account), and Subjectcolumns.
Note: You can also create your own template. The default templates cannot bemodified, but they can be copied to use as the starting point for a new template.
Scheduling options
You can configure a schedule to specify the frequency at which recertificationoccurs.
You can use the following scheduling options when creating a recertificationpolicy:v Calendar optionv Rolling option
Calendar option
362 IBM Security Identity Manager Version 6.0.0.18: Administration Topics

Use the calendar option to set the schedule for the policy evaluation period.Recertification for all users, accounts and accesses that are targeted by the givenpolicy then occur at the same time. If the setting is monthly on the first day of themonth, and the policy targets a service, the recertification policy workflow istriggered on all accounts on that service at the first of every month.
You can use the following types of options:
Daily Recertifies targets every day.
HourlySpecify the minute of the hour.
WeeklySpecify the day of the week.
MonthlySpecify the day of the month (1-28).
QuarterlySpecify the day of the quarter (1-90).
AnnuallySpecify the month and day (for example, Jan 28).
Semi-annuallySpecify the day (1-180).
During a specific monthSpecify the month and day of week or daily and set at a specific time, forexample, 12:00 AM.
After specifying the policy evaluation period, you must set the time at which therecertification policy workflow is to be run (for example, 12:00 AM).
Rolling option
You can set the rolling option to ensure that only those targets that have not beenrecertified within a specified interval are subject to recertification when the policyis evaluated. For example, if an account policy is scheduled for weekly evaluationwith a rolling interval of 90 days, only the accounts that were recertified more than90 days prior are subject to recertification each week. The rolling option is notavailable for access recertification.
A rolling schedule and calendar schedule are identical in terms of how often therecertification policy is evaluated. The difference is that a calendar schedule alwaystriggers recertification for the target resources when the policy evaluates. A rollingschedule, however, triggers recertification only for the target resources that havenot been recertified within the specified interval when the policy evaluates.
Recertification policy resultsDepending on the user response, a recertification policy can mark an account,access, group membership, or role membership as recertified. The recertificationpolicy can also suspend or delete the resource or membership.
Recertification states for accounts and accesses
After an activity is completed, an account or access can be in one of the followingstates:
Chapter 10. Policy administration 363

Active The account or access target is marked as recertified, and no further actionis taken. It is not suspended or deleted. If approved, the target remainsactive, and the entry of the owner is updated.
MarkedThe workflow marks the account or access as not certified and issues arejection notification. The contents of the rejection notification areconfigured in the policy definition.
SuspendedThe workflow suspends the account or access and issues suspensionnotifications. Suspended is not an option for access recertifications becausean access cannot be suspended.
DeletedThe workflow deletes the target type and issues rejection notifications.
Note: Audit records are created for each of these actions. The records can be readwith the Recertification Change History report. Recertification status for accountsand access entitlements can also be seen with the Account Recertification Status orAccess Recertification Status pages.
Recertification states for group membership and rolemembership
After a recertification activity is completed, a role membership or groupmembership can be in one of the following states:
Active The membership is marked as recertified, and no further action is taken.
MarkedThe membership is marked as not certified, and a rejection notification issent according to the policy configuration.
RemovedThe user is removed from the role, or the account is removed from thegroup. A rejection notice is sent according to the policy configuration.
Overrides
You can use recertification override tasks to update the recertification status ofspecific targets without re-evaluating an entire recertification policy.
The Account Recertification Status task allows authorized users to manually markaccounts on a service as Recertified. The task applies to owned accounts that arenot already recertified. Overriding the recertification status of a suspended accountchanges the recertification status of the account to Recertified, but it does notrestore the account. Authorization for the task is governed by the RecertificationOverride ACI operation on the service protection category.
To override the recertification status of accounts on a service, navigate to ManageServices > Select a Service. Click the icon next to the service name and selectAccount Recertification Status to get to the status page. On the status page, selectthe accounts to override and click the Recertify button. You must enter ajustification before recertifying. The justification that you provide for the overrideis recorded in the audit record and is included in the Recertification ChangeHistory report.
364 IBM Security Identity Manager Version 6.0.0.18: Administration Topics

The Access Recertification Status task allows authorized users to manually markaccesses on a service as Recertified. The task applies to accesses that are notalready recertified. Authorization for the task is governed by the RecertificationOverride ACI operation on the service group protection category.
To override the recertification status of accesses on a service, navigate to ManageGroups > Select a Service. Select the service and click OK. Then, click the iconnext to the group for the accesses and select Access Recertification Status to get tothe status page. On the status page, select the accesses and click the Recertifybutton. You must enter a justification before recertifying. The justification that youprovide for the override is recorded in the audit record and is included in theRecertification Change History report.
The Recertify task allows system administrators to trigger a user recertificationactivity for a specific user and policy.
Creating an account recertification policyAs an administrator, you can create an account recertification policy to use withone or more services or access instances. For example, you might create arecertification policy that specifies that managers must recertify their employeeaccounts every 60 days.
Before you begin
Depending on how your system administrator customized your system, you mightnot have access to this task. To obtain access to this task or to have someonecomplete it for you, contact your system administrator.
Before you create a recertification policy, one or more service instances must exist.
Procedure1. From the navigation tree, select Manage Policies > Manage Recertification
Policies.2. On the Recertification Policies page, in the Recertification Policies table, click
Create.3. On the Manage Recertification Policies page, on the General page, complete
these steps:a. Type a name for the recertification policy.b. Optional: Type a description for the recertification policy.c. Select the status of the policy, enabled or disabled.d. Select the business unit to which the policy appliese. Select the scope of the business unit that you selected.f. Click Next.
4. On the Target Type page, select Accounts, and then click Next.5. On the Service Target page, add one or more specific services to associate with
the policy, and then click Next.6. To add one or more services:
a. Click Add.b. On the Services page, type your search criteria, and then click Search.c. In the Services table, select one or more services.d. Click OK.
Chapter 10. Policy administration 365

7. On the Schedule page, select the schedule type and evaluation frequency, andthen click Next.
8. On the Policy page, select either simple or advanced configuration mode, andthen click Next. If you choose the advanced mode, use the workflow designerto configure the policy.
Note: On the Policy page, you can also specify the following options:v Who approves recertificationv The action, such as suspend or delete, that occurs when a participant
declines to recertify an accountv An optional recipient who receives the rejection email, which can be
configured to none, such as a manager, who is notified when recertificationis declined
v A value for the number of days in which the participant must respond tothe recertification request
v An action, such as reject or approve, that occurs when the recertificationresponse interval expires
v A user type to specify the scope of the recertification policy to apply only topeople of a certain type on the specified policy schedule
Note: The user type option includes a performance penalty for usingoptions other than all. If the person or business partner (bp) person type ischosen, IBM Security Identity Manager still retrieves all accounts from theLDAP server. IBM Security Identity Manager then iterates through theaccounts, does an LDAP search to look up owners of the accounts, anddetermines if the owner is of the type person or bp person. If your userpopulation is large, doing two searches per account can be expensive.
9. On the Recertification E-mail page, select an email template, and click Next.10. On the Rejection E-mail page, select a rejection email template, and click
Finish.11. On the Success page, click Close.
Creating an access recertification policyAs an administrator, you can create an access recertification policy for use with oneor more access instances.
Before you begin
Depending on how your system administrator customized your system, you mightnot have access to this task. To obtain access to this task or to have someonecomplete it for you, contact your system administrator.
About this task
Before you create a recertification policy, an access instance must exist.
Procedure1. From the navigation tree, select Manage Policies > Manage Recertification
Policies.2. On the Recertification Policies page, in the Recertification Policies table, click
Create.
366 IBM Security Identity Manager Version 6.0.0.18: Administration Topics

3. On the Manage Recertification Policies page, on the General page, completethese steps:a. Type a name for the recertification policy.b. Optional: Type a description for the recertification policy.c. Select the status of the policy, enabled or disabled.d. Select the business unit to which the policy appliese. Select the scope of the business unit that you selected.f. Click Next.
4. On the Target Type page, select Access, and then click Next.5. On the Access Target page, add one or more specific accesses to associate with
the policy, and then click Next.6. To add one or more accesses, complete these steps:
a. Click Add.b. On the Accesses page, type your search criteria, and then click Search.c. In the Accesses table, select one or more accesses.d. Click OK.
7. On the Schedule page, select the schedule type and evaluation frequency, andthen click Next.
8. On the Policy page, select the configuration mode, and then click Next. If youchoose the advanced mode, use the workflow designer to configure the policy.
Note: On the Policy page, you can also specify the following options:v Who approves recertificationv The action, such as suspend or delete, that occurs when a participant
declines to recertify an accessv An optional recipient who receives the rejection email, which can be
configured to none), such as a manager, who is notified when recertificationis declined
v A value for the number of days in which the participant must respond tothe recertification request
v An action, such as reject or approve, that occurs when the recertificationresponse interval expires
v A user type to specify the scope of the recertification policy to apply only topeople of a certain type on the specified policy schedule
Note: The user type option includes a performance penalty for usingoptions other than all. If the person or business partner (bp) type ischosen, IBM Security Identity Manager still retrieves all accounts from theLDAP server. IBM Security Identity Manager then iterates through theaccounts, does an LDAP search to look up the owners of the accounts, anddetermines if the owner is of the type person or bp person. If your userpopulation is large, doing two searches per account can be expensive.
9. On the Recertification E-mail page, select an e-mail template, and then clickNext.
10. On the Rejection E-mail page, select a rejection e-mail template, and then clickFinish.
11. On the Success page, click Close.
Chapter 10. Policy administration 367

Creating a user recertification policyAs an administrator, you can create a user recertification policy to recertify theaccounts, group membership of accounts, and memberships of users.
Before you begin
Depending on how your system administrator customized your system, you mightnot have access to this task. To obtain access to this task or to have someonecomplete it for you, contact your system administrator.
Procedure1. From the navigation tree, select Manage Policies > Manage Recertification
Policies.2. On the Recertification Policies page, in the Recertification Policies table, click
Create.3. On the Manage Recertification Policies page, on the General page, complete
these steps:a. Type a name for the recertification policy.b. Optional: Type a description for the recertification policy.c. Select the status of the policy, enabled or disabled.d. Select the business unit to which the policy applies.e. Select the scope of the business unit that you selected.f. Click Next.
4. On the Target Type page, select Users, and then click Next.5. On the User Target page, select the user type, and then click Next.6. On the Resource Target page, complete these steps:
a. Select which roles you want the policy to recertify membership on.b. Select which accounts you want the policy to recertify.c. Select which groups you want the policy to recertify.d. Click Next.
7. Optional: If you selected Specified roles on the Resource Target page, on theRole Target page, select one or more roles for which you want to recertifymembership.
8. Optional: If you selected Accounts on specified services on the ResourceTarget page, on the Account Target page, select one or more services for whichaccounts on the service are recertified.
9. Optional: If you selected Specified groups on the Resource Target page, onthe Group Target page, select one or more groups you want the policy torecertify.
10. On the Schedule page, select the schedule type and evaluation frequency, andthen click Next.
11. On the Policy page, select the configuration mode, and then click Next. If youchoose the advanced mode, use the workflow designer to configure the policy.
Note: On the Policy page, you can also specify the following options:v Who approves recertification.v An action, such as Suspend accounts and mark others, that occurs when the
recertification is rejected.
368 IBM Security Identity Manager Version 6.0.0.18: Administration Topics

v An optional recipient who receives the rejection email (which can beconfigured to None) such as a manager, who is notified when recertificationis declined.
v A value for the number of days in which the participant must respond tothe request until the recertification is due.
v An action, such as Reject All or Approve All, that occurs when therecertification is overdue. If you do not select an action, the recertificationactivity remains in the activity list of the participant after the due date untilit is completed.
12. On the Recertification E-mail page, select an email template, and then clickNext.
13. On the Rejection E-mail page, select a rejection email template, and then clickFinish.
14. On the Success page, click Close.
Changing a recertification policyAs an administrator, you can change a recertification policy. For example, you canmodify the recertification interval, add or remove users, services, or accessinstances. Alternatively, you can modify the template that provides a messagewhen recertification is declined.
Before you begin
Depending on how your system administrator customized your system, you mightnot have access to this task. To obtain access to this task or to have someonecomplete it for you, contact your system administrator.
About this task
If you modify a recertification policy, ensure that you consider the consequences ofthe changes. For example, when the schedule for recertification is modified, thechanges might require users, accounts, or accesses that were recently recertified tobe recertified again immediately. When setting the default timeout action, ensurethat you properly set up the participant of recertification. An escalation participantis not specified in the default simple workflow.
Suppose that a recertification policy exists for LDAP accounts and the notificationsfor recertification are sent to all account owners. If the target for the recertificationpolicy is changed from LDAP service to Win local service, the LDAP accounts stillmust be recertified by the LDAP account owners. Because the to-do activities forLDAP recertification are already created, the timeout action and the action uponrejection are applicable as specified in the LDAP recertification policy beforeupdating. To-do items that are already in process are not deleted automatically,and progress to their natural ending.
You can use policy modification to disable a policy. If you disable a policy, thepolicy does not generate any additional recertification to-do items until it isre-enabled. However, any running recertifications are not stopped, and theycomplete as normal.
Procedure1. From the navigation tree, select Manage Policies > Manage Recertification
Policies.
Chapter 10. Policy administration 369

2. On the Recertification Policies page, type information about the recertificationpolicy or service in the Search information field, or type an asterisk (*). Select afilter in the Search by field, and then click Search.
3. In the Recertification Policies table, locate and select a recertification policythat you want to change, and then click Change.
4. On the Manage Recertification Policies page, modify the information on theavailable pages.
5. Click OK to save the changes.6. On the Success page, click Close.
Deleting a recertification policyAs an administrator, you can delete a recertification policy that is no longer neededto manage user, account, or access recertification.
Before you begin
Depending on how your system administrator customized your system, you mightnot have access to this task. To obtain access to this task or to have someonecomplete it for you, contact your system administrator.
About this task
If you delete the recertification policy, any users, accounts, or accesses that weretargeted by that policy are no longer governed by any recertification policy.
Suppose that a recertification policy exists for LDAP accounts and the notificationsfor recertification are sent to all account owners. If the policy is deleted, the LDAPaccounts still must be recertified by LDAP account owners. Because the to-doactivities for LDAP recertification are already created, the timeout action and actionupon rejection are applicable as specified in the LDAP recertification policy beforedeletion.
However, any running recertifications are not stopped, and they complete asnormal.
Procedure1. From the navigation tree, select Manage Policies > Manage Recertification
Policies.2. On the Recertification Policies page, type information about the recertification
policy or service in the Search information field, or type an asterisk (*). Select afilter in the Search by field, and then click Search.
3. In the Recertification Policies table, locate and select a recertification policythat you want to delete and click Delete.
4. On the Confirmation page, review the recertification policy that you want todelete and click Delete.
5. On the Success page, click Close.
Recertification default notificationsIBM Security Identity Manager provides default templates for user, account, andaccess recertification notifications.
370 IBM Security Identity Manager Version 6.0.0.18: Administration Topics

Default recertification templates
The default templates exist in LDAP and cannot be modified. An administrator canview the default templates in the recertification policy interface and copy themthere.
The following labels are the default template names for the account and accessrecertification policy recertification email:v Delete Accountv Mark Accessv Mark Accountv Remove Accessv Suspend Account
The following labels are the default template names for the account and accessrecertification policy rejection email:v Access Markedv Access Removedv Account Deletedv Account Markedv Account Suspended
The following labels are the default template names for the user recertificationpolicy recertification e-mail:v User Recertification Pending
The following labels are the default template names for the user recertificationpolicy rejection e-mail:v User Recertification Rejected
Properties file values
To change templates, you can use all the key=value statements in theCustomLabels.properties file, or create your own properties and values.
These properties are referenced by the default templates. The properties can bemodified if you want to reword some of the templates while keeping the sameparameter substitutions. You can either modify these defaults, or make up yourown keys and reference them from the templates.
The properties include the following items on one line:recertOn={0} on {1}recertTemplateSubject=Recertification required
for account {0} on service {1}recertTemplateAccessSubject=Recertification required
for account {0} on access {1}recertTemplateBody=You have received a recertification request
for account {0} on service {1} owned by {2}.recertTemplateAccessBody=You have received a recertification request
for account {0} on access {1} owned by {2}.recertDeclineSuspendsBody=Rejection of this recertification request
will result in the suspension of account {0} on {1}.recertDeclineDeletesBody=Rejection of this recertification request
will result in the deletion of account {0} on {1}.recertDeclineMarksBody=Rejection of this recertification request
Chapter 10. Policy administration 371

will result in account {0} on {1} being marked as rejected forrecertification.
recertDeclineDeletesAccessBody=Rejection of this recertificationrequest will result in the deletion of access {0}.
recertDeclineMarksAccessBody=Rejection of this recertification requestwill result in access {0} being marked as rejected for recertification.
recertDeclinedAcctSuspendedSubj=Account {0} on service {1} has beensuspended due to rejection of a recertification request
recertDeclinedAcctDeletedSubj=Account {0} on service {1} has beendeleted due to rejection of a recertification request
recertDeclinedAcctMarkedSubj=Account {0} on service {1} has beenmarked as rejected for recertification due to rejectionof a recertification request
recertDeclinedAccessDeletedSubj=Account {0} on access {1} has beendeleted due to rejection of a recertification request
recertDeclinedAccessMarkedSubj=Account {0} on access {1} has beenmarked as rejected for recertification due to rejection of arecertification request
recertDeclinedAcctSuspendedBody=The account {0} on service {1} ownedby {2} has been suspended due to rejection of a recertification request.
recertDeclinedAcctDeletedBody=The account {0} on service {1} ownedby {2} has been deleted due to rejection of a recertification request.
recertDeclinedAcctMarkedBody=The account {0} on service {1} ownedby {2} has been marked as rejected for recertification due torejection of a recertification request.
recertDeclinedAccessDeletedBody=The account {0} on access {1} ownedby {2} has been deleted due to rejection of a recertification request.
recertDeclinedAccessMarkedBody=The account {0} on access {1} ownedby {2} has been marked as rejected for recertification due torejection of a recertification request.
userRecertTemplateSubject=Recertification required for user {0}userRecertTemplateBody=You have received a recertification request
for user {0}. The recertification includes their membership in {1} role(s)and ownership of {2} account(s). Please indicate whether the user stillrequires these resources.
userRecertDeclinedSubj=Recertification request rejected for user {0}userRecertDeclinedBody=One or more resources for user {0} have been
rejected during recertification.userRecertRolesRejectedLabel=The following roles were rejected:userRecertAccountsRejectedLabel=The following accounts were rejected,
along with all groups associated with the accounts:userRecertGroupsRejectedLabel=The following groups were rejected,
but the account was accepted:userRecertAcctLabel=Account "{0}" on service "{1}"userRecertGroupLabel=Group "{0}" for account "{1}" on service "{2}"
Separation of duty policiesA separation of duty policy is a logical container of separation rules that definemutually exclusive relationships among roles. Policies for separation of duty aredefined by one or more business rules. The rules exclude users from membershipin multiple roles that might present a business conflict.
A separation of duty policy uses business rules to define the relationships amongroles. The separation of duty policy groups the business rules for ease ofadministration. For example, you can assign a set of administrators to a policy,making the administrators responsible for tracking the violations of a set of rules.
Policy owners
You can specify one or more owners for the policy. Owners can be anycombination of users and roles. You can configure policy owners to participate inpolicy and role change workflows. For example, a policy owner can approve or
372 IBM Security Identity Manager Version 6.0.0.18: Administration Topics

reject separation of duty violation activities that occur when roles are added to aSecurity Identity Manager user. Separation of duty policy owners can also:v Exempt users or revoke exemptions from any policy violations that occurv Be used as principals in system access control items (ACIs)
Exemption approval and revocation
Policy owners can approve and revoke exemptions by default, but they do notnecessarily require this ability. You can configure roles or users to have accesscontrol capabilities over separation of duty policies though ACIs. The ACIs allowpolicy owners to do tasks such as editing or tracking violations. You can alsoconfigure the approval workflow to use participants other than the policy owner.
Separation of duty rules
A separation of duty policy can include multiple rules. For each rule, two or moreroles must be listed. The number of roles to which a user can belong depends onhow many roles you allow in the rule. The number of roles that you allow tocoexist must be one fewer than the total number of roles in the list. For example,you might create a rule that excludes procurement and order approval. Theallowed number of roles in the rule must be one, meaning that a user can haveonly one role. If you add more roles, such as invoicing and financing, you canallow up to three roles. Each user can have three different roles and the systemcapabilities defined by that role.
Allowed roles set to greater than one are typically used to prevent one person fromhaving complete control over a process. The process is described by a set of roles.For example, a rule named "A user cannot have full control over the procurementprocess" might be defined by three roles named purchaser, approver, and orderer.In this example, the rule has two allowed roles. A user can be a member of two ofthese roles, but the user cannot a member of all three roles.
Enabled and disabled policies
An enabled policy creates exemption approvals and warns users before they submita role membership change that breaks a separation of duty rule.
A disabled policy can still track violations, but it does not generate approvals orwarn users. Violations from disabled policies are not displayed in audit reports.Using a disabled policy is a good way for a security administrator to trackviolations that occur before a policy is active in the system.
Role hierarchy and rules
Two roles in a rule cannot be direct ascendants or descendants of each other in therole hierarchy. For example, you cannot have a rule with both HR organization andHR department x if HR department x is a child role of HR organization.
ACI operations for the separation of duty policy protectioncategory
You can configure role owners to have access control capabilities over separation ofduty policies though access control items (ACIs). The ACIs allow role owners to dotasks such as editing or tracking violations. ACIs must apply to the business unitin which the policy is defined. Creators of separation of duty ACIs can define ACIfilter rules to scope the policies to which an ACI applies.
Chapter 10. Policy administration 373

Add Protects separation of duty policy creation. The add operation fails if thisACI is not met.
Exemption AdministrationProtects separation of duty policy violation and exemption managementthrough the Violations and Exemptions Summary page. The ability toexempt a violation or revoke an exemption is governed by this operation.The Approve and Revoke buttons are not displayed if this ACI is not met.The operations of exempt and revoke also apply to the public API.
ModifyProtects separation of duty policy modifications. The modify operation failsif this ACI is not met. When change is denied and search is allowed, theuser has a read-only view of the policy.
ReconcileProtects separation of duty policy reconciliation. Separation of duty policyreconciliation is the operation that analyzes the policy separations andcreates violations or cleans up violations or exemptions. Clicking theEvaluate button causes a "not authorized" message to be displayed if thisACI is not met.
RemoveProtects separation of duty policy deletions. Clicking the Delete buttoncauses a "not authorized" message to be displayed if this ACI is not met.
SearchProtects separation of duty policy searches. With the search operationgranted, the user can see details about violations and exemptions. If a useris authorized for search but not modify, the user can open the policy in aread-only mode and view violations and exemptions. However, the usercannot act on those violations and exemptions or change the policy.
Default ACIs for the separation of duty policySee descriptions of the default access control items (ACIs) for separation of dutycapabilities.
Grant Search to Auditor GroupAllows the auditor group to view the policies, rules, violations, andexemptions.
Grant All to OwnerGrants all operations to the owner of a separation of duty policy in theorganization. You might allow a user who is not a system administrator tocreate a separation of duty policy. You must create an ACI that grants theadd permission to that user.
Separation of duty approval workflow operationAfter you create the policy, an approval workflow operation namedapproveSoDViolation for each violation is started during person operations. Theseoperations might be role membership changes that cause separation of duty policyviolations.
There is one separation of duty approval workflow that is called for all separationof duty violations. However, you can customize the workflow for individualpolicies to have multilevel approval, but the customizations must be done fromwithin that one workflow.
374 IBM Security Identity Manager Version 6.0.0.18: Administration Topics

To locate the approveSoDViolation approval operation, click Configure System >Manage Operations, and then select Global level. The approval operation is calledfor each violation that is found during the person operation (role membershipchange). You can modify this operation to include custom approval paths. Forexample, you can specify that both the policy owner and the user's managerapprove the violation. By default, the policy owner is the approval participant.This image illustrates the approveSoDViolation approval operation.
After the approval participant approves the operation, the person operation isallowed to occur (implying approved) or fail (implying the approval was rejected).During the approval path, a violation exemption is recorded, noting who approvedthe exemption. The violation and exemption statistics are updated. You can viewthe exemption by clicking Manage Policies > Manage Separation of DutyPolicies, and then clicking a number in the Exemptions column of the Separationof Duty Policies table.
When you request a change, such as adding a role to a user, a warning might bedisplayed. The warning indicates that the change can cause a separation of dutyviolation. The warning lists the policy and rule in violation. You can continue tosubmit the request or cancel the request. The warning is displayed in both theadministrative console and the Self Service or the Identity Service Center interfacefor the following requests:v Modifying or creating a personv Requesting an accessv Modifying static role membershipv Changing the role hierarchy
If you try to change role hierarchy in such a way that an existing separation ofduty policy would become invalid, an error is displayed. The change does notoccur. The error lists the policy and rule that would be in violation if the rolehierarchy was modified as requested.
The audits of the exemption process occur automatically, depending on the resultof the workflow. You do not need to manually call audit methods to have theaudits recorded for use in the administrative console or reports.
However, you must set the process result with AA and process result detail with thestring value that you want to audit as the justification for the exemption approvalif the intent is to allow the violation to exist in the system. By default, the approvaloperation in the approveSoDViolation workflow has this PostScript code:WorkflowRuntimeContext.setProcessResult(WorkflowRuntimeContext.getActivityResult());WorkflowRuntimeContext.setProcessResultDetail(WorkflowRuntimeContext.getActivityResultDetail());
The first line in the PostScript code sets the process result to the same value as theresult of the approval. AA indicates approved and AR indicates rejected. The second
Figure 2. approveSoDViolation approval operation
Chapter 10. Policy administration 375
line sets the process result detail to the comments that were typed by the userwhen the approval to do activity was approved.
You can use normal workflow customizations to get the values you want, but besure to call WorkflowRuntimeContext.setProcessResult() andWorkflowRuntimeContext.setProcessResultDetail() with some value if you wantthe system to treat the approval as an approved separation of duty exemption.
There might be multiple approvals in the workflow for separation of duty. Theapprover that is listed in the exemption record is the last person to approve anapproval request in the workflow.
Separation of duty policy violations and exemptionsA violation is a specific violation of a separation of duty policy, and an exemption isan approved separation of duty violation. Policy evaluation is a way to discoverviolations.
Policy violations
A violation is a specific violation of a separation of duty policy, which means thatthe roles for a user have a conflict that is based on a defined separation of dutyrule.
Violations are created when the following events occur:v A user requests membership in a role that would violate one or more separation
of duty policy rules.v A user creates a separation of duty policy or rule.v User records are fed into Security Identity Manager through an identity feed if
they create a rule violation.v Any other request to modify role membership if it creates a rule violation.v When there are existing conflicts when a policy is introduced.v A security administrator revokes an exemption.
When a policy is created or changed, the violations do not update automatically.You must either perform an evaluation on the policy or wait for a scheduled datasynchronization.
Policy exemptions
An exemption is an approved separation of duty violation, which means that theconflict cannot be flagged as a violation in an audit, and additional updates to theuser's role list do not require reapproval. Exemptions occur when a securityadministrator approves a request that violates a defined and active separation ofduty policy. A security administrator can also convert existing violations intoexemptions.
Exemptions are created for a specific policy rule, not for an entire policy. If a policycontains multiple rules and the user is approved for the violation of one rule, thatuser is not automatically allowed to violate the other rules in the policy.
Exemptions remain stored in the database when a policy is disabled. Therefore, if apolicy is disabled and then re-enabled at a later date, the exemptions areremembered.
376 IBM Security Identity Manager Version 6.0.0.18: Administration Topics

You can exempt a user from violating separation of duty policy rules manually orthrough an approval process.
When a rule violation event occurs and a policy and role change workflow activityhave been defined, an approval activity is created for workflow participants (suchas policy owners) to exempt the user from a specified separation of duty policyrule. Only a role membership change request for the user triggers an approvalactivity.
An approval activity is generated for each rule violation. If the approval is rejected,any modifications to the user that were made at the time of the role membershipchange are lost. If an exemption approval request is triggered as part of a personbeing created, that person is not created if the approval is rejected.
Policy evaluation
Policy evaluation is a way to discover violations, and can occur in any of thesesituations:v Use the Evaluate button. This button causes the policy to be evaluated against
all people who currently have roles in the policy.v Perform a data synchronization. Rule violations are recorded for each policy, and
the number of violations is displayed in the separation of duty policy table. Youcan then exempt any rule violations manually by clicking the link provided inthe table and viewing or modifying any rule violations and exemptions.
v When you create any HR feed service, you can specify whether to evaluate theseparation of duty policy. If you choose to evaluate the separation of duty policy,you must also enable workflow. If this option is enabled, an approval activity isgenerated for each separation of duty rule violation that is found in theincoming HR feed data. That approval process must be marked as approved toget the updates into Security Identity Manager. If the approval processes arerejected, the entire entry or change that was in that HR feed record is ignoredand is not stored in Security Identity Manager.
Enabling the Manage Separation of Duty Policies portfoliotask
System administrators have access to the Manage Separation of Duty Policiesportfolio task. Other users must be assigned to a group that has access to the task.
Before you begin
Depending on how your system administrator customized your system, you mightnot have access to this task. To obtain access to this task or to have someonecomplete it for you, contact your system administrator.
About this task
To have the Manage Separation of Duty Policies portfolio task be displayed in theadministrative console, you must enable the task in one of the default views or ina view that you created.
To enable the Manage Separation of Duty Policies portfolio task, complete thesesteps:
Chapter 10. Policy administration 377

Procedure1. From the navigation tree, select Set System Security > Manage Views. The
Define Views page is displayed.2. On the Define Views page, complete these steps:
a. In the Name field, type information about the view and click Search. TheManage Views Results table is displayed.
b. In the Manage Views Results table, select the check box next to a view andclick Change.
c. Optional: In General tab, change the name or description of the view.d. In the Configure View tab, in the tree of tasks, expand Manage Policies,
and then select Manage Separation of Duty Policies task. Both ManagePolicies and Manage Separation of Duty Policies are selected.
e. Click OK to save the changes.
Results
A Success page is displayed, indicating that you successfully updated the views onthe system.
What to do next
You can continue working with views, or click Close.
Creating separation of duty policiesAn administrator can create a separation of duty policy to use for auditingpurposes. For example, you might create a separation of duty policy to reportusers that belong to multiple roles that are mutually exclusive.
Before you begin
Depending on how your system administrator customized your system, you mightnot have access to this task. To obtain access to this task or to have someonecomplete it for you, contact your system administrator.
To create a valid policy rule, you must have two or more roles defined in thesystem for the business unit you select.
About this task
To create a separation of duty policy, complete these steps:
Procedure1. From the navigation tree, select Manage Policies > Manage Separation of Duty
Policies. The Manage Separation of Duty Policies page is displayed.2. On the Manage Separation of Duty Policies page, in the Separation of Duty
Policies table, click Create. The Create a Separation of Duty Policy page isdisplayed.
3. On the Create a Separation of Duty Policy page, complete these steps:a. Type a name for the policy.b. Provide a description for the policy.c. Select the business unit to which this policy applies. Click Search to search
for a business unit. The Business Unit page is displayed.
378 IBM Security Identity Manager Version 6.0.0.18: Administration Topics

4. On the Business Unit page, complete these steps:a. Type your search criteria, and then click Search.b. In the Business Units Found table, select a business unit and click OK. The
Create a Separation of Duty Policy page is displayed.5. On the Create a Separation of Duty Policy page, in the Policy Rules table, click
Create. The Create Policy Rule page is displayed.6. On the Create Policy Rule page, complete these steps:
a. In the Description of separation field, type a description for the policy rule.For example, you might describe a rule that you add to a policy as Peoplein the IT department may not be given accounting responsibilities.
b. Type each role name that you want to add to the role separation list andclick Add. If you type the exact name of an existing role in the Role namefield and click Add, the role is immediately added to the list. If you type avalue in the Role name field that does not exactly match a role or matchesmore than one role, a search panel opens. Select the appropriate roles.
Note: You can search only for the roles for which you have permission.c. In the Allowed number of roles list, select the number of roles to which a
user can belong. For each policy rule that you create, two or more rolesmust be listed. The number of roles to which a user can belong depends onhow many roles you allow in the policy rule. The number of roles that youallow can be, at a maximum, one fewer than the total number of roles in thelist.
d. Click OK. The Create a Separation of Duty Policy is displayed.7. On the Create a Separation of Duty Policy page, complete these steps:
a. Create more policy rules as necessary.
b. Click the
icon next to Policy Owners. The Role Policy Owners tableand the User Policy Owners table are displayed.
c. In the Role Policy Owners table, click Add to search for and select roles tohave ownership of the policy.
d. In the User Policy Owners table, click Add to search for and select users tohave ownership of the policy.
e. In the Policy state field, select whether to enable or disable the policy. Anenabled policy creates exemption approvals and warns users before theysubmit a role membership change that breaks a separation of duty rule. Adisabled policy can still track violations, but it does not generate approvals orwarn users. Violations from disabled policies are not displayed in auditreports. Using a disabled policy is a good way for a security administratorto track violations that occur before a policy is active in the system.
f. Click Submit to save the policy.
Results
A Success page is displayed, indicating that you successfully submitted a requestfor a new separation of duty policy.
What to do next
You can view your request, continue working with policies, or click Close.
Chapter 10. Policy administration 379

Modifying separation of duty policiesAn administrator can modify a separation of duty policy. For example, you canadd or remove policy owners. You can also add or remove separation rules, changerole attributes for a specific rule, and enable or disable the policy.
Before you begin
Depending on how your system administrator customized your system, you mightnot have access to this task. To obtain access to this task or to have someonecomplete it for you, contact your system administrator.
About this task
You can use policy modification to disable or enable a policy. If you disable apolicy, the policy does not generate any additional to-do items until you re-enableit.
You cannot change the business unit to which the policy applies.
Procedure1. From the navigation tree, select Manage Policies > Manage Separation of Duty
Policies. The Manage Separation of Duty Policies page is displayed.2. On the Manage Separation of Duty Policies page, complete these steps:
a. Type information about the policy in the Search information field.b. In the Search by field, specify whether to do the search against policy
names or descriptions, business units, or role names, and then click Search.A list of policies that match the search criteria is displayed.If the table contains multiple pages, you can:v Click the arrow to go to the next page.v Type the number of the page that you want to view and click Go.
c. In the Separation of Duty Policies table, select the check box next to thepolicy that you want to modify, and then click Change. Selecting the checkbox at the top of this column selects all policies. The Change Separation ofDuty Policy page is displayed.
3. On the Change a Separation of Duty Policy page, complete these steps:a. Provide any necessary updates to the policy name and description.b. In the Policy Rules table, create, delete, or modify any rules that apply to
the policy.
c. Click the
icon next to Policy Owners. The Role Policy Owners tableand the User Policy Owners table are displayed.
d. Optional: In the Role Policy Owners table, click Add to search for andselect roles to have ownership of the policy.
e. Optional: In the User Policy Owners table, click Add to search for andselect users to have ownership of the policy.
f. Select whether to enable or disable the policy.g. Click Submit to save the policy.
Results
A Success page is displayed, indicating that you submitted a request to change aseparation of duty policy.
380 IBM Security Identity Manager Version 6.0.0.18: Administration Topics

What to do next
You can continue working with separation of duty policies, view your request, orclick Close.
Evaluating separation of duty policiesAn administrator can evaluate a separation of duty policy without doing a datasynchronization. By running the evaluation, you can view current policy violationand exemption information. The evaluation process searches for violations to thepolicies that you specify.
Before you begin
Depending on how your system administrator customized your system, you mightnot have access to this task. To obtain access to this task or to have someonecomplete it for you, contact your system administrator.
About this task
Violations are kept current as user role membership is modified. There are somecases where a change in the system might require a re-evaluation of separation ofduty policy violations for one or more specific policies. These situations include:v Creating or changing a separation of duty policyv Changing a role hierarchyv Running an identity feed with evaluations disabled
In these cases, run a separation of duty policy violation evaluation on one or morepolicies. You can do the evaluation in one of these ways:v By running a full report data synchronization, which finds violations for all
policiesv By running evaluations on individual policies
When you disable a policy and then do another evaluation on the disabled policy,new violation warnings or exemption approval to-do activities are generated.
Procedure1. From the navigation tree, select Manage Policies > Manage Separation of Duty
Policies. The Manage Separation of Duty Policies page is displayed.2. On the Manage Separation of Duty Policies page, complete these steps:
a. Type information about the policy in the Search information field.b. In the Search by field, specify whether to do the search against policy
names or descriptions, business units, or role names, and then click Search.A list of policies that match the search criteria is displayed.If the table contains multiple pages, you can:v Click the arrow to go to the next page.v Type the number of the page that you want to view and click Go.
c. In the Separation of Duty Policies table, select the check box next to thepolicy that you want to evaluate, and then click Evaluate. Selecting thecheck box at the top of this column selects all policies. A confirmation pageis displayed.
d. On the Confirm page, click Evaluate to run the evaluation, or click Cancel.
Chapter 10. Policy administration 381

Results
A Success page is displayed, indicating that you successfully submitted a requestto do an evaluation on a separation of duty policy.
After the evaluation is complete, the violation count for the policy is updated.
What to do next
You can continue working with separation of duty policies, view your request, orclick Close.
Deleting separation of duty policiesAs an administrator, you can delete a separation of duty policy that is no longerneeded to manage exclusive relationships between roles.
Before you begin
Depending on how your system administrator customized your system, you mightnot have access to this task. To obtain access to this task or to have someonecomplete it for you, contact your system administrator.
About this task
If you delete the separation of duty policy, any roles that were targeted by thatpolicy are no longer governed by the separation of duty policy.
When you delete a policy, all violations and exemptions for that policy are retainedand marked with a statement that the policy is deleted.
Procedure1. From the navigation tree, select Manage Policies > Manage Separation of Duty
Policies. The Manage Separation of Duty Policies page is displayed.2. On the Manage Separation of Duty Policies page, complete these steps:
a. Type information about the policy in the Search information field.b. In the Search by field, specify whether to do the search against policy
names or descriptions, business units, or role names, and then click Search.A list of policies that match the search criteria is displayed.If the table contains multiple pages, you can:v Click the arrow to go to the next page.v Type the number of the page that you want to view and click Go.
c. In the Separation of Duty Policies table, select the check box next to thepolicy that you want to delete, and then click Delete. Selecting the checkbox at the top of this column selects all policies. A confirmation page isdisplayed.
3. On the Confirm page, click Delete, or click Cancel.
Results
A message is displayed, indicating that you successfully submitted the policy fordeletion.
382 IBM Security Identity Manager Version 6.0.0.18: Administration Topics

What to do next
Continue working with policies, view your request to confirm that the policy isdeleted, or click Close.
Viewing policy violations and exemptionsAn administrator or policy owner can view a summary of the separation of dutypolicy violations and exemptions for each rule in the policy. The administrator orpolicy owner can also do administrative operations, such as approve or revoke, onthe violations and exemptions.
Before you begin
Depending on how your system administrator customized your system, you mightnot have access to this task. To obtain access to this task or to have someonecomplete it for you, contact your system administrator.
Procedure1. From the navigation tree, select Manage Policies > Manage Separation of Duty
Policies. The Manage Separation of Duty Policies page is displayed.2. On the Manage Separation of Duty Policies page, complete these steps:
a. Type information about the policy in the Search information field.b. In the Search by field, specify whether to do the search against policy
names or descriptions, business units, or role names, and then click Search.A list of policies that match the search criteria is displayed.If the table contains multiple pages, you can:v Click the arrow to go to the next page.v Type the number of the page that you want to view and click Go.
c. In the Separation of Duty Policies table, click the link provided in theViolations or Exemptions column of the policy that you want to view. Thelink is displayed only if there are one or more violations or exemptions forthe separation of duty policy. The Violations and Exemptions Summarypage is displayed.
3. On the Violations and Exemptions Summary page, complete these steps:a. Select the order in which you want to sort the rules, and then click Sort.
You can sort alphabetically by rule name, or sort by the number ofviolations or exemptions.
b. Click the icon ( ) next to each rule that you want to view, or click the rulename.
Results
Two tables that provide information about violations and exemptions aredisplayed.
What to do next
You can approve violations or revoke exemptions.
When you are done viewing violations and exemptions, click Close.
Chapter 10. Policy administration 383

Approving policy violationsAn administrator or policy owner can approve separation of duty policy violationsfor each rule in the policy.
Before you begin
Depending on how your system administrator customized your system, you mightnot have access to this task. To obtain access to this task or to have someonecomplete it for you, contact your system administrator.
About this task
When you approve a violation, an exemption is created for the specified user andthe combination of roles that caused the violation. After you approve a policyviolation, that violation is removed from the violation list, and a new exemption isdisplayed in the exemption list.
Having an exemption means that the user is allowed to be a member of theviolating roles. Updates to the user's person record do not cause additionalviolations or warnings unless the user introduces a new violation that is notcovered by the exemption.
Updates to the record of a person do not trigger an approval unless the roles of theperson are updated and the combination violates a separation of duty policy,assuming that an exemption does not exist for the policy.
Procedure1. From the navigation tree, select Manage Policies > Manage Separation of Duty
Policies. The Manage Separation of Duty Policies page is displayed.2. On the Manage Separation of Duty Policies page, complete these steps:
a. Type information about the policy in the Search information field.b. In the Search by field, specify whether to do the search against policy
names or descriptions, business units, or role names, and then click Search.A list of policies that match the search criteria is displayed.If the table contains multiple pages, you can:v Click the arrow to go to the next page.v Type the number of the page that you want to view and click Go.
c. In the Separation of Duty Policies table, click the link provided in theViolations column of the policy that you want to view. The link isdisplayed only if there are one or more violations for the separation of dutypolicy. The Violations and Exemptions Summary page is displayed.
3. On the Violations and Exemptions Summary page, complete these steps:a. Select the order in which you want to sort the rules, and then click Sort.
You can sort alphabetically by rule name, or sort by the number ofviolations or exemptions.
b. Click the icon ( ) next to each rule that you want to view. The Violationstable is displayed, providing information about violations for the rule thatyou specified.
c. In the Violations table, select the check box next to one or more violationsthat you want to approve, and then click Approve. Selecting the check boxat the top of this column selects all violations. The Approve Violations pageis displayed.
384 IBM Security Identity Manager Version 6.0.0.18: Administration Topics

4. On the Approve Violations page, complete these steps:a. In the Violation Summary, ensure that the policies and rules are correct.b. In the Notes field, type a reason for approving the violation, and then click
Approve.
Results
A Success page is displayed, indicating that you successfully approved theviolations for the specified policy and rule.
What to do next
You can approve additional violations or revoke exemptions.
When you are done viewing violations and exemptions, click Close.
Revoking policy exemptionsAn administrator or policy owner can revoke separation of duty policy exemptionsfor each rule in the policy.
Before you begin
Depending on how your system administrator customized your system, you mightnot have access to this task. To obtain access to this task or to have someonecomplete it for you, contact your system administrator.
About this task
When you revoke an exemption, that exemption is removed from the exemptionlist. The user to which the exemption applies might continue to have roles that arein violation of a separation of duty policy rule. In that case, the violation isdisplayed again the list of violations for that policy.
Procedure1. From the navigation tree, select Manage Policies > Manage Separation of Duty
Policies. The Manage Separation of Duty Policies page is displayed.2. On the Manage Separation of Duty Policies page, complete these steps:
a. Type information about the policy in the Search information field.b. In the Search by field, specify whether to do the search against policy
names or descriptions, business units, or role names, and then click Search.A list of policies that match the search criteria is displayed.If the table contains multiple pages, you can:v Click the arrow to go to the next page.v Type the number of the page that you want to view and click Go.
c. In the Separation of Duty Policies table, click the link provided in theExemptions column of the policy that you want to view. The link isdisplayed only if there are one or more exemptions for the separation ofduty policy. The Violations and Exemptions Summary page is displayed.
3. On the Violations and Exemptions Summary page, complete these steps:a. Select the order in which you want to sort the rules, and then click Sort.
You can sort alphabetically by rule name, or sort by the number ofviolations or exemptions.
Chapter 10. Policy administration 385

b. Click the icon ( ) next to each rule that you want to view. The Exemptionstable is displayed, providing information about exemptions for the rule thatyou specified.
c. In the Exemptions table, select the check box next to one or moreexemptions that you want to revoke, and then click Revoke. Selecting thecheck box at the top of this column selects all exemptions. The RevokeExemptions page is displayed.
4. On the Revoke Exemptions page, complete these steps:a. In the Exemption Summary, ensure that the policies and rules are correct.b. In the Notes field, type a reason for revoking the exemption, and then click
Revoke. The Notes field is for auditing purposes and is not displayed inthe administrative console after an exemption is revoked.
Results
A Success page is displayed, indicating that you successfully revoked theexemptions for the specified policy and rule.
What to do next
You can revoke additional exemptions or approve violations.
You can use a custom audit data report to provide justification for revokingexemptions.
When you are done viewing violations and exemptions, click Close.
Service selection policiesA service selection policy extends provisioning policies by enabling selection of aservice based on person attributes. To be enforced, a service selection policy mustbe the target of a provisioning policy. The service selection policy then identifiesthe service type to target and defines the service based on JavaScript.
The service selection policy can be in the same container as the provisioning policyor in a container located above the container of the provisioning policy. The scopeof a service selection policy determines which provisioning policies can target it.Service selection policies with single scope can be targeted only by provisioningpolicies at the same level in the organization tree as the service selection policy.Service selection policies with subtree scope can be targeted by provisioningpolicies at the same level or below the service selection policy.
Service selection policies are evaluated in the following circumstances:v When a user is added to an organizational role that is a member of a
provisioning policy that targets the service selection policyv When a user's attributes are modifiedv When the policy itself is modified
Evaluating the policy might require moving a user's account to a different serviceinstance than the one the user is currently using. A new account for the user iscreated on the new service instance. One of the following actions completes,depending on the policy enforcement setting of the service instance:v Suspends the existing user account on the old service instance.
386 IBM Security Identity Manager Version 6.0.0.18: Administration Topics
Note: The account is deleted, suspended, or marked as disallowed only if theservice selection policy does not allow the account on that service. An accounton the new service is not created.
v Deletes the existing user account on the old service instance.v Sends a work item to alert the recipient to delete the existing user account on
the old service instance.v Marks the account on the old service instance as disallowed.
Creating a service selection policyAn administrator can create a service selection policy.
Before you begin
Depending on how your system administrator customized your system, you mightnot have access to this task. To obtain access to this task or to have someonecomplete it for you, contact your system administrator.
About this task
A service selection policy is not used by the IBM Security Identity Manager Serveruntil a provisioning policy targets it. If you enable a service selection policy afteryou enable a provisioning policy, the Security Identity Manager Server does apolicy check and uses the policy to provision new and existing accounts.
Procedure1. From the navigation tree, select Manage Policies > Manage Service Selection
Policies.2. On the Work With Service Selection Policies page, in the Service Selection
Policies table, click Create.3. On the Manage Service Selection Policies page, on the General page, type a
name and select a business unit for your service selection policy.4. Click the Service Type tab, and select the type of service you want to associate
with the service selection policy.5. On the Manage Service Selection Policies page, on the Service Selection Script
page, type a selection script.
Important: The Security Identity Manager Server does not verify that theJavaScript is correctly coded. Verify that the JavaScript is correctly coded beforeusing it to define the service selection policy.
6. Click Submit Now to save the policy.7. On the Success page, click Close.
Changing a service selection policyAn administrator can change a service selection policy. Service selection policiesare not usually modified after being created.
Before you begin
Depending on how your system administrator customized your system, you mightnot have access to this task. To obtain access to this task or to have someonecomplete it for you, contact your system administrator.
Chapter 10. Policy administration 387

About this task
Modifying an existing, enabled service selection policy can cause deprovisioning ofuser accounts. Modifying the scope or status of a service selection policy can affectuser access as soon as the policy changes take effect.
Procedure1. From the navigation tree, select Manage Policies > Manage Service Selection
Policies.2. On the Work With Service Selection Policies page, type information about the
service selection policy or business unit in the Search information field, or typean asterisk (*). Select a filter in the Search by field, and click Search.
3. In the Service Selection Policies table, locate and select a service selectionpolicy, and then click Change.
4. On the Manage Service Selection Policies page, modify the information on theGeneral, Service Type, and Service Selection Script pages.
Important: The IBM Security Identity Manager Server does not verify that theJavaScript is correct. Verify that the JavaScript is correctly coded before using itto define the service selection policy.
5. Click Submit Now to save the changes.6. On the Success page, click Close.
Deleting a service selection policyAn administrator can delete a service selection policy, which can be removed whenno provisioning policy references it.
Before you begin
Depending on how your system administrator customized your system, you mightnot have access to this task. To obtain access to this task or to have someonecomplete it for you, contact your system administrator.
Procedure1. From the navigation tree, select Manage Policies > Manage Service Selection
Policies.2. On the Work With Service Selection Policies page, type information about the
service selection policy or business unit in the Search information field, or typean asterisk (*). Select a filter in the Search by field, and click Search.
3. In the Service Selection Policies table, locate and select a service selectionpolicy, and then click Delete.
4. On the Confirm page, review the service selection policy to delete, choose adate and time for the deletion to occur, and then click Delete.
5. On the Success page, click Close.
388 IBM Security Identity Manager Version 6.0.0.18: Administration Topics

Chapter 11. Workflow management
Workflows for entitlements to an account or access can be added, deleted, andmodified from the workflow design page. Additionally, you can change workflowproperties, escalation, notification, and other workflow activities.
Before you begin
Depending on how your system administrator customized your system, you mightnot have access to this task. To obtain access to this task or to have someonecomplete it for you, contact your system administrator.
Adding an entitlement workflowAs an administrator, you can create a workflow for either an account request or anaccess request.
Before you begin
Depending on how your system administrator customized your system, you mightnot have access to this task. To obtain access to this task or to have someonecomplete it for you, contact your system administrator.
Before you begin, determine whether additional access control items are needed forthe new workflow.
About this task
You can use the Workflow Designer page to add a workflow to either an accountrequest or an access request.
Procedure1. From the navigation tree, select Design Workflows. Then, click either Manage
Account Request Workflows or click Manage Access Request Workflows.2. In the page that is displayed, in the table that lists the workflows, click Create.3. In the General tab, complete the name and description of the workflow, and
select a business unit and service type. Click other tabs to specify additionalinformation. Then, either click OK to save the changes or Apply to save yourchanges and continue.
4. In the Activities tab, complete either a simple or an advanced workflow: Youcan create a simple workflow and convert it to an advanced one if you laterdecide that you require more advanced capabilities. However, you cannotconvert an advanced workflow to a simple one. If you do so, all of youradvanced activities are discarded and you start with a new, simple workflow.
389

Option Description
Simple Click to add a workflow that consists of alinear series of approval, mail, or request forinformation activities.
Complete the activity name, participanttype, and escalation time and escalationparticipant type. Then, click OK.
Advanced Click to add an advanced workflowpotentially consisting of other types ofactivities, loops, and conditional branches.The workflow designer applet starts.
Using the workflow designer, specify theworkflow. Click other tabs to specifyadditional information. Then, either clickOK to save the changes or Apply to saveyour changes and continue.
5. On the Success page, click Close.
What to do next
You might associate this workflow with an access or account entitlement.
Changing an entitlement workflowAs an administrator, you can change a workflow for either an account request oran access request.
Before you begin
Depending on how your system administrator customized your system, you mightnot have access to this task. To obtain access to this task or to have someonecomplete it for you, contact your system administrator.
About this task
Before you begin, determine whether changes are also needed to access controlitems that apply to the workflow.
You can use the Workflow Designer page to change a workflow for either anaccount request or an access request.
Procedure1. From the navigation tree, select Design Workflows. Then, click either Manage
Account Request Workflows or click Manage Access Request Workflows.2. In the page that is displayed, in the Search information field, type information
about the workflow, and click Search.You can also type information about the service to which the account requestworkflow is associated, or information about the access to which the accessrequest workflow is associated.
Note: A search done by Access type returns only workflows that have anexisting association with the access definition. To see all workflows, selectWorkflow as the search type.
390 IBM Security Identity Manager Version 6.0.0.18: Administration Topics

3. In the table that lists the available workflows, select the workflow that youwant to modify, and click Change.
4. In the General tab or the Activities tab, complete your changes. Then, click OK.5. On the Success page, click Close.
What to do next
You might make additional changes to an access control item, or associate thisworkflow with a different provisioning policy.
Deleting an entitlement workflowAs an administrator, you can delete a workflow for either an account request or anaccess request.
Before you begin
Depending on how your system administrator customized your system, you mightnot have access to this task. To obtain access to this task or to have someonecomplete it for you, contact your system administrator.
Before you begin, make sure the workflow that you are deleting is no longerreferenced by a provisioning policy or access definition.
Procedure1. From the navigation tree, select Design Workflows. Then, click either Manage
Account Request Workflows or click Manage Access Request Workflows.2. In the page that is displayed, in the Search information field, type information
about the workflow, and click Search.You can also type information about the service to which the account requestworkflow is associated, or information about the access to which the accessrequest workflow is associated.
3. In the table that lists the available workflows, select the workflow that youwant to delete, and click Delete.
4. In the Confirm page, ensure that you want to proceed, and click then Delete.5. On the Success page, click Close.
Creating a mail activity template with the workflow designerUsing the workflow designer, you can create a mail activity template that is basedon a default template.
Before you begin
Depending on how your system administrator customized your system, you mightnot have access to this task. To obtain access to this task or to have someonecomplete it for you, contact your system administrator.
About this task
You can use the Workflow Designer page to create a mail activity workflowtemplate that specifies content to be used by mail activities across differentworkflows.
Chapter 11. Workflow management 391
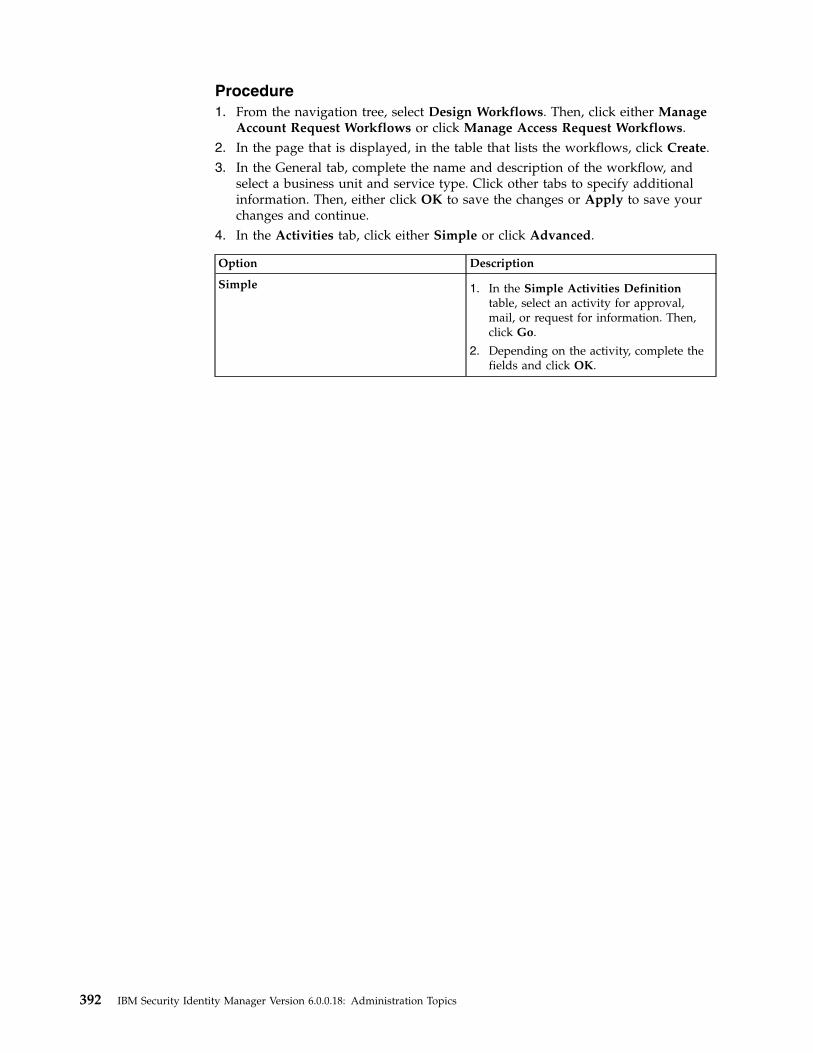
Procedure1. From the navigation tree, select Design Workflows. Then, click either Manage
Account Request Workflows or click Manage Access Request Workflows.2. In the page that is displayed, in the table that lists the workflows, click Create.3. In the General tab, complete the name and description of the workflow, and
select a business unit and service type. Click other tabs to specify additionalinformation. Then, either click OK to save the changes or Apply to save yourchanges and continue.
4. In the Activities tab, click either Simple or click Advanced.
Option Description
Simple 1. In the Simple Activities Definitiontable, select an activity for approval,mail, or request for information. Then,click Go.
2. Depending on the activity, complete thefields and click OK.
392 IBM Security Identity Manager Version 6.0.0.18: Administration Topics

Option Description
Advanced 1. After the workflow designer appletstarts, select the Mail node. Then, copy(click and drag) an instance of the Mailnode to the Workflow Diagramworkspace. Double-click the Mail nodeinstance to open the Properties: MailNode page.
a. In the General tab, make theseentries:
v In the Activity ID field, type avalue that identifies the activity,such as mytesttemplate.
v In the Recipient field, select arecipient from the list.
v Optionally, type a value for theactivity name, and change thedefault value of the Join Type andSplit Type conditions.
b. In the Notification tab, either type thetags and other information that youwant to be displayed in a customizedmessage notification, by completingthe Subject, Text, and XHTML fieldsas needed. Alternatively, click LoadFrom Template.
If you load a template, completethese tasks:
v In the templates table, select atemplate. Then, click a button suchas Create Like.
v On the Mail Activity Templatepage, accept or modify the entriesthat populate the Template Name,Subject, Text, and XHTML fields.
v Change the Text and Dynamicentries as needed. Then, click OK.
c. In the Postscript tab, type anypostscript information.
d. Click OK to complete the task.
Depending on the customized stepsthat you took or the template thatyou selected, you might need tochange the notification recipient.
5. Click other tabs to specify additional information. Then, either click OK to savethe changes or Apply to save your changes and continue.
6. On the Success page, click Close.
Workflow notification propertiesSome workflow properties can be configured to apply globally to workflows inIBM Security Identity Manager
Chapter 11. Workflow management 393

IBM Security Identity Manager can be configured with a default escalation periodthat is used to determine when work items that result from workflow activities areescalated. Activity notification message templates can be customized to sendnotifications.
All workflow activities are escalated when the escalation period expires. Thedefault escalation period serves as the initial value for newly defined workflowactivities. To override the default escalation period, configure the escalation periodfor a specific activity contained in a workflow.
IBM Security Identity Manager sends email notifications for specific type ofaccount requests and for specific events in the workflow system. The notificationcan be enabled or disabled based on the request type or event type. Thenotification template can be customized for each type of notification.
The following is a list of account requests in which an email notification can begenerated:v New accountv New passwordv Change accountv Deprovision accountv Suspend accountv Restore account
For access requests that are submitted from the Identity Service Center, an emailnotification can be generated at the following times:v Before the access request batch is processedv After access request batch processing is completed
The following is a list of workflow system events in which an email notificationcan be generated:v Activity timeoutv Process timeoutv Process completev Approval work itemv Request for input work itemv Work orderv Compliance alertv Work item reminder
IBM Security Identity Manager can also be configured to send activity notificationsand to-do list item reminders through email to workflow participants after aconfigured amount of time. IBM Security Identity Manager can create defaultnotifications for a type of activity in the form of templates. Notification templatesprovide a consistent notification style and content across manual activities andsystem activities such as adding accounts and changing passwords.
Configuring the workflow escalation periodAdministrators can set the default escalation limit for work items in workflows.
394 IBM Security Identity Manager Version 6.0.0.18: Administration Topics

Before you begin
Depending on how your system administrator customized your system, you mightnot have access to this task. To obtain access to this task or to have someonecomplete it for you, contact your system administrator.
About this task
Before you begin, determine the escalation period that your organization needs forcustomary escalations.
You can use the Workflow Notification Properties page to change the workflowescalation limit.
Procedure1. From the navigation tree, select Configure System > Workflow Notification
Properties.2. On the Workflow Notification Properties page, in the Escalation Limit field,
specify the time in days, hours, and minutes. Click OK.3. On the Success page, click Close.
What to do next
You might also change the default reminder interval and message.
Configuring the work item reminder interval and remindercontent
Administrators can set the work item reminder interval and define remindercontent.
Before you begin
Depending on how your system administrator customized your system, you mightnot have access to this task. To obtain access to this task or to have someonecomplete it for you, contact your system administrator.
Before you begin, determine the work item reminder interval and the remindercontent that your organization needs. Because there are multiple notificationtemplates, you might read the list of templates and their notification content first.
About this task
You can use the Workflow Notification Properties page to change the work itemreminder interval and reminder content.
Procedure1. From the navigation tree, select Configure System > Workflow Notification
Properties.2. On the Workflow Notification Properties page, you might complete these tasks:v In the Reminder Interval field, specify the time in days. The value that you
enter cannot be less than the time interval for the escalation limit.v In the Reminder Interval table, select a notification template, and click
Change. Your changes depend on the content of the template.
Chapter 11. Workflow management 395

3. When your changes are complete, click OK.4. On the Success page, click Close.
What to do next
You might also configure notification aggregation (post office).
Enabling workflow notificationYou can use the Workflow Notification Properties page to enable workflownotification.
Before you begin
Depending on how your system administrator customized your system, you mightnot have access to this task. To obtain access to this task or to have someonecomplete it for you, contact your system administrator.
Procedure1. From the navigation tree, select Configure System > Workflow Notification
Properties.2. On the Workflow Notification Properties page, in the E-mail Notification
Templates table, locate the template for the notification you want to enable. Inthe Status column of the table, click the popup menu icon, and then clickEnable.
3. After the value of the field changes to Enabled, click OK.4. On the Success page, click Close.
Disabling workflow notificationYou can use the Workflow Notification Properties page to disable workflownotification.
Before you begin
Depending on how your system administrator customized your system, you mightnot have access to this task. To obtain access to this task or to have someonecomplete it for you, contact your system administrator.
Procedure1. From the navigation tree, select Configure System > Workflow Notification
Properties.2. On the Workflow Notification Properties page, in the E-mail Notification
Templates table, locate the template for the notification you want to enable. Inthe Status column of the table, click the popup menu icon, and then clickDisable.
3. After the value of the field changes to Disabled, click OK.4. On the Success page, click Close.
Changing a workflow notification templateYou can use the Workflow Notification Properties page to change a workflownotification template.
396 IBM Security Identity Manager Version 6.0.0.18: Administration Topics

Before you begin
Depending on how your system administrator customized your system, you mightnot have access to this task. To obtain access to this task or to have someonecomplete it for you, contact your system administrator.
Procedure1. From the navigation tree, select Configure System > Workflow Notification
Properties.2. On the Workflow Notification Properties page, in the E-mail Notification
Templates table, select the template for the notification you want to configure.Then, click Change.
3. In the Notification Template page, make your changes to the Template name,Subject, Plaintext body, and XHTML body fields. Then, click OK.
4. On the Workflow Notification Properties page, click OK.5. On the Success page, click Close.Related tasks:“Manually applying the email notification template changes for canceling arequest”You can use the Workflow Notification Properties page to manually addinformation about canceling a request to the email notification template. When youinstall the IBM Security Identity Manager Fix Pack 6.0.0.3, the email notificationtemplate content that includes information about canceling a request is notautomatically applied. The template changes that are available with Fix Pack 6.0.0.3are not automatically applied so that the installation process does not overwriteany custom changes that you might have made to the email templates.
Manually applying the email notification template changes forcanceling a request
You can use the Workflow Notification Properties page to manually addinformation about canceling a request to the email notification template. When youinstall the IBM Security Identity Manager Fix Pack 6.0.0.3, the email notificationtemplate content that includes information about canceling a request is notautomatically applied. The template changes that are available with Fix Pack 6.0.0.3are not automatically applied so that the installation process does not overwriteany custom changes that you might have made to the email templates.
Before you begin
Depending on how your system administrator customized your system, you mightnot have access to this task. To obtain access to this task or to have someonecomplete it for you, contact your system administrator.
Procedure1. From the navigation tree, select Configure System > Workflow Notification
Properties.2. On the Workflow Notification Properties page, in the E-mail Notification
Templates table, select Process Completion Template. Then, click Change.3. In the Notification Template page, modify the Plaintext body field by adding
this code to the end of the existing code:
Chapter 11. Workflow management 397

<JS> if (process.canceledBy != null) { ’<RE key="CanceledBy"/>: ’ + process.canceledBy; }</JS><JS> if (process.canceledBy != null) { ’<RE key="DateCanceled"/>: ’; }</JS> <RE key="readOnlyDateFormat"><PARM><JS> if (process.canceledDate != null) return process.canceledDate.getTime(); else return ’’;</JS></PARM></RE><JS> if (process.canceledBy != null) { ’<RE key="CanceledReason"/>:<JS> (process.canceledJustification == null)? ’’: process.canceledJustification;</JS>’; }</JS>
4. In the Notification Template page, modify the XHTML body field by addingthis code inside the table:<tr align="left" valign="middle"><td class="text-description" bgcolor="EBEDF3">
<RE key="CanceledBy"/>:</td><td width="773" class="text-description" bgcolor="white"><JS>process.canceledBy;</JS></td></tr>
<tr align="left" valign="middle"><td class="text-description" bgcolor="EBEDF3"><RE key="DateCanceled"/>:</td><td width="773" class="text-description" bgcolor="white"><RE key="readOnlyDateFormat"><PARM><JS>if (process.canceledDate != null) return process.canceledDate.getTime();else return ’’;</JS></PARM></RE></td></tr>
<tr align="left" valign="middle"><td class="text-description" bgcolor="EBEDF3"><RE key="CanceledReason"/>:</td><td width="773" class="text-description" bgcolor="white"><JS>process.canceledJustification;</JS></td></tr>
Place the new code inside the table between these two sets of existing code:<pre><JS>Enrole.localize(process.resultDetail, "$LOCALE");</JS></pre></td></tr>
and</table>
</td><!-- End Of Notification body -->
5. To save the changes, click OK.6. On the Workflow Notification Properties page, click OK.7. On the Success page, click Close.Related tasks:“Canceling pending requests” on page 437You can cancel requests that are not completed.“Changing a workflow notification template” on page 396You can use the Workflow Notification Properties page to change a workflownotification template.
Sample workflowsThis section contains sample workflows.
Sample workflow: manager approval of accountsIn this scenario, an organization has a policy that requires all accounts provisionedon a WinLocal service to be approved by the direct manager of the requestee.
The request for approval is sent to the manager of the requestee, who has two fulldays to approve the request. The manager might not respond to the request withinthe allotted time period. Then, the request is escalated to the service owner whohas two full days to act on the request. The task is removed from the task list ofthe manager at this time. If the service owner fails to act on the request within theallotted time, the request fails, and it is canceled by the system.
The manager or service owner might act on the request within the allotted timeperiod. An Approve response sets the process result to Approved and a Rejectresponse sets the process result to Rejected. An Approved result provisions theaccount and logs the process activity in the audit log. A Rejected result cancels theprocess and logs the rejection in the audit log.
398 IBM Security Identity Manager Version 6.0.0.18: Administration Topics

The graphic demonstrates this business case with the default script nodesRETURN_APPROVED and RETURN_REJECTED, which set the process resultbased upon participant response. The table identifies the workflow node propertiesand their values for a workflow named Approval_Example, defined with a servicetype of WinLocal Profile.
Table 82. Node properties: Sample workflow for manager approval
Node Feature Value
Start Activity ID Start
Split Type AND
JavaScript N/A
Approval Activity ID Supervisor
Participant Supervisor
Escalation Participant Service Owner
Escalation Limit 2 days
Join Type AND
Split Type AND
Entity Type Account
RETURNED_APPROVED Activity ID RETURNED_APPROVED
Join Type AND
Split Type AND
JavaScript [Custom]
process.setResult("AA")
RETURN_REJECTED Activity ID RETURN_REJECTED
Join Type AND
Split Type AND
JavaScript [Custom]
process.setResult("AR")
Sample workflow: multiple approvalsIn this scenario, an organization has a policy in place for provisioning an accounton a Windows server that is used for financial applications.
When a request is generated, a service owner must enter the appropriate accountinformation before any approvals can take place. Then the request must be
Start Supervisor
RETURN_APPROVED
RETURN_REJECTED
End
Approval
Script
Script
Figure 3. Sample workflow for manager approval
Chapter 11. Workflow management 399

approved by both the Chief Financial Officer and the direct manager of therequestee. Each approver has one full day to act on the request.
After receiving a result from both approval requests, an email is generated andsent to the direct manager of the requestee. The email details the result and theprocess completes.
If both participants approve the request, the request is completed and the accountis provisioned. If either of the participants rejects the request for approval, theprocess is completed without provisioning the account and the process result is setto Rejected.
All relevant activity is logged in the Audit Log.
Table 83. Node properties: Sample workflow for multiple approvals
Node Feature Value
Start Activity ID Start
Split Type AND
JavaScript N/A
RFI Activity ID Service_Owner
Participant Service_Owner
EscalationParticipant
System Administrator
Escalation Limit 1 day
Join Type AND
Split Type AND
Entity Type Account
Entity WinLocal
Subprocess Activity ID Supervisor_Approval
Subprocess Workflow created in “Sample workflow: managerapproval of accounts”
Join Type AND
Split Type AND
Start Service_Owner
Supervisor_Approval
CFO
End
RFI
Subprocess
Approval
Process_Status
Script Work Order
Process_Status Notify_Supervisor
Figure 4. Sample workflow: multiple approvals required
400 IBM Security Identity Manager Version 6.0.0.18: Administration Topics

Table 83. Node properties: Sample workflow for multiple approvals (continued)
Node Feature Value
Approval Activity ID CFO
Participant [Org Role] Chief Financial Officer
EscalationParticipant
System Administrator
Escalation Limit 1 day
Join Type AND
Split Type AND
Entity Type Account
Script Activity ID Process_Status
Join Type AND
Split Type AND
JavaScript supervisorApproval=process.getActivity("Supervisor_Approval").resultSummarycfoApproval=process.getActivity("CFO").resultSummaryif(supervisorApproval==activity.APPROVED &&cfoApproval==activity.APPROVED){ process.setResult(process.APPROVED) }else{ process.setResult(process.REJECTED) }
Work Order Activity ID Notify_Supervisor
Participant Manager
EscalationParticipant
System Administrator
Escalation Limit 1 day
Join Type AND
Split Type AND
Subject New <JS>process.subject;</JS> provisioning requestfor <JS>process.requesteeName;</JS>
Message Process Result: <JS>process.resultSummary</JS>
End Activity ID End
Join Type AND
JavaScript N/A
Transition LineStart >Service_Owner RFI
JavaScript [Custom]
true
Transition LineService_OwnerRFI > Supervisor_ApprovalSubprocess
JavaScript [Custom]
true
Transition LineService_OwnerRFI > CFO Approval
JavaScript [Custom]
true
TransitionLineSupervisor_ApprovalSubprocess > Process_StatusScript
JavaScript [Custom]
true
Transition LineCFO Approval >Process_Status Script
JavaScript [Custom]
true
Chapter 11. Workflow management 401

Table 83. Node properties: Sample workflow for multiple approvals (continued)
Node Feature Value
Transition LineProcess_StatusScript > Notify_SupervisorWork Order
[Custom]
true
TransitionLineNotify_Supervisor WorkOrder > End
JavaScript [Custom]
true
Sample workflow: multiple approvals with loop processingIn this scenario, an organization has a policy in place for all new hires. A humanresources staff member submits the person information, which initiates a workflowprocess to provision a Windows account.
A request is sent the immediate manager of the requestee and must first beapproved whether the account is okay to be provisioned. If the manager rejects theapproval, the account is not provisioned and the process is cancelled. Then themanager is requested to enter the information needed to provision the account.The service owner then reviews the account data to assure the account is createdcorrectly. If any of the account information is incorrect the service owner commentson errors and rejects the request. The request is then sent back to the manager forchanges. This process is repeated up to three times or until the Service Owner issatisfied with the account data and approves it. The service owner approval isstrictly for approving the RFI data submitted by the manager. The service ownerapproval has no bearing on the end process result or provisioning of the account.
Even though the service owner is not satisfied with the manager’s third correction,the department manager is requested for the approval. After the approval from thedepartment manager, the account is provisioned. If rejected, the account is notprovisioned and the process is canceled.
Basically, provisioning a new Windows account requires the approval from boththe manager of the requestee and manager of the department. During the process,the account information gets audited from the service owner.
All activities are logged in the audit log.
Start Supervisor End
Approval
Process_Status
Script
Process_Status
LOOP Department_Manager
Approval
LOOP_Superviosr LOOP_ServiceOwner
RFI Approval
Figure 5. Sample workflow: multiple approvals with loop processing
402 IBM Security Identity Manager Version 6.0.0.18: Administration Topics

Table 84. Node properties: Sample workflow for multiple approvals with loop processing
Node Feature Value
Start Activity ID Start
Split Type AND
JavaScript N/A
Approval Activity ID Supervisor
Participant Manager
EscalationParticipant
System Administrator
Escalation Limit 1 day
Join Type AND
Split Type OR
Entity Type Account
Loop Name LOOP
Join Type AND
Split Type AND
Loop Type While
Loop Condition (loopcount<=1) || (loopcount <=3 &&(process.getActivity("LOOP_ServiceOwner",loopcount-1)).resultSummary==activity.REJECTED)
RFI Name LOOP_Supervisor
Participant Manager
EscalationParticipant
System Administrator
Escalation Limit 1 day
Join Type AND
Split Type AND
Entity Type Account
Entity WinLocal
Approval Name LOOP_ServiceOwner
Participant Service Owner
EscalationParticipant
System Administrator
Escalation Limit 1 day
Join Type AND
Split Type AND
Entity Type Account
Chapter 11. Workflow management 403

Table 84. Node properties: Sample workflow for multiple approvals with loop processing (continued)
Node Feature Value
Approval Name Department_Manager
Participant [Organizational Role] Department_Manager
EscalationParticipant
System Administrator
Escalation Limit 1 day
Join Type AND
Split Type AND
Entity Type Account
Script Activity ID Process_Status
Join Type OR
Split Type AND
JavaScript [Custom]
supervisorApproval=process.getActivity("Supervisor").resultSummaryif(supervisorApproval==activity.REJECTED) {process.setResult(process.REJECTED)}else if(supervisorApproval==activity.APPROVED) {departmentManagerApproval=process.getActivity("Department_Manager").resultSummaryif (departmentManagerApproval==activity.APPROVED) {process.setResult(process.APPROVED)} else if(departmentManagerApproval==activity.REJECTED) {process.setResult(process.REJECTED)}}
End Activity ID End
Join Type AND
JavaScript N/A
Transition LineStart >Supervisor Approval
JavaScript Custom]
true
Transition LineSupervisorApproval > LOOP
JavaScript [Approved]
activity.resultSummary==activity.APPROVED;
Transition LineSupervisorApproval > Process_StatusScript
JavaScript [Rejected]
activity.resultSummary==activity.REJECTED;
Loop Begin TransitionLineLOOP >LOOP_Supervisor RFI
TransitionLineLOOP_Supervisor RFI> LOOP_ServiceOwnerApproval
JavaScript [Custom]
true
Loop End TransitionLineLOOP_ServiceOwnerApproval > LOOP
404 IBM Security Identity Manager Version 6.0.0.18: Administration Topics

Table 84. Node properties: Sample workflow for multiple approvals with loop processing (continued)
Node Feature Value
Transition LineLOOP >Department_ManagerApproval
JavaScript [Custom]
true
TransitionLineDepartment_ManagerApproval > Process_StatusScript
JavaScript [Custom]
true
TransitionLineProcess_StatusScript > End
JavaScript [Custom]
true
Sample workflow: RFI and subprocessThis example displays an entitlement workflow that uses an RFI and a subprocess.
For the request to be approved and reach completion, the following actions mustoccur:v The workflow initiated by the Subprocess node must be completed with a result
of approved.v The participant defined in the RFI node is sent a request for information.
An approved response must come from the subprocess for the request to continueto the RFI.
Table 85. Node properties: Sample workflow with an RFI and a subprocess
Node Feature Value
Start Activity ID Start
Split Type AND
JavaScript N/A
Subprocess Activity ID New_Employee_Approval
Subprocess Workflow created in "Sample workflow:supervisor approval of accounts"
Join Type OR
Split Type OR
Figure 6. Sample workflow: RFI and subprocess
Chapter 11. Workflow management 405

Table 85. Node properties: Sample workflow with an RFI and a subprocess (continued)
Node Feature Value
RFI Activity ID Request_Storage_Quota
Participant Service Owner
Escalation Limit 3 days
Entity Type Account
Entity WinLocalAccount
Attribute Selection Max. Storage
Join Type OR
Split Type OR
RETURNED_APPROVED Activity ID RETURNED_APPROVED
Join Type OR
Split Type OR
JavaScript process.setResult(process.APPROVED);
RETURN_REJECTED Activity ID RETURN_REJECTED
Join Type OR
Split Type OR
JavaScript process.setResult(process.REJECTED);
End Activity ID End
Join Type OR
JavaScript N/A
Transition LineStart > NewEmployee Approval
JavaScript [Custom]
true
Transition LineNew EmployeeApproval > Request StorageQuota
JavaScript [Approved]
activity.resultSummary==activity.APPROVED;
Transition LineNew EmployeeApproval > RETURN_REJECTED
JavaScript [Rejected]
activity.resultSummary==activity.REJECTED;
Transition LineRequestStorage Quota >RETURN_APPROVED
[Custom]
true
TransitionLineRETURN_APPROVED > End
JavaScript [Custom]
true
TransitionLineRETURN_REJECTED > End
JavaScript [Custom]
true
Sample workflow: approval loopThis example displays a workflow that loops an Approval node.
In this workflow, the manager approval is set within the Loop node. The managerapproval repeats five times before failing if an approved or rejected response is notreceived within the escalation Limit.
406 IBM Security Identity Manager Version 6.0.0.18: Administration Topics

Conditions for the transition lines to the RETURN_APPROVED andRETURN_REJECTED script nodes must be defined to retrieve and evaluate theresults of the Approval node. The loop node does not return a response from theApproval.
Table 86. Node properties: Sample workflow with an approval loop
Node Feature Value
Start Activity ID Start
Split Type AND
JavaScript N/A
Loop Activity ID Approval_Loop
Loop Type Until
Loop Condition var flag = approvalFlag.get();return (loopcount <= 5&& (flag != "APPROVED" && flag != "REJECTED"));
Split Type OR
Join Type OR
Approval Activity ID Manager_Approval
Participant Manager
Escalation Limit 1 day
Entity Type Account
Postscript if (activity.resultSummary == activity.APPROVED){ approvalFlag.set("APPROVED");} else if(activity.resultSummary ==activity.REJECTED){approvalFlag.set("REJECTED");}
Join Type OR
Split Type OR
RETURNED_APPROVED Activity ID RETURNED_APPROVED
Join Type OR
Split Type OR
JavaScript process.setResult(process.APPROVED);
RETURN_REJECTED Activity ID RETURN_REJECTED
Join Type OR
Split Type OR
JavaScript process.setResult(process.REJECTED);
Start Approval_Loop RETURN_APPROVED
RETURN_REJECTED
End
Script
ScriptApproval
Manager_Approval
Figure 7. Sample workflow: approval loop
Chapter 11. Workflow management 407

Table 86. Node properties: Sample workflow with an approval loop (continued)
Node Feature Value
End Activity ID End
Join Type OR
JavaScript N/A
Transition LineStart > ApprovalLoop
JavaScript [Custom]
true
Transition LineApproval Loop >RETURN_APPROVED
JavaScript [Custom]
approvalFlag.get() == "APPROVED"
Transition LineApproval Loop >RETURN_REJECTED
JavaScript [Custom]
approvalFlag.get() == "REJECTED"
Transition LineRETURN_APPROVED> END
JavaScript [Custom]
true
Transition LineRETURN_REJECTED> END
JavaScript [Custom]
true
Relevant DataapprovalFlag ID approvalFlag
Description Data for storing the last approval result
Context N/A
Type String
Default Value FALSE
Sample workflow: mail activityUse the Workflow Designer page to create a mail activity workflow template thatspecifies content to be used by mail activities across different workflows.
Use this page to specify the contents and recipient of an email message. You canalso create, change, or delete email templates used for defining contents of mailactivities. To create a notification that uses an existing notification template as itsinitial content, or to create an entirely new notification, complete these steps:1. From the navigation tree, select Design Workflows. Then, click either Manage
Account Request Workflows or click Manage Access Request Workflows.2. In the page that appears, in the table that lists the workflows, click Create.3. In the General tab, complete the name and description of the workflow, and
select a business unit and service type.4. In the Activities tab, click Simple.5. In the Simple Activities Definition table, select Create a mail activity. Then,
click GO.6. In the Mail Activity page, complete the following fields:
Activity nameProvides a name for the mail activity.
Recipient typeSelect a recipient for mail from the list. You might select User name orGroup. An additional field is displayed for you to search for andspecify a specific user or group that is not in the list.
Load from TemplateClick to select the mail template from which to load the content and to
408 IBM Security Identity Manager Version 6.0.0.18: Administration Topics

do other mail template management tasks. After loading the contentsfrom a mail template, editing the content in the mail activity will affectonly the mail activity, not the template.
SubjectProvides a description of the activity to the recipient of the mailnotification.
Plaintext bodyProvides additional details to the recipient that describe the outcome ofthe activity, in plaintext format. For example, an account or accessrequest was approved.
XHTML bodyProvides additional details to the recipient that describe the outcome ofthe activity, in XHTML format. For example, an account or accessrequest was denied.
7. When the fields are complete, click OK.8. Click other tabs to specify additional information. Then, either click OK to save
the changes or Apply to save your changes and continue.9. On the Success page, click Close.
Sample workflow: sequential approval for user recertificationwith packaged approval node
This scenario shows an organization policy that requires user recertification to beapproved by two levels of approvers. The first approver submits decisions that arereviewed by the second approver. The second approver can change the decisionsmade by the first approver and then submit the final decisions. The request in thisscenario is for recertification approval of user resources (accounts, groups, or roles).
For the request to be approved and reach completion, the following actions mustoccur:1. A user sends the request to an IBM Security Identity Manager user (Approver1).2. Approver1 has one day to approve the request.3. Approver1 submits decisions for the item in the To-Do list.4. Approver1 sends the request to the second Security Identity Manager user
(Approver2).5. Approver2 can view the decisions from Approver1 in the To-Do list.6. Approver2 can make and submit additional decisions.7. Security Identity Manager does the recertification of the user resources based
on decisions of Approver2.
The following workflow graphic demonstrates this business case. The workflowuses the two packaged approval nodes DECISION_OF_APPROVER1 andDECISION_OF_APPROVER2 in a sequence. The decisions from Approver1 arestored in the ApprovalDocument so that Approver2 can view them before submittingfinal decisions.
Chapter 11. Workflow management 409

Table 87 identifies the workflow node properties and values forUser_Recertification_Sequential_Approval_Example.
Table 87. Node properties: sample workflow for packaged approvalsNode Feature Value
Start Activity ID START
Activity Name Start Activity
Join Type AND
Split Type AND
JavaScript RejectionAction.set(’SUSPEND’)
Extension Activity ID CONSTRUCT_APPROVAL_DOCUMENT
Activity Name CONSTRUCT_APPROVAL_DOCUMENT
Description Get all account and access recertification targets for person extension for recertification.
Join Type OR
Split Type AND
Extension Name constructApprovalDocument(Person person, RecertificationPolicy policy)
PackagedApproval
Activity ID DECISION_OF_APPROVER1
Participant Approver1
Escalation Limit 1 day
Skip Escalation Checked
Join Type AND
Split Type AND
Postscript if (activity.resultSummary == activity.TIMEOUT) {var auditMessage = "Recertification period exceeded with no action taken, all items were approved based on policy configuration.";activity.setResult(activity.TIMEOUT, auditMessage);
var doc = ApprovalDocument.get();doc.setDecisionCodeForAllItems(activity.APPROVED);ApprovalDocument.set(doc);
RecertificationWorkflow.auditTimeout(Entity.get(), Policy.get(), doc, false, true);} else if (activity.resultSummary != activity.FAILED) {
RecertificationWorkflow.auditCompletion(Entity.get(), Policy.get(), ApprovalDocument.get(), false, true);}
PackagedApproval
Activity ID DECISION_OF_APPROVER2
Activity Name $ITIM_RECERTIFY
Participant Approver2
Escalation Limit 10 days
Skip Escalation Checked
Join Type AND
Split Type AND
Postscript if (activity.resultSummary == activity.TIMEOUT) {var auditMessage = "Recertification period exceeded with no action taken, all items were approved based on policy configuration.";activity.setResult(activity.TIMEOUT, auditMessage);
var doc = ApprovalDocument.get();doc.setDecisionCodeForAllItems(activity.APPROVED);ApprovalDocument.set(doc);
RecertificationWorkflow.auditTimeout(Entity.get(), Policy.get(), doc);} else if (activity.resultSummary != activity.FAILED) {
RecertificationWorkflow.auditCompletion(Entity.get(), Policy.get(), ApprovalDocument.get());}
Mail Activity ID RECERTMAIL
Activity Name $RECERTMAIL
Recipient Requestee
Join Type AND
Split Type AND
Extension Activity ID REMEDIATE_ACCTS_GROUPS
Activity Name REMEDIATE_ACCTS_GROUPS
Description Performs account, group, and access remediation
Join Type OR
Split Type AND
Extension Name remediateAccountsAndGroups(PackagedApprovalDocument approvalDocument, Person person, RecertificationPolicy policy, String rejectionAction)
Figure 8. Sample workflow: sequential approval with packaged approval node
410 IBM Security Identity Manager Version 6.0.0.18: Administration Topics

Table 87. Node properties: sample workflow for packaged approvals (continued)Node Feature Value
Extension Activity ID REMEDIATE_PERSON_ROLES
Activity Name REMEDIATE_PERSON_ROLES
Description Performs role remediation, including policy enforcement for the person
Join Type OR
Split Type AND
Extension Name remediateRoleMemberships(PackagedApprovalDocument approvalDocument, Person person, RecertificationPolicy policy, String rejectionAction)
Extension Activity ID UPDATE_RECERTIFICATION_STATUS_ALL_APPROVED
Activity Name UPDATE_RECERTIFICATION_STATUS_ALL_APPROVED
Description Updates recertification status
Join Type OR
Split Type AND
Extension Name updateRecertificationStatusAllApproved(PackagedApprovalDocument approvalDocument, Person person, RecertificationPolicy policy)
Extension Activity ID UPDATE_RECERTIFICATION_STATUS_EMPTY
Activity Name UPDATE_RECERTIFICATION_STATUS_EMPTY
Description Updates recertification status
Join Type OR
Split Type AND
Extension Name updateRecertificationStatusEmptyDocument(PackagedApprovalDocument approvalDocument, Person person, RecertificationPolicy policy)
End Activity ID END
Activity Name End Activity
Join Type OR
Split Type AND
Table 88 identifies the link properties and their values for the packaged approvalsample workflow.
Table 88. Link properties: sample workflow for packaged approvalsFrom To Feature Value
Start
START
Extension
CONSTRUCT_APPROVAL_DOCUMENT
Name startToConstructApprovalDocumentExtension
Description Start node to construct approval document extension
CustomCondition
true
Extension
CONSTRUCT_APPROVAL_DOCUMENT
Packaged Approval
DECISION_OF_APPROVER1
Name constructApprovalDocumentExtensionToApprover1Approval
Description Construct approval document extension to Approver1 approval node
CustomCondition
activity.resultSummary == activity.SUCCESS
Extension
CONSTRUCT_APPROVAL_DOCUMENT
Extension
UPDATE_RECERTIFICATION_STATUS_EMPTY
Name contructApprovalDocumentExtensionToUpdateStatusEmpty
Description Construct approval document extension to update status for emptydocument
CustomCondition
activity.resultSummary == activity.WARNING
Extension
CONSTRUCT_APPROVAL_DOCUMENT
End
END
Name constructApprovalDocumentExtensionToEnd
Description Construct approval document extension to end node
CustomCondition
activity.resultSummary != activity.SUCCESS &&activity.resultSummary != activity.WARNING
Packaged Approval
DECISION_OF_APPROVER1
Packaged Approval
DECISION_OF_APPROVER2
Name approver1ApprovalToApprover2Approval
Description Approver1 approval node to Approver2 approval node
CustomCondition
activity.resultSummary != activity.FAILED
Packaged Approval
DECISION_OF_APPROVER2
RECERTMAIL
Name approver2ApprovalToMail
Description Approver2 approval node to mail node
CustomCondition
(activity.resultSummary != activity.FAILED) &&(Approvalocument.get().containsDecisionCode(activity.REJECTED))
Packaged Approval
DECISION_OF_APPROVER2
Extension
UPDATE_RECERTIFICATION_STATUS_ALL_APPROVED
Name approver2ApprovalToUpdateStatus
Description Approver2 approval node to update recertification status
CustomCondition
(activity.resultSummary != activity.FAILED) &&(!ApprovalDocument.get().containsDecisionCode(activity.REJECTED))
RECERTMAIL
Extension
REMEDIATE_ACCTS_GROUPS
Name mailToRemediateAccts
Description Mail node to remediate accounts, groups, and accesses
CustomCondition
true
Extension
REMEDIATE_ACCTS_GROUPS
Extension
REMEDIATE_PERSON_ROLES
Name remediateAcctsToRemediateRoles
Description Remediate accounts, groups, and accesses to remediate roles
CustomCondition
true
Extension
REMEDIATE_PERSON_ROLES
End
END
Name remediateRolesToEnd
Description Remediate roles to end node
CustomCondition
true
Chapter 11. Workflow management 411

Table 88. Link properties: sample workflow for packaged approvals (continued)From To Feature Value
Extension
UPDATE_RECERTIFICATION_STATUS_ALL_APPROVED
End
END
Name updateStatusToEnd
Description Update recertification status to end node
CustomCondition
true
Extension
UPDATE_RECERTIFICATION_STATUS_EMPTY
End
END
Name updateStatusEmptyToEnd
Description Update status for empty document to end node
CustomCondition
true
Sample workflow: packaged approval combined with simpleapproval node
This scenario shows an organization with a policy that requires user recertification.User recertification validates user resources (accounts, groups, or roles).
IBM Security Identity Manager does the request based on the following decisions:v The request for recertification approval of user roles is sent to the respective role
owners.v The request for recertification approval of user accounts and groups is sent to
the manager of the user to be recertified.
The following workflow graphic demonstrates this business case:
Table 89 identifies the workflow node properties and values forUser_Recertification_Simple_Approval_Example.
Table 89. Sample workflow node properties: Simple approval for user recertification with packaged approval nodeNode Feature Value
Start Activity ID Start
Activity Name Start Activity
Join Type AND
Split Type AND
JavaScript RejectionAction.set(’SUSPEND’);
Extension Activity ID CONSTRUCT_APPROVAL_DOCUMENT
Activity Name CONSTRUCT_APPROVAL_DOCUMENT
Description Get all account and access recertification targets for person extension for recertification
Join Type OR
Split Type AND
Extension Name constructApprovalDocument(Person person, RecertificationPolicy policy)
Figure 9. Sample workflow: simple approval with packaged approval node
412 IBM Security Identity Manager Version 6.0.0.18: Administration Topics

Table 89. Sample workflow node properties: Simple approval for user recertification with packaged approvalnode (continued)Node Feature Value
Script Activity ID FILTER_ROLES
Activity Name FILTER_ROLES
Description Extracts roles from the approval document and creates a temporary approval document with the roles
Join Type AND
Split Type AND
JavaScript var updatedDoc=ApprovalDocument.get();var tempDoc=new PackagedApprovalDocument();TemporaryDocument.set(tempDoc);var tempRoles=new Array();var roleItems=updatedDoc.getItemsByType(ApprovalDocument.get().TYPE_ROLE);for(var i=0;i<roleItems.length;i++){updatedDoc.removeItem(roleItems[i]);var roledn= roleItems[i].getValue().dn;var role=new Role(roledn);tempRoles.push(role);RolesThere.set("true");
}Roles.set(tempRoles);ApprovalDocument.set(updatedDoc);var accountsCount=updatedDoc.getItemsByType(ApprovalDocument.get().TYPE_ACCOUNT);var groupCount=updatedDoc.getItemsByType(ApprovalDocument.get().TYPE_GROUP);if((!accountsCount.length==0||!groupCount.length==0)){OnlyRoles.set("false");}else{OnlyRoles.set("true");
}
Packaged Approval Activity ID RECERTAPPROVAL
Activity Name ITIM_RECERTIFY
Participant Manager
Escalation Participant Participant Type
Escalation Limit 10 days
Skip Escalation Checked
No Timeout Action Unchecked
Join Type AND
Split Type AND
Loop Activity ID ROLE_LOOP
Activity Name ROLE_LOOP
Description This loop is required to iterate through the roles.
Join Type AND
Split Type AND
Loop Type Until
Loop Condition return loopcount<=Roles.get().length;
Script Activity ID UPDATE_APPROVAL_DOC
Activity Name UPDATE_APPROVAL_DOC
Description Gets the role information from the temporary approval document and updates in into the approval document
Join Type AND
Split Type AND
JavaScript var approvalDoc=ApprovalDocument.get();var tempDoc=TemporaryDocument.get();var roleItems=tempDoc.getItemsByType(TemporaryDocument.get().TYPE_ROLE);for(var i=0;i<roleItems.length;i++){approvalDoc.addItem(roleItems[i]);}ApprovalDocument.set(approvalDoc);
Script Activity ID SET_ROLE
Activity Name SET_ROLE
Description Sets the role in relevant data
Join Type AND
Split Type AND
JavaScript var roles=Roles.get();var role=roles[loopcount-1];RoleHolder.set(role);
Work Order Activity ID RECERTWORKORDER
Activity Name RECERTWORKORDER
Escalation Limit 9 days
Join Type AND
Split Type AND
Chapter 11. Workflow management 413
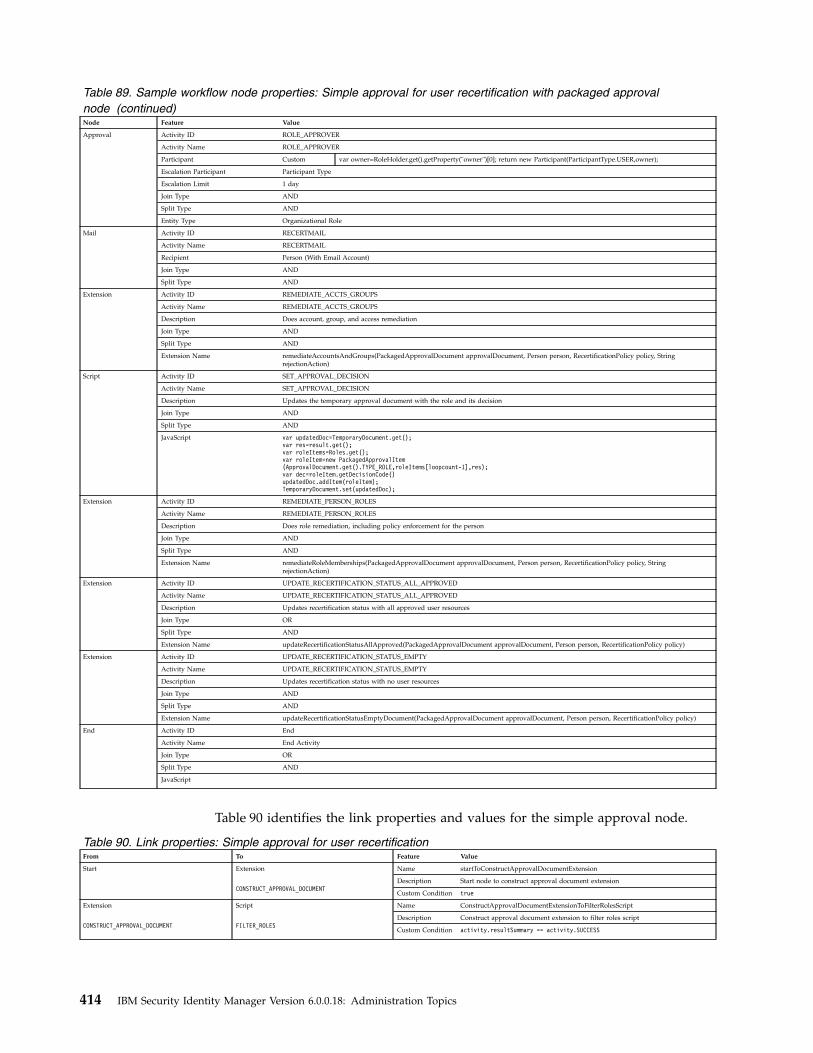
Table 89. Sample workflow node properties: Simple approval for user recertification with packaged approvalnode (continued)Node Feature Value
Approval Activity ID ROLE_APPROVER
Activity Name ROLE_APPROVER
Participant Custom var owner=RoleHolder.get().getProperty("owner")[0]; return new Participant(ParticipantType.USER,owner);
Escalation Participant Participant Type
Escalation Limit 1 day
Join Type AND
Split Type AND
Entity Type Organizational Role
Mail Activity ID RECERTMAIL
Activity Name RECERTMAIL
Recipient Person (With Email Account)
Join Type AND
Split Type AND
Extension Activity ID REMEDIATE_ACCTS_GROUPS
Activity Name REMEDIATE_ACCTS_GROUPS
Description Does account, group, and access remediation
Join Type AND
Split Type AND
Extension Name remediateAccountsAndGroups(PackagedApprovalDocument approvalDocument, Person person, RecertificationPolicy policy, StringrejectionAction)
Script Activity ID SET_APPROVAL_DECISION
Activity Name SET_APPROVAL_DECISION
Description Updates the temporary approval document with the role and its decision
Join Type AND
Split Type AND
JavaScript var updatedDoc=TemporaryDocument.get();var res=result.get();var roleItems=Roles.get();var roleItem=new PackagedApprovalItem(ApprovalDocument.get().TYPE_ROLE,roleItems[loopcount-1],res);var dec=roleItem.getDecisionCode()updatedDoc.addItem(roleItem);TemporaryDocument.set(updatedDoc);
Extension Activity ID REMEDIATE_PERSON_ROLES
Activity Name REMEDIATE_PERSON_ROLES
Description Does role remediation, including policy enforcement for the person
Join Type AND
Split Type AND
Extension Name remediateRoleMemberships(PackagedApprovalDocument approvalDocument, Person person, RecertificationPolicy policy, StringrejectionAction)
Extension Activity ID UPDATE_RECERTIFICATION_STATUS_ALL_APPROVED
Activity Name UPDATE_RECERTIFICATION_STATUS_ALL_APPROVED
Description Updates recertification status with all approved user resources
Join Type OR
Split Type AND
Extension Name updateRecertificationStatusAllApproved(PackagedApprovalDocument approvalDocument, Person person, RecertificationPolicy policy)
Extension Activity ID UPDATE_RECERTIFICATION_STATUS_EMPTY
Activity Name UPDATE_RECERTIFICATION_STATUS_EMPTY
Description Updates recertification status with no user resources
Join Type AND
Split Type AND
Extension Name updateRecertificationStatusEmptyDocument(PackagedApprovalDocument approvalDocument, Person person, RecertificationPolicy policy)
End Activity ID End
Activity Name End Activity
Join Type OR
Split Type AND
JavaScript
Table 90 identifies the link properties and values for the simple approval node.
Table 90. Link properties: Simple approval for user recertificationFrom To Feature Value
Start Extension
CONSTRUCT_APPROVAL_DOCUMENT
Name startToConstructApprovalDocumentExtension
Description Start node to construct approval document extension
Custom Condition true
Extension
CONSTRUCT_APPROVAL_DOCUMENT
Script
FILTER_ROLES
Name ConstructApprovalDocumentExtensionToFilterRolesScript
Description Construct approval document extension to filter roles script
Custom Condition activity.resultSummary == activity.SUCCESS
414 IBM Security Identity Manager Version 6.0.0.18: Administration Topics

Table 90. Link properties: Simple approval for user recertification (continued)From To Feature Value
Extension
CONSTRUCT_APPROVAL_DOCUMENT
End Name ConstructApprovalDocumentExtensionToEnd
Description Construct approval document extension to end node
Custom Condition activity.resultSummary != activity.SUCCESS && activity.resultSummary !=activity.WARNING
Extension
CONSTRUCT_APPROVAL_DOCUMENT
Extension
UPDATE_RECERTIFICATION_STATUS_EMPTY
Name ConstructApprovalDocumentExtensionToUpdateStatusEmpty
Description Construct approval document extension to update status for empty document
Custom Condition activity.resultSummary == activity.WARNING
Script
FILTER_ROLES
Packaged Approval
RECERTAPPROVAL
Name FilterRolesScriptToRecertApproval
Description Filter roles script to recert approval
Custom Condition OnlyRoles.get()=="false"
Script
FILTER_ROLES
Loop
ROLE_LOOP
Name FilterRolesScriptToRoleLoop
Description Filter roles script to role loop
Custom Condition RolesThere.get()=="true"
Loop
ROLE_LOOP
Script
COMBINE_APPROVAL_DOC
Name RoleLoopToCombineApprovalDocScript
Description Role loop to combine approval document script
Custom Condition true
Script
COMBINE_APPROVAL_DOC
Packaged Approval
RECERTAPPROVAL
Name CombineApprovalDocScriptToRecertApproval
Description Combine approval document script to recert approval
Custom Condition true
Script
COMBINE_APPROVAL_DOC
RECERTMAIL
Name CombineApprovalDocScriptToMail
Description Combine approval document script to mail node
Custom Condition (activity.resultSummary != activity.FAILED) &&(ApprovalDocument.get().containsDecisionCode(activity.REJECTED))
Script
COMBINE_APPROVAL_DOC
Extension
UPDATE_RECERTIFICATION_STATUS_ALL_APPROVED
Name CombineApprovalDocScriptTo
Description Combine approval document script to
Custom Condition (activity.resultSummary != activity.FAILED) &&(!ApprovalDocument.get().containsDecisionCode(activity.REJECTED))
Script
SET_ROLE
Approval
ROLE_APPROVER
Name SetRoleScriptToRoleApproverApproval
Description Set role script to role approver approval
Custom Condition true
Approval
ROLE_APPROVER
Script
SET_APPROVAL_DECISION
Name RoleApproverApprovalToSetApprovalDecisionScript
Description Role approver approval to set approval decision script
Custom Condition true
RECERTMAIL
Extension
REMEDIATE_ACCTS_GROUPS
Name mailToRemediateAccts
Description Mail node to remediate accounts, groups, and accesses
Custom Condition true
Extension
REMEDIATE_ACCTS_GROUPS
Extension
REMEDIATE_PERSON_ROLES
Name remediateAcctsToRemediateRoles
Description Remediate accounts, groups, and accesses to remediate roles
Custom Condition true
Extension
REMEDIATE_PERSON_ROLES
End Name remediateRolesToEnd
Description Remediate roles to end node
Custom Condition true
Extension
UPDATE_RECERTIFICATION_STATUS_ALL_APPROVED
End Name updateStatusToEnd
Description Update recertification status to end node
Custom Condition true
Extension
UPDATE_RECERTIFICATION_STATUS_EMPTY
End Name updateStatusEmptyToEnd
Description Update status for empty document to end node
Custom Condition true
Table 91 identifies the relevant data used in the simple approval node.
Table 91. Relevant DataID Type
ApprovalDocument PackagedApprovalDocument
Roles List
RoleHolder OrgRole
TemporaryDocument PackagedApprovalDocument
RejectionAction String
result String
OnlyRoles String
RolesThere String
Sample workflow: access owner approvalIn this scenario, an organization has a policy that requires access to be provisionedfor a user to access an application.
Chapter 11. Workflow management 415

Note that this example applies only to group accesses. It does not apply to rolesthat are exposed as accesses. See ${ISIM_HOME}/extensions/6.0/examples/workflow/roleApproval/index.html for examples of configuration changes neededto require or skip access owner (or other) approval for role-based examples.
The access request must be approved by the access owner. The request forapproval is sent to the access owner, who has two full days to approve the request.The access owner might not respond within the allotted period. In that case, therequest is removed from the task list of the access owner and is escalated to theservice owner. The service owner then has two full days to act on the request. Ifthe service owner fails to act on the request within the allotted time, the requestfails, and is canceled by the system.
The access owner or the service owner might act on the request within the allottedtime period. An Approve response sets the process result to Approved and a Rejectresponse sets the process result to Rejected. An Approved result provisions theaccess and logs the process activity in the audit log. A Rejected result cancels theprocess and logs the rejection in the audit log.
The graphic demonstrates this business case with the default script nodesRETURN_APPROVED and RETURN_REJECTED, which set the process resultbased upon participant response. The table identifies the workflow node propertiesand their values for the workflow.
Table 92. Node properties: Sample workflow for access request
Node Feature Value
Start Activity ID Start
Split Type AND
JavaScript N/A
Approval Activity ID AccessOwnerApproval
Participant Access Owner
Escalation Participant Service Owner
Escalation Limit 2 days
Join Type AND
Split Type AND
Entity Type UserAccess
Start AccessOwnerApproval
RETURN_APPROVED
RETURN_REJECTED
End
Approval
Script
Script
Figure 10. Sample workflow for access request
416 IBM Security Identity Manager Version 6.0.0.18: Administration Topics

Table 92. Node properties: Sample workflow for access request (continued)
Node Feature Value
RETURNED_APPROVED Activity ID RETURNED_APPROVED
Join Type AND
Split Type AND
JavaScript [Custom]
process.setResult("AA")
RETURN_REJECTED Activity ID RETURN_REJECTED
Join Type AND
Split Type AND
JavaScript [Custom]
process.setResult("AR")
Chapter 11. Workflow management 417

418 IBM Security Identity Manager Version 6.0.0.18: Administration Topics

Chapter 12. Activity administration
An activity is the smallest unit of work in a workflow. For a user assigned to theactivity, it represents a task to perform.
Collectively, the activities assigned to you represent your "to-do" list. You canperform the following actions with an activity assigned to you:v view itv complete itv lock it (to claim exclusive access to completing it)v assign it to another userv delegate it to another user
Depending on the workflow type and configuration, if you do not complete anactivity within a defined time, the activity may be escalated to another user.
Administrators can view their own activities and activities that belong to anotheruser. Depending on the workflow and the policies affecting the workflow,administrators may also be able to complete, lock, reassign, or delegate activitiesthat belong to another user.
Access and permissions
Your options for working with activities appear in the Manage Activities section ofthe navigation tree. You can view activities and perform actions on them asdefined by system policies and permissions, including those defined within aworkflow. Contact your system administrator if you encounter issues in workingwith activities.
Viewing activitiesYou can view a list of to-do items that require action.
About this task
Activities that you can view are part of workflow processes that require yourparticipation in order to proceed.
The View Activities page contains the following item types:v Approval requestsv Recertification requestsv Work order requestsv Requests for Information (RFI)v Policy Compliance alerts
From this page you work with the activities you select.
Procedure1. In the navigation tree, select Manage Activities > View Activities.2. On the View Activities page, click Refresh to update the Activities table.
419

3. To view the details of an activity, click the activity. The information about theactivity is read-only.
4. Click Close to close the activity details.5. When you are done reviewing activities, click Close.
Viewing activities for a userYou can view activities for other users if you have the appropriate permissions.
Procedure1. In the navigation tree, select Manage Activities > View Activities by User.2. On the Select Account page, type the user ID in the User ID field and then
click Search.3. In the ITIM Accounts table, select the accounts that you want to view activities
for. These activities are associated with a specific user ID and activity owner.4. Click Continue.5. On the View Activities by User page, click the activity to view information
about the activity. The information about the activity is read-only.6. Click Close to close the activity details.7. When you are done reviewing activities for a user, click Close.
Locking an activityLock an activity to claim exclusive access to working with it. When you lock anactivity, other users cannot act on it.
About this task
Activities that are assigned to you are displayed in your activities list. In somecases, you might be only one of many participants who are permitted to completethe activity. For items that are assigned to multiple people, you can select one ormore activities and lock them. Use the lock to act on the item and prevent othersfrom duplicating or otherwise conflicting with your efforts. Locked items aredisplayed as locked in the queues of other participants. Only the lock owner or asystem administrator can unlock them.
Lock actions are an audited process. If the lock owner is removed from the system,their locks are also removed.
Procedure1. In the navigation tree, select Manage Activities > View Activities.2. Select one or more activities, then click Lock to lock the activities.
Unlocking an activityYou can unlock activities that you locked. Once it is unlocked, an activity can becompleted by other users.
About this task
Locked items are displayed as locked in your activities list and in the activities listsof other participants. Only the lock owner or a system administrator can unlock alocked activity.
420 IBM Security Identity Manager Version 6.0.0.18: Administration Topics

To unlock an activity, complete these steps:
Procedure1. In the navigation tree, select Manage Activities > View Activities.2. Select one or more locked activities, then click Unlock to unlock the activities.
Delegating activitiesYou can delegate activities for completion.
To delegate activities from one user to another user, the user you are delegating tomust have authorization from the system administrator to manage activities. If youare delegating activities for yourself, you must have both read and write Delegateaccess control item attribute permissions set to Grant. The logged-in user musthave the access control item permission to write the delegate attribute of the userwho is delegated.
You can add or delete delegation schedules for the user whose activities you aredelegating. Adding a delegation schedule requires you to select a user who canmanage activities and specify a time period in which to delegate activities. You canset up multiple delegation schedules for multiple delegates, but time periodscannot overlap. If you already delegated activities and want to turn off delegation,delete the delegation schedule.
Delegation does not affect the escalation period for an activity. That is, it does notrestart the escalation period.
Creating a delegation scheduleYou can delegate your to-do items to another user during a time when you are notavailable to manage them by creating delegation schedules.
About this task
Your activities can be delegated only to one user. Your activities might bedelegated to one user. If you delegate them to another user without stopping thefirst delegation, the second delegation replaces the first one.
Delegation does not affect the escalation period for an activity. That is, it does notrestart the escalation period.
Procedure1. In the navigation tree, select Manage Activities > Manage Delegation
Schedules.2. On the Manage Delegation Schedules page, click Add to create a delegation
schedule.3. On the Setup Delegation page, click Search to find a user.4. On the Select Delegate Account page, complete these steps:
a. Type information about a user in the User ID field and click Search.b. In the Accounts table, click the name of the user whose account you want to
delegate your activities to, then click OK.5. On the Setup Delegation page, click the calendar and clock icons to choose a
date and time for starting and ending the delegation, then click OK.6. On the Success page, click Close.
Chapter 12. Activity administration 421

Changing delegation schedulesYou can change your current delegation schedule.
About this task
If you change a delegation schedule, you are only allowed to change the scheduleand not the delegation owner.
Delegation does not affect the escalation period for an activity. That is, it does notrestart escalation period.
Procedure1. In the navigation tree, select Manage Activities > Manage Delegation
Schedules.2. On the Manage Delegation Schedules page, select the delegation schedule you
want to change and click Change to modify the delegation schedule.3. On the Setup Delegation page, click the calendar and clock icons to choose a
new date and time for starting and ending the delegation. After you set thetimes, click OK.
4. On the Success page, click Close.
Deleting delegation schedulesYou can delete or cancel delegation schedules.
About this task
When you delete an active delegation, you are stopping the current delegation.
Deleting a delegation does not affect the escalation period for an activity. That is, itdoes not restart the escalation period.
Procedure1. From the navigation tree, select Manage Activities > Manage Delegation
Schedules.2. On the Manage Delegation Schedules page, select the delegation schedule you
want to remove, then click Delete.3. On the Confirm page, click Delete.4. On the Success page, click Close.
Assigning activities to another userYou can assign activities to other users for completion.
About this task
A person can be designated as the new owner of the activity if they are aparticipant of the selected activity as an individual. A new owner of an activity canbe a member of a relevant group, such as a service owner. For example, you mightassign an activity to another person who is listed as a required approver for theactivity.
To assign an activity to another user, complete these steps:
422 IBM Security Identity Manager Version 6.0.0.18: Administration Topics

Procedure1. In the navigation tree, select Manage Activities > View Activities.2. Select one or more activities, then click Assign.3. Select an authorized user from the table, then click Assign. Only authorized
users are displayed in this table for selection.4. On the Success page, click Close.
Requests and activitiesRequests initiate a workflow or a work order for manual service operations.
There are many different types of requests that can occur, such as requestingchanges to accounts, adding and modifying users, and changing policies. Somerequests might require the completion of an activity by another user, such as anapproval or recertification. Other requests can be completed without any furtheractions.
Note: Requests that do not initiate a workflow, such as Orphan Account Requests,do not get displayed in the pending or completed requests.
Requests can involve several steps to complete. Each step might require differentusers to complete an action. You can view the status of a request by viewingpending requests or all requests that are both pending and completed.
Completed requests are requests that completed processing. The completion of arequest does not mean that it was successful. Requests might fail, might completewith a warning message, or might be canceled while in a pending state.
Pending requests are requests that are submitted but are not finished. Theserequests might be in the process of running or might require the completion of aworkflow activity, such as a recertification or approval activity.
EscalationThe escalation period specifies the period within which an assigned party must doan activity before it is designated to a specified escalation participant.
Escalation is the period in which the participant must process approvals, requestsfor information, work orders, compliance alerts, and recertifications. If theparticipant does not complete the activity by the escalation date, the activity is sentto the escalation participant and the escalation period restarts. Activity isterminated if none of the participants act on it. Activity is sent to the systemadministrator only if participant resolution fails.
Escalation behavior is controlled through properties on approval, RFI, or workorder nodes. The following properties affect escalation behavior:v Skip Escalation
v No Timeout Action
v Complete on Timeout
The following figure shows a flow diagram that illustrates how each propertyaffects the process.
Chapter 12. Activity administration 423

The following list describes escalation process that is pictured in the diagram.1. Request arrivesv If a participant handles the request by accepting it or rejecting it, the activity
ends in the corresponding state.v If the request times out, the system checks the Skip Escalation property.
2. Check for skipping escalation.v If Skip Escalation is set, the activity continues and checks the No Timeout
Action property.v If Skip Escalation is not set, the systems checks for the escalation participant.
If it can identify the configured escalation participant, the activity is put intoPENDING state for the escalation participant to handle. If no escalationparticipant is configured for the activity or the check for the escalationparticipant fails, the activity ends with state TERMINATED/FAILED.
3. Check for timeout action. If Skip Escalation is set or the activity times out ofthe PENDING state for escalation, the system checks the No Timeout Actionproperty.v If FALSE, the system proceeds and checks the Complete On Timeout
property.v If TRUE, the activity is placed in PENDING state. A participant can approve
or reject the request.4. Check for what to do when the activity times out.v If Complete On Timeout is set (TRUE), the postscript for the activity runs
and the activity state is set to COMPLETED/TIMEOUT.
Send timeoutnotification
Executepostscript
PENDING
PENDINGescalated
COMPLETEDREJECTED
COMPLETEDAPPROVED
COMPLETEDTIMEOUT
Legend
STATE
System action
Property setting
Process flow
User actionTERMINATEDFAILED
TRUEFALSE
Skip Escalation?
Complete OnTimeout
?
INITIAL
PENDINGuntil process ends
approve orreject
approve orreject
approve orreject
No Timeout Action?
Escalation participant?
TRUE
TRUE
FALSE
timeout
timeout
FALSE
FALSE
TRUE
424 IBM Security Identity Manager Version 6.0.0.18: Administration Topics
v If Complete On Timeout is not set (FALSE), the system sends a timeoutnotification and the activity state is set to TERMINATED/FAILED.
Activity typesAn activity in your activities list may be one of several types.
Activities that you can view are part of workflow processes that require yourparticipation in order to proceed.
The View Activities page contains the following types of activity:v Approval activitiesv Requests for Information (RFI) activitiesv Work order activitiesv Compliance alert activitiesv Recertification activities
From this page you work with the activities you select.
Approval activitiesAn approval activity is prompts the assigned user to approve or reject a request.
If the request is approved, the next activity in the workflow is processed. If,however, the request is rejected, the workflow stops and no additional activities areprocessed.
If you submit a request that must be approved, the approval activity is sent to allparticipants in the assigned group except to the user who makes the request. Youmight be a member of the group who normally approves requests. If you are theperson who makes the request, you do not see the approval activity in youractivities list.
If a timeout occurs, the Activity Result Summary Code is set to SF (failed). If aparticipant resolution failure occurs, the Activity Result Summary Code can takethe following values:
AA (approved)If the request is submitted by the system administrator, the request isautomatically approved by the system administrator. The approval occurseven though the system administrator is not explicitly set as an escalationparticipant. The result is set to Approved.
SF (failed)The Approval activity ends with result set to Failed, if:v The request is submitted by a non-admin user.v The escalation participant is not defined at all.
Note: This result is true even when the requester is the systemadministrator.
v The participant resolution failed.
If the property enrole.workflow.skipapprovalforrequester is set to true inenRole.properties file and the requester is identified as one of the participant users,the approval is completely skipped. The Activity Result Summary Code is set to AA
Chapter 12. Activity administration 425

(approved). When an RFI activity times out or fails because of participantresolution failure, the Activity Result Summary Code is set to SF (failed) for bothcases.
Approval statesWhen you view the status of an approval, the approval activity is in one of severalstates.
The states of an approval activity can be viewed only by the user who submittedthe request.
Table 93. States of approval activities
Approval activity state Description
Approved The account request was approved, and thenext activity in the workflow is processed.
Rejected The account request was rejected. Noadditional activities are processed.
Pending No action was taken to complete theapproval.
Completing an approval activityYou can approve or reject approval activities.
Procedure1. In the navigation tree, select Manage Activities > View Activities.2. On the View Activities page, click the name of the approval activity.3. On the Approval Details page, review the approval details, enter a comment for
the approval or rejection of the request, then click Approve or Reject.4. On the Success page, click Close.
Request for information activitiesA request for information activity prompts you to supply information about arequest.
Request-for-information activities in your activities list are part of workflowprocesses that require your response before they can be completed. For example, auser submits an account request but does not have the knowledge required tospecify a value for a particular attribute. The system administrator creates aprocess to send the request to a more knowledgeable user. That user can thenspecify the appropriate value for the attribute.
Request for information (RFI) statesRequest for information (RFI) activities have several states.
The states of an RFI activity can be viewed only by the user who submitted therequest. The following table shows a description of each RFI state.
Table 94. Descriptions of the states of RFIs
Request state Description
Canceled A pending request is canceled and any action items associatedwith the request are canceled.
426 IBM Security Identity Manager Version 6.0.0.18: Administration Topics

Table 94. Descriptions of the states of RFIs (continued)
Request state Description
Escalated Because the original approver did not complete the RFI in theallotted amount of time, the RFI was sent to another approver.
Failed The activity could not be completed. No further activity occurs.
Participant ResolutionFailed
The activity could not be completed because the approver wasdeleted from the system.
Pending No action was taken to complete the activity.
Submitted The activity was submitted for approval.
Success The RFI was successfully completed.
Terminated The process run fails with an unknown exception.
Timeout The specified amount of time to complete an activity passed. Theactivity is completed and a new activity is created and sent tothe escalation participant.
Warning The activity was partially completed. A problem occurred,preventing the work order from being successfully completed.
Related reference:ACTIVITY table
Completing a request for information activityYou can provide information for request-for-information activities.
Procedure1. In the navigation tree, select Manage Activities > View Activities.2. On the View Activities page, click the name of the request for information
activity.3. On the RFI Details page, review the request for information details, then click
Provide Information.4. On the Provide Information page, provide information for the request as
needed, then click Submit.5. On the Success page, click Close.
Work order activitiesWork order activities are part of workflow processes that require your response inorder to be completed.
Work order activities are displayed in your to-do list and consist of action itemsthat you must complete outside the system. For example, you can be assigned awork order to have an office key made for a new employee. After you completethe work order activity, you enter the outcome of the work order when youcomplete the activity in IBM Security Identity Manager.
Work order statesWhen you view the status of a work order, the work order activity is in one ofseveral states.
The states of a work order activity can be viewed only by the user who submittedthe request. Table 95 on page 428 gives a description of each work order state.
Chapter 12. Activity administration 427
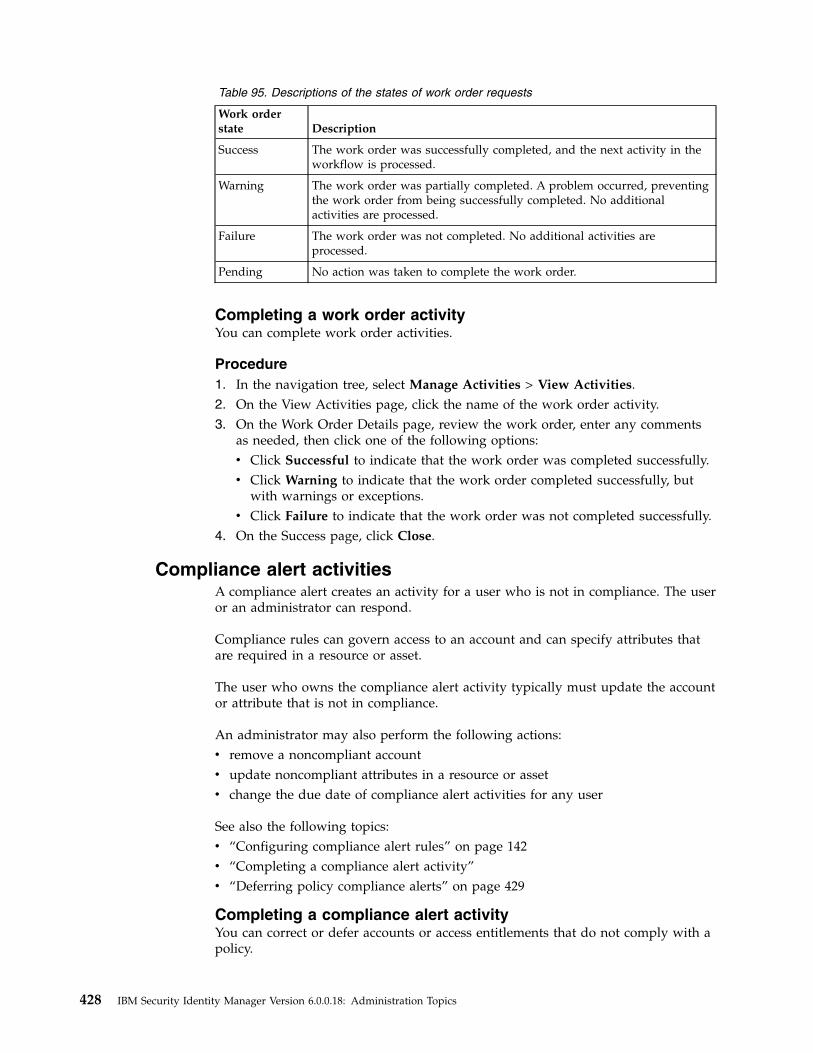
Table 95. Descriptions of the states of work order requests
Work orderstate Description
Success The work order was successfully completed, and the next activity in theworkflow is processed.
Warning The work order was partially completed. A problem occurred, preventingthe work order from being successfully completed. No additionalactivities are processed.
Failure The work order was not completed. No additional activities areprocessed.
Pending No action was taken to complete the work order.
Completing a work order activityYou can complete work order activities.
Procedure1. In the navigation tree, select Manage Activities > View Activities.2. On the View Activities page, click the name of the work order activity.3. On the Work Order Details page, review the work order, enter any comments
as needed, then click one of the following options:v Click Successful to indicate that the work order was completed successfully.v Click Warning to indicate that the work order completed successfully, but
with warnings or exceptions.v Click Failure to indicate that the work order was not completed successfully.
4. On the Success page, click Close.
Compliance alert activitiesA compliance alert creates an activity for a user who is not in compliance. The useror an administrator can respond.
Compliance rules can govern access to an account and can specify attributes thatare required in a resource or asset.
The user who owns the compliance alert activity typically must update the accountor attribute that is not in compliance.
An administrator may also perform the following actions:v remove a noncompliant accountv update noncompliant attributes in a resource or assetv change the due date of compliance alert activities for any user
See also the following topics:v “Configuring compliance alert rules” on page 142v “Completing a compliance alert activity”v “Deferring policy compliance alerts” on page 429
Completing a compliance alert activityYou can correct or defer accounts or access entitlements that do not comply with apolicy.
428 IBM Security Identity Manager Version 6.0.0.18: Administration Topics

About this task
Policy compliance alerts can be displayed when accounts or access entitlements donot comply with a policy. For example, you have an existing account to use anemployee records database. An administrator creates a policy that states that youmust be assigned to the role of HRManager to access the records. To bring theaccount back into compliance, you must be assigned the role of HRManager.
You might need to defer policy compliance alerts. In the example, assume that youcannot assign the HRManager role to each account without first verifying that theowner of each account belongs in the role of HRManager. You determine that theamount of time it takes to verify that each account owner exceeds the escalationperiod of the alert, at which time, the alert is forwarded. You can decide to deferthe compliance alert, which keeps the item in your activities list for an extendedperiod.
You can correct or defer multiple policy compliance alerts at one time if they aregrouped together in your activities list.
Policy compliance alerts listed in your activities list are part of workflow processesthat require your response before they can complete.
Procedure1. In the navigation tree, select Manage Activities > View Activities.2. On the View Activities page, click the name of the compliance alert activity.3. On the Compliance Alert Details page, review the compliance alert, enter any
comments as needed, then click one of the following options:v Click Correct to correct the compliance alert.v Click Defer to defer the compliance alert to a later time.
4. On the Success page, click Close.
Deferring policy compliance alertsYou can defer policy compliance alerts in your activities list.
About this task
You might need to defer policy compliance alerts. For example, assume that youare responsible for accounts used to access an employee records database. Anadministrator creates a policy that states that all accounts must be assigned to therole of HRManager to access the records. The accounts are currently not compliantwith the policy. In order to bring the accounts back into compliance, they eachmust be assigned the role of HRManager. Now assume that you cannot assign theHRManager role to each account without first verifying that each account ownerbelongs in the role of HRManager. You determine that the amount of time requiredto verify each account owner is greater than the escalation period of the alert.Escalation forwards the alert. You decide to defer the compliance alert, whichkeeps the item in your activities list for an extended period.
You can defer multiple policy compliance alerts at one time if they are groupedtogether in your activities list.
Procedure1. In the navigation tree, select Manage Activities > View Activities.2. Click Defer.
Chapter 12. Activity administration 429

3. On the Success page, click Close.
Recertification activitiesRecertification activities are part of workflow processes that require your responsebefore they can be complete.
Recertification activities are displayed in your activities list. Three types ofrecertification activities exist:
AccessCertifies whether an access is still required.
AccountCertifies whether an account is still required.
User Certifies whether the roles, accounts, and accesses for a specific user arestill required.
Completing a recertification activityYou can complete recertification activities.
Procedure1. In the navigation tree, select Manage Activities > View Activities.2. On the View Activities page, click the name of the recertification activity.3. On the Approval Details page, review the recertification, enter any comments
as needed, then click Approve or Reject to approve or reject the recertification.4. On the Success page, click Close.
430 IBM Security Identity Manager Version 6.0.0.18: Administration Topics

Chapter 13. Requests administration
The View Requests task indicates the progress and completion of submittedchanges and requests that you and other users make to the system.
Request status is available through the View Requests task from the mainnavigation tree. You can choose to filter your search for requests by user or service.To view pending requests, click View Requests > View Pending Requests by Useror View Requests > View Pending Requests by Service. You can also choose toview the status of all pending and completed requests from the View Requests >View All Requests task.
Requests and activitiesRequests initiate a workflow or a work order for manual service operations.
There are many different types of requests that can occur, such as requestingchanges to accounts, adding and modifying users, and changing policies. Somerequests might require the completion of an activity by another user, such as anapproval or recertification. Other requests can be completed without any furtheractions.
Note: Requests that do not initiate a workflow, such as Orphan Account Requests,do not get displayed in the pending or completed requests.
Requests can involve several steps to complete. Each step might require differentusers to complete an action. You can view the status of a request by viewingpending requests or all requests that are both pending and completed.
Completed requests are requests that completed processing. The completion of arequest does not mean that it was successful. Requests might fail, might completewith a warning message, or might be canceled while in a pending state.
Pending requests are requests that are submitted but are not finished. Theserequests might be in the process of running or might require the completion of aworkflow activity, such as a recertification or approval activity.
Request statesWhen you view the status of a request, the request might be in one of severalstates.
The states of a request can be viewed only by the user who submitted the request.The following table provides a description of each request state.
Table 96. Descriptions of the states of requests
Request state Description
Not started The request was not started.
In process The request is running and is not waiting for any activity for whichthere is a participant.
Pending approval The request requires approval, and no action is taken to complete therequest.
431

Table 96. Descriptions of the states of requests (continued)
Request state Description
Pendinginformation
The request requires that an information provider completes a requestfor information (RFI) activity.
Pending response The request requires that a responder complete a workflow activity,such as a work order or compliance alert.
Canceled The request is canceled.
Successful The request was completed successfully.
Completed withwarning
The request was partially completed. A problem occurred, preventingthe request from being successfully completed.
Failed The request was not able to complete. No further activity can occur.
This section describes the workflow request status and its indicators and how therequest status indicator works, including few examples.
Status A status of a request is associated with several child requests or processes,and each child request has a status of its own. The status of the parentrequest depends on the status of the child requests.
Errors An error occurs when a subsequent child request failed or wasrejected. For example, when an incorrect URL is specified forreconciliation of the service or when an approver rejects a request.
WarningsA warning occurs when one or more child requests failed. Forexample, you want to change passwords of five accountssimultaneously. However, even if one change password requestfailed and other four change password requests succeeded, thestatus of the parent request is Warning.
Note: A warning might also include activities that are marked asTerminated. For example, two approvers are involved in anapproval workflow and none of them approve the request withinthe specified time period. Then the approval activity is marked asTerminated and the status of the parent request is Warning.
SuccessA request is successful in one of the following situations:v When all the child requests are successfulv When the primary child requests are successful
When the primary child requests are successful, it might alsoinclude approval activities that are marked as Approved. Forexample, two approvers are involved in an approval workflow andthe first approver approves the request. In this case, the status ofthe approval activity is Approved, but the status of the parentrequest is Success.
PendingA pending request occurs when one or more child requests are in apending state. For example, you request to create an account thatrequires approval workflow. In this case, if the approval activity ispending, then the status of the parent request is also Pending.
432 IBM Security Identity Manager Version 6.0.0.18: Administration Topics

Note: Pending requests might also include activities that aremarked as Escalated. For example, a user requests an account on aservice with an associated approval workflow that involves twoapprovers. If the first approver fails to approve the request withinthe specified time period, the status of the approval activity isEscalated. But the status of the parent request is Pending.
Viewing all requestsYou can view all the requests that users submitted.
Before you begin
Depending on how your system administrator customized your system, you mightnot have access to this task. To obtain access to this task or to have someonecomplete it for you, contact your system administrator.
About this task
Use the View All Requests page to use various search criteria to find all requestsare submitted to the system, regardless of their completion status.
View All Requests is only intended for users that have full, unrestricted access tothe audit trail. There is no ACI checking in this view. Use caution when exposingthis task in a user's view.
Procedure1. From the navigation tree, select View Requests > View All Requests.2. On the View All Requests page, complete these steps:
a. Select a request type from the list.b. Select a time interval.c. Optionally, click the icon ( ) next to More Search Criteria to filter by
status, date request was completed or submitted, service, user, or requestID.
d. Click Search Requests when you are done specifying search criteria.3. To view the details of a request, click the request type. The information about
the request is read-only.4. Click the icon ( ) below the Process Data section to view further information
about the initial process data of the request.5. On the View All Requests page, click the root structure to view the request
details. The information about the request is read-only.6. Click Close to close the View All Requests page.7. When you are done reviewing the requests, click Close.
Viewing pending requests of usersYou can view those requests that are submitted by a user, but are not completed.
Before you begin
Depending on how your system administrator customized your system, you mightnot have access to this task. To obtain access to this task or to have someonecomplete it for you, contact your system administrator.
Chapter 13. Requests administration 433

About this task
Use the View Pending Requests by User page to search by user information to findrequests that are submitted to the system, but are not yet completed.
View Pending Requests by User is intended for the help desk administrators andmanagers that need to view the audit trail related to specific users. ACIs are onlyapplied when initially searching for a user. ACIs are not applied to any of therequest data shown as a result of selecting a user.
Procedure1. From the navigation tree, select View Requests > View Pending Requests by
User.2. On the View Pending Requests by User page, click Search to specify a user in
the User name field.3. On the Select a User page, complete these steps:
a. Type information about the user in the Value field, select an attribute fromthe Attribute list, and then click Search.
b. In the Users table, select the user whose requests you want to view.c. Click OK.
4. Select the time period that you want to search. Specify a start date in the StartDate field and an end date in the End Date field, and then click SearchRequests.
5. To view the details of a request, click the request type. The information aboutthe request is read-only.
6. Click the icon ( ) below the Process Data section to view further informationabout the initial process data of the request.
7. On the View Pending Requests by User page, click the root structure to viewthe request details. The information about the request is read-only.
8. Click Close to close the View Pending Requests by User page.9. When you are done reviewing the pending requests of others, click Close.
Viewing all requests of usersYou can view all the requests that a user submitted.
Before you begin
Depending on how your system administrator customized your system, you mightnot have access to this task. To obtain access to this task or to have someonecomplete it for you, contact your system administrator.
About this task
Use the View All Requests by User page to search by user information to find allrequests that are submitted to the system, regardless of their completion status.
View All Requests by User is intended for the help desk administrators andmanagers that need to view the audit trail related to specific users. ACIs are onlyapplied when initially searching for a user. ACIs are not applied to any of therequest data shown as a result of selecting a user.
434 IBM Security Identity Manager Version 6.0.0.18: Administration Topics

Procedure1. From the navigation tree, select View Requests > View All Requests by User.2. On the View All Requests by User page, click Search to specify a user in the
User name field.3. On the Select a User page, complete these steps:
a. Type information about the user in the Value field, select an attribute fromthe Attribute list, and then click Search.
b. In the Users table, select the user whose requests you want to view.c. Click OK.
4. Select the time period that you want to search. Specify a start date in the StartDate field and an end date in the End Date field. Optionally, filter for requeststatus in the Status field, and then click Search Requests.
5. To view the details of a request, click the request type. The information aboutthe request is read-only.
6. Click the icon ( ) below the Process Data section to view further informationabout the initial process data of the request.
7. On the View All Requests by User page, click the root structure to view therequest details. The information about the request is read-only.
8. Click Close to close the View All Requests by User page.9. When you are done reviewing the requests, click Close.
Viewing pending requests by serviceYou can view all pending requests that are submitted for a particular service.
Before you begin
Depending on how your system administrator customized your system, you mightnot have access to this task. To obtain access to this task or to have someonecomplete it for you, contact your system administrator.
About this task
Use the View Pending Requests by Service page to search by service information tofind requests that are submitted to the system, but are not yet completed.
View Pending Requests by Service is intended for service and application ownersthat need to view the audit trail related to services they administer. ACIs are onlyapplied when initially searching for a service. ACIs are not applied to any of therequest data shown as a result of selecting a service.
Procedure1. From the navigation tree, select View Requests > View Pending Requests by
Service.2. On the View Pending Requests by Service page, click Search to specify a
service in the Service name field.3. On the Select a Service page, complete these steps:
a. Type information about the service in the Service information field. Select aservice type from the Service Type list and then click Search.
b. In the Services table, select the service whose requests you want to view.c. Click OK.
Chapter 13. Requests administration 435

4. Select the time period that you want to search. Specify a start date in the StartDate field and an end date in the End Date field and then click SearchRequests.
5. To view the details of a request, click the request type. The information aboutthe request is read-only.
6. Click the icon ( ) below the Process Data section to view further informationabout the initial process data of the request.
7. On the View Pending Requests By Service page, click the root structure to viewthe request details. The information about the request is read-only.
8. Click Close to close the View Pending Requests by Service page.9. When you are done reviewing the requests for a service, click Close.
Viewing all requests by serviceYou can view all the requests that are submitted for a particular service.
Before you begin
Depending on how your system administrator customized your system, you mightnot have access to this task. To obtain access to this task or to have someonecomplete it for you, contact your system administrator.
About this task
Use the View All Requests by Service page to search by service information to findall requests that are submitted to the system, regardless of their completion status.
View All Requests by Service is intended for service and application owners thatneed to view the audit trail related to services they administer. ACIs are onlyapplied when initially searching for a service. ACIs are not applied to any of therequest data shown as a result of selecting a service.
Procedure1. From the navigation tree, select View Requests > View All Requests by
Service.2. On the View All Requests by Service page, click Search to specify a service in
the Service name field.3. On the Select a Service page, complete these steps:
a. Type information about the service in the Service information field, select aservice type from the Service Type list, and then click Search.
b. In the Services table, select the service whose requests you want to view.c. Click OK.
4. Select the time period that you want to search. Specify a start date in the StartDate field and an end date in the End Date field. Optionally, filter for requeststatus in the Status field, and then click Search Requests.
5. To view the details of a request, click the request type. The information aboutthe request is read-only.
6. Click the icon ( ) below the Process Data section to view further informationabout the initial process data of the request.
7. On the View All Requests By Service page, click the root structure to view therequest details. The information about the request is read-only.
8. Click Close to close the View All Requests by Service page.
436 IBM Security Identity Manager Version 6.0.0.18: Administration Topics

9. When you are done reviewing the requests for a service, click Close.
Canceling pending requestsYou can cancel requests that are not completed.
Before you begin
Depending on how your system administrator customized your system, you mightnot have access to this task. To obtain access to this task or to have someonecomplete it for you, contact your system administrator.
About this task
Pending requests are requests that are submitted to the system, but are not yetcompleted. When a pending request is canceled, the request is canceled. Any actionitems associated with the request are canceled and the request status is changed tocanceled.
Note: When you cancel a request, the workflow is interrupted and is not fullyprocessed.
Administrators can also choose to search for requests to cancel from the navigationtree by selecting View Requests > View Pending Requests by Service and ViewRequests > View Pending Requests by User.
Depending on how your system administrator customized your system, you mightnot have access to this task. To obtain access to this task or to have someonecomplete it for you, contact your system administrator.
Procedure1. From the main navigation tree, click View Requests > View All Requests.2. On the View All Requests page, complete these steps:
a. Click the icon ( ) next to More Search Criteria.b. Under Status, clear all items except Pending.c. Optionally, you can filter by date, service, and user to narrow your options.d. Click Search Requests to display a list of pending requests.e. Select the request that you would like to cancel, and click Cancel Request.
3. On the Confirm page, click Cancel Requests.4. On the Success page, click Close.
Results
When a request is canceled, an email notification is sent to the requester, providedthat:v Notification is not disabled. (By default, notification is enabled.)v The email server and other properties are configured in the
enroleMail.properties file.v The requester has a valid email address.
The email notification lists the person who canceled the request, the date and timethat the request was canceled, and the reason that the request was canceled.Related tasks:
Chapter 13. Requests administration 437

“Manually applying the email notification template changes for canceling arequest” on page 397You can use the Workflow Notification Properties page to manually addinformation about canceling a request to the email notification template. When youinstall the IBM Security Identity Manager Fix Pack 6.0.0.3, the email notificationtemplate content that includes information about canceling a request is notautomatically applied. The template changes that are available with Fix Pack 6.0.0.3are not automatically applied so that the installation process does not overwriteany custom changes that you might have made to the email templates.Related reference:“Request for information (RFI) states” on page 426Request for information (RFI) activities have several states.
438 IBM Security Identity Manager Version 6.0.0.18: Administration Topics

Index
Aaccess
clearing from service instance 148configuration, namespace 272configuration, query items 273configuration, query subjects 272deleting 17management 15overview 15requesting 16type, creating, based on role 86viewing 17
access audithistory, reports 189namespace 268query items 269query subjects 268report models 186
access audit (Deprecated)namespace 263query items 264query subjects 263
access controloverview 53reports 180
access control itemsadministrator domains 41changing 60creating 59default 54definition 53deleting 61
access dataCSV
formats 66, 104, 157values 66, 104, 157
access definitionfilters 188report, base icon URL path 196
access informationconfiguring for a group 163configuring for a role 77configuring for a service 107
access reports, defining 181account
audit history, reports 190audit, namespace 213audit, query items 214audit, query subjects 213changing details 12configuration, namespace 217configuration, query items 219defaults, adding to service 131defaults, changing 132defaults, global 135defaults, management 130defaults, removing from service 134management on a service 119status filters 188types 9viewing details 12
account informationmodifying 122
account information, editing 122account recertification
displaying status 144overview 144
accounts 9active, inactive 9adding default values 131assigning users 127changing 122changing defaults in a service 122deleting 13, 123displaying 120editing 122modifying 122orphan 128overview 9, 119policy enforcement 351recertification overview 144recertification, displaying status 144report models 185requesting 10, 121restoring 14, 126suspending 13, 124viewing 11
ACIsadministrator domains 41changing 60creating 59default 54deleting 61report filters 325reports 325
activitiesadministration overview 419approval 425, 426assigning 422compliance 428compliance alert 429deferring compliance 429definition 419delegate 22, 421delegating 23delegating, changing schedule 422delegating, creating schedule 421delegating, overview 22, 421delegating, stopping 422locking 420overview 22, 421recertification 361, 430request for information 426, 427RFI 427unlocking 420viewing 419viewing user 420work order 427, 428
activity reminder in workflow 394administration
creating nodes, organizational tree 42organization 41
administratoraccess restriction 180domains, ACIs 41
adoptionchanging policies 331creating policies 328deleting policies 332orphan account policies 333policies
attribute matching 333policies overview 327policies, JavaScript examples 329policy reconciliation 333writing policies 329
aliases 1approvals
activities 425completing 426states 426
approveSoDViolation 374assignment attributes 72
defining for existing role 75defining when creating role 74setting values 76
attribute matching 333attributes 1, 277
defining assignment for existingrole 75
defining assignment for new role 74mapping 277, 303unmapping 304
auditand security, generating 291history report 189report, example 298
authenticationIBM Cognos reports 176
authorization 53IBM Cognos reports 176
Ccancel request
notification template 397changelog 319child roles
adding to parent role 84managing 83removing from parent role 85
Cognos Business Intelligenceinstallation 171
comma-separated value filereconciliation 117
compliance alert rules, configuring 142connection mode
changing 102enabling 98
console reportsIBM Security Identity Manager 286
content store, creation 172conventions 320
439

CSVdata values, formats 66, 104, 157
CSV filereconciliation 117
custom reportscreating 292generating 295shared access objects 296
custom tables, adding 279custom tasks
changing 51changing task parameters 51defining access 49deleting 53
customizationmodel 279password age rules 348password rules 344
adding customized passwordgenerator 345
adding customized rule 344customized rules and
generator 346report banner 313reports 292
Ddashboard
IBM Security Identity Managerenvironment 191
data sourceIBM Security Identity Manager
Cognos reports 175data synchronization 171
creating a schedule 316deleting a schedule 318modifying a schedule 317overview 314, 315synchronizing data immediately 316
db2admin 38changing password 39
db2inst1 38default values, accounts 131define base icon URL path
access definition report 196delegation schedules
changing 422creating 421deleting 422
domain administrator, creating 42draft provisioning policies 356drill-through reports 176
Eenabling connection mode 98entities 277
mapping 277mapping attributes 277
entitlementsreport filters 191
environment variables settings 173escalation 423
period in workflow 395
exampleaccounts, filters 310audit report check-in 298checking out shared access
credentials 296filters 311person and organization roles 311persons and account, filters 312role and shared access
entitlement 300
Ffilters
access definition 188account status 188accounts 310custom reports 310entitlements report 191persons and account 312separation of duty policy
definition 193services report 193
Framework managerconfiguration 172IBM Cognos 169installation 171
Gglobal account defaults 135globalization, language support 183groups 1
access information 163adding members 153administration overview 151configuring manual service type 116creating 151defining access on 162deleting 161enabling automatic membership 166exporting access data 158importing access data 159modifying attributes 156recertifying access on 165removing members 155viewing members 152
IIBM Cognos
components 279connection 169installation prerequisites, report
models 169objects, report models 184prerequisites, report models 169report server, software
requirements 170reporting framework 168
IBM Security Identity Manager 191Cognos reports troubleshooting 283Cognos reports, data source 175console reports 286
identities 334
identitycreating policies 336definition 334deleting policies 338policies 333policies, changing 338policies, creating 336policies, deleting 338policies, overview 333policies, script 335
Incremental Data Synchronizerchangelog 319conventions 320overview 318starting 320starting, command
interfaceIncremental DataSynchronizer 321
starting, graphical user interface 320tuning 322
ISIM Environment dashboardediting 174refresh interval 174
itimuser 38changing password 38
JJOIN conditions, design reports 312join directive 350
Llanguage preferences, setting 183language support, globalization 183LDAP
creating users 178LDAP namespace
configuration 177ldapdb2 38ldapdb2, changing password 39login
administration 25overview 25setting maximum attempts 25
Mmanagement, account defaults 130management, reconciliation
schedules 109manual connection mode
creating a service 95manual services
changing 103creating 99
members, adding 181
Nnamespace
access audit 268access audit (Deprecated) 263access configuration 272account audit 213
440 IBM Security Identity Manager Version 6.0.0.18: Administration Topics

namespace (continued)account configuration 217provisioning policy audit 226provisioning policy
configuration 229recertification audit 196recertification configuration 206report models 184role audit 233role configuration 236separation of duty audit 243separation of duty configuration 249service audit 259user configuration 251
node treeadministering 41changing 43creating 42deleting 43
notificationescalation in workflow 394in workflow, disabling 396in workflow, enabling 396
notification for passwords 33notification template
cancel request 397
Oorganization
administration 41changing a node 43creating a node 42deleting a node 43node tree 41
organizational rolesaccess information 77adding users to membership 81administration 63assignments 72child, adding to parent role 84child, managing 83child, removing from parent role 85classifying 69creating 65creating access type 86deleting 79displaying role-based access 71exporting access data 67importing access data 68managing users as members 80modifying 65overview 63removing users from membership 82specifying owners 70
orphan accountsaccount reconciliation 333making 128overview 128
overviewdata synchronization 314format 167incremental data synchronizer 318report data synchronization
utility 323reports 167
Ppackages, publishing 279parameter enforcement rules 351password
policies 339password age rules
configuration 347password policies
changing 342creating 340definition 339deleting 344
password policyadding targets 341changing rules 343changing targets 343creating rules 341
password rules, customized logic 346password strength rules 33, 339passwords
adding minimum password age 348administration of system settings 27administration overview 27changing 18, 20changing for db2admin 39changing for itimuser 38changing for ldapdb2 39configuring administrator-defined
questions for 36configuring minimum password
age 347configuring user-defined questions
for 35creating strength rules 33customized rules 344, 347, 348
adding customized logic 346adding customized password
generator 345adding customized rule 344
enabling editing 29enabling resetting 27excluding 37expiration 25forgotten 34hiding generated 28management 18resetting 19, 21setting on user creation 31setting retrieval expiration 32setting the notification method 33showing generated 29synchronization 30
pending requestsviewing by service 435viewing by users 433
person and organization roles filters 311person profiles 1policies
adoption 327changing 331creating 328deleting 332
approving 384changing identity 338creating identity 336definition 327deleting identity 338
policies (continued)enforcing 143identity 333password 339
changing 342creating 340deleting 344
provisioning 350changing 353creating 353deleting 357preview 354
recertification 358changing 369creating 365, 366, 368default notifications 371deleting 370results 363
separation of duty 372, 374, 384ACI operations 374changing 380creating 378default ACI 374deleting 382disabled 372enabled 372enabling the portfolio task 377evaluating 381exemptions 376, 383revoking exemptions 385violations 376, 383
service selectionchange 387create 387delete 388overview 386
policy enforcementcompliance alerts 137configuring enforcement 140definition 351overview 137policy enforcement actions 137policy enforcement alerts 137scheduling on service 143
policy evaluation 376policy management 327portfolio tasks 377provisioning
policies 350report models 185
provisioning policieschanging 353creating 353definition 350deleting 357draft
change 356commit 356create 356
managing by role 357parameter enforcement rules 351preview 354
provisioning policies draft, creating 356provisioning policy audit
namespace 226query items 228query subjects 226
Index 441

provisioning policy configurationnamespace 229query items 230query subjects 230
Qquery items 196
access audit 269access audit (Deprecated) 264access configuration 273account audit 214account configuration 219provisioning policy audit 228provisioning policy
configuration 230recertification audit 198recertification configuration 207role audit 234role configuration 238separation of duty audit 245separation of duty configuration 250service audit 260user configuration 252
query studio 169query subjects 196
access audit 268access audit (Deprecated) 263access configuration 272account audit 213account configuration 217provisioning policy audit 226provisioning policy
configuration 230recertification audit 197recertification configuration 206role audit 233role configuration 236separation of duty audit 244separation of duty configuration 249service audit 259user configuration 251
Rrecertification
account 144activities 361completing 430message templates 362notification 362overview 430report models 184schedule 362
recertification auditnamespace 196query items 198query subjects 197
recertification configurationnamespace 206query items 207query subjects 206
recertification definitionaccess 192account 192subreports 192
recertification definition (continued)user 192
recertification policieschanging 369creating 365, 366, 368default notifications 371deleting 370overview 358results 363
reconciliation 333changing a schedule 114creating a schedule 113deleting a schedule 115deleting reconciliation schedule 115managing schedules 109manual service overview 116overview 109, 111reconciling accounts
immediately 112, 116references
mapping entities 277security configuration 182
regular expression notation,searching 291
relationshipcreating 279modifying 279with existing tables, creating 280
reminder interval in workflow 395removing account defaults 134report
server execution mode 173shared access entitlement
creation 300report banner customization 313report data synchronization utility
overview 323run 323running 323troubleshooting errors 324
report generation 282report models 184
access audit 186accounts 185IBM Cognos objects 184provisioning 185recertification 184roles 185separation of duty 185services 186users 186
report packagedefining access 182importing 174
report parameters and descriptionsaccess approval and rejection 186audit, account 186noncompliant account 186shared access, entitlements by
owner 186shared access, entitlements by
role 186report studio 169reporting framework
reporting model 168static reports 168
reportsaccess audit history 189access control 180access control items 325account audit history 190ACI 325adhocreporting.properties 314audit and security 291audit history report 189configuration files 314custom 295custom reports 310customization 292DatabaseFunctions.conf 314define access 181delete custom templates 295deleting custom templates 295designing, JOIN conditions 312drill-through 176filters 310format 167generate 289, 295generating 289, 290, 291mapping attributes 303modify custom templates 294modifying custom templates 294overview 167requests 289schema mapping 303separation of duty policy
violation 193services 290synchronizing data 315, 316, 317, 318templates 292types 286unmapping attributes 304user and accounts 290user input filters 307user input values 305user recertification history 195
request for informationcompleting 427overview 426states 426
requestsaccounts 121cancelling 437definition 423, 425, 431generating 289overview 423, 425, 431states 431view all 433view all by service 436view pending 433view pending by service 435viewing 431viewing all by service 436viewing all submitted by user 434
restoration, accounts 126retry blocked request 92RFI overview 426role audit
namespace 233query items 234query subjects 233
role configurationnamespace 236
442 IBM Security Identity Manager Version 6.0.0.18: Administration Topics

role configuration (continued)query items 238query subjects 236
role custom report templatescreating 302
roles 1, 63, 72adding users to membership 81assignment attributes 72child, adding to parent role 84child, managing 83child, removing from parent role 85classifying 69creating 65, 181creating access type 86deleting 79displaying role-based access 71exporting access data 67hierarchies 64importing access data 68managing users as members 80modifying 65removing users from membership 82report models 185specifying owners 70
rulescompliance alert, configuring 142configuring, password 347customized logic, password 346customizing password age rule 348customizing, password 344
Ssample workflow
access owner approval 416approval loop 406mail activity 408manager approval of accounts 398multiple approvals 399multiple approvals with loop 402packaged approval 412RFI and subprocess 405sequential approval for user
recertification 409scenario
adding custom tables 279creating a relationship 280customize model 279generating report 282
schedules, delegating 23schema mapping 196
reports 303script, identity policy 335search, regular expression notation 291security administration overview 47security configuration references 182security layer configuration 176separation of duty audit
namespace 243query items 245query subjects 244
separation of duty configurationnamespace 249query items 250query subjects 249
separation of duty policies 374ACI operations 374
separation of duty policies (continued)changing 380creating 378default ACI 374definition, filters 193deleting 382disabled policy 372enabled policy 372enabling the portfolio task 377evaluating 381exemptions 376, 383exemptions, revoking 385overview 372violation, reports 193violations 376, 383violations, approving 384
separation of duty report models 185service
access information 107changing 101clearing access 148creating 93creating, manual connection mode 95managing access 147managing accounts on 119managing groups 147status 92tagging 136
service auditnamespace 259query items 260query subjects 259
service selection policieschanging 387creating 387deleting 388overview 386
service tags, adding 137service template, adding tag
attribute 136service types
default 90overview 90
servicesdeleting 109exporting access data 105generating 290importing access data 106manual, changing 103manual, creating 99policy enforcement 351reconciling accounts 112, 113, 114,
115, 116report filters 193report models 186viewing all requests 436viewing pending requests 435
set of tasks 47setup, user authentication 177shared access configuration 172shared access credentials, example 296shared access objects
custom reports 296software requirements
IBM Cognos report server 170sponsored accounts
changing passwords 20
sponsored accounts (continued)resetting passwords 21
static reports, IBM Cognos models 169suspension, accounts 124system users
db2admin 38db2inst1 38default 38itimuser 38ldapdb2 38passwords 38
Ttag attribute, adding 136tagging, service 136tags, adding to service 137TCR reports
migrating to IBM Cognos reports 279migration to IBM Cognos reports 279
templates, reports 292troubleshooting
IBM Security Identity ManagerCognos reports 283
report data synchronizationutility 324
tuning 322types, reports 286
Uuser accounts
deleting 13requesting 10restoring 14suspending 13
user activities, viewing 420user and accounts, generating 290user authentication
setup 177user configuration
namespace 251query items 252query subjects 251
user inputfilters, reports 307values, reports 305
user passwordschanging 18, 20resetting 19, 21
user profileschanging 4creating 2deleting 5user information, changing 4
user recertificationhistory, reports 195
users 1adding to membership of role 81administration overview 1assigning to accounts 127creating 2delegating activities 23deleting 5deleting access 17managing as members of role 80
Index 443

users (continued)removing from membership of
role 82report models 186requesting access 16requesting accounts for 10restoring 7suspending 6, 8transferring 6viewing access 17viewing accounts for 11viewing activities for 420viewing all requests submitted 434
Vview 47
changing 48changing custom tasks 51creating 47defining custom tasks 49deleting 49deleting custom tasks 53
Wweb gateway configuration 172web server configuration 172work order
states 427work orders
activities 427completing 428
workflowsadding 389changing 390deleting 391disable 396enabling 396escalation period 395mail activity template 391management overview 389notification 396, 397notification, activity reminder 394notification, escalation 394reminder content in workflow 395reminder interval 395sample, access owner approval 416sample, approval loop 406sample, mail activity 408sample, manager approval of
accounts 398sample, multiple approvals 399sample, multiple approvals with
loop 402sample, packaged approval 412sample, RFI and subprocess 405sample, sequential approval for user
recertification 409template 397
444 IBM Security Identity Manager Version 6.0.0.18: Administration Topics


IBM®
Printed in USA