
Git for Authors, PDF - PreTeXt
56
Git for Authors
-
Upload
khangminh22 -
Category
Documents
-
view
3 -
download
0
Transcript of Git for Authors, PDF - PreTeXt
Git for Authors

Git for Authors
Robert A. BeezerUniversity of Puget Sound
David FarmerAmerican Institute of Mathematics
DRAFT March 30, 2022 DRAFT

©2016 Robert A. Beezer, David Farmer
Permission is granted to copy, distribute and/or modify this document underthe terms of the GNU Free Documentation License, Version 1.3 or any laterversion published by the Free Software Foundation; with no Invariant Sections,no Front-Cover Texts, and no Back-Cover Texts. A copy of the license isincluded in the section entitled “GNU Free Documentation License”.
How to Read This Book
The essential concepts of git are treated in the first four chapters, they shouldbe read thoroughly and carefully, in order. Chapter 2, Chapter 3, and Chapter 4,treat the cases, respectively, of one, several, and many collaborators, with verydifferent organizational models, but the concepts are universal to all threemodels.
Eventually you will find more intricate topics in Chapter 5 and Chapter 6necessary or useful, and maybe both. Chapter 7 explains ways to backupand correct mistakes. Chapter 8 is a grabbag of short topics that do not fitnaturally in the early material and would have just been a distraction. At somepoint familiarize yourself with what is on-offer there. The appendices containtechnical information that might change over time, in addition to referencematerial.
iv
Contents
How to Read This Book iv
1 Introduction 1
2 All By Yourself 3
2.1 Commits . . . . . . . . . . . . . . . . . . . . . 32.2 Branches . . . . . . . . . . . . . . . . . . . . . 72.3 Commit Hashes . . . . . . . . . . . . . . . . . . 12
3 With a Few Friends 14
3.1 Collaborating across Time and Space. . . . . . . . . . . 143.2 Conflicting Edits . . . . . . . . . . . . . . . . . . 20
4 In Control 23
4.1 Creating a Pull Request . . . . . . . . . . . . . . . 234.2 Reviewing and Accepting a Pull Request . . . . . . . . . 27
5 Merge Conflicts 32
6 (∗) Branch Management 34
7 (∗) Oops! 35
7.1 That is So Messed Up . . . . . . . . . . . . . . . . 35
8 Git Miscellany 36
8.1 (∗) Word Diff . . . . . . . . . . . . . . . . . . . 368.2 (∗) Impersonating a Commiter . . . . . . . . . . . . . 368.3 The Stash . . . . . . . . . . . . . . . . . . . . 368.4 (∗) Tagging Releases, Signing a Repository . . . . . . . . 378.5 (∗) Who Did What, and When? . . . . . . . . . . . . 378.6 (∗) Where Did it All Go Wrong? . . . . . . . . . . . . 378.7 (∗) File Management . . . . . . . . . . . . . . . . 378.8 (∗) Binary Files . . . . . . . . . . . . . . . . . . 38
v
CONTENTS vi
8.9 (∗) Everything: The reflog . . . . . . . . . . . . . . 388.10 (∗) README on GitHub . . . . . . . . . . . . . . . 388.11 (∗) Log Display Options . . . . . . . . . . . . . . . 38
9 Parting Shot 39
Appendices
A Getting Started with Git 40
A.1 Installing Command-Line Git . . . . . . . . . . . . . 40A.2 Configuring Git the First Time . . . . . . . . . . . . . 40A.3 Initializing a Git Repository . . . . . . . . . . . . . . 41A.4 Ignore Temporary Files. . . . . . . . . . . . . . . . 41
B Getting Started with GitHub 43
B.1 Make An Account. . . . . . . . . . . . . . . . . . 43B.2 Creating a New Repository on GitHub . . . . . . . . . . 43B.3 Adding Collaborators to a GitHub Repository . . . . . . . 44B.4 Copying a GitHub Repository (Forks, Clones) . . . . . . . 44
C Quick Reference 46
D Cheat sheet for contributing to a project 47
E Cheat sheet for managing pull requests 48
F List of Principles 49
Back Matter
Resources 50
Chapter 1
Introduction
Git, henceforth git, is a revision control system. What’s that? It is a toolto record changes to software, a tool to experiment with changes to software,and a tool to collaborate creating software. Why might an author want to usea tool designed to keep track of software? Presumably your writing is in anelectronic form, and you may want to keep track of your work, you may want toexperiment with different approaches to your writing, and you may collaboratewith others, not least perhaps a copyeditor and an editor.
git has a powerful feature, know as branching, which allows you to branchoff in two different directions with your writing. You can decide to tie the twobranches back together later, with a process known as a merge or you candecide to keep one branch, and kill off the other. On a collaborative project,two different collaborators can work on two unrelated personal branches of thesame project. These branches can be local to their own computers, with neithercollaborator aware of, or concerned about, the other’s work. If their work isindependent, then both collaborator’s additions may be merged into the projectseparately, or if their work overlaps, git can be used to resolve the overlaps.
Example 1.0.1 Heroine versus Hero. Suppose you are well along onwriting the next Pulitzer Prize winning novel. But you cannot figure out howyou want it to end? In one scenario, the hero dies, and in another scenario theheroine dies. You might choose to make two copies of your novel in differentdirectories and work on separate endings, eventually choosing one over theother. But let us suppose that in the course of doing this work in two differentdirectories, you think of a great new way to develop your two characters in theearly chapters. So now you need to make the same edits to both copies? Ormaybe your novel is spread across several files, one per chapter, and you onlyneed to edit a few early files in one version and copy just those files over to theother directory (hopefully not overwriting some other work there). This soundsa bit tedious, maybe complicated, and likely error-prone.
Let us see how git would handle this. Originally you are working on themain branch, almost always named master. Once ready to create two differentendings, you would split off from master along two branches, perhaps namedhero and heroine. You can now add material to each of the two differentbranches, switching between them at will. When you get your idea to improvethe early character development, you can switch back to the master branch,edit your early chapters in a way that is common to both of your endings, thenreturn to alternately working on your heroine and hero branches. You onlyever have one copy of your early work, and if you ever make overlapping changeson your two branches, then there are procedures for managing those conflicts.
1
CHAPTER 1. INTRODUCTION 2
�That example is a bit contrived, but basically realistic. And there is
necessarily some hand-waving in how git helps you. We will guide you carefullythrough a similar application of git in Checkpoint 2.2.1.
To use git you need to author with source files that are simple text. Sothat likely means using some markup language like LATEX, MathBook XML,Markdown, reStructured Text, or a similar language such as those supportedby pandoc. XML formats for Word files might work out acceptably, but willbe less than perfect. We are also going to show you how to use git at thecommand-line in a terminal, so you might need to consult a tutorial on using acommand-line and file management. We have some quickstart information ongit itself in Appendix A.
git provides some powerful tools, and perhaps as a corollary, has a steeplearning curve. There is no right way to use git, and the way you choose toemploy it may in large part depend on social aspects of your project and itsorganization. We will organize our initial material according to the numberof contributors and the organizational structure of the people in your project:solo contributor (Chapter 2), a few collegial contributors (Chapter 3), or manycontributors with a central authority (Chapter 4). Read all of these chapters,and read them in order, even if you know which model you might want toeventually employ. The techniques, concepts and principles build on each other,and there are no firm rules about numbers, procedures or organizational models.It is even possible they will fluctuate over the lifetime of a project.
We will distill some of the essential concepts of git into a short series ofeight Principles, summarized in Appendix F. Review them often, until youfeel you understand them well, and it will be much easier to grasp the finerdetails of git.Principle 1.0.2 Git is a Tool. git is a tool that can be adapted to manypurposes and projects, in many different ways.
Discussions on the Internet about how best to use git can generate a lot ofheat, but not much light. Ignore them. Understand the basic principles of howthe tool functions, learn the commands that work for your projects, and employit to make your real work more productive, efficient and enjoyable. Simplybecoming a git expert is not the object.
You will find that git is like a garage door opener. Without one, you wonderwhy you might ever need one, but once you start using one, you decide youcould not live without it. Or to extend the automotive motif, it is like a seatbelt–you feel unsafe without it. Enjoy getting to know git.
Chapter 2
All By Yourself
git is at its best when people collaborate, but it can still be valuable to anindividual, and you may gain collaborators or contributors in the later stagesof a project. We can understand some basic concepts by considering first thesimple situation of a single, solo contributor.
You will not fully appreciate all of our Principles on a first reading, but ifyou come back to review them, they may be more useful on each reading. Hereis one such.Principle 2.0.1 Git Manages Changes. git manages collections of changesto your files. And it does so in linear sequences of incremental changes that arealways consistent.
You may be very comfortable with organizing your writing as a collectionof files, perhaps further organized in a series of directories or folders, perhapseven nested several levels deep. git works on, and manipulates, your files foryou, which can be disconcerting at some point. The objects that git storesand tracks are collections of changes to your files. One such collection mightmake several small changes to several different files (perhaps you renamed acharacter throughout your novel), or the change may be to add a new file (anentire new chapter, say). As you instruct git to move between branches, youmight see your character’s name change back and forth, or you might see yournew chapter entirely disappear, only to reappear later. The files in your projectare the cumulative result of many changes applied in sequence, not some finalstate that never regresses to an earlier state. But don’t panic, git has all yourchanges stored away safely.
git manages changes to your files, and those changes are accumu-lated in files, whose state may change in ways you are not accustomedto.
If that sounds scary, realize that RAB is self-taught when it comes to gitand has never lost any work. He has panicked. But he has gained valuableexperience puzzling his way out of some jams (see Chapter 7). And once heended up applying the same collection of changes twice, mysteriously gettingtwo of everything in a chapter (see Section 8.3).
2.1 CommitsCollections of changes can be called changesets, but we will be more likely tocall each such collection a commit. That is a noun, not a verb. If you have
3
CHAPTER 2. ALL BY YOURSELF 4
some experience with other revision control systems, then you might be familiarwith the notion of “committing”, or “checking in.” Try to avoid confusing thenew noun with your old verbs.
How do you make a commit? Roughly, you edit your files, so that yourdirectory of files (your working directory) is dirty. The dirty or cleandirectory is a good mental image as you start working with git. Edit yourfiles, and save your files. Normally, you feel pretty secure at this point. Youhave made changes, and by saving the edited files, you feel like you have savedyour changes. But from git’s perspective, your files are dirty and you have notmade your changes known to git yet. Here is the drill, using two commands atthe command line in a terminal.
List 2.1.1 Making a Commit
1. Edit some files and save them, making your working directorydirty.
2. git add <file1> <file2> <file3>
3. git commit -m "Add the incident at the train station"
You will get no reaction (output) from the git add command, but whenyou actually make the commit, you should get a response like
[master c0f19a2] Add the incident at the train station
OK, that is a basic recipe, but what actually happened? In the add commandyou would have listed some, or all, of the files you had edited and saved. If youonly listed some, the commit would only contain some of your changes, and theremaining changes would contribute to keeping your working directory dirty.The add command moves your changes in the indicated files to a staging area,a sort of purgatory, called the index. We say those changes are staged. Youcan incrementally add changes to the index to form a coherent set of changesthat will eventually become a commit. For example, above you could have runthe add command three times, once for each file, to stage the same collection ofchanges. If you further edit a file after git add, you can add that file again tomove the subsequent edits into the index.
Realize that git add does two similar things. If git is unaware of some file,then add will make it one of the files that git tracks and will put the currentcontents of that file into the index. And from now on, git will include relevantdetails about this file in reports. For example if the file is dirty, then certainreports will show the changes (see next paragraph). But “tracking” a file doesnot mean git automatically packages up changes. That is your job. You havecontrol of exactly which changes git will manage, and when you want git tobecome aware of those changes. Subsequently, git add moves changes from afile into the index, and you can do this repeatedly to update which collectionof changes are staged in the index.
With all this talk of a dirty directory, how can you tell if your directory iseven dirty at all? The command is git diff. It takes no action and is merelyinformative. You can run it anytime you like and it is wise to do it often,especially when getting started. RAB often walks away from his writing witha dirty directory (not best practice). So it is a good habit he has to alwaysrun git diff when first returning to a project. The output of git diff is allof the changes in your working directory that are not staged into the index.It is organized by file (given in yellow on my computer), with red text beingremoved and green text being added. White text is unchanged and provides
CHAPTER 2. ALL BY YOURSELF 5
context for changed text, in order to help git apply changes in the right places.Solid red squares or bars are extraneous whitespace that serves no purposeother than to potentially confuse git. It is a good idea to become comfortableunderstanding this information. When all your changes are in the index, yourworking directory is now clean, and git diff reports nothing.
git diff drops you into a simple program known as a pager. The downand up arrows work to scroll through the output, the spacebar advances by ascreenful, and the b key takes you back a screenful. Press h for help on morecommands, and use q to quit and exit.
As you add changes to the index, you can see what your future commitlooks like by running git diff –cached, which will report the accumulatedchanges in the index, using the same format.
After all this add’ing and diff’ing, making the commit itself is straightfor-ward. git commit will do the job—moving changes from the index into a singlecollection of changes, a changeset, to be stored, managed and manipulated bygit. Technically, this is an irreversible action, but in practice there are manyways to back-up and have a do-over, especially when you are solo. So don’tpanic.
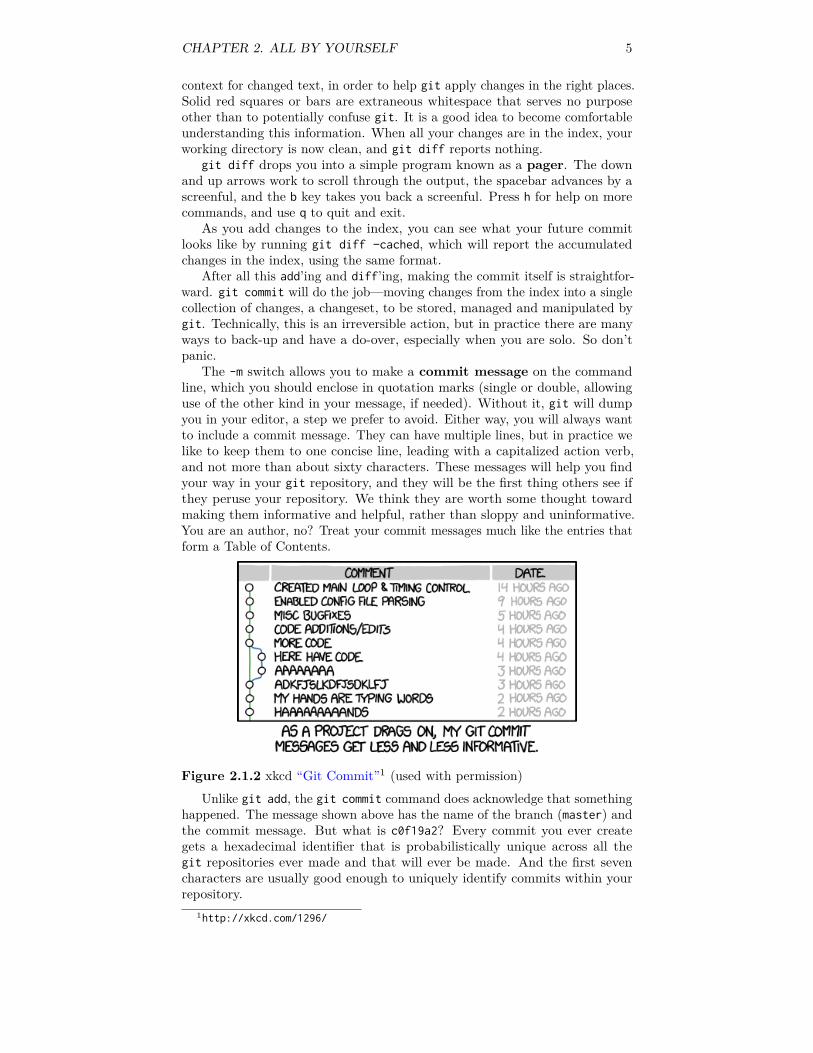
The -m switch allows you to make a commit message on the commandline, which you should enclose in quotation marks (single or double, allowinguse of the other kind in your message, if needed). Without it, git will dumpyou in your editor, a step we prefer to avoid. Either way, you will always wantto include a commit message. They can have multiple lines, but in practice welike to keep them to one concise line, leading with a capitalized action verb,and not more than about sixty characters. These messages will help you findyour way in your git repository, and they will be the first thing others see ifthey peruse your repository. We think they are worth some thought towardmaking them informative and helpful, rather than sloppy and uninformative.You are an author, no? Treat your commit messages much like the entries thatform a Table of Contents.
Figure 2.1.2 xkcd “Git Commit”1 (used with permission)Unlike git add, the git commit command does acknowledge that something
happened. The message shown above has the name of the branch (master) andthe commit message. But what is c0f19a2? Every commit you ever creategets a hexadecimal identifier that is probabilistically unique across all thegit repositories ever made and that will ever be made. And the first sevencharacters are usually good enough to uniquely identify commits within yourrepository.
1http://xkcd.com/1296/
CHAPTER 2. ALL BY YOURSELF 6
Try the new command git log. It may not show much, but it will listinformation on every commit on your current branch. And you will see somehuge commit hashes. There are 268 435 456 different possibilities for sevenhexadecimal digits. A full 40-digit commit hash has about 1048 possibilities.This is not a technical aside, we will see soon enough the critical role commithashes play in a git repository (see Section 2.3). Even though your commitabout the train station incident might often be shown shorthand as c0f19a2, itmay in reality be
c0f19a223404c394d592661532747527038754e
which you would see in the log.Here are two more useful diagnostic commands. git status will tell you
which files are dirty, which files have changes staged in the index and destined forthe next commit, and which files are lurking about in your directory, but whichyou have not ever told git about. This is a good command to run frequently,especially when you are beginning. Finally git ls-files will output all thefiles git has changes for. This one is interesting, but less useful day-to-day.
We will primarily teach by guiding you through exercises. They almostalways have extra information, so read them just for that. Experiment witha scratch repository where you can try different things without the inevitablemistakes also being worrisome disasters. And realize you can always start over.
Checkpoint 2.1.3 My First Repository.1. Consult Appendix A for instructions, setup git, and init an empty
repository.
2. Make several commits, creating and adding at least three files into therepository. Use git diff, git diff –cached, git status, and git logliberally in the process.Put some non-trivial content into each file (though it does not need to beexcessive). We will use this repository for future exercises, so do not getrid of it. Put a typographical mistake into one of your three files.
3. Do not experiment with branches, we will do that next.
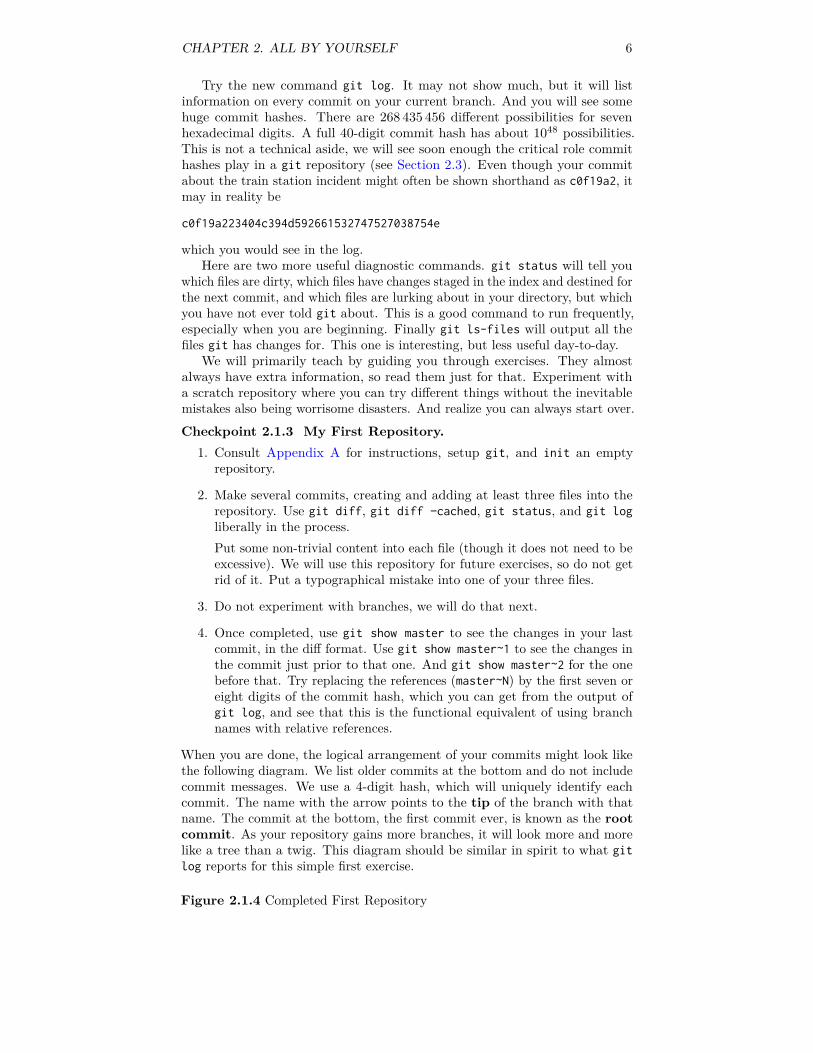
4. Once completed, use git show master to see the changes in your lastcommit, in the diff format. Use git show master~1 to see the changes inthe commit just prior to that one. And git show master~2 for the onebefore that. Try replacing the references (master~N) by the first seven oreight digits of the commit hash, which you can get from the output ofgit log, and see that this is the functional equivalent of using branchnames with relative references.
When you are done, the logical arrangement of your commits might look likethe following diagram. We list older commits at the bottom and do not includecommit messages. We use a 4-digit hash, which will uniquely identify eachcommit. The name with the arrow points to the tip of the branch with thatname. The commit at the bottom, the first commit ever, is known as the rootcommit. As your repository gains more branches, it will look more and morelike a tree than a twig. This diagram should be similar in spirit to what gitlog reports for this simple first exercise.
Figure 2.1.4 Completed First Repository
CHAPTER 2. ALL BY YOURSELF 7
2.2 BranchesThe term branch gets used many ways in git, as a verb and a noun, likelybecause it is so fundamental. We will introduce you to this concept with anexercise, that will also give you some idea of the power of the idea. So even ifyou do not work the example right away, read through it, since it contains a lotof explanation.
Checkpoint 2.2.1 Hero and Heroine on Branches. Make sure yourpractice repository has at least three files in it, with one typographic mistake.So go ahead and create a new file and a new commit if you need to. We willwait.
We are going to pretend that we are writing a novel and we want to designtwo possible endings. In one, the hero dies, and in the other, the heroine dies.
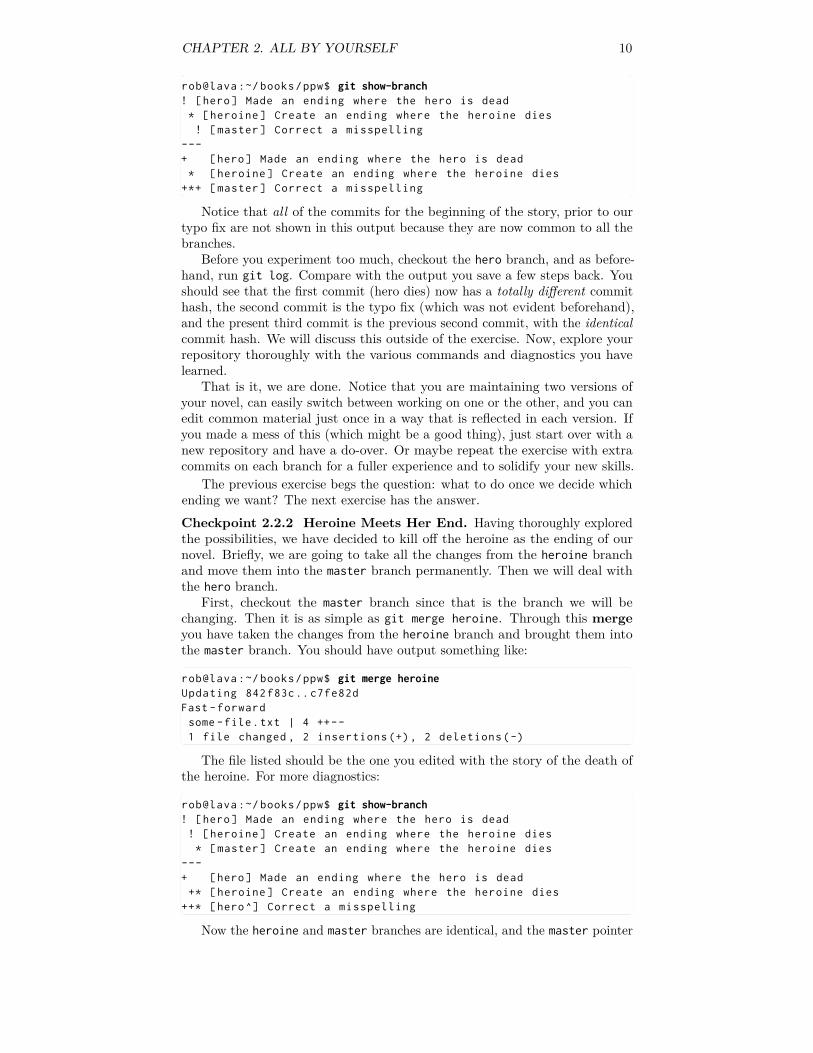
Make sure your working directory is clean and type git branch heroine.Not much will appear to have just happened. So here is a new diagnosticcommand you will want to use all the time. Type git show-branch. This showsall of your possible branches, with an asterisk (“*”) indicating the branch youare “on” and an exclamation mark indicating other branches (“!”). It is notvery informative yes, since your repository is just beginning to take shape andyou have only just created a branch. Be sure to keep this output visible in yourterminal for an upcoming comparison.
Now we are going to move to you new branch. Ready? Type git checkoutheroine. Now run git show-branch again and compare to the previous output.The big change is that the asterisk has moved to indicate the heroine branch.We say you are now on the heroine branch. If you have experience with otherrevision control systems, the word “checkout” is fraught with other meaningsthat are not accurate. Sorry, just get over it. In git the checkout commandwill change the files in your working directory to some possibly different state,based on a different sequence of changes in a sequence of commits constitutinga different branch. (Remember, commits are collections of changes.)
Choose one of your two files without a typo and edit it to include somewords about the heroine dying, and also remove some existing words at thesame time. Use git diff, git add, git commit to form a new commit thatis the changes you just made, and with a commit message about creating anending where the heroine dies. You should have a clean working directory afterthe commit.
Now show-branch will show something interesting:
rob@lava :~/ books/ppw$ git show-branch* [heroine] Create an ending where the heroine dies! [master] <message about last commit on master >
--* [heroine] Create an ending where the heroine dies*+ [master] <message about last commit on master >
The top half lists all your branches, with color-coding and identifyingsymbols. The bottom half tries to describe to you how those branches relate.We will make it even more interesting shortly.
Close any files you have open in your editor, type git checkout master,and open the files again. Don’t panic. You have restored your working directoryto the state of all the accumulated changes up to the tip of the master branch,so you do not see your most recent change to your novel. The changes thatconstitute the brilliant ending about the death of the heroine is saved by gitin a place that it is hard for you to find but easy for you to manage. Would

CHAPTER 2. ALL BY YOURSELF 8
you like your ending back? Close your files, type git checkout heroine, andopen your files. git has manipulated your files and applied the changes withthe ending, so now your novel should contain the new ending.
Perhaps you now see why git can feel a bit foreign and why at some pointyou will have that “Oh, &\#∗!” feeling. Don’t panic. git manipulates thestate of the files in your working directory, so in a way those files are ethereal.git stores your commits (collections of changes) safely and can rewind andreplay them in ways consistent with your writing while on various branches,using your working directory as a sort of sandbox or laboratory.
Switch back and forth several times between the master and heroinebranches with git checkout. Close and open your files in your editor asyou let git manipulate your working directory. Run git show-branch liberally.When you are ready, leave a file open when you know a checkout is going tochange it. How does your editor react? We don’t know, so can’t help. Buta good editor might say something like “File on disk changed, do you wantto reload it?” We use an editor that just silently reloads the file, unless thereare unsaved edits in it by mistake. If a git checkout results in a file not evenbeing present, our editor leaves it in a state we find very confusing. Sometimesthis sort of behavior can be configured in a editor. Experiment until this is notconfusing and in the meantime as you are learning, close and reopen files asyou instruct git to manipulate the state of your working directory.
Ready for another branch? Make sure you are on master (by runninggit checkout master). Then make a new branch with git branch hero, andswitch to it with git checkout hero. Run git show-branch as you go, studyingcarefully how the output is changing.
Open the file that is different from the one you edited before, and that isnot the one with the typo. Remove some words, and author an ending wherethe hero dies. Create a commit with these changes, using a commit messageabout the hero dying. (We might now use “commit” as a verb, and say commityour changes.) Now show-branch will produce something like:
rob@lava :~/ books/ppw$ git show-branch* [hero] Made an ending where the hero is dead! [heroine] Create an ending where the heroine dies! [master] <message about last commit on master >
---* [hero] Made an ending where the hero is dead+ [heroine] Create an ending where the heroine dies
*++ [master] <message about last commit on master >
Now this is interesting. You have three branches, you are on the herobranch, and the heroine and hero branches contain divergent storylines basedon a common beginning. (Everything up to master is common and not reportedin this output.) Experiment checking out different branches, run show-branchliberally, and do not forget that you can do things like git show hero even ifyou are not presently on the hero branch. Get comfortable with the currentstate of your repository. Notice that each of our two new branches could eachbe a sequence of many commits, but we just need one commit each for thepurposes of this exercise.
As you looked around, did you notice that typographical error you made inthe third file when you first start writing? (If not, play along.) Checkout themaster branch, open the file with the typo and and edit to correct the mistake.Commit those changes. You should now see:
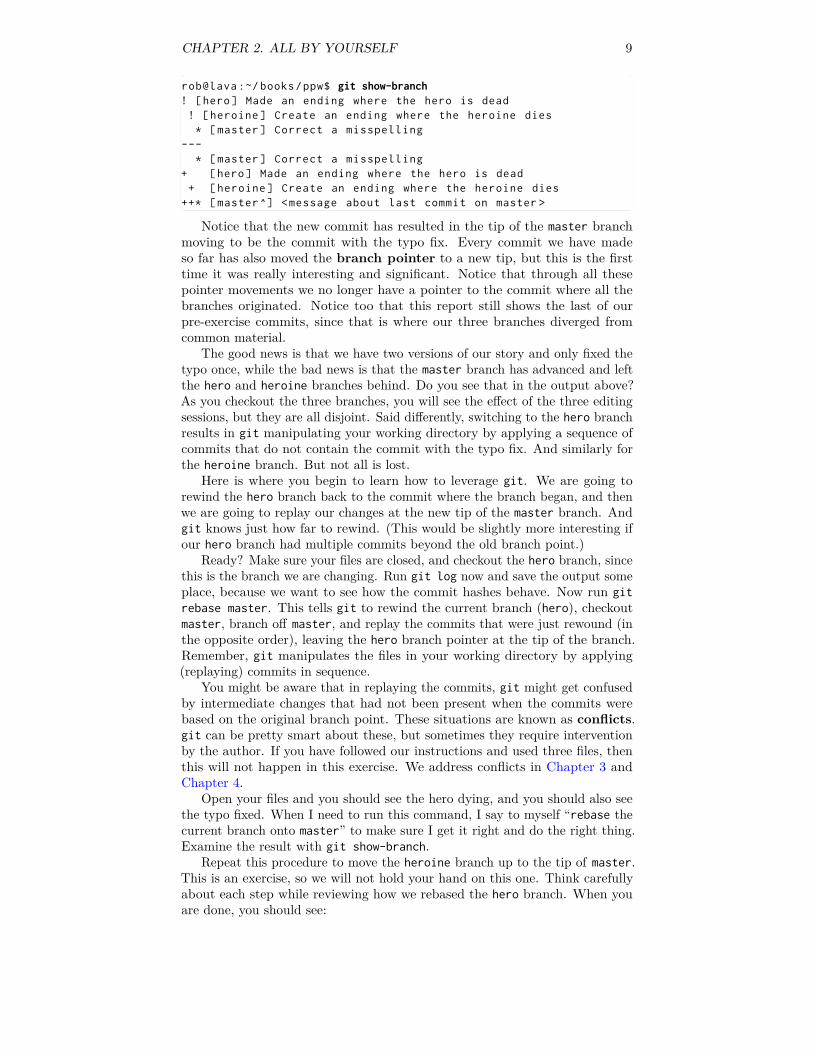
CHAPTER 2. ALL BY YOURSELF 9
rob@lava :~/ books/ppw$ git show-branch! [hero] Made an ending where the hero is dead! [heroine] Create an ending where the heroine dies* [master] Correct a misspelling
---* [master] Correct a misspelling
+ [hero] Made an ending where the hero is dead+ [heroine] Create an ending where the heroine dies
++* [master ^] <message about last commit on master >
Notice that the new commit has resulted in the tip of the master branchmoving to be the commit with the typo fix. Every commit we have madeso far has also moved the branch pointer to a new tip, but this is the firsttime it was really interesting and significant. Notice that through all thesepointer movements we no longer have a pointer to the commit where all thebranches originated. Notice too that this report still shows the last of ourpre-exercise commits, since that is where our three branches diverged fromcommon material.
The good news is that we have two versions of our story and only fixed thetypo once, while the bad news is that the master branch has advanced and leftthe hero and heroine branches behind. Do you see that in the output above?As you checkout the three branches, you will see the effect of the three editingsessions, but they are all disjoint. Said differently, switching to the hero branchresults in git manipulating your working directory by applying a sequence ofcommits that do not contain the commit with the typo fix. And similarly forthe heroine branch. But not all is lost.
Here is where you begin to learn how to leverage git. We are going torewind the hero branch back to the commit where the branch began, and thenwe are going to replay our changes at the new tip of the master branch. Andgit knows just how far to rewind. (This would be slightly more interesting ifour hero branch had multiple commits beyond the old branch point.)
Ready? Make sure your files are closed, and checkout the hero branch, sincethis is the branch we are changing. Run git log now and save the output someplace, because we want to see how the commit hashes behave. Now run gitrebase master. This tells git to rewind the current branch (hero), checkoutmaster, branch off master, and replay the commits that were just rewound (inthe opposite order), leaving the hero branch pointer at the tip of the branch.Remember, git manipulates the files in your working directory by applying(replaying) commits in sequence.
You might be aware that in replaying the commits, git might get confusedby intermediate changes that had not been present when the commits werebased on the original branch point. These situations are known as conflicts.git can be pretty smart about these, but sometimes they require interventionby the author. If you have followed our instructions and used three files, thenthis will not happen in this exercise. We address conflicts in Chapter 3 andChapter 4.
Open your files and you should see the hero dying, and you should also seethe typo fixed. When I need to run this command, I say to myself “rebase thecurrent branch onto master” to make sure I get it right and do the right thing.Examine the result with git show-branch.
Repeat this procedure to move the heroine branch up to the tip of master.This is an exercise, so we will not hold your hand on this one. Think carefullyabout each step while reviewing how we rebased the hero branch. When youare done, you should see:
CHAPTER 2. ALL BY YOURSELF 10
rob@lava :~/ books/ppw$ git show-branch! [hero] Made an ending where the hero is dead* [heroine] Create an ending where the heroine dies! [master] Correct a misspelling
---+ [hero] Made an ending where the hero is dead* [heroine] Create an ending where the heroine dies
+*+ [master] Correct a misspelling
Notice that all of the commits for the beginning of the story, prior to ourtypo fix are not shown in this output because they are now common to all thebranches.
Before you experiment too much, checkout the hero branch, and as before-hand, run git log. Compare with the output you save a few steps back. Youshould see that the first commit (hero dies) now has a totally different commithash, the second commit is the typo fix (which was not evident beforehand),and the present third commit is the previous second commit, with the identicalcommit hash. We will discuss this outside of the exercise. Now, explore yourrepository thoroughly with the various commands and diagnostics you havelearned.
That is it, we are done. Notice that you are maintaining two versions ofyour novel, can easily switch between working on one or the other, and you canedit common material just once in a way that is reflected in each version. Ifyou made a mess of this (which might be a good thing), just start over with anew repository and have a do-over. Or maybe repeat the exercise with extracommits on each branch for a fuller experience and to solidify your new skills.
The previous exercise begs the question: what to do once we decide whichending we want? The next exercise has the answer.
Checkpoint 2.2.2 Heroine Meets Her End. Having thoroughly exploredthe possibilities, we have decided to kill off the heroine as the ending of ournovel. Briefly, we are going to take all the changes from the heroine branchand move them into the master branch permanently. Then we will deal withthe hero branch.
First, checkout the master branch since that is the branch we will bechanging. Then it is as simple as git merge heroine. Through this mergeyou have taken the changes from the heroine branch and brought them intothe master branch. You should have output something like:
rob@lava :~/ books/ppw$ git merge heroineUpdating 842 f83c.. c7fe82dFast -forwardsome -file.txt | 4 ++--1 file changed , 2 insertions (+), 2 deletions(-)
The file listed should be the one you edited with the story of the death ofthe heroine. For more diagnostics:
rob@lava :~/ books/ppw$ git show-branch! [hero] Made an ending where the hero is dead! [heroine] Create an ending where the heroine dies* [master] Create an ending where the heroine dies
---+ [hero] Made an ending where the hero is dead+* [heroine] Create an ending where the heroine dies
++* [hero^] Correct a misspelling
Now the heroine and master branches are identical, and the master pointer
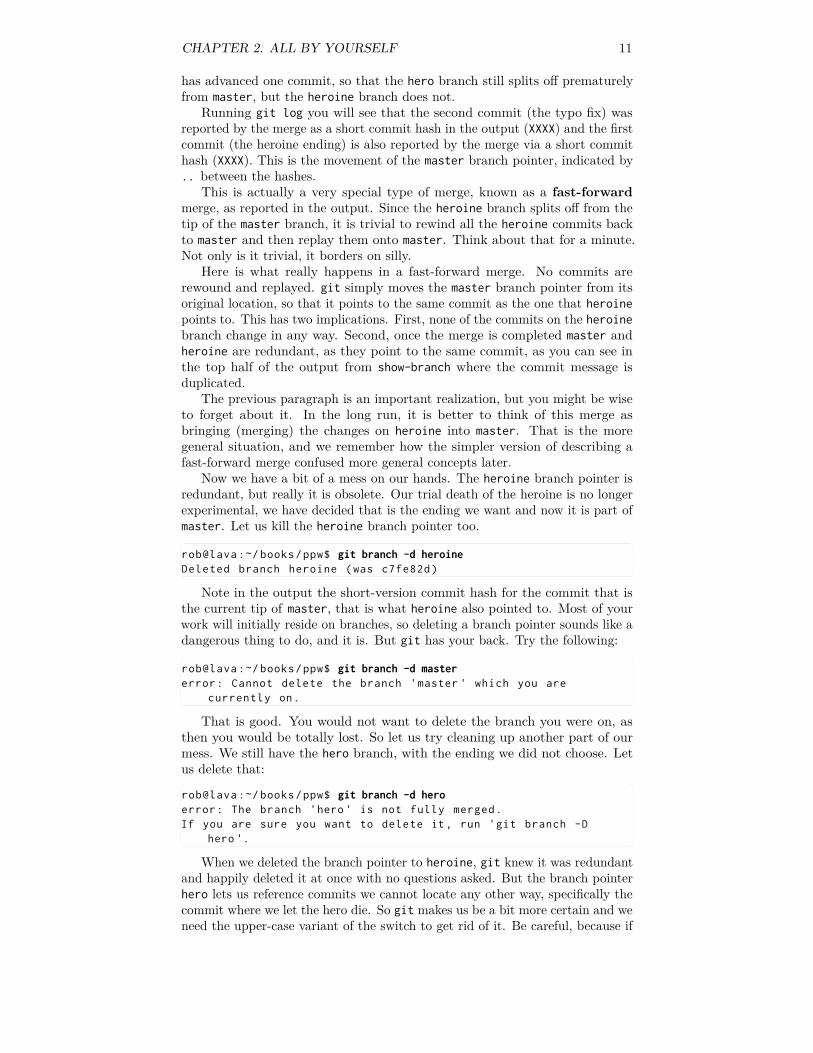
CHAPTER 2. ALL BY YOURSELF 11
has advanced one commit, so that the hero branch still splits off prematurelyfrom master, but the heroine branch does not.
Running git log you will see that the second commit (the typo fix) wasreported by the merge as a short commit hash in the output (XXXX) and the firstcommit (the heroine ending) is also reported by the merge via a short commithash (XXXX). This is the movement of the master branch pointer, indicated by.. between the hashes.
This is actually a very special type of merge, known as a fast-forwardmerge, as reported in the output. Since the heroine branch splits off from thetip of the master branch, it is trivial to rewind all the heroine commits backto master and then replay them onto master. Think about that for a minute.Not only is it trivial, it borders on silly.
Here is what really happens in a fast-forward merge. No commits arerewound and replayed. git simply moves the master branch pointer from itsoriginal location, so that it points to the same commit as the one that heroinepoints to. This has two implications. First, none of the commits on the heroinebranch change in any way. Second, once the merge is completed master andheroine are redundant, as they point to the same commit, as you can see inthe top half of the output from show-branch where the commit message isduplicated.
The previous paragraph is an important realization, but you might be wiseto forget about it. In the long run, it is better to think of this merge asbringing (merging) the changes on heroine into master. That is the moregeneral situation, and we remember how the simpler version of describing afast-forward merge confused more general concepts later.
Now we have a bit of a mess on our hands. The heroine branch pointer isredundant, but really it is obsolete. Our trial death of the heroine is no longerexperimental, we have decided that is the ending we want and now it is part ofmaster. Let us kill the heroine branch pointer too.
rob@lava :~/ books/ppw$ git branch -d heroineDeleted branch heroine (was c7fe82d)
Note in the output the short-version commit hash for the commit that isthe current tip of master, that is what heroine also pointed to. Most of yourwork will initially reside on branches, so deleting a branch pointer sounds like adangerous thing to do, and it is. But git has your back. Try the following:
rob@lava :~/ books/ppw$ git branch -d mastererror: Cannot delete the branch 'master ' which you are
currently on.
That is good. You would not want to delete the branch you were on, asthen you would be totally lost. So let us try cleaning up another part of ourmess. We still have the hero branch, with the ending we did not choose. Letus delete that:
rob@lava :~/ books/ppw$ git branch -d heroerror: The branch 'hero ' is not fully merged.If you are sure you want to delete it, run 'git branch -D
hero '.
When we deleted the branch pointer to heroine, git knew it was redundantand happily deleted it at once with no questions asked. But the branch pointerhero lets us reference commits we cannot locate any other way, specifically thecommit where we let the hero die. So git makes us be a bit more certain and weneed the upper-case variant of the switch to get rid of it. Be careful, because if

CHAPTER 2. ALL BY YOURSELF 12
you lose track of commits, they can be hard to resurrect and eventually git willgarbage collect them when it does some automatic spring cleaning of yourrepository. For us, there is no real harm in leaving the hero branch in place,and it is instructive to wait a while before killing it. It is doing no damagewhere it is, we do not ever need to check it out, though eventually we will growtired of seeing it in all our diagnostic reports.
Realize that the decision above to merge heroine into master should not betaken lightly, as it is quite difficult to reverse it, and not really in the spirit ofhow you use git. Branches like hero and heroine are sometimes called topicbranches. Or in a nod to software development they may be called featurebranches, since they might be used to create and test a new feature for alarger piece of software. I like to refer to a branch like master as the mainline.An essential aspect of working with git is to always work on a branch, andrealize that there is little cost to making a branch, merging it, and then deletingthe (temporary) branch pointer. I have made branches that only had a lifetimeof five minutes. That is a principle.
Principle 2.2.3 Always Work on a Branch. Always make a topic branchoff your mainline when starting new work, and only merge once satisfied.
2.3 Commit HashesIn computer science, a hash function is a many-to-one function that takeslengthy input, massages it, and produces vastly shorter output of a fixedlength, called the hash. While the output looks random, the function has norandomness, and the actual function is well-known to everyone. Identical inputswill always produce the same output. But if two inputs differ even slightly,they will have wildly different outputs—this is a design criteria for most hashfunctions. Similarly, we might require that if we know the hash (output), it isvery hard to manufacture input to the hash function to produce that output.For the hash function used in git it is highly unlikely that two different inputs(commits) will produce the same output (hash). So the commit hash is similarto how we use fingerprints or retinal scans to identify humans. If you want tolearn more, git uses the SHA-1 hash function, whose tamperproof propertieswere designed for use in cryptographic applications. It is no longer consideredsecure for that purpose, but works fine for use in git.
The input git uses to form the hash include things like your name, thedate, the commit message, the changes in the commit, and most importantly,the commit hash of the previous commit in the sequence on the branch. Thisis similar to the blockchain technology used in BitCoin, and lately a darlingof fintech (financial technology). A sequence of blocks of information andtheir hashes, each formed with input including the previous hash, makes itpractically impossible to tamper with any one piece of information withoutradically disturbing every subsequent hash.
Return to the fast-forward merge above to see that there was absolutely nochange in the information for each commit and there was no disruption in thesequence (chain) of commits. As explained, the only thing that really happenedwas that the master block pointer was changed to point to a new commit, thetip of the heroine branch.
Contrast that to when we rebased the hero branch onto the master branchthat contained the typo fix. git rewound the commits on hero up to the oldbranch point, but then replayed them onto a commit (the tip of master) with adifferent commit hash. All of the replayed commits from the hero branch (wejust had one) will have their commit hashes recomputed and will be radically
CHAPTER 2. ALL BY YOURSELF 13
different since the hash of the tip of master is an input to the first commit ofthe rewound branch. The previous hash(es) are meaningless (and lost to time).Notice that git updates the branch pointer hero to use a new hash from thetip of the replayed branch.
This is a principle that will be important once we get social and work withothers.Principle 2.3.1 A Rebase Changes Hashes, a Merge Does Not. Arebase will always change some commit hashes, while a merge will never changeany commit hashes.
You now know, and have experience with, four of the six important concepts ofworking with git: committing, branching, rebasing and fast-forward merging.Only (general) merging and pull requests remains. But first, let us get social andbegin collaborating with others, to realize some of the most powerful aspects ofgit.
Chapter 3
With a Few Friends
One of the real benefits of git is the ability to collaborate easily with others in ade-centralized manner across time and space. In this chapter we will experimentwith a model that is appropriate for a small group of collegial collaborators.My dictionary (WordNet) defines “collegial” as “characterized by or havingauthority vested equally among colleagues,” which is precisely the situation wewill simulate. So, in this chapter we will explore the scenario where a smallgroup of equals works on a writing project, on the assumption that everyone inthe group is trusted to make any sort of change at any time.
We will not be using email attachments or Google Docs to communicate.Rather, an easy way to collaborate with git is to place a copy of the repositoryon a server where each collaborator has the right privileges to interact withthe repository. If your project is secret and sensitive, this might be a server atyour workplace, or a web host you control and trust. Or maybe the project isnot so sensitive and a private account at GitHub is appropriate and easy toset-up. Or maybe your project has an open license and an open repository willeventually allow total strangers to contribute to your project (see Chapter 4).For exercises in this chapter, we will use GitHub1, a (free) site that hosts gitrepositories along with tools supporting collaboration around a git repository.
Principle 3.0.1 Merge into Your Current Branch. A merge integrateschanges into your current branch, from a branch you specify.
3.1 Collaborating across Time and SpaceTo get started, visit Appendix B, read the advice on making a GitHub account,and make an account. Then come back here to work the following example.To keep things simple, we will walk through an exercise with just two co-authors, but you might imagine up to about five individuals participating inthe following.
Checkpoint 3.1.1 Alice and Bob Write Crypto. Alice and Bob aretwo professional cryptographers who have discovered a weakness in a criticalalgorithm underlying much of the world’s electronic banking programs. Theyneed to get the details out quickly as a research paper that they will host on thearXiv1 for the security community to vet. Alice and Bob have known each otherfor years. They trust each others technical skills and writing style, and evenbetter, they both have GitHub accounts. In the best traditions of cryptography
1https://github.com/
14

CHAPTER 3. WITH A FEW FRIENDS 15
research, they decide to write their paper openly as a public GitHub repository,and they decide to host the repository in Alice’s account. Everything else willbe discussed on GitHub.
Work this exercise playing the role of Alice. If you have a friend who canbe Bob, all the better, but you can also play both sides of the collaborationyourself and get almost as much out of the exercise (if Bob is somebody else,then he need a GitHub account, but if you are playing both sides, then your oneGitHub account is enough.). Alice (you!) will log into her GitHub account andinitiate a new repository. Recall that in Chapter 2 we created a new repositoryon our local computer at the command-line with git init. Now Alice will letGitHub do that step since GitHub will automatically configure the repositoryfor subsequent communication.
See Section B.2 and Section B.3 for instructions on the steps in this para-graph. Alice will create a new repository and name it banking-paper. She willmake Bob a collaborator on the repository since she knows Bob’s username onGitHub from their previous collaborations. So there is now a fresh repositoryon GitHub, which Alice and Bob can manipulate. We are going to call this thedefinitive repository, as it will hold the “official” version of their paper. Ina minute we will setup Alice and Bob with local copies, but they have agreedthat those are just their local workspaces and the repository on GitHub alwaysholds the latest, and presumably best, version of their paper.
Section B.4 contains the necessary instructions for this paragraph, but aremore general, so read them and this paragraph through completely beforedoing anything. In particular, ignore any discussion of “forks” until Chapter 4.Alice should make a copy of the fresh repository onto her work computer,and Bob should do the same. If you are playing both sides this exerciseyourself, copy the repository once, and then rename the banking-paper directoryto alice-banking. Then copy again and rename the resulting directory asbob-banking. These changes have zero effect on how your repository behaves,but you will need to mentally figure out which files you should be working within the remainder of the exercise.
In principle, Alice and Bob are totally setup and organized, and never evenneed to visit the GitHub site ever again. But GitHub has some nice tools andAlice and Bob have decided to be 100% transparent in their work. A GitHubissue is like a topic on an online discussion forum. It is designed mostly forreporting and discussing bugs in software, or requesting and implementing newfeatures in software. But they can also be used for planning and discussion.Alice and Bob would like to plan their writing as an open discussion on GitHub,deciding that Alice will concentrate on the introduction since she is the betteroverall writer, and Bob will therefore get started on the section with the detailsof the vulnerability. They will work more closely on the final section containingrecommendations.
So in our exercise, Alice should create a branch off of master named intro,create a file intoduction.txt, add it to her branch, make some edits, committhe changes, and so on. Bob should do similarly but make a branch off masternamed vulnerable where he adds and edits a file vulnerability.txt as a seriesof commits. Recall that Principle 2.2.3 says Alice and Bob should do all oftheir work on branches.
Alice had the simpler task, so let us assume she finishes the introductionfirst. She does not know she is first, she does not even have any idea where Bobis in his writing. She has been doing her best to get the introduction right, andto not disturb Bob, who is presumably also working hard. So Alice suspectsthere are no new commits on the master branch, but does not really know. OK,Alice is going to update master with a pull, see no new commits there, do a
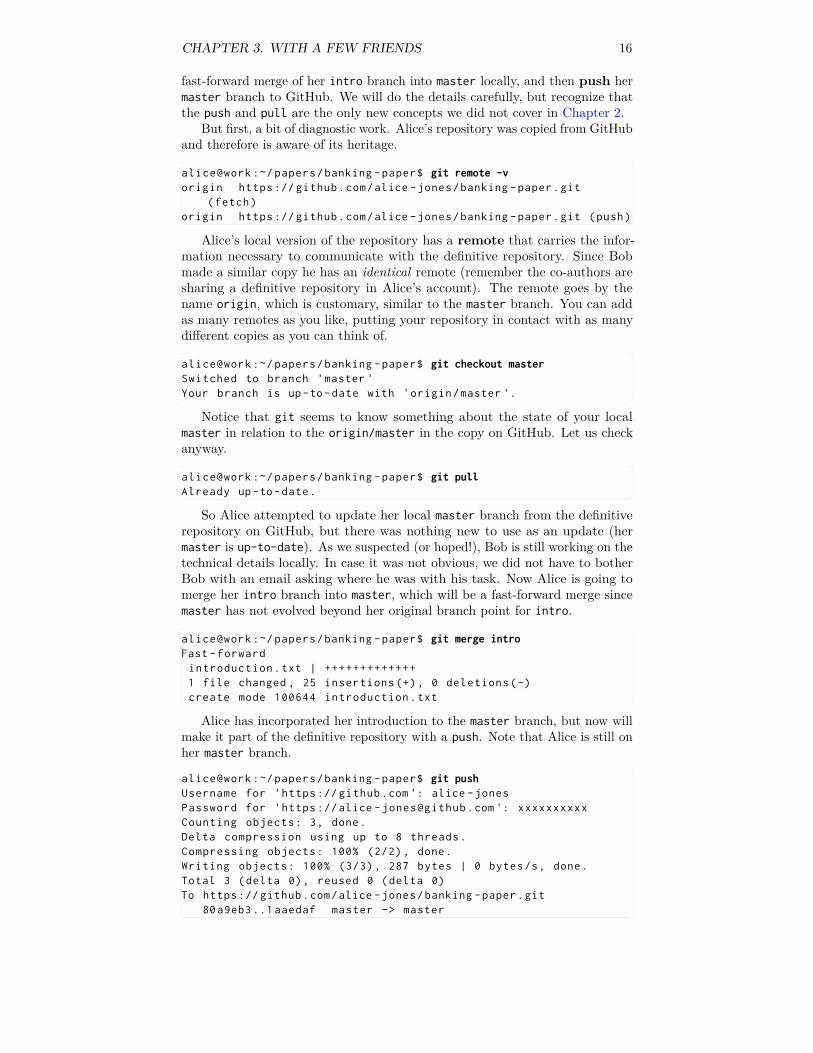
CHAPTER 3. WITH A FEW FRIENDS 16
fast-forward merge of her intro branch into master locally, and then push hermaster branch to GitHub. We will do the details carefully, but recognize thatthe push and pull are the only new concepts we did not cover in Chapter 2.
But first, a bit of diagnostic work. Alice’s repository was copied from GitHuband therefore is aware of its heritage.
alice@work :~/ papers/banking -paper$ git remote -vorigin https :// github.com/alice -jones/banking -paper.git
(fetch)origin https :// github.com/alice -jones/banking -paper.git (push)
Alice’s local version of the repository has a remote that carries the infor-mation necessary to communicate with the definitive repository. Since Bobmade a similar copy he has an identical remote (remember the co-authors aresharing a definitive repository in Alice’s account). The remote goes by thename origin, which is customary, similar to the master branch. You can addas many remotes as you like, putting your repository in contact with as manydifferent copies as you can think of.
alice@work :~/ papers/banking -paper$ git checkout masterSwitched to branch 'master 'Your branch is up-to-date with 'origin/master '.
Notice that git seems to know something about the state of your localmaster in relation to the origin/master in the copy on GitHub. Let us checkanyway.
alice@work :~/ papers/banking -paper$ git pullAlready up-to-date.
So Alice attempted to update her local master branch from the definitiverepository on GitHub, but there was nothing new to use as an update (hermaster is up-to-date). As we suspected (or hoped!), Bob is still working on thetechnical details locally. In case it was not obvious, we did not have to botherBob with an email asking where he was with his task. Now Alice is going tomerge her intro branch into master, which will be a fast-forward merge sincemaster has not evolved beyond her original branch point for intro.
alice@work :~/ papers/banking -paper$ git merge introFast -forwardintroduction.txt | +++++++++++++1 file changed , 25 insertions (+), 0 deletions(-)create mode 100644 introduction.txt
Alice has incorporated her introduction to the master branch, but now willmake it part of the definitive repository with a push. Note that Alice is still onher master branch.
alice@work :~/ papers/banking -paper$ git pushUsername for 'https :// github.com ': alice -jonesPassword for 'https ://alice [email protected] ': xxxxxxxxxxCounting objects: 3, done.Delta compression using up to 8 threads.Compressing objects: 100% (2/2), done.Writing objects: 100% (3/3), 287 bytes | 0 bytes/s, done.Total 3 (delta 0), reused 0 (delta 0)To https :// github.com/alice -jones/banking -paper.git
80a9eb3 ..1 aaedaf master -> master

CHAPTER 3. WITH A FEW FRIENDS 17
Notice that Alice must sign in to GitHub, since only she and Bob are allowedto modify the repository (the world can view it and copy it, not modify it).So Alice has placed her introduction in the definitive repository without anyadditional coordination with Bob. Time is important, so Alice initiates anissue on GitHub to discuss their recommendations, which will now interruptBob, but they need to form a plan. However, without waiting for Bob’s reply,Alice creates a new branch off master named last-chapter where she simplyadds an empty file named recommendations.txt. She repeats the steps aboveand with a fast-forward merge, updates her local master and pushes it to thedefinitive repository on GitHub. Alice can now clean up by deleting her introand last-chapter branch pointers that have become obsolete.
Now that Alice has communicated with a public repository, known tothe world, it is the right time to introduce a principle that we will illustratesubsequently.
Principle 3.1.2 Never Alter a Public Commit. Never, ever, alter in anyway a commit that has been made available to anybody else.
We discussed the nature of commit hashes in Section 2.3. We have seen how alocal rebase changes commit hashes in Checkpoint 2.2.1. And we have a principleabout a rebase changing hashes, while a merge does not (Principle 2.3.1). Alicecan rebase her branch all she wants within her repository on her local computer,but the instant she pushes commits to the definitive repository, they becomeavailable to her co-author (Bob), and to the entire world. The commit hashfor each of these commits is a globally unique ID (GUID). There are waysto modify these public commits in the definitive repository, but this would betantamount to chopping off somebody’s finger and replacing it with a new onewith a different fingerprint. Don’t do it!
Why not? All of git’s coordination is predicated on identical commitshaving identical ID (the commit hash). In Chapter 4 we will expand our circleof contributors to anybody in the world (don’t panic, we will have a procedure forapproving changes before they go into the definitive repository). Manipulatinga public commit will totally confuse git, make a big mess, and infuriate yourcollaborators, whose copies of the repository are no longer consistent withyour ill-advised action. This may be the only advice that all the Internet gitcommentators can agree on. If you follow the procedures we are describing, thiswill never be a danger. But when you push a commit to the master branch ofthe definitive repository and feel like you made a mistake, resist the temptationto go backwards locally and then do a “forced push” to the definitive repository.You might get away with it for a while, but eventually you will regret it. Justlive with it (a misspelled commit message), or add another commit to fix yourmistake (a grammatically poor sentence). And forget we even mentioned thepossibility of changing public commits.
Back to our exercise, now Bob has finished up his section, so he wants tomake it part of the definitive repository. He suspects Alice has finished theintroduction, since she was eager to discuss the recommendations. So, just likeAlice, he is going to update his master branch.
bob@laptop :~/ publications/banking -paper$ git checkout masterSwitched to branch 'master 'Your branch is up-to-date with 'origin/master '.
Notice that this particular up-to-date message is misleading. Bob willreally check with a pull. Remember that Bob has a remote named origin,with connection information for the definitive repository. (Why doesn’t a pullrequire a login?)
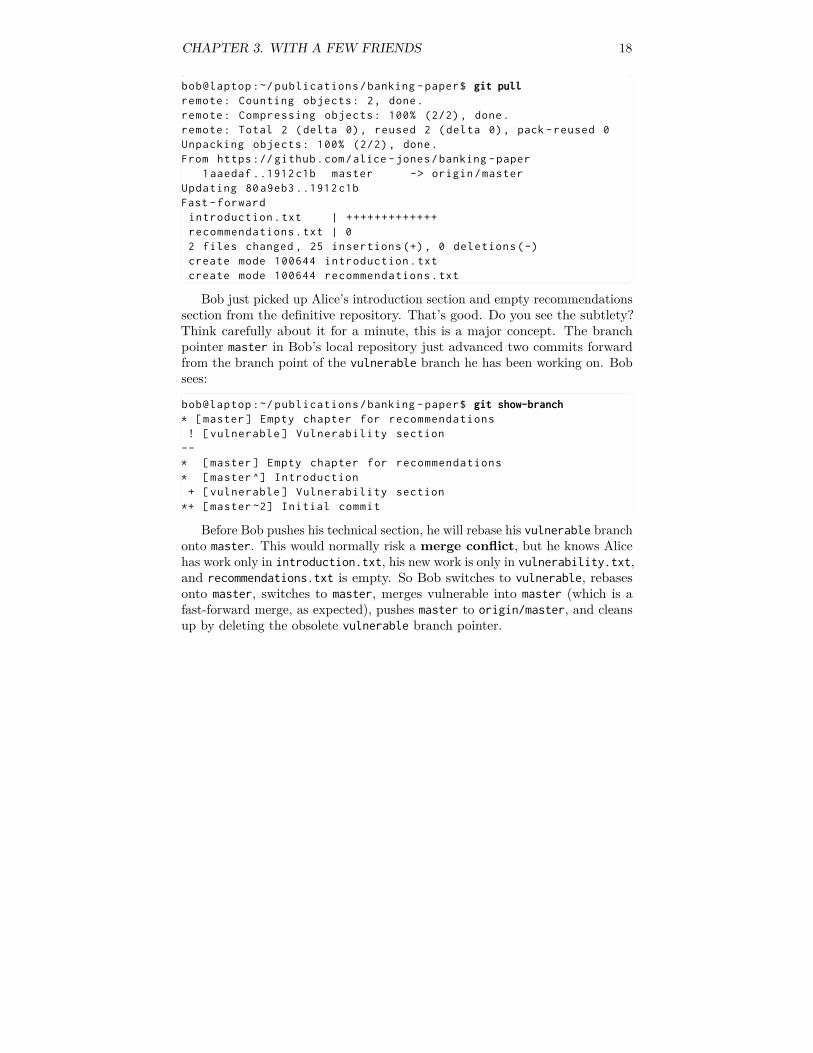
CHAPTER 3. WITH A FEW FRIENDS 18
bob@laptop :~/ publications/banking -paper$ git pullremote: Counting objects: 2, done.remote: Compressing objects: 100% (2/2), done.remote: Total 2 (delta 0), reused 2 (delta 0), pack -reused 0Unpacking objects: 100% (2/2), done.From https :// github.com/alice -jones/banking -paper
1aaedaf ..1912 c1b master -> origin/masterUpdating 80a9eb3 ..1912 c1bFast -forwardintroduction.txt | +++++++++++++recommendations.txt | 02 files changed , 25 insertions (+), 0 deletions(-)create mode 100644 introduction.txtcreate mode 100644 recommendations.txt
Bob just picked up Alice’s introduction section and empty recommendationssection from the definitive repository. That’s good. Do you see the subtlety?Think carefully about it for a minute, this is a major concept. The branchpointer master in Bob’s local repository just advanced two commits forwardfrom the branch point of the vulnerable branch he has been working on. Bobsees:
bob@laptop :~/ publications/banking -paper$ git show-branch* [master] Empty chapter for recommendations! [vulnerable] Vulnerability section
--* [master] Empty chapter for recommendations* [master ^] Introduction+ [vulnerable] Vulnerability section
*+ [master ~2] Initial commit
Before Bob pushes his technical section, he will rebase his vulnerable branchonto master. This would normally risk a merge conflict, but he knows Alicehas work only in introduction.txt, his new work is only in vulnerability.txt,and recommendations.txt is empty. So Bob switches to vulnerable, rebasesonto master, switches to master, merges vulnerable into master (which is afast-forward merge, as expected), pushes master to origin/master, and cleansup by deleting the obsolete vulnerable branch pointer.
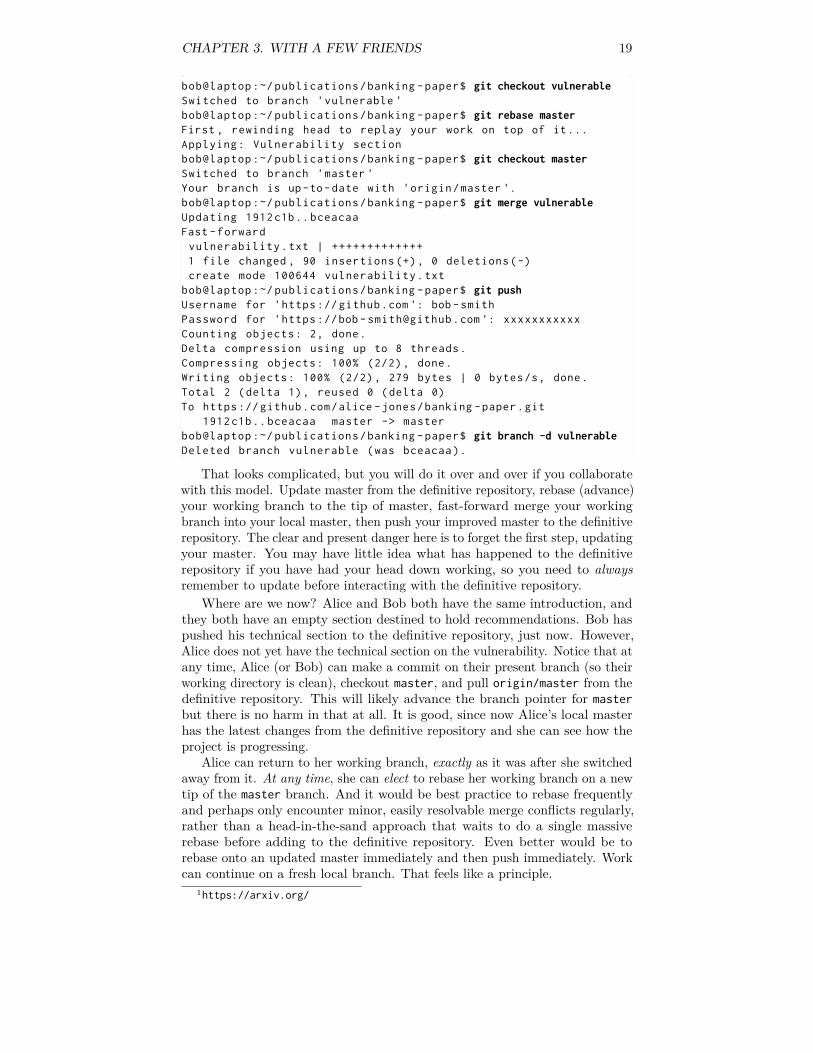
CHAPTER 3. WITH A FEW FRIENDS 19
bob@laptop :~/ publications/banking -paper$ git checkout vulnerableSwitched to branch 'vulnerable 'bob@laptop :~/ publications/banking -paper$ git rebase masterFirst , rewinding head to replay your work on top of it...Applying: Vulnerability sectionbob@laptop :~/ publications/banking -paper$ git checkout masterSwitched to branch 'master 'Your branch is up-to-date with 'origin/master '.bob@laptop :~/ publications/banking -paper$ git merge vulnerableUpdating 1912 c1b.. bceacaaFast -forwardvulnerability.txt | +++++++++++++1 file changed , 90 insertions (+), 0 deletions(-)create mode 100644 vulnerability.txt
bob@laptop :~/ publications/banking -paper$ git pushUsername for 'https :// github.com ': bob -smithPassword for 'https ://bob [email protected] ': xxxxxxxxxxxCounting objects: 2, done.Delta compression using up to 8 threads.Compressing objects: 100% (2/2), done.Writing objects: 100% (2/2), 279 bytes | 0 bytes/s, done.Total 2 (delta 1), reused 0 (delta 0)To https :// github.com/alice -jones/banking -paper.git
1912 c1b.. bceacaa master -> masterbob@laptop :~/ publications/banking -paper$ git branch -d vulnerableDeleted branch vulnerable (was bceacaa).
That looks complicated, but you will do it over and over if you collaboratewith this model. Update master from the definitive repository, rebase (advance)your working branch to the tip of master, fast-forward merge your workingbranch into your local master, then push your improved master to the definitiverepository. The clear and present danger here is to forget the first step, updatingyour master. You may have little idea what has happened to the definitiverepository if you have had your head down working, so you need to alwaysremember to update before interacting with the definitive repository.
Where are we now? Alice and Bob both have the same introduction, andthey both have an empty section destined to hold recommendations. Bob haspushed his technical section to the definitive repository, just now. However,Alice does not yet have the technical section on the vulnerability. Notice that atany time, Alice (or Bob) can make a commit on their present branch (so theirworking directory is clean), checkout master, and pull origin/master from thedefinitive repository. This will likely advance the branch pointer for masterbut there is no harm in that at all. It is good, since now Alice’s local masterhas the latest changes from the definitive repository and she can see how theproject is progressing.
Alice can return to her working branch, exactly as it was after she switchedaway from it. At any time, she can elect to rebase her working branch on a newtip of the master branch. And it would be best practice to rebase frequentlyand perhaps only encounter minor, easily resolvable merge conflicts regularly,rather than a head-in-the-sand approach that waits to do a single massiverebase before adding to the definitive repository. Even better would be torebase onto an updated master immediately and then push immediately. Workcan continue on a fresh local branch. That feels like a principle.
1https://arxiv.org/
CHAPTER 3. WITH A FEW FRIENDS 20
Principle 3.1.3 Rebase Working Branches Often. Frequently rebaseprivate working branches onto an up-to-date master branch.
What does “private” mean here? We have seen that commit hashes forma chain of repeated hashes all the way back to the root commit (Section 2.3),and that we can identify commits by the leading digits of a commit hash. Also,a rebase will always change some commit hashes (Principle 2.3.1). So whilethe present principle advocates frequent rebases, never perform a rebase thatchanges a commit hash that has been made available to somebody else. This isthe advice contained in Principle 3.1.2, and now could be a good time to backand re-read the discussion that follows it.
We have seen how to pull from the master branch of the definitive repository,and how to push commits to the master branch of the definitive repository. Sowe have the tools for two-way communication between repositories. We canpull from public repositories at will, but need permission to push to repositorieswhere we are trusted to make unilateral changes.
3.2 Conflicting EditsLet us do one more exercise with Alice and Bob.Checkpoint 3.2.1 Alice and Bob Edit Simultaneously. With agreementabout the recommendations, and in a rush, both Alice and Bob are going tosimultaneously perform conflicting edits in the recommendations section. Wewill purposely engineer a merge conflict as an exercise, so follow the instructionscarefully.
Alice should make a new branch, named rec, for her work on the recom-mendations. She should write three short paragraphs in recommendations.txt,separated by blank lines, and she should commit those changes on her branch.Bob should make a new branch, named recommend, and should also authorthree short paragraphs in recommendations.txt, separated by blank lines, andhe should commit those changes on his branch. However, Alice and Bob shouldcollude (outside of GitHub) to have identical first and third paragraphs, butradically different second paragraphs. Of course, this is unrealistic, but thismakes the exercise work. If you put Alice’s name into her second paragraphsomeplace, and put Bob’s name into his second paragraph, the exercise will beeven more informative.
We will let Alice go first, since she got a head-start on Bob originally andshe does not yet have the section with the technical details of the vulnerability.Alice updates her master branch from the definitive repository (origin/master),and in doing so, she will pickup Bob’s technical section. Then she should rebaseher rec branch onto master, which will go smoothly. Then she merges rec intoher local master (which will be a fast-forward merge) and push the improvedmaster to origin/master.
So the definitive repository has Alice’s recommendation section, while Bob’srecommendations are still local to his repository, and origin/master has ad-vanced beyond Bob’s local master. Here is the transcript for Bob (again).

CHAPTER 3. WITH A FEW FRIENDS 21
bob@laptop :~/ publications/banking -paper$ git checkout masterSwitched to branch 'master 'Your branch is up-to-date with 'origin/master '.bob@laptop :~/ publications/banking -paper$ git pullremote: Counting objects: 3, done.remote: Compressing objects: 100% (2/2), done.remote: Total 3 (delta 1), reused 3 (delta 1), pack -reused 0Unpacking objects: 100% (3/3), done.From https :// github.com/alice -jones/banking -paper
bceacaa .. b7abe18 master -> origin/masterUpdating bceacaa .. b7abe18Fast -forwardrecommendations.txt | 5 +++++1 file changed , 5 insertions (+)
bob@laptop :~/ publications/banking -paper$ git checkout recommendSwitched to branch 'recommend 'bob@laptop :~/ publications/banking -paper$ git rebase masterFirst , rewinding head to replay your work on top of it...Applying: Bob recommendsUsing index info to reconstruct a base tree ...M recommendations.txtFalling back to patching base and 3-way merge ...Auto -merging recommendations.txtCONFLICT (content): Merge conflict in recommendations.txtFailed to merge in the changes.Patch failed at 0001 Bob recommendsThe copy of the patch that failed is found in:
~/ publications/banking -paper/.git/rebase -apply/patch
When you have resolved this problem , run "git rebase--continue ".
If you prefer to skip this patch , run "git rebase --skip"instead.
To check out the original branch and stop rebasing , run "gitrebase --abort".
Boom! The scariest thing that can happen in git. But you know weengineered this conflict to happen and we are not going to panic. (If youdo want to panic, try git rebase –abort as suggested and when you collectyourself and settle down, come back to try the rebase again.)
Your hint about where the conflict lies is in the line
CONFLICT (content): Merge conflict in recommendations.txt
Details on resolving conflicts are in Chapter 5 so head there for details onwhat to do now, specifically see the instructions for a “rebase conflict” inList 5.0.1. Briefly, Bob will open recommendations.txt in his editor and seethe two different second paragraphs adjacent to each other, with Alice’s officialsecond paragraph first, and his proposed second paragraph afterwards. Nowthere is no notion of official or not, Bob and Alice are equals. But Alice gotthere first, so Bob has the responsibility to decide which paragraph to keep, orto keep both, and in what order. If Alice does not like Bob’s decisions, theycan do another round of changes (perhaps after some discussion on a GitHubissue, including commit hashes in the discussion to reference the details of anydisagreement).
Done resolving the conflict, Bob’s recommend branch now comes off the tipof master and is positioned for a fast-forward merge that he can then push toorigin/master.
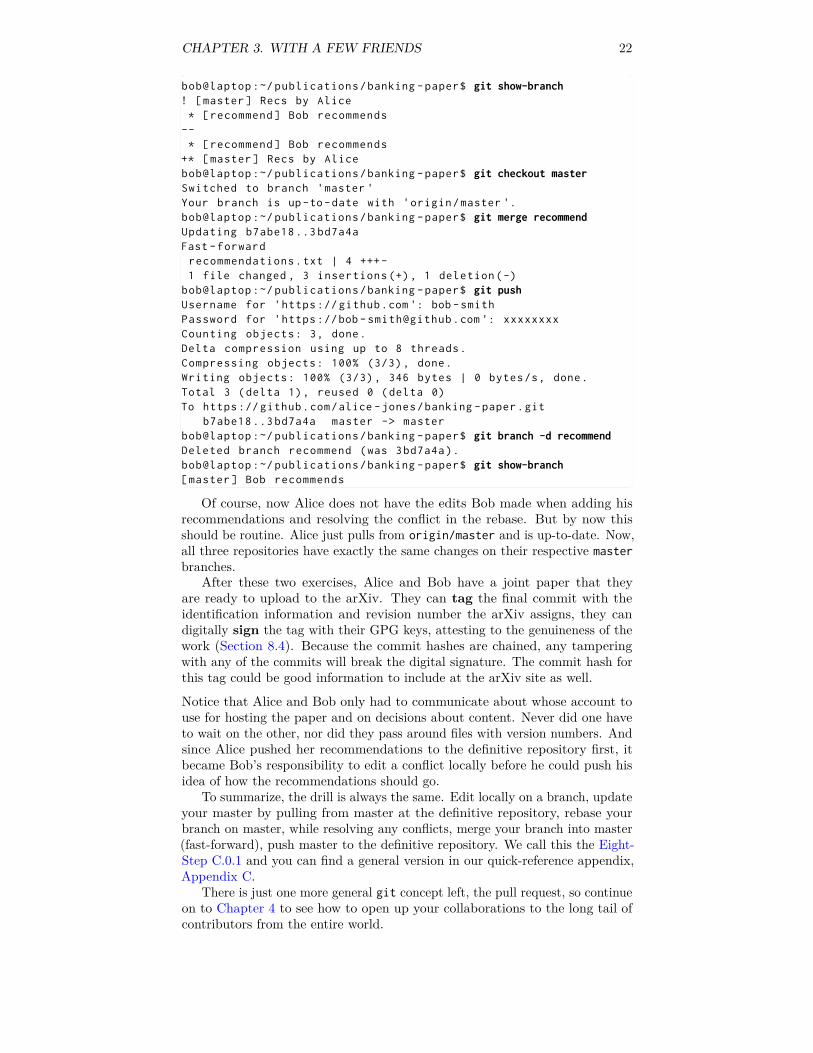
CHAPTER 3. WITH A FEW FRIENDS 22
bob@laptop :~/ publications/banking -paper$ git show-branch! [master] Recs by Alice* [recommend] Bob recommends
--* [recommend] Bob recommends
+* [master] Recs by Alicebob@laptop :~/ publications/banking -paper$ git checkout masterSwitched to branch 'master 'Your branch is up-to-date with 'origin/master '.bob@laptop :~/ publications/banking -paper$ git merge recommendUpdating b7abe18 ..3 bd7a4aFast -forwardrecommendations.txt | 4 +++-1 file changed , 3 insertions (+), 1 deletion(-)
bob@laptop :~/ publications/banking -paper$ git pushUsername for 'https :// github.com ': bob -smithPassword for 'https ://bob [email protected] ': xxxxxxxxCounting objects: 3, done.Delta compression using up to 8 threads.Compressing objects: 100% (3/3), done.Writing objects: 100% (3/3), 346 bytes | 0 bytes/s, done.Total 3 (delta 1), reused 0 (delta 0)To https :// github.com/alice -jones/banking -paper.git
b7abe18 ..3 bd7a4a master -> masterbob@laptop :~/ publications/banking -paper$ git branch -d recommendDeleted branch recommend (was 3bd7a4a).bob@laptop :~/ publications/banking -paper$ git show-branch[master] Bob recommends
Of course, now Alice does not have the edits Bob made when adding hisrecommendations and resolving the conflict in the rebase. But by now thisshould be routine. Alice just pulls from origin/master and is up-to-date. Now,all three repositories have exactly the same changes on their respective masterbranches.
After these two exercises, Alice and Bob have a joint paper that theyare ready to upload to the arXiv. They can tag the final commit with theidentification information and revision number the arXiv assigns, they candigitally sign the tag with their GPG keys, attesting to the genuineness of thework (Section 8.4). Because the commit hashes are chained, any tamperingwith any of the commits will break the digital signature. The commit hash forthis tag could be good information to include at the arXiv site as well.
Notice that Alice and Bob only had to communicate about whose account touse for hosting the paper and on decisions about content. Never did one haveto wait on the other, nor did they pass around files with version numbers. Andsince Alice pushed her recommendations to the definitive repository first, itbecame Bob’s responsibility to edit a conflict locally before he could push hisidea of how the recommendations should go.
To summarize, the drill is always the same. Edit locally on a branch, updateyour master by pulling from master at the definitive repository, rebase yourbranch on master, while resolving any conflicts, merge your branch into master(fast-forward), push master to the definitive repository. We call this the Eight-Step C.0.1 and you can find a general version in our quick-reference appendix,Appendix C.
There is just one more general git concept left, the pull request, so continueon to Chapter 4 to see how to open up your collaborations to the long tail ofcontributors from the entire world.

Chapter 4
In Control
We now turn to the situation where your book may have numerous collaborators.Maybe your book is an anthology of short stories with thirty contributors, ormaybe it is a human anatomy textbook with the potential for students todiscover small errors for many, many years down the road. If the anatomytextbook has four authors, you might begin as colleagues as in Chapter 3, butlater may have specialists reviewing and editing select chapters, until finallythe book is published and students suggest changes and corrections for theinevitable Second Edition. git is flexible enough to help you at every step.
So the model here is a select few that are in control of the repository. Theymight be called authors or editors, but we will refer to them generically asoverlords (WordNet: “a person who has general authority over others”). Inour opinion many projects should be large, because you want to encouragepeople to contribute.
4.1 Creating a Pull RequestA pull request is a way for a contributor to provide changes to your project,such as new material, suggestions for changes, or corrections, in an “embargoed”way. This is perfect when the collaborator is a junior partner in your project,or even a total stranger. As an overlord you retain control, and as a contributoryou have total freedom to craft your contribution exactly as you think it shouldbe, and to make it extremely easy for an overlord to accept. For the rest ofthis section, we will stop supposing the project is yours, but instead, we adoptthe point-of-view of a collaborator. Here is the suggested setup.
• As in Chapter 3 there is one “definitive” version of the project as a gitrepository. It resides on GitHub (see Appendix B). One or more peoplehave control over the definitive repository (the overlords). You do notneed to know who the overlords are. Everyone’s goal is to have theirchanges become part of the definitive repository.
• Every person who wants to contribute to the project has a fork, which isa git repository under their own personal account on GitHub. (Thosemysterious people who have control over the definitive repository: theyalso have their own forks in their own GitHub accounts.) A fork is acopy of the definitive repository, and your fork is completely under yourcontrol.
23
CHAPTER 4. IN CONTROL 24
• Everyone who wants to contribute to the project also has a copy of theirfork on their own computer. (We now know of three copies of the project:definitive, your fork on GitHub, your fork on your computer.) We willrefer to this as “the version on your laptop,” although your computermight be a desktop machine, or something in the cloud, or something else.(The technical term for “version on your laptop” is clone, but we will notuse that terminology. Keep in mind that the version on your laptop wascopied from your fork, not from the definitive repository.)
• The repository on each contributors’s individual laptop knows about tworepositories on GitHub:
◦ Their own fork, which is called origin.◦ The definitive repository, which is called upstream.
Both of these repositories are known and managed as remotes withinthe repository on the laptop.
To summarize, everyone has a repository on their laptop. Everyone has the sameupstream remote: it is the definitive repository. Everyone has a different origin,which is their own personal fork (a repository) in their account on GitHub.Notice that in Chapter 3 the origin remote was the definitive repository, butnow origin is a sort of intermediary between the repository on your laptopand upstream, the definitive repository. (See Appendix B for details on forkinga project on GitHub and setting up your laptop with a copy.)
Once all of that is set up, you go through the exact same cycle every timeyou want to contribute changes to the project. You already know how to workwith branches, and their usefullness in a personal project, or with a small group.Chapter 6 is devoted entirely to how you can work effectively with a branch.
In a big complicated project, like a calculus textbook, there are lots ofdifferent things that may need attention. Maybe you need to put in the solutionsto the problems from Chapter 6, or maybe you need to add a new section onthe chain rule to Chapter 4, or maybe you need to edit the introduction toSection 5.3.
With branches, you know that you could use your repository to productivelywork on all three tasks, switching between them at will. You would have three dif-ferent branches, solutions-chap-6, chain-rule-section, intro-section5-3,and in each branch you would be doing something a bit different.
Why is this good? There are many reasons, two of which are: (i) You do notneed to mess up the working version of the book, because you are just workingon a copy, and (ii) independent changes can be evaluated independently. Item(ii) suggests the following principle.
Principle 4.1.1 Pull Requests Separate Creation and Approval. Theprocess of suggesting changes to the definitive repository of a project is separatefrom the process of accepting those changes.
This may seem silly if you are thinking in terms of a single person writinga book. But if the writing and editing is a group effort, and many peopleare contributing, it makes perfect sense for all changes to require at least twopeople: the person who wrote the new material, and the person who agreedto add that material to the definitive version. Notice that the sections of thischapter are organized exactly according to this principle.
So, you make a branch when you are about to start working on some aspectof the document (Principle 2.2.3). You may work on that branch for just anhour, or for several days, or off-and-on for months. You may switch to workingon other branches. If it sounds confusing at first, it will not be confusing once

CHAPTER 4. IN CONTROL 25
you start doing it, and it is totally worth it. For example, suppose you havefinished making the solutions to the problems for Chapter 6. Good, becausenow you can propose those changes to be included in the definitive repository,and it is no problem that you have not yet finished the other work you aregoing, because those tasks are on different branches. And if the overlords reviewyour work promptly, that is nice, but if it takes them some time to do that,you are not hung up waiting for their feedback before you can go back to toediting your new section on the chain rule. Juggling several writing tasks hasjust become a whole lot easier.
One last bit of terminology: proposing that the changes in a branch gointo the definitive version is called a pull request. As in, “I request that theoverlords pull my changes into the definitive repository.” Once the authoritiesaccept your pull request, the changes from your branch are now incorporatedinto the definitive repository and part of the official version of the project.
Now that we know the purpose and workflow of a pull request, and how tosetup our laptop, let us describe the procedure of making a pull request. Noticethat we are leveraging what you already know about branches from Chapter 2and what you know about pushing and pulling changes from Chapter 3. Youwill go through the following recipe every time you want to contribute to aproject where an overlord will review your contribution.
List 4.1.2 Creating a Pull Request
1. git checkout master
git pull upstream master
Remember that upstream is the name your laptop has for thedefinitive repository. This checkout and pull will update your localmaster branch with all of the latest changes that constitute theofficial version of the project.
2. git branch <branch_name>
Initate a new branch, named branch_name. Previously your branchnames were disposable, known only to you. They will now beconepart of the public workflow for you and the overlords, so concoctsomething short but descriptive. (You can change this name beforemaking it public, Chapter 6.)
3. git checkout <branch_name>
Switch to your new branch, where you are going to work (Princi-ple 2.2.3).
4. git add <file1> <file2> <file3>
git commit -m "An informative message"
Edit files, and accumulate new commits, just like before. Whenyour branch is just the way you would like it to look, it is time togo public. Ready?
5. git pull upstream master
While on the <branch_name> branch, you are pulling in any newcommits from the master branch of the definitive repository andmerging them into your working branch.There is the very real possibility of a conflict in this merge. But youwould much, much rather discover this yourself now, in the privacy

CHAPTER 4. IN CONTROL 26
of your own laptop, instead of an overlord getting all geared up toevaluate your public pull request and being immediately stymiedby discovering there is a merge conflict that will simply be handedright back to you to resolve. When this happens, the overlord isonly going to let you know about it, and then head off to evaluatesomebody else’s pull request.When you do have a conflict in the merge, head out to List 5.0.2in Chapter 5 for instructions on resolving it. Now you have doneall you can. Your work is all packaged up nicely and consistentwith the absolute latest changes in the definitive repository, soyou are ready to go public.
6. git push origin <branch_name>
Remember that origin is the name your laptop has for your forkof the project in your GitHub account. Now your fork has a newbranch, which you would like to see also incorporated into thedefinitive repository.
7. Go to your fork on GitHub.Use your browser to visit your GitHub account, and locate yourfork of the project. GitHub knows that you just put a new branchon that fork, so you should see a prominent green button on theright which says Compare & pull request.Click that button and you will see a page with a text box whereyou can describe the changes you have made. It is consideredpolite to describe where those changes can be seen (in the finalproduct, not in the source files) so that the reviewer can take alook at the effect of your changes. For example, say somethinglike “New exercises for Chapter 6, see page 88.”Click the green create pull request button and you are done.Easy, since GitHub knows who the overlords are and has alreadybeen in touch with them about your changes.
8. git checkout master
git pull upstream master
You are ready to start on something new while you wait on theoverlords, so these two commands will reset the repository on yourlaptop to be ready to begin on something new, and update yourrepository with the latest changes from the definitive repository.
What might happen next? Hopefully someone with control over the defini-tive repository will accept your pull request. But maybe they want you tomake some changes; perhaps they found a typo or other error. No problem:just checkout your branch again on your laptop, edit to make the corrections,save those changes as a new commit on the branch, and push your branch toyour fork (origin). This is the same recipe as in List 4.1.2, except that youskip over the command that actually creates branch_name, since that branchalready exists.
Your pull request will be automatically updated and the overlords notified.Notice that we are not changing any commits, just adding to, and extendingthe branch. And anybody can look and see the record of your original proposal
CHAPTER 4. IN CONTROL 27
and your response to the overlord’s request. There is a complete record ofexactly what decisions were taken and git and GitHub make the mechanics ofthe collaboration between contributor and overlord very simple.
It may happen that you (the person who created the pull request) are alsoa person who has control over the definitive repository, i.e. an overlord. In thatcase you can actually go to the definitive version on GitHub and accept yourown pull request. However, many projects adopt the policy that people are notsupposed to accept their own pull request, so would frown on this. This sortof policy is a best practice, but is not enforced by git or GitHub, it is a socialconstruct of the organization of your project.
Even if you never aspire to be an overlord, you will find reading the nextsection is helpful, since it is always a good idea to see what it is like when theshoe is on the other foot. It also explains what you should do as a contributorwhen the branch in your pull request has a conflict with the master branch dueto some changes that were introduced to master between the time you pushedyour branch and an overlord got interested in an evaluation.
4.2 Reviewing and Accepting a Pull RequestWe now change our point-of-view, to assume that you, dear reader, are theowner of the definitive repository, or have control over a definitive repository.In other words, you are an overlord now, with responsibility for the officialversion that will be produced from the definitive repository. Other people wantto contribute to your project, so they create pull requests that GitHub notifiesyou about. The pull request is GitHub’s way of letting other people contributeto your project, while still allowing you to have complete control.
Here is an annotated description of the process of reviewing and acceptinga GitHub pull request.
Locate a Pull Request on GitHub. GitHub has likely sent you a notifi-cation immediately after a contributor has created a pull request, and maybethat email has a link to take you directly there. But you also need to knowhow to find any given pull request later.
Go to the project’s home on GitHub and see if there are any pending pullrequests. Note that you are going to the definitive repository, not your ownpersonal fork of the project. You have your manager-hat on now, not yourcontributor-hat.
It is common to see seven tabs across the top of the repository on GitHub:
Code Issues Pull requests Wiki Pulse Graphs Settings
The first three and the last one are used most often. For Issues and Pullrequests there will be a little number telling you how many items need yourattention. Click on Pull requests. Each pull request will have a title, and itwill tell you who made the pull request and when they created it. Click on oneof the pull requests.
Initial Review of a Pull Request. If the contributor did a good job, therewill be a few sentences describing what they did, and an indication of howtheir proposed changes appear in the final product, such as “New exercises forChapter 6, see page 88.”. Let us assume the contributor gave a clear description,and what they describe sounds like something beneficial to your project.
Below the description you should see a check mark in a green disk, and thephrase

CHAPTER 4. IN CONTROL 28
This branch has no conflicts with the base branch
What does that mean? A merge conflict occurs when two people modifythe same part of the same file. This could happen, for example, if a definitionhad awkward wording, and two people decided to fix it at about the same time.If they both submit pull requests, and you accept one of the pull requests,then the other pull request will cause a merge conflict because there is noautomated way to figure out how to apply the second set changes since theoriginal context has been destroyed by the application of the first pull request.(In the unlikely case that both people use the exact same wording then therewould not be a merge conflict.) Another common scenario is when two peopleadd new exercises to the end of an existing list. Once you accept one of thesepull requests, there is no automated way to determine where to put the secondset of new exercises. Should the second group of exercises go before the firstaddition, or after the first addition? git cannot help you here, and thereforewill not help you.
Another likely explanation is that the pull request has a branch with a longlifetime. It was created as a branch off the tip of master, but that was a longtime ago. The contributor added commits at a leisurely pace, and the overlordstook their time in getting to their pull requests (always a bad practice for anoverlord, you want happy contributors!). During this time, conceivably manynew commits have been added to the master branch and somewhere there isan unfortunate overlap with the contributor’s edits or their context.
So a merge conflict requires a human to figure out how to resolve it. Usuallyit is simple: just look at both versions and choose one, or the other, or come upwith some happy medium. Simple for a person, but impossible for a machine.
When GitHub says there is a merge conflict, it is because GitHub has donea trial test of merging your branch in the pull request into the master branchof the definitive repository and the trial ended badly. The usual thing to do isscroll down to the next item on the page, which is a comment box. Write abrief message to the contributor saying there is a merge conflict, and click theComment button and an email will be sent to the contributor. You should expectthe contributor to resolve the conflict (see next paragraph). Occasionally youmay choose to fix a small conflict yourself, but let us not worry about that now.
The contributor can resolve the conflict by doing
git checkout <branch_name>git pull upstream master
So the contributor is on the branch they offered in the pull request, and it isimportant to get this part right. Then the contributor pulls commits from themaster branch of the definitive repository. Several things happen as a result.First, the contributor gets the very latest commits from the master branchof the definitive repository, so it very up-to-date. Then git will try to mergemaster into <branch_name>. This is going to end the same way as it did ingit’s trial: badly. But we expected it, were prepared for it, and git will doeverything it can to help us.
The merge of the commits pulled from master, into the contributor’s branchwill cause a merge conflict. See Chapter 5 for the general procedure for resolvinga merge conflict. Once that is done, the contributor can now push their branchto their fork at origin and GitHub will notify the overlords that the updatedbranch is ready for review.
Note: there is no need to click Close pull request. Only do that whenyou really intend to reject the request. And always leave a message so that itis clear you did not close the pull request by accident.

CHAPTER 4. IN CONTROL 29
In-depth Review of a Pull Request. Now you are looking at a pull requestwith a description that sounds useful, and there are no conflicts. The next stepis to look at the actual changes the contributor made and their effect on yourproject. There are three tabs below the title of the pull request:
Conversation Commits Files changed
Click on Files changed. Highlighted in red and green will be the lines whichwere deleted and added (respectively) as part of this pull request. You needto look carefully at what was written, because this is destined to become anofficial part of your project. All large successful projects have standards forwriting the source material, and you should check that the author has donea good job. Suppose, for example, you see the following line added to yourcalculus textbook:
When finding a maximum, be sure to check {\em both} end points.
The author has not used the LaTeX markup language in the best way, so itwould be reasonable to click back to the Conversation tab, and in the commentsbox put something like
Use \emph{...} instead of {\em ...} for emphasis.
It is a good idea to look through all of their changes and submit multiplecomments (in the same comment box), otherwise both of you will becomeannoyed if you have to go back and forth several times.
Assuming you have looked through the contributor’s changes and the formatand content seems to look okay, now you need to actually check that theircontribution performs as claimed. If the project is code, that means youneed to compile and run their code. If it is a book, you need to producethe book with their changes and see that the output looks good. Here is theprocedure for doing a preliminary review within your fork on your laptop (thisis your personal sandbox) and then actually incorporating the changes into thedefinitive repository.
List 4.2.1 Reviewing and Accepting a Pull Request
1. git checkout master
git pull upstream master
You are preparing your fork on your laptop and updating to themost recent version of the definitive repository. You should be inthe habit of doing that whenever you are about to start somethingnew, so it shouldn’t be a surprise that you are supposed to do thatnow.
2. Click back to Conversation, and next to the big green Merge pullrequest click on the blue words command line instructions. Ifthe GitHub user fredstro made a pull request for your calculusrepository as a branch named solutions-chap-6, then these com-mands would look similar to:git checkout -b fredstro-solutions-chap-6 master
git pull https://github.com/fredstro/calculus.git solutions-chap-6
You want to run these commands for your fork on your laptop–youcould just cut them from your web browser and paste them intoyour terminal session.
CHAPTER 4. IN CONTROL 30
As a result you will now have a branch in your laptop’s fork namedfredstro-solutions-chap-6 with all of the changes fredstro isproposing. Now you can do a thorough check on the pull request.Produce your book, or run code, or whatever is appropriate foryour project. Examine the output to see if the changes performedas expected. Notice that you have not endangered the definitiverepository in any way, and eventually you can just delete thebranch from your fork.
3. If the contribution fails to pass your discriminating review, thenleave a comment under Conversation and the person will respondwith further changes. That scenario is quite common: people oftenforget to actually verify that their changes behave as claimed beforesubmitting a pull request. It can also happen that the overlordevaluating the pull request fails to actually check everything beforeaccepting it. Then the real blame lies with the overlord whoaccepted the request, because they are in a position of responsibilityfor the project. So be very careful if you accept a pull request afteronly glancing at the Files changed on GitHub. Once the changesgo into the definitive repository, you and your collaborators areresponsible for them.
4. If everything looks good, then it is easy. Maybe too easy! Goback to the definitive repository on GitHub and click the big greenMerge pull request. Modify the commit message if necessary,and then click Confirm merge. GitHub may then say somethingabout deleting a branch which is no longer needed: that is a finething to do.
5. Note that your laptop is still on the temporary branch you createdto check that pull request. So you should checkout master andgit pull upstream master. The master branch on your fork onyour laptop will now have the changes from the pull request youjust accepted.If you handle a lot of pull requests you will acquire a lot of brancheswhich are no longer needed. We have seen earlier how to deletebranches. The temporary branches you make when you evaluate apull request have distinctive names, which makes it easy to identifyand delete them.
That is it! More than ninety percent of pull requests can be handled withthose simple steps. If you encounter a complicated situation, seek help from anexpert.
Large projects use a model similar to this one. Sage, an open source computeralgebra system, has hundreds of contributors with a single release manageras the overlord. Reviews of proposed branches are distributed among thecontributors themselves, so if the release manager is familiar with the reputationsand expertise of members of the community, it can be feasible for a singleperson to roll up fifty or so contributions on a weekly basis and still maintainthe integrity of the project, and their sanity.

CHAPTER 4. IN CONTROL 31
Figure 4.2.2 xkcd “Git”1 (used with permission)Notice that with a large project, there are many people working asyn-
chronously and the potential for conflicts is very real as the mainline branchmay advance rapidly from where a contributor initiated it. In the Sage project,reviews are not assigned, and are voluntary. A diligent contributor mightregularly merge the master branch into their proposed branch, creating mergecommits every time, with or without any necessary edits, which are then pushedto the public equivalent of GitHub. In this way, the contributor’s proposedbranch is always consistent with a relatively recent version of the definitiverepository. Due to this, and to the public nature of the commits on a pullrequest, there will be many merge commits in such a repository. The networkof commits begins to look less like a tree, and more resembles a slow, broad,meandering river with many branches forming, coming back together, split-ting again, reforming,. . . Mathematicians refer to this network as a directedacyclic graph, which you may see described as “the DAG”. There is always anunambiguous path through the commits back to the original root commit.
If you have ever tried to collaborate on a writing project using emailwith attachments of traditional word-processing files (with or without “trackchanges”), then you may already be starting to appreciate how git’s branchesand remotes, along with GitHub’s pull requests and notifications, can freecontributors and overlords to collaborate efficiently and concentrate on contentwith very little procedural friction.
1http://xkcd.com/1597/
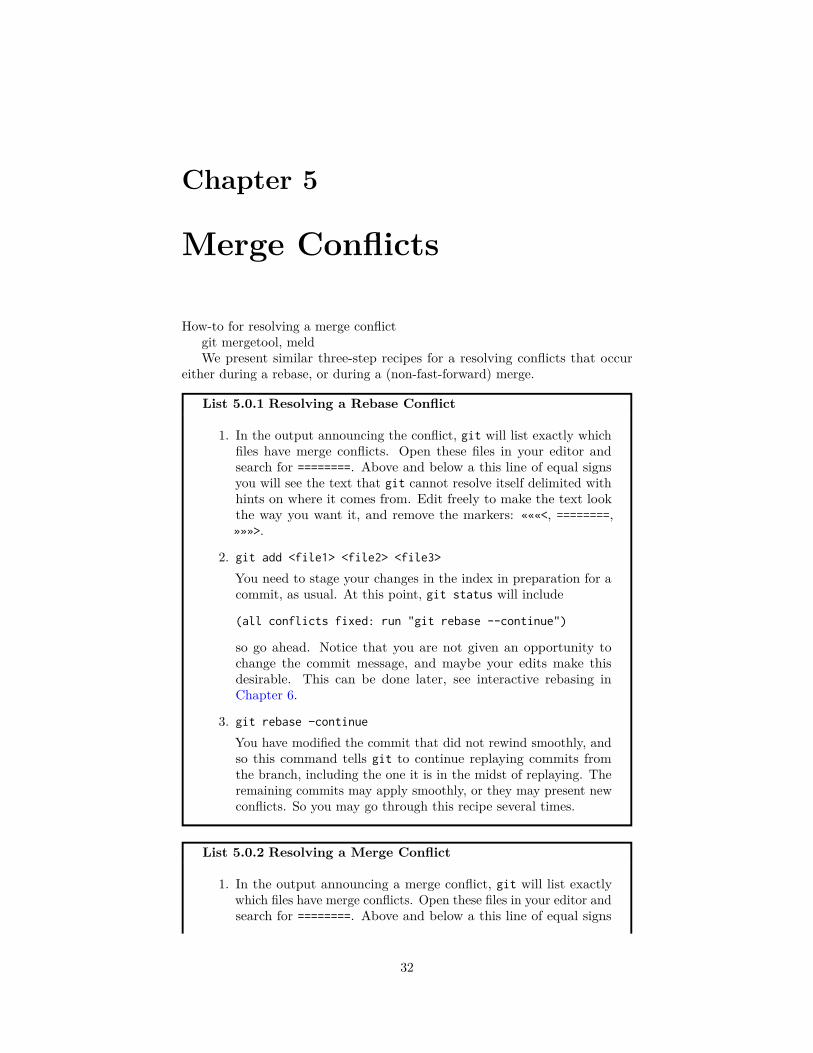
Chapter 5
Merge Conflicts
How-to for resolving a merge conflictgit mergetool, meldWe present similar three-step recipes for a resolving conflicts that occur
either during a rebase, or during a (non-fast-forward) merge.
List 5.0.1 Resolving a Rebase Conflict
1. In the output announcing the conflict, git will list exactly whichfiles have merge conflicts. Open these files in your editor andsearch for ========. Above and below a this line of equal signsyou will see the text that git cannot resolve itself delimited withhints on where it comes from. Edit freely to make the text lookthe way you want it, and remove the markers: «««<, ========,»»»>.
2. git add <file1> <file2> <file3>
You need to stage your changes in the index in preparation for acommit, as usual. At this point, git status will include
(all conflicts fixed: run "git rebase --continue")
so go ahead. Notice that you are not given an opportunity tochange the commit message, and maybe your edits make thisdesirable. This can be done later, see interactive rebasing inChapter 6.
3. git rebase –continue
You have modified the commit that did not rewind smoothly, andso this command tells git to continue replaying commits fromthe branch, including the one it is in the midst of replaying. Theremaining commits may apply smoothly, or they may present newconflicts. So you may go through this recipe several times.
List 5.0.2 Resolving a Merge Conflict
1. In the output announcing a merge conflict, git will list exactlywhich files have merge conflicts. Open these files in your editor andsearch for ========. Above and below a this line of equal signs
32
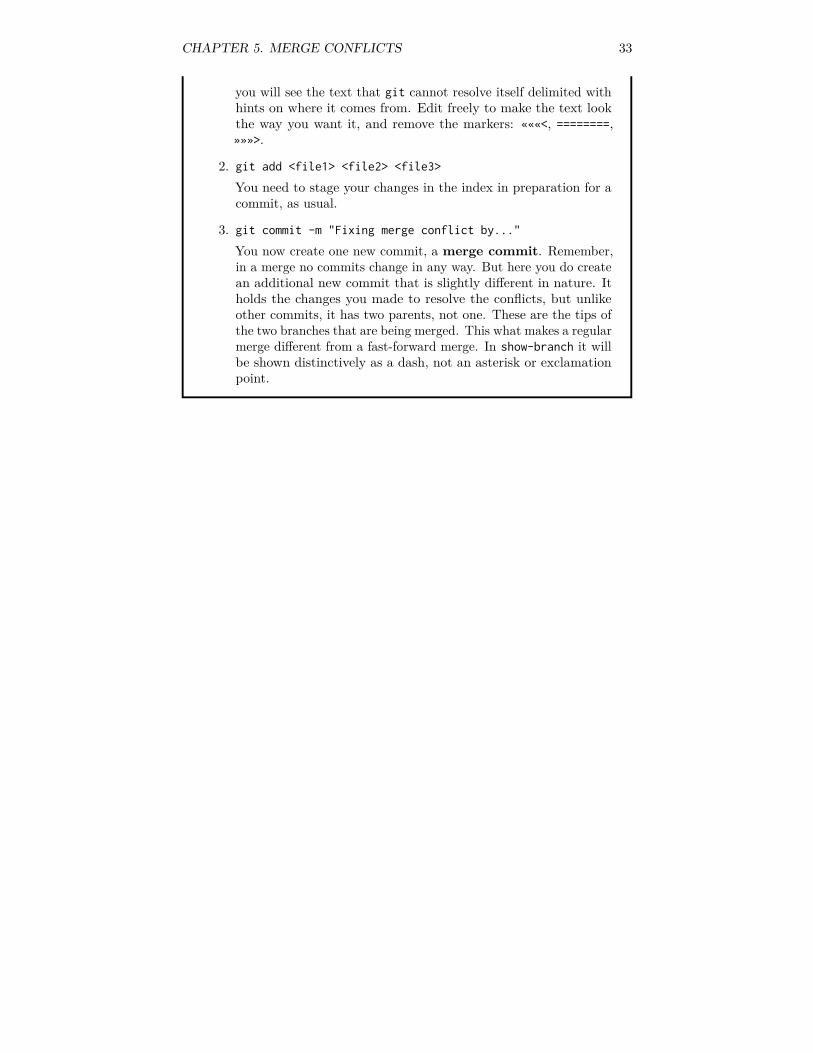
CHAPTER 5. MERGE CONFLICTS 33
you will see the text that git cannot resolve itself delimited withhints on where it comes from. Edit freely to make the text lookthe way you want it, and remove the markers: «««<, ========,»»»>.
2. git add <file1> <file2> <file3>
You need to stage your changes in the index in preparation for acommit, as usual.
3. git commit -m "Fixing merge conflict by..."
You now create one new commit, a merge commit. Remember,in a merge no commits change in any way. But here you do createan additional new commit that is slightly different in nature. Itholds the changes you made to resolve the conflicts, but unlikeother commits, it has two parents, not one. These are the tips ofthe two branches that are being merged. This what makes a regularmerge different from a fast-forward merge. In show-branch it willbe shown distinctively as a dash, not an asterisk or exclamationpoint.
Chapter 6
(∗) Branch Management
Reference a principle, always working on a branchinteractive rebase, total squash and rebuild commits, graftingrelative references, merge commits, etc, seen already in solo chapterstash, "I’ll just be a minute"branch rename, prior to public PRcherry-pickRename a branchdon’t rebase through branch points, might lose oneFancier diff commands to see whole cumulative branch
34
Chapter 7
(∗) Oops!
Sections with titles describing problems, content is fixes. General overarchingadvice (stop quickly, diagnostics,directory backup, reflog).
7.1 That is So Messed UpSuppose you have really made a mess of some file, and you do not even reallyknow just how it happened. No problem. With a clean working directory, youcan git checkout <ref> where ref is any reference you can think of to referto a certain commit anywhere in your repository. This reference could be abranch pointer, like master or heroine, or it could be the leading digits of acommit hash that you locate in the output of git log, like 39b56cc9. This willconvert the working directory to some previous state, where your file has whatyou want.
Now copy the acceptable version of the file in question to someplace outsideof your repository. Then something like git checkout giraffes will bring youback to where you were. Now copy the file from outside the repository on topof the messed-up one. To git the changes will look indistinguisable to youtyping at the keyboard to fix everything. Commit these changes in the usualway as a single changeset and get back to your writing.
Your history will contain a record of whatever mistake you made, but atleast the collection of commits you had created in git allowed you to go backand re-create something acceptably close to your original work. Note thatcommiting frequently gives you greater latitude to pick just the right commitfor the recovery.
Of course, if the damage is extensive and several files are affected, you cando the copy and replace with each one.
35

Chapter 8
Git Miscellany
This final chapter is a loose collection of tidbits that you may find useful,without getting too technical or arcane. We have not tried to cover everything,and we may have told you a few white lies along the way. When you exhaustwhat we have here, re-read Chapter 9, and send us a pull request if you havesomething useful (and not too arcane) for this chapter.
8.1 (∗) Word Diffgit diff –word-diff
8.2 (∗) Impersonating a Commiter
8.3 The StashThe stash is a stack, a last-in, first-out arrangment, like a stack of plates ina warmer in a cafeteria. At any time you can save your changes in a dirtydirectory with the command git stash save and they are removed from theworking directory, thus making the directory clean again, and are saved as achangese in the stash. This great if you just want to wander off some place elsein your repository and you will be right back to your work-in-progress. So wetalk of “stashing your changes” as a temporary measure.
When you are a begineer, the stash is very alluring. Resist the siren call. Itis not a cure-all and there is usually a better way to juggle two things at once.Remember the three branches of Checkpoint 2.2.1? Here are some notes (whichwill not explain everything carefully). Since the stash manipulates the workingdirectory all at once, you have less control than you do with commits, even ifthe stash seems less permanent.
• git stash save – "Reworking turtle chapter" will include a messagewith the entry you place on the stack. Without it, you get a crypticautomatic message that includes the initialism WIP (work-in-progress). Ifyou will be away more than ten minutes, a message is a good idea.This is like putting a plate into the warmer, perhaps with a special notescribbled onto it.
• git stash show will show you the diff of the changeset on top.This is like looking real closely at the top plate.
36

CHAPTER 8. GIT MISCELLANY 37
• git stash list will show you all the changesets currently in the stash,so it helps to provide good messages if you have many.This like like reading the notes on all the plates in the warmer.
• git stash pop will put your changes back into the working directory andremove the entry from the stack. It is up to you to make sure you areon the branch you want to be, and that your working directory is in theright state to accept these changes (or you may end up starting a mergeyou may not want).This is like taking a plate out of the warmer.
• git stash apply will take the changes on the top of the stack and putthem back into the working dirtectory, but it will leave the original entryon top of the stash. RAB once ended up with duplicate copies of a setof changes in his working directory. He thinks he did an apply andsubsequently did a pop. Maybe.This is like magically duplicating the plate on top, and removing it, leavingthe original still in the warmer.
• git stash drop will remove the changes on top of the stack and throwthem away. This can actually be very useful. You may add and commita variety of changes to your branch, but still have some paragraphs youdo not really like, and decided not to use, still polluting your workingdirectory. Simple. Move the changes to the stash and immediately deletethem, no message needed. Careful, think twice, you really are deletingchanges, though they may be recoverable with advanced techniques.This is exactly like taking the top plate out and dropping it on the floorso it breaks into many unusable pieces.
• There are many more actions you can take with the stash, but the aboveshould be sufficient for intermediate git use. Consult the usual sourcesfor more advanced use. Note that prior to the time around git version1.6.0 changesets in the stash expired, but it appers that behavior haschanged. So don’t panic if you see older posts that speak of expiration.
8.4 (∗) Tagging Releases, Signing a Repository
8.5 (∗) Who Did What, and When?blame, log with diff-filter, "When a file was added to the repo",
8.6 (∗) Where Did it All Go Wrong?git bisect
8.7 (∗) File Managementrm, mv

CHAPTER 8. GIT MISCELLANY 38
8.8 (∗) Binary Files
8.9 (∗) Everything: The reflog
8.10 (∗) README on GitHub
8.11 (∗) Log Display Options–pretty=oneline, –graph

Chapter 9
Parting Shot
There are often many ways to accomplish the same thing in git, and some willbe easier than others. You can find lots of advice on the Internet, some of it iseven good. Sites where answers get upvoted or downvoted are often useful. Asyou gain a good understanding of the basic principles of how git works andthe job it has been designed for, you will get better at locating and evaluatingsuggestions. We have tried to give you a headstart on that basic understanding.Take notes when you find good stuff that works for you. (Much of the laterbits and pieces here are inspired by our own notes accumulated through ourfirst three years of gaining valuable experience with git.)
Beware of dogma. Some will say you should never rewrite history–we doit all the time. Others will say you should always do fast-forward mergesand obtain a perfectly linear history–impossible on a big public project. Useyour independent judgement, and always remember the first of our principles,Principle 1.0.2, git is just a tool.
But most of all, have fun and don’t panic!
39
Appendix A
Getting Started with Git
We generally prefer to use a large collection of very sharp tools to get ourwork done, and it is no different with git. There are pretty point-and-clickprograms that are suppose to make it easier to use and understand git, andeven GitHub will offer to do certain tasks for you. In our limited experience,we just find these interfaces at best confusing, and downright impossible whenthings go south. Thus our decision to teach you how to interact with git atthe command-line.
As it is, command-line git is already an interface to even more primitivecommands. What you and I are using in these exercises are known as theporcelain commands, while the primitive versions are the plumbing com-mands. You can work out the metaphor. You can find tutorials that walkyou through a sequence of plumbing commands to effect one of our porcelaincommands like a commit or merge, and you can learn a lot from the exercise.(see [3, Chapter 10].) Don’t panic if you see some terms below that you are notyet familiar with, they will be explained eventually.
The information in this appendix is accurate as of 2016-04-10. Correctionsand updates are greatly appreciated. How about as a pull request?
A.1 Installing Command-Line GitWe are not going to be much help here, as we are not going to try to coverall the bases. Use your operating system’s package manager or other tools toinstall command-line git. A good place to start is the download area1 of thecanonical git site [1], or see the Pro Git book [3, Section 1.5].
You can verify a successful installation with:
rob@lava :~$ git –versiongit version 2.5.0
Your version number will likely be different.
A.2 Configuring Git the First TimeThis subsection has some one-time details you need to work through beforeusing git.
First you need to identify yourself as the author of commits. Even ifyour repository will be private for a while, someday you may open it up to
1
40

APPENDIX A. GETTING STARTED WITH GIT 41
collaborators, and you would rather not go back and edit all of your commits.Fortunately, git makes it easy. Use your real name, and use an email addressthat you expect to own for a long time. Together, these two pieces of informationshould identify you across all the repositories you will ever contribute to, andacross all the repositories ever made.
rob@lava :~$ git config –global user.name "Robert A. Beezer"rob@lava :~$ git config –global user.email [email protected]
Notice that I use different values in practice, rather than the example here.In the earlier days of electronic mail, my institution used the domain nameups.edu, often confusing us with the shipping company, ups.com. So I preferto use the older form that I was known by in other settings for many years.Notice the quotes around my name, in order to include the spaces as part ofthe text of my name.
git is inclined to drop you into an editor for various tasks. We try to avoidthis, so often show you the -m switch, followed by a short quote-protectedmessage you can supply as part of a command. But you will need to use aneditor for various tasks (such as an interactive rebase) so you do not want tosuddenly find yourself in a system-default editor (like vi or emacs) that you donot understand. I know the basics of an enhanced version of vi, known as vim,so I use the command-line name of this program in the setting below.
rob@lava :~$ git config –global core.editor vim
There are other settings, and you can check yours with git config –list.One last thing. If your version of git happens to be prior to version 2.0, thencheck your configurations for the value of push.default and ensure that it issimple. It will be important later.
More details, and especially for Windows systems, can be found in the ProGit book [3, Section 1.6]
A.3 Initializing a Git RepositoryTo begin a new repository, create a directory where you want your files to live.We have been using ~/books/ppw in our examples. Then make that the defaultdirectory in a command-line session.
rob@lava :~/ books/ppw$ git initInitialized empty Git repository in /home/rob/books/ppw/.git/
Naturally, there will be no commits in your repository.
rob@lava :~/ books/ppw$ git show-branchNo revs to be shown.
But once you do make a commit, there will be a master branch and theroot commit will get special identification as such. That’s it, you are ready togo.
A.4 Ignore Temporary FilesYou can save this subsection for later. When you run git status you willeventually become annoyed by intermediate or temporary files in your workingdirectory that keep being reported as untracked, and worse case, they will

APPENDIX A. GETTING STARTED WITH GIT 42
obscure files you really need to know about. There is a .gitignore file (glob-ally, or per-repository) where you can list filename patterns for git to ignore.You can find lots of examples on the Internet (in addition to lots of customconfigurations). I prefer not to use too much extra configuration, so that if Iend up on an unfamiliar computer, commands continue to work as I expect.

Appendix B
Getting Started with GitHub
GitHub1 is a site that lets users host, and communicate with, their git reposi-tories and the repositories of others. There are similar services, but GitHubappears to be the most popular, and so benefits from the network effects of alarge number of users. You can make an unlimited number of public repositories,but must pay for private repositories. Here “public” means anybody can seethe content of your repository and copy it, but you retain control over who canmodify the repository.
The information in this appendix is accurate as of 2016-04-10. Correctionsand updates are greatly appreciated. How about as a pull request?
B.1 Make An AccountThis is routine, but we have one piece of advice. Choose your username withsome thought. It will be part of the URL for your repositories and others willuse it to identify you in discussions. It will also be part of a GitHub emailaddress you may choose to use. And so on. If you are doing professional work,it might be best to use some variant of your real name, and if the base nameof your canonical email is available, that might be the best. You will have aGitHub profile that you can use to disambiguate yourself.
Pick a strong password, since you would rather not have untrusted individ-uals changing your repositories, or worse, impersonating you on GitHub anddestroying your hard-earned reputation.
B.2 Creating a New Repository on GitHubFind a plus-sign button in the upper-right hand corner of a GitHub page, ormaybe as a new user you see a big button for creating a new repository. Thiswill take you to a set-up screen. You will give your repository a name. Forbooks, we like initialisms (lower-case), so the book you are reading has therepository name gfa. Alice uses banking-paper in our first exercise. Like yourusername and commit messages, give this name some thought.
Fill in a human-readable description if you wish, and go ahead and tick thebox for a README, which we will discuss elsewhere (Section 8.10). No needto mess with .gitignore now, and adding a license is your choice. You’ll betaken to the main screen for your new repository and you will see much of theinformation you just provided.
1https://github.com/
43
APPENDIX B. GETTING STARTED WITH GITHUB 44
B.3 Adding Collaborators to a GitHub Reposi-tory
In the seven tabs near the top, locate Settings, with the gear icon. This willtake you to a page with five choices in the left sidebar. Go to Collaborators.Here you can search for and add a collaborator, who will then be able to addcommits to your repository. So make sure you understand the trust you haveplaced in this person before you pull the trigger. https://github.com/rbeezer/banking-paper.git
B.4 Copying a GitHub Repository (Forks, Clones)For collaborators to work independently on a project, they need their ownindependent copy of a repository. On GitHub you can visit somebody else’srepository and fork that repository. This will make an entire independentcopy of that person’s repository in your account (where you have permission tomodify your copy), and GitHub will remember where your copy came from. Inthis case the copy is known as a fork. Yes, the word fork has just been used asa verb, “Cameron forked Drew’s repo”, and is also used as a noun, “Cameron’sfork of Drew’s repo.” Making a fork of someone’s project is a compliment, sinceit suggests interest, and the possibility of someday contributing back to theproject, in the style of Chapter 4.
You can also, and often may prefer, to copy a repository to your localcomputer. You might like to write while on airplanes, on your desktop at work,or on your laptop at home in bed. Then you can even collaborate with yourselfand keep all those repositories syncronized. So you could have copies of yourproject all over the place.
It is easy to copy a git repository generally, and dead-simple to copy aGitHub-hosted repository. To copy a GitHub repository, you need to know theURL. It is a bit hidden. On the main page for a project (yours, or somebodyelse’s), you will find a box about a third of the way down, to the right, but justinside of Download ZIP. It is prefixed by HTTPS, but the distinguishing contentsmay be obscured. You are looking for something like
https://github.com/alice-jones/banking-paper.git
which would fit our first GitHub example. When you find it, highlight it andcopy it to your clipboard.
Now open a terminal on your local machine where you can use the command-line. Navigate to a directory, where a new repository-specific directory makessense for your work. In our first example, Alice might navigate to her existing~/papers/ directory, where she expects to soon have a ~/papers/banking-paperdirectory. OK, all set. Making a copy is known as a clone. (And a fork is justa special type of clone.)
alice@work :~/ papers$ git clonehttps://github.com/alice-jones/banking-paper.git
Cloning into 'banking -paper '...remote: Counting objects: 3, done.remote: Total 3 (delta 0), reused 0 (delta 0), pack -reused 0Unpacking objects: 100% (3/3), done.Checking connectivity ... done.
The above may take a long time for a large repository (many large files, ora long history of many, many changes). The output above is for an essentially

APPENDIX B. GETTING STARTED WITH GITHUB 45
empty repository. Now verify the expected directory exists and has the expectedfiles in it.
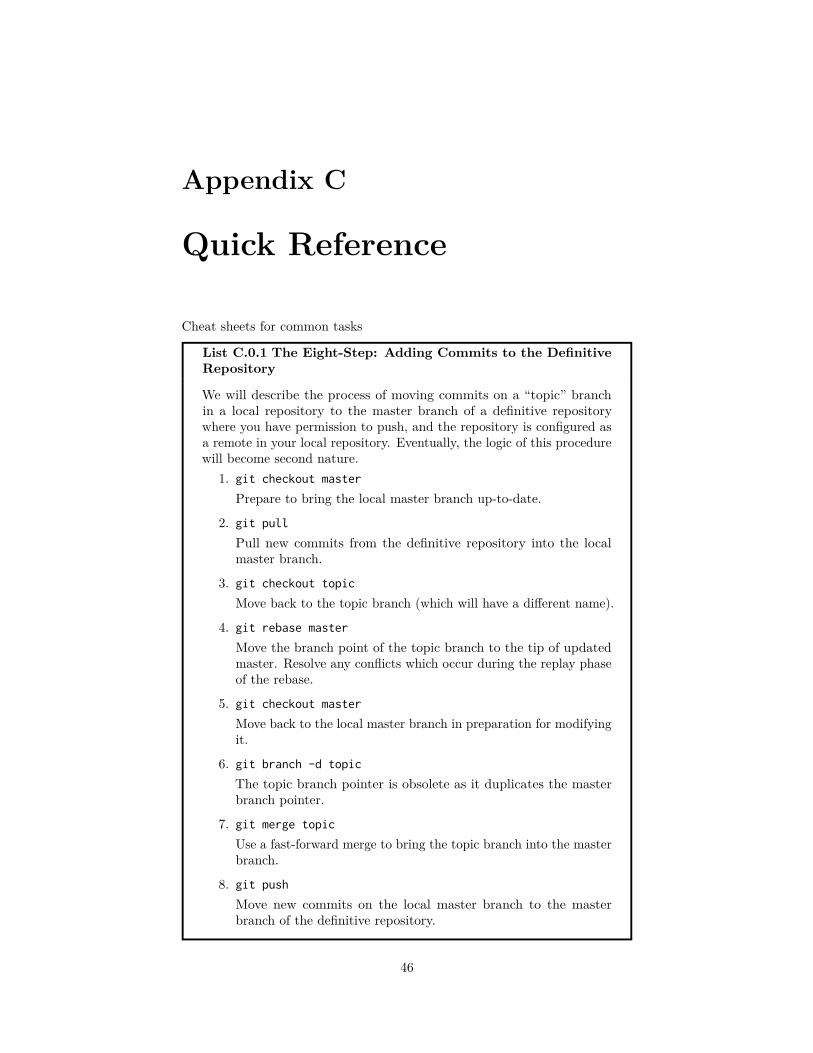
Appendix C
Quick Reference
Cheat sheets for common tasks
List C.0.1 The Eight-Step: Adding Commits to the DefinitiveRepository
We will describe the process of moving commits on a “topic” branchin a local repository to the master branch of a definitive repositorywhere you have permission to push, and the repository is configured asa remote in your local repository. Eventually, the logic of this procedurewill become second nature.
1. git checkout master
Prepare to bring the local master branch up-to-date.
2. git pull
Pull new commits from the definitive repository into the localmaster branch.
3. git checkout topic
Move back to the topic branch (which will have a different name).
4. git rebase master
Move the branch point of the topic branch to the tip of updatedmaster. Resolve any conflicts which occur during the replay phaseof the rebase.
5. git checkout master
Move back to the local master branch in preparation for modifyingit.
6. git branch -d topic
The topic branch pointer is obsolete as it duplicates the masterbranch pointer.
7. git merge topic
Use a fast-forward merge to bring the topic branch into the masterbranch.
8. git push
Move new commits on the local master branch to the masterbranch of the definitive repository.
46
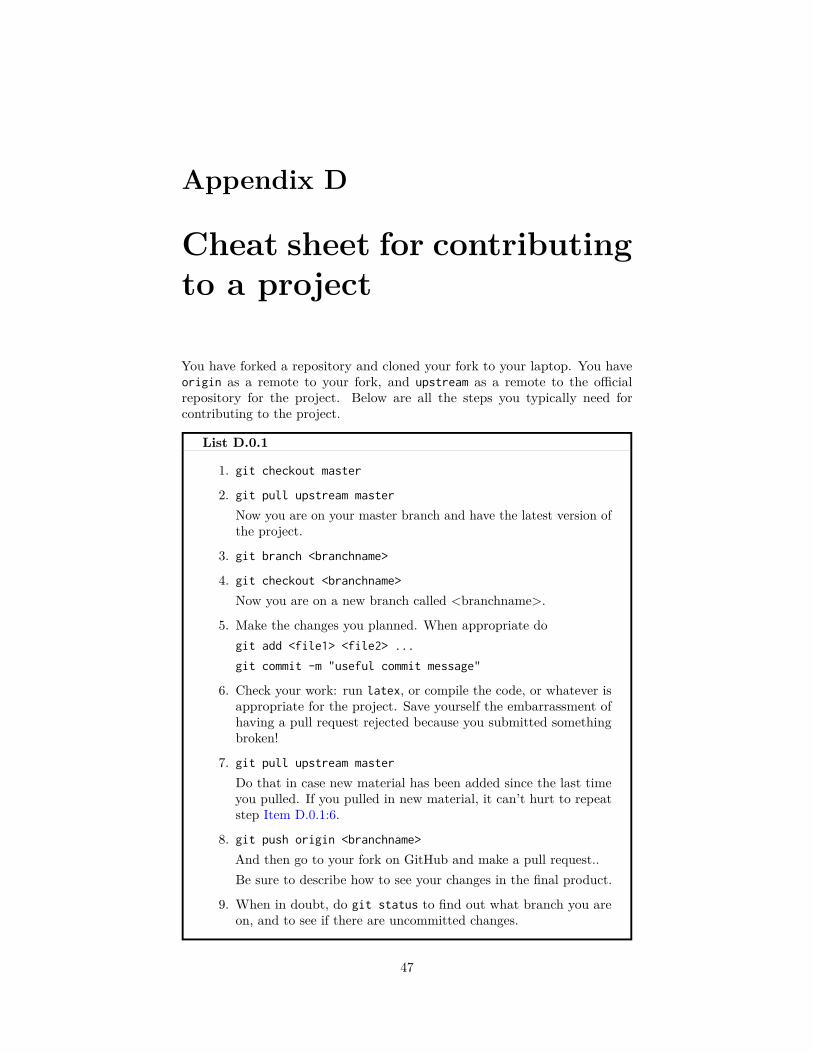
Appendix D
Cheat sheet for contributingto a project
You have forked a repository and cloned your fork to your laptop. You haveorigin as a remote to your fork, and upstream as a remote to the officialrepository for the project. Below are all the steps you typically need forcontributing to the project.
List D.0.1
1. git checkout master
2. git pull upstream master
Now you are on your master branch and have the latest version ofthe project.
3. git branch <branchname>
4. git checkout <branchname>
Now you are on a new branch called <branchname>.
5. Make the changes you planned. When appropriate dogit add <file1> <file2> ...
git commit -m "useful commit message"
6. Check your work: run latex, or compile the code, or whatever isappropriate for the project. Save yourself the embarrassment ofhaving a pull request rejected because you submitted somethingbroken!
7. git pull upstream master
Do that in case new material has been added since the last timeyou pulled. If you pulled in new material, it can’t hurt to repeatstep Item D.0.1:6.
8. git push origin <branchname>
And then go to your fork on GitHub and make a pull request..Be sure to describe how to see your changes in the final product.
9. When in doubt, do git status to find out what branch you areon, and to see if there are uncommitted changes.
47
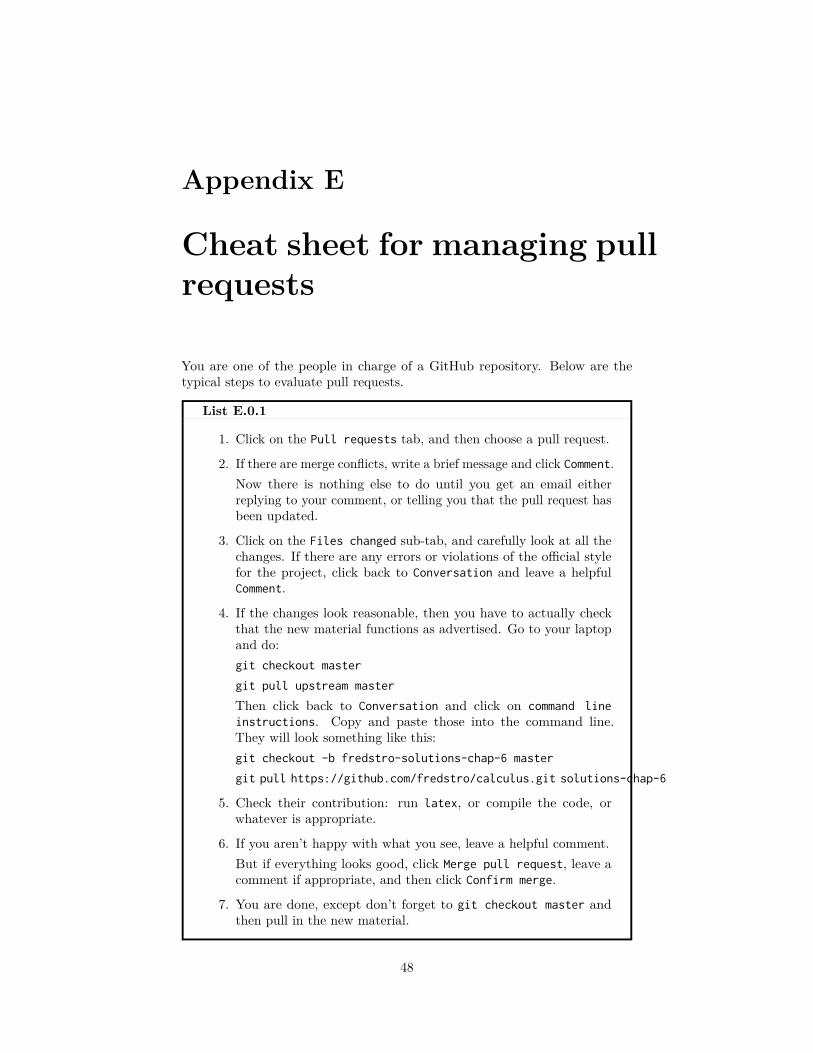
Appendix E
Cheat sheet for managing pullrequests
You are one of the people in charge of a GitHub repository. Below are thetypical steps to evaluate pull requests.
List E.0.1
1. Click on the Pull requests tab, and then choose a pull request.
2. If there are merge conflicts, write a brief message and click Comment.Now there is nothing else to do until you get an email eitherreplying to your comment, or telling you that the pull request hasbeen updated.
3. Click on the Files changed sub-tab, and carefully look at all thechanges. If there are any errors or violations of the official stylefor the project, click back to Conversation and leave a helpfulComment.
4. If the changes look reasonable, then you have to actually checkthat the new material functions as advertised. Go to your laptopand do:git checkout master
git pull upstream master
Then click back to Conversation and click on command lineinstructions. Copy and paste those into the command line.They will look something like this:git checkout -b fredstro-solutions-chap-6 master
git pull https://github.com/fredstro/calculus.git solutions-chap-6
5. Check their contribution: run latex, or compile the code, orwhatever is appropriate.
6. If you aren’t happy with what you see, leave a helpful comment.But if everything looks good, click Merge pull request, leave acomment if appropriate, and then click Confirm merge.
7. You are done, except don’t forget to git checkout master andthen pull in the new material.
48
Appendix F
List of Principles
Principle 1.0.2 Git is a ToolPrinciple 2.0.1 Git Manages ChangesPrinciple 2.2.3 Always Work on a BranchPrinciple 2.3.1 A Rebase Changes Hashes, a Merge Does NotPrinciple 3.0.1 Merge into Your Current BranchPrinciple 3.1.2 Never Alter a Public CommitPrinciple 3.1.3 Rebase Working Branches OftenPrinciple 4.1.1 Pull Requests Separate Creation and Approval
49
Resources
[1] Git Site, https://git-scm.com/.[2] GitHub Site, https://github.com/.[3] Pro Git, Scott Chacon and Ben Straub, https://git-scm.com/book/en/v2.
50