Geotechnical engineering Geology Unit for pupils from 9-12 ...
50
Knee deep Designing and constructing a water pond Geotechnical engineering Geology Unit for pupils from 9-12 years This document is produced under the EC contract № 288989 This work is licensed under a Creative Commons Attribution-NonCommercial 4.0 International License
-
Upload
khangminh22 -
Category
Documents
-
view
1 -
download
0
Transcript of Geotechnical engineering Geology Unit for pupils from 9-12 ...

Knee deep Designing and constructing a water pond
Geotechnical engineering
Geology Unit for pupils from 9-12 years
This document is produced under the EC contract № 288989 This work is licensed under a Creative Commons Attribution-NonCommercial 4.0 International License
Introduction This is one of ten ENGINEER primary school units developed to support science learning within the context of a wide range of engineering design challenges. Based on the successful Boston Museum of Science Engineering is Elementary model of inquiry-based learning, each unit features a different science area and engineering field and requires only inexpensive materials in order to support pupil-led science exploration and problem-solving design. The units have been developed to appeal to a wide range of pupils and to challenge stereotypes of engineering and engineers and so enhance both boys’ and girls’ participation in science, technology and engineering. Our pedagogic approach Central to each unit is the engineering design cycle: ask, imagine, plan, create, improve. Emphasizing the cycle helps teachers to foster pupils’ questioning and creativity, and gives space for pupils to develop their problem-solving skills including testing alternative options, interpreting results and evaluating their solutions. Tasks and challenges have been designed to be as open-ended as possible, and to avoid ‘right answers’; in particular, the unit developers have aimed to avoid competition which may alienate some pupils, while retaining the motivation of wanting to solve a problem. An important goal of all of the units is to maximise opportunities for group work and to support pupils in learning to work together and communicate their ideas effectively. Students need to discuss their ideas as they explore a new problem, work out what they need to know and share their findings, design solutions, and then improvements. How the units are organised Each unit begins with Lesson 0, a general preparatory lesson which is common to all ten units. Teachers choosing to use more than one unit will want to start with this lesson the first time they use the units and begin at Lesson 1 in subsequent units. Lesson 1 introduces a story context or problem which drives what happens next: Lesson 2 focuses on what exploring the science that the pupils need to solve the problem, while in Lesson 3 they design and build their design solution. Finally, Lesson 4 is an opportunity to evaluate, present, and discuss what they have done. Each unit is, however, unique, and some units are more demanding in terms of science understanding and the length of time required for the unit varies. Likely timings and age targets are indicated in each unit overview. Units have been designed to be flexible, however – teachers can choose which activities they want to include, and there are options for differentiating activities to cater for a range of abilities. Teacher support Each unit guide has been written to provide appropriate science, technical and pedagogic support for teachers with a wide range of experience and expertise. Each lesson includes suggestions and tips for supporting inquiry-based learning, classroom organisation and preparation. Science and making activities are illustrated with photographs. Science pedagogy notes in the Appendix explain and discuss the science involved in the unit and how to support understanding of the central concepts for pupils in the age range. Worksheets which can be copied and answer keys are also provided.
2 This document is produced under the EC contract № 288989
This work is licensed under a Creative Commons Attribution-NonCommercial 4.0 International License

Index Introduction .................................................................................................................................................... 2 Overview of the unit ....................................................................................................................................... 5 Resources ........................................................................................................................................................ 6 Lesson 0 – Engineering an envelope ............................................................................................................... 9
0.1 Introduction - 10 minutes - small group and whole class discussion ..................................................... 10 0.2 Activity 1 What is an envelope? - 5 minutes, small groups ................................................................... 10 0.3 Activity 2 Matching envelopes to objects - 15 minutes - small groups and whole class discussion ....... 11 0.4 Extension work - optional - 10-30 minutes - small groups..................................................................... 11 0.5 Conclusion – 10 minutes - whole class discussion .................................................................................. 12 0.6 Learning outcomes - for optional assessment ....................................................................................... 13
Lesson 1 –What is the engineering problem? ............................................................................................... 14 1.1 Introductory activity - Leo and the pond - whole class discussion - 15 minutes .................................... 15 1.2 What is a pond - observation and discussion - 30 minutes .................................................................... 15 1.3 Summary opening phase of the lesson and review the engineering design cycle - 5 minutes .............. 15 1.4 Introducing the practical activity - 5 minutes ......................................................................................... 15 1.5 Shake soil and water together - experiment, working in groups - 20 minutes ....................................... 16 1.6 Conclusion – plenary - 15 minutes .......................................................................................................... 16
Lesson 2 – What do we need to know? ......................................................................................................... 18 2.1 Introductory activity - What is the composition of soil? - experiment, working in groups - 20
minutes 19 2.2 Water meets the components of soil - experiment, working in groups - 30 minutes ............................ 20 2.3 Water meets materials - experiment, working in groups - 30 minutes .................................................. 20 2.4 A waterproof bottom - experiment, working in groups - 30 minutes .................................................... 21 2.5 Conclusion – plenary - 15 minutes ......................................................................................................... 22
Lesson 3 – Let’s build! ................................................................................................................................... 23 3.1 Introductory activity - design the pond - working in groups - 30 minutes ............................................. 24 3.2 The model pond - experiment, working in groups - 40 minutes ............................................................ 24 3.3 Conclusion – plenary - 20 minutes .......................................................................................................... 25
Lesson 4 – How did we do? Is the challenge met? ........................................................................................ 26 4.1 Introductory activity - How to judge the model ponds - working in groups, plenary - 30 minutes ........ 27 4.2 Designing a real pond - working in groups, plenary - 45 minutes .......................................................... 27 4.3 Conclusion - plenary - 15 minutes .......................................................................................................... 27
Appendices .................................................................................................................................................... 28 Story to set the context: Leo and the pond .................................................................................................................... 28 Engineering design cycle ............................................................................................................................................... 30 Worksheets and answer sheets ..................................................................................................................................... 31
Worksheet 1 Lesson 0 - Engineering? ............................................................................................................ 32 Worksheet 1 Lesson 0 - Engineering? - Teacher notes .................................................................................... 33 Worksheet 1 Lesson 1 - How a pond is made (1) ............................................................................................. 34 Worksheet 1 Lesson 1 - How a pond is made (2) ............................................................................................. 35 Worksheet 1 Lesson 1 - How a pond is made (3) ............................................................................................. 36 Worksheet 2 Lesson 1 - Shake soil and water ................................................................................................. 37 Worksheet 1 Lesson 2 - Water meets components of soil............................................................................... 38 Worksheet 2 Lesson 2 - Water meets materials .............................................................................................. 39 Worksheet 3 Lesson 2 - A waterproof bottom ................................................................................................ 40 Worksheet 1 Lesson 3 - The model pond ......................................................................................................... 41 Worksheet 1 Lesson 4 - The pond .................................................................................................................... 42 Worksheet 2 Lesson 4 - Imagine how to build a pond ..................................................................................... 43
3 This document is produced under the EC contract № 288989
This work is licensed under a Creative Commons Attribution-NonCommercial 4.0 International License

Appendix Lesson 2 – Building the cell ............................................................................................................................ 44 Science notes for teachers about soils and the flow of water through materials ........................................................... 45 Some pupils’ ideas about the science of soils and water movement .............................................................................. 48 Partners ........................................................................................................................................................................ 50
4 This document is produced under the EC contract № 288989
This work is licensed under a Creative Commons Attribution-NonCommercial 4.0 International License

Overview of the unit Duration: 6 hours 35 minutes Target group: 9, 10 and 11 year old pupils Description: A big shopping centre is to be built in place of a park which has been home to a beautiful pond with frogs and other animals. To save the frogs, we need to know how to build a pond. Beginning with this story, the teacher introduces the pupils to an engineering problem. The practical aim of the unit is to design and to make a model of a pond. This enables pupils to reflect on how to create a real pond. The pupils explore the main features of a pond. They investigate through experiments the composition of the soil and how different materials react in contact with water. Then, in groups, the pupils choose an appropriate waterproof material to build the lining of the pond, following the engineering process (ask, imagine, plan, create, improve). Science curriculum: this unit relates to the science curriculum for materials and geology. Engineering field: this unit introduces the field of geotechnical engineering. Objectives: in this unit pupils will learn • that about the composition of soil is composed and its permeable qualities; • to design a functioning pond; • to apply the Engineering Design Cycle(EDC) in order to solve a geotechnical problem and make wider links
with science and engineering; • the relevance of environmental factors to good engineering design.
The lessons in this unit: A Preparatory lesson aims to raise awareness of how engineering contributes to our daily lives in ways that are not always obvious. Lesson 1 introduces the engineering problem, its context and the engineering process. In Lesson 2, the ‘ask’ element of the engineering process leads to an investigation of the composition of soil, the permeability of some components of the soil and common materials. Lesson 3 involves the pupils in applying the engineering design process to meet the challenge. The challenge is to design and build a model of a pond. In Lesson 4 it’s time to evaluate the model of a pond and to propose improvements. This is the time for pupils to show if they were able to meet all the criteria and to talk about how they made improvements. Pupils will think about how to organise activities in order to create a real pond.
5 This document is produced under the EC contract № 288989
This work is licensed under a Creative Commons Attribution-NonCommercial 4.0 International License

Resources List with all the materials and quantities needed for 30 pupils (6 group of 5 pupils). Material Total
amount Lesson 0 Lesson 1 Lesson 2 Lesson 3 Lesson 4
Bucket
6 6 6
little shovel
6 6 6
plastic bottle, transparent, not coloured , 1,5-2 litres
24 12 24
measuring tape
6 6 6
Scissors
6 6
Gauze
6 6
elastic bands 18 18 Gravel
3 kg 3 kg
Sand
6 kg 6 kg
6 This document is produced under the EC contract № 288989
This work is licensed under a Creative Commons Attribution-NonCommercial 4.0 International License

clay flour (found in art stores) 5 kg 5 kg soil from a garden or field (not bought in a shop)
6 buckets x x x
container for water
6 6
disposable plates
30 30
disposible transparent glasses
30 30
paper sponge 12 12 plastic bag 6 6 fabric 6 6 clumping cat litter
1 bag 1 bag
flour 3 kg 3 kg
baby diapers
12 6
7 This document is produced under the EC contract № 288989
This work is licensed under a Creative Commons Attribution-NonCommercial 4.0 International License
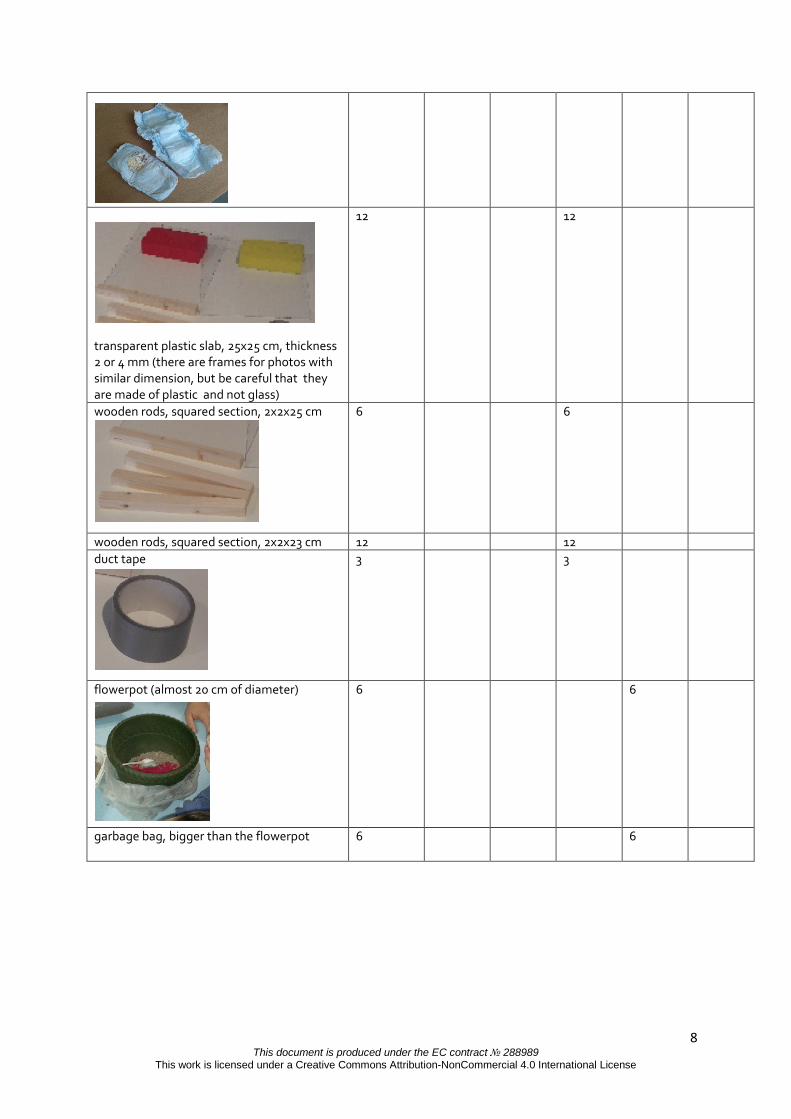
transparent plastic slab, 25x25 cm, thickness 2 or 4 mm (there are frames for photos with similar dimension, but be careful that they are made of plastic and not glass)
12 12
wooden rods, squared section, 2x2x25 cm
6 6
wooden rods, squared section, 2x2x23 cm 12 12 duct tape
3 3
flowerpot (almost 20 cm of diameter)
6 6
garbage bag, bigger than the flowerpot 6 6
8 This document is produced under the EC contract № 288989
This work is licensed under a Creative Commons Attribution-NonCommercial 4.0 International License

Lesson 0 – Engineering an envelope What is engineering? Duration: teachers can choose how long to spend on this lesson depending on how much experience pupils already have. The introduction, main activities and conclusion will take up to 40 minutes; additional extension work can add a further 10-30 minutes. Objectives, in this lesson pupils will learn that: • engineers design solutions to problems using a range of technologies; • technologies that are appropriate for a particular problem depend on the context and materials available; • made objects have been engineered to solve problems; • engineers can be men or women. Resources (for 30 pupils) � 8 ‘post-it’ notes packs � 8 sets of at least 5 different envelope types � 8 sets of at least 5 different objects
� 8 sets of packaging examples for optional extension work
� Card, paper, glue, scissors for optional extension work
Preparation • Collect together a range of different
envelopes and packages • Print copies of worksheet 1 if using • Collect pictures for introductory activity
Working method • Small groups • Whole class discussion
Context and background This lesson is the same in all units and is intended to encourage thinking about what technology is and to challenge stereotypes about engineers (particularly those associated with gender) and engineering. It aims to develop the understanding that objects in the made world are designed for a purpose and that technology in its broadest sense refers to any object, system or process that has been designed and modified to address a particular problem or need. Pupils can think about this by discussing what problem the technology of a particular artefact (in this case an envelope) is intended to solve. In this lesson, they discuss the range of technologies that are used to engineer an envelope for a particular intended purpose. The lesson is also intended to avoid value judgments of ‘ high tech’ versus ‘low tech’ and to encourage pupils to appreciate that it is appropriate technology in a particular context that is important: the range of available materials will determine the tec hnology that the engineer applies to solving the problem.
9 This document is produced under the EC contract № 288989
This work is licensed under a Creative Commons Attribution-NonCommercial 4.0 International License

0.1 Introduction - 10 minutes - small group and whole class discussion Divide the class into groups of 4 and provide a packet of ‘post-its’ for each group. Ask the groups to discuss all the things they associate with the terms ‘engineering’ and ‘technology’. Ensure that, as part of the discussion, each individual within the group puts at least one idea on a ‘post it’. Invite each group to place their ‘post its’ on to a master display sheet and briefly explain their choices to the rest of the class. Keep the whole class list for review at the end of the lesson.
Additional support for discussion This part of the lesson can be extended by providing pictures of stereotypical and unusual examples of engineering and asking pupils to group the pictures into those that they associate with engineering and those that they do not. You could use Worksheet 1 for this activity, or use the pictures there as a whole class display. Ask pupils to work in pairs to decide which of the pictures they think are related to engineering and to give their reasons why they think that some are and some are not. Each pair of pupils could share their ideas with another pair and discuss similarities and differences in ideas. You could use these ideas as a basis for a whole class discussion; encourage pupils to open up their thinking about what counts as engineering and who could be involved in it.
0.2 Activity 1 What is an envelope? - 5 minutes, small groups Organise pupils into small groups to discuss what an envelope is and what counts as an envelope. To help discussion, provide a range of examples which cover and/or protect objects or materials for particular purposes (as in the pictures).
An important part of this activity is to encourage pupils to notice that there are many interpretations of the idea of an envelope. In the pictures there are some examples that might challenge their idea of an envelope: they include a broader interpretation of what an envelope is as something that ‘houses’, ‘protects’, ‘holds in place’, ‘covers’, ‘hides’ or even ‘reveals’ a range of different objects.
This document is produced under the EC contract № 288989 This work is licensed under a Creative Commons Attribution-NonCommercial 4.0 International License

0.3 Activity 2 Matching envelopes to objects - 15 minutes - small groups and whole class discussion
Divide the class into groups of 4 and provide a range of ‘envelopes’ and objects that could go in them. Ask the pupils to select which envelopes would be most suitable for the objects and to explain why.
The objects could include: a pair of spectacles; a certificate or photograph that must not be bent; a delicate piece of jewellery; a returnable DVD; a set of confidential papers; a pair of scissors. The range of objects and envelopes can be varied according to context and what you have available.
The following questions can help guide the discussion: ─ What material is the envelope made from? ─ What fixings and fastenings are used in the envelope? ─ What range or types of objects could the envelope be used for? ─ What other materials it could be made from? Each group should report their ideas back to the class.
There is an opportunity here for the teacher to lead the discussion and talk about the various technologies used in each engineered envelope including the types of structures, fixings and fastenings used (e.g. reusable or permanent fixings; reinforcement areas; internal and external materials selected; how edges are sealed.)
This is an evaluative activity and could be related back to the engineering design process: discussion could include thinking about the process that engineers need to be involved in when making something to solve a particular problem.
0.4 Extension work - optional - 10-30 minutes - small groups 1. Present pupils with a range of envelopes and ask them to evaluate their design in terms of their fitness for purpose (see picture). Envelopes could be compared in terms of the types of fastenings and reinforcements used, and the mix of different materials used (e.g. bubble wrap, absorbency, strength- i.e. resistance to tearing). This activity could be extended to looking at different types of packaging in relation to net folds and how these are used to reduce (or eliminate) the need for adhesives in the manufacturing process. The following 3 pictures demonstrate packaging that does not use any form of adhesive; the making involves only one type of material using cuts and folds for fastenings.
11 This document is produced under the EC contract № 288989
This work is licensed under a Creative Commons Attribution-NonCommercial 4.0 International License

2. Organise pupils into small groups to design and/or make an envelope in order to deliver a particular chosen object. Groups will need to draw on their understanding of materials and the design making process to produce a range of alternative designs. These could then be evaluated in whole class discussion.
0.5 Conclusion – 10 minutes - whole class discussion
Lead a plenary discussion drawing on the original class ‘post its’ (and where appropriate their groupings of the ‘engineering’ photographs), reminding the pupils of how their original thinking might now have changed. Ask pupils to reflect on what an engineer does and what technology is. ─ Emphasise that most things we use are made for a purpose and that engineers use a
range of skills in finding solutions to problems. ─ This involves thinking about solutions to solve problems; some of these work and some
are less successful – the engineering design process includes evaluation and improvement.
─ It is not ‘high’ tech or ‘low’ tech but appropriate technology that matters - engineers need to consider their context and resources.
─ There are many types of engineering, and many different types of people from across the world, and both men and women, are engineers.
There might be a range of equally acceptable definitions for the terms ‘engineer’ and ‘technology’; these terms are often used interchangeably, e.g. engineering could be considered as the use of technology for problem solving. In talking about the relationship between engineering, science and technology, pupils can be encouraged to think about how engineers, in
12 This document is produced under the EC contract № 288989
This work is licensed under a Creative Commons Attribution-NonCommercial 4.0 International License

the process of making objects to solve problems, use a range of technologies (including fixings and fastenings, various types of materials and different components in a range of systems) and a range of science understandings. This is an opportunity to open up discussion about how things are made and by who, and what is involved in the process of thinking about solutions to problems.
0.6 Learning outcomes - for optional assessment
At the end of this lesson pupils should be able to: ─ Recognise how a range of systems, mechanisms, structures, fixings and fastenings are
used in artefacts in different ways to provide a range of solutions to solve problems ─ Understand that appropriate technology is often dependent on the context and
materials available ─ Recognise that engineers use a wide range of skills in developing solutions to problems ─ Recognise that many different types of people with different interests and skills can be
engineers
13 This document is produced under the EC contract № 288989
This work is licensed under a Creative Commons Attribution-NonCommercial 4.0 International License

Lesson 1 –What is the engineering problem? Finding out about the challenge Duration: 90 minutes Objectives: in this lesson pupils will learn − to relate the engineering design cycle to pond building; • to identify the main characteristics of a pond, especially dimensions, depth; • science inquiry skills including organising and classifing their observations and predicting effects. Resources (for 30 pupils: 6 group of 5 pupils) � 3 buckets � 6 little shovels � 12 plastic bottles, 1,5-2 l
Preparation • Print out the images on worksheet 1.1 for each
group or prepare a video-projector to show them
• Bring in some small buckets of garden soil and ask the children to do likewise
Working method • Small group work • Whole class discussion
.
Key ideas in this lesson • we can try to solve a problem with technology Context and background The challenge, the context and the design cycle is introduced. The pupils consider what knowledge they have to know in order to meet the challenge.
14 This document is produced under the EC contract № 288989
This work is licensed under a Creative Commons Attribution-NonCommercial 4.0 International License

1.1 Introductory activity - Leo and the pond - whole class discussion - 15 minutes The teacher introduces the lesson through the learning objectives and by reading “Leo and the pond” (in Appendices) followed by a short class discussion. The key question for the teacher to ask is ‘what do you think the challenges might be in making a pond?’ The teacher should note on a whiteboard or elsewhere the children’s views. These are likely to include siting and environmental issues but the teacher should reinforce the engineering challenge of ensuring the pond retains water
1.2 What is a pond - observation and discussion - 30 minutes The teacher asks the pupils if they know what is a pond and how it is created. The teacher invites pupils to look at images related to the topic (worksheet 1, lesson 1). The pupils compare their knowledge and their observations. The teacher asks pupils to list other water basins they know and to compare them with a pond. The teacher will draw attention to the difference between’ natural’ features (ponds and lakes) and those built by engineers (such as reservoirs, swimming pools and ornamental ponds). Sometimes of course, we want our built water features such as garden ponds to look as natural as possible. The teacher writes all the pupils’ observations on a poster. In building a pond it is important to recognise that:
• a pond is a pool of standing water • it is relatively small and has a shallow depth (up to 3 m) • for its formation and maintenance, a pond needs a supply of water: it may be spring
water (groundwater sources), surface water (tributary streams or channels), or rain • it is necessary that the bottom is sufficiently waterproof to ensure a permanent
durable water basin • the physical environment consists of mud, sand and stones on the bottom, and
banks that offer an ideal support for growth of lush vegetation • the water level varies seasonally: it reaches a minimum during periods of drought
and a maximum when rainfall is abundant. 1.3 Summary opening phase of the lesson and review the engineering design cycle - 5 minutes
The teacher introduces the cycle and asks the children to identify which stage they think they are at in designing a pond (The answer is that the children are beginning to ask questions about the design of a pond and imagine what it might look like). The teacher explains that in order to design a successful pond, it is necessary to understand how soil and water mix, which is the next phase of the lesson. At this point, the children can be divided into groups. It is best for them to be in mixed gender / mixed ability groups if possible.
1.4 Introducing the practical activity - 5 minutes
Some days before the lesson, the teacher can also ask pupils to bring a little bucket (or a bag) of soil from garden or a field. The teacher will also have gathered some soil samples. This will give them an opportunity to compare soils from different locations in order to discover if there are differences in composition. The teacher will explain how important it is in any engineering project involving earth movement to understand the geological properties of the soil. Before building a house or a channel, geologists study the soil, taking
15 This document is produced under the EC contract № 288989
This work is licensed under a Creative Commons Attribution-NonCommercial 4.0 International License

samples at different depths, making a core sampling, or digging a trench. Core sampling is used also to take ice samples. For example, in the Antarctica, samples are taken at depths of hundreds of metres. The deepest ice core drilling, made in the Antarctic Russian base Vostok reached 3623 m in depth.
1.5 Shake soil and water together - experiment, working in groups - 20 minutes
The teacher should remind the pupils of Leo’s last observation: “But soil is soil”! Really, is soil a single material? Is it so simple? The key discovery that the children will make in this part of the lesson is that of ‘layering’ – that the constituency of soil is such that it will settle in layers and that this is important to understand in building a pond. The teacher proposes that the class might investigate the phenomenon of mixing soil and water. Distribute worksheet 3, lesson 1: the pupils can write their answers on the worksheet, or on post-it notes that can be stuck to a large common poster; otherwise the questions can be used as a guide for discussion, first within each group and then altogether. The pupils follow the worksheet as far as giving their prediction: they will finish the worksheet in the next lesson.
The teacher describes what the pupils need to do. The pupils put the soil in a bottle: each group chooses the level to which the soil is added (3 cm from the bottom? 7 cm? nearly half a bottle?). Pupils then fill the bottle almost completely with water and screw the cap on. Pupils should shake the bottle carefully in order to mix the soil and water. Ask the pupils “what do you think will happen in the bottle?” Put the bottles on the table and observe them over some time: It is important to put all the bottles in a row on a table, where they can stay undisturbed. The pupils should clean and put away the materials and tools they used and clean the tables.
1.6 Conclusion – plenary - 15 minutes In discussion, pupils should begin to work on the design process: what do they need to know in order to meet the challenge and find a viable solution to the problem? Recall with the pupils the main characteristics of a pond. A pond is not only a big hole in the soil filled with water! Water must not be absorbed immediately by the soil! Ask pupils what they think they think is important to know in order to create a pond.
16 This document is produced under the EC contract № 288989
This work is licensed under a Creative Commons Attribution-NonCommercial 4.0 International License

The most important question (for the building) is how to waterproof the bottom of the hollow sufficiently. Pupils might also say something about plants and animals in the pond, but the waterproof liner is the key issue in proceeding with the challenge.
17 This document is produced under the EC contract № 288989
This work is licensed under a Creative Commons Attribution-NonCommercial 4.0 International License

Lesson 2 – What do we need to know? Finding out about composition of soil and permeability Duration: 125 minutes Objectives: in this lesson the pupils will learn • to observe and recognize the different components of soil and their degree of permeability; • to identify natural and made materials which are approximately or totally waterproof; • to begin to apply their scientific learning to the challenge of designing a pond. Resources (for 30 pupils: 6 groups of 5 pupils) � 3 buckets of soil picked up in the school
garden and/or in other gardens or fields � 24 plastic bottle, 1,5 or 2 l, transparent and
clear, with screw top � 3 kg gravel � 6 kg sand � 3 kg clay flour � 1 bag of clumping cat litter � 6 sponges � paper or cardboard � fabric � 3 plastic bags � 3 kg flour
� 6 baby diapers � other materials to test � 12 transparent plastic slabs, 25x25 cm,
thickness 2 or 4 mm � 6 wooden rods, squared section, 2x2x25 cm � 12 wooden rods, squared section, 2x2x23 cm � duct tape � 6 rulers � 6 scissors � 6 gauzes � 6 spoons � 18 rubber bands � 6 containers for water, like a carafe or a
graduated cylinder
Preparation • Some days before, ask pupils to bring empty
plastic bottles (transparent, 1,5 or 2 litres) and materials that they think can slow down or prevent the passage of water
• Keep on hand rags and paper towel to dry things: pupils are working with water!
Working method • experimental • pupils work in groups • group and whole class discussion
Key ideas in this lesson • to maintain an equilibrium in a dynamic system (like a pond) there must be a balance between gains and
losses; • rate of flow (in this case of water) through a material is called its permeability;
• materials (including solid and soil components) show a range of permeability.
Context and background The ‘ask’ element of the engineering process leads to an investigation of the composition and properties of soil. Through experiment pupils discover the permeability of various materials and the characteristics necessary for making a pond.
18 This document is produced under the EC contract № 288989
This work is licensed under a Creative Commons Attribution-NonCommercial 4.0 International License
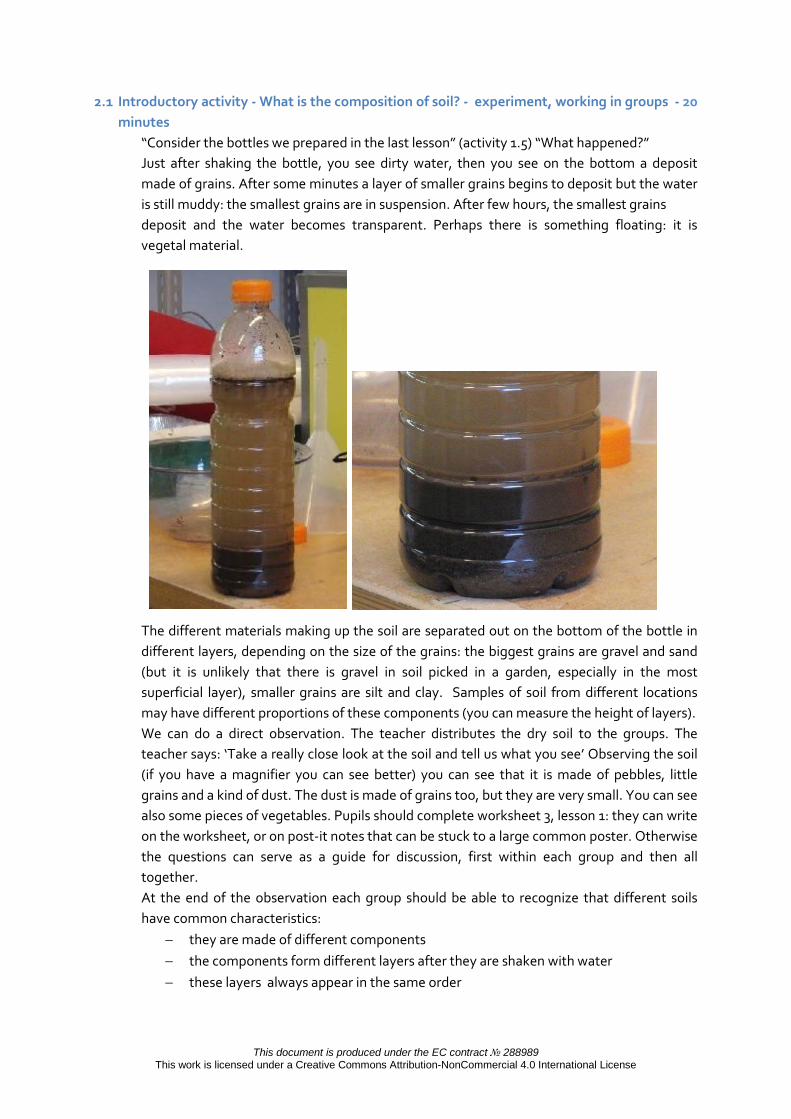
2.1 Introductory activity - What is the composition of soil? - experiment, working in groups - 20 minutes
“Consider the bottles we prepared in the last lesson” (activity 1.5) “What happened?” Just after shaking the bottle, you see dirty water, then you see on the bottom a deposit made of grains. After some minutes a layer of smaller grains begins to deposit but the water is still muddy: the smallest grains are in suspension. After few hours, the smallest grains deposit and the water becomes transparent. Perhaps there is something floating: it is vegetal material.
The different materials making up the soil are separated out on the bottom of the bottle in different layers, depending on the size of the grains: the biggest grains are gravel and sand (but it is unlikely that there is gravel in soil picked in a garden, especially in the most superficial layer), smaller grains are silt and clay. Samples of soil from different locations may have different proportions of these components (you can measure the height of layers). We can do a direct observation. The teacher distributes the dry soil to the groups. The teacher says: ‘Take a really close look at the soil and tell us what you see’ Observing the soil (if you have a magnifier you can see better) you can see that it is made of pebbles, little grains and a kind of dust. The dust is made of grains too, but they are very small. You can see also some pieces of vegetables. Pupils should complete worksheet 3, lesson 1: they can write on the worksheet, or on post-it notes that can be stuck to a large common poster. Otherwise the questions can serve as a guide for discussion, first within each group and then all together. At the end of the observation each group should be able to recognize that different soils have common characteristics:
− they are made of different components − the components form different layers after they are shaken with water − these layers always appear in the same order
This document is produced under the EC contract № 288989 This work is licensed under a Creative Commons Attribution-NonCommercial 4.0 International License

− different materials are present in different quantities (some material is not always present)
2.2 Water meets the components of soil - experiment, working in groups - 30 minutes We ended lesson 1 supposing that a pond is a bit more complicated than a hollow (in the soil) full of water and we have seen that soil is not made of a single material. How do different components of soil behave when they come into contact with water? The teacher should explain that gravel, sand and clay are three of the main components of soils. The pupils can pour water through layers of gravel, sand and clay to observe how fast it passes through the layers, and to discover which is the most waterproof (see worksheet 1, lesson 2).
They will see that water flows fast through gravel, less fast through sand and very, very slowly through clay: clay is somewhat waterproof (for example, the bottoms of rice fields are made of clay). The pupils should put away the materials and tools they have used and clean the tables.
2.3 Water meets materials - experiment, working in groups - 30 minutes
Pupils are now asked to test how quickly water passes through other materials commonly found at home. The teacher can ask pupils to bring from home materials they want to test. The teacher distributes to each group one different material, chosen from among paper or cardboard, sponges, plastic bag, fabric, clumping cat litter, flour, baby diapers and other materials brought from home. This means that in a class of 6 groups, 6 materials will be tested. Pupils are asked to predict how permeable their material will be. Pupils should pour water on the materials and observe what happens; instructions for the experiments and recording the results are on worksheet 3 lesson 2. At the end of the experiment, pupils can discuss their findings with the whole class and together with the teacher make a list of the most waterproof materials to stick on a poster. The pupils should put away the materials and tools they have used and clean the tables. The teacher points out that sponges absorb water: are they useful to slow or prevent the passage of water? Not so much, since after some time water flows away from sponges. Ask the pupils to imagine how water flows through materials. Water moves in the materials flowing in small irregular channels made of pores, cavities and other discontinuities present in materials such as paper or sponge; in some porous materials the cavities aren't connected
20 This document is produced under the EC contract № 288989
This work is licensed under a Creative Commons Attribution-NonCommercial 4.0 International License

with each other so water can't flow through. In granular matter water goes through the empty spaces between grains.
This phenomenon is called percolation. The flow of the water is slowed by the compactness of soil or clay that reduces the width of empty spaces between grains. Some materials are waterproof, for example plastic, clay, magic sand, umbrella canvas. The clumping cat litter prevents the flow of water very well. It is made from a particular kind of clay called bentonite. This material is used also to waterproof foundations of buildings. To know more about it see wikipedia: http://en.wikipedia.org/wiki/Bentonite The flour is also waterproof, but If you do not throw it away immediately after use you will find that after some days it smells. Flour is an organic material that is "eaten" by micro-organisms: a consequence of their digestion is the bad smell. In the discussion in lesson 3 the teacher can point out that flour is waterproof but that using it as a waterproof layer for the pond is not a good idea: the soil is home to many micro-organisms that will be more than happy to feed on a good snack. In time, the layer of flour will be transformed, losing its thickness and waterproof features. The baby diaper absorbs water thanks to little grains made by a super-absorbent material made from a polymer known as sodium polyacrylate: the molecules of this polymer attract and hold molecules of water. Grains get bigger and bigger when they absorb water.
2.4 A waterproof bottom - experiment, working in groups - 30 minutes
A pond has to be constantly filled with water. Invite pupils to imagine how to make the soil of the garden more impermeable: suggest adding a layer of more impermeable material (worksheet 3 lesson 2). In this activity the teacher will have constructed six particular containers (one per group), called a “cell”: the instructions for its construction are in the appendix. If the teacher has the time and is confident about the pupils’ craft skills then the children could construct the cells. In this case the teacher should build one cell in front of the pupils, stopping after each step to ensure that pupils have completed it.
21 This document is produced under the EC contract № 288989
This work is licensed under a Creative Commons Attribution-NonCommercial 4.0 International License

The teacher should model the process by pouring water into one cell and ask the pupils to predict the time it will take the water to infiltrate the cell. Their predictions can be recorded. While waiting for the water to infiltrate each group should fill about one third of the cell with dry soil, then make a layer of the waterproof material to be tested, then finish filling the cell with the soil. They should then dig a small cavity in the middle of the surface (without touching the waterproof layer) and pour the water very slowly into the cavity, filling it. They will need to top it up slowly as the water is absorbed. What happens? How long does it take? The cell in this activity is like a cross section of a pond. The pupils will discover that water infiltrates not only downward but also to the side and that adding a layer of impermeable material can change how water passes through to the bottom. It's important that the groups agree on testing different situations: for example, each group should choose a different material or make a layer of the same material with different thickness. At the end of the activity pupils will share their observations, so there are many results at the same time. The technicians who will build the shopping centre in Leo’s story also have a problem of impermeability, but they want the water to stay outside of the foundation cavity. The pupils should put away the materials and tools they have used and clean the tables.
2.5 Conclusion – plenary - 15 minutes The teacher asks the pupils what discoveries they have made which are useful for designing their model pond. In the discussion the teacher highlights that we need to maintain the level of water approximately constant: in other terms, we need to keep a balance between loss and gain of water. In order to keep the balance we need to reduce the water infiltration and to add water to compensate for what is lost (we can’t completely avoid the infiltration of water because a pond is not a swamp and there must be some replacement of water; water is lost also by evaporation). The teacher revisits the engineering design cycle and asks the pupils what stage they think they are at now (they are beginning to plan).
22 This document is produced under the EC contract № 288989
This work is licensed under a Creative Commons Attribution-NonCommercial 4.0 International License

Lesson 3 – Let’s build! Design and build your model pond Duration: 90 minutes Objectives: in this lesson the pupils will learn that
• the EDC offers an important template when it comes to tackling engineering problems • that a scientific understanding of the permeable qualities of soil matters in the construction of a pond • that the scientific process of prediction and testing are central to successful engineering Resources (for 30 pupils: 6 groups of 5 pupil) � 6 flowerpots (around 20 cm diameter) � 6 garbage bags, bigger than the flowerpot � 3 buckets of soil � 6 little shovels
� material to make a waterproof bottom � water � 6 containers to pour the water � paper towels or rags
Preparation • keep on hand rags and paper towels for
drying, pupils are working with water!
Working methods • experimental • pupils work in groups • small group and whole class discussion
Key ideas in this lesson • models help to understand reality and to solve problems
Context and background This lesson involves pupils in the “imagine” and “plan” stages of solving the problem. These steps of the engineering design process lead towards constructing a scale model of the pond.
23 This document is produced under the EC contract № 288989
This work is licensed under a Creative Commons Attribution-NonCommercial 4.0 International License

3.1 Introductory activity - design the pond - working in groups - 30 minutes The teacher recalls the initial problem for the pupils: make a pond! − Where to start? − What to pay attention to? The teacher reminds the pupils of the engineering design cycle: they have asked questions about the construction of ponds, they have imagined building one, now they are going to build a very small scale pond but first they must plan Pupils have discovered how water drains in soil and how they can change features of the soil to improve impermeability. Now they can realise a model of the pond. Pupils decide how to make the bottom of the pond. They draw a plan for a model that includes all the characteristics that they have chosen (for example, see figure below).
Drawing is a fundamental tool in engineering work. Some researchers believe that Leonardo da Vinci (1452-1519) was the first producer of modern technical drawings.
.
3.2 The model pond - experiment, working in groups - 40 minutes Often engineers make a model before building the real thing so that they can test their plan and improve it. Pupils should construct a model of the pond using a flowerpot, soil and the waterproof materials they think re best for the bottom (worksheet 1 lesson 3). They should fill the flowerpot with soil almost completely and dig a cavity in the soil. Each group should put a layer of the waterproof material it has chosen in lesson 2 on the bottom of the cavity. Then they should cover the waterproof material with a layer of soil and shape the pond.
This document is produced under the EC contract № 288989 This work is licensed under a Creative Commons Attribution-NonCommercial 4.0 International License

Each group fills the hollow with water and checks how the level varies over time. When they have finished, the pupils should put away the materials and tools they have used and clean the tables. Pupils can check the water level again before to go home: if they have to add water they should measure the quantity necessary to refill the cavity. The day after they can check it for the last time.
3.3 Conclusion – plenary - 20 minutes
Each group presents their model pond to the other groups. They should describe the main characteristics of the model they have constructed and draw it on a large sheet of paper. Pupils can describe how they decided to waterproof the bottom of the pond, and why. During the discussion the teacher should point out what is the most environmentally friendly solution: for example, clay is most suitable than a sheet of plastic. The teacher needs to store the ‘ponds’ away safely for the next lesson
25 This document is produced under the EC contract № 288989
This work is licensed under a Creative Commons Attribution-NonCommercial 4.0 International License

Lesson 4 – How did we do? Is the challenge met? Duration: 90 minutes Objectives: in this lesson the pupils will learn • to deploy evaluative criteria (in this case water retention) to assess the success of their engineering
projects; • to address the problems involved in changing the scale of an engineering project; • to consider the importance of environmental factors. Resources (for 30 pupils: 6 groups of 5 pupil) � 6 measuring tapes
Preparation • In advance, ask if any pupils’ parents work in
excavations or a similar work: he/she can be invited to speak about the machines used and how the work is carried out.
Working method • discussion in groups • whole class discussion
Key ideas in this lesson • it is good to try to figure out as precisely as possible how a situation will be, even though unexpected
things will happen.
Context and background In this lesson pupils evaluate their model pond and they suggest improvements. They imagine how to construct a real pond in the school garden.
26 This document is produced under the EC contract № 288989
This work is licensed under a Creative Commons Attribution-NonCommercial 4.0 International License

4.1 Introductory activity - How to judge the model ponds - working in groups, plenary - 30 minutes
Pupils have prepared model ponds. The teacher asks them to explain how can they judge what is the best design, first of all in groups, then in a whole class discussion. They can consider the loss of water, the type of material used, and the quantity of material used. Using the previous discussion, pupils discuss how their model pond has worked: they start in groups and then move to whole class discussion. If one of the model ponds did not work properly they investigate what did not work and how to improve it. The teacher collects the improvements proposed on the board.
4.2 Designing a real pond - working in groups, plenary - 45 minutes
The teacher asks pupils to design a real pond: Key questions are: Can the materials and features of the scale models be exactly the same for the real pond or it will be necessary to make changes? Is siting of the pond important and why? For example: in choosing where they dig it perhaps it’s important to consider a place where the soil is not too dry and where there will be less evaporation (not in full sun); Do they need to include a device for adding water, in addition to the rain? A pond cannot be dry: the most efficient project will guarantee that there is water in the model pond for at least one day, with little (or not at all) addition of water. What is the size of the pond and does changing the scale present new scientific and engineering challenges? Usually pupils don’t have an instinctive idea of length, so it is difficult for them to write about the dimensions of the pond. To indicate the size of their “real” pond the teacher can ask if they imagine it to be as large as the classroom, smaller or wider, and how deep they think it will be compared to the walls of their classroom. It is useful to give each group a measuring tape to indicate the pond size (perhaps measuring the dimensions of the classroom for comparison). What environmental features would they want to build into the design? Remember Leo and the frogs. How would they encourage frogs and other wildlife? Pupils are asked to complete worksheet 1 lesson 4: Pupils can write their answers on the worksheet, or on post-it notes that can be stuck to a large common poster. Otherwise these questions can serve as a guide for discussion, first within each group and then altogether The pupils then outline their design to the class as a whole for a shared evaluation of the designs. After this the pupils will work for a short period in groups to amend their designs in the light of the discussion and present the outcomes on a poster for the classroom wall
4.3 Conclusion - plenary - 15 minutes
The teacher leads the class in a final review of the lesson and the unit. Key questions are: − How have they used the engineering design cycle? − What scientific knowledge have they learned and deployed in designing their pond? − Has science been fun? − What have they learned about working together?
27
This document is produced under the EC contract № 288989 This work is licensed under a Creative Commons Attribution-NonCommercial 4.0 International License

Appendices Story to set the context: Leo and the pond
Leo had finally finished the school year successfully. Now he had a lot of free time. He decided to go to the park not far from home, where he usually played with friends; it was the park where he had often been with his classmates and his teacher, who liked holding some of his science lessons there. He walked along the path around the pond, remembering all that he had learnt with his friends about frogs, newts, dragonflies, salamanders, mosquitoes. He had followed the life cycle of some of these animals, he had discovered how they share the territory of a pond, how they fight for survival, what plants live alongside them. He and his friends were very fond of that natural area. As he thought about all this, he noticed a different group of people in the park: they had peculiar, mysterious- looking instruments, and they talked among themselves, looking at a large sheet, which seemed to be a map. Some were drilling holes in the ground with an auger, then looking down small telescopes mounted on tripods to analyse what they had found. "What are they doing?” he wondered. He walked around, trying not to be too obvious, trying to understand what they were talking about; he noticed that all of them were wearing a shirt that carried a name: GEOTEKN. "Here ... " - pointing in the direction of the pond - " ... the entrance of the shopping centre will be built, to be extended towards the woods” - said a man who seemed in charge of the group. "We need to know the composition of the soil layers below the area occupied by the pond and the area occupied by the wood to see what kind of foundations we need to design", he continued. Leo had a shock: A shopping centre in place of the wood and the pond?! ...... but, but it is impossible! He ran home. He had to share with someone what he had just discovered. Leo was lying on his bed, staring at the ceiling and waiting for his parents to come back from work.. "How can I bear to lose the pond and the park?" – he kept repeating to himself. Anger and sadness stirred inside him about the situation: where was he going to play with his friends? Where would all the creatures in the pond go? When at last his mother and father got home, Leo ran to meet them and immediately called a family meeting, as they usually did when there were problems to be solved or decisions to make. His parents, a bit surprised by the urgency of the request, didn’t object and sat down, even though they were tired after at the end of the day.
28 This document is produced under the EC contract № 288989
This work is licensed under a Creative Commons Attribution-NonCommercial 4.0 International License

"What’s happened, Leo?”, they asked. Leo told them all about it: "I don’t want to lose that place, what can I do to stop the work that they are planning?” His plea was so emotional that parents exchanged a despairing look: they did not know how to sweeten the inevitable disappointment for their child. As often happens, we often work out problems during the night, and Leo showed up the next morning at breakfast with a lot of enthusiasm for an idea that had matured while he was in bed: "Mum, I will persuade my teacher to re-create the pond in the school garden,, so we can move some of the animals and save them!". . He was so enthusiastic that he did not even wait for an answer. He shouted goodbye to his mother and ran to call his classmates and to present his idea to his teacher. Leo’s idea soon became a real project with the help of his teacher and some parents; it had to be approved by many school officials but finally everyone gave their consent. In the autumn, Leo began planning the construction of the pond. But how to make a start on the pond? What did they need to think about? Was it enough to dig a hole in the ground and fill it with water to make a pond? Meanwhile, the building work in the park had started and several bulldozers were digging in an area close to the pond. After seeing Leo so often in the area, one of the technicians asked him why he was so interested in their work. Leo told him about his plan and asked the questions he had in mind. The technician answered his questions, and told him how important it was to build waterproof walls because there was so much water in the land that the shopping centre would be built on (of course, there was a pond!). The engineers had to prevent water from filtering into the building: they were using a special type of cement, and applying layers of impermeable material to the walls (in some cases they also used thick sheets of very strong rubber). He also told him that sometimes it was necessary to constantly operate pumps to suck up get rid of any water that filtered in. Leo thought about how these issues could be useful for the school pond project. They too would have to dig and make a hole in the ground! He remembered the first day that he had seen the engineers in the park when they were talking about the importance of studying the composition of the soil. “But soil is soil!” he thought....
29 This document is produced under the EC contract № 288989
This work is licensed under a Creative Commons Attribution-NonCommercial 4.0 International License
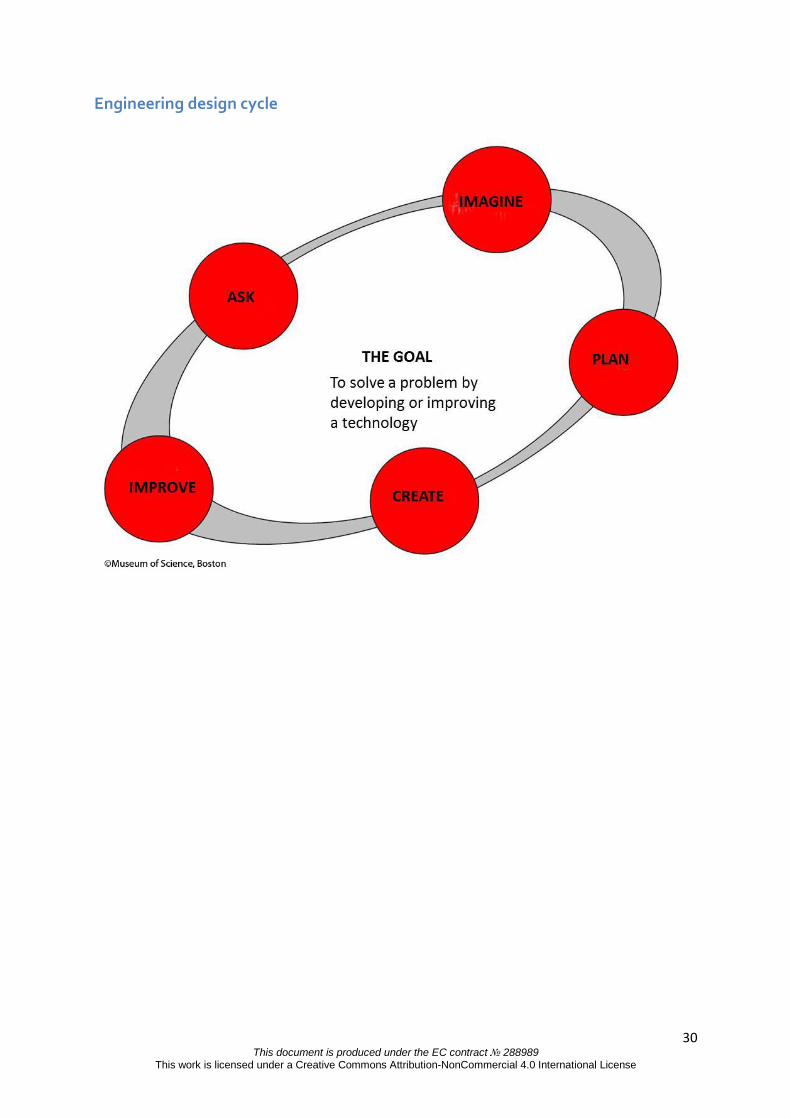
Engineering design cycle
30 This document is produced under the EC contract № 288989
This work is licensed under a Creative Commons Attribution-NonCommercial 4.0 International License

Worksheets and answer sheets
31 This document is produced under the EC contract № 288989
This work is licensed under a Creative Commons Attribution-NonCommercial 4.0 International License

Worksheet 1 Lesson 0 - Engineering?
32 This document is produced under the EC contract № 288989
This work is licensed under a Creative Commons Attribution-NonCommercial 4.0 International License
Worksheet 1 Lesson 0 - Engineering? - Teacher notes
The pictures on the worksheet are intended to promote pupils’ discussion about what engineering is, what engineers do and who could be involved in different types of engineering.
The pictures of the spider and snail present some interesting challenges. The pupils could for example, decide that the spider is ‘engineering’ a web and this could be related to other animal ‘engineering’ examples (such as a beaver building a dam). An interesting point to make is that it is more common to think of engineering in terms of the made world. We can however, learn from studying nature and the environment. For example, the material that spiders use for making a web has been copied to make a very strong material (Kevlar) that has many useful properties. Similarly, the snail has developed a useful strategy for travelling over rough surfaces to protect its soft body from being damaged. An interesting question is whether this would be useful to solve a problem in the human world (a good example is Velcro which was developed from the burrs of burdock plant).
The toys could be considered engineering since they demonstrate the application of cams but it is interesting to ask what materials they could be made from and who actually makes them. This is likely to lead to some gender issues (many of the class may think that toys are made for children by toy designers who are male).
A similar issue might arise when pupils discuss the knitted garment and the prepared meal - pupils may think that these are only made by women, and that they are not the product of engineering.
Some of the other pictures of sculptures and works of art might be perceived as not engineering and without any real practical purpose. This will raise a question about the links between engineering and art and whether or not a made object needs to have a practical purpose for it to count as being engineering.
The pictures are meant to stimulate engagement and dialogue about engineering. This could lead to a discussion about what is involved in engineering, in which you might choose to introduce the Engineering Design Cycle.
33 This document is produced under the EC contract № 288989
This work is licensed under a Creative Commons Attribution-NonCommercial 4.0 International License

Worksheet 1 Lesson 1 - How a pond is made (1) Name: Date:
Lura pond (Italy)
Centovello pond (Italy)
Circeo swamp (Italy)
34 This document is produced under the EC contract № 288989
This work is licensed under a Creative Commons Attribution-NonCommercial 4.0 International License
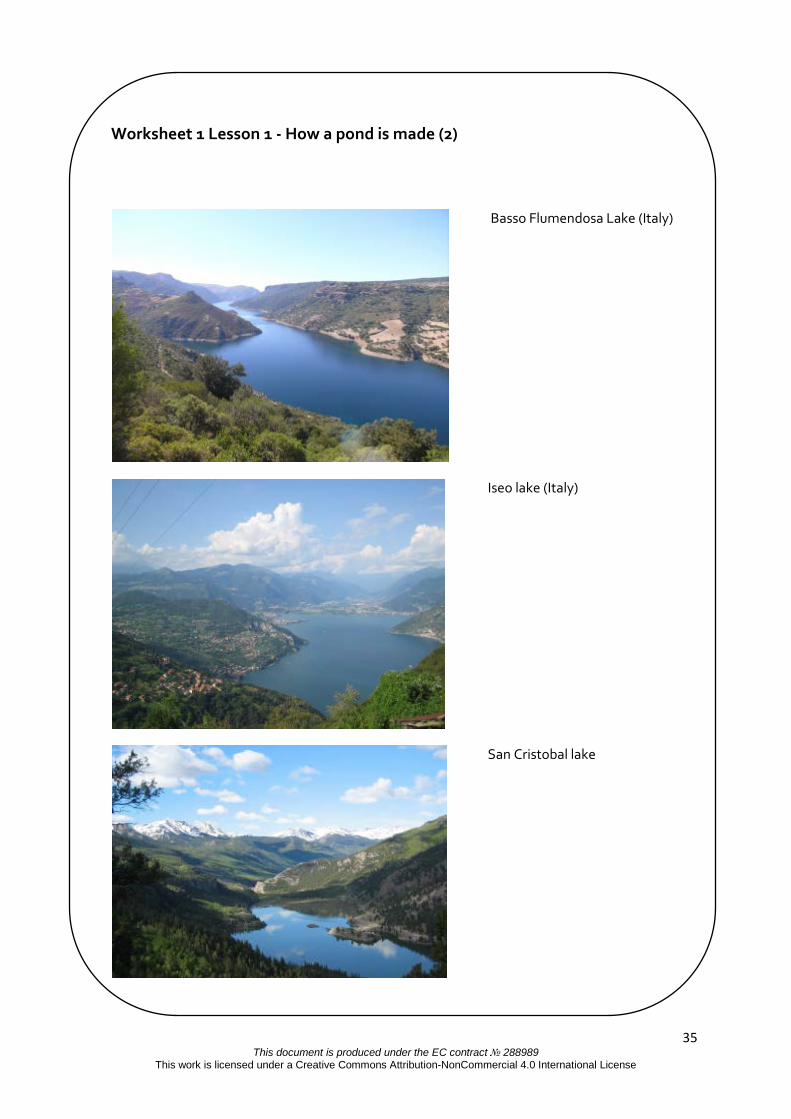
Worksheet 1 Lesson 1 - How a pond is made (2)
Basso Flumendosa Lake (Italy)
Iseo lake (Italy)
San Cristobal lake
35 This document is produced under the EC contract № 288989
This work is licensed under a Creative Commons Attribution-NonCommercial 4.0 International License

Worksheet 1 Lesson 1 - How a pond is made (3)
Dam van Duhok
What differences do you see between a pond, a lake and a swamp?
.........................................................................................................................................
.........................................................................................................................................
.........................................................................................................................................
.........................................................................................................................................
What might ponds and rivers have in common?
.........................................................................................................................................
.........................................................................................................................................
.........................................................................................................................................
.........................................................................................................................................
Is a dam a reservoir of water? Has it something in common with the pond?
.........................................................................................................................................
.........................................................................................................................................
.........................................................................................................................................
.........................................................................................................................................
What do you think are the main characteristics of a pond? List them.
.........................................................................................................................................
.........................................................................................................................................
.........................................................................................................................................
.........................................................................................................................................
36 This document is produced under the EC contract № 288989
This work is licensed under a Creative Commons Attribution-NonCommercial 4.0 International License

Worksheet 2 Lesson 1 - Shake soil and water Name: Date: Remember Leo’s last observation: “But soil is soil”! Really, is soil a single material? Is it so simple? What do you need? • soil picked up in the school garden and/or in other gardens or fields • plastic bottle, 1,5 l, transparent and clear, with screw top • spoon and paper sheet • ruler To work! 1. Put the soil in the bottle: mark the level of the soil ...... cm 2. Fill the bottle with water 3. Close the bottle with the screw cap 4. Shake the bottle (be sure to dissolve possible lumps), put the bottle on a common table:
write what you think will happen. .................................................................................................................................
.................................................................................................................................
.................................................................................................................................
5. Observe what happens in the bottle immediately after the shake, after 5 minutes, 30 minutes, 2 hours (or, better, the day after). .................................................................................................................................
.................................................................................................................................
.................................................................................................................................
6. Can you give an explanation for what you have observed?
.................................................................................................................................
.................................................................................................................................
.................................................................................................................................
37 This document is produced under the EC contract № 288989
This work is licensed under a Creative Commons Attribution-NonCommercial 4.0 International License

Worksheet 1 Lesson 2 - Water meets components of soil Name: Date: What do you need? • 3 plastic bottles of 1,5-2 litres, transparent and clear • scissors • gauze • 3 rubber bands • gravel • sand • clay flour • water • container for the water
To work! 1. Cut the bottle almost in the middle to obtain two pieces. 2. Cover the mouth of the bottle with gauze and fix it to the bottleneck with the elastic
band: when you capsize this half bottle you have a funnel.
3. Insert the funnel inside the other half bottle: it will collect the water passing through the
funnel.
4. Put the gravel into one funnel and sand and clay into the others, to the same height. 5. Pour the water slowly into the funnels: observe the water falling into the lower container.
38 This document is produced under the EC contract № 288989
This work is licensed under a Creative Commons Attribution-NonCommercial 4.0 International License

Worksheet 2 Lesson 2 - Water meets materials Name: Date: What do you need? • some throwaway plates and transparent glasses • the funnels (with gauze) and the half bottles
from the previous activity • paper or cardboard, two different sponges,
plastic bag, fabric, clumping cat litter, flour, a baby diaper, ....................., .....................,
• water • a container for water, like a carafe or a graduated cylinder
To work! 1. Put your chosen material in the funnel or cover the mouth of a plastic glass with the
material. 2. Pour the water slowly on to the material. Which materials are more impermeable?
...................................................................................................................................
...................................................................................................................................
Did you expect these results?
...................................................................................................................................
...................................................................................................................................
3. If you test powder and granular matter compare what happens when they are soft and when they are compact.
4. Put materials like sponge that have absorbed water on to a dry plate: does water remain
in the material?
...................................................................................................................................
...................................................................................................................................
39 This document is produced under the EC contract № 288989
This work is licensed under a Creative Commons Attribution-NonCommercial 4.0 International License

Worksheet 3 Lesson 2 - A waterproof bottom Name: Date: What do you need? • one cell (see worksheet 5 lesson 2) • dry soil • materials to be used as intermediate layer: clumping cat litter, ....................., .....................,
..........................., ... • water • a container to pour water or a syringe (without needle) • plasticine
To work! 1. Fill about one third of the cell with dry soil. 2. Make a layer of the material that you will test. 3. Finish filling in the cell with the soil. 4. Keep it vertical, using the plasticine to keep it in position on the table. 5. Dig a small cavity in the middle of the surface (be careful not to touch the layer). 6. Pour the water very slowly into the cavity until it is full: you will top it up slowly as the water
is absorbed. What happens? How long does it take?
...........................................................................................................................................
...........................................................................................................................................
...........................................................................................................................................
...........................................................................................................................................
40 This document is produced under the EC contract № 288989
This work is licensed under a Creative Commons Attribution-NonCommercial 4.0 International License

Worksheet 1 Lesson 3 - The model pond Name: Date: What do you need? • 1 flowerpot (almost 20 cm of diameter) • 1 garbage bag, bigger than the flowerpot • water • half a bucket of soil • a little shovel • material to make the waterproof bottom • (paper towel or rags) To work! 1. Choose where to put the model, lay out the garbage bag (open) and put the flowerpot in
the bag (so water doesn’t spread on the table if the model doesn’t work well). 2. Fill the flowerpot almost completely with soil. 3. Dig a cavity in the soil (don’t reach to the bottom of the pot). 4. Put on the bottom of the cavity a layer of the waterproof material you have chosen: take
note the thickness of the layer. 5. Cover the waterproof material with a layer of soil and shape it like a pond. 6. Fill the pond with water: measure the quantity of water needed. 7. After 1 hour check the water level and check if there is water in the garbage bag.
41 This document is produced under the EC contract № 288989
This work is licensed under a Creative Commons Attribution-NonCommercial 4.0 International License

Worksheet 1 Lesson 4 - The pond Name: Date: To work! 1. Decide the pond position: where you will dig the pond? Why?
…………………………………………………………………………………………………………………………
…………………………………………………………………………………………………………………………
…………………………………………………………………………………………………………………………
…………………………………………………………………………………………………………………………
…………………………………………………………………………………………………………………………
2. Length: ..........................
width: .......................... depth: .......................... thickness of the waterproof layer: ..........................
3. Do you think it will be necessary to add water, occasionally or periodically? How?
…........................................................................................................................................
…........................................................................................................................................
…........................................................................................................................................
…........................................................................................................................................
…........................................................................................................................................
42 This document is produced under the EC contract № 288989
This work is licensed under a Creative Commons Attribution-NonCommercial 4.0 International License

Worksheet 2 Lesson 4 - Imagine how to build a pond Name: Date: To work! 1. Which features of the scale model have to be changed?
…………………………………………………………………………………………………………………………
…………………………………………………………………………………………………………………………
…………………………………………………………………………………………………………………………
2. List the steps in making the pond: …........................................................................................................................................
…........................................................................................................................................
…........................................................................................................................................
…........................................................................................................................................
…........................................................................................................................................
3. Which tools and machines do you think must be used?
…........................................................................................................................................
…........................................................................................................................................
…........................................................................................................................................
…........................................................................................................................................
…........................................................................................................................................
4. What do you think will be the hardest part of manufacture?
…........................................................................................................................................
…........................................................................................................................................
…........................................................................................................................................
43 This document is produced under the EC contract № 288989
This work is licensed under a Creative Commons Attribution-NonCommercial 4.0 International License
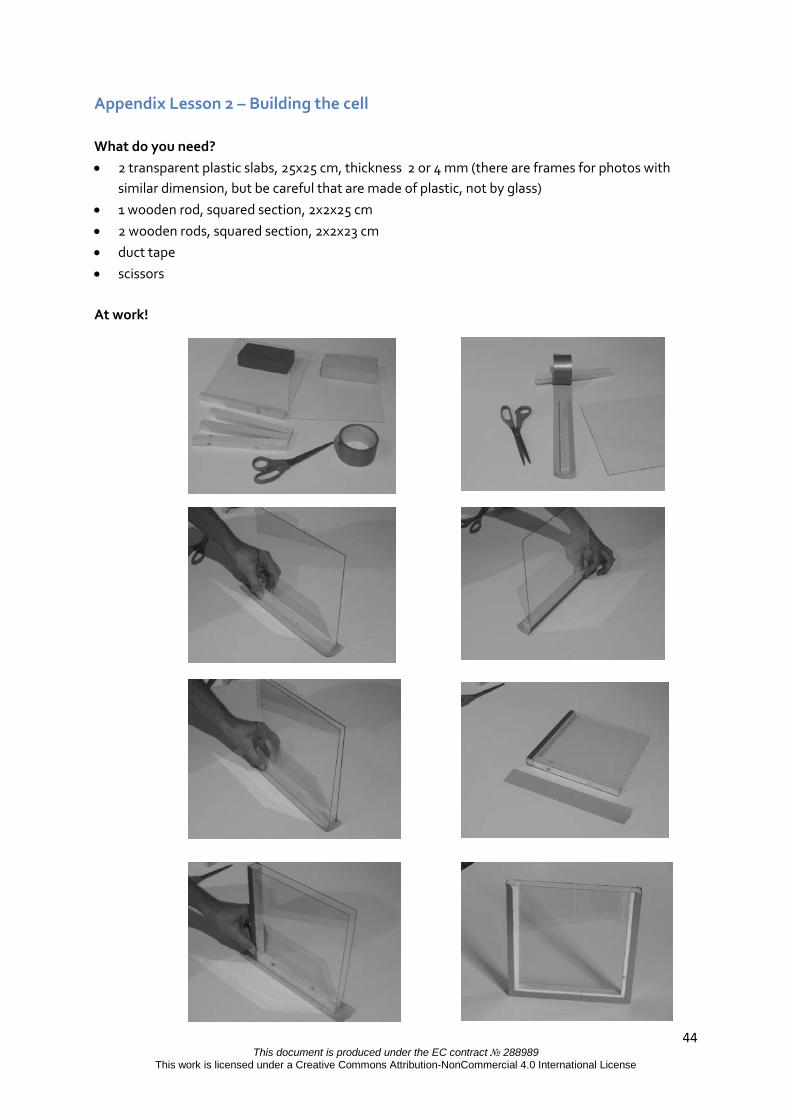
Appendix Lesson 2 – Building the cell What do you need? • 2 transparent plastic slabs, 25x25 cm, thickness 2 or 4 mm (there are frames for photos with
similar dimension, but be careful that are made of plastic, not by glass) • 1 wooden rod, squared section, 2x2x25 cm • 2 wooden rods, squared section, 2x2x23 cm • duct tape • scissors
At work!
44 This document is produced under the EC contract № 288989
This work is licensed under a Creative Commons Attribution-NonCommercial 4.0 International License

Science notes for teachers about soils and the flow of water through materials
Some key knowledge and science concepts involved in Lesson 2
About soils: • soils are a mix of different components • when soil is shaken with water and allowed to settle, the components form different layers • the layers always appear in the same order with heaviest deposits on the bottom, smaller grains above this
layer and the smallest particles in suspension • there may be floating vegetal material • different components are present in different quantities • the three main components of soil are gravel, sand and clay • the largest grains are gravel and sand, and the smaller grains are silt and clay • soil from different locations may have different proportions of these components • water doesn’t pass through the different components of soil in the same way • water flows fast through gravel, less fast through sand and very slowly through clay About ponds: • a pond is a dynamic system that both gains and loses water • to maintain equilibrium in a pond there must be a balance between gains and losses • water must be added constantly to a pond and water loss from a pond must be kept to a minimum • the rate of flow of water through the materials lining a pond is a critical factor in maintaining equilibrium About water flow through materials: • the rate of flow (in this case of water) through a material is called its permeability • materials (including solid ,soil components and man-made materials) show a range of permeability • some materials, such as plastic and clay, are approximately or totally waterproof • in porous materials (such as paper or sponge), water can penetrate the small, irregular channels made of
pores, cavities and other discontinuities present within the material • in granular matter (such as sand and gravel) water penetrates the empty spaces between grains • the passage of a liquid (in this case water) through porous materials is called percolation • in some porous materials the cavities do not connect with each other so water is unable to flow through • the compactness of soil or clay reduces the width of empty spaces between grains and slows the rate of
flow of water through it
Geotechnical Engineering Geotechnical Engineering is a branch of Civil Engineering that is focused on earth materials. It is concerned with construction in or on the ground (such as mining and building). The role of the geotechnical engineer is to investigate the subsurface conditions and materials of an area and to ensure they meet the requirements of a proposed project. This involves using the principles of soil and rock mechanics to conduct a site investigation. The physical/mechanical properties of the site materials are explored as well as risk assessment to humans, property and the environment from natural hazards such as landslides, earthquakes, sinkholes, soil liquefaction and rock falls. The properties of the soil and underlying bedrock are examined, as well as the distribution of faults in the rock and their potential interaction or in the proposed construction. The results of the site investigation are used to support the design of appropriate foundations for the construction. For example, foundations may need to be shallow or deep and may involve retaining structures such as earth-filled dams and retaining walls. Accompanying Earthworks may include embankments, tunnels, levees and the deposition of hazardous waste. What is a pond? A pond is a pool of standing water, natural or artificial, that is relatively small and shallow. Technical definitions of ‘pond’ vary but generally include notions that light must penetrate to the bottom of the water body (if the water is not muddy) , and that it must be shallow enough for plants to root and lack thermal
45 This document is produced under the EC contract № 288989
This work is licensed under a Creative Commons Attribution-NonCommercial 4.0 International License

stratification and wave action on the shoreline. Shallow depth (up to 3 m approx.) plays a key role in characterizing ponds in relation to lakes. Both lakes and ponds are formed in various ways including glacial, tectonic and volcanic activity that leave isolated depressions in the earth’s surface that fill with water. Ponds may occur in floodplains as part of a river system and some animals, such as beavers, also create ponds. Unlike the marshes, a pond does not come from flooding of lowland areas by the sea or river waters. For its formation and maintenance a pond needs a supply of water; this may be from spring (groundwater sources), surface (tributary streams or channels) or precipitation. As water level varies seasonally, the pond reaches a minimum during periods of drought and a maximum when rainfall is abundant. A pond will only form if the material lining it is suitable to prevent water leakage in order to ensure a permanent water content, if not water will simply drain away. The physical environment of a pond consists of mud, sand and stones on the bottom and banks. The banks offer stability and support for growth of vegetation. Despite its small size, a pond can be an ecosystem rich in biodiversity. This challenge involves pupils in thinking about the effectiveness of materials (including soils) that might be used in designing a pond. A geotechnical engineer would investigate the physical and chemical properties of proposed materials and look at how they behave when in contact with the soil. The engineer would also consider how proposed materials might influence the behaviour of soil. This process would begin with the investigation of soil samples from the site. What is soil made of? Soil is the product of physical, chemical and organic processes acting over long periods of time (1000 years or more).Rocks are broken down through a process of weathering. Physical weathering caused by wind erosion, water, ice and changes in temperature, breaks down rocks into smaller pieces (their composition remains unchanged). Chemical weathering not only breaks rock down, but also changes its composition. For instance, a hard material may change to a soft material following chemical weathering. Chemical reactions can occur between the rock minerals and oxygen or carbon dioxide in the atmosphere, and bacteria turn vegetal roots into further soil components. The state of a soil (composition and stratification) is the result of different phases in its history: formation (disintegrating processes), transport (glaciation, rains, rivers, floods) and deposition (sedimentation, draining). If you dig vertically into the soil to reveal a soil profile, you will see a series of layers or horizons. For more in-depth reading about soil profiles visit: http://passel.unl.edu/pages/informationmodule.php?idinformationmodule=1130447025&topicorder=4 If you look closely at soil with a magnifier you can see that it is composed of different grains. The spaces between the grains can be filled by air, water or by both at the same time. Geologists and geotechnical engineers place great importance on the size of the grains in order to understand the soil properties. They assess soils using the following classification:
Rock fragments (diameter d> 200 mm) Gravel (2 ≤ d ≤ 200 mm) Sand (0,06 ≤ d ≤ 2 mm) Silt (0,002 ≤ d ≤ 0,06 mm) Clay (d ≤ 0,002 mm).
The relative amounts of these components determine the physical properties of the soil (such as its water holding capacity or ability to allow water to pass through it). Water passes through sandy soils quickly; they are well-drained and aerated and prone to drying out (not good for building ponds). Soils with a high level of clay in them have a high water holding capacity and tend to get water-logged (much better for holding water). You can carry out a simple test of soil texture that will provide a basic measure of soil composition. Just collect a small sample of soil from just below the surface (sufficient to roll into a ball of approx. 2.5 cm diameter). Using a small drop of water, moisten to the point at which it becomes sticky enough to begin to stick to your finger. Now carry out a ‘ball squeeze’ test – squeeze the moistened ball of soil gently in your hand. If the soil is sandy or loamy sand (course texture) the ball will break with slight pressure. If the soil is a sandy or silty loam (medium texture) the ball will change shape easily but stay together. If there is resistance to breaking and changing shape then the soil is clayey or clayey loam (fine textured).
46 This document is produced under the EC contract № 288989
This work is licensed under a Creative Commons Attribution-NonCommercial 4.0 International License

In Lesson 2, the pupils explore the composition of soils and consider soil’s importance in pond construction. In thinking about preventing excessive seepage, clay and silty clays make excellent soil because of their slow drainage properties. Coarse-textured sands and sand-gravel mixes drain quickly and are not suitable. How water passes through materials Soil acts as a sponge taking up and retaining water. Movement of water into the soil is called infiltration and the downward movement of water within the soil is called percolation. The spaces between the soil grains allow water to infiltrate and percolate; soil acts as a water store. Permeability is the property of a material that relates to its capability of having liquids (in this case water) move through it. In lesson 2 pupils explore how water passes through a range of materials (including gravel, sand and clay) as part of their investigation into suitable soils and potential linings for the pond. They are introduced to the notion of permeability as a measure of the ability of a material to transmit fluids (in this case water).They think about the nature of porous materials in terms of water flow through small irregular channels made of pores, cavities and other discontinuities present in materials such as paper, sponge or the size of spaces between soil components. The flow of the water is slowed by the compactness of soil or clay that reduces the width of empty spaces between grains. Infiltration rates can be very low (almost zero) for clay and compacted soils whereas in sandy soils infiltration may be in excess of 20cm per hour. Pupils also think about porous materials in which the cavities are not connected with each other so water can't flow through. Lessons 2.3 and 2.4 allow pupils to explore the permeability of the components of soil and other materials as they research appropriate soils and lining materials for designing their pond.
47 This document is produced under the EC contract № 288989
This work is licensed under a Creative Commons Attribution-NonCommercial 4.0 International License

Some pupils’ ideas about the science of soils and water movement Children's thinking about the natural world comes from their everyday experiences. They may not represent the established current scientific view but they usually contain sensible reasoning based on observation and interaction. Offering opportunities for children to challenge their thinking through activity is more likely to shift their perceptions than telling them facts. However, this presents a significant pedagogical task. It is extremely demanding for learners at all levels and ages to accommodate new ideas about a particular phenomenon, especially when these seem to contradict common sense reasoning. Although through research we have some insight into the ideas pupils are likely to have in particular conceptual domains in science, often, pupils have difficulty in articulating their thinking so there is a need to exercise some caution in making assumptions about their reasoning. This highlights the importance of providing opportunity for children to discuss their thinking. Pupils may have limited experience of earth science and the scientific language employed within the subject. Teachers should be aware that children’s ideas about common terms such as ‘rock’ and ‘soil’ may differ from scientific views. Allen (1), for instance, points out that the scientific definition of rock is ‘any natural material that is a product of geological processes and consists of an aggregate of more than one mineral’. Some pupils, however, think that ‘rocks’ are too big to throw, whereas ‘stones’ can be held in the palm of the hand and thrown. Rocks may be viewed as jagged by some, while others accept that some rocks are rounded (1). Pupils’ ideas about soil may also be limited. Among common misconceptions is the notion that soil is simply ‘dirt’ or ‘any stuff in the ground’ (see (2) for a summary of research). In some cases, pupils distinguish soil from ‘dirt’ in that ‘soil has more goodness in it’. They may think that the ‘goodness’ of the soil for growing plants can be judged on the basis of how the soil looks or feels. If they are unable to decide, they reason that an ‘expert’ would be able to. Pupils are generally aware of the importance of soil for plant growth (1) and that soil provides a habitat for some animals such as earthworms (earthworms eat soil). They are less aware of the biodiversity of soil and the role of living organisms within it. Some children express ideas about the decay of dead organisms in soil; this can be related to the formation of fossils (3). While some pupils regard soil as uniform in nature, others will think of it as a collection of little bits of certain sizes and colours (3). They are strongly influenced by the topsoil they know in their own environment and may not recognize other types of soil as ‘soil’. They often focus on the ‘little dark brown bits’ and regard visible decaying matter and larger pieces of rock as not being part of the soil. The ‘little bits’ may not be associated with rock (rock is ‘hard’ and soil is ‘soft’). Pupils often associate rock with places where it is exposed and they seem less aware of layers of rock underneath the soil (3). Rock is often thought of as being ‘hard’ and unchanging and pupils may not understand its connection with soil (3). Some ideas about the formation of soil (3):
• it is associated with deposition by rivers • soil has always been present • soil is relatively ‘young’, formed in a few years • soil is as old as the planet
Lesson 2 provides opportunity to extend pupils’ knowledge of soil through the practical experience of observation and investigation. Key ideas to be developed relate to the composition of soil. There is opportunity to help pupils to make connections between soil and rock and to talk about how soil is formed over long periods of time Lesson 2 also focuses on the spaces between soil particles and the role they play in allowing water to pass through the material. Pupils may be unaware of spaces between soil particles and they may not understand that the spaces contain air/water. They may have observed soil animals at the surface periodically (especially
48 This document is produced under the EC contract № 288989
This work is licensed under a Creative Commons Attribution-NonCommercial 4.0 International License

after heavy rain) and have made the connection that they need to surface in order to breathe(3). Allen(1) suggests that a useful way to address the idea that soil is not a solid mass is to ask pupils to add a small amount of soil into an egg cup and then to predict how much water they will be able to add before it overflows. They will be surprised at how much they can add. This experience will support their thinking about how the water occupies the spaces between the soil particles. Modelling soil components using balls/marbles of different sizes helps pupils to see the size of spaces and to visualize soils more easily. Magnifying equipment is very useful as an aide to observation. By comparing the grains in different types of soil, pupils can begin to make connections between soil composition and how soil type might affect plant growth and pond drainage. The wider experience of examining how water flows (or doesn’t flow) through a range of everyday materials not only helps pupils to decide on appropriate materials for a pond liner, it also helps to deepen their understanding of infiltration and permeability. References (1) Allen, M. ( 2010) Misconceptions in Primary Science. Open Univesrity Press: Berkshire, England. (2) Driver, R., Squires, A., Rushworth, P. & Wood-Robinson, V.(1994) Making Sense of Secondary Science. Routledge : London. (3) Nuffield Primary Science: Teachers’ Guides (Ages 7-12): Rocks, Soils and Weather (1995) HarperCollins Publishers:London.
49 This document is produced under the EC contract № 288989
This work is licensed under a Creative Commons Attribution-NonCommercial 4.0 International License

Partners Bloomfield science Museum Jerusalem The National Museum of Science and Technology “Leonardo da Vinci” Science Centre NEMO Teknikens hus Techmania Science Center Experimentarium The Eugenides foundation Condervatoire National des Art et Métiers- muse des arts et métiers Science Oxford The Deutsches Museum Bonn Boston’s Museum of Science Netiv Zvulun – School Istituto Comprensivo Copernico Daltonschool Neptunus Gränsskolan School The 21st Elementary School Maglegårdsskolen The Moraitis school EE. PU. CHAPTAL Pegasus Primary School KGS Donatusschule ECSITE – European Network of Science Centres and Museums ICASE – International Council of Associations for Science Education ARTTIC Manchester Metropolitan University University of the West of England There are 10 units available in these languages:
The units are available on www.engineer-project.eu till 2015 and on www.scientix.eu
MAGLEGÅRDSSKOLEN Gentofte Kommunes skolevæsen
50 This document is produced under the EC contract № 288989
This work is licensed under a Creative Commons Attribution-NonCommercial 4.0 International License