
For Review – Chapter 1
92
1 For Review – Chapter 1 1. a. Law versus theory: A law is a concise statement or equation that summarizes observed behavior. A theory is a set of hypotheses that gives an overall explanation of some phenomenon. A law summarizes what happens; a theory (or model) attempts to explain why it happens. b. Theory versus experiment: A theory is an explanation of why things behave the way they do, while an experiment is the process of observing that behavior. Theories attempt to explain the results of experiments and are, in turn, tested by further experiments. c. Qualitative versus quantitative: A qualitative observation only describes a quality while a quantitative observation attaches a number to the observation. Some qualitative observations would be: The water was hot to the touch. Mercury was found in the drinking water. Some quantitative observations would be: The temperature of the water was 62EC. The concentration of mercury in the drinking water was 1.5 ppm. d. Hypothesis versus theory: Both are explanations of experimental observation. A theory is a set of hypotheses that has been tested over time and found to still be valid, with (perhaps) some modifications. 2. No, it is useful whenever a systematic approach of observation and hypothesis testing can be used. 3. a. No b. Yes c. Yes Only statements b and c can be determined from experiment. 4. Volume readings are estimated to one decimal place past the markings on the glassware. The assumed uncertainty is ±1 in the estimated digit. For glassware a, the volume would be estimated to the tenths place since the markings are to the ones place. A sample reading would be 4.2 with an uncertainty of ±0.1. This reading has two significant figures. For glassware b, 10.52 ± 0.01 would be a sample reading and the uncertainty; this reading has four significant figures. For glassware c, 18 ±1 would be a sample reading and the uncertainty, with the reading having two significant figures. 5. Accuracy: How close a measurement or series of measurements are to an accepted or true value. Precision: How close a series of measurements of the same item are to each other. The results, average = 14.91 "0.03%, are precise (are close to each other) but are not accurate (are not close to the true value). 6. In both sets of rules, the lease precise number determines the number of significant figures in the final result. For multiplication/division, the number of significant figures in the result is the same as the number of significant figures in the least precise number used in the calculation. For addition/subtraction, the result has the same number of decimal places as the least precise number used in the calculation (not necessarily the number with the fewest significant figures).
-
Upload
khangminh22 -
Category
Documents
-
view
0 -
download
0
Transcript of For Review – Chapter 1

1
For Review – Chapter 1 1. a. Law versus theory: A law is a concise statement or equation that summarizes observed
behavior. A theory is a set of hypotheses that gives an overall explanation of some phenomenon. A law summarizes what happens; a theory (or model) attempts to explain why it happens.
b. Theory versus experiment: A theory is an explanation of why things behave the way they
do, while an experiment is the process of observing that behavior. Theories attempt to explain the results of experiments and are, in turn, tested by further experiments.
c. Qualitative versus quantitative: A qualitative observation only describes a quality while a
quantitative observation attaches a number to the observation. Some qualitative observations would be: The water was hot to the touch. Mercury was found in the drinking water. Some quantitative observations would be: The temperature of the water was 62EC. The concentration of mercury in the drinking water was 1.5 ppm.
d. Hypothesis versus theory: Both are explanations of experimental observation. A theory is
a set of hypotheses that has been tested over time and found to still be valid, with (perhaps) some modifications.
2. No, it is useful whenever a systematic approach of observation and hypothesis testing can be
used. 3. a. No b. Yes c. Yes Only statements b and c can be determined from experiment. 4. Volume readings are estimated to one decimal place past the markings on the glassware. The
assumed uncertainty is ±1 in the estimated digit. For glassware a, the volume would be estimated to the tenths place since the markings are to the ones place. A sample reading would be 4.2 with an uncertainty of ±0.1. This reading has two significant figures. For glassware b, 10.52 ± 0.01 would be a sample reading and the uncertainty; this reading has four significant figures. For glassware c, 18 ±1 would be a sample reading and the uncertainty, with the reading having two significant figures.
5. Accuracy: How close a measurement or series of measurements are to an accepted or true
value.
Precision: How close a series of measurements of the same item are to each other. The results, average = 14.91 "0.03%, are precise (are close to each other) but are not accurate (are not close to the true value).
6. In both sets of rules, the lease precise number determines the number of significant figures in the final result. For multiplication/division, the number of significant figures in the result is the same as the number of significant figures in the least precise number used in the calculation. For addition/subtraction, the result has the same number of decimal places as the least precise number used in the calculation (not necessarily the number with the fewest significant figures).
2
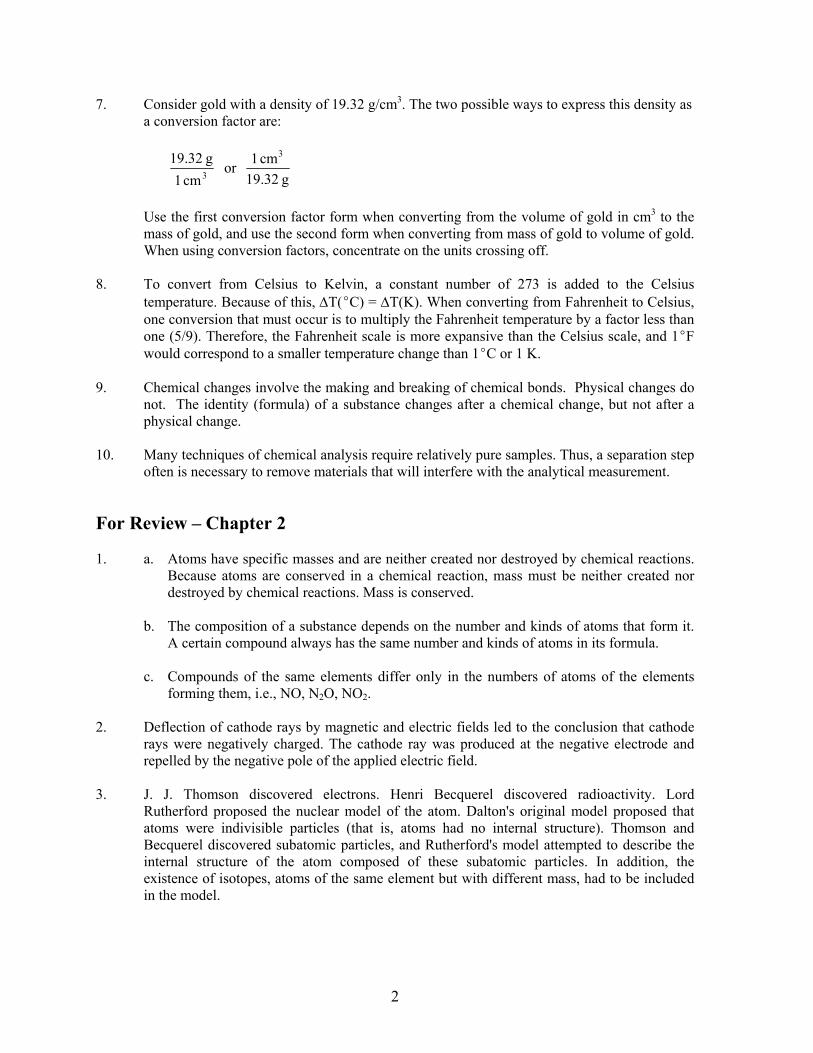
7. Consider gold with a density of 19.32 g/cm3. The two possible ways to express this density as a conversion factor are:
3cm1g32.19 or
g32.19cm1 3
Use the first conversion factor form when converting from the volume of gold in cm3 to the
mass of gold, and use the second form when converting from mass of gold to volume of gold. When using conversion factors, concentrate on the units crossing off.
8. To convert from Celsius to Kelvin, a constant number of 273 is added to the Celsius
temperature. Because of this, ∆T(EC) = ∆T(K). When converting from Fahrenheit to Celsius, one conversion that must occur is to multiply the Fahrenheit temperature by a factor less than one (5/9). Therefore, the Fahrenheit scale is more expansive than the Celsius scale, and 1EF would correspond to a smaller temperature change than 1EC or 1 K.
9. Chemical changes involve the making and breaking of chemical bonds. Physical changes do
not. The identity (formula) of a substance changes after a chemical change, but not after a physical change.
10. Many techniques of chemical analysis require relatively pure samples. Thus, a separation step
often is necessary to remove materials that will interfere with the analytical measurement. For Review – Chapter 2 1. a. Atoms have specific masses and are neither created nor destroyed by chemical reactions.
Because atoms are conserved in a chemical reaction, mass must be neither created nor destroyed by chemical reactions. Mass is conserved.
b. The composition of a substance depends on the number and kinds of atoms that form it.
A certain compound always has the same number and kinds of atoms in its formula. c. Compounds of the same elements differ only in the numbers of atoms of the elements
forming them, i.e., NO, N2O, NO2. 2. Deflection of cathode rays by magnetic and electric fields led to the conclusion that cathode
rays were negatively charged. The cathode ray was produced at the negative electrode and repelled by the negative pole of the applied electric field.
3. J. J. Thomson discovered electrons. Henri Becquerel discovered radioactivity. Lord
Rutherford proposed the nuclear model of the atom. Dalton's original model proposed that atoms were indivisible particles (that is, atoms had no internal structure). Thomson and Becquerel discovered subatomic particles, and Rutherford's model attempted to describe the internal structure of the atom composed of these subatomic particles. In addition, the existence of isotopes, atoms of the same element but with different mass, had to be included in the model.
3
4. If the plum pudding model were correct (a diffuse positive charge with electrons scattered throughout), then alpha particles should have traveled through the thin foil with very minor deflections in their path. This was not the case as a few of the alpha particles were deflected at very large angles. Rutherford reasoned that the large deflections of these alpha particles could be caused only by a center of concentrated positive charge that contains most of the atom’s mass (the nuclear model of the atom).
5. The proton and neutron have similar mass with the mass of the neutron slightly larger than
that of the proton. Each of these particles has a mass approximately 1800 times greater than that of an electron. The combination of the protons and the neutrons in the nucleus makes up the bulk of the mass of an atom, but the electrons make the greatest contribution to the chemical properties of the atom.
6. The atomic number of an element is equal to the number of protons in the nucleus of an atom
of that element. The mass number is the sum of the number of protons plus neutrons in the nucleus. The atomic mass is the actual mass of a particular isotope (including electrons). As we will see in Chapter Three, the average mass of an atom is taken from a measurement made on a large number of atoms. The average atomic mass value is listed in the periodic table.
7. A family is a set of elements in the same vertical column. A family is also called a group. A
period is a set of elements in the same horizontal row. 8. AlCl3, aluminum chloride; CrCl3, chromium(III) chloride; ICl3, iodine trichloride; AlCl3 and
CrCl3 are ionic compounds, following the rules for naming ionic compounds. The major difference is that CrCl3 contains a transition metal (Cr), which generally can have two or more stable charges when in ionic compounds. We need to indicate which charged ion we have in the compound. This is generally true whenever the metal in the ionic compound is a transition metal. ICl3 is made from only nonmetals and is a covalent compound. Predicting formulas for covalent compounds is extremely difficult. Because of this, we need to indicate the number of each nonmetal in the binary covalent compound. The exception is when there is only one of the first species present in the formula; when this is the case, mono is not used (it is assumed).
9. When in ionic compounds, the metals in groups 1A, 2A, and aluminum form +1, +2, and +3
charged ions, respectively. The nonmetals in the groups 5A, 6A, and 7A form !3, !2, and !1 charged ions, respectively, when in ionic compounds. The correct formulas are A2S where A is an alkali metal, B3N2 where B is an alkaline earth metal, and AlC3 where C is a halogen.
10. The polyatomic ions and acids in this problem are not named in the text. However, they are
all related to other ions and acids named in the text which contain a same group element. Since HClO4 is perchloric acid, HBrO4 is perbromic acid. Since ClO3
− is the chlorate ion, KIO3 is potassium iodate. Since ClO2
− is the chlorite ion, NaBrO2 is sodium bromite. And finally, since HClO is hypochlorous acid, HIO is hypoiodous acid.
4
For Review – Chapter 3 1. Counting by weighing utilizes the average mass of a particular unit of substance. For marbles,
a large sample size will contain many different individual masses for the various marbles. However, the large sample size will have an average mass so that the marbles behave as if each individual marble has that average mass. This assumption is valid as long as the sample size is large. When a large sample of marbles is weighed, one divides the total mass of marbles by the average mass of a marble, and this will give a very good estimate of the number of marbles present. For atoms, because we can’t count individual atoms, we “count” the atoms by weighing; converting the sample mass in grams to the number of atoms in the sample by using the average molar mass given in the periodic table and Avogadro’s number. The mole scale of atoms is a huge number (6.022 × 10²³ atoms = 1 mole), so the assumption that a weighable sample size behaves as a bunch of atoms, each with an average mass, is valid and very useful.
2. The masses of all the isotopes are relative to a specific standard. The standard is one atom of
the carbon-12 isotope weighing exactly 0000.12 amu. One can determine from experiment how much heavier or lighter any specific isotope is than 12C. From this information, we assign an atomic mass value to that isotope. For example, experiment tells one that 16O is about 4/3 heavier than 12C, so a mass of 4/3(12.00) = 16.00 amu is assigned to 16O.
3. The two major isotopes of boron are 10B and 11B. The listed mass of 10.81 is the average
mass of a very large number of boron atoms. 4. There are several ways to do this. The three conversion factors to use are Avogadro’s
number, the molar mass, and the chemical formula. Two ways to use these conversions to convert grams of aspirin to number of H atoms are given below:
molar mass of aspirin = 9(12.01) + 8(1.008) + 4(16.00) = 180.15 g/mol
1.00 g C9H8O4 × Hmol
Hatoms10022.6OHCmol
Hmol8OHCg15.180
OHCmol1 23
489489
489 ×××
= 2.67 × 10²² H atoms or
1.00 g C9H8O4 × 489
48923
489
489
OHCmolOHCmolecules10022.6
OHCg15.180OHCmol1 ×
× ×
489 OHCmoleculeHatoms8
= 2.67 × 10²² H atoms
Of course the answer is the same no matter which order of the conversion factors is used. 5. CxHyOz + oxygen → x CO2 + y/2 H2O
From the equation above, the only reactant that contains carbon is the unknown compound and the only product that contains carbon is CO2. From the mass of CO2 produced, one can calculate the mass of C present which is also the mass of C in CxHyOz. Similarly, all the hydrogen in the unknown compound ends up as hydrogen in water. From the mass of H2O produced, one can calculate the mass of H in CxHyOz. Once the mass of C and H are known,

5
the remainder of the compound is oxygen. From the masses of C, H, and O in the compound, one can then go on to determine the empirical formula.
6. The molecular formula tells us the actual number of atoms of each element in a molecule (or
formula unit) of a compound. The empirical formula tells only the simplest whole number ratio of atoms of each element in a molecule. The molecular formula is a whole number multiple of the empirical formula. If that multiplier is one, the molecular and empirical formulas are the same. For example, both the molecular and empirical formulas of water are H2O.
7. The product of the reaction has two A atoms bonded to a B atom for a formula of A2B. The
initial reaction mixture contains 4 A2 and 8 AB molecules and the final reaction mixture contains 8 A2B molecules. The reaction is:
8 AB(g) + 4 A2(g) → 8 A2B(g) Using the smallest whole numbers, the balanced reaction is: 2 AB(g) + A2(g) → 2 A2B(g)
2.50 mol A2 × 2
2
AmolBAmol2
= 5.00 mol A2B
The atomic mass of each A atom is 40.0/2 = 20.0 amu and the atomic mass of each B atom is 30.0 ! 20.0 = 10.0 amu. The mass of A2B = 2(20.0) + 10.0 = 50.0 amu.
15.0 g AB × 2
22
AmolAg0.40
ABmol2Amol1
ABg0.30ABmol1
×× = 10.0 g A2
From the law of conservation of mass, the mass of product is: 10.0 g A2 + 15.0 g AB = 25.0 g A2B or by stoichiometric calculation:
15.0 g AB × BAmolBAg0.50
ABmolBAmol1
ABg0.30ABmol1
2
22 ×× = 25.0 g A2B
or
10.0 g A2 × BAmolBAg0.50
AmolBAmol2
Ag0.40Amol1
2
2
2
2
2
2 ×× = 25.0 g A2B
Generally, there are several ways to correctly do a stoichiometry problem. You should choose the method you like best.
8. A limiting reactant problem gives you initial masses of two (or more) of the reactants and then asks for the amount of product that can form. Because one doesn’t know which reactant runs out first and hence determines the mass of product formed, a limiting reactant problem is a more involved problem. The first step in solving the problem is to figure which reactant runs out first (is limiting).
6
The strategy outlined in the text is to calculate the mole ratio of reactants actually present and compare this mole ratio to that required from the balanced reaction. Whichever ratio is larger allows one to deduce the identity of the limiting reactant. After the limiting reactant is determined, that amount of the limiting reactant is used to calculate the amount of product that can form. Another strategy is to pick one of the reactants and then calculate the mass of the other reactant required to react with it. By comparing the calculated mass to the actual mass present in the problem, one can deduce the identity of the limiting reactant and go on to solve the problem. A third common strategy is to assume each reactant is limiting and then calculate for each reactant the amount of product that could form. This gives two or more possible answers. The correct answer is the mass of product that is smallest. Even though there is enough of the other reactant to form more product, once the smaller amount of product is formed, the limiting reactant has run out.
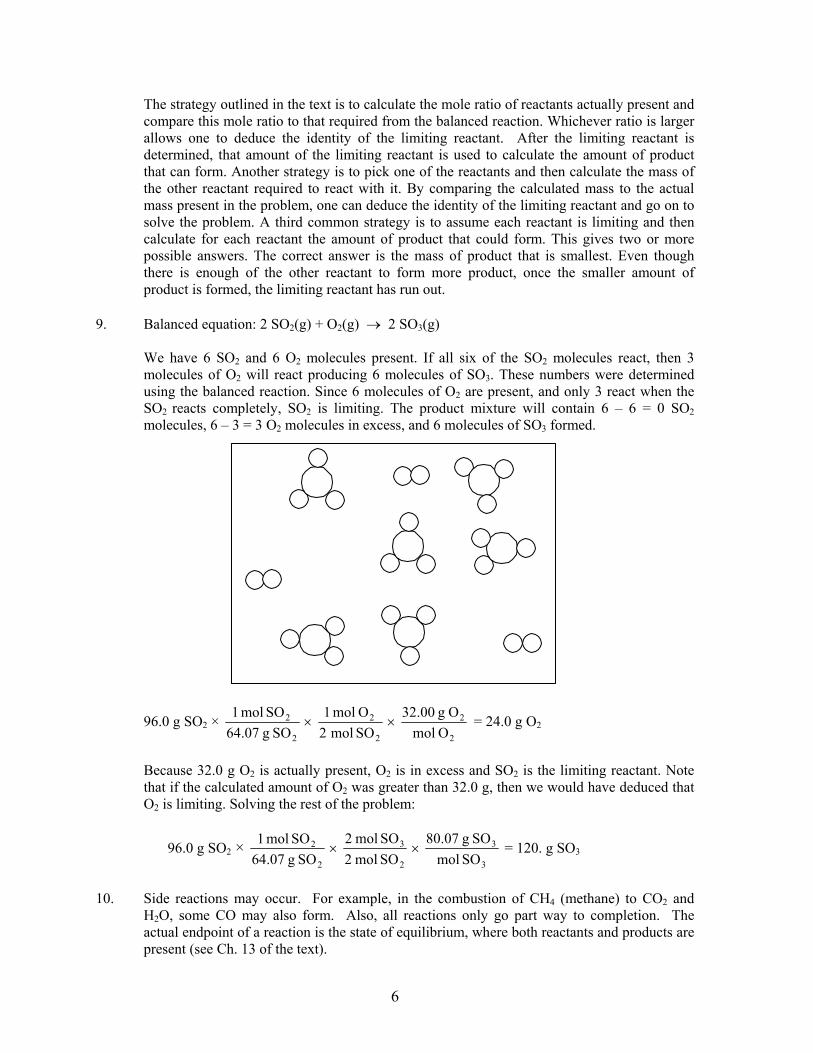
9. Balanced equation: 2 SO2(g) + O2(g) → 2 SO3(g) We have 6 SO2 and 6 O2 molecules present. If all six of the SO2 molecules react, then 3
molecules of O2 will react producing 6 molecules of SO3. These numbers were determined using the balanced reaction. Since 6 molecules of O2 are present, and only 3 react when the SO2 reacts completely, SO2 is limiting. The product mixture will contain 6 – 6 = 0 SO2 molecules, 6 – 3 = 3 O2 molecules in excess, and 6 molecules of SO3 formed.
96.0 g SO2 × 2
2
2
2
2
2
OmolOg00.32
SOmol2Omol1
SOg07.64SOmol1
×× = 24.0 g O2
Because 32.0 g O2 is actually present, O2 is in excess and SO2 is the limiting reactant. Note that if the calculated amount of O2 was greater than 32.0 g, then we would have deduced that O2 is limiting. Solving the rest of the problem:
96.0 g SO2 × 3
3
2
3
2
2
SOmolSOg07.80
SOmol2SOmol2
SOg07.64SOmol1
×× = 120. g SO3
10. Side reactions may occur. For example, in the combustion of CH4 (methane) to CO2 and
H2O, some CO may also form. Also, all reactions only go part way to completion. The actual endpoint of a reaction is the state of equilibrium, where both reactants and products are present (see Ch. 13 of the text).
7
For Review – Chapter 4 1. Soluble ionic compounds break apart into their separate ions when in solution. KBr(aq)
really means K+(aq) + Br−(aq). The hydration process for ions has the partial negative end of the polar water molecules surrounding and stabilizing the cations in solution. Here, many water molecules align themselves so the oxygen end of water aligns with the K+ ions. The negative ions are stabilized in water by having the partial positive end of the polar water molecules surround the anions in solution. Here, many water molecules align themselves so the hydrogen end of water aligns with the Br− ion. All this is assumed when (aq) is placed after an ionic compound.
C2H5OH is a covalent compound and does not break up into ions when dissolved in water.
C2H5OH is a polar covalent compound which means it has a partial negative end and a partial positive end. The hydration process for polar covalent solutes in water is again to have the opposite charged parts of the solute and solvent align themselves. Here, the hydrogens of many water molecules align with the partial negative end of each C2H5OH molecule, and the oxygens of many water molecules align with the partial positive end of each C2H5OH molecule. This is the hydration process for polar covalent compounds and is always assumed when (aq) is listed after a covalent compound. Note: at this point, you are not able to predict the partial negative and partial positive ends for polar covalent compounds.
2. The electrolyte designation refers to how well the dissolved solute breaks up into ions. Strong
electrolytes fully break up into ions when in water, weak electrolytes only partially break up into ions (less than 5% usually), and nonelectrolytes do not break up into ions when they dissolve in water. The conductivity apparatus illustrated in Figure 4.4 of the text is one way to experimentally determine the type of electrolyte. As illustrated, a bright light indicates many charge carriers (ions) are present and the solute is a strong electrolyte. A dim light indicates few ions are present so the solute is a weak electrolyte, and no light indicates no ions are present so the solute is a nonelectrolyte.
3. The electrolyte designation refers to what happens to a substance when it dissolves in water,
i.e., does it produce a lot of ions or a few ions or no ions when the substance dissolves. A weak electrolyte is a substance that only partially dissociates in water to produce only a few ions. Solubility refers to how much substance can dissolve in a solvent. "Slightly soluble" refers to substances that dissolve only to a small extent, whether it is an electrolyte or a nonelectrolyte. A weak electrolyte may be very soluble in water, or it may be slightly soluble. Acetic acid is an example of a weak electrolyte that is very soluble in water.
4. Consider a 0.25 M solution of NaCl. The two ways to write 0.25 M as conversion factors are:
L
NaClmol25.0 or NaClmol25.0
L1 Use the first conversion factor when converting from volume of NaCl solution (in liters) to
mol NaCl and use the second conversion factor when converting from mol NaCl to volume of NaCl solution.
5. Dilution refers to a method used to prepare solutions. In a dilution, one starts with a certain
amount of a more concentrated solution; water is then added to a specific new volume, forming a solution which has a smaller concentration (it is diluted). The quantity that is
8
constant in a dilution is the moles of solute between the concentrated solution and the dilute solution. The difference between the two solutions is that in the new solution, we have the same number of solute particles occupying a larger volume of water; the new solution is less concentrated. Molarity (mol/L) × volume (L) gives mol of solute. M1V1 = mol of solute in the concentrated solution. M2V2 = mol of solute in the diluted solution. Since the mol of solute are constant between the two solutions, M1V1 = M2V2 for dilution problems.
6. In the first set of beakers, Pb2+ reacts with Br− to form PbBr2(s) (from the solubility rules).
The Na+ and NO3− ions are spectator ions. There are 6 Na+, 6 Br−, 3 Pb2+ and 6 NO3
− ions present initially. Pb2+(aq) + 2 Br−(aq) → PbBr2(s). The 3 Pb2+ ions will react with 6 Br− ions to form 3 formula units of the PbBr2 precipitate. The ions remaining in solution will be 6 Na+ ions and 6 NO3
− ions floating about in solution, and there will be three formula units of PbBr2 settled on the bottom as the precipitate (all this would be in a correct drawing).
In the second set of beakers, Al3+ reacts with OH− to form Al(OH)3(s) (from the solubility
rules). There are 3 Al3+ ions, 9 Cl− ions, 6 OH− ions and 6 K+ ions present initially. Al3+(aq) + 3 OH−(aq) → Al(OH)3(s). The 6 OH− ions will react with two of the three Al3+ ions to form 2 formula units of the Al(OH)3 precipitate. One Al3+ ion is in excess. Also remaining in solution are the K+ and Cl− spectator ions. Therefore, your drawing should show 1 Al3+ ion, 9 Cl− ions, and 6 K+ ions in solution, with 2 Al(OH)3 formula units shown as the precipitate.
7. The formula equation keeps all of the ions together in nice, neutral formulas. This is not how
soluble ionic compounds are present in solution. Soluble ionic compounds (indicated with aq) exist as separate ions in solution; only the precipitate has the ions together. So in the complete ionic equation, the soluble ionic compounds are shown as separate ions and the precipitate is shown as staying together. In the net ionic equation, we get rid of the ions that did nothing but balance the charge. These ions are called spectator ions. In the net ionic equation, only the ions that come together to form the precipitate are shown. In the following balanced equations, the formula equation is written first, the complete ionic equation is second, and the net ionic equation is third.
2 NaBr(aq) + Pb(NO3)2(aq) → PbBr2(s) + 2 NaNO3(aq)
2 Na+(aq) + 2 Br−(aq) + Pb2+(aq) + 2 NO3−(aq) → PbBr2(s) + 2 Na+(aq) + 2 NO3
−(aq)
Pb2+(aq) + 2 Br−(aq) → PbBr2(s) AlCl3(aq) + 3 KOH(aq) → Al(OH)3(s) + 3 KCl(aq)
Al3+(aq) + 3 Cl−(aq) + 3 K+(aq) + 3 OH−(aq) → Al(OH)3(s) + 3 K+(aq) + 3 Cl−(aq)
Al3+(aq) + 3 OH−(aq) → Al(OH)3(s) 8. An acid-base reaction involves the transfer of a H+ ion from an acid to a base. The H+ ion is
just a proton; an electron is removed from neutral hydrogen to form H+. Acid-base reactions are commonly called proton transfer reactions. The acid is the proton donor and the base is the proton acceptor.
The strong bases are (by the solubility rules) LiOH, NaOH, KOH, RbOH, CsOH, Ca(OH)2,
Sr(OH)2 and Ba(OH)2. When OH− from these strong bases react with H+ (a proton), water is formed [H+(aq) + OH−(aq) → H2O(l)].
9
Titration: A technique in which one solution is used to analyze another. Stoichiometric point: When exactly enough of one solution has been added to react
completely with the other solution. Neutralization: A term used for acid-base reactions referring to the added OH− reacting with
(neutralizing) the protons from the acid. It can be reversed; the added protons neutralizing the OH− ions from the base. Either way, the neutralization reaction is H+(aq) + OH−(aq) → H2O(l).
Standardization: The experimental procedure of running a controlled acid-base reaction in
order to determine the concentration of a specific solution. 9. Oxidation: A loss of electrons.
Reduction: A gain of electrons.
Oxidizing agent: A reactant that accepts electrons from another reactant.
Reducing agent: A reactant that donates electrons to another reactant. The best way to identify a redox reaction is to assign oxidation states to all elements in the
reaction. If elements show a change in oxidation states when going from reactants to products, then the reaction is a redox reaction. No change in oxidation states indicates the reaction is not a redox reaction. Note that the element oxidized shows an increase in oxidation state and the element reduced shows a decrease in oxidation state.
10. You first assign oxidation states to all atoms in the equation. The species reduced is the atom
whose oxidation state decreases. The oxidation state for the atom reduced decreases because it is gaining electrons (gaining negative charges). The species oxidized is the atom whose oxidation state increases; this is due to the loss of negative charges (loss of electrons).
To balance the electrons lost to the electrons gained, you examine the magnitude of the
changes in oxidation states of the species reduced and the species oxidized. A common factor of electron transfer is then determined from the changes in oxidation states. Coefficients are then placed in front of the substances containing the species reduced and species oxidized in order to balance the total electrons lost with the total electrons gained.
Once electron transfer is balanced, then the reaction needs to be mass balanced. That is, we
lastly determine the coefficients of other substances present in the reaction to make sure there are the same number and type of atoms on both sides of the equation.
For Review – Chapter 5
1. See Figure 5.2 of the text for an illustration of a barometer. A barometer initially starts with a full column of mercury which is tipped upside down and placed in a dish of mercury. The mercury in the column drops some, then levels off. The height of the column of mercury is a measure of the atmospheric pressure. Here, there are two opposite processes occurring. The weight of the mercury in the column is producing a force downward; this results in mercury wanting to flow out of the column. However, there is an opposing force keeping mercury in
10
the column. The opposing force is that of the atmospheric gas particles colliding with the surface of the mercury in the dish; this results in mercury being pushed up into the column. When the two opposing processes are equal in strength to each other, the level of mercury in the column stays constant. The height of mercury in the column supported by the atmosphere is then a measure of pressure of the atmosphere.
See Figure 5.3 for an illustration of a simple manometer. A manometer also has two opposing
forces going against each other. There is the force exerted by the gas molecules in the flask. The opposing force is on the other side of the mercury filled U tube; it is the force exerted by atmospheric gases. The difference in height of the mercury in the U tube is a measure of the difference in pressure between the gas in the flask and the atmosphere. By measuring the height difference of mercury, one can determine how much greater than or less than the gas pressure in the flask is to the atmospheric pressure.
2. Boyle’s law: P is inversely proportional to V at constant n and T. Mathematically, PV = k =
constant. The plot to make to show a linear relationship is V vs. 1/P. The resulting linear plot has positive slope equal to the value of k, and the y-intercept is the origin.
Charles’s law: V is directly proportional to T at constant P and n. Mathematically: V = bT
where b = constant. The plot to make to show a linear relationship is V vs. T. The slope of the line is equal to b, and the y-intercept is the origin if the temperature is in Kelvin.
Avogadro’s law: V is directly proportional to n at constant P and T. Mathematically: V = an
where a = constant. A plot of V vs. n gives a line with a positive slope equal to the a constant value, and the y-intercept is the origin.
3. Boyles’ law: T and n are constant. PV = nRT = constant, PV = constant
Charles’s law: P and n are constant. PV = nRT, V = ⎟⎠⎞
⎜⎝⎛
PnR T = (constant) T
Avogadro’s law: V and T are constant. PV = nRT, V = ⎟⎠⎞
⎜⎝⎛
PRT n = (constant) n
P and n relationship at constant V and T: PV = nRT, P = ⎟⎠⎞
⎜⎝⎛
VRT n = (constant) n
P is directly proportional to n at constant V and T.
P and T relationship at constant V and n. PV = nRT, P = ⎟⎠⎞
⎜⎝⎛
VnR T = (constant) T
P is directly proportional to T at constant V and n. 4. a. Heating the can will increase the pressure of the gas inside the can, P % T when V and n
are constant. As the pressure increases, it may be enough to rupture the can.
b. As you draw a vacuum in your mouth, atmospheric pressure pushing on the surface of the liquid forces the liquid up the straw.
c. The external atmospheric pressure pushes on the can. Since there is no opposing pressure
from the air inside the can, the can collapses.
11
d. How "hard" the tennis ball is depends on the difference between the pressure of the air inside the tennis ball and atmospheric pressure. A "sea level" ball will be much "harder" at high altitude since the external pressure is lower at high altitude. A “high altitude” ball will be "soft" at sea level.
5. Rigid container (constant volume): As reactants are converted to products, the moles of gas
particles present decrease by one-half. As n decreases, the pressure will decrease (by one-half). Density is the mass per unit volume. Mass is conserved in a chemical reaction, so the density of the gas will not change since mass and volume do not change.
Flexible container (constant pressure): Pressure is constant since the container changes volume in order to keep a constant pressure. As the moles of gas particles decrease by a factor of 2, the volume of the container will decrease (by one-half). We have the same mass of gas in a smaller volume, so the gas density will increase (is doubled).
6. Boyle's law: P % 1/V at constant n and T
In the kinetic molecular theory (KMT), P is proportional to the collision frequency which is proportional to 1/V. As the volume increases there will be fewer collisions per unit area with the walls of the container and pressure will decrease (Boyle's law).
Charles's law: V % T at constant n and P
When a gas is heated to a higher temperature, the average velocity of the gas molecules increases and thus the gas molecules hit the walls of the container more often and with more force. In order to keep the pressure constant, the volume of the container must increase (this increases surface area which decreases the number of collisions per unit area which decreases the pressure). Therefore, volume and temperature are directly related at constant n and P (Charles’s law).
Avogadro’s law: V % n at constant P and T As gas is added to a container (n increases), there will be an immediate increase in the
number of gas particle collisions with the walls of the container. This results in an increase in pressure in the container. However, the container is such that it wants to keep the pressure constant. In order to keep pressure constant, the volume of the container increases in order to reduce the collision frequency which reduces the pressure. V is directly related to n at constant P and T.
Dalton’s law of partial pressure: Ptot = P1 + P2 + P3 + … The KMT assumes that gas particles are volumeless and that they exert no interparticle forces
on each other. Gas molecules all behave the same way. Therefore, a mixture of gases behaves as one big gas sample. You can concentrate on the partial pressures of the individual components of the mixture or you can collectively group all of the gases together to determine the total pressure. One mole of an ideal gas behaves the same whether it is a pure gas or a mixture of gases.
P vs. n relationship at constant V and T. From question 3, this is a direct relationship. As gas
is added to a rigid container, there will be an increase in the collision frequency, resulting in an increase in pressure. P and n are directly related at constant V and T.

12
P vs. T relationship at constant V and n. From question 3, this is a direct relationship. As the
temperature of the gas sample increases, the gas molecules move with a faster average velocity. This increases the gas collision frequency as well as increases the force of each gas particle collision. Both of these result in an increase in pressure. Pressure and temperature are directly related at constant V and n.
7. a. At constant temperature, the average kinetic energy of the He gas sample will equal the
average kinetic energy of the Cl2 gas sample. In order for the average kinetic energies to be the same, the smaller He atoms must move at a faster average velocity as compared to Cl2. Therefore, plot A, with the slower average velocity, would be for the Cl2 sample, and plot B would be for the He sample. Note the average velocity in each plot is a little past the top of the peak.
b. As temperature increases, the average velocity of a gas will increase. Plot A would be for
O2(g) at 273 K and plot B, with the faster average velocity, would be for O2(g) at 1273 K.
Because a gas behaves more ideally at higher temperatures, O2(g) at 1273 K would behave most ideally.
8. Method 1: molar mass = P
dRT
Determine the density of a gas at a measurable temperature and pressure, then use the above equation to determine the molar mass.
Method 2: 1
2
)massmolar()massmolar(
2gasforrateeffusion1gasforrateeffusion =
Determine the effusion rate of the unknown gas relative to some known gas; then use Graham’s law of effusion (the above equation) to determine the molar mass of the unknown gas.
9. The pressure measured for real gases is too low as compared to ideal gases. This is due to the attractions gas particles have for each other; these attractions “hold” them back from hitting the container walls as forcefully. To make up for this slight decrease in pressure for real gases, a factor is added to the measured pressure. The measured volume is too large. A fraction of the space of the container volume is taken up by the volume of gas of the molecules themselves. Therefore, the actual volume available to real gas molecules is slightly less than the container volume. A term is subtracted from the container volume to correct for the volume taken up by real gas molecules.
10. The kinetic molecular theory assumes that gas particles do not exert forces on each other and
that gas particles are volumeless. Real gas particles do exert attractive forces for each other, and real gas particles do have volumes. A gas behaves most ideally at low pressures and high temperatures. The effect of attractive forces is minimized at high temperatures since the gas particles are, in general, moving very rapidly and so are less easily attracted to each other. At low pressure, the container volume is relatively large (P and V are inversely related), so the volume of the container taken up by the gas particles is negligible.
13
For Review – Chapter 6 1. Potential energy: Energy due to position or composition.
Kinetic energy: Energy due to motion of an object.
Path-dependent function: A property that depends on how the system gets from the initial state to the final state; a property that is path-dependent. State function: A property that is independent of the pathway.
System: That part of the universe on which attention is to be focused.
Surroundings: Everything in the universe surrounding a thermodynamic system. 2. Plot a represents an exothermic reaction. In an exothermic process, the bonds in the product
molecules are stronger (on average) than those in the reactant molecules. The net result is that the quantity of energy ∆(PE) is transferred to the surroundings as heat when reactants are converted to products.
For an endothermic process, energy flows into the system from the surroundings as heat to increase the potential energy of the system. In an endothermic process, the products have higher potential energy (weaker bonds on average) than the reactants.
3. First law of thermodynamics: The energy of universe is constant. A system can change its
internal energy by flow of work, heat, or both (∆E = q + w). Whenever a property is added to the system from the surroundings, the sign is positive; whenever a property is added to the surroundings by the system, the sign is negative.
4. As a gas expands, the system does work on the surroundings so w is negative. When a gas
contracts, the surroundings do work on the system so w is positive. H2O(l) → H2O(g); To boil water, heat must be added so q is positive. The molar volume of a gas is huge compared to the molar volume of a liquid. As a liquid converts to a gas, the system will expand its volume, performing work on the surroundings; w is negative.
5. qP = ∆H; qV = ∆E; a coffee-cup calorimeter is at constant (atmospheric) pressure. The heat
released or gained at constant pressure is ∆H. A bomb calorimeter is at constant volume. The heat released or gained at constant volume is ∆E.
6. The specific heat capacities are 0.89 J/°CCg (Al) and 0.45 J/°CCg (Fe). Al would be the better
choice. It has a higher heat capacity and a lower density than Fe. Using Al, the same amount of heat could be dissipated by a smaller mass, keeping the mass of the amplifier down.
7. In calorimetry, heat flow is determined into or out of the surroundings. Because ∆Euniv = 0 by
the first law of thermodynamics, ∆Esys = !∆Esurr; what happens to the surroundings is the exact opposite of what happens to the system. To determine heat flow, we need to know the heat capacity of the surroundings, the mass of the surroundings that accepts/donates the heat, and the change in temperature. If we know these quantities, qsurr can be calculated and then equated to qsys (!qsurr = qsys). For an endothermic reaction, the surroundings (the calorimeter contents) donates heat to the system. This is accompanied by a decrease in temperature of the surroundings. For an exothermic reaction, the system donates heat to the surroundings (the calorimeter) so temperature increases.
14
8. Hess’s law: In going from a particular set of reactants to a particular set of products, the change in enthalpy is the same whether the reaction takes place in one step or in a series of steps (∆H is path independent). When a reaction is reversed, the sign of ∆H is also reversed but the magnitude is the same. If the coefficients in a balanced reaction are multiplied by a number, the value of ∆H is multiplied by the same number while the sign is unaffected.
9. Standard enthalpy of formation: The change in enthalpy that accompanies the formation of
one mole of a compound from its elements with all substances in their standard states. The standard state for a compound has the following conventions:
a. gaseous substances are at a pressure of exactly 1 atm.
b. for a pure substance in a condensed state (liquid or solid), the standard state is the pure liquid or solid.
c. for a substance present in solution, the standard state is a concentration of exactly 1 M. The standard state of an element is the form in which the element exists under conditions of 1 atm and 25EC. o
fH∆ values for elements in their standard state are, by definition, equal to zero. Step 1: reactants → elements in standard states )reactants(H∆nH∆ o
fr1 ∑−= Step 2: elements in standard state → products )products(H∆nH∆ o
fp2 ∑= _________________________________________________________________________________________________
reactants → products 21oreaction H∆H∆H∆ +=
oreactionH∆ )reactants(H∆n)products(H∆n o
frofp ∑−∑=
10. Three problems are there is only a finite amount of fossil fuels, fossil fuels can be expensive,
and the combustion and exploration of fossil fuels can add pollution to the biosphere whose effects may not be reversible. Some alternative fuels are syngas from coal, hydrogen from the breakdown of water, and ethanol from the fermentation of sugar.
For Review – Chapter 7 1. Wavelength: The distance between two consecutive peaks or troughs in a wave. Frequency: The number of waves (cycles) per second that pass a given point in space.
Photon energy: The discrete units by which all electromagnetic radiation transmits energy; EMR can be viewed as a stream of “particles” called photons. Each photon has a unique quantum of energy associated with it; the photon energy is determined by the frequency (or wavelength) of the specific EMR.
Speed of travel: All electromagnetic radiation travels at the same speed, c, the speed of light; c = 2.9979 × 10⁸ m/s.
15
λν = c, E = hν = hc/λ: From these equations, wavelength and frequency are inversely related, photon energy and frequency are directly related, and photon energy and wavelength are inversely related. Thus, the EMR with the longest wavelength has the lowest frequency and least energetic photons. The EMR with the shortest wavelength has the highest frequency and most energetic photons. Using Figure 7.2 of the text to determine the wavelengths, the order is:
wavelength: gamma rays < ultraviolet < visible < microwaves
frequency: microwaves < visible < ultraviolet < gamma rays
photon energy: microwaves < visible < ultraviolet < gamma rays
speed: all travel at the same speed, c, the speed of light 2. The Bohr model assumes that the electron in hydrogen can orbit the nucleus at specific
distances from the nucleus. Each orbit has a specific energy associated with it. Therefore, the electron in hydrogen can only have specific energies; not all energies are allowed. The term quantized refers to the allowed energy levels for the electron in hydrogen.
The great success of the Bohr model is that it could explain the hydrogen emission spectrum. The electron in H, moves about the allowed energy levels by absorbing or emitting certain photons of energy. The photon energies absorbed or emitted must be exactly equal to the energy difference between any two allowed energy levels. Because not all energies are allowed in hydrogen (energy is quantized), not all energies of EMR are absorbed/emitted.
The Bohr model predicted the exact wavelengths of light that would be emitted for a hydro-gen atom. Although the Bohr model has great success for hydrogen and other 1 electron ions, it does not explain emission spectra for elements/ions having more than one electron. The fundamental flaw is that we cannot know the exact motion of an electron as it moves about the nucleus; therefore, well defined circular orbits are not appropriate.
3. Planck’s discovery that heated bodies give off only certain frequencies of light and Einstein’s
study of the photoelectric effect support the quantum theory of light. The wave-particle duality is summed up by saying all matter exhibits both particulate and wave properties. Electromagnetic radiation, which was thought to be a pure waveform, transmits energy as if it has particulate properties. Conversely, electrons, which were thought to be particles, have a wavelength associated with them. This is true for all matter. Some evidence supporting wave properties of matter are:
1. electrons can be diffracted like light.
2. the electron microscope uses electrons in a fashion similar to the way in which light is used in a light microscope.
However, wave properties of matter are only important for small particles with a tiny mass, e.g., electrons. The wave properties of larger particles are not significant.
4. Four scientists whose work was extremely important to the development of the quantum
mechanical model were Niels Bohr, Louis deBroglie, Werner Heisenberg, and Erwin Schrödinger. The Bohr model of the atom presented the idea of quantized energy levels for
16
electrons in atoms. DeBroglie came up with the relationship between mass and wavelength, supporting the idea that all matter (especially tiny particles like electrons) exhibits wave properties as well as the classic properties of matter. Heisenberg is best known for his uncertainty principle which states there is a fundamental limitation to just how precisely we can know both the position and the momentum of a particle at a given time. If we know one quantity accurately, we cannot absolutely determine the other. The uncertainty principle, when applied to electrons, forbids well-defined circular orbits for the electron in hydrogen, as presented in the Bohr model. When we talk about the location of an electron, we can only talk about the probability of where the electron is located. Schrödinger put the ideas presented by the scientists of the day into a mathematical equation. He assumed wave motion for the electron. The solutions to this complicated mathematical equation give allowed energy levels for the electrons. These solutions are called wave functions, ψ, and the allowed energy levels are often referred to as orbitals. In addition, the square of the wave function (ψ2) indicates the probability of finding an electron near a particular point in space. When we talk about the shape of an orbital, we are talking about a surface that encompasses where the electron is located 90% of the time. The key is we can only talk about probabilities when referencing electron location.
5. Quantum numbers give the allowed solutions to Schrödinger equation. Each solution is an
allowed energy level called a wave function or an orbital. Each wave function solution is described by three quantum numbers, n, R, and mR. The physical significance of the quantum numbers are:
n: gives the energy (it completely specifies the energy only for the H atom or ions with
one electron) and the relative size of the orbitals. ℓ: gives the type (shape) of orbital. mℓ: gives information about the direction in which the orbital is pointing.
The specific rules for assigning values to the quantum numbers n, ℓ, and mℓ are covered in Section 7.6 of the text. In Section 7.8, the spin quantum number ms is discussed. Since we cannot locate electrons, we cannot see if they are spinning. The spin is a convenient model. It refers to the ability of the two electrons that can occupy any specific orbital to produce two different oriented magnetic moments.
6. The 2p orbitals differ from each other in the direction in which they point in space. The 2p
and 3p orbitals differ from each other in their size, energy and number of nodes. A nodal sur-face in an atomic orbital is a surface in which the probability of finding an electron is zero.
The 1p, 1d, 2d, 1f, 2f, and 3f orbitals are not allowed solutions to the Schrödinger equation.
For n = 1, R ≠ 1, 2, 3, etc., so 1p, 1d, and 1f orbitals are forbidden. For n = 2, R ≠ 2, 3, 4, etc., so 2d and 2f orbitals are forbidden. For n = 3, R ≠ 3, 4, 5, etc., so 3f orbitals are forbidden.
The penetrating term refers to the fact that there is a higher probability of finding a 4s
electron closer to the nucleus than a 3d electron. This leads to a lower energy for the 4s orbital relative to the 3d orbitals in polyelectronic atoms and ions.
7. The four blocks are the s, p, d, and f blocks. The s block contains the alkali and alkaline earth
metals (Groups 1A and 2A). The p block contains the elements in Groups 3A, 4A, 5A, 6A,
17
7A, and 8A. The d block contains the transition metals. The f block contains the inner transition metals. The energy ordering is obtained by sequentially following the atomic numbers of the elements through the periodic table while keeping track of the various blocks you are transversing. The periodic table method for determining energy ordering is illustrated in Figure 7.28 of the text.
The Aufbau principle states that as protons are added one by one to the nucleus to build up
the elements, electrons are similarly added to hydrogenlike orbitals. The main assumptions are that all atoms have the same types of orbitals and that the most stable electron configuration, the ground state, has the electrons occupying the lowest energy levels first. Hund’s rule refers to adding electrons to degenerate (same energy) orbitals. The rule states that the lowest energy configuration for an atom is the one having the maximum number of unpaired electrons allowed by the Pauli exclusion principle. The Pauli exclusion principle states that in a given atom, no two electrons can have the same four quantum numbers. This corresponds to having only two electrons in any one orbital, and they must have opposite “spins” if the electrons are in the same orbital.
The two major exceptions to the predicted electron configurations for elements 1-36 are Cr
and Cu. The expected electron configurations for each are: Cr: [Ar]4s23d4 and Cu: [Ar]4s23d9
The actual electron configurations are:
Cr: [Ar]4s13d5 and Cu: [Ar]4s13d10 8. Valence electrons are the electrons in the outermost principle quantum level of an atom
(those electrons in the highest n value orbitals). The electrons in the lower n value orbitals are all inner core or just core electrons. The key is that the outer most electrons are the valence electrons. When atoms interact with each other, it will be the outermost electrons that are involved in these interactions. In addition, how tightly the nucleus holds these outermost electrons determines atomic size, ionization energy and other properties of atoms. Elements in the same group have similar valence electron configurations and, as a result, have similar chemical properties.
9. Ionization energy: P(g) → P+(g) + e−; electron affinity: P(g) + e− → P−(g) Across a period, the positive charge from the nucleus increases as protons are added. The
number of electrons also increase, but these outer electrons do not completely shield the increasing nuclear charge from each other. The general result is that the outer electrons are more strongly bound as one goes across a period which results in larger ionization energies (and smaller size).
Aluminum is out of order because the electrons in the filled 3s orbital shield some of the nuclear charge from the 3p electron. Hence, the 3p electron is less tightly bound than a 3s electron, resulting in a lower ionization energy for aluminum as compared to magnesium. The ionization energy of sulfur is lower than phosphorus because of the extra electron-electron repulsions in the doubly occupied sulfur 3p orbital. These added repulsions, which are not present in phosphorus, make it slightly easier to remove an electron from sulfur as compared to phosphorus.
18
As successive electrons are removed, the net positive charge on the resultant ion increases. This increase in positive charge binds the remaining electrons more firmly, and the ionization energy increases.
The electron configuration for Si is 1s22s22p63s23p2. There is a large jump in ionization energy when going from the removal of valence electrons to the removal of core electrons. For silicon, this occurs when the fifth electron is removed since we go from the valence electrons in n = 3 to the core electrons in n = 2. There should be another big jump when the thirteenth electron is removed, i.e., when a 1s electron is removed.
10. Both trends are a function of how tightly the outermost electrons are held by the positive
charge in the nucleus. An atom where the outermost electrons are held tightly will have a small radius and a large ionization energy. Conversely, an atom where the outermost electrons are held weakly will have a large radius and a small ionization energy. The trends of radius and ionization energy should be opposite of each other.
Electron affinity is the energy change associated with the addition of an electron to a gaseous
atom. Ionization energy is the energy it takes to remove an electron from a gaseous atom. Because electrons are always attracted to the positive charge of the nucleus, energy will always have to be added to break the attraction and remove the electron from a neutral charged atom. Ionization energies are always endothermic for neutral charged atoms. Adding an electron is more complicated. The added electron will be attracted to the nucleus; this attraction results in energy being released. However, the added electron will encounter the other electrons which results in electron-electron repulsions; energy must be added to overcome these repulsions. Which of the two opposing factors dominates determines whether the overall electron affinity for an element is exothermic or endothermic.
For Review – Chapter 8 1. Electronegativity is the ability of an atom in a molecule to attract electrons to itself.
Electronegativity is a bonding term. Electron affinity is the energy change when an electron is added to a substance. Electron affinity deals with isolated atoms in the gas phase.
A covalent bond is a sharing of electron pair(s) in a bond between two atoms. An ionic bond is a complete transfer of electrons from one atom to another to form ions. The electrostatic attraction of the oppositely charged ions is the ionic bond.
A pure covalent bond is an equal sharing of shared electron pair(s) in a bond. A polar
covalent bond is an unequal sharing. Ionic bonds form when there is a large difference in electronegativity between the two atoms
bonding together. This usually occurs when a metal with a small electronegativity is bonded to a nonmetal having a large electronegativity. A pure covalent bond forms between atoms having identical or nearly identical eletronegativities. A polar covalent bond forms when there is an intermediate electronegativity difference. In general, nonmetals bond together by forming covalent bonds, either pure covalent or polar covalent.
Ionic bonds form due to the strong electrostatic attraction between two oppositely charged
ions. Covalent bonds form because the shared electrons in the bond are attracted to two
19
different nuclei, unlike the isolated atoms where electrons are only attracted to one nuclei. The attraction to another nuclei overrides the added electron-electron repulsions.
2. Anions are larger than the neutral atom and cations are smaller than the neutral atom. For
anions, the added electrons increase the electron-electron repulsions. To counteract this, the size of the electron cloud increases, placing the electrons further apart from one another. For cations, as electrons are removed, there are fewer electron-electron repulsions and the electron cloud can be pulled closer to the nucleus.
Isoelectronic: Same number of electrons. Two variables, the number of protons and the
number of electrons, determine the size of an ion. Keeping the number of electrons constant, we only have to consider the number of protons to predict trends in size. The ion with the most protons attracts the same number of electrons most strongly resulting in a smaller size.
3. Lattice energy: The change in energy that takes place when separated gaseous ions are
packed together to form an ionic solid. The reason ionic compounds form is the extremely favorable lattice energy value (large and negative). Looking at Figure 8.11, there are many processes that occur when forming an ionic compound from the elements in their standard state. Most of these processes (if not all) are unfavorable (endothermic). However, the large, exothermic lattice energy value dominates and the ionic compound forms.
The lattice energy follows Coulomb’s law (E % Q1Q2/r). Because MgO has ions with +2 and
!2 charges, it will have a more favorable lattice energy than NaF where the charge on the ions are !1 and +1. The reason MgO has +2 and !2 charged ions and not +1 and !1 charged ions is that lattice energy is more favorable as the charges increase. However, there is a limit to the magnitude of the charges. To form Mg3+O3−, the ionization energy would be extremely unfavorable for Mg2+ since an inner core (n = 2) electron is being removed. The same is true for the electron affinity of O2−; it would be very unfavorable as the added electron goes into the n = 3 level. The lattice energy would certainly be more favorable for Mg3+O3−, but the unfavorable ionization energy and electron affinity would dominate making Mg3+O3− energetically unfavorable overall. In general, ionic compounds want large charges, but only up to the point where valence electrons are removed or added. When we go beyond the valence shell, the energies become very unfavorable.
4. When reactants are converted into products, reactant bonds are broken and product bonds are
formed. Thus, ∆H for a reaction should be the energy it takes to break the reactant bonds minus the energy released when bonds are formed. Bond energies give good estimates for gas phase reactions, but give poor estimates when solids or liquids are present. This is because bond energy calculations ignore the attractive forces holding solids and liquids together. Gases have the molecules very far apart and they have minimal (assumed zero) attractive forces. This is not true for solids and liquids where the molecules are very close together. Attractive forces in substances are discussed in Chapter 10.
For an exothermic reaction, stronger bonds are formed in the products as compared to the
strength of the bonds broken in the reactants so energy is released. For endothermic reactions, the product bonds are weaker overall and energy must be absorbed.
As the number of bonds increase, bond strength increases and bond length decreases.
20
5. Nonmetals, which form covalent bonds, have valence electrons in the s and p orbitals. Since there are 4 total s and p orbitals, there is room for only 8 valence electrons (the octet rule). The valence shell for hydrogen is just the 1s orbital. This orbital can hold 2 electrons, so hydrogen follows the duet rule.
Drawing Lewis structures is mostly trial and error. The first step is to sum the valence
electrons available. Next, attach the bonded atoms with a single bond. This is called the skeletal structure. In general, the atom listed first in a compound is called the central atom; all other atoms listed after the first atom are attached (bonded) to this central atom. If the skeletal structure is something different, we will generally give you hints to determine how the atoms are attached. The final step in drawing Lewis structures is to arrange the remaining electrons around the various atoms to satisfy the octet rule for all atoms (duet role for H).
Be and B are the usual examples for molecules that have fewer than 8 electrons. BeH2 and
BH3 only have 4 and 6 total valence electrons, respectively; it is impossible to satisfy the octet rule for BeH2 and BH3 because fewer than 8 electrons are present.
All row three and heavier nonmetals can have more than 8 electrons around them, but only if
they have to. Always satisfy the octet rule when you can; exceptions to the octet rule occur when there are no other options. Of the molecules listed in Review Question 10, KrF2, IF3, SF4, XeF4, PF5, IF5, and SCl6 are all examples of central atoms having more than 8 electrons. In all cases, exceptions occur because they have to.
The octet rule cannot be satisfied when there is an odd number of valence electrons. There
must be an unpaired electron somewhere in the molecule and molecules do not like unpaired electrons. In general, odd electron molecules are very reactive; they react to obtain an even number of valence electrons. NO2 is a good example. NO2 has 17 valence electrons; when two NO2 molecules react, N2O4, which has 34 valence electrons forms. The octet rule can be satisfied for N2O4.
6. Resonance occurs when more than one valid Lewis structure can be drawn for a particular
molecule. A common characteristic of resonance structures is a multiple bond(s) that can be drawn in different positions. We say the electrons in the multiple bond(s) are delocalized in the molecule. This helps us rationalize why the bonds in a molecule that exhibit resonance are all equivalent in length and strength. Any one of the resonance structures indicates different types of bonds within that molecule. This is not correct, hence none of the individual resonance structures are correct. We think of the actual structure as an average of all the resonance structures; again this helps explain the equivalent bonds within the molecule that experiment tells us we have.
7. Formal charge: A made up charge assigned to an atom in a molecule or polyatomic ion
derived from a specific set of rules. The equation to calculate formal charge is: FC = (number of valence electrons of the free atom) –
(number of valence electrons assigned to the atom in the molecule)
The assigned electrons are all of the lone pair electrons plus one-half of the bonding elec-trons.
Formal charge can be utilized when more than one nonequivalent resonance structure can be drawn for a molecule. The best structure, from a formal charge standpoint, is the structure

21
that has the atoms in the molecule with a formal charge of zero. For organic compounds, carbon has 4 valence electrons and needs 4 more electrons to satisfy the octet rule. Carbon does this by forming 4 bonds to other atoms and by having no lone pairs of electrons. Any carbon with 4 bonds and no lone pairs has a formal charge of zero. Hydrogen needs just 1 more electron to obtain the He noble gas electron configuration. Hydrogen is always attached with a single bond to one other atom. N has 5 valence electrons. For a formal charge of zero, N will form 3 bonds to other atom(s) for 6 shared electrons, and the remaining 2 electrons are a lone pair on N. Oxygen will have a formal charge of zero when it is attached to other atom(s) with 2 bonds and has 2 lone pairs. The halogens obtain a formal charge of zero by forming 1 bond to another atom as well as having 3 lone pairs.
8. VSEPR = Valence Shell Electron-Pair Repulsion model. The main postulate is that the
structure around a given atom is determined principally by minimizing electron-pair repulsion. Electrons don’t like each other, so a molecule adopts a geometry to place the electron pairs about a central atom as far apart as possible. The five base geometries and bond angles are:
Number of bonded atoms plus
lone pairs about a central atom Geometry Bond Angle(s) 2 linear 180E 3 trigonal planar 120E 4 tetrahedral 109.5E 5 trigonal bipyramid 90E, 120E 6 octahedral 90E To discuss deviations from the predicted VSEPR bond angles, let us examine CH4, NH3, and
H2O. CH4 has the true 109.5E bond angles, but NH3 (107.3E) and H2O (104.5E) do not. CH4 does not have any lone pairs of electrons about the central atom, while H2O and NH3 do. These lone pair electrons require more room than bonding electrons, which tends to compress the angles between the bonding pairs. The bond angle for H2O is the smallest because oxygen has two lone pairs on the central atom; the bond angle is compressed more than in NH3 where N has only one lone pair. So, in general, lone pairs compress the bond angles to a value slightly smaller than predicted by VSEPR.
9. The two general requirements for a polar molecule are: 1. polar bonds 2. a structure such that the bond dipoles of the polar bonds do not cancel. CF4, 4 + 4(7) = 32 valence electrons XeF4, 8 + 4(7) = 36 e− tetrahedral, 109.5E square planar, 90E
C
F
F FF
FXe
F F
F
22
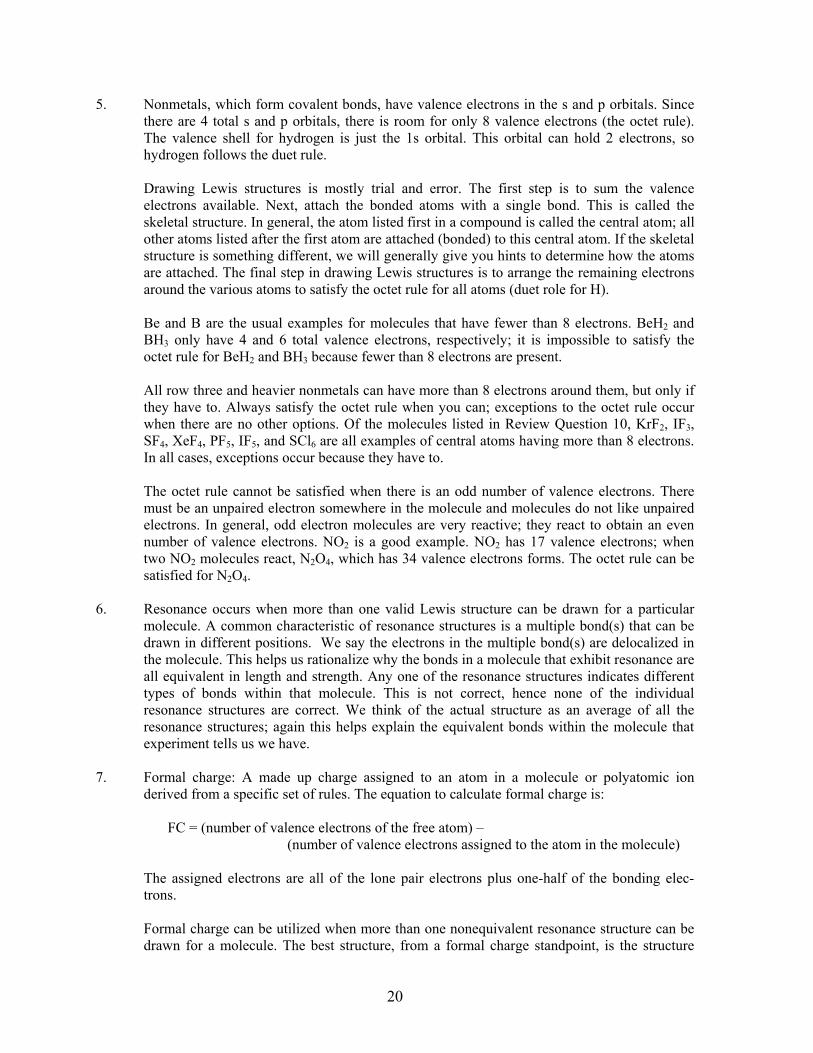
SF4, 6 + 4(7) = 34 e−
≈90E ≈120E ≈90E see-saw, ≈90E, ≈120E The arrows indicate the individual bond dipoles in the three molecules (the arrows point to
the more electronegative atom in the bond which will be the partial negative end of the bond dipole). All three of these molecules have polar bonds. To determine the polarity of the overall molecule, we sum the effect of all of the individual bond dipoles. In CF4, the fluorines are symmetrically arranged about the central carbon atom. The net result is for all of the individual C−F bond dipoles to cancel each other out giving a nonpolar molecule. In XeF4, the 4 Xe−F bond dipoles are also symmetrically arranged and XeF4 is also nonpolar. The individual bond dipoles cancel out when summed together. In SF4, we also have 4 polar bonds. But in SF4, the bond dipoles are not symmetrically arranged and they do not cancel each other out. SF4 is polar. It is the positioning of the lone pair that disrupts the symmetry in SF4.
CO2, 4 + 2(6) = 16 e− COS, 4 + 6 + 6 = 16 e− CO2 is nonpolar because the individual bond dipoles cancel each other out, but COS is polar.
By replacing an O with a less electronegative S atom, the molecule is not symmetric any more. The individual bond dipoles do not cancel since the C−S bond dipole is smaller than the C−O bond dipole resulting in a polar molecule.
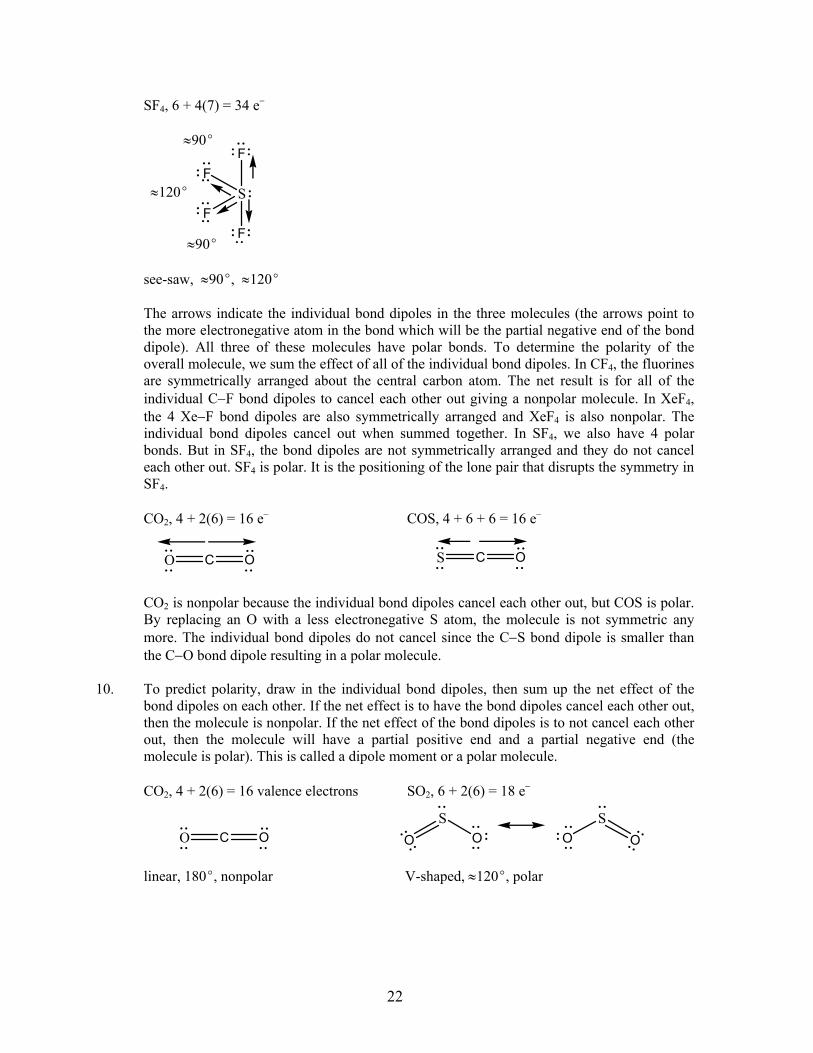
10. To predict polarity, draw in the individual bond dipoles, then sum up the net effect of the
bond dipoles on each other. If the net effect is to have the bond dipoles cancel each other out, then the molecule is nonpolar. If the net effect of the bond dipoles is to not cancel each other out, then the molecule will have a partial positive end and a partial negative end (the molecule is polar). This is called a dipole moment or a polar molecule.
CO2, 4 + 2(6) = 16 valence electrons SO2, 6 + 2(6) = 18 e−
linear, 180E, nonpolar V-shaped, ≈120E, polar
O C O S C O
S
F
FF
F
O C OS
OOS
O O

23
KrF2, 8 + 2(7) = 22 e− SO3, 6 + 3(6) = 24 e− + 2 other resonance structures linear, 180E, nonpolar trigonal planar, 120E, nonpolar
NF3, 5 + 3(7) = 26 e− IF3, 7 + 3(7) = 28 e− trigonal pyramid, < 109.5E, polar T-shaped, ≈90, polar
The bond angles will be somewhat less than 109.5E due to the lone pair on the central nitrogen atom needing more space. CF4, 4 + 4(7) = 32 e− SF4, 6 + 4(7) = 34 e− tetrahedral, 109.5E, nonpolar see-saw, ≈90E and ≈120E, polar
XeF4, 8 + 4(7) = 36 e− PF5, 5 + 5(7) = 40 e− square planar, 90E, nonpolar trigonal bipyramid, 90E and 120E, nonpolar
SO O
O
NF F
F
CF F
F
F
F Kr F
I F
F
F
SF
F
FF
PF
F
FF
FXeF F
F F
24
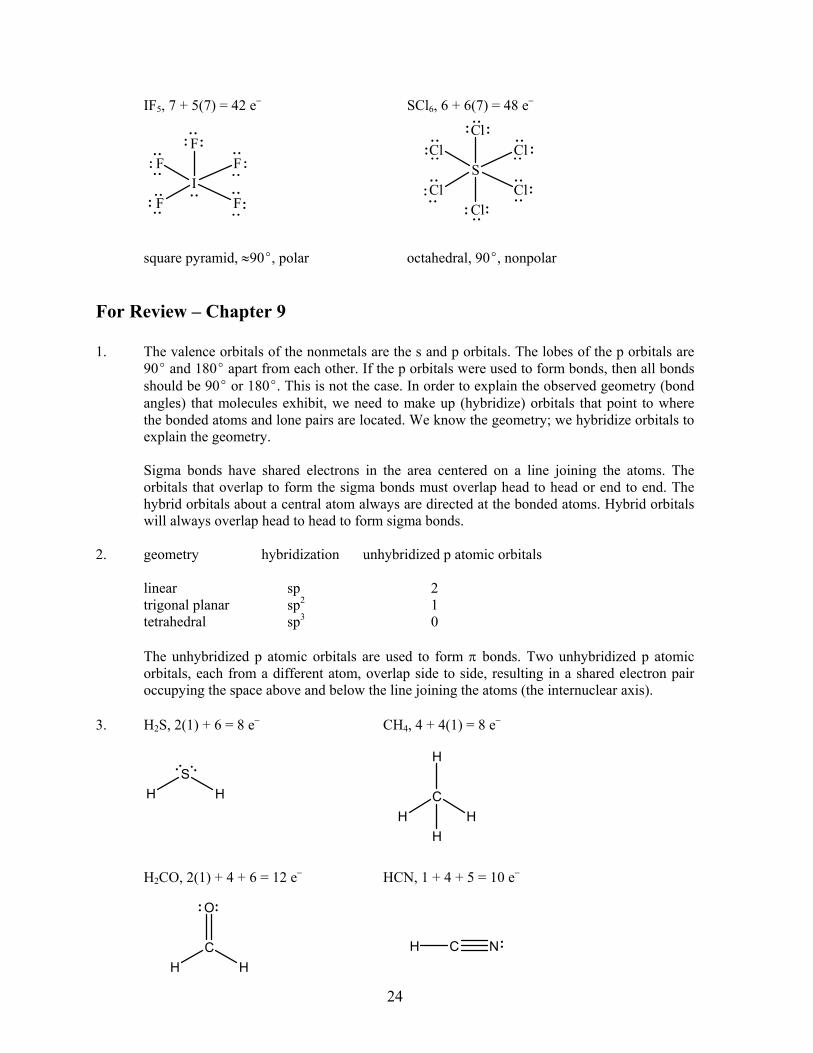
IF5, 7 + 5(7) = 42 e− SCl6, 6 + 6(7) = 48 e− square pyramid, ≈90E, polar octahedral, 90E, nonpolar For Review – Chapter 9 1. The valence orbitals of the nonmetals are the s and p orbitals. The lobes of the p orbitals are
90E and 180E apart from each other. If the p orbitals were used to form bonds, then all bonds should be 90E or 180E. This is not the case. In order to explain the observed geometry (bond angles) that molecules exhibit, we need to make up (hybridize) orbitals that point to where the bonded atoms and lone pairs are located. We know the geometry; we hybridize orbitals to explain the geometry.
Sigma bonds have shared electrons in the area centered on a line joining the atoms. The
orbitals that overlap to form the sigma bonds must overlap head to head or end to end. The hybrid orbitals about a central atom always are directed at the bonded atoms. Hybrid orbitals will always overlap head to head to form sigma bonds.
2. geometry hybridization unhybridized p atomic orbitals linear sp 2 trigonal planar sp2 1 tetrahedral sp3 0 The unhybridized p atomic orbitals are used to form π bonds. Two unhybridized p atomic
orbitals, each from a different atom, overlap side to side, resulting in a shared electron pair occupying the space above and below the line joining the atoms (the internuclear axis).
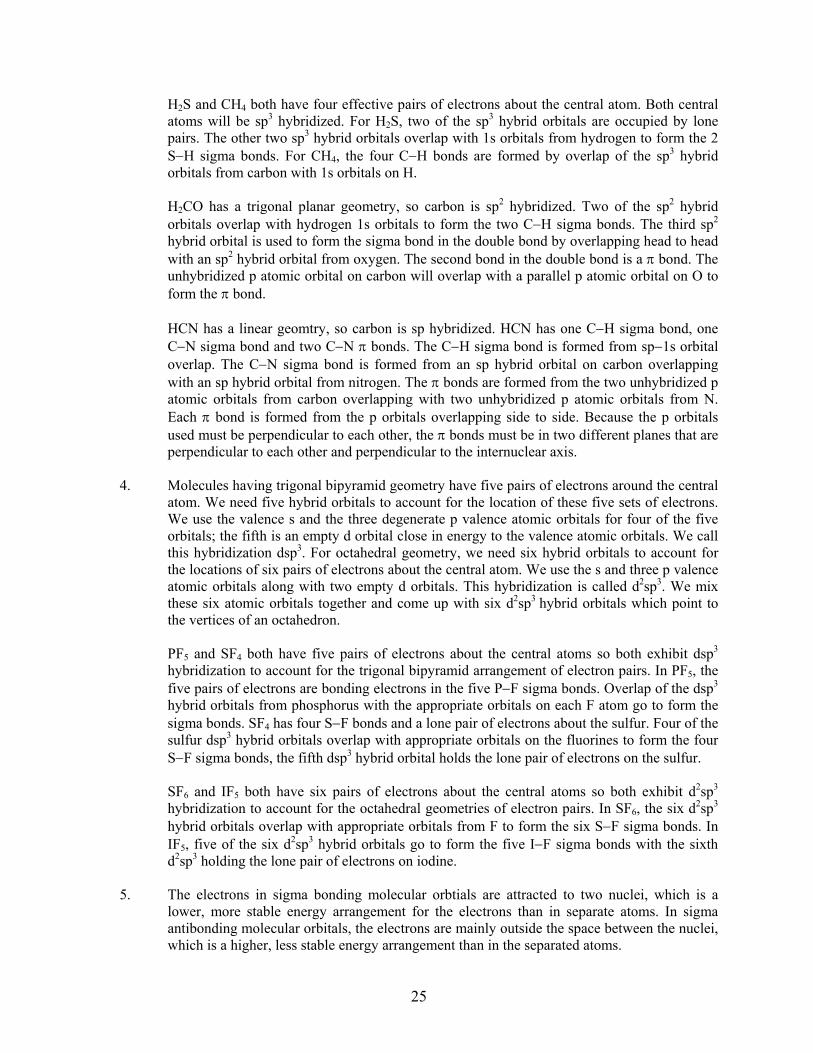
3. H2S, 2(1) + 6 = 8 e− CH4, 4 + 4(1) = 8 e− H2CO, 2(1) + 4 + 6 = 12 e− HCN, 1 + 4 + 5 = 10 e−
SCl
Cl Cl
Cl
Cl
Cl
IF F
F F
F
CH H
H
H
H C N
SH H
CH H
O
25
H2S and CH4 both have four effective pairs of electrons about the central atom. Both central atoms will be sp3 hybridized. For H2S, two of the sp3 hybrid orbitals are occupied by lone pairs. The other two sp3 hybrid orbitals overlap with 1s orbitals from hydrogen to form the 2 S−H sigma bonds. For CH4, the four C−H bonds are formed by overlap of the sp3 hybrid orbitals from carbon with 1s orbitals on H.
H2CO has a trigonal planar geometry, so carbon is sp2 hybridized. Two of the sp2 hybrid
orbitals overlap with hydrogen 1s orbitals to form the two C−H sigma bonds. The third sp2 hybrid orbital is used to form the sigma bond in the double bond by overlapping head to head with an sp2 hybrid orbital from oxygen. The second bond in the double bond is a π bond. The unhybridized p atomic orbital on carbon will overlap with a parallel p atomic orbital on O to form the π bond.
HCN has a linear geomtry, so carbon is sp hybridized. HCN has one C−H sigma bond, one
C−N sigma bond and two C−N π bonds. The C−H sigma bond is formed from sp−1s orbital overlap. The C−N sigma bond is formed from an sp hybrid orbital on carbon overlapping with an sp hybrid orbital from nitrogen. The π bonds are formed from the two unhybridized p atomic orbitals from carbon overlapping with two unhybridized p atomic orbitals from N. Each π bond is formed from the p orbitals overlapping side to side. Because the p orbitals used must be perpendicular to each other, the π bonds must be in two different planes that are perpendicular to each other and perpendicular to the internuclear axis.
4. Molecules having trigonal bipyramid geometry have five pairs of electrons around the central
atom. We need five hybrid orbitals to account for the location of these five sets of electrons. We use the valence s and the three degenerate p valence atomic orbitals for four of the five orbitals; the fifth is an empty d orbital close in energy to the valence atomic orbitals. We call this hybridization dsp3. For octahedral geometry, we need six hybrid orbitals to account for the locations of six pairs of electrons about the central atom. We use the s and three p valence atomic orbitals along with two empty d orbitals. This hybridization is called d2sp3. We mix these six atomic orbitals together and come up with six d2sp3 hybrid orbitals which point to the vertices of an octahedron.
PF5 and SF4 both have five pairs of electrons about the central atoms so both exhibit dsp3
hybridization to account for the trigonal bipyramid arrangement of electron pairs. In PF5, the five pairs of electrons are bonding electrons in the five P−F sigma bonds. Overlap of the dsp3 hybrid orbitals from phosphorus with the appropriate orbitals on each F atom go to form the sigma bonds. SF4 has four S−F bonds and a lone pair of electrons about the sulfur. Four of the sulfur dsp3 hybrid orbitals overlap with appropriate orbitals on the fluorines to form the four S−F sigma bonds, the fifth dsp3 hybrid orbital holds the lone pair of electrons on the sulfur.
SF6 and IF5 both have six pairs of electrons about the central atoms so both exhibit d2sp3
hybridization to account for the octahedral geometries of electron pairs. In SF6, the six d2sp3 hybrid orbitals overlap with appropriate orbitals from F to form the six S−F sigma bonds. In IF5, five of the six d2sp3 hybrid orbitals go to form the five I−F sigma bonds with the sixth d2sp3 holding the lone pair of electrons on iodine.
5. The electrons in sigma bonding molecular orbtials are attracted to two nuclei, which is a
lower, more stable energy arrangement for the electrons than in separate atoms. In sigma antibonding molecular orbitals, the electrons are mainly outside the space between the nuclei, which is a higher, less stable energy arrangement than in the separated atoms.
26
6. See Figure 9.32 of the text for the 2s σ bonding and σ antibonding molecular orbitals. Reference Section 9.3 of the text for the 2p σ bonding, σ antibonding, π bonding, and π antibonding molecular orbitals.
7. Bond energy is directly proportional to bond order. Bond length is inversely proportional to
bond order. Bond energy and bond length can be measured; bond order is calculated from the molecular orbital energy diagram (bond order is the difference between the number of bonding electrons and the number of antibonding electrons divided by two).
Paramagnetic: A kind of induced magnetism, associated with unpaired electrons, that causes
a substance to be attracted into an inducing magnetic field. Diamagnetic: A type of induced magnetism, associated with paired electrons, that causes a substance to be repelled from the inducing magnetic field. The key is that paramagnetic substances have unpaired electrons in the molecular orbital diagram while diamagnetic substances have only paired electrons in the MO diagram.
To determine the type of magnetism, measure the mass of a substance in the presence and
absence of a magnetic field. A substance with unpaired electrons will be attracted by the magnetic field, giving an apparent increase in mass in the presence of the field. A greater number of unpaired electrons will give a greater attraction and a greater observed mass increase. A diamagnetic species will not be attracted by a magnetic field and will not show a mass increase (a slight mass decrease is observed for diamagnetic species).
8. a. H2 has two valence electrons to put in the MO diagram for H2 while He2 has 4 valence
electrons. H2: (σ1s)2 Bond order = B.O. = (2!0)/2 = 1
He2: (σ1s)2(σ1s*)2 B.O. = (2!2)/2 = 0
H2 has a nonzero bond order so MO theory predicts it will exist. The H2 molecule is stable with respect to the two free H atoms. He2 has a bond order of zero so it should not form. The He2 molecule is not more stable than the two free He atoms.
b. See Figure 9.39 of the text for the MO energy-level diagrams of B2, C2, N2, O2, and F2. B2
and O2 have unpaired electrons in their electron configuration so they are predicted to be paramagnetic. C2, N2 and F2 have no unpaired electrons in the MO diagrams; they are all diamagnetic.
c. From the MO energy diagram in Figure 9.38, N2 maximizes the number of electrons in
the lower energy bonding orbitals and has no electrons in the antibonding 2p molecular orbitals. N2 has the highest possible bond order of three so it should be a very strong (stable) bond.
d. NO+ has 5 + 6 – 1 = 10 valence electrons to place in the MO diagram and NO− has 5 + 6
+ 1 = 12 valence electrons. The MO diagram for these two ions is assumed to be the same as that used for N2. The MO electron configurations are:
NO+: (σ2s)2(σ2s*)2(π2p)4(σ2p)2 B.O. = (8!2)/2 = 3 NO−: (σ2s)2(σ2s*)2(π2p)4(σ2p)2(π2p*)2 B.O. = (8!4)/2 = 2
NO+ has a larger bond order than NO− , so NO+ should be more stable than NO−.
27
9. In HF, it is assumed that the hydrogen 1s atomic orbital overlaps with a fluorine 2p orbital to form the bonding molecular orbital. The specific 2p orbital used in forming the bonding MO is the p orbital on the internuclear axis. This p orbital will overlap head to head with the hydrogen 1s orbital forming a sigma bonding and a sigma antibonding MO. In the MO diagram, the unpaired H 1s electron and the unpaired fluorine 2p electron fill the σ bonding MO. No electrons are in the antibonding orbital. Therefore, HF has a bond order of (2!0)/2 = 1 and it should (and does) form.
We also use the MO diagram to explain the polarity of the H!F bond. The fluorine 2p
orbitals are assumed lower in energy than the hydrogen 1s orbital because F is more electro-negative. Because the σ bonding MO is closer in energy to the fluorine 2p atomic orbitals, we say the bonding orbital has more fluorine 2p character than hydrogen 1s character. With more fluorine 2p character, the electrons in the bonding orbital will have a greater probability of being closer to F. This leads to a partial negative charge on F and a partial positive charge on H.
10. Molecules that exhibit resonance have delocalized π bonding. This is a fancy way of saying
that the π electrons are not permanently stationed between two specific atoms, but instead can roam about over the surface of a molecule. We use the concept of delocalized π electrons to explain why molecules that exhibit resonance have equal bonds in terms of strength. Because the π electrons can roam about over the entire surface of the molecule, the π electrons are shared by all of the atoms in the molecule giving rise to equal bond strengths.
The classic example of delocalized π electrons is benzene, C6H6. Figure 9.47 of the text
shows the π molecular orbital system for benzene. Each carbon in benzene is sp2 hybridized, leaving one unhybridized p atomic orbital. All six of the carbon atoms in benzene have an unhy-bridized p orbital pointing above and below the planar surface of the molecule. Instead of just two unhybridized p orbitals overlapping, we say all six of the unhybridized p orbitals overlap resulting in delocalized π electrons roaming about above and below the entire surface of the benzene molecule.
O3, 6 + 2(6) = 18 e− Ozone has a delocalized π system. Here the central atom is sp2 hybridized. The unhybridized
p atomic orbital on the central oxygen will overlap with parallel p orbitals on each adjacent O atom. All three of these p orbitals overlap together resulting in the π electrons moving about above and below the surface of the O3 molecule. With the delocalized π electrons, the O-O bond lengths in O3 are equal (and are not different as each individual Lewis structure indicates).
For Review – Chapter 10 1. Intermolecular forces are the relatively weak forces between molecules that hold the
molecules together in the solid and liquid phases. Intramolecular forces are the forces within a molecule. These are the covalent bonds in a molecule. Intramolecular forces (covalent bonds) are much stronger than intermolecular forces.
OO O
OOO
28
Dipole forces are the forces that act between polar molecules. The electrostatic attraction between the positive end of one polar molecule and the negative end of another is the dipole force. Dipole forces are generally weaker than hydrogen bonding. Both of these forces are due to dipole moments in molecules. Hydrogen bonding is given a separate name from dipole forces because hydrogen bonding is a particularly strong dipole force. Any neutral molecule that has a hydrogen covalently bonded to N, O, or F exhibits the relatively strong hydrogen bonding intermolecular forces. London dispersion forces are accidental-induced dipole forces. Like dipole forces, London dispersion forces are electrostatic in nature. Dipole forces are the electrostatic forces between molecules having a permanent dipole. London dispersion forces are the electrostatic forces between molecules having an accidental or induced dipole. All covalent molecules (polar and nonpolar) have London dispersion forces, but only polar molecules (those with permanent dipoles) exhibit dipole forces. As the size of a molecule increases, the strength of the London dispersion forces increases. This is because, as the electron cloud about a molecule gets larger, it is easier for the elec-trons to be drawn away from the nucleus. The molecule is said to be more polarizable.
London dispersion (LD) < dipole-dipole < H bonding < metallic bonding, covalent network, ionic. Yes, there is considerable overlap. Consider some of the examples in Exercise 10.108 of the text. Benzene (only LD forces) has a higher boiling point than acetone (dipole-dipole forces). Also, there is even more overlap among the stronger forces (metallic, covalent, and ionic).
2. a. Surface tension: The resistance of a liquid to an increase in its surface area. b. Viscosity: The resistance of a liquid to flow.
c. Melting point: The temperature (at constant pressure) where a solid converts entirely to a liquid as long as heat is applied. A more detailed definition is the temperature at which the solid and liquid states have the same vapor pressure under conditions where the total pressure is constant.
d. Boiling point: The temperature (at constant pressure) where a liquid converts entirely to a
gas as long as heat is applied. The detailed definition is the temperature at which the vapor pressure of the liquid is exactly equal to the external pressure.
e. Vapor pressure: The pressure of the vapor over a liquid at equilibrium. As the strengths of intermolecular forces increase, surface tension, viscosity, melting point and boiling point increase, while vapor pressure decreases.
3. Solid: Rigid; has fixed volume and shape; slightly compressible
Liquid: Definite volume but no specific shape; assumes shape of the container; slightly compressible
Gas: No fixed volume or shape; easily compressible
29
4. a. Crystalline solid: Regular, repeating structure Amorphous solid: Irregular arrangement of atoms or molecules b. Ionic solid: Made up of ions held together by ionic bonding
Molecular solid: Made up of discrete covalently bonded molecules held together in the solid phase by weaker forces (LD, dipole, or hydrogen bonds).
c. Molecular solid: Discrete, individual molecules
Network solid: No discrete molecules; A network solid is one large molecule. The forces holding the atoms together are the covalent bonds between atoms.
d. Metallic solid: Completely delocalized electrons, conductor of electricity (cations in a sea of electrons) Network solid: Localized electrons; Insulator or semiconductor 5. Lattice A three-dimensional system of points designating the positions of the centers of the
components of a solid (atoms, ions, or molecules). Unit cell: The smallest repeating unit of a lattice. A simple cubic unit cell has an atom, ion or molecule located at the eight corners of a cube.
There is one net atom per simple cubic unit cell. Because the atoms in the cubic unit cell are assumed to touch along the cube edge, cube edge = R = 2r where r = radius of the atom. A body-centered cubic unit cell has an atom, ion or molecule at the eight corners of a cube and one atom, ion, or molecule located at the center of the cube. There are two net atoms per body-centered cubic unit cell. Because the atoms in the cubic unit cell are assumed to touch along the body diagonal of the cube, body diagonal = 3 R = 4r where R = cube edge and r = radius of atom. A face-centered cubic unit cell has an atom, ion, or molecule at the eight corners of a cube and an atom, ion, or molecule located at the six faces of the cube. There are four net atoms per face-centered unit cell. Because the atoms in the cubic unit cell are assumed to touch along the face diagonal of the cube, face diagonal = 2 R = 4r.
6. Closest packing: the packing of atoms (uniform, hard spheres) in a manner that most
efficiently uses the available space with the least amount of empty space. The two types of closest packing are hexagonal closest packing and cubic closest packing. In both closest packed arrangements, the atoms (spheres) are packed in layers. The difference between the two closest packed arrangements is the ordering of the layers. Hexagonal closest packing has the third layer directly over the first layer forming a repeating layer pattern of abab… In cubic closest packing the layer pattern is abcabc… The unit cell for hexagonal closest packing is a hexagonal prism. See Figure 10.14 of the text for an illustration of the hexagonal prism unit cell. The unit cell for cubic closest packing is the face-centered cubic unit cell.
30
7. Conductor: The energy difference between the filled and unfilled molecular orbitals is minimal. We call this energy difference the band gap. Because the band gap is minimal, electrons can easily move into the conduction bands (the unfilled molecular orbitals).
Insulator: Large band gap; electrons do not move from the filled molecular orbitals to
the conduction bands since the energy difference is large. Semiconductor: Small band gap; the energy difference between the filled and unfilled mo- lecular orbitals is smaller than in insulators, so some electrons can jump into the conduction bands. The band gap, however, is not as small as with con- ductors, so semiconductors have intermediate conductivity. a. As the temperature is increased, more electrons in the filled molecular orbitals have
sufficient kinetic energy to jump into the conduction bands (the unfilled molecular orbitals).
b. A photon of light is absorbed by an electron which then has sufficient energy to jump into
the conduction bands. c. An impurity either adds electrons at an energy near that of the conduction bands (n-type)
or creates holes (unfilled energy levels) at energies in the previously filled molecular orbitals (p-type). Both n-type and p-type semiconductors increase conductivity by creating an easier path for electrons to jump from filled to unfilled energy levels.
In conductors, electrical conductivity is inversely proportional to temperature. Increases in
temperature increase the motions of the atoms, which gives rise to increased resistance (decreased conductivity). In a semiconductor, electrical conductivity is directly proportional to temperature. An increase in temperature provides more electrons with enough kinetic energy to jump from the filled molecular orbitals to the conduction bands, increasing conductivity.
To produce an n-type semiconductor, dope Ge with a substance that has more than 4 valence
electrons, e.g., a group 5A element. Phosphorus or arsenic are two substances which will produce n-type semiconductors when they are doped into germanium. To produce a p-type semiconductor, dope Ge with a substance that has fewer than 4 valence electrons, e.g., a group 3A element. Gallium or indium are two substances which will produce p-type semi-conductors when they are doped into germanium.
8. The structures of most binary ionic solids can be explained by the closest packing of spheres.
Typically, the larger ions, usually the anions, are packed in one of the closest packing arrangements, and the smaller cations fit into holes among the closest packed anions. There are different types of holes within the closest packed anions which are determined by the number of spheres that form them. Which of the three types of holes are filled usually depends on the relative size of the cation to the anion. Ionic solids will always try to maximize electrostatic attractions among oppositely charged ions and minimize the repulsions among ions with like charges.
The structure of sodium chloride can be described in terms of a cubic closest packed array of
Cl− ions with Na+ ions in all of the octahedral holes. An octahedral hole is formed between 6 Cl− anions. The number of octrahedral holes is the same as the number of packed ions. So in

31
the face-centered unit cell of sodium chloride, there are 4 net Cl− ions and 4 net octahedral holes. Because the stoichiometry dictates a 1:1 ratio between the number of Cl− anions and Na+ cations, all of the octahedral holes must be filled with Na+ ions.
In zinc sulfide, the sulfide anions also occupy the lattice points of a cubic closest packing
arrangement. But instead of having the cations in octahedral holes, the Zn2+ cations occupy tetrahedral holes. A tetrahedral hole is the empty space created when four spheres are packed together. There are twice as many tetrahedral holes as packed anions in the closest packed structure. Therefore, each face-centered unit cell of sulfide anions contains 4 net S2− ions and 8 net tetrahedral holes. For the 1:1 stoichiometry to work out, only one-half of the tetrahedral holes are filled with Zn2+ ions. This gives 4 S2− ions and 4 Zn2+ ions per unit cell for an empirical formula of ZnS.
9. a. Evaporation: Process where liquid molecules escape the liquid’s surface to form a gas.
b. Condensation: Process where gas molecules hit the surface of a liquid and convert to a liquid.
c. Sublimation: Process where a solid converts directly to a gas without passing through the liquid state.
d. Boiling: The temperature and pressure at which a liquid completely converts to a gas as
long as heat is applied.
e. Melting: Temperature and pressure at which a solid completely converts to a liquid as long as heat is applied.
f. Enthalpy of vaporization (∆Hvap): The enthalpy change that occurs at the boiling point when a liquid converts into a gas.
g. Enthalpy of fusion (∆Hfus): The enthalpy change that occurs at the melting point when a solid converts into a liquid.
h. Heating curve: A plot of temperature versus time as heat is applied at a constant rate to some substance.
10. Fusion refers to a solid converting to a liquid, and vaporization refers to a liquid converting to a gas. Only a fraction of the hydrogen bonds in ice are broken in going from the solid phase to the liquid phase. Most of the hydrogen bonds in water are still present in the liquid phase and must be broken during the liquid to gas phase transition. Thus, the enthalpy of vaporization is much larger than the enthalpy of fusion because more intermolecular forces are broken during the vaporization process.
A volatile liquid is one that evaporates relatively easily. Volatile liquids have large vapor pressures because the intermolecular forces that prevent evaporation are relatively weak.
11. See Figures 10.49 and 10.52 of the text for the phase diagrams of H2O and CO2. Most
substances exhibit only three different phases: solid, liquid, and gas. This is true for H2O and CO2. Also typical of phase diagrams is the positive slopes for both the liquid-gas equilibrium line and the solid-gas equilibrium line. This is also true for both H2O and CO2. The solid-

32
liquid equilibrium line also generally has a positive slope. This is true for CO2, but not for H2O. In the H2O phase diagram, the slope of the solid-liquid line is negative. The determining factor for the slope of the solid-liquid line is the relative densities of the solid and liquid phases. The solid phase is denser than the liquid phase in most substances; for these substances, the slope of the solid-liquid equilibrium line is positive. For water, the liquid phase is denser than the solid phase which corresponds to a negative sloping solid-liquid equilibrium line. Another difference between H2O and CO2 is the normal melting points and normal boiling points. The term normal just dictates a pressure of 1 atm. H2O has a normal melting point (0EC) and a normal boiling point (100EC), but CO2 does not. At 1 atm pressure, CO2 only sublimes (goes from the solid phase directly to the gas phase). There are no temperatures at 1 atm for CO2 where the solid and liquid phases are in equilibrium or where the liquid and gas phases are in equilibrium. There are other differences, but those discussed above are the major ones.
The relationship between melting points and pressure is determined by the slope of the solid-
liquid equilibrium line. For most substances (CO2 included), the positive slope of the solid-liquid line shows a direct relationship between the melting point and pressure. As pressure increases, the melting point increases. Water is just the opposite since the slope of the solid-liquid line in water is negative. Here the melting point of water is inversely related to the pressure.
For boiling points, the positive slope of the liquid-gas equilibrium line indicates a direct
relationship between the boiling point and pressure. This direct relationship is true for all substances including H2O and CO2.
The critical temperature for a substance is defined as the temperature above which the vapor
cannot be liquefied no matter what pressure is applied. The critical temperature, like the boiling point temperature, is directly related to the strength of the intermolecular forces. Since H2O exhibits relatively strong hydrogen bonding interactions and CO2 only exhibits London dispersion forces, one would expect a higher critical temperature for H2O than for CO2.
For Review – Chapter 11 1. Mass percent: The percent by mass of the solute in the solution.
Mole fraction: The ratio of the number of moles of a given component to the total number of moles of solution.
Molarity: The number of moles of solute per liter of solution.
Molality: The number of moles of solute per kilogram of solvent.
Volume is temperature dependent, whereas mass and the number of moles are not. Only molarity has a volume term so only molarity is temperature dependent.
2. KF(s) → K+(aq) + F−(aq) ∆H = ∆Hsoln; K+(g) + Cl− (g) → K+(aq) + F−(aq) ∆H = ∆Hhyd KF(s) → K+(g) + F−(g) ∆H1 = !∆HLE
K+(g) + F−(g) → K+(aq) + F−(aq) ∆H2 = ∆Hhyd __________________________________________________________ KF(s) → K+(aq) + F−(aq) ∆H = ∆Hsoln = !∆HLE + ∆Hhyd
33
It is true that ∆H1 and ∆H2 have large magnitudes for their values; however, the signs are opposite (∆H1 is large and positive because it is the reverse of the lattice energy and ∆H2, the hydration energy, is large and negative). These two ∆H values basically cancel out each other giving a ∆Hsoln value close to zero.
3. “Like dissolves like” refers to the nature of the intermolecular forces. Polar solutes and ionic solutes dissolve in polar solvents because the types of intermolecular forces present in solute and solvent are similar. When they dissolve, the strength of the intermolecular forces in solution are about the same as in pure solute and pure solvent. The same is true for nonpolar solutes in nonpolar solvents. The strength of the intermolecular forces (London dispersion forces) are about the same in solution as in pure solute and pure solvent. In all cases of like dissolves like, the magnitude of ∆Hsoln is either a small positive number (endothermic) or a small negative number (exothermic). For polar solutes in nonpolar solvents and vice versa, ∆Hsoln is a very large, unfavorable value (very endothermic). Because the energetics are so unfavorable, polar solutes do not dissolve in nonpolar solvents and vice versa.
4. Structure effects refer to solute and solvent having similar polarities in order for solution
formation to occur. Hydrophobic solutes are mostly nonpolar substances that are “water-fearing.” Hydrophilic solutes are mostly polar or ionic substances that are “water-loving.”
Pressure has little effect on the solubilities of solids or liquids; it does significantly affect the solubility of a gas. Henry’s law states that the amount of a gas dissolved in a solution is directly proportional to the pressure of the gas above the solution (C = kP). The equation for Henry’s law works best for dilute solutions of gases that do not dissociate in or react with the solvent. HCl(g) does not follow Henry’s law because it dissociates into H+(aq) and Cl−(aq) in solution (HCl is a strong acid). For O2 and N2, Henry’s law works well since these gases do not react with the water solvent.
An increase in temperature can either increase or decrease the solubility of a solid solute in water. It is true that a solute dissolves more rapidly with an increase in temperature, but the amount of solid solute that dissolves to form a saturated solution can either decrease or increase with temperature. The temperature effect is difficult to predict for solid solutes. However, the temperature effect for gas solutes is easier to predict as the solubility of a gas typically decreases with increasing temperature.
5. Raoult’s law: Psoln = o
solventsolventPχ ; when a solute is added to a solvent, the vapor pressure of a solution is lowered from that of the pure solvent. The quantity χsolvent, the mole fraction of solvent, is the fraction that the solution vapor pressure is lowered.
For the experiment illustrated in Figure 11.9 of the text, the beaker of water will stop having a
net transfer of water molecules out of the beaker when the equilibrium vapor pressure, oOH2
P , is reached. This can never happen. The beaker with the solution wants an equilibrium vapor pressure of OH2
P , which is less than oOH2
P . When the vapor pressure over the solution is above OH2
P , a net transfer of water molecules into the solution will occur in order to try to reduce the vapor pressure to OH2
P . The two beakers can never obtain the equilibrium vapor pressure they want. The net transfer of water molecules from the beaker of water to the beaker of solution stops after all of the water has evaporated.
34
If the solute is volatile, then we can get a transfer of both the solute and solvent back and forth between the beakers. A state can be reached in this experiment where both beakers have the same solute concentration and hence the same vapor pressure. When this state is reached, no net transfer of solute or water molecules occurs between the beakers so the levels of solution remain constant. When both substances in a solution are volatile, then Raoult’s law applies to both. The total vapor pressure above the solution is the equilibrium vapor pressure of the solvent plus the equilibrium vapor pressure of the solute. Mathematically: o
BBoAABATOTAL PPPPP χχ ++ ==
where A is either the solute or solvent and B is the other one.
6. An ideal liquid-liquid solution follows Raoult’s law:
oBB
oAATOTAL PPP χχ +=
A nonideal liquid-liquid solution does not follow Raoult’s law, either giving a total pressure greater than predicted by Raoult’s law (positive deviation) or less than predicted (negative deviation). In an ideal solution, the strength of the intermolecular forces in solution are equal to the strength of the intermolecular forces in pure solute and pure solvent. When this is true, ∆Hsoln = 0 and ∆Tsoln = 0. For positive deviations from Raoult’s law, the solution has weaker intermolecular forces in solution than in pure solute and pure solvent. Positive deviations have ∆Hsoln > 0 (are endothermic) and ∆Tsoln < 0. For negative deviations, the solution has stronger intermolecular forces in solution than in pure solute or pure solvent. Negative deviations have ∆Hsoln < 0 (are exothermic) and ∆Tsoln > 0. Examples of each type of solution are: ideal: benzene-toluene positive deviations: ethanol-hexane negative deviations: acetone-water
7. Colligative properties are properties of a solution that depend only on the number, not the
identity, of the solute particles. A solution of some concentration of glucose (C6H12O6) has the same colligative properties as a solution of sucrose (C12H22O11) having the same con-centration.
A substance freezes when the vapor pressure of the liquid and solid are identical to each
other. Adding a solute to a substance lowers the vapor pressure of the liquid. A lower temperature is needed to reach the point where the vapor pressures of the solution and solid are identical. Hence, the freezing point is depressed when a solution forms.
A substance boils when the vapor pressure of the liquid equals the external pressure. Because
a solute lowers the vapor pressure of the liquid, a higher temperature is needed to reach the point where the vapor pressure of the liquid equals the external pressure. Hence, the boiling point is elevated when a solution forms.
The equation to calculate the freezing point depression or boiling point elevation is:
∆T = Km
35
where K is the freezing point or boiling point constant for the solvent and m is the molality of the solute. Table 11.5 of the text lists the K values for several solvents. The solvent which shows the largest change in freezing point for a certain concentration of solute is camphor; it has the largest Kf value. Water, with the smallest Kb value, will show the smallest increase in boiling point for a certain concentration of solute.
To calculate molar mass, you need to know the mass of the unknown solute, the mass and
identity of solvent used, and the change in temperature (∆T) of the freezing or boiling point of the solution. Since the mass of unknown solute is known, one manipulates the freezing point data to determine the number of moles of solute present. Once the mass and moles of solute are known, one can determine the molar mass of the solute. To determine the moles of solute present, one determines the molality of the solution from the freezing point data and multiplies this by the kilograms of solvent present; this equals the moles of solute present.
8. Osmotic pressure: the pressure that must be applied to a solution to stop osmosis; osmosis is
the flow of solvent into the solution through a semipermeable membrane. The equation to calculate osmotic pressure, π, is:
π = MRT where M is the molarity of the solution, R is the gas constant, and T is the Kelvin
temperature. The molarity of a solution approximately equals the molality of the solution when 1 kg solvent ≈ 1 L solution. This occurs for dilute solutions of water since OH2
d = 1.00 g/cm3.
With addition of salt or sugar, the osmotic pressure inside the fruit cells (and bacteria) is less
than outside the cell. Water will leave the cells which will dehydrate bacteria present, causing them to die.
Dialysis allows the transfer of solvent and small solute molecules through a membrane. To
purify blood, the blood is passed through a cellophane tube (the semipermeable membrane); this cellophane tube is immersed in a dialyzing solution which contains the same concen-trations of ions and small molecules as in blood, but has none of the waste products normally removed by the kidney. As blood is passed through the dialysis machine, the unwanted waste products pass through the cellophane membrane, cleansing the blood.
Desalination is the removal of dissolved salts from an aqueous solution. Here, a solution is
subjected to a pressure greater than the osmotic pressure and reverse osmosis occurs, i.e., water passes from the solution through the semipermeable membrane back into pure water. Desalination plants can turn sea-water with its high salt content into drinkable water.
9. A strong electrolyte completely dissociates into ions in solution, a weak electrolyte only
partially dissociates into ions in solution, and a nonelectrolyte does not dissociate into ions when dissolved in solution. Colligative properties depend on the total number of solute particles in solution. By measuring a property such as freezing point depression, boiling point elevation, or osmotic pressure, we can determine the number of solute particles present from the solute and thus characterize the solute as a strong, weak, or nonelectrolyte.

36
The van’t Hoff factor i is the number of moles of particles (ions) produced for every mol of solute dissolved. For NaCl, i = 2 since Na+ and Cl− are produced in water; for Al(NO3)3, i = 4 since Al3+ and 3 NO3
− ions are produced when Al(NO3)3 dissolves in water. In real life, the van’t Hoff factor is rarely the value predicted by the number of ions a salt dissolves into; i is generally something less than the predicted number of ions. This is due to a phenomenon called ion pairing where at any instant a small percentage of oppositely charged ions pair up and act like a single solute particle. Ion pairing occurs most when the concentration of ions is large. Therefore, dilute solutions behave most ideally; here i is close to that determined by the number of ions in a salt.
10. A colloidal dispersion is a suspension of particles in a dispersing medium. See Table 11.7 of
the text for some examples of different types of colloids. Both solutions and colloids have suspended particles in some medium. The major difference
between the two is the size of the particles. A colloid is a suspension of relatively large particles as compared to a solution. Because of this, colloids will scatter light while solutions will not. The scattering of light by a colloidal suspension is called the Tyndall effect.
Coagulation is the destruction of a colloid by the aggregation of many suspended particles to form a large particle that settles out of solution.
For Review – Chapter 12 1. The reaction rate is defined as the change in concentration of a reactant or product per unit
time. Consider the general reaction:
A → Products where rate = t∆
]A[∆−
If we graph [A] vs. t, it would usually look like the solid line in the following plot.
[A]
0
a
c
b
t1 t2
time
37
An instantaneous rate is the slope of a tangent line to the graph of [A] vs. t. We can determine the instantaneous rate at any time during the reaction. On the plot, tangent lines at t ≈ 0 and t = t1 are drawn. The slope of these tangent lines would be the instantaneous rates at t ≈ 0 and t = t1. We call the instantaneous rate at t ≈ 0 the initial rate. The average rate is measured over a period of time. For example, the slope of the line connecting points a and c is the average rate of the reaction over the entire length of time 0 to t2 (average rate = ∆[A]/∆t). An average rate is determined over some time period while an instantaneous rate is determined at one specific time. The rate which is largest is generally the initial rate. At t ≈ 0, the slope of the tangent line is greatest, which means the rate is largest at t ≈ 0.
The initial rate is used by convention so that the rate of reaction only depends on the forward reaction; at t ≈ 0, the reverse reaction is insignificant because no products are present yet.
2. The differential rate law describes the dependence of the rate on the concentration of
reactants. The integrated rate law expresses reactant concentrations as a function of time. The differential rate law is generally just called the rate law. The rate constant k is a constant that allows one to equate the rate of a reaction to the concentration of reactants. The order is the exponent that the reactant concentrations are raised to in the rate equation.
3. The method of initial rates uses the results from several experiments where each experiment
is carried out at a different set of initial reactant concentrations and the initial rate is determined. The results of the experiments are compared to see how the initial rate depends on the initial concentrations. If possible, two experiments are compared where only one reactant concentration changes. For these two experiments, any change in the initial rate must be due to the change in that one reactant concentration. The results of the experiments are compared until all of the orders are determined. After the orders are determined, then one can go back to any (or all) of the experiments and set the initial rate equal to the rate law using the concentrations in that experiment. The only unknown is k, which is then solved for. The units on k depend on the orders in the rate law. Because there are many different rate laws, there are many different units for k.
Rate = k[A]n; for a first-order rate law, n = 1. If [A] is tripled, then the rate is tripled. When
[A] is quadrupled (increased by a factor of four), and the rate increases by a factor of 16, then A must be second order (42 = 16). For a third order reaction, as [A] is doubled, the rate will increase by a factor of 23 = 8. For a zero order reaction, the rate is independent of the concentration of A. The only stipulation for zero order reactions is that the reactant or reactants must be present; if they are, then the rate is a constant value (rate = k).
4. Zero order:
tkd]A[d,kdt
]A[d t
0
]A[
]A[
t
0
∫∫ −− ==
,kt]A[]A[,kt]A[ 0t
t
0
]A[
]A[
t
0
−−− == [A]t = !kt + [A]0
38
First order:
tkd]A[]A[d],A[k
dt]A[d t
0
]A[
]A[
t
0
∫∫ −− ==
,kt]Aln[]Aln[,kt]Aln[ 0t
]A[
]A[
t
0
−−− == ln[A]t = !kt + ln[A]0
Second order:
tkd]A[
]A[d,]A[kdt
]A[d t
0
]A[
]A[2
2t
0
∫∫ −− ==
0t0t
]A[
]A[ ]A[1kt
]A[1,kt
]A[1
]A[1
]A[1 ,kt
t
0
+−+−− ==−=
5. The integrated rate laws can be put into the equation for a straight line, y = mx + b where x
and y are the x and y axes, m is the slope of the line, and b is the y-intercept. Zero order: [A] = !kt + [A] y = mx + b
A plot of [A] vs. time will be linear with a negative slope equal to !k and a y-intercept equal to [A]. First order: ln[A] = !kt + ln[A]0 y = mx + b A plot of ln[A] vs. time will be linear with a negative slope equal to !k and a y-intercept equal to ln[A]0.
Second order: ]A[
1 = kt + 0]A[
1
y = mx + b A plot of 1/[A] vs. time will be linear with a positive slope equal to k and a y-intercept equal to 1/[A]0. When two or more reactants are studied, only one of the reactants is allowed to change during any one experiment. This is accomplished by having a large excess of the other reactant(s) as compared to the reactant studied; so large that the concentration of the other reactant(s) stays effectively constant during the experiment. The slope of the straight-line plot equals k (or –k) multiplied by the other reactant concentrations raised to the correct orders. Once all the orders are known for a reaction, then any (or all) of the slopes can be used to determine k.
6. At t = t1/2, [A] = 1/2[A]0; Plugging these terms into the integrated rate laws yields the
following half-life expressions:
39
zero order first order second order
t1/2 = k2]A[ 0 t1/2 =
k2ln t1/2 =
0]A[k1
The first order half-life is independent of concentration, the zero order half-life is directly related to the concentration, and the second order half-life is inversely related to concentra-tion. For a first order reaction, if the first half-life equals 20. s, the second half-life will also be 20. s because the half-life for a first order reaction is concentration independent. The second half-life for a zero order reaction will be 1/2(20.) = 10. s. This is because the half-life for a zero order reaction has a direct relationship with concentration (as the concentration decreases by a factor of 2, the half-life decreases by a factor of 2). For a second order reaction which has an inverse relationship between t1/2 and [A]0, the second half-life will be 40. s (twice the first half-life value).
7. a. An elementary step (reaction) is one for which the rate law can be written from the
molecularity, i.e., from coefficients in the balanced equation.
b. The molecularity is the number of species that must collide to produce the reaction represented by an elementary step in a reaction mechanism.
c. The mechanism of a reaction is the series of proposed elementary reactions that may
occur to give the overall reaction. The sum of all the steps in the mechanism gives the balanced chemical reaction.
d. An intermediate is a species that is neither a reactant nor a product but that is formed and
consumed in the reaction sequence. e. The rate-determining step is the slowest elementary reaction in any given mechanism.
8. For a mechanism to be acceptable, the sum of the elementary steps must give the overall balanced equation for the reaction, and the mechanism must give a rate law that agrees with the experimentally determined rate law. A mechanism can never be proven absolutely. We can only say it is possibly correct if it follows the two requirements described above. Most reactions occur by a series of steps. If most reactions were unimolecular, then most reactions would have a first order overall rate law, which is not the case.
9. The premise of the collision model is that molecules must collide to react, but not all collisions between reactant molecules result in product formation.
a. The larger the activation energy, the slower the rate.
b. The higher the temperature, the more molecular collisions with sufficient energy to convert to products and the faster the rate.
c. The greater the frequency of collisions, the greater the opportunities for molecules to
react, and, hence, the greater the rate.
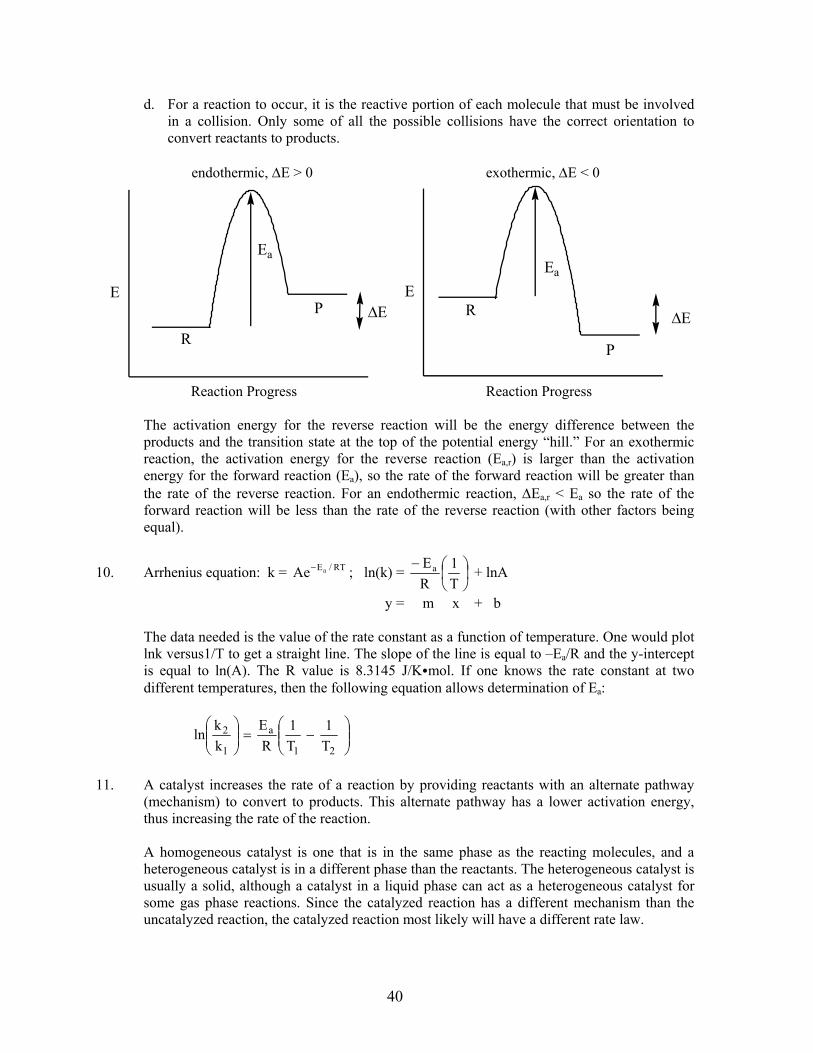
40
d. For a reaction to occur, it is the reactive portion of each molecule that must be involved in a collision. Only some of all the possible collisions have the correct orientation to convert reactants to products. endothermic, ∆E > 0 exothermic, ∆E < 0
RE
P
∆Ε
Ea
Reaction Progress Reaction Progress
The activation energy for the reverse reaction will be the energy difference between the products and the transition state at the top of the potential energy “hill.” For an exothermic reaction, the activation energy for the reverse reaction (Ea,r) is larger than the activation energy for the forward reaction (Ea), so the rate of the forward reaction will be greater than the rate of the reverse reaction. For an endothermic reaction, ∆Ea,r < Ea so the rate of the forward reaction will be less than the rate of the reverse reaction (with other factors being equal).
10. Arrhenius equation: k = RT/EaAe− ; ln(k) = ⎟⎠⎞
⎜⎝⎛−
T1
REa + lnA
y = m x + b
The data needed is the value of the rate constant as a function of temperature. One would plot lnk versus1/T to get a straight line. The slope of the line is equal to –Ea/R and the y-intercept is equal to ln(A). The R value is 8.3145 J/KCmol. If one knows the rate constant at two different temperatures, then the following equation allows determination of Ea:
⎟⎟⎠
⎞⎜⎜⎝
⎛−=⎟⎟
⎠
⎞⎜⎜⎝
⎛
21
a
1
2T1
T1
RE
kkln
11. A catalyst increases the rate of a reaction by providing reactants with an alternate pathway
(mechanism) to convert to products. This alternate pathway has a lower activation energy, thus increasing the rate of the reaction.
A homogeneous catalyst is one that is in the same phase as the reacting molecules, and a
heterogeneous catalyst is in a different phase than the reactants. The heterogeneous catalyst is usually a solid, although a catalyst in a liquid phase can act as a heterogeneous catalyst for some gas phase reactions. Since the catalyzed reaction has a different mechanism than the uncatalyzed reaction, the catalyzed reaction most likely will have a different rate law.
R
EP ∆Ε
Ea
41
For Review – Chapter 13 1. a. The rates of the forward and reverse reactions are equal at equilibrium. b. There is no net change in the composition (as long as temperature is constant).
See Figure 13.5 of the text for an illustration of the concentration vs. time plot for this reaction. In Figure 13.5, A = H2, B = N2, and C = NH3. Notice how the reactant concentrations decrease with time until they reach equilibrium where the concentrations remain constant. The product concentration increases with time until equilibrium is reached. Also note that H2 decreases faster than N2; this is due to the 3:1 mole ratio in the balanced equation. H2 should be used up three times faster than N2. Similarly, NH3 should increase at rate twice the rate of decrease of N2. This is shown in the plot.
Reference Figure 13.4 for the reaction rate vs. time plot. As concentrations of reactants decrease, the rate of the forward reaction decreases. Also, as product concentration increases, the rate of the reverse reaction increases. Eventually they reach the point where the rate that reactants are converted into products exactly equals the rate that products are converted into reactants. This is equilibrium and the concentrations of reactants and products do not change.
2. The law of mass action is a general description of the equilibrium condition; it defines the
equilibrium constant expression. The law of mass action is based on experimental observation.
K is a constant; the value (at constant temperature) does not depend on the initial conditions. Table 13.1 of the text illustrates this nicely. Three experiments were run with each ex-periment having a different initial condition (only reactants present initially, only products present initially, and some reactants and products present initially). In all three experiments, the value of K calculated is the same in each experiment (as it should be). Equilibrium and rates of reaction (kinetics) are independent of each other. A reaction with a large equilibrium constant value may be a fast reaction or a slow reaction. The same is true for a reaction with a small equilibrium constant value. Kinetics is discussed in detail in Chapter 12 of the text. The equilibrium constant is a number that tells us the relative concentrations (pressures) of reactants and products at equilibrium. An equilibrium position is a set of concentrations that satisfy the equilibrium constant expression. More than one equilibrium position can satisfy the same equilibrium constant expression. From Table 13.1, each of the three experiments have different equilibrium positions; that is, each experiment has different equilibrium concentrations. However, when these equilibrium concentrations are inserted into the equilibrium constant expression, each experiment gives the same value for K. The equilibrium position depends on the initial concentrations one starts with. Since there are an infinite number of initial conditions, there are an infinite number of equilibrium positions. However, each of these infinite equilibrium positions will always give the same value for the equilibrium constant (assuming temperature is constant).
3. 2 NOCl(g) ⇌ 2 NO(g) + Cl2(g) K = 1.6 × 10⁻⁵
42
The expression for K is the product concentrations divided by the reactant concentrations. When K has a value much less than one, the product concentrations are relatively small and the reactant concentrations are relatively large.
2 NO(g) ⇌ N2(g) + O2(g) K = 1 × 1031 When K has a value much greater than one, the product concentrations are relatively large and the reactant concentrations are relatively small. In both cases, however, the rate of the forward reaction equals the rate of the reverse reaction at equilibrium (this is a definition of equilibrium).
4. The difference between K and Kp are the units used to express the amounts of reactants and
products present. K is calculated using units of molarity. Kp is calculated using partial pressures in units of atm (usually). Both have the same form; the difference is the units used to determine the values. Kp is only used when the equilibria involves gases; K can be used for gas phase equilibria and for solution equilibria.
Kp = K(RT)∆n where ∆n = moles gaseous products in the balanced equation – moles
gaseous reactants in the balanced equation. K = Kp when ∆n = 0 (when moles of gaseous products = moles of gaseous reactants). K ≠ Kp when ∆n ≠ 0.
When a balanced equation is multiplied by a factor n, Knew = (Koriginal)n. So if a reaction is
tripled, Knew = 3originalK . If a reaction is reversed, Knew = 1/Koriginal. Here, Kp, new = 1/Kp, original.
5. When reactants and products are all in the same phase, these are homogeneous equilibria.
Heterogeneous equilibria involve more than one phase. In general, for a homogeneous gas phase equilibria, all reactants and products are included in the K expression. In heterogeneous equilibria, equilibrium does not depend on the amounts of pure solids or liquids present. The amount of solids and liquids present are not included in K expressions; they just have to be present. On the other hand, gases and solutes are always included in K expressions. Solutes have (aq) written after them.
6. For the gas phase reaction aA + bB ⇌ cC + dD:
the equilibrium constant expression is: K = ba
dc
]B[]A[]D[]C[
and the reaction quotient has the same form: Q = ba
dc
]B[]A[]D[]C[
The difference is that in the expression for K, we use equilibrium concentrations, i.e., [A],
[B], [C], and [D] are all in equilibrium with each other. Any set of concentrations can be plugged into the reaction quotient expression. Typically, we plug initial concentrations into the Q expression and then compare the value of Q to K to see if the reaction is at equilibrium. If Q = K, the reaction is at equilibrium with these concentrations. If Q ≠ K, then the reaction will have to shift either to products or to reactants to reach equilibrium. For Q > K, the net change in the reaction to get to equilibrium must be a conversion of products into reactants. We say the reaction shifts left to reach elquilibrium. When Q < K, the net change in the reaction to get to equilibrium must be a conversion of reactants into products; the reaction shifts right to reach equilibrium.
43
7. The steps to solve equilibrium problems are outlined at the beginning of section 13.6. The
ICE table is a convenient way to summarize an equilibrium problem. We make three rows under the balanced reaction. The initials in ICE stand for initial, change, and equilibrium. The first step is to fill in the initial row, then deduce the net change that must occur to reach equilibrium. You then define x or 2x or 3x … as the change (molarity or partial pressure) that must occur to reach equilibrium. After defining your x, fill in the change column in terms of x. Finally, sum the initial and change columns together to get the last row of the ICE table, the equilibrium concentrations (or equilibrium partial pressures). The ICE table again summarizes what must occur for a reaction to reach equilibrium. This is vital in solving equilibrium problems.
8. The assumption comes from the value of K being much less than 1. For these reactions, the
equilibrium mixture will not have a lot of products present; mostly reactants are present at equilibrium. If we define the change that must occur in terms of x as the amount (molarity or partial pressure) of a reactant that must react to reach equilibrium, then x must be a small number because K is a very small number. We want to know the value of x in order to solve the problem, so we don’t assume x = 0. Instead, we concentrate on the equilibrium row in the ICE table. Those reactants (or products) have equilibrium concentrations in the form of 0.10 – x or 0.25 + x or 3.5 – 3x, etc., is where an important assumption can be made. The assumption is that because K << 1, x will be small (x << 1) and when we add x or subtract x from some initial concentration, it will make little or no difference. That is, we assume that 0.10 – x ≈ 0.10 or 0.25 + x ≈ 0.25 or 3.5 – 3x ≈ 3.5; we assume that the initial concentration of a substance is equal to the equilibrium concentration. This assumption makes the math much easier, and usually gives a value of x that is well within 5% of the true value of x (we get about the same answer with a lot less work).
We check the assumptions for validity using the 5% rule. From doing a lot of these
calculations, it is found that when a assumption like 0.20 – x ≈ 0.20 is made, if x is less than 5% of the number the assumption was made against, then our final answer is within acceptable error limits of the true value of x (as determined when the equation is solved exactly). For our example above (0.20 – x ≈ 0.20), if (x/0.20) × 100 ≤ 5%, then our assumption is valid by the 5% rule. If the error is greater than 5%, then we must solve the equation exactly or use a math trick called the method of successive approximations. See Appendix 1 for details regarding the method of successive approximations as well as for a review in solving quadratic equations exactly.
9. LeChatlier’s Principle: if a change is imposed on a system at equilibrium, the position of the
equilibrium will shift in the direction that tends to reduce that change. a. When a gaseous (or aqueous) reactant is added to a reaction at equilibrium, the reaction
shifts right to use up some of the added reactant. Adding NOCl causes the equilibrium to shift to the right.
b. If a gaseous (or aqueous) product is added to a system at equilibrium, the reaction shifts
left to use up some of the added product. Adding NO(g) causes the equilibrium to shift left.
c. Here a gaseous reactant is removed (NOCl), so the reaction shifts left to produce more of
the NOCl.
44
d. Here a gaseous product is removed (Cl2), so the reaction shifts right to produce more of the Cl2.
e. In this reaction, 2 moles of gaseous reactants are converted into 3 moles of gaseous
products. If the volume of the container is decreased, the reaction shifts to the side that occupies a smaller volume. Here, the reactions shift left to side with the fewer moles of reactant gases present.
For all of these changes, the value of K does not change. As long as temperature is constant, the value of K is constant.
2 H2(g) + O2(g) ⇌ 2 H2O(l); in this reaction, the amount of water present has no effect on the equilibrium; H2O(l) just has to be present whether it’s 0.0010 grams or 1.0 × 10⁶ grams. The same is true for solids. When solids or liquids are in a reaction, addition or removal of these solids or liquids has no effect on the equilibrium (the reaction remains at equilibrium). Note that for this example, if the temperature is such that H2O(g) is the product, then the amount of H2O(g) present does affect the equilibrium. A change in volume will change the partial pressure of all reactants and products by the same factor. The shift in equilibrium depends on the number of gaseous particles on each side. An increase in volume will shift the equilibrium to the side with the greater number of particles in the gas phase. A decrease in volume will favor the side with fewer gas phase particles. If there are the same number of gas phase particles on each side of the reaction, a change in volume will not shift the equilibrium. When we change the pressure by adding an unreactive gas, we do not change the partial pressures (or concentrations) of any of the substances in equilibrium with each other. This is because the volume of the container did not change. If the partial pressures (and concentrations) are unchanged, the reaction is still at equilibrium.
10. In an exothermic reaction, heat is a product. When the temperature increases, heat (a product)
is added and the reaction shifts left to use up the added heat. For an exothermic reaction, the value of K decreases as temperature increases. In an endothermic reaction, heat is a reactant. Heat (a reactant) is added when the temperature increases and the reaction shifts right to use up the added heat in order to reestablish equilibrium. The value of K increases for an endothermic reaction as temperature increases.
A decrease in temperature corresponds to the removal of heat. Here, the value of K increases
as T decreases. This indicates that as heat is removed, more products are produced. Heat must be a product, so this is an exothermic reaction.
For Review- Chaper 14 1. a. Arrhenius acid: produce H+ in water b. Brrnsted-Lowry acid: proton (H+) donor c. Lewis acid: electron pair acceptor

45
The Lewis definition is most general. The Lewis definition can apply to all Arrhenius and Brrnsted-Lowry acids; H+ has an empty 1s orbital and forms bonds to all bases by accepting a pair of electrons from the base. In addition, the Lewis definition incorporates other reactions not typically considered acid-base reactions, e.g., BF3(g) + NH3(g) → F3B−NH3(s). NH3 is something we usually consider a base and it is a base in this reaction using the Lewis definition; NH3 donates a pair of electrons to form the N−B bond.
2. a. The Ka reaction always refers to an acid reacting with water to produce the conjugate base of the acid and the hydronium ion (H3O+). For a general weak acid HA, the Ka reaction is:
HA(aq) + H2O(l) ⇌ A−(aq) + H3O+(aq) where A− = conjugate base of the acid HA
This reaction is often abbreviated as: HA(aq) ⇌ H+(aq) + A−(aq) b. The Ka equilibrium constant is the equilibrium constant for the Ka reaction of some sub- stance. For the general Ka reaction, the Ka expression is:
Ka = ]HA[
]A][H[Kor]HA[
]OH][A[a
3−++−
= (for the abbreviated Ka reaction)
c. The Kb reaction alwlays refers to a base reacting with water to produce the conjugate acid of the base and the hydroxide ion (OH−). For a general base, B, the Kb reaction is:
B(aq) + H2O(l) ⇌ BH+(aq) + OH−(aq) where BH+ = conjugate acid of the base B
d. The Kb equilibrium constant for the general Kb reaction is: Kb = ]B[
]OH][BH[ −+
e. A conjugate acid-base pair consists of two substances related to each other by the
donating and accepting of a single proton (H+). The conjugate bases of the acids HCl, HNO2, HC2H3O2, and H2SO4 are Cl−, NO2
−, C2H3O2−, and HSO4
−, respectively. The conjugate acids of the bases NH3, C5H5N, and HONH2 are NH4
+, C5H5NH+, and HONH3+,
respectively. Conjugate acid-base pairs only differ by H+ in their respective formulas.
3. a. Amphoteric: A substance that can behave either as an acid or as a base. b. The Kw reaction is also called the autoionization of water reaction. The reaction always occurs when water is present as the solvent. The reaction is:
H2O(l) + H2O(l) ⇌ H3O+(aq) + OH−(aq) or H2O(l) ⇌ H+(aq) + OH−(aq) c. The Kw equilibrium constant is also called the ion-product constant or the dissociation
constant of water. It is the equilibrium constant for the autoionization reaction of water: Kw = [H3O+][OH−] or Kw = [H+][OH−] At typical solution temperatures of 25EC, Kw = 1.0 × .10 14−
46
d. pH is a mathematical term which is equal to the –log of the H+ concentration of a solution (pH = –log[H+]).
e. pOH is a mathematical term which is equal to the –log of the OH− concentration of a solution (pOH = –log[OH−]).
f. The p of any quantity is the –log of that quantity. So: pKw = –logKw. At 25EC,
pKw = –log(1.0 × )10 14− = 14.00. Neutral solution at 25EC: Kw = 1.0 × 1410− = [H+][OH−] and pH + pOH = 14.00 [H+] = [OH− ] = 1.0 × 710− M; pH = pOH = –log(1.0 × 710− ) = 7.00 Acidic solution at 25EC: [H+] > [OH− ]; [H+] > 1.0 × 710− M; [OH− ] < 1.0 × 710− M; pH < 7.00; pOH > 7.00 Basic solution at 25EC: [OH−] > [H+]; [OH−] > 1.0 × 710− M; [H+] < 1.0 × 710− M; pOH < 7.00; pH > 7.00
As a solution becomes more acidic, [H+] increases, so [OH−] decreases, pH decreases, and pOH increases. As a solution becomes more basic, [OH−] increases, so [H+] decreases, pH increases, and pOH decreases.
4. The Ka value refers to the reaction of an acid reacting with water to produce the conjugate
base and H3O+. The stronger the acid, the more conjugate base and H3O+ produced, and the larger the Ka value.
Strong acids are basically 100% dissociated in water. Therefore, the strong acids have a Ka
>> 1 because the equilibrium position lies far to the right. The conjugate bases of strong acids are terrible bases; much worse than water, so we can ignore their basic properties in water.
Weak acids are only partially dissociated in water. We say that the equilibrium lies far to the left, thus giving values for Ka < 1 (weak acids have mostly reactants at equilibrium and few products present). The conjugate bases of weak acids are better bases than water. When we have a solution composed of just the conjugate base of a weak acid in water, tbe resulting pH is indeed basic (pH > 7.0). In general, as the acid strength increases, the conjugate base strength decreases, or as acid strength decreases, the conjugate base strength increases. They are inversely related. Base strength is directly related to the Kb value. The larger the Kb value, the more OH− produced from the Kb reaction, and the more basic the solution (the higher the pH). Weak bases have a Kb < 1 and their conjugate acids behave as weak acids in solution. As the strength of the base increases, the strength of the conjugate acid gets weaker; the stronger the base, the weaker the conjugate acid, or the weaker the base, the stronger the conjugate acid.
5. Strong acids are assumed 100% dissociated in water, and we assume that the amount of H+
donated by water is negligible. Hence, the equilibrium [H+] of a strong acid is generally equal

47
to the initial acid concentration ([HA]0). Note that solutions of H2SO4 can be different from this because H2SO4 is a diprotic acid. Also, when you have very dilute solutions of a strong acid, the H+ contribution from water by itself must be considered. The strong acids to memorize are HCl, HBr, HI, HNO3, HClO4, and H2SO4.
Ka values for weak acids are listed in Table 14.2 and in Appendix 5 of the text. Because weak
acids only partially dissociate in water, we must solve an equilibrium problem to determine how much H+ is added to water by the weak acid. We write down the Ka reaction, set-up the ICE table, then solve the equilibrium problem. The two assumptions generally made are that acids are less than 5% dissociated in water and that the H+ contribution from water is negligible.
The 5% rule comes from the assumptions that weak acids are less than 5% dissociated. When
this is true, the mathematics of the problem are made much easier. The equilibrium expression we get for weak acids in water generally has the form (assuming an initial acid concentration of 0.10 M):
Ka = 10.010.0
22 xx
x≈
−
The 5% rule refers to assuming 0.10 – x ≈ 0.10. The assumption is valid if x is less than 5%
of the number the assumption was made against ([HA]0). When the 5% rule is valid, solving for x is very straight forward. When the 5% rule fails, we must solve the mathematical expression exactly using the quadratic equation (or your graphing calculator). Even if you do have a graphing calculator, reference Appendix 1 to review the quadratic equation. Appendix 1 also discusses the method of successive approximations which can also be used to solve quadratic (and cubic) equations.
6. Strong bases are soluble ionic compounds containing the OH− anion. Strong bases increase
the OH− concentration in water by just dissolving. Thus, for strong bases like LiOH, NaOH, KOH, RbOH, and CsOH, the initial concentration of the strong base equals the equilibrium [OH−] of water.
The other strong bases to memorize have +2 charged metal cations. The soluble ones to know
are Ca(OH)2, Sr(OH)2, and Ba(OH)2. These are slightly more difficult to solve because they donate 2 moles OH− for every mole of salt dissolved. Here, the [OH−] is equal to two times the initial concentration of the soluble alkaline earth hydroxide salt dissolved.
Neutrally charged organic compounds containing at least one nitrogen atom generally behave
as weak bases. The nitrogen atom has an unshared pair of electrons around it. This lone pair of electrons is used to form a bond to H+.
Weak bases only partially react with water to produce OH−. To determine the amount of OH− produced by the weak base (and, in turn, the pH of the solution), we set-up the ICE table using the Kb reaction of the weak base. The typical weak base equilibrium expression is:
Kb = 25.025.0
22 xx
x≈
− (assuming [B]0 = 0.25 M)
48
Solving for x gives us the [OH−] in solution. We generally assume that weak bases are less than 5% reacted with water and that the OH− contribution from water is negligible. The 5% assumption makes the math easier. By assuming an expression like 0.25 M – x ≈ 0.25 M, the calculation is very straight forward. The 5% rule applied here is that if (x/0.25) × 100 is less than 5%, the assumption is valid. When the assumption is not valid, then we solve the equilibrium expression exactly using the quadratic equation (or by the method of successive approximations).
7. Monoprotic acid: An acid with one acidic proton; the general formula for monoprotic acids is
HA. Diprotic acid: An acid with two acidic protons (H2A). Triprotic acid: An acid with three acidic protons (H3A). H2SO4(aq) → HSO4
−(aq) + H+(aq) 1aK >> 1; this is a strong acid.
HSO4−(aq) ⇌ SO4
2−(aq) + H+(aq) 2aK = 0.012; this is a weak acid.
When H2SO4 is dissolved in water, the first proton is assumed 100% dissociated because
H2SO4 is a strong acid. After H2SO4 dissociates, we have H+ and HSO4− present. HSO4
− is a weak acid and can donate some more protons to water. To determine the amount of H+ donated by HSO4
−, one must solve an equilibrium problem using the 2aK reaction for HSO4
−.
H3PO4(aq) ⇌ H+(aq) + H2PO4−(aq)
1aK = 7.5 × 310−
H2PO4−(aq) ⇌ H+(aq) + HPO4
2−(aq) 2aK = 6.2 × 810−
HPO42−(aq) ⇌ H+(aq) + PO4
3−(aq) 3aK = 4.8 × 1310−
When H3PO4 is added to water, the three acids that are present are H3PO4, H2PO4
−, and HPO4
2−. H3PO4, with the largest Ka value, is the strongest of these weak acids. The conjugate bases of the three acids are H2PO4
−, HPO42−, and PO4
3−. Because HPO42− is the weakest acid
(smallest Ka value), its conjugate base (PO43−) will have the largest Kb value and is the
strongest base. See Examples 14.15-14.17 of the text on the strategies used to solve for the pH of polyprotic
acids. The strategy to solve most polyprotic acid solutions is covered in Example 14.15. For typical polyprotic acids,
1aK >> 2aK (and
3aK if a triprotic acid). Because of this, the dominant producer of H+ in solution is just the
1aK reaction. We set-up the equilibrium problem using the
1aK reaction and solve for H+. We then assume that the H+ donated by the
2aK (and3aK if triprotic) reaction is negligible, that is, the H+ donated by the
1aK reaction is assumed to be the H+ donated by the entire acid system. This assumption is great when
1aK >>2aK (roughly a 1000 fold difference in magnitude).

49
Examples 14.16 and 14.17 cover strategies for the other type of polyprotic acid problems. This other type is solutions of H2SO4. As discussed previously, H2SO4 problems are both a strong acid and a weak acid problem in one. To solve for the [H+], we sometimes must worry about the H+ contribution from HSO4
−. Example 14.16 is an example of an H2SO4 solution where the HSO4
− contribution of H+ can be ignored. Example 14.17 illustrates an H2SO4 problem where we can’t ignore the H+ contribution from HSO4
−. 8. a. H2O and CH3CO2
−
b. An acid-base reaction can be thought of as a competiton between two opposing bases. Since this equilibrium lies far to the left (Ka < 1), CH3CO2
− is a stronger base than H2O.
c. The acetate ion is a better base than water and produces basic solutions in water. When we put acetate ion into solution as the only major basic species, the reaction is:
CH3CO2− + H2O ⇌ CH3CO2H + OH−
Now the competition is between CH3CO2
− and OH− for the proton. Hydroxide ion is the strongest base possible in water. The equilibrium above lies far to the left, resulting in a Kb value less than one. Those species we specifically call weak bases ( 1410− < Kb < 1) lie between H2O and OH− in base strength. Weak bases are stronger bases than water but are weaker bases than OH−.
The NH4
+ ion is a weak acid because it lies between H2O and H3O+ (H+) in terms of acid strength. Weak acids are better acids than water, thus their aqueous solutions are acidic. They are weak acids because they are not as strong as H3O+ (H+). Weak acids only partially dissociate in water and have Ka values between 1410− and 1. For a strong acid HX having Ka = 1 × 10⁶, the conjugate base, X−, has Kb = Kw/Ka = 1.0 × /110 14− × 106 = 1 × 2010− (a very small value). The conjugate bases of strong acids have extremely small values for Kb; so small that they are worse bases than water (Kb << Kw). Therefore, conjugate bases of strong acids have no basic properties in water. They are present, but they only balance charge in solution and nothing else. The conjugate bases of the six strong acids are Cl−, Br−, I−, NO3
−, ClO4−, and HSO4
−. Summarizing the acid-base properlties of conjugates:
a. The conjugate base of a weak acid is a weak base ( 1410− < Kb < 1)
b. The conjugate acid of a weak base is a weak acid ( 1410− < Ka < 1)
c. The conjugate base of a strong acid is a worthless base (Kb << 1410− )
d. The conjugate acid of a strong base is a worthless acid (Ka << 1410− ) Identifying/recognizing the acid-base properties of conjugates is crucial in order to understand the acid-base properties of salts. The salts we will give you will be salts

50
containing the conjugates discussed above. Your job is to recognize the type of conjugate present, and then use that information to solve an equilibrium problem (if necessary).
9. A salt is an ionic compound composed of a cation and an anion.
Weak base anions: These are the conjugate bases of the weak acids having the HA general formula. Table 14.2 of the text lists several HA type acids. Some weak base anions derived from the acids in Table 14.2 are ClO2
−, F−, NO2−, C2H3O2
−, OCl−, and CN−. Garbage anions (those anions with no basic or acidic properties): These are the conjugate bases of the strong acids having the HA general formula. These are Cl−, NO3
−, Br−, I−, and ClO4
−. Weak acid cations: These are the conjugate acids of the weak bases which contain nitrogen. Table 14.3 of the text lists several nitrogen-containing bases. Some weak acid cations derived from the weak bases in Table 14.3 are NH4
+, CH3NH3+, C2H5NH3
+, C6H5NH3+, and C5H5NH+.
Garbage cations (those cations with no acidic properties or basic properties): The most common ones used are the cations in the strong bases. These are Li+, Na+, K+, Rb+, Cs+, Ca2+, Sr2+, and Ba2+. We mix and match the cations and anions to get what type of salt we want. For a weak base salt, we combine a weak base anion with a garbage cation. Some weak base salts are NaF, KNO2, Ca(CN)2, and RbC2H3O2. To determine the pH of a weak base salt, we write out the Kb reaction for the weak base anion and determine Kb (= Kw/Ka). We set up the ICE table under the Kb reaction, and then solve the equilibrium problem to calculate [OH−] and, in turn, pH. For a weak acid salt, we combine a weak acid cation with a garbage anion. Some weak acid salts are NH4Cl, C5H5NHNO3, CH3NH3I, and C2H5NH3ClO4. To determine the pH, we write out the Ka reaction for the weak acid cation and determine Ka (= Kw/Kb). We set up the ICE table under the Ka reaction, and then solve the equilibrium problem to calculate [H+] and, in turn, pH. For a neutral (pH = 7.0) salt, we combine a garbage cation with a garbage anion. Some examples are NaCl, KNO3, BaBr2, and Sr(ClO4)2. For salts that contain a weak acid cation and a weak base anion, we compare the Ka value of the weak acid cation to the Kb value for the weak base anion. When Ka > Kb, the salt produces an acidic solution (pH < 7.0). When Kb > Ka, the salt produces a basic solution. And when Ka = Kb, the salt produces a neutral solution (pH = 7.0).
10. a. The weaker the X−H bond in an oxyacid, the stronger the acid.
b. As the electronegativity of neighboring atoms increases in an oxyacid, the strength of the acid increases.
c. As the number of oxygen atoms increases in an oxyacid, the strength of the acid
increases.
51
In general, the weaker the acid, the stronger the conjugate base and vice versa. a. Because acid strength increases as the X−H bond strength decreases, conjugate base
strength will increase as the strength of the X−H bond increases. b. Because acid strength increases as the electronegativity of neighboring atoms increases,
conjugate base strength will decrease as the electronegativity of neighboring atoms increases.
c. Because acid strength increases as the number of oxygen atoms increases, conjugate base
strength decreases as the number of oxygen atoms increases. Nonmetal oxides form acidic solutions when dissolved in water: SO3(g) + H2O(l) → H2SO4(aq) Metal oxides form basic solutions when dissolved in water: CaO(s) + H2O(l) → Ca(OH)2
For Review – Chapter 15 1. A common ion is an ion that appears in an equilibrium reaction but came from a source other
than that reaction. Addition of a common ion (H+ or NO2−) to the reaction HNO2 ⇌ H+ +
NO2− will drive the equilibrium to the left as predicted by LeChatelier’s principle.
When a weak acid solution has some of the conjugate base added from an outside source, this solution is called a buffer. Similarly, a weak base solution with its conjugate acid added from an outside source would also be classified as a buffer.
2. A buffer solution is one that resists a change in its pH when either hydroxide ions or protons
(H+) are added. Any solution that contains a weak acid and its conjugate base or a weak base and its conjugate acid is classified as a buffer. The pH of a buffer depends on the [base]/[acid] ratio. When H+ is added to a buffer, the weak base component of the buffer reacts with the H+ and forms the acid component of the buffer. Even though the concentrations of the acid and base component of the buffer change some, the ratio of [base]/[acid] does not change that much. This translates into a pH that doesn’t change much. When OH− is added to a buffer, the weak acid component is converted into the base com-ponent of the buffer. Again, the [base]/[acid] ratio does not change a lot (unless a large quantity of OH− is added), so the pH does not change much.
The concentrations of weak acid and weak base do not have to be equal in a buffer. As long
as there are both a weak acid and a weak base present, the solution will be buffered. If the concentrations are the same, the buffer will have the same capacity towards added H+ and added OH−. Also, buffers with equal concentrations of weak acid and conjugate base have pH = pKa.
Because both the weak acid and conjugate base are major spelcies present, both equilibriums
that refer to these species must hold true. That is, the Ka equilibrium must hold because the
52
weak acid is present, and the Kb equilibrium for the conjugate base must hold true because the conjugate base is a major species. Both the Ka and Kb equilibrium have the acid and conjugate base concentrations in their expressions. The same equilibrium concentrations of the acid and conjugate base must satisfy both equilibriums. In addition, the [H+] and [OH−] concentrations must be related through the Kw constant. This leads to the same pH answer whether the Ka or Kb equilibrium is used.
The third method to solve a buffer problem is to use the Henderson-Hasselbalch equation.
The equation is:
pH = pKa + log]acid[]base[
where the base is the conjugate base of the weak acid present or the acid is the conjugate acid of the weak base present. The equation takes into account the normal assumptions made for buffers. Specifically, it is assumed that the initial concentration of the acid and base component of the buffer equal the equilibrium concentrations. For any decent buffer, this will always hold true.
3. Whenever strong acid is added to a solution, always react the H+ from the strong acid with the
best base present in solution. The best base has the largest Kb value. For a buffer, this will be the conjugate base (A−) of the acid component of the buffer. The H+ reacts with the conjugate base, A−, to produce the acid, HA. The assumption for this reaction is that because strong acids are great at what they do, they are assumed to donate the proton to the conjugate base 100% of the time. That is, the reaction is assumed to go to completion. Completion is when a reaction goes until one or both of the reactants runs out. This reaction is assumed to be a stoichiometry problem like those we solved in Chapter 3 of the text.
Whenever a strong base is added to a buffer, the OH− ions react with the best acid present.
This reaction is also assumed to go to completion. In a buffer, the best acid present is the acid component of the buffer (HA). The OH− rips a proton away from the acid to produce the conjugate base of the acid (A−) and H2O. Again, we know strong bases are great at accepting protons, so we assume this reaction goes to completion. It is assumed to be a stoichiometry problem like the ones we solved in Chapter 3. Note: For BH+/B type buffers (buffers composed of a weak base B and its conjugate acid BH+), added OH− reacts to completion with BH+ to produce B and H2O, while added H+ reacts to completion with B to produce BH+. An example of a BH+/B type buffer is NH4
+/NH3. 4. When [HA] = [A−] (or [BH+] = [B]) for a buffer, the pH of the solution is equal to the pKa
value for the acid component of the buffer (pH = pKa because [H+] = Ka). A best buffer has equal concentrations of the acid and base component so it can be equally efficient at absorbing added H+ or OH−. For a pH = 4.00 buffer, we would choose the acid component having a Ka close to 00.410− = 1.0 × 410− (pH = pKa for a best buffer). For a pH = 10.00 buffer, we would want the acid component of the buffer to have a Ka close to 00.1010− = 1.0 ×
1010− . Of course, we can have a buffer solution made from a weak base (B) and its conjugate acid (BH+). For a pH = 10.00 buffer, our conjugate acid should have Ka ≈ 1.0 × 10¹⁰− which translates into a Kb value of the base close to 1.0 × 410− (Kb = Kw/Ka for conjugate acid-base pairs).
53
The capacity of a buffer is a measure of how much strong acid or strong base the buffer can neutralize. All the buffers listed have the same pH (= pKa = 4.74) because they all have a 1:1 concentration ratio between the weak acid and the conjugate base. The 1.0 M buffer has the greatest capacity; the 0.01 M buffer the least capacity. In general, the larger the concen-trations of weak acid and conjugate base, the greater the buffer capacity, i.e., the more strong acid or strong base that can be neutralized with little pH change.
5. Let’s review the strong acid-strong base titration using the example (case study) covered in
section 15.4 of the text. The example used was the titration of 50.0 mL of 0.200 M HNO3 titrated by 0.100 M NaOH. See Figure 15.1 for the titration curve. The important points are:
a. Initially, before any strong base has been added. Major species: H+, NO3
−, and H2O. To determine the pH, determine the [H+] in solution after the strong acid has completely dissociated as we always do for strong acid problems.
b. After some strong base has been added, up to the equilivance point. For our example, this
is from just after 0.00 mL NaOH added up to just before 100.0 mL NaOH added. Major species before any reaction: H+, NO3
−, Na+, OH−, and H2O. Na+ and NO3− have no acidic
or basic properties. In this region, the OH− from the strong base reacts with some of the H+ from the strong acid to produce water (H+ + OH− → H2O). As is always the case when something strong reacts, we assume the reaction goes to completion. Major species after reaction: H+, NO3
−, Na+, and H2O: To determine the pH of the solution, we first determine how much of the H+ is neutralized by the OH−. Then we determine the excess [H+] and take the –log of this quantity to determine pH. From 0.1 mL to 99.9 mL NaOH added, the excess H+ from the strong acid determines the pH.
c. The equivalence point (100.0 mL NaOH added). Major species before reaction: H+,
NO3−, Na+, OH−, and H2O. Here, we have added just enough OH− to neutralize all of the
H+ from the strong acid (moles OH− added = moles H+ present). After the stoichiometry reaction (H+ + OH− → H2O), both H+ and OH− have run out (this is the definition of the equivalence point). Major species after reaction: Na+, NO3
−, and H2O. All we have in solution are some ions with no acidic or basic properties (NO3
− and Na+ in H2O). The pH = 7.00 at the equivalence point of a strong acid by a strong base.
d. Past the equivalence point (volume of NaOH added > 100.0 mL). Major species before reaction H+, NO3
−, Na+, OH−, and H2O. After the stoichiometry reaction goes to completion (H+ + OH− → H2O), we have excess OH− present. Major species after reaction: OH−, Na+, NO3
−, and H2O. We determine the excess [OH−] and convert this into the pH. After the equivalence point, the excess OH− from the strong base determines the pH.
6. See Figure 15.2 of the text for a titration curve of a strong base by a strong acid. The stoichiometry problem is still the same, H+ + OH− → H2O, but what is in excess after this reaction goes to completion is reverse of the strong acid-strong base titration. The pH up to just before the equivalence point is determined by the excess OH− present. At the equivalence point, pH = 7.00 because we have added just enough H+ from the strong acid to react with all of the OH− from the strong base (mole base present = mole acid added). Past the equivalence point, the pH is determined by the excess H+ present. As can be seen from Figures 15.1 and 15.2, both strong by strong titrations have pH = 7.00 at the equivalence point, but the curves are the reverse of each other before and after the equivalence point.
54
7. In Section 15.4 of the text, the case study for the weak acid-strong base titration is the titration of 50.0 mL of 0.10 M HC2H3O2 by 0.10 M NaOH. See Figure 15.3 for the titration curve. As soon as some NaOH has been added to the weak acid, OH− reacts with the best acid present. This is the weak acid titrated (HC2H3O2 in our problem). The reaction is: OH− + HC2H3O2 → H2O + C2H3O2
−. Because something strong is reacting, we assume the reaction goes to completion. This is the stoichiometry part of a titration problem. To solve for the pH, we see what is in solution after the stoichiometry problem and decide how to proceed. The various parts to the titration are: a. Initially, before any OH− has been added. The major species present is the weak acid,
HC2H3O2, and water. We would use the Ka reaction for the weak acid and solve the equilibrium problem to determine the pH.
b. Just past the start of the titration up to just before the equivalence point (0.1 mL to 49.9
mL NaOH added). In this region, the major species present after the OH− reacts to completion are HC2H3O2, C2H3O2
−, Na+, and water. We have a buffer solution because both a weak acid and a conjugate base are present. We can solve the equilibrium buffer problem using the Ka reaction for HC2H3O2, the Kb reaction for C2H3O2
−, or the Henderson-Hasselbalch equation. A special point in the buffer region is the halfway point to equivalence. At this point (25.0 mL of NaOH added), exactly one-half of the weak acid has been converted into its conjugate base. At this point, we have [weak acid] = [conjugate base] so that pH = pKa. For the HC2H3O2 titration, the pH at 25.0 mL NaOH added is –log (1.8 × 510− ) = 4.74; in this titration the pH is acidic at the halfway point to equivalence. However, other weak acid-strong base titrations could have basic pH values at the halfway point. This just indicates that the weak acid has Ka < 1 × 710− , which is fine.
c. The equivalence point (50.0 mL NaOH added). Here we have added just enough OH− to
convert all of the weak acid into its conjugate base. In our example, the major species present are C2H3O2
−, Na+, and H2O. Because the conjugate base of a weak acid is a weak base, we will have a basic pH (pH > 7.0) at the equivalence point. To calculate the pH, we write out the Kb reaction for the conjugate base and then set-up and solve the equilibrium problem. For our example, we would write out the Kb reaction for C2H3O2
−.
d. Past the equivalence point (V > 50.0 mL). Here we added an excess of OH−. After the stoichiometry part of the problem, the major species are OH−, C2H3O2
−, H2O, and Na+. We have two bases present, the excess OH− and the weak conjugate base. The excess OH− dominates the solution and thus determines the pH. We can ignore the OH− contribution from the weak conjugate base.
See the titration curve after Figure 15.3 that compares and contrasts strong acid-strong base titrations to weak acid-strong base titration. The two curves have the same pH only after the equivalence point where the excess strong base added determines the pH. The strong acid titration is acidic at every point before the equivalence point, has a pH = 7.0 at the equivalence point, and is basic at every point after the equivalence point. The weak acid titration is much more complicated because we cannot ignore the basic properties of the
55
conjugate base of the weak acid; we could ingore the conjugate base in the strong acid titration because it had no basic properties. In the weak acid titration, we start off acidic (pH < 7.0), but where it goes from here depends on the strength of the weak acid titrated. At the halfway point where pH = pKa, the pH may be acidic or basic depending on the Ka value of the weak acid. At the equivalence, the pH must be basic. This is due to the presence of the weak conjugate base. Past the equivalence point, the strong acid and weak acid titrations both have their pH determined by the excess OH− added.
8. The case study of a weak base-strong acid titration in Section 15.4 of the text is the titration
of 100.0 mL of 0.050 M NH3 by 0.10 M HCl. The titration curve is in Figure 15.5. As HCl is added, the H+ from the strong acid reacts with the best base present, NH3. Because
something strong is reacted, we assume the reaction goes to completion. The reaction used for the stoichiometry part of the problem is: H+ + NH3 → NH4
+. Note that the effect of this reaction is to convert the weak base into its conjugate acid. The various parts to a weak base-strong acid titration are:
a. Initially before any strong acid is added. We have a weak base in water. Write out the Kb
reaction for the weak base, set-up the ICE table, and then solve. b. From 0.1 mL HCl added to just gefore the equivalence point (49.9 mL HCl added). The
major species present in this region are NH3, NH4+, Cl−, and water. We have a weak base
and its conjugate acid present at the same time; we have a buffer. Solve the buffer problem using the Ka reaction for NH4
+, the Kb reaction for NH3, or the Henderson-Hasselbalch equation. The special point in the buffer region of the titration is the halfway point to equivalence. Here, [NH3] = [NH4
+], so pH = pKa = !log (5.6 × )10 10− = 9.25. For this titration, the pH is basic at the halfway point. However, if the Ka for the weak acid component of the buffer has a Ka > 1 × 710− (Kb for the base < 1 × 10⁻⁷), then the pH will be acidic at the halfway point. This is fine. In this review question, it is asked what is the Kb value for the weak base where the halfway point to equivalence has pH = 6.0 (which is acidic). Because pH = pKa at this point, pKa = 6.0, so pKb = 14.00 – 6.0 = 8.0; Kb = 0.810− = 1.0 × 810− .
c. The equivalence point (50.0 mL HCl added). Here, just enough H+ has been added to
convert all of the NH3 into NH4+. The major species present are NH4
+, Cl− and H2O. The only important species present is NH4
+, a weak acid. This is always the case in a weak base-strong acid titration. Because a weak acid is always present at the equivalence point, the pH is always acidic (pH < 7.0). To solve for the pH, write down the Ka reaction for the conjugate acid and then determine Ka (= Kw/Kb). Fill in the ICE table for the problem, and then solve to determine pH.
d. Past the equivalence point (V > 50.0 mL HCl added). The excess strong acid added
determines the pH. The major species present for our example would be H+ (excess), NH4
+, Cl−, and H2O. We have two acids present, but NH4+ is a weak acid. Its H+
contribution will be negligible compared to the excess H+ added from the strong acid. The pH is determined by the molarity of the excess H+.
56
Examine Figures 15.2 and 15.5 to compare and contrast a strong base-strong acid titration with a weak base-strong acid titration. The points in common are only after the equivalence point has been reached where excess strong acid determines the pH. Leading up to and including the equivalence point, the two titrations are very different. This is because the conjugate acid of a weak base is a weak acid, whereas, when a strong base dissolves in water, only OH− is important; the cation in the strong base is garbage (has no acidic/basic properties). There is no conjugate acid to worry about when a strong base is titrated. This is not the case when a weak base is titrated. For a strong base-strong acid titration, the excess OH− from the strong base determines the pH from the initial point all the way up to the equivaldnce point. At the equivalence point, the added H+ has reacted with all of the OH− and pH = 7.0. For a weak base-strong acid, we initially have a weak base problem to solve in order to calculate the pH. After H+ has been added, some of the weak base is converted into its conjugate acid and we have buffer solutions to solve in order to calculate the pH. At the equivalence point, we have a weak acid problem to solve. Here, all of the weak base has been converted into its conjugate acid by the added H+.
9. An acid-base indicator marks the end point of a titration by changing color. Acid-base indicators are weak acids themselves. We abbreviate the acid form of an indicator as HIn and the conjugate base form as In−. The reason there is a color change with indicators is that the HIn form has one color associated with it while the In− form has a different color associated with it. Which form dominates in solution and dictates the color is determined by the pH of the solution. The related quilibrium is: HIn ⇌ H+ + In−. In a very acidic solution, there are lots of H+ ions present which drives the indicator equilibrium to the left. The HIn form dominates and the color of the solution is the color due to the HIn form. In a very basic solution, H+ has been removed from solution. This drives the indicator equilibrium to the right and the In− form dominates. In very basic solutions, the solution takes on the color of the In− form. In between very acidic and very basic solutions, there is a range of pH values where the solution has significant amounts of both the HIn and In− forms present. This is where the color change occurs and we want this pH to be close to the stoichiometric point of the titration. The pH that the color change occurs is determined by the Ka of the indicator.
Equivalence point: When enough titrant has been added to react exactly with the substance in the solution being titrated. Endpoint: indicator changes color. We want the indicator to tell us when we have reached the equivalence point. We can detect the end point visually and assume it is the equivalence point for doing stoichiometric calculations. They don’t have to be as close as 0.01 pH units since, at the equivalence point, the pH is changing very rapidly with added titrant. The range over which an indicator changes color only needs to be close to the pH of the equivalence point.
10. The two forms of an indicator are different colors. The HIn form has one color and the In−
form has another color. To see only one color, that form must be in an approximately ten-fold excess or greater over the other form. When the ratio of the two forms is less than 10, both colors are present. To go from [HIn]/[In−] = 10 to [HIn]/[In−] = 0.1 requires a change of 2 pH units (a 100-fold decrease in [H+]) as the indicator changes from the HIn color to the In− color.
57
From Figure 15.8 of the text, thymol blue has three colors associated with it: orange, yellow, and blue. In order for this to happen, thymol blue must be a diprotic acid. The H2In form has the orange color, the HIn− form has the yellow color, and the In2− form has the blue color associated with it. Thymol blue cannot be monoprotic; monoprotic indicators only have two colors associated with them (either the HIn color or the In− color).
For Review − Chapter 16 1. Ksp refers to the equilibrium reaction where a salt (ionic compound) dissolves into its ions to
form a saturated solution: For example, consider Ca3(PO4)2(s). The Ksp reaction and Ksp expression are:
Ca3(PO4)2(s) ⇌ 3 Ca2+(aq) + 2 PO4
3−(aq) Ksp = [Ca2+]3[PO43−]2
Ksp is just an equilibrium constant (called the solubility product constant) that refers to a specific equilibrium reaction. That reaction is always a solid salt dissolving into its ions. Because the ionic compound is a solid, it is not included in the Ksp expression. The solubility of a salt is the maximum amount of that salt that will dissolve per liter of solution. We determine solubility by solving a typical equilibrium problem using the Ksp reaction. We define our solubility (usually called s) as the maximum amount of the salt that will dissolve, then fill in our ICE table and solve. The two unknowns in the equilibrium problem are the Ksp value and the solubility. You are given one of the unknowns and asked to solve for the other. See Examples 16.1-16.3 of the text for typical calculations. In Examples 16.1 and 16.2, you are given the solubility of the salt and asked to calculate Ksp for the ionic compound. In Example 16.3, you are given the Ksp value for a salt and asked to calculate the solubility. In both types of problem, set-up the ICE table in order to solve.
2. If the number of ions in the two salts is the same, the Ksp’s can be compared directly to determine relative solubilities, i.e., 1 : 1 electrolytes (1 cation : 1 anion) can be compared to each other; 2 : 1 electrolyes can be compared to each other, etc. If the number of ions is the same, the salt with the largest Ksp value has the largest molar solubility. If the number of ions is different between two salts, then you must actually calculate the solubility of each salt to see which is more or less soluble.
3. A common ion is when either the cation or anion of the salt in question is added from an outside source. For example, a common ion for the salt CaF2 would be if F− (or Ca2+) was added to solution by dissolving NaF [or Ca(NO3)2]. When a common ion is present, not as much of the salt dissolves (as predicted by LeChatelier’s Principle), so the solubility decreases. This decrease in solubility is called the common ion effect.
4. Salts whose anions have basic properties have their solubilities increase as the solution
becomes more acidic. Some examples are CaF2, Ca3(PO4)2, CaCO3, and Fe(OH)3. In all of these cases, the anion has basic properties and reacts with H+ in acidic solutions. This removes one of the ions from the equilibrium, so more salt dissolves to replenish the ion concentrations (as predicted by LeChatelier’s Principle). In our example, F−, PO4
3−, and
58
CO32− are all conjugate bases of weak acids so they are all weak bases. In Fe(OH)3, OH− is a
strong base. For salts with no pH dependence on solubility, the ions in the salt must not have any acidic or
basic properties. Examples of these salts have anions that are the conjugate bases of strong acids so they are worthless bases. Examples of these types of salts are AgCl, PbBr2, and Hg2I2. The solubility of these salts do not depend on pH because Cl−, Br−, and I− (as well as Ag+) have no basic (or acidic) properties.
5. Q and Ksp have the same expression; the difference is the type of concentrations used. Ksp
always uses equilibrium concentrations for the ions. Q, however, uses initial concentrations of the ions given in a problem. The purpose of Q is to see if a reaction is at equilibrium. If Q = Ksp, then the salt is at equilibrium with ion concentrations given in the problem. If Q ≠ Ksp, then the reaction is not at equilibrium; these concentrations must change in order for the salt to get to equilibrium with its ions. If Q > Ksp, the ion concentrations are too large. The Ksp reaction shifts left to produce the solid salt in order to reduce the ion concentrations, and to eventually get to equilibrium. If Q < Ksp, the Ksp reaction shifts right to produce more ions in order to get to equilibrium (more salt dissolves).
6. Selective precipitation is a way to separate out ions in an aqueous mixture. One way this is
done is to add a reagent that precipitates with only one of the ions in the mixture. That ion is removed by forming the precipitate. Another way to selectively precipitate out some ions in a mixture is to choose a reagent that forms a precipitate with all of the ions in the mixture. The key is that each salt has a different solubility with the ion in common. We add the common ion slowly until a precipitate starts to form. The first precipitate to form will be the least soluble precipitate. After precipitation of the first is complete, we filter off the solution and continue adding more of the common ion until precipitation of the next least soluble salt is complete. This process is continued until all of the ions have been pricipitated out of solution.
For the 0.10 M Mg2+, Ca2+, and Ba2+, adding F− (NaF) slowly will separate the ions due to
their solubility differences with these ions. The first compound to precipitate is the least soluble CaF2 compound (it has the smallest Ksp value, 4.0 × 1110− ). After all of the CaF2 has precipitated and been removed, we continue adding F− until the second least soluble flouride has precipitated. This is MgF2 with the intermediate Ksp value (6.4 × 910− ). Finally, the only ion left in solution is Ba2+ which is precipitated out by adding more NaF. BaF2 precipitates last because it is the most soluble fluoride salt in the mixture (Ksp = 2.4 × 510− ).
For the Ag+, Pb2+, Sr2+ mixture, because the phosphate salt of these ions do not all have the
same number of ions, we cannot just compare Ksp values to deduce the order of precipitation. This would work for Pb3(PO4)2, Ksp = 1 × 5410− and Sr3(PO4)2, Ksp = 1 × 3110− because these contain the same number of ions (5). However, Ag3PO4(s) only contains 4 ions per formula unit. We must calculate the [PO4
3−] necessary to start precipitation. We do this by setting Q = Ksp and determining the [PO4
3−] necessary for this to happen. Any [PO43−] greater than this
calculated concentration will cause Q > Ksp and precipitation of the salt. A sample calculation is:
Sr3(PO4)2 ⇌ 3 Sr2+(aq) + 2 PO43−(aq) Ksp = 1 × 3110−
Q = 1 × 3110− = [Sr2+]3[PO4
3−]2 = (1.0 M)3 [PO43−]2, [PO4
3−] = 3 × 1610− M
59
When [PO4
3−] > 3 × 1610− M, precipitation of Sr3(PO4)2 will occur. Doing similar calculations with the other two salts leads to the answers: Ag3PO4(s) will precipitate when [PO4
3−] > 1.8 × 1810− M. Pb3(PO4)2(s) will precipitate when [PO4
3−] > 1 × 2710− M. From the calculations, Pb3(PO4)2(s) needs the smallest [PO4
3−] to precipitate, so it precipitates first as we add K3PO4. The next salt to precipitate is Ag3PO4(s), and Sr3(PO4)2(s) is last to precipitate because it requires the largest [PO4
3−]. 7. In step 1, the insoluble chloride salts are precipitated by adding HCl. If Ag+, Pb2+, and/or
Hg22+ is/are present, these ions would be removed from solution as precipitates. In step 2, the
least soluble of the insoluble sulfide salts are removed by addition of H2S. Because the solution is very acidic by addition of HCl in step 1, the amount of free S2− ions when H2S is added will be very small. This is because the presence of a lot of protons suppresses the H2S dissociation. With only a minimal amount of S2− present, only the least insoluble sulfide salts will precipitate in this step. In the next step (step 3), NaOH is added in order to react with the excess protons. This causes more H2S to dissociate, which causes more free S2− to be produced. As the S2− concentration increases with addition of NaOH, the insoluble sulfide salts that didn’t precipitate in step 2, will now precipitate. In the fourth and final step, ions that don’t form insoluble chloride and insoluble sulfide salts are all that remain in solution. Here, a solution of Na2CO3(aq) is added to remove Ba2+, Ca2+, and/or Mg2+ as the insoluble carbonate salts. The ions that remain after addition of Na2CO3 are those ions which do not form insoluble salts. These are the alkali metal ions and ammonium ions. Because these ions do not form insoluble salts, selective precipitation cannot be used to determine their presence.
8. A complex ion is a charged species consisting of a metal ion surrounded by ligands. A ligand
is a molecule or ion having a lone pair of electrons that can be donated to an empty orbital on the metal ion to form a covalent bond. A ligand is a Lewis base (electron pair donor).
Cu2+(aq) + NH3(aq) ⇌ CuNH32+(aq) K1 ≈ 1 × 10³
CuNH32+(aq) + NH3(aq) ⇌ Cu(NH3)2
2+(aq) K2 ≈ 1 × 10⁴
Cu(NH3)22+(aq) + NH3(aq) ⇌ Cu(NH3)3
2+(aq) K3 ≈ 1 × 10³
Cu(NH3)32+(aq) + NH3(aq) ⇌ Cu(NH3)4
2+(aq) K4 ≈ 1 × 10³ Because the K values are much greater than one, all of these reactions lie far to the right
(products are mostly present at equilibrium). So most of the Cu2+ in a solution of NH3 will be converted into Cu(NH3)4
2+. Therefore, the [Cu(NH3)42+] will be much larger than the [Cu2+] at
equilibrium.
9. Cu(OH)2(s) ⇌ Cu2+(aq) + 2 OH−(aq)
60
As NH3 is added, it removes Cu2+ from the above Ksp equilibrium for Cu(OH)2. It removes Cu2+ by reacting with it to form Cu(NH3)4
2+ mostly. As Cu2+ is removed, more of the Cu(OH)2(s) will dissolve to replenish the Cu2+. This process continues until equilibrium is reached or until all of the Cu(OH)2 dissolves.
H+(aq) + NH3(aq) → NH4
+(aq) The added H+ from the strong acid reacts with the weak base NH3 to form NH4
+. As NH3 is removed from solution, the complex ion equilibrium will shift left to produce more NH3. This has the effect of also producing more Cu2+. Eventually enough Cu2+ will be produced to react with OH− to form Cu(OH)2(s).
The general effect of complex ion formation is to increase the solubility of salts that contain
cations which form complex ions. 10. The three metals that form insoluble chloride salts are Ag+, Pb2+ and Hg2
2+. A mixture that contains any or all of these ions is first reacted with some cold HCl(aq). All of the insoluble chloride salts form under these conditions. Next the solution is heated. PbCl2(s) dissolves in hot HCl, while AgCl(s) and Hg2Cl2 will not dissolve upon heating. If a precipitate still is present after heating, then all we can conclude is that Ag+ and/or Hg2
2+ could be present. The solution above the precipitate is filtered off and is then reacted with Na2CrO4(aq). If Pb2+
is present in the original mixture, then a yellow precipitate of PbCrO4(s) will form. If no Pb2+ ions were present, then no precipitate will form with addition of Na2CrO4(aq).
In the next step, the precipitate formed initially with cold HCl(aq) and remained after heating
is examined. Some NH3(aq) is added to the precipitate, and the solution above the precipitate is filtered off. Ammonia forms a complex ion with Ag+, but does not form a complex ion with Hg2
2+. If Ag+ is present, then it will be in the solution above the precipitate as Ag(NH3)2
+. Also, if a precipitate remains after NH3 is added, then the Hg22+ ion must have
been present originally. If no precipitate remains, then Hg22+ was not present.
To prove Ag+ is present (or not present), the solution above the precipitate is made acidic.
The added protons remove NH3 from solution. This frees up Ag+ ions to react with the Cl− ions present. So if Ag+ is present, AgCl(s) will reform when the solution is made acidic; if no precipitate forms, then no Ag+ was present in the original mixture.
For Review − Chapter 17 1. a. A spontaneous process is one that occurs without any outside intervention. b. Entropy is a measure of disorder or randomness. c. Positional probability is a type of probability that depends on the number of arrangements
in space that yield a particular state. The more disordered state generally has the larger positional probability.
d. The system is the portion of the universe in which we are interested.
61
e. The surroundings are everything else in the universe besides the system. f. The universe is everything; universe = system + surroundings. 2. Second law of thermodynamics: in any spontaneous process, there is always an increase in
the entropy of the universe. ∆Suniv = ∆Ssys + ∆Ssurr; When both ∆Ssys and ∆Ssurr are positive, ∆Suniv must be positive (so the process is spontaneous). ∆Suniv is always negative (so the process is nonspontaneous) when both ∆Ssys and ∆Ssurr are negative. When the signs of ∆Ssys are opposite of each other [(∆Ssys (+), ∆Ssurr (−) or vice versa], the process may or may not be spontaneous.
3. ∆Ssurr is primarily determined by heat flow. This heat flow into or out of the surroundings
comes from the heat flow out of or into the system. In an exothermic process (∆H < 0), heat flows into the surroundings from the system. The heat flow into the surroundings increases the random motions in the surroundings and increases the entropy of the surroundings (∆Ssurr > 0). This is a favorable driving force for spontaneity. In an endothermic reaction (∆H > 0), heat is transferred from the surroundings into the system. This heat flow out of the surroundings decreases the random motions in the surroundings and decreases the entropy of the surroundings (∆Ssurr < 0). This is unfavorable. The magnitude of ∆Ssurr also depends on the temperature. The relationship is inverse; at low temperatures, a specific amount of heat exchange makes a larger percent change in the surroundings than the same amount of heat flow at a higher temperature. The negative sign in the ∆Ssurr = !∆H/T equation is necessary to get the signs correct. For an exothermic reaction where ∆H is negative, this increases ∆Ssurr so the negative sign converts the negative ∆H value into a positive quantity. For an endothermic process where ∆H is positive, the sign of ∆Ssurr is negative and the negative sign converts the positive ∆H value into a negative quantity.
4. ∆Suniv = !∆G/T (at constant T and P); when ∆G is negative (∆Suniv > 0), the process is
spontaneous. When ∆G is positive (∆Suniv < 0), the process in nonspontaneous (the reverse process is spontaneous). When ∆G = 0, the process is at equilibrium.
∆G = ∆H ! T∆S; see Table 17.5 of the text for the four possible sign conventions and the
temperature dependence for these sign combinations. When the signs for ∆H and ∆S are both the same, then temperature determines if the process is spontaneous. When ∆H is positive (unfavorable) and ∆S is positive (favorable), high temperatures are needed to make the favorable ∆S term dominate, which makes the process spontaneous (∆G < 0). When ∆H is negative (favorable) and ∆S is negative (unfavorable), low temperatures are needed so the favorable ∆H term dominates, which makes the process spontaneous (∆G < 0). Note that if ∆G is positive for a process, then the reverse process has a negative ∆G value and is spontaneous.
At the phase change temperature (melting point or boiling point), two phases are in
equilibrium with each other so ∆G = 0. The ∆G = ∆H ! T∆S equation reduces to ∆H = T∆S at the phase change temperature. For the s → l phase change, ∆G is negative above the freezing point because the process is spontaneous (as we know). For the l → g phase change, the sign of ∆G is positive below the boiling point as the process is nonspontaneous (as we know).
62
5. Third law of thermodynamics: The entropy of a perfect crystal at 0 K is zero. Standard entropy values (SE) represent the increase in entropy that occurs when a substance is heated from 0 K to 298 K at 1 atm pressure. The equation to calculate ∆SE for a reaction using the standard entropy values is: o
rxnS∆ = oreactantsr
oproductsp SΣnSΣn − .
This equation works because entropy is a state function of the system (it is not pathway-
dependent). Because of this, one can manipulate chemical reactions with known ∆SEvalues to determine ∆SE for a different reaction. The entropy change for a different reaction equals the sum of the entropy changes for the reactions added together that yield the different reaction. This is utilizing Hess’s law. The superscript E indicates conditions where T = 25EC and P = 1 atm.
To predict signs for gas phase reactions, you need to realize that the gaseous state represents a
hugely more disordered state (a state with much larger positional probability) as compared to the solid and liquid states. Gases dominate sign predictions for reactions. Those reactions that show an increase in the number of moles of gas as reactants are converted to products have an increase in disorder (an increase in positional probability) which translates into a positive ∆SE value. ∆SE values are negative when there is a decrease in the moles of gas as reactants are converted into products. When the moles of gaseous reactants and products are equal, ∆SE is usually difficult to predict for chemical reactions. However, predicting signs for phase changes can be done by realizing the solid state is the most ordered phase (lowest SE values, smallest positional probability). The liquid state is a slightly more disordered phase (has a higher positional probability) than the solid state, with the gaseous state being the most disordered phase (has the largest positional probability) by a large margin
)SSS( ogas
oliquid
osolid <<< . Another process involving condensed phases whose sign is also easy
to predict (usually) is the dissolution of a solute in a solvent. Here, the mixed up solution state is usually the more disordered state (has a larger positional probability) as compared to the solute and solvent separately.
6. Standard free energy change: the change in free energy that will occur for one unit of reaction
if the reactants in their standard states are converted to products in their standard state. The standard free energy of formation (∆G o
f ) of a substance is the change in free energy that accompanies the formation of 1 mole of that substance from its constituent elements, with all reactants and products in their standard states. The equation that manipulates ∆G o
f values to determining o
reactionG∆ is: ∆G° = o)(reactantsfr
o(products)fp ∆GΣn∆nΣn − .
Because ∆GE is a state function (path independent), chemical reactions with known ∆GE
values can be manipulated to determine ∆GE for a different reaction. ∆GE for the different reaction is the sum of ∆GE for all the steps (reactions) added together to get the different reaction. This is Hess’s law.
Another way to determine ∆G° for a reaction is to utilize the ∆G° = ∆H° ! T∆S° equation.
Here, you need to know ∆H°, ∆S°, and the temperature, then you can use the above equation to calculate ∆G°.
Of the functions ∆GE, ∆HE, and ∆SE, ∆GE has the greatest dependence on temperature. The
temperature is usually assumed to be 25EC. However, if other temperatures are used in a reaction, we can estimate ∆G° at that different temperature by assuming ∆H° and ∆S° are temperature independent (which is not always the best assumption). We calculate ∆HE and
63
∆S° values for a reaction using Appendix 4 data, then use the different temperature in the ∆G° = ∆HE ! T∆S° equation to determine (estimate) ∆G° at that different temperature.
7. No; when using ∆G o
f values in Appendix 4, we have specified a temperature of 25°C. Further, if gases or solutions are involved, we have specified partial pressures of 1 atm and solute concentrations of 1 molar. At other temperatures and compositions, the reaction may not be spontaneous. A negative ∆G° value means the reaction is spontaneous under standard conditions.
The free energy and pressure relationship is G = G° + RT ln(P). The RT ln(P) term corrects
for nonstandard pressures (or concentrations if solutes are involved in the reaction). The standard pressure for a gas is 1 atm and the standard concentration for solutes is 1 M. The equation to calculate ∆G for a reaction at nonstandard conditions is: ∆G = ∆G° + RT ln Q where Q is the reaction quotient determined at the nonstandard pressures and/or concentrations of the gases and/or solutes in the reaction. The reaction quotient has the exact same form as the equilibrium constant K. The difference is that the partial pressures or concentrations used may or may not be the equilibrium concentrations.
All reactions want to minimize their free energy. This is the driving force for any process. As
long as ∆G is a negative, the process occurs. The equilibrium position represents the lowest total free energy available to any particular reaction system. Once equilibrium is reached, the system cannot minimize its free energy anymore. Converting from reactants to products or products to reactants will increase the total free energy of the system which reactions do not want to do.
8. At equilibrium, ∆G = 0 and Q = K (the reaction quotient equals the equilibrium constant
value). From the ∆G° = !RT ln K equation, when a reaction has K < 1, the ln K term is negative, so ∆G° is positive. When K > 1, the ln K term is positive, so ∆G° is negative. When ∆G° = 0, this tell us that K for the process is equal to one (K = 1) because ln(1) = 0.
The sign of ∆G (positive or negative) tells us which reaction is spontaneous (the forward or
reverse reaction). If ∆G < 0, then the forward reaction is spontaneous, and if ∆G > 0, then the reverse reaction is spontaneous. If ∆G = 0, then the reaction is at equilibrium (neither the forward or reverse reactions are spontaneous). ∆G° gives the equilibrium position by determining K for a reaction utilizing the equation ∆G° = !RT ln K. ∆G° can only be used to predict spontaneity when all reactants and products are present at standard pressures of 1 atm and/or standard concentrations of 1 M.
9. A negative ∆G value does not guarantee that a reaction will occur. It does say that it can
occur (is spontaneous), but whether it will occur also depends on how fast the reaction is (depends on the kinetics). A process with a negative ∆G may not occur because it is too slow. The example used in the text is the conversion of diamonds into graphite. Thermodynamics says the reaction can occur (∆G > 0), but the reaction is so slow that it doesn’t occur.
The rate of a reaction is directly related to temperature. As temperature increases, the rate of a
reaction increases. Spontaneity, however, does not necessarily have a direct relationship to temperature. The temperature dependence of spontaneity depends on the signs of ∆H and ∆S (see Table 17.5 of the text). For example, when ∆H and ∆S are both negative, the reaction becomes more favorable thermodynamically (∆G becomes more negative) with decreasing temperature. This is just the opposite of the kinetics dependence on temperature. Other sign combinations of ∆H and ∆S have different spontaneity temperature dependence.
64
10. wmax = ∆G; when ∆G is negative, the magnitude of ∆G is equal to the maximum possible useful work obtainable from the process (at constant T and P). When ∆G is positive, the magnitude of ∆G is equal to the minimum amount of work that must be expended to make the process spontaneous. Due to waste energy (heat) in any real process, the amount of useful work obtainable from a spontaneous process is always less than wmax, and for a non-spontaneous reaction, an amount of work greater than wmax must be applied to make the process spontaneous.
Reversible process: A cyclic process carried out by a hypothetical pathway, which leaves the
universe the same as it was before. No real process is reversible. For Review – Chapter 18 1. Half-reactions: the two parts of an oxidation-reduction reaction, one representing oxidation,
the other reduction. Overall charge must be balanced in any chemical reaction. We balance the charge in the half-
reactions by adding electrons to either the reactant side (reduction half-reaction) or to the product side (oxidation half-reaction). In the overall balanced equation, the number of electrons lost by the oxidation half-reaction has to exactly equal the number of electrons gained in the reduction half-reaction. Since electrons lost = electrons gained, then electrons will not appear in the overall balanced equation.
See Section 18.1 of the text for a flow chart summarizing the half-reaction method for
balancing redox reactions in acidic or basic solution. In all cases, the redox reaction must be mass balanced as well as charge balanced. Mass balance means that we have the same number and types of atoms on both sides of the equation; charge balance means that the overall net charge on each side of the reaction is the same.
2. Before we answer the question, here are four important terms relating to redox reactions and
galvanic cells. a. Cathode: The electrode at which reduction occurs. b. Anode: The electrode at which oxidation occurs. c. Oxidation half-reaction: The half-reaction in which electrons are products. In a galvanic
cell, the oxidation half-reaction always occurs at the anode. d. Reduction half-reaction: The half-reaction in which electrons are reactants. In a galvanic
cell, the reduction half-reaction always occurs at the cathode. See Figures 18.2 and 18.3 for designs of galvanic cells. The electrode compartment in which reduction occurs is called the cathode and the electrode compartment in which oxidation occurs is called the anode. These compartments have electrodes (a solid surface) immersed in a solution. For a standard cell, the solution contains the reactant and product solutes and gases that are in the balanced half-reactions. The solute concentrations are all 1 M and gas partial pressures are all 1 atm for a standard cell. The electrodes are connected via a wire and a salt-bridge connects the two solutions.
65
The purpose of the electrodes is to provide a solid surface for electron transfer to occur in the two compartments. Electrons always flow from the anode (where they are produced) to the cathode (where they are reactants). The salt bridge allows counter ions to flow into the two cell compartments to maintain electrical neutrality. Without a salt bridge, no sustained electron flow can occur. In the salt bridge, anions flow into the anode to replenish the loss of negative charge as electrons are lost; cations flow into the cathode to balance the negative charge as electrons are transferred into the cathode. The “pull” or driving force on the electrons is called the cell potential (Ecell) or the electromotive force. The unit of electrical potential is the volt (V) which is defined as 1 joule of work per coulomb of charge transferred. It is the cell potential that can be used to do useful work. We harness the spontaneous redox reaction to produce a cell potential which can do useful work.
3. The zero point for standard reduction potentials (EE) is the standard hydrogen electrode. The half-reaction is: 2 H+ + 2 e− → H2. This half-reaction is assigned a standard potential of zero, and all other reduction half-reactions are measured relative to this zero point. Sub-stances less easily reduced than H+ have negative standard reduction potentials (EE < 0), while substances more easily reduced than H+ have positive standard reduction potentials (EE > 0). The species most easily reduced has the most positive EE value; this is F2. The least easily reduced species is Li+ with the most negative EE value. When a reduction half-reaction is reversed to obtain an oxidation half-reaction, the sign of the reduction potential is reversed to give the potential for the oxidation half-reaction (E o
ox = !Ered). The species oxidized are on the product side of the reduction half-reactions listed in Table 18.1. Li will have the most positive oxidation potential [E o
ox = !Ered = ! (!3.05 V) = 3.05 V], so Li is the most easily oxidized of the species. The species most easily oxidized is the best reducing agent. The worst reducing agent is F− because it has the most negative oxidation potential (E o
ox = !2.87 V). For a spontaneous reaction at standard conditions, E o
cell must be positive (E ocell = E o
red + E oox
> 0). For any two half-reactions, there is only one way to manipulate them to come up with a positive E o
cell (a spontaneous reaction). Because the half-reactions do not depend on how many times the reaction occurs, half-reactions are an intensive property. This means that the value of E o
red or E oox is not changed when the half-reactions are multiplied by integers to get
the electrons to cross off. The line notation of the standard galvanic cell illustrated in Figure 18.5 of the text would be: Zn(s) | Zn2+(aq) || H2(g) | H+(aq) | Pt or Zn(s) | Zn2+(1.0 M) || H2(1.0 atm) | H+(1.0 M) | Pt The double line represents the salt-bridge separating the anode and cathode compartments. To the left of the double line are the pertinent anode compartment contents, and to the right are the pertinent cathode compartment contents. At each end, the electrodes are listed; to the inside, the solution contents are listed. A single line is used to separate the contents of each compartment whenever there is a phase change. Here in the cathode compartment, a single line is used to separate H2(g) from H+(aq) and to separate H+(aq) from Pt (the electrode).
66
When concentrations and partial pressures are not listed, they are assumed to be standard (1.0 M for solutes and 1.0 atm for gases). For cells having nonstandard concentrations and pressures, we always include the actual concentrations and pressures in the line notation instead of the phases.
4. ∆GE = !nFEE; ∆GE is the standard free energy change for the overall balanced reaction, n is
the number of electrons transferred in the overall balanced reaction, F is called the Faraday constant (1 F = 96,485 coulombs of charge transferred per mole of electrons), and EE is the standard cell potential for the reaction. For a spontaneous redox reaction, E o
cell is positive while ∆G o
rxn is negative. The negative sign is necessary to convert the positive E ocell value for
a spontaneous reaction into a negative ∆G orxn . The superscript E indicates standard
conditions. These are T = 25EC, solute concentrations of 1.0 M, and gas partial pressures of 1.0 atm. Note that n is necessary in order to convert the intensive property EE into the extensive property ∆GE.
5. E = EE
nFRT
− ln Q; At 25EC, the Nernst equation is: E = EE Qlogn
0591.0−
Nonstandard conditions are when solutes are not all 1.0 M and/or partial pressures of gases are not all 1.0 atm. Nonstandard conditions also occur when T ≠ 25EC, For most problem solving, T = 25EC is usually assumed, hence the second version of the Nernst equation is most often used. E = cell potential at the conditions of the cell; EE = standard cell potential; n = number of electrons transferred in the overall reaction, and Q is the reaction quotient determined at the concentrations and partial pressures of the cell contents. At equilibrium, E = 0 and Q = K. At 25EC, EE = (0.0591/n)log K. The standard cell potential allows calculation of the equilibrium constant for a reaction. When K < 1, the log K term is negative, so E o
cell is negative and ∆GE is positive. When K > 1, the log K term is positive , so E o
cell is positive and ∆GE is negative. From the equation EE = (0.0591/n)log K, the value of EE allows calculation of the equili-brium constant K. We say that EE gives the equilibrium position for a reaction. E is the actual cell potential at the conditions of the cell reaction. The sign of E determines the spontaneity of the cell reaction. If E is positive, then the cell reaction is spontaneous as written (the forward reaction can be used to make a galvanic cell to produce a voltage). If E is negative, the forward reaction is not spontaneous at the conditions of cell, but the reverse reaction is spontaneous. The reverse reaction can be used to form a galvanic cell. EE can only be used to determine spontaneity when all reactants and products are at standard conditions (T = 25EC, [ ] = 1.0 M, P = 1.0 atm).
6. Concentration cell: A galvanic cell in which both compartments contain the same
components, but at different concentrations. All concentration cells have E ocell = 0 because
both compartments contain the same contents. The driving force for the cell is the different ion concentrations betweeen the anode and cathode. The cell produces a voltage as long as the ion concentrations are different. Equilibrium for a concentration cell is reached (E = 0) when the ion concentrations in the two compartments are equal.
67
The net reaction in a concentration cell is: Ma+(cathode, x M) → Ma+ (anode, y M) E o
cell = 0 and the Nernst equation is: E = EE Qlog
n0591.0
− = )]cathode(M[
)]anode(M[loga
0591.0a
a
+
+− where a is the number of
electrons transferred. To register a potential (E > 0), the log Q term must be a negative value. This occurs when
Ma+(cathode) > Ma+(anode). The higher ion concentration is always at the cathode and the lower ion concentration is always at the anode. The magnitude of the cell potential depends on the magnitude of the differences in ion concentrations between the anode and cathode. The larger the difference in ion concentrations, the more negative the log Q term and the more positive the cell potential. Thus, as the difference in ion concentrations between the anode and cathode compartments increase, the cell potential increases. This can be accomplished by decreasing the ion concentration at the anode and/or by increasing the ion concentration at the cathode.
When NaCl is added to the anode compartment, Ag+ reacts with Cl− to form AgCl(s). Add-
ing Cl− lowers the Ag+ concentration which causes an increase in the cell potential. To determine Ksp for AgCl (Ksp = [Ag+][Cl−]), we must know the equilibrium Ag+ and Cl− concentrations. Here, [Cl−] is given and we use the Nernst equation to calculate the [Ag+] at the anode.
7. As a battery discharges, Ecell decreases, eventually reaching zero. A charged battery is not at
equilibrium. At equilibrium, Ecell = 0 and ∆G = 0. We get no work out of an equilibrium system. A battery is useful to us because it can do work as it approaches equilibrium.
Both fuel cells and batteries are galvanic cells that produce cell potentials to do useful work. However, fuel cells, unlike batteries, have the reactants continuously supplied and can produce a current indefinitely. The overall reaction in the hydrogen-oxygen fuel cell is 2 H2(g) + O2(g) → 2 H2O(l). The half-reactions are: 4 e− + O2 + 2 H2O → 4 OH− cathode 2 H2 + 4 OH− → 4 H2O + 4 e− anode Utilizing the standard potentials in Table 18.1, E o
cell = 0.40 V + 0.83 V = 1.23 V for the hydrogen-oxygen fuel cell. As with all fuel cells, the H2(g) and O2(g) reactants are con-tinuously supplied. See Figure 18.16 of the text for a schematic of this fuel cell.
8. The corrosion of a metal can be viewed as the process of returning metals to their natural
state. The natural state of metals is to have positive oxidation numbers. This corrosion is the
68
oxidation of a pure metal (oxidation number = 0) into its ions. For corrosion of iron to take place, you must have:
a. exposed iron surface – a reactant b. O2(g) – a reactant c. H2O(l) – a reactant, but also provides a medium for ion flow (it provides the salt bridge) d. ions – to complete the salt bridge
Because water is a reactant and acts as a salt bridge for corrosion, cars do not rust in dry air climates, while corrosion is a big problem in humid climates. Salting roads in the winter also increases the severity of corrosion. The dissolution of the salt into ions on the surface of a metal increases the conductivity of the aqueous solution and accelerates the corrosion process.
Some of the ways metals (iron) are protected from corrosion are listed below. a. Paint: Covers the metal surface so no contact occurs between the metal and air. This only works as long as the painted surface is not scratched. b. Durable oxide coatings: Covers the metal surface so no contact occurs between the metal and air. c. Galvanizing: Coating steel with zinc; Zn forms an effective oxide coating over steel;
also, zinc is more easily oxidized than the iron in the steel. d. Sacrificial metal: Attaching a more easily oxidized metal to an iron surface; the more
active metal is preferentially oxidized instead of iron. e. Alloying: Adding chromium and nickel to steel; the added Cr and Ni form oxide
coatings on the steel surface. f. Cathodic protection: A more easily oxidized metal is placed in electrical contact with the
metal we are trying to protect. It is oxidized in preference to the protected metal. The protected metal becomes the cathode electrode, thus, cathodic protection.
9. An electrolytic cell uses electrical energy to produce a chemical change. The process of
electrolysis involves forcing a current through a cell to produce a chemical change for which the cell potential is negative. Electrical work is used to force a nonspontaneous reaction to occur.
The units for current are amperes (A) which equal 1 coulomb of charge per second. current (A) × time (s) = coulombs of charge passed
69
We use Faraday’s constant (F = 96,485 coulombs of charge per mole) to convert coulombs of charge passed into moles of electrons passed. The half-reaction gives the mole ratio between moles of electrons and moles of metal produced (or plated out). Plating means depositing the neutral metal on the electrode by reducing the metal ions in solution.
In electrolysis, as with any redox reaction, the reaction that occurs first is the one most
favored thermodynamically. The reduction reaction most favored thermodynamically has the largest, most positive E o
red value. The oxidation reaction most likely to occur is the one with the largest, most positive E o
ox value. Note that for electrolytic cells, E ocell < 0, so the E o
red and E o
ox values are commonly negative. The half-reactions that occur first as a current is applied are the ones with the least negative potentials (which are the most positive potentials). To predict the cathode half-reaction, write down the half-reaction and E o
red value for all species present that can be reduced. The cathode reaction that occurs has the least negative (most positive) E o
red value. The same thing is done for the anode; write down everything present that can be oxidized; the species oxidized has the least negative (most positive) E o
ox value. Note that we commonly assume standard conditions when predicting which half-reactions occur, so we can use the standard potentials in Table 18.1.
When molten salts are electrolyzed, there is only one species present that can be oxidized (the anion in simple salts) and there is only one species that can be reduced (the cation in simple salts). When H2O is present as is the case when aqueous solutions are electrolyzed, we must consider the oxidation and reduction of water as potential reactions that can occur. When water is present, more reactions can take place, making predictions more difficult. When the voltage required to force a chemical reaction to occur is larger than expected, this is called overvoltage. The amount of overvoltage necessary to force a reaction to occur varies with the type of substance present. Because of this, EE values must be used cautiously when predicting the half-reactions that occur.
10. Electrolysis is used to produce many pure metals and pure elements for commercial use. It
also is used to purify metals as well as to plate out thin coatings on substances to provide protection from corrosion and to beautify objects. Another application of electrolysis is the charging of batteries.
When aqueous NaCl is electrolyzed, water, with its less negative reduction potential is
preferentially reduced over Na+ ions. Thus, the presence of water doesn’t allow Na+ ions to be reduced to Na. In molten NaCl, water is not present, so Na+ can be reduced to Na.
Purification by electrolysis is called electrorefining. See the text for a discussion of the electrorefining of copper. Electrorefining is possible because of the selectivity of electrode reactions. The anode is made up of the impure metal. A potential is applied so just the metal of interest and all more easily oxidized metals are oxidized at the anode. The metal of interest is the only metal plated at the cathode due to the careful control of the potential applied. The metal ions that could plate out at the cathode in preference to the metal we are purifying will not be in solution, because these metals were not oxidized at the anode.
70
For Review − Chapter 19 1. a. Thermodynamic stability: The potential energy of a particular nucleus as compared to the sum of the potential energies of its component protons and neutrons. b. Kinetic stability: The probability that a nucleus will undergo decomposition to form a different nucleus.
c. Radioactive decay: A spontaneous decomposition of a nucleus to form a different nucleus.
d. Beta-particle production: A decay process for radioactive nuclides where an electron is produced; the mass number remains constant and the atomic number changes. e. Alpha-particle production: A common mode of decay for heavy radioactive nuclides,
where a helium nucleus is produced causing the mass number to change. f. Positron production: A mode of nuclear decay in which a particle is formed having the same mass as an electron but opposite in charge. g. Electron capture: A process in which one of the inner-orbital electrons in an atom is captured by the nucleus.
h. Gamma-ray emissions: The production of high-energy photons called gamma rays that frequently accompany nuclear decays and particle reactions.
A is the mass number and is equal to the number of protons plus neutrons in a nuclei; the sum of all the mass number values must be the same on both sides of the equation (A is conserved). Z is the atomic number and is equal to the number of protons in a nucleus; the sum of the atomic number values must also be the same on both sides of the equation (Z is conserved).
2. The zone of stability is the area encompassing the stable nuclides on a plot of their positions
as a function of the number of protons and the number of neutrons in the nucleus. The neutron/proton ratio increases to a number greater than one as elements become heavier. Nuclides with too many neutrons undergo beta-particle production in order to decrease the neutron/proton ratio to a more stable value. Position production, electron capture and alpha-particle production all increase the neutron/proton ratio, so these occur for nuclides having too many protons.
3. First-order kinetics is where there is a direct relationship between the rate of decay and the
number of nuclides in a given sample. The rate law for all radioactive decay is rate = kN. Because of the direct relationship between rate and N, as the number of nuclides is halved, the rate is also halved. The first-order rate law and the integrated first-order rate law are:
rate = kN and ln ⎟⎟⎠
⎞⎜⎜⎝
⎛
oNN = !kt
k is the first-order rate constant, N is the number of nuclides present at some time t, No is the initial number of nuclides present at t = 0, and t is the time the decay process has been occurring.
71
The half-life equation is: t1/2 = ln 2/k. The half-life for all radioactive decay is independent of the number of nuclides present; it is a constant. From the half-life equation, t1/2 is inversely related to the rate constant, k. As k increases, t1/2 decreases and vice versa.
4. Nuclear transformation: The change of one element into another. Like all nuclear processes,
the reaction must be mass number balanced and atomic number balanced. Particle accelerators are devices used to accelerate nuclear particles to very high speeds. Because of the electrostatic repulsion between the target nucleus and a positive ion, accelerators are needed for bombardment of like charged ions in order to overcome the electrostatic repulsion.
5. Geiger counter: An instrument that measures the rate of radioactive decay based on the ions
and electrons produced as a radioactive particle passes through a gas-filled chamber. The instrument takes advantage of the fact that the high-energy particles from radioactive decay processes produce ions when they travel through matter. The formation of ions and electrons by the passage of high-energy particles allows a momentary current to flow. Electronic devices detect the current flow and the number of these events can be counted. This gives the decay rate of the radioactive sample.
Scintillation counter: An instrument that measures radioactive decay by sensing flashes of
light produced in a substance by the radiation. Certain substances, such as zinc sulfide, give off light when they are struck by high energy radiation. A photocell senses the flashes of light which is a measure of the number of decay events per unit of time.
Radiotracer: A radioactive nuclide, introduced into an organism for diagnostic purposes,
whose pathway can be traced by monitoring its radioactivity. 14C and 31P work well as radiotracers because the molecules in the body contain carbon and/or phosphorus; they will be incorporated into the worker molecules of the body easily, which allows monitoring of the pathways of these worker molecules. 131I works well for thyroid problems because iodine concentrates in the thyroid.
To study chemical equilibrium, a nonradioactive substance can be put in equilibrium with a
radioactive substance. The two materials can then be checked to see if all the radioactivity remains in the original material or if it has been scrambled by the equilibrium. The scrambling of the radioactive substance is proof that equilibrium is dynamic.
6. Plants take in CO2 in the photosynthesis process, which incorporates carbon, including 14C,
into its molecules. As long as the plant is alive, the 14C/12C ratio in the plant will equal the ratio in the atmosphere. When the plant dies, 14C is not replenished as 14C decays by beta-particle production. By measuring the 14C activity today in the artifact and comparing this to the assumed 14C activity when the plant died to make the artifact, an age can be determined for the artifact. The assumptions are that the 14C level in the atmosphere is constant or that the 14C level at the time the plant died can be calculated. A constant 14C level is a pure assumption, and accounting for variation is complicated. Another problem is that some of the material must be destroyed to determine the 14C level.
238U has a half-life of 4.5 × 10⁹ years. In order to be useful, we need a significant number of
decay events by 238U to have occurred. With the extremely long half-life of 238U, the period of time required for a significant number of decay events is on the order of 108 years. This is the time frame of when the earth was formed. 238U is worthless for aging 10,000 year-old objects or less because a measurable quantity of decay events has not occurred in 10,000 years or less. 14C is good at dating these objects because 14C has a half-life on the order of 103 years.
72
14C is worthless for dating ancient objects because of the relatively short half-life; no discernable amount of 14C will remain after 108 years.
7. Mass defect: The change in mass occurring when a nucleus is formed from its component
nucleons.
Binding energy: The energy required to decompose a nucleus into its component nucleons. The mass defect is determined by summing the masses of the individual neutrons and protons
that make up a nuclide and comparing this to the actual mass of the nuclide. The difference in mass is the mass defect. This quantity of mass determines the energy released when a nuclide is formed from its protons and neutrons. This energy is called the binding energy. The equation ∆E = ∆mc2 allows conversion of the mass defect into the binding energy. 56Fe, with the largest binding energy per nucleon of any nuclide, is the most stable nuclide. This is because when 56Fe is formed from its protons and neutrons, it has the largest relative mass defect. Therefore, 56Fe is the most stable nuclei because it would require the largest amount of energy per nucleon to decompose the nucleus.
8. Fission: Splitting of a heavy nucleus into two (or more) lighter nuclei. Fusion: Combining two light nuclei to form a heavier nucleus. The energy changes for these nuclear processes are typically millions of times larger than
those associated with chemical reactions. The fusion of 235U produces about 26 million times more energy than the combustion of methane.
The maximum biding energy per nucleon occurs at Fe. Nuclei smaller than Fe become more
stable by fusing to form heavier nuclei closer in mass to Fe. Nuclei larger than Fe form more stable nuclei by splitting to form lighter nuclei closer in mass to Fe. In each process, more stable nuclei are formed. The difference in stability is released as energy.
For fusion reactions, a collision of sufficient energy must occur between two positively
charged particles to initiate the reaction. This requires high temperatures. In fission, an electrically neutral neutron collides with the positively charged nucleus. This has a much lower activation energy.
9. 235U splits into lighter elements when it absorbs a neutron; neutrons are also produced in the
fission reaction. These neutrons produced can go on to react with other 235U nuclides, thus continuing the reaction. This self-sustaining fission process is called a chain reaction.
In order for a fission process to be self-sustaining, at least one neutron from each fission
event must go on to split another nucleus. If, on average, less than one neutron causes another fission event, the process dies out and the reaction is said to be subcritical. A reaction is critical when exactly one neutron from each fission event causes another event to occur. For supercritical reactions, more than one neutron produced causes another fission event to occur. Here, the process escalates rapidly and the heat build up causes a violent explosion. The critical mass is the mass of fissionable material required to produce a self-sustaining chain reaction, not too small and not too large.
73
Reference Figure 19.14 of the text for a schematic of a nuclear power plant. The energy produced from controlled fission reactions is used to heat water to produce steam to run turbine engines. This is how coal-burning power plants generate energy.
Moderator: Slows the neutrons to increase the efficiency of the fission reaction. Control rods: Absorbs neutrons to slow or halt the fission reaction. Some problems associated with nuclear reactors are radiation exposure to workers, disposal
of wastes, nuclear accidents including a meltdown, and potential terrorist targets. Another problem is the supply of 235U, which is not endless. There may not be enough 235U on earth to make fission economically feasible in the long run.
Breeder reactors produce fissionable fuel as the reactor runs. The current breeder reactors
convert the abundant 238U isotope (which is nonfissionable) into fissionable plutonium. The reaction involves absorption of a neutron. Breeder reactors, however, have the additional hazard of handling plutonium, which flames on contact with air and is very toxic.
10. Some factors for the biological effects of radiation exposure are: a. The energy of the radiation. The higher the energy, the more damage it can cause. b. The penetrating ability of radiation. The ability of specific radiation to penetrate human tissue where it can do damage must be considered. c. The ionizing ability of the radiation. When biomolecules are ionized, there function is
usually disturbed.
d. The chemical properties of the radiation source. Specifically, can the radioactive substance be readily incorporated into the body, or is the radiation source inert chemically so it passes through the body relatively quickly.
90Sr will be incorporated into the body by replacing calcium in the bones. Once
incorporated, 90Sr can cause leukemia and bone cancer. Krypton is chemically inert so it will not be incorporated into the body.
Even though gamma rays penetrate human tissue very deeply, they are very small and cause
only occasional ionization of biomolecules. Alpha particles, because they are much more massive, are very effective at causing ionization of biomolecules; alpha particles produce a dense trail of damage once they get inside an organism.
For Review – Chapter 20 1. Oxygen and silicon are the two most abundant elements in the earth’s crust, oceans, and
atmosphere. Oxygen is found in the atmosphere as O2, in the oceans in H2O, and in the earth’s crust primarily in silicate and carbonate minerals. Because oxygen is everywhere, it is not too surprising that it is the most abundant element. The second most abundant element, silicon, is found throughout the earth’s crust in silica and silicate minerals that form the basis

74
of most sand, rocks, and soils. Again, it is not too surprising that silicon is the second most abundant element, as it is involved in the composition of much of the earth.
The four most abundant elements in the human body are oxygen, carbon, hydrogen, and
nitrogen. Not surprisingly, these elements form the basis for all biologically important molecules in the human body. They should be abundant.
2. Hydrogen forms many compounds in which the oxidation state is +1, as do the Group 1A
elements. For example, H2SO4 and HCl compare to Na2SO4 and NaCl. On the other hand, hydrogen forms diatomic H2 molecules and is a nonmetal, while the Group 1A elements are metals. Hydrogen also forms compounds with a !1 oxidation state, which is not characteristic of Group 1A metals, e.g., NaH.
Alkali metals have a ns1 valence shell electron configuration. Alkali metals lose this valence
electron with relative ease to form M+ cations when in ionic compounds. They all are easily oxidized. Therefore, in order to prepare the pure metals, alkali metals must be produced in the absence of materials (H2O, O2) that are capable of oxidizing them. The method of preparation is electrochemical processes, specifically, electrolysis of molten chloride salts and reduction of alkali salts with Mg and H2. In all production methods, H2O and O2 must be absent.
Table 20.5 of the text lists some reactions of alkali metals. From Table 20.5, MF, M2S, M3P,
MH, and MOH are the predicted formulas when alkali metals react with F2, S, P4, H2, and H2O, respectively. These formulas exhibit the typical oxidation states as predicted by the periodic table.
3. Alkaline earth metals have ns2 for valence electron configurations. They are all very reactive,
losing their two valence electrons to nonmetals to form ionic compounds containing M2+ cations. Alkaline earth metals, like alkali metals, are easily oxidized. Their preparation as pure metals must be done in the absence of O2 and H2O. The method of preparation is electrolysis of molten alkaline earth halides.
Table 20.7 of the text summarizes the formulas of alkaline earth metals with typical
nonmetals. With a rare exception or two, there aren’t many surprises. The typical formulas are MF2, MO, MS, M3N2, MH2, and M(OH)2, when alkaline earth metals are reacted with F2, O2, S, N2, H2, and H2O, respectively.
4. The valence electron configuration of Group 3A elements is ns2np1. The lightest Group 3A
element, boron, is a nonmetal as most of its compounds are covalent. Aluminum, although commonly thought of as a metal, does have some nonmetallic properties as its bonds to other nonmetals have significant covalent character. The other Group 3A elements have typical metal characteristics; its compounds formed with nonmetals are ionic. From this discussion, metallic character increases as the Group 3A elements get larger.
As discussed above, boron is a nonmetal in both properties and compounds formed. However
aluminum has physical properties of metals like high thermal and electrical conductivities and a lustrous appearance. The compounds of aluminum with other nonmetals, however, do have some nonmetallic properties as the bonds have significant covalent character.
The formulas that aluminum form with nonmetals (as well as the formulas of other heavier
Group 3A elements) are summarized in Table 20.9. The compounds formed between aluminum and F2, O2, S, and N2 follow what would be predicted for ionic compounds
75
containing Al3+. However, there is some covalent character in these compounds. The formulas are AlF3, Al2O3, Al2S3, and AlN.
5. The valence electron configuration of Group 4A elements is ns2np2. The two most important
elements on earth are both Group 4A elements. They are carbon, found in all biologically important molecules, and silicon, found in most of the compounds that make up the earth’s crust. They are important because they are so prevalent in compounds necessary for life and the geologic world.
As with Group 3A, Group 4A shows an increase in metallic character as the elements get
heavier. Carbon is a typical nonmetal, silicon and germanium have properties of both metals and nonmetals so they are classified as semimetals, while tin and lead have typical metallic characteristics.
The two major allotropic forms of carbon are graphite and diamond. See Section 10.5 of the
text for their structures and a description of their properties. Germanium is a relatively rare element and is classified as a semimetal. Its main uses are in
the manufacture of semiconductors. Tin is a metal and is used to form alloys with other metals. Some alloys containing tin are bronze, solder, and pewter. Tin’s major current use is as a protective coating for steel which helps prevent the corrosion of iron in steel. Lead is a metal, but has a relatively low melting point. Lead is very toxic and the use of lead paints and lead additives to gasoline are not allowed in the United States. The major use of lead is for electrodes in the lead storage battery used in automobiles.
Ge forms GeF4 when reacted with F2 and forms GeO2 when reacted with O2. Both these
compounds have Ge in the predicted +4 oxidation state as determined from its position in the periodic table. However, the fluorine compound is strictly covalent in nature, while the oxygen compound has more ionic character.
6. Group 5A: ns2np3; As with groups 3A and 4A, metallic character increases going down a
group. Nitrogen is strictly a nonmetal in properties, while bismuth, the heaviest Group 5A element, has mostly metallic physical properties. The trend of increasing metallic character going down the group is due in part to the decrease in electronegativity. Nitrogen, with its high electronegativity, forms covalent compounds as nonmetals do. Bismuth and antimony, with much lower electronegativities, exhibit ionic character in most of their compounds. Bismuth and antimony exist as +3 metal cations in these ionic compounds.
This is due to nitrogen’s ability to form strong π bonds whereas heavier group 5A elements
do not form strong π bonds. Therefore, P2, As2, and Sb2 do not form since two π bonds are required to form these diatomic substances.
White phosphorus consists of discrete tetrahedral P4 molecules. The bond angles in the P4
tetrahedrons are only 60°, which makes P4 very reactive, especially towards oxygen. Red and black phosphorus are covalent network solids. In red phosphorus, the P4 tetrahedra are bonded to each other in chains, making them less reactive than white phosphorus. They need a source of energy to react with oxygen, such as when one strikes a match. Black phosphorus is crystalline, with the P atoms tightly bonded to each other in the crystal, and is fairly unreactive towards oxygen.

76
7. N: 1s22s22p5; The extremes of the oxidation states for N can be rationalized by examining the electron configuration of N. Nitrogen is three electrons short of the stable Ne electron configuration of 1s22s22p6. Having an oxidation state of −3 makes sense. The +5 oxidation state corresponds to N “losing” its 5 valence electrons. In compounds with oxygen, the N−O bonds are polar covalent, with N having the partial positive end of the bond dipole. In the world of oxidation states, electrons in polar covalent bonds are assigned to the more electronegative atom; this is oxygen in N−O bonds. N can form enough bonds to oxygen to give it a +5 oxidation state. This loosely corresponds to losing all of the valence electrons.
NH3: fertilizers, weak base properties, can form hydrogen bonds; N2H4: rocket propellant,
blowing agent in manufacture of plastics, can form hydrogen bonds; NH2OH: weak base properties, can form hydrogen bonds; N2: makes up 78% of air, very stable compound with a very strong triple bond, is inert chemically; N2O: laughing gas, propellant in aerosol cans, effect on earth’s temperature being studied; NO: toxic when inhaled, may play a role in regulating blood pressure and blood clotting, one of the few odd electron species that forms; N2O3, least common of nitrogen oxides, a blue liquid that readily dissociates into NO(g) and NO2(g); NO2: another odd electron species, dimerizes to form N2O4, plays a role in smog production; HNO3: important industrial chemical, used to form nitrogen-based explosives, strong acid and a very strong oxidizing agent.
Hydrazine also can hydrogen bond because it has covalent N−H bonds as well as having a
lone pair of electrons on each N. The high boiling point for hydrazine’s relatively small size supports this.
Even though phosphine and ammonia have identical Lewis structures, the bond angles of PH3
are only 94E, well below the predicted tetrahedral bond angles of 109.5E. PH3 is an unusual exception to the VSEPR model.
8. Group 6A: ns2np4; As expected from the trend in other groups, oxygen has properties which
are purely nonmetal. Polonium, on the other hand, has some metallic properties. The most significant property differences are radioactivity and toxicity. Polonium is only composed of radioactive isotopes, unlike oxygen, and polonium is highly toxic, unlike oxygen.
The two allotropic forms of oxygen are O2 and O3. O2, 2(6) = 12 e− O3, 3(6) = 18 e−
Ozone has a V-shape molecular structure with bond angles of 117E, slightly less than the predicted 120E trigonal planar bond angle.
Both rhombic and monoclinic sulfur exist in S8 rings. The difference between the two is that
the S8 rings are stacked together differently giving different solid structures. Oxygen forms strong π bonds and, because of this, exists in nature as O2 molecules. Sulfur
forms much stronger sigma bonds than π bonds. Therefore, elemental sulfur is found in nature singly bonded to other sulfur atoms. We assume SO doesn’t form because of the
O OO
O OO
OO

77
difference in ability of oxygen and sulfur to form π bonds. Sulfur forms relatively weak π bonds as compared to oxygen.
SO2(aq) + H2O(l) → H2SO3(aq); SO3(aq) + H2O(l) → H2SO4(aq); SO2 and SO3 dissolve in water to form the acids H2SO3 and H2SO4, respectively. The molecular structure of SO2 is bent with a ~120E bond angle. The molecular structure of SO3 is trigonal planar with 120° bond angles.
A dehydrating agent is one that has a high affinity for water. Sulfuric acid grabs water whenever it can. When it reacts with sugar (C12H22O11), it removes the hydrogen and oxygen in a 2 : 1 mole ratio even though there are no H2O molecules in sugar. H2SO4 is indeed a powerful dehydrating agent.
9. Group 7A: ns2np5; the diatomic halogens (X2) are nonpolar, so they only exibit London
dispersion (LD) intermolecular forces. The strength of LD forces increases with size. The boiling points and melting points steadily increase from F2 to I2 because the strength of the intermolecular forces are increasing.
Fluorine is the most reactive of the halogens because it is the most electronegative atom and
the bond in the F2 molecule is very weak.
HF exhibits the relatively strong hydrogen bonding intermolecular forces, unlike the other hydrogen halides. HF has a high boiling point due to its ability to form these hydrogen bonding interactions. The halide ion is the −1 charged ion that halogens form when in ionic compounds. As can be seen from the positive standard reduction potentials in Table 20.17 of the text, the halogens energetically favor the X− form over the X2 form. Because the reduction potentials are so large, this give an indication of the relative ease to which halogens will grab electrons to form the halide ion. In general, the halogens are highly reactive; that is why halogens exist as cations in various minerals and in seawater as opposed to free elements in nature.
Some compounds of chlorine exhibiting the −1 to +7 oxidation state are: HCl(−1), HOCl (+1), HClO2 (+3), HClO3 (+5), and HClO4 (+7).
10. The noble gases have filled s and p valence orbitals (ns2np6 = valence electron configura-
tion). They don’t need to react like other representative elements in order to achieve the stable ns2np6 configuration. Noble gases are unreactive because they do not want to lose their stable valence electron configuration.
Noble gases exist as free atoms in nature. They only exhibit London dispersion forces in the
condensed phases. Because LD forces increase with size, as the noble gas gets bigger, the strength of the intermolecular forces get stronger leading to higher melting and boiling points.
In Mendeleev's time, none of the noble gases were known. Since an entire family was
missing, no gaps seemed to appear in the periodic arrangement. Mendeleev had no evidence to predict the existence of such a family. The heavier members of the noble gases are not really inert. Xe and Kr have been shown to react and form compounds with other elements.
XeF2: 180E, dsp3; XeO2F2: ~90E and ~120E, dsp3; XeO3: < 109.5E, sp3; XeO4: 109.5E, sp3; XeF4: 90E, d2sp3; XeO3F2: 90E and 120E, dsp3; XeO2F4, 90E, d2sp3
78
For Review − Chapter 21 1. Chromium ([Ar]:4s03d5) and copper [Ar]:4s13d10) have electron configurations which are
different from that predicted from the periodic table. Other exceptions to the predicted filling order are transition metal ions. These all lose the s electrons before they lose the d electrons. In neutral atoms, the ns and (n!1)d orbitals are very close in energy, with the ns orbitals slightly lower in energy. However, for transition metal ions, there is an apparent shifting of energies between the ns and (n!1)d orbitals. For transition metal ions, the energy of the (n!1)d orbitals are significantly less than that of the ns electrons. So when transition metal ions form, the highest energy electrons are removed, which are the ns electrons. For example, Mn2+ has the electron configuration [Ar]:4s03d5 and not [Ar]:4s23d3.
Most transition metals have unfilled d orbitals, which creates a large number of other
electrons that can be removed. Stable ions of the representative metals are determined by how many s and p valence electrons can be removed. In general, representative metals lose all of the s and p valence electrons to form their stable ions. Transition metals generally lose the s electron(s) to form +1 and +2 ions, but they can also lose some (or all) of the d electrons to form other oxidation states as well.
2. a. Coordination compound: A compound composed of a complex ion (see b) and counter
ions (see c) sufficient to give no net charge. b. Complex ion: A charged species consisting of a metal ion surrounded by ligands (see e).
c. Counter ions: Anions or cations that balance the charge on a complex ion in a coordina-tion compound.
d. Coordination number: The number of bonds formed between the metal ion and the
ligands (see e) in a complex ion. e. Ligand: Species that donates a pair of electrons to form a covalent bond to a metal ion. Ligands act as Lewis bases (electron pair donors).
f. Chelate: Ligand that can form more than one bond to a metal ion.
g. Bidentate: Ligand that forms two bonds to a metal ion.
Because transition metals form bonds to species that donate lone pairs of electrons, transition metals are Lewis acids (electron pair acceptors). The Lewis bases in coordination com-pounds are the ligands, all of which have an unshared pair of electrons to donate. The coordinate covalent bond between the ligand and the transition metal just indicates that both electrons in the bond originally came from one of the atoms in the bond. Here, the electrons in the bond come from the ligand.
3. Linear geometry (180E bond angles) is observed when the coordination number is 2. Tetrahedral geometry (109.5E bond angles) or square planar geometry (90E bond angles) is observed when the coordination number is 4. Octahedral geometry (90E bond angles) is observed when the coordination number is 6.
79
For the following complex ions, see Table 21.13 if you don’t know the formula, the charge, or the number of bonds the ligands form.
a. Ag(CN)2
−; Ag+: [Kr]4d10 b. Cu(H2O)4+; Cu+: [Ar]3d10
c. Mn(C2O4)2−; Mn2+: [Ar]3d5 d. Pt(NH3)42+; Pt2+: [Xe]4f145d8
e. Fe(EDTA)−; Fe3+: [Ar]3d5; Note: EDTA has an overall 4! charge and is a six coordinate ligand. f. Co(Cl)6
4−; Co2+: [Ar]3d7 g. Cr(en)3
3+ where en = ethylenediane (NH2CH2CH2NH2); Cr3+: [Ar]3d3 4. See Section 21.3 of the text for a summary of the nomenclature rules. a. The correct name is tetraamminecopper(II) chloride. The complex ion is named incorrectly in several ways. b. The correct name is bis(ethylenediamine)nickel(II) sulfate. The ethylenediamine ligands are neutral and sulfate has a 2! charge. Therefore, Ni2+ is present, not Ni4+.
c. The correct name is potassium diaquatetrachlorochromate(III). Because the complex ion is an anion, the –ate suffix ending is added to the name of the metal. Also, the ligands were not in alphabetical order (a in aqua comes before c in chloro).
d. The correct name is sodium tetracyanooxalatocobaltate(II). The only error is that tetra
should be omitted in front of sodium. That four sodium ions are needed to balance charge is deduced from the name of the complex ion.
5. a. Isomers: Species with the same formulas but different properties; they are different com- pounds. See the text for examples of the following types of isomers. b. Structural isomers: Isomers that have one or more bonds that are different. c. Steroisomers: Isomers that contain the same bonds but differ in how the atoms are arranged in space. d. Coordination isomers: Structural isomers that differ in the atoms that make up the
complex ion. e. Linkage isomers: Structural isomers that differ in how one or more ligands are attached to the transition metal. f. Geometric isomers (cis-trans isomerism): Steroisomers that differ in the positions of atoms with respect to a rigid ring, bond, or each other. g. Optical isomers: Steroisomers that are nonsuperimposable mirror images of each other; that is, they are different in the same way that our left and right hands are different.
80
The trans form of Cr(en)Cl2 is not optically active, but the the cis form is optically active. See Figure 21.17 of the text for illustrations showing the cis and trans forms for a similar compound; shown also is the optical activity of the cis form. The only difference between the complex in this question, and the complex in Figure 21.17, is that Cr2+ has replaced Co3+. Note that not all cis isomers are optically active. For example, the cis isomer of Cr(NH3)4Cl2 is not optically active because the mirror image is superimposable (prove it to yourself). In Figure 21.17, a plane of symmetry exists through the square planar orientation of the two en ligands in the trans form. Other planes of symmetry also exist in the trans isomer. In the cis isomer in Figure 21.17, no plane of symmetry exists, so this cis form is optically active (as we know).
6. The crystal field model focuses on the energies of the d orbitals and what happens to the
energies of these d orbitals as negative point charges (the ligands) approach (and repel) the electrons in the d orbitals. For octahedral geometry, six ligands are bonded to the metal ion. Because of the different orientations of the d orbitals, not all d orbitals are affected the same when six negative point charges (ligands) approach the metal ion along the x, y, and z axis. It turns out that the dxy, dxz, and dzy orbitals are all destabilized by the same amount from the octahedrally arranged point charges, as are the 22 yxd
−and 2zd orbitals. These are the two sets
that the d orbitals split into. The dxy, dxz, and dyz set is called the t2g set, while the 22 yxd−
and 2zd set is called the eg set.
Another major point for the octahedral crystal field diagram is that the eg set of orbitals is
destabilized more than the t2g set. This is because the t2g orbital set (dxy, dxz, and dzy) points between the point charges while the eg orbital set ( 22 yxd
−and 2zd ) points directly at the point
charges. Hence, there is more destabilization in the eg orbital set, and they are at a higher energy.
a. Weak field ligand: Ligand that will give complex ions with the maximum number of unpaired electrons. b. Strong-field ligand: Ligand that will give complex ions with the minimum number of
unpaired electrons. c. Low-spin complex: Complex ion with a minimum number of unpaired electrons (low-
spin = strong-field). d. High-spin complex: Complex ion with a maximum number of unpaired electrons (high-
spin = weak-field).
In both cobalt complex ions, Co3+ exists which is a d6 ion (6 d electrons are present). The difference in magnetic properties is that Co(NH3)6
3+ is a strong-field (low-spin) complex having a relatively large ∆, while CoF6
3− is a weak-field (high-spin) complex having a relatively small ∆. The electron configurations for Co3+ in a strong field vs. a weak field is shown in Figure 21.22. The strong-field d6 ion is diamagnetic because all electrons are paired. This is the diagram for Co(NH3)6
3+. The weak field d6 ion is paramagnetic because it has unpaired electrons (4 total). This is the diagram for CoF6
3−.

81
Looking at Figure 21.22, d1, d2, and d3 metal ions would all have the same number of unpaired electrons. This won’t happen again until we get all the way up to d8, d9, and d10 metal ions (prove it to yourself that d4, d5, d6, and d7 metal ions have a different d orbital electron configurations depending on a strong-field or a weak-field). V3+ is a d2 ion (2 unpaired electrons in the t2g set). It has the same diagram no matter how strong the field strength. The same is true for the d8 Ni2+ ion (filled t2g set and half-filled eg set). However, Ru2+, a d6 ion, will have different diagrams depending on a strong-field or a weak-field. If a weak-field is present, then there are four unpaired electrons. In the strong-field case, all six d electrons are in the t2g set and all are paired (no unpaired electrons are present).
7. The valence d electrons for the metal ion in the complex ion are placed into the octahedral
crystal field diagram. If electrons are all paired, then the complex is predicted to be diamagnetic. If there are unpaired electrons, then the complex is predicted to be paramagnetic.
Color results by the absorption of specific wavelengths of light. The d-orbital splitting, ∆, is
on the order of the energies of visible light. The complex ion absorbs the wavelength of light that has energy equal to the d-orbital splitting, ∆. The color we detect for the substance is not the color of light absorbed. We detect (see) the complementary color to that color of light absorbed. See Table 21.16 for observed colors of substances given the color of light absorbed.
From Table 21.16, if a complex appears yellow then it absorbs blue light on the order of λ
~450 nm. Therefore, Cr(NH3)63+ absorbs blue light.
The spectrochemical series places ligands in order of their ability to split the d-orbitals. The
strongest field ligands (large ∆) are on one side of the series with the weakest field ligands (small ∆) on the other side. The series was developed from studies of the light absorbed by many octahedral complexes. From the color of light absorbed, one can determine the d-orbital splitting. Strong-field ligands absorb higher energy light (violet light, for example, with λ ~400 nm), while weak-field ligands absorb lower energy light (red light, for example, with λ ~650 nm).
The higher the charge on the metal ion, the larger the d-orlbital splitting. Thus, the Co3+
complex ion [Co(NH3)63+], would absorb higher energy (shorter wavelength) light than a Co2+
complex ion (assuming the ligands are the same). 8. The crystal field diagrams are different because the geometries of where the ligands point is
different. The tetrahedrally oriented ligands point differently in relationship to the d-orbitals than do the octahedrally oriented ligands. Plus, we have more ligands in an octahedral complex.
See Figure 21.27 for the tetrahedral crystal field diagram. Notice that the orbitals are reverse
of that in the octahedral crystal field diagram. The degenerate 2zd and 22 yxd−
are at a lower energy than the degenerate dxy, dxz, and dyz orbitals. Again, the reason for this is that tetrahedral ligands are oriented differently than octahedral field ligands, so the interactions
82
with specifically oriented d-orbitals are different. Also notice that the difference in magnitude of the d-orbital splitting for the two geometries. The d-orbital splitting in tetrahedral complexes is less than one-half the d-orbital splitting in octahedral complexes. There are no known ligands powerful enough to produce the strong-field case, hence all tetrahedral complexes are weak-field or high spin.
See Figure 21.28 for the descriptions of the square planar and linear crystal field diagrams.
Each is unique which is not surprising. The ligands for any specific geometry will point differently relative to the orientations of the five d-orbitals. Different interactions result giving different crystal field diagrams.
9. Each hemoglobin molecule can bind four O2 molecules. It is an Fe2+ ion in hemoglobin that
binds an individual O2 molecule, and each hemoglobin molecule has four of these Fe2+ binding sites. The Fe2+ ion at the binding site is six-coordinate. Five of the coordination sites come from nitrogens in the hemoglobin molecule. The sixth site is available to attach an O2 molecule. When the O2 molecule is released, H2O takes up the sixth position around the Fe2+ ion. O2 is a strong field ligand, unlike H2O, so in the lungs, O2 readily replaces the H2O ligand. With four sites, each hemoglobin molecule has a total of four O2 molecules attached when saturated with O2 from the lungs. In the cells, O2 is released by the hemoglobin and the O2 site is replaced by H2O. The oxygen binding is pH dependent, so changes in pH in the cells as compared to blood, causes the release of O2. Once the O2 is released and replaced by H2O, the hemoglobin molecules return to the lungs to replenish with the O2.
10. The definitions follow. See section 21.8 for examples. a. Roasting: Converting sulfide minerals to oxides by heating in air below their melting
points.
b. Smelting: Reducing metal ions to the free metal.
c. Flotation: Separation of mineral particles in an ore from the unwanted impurities. This process depends on the greater wetability of the mineral particles as compared to the unwanted impurities.
d. Leaching: The extraction of metals from ores using aqueous chemical solutions.
e. Gangue: The impurities (such as clay, sand, or rock) in an ore.
Advantages of hydrometallurgy: cheap energy cost; less air pollution; Disadvantages of hydrometallurgy: chemicals used in hydrometallurgy are expensive and sometimes toxic.
In zone refining, a bar of impure metal travels through a heater. The impurities present are more soluble in the molten metal than in the solid metal. As the molten zone moves down a metal, the impurities are swept along with the liquid, leaving behind relatively pure metal.
83
For Review – Chapter 22 1. A hydrocarbon is a compound composed of only carbon and hydrogen. A saturated
hydrocarbon has only carbon-carbon single bonds in the molecule. An unsaturated hydro-carbon has one or more carbon-carbon multiple bonds, but may also contain carbon-carbon single bonds.
An alkane is a saturated hydrocarbon composed of only C−C and C−H single bonds. Each
carbon in an alkane is bonded to four other atoms (either C or H atoms). If the compound contains a ring in the structure and is composed of only C−C and C−H single bonds, then it is called a cyclic alkane.
Alkanes: general formula = CnH2n + 2; all carbons are sp3 hybridized; bond angles = 109.5E Cyclic alkanes: general formula CnH2n (if only one ring is present in the compound); all
carbons are sp3 hybridized; prefers 109.5E bond angles, but rings with three carbons or four carbons or five carbons are forced into bond angles less than 109.5E.
In cyclopropane, a ring compound made up of three carbon atoms, the bond angles are forced
into 60E in order to form the three-carbon ring. With four bonds to each carbon, the carbons prefer 109.5E bond angles. This just can’t happen for cyclopropane. Because cyclopropane is forced to form bond angles smaller than it prefers, it is very reactive.
The same is true for cyclobutane. Cyclobutane is composed of a four-carbon ring. In order to
form a ring compound with four carbons, the carbons in the ring are forced to form 90E bond angles; this is much smaller than the preferred 109.5E bond angles.
Cyclopentane (five-carbon rings) also has bond angles slightly smaller than 109.5E, but they
are very close (108E), so cyclopentane is much more stable than cyclopropane or cyclobutane. For rings having six or more carbons, the observed bonds are all 109.5E.
Straight chain hydrocarbons just indicates that there is one chain of consecutively bonded C-
atoms in the molecule. They are not in a straight line which infers 180E bond angles. The bond angles are the predicted 109.5E.
To determine the number of hydrogens bonded to the carbons in cyclic alkanes (or any alkane
where they may have been omitted), just remember that each carbon has four bonds. In cycloalkanes, only the C−C bonds are shown. It is assumed you know that the remaining bonds on each carbon are C−H bonds. The number of C−H bonds is that number required to give the carbon four total bonds.
2. Alkenes are unsaturated hydrocarbons that contain a carbon-carbon double bond. Carbon-
carbon single bonds may also be present. Alkynes are unsaturated hydrocarbons that contain a carbon-carbon triple bond.
Alkenes: CnH2n is the general formula. The carbon atoms in the C=C bond exhibit 120E bond
angles. The double-bonded carbon atoms are sp2 hybridized. The three sp2 hybrid orbitals form three sigma bonds to the attached atoms. The unhybridized p atomic orbital on each sp2 hybridized carbon overlap side to side to form the π bond in the double bond. Because the p
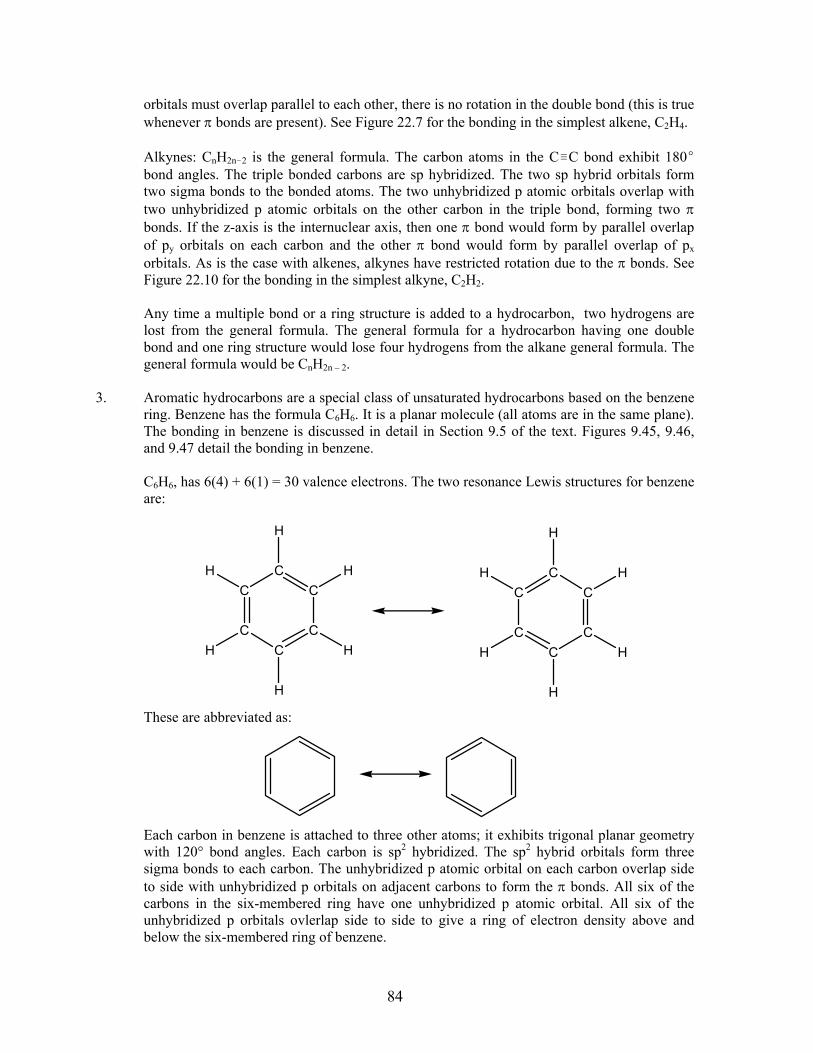
84
orbitals must overlap parallel to each other, there is no rotation in the double bond (this is true whenever π bonds are present). See Figure 22.7 for the bonding in the simplest alkene, C2H4.
Alkynes: CnH2n!2 is the general formula. The carbon atoms in the C/C bond exhibit 180E
bond angles. The triple bonded carbons are sp hybridized. The two sp hybrid orbitals form two sigma bonds to the bonded atoms. The two unhybridized p atomic orbitals overlap with two unhybridized p atomic orbitals on the other carbon in the triple bond, forming two π bonds. If the z-axis is the internuclear axis, then one π bond would form by parallel overlap of py orbitals on each carbon and the other π bond would form by parallel overlap of px
orbitals. As is the case with alkenes, alkynes have restricted rotation due to the π bonds. See Figure 22.10 for the bonding in the simplest alkyne, C2H2.
Any time a multiple bond or a ring structure is added to a hydrocarbon, two hydrogens are
lost from the general formula. The general formula for a hydrocarbon having one double bond and one ring structure would lose four hydrogens from the alkane general formula. The general formula would be CnH2n – 2.
3. Aromatic hydrocarbons are a special class of unsaturated hydrocarbons based on the benzene
ring. Benzene has the formula C6H6. It is a planar molecule (all atoms are in the same plane). The bonding in benzene is discussed in detail in Section 9.5 of the text. Figures 9.45, 9.46, and 9.47 detail the bonding in benzene.
C6H6, has 6(4) + 6(1) = 30 valence electrons. The two resonance Lewis structures for benzene
are: These are abbreviated as: Each carbon in benzene is attached to three other atoms; it exhibits trigonal planar geometry
with 120° bond angles. Each carbon is sp2 hybridized. The sp2 hybrid orbitals form three sigma bonds to each carbon. The unhybridized p atomic orbital on each carbon overlap side to side with unhybridized p orbitals on adjacent carbons to form the π bonds. All six of the carbons in the six-membered ring have one unhybridized p atomic orbital. All six of the unhybridized p orbitals ovlerlap side to side to give a ring of electron density above and below the six-membered ring of benzene.
CC
CC
C
C
H
H
H
H
H
H CC
CC
C
C
H
H
H
H
H
H
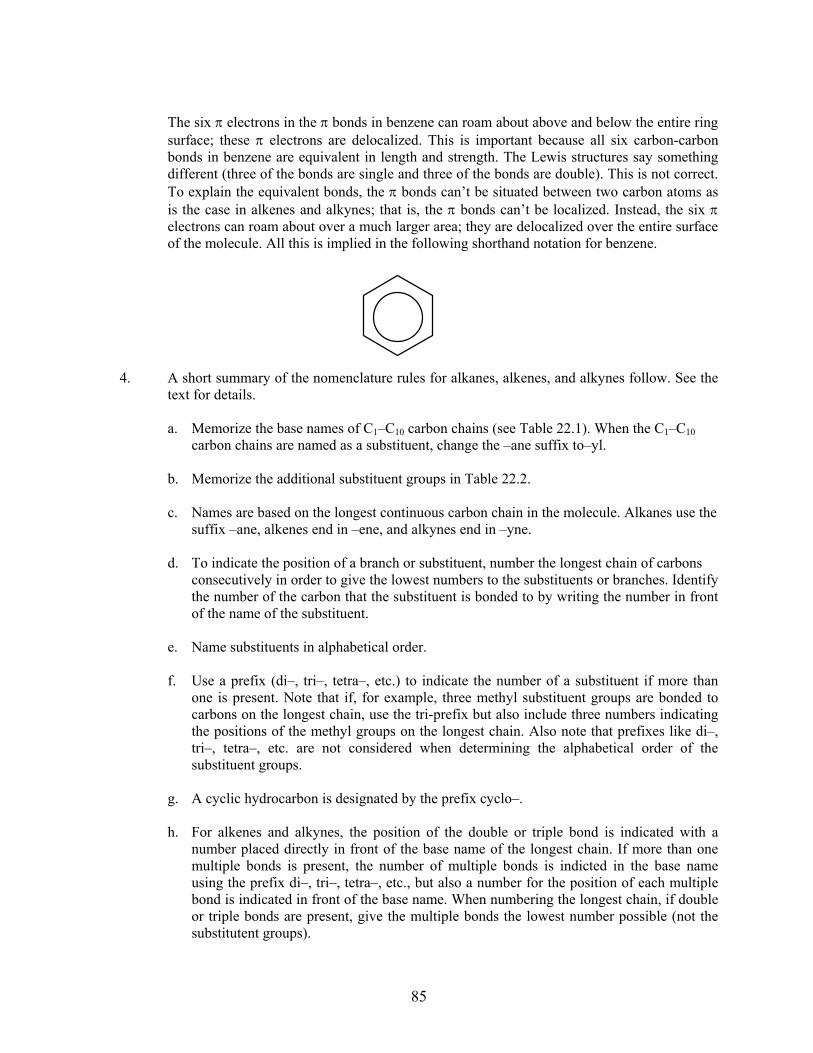
85
The six π electrons in the π bonds in benzene can roam about above and below the entire ring
surface; these π electrons are delocalized. This is important because all six carbon-carbon bonds in benzene are equivalent in length and strength. The Lewis structures say something different (three of the bonds are single and three of the bonds are double). This is not correct. To explain the equivalent bonds, the π bonds can’t be situated between two carbon atoms as is the case in alkenes and alkynes; that is, the π bonds can’t be localized. Instead, the six π electrons can roam about over a much larger area; they are delocalized over the entire surface of the molecule. All this is implied in the following shorthand notation for benzene.
4. A short summary of the nomenclature rules for alkanes, alkenes, and alkynes follow. See the
text for details. a. Memorize the base names of C1–C10 carbon chains (see Table 22.1). When the C1–C10 carbon chains are named as a substituent, change the –ane suffix to–yl. b. Memorize the additional substituent groups in Table 22.2. c. Names are based on the longest continuous carbon chain in the molecule. Alkanes use the suffix –ane, alkenes end in –ene, and alkynes end in –yne. d. To indicate the position of a branch or substituent, number the longest chain of carbons
consecutively in order to give the lowest numbers to the substituents or branches. Identify the number of the carbon that the substituent is bonded to by writing the number in front of the name of the substituent.
e. Name substituents in alphabetical order. f. Use a prefix (di–, tri–, tetra–, etc.) to indicate the number of a substituent if more than
one is present. Note that if, for example, three methyl substituent groups are bonded to carbons on the longest chain, use the tri-prefix but also include three numbers indicating the positions of the methyl groups on the longest chain. Also note that prefixes like di–, tri–, tetra–, etc. are not considered when determining the alphabetical order of the substituent groups.
g. A cyclic hydrocarbon is designated by the prefix cyclo–. h. For alkenes and alkynes, the position of the double or triple bond is indicated with a
number placed directly in front of the base name of the longest chain. If more than one multiple bonds is present, the number of multiple bonds is indicted in the base name using the prefix di–, tri–, tetra–, etc., but also a number for the position of each multiple bond is indicated in front of the base name. When numbering the longest chain, if double or triple bonds are present, give the multiple bonds the lowest number possible (not the substitutent groups).

86
This is a start. As you will find out, there are many interesting situations that can come up which aren’t covered by these rules. We will discuss them as they come up.
For aromatic nomenclature rules, reference Section 22.3 of the text. The errors in the names are discussed below. a. The longest chain gives the base name. b. The suffix –ane indicates only alkanes. Alkenes and alkynes have different suffixes as do
other “types” of organic compounds. c. Smallest numbers are used to indicate the position of substituents. d. Numbers are required to indicate the positions of double or triple bonds. e. Multiple bonds (double or triple) get the lowest number. f. The term ortho– in benzene nomenclature indicates substituents in the benzene ring
bonded to C–1 and C–2. The term meta– describes C–1 and C–3 substituent groups, while para– is used for C–1 and C–4 substituent groups.
5. See Table 22.4 for the types of bonds and atoms in the functional groups listed in a-h of this
question. Examples are also listed in Table 22.4. a. Halohydrocarbons: name the halogens as substituents, adding o to the end of the name of
the halogen. Assuming no multiple bonds, all carbons and the halogens are sp3 hybridized because the bond angles are all 109.5E.
b. Alcohols: –ol suffix; the oxygen is sp3 hybridized because the predicted bond angle about
O is 109.5E. c. Ethers: name the two R-groups bonded to O as substituent groups (in alphabetical order),
and then end the name in ether. These are the common nomenclature rules for ethers. The oxygen in an ether is sp3 hybridized due to the predicted 109.5E bond angle.
d. Aldehydes: –al suffix; the carbon doubly bonded to oxygen is sp2 hybridized because this
carbon exhibits 120E bond angles. The oxygen in the double bond is also sp2 hybridized because it has three effective pairs of electrons around it (two lone pairs and the bonded carbon atom).
e. Ketones: –one suffix; the carbon doubly bonded to oxygen is sp2 hybridized because the
bond angles about this carbon are 120E. The O in the double bond is sp2 hybridized. f. Carboxylic acids: –oic acid is added to the end of the base name; the carbon doubly
bonded to oxygen is sp2 hybridized (120E bond angles), and the oxygen with two single bonds is sp3 hybridized (predicted 109.5E bond angles). The oxygen in the double bond is sp2 hybridized.

87
g. Esters: the alcohol part of ester is named first as a substituent using the –yl suffix; the carboxylic acid part of the ester gives the base name using the suffix –oate. In the common nomenclature rules, the carboxylic acid part is named using common names for the carboxyclic acid ending in the suffix –ate. The bonding and bond angles are the same as discussed previously with carboxylic acids.
h. Amines: similar to ethers, the R-groups are named as substituent groups (in alphabetical
order), and then end the name in amine (common rules). The nitrogen in amines is sp3 hybridized due to predicted 109.5 E bond angles.
The difference between a primary, secondary, and tertiary alcohol is the number of R-groups (other carbons) that are bonded to the carbon with the OH group. Primary: 1 R-group; secondary: 2 R-groups; tertiary: 3 R-groups. A number is required to indicate the location of a functional group only when that functional group can be present in more than one position in the longest chain. Hydrohalogens, alcohols, and ketones require a number. The aldeyde group must be on C–1 in the longest chain, and the carboxylic acid group must also be on C–1; no numbers are used for aldehyde and carboxylic acid nomenclature. In addition, no numbers are used for nomenclature of simple ethers, simple esters, and simple amines. carboxylic acid aldehyde
The R designation may be a hydrogen, but is usually a hydrocarbon fragment. The major point in the R-group designation is that if the R-group is a hydrocarbon fragment, then the first atom in the R-group is a carbon atom. What the R-group has after the first carbon is not important to the functional group designation.
6. Resonance: All atoms are in the same position. Only the positions of π electrons are different. Isomerism: Atoms are in different locations in space.
Isomers are distinctly different substances. Resonance is the use of more than one Lewis structure to describe the bonding in a single compound. Resonance structures are not isomers.
Structural isomers: Same formula but different bonding, either in the kinds of bonds present
or the way in which the bonds connect atoms to each other. Geometrical isomers: Same formula and same bonds, but differ in the arrangement of atoms
in space about a rigid bond or ring. To distinguish isomers from molecules that differ by rotations about some bonds, name them.
If two structures have different names, they are different isomers (different compounds). If the two structures have the same name, then they are the same compound. The two com-
R C O H
O
R C H
O
RCOOH RCHO
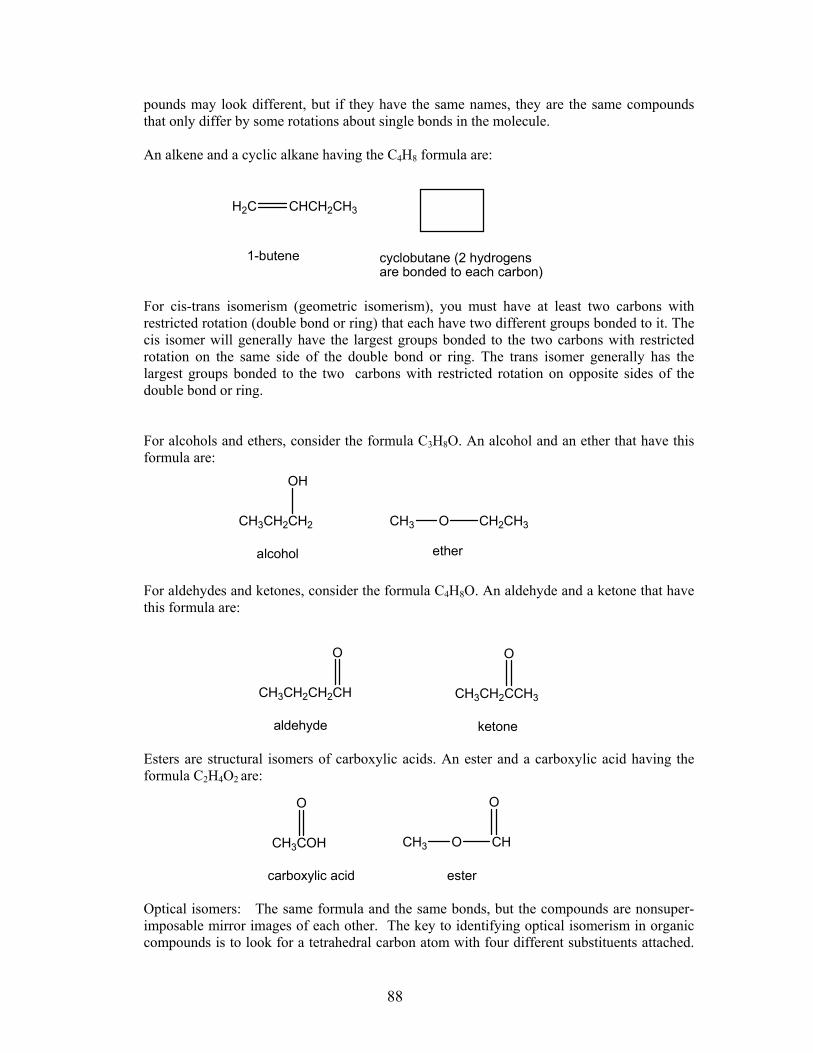
88
pounds may look different, but if they have the same names, they are the same compounds that only differ by some rotations about single bonds in the molecule.
An alkene and a cyclic alkane having the C4H8 formula are:
For cis-trans isomerism (geometric isomerism), you must have at least two carbons with restricted rotation (double bond or ring) that each have two different groups bonded to it. The cis isomer will generally have the largest groups bonded to the two carbons with restricted rotation on the same side of the double bond or ring. The trans isomer generally has the largest groups bonded to the two carbons with restricted rotation on opposite sides of the double bond or ring.
For alcohols and ethers, consider the formula C3H8O. An alcohol and an ether that have this
formula are:
For aldehydes and ketones, consider the formula C4H8O. An aldehyde and a ketone that have this formula are:
Esters are structural isomers of carboxylic acids. An ester and a carboxylic acid having the formula C2H4O2 are:
carboxylic acid ester
Optical isomers: The same formula and the same bonds, but the compounds are nonsuper-imposable mirror images of each other. The key to identifying optical isomerism in organic compounds is to look for a tetrahedral carbon atom with four different substituents attached.
CH3CH2CH2
OH
CH3 O CH2CH3
alcohol ether
CH3COH
O
CH3 O CH
O
CH3CH2CH2CH CH3CH2CCH3
O O
aldehyde ketone
H2C CHCH2CH3
1-butene cyclobutane (2 hydrogens are bonded to each carbon)

89
When four different groups are bonded to a carbon atom, then a nonsuperimposable mirror image does exist.
1−bromo−1−chloroethane 1−bromo−2−chloroethane
The carbon with the asterisk has 4 different groups bonded to it (1−Br; 2−Cl; 3−CH3; 4−H). This compound has a nonsuperimposable mirror image.
Neither of the two carbons have four different groups bonded to it The mirror image of this molecule will be superimposable (it does not exhibit optical isomerism).
7. Hydrocarbons only have nonpolar C−C and C−H bonds; they are always nonpolar compounds having only London dispersion forces. The strength of the London dispersion (LD) forces is related to size (molar mass). The larger the compound, the stronger the LD forces. Because n-heptane (C7H16) is a larger molecule than n-butane (C4H10), n-heptane has the stronger LD forces holding the molecule together in the liquid phase and will have a higher boiling point.
Another factor affecting the strength of intermolecular forces is the shape of the molecule.
The strength of LD forces also depends on the surface area contact among neighboring molecules. As branching increases, there is less surface area contact among neighboring molecules, leading to weaker LD forces and lower boiling points.
All the function groups in Table 22.4 have a very electronegative atom bonded to the carbon
chain in the compound. This creates bond dipoles in the molecule leading to a polar molecule which leads to additional dipole-dipole forces. Most of the functional groups have carbon-oxygen polar bonds leading to a polar molecule. In halohydrocarbons, the polar bond is C−X where X is a halogen. In amines, the polar bond is C−N. Note that CF4, even though it has 4 polar C−F bonds, is nonpolar. The bond dipoles are situated about carbon so they all cancel each other out. This type of situation is atypical in hydrocarbons.
Alcohols, carboxylic acids and amines exhibit a special type of dipole force. That force is the
relatively strong hydrogen-bonding interaction. These compounds have an O−H or N−H bond, which is a requirement for H−bonding.
Reference the isomers of C3H8O in Review question 6. The alcohol can H−bond, the ether
cannot (no O−H bonds exist in the ether). Because the alcohol has the ability to H−bond, it will have a significantly higher boiling point than the ether.
Br C C
H
H
H
Cl
H
Br C CH3
H
Cl
*

90
The same holds true for carboxylic acids and esters, which are structural isomers. Even though the isomers have the same formula, the bonds are arranged differently. In a carboxylic acid, there is an O−H bond, so it can H−bond. The ester does not have an O−H bond. Therefore, carboxylic acids boil at a higher temperature than same size esters.
Because these compounds are about the same size (molar mass: 44-46 g/mol), they all have
about the same strength LD forces. However, three of the compounds have additional intermolecular forces, hence they boil at a higher (and different) temperature than the nonpolar CH3CH2CH3. Among the polar compounds; the two compounds which H−bond will have higher boiling points than the aldehyde. Between the two compounds which can H−bond, the carboxylic acid wins out because it has additional dipole forces from the polar C=O bond. The alcohol does not have this. The order of boiling points is:
CH3CH2CH3 < CH3CHO < CH3CH2OH < HCOOH lowest boiling point highest boiling point 8. Substitution: An atom or group is replaced by another atom or group.
e.g., H in benzene is replaced by Cl. C6H6 + Cl2 catalyst→ C6H5Cl + HCl
Addition: Atoms or groups are added to a molecule. e.g., Cl2 adds to ethene. CH2=CH2 + Cl2 → CH2Cl ‒ CH2Cl To react Cl2 with an alkane, ultraviolet light must be present to catalyze the reaction. To react
Cl2 with benzene, a special iron catalyst is needed. Its formula is FeCl3. For both of these hydrocarbons, if no catalyst is present, there is no reaction. This is not the case for reacting Cl2 with alkenes or alkynes. In these two functional groups, the π electrons situated above and below the carbon-carbon bond are easily attacked by substances that are attracted to the negative charge of the π electrons. . Hence, the π bonds in alkenes and alkynes are why these are more reactive. Note that even though benzene has π electrons, it does not want to disrupt the delocalized π bonding. When Cl2 reacts with benzene, it is the C−H bond that changes, not the π bonding.
A combustion reaction just means reacting something with oxygen (O2) gas. For organic
compounds made up of C, H, and perhaps O, the assumed products are CO2(g) and H2O(g).
CH3CH2CH3CH3CH2OH CH3CH
O
H C OH
O
LD only LD + H-bonding LD + dipole LD + H-bonding + dipole
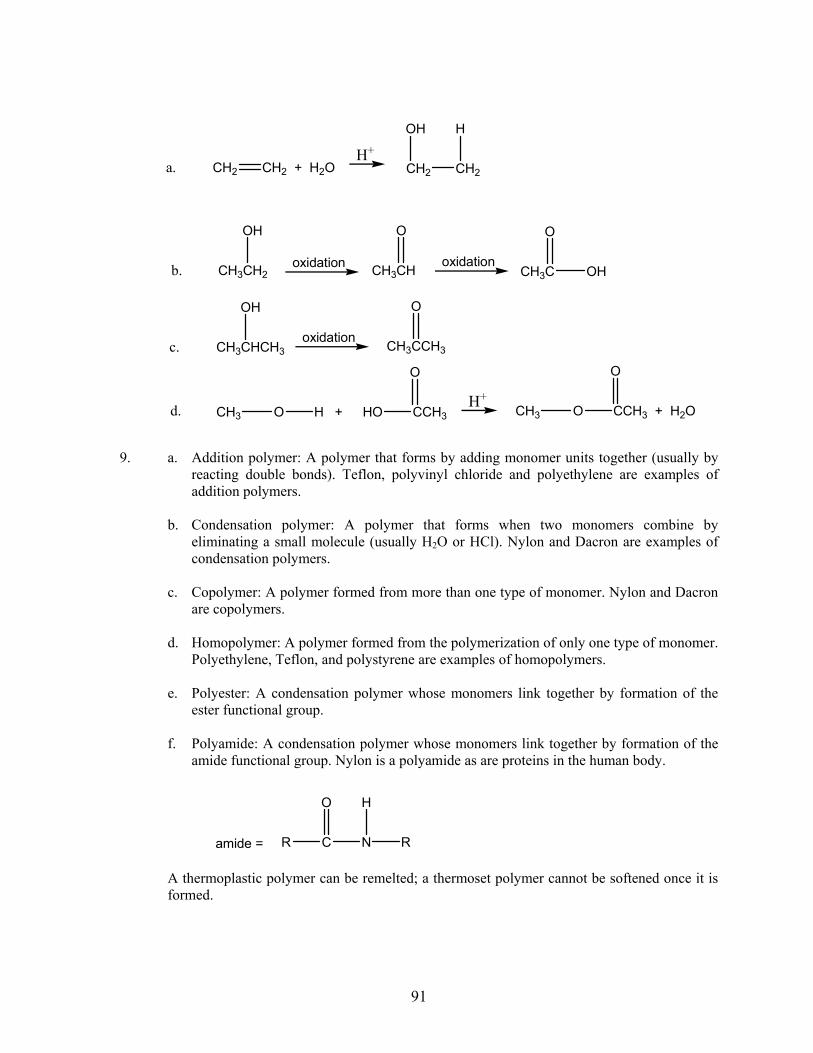
91
9. a. Addition polymer: A polymer that forms by adding monomer units together (usually by
reacting double bonds). Teflon, polyvinyl chloride and polyethylene are examples of addition polymers.
b. Condensation polymer: A polymer that forms when two monomers combine by
eliminating a small molecule (usually H2O or HCl). Nylon and Dacron are examples of condensation polymers.
c. Copolymer: A polymer formed from more than one type of monomer. Nylon and Dacron
are copolymers. d. Homopolymer: A polymer formed from the polymerization of only one type of monomer.
Polyethylene, Teflon, and polystyrene are examples of homopolymers. e. Polyester: A condensation polymer whose monomers link together by formation of the
ester functional group. f. Polyamide: A condensation polymer whose monomers link together by formation of the
amide functional group. Nylon is a polyamide as are proteins in the human body.
A thermoplastic polymer can be remelted; a thermoset polymer cannot be softened once it is formed.
CH2 CH2 + H2OH+
CH2 CH2
OH H
a.
amide = R C N R
O H
CH3CH2
OH
CH3CH
O
CH3C OH
O
c. CH3CHCH3
OH
CH3CCH3
O
CH3 O H + HO CCH3 CH3 O CCH3 + H2OH+
d.
b. oxidation oxidation
oxidation
O O
92
The physical properties depend on the strengths of the intermolecular forces among adjacent polymer chains. These forces are affected by chain length and extent of branching: longer chains = stronger intermolecular forces; branched chains = weaker intermolecular forces. Crosslinking makes a polymer more rigid by bonding adjacent polymer chains together. The regular arrangement of the methyl groups in the isotactic chains allows adjacent polymer chains to pack together very closely. This leads to stronger intermolecular forces among chains as compared to atactic polypropylene where the packing of polymer chains is not as efficient. Polyvinyl chloride contains some polar C−Cl bonds compared to only nonpolar C−H bonds in polyethylene. The stronger intermolecular forces would be found in polyvinyl chloride since there are dipole-dipole forces present in PVC that are not present in polyethylene.
10-12. These questions are meant to guide you as you read Section 22.6 of the text on Natural
Polymers. The three specific natural polymers discussed are proteins, carbohydrates, and nucleic acids, all of which are essential polymers found and utilized by our bodies. Read the questions to familiarize yourself with the important terms and concepts covered in Section 22.6, and then review the Natural Polymer section to help you answer these questions