For PCIe-8622 - ICP DAS USA
8
PCIe-8622 Quick Start Guide ICP DAS CO., LTD. 1 Website: http:// www.icpdas.com.tw E-Mail: [email protected] , [email protected] The shipping package includes the following items: The UniDAQ driver supports Windows 2000 and 32/64-bit versions of Windows XP/2003/2008/7/8. The driver installation package for PCIe-8622 board can be found on the companion CD-ROM, or can be obtained from the ICP DAS FTP web site. The driver is located at: CD: \NAPDOS\PCI\UniDAQ\DLL\Driver http://ftp.icpdas.com/pub/cd/iocard/pci/napdos/pci/unidaq/dll/driver/ For PCIe-8622 Check the Supplied Items English/May 2015/Version 1.0 Installing the Windows Driver Software Utility CD (V6.2 or later) Quick Start Guide (This Document) PCIe-8622
-
Upload
khangminh22 -
Category
Documents
-
view
2 -
download
0
Transcript of For PCIe-8622 - ICP DAS USA

PCIe-8622 Quick Start Guide ICP DAS CO., LTD.
1 Website: http:// www.icpdas.com.tw E-Mail: [email protected] , [email protected]
The shipping package includes the following items:
The UniDAQ driver supports Windows 2000 and 32/64-bit versions of Windows
XP/2003/2008/7/8. The driver installation package for PCIe-8622 board can be
found on the companion CD-ROM, or can be obtained from the ICP DAS FTP web
site. The driver is located at:
CD: \NAPDOS\PCI\UniDAQ\DLL\Driver
http://ftp.icpdas.com/pub/cd/iocard/pci/napdos/pci/unidaq/dll/driver/
For PCIe-8622
Check the Supplied Items
English/May 2015/Version 1.0
Installing the Windows Driver
Software Utility CD
(V6.2 or later) Quick Start Guide
(This Document)
PCIe-8622

PCIe-8622 Quick Start Guide ICP DAS CO., LTD.
2 Website: http:// www.icpdas.com.tw E-Mail: [email protected] , [email protected]
To install the UniDAQ driver, follow the procedure described below.
Step 1: Double-click the UniDAQ_Win_Setupxxx.exe icon to begin the installation
process.
Step 2: When the “Welcome to the ICP DAS UniDAQ Driver Setup Wizard” screen
is displayed, click the “Next>” button to start the installation.
Step 3: On the “Information” screen, verify that the DAQ card is included in the
list of supported devices, then click the “Next>” button.
Step 4: On the “Select Destination Location” screen, click the “Next>” button to
install the software in the default folder, C:\ICPDAS\UniDAQ.
Step 5: On the “Select Components” screen, verify that the DAQ Card is in the list
of device, and then click the “Next>” button to continue.
Step 6: On the “Select Additional Tasks” screen, click the “Next>” button.
Step 7: On the “Download Information” screen, click the “Next>” button
Step 8: Once the installation has completed, click “No, I will restart my computer
later”, and then click the “Finish” button.
For detailed information about the driver installation, refer to Chapter 2 “Install
UniDAQ Driver DLL” of the UniDAQ SDK User Manual.
Board Layout
Card ID Switch (SW1)
The default Card ID is 0x0.
For more details regarding the SW1
Card ID settings, refer to the Section
2.2 “Card ID Switch” of the PCIe-862x
Series Board User Manual.
CON1 Connector
(See Section 5 Pin Assignments)
PCIe-8622 Quick Start Guide ICP DAS CO., LTD.
3 Website: http:// www.icpdas.com.tw E-Mail: [email protected] , [email protected]
Step 1: Shut down and power off the computer.
Step 2: Remove all the covers from the computer.
Step 3: Select an unused PCI Express slot.
Step 4: Carefully insert the PCIe-8622 board into
the PCI Express slot and secure the board
in place.
Step 5: Replace the covers on the computer.
Step 6: Reconnect the power supply and power on the computer.
Step 7: Once the computer reboots, follow any messages that may be displayed
to complete the Plug and Play installation procedure.
Step 8: Open the “Device Manager” in the Control Panel and verify that the
PCIe-8622 board is listed correctly, as illustrated below.
Installing the Hardware
Installation successful
PCIe-8622 Quick Start Guide ICP DAS CO., LTD.
4 Website: http:// www.icpdas.com.tw E-Mail: [email protected] , [email protected]
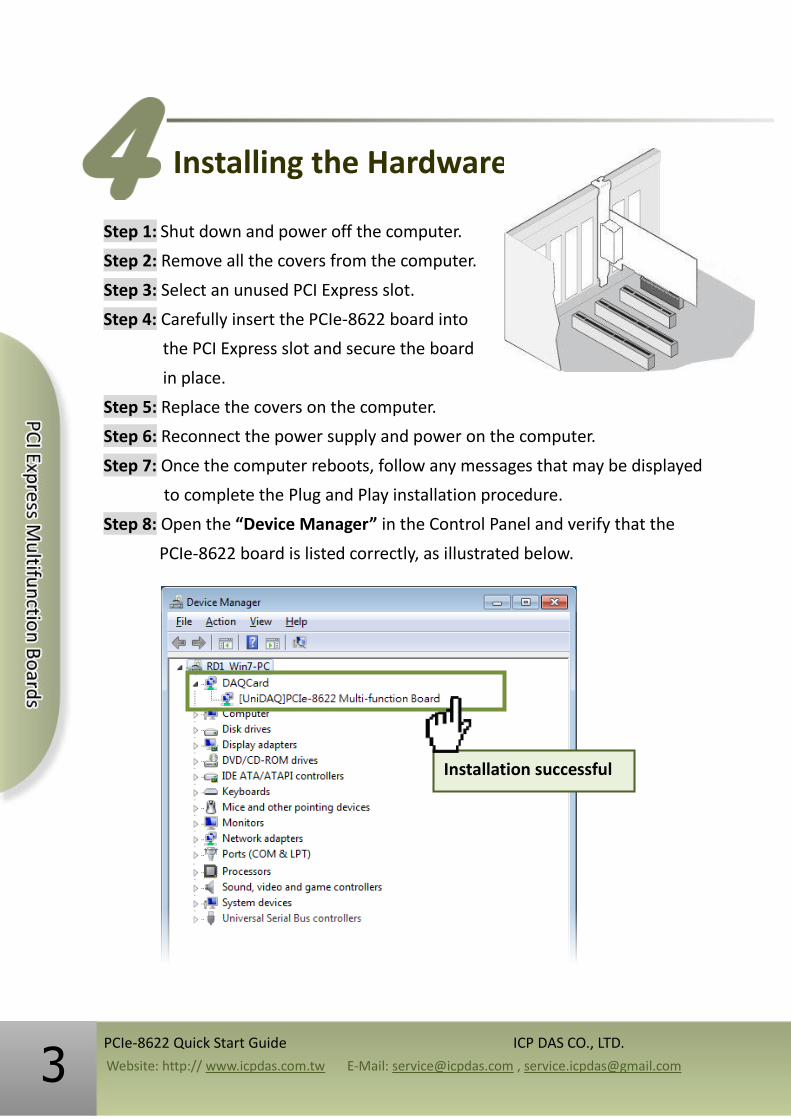
Pin Assignments

PCIe-8622 Quick Start Guide ICP DAS CO., LTD.
5 Website: http:// www.icpdas.com.tw E-Mail: [email protected] , [email protected]
Preparation:
A stable signal source. (For example, a dry cell battery)
One DN-68A wiring terminal board.
One CA-SCSI15-H cable.
Step 1: Connect the DN-68A terminal board
to the CON1 connector on the PCIe-8622
board using the CA-SCSI15-H cable.
Wiring for the Digital Input/Output Test: Step 2: Connect the DI0 pin (Pin52) on the terminal board to DO0 pin (Pin45)
and connect the DI1 pin (Pin18) on the terminal board to DO1 pin (Pin11).
Self-Test
PCIe-8622 Quick Start Guide ICP DAS CO., LTD.
6 Website: http:// www.icpdas.com.tw E-Mail: [email protected] , [email protected]
Wiring for the Analog Input Test: Step 3: Connect the signal source to AI channel 0, and connect the signals as
follows.
1. Connect the AI0 pin (Pin68) on the terminal board to positive signal
terminal (+)
2. Connect the A_GND pin (Pin60) on the terminal board to negative signal
terminal (-)
Execute the UniDAQ Utility Program:
Step 4: In Windows 7, click the “Start” button,
point to “All Programs”, and then click the
“ICPDAS” folder. Point to “UniDAQ
Development Kits”and then click the
“UniDAQ Utility” to execute the UniDAQ
Utility Program.
Step 5: Confirm that the PCIe-8622 board has
been successfully installed in the Host system.
Note that the device numbers start from 0.
Step 6: Click the “TEST” button to start the
test.
5 6

PCIe-8622 Quick Start Guide ICP DAS CO., LTD.
7 Website: http:// www.icpdas.com.tw E-Mail: [email protected] , [email protected]
Step 7: Check the results of the Digital Input/Output functions test.
Check the checkboxes for channels 0 and 2
Select “Port 0” 2
3
Click the “Digital Output” tab 1
Click the “Digital Input” tab 4
Select “Port 0” 5
The DI indicators will turn red when the
corresponding DO channels (0 and 2) are ON.
6

PCIe-8622 Quick Start Guide ICP DAS CO., LTD.
8 Website: http:// www.icpdas.com.tw E-Mail: [email protected] , [email protected]
Step 8: Check the results of the Analog Input functions test.
PCIe-8622 Series Board Product Page:
http://www.icpdas.com/root/product/solutions/pc_based_io_board/pci/pcie-862x
.html
DN-68A and CA-SCSI15-H Product Pages (optional):
http://www.icpdas.com/root/product/solutions/pc_based_io_board/daughter_bo
ards/dn-68a.html
http://www.icpdas.com/products/Accessories/cable/cable_selection.htm
UniDAQ Documentation and Software:
CD:\NAPDOS\PCI\UniDAQ\
http://ftp.icpdas.com/pub/cd/iocard/pci/napdos/pci/unidaq/
Related Information
Confirm the configuration settings Click the “Start” button to
start the test
8
Click “Analog Input” tab 7
9
Check the Analog Input value for Channel 0.
The values for other channels will be a
floating number.
10
PASS