Beginning ASP.NET 2.0
793
TEAM LinG
-
Upload
khangminh22 -
Category
Documents
-
view
18 -
download
0
Transcript of Beginning ASP.NET 2.0

TEAM LinG

Beginning ASP.NET 2.0
01_588508 ffirs.qxd 10/10/05 6:28 PM Page i

01_588508 ffirs.qxd 10/10/05 6:28 PM Page ii

Beginning ASP.NET 2.0
Chris Hart, John Kauffman, Dave Sussman, and Chris Ullman
01_588508 ffirs.qxd 10/10/05 6:28 PM Page iii

Beginning ASP.NET 2.0Published byWiley Publishing, Inc.10475 Crosspoint BoulevardIndianapolis, IN 46256www.wiley.com
Copyright © 2006 by Wiley Publishing, Inc., Indianapolis, Indiana
Published simultaneously in Canada
ISBN-13: 978-0-7645-8850-1ISBN-10: 0-7645-8850-8
Manufactured in the United States of America
10 9 8 7 6 5 4 3 2 1
1B/SW/RQ/QV/IN
Library of Congress Cataloging-in-Publication Data is available from the Publisher.
No part of this publication may be reproduced, stored in a retrieval system or transmitted in any form or byany means, electronic, mechanical, photocopying, recording, scanning or otherwise, except as permittedunder Sections 107 or 108 of the 1976 United States Copyright Act, without either the prior written permis-sion of the Publisher, or authorization through payment of the appropriate per-copy fee to the CopyrightClearance Center, 222 Rosewood Drive, Danvers, MA 01923, (978) 750-8400, fax (978) 646-8600. Requests tothe Publisher for permission should be addressed to the Legal Department, Wiley Publishing, Inc., 10475Crosspoint Blvd., Indianapolis, IN 46256, (317) 572-3447, fax (317) 572-4355, or online at http://www.wiley.com/go/permissions.
LIMIT OF LIABILITY/DISCLAIMER OF WARRANTY: THE PUBLISHER AND THE AUTHOR MAKENO REPRESENTATIONS OR WARRANTIES WITH RESPECT TO THE ACCURACY OR COMPLETENESSOF THE CONTENTS OF THIS WORK AND SPECIFICALLY DISCLAIM ALL WARRANTIES, INCLUDINGWITHOUT LIMITATION WARRANTIES OF FITNESS FOR A PARTICULAR PURPOSE. NO WARRANTYMAY BE CREATED OR EXTENDED BY SALES OR PROMOTIONAL MATERIALS. THE ADVICE ANDSTRATEGIES CONTAINED HEREIN MAY NOT BE SUITABLE FOR EVERY SITUATION. THIS WORK ISSOLD WITH THE UNDERSTANDING THAT THE PUBLISHER IS NOT ENGAGED IN RENDERINGLEGAL, ACCOUNTING, OR OTHER PROFESSIONAL SERVICES. IF PROFESSIONAL ASSISTANCE ISREQUIRED, THE SERVICES OF A COMPETENT PROFESSIONAL PERSON SHOULD BE SOUGHT.NEITHER THE PUBLISHER NOR THE AUTHOR SHALL BE LIABLE FOR DAMAGES ARISING HERE-FROM. THE FACT THAT AN ORGANIZATION OR WEBSITE IS REFERRED TO IN THIS WORK AS ACITATION AND/OR A POTENTIAL SOURCE OF FURTHER INFORMATION DOES NOT MEAN THATTHE AUTHOR OR THE PUBLISHER ENDORSES THE INFORMATION THE ORGANIZATION ORWEBSITE MAY PROVIDE OR RECOMMENDATIONS IT MAY MAKE. FURTHER, READERS SHOULD BEAWARE THAT INTERNET WEBSITES LISTED IN THIS WORK MAY HAVE CHANGED OR DISAP-PEARED BETWEEN WHEN THIS WORK WAS WRITTEN AND WHEN IT IS READ.
For general information on our other products and services please contact our Customer Care Departmentwithin the United States at (800) 762-2974, outside the United States at (317) 572-3993 or fax (317) 572-4002.
Trademarks: Wiley, the Wiley logo, Wrox, the Wrox logo, Programmer to Programmer, and related tradedress are trademarks or registered trademarks of John Wiley & Sons, Inc. and/or its affiliates, in the UnitedStates and other countries, and may not be used without written permission. All other trademarks are theproperty of their respective owners. Wiley Publishing, Inc., is not associated with any product or vendormentioned in this book.
Wiley also publishes its books in a variety of electronic formats. Some content that appears in print may notbe available in electronic books.
01_588508 ffirs.qxd 10/10/05 6:28 PM Page iv

Chris Ullman: All my love to my wife Kate and the boys.
01_588508 ffirs.qxd 10/10/05 6:28 PM Page v

01_588508 ffirs.qxd 10/10/05 6:28 PM Page vi

About the Authors
Chris HartChris works full-time as a developer at Trinity Expert Systems Plc, based in Coventry (UK), where she’sworked on several major .NET, SharePoint, and CMS applications. She enjoys having a job where shegets to learn and play with new technologies on a regular basis, often working on-site with customers.She’s been using .NET since the pre-Alpha days, and yet still enjoys the fun of working with beta software.
Chris lives in Birmingham (UK, not Alabama) with her extremely understanding husband James, as shetries to fit writing alongside her hectic job and her attempts at gardening. She collects computers inmuch the same way as some old ladies collect cats.
Chris Hart contributed Chapters 3–5 and 11 and Appendix C to this book.
John KauffmanJohn Kauffman was born in Philadelphia, the son of a chemist and a nurse. He received his degrees fromThe Pennsylvania State University, the colleges of Science and Agriculture. His early research was forHershey foods in the genetics of the chocolate tree and the molecular biology of chocolate production.Since 1993, John has focused on explaining technology in the classroom and in books.
In his spare time, John is an avid sailor and youth sailing coach. He also enjoys jazz music and drum-ming. In addition to technical material, he manages to read the New Yorker magazine from cover-to-covereach week.
John Kauffman contributed Chapters 1, 2, 7, and 8 and Appendix D to this book.
Dave SussmanDave Sussman is an independent trainer, consultant, and writer, who inhabits that strange place calledbeta land. It’s full of various computers, multiple boot partitions, VPC images, and very occasionally,stable software. When not writing books or testing alpha and beta software, Dave can be found workingwith a variety of clients helping to bring ASP.NET projects into fruition. He is a Microsoft MVP, and amember of the ASP Insiders and INETA Speakers Bureau. You can find more details about Dave and hisbooks at his official Web site (www.ipona.com) or the site he shares with Alex Homer (http://daveandal.net).
Dave Sussman contributed Chapters 6, 9, 14, and 15 and Appendix E to this book.
01_588508 ffirs.qxd 10/10/05 6:28 PM Page vii

Chris UllmanChris Ullman is a freelance web developer and technical author who has spent many years stewing inASP/ASP.NET, like a teabag left too long in the pot. Coming from a Computer Science background, hestarted initially as a UNIX/Linux guru, who gravitated toward MS technologies during the summer ofASP (1997). He cut his teeth on Wrox Press ASP guides, and since then he has written on more than 20books, most notably as lead author for Wrox’s bestselling Beginning ASP/ASP.NET 1.x series, and hascontributed chapters to books on PHP, ColdFusion, JavaScript, Web Services, C#, XML, and otherInternet-related technologies too esoteric to mention, now swallowed up in the quicksands of thedot.com boom.
Quitting Wrox as a full-time employee in August 2001, he branched out into VB.NET/C# programmingand ASP.NET development and started his own business, CUASP Consulting Ltd, in April 2003. Hemaintains a variety of sites from www.cuasp.co.uk, his “work” site, to www.atomicwise.com, aselection of his writings on music and art. The birth of his twins, Jay and Luca, in February 2005 tookchaos to a new level. He now divides his time between protecting the twins from their over-affectionatethree-year-old brother Nye, composing electronic sounds on bits of dilapidated old keyboards for hismusic project, Open E, and tutoring his cats in the art of peaceful coexistence, and not violently muggingeach other on the stairs.
Chris Ullman contributed Chapters 10, 12, 13, and 16 and Appendix B to this book.
01_588508 ffirs.qxd 10/10/05 6:28 PM Page viii

CreditsSenior Acquisitions EditorJim Minatel
Development EditorBrian Herrmann
Technical EditorDan Maharry
Production EditorFelicia Robinson
Copy EditorKim Cofer
Editorial ManagerMary Beth Wakefield
Production ManagerTim Tate
Vice President & Executive Group PublisherRichard Swadley
Vice President and PublisherJoseph B. Wikert
Project CoordinatorRyan Steffen
Graphics and Production SpecialistsAndrea DahlCarrie FosterLauren GoddardDenny HagerJoyce HaugheyJennifer HeleineStephanie D. JumperLynsey OsbornAlicia B. South
Quality Control TechnicianLeeann Harney
ProofreadingSossity R. Smith
IndexingTECHBOOKS Production Services
01_588508 ffirs.qxd 10/10/05 6:28 PM Page ix

01_588508 ffirs.qxd 10/10/05 6:28 PM Page x

Contents
Acknowledgments xxiIntroduction xxiiiWho This Book Is For xxiiiWhat This Book Covers xxiv
Chapter 1: An Introduction to ASP.NET 2.0 and the Wrox United Application xxivChapter 2: Site Design xxivChapter 3: Page Design xxivChapter 4: Membership and Identity xxvChapter 5: Styling with Themes xxvChapter 6: Events and Code xxvChapter 7: Reading Data xxvChapter 8: Writing Data xxvChapter 9: Code xxvChapter 10: Componentization xxvChapter 11: Roles and Profiles xxviChapter 12: Web Services xxviChapter 13: E-Commerce xxviChapter 14: Performance xxviChapter 15: Dealing with Errors xxviChapter 16: Deployment, Builds, and Finishing Up xxvi
How This Book Is Structured xxviiWhat You Need to Use This Book xxviiConventions xxviiSource Code xxviiiErrata xxviiip2p.wrox.com xxix
Chapter 1: An Introduction to ASP.NET 2.0 and the Wrox United Application 1
The Site You Will Build 3ASP.NET 2.0 — A Powerful Tool to Build Dynamic Web Sites 4Simple Solutions for Common Web Site Tasks 5
Consistency and Personalization 5Navigation 5Login, Security, and Roles 5Connection to Data 6Code 6
02_588508 ftoc.qxd 10/10/05 6:27 PM Page xi

xii
Contents
Componentization 6Web Services 6Performance and Caching 7Errors and Exception Handling 7Deployment 7Development Tools 7
Where Does ASP.NET 2.0 Fit with Other Technology? 8Exploring the Wrox United Application 9Getting Started with Your Wrox United Site 10VWD Express — A Development Environment 10
Introducing Cassini 11VWD’s Solution Explorer 11Creating, Opening, and Using Web Sites and Pages with VWD 14The Sample Code Directories 14Running a Page 16Design Surface 17Toolbox 18Properties Window 21Error List Window 22VWD’s Database Explorer 25
Summary 26Exercises 26
Chapter 2: Site Design 29
General Design Objectives 30Master and Content Pages 31
Creating a Master Page 31Creating Content Pages 33A Sample of Master and Content Pages 35Using Cascading Style Sheets in a Master Page 36
Additional Capabilities of Master Pages 42Multiple Levels of Master Pages 42Master Pages Support Multiple Content Placeholders 43
Creating a Site Map 44General Guidelines for Site Design 47Standard Files for ASP.NET 2.0 Applications 47
Web.config Holds Settings for the Entire Site 48Global.asax Holds Code for the Entire Site 52Editing Site Configuration Through a Web Browser 52
Troubleshooting Site Design Errors 55Summary 55Exercises 56
02_588508 ftoc.qxd 10/10/05 6:27 PM Page xii

xiii
Contents
Chapter 3: Page Design 57
Static Page Design 57The World of HTML 65
From HTML to XHTML Code 68Dynamic Content 70
Dynamic Client Code and Dynamic Server Code 71Introduction to Server Controls 72
The Server Control Toolbox 72What Are Server Controls? 73Source View in VWD 78
Types of Server Controls 83Standard Controls 83HTML Controls 84Navigation Controls 86
Summary 102Exercises 103
Chapter 4: Membership and Identity 105
Security Basics 106Identity — Who Am I? 106Authentication — This Is Who I Am 106Authorization — This Is What I Can Do 106Logging In to a Site 107
ASP.NET Security 107Login Controls 107Personalization 121Membership 124Authentication 130
Wrox United Security 132Summary 136Exercises 136
Chapter 5: Styling with Themes 137
Styling a Site 137Style Attributes 138CSS — Cascading Style Sheets 142Themes 151Applying Styling to a Site 168
Themes in Wrox United 171
02_588508 ftoc.qxd 10/10/05 6:27 PM Page xiii

xiv
Contents
Styling and Layout Best Practices 177Usability 177Accessibility 178
Summary 179Exercises 179
Chapter 6: Events and Code 181
Web Server Architecture 181HTTP Is Stateless 182
Server-Side Events 183Adding Events to the Page 184
The Postback Architecture 190What Events Are Available? 191Which Events Should I Use? 193
Events Aren’t Triggered by Users Only 195Indirect Events 200Canceling Events 203Global Events 206Summary 207Exercises 208
Chapter 7: Reading Data 209
Introducing Databases 210Using ASP.NET 2.0’s Data Controls 211
Introducing Data Source Controls 211Introducing Data-Bound Controls 212Data Source Controls and Data-Bound Controls Work Together 216Configuring Data Controls with VWD 217
Data Source Controls 217The Basic Properties of Data Source Controls 218Hiding the Connection String 221Details of the Connection String and Provider 223
Data-Bound Controls 224Data-Bound Selection Lists 224The GridView Control 230The DataList and Repeater Controls 236The DetailsView and FormView Controls 244
Data Source Controls with Parameters 247
02_588508 ftoc.qxd 10/10/05 6:27 PM Page xiv

xv
Contents
Multiple Data Controls Working Together 252Working with XML Data 258
Reading XML Data 260Binding Syntax 262Summary 263Exercises 264
Chapter 8: Writing Data 265
Introduction to Writing Data 265Options for Writing Data 266DataKeyNames 266
Changing Existing Records 267Adding New Records 273Deleting Records 275Uploading Pictures 278Improving the Upload of Pictures 281Summary 286Exercises 287
Chapter 9: Code 289
Variables and Data Types 289Common Language Runtime Types 291Declaring Variables 292Assigning Values 292Data Conversion 293Null Values 295Working with Strings 295Working with Dates 297Working with Arrays and Collections 301Deciding Whether to Use Arrays or Collections 307Enumerations 307Constants 309
Statements 310Operators 310Decisions 317Loops 320
Namespaces 328Working with Classes 329
Creating Classes 330Inheritance 339
02_588508 ftoc.qxd 10/10/05 6:27 PM Page xv

xvi
Contents
Variable Scope and Lifetime 344Generics 345Summary 346Exercises 347
Chapter 10: Componentization 349
The Separation of Code from Content 350The Separation of Code from Design 351Code-Behind 352
The Page Directive 352Partial Classes 353Event Handlers/Functions 353
Creating a Code-Behind File 354Compilation in ASP.NET 2.0 357The App_Code Folder 359
Data Layers 359Two-Tier Applications 359Three-Tier Applications 360What’s New in ASP.NET 2.0 361The Wrox United ObjectDataSource 367
User Controls 370User Control Structure 372A Simple User Control 373The Wrox United News User Control 377
Composite Controls 382Assemblies and Custom Server Controls 382Summary 383Exercises 383
Chapter 11: Roles and Profiles 385
The Importance of Roles 386Introducing Roles in Wrox United 387Configuring Page-Level Authorization 397
Controlling Page Visibility 399Working with Roles in Code 406Enabling User Profiles 407Building a Profile 408
Profiles in Wrox United 410Storing Preferences 418
Managing Anonymous Shopping Carts 424Summary 425Exercises 426
02_588508 ftoc.qxd 10/10/05 6:27 PM Page xvi

xvii
Contents
Chapter 12: Web Services 427
Looking at Web Services 428Consuming a Third-Party Web Service 429
The Life Cycle of a Web Service 433Calling the Web Service 433Transmitting the Web Service 434Returning the Response 436Using the Response 438
The Structure of Your Web Service 438Processing Directive 438Namespaces 439Public Class 439Web Methods 439
Creating a Web Service 441Testing Your Web Service 444
The WSDL Contract 446Web Service Discovery 447
DISCO 448UDDI 448Discovering Your Web Service 448
Adding the Fixture Service to Your Application 451Putting It All Together 454Remote Web Services — PocketPC Application 458Web Service Security 463
Encryption and Message-Based Security 463Authentication and Access Controls for Services 463
Summary 464Exercises 464
Chapter 13: E-Commerce 465
The E-Commerce Pipeline 466The Product Catalog 467
The Structure of the Catalog 467The Design of the Catalog 467Implementation of the Catalog 468The Product Item Page 475
The Shopping Cart 481The Shopping Object 482The Profile 490The Shopping Cart Control 492
02_588508 ftoc.qxd 10/10/05 6:27 PM Page xvii

xviii
Current HeadContents
Checkout 505Order Processing 506Login 506Address/Delivery Details 506Credit Card Handling 507How You Intend to Checkout 508
Secure Transactions 523What Else Can You Do? 524Summary 524Exercises 525
Chapter 14: Performance 527
Simple Techniques 527Object Disposal 528Database Connections 531Stored Procedures 531Strongly Typed Collections 540Session State 541View State 542
Pages and Code 543Data Binding and Postback 543Object References 544StringBuilder Versus String Concatenation 544Picking the Right Collection 546
Caching 547Page Caching 547
Designing for Performance 552Web Server Hardware and Software 553
Testing Performance 553Tracing 554Stress Testing Tools 556Performance Monitor 557
Summary 557Exercises 557
Chapter 15: Dealing with Errors 559
Defensive Coding 559Parameter Checking 560Avoiding Assumptions 561Query Parameters 562Validation 563
02_588508 ftoc.qxd 10/10/05 6:27 PM Page xviii

xix
Contents
Exception Handling 568What Are Exceptions? 569The Exception Object 569How to Trap Exceptions 570Logging Exceptions 576Mailing Exceptions 580Raising Exceptions 582
Exceptions Best Practices 582Global Exception Handling 583Custom Error Pages 585
Configuring Custom Error Pages 585Debugging and Tracing 587
Using ASP.NET Tracing 587Using the Debugger 592
Summary 599Exercises 600
Chapter 16: Deployment, Builds, and Finishing Up 601
Site Deployment 602Checklist 602Compiling and Running Your Application 603Publishing the Site 604XCOPY Deployment 609Common Problems Encountered When Deploying a Site 611
Testing and Maintenance 615Testing Before and After 615Maintenance 616
Where To Now? 623References 623Summary 624Exercises 624
Appendix A: Exercise Answers 625
Appendix B: Setup 653
Appendix C: Wrox United Database Design 671
02_588508 ftoc.qxd 10/10/05 6:27 PM Page xix

xx
Contents
Appendix D: VWD Database Explorer 679
Appendix E: CSS and HTML Quick Reference 699
Index 723
02_588508 ftoc.qxd 10/10/05 6:27 PM Page xx

xxi
Acknowledgments
Chris HartI’d like to thank James for sharing me with a laptop while I wrote this book—this was the hardest oneyet, and you were great. Thanks also to my brother Rob for your inspiring creativity—best of luck inyour final year at Uni. Finally, big thanks to Lou for designing the Wrox United site, and for being such afantastic friend.
John KauffmanI gratefully acknowledge the help of the Microsoft ASP.NET 2.0 development team, particularly BradleyMillington. It was Brad who first demonstrated the enormous capability of the ASP.NET 2.0 data con-trols to me and has continued to tutor in the best use of the code his team developed. I also deeplyappreciate the ongoing advice and friendship of my co-author Dave Sussman.
Dave SussmanI would like to thank everyone on the ASP.NET team for supplying interim builds and answering manyquestions; Dan Maharry for his invaluable reviewing; and Brian Herrmann for coping admirably withnot only my writing, but also my occasional stroppy fits.
Chris UllmanThanks to everyone on the author team (Dave, Chris, and John) for being available for my Messengerand e-mail queries, thanks to Dan for being an honest reviewer and always ready with good advice, andthanks to Jim and Brian for being patient on the chapters—I got there eventually!
03_588508 flast.qxd 10/10/05 6:21 PM Page xxi

03_588508 flast.qxd 10/10/05 6:21 PM Page xxii

Introduction
Many different technologies are available today for developing complex web sites and web applications,and with so many to choose from, it’s great that there’s one technology in particular that stands out fromthe crowd and is such a joy to use. ASP.NET 2.0 is a fantastic technology that enables you to developweb sites and applications with very little hassle. Developing web applications was never this easy, yeteven though it may appear simple, there is real power and depth to this technology that enables it tohost even the most complex applications available today.
With every new release from Microsoft comes a new way of thinking, new technologies designed tomake your life easier, and the best-ever programming experience; ASP.NET 2.0 is no exception to thisrule. Whether you have developed web applications before, or if you are completely new to the world ofweb development, there’s a lot to learn about this particular version of the technology.
Built on top of version 2.0 of the .NET Framework, ASP.NET 2.0 extends on the functionality first seen inASP.NET 1.0 and 1.1. At its core, you have a control-based, event- driven architecture, which means thatyou have the ability to add small blocks of code to a page, and see dynamic results with minimal effort,and you can react to user input to provide a smooth and intuitive user experience.
The biggest change since the previous edition of ASP.NET is in the amount of code you have to write—the ASP.NET team aimed for a 70% reduction in the amount of code you write, and having spent timemyself working with ASP.NET 2.0 in the field, even if this claim does sound somewhat large, the reduc-tion in time spent with fingers on keys is very noticeable. The mundane and repetitive tasks that youwould have previously had to complete have been simplified. For example, providing user login func-tionality to a site is now a very swift process—adding a few controls to a page and setting up some useraccounts is pretty much all you need to do to get basic user login functionality implemented on a site,and personalizing the user experience is just a step away from there!
Now add the new development environment designed for building ASP.NET 2.0 applications, VisualWeb Developer (available on its own, or as part of Visual Studio 2005), and you will find buildingdynamic, feature-rich applications to be a fast, smooth process.
Visual Web Developer is a new innovation from Microsoft, and was developed mostly in response todeveloper demand. Previous editions of Visual Studio .NET were not great when it came to web pro-gramming, and you’d often find your code had been “fixed” for you behind the scenes because yourHTML came out looking very different thanthe way it went in originally! Visual Web Developer has afantastic HTML editing environment, and a really smooth and intuitive interface for developing com-plex ASP.NET applications. Best of all, it’s a low-cost product, which makes it accessible to a wide audi-ence who may not be able to afford the complete Visual Studio package.
Who This Book Is ForThis book teaches you how to program web applications in ASP.NET 2.0 that can display data stored in adatabase, provide a personalized user experience to your users, and even offer shopping functionality.
03_588508 flast.qxd 10/10/05 6:21 PM Page xxiii

xxiv
Introduction
All of these sorts of web applications can be developed using ASP.NET 2.0, so if these are the sorts ofapplications that you are interested in developing, then this is a great place to start!
This book is for anyone new to web programming, or who has a small amount of knowledge of web pro-gramming concepts. Maybe you want to start a career as a web developer? Or perhaps you just want tolearn how to use some cool server-side technology to put together some sites in your spare time? Ineither case, this book teaches you what you need to know, and gives you a good feel for how the tech-nology works, how to use the Visual Web Developer environment to speed up your development, and togive you total control over the development process.
The early chapters in this book ease you into the world of ASP.NET development, and if you alreadyhave some knowledge of programming, you will find these early chapters a swift and pleasant read.Note, though, that ASP.NET 2.0 has a lot of neat tricks and tools at its disposal, and we’ll be introducingthese throughout the book. As with other Wrox Beginning books, you should find that the concepts dis-cussed in one chapter are then used and extended in other chapters.
What This Book CoversThis book teaches you ASP.NET 2.0, with the help of the Visual Web Developer IDE (IntegratedDevelopment Environment). Working through this book, you will learn how to develop powerful data-driven web applications, and even to expose functionality using web services. Here’s how the bookshapes up over the next 16 chapters.
Chapter 1: An Introduction to ASP.NET 2.0 and the WroxUnited Application
This chapter provides an overview of ASP.NET 2.0 and the Visual Web Developer environment, andgives you a chance to create and run a simple page. You’ll also learn about the Wrox United sample website, which is used in examples throughout the book to demonstrate different aspects of ASP.NET 2.0.
Chapter 2: Site DesignNow that you’ve gained some familiarity with creating simple pages, this chapter discusses the conceptof site design, and introduces the concept of a Master page, which can be used to provide a consistentlook for all pages on a site. It also introduces Web.config and Global.asax—two important ASP.NETfiles that control the behavior of a site, and the concept of a site map, for defining a site page hierarchy.
Chapter 3: Page DesignThis chapter starts by providing a quick crash-course (or a refresher course as the case may be) in HTMLand XHTML development, and introduces the crucial concept of server controls. The chapter continues bydemonstrating several of the built-in server controls in action to provide navigation functionality on a site.
03_588508 flast.qxd 10/10/05 6:21 PM Page xxiv

xxv
Introduction
Chapter 4: Membership and IdentityOne of the big new features of ASP.NET 2.0 is the addition of the Login server controls, so this chapterintroduces these controls, alongside discussions of how to create user accounts, how to configure roles,and how to enable login functionality on a site.
Chapter 5: Styling with ThemesOnce the functionality of a site has been developed, it’s important to make a site look and feel the rightway. This chapter introduces CSS style sheets, and integrates them into the discussion of ASP.NET’sTheme functionality, making it simple to keep your functionality and your site styling cleanly separated—great for future maintainability!
Chapter 6: Events and CodeReacting to events involves writing code, so this chapter talks about server-side coding concepts andhow web servers work. It walks you through the basics of HTTP so that you will gain an understandingof the postback, and how you can write code to handle postback events.
Chapter 7: Reading DataDeveloping a site will almost always involve reading data stored in a database, and displaying that dataon the screen, so this chapter talks about how you can use ASP.NET controls (such as the GridView,DataLists, and DetailsView controls) to connect to a database and display data. This chapter also dis-cusses reading data stored in an XML file.
Chapter 8: Writing DataThe storing and updating of data is the next topic to be covered in this book, and in this chapter, you’lllearn some useful techniques for safely updating the data stored in the database using parameters andreferring to data using keys that uniquely identify items in a database.
Chapter 9: CodeThis chapter teaches you the fundamental programming concepts that you will need to understand ifyou are to become a fully fledged .NET developer. It starts by taking you through basic variables anddata types, before looking at collections, statements, operators, branches, and loops. Then it introducessome object orientation and talks about classes, properties, methods, and simple class design principles.
Chapter 10: ComponentizationHaving learned all about the principles of code in the previous chapter, this chapter takes those buildingblocks and talks about creating pages with separate code files, and about how to design applicationswith logic stored in different classes or files. This chapter also introduces the concept of user controls,which are great for storing pieces of code that can be reused across pages on a site.
03_588508 flast.qxd 10/10/05 6:21 PM Page xxv

xxvi
Introduction
Chapter 11: Roles and ProfilesFollowing on from simple user accounts and roles as introduced in Chapter 4, this chapter builds on theconcept of site design, and changing the appearance of a site depending on which user is accessing thesite. This chapter also looks at storing user profiles and populating profiles in code, as well as switchingthe theme used on a site according to user preferences.
Chapter 12: Web ServicesAt this stage in the book, you’ll have gained sufficient experience with ASP.NET 2.0 and coding that youshould now be ready to enter the world of web services. First, you’ll learn how to consume a third-partyweb service, and use that functionality on a page. Next, you’ll get the chance to build your own web ser-vices, and you’ll learn about proxies and WSDL.
Chapter 13: E-CommerceAdding e-commerce functionality to a site can be a bit tricky, so this chapter walks you through the e-commerce facilities built into the Wrox United sample application, looking at how to implement aproduct catalog, and build a shopping cart system that links in to user’s profiles.
Chapter 14: PerformanceYou may find your rather lovely web applications may crawl to a halt if you haven’t quite tweaked themthe right way to make them perform well under heavy loading, so this chapter talks about many of thedifferent ways you can enhance the performance of an application. This includes concepts such as dis-posing of objects, using stored procedures, and making efficient use of caching.
Chapter 15: Dealing with ErrorsErrors happen whenever you develop any application, so this chapter talks you through some of themost common ways to handle errors, how to trap exceptions, and how to present custom error pages tousers of your site. After all, they don’t need to know that your database server collapsed, but they wouldlike to know, if the site is down, that faults will be rectified shortly. You can then use some of the excel-lent debugging and tracing functionality available in ASP.NET.
Chapter 16: Deployment, Builds, and Finishing UpThe final chapter of the book talks you through the ideal way to deploy a finished web application to alive server. The application used as an example is the Wrox United application, which you can publishusing both the Visual Web Developer tools and what’s known as XCOPY deployment. This chapter alsolooks at testing the deployment and looking out for common deployment problems. The final part of thechapter reviews the different parts of the Wrox United application, and recaps where each part of theapplication was discussed in the book. Finally, we’ll give you some pointers as to where you can headnext to further your ASP.NET development career!
03_588508 flast.qxd 10/10/05 6:21 PM Page xxvi

xxvii
Introduction
How This Book Is StructuredThis book takes time to explain concepts step-by-step, using worked examples and detailed explana-tions, to tell the story of how to develop ASP.NET applications. Each chapter assumes knowledge devel-oped in previous chapters, so you will likely find a front-to-back study approach works best tounderstand the concepts explained. Four authors worked on this book as a team, and we all workedquite closely together (with some great editorial support), to give you a steady and complete tutorial ofthe basics of developing ASP.NET applications.
What You Need to Use This BookTo gain the most from this book, you should have the following software installed on your system:
❑ A minimum of Windows XP Home Edition as your operating system
❑ Microsoft Visual Web Developer
❑ Microsoft SQL Server 2005 Express Edition
Because Visual Web Developer includes the .NET Framework and ASP.NET 2.0, these three pieces ofsoftware are all you will need to develop ASP.NET applications.
ConventionsTo help you get the most from the text and keep track of what’s happening, we’ve used a number of con-ventions throughout the book.
Try It OutThe Try It Out is an exercise you should work through, following the text in the book.
1. They usually consist of a set of steps.
2. Each step has a number.
3. Follow the steps through with your copy of the code.
How It WorksAfter each Try It Out, the code you’ve typed will be explained in detail.
Tips, hints, tricks, and asides to the current discussion are offset and placed in italics like this.
Boxes like this one hold important, not-to-be forgotten information that is directlyrelevant to the surrounding text.
03_588508 flast.qxd 10/10/05 6:21 PM Page xxvii

xxviii
Introduction
As for styles in the text:
❑ We italicize new terms and important words when we introduce them.
❑ We show keyboard strokes like this: Ctrl+A.
❑ We show file names, URLs, and code within the text like so: persistence.properties.
❑ We present code in two different ways:
In code examples we highlight new and important code with a gray background.The gray highlighting is not used for code that’s less important in the presentcontext, or has been shown before.
Source CodeAs you work through the examples in this book, you may choose either to type in all the code manuallyor to use the source code files that accompany the book. All of the source code used in this book is avail-able for download at http://www.wrox.com. Once at the site, simply locate the book’s title (either byusing the Search box or by using one of the title lists) and click the Download Code link on the book’sdetail page to obtain all the source code for the book.
Because many books have similar titles, you may find it easiest to search by ISBN; for this book theISBN is 0-7645-8850-8.
Once you download the code, just decompress it with your favorite compression tool. Alternatively, you can go to the main Wrox code download page at http://www.wrox.com/dynamic/books/download.aspx to see the code available for this book and all other Wrox books.
ErrataWe make every effort to ensure that there are no errors in the text or in the code. However, no one is per-fect, and mistakes do occur. If you find an error in one of our books, like a spelling mistake or faultypiece of code, we would be very grateful for your feedback. By sending in errata you may save anotherreader hours of frustration and at the same time you will be helping us provide even higher-qualityinformation.
To find the errata page for this book, go to http://www.wrox.com and locate the title using the Searchbox or one of the title lists. Then, on the book details page, click the Book Errata link. On this page youcan view all errata that has been submitted for this book and posted by Wrox editors. A complete booklist including links to each book’s errata is also available at www.wrox.com/misc-pages/booklist.shtml.
If you don’t spot “your” error on the Book Errata page, go to www.wrox.com/contact/techsupport.shtml and complete the form there to send us the error you have found. We’ll check the informationand, if appropriate, post a message to the book’s errata page and fix the problem in subsequent editionsof the book.
03_588508 flast.qxd 10/10/05 6:21 PM Page xxviii

xxix
Introduction
p2p.wrox.comFor author and peer discussion, join the P2P forums at p2p.wrox.com. The forums are a web-based sys-tem for you to post messages relating to Wrox books and related technologies and interact with otherreaders and technology users. The forums offer a subscription feature to e-mail you topics of interest ofyour choosing when new posts are made to the forums. Wrox authors, editors, other industry experts,and your fellow readers are present on these forums.
At http://p2p.wrox.com you will find a number of different forums that will help you not only asyou read this book, but also as you develop your own applications. To join the forums, just follow thesesteps:
1. Go to p2p.wrox.com and click the Register link.
2. Read the terms of use and click Agree.
3. Complete the required information to join as well as any optional information you wish to pro-vide and click Submit.
4. You will receive an e-mail with information describing how to verify your account and com-plete the joining process.
You can read messages in the forums without joining P2P but in order to post your own messages, youmust join.
Once you join, you can post new messages and respond to messages other users post. You can read mes-sages at any time on the web. If you would like to have new messages from a particular forum e-mailedto you, click the Subscribe to this Forum icon by the forum name in the forum listing.
For more information about how to use the Wrox P2P, be sure to read the P2P FAQs for answers to ques-tions about how the forum software works as well as many common questions specific to P2P and Wroxbooks. To read the FAQs, click the FAQ link on any P2P page.
03_588508 flast.qxd 10/10/05 6:21 PM Page xxix

03_588508 flast.qxd 10/10/05 6:21 PM Page xxx

1An Introduction to ASP.NET
2.0 and the Wrox UnitedApplication
At the end of the twentieth century something unprecedented happened to computers. Previouslyrelegated to the realm of the bedroom and dedicated hobbyists who never saw the light of day, theexplosion of the Internet lead to computers acquiring a glamour, an aura of excitement that hadnever been associated with them before. Prior to the 1990s it was almost embarrassing to admityou worked with computers, and then suddenly everyone wanted one. Every business had to beattached to the Internet, and many families wanted their own web site. If you had to name onepiece of technology that became synonymous with the explosion, it was undoubtedly the webbrowser. However, without anything to view on a web browser, it becomes virtually useless. Youneed information, and like mushrooms sprouting up in a woodland, hundreds of web sites onevery imaginable subject were born.
The late ‘90s were a time of vast upheaval. Business empires were founded on the simplest ideas — a search engine (Google) or an online store for buying books (Amazon). Everyone wantedto know how to build a web site for themselves. HTML (HyperText Markup Language) enabledthem to do that, but it was soon obvious that it only went so far. You could display pictures andtext, but what happened if you wanted more than that? What happened if you wanted a site thatwas reactive, that received information from your users and was automatically updated withoutsomeone having to beaver away writing new web pages every time? What if you wanted to attacha database to the Internet, or you wanted to display a stock catalogue, or you wanted to personal-ize your site to everyone who visited it, or you just wanted it to look good for your family andfriends who visited it?
The race was on and several competing technologies were created for doing this, including CGI, PHP, and Java. Microsoft’s own entry into the race was ASP and what made it particularly attractive was that it was simpler to pick up and learn than most of its rivals, but it also had someexciting features — the ability to store details of users as they moved through pages on a web site,and controls such as calendars and ad rotators that you could just stick into your pages like HTMLtags. ASP was a huge success. Microsoft went one further; it created the .NET Framework, and
04_588508 ch01.qxd 10/10/05 6:31 PM Page 1

ASP.NET became a “grown up” version of its ASP technology, using its mature programming languagesVB.NET and C#. The leap forward in power was amazing, but Microsoft lost partial sight of one criticalaim — simplicity. Web sites suddenly became things you needed expensive consultants to build and cutting-edge designers to visualize. It was out of the hands of those who so empowered the boom.
ASP.NET 2.0 is the big step back in this right direction. Microsoft recognized that one thing people whobuild web sites don’t want to do is have to code. Code is dull; code is geeky. However, Microsoft alsorecognized that some people still have to code for a living. And more than that, these coders have tobuild the same things, over and over again. A login mechanism, a menu system, a shopping cart, a funkytheme for your site’s backdrop applied to every page — something every web site requires. Two guidingprinciples seem to be at work here: make it easier for the novice to use and reduce the amount of repeti-tive work the developer has to do. Claims for ASP.NET 2.0 boast “70% less code” is needed; ASP.NET 2.0also comes with a multitude of controls to enable the developer to create login systems and menus inminutes.
Late in 2003 we saw the previews of the new version of Active Server Pages named ASP.NET 2.0.Everyone knew that these claims weren’t just hyperbole and that the way developers create web applica-tions was going to change fundamentally. Microsoft expanded the powerful features of earlier ASP ver-sions while greatly reducing the effort to implement those features. The ease of implementation meant areduction in the cost of developing complex sites. Or, put another way, there would now be a largeexpansion of the number of people that have the capability to build a complex site.
In addition to ASP.NET 2.0 comes a new, affordable tool for creating these web sites: Visual WebDeveloper Express. Microsoft’s previous attempts at tools for helping create web sites have been clunky(Front Page) or have never really taken off (Visual Interdev), but this time they’ve got it right. VisualWeb Developer will be part of the Visual Studio.NET suite, but a limited version named Visual WebDeveloper Express will be sold inexpensively (or given away). It’ll allow you to drag and drop a sitetogether within minutes, but it’ll also be instantly recognizable to developers, and allows easy creationand management of your web pages.
This book leads you step-by-step through creating dynamic, data-driven, complex web sites usingASP.NET 2.0. To those ends this chapter explains the basic ideas and examines the completed samplesite. You then spend time learning how to use Visual Web Developer Express (VWD) to build ASP.NET2.0 sites.
Specifically, this chapter covers five topics:
❑ An introduction to ASP.NET 2.0
❑ Review of the Internet programming problems that ASP.NET 2.0 solves
❑ An explanation of how ASP.NET 2.0 fits in with other technologies
❑ A tour of the dynamic features of a site built with ASP.NET 2.0
❑ Understanding the tool you will use to build ASP.NET 2.0 (ASPX) pages — Visual WebDeveloper Express (VWD)
In previous books we’ve been pleased if our readers can create a single page by the end of the chapter,but ASP.NET 2.0 inspires much greater ambitions, and you will have the structure and outline of a work-ing web site up by the end of the second chapter. Your Web site will be focused around a hapless soccer
2
Chapter 1
04_588508 ch01.qxd 10/10/05 6:31 PM Page 2

(football) team named Wrox United and will be able to display their news and results, sell their mer-chandise, screen their footage, and will offer different views of the site depending on whether you are acustomer or an administrator. And, as always, a list of gotchas and some exercises are included to helpyou review the concepts covered in this chapter.
The Site You Will BuildGo to www.wroxunited.net and have a good look at the site (the main page is shown in Figure 1-1).This site is built entirely in ASP.NET 2.0 and is the site you will build in the book. Likewise, it is the sitethat you will learn how to create a working miniature of in just two chapters.
Figure 1-1
On the home page alone you can see a menu system, a login control, and some news items — these areall things that would have taken considerable time and code to create in any previous version of ASP orASP.NET. If you take the example of a login mechanism, you’d have to think of accepting a user ID andpassword, checking that against an existing set of users and passwords, making sure the password wasn’t corrupted in any way, and making sure that password was transmitted securely. So just to dosomething relatively trivial, you’d be talking an hour or two of your time at least and not much to showfor it. Now this could take seconds.
Click the View Page Source link — it doesn’t matter if you don’t understand what you see yet — there arefewer than 10 lines of ASP.NET 2.0 code:
3
An Introduction to ASP.NET 2.0 and the Wrox United Application
04_588508 ch01.qxd 10/10/05 6:31 PM Page 3

<%@ Page Language=”VB” Trace=”false” MasterPageFile=”~/site.master”AutoEventWireup=”false” codefile=”Default.aspx.vb” Inherits=”_Default” %><%@ Register TagPrefix=”wu” TagName=”News” Src=”News.ascx” %>
<asp:Content ID=”Content1” ContentPlaceHolderID=”mainContent” Runat=”server”>
<h2>Welcome to the Wrox United Web site.</h2><p>We’re a great football team. No really, we are. Don’t take any notice of our past performance. We’re just unlucky.</p>
<wu:news id=”News1” runat=”server” ItemsToShow=”5”></wu:news>
</asp:Content>
Step through the different links in the menu and see how league tables and fixture lists work, and seehow few lines of code there are. Notice how the theme and style of the site remains consistent through-out, yet there is no evidence of how this is done. Welcome to ASP.NET 2.0. This is about to revolutionizehow you build web sites from now on. You’re going to look at some of the features behind the WroxUnited site in more detail shortly, but first let’s talk about what ASP.NET 2.0 offers.
ASP.NET 2.0 — A Powerful Tool to BuildDynamic Web Sites
The World Wide Web (WWW) on the Internet provides a wide expanse of connectivity. Virtually every-one that uses computers has access to the Net. But this pervasive reach was achieved by establishingvery minimal standards. Information is transmitted in ASCII characters, without a built-in capability formachine-level code. The client requirements are very minimal — in fact the Internet itself does not haveany standards for how a browser works, and thus multiple browsers for multiple operating systems(OS) and platforms exist. It is easy for us, in 2005, to forget that the Internet was designed to send simplestatic pages of text with images and links.
The story of the past fifteen years of Internet programming is an effort to provide sophistication andcomplexity to the user experience while not violating the WWW rules that demand extreme simplicity inpage design. Users expect an experience that comes close to desktop applications such as word process-ing and database access. But such a level of complexity has not been easy to implement in the Web givenits minimal configuration.
ASP.NET 2.0 fundamentally reduces the barriers for development of complex web sites. The ASP.NETdevelopment team at Microsoft looked at thousands of pages, sites, and scenarios to create a list of com-mon objectives of site owners. The list included about twenty goals, including reading data, a unifiedlogin and authentication procedure, consistency in site appearance, and customization of pages for dif-ferent browser platforms. The team then set to work to create bundles of code that would achieve eachobjective in the right way, with a minimum of developer effort and with Microsoft performing extensivetests of that code. This set of capabilities is available as classes (encapsulated and ready-to-use batches ofcode) in ASP.NET 2.0. The end result is simple — developers can very quickly put together (and easilymaintain) a complex site by merely assembling the building blocks Microsoft has developed in ASP.NET2.0. Instead of writing 50 or so lines of code (as in earlier versions of ASP), the designer can now simply
4
Chapter 1
04_588508 ch01.qxd 10/10/05 6:31 PM Page 4

drag and drop a control to the page and answer some questions in a wizard. This control generates asmall amount of code for your page and the server uses that code to build pages in HTML that are thensent to the browser. Because HTML is sent to the browser, there is no requirement for special capabilityon the browser beyond display of HTML and the execution of a single simple JavaScript script. Anybrowser that can display HTML can display ASP.NET 2.0 pages. This includes not only desktopbrowsers, but also PDAs, cell phones, and other devices.
Because all the code for these controls is run on the server before a web browser ever gets a hold of apage, these controls are known as server-side controls. The next section looks at what some of these server-side controls can do.
Simple Solutions for Common Web Site Tasks
Microsoft’s survey of sites in earlier versions of ASP created a list of common objectives that site pro-grammers were implementing. Some objectives were easy to achieve but time-consuming, whereas oth-ers were too complex for all but the most sophisticated developers. Overall, the programmers’ solutionsvaried from brilliant to dysfunctional. Not only were the observed solutions sometimes poor, but theyalso represented a tremendous waste of time, because thousands of programmers spent time planning,writing, and testing code that had the same purpose. This section goes through eleven of the objectivesfor which ASP.NET 2.0 offers built-in solutions. As you will see in Chapter 3 and beyond, these solutionsare in the form of ASP.NET 2.0 server-side controls that contain code to execute settings and behaviors.By simply placing one of these controls on a page, the designer gets all of the behavior that would havebeen hand-coded in the past.
Consistency and PersonalizationWeb designers tend to desire two conflicting design features. On the one hand they want a consistentlook to the entire site. But conversely, they desire the capability of users to customize the site to theuser’s taste in colors, font size, and other features. ASP.NET 2.0 offers a MasterPage control that allowsa site to be consistent in the layout of its headers, menus, and links. Within that consistent layout adesigner can add a control that allows users to pick one of several themes to apply to all pages.
NavigationEvery site requires tools for navigation, generally in three forms. Users need a menu. They also need tobe able to see where they are currently located in a site. And last, they want to be able to easily navigateup or down a level. ASP.NET 2.0 supports an XML file called a SiteMap. ASP.NET 2.0 controls can thenrender menus and other navigation aids based on the site map and the name of the current page.
Login, Security, and RolesMany sites need a login system that can check a potential user’s ID and password against a list and thenauthorize or deny entry. Although basic implementations are not difficult, only a small percentage ofprogrammers are successful in creating a system that conforms to best security practices. ASP.NET 2.0
5
An Introduction to ASP.NET 2.0 and the Wrox United Application
04_588508 ch01.qxd 10/10/05 6:31 PM Page 5

offers a few controls that create and implement a logon better than most of us can program by hand.Beyond simple site entry, the system offers password reminders and a system to create new users. A usercan also be assigned a role that determines what pages and features will be available for that user toview. For example, all users can view the employee phonebook, but only users with the role of Managercan view pages to change information about employees.
Connection to DataAlthough most dynamic web sites are connected to data, few designers are successful in implementingthe full suite of features that users desire. In sites built with older ASP versions Microsoft observed manyproblems in efficiency and security. Furthermore, even modest objectives required scores of lines of code.ASP.NET 2.0 provides a rich suite of data features through two groups of controls for working with data.Data source controls offer the behavior of connecting to sources of data. Data-bound controls take thatinformation and render it into HTML. The several data source controls can connect to almost any sourceof data, and the data-bound controls offer the user tables, lists, trees, and other presentations. Workingtogether, these controls offer the user the capability to page through data, as well as to sort and edit data.
CodeAlmost every web site requires customized code because it is impossible for ASP or any other web sitetechnology to anticipate the needs of all businesses. ASP.NET 2.0 supports more than 20 different lan-guages. Regardless of the language the programmer uses, the code is translated into a single intermedi-ate language prior to execution. ASP.NET 2.0 controls are executed on the server, but the programmeralso has the option of writing code (for example Java or other client-side script) in a block to go out forexecution on the client.
ComponentizationWeb sites are easier to develop and maintain if various parts can be created independently of each other.Traditional ASP relied on large pages containing content, HTML, ASP controls, and scripts of code.ASP.NET 2.0 provides more efficient models and structures to divide the site into logical parts. Forexample, code is normally kept in separate files from the presentation layer (the text and HTML tags).Furthermore, Visual Web Developer offers wizards to easily create objects to provide data resources.
Web ServicesEnterprises offer information and services on their own sites. For example, from its worldwide head-quarters, www.Ford.com can give you a list of colors and price quotes. But in the past few years we haveseen a demand for those services to be available to other sites. For example, a local Ford dealer maywant to offer the list of colors and prices at www.YourLocalFordDealer.com. Web Services allow a consumer site (the local dealer) to obtain information from a provider site (Ford headquarters). The localFord dealer can display real-time data using Web Services provided by the Ford corporate site, but keepthe user on the page of the local site. ASP.NET 2.0 offers a complete Web Services solution that conformsto the specifications of SOAP (Simple Object Access Protocol, a way to ask for data from a Web Service)and XML (Extensible Markup Language, a format for data).
6
Chapter 1
04_588508 ch01.qxd 10/10/05 6:31 PM Page 6

Performance and CachingAfter the designer writes a page on the development machine it is compiled into the single uniform lan-guage of .NET 2.0 called the Microsoft Intermediate Language (MSIL). Then it is copied to the deploy-ment machine. The first time it is requested the page undergoes a further compilation into the CommonLanguage Runtime (CLR), which optimizes the page for the hardware that will serve it. This two-stepprocess achieves the dual aims of consistency for software and optimization for hardware. Both stepshave undergone intensive performance analysis from the .NET 2.0 team. The great aspect for beginnersis that all of this compilation occurs automatically.
ASP.NET 2.0 easily enables caching of pages so that subsequent requests are served faster. When cached,the final version of a page is stored in the server’s RAM so that it can be immediately sent on the nextrequest rather than having the server rebuild the page. Furthermore, the designer can specify that onlyparts of pages can be cached, a process known as fragment caching. Fragment caching accelerates the ser-vice of non-changing portions of a page while still allowing the dynamic fragments to be custom gener-ated. If you are using Microsoft SQL Server 7 or higher you also have the option of data invalidationcaching for portions of the page that are data-dependent but less variable (perhaps a list of employees oryour retail outlets). Data invalidation caching will keep a page in cache until it gets a message from SQLServer that the underlying data has changed. You cache a set of data with a designation to receive a SQLdata changed notice. SQL Server will notify .NET when the data has changed, which triggers ASP.NET2.0 to perform a reread.
Errors and Exception HandlingAny web site, indeed any system, needs to respond to errors. ASP.NET 2.0 provides a system to respondto errors. The response can be in code or it can be a redirect to an error page. The error page can beunique to the error or it can be a single error page for the entire site. The .NET 2.0 Framework alsoallows multiple levels error handling. If an error occurs in a data read it can be handled at the level ofthe data source. If it is not handled, the error bubbles up to the next level and can be handled there.Unhandled errors continue to bubble up through layers with the designer having the option to resolvethe problem at the most effective level.
DeploymentIn the past, sites deployed to Windows or Linux required a series of setup steps that registered and con-figured the site on the host machine. The ASP.NET 2.0 team set a goal of XCOPY deployment, naming itafter an old DOS command that performed a simple copy of a folder and all of its subfolders. A simpleXCOPY deploys your site from the development machine to the deployment host. All registrations andmachine-level customizations occur automatically when the first request hits the site.
Development ToolsAlthough not part of ASP.NET 2.0, Microsoft has spent considerable effort improving tools for buildingASP pages, namely the Visual Studio, Visual Web Developer, and Visual Web Developer Express prod-ucts. These IDEs (Integrated Development Environments) allow drag-and-drop building of pages. Mostcommon actions are either automatic or guided with wizards. In cases where typing is required, the IDEprovides intelligent completion of most phrases. This book uses the freely downloadable VWD Express.
7
An Introduction to ASP.NET 2.0 and the Wrox United Application
04_588508 ch01.qxd 10/10/05 6:31 PM Page 7

Where Does ASP.NET 2.0 Fit with OtherTechnology?
Many people have questions about how ASP.NET 2.0 fits in with all of the other web-related terms (most of them acronyms). We will clarify this now — where does ASP.NET 2.0 fit with other softwarethat is running on the server? What is its role, and what are the roles of the other pieces of technology?ASP.NET 2.0 is part of the .NET 2.0 Framework. The .NET Framework is a brand of Microsoft that setssoftware standards for Internet connectivity using Web Services and XML. Many Microsoft productsconform to the .NET standard, including various server software, data management systems, and desk-top applications. ASP.NET 2.0 is the subset of .NET 2.0 that offers software for generating dynamic websites. The software is published in a set of classes holding various controls that execute their behavior onthe web server. In our day-to-day designing of pages we work with these server-side controls. BecauseASP.NET 2.0 is a subset of the .NET 2.0 Framework, in this book we sometimes uses features of ASP.NET2.0 and sometimes uses features of the .NET 2.0 Framework. Use of these various features will be essen-tially seamless.
As a Microsoft product, ASP.NET 2.0 runs on Windows. For development, it will work on the desktopwith Windows 2000 or later (including both XP Home and XP Pro). At deployment the normal OS isWindows Server 2003 or another Windows OS version designed for higher loads. Within Windows,ASP.NET 2.0 works with the Internet Information Server to read pages from disk and send them torequestors. Alternatively, on the development desktop, ASP.NET 2.0 can be tested with a lightweightweb server named Cassini that is distributed with development tools such as VWD.
When a designer uses the ASP.NET 2.0 controls to connect with data, two more levels of interaction areintroduced. The data controls use a technology named ActiveX Data Objects (ADO.NET), but fortu-nately the use of ADO.NET is behind the scenes for us. Those ADO.NET objects, in turn, interact withthe source of data. The source of data can be Microsoft SQL Server (as used in this book) or almost anyother source of data including relational databases such as Oracle or MySQL, and non-relational sourcessuch as XML or text files.
Microsoft offers tools for several levels of developers to build ASP.NET 2.0 web sites. The most compre-hensive product is Visual Studio 2005, aimed at professional developers. A low-cost, and only slightlyless function version, is Visual Web Developer Express. Front Page can work, but it focuses more onstatic HTML pages and thus lacks the set of tools that makes designing the dynamic, data-intensiveASP.NET 2.0 pages such a pleasure. Creating pages in Notepad was long the preferred method of ASPdevelopers and is still theoretically possible; however, the necessary management of web sites and webpages make this impractical, laborious, and far more prone to errors.
Enough of the theory; let’s see ASP.NET 2.0 in action. During the course of this book you will build acomplete web site for a hapless football (soccer) team named Wrox United. A completed example ishosted at www.wroxunited.net, which you explore in the next section to observe the range of featuresASP.NET 2.0 supports. Then in the remainder of the book you will build the same site on your desktop.For this exercise you do not have to install software on your machine. The remainder of the book, how-ever, relies on your completion of the setup outlined in Appendix B.
8
Chapter 1
04_588508 ch01.qxd 10/10/05 6:31 PM Page 8

Exploring the Wrox United ApplicationThis section explores the site as built by the authors and that you will build, and which is hosted atwww.wroxunited.net. Open your browser and direct it to that address.
❑ MasterPages and Site map (discussed in Chapter 2): Click through several pages to observe theuniform layout across the top and left side of the page. This design consistency derives from aneasy-to-implement feature called MasterPages. Second, note the maroon box in the lower-rightof each page that indicates your current page and its relationship to parent pages back to thehome page. This feature was created with the ASP.NET 2.0 Site Map and Navigation controls.
❑ Server-Side controls (discussed in Chapter 3): Go to the Players page. All of the data comesfrom two server-side controls — a data source control to connect to the database and a data-bound control to display the information. Most of the behavior of ASP.NET 2.0 pages is encap-sulated in server-side controls. These include links like the shopping cart at the bottom-left,images such as the logo at top-left, and text boxes such as the logon section at the lower-left.
❑ Login and Security system (discussed in Chapter 4): On the home page, log in as User NameLou and Password lou@123. Then log out. Authentication systems can require a tremendousamount of work to create and even then frequently contain security holes. ASP.NET 2.0 offers avery simple system based on several server-side controls including the login and password veri-fication schemes, and a system to e-mail a clue for forgotten passwords.
❑ Events (discussed in Chapter 6): Browse to the Shop page, click an item and add it to your cart(of course, this is not a real shopping site, just a demo). An event occurred as you clicked theAdd to Cart button and that event was handled by custom code that created an order andadded the item to the order.
❑ Data Reads (discussed in Chapter 7): Browse to the Players page where the names and joiningdates are read from a SQL Server Express database. Many kinds of information on the site areheld in data stores that are read by ASP.NET 2.0 server-side controls on the page. Browse back tothe home page and observe the menu. Even these menu choices are read from an XML file thatholds a map of the site.
❑ Data Writes (discussed in Chapter 8): Browse to Shop, click car sticker and click Add to Cart.You have just written a value to a database. The behavior of writing your order to the databasewas implemented by two ASP.NET 2.0 server-side controls. The designer of the site did not haveto do any custom code.
❑ Code behind the controls (discussed in Chapter 9): From the home page click Shopping Cart atthe lower-left of the page. We have written custom code that executes when the page is loadedthat checks if there are currently any items in the shopping cart and renders a page appropriatefor the cart contents: either empty or a list of contents. Although the capabilities of the ASP.NET2.0 server-side controls are impressive, they cannot cover every possible case. An ASP.NET 2.0site offers numerous places that a designer can add custom code.
❑ Components (discussed in Chapter 10): Browse to the Fixtures page. Although the data isstored in a SQL Server database, the ASP.NET 2.0 page does not read it directly. There is a com-ponent that reads that data and then sends it on to the ASP.NET 2.0 page. That component canbe reused by other web sites or by Windows applications that run on a local network withoutthe Internet.
9
An Introduction to ASP.NET 2.0 and the Wrox United Application
04_588508 ch01.qxd 10/10/05 6:31 PM Page 9

❑ Roles (discussed in Chapter 11): If you had administrative rights you could log in and see dif-ferent screens. Once you have installed the site on your local machine you will experiment withthis feature in Chapter 4. ASP.NET 2.0 goes beyond just logging in visitors. They can be autho-rized to have sets of privileges called roles. The public site does not allow non-authors to log inas administrators, so no need to take action at this point.
❑ E-Commerce (discussed in Chapter 13): From the menu go to Shop, and click a few items toadd to your cart. Now on the bottom of the menu click Shopping Cart and view its contents.The most complex part of the site is the shopping cart. ASP.NET 2.0 does not have a pre-built e-commerce solution, but because so much behavior is built into the ASP.NET 2.0 controls, design-ers can develop features such as e-commerce much more quickly than in the past.
❑ Performance (discussed in Chapter 14)
❑ Errors and exception handling (discussed in Chapter 15)
❑ Deployment (discussed in Chapter 16): At this point we will not walk through a deployment.However, keep in mind that for ASP.NET 2.0 the transfer for a site from a development machineto a deployment machine is generally only a few steps that copy the databases to the data serverand then do a simple file copy of the site folder and its subfolders to the new server.
This walk-through gave you a taste of what you will learn to create in this book. Most of the featuresexplored were implemented with very little code that we wrote. The behavior was performed by codethat Microsoft baked into a set of server-side controls that are the components of ASP.NET 2.0. Wemerely placed these controls on pages and set various properties.
Getting Star ted with Your Wrox United SiteHaving observed the finished site as publicly hosted, now is the time to begin creating the same site onyour desktop. If you have not installed Visual Web Developer Express, SQL Express, the sampledatabase, and the sample site (outlined in Appendix B) then do so now. Start by reading the overview atthe beginning of the appendix and then work your way through each step. You can be sure of yourinstallation by performing the check at the end of each section.
This chapter and the next chapter set up the basic framework of the site as you learn how to use VWDand establish some design parameters for the site. Because VWD offers drag-and-drop solutions to mosttasks, you will be able to create the entire site with a minimum of typing. In the cases where some typingis necessary you can cut and paste from text files in this book’s download at www.wrox.com. All pagesare in the download in their final form, but we strongly believe that creating ASPX pages yourself is abetter way to learn ASP than merely copying completed pages from our reference set.
VWD Express — A Development EnvironmentA fundamental difference between most animals and humans is the ability to use tools. In the early daysof programming the tools to write programs were very primitive. Today we enjoy the benefits of verysophisticated tools for software development. Engineers have taken almost every area of human weak-ness (primarily related to the capacity of memory and the brain’s interface to the world) and created
10
Chapter 1
04_588508 ch01.qxd 10/10/05 6:31 PM Page 10

compensating tools. These tools are pulled together into a type of software called an IntegratedDevelopment Environment (IDE). The IDE used in this text is Visual Web Developer Express (VWD).
VWD contains a number of development tools. First is an editor in which you can build a web page.This editor is enhanced with IntelliSense, a tool that finishes typing commands and offers appropriatechoices for the developer. In addition, a toolbar contains icons that can be dragged to the editor and willautomatically type a block of code into the editor. Another way to automatically get code into a page iswith the many wizards that pop up when attempting a more complex task. VWD also contains a miniFile Manager to organize ASPX and associated files and folders. Similarly, there is a Data Explorer thatoffers navigation through the data sources of the web site. A suite of troubleshooting tools is alsoincluded. Finally, VWD ships from Microsoft with a web server for testing named Cassini, which is cov-ered in the next section. If you go beyond the scope of this book you can discover tools for more complexscenarios including the management of code versions among a team of developers.
Introducing CassiniEarlier, Cassini was mentioned as the lightweight web server that comes with VWD. Both Cassini andIIS (included with the .NET Framework) can serve all ASPX and associated pages, so at deploymentthere is no need to make changes to your site. But a number of differences exist between the servers.
The two servers use different security models. IIS is a service and every service in Windows requires auser. The special user for IIS is named ASPNET. Cassini runs as an application that uses the currentlylogged-in Windows user. That makes Cassini easier to install because there is no need to create a specificASPNET account in Windows. In fact, the installation of Cassini is transparent when VWD is installed.
Cassini has three downsides. First, it is a tool for designers to test pages on their development machineand thus it does not scale to more than one user. Second, because of the simplifications to the usermodel, Cassini cannot support a robust security scheme. Cassini should only run in a closed environ-ment or behind a robust firewall. Third, when you run a page in Cassini it locks the page back in VWD.In order to unlock the page you must close the browser, which can be inconvenient when making andtesting many changes to a site. Therefore, many developers use IIS even on their development machinesso they do not have to close a page in the browser before working on it in VWD. The downside is thatyou have to configure your development machine to provide IIS, set up the appropriate authorizations,establish security controls, and create a virtual root. You learn how to set this up in Appendix B. If youdon’t want to go through the IIS setup you can still use Cassini and just close the browser between modifications.
VWD’s Solution ExplorerAn ASP.NET 2.0 web site is stored as a family of files. You need to be able to organize these files, includ-ing the tasks of viewing their names and relationships, copying, creating, and deleting. They can beviewed and manipulated in Windows Explorer. But it is inconvenient to switch between VWD andWindows Explorer, so VWD includes an explorer-like tool called the Solution Explorer, shown in Figure1-2. The Solution Explorer is displayed by default on the right of the screen, or you can redisplay it bypressing Ctrl+Alt+L. Think of it as a Windows Explorer that considers your web root to be the highestlevel and does not require you to switch out of VWD. Note that the Toolbox may be placed behind theSolution Explorer, as in the case of Figure 1-2.
11
An Introduction to ASP.NET 2.0 and the Wrox United Application
04_588508 ch01.qxd 10/10/05 6:31 PM Page 11

Figure 1-2
The layout of Solution Explorer is instantly familiar to anyone who uses Windows Explorer. Click theplus and minus icons to expand or contract folders. The icons in the toolbar start from the left with a toolthat switches from the Solution Explorer to a view of properties (more on that later in this chapter). Thedouble horizontal arrows perform a refresh. The double file icon automatically hides or expands nestedsub-files. The next two icons open the selected files to display either their user interface (design) or theircode. The double browser icon is used to copy the entire site to the deployment machine. The right-mosticon, with the hammer, opens a Web Administrator tool to manage features of the site.
At the bottom of the Solution Explorer may be a small task bar that shows tabs for the Solution Explorer,Toolbox, Data Explorer, and/or Properties windows. To conserve monitor real estate these four tools arefrequently stacked and the tabs offer quick switching. For example, in Figure 1-2, the Toolbox is alsoopen (albeit hidden behind the Solution Explorer) and clicking the Toolbox tab would hide the SolutionExplorer behind it. They are not strictly part of the Solution Explorer, but rather the pane that holds thefour stacked tools.
In the main pane of the Solution Explorer is the list of files that make up your site. At the top is the root, generally in C:\websites\MyWebSiteName. In the case of WroxUnited we have used C:\BegASPNET2\WroxUnited. The files are displayed in their subfolders. Using the same techniques asWindows Explorer, you can expand, collapse, cut, copy, and paste files among folders. Solution Explorerrecognizes the implied link between an .ASPX file and its .ASPX.VB or .ASPX.CS file (more on these inChapters 6 and 9). If you copy the .ASPX file the code file will move with it.
You can also right-click a folder and select Add Existing Item. The resulting dialog box allows you tonavigate anywhere on your computer and network (including FTP sites) to bring in files. For example,
12
Chapter 1
04_588508 ch01.qxd 10/10/05 6:31 PM Page 12

when you begin to build your project there are times you will be asked to use an image or text file fromthis book’s download at www.wrox.com. You can use Solution Explorer to add the item to your web sitefrom your download folder.
ASP.NET 2.0 sites do not contain, during development, a special system of file registration. The files,including ASPX pages, code files, data files, and images are all contained in a normal Windows folderand subfolder structure. If you do not have VWD open, you can cut, copy, and paste your site filesdirectly from Windows Explorer.
The Solution Explorer, like the Toolbar, Data Explorer, and Properties window discussed in the next sec-tion, can be placed on the page in one of two modes: floating or dockable. Floating allows the window tobe placed anywhere on the screen, similar to a normal window of a base size (not maximized). Dockablewill automatically place the window in one of five locations: top, bottom, left, right, or stacked onanother window. Change the mode by selecting one of the windows, and click through Window ➪
Floating or dockable in the menu. In dockable mode you will see, when you drag the window’s title bar,some translucent positioners (see Figure 1-3). Drag the title bar onto one of these positioners, and thewindow will automatically size and place itself in the correct dock.
Figure 1-3
13
An Introduction to ASP.NET 2.0 and the Wrox United Application
04_588508 ch01.qxd 10/10/05 6:31 PM Page 13

Having learned to modify the VWD Express IDE, you can now move on to the techniques of creatingweb sites and pages within those sites.
Creating, Opening, and Using Web Sites and Pages with VWD
To create a new site you only have to open VWD and click Menu ➪ File ➪ New Site. From the wizard,select an ASP.NET Web Site. Assuming you will create a local copy for development, set the location toFile System and browse to the path. Normally this would be C:\Websites\MyWebsiteName (our prac-tice site allows backward compatibility with earlier books by using C:\BegASPNET2\WroxUnited). Youcan pick either Visual Basic or C# as your language. Visual Basic is the default for VWD and the samplesin the book. VWD will automatically create for you a folder, a default page, and a subfolder for data.
ASP.NET 2.0 introduces a very simple model for file organization and code registration for a web site.All files for the site are stored in a folder and its subfolder. At the time of deployment, that entire groupis copied from the development machine to the host. Therefore, you are not required to create a virtualroot as in former versions of ASP. Deployment is further simplified by VWD: If you select Menu ➪
Website ➪ Copy Website, VWD opens an FTP screen that you can use to send new or updated files toyour host.
To edit an existing site, choose Menu ➪ File ➪ Open Web Site. If you are working locally you can browseto the folder. On the left side of the screen, VWD presents a menu with options to work directly on pagesvia FTP or through a local IIS installation.
Once the web site is created pages can be added. We usually start by adding some folders to organizethe pages. Right-click an existing folder and click the option to add a folder. Special ASP.NET folders,such as those for Code, Themes, and Web References, have their own menu option.
To add a page, right-click a folder and click Add New Item. A wizard presents many choices. For now,you simply need to create a Web Form, but take a look at the other options to get a feel for the capabilityof VWD and ASP.NET 2.0. Give your new page a name and set its language. Later chapters discuss thetwo checkboxes. Having introduced you to creating web sites and pages, the following Try It Out putsthat knowledge to use, asking you to create the Wrox United site and a couple of practice pages.
The Sample Code DirectoriesTo make things easy, each chapter has its own code, and there are two directories for each chapter, heldunder one of two higher-level directories. There is a Begin directory, which contains the samples readyfor you to work through – it’s the samples without any changes. The End directory contains the sampleswith the Try It Outs completed, so you can use these as a reference as you are working through theexamples, or to cut and paste code if the example directs you to do this.
These Begin and End directories appear under a Chapters directory, with each chapter having its owndirectory. So the starting set of samples for this chapter is under Chapters\Begin\Chapter01, while thefinished code for this chapter is under Chapters\End\Chapter01. Some chapters work on the mainWroxUnited application, and will therefore contain a copy of the WroxUnited directory, while othershave non-WroxUnited samples. The reasons for this is that for some techniques it is easier to see them insmaller, easier to digest samples, than in a fully working application. All of the techniques however, areused in the main application.
14
Chapter 1
04_588508 ch01.qxd 10/10/05 6:31 PM Page 14

Having separate directories, some with complete copies of WroxUited, does mean that the samples arequite large, but the advantage is that each chapter is kept separate from the others, and allows you towork through chapters without mixing up which code came from which chapter.
As well as the code for the chapters, there is a WroxUnited application that contains the final application.This may differ slightly from the samples, but only in that the data may be more complete, and some ofthe pages look a little nicer.
Try It Out Creating the Wrox United Site and Two Practice Pages1. Open VWD. Choose Menu ➪ File ➪ New Web Site. Select ASP.NET Web Site located in the File
System at C:\BegASPNET2\Chapters\Begin\; you can use the Browse button to navigate tothis directory, and when you have, type Chapter01 on the end, so that the new Web site islocated at C:\BegASPNET2\Chapters\Begin\Chapter01. Make sure the Language list is setto Visual Basic. Click OK. You should see your folder on the right side of the screen in theSolution Explorer. If not, choose View ➪ Solution Explorer. Note that VWD automatically buildsthree items: a folder named App_Data, a page named Default.aspx, and (if you expandDefault.aspx) a file named Default.aspx.vb, which will hold code for the default page.
2. In the center of VWD you will see a space for editing pages with the Default.aspx pageopened. Note in the bottom-left a choice of Design and Source. Click each in turn to observe thecode and the results of the code. When in Design View, click the page and type the simple textHome Page. Press Ctrl+S to save.
3. Create a folder for images by going to your Solution Explorer and right-clicking the root of yoursite (this will probably show as C:\...\Chapter01, as the Solution Explorer hides part of thepath) and then clicking Add Folder of the regular type. Name the nascent folder Images.
4. You can manipulate your site’s files and folders outside of VWD. Open Windows Explorer andnavigate to C:\BegASPNET2\Chapters\Begin\Chapter01 to see the same set of folders andfiles as you see in VWD’s Solution Explorer.
5. Returning to VWD, right-click the nascent Images folder and click Add an Existing Item.Browse to the folder where you stored the download for this book, probably named C:\ BegASPNET2\WroxUnited. Open the Images folder and select all the images. Click Add to actually copy those images from the download folder to your site’s image folder.
6. Staying in VWD, now create your first page, the history of Wrox United. Right-click the site’sroot (C...\Chapter01at the top of the Solution Explorer) and select Add New Item from themenu. Select the Web Form template and give it the name History. Accept the other default set-tings. Click Add, and switch to Design View. Rather than typing text on the page you can copy ashort history of the team from a file included in the download. Switch to Windows Explorer andnavigate to your C:\BegASPNET2\Chapters\End\Chapter01 folder. Look for the file namedHistory.txt, open it, and select the paragraphs. Switch back to VWD and paste the text intothe page. Click the diskette icon of the toolbar to save.
7. Repeat Step 6 for a Mishaps page, whose contents come from Mishaps.txt.
How It WorksIn this exercise you created your site and the first few pages. By using the menu choices in VWD to cre-ate a site, you automatically get some standard folders and files. You could have followed the Microsoftrecommendation of storing the site in the C:\Websites directory, but you can also put your site in an
15
An Introduction to ASP.NET 2.0 and the Wrox United Application
04_588508 ch01.qxd 10/10/05 6:31 PM Page 15

alternate folder as we have done at C:\BegASPNET2\ – we did this to keep the book samples separatefrom any other Web sites you create. As you saw with the Images folder, it is easy to add subfolders tothe root to organize your files.
When you created a page in VWD you were offered a few dozen templates. You selected Web Form asthe standard plain ASP.NET 2.0 web page. By using cut and paste you have no problems bringing in textfrom other files.
You also learned that there is no requirement for a special file indexing or storage mechanism in VWD.The files sit in the folders organized by Windows on the hard drive. However, it is better to create andadd files in VWD when possible to keep the Solution Explorer view and other VWD features immedi-ately up to date with your changes.
Running a PageOnce a page is created it can be served to a user. Because the server actually executes code in the server-side controls to create the final HTML page, this serving of the page is also called running the page, as ifyou were running a program. VWD has a green triangle tool icon to initiate a run or you can press F5 orchoose Menu ➪ Debug ➪ Run. VWD then performs several steps:
1. All pages in the site are compiled to the Microsoft Intermediate Language (MSIL) that is thenstored with supporting files in an assembly. At this point development language differences (forexample VB and C#) disappear because the result is in MSIL. However, there is no optimizationfor the hardware that will serve the page.
2. The assembly is Just In Time (JIT)–compiled from MSIL to Native Code that is optimized for theserving machine.
3. A lock is placed on the page that prevents changes in VWD Design View while the page isopened by Cassini.
4. VWD starts Cassini and your browser is opened with a request to Cassini for the page.
As your site gets larger, you’ll find that the compilations take longer. You can press Ctrl+F5 to run a pagewith a compilation of only that page. In the following Try It Out, you practice running the History andMishaps pages created in the previous Try It Out.
Try It Out Running a Page1. In VWD’s Solution Explorer, double-click the History.aspx file to open it (if it is not already
open).
2. Click the Run icon (green arrow) on the toolbar. If there is a message to add a Web.config witha Debug, accept the suggestion. Note that your Browser opens and displays the History page.
A common mistake for beginners is to attempt to change a page in VWD’s DesignView while it is still open in a browser served by Cassini.
16
Chapter 1
04_588508 ch01.qxd 10/10/05 6:31 PM Page 16

3. In the Windows tray, the icon of a yellow page with a gear indicates that Cassini is running.Double-click it and you will see that it is pointing to your web site. Close your browser soCassini unlocks the page.
4. Return to VWD and open the Mishaps page. This time, watch the lower-left corner of VWD asyou start to run the page. You will see a message that the build has started and a brief display ofan error list box. After seeing the Mishaps page in your browser, switch back to VWD. Note thatthe page (in Design View) is locked while it is served.
How It WorksThis section focuses on running pages from VWD. You can start the run by clicking the green arrow. Thisaction starts Cassini. It also opens your browser and sends a request to Cassini for the page. Once run-ning, you can see the icon for the server in the Windows system tray.
Design SurfaceThe center of the VWD interface is occupied by the large Design Surface. This is the area where you willdo most of your work of adding content to ASP.NET 2.0 pages. You can switch between Design View,which displays a simile of the final page in a browser-like display, or you can switch to Source View,which displays code in a text screen (see Figure 1-4). In general, the Design View is easier and faster formost work because it supports more drag-and-drop features. You can switch to Source View when youneed to make those minor changes that are beyond the capability of the VWD drag-and-drop interface.
Figure 1-4
When you add a control to a page in Design View, a Common Tasks Menu may pop up. This mini menucontains the most frequently used setup features for the control. Not all controls have smart task panels,but if it is available it can be opened and closed using the small black triangle at the top corner (shownin Figure 1-5) of a control that is selected.
Figure 1-5
17
An Introduction to ASP.NET 2.0 and the Wrox United Application
04_588508 ch01.qxd 10/10/05 6:31 PM Page 17

Several default settings can be changed in the Design Surface by opening the Tools menu and selectingOptions. These options change the way the pages appear to you, as the programmer, when they areopened for editing in VWD. These are not the settings for the appearance of the page to the web site visi-tor. You can select to start pages in Design View or Source View, as well as the automatic opening of thesmart task panel. Being able to revise the number of spaces for tabs and indents helps your projects con-form to your company’s specifications for web page code.
At the bottom edge of the Design Surface is a navigation tool that is useful in large and complex docu-ments. You can read the navigation tags to find out where the insertion bar (cursor) is currently placed.The current setting will appear to be highlighted, as depicted in Figure 1-6. You can also click a tag andthe entire tag will be selected in the Design Surface.
Figure 1-6
The designer is, in many ways, like your word processor. But VWD also offers the two alternatives toviewing a page (Design and Source) as well as enhancements for navigating through the page. The nextsection discusses how VWD helps you to add features to the page.
ToolboxVWD offers the set of ASP.NET server-side controls in a Toolbox for easy drag and drop onto the page.Chapter 3 discusses in detail the various server-side controls and how they are used; here you will justget a feel for how to use the Toolbox in general. The Toolbox can be displayed by choosing Menu ➪
View ➪ Toolbox or by pressing Ctrl+Alt+X. Once displayed, the Toolbox can be moved to a new locationon the screen by dragging its title bar. As you drag the Toolbox to different areas it will render a compassicon that allows you to drop the toolbar toward the top, bottom, left, or right, as well as on top of otherwindows. If you are trying to maximize the size of your design surface, you can stack your SolutionExplorer and Toolbox on top of each other at one location on the screen.
The Toolbox is organized into several panels that group similar controls. The panels can be expanded toshow their tools or collapsed to save space. There is some variation among installations, but a typical setof panels includes the following:
❑ Standard for the majority of ASP.NET 2.0 server-side controls.
❑ Data for data source and data-bound controls.
❑ Validation for controls that reject user input that does not meet your range of acceptable values.
❑ Navigation for menus and breadcrumbs.
❑ Login for the authentication controls.
❑ WebParts for larger components in sites that the user can rearrange or hide.
❑ HTML for generic (non-ASP) tags.
❑ General can be customized.
18
Chapter 1
04_588508 ch01.qxd 10/10/05 6:31 PM Page 18

Figure 1-7 depicts the Toolbox as it will appear on your screen.
Figure 1-7
Clicking the plus icon expands a panel to show its list of available controls. Figure 1-8 shows the Loginand Standard panels expanded.
Figure 1-8
19
An Introduction to ASP.NET 2.0 and the Wrox United Application
04_588508 ch01.qxd 10/10/05 6:31 PM Page 19

The General panel starts out empty. After you have created part of a page, you can select that page anddrag it into the General panel to create your own reusable tool. This is useful if you want to duplicate aset of a couple controls with formatting onto several pages.
On the right side of the Toolbox title bar there is a pushpin icon, shown in Figure 1-9. When clicked, thepushpin turns horizontal, meaning that the Toolbox will automatically hide when not in use, leavingonly its title bar exposed.
Figure 1-9
When your mouse moves over the Toolbox title bar, the Toolbox will expand out for your employment,as shown in Figure 1-10.
Figure 1-10
In this Try It Out you practice using the Design and Source Views and Toolbox features of VWD.
Try It Out Using the Views and Toolbox1. Continue working in VWD with your Mishaps page.
2. Switch to Design View. In the Toolbox, expand the HTML panel and scroll down to the bottomof the panel. Drag a Horizontal Rule from the Toolbox onto the page (anywhere between paragraphs).
3. Your next objective is to add a calendar to the bottom of the History page. Open the Standardpanel of the Toolbox and find the ASP.NET calendar control. Drag it to the page. (Double-clicking performs the same operation.) Select the calendar with a single click and notice thesmall right-facing arrow in the top-right corner. Click it to expose the smart task panel. ClickAuto Format, select a format, and click Apply. Observe how easy it is to modify many renderingcriteria at once using VWD’s dialog interface.
4. Open your History page in VWD. View it in DesignView. Move your insertion bar up to the firstline to the tag that begins with <%@ Page...>. Note that the navigation guide (at the bottom of
The appearance of the Toolbox changes as it is used. For example, the titles of eachpanel will change as they are selected.
20
Chapter 1
04_588508 ch01.qxd 10/10/05 6:31 PM Page 20

the design panel) shows you that you are in the <Page> tag. Click the <Page> tag. You will seethat the entire tag is selected in the design panel.
How It WorksAs you saw, by adding a simple HTML Horizontal Rule, the Toolbox offers the ability to drag and dropelements to the page rather than typing out their tags. Even complex constructs like a calendar areadded with just a drag and drop. Once on the page, you can modify an element by using the smart taskpanel.
Properties WindowAn object, such as a web page, a ListBox server-side control, or a connection to a data source, has prop-erties. Properties are settings that determine how the object appears and behaves. In earlier versions ofASP, many goals were achieved by writing lengthy and complex code. In ASP.NET 2.0, however, most ofthat code has been pre-written by Microsoft and encapsulated within the server-side controls. Propertiesdetermine how that behavior will be exercised. Properties can be very simple, such as BackColor, or verycomplex, such as EnablePaging. Likewise, the values assigned to a property can be as simple as BLUE oras complex as a multiple-line SQL statement. Properties values can be set by typing them directly intothe Code View or by using the Properties window, which is shown in Figure 1-11.
Figure 1-11
21
An Introduction to ASP.NET 2.0 and the Wrox United Application
04_588508 ch01.qxd 10/10/05 6:31 PM Page 21

Display the Properties window by pressing F4 or by choosing Menu ➪ View ➪ Properties. The propertiesare organized into panels that can be collapsed or expanded (similar to the Toolbox). For example, inFigure 1-11 the top three panels are collapsed. At the top of the Properties window is a drop-down listcontaining the names of all of the controls on the page currently open. Below that are icons to arrangethe list of properties categorically or alphabetically. The lightning icon will change the Properties win-dow so that it displays events (a topic covered in Chapter 6) rather than properties. The body of the win-dow displays property names on the left and their current values on the right. At the bottom sits a boxthat gives some help on the currently selected property.
The fundamental technique used to change properties is to select an object, usually a control, and thenfind the property of interest and set it. You can select the object with a single click on the object in DesignView or by locating the insertion bar in the object in Source View. Alternatively, you can select an objectfrom a drop-down list at the top of the Properties window. One common mistake arises when youattempt to change the properties but have not first actually selected the object you want to change. Youend up changing an object that was still selected from earlier work.
You have several options for setting the value of a property. If the property has a limited number ofallowed values (such as true and false), you can double-click the property name to toggle through thevalues. If there are more than a few options, but still a finite amount, the values will be in a drop-downlist. Some properties have many options, and their value box offers an ellipses button that takes you to adialog box. Last, some properties can accept strings, so their values are set in text boxes. It is always bet-ter to select or to toggle a value rather than type it. Once a value has been changed, you must press Enteror Tab or click another property in order to set the value. At that time the Design View will render thechange.
You can also set property values by typing into the Source View. Locate the insertion bar within a tagand press the space bar to display an IntelliSense list of all the properties that can be inserted at the loca-tion of the insertion bar. Type the first letter or two then an equals sign. IntelliSense will then display allof the legal values (if the list is finite), and again type the first letter or two of the value you desire. Finishby typing a space. Note that there will be no value list if the range of possible property values is notfinite. For example, if the value is a SQL statement you will have to type the statement withoutIntelliSense.
Error List WindowWhen problems arise you have two major paths for obtaining clues about the problem. First is an errorreport on the page delivered to the browser, and second is the Error List window within VWD.
ASP.NET 2.0 will give an error report (shown in Figure 1-12) on the page sent to the browser if the fol-lowing shaded line is in your Web.config file:
<system.web><compilation debug=”true”></compilation>
Note that the first time you run (F5) a page you will get a default of <compilation debug=”true”strict=”false” explicit=”true”/>.
22
Chapter 1
04_588508 ch01.qxd 10/10/05 6:31 PM Page 22

Because the default is true, you will have debug turned on if there is no specific attribute. So debug=true for the following case as well where there are no changes to the default. Of course, having it liter-ally set to true helps other programmers on your team that may be looking through your settings:
<system.web><compilation></compilation>
Figure 1-12
A fatal error on the page produces a characteristic white and yellow page on your browser with an errormessage. Just below the yellow block is the name of the offending file and the line containing the failure.As with all errors, the error may actually be related to the line number displayed, but this should giveyou a good clue. Note that when you deploy a site the debug command in Web.config should be set tofalse to improve performance and to reduce information given to hackers. Error handling is covered ingreater depth in Chapter 15.
The second way to identify errors comes from within VWD itself via the Error List window, depicted inFigure 1-13. By default, the window is hidden until you run a page. You can force it to be displayed bychoosing Menu ➪ View ➪ Error List. The window displays all of the errors encountered during the con-version of the page into the MSIL.
23
An Introduction to ASP.NET 2.0 and the Wrox United Application
04_588508 ch01.qxd 10/10/05 6:31 PM Page 23

Figure 1-13
Note that the top of the Error List window has three clickable icons: Errors, Warnings, and Messages,which display different lists of items created when the page was built. Hiding a type of item does notremove it from the list; rather, doing so only hides the item so the list is shorter. The second column fromthe left identifies the order in which the errors occurred.
Errors cause the page as a whole, or some portion of it, to fail. This includes, for example, references toobjects that do not exist.
Warnings are problems that could be solved by VWD while building the page (for example, the lack of aclosing tag).
Messages are sets of texts that the programmer can include in the code to appear when IIS is building the page.
When viewing the list of items you can sort by clicking a column heading. If you hold Shift you can clicka second column for tiebreakers (to determine the order for records with the same value in the primarycolumn). You can also resize the columns by dragging their dividers, or re-order them by dragging thecolumn name left or right. Double-clicking an item allows you to open the offending file and jump thecursor to the offending line.
In this Try It Out you practice changing properties of an image control on the History page. Then youcreate some errors and observe the results.
Try It Out Using the Properties and Error Lists Windows1. Open the History page in Design View. In the Solutions window, open the Images folder and
drag the jpeg named logo-yellow to the top of the History page. VWD will automatically createan image with its source set to the jpeg.
2. Click the image once to select it, and then switch to the Properties window (or open it with F4).Change the height from 447 to 100 and press Enter to set the value. As you can see, changes areimmediately visible in the design panel.
3. Now modify properties from Source View. Find the <img> control and within it the property(attribute) for height. Change it from 100 to 300. Click the green arrow (or press F5) to run thepage to see the result.
24
Chapter 1
04_588508 ch01.qxd 10/10/05 6:31 PM Page 24

4. Close your browser and return to Source View. Locate your insertion bar in the <img> tagimmediately after the closing quote of height=”300” and press the space bar. This opens theIntelliSense list with all of the properties that are suitable at this point in your page. Press the tkey and then the i key to move down the list to the Title property. Press the equal (=) key toclose the IntelliSense and type in “Wrox Logo In Yellow” including the start and end quotes.Run the page, and in your browser note that when you mouse over the image you see the titleyou created. Close the browser.
5. Next, introduce a non-fatal error. Open the History page in Source View and find the <h1> tagnear the top of the page. Change the <h1> tag to <H1xx> and run the page. The browser opensand you can see that the text “Wrox United — a potted history” fails to render in heading-onestyle. Close the browser and switch back to VWD to observe the Errors List window. If notalready visible, choose Menu ➪ View ➪ Error List to view the Errors List window. Note that twoerrors were entered in the list. First was a note that “h1xx” on line 3 is not supported. Second,the closing tag of </h1> on line 4 no longer matches an opening tag.
6. Your last experiment is to introduce a fatal error. In Source View go to the top of the page andchange the first line from Language = “VB” to Language=”Esperanto” and run the page.
7. You will deal with solving many kinds of errors in each chapter of this book. For now, returnyour page to its original form by deleting the <img> tag, restoring the goofy <h1xx> to theproper <h1>, and changing the language back to VB.
8. Save the page.
How It WorksYou experimented with three ways to change a property. First you worked in Design View and changeda property by typing its new value into the Properties window. Next you made a change by hand-typinga new value into the source code. Last, you used IntelliSense to guide you through adding a property toan existing control.
You observed the results of two types of errors: fatal and non-fatal. In the first case, ASP.NET 2.0 couldstill render the page even though the faulty tag of <h1xx> left your text as default, not heading one.Although the page rendered, back in VWD an error message was logged on to the Error List window.You introduced a more serious error when you changed the language value to a non-supported lan-guage. ASP.NET 2.0 could not overcome this error and so you see two results: In the browser you got theerror page with troubleshooting information, and back in VWD you got entries to the error list.
VWD’s Database ExplorerWhen you begin to work with data (in Chapter 7 and following) you can use tools in VWD to gainknowledge about your data sources. This information includes the exact names of tables and columns.In fact, as you see later in this book, you can drag columns to the designer and VWD will do all the workof setting up the proper controls to display data from those columns. For now, understand that in theSolution Explorer you can double-click the name of an Access MDB to open that file in Access (assumingAccess is installed). For SQL Server databases (as used in this book) you can use a tool named theDatabase Explorer to do even more exploration of a database and change its data and properties. Thesefeatures are discussed in detail in Appendix D.
25
An Introduction to ASP.NET 2.0 and the Wrox United Application
04_588508 ch01.qxd 10/10/05 6:31 PM Page 25

SummaryMicrosoft has revised large parts of ASP.NET in version 2.0. The overall biggest benefit is that tasks,which formerly required custom coding, can now be implemented by dragging pre-built controls to thepage. These pre-built controls include tools for logging on users, navigation, connecting to stores of data,displaying data, creating a consistent look to the site, and offering customization options to the user. Theresult is both faster and more robust development of dynamic web pages. On top of this Microsoft hasmade version 2.0 easier to deploy and faster in performance. As with earlier versions of ASP, the execu-tion of code (that is, the building of dynamic pages) occurs on the server and only standard HTML issent to the browser. Thus, ASP.NET 2.0 is compatible with all browsers.
Three tools are available from Microsoft for creating ASP.NET 2.0 pages. The one used in this book,Visual Web Developer Express (VWD). VWD displays the organization of pages on your site, and helpsyou to build new pages or modify existing pages. VWD also comes with a lightweight web servernamed Cassini for testing your pages. After building a page you can click Run and VWD will startCassini, start your browser, build the page, and serve it to the browser. This chapter also covered the fol-lowing topics:
❑ VWD offers many options for the way that you view and work with pages during their devel-opment. Tabs allow switching between Design View (which displays a good facsimile of howthe browser will render the page) and Source View (which shows the tags and code that gener-ate the page).
❑ When creating a new site or adding pages, VWD offers wizards and templates that walk youthrough the most common setups. In this chapter you looked at how to create a new page basedon one of several dozen templates, followed by working with the Toolbox. This source of pre-built objects is a focus of building pages in all the exercises of this book. To organize the largeToolbox, the tools are divided into groups.
❑ Another window displays properties of whichever object is currently selected. You can, forexample, select a text box and see its size, background color, and dozens of other properties. The remainder of this book goes into the details of many properties of objects that ASP.NET 2.0supports on a page.
❑ When a page is built as a result of the VWD Run command, you get some feedback on how theprocess fared. Fatal errors are listed, as well as warnings about potential problems with thepage. Double-clicking any of those errors will lead you to the offending line in the site.
This first chapter focused on an introduction to ASP.NET 2.0 and how to build your first pages usingVWD. Chapter 2 moves on to understanding some of the ASP.NET 2.0 features that govern the look andfeel of all the pages on a site.
Exercises1. Explain the differences among the .NET 2.0 Framework, ASP.NET 2.0, VWD, and IIS.
2. List some differences between Cassini and IIS.
3. When you drag the title bar of the toolbar it will only go to certain locations and certain sizes.How can you put the title bar where you want it?
26
Chapter 1
04_588508 ch01.qxd 10/10/05 6:31 PM Page 26

4. How can you copy a .jpg file in C:\MyPhotos into your site for display on a page?
5. You want to add a subfolder to your site, but Folder is not one of the items listed in Add Items. Why?
6. Microsoft has written extensive code to make it easier for programmers to create Web pages.How does a programmer actually use that code?
7. Why are there no tools in the General panel of the Toolbox?
27
An Introduction to ASP.NET 2.0 and the Wrox United Application
04_588508 ch01.qxd 10/10/05 6:31 PM Page 27

04_588508 ch01.qxd 10/10/05 6:31 PM Page 28

2Site Design
When you start to develop a web site, you’ll often have a good idea of what the site needs to beable to do; for example, a blog site needs the ability to store blog entries by categories, for addingcomments to blog entries and an administration section, at the very least. Alternatively, consider asimple retail store that wants to enter the realm of e-business by having a web site that enablescustomers to browse and buy their products. Each and every site needs to be carefully thoughtabout and designed before you can start work, and only then can you start putting code togetherto implement a site.
Before jumping into the discussion and implementation of specific techniques, we should discuss the development of good site design with an eye toward the features supported by theASP.NET 2.0 server-side controls. After all, a well-designed site is easier to create, easier to use,and easier (and cheaper) to maintain.
In this chapter, you learn about the following concepts:
❑ How to start the design process for a site, and consider all the requirements for the sitebefore you start coding.
❑ Using Master and Content pages to implement a consistent look and feel to a site usingthis great new ASP.NET 2.0 feature.
❑ Constructing a site map that defines which pages exist on a site, and how these pagesrelate to each other hierarchically.
❑ Storing central configuration data and code that is used by all pages on a site using theWeb.config and Global.asax files.
At the end of the chapter are some exercises to help you to gain a bit more familiarity with the con-cepts learned in this chapter.
05_588508 ch02.qxd 10/10/05 6:21 PM Page 29

General Design ObjectivesDesigning a fully functional web application is a big task. If you’re developing your own site, you mayhave thought long and hard about what you want your site to be about, so you know what it is you’retrying to do before you start. However, if you are developing a site for a customer, you must make sureyou are careful and thorough about how you agree on a design for a site. In a professional developmentenvironment, this process normally includes the following steps:
❑ Develop a functional model that describes exactly how the site should function. What happenswhen the user clicks the Log In button? What features are available when a user wants to view aproduct? These questions, and many others, need to be answered before you start work, so youdon’t end up developing something that the customer doesn’t want!
❑ Identify which technologies you have available to use in the implementation of the site. Manyhosting packages have different levels of support for databases, and limitations on the overallsize of a site, so make sure you talk about this early on and make sure you can use all the tech-nologies you would like to use.
❑ Develop a technical specification that describes how you will implement the required function-ality. For example, on a blog site, how will you make sure that when the user clicks the button topost a new blog entry, the text that has been entered is saved in the database? Be as thorough asyou can, because you may not be the one who has to maintain the site later.
This may sound like quite a lot of work, but even for smaller businesses or sole trading contractors, fol-lowing this process will help you to maintain a happy relationship with your customer, and potentiallysecure future work with either that customer or any of their friends or business contacts.
Once you move from the business side of things into the implementation phase, you start to think abouthow to create the application, and how to actually design the site in line with what the customer wants.Creating a web application requires more than just correct use of the ASP.NET 2.0 server-side controls,because the process of actually designing and laying out the pages of the site is just as important.
Note that the term design can have two meanings. The first is the selection of colors and layout, whichare typically created by a design artist for the site. The second definition includes the intellectual con-struction and coordination of the parts of the site. This includes the plans for the architecture of theinformation; in your case you want to store as much information as possible in a relational database.This chapter concentrates on the second definition. The next chapter considers how to design each pagein a site, using a healthy mix of HTML and ASP.NET controls.
The Wrox United sample site has several site-wide design objectives that are implemented in this chapter:
❑ Facilitate troubleshooting as much as possible during the development, so that it’s a simple pro-cess to track down errors.
❑ Set site-wide standards for coping with errors after deployment.
❑ Create a consistent look for all pages.
30
Chapter 2
05_588508 ch02.qxd 10/10/05 6:21 PM Page 30

Additional general design objectives are covered later in the book, including an interface for a login sys-tem to identify members (Chapter 4), applying consistent styling and themes to a site (Chapter 5), andsourcing as much information as possible on databases or XML data files (Chapters 7 and 8).
Master and Content PagesA site benefits from a consistent look and feel, and you’ll rarely find sites on the Internet that deviatefrom having a generic site layout, which generally includes the following:
❑ A common header and menu system for the entire site
❑ A bar on the left side of the page offering some page navigation options
❑ A footer providing copyright information and a secondary menu for contacting the webmaster
These elements will be present on every page and they not only provide essential features, but the con-sistent layout of these elements signal to users that they are still in the same site. Although this appear-ance can be built with include files in HTML, ASP.NET 2.0 provides more robust tools with the Masterpage and Content page system.
A Master page defines the layout to be used by all pages based on the Master. It’s the overall parent thatcontrols your layout, specifying how big your header will be on every page, where your navigation fea-tures will be placed, and the text to display in the footer on every page — a bit like a cookie cutter foreach page. The Master page contains some of the content available to each page on the site, so standardcopyright footer text can be defined here, along with positioning the main site logo at the top of thepage. Once the standard features of the Master are defined, you then add some placeholders — namedregions on a page that define where content that varies from page to page will be positioned.
A Content page is a page based on a Master, and is where you add the content for each page on a site thatvaries from page to page. The Content page contains text, HTML, and controls within <asp:content>tags. When the Content page is requested, its content is combined with a copy of the Master page, withthe specific content defined in the Content page placed within the specified placeholder on the Masterpage. Then the whole package is delivered to the browser, as shown in Figure 2-1.
Fortunately, the heavy lifting for this architecture is performed by ASP.NET 2.0; you only have to createthe Master and Content pages as laid out in the next two sections.
Creating a Master PageA Master page is created in VWD’s Solution Explorer by right-clicking the root of the site, selecting AddItem, and designating the type as a Master Page. By default, the name for a new Master page isMasterPage.master and is located in the root of the site. The Master page has three parts.
First are some basic page tags and designations (such as the designation of a Master, DOCTYPE, xmlns,html, and head tags) that are required by any rendered page. This content is entered only once in theMaster page, to reduce repetition. The DOCTYPE and xmlns refer to the place the server can look up thedefinitions of tags used by the page. Note that these tags will not appear in the Content pages:
31
Site Design
05_588508 ch02.qxd 10/10/05 6:21 PM Page 31

Figure 2-1
<%@ master language=”VB” %>
<!DOCTYPE HTML PUBLIC “-//W3C//DTD XHTML 1.0 Transitional//EN”“http://www.w3.org/TR/xhtml1/DTD/xhtml1-transitional.dtd”>
<html xmlns=”http://www.w3.org/1999/xhtml”>
<head id=”PageHead” runat=”server”><meta http-equiv=”Content-Type” content=”text/html; charset=utf-8” /><meta http-equiv=”Content-Language” content=”en-uk” /><title>Wrox United</title><link rel=”stylesheet” type=”text/css” href=”site.css” runat=”server” />
</head>
Master Page
Final page as sentto browser
Content Page
WROX UNITED
MENU
WROX UNITED
MENUPlayer List
AaronBillChris
Player List
AaronBillChris
32
Chapter 2
05_588508 ch02.qxd 10/10/05 6:21 PM Page 32

The second part of the Master page is a place for scripts that will be run on all pages (for example,Page_Load code, which runs each time a page is loaded), for example:
<script runat=”server”>Sub Page_Load(ByVal sender As Object, ByVal e As System.EventArgs)
‘ ...End Sub
</script>
Third, the Master page includes some HTML for layout, and the start/end tags <asp:content ...ContentPlaceHolderID=”xxx> and </asp:content> tags. The material from the Content page willbe placed between these tags. For example:
<body><form id=”mainForm” runat=”server”>
<div id=”header”>...</div><div id=”sidebar”>...</div><div id=”content”>
<asp:contentplaceholder id=”mainContent” runat=”server” /></div><div id=”footer”>
<p class=”left”>All content copyright © Wrox Press and its subsidiaries 2004.</p>
</div></form>
</body></html>
In summary, each Master page must include the following elements:
❑ Basic HTML and XML typing tags
❑ <%@ master ... %> on the first line
❑ An <asp:ContentPlaceHolder> tag with an ID
The Master page is now available as a container to hold other pages. You create those Content pages inthe next section.
Creating Content PagesAs with most of ASP.NET 2.0, VWD saves you typing. Starting in the Solution Explorer, right-click theroot and select Add New Item. Generally, you will pick a Web Form; there is no special template for aContent page. Notice at the bottom of the dialog box the option to Select master page (see Figure 2-2).When this box is checked and you click Add, you will be led to an additional dialog that asks whichMaster page to use for the new Content page.
33
Site Design
05_588508 ch02.qxd 10/10/05 6:21 PM Page 33

Figure 2-2
The second dialog box (shown in Figure 2-3) allows you to pick which Master page to use. Select theMaster page (usually named MasterPage.master) and click OK.
Figure 2-3
VWD sets two values in the Content page. They are not shown in Design View, but switching to SourceView reveals them, as displayed in the code below. First, the Master page to use will be stated in the firstdirective. Second, VWD will include an <asp:content> control with a property that designates the IDof the placeholder in the Master page. A Master page may have many places where Content pages canbe inserted. This designator identifies which placeholder to fill with this particular page.
34
Chapter 2
05_588508 ch02.qxd 10/10/05 6:21 PM Page 34

<%@ Page Language=”VB” MasterPageFile=”MyMasterPage.master” %><asp:Content ID=”Content1” ContentPlaceHolderID=”Content Place Holder ID in Master Page” Runat=”Server”>
... content goes here
</asp:Content>
To summarize, the Content page exhibits three features as follows:
❑ Lack of the HTML <!DOCTYPE HTML ... > and XML <html xmlns=...> typing tags
❑ <%@ page MasterPageFile= ... %> on the first line to instruct ASP.NET 2.0 which Master pageto use
❑ An <asp:content> tag
The theory is not difficult and the typing is done automatically by VWD. In the following sample, yousee Master and Content pages working together.
A Sample of Master and Content PagesAlmost all of the exercises in this book can be carried out in Design View (without working directly incode). But it is interesting to take a look at how VWD builds pages by switching to Source View. The fol-lowing code listing shows an example of a Master page (named research.master) for a corporationand a Content page called “mission statement.” The first shaded line designates the Master page, andthe second shaded area is a control that defines a content placeholder, where the content developed on aContent page will be inserted:
<%@ Master Language=”VB” %><!DOCTYPE html PUBLIC “-//W3C//DTD XHTML 1.1//EN”“http://www.w3.org/TR/xhtml11/DTD/xhtml11.dtd”><html xmlns=”http://www.w3.org/1999/xhtml” ><head runat=”server”> <title>CorporateMaster</title></head><body>Corporation Name
<form id=”form1” runat=”server”><div>
<asp:contentplaceholder id=”ContentPlaceMissionStatement”
runat=”server”></asp:contentplaceholder>
</div></form>
</body></html>
35
Site Design
05_588508 ch02.qxd 10/10/05 6:21 PM Page 35

Following is the Content page for this example. The highlighted section designates the Master page andthe control that delineates the material to be put in the Master page. The ID of the ContentPlaceHoldermust match the ID of the ContentPlaceHolder in the Master page. The following listing is complete;there are no additional tags or attributes at the top of the page:
<%@ Page Language=”VB” MasterPageFile=”~/research.master” Title=”Untitled Page” %>
<asp:Content ID=”Content1” ContentPlaceHolderID=”ContentPlaceHolderMissionStatement” Runat=”Server”>
Our Mission Statement is to provide value to the customer.
</asp:Content>
Note that a Content page must have a very minimal set of tags. The Content page does not have tagssuch as <!DOCTYPE > or <html xmlns=”http://www.w3.org/1999/xhtml” >. Nor does the Contentpage contain <head> information. This data will be provided by the Master page.
Using Cascading Style Sheets in a Master PageA Master page is a good location to declare a link to a Cascading Style Sheet (CSS). CSS is a feature ofHTML, not ASP.NET 2.0, so the topic isn’t covered in depth in this book. However, CSS is discussed asrelated to themes in Chapter 5. There is also a brief reference for HTML and CSS in Appendix E. In short,a CSS contains formatting for various styles to be applied to pages and controls, so that when a page isrendered, the elements on a page, the style of the text, buttons, links, and so on, appear formattedaccording to the style definition in the CSS. This saves the designer from having to include (and main-tain) many individual style format tags for frequently used designs. A CSS also speeds page loadingbecause the CSS is loaded just once by the browser, and then reused directly from the client-side cachefor each subsequent page that uses that style sheet. On a Master page, you should include the followingkind of link (highlighted with a gray background) in the <head> section to link a page with a CSS:
<head id=”PageHead” runat=”server”><title>Wrox United</title><link rel=”stylesheet” type=”text/css” href=”MySite.css” runat=”server” />
</head>
In the following Try It Out, you get the chance to create the Master page for the Wrox United site. Youwill be adding content and features in the exercises of each chapter of this book. At this point you willsimply create the shell of the Master page. You will add many additional parts to the Master page laterin the book, so if it seems a bit incomplete now, hang in there!
Try It Out Creating a Master Page and Importing a CSS1. Open the sample site for this chapter, located at C:\BegASPNET2\Chapters\Begin\Chapter02.
You will start by importing a CSS file the authors have created for you. Right-click the root ofthe site and select Add Existing Item, as shown in Figure 2-4.
36
Chapter 2
05_588508 ch02.qxd 10/10/05 6:21 PM Page 36

Figure 2-4
2. Navigate to the folder where you downloaded the files for this book (C:\BegASPNET2\WroxUnited), select site.css, and click Add. CSS is an HTML topic (not ASP.NET), but if youwant to open the file you can observe styles set for the HTML of the body, such as <h1>, <h2>,and so forth. There is no need for you to modify this file. Observe that you now have a site.css file in the list of files displayed in the Solution Explorer. If you opened the CSS file, close it now.
3. Again, right-click the root, but this time select Add New Item and use the Master Page template.Name the page site.master. Ensure that the checkbox for Select master page is not checked(that option is only for Content pages). After VWD creates the page you can observe it in DesignView, although it is empty at this point. Notice in Source View that VWD has added several tagsand controls for you (see the following code). The first tag is a designation that this will be aMaster page and the second tag is the normal document type designation. Following that sits aplace to insert scripts and then an XMLNS value. Observe that in the <body> VWD created acontentplaceholder:
<%@ master language=”VB” debug=”true” %><!DOCTYPE HTML PUBLIC “-//W3C//DTD XHTML 1.0 Transitional//EN”“http://www.w3.org/TR/xhtml1/DTD/xhtml1-transitional.dtd”>
<script runat=”server”></script>
37
Site Design
05_588508 ch02.qxd 10/10/05 6:21 PM Page 37

<html xmlns=”http://www.w3.org/1999/xhtml”>
<head id=”PageHead” runat=”server”> ... </head>
<body><form id=”Form1” runat=”server”>
<div><asp:contentplaceholder id=”mainContent” runat=”server” />
<div></form>
</body></html>
4. You want to change the name of the form from the generic VWD names to something moreapplicable to your situation. Switch to Source View and change the <form id=”form1”runat=”server”> to <form id=”MainForm” runat=”server”>.
5. Switch back to Design View to set the style sheet. At the top of the Properties box, drop downthe list of controls and select Document. At the bottom of the properties list, find Style Sheet (seeFigure 2-5), click its ellipses, and browse to site.css. Click OK.
Figure 2-5
6. Adding <div> tags divides the page for easier formatting. Your Master page will use four<div> sections within the <form>. Some of these will then contain additional <div> tags withinthem (lower-level <div>). The first <div> is automatically created by VWD; the others you willadd by hand. A <div> can be dragged onto a page from the HTML section of the toolbar, but itis difficult to get it located properly in Design View. You will use Source View to get exact placement.
38
Chapter 2
05_588508 ch02.qxd 10/10/05 6:21 PM Page 38

7. Switch to Source View and find the default <div> within the form. Select from the beginning ofthe <div> tag to the end of the </div> tag, and note that the Properties window now showsproperties for the <div>. Set the id property to content.
8. Staying in Source View, add another <div> by dragging the control from the HTML section ofthe toolbar to a position above the <div id=”content”>, but still within the <form>. Set its idproperty to header.
9. Add two more <div> tag sets within the form. Give the first one below header an ID of sidebarand give the lowest one an id of footer.
10. Staying in Source View, now create lower-level <div> tags, which will reside inside of the<div> you created earlier. In the header <div>, drag in a <div> and give it an id of logo.Follow the logo <div> with some simple text for display, shown here:
<form id=”mainForm” runat=”server”>
<div id=”header”><div id=”logo”></div><h1>Wrox United</h1>
</div>
11. In the sidebar <div> add the text Navigation, as shown in the following code:
<div id=”sidebar”><h3>Navigation</h3>
</div>
12. You will add controls to the content <div> in the next few chapters, but for now, add a lower-level <div id=> with an id of itemcontent:
<div id=”content”><div class=”itemContent”>
<asp:contentplaceholder id=”mainContent” runat=”server” /></div>
</div>
13. In the footer <div> add two notices of copyright:
<div id=”footer”><p class=”left”>
All images and content copyright © Wrox Press and its subsidiaries 2004.</p><p class=”right”>
Website designed by <a href=”http://www.frogboxdesign.co.uk” title=”croak”>Frog Box Design</a>
</p></div>
</form>
How It WorksYou started by simply importing to your site a CSS that the authors created for you and included in thedownload for this book. (Actually, the authors are lame at design. We originally thought red, pink, andorange went well together, so we asked a designer at Frog Box Design to make the design palatable.)Because CSS is an HTML topic, the structure of the style sheet is not discussed here (see Appendix E forsome details).
39
Site Design
05_588508 ch02.qxd 10/10/05 6:21 PM Page 39

The more important objective, however, is to use VWD to help you create a Master page with the threebasic components. By using the Master page template you got the basic HTML and XML typing tags.VWD also added for you the <%@ master ... %> on the first line. Finally, VWD provided a single <div>with an <asp:ContentPlaceHolder> tag. Every placeholder tag must have an ID, so you changed theID so that it made sense in your context.
You then did some basic modifying of the Master page to support features you will add later in thebook. All of these are actually HTML features, not ASP.NET 2.0. First, you used VWD IntelliSense to adda link to the CSS sheet you imported. Then you created several more <div> tags to organize the pageinto header, sidebar, content, and footer sections.
The following Try It Out complements the previous exercise in that you will now create a Content pageto fill the placeholder of the site.master. Because of its simplicity, the “about the site” page is a goodstarting point.
Try It Out Create Content Pages1. In VWD and with Wrox United open, right-click the root of the site. Select Add New Item and
select the template type of Web Form. Name it About.aspx and make sure that both Select amaster page and Place code in separate file are checked as in Figure 2-6, even though there willbe no code. (If you don’t set code in a separate file, the framework tags for code will be in the.aspx file. It’s better to stay consistent with the rest of the site and keep the container tags andthe code in a separate file.)
Figure 2-6
2. In the second dialog, select site.master for the Master page and click OK, as in Figure 2-7.
40
Chapter 2
05_588508 ch02.qxd 10/10/05 6:21 PM Page 40

Figure 2-7
3. In Design View, type in a few lines, such as the following:
The site was initially written by Dave, while design & graphics were done by Lou.Conformance is XHTML 1.0 Transitional and CSS 2.1.
4. As an aside, you can experience that VWD helps you with non-ASP tags, such as a hyperlink.Staying in Design View, look on the Toolbox’s Standard panel for the Hyperlink control anddrag one to the end of the first sentence in the preceding code. In the properties box set the textto Frog Box Design and the NavigationURL property to www.frogboxdesign.co.uk. VWDwill automatically take care of all the typing to create the link.
5. Look at the page in Design View and note that the Master page contributes the framework, andthe Content page only has the text you typed. Switch to Source View and note that the Aboutpage designates its Master page and that its content will go into the MainContent placeholder.
How It WorksThe general steps to create a page start with selecting the parent folder in the Solution Explorer. In manycases this is the root of the web site C:\BegASPNET2\WroxUnited, but in some cases it can be a lowerfolder such as the location of FanClub.aspx in the folder C:\ BegASPNET2\WroxUnited\FanClub.
Observe how a Content page has the three features to work with the site.master page. The initial tag<%@ Page... > must contain the MasterPageFile attribute. Because you might move the files into adifferent folder structure, you refer to the Master page’s location with an initial tilde (~) that indicatesthat it will be in the root of the site. Second, the material of the Content page is held within an ASP.NETserver-side control named asp:Content with a ContentPlaceHolderID attribute that points to one ofthe locations for content in the Master page. Third, because the HTML and XMLNS tags will be broughtin with the Master page, you omit them from all the Content pages.
41
Site Design
05_588508 ch02.qxd 10/10/05 6:21 PM Page 41

Additional Capabilities of Master PagesAlthough not implemented in Wrox United, several additional features are available that you can usewith Master and Content pages. Multiple levels of Master pages can contribute to a final page. One ofseveral Master pages can be served depending on the requesting browser. And a Master page can support several content placeholders.
Multiple Levels of Master PagesAlthough the technique is not used on Wrox United, your pages can inherit multiple levels of Masterpages. This feature provides a way to display standard content from several levels of hierarchy. For example, a Content page named Publication.aspx can establish its Master as Research.master,which can in turn declare its Master as Corporate.master. The final rendering will be of Research.aspx surrounded by Research.master, and all of that surrounded by Corporate.master. One problem is that the space remaining for content reduces at each level. VWD does not contain automatictools to create multiple levels of Masters. In fact, if you have multiple levels you can only open thosepages in Source View.
To create pages with multiple levels of Masters you must include in the middle-level page tags that bothindicate its Master page (up a level) and its content placeholders (for the lower level). Recall that aMaster page must have <%@ master ... %> on the first line, and that a lower-level or Content page musthave <%@ page masterPageFile= %> on its first line. In the case of a middle page that is both a Contentand Master page, the tag must start with <%@ master ... and also contain ...masterPageFile= %>.
Also recall that a Master page contains an <asp:ContentPlaceHolder> tag whereas the Content pagehas an <asp:content> tag. In the case of a middle layer there must be an <asp:content> holding theID of the Master’s <ContentPlaceHolder> tag. Then within that tag there is an <asp:ContentPlaceHolder> tag that will be used by the next level down.
The following example illustrates a Corporate Master page, then a Research department Master page,and finally a Publication.aspx page that holds the content. The Corporate page is shown in the following code. Note that its content placeholder is defined in the shaded lines:
<%@ Master Language=”VB” %><!DOCTYPE html PUBLIC “-//W3C//DTD XHTML 1.1//EN”“http://www.w3.org/TR/xhtml11/DTD/xhtml11.dtd”><html xmlns=”http://www.w3.org/1999/xhtml” ><head runat=”server”>
<title>CorporateMaster</title></head><body>Corporation Name
<form id=”form1” runat=”server”><div>
<asp:contentplaceholder id=”ContentPlaceHolderCorporate” runat=”server”>
</asp:contentplaceholder></div>
</form></body></html>
42
Chapter 2
05_588508 ch02.qxd 10/10/05 6:21 PM Page 42

The Research department Master page is illustrated by the following code. This page is the most complex,because it is a Content page for the Corporate page, and a Master page for the Publication page. Notice theuse of Master and MasterPageFile= on the first line that establishes this as content for the CorporateMaster page. Then observe that the <asp:ContentPlaceHolder> will house other pages as content (inthis case the Publication page). The content placeholder must sit wholly within the <asp:content> tags:
<%@ Master MasterPageFile=”~/Corporate.master” Language=”VB” %>
<asp:Content runat=”server” ContentPlaceHolderID=”ContentPlaceHolderCorporate”>
Research Department
<asp:contentplaceholder id=”ContentPlaceHolderResearch” runat=”server”>
</asp:contentplaceholder>
</asp:Content>
Code for the Publication.aspx page (designed with content only) is shown in the following code. Hereyou only need to designate a Master page. This page, which sits at the lowest level, is not a Master page:
<%@ Page Language=”VB” MasterPageFile=”~/Research.master” Title=”Untitled Page” %>
<asp:Content ID=”Content1” ContentPlaceHolderID=”ContentPlaceHolderResearch” Runat=”Server”>
Publication text
</asp:Content>
Master Pages Support Multiple Content PlaceholdersThe examples so far have used a single <asp:ContentPlaceHolder> in the Master page and a single<asp:content> tag in the Content page. ASP.NET 2.0 supports multiple content placeholders.However, each must have its own ID, as in the following example:
<%@ Master Language=”VB” %>
<html><body><form id=”form1” runat=”server”>
<asp:contentplaceholder runat=”server” id=”TopContent” /><asp:contentplaceholder runat=”server” id=”MiddleContent” /><asp:contentplaceholder runat=”server” id=”BottomContent” />
</form></body></html>
The content can then have <asp:content> tags that have ContentPlaceHolderID values equal to theID values in the Master page:
43
Site Design
05_588508 ch02.qxd 10/10/05 6:21 PM Page 43

<%@ Page Language=”VB” MasterPageFile=”~/research.master” Title=”Untitled Page” %>
<asp:Content ID=”Content1” ContentPlaceHolderID=”TopContent” Runat=”Server”>Text to go in Top section
</asp:Content>
<asp:Content ID=”Content1” ContentPlaceHolderID=”MiddleContent” Runat=”Server”>Text to go in Middle section
</asp:Content>
<asp:Content ID=”Content1” ContentPlaceHolderID=”BottomContent” Runat=”Server”>Text to go in Bottom section
</asp:Content>
Dividing content into several <asp:ContentPlaceHolder> tags helps with the layout of the Master page.
Creating a Site MapTo enable navigation features of ASP.NET 2.0 you need to have a standard way to describe each of thepages of the site. This standard should not only include the names of all of the site’s pages, but also asense of their hierarchy. For example, the page of a player’s statistics would be a sub-page of the generalplayers list, and that would be a sub-page of the home page:
Home- Players-- Player Statistics
Defining this sort of hierarchy is an important part of site design, because you want to know (before youstart coding) what pages need to be developed, which links will be relevant to users on different pages,and where the user is likely to want to go after viewing a specific page. Drawing up a site tree, like thesimple one shown above, is the first step you need to take. Then you can move to the next stage anddefine this hierarchy in code.
ASP.NET 2.0 holds this information in an XML file named web.sitemap. You can use this file as thesource of data for menu and navigation controls, which are discussed in Chapter 3.
The site map must be an XML file with the exact name web.sitemap and located in the root of the webapplication. XML is a standard for holding data, somewhat like a database, but in a human-readable textform. Each item of data is held in a node, and in this case a node would represent one page of the sitewith data for the page URL, title, and description. An XML file holds the nodes in a tree-like structure soASP.NET 2.0 will know which pages are to be considered children of a parent page. For example, a page
What Microsoft offers in ASP.NET 2.0 is a way to use site data in menus and navigation controls if that data is stored according to the web.sitemap standards.VWD includes a template with the tags for a web.sitemap file. But as of this writingthere is no tool to scan the site and generate the actual data that goes into those tags.Third parties will surely fill this gap, but for now you must type the informationinto the web.sitemap file.
44
Chapter 2
05_588508 ch02.qxd 10/10/05 6:21 PM Page 44

of Corporate Departments would be a parent to children pages with details on Sales, Research, andAccounting. The first tags in the file are standard for XML files to identify the version and the XMLNS, asshown in the following code:
<?xml version=”1.0” encoding=”utf-8” ?><siteMap xmlns=”http://schemas.microsoft.com/AspNet/SiteMap-File-1.0” >
These first two lines are automatically typed for you when you use VWD to add an item to the root fromthe template site map. The node names are simple: <siteMap> containing <siteMapNode> tags. Eachtag represents a web page and can include the following attributes (all attributes of the <SiteMapNode>tag are strings):
❑ Title: Describes the page (this is not linked to the <Title> tag in the header of the page,although it could have the same value).
❑ URL: The location of the page described in this node.
❑ Description: A description of the page.
Note that a URL can contain querystring data, which is additional information defined at the end of theURL string of a page, which is sent as part of a request to display a page. For example, a general referenceto a page would be similar to the first line in the following code, whereas a reference to a page with somedata (for example, the month to display on the calendar) would be similar to the third line:
url=”Calendar.aspx”
url=”Calendar.aspx?Month=May”
The hierarchy (parent/child relationships) of pages listed in the site map is established by including achild node within its parent’s open and close tags. Notice in the following code how the two sub-pages(Members and Calendar) occur within the open and close tags for the Home page (shown with a graybackground). The indentation is only for the human eye; it does not affect the hierarchy. Note that thetags for the child pages (Members and Calendar) can use the single tag format of <Tag... />. Butbecause the parent page (Home) has children (it contains other nodes) it must use the two-tag format of<Tag>...</ Tag>:
<siteMap><siteMapNode title=”Home” url=”Default.aspx” description=”Home page for MySite”>
<siteMapNode title=”Members” url=”Members.aspx” description=”All Members” /><siteMapNode title=”Calendar” url=”Calendar.aspx” description=”Club Events” />
</siteMapNode></siteMap>
To create two child pages within Calendar (grandchildren to the Home page) you take two steps. First convert the Calendar <SiteMapNode> to the two-tag format and then add the two child tags as shown inthe following highlighted code. Remember, as stated in the preceding note box, you must do all of this byhand-typing in the Source View of the web.sitemap file. VWD offers neither a tool to perform an auto-matic scan and build, nor a way to drag and drop from the Solution Explorer into the web.sitemap file.
<siteMap><siteMapNode title=”Home” url=”Default.aspx” description=”Home page for MySite”>
<siteMapNode title=”Members” url=”Members.aspx” description=”All Members” />
45
Site Design
05_588508 ch02.qxd 10/10/05 6:21 PM Page 45

<siteMapNode title=”Calendar” url=”Calendar.aspx” description=”Club Events”><siteMapNode title=”Calendar of Racing Events”
url=”Calendar\Racing.aspx” description=”Racing Events” /><siteMapNode title=”Calendar of Social Events”
url=”Calendar\Social.aspx” description=”Social Events” /></siteMapNode>
</siteMapNode></siteMap>
Note that there is another attribute that you can specify on a <SiteMapNode> element; the rolesattribute. As you learn in Chapter 11, this attribute is used in the Wrox United sitemap file. There may besome situations where you will want to allow a user to know of the existence of a page, even if the useris denied access to the page. In this way, you can offer a link to a user, but when he clicks that link, he isprompted to log in as a user with sufficient privileges before he can view the page.
In the next Try It Out you create a web.sitemap for Wrox United. You won’t be able to see the results ofyour hard work until you reach the next chapter, where you learn the concept of navigation controls, butthis stage is a way of putting your paper-based design for the structure of a site into code, so it’s impor-tant to get it right.
Try It Out Create a Site Map1. Right-click the root of the site in Solution Explorer and select Add New Item. Choose the
template named Site Map and name it web.sitemap. Note that VWD added the first two tagsautomatically and gave you the framework for three nodes. The first is the highest level (Home)and the next two are children.
2. Modify the first <siteMapNode> to represent your Home page with the following code:
<siteMapNode title=”Home” url=”Default.aspx” description=”Wrox United Home Page”>
3. Modify the next <siteMapNode> (the first child) as follows:
<siteMapNode title=”Fixtures” url=”Fixtures.aspx” description=”Match Fixtures”>
4. Copy an entire blank <siteMapNode> to the clipboard so you can paste it without having toretype the tag.
5. Create two children to Fixtures, as highlighted here:
<siteMapNode title=”Fixtures” url=”Fixtures.aspx” description=”Match Fixtures”><siteMapNode title=”Future Fixtures”
url=”Fixtures.aspx?type=future”description=”Who we’re going to be playing” />
<siteMapNode title=”Past Fixtures”url=”Fixtures.aspx?type=past”description=”Who we’ve already played” />
</siteMapNode>
As you can see, there are two sub-nodes within the Fixtures section of the site that enable you toview details of both future and past fixtures.
46
Chapter 2
05_588508 ch02.qxd 10/10/05 6:21 PM Page 46

6. There are quite a few more nodes to specify to complete this example, so to save you some time,we’ve included the rest of the nodes in a file called web.sitemap.remainder in the chapterdirectory (C:\BegASPNet2\Chapters\begin\Chapter02). All you have to do is open this file inNotepad, copy the entire contents of the file, and paste the contents into your version of the fileright at the bottom. Alternatively, feel free to just import our web.sitemap file into your site.
7. At this point there is no a good test for your web.sitemap file because the controls that displaythe data aren’t discussed until Chapter 3, but having an understanding of this foundation isvery important because you can use it to add navigation features to a site.
How It WorksIn this exercise you undertook the tasks to create a site map file. Recall that VWD does not include a toolto automatically create this file, but does include a simple template to pre-type some tags to get started.ASP.NET 2.0 will only utilize this file when named web.sitemap, so try to avoid any temptation tochange the name.
You added a new item of the site map template and switched to Source View. VWD adds the initial tagsand the tags for the first node. But you then have to manually type in all of the data and begin copyingand pasting tags for all of the rest of the pages and their data. Obviously, the third party that writes aprogram to automate this task will enjoy good sales!
General Guidelines for Site DesignPrior to designing any web site you benefit from reviewing the principles of a good site design. In thisbook, you should keep in mind three general concepts:
❑ Endeavor to separate the presentation from the information. For example, you will design thetitle, layout, and format of a page (the presentation). On that page you will put a control that isconfigured to get and display information (such as the list of players for the team). By dividingthese goals you are able to make updates to each without impacting the other. For example,when a new player is added to the team, the information about the player will be entered intothe site’s database, and the page will automatically display the new list of players on the teamwithout having to modify the presentation layer.
❑ Strive for a consistent look and feel throughout the site. By keeping the same colors, logo, andarrangement on the screen you develop a sense of presence. The loyal followers immediatelyfeel at home with the team colors. Return visitors will be able to use the same set of learnedbehaviors for using the site.
❑ Make the site as easy to navigate as possible. First, a menu bar on all pages provides easy jumpsform one part of the site to another. You will also use ASP.NET 2.0 tools to indicate where thecurrently viewed page is located in the site.
Standard Files for ASP.NET 2.0 ApplicationsASP.NET 2.0 uses two files, common to every ASP.NET site, to hold configuration information and codethat applies to the entire site. These are the Web.config and Global.asax files, respectively.
47
Site Design
05_588508 ch02.qxd 10/10/05 6:21 PM Page 47

❑ Web.config contains configuration settings for a site; for example, for specifying a standardcustomized error page to display to end users if anything on the site breaks.
❑ Global.asax contains code that handles events raised by any page on the entire site; for example, code that is run each time a user first accesses the site (the start of a session).
Web.config Holds Settings for the Entire SiteWeb.config stores values that apply to the entire site. Structured as an XML file and located in the root,nodes hold information in three major areas:
❑ Application settings for feature availability used in development versus deployment
❑ Connection strings that hold values used when reading or writing from a data source.
❑ System.Web and System.Net settings that hold all else.
System.Web settings is then broken into several sub-catagories, including the following (not all are usedin WroxUnited).
❑ HTTP Modules that point the page to other pages for execution of code
❑ Debugging routines that should be turned on at the time of compilation.
❑ Authentication Technique
❑ Role Manager turned on or off
❑ Anonymous Identification permitted or not
❑ Error handling settings.
❑ SiteMap file data used for navigation and menus
❑ Profile data that is used for identifying users.
❑ E-mail settings for the Simplified Mail Transfer Protocol (SMTP) (not used in WroxUnited)
❑ Definition of NameSpaces that identify the location of objects within larger objects (not used inWroxUnited)
System.net holds just one setting for our purposes, a series of values for sending Email.
You can amend the contents of this file in two ways; the first is to edit it by hand in VWD, which, thankfully,is not too tricky to do. The alternative is to use the ASP.NET Web Site Administration Tool, which you canlaunch from within VWD. You can go to the main VWD menu and select Website ➪ ASP.NET Configuration.A series of dialog boxes will allow you to set values that VWD will change in Web.config without directlyopening the file. You can have a look at this tool later on in the last Try It Out in this chapter.
The following explanation of the structure of a Web.config file takes a look at parts of the Wrox UnitedWeb.config file, looking at sections from the top of the file and working down. If you open the file, youcan see that the structure (with opening and closing tags, each with attributes, and sometimes with childnodes) is the same as for any other XML file. Application-wide configuration settings are made by addingappropriate nodes and attributes. Text within the special <!-- -- > characters is treated as a comment,which you can add to the file to help other users understand what each part of the file is used for.
48
Chapter 2
05_588508 ch02.qxd 10/10/05 6:21 PM Page 48

When VWD creates a Web.config file it includes many comments that provide advice for the settingsof each section. A list of all of the values is contained in a text file located at C:\Windows\Microsoft.NET\Framework\v2.xxx\CONFIG\Web.config.Comments.
Here’s the start of the Wrox United Web.config file as you can view in the download. Feel free toimport it into your site in place of the default Web.Config.:
<?xml version=”1.0”?><!-- Note: As an alternative to hand editing this file you can use the web admin
tool to configure settings for your application. Use the Website->Asp.Net Configuration option in Visual Studio.A full list of settings and comments can be found in machine.config.commentsusually located in \Windows\Microsoft.Net\Frameworks\v2.x\Config -->
<configuration xmlns=”http://schemas.microsoft.com/.NetConfiguration/v2.0”>
Three lines of code here are added by default to all new Web.config files. The first line contains theXML declaration, specifying that the Web.config file follows the XML standard. The next section is alarge comment that reminds you that you can use the administration tool, instead of hand-editing thecode. The last item to note is the root node for the file; the <configuration> node will contain all childnodes that contain settings relating to the content stored on the site.
The next section contains a custom application setting that can be useful to change the way the sampleapplication runs for different environments as follows. The large section between <! — and --> is a noteto programmers from VWD and not part of the actual settings.
<!--Mode defines certain feature availability:
Full: No restrictionsReal: Runs as if a real site, without the view code and download links
--><appSettings>
<add key=”mode” value=”Full” /></appSettings>
The next section, the connection string section, holds sets of information about data sources. This stringgenerally includes authentication information that you can use to connect your code to the data stored inyour database. Connection strings are discussed in detail in Chapter 7. For now simply notice thatwithin the connection strings section you have one or more tags that add strings:
<!--define the connection string to the database
--><connectionStrings>
<add name=”WroxUnited” connectionString=”Data Source=.\SQLEXPRESS;
AttachDbFilename=|DataDirectory|WroxUnited.mdf;Integrated Security=True;User Instance=True”/>
</connectionStrings>
Note that the connectionString attribute wraps here because of page width limitations. This line ofcode should remain on one line in your code.
49
Site Design
05_588508 ch02.qxd 10/10/05 6:21 PM Page 49

After the connection strings the remainder of the settings are found within the <system.web> tag. Theycan be in any order; here the httpModules setting is covered first. This value allows the site to handleuser selected themes centrally, without requiring code in pages. Themes are covered in Chapter 5, andwhile the HttpModule isn’t covered in detail in this text, the code is well commented.
<system.web> <httpModules>
<add name=”Page” type=”Wrox.Web.GlobalEvents.ThemeModule” /></httpModules>
Next within System.Web is the compilation value. When set to true (as illustrated in the followingcode), ASP.NET 2.0 will provide output to the page describing any problems that were found during thebuild of the page. This feature is useful when developing the site but should be set to false prior todeployment:
<system.web><compilation debug=”true”></compilation>
Wrox United declares site-wide values for three security settings: authentication, roles, and profiles.Chapters 4 and 11 discuss these functions in detail. The section of Web.config in the following code givesyou a preview of what you will learn to write. Notice how the settings establish the page to use for log-on(Default.aspx) and then turn on the Role Manager. You then have a set of tags that create the Membertype of role. Again, these are explained in detail in Chapters 4 and 11. The following code listing savesspace by not listing the VWD programmers help comments. Also, there is a break in the WroxUnitedweb.config between the second and third settings in which are other settings.
<authentication mode=”Forms”><forms loginUrl=”Default.aspx”></forms>
</authentication>
<roleManager enabled=”true”/><anonymousIdentification enabled=”true”/>
...
<profile enabled=”true”><properties>
<add name=”MemberName”/><add name=”Name”/>...
<add name=”Cart” serializeAs=”Binary” type=”Wrox.Commerce.ShoppingCart” allowAnonymous=”true”/>
</properties></profile>
The next section to look at concerns handling errors that can (and will) affect the day-to-day running ofyour site. Chapter 15 discusses error handling in detail, but as an introduction, ASP.NET can be set toredirect the user to a custom error page if there is a problem. The file to display in the case of an error isdeclared in the Web.config defaultRedirect setting as follows:
<!-- The <customErrors> section enables configuration of what to do if/when anunhandled error occurs during the execution of a request. Specifically, it enables
50
Chapter 2
05_588508 ch02.qxd 10/10/05 6:21 PM Page 50

developers to configure html error pages to be displayed in place of a error stacktrace. -->
<customErrors mode=”RemoteOnly”><error statusCode=”404” redirect=”missingPage.aspx”/></customErrors>
So, for example, if your database server was the victim of a power cut, your users don’t need to knowthe details, but they’d like to be reassured, along the lines of “Sorry, there is a fault — we’re workinghard to fix the problem. Normal service will resume shortly.” Whereas local administrators would like toknow what the problem is so that they can get it back up and running as quickly as possible! TheRemoteOnly attribute in this example means that remote users see the friendly message, whereas theadministrator will see all the details of any error.
The last setting of System.Web identifies the file that will hold the site map, an index to all of the pages andtheir relationships to each other (as we will study in chapter 2). ASP.NET 2.0 also requires the identificationof what Provider, or reading tool, to use for the site map.
<!-- Redefine the Site Map Provider, to add the security trimming attribute,which is off by default -->
<siteMap defaultProvider=”AspXmlSiteMapProvider” enabled=”true”><providers>
<clear/><add name=”AspXmlSiteMapProvider”
type=”System.Web.XmlSiteMapProvider, System.Web, Version=2.0.3600.0, Culture=neutral, PublicKeyToken=b03f5f7f11d50a3a”siteMapFile=”web.sitemap” securityTrimmingEnabled=”true”/>
</providers></siteMap>
The last group of settings is in system.net. Although not explicitly used in the WroxUnited application, itcould be used so that automated e-mails can be sent to a user when he has forgotten his password, andrequests that the password be sent in an e-mail. Regardless of how the e-mail is created, you mustdeclare the SMTP (Simplified Mail Transfer Protocol) in Web.config as follows:
<system.net><mailSettings>
<!-- these settings define the mail server settings from: the user name fromwhich the email is sent - this is the application that is sending the message host:the name of your mail server userName: the name the application will use to loginto the mail server password: the password for the above user name
--><smtp from=”[email protected]”>
<network host=”your-mail-server-name”userName=”your-user-name”password=”your-password” />
</smtp> </mailSettings>
</system.net>
51
Site Design
05_588508 ch02.qxd 10/10/05 6:21 PM Page 51

Finally, as with all XML files, each opening tag must have a closing tag and so you finish up the file withthe following:
</system.web></configuration>
Web.config, as you have seen, holds site-wide settings to which all other pages can refer. This savesyou from having to repeatedly specify the same pieces of information in every page that needs it, andyou have one place to go to change settings.
Later on in the book, you’ll be adding lots more capabilities to all your site pages, including adding codeto deal with various events that happen on each page. But, in the same way that you don’t want to specifythe same settings in every page, if you need to have the same behavior repeated on multiple pages, you’llneed a way to share that code. There was no executable code in Web.config— for that you need anothersite-wide file — the Global.asax file.
Global.asax Holds Code for the Entire SiteWhereas Web.config holds values, Global.asax holds code. Global.asax, like Web.config, residesin the root of the site. Writing code is discussed in detail in Chapter 9, but for now you can get anoverview of Global.asax.
The code in Global.asax executes in one of three cases. First is the case of the application as a wholestarting or stopping. Second is when each user starts or stops using the site. Third is in response to spe-cial events taking place that could happen on any page, such as a user logging in or an error occurring.Each of these is known as an event. When each of these events occurs, ASP.NET lets Global.asax know,and by editing Global.asax, you can put code into it that will be executed in response to the events.
You’ll be using Global.asax to share code across all the pages of the Wrox United web site later on inthe book.
Editing Site Configuration Through a Web BrowserNow, it’s perhaps a little daunting looking at the complex XML syntax of Web.config and the code inGlobal.asax. Editing these files to make changes to the overall configuration and behavior of yourapplication requires a good understanding of the files’ syntax rules, and sure typing to avoid introducinglittle errors. Conveniently, though, ASP.NET 2.0 provides a graphical tool that lets you modify many ofthe settings you could manually enter in Web.config, through the Web Site Properties dialog.
You can bring up the Web Site Administration Tool by clicking the ASP.NET Configuration button just atthe top of the Solution Explorer, as shown in Figure 2-8.
52
Chapter 2
05_588508 ch02.qxd 10/10/05 6:21 PM Page 52

Figure 2-8
In Figure 2-9, you can see the Properties window that this opens up.
Figure 2-9
53
Site Design
05_588508 ch02.qxd 10/10/05 6:21 PM Page 53

As you can see, VWD has actually opened up a web browser showing a web site that is built intoASP.NET, called the ASP.NET Administration Tool, through which you can edit the settings of your webapplication. You’ll be using this administration tool in depth later on in the book, but for now, you canexplore the Application Configuration section of the tool. Figure 2-10 shows what options are presentedto you by this page.
Figure 2-10
Although you can’t administer everything that you looked at earlier, some of the key sections fromWeb.config are represented here. You have the ability to edit application settings (the contents of the<appSettings> element you looked at earlier), e-mail settings (the <smtpMail> section you saw in theWeb.config file), and debugging and error handling (the <compilation> and <customErrors> sectionsyou examined before).
In this Try It Out, you see how the ASP.NET Administration Tool edits the Web.config file for you.
54
Chapter 2
05_588508 ch02.qxd 10/10/05 6:21 PM Page 54

Try It Out Changing Settings with the Administration Tool1. Working in VWD’s Solution Explorer, import into your site missingPage.aspx from the download
files (C:\BegASPNET2\WroxUnited).
2. Open up the Web Site Administration Tool by clicking the icon on the Solution Explorer.
3. Navigate to the Application Configuration page, and click Define Default Error Page.
4. Select “Specify a URL to use as the default error page,” and select MissingPage.aspx as thepage to redirect users to when an error occurs.
5. Click the Save button.
6. Return to VWD, and open up the Web.config file.
7. Scroll down until you find the <customErrors> section of the configuration, and notice thatthe value of the defaultRedirect attribute has been changed to the path of the page youchose in the administration tool:
<customErrors mode=”RemoteOnly” defaultRedirect=”MissingPage.aspx”></customErrors>
How It WorksThe administration tool is just a friendlier way to edit some of the settings present in Web.config,including the default error page. When you change the application’s error handling setting through theadministration web tool, it edits Web.config for you — without your having to get your hands dirtyediting XML data!
Troubleshooting Site Design ErrorsNow that you have a good idea of what goes into site design, here are the most common errors youmight run into when using Master pages, and the other facilities you’ve looked at in this chapter:
❑ The reference to the Master page is misspelled in a Content page. This will prevent ASP.NETfrom being able to find the Master page template for a page. To avoid this, whenever possible,use the VWD checkbox in the template dialog to create the master reference.
❑ A mismatch between the ID of the content placeholder in the Master page and theContentPlaceHolder ID property of the content tag in the Content page will prevent yourpage from displaying. Double-check that they match up.
❑ Typos in the Web.config or Global.asax files. These files are very strict about their syntax, anderrors in them can be hard to track down. You can get around having to edit Web.config by usingthe ASP.NET Administration Tool, so you can be sure you haven’t introduced typographical errorsinto the file.
SummaryWeb sites are easy to create, use, and maintain if they are well designed. ASP.NET 2.0 offers several toolsto organize the design of the site.
55
Site Design
05_588508 ch02.qxd 10/10/05 6:21 PM Page 55

In this chapter, you learned that Master and Content pages create a consistent look and feel to the site.Master pages provide the consistent sections of the pages along with a position for the material con-tained in the Content page. Whenever possible, create the Master and Content pages using the Add NewItem choice after right-clicking the root of the site in the Solution Explorer. A Master page must have thenormal HTML and XML typing tags, <%@ master ... %> on the first line, and an<asp:ContentPlaceHolder> tag with an ID. Content pages must not have the basic HTML and XMLtyping tags, must have <%@ page masterPageFile= %> on the first line, and must at some point use an<asp:content> tag to contain the material to be displayed. A Master page <head> can contain the linkto a CSS if you are using one. Additionally, this chapter covered the following topics:
❑ Your site can implement multiple levels of Master pages. You can also create several Masterpages to be served depending on the requesting browser. Furthermore, a Master page can support several <ContentPlaceHolder> tags provided that each has its own ID.
❑ Site maps contain a description of each file and its relationship to surrounding files. This XMLfile can then be read by ASP.NET 2.0 server-side controls to create navigation aids. VWD doesnot have a way to automatically create a site map, but the XML structure is not hard to under-stand because each page is a SiteMapNode.
❑ Two files hold information for an entire application. Web.config holds settings such as connection strings used with a data source, debugging routines for compilation, security settings,values for handling errors, among other settings. Global.asax holds code for the entire site,including code to run when the application as a whole starts or stops. Additional code blocks canrun when each user starts or stops using the site. Global.asax also houses code that can run onany page.
In the next chapter you learn about the various server-side controls and how to use them to build properpages. You will construct the Wrox United home page and fill in some of the Master page you created inthis chapter.
Exercises1. Describe the functional difference between the Web.config file and Global.asax.
2. What files discussed in this chapter are in XML format?
3. Take a look at the code for a Content page. Why does it lack directives and tags?
<!DOCTYPE HTML PUBLIC “-//W3C//DTD XHTML 1.0 Transitional//EN”“http://www.w3.org/TR/xhtml1/DTD/xhtml1-transitional.dtd”><html xmlns=”http://www.w3.org/1999/xhtml”><head ></head>
4. What values must match between a set of Master and Content pages?
56
Chapter 2
05_588508 ch02.qxd 10/10/05 6:21 PM Page 56

3Page Design
Successful web sites are generally easy to use, intuitive, and clearly presented. It’s your job (possiblywith the help of a friendly designer) to ensure that the sites you develop are not just functional, butcan be presented in a meaningful manner. Once you have a basic site outline structure in place, youneed to make decisions about how to present the information and user interface elements.
ASP.NET, in conjunction with VWD, has some great tools for designing and laying out pages. Recallthat you’ve already created a few pages with simple content simply by dragging and droppingfrom the Toolbox in VWD. Designing an entire site is obviously going to involve a whole lot moredragging and dropping, but there are ways of making this process less painful.
This chapter looks at the following topics:
❑ Creating and laying out static pages
❑ HTML and the HTML viewer in VWD
❑ Server controls and dynamic content
❑ Configuring controls in Design View
❑ The controls available in the web control library
❑ Adding dynamic navigation controls to a page, and getting them to work without writinga single line of code
If you have experience programming in HTML, some of this chapter may cover familiar territory,but the toolset available for working with HTML in VWD is quite advanced, so it’s worth stickingaround and enjoying a light refresher.
Static Page DesignThe term static refers purely to the fact that the page shown in Figure 3-1, like many others on theInternet, is view-only (imagine an HTML page with nothing but text, or just a series of images) —you don’t always want to have every page in a site include a form for submitting information, orreact to user input. Static pages contain, by definition, content that doesn’t change (or that rarely
06_588508 ch03.qxd 10/10/05 6:26 PM Page 57

needs to be updated). Imagine you had a personal web site that contained an “About Me” page — youmight want to change the content from time to time (if you move, change jobs, or get married), but onthe whole, you’re not likely to want to change that page more than a couple of times a year.
Figure 3-1
Static pages remind me of the Web circa 1995 — most of the sites I’d view at the time would be simple,plain sites, and the joy of just playing with HTML tables for layout was enough to keep me occupied fora few afternoons. Time for a quick Try It Out — you’re going to create a really simple page and see whatthis page looks like in HTML view, looking at how HTML elements are structured.
Try It Out Creating a Static PageFire up VWD and get started! This is a light run-through — you don’t have to do much at this stage, justfollow the steps and feel comfortable with the techniques.
1. First, it will help if you download the base code for this chapter from www.wrox.com. Makesure you place the base code folder in the following location: C:\BegASPNET2\Chapters\Begin\Chapter03.
2. Open up VWD and select Open Web Site from the main menu. In the dialog that appears, selectthe Chapter03 folder and click Open (see Figure 3-2).
3. In the Solution Explorer on the right (shown in Figure 3-3), right-click the Chapter03 site andselect Add New Item.
4. The Add New Item dialog appears, where you need to select a new HTML page calledStaticHTMLPage.htm, and click Add (see Figure 3-4).
58
Chapter 3
06_588508 ch03.qxd 10/10/05 6:26 PM Page 58

Figure 3-2
Figure 3-3
59
Page Design
06_588508 ch03.qxd 10/10/05 6:26 PM Page 59

Figure 3-4
Figure 3-5
5. Switch to Design View and type in some text, as depicted in Figure 3-5.
Don’t worry about the actual text — this is a simple example, and you don’t have to publish thison the Web!
6. Next, from the toolbar select Layout ➪ Insert Table to add a table to the page. Give it two rows,two columns, and borders and padding if you like, all of which appear in Figure 3-6.
60
Chapter 3
06_588508 ch03.qxd 10/10/05 6:26 PM Page 60

7. Once you have a table, you can add content within each cell. Try adding some text to a cell, thendrag an image tag from the HTML section of the Toolbox on the left of VWD onto the page, asshown in Figure 3-7.
Figure 3-6
Figure 3-761
Page Design
06_588508 ch03.qxd 10/10/05 6:26 PM Page 61

Once you have a table in the designer, you can click the <table> button at the bottom of thescreen to select only that element on the page (see Figure 3-8) — you can then modify the paddingand border attributes on the table by changing the values in the Properties box on the right.
Figure 3-8
8. Click the Source button at the bottom of the screen and you can see the HTML that’s generatedfor you (see Figure 3-9). With some small tweaks, you can add a small amount of styling andsome links to your images.
9. To turn the nascent page into the finished example, I added some more text and images to myversion. Here’s the code for the version of the finished page that you can download fromwww.wrox.com— notice the <style> attribute on the <body> tag:
<body style=”color: darkolivegreen; font-family: georgia”>This is a simple static web page with an image and some interesting informationabout some places I have been:<br /><br /><table cellspacing=”3” cellpadding=”3” border=”1”>
<tr><td>
<img src=”azoreschurch.jpg” height=”100” /><br />A church near Faja Grande, a small town on the western-most edge of Flores - one of the 9 islands in the Azores.</td>
62
Chapter 3
06_588508 ch03.qxd 10/10/05 6:26 PM Page 62

<td><img src=”budapest.jpg” height=”100” /><br />A view of old parts of Budapest (Hungary) across the Danube.</td>
</tr><tr>
<td style=”height: 192px”><img src=”sirmione.jpg” width=”100” /><br />A castle on the end of a peninsula on the shores of Lake Garda, Italy.</td>
<td style=”height: 192px”><img src=”bullring.jpg” width=”100” /><br />Selfridges at the Bullring shopping centre - a truly remarkable piece of architecture in Birmingham, UK.<br /></td>
</tr></table>
</body>
Having finished adding content to the page, you can view the page by pressing Ctrl+F5. Theresult is a page that looks like Figure 3-10 (which is the same as Figure 3-1).
Figure 3-9
63
Page Design
06_588508 ch03.qxd 10/10/05 6:26 PM Page 63

Figure 3-10
How It WorksAs you carry on through this chapter, you’ll become increasingly familiar with the technique of addinglayout elements in the design window, and making some changes either in the Properties pane on theright, or by modifying the code manually. Static elements such as the ones used in this example (simpletext within a body tag, tables, and images) are used throughout both static and dynamic pages, andunderstanding how to add and integrate these elements is all part of building dynamic web applications.
In this example, you gained a bit of practice in working with simple HTML layout of a page. For exam-ple, the elements on the page were laid out in a simple HTML table, and within each of the cells in thetable were some text and some images:
<td><img src=”azoreschurch.jpg” height=”100” /><br />A church near Faja Grande, a small town on the western-most edge of Flores - oneof the 9 islands in the Azores.
</td>
The body tag in the rendered page has some simple styling attached to it that defines the color and fontused for the text on the page:
<body style=”color: darkolivegreen; font-family: georgia”>
64
Chapter 3
06_588508 ch03.qxd 10/10/05 6:26 PM Page 64

This attribute will apply to all of the elements within the opening and closing <body> tags, hence all ofthe content of the visible page.
Don’t worry if a lot of this is new to you — the next section is designed as a crash course in HTML tohelp you get up to speed.
The World of HTMLIf you are unfamiliar with HTML, here are some of the basic concepts you need to understand:
❑ An HTML file is human-readable text with a few extra brackets — when you browse a webpage, your web browser will understand how to convert the bracketed bits into something thatlooks interesting.
❑ The bracketed bits are called elements, though strictly speaking, the element normally consists oftwo tags that open and close the element, and sometimes have textual or other HTML contentbetween them. Some elements have only a single tag.
❑ Elements have attributes that give the browser extra information about how the element shouldappear on the page.
Here’s a simple HTML element:
<div id=”divUserDetails”style=”width:300px;height:100px;float:left;background:darkred;color:white”>
These are my details, my favorite color, and my hobbies</div>
In this example, the <div ...> and </div> parts are tags describing the div element, theid=”” and style=”” bits are attributes, and the text between the two tags is the contentof the element.
❑ Rendering is the process of turning HTML code into visual elements, so the preceding code willrender as shown in Figure 3-11.
Figure 3-11
65
Page Design
06_588508 ch03.qxd 10/10/05 6:26 PM Page 65

The following table contains some of the HTML elements you’re likely to run into.
Element Description Example Usage
<img> An image tag. This tag <img src=”myimage.gif” />places an image on a page.
<div> A paragraph-style block of text. <div style=”float:left”>Text contained in a <div> element Left-hand content here</div>can be positioned on a page using <div style=”float:right”various attributes. For example, to >Right-hand content place two div elements side-by-side, here</div>you could have one with a float:left style, and one with a float:right style.
<span> A tag used to format characters of <div>text, so you could surround a word Some standard text with ain a sentence with a <span> tag <span style=”font-and make the span have bold styling weight:bold>to highlight that word. bold</span> word in the
middle</div>
<table> A table element that contains rows <table border=”1”><tr> (<tr>) and cells (<td>). Commonly <tr><td> used to position elements on a page, <td>The contents of a
should ideally be used only for tabular cell</td>data. According to accessibility </tr>guidelines, <div> elements should be </table>used for layout and positioning, but a lot of sites still use tables because theyare simpler to develop.
<a> An anchor element. Defines a hyperlink Some text with a <a href=pageon a page, enabling the developer to .htm”>hyperlink</a> in it”specify both the target content (in the href attribute) and the text to display to the user.
<head> The two main parts of an HTML page <html><body> are the <head> and the <body>. The <head>
<head> is where the <title> element <title>Page Title</title>and <link> elements (along with a </head>variety of metadata) are placed. <body>The <body> contains the display Contents of pageelements. </body>
</html>
66
Chapter 3
06_588508 ch03.qxd 10/10/05 6:26 PM Page 66

Element Description Example Usage
<form> A form element. When creating a site <form id=”form1”<input> that has a data entry form, the elements runat=”server”>
that are used to transmit data to the <input id=”Text1”server must be contained within a type=”text” /><form> element. The HTML <input> <input id=”Submit1”element is quite versatile; with a type type=”submit”attribute of text, it appears as a text value=”submit” />box on the screen. With a type of </form>submit, it appears as a button that, when clicked, submits the form to the server.
<title> Within the <head> of the page, the <head><link> <title> element controls the text in <title>Page Title</title>
the title bar of the page. The <link> is <link rel=”Stylesheet”most often used to link a page with a type=”text/css”CSS style sheet. href=”MyCss.css” />
</head>
<script> Can contain either client-side script <script(script run on the browser, normally language=”JavaScript”>written in JavaScript, or possibly alert(‘Hello World!’);VBScript), or server-side .NET code. </script>
<script runat=”server”>Protected Sub Page_Load( _sender As Object, _e As EventArgs)...End Sub</script>
<br /> Used to help to lay out a page, the This is a string of text with a<hr /> <br /> tag adds a line break to a string line<br />break and of text, and the   forcibly enters a a space.
non-breaking space character; hence <hr />two words (or elements) separated only Two images separated by aby a   character cannot be split space:<br />apart over two lines. The <hr /> <img src=”1.gif”> <imgelement displays a horizontal line src=”2.gif”>across the page.
A sample HTML page called SampleHTMLElements.htm that includes these simple examples is availablein the code download for this chapter, and it appears as shown in Figure 3-12.
Gaining familiarity with the common elements in HTML is a necessity for any ASP.NET developer, and notonly do you have to understand how to use these elements, you have to learn how to use them correctly, in adhering to the standards, and making sure that sites you develop are accessible by as many users aspossible.
67
Page Design
06_588508 ch03.qxd 10/10/05 6:26 PM Page 67

It’s very easy to end up with HTML that’s almost impossible to maintain, with tags and styling all overthe place. Many older tools for constructing HTML pages would take pride in destroying your carefullycrafted HTML code, and supposedly correct your code to follow the guidelines within the tool. Anyonewho used older versions of FrontPage would have cursed many a time at the fact that simply opening anHTML page and closing it in FrontPage would permanently mangle your HTML code! Thankfully, VWDhas one of the best HTML editors I’ve ever used.
Perhaps the best way to make your code clean and easy to maintain is to adhere to a common standard.The introduction of XHTML has brought many more guidelines to web development, and followingthese guidelines is a great way to improve your technique.
Figure 3-12
From HTML to XHTML CodeAlthough most people speak of HTML code, the fact is that if you write good HTML code, you’re actuallywriting XHTML. XHTML is a set of rules that, if you follow them when you write HTML code, result incode that is more standards-compliant, and hence more likely to render as you want it to on a variety ofdifferent client browsers.
The core rules of XHTML are as follows:
❑ Always close your tags (so always have both a <p> and a </p> for a paragraph) or use self-closingtags (such as <br /> instead of <br>).
68
Chapter 3
06_588508 ch03.qxd 10/10/05 6:26 PM Page 68

❑ Tag and attribute names must be lowercase (so <div id=”myDiv”> is acceptable, but <DivID=”myDiv”> is not) because XHTML is case-sensitive (so <div>, <Div>, and <DIV> are alldifferent entities to XHTML).
❑ Attribute values must be enclosed within double quotes.
This is only a brief summary of XHTML; if you want to learn more about the rules, you should refer tothe W3 site www.w3.org/TR/xhtml1/ where you can learn all about the XHTML standard. Section 4 ofthat page deals specifically with the way XHTML differs from standard HTML.
In essence, the aim of XHTML is to provide a common set of guidelines for web developers and browserdevelopers to both attempt to follow. With newer web browsers such as Firefox starting to gain groundon the Microsoft Internet Explorer–dominated landscape, it’s important that all parties agree to supportXHTML in all future iterations of their products to move away from the old problem of developing a sitethat worked just fine on Internet Explorer, but looked awful on Netscape.
The move toward XHTML as the standard language of the Web is gradual, and will likely never happen fully (with browsers likely to support older tags and markup for many years yet for backwardcompatibility), but you’ll find that future maintenance of web sites that you write today will be muchsimpler if you follow the XHTML guidelines. You should be less likely to see your sites break when thenext version of Internet Explorer or Firefox arrives.
Visual Web Developer has a great feature for helping you to develop standards-compliant web sites. Ifyou open up SampleHTMLElements.htm in VWD you’ll notice that there is a toolbar at the top of thepage (see Figure 3-13) that lists Internet Explorer 6.0 as the target for the web page.
Figure 3-13
69
Page Design
06_588508 ch03.qxd 10/10/05 6:26 PM Page 69

Now if you change the selection so that your page is supposed to target the XHTML 1.1 standard, you’llsee plenty of red squiggly underlining, as shown in Figure 3-14.
Figure 3-14
The highlighted error shown in Figure 3-14 refers to the fact that <br /> tags are supposed to onlyappear within a block element, such as a <div>. If you changed the first part of the page to be enclosedwithin a <div> element, this error would be fixed, without any discernable change to the appearance ofthe page:
<div><div style=”float:left”>Left-hand content here</div><div style=”float:right”>Right-hand content here</div><br />
</div>
The rules of XHTML are also followed in any code that ASP.NET generates dynamically. You haven’t created much in the way of dynamic content so far, so let’s move on to looking at how you can makepages a bit more exciting.
Dynamic ContentIn order to move from the static world of HTML to the dynamic world of ASP.NET, it’s important toknow what is meant by dynamic content.
70
Chapter 3
06_588508 ch03.qxd 10/10/05 6:26 PM Page 70

When you click a button on a form on a web page, you expect something to happen — and most of thetime (if the page has been coded correctly), something does happen. You might submit an order form for astack of CDs by clicking a button. You might also select an item on a menu on a page — take, for example,a menu from the Wrox United web site. Clicking the menu causes the menu contents to pop out (seeFigure 3-15) and become selectable in a similar way to clicking your Start button.
Figure 3-15
Now notice that there’s no lag between clicking the menu and clicking a different menu — the pageresponds just like your own system. Your browser’s actually executing some local code in order to displaythese items. Click a button or a hyperlink on a form and the page will likely take longer to respond.Clicking buttons, hyperlinks, or other similar elements on a page causes your browser to start talking tothe server, asking for something, or sending some data.
Dynamic Client Code and Dynamic Server CodeHovering over the menu on the Wrox United web site will run some code on the page that is likely writtenin JavaScript, a programming language that most browsers can understand and run, and is used to providequick responses to user input. The page won’t flicker and refresh (unlike clicking a hyperlink) because thebrowser already knows what to display when you hover over the menu. This is an example of dynamicclient code.
When a more complicated response is required (for example, when you submit an order on a shoppingsite or when you want to search for a specific item on a shopping site), the page submits informationback to the web server for processing. The processing on the server is dynamic server code, and this isthe code that you will learn to write over the course of this book.
71
Page Design
06_588508 ch03.qxd 10/10/05 6:26 PM Page 71

Server-side code can be written in many different languages, not just ASP.NET with VB.NET, C#, orother .NET languages. You probably have heard of PHP and perhaps JSP (Java Server Pages) — these arejust two examples of other languages used by developers to write server-side code. Each language hasits strengths and weaknesses, but you’ll be hard-pressed to find a server-side technology that’s as easy touse and as powerful as ASP.NET.
When it comes to creating dynamic pages in ASP.NET, the fastest way to build a dynamic page is to dragserver controls onto the page, set properties on those controls, and eventually write code to customize theirfunctionality. This drag-and-drop architecture has improved greatly in the latest edition of ASP.NET, makingit possible to create the structural framework for an entire site without having to write any code at all.
Introduction to Server ControlsWhen you look at the Visual Web Developer Toolbox, you’ll notice several different sections, each con-taining a different set of tools. Many of these tools are server controls, and you’ll be using these controlsregularly when you develop ASP.NET applications.
This section starts by taking a look at some of the categories of controls available to you, and then dis-cussing how they work.
The Server Control ToolboxAt first glance, the array of server controls in the Toolbox can be quite overwhelming. Not only do youhave standard web page elements to choose from (such as radio buttons, hyperlinks, and drop-downlists), but other categories of controls are also available (shown minimized in Figure 3-16) that containeven more controls. The Toolbox will change appearance depending on which type of page is beingedited, so Figure 3-16 is the standard appearance when working on ASP.NET pages.
The categories of controls available are as follows:
❑ Standard: Common controls that make up 90 percent of all pages.
❑ Data: Controls used to connect to data sources (databases or XML files).
❑ Validation: Controls that can be added to a page to validate user input (for example, to ensurethat certain text boxes contain data or that data has been entered in the correct format).
❑ Navigation: Controls used to provide a simple and quick solution to making a site navigable(for example, dynamic menus and breadcrumbs of hyperlinks).
❑ Login: A set of controls that make it simple to move from a completely open site to one that haspersonalized areas.
A server control appears on the source code for an ASP.NET page as a tag; for example, <asp:textbox ... />. These tags are not standard HTML elements, so abrowser will not be able to understand them if they appear on a page, however,when you request an ASP.NET page from a web server, these tags are converted intoHTML elements dynamically, so the browser only receives HTML content that it canunderstand.
72
Chapter 3
06_588508 ch03.qxd 10/10/05 6:26 PM Page 72

❑ WebParts: Controls that make it possible to create Sharepoint-style sites with drag-and-droppablesections, known as Web Parts, which enable the user to rearrange their view of a site.
❑ HTML: Simple HTML elements.
Figure 3-16
Throughout the rest of this book, you’ll meet many of the controls in each category. Later in this chapter,you can play with some of the navigation controls when you build some menus for the Wrox United site.
What Are Server Controls?Let’s start from first principles — when you create a simple HTML page and save it to your local file system, you can view that page in your browser by double-clicking the file. This is fine if you’re puttingtogether a static HTML site and want to test the output, but there’s no point in developing a web site that
73
Page Design
06_588508 ch03.qxd 10/10/05 6:26 PM Page 73

users would have to download to view! That’s why, when a web site is deployed, it is uploaded to a webserver, which everyone can access via its URL (Uniform Resource Locator).
Now that the site is hosted on a web server, people can access the site from other machines and browsethrough the HTML pages. However, if the server has the right software installed, you can then do muchmore than offer static HTML pages. When you request an HTML page, the server looks up the file andsends it to you; when you request an ASP.NET page (a page with the file extension .aspx), the server looksup the file on its file system and reads the file, and then it performs some processing before sending theresulting page back to you. The “performs some processing” bit is the magic that makes ASP.NET work.
The extra processing that the server performs includes the capability to read an ASP.NET page and convertthe server controls in that page into HTML that the browser can understand. Remember, your browserdoesn’t speak ASP.NET. A web browser is a simple thing that only speaks HTML and possibly JavaScript —it cannot process ASP.NET code. The server reads the ASP.NET code and processes it, converting anythingthat is ASP.NET-specific to HTML and (as long as the browser supports it) a bit of JavaScript, and sends thefreshly generated HTML back to the browser.
The process of converting ASP.NET code to HTML is how server controls work; you can happily createpages that contain server controls when you are developing the source .aspx page, yet the browser thatrequests that page from the web server will only receive HTML and JavaScript (see Figure 3-17). This is akey concept to understand, and the process is discussed in more detail in Chapter 6.
Figure 3-17
You can see how this works with the aid of a simple example. The following Try It Out is a really simpleexample to demonstrate the differences between the ASP.NET code and HTML code.
Try It Out Adding Server Controls in Design View1. Start by reopening the Chapter03 web site.
2. Right-click the root of the web site and select Add New Item.
Browser
http://server/Page.aspx
Server
Page.aspx
Server code
Client code
74
Chapter 3
06_588508 ch03.qxd 10/10/05 6:26 PM Page 74

3. In the dialog that appears (shown in Figure 3-18), select Web Form, call the pageServerControls.aspx, and select your preferred language from the drop-down list andleave both of the checkboxes unchecked.
Figure 3-18
4. If you are not already in Design View, make sure you are switched into that mode and double-click a TextBox control from the Standard section of the control toolbox on the left(see Figure 3-19) to add it to the main body of the page.
Figure 3-19
75
Page Design
06_588508 ch03.qxd 10/10/05 6:26 PM Page 75

5. You’re actually ready to view the page now, so click the run button on the toolbar (the greenarrow with the tooltip Start Debugging).
Your browser should fire up and display the page shown in Figure 3-20.
Figure 3-20
Note that the number displayed in the address bar (after the word localhost) is a fairly randomnumber that will change each time you start debugging for the first time.
How It WorksIn this example you’ve only added a single server control to an ASP.NET page and viewed the page in the browser. It’s not exactly the most exciting example in the world, but the point is to see how server-side code is changed into client-side code.
First, click the View menu in the browser and select View Source — you should see the code shown inFigure 3-21 appear within Notepad.
Figure 3-21
76
Chapter 3
06_588508 ch03.qxd 10/10/05 6:26 PM Page 76

This code is the client-side code — the rendered output of the page. Compare this with the original code;flick back to VWD and click the Source View of the page (see Figure 3-22).
Figure 3-22
The lines you should pay attention to are the ones that describe the control with the ID of TextBox1.Here are those lines, as they appear in the original source code for the page:
<div><asp:TextBox ID=”TextBox1” runat=”server”></asp:TextBox>
</div>
And here is the equivalent line in the rendered source code:
<div><input name=”TextBox1” type=”text” id=”TextBox1” />
</div>
Notice that the original TextBox1 control has been converted from an ASP.NET control to an HTMLelement. The server received the request for the page and was able to glean, from the original request,that the browser could understand HTML, so the server spat out an HTML version of the control alongwith the rest of the page back to the browser. The browser then does the legwork in converting thatHTML code to a viewable web page.
77
Page Design
06_588508 ch03.qxd 10/10/05 6:26 PM Page 77

Source View in VWDVisual Web Developer has two main modes when it comes to building and editing pages. The DesignView is one that you’ve spent a little while working in now, and it’s the Design View that we’ll concentrate on using (where we can) in this book to avoid having to type too much code. However,Source View is really useful for hand-editing a page and fixing nagging problems, so it’s worthwhile taking a look at this now and gaining some familiarity. Add another control to the page you were justworking on; this time, in Source View.
Try It Out Adding Server Controls in Source View1. Head back into VWD and ensure that you are in Source View for the ServerControls.aspx
page (click the link at the bottom of the window to switch between Design and Source views).In the code that appears on the screen, click the line immediately below the code representingthe TextBox control that you added in the previous example.
<div><asp:TextBox ID=”TextBox1” runat=”server”></asp:TextBox>
</div>
2. You have two options available to you when you add server controls in Source View; you caneither type in the code by hand, or drag and drop the control from the Toolbox, much like thetechnique used in Design View. Do it the hard way first — start typing the following code:
<asp:Image
Before you even finish the word Image, you’ll notice some handy tooltips popping up, as shownin Figure 3-23, trying to guess what you’re hoping to type.
3. Continue to enter the code as follows:
<div><asp:TextBox ID=”TextBox1” runat=”server”></asp:TextBox><asp:Image ID=”MyImage” runat=”server” ImageUrl=”~/azoreschurch.jpg” />
</div>
Notice that VWD presents you with a list of local images when you enter the ImageUrlproperty (see Figure 3-24).
This is a feature available to VWD and Visual Studio known as IntelliSense, and it’sdesigned to make your life as a developer a little easier. To accept a suggestion, youcan scroll through the list with the arrow keys and then press either the Tab, Space,or Enter key, or click the suggestion with your mouse. To forcibly show any relevantIntelliSense, press Ctrl+Space and the popup will appear.
78
Chapter 3
06_588508 ch03.qxd 10/10/05 6:26 PM Page 78

Figure 3-23
Figure 3-24
79
Page Design
06_588508 ch03.qxd 10/10/05 6:26 PM Page 79

4. Add one more control to the page; this time, add it using the double-click technique. Add ablank line before the </div>, position your cursor in this line, and double-click the Hyperlinkcontrol (see Figure 3-25) in the Toolbox to add it to the page.
Figure 3-25
5. You’ll still have to edit this control before you can run the page successfully, so position yourcursor anywhere within the Hyperlink’s definition and then cast your eye over to theProperties pane on the right (if it is hidden, as in Figure 3-25, you will need to pop it out fromthe side by hovering your mouse over the Properties tab at the right-hand edge of your screen,or select View ➪ Properties Window). Notice a property called NavigateUrl near the bottom ofthe list of properties — enter http://www.wroxunited.net as the value for this property andpress Enter. Take a look at Figure 3-26 and you’ll notice a new attribute of the hyperlink tagcalled NavigateUrl appear on the page with the value you entered.
6. At this stage, why not flick over to Design View and see how it looks — you’ll notice all threecontrols on the page in one line. If you’d prefer them to appear one below the other, simply type<br /> after each control to add an HTML line break character in Source View. You might alsowant to change the display text of the hyperlink control (the text immediately before the</asp:HyperLink> closing tag) to some text of your choosing.
<body><form id=”form1” runat=”server”>
<div><asp:TextBox ID=”TextBox1” runat=”server”></asp:TextBox><br /><asp:Image ID=”MyImage” runat=”server” ImageUrl=”~/azoreschurch.jpg” /><br /><asp:HyperLink ID=”HyperLink1” runat=”server”
80
Chapter 3
06_588508 ch03.qxd 10/10/05 6:26 PM Page 80

NavigateUrl=”www.wroxunited.net”>Visit Wrox United Online!</asp:HyperLink>
</div></form>
</body>
Figure 3-26
Notice the bar at the bottom of the screen next to the Design and Source buttons; there’s an orangehighlight on the element that is underneath the current cursor position (see Figure 3-26). This ele-ment hierarchy changes whenever you select different elements in either Design or Source View.
7. Now run the page again and view the results, which are depicted in Figure 3-27.
How It WorksIn this example, you’ve gained a bit more familiarity with the drag-and-drop method of page design,and with using Source View to manually craft pages. You’ll have noticed that VWD has lots of featuresthat spring into action at different times to help you with this process.
Here’s a walkthrough of the code that was generated in VWD. The main content region of the page wassurrounded by a <div> control, and within this are the three controls added to the page:
<div><asp:TextBox ID=”TextBox1” runat=”server”></asp:TextBox><br /><asp:Image ID=”MyImage” runat=”server” ImageUrl=”~/azoreschurch.jpg” /><br /><asp:HyperLink ID=”HyperLink1” runat=”server”
NavigateUrl=”www.wroxunited.net”>Visit Wrox United Online!</asp:HyperLink>
</div> 81
Page Design
06_588508 ch03.qxd 10/10/05 6:26 PM Page 81

Figure 3-27
Now take a look at the rendered source — while the page is running in the browser, select View ➪ Sourcefrom the main menu in your browser, and see how the contents of the <div> have been changed:
<div><input name=”TextBox1” type=”text” id=”TextBox1” /><br /><img id=”MyImage” src=”azoreschurch.jpg” style=”border-width:0px;” /><br /><a id=”HyperLink1” href=”www.wroxunited.net”>Visit Wrox United Online!</a>
</div>
Web browsers don’t know anything about ASP.NET server controls, so when the page is requested, theASP.NET processor on the web server kicks in and starts converting the server-side elements into simpleHTML that the browser is more happy to receive. The TextBox control maps straight onto an HTML<input> element. The Image control is converted into an <img> element, but notice how the ImageUrlattribute is converted into the src attribute:
ImageUrl=”~/azoreschurch.jpg”
The name of the file (or URL to the image) in the ImageUrl is converted to the src attribute. If the file islocal to the project, the file is prefixed with ~/ on the server side.
src=”azoreschurch.jpg”
The HyperLink control also mapped fairly directly to its rendered equivalent, where the NavigateUrlis easily converted to the href attribute of the a tag.
82
Chapter 3
06_588508 ch03.qxd 10/10/05 6:26 PM Page 82

In this simple example, you didn’t really gain a lot from using server controls instead of hand-coding theHTML, but bear in mind that this page is completely static. If you wanted to respond to user input, reactto events, or obtain data from a database, you would need to use server-side code. Server controls makethe process of working with visual elements on the server possible.
Types of Server ControlsMany of the ASP.NET server controls that exist are ASP.NET equivalents of HTML elements, so there is atext box, a button, a hyperlink, a drop-down list, and so on. These controls look like the elements thatthey will eventually be turned into, but there is more to them than that. Each control has a common setof properties (for example, they all have an ID, and controls such as the text box, label, and so on allhave a Text property), which makes it easier to work with these controls in code. Having listed the different categories of controls earlier in this chapter, you can concentrate on some of the most com-monly used controls as you tour the server controls you can add to a site.
Standard ControlsThese controls are the Web equivalents of the tools that you will have encountered when using Windowsapplications. Web pages that include these controls have that standard application feel that we’re allfamiliar with, so it’s great that the process of adding them to pages is quick and simple. Here are some ofthe most commonly used controls:
❑ TextBox Control: Used for entering text on a page, commonly seen on order forms on shoppingsites, or for logging in to a site.
❑ Button Control: From submitting an order to changing preferences on a web site, clicking a button on a page normally causes information to be sent to the server, which reacts to that information and displays a result.
❑ Label Control: Used for displaying simple text in a specified position on a page. The Labelcontrol is an easy way to change the text on part of a page in response to user interaction.
❑ Hyperlink Control: Used for providing hyperlink functionality on a page that enables navigationto other parts of a site, or to other resources on the Internet.
❑ Image Control: Used for displaying images on a page. The server can change the image that isdisplayed in the control programmatically in response to user input.
❑ DropDown List Control: Used for offering the user a list of options to choose from; collapseswhen not in use to save on space.
❑ Listbox Control: Used for offering a fixed-size list of items to choose from.
❑ CheckBox and Radio Button Controls: Used for selecting optional extras with either a yes/noor “this one out of many” style, respectively.
Figure 3-28 shows the ASP.NET Web Site Administration Tool screen that you will learn to use in the nextchapter for administering user accounts. On this screen, you’ll see many of these controls in one place.
83
Page Design
06_588508 ch03.qxd 10/10/05 6:26 PM Page 83

Figure 3-28
The Search by: label on the page is likely to be a Label control, and it’s next to a DropDownList control.The for: label is next to a TextBox, which is next to a Button control. Next to each user name is aCheckBox for selecting the user, and some HyperLink controls for managing the user account. In the nextchapter, you’ll become very familiar with this configuration application, and it’s a great example of manytypes of controls all on one page.
HTML ControlsOften when creating a site you don’t need to do anything with a control on the server. In these situations,you might just want to add simple static HTML to part of a page; for example, just to position elements ona page or to provide a container for groups of elements. The HTML Control Toolbox contains drag-and-drop versions of the most commonly used HTML elements for this purpose. If you browse through thissection of the Toolbox (see Figure 3-29), you’ll notice HTML controls for client-side elements such as theInput (Text) box, the Table control, and the Div.
The controls on the toolbar are just a handy way to add the most common HTML elements to a page,and you are not restricted to using only those HTML elements. In Source View, you can add any validHTML element you like; for example, an anchor tag <a> for hyperlinks, or a <span> for highlightingtext within a section of a page.
84
Chapter 3
06_588508 ch03.qxd 10/10/05 6:26 PM Page 84

Figure 3-29
Elements such as the Table control and the Div control are containers and hence can contain other controlswithin their definitions. For example, in a Table control, you can have different controls nested withineach table cell. Within a Div control you can also place a wide variety of elements and controls. You cannest server-side controls within static, non-server HTML elements such as these for laying out a page.
HTML Controls as Server ControlsIt’s possible to turn any HTML element into a server control by adding a runat=”server” attribute tothe element. As you’ll see in Chapter 6, you can work with any server controls (HTML or ASP.NET) on apage dynamically using code when a page is submitted to the server. For example, once you add anASP.NET TextBox control to a page, you can set the value to be displayed in the text area using coderunning on the server. However, once you add a runat=”server” attribute (and give the element aunique ID) to, for example, a div element, you can then specify what the div should display and where itshould be positioned on the page dynamically, using code running on the server.
Additionally, because you can add a runat=”server” to any HTML element, you could use an Inputtype=”text” control instead of the ASP.NET TextBox control if you like — and the same goes for theother types of HTML elements that have direct equivalents in the ASP.NET Toolbox.
Should I Use HTML Controls or ASP.NET Server Controls?This question only really relates to simple elements on a page, such as the text box, the button, tables, andso on. Complicated server controls such as the Calendar control exist to speed up development time forsites, so there’s no real question of which to use in cases like these. The approach taken by most developers,when making the choice about which type of control to add to a page, is to use ASP.NET’s Standard ServerControls for the majority of server-side controls on a page and static HTML elements for layout.
85
Page Design
06_588508 ch03.qxd 10/10/05 6:26 PM Page 85

Although this works in most situations (and indeed you’ll find that many situations require server controlswhere HTML controls simply can’t offer the correct functionality), you may find exceptions to the rule. Forexample, adding runat=”server” to HTML elements is a technique I often use with HTML divs or tables;if I know that I want to show or hide parts of a page depending on user input, I can convert those elementsI need to work with on the server into server controls, and then dynamically toggle their visibility. Thoughit’s also easy to create sites that offer the same functionality using standard server controls, the design teamI work with only produces page layouts using simple HTML, so it’s sometimes easier to convert some ofthose HTML elements to run on the server than it is to recode the site to use the built-in ASP.NET servercontrols. There is no real right or wrong approach here, so use your own judgment, but be aware that youmay encounter code written by others that takes a different, but equally viable, approach.
Navigation ControlsThe three out-of-the-box controls available for navigating a site provide a wealth of functionality for verylittle effort. Compare this to the situation that was in place previously for ASP.NET developers and you’ll see that this is a big improvement — what would have previously been a couple of work items ona task list that might take a couple of hours each for a developer to code now takes a few seconds! TheMenu, TreeView, and the SiteMapPath controls are new in ASP.NET 2.0, and are quick and simple to setup. Following is an overview of these controls; later on, you’ll add both of these controls to the WroxUnited site.
The SiteMapPath ControlThis control is used to add breadcrumb functionality to a site, giving you a visual aid to remind youwhere you are in the site hierarchy. This is demonstrated in the Wrox United site, as shown in Figure 3-30.
The term breadcrumb most likely comes from the old fairy tale of Hansel and Gretel — two children whowent for an adventure in the woods, leaving a trail of breadcrumbs behind them to help them to findtheir way home. As you click through pages on a site, you may pass through to different sections andsubsections of the site, until you are several links deep into an application. A breadcrumb helps you togo back to a specific point in your navigation path without having to rely on the back button on thebrowser. You may have encountered situations where you can’t hit the back button to head back a link —a bit like a crow eating your breadcrumbs. Some pages submit information to the server in such a waythat you can’t go back without resending the information.
You’ll find breadcrumb functionality available on many different sites across the Internet. One such siteis the Wrox United site, as shown in Figure 3-30. However, in order to add one of these controls to thesite, you need to have a Web.SiteMap file at hand. Got one? Excellent! (If not, you need to go back toChapter 2 and learn how to create one!)
Once you have a Web.SiteMap available to your application, adding a SiteMapPath control and seeingsome results is easy — all you need to do is add it to a page. To add it to Wrox United, the best thing todo would be to add the control to the master page so that all of the content pages will suddenly havebreadcrumbs at their feet!
86
Chapter 3
06_588508 ch03.qxd 10/10/05 6:26 PM Page 86

Figure 3-30
If you open the Chapter 3 version of the WroxUnited application as it stands, you’ll see what’s shown inFigure 3-31. If it doesn’t look quite like the figure, don’t worry – VWD has some problems displayingpages that use CSS, so you may see the most of the site without having to scroll down.
Although the site looks fairly normal, two things are missing: the links on the left of the page and thebreadcrumbs at the bottom of the page. In the following Try It Out example, you’ll add these to the siteand see how simple it is to add navigation.
For this next Try It Out, you need to work with the Chapter03 version of the WroxUnited application (stored within the Chapter 03 folder in the code download asWroxUnited). This version of the site has been modified to enable you to try outthese examples.
87
Page Design
06_588508 ch03.qxd 10/10/05 6:26 PM Page 87

Figure 3-31
Try It Out Adding the SiteMapPath Control1. Open up the Chapter 3 version of the Wrox United application (C:\BegASPNET2\Chapters\
Begin\Chapter03\WroxUnited) and open the site.master file. Make sure you’re inDesign View.
2. Place your cursor inside the Breadcrumbs div at the bottom of the page — it’s the red blob inthe bottom right of the page. You’ll know when you’ve found the right spot when you see<div#breadcrumbs> highlighted at the bottom of the window, as shown in Figure 3-32.
3. Now drag a SiteMapPath control into the Breadcrumbs div from the Navigation section of theToolbox (see Figure 3-33).
4. Ignore the Common Task menu on this one — the only modification to make here is to changethe name of the control. Ensure that the SiteMapPath control is selected and change its ID tocrumbs in the Properties panel. Notice the mouse cursor in Figure 3-34 highlights the ID prop-erty for the control.
5. Now run the site again by launching Default.aspx and see the results of your hard workdown at the bottom of the page, as shown in Figure 3-35. Notice that the URL my browser isusing is http://localhost:1621/WroxUnited/default.aspx. Your port number (the bitafter the colon) will be different.
6. Now try browsing to the History page by changing the Default.aspx part of the URL toHistory.aspx. Figure 3-36 shows how the rendered SiteMapPath control changes down atthe bottom of the page.88
Chapter 3
06_588508 ch03.qxd 10/10/05 6:26 PM Page 88

Figure 3-32
Figure 3-3389
Page Design
06_588508 ch03.qxd 10/10/05 6:26 PM Page 89

Figure 3-34
Figure 3-35
90
Chapter 3
06_588508 ch03.qxd 10/10/05 6:26 PM Page 90

Figure 3-36
How It WorksIn this example, you’ve added a simple SiteMapPath control to a modified version of the Wrox Unitedweb site to give users some visual feedback as to which page is being viewed, and where in the site hierarchy that page resides. Adding the control to the page is enough to achieve this, because there is aWeb.SiteMap file included in the application files.
The SiteMapPath control hooks in to the Web.SiteMap (if it exists) and renders content dynamically byfiguring out which page the user is currently viewing, and where that page is situated in relation to theorder of nodes in the site map. Here’s the Web.SiteMap code that relates to the nodes you looked at:
<siteMap><siteMapNode title=”Home” url=”Default.aspx”
description=”Wrox United Home Page”>...
<siteMapNode title=”About” description=”About the club” url=”about.aspx”><siteMapNode title=”History” url=”History.aspx”
description=”The history of the club” />
91
Page Design
06_588508 ch03.qxd 10/10/05 6:26 PM Page 91

Notice that the History node resides within the About node, which in turn resides within the Homenode, so when you look at the History page, you know that the page below must be the About page,and the root node is the Home node — which is exactly what you saw on the SiteMapPath control:
Home > About > History
If you’d navigated to a different part of the hierarchy (to either the Match Fixtures, Future Fixtures, orPast Fixtures pages), the display would have changed appropriately. So, navigating toFixtures.aspx?type=future would present the following:
Home > Fixtures > Future Fixtures
This is how the SiteMapPath control that was added to the page appears in code:
<div id=”breadcrumbs”><asp:SiteMapPath ID=”crumbs” runat=”server”></asp:SiteMapPath>
</div>
Without customizing the control at all (no specific attributes have been set), the nodes are rendered. Thestyle used for the control is all controlled in the style sheet for the page (Chapter 5 looks at styling pages).
SiteMapPath Control PropertiesIn the previous Try It Out you added a SiteMapPath control without modifying it in any way and thelist of nodes was displayed. If you’d modified it to change the number of levels displayed, it could havebeen used in quite a different way; perhaps to be used to display the name of the current page in aheader, for example:
<asp:SiteMapPath ID=”PageTitle” Runat=”server” ParentLevelsDisplayed=”0”></asp:SiteMapPath>
So, with this modification, the site map node would display only the name of the current page; in thecase of History.aspx, the SiteMapNode would simply say History.
Another modification that could be made would be to change the path separator character, for example:
<asp:SiteMapPath ID=”crumbs” runat=”server” PathSeparator=” : “></asp:SiteMapPath>
Again, if you were then to navigate to the History.aspx page, you’d see the following:
Home : About : History
In addition to these two properties, you can set many other attributes to customize this control. The following table describes some of these properties in a bit more detail.
92
Chapter 3
06_588508 ch03.qxd 10/10/05 6:26 PM Page 92

Attribute Description Options (default in bold)
RenderCurrentNodeAsLink Specifies whether the active True / Falsenode is clickable, or whether the current node appears as plain text.
PathDirection Sets whether the breadcrumbs RootToCurrent / appear in order from the root CurrentToRootlink to the current link (from left to right) or vice versa.
PathSeparator Sets the character to use as the >, any ASCII characterseparator marker between nodes.
Having looked at how the SiteMapPath control works, it’s time to move on to look at the remainingtwo navigation controls: the Menu control and the TreeView control. However, to use these controls on apage, you need to add a different type of control to provide the data to these controls; theSiteMapDataSource control.
The SiteMapDataSource ControlThis control is a non-visual control, and is used to expose the nodes defined in the Web.SiteMap file in away that the Menu and TreeView controls can understand, and to make it possible to amend the contentthat these controls will display.
To add this control to a site, you only have to drag a copy onto a page. That’s all there is to it. The codethat’s generated for you will appear as follows in Source View:
<asp:SiteMapDataSource ID=”SiteMapDataSource1” runat=”server” />
In the next Try It Out example, you will do this for yourself so that you will be able to use the Menucontrol. The Menu control is used in the full Wrox United site to provide the means to navigate the WroxUnited site, so you won’t have to keep typing in links; let’s see how this works in connection with theSiteMapDataSource control.
The Menu ControlThe Menu control provides a mixture of static and dynamic menu functionality. You have the option,when you add this control to a page, of making the menu completely dynamic if you want, so an entirenavigational structure can be displayed in the menu, a bit like a Start menu. Alternatively, you can adopta more traditional approach and opt for a fixed menu, or one mixing this functionality. The dynamic bitsuse client-side JavaScript that ASP.NET generates for you (again, without you having to lift a finger).
In order to add a menu control to the site, you first need to add the SiteMapDataSource control, whichspecifies what links your menu will have access to and the order in which they appear. You’ll do both ofthese now in a Try It Out example based on the WroxUnited application.
93
Page Design
06_588508 ch03.qxd 10/10/05 6:26 PM Page 93

Try It Out Adding a Menu Control to Wrox United1. Open up site.Master once again and switch to Design View. Position your cursor in the nav
div on the left of the page, as shown in Figure 3-37.
Figure 3-37
94
Chapter 3
06_588508 ch03.qxd 10/10/05 6:26 PM Page 94

2. Now drag a SiteMapDataSource control (highlighted on the left in Figures 3-38 and 3-39) ontothe page inside the nav div (you’ll find it hiding in the Data tool group on the Toolbox), and, inthe Properties pane, rename the control siteData.
That’s all the groundwork you need to do — next, you’ll add the Menu control itself.
Figure 3-38
95
Page Design
06_588508 ch03.qxd 10/10/05 6:26 PM Page 95

3. Drag a Menu control onto the page just next to the right edge of the SiteMapDataSourcecontrol. You will see a fly-out dialog appear as shown in detail in Figure 3-39 — this is the SmartTasks window:
Figure 3-39
In the dialog, choose the siteData data source that you generated in Step 3. Once this has beenset, the menu will change as shown in Figure 3-40:
96
Chapter 3
06_588508 ch03.qxd 10/10/05 6:26 PM Page 96

Figure 3-40
4. Click the small arrow at the top-right corner of the menu to close the pop-out menu. Now, withthe menu selected, change the menu’s StaticDisplayLevels to 2 using the Properties pane.You’ll immediately notice a difference: have a look at Figure 3-41.
5. Some properties need to have values set before this control will work and behave as it does onthe full version of Wrox United. Switch to Source View, and add the following properties in code:
<asp:Menu ID=”Menu1” runat=”server” DataSourceID=”siteData” StaticDisplayLevels=”2”orientation=”Vertical”StaticSubMenuIndent=”0”disappearafter=”200”AccessKey=”m” EnableViewState=”false”><DynamicMenuStyle CssClass=”dynamicMenu” /><DynamicMenuItemStyle CssClass=”dynamicMenuItem” />
</asp:Menu>
97
Page Design
06_588508 ch03.qxd 10/10/05 6:26 PM Page 97

Figure 3-41
6. Now run the site again (press Ctrl+F5 to start without debugging) and you’ll see the screenshown in Figure 3-42.
Notice that you can hover over the About link and a flyout appears with submenu items, including the History page, displayed. This is out-of-the-box dynamic functionality at its finest — and isn’t it great?
98
Chapter 3
06_588508 ch03.qxd 10/10/05 6:26 PM Page 98

Figure 3-42
How It WorksThe Menu control that was added to the master page read the contents of the SiteMapDataSource con-trol (siteData) and rendered a set of links corresponding to the data stored in that data source. TheSiteMapDataSource itself required no customization (other than a quick renaming) — by default, the SiteMapDataSource will read the Web.SiteMap file and act as a middle-man for the menu controlso that it can display links corresponding to the contents of the Web.SiteMap file.
The SiteMapDataSource can be customized if required using the following parameters:
Property Values Result
EnableViewState True/False Specifies whether the SiteMapData-Source control retains its data onpostbacks.
ShowStartingNode True/False Specifies whether the root node shouldbe displayed on any control depen-dent on this data source.
Table continued on following page
99
Page Design
06_588508 ch03.qxd 10/10/05 6:26 PM Page 99

Property Values Result
SiteMapProvider Any valid provider Can be used to specify a customprovider (necessary if, for example,site map data is stored in a completelydifferent structure such as a .csv file ora database instead of theWeb.SiteMap file).
StartFromCurrentNode True/False If set to true, then only sublinks fromthe current node (active page) areshown, instead of the entire hierarchy.
StartingNodeOffset Integer values Used to shift the starting point of thehierarchy inward. This could be usefulif you only want a Menu control toshow sub-menu links, and not the fullsite structure. If the menu in WroxUnited had this value set to 1, themenu would ignore all the first-levelmenu items, and only show the nextlevel in the hierarchy, so, in the case ofthe Wrox United hierarchy, this wouldshow the Future and Past Fixtures,History, News, and similar links.
StartingNodeUrl String representing Used to specify a different point at a URL of a page which to start the hierarchy.defined within the Web.SiteMap file.
Binding a menu to a SiteMapDataSource control is a really simple way to generate a hierarchy of links from the Web.SiteMap data file, but it is possible to do much more via this data source control,including binding to a completely different data source, and combining different controls (other than a menu) to the data. If you’re the sort of person who has to work with site map information stored in a completely different format (other than Web.SiteMap), then in order to get a workingSiteMapDataSource control, you’ll need to have a custom SiteMapProvider class available. Creatingcustom providers is quite an involved process (which is beyond the scope of this chapter), so for moreinformation on this process, you should refer to Professional ASP.NET 2.0, by Bill Evjen, Wrox Press.
The Menu control itself was changed slightly in this example to include some additional property values.Here’s a look at these values:
<asp:Menu ID=”Menu1” runat=”server” DataSourceID=”siteData” StaticDisplayLevels=”2”orientation=”Vertical”StaticSubMenuIndent=”0”disappearafter=”200”
100
Chapter 3
06_588508 ch03.qxd 10/10/05 6:26 PM Page 100

AccessKey=”m” EnableViewState=”false”><DynamicMenuStyle CssClass=”dynamicMenu” /><DynamicMenuItemStyle CssClass=”dynamicMenuItem” />
</asp:Menu>
The additional attributes on the Menu control itself are fairly simple. The two on the first line in the listing (DataSourceID and StaticDisplayLevels) were set in the Properties pane in the example. Theremaining attributes control the following:
❑ Orientation: Used to have a horizontal menu bar on a page.
❑ StaticSubMenuIndent: Controls the depth of indentation used to render submenu items, if thelevels are set to appear in static mode.
❑ DisappearAfter: Dictates how long a flyout will remain visible before disappearing.
❑ AccessKey: Enables keyboard shortcuts for enhanced usability.
❑ EnableViewState: An ASP.NET feature that, if set to true, is used to maintain control state when a page is posted back to the server. This is used, for example, on text boxes, whensubmitting data to the server, for keeping the values in the text box when the page refreshes.This is unnecessary in this control, and will slightly improve page performance if disabled.
In addition to these attributes are two properties that help to define the visible style of the rendered control. The DynamicMenuStyle controls the appearance of the flyout itself, and the DynamicMenu-ItemStyle controls the appearance of the links. The styling for these items is controlled by CSS. You’lllearn more about this in Chapter 5.
There is just one last navigation control to consider in this chapter: the TreeView control. This control isvery similar in usage to the Menu control.
The TreeView ControlThe TreeView and the Menu controls are very similar to implement, though the rendered experience is quite different. With a TreeView control, you end up with a user experience more akin to usingWindows Explorer to work through the files stored on your file system, with expandable nodes that contain sublevels.
Deploying the control is very similar to deploying a Menu control; you just drag it onto the page andselect the SiteMapDataSource control to use to provide its data. If this control were used on the WroxUnited site, it would appear shown in Figure 3-43.
Notice that the Home node and the Fixtures nodes are expanded in the preceding view, though theAbout link is collapsed. If you replaced this control yourself, aside from some minor styling quirks, thiscould easily be used to navigate the site instead of the Menu control.
101
Page Design
06_588508 ch03.qxd 10/10/05 6:26 PM Page 101

Figure 3-43
SummaryThis chapter looked at the differences between code that the browser can understand and server controls, which the server can convert into a format that is displayable on the browser. In particular, youshould now feel comfortable with the following facts:
❑ HTML is the language that the browser can understand, and is used throughout web programming to form the web pages we view on any site.
❑ XHTML is a version of HTML that follows a strict set of guidelines, with the aim that both current and future browsers will all be able to speak the same language, thus removing some ofthe uncertainty when developing a web site.
❑ Client-side code and server-side code are two different entities; server-side code is processed onthe server, and is processed and turned into client-side code that the browser can understand.
❑ ASP.NET’s server controls can be used to construct complex sites in a short space of time via theVWD environment, and can be added to a page either in Design View or in Source View.
102
Chapter 3
06_588508 ch03.qxd 10/10/05 6:26 PM Page 102

❑ Server controls are converted (by the server) into HTML that the browser can understand, andJavaScript for dynamic client-side elements, provided the browser has JavaScript support.
❑ Complex functionality can be added to a web site for navigating around the pages in a site withminimal effort on the part of the developer.
The next chapter starts to look at how to personalize a site by using server controls and some neatASP.NET functionality to log in to the web site.
ExercisesThese exercises are designed to help you get more comfortable with the VWD interface. The sample code(available from www.wrox.com) is an end solution, but you’ll obviously gain more knowledge andunderstanding by trying out these exercises for yourself. Answers to these exercises are in Appendix A.
1. Practice using the drag-and-drop functionality of VWD to put together a simple web page thatdisplays the following information:
❑ The WroxUnited Logo (available for free download from www.wrox.com— or just useany small image of your choice).
❑ The names of the players and some information about each of them, arranged in a table,as shown in Figure 3-44.
Figure 3-44
103
Page Design
06_588508 ch03.qxd 10/10/05 6:26 PM Page 103

2. Head back to Wrox United and go to the Master page. Try deleting the Menu control and replacingit with a TreeView control. Bind that control to the siteData data source, and bingo — youshould see a fully populated tree of items, both in Design View (shown in Figure 3-45) and whenyou run the page, as shown previously in Figure 3-43.
Figure 3-45
104
Chapter 3
06_588508 ch03.qxd 10/10/05 6:26 PM Page 104

4Membership and Identity
The concept of membership appeals to human beings on a low level, and stems from the sense ofwanting to belong to a group. We want to feel part of the team, and for others to know who weare, so it was only a matter of time before the Web jumped on the bandwagon and adopted thisconcept as a way of life. If you sit down and consider how many web sites you have logged in toand stored a simple user profile, you may find that you’re a member of many more groups thanyou first imagined. From sites that sell books and gadgets to community sites that discuss the merits of owning a Ford Puma, or that enthuse about a BBC TV comedy show called Look AroundYou, I know I’m a member of far too many sites to name. And then there is the familiar dilemma of“which username and password do I use to log in to this site?”
One of the most successful sites on the Web, Amazon.com, started life as a bookstore, but hasevolved into something much larger. When you log in to Amazon now, you find entire pages onthe site that offer only those items related to your spending habits.
In this chapter, you learn how to personalize sites using some of the membership features availableto ASP.NET 2.0. This chapter discusses the following:
❑ The concepts of identity, authentication, and authorization
❑ The membership server controls, including the Login control
❑ Storing member profiles so that they can be retrieved
❑ Restricting access to certain areas of a site to allow only specified members
❑ Personalizing a site based on the active user profile
You’ll also extend the Wrox United sample application so that you can log in to the site and personalize the site according to a set of stored preferences based on the membership profile.
07_588508 ch04.qxd 10/10/05 6:27 PM Page 105

Security BasicsYou need to feel comfortable with some key important concepts before you start to put together webapplications involving membership, and those are the concepts of identity, authentication, and authorization.
Identity — Who Am I?When you think of your identity, you can use several unique features to describe yourself. For example, Iam a woman with blonde hair who enjoys watching sci-fi shows and building PCs, but that’s not necessarily of interest to someone who is interested in my skills on the badminton court. Identity infor-mation stored on a web site will likely be tailored to only relevant aspects of a person. For example, ashopping web site can store your name, telephone number, e-mail address, and home address, which areall facts that are relevant to the sale of goods. They may not care about your interests (unless they are asbig as Amazon), so they won’t need to store that sort of information about you, but that doesn’t stop youfrom having those aspects of your identity.
So your identity, the concept of who you are, is a collection of a wide range of facts. You may even havea résumé (or CV as we Brits call it) that puts many of these facts down on paper, but these facts again areonly those relevant to potential employers. It’s up to you to decide which facts to store on your résumé,and which facts to leave off. The same is true when you store membership information about memberson a web site in that you should choose which facts you need to know about the members of a site earlyon in the development process.
Authentication — This Is Who I AmWhen you attempt to log in to a web site, you pass in certain credentials; for example, an e-mail addressand password combination. The web site then has to determine that you are who you claim to be, so thee-mail address and password combination that you enter must match the combination stored on file onthe server for the specified e-mail address.
The process of authentication is all about proving you are who you say you are. The e-mail and passwordcombination is a tried and tested method adopted by many of the web sites out there offering retail orcommunity services, and although it’s not bulletproof, as long as you choose a strong enough passwordand don’t tell it to anyone, and as long as the site is coded well, your profile will be kept unique for youruse only.
Authorization — This Is What I Can DoOnce you have passed in your username and password to a web site, the web server will then not onlyverify that the password matches the username, but it will see what permissions you have been grantedby the webmaster of that site. The next step from authentication is authorization, and this is the process ofretrieving more information about the type of user account you may have with a site.
Take, for example, a banking web site. Once your login credentials have been verified, the server willlook and see what level of access you have to the site. Like most users of a bank site, you’ll be authorizedto check your balances and perhaps transfer money between accounts or pay bills. If, however, the bank
106
Chapter 4
07_588508 ch04.qxd 10/10/05 6:27 PM Page 106

was the victim of a security scare (like many phishing e-mails circulating around the Internet), you mayfind that you suddenly lack permission to add third-party standing orders to your account via the onlineapplication until the security issues have been resolved. This switching off of functionality may well becontrolled by the administrators of the server by setting a special flag against either a subset of users orall users, stating that they no longer have authority to amend their account details.
Logging In to a SiteThe process of logging in to a site, from a user’s perspective, is a case of entering a set of credentials, thenbeing shown a different user interface corresponding to your profile. Commonly, this will happen by user-name and password combination; however, more secure sites, such as banking web sites, can use othermethods of logging in, including PINs and security certificates. The general principle of authenticationremains the same, though, regardless of the method used to pass those authentication credentials to theserver. And once you’re authenticated, it’s a simple matter to inquire about whether you have therequired level of access for the resource you’re looking for via the authentication mechanism.
ASP.NET SecurityMoving beyond the theory, ASP.NET 2.0 has some great tools available to help with implementing alogin-authentication-authorization framework with minimal effort. In previous editions of ASP.NET, youwould have to write code to implement a login framework, to authenticate against a database, and toreact to the currently logged-in user. Though you will still eventually find yourself having to write codefor working with users (as you’ll discover in later chapters), a lot of the pain of the initial process hasbeen taken away with the inclusion of some great controls and wizards. In this section, you learn moreabout the server controls available for working with logins, and the ASP.NET Web ApplicationConfiguration utility.
Login ControlsIn this section, you start the process of building up a simple mock web site with just two pages; aDefault.aspx as the front page and a login.aspx page for logging in to the site. You’ll work througha series of steps using Try It Out examples, and then pause along the way to look at what’s going onbehind the scenes. Later in this chapter, you’ll take some of these principles and apply them to the WroxUnited web site to integrate the login framework into that application.
This section introduces the following controls:
❑ The Login control, which provides text boxes, buttons, and built-in validation to enable you toadd login functionality to a page with a single drag-and-drop operation.
❑ The LoginView control, which provides a way of altering the appearance of the page depen-dent on whether a user is logged in or not, or showing different content to different groups ofusers.
❑ The LoginStatus control, which gives a simple bit of feedback to users so that they knowwhether they have remembered to log in to the site.
107
Membership and Identity
07_588508 ch04.qxd 10/10/05 6:27 PM Page 107

In the following Try It Out, you put some of these controls to use. This example will build up the skeletonsite by creating the pages and adding the login controls.
Try It Out Personalized Site: Web Page Design1. Open up VWD and create a new blank web site in your C:\BegASPNET2\Chapters\Begin
directory called Chapter04. By default, you should have a page called Default.aspx alreadyadded to the project, as shown in Figure 4-1.
Figure 4-1
2. Time to add some controls. Switch to Design view, drag on a LoginView control from the Logincontrols section of the Toolbox (see Figure 4-2). In the Common Tasks menu that appears, ensurethat Anonymous Template is selected and type You are not logged in in the main box.
108
Chapter 4
07_588508 ch04.qxd 10/10/05 6:27 PM Page 108

Figure 4-2
3. Pop out the Common Tasks menu again by clicking the small arrow in the top right and selectLoggedInTemplate from the drop-down list, then type You are logged in in the box. This willensure that the page will tell you when you’re logged in or not.
4. Drag a LoginStatus control onto the page underneath the LoginView control, as shown inFigure 4-3. This control will give you a hyperlink to either log in or log out, depending onwhether or not you’re currently logged in.
Figure 4-3
109
Membership and Identity
07_588508 ch04.qxd 10/10/05 6:27 PM Page 109

5. The next step is to create a login page, so right-click the root of the web site in the SolutionExplorer and select Add New Item. In the dialog that appears, depicted in Figure 4-4, select WebForm and call it Login.aspx.
Figure 4-4
6. In the newly created page, drag a Login control onto the page from the Login section of theToolbox, as shown in Figure 4-5.
Figure 4-5
110
Chapter 4
07_588508 ch04.qxd 10/10/05 6:27 PM Page 110

7. In the flyout that appears, you have the option of administering the web site. At this stage, youhave the framework ready to roll, but you’ll need to configure the site by adding some useraccounts before the site will work, so click the Administer Website link in the flyout to launch theASP.NET Web Application Configuration Tool, which is covered in the next Try It Out example.
How It WorksThese controls are really quite powerful, and although you’re not quite at the stage of running the example,you can feel confident that you’re only a few steps away from having a fully functional (if a little simplistic)application for trying out login functionality. These controls are a new addition to this edition of ASP.NET;previously, you would have had to add text boxes, buttons, and write lines of VB.NET or C# code to handlethe login process, to display messages relating to whether or not you are logged on, and to change the viewof the page depending on the current user. At this stage, all you’ve had to do is drag and drop a couple ofcontrols onto a page, and you’ll be pleased to know that this is all you need to do to get the framework of an application together.
So, first take a look at the controls that were added to the pages, starting with the Default.aspx page.
Viewing the source on Default.aspx will display the following code:
<asp:LoginView ID=”LoginView1” Runat=”server”><LoggedInTemplate>
You are logged in</LoggedInTemplate><AnonymousTemplate>
You are not logged in.</AnonymousTemplate>
</asp:LoginView><asp:LoginStatus ID=”LoginStatus1” Runat=”server” />
You can see that two controls are defined in the code: a LoginView control for displaying login informationand a LoginStatus control that can be used to control the login and logout processes. Note that if youconfigured your site as in this example, you will not see the anonymous template message because anonymous users are denied access to the site (and are redirected straight to the login page).
In the Login.aspx page, you will see the following code has been added:
<asp:Login ID=”Login1” Runat=”server”></asp:Login>
Barely any code at all! Everything has been pre-written, so you don’t see any text boxes, you don’t seeany validation code — you just see a single line of code. ASP.NET 2.0 has tools available so that you canactually create complex controls like this yourself, but that’s a bit beyond this chapter.
Try It Out Personalized Site: User Account ConfigurationOnce you click the administration link in Step 7 of the previous Try It Out, the web page shown inFigure 4-6 will be displayed (note that the port number used will be different whenever you launch thisfor the first time).
111
Membership and Identity
07_588508 ch04.qxd 10/10/05 6:27 PM Page 111

Figure 4-6
1. Click the Security link to take you to the Security settings administration tab, shown in Figure 4-7.
Figure 4-7112
Chapter 4
07_588508 ch04.qxd 10/10/05 6:27 PM Page 112

2. In this page you will see a hyperlink that enables you to launch the Security Setup Wizard. Clickthis link to proceed to the first stage in the wizard, as depicted in Figure 4-8.
Figure 4-8
3. Click Next to skip past the first page, and you’ll arrive at the screen shown in Figure 4-9. Selectthe From the Internet radio button to enable both anonymous users and users who have to login via the Web.
113
Membership and Identity
07_588508 ch04.qxd 10/10/05 6:27 PM Page 113

Figure 4-9
Click Next to continue to the next screen, displayed in Figure 4-10.
114
Chapter 4
07_588508 ch04.qxd 10/10/05 6:27 PM Page 114

Figure 4-10
You can skip straight past this step and click Next to continue — the default provider will enableall of the required functionality without additional work. In the next screen, you are asked ifyou want to define any roles for the web site. In this example, you can skip this step — you willbe defining roles later in this chapter. Keep the checkbox unchecked and click Next.
4. When you reach the next screen, shown in Figure 4-11, you will be prompted to enter somedetails for a user.
115
Membership and Identity
07_588508 ch04.qxd 10/10/05 6:27 PM Page 115

Figure 4-11
5. As shown in Figure 4-12, enter some details for a user of the site — these could be your name,my name, anyone’s name! Just make sure you don’t forget the password you enter — you’llneed this later on. Clicking the Create User button shows a confirmation prompt, at which pointyou can click Continue to create another user. At this stage, you should create two users — onestandard user and one that you’ll use later as the administrator of the site.
Later, you’ll be able to give these users appropriate access permissions for the site. Note thatyou don’t get the option to make these users members of any roles at this stage — this is donelater in the setup process. Click Next to continue.
116
Chapter 4
07_588508 ch04.qxd 10/10/05 6:27 PM Page 116

Figure 4-12
6. The next step is to define the accessibility levels for the site, defining who is able to see the content of the site, and who is denied access. At this stage, you can add permissions to usersdirectly. Later on, you will add those users to groups and assign rights and permissions to entiregroups of people. As illustrated in Figure 4-13, you need to grant the Allow permission to eachuser individually, and deny access to all anonymous users. To set permissions for a user, selectthe User radio button, enter the username in the box next to the radio button, select Allow, andclick Add This Rule. To deny access to anonymous users, select the Anonymous Users radiobutton, click Deny in the Permission section, and click Add This Rule.
Once you click Next, you should see that you have completed the wizard, which means thatyou should now have a web site with some user profiles and some access rights restrictions. Allthat remains is to try out the pages!
117
Membership and Identity
07_588508 ch04.qxd 10/10/05 6:27 PM Page 117

Figure 4-13
7. Back in VWD, press Ctrl+F5 to run the Default.aspx page — you should see the screen shownin Figure 4-14.
Figure 4-14
118
Chapter 4
07_588508 ch04.qxd 10/10/05 6:27 PM Page 118

Because anonymous access is denied for the site, you are immediately taken to the login page. Notice that the address of the page indicates that your intention was to view theDefault.aspx page.
8. Before you log in, try entering some invalid credentials (a username and password that don’texist, but not a blank password). You should see the message shown in Figure 4-15.
Figure 4-15
9. Now try to log in as one of the user accounts available to the site; you will automatically betaken back to the Default.aspx page, as illustrated in Figure 4-16.
Figure 4-16
Clicking the Logout link will take you back to the Login.aspx page — the site will not let anyoneview pages without being logged in first.
119
Membership and Identity
07_588508 ch04.qxd 10/10/05 6:27 PM Page 119

How It WorksThe Login controls available to ASP.NET pages are a real gift from the Microsoft teams. I’ve lost count ofthe number of sites I’ve worked on that had custom login functionality, all coded by hand, and now all Ihave to do is drag a few controls onto a page. On top of that, the wizards available for configuring useraccounts and permissions make it even easier to get results up and running quickly. You may prefer touse your own user account data store, or even to link in to Active Directory user accounts, but this canbe changed later in your development process.
This Try It Out simply walked you through the process of configuring user accounts. Though that is anecessary process, the Website Administration Tool is more interesting in what it creates behind thescenes. First, the user account profiles that were created have to be stored in some central repository, sothe tool creates a new profile database for you for this purpose. Take a look at the Chapter04 folder inyour C:\BegASPNET2\Chapters\Begin\Chapter04 directory and you should see a folder calledApp_Data. Right-click and select Refresh Folder, and you should see a file called AspNetDB.mdf. This isa Microsoft SQL database file, and you can view the structure and contents of the database tables withinthe VWD environment, as shown in Figure 4-17 (you’ll learn more about this process when you get tothe database chapters).
Figure 4-17
The other part of the configuration was to assign some permissions to user accounts for accessing the site.By running the wizard, you’re able to run through this process quite easily. Once the wizard is finished,you have a new file in your solution called Web.config (the configuration file that stores preferencesrelated to the way the application runs on your server — see Chapter 2 for more details). If you look in theWeb.config file stored in your Chapter04 folder, you will see the statements shown in Figure 4-18.
120
Chapter 4
07_588508 ch04.qxd 10/10/05 6:27 PM Page 120

Figure 4-18
Notice that the <allow ... /> and <deny ... /> parts of the configuration file reflect the permissionsthat were set as part of the example. You can add and modify these statements yourself directly in theWeb.config file by typing them in, or you can use the Administration Tool to streamline the process,whichever you prefer.
It’s worth a quick note to say that the LoginView control can do much more than display specific text tousers depending on whether or not they’re logged in. In Chapter 11, you’ll see that this control can be usedto change the appearance of a page entirely based on not just user identity, but also on roles. This controlcan contain text, HTML, or even other controls. The next Try It Out shows an example of this in action.
PersonalizationThe capability to personalize a site to reflect the preferences of the currently logged-in user is a great wayto give a site a sense of community and belonging. Although you won’t be doing too much personalizationin this site, the next chapter explores some of the features available to ASP.NET developers to give users amore personalized user interface and browsing experience.
A useful addition to any personalized site is to provide some kind of feedback to logged-in users to confirmthat they have been correctly identified. The LoginName control is a simple way to add this functionality. Inthis Try It Out, you learn how this control is used. For this example, you will need to enable anonymousaccess.
121
Membership and Identity
07_588508 ch04.qxd 10/10/05 6:27 PM Page 121

Try It Out Displaying User-Specific Information1. You can choose which way you want to enable anonymous access — you can either edit the
Web.config file (refer to the previous “How It Works”) or you can launch the Web SiteAdministration Tool. To relaunch the tool, right-click the administration site icon in your systemtray and select Open in Web Browser. Alternatively, to modify the Web.config file, simply openit up in VWD and change the following highlighted line of code:
<authorization><allow users=”?” /><allow users=”administrator” /><allow users=”chrishart” />
</authorization>
The question mark represents all unknown (anonymous) users, so by changing deny to allow,you can enable anonymous access.
2. Next you need to make a slight change to the web page code to add the LoginName control.Open up Default.aspx and pop out the Common Task menu next to the LoginView control(click the small right-hand arrow next to the control and select the LoggedInTemplate, asshown in Figure 4-19). Change the text to You are logged in as, and then drag a LoginNamecontrol to the end of the text.
Figure 4-19
3. There is no need to make any amendments to the LoginName control once it’s been added to thepage, so all that remains is to save your changes and run the page. The first thing you shouldsee is the anonymous user’s perspective on the site, shown in Figure 4-20.
122
Chapter 4
07_588508 ch04.qxd 10/10/05 6:27 PM Page 122

Figure 4-20
Now click the Login link and log in to the site. Once logged in, you should see something simi-lar to Figure 4-21, depending on which user account you used.
Figure 4-21
How It WorksThe LoginName control is a quick an easy way to display a user’s currently logged-in identity on a site.If you switch to Source View for the page, you can see the LoginName control, shown here with a graybackground:
<LoggedInTemplate>You are logged in as<asp:LoginName ID=”LoginName1” runat=”server” /><br />
</LoggedInTemplate>
Some HTML code has been added to my code; because I pressed Return after the LoginName control (sothat the LoginStatus control would appear on the next line), there’s a <br /> HTML tag in the code.This is the HTML code for a simple line break. You’ll often find tags like this, added to your code afterswitching from Design View to Source View. The two most common are the character, which is anon-breaking space (a space character that keeps the items immediately before and after it on the same
123
Membership and Identity
07_588508 ch04.qxd 10/10/05 6:27 PM Page 123

line), and the <br />, which is a simple line break. The bit of code that is most relevant in this case is notthe HTML, but the LoginName’s source. Again, there’s hardly anything exciting to see in the generatedsource, because ASP.NET does all the hard work of finding out what the currently logged-in user’s nameis behind the scenes, and inserts it when the page is rendered.
Note that the LoginName control was not added to the Anonymous template, but then there’s no reasonto do so — if you view the site as an anonymous user, the control will not display anything when it isrendered.
So you’ve spent a while experimenting with user accounts and logging in to the site. Earlier in the chapter,the concept of roles was discussed. The following section takes a look at what roles are and how they areused to refine the membership characteristics of a site.
MembershipDefining which users can access a site is a perfectly viable way to build a small site, but it would have tobe very small and remain small to be a manageable solution. A far better solution would be to define aset of user roles, and add user accounts to the appropriate roles. Once users are members of a role, youcan assign permissions based on a role.
For example, consider a typical site configuration scenario: all the members of an Administrators rolecan access the site, and can access all areas of the site. All members of a Users role can access the site, butcannot access certain restricted areas. All anonymous users will see a cut-down version of the site, butwithout any personalization, and certainly without any permissions for visiting restricted areas of a site.
Chapter 11 examines roles in more detail, including refining the Wrox United site to make good use ofroles. In the meantime, you can experience roles for yourself in the next Try It Out, because the Chapter04example site is extended to include roles. In this example you will be defining two roles: Users andAdministrators. These roles have to be created before you can add users to the roles.
Try It Out Adding Users to Roles1. Start off by launching the Web Site Administration Tool once more. If you have been running the
tool recently, you can right-click the icon in your system tray for the administration site and selectOpen in Web Browser. Or, as an alternative, you can click Website ➪ ASP.NET Configuration fromthe main VWD menu bar. Once the tool is up and running, select the Security tab and click theEnable Roles link, as shown in Figure 4-22.
124
Chapter 4
07_588508 ch04.qxd 10/10/05 6:27 PM Page 124

Figure 4-22
2. The Create or Manage Roles link should then be enabled, so click it to enter the Create NewRole screen. In here, you need to create the two roles; users and administrators, by entering arole name in the text box and clicking Add Role (see Figure 4-23).
125
Membership and Identity
07_588508 ch04.qxd 10/10/05 6:27 PM Page 125

Figure 4-23
3. Click the Manage link for the Administrators group, then search for the Administrator useraccount, using the search tools shown in Figure 4-24. The easiest way to find the Administratoraccount is to search for all accounts beginning with the letter A, so type a* in the text box andclick Find User. Add the Administrator account to the Administrators role simply by checkingthe User Is In Role checkbox.
4. Add the remaining user accounts to the Users role in the same way.
5. Click the Security tab to return to the main Security section of the administration tool. Oncethere, click the Manage access rules link to return to managing the access rules for the site. Inthe same interface as you used in the earlier example for managing access rules (see Figure4-13), remove the access rules for the individual user accounts, and instead grant access to thesite to both the administrators and users groups. As you delete rules, you’ll be prompted as inFigure 4-25.
126
Chapter 4
07_588508 ch04.qxd 10/10/05 6:27 PM Page 126

Figure 4-24
Figure 4-25
You can then add the new permissions on a role-by-role basis with the interface shown in Figure 4-26.
127
Membership and Identity
07_588508 ch04.qxd 10/10/05 6:27 PM Page 127

Figure 4-26
Once you have added the rules, you should see the list of rules shown in Figure 4-27.
Figure 4-27
128
Chapter 4
07_588508 ch04.qxd 10/10/05 6:27 PM Page 128

6. If you run the application again now, you should be able to log in as any of the user accounts andaccess the site as before. If you change the permissions for one of the roles, all members of thatrole will be affected, hence you could block access to all non-administrative users if you wanted.
How It WorksAll of the changes made in this example were performed via the magic Web Site Administration interface,which simplifies the process of adding role definitions and access rules. If you were to do this by hand, asyou will see in just a moment, you would have to manipulate the contents of the Roles table in theAspNetDB.mdf database that was shown earlier to include two role definitions, and then add users tothose roles by changing the UsersInRoles table by hand. Then you would have to manipulate theWeb.config file to change the access permissions to the site.
This configuration process was all handled for you automatically by the tool, so it’s made configurationand administration quite a lot simpler! However, this is a Visual Web Developer and Visual Studio 2005feature, not an ASP.NET feature, so you would have to do this by hand if you didn’t have access to theVWD environment.
If you flick back to the Source View of your Web.config file, you’ll see the following changes have beenmade (shown with a gray background):
<roleManager enabled=”true” /><authorization>
<allow users=”?” /><allow roles=”administrators” /><allow roles=”users” />
</authorization>
In addition, the process of enabling roles has modified the user profile database slightly too, by addingtwo new tables: one to store roles and one that tells you which users are members of which roles (seeFigure 4-28).
Figure 4-28
129
Membership and Identity
07_588508 ch04.qxd 10/10/05 6:27 PM Page 129

AuthenticationOne area not yet discussed is that of how the authentication works for this application, and what optionsare available in ASP.NET for authentication. The examples so far have all relied on what’s known asForms authentication. So, what is Forms authentication, and what are the other options available?
❑ Forms authentication: Login requests are made by filling in a form on a web page and submittingthat form to the server. Once the server receives the request, a cookie is written to the user’s localmachine, and this cookie is passed back to the server by the browser along with each request thatis sent so that the user remains authenticated for as long as is required.
❑ Windows authentication: Login pages pass user credentials to a web server (IIS only, not the webserver built into VWD). The web server then handles the authentication using whichever methodis configured on the virtual directory that the application is running within. IIS hooks in to theWindows operating system and Active Directory domain structures, which means that it can relyon user profiles that are stored externally, and use standard Windows credentials to log in to thesite. Depending on the configuration of your site, and depending on which user account you haveused to log in to your machine, you may not even have to log in to the site directly, because yourcurrent Windows credentials can be passed to the web server automatically for authentication.This is really handy when it comes to developing intranet applications.
❑ Passport authentication: Login credentials are passed to a Microsoft Passport server where userprofiles are stored centrally. You may be familiar with this from logging in to a Hotmail account.And because you can configure Windows to log on to a Passport account on start up, you canaccess your Hotmail inbox without even having to type a password.
Forms Authentication ModelThis section looks at how Forms authentication works. Consider the following scenario:
❑ The user — let’s call him Bob — wants to view Page A, which can’t be accessed by anonymoususers, so when Bob tries to view Page A, the browser instead displays a login page, as shown inFigure 4-29.
Figure 4-29
Server refuses anonymous accessand sends login page instead
Browser sends requestfor PageA to the server
Browser Server
130
Chapter 4
07_588508 ch04.qxd 10/10/05 6:27 PM Page 130

❑ Bob is now looking at a login page. Because Bob has registered with this site previously, he logsin to the site using his username and password combination. Figure 4-30 shows the interactionbetween Bob’s browser and the server.
Figure 4-30
❑ Bob can now view Page A and is a happy user. Now Bob wants to view Page B by following alink from Page A. Along with the request for the page, Bob’s browser sends a copy of the cookieto the server to let the server know that it’s Bob who’s trying to view the page. The serverknows who Bob is, and likes Bob, so sends Bob Page B as requested, as shown in Figure 4-31.
Figure 4-31
❑ If Bob now requests the site’s home page, the browser will still tack on the cookie to the request,so even though the home page is not restricted content, the cookie is still sent to the server.Because the page isn’t restricted, the server doesn’t worry about the cookie, ignores it, andsends back the home page.
❑ Bob then heads back to Page A. Because the cookie is still fresh on Bob’s machine, the cookie isstill sent to the server. The server is still happy with Bob, so it lets Bob view the page.
❑ Bob goes off and makes himself a coffee. He then makes some lunch. By the time he gets back tohis computer, 25 minutes have elapsed. Bob now wants to view Page B again, but the cookie onhis machine has expired. The server doesn’t receive a cookie along with the page request, so Bobhas to log back in again.
Server accepts cookie andsends back Page B
Browser requests Page Band passes a copy of the cookie
Browser Server
Server authenticates Bob and returnsPage A along with a cookie to the
browser
Browser sends a loginrequest to the server
Browser Server
131
Membership and Identity
07_588508 ch04.qxd 10/10/05 6:27 PM Page 131

Cookies on a user’s machine will normally be set to expire after a specific amount of time has elapsed. Inthis scenario, the server gives out cookies with a 20-minute expiry, which means that as long as the userkeeps making requests within 20 minutes of each other, the cookie will remain active. However, more than20 minutes away from the site and the user will have to log back in to the site to view restricted content.
You will note that the login page built in the earlier examples included a box that offered you the“remember my details for next time” option. This will write a more permanent cookie to your browser’scookie collection so that your account name will be prepopulated when you revisit the site. Because youshould never store password information in a cookie, you should always have to enter your password,but at least your username field will be filled in for you on each visit.
Other methods of authentication (Windows and Passport) provide the end user with a similar experience.For example, the Windows authentication model relies on the web server (which will likely be IIS) to control access to the site, but can also incorporate the timeout mechanism to block users that have beenidle for too long. To configure Windows authentication, you would need to specify which users or rolesfrom the corporate Active Directory (AD) domain could access a site. These users could then access thesite whenever they are logged on using their login details to a PC on the corporate network.
It’s also possible to view a Windows authenticated site from outside of the corporate environment,though you will be asked to enter your standard Windows logon credentials when you attempt to accessa page protected by Windows authentication.
Passport authentication isn’t as widely adopted as Microsoft perhaps would have liked, but some siteson the Internet do link up to the Passport network to handle web site authentication (for example,Expedia.com). Passport authentication relies on the entire repository of user accounts being accessiblefrom anywhere in the wired world, a bit like a central Active Directory for web accounts.
This book uses Forms authentication to handle all authentication with the Wrox United application.
Wrox United SecurityThe Wrox United site that you’ve been working on so far will need to have some security applied to it if youwant to be able to include some personalization in the site. In the finished site (www.wroxunited.net)you’ll see that there is shopping cart functionality built in to the site. Additionally, the finished site will alsohave an administration area, where you can edit fixtures, team members, and much more. This all meansthat you’re going to have to add some users and roles at some stage — because you will have gained plentyof experience of using the configuration tool, you will now be able to perform the first stage in this process.The next Try It Out walks you through the user accounts and roles configuration for the Wrox United site. Atthis stage, you don’t have to worry about locking down parts of the site; that’s a task for later in the book.
Try It Out Configuring Security in the Wrox United Site1. Start by opening your chapter version of the Wrox United site in VWD. Once it’s opened, click
the Website menu and select ASP.NET Configuration. This will launch the configuration tool for the site. Figure 4-32 shows the configuration screen that is displayed for the finished versionof the site.
132
Chapter 4
07_588508 ch04.qxd 10/10/05 6:27 PM Page 132

Figure 4-32
2. Click the Security link to go into the section where you can configure users and roles. As you didpreviously in this chapter, launch the security setup wizard. As you walk through the wizard,select the following:
❑ The application will be used over the Internet.
❑ Roles are enabled.
❑ If they don’t yet exist, create roles for Administrator, FanClubMember, Manager,Owner, and Reporter (see Figure 4-33).
❑ Finally, create some user accounts — start with at least five so you can have at least oneuser in each role. The user accounts predefined with the Wrox United application areshown in Figure 4-34.
133
Membership and Identity
07_588508 ch04.qxd 10/10/05 6:27 PM Page 133

Figure 4-33
Take a look at the configuration for the finished application and you’ll see that the preconfig-ured user accounts are each members of different roles, so while the ChrisH account is a member of the Reporter role, Jim is a member of the Owners role, and Lou is a member of theFan Club.
3. Once you finish the wizard you need to make a couple of subfolders within the WroxUniteddirectory that will contain specific areas of the site — the Admin and the FanClub sections.
4. Now you can head into the section for managing Access Rules and add the following rules:
❑ For the main WroxUnited folder, allow anonymous access.
❑ For the FanClub folder, firstly deny access to all users, then add a second rule to onlyallow access to members of the FanClub role.
❑ For the Admin folder, deny access to all users.
Because these user accounts and roles are not going to be used at this stage, you don’t need todo any further work to the site just yet. However, this preparation work will pave the way forfurther work later down the line when you create other pages in the site.
134
Chapter 4
07_588508 ch04.qxd 10/10/05 6:27 PM Page 134

Figure 4-34
How It WorksWith the Wrox United application, you have access to the configuration of a fully functional web appli-cation. Feel free to have a look through this configuration using both the administration tool and theWeb.config file to see how the basic permissions are enabled. This example is only a taste of what willcome later in the book, because Chapter 11 covers the details of role-based access to a site and shows youdifferent techniques for enabling and disabling content by role.
The code generated for filtering access to the FanClub folder has been added to the Web.config file thatlives within the FanClub folder. This code appears as follows:
<?xml version=”1.0” encoding=”utf-8”?><configuration>
<system.web><authorization>
<allow roles=”FanClubMember” /><deny users=”*” />
</authorization></system.web>
</configuration>
135
Membership and Identity
07_588508 ch04.qxd 10/10/05 6:27 PM Page 135

Notice that the FanClubMember role has been defined as the only role that has permission to access thecontent in this folder.
The directory-level permission created in this example has created a restricted zone in the site. Chapter11 walks through some examples using the Administration section and the Fan Club sections, demon-strating different parts of ASP.NET 2.0 technology. These examples will rely on an understanding of thefoundations built in this section.
SummaryThis chapter discussed the basics of security, the concept of identity, and the process involved in loggingon to a site. These are familiar concepts to anyone who spends time on the Internet, surfing fan sites,community portals, or online shops, and because these concepts are so universal, you’ve seen howASP.NET 2.0 has been designed to make the process of creating sites that use this functionality.
The core concepts to understand are as follows:
❑ Identity: The concept of an individual as described by a set of attributes that make that individ-ual unique.
❑ Authentication: The concept of identifying a user to a server by passing a set of credentials to the server. If the server can identify the user attempting to connect, he or she will be authenticated.
❑ Authorization: The process of taking authenticated user credentials and comparing themagainst a set of access control list information, providing the answer to the question “can thisuser access the requested resource?”
❑ Personalization: The capability to provide information that is specific to the currently logged-in user.
❑ Membership: The concept of belonging. This chapter considered the concept of users beingmembers of specific roles.
The next chapter expands on the concept of personalization and looks at how ASP.NET sites can be personalized.
Exercises1. Change the configuration of your Chapter 4 web site to allow anonymous access, but to deny
access to one specific user account.
2. Add a subfolder to the Chapter 4 web site called Admin. Within this folder, add a page calledMainAdmin.aspx with a LoginName control on it and any other controls you might want.Change the access permissions for that specific folder so that only members of theAdministrators group can view the page.
136
Chapter 4
07_588508 ch04.qxd 10/10/05 6:27 PM Page 136

5Styling with Themes
The process of developing any web application usually revolves around two main areas: functionality and appearance. The functionality aspect of a web application includes the structureof the site, the behavior of the controls, the user experience, code for securing the application, whathappens when the user clicks a button, and so on. The appearance of a site is somewhat more aesthetic, and involves the use of color, images, the layout of pages, and to some extent, the style ofcode that is rendered to the browser. A successful application will strike a good balance betweenthe two sides, providing a visually pleasant site that is easy to use and to work with for all users,and it’s the balancing act between the two sides where many sites fail.
This chapter starts by introducing the fundamental tools available for styling web applications,before introducing the styling capabilities of Visual Web Developer. It goes through the basics of styling individual controls before moving style information into a separate CSS file, then introduces themes — a new technique for styling pages and sites.
In this chapter, the following topics are discussed:
❑ Styling a web site, from styling individual elements to the use of CSS style sheets
❑ Developing style sheets for an application in VWD
❑ Using ASP.NET 2.0’s themes and skins to rapidly develop styled web content that conformsto a standard look and feel
❑ Adding style to the Wrox United site using themes and skins
Additionally, this chapter also discusses the concepts of usability and accessibility, which are twoimportant areas of web design that should be considered when developing any web site.
Styling a SiteIt may sound obvious, but the front page appearance of a site is the first thing your visitors will see,and although we are told never to judge a book by its cover (particularly in the case of Wrox authormug shots!), most of us will still have an initial impression of a site based on its appearance, whetherit’s a fairly neutral response (it’s ok, it does the job, where’s the search box?), a positive response
08_588508 ch05.qxd 10/10/05 6:29 PM Page 137

(neat, slick, pretty, show me more!), or a negative response (yuk, messy, I’m going somewhere else!). Initialimpressions count, so it’s important that you get them right.
In any site design there are common elements; for example, some kind of header that gives you a companyname, an idea of what the site is about, or a reflection of why you are looking at the site. You will also findareas such as menus, search boxes, groups of links, footers, and so on. A page without these sorts of elements will only be relevant to a specific audience; for example, a developer proving a concept, or thereader of a book who’s trying out some new technology. Positioning these elements precisely is important,as is structuring the content to fit the style of site you’re trying to develop.
Styling and laying out a site is an integral part of web development. Although laying out a site is oneaspect, the styling of a site can be a bit trickier. This chapter focuses on styling pages and the rules andhierarchy involved in this process — laying out elements and positioning items on a page is part of webdesign that is discussed throughout this book.
Style AttributesThe easiest and quickest way to change the way an element appears on a page is to add a styleattribute. The style attribute can be applied to any visible element on a page. For example:
<div style=”font-weight:bold;color:red;border-bottom:solid 2pt navy”>This is astyled “div” tag</div>
Figure 5-1 shows how this style attribute will look in Internet Explorer.
Figure 5-1
In the following Try It Out, you start by creating a web site that you can use to host all of the examples inthis chapter.
Try It Out Styling a Simple Page, Part 1 — Element by Element1. In VWD, open the starter web site called Chapter05 (C:\BegASPNET2\Chapters\Begin\). This
starter site contains just a few files to give you a head start on the examples within this chapter.
2. Add a new blank .aspx page and call it Default.aspx. Switch straight to Source View and typein the following highlighted lines of code between the Form tags:
138
Chapter 5
08_588508 ch05.qxd 10/10/05 6:29 PM Page 138

<form id=”form1” runat=”server”><div style=”font-weight:bold; color:red; border-bottom:solid 2pt navy;”>This is a styled “div” tag</div>
</form>
Notice how Visual Web Developer helps you as you type in the style information (see Figure 5-2).
Figure 5-2
3. Now switch over to Design View and see how your formatting has been applied to the page, asshown in Figure 5-3.
Figure 5-3
139
Styling with Themes
08_588508 ch05.qxd 10/10/05 6:29 PM Page 139

4. Notice how the style tag has the style attribute information visible in the properties pane. Ifyou click somewhere within the value for the Style attribute, you’ll notice the ellipsis button(...) next to the style information. Click this button and you will see the Style Builder dialog,shown in Figure 5-4.
Figure 5-4
This dialog comes in very handy when you are styling elements, because you won’t have toremember the individual syntax for each style. All you need to do is select the attributes youwant to apply to the element and click OK to apply the style. Go ahead and do that withanother page.
5. Create another .aspx page and call it StyledPage1.aspx. In this page, you need to add a simple<div> element with the text “This is highlighted text,” and a Heading 1 (h1) element with thetext “This is also highlighted text.”
6. Using the Style Builder dialog (see Figure 5-5), set the style for both elements to use the TrebuchetMS font family, and set them to appear in Navy. This will add the following code to Source Viewfor you automatically:
<div style=”font-family: ‘Trebuchet MS’;Color: Navy;”>This is highlighted text.</div>
<h1 style=”font-family: ‘Trebuchet MS’;Color: Navy;”>This is also highlighted text.</h1>
140
Chapter 5
08_588508 ch05.qxd 10/10/05 6:29 PM Page 140

Figure 5-5
7. View the page in your browser to see the finished article. It should look similar to Figure 5-6.
Figure 5-6
How It WorksNow it might not look fantastic, but it didn’t take long to change how this element appeared on the page.This technique can then be applied to each element on the site. You can apply many different possiblestyle attributes to a site, and so Appendix E includes some of the most common elements to help you topick out your favorite styles for a site.
The good news is that having learned to style elements on a page, it’s just a short step to reorganizingyour code into using a style sheet. The style attributes on HTML elements use exactly the same syntax asthe style syntax used in style sheets, so move on to the next section and tidy up all this style code.
141
Styling with Themes
08_588508 ch05.qxd 10/10/05 6:29 PM Page 141

CSS — Cascading Style SheetsThe concept of style sheets has been around for several years now (it was first made a recommendationby the W3C in December 1996), and every well-designed web application will be backed by a well-definedCSS style sheet that defines a specific look and feel for the site. Using a style sheet, you are able to definehow every type of element on a page will appear, and you can also create definitions for specific stylesthat you can pick and choose from to apply to specific elements on a page. For example, you can specify that every instance of a <div> tag should contain navy text, or you can define a style class calledHighlightedText that you can apply to any <div>, or other similar element, on a page. Here’s a section from a style sheet that defines these styles:
div{
font-family: ‘Trebuchet MS’;Color: Navy;
}
.HighlightedText{
font-family: ‘Trebuchet MS’;Color: Navy;
}
Notice that the only difference between these two is that the HighlightedText class has a period beforethe name of the custom class. This identifies the section as a class that can be applied to any element youwant, instead of defining default styling for a particular type of element.
To apply a style to an element you don’t need to do anything to the element itself; as long as your pageknows where the style information for the page can be found, the style will be applied automatically(locating style information is discussed in just a moment). However, to specify a custom class to be usedto style an element, you use the Class attribute, for example:
<div class=”HighlightedText”>This is highlighted text.</div><h1 class=”HighlightedText”>This is also highlighted text.</h1>
Although you can’t see the color of the text in this printed book, you can see that the font style that wasdefined in the preceding style class has been applied to these two elements in Figure 5-7.
Figure 5-7
142
Chapter 5
08_588508 ch05.qxd 10/10/05 6:29 PM Page 142

Of course, if you try this out for yourself, you should see the font has also been rendered in navy blue.
Style SyntaxStyle definitions are surrounded by curly brackets (braces). The position of the opening brace is usuallyeither next to the name of the element or class, or on the following line; for example, the div style can berewritten as follows:
div{font-family: ‘Trebuchet MS’;Color: Navy;
}
You can choose whichever presentation style you prefer — personally, I like my braces to all line up in avertical line.
Style information can also be applied to elements like anchor tags (<a>) with some specific modifiers toprovide some dynamic hover-style appearance as follows:
a:link, a:visited {
color: #cc3300;text-decoration: underline;
}a:hover {
text-decoration: none;}a:active {
color: #ff9900;text-decoration: underline;
}
This code will render red links with underline on a page that, when you hover your mouse over them,lose their underline, and when you click them, they momentarily appear slightly orange. This is to provide you with some feedback that you are hovering over a link, and that you have just clicked a link.The comma-separated items mean that the following style information will be applied to both style definition items (in this case, the a:link and a:visited items).
The first step in moving to a fully CSS-based layout is to decide what styles you want to use for each element and construct a set of style definitions.
You can put style definitions in two places so that they can be used in a web page.The first option is to embed style information at the top of the web page within a<style> tag, placed within the <head> element. The other option is to create a separate external style sheet to store the style definitions, and to link that externalstyle sheet to each web page that it should be applied to.
143
Styling with Themes
08_588508 ch05.qxd 10/10/05 6:29 PM Page 143

In the next sections, you look first at placing style definitions within the <style> tags on a page, andthen see how to attach an external CSS style sheet.
Moving from Style Attributes to a Style SectionIf you are only interested in styling a single page, you can embed style information in the <head>section of the HTML for the page as follows:
<html xmlns=”http://www.w3.org/1999/xhtml” ><head runat=”server”>
<title>Styled Page 1</title><style>
.HighlightedText{
font-family: ‘Trebuchet MS’;Color: Navy;
}</style>
</head><body>
<form id=”form1” runat=”server”><div class=”HighlightedText”>This is highlighted text.</div><h1 class=”HighlightedText”>This is also highlighted text.</h1>
</form></body></html>
This code is the same code used to display the previous example. Notice how you can embed the styleinformation quite easily within the <head> of the page using the <style> tag. This technique is fine forsingle pages — in fact, if you ever save a Word document as HTML, you’ll see that this technique is usedto define the document styles in use so that the document can be rendered as HTML. I just saved thisdocument from within Word 2003 as a Web Page (Filtered), which produces HTML code that’s a lotcleaner than the standard auto-generated code when you just save as a Web Page from Word. After Isaved it, I viewed the source code that was generated, and found the following style definition thatdescribes how some of the highlighted sections of code used in this chapter are defined:
p.code, li.code, div.code{margin-top:0cm;margin-right:0cm;margin-bottom:0cm;margin-left:30.0pt;margin-bottom:.0001pt;line-height:112%;font-size:8.5pt;font-family:Courier;}:
This technique isn’t really ideal for constructing a web site with style information applied to many different pages, because you would have to copy the <style> tags and style definitions across to all ofthe pages in the site individually. The solution for that scenario is to move to a separate CSS.
144
Chapter 5
08_588508 ch05.qxd 10/10/05 6:29 PM Page 144

Moving to a Separate CSSThis step is perhaps the simplest to achieve. Once you have style definitions encapsulated within<style> tags, it’s a really simple matter to extract that information into a separate style sheet. All youneed to do is create a file with the file extension of .css, copy across all the style information from yourweb page, and then add a link to that style sheet as follows:
<head runat=”server”><title>Styled Page 2</title><link href=”StyleSheet.css” rel=”stylesheet” type=”text/css” />
</head>
The style sheet file contains only style information, so say you had a style sheet with all of your stylecode in it:
.HighlightedText{
font-family: ‘Trebuchet MS’;color: Navy;
}a:link, a:visited{
color: #cc3300;text-decoration: underline;
}a:hover{
text-decoration: none;}a:active{
color: #ff9900;text-decoration: underline;
}
You can then link that style sheet to your web page, and make a minor addition to the page code:
<form id=”form1” runat=”server”><div class=”HighlightedText”>This is highlighted text.</div><h1 class=”HighlightedText”>This is also highlighted text.</h1><div><a href=”default.aspx”>This is a sample link</a></div>
</form>
When you view this page you’ll see the result shown in Figure 5-8.
145
Styling with Themes
08_588508 ch05.qxd 10/10/05 6:29 PM Page 145

Figure 5-8
Go ahead and try out these concepts. In the next Try It Out, you create a simple styled page that is basedon the StyledPage1.aspx that you created earlier.
Try It Out Styling a Simple Page, Part 2 — Using CSS1. Create another new page in your Chapter05 web site and call it StyledPage2.aspx.
2. Copy the <div> and heading from StyledPage1.aspx and remove the style attributes fromeach element. In their place, add a class attribute, and give it a value of “HighlightedText”:
<form id=”form1” runat=”server”><div class=”HighlightedText”>
This is highlighted text.</div><h1 class=”HighlightedText”>
This is also highlighted text.</h1></form>
3. Add a hyperlink to the page below the heading with the text “This is a sample link”. Enter“default.aspx” as the value for the href:
<form id=”form1” runat=”server”><div class=”HighlightedText”>
This is highlighted text.</div><h1 class=”HighlightedText”>
This is also highlighted text.</h1><div><a href=”default.aspx”>This is a sample link</a></div>
</form>
4. After the hyperlink, add a line break, followed by an ASP.NET Label control. Remember thatserver controls have a different set of properties than standard controls, so set the label’sCssClass property to “HighlightedText”, and the Font-Italic property to “true”:
This is also highlighted text.</h1><div><a href=”default.aspx”>This is a sample link</a></div><br /><asp:Label CssClass=”HighlightedText” Font-Italic=”true” ID=”Label1”
runat=”server” Text=”This is an ASP.NET label”></asp:Label></form>
146
Chapter 5
08_588508 ch05.qxd 10/10/05 6:29 PM Page 146

5. Right-click the Chapter05 site in the Solution Explorer and select Add New Item. SelectStyleSheet from the list of icons and accept the default name: StyleSheet.css. In this file, addthe following code:
.HighlightedText{
font-family: ‘Trebuchet MS’;color: Navy;
}a:link, a:visited{
color: #cc3300;text-decoration: underline;
}a:hover{
text-decoration: none;}a:active{
color: #ff9900;text-decoration: underline;
}
Notice how you get the same syntax help when you work with a CSS style sheet as when youwork with <style> attributes on a HTML control in Source View, as displayed in Figure 5-9.
Figure 5-9
Also notice the Build Style icon on the toolbar; if you click this button, it launches the StyleBuilder dialog. You can try this out for yourself — add another element definition (a <div>,
147
Styling with Themes
08_588508 ch05.qxd 10/10/05 6:29 PM Page 147

perhaps), and add the opening and closing curly braces. Place your cursor between those bracesand click the button to launch the style builder. Once you have selected the styles you want, youjust click OK and your styles appear as CSS items in the StyleSheet.css file.
6. There is just one final finishing thing to do, which is to tell your page to refer to the stylesdefined in the .css file. Switch back to StyledPage2.aspx and flip to Design View. You shouldsee the screen shown in Figure 5-10.
Figure 5-10
7. Now drag and drop the StyleSheet.css file icon from the Solution Explorer onto the designsurface. As soon as you do that, your page will change appearance (see Figure 5-11).
Figure 5-11
If you run the page now, you’ll see pretty much the same thing in your browser window.
148
Chapter 5
08_588508 ch05.qxd 10/10/05 6:29 PM Page 148

How It WorksOnly two things are required to style an HTML element on a page using a separate CSS file. One is theclass to be used by the element, and the other is a link that the page will use to locate the CSS file. Whenyou dragged the CSS file onto the design surface of the page, the following code was added for you atthe top of the page:
<html xmlns=”http://www.w3.org/1999/xhtml”><head runat=”server”>
<title>Styled Page 2</title><link href=”StyleSheet.css” rel=”stylesheet” type=”text/css” />
</head>
That link at the top of your page tells your page where to find its style information. From that moment on,any class attributes in the page will attempt to refer to the CSS style sheet for the styling information forthose elements. If the class cannot be found, no styles are applied, unless they are specified manually inthe Style attribute of the element.
HTML elements with class attributes specified can also have additional style information specified inthe Style attribute. Any styles defined in the Style attribute will override those specified in the CSSfile, giving you the chance to fine-tune the appearance of selected elements on your page.
Server controls are somewhat different. Because a server control will be converted to appropriate HTMLwhen it is rendered, the available properties will be different. In this example, you used a Label control.The Label control is a relatively simple control, so there’s not a huge amount of styling you can add toit. In this case, you added a link to the CSS style, and defined one additional style. The CssClassattribute used by server controls relates directly to the class attribute found on HTML elements. Theindividual style attributes are similar to the individual parts found in the HTML style attributes:
<asp:Label CssClass=”HighlightedText” Font-Italic=”true” ID=”Label1” runat=”server” Text=”This is an ASP.NET label”></asp:Label>
When the label is rendered, the following code is generated:
<span id=”Label1” class=”HighlightedText” style=”font-style:italic;”>This is anASP.NET label</span>
Notice that the custom style attributes are converted to a standard style tag on the browser. BecauseCSS styling is applied on the client side, once the page is rendered the class and style attributes onthe HTML elements will have styles and CSS styling applied just like static HTML elements.
Limitations of CSS and Server-Side Code StylesWhen you style a site using CSS, you can specify how specific elements will appear on a page. Thisworks just fine in a static HTML web site, but when it comes to server-side elements, you will start torun into problems. Take, for example, a simple ASP.NET Panel control. If you drag a Panel control ontoa page, add some text, and view the page in two different browsers (for example, Internet Explorer andan older or more limited browser like Links), you will see different results when you view the source ofthe page. Here’s some example source code:
149
Styling with Themes
08_588508 ch05.qxd 10/10/05 6:29 PM Page 149

<form id=”form1” runat=”server”><asp:Panel ID=”Panel1” runat=”server” Height=”50px” Width=”125px”>This text
is contained within an ASP.NET Panel control</asp:Panel>
</form>
Now, viewed in Internet Explorer 6 and Firefox 1.0.2, the following source code has been generated:
<form method=”post” action=”StyledPanels.aspx” id=”form1”><div>
<input type=”hidden” name=”__VIEWSTATE” id=”__VIEWSTATE” value=”/wEPDwULLTEwODU4OTkxMzRkZHehxD/SHmjEeZzCKx7+bB752B3R” />
</div>
<div id=”Panel1” style=”height:50px;width:125px;”>This text is contained within an ASP.NET Panel control
</div></form>
Now if you view that same page in an older browser (for example, Mozilla 5.0):
<form name=”form1” method=”post” action=”StyledPanels.aspx” id=”form1”><input type=”hidden” name=”__VIEWSTATE” id=”__VIEWSTATE”
value=”/wEPDwULLTEwODU4OTkxMzRkZHBovyeleyCJNtOpi+uco+l/zE5a” />
<div id=”Panel1”>This text is contained within an ASP.NET Panel control
</div></form>
Notice how the Panel has been rendered to a <div> control in both cases, but in the second case, it haslost its height and width information. It’s a small change in this case, but it’s a great improvement overASP.NET 1.1, which used to render HTML tables on older browsers for ASP.NET Panel controls. Forexample:
<table id=”Panel1” cellpadding=”0” cellspacing=”0” border=”0” height=”50”width=”125”>
<tr><td>This text is contained within an ASP.NET Panel control
</td></tr></table>
Now although ASP.NET 2.0 has removed a lot of issues like this from our day-to-day programminglives, the problem still remains that what you see on the server side isn’t the same as you will see on theclient side, and you can’t guarantee that an element will always be rendered in the same way on everybrowser. What ASP.NET 2.0 attempts to do is to provide a mechanism for specifying the appearance of an element based on its server-side control type, not on its client-side control type, so that when a control is rendered on different browsers, consistency is maintained where possible. This is achievedusing themes and skins.
150
Chapter 5
08_588508 ch05.qxd 10/10/05 6:29 PM Page 150

ThemesThemes are used to define the look and feel of a web site, similarly to how pages are styled using CSS.However, unlike CSS, themes can specify how server-side elements, like a TreeView control, for example,will appear when they are rendered on the browser. Remember that server controls have to be convertedto standard HTML and possibly JavaScript if a browser is to understand how to render them on a page.A themed server control will have style attributes applied to each of the relevant client-side elements thatare generated when the page is requested.
A theme, once it has been created, can be used in one of two ways. A theme can be used as a Stylesheettheme, which acts in a similar way to a regular CSS style sheet. The alternative is to use your theme as aCustomization theme, which changes the order of preference for style rules that you may be used to, so that the Customization theme will specify the style to use for each element, overriding any style preferences specified in a separate style sheet, or even in the style attributes of an element.
The basic method for creating a theme is the same, whichever way you use it. Additionally, you canchoose to use one theme throughout an entire site, or a different theme on each individual page.
Creating a ThemeThe process of creating a theme involves creating a .skin file, which defines the appearance of each element on the page, and placing this skin file within a folder, the name of which specifies the name ofthe theme. All themes are stored within a folder in an application directory called App_Themes. Here’s alook at a sample skin file:
<asp:Calendar runat=”server” Font-Names=”Century Gothic” Font-Size=”Small”><OtherMonthDayStyle BackColor=”Lavender” /><DayStyle ForeColor=”MidnightBlue” /><TitleStyle BackColor=”LightSteelBlue” />
</asp:Calendar>
<asp:TreeView runat=”server” ExpandDepth=”1” Font-Names=”Century Gothic” BorderColor=”LightSteelBlue” BorderStyle=”Solid” >
<SelectedNodeStyle Font-Bold=”True” ForeColor=”SteelBlue” /><RootNodeStyle Font-Bold=”True” /><NodeStyle ForeColor=”MidnightBlue” /><LeafNodeStyle Font-Size=”Smaller” /><HoverNodeStyle ForeColor=”SteelBlue” />
</asp:TreeView>
<asp:Label SkinId=”textLabel” runat=”server” Font-Names=”Century Gothic” Font-Size=”10pt” ForeColor=”MidnightBlue”></asp:Label>
<asp:ImageButton SkinId=”homeImage” runat=”server” ImageUrl=”~/platypus.gif” />
This file contains definitions for four types of elements. The ASP.NET TreeView control and theASP.NET Calendar control in this file define how each of the calendars and tree view controls on a sitewill appear. Notice that these controls have no ID tag — this is a feature of all skin files. Each elementwithin a skin file appears without an ID. At run time, if you have a page that has this theme specified asthe default theme, and contains a Calendar control, the calendar on the page will automatically inheritthe styles defined in this file.
151
Styling with Themes
08_588508 ch05.qxd 10/10/05 6:29 PM Page 151

The other two controls in this skin file, the Label and the Image Button controls, have associatedSkinIds. These attributes enable you to create sites with many different types of Label controls or ImageButton controls on them, and style selected instances of those controls using the skin data provided — thelink to the skin file is controlled by the SkinId property. Hence, if you want to include two Label controlson a web page and style one of them using a theme, you can use the following syntax:
<asp:Label ID=”Label1” SkinID=”textLabel” runat=”server” Text=”Label”>Styled label</asp:Label>
<asp:Label ID=”Label2” runat=”server” Text=”Label”>Unstyled label</asp:Label>
The SkinID property in this example specifies the style to apply to this control, as long as it has beendefined in the theme used on that page.
In the following Try It Out, you create a simple theme in VWD and see how to define style formatting.You’ll use this theme, and one other, in the examples later in this chapter.
Try It Out Creating Themes1. In VWD, open up the Chapter05 web site. Right-click the C:\...\Chapter05\ folder at the top of
the Solution Explorer and select Add ASP.NET Folder ➪ Theme. You will see the screen shownin Figure 5-12.
Figure 5-12
152
Chapter 5
08_588508 ch05.qxd 10/10/05 6:29 PM Page 152

2. This will create a new folder within the application called App_Themes, and a new empty folderwithin App_Themes that you will have to name. Name the new folder Blue.
3. Right-click the App_Themes folder and add a new Theme folder named Red. You now have twothemes available to your site, although you don’t yet have any skin files containing style defini-tions. This is the next part.
4. Right-click the Blue folder and select Add New Item. Select Skin File and call itBlueBits.skin, as shown in Figure 5-13.
Figure 5-13
Click Add. Take a look at the resulting file (see Figure 5-14) and you’ll see some default commentsthat overview some of the basics of skin files.
Figure 5-14
153
Styling with Themes
08_588508 ch05.qxd 10/10/05 6:29 PM Page 153

5. Repeat this step to add a skin file for the Red theme, called RedBits.skin.
6. For these examples, you’ll find it really handy to create a simple ASP.NET page for trying outnew styles before you add controls to a skin file. Create a new web page calledSkinSource.aspx by right-clicking the C:\...\Chapter05 root in the Solution Explorer andselecting Add New Item, selecting a Web Form, calling it SkinSource.aspx, and clicking OK.
7. Drag two Calendar controls onto the page. These controls need some styling, and the first stepis to manually add some styles to each of these controls so that the first one can be used in ablue theme, and the second can be used in a red theme. In just a moment, you’ll see the styles touse for these controls — first, Figure 5-15 shows how they will look when they are styled.
Figure 5-15
Notice that the Properties pane contains many different style options for the Calendar control.Set the properties as follows:
154
Chapter 5
08_588508 ch05.qxd 10/10/05 6:29 PM Page 154

Blue SkinAttribute Style Code
Font-Names Century Gothic <asp:Calendar ID=”Calendar1” runat=”server”
Font-Size Small Font-Names=”Century Gothic” Font-Size=”Small”>
OtherMonthDayStyle - Lavender <OtherMonthDayStyle BackColor BackColor=”Lavender” />
<DayStyle DayStyle - ForeColor MidnightBlue ForeColor=”MidnightBlue” />
<TitleStyle TitleStyle - BackColor LightSteelBlue BackColor=”LightSteelBlue” />
</asp:Calendar>
Red SkinAttribute Style Code
Font-Names Garamond <asp:Calendar ID=”Calendar2”runat=”server”
Font-Size Medium Font-Names=”Garamond” Font-Size=”Medium”
BorderColor Chocolate BorderColor=”Chocolate” BorderStyle=”Ridge”
BorderStyle Ridge BorderWidth=”8px” DayNameFormat=”FirstLetter”>
BorderWidth 8px <OtherMonthDayStyle BackColor=”BlanchedAlmond” />
DayNameFormat FirstLetter <DayStyle ForeColor=”Maroon” /><TitleStyle BackColor=”Maroon”
OtherMonthDayStyle - BlanchedAlmond Font-Bold=”True” BackColor ForeColor=”#FFFFC0” />
</asp:Calendar>DayStyle - ForeColor Maroon
TitleStyle - BackColor Maroon
TitleStyle - Font-Bold True
TitleStyle - ForeColor # FFFFC0
8. Now drag a Label control onto the page and style it with a bit of color and font styling. The fol-lowing code creates two labels and defines styles that should match with your blue and redthemes:
155
Styling with Themes
08_588508 ch05.qxd 10/10/05 6:29 PM Page 155

<asp:Label ID=”Label1” runat=”server” Text=”Label” Font-Names=”century gothic”Font-Size=”10pt” ForeColor=”MidnightBlue”></asp:Label>
<asp:Label ID=”Label2” runat=”server” Font-Names=”garamond” Font-Size=”11pt”ForeColor=”DarkRed” Text=”Label”></asp:Label>
Once you have finished defining styles, you are ready for the next phase.
9. Open up the BlueBits.skin file in VWD and copy and paste the HTML for your blueCalendar and Label controls in the SkinSource.aspx page into the skin file and remove theID tags for each of them.
10. Finally, add a SkinID attribute to the Label control to give it a unique style reference that youcan use later (see the bold text in the following listing):
<asp:Calendar runat=”server” Font-Names=”Century Gothic” Font-Size=”Small”><OtherMonthDayStyle BackColor=”Lavender” /><DayStyle ForeColor=”MidnightBlue” /><TitleStyle BackColor=”LightSteelBlue” />
</asp:Calendar>
<asp:Label SkinId=”textLabel” runat=”server” Font-Names=”Century Gothic” Font-Size=”10pt” ForeColor=”MidnightBlue”></asp:Label>
11. Repeat Steps 7 and 8 for the red controls, placing them in the RedBits.skin definition file:
<asp:Calendar runat=”server” Font-Names=”Garamond” Font-Size=”Medium”BorderColor=”Chocolate” BorderStyle=”Ridge” BorderWidth=”8px”DayNameFormat=”FirstLetter”>
<OtherMonthDayStyle BackColor=”BlanchedAlmond” /><DayStyle ForeColor=”Maroon” /><TitleStyle BackColor=”Maroon” Font-Bold=”True” ForeColor=”#FFFFC0” />
</asp:Calendar>
<asp:Label SkinId=”textLabel” runat=”server” Font-Names=”Garamond” Font-Size=”11pt”ForeColor=”DarkRed” />
It’s simply a case of repeating the process for any other controls you might want to add to your skin file. In the next Try It Out, you’ll be adding a Calendar control and a Label controlto pages and seeing how these themes change their appearance. Additionally, you’ll also add a TreeView control and an ImageButton control, so you will need to have some moreinformation in your skin file to render these.
12. Add the following code to the blue skin (BlueBits.skin) file to specify styling for theTreeView and ImageButton controls:
<asp:TreeView runat=”server” ExpandDepth=”1” Font-Names=”Century Gothic”BorderColor=”LightSteelBlue” BorderStyle=”Solid” >
<SelectedNodeStyle Font-Bold=”True” ForeColor=”SteelBlue” /><RootNodeStyle Font-Bold=”True” /><NodeStyle ForeColor=”MidnightBlue” /><LeafNodeStyle Font-Size=”Smaller” /><HoverNodeStyle ForeColor=”SteelBlue” />
</asp:TreeView>
<asp:ImageButton SkinId=”homeImage” runat=”server” ImageUrl=”~/platypus.gif” />
156
Chapter 5
08_588508 ch05.qxd 10/10/05 6:29 PM Page 156

13. Now you need to add similar code to the red skin (RedBits.skin) file to specify how to style aTreeView control:
<asp:TreeView runat=”server” ExpandDepth=”1” Font-Names=”Garamond”BorderColor=”Chocolate” BorderStyle=”Ridge”>
<SelectedNodeStyle Font-Bold=”True” ForeColor=”Chocolate” /><RootNodeStyle Font-Bold=”True” /><NodeStyle ForeColor=”DarkRed” /><LeafNodeStyle Font-Size=”Smaller” /><HoverNodeStyle ForeColor=”Chocolate” />
</asp:TreeView>
<asp:ImageButton SkinId=”homeImage” runat=”server” ImageUrl=”~/platypus.gif” />
That’s all there is to it as far as creating a theme is concerned — you should now have twothemes available to your Chapter05 pages: blue and red.
How It WorksThe presence of a .skin file within an App_Themes in your web application is all that’s needed to make thethemes within the folder available to your application. If you are hosting your web sites on a web serverrunning IIS, you can alternatively place your themes within your <drive>:\Inetpub\wwwroot\aspnet_client\<version> folder, which makes them available to all of the applications hosted on your server.
You can create more than one .skin file for each theme you work on. All you need to do is create another.skin file within the theme’s directory and create more control definitions within this file. This may helpyou to split up your .skin file definitions into smaller pieces. For example, if you created a site that hadtwo different fonts in use on it (for example, one for text and one for code snippets), you could have stylesdefined in two .skin files, one containing the body text styles and one containing code snippet styles.
You can also include CSS style sheets in themes and use styles generated by your friendly designer onyour web site. You’ll see how this works later on. First, you need to have a go at putting these red andblue themes into action!
The .skin files that formed the themes in the previous example define some standard control styles thatcan be applied to any instance of a Calendar control on a page, or any instance of a Label control withthe appropriate SkinID on a page. In this Try It Out, you apply these themes to some simple pages in asite. Note that the entire code for this chapter is available to download from www.wrox.com.
Try It Out Applying Themes to Pages1. Start by creating a master page for the site. This is going to be a very small and simple site, but
having a master page will help you to navigate consistently around the site. Call the masterpage ThemedMaster.master. Into the master page, add a TreeView control on the left-handside of the page, and place the ContentPlaceholder to the right by using the followingHTML. Notice the style attributes on the two bold <div> elements that will help to lay out thecontents of the page in two columns:
157
Styling with Themes
08_588508 ch05.qxd 10/10/05 6:29 PM Page 157
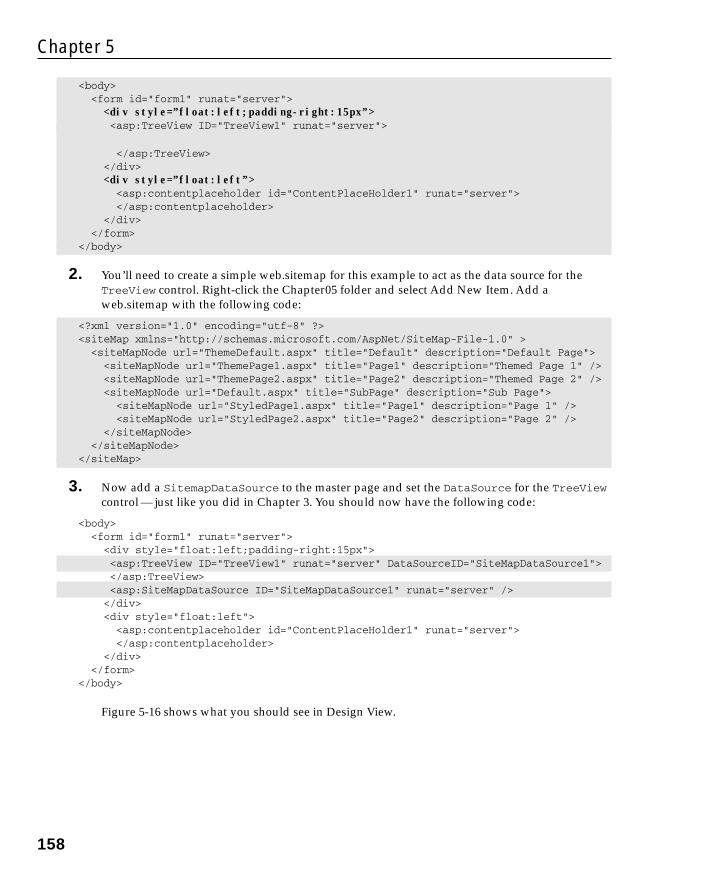
<body><form id=”form1” runat=”server”>
<div style=”float:left;padding-right:15px”><asp:TreeView ID=”TreeView1” runat=”server”>
</asp:TreeView></div><div style=”float:left”>
<asp:contentplaceholder id=”ContentPlaceHolder1” runat=”server”></asp:contentplaceholder>
</div> </form>
</body>
2. You’ll need to create a simple web.sitemap for this example to act as the data source for theTreeView control. Right-click the Chapter05 folder and select Add New Item. Add aweb.sitemap with the following code:
<?xml version=”1.0” encoding=”utf-8” ?><siteMap xmlns=”http://schemas.microsoft.com/AspNet/SiteMap-File-1.0” >
<siteMapNode url=”ThemeDefault.aspx” title=”Default” description=”Default Page”><siteMapNode url=”ThemePage1.aspx” title=”Page1” description=”Themed Page 1” /><siteMapNode url=”ThemePage2.aspx” title=”Page2” description=”Themed Page 2” /><siteMapNode url=”Default.aspx” title=”SubPage” description=”Sub Page”>
<siteMapNode url=”StyledPage1.aspx” title=”Page1” description=”Page 1” /><siteMapNode url=”StyledPage2.aspx” title=”Page2” description=”Page 2” />
</siteMapNode></siteMapNode>
</siteMap>
3. Now add a SitemapDataSource to the master page and set the DataSource for the TreeViewcontrol — just like you did in Chapter 3. You should now have the following code:
<body><form id=”form1” runat=”server”>
<div style=”float:left;padding-right:15px”><asp:TreeView ID=”TreeView1” runat=”server” DataSourceID=”SiteMapDataSource1”></asp:TreeView><asp:SiteMapDataSource ID=”SiteMapDataSource1” runat=”server” />
</div><div style=”float:left”>
<asp:contentplaceholder id=”ContentPlaceHolder1” runat=”server”></asp:contentplaceholder>
</div> </form>
</body>
Figure 5-16 shows what you should see in Design View.
158
Chapter 5
08_588508 ch05.qxd 10/10/05 6:29 PM Page 158

Figure 5-16
4. Time to build some content pages. In this example, you should create three very simple pages.The first one is called ThemeDefault.aspx. Start by right-clicking the Chapter05 folder andselect Add New Item. Make sure you check the box to specify a master page for the new pageand select the master page you just created when prompted (see Figure 5-17).
Figure 5-17
159
Styling with Themes
08_588508 ch05.qxd 10/10/05 6:29 PM Page 159

5. In the Content placeholder on this new page, type in some plain text: “Default page!”, andthen drag two Label controls onto the page. Set the first Label control’s text property to“Styled label” and the second Label control’s text property to “Unstyled label”. Finally,set the first Label control’s SkinID property to textLabel. This will link up the Label controlto use the skinned label’s styling. Your page should look like Figure 5-18.
Figure 5-18
6. Last, you need to specify which theme to use for this page. Let’s use the blue theme. If you are inDesign View, click the gray area and view the properties for the Document: In this properties list,you should set the Theme property to Blue. Save the page and that’s the first one out of the way.
If you prefer to use Source View and work with HTML directly, your code should be similar to thefollowing — notice the MasterPageFile and Theme attributes (in bold) on the @Page directive atthe top of the page that control the layout and style for this page:
<%@ Page Language=”VB” MasterPageFile=”~/ThemedMaster.master” Title=”Untitled Page”Theme=”Blue” %><asp:Content ID=”Content1” ContentPlaceHolderID=”ContentPlaceHolder1”
Runat=”Server”>Default page!<br /><asp:Label ID=”Label1” SkinID=”textLabel” runat=”server” Text=”Label”>
Styled label</asp:Label><asp:Label ID=”Label2” runat=”server” Text=”Label”>
Unstyled label</asp:Label></asp:Content>
160
Chapter 5
08_588508 ch05.qxd 10/10/05 6:29 PM Page 160

7. Now you need to add two more pages in the same way. Call them ThemePage1.aspx andThemePage2.aspx. Make sure that you specify the same master page for these content pages.
8. In ThemePage1.aspx, enter the text “Page 1” and add a Calendar control onto the Contentarea of the page. Set the page’s Theme property to Blue. The source code for this page shouldlook as follows:
<%@ Page Language=”VB” MasterPageFile=”~/ThemedMaster.master” Title=”Untitled Page”Theme=”Blue” %><asp:Content ID=”Content1” ContentPlaceHolderID=”ContentPlaceHolder1”
Runat=”Server”>Page 1<br /><asp:Calendar ID=”Calendar1” runat=”server”></asp:Calendar>
</asp:Content>
9. In ThemePage2.aspx, enter the text “Page 2” and add an ImageButton control to the page. Setits SkinID property to be homeImage and the PostBackUrl property to beThemeDefault.aspx. This will mean that if a user clicks the image, she will be taken back tothe ThemeDefault.aspx page. Finally, set the page’s Theme property to Red. The source codefor this page should look as follows:
<%@ Page Language=”VB” MasterPageFile=”~/ThemedMaster.master” Title=”Untitled Page”Theme=”Red” %><asp:Content ID=”Content1” ContentPlaceHolderID=”ContentPlaceHolder1”
Runat=”Server”>Page 2<br /><asp:ImageButton ID=”ImageButton1” SkinID=”homeImage” runat=”server”
PostBackUrl=”ThemeDefault.aspx” /></asp:Content>
10. Right — you’ve finished the groundwork, so it’s time to see the results of your hard work! Click theThemeDefault.aspx in the Solution Explorer and press Ctrl+F5 to run the page (see Figure 5-19).
Figure 5-19
161
Styling with Themes
08_588508 ch05.qxd 10/10/05 6:29 PM Page 161

Click through to Page 1 to see the Calendar control, shown in Figure 5-20.
Figure 5-20
And finally, Page 2 (see Figure 5-21) includes the ImageButton control, and will use the redtheme.
Figure 5-21
162
Chapter 5
08_588508 ch05.qxd 10/10/05 6:29 PM Page 162

11. Change the Theme attribute on Page 1 to use the red theme. Save the page and view it again. Itshould look like Figure 5-22.
Figure 5-22
How It WorksIn this example, the themes built in the previous Try It Out example have been applied to a simple collection of pages. You’ll recall that master pages were first discussed way back in Chapter 2, and in this chapter you’ve seen that when you have a page that uses a master page, the entire rendered page istreated as a single entity. Remember how you set the ThemeDefault.aspx page to use the Blue theme, butyou didn’t specify any Theme property on the master page? The truth is that you can’t actually specify atheme directly on a master page in any case. Your pages in this example have shown how changing theTheme property on each page individually has styled the entire page (including the TreeView controladded to the master page) with the same consistent look and feel. That style can easily be switched ondifferent pages, as you saw with Page 1 in this Try It Out.
The main pieces of code that you need to be aware of are the Theme property in the Page directive andthe SkinID attribute on server controls. Adding just these two pieces of information to a page resulted inthe finished pages. Take ThemePage2.aspx as an example:
<%@ Page Language=”VB” MasterPageFile=”~/ThemedMaster.master” Title=”Untitled Page”Theme=”Red” %><asp:Content ID=”Content1” ContentPlaceHolderID=”ContentPlaceHolder1”
Runat=”Server”>Page 2<br /><asp:ImageButton ID=”ImageButton1” SkinID=”homeImage” runat=”server”
PostBackUrl=”ThemeDefault.aspx” /></asp:Content>
163
Styling with Themes
08_588508 ch05.qxd 10/10/05 6:29 PM Page 163

The Theme attribute at the top of the page specifies which theme should be applied to the entire page,including the contents of the master page that it’s connected to. The SkinID property specifies whichskin of an ImageButton control to apply to the ImageButton on the page, so if you had many differentImageButton control styles defined in your skin file, this attribute would specify which one to use onyour page.
In the preceding example, you used the Theme attribute specified at the top of each page to indicatewhich theme to use to style a page. There is another attribute that you can use to style the elements on apage: the StyleSheetTheme attribute. Both the Theme attribute and the StyleSheetTheme attributetake the name of the theme to apply as the value, and both are used to style pages using themes, but theattribute you choose to use can result in slightly differently rendered pages. Here’s why.
Customization Themes — You Have Control!The pages in the previous example used the Theme attribute, which means that you have just usedCustomization themes to style each of the pages in the example. A Customization theme has total controlover the styling of elements on a page. If you manually style elements on a page controlled by aCustomization theme, those styles will only be applied if the elements to which they are added are notalready styled by the theme.
Stylesheet Themes — CSS for Server ControlsIf you’d prefer to use your themes like a style sheet, you can easily choose to do so by using theStyleSheetTheme attribute at the top of a page. This change in attribute means that you can still givedevelopers the freedom to add some small amounts of styling to controls using style attributes on eachtag, while providing a common look and feel for a site in the theme itself.
The best way to see the differences between Stylesheet themes and Customization themes is to have aplay, so in this Try It Out you modify the previous example to see the differences.
Try It Out Customization and Stylesheet Themes1. Open up ThemeDefault.aspx and add a Font-Bold=”true” to the code for the Styled
label. Alternatively, switch to Design View, select the Styled label and select the Font nodefrom the Properties tab and specify that the font should be bold:
<asp:Label ID=”Label1” SkinID=”textLabel” runat=”server” Text=”Styled label” Font-Bold=”True”></asp:Label>
2. Run the page now and you’ll see a bold label, as depicted in Figure 5-23.
164
Chapter 5
08_588508 ch05.qxd 10/10/05 6:29 PM Page 164

Figure 5-23
3. Now edit the label declared with the SkinId=”textLabel” in the BlueBits.skin file and addthe following bolded declaration:
<asp:Label SkinId=”textLabel” runat=”server” Font-Names=”Century Gothic” Font-Size=”10pt” ForeColor=”MidnightBlue” Font-Bold=”False”></asp:Label>
4. Run the page again and the label will no longer be bold, evidenced in Figure 5-24.
Figure 5-24
5. Change the Theme attribute at the top of the ThemeDefault.aspx page to read StyleSheetThemeinstead of Theme. Alternatively, in Design View, edit the properties for the page and specify thatthe page’s StyleSheetTheme should be Blue, and delete the Theme property. Run the pageagain and you’ll see that the label is now bold once more.
How It WorksThe first step in this exercise was to add a Font-Bold=”True” attribute to the label. Because the boldattribute hadn’t been specified in the Customization theme, the style in the page was applied successfullyand the control was rendered with bold blue text.
165
Styling with Themes
08_588508 ch05.qxd 10/10/05 6:29 PM Page 165

However, adding a Font-Bold=”False” to the skin’s textLabel control overrides the style in the pagebecause the page is still using the Customization theme (the Theme attribute at the top of the page). As aresult, the second time you ran the page, you saw that the page now has a non-bold blue label.
The last step was to change to using a StyleSheetTheme instead of a Theme attribute at the top of thepage. This enabled the page’s styles to once more take priority, and so the bold blue label returned thethird time the page was run.
Using a Stylesheet theme or a Customization theme is completely up to you. Choosing a Customizationtheme gives your designer a bit more control over the look and feel of a site, whereas the Stylesheettheme lets you play with control rendering yourself. Bear in mind, though, that if you start adding yourown style attributes to controls, you may find that your site appears somewhat strangely if you everdecide to change the contents of the theme, or switch to a completely different theme.
Using Both Stylesheet Themes and Customization ThemesNo rules in ASP.NET specify that you can only use a Stylesheet theme or a Customization theme in yourpages. If you want to have two levels of styling available to your pages, some mandatory, some optional,you can use both types of theme on your site.
For example, you may specify that major page elements must stay consistent from page to page. The<body> tag of a page must always be in a certain font, and the Menu control must always contain a certainstyle of node, but you may want to only use styling on Label controls as a guideline or default style. Youcan therefore create one theme that defines rules for main page elements and Menu controls and specifythat theme to be used as the Customization theme. You can then create a different theme with some otherstyle information in it that you can apply to a site as you create it and override certain element styles, andthen apply the second theme as a Stylesheet theme. The following list is the order of application when itcomes to styling:
1. Stylesheet theme
2. CSS styles
3. Element styles
4. Customization theme
Styles specified in a Customization theme will always override all other settings.
Themes and CSS TogetherCSS is a great way to style a site, so it’s great that there’s a really simple way to integrate style sheets inyour themes. All you need to do is add a style sheet file to the theme’s directory and slot it in right nextto your skin files. Your non-ASP.NET designer will certainly be pleased that you can easily integrate hisdesigns in your server-side pages!
Because this isn’t a tough concept, you can jump straight in with a quick example to show how thisworks.
166
Chapter 5
08_588508 ch05.qxd 10/10/05 6:29 PM Page 166

Try It Out Integrating CSS and Themes1. Head straight back into VWD, right-click the Blue theme folder, and select Add New Item. In
the dialog that pops up, add a new style sheet and call it BlueStyleSheet.css.
2. In the newly created style sheet, add the following code:
body {
font-family:Arial;}.bigtext{
font-size:xx-large;}
3. Now flip back into ThemeDefault.aspx and add a CssClass attribute to the unstyled label,with a value of “bigtext”:
<asp:Label ID=”Label2” CssClass=”bigtext” runat=”server” Text=”Unstyled label”></asp:Label>
4. Run the page now and you’ll see that the label now has xx-large text style applied (see the CSSstyle sheet definition), and the default font for the page (everything within the <body> tag) isnow formatted using Arial as the font face, as shown in Figure 5-25.
Figure 5-25
5. Flip to the BlueBits.skin file and add another Label control definition. Set its SkinID to be“bigLabel” and give it a CssClass attribute of “bigtext” and save the file:
<asp:Label SkinId=”bigLabel” runat=”server” CssClass=”bigtext”></asp:Label>
6. Remove the CssClass attribute from the label and set its SkinID attribute to “bigLabel”:
<asp:Label ID=”Label2” SkinID=”bigLabel” runat=”server” Text=”Unstyled label”></asp:Label>
167
Styling with Themes
08_588508 ch05.qxd 10/10/05 6:29 PM Page 167

Notice that the IntelliSense in VWD kicks in here and helps out by giving you the option ofspecifying which label style to use (see Figure 5-26), because you now have more than one avail-able in your selected theme.
Figure 5-26
Note that you will get the IntelliSense support here only if you have saved the skin file beforegoing back into the ThemeDefault.aspx page.
Running the page once more will render the same result; the only differences are whether theskin file or the page contains the styling information.
How It WorksBy adding a CSS style sheet to a theme folder, that style sheet is now available to all pages that use thattheme. Once the theme has been applied, whether it’s a Customization theme or a Stylesheet theme, the styles in the style sheet are available both to the skin files within the theme’s folder, and within thepage itself.
The same rules apply to CSS-styled server controls from a Customization versus Stylesheet theme perspective — if you apply a CSS style to an element in a theme and apply a different style to an element on a page, the result will vary according to which type of theme you have applied. If you applya Customization theme, the theme defined in the skin file will overrule any styles or CSS classes specified in the .aspx page, whereas the opposite is true if you specify that your theme be used as aStylesheet theme.
Applying Styling to a SiteIn most situations, you will likely want to apply a consistent look and feel to all pages within a site.Although you could just specify that all of your pages in the site use the same theme, it’s quicker andeasier to specify the default theme for the site in a central location. In ASP.NET 2.0, you can add a valueto the Web.config file for your site to specify the default theme for your pages. You will remember that
168
Chapter 5
08_588508 ch05.qxd 10/10/05 6:29 PM Page 168

you used the Web.config file in Chapter 4 when you specified site access permissions for different useraccounts. Because a Web.config file is the central location for all site-wide settings, this is where youcan store default theme settings for your site. The basic syntax for this is as follows:
<?xml version=”1.0”?><configuration>
<appSettings/><connectionStrings/><system.web>
<pages theme=”myTheme” styleSheetTheme=”myOtherTheme” />
You can specify both a Stylesheet theme and a Customization theme in the Web.config file. If a theme isspecified in the Web.config file and no theme is specified in a page, the theme in the Web.config willbe applied. Additionally, if your Web.config specifies a Customization theme for a site and you specifya Stylesheet theme for your page, the Customization theme from the Web.config will be applied.Here’s a slightly amended order of application for themes, including the Web.config themes:
1. Web.config Stylesheet theme
2. Page Stylesheet theme
3. CSS styles
4. Element styles
5. Web.config Customization theme
6. Page Customization theme
In the next Try It Out, you quickly specify a site-wide theme for the pages in the small applicationyou’ve been building in this chapter so far.
Try It Out Applying Themes to a Site1. Right-click the Chapter05 folder and select Add New Item. In the dialog, create a new Web
configuration file (Web.config) and click OK.
2. Add the following line of code (highlighted in bold) to the Web.config file and save the file:
<?xml version=”1.0”?><!--
Note: As an alternative to hand editing this file you can use the web admin tool to configure settings for your application. Usethe Website->Asp.Net Configuration option in Visual Studio.A full list of settings and comments can be found in machine.config.comments usually located in \Windows\Microsoft.Net\Framework\v2.x\Config
--><configuration>
If you want to completely control the appearance of an entire site, use aCustomization theme in the Web.config file.
169
Styling with Themes
08_588508 ch05.qxd 10/10/05 6:29 PM Page 169

<appSettings/><connectionStrings/><system.web>
<pages theme=”red” styleSheetTheme=”blue” />
3. Remove all Theme and StyleSheetTheme attributes from all of the pages used in this chapterand run the application. All of the pages in the site will now be rendered in the red theme, butnote in Figure 5-27 the result in the ThemeDefault page.
Figure 5-27
How It WorksThe resulting output in the ThemeDefault.aspx page seems to be a bit of a mixture of two differentthemes, yet you specified that all pages in a site should use the red Customization theme. However, inthe previous example, you added a CSS file and some additional style information to the blue theme,and because the blue theme is set as a Stylesheet theme for the site, and because there are no equivalentsfor these styles in the red theme, these styles are picked up from the blue theme and applied to the bodytext and the “Unstyled label” label control:
The first line of HTML code is part of the body of the page:
Default page!<br />
So this is styled using the blue theme’s body style from the BlueStyleSheet.css file:
body {
font-family:Arial;}
170
Chapter 5
08_588508 ch05.qxd 10/10/05 6:29 PM Page 170

The next item in the code for this page is the “Styled label” control, which has a SkinID oftextLabel:
<asp:Label ID=”Label1” SkinID=”textLabel” runat=”server” Text=”Styled label”Font-Bold=”True”></asp:Label>
Because this SkinID exists in both themes, the red theme is applied, because this theme is set to be theCustomization theme in the Web.config file:
<asp:Label SkinId=”textLabel” runat=”server” Font-Names=”Garamond” Font-Size=”11pt”ForeColor=”DarkRed” />
Here’s the line of code in the Web.config again:
<pages theme=”red” styleSheetTheme=”blue” />
Remember that the theme attribute represents the Customization theme. However, the specifiedCustomization theme in this case, the red theme, has no SkinID for a “bigLabel”, so the blue theme isused instead:
<asp:Label ID=”Label2” SkinID=”bigLabel” runat=”server” Text=”Unstyledlabel”></asp:Label>
So the last item on the page is styled according to the blue theme:
<asp:Label SkinId=”bigLabel” runat=”server” CssClass=”bigtext”></asp:Label>
One last thing to note — the Label control is still part of the body of the page, and because no additionalfont information has been specified for the control, it also inherits the CSS style for the body of the pagefrom the blue theme.
The final example to look at in this chapter is that of the themes used in the Wrox United application.The following section takes a quick look at the themes and styling in the application.
Themes in Wrox UnitedThe themes defined for the Wrox United site control the appearance of the team’s site. Two themes areavailable for the site: a red theme and a blue theme. The normal, everyday theme is the red theme, and itreflects the team’s home outfit in blocks of bold red and yellow. The other theme available to contrastwith the red theme is the blue theme, which is designed mainly to show up the differences between twodifferent themes being applied to a site. Figure 5-28 shows the site in its traditional Wrox Red colors.
171
Styling with Themes
08_588508 ch05.qxd 10/10/05 6:29 PM Page 171

The way that themes are applied in Wrox United is slightly different from the techniques that you’velooked at in this chapter, because it relates to user preferences. As you saw in Chapter 4, you can adduser accounts to a web site to enable users to log in to a site. Once a user has logged on to the WroxUnited site, there is some code that enables that user to store personal information (the user’s name,address, and so on), and to store personal preferences, such as the theme to apply to the site when theuser logs on.
The code that handles the theme switching is explained in detail in Chapter 11, because it involves an understanding of several techniques that you’ve not yet met this far in the book. However, in the following Try It Out, you can see how the themes are applied to the Wrox United site, and it stepsthrough the most interesting bits in the theme definitions for the Wrox United site.
Figure 5-28
172
Chapter 5
08_588508 ch05.qxd 10/10/05 6:29 PM Page 172

Try It Out Using Themes in Wrox United1. Open up your local copy of the Wrox United application — this should be stored within your
C:\BegASPNET2\WroxUnited folder.
2. Press Ctrl+F5 to run the site and you’ll be taken to the main front page in its default color scheme. In the login box near the bottom of the left-hand column, log in as the user Lou,password lou@123. In the box that appears below the login box, you need to click the ModifyAccount link, as highlighted by the hand-style cursor in Figure 5-29.
Figure 5-29
173
Styling with Themes
08_588508 ch05.qxd 10/10/05 6:29 PM Page 173

3. In the screen that appears (see Figure 5-30), select the Wrox Blue theme from the Theme drop-down list and click Save Changes.
Figure 5-30
4. Click the Home link at the top of the menu at the side of the page to go back to the front page ofthe site and you’ll now see the site rendered with the blue theme, as shown in Figure 5-31.
You might not be able to see the difference that clearly in a printed book, but because it’s quiteeasy to try out for yourself, give it a go and see the changes for yourself!
174
Chapter 5
08_588508 ch05.qxd 10/10/05 6:29 PM Page 174

Figure 5-31
How It WorksThis example has demonstrated the theme-switching capability of the Wrox United site, which is something you’ll look at in a lot more detail in Chapter 11, but the important part of the exercise to concentrate on here is the styling of the site itself.
Many styles are in use on this site, so look at the Wrox Red theme first of all and see how the styling isapplied to the elements on the page using this theme.
The Wrox United red skin (the WroxRed.skin file within the WroxRed Theme folder) is included with therest of the code for the site (available at www.wrox.com). The following listing shows some of the stylesdefined in this skin file:
175
Styling with Themes
08_588508 ch05.qxd 10/10/05 6:29 PM Page 175

<asp:Label runat=”server” ForeColor=”#000000” BackColor=”transparent”></asp:Label>
<asp:TextBox runat=”server” ForeColor=”#000000” BorderWidth=”1px” BorderStyle=”Solid” BorderColor=”#ff0000” BackColor=”Transparent”></asp:TextBox>
<asp:Button runat=”server” BorderStyle=”Solid” BorderColor=”#ff0000” BorderWidth=”1pt” ForeColor=”#000000” BackColor=”#ffe5e5”></asp:Button>
<asp:HyperLink runat=”server” Font-Underline=”True” BorderStyle=”None”></asp:HyperLink>
Notice that there are specific style definitions for Label, TextBox, Button, HyperLink, and Calendarcontrols, which means that every instance of a control of each of those types will be styled as defined inthis skin file.
Here’s the TextBox definition:
<asp:TextBox runat=”server” ForeColor=”#000000” BorderWidth=”1px” BorderStyle=”Solid” BorderColor=”#ff0000” BackColor=”Transparent”></asp:TextBox>
The TextBox has been styled so that it has a thin solid red border around it. Note that the value specified for the BorderColor attribute doesn’t actually say red in English, but instead it uses the hexadecimal representation of a pure, bright red color.
The hash symbol (#) indicates that the color to be applied is provided as a hexadecimal value. The nexttwo characters control how much red to add to the control, from 00 to FF. The next two characters control the level of green to apply, and the last two control the level of blue. The hexadecimal value000000 represents a pure black (none of each color), whereas the value FFFFFF renders as white (all ofevery color).
The hexadecimal counting system (sometimes known as Base 16) means that the hex value FF corresponds to the decimal value of 256. With 256 different values for each component, that enables youto choose from one of 16 million possible color values!
The Wrox Red theme also has an associated CSS style sheet, WroxRed.css, which is also available in thecode for download. The following is an extract from this file:
html, body {margin: 0;padding:0 5px 0 5px;background-color: #f00;color: #000;
}
title {color: #f66;
}
#nav {background-color: #f00;width: 20px;float: left;margin-left: -1px;
176
Chapter 5
08_588508 ch05.qxd 10/10/05 6:29 PM Page 176

padding: 10px;}
#content {padding: 10px;margin-left: 230px;width: 100%;
}
The styles in use in this theme define some simple color and positioning for some of the elements usedon the site. The #nav definition and the #content definition are used to match all elements on a pagewith an ID set to nav or content respectively, rather than specifying the class attribute, or specifying aspecific element type to style.
Styling and Layout Best PracticesThe concepts discussed in this chapter can be used for both good and evil. You can have as many styledefinitions in your site as you like, but if you have little or no sense of style, you could make a big messof things. And style is nothing without layout — the two go hand in hand. Pages need to be structuredsensibly so that any user can view and understand what you’re trying to tell them. Now that you’vegrasped the basics of styling and presenting a site, the two concepts you need to learn about now areusability and accessibility.
UsabilityUsability is all about keeping users on your site, and giving them the best possible user experience whilethey browse. Users want to see prompt responses to their requests, they want to be able to find whatthey want, and they want to be able to understand what the site is all about. A site that has fifteen fontson it will appear cluttered, hard to read, and most likely look like it was put together by someone who’dnever spent time reading content on a web site.
The goal of every web development team is to make a site as usable as possible, which means developersworking together with designers to provide an attractive and intuitive user interface, which is where youcan start to employ the techniques discussed in this chapter. The core principles of usability are as follows:
❑ Learnability: Design the user interface so that it takes a minimum of time for a first-time visitorto understand the design and use the site.
❑ Efficiency: Make the site efficient so that experienced users can accomplish tasks swiftly.
❑ Memorability: A user should be able to remember how to use the system next time they cometo visit.
❑ Bugability: Squash those errors where possible, and if errors occur, make them user-friendlyand recoverable.
❑ Satisfaction: Users should like and enjoy using your site.
177
Styling with Themes
08_588508 ch05.qxd 10/10/05 6:29 PM Page 177

Usability is an art that has been written about by many people, but the main site you should refer towhen it comes to usability guidelines is www.useit.com/, which is the web site owned by JakobNielsen. I recommend that all developers spend some time looking in to this area and gain some keyinsights into making your sites really effective.
AccessibilityAccessibility is all about making sites accessible by all users. For example, web users who are partiallysighted access the web with the assistance of a screen reader, which reads the contents of a web sitealoud. Alternatively, these users could have their screens set to a much lower resolution, where mostsites would be unable to fit on the screen. At another end of the spectrum, you could also find mobileusers connecting to the Web using a Pocket PC device that’s only capable of displaying 320×240 pixels ofinformation at one time. The browsers used on different devices like Pocket PCs employ some greattechniques for scaling images to make a site fit on a screen. You could also find yourself having to caterto users who have very limited-functionality browsers; perhaps browsers that don’t allow the use ofJavaScript for client-side code, or that don’t display images on a page to save on bandwidth. If an imagewere missing from a page, it would be nice to know what the image was supposed to represent to give itsome context in the absence of the image itself.
At the core of accessibility are some facts that will help you to make your sites as accessible as possible.For example, if you have a screen reader reading out your source code, you should always include anHTML alt attribute on your images, so that the screen reader can describe what the image represents.You should always provide code that can render your site on browsers that don’t support HTML framesusing the <noframes> element, and you should avoid, where possible, using many levels of nestedHTML tables to lay out a site, because a screen reader will read out the contents of every cell and row.
Many different guidelines are available for making a site accessible, and the best place to start reading isthe following site: www.w3.org/WAI/.
This site is the home page for the Web Accessibility Initiative and is packed full of useful and importantadvice.
Despite the existence of myriad resources, the vast majority of developers in the world have never given asecond thought to making a site truly accessible. Many more have thought about it and made somechanges to their site in an attempt to make it more accessible, but building truly accessible sites is actuallyquite difficult.
Take for example the Wrox United web site. This book has concentrated on teaching you how to buildASP.NET web sites. The main focus of our efforts was in teaching what is possible, the techniques youcan use, and how you can get results quickly. To make this site truly accessible would take a fair bit moretime, and perhaps that would be the topic for another book.
We strongly recommend learning more about building accessible web sites for any public site youdevelop, because it’s actually illegal (though not often enforced) to only provide an inaccessible web site,as described in Section 508 (see www.section508.gov) in the U.S., and the Disability RightsCommission’s (DRC) Disability Discrimination Act (DDA) Code of Practice (www.opsi.gov.uk/acts/
178
Chapter 5
08_588508 ch05.qxd 10/10/05 6:29 PM Page 178

acts1995/95050--c.htm) in the UK. Prosecution for inaccessibility is quite rare, but because it’sentirely possible to design accessible web sites, it’s worth adding accessible web design to your skill setfor both those with disabilities, and for your own professional reputation.
SummaryThis chapter discussed all of the different ways of styling a page and its elements, and demonstratednumerous methods for controlling look and feel. The new skinning and themeing capabilities of ASP.NET2.0 provide you with a great way to combine all available techniques into one easily applied package.
This chapter discussed the following:
❑ How to apply style attributes to elements.
❑ How to move style attribute information into <style> sections in a page, then into a separateCSS file.
❑ Creating ASP.NET themes and applying them to pages.
❑ The differences between Customization themes and Stylesheet themes.
❑ Integrating themes and CSS.
❑ Applying a consistent style to all pages in a site.
❑ The issues of usability and accessibility and why they are so important in today’s Internet world.
The next chapter moves on to discuss something quite different; the issues of raising and handlingevents in code, as you are introduced to the concept of a postback-driven architecture.
Exercises1. You have an ASP.NET Label control on a page. The label has a font-italic=”true” attribute,
and a CssClass=”maintext” attribute:
<asp:label id=”myLabel” CssClass=”maintext” font-italic=”true” text=”This is a label”></asp:label>
The page has an associated CSS style sheet (not associated with a theme) that defines a .main-text style class. This style class has the following attributes:
.maintext{
color: Navy;font-family: Verdana;font-weight: Bold;font-style: normal;
}
How will the label appear when it is rendered?
179
Styling with Themes
08_588508 ch05.qxd 10/10/05 6:29 PM Page 179

2. You now add a Theme=”ExerciseTheme” to the preceding page. You place the CSS style sheetfrom the previous exercise within the ExerciseTheme theme folder. How will the label controlappear now?
3. You define a skin for all labels within the ExerciseTheme theme folder and specify the followingattributes:
<asp:Label CssClass=”maintext” runat=”server” font-italic=”false”></asp:Label>
How will the label appear now?
180
Chapter 5
08_588508 ch05.qxd 10/10/05 6:29 PM Page 180

6Events and Code
We’ve managed to avoid lots of code so far, but you can’t get away from it completely, so now it’stime to get your hands dirty. You’re not only going to look at code, but also the event architectureof ASP.NET and how web servers work. The reason for this is simply because knowing how webservers process pages enables you to understand how the architecture of ASP.NET works. In turnthis leads to understanding how and why the ASP.NET events work.
In particular, this chapter looks at the following:
❑ A high-level overview of the Internet HTTP protocol
❑ The problems brought by web servers and how the ASP.NET event architecture solvesthose problems
❑ How server-side code works, and how it is created and used
❑ How events relate to the controls placed on a page, and the various types of events thatyou can use
The chapter starts by looking at web servers and the HTTP protocol.
Web Server ArchitectureHTTP stands for HyperText Transfer Protocol, and it’s the method of communicating with webservers. The protocol defines the commands that web servers can accept, and how browsers interact with them. The key point is that a web browser requests a page from the server. The serverprocesses that page and sends the results back to the browser. The browser only understandsHTML or JavaScript. HTML is the language that describes the layout of text and images on thepage, and JavaScript enables programming on the client, within the browser. It’s the web server’sjob to ensure that only the required content is sent back to the client browser.
09_588508 ch06.qxd 10/10/05 6:28 PM Page 181

Chapter 3 briefly discussed the difference between static and active content, and went on to look at theHTML and server controls, so you’ve seen that server controls need to be processed on the server, andthat they emit HTML for the browser. What you need to do now is look at how this process actuallyworks: what happens when you fire up your browser and type a URL into the address box, what hap-pens when you press a button on a page, how the web server keeps track of the pages, and so on.
HTTP works by having a set of commands that browsers send to a web server. The two most common ofthese commands are GET and POST. The GET command is what a browser sends when a web page is tobe fetched — it’s what happens when you type a URL into the browser’s address bar and press Return; itsimply means “get me this web page.” The POST command is for when something is to be sent back tothe web server — for example, when you fill in a form and press a button. In reality the POST commandactually fetches a page, but it also sends the form data back to the web server.
You don’t need to know the rest of the HTTP commands or how any of them work in detail, but it’s use-ful to know the terms and to understand that HTTP is very simple.
HTTP Is StatelessOne of the things you have to understand about HTTP is that it is stateless, meaning that it retains noknowledge from one request to the next. So when you request a page from a web server, the page is sentto you, and the server immediately forgets everything about you; each request stands alone. HTMLdoesn’t help much either, because it’s simple a language for the representation of the contents of thepage; like HTTP, HTML doesn’t retain content. For example, consider a simple web page that has a textbox and a button. In your browser you enter some text and press the button. The data you entered issent back to the web server, the web server process the page (making changes as necessary), and thepage is sent back to the browser to be redisplayed. However, because there is no retention of data, thetext box comes back empty — it’s as though the web server has forgotten your text.
Why is this a problem? Well, it poses some real issues when writing applications, because very often youwant some form of data retention. For example, consider the checkout page at an online store, such asthe one at the Wrox United online shop, as shown in Figure 6-1.
Figure 6-1
182
Chapter 6
09_588508 ch06.qxd 10/10/05 6:28 PM Page 182

The checkout involves several steps, each of which requires users to supply some form of information:making sure they are logged in, checking their address, and authorizing payment. As far as HTTP is concerned, each step is a separate request from the user; the page loading is one request, pressing theNext button is another request, and so on.
When you fill in some details on a page and press a button, that information is posted back to the webserver (the term posted derives from the actual HTTP POST command used). When you reach the last ofthe checkout steps, you need all of the information entered by the user, not just the data supplied withthe last step. Because HTTP and HTML don’t retain this information for you, you have to store it your-self. In non-ASP.NET environments this can be quite complex and time consuming, but luckily for us theserver controls are clever; they retain their state across postbacks. This means you don’t have to do any-thing special; if you press a button to post the information back to the server, when the page is refreshedthe text boxes still have their data. This is one of the big differences between standard HTML and servercontrols, and is one of the reasons why we use server controls.
The server controls remove even more of a burden from us. Consider the checkout page shown earlier,which has several text boxes, and that’s only one step; there’s also the login details, plus the credit carddetails, plus the management of the steps themselves. Server controls are used for all of the text entry,but there is also a Wizard control, designed specially for use in situations like this. It manages the steps,creates the menu of steps on the left, and provides the Previous and Next buttons. All you have to do isdefine what you want within those steps. When you get to the last step everything the user has typed inis available, and the order can be processed.
Server-Side EventsSo far you’ve seen a very simple view of what happens when you interact with a web server — you pressa button and something happens. So what is it that actually happens on the server, in your ASP.NETpage? Well, simply put, there are a number of events that run; some that always run, some that only rundepending on what the user has done (which button they’ve pressed), and some that run due to otheractions, such as data being changed. These events are ASP.NET’s way of letting you know something hashappened, and they allow you to take some action. For example, all ASP.NET pages have an event thatruns when the page loads, and you can place code within this event to perform some action. Buttons havean event that runs when you click them, lists have an event that runs when you select a list item, and soon, and these events are what give you the power to control how the web page reacts to the user.
Before digging into the code, some terms need explaining. When an event happens it is called firing orraising. That is, the event is raised or the event is fired. Both terms are valid, and which you use is a matter of preference (I prefer raised, because fired always makes me think of a poor little event beingstuffed into a canon at a circus before being launched into a tiny net to amuse the crowd). Both terms areused regularly in the .NET documentation and on various online sites and articles.
The code that is run when the event is raised is called the event procedure or event handler. Any code you put in here becomes part of the event procedure and runs when the event is raised. For example,consider a page with two buttons. Each of these buttons could have its own event procedure, while thereis a separate event procedure for when the page loads, as illustrated by Figure 6-2.
183
Events and Code
09_588508 ch06.qxd 10/10/05 6:28 PM Page 183

Figure 6-2
Figure 6-2 shows three event procedures. This first is the Page_Load event, which is raised by ASP.NETand allows you to prepare the page for the user, perhaps fetching data from a database. The other twoevents are generated by the user when a button is clicked; each button has its own event handler. Forexample, the first button might save some user-entered details, whereas the second button cancels user-entered details.
Adding Events to the PageAdding events to ASP.NET pages is simple because Visual Web Developer (VWD) provides a way to dothis for you. It allows you to select the page or a control and for the allowable events to be listed. You canthen instruct VWD to create the event procedure for you. The first thing that needs to be discussed iswhere the events are created, because there are two places where events can be created. The first is in thesame file as the ASP.NET controls, and this is called code inline. The second place to create events andcode is in a separate file and this is called code-behind. Where the code is created depends upon a simplecheckbox on the Add New Item dialog, as shown in Figure 6-3.
Figure 6-3
184
Chapter 6
09_588508 ch06.qxd 10/10/05 6:28 PM Page 184

You can use either code inline or code-behind, because it doesn’t make any difference to ASP.NET, butcode-behind is the accepted standard, and all of the pages in the Wrox United application use code-behind, as do all of the examples in this chapter.
In the following Try It Out, you give events a go and add some events to a page.
Try It Out Adding Page and Control Events1. Start Visual Web Developer, and open the web site at C:\BegASPNET2\Begin\Chapter06. You
should see a screen similar to Figure 6-4.
Figure 6-4
2. Open the Default.aspx file and switch from Source View to Design View.
3. Drag a Label, a TextBox, and two Button controls onto the page, so that it looks like Figure 6-5.
Figure 6-5
185
Events and Code
09_588508 ch06.qxd 10/10/05 6:28 PM Page 185

4. In an empty area of the page, double-click the left mouse button to load the code file associatedwith the page and create an empty event procedure for you, as shown in Figure 6-6.
Figure 6-6
5. Switch back to the page design and double-click the first button, Button1. The event procedurefor this button is created (see Figure 6-7), underneath the event procedure for the page.
Figure 6-7
6. At the top of the code window, click the drop-down list on the left and select Button2. From thedrop-down list on the right, select Click to add another event procedure to the file, as illustratedin Figure 6-8.
Figure 6-8
7. In the Page_Load event procedure, add the following line of code:
186
Chapter 6
09_588508 ch06.qxd 10/10/05 6:28 PM Page 186

Label1.Text = “You entered “ & TextBox1.Text
The event procedure will now look something like this (it may be slightly different because thefollowing code has been wrapped to fit on the page):
Protected Sub Page_Load(ByVal sender As Object, ByVal e As System.EventArgs) Handles Me.Load
Label1.Text = “You entered “ & TextBox1.TextEnd Sub
8. In the Button1_Click event, add the following line of code:
TextBox1.Text = “You clicked button 1”
9. In the Button2_Click event, add the following line of code:
TextBox1.Text = “You clicked button 2”
10. Press F5 to run the example. Click OK if the Debugging Not Enabled dialog appears, acceptingthe default selection for adding a new Web.config file with debugging enabled. This is shown in Figure 6-9 and will only appear if debugging is not enabled, so clicking the OK button enables debugging and stops the dialog from appearing again. You may also receiveanother dialog or pop-up from a firewall if you have one running; this might be to warn you thata program is trying to access the Internet and if you have an option you should allow the access.
Figure 6-9
11. When the browser window appears you’ll see a screen similar to Figure 6-10. Don’t worry if thenumbers after localhost are different, because VWD picks this number.
Figure 6-10
Notice that the label has the text you set in the Page_Load event, but nothing else.
187
Events and Code
09_588508 ch06.qxd 10/10/05 6:29 PM Page 187

12. Enter your name into the text box and click the first button. For example, I entered Davebecause that’s my name, so the figures show Dave. Now the label has the text you entered (asshown in Figure 6-11), but the text box has the text set from the Button1_Click event.
Figure 6-11
13. Now click the second button. Figure 6-12 shows that the label text has changed to what the textbox contained in the previous step, and the text box contains the text from the Button2_Clickevent.
Figure 6-12
14. Now click the first button again, and you’ll see something similar to Figure 6-13.
Figure 6-13
How It WorksTake a look at how this works, starting with the Page_Load event.
Protected Sub Page_Load(ByVal sender As Object, ByVal e As System.EventArgs) Handles Me.Load
This is known as the declaration, and tells you lots about the procedure. It has three main areas: the bitsbefore the parentheses, the bits within them, and the bits after them. So at the beginning of the line youhave the following:
Protected Sub Page_Load
188
Chapter 6
09_588508 ch06.qxd 10/10/05 6:29 PM Page 188

❑ Protected tells you about who can use the procedure. In this case it means that only other programs within the same class can use this procedure. You don’t need to worry about this fornow; Chapter 9 looks at this in more detail.
❑ Sub tells you that this is a subroutine, and that it doesn’t return a value. That means ASP.NETcan simply call this and not expect anything back.
❑ Page_Load is the name of the event procedure. The name of event procedures can be anything,but you’ll find certain standard usages appearing that are descriptive of the actual event. ThePage_Load event is very descriptive because this event procedure will be used whenever the page is loaded into ASP.NET for processing.
Next you have the middle section; these are the parameters. There are two parameters, separated fromeach other by a comma:
ByVal sender As Object, ByVal e As System.EventArgs
The parameters are simply variables that get passed into the event procedure by ASP.NET. Chapter 9covers variables in more detail, so the actual syntax isn’t explained here, but some details are worthknowing. By and large all events in ASP.NET have two parameters. The first, typically called sender, isthe object that raised the event. In this case it is the actual page, because the page is saying “Hey, I’veloaded and you can do your stuff now.” For other events, such as those that buttons raise, the senderwould be the button. The second parameter, e, is any additional information that the event proceduremight need. For the Page_Load event there is no additional information, but later in the chapter you’lllook at events where you do need some extra detail. Neither of these arguments is needed for your eventprocedure, but they are provided by ASP.NET in case they are required.
The last part of the event procedure indicates which event the procedure is handling:
Handles Me.Load
This is how you actually hook into the event handling. When the page loads it raises its Load event, and any procedure that handles that event will be called. If you didn’t have this Handles statement,Page_Load would simply be a procedure, not an event procedure. So it’s not the name of the procedurethat’s important, it’s the Handles keyword and the name of the actual event; they tell ASP.NET thatwhen the Load event of the page is raised, this procedure should be run. The use of Me simply indicatesthe current page.
Now that you’ve actually hooked your procedure into the event handling system of ASP.NET, you canrun your own code:
Label1.Text = “You entered “ & TextBox1.Text
This line of code simply sets the text for the label to some static text plus whatever text was entered intothe text box. Don’t worry too much about what the ampersand (&) means — Chapter 9 looks at that sortof thing in more detail.
189
Events and Code
09_588508 ch06.qxd 10/10/05 6:29 PM Page 189

Here are the event procedures for the buttons:
Protected Sub Button1_Click(ByVal sender As Object, ByVal e As System.EventArgs) Handles Button1.Click
TextBox1.Text = “You clicked button 1”End Sub
The declaration is very similar to the Page_Load one, apart from the name of the procedure and theevent being handled. This time the event is the Click event on the button. Within the event procedureyou simply set the text of the text box. The event procedure for the second button is similar, but with theobvious changes of the names and text.
Now look at what happens when the examples are run. When the page is first loaded, the Page_Loadevent procedure runs and the text for the label is set. However, because there is no text in the text box,the label only has “You entered” as its text. When you enter some text into the text box and click the first button, the page is loaded again, so the Page_Load event procedure is run, followed by theButton1_Click event procedure. So the text you entered into the text box is displayed in the label, andthen the text box has new text set from within the Button1_Click event procedure. The important thingto note is that both event procedures run; the Page_Load event procedure will always be before eventprocedures for controls on the page.
This process is repeated as you continue to click the buttons.
The Postback ArchitectureOne of the problems you might have spotted is that the Page_Load event always runs, even when a button is clicked. There may be times when you want code to run when the page is first loaded, but notwhen buttons are clicked. For example, consider the previous example, where you displayed the contents of a text box in a label. When the page first loaded there was nothing in the text box so yourlabel text was incomplete. The next Try It Out corrects this.
Try It Out Checking for Postback1. If you are still running the browser from the previous example, close it.
2. In Visual Web Developer, change the Page_Load event procedure so that it looks like this:
Protected Sub Page_Load(ByVal sender As Object, ByVal e As System.EventArgs) Handles Me.Load
If Page.IsPostBack ThenLabel1.Text = “You entered “ & TextBox1.Text
End IfEnd Sub
3. Save the page and press F5 to run it. Notice that the label text is label— this is the default textfor a Label control and you didn’t change it when you placed the Label on the page. Entersome text and click a button, and you’ll see that the label now has text. Close the browser.
4. Now change the Page_Load event to this:
190
Chapter 6
09_588508 ch06.qxd 10/10/05 6:29 PM Page 190

Protected Sub Page_Load(ByVal sender As Object, ByVal e As System.EventArgs) Handles Me.Load
If Page.IsPostBack ThenLabel1.Text = “You entered “ & TextBox1.Text
ElseLabel1.Text = “Enter some text and press a button”
End IfEnd Sub
5. Save the page and press F5 to run it. Now you have this more useful, new text when the pagefirst loads, and different text when a button is pressed.
How It WorksHaving different text at the first page load from subsequent page loads works because the ASP.NETpage has a property called IsPostBack, which identifies whether or not the page has been posted backto — that is, whether a button has been pressed. If so, IsPostBack will be true. If it’s the first time thepage has loaded — that is, a button has not been pressed —IsPostBack will be false.
In the first code change you only displayed text if IsPostBack was true — if a button had been pressed.The second code change had different text for the two different situations.
It is important to know that this postback design only works when you are dealing with a single page,because IsPostBack gets reset when you move to another page. Consider two pages, Page1 and Page2,each with a Page_Load event procedure and a Button1_Click event procedure for a button. They alsohave a hyperlink to each other, allowing you to jump between the pages. You start with Page1, thePage_Load event procedure runs, and IsPostBack is false. You press the button and the Page_Loadevent is run again, followed by the Button1_Click event; in both event procedures IsPostBack wouldbe True. You click the link to jump to Page2 and the Page_Load event procedure on that page runs, andIsPostBack in the Page_Load event on Page2 is False. Now you click the link to jump directly back toPage1, where the Page_Load event runs once more, but this time IsPostBack is False as well. The useof IsPostBack only works when you remain on the same page, so don’t think that “the first time thepage is loaded” means the very first time. The following table might help to make this clear.
Action Page Control Events IsPostBack
Page loads Page1 Page_Load False
Button clicked Page1 Button1 Page_Load TrueButton1_Click
Navigate to Page 2 Page2 Page_Load False
Navigate to Page 1 Page1 Page_Load False
What Events Are Available?In the first example in this chapter you created event procedures in different ways: by double-clickingthe page and control, and by selecting the event from a drop-down list. The questions that might be
191
Events and Code
09_588508 ch06.qxd 10/10/05 6:29 PM Page 191

poised on your lips are what events are there, how can I find the events, and which events should I use?Well, the first two questions can be answered in the same way, and there are several places to look.
In order to find out what events are available, you can use the code editor window in Visual WebDeveloper. The left-hand drop-down list shows the controls on the page, as well as an entry for the pageitself. Selecting the page or a control causes the right-hand drop-down list to be filled with the events forthe selected control (see Figure 6-14 — you can’t actually get both lists to drop down at once; we’ve donethis to make it clearer to see). Selecting the event creates the empty event procedure, or shows the eventprocedure if it has already been created.
Figure 6-14
You can also use the Properties area on the page designer. Above the list of properties is an icon thatlooks like a lightning bolt; clicking this icon shows a list of events for the control, as shown in Figure6-15. If you double-click in the space to the right of an event, the code window will be displayed and theevent procedure created for you, or like the code window selection, you’ll be shown the event procedureif it already exists. By and large the events you’ll be interested in will be grouped under Action or Data.
Figure 6-15
The other place to find a list of events is in the Help files, where details of each event and what they areused for is listed.
192
Chapter 6
09_588508 ch06.qxd 10/10/05 6:29 PM Page 192

Which Events Should I Use?If you start looking into the events that are available you’ll soon realize that there are quite a few, and it’snot always obvious which ones should be used. The following table details some of the most commoncontrols and events; this isn’t all of them, just the ones you’ll find most useful.
Control Event Is raised when . . .
Button Click The button is clicked.LinkButtonImageButton
DropDownList SelectedIndexChanged The selection on the list changes. ListBox This is useful for performing some
action based on the new selection.
CheckBox CheckChanged The status of the CheckBox or RadioButton RadioButton changes. That is, when
they either become checked orunchecked.
CheckBoxList SelectedIndexChanged The selection on the list changes.RadioButtonList
Calendar SelectionChanged The selected date is changed.
VisibleMonthChanged The month is changed.
Login Authenticate The user is authenticated.
LoggedIn The user has logged in.
LoginError There is an error during the login process.
DataList DataBound An item is taken from a database andbound to the list.
GridView RowDeleting The current row is being deleted.
RowUpdating The current row is being updated.
SelectedIndexChanged The selected row has changed.
SqlDataSource Deleted A row has been deleted from the set ofdata.
Inserted A row has been inserted into the set ofdata.
Updated A row has been updated in the set ofdata.
Menu MenuItemDataBound An item is being bound to the menu.
193
Events and Code
09_588508 ch06.qxd 10/10/05 6:29 PM Page 193

Some of these are fairly obvious in their usage. For example, you’ve already seen the Click event of thebutton, and you can see that all of the button type controls have that same event. So if you don’t want tohave a standard button, but want to maybe have an image instead, you still use the Click event. Give thisa try in the following Try It Out, but this time you’ll use a different method for hooking into the event.
Try It Out Manually Creating Events1. If you have a running browser window, close it, and open Default.aspx in Visual Web
Developer.
2. Create a Regular Folder called Images under the web site. You can use the right-click AddFolder menu on the web site for this, as shown in Figure 6-16.
Figure 6-16
3. Copy AddToCart.gif from the Images folder of the Wrox United site and place it in the Imagesfolder you have just created.
4. In Design View place an ImageButton on the form, and set the ImageUrl property to~/images/AddToCart.gif.
5. Select the TextBox and change the Columns property from 0 to 50.
6. Switch to Source View and locate the ImageButton control. Change the declaration so that itlooks like this:
<asp:ImageButton ID=”ImageButton1” runat=”server”OnClick=”ImageButton_Click” ImageUrl=”~/images/AddToCart.gif” />
7. Open the code file, Default.aspx.vb, and add the following code, just before the End Classstatement:
Protected Sub ImageButton_Click(ByVal sender As Object, _ByVal e As System.Web.UI.ImageClickEventArgs)
TextBox1.Text = “You clicked the ImageButton at position” & _e.X.ToString() & “,” & e.Y.ToString()
End Sub
194
Chapter 6
09_588508 ch06.qxd 10/10/05 6:29 PM Page 194

8. Press F5 to run the page. Click several times in the ImageButton, moving the cursor so that you click in a different position. Notice how the coordinates of where you click are shown in thetext box.
How It WorksThe important bit of how this works is in the Source View, where the ImageButton control is defined.Here you added the following to it:
OnClick=”ImageButton_Click”
This tells the control that for the Click event you want to run the procedure called ImageButton_Click.It says OnClick because that’s the convention for ASP.NET events. For each event there is usually a corre-sponding property that starts with On— this allows the events to be defined on the control as well as inthe code. It’s just two ways of doing the same thing. For the standard Button controls you used Handleson the end of the event procedure declaration, but for the ImageButton you used the OnClick propertyto define the event procedure.
Within the code file, the event procedure declaration is similar, but the second parameter is differentfrom the type you’ve seen before:
Protected Sub ImageButton_Click(ByVal sender As Object, _ByVal e As System.Web.UI.ImageClickEventArgs)
For the Button, the second parameter was System.EventArgs, but for the ImageButton it isSystem.Web.UI.ImageClickEventArgs. Remember that the second parameter can be used byASP.NET to pass extra information into the event procedure, but for Button controls there was no extrainformation. For an ImageButton there is extra information, so the parameter is different — in this caseit contains the X and Y coordinates of where on the image the mouse was clicked. You simply displaythese coordinates in the text box. You don’t actually need these coordinates, but this is a great example ofparameters having extra information.
A parameter name other than System.EventArgs is actually a good indication that additional information may be available to you in the event procedure. You can find out what that information isby simply typing e. in the code window and looking at the IntelliSense that pops up.
Events Aren’t Triggered by Users OnlySo far in this chapter the events you’ve seen have been explicitly generated by the user, by way of clickinga button. Some events, however, are generated in other ways. Some are indirectly generated by the user,perhaps by way of updating some data, and others are generated directly by ASP.NET. You can use theevents regardless of how they are generated, and in this section you see how you can do this.
You’re going to create some events from data in a database, and although data has not been covered yet, it’s the events that are important. First, have a look at the news items on the Wrox United site (seeFigure 6-17), found under the About ➪ News menu item.
195
Events and Code
09_588508 ch06.qxd 10/10/05 6:29 PM Page 195

Figure 6-17
Here you can see that not all of the news items have a picture. In the following Try It Out, you see howthe news items can be customized, by responding to events generated by controls that fetch data. You’llmake sure that an image is only visible when there is a picture associated with the news item.
Try It Out Data Events1. Close any open browser windows.
2. In Visual Web Developer open the DataEvents.aspx file from the Chapter06 web site.
3. Right-click the mouse button anywhere on the page, and select View in Browser from the menuthat appears. You’ll see a screen similar to Figure 6-18.
196
Chapter 6
09_588508 ch06.qxd 10/10/05 6:29 PM Page 196

Figure 6-18
Notice that not all of the news items have images. For those that don’t there is a small imagewith a red cross in it, indicating that the image is missing; this is the default. You need to modifythe page to use events, so that if there is no image for the news item, that red cross isn’t shown.
4. Close the browser and switch to Design View in Visual Web Developer.
5. Select the DataList control. There are only two controls on the page: SqlDataSource andDataList. The DataList control is bound to a database, so it shows Databound items —simply click anywhere on this control to select it.
6. From the Properties box, select the events and double-click into the ItemDataBound event.Don’t enter any text, just double-click, and this will open the code editor and create the emptyevent procedure for you.
197
Events and Code
09_588508 ch06.qxd 10/10/05 6:29 PM Page 197

7. Add the following code in the empty event procedure:
Dim row As DataRowViewDim img As Image
If e.Item.ItemType = ListItemType.Item Or _e.Item.ItemType = ListItemType.AlternatingItem Then
row = DirectCast(e.Item.DataItem, DataRowView)
If row(“PictureUrl”).ToString().Trim() = “” Thenimg = DirectCast(e.Item.FindControl(“NewsImage”), Image)
img.Visible = FalseEnd If
End If
8. Save the pages and switch back to the Design View of the page. Right-click the page and selectthe View in Browser menu item to view the page in the browser. Notice how the red crossimages have disappeared.
How It WorksBefore looking at the code you need to understand how HTML handles images. The image is createdwith an img tag, like so:
<img src=”ImageName.gif”></img>
When the browser receives this HTML it displays the image, or that red cross if the image isn’t found.When you use server controls for images, you use an Image control:
<asp:Image ImageUrl=”ImageName.gif” runat=”server” id=”Image1”></Image>
This renders the same HTML as the first example. So if there’s no physical file you get that red cross,which is exactly what’s happening on this page; you need some way to not show the red cross image ifthere’s no picture associated with the news story.
In the DataEvents.aspx page you use an Image server control, but the value for the ImageUrl prop-erty is fetched from a database. Databases are covered in the next two chapters, so it’s not important toknow how this works just yet. The important point is to realize that as each row of data (a news item) isfetched from the database it is bound to the DataList, which means that there will be an item in theDataList for each row in the table fetched from the database. Each row of data contains different bits ofthe news: the title, the description, and what you’re really interested in for this example, the picturename. But not every news item has a picture, so you have to check to see if the database has a pictureand if it doesn’t, you make the Image control invisible. Take a look at the code that makes this possible.
First, you have the ItemDataBound event itself:
Protected Sub DataList1_ItemDataBound(ByVal sender As Object, ByVal e As System.Web.UI.WebControls.DataListItemEventArgs) Handles DataList1.ItemDataBound
198
Chapter 6
09_588508 ch06.qxd 10/10/05 6:29 PM Page 198

This event is raised when a row from the database is bound to a server control. Like the Click event ofthe ImageButton, the ItemDataBound event of the DataList supplies extra information to the eventprocedure in the form of the second parameter. This contains information about the row being bound,and contains a property called DataItem, which itself contains three properties:
❑ DataItem: The actual data item from the database.
❑ ItemIndex: The index number of the item being bound. This starts at 0 and increments by onefor each row.
❑ ItemType: The type of the item in the DataList. This will be one of the following:AlternatingItem, EditItem, Footer, Header, Item, Pager, SelectedItem, or Separator.
The ItemType is used to determine what type of row item you are on. For example, if data is beingbound into the header row, the ItemType would be Header. For the actual rows in this example, theItemType will be Item or AlternatingItem (for each row and every other row). So your code, shownhere, simply checks the ItemType, so you only work with the rows you are interested in:
If e.Item.ItemType = ListItemType.Item Or _e.Item.ItemType = ListItemType.AlternatingItem Then
Next you can use the ItemType to access the actual data being bound to the Image control, so you cancheck to see if there is any data for the image. First, you extract the actual row of data — don’t worryabout the exact details of this code; data and data conversion are covered in the next few chapters.What’s important to remember is that e.Item.DataItem is the actual data from the database for thisrow, and you check to see whether the PictureUrl column is empty:
row = DirectCast(e.Item.DataItem, DataRowView)
If row(“PictureUrl”).ToString().Trim() = “” Then
If the PictureUrl column is empty, you want to access the Image control and make it invisible. Here you again use e.Item, but this time to find the Image control (NewsImage), and set its Visibleproperty to False:
img = DirectCast(e.Item.FindControl(“NewsImage”), Image)img.Visible = False
Several things in this example have not been explained fully because they are covered in more detail later inthe book. Data binding and databases are covered in Chapter 7, and data conversion (using DirectCast)and the use of FindControl are covered in Chapter 9. You don’t need to understand how these work at themoment, because the important thing is to know what is possible. In this case, you are seeing that an event israised when an item from the database is bound to a server control. This event provides information aboutthe underlying data and the row on the server control, thus giving you a lot of information.
This technique is also used on the menu. Chapter 3 looked at the navigation controls such as the Menuand SiteMapPath controls. One of the issues we have with the Wrox United web site is that we wantedthe SiteMapPath on every page, which means that every page has to be in the SiteMap file as XMLnodes. However, we don’t want all of the pages to appear in the Menu. For example, we don’t want usersto navigate directly to the Checkout page, because we only want them to access it from the ShoppingCart page. The problem we have is that we can have an item that appears in the SiteMap andSiteMapPath, but that doesn’t appear in the Menu— the navigation framework doesn’t cater for that situation. So we have to cheat.
199
Events and Code
09_588508 ch06.qxd 10/10/05 6:29 PM Page 199

What we do is use the MenuItemDataBound event in the master page (site.Master), as shown here:
Protected Sub MyMenu_MenuItemDataBound(ByVal sender As Object, ByVal e As System.Web.UI.WebControls.MenuEventArgs)
Dim text As String = e.Item.Text
If text = “Checkout” Or text = “Shop Item” Or _text = “Shopping Cart” Thene.Item.Parent.ChildItems.Remove(e.Item)
End If
End
As each menu item is taken from the SiteMap file and bound to the menu the MenuItemDataBoundevent is raised. Within this event procedure we check to see if the menu text is one of the pages we don’twant to show, and if it is we remove the item from the menu. This means that the item still retains itsplace in the navigation structure, but that it won’t show on the menu.
So you can see that events raised by ASP.NET are extremely useful. Despite the fact ASP.NET takes careof the data binding and display of data for us, we still have access to what’s happening. The next sectionlooks at another example, where events are raised indirectly by the user.
Indirect EventsIndirect events are raised by ASP.NET, but because of some action that the user took. For example, havea look at one of the administration pages, where the team owner can change the players in the squad, asshown in Figure 6-19.
Figure 6-19
200
Chapter 6
09_588508 ch06.qxd 10/10/05 6:29 PM Page 200

Here there are two visible controls: the GridView at the top, showing all players, and the DetailsViewat the bottom where the player details are edited. One of the things you have to do is make sure that theGridView is updated when the player details are changed. The following Try It Out shows how you cando this.
Try It Out Indirect Events1. In the Chapter06 web site in Visual Web Developer, open the EditSquad.aspx page.
2. Click the right mouse button and select View in Browser from the menu.
3. View the player details by clicking the More details link — pick Chris Christopher the Left Back.
4. Click the Edit link to allow the player details to be changed. Change his position from Left Backto Goalkeeper and click Update. Notice how the details show him as Goalkeeper, but the gridstill shows him as Left Back, as in Figure 6-20.
Figure 6-20
You need to change this to make sure that the grid is updated with the new details.
5. Close the browser window and return to Visual Web Developer.
6. Open the EditSquad.aspx.vb file, and from the drop-down list at the top-left of the page,select DetailsDataSource, and from the drop-down list at the top-right, select the Updatedevent.
7. Add the following line of code into the empty event procedure:
GridView1.DataBind()
201
Events and Code
09_588508 ch06.qxd 10/10/05 6:29 PM Page 201

8. Save and close the code file.
9. From the web page, view the page in the browser and repeat the update process, changing thePosition of Chris Christopher to Striker. Notice that when you click Update to save the changesthe grid also changes.
How It WorksThis code is extremely simple, and even though it relies on data binding, it is easy to understand. Thekey is that the page uses a SqlDataSource object, which is responsible for fetching the data from thedatabase and making it available to the grid to display. The SqlDataSource control is just like otherASP.NET server controls, except that it doesn’t actually display anything. So although it’s on the page,nothing is shown to the user.
As well as providing data for the grid to show, the SqlDataSource also deals with data edits — insertingnew rows, and updating and deleting existing rows, and for each of these actions there are events. One ofthese events is the Updated event, which is raised when the data is updated. So when you click the Updatelink, the SqlDataSource updates the database, and then raises the Updated event. The code in theUpdated event simply tells the grid to rebind its data — to fetch it again and redisplay it. So what you’redoing is using multiple controls, with a chain of actions that result in an event, as seen in Figure 6-21.
Figure 6-21
Date Left
Data Saved
Update Cancel
SqlDataSource - DetailsDataSource
Update
GridView1.DataBind()
FirstName LastName Position PictureURL DateJoined
DateLeft
DateLeft
Aaron Aaronson Goalkeeper aaronson.jpg 02-Jan-00 More details
Bill Barker Goalkeeper aaronson.jpg More details
Chris Christopher Right Back aaronson.jpg More details
Dave Dickenson Right Back aaronson.jpg More details
Eric Edmundson CentralDefender
aaronson.jpg More details
202
Chapter 6
09_588508 ch06.qxd 10/10/05 6:29 PM Page 202

You can see that although you can easily construct pages by just dropping controls onto a page and configuring properties, knowing how these controls work is important. Without knowing that theupdate of the DetailsView generated a similar event for the data source, you might spend time tryingto work out which event on the DetailsView could be used to refresh the grid.
Canceling EventsSo far in this chapter you’ve seen controls raise single events. Both the Button control and theImageButton control raise a Click event, whereas other controls raise other events. One thing you haveprobably noticed is that the controls have quite a lot of events that could be raised, and you may nothave realized that a single action can raise multiple events. For example, when updating data there isboth an Updating and an Updated event. Likewise, there are pairs of events for adding new data(Inserting/Inserted) and for data being deleted (Deleting/Deleted). The present tense event(Inserting, for example) is raised as the action is occurring, whereas the past tense event (such asDeleted) is raised after the event. For example, when deleting a row, the Deleting event is raised justbefore the row is deleted, and the Deleted event is raised after the event is raised.
For some events, the fact that they are raised before the actual action takes place gives you the opportunityto cancel the event. For example, consider the EditSquad.aspx file, where the team owner can change thesquad. One of the things the owner wants is to make sure that any players that left during the playing season remain in the database — so you can’t delete players between August 20 and May 31. To enable this,you need to allow deletion of players, but not within those dates. Give this a go in the next Try It Out.
Try It Out Canceling Events1. Open the EditSquad.aspx file in the Visual Web Developer designer, and add a Label control
at the very end of the page.
2. Set the ID of the Label control to Message, and clear the Text property.
3. View the code file for this page and create an empty event procedure for the Deleting event forthe DetailsDataSource. You can use the drop-down menus at the top of the code file editor todo this, just like you did in the Try It Out for indirect events.
4. In the empty event procedure, add the following code:
Dim today As DateTime = DateTime.Now()Dim startYear As IntegerDim endYear As IntegerDim seasonStart As DateTimeDim seasonEnd As DateTime
If today.Month > 5 ThenstartYear = today.YearendYear = today.Year + 1
ElsestartYear = today.Year - 1
203
Events and Code
09_588508 ch06.qxd 10/10/05 6:29 PM Page 203

endYear = today.YearEnd If
seasonStart = New DateTime(startYear, 8, 20) ‘ 20th AugustseasonEnd = New DateTime(endYear, 5, 31) ‘ 31 May
If today >= seasonStart And today <= seasonEnd Thene.Cancel = TrueMessage.Text = “Cannot delete players during the season”
ElseGridView1.DataBind()Message.Text = “”
End If
5. Save the file and from the right mouse menu select View in Browser.
6. Make sure your system date is set between August 20 and May 31.
7. Select a player and try to delete him. You’ll see a message telling you that players cannot bedeleted during the season, and the player is not deleted.
8. Change the system clock so that the date is out of season — that is, between June 1 and August 19.
9. Select a player and try to delete him. You may want to add a new test player just so that you candelete him, to save you deleting real squad members.
How It WorksThis example relies on the fact that the Deleting event is raised before the actual action takes place, whichgives you the opportunity to cancel the event. One of the keys to how this works are the parameters of theevent procedure, the declaration of which is shown here:
Protected Sub DetailsDataSource_Deleting(ByVal sender As Object, ByVal e As System.Web.UI.WebControls.SqlDataSourceCommandEventArgs) Handles DetailsDataSource.Deleting
You can see that the second parameter provides extra information, but not only that it allows you tosend information back to ASP.NET. One of the properties of the parameter e is called Cancel, and if youset this to True, the event will be cancelled and the action (the deletion) will not take place. Take a lookat the code used to determine whether or not the player should be deleted.
You start with some declarations, which will be used to store date information:
Dim today As DateTime = DateTime.Now()Dim startYear As IntegerDim endYear As IntegerDim seasonStart As DateTimeDim seasonEnd As DateTime
204
Chapter 6
09_588508 ch06.qxd 10/10/05 6:29 PM Page 204

The first line sets the variable today to the current date. The variables startYear and endYear indi-cate the year in which the season starts and ends, and seasonStart and seasonEnd are the actual dates for the start and end of the season.
To determine the start and end year you see if the current date is after May. If it is, you know that theseason has ended, or is already under way, so the start year is the current year and the end year is next year. If the current date is before May, you are in the second half of the season, so the start year waslast year and the end year is the current year:
If today.Month > 5 ThenstartYear = today.YearendYear = today.Year + 1
ElsestartYear = today.Year - 1endYear = today.Year
End If
Next you create the actual start and end dates of the season, using the start and end year already set:
seasonStart = New DateTime(startYear, 8, 20) ‘ 20 AugustseasonEnd = New DateTime(endYear, 5, 31) ‘ 31 May
Now you check to see if the current date falls within the season start and end dates. If it does, you set theCancel property of the parameter e to True, so when the event procedure ends the event action (thedelete) will be cancelled. You also display a message to tell the user that players cannot be deleted dur-ing the season:
If today >= seasonStart And today <= seasonEnd Thene.Cancel = TrueMessage.Text = “Cannot delete players during the season”
If you are outside of the season, then players can be deleted, so you simply clear any message. Becauseyou haven’t set the Cancel property of parameter e to True (it is False by default), the action will takeplace, and the player will be deleted:
ElseMessage.Text = “”
End If
So what you’ve seen here is that some events can be cancelled, which allows you to build logic into yourapplications, enabling you to control the actions that are run. This also means that events that you thinkwill run might not. For example, it was mentioned earlier that some of these events are paired. So, aswell as the Deleting event, there is a Deleted event, and if you cancel the Deleting event theDeleted event isn’t run. The logic of this is shown in Figure 6-22.
205
Events and Code
09_588508 ch06.qxd 10/10/05 6:29 PM Page 205

Figure 6-22
This process is also the same for inserted and updated items, where the Inserting and Updating eventprocedures are used. In all three cases you can set the Cancel property of the parameter to True to cancelthe event.
Global EventsSo far in this chapter you’ve seen that events are raised by controls or by pages, but there is a third type ofevent — an application event. Application events are raised by ASP.NET in response to certain conditions,and these are stored in the Global Application Class, global.asax, a code-only file.
FirstNameLastNamePositionPictureURL
ChrisChristopherLeft Backaaronson.jpg
Date JoinedDate LeftEdit Delete New
SqlDataSource - DetailsDataSource
Deleting
Is deletionAllowed?
EventCancelled
Event raised
Deleted
Yes
No
EventRuns
206
Chapter 6
09_588508 ch06.qxd 10/10/05 6:29 PM Page 206

The global.asax page has several events:
❑ Application_Start, which is raised when the application first starts. This is when the firstuser accesses the site and should be used to set any initial start conditions.
❑ Application_End, which is raised when the application stops.
❑ Session_Start, which is raised when a user starts a session. This is when the user starts accessingthe site for the first time, and includes the time when a user closes the browser window andopens it again.
❑ Session_End, which is raised when a user session ends. This isn’t when the browser window is closed, because sessions have a timeout — if there is no user activity within that time, the session ends.
❑ Application_Error, which is raised when an unhandled error occurs.
❑ Profile_OnMigrateAnonymous, which is raised when an anonymous user logs in, and allowsmigration of any Profile properties.
You can create a Global Application Class in the same way as adding normal Web Forms, and when created, the first four events in the preceding list will be created for you. They’ll have no code, but willbe ready for you to add code if you need it.
In the Wrox United application, none of the first four events are used, but the latter two are. TheApplication_Error event is covered in Chapter 15, which looks at error handling, and theProfile_OnMigrateAnonymous event is covered in Chapter 11, which looks at the Profile.
SummaryThis chapter covered a lot about events, and you’ve seen that they can be raised under a number of different circumstances. First you looked at the ASP.NET page itself, where an event is raised when thepage is loaded, which allows you to take some action before anything is shown to the user. Additionally,this chapter examined the following topics:
❑ The ASP.NET page has the IsPostback property that allows you to identify whether this is thefirst time the page has been displayed, or whether the user has clicked a button.
❑ Button controls, where an event is raised when the user clicks the button. You saw that similartypes of controls (the Button and ImageButton controls) have similar events (the Clickevent).
❑ Events that are raised by ASP.NET itself, both directly (such as the binding of data from a database)and indirectly (such as updating database records). These events give you an opportunity tointeract with the process of displaying or updating data, and allow you to fine tune the interfaceand provide user feedback.
❑ How some events can be cancelled, thus canceling any action they trigger, such as another event.In the example you saw that you can stop the deletion of data by using an event procedure.
207
Events and Code
09_588508 ch06.qxd 10/10/05 6:29 PM Page 207

Now that you’ve had a look at events, and especially some related to data, it’s time to look at databasesin more depth. The next chapter looks at some of the data controls and shows you how data can befetched from the database and displayed for easy use by the user.
Exercises1. In the Chapter06 project create a new Web Form called Lists.aspx and add a ListBox
control to the page, and add three list items with values of One, Two, and Three. Add a Labelcontrol and a Button control to the page. In the Click event of the Button, display the selectedvalue of the ListBox in the Label.
2. Modify Exercise 1 so that just selecting an item in the list posts back to the server (meaning youdon’t need to click the button). You’ll need to add an event procedure to the ListBox, and inthat event procedure you can use the same code from the Click event of the Button to displaythe selected value in the Label. Hint: The terms postback and automatic might be useful inyour hunt for correct properties.
3. Modify the EditSquad.aspx example so that the GridView is refreshed when a new player isadded to the squad. The technique is similar to the code you already have, but you’ll need touse a different event. Remember that you can use the drop-down lists in the code view to findthe events.
208
Chapter 6
09_588508 ch06.qxd 10/10/05 6:29 PM Page 208

7Reading Data
The hallmark of dynamic web application pages is the capability to use information from a database.No other capability so widely expands the horizons of functionality for the visitor. The majority ofinformation in an enterprise is held in databases, so it is imperative that a web application repre-senting a business interact with that data. A tremendous effort by the ASP.NET 2.0 developmentteam has reduced the knowledge and lines of code needed to work with data. This chapter andChapter 8 explain how to implement the data-based features.
This chapter covers several major ideas:
❑ The theory of using data in ASP.NET 2.0, including a brief overview of the theory and ter-minology of databases, an introduction to ASP.NET 2.0 data source controls and data-bound controls, and the role of VWD in creating data-based pages
❑ Data source controls
❑ Data-bound selection lists
❑ Various data-bound controls, including GridView, DataList, Repeater, DetailsViewand FormView
❑ Data source controls with parameters
❑ Implementing multiple data controls that work together
❑ Working with XML data
By the end of the chapter you will have the tools and experience to use ASP.NET 2.0 the serverside controls for data to present on your pages information that comes from a database.
10_588508 ch07.qxd 10/10/05 6:32 PM Page 209

Introducing DatabasesBefore starting on the ASP.NET 2.0 data controls, let’s take a moment to consider sources of data. Datacan be broadly divided into one of three categories. Relational data is organized into sets of tables accord-ing to rules of normalization. This category includes the data held in Microsoft Access, Microsoft SQLServer, Oracle, SAP, DB2, and MySQL. A second category of data resides in tree structures, such as XMLfiles, the Windows registry, and the Windows file system. Last, data can be held in a wide range of mis-cellaneous types, such as Excel files, text files, or proprietary formats. This book (as per the vast majorityof web site data interaction) discusses relational data and XML files.
Relational databases divide information into tables, and the tables contain records (also called rows). Arecord represents one instance of the topic of the table. A table contains multiple fields, or columns, thatorganize values by their type. For instance, a table of employees could contain a record for each employee.The table’s columns may be NameFirst, NameLast, DateOfHire, and so forth. For each column therewould be a value for each record. A group of tables makes a database in most management systems. InMicrosoft SQL Server, which is used in this book, one or more databases together make an instance ofthe server. Typically, tables contain only the data. The description of how the data is organized, thenames of fields, and restrictions all reside in a separate structure of the database called metadata.
XML files are different from relational databases. First, instead of tables, the data is organized into a treewith branches of the tree holding finer and finer points of data. Each set of data and each individualdatum is contained in a node. For example, an Employees XML file would have an Employees node thatwould represent the main trunk. Then there would be a limb for each employee. From that limb wouldbe branches for FirstName, LastName, and so on. Second, an XML file is self-describing in that the metadata is included with the data. Each piece of information has an HTML tag that acts like a containerthat states the description of that data. For example, a datum like “John” would actually be stored as<NameFirst>John</NameFirst>. Although the self-descriptors can make an XML file huge, they makeit easy to understand the data without having the metadata information.
Almost all sources of data will have a system that controls who is allowed to use the data. The first step in security is authentication, wherein the system determines who is asking to use it. The topic ofauthentication is covered in detail in Chapter 4, so we won’t spend much time on it here. Basically, thereare two types of authentication: Windows Authentication (also known as Trusted Security) and SQLAuthentication. The decision of which authentication to use is made when the database is installed. With SQL Server Express, you have the option of Windows Authentication or Mixed, which means youcan use either Windows Authentication or SQL Authentication. SQL Server Express installs, by default,with Mixed Authentication. This book accepts the default of Windows Authentication.
This book mainly uses Microsoft’s SQL Server. The product is sold with different sets of features, but forour use the simplest version (SQL Server Express) is adequate. Fortunately, Microsoft provides SQLServer Express free of charge, and automatically installs with the instructions given in this book for thesetup. The beauty of SQL Server Express is that when you go to deploy your site to the public, all ofyour code will fit without modification into the full-featured SQL Server.
Once you have been authenticated (you prove that you actually are who you say you are), there willprobably be a set of rights and limitations for your use of the data. First are restrictions in how you canlook at data. Database administrators (DBAs) generally restrict direct access to tables. Instead, data mayonly be available to you through a view or query that contains limited fields or records. Second, you
210
Chapter 7
10_588508 ch07.qxd 10/10/05 6:32 PM Page 210

may have limits on how (or if) you can change data. Last, even if you have the right to change data theremay be restrictions (called constraints) on how data can be changed. To use Wrox United as an example,you generally cannot delete a team that is listed in the schedule (thus leaving the schedule with the logi-cal fault of a game without an existing team).
Using ASP.NET 2.0’s Data ControlsChapter 3 presented the idea that ASP.NET offers server-side controls. These controls contain code writ-ten by Microsoft that offers various behaviors, such as a drop-down list or a button. ASP.NET 2.0 hastwo sets of controls that are specific to working with data. The first set is data source controls that allow a page to connect to a source of data and to read from and write to that source. However, a data sourcecontrol has no means to display data on an ASP.NET 2.0 page, which is where data-bound controls comeinto play. Data-bound controls display data to the user by rendering data onto a page. This chapter dis-cusses data source controls and the reading behaviors of data-bound controls.
Almost all data source controls can work with almost all data-bound controls. This gives designers amix-and-match solution. Pick the data source control that is optimized for the data and then pick a data-bound control that displays the information as desired.
Introducing Data Source ControlsASP.NET 2.0 ships with several types of data source controls that are tailored to work with differenttypes of data sources. These controls are as follows:
❑ The SqlDataSource control allows connections to most relational databases. The Sql in itsname refers to databases that understand the SQL language. That includes almost every kind of database that holds its data in a relational format. Note that the Sql does not refer only to the Microsoft SQL Server database management system. SqlDataSource controls utilize one of several providers that are specific to different kinds of databases. The default provider is forMicrosoft SQL Server. Another provider is for Oracle. Both of these are written in managedcode, the most robust option in the .NET Framework. ASP.NET 2.0 contains an additional providerthat can communicate with any database that is OLEDB-enabled (OLEDB is an acronym forObject Linking and Embedding for Databases). Because OLEDB is an old standard, thatincludes almost every other database management system including IBM DB2, MySQL, andSAP. However, the provider for OLEDB connections is not written in managed code. Thatmeans it does not meet all the requirements of being .NET technology, but it still can work with.NET. We can expect third parties to publish more data source controls and providers and canhope that they are in proper managed code.
If you begin writing more advanced scenarios you will discover that OLEDB datasource controls are not part of the System.Data hierarchy. These controls actuallyreside in the System.Web.UI.Controls namespace. But this point does not arise for most scenarios where you can just drag data controls from the toolbar.
211
Reading Data
10_588508 ch07.qxd 10/10/05 6:32 PM Page 211

❑ The AccessDataSource control is a special case of the SqlDataSource control that contains aprovider optimized for Microsoft Access.
❑ The XMLDataSource control allows connection to XML sources.
❑ The SiteMapDataSource control, a specialized form of the XMLDataSource control, is optimizedfor the specific architecture of the ASP.NET 2.0 web application site map (as you built in Chapter 2).
❑ The ObjectDataSource control connects to business objects you build yourself (discussed inChapter 10).
Regardless of which data source control (and in the case of the SqlDataSource, which provider), thedata source control will enable a set of behaviors for your ASP.NET 2.0 page. These include a connectionto the database and enablement of behaviors such as reading and writing data. These behaviors will beavailable to data-bound controls that display data and receive input from the user.
In summary, the data source controls create the background infrastructure needed to use data. However,they do not create any rendering on the web page (see the next section for those capabilities). Rather,they make the data behaviors like reading and writing to data stores available to data-bound controls.
Introducing Data-Bound ControlsData-bound controls provide the link between the data source controls and the user. They take the dataand behaviors of the data source control and render it to the visitor. This division of labor works verywell. You can select any data source control and link that to any of the data-bound controls. With just afew exceptions, it is a mix-and-match scenario.
Data-bound controls encapsulate remarkable amounts of behavior. For example, the GridView controlcan not only display data in a table, but it offers sorting, selecting, paging through sub-sets, and one-click transition to data editing. If your needs extend beyond these capabilities, you can write customcode hooked into events exposed by the GridView control.
There is one constraint on the compatibility of data source controls and data-bound controls. Each con-trol is optimized for tabular data, tree data, or custom class data. For example, XML data is organized asa tree and thus best accessed with the XMLDataSource control and displayed in Menu or TreeViewdata-bound controls. SQL Server data is organized into tables and thus accessed with the SqlDataSource
control and displayed in GridView (tables) or DetailsView. List type data-bound controls can displayeither source of data. You can twist the controls to cross-utilize types of data, but in general it is best tostick to their intended purpose.
If you are familiar with older version of ASP, the ASP.NET 2.0 data source controlsinstantiate ADO.NET objects. Therefore, ADO.NET provides the underlying tech-nology for data access. The creation and manipulation of ADO.NET objects for mostscenarios is now handled automatically (and correctly and efficiently) by the higher-level data source control objects.
212
Chapter 7
10_588508 ch07.qxd 10/10/05 6:32 PM Page 212

Four general groups of data-bound controls ship with ASP.NET 2.0. Because there is overlap in their func-tionality, this chapter spends some time differentiating them. First you will look at their renderings, then acomparison chart, and finally a guide to selecting the correct data-bound control for your purposes.
The trick with data-bound controls arises in the selection. It can be confusing in the first attempts to getthe correct control for your purpose. To help, the following sections organize the data-bound controlsinto four groups. Later in the chapter you will practice using each of them in a series of exercises.
Tabular ControlsTabular controls produce the classic HTML table listing the data of records, albeit with opportunity forsignificant enhancements. These controls show multiple records in rows and one or more fields fromeach record as columns. The GridView control shows one value (datum) in each cell in a table layout.The DataList and Repeater controls behave in the same way, and render each cell with all of the fields for one record. Figure 7-1 shows how these controls will look in a browser.
Figure 7-1
The GridView control offers the most behaviors, as it can read, edit, and select records. The DataListcontrol allows reading and editing, whereas the Repeater is a read-only control. The name of DataListis a bit confusing because you have a separate set of List controls that are optimized for selecting arecord. The DataList is a display control in a tabular format.
Single Record Display ControlsSingle record controls (DetailsView and FormView) display one record at a time. You can think of themas a deck of playing cards in a pile face up. At any moment all of the cards are there, but you can onlysee the top one. You have to navigate down through the deck to see other cards (see Figure 7-2 for anexample of the DetailsView control). Single record controls have navigation features to permit the vis-itor to go to the next record, jump to a specific record, or fly to the first or last record. The DetailsView
Note that other controls, such as text boxes, can be data-bound. However, these inde-pendent controls are best connected to data in context of a template within one ofthe controls just mentioned. This topic is discussed in detail in Beginning ASP.NET2.0 Databases from Wrox, ISBN 0-7645-7081-1 or 0-4717-8134-7.
213
Reading Data
10_588508 ch07.qxd 10/10/05 6:32 PM Page 213

control provides some default layout when you create the control, whereas the FormView control createsa blank slate upon which you create the entire layout. Both of these data-bound controls support read-ing, editing, and the creation of new records.
Figure 7-2
Selection List ControlsSelection list controls are optimized to accept a user selection. These two controls display just one fieldfrom each record and stand by for a mouse-click. As shown in Figure 7-3, ListBox controls (right side of figure) are by default expanded, whereas DropDownList controls (left side of figure) display a singlerow until the user expands. As you would expect, these controls are display-only with no capability tochange data.
Figure 7-3
Tree ControlsTree controls have been optimized to handle data that are stored in nodes rather than tables. The Menucontrol provides a slide-out dynamic so that when you pass your mouse over a menu choice the sub-menu slides out. The TreeView control gives the user the option to expand or collapse nodes (see Figure 7-4). The Menu control is on the left of Figure 7-4, and the TreeView control is on the right. TheSiteMapPath control offers a navigation trail that automatically updates based on the current page.
The differences among the data-bound controls discussed are summarized in the following table.
214
Chapter 7
10_588508 ch07.qxd 10/10/05 6:32 PM Page 214

Figure 7-4
Control Primary Data Capabilities Description and Primary UsesStructure
GridView Table Read and Separate column for each fieldedit Each field value in its own cell
Display multiple records in a gridEdit existing records
DataList Table or Tree Read and All fields in one celledit One cell equals one record
Display multiple records in a gridCreate new record for GridView
Repeater Table or Tree Read only All fields in one cellOne cell equals one recordDisplay multiple records in a gridCreate new record for GridView
Table continued on following page
215
Reading Data
10_588508 ch07.qxd 10/10/05 6:32 PM Page 215

Control Primary Data Capabilities Description and Primary UsesStructure
DetailsView Table or Tree Read, edit, Display single recordscreate Default structure provided
Edit existing recordsCreate new records
FormView Table or Tree Read, edit, Display single recordscreate No default structure
Edit existing recordsCreate new records
DropDownList Table or Tree Read only List of a few fieldsand ListBox Invites a user selection
Display data for user selection
SiteMapPath Tree Read only List page names between home and current page
Used to identify current position in site
Menu Tree Read only Displays top-level nodes with option to expand one sub-node at a time
Used to display a menu where there will be one selection
TreeView Tree Read only Displays top-level nodes with option to expand one or many sub-nodes
Used to display multiple sub-nodes at once
Data Source Controls and Data-Bound Controls Work Together
As discussed in the previous two sections, ASP.NET 2.0 offers two families of controls for working withdata: data source controls and data-bound controls. This section takes a moment to look at how theywork together. The data source control handles the behind-the-scenes connections to the data as well asa set of behaviors such as editing, sorting, and paging. The data-bound control presents the data andbehavior to the user in actual renderings to the page.
The two controls you use on your page should match in type. Tabular-type data-bound controls such as GridView and FormView should be sourced by table-type data source controls such as theSqlDataSource. Tree-type data-bound controls should be sourced by an XML data source. Lists can besourced by either type. Having said that, there are some exceptions. Some tree sources can be used withtabular data-bound controls. This combination generally requires an InfoPath statement that narrows thescope of information that is harvested from the tree source of data. Examples of InfoPath statements arepresented later in this chapter.
216
Chapter 7
10_588508 ch07.qxd 10/10/05 6:32 PM Page 216

A data-bound control must have a property that sets its source to the data source control. In addition, formany behaviors there must be some coordination of properties between the pair of controls. For exam-ple, if editing is to be enabled, the data source control must have that option turned on and the data-bound control must also have its editing features enabled. As the controls are demonstrated later in thechapter you will see more details of how data source and data-bound controls work together.
Configuring Data Controls with VWDWhen you place a data source control on your page (in Design View) VWD will lead you through a wiz-ard to configure the various properties of the control. This procedure is remarkably cognizant of all thedetails to work with data on a page.
You can add data interactions using VWD at several levels. If you like to create controls one at a time,you can drag a data source control and walk through its wizard, then drag a data-bound control andconnect it to the data source control. Alternatively, you can start with a data-bound control, and its wiz-ard will step you through creating a data source control. You can even work at a higher level by openingthe database explorer, selecting several fields, and dragging them to the page. VWD will then create boththe data source controls and data-bound controls for you.
VWD also offers tools for editing data controls that already exist on the page. The properties windowoffers a very graphical user interface for changing settings. If you are working with code in Source Viewyou can move the insertion bar within a data control tag and press the space bar to get a list of theappropriate attributes in IntelliSense.
Last, VWD offers a very useful tool within wizards for building the SQL statements needed to display or modify data. Instead of you typing (and commonly mistyping) the names of fields and the SQL key-words, the wizard offers a drag-and-drop interface with checkbox options. When you click Finish, VWDbuilds the SQL statement for you.
The tools of VWD greatly speed the development of data pages. However, you may find that some ofthe default settings and tags created by VWD are not to your liking. Particularly for beginners, the num-ber of tags created by VWD can be overwhelming (like long lists of parameters). Advanced designerswill want to substitute validation controls for the basic text boxes created by VWD. So although VWDwill do a large amount of the page construction for you, most designers follow on with tweaks or partialrewrites. You will see an example in a Try It Out later in this chapter.
Data Source ControlsThis section moves from the theory to the practice by adding data source controls to a page. As mentionedin the previous section on VWD and data controls, a data source control is most easily created by adding adata-bound control to a page and letting the VWD wizard set up the data source control for you. However,at times you will have to create the data source control yourself, so you will walk through that processhere. The first step, of course, is to decide which data source control to use based on your type of data. Fora first discussion you can look at a SQL Server Express data source (as used in this book).
217
Reading Data
10_588508 ch07.qxd 10/10/05 6:32 PM Page 217

The Basic Properties of Data Source ControlsData source controls require several attributes. The obvious are an ID and the runat=”server”. Youmust also specify which database on which server to use and your log on name and password forauthentication. These data are held in a connection string. Next you must specify which records andfields to read from the data source. The data source control also requires a provider that describes howto interact with the database (the default provider for the SqlDataSource control is the provider forMicrosoft SQL Server). In this case VWD walks you through these specifications in a wizard.
In this chapter you mostly work on a Fixtures.aspx page that will list Wrox United’s schedule. In thisTry It Out you add the data source control using the VWD wizard and then examine the source code thatthe IDE created for you.
Try It Out Data Source Control1. Open the web site for the chapter (C:\BegASPNET2\Chapters\Begin\Chapter07) and create a
Web Form called Fixtures.aspx in the site’s root using the web form template with the sitemaster page and with code in a separate page. Switch to Design View and type Fixtures in thecontent panel.
2. From the Data section of the toolbar (see Figure 7-5), drag a SqlDataSource control to the mid-dle of the content pane. You may have to scroll down to see the new control. Open the smarttask panel and click Configure Data Source.
Figure 7-5
3. Click the small arrow at the top right of the control to open the smart task panel (as shown inFigure 7-6) and click Configure Data Source. A wizard will start and in the first dialog click NewConnection.
218
Chapter 7
10_588508 ch07.qxd 10/10/05 6:32 PM Page 218

Figure 7-6
4. Set the data source to Data Source for a Microsoft SQL Server Database file. For the DatabaseFile Name, browse to your App_Data folder and select WroxUnited.mdf. Stick with the defaultWindows Authentication as shown in Figure 7-7. Click the Test Connection button to be sure thefile was spelled correctly and all is in working order. Click OK to close the window.
Figure 7-7
5. Click Next and, for this example, do not save the connection in the application file.
6. Click Next and in the next dialog box accept the choice to specify columns from a table. Fromthe drop-down list select the Fixtures table. Then select all of its fields by checking the asterisk(*) choice in the columns panel. See Figure 7-8 for an example.
219
Reading Data
10_588508 ch07.qxd 10/10/05 6:32 PM Page 219

Figure 7-8
7. Click Next and in the last step of the wizard you will have an opportunity to test your query.You should see several records and fields appear in the panel as in Figure 7-9.
Figure 7-9
220
Chapter 7
10_588508 ch07.qxd 10/10/05 6:32 PM Page 220

8. Click finish, and run the page and observe that although you have created a data source controlthere is no rendering. That will come when you add a data-bound control.
9. Close the browser and click Source View in VWD. Take a look at what VWD built for you in the SqlDataSource control. The Fixtures.aspx page will appear as follows in Source View.Instead of (local)\SQLExpress your server may be identified with a period (full stop) as.\SQLExpress:
<%@ Page Language=”VB” MasterPageFile=”~/site.master” AutoEventWireup=”false”CodeFile=”Fixture.aspx.vb” Inherits=”Fixture” title=”Untitled Page” %>
<asp:Content ID=”Content1” ContentPlaceHolderID=”mainContent” Runat=”Server”>
<asp:SqlDataSource ID=”SqlDataSource1” runat=”server”
ConnectionString=”Data Source=.\SQLEXPRESS;AttachDbFilename=C:\BegASPNET2\Chapters\Begin\Chapter07\App_Data\WroxUnited.mdf;Integrated Security=True; User Instance=True”
providerName=”System.Data.SqlClient”
SelectCommand=”SELECT * FROM [Fixtures]”>
</asp:SqlDataSource>
</asp:Content>
How It WorksIn this Try It Out you used VWD to create a SqlDataSource control for you. Note how easy it was todrag the control and then answer the series of questions in the wizard. VWD typed each of the proper-ties listed earlier in the section. The basic ID and runat are there. Then you see a connection string hold-ing the name of your server and database identified with the AttachDbFilename. You requested in thewizard to use Windows Authentication and so VWD wrote the connection string with IntegratedSecurity. That means you will allow Windows to certify who you are by using the name and passwordwith which you logged in to Windows. Last, when you picked your data source to be a Microsoft SQLServer data file, VWD added a property to the data source control that sets the provider to use theSystem.Data.SqlClient.
Hiding the Connection StringIn the preceding Try It Out you placed the data of your connection string in the page. This leads to twoproblems. First, if the name of your server or database changes you would have to change the connec-tion string in every page. Second, if you were using SQL Authentication you would have to present cre-dentials (name and password). Although the connection string is never sent to the browser, it should stillmake any developer nervous to ever have that confidential authentication information on an ASP page.
Both of these problems can be solved by moving the connection string from the pages into a single entryof the Web.config file, and then referring to the entry rather than writing out the entire connectionstring in the page. This change can be made by simply accepting the offer to “save the connection stringin the application configuration file” in the second page of the Data Source Configuration wizard.
221
Reading Data
10_588508 ch07.qxd 10/10/05 6:32 PM Page 221

In this Try It Out you replace the data source control of Fixtures.aspx with a new data source controlconfigured to use a connection string stored in the Web.config file.
Try It Out Hiding Connection Strings1. Open your Fixtures.aspx page in Design View and delete the SqlDataSource1 control.
2. Now drag a new SqlDataSource control to the content panel of the page. As before, clickConfigure Data Source.
3. As before, make a new connection to the WroxUnited.mdb in the App_Data folder. Click testand OK. Click Next to move to the Save Connection String... panel.
4. This time leave the check on (as default) to save the connection string to the application configu-ration file and give it the name WroxUnited (see Figure 7-10). Click Next.
Figure 7-10
5. Continue with the rest of the wizard as before; use the fixtures table and select all of thecolumns. Click Next, test the query, and click Finish. Save the page.
6. In the end your data source control will appear as follows in the Fixtures.aspx page:
<asp:sqldatasource id=”SqlDataSource1” runat=”server”connectionstring=”<%$ ConnectionStrings:WroxUnited %>”>SelectCommand=”SELECT * FROM [Fixtures]”
</asp:sqldatasource>
222
Chapter 7
10_588508 ch07.qxd 10/10/05 6:32 PM Page 222

7. Meanwhile, an addition has been created in <connectionstrings> section of the Web.configcode (line break modified for clarity in code listing below):
<connectionStrings><add name=”WroxUnited”
connectionString=”Data Source=.\SQLEXPRESS;AttachDbFilename=|DataDirectory|WroxUnited.mdf;Integrated Security=True;Connect Timeout=30;User Instance=True”/>providerName=”System.Data.SqlClient” /></connectionStrings>
How It WorksTake a look at the Fixtures.aspx page in Source View and focus on the data source control. Notice thatit now lacks the actual values for the connection string. Instead, you get a pointer to connectionString(which is understood to mean in the Web.config file) and within the connection strings to Wrox United.
Open the Web.config file. Slide down to the section on connectionStrings. The tag <add> indicatesanother connection string within the section. Following the name you see the same information that youprovided on the page in the previous Try It Out.
Details of the Connection String and ProviderThe most complex parts of the data source control are the connectionString and the provider. Theprevious examples present the simplest case. The connection string has three parts when connecting to aSQL Server data source:
❑ First is the data source that means the name of the SQL server. A period (full stop) means thelocal server:
<connectionStrings><add name=“WroxUnited” connectionString=”Data Source=.\SQLEXPRESS;
❑ Second is the name of the database file to attach:
AttachDbFilename=|DataDirectory|WroxUnited.mdf;
Or alternatively:
❑ AttachDbFilename= C:\BegASPNET2\Chapters\Begin\Chapter07\App_Data\WroxUnited.mdf;
❑ Last is the type of security to use:
Integrated Security=True;User Instance=True”/></connectionStrings>
If you use another relational database manager (such as Oracle or MySql) you must specify a provider asfollows. The provider for SQL Server is the default, so you did not have to use a provider in the Try ItOuts of this book. But for other sources you must use the following syntax. The Sql in SqlDataSourcemeans that the control can be used with any SQL-compliant data source (not only Microsoft SQL Server).
223
Reading Data
10_588508 ch07.qxd 10/10/05 6:32 PM Page 223

But if you use a data source other than Microsoft SQL Server, you must specify a provider for that source sothat the named provider can override the default provider:
<asp:SqlDataSource ID=”SqlDataSource1” Runat=”server”providerName=”System.Data.OracleClient”
ASP.NET 2.0 can use virtually any source of data, including OLEDB- or ODBC-enabled systems. Accessfiles can be used for lightly loaded local sites, but complexities emerge when the MDB file has a securityscheme. Extensive discussion of the permutations, advantages, and syntax are presented in several chap-ters of our sister book, Beginning ASP.NET 2.0 Databases.
Data-Bound ControlsKeep in mind the basic model of ASP.NET 2.0 for using data. Two controls must be on the page: a datasource control and the data-bound control. The remainder of this chapter focuses on the various data-bound controls. It starts with selection lists; moves on to the GridView, DataList, and Repeater; thetwo single-record-display controls (DetailsView and FormView); and finally the tree view for hierar-chical data. Along the way we will pause to look at how multiple data-bound controls can be used to setparameters for each other.
Data-bound controls can be added to a page (in Design View) using VWD in three ways:
❑ Add the data-bound control after adding a data source control and point to the existing datasource control.
❑ Add the data-bound control directly without an existing data source control, and let the VWDwizard guide you through setting up a data source control.
❑ Add the field names directly from the Database Explorer to the page, and let VWD set up bothan appropriate data-bound control and a data source control.
This list increases in terms of ease as you move down the list, but decreases some of your options. Forexample, a direct drag-and-drop of field names automatically creates a GridView, whereas in the secondoption you could create a DropDownList.
Data-Bound Selection ListsData-bound lists present the user with a set of data from the database and imply a request that the userselect from the list. ASP.NET provides four types of lists for user selection: DropDownList, ListBox,RadioButtonList, and CheckBoxList. The items in the selection list can be added either by hard cod-ing (static) or from a data source control (dynamic). After the user makes a selection the value is avail-able to your code or to other controls on the same page, or even controls on different pages.
It is easy to confuse the topic of this section (lists that request a user selection) withthe control named ASP.NET DataList, which presents data without expectation ofuser selection. ASP.NET DataList is covered later in the chapter.
224
Chapter 7
10_588508 ch07.qxd 10/10/05 6:32 PM Page 224

All four of these selection controls support a pair of properties that are easily confused. The first is theDataTextField property, which determines the text that the user will see. Related, but different, is theDataValueField property that will hold the value that is used internally in your site to process theuser’s selection. For example, the DataTextField control may show a combination of a customer’s full name and city. But that long and mixed value is not useful to select the single customer from yourCustomers table. So you set the selection list control’s DataValueField property to be the customer IDnumber, and that neatly fits into your code to narrow the orders you receive to those for that one cus-tomer ID. When using different fields as sources for the list control’s DataText and DataValue, bothfields must be included in the list of fields obtained by the appropriate data source control.
One additional property is of importance for all of the selection lists. AutoPostBack will automaticallypost back to the server when the list selection changes. This is critical if there is code in the post backevent that you want to execute to reflect the user’s selection, such as re-rendering a GridView to show a limited set of records based on the user’s selection from a list box.
Items can be added to a list in three ways. The first way adds items using individual ASP.NET 2.0 tags.The second way binds the list to an array of values. Finally, the items can be read from a data source.
Adding List Items with Individual ASP.NET 2.0 TagsWhen the items remain relatively static (for example, a list of states or provinces) you use hard coding toadd items. Although the code can be long, it will execute faster than opening up a connection to a datasource. Note that in some cases, although the original list of items may be static (the list of states), theitems to appear in the selection list may be dynamic (only those states with customers). Items can beadded with simple <asp:ListItem> tags as shown in the following code. In this example you create adrop-down list for users to pick a player position. You want the user to see the full name of the position(such as Left Back), so that is the Text property. After the user makes a selection you, as a programmer,will want to actually work with your code for the position, so that is the Value property. Also note thatyou can set a default selection on the Central Defender position. For example, in the following code list-ing the first item in the list will be for the Goalkeeper. The word Goalkeeper will appear in the list boxas text while the value of GK will be the value you can work with if the user selects Goalkeeper. (The con-cepts of DataTextField and DataValueField are covered a bit later.)
<asp:DropDownList id=”DropDownList1” runat=”server”><asp:ListItem Value=”GK”>Goalkeeper</asp:ListItem><asp:ListItem Value=”LB”>Left Back</asp:ListItem><asp:ListItem Value=”RB”>Right Back</asp:ListItem><asp:ListItem Value=”CD” Selected=”True”>Central Defender</asp:ListItem>
</asp:DropDownList>
Binding List Items to an ArrayA more sophisticated method for adding static items employs an array. You create an array in thePage_Load event, and then set the array as the data source for the list. Finally, you perform a binding.Binding, in ASP.NET 2.0, refers to the act of bringing data into a control. For example, when you bind a ListBox to a data source control the information from the data source is actually brought into theListBox control. This is one of the few places in ASP.NET 2.0 where you use the version 1.x technique of performing binding as a distinct line of code. In most cases in version 2.0 the data controls automati-cally perform binding as needed. You carry out the steps as follows:
225
Reading Data
10_588508 ch07.qxd 10/10/05 6:32 PM Page 225

<%@ Page Language=”VB” %><script runat=”server”>
Public MyStates() As String = {“AK”,”AL”,”AR”}
Protected Sub Page_Load(ByVal sender As Object, ByVal e As System.EventArgs)DropDownList1.DataBind()
End Sub</script>
<html xmlns=”http://www.w3.org/1999/xhtml” > <head runat=”server”>
<title>Untitled Page</title></head><body>
<form id=”form1” runat=”server”><div>
<asp:DropDownList ID=”DropDownList1” runat=”server”DataSource=”<%# MyStates %>”
> </asp:DropDownList>
The first shaded line creates a variable named MyStates and fills it with three values. The third shadedline identifies that array (MyStates) as the one to be bound to DropDownList1. The second shaded lineinstructs the ASP.NET 2.0 page to, at the time of page load, actually perform the binding; that is, bringthe values in MyStates into DropDownList1.
When you support variation in the items to be displayed, the population of the selection list should bebased on a data source control. The selection list will have a property of DataSourceID with the value ofthe ID of the data source control. Then there are values for the DataTextField and DataValueField,which are set to fields included in the SelectCommand of the data source control.
Adding List Items from a Data SourceIn many cases the items of a list will be stored in a database, so it makes sense to populate the list fromthe database rather than creating an array or individual tags as shown in the previous sections. Becauseof ASP.NET 2.0’s mix-and-match design of data source and data-bound controls, you can populate thelist from a data source control. You just have to follow the VWD wizard to identify what data source touse to supply the information to the ListBox.
On the page you want visitors to be able to limit the view of games to just one month. In this Try It Outyou start with a page that hard-codes the months, then move to a dynamic binding. Note that the teamsplay games from October to December. You start with static binding for September to December. Thenyou improve the page to dynamically bind to the actual dates in the database of games.
Try It Out Selection List Bound to a Data Source Control1. Early in this chapter you created a Fixtures.aspx page. Open it in VWD.
2. Add some text similar to Please pick a month, and then drag a ListBox control from the Toolboxonto the content area. You will probably have to scroll down to see it, as in Figure 7-11.
3. Because code-behind is used in this book, you have to write your code in a separate file. At thetop of the Solution Explorer click the View Code icon (right-most icon in Figure 7-12) to openthe editor panel.
226
Chapter 7
10_588508 ch07.qxd 10/10/05 6:32 PM Page 226

Figure 7-11
Figure 7-12
At the top left of the editor panel, expand the drop-down list and click the Page Events object,and at the top right expand the drop-down and select Load as shown in Figure 7-13.
Figure 7-13
4. Add the following shaded lines to the Page_Load event. Note that around the list of numbersare braces ({}), not parentheses. Also note that the declaration of the array occurs before thePage_Load Sub:
Partial Class FixturesInherits System.Web.UI.Page
Protected ListOfMonths() As Integer = {9,10,11,12}
Protected Sub Page_Load(ByVal sender As Object, ByVal e As System.EventArgs) _Handles Me.Load
ListBox1.DataBind()End Sub
227
Reading Data
10_588508 ch07.qxd 10/10/05 6:32 PM Page 227

5. Now direct the ListBox control to use your array for its source of data. Switch from theFixtures.aspx.vb code page back to the Fixtures.aspx page and switch to Source View.Select the ListBox and modify its properties so that it will get its list of items from the datasource control, as shown in the shaded lines (same for VB or C#, because this is outside thescript):
<body><form id=”form1” runat=”server”><div>
<asp:ListBox ID=”ListBox1” runat=”server”DataSource=”<%# ListOfMonths %>”
></asp: ListBox>
</div></form>
</body>
6. Save and test the page in your browser by pressing F5. At this point the list does not do any-thing beyond show the months (see Figure 7-14).
Figure 7-14
228
Chapter 7
10_588508 ch07.qxd 10/10/05 6:32 PM Page 228

7. But what if the team plays in January or February or you observe that there are no Septembergames even though you have the ninth month in your list box? You want the pages to offer newchoices in the list box automatically (dynamically). Now you will improve the ListBox controlby binding it to the list of fixtures.
8. Drag a SqlDataSource control from the toolbar onto the fixtures page (the .aspx page, not thecode page), as shown in Figure 7-15. You will probably have to scroll down to see it, then openits smart task panel and configure its data source. Select the WroxUnited and click Next.
Figure 7-15
9. Specify a custom SQL statement and click Next. Type in the following statement:
SELECT DISTINCT MONTH(FixtureDate) AS FixtureMonth FROM Fixtures
10. Click Next, Test Query, and finally, click Finish.
11. Now change your ListBox control in the Properties window by performing the followingactions: Eliminate the DataSource value; add a DataSourceID value of SqlDataSource1; setboth the DataTextField and DataValueField to FixtureMonth (see Figure 7-16). Recall thatif the Properties window is not already visible (usually in the bottom right of your screen) youcan bring it back by pressing F4.
Figure 7-16
229
Reading Data
10_588508 ch07.qxd 10/10/05 6:32 PM Page 229

12. Last, in Source View, remove some lines in the code page that are no longer needed. Delete thelines shaded here:
Protected ListOfMonths() As Integer = {9,10,11,12}
Protected Sub Page_Load(ByVal sender As Object, ByVal e As System.EventArgs) _Handles Me.Load
ListBox1.DataBind()End Sub
13. Run the page. Now the ListBox control only shows the months with games; 9 is left out.Months will also automatically change if the Wrox United schedule adds games in anothermonth.
How It WorksAdding a ListBox control is easy with VWD’s drag-and-drop functionality. In the hard-coded techniqueyou created an array of integers and filled it with what you expected would be useful values. Then downin the ListBox properties you specified that the items of the list (its DataSource) should come from thevalues returned by a read of the array ListOfMonths. Last, back up in the code, you added a line to the Page_Load event that instructs ASP.NET 2.0 to actually bind the data of the array to the data-boundcontrol.
Two problems exist with this technique. First, it uses the ASP.NET version 1.1 technique of binding byexplicit command. Although that works (and is the only technique for hard-coded arrays) it does not utilize the automatic binding features of version 2.0. Second, if Wrox United changes the months inwhich it plays, then your list box choices are out of synch.
In the second technique you created a new data source control that will read the actual months that arecurrently in the games list. However, those months are stored as full dates (such as 12/21/04). So youuse a SQL function called MONTH to extract the number of the month from the date. And because morethan one game is played in a month, you add the DISTINCT term to give you just one of each value.(These kinds of SQL tricks are discussed in Wrox’s Beginning SQL.) Now you do not need the lines to create or fill the array and you can also chuck out the binding line (ASP.NET 2.0 will do it for you whenyou use an ASP.NET 2.0 data source control).
Notice the subtle but important difference between two properties of the ListBox control. DataSource isused when you are binding by explicit command to an ASP.NET version 1.1 source of data. DataSourceIDis employed when you use ASP.NET 2.0 automatic binding to a data source control.
The GridView ControlThe GridView data-bound control provides the classic display of tabular data. Each row represents oneinstance or record, and each column holds one field of data. A cell within the table displays a value thatis appropriate for its intersection of record and column. By default, GridView displays all of the columnsthat are provided by the data source control, but you’ll see how to show the user only a subset. Thebiggest advance in tabular data display comes when you activate two simple features of the GridViewcontrol: sorting and paging. Sorting allows the user to re-order the records according to taste. Pagingallows you, as the designer, to specify the number of records to show at one time and then provide theuser navigation tools to jump to different sets of records. Both of these features took hundreds of lines of
230
Chapter 7
10_588508 ch07.qxd 10/10/05 6:32 PM Page 230

codes to get right in earlier versions of ASP.NET, so they are huge timesavers that you get for free withASP.NET 2.0.
Like all data-bound controls the GridView control must have a data source control to provide the val-ues. GridView was optimized to work with the data source controls optimized for tabular data, forexample SQL, Access, and Data controls, as opposed to the tree data of an XML source control.
Adding a GridView ControlOf course, VWD reduces control implementation to simple drag and drop. You can add a GridViewcontrol in VWD one of three ways. The techniques in the following list increase in the number of stepsrequired as you go down the list; drag-and-drop a field is quickest, adding the controls independentlyrequires the most steps. However, in every case you can go back and edit a GridView control’s proper-ties in Design View, or even modify the source code directly:
❑ From the Data Explorer window, select and drag field names to create a GridView control andautomatically create a data source control — with no questions asked.
❑ From the toolbar, drag a GridView control to the page and let VWD walk you through the setupof a new data source control.
❑ From the toolbar, first add a data source control then drag on a GridView control and use thenascent data source control.
Regardless of which technique you use, once the GridView control is on the page its smart task panelwill open, as shown in Figure 7-17. Click the Auto Format option to quickly apply a set of colors, bor-ders, and cell sizes. Note the first choice, the ability to remove a prior auto-formatting.
Figure 7-17
You can add or remove columns with three techniques. The easiest way is to use the smart task paneland click Edit Columns. Expand the entry for BoundField, select a field, and click Add. From the boxbelow you can select a field and click the X button to delete (see Figure 7-18).
A second technique, while you have the Fields dialog box open, is to click the option in the bottom-leftcorner to Auto-Generate fields. This option will display all fields.
And last, you can switch to Source View and hand-edit the list of fields.
231
Reading Data
10_588508 ch07.qxd 10/10/05 6:32 PM Page 231

Figure 7-18
Before moving on, take a look at the code that VWD builds for a GridView control. Note that a data-bound control such as GridView will always have a DataSourceID property that points to the datasource control providing the data. Note that the DataSourceID property points to a data source controland is used here. A similarly named property, the DataSource, is used in more advanced scenarios.First, display of all fields by including setting the autogeneratecolumns property to True, as follows:
<asp:gridview id=”EmployeesTable” runat=”server” datasourceid=”EmployeesDataSource”autogeneratecolumns=”True”
</asp:gridview>
The following syntax would only display three of the fields because you set the autogeneratecolumns tofalse and instead, have a set of tags called <Columns>. Within those tags you add an <asp:BoundField>tag for each field. Note that ASP.NET 2.0 uses the terms columns and fields interchangeably here.
<asp:gridview id=”EmployeesTable” runat=”server” datasourceid=”EmployeesDataSource”autogeneratecolumns=”False”
</asp:gridview><Columns>
<asp:BoundField HeaderText=”Hired Date” DataField=”DateHire” </asp:BoundField>
<asp:BoundField HeaderText=”First Name” DataField=”NameFirst” </asp:BoundField>
<asp:BoundField HeaderText=”Last Name” DataField=”NameLast” </asp:BoundField>
</Columns></asp:gridview>
232
Chapter 7
10_588508 ch07.qxd 10/10/05 6:32 PM Page 232

Adding Paging and Sorting to a GridView ControlDesigners faced an onerous task prior to ASP.NET 2.0 when they had to implement paging and sorting.The ASP.NET 2.0 design team took it upon itself to offer these features fully coded and ready to use.Select a GridView control and open its smart task panel by clicking the small triangle at the top right ofthe control to see checkboxes to turn on paging and sorting as shown Figure 7-19.
Figure 7-19
Turning on paging and sorting requires two prerequisites. First, the GridView control must have itsDataSourceID set to a valid data source control on the page. Second, that data source control must haveits EnablePaging and/or EnableSorting properties set to True. The logic is that when a user requests asort by clicking on a GridView control, the GridView passes the request down to its data source control.The data source control revises the data and sends the new information back to the GridView control,which re-renders. Sorting also requires that fields have a header value so there is a target for users to click.
Checking sorting enables sorts on all columns. Note that when the page is running, a user can click asecond time on a column’s header to change the direction of the sort. Individual columns can be sortableor not by going to Source View and removing the SortExpression property. In the following snippetbuilt by VWD the Date field is not sortable but the Name field will sort because after the sort option waschecked, VWD added a SortExpression property to the Name field (the shaded line):
<asp:GridView ID=”GridViewSemiSortable” runat=”server” AllowSorting=”True”AutoGenerateColumns=”False” DataSourceID=”SqlDataSource1”><Columns>
<asp:BoundField DataField=”Date” HeaderText=”FixtureDate” />
<asp:BoundField DataField=”Name” HeaderText=”FixtureType” SortExpression=”FixtureType” />
</Columns></asp:GridView>
233
Reading Data
10_588508 ch07.qxd 10/10/05 6:32 PM Page 233

Paging requires additional design elements to offer navigation tools to the user. As soon as the pagingoption is checked, the GridView control has an additional panel for PagerSettings in the Propertieswindow, as shown in Figure 7-20.
Figure 7-20
The last entry is a setting for the number of records to show at once (PageSize). For navigation, thehighest-level property is Mode, wherein you can select one of four custom sets of tools that are self-describing, and explained in the following list. Selecting one of these sets of tools automatically sets the remainder of the properties for PagerSettings:
❑ NextPrevious: Displays only the Next and Previous options.
❑ Numeric: Displays a list of page numbers, with the number of pages to display set byPageButtonCount.
❑ NextPreviousFirstLast: Displays only the Next, Previous, First, and Last options.
❑ NumericFirstLast: Displays the numbers of pages and also the two terminal buttons.
Of course, you can go beyond the option packages and set any property as desired. A common modifica-tion is to substitute site-specific images for the tools. We also recommend you look carefully at the textproperties. Sometimes the default words do not clearly relay the intention; for example, the term “last”when working with dates could mean the last record added in time, the last event to occur, or the lastpage that you viewed.
In the following Try It Out you add a GridView of games. Each row will be a record from the Fixturestable, that is, one game. Columns will hold information such as the date and opponent of the game.
Try It Out Adding a GridView Control to Fixtures.aspx1. Open your Fixtures.aspx page and use Source View.
2. Switch to (or open with Ctrl+Alt+S) the database explorer. Expand the WroxUnited.mdf, thenexpand Tables, and finally expand Fixtures, as shown in Figure 7-21. Select all of the fields and
234
Chapter 7
10_588508 ch07.qxd 10/10/05 6:32 PM Page 234

drag them to the content section of the Fixtures.aspx page. VWD does all of the heavy lifting.Wait for it to finish and then run the page. Admire your work and close the browser.
Figure 7-21
3. Next you modify which fields are displayed. Looking at the scores, it might be just as good to delete those. Be sure the browser is not displaying the page, because that will lock it in VWD.Select the GridView and open its smart task panel. Click Edit Columns and in the bottom left, select the GoalsFor, and click the X button to delete as shown in Figure 7-22. Repeat for theGoalsAgainst column. Click OK when you are finished.
Figure 7-22
235
Reading Data
10_588508 ch07.qxd 10/10/05 6:32 PM Page 235

4. Now you can go back and enable paging. In Design View, select the GridView and open its smarttask panel. Turn on the checkbox for Enable Paging and then close the panel. Look in the propertywindow to find the PageSize property that you will set to two (Wrox United doesn’t get invitedto many games). Also note the section of PagerSettings. Set the mode to NumericFirstLast.Again, run in the browser, play with paging, and then close the browser.
5. You finish by enabling sorting. Open the smart task panel and check Enable Sorting.
Because the Notes field is not logical for sorts, turn off sorting for that one field. Switch toSource View, and within the GridView control find the BoundField for Notes. Delete the entire property of SortExpression=”Notes”. Save the file and check it in your browser.
How It WorksAdding a GridView control is simplicity itself with the help of VWD. This example demonstratedremoving columns with the Edit Columns feature and it is just as easy to add columns. Turning on paging is as simple is checking the option, followed by setting properties for the control in the propertieswindow. The PageSize property is obvious, but other settings are under the PagerSettings group.Turning on sorting was easy. Removing the sort option from one column was similarly easy. All you had to do was go to Source View and delete that field’s SortExpression property.
The DataList and Repeater ControlsThe GridView control displayed data with each cell holding one piece of information (for example, thefirst name of employee 6). ASP.NET 2.0 offers the alternative of a table where all of the fields for onerecord are in one cell (one cell holds first name, last name, ID, and date of hire, all for employee 6). Twodata-bound controls render one record per cell: DataList and Repeater. The only difference is that theDataList control has a default formatting and templates whereas the Repeater control requires moresetup by the designer.
Creating a DataList control is similar to creating a GridView control. You can drag and drop the data-bound control from the toolbar and a let VWD walk you through creation of a new data source control,or you can add the data source control by hand and then add the data-bound control. The DataListcontrol’s properties support the capability to set the Layout Repeat Direction so that records are orderedto increase horizontally across the page or vertically down the page, as well as the number of columns.
Templates offer the capability to lay out the space within a cell. For example, if you want a different set offields in each DataList cell, want to change the cell’s background to pink, and want to add a logo to eachcell, you can modify the template. The exercise that follows walks you through changing a template.
Templates are invaluable, but there are several confusing points. First, templates by themselves do notdisplay data. Rather, templates contain data-bound controls, such as labels, that do the actual display ofdata. Second, there are multiple templates for a given space. A DataList cell can have an Item Template(the normal display for data), an Alternating Item Template (to create every other record with a differentcolor), a Selected Template (to change the appearance when selected), and an Edit Item template (tochange the appearance during editing). Each of these templates is designed independently, as you willsee. The third point of confusion is that you must enter into a specific template editing mode in order tomake the changes; you cannot change a template by just selecting and modifying fields in Design View.
236
Chapter 7
10_588508 ch07.qxd 10/10/05 6:32 PM Page 236

After editing a template you must explicitly end the template editing mode. Last, ASP.NET 2.0 uses theterm style in context of templates. Styles primarily provide the properties for appearance (color, borders,and so forth), whereas the template primarily provides the layout of fields (but can also specify appear-ance). If a color or border is set in both the style and the template, the template will take precedence. Itmay seem that this is a minefield, but once you have worked with templates (as in the next exercise) youwill find the template feature is well designed.
With an understanding of templates, we can go back and make two notes. First, templates are also avail-able in the GridView control and work the same way. Second, the difference between a DataList con-trol and a Repeater control is that the DataList control has a set of default templates, whereas theRepeater control is a blank space in which you must build all of the templates.
In this Try It Out you practice using a DataList to display pictures from Wrox United matches. You willcreate a simple page that shows all of the pages and name it Gallery-All. Later in the chapter you willcreate a more complex version as your final Gallery.aspx.
Try It Out The DataList Control1. Create a simple ASP.NET 2.0 Web Form page named Gallery.aspx using our site.master and with
the code placed in a separate page. Save it and then save it again as Gallery-All.aspx. Also, for thisexercise you will need some images that we supply in the download. Check if you have alreadyimported the MatchImages folder in from the download (C:\BegASPNET2\WroxUnited). If not,import it by right clicking on the root of the site in Solution Explorer and using Add Existing Item.In the end you should have below the root a folder named Images and within there a series of GIFand JPG files including AddToCart.gif, ArrowFirst.gif and logo_white.jpg.
2. Start by dragging a DataList control from the Data section of the Toolbox to the content area.Open its smart task panel, as shown in Figure 7-23, and click Choose Data Source. Click NewData Source for the wizard to create a data source control.
Figure 7-23
3. Select Database as the source and leave the name as SqlDataSource1. Click OK. Use theWroxUnited.
4. From the Gallery table check off just five fields: PictureURL, FixtureID,UploadedByMemberName, Notes and PictureURL, and then test the query. At this point VWDautomatically creates the data source control and sets it as the source for the DataList control.
237
Reading Data
10_588508 ch07.qxd 10/10/05 6:32 PM Page 237

Figure 7-24
5. Run the page in your browser to test (see Figure 7-24), noticing that you don’t have the picturesyet. Close the browser.
6. Now you need to actually get the pictures displayed. Be sure your browser is closed and then inDesign View select the DataList control, open its smart task panel, and click Edit Templates tosee a screen similar to Figure 7-25. Select and then delete the line that has the text PictureURLand a Label control.
7. From the toolbar, drag an Image control into the space left by the old PictureURL field. On theImage control’s smart task panel click Edit Data Bindings, and select the property ImageURL tobind to the field PictureURL, as shown in Figure 7-26.
The resulting source code follows. If you test the page in your browser, you’ll notice that youare still not there. The Image control still does not have a URL that actually points to an image:
<asp:image id=”PictureImage” runat=”server” ImageUrl=’<%# Eval(“PictureURL”)%>’
</asp:image>
238
Chapter 7
10_588508 ch07.qxd 10/10/05 6:32 PM Page 238

Figure 7-25
Figure 7-26
8. To get this to work you must identify not only the name of the image file but also its path(folder). Switch to Source View and add the following argument to the imageURL property:
<asp:image id=”PictureImage” runat=”server” ImageUrl=’<%# Eval(“PictureURL”, “~/MatchImages/{0}”) %>’>
</asp:image>
9. Check your page in the browser (see Figure 7-27), shout “Eureka!” and then close the browser.
239
Reading Data
10_588508 ch07.qxd 10/10/05 6:32 PM Page 239

Figure 7-27
10. Now make some modifications to the DataList. Back in Design View, change the layout of theDataList control. Select the DataList control (see Figure 7-28), and in the Properties windowchange RepeatColumns to 3 and the RepeatDirection to Horizontal.
Figure 7-28
11. You’ll finish with a little practice on templates. In Design View select the DataList control andopen its smart task panel. Click Edit Templates and, by default, you will be editing the Itemtemplate, shown in Figure 7-29.
240
Chapter 7
10_588508 ch07.qxd 10/10/05 6:32 PM Page 240

Figure 7-29
12. Delete the text “Notes:”, but keep the label that shows the notes.
13. In the layout move the FixtureID up higher in the template and the Member Name lower inthe template. Edit the text UploadedByMemberName by adding some spaces between the wordsso it is easier to read. Delete the text and label that refers to the PictureURL. These actions areshown finished in Figure 7-30.
Figure 7-30
14. In the DataList control’s smart task panel (probably still open), click End Template Editing.The page will look as follows in Source View:
241
Reading Data
10_588508 ch07.qxd 10/10/05 6:32 PM Page 241

<%@ Page Language=”VB” MasterPageFile=”~/site.master” AutoEventWireup=”false”CodeFile=”Gallery-AllTest.aspx.vb” Inherits=”Gallery_AllTest” title=”Untitled Page” %><asp:Content ID=”Content1” ContentPlaceHolderID=”mainContent” Runat=”Server”>
<asp:DataList ID=”DataList1” runat=”server” DataSourceID=”SqlDataSource1”RepeatColumns=”3” RepeatDirection=”Horizontal”>
<ItemTemplate>
<asp:Image ID=”Image1” runat=”server” ImageUrl=’<%# Eval(“PictureURL”,“~/MatchImages/{0}”) %>’ /><br />
<asp:Label ID=”NotesLabel” runat=”server” Text=’<%# Eval(“Notes”)%>’></asp:Label><br />
FixtureID:<asp:Label ID=”FixtureIDLabel” runat=”server” Text=’<%#
Eval(“FixtureID”) %>’></asp:Label><br />
Uploaded By Member:<asp:Label ID=”UploadedByMemberNameLabel” runat=”server” Text=’<%#
Eval(“UploadedByMemberName”) %>’></asp:Label><br /></ItemTemplate>
</asp:DataList>
<asp:SqlDataSource ID=”SqlDataSource1” runat=”server” ConnectionString=”<%$ ConnectionStrings:WroxUnited %>”SelectCommand=”SELECT [PictureURL], [Notes], [UploadedByMemberName], [FixtureID]
FROM [Gallery]”></asp:SqlDataSource></asp:Content>
15. Run the page to see the results of your work in your browser (see Figure 7-31).
How It WorksAfter the fifth step you had produced a page with names of picture files, not the actual images. This was because when VWD made the DataList control’s default template it saw there was text in thePictureURL field so it created a Label control, as follows:
...<asp:DataList ID=”DataList1” runat=”server” DataSourceID=”SqlDataSource1”RepeatColumns=”3” RepeatDirection=”Horizontal”>
<ItemTemplate><asp:label ID=”label1” runat=”server”
Text=’<%# Eval(“PictureURL”) %>’></asp:Label>
In the next step you changed the control from a Label to an Image control, as shown in the followingcode. This gave you an image but left the image rendered as a red x, meaning that the image could notbe found.
<asp:Image ID=”Image1” runat=”server” ImageUrl=’<%# Eval(“PictureURL”) %>’ />
242
Chapter 7
10_588508 ch07.qxd 10/10/05 6:32 PM Page 242

Figure 7-31
The problem is that an ASP.NET 2.0 page will, by default, look for an image file in the same folder asitself. The images are kept in a different folder named MatchImages. So, you can use a feature of theEval method to add the relative path to the name of the picture file. You add a second argument thatembellishes some text onto whatever value is provided by the database. In this case you added the path.There are two new tricks in this syntax. First, in the formatting argument you use a tilde (~) that meansthe root of the site. When you deploy the site to another server you will not have to change all of thepaths. Second, the syntax {0} indicates the place to plug in the value that comes from the database. Sosyntax such as the following will be translated into C:\BegASPNET\WroxUnited\MatchImages\aaronson.jpg for the first record before it is used as the ImageURL:
<asp:Image ID=”Image1” runat=”server” ImageUrl=’<%# Eval(“PictureURL”, “~/MatchImages/{0}”) %>’ />
You finished the exercise by getting some practice with editing templates. Remember that you must shiftinto Edit Templates mode prior to making changes to the controls in a template that actually present thedata. If you become perplexed by the unresponsiveness of VWD when you attempt to select or modifythe Label and Image controls, you have forgotten to enter Edit Templates mode. You saw how fieldscould be selected and then deleted or moved.
243
Reading Data
10_588508 ch07.qxd 10/10/05 6:32 PM Page 243

The DetailsView and FormView ControlsThe three data-bound controls you have studied so far (GridView, DataList, and Repeater) displaymore than one record at a time. An alternative pair of data-bound controls display just one record at atime: DetailsView automatically creates a set of templates, whereas FormView is a blank slate uponwhich you build templates as desired. These are useful controls when you want to focus the user’s atten-tion on one record or need more screen real estate to display many fields for one record. They are alsothe preferred controls for adding or editing a record.
Like many other data-bound controls, DetailsView and FormView can be added to the page eitherdirectly, in which case VWD kicks off the wizard to create a data source control, or can be added after adata source control is already on the page.
Both the DetailsView and FormView controls rely on templates as described in the previous section.After creating the control, open the smart task panel and click Edit Templates. The appearance willchange as you enter Template Edit Mode. Figure 7-32 shows the default mode.
Figure 7-32
Figure 7-33 depicts the Template Edit mode where fields can be added, removed, or rearranged.
When displaying only one record you have to make a decision whether or not to allow navigation fromrecord to record. If you are showing details of a record selected in a GridView control, you would notwant the user to be able to navigate off to other records because that would cause a loss of synchro-nization with the GridView. But if the DetailsView is standing alone you can turn on paging with thecheckbox in the smart task panel. The same Navigation Mode options are available as discussed for theGridView, such as Numeric, FirstLast, and PreviousNext.
In this Try It Out you practice looking at the information of one Wrox United match at a time usingDetailsView.
As you will study in Chapter 8, only DetailsView and FormView can accept theaddition of new records. GridView, DataList, and Repeater can change, display,and modify existing records, but not create new records.
244
Chapter 7
10_588508 ch07.qxd 10/10/05 6:32 PM Page 244

Figure 7-33
Try It Out Using DetailsView and FormView1. Create a new page in the root of your site named Fixtures-Stacked using the master page and
putting the VB code in a separate file. Switch to Design View.
2. Drag a DetailsView control from the Toolbox onto the page, as shown in Figure 7-34.
Figure 7-34
3. In the DetailsView control’s smart task panel, choose its data source to be a new data sourcefrom Database with an ID of SqlDataSource2 and using the existing Wrox United connectionstring. Be sure to name it SqlDataSource2 because you will add a SqlDataSource1 later. Includeall of the fields from the Fixtures table.
4. Before testing the page, you need to enable paging from the DetailsView control’s smart task panel. In addition, in the Properties window, configure the Pager Settings / Mode to useNumericFirstLast.
5. With the DetailsView control selected, in the Properties window change the LastPageTextproperty to “Last Game of the Season” and FirstPageText property to “First Game of theSeason.” Also, select the DetailsView control and make it wider by dragging its right edge to the right.
245
Reading Data
10_588508 ch07.qxd 10/10/05 6:32 PM Page 245

The results are as follows:
<%@ Page Language=”VB” MasterPageFile=”~/site.master” AutoEventWireup=”false”CodeFile=”Fixtures-Stacked.aspx.vb” Inherits=”Fixtures_Stacked” title=”UntitledPage” %>
<asp:Content ID=”Content1” ContentPlaceHolderID=”mainContent” Runat=”Server”>
<asp:DetailsView ID=”DetailsView1” runat=”server” AllowPaging=”True” AutoGenerateRows=”False”DataKeyNames=”FixtureID” DataSourceID=”SqlDataSource2” Height=”50px” Width=”350px”>
<PagerSettings Mode=”NumericFirstLast” FirstPageText=”First Game of the Season” LastPageText=”Last Game of the Season”/>
<Fields><asp:BoundField DataField=”FixtureID” HeaderText=”FixtureID”
InsertVisible=”False”ReadOnly=”True” SortExpression=”FixtureID” />
<asp:BoundField DataField=”FixtureDate” HeaderText=”FixtureDate”SortExpression=”FixtureDate” />
<asp:BoundField DataField=”FixtureType” HeaderText=”FixtureType”SortExpression=”FixtureType” />
<asp:BoundField DataField=”GoalsFor” HeaderText=”GoalsFor”SortExpression=”GoalsFor” />
<asp:BoundField DataField=”GoalsAgainst” HeaderText=”GoalsAgainst”SortExpression=”GoalsAgainst” />
<asp:BoundField DataField=”Notes” HeaderText=”Notes”SortExpression=”Notes” />
<asp:BoundField DataField=”Opponents” HeaderText=”Opponents”SortExpression=”Opponents” />
</Fields></asp:DetailsView>
<asp:SqlDataSource ID=”SqlDataSource2” runat=”server” ConnectionString=”<%$ ConnectionStrings:WroxUnited %>”SelectCommand=”SELECT * FROM [Fixtures]”>
</asp:SqlDataSource></asp:Content>
6. Run the page in your browser to observe that only one match is shown at a time (see Figure 7-35).
How It WorksThe key point of this exercise is to create and view a presentation where one record is shown at a time,like the top playing card in a deck. You can use either the DetailsView or FormView; you choseDetailsView because it does an automatic default layout for you.
246
Chapter 7
10_588508 ch07.qxd 10/10/05 6:32 PM Page 246

Figure 7-35
The modifications you made to the DetailsView control were almost the same as those for other data-bound controls in earlier exercises. To move through the records of games you enabled paging by check-ing the appropriate box in the control’s smart task panel. To enhance the user experience you specified aspecific set of navigation tools in the Properties window of the control and modified their text to presenta more logical user interface.
Data Source Controls with ParametersSo far in this chapter you have created pages with fixed sets of data. With parameters you can deter-mine, dynamically, what data to display in a data-bound control. In ASP.NET 2.0, a parameter is a tag thatholds a data that can be used when a control carries out its task. For example, a parameter could hold adate, and that date is used to determine which game to show in a data-bound control. This section startswith a simpler case where you will look at how you can pass a parameter between pages. In the next section you will use parameters to enable two controls to work together. As with all of ASP.NET 2.0, theimplementation is made even easier with tools in VWD. You will start with a simple page that picks up a value from a querystring and uses it to find one record of a table.
When you created data source controls earlier in the chapter you saw how to add only certain columnsfrom a table in the dialog step titled Configure the Select Statement, but the wizard button captionedWHERE was not discussed (see Figure 7-36).
A querystring is field name and value added to a HTTP request, as shown in the italic part of the following URL (the text following the question mark):www.WroxUnited.com\PlayerInformation.aspx?PlayerLastName=Smith.
247
Reading Data
10_588508 ch07.qxd 10/10/05 6:32 PM Page 247

Figure 7-36
If you click the WHERE button of the wizard you get a dialog box that leads you through the options tolimit the data set to only certain records. This step selects which column to use in the process of limitingrecords. Then the “source” drop-down list offers the choice of getting the data from a querystring. Thatopens a section for parameter properties. In the case shown in the shaded box above you would enterPlayerLastName. These steps add a section to the data source control called SelectParameters, asshown in the following shaded code. SelectParameters is one type of parameter; you will encounterothers later in the book.
<asp:SqlDataSource ID=”SqlDataSource1” runat=”server” ConnectionString=”<%$ ConnectionStrings:WroxUnited %>”SelectCommand=“SELECT * FROM [Players] WHERE ([PlayerLastName] = @PlayerLastName)”>
<SelectParameters><asp:QueryStringParameter Name=”PlayerLastName”
DefaultValue=”XXX” QueryStringField=”PlayerLastName” Type=”String” /></SelectParameters>
</asp:SqlDataSource>
In this code, first notice in the shaded section that a <SelectParameters> is added. This is similar to a variable that will be filled by ASP.NET 2.0 with the value of Smith that comes in when you specify aquerystring, as your did earlier. Then notice in the SELECT command that VWD has made the WHEREclause equal to a name starting with an at (@) sign. The at symbol means a parameter and in this case theparameter that holds the player’s last name. Each time the page is opened or refreshed it will search thequerystring for a PlayerLastName value. Typing all of these would be a waste of time; you will instructVWD to do it for you in the next exercise.
248
Chapter 7
10_588508 ch07.qxd 10/10/05 6:32 PM Page 248

In this Try It Out you modify the previous Try It Out. Instead of presenting a DetailsView control withall of the games stacked up, you will present just one game. That one game will be determined by a gameidentifier (FixtureID) in the querystring.
Try It Out Data Controls with Parameters1. Make a copy of Fixtures-Stacked as follows. In Solution Explorer select Fixtures-
Stacked.aspx. Right-click and select Copy. Right-click the root of the site and select Paste.
Look in the list of files for Copy of Fixtures-Stacked.aspx. Rename the copy to Fixtures-One.aspx.
2. Select the DetailsView control and dis-enable paging.
3. Select the SqlDataSource control, open its smart task panel, and click Configure Data Source.
4. Click Next to keep the current connection, and go to configuration of the Select Statement. Thereis no need to change the table source or fields. Click the WHERE button to detour to the AddWHERE Clause box (see Figure 7-37).
Figure 7-37
5. Select FixtureID from the drop-down list of columns.
6. Accept an operator of equals and set the source to querystring. In the parameters propertiespanel set the QueryString field to FixID (type in the name) and a default of 1. Click Add andthen click OK. Click Next and test. Notice that before the test runs, VWD gives you a chance toinput by hand the value that will be in the querystring. Try the default of 1, and then also testvarious numbers between. (See Figure 7-38.) Click Finish and read on.
249
Reading Data
10_588508 ch07.qxd 10/10/05 6:32 PM Page 249

Figure 7-38
7. VWD registers that there was a change to the data source feeding the DetailsView control. Itwill give you a chance to rebuild the data-bound control to be synchronous with the new set-tings of the data source control. Agree to the update. You can also perform such a synchroniza-tion at any time by clicking the Refresh Schema choice in the smart task panel. Your file sourcecode will end up as follows.
<%@ Page Language=”VB” MasterPageFile=”~/site.master” AutoEventWireup=”false”CodeFile=”Fixtures-One.aspx.vb” Inherits=”Fixtures_One” title=”Untitled Page” %><asp:Content ID=”Content1” ContentPlaceHolderID=”mainContent” Runat=”Server”>
<asp:DetailsView ID=”DetailsView1” runat=”server” AutoGenerateRows=”False” DataSourceID=”SqlDataSource2” Height=”50px” Width=”447px”><PagerSettings Mode=”NumericFirstLast” FirstPageText=”First Game of the Season” LastPageText=”Last Game of the Season”/>
</asp:DetailsView>
<asp:SqlDataSource ID=”SqlDataSource2” runat=”server” ConnectionString=”<%$ ConnectionStrings:ConnectionString2 %>”SelectCommand=”SELECT [FixtureDate], [FixtureType], [GoalsFor],
[GoalsAgainst], [Notes], [Opponents] FROM [Fixtures] WHERE ([FixtureID] =@FixtureID)”>
<SelectParameters>
250
Chapter 7
10_588508 ch07.qxd 10/10/05 6:32 PM Page 250

<asp:QueryStringParameter DefaultValue=”1” Name=”FixtureID”QueryStringField=”FixID”
Type=”Int32” /></SelectParameters>
</asp:SqlDataSource></asp:Content>
8. Now you can test the page by running it. By default game number 1 will be displayed. In yourbrowser’s address bar try changing the URL from ... /WroxUnited/Fixtures-One.aspx byadding a querystring to get ... /WroxUnited/Fixtures-One.aspx?FixID=3 and click theGO button of your browser (as shown in Figure 7-39).
Figure 7-39
How It WorksYou did a rather elaborate procedure to make the copy. You might be tempted to just open the originaland Save As with the new name. But with a Save As you do not get a copy of the code-behind page nordo you get a change in the .aspx page’s reference to the code-behind file. Copying, pasting, and chang-ing the name in Solution Explorer instructs VWD to take care of the details.
First, you disabled paging because with only one record in the stack there is no need for navigation.Then you revised your SelectCommand. Even though you already have your SqlDataSource controlconfigured, you can restart the wizard and modify the control. This eliminates the possibility of intro-ducing typos by editing in Source View.
In prior exercises you did not use the WHERE button and so VWD built for you a SelectCommand thatreturned all of the records. In the Add WHERE Clause step you selected a column (which means field)that was going to be scanned for matches. You wanted your matches to be exact, so you selected theequals operator. Then you selected a source of QueryString. This means that the value of which fixtureto display (the parameter) can be found in the querystring. Under parameters properties you set thename of the value in the querystring to be FixID. Don’t forget to click the Add button in the Add WhereClause window — it is easy to overlook.
251
Reading Data
10_588508 ch07.qxd 10/10/05 6:32 PM Page 251

VWD keeps an eye on the data source control for each data-bound control. When you finish your revi-sion to the data source control VWD warns you that you better synch up any data-bound controls usingthat source. You can also do that synch explicitly with a click on the Refresh Schema button of the smarttask panel.
All of these changes have left the page ready to accept an ID of a game in the querystring. The valuemust have the name of FixID. Your data source will take that value (or 1 if there is no FixID) and usethat in the SelectCommand to find the records with a matching FixtureID. Only that game will beshown. When you test the page you only have to remember the syntax to attach a value to a URL. Afterthe page name type a question mark to begin parameters. Then type the parameter name, an equals sign, and the parameter’s value.
Multiple Data Controls Working TogetherThe previous section described a crude way to use parameters by typing them into the URL. The enlight-ened way is to use one data-bound control to create the parameters for another data-bound control.These are termed ControlParameters. This section demonstrates two very common cases. In the firstcase, a DropDownList control determines which record or records to display in a GridView control. Inthe second case, a selection in a GridView control determines which record for which the page shouldshow more fields in a DetailsView control. These are called master-child scenarios. A selection in amaster data-bound control establishes the value for a WHERE clause in the data source control of the childdata-bound control. In almost all cases there must be separate data source controls for the master andchild data-bound controls.
In the master control you only need one special property. If the master control is a ListBox orDropDownList control, the AutoPostBack property must be set to True so that when a selection ismade from the master, ASP.NET 2.0 will invoke a refresh of the page and the resulting change in therecord will be shown in the child control. Keep in mind that ListBox and DropDownList controls have two field parameters. The first is the field to display (DataTextField property), and the second is the field that is used in page code (DataValueField property). This allows a last name, for example,to be displayed to the user in the list box but the more useful value of, for example, PlayerID to be usedin SQL statements. If the master control is a GridView you can open its smart task panel and EnableSelection to get VWD to build a new column with select buttons for each record. When clicked, ASP.NETwill react to the selection of that record, as you will see.
In the child control you must set a parameter into the WHERE clause of the child control’s data sourcecontrol. In the previous section you set the parameter to a field of the querystring using the Add WHEREClause dialog of the Configure Data Source Control wizard. You can use the wizard again, but this timewhen you get to the Add WHERE Clause panel you set your column equal to a value from a control (not a querystring). The wizard presents a list of controls from which you can select. Within the selectingcontrol you determine which value to use, normally the SelectionValue.
In the following Try It Out you practice two combinations of controls. In the first you use a GridViewselection to show additional fields in a DetailsView control. In the second you use a DropDownListcontrol to show only certain records in a GridView.
252
Chapter 7
10_588508 ch07.qxd 10/10/05 6:32 PM Page 252

Try It Out Multiple Controls Working Together1. Now you will build your final version of Fixtures.aspx. Move your existing Fixtures.aspx to
a folder that you create and name OldPages. Because the steps are so quick and easy (and it is agood review) you will start from scratch. Add a new item to the site named Fixtures.aspxusing the Master page with VB code in a separate file. Switch to Design View.
2. Open Database Explorer, navigate to WroxUnited.mdf ➪ Tables ➪ Fixtures. Select only the fieldsfor FixtureID, FixtureDate, and Opponents (using Ctrl+Click), and drag them to the page.VWD will crank for a few seconds and then give you a GridView with its smart task panelopen. Enable Selection as shown in Figure 7-40. Note that VWD has already added the columnof Select buttons.
Figure 7-40
3. Go to the bottom of the content holder and drag a DetailsView control from the Toolbox.Choose a data source of New and configure the database with an ID of SqlDataSource2 andcontinue using the connection string named WroxUnited that you use in all of this chapter.Specify to get data from the Fixtures table and select all the fields.
4. Click the WHERE button and select the column of FixtureID. Set the operator to equals andselect Control from the Source drop-down (see Figure 7-41).
5. Now in the parameter properties, set the ControlID to GridView1 and the default value to 1.Don’t forget to click the Add button (not done yet in Figure 7-41). Click OK, Next, and then theTest Query button (a value of 1 is fine), and finally, click the Finish button.
6. Drag the DetailsView control to be wider. Save and view it in your browser (see Figure 7-42).Select various matches from the GridView and see their notes below the GridView in theDetailsView control.
7. Now you will improve the Gallery page by only showing pages from one match. In SolutionExplorer, make a copy of Gallery-All.aspx to the root. Change the copy’s name toGallery.aspx.
253
Reading Data
10_588508 ch07.qxd 10/10/05 6:32 PM Page 253

Figure 7-41
Figure 7-42
254
Chapter 7
10_588508 ch07.qxd 10/10/05 6:32 PM Page 254

8. Open Gallery.aspx and add a few line breaks and then a DropDownList box to the top of thepage. Configure its data source to a new source of type Database and name it SqlDataSource3.Use the WroxUnited and from the Fixtures table select the FixtureID, FixtureDate, andOpponents.
Click ORDER BY and sort on FixtureDate ascending. Click OK, Next, and then test the queryand finish. This brings you back to the Choose a Data Source window, and you will display (fornow) the Opponents and set the value to FixtureID. Click OK. While the DropDownList con-trol is still selected, turn on Enable AutoPostback from the smart task panel.
9. Open the smart task panel for the DataSourceControl1 (used by the DataList) and start itsConfigure Data Source wizard. Step through to the WHERE clause. Set the Column of FixtureIDto equal a control with the ControlID of DropDownList1 and a default value of 1. Don’t for-get to click the Add button and click OK. Finish the procedure with clicking Next, and then test query (a parameter value of 1 is fine) and finish. Refresh the data-bound control whenprompted. You will see the result shown in Figure 7-43 in your browser (albeit all the photos todate have been from game 1) and code in Source View.
Figure 7-43
<%@ Page Language=”VB” MasterPageFile=”~/site.master” AutoEventWireup=”false”CodeFile=”FixFinal.aspx.vb” Inherits=”FixFinal” title=”Untitled Page” %>
<asp:Content ID=”Content1” ContentPlaceHolderID=”mainContent” Runat=”Server”><asp:DropDownList ID=”DropDownList1” runat=”server” AutoPostBack=”True” DataSourceID=”SqlDataSource3”DataTextField=”Opponents”
DataValueField=”FixtureID”></asp:DropDownList>
255
Reading Data
10_588508 ch07.qxd 10/10/05 6:32 PM Page 255

<asp:SqlDataSource ID=”SqlDataSource3” runat=”server” ConnectionString=”<%$ ConnectionStrings:WroxUnited %>”
SelectCommand=”SELECT [FixtureID], [FixtureDate], [Opponents] FROM[Fixtures] ORDER BY [FixtureDate]”></asp:SqlDataSource>
<asp:GridView ID=”GridView1” runat=”server” AutoGenerateColumns=”False” DataSourceID=”SqlDataSource1”EmptyDataText=”There are no data records to display.”>
</asp:GridView><asp:SqlDataSource ID=”SqlDataSource1” runat=”server” ConnectionString=”<%$ ConnectionStrings:WroxUnitedConnectionString1 %>”DeleteCommand=”DELETE FROM [Fixtures] WHERE [FixtureID] = @FixtureID”InsertCommand=”INSERT INTO [Fixtures] ([FixtureDate], [Opponents]) VALUES(@FixtureDate, @Opponents)”
ProviderName=”<%$ ConnectionStrings:WroxUnited.ProviderName %>”SelectCommand=”SELECT [FixtureID], [FixtureDate], [Opponents] FROM
[Fixtures] WHERE ([FixtureID] = @FixtureID)”UpdateCommand=”UPDATE [Fixtures] SET [FixtureDate] = @FixtureDate,
[Opponents] = @Opponents WHERE [FixtureID] = @FixtureID”><DeleteParameters>
<asp:Parameter Name=”FixtureID” Type=”Int32” /></DeleteParameters><UpdateParameters>
<asp:Parameter Name=”FixtureDate” Type=”DateTime” /><asp:Parameter Name=”Opponents” Type=”String” /><asp:Parameter Name=”FixtureID” Type=”Int32” />
</UpdateParameters><SelectParameters>
<asp:ControlParameter ControlID=”DropDownList1” DefaultValue=”1”Name=”FixtureID”
PropertyName=”SelectedValue” Type=”Int32” /></SelectParameters><InsertParameters>
<asp:Parameter Name=”FixtureDate” Type=”DateTime” /><asp:Parameter Name=”Opponents” Type=”String” />
</InsertParameters></asp:SqlDataSource>
<asp:DetailsView ID=”DetailsView1” runat=”server” AutoGenerateRows=”False” DataKeyNames=”FixtureID”
DataSourceID=”SqlDataSource2” Height=”50px” Width=”492px”>
<Fields><asp:BoundField DataField=”FixtureID” HeaderText=”FixtureID”
InsertVisible=”False”ReadOnly=”True” SortExpression=”FixtureID” />
<asp:BoundField DataField=”FixtureDate” HeaderText=”FixtureDate”SortExpression=”FixtureDate” />
<asp:BoundField DataField=”FixtureType” HeaderText=”FixtureType”SortExpression=”FixtureType” />
<asp:BoundField DataField=”GoalsFor” HeaderText=”GoalsFor”SortExpression=”GoalsFor” />
256
Chapter 7
10_588508 ch07.qxd 10/10/05 6:32 PM Page 256

<asp:BoundField DataField=”GoalsAgainst” HeaderText=”GoalsAgainst”SortExpression=”GoalsAgainst” />
<asp:BoundField DataField=”Notes” HeaderText=”Notes”SortExpression=”Notes” />
<asp:BoundField DataField=”Opponents” HeaderText=”Opponents”SortExpression=”Opponents” />
</Fields></asp:DetailsView><asp:SqlDataSource ID=”SqlDataSource2” runat=”server” ConnectionString=”<%$ ConnectionStrings:WroxUnited %>”
SelectCommand=”SELECT * FROM [Fixtures] WHERE ([FixtureID] = @FixtureID)”><SelectParameters>
<asp:ControlParameter ControlID=”GridView1” DefaultValue=”1”Name=”FixtureID” PropertyName=”SelectedValue”
Type=”Int32” /></SelectParameters>
</asp:SqlDataSource></asp:Content>
10. You’ll finish up with a trick to resolve the problem of the user not knowing which match toselect in the DropDownList when the same opponent is listed several times. Change theSelectCommand of the DropDownList data source control (SqlDataSource2) and theDataTextField of the DropDownList as follows:
<asp:DropDownList ID=”DropDownList1” runat=”server” DataSourceID=”SqlDataSource2”DataTextField=”FixtureCombo” DataValueField=”FixtureID”AutoPostBack=true >
</asp:DropDownList>
<asp:SqlDataSource ID=”SqlDataSource2” runat=”server” ConnectionString=”<%$ ConnectionStrings:WroxUnited %>”SelectCommand=”SELECT [FixtureID], (Opponents + ‘ - ‘ + CONVERT(varchar,
FixtureDate, 6)) As FixtureCombo FROM [Fixtures] ORDER BY [FixtureDate]”>
How It WorksBoth of these pages are logical extensions of what you did in earlier exercises. As before, you changedthe SelectCommand (using VWD’s Configure Data Source wizard) so that there is a WHERE clause thatgets its value from a parameter. In the previous Try It Out the parameter came in with the querystring,but on these two pages the parameter comes from another control.
In the first case the GridView filled the parameter with the ID of the record for which the Select buttonwas clicked. That value was then used by the data source control in its WHERE clause. An important (andfrequently overlooked) step is to set the DropDownList control to AutoPostBack.
In the final step you wanted to display more than one field in the DropDownList control. You can achievethat goal by using a SQL statement that creates a new field by concatenating values from existing fields.The following code brings together the opponent’s name, the literal text of spaces, a hyphen, and a con-verted format of the game date to create a field called FixtureCombo:
SelectCommand=”SELECT [FixtureID], (Opponents + ‘ - ‘ + CONVERT(varchar,FixtureDate, 6)) As FixtureCombo FROM [Fixtures] ORDER BY [FixtureDate]”>
257
Reading Data
10_588508 ch07.qxd 10/10/05 6:32 PM Page 257

Note how a plus sign (+) is used between each section of the string of text. The opponent value comesfrom the database in a form ready to use. The FixtureDate also comes from the database. But it comesin a date format that is not what you want. So you convert it to a type called varchar, which is a stringof characters. You then put together the two parts with a dividing section of text that consists of a space,a hyphen, and another space.
Working with XML DataXML has solidified as the standard format for information on the Web. XML files (or streams of data) are self-describing (each value has a label) and hierarchical in that every item of data has a parent exceptthe topmost tag. Typically an XML file will have its highest-level tags that merely state the kind of infor-mation held, like Players. Then there would be a set of tags called “player” for each member of the team.Within there would be further, lower-level tags describing that player. Each item is called a node, forexample, one player. Additionally, XML is case-sensitive. XML files can be created, read, and revisedusing ASP.NET 2.0. In the following Try It Out, you create an XML file using VWD.
The league has issued a few changes to Wrox United’s 2007 schedule:
Game Number Date Home Visitor
1 2007, October 21 Wrox United Clatterham
2 2007, October 22 Mellingham WroxUnited
3 2007, October 22 Wrox United Fulchester
Try It Out Creating XML Data1. Right-click the root of your site and add a new item of the type XML file and name it
Schedule2007. Normally you would store an XML file in App_Data, but for this exercise thatcreates some rights problems when viewing in your browser.
2. At the beginning of the file VWD will automatically add the tag for the XML version. Go to theend of the file and type in <Games>. Notice that VWD automatically adds the closing tag for<Games>. These tags are the highest level and describe the entire contents of the XML file.
3. Now you will create a node for the first game. Inside the <Games> tags, create a <game> tag(note that this is singular). Now add a Number=”1” inside the opening <Game> tag as per thecode listing after the next step.
4. Inside the <Games> tag, add three pairs of child tags with values for the team names and thedate as follows:
<Games><Game Number=”1”>
<Date>2007/10/21</Date><Home>WroxUnited</Home><Visitor>Clatterham</Visitor>
</Game></Games>
258
Chapter 7
10_588508 ch07.qxd 10/10/05 6:32 PM Page 258

5. Now add the other two games in the same manner and save the file. The additional games willbe as follows. (For the sake of completeness, the first game is included again.)
<Games><Game Number=”1”>
<Date>2007/10/21</Date><Home>WroxUnited</Home><Visitor>Clatterham</Visitor>
</Game>
<Game Number=”2”><Date>2007/10/22</Date><Home>Mellingham </Home><Visitor>WroxUnited</Visitor>
</Game>
<Game Number=”3”><Date>2007/10/22</Date><Home>WroxUnited</Home><Visitor>Fulchester</Visitor>
</Game>
</Games>
6. If you run the file the XML data will be sent to the browser, and most browsers can render a simple presentation (see Figure 7-44). Try it, noting that there is no ASP.NET 2.0 involve-ment yet.
Figure 7-44
259
Reading Data
10_588508 ch07.qxd 10/10/05 6:32 PM Page 259

How It WorksYou saw in this exercise that you start with a top-level node named <Games>. Then, being careful not tomake typos in the case, you added a node for the first game. The data for that game was organized intwo ways. The number of the game was placed in the <Game> tag as an attribute. But you chose to placethe date and competitors in separate tags at a lower level than the <Game> tag. After running the file yousaw how your browser handles a raw XML file. In the next section you see what ASP.NET 2.0 can dowith that information.
Reading XML DataBecause XML data is organized as a hierarchy, ASP.NET 2.0 provides alternate data source and data-bound controls from those you used with tabular data earlier in the chapter. The XML data source con-trol provides the data source control for most cases. The key property that must be set in this control isthe name of the XML database file.
ASP.NET 2.0 supports rendering of tree data with three data-bound controls named TreeView, Menu,and SiteMapPath. The TreeView is a little tricky to set up, as you will see, but then does its job justfine. The TreeView control is fine for any XML data. The Menu control is designed only for its namedpurpose. The SiteMapPath control renders differently depending on the page that is currently opened.Chapter 2 presented more on this navigation control.
VWD offers a handy way to identify which pieces of data should appear in its rendering. The tool iscalled the TreeViewDataBindings Editor and it can be opened from the TreeView control’s smart taskpanel as you will practice in the following exercise.
In the following Try It Out you create a display of the games scheduled for 2007 at the bottom of theFixtures.aspx page.
Try It Out Reading XML Data1. Open Fixtures.aspx in Design View and drag a TreeView control (in the navigation section
of the Toolbox, shown in Figure 7-45) to the bottom of the page.
Figure 7-45
2. On the smart task panel select Choose Data Source and select New. Note that this time you havedifferent choices for a data source; you want to use an XML file (see Figure 7-46).
260
Chapter 7
10_588508 ch07.qxd 10/10/05 6:32 PM Page 260

Figure 7-46
3. Specify an ID of Schedule2007XML and then browse to the Schedules2007.XML file that youcreated. For now, leave the Transform and XPath boxes in the wizard blank. Run the page inyour browser (see Figure 7-47) and look at the tree at the bottom of the page:
Figure 7-47
The page is rendering the names of the nodes but not the data of the nodes. Close the browser.
4. In Design View, select the TreeView control, open its smart task panel, and click “Edit TreeNodeData bindings.” Select Game in the top left (the singular Game, not the plural Games) and clickAdd (see Figure 7-48).
261
Reading Data
10_588508 ch07.qxd 10/10/05 6:32 PM Page 261

Figure 7-48
5. In the Properties window set the TextField to Number. Staying in the DataBindings editor,select Home, click Add, and set its TextField to #InnerText because you want to display the text between the <Home> and </Home> tags on the page. Repeat for the Date and Visitordata.
How It WorksIn the first step you found the TreeView control in the Navigation panel of the Toolbox. After draggingit to the page you can set its source of data the same way that you do for other data-bound controls, byusing the Choose Data Source in the smart task panel. But in the case of a TreeView you want to use ahierarchical source, so you pick the XML file you made in the last exercise.
As you observed in the first run of the page, by default you only get the generic names of the nodes, not the actual data. The data is specified by using the TreeViewDataBindings Editor. You can add (orremove) tags to which you want data rendered. Once a field is added you go to the right side and selectits TextField property. If you have data within a tag, such as Number within the <Game> tag, then thename of that data will show up without a number sign. If the data is between an opening and closingtag, such as <Home>WroxUnited</Home>, the TextField option will be set to #InnerText.
Binding SyntaxIn this book you have taken advantage of VWD’s features to build code and thus spent little time exam-ining the code that was built for you. But it is worth understanding code that actually brings togetherthe data source controls and the data-bound controls. Within a template for a GridView, DataList,Repeater, DetailsView, or FormView you see the following code:
262
Chapter 7
10_588508 ch07.qxd 10/10/05 6:32 PM Page 262

<asp:DataList ID=”DataList1” runat=”server” DataSourceID=”SqlDataSource1”
<ItemTemplate><asp:Label ID=”FixtureIDLabel”
runat=”server”Text=’<%# Eval(“FixtureID”) %>’ BackColor=”Yellow”></asp:Label>
</ItemTemplate></asp:DataList>
The shaded line instructs the page to bind the Text property of the control named FixtureIDLabel tothe field named FixtureID in the data source SqlDataSource1. This method (request for a specificbehavior) named Eval() actually performs the connection between one field in the data source controland a rendering mechanism in the data-bound control. Two similar methods exist: Eval() is for read-only, and Bind() allows both read and write (and is covered in the Chapter 8). Within templates VWDwill write code to specifically employ these methods. But if there is no templating, the binding is impliedand will not appear in the code.
SummaryASP.NET 2.0 greatly eases the use of data on a web page by encapsulating most of the code into easy-to-use controls. In this chapter you learned that data source controls and data-bound controls work together.The former provides a connection to an information source, and the latter renders that information onto a page. ASP.NET 2.0 ships with four data source controls (SqlDataSource, AccessDataSource,XMLDataSource, and SiteMapDataSource), each optimized to work with a particular type of data.This chapter focused primarily on the SqlDataSource control, because it can be used with any databasethat can understand SQL statements. A fifth data source control, ObjectDataSource, is used for custom-designed business objects.
After learning the basics of data source and data-bound controls, the chapter drilled down into thespecifics of how to use them on your pages, specifically covering the following topics:
❑ How to use the GridView, DataList, and Repeater controls to display tabular data.
❑ How to use the DetailsView and FormView controls to display single records.
❑ How to use the ListBox and DropDownList controls to display a selection of records.
❑ How to use the TreeView, SiteMapPath, and Menu controls to display tree data.
Additionally, this chapter covered the use of templates and wizards when setting up data source anddata-bound controls. Recall that a template is a space into which you can drag various fields or othercontrols. Once in a template, these controls can be bound to the record currently shown by the template.
Most data-bound controls offer templates. These spaces can hold many kinds of controls that can bedata-bound, including labels, text boxes, and images. All of the bound controls within a template willhave their information revised when the user moves from record to record. To change a template youselect the control and switch to Template Editing mode. After making your changes, be sure to click thesmart task panel’s End Template Editing to revert to normal mode.
263
Reading Data
10_588508 ch07.qxd 10/10/05 6:32 PM Page 263

Data-bound controls can be configured to display only a portion of the records. This behavior can be setstatically by a value in a WHERE clause of the SELECT command of the data source control. The restrictionof records can also be set dynamically. The parameter can come from a querystring or another data-bound control. For example, the selection in a DropDownList (master control) can be used as the param-eter of a WHERE clause that limits the records shown in a GridView (child control).
Reading and displaying data is half of the data story. The other half is getting information to flow in theopposite direction. Chapter 8 looks at how to get information from users and write it to your data store.
Exercises1. Describe the general capabilities of data source and data-bound controls.
2. Which data-bound controls render data in tables?
3. Compare and contrast the DetailsView and FormView controls.
4. Describe how a GridView control can limit its records to only those that match a player’s nameselected in a DropDownList of last names.
5. Which data source control is best suited for the Menu or SiteMapPath data-bound controls?
264
Chapter 7
10_588508 ch07.qxd 10/10/05 6:32 PM Page 264

8Writing Data
In Chapter 7 you learned how to read data from a database and present it on a page. In this chapteryou study the reverse, how to gather data from a user and write it to a database. When we refer towriting we mean three kinds of operations: the creation of new records, changing existing records,and deleting records. The pattern is the same for all three and the setup is made quite easy with theinternal functionality of the data source and data-bound controls, as well as the auto-typing featuresof VWD. As a bonus this chapter discusses transferring files from the browser to the server and thenwraps up with an exercise that integrates several techniques from Chapters 6 through this one.
Introduction to Writing DataRecall from Chapter 7 that ASP.NET 2.0 uses two groups of controls to work with data. Data sourcecontrols provide a connection to a source of data and enable certain behaviors, such as reading andwriting to the data source. Data-bound controls provide a user interface on the page that can takeadvantage of the data source control capabilities. For the most part, the controls are mix-and-match.A DropDownList can use a SqlDataSource, XMLDataSource, or AccessDataSource control.Conversely, a SqlDataSource control can have its output rendered by a GridView, DetailsView,DataList, or DropDownList data-bound control. Having noted that flexibility, data controls areoptimized for either tabular (relational) or hierarchical (tree) data.
Data controls are optimized for one of two ways to organize information, as discussed in Chap-ter 7. The first type is relational and the second is hierarchical. Although there can be somecrossover in functionality, the division of the controls is described in the following table.
Relational Hierarchical
Data Source Controls SQLDataSource XmlDataSourceAccessDataSource SiteMapDataSourceObjectDataSource
Data-bound Controls GridView TreeViewDataList and Repeater MenuDetailsView and FormView SiteMapPath
11_588508 ch08.qxd 10/10/05 6:33 PM Page 265

Both data source and data-bound controls have functionality (like writing to a database) built into theircode and you can specifically turn on any or all of those behaviors. For example, in Chapter 7 you enabledpaging and sorting. Most of this chapter discusses how to turn on the writing behaviors.
Before diving into details, let us clarify some terminology surrounding writing data. First, writing actu-ally means changing data, as opposed to just creating it. That means that writing includes changes toexisting records, creating new records, and deleting existing records. ASP.NET 2.0 uses some industry-standard language for control properties. Changing an existing record is called an UPDATE, and creatinga new record is called an INSERT or INSERT INTO. DELETE means removing an entire record from thedatabase. Note that if you want to delete one value from an existing record (for example the date of birth of one player), you would UPDATE that player’s record with a change of the birth date value from a date to NULL. The term SELECT, which you used in the last chapter, means reading data (no changes).ASP.NET 2.0 controls add three additional terms that are used to accept a user’s actions. NEW means toswitch to a view of a control that allows the user to enter data for a new record. This action would be followed by create, which actually sends the SQL INSERT INTO instruction to the database. And last,EDIT means switch to a view wherein the user can change a record’s data. That would be followed by aclick on UPDATE to actually execute the updating instruction.
Options for Writing DataNot all data controls support writing. Of the data source controls, all support writing data except for the SiteMapDataSource. But among the data-binding controls there are more limitations. The selectionlists (DropDownList and ListBox) do not support writing. The new ASP.NET 2.0 data-bound controlssupport the best methods of writing data: GridView, DetailsView, and FormView. However, GridViewcan only update existing records, not create new records. DataList and Repeater can be used to writedata, but because they are older controls in many cases they must use the older ASP.NET 1.1 techniques.
DataKeyNamesAt the time you enable some types of data writing, VWD will add a property to the data-bound controlnamed DataKeyNames. The purpose is to hold both old and new values of a field so that the writing canbe performed correctly. To understand this role, imagine that you have a table of comments about WroxUnited games named MatchReports. In the table you have as the first field (as most tables do) a fieldthat contains an ID number unique to each row. You call it MatchReportID, and it gets values of 1, 2, 3,and so forth, as fans send in reports about matches. Now say that there was a mix-up and the adminis-trator has to change the ID of a report, say from 20 to 19. When the administrator makes the change hestarts by selecting which record to change. ASP.NET 2.0 will store that record’s ID value in a parameterjust like it did in Chapter 7 when you used a GridView as a master control. Next the administratorchanges the value of the ID field. When he sends that command to the database it will look somethinglike the following:
UPDATE MatchReports SET MatchReport=19 WHERE MatchReport=@MatchReportID
GridView does not support the creation of new records. But GridView can easilyopen a DetailsView control (as you practiced in Chapter 7) and that DetailsViewcan create a new record.
266
Chapter 8
11_588508 ch08.qxd 10/10/05 6:33 PM Page 266

Notice that there is the name of the field to change (MatchReportID) and the new value (19). That com-mand also holds an identification of which record to change, something like WHERE MatchReportID=@MatchReportID. But there is a conflict because you have two potential values that could go into@MatchReportID: the old one as saved by the GridView (the value of 20) and the new one that theadministrator entered (the value of 19).
DataKeyNames solves this problem by creating a dictionary that keeps two values for fields in its list.One value is the old and one is the new. When a writing command is issued to a database, ASP.NET usesits smarts to supply the new value from DataKeyNames for the SET part of the command and to use theold value from DataKeyNames for the WHERE part of the command. It would be wasteful and slow toload up the DataKeyNames dictionary with every field, particularly because most fields will not raiseconflicts. VWD automatically adds to the DataKeyNames those fields that are structured as unique in thedatabase. You can add others, but VWD usually gets it right. In summary, DataKeyNames holds namesof fields for which ASP.NET 2.0 must remember both old and new values. When using VWD you rarelyhave to change DataKeyNames.
Changing Existing RecordsThe capability to change an existing record can be turned on with two simple steps using VWD. Whenyou create a data source control you go through a panel in the wizard that asks you to select the tableand columns (see Figure 8-1).
Figure 8-1
There is also an Advanced button that gives you the option to tell VWD to generate INSERT, UPDATE,and DELETE statements (see Figure 8-2). This simple step enables the UPDATE behavior of the data source
267
Writing Data
11_588508 ch08.qxd 10/10/05 6:33 PM Page 267

control. Also, checking Use optimistic concurrency will reduce conflicts of two updates at once on a busyweb site.
Figure 8-2
VWD takes care of all the work for you, fast and without error (we wish we could say the same for theWrox United strikers). Two changes are made to the data source control. First, an UPDATE statement isadded, similar to the following (INSERT and DELETE statements are also added, but those are discussedlater):
<asp:SqlDataSource ID=”SqlDataSource1” runat=”server” ...UpdateCommand= “UPDATE [MyTable]
SET [Field1] = @Field1, [Field2] = @Field2 WHERE [Field1] = @Field1>
...</asp:SqlDataSource>
The UPDATE statement indicates that you want to change an existing record. You provide the table hold-ing the record (MyTable):
UpdateCommand= “UPDATE [MyTable]
Then you provide a set of field names and the values you want them to contain. ASP.NET 2.0 generallydoes not specify those values directly in the command; rather, it uses a reference to a parameter thatholds the value. References to parameters begin with an at symbol (@) before the parameter’s name, asshown here:
SET [Field1] = @Field1, [Field2] = @Field2
Note the WHERE clause at the end, which specifies which record to modify. The following syntax says to change the record in the database for which the Field1 value matches the value held in the Field1parameter. You know that the value to match is from the parameter because you use @ before the fieldname, which directs ASP.NET 2.0 to get the value from the parameters list. Without the WHERE clause theupdate would change all of the records to have the new values the user entered.
WHERE [Field1] = @Field1
268
Chapter 8
11_588508 ch08.qxd 10/10/05 6:33 PM Page 268

VWD also adds a set of tags to the data source control to create the UPDATE parameters. ASP.NET 2.0automatically fills these with the values that currently exist in the table. When the user makes a changeto the data-bound control, ASP.NET 2.0 intelligently substitutes in the new value. The exception is forunique fields such as identifiers, in which case ASP.NET 2.0 keeps both the old and new value in theDataKeyNames dictionary as discussed in the introduction to this chapter.
<ControlParameters> can hold values in the same way as <UpdateParameters>. Whereas<UpdateParameters> hold the values that the data source control read from the existing record,<ControlParameters> hold values that the user enters or selects from controls other than the data-boundcontrol that is changing the data. For example, you may be changing the date in a GridView, but you wantthe date to come from a selection in a Calendar control. You encountered <ControlParameters> inChapter 7 when you created pages with a master-child relationship, and you will see examples in contextof writing data later in this chapter.
An optional property can be added to a data source control: ConflictDetection=”CompareAllValues”.Conflict detection implements the DataKeyNames solution to avoid two users updating the same record atthe same time.
In a data-bound control that implements updates you see two changes as well that are needed to movefrom a read-only control to a control that can update records (highlighted in the following code listing).First is the addition of a property for DataKeyNames. Second is in the list of fields, where you see the fol-lowing new “field” added. Called a CommandField because it offers the user a button that will execute acommand, it is only a field in the sense that ASP.NET 2.0 will create a field-like rendering for the buttonon the data-bound control:
<asp:DetailsView ID=”DetailsView1” runat=”server” AutoGenerateRows=”False” DataKeyNames=”FixtureID”DataSourceID=”SqlDataSource1” Height=”50px” Width=”125px”>
<Fields><asp:BoundField DataField=”FixtureID”
HeaderText=”FixtureID” InsertVisible=”False”ReadOnly=”True” SortExpression=”FixtureID” />
<asp:BoundField DataField=”FixtureDate”HeaderText=”FixtureDate” SortExpression=”FixtureDate” /><asp:CommandField ShowEditButton=”True” ShowInsertButton=”True” />
</Fields></asp:DetailsView>
For example, the preceding code would contribute toward a DetailsView as follows in Figure 8-3 withthe Edit and New buttons at the bottom of the data-bound DetailsView control.
<asp:CommandField ShowEditButton=”True”
Parameters (of any type) are not controls. They are tags within data source controls.
269
Writing Data
11_588508 ch08.qxd 10/10/05 6:33 PM Page 269

Figure 8-3
This small tag enables all of the functionality in the data-bound control to update records. This tag willrender itself as a button labeled EDIT on a DetailsView or a column of EDIT buttons in a GridView. Itwill also automatically hide itself and substitute buttons for Update and Cancel when the control is inedit mode.
A common problem is to attempt to update a record with invalid data. For example, in the box for GoalsAgainst a user may enter a bit of text or a date. When the data controls send this to the database an errorwill arise because the database is configured to limit values in a GoalsAgainst field to be integers. Theproblem can be solved in several ways, two of which are aspects of ASP.NET 2.0. First, you try to elimi-nate user-typed input whenever possible. For example, for the user to enter values for GoalsAgainst afootball team, you could offer a list box with options from 1 to 10 (maybe 1 to 20 for Wrox United). Thesecond technique is to use the ASP.NET 2.0 validation controls, which are covered in Chapter 15. As arule of thumb, anything that a user types should be run through a validation control before it is sent tothe database. This policy greatly reduces the susceptibility to a SQL injection attack.
The preceding directions explain the steps to turn on editing at the time you create a control. You canstill turn on this feature using VWD after the control is on a page. Open the Common Tasks panel for the data source control and click Configure Data Source. You walk through the wizard again, but withchoices filled in as per the existing state. It is easy to click the Advanced button and add the extra com-mands. Then go back and open the Common Tasks panel for the data-bound control and enable theEditing feature.
In the following Try It Out you practice the technique to enable updating data in a GridView and aDetailsView control by changing data for fixtures (games). You will be building on the Fixtures.aspxpage you created in Chapter 7 that had a GridView with a child control of a DetailsView.
Try It Out Updating Existing Records1. In VWD open the chapter Web site at C:\BegASPNET2\Chapters\Begin\Chapter08, and
open the Fixtures.aspx page in Design. (Use the true Fixtures.aspx. Do not use theFixtures-One or Fixtures-Stacked that you used as test pages in Chapter 7.)
2. Select the GridView1 control and open its Common Tasks panel. Enable Editing and, if notalready enabled, enable Selection.
3. Select the SqlDataSource2 control (used by the DetailsView), open its Common Tasks panel,and click Configure Data Source. Make sure you select WroxUnitedConnectionString for theconnection. On the Configure Select Statement screen, select the option to specify the columnsfrom a table or view, select the Fixtures table, and select the individual columns (not the *).
270
Chapter 8
11_588508 ch08.qxd 10/10/05 6:33 PM Page 270

4. Click the WHERE button to open the Add WHERE Clause window. For Column select FixtureIDand for Source select Control. In the Parameter properties select GridView1 for the Control IDand click the Add button to add the parameter to the WHERE clause at the bottom of the screen.Click OK to close the window.
5. Back on the main wizard window, click the Advanced button, and on the Advancedwindow,turn on both options. Click OK to close the window, then Next and Finish to close the configura-tion wizard. As always, accept the refresh of the data keys if offered.
6. Select the DetailsView data-bound control and open its Common Tasks panel. Turn on Editingand close the panel. With these simple changes you have enabled editing of fixtures in both theGridView and DetailsView.
7. You will make one final change. VWD is overzealous in creating the WHERE clause for theUpdateCommand. By default VWD added a check of every field prior to updating. You can be con-fident that if you match the FixtureID you have the right record. So modify the UpdateCommandof SqlDataSource2 (be sure you pick number two) in Source View to delete the shaded section inthe following code – you may have to scroll the Source window to see the UpdateCommand. Yourline breaks may be different; we have modified the listing for clarity. Be sure that the commandstill ends with the “> characters:
UpdateCommand=”UPDATE [Fixtures] SET [FixtureDate] = @FixtureDate, [FixtureType] = @FixtureType, [GoalsFor] = @GoalsFor, [GoalsAgainst] = @GoalsAgainst, [Notes] = @Notes, [Opponents] = @Opponents WHERE [FixtureID] = @original_FixtureIDAND [FixtureDate] = @original_FixtureDateAND [FixtureType] = @original_FixtureTypeAND [GoalsFor] = @original_GoalsForAND [GoalsAgainst] = @original_GoalsAgainstAND [Notes] = @original_NotesAND [Opponents] = @original_Opponents
8. Run the page in your browser. In the GridView control, try clicking Edit and changing the nameof an opponent as in Figure 8-4.
Figure 8-4
Now do the same in the DetailsView as in Figure 8-5.
271
Writing Data
11_588508 ch08.qxd 10/10/05 6:33 PM Page 271

Figure 8-5
How It WorksOnce again, ASP.NET 2.0 has made all of this easy by including the functionality of updating within thedata controls. To enable updates in the data source control you checked off the option to include INSERT,UPDATE, and DELETE commands. This is more than you need for now (although you will use the INSERTand DELETE later in this chapter). VWD built two changes to the data source control that apply to updates.First is the addition of an UpdateCommand as follows.
<asp:SqlDataSource ID=”SqlDataSource1” ...UpdateCommand=”UPDATE [Fixtures] SET [FixtureDate] = @FixtureDate, [FixtureType] =@FixtureType, [GoalsFor] = @GoalsFor, [GoalsAgainst] = @GoalsAgainst, [Notes] =@Notes, [Opponents] = @Opponents WHERE [FixtureID] = @original_FixtureID”>
VWD then added a set of parameters that will hold the values you will use for updates, as shown in thefollowing code. Note that the FixtureID is saved in two parameters (the first and last). The first is thenew value, if the user enters one. The second is named original_FixtureID and will hold the originalvalue so it can be used in the WHERE clause to match which record to change:
<UpdateParameters><asp:Parameter Name=”FixtureDate” Type=”DateTime” /><asp:Parameter Name=”FixtureType” Type=”String” /><asp:Parameter Name=”GoalsFor” Type=”Int16” /><asp:Parameter Name=”GoalsAgainst” Type=”Int16” /><asp:Parameter Name=”Notes” Type=”String” /><asp:Parameter Name=”Opponents” Type=”String” /><asp:Parameter Name=”original_FixtureID” Type=”Int32” />
</UpdateParameters>
In the GridView control you added the single property of displaying the Edit button in a column:
<asp:GridView ID=”GridView1” ...<Columns>
<asp:CommandField ShowSelectButton=”True” ShowEditButton=”True” />
The procedure was almost the same for the DetailsView. You modified the SqlDataSource2 to enableupdates by adding an UpdateCommand and a set of update parameters. However, VWD is more conser-vative with DetailsView and provides original_ parameters for all fields and compares all fields inthe WHERE clause. You excised those extra comparisons and just relied on matching the FixtureID.
272
Chapter 8
11_588508 ch08.qxd 10/10/05 6:33 PM Page 272

Adding New RecordsAdding new records, known in SQL parlance as INSERT or INSERT INTO, is almost as easy as changingan existing record. The main difference is that the GridView does not support adding a new record, sowe consider that case in a minute.
As discussed previously, four changes must be made to the data controls. First, in the data source controlyou have that Advanced button in the Create New Data Source wizard. A click there and a check on theGenerate INSERT, UPDATE, and DELETE gave you all three of the SQL statements. That created two addi-tions to the data source control. The first is the InsertCommand itself. The second is the set of INSERTparameters. (Actually, commands and parameters were also created for UPDATE and DELETE, but it isINSERT that is of interest to us in this section.)
In the data-bound control you enable inserting with a checkbox on the data-bound control’s CommonTasks panel. Two changes result; the first is in the <asp:commandfield> where you now have theShowInsertButton. This will co-exist with the ShowEditButton and ShowDeleteButton if they havebeen selected. The ShowInsertButton enables the functionality to add new records. Like the otherCommandField buttons, ShowInsertButton automatically hides itself and displays other buttons(Insert and Cancel) when the control switches to INSERT mode.
GridView is a special case because it does not directly support the addition of new records. The mostcommon path is to display existing records in the GridView and create a button on the GridView thatgoes to a DetailsView (which can be on the same page or a second page). The DetailsView can thenopen in INSERT mode, ready to accept the values for the new record. The option to open in INSERTmode is set by the DefaultMode property of the data-bound control.
As in editing, constraints on data are acceptable. For example, if you were adding a new match report,the fixture must match an existing fixture. You can’t comment on a match that did not happen. As withediting, you can decrease these conflicts by giving users a list of possible options instead of typing. Ifthey must type, then run the values through a validation control.
In this Try It Out you add the INSERT capability to the Fixtures.aspx page. You cannot insert newrecords in a GridView, so this exercise only affects the DetailsView control.
Try It Out Inserting a New Record1. Open VWD and your Fixtures.aspx page in Source View and scroll down to the
SqlDataSource2 control (the data source for the DetailsView control). Observe that in thelast exercise when VWD added the capability to update a record, it also added similar tags forinsert and delete operations. Therefore, in the data source control the insert behavior is alreadyenabled.
2. Select the DetailsView control, open its Common Tasks panel, and enable inserting, as shownin Figure 8-6.
3. In the Properties window, find DefaultMode (see Figure 8-7) and change its value to Insert.
4. Save and view in the browser (see Figure 8-8). Try adding a new fixture and refresh the page.
5. As a final step, try entering some nonsense data, such as a date of 99/99/2006. Note how theerror is not, at this point, handled very gracefully. Chapter 15 looks at handling errors.
273
Writing Data
11_588508 ch08.qxd 10/10/05 6:33 PM Page 273

Figure 8-6
Figure 8-7
Figure 8-8
How It WorksMany of the tags for this process were created in the previous exercise when you configured the datasources and VWD offered the Advanced button with options to create INSERT, UPDATE, and DELETEcommands. It may have seemed like an overwhelming number of tags at first, but you can now see how the pattern of a command plus a set of parameters enables a data writing function.
274
Chapter 8
11_588508 ch08.qxd 10/10/05 6:33 PM Page 274

Specifically, you are using the InsertCommand of the SqlDataSource2 that supports the DetailsView.That command relies on the set of InsertParameters, as shown in the following code. Note that thereis no need for a WHERE clause because you do not need to identify an existing record upon which to carryout the action:
<asp:SqlDataSource ID=”SqlDataSource2” ...InsertCommand=”INSERT INTO [Fixtures] ([FixtureDate], [FixtureType], [GoalsFor],[GoalsAgainst], [Notes], [Opponents]) VALUES (@FixtureDate, @FixtureType,@GoalsFor, @GoalsAgainst, @Notes, @Opponents)” ...
<InsertParameters><asp:Parameter Name=”FixtureDate” Type=”DateTime” /><asp:Parameter Name=”FixtureType” Type=”String” /><asp:Parameter Name=”GoalsFor” Type=”Int16” /><asp:Parameter Name=”GoalsAgainst” Type=”Int16” /><asp:Parameter Name=”Notes” Type=”String” /><asp:Parameter Name=”Opponents” Type=”String” />
</InsertParameters>...</asp:SqlDataSource>
ASP.NET 2.0 handles INSERTs in a way that is very similar to the UPDATEs you did in the last section.When you select the option in the Advanced dialog, VWD builds a SQL INSERT INTO statement with aset of parameters that can hold the data entered by the user. When you enable INSERT on the data-boundcontrol VWD adds the CommandField (button) for adding a new record. All the rest of the code is takencare of by Microsoft, hidden from your view in the data controls. The only trap to remember is that insert-ing new records is available in DetailsView and FormView, but not GridView.
Deleting RecordsBy now you have a good feel for how writing data works and can anticipate that the procedure for delet-ing a record is similar. In the data source control you must include the DELETE command, which can be automatically generated in the Advanced button of the control’s Configure New Data Source dialogbox. That button will also create a set of DeleteParameters. But there are differences. For example, theDeleteParameters will be used to make an exact match for deletion in the WHERE clause, but they willnot be used for changing information in the record.
As discussed before, there are some hazards when writing data and these are particularly true for delet-ing. The first is the human error of deleting the wrong record. More sophisticated systems respond to arequest to delete by actually moving the record to a Deleted table. That gives a chance for recovery, atleast until the Deleted table is purged. Discussions of this strategy are common in database texts and arenot difficult to implement in ASP.NET 2.0. A second problem is that the user attempts to delete a recordthat the database has blocked from deletion. That block is most often the result of another record beingdependent on the record that was to be deleted. For example, a table of orders would have a field for theID of a customer that placed an order. If you delete that customer you are left with a value in the Orderstable that points to nowhere. In this case, the database will return an error.
In this Try It Out you enable the capability to remove a match from the list of fixtures.
275
Writing Data
11_588508 ch08.qxd 10/10/05 6:33 PM Page 275

Try It Out Deleting an Entire Record1. Continue using VWD with Fixtures.aspx in Design View. Both of the data source controls
already have the DeleteCommand and a set of DELETE parameters.
2. Select the GridView control, open its Common Tasks panel, and Enable Deleting (see Figure 8-9),which adds the following shaded line to the GridView control. That code also adds the Deletecommand fields in Figure 8-9.
<asp:GridView ID=”GridView1” runat=”server” ...
<Columns><asp:CommandField
ShowEditButton=”True” ShowSelectButton=”True” ShowDeleteButton=”True” />
...</Columns>
</asp:GridView>
Figure 8-9
3. Select the DetailsView control, open its Common Tasks panel, and Enable Deleting. Also go tothe DetailsView’s Properties window and change the DefaultMode back to ReadOnly.
4. As before, when VWD creates a DetailsView with deleting it is overly cautious in checkingfields to match up the correct record to delete. The original DELETE statement is shown in thefollowing code. (Be sure you are looking at SqlDataSource2, the one for the DetailsView.)Delete the shaded portion. Double-check that the DeleteCommand still ends with a doublequote:
DeleteCommand=”DELETE FROM [Fixtures] WHERE [FixtureID] = @original_FixtureIDAND [FixtureDate] = @original_FixtureDate AND [FixtureType] = @original_FixtureType AND [GoalsFor] = @original_GoalsFor AND [GoalsAgainst] = @original_GoalsAgainst AND [Notes] = @original_Notes AND [Opponents] = @original_Opponents“
276
Chapter 8
11_588508 ch08.qxd 10/10/05 6:33 PM Page 276

5. Save the page and test it in your browser. It should look like Figure 8-10.
6. Note that if you try to actually delete a fixture you will get an error message. Many other aspectsof the site rely on the list of fixtures, so deleting on will leave those data hanging without a fix-ture. This situation is called a reference constraint as mentioned in the error.
Figure 8-10
How It WorksThe pattern is the same as for other means of changing data. The data source control must have aDeleteCommand. When you checked the option in the Advanced step of the Configure Data Source wiz-ard, VWD created the DeleteCommand for you. VWD also created a set of DeleteParameters that willbe used by the WHERE clause to identify the record to delete. As with UPDATE, VWD tries to match everyfield in the DeleteParameters list for DetailsView. This may be necessary in some cases, but for us asimple match of the FixtureID is sufficient.
You then enabled deleting on the data-bound control, which instructed VWD to add a CommandFieldof the type Delete to the data-bound control. The term “field” here is a little odd because there is no con-nection to a field in the data table. But it is an addition to the data-bound control that is rendered simi-larly to a field.
One thing you may have noticed while running through the exercises in this chapter is that you havetwo ways of showing and editing the fixtures: a GridView and a DetailsView. When you edited data in one, the changes weren’t reflected in the other. To get around this you need to add code to the datasource controls, and although it’s only a single line of code you need, it has to be entered in several places.This is because there are several ways the data can change; you can insert new fixtures, edit existing fix-tures, or delete fixtures. Each of these causes the SqlDataSource control to raise an event, and it is withinthat event that you have to rebind the data for the other control.
277
Writing Data
11_588508 ch08.qxd 10/10/05 6:33 PM Page 277

The code for this is shown below:
Protected Sub SqlDataSource1_Deleted(ByVal sender As Object, _ByVal e As System.Web.UI.WebControls.SqlDataSourceStatusEventArgs) _Handles SqlDataSource1.Deleted
DetailsView1.DataBind()End Sub
Protected Sub SqlDataSource1_Inserted(ByVal sender As Object, _ByVal e As System.Web.UI.WebControls.SqlDataSourceStatusEventArgs) _Handles SqlDataSource1.Inserted
DetailsView1.DataBind()End Sub
Protected Sub SqlDataSource1_Updated(ByVal sender As Object, _ByVal e As System.Web.UI.WebControls.SqlDataSourceStatusEventArgs) _Handles SqlDataSource1.Updated
DetailsView1.DataBind()End Sub
Protected Sub SqlDataSource2_Deleted(ByVal sender As Object, _ByVal e As System.Web.UI.WebControls.SqlDataSourceStatusEventArgs) _Handles SqlDataSource2.Deleted
GridView1.DataBind()End Sub
Protected Sub SqlDataSource2_Inserted(ByVal sender As Object, _ByVal e As System.Web.UI.WebControls.SqlDataSourceStatusEventArgs) _Handles SqlDataSource2.Inserted
GridView1.DataBind()End Sub
Protected Sub SqlDataSource2_Updated(ByVal sender As Object, _ByVal e As System.Web.UI.WebControls.SqlDataSourceStatusEventArgs) _Handles SqlDataSource2.Updated
GridView1.DataBind()End Sub
You can see that there are three events for each control. The Deleted event is raised after a record isdeleted, the Inserted event is raised after a record is added, and the Updated event is raised when arecord is updated. Even through you are using a GridView control to display one set of data, and aDetailsView control for the other, the events look the same because it is the SqlDataSource control thatraises the event. For the GridView, which is bound to SqlDataSource1, the DetailsView needs to berefreshed, so the DataBind() method is called on the DetailsView, which instructs it to re-fetch the data.A similar procedure is done for the events of SqlDataSource2, which is used by the DetailsView, butthis time the DataBind() method is called on the GridView1 control. It’s a simple procedure — whendata in one control changes, you refresh the data in the other control.
Uploading PicturesASP.NET 2.0 offers an easy way to upload pictures (or other files) from the browser to the server. Althoughnot strictly a database issue, the topic is covered here. The toolbar offers the FileUpload tool, which can
278
Chapter 8
11_588508 ch08.qxd 10/10/05 6:33 PM Page 278

be added to the page to produce a text box with a browse button. You, as the designer, must also add abutton to give the user the capability to actually execute the upload.
In the button’s click code, the simplest option is shown in the following line. The file that the user indi-cated (either by typing or browsing) will be transferred to the server:
FileUpload1.SaveAs(FileUpload1.FileName)
But this code is too simplistic because the file will be plopped into the root of the web site. You can add aliteral string to be appended in front of the file name that will direct the file into an appropriate folder onthe server. Note that when you open the page in your browser you can view the source, but the path onyour server is not revealed. The following code places the file in MyImageFolder:
FileUpload1.SaveAs(“MyServer\MyWebsite\MyImageFolder\” & FileUpload1.FileName)
When the FileUpload.SaveAs method has been invoked, ASP.NET 2.0 creates an object namedFileUpload.PostedFile with several properties about the operation. The most obvious are FileNameand ContentLength. So if you create a label named Label1 you can display in its text the name of thefile that was uploaded as follows:
FileUpload1.SaveAs(“C:\BegASPNET2\WroxUnited\MatchImages\” & FileUpload1.FileName)Label1.Text = “File uploaded to WroxUnited from: <br/>” & _
FileUpload1.PostedFile.FileName
What if the user clicks the button without first selecting a file? You can avoid this problem with an IFTHEN statement as follows (code structures such as IF THEN are explained in Chapter 9):
If FileUpload1.HasFile ThenFileUpload1.SaveAs(“C:\BegASPNET2\WroxUnited\MatchImages\” & FileUpload1.FileName)
ElseLabel1.Text = “Please select a file before clicking the ‘Upload’ button”
End If
Other errors can occur, so you should encase the FileUpload method in an error catching routine as follows:
If FileUpload1.HasFile ThenTry
FileUpload1.SaveAs(“C:\BegASPNET2\WroxUnited\MatchImages\” & _FileUpload1.FileName)
Catch ex As Exception0Label1.Text = “Failed because: <br/>” & ex.Message
End TryLabel1.Text = “File uploaded to WroxUnited from: <br/>” & _
FileUpload1.PostedFile.FileNameElse
Label1.Text = “Please select a file before clicking the ‘Upload’ button”End If
In the following Try It Out you give users a way to add pictures to the gallery.
279
Writing Data
11_588508 ch08.qxd 10/10/05 6:33 PM Page 279

Try It Out Uploading Files — Basic1. Using VWD, create a new page named GalleryUpload.aspx using the Web Form template. As
you have with most pages up to this point, use the site.master as the Master page, use VisualBasic, and enable the option to place the code on a separate page.
2. In Design View, add a FileUpload control from the toolbar and a Label control that will havean ID of FileUploadReport with an empty text property. Also add a button control with thetext property set to “Upload”.
3. Double-click the button to go to its code. Add the following shaded code to the Sub:
Protected Sub Button1_Click(ByVal sender As Object, ByVal e As System.EventArgs)Handles Button1.Click
If FileUpload1.HasFile ThenTry
FileUpload1.SaveAs(“C:\BegASPNET2\Chapters\Begin\Chapter08\MatchImages\” & _FileUpload1.FileName)
Catch ex As ExceptionFileUploadReport.Text = “Failed because: <br/>” & ex.Message
End TryFileUploadReport.Text = “File uploaded to WroxUnited from: <br/>” & _
FileUpload1.PostedFile.FileNameElse
FileUploadReport.Text = “Please select a file before clicking “ & _“the ‘Upload’ button”
End IfEnd Sub
4. Save the page and view it in your browser (see Figure 8-11). You probably won’t have picturesof the hapless Wrox United fumblers, but you can try uploading any jpeg or gif you have onyour hard drive.
Figure 8-11
280
Chapter 8
11_588508 ch08.qxd 10/10/05 6:33 PM Page 280

How It WorksThe FileUpload control itself is a simple drag and drop. The browsing capability is built in. However,there is no built-in means to execute the upload. So you added a button to fire the SaveAs method of theFileUpload control. That method needs an argument of where to put the file on the server. You hard-coded a literal for the path and then appended the name of the file as the user entered in the FileUploadcontrol.
But you have done some embellishments beyond the basic control. The FileUpload control has a handyproperty called HasFile. When there is a valid file name in the text box, the HasFile property will be TRUE. The IF statement determines whether the user actually typed or browsed to a file to upload. If not, the code hops down to the ELSE statement to display an error message. Other things could gowrong, like the Wrox United webmaster (even more hapless than the team) changes the name of the folderin which to store images. So you encapsulated the execution of the SaveAs within a Try...Catch block.
Improving the Upload of PicturesYou finish this chapter with an improvement to the page that uploads photos and, in the process, reviewsome ideas from this chapter and Chapters 6 and 7. You will add a feature that when a photo is uploaded,an entry is created in the database table of photos. In other words, you will both upload the file and cre-ate a new record. The following few paragraphs give an overview of your tasks and the Try It Out givesexact directions.
Start by using the Data Explorer to take a look at the structure of the Gallery table as in Figure 8-12. Eachrecord represents an image a fan has uploaded, with fields for the fan’s name, URL of the picture file,date, and opponent.
Figure 8-12
281
Writing Data
11_588508 ch08.qxd 10/10/05 6:33 PM Page 281

Now you need to add inputs to the page to get the information you need for the fields of the Gallery table.Whenever possible, avoid letting users type information. In this case, the number of matches is reasonablysmall, so you will create a ListBox control for that input. The SelectCommand that provides data for theListBox will display the date of the match to the user. The FixtureID will be the ListBoxValue. Youwill also want to gather the user’s name and comments with text boxes. The page will end up looking likeFigure 8-13.
Figure 8-13
Now the trick will be inserting a new record into the table. You do this by setting up a SqlDataSourcecontrol that is enabled for inserting. But you do not need to render any data, so this data source controlwill not have a data-bound control. Built into the SqlDataSource is the Insert method, which you caninvoke from your button-click code.
In this Try It Out you enhance the gallery upload so that it performs the upload of the image file andthen creates a record for the image file in the Gallery table.
Try It Out Uploading Files with Record Creation1. Using VWD, open the Solution Explorer and make a copy of the GalleryUpload.aspx
pages following these instructions. Find in the file list, but do not open, the GalleryUpload.aspx page. Right-click it and select Copy. Right-click the root of the site and select Paste. Now find the nascent file that will be named Copy of GalleryUpload.aspx. Rename itGalleryUploadEnhanced.aspx. This procedure ensures proper copying and renaming of the associated code file.
2. Working with GalleryUploadEnhanced.aspx in Design View, move the insertion bar belowthe FileUpload control, add a ListBox, and from the smart task panel invoke the Configure
282
Chapter 8
11_588508 ch08.qxd 10/10/05 6:33 PM Page 282

Data Source wizard. Use a Database source and name the control SqlDataSourceFixtures.Use the WroxUnited connection string and set it to display from the Fixtures table only theFixtureID and FixtureDate fields, ordered by date. In the end of the wizard you can set the ListBox properties of the DataTextField to the date and the DataValueField to theFixtureID (see Figure 8-14).
Figure 8-14
3. Add two TextBox controls for the fan’s name and notes about the picture. In the Propertieswindow set the ID of the boxes to TextBoxMemberName and TextBoxNotes. Give them somelabels with text that identify what the user should type in the box.
4. Add a second SqlDataSource to the page that you will configure to create the record in Galleryfor the new uploaded photo. Name it SqlDataSource2. Using its smart task panel, configurethe data source and choose the Wrox United connection string. Use the Gallery table and selectall of the fields. In the Advanced panel, check on the creation of the INSERT, DELETE, and UPDATEcommands. Click the Next and Finish buttons. If you want, switch to Source View and deletethe commands and parameters for the UPDATE and DELETE functions. They will not be used, sodeleting them cleans up the code and makes it mountains easier, but they don’t interfere if youwant to leave them. Be careful not to delete any end-of-property double quotes or any end-of-tag > symbols.
5. Switch to Source View and find the set of <InsertParameters>. Modify them so that theycome from the four input controls, as per the shaded lines in the following listing of the entire.aspx page’s code:
<%@ Page Language=”VB” MasterPageFile=”~/site.master” AutoEventWireup=”false”CodeFile=”GalleryUpload-Enhanced.aspx.vb” Inherits=”GalleryUpload” title=”UntitledPage” %>
283
Writing Data
11_588508 ch08.qxd 10/10/05 6:33 PM Page 283

<asp:Content ID=”Content1” ContentPlaceHolderID=”mainContent” Runat=”Server”><h2>Upload your photos from matches</h2><br /><br />Please enter the name of the photo file: <asp:FileUpload ID=”FileUpload1” runat=”server” /><br /><br />Match Date:<asp:ListBox ID=”ListBox1” runat=”server”
DataSourceID=”SqlDataSource1” DataTextField=”FixtureDate”DataValueField=”FixtureID”>
</asp:ListBox>
<asp:SqlDataSource ID=”SqlDataSource1” runat=”server”ConnectionString=”<%$ ConnectionStrings:WroxUnited2 %>” SelectCommand=”SELECT [FixtureID], [FIxtureDate] FROM [Fixtures]”>
</asp:SqlDataSource>
<br /><br />User Name: <asp:TextBox ID=”TextBoxMemberName” runat=”server”></asp:TextBox><br /><br />Comments: <asp:TextBox ID=”TextBoxNotes” runat=”server”></asp:TextBox><br /><br /><asp:Button ID=”Button1” runat=”server” Text=”Upload” /><br /><asp:Label ID=”FileUploadReport” runat=”server”></asp:Label><br />
<asp:SqlDataSource ID=”SqlDataSource2” runat=”server” ConflictDetection=”CompareAllValues”ConnectionString=”<%$ ConnectionStrings:WroxUnited2 %>” InsertCommand=”INSERT INTO [Gallery] ([FixtureID], [UploadedByMemberName],
Notes], [PictureURL]) VALUES (@FixtureID,@UploadedByMemberName,@Notes,@PictureURL)”OldValuesParameterFormatString=”original_{0}” ><InsertParameters>
<asp:ControlParameter Name=”FixtureID”ControlID=”ListBox1” PropertyName=”SelectedValue”Type=”Int32” />
<asp:ControlParameter Name=”UploadedByMemberName”ControlID=”TextBoxMemberName” PropertyName=”Text”Type=”String” />
<asp:ControlParameter Name=”Notes”ControlID=”TextBoxNotes” PropertyName=”Text”Type=”String” />
<asp:ControlParameter Name=”PictureURL”ControlID=”FileUpload1” PropertyName=”FileName”Type=”String” />
</InsertParameters></asp:SqlDataSource>
</asp:Content>
6. Now you just need to modify the GalleryUpload-Enhanced.APX.VB code page (shown here). InDesign View, double-click the Upload button and add one line to the code, as follows:
284
Chapter 8
11_588508 ch08.qxd 10/10/05 6:33 PM Page 284

Protected Sub Button1_Click(ByVal sender As Object, ByVal e As System.EventArgs)Handles Button1.Click
If FileUpload1.HasFile ThenTry
FileUpload1.SaveAs(“C:\BegASPNET2\Chapters\Begin\Chapter08\MatchImages\” & _FileUpload1.FileName)
Catch ex As ExceptionFileUploadReport.Text = “Failed because: <br/>” & ex.Message
End TryFileUploadReport.Text = “File uploaded to WroxUnited from: <br/>” & _
FileUpload1.PostedFile.FileNameSqlDataSource2.Insert()
ElseFileUploadReport.Text = “Please select a file before clicking “ & _
“the ‘Upload’ button”End If
End Sub
7. Save the page and test it in your browser by uploading any picture (you can use MyPictures/Samples) along with picking a match and your name and a comment. Figure 8-15shows the screen prior to clicking the Upload button.
Figure 8-15
285
Writing Data
11_588508 ch08.qxd 10/10/05 6:33 PM Page 285

8. Confirm your success by closing the browser, returning to VWD, opening the Database Explorer,and expanding WroxUnited and then Tables. Right-click Gallery and select Show Table Data.Observe your new record as in the bottom line of Figure 8-16.
Figure 8-16
How It WorksThe objective here was to create a new record in the Gallery table whenever a user uploaded an image.You started by setting up inputs so the user could enter data needed for the record. The ListBox offereda choice of games and two TextBox controls took in the user’s name and notes. In order to populate theListBox you created a SqlDataSource that picked up two fields from the Fixtures table.
In order to create a new record you need to add a SqlDataSource control that holds the INSERT function-ality. When you asked VWD to add commands for insert you got a lot, and it wasn’t what you wanted. Youdeleted the commands and parameters for SELECT, UPDATE, and DELETE because you won’t use them.Then within the <InsertParameters> you changed to use the input controls as sources.
Last, you wanted to actually tell the SqlDataSource to perform the insert of a new record. You did thatwith a single line of code in the Button_Click event that invoked the Insert() method.
This enhanced page brings together several ideas from the last few chapters. You used code in an event(Chapter 6) to catch problems with the FileUpload and to invoke the data source control’s Insert()method. You read from a database (Chapter 7) to stock the ListBox. And, last, you wrote to a database(in this chapter) to create a new record to represent the uploaded picture.
SummaryWriting data includes creating entire new records (called inserting), changing values in existing records(updating), and removing entire records (deleting). Both data source and data-bound controls containcode for behavior to write to databases. This chapter explained how to turn on and use these behaviors.
Most, but not all, data controls support writing. Selection lists (DropDownList and ListBox) do notsupport writing. GridView can update and delete, but not insert. DetailsView or FormView are idealfor all forms of writing.
Any database front-end that updates data can run into problems when a value is simultaneouslychanged and needed for identifying a unique record. ASP.NET 2.0 manages a dictionary of old and new
286
Chapter 8
11_588508 ch08.qxd 10/10/05 6:33 PM Page 286

values. The fields to be included in the dictionary are listed in the DataKeyNames property of the data-bound control.
The pattern for inserting, updating, and deleting is to make three changes to the data controls. In the datasource control you must add the appropriate command with the value of a valid SQL statement. You mustalso include a set of parameters that feed values into the SQL statement. In the data-bound control youmust include a CommandField of the type equal to the writing operation you want to perform. All three ofthese changes are made through VWD with check-offs in wizards or the Common Tasks panels.
The parameters can be a little tricky until you gain some experience. Simple parameters will hold theexisting values that came from the database. ControlParameters will hold values that were entered bythe user into controls other than the data-bound control that holds the parameter. Reference to a value ina parameter is made in a command by placing an at (@) symbol before the parameter’s name. Parametersare organized into sets for each kind of writing command. So when performing an INSERT ASP.NET 2.0will look up values in the parameter set within <InsertParameters>.
Keep in mind two caveats when writing data:
❑ First, writes can lead to logical and organizational errors. For example, your database adminis-trator will not let you delete a customer if that customer has an order (otherwise the orderwould be shipped to a non-existent customer). It behooves you to limit your user requests andthen also be prepared to handle a rejection from your database.
❑ Second, writing commands opens your data to a number of types of attacks. Whenever possible,present the user with a list of options rather than allowing typed input. When typing is abso-lutely necessary, use the ASP.NET 2.0 validation controls.
The capability to transfer files from the user to the server enhances many business objectives. A single,simple control provides the functionality to identify a file. However, the actual transfer requires the useof a button to actually execute the uploading behavior. As demonstrated in the final exercise, that buttoncan also trigger the execution of writing behavior in a data source control that has no data-bound con-trol. The data source control can use control parameters to gather values and create an insert in a table.
Over the last eight chapters you have seen how powerful ASP.NET 2.0 can be with the use of practicallyno code. You have solved many common business scenarios such as logging on, personalization, andworking with data. But in some more advanced cases you will be forced to write custom code, and forthose techniques carry on to Chapter 9.
Exercises1. Enabling the capability to write to a database requires changes to the properties of a data source
control, a data-bound control, or both?
2. Describe the difference between an asp:Parameter and an asp:ControlParameter.
3. What problem does the DataKeyNames property solve?
4. A page needs to delete the date of birth value from one record. Which command should be used?
5. What tags must be added to a page to allow a GridView to create new records?
287
Writing Data
11_588508 ch08.qxd 10/10/05 6:33 PM Page 287

11_588508 ch08.qxd 10/10/05 6:33 PM Page 288

9Code
You’re now at the stage where the site is getting more features, and you need to start learning moreabout code. Some of the code used in previous chapters might not have been explained fully —that’s because what the code was doing was more important than the actual code itself. It’s notthat the code wasn’t important, but rather that the technique being taught was the key; under-standing how the actual code worked would come later. Now it’s time to learn about the basics of writing code, what makes good code, and how you put all that code together.
This chapter looks at the following topics:
❑ What data types and variables are and how they are used
❑ How you make decisions in your code
❑ How you repeat lines of code
❑ What object-oriented programming means and why it’s important
❑ How to think about structuring your code so it’s well organized and easy to maintain
❑ How one of the new language features in ASP.NET 2.0 eases working with collections ofobjects
There’s a lot to cover, and although some of it might sound difficult, it’s actually quite easy. Thefirst section discusses data types.
Variables and Data TypesWhen you use applications, you don’t really care how the application stores your data, just that itdoes. As a programmer, however, you have to think about this. What sort of data is the user enter-ing? Is it text, numbers, dates, or something else? This matters because how you store data inter-nally in your application affects not only how you deal with the data, but also what you can dowith that data. To store data internally, variables are used (variables are simply names, used to storeinformation during code), and variables have types; there is a type for each type of data. For exam-ple, there is a data type called String, unsurprisingly used for strings, or text data. There is a data
12_588508 ch09.qxd 10/10/05 6:23 PM Page 289

type called Date for dates and times, an Integer data type for whole numbers, and a Decimal orDouble data type for floating-point numbers. Each has different characteristics; the Integer type canonly store integer numbers, and trying to store any other type of data into an Integer will raise anexception. Likewise, the Date data type can only store dates and times. The full list of data types is asfollows:
❑ Boolean is used to store either True or False. The default value is False.
❑ Byte is used for a single byte of data. This can be a single character or a number from 0 to 255.The default value is 0.
❑ Char is used for two bytes of data. This can be a character or a number from 0 to 65,535. Becauseit is bigger than a Byte, Char can store double-byte characters like those used by foreign charac-ters sets such as Chinese. The default value is 0.
❑ Date is used to store a date and time. The default value is 0:00:00 (midnight) on January 1, 0001.
❑ Decimal is used for decimal values. It supports up to 29 significant digits and is therefore themost accurate type for financial numbers. The default value is 0.
❑ Double is used for floating-point numbers. Unlike the Decimal data type, Double has a smallerrange and is less accurate. However, it is also faster in use, so it is the preferred data type forfloating-point numbers unless a great depth of precision is required. The default value is 0.
❑ Integer is used for whole numbers between –2,147,483,648 and 2,147,483,647. The defaultvalue is 0.
❑ Long is used for whole numbers between –9,223,372,036,854,775,808 and9,223,372,036,854,775,807. The default value is 0.
❑ Object is used to represent objects. In VB, the default value is Nothing. In C#, the default valueis null.
❑ SByte is used to hold whole numbers between –128 and 127. The default value is 0.
❑ Short is used for whole numbers between –32,768 and 32,767. The default value is 0.
❑ Single is used for floating-point numbers that don’t require the full size of a Double. Thedefault value is 0.
❑ String is used for storing text (or string) data. The default value is Nothing in VB and null in C#.
❑ UInteger is the unsigned equivalent of an Integer. Because it is unsigned it can only storepositive numbers, giving a range of 0 to 4,294,967,295. The default value is 0.
❑ ULong is the unsigned equivalent of a Long. Because it is unsigned it can only store positivenumbers, giving a range of 0 to 18,446,774,073,709,551,615. The default value is 0.
❑ UShort is the unsigned equivalent of a Short. Because it is unsigned it can only store positivenumbers, giving a range of 0 to 65,535. The default value is 0.
Having different data types allows the type to provide features that only that type requires. For example,the DateTime type allows dates to be manipulated, the individual parts of the date or time to be extracted,and so on. Also, data types allow you to choose the most efficient way of storing data, so if you need tostore a really long number, you would use a Long. A Long takes up more room in memory than a Short,
290
Chapter 9
12_588508 ch09.qxd 10/10/05 6:23 PM Page 290

so if you only ever needed to store numbers between 1 and 100, you wouldn’t use a Long. In essence thedata type you choose depends not only on the type of data, but also its size.
Common Language Runtime TypesThis may seem confusing, but there are different names for the same data types. This is because there are data types that the language uses, and data types that the Common Language Runtime (CLR) uses.Simply put, the CLR is the system that actually makes .NET run. You don’t need to know much about it now, although it’s definitely worth learning about as you become more experienced. The reason thatthe CLR has data types and the language has data types is that the CLR is common to all languages in.NET. Whether you use Visual Basic .NET, C#, or even COBOL .NET, underneath you are using the CLR.However, languages have history (apart from C#, which was new for .NET, but C# has a C and C++ basein terms of the language syntax), and so have data types of their own. For compatibility reasons it makessense to keep these specific language types. This enables users of the language to work with familiardata types, and the compiler takes care of using the actual CLR data type.
For much of what you do you’ll use the language data types, but there are times when you need to knowwhat CLR data type a language data type maps onto, and the following table shows this:
CLR Type Visual Basic Type C# Type
Boolean Boolean bool
Byte Byte byte
Char Char char
DateTime Date DateTime
Decimal Decimal decimal
Double Double double
Int32 Integer int
Int64 Long long
Object Object Object
SByte SByte sbyte
Int16 Short short
Single Single float
String String string
UInt32 UInteger uint
UInt64 ULong ulong
UInt16 UShort ushort
When you look at converting between data types you’ll see why it might be important to know theunderlying data type.
291
Code
12_588508 ch09.qxd 10/10/05 6:23 PM Page 291

Declaring VariablesThere is a specific syntax for creating variables, which requires the name and data type. The name is upto you, but it’s always best to use a sensible name, something that represents what the variable holds. Todefine a variable you use the Dim statement, like so:
Dim VariableName As DataType
Replace the VariableName and DataType with your requirements:
Dim FirstName As StringDim LastName As StringDim Age As IntegerDim Birthday as Date
You’ve used sensible names for the variables: two String types to hold the first and last names, anInteger to hold the age, and a Date to hold the birthday. In some documents and books you might see a prefix on the variable name, giving an indication of its data type. For example, the names and ages might be declared like so:
Dim strFirstName As StringDim sLastName As StringDim iAge As IntegerDim dBirthday as Date
Here str or s has been used as a prefix for String types, i for Integer types, and d for Date datatypes. You may find this technique useful when learning how to use variables and data types, althoughit isn’t generally recommended and has dropped out of favor. A correctly named variable should give agood indication of its data type. Having said that, there are times when some form of prefix is useful,and you’ll see this when you look at classes a little later in the chapter.
Assigning ValuesOnce you declare a variable, you can assign values to it, and this is simply a matter of setting the vari-able equal to the required value. The syntax for this is as follows:
variable = value
This says give the variable named on the left of the equals sign the value on the right of the equals sign.For example:
FirstName = “Arthur”LastName = “Arbuthnot”Age = 24Birthday = #10/25/1980#
As you can see, string values are enclosed in quotation marks, whereas numeric values aren’t. Noticethat the date value is enclosed within hash marks (#), and the format is MM/DD/YYYY. This is a fixedformat when assigning dates like this, and takes no account of the regional settings of your machine. Youcan also assign a time part, like so:
292
Chapter 9
12_588508 ch09.qxd 10/10/05 6:23 PM Page 292

Appointment = #10/25/1980 11:10 PM #
Alternatively, you can assign a time like this:
Appointment = #10/25/1980 23:10 #
Variables can also be initialized when they are declared, like so:
Dim FirstName As String = “Arthur”Dim LastName As String = “Arbuthnot”Dim Age As Integer = 24Dim Birthday As Date = #10/25/1980#
These examples show the assignment using literal values, but you can also assign values to other vari-ables or objects. For example, in ASP.NET pages it’s very common to assign values from user-entereddata, perhaps from a text box:
FirstName = FirstNameTextBox.TextLastName = LastNameTextBox.Text
Or vice versa:
FirstNameTextBox.Text = FirstNameLastNameTextBox.Text = LastName
The TextBox control has a property called Text that contains the text value, so you are simply copyingthat value into the String variable, or copying the string value into the property. This is fine for Stringtypes, but extra work needs to be done if the variable isn’t a String type; for example, allowing users to enter their age would require a text box and an Integer type variable. However, you can’t assign thevalues of differing types — you need to convert them.
Data ConversionVisual Basic .NET does provide some automatic conversion of data types, but it’s best not to rely on this,otherwise you tend to forget that conversion is actually happening. Explicit conversion makes it clearexactly what your code does, a useful point when you (or others) look at your code later. There isn’t asingle syntax for converting between types, but there is a lot of commonality in the different methods.
Converting to string values is the simplest, because every data type has a ToString method. For exam-ple, to convert the age to a TextBox you could use:
AgeTextBox.Text = Age.ToString()
For the Boolean type the conversion method is the same, but the string value will be either True orFalse.
Converting from a string value to another type is slightly different, because no methods on the Stringtype do this automatically. Instead you have to use a separate class to perform the conversion.
293
Code
12_588508 ch09.qxd 10/10/05 6:23 PM Page 293

Converting Data Types Using the Framework ClassesTwo ways exist to convert from string values to other types using the framework classes, and it’s worthmentioning both in case you see them in code. The first is to use the Parse method that most data typessupply. For example, to convert a number held in a TextBox control into an Integer data type, youcould do this:
Dim Age As IntegerAge = Integer.Parse(AgeTextBox.Text)
What’s happening here is that the Parse method parses the value passed to it — that is, it reads the value,checks that it is an integer value, and converts it into an integer. The value to be converted is the valuefrom the Text property of the AgeTextBox control, which is a string. So the string is passed into theParse method, which converts it into an integer and returns the integer, which in turn is assigned to theAge variable.
All of the data types, apart from Object, support the Parse method, which means that even though youmay be using a different data type the syntax is the same. For example:
Dim ANumber As DoubleANumber = Double.Parse(NumberTextBox.Text)
The second way to perform data conversion is to use the Convert class, which converts between types.It’s a very flexible class in that it can convert between all types, but it does require knowledge of the CLRtype. For example, the preceding example using an integer could be written as follows:
Dim Age As IntegerAge = Convert.ToInt32(AgeTextBox.Text)
For the double example this would be:
Dim ANumber As DoubleANumber = Convert.ToDouble((NumberTextBox.Text)
In use there is no difference between the Convert class and the data type class when converting types.The only reason for using the Convert class is that it makes code easier to convert to another language.This was important when writing the Wrox United web site, but may not be important to you if youintend to stick with one language.
Converting Data Types with CastingAnother way of converting between types is by casting. Instead of explicitly converting the type, thevalue is forced into another type. Casting doesn’t work in the same way as converting, and isn’t alwayssuitable. For example, you can’t use casting to convert from strings to numbers. You can, however, use casting to convert between similar types. For example, you could cast between a Double and anInteger by using the following code:
Dim MyDouble As Double = 123.456Dim MyInteger As IntegerMyInteger = CType(MyDouble, Integer)
294
Chapter 9
12_588508 ch09.qxd 10/10/05 6:23 PM Page 294

The CType function accepts two arguments. The first is the variable to be converted, and the second isthe new type. What this does is to force the variable, MyDouble, into being something it’s not; it’s a bitlike pushing a round block through a square hole. MyDouble is still a Double, but the value that CTypereturns is an Integer— the Double squashed into the space that an Integer holds.
Another way of casting is to use DirectCast, which has the same syntax as CType:
Dim MyDouble As Double = 123.456Dim MyInteger As IntegerMyInteger = DirectCast(MyDouble, Integer)
One thing you should be aware of is that casting may change the value of the variable. In the precedingexample this is obvious, because changing a floating-point number into an integer will lose the valuesafter the decimal point. Converting between a Long and an Integer isn’t so obvious, but may result inchanges. Because an Integer has a range half that of a Long, if the value in the Long exceeds that of theInteger, the value will be shortened when converted.
Null ValuesAll data types have default values, but there is also the concept of a null value. This doesn’t usuallyaffect the standard types, and is more common on custom or complex types, and simply means that theobject doesn’t exist. For example, consider a method that returns a DataSet object, filled with data froma database. What happens if, while fetching the data, there is some sort of error? There will probably bean exception thrown (these are covered in Chapter 15), but the method still might return, only there’s nodata for you — the value returned might be null.
In Visual Basic .NET the null value is represented by the keyword Nothing. You’ll look at how you testfor null values later.
Working with StringsWhen working with strings it’s useful to know that the string class has a great number of methods thatallow you to manipulate those strings, and any variable that is a string therefore has the ability to use thosemethods. You won’t see all of them here, but instead concentrate on some of the most common ones.
One of the most common requirements is being able to strip blank spaces (or white space as it’s some-times called) from the beginning or end of strings. This is useful when taking input from a user and isespecially important when trying to compare two string values. For example, consider the followingcode fragment:
Dim Name1 As String = “Dave”Dim Name2 As String = “Dave “
If Name1 = Name2 Then
The If test would result in False, because the strings aren’t the same —Name2 has spaces at the end.Three methods can help here: TrimStart removes spaces from the start of the string, TrimEnd removesspaces from the end of a string, and Trim removes spaces from both the start and end of a string. If thepreceding code were modified to include Trim, the result would be True:
295
Code
12_588508 ch09.qxd 10/10/05 6:23 PM Page 295

Dim Name1 As String = “Dave”Dim Name2 As String = “Dave “
If Name1.Trim() = Name2.Trim() Then
Both strings have been trimmed so the If test would return True. The strings have only been trimmedas part of the comparison, though; the strings haven’t been modified themselves. Consider this code:
Dim Name1 As String = “Dave”Dim Name2 As String = “Dave “
If Name1.Trim() = Name2.Trim() Then‘ this would return True
End If
If Name1 = Name2 Then‘ this would return False
End If
You can see that using Trim affects only that one instance, unless the underlying variable is changed:
Dim Name1 As String = “Dave”Dim Name2 As String = “Dave “
Name1 = Name1.Trim()Name2 = Name2.Trim()
If Name1 = Name2 Then‘ this would return True
End If
Now that Name1 and Name2 have been reassigned with the trimmed values, subsequent comparisonswork. The key point here is that using string methods affects only that particular use of the string, andthe string variable will be changed only if assignment is done.
Another situation that can occur when comparing strings, especially those supplied by user input, ismismatched case. What if the user has the caps-lock key stuck on? Two methods can help with this:ToLower, which converts the string to lowercase, and ToUpper, which converts the string to uppercase.For example:
Dim Name1 As String = “dave”Dim Name2 As String = “DAVE”
If Name1 = Name2 Then
This code would fail because the strings are different, even though we as humans know them to meanthe same thing. To get around this you can change the case:
Dim Name1 As String = “dave”Dim Name2 As String = “DAVE”
If Name1.ToLower() = Name2.ToLower() Then
296
Chapter 9
12_588508 ch09.qxd 10/10/05 6:23 PM Page 296

Now the test would succeed because the values being compared are lowercase.
Plenty of other string methods exist, some of which are described in the following list:
❑ EndsWith, which returns True if the string ends with a given string. For example:
If MyString.EndsWith(“ate”) Then
❑ StartsWith, which returns True if the string starts with a given string. For example:
If MyString.StartsWith(“wha”) Then
❑ IndexOf, which returns the position within the string of a given character or string, or -1 if theitem isn’t found. For example:
If MyString.IndexOf(“abc”) > 0 Then
❑ Insert, which inserts a string at a given position. For example, to insert the string new words atposition 5 you would use:
MyString.Insert(5, “new words”)
❑ LastIndexOf, which returns the last position within the string of a given character or string.This is similar to Indexof but is useful for finding the last instance of a character.
❑ Length, which returns the length of a string.
❑ PadLeft and PadRight perform the opposite of Trim, allowing you to pad strings to a givenlength. The padding defaults to a space but can be any character. For example, to pad a string toa total of 15 characters you would use the following:
MyNewString = MyString.PadLeft(15)
❑ Remove, which removes a section of a string. For example, to remove five characters starting atposition 4 you would use:
MyNewString = MyString.Remove(4, 5)
❑ Replace, which replaces characters within the string. For example to replace abc with def youwould use:
MyNewString = MyString.Replace(“abc”, “def”)
❑ SubString, which returns a portion of a string. For example, to return five characters starting atposition 4 you would use:
MyNewString = MyString.SubString(4, 5)
For a full list of string methods you should consult the documentation.
Working with DatesIn earlier code snippets you saw dates being assigned to a literal value in MM/DD/YYYY format. Youmay think this is fine, especially if you are used to that format, but seeing literal dates can be very con-fusing. If your code is used by someone not used to that format, whether they are across the world or at
297
Code
12_588508 ch09.qxd 10/10/05 6:23 PM Page 297

the desk next to yours, they might be unsure of your intentions. For example, take the date 03/05/2005;does this represent March 5 or May 3? You could easily assume the format, but that leads to potentialerrors.
Instead of using literals to initialize dates, it’s better to create a new instance on a date, like so:
Dim Birthday As New Date(2005, 3, 5)
The parameters are in year, month, and day order, and because you have IntelliSense (or at least the doc-umentation if you aren’t using VWD), you know what the order should be. If required, the individualparts of the date can be accessed like so:
Birthday.DayBirthday.MonthBirthday.Year
Other properties exist such as DayOfWeek and DayOfYear, as well as ones for dealing with the time andparts of the time. You can find more information about these additional properties in the documentation.
Dates behave just like numeric variables in that they allow addition, subtraction, and comparison. Forexample, you can add a number of days using the AddDays method:
NewDate = Birthday.AddDays(18)
There is also a Subtract method that subtracts one date from another. However, this method doesn’treturn a Date type, but rather a TimeSpan, which is a data type used to define spans of time. For example:
Dim Date1 As New Date(2005, 3, 10)Dim Date2 As New Date(2005, 3, 5)Dim Difference As TimeSpan
Difference = Date1.Subtract(Date2)Label1.Text = Difference.ToString()
This code creates two dates, March 10 and March 5, and then declares a variable of type TimeSpan, whichwill hold the difference between the dates. The difference is calculated by using the Subtract method ofthe date — because the Date1 variable is a Date type the Subtract method can be used, and Date2 ispassed into this method. The result is that Date2 is subtracted from Date1, and in this case the resultwould be 5.00:00:00, which represents 5 days, 0 hours, 0 seconds, and 0 milliseconds.
Now that you have a good base of knowledge to work with, the following Try It Out has you work withsimple data types.
Try It Out Working with Simple Types1. Open the directory for the Chapter 9 samples, called C:\BegASPNET2\Chapters\Begin\
Chapter09 under the directory where you placed the sample code.
2. Create a new Web Form called SimpleTypes.aspx. Remember to make sure it uses a separatefile for the code.
298
Chapter 9
12_588508 ch09.qxd 10/10/05 6:23 PM Page 298

3. Drag three text boxes, three labels, and a button onto the page, so it looks like Figure 9-1. Makesure the TextBox and Label controls are in order, so TextBox1 is at the top, followed byTextBox2 and then TextBox 3.
Figure 9-1
4. Double-click the button to create the code-behind file and button click event, and add the fol-lowing code into the event procedure:
Label1.Text = TextBox1.Text + TextBox2.TextLabel2.Text = DateTime.Parse(TextBox3.Text).ToString(“dd MMM yyyy”)Label3.Text = DateTime.Parse(TextBox3.Text).ToString()
5. Save both the Web Form and the code-behind file, and set the Web Form to be the start page(right-click the page in the Solution Explorer).
6. Press F5 to run the page and enter 3 into the first text box, enter 4 into the second text box, and12/2/05 into the third text box.
7. Press the button and observe the results. On a machine configured with UK regional settings,you’ll see Figure 9-2.
Figure 9-2
With the regional settings set to USA, Figure 9-3 will appear.
299
Code
12_588508 ch09.qxd 10/10/05 6:23 PM Page 299

Figure 9-3
How It WorksThere are two points to note about this page. The first is that the numbers you entered into the text boxeshaven’t been added together as you might expect, and the second is that the date format changesdepending on the regional settings.
Take a look at the numbers first:
Label1.Text = TextBox1.Text + TextBox2.Text
The code seems obvious, just adding two numbers together, but you have to remember that the Textproperty of the TextBox control returns a string. For strings, the addition operator (+) means the sameas the concatenate operator (&), so it simply joins the strings together. To add the strings you would haveto convert them to numbers first, like so:
Label1.Text = Convert.ToInt32(TextBox1.Text) + Convert.ToInt32(TextBox.Text)
Here the Convert class is used to convert the text to numbers, so when the addition is done the valuesare numbers.
For the dates, you have to consider the regional settings of the machine upon which the web server isrunning — this is where the code is executed. As it happens, when running the VWD web server, themachine processing the pages is the same as your browser, but on a real web site this isn’t the case. Solet’s see what the code does. The first line converts the value from the text box into a DateTime type byusing the Parse method, and then it converts it back into a string. The ToString method has an explicitformat, where dd is the day number, MMM is the month name, and yyyy is the year:
Label2.Text = DateTime.Parse(TextBox3.Text).ToString(“dd MMM yyyy”)
The reason for converting to a date and back to a string is to show that parsing the date is system-dependent. So if you are writing a web site for a company that uses a different date format from yours,the results you see may not always be what you expect.
The final line of code shows what the default ToString method does:
Label3.Text = DateTime.Parse(TextBox3.Text).ToString()
300
Chapter 9
12_588508 ch09.qxd 10/10/05 6:23 PM Page 300

This simply shows the date and time. Notice that this displays the same value for the date irrespective ofthe regional settings. The time is shown differently but again that’s because of the regional settings onthe machine. You might like to experiment with your regional settings to see how the output differs. Ifyou do this you will need to stop the VWD web server before rerunning the application; you can do thisby selecting the icon in the task tray and clicking Stop from the right mouse-button menu.
One thing you might like to experiment with is what happens if you either leave a text box empty orenter the wrong data type (for example, entering a string into the third text box for conversion to astring). Depending on what you enter you might see a different range of exceptions, a topic that is cov-ered in more detail in Chapter 15.
Working with Arrays and CollectionsArrays and collections are two sides of the same coin; they both provide ways of storing multiple copiesof data types. For example, consider having to store several names, perhaps the authors of this book. Youcould store them in individual strings, but then what if you wanted to print them all out? You’d need astatement for each variable. With an array or a collection you need only one variable for multiple items.You can think of arrays as cells in a spreadsheet. A single dimensional array is a single row with multiplecells, and a multi-dimensional array is multiple rows, each with multiple cells. Instead of cells, the termelements is generally used, and the index is the number of the element (the row or column number, tocontinue the spreadsheet analogy).
Single Dimensional ArraysArrays are declared in much the same way as variables, but with the addition of parentheses after thevariable name. For example:
Dim Names() As String
This declares a string array called Names, but it’s an empty array because there is no number within theparentheses. The number defines the length of the array — the number of items it can hold. So to storefive names you would change the declaration to the following:
Dim Names(4) As String
The use of 4 isn’t a typo here, it’s because arrays start at 0. So this array has 0, 1, 2, 3, and 4, which givesfive entries. The bounds of the array are 0 to 4.
Accessing array values, either to read or assign values, follows the same rules, with the addition of theparentheses. Within the parentheses you put the index number of the element required. For example:
Names(0) = “Dave”Names(3) = “Dan”NameTextBox.Text = Names(4)
In this example Dave is the first entry and Dan is the fourth entry. The entries between are empty becauseno values have been set for them.
Trying to access an element that doesn’t exist (anything above 4 in this example) will generate an excep-tion with the message “Index was outside the bounds of the array.”
301
Code
12_588508 ch09.qxd 10/10/05 6:23 PM Page 301

Arrays can also be dynamically sized when declared:
Dim Names() As String = {“Dave”, “Chris”, “Chris”, “John”, “Dan”}
Here the array has five elements with the first being assigned to Dave, the second to Chris, and so on.The braces enclose the list of items for the array.
If you need to resize an array you can use the ReDim statement:
ReDim Names(9)
This will resize the array to 10 elements, but will remove the existing values. The Preserve keywordneeds to be added if you need to keep the values:
ReDim Preserve Names(9)
If the array is resized to smaller than its original size, elements will be lost.
Multi-Dimensional ArraysArrays aren’t limited to one dimension, so you can replicate that spreadsheet type of storage. For exam-ple, to use an array to store first and last names, you could do this:
Dim Names(4, 1) As StringNames(0,0) = “Dave”Names(0,1) = “Sussman”Names(1,0) = “Chris”Names(1,1) = “Hart”...Names(4,0) = “Dan”Names(4,1) = “Maharry”
Here the declaration separates the dimensions by a comma. The number of elements in each dimensionis included in the variable declaration, so the first dimension has five elements (0–4), and the second hastwo (0–1). This gives you storage like so:
0 1
0 Dave Sussman
1 Chris Hart
...
4 Dan Maharry
A 4-by-4 array (four rows, four columns) would be declared as follows:
Dim MyArray(3, 3) As String
302
Chapter 9
12_588508 ch09.qxd 10/10/05 6:23 PM Page 302

Remember, 0 counts as one element, to 0 to 3 is four elements. Adding another dimension is as simple asadding a comma and another number. So a three-dimensional array, with four elements in each dimen-sion, would be
Dim MyArray (3, 3, 3) As String
Like single dimensional arrays, multi-dimensional ones can also be initialized at declaration time:
Dim Names(,) = {{“Dave”, “Sussman”}, {“Chris”, “Hart”}}
Like the single dimension, braces are used to surround the entries, but there are two sets of braces, onefor each dimension; the outer set for the first dimension and the inner set for the second. The first names,Dave and Chris, are placed in the first dimension, and the last names, Sussman and Hart, are placed inthe second dimension. So this is the same as
Dim Names(1, 1) As StringNames(0,0) = “Dave”Names(0,1) = “Sussman”Names(1,0) = “Chris”Names(1,1) = “Hart”
Which style you use is a matter of personal preference. There’s no real difference between them.
CollectionsAnother way of storing multiple items is to use collections. These differ from arrays in that they arealways dynamically allocated, which makes them more suitable for situations where the amount of datachanges frequently. There are different collections for different purposes, stored in theSystem.Collections namespace (more on namespaces later), including
❑ ArrayList, which provides a general collection for objects.
❑ Hashtable, which provides storage for key/value pairs. A key/value pair is simply the storageof values, which can then later be identified by a key. In array terms the key is the index of thearray element, but a Hashtable allows the key to be non-numeric.
❑ Queue provides a first-in, first-out collection, which means that items are taken off the queue inthe same order in which they were placed onto it, just like a real queue — the person who arrivesfirst gets served first.
❑ SortedList, which provides ordered storage for key/value pairs.
❑ Stack provides a last-in, first-out collection, where items are taken off the stack in the reverseorder in which they were placed onto it. Think of a stack of plates — the last one put onto thestack is the first off.
❑ StringCollection, which provides a collection of strings.
There are other collections, but these are the ones you’ll probably use most frequently. Data is added tocollections by calling an Add method, the parameters of which depend on the collection being used. Forthe StringCollection you simply supply the string to be added. For example:
303
Code
12_588508 ch09.qxd 10/10/05 6:23 PM Page 303

Dim Names As New StringCollection()Names.Add(“Dave”)Names.Add(“Chris”)
To access the entries you use the same method as an array:
NameTextBox.Text = Names(0)
This would return Dave, because the names are added in numerical order.
A HashTable is different because the index isn’t numerical, but rather string-based. With aStringCollection the index is a number, and it is assigned automatically, in order of the items added.With a HashTable you have to specify the key as well as the item you want to add. For example:
Dim Names As New Hashtable()Names.Add(“Dave”, “Sussman”)Names.Add(“Chris”, “Hart”)
In this example the first parameter is the key and the second is the value; this leads to them being calledkey/value pairs. You can also add entries without using the Add method:
Names(“John”) = “Kauffman”
There’s no real difference between using and not using the Add method, although it’s best to use Add ifonly because it’s clearer as to what is being done. Without the Add method the code looks more like anassignment, so you aren’t completely sure whether a new item is being added, or if an existing one isbeing modified.
To access the entries you use the key:
NameTextBox.Text = Names(“Chris”)
One important point about using HashTables is that the keys must be unique. So in the previous exam-ple a HashTable wouldn’t really be suitable for storing the author names, because two of the authorshave the same first name. So this code would fail:
Dim Names As New Hashtable()Names.Add(“Chris”, “Ullman”)Names.Add(“Chris”, “Hart”)
An exception would be raised on the second Add line, because the key has already been used.
Collections, and arrays for that matter, aren’t only useful for storing native types such as strings or inte-gers. They can also be used to store custom classes, and you’ll look at that later in the chapter. The fol-lowing Try It Out, however, puts your knowledge of arrays and collections to use.
Try It Out Working with Arrays and Collections1. Create a new Web Form, called ArraysCollections.aspx.
2. Add a TextBox, a Button, a ListBox, and another TextBox to the form.
304
Chapter 9
12_588508 ch09.qxd 10/10/05 6:23 PM Page 304

3. For the text boxes set the TextMode property to MultiLine, the Columns property to 50, andthe Rows property to 5. When finished it should look like Figure 9-4.
Figure 9-4
4. Enter the following code into the Click event for the button:
Dim splitChars As String = “ “Dim words() As StringDim wordIndex As Integer
words = TextBox1.Text.Split(splitChars.ToCharArray())
ListBox1.Items.Clear()For wordIndex = words.Length – 1 To 0 Step -1
ListBox1.Items.Add(words(wordIndex))Next
Dim paragraph As String = String.EmptyFor Each word As ListItem In ListBox1.Items
paragraph &= word.Value & “ “Next
TextBox2.Text = paragraph
5. Save the files, and set ArraysCollections.aspx as the start page.
6. Press F5 to run the page and enter Wrox United are the best into the first text box.
7. Press the button and you will see the screen shown in Figure 9-5.
You can see that the sentence in the first text box has been split into its component words, that thosewords have been entered into the list box in reverse order, and then the words have been combined intothe second text box.
305
Code
12_588508 ch09.qxd 10/10/05 6:23 PM Page 305

Figure 9-5
How It WorksThe first three lines of the code simply define variables. The first, splitChars, is a string containing thecharacters that will be used to split the sentence. The second, words, is an array of strings, and the third,wordIndex, is an Integer that will be used to count through the array:
Dim splitChars As String = “ “Dim words() As StringDim wordIndex As Integer
Next, the sentence entered into the text box is split into an array, using the Split method. Although itlooks like Split is a method of the Text property, you must remember that the Text property returns a String— so Split is a method of the String class. The parameter passed into the string is not thesplitChars variable itself, but splitChars converted to a character array (using the ToCharArraymethod). This is because a character array is the required type for the Split method, which allows agreat deal of flexibility in splitting strings:
words = TextBox1.Text.Split(splitChars.ToCharArray())
At this stage the words array now contains a separate entry for each word in the sentence, ready foraddition into the list box. Before the words are added to the list the existing Items collection is cleared,which stops the list from getting ever bigger if the button is clicked multiple times. Then you loopthrough the words array, but loop backwards, adding each word into the list:
ListBox1.Items.Clear()For wordIndex = words.Length – 1 To 0 Step -1
ListBox1.Items.Add(words(wordIndex))Next
Don’t worry too much about the exact syntax of the looping — you’ll get to that later in the chapter.
306
Chapter 9
12_588508 ch09.qxd 10/10/05 6:23 PM Page 306

Once the words are in the list they can be removed again, into another string. This has an initial valuethat might seem unusual —String.Empty— but this is quite a common thing for initializing strings:
Dim paragraph As String = String.Empty
String.Empty is a special value that indicates that the string is, well, empty. This is different from astring assigned to “”, which has a value, albeit a string of length zero that doesn’t contain any charac-ters. The reason for having a distinction between a zero length string and an empty string is that it allowsyou to detect whether the string has been set or changed from its initial value. One of the reasons fordeclaring an initial value is that without it you get a warning in VWD, but on a later line, indicating thatthe paragraph variable is being used before it has been set. In this case it doesn’t matter, but reducingwarnings in VWD means it’s easier to spot warnings and errors that do matter.
You now loop through the Items collection of the list box, and the Items collection contains ListItemobjects. The Value of each ListItem is simply appended to the paragraph string, along with a space:
For Each word As ListItem In ListBox1.Itemsparagraph &= word.Value & “ “
Next
Finally, the paragraph is displayed in the second text box:
TextBox2.Text = paragraph
This may seem an overly lengthy way to reverse the words in a sentence, but the point of the exercise isto show that there are different ways of working with arrays and collections.
Deciding Whether to Use Arrays or CollectionsThere are pros and cons of using both arrays and collections, and the decision of which to use can some-times be confusing. In general if the number of elements isn’t going to change, an array is best; it’s effi-cient, fast, and provides easy access to the elements. If you need to change the number of elements, orinsert elements in between others, then a collection is best.
Both arrays and collections can, like some of the data objects, be used for data binding. For example, theWrox United shop could have a list of delivery methods in a drop-down list:
Dim delivery() As String = {“Post”, “Courier”, “International”}DeliveryDropDownList.DataSource = deliveryDeliveryDropDownList.DataBind()
Here the array is simply used as the source to which to bind the list. Collections can also be used in thismanner. Data binding was covered in Chapter 7.
EnumerationsEnumerations are a custom data type where the value can be one of a number of values. This is easier tosee with an example, so let’s look at the Calendar control. This is a complex control and has many prop-erties to allow its look to be changed, one of which is the DayNameFormat (see Figure 9-6).
307
Code
12_588508 ch09.qxd 10/10/05 6:23 PM Page 307

Figure 9-6
The format must be one of these five values (Full, Short, FirstLetter, FirstTwoLetters, and Shortest), andno other, so there needs to be a way of ensuring only these values can be selected. This is where enumer-ations come in because enumerations restrict the variable to a set of known values. The syntax for creat-ing an enumeration is as follows:
Public Enum EnumerationNameenumeration values
End Enum
What this does is declare a new type, with the name of the type being whatever name you give it asEnumerationName. This type is a special type where the values can only be one of the supplied list. Forexample, the DayNameFormat is an enumeration, which has been created like so:
Public Enum DayNameFormatFull[Short]FirstLetterFirstTwolettersShortest
End Enum
Because this is a new type it can be used in variable declarations:
Dim dayFormat As DayNameFormatdayFormat = DayNameFormat.FirstLetter
This declares a new variable of the enumeration type —DayNameFormat. Then it assigns a value to thevariable, and the value assigned is one of the defined values. This shows as the enumeration name andvalue separated by a period. What’s great is that you get IntelliSense, so you can pick from a list of theknown values when assigning the variable.
Enumerations provide a way to have a human-readable value associated with a number. In the preced-ing example no numbers are explicitly assigned, so they are created automatically, starting at 0. So here
308
Chapter 9
12_588508 ch09.qxd 10/10/05 6:23 PM Page 308

Full would be 0, Short would be 1, and so on. The Short value has been enclosed within squarebrackets because Short is also a data type; using the square brackets tells .NET that this is the customname rather than the data type. If you don’t want to use the default numbers for the values, you canspecify them yourself. For example:
Public Enum DeliveryTypePostCourier = 4International
End Enum
Here the Post would be 0 and the Courier has an explicit value of 4. International doesn’t have anexplicit value so automatic numbering starts again, at the last number used, so would therefore have avalue of 5.
Enumerations are used when you need to allow one of a limited number of values for a selection. It’s usedextensively in the ASP.NET server controls to allow only selected values, often allowing the behavior tochange; the TextBox, for example, has a TextMode property that can be one of SingleLine, MultiLine,or Password. How the TextBox is displayed changes depending on which value is selected. When cre-ating code yourself, for the day-to-day running of an application, there is perhaps less use for them (theWrox United site doesn’t use any Enums), but they can be useful, perhaps when building central librariesof code.
ConstantsConstants are another way to provide a human-readable form for values, but unlike enumerations, con-stants are a single value only and as their name suggests, they are constant and never change. This is usefulfor situations where you need to use a fixed value; using a constant means you can give that value a nameand use the name throughout the code. The value is defined once, meaning it is easy to change, andbecause the readable name is used throughout the code, the code becomes more maintainable.
Even if the value is used only once, it’s sensible to use constants because they provide a way to central-ize this type of fixed value. The syntax for a constant is as follows:
Private Const ConstantName As Type = Value
Const is what defines this as a constant, and Private is how visible the constant is — you’ll be lookingat this later in the chapter. The rest of the declaration is just like any other variable, the difference beingthat the value is constant, and therefore cannot be changed.
For example, in the Wrox United web site there is a shopping cart to store items bought from the shop.Members of the fan club receive a 10% discount, so this value is stored as a constant:
Private Const MemberDiscountPercentage As Single = 0.1
When the total price of the order is calculated this constant can be used, just like any other variable:
MemberDiscount = SubTotal * MemberDiscountPercentageTotal = SubTotal – MemberDiscount
You’ll look at the implementation of the shopping cart later in the chapter.
309
Code
12_588508 ch09.qxd 10/10/05 6:23 PM Page 309

StatementsStatements are where the real action of code is, allowing you to control the program. You have seenmany statements in code already in the book, and at the time it wasn’t convenient to explain what theymeant or how they worked. Now is that time, because statements are what drive your code. Statementsare what allow you to structure your code, to make decisions, to repeat actions a number of times. Forexample, to make a decision you use the If Then statement, which can be used to allow the code to reactto external criteria. Take the Wrox United checkout page, where members of the fan club receive a dis-count. This is done with a decision, which goes something like this:
If person is a member of the fan club Thengive that person a discount
End If
The If, Then and End If are the Visual Basic statements that test a condition — or ask a question. Thinkof the program as a person deciding what to do.
For repeating tasks there are statements called loops, and there are different types of loops for differenttasks. Some (For Next) repeat a fixed number of times, whereas others (While) repeat until a conditionis met, or while a condition is true.
Before conditions and loops can be examined in more detail, some other topics need to be covered.
OperatorsThe first thing to look at is operators, which are how values are manipulated. If you can remember backto your math lessons in school, this will be familiar. You’ve already seen the assignment operator, theequals sign (=), in action earlier in the chapter, and this simply assigns a value to a variable. The nextseveral sections discuss how remaining operators allow you to carry out some predefined operation.
ConcatenationConcatenation is used to join strings together. For example, consider if you had the first and last names ina multi-dimensional array (as shown when you looked at arrays), and you wanted to have a single vari-able with the full name. You would use the concatenation operator, the ampersand (&), to do this:
Dim FullName As StringFullName = Names(0,0) & Names(0,1)
This takes the last name and joins it to the end of the first name. However, there is no space separatingthem, so the code could be
FullName = Names(0,0) & “ “ & Names(0,1)
Now you have two concatenations taking place. First a space is added and then the last name. You couldhave also used another form of the assignment operator:
FullName = Names(0,0)FullName &= “ “FullName &= Names(0,1)
310
Chapter 9
12_588508 ch09.qxd 10/10/05 6:23 PM Page 310

The use of &= simply says take the variable on the left of the assignment and append to it the contents onthe right. This also works with arithmetic operators, which are the subject of the next section. The addi-tion operator (+) can also be used for string concatenation.
Arithmetic OperatorsArithmetic operators allow you to perform, well, arithmetic on variables: addition, subtraction, and soon. The following table displays the arithmetic operators:
Operator Action
+ Addition
- Subtraction
* Multiplication
/ Division
^ Exponentiation
Mod Modulus
\ Integer division
The standard mathematical operators are easy to understand; they add, subtract, multiply, and divide inthe way you’d expect:
Dim n1 As Integer = 6Dim n2 As Single = 14.3Dim n3 As Double
n3 = n1 + n2 ‘ results in: 20.3n3 = n2 – n1 ‘ results in: 8.3n3 = n1 / n2 ‘ results in: 0.41958n2 = n1 * n2 ‘ results in: 85.8
Exponentiation raises one number to the power of another:
Dim n1 As Integer = 10Dim n2 As Integer
n2 = n1 ^ 2 ‘ results in: 100n2 = n1 ^ 3 ‘ results in: 1000
Modulus divides two numbers and returns the remainder. One of the classic uses for this has been to testwhether a number is odd or even:
Dim n1 As Integer
n1 = 1 Mod 2 ‘ results in: 1n1 = 2 Mod 2 ‘ results in: 0n1 = 3 Mod 2 ‘ results in: 1n1 = 14 Mod 2 ‘ results in: 0
311
Code
12_588508 ch09.qxd 10/10/05 6:23 PM Page 311

So if a number Mod 2 is 0, then it’s even.
Integer division allows you to obtain the integer portion of a division — the number of times a divisorgoes into a number:
Dim n1 As Integer
n1 = 1 \ 2 ‘ results in: 0n1 = 2 \ 2 ‘ results in: 1n1 = 3 \ 2 ‘ results in: 1n1 = 14 \ 2 ‘ results in: 7
Like concatenation, operators can be combined with assignment. In order to add one to a number youcan do this:
Dim n1 As Integer = 4n1 = n1 + 1
This says take n1, add one to it, and assign that value back to n1. Remember that assignment works bytaking the value on the right of the equals sign and assigning that to the variable of the left of the equalssign. This works even if the variable being assigned is on the right because the right side is calculatedfirst. An alternative to this is to combine operators:
Dim n1 As Integer = 4n1 += 1
This has the same result as the first example although it looks very different. In fact it’s just a shortcutthat allows the addition operator to be combined with the assignment; it simply says take the n1 vari-able and add one to it. The other arithmetic operators can be used in the same way.
The subtraction operator is also used for negation, like so:
Dim n1 As IntegerDim n2 As Integer
n1 = -3n2 = -n1 ‘ results in: 3
Negation can be used on any numeric type.
Comparison OperatorsComparison is how decisions are made in code; you’ll come onto the mechanism of that in due time, butthe operators define what comparison is made. The comparison operators are shown in the following table:
Operator Action
< Less than
<= Less than or equal to
312
Chapter 9
12_588508 ch09.qxd 10/10/05 6:23 PM Page 312

Operator Action
> Greater than
>= Greater than or equal to
= Equal to
<> Not equal to
Comparison always involves an expression — the term for all operators and operands involved in thecomparison. The result of a comparison expression is a Boolean value — it is either True or False. You’lllook at the mechanics of using expressions in decisions in a while, but these operators work just like theones you’ve already seen. So if you have two variables, n1 with a value of 4 and n2 with a value of 5, thefollowing could be used as expressions:
n1 > n2 ‘ results in: Falsen2 > n1 ‘ results in: True
For numbers the comparison is obvious, but for other data types it might not be. Dates, for example,work in a similar way, but the test is whether one date is earlier or later than another. For example:
Dim d1 As New DateTime(2005, 10, 1) ‘ 1 October 2005Dim d2 As New DateTime(2004. 1, 2) ‘ 2 January 2004
d1 > d2 ‘ results in: True
The greater than operator tests to see if the first date is later than the second, so the result is True.
Two other comparison operators also are used with objects. The operator Is checks to see if two objectreferences point at the same object. The IsNot operator does the opposite, checking to see if two objectreferences point at different objects; they are the equivalent of equals (=) and not equals (<>) for objects.This is useful when dealing with objects, and many of the scenarios where this is used are covered inlater chapters. However it’s worth showing an example here, and because databases have already beencovered that can be the example. When using the data controls on pages you get a lot of functionality byjust dropping a control onto a page and setting a few properties, but there are occasions where you needto explicitly deal with a database, and this becomes more true as you gain experience and write morecomplex applications. The checkout for Wrox United is one case, where the items from the shopping cartare written to the database. For this a SqlConnection object is used, which provides a way to connect toa specific database. For example:
Dim conn As New SqlConnection(“ . . .”)conn.Open()
‘ insert the checkout items
conn.Close()
This code fragment opens a database connection, inserts the checkout items, and then closes the connec-tion. However, if there is an error when opening the connection, the conn variable wouldn’t contain an
313
Code
12_588508 ch09.qxd 10/10/05 6:23 PM Page 313

active connection, so the Close would fail. This is where the Is and IsNot tests are used, so the Closecould be modified to
If conn IsNot Nothing Thenconn.Close()
End If
If an error occurs, conn wouldn’t be assigned a value and would be Nothing, so conn is tested beforebeing closed. If it is not Nothing (I’m sure the editors are having a fit about all these double negatives),the connection can be closed. You’ll see more about this topic in Chapter 15.
Logical OperatorsLogical operators allow the combination of expressions. The operators are as follows:
Operator Action
And True if both sides of the expression are true
Or True if one side of the expression is true
Xor True if only one side of the expression is true
AndAlso Short-circuited version of And
OrElse Short-circuited version of Or
Not Negates the expression
All except Not require two expressions, in the following form:
LeftExpression Operator RightExpression
The following table should make the result more obvious:
Operator LeftExpression RightExpression Result
And True True True
True False False
False True False
False False False
Or True True True
True False True
False True True
False False False
314
Chapter 9
12_588508 ch09.qxd 10/10/05 6:23 PM Page 314

Operator LeftExpression RightExpression Result
Xor True True False
True False True
False True True
False False False
The AndAlso and OrElse operators have the same result as And and Or, but there is a subtle difference.With the normal versions, both expressions (left and right) are evaluated, but with the short-circuitedoperators this isn’t necessarily so. They will stop evaluating expressions if one of the expressions canguarantee a result. For example, consider the following code:
Dim Name As String = “Dave”
If Name = “Dave” Or Name = “Dan” Then‘ name is either Dave or Dan
End If
In this case Name is checked to see if it is Dave and then checked to see if it is Dan. Now consider this:
If Name = “Dave” OrElse Name = “Dan” Then
Here Name is first checked to see if it is Dave. It is, so the second expression (the check for Dan) is neverdone — it’s not needed, because it won’t affect the result. In many cases it won’t matter which form (normal or short-circuited) you use, but there are times it does. For example, imagine instead of a simpletest for a name you called a function that updated a database. When using the normal form the databasewould be updated, but the short-circuited version wouldn’t call the function and the database wouldn’tbe updated. Using the standard And the code would be
If User.IsInRole(“Admin”) And UserAudit(“Admin”) Then‘ user is an admin and their details have been updated
End If
This would call the UserAudit function even if the current user weren’t in the Admin role because usingAnd means that both parts of the test are done. To get around this the following could be used:
If User.IsInRole(“Admin”) AndAlso UserAudit(“Admin”) Then‘ user is an admin and their details have been updated
End If
Now UserAudit is called only if the user is in the Admin role. Using AndAlso means that if the first partof the test fails, there is no point evaluating the second part, so it is never run.
Another time when the short-circuited form is useful is when you need to see if a property of an objecthas a value; you only want to check if the object actually exists, not if it is set to Nothing. For example,consider the following code, where data is fetched from a database and then some action needs to beperformed only if some rows were returned:
315
Code
12_588508 ch09.qxd 10/10/05 6:23 PM Page 315

Dim rdr As SqlDataReaderrdr = DataLayer.GetProducts()
If rdr IsNot Nothing And rdr.HasRows Then
Assume that the database access fails for some reason, and rdr is set to a null value — that is, Nothing.With the normal form of And, both expressions are tested. First the check for Nothing is done, and thistest returns False—rdr is Nothing. Next the second test is done, to check the Boolean HasRows prop-erty, to see if any data was returned. But rdr is Nothing so this will generate an exception. To cure thisproblem you can use the short-circuited form of And:
If rdr IsNot Nothing AndAlso rdr.HasRows Then
Now there will be no exception. The first test is done, and because it is False the second test isn’t done.There’s no need because the first is False and the entire expression can never be True.
Operator PrecedenceOperators aren’t limited to just one or two expressions, and can be combined in a multitude of ways.Before doing this however, you need to understand that there is an order of precedence, so the result youget might not be what you expected. Consider the simple expression:
1 + 2 * 3
This returns 7 because multiplication has a higher precedence than addition. You can use parentheses toforce a change in order:
(1 + 2) * 3
This returns 9 because the expression in parentheses is evaluated first. It’s always a good idea to includeparentheses in your expressions because it makes your intentions clear, and this is certainly a good thingwhen you (or someone else) comes to look at your code later.
If you don’t use parentheses the order of precedence is as follows, in descending order:
❑ Exponentiation (^)
❑ Unary negation (-)
❑ Multiplication and division (*, /)
❑ Integer division (\)
❑ Modulus (Mod)
❑ Addition and subtraction (+, -) and string concatenation (+)
❑ String concatenation (&)
❑ Arithmetic bitshift (<<, >>)
❑ Comparison (=, <>, <, <=, >, <=, Like, Is, TypeOf...Is)
316
Chapter 9
12_588508 ch09.qxd 10/10/05 6:23 PM Page 316

❑ Negation (Not)
❑ Conjunction (And, AndAlso)
❑ Disjunction (Or, OrElse, Xor)
This chapter hasn’t covered all of these operators because some of them you won’t use very often, orthey are used in more advanced techniques. They have been included in the preceding list just so thatyou know where they fit into the order.
DecisionsDecisions are how you make code react to data, usually from a database or user input. You’ve alreadyseen plenty of decisions throughout the book, and in this chapter logical operators covered how expres-sions play an important part of the decision-making process. Decisions can be made in two ways, andwhich way you use depends on the number of values an expression can be. For example, if an expres-sion can return one of two values (True or False), the If statement is used. If the decision is a selectionamong a number of choices (perhaps the delivery method from the Wrox United shop), the Selectstatement is used.
Single SelectionsSingle selections are based around the If...Then statement, which always has three parts. The first isthe expression being tested, which will result in a True or False value. The second is the block of codeto be executed if the expression is True. Finally there is the End If, which ends the decision-making pro-cess. The syntax is as follows:
If condition Then‘ code to run if condition is true
End If
This tests a single condition and only runs code if the condition is true. Alternatively there is
If condition Then‘ code to run if condition is true
Else‘ code to run if the condition is false
End If
This tests a single condition but has code for both the true and false situations. For multiple tests you can use:
If condition Then‘ code to run if condition is true
ElseIf condition1 Then‘ code to run if condition1 is true
Else‘ code to run if no conditions were true
End If
There can be any number of ElseIf conditions.
317
Code
12_588508 ch09.qxd 10/10/05 6:23 PM Page 317

Consider Wrox United, where the club sends out a newsletter, but only to those fan club members whohave checked the checkbox when they entered their details. The user settings are stored in the Profileobject, which was shown in Chapter 5:
If Profile.Mailings = True Then‘ send the newsletter to this person
End If
This is a simple case, where there is only one expression being tested, and one set of code to run.
If some code needs to be run when the expression is False, the Else statement can be used:
If Profile.Mailings = True Then‘ send the newsletter to this person
Else‘ don’t send the newsletter
End If
There is also a third statement, ElseIf, for choosing among several different expressions. For example:
If Profile.IsNewUser Then‘ send introductory mail
ElseIf Profile.Mailings = True Then‘ send the newsletter to this person
Else‘ don’t send the newsletter
End If
In this example the expressions first checks to see if the member is a new user — that is, if they’ve onlyjust joined and haven’t had any mailings yet. If so, the introductory mail is sent. If the first expression isFalse, that is, they aren’t a new user, the next expression is checked — do they require mailings? If so,then that code block is run, and if none of the expressions are True the Else block is run. If a conditiontests true the appropriate code block is run and no more conditions are tested — the If statement ends.
Multiple SelectionsFor selections where the expression can be one of a number of possible answers, the If statement canbecome unwieldy. For example, consider the Wrox United shop where you can buy a range of brandedmerchandise. Currently items are sent using the standard postal service, but what if the club wanted tooffer different delivery methods, perhaps by way of a drop-down list:
Dim delivery() As String = {“Next Day Post”, “3 Day Post”, _“Courier”, “International”}
DeliveryDropDownList.DataSource = deliveryDeliveryDropDownList.DataBind()
The underscore at the end of the line is a line wrapping character. It must be preceded with a space andtells Visual Basic that the line of code hasn’t ended, but continues on the next line.
Maybe the data is from an array, or more likely from a database where the delivery type and associ-ated cost are both included. When the total price is calculated, though, different action needs to be taken — perhaps to instruct the packing department which box type to use, or maybe to interface
318
Chapter 9
12_588508 ch09.qxd 10/10/05 6:23 PM Page 318

directly with the delivery company’s tracking system. Using the If statement would result in the fol-lowing code:
Dim del As String = DeliveryDropDownList.SelectedValueIf del = “Next Day Post” Then
‘ pack in a normal box and stick lots of stamps on itElseIf del=”3 Day Post” Then
‘ pack in a normal box and stick one stamp on itElseIf del=”Courier” Then
‘ pack in a courier specific box and book a pickupElse
‘ pack in a large crate and take to the freight companyEnd If
You can see that all those ElseIf statements and the layout make this hard to read. In situations like thisit’s best to use the Select statement, which would turn this code into the following:
Select Case DeliveryDropDownList.SelectedValueCase “Next Day Post”
‘ pack in a normal box and stick lots of stamps on itCase “3 Day Post” Then
‘ pack in a normal box and stick one stamp on itCase “Courier” Then
‘ pack in a courier specific box and book a pickupCase Else
‘ pack in a large crate and take to the freight companyEnd Select
This code is much neater, easier to read, and less error prone. It works in a similar way to the previousexample, where the expression is on the first line — the selected value from the drop-down list. This isthen compared to each of the values in the Case statements, starting at the top and working down. Thefirst match causes the code block under that Case statement to be executed, and all other Case state-ments are ignored. If there is no match, the code block under the Case Else statement is run.
The Select statement is much more flexible than shown in the preceding code, because it allows match-ing multiple selections or ranges. The syntax for this is as follows:
Select Case conditionCase test1
‘ code to run if condition matches test1Case test2
‘ code to run if condition matches test2Case else
‘ code to run if the condition matches no testsEnd Select
The Select Case starts the selection process, with each selection being preceded by a Case keyword. Onceagain, you have to think of the program as a person making decisions; in this case do that, and so on.
For example, consider a membership system that requests the age when the member is created, perhapsto customize the membership pack (free crayons for kids!):
319
Code
12_588508 ch09.qxd 10/10/05 6:23 PM Page 319

Select Profile.AgeCase 0
‘ wow, that’s starting really earlyCase 1, 2, 3, 4, 5
‘ add some free crayonsCase 8 To 15
‘ add leaflet about junior training campCase Is <= 21
‘ add leaflet about under 21 sideCase Is > 65
‘ add leaflet about bingo eveningsEnd Select
Here there are a variety of ways in which selection is done. The first Case matches a single value, andthe second matches any of the values 1, 2, 3, 4, or 5. The third Case matches a range of values, and thefourth Case matches any value less than or equal to 21, with the final match being for values over 65.You need to be careful with the Is keyword and comparison operators, because these could maskmatches further down in the list (remember these are tested in order). So placing Case Is <= 21 firstwould catch all numbers below 22 irrespective of whether more specific matches were declared furtherdown in the Select statement. Notice that there is no Case Else statement, so nothing happens if theage is between 22 and 65. This is fine under these circumstances, but when using a Select statementwith user input it’s always best to include an Else statement to ensure that you catch data that is out-side your range checking.
LoopsLoops provide a way to repeat actions, either a fixed number of times or until some condition is met. Thedecision of which loop to use depends on whether you know in advance how many times you need toloop, or whether some external factor influences this. For example, when a DataReader object provides away to read through some records from a database, this has a Read method that returns False when thereare no more records. This is a case of not knowing in advance the number of times you need to loop.
The While and Do LoopsTo perform looping until some condition is met you can use the While or Do loops, both of which aredependent upon an expression. Take the While loop first, using the case of data from a database:
Dim conn As New SqlConnection(“...”)Dim cmd As New SqlCommand(“SELECT * FROM Products”, conn)Dim rdr As SqlDataReader = cmd.ExecuteReader()
While rdr.Read()‘ do something with the data record
End Whilerdr.Close()
Ignore the SQL statement, because it’s not that important for this example; all that’s important is that anumber of records will be returned when the SQL command is run. This statement is simple — the Whileloop continues execution of its code block while the condition is True. The Read method returns Trueif it has a record, and False if it doesn’t, so this loop continues until there are no more records. So, thefirst time the While statement is encountered the expression is tested. If it is True, the code between the
320
Chapter 9
12_588508 ch09.qxd 10/10/05 6:23 PM Page 320

While and End While statements is executed, and when the End While is encountered, the loop startsagain, testing the expression once more. This continues until the expression is False, in which case pro-cessing continues with the statement after the End While. This happens irrespective of the initial valueof the condition, so if the condition is initially False, the contents of the loop are never executed.
If you need to stop processing a loop, that is, break out of it in the middle, you can use the Exit Whilestatement. For example:
While rdr.Read()If rdr(“ItemCost”) < 0 Then
Exit WhileEnd If
End While
Now on to the Do loop, which has two forms, the first of which is where the condition is tested beforethe contents of the loop are executed. For example:
Do While rdr.Read()‘ loop contents
Loop
In this case the Do loop is no different from a While loop; looping continues while the condition is true. This can be reversed by use of the Until statement, where the loop continues until the condition is true:
Do Until condition‘ loop contents
Loop
Both the While and Do loops in the form shown test the condition before the loop starts, which meansthat the code block for the loop might never get executed. To guarantee at least one execution you canuse the Do loop with the condition at the end:
Do‘ loop contents
Loop While condition
Alternatively, you can use the Until statement in the place of the While statement:
Do‘ loop contents
Loop Until condition
Because the condition is not tested until after the loop contents have been executed the first time, thistype of loop is not suitable for use with a data reader. For example, you cannot do this:
DoIf rdr(“ItemCost”) < 0 Then
Exit WhileEnd If
Loop While rdr.Read()
321
Code
12_588508 ch09.qxd 10/10/05 6:23 PM Page 321

Though this is perfectly valid, the code will fail unless Read has already been called. The reason for thisis that when a data reader is first opened it doesn’t point at the first record, but rather before it. So the actof calling Read moves to the first record. In the preceding code, if no Read has been called, the access tordr(“ItemCost”) will fail because there will not be a valid record.
The For LoopThe For loop is useful when the number of iterations is known, and is most often used when countingthrough numeric values or performing some action a set number of times. For example:
Dim counter As IntegerFor counter = 1 To 10
‘ loop codeNext
Here the loop code is executed 10 times. The variable counter starts at 1 and is incremented by 1 eachtime through the loop. The default increment can be changed by using the Step statement, as shown inthe following code:
Dim counter As IntegerFor counter = 1 To 10 Step 2
‘ loop codeNext
This time the loop is executed five times because counter is incremented by 2 each time through theloop. You’re not limited to incrementing either, because looping can be done backwards:
Dim counter As IntegerFor counter = 10 To 1 Step -1
‘ loop codeNext
Here the loop starts at 10 and 1 is subtracted from counter each time. Like the While and Do loops, Forloops can be exited during processing:
Dim counter As IntegerFor counter = 1 To 10
‘ loop code
If SomeFunction(counter) ThenExit For
End If
‘ loop codeNext
Here if SomeFunction returns True, the loop is executed directly. Any code below the Exit For state-ment is ignored.
322
Chapter 9
12_588508 ch09.qxd 10/10/05 6:23 PM Page 322

The For Each LoopThe For Each loop is used for looping through collections or arrays and has a variety of uses, and unlikethe For loop you don’t need to know in advance the number of times the loop will run. Regardless ofwhat you’re looping through the syntax is the same:
For Each LoopVariable As Type In CollectionNext
The parts of this are as follows:
❑ Collection is the object containing the items to be looped through. It doesn’t have to be a col-lection (from System.Collections), but can be an array.
❑ LoopVariable is the name of the variable that will be assigned to each individual entry fromCollection.
❑ Type is the data type of LoopVariable.
For example, consider the following code that loops through a string array:
Dim Names() As String = {“Dave”, “Dan”, “Chris”, “Chris”, “John”}Dim AllNames As String
For Each Name As String In NamesAllNames &= Name & “ “
Next
This first creates an array of names, plus a variable to hold all of the names concatenated together. When the loop starts, Name is assigned to the first entry in the array, Dave, and this is appended to theAllNames variable. The next time around the loop, Name is assigned to the next entry in the array, Dan,and so on. When all items in the array have been processed the loop ends.
There is a second form of this loop where the loop variable is declared outside of the loop:
Dim Name As StringFor Each Name In Names
AllNames &= Name & “ “Next
For the purposes of the loop this is exactly the same as declaring the variable in the loop itself, but itdoes affect the scope of the variable (more on that in the “Variable Scope and Lifetime” section later inthe chapter).
Collections and lists are used a lot in .NET programming, so For Each is very useful. In Wrox UnitedForEach is used as part of the shop, when the checkout is reached (this is Checkout.aspx). The shopallows you to buy multiple items, and these are put into a shopping cart — this is a custom object calledCart, which contains a collection of CartItem objects. You’ll look at the creation of the shopping cartlater, but when you check out, the items in the cart need to be added to the database, and because it is acollection, For Each is ideal.
323
Code
12_588508 ch09.qxd 10/10/05 6:23 PM Page 323

The checkout function won’t be discussed in complete detail, but here’s what you have:
❑ A ShoppingCart object that contains the cart. This is stored in the Profile as Cart (the profileis covered in Chapter 11).
❑ A collection of CartItem objects. This is stored as the Items property of the ShoppingCart.
In order to iterate through the items in the cart you could use the following code:
For Each item As CartItem In Profile.Cart.ItemsNext
Each time through the loop, item would contain the actual item from the cart. When the user proceedsto the checkout, here is what you need to do:
❑ Create an order in the database, adding it into the Orders table.
❑ Loop through the items in the cart and add each item to the OrderLines table.
This sounds like a lot of work, and is actually quite a lot of code (around 80 lines or so including com-ments), but is really simple. It builds on some of the data techniques seen in Chapter 8, and althoughthose aren’t covered in detail the code should be familiar. Here’s where the actual items from the cart areadded to the database:
cmd.CommandText = “INSERT INTO OrderLines(OrderID, ProductID, “ & _“Quantity, Price)” & _
“ VALUES (@OrderID, @ProductID, @Quantity, @Price)”
cmd.Parameters.Add(“@OrderID”, Data.SqlDbType.Int)cmd.Parameters.Add(“@ProductID”, Data.SqlDbType.Int)cmd.Parameters.Add(“@Quantity”, Data.SqlDbType.Int)cmd.Parameters.Add(“@Price”, Data.SqlDbType.Money)
cmd.Parameters(“@OrderID”).Value = OrderID
For Each item As CartItem In Profile.Cart.Itemscmd.Parameters(“@ProductID”).Value = item.ProductIDcmd.Parameters(“@Quantity”).Value = item.Quantitycmd.Parameters(“@Price”).Value = item.Price
cmd.ExecuteNonQuery()Next
‘ clear the cartProfile.Cart.Items.Clear()
The first line simply sets the SQL statement used to insert the items, and the following lines create theparameters and set the OrderID. The object cmd is a SqlCommand object, with an associated connection.Within the loop the details of each item are copied to the parameters, and then the query is executed —this happens for each order item, so the SQL statement happens each time. Once all of the items havebeen added to the database the Items collection of the shopping cart is cleared.
324
Chapter 9
12_588508 ch09.qxd 10/10/05 6:23 PM Page 324

Give all of this looping and testing a try by working out how well Wrox United is doing. In the follow-ing Try It Out you loop through the fixtures to see how many goals have been scored and how manygames have been won, lost, or drawn.
Try It Out Looping and Making Decisions1. Create a new Web Form called Decisions.aspx and set this as the start page. Remember to
place the code in a separate file when you create the Web Form.
2. Add six labels and some text, so the page looks like Figure 9-7. You can just type the text directlyonto the page, and make sure you add the labels in top to bottom order, so Label1 is at the topand Label6 is at the bottom:
Figure 9-7
3. Create the Page_Load event procedure by opening the code file and selecting (Page Events)from the first list and Page_Load from the second. In the Page_Load event add the followingcode (remember you can copy if from the finished samples if you don’t want to type it all in):
Dim conn As New SqlConnection( _ConfigurationManager.ConnectionStrings(“WroxUnited”).ConnectionString)
Dim cmd As New SqlCommand(“select * from Fixtures”, conn)Dim rdr As SqlDataReader
Dim wins As Integer = 0Dim losses As Integer = 0Dim draws As Integer = 0Dim goalsFor As Integer = 0Dim goalsAgainst As Integer = 0Dim winRatio As Integer
conn.Open()rdr = cmd.ExecuteReader(CommandBehavior.CloseConnection)
While rdr.Read()goalsFor += Convert.ToInt32(rdr(“GoalsFor”))goalsAgainst += Convert.ToInt32(rdr(“GoalsAgainst”))
If goalsFor > goalsAgainst Thenwins += 1
ElseIf goalsFor < goalsAgainst Thenlosses += 1
Else
325
Code
12_588508 ch09.qxd 10/10/05 6:23 PM Page 325

draws += 1End If
End While
Label1.Text = wins.ToString()Label2.Text = losses.ToString()Label3.Text = draws.ToString()Label4.Text = goalsFor.ToString()Label5.Text = goalsAgainst.ToString()
If losses = 0 ThenLabel6.Text = “No losses - a perfect season.”Return
End If
winRatio = Convert.ToInt32((wins / losses) * 100)
Select Case winRatioCase 0
Label6.Text = “No wins. Relegation is a certainty.”Case Is < 25
Label6.Text = “Less than 25%. Very poor.”Case Is < 50
Label6.Text = “Under half. Could do better.”Case Is < 75
Label6.Text = “Winning more than losing. Excellent.”Case Else
Label6.Text = “A high ratio - near the top of the table.”End Select
4. At the top of the code file add the following two Imports statements (don’t worry about whatthese are — they are covered later in the “Namespaces” section):
Imports System.DataImports System.Data.SqlClient
5. Save the files and run the page to see Figure 9-8.
Figure 9-8
The output isn’t spectacular, but it’s the code that’s interesting, so let’s see how it works.
326
Chapter 9
12_588508 ch09.qxd 10/10/05 6:23 PM Page 326

How It WorksFirst you have the variable declarations, starting with a connection to the database, a command to fetchthe fixtures, and a reader to iterate through the fixtures:
Dim conn As New SqlConnection( _ConfigurationManager.ConnectionStrings(“WroxUnited”).ConnectionString)
Dim cmd As New SqlCommand(“select * from Fixtures”, conn)Dim rdr As SqlDataReader
Next you have the variables to hold the counts of the wins, losses, draws, goals scored, and the win ratio:
Dim wins As Integer = 0Dim losses As Integer = 0Dim draws As Integer = 0Dim goalsFor As Integer = 0Dim goalsAgainst As Integer = 0Dim winRatio As Integer
Once the variables are declared the database is opened and the data fetched:
conn.Open()rdr = cmd.ExecuteReader(CommandBehavior.CloseConnection)
With the data reader full of data, the loop is started; the Read method returns a Boolean value of Falsewhen it has read the last record. This will continue until there are no more records:
While rdr.Read()
Within the loop the totals are incremented, the values from the reader being converted into integersbefore being used to increment the totals:
goalsFor += Convert.ToInt32(rdr(“GoalsFor”))goalsAgainst += Convert.ToInt32(rdr(“GoalsAgainst”))
Now comes the first decision, incrementing the number of wins, losses, and draws:
If goalsFor > goalsAgainst Thenwins += 1
ElseIf goalsFor < goalsAgainst Thenlosses += 1
Elsedraws += 1
End IfEnd While
Once the loop has finished, the totals can be displayed in the labels:
Label1.Text = wins.ToString()Label2.Text = losses.ToString()Label3.Text = draws.ToString()Label4.Text = goalsFor.ToString()Label5.Text = goalsAgainst.ToString()
327
Code
12_588508 ch09.qxd 10/10/05 6:23 PM Page 327

The ratio of wins to losses needs to be counted next (despite the fact that given the team’s performanceyou can almost assume this will be zero!). However, before you do the calculation you need to ensurethat the number of losses isn’t zero, otherwise a division by zero exception would occur. So if the num-ber of losses is zero, a message is displayed and Return forces the Page_Load event handler to exit:
If losses = 0 ThenLabel6.Text = “No losses - a perfect season.”Return
End If
If the team has lost at least one match, the ratio is calculated:
winRatio = Convert.ToInt32((wins / losses) * 100)
Now the message can be displayed depending on the win ratio. Remember that the Case statements aretried in the order in which they are declared, so the Case Else will match a win ratio of higher than 75%:
Select Case winRatioCase 0
Label6.Text = “No wins. Relegation is a certainty.”Case Is < 25
Label6.Text = “Less than 25%. Very poor.”Case Is < 50
Label6.Text = “Under half. Could do better.”Case Is < 75
Label6.Text = “Winning more than losing. Excellent.”Case Else
Label6.Text = “A high ratio - near the top of the table.”End Select
All of these statements, the loops and decisions, are fairly simple on their own, but together they showyou the power of what code can do. You can build up functionality with more and more statements, asthe complexity of your applications requires.
The next section introduces the topic of namespaces, a fundamental way in which code can be arranged.
NamespacesNamespaces are simply a way to logically group related code, and a namespace is simply a name, and thatname can include periods to provide grouping. For example, the namespace for the data handling code ofADO.NET is in System.Data, whereas the SQL Server-specific code is in System.Data.SqlClient. Allof the data types are in the System namespace. Namespaces can also be created for your own code, so forthe Wrox United code the namespace is Wrox.Web— this is defined in the classes within the App_Codedirectory.
Namespaces are important for several reasons:
❑ Grouping related code means it’s easier to find related items. For example, if you want to findall of the data handling code you know it’s located within the System.Data namespaces. Thiscan be useful when using the documentation.
328
Chapter 9
12_588508 ch09.qxd 10/10/05 6:23 PM Page 328

❑ Namespaces provide more readable code, because if the namespace is known then only the datatype is required to define a variable. For example, consider declaring a SqlConnection objectwithout having the namespace known to the program:
Dim conn As System.Data.SqlClient.SqlConnection()
This is more typing as well as being hard to read. However, with the namespace known this canbe reduced to:
Dim conn As SqlConnection()
❑ Namespaces allow both the compiler and IntelliSense to find the variable types.
To use a namespace you use the Imports statement:
Imports System.DataImports System.Data.SqlClient
You can test to see if this is working by taking these lines out of the Decisions sample. See what happensin the code editor; IntelliSense squiggles indicate a problem, and you get a compiler error if you try torun the page.
Within your code you can declare namespaces by use of the Namespace statement — you place thisaround your classes. For example:
Namespace Wrox.Web‘ class goes here
End Namespace
You can use the same namespace in multiple files, so you can split your code into physical files (a file foreach class is a good idea), while the namespace spans those classes — the namespace is logical and notphysical.
Now that you know how code works and how it can be organized, you can move on to the subject ofclasses, a topic that underlies the whole of .NET.
Working with ClassesObject orientation sounds complex and scary, one of those things people tell you that you have to masterbefore you become a “‘proper programmer.” Ignore them; there’s no such thing as a “proper program-mer.” It’s a term that doesn’t really mean anything. Object orientation is worth learning though, and itwill make you a better programmer; everyone can be a better programmer, and this is just one step alongthe ladder. It’s important not to worry about this topic, because object orientation is actually quite sim-ple. It can get complex, but at the basic level it’s easy to get into and doesn’t require a degree in rocketscience (unless you work at NASA, in which case knowledge of astrophysics might be useful).
Throughout the book you’ve already seen plenty of objects. In fact everything you’ve seen has been anobject: the ASP.NET controls are objects, data access is done via objects, ASP.NET pages are objects, eventhe data types are objects. This is one of the underpinnings of .NET — everything is an object. By defin-ing a few terms you’ll see how these fit in with the existing objects and new objects you create.
329
Code
12_588508 ch09.qxd 10/10/05 6:23 PM Page 329

First is the difference between objects, classes, and instances. A class is a template for an object; it defineswhat the object will be able to do — think of it as a cookie cutter, defining the shape of the cookie. Anobject or instance is a class that’s been created — it’s the actual cookie, once freed from the cutter. Let’slook at these terms with an example, perhaps the SqlConnection:
Dim conn As SqlConnection
This defines the variable conn as being of type SqlConnection. As it stands, however, this isn’t usable,because it just defines the type of object — the object doesn’t yet exist. You’ve only defined the shape ofthe cookie cutter, and haven’t actually cut the cookie. To create the cookie you create an instance of theobject:
conn = New SqlConnection
This can also be done at declaration time:
Dim conn As New SqlConnection
Use of the New keyword creates the instance, and once created the object becomes usable.
The properties of a class define the characteristics of that class. For example, the SqlConnection objecthas a property called ConnectionString, which defines the details of the database being connected to.Another property is State, which indicates what state the connection is in (open, closed, and so on):
If conn.State = ConnectionState.Open Then‘ The connection is open
End If
The methods of a class define the actions that can be performed, so for the SqlConnection you can Openor Close it:
conn.Open()
The events of a class provide the user of the class with information about the status. For example, theSqlConnection has two useful events, InfoMessage and StateChange. The first is raised (or fired)when SQL Server returns a warning or some informational message, and the second is raised when theState is changed — when the connection is closed, for example.
Creating ClassesYou can create classes in ASP.NET pages, but if you are creating the class for a special purpose it’s best touse a separate file and location. The best place for these is in the App_Code directory, a special directoryinto which class files can be put. Using this directory allows you to keep your class files together, as wellas having them automatically compiled by ASP.NET. You’ll look at creating this later, but for now look atthe structure of a class. The syntax is as follows:
[Accessor] Class ClassName
End Class
330
Chapter 9
12_588508 ch09.qxd 10/10/05 6:23 PM Page 330

The ClassName can be anything you want, but like variable naming it’s best to use something sensible.For example, the shopping cart item is a class called CartItem, and the cart itself is called ShoppingCart.
The Accessor defines the accessibility of the class; that is where the class can be seen from. This can beone of the values detailed in the following table:
Accessor Description
Public No access restrictions.
Private The class is only accessible from within its declaration context.
Protected The class is only accessible from within its own class or derived classes.
Friend The class is only accessible from within the assembly that contains it.
Protected Friend The class is only accessible from within its own class, a derived class, orits containing assembly.
It’s best not to worry too much about these for the moment. As a general rule, if you create a class that’sgoing to be used in ASP.NET pages you should use Public. So the shopping cart becomes:
Public Class ShoppingCartEnd Class
ConstructorsThe constructor is a special method that runs when the class is instantiated, and it allows you to set theinitial state of the class when it’s created. The constructor is always called New. For example, the shop-ping cart with the constructor is highlighted in the following code:
Public Class ShoppingCart
Private _dateCreated As DateTimePrivate _items As List(Of CartItem)
Public Sub New()_items = New List(Of CartItem)_dateCreated = DateTime.Now
End Sub
End Class
What this constructor does is create another object — a new List of CartItem objects. This is what the cart items are stored in — it’s a collection of CartItem objects (this is covered in more detail in the“Generics” section). Once that’s created, the initial creation date is set. You could use this ShoppingCartclass like so:
Dim cart As New ShoppingCart()
This would create a new instance, and you’d know that the items collection had also been created, readyfor you to add items.
331
Code
12_588508 ch09.qxd 10/10/05 6:23 PM Page 331

The CartItem class shows another aspect of constructors — overloading:
Public Class CartItem
Private _productID As IntegerPrivate _productName As StringPrivate _productImageUrl As StringPrivate _quantity As IntegerPrivate _price As DoublePrivate _lineTotal As Double
Public Sub New()End Sub
Public Sub New(ByVal ProductID As Integer, ByVal ProductName As String, _ByVal ProductImageUrl As String, _ByVal Quantity As Integer, ByVal Price As Double)
_productID = ProductID_productName = ProductName_productImageUrl = ProductImageUrl_quantity = Quantity_price = Price_lineTotal = Quantity * Price
End SubEnd Class
Here there are two constructors. The first, with no parameters, does nothing, and the second acceptsparameters containing the details for an item being bought. Don’t worry too much about the specificsyntax of the parameters; you’ll look at that in detail when you look at methods. The important point tonote is that the constructor is overloaded — that is, there are two of them. You can have overloaded con-structors (and methods) as long as the signature differs. A signature is what defines the uniqueness of aconstructor or method — this includes its name, its return type, and the type and order of the parame-ters. Because these two constructors have different signatures, they are both allowed.
Having two constructors means the class can be created in two ways. Either with this:
Dim item As New CartItem()
Or with this:
Dim item As New CartItem(1, “Scarf”, “images\scarf.jpg”, 1, 4.95)
The first constructor creates an empty cart item, ready for you to fill in the details, whereas the secondconstructor creates a cart item with the details already filled in. These details are passed in as parameterswithin the parentheses and these get mapped to the parameters declared in the New method.
PropertiesProperties are used to control the characteristics of a class, or to expose to users of the class some internalvalues. For example, consider the CartItem class; if the first constructor is used, how would the detailsof the item being bought be set? The variables can’t be accessed directly because they are Private, so
332
Chapter 9
12_588508 ch09.qxd 10/10/05 6:23 PM Page 332

they can’t be seen outside of the class. Properties are the answer, and these would be created in the fol-lowing manner:
Public Class CartItem
Private _productID As IntegerPrivate _productName As StringPrivate _productImageUrl As StringPrivate _quantity As IntegerPrivate _price As DoublePrivate _lineTotal As Double
Public Property ProductID() As IntegerGet
Return _ProductIDEnd GetSet (ByVal value As Integer)
_productID = valueEnd Set
End Property
End Class
Let’s break this down and look at the parts. First you have the definition of the property itself, by use ofPublic Property— the Public means it’s going to be accessible outside of the class, which is exactlywhat you want. In fact it’s the reason for creating the property in the first place, to make the internalvariable accessible. You then specify the name of the property and the data type:
Public Property ProductID() As Integer
Next comes the bit allowing read access to the property — the Get ... End Get (often called the getter),which simply returns the value of the internal private variable:
GetReturn _ProductID
End Get
Next is the bit that allows the value to be written to — between the Set ... End Set. The Set (or setteras it’s sometimes called) has a parameter that is of the same type as the property — an Integer in thiscase. This value is used to set the value of the internal variable:
Set (ByVal value As Integer)_productID = value
End SetEnd Property
This form is the same for all properties, with only the name and data type changing. For example, aproperty for the product name would be:
Public Property ProductName() As StringGet
Return _Productname
333
Code
12_588508 ch09.qxd 10/10/05 6:23 PM Page 333

End GetSet (ByVal value As String)
_productName = valueEnd Set
End Property
With these two properties in place, the CartItem could be used like so:
Dim item As New CartItem()
item.ProductID = 1item.ProductName = “The WroxUnited Scarf”
That would create the class and set the properties. When setting a property value the setter part of theproperty is called, and the value to be set (1 in this case of the ProductID) is passed into the setter as thevariable value.
To read from the properties you could do the following:
IDTextBox.Text = item.ProductID.ToString()NameTextBox.Text = item.ProductName
The first line reads from the property, converting to a string, because the Text property of the TextBoxis a String type. When the property is accessed, the getter is called, which simply returns the valuefrom the internal variable. For the ProductID that is an Integer, but the ProductName property is aString so no conversion is required.
Read-Only PropertiesIf you only want to provide read-only access to a property, and not allow the user of the class to updatethe property, you can make it read-only, like so:
Public ReadOnly Property ProductID() As IntegerGet
Return _ProductIDEnd Get
End Property
Here another keyword has been added —ReadOnly, and only the getter section of the property isincluded. Now the value cannot be set. This is exactly what the LineTotal property of the CartItem does:
Public ReadOnly Property LineTotal() As DoubleGet
Return _quantity * _priceEnd Get
End Property
Here you can see that you don’t even have a Private variable. The value returned is simply a calculation.
Because the property is read-only, the value cannot be set, and trying to do so will generate a compileerror.
334
Chapter 9
12_588508 ch09.qxd 10/10/05 6:23 PM Page 334

Write-Only PropertiesMaking a property write-only follows a similar procedure to the read-only, except for a different key-word and the inclusion of only the setter:
Public WriteOnly Property ProductID() As IntegerSet (ByVal value As Integer)
_productID = valueEnd Set
End Property
Here the keyword is WriteOnly. With this definition, trying to read from the property would result in acompile error.
Properties Versus Public VariablesWhile you’ve been reading the text on properties you might have been wondering why you have them,why not just make the internal variables public? Well, you could easily do this:
Public Class CartItem
Public ProductID As IntegerPublic ProductName As StringPublic ProductImageUrl As StringPublic Quantity As IntegerPublic Price As DoublePublic LineTotal As Double
End Class
This would work, but is not a good idea because it breaks one of the rules of object orientation — abstraction(there are other rules of object orientation, but they aren’t pertinent to this particular topic). This means thatyou should abstract functionality, thus hiding the inner workings of the class. The reason for working thisway is that it allows you to change how the class works internally without changing how it’s used. Forexample, consider the LineTotal, which is the Quantity multiplied by the Price. You have to havesome way of calculating the total, and if you use a Public variable then where do you put the calcula-tion? It could be done in the constructor, but what about the blank constructor that just creates an emptyitem? Would you have the user of the class calculate the total, or provide some other function to do it?Neither are good solutions.
Abstraction simply means that you are providing a simple, guaranteed way to access the functionality ofthe class, and that the user doesn’t have to know about how the class works. You’re using properties tohide the internal storage — those private variables are the internal storage and the properties are just away for users of the class to access the internal variables.
Abstracting the internal storage with properties allows you to handle the problem of a line total, becausethe property accessor does the calculation for you. In fact, using this type of abstraction means you couldstore the internal state of the CartItem in any way you pleased, without having to change the code thatuses CartItem.
There are no strict rules on naming for the private variables that actually store the property values, butan underscore as a prefix is commonly used, as well as a different case. So your property would beLineTotal, and the internal private variable is _lineTotal.
335
Code
12_588508 ch09.qxd 10/10/05 6:23 PM Page 335

MethodsMethods are the actions of a class, what you use to get the class to perform a task. The CartItem class ispurely for storage, has no actions, and therefore contains no methods (although technically the construc-tor is a method). The shopping cart, however, contains methods, because you need to do things like insert,update, and delete items.
Methods fall into two types: those that return a value (a Function) and those that don’t (a Sub). TheFunction is useful for performing an action and then returning some result, perhaps whether or not theaction succeeded. The Sub is useful when you don’t need a value from the action.
The syntax for a Function is as follows:
[Accessor] Function FunctionName([parameters]) As DataTypeReturn value
End Function
For a Sub the syntax is as follows:
[Accessor] Sub FunctionName([parameters])End Sub
You can see that they are broadly similar. Like classes, the Accessor defines the visibility of the method.Use Public for methods that are visible from everywhere, and use Private for a method that is onlyused by the class. Both Subs and Functions accept an optional parameter list, much like constructors —you’ll look at the ins and outs of parameters in more detail soon.
The difference between the two method types is the returning of a value. The Function defines a datatype, which is the type of the value being returned, and this is done with the Return statement. Let’s usethe shopping cart and examine the methods, starting with deleting items, because that’s the simplest:
Public Sub DeleteItem(ByVal rowID As Integer)
_items.RemoveAt(rowID)_lastUpdate = DateTime.Now
End Sub
Here the Sub takes a single parameter — the index of the row to be deleted. This index is then passedinto the RemoveAt method of the _items collection, which is the collection that stores the cart items.When the item has been removed, the last update time is set. The method could be called like so:
Profile.Cart.DeleteItem(2)
This would remove the third row — remember that arrays and collections start at 0.
Inserting items into the cart is done with the Insert method:
Public Sub Insert(ByVal ProductID As Integer, ByVal Price As Double, _ByVal Quantity As Integer, ByVal ProductName As String, _
336
Chapter 9
12_588508 ch09.qxd 10/10/05 6:23 PM Page 336

ByVal ProductImageUrl As String)
Dim NewItem As New CartItem()
NewItem.ProductID = ProductIDNewItem.Quantity = QuantityNewItem.Price = PriceNewItem.ProductName = ProductNameNewItem.ProductImageUrl = ProductImageUrl
_items.Add(NewItem)_lastUpdate = DateTime.Now()
End Sub
This routine accepts five parameters, one for each part of the item (the ID, the price, and so on). Withinthe routine, a new CartItem is created, and the properties are set to the values of the parameters. Onceall of the parameters are set the item is added to the _items collection and the time is updated.
One problem with the Insert method is that it could be called multiple times for the same product; thiswould result in multiple items in the cart. It would be more sensible to see if the item is already in thecart, and if so simply add one to the quantity. To do this you need to search through the collection look-ing for an item with the same ProductID, so a function has been created to do this:
Private Function ItemIndexOfID(ByVal ProductID As Integer) As Integer
Dim index As Integer
For Each item As CartItem In _itemsIf item.ProductID = ProductID Then
Return indexEnd Ifindex += 1
Next
Return -1
End Function
Here the function accepts the ProductID as a parameter and returns an Integer. Within the functionthe _items collection is looped and if the ProductID of an item matches the supplied ProductID, theReturn statement is used to return the index. If the loop ends without having found a match, -1 isreturned. Notice that this function is marked as Private; that’s because it’s not going to be used fromoutside the class.
The Insert method can now be changed to the following:
Public Sub Insert(ByVal ProductID As Integer, ByVal Price As Double, _ByVal Quantity As Integer, ByVal ProductName As String, _ByVal ProductImageUrl As String)
Dim ItemIndex As Integer = ItemIndexOfID(ProductID)
If ItemIndex = -1 ThenDim NewItem As New CartItem()
337
Code
12_588508 ch09.qxd 10/10/05 6:23 PM Page 337

NewItem.ProductID = ProductIDNewItem.Quantity = QuantityNewItem.Price = PriceNewItem.ProductName = ProductNameNewItem.ProductImageUrl = ProductImageUrl
_items.Add(NewItem)Else
_items(ItemIndex).Quantity += 1End If
_lastUpdate = DateTime.Now()
End Sub
The method still accepts the same parameters, but the first thing it does is call the private ItemIndexOfIDto get the index number of the current product. If the index is -1, then it didn’t already exist in the collec-tion and is added. If it does exist, the Quantity is increased.
Shared Methods and PropertiesWith classes you’ve seen that you have to create an instance of them before they can be used. For certainclasses this can be an overhead that’s not really required. For example, consider a class called Utils thatprovides a range of utility methods, one of which is Log, to log exceptions:
Public Class UtilsPublic Sub Log(ErrorMessage As String)
‘ log the errorEnd Sub
End Class
You could use this like so:
Dim u As New Utilsu.Log(“An exception occurred”)
The object instance exists only for the purpose of calling the Log method; there are no properties to set,so it seems a bit of a waste to have to create the instance, especially if it’s going to be used only once. Toget around this you can create shared class members (sometimes called static members). For example:
Public Class UtilsPublic Shared Sub Log(ErrorMessage As String)
‘ log the errorEnd Sub
End Class
The introduction of the Shared keyword means that a class instance is no longer required, allowing themethod to be called like so:
Utils.Log(“An exception occurred”)
When dealing with utility classes, shared methods are extremely useful, and you’ll see how the loggingfeatures can be implemented in Chapter 15.
338
Chapter 9
12_588508 ch09.qxd 10/10/05 6:23 PM Page 338

InheritanceInheritance is another of the key features of objected-oriented software, and works just like real life,where we inherit properties and behavior from our parents. Inheritance can get quite complex, so thissection just covers the basics to give you an understanding of what it is and how it works, especially asit’s used in all code-behind files. The essentials of inheritance are that one class (the base class) can beinherited by another (the sub-class), in which case the sub-class automatically has the same methods andproperties as the base class. But the sub-class can change the behavior if it needs to, or add to it.
ASP.NET uses inheritance as part of its standard programming model, and you have probably already seenthis in action. For example, consider a Default.aspx Web Form, which would have the following in it:
<%@ Page Language=”VB” CodeFile=”Default.aspx.vb” Inherits=”_Default” %>
Here you can see the Inherits keyword being used, telling you that when the Web Form is compiled itshould inherit its features from the class _Default. This class is in the code-behind file:
Partial Class _DefaultInherits System.Web.UI.Page
. . .End Class
This class in turn inherits from System.Web.UI.Page, which is the class that provides all of the basefunctionality for ASP.NET pages. One thing to notice is the Partial keyword, which tells the compilerthat this class is split across multiple files — the Web Form and the code-behind file.
The following Try It Out uses some simple (and rather contrived) examples to show how inheritanceworks.
Try It Out Classes and Inheritance1. Create a new class in the App_Code directory called Vehicles.vb. If the App_Code directory
doesn’t exist you can create this directory by selecting the top item in the Solution Explorer andusing the right mouse button to select Add ASP.NET Folder and then App_Code Folder, asshown in Figure 9-9.
2. Delete the template class created, and create a new one called Vehicle, which has propertiescalled Wheels and TopSpeed, and a method called Warning:
Public Class Vehicle
Protected _wheels As IntegerProtected _topSpeed As IntegerProtected _warningSound As String
Public Property Wheels() As IntegerGet
Return _wheelsEnd GetSet(ByVal value As Integer)
_wheels = value
339
Code
12_588508 ch09.qxd 10/10/05 6:23 PM Page 339

End SetEnd Property
Public Property TopSpeed() As IntegerGet
Return _topSpeedEnd GetSet(ByVal value As Integer)
_topSpeed = valueEnd Set
End Property
Public Overridable Function Warning() As StringReturn _warningSound
End Function
End Class
Figure 9-9
3. After that create another class, in the same file, called Car:
Public Class CarInherits Vehicle
Public Sub New()_wheels = 4_topSpeed = 150_warningSound = “Honk”
End Sub
End Class
340
Chapter 9
12_588508 ch09.qxd 10/10/05 6:23 PM Page 340

4. And now another class called Bike:
Public Class BikeInherits Vehicle
Public Sub New()Wheels = 2MyBase.TopSpeed = 30_warningSound = “Ring Ring”
End Sub
End Class
5. And another class called Skateboard:
Public Class SkateboardInherits Vehicle
Public Sub New()_wheels = 4_topSpeed = 15
End Sub
End Class
Between the End Sub and End Class, type the following:
Public Overrides
Now press the space bar to see that a little helper tip pops up (see Figure 9-10).
Figure 9-10
6. Select the Warning() As String entry (you can ignore the others) and press Return. See howthe function is created for you. Delete the existing return line and add a new one:
Public Overrides Function Warning() As StringReturn “No warning – you’ll have to shout yourself”
End Function
7. Save and close the class file.
341
Code
12_588508 ch09.qxd 10/10/05 6:23 PM Page 341

8. Create a new Web Form called Inheritance.aspx. Add three buttons and three labels, so itlooks like Figure 9-11. Make sure the Label next to Wheels is Label1, the Label next to Speedis Label2, and the Label next to Warning is Label3. You can use the Text property of the but-tons to change the text shown on them.
Figure 9-11
9. Create event handlers for the Click event for the three buttons. For the Car button:
Public Sub Button1_Click(ByVal Sender As Object, _ByVal e As Sytem.EventArgs) Handles Button1.Click
Dim MyTransport As New Car()Label1.Text = MyTransport.Wheels.ToString()Label2.Text = MyTransport.TopSpeed.ToString()Label3.Text = MyTransport.Warning()
End Sub
10. For the Bike button:
Public Sub Button2_Click(ByVal Sender As Object, _ByVal e As Sytem.EventArgs) Handles Button1.Click
Dim MyTransport As New Bike()Label1.Text = MyTransport.Wheels.ToString()Label2.Text = MyTransport.TopSpeed.ToString()Label3.Text = MyTransport.Warning()
End Sub
11. For the Skateboard button:
Public Sub Button3_Click(ByVal Sender As Object, _ByVal e As Sytem.EventArgs) Handles Button1.Click
Dim MyTransport As New Skateboard()Label1.Text = MyTransport.Wheels.ToString()Label2.Text = MyTransport.TopSpeed.ToString()Label3.Text = MyTransport.Warning()
End Sub
12. In the Solution Explorer right-click Inheritance.aspx, and from the menu select Set As Start Page.
13. Press F5 to run the page. Click the three buttons and notice what is displayed in the labels.
342
Chapter 9
12_588508 ch09.qxd 10/10/05 6:23 PM Page 342

How It WorksTo see how this works you’ll start with the Vehicle class. This is much as you’ve seen before, but with afew subtle differences. One of the private variables, _warningSound, is not set anywhere — don’t worryabout that, it’s deliberate, and will be used in other classes. Also the private variables are declared asProtected, meaning that other classes in the same file will be able to access them. This class will be thebase class — the class that other classes inherit from. The other difference is that the Warning methodhas a new keyword on it —Overridable:
Public Overridable Function Warning() As StringReturn _warningSound
End Function
This means that inheriting classes can override this method and provide their own implementation. Solet’s look at the inheriting classes, starting with the Car:
Public Class CarInherits Vehicle
Public Sub New()_wheels = 4_topSpeed = 150_warningSound = “Honk”
End Sub
End Class
This defines a new class but in the line after the class name it specifies the class to be inherited from. This means the Car automatically has the properties and methods that the base class has. The base classhasn’t set any values so the car has a constructor to do this, which uses the private variables declared bythe base class. It can access those variables because they’ve been declared as Protected.
The Bike class is slightly different:
Public Class BikeInherits Vehicle
Public Sub New()Wheels = 2MyBase.TopSpeed = 30_warningSound = “Ring Ring”
End Sub
End Class
The way it inherits is the same, but setting the properties is different. For the number of wheels, insteadof using the private variable of the base class, the property of the class is used. Even though the currentclass doesn’t define the Wheels property itself, it does have a Wheels property because it is inheritedfrom the base class. For the top speed the property of the base class is called directly; the keyword MyBaserefers to the base class. There is no property for the warning sound so the private variable is useddirectly.
343
Code
12_588508 ch09.qxd 10/10/05 6:23 PM Page 343

All of these methods are acceptable, and you’ll see all three used in various pieces of documentation,books, or online tutorials. In general it’s best to use the properties, because that fits with the object-oriented principles talked about earlier.
The Skateboard class is different again:
Public Class SkateboardInherits Vehicle
Public Sub New()_wheels = 4_topSpeed = 15
End Sub
Public Overrides Function Warning() As StringReturn “No Warning – you’ll have to shout yourself!”
End Function
End Class
The constructor sets the values for wheels and top speed, but not the warning message. The big differ-ence is that the Warning property is overridden, meaning that instead of using the Warning methodfrom the base class, the Skateboard class is defining its own Warning method. This is called polymor-phism, and allows different classes to have the same methods and properties but with different behavior.
Using these classes is simple:
Dim MyTransport As New Car()Label1.Text = MyTransport.Wheels.ToString()Label2.Text = MyTransport.TopSpeed.ToString()Label3.Text = MyTransport.Warning()
This simply creates the new class and accesses the properties and the methods. Whatever the class typecreated you can see that the same properties and methods are available. Even though these classes don’tdefine the properties themselves, inheritance means they have the properties. The same applies to themethods, where the Car and Bike don’t define the methods, but the Skateboard does, overriding theexisting implementation and providing its own.
Variable Scope and LifetimeAlthough a topic related to variables, the discussion of scope and lifetime has been left until now because itaffects all of the other topics you’ve learned about. The term scope means the degree to which a variableis accessible to other code, and the scope affects the lifetime. You’ve seen how Private and Publicaffect the visibility of methods and properties, but may not realize that visibility of variables depends onwhere they are declared. To make this easier, take a look at some code:
Public Class Class1Private _variable1 As Integer
Private Sub Method1()
344
Chapter 9
12_588508 ch09.qxd 10/10/05 6:23 PM Page 344

Dim variable2 As Integer
_variable1 = 1variable2 = 3
End Sub
Private Sub Method2()_variable1 = 2
End SubEnd Class
The variable _variable1 is declared within the class, outside of any methods, so it can be accessed fromany methods and properties. On the other hand, variable2 is declared within the method Method1, soit can only be accessed within Method1— no other methods or properties would be able to use it. This istermed a local variable.
The same rules apply to variables declared within code blocks. For example:
Dim number1 As IntegerIf number1 = 15 Then
Dim number2 As Integernumber2 = number1 + 15
End If
Here number1 is declared outside of the If Then block, and can therefore be used within it. But num-ber2 is declared within the code block, so it cannot be used outside of the code block. The same rulesapply to other code blocks such as loops.
The For Each loop also has this:
For Each item As CartItem in Cart.ItemsNext
The variable item is declared within the statement itself, but follows the same rule — it can only beaccessed from within the loop. Trying to access it outside of the loop would generate a compile error.
GenericsGenerics refers to classes and methods that work uniformly on values of different types. Generics areoften discussed as an advanced topic, and though some of it is advanced, some of it is simple and easyto use. In fact, one feature of generics is used in the shopping cart. Remember how the cart consists oftwo classes: the CartItem and the ShoppingCart, which uses the CartItem as a collection.
Many of the collections discussed early in the chapter provide storage for objects — the Object being atype. Because they are designed to work with a data type of Object, collections can in fact store anydata type. However, when you take items out of a collection they often need to be converted from theObject data type to their native data type. This involves extra coding and reduces performance. Anotherproblem is because collections can store any data type it means you can store any data type in them. If
345
Code
12_588508 ch09.qxd 10/10/05 6:23 PM Page 345

you had a collection to store the CartItem objects you could in fact store strings, numbers, dates, and soforth in the same collection. For example you could do this:
Dim _items As New List()Dim item As New CartItem( . . .)
_items.Add(item)_items.Add(“this isn’t a cart item”)_items.Add(“65”)
When taking items out of the collection you’d have no idea what data type it was unless you trackedwhich objects you put into the list.
To get around this problem you use generics, or more specifically generic collections. These are stored inthe System.Collections.Generic namespace, and the one the shopping cart uses is the List:
Private _items As List(Of CartItem)
This simply states that _items is a List, but a list only of CartItem objects. So now you do this:
Dim _items As New List(Of CartItem)Dim item As New CartItem( . . .)
_items.Add(item)
But because the list is of a specific data type you can’t do this:
_items.Add(“this isn’t a cart item”)_items.Add(“65”)
Both of these lines would generate compile time errors. Whenever you need a collection of customclasses, it’s always a good idea to use generic collections, because they improve the readability of yourcode, reduce the potential for errors, as well as provide performance improvements over the standardcollections.
SummaryThis chapter has covered a lot of ground, but it was necessary. Although the rich controls in ASP.NET 2.0provide a way to create web applications with less code than previous versions, you can’t get away with-out coding completely. So you’ve learned the fundamentals of coding and what you need to control yourprogram. Specifically, this chapter covered the following topics:
❑ Variables and data types, and how to work with the different data types, seeing that data typeshave different features. You also looked at arrays and collections, as a way of storing groups ofvariables.
❑ The control of programs is by way of decisions and loops, which use expressions and operatorsas part of the decision process. You saw how there are different ways to perform both decisionsand loops, depending on the requirements.
346
Chapter 9
12_588508 ch09.qxd 10/10/05 6:23 PM Page 346

❑ You then looked at classes, and how they have constructors, properties, and methods. Thischapter didn’t look at events explicitly, but like the controls you use on Web Forms, customclasses can have them if required.
❑ Finally, you took a brief look at generics, and saw how they help produce type-safe code andimprove code readability and performance.
The next chapter examines componentization, and discusses the use of code-behind files and standaloneclasses from the design and structure perspective rather than what the code actually means.
Exercises1. Create a class and shared method (called DeliveryDate) to calculate delivery date given the
date of an order. All deliveries should be made within three days of the order.
2. Continuing from Exercise 1, modify the DeliveryDate method to take into account that deliv-eries do not happen on the weekend.
3. Modify the DeliveryDate method to take into account that an order takes three working daysto process. So orders falling on a Thursday will be delivered on the following Monday, andorders from Friday will be delivered on the following Tuesday.
4. For each of the following Boolean expressions, say for what integer values of A each of them willevaluate to True and when they will evaluate to False:
a. NOT A=0
b. A > 0 OR A < 5
c. NOT A > 0 OR A < 5
d. A > 1 AND A < 5 OR A > 7 AND A < 10
e. A < 10 OR A > 12 AND NOT A > 20
347
Code
12_588508 ch09.qxd 10/10/05 6:23 PM Page 347

12_588508 ch09.qxd 10/10/05 6:23 PM Page 348

10Componentization
Programming has been through several distinct phases in its history and has moved a long way fromits humble beginnings where punch-cards dashed with holes were placed into mechanical readers.Early programs on PCs were often just sequential lines of Do A, Do B, Do C kinds of commands. Ifyou wanted to repeat a section of the code, you were left with the option of going Do A, Do A, andDo A or encasing it in a loop and telling the PC to Do A 20 times. This quickly made code repetitiveand unwieldy. Worse than that, it made it hard to follow, even for the people who had written it. Tofollow the flow from the beginning of a program to the end was as difficult as following the path ofone thread of spaghetti on a plate in a mound of food. In fact, it became commonly known asspaghetti-coding!
Over the past 20 years there has been a move away from this kind of coding to a more object-basedapproach. This is where you break down the design of an application into a series of objects, andthen any time you require an object, you just call it whenever you need it. This process is known ascomponentization. This is the creation of small objects, or components, that are self-contained parcelsof code that have specific functions and are only called by the main application when needed. Youlooked at objects in Chapter 9 and saw how they could be mapped onto real-life counterparts tomake coding less abstract. However, objects didn’t totally solve the problems with spaghetti-coding.
Classic ASP suffered from this malaise as well, and despite having a whole series of objects such asResponse, Request, and Server, and also allowing users to create their own objects, ASP pages arestill a nightmare to debug and follow if they get too big. In fact, three main problems can be high-lighted, the first being that HTML code and ASP code tended to be dumped in the same pagetogether, despite having completely different purposes. HTML manages the structure of the page, whereas ASP is concerned with what the page does. The second problem is that with any kindof data handling in a page, there are two different purposes being dealt with, the connecting to andmanagement of data stores, and the reading and writing of the data itself to a data source. The thirdproblem is that of code-reuse, how users could easily create portable objects that could be called fromwithin the code over and over, and how they could end up reducing the amount of code needed.
13_588508 ch10.qxd 10/10/05 6:23 PM Page 349

With ASP.NET 1.x these problems were partially addressed; however, the solutions weren’t perfect.ASP.NET 2.0 delivers the most comprehensive set of solutions to these problems; indeed, at the designpreviews the ASP.NET development team openly boasted that ASP.NET 2.0 meant a 70% reduction ofcode in your pages. This chapter looks at the following topics:
❑ Separation of code and content
❑ Code-behind
❑ Data layers
❑ User controls
You’ve already looked at a lot of the new controls that are designed for every aspect of a web site, but nowyou’re going to dig behind the scenes and see how ASP.NET 2.0 also makes life easier for the developerwith separation of code from content, data layers, and user controls.
The Separation of Code from ContentThe funny thing with most text books that you pick up about a new technology is that they’ll quite happily tell you what was wrong with the old one, but not a lot about shortcomings in the new. Timeand time again you’ll probably come across a variation on the same theme: the code of the page shouldbe separated from the style and design of the page. It happened in HTML, it happened in classic ASP, and it still happened to some extent in ASP.NET 1.x, although with a little care and effort it waspossible to eliminate. With each new release you get a bit closer to achieving that lofty ambition. Beforedescribing what ASP.NET 2.0 can offer to improve upon this, you need to know the answer to the question, “What is the separation of code from content, and why do you need to do it?
Let’s start with the first part, but first, I will digress a little. In most walks of life it’s possible for a personto wear many hats at the same time, thus you’ll find builders who can do carpentry, actors who think theycan write, bus drivers who think they could drive a racing car; the list goes on. The truth is while mostpeople’s skills are spread across a fairly wide area, they’re only likely to be able to specialize or be anexpert in one or two areas at most. With programming, it’s common to find designers, administrators, andprogrammers lumped in together. In fact, in recent years “web site developer” has become a bit of aninsult, meaning someone who can’t really design, can’t really program, and would struggle to administera database as well. In fact, I’ve seen several job advertisements where the time-honored “time wastersneed not apply” has been replaced by the 21st-century version “web developers need not apply!”
You might well be thinking at this point, “Hang on, I want to be a web developer, what’s wrong withthat?” Well behind the seeming insult is a more serious point: A web developer is usually the person whohas to spread him- or herself thinly across three related but really quite different disciplines. The old cliché“jack of all trades, master of none” springs to mind. One of the reasons why they’ve had to do this isbecause the technologies involved (in this case ASP) have forced all three disciplines into one web page. Sowithin your ASP page you would have to place the controls, have to implement the design, have to stickthe code to make it work, and that code would more likely than not reference the database. Classic ASPwas very easy to learn and pick up and hence people could get away with doing this kind of thing, but thetruth is a lot of early ASP sites were very ugly, took ages to access the database, and were quite often buggy.
350
Chapter 10
13_588508 ch10.qxd 10/10/05 6:23 PM Page 350

Consider this scenario: What happens if your boss tells a designer to change the font on the web site,while telling the developer to add a search text box to the front page to search on the contents of the site?In times gone by, both people would be scrambling for the same page to make the alterations. Worsestill, the designer could do his version of index.asp, while the programmer could do his, and thereforeneither version would please the boss. Even if they did it sequentially, quite often the programmerwould mess up the pristine design, or the design would break a vital piece of code. I’m not intending topatronize either job; this has honestly happened on projects I’ve worked on. It therefore makes moresense to have two different versions of the same page. And it makes sense to let the designer with hisgraphic design and art qualifications do the interface of the web site, with the programmer at the backend connecting all the bits of the site and making them work.
This is where separating the code from the content comes in. In this fictitious scenario, you’d probably useCascading Style Sheets to get around the problem. However, you’d still have the problem of the separatingthe design from the code. In other words, the positioning of the ASP.NET controls would still be the remitof the programmer. ASP.NET 2.0 goes beyond the separation of code from content.
The Separation of Code from DesignSo far you’ve read about two distinct areas in ASP.NET 2.0, the first being the HTML code and ASP.NETcontrols, which you can see in this sample page:
<html><head></head><body><form runat=”server”><aspnet:label id=”label1” runat=”server” text=”Enter your name:”><aspnet:label><aspnet:textbox id=”textbox1” runat=”server”></aspnet:textbox><aspnet:button id=”button1” runat=”server” text=”submit”></form></body></html>
The second is the actual code, which is placed within the <head> tags of the first:
<script language=”VB”>Sub Form Page_Load()If Page.IsPostback=true then
Label1.Text = “Hello” + textbox1.TextEnd If
End Sub</script>
This layout is known as the single-file scenario. This chapter uses the term single-file when talking aboutputting the code within <script> tags on the page. The first section of code in the single-file samplepage is purely concerned with the design and structure of the page. For instance, you could move thelabel and textbox and button around, and the program would still work perfectly. However, if youmessed with the order of the second page, everything would come to a jarring halt.
351
Componentization
13_588508 ch10.qxd 10/10/05 6:23 PM Page 351

Worse still, behind the scenes the single-file scenario actually created far more work than was necessary.A second scenario is a little sidebar that displays a shopping basket as you browse around the site. Howwould you do it? Would you have to add this code to every single page? If you added it to every page,would you have to update every single page, every time you made a change? A sensible strategy of sep-arating content from code, data from code, and being able to reuse the code is obviously needed. So let’sstart by looking at the first point in this three-pronged strategy.
Code-BehindCode-behind is simply a separate code file linked to your Web Form or .aspx page. You place all of yourHTML tags and ASP.NET controls in the .aspx page, and you have a separate page “behind” this page thatcontains all of the code that is normally contained within the <script> blocks for the page. So to answerthe designer/developer dilemma, your designer can update the .aspx page, while your developer canupdate the code-behind page.
Code-behind pages are very easy to use. Like their .aspx counterparts, they are composed of pure textand can be viewed in Visual Web Developer, Notepad, or any text editor. The .aspx is the centerpoint,and the code-behind is like an attachment. In Visual Web Developer code-behind pages are not createdalongside until they are needed, although when you select a Create Web Site option, a Default.aspxpage and the corresponding code-behind Default.aspx.vb are created automatically. However, forany further pages that you create, only the .aspx page is added, unless you check the Place Code inSeparate File option, which is unchecked by default.
The code is stored in a separate file, which is identified by a .vb suffix or (if you’re using C#) a .cs suffix.So if you created a Default.aspx page, then the code-behind file for that page would be calledDefault.aspx.vb. Not all languages in the .NET Framework actually support the code-behind model,most notably J#, but the two main languages that most developers use and the only two considered inthis book both use code-behind.
The Page DirectiveYou’ve already met the Page directive in Chapter 9 when you learned about the idea of using inheritancewith the .NET Framework, to inherit certain features from classes. The Page directive also refers to whereyour separate code-behind file is stored. Look at the same directive and the same attributes once again,but this time from a slightly different angle:
<%@Page Language=”VB” CodeFile=”Default.aspx.vb” Inherits=”_default”%>
You’re interested in two particular attributes of Page, namely Inherits and CodeFile.
❑ Inherits: This attribute tells you which class you want to inherit from. It’s vital that theInherits attribute matches a class in the code-behind file.
This runs contrary to what happens in Visual Studio .NET 2005, where when you create a new Web Form, a new code-behind file is automatically created at thesame time.
352
Chapter 10
13_588508 ch10.qxd 10/10/05 6:23 PM Page 352

❑ CodeFile: This attribute specifies the name of the code-behind file. Typically you would expectthe code-behind file to be kept in the same folder, but it’s possible to keep it separate and specifya URL inside this attribute as well.
If you want to use code-behind, you must include these two attributes at all times. If you want to add acode-behind file manually to an .aspx file, then once you’ve added these two attributes, next you need tocreate the code-behind file itself.
Partial ClassesIf you check the contents of a typical code-behind file, and you can do this by creating a new ASP.NETweb site and then viewing the contents of Default.aspx.vb, which is created automatically, you willsee the following three lines:
Partial Class _DefaultInherits System.Web.UI.Page...
End Class
Any code you create should be placed within a partial class. Although this section won’t go into partialclasses too much, it is necessary to talk a little about them. In the last chapter you saw classes as beingcookie cutters that define the shape of the cookies. So what is a partial class? Half a cookie cutter? Well insome ways, yes is the answer. If you’ve played around with ASP.NET 1.x at all, you’ll have noticed thatthere was a lot more than just three lines of code in the code-behind file. In the previous version ofASP.NET if you stuck your control in the page, under certain conditions your code-behind file didn’talways see it. Partial classes mean that at compilation time your code-behind file and the Web Form arenow merged into one class file, thus making sure this kind of scenario didn’t happen. It also means youonly need these three lines of code to make it work. So your code-behind file is one half of the cookiecutter and the Web Form is the other half, and together they make the whole. Let’s leave that analogybefore it gets squeezed any more.
Event Handlers/FunctionsYou place the code in the partial class; however, this is not quite enough to make it work. The code alsoshould be placed within an event handler or a subroutine or function of some sort. All code in ASP.NETis run in reaction to an event of some sort. If you don’t actually place your code in an event handler,you’ll probably need a call to your subroutine or function placed within an event handler. The mostcommon one is the Page_Load event handler (see the following code) that occurs when the page is firstloaded up:
Sub Page_Load (ByVal Sender As Object, ByVal e as EventArgs) Handles Me.Load...
End Sub
Of course you don’t have to type this in; if you double-click the page in Design View, the Page_Loadevent handler will be added for you. This is just another good reason for using Visual Web Developer. Inprevious versions of this book we’ve used humble Notepad as our editor to make changes to the code.This isn’t because we endorse a firmly Luddite/anti-progress view of the world, but because Notepad
353
Componentization
13_588508 ch10.qxd 10/10/05 6:23 PM Page 353

made no changes to our HTML code (unlike the majority of HTML editors), and because it is somethingeverybody with a version of Windows automatically had. With code-behind, things become slightlymore complex, in that you have two files that basically refer to the same page (see Figure 10-1). You canstill of course manage them via Notepad, but the features in Visual Web Developer make it much easierto manage the two separate pages (and see them as connected entities).
Figure 10-1
Of course, you might think, well why not stick with Notepad and also stick with the single-file model?The following list reiterates some of the advantages of using code-behind files:
❑ Separation of the content (user interface) from the code. It is practical to have a designer workingon the markup while a programmer writes code.
❑ Better security, because code is not exposed to the designers or others who are working onlywith the page content.
❑ Code can be easily reused for multiple pages.
However, this doesn’t mean that code-behind is always the perfect solution to all your problems; using asingle file for your code and content is still the more sensible option within some scenarios:
❑ Single-file is best suited for pages where the code consists primarily of event handlers for thecontrols on the page.
❑ Where there is little code it can be easier to view a single-file page because both the code and theHTML are in the same place.
There are also some reasons of convenience to consider, too, namely single-file pages are easier to sendto another programmer because there is only one file, they’re also easier to rename, and managing filesis slightly easier, because the page is self-contained in a single file, and there are therefore fewer pages tomanage. Generally, though, you really should be placing your code in a separate code-behind file,because the advantages outweigh the disadvantages for the most part.
Creating a Code-Behind FileThat’s enough talk. In the next Try It Out you get down to the business of creating an incredibly simplecode-behind file that interacts with a sample page containing a TextBox, Button, and Label control.You’ll see how you can manipulate all of these controls in the same way as you might expect to whenusing a single file.
354
Chapter 10
13_588508 ch10.qxd 10/10/05 6:23 PM Page 354

Try It Out Creating a Code-Behind File1. Open VWD and create a new web site called TestCodeBehind in the Chapter directory
(C:\BegASPNET2\Chapters\Begin\Chapter10).
2. Go to Solution Explorer and click the plus symbol (+) next to Default.aspx to expand the treeto reveal the file Default.aspx.vb (refer to Figure 10-1).
3. Go back to the Default.aspx file first and add two Label controls, a TextBox control, and aButton control, as shown in Figure 10-2.
Figure 10-2
Once again I stress that Default.aspx is the only file that has the code-behind fileautomatically created for you. If you create another Web Form, you must make sureto check the Place Code in a Separate File option, which is unchecked by default.
355
Componentization
13_588508 ch10.qxd 10/10/05 6:23 PM Page 355

You’ll need to adjust the source HTML to read as follows:
<asp:Label ID=”Label1” runat=”server” Text=”What is the answer to the meaningof life, the universe and everything?:”></asp:Label>
<br /><br /> <asp:TextBox ID=”TextBox1” runat=”server”></asp:TextBox><br /><br /><asp:Button ID=”Button1” runat=”server” Text=”Submit” /><br /><br /><asp:Label ID=”Label2” runat=”server” Text=””></asp:Label>
4. Go back to Design View and double-click anywhere on the background of Default.aspx otherthan on the controls. Doing so will open up into the code-behind file, shown in Figure 10-3.
Figure 10-3
5. Add the following code to the Page_Load event handler:
If (Page.IsPostBack) ThenIf TextBox1.Text = “42” Then
Label2.Text = “So you read Douglas Adams as well...”Else
Label2.Text = “No, I’m not sure that’s it”End If
End If
356
Chapter 10
13_588508 ch10.qxd 10/10/05 6:23 PM Page 356

6. Click the green arrow to run it and enter a value or lengthier sentence into the text box, asshown in Figure 10-4.
Figure 10-4
How It WorksIt all seems very simple; instead of putting your code within <script> tags, you place it within a separatepage, connected by the Page directive tag. Indeed, if you check at the top of the Source View forDefault.aspx you can see that the following had already been created:
<%@Page ... CodeFile=”Default.aspx.vb” Inherits=”_Default” %>
This refers to the code-behind file Default.aspx.vb. There the following code is run when thePage_Load event is called (when the page is viewed). This is just the normal kind of code talked aboutin Chapter 9:
If (Page.IsPostBack) ThenIf TextBox1.Text = “42” Then
Label2.Text = “So you read Douglas Adams as well...”Else
Label2.Text = “No, I’m not sure that’s it”End If
End If
It says if the page has been posted back/submitted, check the contents of the TextBox control. If it equals42, then you have your correct answer, and you set the Label2 control’s Text property accordingly. If thecontents of the TextBox control do not equal 42, you display a different answer (“No, I’m not surethat’s it”).
However, there is a bit more going on beneath the covers, namely the method by which your code iscompiled.
Compilation in ASP.NET 2.0Compilation is another one of those subjects that I don’t really want to go into in depth, because youdon’t need to know too much about it, however you should be aware of its presence. What happenswhen you submit your Web Form to the server is that your Web Form and ASP.NET pages first have to
357
Componentization
13_588508 ch10.qxd 10/10/05 6:23 PM Page 357

be translated into a language the server can understand. This is known as compilation. You how this pro-cess works in .NET 2.0 in Figure 10-5.
Figure 10-5
The compiler changes your code into something known as intermediate code, or Microsoft IntermediateLanguage (MSIL). This language is something that is independent of any PC it is run on. The .NET CLR(Common Language Runtime) is able to take this intermediate code and change it into executable codethat it can run and provide output for. The output is then sent back to the user as a response. (There’sactually a bit more to this process, as you’ll see in Chapter 14.)
During the process of compilation, your pages are approved syntactically, so if you’ve made any typossuch as the following, they will be spotted at compile time:
If (Page.IsPostBack)
Your code can be compiled in two ways:
❑ Pre-Runtime Compilation: Normal (the “old way,” the default way in ASP.NET 1.1) — Code-behind files are compiled into an assembly and stored in the \bin directory. Web Forms and.aspx pages are compiled when needed.
❑ Full Runtime Compilation: Code-behind files and any other associated code can now be placedin the App_Code folder. ASP.NET 2.0 will then create and maintain references to the assemblythat is generated from these files at runtime.
Disk
RequestASP.NET page Compiler
Intermediate CodeResponse
.NET CLRRuntime
358
Chapter 10
13_588508 ch10.qxd 10/10/05 6:23 PM Page 358

The App_Code FolderIf you create an App_Code folder in your project, any code you place in that project will automatically becompiled when you run the project. It’s a far more robust solution than the old \bin folder, and for thatreason we recommend using it for any code other than code-behind. The reason we suggest not using itfor code-behind is that it is easier in VWD to keep your code files attached to the page they are relatedto; otherwise viewing them could be a pain.
So not only can you organize your code and in which pages it is placed, but ASP.NET 2.0 dictates a different structure for ordering where those pages are placed.
Data LayersWhile you’ve looked at how code and content can be successfully separated, there is a third dimension toour discussions, namely that of the data. Throughout this book we’ve paused to reflect briefly on variousaspects of the history of the Internet and the Web, while trying to keep you away from a huge lecture onthe entire subject. Once again you’re going to have another quick history lecture to help you understandthe purpose of the next ASP.NET 2.0 feature.
Two-Tier ApplicationsWe don’t really want to rewind too far back, so let’s jump in halfway. Once HTML started getting beyondthe universities, it became necessary to provide something more than just static text and images. One ofthe first ways in which web pages were made dynamic was to be able to access a database. The browserwas one tier, and the database was the second tier. In this scenario, the browser dealt with rules about thebusiness/application and user interface.
The data retrieval and manipulation was performed by another separate database application, such asSQL Server or Microsoft Access. It would handle the data storage and retrieval device for the application.These two-tier applications were also commonly know as client-server applications. A typical client-serverapplication is depicted in Figure 10-6.
The term business rules is used to encompass any part of the application logic thatisn’t the user interface or the database. If the application isn’t being used for a busi-ness, then the term application logic might be more applicable, although they meanthe same thing.
There is actually a third option called deployment pre-compilation, which is for fullcompilation of your project prior to deployment. You’ll learn a little more about thisin Chapter 16.
359
Componentization
13_588508 ch10.qxd 10/10/05 6:23 PM Page 359

Figure 10-6
The other popular variation on the two-tier application saw the business rules/application logic beingexecuted on the database system. Such applications would commonly use stored procedures to manipulatethe database (or in some cases triggers). A stored procedure is a query that is stored on the database. It canbe called by the client application and then run on the server. It would contain rules about the business aswell. For example, if you had a league table on Wrox United that awarded three points for a win and onepoint for a draw, then in the database query it would somehow have to record that when one side scoresmore goals than another side, it is worth three points. This is a business rule. It doesn’t matter to thedatabase how many points you add on to the win; however, your league table would fail to work properly if you added two or five points for a win.
Three-Tier ApplicationsThe big difference with three-tier applications is that business rules are no longer located on either theclient or the database. They are stored and run on a system in between the client and the server. Theadvantage of this is that the business rules server can ensure that all of the business processing is donecorrectly. There is now a third layer interface, business rules and data. The introduction of the data tier isillustrated in Figure 10-7.
Figure 10-7
In a three-tier application the client never accesses the data storage system directly. You can make changesto the business rules and this would mean you could change any part of the system without having to alterthe other two parts. As the three different sections of the application communicate via interfaces, and aslong as the interface between the code and application front-end remains the same, the internal workingsof each part can be changed without affecting the rest of the application. The advantages of doing this are
REQUEST
RESPONSE
RECORDS QUERY
Client ServerBUSINESS
RULES
DataSource
REQUEST
RESPONSE
Client Server
360
Chapter 10
13_588508 ch10.qxd 10/10/05 6:23 PM Page 360

similar to those for keeping code and content separate. Typically a database is managed by a databaseadministrator (DBA), and it might even be managed by a separate company. The web developer as jack-of-all-trades would previously have been required to know the intimate workings of the database, whenreally he shouldn’t be interfering there at all. So this brings us to the end of our little excursion, because youcan now look at a new feature in ASP.NET 2.0 that allows you to separate your applications more simplyinto three tiers.
What’s New in ASP.NET 2.0In ASP.NET 2.0, you are no longer restricted to binding only to data controls; you can also bind to separatebusiness controls via the ObjectDataSource control.
Using the ObjectDataSource ControlThe new ASP.NET ObjectDataSource control allows you to declaratively bind data controls such as theGridView, DataList, and DropDownList controls to a separate business control or a data component.Previously you could only bind the controls directly to a database. This new development enables theseparation of your business rules from your content and your data.
ObjectDataSource is a more difficult control to explain than a GridView or DropDownList control, sorather than wasting excessive verbiage, it’s quicker to show you exactly what the ObjectDataSourcecontrol does in an example. We’re actually going to do two examples to show it in action. The first example we’ll show you how to create a data component to return a list of players from the Players table.We’ll split this Try It Out into two sections, the first section where we create the ObjectDataSource itselfand the second where we bind our ObjectDataSource control to a GridView control. The resulting outputwill be completely non-editable. In the second example, we’ll use the Try It Out to create a data compo-nent that can not only read from the Wrox United database but also write data to it. We will create andbind the data component in this same example which will make it quite lengthy.
The data component that you create in both examples will consist of an XSD schema file (.xsd). This filedescribes the data you require and defines which methods will be used to read and write data. Thisdoesn’t require any code or knowledge of XML schemas because when you run the application, the .xsdfile is compiled for you and performs all of the tasks needed.
Let’s start by creating the data component for our read-only example.
Try It Out Creating the Data Component1. Open Visual Web Developer and select Open Web Site. From the C:\BegASPNet2\Chapters\
Begin\Chapter10 folder, select ObjectDataSource and click OK.
2. In Solution Explorer, right-click the name of your web site, select Add ASP.NET Folder, andselect App_Code.
3. Right-click the App_Code folder and select Add New Item from the list.
4. From the Visual Studio installed templates, click DataSet.
5. Rename the DataSet ods.xsd and click Add.
6. Next, VWD will start the TableAdapter Configuration Wizard. Be patient here, because this onereally does take a while to kick in.
361
Componentization
13_588508 ch10.qxd 10/10/05 6:23 PM Page 361

7. When it finally arrives, select ConnectionString(Web.config) from the drop-down list (see Figure 10-8) and click Next.
Figure 10-8
8. Next you get a page where you can choose to use SQL statements or stored procedures. Selectthe Use SQL statements radio button (as shown in Figure 10-9) and click Next.
Figure 10-9362
Chapter 10
13_588508 ch10.qxd 10/10/05 6:23 PM Page 362

9. On the next wizard screen you can define the SQL statement. Type the following SQL statementinto the “What data should be loaded into the table” area of the dialog:
SELECT PlayerID, FirstName, LastName, Position, DateJoined, DateLeft FROM Players
10. After entering the SQL statement, click Next. You can now define which methods the compo-nent will expose. Uncheck the Fill a DataTable checkbox and make sure that the Return aDataTable checkbox is checked (see Figure 10-10). In the Method name box, type GetPlayers.This method is used later to retrieve the data. Uncheck the final checkbox.
Figure 10-10
11. Click Finish. In Figure 10-11, you can see the data component in the designer. It shows both thedata you selected and the method you created.
Figure 10-11
12. Save the data component and close the component designer.
363
Componentization
13_588508 ch10.qxd 10/10/05 6:23 PM Page 363

13. Select Build ➪ Build Web Site to compile the component (note this won’t produce anythingviewable).
How It WorksThe data component is now usable as a data source within a Web Form. You’ve used the wizard to createthe component for you, to select the fields from the database, and also to name the method that youwant to be able to call this component by.
The next step is to bind to this component. To do this, you can create and configure an ObjectDataSourcecontrol. You can then add controls, such as the GridView control, to the page and bind them to the datasource control.
Try It Out Binding to the ObjectDataSource Control1. Open the Default.aspx from Solution Explorer and switch to Design View.
2. Open the Toolbox and from the Data section drag an ObjectDataSource control onto the page.
3. Select the Toolbox again, and from the Data section drag a GridView control onto the page.
4. Click the black arrow on the top-right corner of the ObjectDataSource control. The CommonTasks box appears with the words Configure Data Source. Click this.
5. In the dialog that appears, there is a single drop-down list asking you to choose your businessobject (see Figure 10-12). There should only be one, the odsTableAdapters.PlayersTableAdapter;select that and click Next.
Figure 10-12
364
Chapter 10
13_588508 ch10.qxd 10/10/05 6:23 PM Page 364

6. On the next screen (shown in Figure 10-13), under the Select tab in the Choose a method drop-down box the GetPlayers(), returns PlayersDataTable method should be displayed. Select this and click Finish (the other methods are automatically picked for you).
Figure 10-13
7. Click the black arrow on the top-right corner of the GridView control and from the Choose DataSource list that appears, select ObjectDataSource1. The Grid will update in Design View.
8. Open the Properties window and check that the DataKeyNames property is set to PlayerID.
9. Run the application, and you will see Figure 10-14 in your browser:
365
Componentization
13_588508 ch10.qxd 10/10/05 6:23 PM Page 365

Figure 10-14
How It WorksYou started by creating an instance of an ObjectDataSource control. To give it its functionality youattached it to the GetPlayers() method that was specified in the data component. The GetPlayers()method was created in the previous Try It Out. This method returns the results of the SQL statement,available as a DataTable object. The DataTable object is an object that the GridView (and indeed alldata controls) can bind to. If you go back and look at the source that has been created, you can see thesource for the two controls you added to your form.
<div><asp:ObjectDataSource ID=”ObjectDataSource1” runat=”server”
OldValuesParameterFormatString=”original_{0}”SelectMethod=”GetPlayers”
TypeName=”wroxunitedTableAdapters.PlayersTableAdapter”></asp:ObjectDataSource>
</div><asp:GridView ID=”GridView1” runat=”server” AutoGenerateColumns=”False”
DataKeyNames=”PlayerID”DataSourceID=”ObjectDataSource1”><Columns>
<asp:BoundField DataField=”PlayerID” HeaderText=”PlayerID”InsertVisible=”False”
ReadOnly=”True” SortExpression=”PlayerID” /><asp:BoundField DataField=”FirstName” HeaderText=”FirstName”
SortExpression=”FirstName” />
366
Chapter 10
13_588508 ch10.qxd 10/10/05 6:23 PM Page 366

<asp:BoundField DataField=”LastName” HeaderText=”LastName”SortExpression=”LastName” />
<asp:BoundField DataField=”Position” HeaderText=”Position”SortExpression=”Position” />
<asp:BoundField DataField=”DateJoined” HeaderText=”DateJoined”SortExpression=”DateJoined” />
<asp:BoundField DataField=”DateLeft” HeaderText=”DateLeft”SortExpression=”DateLeft” />
</Columns></asp:GridView>
The GridView control binds each of the fields in the dataset to a column in a table on the display. The ObjectDataSource takes five attributes. The ID and runat attributes are standard, theOldValuesParameterFormatString is set to the original setting, the SelectMethod attribute specifiesthe name of the actual method, and the TypeName specifies the PlayersTableAdapter. These are all theinstructions needed to be able to bind the return PlayersTable to the GridView control. The final displaylooks the same as a normal GridView control; it’s only the plumbing underneath that has routed yourdata from the ObjectDataSource control that is different.
The Wrox United ObjectDataSourceThis data so far has been static; so as we mentioned previously, in this next Try It Out you go one furtherand use the ObjectDataSource control to be able to edit and update your squad’s details. In the Adminsection of the Wrox United site there is a page called EditSquad.aspx, which is used to change theplayers’ details. However, it uses the SqlDataSource control for the details. This can be replaced withan ObjectDataSource control. It has the insert, update, select, and delete methods to map neatly to themethods in a simple class.
Try It Out The Wrox United ObjectDataSource1. Open the Wrox United application from the chapter samples (C:\BegASPNET2\Chapters\
Begin\Chapter10\WroxUnited) in Visual Web Developer.
2. Right-click the App_Code folder and select Add New Item from the list.
3. From the Visual Studio installed templates, click DataSet.
4. Rename the DataSet wroxunited.xsd and click Add.
5. Next, VWD will start the TableAdapter Configuration Wizard. Be patient here, because this onereally does take a while to kick in.
6. When it finally arrives, select wroxunited (Web.config), and click Next.
7. Next, you get a page where you can choose to use SQL statements or stored procedures. Selectthe Use SQL statements radio button and click Next.
8. On the next wizard screen you can define the SQL statement. Type the following SQL statementinto the “What data should be loaded into the table” area of the dialog:
367
Componentization
13_588508 ch10.qxd 10/10/05 6:23 PM Page 367

SELECT PlayerID, FirstName, LastName, Position, PictureURL, DateJoined, DateLeftFROM PlayersWHERE PlayerID = @PlayerID
9. After entering the SQL statement, click Next. You can now define which methods the componentwill expose. Uncheck the Fill a DataTable checkbox and make sure that Return a DataTable checkbox is checked. In the Method name box, type GetPlayers. This method is used later toretrieve the data. Make sure the final checkbox “Create methods to send update directly to thedatabase” box is checked.
10. Click Next and the click Finish, save the data component, and close the component designer.
11. Select Build ➪ Build Web Site to compile the component.
12. Open the Admin folder of WroxUnited and open the file EditSquad.aspx.
13. In Design View scroll down, select the second SqlDataSource control (shown in Figure 10-15),DetailsDataSource, and delete it.
Figure 10-15
368
Chapter 10
13_588508 ch10.qxd 10/10/05 6:23 PM Page 368

14. From the Data Section of the Toolbox, drag an ObjectDataSource control where theSqlDataSource used to be.
15. Click the black arrow at the top right of the ObjectDataSource control, and from the CommonTasks menu select Configure Data Source.
16. In the opening dialog select wroxunitedTableAdapters.PlayersTableAdapter and click Next.
17. In the Select tab pick the “GetPlayers(Int32 PlayerID), returns PlayersDataTablemethod isselected from the drop-down list box and click Next.
18. In the Define Parameters dialog select “Control” from the Parameter Source: dropdown list boxand select GridView1 in Control view. The parameters on the left of the dialog will now showGridView.SelectedValue. Click Finish.
19. Right-click the ObjectDataSource control in Design View and select Properties.
20. In the Properties window change the (ID) property so that it reads “DetailsDataSource”.
21. Open EditSquad.aspx.vb and amend code in the procedure parameters to read as follows inthe following three subs:
Sub DetailsDataSource_Updated(ByVal sender As Object, ByVal e AsSystem.Web.UI.WebControls.ObjectDataSourceMethodEventArgs )...
End SubSub DetailsDataSource_Inserted(ByVal sender As Object, ByVal e AsSystem.Web.UI.WebControls.ObjectDataSourceMethodEventArgs )...
End SubSub DetailsDataSource_Deleting(ByVal sender As Object, ByVal e AsSystem.Web.UI.WebControls.ObjectDataSourceMethodEventArgs )...
End Sub
22. Save and close the file.
23. Run the application, log in as an administrator (dave\dave@123), and navigate to theEditSquad.aspx page. It works in the same way as before except that you are now using anObjectDataSource control.
How It WorksYou haven’t changed much between this and the previous example. You built a data component, andyou then added an ObjectDataSource control into the EditSquad.aspx page. You added methods forthe Update, Insert, and Delete methods via the wizard. The code that provided your functionality in theclasses was already in existence; all you had to do was change the references from the SqlDataSourcecontrol to the ObjectDataSource control. Then you ran it, and the WroxUnited application was able touse the ObjectDataSource instead.
369
Componentization
13_588508 ch10.qxd 10/10/05 6:23 PM Page 369

User ControlsYour final problem is that of making your code easy to reuse, and this is addressed by user controls.Again, these are something that existed in ASP.NET 1.x, but this is something that also has beenimproved upon in ASP.NET 2.0. So what are user controls? Well in a nutshell, user controls are reusableWeb Forms. They’ve been through several name changes and evolutions from scriptlets to pagelets,before arriving at user controls. They can be thought of as mini-scripts or mini-pages, or pages withinyour pages, but however you choose to think of them the key is that they can be called up as many timesas you need them.
If you browse the Wrox United site you can see several examples of user controls, and one, the Newscontrol, is visible on the front page. In fact, if you look at the front page (shown in Figure 10-16), it is amultitude of components garnered from different sources.
Figure 10-16
Login Control (ASP.NET)
Link to ShoppingCart Control (User) News Control (User)
370
Chapter 10
13_588508 ch10.qxd 10/10/05 6:23 PM Page 370

The News control is a user control, the Login control is an ASP.NET control, the shopping cart is a link toa user control, and the menu is derived from the site master, which itself is an ASP.NET control. So theentire site front page and design is reusable. If you click the Shopping Cart link, you will see the seconduser control, shown in Figure 10-17.
Figure 10-17
And there are a couple more in the administrative section of the site too, but you get the idea! The idea isthat these controls can be used in multiple pages, or called from different places, and rather than having tocut and paste the code individually each time, you can just call on this one section of code over and overagain. One question that might be on your lips is how do they differ from the normal ASP.NET server controls, such as the TextBox control or the Login control that you looked at earlier?
Very little is the answer. The main difference is that you have to provide the code behind the controlyourself, whereas ASP.NET server controls come fully working out of the box. You can add properties touser controls and set them as attributes, just like you would with a normal ASP.NET server control.
So why isn’t everything an ASP.NET server control? Well, ASP.NET 2.0 ships with a multitude of controlsdesigned for the most common scenarios and situations. ASP.NET 2.0 adds greatly to the number ofserver controls. For example, in ASP.NET 1.1 if you wanted a Login control you had to stitch together ausername text box, a password text box, a button, and a label for messages within a panel, so you had tocreate this as a user control. In version 2.0, the Login control comes as a server control. However, it justisn’t possible to anticipate everything that a user might want or need. So therefore it makes sense to havethe flexibility to create your own.
If you view the source code in Internet Explorer for the home page (Default.aspx) in WroxUnited.net,you’ll see no indication that a user control has been used; it’s all HTML elements and some occasionalscript, which is just as it should be. If you were using a Flash plug-in or a Java applet, you would seesome indication with an <object> tag or on older browsers possibly an <embed> tag. So there’s noworry about extra download time being taken either.
371
Componentization
13_588508 ch10.qxd 10/10/05 6:23 PM Page 371

If you look at the actual page that is sent to the server, you can see the user control is included with asimple two lines of code that we’ve highlighted (this source code page is available for download atwww.wrox.com):
<%@ Page Language=”VB” MasterPageFile=”~/site.master” AutoEventWireup=”false”codefile=”Default.aspx.vb” Inherits=”_Default” %><%@ Register TagPrefix=”uc1” TagName=”News” Src=”News.ascx” %><asp:Content ID=”Content1” ContentPlaceHolderID=”mainContent” Runat=”server”>
<h2>Welcome to the Wrox United Web site.</h2><p>We’re a great football team. No really, we are. Don’t take any notice of our past performance. We’re just unlucky.</p>
<uc1:news id=”News1” runat=”server” ItemsToShow=”3”></uc1:news>
</asp:Content>
This page starts giving you some clues as to how user controls work.
User Control StructureUser controls are stored in separate files with a separate .ascx extension. Any time you see this extensionyou know that you are dealing with a user control. To create a user control you need to add a@Register directive to the top of your Web Form identifying where you can find your user control:
<%@Register TagPrefix=”WroxUnited” TagName=”MyControl” %>
You need to add a new tag specifying where the control will go on your page. It will be composed of theTagPrefix, followed by a colon, followed by the TagName, an ID, and the now familiar runat=serverattribute:
<WroxUnited:MyControl id=”mycontrol1” runat=”server”></WroxUnited:MyControl>
Lastly, you need to specify the user control itself in a separate .ascx file. Unlike Web Forms, you don’tneed to specify extra <html> and <body> tags, because the contents of this control will be added to thebody of the containing main page. In fact, all you need to have is the controls themselves that you wantto include. For example, you could include the controls from the code-behind example used earlier inthe chapter:
<asp:Label ID=”Label1” runat=”server” Text=”What is the answer to the meaningof life, the universe and everything?:”></asp:Label>
<asp:TextBox ID=”TextBox1” runat=”server”></asp:TextBox><br /><br /><asp:Button ID=”Button1” runat=”server” Text=”Submit” /><br /><asp:Label ID=”Label2” runat=”server” Text=””></asp:Label>
Of course, user controls can have code-behind files as well, just like Web Forms:
372
Chapter 10
13_588508 ch10.qxd 10/10/05 6:23 PM Page 372

Sub Page Load()If (Page.IsPostBack) Then
If TextBox1.Text = “42” ThenLabel2.Text = “So you read Douglas Adams as well...”
ElseLabel2.Text = “No, I’m not sure that’s it”
End IfEnd If
End Sub
This control can then be bolted into your web pages wherever you specify the @Register directive andadd a tag for the control.
A Simple User ControlIn the next Try It Out, you’re going to start by creating a trivial “Hello World”-style user control to getyou used to the idea of including them in your pages. This code does no more than encapsulate the codebehind from the first example we created in the chapter as a user control. You’ll see how you can placethe user control in one web page, and then a second web page.
Try It Out Creating a Simple User Control1. Open VWD and create a new ASP.NET web site called SimpleUserControl in the chapter directory
(C:\BegASPNET\Chapters\Begin\Chapter10).
2. In Solution Explorer, right-click the web site and select Add New Item. Select Web User Control,enter the name SimpleUserControl.ascx, and check the Place Code in Separate File option, asshown in Figure 10-18.
Figure 10-18
373
Componentization
13_588508 ch10.qxd 10/10/05 6:23 PM Page 373

3. Now you need to add the controls to the page. Once again, drag two Label controls, a TextBoxcontrol, and a Button control, as shown in Figure 10-19.
Figure 10-19
You can cut and paste the relevant code from the first Try It Out in this chapter into Source Viewif you still have it at hand:
<asp:Label ID=”Label1” runat=”server” Text=”What is the answer to the meaning oflife, the universe and everything?:”></asp:Label>
<asp:TextBox ID=”TextBox1” runat=”server”></asp:TextBox><br /><br /><asp:Button ID=”Button1” runat=”server” Text=”Submit” /><br /><asp:Label ID=”Label2” runat=”server” Text=””></asp:Label>
4. Double-click the page again and this time add the following code-behind toSimpleUserControl.ascx.vb:
Partial Class SimpleUserControl
374
Chapter 10
13_588508 ch10.qxd 10/10/05 6:23 PM Page 374

Inherits System.Web.UI.UserControlSub Page Load()
If (Page.IsPostBack) ThenIf TextBox1.Text = “42” Then
Label2.Text = “So you read Douglas Adams as well...”Else
Label2.Text = “No, I’m not sure that’s it”End If
End If End Sub
End Class
5. Next you need to add this control to a page. From Solution Explorer drag theSimpleControlUser.ascx into Design View for Default.aspx (see Figure 10-20).
Figure 10-20
6. Click the green arrow to run Default.aspx; it works in exactly the same way as it did in thefirst Try It Out of this chapter, as evidenced in Figure 10-21.
375
Componentization
13_588508 ch10.qxd 10/10/05 6:23 PM Page 375

Figure 10-21
7. Now go to Solution Explorer and right-click the project. Select Add New Item and add a newWeb Form to the page called secondpage.aspx.
8. Go to Design View and drag SimpleUserControl.ascx into this page. Next, go to SolutionExplorer and right-click secondpage.aspx and select Set As Start Page.
9. Run the project again. You should see what appears in Figure 10-22. Your control has been successfully duplicated with no extra lines of code being required.
Figure 10-22
How It WorksThis hopefully shows you just how easy it is to reuse code in your pages. If you go to Default.aspxand view the source you will see the following:
<%@ Page Language=”VB” AutoEventWireup=”false” CodeFile=”Default.aspx.vb”Inherits=”_Default” %><% Register Src=”SimpleUserControl.ascx” TagPrefix=”uc1”TagName=”SimpleUserControl” %>
<!DOCTYPE html PUBLIC “-//W3C//DTD XHTML 1.1//EN”“http://www.w3.org/TR/xhtml11/DTD/xhtml11.dtd”>
<html xmlns=”http://www.w3.org/1999/xhtml” ><head runat=”server”>
<title>Untitled Page</title>
376
Chapter 10
13_588508 ch10.qxd 10/10/05 6:23 PM Page 376

</head><body>
<form id=”form1” runat=”server”><div><uc1:SimpleUserControl id=”SimpleUserControl1 runat=”server” /> </div></form>
</body></html>
The highlighted lines of code are the only two lines that have been added to the original source code.The first registers the user control and specifies a tag prefix of uc1 (short for user control one) and aTagName of SimpleUserControl. The control is then inserted into the page along with an id attributeand a runat=server attribute.
There’s nothing to stop you from copying this tag and pasting it again and again in the page, although itmight make your page a little illogical, with several versions of the user control. Note that this examplegot you to cut and paste the old code from the code-behind page. This was quite deliberate because thiswas the old way of transferring replicated code. Each time you want to transfer the code, you would cutand paste it manually. Not only is cutting and pasting more labor-intensive, but it is also far more proneto mistakes, because if you altered the code in one page, it would need to be altered in all of the rest.With user controls, any changes you need to make can just be made to the .ascx file and the .ascx.vb filethemselves, and then every time the user control is called, it automatically uses the new code.
The Wrox United News User ControlYou’re now going to move onto a more complex user control, and one that is used on the Wrox United website. You’re going to re-create the News control that you find on the main Wrox United site. This controlscans the News table and selects the most up-to-date stories and displays them on the front page, with themost recent being displayed first.
Before you launch into the coding, it’s worth saying a little bit about why we chose to make this a user control, while other bits and pieces we chose not to. A News control is something that is going to be com-mon on many web sites (although technically speaking user controls shouldn’t be used across severalapplications — as you will see at the end of this chapter — because there is something better served for that purpose). It is also something that will quite likely be called upon at several places throughout theapplication (although you only call upon it once within the Wrox United application), and the principlewill remain the same throughout; it will display a list of articles in order, with the most recent first. Ofcourse, not all things you will design on this site will be suitable for reuse and for creating as user controls, but the News control is a content delivery mechanism and content is the driving force behindmost web sites. In the following Try It Out, you create your own News user control and drop it into yourown blank page.
Try It Out Using the News Control1. Open Visual Web Developer and select Open Web Site. From the Chapter10 folder
(C:\BegASPNET\Chapters\Begin\Chapter10), select WroxUnitedNewsControl and click OK. This contains the connection string information that you will need for this example.
377
Componentization
13_588508 ch10.qxd 10/10/05 6:23 PM Page 377

2. Go to Visual Web Developer and right-click the top item in Solution Explorer. Select Add NewItem and select Web User Control. Type NewsUserControl.ascx in the Name text box. Makesure the Place Code in Separate File checkbox is selected, as depicted in Figure 10-23.
Figure 10-23
3. Go to Design View and drag a SqlDataSource control from the Data section of the Toolboxmenu. Don’t, however, click to configure the Data Source from the Common Tasks box thatappears. Instead, switch to source view, and add the following to the SqlDataSource:
ConnectionString=”<%$ConnectionStrings:WroxUnited%>”
4. From the Data section of the Toolbox menu, add a Repeater control below the SqlDataSourceand select SqlDataSource1 to be the Repeater’s Data Source (see Figure 10-24).
5. First we’ll add the template to the HTML. With the Repeater control you have to switch toSource View to add the template. Switch to Source View and add the following code:
<asp:Repeater ID=”Repeater1” Runat=”server” DataSourceID=”SqlDataSource1”><ItemTemplate>
<div class=”newsItem”><span class=”newsDate”><%#Eval(“DateToShow”, “{0:dd MMM yyyy}”)%></span><span class=”newsTitle”><%#Eval(“Title”)%></span>
</div><span class=”newsContent”>
<%#Eval(“Description”) %></span>
</ItemTemplate></asp:Repeater>
378
Chapter 10
13_588508 ch10.qxd 10/10/05 6:23 PM Page 378

Figure 10-24
6. Next we need to add the namespace. Go to the code-behind file NewsUserControl.ascx.vband add a reference to the System.Data namespace at the top of the file:
Imports System.Data
7. Now we’ll add the code. Still in the code-behind file add the following code for an ItemsToShowproperty, which governs how many items are shown on the screen at the same time:
Partial Class NewsControlInherits System.Web.UI.UserControlPrivate _itemsToShow As Integer = 5Public Property ItemsToShow() As Integer
GetReturn _itemsToShow
End GetSet(ByVal value As Integer)
_itemsToShow = valueEnd Set
End Property
8. Select (Page Events) from the left-hand drop-down box.
9. Select the Pre_Render method from the top of the screen in the right drop-down list box, andadd the following code to it:
Private Sub Page_PreRender(ByVal sender As Object, ByVal e As System.EventArgs) Handles Me.PreRender
379
Componentization
13_588508 ch10.qxd 10/10/05 6:23 PM Page 379

Dim sel As String = String.Format(“SELECT Top {0} * FROM [News] WHERE “ & _“ DateToShow <= ‘{1}’ ORDER BY DateToShow DESC”, _itemsToShow, _DateTime.Now.ToString(“yyyy/MM/dd”))
SqlDataSource1.SelectCommand = selEnd Sub
10. Now go to Solution Explorer and create a new Web Form called NewsDisplay.aspx. Go toDesign View and drag your NewsUserControl.ascx into the Web Form.
11. Run it — it’s fairly raw without any styles, but you will see five news items, as shown in Figure 10-25.
Figure 10-25
12. Go back to Source View and add an ItemsToShow attribute, and set it to 2:
<div><uc1:NewsUserControl id=”NewsUserControl1” runat=”server” ItemsToShow=”2”></uc1:NewsUserControl>
</div>
13. Save the page and run it again, and you will see the output shown in Figure 10-26. If you wantto improve the “rough and ready” look of this control, as we have, drag the site.css file from thetemplates folder in the directory into the aspx file to apply the style sheet.
380
Chapter 10
13_588508 ch10.qxd 10/10/05 6:23 PM Page 380

Figure 10-26
How It WorksYou have a News control that not only can you drop in any page (it is used on the front page of the WroxUnited site), but also allows you to configure the number of items shown via a single attribute. The following code has been created in the user control, a SqlDataSource control that queries the newstable together with a Repeater control that displays each of the individual news items:
<%@ Control Language=”VB” AutoEventWireup=”false” codefile=”News.ascx.vb”Inherits=”NewsControl” %><asp:SqlDataSource id=”SqlDataSource1” Runat=”server”
ConnectionString=”<%$ ConnectionStrings:WroxUnited %>”></asp:SqlDataSource>
<asp:Repeater ID=”Repeater1” Runat=”server” DataSourceID=”SqlDataSource1”<ItemTemplate><div class=”newsItem”>
<span class=”newsDate”><%#Eval(“DateToShow”, “{0:dd MMM yyyy}”)%></span><span class=”newsTitle”><%#Eval(“Title”)%></span>
</div><span class=”newsContent”>
<%#Eval(“Description”) %></span>
</ItemTemplate></asp:Repeater>
It’s the code-behind that provides the main functionality, though. Once again the relationship betweenthe code-behind and the main control is shown. You added an ItemsToShow property to the code-behind and exposed it as a public property. This has the effect of creating an attribute that you can set viathe Web Form:
Private _itemsToShow As Integer = 5Public Property ItemsToShow() As Integer
Get
381
Componentization
13_588508 ch10.qxd 10/10/05 6:23 PM Page 381

Return _itemsToShowEnd GetSet(ByVal value As Integer)
_itemsToShow = valueEnd Set
End Property
You set the default to 5, so if the attribute isn’t set you automatically display five items instead. Theproperty allows you to both get and set the separate values.
What allows you to display the contents of the control is the code that occurs in the Pre_Render event.This is similar to the Page_Load event, except it occurs just before the controls on a page are rendered.Because you want to display these at the last possible moment, you place two statements here. The first one provides a SQL statement that selects the top news items ordered by date, and restricted by the _itemsToShow variable that you created at the top of the class:
Dim sel As String = String.Format(“SELECT Top {0} * FROM [News] WHERE “ & _“ DateToShow <= ‘{1}’ ORDER BY DateToShow DESC”, _itemsToShow,
DateTime.Now.ToString(“yyyy/MM/dd”))SqlDataSource1.SelectCommand = sel
The second sets this SQL to the SelectCommand property of your data source, and this restricts the numberof items shown by your user control.
Composite ControlsYou’ve looked at how user controls are nested inside pages, but it doesn’t stop there. You can nest usercontrols inside user controls. These are known as composite controls. If you consider a scenario whereyou require a group of user controls, such as, say, a News control and a Login control, and a Fixtureviewer control. Rather than having to place references to these controls separately each time, you couldplace them in a single user control and use that control instead. This further enhances the code-reusewithin the application.
Assemblies and Custom Server Controls.NET also provides the capability to pre-compile code components into a central location that can beaccessed from anywhere within the site. These components, like user controls, can contain one or moreclasses; however, the crucial difference is that ASP.NET uses the compiled assemblies rather than the codeinside the component itself at runtime (in other words, the component isn’t compiled at the same time asthe main application, but rather has to be done beforehand). .NET assemblies can use any of the .NET-compliant languages, and the assemblies are compiled into .dll files. These .dll files are then placedwithin the App_Code folder, and can be used by ASP.NET as part of the program.
Custom server controls are a specific version of assemblies. You have already seen how ASP.NET providessuch controls as TextBox, Label, CheckBox, and radio button controls to aid in the development of userinterfaces. Although the vast majority of server controls should cover you for most situations, and also thefact that in ASP.NET 2.0, there is an even wider range of server controls, there are still times when you
382
Chapter 10
13_588508 ch10.qxd 10/10/05 6:23 PM Page 382
might need to create controls that extend the user interface still further. Custom controls are controls thatgenerate a visible user interface. If you consider that when ASP.NET was created, the ASP.NET server controls are actually just custom controls that someone at Microsoft has already created for you and distributed with ASP.NET 2.0. A main difference between user controls and custom controls is that usercontrols are intended to be confined to the application they were created for, whereas custom controls can be used with any application. Hence they are pre-compiled into assembly files, making them moreportable. They also inherit from the System.Web.UI.Control namespace rather than the namespacespecific to the application. Typical examples of custom controls include TreeView controls and customfile open dialogs for a particular file type.
The creation of custom controls is something you have to worry about less now, given the vast amountof controls provided with ASP.NET 2.0, and for that reason they are not covered in this book.
For in-depth discussion of custom controls, consult Professional ASP.NET 2.0 by Bill Evjen, et al,from Wrox Press.
SummaryThis chapter has taken a slightly more theory-heavy slant than previous chapters. I make no apologiesfor this; the only way developers can learn their trade well is by learning the best practices. This chapterhas been all about componentization and code reuse. You have looked at four strategies for these. Thefirst was the use of code-behind. The main reason for using code-behind is to separate the web page’sdesign, style, and user interface from the main structure and the code of the web site. The second was using the ObjectDataSource control to create a separate business layer and data layer in yourapplication. This was the next step, separating your application into an interface, a business rules layer,and a data layer. Third was the idea of centralizing all of our data access code into one component thatcould be deployed across different applications. Finally, you looked a user controls and how the use ofuser controls promotes code-reuse.
While this chapter has delved a lot into theory, it has been teaching you the way you should code andthe techniques you should employ. Good applications are ones that contain as little code as possible, thatdon’t repeat the same code and ultimately run quicker, have fewer bugs and are easier to maintain, and possibly even easier for the end-user to use. The next chapter examines another new feature inASP.NET 2.0, that of profiles and roles.
Exercises1. Create a new web site and a new page called CodeBehind.aspx with a single label, but
making sure that you don’t check the box marked Placed Code in a Separate File. Now create a code-behind file manually for that page that displays the content of the label.
2. How would you go about adding an image to accompany each news item? Note that it shouldn’tdisplay if there is no news image present for that article.
383
Componentization
13_588508 ch10.qxd 10/10/05 6:23 PM Page 383

13_588508 ch10.qxd 10/10/05 6:23 PM Page 384

11Roles and Profiles
Back in Chapter 4, you learned how ASP.NET handles simple user accounts, how access to a sitecan be controlled on a user-by-user basis, and how to group users into roles and control access to a site through the use of roles. Using the ASP.NET Web Site Administration Tool, you have theability to define user accounts, administer roles, and set security permissions all in one centrallocation. This chapter revisits the concept of roles and looks at how accounts and roles are used in Wrox United. You also learn how to control program logic and flow based on which roles thecurrent user is a member of, all using code.
Additionally, because you should now feel comfortable working with .NET code, this chaptertakes you on a tour of user profiles. The user profiles that you can create in ASP.NET can storeadditional information on a user-account-by-user-account basis; for example, a user’s favoritefootball team or favorite color. You’ll recall that, back in Chapter 5, the concepts of styling controlsand pages using central themes were discussed; in this chapter, one of the items you’ll be addingto user profiles is the preferred theme to use for a specific web site.
In this chapter, you learn how to:
❑ Manage site accessibility on a role-by-role basis in code
❑ Use roles effectively in a site, using the Wrox United site as an example
❑ Employ user profiles to store additional information about a user
❑ Work with profiles in code to store and apply favorite themes to a site
This chapter revisits Wrox United and introduces the Fan Club page to the site. In this page, you’lllearn how to display different content depending on which role a user is a member of, and how toupdate a user’s profile. You’ll also make use of the powerful LoginView control, which simplifiesthe process of displaying different content dependent on role membership.
14_588508 ch11.qxd 10/10/05 6:22 PM Page 385

The Importance of RolesA role is a key concept to understand when you do any work on a system that involves working withuser accounts. In any organization, user accounts are likely to be assigned to roles that relate to the typeof user account. For example, if you look at the local user accounts set up on your PC, you will find listsof different types of groups; for example, users, power users, and administrators. In a simple Windowsdomain-based network, you may find that all corporate users are members of the Domain Users role.Certain user accounts in a network may be members of a different group — for example, your systemadministrators may be members of the Domain Administrators group, enabling them to administer theusers in the company domain. Figure 11-1 displays the groups available to a fairly basic Windows XPinstallation; each user account can be a member of zero or more groups.
Figure 11-1
Because each user account can be a member of more than one group, if required, Figure 11-2 shows anexample of an account on the same machine.
Figure 11-2
386
Chapter 11
14_588508 ch11.qxd 10/10/05 6:22 PM Page 386
Notice that the user displayed here is a member of both the Power Users and Remote Desktop Usersgroups. This means that the user (called Chris) can log in via a Remote Desktop session (if remote con-nections are allowed), and can perform most day-to-day administration tasks, with some restrictions,required on the computer.
The ability to group users together into related roles simplifies the process of administration. If myadministrator wanted to grant a specific permission to all the members of the development team at theoffice where I work, he could either assign those permissions to each one of the 12 user accounts individ-ually, or he could add us all to a “Developers” role, and grant that one permission to the role. It’s a sim-ple and logical way to work, and you will almost always have to consider which roles a user is amember of when you develop an application.
One of the most important roles you will come across is that of the Administrator. An Administrator canpretty much do anything to an application or a system. For this reason, you can rejoice in the ability tolog in as an Administrator to fix a problem that can only be fixed with a specific set of permissions.However, you need to be very aware of permissions when you develop applications because it’s poten-tially dangerous from a security perspective. Code running with full privileges can modify a system tothe point where the system is completely destroyed — you don’t want to end up deleting the entire con-tents of your Windows directory, or formatting your hard drive accidentally.
The best practice to adopt is that of lowest-privilege; start with a low-privilege user account and add onlythose permissions that are required by the application. The default settings in ASP.NET mean that thecode that runs ASP.NET web applications will have a limited set of privileges by default, and IIS6 (theweb server provided with Windows Server 2003) is locked down tight when you first install it, so youhave to actually enable ASP.NET when you install it just to run ASP.NET web applications. That doesn’tmean that you can sit back and keep running as an administrator the whole time — try logging in as auser who is only a member of Power Users, or, better still, the Users group, and test your code regularly.Never assume that an application is working without having tested it as a completely different user.
Introducing Roles in Wrox UnitedIn the full Wrox United application, you’ll recall that roles have been configured to enable different lev-els of access to the site. Each user account that is defined has a different level of access, whether it’s as asite administrator or a fan club member. Time to recap a little on what you achieved in Chapter 4 — ifyou open up the Wrox United application source in VWD and select Website ➪ ASP.NET Configuration,you’ll see the list of current users, the list of roles, and you can explore each user account to see theirroles. Figure 11-3 shows the list of roles defined in the preconfigured Wrox United application.
These screenshots were taken from the user configuration stored in the Chapter11 version of the site,though the configuration is the same in the full version of the site.
So, that’s a total of five different roles. If you look at the users defined in the application, you’ll find thatthere are seven different users: ChrisH, ChrisU, Dan, Dave, Jim, John, and Lou. Now, because users canbe members of more than one role, and roles can have more than one member, that’s quite a few possiblecombinations. Clicking the Manage link shown next to each role in Figure 11-3 displays all members of arole. Figure 11-4 displays the list of FanClubMembers.
387
Roles and Profiles
14_588508 ch11.qxd 10/10/05 6:22 PM Page 387

Figure 11-3
Figure 11-4
388
Chapter 11
14_588508 ch11.qxd 10/10/05 6:22 PM Page 388

You can continue to explore each of the user accounts and roles to see who is a member of each group, soyou can discover (among other things) that
❑ ChrisH, ChrisU, Dave, and John are reporters.
❑ Dave is a member of all groups, hence he’s the “super user” (who can access all areas of the site —great for testing!).
❑ Lou is only a member of the Fan Club; hence she is the only true fan of the team.
❑ Dan’s the team’s manager and Jim’s the owner.
After digging through the site configuration, in the Access Rules section, you’ll also recall that theAdmin section of the site was restricted so that only site administrators could enter that part of the site.Additionally, the Fan Club was restricted so that only members could see the fan club–specific linksavailable in the fan club section.
In the next example, you’ll get to use this configuration and try it out for yourself. The Fan Club forWrox United is a good place to start.
In the following Try It Out, you build the skeleton for the Fan Club page and see how different users willsee a different version of the page, depending on whether they are logged in, and, if the user has loggedin, the current user’s identity.
Try It Out The Wrox United Fan Club1. Open up the chapter version (in C:\BegASPNET2\Chapters\Begin\Chapter11\WroxUnited
folder) of the Wrox United application and run the site by pressing Ctrl+F5.
2. Log in to the site as Lou; use the password lou@123. There is a link to the Fan Club(FanClub.aspx) in the menu on the left (shown in Figure 11-5), and to the two sub-pages,FanClubMatchReport.aspx and FanClubPictures.aspx.
At the moment, the pages are looking a bit empty, so it’s time to start adding some code.
3. Open up FanClub.aspx in Visual Web Developer and switch to Design View.
4. Drag a LoginView control onto the page, as shown in Figure 11-6.
5. Rename the control FCLoginView.
6. You’re going to create three different views on this page:
❑ AnonymousTemplate: Anonymous visitors will be asked to purchase a Fan Club mem-bership before they can access the fan club pages.
389
Roles and Profiles
14_588508 ch11.qxd 10/10/05 6:22 PM Page 389

Figure 11-5
❑ Administrator/Manager/Owner/Reporter: All logged-in users who are not members of the Fan Club will be told to contact the administrator of the site to gain access to thefan club.
❑ FanClubMembers: Members of the Fan Club will be able to change their passwordsand to update their profiles (you add this part later in the chapter).
7. In the Common Tasks box of the LoginView control (the flyout highlighted in Figure 11-6), clickthe Edit RoleGroups link. In the dialog that appears (shown in Figure 11-7), you can enter thedetails for the two custom role groups. Click the Add button to add a new group, then click theellipsis next to the Roles property on the right and enter FanClubMember in the dialog thatappears.
8. Repeat the process and enter Administrator, Owner, Manager, and Reporter, each on sepa-rate lines in the pop-up, as depicted in Figure 11-8.
390
Chapter 11
14_588508 ch11.qxd 10/10/05 6:22 PM Page 390

Figure 11-6
Click OK to close the dialogs and you’ll be returned to the Design View for the page.
Figure 11-7
391
Roles and Profiles
14_588508 ch11.qxd 10/10/05 6:22 PM Page 391

Figure 11-8
9. Back in the Common Tasks box of the LoginView control (refer to Figure 11-6), select theAnonymousTemplate from the View drop-down and enter just a few words of text in the bodyof the control (see Figure 11-9).
When you flick back to Source View you will now see the following code:
<%@ Page Language=”VB” MasterPageFile=”~/site.master” AutoEventWireup=”false”CodeFile=”FanClub.aspx.vb” Inherits=”FanClub” Title=”Fan Club” %><asp:Content ID=”Content1” ContentPlaceHolderID=”mainContent” Runat=”Server”>
<asp:LoginView ID=”FCLoginView” runat=”server”><RoleGroups>
<asp:RoleGroup Roles=”FanClubMember”></asp:RoleGroup><asp:RoleGroup Roles=”Administrator,Owner,Manager,Reporter”></asp:RoleGroup>
</RoleGroups><AnonymousTemplate>
This is the anonymous template</AnonymousTemplate>
</asp:LoginView></asp:Content>
10. Stay in Source View and enter the following lines of code — this will make sure you have somevisible content displayed no matter who views the site:
<asp:LoginView ID=”FCLoginView” runat=”server”><RoleGroups>
<asp:RoleGroup Roles=”FanClubMember”><ContentTemplate>
<p>Welcome back<asp:LoginName ID=”FCLoginName” runat=”server” />.</p>
<p>There are always lots of exciting things happening with the fan club, most of which you already know from the email we regularly send out. One that hasn’t made it to the email yet is the proposed end of season BBQ – a great excuse for a summer party (not that we really need an excuse). This will be open to all members of the public and tickets will be heavily discounted for fan club members as a thank you for allof the great support you’ve given the club. The date hasn’t yet been set, but keep your eyes on your inbox for more details.
392
Chapter 11
14_588508 ch11.qxd 10/10/05 6:22 PM Page 392

</p></ContentTemplate>
</asp:RoleGroup><asp:RoleGroup Roles=”Administrator,Owner,Manager,Reporter”>
<ContentTemplate>To see the Fan Club features you need to be a member. As special users you get free entry to the fan club – talk to the admin people to get set up.
</ContentTemplate></asp:RoleGroup>
</RoleGroups><AnonymousTemplate>
<p>The fan club provides a way for you to show your devotion to the club, and gains you exclusive privileges. You get discounts on match tickets and at the club store, as well as having the opportunity to meet up with like-minded fans.
</p><p>
Membership to the Fan Club can be bought from the <a href=”Shop.aspx”> Club Shop</a>. Once membership has been received we’ll enable your account as a Fan Club Member.
</p></AnonymousTemplate>
</asp:LoginView>
Figure 11-9
393
Roles and Profiles
14_588508 ch11.qxd 10/10/05 6:22 PM Page 393

11. Time to run the page and see how this works! Launch the site from VWD and, before you log in, go to the Fan Club page as an anonymous user. You should see the screen shown in Figure 11-10.
12. Log in to the site as ChrisH, using the password chrish@123. You will now see the screen inFigure 11-11.
13. Finally, log out, and then log back in as Lou, using password lou@123. You’ll be presented withthe welcome screen shown in Figure 11-12.
How It WorksThe LoginView control, which you first met in Chapter 4, is a great way of displaying content that isdirectly related to the user who is currently viewing a page. In this example, you’ve added code so thatthree possible views are available of the Fan Club home page.
Figure 11-10
394
Chapter 11
14_588508 ch11.qxd 10/10/05 6:22 PM Page 394

Figure 11-11
If the user is anonymous, the anonymous template is used:
<AnonymousTemplate><p>
The fan club provides a way for you to show your devotion to the club, and gains you exclusive privileges. You get discounts on match tickets and at the club store, as well as having the opportunity to meet up with like minded fans.
</p><p>
Membership to the Fan Club can be bought from the <a href=”Shop.aspx”>Club Shop</a>. Once membership has been received we’ll enable your account as a Fan Club Member.
</p></AnonymousTemplate>
395
Roles and Profiles
14_588508 ch11.qxd 10/10/05 6:22 PM Page 395

Figure 11-12
If the user has logged in, it’s fairly safe to assume that he is a member of a group, and hence he will see adifferent page depending on which roles he belongs to:
<RoleGroups><asp:RoleGroup Roles=”FanClubMember”>
<ContentTemplate><p>
Welcome back<asp:LoginName ID=”FCLoginName” runat=”server” />.</p>
<p>There are always lots of exciting things happening with the fan club, most of which you already know from the email we regularly send out. One that hasn’t made it to the email yet is the proposed end of season BBQ – a great excuse for a summer party (not that we really need an excuse). This will be open to all members of the public and tickets will be heavily discounted for fan club members as a thank you for allof the great support you’ve given the club. The date hasn’t yet been set, but keep your eyes on your inbox for more details.
</p></ContentTemplate>
</asp:RoleGroup>
396
Chapter 11
14_588508 ch11.qxd 10/10/05 6:22 PM Page 396

Fan Club members will see a custom page with some text. There’s not a lot on here yet, but that willchange later in this chapter when you learn about user profiles. These profiles can be used to store addi-tional information about a user, so the fan club page will become a central place for site members tocome so that they can modify their profiles.
If the user is a member of one of the other roles (Administrator, Owner, Manager, or Reporter), the userwill see a different display:
<asp:RoleGroup Roles=”Administrator,Owner,Manager,Reporter”><ContentTemplate>
To see the Fan Club features you need to be a member. As special users you get free entry to the fan club – talk to the admin people to get set up.
</ContentTemplate></asp:RoleGroup>
</RoleGroups>
If you wanted to extend this part of the site, perhaps you could include a button or a link that would firean e-mail to the site administrator, indicating your interest in joining the fan club.
This example demonstrates how simple and easy it is to change the appearance of a page, depending onwho is logged in to the site. There are some drawbacks to this technique, however, which you’ll see whenyou look at extending the display for fan club members to show and edit their profile details.
So, you can change the display of a site by user roles. The next step is to lock down parts of the site byrole, and work with role-level access to the site.
Configuring Page-Level AuthorizationManaging general application access via the Web Site Administration Tool (see Figure 11-13) controlsaccess to folders. Previously (back in Chapter 4), you learned how to restrict access to the pages con-tained within the Admin folder to deny all unapproved users access to those pages.
This general level of restriction is fine for hiding the contents of a directory, but configuring who canaccess each page is controlled in the Web.config file for each folder.
In the Admin folder in the code for the full Wrox United application, you will find a Web.config file.The following statements appear in this file:
<system.web><authorization>
<deny users=”*” /></authorization>
</system.web><location path=”Admin.aspx”>
<system.web><authorization>
397
Roles and Profiles
14_588508 ch11.qxd 10/10/05 6:22 PM Page 397

<allow roles=”Reporter,Administrator,Owner,Manager” /></authorization>
</system.web></location>
The first part of this extract reflects the setting applied in the site administration tool, denying all usersaccess:
<deny users=”*” />
The second part of the extract applies access permissions to a specific page — the Admin.aspx page, inthis case. The users who are allowed to view the Admin.aspx page include anyone who is a member ofany of the Reporter, Administrator, Owner, or Manager roles:
<allow roles=”Reporter,Administrator,Owner,Manager” />
And so the pattern continues for the remainder of the configuration file, where access to each page iscontrolled by the configuration file, enabling access permissions to be set for each role against each pagein the hierarchy.
Figure 11-13
398
Chapter 11
14_588508 ch11.qxd 10/10/05 6:22 PM Page 398

Controlling Page VisibilityThere may be some situations where you will want to allow a user to know of the existence of a page,even if the user is denied access to it. In this way, you can offer a link to users, but when they click thatlink, they are prompted to log in as a user with sufficient privileges before they can view the page. Inorder to achieve this, a roles attribute (see the shaded lines in the following code) can be added to theweb.sitemap file, which ensures that a link will be visible to certain users to specified pages, even if theuser is unable to view the content of the page itself. As an example:
<siteMapNode title=”Administration” url=”Admin/Admin.aspx”roles=”Reporter,Owner,Manager,Administrator”>
<siteMapNode title=”Edit News” url=”Admin/EditNews.aspx”description=”Edit club news”roles=”Reporter,Owner,Manager,Administrator” />
<siteMapNode title=”Schedule Match” url=”Admin/ScheduleMatch.aspx”description=”Schedule a Match”roles=”Manager,Owner” />
Notice that the roles attribute on the Admin.aspx page states that Reporters, Owners, Managers, andAdministrators should be aware of the existence of the Admin.aspx page. Contrast this with theScheduleMatch.aspx page, and you’ll see that only Managers or Owners can see the link to be able toschedule matches.
If you log in to the site as ChrisH, you’re a member of the Reporter role, so even if all access to all adminpages is revoked, you will still see links to the Admin.aspx and EditNews.aspx pages, but you won’tsee a link to the ScheduleMatch.aspx page.
Because the Web.config file and the roles attributes in the web.sitemap work together to controlboth visibility and access, the best way to understand how they work together is to see them in an example!
For this Try It Out, make sure you are using the Chapter 11 version of the Wrox United code. The codethat has been supplied for this example has been modified slightly for the purposes of this example.
Try It Out Configuring Visibility, Access, and Authorization1. First, take a look at the code in the web.sitemap file. This file contains the same code that is
used in the live Wrox United application. This is an extract from that file, highlighting the use ofthe roles attribute:
...<siteMapNode title=”Fan Club” url=”FanClub.aspx”>
<siteMapNode title=”Add Match Report” url=”FanClub/FanClubMatchReport.aspx”description=”Add a match report”roles=”FanClubMember” />
<siteMapNode title=”Upload Pictures” url=”FanClub/FanClubPictures.aspx”description=”Upload pictures or video of a match”roles=”FanClubMember” />
</siteMapNode>...
399
Roles and Profiles
14_588508 ch11.qxd 10/10/05 6:22 PM Page 399

<siteMapNode title=”Administration” url=”Admin/Admin.aspx”roles=”Reporter,Owner,Manager,Administrator”>
<siteMapNode title=”Edit News” url=”Admin/EditNews.aspx”description=”Edit club news”roles=”Reporter,Owner,Manager,Administrator” />
<siteMapNode title=”Schedule Match” url=”Admin/ScheduleMatch.aspx”description=”Schedule a Match”roles=”Manager,Owner” />
<siteMapNode title=”Edit Squad” url=”Admin/EditSquad.aspx”description=”Edit the players in the squad”roles=”Owner” />
<siteMapNode title=”Update Score” url=”Admin/MatchScore.aspx”description=”Edit the score for a match in progress”roles=”Reporter” />
<siteMapNode title=”Match Report” url=”Admin/MatchReport.aspx”description=”Upload or edit a match report”roles=”Reporter” />
<siteMapNode title=”Shop” url=”Admin/UpdateProducts.aspx”description=”Update products”roles=”Administrator” />
</siteMapNode>...
2. The next step is to take a look at the Web.config stored in the root of the Admin folder — noticethat no specific locations are defined in this file, hence the only permission currently active onthat folder is to deny access to all users:
<?xml version=”1.0” encoding=”utf-8”?><configuration>
<system.web><authorization>
<deny users=”*” /></authorization>
</system.web></configuration>
The result of these two configuration specifications is demonstrated if you run the site and login, as I have, as ChrisH (password chrish@123). Take a look at Figure 11-14.
I’m a reporter, so I can see the Administration link, and I can see the links to Edit News, UpdateScore, and Match Report. However, if I click any of those links, I go straight back to the frontpage of the site — access has been denied!
3. The next step is to allow access to certain resources in the Admin section of the site by role.Open up the Web.config for the Admin folder and add just the following highlighted code:
<?xml version=”1.0” encoding=”utf-8”?><configuration>
<system.web><authorization>
<deny users=”*” /></authorization>
</system.web>
400
Chapter 11
14_588508 ch11.qxd 10/10/05 6:22 PM Page 400

Figure 11-14
<location path=”Admin.aspx”><system.web>
<authorization><allow roles=”Reporter,Administrator,Owner,Manager” />
</authorization></system.web>
</location></configuration>
Log in to the site again as ChrisH and you will now be able to click the Administration linkitself and see the Admin.aspx page, shown in Figure 11-15.
The only problem is that you still can’t actually update scores or match reports until you addthe remaining permissions.
401
Roles and Profiles
14_588508 ch11.qxd 10/10/05 6:22 PM Page 401

Figure 11-15
4. Add the following code to complete the Web.config file for the Admin section — and noticethat one of the permissions isn’t quite correct:
...<location path=”Admin.aspx”><system.web>
<authorization><allow roles=”Reporter,Administrator,Owner,Manager” />
</authorization></system.web>
</location><location path=”EditNews.aspx”>
<system.web><authorization>
<allow roles=”Reporter,Administrator,Owner,Manager” /></authorization>
</system.web></location><location path=”MatchScore.aspx”>
<system.web>
402
Chapter 11
14_588508 ch11.qxd 10/10/05 6:22 PM Page 402

<authorization><allow roles=”Reporter” />
</authorization></system.web>
</location><location path=”MatchReport.aspx”>
<system.web><authorization>
<allow roles=”Reporter” /></authorization>
</system.web></location><location path=”EditSquad.aspx”>
<system.web><authorization>
<allow roles=”Owner,Reporter” /></authorization>
</system.web></location><location path=”ScheduleMatch.aspx”>
<system.web><authorization>
<allow roles=”Owner,Manager” /></authorization>
</system.web></location><location path=”UpdateProducts.aspx”>
<system.web><authorization>
<allow roles=”Administrator” /></authorization>
</system.web></location><location path=”UserAdmin.aspx”>
<system.web><authorization>
<allow roles=”Administrator” /></authorization>
</system.web></location><location path=”CreateUser.aspx”>
<system.web><authorization>
<allow roles=”Administrator” /></authorization>
</system.web></location>
</configuration>
In the permissions for the EditSquad.aspx page, notice that the Reporter role has just beengranted access. The web.sitemap page hasn’t been modified, so see if you can guess what willbe displayed when the page is run! Try it again, logging in as ChrisH once more and see whathappens (see Figure 11-16).
403
Roles and Profiles
14_588508 ch11.qxd 10/10/05 6:22 PM Page 403

Figure 11-16
Here’s the final result — not only can you see the Edit Squad link, but you can actually go to theEdit Squad page and modify members of the squad! Make just one last change to fix this prob-lem. After all, reporters aren’t supposed to be able to modify membership of a team.
5. Open the Admin folder’s Web.config file once more and edit the following highlighted line:
<location path=”EditSquad.aspx”><system.web>
<authorization><allow roles=”Owner” />
</authorization></system.web>
</location>
Run the site again, and you will find that if you log in as any of the users who are only membersof the Reporters role (ChrisH, John, or ChrisU), you will be able to view the Edit News, UpdateScore, and Match Report links and page content.
404
Chapter 11
14_588508 ch11.qxd 10/10/05 6:22 PM Page 404

6. One last change to make. This time, modify the web.sitemap file as follows:
<siteMapNode title=”Match Report” url=”Admin/MatchReport.aspxdescription=”Upload or edit a match report”roles=”Reporter” />
<siteMapNode title=”Shop” url=”Admin/UpdateProducts.aspx”description=”Update products”roles=”Administrator, Reporter” />
</siteMapNode>
Now run the page one last time and log in as a Reporter. You will be able to see the link to theShop page in the Administration section, but if you click the link, you will be taken straightback to the default page!
Before finishing the example, fix this by removing the Reporter role from the SiteMapNode forthe UpdateProducts.aspx page.
How It WorksThis example highlights the somewhat delicate nature of keeping your web.sitemap and Web.configfile data up to date with current business case requirements. If you want to allow users to browse a siteanonymously, a common configuration decision is to prompt users when it’s time for them to log in,then display a link that they will want to click but forcing them to authenticate before enabling them toview the page.
In this example, you have seen that the settings for authorization will control which links are available toeach user role. The web.sitemap file then can be used to display additional links to a user — links tocontent that the user doesn’t have permission to access, to indicate that a facility exists (in this case, theUpdate Products facility in the Admin section) but that the user needs to log in as a sufficiently privi-leged user before the link will work.
Here’s a look at the most important bits in the code. From the Web.config file for the Admin folder onthe site, the shaded lines of code specify that only administrators can add or update products:
<location path=”UpdateProducts.aspx”><system.web>
<authorization><allow roles=”Administrator” />
</authorization></system.web>
</location>
Compare this with the addition to the siteMapNode that was made in the last part of the example:
<siteMapNode title=”Shop” url=”Admin/UpdateProducts.aspx”description=”Update products”roles=”Administrator, Reporter” />
This particular combination results in a reporter being able to see a link, but being unable to access thecontents of the link.
405
Roles and Profiles
14_588508 ch11.qxd 10/10/05 6:22 PM Page 405

If the opposite is true, and the authorization level specified in the Web.config file contains more rolesthan the web.sitemap file, the authorization will take precedence. Hence, when you changed the per-missions for the EditSquad.aspx page and logged in as a Reporter, the link appeared in the navigationmenu, and the page could be accessed:
<location path=”EditSquad.aspx”><system.web>
<authorization> <allow roles=”Owner,Reporter” />
</authorization></system.web>
</location>
Working with Roles in CodeUp to this point in the chapter, all of the customization that you’ve looked at has concerned the use ofconfiguration files to lock down access to parts of the site based on user roles. In addition to these tech-niques, it’s possible to work with roles programmatically in code. This technique has been employed tosome extent in the process of applying discounts to shop prices for members of the Fan Club. Manyother different methods exist that you can use for working with roles, but the most commonly used isthe IsInRole() method.
The following code extract (which you will encounter again in Chapter 13) shows this in action:
Public ReadOnly Property MemberDiscount() As DoubleGet
If HttpContext.Current.User.IsInRole(“FanClubMember”) ThenReturn SubTotal * MemberDiscountPercentage
ElseReturn 0
End IfEnd Get
End Property
This code resides within the Shopping.vb class file used when users purchase items from the shop. Theimportant piece in this code is the statement that applies the discount to users who are members of theFan Club, using the User.IsInRole() method call.
The IsInRole() method takes, as an input, a string that is the name of the role to test. As the name ofthe method suggests, the result will indicate whether or not the user belongs to the role, hence the returnvalue for the method is either true (yes, the user belongs to the requested role) or false (no, the user isnot a member of that role). This useful technique is used again as part of the shopping process:
If Context.User.IsInRole(“FanClubMember”) ThenSubTotalLabel.Text = String.Format(“Sub-Total:{0,35:C}”, Profile.Cart.SubTotal)MemberDiscount.Text = String.Format(“Member Discount:{0:C}”, _
Profile.Cart.MemberDiscount)DiscountPanel.Visible = True
End If
406
Chapter 11
14_588508 ch11.qxd 10/10/05 6:22 PM Page 406

In this extract (from ShoppingCart.ascx.vb), the same test is made. There are slight differencesbetween the two calls. The first employs the HttpContext.Current object:
If HttpContext.Current.User.IsInRole(“FanClubMember”) Then...
And the second call employs the Context object:
If Context.User.IsInRole(“FanClubMember”) Then...
You don’t really need to worry about why there is a difference between the two method calls in the con-text of this chapter, because the actual method that is being called is the same in both cases. However, incase you are of a more inquisitive nature, here’s what’s going on.
In the first case, because the code lives within a separate class file (not a code-beside file for an aspx pageor ascx user control), the code could theoretically be called by a different application entirely, outside ofthe Web environment. When users request a web page, they do so within a context. This context willcontain a small amount of information along with each request that the user makes, which is understoodby the web server. If the user is anonymous, the server will know that the current context represents ananonymous user; if the user has logged in, this small bit of information indicates that the request hascome from an authenticated user. So, the context of a logged-in user states that the request comes from aspecific user ID, which ASP.NET can interrogate to find out which roles the user belongs to.
The current context is freely available to web pages and user controls, but classes need to be told a bitmore information before they will compile. The actual context that’s being used on the web page is thecurrent context of the HTTP request, hence the class needs to have the HttpContext.Current versionof the context, rather than the context that is available to all requests to a web page.
Enabling User ProfilesEnabling roles on a web site is a good way to open up or hide resources to users, and it also provideslimited metadata about the users themselves. Just by being a member of the Reporters group, you canassume that John regularly attends matches and submits scores as they happen. However, this is verylimited metadata, and it doesn’t give us much more insight into who John is, or what he is interested in.This is where you can start to adopt ASP.NET’s user profiles technology to store more information abouta user.
For example, if you are a member of a web site that sells a wide variety of goods, you can buy goodsfrom that site by creating a very basic user profile that validates your e-mail address, and can be used to process and track orders. However, on many shopping sites, you can take this “enrollment” processmuch further and supply additional information to your user account and say, “I like products like this.”When you revisit the site, you may then find that the front page changes to show you more items thatyou are interested in buying, and less of those you’re not so bothered about.
This sort of information can be used to extend a simple user account by creating a user profile for storingthis additional information; hence I can specify that I have no interest in owning a PlayStation or Xbox,because I only play games on my PC, and the site will be less likely to show me offers related to PS2 or
407
Roles and Profiles
14_588508 ch11.qxd 10/10/05 6:22 PM Page 407

Xbox editions of games. Furthermore, the sales team behind the web site may send out targeted e-mailsto customers who have expressed an interest in a certain type of product, with the aim of increasingsales.
One of the uses for user profiles is to create areas of a site that are tailored specifically to the currentlylogged-in user, giving that user a more personalized view of the site. This technique — called personalization — can be used to develop a My Site style area of a web site, where you can amend yourown user profile settings, and view information directly relevant to you. In larger corporations, you’llfind that the idea of a personalized area of a web or intranet application is quite commonly used —anyone who has ever used SharePoint Portal Server (or similar Portal-style application) will be familiarwith the idea of a My Site area.
As far as SharePoint is concerned, the My Site area of a portal can be highly customized to display your cal-endar and inbox (linked to an Exchange server), or to store custom lists of links to areas of the portal thatyou may be interested in. Although you’re not going to build anything as involved as this in this book,SharePoint Portal Server is one of the best examples of personalization I’ve come across, and doubtless themany other Portal-style applications available for purchase will offer similar levels of personalization.
ASP.NET 2.0 has some great tools available for developing simple profiles with relative ease, so in thenext section of this chapter, you’ll explore how these tools can be used to customize a site, and you’lllook at how the Wrox United application uses profiles.
Building a ProfileThere are two parts to building a profile. The first is to define what items you want to store. The secondis to add functionality to a page to both add and edit information in a user profile.
To define which items you want to store in a profile, you add a list of items, and the type of data eachitem will contain, to the root Web.config file for a site, for example:
<profile enabled=”true”><properties>
<add name=”MemberName”/><add name=”Name”/><add name=”Address”/><add name=”City”/><add name=”County”/><add name=”PostCode”/><add name=”Country”/><add name=”Mailings” type=”System.Boolean”/><add name=”Email”/><add name=”Theme”/><add name=”Cart” serializeAs=”Binary” type=”Wrox.Commerce.ShoppingCart”
allowAnonymous=”true”/></properties>
</profile>
408
Chapter 11
14_588508 ch11.qxd 10/10/05 6:22 PM Page 408

The list of profiles specified is actually the set of properties to be stored for all registered users of theWrox United application. The default type of data to store is textual data (string data), so for those itemswithout a specific type attribute, the data type is assumed to be string.
Two items on this list are not strings. The first is the Mailings property. This is a Boolean value (trueor false) that can be used to store a simple choice — does the user want to receive e-mail concerning thecurrent news about the club or not? You can control the input for this value on a web page by simplyincluding a checkbox that the user can click as a simple yes or no response to a question. This is anexample of using a standard .NET type, and you could equally add profile properties using differenttypes, such as storing an age in an Integer, or a date of birth in a DateTime.
The other non-string data type being used in this case is a custom type calledWrox.Commerce.ShoppingCart. This type is explained in more detail in Chapter 13. For now, youshould know that this type will store details of the current user’s shopping cart, so that if they fill thecart with items on one visit to the site, but choose not to purchase those items at that time, the data aboutthe items stored in the cart will remain. In this way, when they next log in, the items are still in their cart.It also dictates whether anonymous users can fill a shopping cart. Because this is set to true, anyonecoming to the site can fill a basket with items, so it’s up to you to make sure that you create a profile forthem when they check out. You’ll come back to this point a bit later in this chapter in the section titled“Managing Anonymous Shopping Carts.”
A custom type is an object that has been defined by code to meet the requirements of a specific scenario.The code is contained in a class that has been developed to describe the properties and methods availableto objects based on that particular type definition. For example, a String object has a ToString()method, but a DateTime object has ToString(), ToShortDateString, andToLongDateString() methods, among others. You can write a custom type, like theShoppingCart in this example, that has a specific set of properties and methods available, so aShoppingCart object will have an Update() method and a SubTotal() method.
To store some data in a profile, the following syntax can be used in a code file for a web page:
Profile.Name = “Chris Hart”
Or, similarly, you can use this syntax to use a value entered by a user to populate the Name informationin the Profile:
Profile.Name = txtName.Text
This will cause the profile to store whatever the user has entered as the value of a text box on a page. So,to retrieve a value from a profile and display it on a page, you use the opposite syntax:
txtName.Text = Profile.Name
This is all quite simple, so the next section looks at it in context.
409
Roles and Profiles
14_588508 ch11.qxd 10/10/05 6:22 PM Page 409

Profiles in Wrox UnitedWhen it comes to employing profiles in a live site, you need first to create a definition for the profileproperties, and then a page where you can add and edit the items in a user profile. On the Wrox Unitedsite, this is controlled on the Fan Club page, so take a look at how this page is constructed.
Earlier in this chapter, you built the skeleton for the FanClub.aspx page and made use of the<asp:LoginView> control to display different content depending on who is logged in to the page. Inthis Try It Out, you build on the code from earlier; you will add code to the FanClub.aspx page, anduse some settings from the Web.config file so that you can store details about each user in their profile.
Try It Out Using Profiles in Wrox United1. Open up the Web.config file from the root of the Chapter 11 version of the Wrox United appli-
cation. Look down at the bottom of the code and you will see the following code:
<!--Define the user profile properties
--><profile enabled=”true”>
<properties><add name=”MemberName”/><add name=”Name”/><add name=”Address”/><add name=”City”/><add name=”County”/><add name=”PostCode”/><add name=”Country”/><add name=”Mailings” type=”System.Boolean”/><add name=”Email”/><add name=”Theme”/><add name=”Cart” serializeAs=”Binary” type=”Wrox.Commerce.ShoppingCart”
allowAnonymous=”true”/></properties>
</profile></system.web>
</configuration>
In the profile definition for Wrox United, you have specified that users can store their name,address details, whether they would like to receive mailings from the site, their e-mail address,their favorite theme for the site, and there is also a Cart property. The Cart property will beused each time the user wants to purchase items from the store.
2. The next step is to add some code to the FanClub.aspx page so that users can both store newprofile properties and view or edit existing properties. Open up the page and add the followinghighlighted lines of code — there’s quite a lot of code to add, but as you’ll see, all you’ll be doingis adding controls to the page and laying them out in a table:
<asp:LoginView ID=”FCLoginView” Runat=”server”OnViewChanged=”FCLoginView_ViewChanged”>
<RoleGroups><asp:RoleGroup Roles=”FanClubMember”>
410
Chapter 11
14_588508 ch11.qxd 10/10/05 6:22 PM Page 410

<ContentTemplate><p>
Welcome back<asp:LoginName ID=”FCLoginName” runat=”server” />.</p>
<p>There are always lots of exciting things happening with the fan club, ...set, but keep your eyes on your inbox for more details.
</p><h3>
User Settings</h3><p>
Your user details are shown below.</p><asp:ChangePassword ID=”ChangePassword1” runat=”server”></asp:ChangePassword><br /><table border=”0”>
<tr><td>Name:</td><td><asp:TextBox ID=”txtName” runat=”server” Columns=”30” />
<asp:RequiredFieldValidator ID=”rfv1” runat=”server” ControlToValidate=”txtName”Text=”*” ErrorMessage=”You must enter a value for your name” />
</td></tr><tr>
<td>Address:</td><td><asp:TextBox ID=”txtAddress” runat=”server” Columns=”25” Rows=”5”
TextMode=”multiLine” /><asp:RequiredFieldValidator ID=”RequiredFieldValidator1” runat=”server” ControlToValidate=”txtAddress” Text=”*” ErrorMessage=”You must enter a value for the address” />
</td></tr><tr>
<td>City:</td><td><asp:TextBox ID=”txtCity” runat=”server” />
<asp:RequiredFieldValidator ID=”RequiredFieldValidator2” runat=”server” ControlToValidate=”txtCity”Text=”*” ErrorMessage=”You must enter a value for the city” />
</td></tr><tr>
<td>County:</td><td><asp:TextBox ID=”txtCounty” runat=”server” />
<asp:RequiredFieldValidator ID=”RequiredFieldValidator3” runat=”server” ControlToValidate=”txtCounty”Text=”*” ErrorMessage=”You must enter a value for the county” />
</td></tr><tr>
<td>Postcode:</td><td><asp:TextBox ID=”txtPostCode” runat=”server” />
<asp:RequiredFieldValidator ID=”RequiredFieldValidator4” runat=”server” ControlToValidate=”txtPostCode” Text=”*” ErrorMessage=”You must enter a value for the post code” />
</td>
411
Roles and Profiles
14_588508 ch11.qxd 10/10/05 6:22 PM Page 411

</tr><tr><td>Country:</td><td><asp:TextBox ID=”txtCountry” runat=”server” />
<asp:RequiredFieldValidator ID=”RequiredFieldValidator5” runat=”server” ControlToValidate=”txtCountry” Text=”*”ErrorMessage=”You must enter a value for the country” />
</td></tr><tr>
<td>Subscribe to email updates:</td><td><asp:CheckBox ID=”chkMailing” runat=”server” /></td>
</tr><tr><td>Email:<br /></td><td><asp:TextBox ID=”txtEmail” runat=”server” />
<asp:RequiredFieldValidator ID=”RequiredFieldValidator6” runat=”server” ControlToValidate=”txtEmail”Text=”*” ErrorMessage=”You must enter a value for the email” />
<asp:RegularExpressionValidator ID=”rev1” runat=”server” ControlToValidate=”txtEmail”
ValidationExpression=”\w+([-+.’]\w+)*@\w+([-.]\w+)*\.\w+([-.]\w+)*” Text=”*” ErrorMessage=”Please enter a valid email address” />
</td></tr><tr>
<td>Membership Alias:</td><td><asp:TextBox ID=”txtAlias” runat=”server” />
<asp:RequiredFieldValidator ID=”RequiredFieldValidator7” runat=”server” ControlToValidate=”txtAlias” Text=”*”
ErrorMessage=”You must enter a value for the membership alias” /></td>
</tr></table><br /><asp:ValidationSummary ID=”vs” runat=”server” DisplayMode=”BulletList” /><br /><asp:Button ID=”btnSaveChanges” runat=”server”
OnClick=”btnSaveChanges_Click” Text=”Save Changes” /><asp:Button ID=”btnCancelChanges” runat=”server”
OnClick=”btnCancelChanges_Click”CausesValidation=”false” Text=”Cancel Changes” />
</ContentTemplate></asp:RoleGroup>
...</RoleGroups>
...</asp:LoginView>
3. You also need to add code to the FanClub.aspx.vb file so that the btnSaveChanges andbtnCancelChanges buttons have event handlers that will run code each time they are clicked.Right-click FanClub.aspx and select View Code, then add the following highlighted methodsto the FanClub.aspx.vb file:
Partial Class FanClubInherits System.Web.UI.Page
412
Chapter 11
14_588508 ch11.qxd 10/10/05 6:22 PM Page 412

Private Sub Page_Load(ByVal sender As Object, ByVal e As System.EventArgs) _Handles Me.Load
If Not Page.IsPostBack ThenDisplayProfileProperties()
End IfEnd Sub
Sub btnCancelChanges_Click(ByVal sender As Object, ByVal e As System.EventArgs)DisplayProfileProperties()
End Sub
Sub btnSaveChanges_Click(ByVal sender As Object, ByVal e As System.EventArgs)Profile.Name = CType(FCLoginView.FindControl(“txtName”), TextBox).TextProfile.Address = CType(FCLoginView.FindControl(“txtAddress”), TextBox).TextProfile.City = CType(FCLoginView.FindControl(“txtCity”), TextBox).TextProfile.County = CType(FCLoginView.FindControl(“txtCounty”), TextBox).TextProfile.PostCode = CType(FCLoginView.FindControl(“txtPostCode”), TextBox).TextProfile.Country = CType(FCLoginView.FindControl(“txtCountry”), TextBox).TextProfile.Mailings = CType(FCLoginView.FindControl(“chkMailing”), _
CheckBox).CheckedProfile.Email = CType(FCLoginView.FindControl(“txtEmail”), TextBox).TextProfile.MemberName = CType(FCLoginView.FindControl(“txtAlias”), TextBox).TextServer.Transfer(SiteMap.CurrentNode.Url)
End Sub
Sub FCLoginView_ViewChanged(ByVal sender As Object, ByVal e As System.EventArgs)DisplayProfileProperties()
End Sub
Private Sub DisplayProfileProperties()Dim NameBox As TextBox = CType(FCLoginView.FindControl(“txtName”), TextBox)
If Not (NameBox Is Nothing) ThenCType(FCLoginView.FindControl(“txtName”), TextBox).Text = Profile.NameCType(FCLoginView.FindControl(“txtAddress”), TextBox).Text = Profile.AddressCType(FCLoginView.FindControl(“txtCity”), TextBox).Text = Profile.CityCType(FCLoginView.FindControl(“txtCounty”), TextBox).Text = Profile.CountyCType(FCLoginView.FindControl(“txtPostCode”), TextBox).Text = _
Profile.PostCodeCType(FCLoginView.FindControl(“txtCountry”), TextBox).Text = Profile.CountryCType(FCLoginView.FindControl(“chkMailing”), CheckBox).Checked = _
Profile.MailingsCType(FCLoginView.FindControl(“txtEmail”), TextBox).Text = Profile.EmailCType(FCLoginView.FindControl(“txtAlias”), TextBox).Text = Profile.MemberName
End IfEnd Sub
End Class
4. Run the site again and log in as Lou, password lou@123. Go to the home page for the Fan Cluband you will see what is shown in Figure 11-17 at the bottom of the page.
5. Now enter some details and click the Save Changes button. If you log out and log back in again,you’ll see that the information is saved, as shown in Figure 11-18.
413
Roles and Profiles
14_588508 ch11.qxd 10/10/05 6:22 PM Page 413

Figure 11-17
How It WorksThe Web.config file contains the definition for each of the profile properties employed in the WroxUnited application. These include (among others) the name of the user, the address, and the e-mailaddress. The capability to store data for each user in a profile is controlled by the code in theFanClub.aspx page.
When users update their profile by clicking the Save Changes button, the following code is run:
Sub btnSaveChanges_Click(ByVal sender As Object, ByVal e As System.EventArgs)Profile.Name = CType(FCLoginView.FindControl(“txtName”), TextBox).TextProfile.Address = CType(FCLoginView.FindControl(“txtAddress”), TextBox).TextProfile.City = CType(FCLoginView.FindControl(“txtCity”), TextBox).TextProfile.County = CType(FCLoginView.FindControl(“txtCounty”), TextBox).TextProfile.PostCode = CType(FCLoginView.FindControl(“txtPostCode”), TextBox).TextProfile.Country = CType(FCLoginView.FindControl(“txtCountry”), TextBox).TextProfile.Mailings = CType(FCLoginView.FindControl(“chkMailing”), _
CheckBox).CheckedProfile.Email = CType(FCLoginView.FindControl(“txtEmail”), TextBox).TextProfile.MemberName = CType(FCLoginView.FindControl(“txtAlias”), TextBox).TextServer.Transfer(SiteMap.CurrentNode.Url)
End Sub
414
Chapter 11
14_588508 ch11.qxd 10/10/05 6:22 PM Page 414

Figure 11-18
This code looks quite messy, and this is because of one very good reason. You’ve chosen to display thesecontrols only on one view of the page using the LoginView control. Here’s the syntax for storing just thename:
Profile.Name = CType(FCLoginView.FindControl(“txtName”), TextBox).Text
The yucky syntax used to essentially say “TextBox.Text” means “find me the control called txtName.When you find it, treat it like a TextBox control, then grab the data stored in its Text property and usethat value to store in the profile.” The similar syntax used against the Mailings profile property demon-strates this slightly differently:
Profile.Mailings = CType(FCLoginView.FindControl(“chkMailing”), _ CheckBox).Checked
This time around, it’s a case of “find me a control called chkMailing, treat it as a CheckBox control, andset the Mailings property of the profile to the value of the Checked property of the CheckBox.”
415
Roles and Profiles
14_588508 ch11.qxd 10/10/05 6:22 PM Page 415

After the profile has been populated with data, the code will then call a method, the Server.Transfermethod, which will run the code that would run if the specified page were requested:
Server.Transfer(SiteMap.CurrentNode.Url)
The Server.Transfer() method stops the current page from executing, and runs the content on thespecified page, which in this case is like reloading the current page again to refresh the current view ofthe page.
At several points in the page life cycle, the display of the profile properties is updated. For example,each time the view of the Fan Club changes, the following code is run:
Sub FCLoginView_ViewChanged(ByVal sender As Object, ByVal e As System.EventArgs)DisplayProfileProperties()
End Sub
This calls the following method:
Private Sub DisplayProfileProperties()Dim NameBox As TextBox = CType(FCLoginView.FindControl(“txtName”), TextBox)
If Not (NameBox Is Nothing) ThenCType(FCLoginView.FindControl(“txtName”), TextBox).Text = Profile.NameCType(FCLoginView.FindControl(“txtAddress”), TextBox).Text = Profile.AddressCType(FCLoginView.FindControl(“txtCity”), TextBox).Text = Profile.CityCType(FCLoginView.FindControl(“txtCounty”), TextBox).Text = Profile.CountyCType(FCLoginView.FindControl(“txtPostCode”), TextBox).Text = _
Profile.PostCodeCType(FCLoginView.FindControl(“txtCountry”), TextBox).Text = Profile.CountryCType(FCLoginView.FindControl(“chkMailing”), CheckBox).Checked = _
Profile.MailingsCType(FCLoginView.FindControl(“txtEmail”), TextBox).Text = Profile.EmailCType(FCLoginView.FindControl(“txtAlias”), TextBox).Text = Profile.MemberName
End IfEnd Sub
The convoluted syntax for retrieving the value of each control should be a bit more familiar from thecode used earlier in this How It Works section, but there’s one addition here. Notice that there is a test to see if the txtName text box exists on the currently visible version of the page:
Dim NameBox As TextBox = CType(FCLoginView.FindControl(“txtName”), TextBox)
If Not (NameBox Is Nothing) Then
So, if the txtName box is visible (which it will be if the user is logged in as a member of the FanClubMember role), then the profile data is retrieved. If the user is anonymous, or is a member of other roles(and not the FanClubMember role), then the profile will not exist. To avoid errors at run-time, you don’twant to try to retrieve data that does not exist, so this check is essential (just try removing it and access-ing the page as an anonymous user to see the mess that happens if you’re not careful!).
416
Chapter 11
14_588508 ch11.qxd 10/10/05 6:22 PM Page 416

One last thing to consider before moving on — in the layout code (on FanClub.aspx), there were somecontrols that you may not be familiar with yet:
<table border=”0”><tr>
<td>Name:</td><td><asp:TextBox ID=”txtName” runat=”server” Columns=”30” />
<asp:RequiredFieldValidator ID=”rfv1” runat=”server” ControlToValidate=”txtName”Text=”*” ErrorMessage=”You must enter a value for your name” />
</td></tr><tr>
In the layout code, each TextBox control had a validation control next to it. In this example, the txtName TextBox had a RequiredFieldValidator control next to it, which will ensure that users fill indata for each of the required fields before saving profile changes. Essentially, the text box is marked as“Required,” as the validator’s name suggests. If no value is entered, there will be a small red asteriskdisplayed next to the text box.
You’ll meet validation controls in more detail in Chapter 15, where you can see how they are used tominimize data entry errors and protect your code from malicious user input.
So, you’ve stored some simple data in a user profile. If you want to know where exactly this data isstored, you will find it in the AspNetDB.mdf database. Take a look in the aspnet_Profiles table and you will see that data, similar to Figure 11-19, is stored in your database.
Figure 11-19
417
Roles and Profiles
14_588508 ch11.qxd 10/10/05 6:22 PM Page 417

In Figure 11-19, you can see that the Lou profile currently has some properties set, as you specified in theexample. You will not need (or want) to edit this data by hand, but it’s useful to know where it’s stored.
Storing PreferencesThere’s one last example that you can play with in this chapter, and that goes way back to the discus-sions you will recall from Chapter 5. In that chapter, along with page styling and CSS, you learned theconcept of storing layout and style preferences in themes. These themes can be switched on a page-by-page basis as was discussed in that chapter. However, you can also store data about which theme a usermay prefer to use for a site in a user profile, enabling users to personalize their viewing experience a bit more. In the following Try It Out, you have a go at including this functionality in the Wrox Unitedapplication.
Try It Out Storing Theme Preference in Profiles1. Add the following highlighted lines of code to the FanClub.aspx page:
</tr><tr><td>Membership Alias:</td><td><asp:TextBox ID=”txtAlias” runat=”server” />
<asp:RequiredFieldValidator ID=”RequiredFieldValidator7” runat=”server” ControlToValidate=”txtAlias” Text=”*”ErrorMessage=”You must enter a value for the membership alias” />
</td></tr><tr>
<td>Theme:</td><td><asp:DropDownList ID=”ThemeList” runat=”server”>
<asp:ListItem Text=”Default” Value=”” /><asp:ListItem Text=”Wrox Red” Value=”WroxRed” /><asp:ListItem Text=”Wrox Blue” Value=”WroxBlue” />
</asp:DropDownList></td>
</tr>
2. The other piece of the puzzle is to add some code to store and retrieve the theme preferencefrom the user’s profile. Modify FanClub.aspx.vb to include the following highlighted lines ofcode to the btnSaveChanges_Click event handler:
Sub btnSaveChanges_Click(ByVal sender As Object, ByVal e As System.EventArgs)Profile.Name = CType(FCLoginView.FindControl(“txtName”), TextBox).TextProfile.Address = CType(FCLoginView.FindControl(“txtAddress”), TextBox).TextProfile.City = CType(FCLoginView.FindControl(“txtCity”), TextBox).TextProfile.County = CType(FCLoginView.FindControl(“txtCounty”), TextBox).TextProfile.PostCode = CType(FCLoginView.FindControl(“txtPostCode”), TextBox).TextProfile.Country = CType(FCLoginView.FindControl(“txtCountry”), TextBox).TextProfile.Mailings = CType(FCLoginView.FindControl(“chkMailing”), _
CheckBox).CheckedProfile.Email = CType(FCLoginView.FindControl(“txtEmail”), TextBox).TextProfile.MemberName = CType(FCLoginView.FindControl(“txtAlias”), TextBox).Text
418
Chapter 11
14_588508 ch11.qxd 10/10/05 6:22 PM Page 418

Profile.Theme = CType(FCLoginView.FindControl(“ThemeList”), _DropDownList).SelectedValue
Server.Transfer(SiteMap.CurrentNode.Url)End Sub
3. Now modify the DisplayProfileProperties method to include the code that will retrieveand display the currently stored value for the Theme property from the user’s profile:
Private Sub DisplayProfileProperties()Dim NameBox As TextBox = CType(FCLoginView.FindControl(“txtName”), TextBox)
If Not (NameBox Is Nothing) ThenCType(FCLoginView.FindControl(“txtName”), TextBox).Text = Profile.NameCType(FCLoginView.FindControl(“txtAddress”), TextBox).Text = Profile.AddressCType(FCLoginView.FindControl(“txtCity”), TextBox).Text = Profile.CityCType(FCLoginView.FindControl(“txtCounty”), TextBox).Text = Profile.CountyCType(FCLoginView.FindControl(“txtPostCode”), TextBox).Text = _
Profile.PostCodeCType(FCLoginView.FindControl(“txtCountry”), TextBox).Text = Profile.CountryCType(FCLoginView.FindControl(“chkMailing”), CheckBox).Checked = _
Profile.MailingsCType(FCLoginView.FindControl(“txtEmail”), TextBox).Text = Profile.EmailCType(FCLoginView.FindControl(“txtAlias”), TextBox).Text = Profile.MemberNameCType(FCLoginView.FindControl(“ThemeList”), DropDownList).SelectedValue = _
Profile.ThemeEnd If
End Sub
At this stage, you’ve added all the required code to store the preference. The thing that’s miss-ing is the ability to actually switch the theme on the pages on the site.
4. Right-click the App_Code folder and add a new item. Select Class from the list of available tem-plates, and call it ThemeModule.vb, as shown in Figure 11-20.
Figure 11-20
419
Roles and Profiles
14_588508 ch11.qxd 10/10/05 6:22 PM Page 419

5. Enter the following code into the new Class file:
Imports Microsoft.VisualBasicImports SystemImports System.WebImports System.Web.UI
Namespace Wrox.Web.GlobalEvents
Public Class ThemeModuleImplements IHttpModule
Public Sub Dispose() Implements System.Web.IHttpModule.DisposeEnd Sub
Public Sub Init(ByVal context As System.Web.HttpApplication) _Implements System.Web.IHttpModule.Init
AddHandler context.PreRequestHandlerExecute, _New EventHandler(AddressOf app_PreRequestHandlerExecute)
End Sub
Private Sub app_PreRequestHandlerExecute(ByVal Sender As Object, _ByVal E As EventArgs)
HttpContext.Current.Trace.Write(“ThemeModule”, “app_PreRequestHandlerExecute”)Dim p As Page = TryCast(HttpContext.Current.Handler, Page)
If p IsNot Nothing ThenDim pb As ProfileCommon = DirectCast(HttpContext.Current.Profile, _
ProfileCommon)p.Theme = pb.Theme
End If
End Sub
End ClassEnd Namespace
6. Save the file, then open up Web.config and add the following highlighted code, just below theSystem.Web node:
<system.web><httpModules>
<add name=”Page” type=”Wrox.Web.GlobalEvents.ThemeModule”/></httpModules>
7. Run the page once more and you will see that there is now a drop-down box (shown at the bot-tom of Figure 11-21) on the page enabling you to select different themes to store in your userprofile.
420
Chapter 11
14_588508 ch11.qxd 10/10/05 6:22 PM Page 420

Figure 11-21
How It WorksIn this example, you’ve extended the basic FanClub.aspx page so that users can store their preferredtheme in their profile. This facility is available only to registered members of the Fan Club.
Amending the layout code was a simple process of adding a DropDownList control to the page:
<asp:DropDownList ID=”ThemeList” runat=”server”><asp:ListItem Text=”Default” Value=”” /><asp:ListItem Text=”Wrox Red” Value=”WroxRed” /><asp:ListItem Text=”Wrox Blue” Value=”WroxBlue” />
</asp:DropDownList>
The value for the theme is stored as a simple string of text in the user’s profile, and is set in the sameway as any other profile setting:
Profile.Theme = CType(FCLoginView.FindControl(“ThemeList”), _ DropDownList).SelectedValue
421
Roles and Profiles
14_588508 ch11.qxd 10/10/05 6:22 PM Page 421

This code means “find me the ThemeList control, it’s a DropDownList, so get me its SelectedValueproperty.” In this case, the DropDownList control’s SelectedValue property will be whatever theValue property for the selected item is set to, so, for example, if the user selected the item with the text“Wrox Red,” the value stored would be WroxRed.
So, at this stage the profile has been updated with the user’s preference, but the last bit of this exercisegave the site the capability to apply the selected theme to each page. The technique used in this case wasto use an HttpModule to do this.
In this case, the event that is intercepted is processed before the code on a page is processed, and therequested page’s theme can be changed to match the theme specified in the user’s profile.
This section of the code is getting to be quite advanced in terms of programming techniques. Don’tworry if you don’t fully understand how this works — you will encounter more code like this inProfessional ASP.NET 2.0, so you can treat this as a taste of what you can expect when you start tounleash the full power of ASP.NET.
Take a look at the code in the HttpModule and see how it works:
Imports Microsoft.VisualBasicImports SystemImports System.WebImports System.Web.UI
Namespace Wrox.Web.GlobalEvents
Public Class ThemeModuleImplements IHttpModule
The first part of the code in the file imports a few useful namespaces that contain classes you’ll needlater in the code. The ThemeModule class is configured to reside within the Wrox.Web.GlobalEventsnamespace. Additionally, the ThemeModule class implements the IHttpModule interface, which turnsthis simple class into a class that can be used as an HttpModule, provided you then implement therequired methods, because there are some specific methods that all HttpModules must implement inorder to work correctly.
In this case, two methods have to be implemented: the Init() method and the Dispose() method.Here’s the Dispose() method first — because there’s nothing that you need to do in this method, theempty method signature will just sit there in the file not bothering anyone:
Public Sub Dispose() Implements System.Web.IHttpModule.DisposeEnd Sub
An HttpModule contains code that is processed every time any page in an applica-tion is processed. The module can be enabled and disabled via the Web.config file.The module code can handle events that are raised each time a page is requested.
422
Chapter 11
14_588508 ch11.qxd 10/10/05 6:22 PM Page 422

Notice that there’s a specific Implements keyword that specifies that this particular Dispose() methodimplements the required IHttpModule.Dispose method, as required by all HttpModules. Now com-pare that to the code in the Init() method:
Public Sub Init(ByVal context As System.Web.HttpApplication) _Implements System.Web.IHttpModule.Init
AddHandler context.PreRequestHandlerExecute, _New EventHandler(AddressOf app_PreRequestHandlerExecute)
End Sub
At the top of this method is an Implements statement (which has wrapped onto the next line in thisprinted book due to page width restriction). The Init() method in this case implements theIHttpModule.Init method as required.
The code within the method itself here is a bit tricky to grasp at first. There’s only one line to consider,which declares a new event handler. The event handler will run each time the current context is at thePreRequestHandlerExecute stage in the request life cycle — in plain English, that’s pretty early in therequest stage! This line of code means that each time the appropriate event fires, you can add an eventhandler that will be processed. This event handler is the last method declared in the code:
Private Sub app_PreRequestHandlerExecute(ByVal Sender As Object, _ByVal E As EventArgs)
Dim p As Page = TryCast(HttpContext.Current.Handler, Page)
If p IsNot Nothing ThenDim pb As ProfileCommon = DirectCast(HttpContext.Current.Profile, _
ProfileCommon)p.Theme = pb.Theme
End If
End Sub
End ClassEnd Namespace
This last method handles that PreRequestHandlerExecute event. The first line in this method gets thecurrently requested page object so that you can interact with it:
Dim p As Page = TryCast(HttpContext.Current.Handler, Page)
Notice the TryCast method used here — this method attempts to cast the current Handler object to aPage object type, which means that if the requested item is a page, the cast will be successful and the p object will contain an object reference to the requested page. However, if the item requested is not apage, the cast fails, and the p object is set to NULL (or nothing in VB.NET terms).
423
Roles and Profiles
14_588508 ch11.qxd 10/10/05 6:22 PM Page 423

As long as the Page object exists (and is not set to Nothing), you can then try to apply the theme to thepage by obtaining the current profile properties and using that profile’s Theme property:
If p IsNot Nothing ThenDim pb As ProfileCommon = DirectCast(HttpContext.Current.Profile, _
ProfileCommon)p.Theme = pb.Theme
End If
Notice the DirectCast notation in this case, which will throw an exception if the attempted cast fails.The only case when this would happen would be if you disabled profiles in the Web.config file, whichwould surely make this example a bit pointless! The Theme property of the page is set, at the end of thismethod, to the value stored in the profile property called Theme.
Finally, there was a new section added to the Web.config file that enabled the HttpModule itself:
<system.web><httpModules>
<add name=”Page” type=”Wrox.Web.GlobalEvents.ThemeModule”/></httpModules>
The <httpModule> section can be filled with many different modules that you may want to run; in thisexample, there is just one module — the ThemeModule. The ThemeModule class that was declared isadded in the type attribute, along with the namespace that it resides in, so that .NET knows exactlywhich ThemeModule you want to run.
That’s about it for this example — it’s a tricky piece of code, but it’s a neat way to make themes switchinstantly on pages, and to stay switched for all pages on a site, because the module will run for eachrequested page on a site.
Managing Anonymous Shopping CartsEarlier this chapter briefly mentioned the presence of the following profile property:
<profile enabled=”true”><properties>
<add name=”MemberName”/>...
<add name=”Cart” serializeAs=”Binary” type=”Wrox.Commerce.ShoppingCart” allowAnonymous=”true”/>
The allowAnonymous flag that is stored against the Profile.Cart value for each user session indicatesthat anonymous users can have a shopping cart. In this case, users may visit the site and neglect to logon, or they may be completely new to the site. The user will then happily fill up a basket with items, so itwill be up to you to handle either switching the cart to an existing user when they log in, or creating anew profile when the anonymous user logs in and transferring the cart to the newly created user whenthe user attempts to check out.
424
Chapter 11
14_588508 ch11.qxd 10/10/05 6:22 PM Page 424

There is code that handles this transition in the Global.asax file, which handles global events raised bythe code. Here’s the code as it is used in the Wrox United application:
Public Sub Profile_OnMigrateAnonymous(ByVal Sender As Object, ByVal e As _ProfileMigrateEventArgs)
‘ get the profile for the anonymous userDim anonProfile As ProfileCommon = Profile.GetProfile(e.AnonymousID)
‘ if they have a shopping cart, then migrate that to the authenticated userIf anonProfile.Cart IsNot Nothing Then
If Profile.Cart Is Nothing Thenprofile.Cart = New Wrox.Commerce.ShoppingCart()profile.Cart.Items.AddRange(anonProfile.Cart.Items)
End if
anonProfile.Cart = NothingEnd If
ProfileManager.DeleteProfile(e.AnonymousID)AnonymousIdentificationModule.ClearAnonymousIdentifier()
End Sub
This code is examined in far more detail in Chapter 13 when you see exactly how the whole shoppingexperience works, but it’s useful to understand that there are consequences that you need to understandwhen you log in as a user, and the transferring of a shopping cart from one profile to another is the mostimportant, because none of the other properties can actually be set for anonymous users.
SummaryThis chapter delved deeper into the world of roles, and introduced the concept of user profiles for stor-ing additional data about a user. The two technologies can sit happily side-by-side, and used togetherare a great way to control access to a site and for customizing the user experience.
In this chapter, you’ve had a chance to take more control over the access permitted to users on a fullyfunctional web application. You’ve had a chance to
❑ Show or hide resources to selected user roles.
❑ Display different page content depending on which role views the page.
❑ Display links to selected pages, but prompt the user for more credentials for authorization.
❑ Store more information about users in their user profile.
❑ Store different types of data in a user profile, including the user’s preference for site theme.
These techniques will be built upon in the upcoming chapters to form part of the shopping cart function-ality built in to the Wrox United site.
425
Roles and Profiles
14_588508 ch11.qxd 10/10/05 6:22 PM Page 425

Exercises1. Create a new user account called Admin, and make this user a member of all of the groups. Log
in to the Wrox United site as Admin and test to see whether you can access all of the differentpages in both the fan club and the administration section.
2. Remove the Admin user from any role other than the Administrator role and test the site again.Ensure that you can access the following pages:
❑ Admin.aspx
❑ EditNews.aspx
❑ UpdateProducts.aspx
3. The Admin user has had a request by a reporter out in the field — he’s uploaded a score for amatch, but the score has just changed! Unfortunately, the reporter’s laptop has run out of bat-tery, so he’s asked the Admin to update the score for him. Make sure that the Admin user canupdate the score of a match.
4. Add a field to the user profile for the Wrox United application called DateOfBirth. Give thisproperty a data type of System.DateTime. Add an input field to the FanClub.aspx page sothat users can update their date of birth. Note that you will need to convert the value entered ina text box to a DateTime value when you save the data — you might want to try theDateTime.Parse() function for this purpose. To retrieve the data, use theProfile.DateOfBirth.ToShortDateString() function.
426
Chapter 11
14_588508 ch11.qxd 10/10/05 6:22 PM Page 426

12Web Services
Web services have been “the next great thing” for a little too long now. They were originally introduced as part of the .NET Framework in its first incarnation (although they have been present inJava for a lot longer). Web services are a method of making information available in a standardizedway that could be accessed by any developer’s application over the Web. Web services can form alibrary or shared repository of information that could be anything from the latest weather forecast, amap of your local amenities, a mathematical function calculator, to the tracks and album cover of theCD that you just inserted into your CD-ROM drive. You should be aware, though, that a web serviceon its own isn’t an application. Web services aren’t rendered as web pages, or as executable files(.exe); they come completely shorn of a user interface. It’s up to you as a developer to use them andintegrate them into your applications. They are there to save you time and effort by reducing codeduplication.
They can be used in one of two ways. You can create a web service that is exposed to the Web, toshare with other developers and other applications. Or you can search for a web service that can beadded to your own application. (They are similar to plug-ins in that respect.) For example, if yourapplication is a company web site and you want to include directions to company headquarters,rather than scan in a map, or attempt to hand-draw one in a graphics tool, why not use one of theweb services that makes sections of maps available online?
The information contained in the web service is wrapped up as an XML document, so that worriesabout platform-specific concerns, such as whether you’re accessing them on an old Windows 98machine or a turbo-powered Powerbook, simply evaporate. Web services aren’t really anything neweither; components have been performing a similar trick for many years now. However, there aresome crucial differences. Components had to be distributed by the developer, and they had to bedownloaded and installed. These things alone meant that they tended to be tied to one platform.This isn’t true of web services. A key word that emphasises what web services offer is standard.Everything to do with web services is standardized: the method of transmission, the method used towrap the web service up, the way the web service is defined, all have clear W3C standards associated with the technologies involved. And to make life much easier, all these standards arebased on XML. So they’re quick and easy to download, and even easier to use.
15_588508 ch12.qxd 10/10/05 6:22 PM Page 427

This chapter looks at the following:
❑ Introducing web services
❑ Consuming web services
❑ What happens in the typical life cycle of a web service
❑ Testing a web service
❑ Discovering a web service
❑ Creating and consuming an example web service that uses a parameter
❑ Creating a proxy — the old way of doing things
❑ Web service security
Looking at Web ServicesSo what’s holding them back? The introduction alluded to the fact that web services haven’t quite takenoff in the way that was expected, and it’s true and there are probably several reasons for that, but nonethat should stop you from using them. One is that developers and businesses don’t like giving awaytheir hard work for free. The truth is when businesses create a web service it usually isn’t for public consumption. It is for in-house usage only, and even if it is available for the public to use, it is likely tocome at a price. On the flipside, with free web services, you have no guarantee that they will still bethere in a week or a year’s time, so it’s no good basing a large application around them. So do you forkout for a web service and increase the cost of your application, or take a gamble that a particular servicewill still be in existence over the next few years? This dilemma isn’t easily remedied.
Second is lack of education. People are still largely unaware of what web services can offer. I recentlyworked on a customer services application, which had to integrate with an existing contacts managerapplication and detect when the contacts manager was running and if it had loaded the latest customerinformation correctly. Rather than use a web service to make this information available, the client choseinstead to write to the clipboard (especially awkward considering the users themselves might also beusing the clipboard) and then my application had to periodically check the clipboard for the text to indicate that the contacts manager was running. As a result the application was twenty times more complicated than it needed to be.
Third is the lack of a single killer application. Before you started this chapter, could you name five commonexamples of web services? The problem is that they’re too good at the job they do, so they become practically invisible. Where is the Google or Internet Explorer of web services? I don’t know, but I mightjust be using it unwittingly. A good web service should dovetail seamlessly into your application, and youruser should never know it’s there.
Last is the apparent learning curve required. With web services it’s easy to get drawn into listing themass of technologies involved, and therefore easy to get confused about what you need to know. SOAP,WSDL, UDDI, and DISCO all play valid parts in the process of making a web service available.However, you don’t need to know about any of these acronyms to be able to use a web service.
428
Chapter 12
15_588508 ch12.qxd 10/10/05 6:22 PM Page 428

In fact, before you start creating a web service and learning what goes into them, it’s a good idea to lookat an example first.
Consuming a Third-Party Web ServiceConsuming a web service is almost as easy as firing up your browser, typing in a URL of a web service,and pressing return. Perhaps I am oversimplifying a little bit here, but if you browse to the URL of a webservice endpoint, you will find that you can use it functionally, albeit without any graphical frills. Anendpoint is the specific location where the web service can be accessed. So let’s do exactly that. Because ofthe nature of the Web, sites are very often up and down. If you wanted to phone up a plumber on theother side of the city, you’d check your local phone directory for a number — but that plumber may ormay not still be in business, and web services are just the same. Several good starting points are the fol-lowing sites: http://uddi.microsoft.com, www.webservicex.net, www.webservicelist.com,www.webserviceoftheday.com, and www.wsiam.com. All of these sites provide lists of web servicesyou can browse. More alternatives are available, and if one of these sites is inoperable another will beworking.
There are plenty of possibilities to integrate web services into your example site. Wrox United chroniclesthe football fixtures, results, merchandise, and news of one soccer team. Now Wrox United isn’t alwaysthe most successful soccer team in the league, and they’re usually looking for an excuse on which tohang a particularly poor performance, such as the weather, so it would be nice if you could stick aweather report on the bottom of your match reports, just so you know that if the goalkeeper claims thefifth and sixth goals slipped through his hands, maybe the 85 degree temperature would be a bit of agiveaway.
In the following Try It Out, you start by finding an example weather web service that is freely available.
Try It Out Consuming an Example Web Service1. To be able to access a web service you need to locate an .asmx file — you’ll learn what one of
those is after you’ve finished this example. Figure 12-1 shows an example of a weather serviceat www.webservicex.net/globalweather.asmx.
Figure 12-1
429
Web Services
15_588508 ch12.qxd 10/10/05 6:22 PM Page 429

2. There are two possible web services here. The format and style of this screen are the same forany .asmx web service file you browse. The link to the web service that gives you the weatherforecast is called GetWeather. Click this link, and you’ll arrive at a screen similar to Figure 12-2.
Figure 12-2
3. Supply the name of the city where you live, or closest to where you live, and the name of thecountry. For me this is Birmingham and United Kingdom. Scroll down and look at the code (seeFigure 12-3).
If for any reason this web service is giving an HTTP error 404, we suggest goingback to any of the previous web service directories and typing “Weather” into theirsearches and using one of the example sites they return, because most weather webservices in essence work in the same way.
430
Chapter 12
15_588508 ch12.qxd 10/10/05 6:22 PM Page 430

Figure 12-3
4. Click Invoke to get the result, shown in Figure 12-4. It will be customized to where you live andis of course dependent on the weather of the moment!
Figure 12-4
431
Web Services
15_588508 ch12.qxd 10/10/05 6:22 PM Page 431

How It WorksYou’ve just consumed a web service. We haven’t created the capability in the Wrox United application todo weather forecasting, so we’ve looked elsewhere to get this service. By browsing to an .asmx file, youare able to use the web service, and supply input and get back an answer tailored to your specifics.When you supplied the city name and country name, you probably noticed that your input waswrapped up in an XML document. This is the document broadcast to the server. Although the data canbe wrapped up by three different methods, we’ll only look at the first on the page:
POST /globalweather.asmx HTTP/1.1Host: www.webservicex.netContent-Type: text/xml; charset=utf-16Content-Length: lengthSOAPAction: “http://www.webserviceX.NET/GetWeather”
<?xml version=”1.0” encoding=”utf-16”?><soap:Envelope xmlns:xsi=”http://www.w3.org/2001/XMLSchema-instance”xmlns:xsd=”http://www.w3.org/2001/XMLSchema”xmlns:soap=”http://schemas.xmlsoap.org/soap/envelope/”>
<soap:Body><GetWeather xmlns=”http://www.webserviceX.NET”>
<CityName>string</CityName><CountryName>string</CountryName>
</GetWeather></soap:Body>
</soap:Envelope>
Your input is simply substituted for the words string in the highlighted code:
<GetWeather xmlns=”http://www.webserviceX.NET”><CityName>Birmingham</CityName><CountryName>United Kingdom</CountryName>
</GetWeather>
Of course one big drawback is that there isn’t a user interface, so you’re using a normal interface, andalso all your code is returned as one large higgledy-piggledy lump of XML. So it’s not exactly somethingyou’d stick into your application as it is, without your users getting indigestion. Also you’ll see that theweather report is much too detailed for your match reports. Ideally you’d just want to be able to pickout, say, sky conditions and temperature and probably leave it at that. To be honest a few other pitfallsexist that would make a weather service difficult to integrate into your application. Not least is the factthat the weather service extracts the current weather, and if you were to display this in your matchreports, you’d need to make sure you saved the weather in the database alongside the match details,otherwise you’d be reading about Wednesday’s match, and seeing Friday’s weather!
Later in the chapter you look at creating some web services for the Wrox United application yourself, butfor now you only need to understand that web services are freely available for very ordinary chores toall sorts of weird and wonderful things (I’ve come across a Shakespearean insult generator.) If there is aURL with an .asmx file available, you can access and use the web service in a standard way. And if youcan access and use the web service in this standard way, you can stick it in your application just as easily.
432
Chapter 12
15_588508 ch12.qxd 10/10/05 6:22 PM Page 432

The Life Cycle of a Web ServiceHaving started with a quick example, it’s time to look at some theory behind what is happening. Thissection strips down a web service to its basic essentials, which is a four-stage process. Following that,this section expands upon each stage, and talks a little bit about the technologies and standards used ateach step. The four-stage process of a web service is detailed in Figure 12-5.
Figure 12-5
1. The client calls web service over a protocol.
2. The client sends the method to the server, which contains instructions on what is needed fromthe web service.
3. The server returns values and/or an acknowledgment that it has received the method.
4. The client gets the results and acts on the received information. This may involve calling theweb service again, or a different web service, with the results received.
This can happen as a cyclical process, where information is sent and received, acted upon, and sent outagain. In the next several sections, each step of the process is put under the magnifying class becausewith web services there are usually quite a few interesting things going on.
Calling the Web ServiceWhen you ran the first example and consumed the simple web service, you did so by typing a URL intoa browser. However when you type the URL, you also specify the protocol that you are using (for exam-ple, http://). This is important, because web services are able to work over a multitude of protocolsfrom SMTP (Simple Mail Transport Protocol) to HTTPS (Secure HTTP). However, using anything otherthan HTTP is beyond the scope of this book, and you can achieve plenty just using the HTTP protocol,but you shouldn’t think that you are restricted in this way.
Client callsweb service
Server returnsvalues or an
acknowledgement
Client sendsmethod
Client acts oninformation
433
Web Services
15_588508 ch12.qxd 10/10/05 6:22 PM Page 433

ASP.NET passes information backward and forward using the HTTP-Request/Response system. Anyinformation is sent to the web service as part of the request, and the server will return anything from theweb service as part of the response. Most commonly you can transmit values to a web service via anHTML form and the standard HTML controls.
The request that is sent to the web service contains the following information:
❑ The web service’s URL
❑ The fact that it is an HTTP request
❑ The amount of information being sent
❑ The type of document you want back from the web service
❑ Information about the client
❑ The date of the request
❑ The parameters you want to send to the web service
The browser collects the information from the form and wraps it up in a document ready for transmis-sion. This process is called serialization.
Transmitting the Web ServiceWhen you transmit the information required by the web service, as you’ve seen already, it is serialized inan XML document. This can be done in three different ways:
❑ HTTP-GET via the querystring
❑ HTTP-POST via the body of the form
❑ SOAP via the body of the form
You already know about the first two methods, so this section focuses on the last. When we say serializedin an XML document, this doesn’t tell the whole story with SOAP. SOAP isn’t just any type of XML, but aspecific dialect specially created for the exchange of messages. SOAP used to stand for Simple Object AccessProtocol, but these days it is commonly regarded as not standing for anything in particular. So SOAP isreally short for SOAP. A message contained in SOAP is nothing more than a well-formed XML document orplain, vanilla text. So what exactly is SOAP’s purpose?
SOAP is a message template for sending requests and receiving responses to web services between thebrowser and the web service. Because the Web relies on the HTTP protocol, it commonly excludes anythingother than HTTP, and so SOAP (XML) documents have to be sent as part of the HTTP data. SOAP will send aparticular instruction such as “Get me a certain bit of information” wrapped up in the HTTP, and then thisinformation can be retrieved by the web service at the other end.
In the previous Try It Out, underneath the text boxes into which you entered the name of a city andcountry, you saw some example code. The example code took the three formats: HTTP-GET, HTTP-POST,and SOAP. The SOAP document looked like this:
POST /globalweather.asmx HTTP/1.1Host: www.webservicex.net
434
Chapter 12
15_588508 ch12.qxd 10/10/05 6:22 PM Page 434

Content-Type: text/xml; charset=utf-16Content-Length: lengthSOAPAction: “http://www.webserviceX.NET/GetWeather”
<?xml version=”1.0” encoding=”utf-16”?><soap:Envelope xmlns:xsi=”http://www.w3.org/2001/XMLSchema-instance”xmlns:xsd=”http://www.w3.org/2001/XMLSchema”xmlns:soap=”http://schemas.xmlsoap.org/soap/envelope/”>
<soap:Body><GetWeather xmlns=”http://www.webserviceX.NET”>
<CityName>string</CityName><CountryName>string</CountryName>
</GetWeather></soap:Body>
</soap:Envelope>
The first thing to note is that the document was split into two sections. The first section is a set of HTTPheaders that are used to communicate various aspects about your document. HTTP headers are also sentas a matter of course with HTML page requests so there’s nothing new here. Let’s take a brief look at theHTTP headers to see what they indicate.
The first line indicates that you are sending information via the HTTP-POST method. This might seem toimmediately contradict the fact that you are using SOAP, but we’ve already mentioned the fact that yourSOAP message has to be sent as or in an HTTP request to allow it to get through to most web servers. It alsomentions the endpoint of your service, globalweather.asmx. The next three lines of HTTP headers arepretty standard, but the final header, the SOAPAction header, must be present; otherwise the message willbe invalid. It’s there to help the server decide whether it can let through a message’s content.
The XML document is of greater interest. The opening line is the XML document header, standard to allXML documents. Then you have the structure of the document, which in SOAP will always have thisstructure. You have a SOAP Envelope tag that contains a SOAP Header and a SOAP Body.
The SOAP Header is optional and is missing from the code, but the SOAP Envelope contains some vitalinformation in the attributes to help it make up the document. It contains three attributes that all providenamespace information: xsi, xsd, and soap. xmlns is short for XML namespace. At this level of programming, you really only want to know about the latter attribute, and this is because you use it tospecify a prefix to your SOAP tags:
xmlns:soap=”http://schemas.xmlsoap.org/soap/envelope/”
The prefix specified after the xmlns: attribute is soap, and this prefix is used in front of all the SOAP tags:
<soap:Envelope><soap:Body>... Web Service content here...<soap:Body>
<soap:Envelope>
All documents sent by SOAP will need to adhere to this structure. Inside the SOAP:Envelope attribute isthe SOAP:Body tag. The SOAP:Body tag is always contained within the envelope and it contains theinformation that has been gleaned from the parameters and needs to be sent to the web service. Insidethe SOAP:Body tags you find at last the data you want to send:
435
Web Services
15_588508 ch12.qxd 10/10/05 6:22 PM Page 435

<GetWeather xmlns=”http://www.webserviceX.NET”><CityName>Birmingham</CityName><CountryName>United Kingdom</CountryName>
</GetWeather>
The GetWeather tag is the web service, and the xmlns attribute outlines the location of the web service,which in this case was www.webservicex.net. Inside the GetWeather tag are two tags, CityName andCountryName. These are the two parameters that you originally supplied to the web service when youinvoked it. These parameters have been serialized into a SOAP document, which itself is parceled up inthe HTTP data and is now transmitted to the web service.
So you’re probably wondering why we’re going into some quite esoteric detail about SOAP documentstructure. The answer is, if you want to supply data to the web service manually, it is going to have tohave this structure involved. Also there is another important reason, which you will discover in the nextsections.
Returning the ResponseStraightaway I need to point out that a web service doesn’t have to return a response. Most commonly itwill return a response, but this isn’t essential; it might be just enough to send some information to adatabase or to change an attribute on the server. Before a response of any sort can be returned, though, afew tasks must be accomplished by the web service.
Because the data has been serialized so that it can be transmitted across the Web, it has to be deserializedfirst. This is just the process of obtaining the data (in the example the words Birmingham and UnitedKingdom) from the XML and then executing the web service with this data. Of course the data isn’t theonly thing sent back as part of the response. You also get the following:
❑ A return address for the consumer
❑ The fact that this is an HTTP response and that there is no further action required
❑ A success or failure code
❑ Configuration information
So one of two scenarios is possible: either a value needs to be returned, in which case the result has to beserialized once more in an XML document and sent back to the client, or there are no values that needtransmitting back, in which case there will only be a success or failure code to indicate what has happenedto your web service.
Rather than use the more common terminology call, the term invoke is used withrelation to web services. If you check Dictionary.com, you will find the definition ofinvoke is to call upon a “higher system or power for assistance, support or inspira-tion.” The higher power in this instance is of course the web service. I suppose it isused because the word call, of course, just doesn’t paint the same picture.
436
Chapter 12
15_588508 ch12.qxd 10/10/05 6:22 PM Page 436

In the example you might notice that the response isn’t actually returned as a SOAP document, but onelarge XML string using the HTTP-POST protocol. This is because you sent your original call to the serviceas a HTTP-POST document, so the web service is just returning in like format. It is also possible to callyour web service using HTTP-GET. As you might remember from Chapter 2, a call to the server usingHTTP-GET involves adding a querystring to the URL and adding the parameters as querystrings. Youcan send the same request to the example web service as follows:
http://www.webservicex.net/globalweather.asmx/GetWeather?CityName=Birmingham&CountryName=United%20Kingdom
Doing so will return exactly the same response you saw in Figure 12-4.
This leaves us finally with the SOAP message template. To send and retrieve a document using SOAPrequires a little more effort, and isn’t possible via the endpoint without extra code. However, the infor-mation contained with a SOAP document retains structure, rather than being sent back as a convolutedjumble bundled up in a <string> element:
HTTP/1.1 200 OKContent-Type: text/xml; charset=utf-16Content-Length: length
<?xml version=”1.0” encoding=”utf-16”?><soap:Envelope xmlns:xsi=”http://www.w3.org/2001/XMLSchema-instance”xmlns:xsd=”http://www.w3.org/2001/XMLSchema”xmlns:soap=”http://schemas.xmlsoap.org/soap/envelope/”>
<soap:Body><GetWeatherResponse xmlns=”http://www.webserviceX.NET”>
<GetWeatherResult> <Location>Birmingham / Airport, United Kingdom (EGBB) 52-27N 001-44W 0M</Location>
<Time>Jul 12, 2005 - 05:20 AM EDT / 2005.07.12 0920 UTC</Time> <Wind> from the E (090 degrees) at 5 MPH (4 KT) (direction variable):0</Wind>
<Visibility> greater than 7 mile(s):0</Visibility> <SkyConditions> mostly cloudy</SkyConditions><Temperature> 64 F (18 C)</Temperature> <DewPoint> 59 F (15 C)</DewPoint><RelativeHumidity> 82%</RelativeHumidity><Pressure> 30.47 in. Hg (1032 hPa)</Pressure> <Status>Success</Status>
</GetWeatherResult> </GetWeatherResponse></soap:Body>
</soap:Envelope>
The first three lines are the HTTP header; however, this time the weather report results (note that thiswas done on a different day than Figure 12-4 and hence has a different weather report) are placed withinthe <soap:Envelope> and <soap:body> elements. There is no <soap:header> element here; it’soptional and you don’t need one. If you examine the results you will also see that the <string> elementis missing, which leaves your document with its intended structure.
437
Web Services
15_588508 ch12.qxd 10/10/05 6:22 PM Page 437

This doesn’t answer one question, though: What happens if you didn’t want to include all of the information that the web service had returned, and just wanted some particular bits and pieces? Theweather web service returns all kinds of extraneous information, when all you were interested in were thesky conditions and temperature. It’s certainly possible to extract items from a string, but you are better served by restricting what information the web service returns at source. To do this, you need toinvest in the flexibility that a command-line prompt tool like wsdl.exe (wsdl.exe is a tool that comes as partof the .NET Framework) offers. And that requires a little extra work and is beyond the scope of this book.
Using the ResponseOnce the client has received a response from the web service saying that either the response has suc-ceeded or failed along with any data that was required, the cycle of your web service ends. The client inthe test example received pure XML, and therefore displayed it as a normal XML document. Both HTTP-POST and HTTP-GET wrapped the response up in a single string, which to be fair isn’t a lot of use to you.This is why it is preferable to use SOAP, because the response would be returned in the same format asthe request, and it would enable you to access individual items within the XML document more easily.However, because browsers use HTTP to transfer information, it would require a separate application tocreate a web service using the SOAP message template, and to be able to decipher the response sent viathe SOAP message template.
When you come to consume a web service in the Wrox United application, it will be problematic whenyou get the whole document returned as one string, rather than individual elements, from which you canpick and choose. However, it is beyond the scope of this chapter to write a separate application to be ableto send a web service request in the SOAP message template. We will instead settle for this imperfect stateof affairs and try and use the information contained within the string as best we can. In the real world wesuggest that you use SOAP. For more details, look at http://msdn.microsoft.com/webservices/.
The Structure of Your Web ServiceA web service has a particular structure that needs to be maintained whenever you create a new webservice. This structure is pretty much unchanged between ASP.NET 1.x and ASP.NET 2.0, so if you haveexperience in the area it should look familiar. Every web service you create must have basically fouritems (detailed in the following sections).
Processing DirectiveAt the head of any web service file, you need a directive, which essentially just lets ASP.NET know thatthis is a web service. The processing directive must always be the first line and it takes the followingsyntax:
<%@ WebService Language=”language” Class=”classname” %>
The directive is used to specify particular settings such as which language the web service is written in andwhere to find the class that defines the particulars of your web service. The class should be a separate file.
438
Chapter 12
15_588508 ch12.qxd 10/10/05 6:22 PM Page 438

NamespacesAs with the rest of ASP.NET, occasionally you will need to specify other namespaces so that you canappropriate other classes and functions within your own web service. These namespaces are definedafter the @WebService attribute in the file. In ASP.NET 1.x you had to import three namespaces as aminimum; in ASP.NET 2.0 you still have three to import, but they are slightly different ones:
Imports System.WebImports System.Web.ServicesImports System.Web.Services.Protocols
These web services are required as an absolute minimum, because they contain classes needed for webservices to handle network connection issues and other related tasks.
Public ClassThe class is simply a container for the web service, and the name of the class signifies the name of theweb service:
Public Class FixturesServiceInherits System.Web.Services.WebService...
End Class
The class name needs to correspond with the Class attribute that is specified within the processingdirective. Then for all other intents and purposes, it is just a normal object, albeit one that is exposed tothe Web. The trick with our web server, though, is that any calls to the object will look like they camefrom the same machine, and not via a foreign source.
Web MethodsTo signify that a particular method (or property) is callable via the Web, you need to add a <WebMethod>declaration. In ASP.NET 1.x, you could only expose methods to the Web, but in ASP.NET 2.0 you canalso expose properties as well.
The <WebMethod> declaration is really the part that does all of the legwork. You can define one or moreweb methods, and not only that, you can make sure some web methods are publicly accessible, whereasothers can have access to them restricted via the protected keyword. Though the syntax does varyslightly between VB.NET and C# (VB.NET uses greater-than and less-than symbols, whereas C# usessquare brackets to define the method call), they are both recognizably similar.
The syntax in VB.NET is as follows:
<WebMethod()> _Public Function Hello (ByVal strName As String) As String....End Function
This defines a web method that accepts a string as a parameter and returns a string as a result, just like anormal function.
439
Web Services
15_588508 ch12.qxd 10/10/05 6:22 PM Page 439

The syntax in C# is as follows:
[WebMethod]public string Hello (string strName){....}
This also defines a web method that accepts a string as a parameter and returns a string as a result. Ifyou don’t want to expose a particular web method to the public, you simply remove the declaration.
Web methods also take parameters of their own. You can set the different attributes to modify the behaviorof the web service. This allows you to customize the web service in several ways. For instance you can use the CacheDuration attribute to specify the number of seconds for which you want the WebMethoddeclaration to cache its results. When a consumer browses to the web service inside this allotted period,instead of the web service going back to retrieve the result, it gets a cached copy of the results instead.
In VB.NET you can specify an attribute as follows:
<WebMethod(CacheDuration:=60)> _Public Function Hello (ByVal strName As String) As String....End Function
In C# you can specify an attribute as follows:
[WebMethod(CacheDuration=60)]public string Hello (string strName){....}
You can specify multiple attributes by separating them with commas. The Description attribute allowsyou to specify a little detail about your web method, which can help potential consumers identifywhether or not they want to use it.
In VB.NET you can specify multiple attributes as follows:
<WebMethod(Description:=”A web service that says hello to you”, _CacheDuration:=60)> _Public Function Hello (ByVal strName As String) As String....End Function
In C# you can specify multiple attributes as follows:
[WebMethod(Description=”A web service that says hello to you”,CacheDuration=60)]public string Hello (string strName){....}
440
Chapter 12
15_588508 ch12.qxd 10/10/05 6:22 PM Page 440

You can see the effect of adding a description to a web method in Figure 12-6. The text is displayed nextto the web service so that in a list of web services, you would be able to differentiate between each one.
Figure 12-6
For more information on WebMethod attributes, go to http://msdn.microsoft.com/library/default.asp?url=/library/en-us/cpref/html/frlrfsystemwebserviceswebmethodattributememberstopic.asp.
Creating a Web ServiceSo far you’ve consumed a third-party web service and seen how you can send and receive responses via a standard interface provided from the .asmx endpoint. However, it isn’t the .asmx file that is the web service, it just points you in the direction of the web service. As stated earlier, we didn’t have the capabilityto provide weather forecasting in the Wrox United application, so we borrowed someone else’s service.What happens, though, if you want to create your own web service?
Creating a web service in the past hasn’t always been as easy as it should’ve been. If you created ASP.NET1.x pages with Notepad, you would find yourself delving around the murky world of the commandprompt to compile the service, and having to create an application by hand with which to consume theservice. Here you’re only going to worry about the first two stages of the life cycle, creating a web servicewith which you can call and transmit the data.
In this Try It Out you create an example web service that is able to return the list of results and fixturesfrom the Wrox United web site.
Try It Out The Fixtures Web Service1. With the Chapter12\WroxUnited solution (C:\BegASPNET2\Chapters\Begin\
Chapter12\WroxUnited) open go to Solution Explorer and select the top line, which readsC:\...\WroxUnited. Right-click it and select Add New Item.
2. A new dialog appears. In this dialog make sure that the Language is set to Visual Basic. Type in thename FixtureService.asmx, select the Web Service option, and click Add, as shown in Figure 12-7.
441
Web Services
15_588508 ch12.qxd 10/10/05 6:22 PM Page 441

Figure 12-7
3. This creates a template web service from which to work. If it doesn’t appear automatically, go tothe App_Code folder in Solution Explorer and click FixtureService.vb, which will now haveappeared, as shown in Figure 12-8.
Figure 12-8
442
Chapter 12
15_588508 ch12.qxd 10/10/05 6:22 PM Page 442

4. Add the following lines to the list of namespaces at the top of the page:
Imports System.WebImports System.Web.ServicesImports System.Web.Services.ProtocolsImports System.DataImports System.Data.SqlClient
5. Remove the lines from <WebMethod())> to End Class (because this is just a default test webservice), and replace it with the following code:
<WebMethod()> _Public Function Fixtures() As DataSet
Dim conn As NewSqlConnection(ConfigurationManager.ConnectionStrings(“WroxUnited”).ConnectionString)
Dim adapter As New SqlDataAdapter(“SELECT FixtureDate, Opponents,FixtureType, GoalsFor, GoalsAgainst FROM Fixtures ORDER BY FixtureDate”, conn)
Dim ds As New DataSet()
adapter.Fill(ds, “Fixtures”)
Return dsEnd Function
End Class
6. Next, change the namespace attribute at the top of the page to the following:
<WebService(Namespace:=”http://wroxunited.net/”)> _
7. Finally, save this file.
How It WorksInside your WebMethod() declaration you have a simple function, which creates a connection using theconnection string, then creates a SQLDataAdapter and passes it the SQL to query the fixtures table:
Public Function Fixtures() As DataSetDim conn As NewSqlConnection(ConfigurationManager.ConnectionStrings(“WroxUnited”).ConnectionString)
Dim adapter As New SqlDataAdapter(“SELECT FixtureDate, Opponents,FixtureType, GoalsFor, GoalsAgainst FROM Fixtures ORDER BY FixtureDate”, conn)
Dim ds As New DataSet()
adapter.Fill(ds, “Fixtures”)
Return dsEnd Function
443
Web Services
15_588508 ch12.qxd 10/10/05 6:22 PM Page 443

You create a dataset, and fill this dataset with the contents of the adapter (in other words the result ofyour query) and then return the dataset as a result. You also had to add in a couple of namespacesbecause the SqlDataAdapter isn’t accessible by default, and so to use it you have to add System.Dataand System.Data.SqlClient to enable you to create a connection and to hook up to your SQLdatabase. You also changed the default namespace from http://tempuri.org (the default namespaceprovided by Microsoft), to http://www.wroxunited.net, which is the URL of the Wrox United site.
There is absolutely nothing unusual about this function; it’s actually the code that surrounds this functionthat is important. This is what you look at in the next section.
Testing Your Web ServiceSo you’ve created your web service and taken a look at its structure, but you haven’t actually done anything with it yet, not even gone as far as testing it. Fortunately you already have tools at your disposal to test the web service. Being able to browse to the endpoint of your service allows you oncemore to try the web service out.
Try It Out Testing Our Fixtures Web Service1. When you created FixtureService.vb and placed it in the App_Code folder, it automatically
created an endpoint (.asmx file) for you. Go to Solution Explorer and select FixtureService.asmx. Right-click it and select View in Browser. You will see something similar to Figure 12-9.
Figure 12-9
2. Click Fixtures, and you will arrive at a screen similar to that displayed in Figure 12-10. Fromhere you can test your service. Note that the service doesn’t require any input.
444
Chapter 12
15_588508 ch12.qxd 10/10/05 6:22 PM Page 444

Figure 12-10
3. Click Invoke and scroll down the screen until you see the XML depicted in Figure 12-11.
Figure 12-11
445
Web Services
15_588508 ch12.qxd 10/10/05 6:22 PM Page 445

How It WorksYou can see that the test has returned within the XML the fixtures and results of Wrox United’s matches.The answers supplied are in pure text, so this is something that can be easily passed back and forthacross the Web. You started by going to the endpoint of the service and clicking the link. From the test-ing page you clicked Invoke to produce the web service result in XML. This web service generated a setof fixtures from the class FixtureService.vb and the resulting dataset is rendered as a set of XMLelements: <FixtureDate>, <Opponents>, <FixtureType>, <GoalsFor>, and <GoalsAgainst>.
The WSDL ContractIf you go back to the endpoint FixtureService.asmx and browse it again, you’ll find a line with a linkreading, “For a formal definition, please review the Service Description.” If you click the ServiceDescription link, you will see the page shown in Figure 12-12, containing the WSDL.
Figure 12-12
This is yet more behind-the-scenes work. WSDL is short for Web Services Description Language and it is anXML file that defines how the interaction between a web service and its consumer will occur. For example,WSDL states whether the web service uses GET, POST, or SOAP. The WSDL document defines whether theweb service requires zero, one, or twenty parameters, and defines how many you expect back. It can also
446
Chapter 12
15_588508 ch12.qxd 10/10/05 6:22 PM Page 446

specify that when, for example, a web service expects two specific parameters and returns a single value,what the names, order, and data types of each input and output value should be. With WSDL all of theinformation necessary is present to begin using the web service functionality. WSDL is yet another standard managed by W3.org and you can find the standard details at www.w3.org/TR/wsdl.
At the head of the WSDL document is a declaration for the <definitions> element, which containsvarious namespaces, which make references to SOAP. Next up is the <types> element, which defineseach of the data types that the web service expects to receive and return after its completion. The<types> element is written in yet another XML language, XSD (XML Schema Definition Language).
If you want to see a particular definition of a data type, you need to scroll down the screen and expandeach node within Internet Explorer.
After the <types> element are various <message>, <port type>, and <binding> elements, which allrefer to transmissions between the web service and consumer. The WebMethod message namedFixtureService is contained in here, and various SOAP message structures are defined. In short, this filehas everything needed to handle communication with your web service. And it was automatically created when you created your .asmx file.
Although you’ve consumed web services by browsing directly to the endpoint (the .asmx file), youhaven’t actually tackled how you’d go about including the web service’s functionality within your ownprogram, which is the purpose of the next section.
Web Service DiscoveryPerhaps another reason why web services haven’t been as successful as they might have been is that webservice discovery has been a rather hit-and-miss affair. If you think back, you’ve created your extrava-gant rainfall amount cataloguing weather service, now how do you let people know about it? Stick it onyour web site and hope the Google spiders will index it sooner rather than later? Stand down at yourlocal shopping center with a placard around your neck? Web service discovery is like the process oflocating any item on a search engine. You know roughly what you want to find, you just need to knowthe URL of where to find it. Web services are the same.
If you are the only person who needs to know about the web service, then it’s a very simple affair; youjust add a web reference in Visual Web Developer. When you add the web reference to the web site, ithandles not only the process of compiling your web service for you, but also the process of discovering aweb service as well. However, you first have to compile the web service. In prior incarnations ofASP.NET, creating a web service was a bit more fiddly than it is in ASP.NET 2.0, and it involved usingthe command-line prompt. You shouldn’t need to drop down to command prompt, though; instead youcan simply use Visual Web Developer’s IntelliSense feature to compile your web services for you.
However, to make it available to a wider range of people, this is inadequate.
447
Web Services
15_588508 ch12.qxd 10/10/05 6:22 PM Page 447

Two technologies are used in making web services available. The great thing is that you really don’tneed to know too much about either. This is because Visual Web Developer has a feature that makes thediscovery of web services very straightforward, the Add Web Reference option. However, before youuse it, the next sections take a very brief look at the two technologies underlying web service discovery.
DISCODISCO is a colorful name that belies a rather more prosaic abbreviation — discovery. DISCO is aMicrosoft technology that is generally used to make web services available on your local machine. To dothis you place information about the web service in a .disco document. This is an XML document thatcontains links to other resources that describe the web service, and can be thought of like an HTML filethat contains human-readable documentation or a WSDL file.
Rather than having to worry about creating this yourself, Visual Web Developer takes care of this task foryou, when you add a web reference. It creates the .disco file from the .asmx endpoint file and generates a.DISCOMAP file, both of which are placed in the app_WebReferences folder. These documents can thenbe used with Visual Web Developer automatically to find your web service.
UDDIUDDI goes beyond DISCO; it’s like a giant directory of web services, and only four big companies thatuse web services keep one. The two main ones are Microsoft’s http://uddi.microsoft.com and IBM’sis www-3.ibm.com/services/uddi/. These aren’t just restricted to the companies involved; you canpublish your own web service details within these directories. The UDDI directory was intended to workin the same way as a phone directory, with white pages, yellow pages, and green pages. White pages contained the business details, yellow pages contained the classification of the business, and the greenpages contained technical information about the web service. Because a lot of web services are created justfor the businesses involved and not for general public use, these never took off in the way they wereintended to. However, if you create a web service and you do want to market it to the public, or give itaway for free, then putting it in a UDDI repository is very simple. Just go to the previously mentionedURLs and follow the registration instructions.
Once again, Visual Web Developer is closely integrated with UDDI, and you can browse different registrieswhen you come to add a web reference to your web site, and add a service to the registry in this way.
Discovering Your Web ServiceDISCO and UDDI are both technologies that go on behind the scenes, and though you can make use ofboth of them, you don’t require any specialist knowledge to do so. In the following Try It Out, you seehow you can go about discovering the fixture service that you have just added to your application, byadding a web reference to it.
Try It Out Adding a Web Reference to Your Application1. Staying within the WroxUnited web site solution, from Visual Web Developer, select the Web
Site ➪ Add Web Reference option, and you will see the screen shown in Figure 12-13.
448
Chapter 12
15_588508 ch12.qxd 10/10/05 6:22 PM Page 448

Figure 12-13
2. From here you can either browse to web services in your local application or on the localmachine. You have already created a web service, so you click “Browse to web services in thissolution” to arrive at the screen displayed in Figure 12-14.
Figure 12-14
449
Web Services
15_588508 ch12.qxd 10/10/05 6:22 PM Page 449

3. Only one web service should be in the solution so far, because you’ve only created one. Clickthe FixtureService link and you should be able to see a view of the web service .asmx file (seeFigure 12-15).
Figure 12-15
4. Click Add Reference to add this to your project. In Solution Explorer you should see a foldercalled App_WebReferences, and underneath this folder, another folder, localhost, which con-tains three files, as shown in Figure 12-16.
Figure 12-16
How It WorksYou have created the .disco and .wsdl files in this Try It Out automatically. The process of adding a web reference involved selecting a web service (there was only one to select) and adding a reference. The reference then appears in the App_WebReferences folder. The .wsdl and .disco files are created at thesame time. This means you are able to access the web service from within your code. This is the ultimatepoint of your web service and you’re almost there now.
450
Chapter 12
15_588508 ch12.qxd 10/10/05 6:22 PM Page 450

Adding the Fixture Service to YourApplication
The web service now exists as an object within your code that you can access and query the methods of,just like you would with any normal object. In fact, to your application, for all intents and purposes thisis a local object. Once again there is a sleight of hand going on here. What .NET Framework has done foryou is to create a proxy object. This object acts like the web service and calls the methods on your behalfand actually passes the details to the web service.
This might sound quite complicated, but there really is absolutely no difference between creating thisproxy object and creating a normal object. In the next Try It Out, you create a small page in your applica-tion that consumes your web service.
Try It Out Adding the Service to Your Application1. Start by creating a new Web Form in Visual Web Developer. In Solution Explorer, right-click the
top line and select Add New Item. Select Web Form and call it Consume.aspx, as shown inFigure 12-17, and then check the Select Master Page box and select site.master as a master page
Figure 12-17
2. In Design View, add a single grid view tool to your new Web Form as in Figure 12-18.
451
Web Services
15_588508 ch12.qxd 10/10/05 6:22 PM Page 451

Figure 12-18
3. Click on the page alongside the new grid, in the blank part of the content are to openConsume.aspx.vb’s Page Load event and add the following code inside:
Partial Class ConsumeInherits System.Web.UI.Page
Protected Sub Page_Load(ByVal sender As Object, ByVal e As EventArgs)Dim wsConvert As New FixtureServiceGridView1.DataSource = wsConvert.Fixtures()GridView1.DataBind()
End SubEnd Class
4. Save the page and view it in the browser. It will look like Figure 12-19.
452
Chapter 12
15_588508 ch12.qxd 10/10/05 6:22 PM Page 452

Figure 12-19
How It WorksAt last, here you have it; the GridView control has created a table that has bound to the results and fixtureprovided by your fixtures web service. Only three lines of code were necessary in your final application todo this:
Dim wsConvert As New FixtureService
GridView1.DataSource = wsConvert.Fixtures()GridView1.DataBind()
First you created a proxy object from localhost.FixtureService called wsConvert. In the previousexample, you saw how you created a localhost folder under your App_WebReferences folder, whichcontained the .wsdl and .disco files.
Next, you bound to the Fixture method of your new wsConvert proxy object, and then you bound tothe GridView control and lo and behold your web service output is rendered in Grid View. You’re nowfree to style and alter the presentation of the web service in any way you choose.
453
Web Services
15_588508 ch12.qxd 10/10/05 6:22 PM Page 453

Putting It All TogetherHere’s a quick recap. We’ve separated out each step of creating, testing, discovering, and consuming a webservice so far, and we might have created the illusion that there are a lot of separate steps to perform. Thisisn’t really the case, because we’ve had to abstract out each step to explain what is going on. Now you canput them all together in one large, fluid example, and create a separate user control that you can place inany application.
One common feature of many sports sites is the capability to access league tables and show a littleminiaturized view of where your team is in the league, and though the Wrox United league table isn’thuge (containing only eight teams), you can certainly create a web service that will show the team aboveand below Wrox United in the league. There are two provisos to this of course. One is that in theunlikely event that Wrox United is top of the league, you need to show the two teams underneath them.In the far more likely scenario that Wrox United is bottom, then you should show the two teams abovethem instead. However, we’ll leap those particular chasms when we get to them.
Try It Out Creating a League Table Mini View Web Service1. Go to Solution Explorer, right-click the top line and select Add New Item, and then select the
Web Service option. Change the name to LeagueMiniView.asmx and click OK.
2. Add the extra namespaces at the very top of the page underneath the existing Imports statements:
Imports System.DataImports System.Data.SqlClient
3. You need to add the following code to the WebMethod (note that the SQL string should all be onone line):
<WebMethod()> _Public Function ViewLeague() As DataSet
Dim conn As NewSqlConnection(ConfigurationManager.ConnectionStrings(“WroxUnited”).ConnectionString)
Dim sqlstring As String
Sqlstring = “SELECT [OpponentID], [Name], [TotalGoalsFor], [TotalGoalsAgainst],[TotalGoalsFor]-[TotalGoalsAgainst] AS [GoalDifference], [Points] FROM [Opponents]Order By [Points] DESC, [GoalDifference] DESC, [TotalGoalsFor] DESC”
Dim adapter As New SqlDataAdapter(sqlstring, conn)Dim adapter2 As New SqlDataAdapter(sqlstring, conn)
Dim ds As New DataSetDim ds2 As New DataSetDim position As IntegerDim offset As IntegerDim rows As DataRowCollection
adapter.Fill(ds, “ViewLeague”)rows = ds.Tables(“ViewLeague”).Rows
For i As Integer = 0 To rows.Count - 1
454
Chapter 12
15_588508 ch12.qxd 10/10/05 6:22 PM Page 454

If rows(i)(“Name”).ToString() = “Wrox United” Thenposition = i + 1
End IfNext
If position > 1 And position < rows.Count Thenoffset = position - 2
ElseIf position = 1 Thenoffset = position - 1
Elseoffset = position - 3
End Ifadapter2.Fill(ds2, offset, 3, “ViewLeague”)
ds2.Tables(“ViewLeague”).Columns.Add(“Position”, GetType(Integer))rows = ds2.Tables(“ViewLeague”).RowsFor i As Integer = 0 To rows.Count - 1
rows(i)(“Position”) = offset + i + 1Next
Return ds2End Function
End Class
4. Change the namespace from tempuri.org to wroxunited.net once again, to<WebService(Namespace:=”http://wroxunited.net/”)>.
5. Save this file.
6. You now need to create a page that can utilize this web service. Create a new web user controlcalled LeagueView.ascx and add a GridView control to it. Double-click the LeagueView webuser control in design view and add the following code to LeagueView.ascx.vb:
Partial Class LeagueViewInherits System.Web.UI.UserControl
Protected Sub Page_Load(ByVal sender As Object, ByVal e As EventArgs)Dim wsConvert As New LeagueMiniView
GridView1.DataSource = wsConvert.ViewLeague()GridView1.DataBind()
End Sub End Class
7. Save the page. Now you can add this control to default.aspx by tweaking that page’s code asfollows.
<%@ Register TagPrefix=”uc1” TagName=”News” Src=”News.ascx” %><%@ Register TagPrefix=”uc1” TagName=”LeagueView” Src=”~/LeagueView.ascx” %><asp:Content ID=”Content1” ContentPlaceHolderID=”mainContent” Runat=”server”>
<h2>Welcome to the Wrox United Web site.</h2><p>We’re a great football team. No really, we are. Don’t take any notice of our past performance. We’re just unlucky.</p><uc1:leagueview id=”miniview” runat=”server”></uc1:leagueview><uc1:news id=”News1” runat=”server” ItemsToShow=”3”></uc1:news>
</asp:Content>
455
Web Services
15_588508 ch12.qxd 10/10/05 6:22 PM Page 455

8. Now go to default.aspx and view it (see Figure 12-20).
Figure 12-20
How It WorksHopefully you will be getting a feel for this now. Although you could make the control a little moreunobtrusive, the basic gist is there. Admittedly, it’s a little repetitious, but should make it easier toremember. Once again your web service has returned a dataset. This time the WebMethod has a lot moreto do. You start by creating a function that returns your dataset:
Public Function ViewLeague() As DataSet
The first task within the function is to connect to the database. You use the predefined WroxUnited con-nection string to do this.
Dim conn As NewSqlConnection(ConfigurationManager.ConnectionStrings(“WroxUnited”).ConnectionString)
You then create the SQL that is needed to return your Mini-League table. You create two SqlDataAdapters,one to go with each SQL string. You need two, because one is a full table and the other is your mini-view ofthe same league table. adapter2 contains your new shortened view of the table with only three teams,whereas adapter contains the full table:
Sqlstring = “SELECT [OpponentID], [Name], [TotalGoalsFor], [TotalGoalsAgainst],[TotalGoalsFor]-[TotalGoalsAgainst] AS [GoalDifference], [Points] FROM [Opponents]Order By [Points] DESC, [GoalDifference] DESC, [TotalGoalsFor] DESC”
Dim adapter As New SqlDataAdapter(sqlstring, conn)Dim adapter2 As New SqlDataAdapter(sqlstring, conn)
456
Chapter 12
15_588508 ch12.qxd 10/10/05 6:22 PM Page 456

You then create two datasets, and create some variables to help you keep track of where you are in thedatasets:
Dim ds As New DataSetDim ds2 As New DataSetDim position As IntegerDim offset As IntegerDim rows As DataRowCollection
Next you fill the first adapter with the results of the first SQL query in sqlstring1, which returns thewhole league table in order. You then iterate through this table, position by position, until you find anentry that matches “Wrox United”. You save that position into the variable position:
For i As Integer = 0 To rows.Count - 1If rows(i)(“Name”).ToString() = “Wrox United” Then
position = i + 1End If
Next
You have to cater for three scenarios here:
❑ The golden scenario: Wrox United is top, and you need to display the second and third place teams.
❑ The doomsday scenario: Wrox United is bottom and you need to display the two teams above them.
❑ The usual scenario: Wrox United is neither top nor bottom, but somewhere in between, in whichcase you display one team above them and one team below them.
Your first if condition deals with the case where the position isn’t top or bottom of the league. You taketwo off the position (so if Wrox United is 5, this would be 3). Then you fill the adapter2 with theadapter2 starting at position 3, and the number 3 indicates that there are three teams only. For example:
Adapter2.Fill(name of dataset, position to start in dataset, number of rows, nameof query).
So you say if the position isn’t 1 and isn’t last (you obtain the amount for last by counting the number ofteams in the league), then you set the offset to the position minus 2 and pass that to the adapter2.Fillmethod at the end of the if then condition:
If position > 1 And position < rows.Count Thenoffset = position - 2
Of course if Wrox United has come in fifth, why are you starting with third? Surely that would displaythird, fourth, and fifth, when actually you intend to display fourth, fifth, and sixth? The answer is thatwhen you filled your adapter, you started at row 0. So the team that came first is 0, the team that camesecond is 1, and so on. So the preceding line to fill the adapter actually does return only three teams, andwill return the teams in fourth, fifth, and sixth.
457
Web Services
15_588508 ch12.qxd 10/10/05 6:22 PM Page 457

Your second condition deals with what happens if Wrox United is top? You check to see if the position is1, you set the offset to 0, (1-1), and then you fill the adapter at the end of the if then condition with thedataset starting at row 0, with the next three teams:
ElseIf position = 1 Thenoffset = position - 1
Last, you can deduce that if our team isn’t first and also didn’t finish between first and last, then theymust be last. You set the offset variable accordingly, and fill your data adapter:
Elseoffset = position - 3
End Ifadapter2.Fill(ds2, offset, 3, “ViewLeague”)
You then add a new column to your second dataset called Position, and you read in the positions foreach team in your mini-table:
rows = ds2.Tables(“ViewLeague”).RowsFor i As Integer = 0 To rows.Count - 1
rows(i)(“Position”) = offset + i + 1NextReturn ds2
End Function
End Class
Having created the method that fuels your web service, you then need some way of being able to reference it. Because you have a dataset, you create a user control called leagueview.ascx and thenadd a GridView control to the user control and bind it to your web service.
The final step is to add a reference to your new user control to the Wrox United front page, so that it isdisplayed in the appropriate position. It is rather large and cumbersome, so you might choose to style itsome more and position it differently. This is left as an exercise for you to complete if you so desire,because any more code would distract from the already large code listings you have created.
Remote Web Services — PocketPCApplication
We’ve stressed that what makes web services so flexible is their capability to work across platforms.However, you’ve had to take that for granted, because not many people will have a Mac or Linuxmachine in addition to their own PC. There is one platform, though, that will be familiar to quite a fewreaders, and that is the PocketPC platform that runs on PDAs and other mobile technologies. Becausewe appreciate not everyone will be able to use the following Try It Out, we will keep it relatively brief,but it demonstrates how your online reporters can supply updates to the Wrox United web site usingjust a web service with a PocketPC application on their PDA. Because you have already created theapplication that can submit data, all you need to do in this Try It Out is create a web service that willreceive scores from reporters and alter the scores on the Wrox United site accordingly.
458
Chapter 12
15_588508 ch12.qxd 10/10/05 6:22 PM Page 458

The extra bit of functionality that this Try It Out also includes is the ability to send parameters with theweb service. This is just like sending parameter in a method, as you saw in Chapter 8.
To be able to run this Try It Out you will need a piece of hardware capable of running PocketPC applications. This Try It Out was tested and run on a Dell AXIM PDA that was running PocketPC2003. While we endeavor to make sure this application will work on all PDAs running PocketPC, dueto the diverse nature of the PDA we can make no such guarantees.
Try It Out Updating the Scores Web Service1. First you need to make sure you have a copy of the PocketPC application from
c:\BegASPNet2\Chapters\Begin\Chapter12\PDA.
2. Next, open the C:\BegASPNet2\Begin\Chapter12\WroxUnited web site.
3. Go to Solution Explorer. Right-click the top line, select Add New Item, and then select the WebService option. Change the name to UpdateScore.asmx and click OK.
4. Add the extra namespaces at the very top of the page underneath the existing Imports statements:
Imports System.DataImports System.Data.SqlClient
5. Add the following web method.
<WebMethod()> _Public Sub UpdateGoals(ByVal FixtureID As Integer, ByVal GoalFor As Boolean, _
ByVal PlayerID As Integer, ByVal GoalTime As Integer)
Dim conn As NewSqlConnection(ConfigurationManager.ConnectionStrings(“WroxUnited”).ConnectionString)
conn.Open()Dim cmd As New SqlCommand(“usp_UpdateScore”, conn)cmd.CommandType = CommandType.StoredProcedure
cmd.Parameters.Add(“@FixtureID”, SqlDbType.Int).Value = FixtureIDcmd.Parameters.Add(“@GoalFor”, SqlDbType.Bit).Value = GoalFor
cmd.ExecuteNonQuery()
If GoalFor ThenGoal(FixtureID, PlayerID, GoalTime)
End IfEnd Sub
6. Next add another web method underneath the previous one:
<WebMethod()> _Public Sub Goal(ByVal FixtureID As Integer, ByVal PlayerID As Integer, _
ByVal GoalTime As Integer)
Dim conn As NewSqlConnection(ConfigurationManager.ConnectionStrings(“WroxUnited”).ConnectionString)
conn.Open()
459
Web Services
15_588508 ch12.qxd 10/10/05 6:22 PM Page 459

Dim cmd As New SqlCommand(“usp_Goal”, conn)cmd.CommandType = CommandType.StoredProcedure
cmd.Parameters.Add(“@FixtureID”, SqlDbType.Int).Value = FixtureIDcmd.Parameters.Add(“@PlayerID”, SqlDbType.Int).Value = PlayerIDcmd.Parameters.Add(“@GoalTime”, SqlDbType.Int).Value = GoalTime
cmd.ExecuteNonQuery()
End Sub
7. Change the namespace from http//:tempuri.org to http://wroxunited.net, once againin the line at the beginning of the definition of the web service:
<WebService(Namespace:=”http://wroxunited.net/”)> _
8. Save this file.
9. Run the PDA app and add a scorer and goal details on the page, and hit the submit button (notethat the PDA must have an active Internet connection for this to work). For example, in Figure12-21, we’ve suggested adding Jerry Johnston at 90 minutes in the Wrox United versusMellingham fixture.
Figure 12-21
460
Chapter 12
15_588508 ch12.qxd 10/10/05 6:22 PM Page 460

10. Run the Wrox United site and go to the scorers link, which now shows the updated detailswhere Jerry Johnston has been added to the scorers list, as shown in Figure 12-22.
Figure 12-22
How It WorksIn this Try It Out you have created two web methods as part of your web service. Which web method youuse depends on whether Wrox United scored the goal or whether the goal was scored by an opponent. IfWrox United scored a goal then you need to update the goal, the player who scored it, and the time it wasscored. If the opposition scored it then you only need to use two of the parameters to update the score inthe database. To use the web service you start by calling the UpdateScore method first and then youdetect whether it is a Wrox United goal, and only if it is a Wrox United goal do you update the Goalmethod as well.
The UpdateGoals web method updates which side scored the goal and the Score method takes fourparameters, shown in bold in the following code:
Public Sub UpdateGoals(ByVal FixtureID As Integer, ByVal GoalFor As Boolean, _ByVal PlayerID As Integer, ByVal GoalTime As Integer)
The web method creates a connection and a command, and sets the command type as stored procedure(stored procedures are discussed in Chapter 14):
461
Web Services
15_588508 ch12.qxd 10/10/05 6:22 PM Page 461

Dim conn As NewSqlConnection(ConfigurationManager.ConnectionStrings(“WroxUnited”).ConnectionString)
conn.Open()Dim cmd As New SqlCommand(“usp_UpdateScore”, conn)cmd.CommandType = CommandType.StoredProcedure
You pass the parameters of the FixtureID and the whether the goal was for or against us and executethe query.
cmd.Parameters.Add(“@FixtureID”, SqlDbType.Int).Value = FixtureIDcmd.Parameters.Add(“@GoalFor”, SqlDbType.Bit).Value = GoalFor
cmd.ExecuteNonQuery()
If the goal was for us, then you call the Goal web method with the FixtureID, the PlayerID, and theGoalTime:
If GoalFor ThenGoal(FixtureID, PlayerID, GoalTime)
End If
The Goal web method updates the Wrox United goals and the Score method only takes three parameters,shown in bold here:
Public Sub Goal(ByVal FixtureID As Integer, ByVal PlayerID As Integer, _ByVal GoalTime As Integer)
These three parameters are the fixture number, the number of the player, and the timing of the goal. In thePDA application, you selected the FixtureID from a selection of possible fixtures (for example, WroxUnited versus Ponsonby Athletic) rather than selecting FixtureID 27 from a DropDownList control, andyou selected the name of the player from a DropDownList control along with checkbox indicating if itwas a goal for or against Wrox United. In the text box you typed the time of the goal. These are passed toyour web method.
The web method is very similar to the previous one in that it you create a connection and call a storedprocedure, which will update the Wrox United database. It passes the three parameters and executes thequery:
Dim conn As NewSqlConnection(ConfigurationManager.ConnectionStrings(“WroxUnited”).ConnectionString)
conn.Open()Dim cmd As New SqlCommand(“usp_Goal”, conn)cmd.CommandType = CommandType.StoredProcedure
cmd.Parameters.Add(“@FixtureID”, SqlDbType.Int).Value = FixtureIDcmd.Parameters.Add(“@PlayerID”, SqlDbType.Int).Value = PlayerIDcmd.Parameters.Add(“@GoalTime”, SqlDbType.Int).Value = GoalTime
cmd.ExecuteNonQuery()
462
Chapter 12
15_588508 ch12.qxd 10/10/05 6:22 PM Page 462

Much of the work is done behind the scenes with the PocketPC application; however, as long as theWrox United application makes the information available in a standard way (as we have done here),then any application — whether a Windows application, a web application, or a PDA application — canuse it via an Internet connection.
Web Service SecurityThis chapter’s introduction mentioned that one of the reasons that web services’ lack of adoption in somequarters may be due to the ease, or rather lack of ease, with which they can be secured. If you create a webservice, and you do want to market it, then you need to be able to control and regulate access to the webservice.
While certainly possible in ASP.NET 1.x, it wasn’t the easiest of tasks and this is one area that has definitelybeen improved in ASP.NET 2.0. Also, as you’ve seen, the web service request and response is sent as XMLdocuments (in other words pure text), so if you’re not sending via SSL, then anyone is able to intercept andsteal the code. A couple of new facilities in ASP.NET 2.0 help you deal with this.
Encryption and Message-Based SecurityEncryption is the process of scrambling the text containing your web service so that only the intendedreader is able to decrypt it with the aid of a key. Message-based security has been introduced in web services.
Message-based security allows you to hand your encrypted messages to anyone, and they won’t be able todecrypt the encrypted data. If your message is modified you will be able to detect that straightawaybecause the signature attached to the message will be invalid and you can throw those messages away. Itworks by encrypting the message at both request and response level and is defined in the web services WS-Security specification (a relatively new W3 specification detailing how to handle web services security).
Authentication and Access Controls for ServicesAuthentication is the process of checking to see if a particular user is who they claim to be. This is doneusually by the common user ID/password entry. One way to secure a web service is to force anyonewho attempts to use a service to have to supply credentials first. They have to supply a user ID andpassword, and if they don’t they are refused access to the web service.
You can find more details at http://msdn.microsoft.com/library/default.asp?url=/library/en-us/rsprog/htm/rsp_prog_soapapi_dev_6ne8.asp.
Using both of these facilities is beyond the scope of this book; they are mentioned here because previouslypeople would have disregarded web services for transferring sensitive and confidential information, butthat no longer needs to be the case.
463
Web Services
15_588508 ch12.qxd 10/10/05 6:22 PM Page 463

SummaryWeb services are a massive subject that could command a whole book quite easily in their own right. Wehave been necessarily curt in our treatment of them to give you an idea of how they might be accessedand used within your own applications. As you saw at the beginning of this chapter a web service issimply a functionality that can be remotely called over the web. However, the distinct advantage theyenjoyed over other similar methods is that all information was sent and returned in the form of XMLdocuments (and therefore text). Specifically, this chapter covered the following topics:
❑ The process of using a web service, which can be broken down into creating a web service, makingthe web service available for discovery, and ultimately consuming the web service.
❑ A lot of new technologies introduced in this chapter (fortunately Visual Web Developer handlesthem smoothly for us), including SOAP, which is a framework for exchanging messages and isused in the transmission of web services. A SOAP document is transmitted as part of the HTTP data. DISCO and UDDI are used to make the web service available so that people can see and use it.
❑ Last, you’ve seen the idea of a proxy object within your code, which takes the place of the webservice and allows you to access the different methods of the web service as though it were onthe same PC.
Although all of these technologies each has a role to play, they have been very much hidden from us.The files and objects are created automatically for us, and the bottom line is that if you create a methodor object, basically all you need to do is start a <WebMethod> with a few extra configuration details, andthe rest is done for you.
The next chapter deals with e-commerce by showing you how to set up a shopping cart and how to shopfor merchandise on Wrox United’s web site.
Exercises1. What is the role of SOAP in web services?
2. Create a web service that retrieves a Wrox United score wherever they’ve scored more than one goal.
3. Create a page that consumes the third-party weather forecast for Birmingham, United Kingdom.(Hint: You will also need to discover this service first.)
464
Chapter 12
15_588508 ch12.qxd 10/10/05 6:22 PM Page 464

13E-Commerce
This is the first version of this book that’s ever dared to talk about e-commerce. This isn’t becausewe’ve forgotten to, or because we think it’s unimportant, but mainly because this is the first ver-sion of ASP.NET where it hasn’t been too complicated to even think about. I must admit it’s theone area as a developer that even I (or any developer) will tread carefully. The reason is simple —money. When you’re handling other people’s money, you really must make every effort to ensurethat nothing can go wrong. If not, you, or the company you work for, could be held responsibleand personally liable for every penny lost or stolen.
If you’re not frightened off by that rather stern introduction, then I must hasten to add that therehas never been a better time for building e-commerce functionality into your applications. By e-commerce I’m using an all-embracing term, because e-commerce covers a multitude of features; in fact, it extends over the entire process of buying and selling an item on the Web. If you considerwhat happens when you visit a site such as Amazon, with an intention to purchase something,there are several stages. First is the product catalog that displays the list of items from which youwant to make a purchase. Once you’ve chosen an item, it is moved into your shopping cart. Youcan choose to continue shopping and add more items, and once you’ve finished, you check out.After you check out, your order has to be processed. These kinds of questions have to be answeredwhen order processing: Is your item in stock? How long will it take to order if it isn’t? Whereshould it be delivered? Next comes the bit we all hate, getting the credit card out and supplyingdetails, checking that the number is valid, and the dates. The whole transaction should be secure.Then at last a summary and maybe an e-mail summarizing the details of the sale. ASP.NET 2.0introduces a terrific range of features to help you build a workable e-commerce solution for anyweb site.
Of course it isn’t possible to fully model every step of this process in just one chapter, and as withweb services entire books are devoted to this subject. Also, it just isn’t practical to set up a creditcard–handling facility for the sake of testing one chapter. However, with the new features thatASP.NET 2.0 brings you can create a product catalog, a shopping cart, and a checkout system, youcan update the stock details and product catalog, get users to enter their details, and see how youwould handle real credit card details. This should give you a strong overview of how you can addthe capability to buy and sell items from your web site, and although it is something to be wary of
16_588508 ch13.qxd 10/10/05 6:33 PM Page 465

and treated very seriously, it isn’t something to be scared of adding, because ASP.NET 2.0 makes it sim-pler than ever before.
This chapter looks at the following:
❑ The typical process involved in an e-commerce transaction
❑ Creating a product catalog
❑ Creating a shopping cart and remembering which items you have in it
❑ Completing an e-commerce transaction and checkout
❑ What you’d need to do to process the order
❑ The considerations involved in credit card–handling
❑ Conducting secure transactions
The E-Commerce PipelineThe once-common term pipeline is used to describe the whole e-commerce process, from browsing forparticular products all the way through to having the product or products in your hand. Although theterm has fallen out of the common vernacular slightly, it’s one that we use here because it accuratelyreflects what is going on. Although different businesses may have different variations on the pipeline, it remains fundamentally similar for most web sites. A typical e-commerce pipeline might look likeFigure 13-1.
Figure 13-1
It’s referred to as a pipeline because the next stage is dependent on the last and you have to pass thedetails through each stage. So like water flowing from a reservoir, through the pipes, to your faucet, here it’s the same with the product. You select a product, you add that product to the shopping cart, you check out with that selected product, you get a total price for the product you want to purchase, youpay for the product, you get confirmation of that purchase, and then hopefully, all being well, the prod-uct is sent to you. At any stage of the pipeline, you must be able to halt the transaction, with the minimumof hassle. The only moment the transaction becomes irrevocable is when you hit “Confirm Purchase.”Even then, you should be able to return the product to the shop if you ordered the wrong one, or youjust plain don’t like it. However, we’re not going to go to quite to that extreme level of detail; you shouldget the idea.
The Wrox United web site already has a fully formed pipeline, and what you’re going to do in this chapter is rebuild the pipeline from the ground up, step by step, right from the initial design, and learnabout the decisions that need to be made as it is built. You should see that e-commerce isn’t just about
Browse the
Product Catalog
Add an Item
to the cart
Checkout Process the
Order
Take the Credit
Card Details
Confirm
Purchase & Send
466
Chapter 13
16_588508 ch13.qxd 10/10/05 6:33 PM Page 466

programming a solution, but it’s about design, layout, and taking into account the customer’s needs andrequirements. This chapter spends a lot of time away from the programming “factory floor” talkingabout these needs, too.
The Product CatalogThis chapter starts at the beginning with the Product catalog. Catalog is the commonly accepted term foran online version of a store’s brochure. It is the one rare occasion where jargon hasn’t gotten involved tocomplicate matters, because the word describes perfectly what it does. Every e-commerce site dependsupon its catalog; it’s the place from which customers will pick and choose which items to buy, and placethem in the shopping cart. Wrox United is no different in this respect.
The Structure of the CatalogThe first question should be, “What are we going to sell?” The Wrox United team, like most franchises,has its own range of branded items, and you want to make all of them available on the web site for thepublic to buy. The current Wrox United product range looks like this:
❑ Scarf (plain edition or stripey edition)
❑ Car Sticker
❑ Lucky Mascot
❑ Large Flag (for at the match)
❑ Fan Club Membership
❑ Replica Kit (Home and Away)
❑ Small Flag (for the car)
❑ Mouse pad
❑ Hat
❑ Bug
Already you can see that there might be different categories of items that you might need to differentiatebetween in your catalog, such as a Home Replica Kit and an Away Replica Kit. However, the productrange is small, boasting just ten different items, so you can make the decision not to subdivide the cata-log into different categories, because you should be able to display the details on just one page, and treatthem all as individual items.
The Design of the CatalogHaving sorted out what you’re going to sell, the next question is, “What should our customers want to seewhen they come to purchase an item?” Because there are only ten items on display, you’ll do your best tomake sure that all of the items are displayed together on one page. That means cramming in a lot on justone page, so you can use a grid to lay them out and try to get away with not adding too much to the page.
467
E-Commerce
16_588508 ch13.qxd 10/10/05 6:33 PM Page 467

For the Wrox United products, perhaps the absolute minimum you could offer is as follows:
❑ Product image
❑ Product title
❑ Price
Behind the scenes you’ll also need to make sure that you can uniquely identify each product you offer,so you’ll need a Product ID as well. When customers come to examine a product, they’ll probably wantto know a little more about it, such as Product Description, but you can deal with this on a separate pagededicated to the item.
In addition to this, you could also consider a wider set of attributes that you might want listed for eachproduct, such as how many products are currently in stock, how long they will take to deliver, the releasedate of the product, customer reviews/testimonials to how wonderful/appalling the product is, andeven a cross-linking reference that mentions which other items customers had purchased when theypurchased this item.
For Wrox United, this is all complete overkill; there are only so many things you can say about a flag.However, you should be able to see that what you will require in the database will be specific to yourparticular business. For Wrox United, it’s easy to settle on the aforementioned five fields (Image, Title,Price, Description, and for behind the scenes, the unique Product ID). Normally, the first stage would beto build or alter the database to add these categories, but all of them are already contained within theProducts table of the database, so you don’t need to add anything else to it. You’ve got a structure of thecatalog and you’ve got a design, and a database that supports it, so you can proceed straight to the nextstage and implement it.
Implementation of the CatalogThe product catalog actually breaks down into two pages: one is like an index of all the products in yourcatalog and the second is the page that shows particular details about the item. In this Try It Out youstart by building the product catalog.
Try It Out Building an Index Page for the Catalog1. Open Visual Web Developer and open the C:\BegASPNET\Chapters\Begin\Chapter13 web
site. Open the blank wroxshop.aspx page.
2. First you’ll add some controls. Drag a SqlDataSource control from the Data menu of theToolbox into Design View of the page, and click the Common Tasks Menu that appears (see Figure 13-2).
3. Click Configure Data Source from the Tasks panel that appears, and then click New Connection inthe dialog that appears. Select WroxUnitedConnectionString (which is already automaticallyconfigured, as indeed connection strings are for all databases found within the App_Datafolder), as shown in Figure 13-3.
468
Chapter 13
16_588508 ch13.qxd 10/10/05 6:33 PM Page 468

Figure 13-2
Figure 13-3
469
E-Commerce
16_588508 ch13.qxd 10/10/05 6:33 PM Page 469

4. Click Next and then click Next again on the page that asks you whether you want to save theConnectionString to app.config (it doesn’t matter either way). From the Configure the SelectStatement dialog that appears, you need to select the Products table and all of the fields con-tained within it, as shown in Figure 13-4.
Figure 13-4
5. Click Next. Test the query to make sure it retrieves the data and then, click Finish, which takesyou back to Design View.
6. Now you need to add a second control to your page. From the Data menu of the Toolbox, selectthe DataList control. Click the smart tag dialog box that appears. From the Choose DataSource drop-down list option, select SqlDataSource1, as shown in Figure 13-5.
7. Click the smart tag dialog box above the DataList control and select Edit Templates. Chapter 7looked at the process of editing an ItemTemplate if you need a quick reminder. Figure 13-6 showsyour default layout.
8. This ensuing layout needs a bit of rejigging to be suitable for displaying a catalog. First delete all of the explanatory text, such as Name: and Description:, using the Backspace key. Also, youdon’t need to display all of the items from the Products table; in fact, you only need a picture ofthe item, its price, and its name on the catalog page, as agreed upon in the design. Delete theProduct ID and Description and move the Picture URL to the top. You can drag and drop theLabel controls to order them correctly, as shown in Figure 13-7.
470
Chapter 13
16_588508 ch13.qxd 10/10/05 6:33 PM Page 470

Figure 13-5
Figure 13-6
Figure 13-7
471
E-Commerce
16_588508 ch13.qxd 10/10/05 6:33 PM Page 471

9. Next, delete the PictureURL label, because you want to display an image here rather than alabel. Select ImageButton from the menu and drag it across to where the PictureURLLabelwas. A red cross and the smart tag dialog box with the legend Edit Data Bindings should appear(see Figure 13-8). (You saw in Chapter 7 how to do this, but it delved directly into the code,whereas here you’re using the wizard.)
Figure 13-8
10. Select Edit Data bindings and then select the Custom binding radio button, and you need toamend the Code expression box so that it reads:
Eval (“PictureURL”,”ProductImages\thumb_{0}”)
Figure 13-9 shows how everything should look.
Figure 13-9
11. Click OK. Next, select the smart tag dialog box that appears next to PriceLabel and select EditDataBindings (see Figure 13-10). This time select the Text property under Bindable properties,and select the Currency option from the Format drop-down list.
12. Click OK. You have a couple of final tasks to perform. Go to the common tasks dialog and select‘End Template Editing’. Next click the smart tag dialog box by the DataList control and selectProperty builder. Set the Columns to 4 and change the Direction from Vertical to Horizontal, asshown in Figure 13-11.
472
Chapter 13
16_588508 ch13.qxd 10/10/05 6:33 PM Page 472

Figure 13-10
Figure 13-11
13. You’ve now finished the layout of the catalog. Run the project and view the catalog. It shouldlook like Figure 13-12.
473
E-Commerce
16_588508 ch13.qxd 10/10/05 6:33 PM Page 473

Figure 13-12
How It WorksYou’ve created a catalog that pretty much resembles the one on the Wrox United web site. You’ve createdyour images as image buttons, which will eventually act as links to the individual product item page. If you click an image, it doesn’t take you anywhere (yet), but in all other respects it is the same as theexample site. In this Try It Out two controls do the work. If you go back to Visual Web Developer andview the source for this page you will see the following code:
<asp:SqlDataSource ID=”SqlDataSource1” runat=”server” ConnectionString=”<%$ConnectionStrings:WroxUnitedConnectionString %>” SelectCommand=”SELECT [Name],[Description], [Price], [ProductID], [PictureURL] FROM [Products]”></asp:SqlDataSource>
<asp:DataList ID=”DataList1” runat=”server” DataKeyField=”ProductID” DataSourceID=”SqlDataSource1” RepeatColumns=”4” RepeatDirection=”Horizontal” Width=”48px”>
<ItemTemplate><asp:ImageButton ID=”ImageButton1” runat=”server” ImageUrl=’<%# Eval(“PictureURL”, “ProductImages\thumb_{0}”) %>’ /><br />
<asp:Label ID=”NameLabel” runat=”server” Text=’<%# Eval(“Name”)%>’></asp:Label><br />
474
Chapter 13
16_588508 ch13.qxd 10/10/05 6:33 PM Page 474

<asp:Label ID=”PriceLabel” runat=”server” Text=’<%# Eval(“Price”, “{0:C}”) %>’></asp:Label>
</ItemTemplate></asp:DataList>
The first control, SqlDataSource1, is the one that sources your catalog. The details of what is for sale in the Wrox United web site are stored in the Products table. It contains the connection string enablingyou to connect to the database, and also a SelectCommand attribute that specifies the SQL that willpluck the Name, Description, Price, ProductID, and the URL of the image from the Products table. TheSqlDataSource on its own doesn’t display anything, though; it needs the DataList to do this for it.
The DataList contains three controls as well as the formatting needed to display your catalog correctly.You started by replacing the Label control contained for PictureURL with an Image button. You didthis because a label would just have displayed the text URL of the image, such as ProductImages\Item1.gif, if you hadn’t. Secondly, you chose an ImageButton in place of an image because you neededa link to the product item page. Rather than having to move or re-create this folder of product images,we have placed it in the web site folder already, and all you’ve had to do is reference it as follows:
Eval(“PictureURL”, “ProductImages\thumb_{0}”)
The data-binding expression has two parameters: the first is the name of the field from the Products tableyou want to bind to your image button and the second is the contents of the field itself (indicated by{0}). You altered the second parameter so that it pointed to the ProductImages folder. Then you placed“thumb_”, which indicates that you don’t want to use a full-sized image, but instead a thumbnail of theimage for the catalog.
You used labels for the other two items in the catalog, because you only needed to display text, but foryour price you changed the format so that it displayed it in currency format as $0.00, rather than just0.0000. Last, you altered the layout so that it displayed the items in a horizontal grid format, four acrossin each row.
The Product Item PageIn our design discussion we talked about all the possible features you might want to add to a specificproduct page, but settled on only really needing an enhanced description of the product. Of course youritem page shouldn’t contain any less information about the product than the catalog, so you will need todisplay the name, image, and price in addition to the description. You add that to your web site in thefollowing Try It Out.
Try It Out Building a Product Page for the Catalog1. Go to Solution Explorer, right-click the top item in it, and select Add New Item. Add a new Web
Form and call it WroxShopItem.aspx.
2. Once again you need the SqlDataSource and DataList controls. In Design View, drag aSqlDataSource control from the Data section of the Toolbox.
3. Click the Configure Data Source flyout and select the WroxUnitedConnectionString from thedrop-down list in the Choose your Data Connection dialog that appears.
4. Click Next and, as with the previous Try It Out, select the Products table and select each of theitems within it, as shown in Figure 13-13.
475
E-Commerce
16_588508 ch13.qxd 10/10/05 6:33 PM Page 475

Figure 13-13
5. This time click WHERE. You will be presented with the screen depicted in Figure 13-14. SelectProductID from the Column drop-down list; select QueryString from the Source drop-down list; and type in ProductID to the QueryString field, leaving the Default value blank. This stepallows you to hone in on your single selected product. You use the filter clause to match theproduct ID of the selected product and therefore only show details about that particular prod-uct. Click Add.
6. Click OK, and then Next and Finish to return to Design View.
7. Add a DataList control and click Configure DataSource and select SqlDataSource1 from theChoose Data Source drop-down list.
8. Next, click Edit Templates from the list, and once again delete all the text alongside the labels.Move the PictureURL label to the top. This time only remove the product ID label, so that itnow looks like Figure 13-15.
9. Right-click PictureURLLabel and select Properties. Change the Visible property to false. You’regoing to need the URL, but you don’t want it displayed on the screen. The PictureURLLabel isused to provide the URL of where to find the image of your product, however you don’t want theactual URL text displayed, but rather the image itself.
10. Next, in Design View add an Image control from the Standard section of the Toolbox.
11. Click the smart tag dialog box next to the Image control and select Edit Data Bindings.
12. In the dialog that appears, click Custom bindings and amend the text so that it reads (slightlydifferently from the last Try It Out, because you want a full-sized version of the image, not athumbnail) as follows:
Eval(“PictureURL”, “ProductImages\{0}”)
476
Chapter 13
16_588508 ch13.qxd 10/10/05 6:33 PM Page 476

Figure 13-14
Figure 13-15
13. Click OK, and then go to Price Label and select the Edit Data Bindings option from the menuthat appears when you click the black arrow. Enter the following code in the Custom bindingsdrop-down list box:
Eval(“Price”, “{0:##0.00}”)
14. Click OK. In Design View, select Hyperlink from the Standard section of the Toolbox menu andplace it below the DataList control, as shown in Figure 13-16.
15. Right-click HyperLink and select the Properties option. Change the Text property so it readsReturn to Shop, and change the NavigateURL property so that it reads ~/WroxShop.aspx, asshown in Figure 13-17. Alternately, the reader can click the ellipsis button in the NavigateURLproperty box and choose wroxshop from there.
This is slightly different from before, because you want to use the currency format,but currency format adds a $ symbol, and you want to use this value in your codelater, so you don’t want to include the $ symbol in the label.
477
E-Commerce
16_588508 ch13.qxd 10/10/05 6:33 PM Page 477

Figure 13-16
Figure 13-17
16. Close the Properties window, and go to Design View in the first page you created(WroxShop.aspx).
478
Chapter 13
16_588508 ch13.qxd 10/10/05 6:33 PM Page 478

17. Select the DataList control underneath SqlDataSource1. From the smart tag dialog box thatappears select Edit Templates ➪ Item Template.
18. Go to the Image Button (the graphic with the red cross), click the smart tag dialog box, andselect Edit Data Bindings in the dialog that appears.
19. Click Show All Properties and select PostbackURL. Check the Custom bindings and change it sothat it reads as follows:
Eval”ProductID”,”WroxShopItem.aspx?ProductID={0}”
20. Run the application from WroxShop.aspx and click the Scarf image. You should see whatappears in Figure 13-18.
Figure 13-18
If you click Return to Shop and go back and select another image, you will get details about thatproduct, too.
How It WorksThe Product Item page is put together in much the same way as the Product Catalog, the main differencebeing that instead of all of the items being viewed, you only want to look at the details of a single item. Ifyou view the source, you will once again see that it is comprised of the SqlDataSource and DataListcontrols:
<form id=”form1” runat=”server”><div>
<asp:SqlDataSource ID=”SqlDataSource1” runat=”server” ConnectionString=”<%$ ConnectionStrings:WroxUnitedConnectionString %>”
479
E-Commerce
16_588508 ch13.qxd 10/10/05 6:33 PM Page 479

SelectCommand=”SELECT DISTINCT [ProductID], [Name], [Description], [Price], [PictureURL] FROM [Products] WHERE ([ProductID] = @ProductID)”>
<SelectParameters><asp:QueryStringParameter Name=”ProductID” QueryStringField=”ProductID” Type=”Int32” />
</SelectParameters></asp:SqlDataSource>
</div><asp:DataList ID=”DataList1” runat=”server” DataKeyField=”ProductID” DataSourceID=”SqlDataSource1”>
<ItemTemplate><asp:Label visible=”false” ID=”PictureURL”
Text=’<%#Eval(“PictureURL”)%>’ /><asp:Image ID=”Image1” runat=”server” ImageUrl=’<%#
Eval(“PictureURL”, “ProductImages\{0}”) %>’ /><br /><asp:Label ID=”NameLabel” runat=”server” Text=’<%# Eval(“Name”) %>’></asp:Label><br />
<asp:Label ID=”DescriptionLabel” runat=”server” Text=’<%# Eval(“Description”) %>’>
</asp:Label><br /><asp:Label ID=”PriceLabel” runat=”server” Text=’<%# Eval(“Price”, “{0:##0.00}”) %>’></asp:Label><br /><br /><br />
</ItemTemplate></asp:DataList><asp:HyperLink ID=”HyperLink1” runat=”server” NavigateUrl=”~/WroxShop.aspx”>Return to Shop</asp:HyperLink>
</form>
The difference is that this time the SqlDataSource’s SelectCommand attribute has an extra WHERE clause:
SelectCommand=”SELECT DISTINCT [ProductID], [Name], [Description], [Price], [PictureURL] FROM [Products] WHERE ([ProductID] = @ProductID)”
This references a ProductID parameter. Underneath this element the SqlDataSource1 also contains aSelectParameters element, which specifies where you are going to get the parameter from:
<SelectParameters><asp:QueryStringParameter Name=”ProductID” QueryStringField=”ProductID” Type=”Int32” />
</SelectParameters>
These parameters are used to transfer the details across about which item you have clicked on. This iswhere the hidden ProductID comes into play. You haven’t used it so far, but now you most definitelyneed it. Each item in your catalog has a unique identifier, this being ProductID. You collect ProductIDwhen the image is collected and send it as a QueryString as follows:
http://localhost/Chapter13/WroxShopItem.aspx?ProductID=1
Then your second page (WroxShopItem.aspx) is able to pick that up and use that in the WHERE clause of the SELECT command of the SqlDataSource control to return the details of that single item. The
480
Chapter 13
16_588508 ch13.qxd 10/10/05 6:33 PM Page 480

DataList control of WroxShopItem is incredibly similar to the WroxShop DataList control. The onlytwo changes are that instead of referencing the thumbnail version of the image, you just use the wholeversion of the image. Space is no longer such an essential here, because you don’t have to worry aboutnine other items. The second change is that you have added the Description from the Products table asan extra label. You’ve also used the PictureURL from PictureURLLabel as a URL for your <asp:Image>control that you use to display the merchandise. Apart from that, it is business as usual.
You’re actually quite a distance into this chapter and so far you haven’t created anything totally specificto e-commerce. I’m not deliberately playing a waiting game here; the problem is that without a catalogand a set of items, you have nothing to put into your cart. The order in which you create things is quiteessential. Now that you have a catalog and the ability to browse specific items in the catalog, it’s at lasttime to wheel out your shopping cart.
The Shopping CartThe shopping cart is a simple enough control in principle, but until ASP.NET 2.0, it has been an awk-ward feature to create. The simple reason is this — how do you go about remembering which items are stored in the cart? The quick answer is state. State management, though, has never been quite asstraightforward as it perhaps should be. Chapter 14 looks at sessions and state in greater detail, but weneed to talk about it briefly here.
It’s not new feature and to be fair it’s been going on behind the scenes throughout this book, becauseevery page contains a ViewState control that holds an encrypted version of each page’s control con-tents. However, this is squared against the fact that the Internet is stateless, and so every time you movefrom page to page, the web server acts like a goldfish — asking the same question, “Who are you?” Soyou must do the remembering for the web server.
Previously in ASP.NET 1.1 you could go about remembering the items in the cart in one of two commonways. Either you could create a cart and stick the whole contents of the cart in a Session object, andlose the list of items every time someone logged out and back in again, or alternatively you could createa shopping cart item in the database, and then be tied to updating the database each time you addedsomething to the cart. The advantage of the second approach is of course that if you lost your Internetconnection suddenly when you came to log back in, you would still have the contents of the cart. This isparticularly useful if you’ve just spent an hour assembling the weekly shop, only to have to endure yourISP’s 0.01% downtime at that crucial point. Of course, the first approach could make use of cookies sothat it could link back to your shopping cart if you logged on again, but then this would rely on a wholemembership system, so you can see how suddenly your nice small shopping cart becomes a ratherlarger and more complex shopping cart and membership system.
ASP.NET 2.0 is able to take some of the advantages from both approaches (remembering the state betweenconnections) while leaving at home some of the awkwardness (constant database access, needing to logon as a member before you can use the shopping cart). It does this by making use of the new profiles features that you looked at in Chapter 11. You’ll see how you can use this as you come to build your shopping cart control. First, though, you need to build the object that is going to form the foundations ofyour shopping cart’s memory.
481
E-Commerce
16_588508 ch13.qxd 10/10/05 6:33 PM Page 481

The Shopping ObjectYou’re going to create an object that can store your items. You need to start once again at the drawingboard by creating a design. The first thing to mention is that your shopping object needs to look aftertwo things: the items in the cart and the cart itself. Therefore, you’re going to need two objects:
❑ CartItem
❑ ShoppingCart
Both merit some more in-depth discussion as to what is required.
The CartItem ObjectThe CartItem object is easiest. Design is often just a case of sitting down with pen and paper and tryingto imagine what you as a user would require from a site. A second option is to look at what everyoneelse is doing. However, it’s probably best to just stick to the pen and paper option when brainstorming,because what you might require from a site might be unduly influenced by you looking at other ven-dors’ sites. So you’re going to have a quick think now. It doesn’t matter if you don’t get it absolutelyright the first time, because you can amend it as you go along.
With your shopping cart a good first stab would be the following list of attributes:
❑ A representation of the item
❑ The quantity of the item
❑ The price of the item
❑ The total price
For the representation of the item, you could quite easily use the title or the description of the item, butgiven that you have some thumbnail pictures at hand, it would be nice to use them as well. In your cartyou can start with the name and a link to the image of the item purchased. The quantity and the priceare both self-explanatory enough. However, the total price needs a little expanding. You could have atotal price as follows:
Item Quantity Price
Scarf 2 $4.95
Bug 2 $0.75
Total Price $11.40
It looks a little strange. That’s because you’re immediately totalling the $4.95 and the 75 cents, and theydon’t add up to make $11.40. So as well as the total price, it might be better to do it spreadsheet style andtotal the price and the quantity first and create a total for each line, as shown in the following table:
482
Chapter 13
16_588508 ch13.qxd 10/10/05 6:33 PM Page 482

Item Quantity Price Item Total
Scarf 2 $4.95 $9.90
Bug 2 $0.75 $1.50
Total Price $11.40
So you can now add line total to the list of attributes you want to store. I think that’s as much as youneed for each CartItem, so let’s move onto the ShoppingCart.
The WroxShoppingCart ObjectThe CartItem object was the easiest, because it’s fairly static in its conception. Either you have a CartItemobject or you don’t, unless you prescribe to some sort of parallel universe theory where you can haveboth at the same time. However, computing is quite complicated enough already without parallel uni-verses to think about, too! The reason the WroxShoppingCart object is more complex is because it willcomprise one or several items in the cart. So you immediately need somewhere to store a stack of cartitems in your object. Rather than a warehouse or a shopping trolley, you can use the collections talkedabout in Chapter 9 to do this.
This also raises other questions, namely how do you differentiate between different items in the cart, andhow do you maintain some sort of order with them? The answer is to add an index, so that, for example,if you add a scarf and that is item 1 in the cart, and then you add a bug, that becomes item 2 in the cart.
Your cart will also need to deal with the set of possible actions that you can perform on the contents ofthe cart. Briefly the most common actions you might perform on a shopping cart are as follows:
❑ Adding an item to the cart
❑ Updating the information about an item in the cart
❑ Updating the total price of all of the items in the cart
❑ Deleting an item from the cart
You will need to handle these four actions. Last, because you are keeping a record of all of the itemswithin the cart, it might be easier to move the total purchase price across to this object instead. This isjust the kind of amendment we talked about earlier when creating a design. Better to discover it now,than when you’ve actually created it. So the cart item collection; an index; the add, update, and deleteactions; and a final total are all the things you are going to have build into your ShoppingCart object.
Now that you’ve got an outline of what you need to store, in this Try It Out you build the object to store it.
Try It Out Building the WroxShoppingCart Object1. Go to Solution Explorer, right-click the top item, and select Add New Item. Choose Class and
call it Shopping.vb.
2. Click OK. Visual Web Developer will inform you with a dialog that you are attempting to add aclass to an ASP.NET application and that it should be moved to the App_Code folder to be gen-erally consumable. Click Yes to accept this proposition.
483
E-Commerce
16_588508 ch13.qxd 10/10/05 6:33 PM Page 483

3. Add the following code to create a shopping cart item object, called CartItem:
Imports Microsoft.VisualBasicImports System.DataImports System.Data.SqlClientImports System.Collections.Generic
Namespace Wrox.Commerce
<Serializable()> _Public Class CartItem
Private _productID As IntegerPrivate _productName As StringPrivate _productImageUrl As StringPrivate _quantity As IntegerPrivate _price As DoublePrivate _lineTotal As Double
Public Sub New()End Sub
Public Sub New(ByVal ProductID As Integer, ByVal ProductName As String, _ByVal ProductImageUrl As String, ByVal Quantity As Integer, _ByVal Price As Double)
_productID = ProductID_productName = ProductName_productImageUrl = ProductImageUrl_quantity = Quantity_price = Price_lineTotal = Quantity * Price
End Sub
Public Property ProductID() As IntegerGet
Return _productIDEnd GetSet(ByVal value As Integer)
_productID = valueEnd Set
End Property
Public Property ProductName() As StringGet
Return _productNameEnd GetSet(ByVal value As String)
_productName = valueEnd Set
End Property
Public Property ProductImageUrl() As StringGet
Return _productImageUrl
484
Chapter 13
16_588508 ch13.qxd 10/10/05 6:33 PM Page 484

End GetSet(ByVal value As String)
_productImageUrl = valueEnd Set
End Property
Public Property Quantity() As IntegerGet
Return _quantityEnd GetSet(ByVal value As Integer)
_quantity = valueEnd Set
End Property
Public Property Price() As DoubleGet
Return _priceEnd GetSet(ByVal value As Double)
_price = valueEnd Set
End Property
Public ReadOnly Property LineTotal() As DoubleGet
Return _quantity * _priceEnd Get
End Property
End Class
4. Underneath the CartItem class add the following code to create the WroxShoppingCart object:
<Serializable()> _Public Class WroxShoppingCart
Private _dateCreated As DateTimePrivate _lastUpdate As DateTimePrivate _items As List(Of CartItem)
Public Sub New()_items = New List(Of CartItem)_dateCreated = DateTime.Now
End Sub
Public Property Items() As List(Of CartItem)Get
Return _itemsEnd GetSet(ByVal value As List(Of CartItem))
_items = valueEnd Set
485
E-Commerce
16_588508 ch13.qxd 10/10/05 6:33 PM Page 485

End Property
Public Sub Insert(ByVal ProductID As Integer, ByVal Price As Double, _ByVal Quantity As Integer, ByVal ProductName As String, _ByVal ProductImageUrl As String)
Dim ItemIndex As Integer = ItemIndexOfID(ProductID)If ItemIndex = -1 Then
Dim NewItem As New CartItem()NewItem.ProductID = ProductIDNewItem.Quantity = QuantityNewItem.Price = PriceNewItem.ProductName = ProductNameNewItem.ProductImageUrl = ProductImageUrl_items.Add(NewItem)
Else_items(ItemIndex).Quantity += 1
End If_lastUpdate = DateTime.Now()
End Sub
Public Sub Update(ByVal RowID As Integer, ByVal ProductID As Integer, _ByVal Quantity As Integer, ByVal Price As Double)
Dim Item As CartItem = _items(RowID)Item.ProductID = ProductIDItem.Quantity = QuantityItem.Price = Price_lastUpdate = DateTime.Now()
End Sub
Public Sub DeleteItem(ByVal rowID As Integer)_items.RemoveAt(rowID)_lastUpdate = DateTime.Now()
End Sub
Private Function ItemIndexOfID(ByVal ProductID As Integer) As IntegerDim index As IntegerFor Each item As CartItem In _items
If item.ProductID = ProductID ThenReturn index
End Ifindex += 1
NextReturn -1
End Function
Public ReadOnly Property Total() As DoubleGet
Dim t As Double
If _items Is Nothing ThenReturn 0
End If
For Each Item As CartItem In _itemst += Item.LineTotal
486
Chapter 13
16_588508 ch13.qxd 10/10/05 6:33 PM Page 486

Next
Return tEnd Get
End Property End Class
End Namespace
5. Save this page. Unfortunately there’s nothing you can do with the class until you come toinstantiate an instance of the object, so there’s nothing to see just yet.
How It WorksThe WroxShoppingCart class provides you with an object that you can just insert into your code. Youstart by defining both objects as being in the Namespace Wrox.Commerce. This means that you caninsert them into any page by using the following reference at the top of a page:
<%@ Imports Namespace = “Wrox.Commerce” %>
This reference enables you to make use of all of the properties and methods within the ShoppingCartobject. There is a lot of code here within the object, so let’s briefly skip through what is happening witheach object inside the ShoppingCart object.
The CartItem is just a series of properties to store each of the cart attributes in. You define a set of pri-vate variables that represent each of the items in your CartItem object. On top of the five previouslymentioned, the productID is also there so you can uniquely identify the type of item:
Private _productID As IntegerPrivate _productName As StringPrivate _productImageUrl As StringPrivate _quantity As IntegerPrivate _price As DoublePrivate _lineTotal As Double
The productID attribute is an integer, because it stores your unique identifier. The productName attributeis text, so you store that as a String. Next comes the productImageUrl attribute, and rather than store aphysical image, you store a URL of the location where you can find that image (thus saving you having tophysically store the images in the database), and so that is also stored as Text. The quantity attribute isalso stored as an Integer, because it is impossible to have a fraction of an item (Wrox United doesn’t sellhalf a scarf, or a bug with two legs). The price attribute, however, is a representation of currency, sothat requires a Double data type because you will be dealing with fractions, and because the lineTotalattribute is made from quantity multiplied by price, that must also be a Double data type.
Each of these attributes must be both readable and writable, so you create a set of properties for each inthis format, using the ProductID() property as an example:
Public Property ProductID() As IntegerGet
Return _productIDEnd GetSet(ByVal value As Integer)
_productID = valueEnd Set
End Property
487
E-Commerce
16_588508 ch13.qxd 10/10/05 6:33 PM Page 487

Each one of the properties takes this format with both Get and Set constructors, referencing the vari-ables you defined at the top of the ShoppingCart definition. The only one that is any different is theLineTotal() property, which is a multiplication of the quantity and price properties. You don’twant anyone to be able to alter this because you change it yourself, so it only has a Get part:
Public ReadOnly Property LineTotal() As DoubleGet
Return _quantity * _priceEnd Get
End Property
That sums up the entire CartItem object. The WroxShoppingCart object is a little trickier. Because youare constantly updating your shopping cart, you need to keep a track of when it was created and when itwas last updated. You start by defining a couple of variables that do this for you:
Private _dateCreated As DateTimePrivate _lastUpdate As DateTime
These two variables store the time at which the WroxShoppingCart object was created and the time atwhich it was last updated. Next you create the collection. The collection is a List object and it contains a list of CartItem objects. You create a New() method that you can call in your code, to create a newinstance of a shopping cart:
Public Sub New()_items = New List(Of CartItem)_dateCreated = DateTime.Now
End Sub
You create a property called Items in which to store your List of CartItems:
Public Property Items() As List(Of CartItem)Get
Return _itemsEnd GetSet(ByVal value As List(Of CartItem))
_items = valueEnd Set
End Property
Then you come to your three actions, which you code as methods. The first method insert requires allthe information that your cart requires, namely ProductID, Quantity, Price, ProductName, and theProductImageUrl:
Public Sub Insert(ByVal ProductID As Integer, ByVal Price As Double, _ByVal Quantity As Integer, ByVal ProductName As String, _ByVal ProductImageUrl As String)
Dim ItemIndex As Integer = ItemIndexOfID(ProductID)If ItemIndex = -1 Then
Dim NewItem As New CartItem()NewItem.ProductID = ProductIDNewItem.Quantity = QuantityNewItem.Price = PriceNewItem.ProductName = ProductName
488
Chapter 13
16_588508 ch13.qxd 10/10/05 6:33 PM Page 488

NewItem.ProductImageUrl = ProductImageUrl_items.Add(NewItem)
Else_items(ItemIndex).Quantity += 1
End If_lastUpdate = DateTime.Now()
End Sub
When you add a new item into the cart (the Insert method), you need to create an index to track this. If the index is –1, you know that item is not already present in the cart, and you need to create a new cartitem with the accompanying ProductID, Quantity, Price, ProductName, and ProductImageUrldetails. If it is present, you just need to add one to the quantity. Because you have just made the lastupdate to the cart, you also need to record this in the lastUpdate variable and use theDateTime.Now() function to record the current date and time.
The Update action is in fact just a recalculation of Price; as mentioned earlier, Quantity is the onlyitem you can actually change when you update the cart details. (If you think about it this makes totalsense, because you can’t have the customers updating the price, or the product name or description anyway.) The quantity affects the price.
Public Sub Update(ByVal RowID As Integer, ByVal ProductID As Integer, _ByVal Quantity As Integer, ByVal Price As Double)
Dim Item As CartItem = _items(RowID)Item.ProductID = ProductIDItem.Quantity = QuantityItem.Price = Price_lastUpdate = DateTime.Now()
End Sub
You identify the item once again using the index, and you read the ProductID, the Quantity, and the Price from the CartItem collection, and set it to the new Quantity for your chosen product. Youupdate the time the cart was updated as well.
You’ve looked at the Update and Insert methods, so that just leaves the question of how customers canremove items from the cart. This is done via the Delete method. The Delete method is the simplest ofthe three; all you need to do is use the index to identify which item has been selected for deletion andremove it with the RemoveAt method. You also set the _lastUpdate variable to contain the currenttime, because you have just updated the cart by deleting an item from it:
Public Sub DeleteItem(ByVal rowID As Integer)_items.RemoveAt(rowID)_lastUpdate = DateTime.Now()
End Sub
Under the Insert, Update, and DeleteItem methods is the index property. The index property is asfollows:
Private Function ItemIndexOfID(ByVal ProductID As Integer) As IntegerDim index As IntegerFor Each item As CartItem In _items
If item.ProductID = ProductID ThenReturn index
489
E-Commerce
16_588508 ch13.qxd 10/10/05 6:33 PM Page 489

End Ifindex += 1
NextReturn -1
End Function
The index, which is used to identify each item in the cart, stores each product’s Product ID. If the firstitem in the cart was a scarf, then the first item in the index will contain the scarf’s ProductID. If youhaven’t got a ProductID, you return -1 instead to indicate that this product is not currently in the cart,and that you need to create a CartItem object for it.
The Total comes last:
Public ReadOnly Property Total() As DoubleGet
Dim t As Double
If _items Is Nothing ThenReturn 0
End If
For Each Item As CartItem In _itemst += Item.LineTotal
Next
Return tEnd Get
End Property
It’s a fairly simple property too. If there are no items in your collection (you check this by seeing if it IsNothing) then you don’t have any arithmetic to do. Otherwise, you iterate through each Item in theCartItem collection, adding the LineTotal property on for that item and you return the total amountas the variable t.
The ProfileYou have your WroxShoppingCart object, which will act as the memory of the shopping cart, but thisstill doesn’t answer a key question — how are you going to keep this shopping cart if your user gets hisInternet connection violently terminated? In fact you’ve already looked at the solution to this in a previ-ous chapter.
In Chapter 11 you looked at how you can create a user profile and how it can be used to create a particularpersonalized view of the site for any user who logs on to the site. In particular, you stored the member’sname, address (including city, county, and country), e-mail, whether he wanted to receive mailings or not,and his particular theme of the site. It is via this capability that you can also store the ShoppingCartobject. Rather than getting you to create the whole profile, we’ve already provided it in the ready-to-goapp that is available for download from www.wrox.com for this chapter.
I can hear the wiseguys at the back now — so I see how to save the cart, but surely you still have to log in to get associated with your cart? That’s where the wiseguys are wrong. Another great new feature ofASP.NET is the capability to track seemingly anonymous users via the personalization and profiling sys-tem. If the wiseguys had been paying attention in Chapter 11, they would have known that!
490
Chapter 13
16_588508 ch13.qxd 10/10/05 6:33 PM Page 490

In Chapter 11 you saw how you could set up a template to handle anonymous users, and how you couldalso migrate the details from the anonymous person’s shopping cart to the bona fide logged-in user’sshopping cart. Now it’s time to fill in the other jigsaw pieces. How does this fit into the overall shoppingcart picture?
Well, you can set an attribute to track anonymous users so that even if they haven’t logged in, and havetheir connection to the application terminated, then when they come back they will still have their shop-ping cart contents intact. This is all contained within the Web.config file, which you have already par-tially predefined for the application in this chapter, so that your e-commerce application makes use ofchanges introduced to the Wrox United site in Chapter 11, and therefore requires a minimal amount ofextra code. You add that capability in the next Try It Out.
Try It Out Amending the Profile to Use the ShoppingCart Object1. In the Chapter13 application, go to Solution Explorer and open up the Web.config file. Scroll
down to find the <profile> element and add the highlighted code:
<anonymousIdentification enabled=”True”><profile enabled=”true”>
<properties><add name=”MemberName”/><add name=”Name”/><add name=”Address”/><add name=”City”/><add name=”County”/><add name=”PostCode”/><add name=”Country”/><add name=”Mailings” type=”System.Boolean”/><add name=”Email”/><add name=”Theme”/><add name=”Cart” serializeAs=”Binary”
type=”Wrox.Commerce.WroxShoppingCart” allowAnonymous=”true”/>
</properties></profile>
2. Save Web.config.
How It WorksBecause Web.config is used by your application, the simple act of saving any changes ensures that theupdate is immediately applied. You’ve only added two items. The first just switches on anonymousidentification, which is switched off by default:
<anonymousIdentification enabled=”True”>
The second is the cart definition:
<add name=”Cart” serializeAs=”Binary” type=”Wrox.Commerce.WroxShoppingCart” allowAnonymous=”true”/>
491
E-Commerce
16_588508 ch13.qxd 10/10/05 6:33 PM Page 491

You use the Type attribute to refer to the ShoppingCart object. You set the allowAnonymous attributeto true so that this particular property is tracked even when the user hasn’t logged in. Last, there is a bitof technical detail in the serializeAs property, which needn’t concern you. It simply enables you tomake use of your ShoppingCart object. You can find more details about it at http://msdn2.microsoft.com/library/46xzk8kd(en-us,vs.80).aspx.
The Shopping Cart ControlUnfortunately, among the multitude of new controls, there is no predefined shopping cart control thatyou can use, so you are going to have to create one. However, what you can do is make use of some ofthe existing ASP.NET 2.0 controls and you can construct a shopping cart control that you can not just usein this application, but in any application you come to build. In ASP.NET 2.0, the data handling featureshave taken a giant leap forward, and you can use the GridView control and some clever data-binding tocreate your shopping cart for you.
Before you rush into building the cart, though, it’s worth thinking a little bit more about design. Howare you going to access your cart? How are you going to display the items in it? The first question is easyenough to answer: You add a button to your product item page, which when clicked simply adds theitem to the cart. However, where should you go then? Rather than going to your shopping cart, youprobably want to return to your catalog. Shopping carts by nature should be unobtrusive; you don’twant to be confronted with the contents of your cart every time you stick an item in; this is probably notconducive to impulse buying (and by inference profitable selling)! It’s much easier only to be confrontedwith the contents once you get to checkout. So your system develops a structure like Figure 13-19.
Figure 13-19
This diagram shows how you can navigate between the different parts of your application. You canmove from the Product Catalog page, either to the Shopping Cart itself or to the Product Item page.From the Product Item page you can Add an Item, which in turn will appear in the Shopping Cart.
The second question, then, is about how you should display your shopping cart. If you were feelingextremely confident about the layout, you could probably have a little control pop up at the side thatappeared in every page of the site, but because you don’t want to have to spend a lot of time with thejigsaw puzzle of fitting things into your web site design, you’ll just make the shopping cart a separatepage that can be easily accessed via a separate link. You’ve already earmarked the GridView control todisplay the contents of your cart, so continue and build the next stage of your pipeline.
In this Try It Out, you create a user control, the Shopping Cart control, and then add it to a page. Theuser control is a lot more portable; you learned about them in Chapter 10 and how they help you toreuse code effectively.
Shopping Cart
Product Catalog Product Item Add an Item
492
Chapter 13
16_588508 ch13.qxd 10/10/05 6:33 PM Page 492

Try It Out Adding a Shopping Cart Control1. Open Solution Explorer in Visual Web Developer. Right-click the top item and select Add New
Item. Add a Web User Control and call it WroxShoppingCart.ascx.
2. In Design View, select the GridView control from the Data section of the Toolbox. Click thesmart tag dialog box and select the Edit Columns option.
3. From the dialog that appears, select one TemplateField, four BoundFields, and oneCommandField, as shown in Figure 13-20.
Figure 13-20
These will be used to represent the ProductImage, ProductName, Quantity, Price, andLineTotal (that is, quantity multiplied by price) of that particular item and a button to editthat item or to delete it from your shopping cart, respectively.
4. Select the BoundFields field and change the properties one by one in the Properties window asfollows:
DataField HeaderText ReadOnly DataFormatString
Bound Field 1 ProductName Product True
Bound Field 2 Quantity Quantity False
Bound Field 3 Price Price True {0:c}
Bound Field 4 LineTotal Total True {0:c}
Don’t click OK in between adding each item, which will take you back to Design View.
493
E-Commerce
16_588508 ch13.qxd 10/10/05 6:33 PM Page 493

5. Go to the CommandField and set the ShowEditButton and ShowDeleteButton properties toTrue.
6. Click OK to go back to Design View. Click the smart tag dialog box, and select Edit Templatesfrom the flyout that appears.
7. Now drop an Image control into the ItemTemplate and click the smart tag dialog box, as dis-played in Figure 13-21.
Figure 13-21
8. Select Edit Data Bindings and select ImageUrl from the Bindable properties. Add the followingcode to the Code Expression box:
Eval(“ProductImageUrl”, “~/ProductImages/thumb_{0}”)
9. Return to Design View and select the smart tag dialog box on the GridView control. Select EditTemplates ➪ EmptyDataTemplate from the menu that appears. Type the following text directlyinto the EmptyDataTemplate (see Figure 13-22): There is nothing in your shopping cart. Youcan buy items from the Shop.
Figure 13-22
Drop back to Source view and add an anchor <a> tag around the Shop section as follows:
<a href=”Wroxshop.aspx”>Shop</a>.
This is the text that will be displayed when the user views a shopping cart with no items in it.You supply a link back to the main shopping page as well.
10. Choose to End Template Editing from the Common Tasks panel
11. In Design View right-click the GridView control and select Properties. Enter the following values:
494
Chapter 13
16_588508 ch13.qxd 10/10/05 6:33 PM Page 494

Property Value
(ID) CartGrid
AutoGenerateColumns False
DataKeyNames ProductID
12. Right-click Solution Explorer and select Add a New Item. Select a Web Form and call the newitem WroxShoppingCartPage.aspx. Note that this is an .aspx file now unlike the user controlyou have just created. This is the page that will host your user control.
13. In Design View, drag WroxShoppingCart.ascx onto the page, as shown in Figure 13-23.
Figure 13-23
How It WorksThis finishes the first stage of your shopping cart control. You’ve created your control and you’ve addeda thumbnail image and fields to store the Quantity, Price, and LineTotal of the product, as well as abutton enabling you to edit or delete your choices in the cart.
If you go to Source View it will currently look as follows:
495
E-Commerce
16_588508 ch13.qxd 10/10/05 6:33 PM Page 495

<asp:GridView ID=”CartGrid” Runat=”server” AutoGenerateColumns=”False”DataKeyNames=”ProductID” >
<Columns><asp:TemplateField>
<ItemTemplate><asp:Image id=”ProductImage” Runat=”server” ImageUrl=’<%# Eval(“ProductImageURL”, “~/ProductImages/thumb_{0}”)%>’ />
</ItemTemplate></asp:TemplateField><asp:BoundField DataField=”ProductName” HeaderText=”Product” ReadOnly=”True” />
<asp:BoundField DataField=”Quantity” HeaderText=”Quantity” /><asp:BoundField DataField=”Price” HeaderText=”Price” DataFormatString=”{0:c}” ReadOnly=”True” />
<asp:BoundField DataField=”LineTotal” HeaderText=”Total” DataFormatString=”{0:c}” ReadOnly=”True” />
<asp:CommandField ShowEditButton=”True” ShowDeleteButton=”true”></asp:CommandField>
</Columns><EmptyDataTemplate>
There is nothing in your shopping cart. You can buy items from the <a href=”wroxshop.aspx”>Shop</a>.
</EmptyDataTemplate></asp:GridView>
This is all very familiar and close to what you supplied to the DataList controls in your Catalog and Itempages. You bind the ProductImageURL to an image in the ItemTemplate. You have several bound fieldsthat will display text. The price fields have settings for the DataFormatString so that they display theirvalues correctly as prices. However, there is one setting to note. In your bound fields, you made three of thefour rows read-only. The Quantity row was left editable so that you can edit the contents of your cart.
You’ve also added an EmptyDataTemplate to display a message in the event that there is nothing in thecart. However, at the moment, you have no data source. In the Catalog and Item pages, you first createda SqlDataSource control and bound it to the DataList control; you haven’t bound the ShoppingCartcontrol to anything yet.
Automating the Shopping CartSo far, so good, you have your ShoppingCart control fully designed. However, it doesn’t do much atthe moment. In fact, it doesn’t do anything! If you want the cart to be responsive, you will need to addsome code telling ASP.NET 2.0 what to do when something occurs. When you created your bound fieldsin the shopping cart, three of the four bound fields were read-only; the last-one, Quantity, was the onlybound field left editable because it means that you only need to anticipate what happens if someonechanges the quantity of items within a particular row in the cart.
You will want to cater to four possible events, because there are four possible scenarios:
❑ Editing the cart: When you enter a new quantity.
❑ Canceling an edit in the cart: When you decide you don’t want go with the quantity valueyou’ve changed.
❑ Updating the cart: When you want that new quantity to take effect.
❑ Deleting items from the cart: When you want to completely remove an item from the cart.
496
Chapter 13
16_588508 ch13.qxd 10/10/05 6:33 PM Page 496

This will require some code-behind. You looked at code-behind in Chapters 9 and 10. Here your code-behind will be run directly in response to one of these four events occurring. A second question isonce you’ve updated the shopping cart, how do you associate that with a particular user? You’ve alreadycreated a profile, so now all you need to do is to reference that profile within your code, via the Profileobject.
Go ahead and add this code to your shopping cart in the next Try It Out.
Try It Out Automating the Shopping Cart1. Go to your ShoppingCart control (right-click GridView and select Properties. From the Properties
window, select the Lightning Bolt button the fourth one along, as shown in Figure 13-24).
Figure 13-24
2. This displays a list of events. Double-click the RowEditing event. In Source View, a gap willhave appeared for the events. Add the following highlighted code to the events:
Sub CartGrid_RowEditing(ByVal sender As Object, ByVal e As System.Web.UI.WebControls.GridViewEditEventArgs)
CartGrid.EditIndex = e.NewEditIndexBindGrid()
End Sub
3. Go back to Design View, right-click GridView, and select Properties. It should take you straightto Events this time. Double-click the RowUpdating event. Add the following highlighted code:
Sub CartGrid_RowUpdating(ByVal sender As Object, ByVal e AsSystem.Web.UI.WebControls.GridViewUpdateEventArgs)
Dim QuantityTextBox As TextBox = _CType(CartGrid.Rows(e.RowIndex).Cells(2).Controls(0), TextBox)
Dim Quantity As Integer = Convert.ToInt32(QuantityTextBox.Text)If Quantity = 0 Then
Profile.Cart.Items.RemoveAt(e.RowIndex)Else
Profile.Cart.Items(e.RowIndex).Quantity = QuantityEnd IfCartGrid.EditIndex = -1BindGrid()
End Sub
4. Go back to Design View. Right-click GridView and select Properties. Double-click theRowCancelingEdit event. Add the highlighted code:
Sub CartGrid_RowCancelingEdit(ByVal sender As Object, ByVal e AsSystem.Web.UI.WebControls.GridViewCancelEditEventArgs)
CartGrid.EditIndex = -1BindGrid()
End Sub
497
E-Commerce
16_588508 ch13.qxd 10/10/05 6:33 PM Page 497

5. In Design View, right-click GridView and select Properties. Double-click the RowDeletingevent. Add the highlighted code:
Sub CartGrid_RowDeleting(ByVal sender As Object, ByVal e AsSystem.Web.UI.WebControls.GridViewDeleteEventArgs)
Profile.Cart.Items.RemoveAt(e.RowIndex)BindGrid()
End Sub
6. From Design View, double-click the blank page surrounding the WroxShoppingCart control,and add the highlighted code to the Page_Load event:
Sub Page_Load(ByVal sender As Object, ByVal e As System.EventArgs) Handles Me.LoadIf Profile.Cart Is Nothing Then
ReturnEnd IfIf Not Page.IsPostBack Then
BindGrid()End IfIf Profile.Cart.Items.Count = 0 Then
TotalLabel.Visible = FalseEnd If
End Sub
7. You may have noticed that you’ve also referenced a function called BindGrid()within all of theseevents. This function does the binding so that your shopping cart can display something. Youneed to add this code for BindGrid() underneath the functions within the code-behind as well:
Private Sub BindGrid()CartGrid.DataSource = Profile.Cart.ItemsDataBind()
TotalLabel.Text = String.Format(“Total:{0,19:C}”, Profile.Cart.Total)End Sub
8. At the top of the page add a reference to your WroxShoppingCart object:
<%@ Import Namespace=”Wrox.Commerce” %>
9. Switch to Design View and drag a Label control onto the screen and place it under theGridView control. Right-click the Label control and select Properties. Delete the Text propertyand change the ID property to TotalLabel, as shown in Figure 13-25.
498
Chapter 13
16_588508 ch13.qxd 10/10/05 6:33 PM Page 498

Figure 13-25
10. If you view the page WroxShoppingCartPage.aspx now, you will see what appears in Figure 13-26.
Figure 13-26
How It WorksFor the first time you’re able to browse your shopping cart, although you only get to view theEmptyDataTemplate at the moment. Your code, though, provides all of the necessary functionality to be able to use the cart properly. The RowEditing method allows you to store the ID of the Productyou are editing to the index:
CartGrid.EditIndex = e.NewEditIndexBindGrid()
After this you bind to the grid. The RowCancelEdit sets it back to the default of -1:
CartGrid.EditIndex = -1BindGrid()
This means that no row in the grid is currently selected. Once again you bind to the grid afterwards.Your delete method removes the index number from the cart stored in the profile and binds to the grid:
Profile.Cart.Items.RemoveAt(e.RowIndex)BindGrid()
499
E-Commerce
16_588508 ch13.qxd 10/10/05 6:33 PM Page 499

The update first has to obtain the quantity figure from the text box, and then it converts it to an integer.If you’ve set the quantity to 0, then this acts the same as a delete, so you perform a RemoveAt to removethe CartItem object. Otherwise you simply re-adjust the quantity and reset the index to -1 and bind tothe grid:
Dim QuantityTextBox As TextBox = _CType(CartGrid.Rows(e.RowIndex).Cells(2).Controls(0), TextBox)
Dim Quantity As Integer = Convert.ToInt32(QuantityTextBox.Text)If Quantity = 0 Then
Profile.Cart.Items.RemoveAt(e.RowIndex)Else
Profile.Cart.Items(e.RowIndex).Quantity = QuantityEnd IfCartGrid.EditIndex = -1BindGrid()
You need to consider two final sections of code. The first is the BindGrid function, which performs yourdata binding for you and is called by each of the events:
CartGrid.DataSource = Profile.Cart.ItemsDataBind()TotalLabel.Text = String.Format(“Total:{0,19:C}”, Profile.Cart.Total)
It simply sets the GridView control’s DataSource property to point to the Items collection of your particular profile and then sets the total for your cart. The second one is the contents of the Page_Loadevent handler, which is fired whenever a page is started up:
If Profile.Cart Is Nothing ThenReturn
End IfIf Not Page.IsPostBack Then
BindGrid()End IfIf Profile.Cart.Items.Count = 0 Then
TotalLabel.Visible = FalseEnd If
This basically says if the cart is empty, then do nothing. It then says if the page hasn’t been posted back,and is therefore the first time the user has seen the page, then you must bind the grid, and it goes onto make the total label invisible if there is nothing in the cart and sets the format correctly for displayingthe total as a currency. There is a distinction to be made here, between the first IF and third IFstatement. The first IF statement will be triggered if the cart hasn’t been created. The third IF will betriggered if the cart has been created but is empty (in other words, someone has removed all the itemsfrom it). You have to be able to handle both scenarios when updating the cart in your profile.
The Add to Cart FacilityYour shopping cart is now fully functional in all but one respect. You can edit it and delete items from it,but you still can’t add any items to it. This is because the adding of items needs to be done from a differentpage entirely.
500
Chapter 13
16_588508 ch13.qxd 10/10/05 6:33 PM Page 500

The next part of your odyssey is to place an “add to cart” button, back on the previous Product Itempage. In the following Try It Out, this will add the corresponding item to your cart every time a button isclicked. If you click it twice on two separate occasions, it will update the quantity for you.
Try It Out Adding the Add to Cart Button1. Open up WroxShopItem.aspx in Visual Web Developer, go to Design View, and add an
ImageButton, above the Return to Shop link. Via the Properties window change its name tobtnAddToCart, and change the ImageUrl property to “~/Images/AddToCart.gif”, as shownin Figure 13-27.
Figure 13-27
2. Double-click the button and add the following code:
Sub btnAddToCart_Click(ByVal sender As Object, ByVal e As _System.Web.UI.ImageClickEventArgs)
Dim Price As Double = _Double.Parse(CType(DataList1.Controls(0).FindControl(“PriceLabel”),Label).Text)
501
E-Commerce
16_588508 ch13.qxd 10/10/05 6:33 PM Page 501

Dim ProductName As String = _CType(DataList1.Controls(0).FindControl(“NameLabel”),Label).Text
Dim PictureURL As String = _CType(DataList1.Controls(0).FindControl(“PictureUrlLabel”),Label).Text
Dim ProductID As Integer = CInt(Request.QueryString(“ProductID”))
If Profile.Cart Is Nothing ThenProfile.Cart = New Wrox.Commerce.WroxShoppingCart()
End IfProfile.Cart.Insert(ProductID, Price, 1, ProductName, PictureURL)Server.Transfer(“WroxShop.aspx”)
End Sub
3. Go back to WroxShopItem.aspx in Design View. Add a hyperlink button from the General section of the Toolbox. Right-click the link, select Properties, and change the following properties:
Property Value
ID ShoppingCartLink
NavigateURL ~/WroxShoppingCartPage.aspx
Text View Shopping Cart
It will now look like Figure 13-28.
Figure 13-28
4. You’re now ready to give the shopping cart a test drive. Go to the WroxShop.aspx and selectthe scarf, as shown in Figure 13-29.
502
Chapter 13
16_588508 ch13.qxd 10/10/05 6:33 PM Page 502

Figure 13-29
5. Click Add to Cart. This takes you back to the main shopping screen. Now click View ShoppingCart, and as you can see in Figure 13-30, your item has been added to the cart.
Figure 13-30
503
E-Commerce
16_588508 ch13.qxd 10/10/05 6:33 PM Page 503

6. Clicking Edit changes the Quantity box into a text box that you can edit (see Figure 13-31).
Figure 13-31
7. Type in 2 and click Update, and the totals are updated, as shown in Figure 13-32.
Figure 13-32
8. Last, you can click Delete and the item is removed from your cart.
How It WorksBy adding two bits to the application in this Try It Out, you enabled the whole functionality of the shopping cart. You started by adding a button to the Product Item page and creating some code that ranwhen the button was clicked. The code handles the business of adding an item to your shopping cart. You start by getting the Price, ProductName, PictureUrl and ProductID:
Dim Price As Double = _Double.Parse(CType(DataList1.Controls(0).FindControl(“PriceLabel”),Label).Text)
Dim ProductName As String = _
504
Chapter 13
16_588508 ch13.qxd 10/10/05 6:33 PM Page 504

CType(DataList1.Controls(0)FindControl(“NameLabel”),Label).TextDim PictureURL As String = _
CType(DataList1.Controls(0).FindControl(“PictureUrlLabel”),Label).Text
This information has already been cunningly stored in the page. You use the FindControl method of acontrol to locate a control. The DataList control contains an item template, so you have to move intothe controls collection of the DataList control to get at the Label controls. The CType function allowsyou to cast the contents of the control to text. So each of the three lines works like this. You declare avariable in which to store your item. You search the DataList control for your Label control usingFindControl, and supply it with the name of the control you want to find. You pass this to the CTypefunction, along with the type to which you want to convert the type. So for the Price, you search for thePriceLabel control’s contents and you convert it to text. There is actually another level of conversionrequired here. You want the price as a Double data type so you convert the text item you receive into adouble and store it in the Double data type. The PictureUrlLabel is the one you didn’t delete in the second Try It Out of this chapter because I said you’d need it later. This is where you need it. Havingstored the Price, ProductName, and PictureURL, you still need the ProductID. This can be located inthe query string passed to the page:
Dim ProductID As Integer = CInt(Request.QueryString(“ProductID”))
You check to see if a cart exists for this profile:
If Profile.Cart Is Nothing ThenProfile.Cart = New Wrox.Commerce.WroxShoppingCart()
End If
If it doesn’t you create a new one. Then you need to insert a new item into your shopping cart alongwith the ProductID, Price, ProductName, PictureURL, and the quantity of 1:
Profile.Cart.Insert(ProductID, Price, 1, ProductName, PictureURL)
Last, you simply transfer the user back to the initial Product Catalog page:
Server.Transfer(“WroxShop.aspx”)
This stage can continue cyclically until the user either leaves the application or needs to check out.
CheckoutChecking out is perhaps the lengthiest stage of the whole process. The checkout process involves a number of considerations, not just the totalling up of the items and how much they cost, but also thingslike stock availability, getting the user’s address and delivery details, obtaining and verifying paymentfor the items, and some sort of rounding up of the whole process.
Checkout is, in itself, a mini set of stages. If you’re serious about implementing your own e-commerceprocess it’s worth checking some of the major e-commerce vendors (such as Amazon) and seeing whatthey do in their checkout process, and asking is it quick and intuitive to use? A lot of time and effort hasgone into producing checkout processes that can be completed in the minimum number of steps, withthe minimum number of clicks.
505
E-Commerce
16_588508 ch13.qxd 10/10/05 6:33 PM Page 505

In your design, consider checkout as being comprised of the following:
❑ Order processing
❑ Login
❑ Enter or get the address and delivery details
❑ Get the credit card details
❑ Finish
This is one part of the process that is impossible to model completely, without actually building a real,live, working e-commerce site. However, some considerations about each step are worth talking about.
Order ProcessingThe first step of the checkout process is to check whether or not the item is in stock. With a large retailersuch as Amazon, not all of the items they carry will be sourced by them. They have a range of suppliersand they often need to check with them first to see if a particular item is in stock. Hence you will findthat some products will ship from Amazon within 24 hours, whereas others may take between four andsix weeks. In reality there is often another pipeline (similar to Figure 13-33) going on here that has to benegotiated.
Figure 13-33
With WroxUnited, once again you’re not going to delve into this level of detail. You are going to assumethat all goods are stored in the Wrox United warehouse, and once you’ve checked the stock level andthey are in stock, they are good to be released for shipping.
LoginWe’ve already mentioned that the Wrox United application uses one of ASP.NET 2.0’s best features to keep track of the shopping cart, in that you don’t have to physically log in to keep track of your shopping cart. However, when you come to checkout, you must log in, because you need to supply youraddress details and credit card information. You need to supply a login box and password to be able toauthenticate your user’s details. You will use the standard ASP.NET 2.0 login control to do this.
Address/Delivery DetailsThe address details are fairly easy to sort as well. One of two scenarios could occur. Either you havealready captured the user’s details and you can access the details that are stored with the profile, or ifyou don’t have them on record, you must request that the user enter them into a series of text boxes. Youcan either use the Profile that was created in Chapter 11 and that stores these details, or you can store thedetails supplied in the text boxes by the user.
Inform Supplier Check Stock Order Ready/Charge Card Supplier Ships Goods NotificationOf Shipping
506
Chapter 13
16_588508 ch13.qxd 10/10/05 6:33 PM Page 506

Credit Card HandlingHere you’re going to cop out and not handle credit cards at all, and just add a small dummy section.This gives the impression that it isn’t a major part of the e-commerce pipeline, but don’t be fooled for amoment; it is of course critical to the success of the pipeline. For obvious reasons you can’t set up anactual credit card handling facility; for starters you don’t have a physical product to sell. Fetching as theWrox United kits undoubtedly would be, they only exist in cyberspace. So here we can’t provide anycode, but instead can quickly consider what you need to take into account when setting up a credit cardhandling facility on your web site.
Credit card retailers first starting out needed a merchant ID, usually supplied via their bank, which gavesome sort of guarantee that the business was genuine. Most Internet businesses require the same thing.In the U.S., there are two ways to do this. The first is to provide all the processing and handling of creditcards yourself, and the second is to get someone else to do it on your behalf.
In-House Credit Card TransactionsSetting up credit card processing in-house is the ideal way to keep an eye on all your transactions, but itcan be quite a slow and unwieldy process. You require an e-commerce ID (also known as a merchantnumber or in the UK as an Internet Merchant Account [IMA]) from a third party who can actually process the credit card details for you, meaning the third party can decide whether or not a particularcredit card number is genuine. You will have to apply for an account with the third party and provide alot of details that help establish your authenticity.
Obtaining an E-Commerce ID, Merchant Number, or IMA
In the U.S. you can go to one of the following web sites:
❑ Verisign/CyberCash: www.icverify.com
❑ First Data/Card Service: www.cardservice.com
In the UK you can go to one of these web sites:
❑ WorldPay: www.worldpay.co.uk
❑ DataCash: www.datacash.com
For worldwide transaction processing you can try PayPal, which accepts credit cards once you have setup a business account with them:
❑ PayPal: www.paypal.com
Payment Gateways
Once you have your e-commerce ID, merchant number, or IMA, you still actually need another link inthe chain, a way of communicating from a payment gateway to a bank. You should be able to use thesame company you obtained an e-commerce ID from to do this. You supply the e-commerce ID to thebank; they use it to track the money’s movements to the gateway service and back again. These servicesusually come at a hefty price. If all this sounds too complex, you might want to consider the alternative.
507
E-Commerce
16_588508 ch13.qxd 10/10/05 6:33 PM Page 507

Bureau ServicesBecause this is a beginner’s book, it’s probably safe to assume that the first site you start development onwon’t be a major store; more likely you’ll be working on a small store (maybe your own), that perhapswon’t really want to cover the risks and costs associated with having a system handling credit cardsthemselves. In the early days of e-commerce on the Web, there were a series of high profile hacks, onenotorious one where all customers of a then high-profile music store had their credit card details stolen,when the database containing them was compromised. Rather than having to worry about all the risksfrom encrypting card details to storing them in a way to ensure their complete safety, it’s easier to getsomeone else to do this for you. These are termed bureau services. When you get to the part of a sitewhere you check out, instead of handling the details you link to the bureau service’s site, and they han-dle the whole process for you from then on.
Until relatively recently bureau services were expensive propositions that still required quite a large financial commitment on the part of the seller. Several years ago, I costed a small record label’s ability todo this, and the cheapest I could find to provide an online store would have meant they would have tohave sold several hundred CDs a month to cover the gateway fees alone. The rise of eBay, though, has ledto a massive rise in demand of people who want to handle their own sales instantly, so rather than havingto wait for checks (which carry risk of both fraud and bouncing if the funds aren’t present), or doingmoney transfers via banks or a third party such as Western Union, they want to be able to handle creditcard transactions. In addition to that, they might only ever want to handle as little as 10 or 20 sales.
Two popular solutions are as follows. You will find they even go one further than supplying this service,and can actually supply common components such as a shopping cart for you.
❑ PayPal: www.paypal.com
❑ BTClick&Buy: www.btclickandbuy.com
Obviously, other sites exist too. There are digital credit card services that specialize in micropaymentswhen paying for small items such as single mp3s. It all depends on what you want to sell and how muchyou want to sell it for. If these two sites don’t provide a solution that suits you, then look around forsomething better! If you want further details about how to handle credit card transactions, we suggestyou read the details given on the sites mentioned in these sections.
Summarizing the TransactionTypically once you’ve completed your transaction, it would be good to receive a notification or receipt ofwhat you’ve ordered. This is actually a relatively simple step of the process, but to e-mail somebodyrequires a working SMTP server, so for that reason alone, you aren’t going to implement this step.
How You Intend to CheckoutOnce again you are governed by keeping things simple. What is the minimum you can boil down yourcheckout process to?
The five-stage process will be as follows:
❑ Login
❑ Delivery address
❑ Payment
508
Chapter 13
16_588508 ch13.qxd 10/10/05 6:33 PM Page 508

❑ Confirmation of the order
❑ Finish
You will also need a breadcrumb next to you to help you keep an eye on where you are in the wholecheckout process. As mentioned at the beginning of the chapter, one priority is being able to abort thetransaction at any point prior to confirming the purchase.
What you’re not going to do is the stock handling (reducing items and keep a track on stock levels) andalso sending a confirmation of order e-mail. The chapter is already big enough as it is and these thingsare arguably stretched over different disciplines to e-commerce. Having added that caveat, in the nextTry It Out, you create the final stages of the e-commerce pipeline.
Try It Out Checking Out1. In Solution Explorer in Visual Web Developer, right-click the C:\...\Chapter13 heading at
the top and select Add New Item. Add a Web Form called Checkout.aspx and check the PlaceCode in separate file box to ensure a separate code behind file is created
2. In Design View, from the Toolbox grab a Wizard control and drop it onto the page, as shown inFigure 13-34.
Figure 13-34
509
E-Commerce
16_588508 ch13.qxd 10/10/05 6:33 PM Page 509

3. From the smart tag dialog box select the Add/Remove wizard steps option.
4. In the dialog that appears you are going to add three extra steps. This is so you have five steps,one for login, one for address, one for credit card details, one to confirm the order, and one tofinish the transaction. Start by clicking Add (see Figure 13-35) and entering Step 3 next to Title,and then clicking Add and entering Step 4 and lastly clicking Add and entering Step 5.
Figure 13-35
5. Go back and change the Title property in each so that it reads as shown in Figure 13-36.
Figure 13-36
6. Click OK.
510
Chapter 13
16_588508 ch13.qxd 10/10/05 6:33 PM Page 510

7. From the Login section of the Toolbox, drag a Login box into the <asp:Wizard> control, asshown in Figure 13-37.
Figure 13-37
8. Click Design View. Add the following code to the Wizard step for Step 2 (Delivery Address):
<asp:checkbox id=”chkUseProfileAddress” runat=”server” autopostback=”True”text=”Use membership address”OnCheckedChanged=”chkUseProfileAddress_CheckedChanged”></asp:checkbox><br />
<table border=”0”><tr><td>Name</td><td><asp:textbox id=”txtName” runat=”server” /></td></tr><tr><td>Address</td><td><asp:textbox id=”txtAddress” runat=”server” /></td></tr><tr><td>City</td><td><asp:textbox id=”txtCity” runat=”server” /></td></tr><tr><td>County</td><td><asp:textbox id=”txtCounty” runat=”server” /></td></tr><tr><td>Postcode</td><td><asp:textbox id=”txtPostCode” runat=”server” />
</td></tr><tr><td>Country</td><td><asp:textbox id=”txtCountry” runat=”server” /></td></tr>
</table>
9. Add the following code to the Wizard step for Step 3 (Payment):
<asp:DropDownList id=”lstCardType” runat=”server”><asp:ListItem>MasterCard</asp:ListItem> <asp:ListItem>Visa</asp:ListItem>
</asp:DropDownList><br />Card Number: <asp:Textbox id=”txtNumber” runat=”server”
511
E-Commerce
16_588508 ch13.qxd 10/10/05 6:33 PM Page 511

Text=”0123456789” ReadOnly=”True”/><br />Expires:<asp:textbox id=”txtExpiresMonth” runat=”server” columns=”2” />/<asp:textbox id=”txtExpiresYear” runat=”server” columns=”4” />
10. Go back to Design View for Step 4 (Confirmation). Type in the following:
Please confirm the amount you wish to have deducted from your credit card.
11. Select WroxShoppingCart.ascx and drag it into the Wizard control above the text you havecreated, as shown in Figure 13-38.
Figure 13-38
12. Click Complete and in Design View for Step 5 (Complete) just type in Thank you for yourorder.
13. Go to Source View and above the <asp:Wizard> control add the following:
<asp:Label id=”NoCartlabel” runat=”server” visible=”false”>There are no items in your cart. Visit the shop to buy items.</asp:Label>
<div style=”float:right”><asp:LoginView ID=”LoginView1” Runat=”server”>
<AnonymousTemplate><asp:passwordrecovery id=”PasswordRecovery1” runat=”server” />
512
Chapter 13
16_588508 ch13.qxd 10/10/05 6:33 PM Page 512

</AnonymousTemplate></asp:LoginView>
</div>
14. Above this code add the following:
<%@ Import Namespace =”System.Data.SqlClient”%><%@ Import Namespace =”Wrox.Commerce”%>
15. Save the design.
16. Go to Solution Explorer, select checkout.aspx.vb.
17. Add the following code-behind in place of whatever is already in there.:
Imports SystemImports System.Data.SqlClientImports Wrox.Commerce
Partial Class CheckoutInherits System.Web.UI.Page
Sub Page_Load(ByVal sender As Object, ByVal e As System.EventArgs) _Handles Me.Load
If Not Page.IsPostBack ThenIf Profile.Cart Is Nothing Then
NoCartlabel.Visible = TrueWizard1.Visible = False
End If
If User.Identity.IsAuthenticated ThenWizard1.ActiveStepIndex = 1
ElseWizard1.ActiveStepIndex = 0
End IfEnd If
End Sub
Sub chkUseProfileAddress_CheckedChanged(ByVal sender As Object, _ByVal e As System.EventArgs)
‘ fill the delivery address from the profile, but only if it’s empty‘ we don’t want to overwrite the valuesIf chkUseProfileAddress.Checked AndAlso txtName.Text.Trim() = “” Then
txtName.Text = Profile.NametxtAddress.Text = Profile.AddresstxtCity.Text = Profile.CitytxtCounty.Text = Profile.CountytxtPostCode.Text = Profile.PostCodetxtCountry.Text = Profile.Country
513
E-Commerce
16_588508 ch13.qxd 10/10/05 6:33 PM Page 513

End If
End Sub
Sub Wizard1_FinishButtonClick(ByVal sender As Object, _ByVal e As System.Web.UI.WebControls.WizardNavigationEventArgs)
‘ Insert the order and order lines into the databaseDim conn As SqlConnection = NothingDim trans As SqlTransaction = NothingDim cmd As SqlCommand
Tryconn = New
SqlConnection(ConfigurationManager.ConnectionStrings(“WroxUnited”).ConnectionString)
conn.Open()
trans = conn.BeginTransaction
cmd = New SqlCommand()cmd.Connection = conncmd.Transaction = trans
‘ set the order detailscmd.CommandText = “INSERT INTO Orders(MemberName, OrderDate, Name, “ & _
“Address, County, PostCode, Country, Total) “ & _“VALUES (@MemberName, @OrderDate, @Name, “ & _“@Address, @County, @PostCode, @Country, @Total)”
cmd.Parameters.Add(“@MemberName”, Data.SqlDbType.VarChar, 50)cmd.Parameters.Add(“@OrderDate”, Data.SqlDbType.DateTime)cmd.Parameters.Add(“@Name”, Data.SqlDbType.VarChar, 50)cmd.Parameters.Add(“@Address”, Data.SqlDbType.VarChar, 255)cmd.Parameters.Add(“@County”, Data.SqlDbType.VarChar, 50)cmd.Parameters.Add(“@PostCode”, Data.SqlDbType.VarChar, 15)cmd.Parameters.Add(“@Country”, Data.SqlDbType.VarChar, 50)cmd.Parameters.Add(“@Total”, Data.SqlDbType.Money)
cmd.Parameters(“@MemberName”).Value = User.Identity.Namecmd.Parameters(“@OrderDate”).Value = DateTime.Now()cmd.Parameters(“@Name”).Value = _
CType(Wizard1.FindControl(“txtName”), TextBox).Textcmd.Parameters(“@Address”).Value = _
CType(Wizard1.FindControl(“txtAddress”), TextBox).Textcmd.Parameters(“@County”).Value = _
CType(Wizard1.FindControl(“txtCounty”), TextBox).Textcmd.Parameters(“@PostCode”).Value = _
CType(Wizard1.FindControl(“txtPostCode”), TextBox).Textcmd.Parameters(“@Country”).Value = _
CType(Wizard1.FindControl(“txtCountry”), TextBox).Textcmd.Parameters(“@Total”).Value = Profile.Cart.TotalDim OrderID As Integer
514
Chapter 13
16_588508 ch13.qxd 10/10/05 6:33 PM Page 514

OrderID = Convert.ToInt32(cmd.ExecuteScalar())
‘ change the query and parameters for the order linescmd.CommandText = “INSERT INTO OrderLines(OrderID, ProductID, “ & _
“Quantity, Price) “ & _“VALUES (@OrderID, @ProductID, @Quantity, @Price)”
cmd.Parameters.Clear()cmd.Parameters.Add(“@OrderID”, Data.SqlDbType.Int)cmd.Parameters.Add(“@ProductID”, Data.SqlDbType.Int)cmd.Parameters.Add(“@Quantity”, Data.SqlDbType.Int)cmd.Parameters.Add(“@Price”, Data.SqlDbType.Money)
cmd.Parameters(“@OrderID”).Value = OrderIDFor Each item As CartItem In Profile.Cart.Items
cmd.Parameters(“@ProductID”).Value = item.ProductIDcmd.Parameters(“@Quantity”).Value = item.Quantitycmd.Parameters(“@Price”).Value = item.Price
cmd.ExecuteNonQuery()Next
‘ commit the transactiontrans.Commit()
Catch SqlEx As SqlException‘ some form of error - rollback the transaction ‘ and rethrow the exceptionIf trans IsNot Nothing Then
trans.Rollback()End If
‘ Log the exceptionTools.log(“An error occurred while creating the order”, SqlEx)Throw New Exception(“An error occurred while creating the order”, _
SqlEx)
ReturnFinally
If conn IsNot Nothing Thenconn.Close()
End If
End Try
‘ we will only reach here if the order has been created successfully‘ so clear the cartProfile.Cart.Items.Clear()
End Sub
Sub Wizard1_NextButtonClick(ByVal sender As Object, _
515
E-Commerce
16_588508 ch13.qxd 10/10/05 6:33 PM Page 515

ByVal e As System.Web.UI.WebControls.WizardNavigationEventArgs)
If e.CurrentStepIndex = 0 Then
Dim l As System.Web.UI.WebControls.Login = _CType(Wizard1.FindControl(“Login1”), Login)
If Membership.ValidateUser(l.UserName, l.Password) ThenFormsAuthentication.SetAuthCookie(l.UserName, l.RememberMeSet)e.Cancel = False
Elsel.InstructionText = “Your login attempt was not successful. “ & _
“Please try again.”l.InstructionTextStyle.ForeColor = System.Drawing.Color.Red
e.Cancel = TrueEnd If
ElseIf Not User.Identity.IsAuthenticated Then
e.Cancel = TrueWizard1.ActiveStepIndex = 0
End IfEnd If
End Sub
Protected Sub Wizard1_ActiveStepChanged(ByVal sender As Object, _ByVal e As System.EventArgs) Handles Wizard1.ActiveStepChanged
If Not User.Identity.IsAuthenticated ThenWizard1.ActiveStepIndex = 0
End If
End Sub
End Class
18. Open WroxShoppingCartPage.aspx and in Design View, and add a hyperlink to the page.Right-click the link and change the properties as follows:
Property Value
ID Checkout
Text Checkout
NavigateURL ~/Checkout.aspx
516
Chapter 13
16_588508 ch13.qxd 10/10/05 6:33 PM Page 516

19. Add two scarves to your shopping cart and click Checkout. First you supply login details in thefields shown in Figure 13-39.
Figure 13-39
20. Click Next once you’re logged in, and then you either click on your membership address orsupply your address details (see Figure 13-40).
Figure 13-40
517
E-Commerce
16_588508 ch13.qxd 10/10/05 6:33 PM Page 517

21. Click Next, and you’ll arrive at the screen shown in Figure 13-41. This is your credit card handler;it doesn’t require any user details.
Figure 13-41
22. Click Next, and on the last page (see Figure 13-42) you see a summary of the details.
Figure 13-42
23. Click Finish to end the checkout.
How It WorksThis completes your e-commerce pipeline. You started by creating the five stages of our agreed checkoutprocess using the <asp:wizard> control. The login stage used a Login control, and the delivery addressused a checkbox and a series of text boxes to record the details. The payment stage took the credit carddetails via a drop-down list, which contained the type of credit card, and you had text boxes for the cardnumber and expiration date. You didn’t validate these details in any way. In the confirmation stage you juststuck a copy of the shopping cart control, and the last step simply displayed a short thank you message.
518
Chapter 13
16_588508 ch13.qxd 10/10/05 6:33 PM Page 518

You added a control LoginView, which contained your anonymous template:
<asp:LoginView ID=”LoginView1” Runat=”server”><AnonymousTemplate>
<asp:passwordrecovery id=”PasswordRecovery1” runat=”server” /></AnonymousTemplate>
</asp:LoginView>
This displayed the password recovery control, which is displayed to aid any user who might have for-gotten their password.
Once again it was left to the code-behind to provide the meat of the example. When the page first loads,you check to see if there is anything in the cart. If there isn’t, then you make the wizard invisible and showthe no cart label, which informs the user that there is nothing in the cart. The second check is to see if theuser identity has been authenticated. This is a test of whether or not they have logged in. If they havelogged in already then you jump them past the login stage, or else you have to get them logged in first:
Sub Page_Load(ByVal sender As Object, ByVal e As System.EventArgs) _Handles Me.Load
If Not Page.IsPostBack ThenIf Profile.Cart Is Nothing Then
NoCartlabel.Visible = TrueWizard1.Visible = False
End If
If User.Identity.IsAuthenticated ThenWizard1.ActiveStepIndex = 1
ElseWizard1.ActiveStepIndex = 0
End IfEnd If
End Sub
The next procedure in the code is the code that responds to the checkbox being altered in Step 2, thedelivery address. If this box is checked, you fill the text boxes with the details stored in the user’s profile.Otherwise you leave them empty:
Sub chkUseProfileAddress_CheckedChanged(ByVal sender As Object, ByVal e AsSystem.EventArgs)
‘ fill the delivery address from the profile, but only if it’s empty‘ we don’t want to overwrite the valuesIf chkUseProfileAddress.Checked AndAlso txtName.Text.Trim() = “” Then
txtName.Text = Profile.NametxtAddress.Text = Profile.AddresstxtCity.Text = Profile.CitytxtCounty.Text = Profile.CountytxtPostCode.Text = Profile.PostCodetxtCountry.Text = Profile.Country
End If
End Sub
519
E-Commerce
16_588508 ch13.qxd 10/10/05 6:33 PM Page 519

The NextButtonClick is used to check whether the user has logged in successfully and can thereforeprogress to the next step of the wizard. This step only comes into play if you are actually on the loginstage at the time. You check to see if the user has been validated and, if not, you display an appropriateerror message informing the user that they haven’t been able to log in this time. Otherwise you validatethe user:
Sub Wizard1_NextButtonClick(ByVal sender As Object, ByVal e AsSystem.Web.UI.WebControls.WizardNavigationEventArgs)
If e.CurrentStepIndex = 0 Then
Dim l As System.Web.UI.WebControls.Login = _CType(Wizard1.FindControl(“Login1”), Login)
If Membership.ValidateUser(l.UserName, l.Password) ThenFormsAuthentication.SetAuthCookie(l.UserName, l.RememberMeSet)
e.Cancel = FalseElse
l.InstructionText = “Your login attempt was not successful. “ & _“Please try again.”
l.InstructionTextStyle.ForeColor = System.Drawing.Color.Red
e.Cancel = TrueEnd If
ElseIf Not User.Identity.IsAuthenticated Then
e.Cancel = TrueWizard1.ActiveStepIndex = 0
End IfEnd If
End Sub
The FinishButtonClick contains perhaps the longest set of code, but it isn’t as daunting as it looks.This is where you write the user’s order to the database. You have to be able to roll this back if a mistakehas occurred. You start by creating a connection string, and you create a transaction. Then you read in allof the details supplied in the checkout process into parameters. There are a lot of them! You have themember name, the delivery address, the credit card details, the whole shopping cart total:
Sub Wizard1_FinishButtonClick(ByVal sender As Object, ByVal e AsSystem.Web.UI.WebControls.WizardNavigationEventArgs)
‘ Insert the order and order lines into the databaseDim conn As SqlConnection = NothingDim trans As SqlTransaction = NothingDim cmd As SqlCommand
Tryconn = New
SqlConnection(ConfigurationManager.ConnectionStrings(“WroxUnited”).ConnectionString)
520
Chapter 13
16_588508 ch13.qxd 10/10/05 6:33 PM Page 520

conn.Open()
trans = conn.BeginTransaction
cmd = New SqlCommand()cmd.Connection = conncmd.Transaction = trans‘ set the order detailscmd.CommandText = “INSERT INTO Orders(MemberName, OrderDate, Name, “ & _
“Address, County, PostCode, Country, SubTotal, Discount, Total) “ & _“VALUES (@MemberName, @OrderDate, @Name, “ & _“@Address, @County, @PostCode, @Country, @Total)”
cmd.Parameters.Add(“@MemberName”, Data.SqlDbType.VarChar, 50)cmd.Parameters.Add(“@OrderDate”, Data.SqlDbType.DateTime)cmd.Parameters.Add(“@Name”, Data.SqlDbType.VarChar, 50)cmd.Parameters.Add(“@Address”, Data.SqlDbType.VarChar, 255)cmd.Parameters.Add(“@County”, Data.SqlDbType.VarChar, 50)cmd.Parameters.Add(“@PostCode”, Data.SqlDbType.VarChar, 15)cmd.Parameters.Add(“@Country”, Data.SqlDbType.VarChar, 50)
cmd.Parameters.Add(“@Total”, Data.SqlDbType.Money)
cmd.Parameters(“@MemberName”).Value = User.Identity.Namecmd.Parameters(“@OrderDate”).Value = DateTime.Now()cmd.Parameters(“@Name”).Value = _
CType(Wizard1.FindControl(“txtName”), TextBox).Textcmd.Parameters(“@Address”).Value = _
CType(Wizard1.FindControl(“txtAddress”), TextBox).Textcmd.Parameters(“@County”).Value = _
CType(Wizard1.FindControl(“txtCounty”), TextBox).Textcmd.Parameters(“@PostCode”).Value = _
CType(Wizard1.FindControl(“txtPostCode”), TextBox).Textcmd.Parameters(“@Country”).Value = _
CType(Wizard1.FindControl(“txtCountry”), TextBox).Text
cmd.Parameters(“@Total”).Value = Profile.Cart.Total
Dim OrderID As IntegerOrderID = Convert.ToInt32(cmd.ExecuteScalar())
Once you’ve written the data into the Orders table, you need to create an order in which you write intothe OrderLines table. This contains an order ID, the product ID, the quantity, and price. After this youcommit the transaction:
‘ change the query and parameters for the order linescmd.CommandText = “INSERT INTO OrderLines(OrderID, ProductID, “ & _
“Quantity, Price) “ & _“VALUES (@OrderID, @ProductID, @Quantity, @Price)”
cmd.Parameters.Clear()cmd.Parameters.Add(“@OrderID”, Data.SqlDbType.Int)cmd.Parameters.Add(“@ProductID”, Data.SqlDbType.Int)cmd.Parameters.Add(“@Quantity”, Data.SqlDbType.Int)cmd.Parameters.Add(“@Price”, Data.SqlDbType.Money)
cmd.Parameters(“@OrderID”).Value = OrderID
521
E-Commerce
16_588508 ch13.qxd 10/10/05 6:33 PM Page 521

For Each item As CartItem In Profile.Cart.Itemscmd.Parameters(“@ProductID”).Value = item.ProductIDcmd.Parameters(“@Quantity”).Value = item.Quantitycmd.Parameters(“@Price”).Value = item.Price
cmd.ExecuteNonQuery()Next
‘ commit the transactiontrans.Commit()
The next part is the exception handler. If there is any kind of database error you have to roll back theexception and write it to the error log. Exception handling is explained in more detail in Chapter 15. Thiscode is specifically tailored to handle SQL errors and will cause an error in the application
Catch SqlEx As SqlException‘ some form of error - rollback the transaction ‘ and rethrow the exceptionIf trans IsNot Nothing Then
trans.Rollback()End If
‘ Log the exceptionTools.log(“An error occurred while creating the order”, SqlEx)Throw New Exception(“An error occurred while creating the order”, SqlEx)
Return
Last, you close the connection and you clear the cart profile of the items if the transaction has been successful:
FinallyIf conn IsNot Nothing Then
conn.Close()End If
End Try
‘ we will only reach here if the order has been created successfully‘ so clear the cartProfile.Cart.Items.Clear()
End Sub
There is also a failsafe step that checks to see if you have jumped in the wizard. Normally this will beunder the direction of the program; in other words, you check to see if the user has logged in and jumpthem forward one step. However, it’s possible an unscrupulous user might have jumped into this procedure halfway through, or that the procedure has accidentally “forgotten” the login details (normally caused by the session variable being lost — this might happen if ASP.NET restarts halfway
522
Chapter 13
16_588508 ch13.qxd 10/10/05 6:33 PM Page 522

through the wizard). In which case you check to see if the user has logged in or not, and if you have norecord of them (in other words, they aren’t authenticated), then you jump them back to the login dialog.
Protected Sub Wizard1_ActiveStepChanged(ByVal sender As Object, ByVal e AsSystem.EventArgs) Handles Wizard1.ActiveStepChanged
If Not User.Identity.IsAuthenticated ThenWizard1.ActiveStepIndex = 0
End If
End Sub
End Class
The checkout process is a lengthy one, but it is the most essential part. If you get this wrong, you willnever get any orders!
Secure TransactionsYou might be forgiven for thinking that you’re missing one vital part of the process. How do you ensurethat your transaction isn’t compromised and that credit card details aren’t left wide open to the ether? Ofcourse the nature of the HTTP protocol is exactly that, you send text across to the web server and youreceive text back again. There’s nothing to stop anybody out there from listening and recording yourdetails.
Fortunately, there is a two-pronged attack with which you can ensure transactions are secure and thatthe credit card details and other confidential information are not compromised:
❑ Encryption: You must encode, or scramble, the information that is sent to the web server andreceived back from the web server. The web server has a public key, and users will have a private key that enables them to decode the information. Only having the public key and the private key together will allow you to encrypt the message. The web server will have a public key and its own private key at the other end. To encrypt messages, you use a secure communications protocol; either Secure Sockets Layer (SSL) or Secure HTTP (S-HTTP) wouldprovide this functionality. You can specify encryption methods and whether to use SSL on aconnection in the Web.config file.
❑ Certificates: To guarantee that the site you are dealing with at the other end is reputable, it canbe certified by a Certificate Authority. Verisign (www.verisign.com) is perhaps the most common Certificate Authority. The authority is paid a yearly fee by the e-commerce vendor andin return the authority performs checks on the business to prove that it is legitimate. Thesechecks are then recorded in the form of a certificate. You can browse particular sites’ certificatesduring the checkout process. To make your site trustworthy, you should go about obtaining acertificate from a Certificate Authority.
You’re not going to implement any of these features on the Wrox United site for reasons of practicality,but if you want to implement an e-commerce solution, you must make use of encryption and certificates.
523
E-Commerce
16_588508 ch13.qxd 10/10/05 6:33 PM Page 523

What Else Can You Do?Having reached this far in the chapter you probably deserve a cup of tea and a sit down. However, whileyou’re enjoying your well-earned brew, this would be a good time to get your thinking cap on and havea think about what else you could add to the shop. An e-commerce site is like a community and can continually evolve as your site evolves; you shouldn’t think that you’ve done everything possible withit. The following list outlines some things to consider as your e-commerce site evolves:
❑ Improving the Product Catalog: To improve the product catalog, you can show how manyproducts are currently in stock, show how long they will take to deliver, show the release dateof a product, add customer reviews or testimonies to how wonderful or appalling the productis, and add a cross-linking reference that mentions which other items a customer purchasedwhen they purchased a particular item.
❑ Improving Membership Tracking and Personalization: Add a member discount, record creditcard details, mail out special offers related to past purchases (so if a customer bought a replicakit in 2004, when the 2005 version comes out, it might be good to e-mail them).
❑ Improving the Shopping Cart: Make the shopping cart visible at all times.
❑ Improving the Checkout Process: Make the checkout process simpler so that it can be achievedin as few clicks as possible.
SummaryHopefully this rather lengthy chapter hasn’t scared you away. E-commerce is a lengthy and complexprocess; however, the new features of ASP.NET 2.0 make it approachable and possible to program for thefirst time without weeks of heartache and stress. While e-commerce isn’t something to be taken lightly, itis something that can be added to an application with a little bit of thought and careful work.
This chapter started by describing the e-commerce pipeline, which is outlined as follows:
❑ Select an item from the catalog
❑ Put the item in the shopping cart
❑ Checkout with the item or items
❑ Supply address details
❑ Pay for the item
❑ Confirm the transaction
You started by creating a design for your product catalog and then you built a Catalog page. From thecatalog you allowed the user to hone in on particular items, and you did this via a Product Item page.Neither of these items specifically required the use of the shopping cart so you held off creating one.They just queried the database and displayed the relevant details. However, without these pages, youwould not be able to shop effectively.
524
Chapter 13
16_588508 ch13.qxd 10/10/05 6:33 PM Page 524

With a catalog working, you could add the cart. The cart consisted of two objects, the CartItem object(one for each item selected by the user from the catalog) and the WroxShoppingCart object, which contained a bundle of CartItem objects. To enable the shopping cart you added Insert, Update, andDelete methods, which allowed you to put things in, change the amount of, and remove items fromyour shopping cart. Last, you connected the shopping cart to your catalog by creating an Add an Itembutton to your Product Item page.
Next you created a checkout process that handled the login, the confirmation of the delivery address, thecredit card details, and finished the procedure. Although you couldn’t handle the card details with the application, you learned about the various options offered. Finally you learned how to make thetransactions secure and some ways to extend and improve the e-commerce procedure in Wrox United.
ExercisesAn e-commerce site could potentially choose to offer many extra features. In these exercises you’re goingto focus on just one. Some fan sites offer the capability for their members to purchase items at a reducedprice, a membership discount. How would you go about implementing it? Each question is about astage of the implementation and together they will give you this functionality.
1. The member discount is something that is applied to the shopping cart as you add items to thecart. What do you need to add to the ShoppingCart object to make sure it can store a discountof 10% for fan club members? You can assume that you can detect a fan club member with theproperty HttpContext.Current.User.IsInRole(“FanClubMember”).
Hint: You will need to create a subtotal as well.
2. How can you display the member discount details on the Shopping Cart page so that only a fanclub member will see them?
525
E-Commerce
16_588508 ch13.qxd 10/10/05 6:33 PM Page 525

16_588508 ch13.qxd 10/10/05 6:33 PM Page 526

14Performance
Throughout the book you’ve learned a range of techniques to help you build web sites, and reallyconcentrated on the possibilities; what controls and code you can use to produce great functionalityfor your site. One thing you haven’t looked at, though, is how to make your site perform as well asit possibly can. After all, it doesn’t matter how great your site looks; if it performs badly it fails.Internet users are an impatient lot and expect sites to be fast.
Although performance should be addressed throughout the design and building of a site, this isn’talways practical, especially for the beginner. So this chapter revisits some of the earlier pages tosee how they can be improved, and discusses the techniques that can be used to create the bestperforming sites.
In particular, this chapter looks at the following:
❑ How to design and test for performance
❑ The techniques to use in ASP.NET pages and data handling to ensure the fastest possiblepages
❑ What caching is and how it can be used
Let’s start with the things you can do to either existing code or new code that you write.
Simple TechniquesSeveral simple things are easy to do and provide good performance, as well as being good designtechniques and aiding future development work and maintenance. After all, writing applicationsisn’t just about getting the best from them now, but also getting the best from them in the future.Being able to fix and update web applications easily is just as much a part of development as producing the application in the first place. This section on simple techniques looks at the following:
❑ How to dispose of resources once they are no longer required.
❑ How to ensure connecting to a database is done in the best possible way.
❑ How using stored procedures can improve data access performance.
17_588508 ch14.qxd 10/10/05 6:31 PM Page 527

❑ How to use generics to improve performance of collections.
❑ How session state can be minimized to allow less processing to be done by ASP.NET.
❑ How view state can be tuned to reduce the amount of data sent to and from the web server.
This section starts with object disposal.
Object DisposalIn performance terms certain things are expensive; that is, they can lead to performance problems. Thereason for this is that objects need resources to manage them, resources such as CPU and memory, so the fewer of these resources used, the less work the server is doing, which in turn leads to more pagesfor more users. If the use of these resources can be minimized, the site will perform better, and part ofthat minimization is to make sure you only use the resource for as little time as possible.
In general, objects that use expensive resources like the file system, graphics, or databases should be disposed of as soon as they are no longer needed. The only exception is database connections inASP.NET applications, as discussed in the “Database Connections” section later in the chapter. Disposalof objects frees up resources, such as files and memory, allowing the web server to perform more efficiently. By default, resources are disposed of automatically by the Garbage Collector, but it is possibleto improve performance by taking control of object disposal yourself, and you can do this in two ways.You can either use a standard pattern for creating the resource, using it, and then disposing of it, or youcan use the Using statement. This section looks at both, because you’ll see both in documentation.
In the Wrox United site, one area where this is used is for images. Certain users have permission toupload images: Administrators can upload new images for the shop, the owner and coach can uploadplayer pictures, and reporters and fan club members can upload match pictures. Part of this upload process involves creating a thumbnail image, which uses the Image object, something that should be disposed of as soon as it’s no longer required. Disposal is necessary for two reasons. The first is becausethe image is a file-based resource, and the file may be required by other pages, so making sure you don’thave any connection to it means it’s available for others — the sooner you remove your need for it, thesooner someone else can access it. The second reason for disposal is because images take memory, so disposing of the image means the memory is freed and available for other processes.
The routine for creating thumbnails is in the ImageHandling.vb file, in the App_Code directory, and is asimple class with a single shared method (well two methods, but one is only required as part of theimage handling and isn’t actually used).
The general structure of this code is to create a new Image object from an existing image stored on disc.Then a new Image object is created using the GetThumbnailImage method, which specifies the newwidth and height. It’s pretty simple, but does involve two Image objects, so it requires two lots of disposal. The next section looks at how this routine works using the two ways of resource disposal.
Disposal with Try/CatchTo dispose using the Try/Catch methods you follow this simple pattern:
Try‘ create resource
Catch‘ handle exception
528
Chapter 14
17_588508 ch14.qxd 10/10/05 6:31 PM Page 528

Finally‘ dispose of resource
End Try
Your image code using this pattern is as follows:
Public Shared Sub GenerateThumbnail(ByVal SourceImagePath As String, _ByVal TargetImagePath As String)
Dim newHeight As ShortDim newWidth As ShortDim sourceImage As Image = NothingDim targetImage As Image = Nothing
TrysourceImage = Image.FromFile(SourceImagePath)
newHeight = CShort(sourceImage.Height * 0.25)newWidth = CShort(sourceImage.Width * 0.25)
Dim cb As New Image.GetThumbnailImageAbort(AddressOf ThumbnailCallback)
TrytargetImage = sourceImage.GetThumbnailImage(newWidth, newHeight, _
cb, IntPtr.Zero)targetImage.Save(TargetImagePath, Imaging.ImageFormat.Gif)
Catch ex As Exception‘ log exception
FinallyIf targetImage IsNot Nothing Then
targetImage.dispose()End If
End TryCatch ex As Exception
‘ log exceptionFinally
If sourceImage IsNot Nothing ThensourceImage.Dispose()
End IfEnd Try
End Sub
You can immediately see this is a little hard to read. There are two Try/Catch blocks, one within the other.The outer one is for sourceImage— the original image. This is loaded from a file using Image.FromFile,and then the new width and height are calculated using the Height and Width properties of the sourceimage; the new height and width are 25% of the original. After the new size is defined, a callback variable(cb) is created in case there is an error during the creation of the thumbnail — the GetThumbnailImagemethod will call the callback if an error occurs. We’re not actually handling any errors because we decidedthat it isn’t critical if thumbnails aren’t generated. If you have an application where it is critical to knowabout these errors, you could log the error in the callback routine.
529
Performance
17_588508 ch14.qxd 10/10/05 6:31 PM Page 529

The inner Try/Catch block then surrounds targetImage, which is generated from sourceImage usingGetThumbnailImage using the new width and height. This creates a new image based on the new size.Once generated, targetImage is then saved to a file as a GIF image.
The Finally blocks of each Try/Catch check that the Image object exists before disposing of the object,by calling the Dispose method.
Disposal with UsingThe Using statement makes the preceding code much simpler, as shown here:
Public Shared Sub GenerateThumbnail(ByVal SourceImagePath As String, _ByVal TargetImagePath As String)
Dim newHeight As ShortDim newWidth As Short
Using sourceImage As Image = Image.FromFile(SourceImagePath)
newHeight = CShort(sourceImage.Height * 0.25)newWidth = CShort(sourceImage.Width * 0.25)
Dim cb As New Image.GetThumbnailImageAbort(AddressOf ThumbnailCallback)Using targetImage As Image = _
sourceImage.GetThumbnailImage(newWidth, newHeight, cb, IntPtr.Zero)targetImage.Save(TargetImagePath, Imaging.ImageFormat.Gif)
End UsingEnd Using
End Sub
You can immediately see how much easier this is to read, as well as how much more sense it makes. TheUsing statement created the resource, which is then automatically disposed of when End Using isreached. The syntax for the Using statement is as follows:
Using resource‘ code that uses the resource
End Using
What happens is that when the End Using is reached the resource is disposed of immediately; there’s nowaiting for the Garbage Collector to dispose of it. In the code you have:
Using sourceImage As Image = Image.FromFile(SourceImagePath)
This is similar to the Dim statement in that it declares a variable, sourceImage, and assigns it a value.Unlike the Dim statement, though, the variable is disposed of as soon as the End Using is reached. So assoon as End Using is done, the sourceImage variable is dead and gone. In fact, because its scope isdefined as part of the Using statement, sourceImage isn’t accessible outside of the Using ... End Usingcode block.
You only need to explicitly dispose of resources if they are deemed expensive resources, such as files(images, text files, and so forth) or graphics resources that use lots of memory. For normal variables andobjects, even those you might think take a lot of memory such as a DataSet, should not be disposed ofexplicitly.
530
Chapter 14
17_588508 ch14.qxd 10/10/05 6:31 PM Page 530

Database ConnectionsFetching data from a database can be done automatically by way of the data source controls, or manuallythough the objects in the System.Data namespaces. One of these objects applies to connecting to adatabase — for SQL Server or SQL Server Express that object is the SqlConnection. In general, databasesare limited to the number of connections they can have; each connection takes resources and may stopanother application from connecting, so these should be used as sparingly as possible, and only kept openfor as short a time as possible. The general rule is to open the connection as late as possible, fetch the data,and close the connection as soon as possible, disposing of the connection once done. The Using statementis excellent for this:
Using conn As New SqlConnection(“. . .”)‘ code that uses the connection
End Using
Here the Using statement keeps track of the connection object, conn, which is closed and disposed ofwhen the End Using is reached.
In general, if you are manually creating connections, you should dispose of them as soon as you are finished. If you are using the data source controls, object disposal is handled automatically for you.
Stored ProceduresIn the examples you’ve seen so far in this book the data has been fetched either using a data source control such as the SqlDataSource or using code, where a SqlCommand or SqlDataAdapter wereused. In all cases the command that fetched the data, the SQL, was entered directly, such as:
SELECT [ProductID], [Name], [Description], [Price], [PictureURL] FROM [Products]
Now there’s nothing intrinsically wrong with this, it’s a standard SQL statement that works fine. However,it’s not the fastest way to fetch data, because the database has to work out exactly how it is going to fetchthe data when the command is executed. This involves creating what’s known as an execution plan — aplan of how the SQL is going to be executed, how tables are to be joined if there are multiple tables, whichindexes to use, and so on, and it does this every time. Once the plan has been created the stored procedureis also compiled and the compiled copy is the one that is executed.
A much better solution would be to work out the execution plan and store it for subsequent use. Sowhen a query is executed the plan is ready and doesn’t need recalculating. You can do this by way ofstored procedures, which are a way of wrapping up SQL into an easily manageable form; it’s a bit like aprocedure or a function in that the SQL to be executed can be wrapped in a stored procedure and thestored procedure name used to execute it. Consider this SqlDataSource:
<asp:SqlDataSource id=”SqlDataSource1” runat=”server”ConnectionString=”<%$ConnectionStrings:WroxUnited%>”SelectedCommand=”SELECT [ProductID], [Name], [Description], [Price], [PictureURL]
FROM [Products]”</asp:SqlDataSource>
531
Performance
17_588508 ch14.qxd 10/10/05 6:31 PM Page 531

Using a stored procedure, the code would look like this:
<asp:SqlDataSource id=”SqlDataSource1” runat=”server”ConnectionString=”<%$ConnectionStrings:WroxUnited%>”SelectedCommand=”usp_Products”SelectCommandType=”StoredProcedure”
</asp:SqlDataSource>
From the code perspective this is already better for two reasons: It makes the code neater and easier toread; and it abstracts the SQL into a central place, the database. Having the SQL in the database is goodbecause it’s the natural place for it; it’s code that deals directly with the tables and columns. It also meansyour code is easier to manage because you know that all of the SQL is in one place. A sensible namingscheme means stored procedures are easy to locate; we’ve used the naming scheme of usp_ followed bythe name of the table. The prefix usp_ is a common one and denotes User Stored Procedure — many ofsystem stored procedures that SQL Server provide are prefixed by sp_, so adding the u makes it obviouswhich procedures are ours and which are the server’s. The other addition when using stored proceduresis the SelectCommandType attribute, which tells the SqlDataSource that the command being issued is astored procedure, rather than a textual SQL statement.
The syntax for creating a stored procedure is as follows:
CREATE PROCEDURE ProcedureNameAS
SqlStatement
where ProcedureName is the name of the procedure (usp_Products) and SqlStatement is the SQLstatement that will be run when the stored procedure is called. So, how do you actually go about creat-ing stored procedures, and what exactly do they contain? You give this a go in the following Try It Out.
Try It Out Creating and Using Stored Procedures1. In the WroxUnited VWD application for this chapter (Chapters/Begin/Chapter14/
WroxUnited)e, load the Shop.aspx file and change the SelectCommand to usp_Products.
2. Add the following new attribute to the SqlDataSource:
SelectCommandType=”StoredProcedure”
3. Save the file.
532
Chapter 14
17_588508 ch14.qxd 10/10/05 6:31 PM Page 532

4. Select the Database Explorer tab and expand WroxUnited.mdf, which will appear under DataConnections (see Figure 14-1).
Figure 14-1
5. Right-click Stored Procedures and select Add New Stored Procedure from the menu.
6. Modify the procedure so that it looks like this:
CREATE PROCEDURE dbo.usp_ProductsAS
SELECT ProductID, [Name], Description, Price, PictureURLFROM ProductsORDER BY [Name]
7. Save and close the procedure.
8. Right-click WroxUnited.mdf and select Close Connection from the menu. This ensures thatwhen you run the application you don’t receive an error telling you that the data file couldn’t beopened because it is in use by another process.
9. On the Wrox United web site, navigate to the Shop page to confirm that the page displays asyou expect it to. You’ll see no change from the user perspective, because stored procedures are aprogramming concept, and apart from speed, have no impact on what the user sees.
533
Performance
17_588508 ch14.qxd 10/10/05 6:31 PM Page 533

How It WorksThe first thing to look at is the stored procedure itself:
CREATE PROCEDURE dbo.usp_ProductsAS
SELECT ProductID, [Name], Description, Price, PictureURLFROM ProductsORDER BY [Name]
So you can see that the name of your stored procedure is usp_Products. The dbo part indicates theowner of the procedure, and in this case the owner is dbo— a synonym for the database owner. Anythingafter the AS statement is the actual procedure itself, and yours simply consists of a SELECT statement. Infact, this is the same SELECT statement that was generated by VWD when the SqlDataSource was created, with the addition of an ORDER BY clause to order the results by the product name. This is actuallya good way to combine the ease of data source controls with stored procedures; let the designer create thecontrol, then copy the SQL statement into a stored procedure and use the procedure name in the datasource control. The column Name is wrapped within square brackets because Name is a keyword with inSQL. The stored procedure works without the brackets, but using them tells SQL Server that this use ofName is a column, and saves SQL Server having to work that out on its own.
The procedure name starts with usp_ for usability and historic reasons. You don’t want your stored procedure to have the same name as the table, but keeping the table name is useful, because it helps toidentify which stored procedures are related to which tables. In SQL Server, the system stored proceduresstart with sp_ (an acronym for stored procedure), so using that as a prefix would confuse your stored procedures with the system ones. So usp_ (an acronym for user stored procedure) is generally usedinstead. This isn’t a requirement, but you’ll find that it is a common practice.
SQL is both case and context insensitive, meaning no line continuation characters are required.
In the ASP.NET page, the SQL statement has simply been replaced by the name of the stored procedure.By default, the SqlDataSource control expects a SQL statement, so when using a stored procedure youhave to add the SelectCommandType attribute, setting its value to StoredProcedure. This tellsASP.NET that the command isn’t a SQL statement to be executed, but that the named stored procedureshould be used instead.
Modifying Stored ProceduresTo modify a stored procedure you simply open it (double-click or right-click and select Open from themenu) from within the Database Explorer, where you will be presented with the following:
ALTER PROCEDURE dbo.usp_ProductsAS
SELECT ProductID, Name, Description, Price, PictureURLFROM ProductsORDER BY Name
Notice that CREATE PROCEDURE has been replaced with ALTER PROCEDURE. The CREATE statement is onlyused when creating stored procedures, and subsequently ALTER is used. Once you’ve completed yourchanges, perhaps changing the columns being selected, you can just save the file, and the procedure in thedatabase will be updated. In fact, just the matter of saving a new query changes the CREATE into ALTER.
534
Chapter 14
17_588508 ch14.qxd 10/10/05 6:31 PM Page 534

Using the Query BuilderIf you don’t want to use the copy-and-paste method for creating SQL statements, you can use the QueryBuilder. This can be accessed when creating or modifying a stored procedure by selecting the Insert SQLitem from the right mouse menu — just click anywhere in the stored procedure editor window to get themenu. You first see a window allowing you to select the table (see Figure 14-2).
Figure 14-2
You can double-click a table to add it, or select the table and use the Add button. When you haveselected your table and closed the window you see the Query Builder, shown in Figure 14-3.
Figure 14-3
535
Performance
17_588508 ch14.qxd 10/10/05 6:31 PM Page 535

The Query Builder is an excellent way of learning SQL, because it presents you with an easy-to-understandgraphical way of designing queries, and shows the actual SQL statement. When the Query Builder isclosed, the SQL is inserted into the stored procedure; it doesn’t update the existing SQL but inserts the newSQL instead.
If you want to use the Query Builder to edit the existing SQL in a stored procedure, you need to placethe cursor within the SQL block when editing the procedure — this block is outlined in blue — and selectthe Design SQL Block from the right mouse menu. When you select this option the Query Builder comesup right away with the existing SQL in place.
Modifying Data and ParametersThe query and stored procedure shown earlier only fetch data, but three other types of queries can berun: updates, inserts, and deletes. Just like SELECT queries these update queries can also be convertedinto stored procedures. As an example, take a look at the administrative Edit News page, where theSqlDataSource is defined like so:
<asp:sqldatasource id=”SqlDataSource2” runat=”server”ConnectionString=”<%$ ConnectionStrings:WroxUnited %>”SelectCommand=”SELECT * FROM [News] WHERE [NewsID] = @NewsID”UpdateCommand=”UPDATE [News] SET [DateToShow] = @DateToShow, [Description] =
@Description, [PictureURL] = @PictureURL, [Category] = @Category, [Title] = @TitleWHERE [NewsID] = @NewsID”
InsertCommand=”INSERT INTO [News] ([DateToShow], [Description], [PictureURL],[Category], [Title]) VALUES (@DateToShow, @Description, @PictureURL, @Category,@Title)”
DeleteCommand=”DELETE FROM [News] WHERE [NewsID] = @NewsID”OnDeleted=”SqlDataSource2_Deleted”OnInserted=”SqlDataSource2_Inserted”OnUpdated=”SqlDataSource2_Updated”>
The important parts are the SelectCommand, UpdateCommand, InsertCommand, and DeleteCommandattributes, which define the SQL used when fetching and modifying data. There are also a number ofparameters, which provide the mapping from the ASP.NET controls to the queries:
<DeleteParameters><asp:Parameter Type=”Int32” Name=”NewsID”></asp:Parameter>
</DeleteParameters><UpdateParameters>
<asp:Parameter Type=”DateTime” Name=”DateToShow”></asp:Parameter><asp:Parameter Type=”String” Name=”Description”></asp:Parameter><asp:Parameter Type=”String” Name=”PictureURL”></asp:Parameter><asp:Parameter Type=”String” Name=”Category”></asp:Parameter><asp:Parameter Type=”String” Name=”Title”></asp:Parameter><asp:Parameter Type=”Int32” Name=”NewsID”></asp:Parameter>
</UpdateParameters><SelectParameters>
<asp:ControlParameter Name=”NewsID” Type=”Int32” ControlID=”GridView1”PropertyName=”SelectedValue”></asp:ControlParameter></SelectParameters><InsertParameters>
<asp:Parameter Type=”DateTime” Name=”DateToShow”></asp:Parameter>
536
Chapter 14
17_588508 ch14.qxd 10/10/05 6:31 PM Page 536

<asp:Parameter Type=”String” Name=”Description”></asp:Parameter><asp:Parameter Type=”String” Name=”PictureURL”></asp:Parameter><asp:Parameter Type=”String” Name=”Category”></asp:Parameter><asp:Parameter Type=”String” Name=”Title”></asp:Parameter>
</InsertParameters>
When converting these queries to stored procedures, the parameters can remain the same, because thestored procedures will still require information to be passed into them. So in the next Try It Out, youconvert this page and see how the parameters and other queries work.
Try it Out Modifying Data and Parameters1. Open the Admin\EditNews.aspx page and find the SqlDataSource2 control.
2. In the Database Explorer, expand the WroxUnited.mdf file and add a new stored procedure(select the Stored Procedures item in the Database Explorer and from the right mouse menuselect Add New Stored Procedure).
3. Delete the existing contents of the new stored procedure and replace them with the following:
CREATE PROCEDURE dbo.usp_NewsByID@NewsID int
ASSELECT * FROM NewsWHERE NewsID = @NewsID
You can copy and paste the SQL from EditNews.aspx if you like. You don’t have to worryabout the square brackets — these were placed around column names when the data source control was created and ensure that the column names are not interpreted as keywords.
4. Save and close the procedure.
5. Create another new procedure, replacing the default text with the following code:
CREATE PROCEDURE dbo.usp_NewsUpdate@DateToShow datetime,@Description text,@PictureUrl varchar(50),@Category varchar(50),@Title varchar(50),@NewsID int
ASUPDATE NewsSET DateToShow = @DateToShow, Description = @Description,
PictureUrl = @PictureUrl, Category = @Category, Title = @Title
WHERE NewsID = @NewsID
6. Save and close the procedure.
7. Create another new procedure, replacing the default text with this code:
CREATE PROCEDURE dbo.usp_NewsInsert@DateToShow datetime,@Description text,
537
Performance
17_588508 ch14.qxd 10/10/05 6:31 PM Page 537

@PictureUrl varchar(50),@Category varchar(50),@Title varchar(50)
ASINSERT INTO News(DateToShow, Description, PictureUrl, Category, Title)VALUES (@DateToShow, @Description, @PictureUrl, @Category, @Title)
8. Save and close the procedure.
9. Create another new procedure, replacing the default text with the following:
CREATE PROCEDURE dbo.usp_NewsDelete@NewsID int
ASDELETE FROM NewsWHERE NewsID = @NewsID
10. Save and close the procedure.
11. In the Database Explorer, close the database connection by right-clicking WroxUnited.mdf andselecting the Close Connection menu item.
12. In EditNews.aspx change the SQL commands to their appropriate stored procedures, using thefollowing table as a guide:
Command Stored Procedure
SelectCommand usp_NewsByID
UpdateCommand usp_NewsUpdate
InsertCommand usp_NewsInsert
DeleteCommand usp_NewsDelete
13. Add the following attributes to SqlDataSource2:
SelectCommandType=”StoredProcedure”UpdateCommandType=”StoredProcedure”InsertCommandType=”StoredProcedure”DeleteCommandType=”StoredProcedure”
14. Save the page and run the application to prove that the page still works as expected; like theprevious example you won’t see anything different when running the application. To edit thenews items you’ll have to be a user in one of the following roles: Reporter, Owner, Manager, orAdmin. You can find out login details by using the “help” link on the login box when notlogged in to the site, but you can use dave, dan, jim, chrish, chrisu, or john.
How It WorksFrom the first example you can see that the SQL statements in the data source control have beenreplaced by names of stored procedures, and the appropriate CommandType attributes set to indicatethis. The stored procedures are rather different from the one used in the first example, though, so take alook at some of the specifics, starting with the one to fetch a row to be edited:
538
Chapter 14
17_588508 ch14.qxd 10/10/05 6:31 PM Page 538

CREATE PROCEDURE dbo.usp_NewsByID@NewsID int
ASSELECT * FROM NewsWHERE NewsID = @NewsID
The first thing to notice is that there is an extra line between the CREATE PROCEDURE and the AS statement.This is where parameters are placed and is very similar to parameters for methods, as discussed inChapter 9. In this case you have a parameter called @NewsID, whose data type is an int (an integer).Parameters in SQL are always preceded by the at symbol (@). The value for this parameter is supplied inthe same way as if this SelectCommand were a SQL statement, by the SelectParameters:
<SelectParameters><asp:ControlParameter Name=”NewsID” Type=”Int32”
Control=”GridView1” PropertyName=”SelectedValue”></asp:ControlParameter></SelectParameters>
The value of the Name attribute is passed through into the @NewsID parameter of the stored procedure.Within the procedure the parameter is used to restrict the rows returned, so only rows where the NewsIDmatches the value of the @NewsID parameter are returned.
The same technique applies for the other stored procedures. For example, to update a news story the following stored procedure is used:
CREATE PROCEDURE dbo.usp_NewsUpdate@DateToShow datetime,@Description text,@PictureUrl varchar(50),@Category varchar(50),@Title varchar(50),@NewsID int
ASUPDATE NewsSET DateToShow = @DateToShow, Description = @Description,
PictureUrl = @PictureUrl, Category = @Category, Title = @Title
WHERE NewsID = @NewsID
There are more parameters here, with each being separated by a comma. The data types are also slightlydifferent from what you might expect, because SQL handles strings differently from .NET. For example,the Description and PictureUrl are both a String type in .NET, but there are two data types used inSQL. This is because SQL allows for strings of a fixed maximum length, in which case the varchar datatype is used with the maximum in parentheses, or for unlimited strings, in which case the text datatype is used. A varchar only defines the maximum length for the string, and doesn’t necessarily storethat much data. For example, PictureUrl is declared as varchar(50), but if the PictureUrl only contains 10 characters, then only 10 characters are stored. There is another data type for handlingstrings, which is char, but that does store all characters. So if PictureUrl was declared as char(50)and only 10 were used, what is stored is the actual string followed by 40 spaces. Those spaces would be
539
Performance
17_588508 ch14.qxd 10/10/05 6:31 PM Page 539

automatically added when the string was inserted into the database and would remain when the data isfetched, which would mean you might have to truncate your data when displaying it. So unless you arestoring a string that you know is fixed (three-character currency codes for example), then a varchardata type is best.
We don’t have time to go into more detail on the SQL itself, because it’s really outside the scope of whatwe’re teaching. The important thing to remember is that using stored procedures improves performanceas well as centralizing data access statements.
For more on SQL get hold of Beginning SQL, by Paul Wilton and John Colby, and for more on databaseaccess in ASP.NET see Beginning ASP.NET 2.0 Databases by John Kauffman. Both books are also by Wrox Press.
Strongly Typed CollectionsChapter 9 briefly mentioned generics as a way to improve code in a number of areas: readability, reducingerrors, and performance. We’re not going to go into much detail about generics — it’s a wide topic — but it does have an impact on performance, especially in regard to collections. So it’s worth reiterating the differences between a normal collection and a generic one. Take the standard ArrayList as an example,which can be used like this:
Imports System.Collections
Dim myList As New ArrayList()myList.Add(“abc”)myList.Add(“def”)
Dim s As String = DirectCast(myList(0), String)
Now there’s nothing wrong with this code; it works fine and is probably used in lots of web sites, but it’snot the most efficient way to store a list of strings. This is because the ArrayList stores objects, so whena string is placed into the list it is converted to an Object data type. Likewise, when fetching data fromthe list it needs to be converted back to its native type. This conversion between types is an overhead.
With a generic collection the overhead is avoided because the collection is automatically of the correcttype. Instead of an ArrayList, a generic List can be used:
Imports System.Collections.Generic
Dim myList As List(Of String)myList.Add(“abc”)myList.Add(“def”)
Dim s As String = myList(0)
When declaring the List you set the type of object it contains — in this case String. When objects are added to the list they don’t need to be converted because the list is only storing strings. Similarly, no conversion is required when reading a value from the list. As a result, there’s a performance improvement when adding data and fetching it.
540
Chapter 14
17_588508 ch14.qxd 10/10/05 6:31 PM Page 540

The added benefit of generic collections is that you can’t store anything other than the defined type inthem. This reduces potential error situations, because attempted storage of the wrong data type willresult in a compiler error.
Session StateChapter 6 explained the stateless nature of web sites, and that without programming they forget informa-tion between requests. The ASP.NET controls retain information about their state, and the Profile retainsinformation about a user, but there is no storage of data about a session, unless this is coded into the appli-cation. The session can be described as the time spent browsing a site; from the moment you first startbrowsing to the moment you close your browser. That’s an important point, because once the browsercloses the session ends — if you start browsing after closing the browser you have a new session.
In previous versions of ASP.NET many things that are now part of the framework had to be coded, andthe session was often used for temporary storage of items such as user details, shopping carts, and so on. With the Profile storing user preferences and the Membership services storing user details, the need for session storage has reduced. Membership is covered in Chapter 4 and the Profile is covered in Chapter 11, so refer to those chapters for details of what is stored.
This is important to know because session state takes resources, both the processor and memory, and if it’snot required then why have it there? By default the session is enabled for read and write access, but thiscan be disabled if your application is never going to use session state. You can do this in the applicationconfiguration file (Web.config), by using the sessionState element:
<sessionState mode=”Off” />
This turns off session state, which will save valuable resources.
If session state is required, but none of the pages need to update it, then it can be made read-only (orturned off for pages) by changing the enableSessionState attribute of the pages element inWeb.config:
<pages enableSessionState=”ReadOnly” />
The values can be False to turn off session state, True to enable it, and ReadOnly to make it read-only.The ReadOnly property can also be applied to the Page directive on individual pages as follows:
<%@ Page enableSessionState=”ReadOnly” %>
It should be noted that for low-user sites, turning off session state probably won’t make much difference,but it could have an impact on a high-performance site with a large number of active users. You shouldalso make sure that developers know that session state is turned off for a site, otherwise they may try tocode for it when it isn’t available.
541
Performance
17_588508 ch14.qxd 10/10/05 6:31 PM Page 541

View StateThe way ASP.NET server controls retain their state is a great boon for the programmer and makes construction of web sites far easier than it used to be. The retention of state is called the view state and isstored within a hidden control on the page, so no extra programming is needed. This does, however, comewith a downside, and that downside is that the size of the page increases, which in turn leads to a slower-loading page. Now by and large the advantages of view state outweigh the disadvantages, but it’s useful tounderstand how it works. Take a look at the Wrox United home page, which contains many controls. Thereare some links at the top, a menu and the login and shopping cart on the left, and then the main content,which consists of the news. All of these are handled by controls, and only the central content is specific to theindividual page — the rest is supplied by the Master page, and therefore appears on every page.
This is important from the performance perspective because the view state for the menu is 2780 bytes.That might not seem like a lot, but it’s sent on every page request and returned on every postback. Plusthat’s just the menu control; others have view state too. Essentially any control that participates in post-back will probably have view state and thus the more controls, the more view state.
Like session state, view state can also be disabled, both at the page and control level, using theEnableViewState attribute. To enable this for all controls on a page (or the Master page) you modifythe Page directive as follows:
<%@ Page EnableViewState=”False” %>
For controls the attribute is the same. For example, the menu control in site.master could have viewstate disabled like so:
<asp:Menu id=”MyMenu” runat=”server”EnableViewState=”False” />
The menu continues to work as before, but now has no view state so the page has more than 2000 bytesless to transmit every time. This technique can be applied to other controls, especially those such asgrids or lists. One case is the Players page (players.aspx), which uses a DataList to show the playerdetails, and has no interaction. Turning off view state for this control reduces the page size by another2700 bytes.
In fact, many of the controls don’t actually need view state, and those that do interact with the pagemight be able to have view state disabled. This is different from previous versions of ASP.NET wheredisabling view state stopped some controls from working. View state can be disabled for the entireapplication in a similar way to session state, by modifying the pages element in the Web.config file:
<pages enableViewState=”false” />
If this was done, you could then turn on view state for those controls that need it.
Later in the chapter you look at how you can find out how large controls are and how much view statethey store. But first, the next section looks at how you can use code to improve performance.
542
Chapter 14
17_588508 ch14.qxd 10/10/05 6:31 PM Page 542

Pages and CodeMany techniques can be used in code to help with performance, from simple use of framework classes toa properly architected application. Some techniques will only come from experience, some will only berelevant to certain applications, and some are things you should generally know.
One of these general points is to know the .NET Framework class library. You don’t have to know itinside out, nor remember all of the classes, but it’s a good idea to familiarize yourself with the classesand namespaces. It’s definitely worthwhile spending some time just browsing through the referencedocumentation, getting a feeling for what’s possible. For example, many string handling routines arebuilt right into the String object, there are data type conversion classes, collections for storing multiplecopies of objects, and so on.
Data Binding and PostbackIf you aren’t using data source controls for your data binding, one thing you should make sure you do isonly to bind when you need to; data binding involves fetching the data from the database (and we’vealready said data access is expensive) and binding each row and column from the data to the rows andcolumns in a control. There’s no point doing all of that data access and binding unless it’s absolutelynecessary. For example, consider the following code:
Protected Sub Page_Load(ByVal Sender As Object, ByVal E As EventArgs)
GridView1.DataSource = SomeCollectionGridView1.DataBind()
End Sub
This simply binds a GridView control to a collection of data (the data is irrelevant for this discussion),but remember that if the page has buttons that post back, then the Page_Load event is run every time, sothe data is bound every time. If the grid isn’t going to change, and it retains its state, why rebind it?Using the IsPostback property can avoid this:
Protected Sub Page_Load(ByVal Sender As Object, ByVal E As EventArgs)
If Note Page.IsPostback ThenGridView1.DataSource = SomeCollectionGridView1.DataBind()
End If
End Sub
Now the grid is only bound the first time the page is loaded. This may seem like an obvious point, butyou’d be surprised how easy it is to forget, and remember that database access is relatively expensive —it consumes both time and resources.
If you are updating data and you do need to rebind the grid after a postback, you can bind in the buttonevent as well, after the data has been changed. What you don’t want to do is bind the grid in when thepage loads, update the data, and then rebind the grid again.
543
Performance
17_588508 ch14.qxd 10/10/05 6:31 PM Page 543

Object ReferencesOne standard performance optimization is the use of references to objects or items in collections. For example, imagine you are processing some user input, perhaps a name, entered into the text box with anID of NameTextBox. You have to work with the entered name in several places in some code, so you do this:
ValidateName(NameTextBox.Text)UpdateDatabase(NameTextBox.Text)DisplayName(NameTextBox.Text)
You can see that the Text property of the name is referenced three times. What happens if you realizethe user could have entered leading and trailing spaces, but that your routines need these stripped off?You might be tempted to just trim the spaces each time, like so:
ValidateName(NameTextBox.Text.Trim())UpdateDatabase(NameTextBox.Text.Trim())DisplayName(NameTextBox.Text.Trim())
A much better solution is to only reference the name once, storing the value in a local variable as follows:
Dim Name As String = NameTextBox.Text.Trim()
ValidateName(Name)UpdateDatabase(Name)DisplayName(Name)
Not only is this easier to read, but it’s also more efficient — you’re performing the Trim once, and onlyreferencing the Text property once.
In general this technique should be used wherever you reference objects properties, or call methods, several times. There’s probably very little performance improvement for referencing a Text property afew times, but it does sometimes aid readability, and it would certainly improve performance in a high-volume site; consider the search box on Amazon — how many times a day does that get used?
StringBuilder Versus String ConcatenationJoining strings together is a common occurrence and the technique most people use is concatenation, like so:
Dim FirstName As String = “Bill”Dim LastName As String = “Barker”Dim FullName As String = FirstName & “ “ & LastName
Here the ampersand (&) is used to join strings; the FullName is created from the FirstName, a space,and then the LastName. With just these three strings, trying to improve performance probably isn’tworthwhile, but when more strings are added together there is a significant overhead. The reason is thatstrings are immutable, which means once they are created they can never be changed. For example, consider creating a mail message to send to new members of the Wrox United fan club:
544
Chapter 14
17_588508 ch14.qxd 10/10/05 6:31 PM Page 544

Dim Message As String = “Dear “ & MemberName & _“. Welcome to the Wrox United Fan Club. As a member you’ll“ & _“ receive regular newsletters to keep you up-to-date with the“ & _“ activities of the club, special discounts in the club store,“ & _“ advance notice of special events, and many more exciting freebies.”
EmailMessage.Body = Message
This is fine as it stands because most of this is literal strings — that is, text within quotation marks. Whenliteral strings are concatenated, the compiler will join them together so there is no overhead. But what ifthe strings are user-supplied? For example, you might have the following code, where the strings aretaken from a Web Form:
Dim Address As String = AddressLine1.Text & AddressLine2 & AddressLine3 & _AddressLine4.Text & AddressLine5.Text
This also is fine, and despite what you might read elsewhere this is still very efficient because the compiler knows how many strings there are and can optimize the code for you. We’ve mentioned thesetwo scenarios because certain books and articles explicitly state that this code is very inefficient; ignorethem, because the code is fine. Where you might have a performance problem is when the number ofstrings is large (more than 10, say) or unknown. For example, imagine a string being built up from somerows in a database (returned as a SqlDataReader, rdr), where you might have the following code:
Dim str As StringWhile rdr.Read()
str &= rdr.GetString(0)End While
Return str
This loops while the reader has some data and appends the data from column 0 to the string variablestr. As it stands, this is very inefficient because the compiler doesn’t know how many strings there willbe, so it cannot perform any optimization. Although this looks innocuous you have to remember thatstrings are immutable, so once created they are never changed. The preceding code, therefore, doesn’treally append one string to another; it actually creates a new string made up from the two beingappended. This new string is then assigned to str. To improve performance the StringBuilder classcan be used, which is in the System.Text namespace:
Imports System.TextDim sb As New StringBuilder()While rdr.Read()
sb.Append(rdr.GetString(0))End While
Return sb.ToString()
When the StringBuilder object is created it allocates a buffer of memory, and as strings are appended toit using the Append class, the buffer gradually fills up. When full, another chunk of memory is allocatedready for more strings, so memory allocation happens infrequently and in chunks. This is far more efficientthan appending strings to each other where the memory allocation happens for each string.
545
Performance
17_588508 ch14.qxd 10/10/05 6:31 PM Page 545
In general you should use a StringBuilder object where you are appending a large number of strings,or where the number of strings is unknown.
Picking the Right CollectionNumerous collections exist and at first glance some seem just as good as others, but you need to carefullyconsider the use of the collection to ensure optimal performance. The following section lists the collectionsand what their best use is:
❑ The ArrayList dynamically resizes as items are added and is best used to store custom objecttypes when the data changes frequently — for example, when you are performing frequentinserts and deletes.
❑ The HashTable is a collection of pairs of data (a key and a value) and is best suited for data thatdoesn’t change frequently, and is especially useful for data that is queried often.
❑ The ListDictionary should only be used to store small amounts of data, generally fewer than10 items.
❑ The NamevalueCollection is a sorted collection of keys and values and is best for data that isalready sorted. It is efficient for data that frequently changes or needs to be queried often.
❑ The Queue provides first-in, first-out storage, so it should be used when sequentially ordereddata is required.
❑ The SortedList stores keys and values in a sorted order. This makes adding data slow, becauseexisting items need to be rearranged to ensure the new item is in the correct order. ASortedList is best for data that doesn’t change often.
❑ The Stack provides first-in, first-out storage, so it should be used when sequentially ordereddata is required.
❑ The StringCollection is a strongly typed ArrayList, so it is useful for storing strings in anarbitrary order, and for strings that change frequently.
❑ The StringDictionary is a strongly typed HashTable, so it is useful when strings need to bestored and those strings don’t change often.
Using the correct collection not only improves performance but also reduces the potential for errors. Forexample, if you need to store strings, use a StringCollection or a StringDictionary, because theyonly store strings; trying to store another data type results in a compiler error, so your code is protectedagainst storage of incorrect types.
Now it’s time to turn away from the coding aspects of performance and look toward a feature thatASP.NET provides for us. Although coding and configuration is still required, it’s not the code itself that will improve performance; rather, it is ASP.NET itself.
546
Chapter 14
17_588508 ch14.qxd 10/10/05 6:31 PM Page 546

CachingCaching is the term given to keeping a copy of something for later use, and provides a way of avoidingresource-intensive operations. For example, we’ve already talked about databases being expensive interms of performance, but there’s no real way to avoid them with data-driven sites. So what you can dois minimize database access, by fetching data and storing it elsewhere (but not another slow resourcesuch as a file). Another type of caching can just involve operations that don’t need to be done multipletimes; storing the result of that operation saves having to redo it when required.
Caching can be used in many ways, but luckily ASP.NET has made some of these easier for us.
Page CachingYou already know that ASP.NET pages are compiled, but probably haven’t thought much about it. After all,it works, so what’s the big deal? Well, knowing how it works means you can understand how page cachingworks, and means you can use it effectively. The following set of diagrams show how the compilation worksand how it affects caching. Figure 14-4 starts with the first request of a page, which is compiled and storedon disk in intermediate language; this isn’t a fully compiled executable, but is a shortened source code format. The .NET runtime then compiles the intermediate code, which executes, and the result of that execution is the HTML that is returned to the browser.
Figure 14-4
The second time the page is requested (see Figure 14-5), assuming the source hasn’t been changed, theintermediate code is still available, so the compilation stage is bypassed.
Disk
RequestASP.NET page Compiler
Intermediate CodeResponse
.NET CLRRuntime
547
Performance
17_588508 ch14.qxd 10/10/05 6:31 PM Page 547

Figure 14-5
So already we have an improvement, just by the intermediate code being cached. What can also happen is that the page output can be cached, if designed as part of the page. When the intermediate code is compiled, the HTML is not only returned to the browser, but also stored on disk, as shown in Figure 14-6.
Figure 14-6
Disk
Disk
RequestASP.NET page Compiler
Intermediate CodeResponse
.NET CLRRuntime
Disk
RequestASP.NET page Compiler
Intermediate CodeResponse
.NET CLRRuntime
548
Chapter 14
17_588508 ch14.qxd 10/10/05 6:31 PM Page 548

Now you have a great situation, because subsequent requests for the page simply get the HTML fromthe cache. All areas of compilation are avoided, as illustrated in Figure 14-7.
Figure 14-7
Now take a look at how you can implement this type of caching.
Output CachingOutput caching is the simplest of the page caching techniques shown in the previous section, wherebythe entire page is cached. Give this a go in the next Try It Out to see how easy it is.
Try It Out Output Caching1. In VWD, open History.aspx.
2. As the first line in the content, above the existing h1 element, add the following:
<div class=”boxFloatRight”><%=DateTime.Now%></div>
3. Save the file and run the application, navigating to the History page under the About menu.Notice the time to the right of the title, and press F5 to refresh the page. Press F5 several times,noting that the time is updated.
4. Close the browser, and back in VWD edit the History.aspx page again, adding the followingline:
<%@ OutputCache Duration=”30” VaryByParam=”none” %>
Disk
Disk
RequestASP.NET page Compiler
Intermediate CodeResponse
.NET CLRRuntime
549
Performance
17_588508 ch14.qxd 10/10/05 6:31 PM Page 549

5. Save the file and re-run the application. Try pressing F5 several times and notice that now thetime isn’t updated. Wait at least 30 seconds (or go make some coffee/tea/favorite beverage —you deserve it) and refresh the page again — notice that the time has changed.
How It WorksOutput caching works in exactly the way shown in Figures 14-4 through 14-7. The OutputCachedirective tells ASP.NET that once the output of the page has been created it is to be stored in the cache.The Duration is the time in seconds that the page is to remain in the cache; any requests within those 30 seconds are served from the cache. Once the 30 seconds is up, the cached page expires and is removedfrom the cache. The next request will re-execute the page, whereupon it is placed into the cache oncemore. The VaryByParam attribute is discussed in a just a bit.
The div displaying the current time shows the time the page was executed. So the first time you requestthe page the current time is shown, because this is when the HTML is generated. But because the HTMLis cached, subsequent views of the page receive the cached HTML, which of course has the time fixed.It’s only when the page is removed from the cache that it’s re-executed and the time updated.
The advantage of this system is that pages that are used frequently will be often cached, whereas pagesthat aren’t used often get discarded from the cache.
The VaryByParam attribute dictates whether any external influences affect how the page is cached.Setting the value to none means that nothing affects the caching — only one copy will be cached.However, what about pages that allow selections and fetch data based upon those selections? One example is the Fixtures page, which can either show past fixtures or future fixtures, depending on avalue passed in as part of the querystring. If VaryByParam=”none” is used, only one copy of the pagewould be cached, so the first Fixtures page requested would be cached. Say two people view the fixturesone after another, and that the first view is for future fixtures, which would be cached. If the second person requests past fixtures he or she would be returned the cached page, which was for future fixtures. In fact, with this model the past fixtures wouldn’t be viewable until the first page was evictedfrom the cache.
To get around this VaryByParam can be set to the name of the querystring variable, which means that acopy of the page would be cached for each different value of the variable. This could be implemented inthe Fixtures page simply by adding the following cache directive:
<%@ OutputCache Duration=”30” VaryByParam=”type” %>
The two menu entries for fixtures have the following as their URLs:
Fixtures.aspx?type=futureFixtures.aspx?type=past
Now when two people request the different fixture pages, two copies are stored in the cache, one foreach type.
550
Chapter 14
17_588508 ch14.qxd 10/10/05 6:31 PM Page 550

Fragment CachingFragment caching allows portions of a page to be cached while the rest of the page remains dynamic.This is ideal for those pages that contain a mixture of static and dynamic content, and is achieved byhaving the content that is to be cached contained within a user control. The user control then uses theOutputCache directive to dictate how it should be cached, in the same way that pages use it:
<%@ Control OutputCache Duration=”30” VaryByParam=”none” %>
When the user control is placed on the page, only the content for the user control will be cached, allowingthe rest of the page to remain dynamic.
This is useful for pages where the data is very dynamic and changing often and you don’t want the pagecached, but there is some content (perhaps from a database) that doesn’t change often and can be cached.
Post Cache SubstitutionPost cache substitution is the opposite of fragment caching, where the page is cached but a portion of thepage is dynamic. This is achieved by use of the Substitution control, which works differently fromother forms of caching. You still use the OutputCache directive on the page to determine the caching,but the Substitution control is simply a placeholder into which the content is to be placed, and thiscontent has to be created manually. The Substitution control has a property called MethodName thatindicates a function that will return a string of data to be substituted into the cached page. For examplethe page would be as follows:
<%@ Page CodeFile=”PCS.aspx.vb” Inherits=”PCS” %><%@ OutputCache Duration=”30” VaryByParam=”none” %><html>
<form runat=”server”><div class=”boxFloatRight”><%=DateTime.Now%></div><asp:Substitution id=”sub1” runat=”server” MethodName=”Substitute” />
</form></html>
The code-behind would be as follows:
Partial Class PCSInherits System.Web.UI.Page
Shared Function Substitute(ByVal myContext As HttpContext) As StringReturn “Date fetched on “ & DateTime.Now.ToString()
End FunctionEnd Class
When this page is run it will be cached so the div with the date and time will remain the same, but eachtime the page is requested the Substitute method will be called, so the data that it returns will not becached. Here’s how it works.
The first time the page is requested by a user, the normal caching regime is applied — the page will beplaced into the output cache. However, because there is a Substitution control on the page the outputcache keeps a note of the MethodName (for each Substitution control if there is more than one on thepage). When the page is next requested, instead of being returned directly from the cache, the method
551
Performance
17_588508 ch14.qxd 10/10/05 6:31 PM Page 551

detailed in MethodName is called, which changes the contents of the Substitution control, at whichpoint it is integrated with the copy of the page in the output cache and returned to the user. In this case,you get the benefit of output caching but with the flexibility of dynamic content.
What’s interesting about post cache substitution is that it’s available to you if you write custom controls,meaning you can drop controls onto a page that automatically display up-to-date content irrespective ofwhether or not the page is cached. The AdRotator control actually works like this, so if you place anAdRotator onto a page, the ads will always be updated even if the page is cached. This works becausewithin the AdRotator code there is a post cache substitution that is dependent on the file that stores theads. When the AdRotator is on a page and that page is rendered, the AdRotator always checks thecache because that’s what the post cache substitution does. If the ad’s file hasn’t changed, the cacheentry will still be present, but if the file has changed the cache entry will have been removed, so the ad’sfile is re-read. With the AdRotator you get the benefits of caching but without the problem of stale ads,an important consideration if customers are paying for ad space.
Designing for PerformanceThis is the most vague area of the book, because much of the topic varies upon the particular applica-tion. While there are general techniques that can be used, some specific things depend upon your site.For example, you wouldn’t want to go to extreme lengths to extract the last ounce of performance froman intranet site with only 50 users. Sure, make it perform as best as you can, but sometimes there aretradeoffs that aren’t really justified. Is it worth spending a week of your time to gain an extra couple ofseconds? Possibly, but not always.
When designing for performance you have to think ahead and perhaps answer the following questions:
❑ How many people are going to use the site? For an intranet site you’ll have a fixed number ofusers — the employees in the company. For an Internet site the user base is unlimited. Moreusers mean more resources will be required on the web server.
❑ How much page interaction is there going to be? Do the pages just fetch and display data, orwill the user be answering questions, making selections, and so on? You obviously want yourpages to respond quickly whichever the interaction type, but for the latter, shaving off thoseextra seconds might be worthwhile.
❑ Can any of the pages be pure HTML? If there is no reason for having an ASP.NET page, thendon’t. HTML and ASP.NET pages can interact, and HTML pages are faster because they don’trequire processing by ASP.NET. Also, when using Internet Information Server 6 on WindowsServer 2003, HTML pages are particularly fast because of the way in which they are stored andprocessed by the web server.
❑ How much database access will there be? This may affect how you configure some of thecaching options shown earlier.
One thing you have to be aware of is what ASP.NET does and what the web server does. For example, inChapter 4 you looked at security and saw how to protect sites and pages so that only certain users canaccess them. This security only works for ASP.NET pages and not HTML pages, so you have to weighup any performance improvements you might gain from HTML pages over the security implications. Ifyou have pages that need to be secure then they need to be ASP.NET pages, even if they don’t contain
552
Chapter 14
17_588508 ch14.qxd 10/10/05 6:31 PM Page 552

any dynamic content. Using ASP.NET pages also allows you to take advantage of other aspects ofASP.NET, such as Master pages, themes, and navigation. Alternatively, you can configure InternetInformation Server so that HTML pages are processed by ASP.NET as well as ASP.NET pages. Thisbrings the addition of security, but at the loss of performance.
By and large you should use the topics shown in this chapter, such as stored procedures and caching.There are other things that you shouldn’t do, though, such as allowing users to free-search on a largedatabase; it’s inevitable that users will at some stage try to query for more data than they really need,causing a slowdown on the database and a slow-loading page. This they’ll complain about. You maythink it’s their fault for running that query, but it reality it would be your fault (or rather the designer ofthe application, which may not be you). You can avoid this situation by designing the application so thissort of long-running query isn’t possible, or that if it is necessary you ensure your database tables areindexed adequately.
Web Server Hardware and SoftwareThis is always a controversial topic, but the physical platform shouldn’t be ignored. Though it’s easy tothrow more hardware at the problem of poor performance, spending money is never the entire solution,nor is it always possible; the bean counters who control the money often can’t see the justification or justdon’t have the money. But, that shouldn’t mean it’s not a valuable topic to think about, and act on if possible. You don’t necessarily have to spend a lot on hardware to benefit. Swapping your processor fora faster one is a choice many people would consider, but could be a waste; not only is it relatively expensive (a new motherboard might also be required, as well as the expense of the processor), but italso might not be required. Memory, on the other hand, is nearly always a cost-effective upgrade.Memory is cheap, and a web server with lots of memory will perform better than one with little memory; there’s more memory for the web server to work with plus more available for caching.
The software also shouldn’t be ignored. Windows Server 2003 uses Internet Information Server 6 and ina like-for-like situation will generally perform better than version 5 (on Windows Server 2000). There areobvious licensing costs involved, but if you have the option IIS6 is a worthwhile upgrade.
Testing PerformanceSo how do you go about testing the performance of applications? Perhaps you want to test a new application or an application you’ve inherited, and you want to see if it’s performing to its best capabil-ity. A number of techniques and tools are available that you can use, not all of them computer-based.One of them is just natural common sense, and this involves being realistic about your expectations, andthe expectations of the web site users. For example, if you were creating an application that showed apicture gallery, you’d expect there to be some delay because pictures can be large and take time to load.But the aforementioned free database query is another matter; whereas you understand the complexitiesinvolved your users may not, and they’ll expect all queries to return with the same speed.
One of the first things you need to do is establish a baseline; this is the set of expectations and numbersthat detail how the site performs currently: how fast pages are returned to the user, the number of pagesserved within a time period, and so on. This is important, because without any numbers you have noaccuracy; you’re in the realms of guesswork. With numbers you can make changes and see whether theyimprove performance (more pages served over a given timeframe means more users). The following sections look at some simple ways of getting these numbers.
553
Performance
17_588508 ch14.qxd 10/10/05 6:31 PM Page 553

TracingThe simplest method is to use ASP.NET tracing, and though not designed as a performance tool it can beused to gain a great deal of understanding into how your pages are performing. One of the primary usesfor tracing is to help with debugging, and you’ll look at that in detail in the next chapter, but for nowyou can concentrate on its use for analyzing performance.
Tracing works by a simple configuration change, either in the page or in Web.config, which instructsASP.NET to output additional information at the bottom of the page. You do this in the following Try It Out.
Try It Out Tracing1. From the Wrox United web site in VWD open the Shop.aspx file — it’s in the main directory.
2. Add the Trace attribute to the Page directive. It doesn’t matter where in the Page directive it goes:
<%@ Page Language=”VB” Trace=”True” MasterPageFile=”...”
3. Save the file and run the application. You’ll see something resembling Figure 14-8. You may seemore or less depending on your screen resolution:
Figure 14-8
554
Chapter 14
17_588508 ch14.qxd 10/10/05 6:31 PM Page 554

How It WorksIt’s not so much how it works as what it does, adding several pages worth of information to the end ofthe page. Chapter 15 looks at some of these sections in more detail, but for now let’s concentrate on theTrace Information and the Control Tree.
The Trace Information shows four columns:
❑ Category, which is the category of the message. All messages generated by ASP.NET for thepage have the page name as the category.
❑ Message, which is an individual trace message. By default some of the ASP.NET events areshown, with two messages for each, one for the start of the event and one for the end.
❑ From First(s) is the time in seconds since the first message was displayed.
❑ From Last(s) is the time in seconds since the last message was displayed.
Immediately you can see that you have some rough performance information, because the total timetaken to render the page is shown in the From First column for the End Render method (shown in theMessage column). In general this isn’t a great guide to performance, but the trace information can helpyou narrow down slow running areas when you realize you can add your own messages. This isachieved by use of the Write method of the Trace class, for example:
Trace.Write(“My Category”, “My Message”)
This means you can wrap sections of code within trace statements to see which perform poorly. Chapter15 looks at the tracing in more detail.
The second section that is of use for performance analysis is the Control Tree, which shows all of the controls on the page as a hierarchical list. Earlier in the chapter we talked about view state and how minimizing it meant that less was being sent to the browser, and it’s this section that allows you to seethe view state. There are five columns:
❑ Control UniqueID is the unique ID of the control on the page. This will differ from the IDyou’ve given a control, because it is a combination of the supplied ID plus the IDs of parent controls.
❑ Type is the data type of the control. You can clearly see from this that all content, even straighttext, is converted to a control.
❑ Render Size Bytes (including children) is the size, in bytes, of the control. For the entire page,which shows as __Page, the first control in the Control Tree section, this tells you the size of thepage.
❑ ViewState Size Byes (excluding children) is the size, in bytes, of the view state for this control.Note that this doesn’t include child controls.
❑ ControlState Size Bytes (excluding children) is the size, in bytes, of the control state for thiscontrol. Note that this doesn’t include child controls.
555
Performance
17_588508 ch14.qxd 10/10/05 6:31 PM Page 555

For performance purposes it’s the numbers that are useful. The render size indicates the size of the con-trols, so you can see if controls are outputting more code than necessary. The view state can be turned offin many areas, further reducing the size of the page (which in turn reduces the time taken to render it).The control state can’t be turned off, but in general, controls use very little control state so this shouldn’tbe taken as a performance issue.
Tracing only gives rudimentary information about the performance of a site, but it’s a useful startingpoint for analyzing pages. What it doesn’t give is how well a site performs as a whole, or when multiplepeople access it. For that you need specialist tools.
Stress Testing ToolsStress testing is the term given to running an application under high load, with lots of users. You couldtry to persuade lots of people to access the site, but that’s not generally practical, so tools are used tosimulate multiple users. Stress testing tools work by accessing pages continuously for a defined periodof time, and recording the statistics for those pages. This gives accurate data on how a site performsunder stress, and because the tools can take into account things such as certain pages being accessedmore than others, the data is very accurate. Another great feature is that some of these tools can readexisting web log files and build a stress test from them, which means they are using real-life data to perform testing.
A detailed look at stress testing tools is outside the scope of this book, but if you want to look into this in more detail, Visual Studio 2005 comes with a stress testing tool. If you’re working in a corporate environment you might already have all of the tools you need. You can find a cut-down version of theVisual Studio tool from the Microsoft Download site at www.microsoft.com/downloads. Search for“Web Application Stress Tool.” The related resources on the download page point to documents showinghow this tool works.
One very important change to make before running any stress tests is to turn off debugging. So makesure that the debug attribute is either removed from a page or is set to False:
<%@ Page debug=”False” ... %>
In the Web.config file you should also ensure that the debug attribute of the compilation element isset to false:
<compilation debug=”false” ... />
The importance of this cannot be over-emphasized, because an application with debugging will performslower than one without. This is because the .NET runtime tracks debug code, and ASP.NET doesn’tbatch compile pages and also creates additional temporary files. All of these can have a significantimpact on performance tests.
556
Chapter 14
17_588508 ch14.qxd 10/10/05 6:31 PM Page 556

Performance MonitorAnother area that’s really too detailed to go into here is that of performance counters, which can beviewed from the Performance Monitor tool in the Windows Administrative Tools folder. This allows youto measure all sorts of statistics about the workings of your computer, including the CPU usage, theamount of memory being used, and so on. There are also groups and counters for ASP.NET so you cansee how well ASP.NET is performing. For more details on performance monitoring, see the PerformanceCounters for ASP.NET topic in the ASP.NET documentation for more details.
SummaryThis chapter looked at a variety of topics that will help your web sites perform to their best capability. Itstarted by looking at some SQL issues, such as database connections and stored procedures, and showedhow they not only will help with performance, but also make your code easier to read and maintain. Thelatter of these is worthwhile achieving on its own, so these techniques really are useful. Additionally, thischapter covered the following topics:
❑ Generic collections, which you won’t encounter too many times as a beginner, but certainly one that you should strive to use as you grow in expertise. Generics, as a specific area of programming, offers much more that just the collections, but these alone bring great benefitssuch as readability and improved performance.
❑ Session state and view state, showing how both can be turned off to reduce the amount of processing that ASP.NET needs to do when running pages.
❑ Binding, object references, concatenation, and collections. All of these are topics that will makeyou think about your code as you design and write it; stepping back and thinking about code isoften a good exercise because it makes you think about the site as a whole.
❑ Caching, which is an easy thing to implement, yet brings great performance improvements.Caching can happen at many levels, from ASP.NET to the database, and all reduce the amountof work required to create pages, and caching should be used wherever data isn’t changing frequently.
❑ Finally, you took a brief look at design and testing, to see what you have to think about and howyou go about seeing if your site can perform faster.
The next chapter looks at what happens when things go wrong, examining things like debugging anderror handling.
Exercises1. Convert the two shop pages, Shop.aspx and ShopItem.aspx from using SQL statements to
stored procedures.
2. Add caching to the ShopItem.aspx page, so that the page is cached. Note that you need to takeinto account that this page shows different products, so the cache needs to be varied by theproduct being shown.
557
Performance
17_588508 ch14.qxd 10/10/05 6:31 PM Page 557

17_588508 ch14.qxd 10/10/05 6:31 PM Page 558

15Dealing with Errors
This chapter covers another topic that you need to think about during the whole of site construction — that of how to deal with errors. In many ways this chapter could fit at the begin-ning of the book, because it’s highly likely you’ll get errors as you work through the book andwhat this chapter covers could be useful. But some of what’s discussed here uses code anddepends upon other chapters, so we’ve left it until now.
It’s a fact that you will get errors when creating applications, and that’s okay. We all make mistakes,so this is nothing to be ashamed of or worried about. Some will be simply typing mistakes andsome more complex, maybe due to lack of practice, but these go away with time (apart from mytyping mistakes, but that’s another story!). So what this chapter looks at is a variety of topics covering all aspects of handling errors. In particular it examines the following:
❑ How to write code so that it is error proof
❑ What exceptions are and how they can be handled
❑ How to centrally handle exceptions
❑ How to use debugging and tracing to work out where errors are occurring
The first section looks at how to bulletproof code.
Defensive CodingDefensive coding is all about anticipation; working out what could possibly go wrong and codingto prevent it. One of the precepts of defensive coding is that you should never assume anything,especially if user input is involved. Most users will be quite happy to use the site as intended, buthackers will search for ways to break into sites, so you have to do anything you can to minimizethis risk.
Being hacked isn’t the only reason to code defensively. A coding bug or vulnerability may not befound by a user, but by yourself or a tester. Fixing this bug, then, involves resources — perhaps aproject manager, a developer to fix the bug, a tester to retest the application, all of which take timeand money. Also, any change to the code leads to potential bugs — there may not be any, but
18_588508 ch15.qxd 10/10/05 6:25 PM Page 559

there’s always the possibility. As you add code to correct bugs, the original code becomes more complexand you occasionally end up with imperfect solutions because you had to code around existing code.
So what can you do to protect your code? Well, there are several techniques to defensive coding.
Parameter CheckingThe first of these defensive coding techniques is checking the parameters of methods. When writing subroutines or functions you should never assume that a parameter has a valid value — you shouldcheck it yourself, especially if the content originates from outside of your code. Take the code for theshopping cart for an example — this is in App_Code\Shopping.vb. One of the methods of the cartallows the item to be updated, like so:
Public Sub Update(ByVal RowID As Integer, ByVal ProductID As Integer, _ByVal Quantity As Integer, ByVal Price As Double)
Dim Item As CartItem = _items(RowID)
Item.ProductID = ProductIDItem.Quantity = QuantityItem.Price = Price_lastUpdate = DateTime.Now()
End Sub
This is fairly simple code, but it does no checking on the parameters that are passed in. The reason forthis is that the code that uses this gets the parameter values from the database before passing them in. Soalthough you can say that the code is okay, what happens if this code is reused in another project? Whathappens if someone circumvents the calling code to pass in an incorrect price, one lower than that storedin the database? Or more simply, what if the RowID passed in is invalid? With this as an example, youcould modify the code like so:
Public Sub Update(ByVal RowID As Integer, ByVal ProductID As Integer, _ByVal Quantity As Integer, ByVal Price As Double)
If RowID <= _items.Count ThenDim Item As CartItem = _items(RowID)
Item.ProductID = ProductIDItem.Quantity = QuantityItem.Price = Price_lastUpdate = DateTime.Now()
End If
End Sub
You’ve now protected this against an incorrect RowID, so no errors will occur when this method is called.It’s a simple check, ensuring that the ID of the row to be updated isn’t larger than the number of rows.
In general, you should always check incoming parameters if the method is a public one; that is, calledfrom outside the class. If it’s a method that isn’t accessible from outside of the class (Private or Protected)then this is less important because you’re probably supplying those parameters yourself, although this
560
Chapter 15
18_588508 ch15.qxd 10/10/05 6:25 PM Page 560

doesn’t necessarily mean the parameters will be correct — you might get the values from elsewherebefore passing them into the method.
Avoiding AssumptionsAs well as checking parameters, you should also avoid assumptions in your code. For example, consideran example that I actually had just now while formatting this document, where there was an error in myown code (yes, shocking isn’t it?). I have macros in Word to perform formatting for the styles of thebook, one of which is for the grey code block. It’s a generic routine that accepts three strings, which arethe Word styles to use for the first line, the intermediate lines, and the last line, as shown here:
Private Sub FormatParas(First As String, Middle As String, Last As String)
Dim iRow As Integer
Selection.Paragraphs(1).Style = FirstFor iRow = 2 To Selection.Paragraphs.Count - 1
Selection.Paragraphs(iRow).Style = MiddleNextSelection.Paragraphs(iRow).Style = Last
End Sub
This code uses Word objects to format paragraphs and assumes that there will be more than one paragraph;this seems sensible because each line is a separate paragraph and there is a separate macro to format codethat is only a single line. The code works by setting the first paragraph in the selection to the style definedby First. For subsequent lines (line two downward) the Middle style is used, and for the final line Last isused as the style. However, if there is only one paragraph in the selection, the For...Next loop doesn’trun (Selection.Paragraphs.Count being 1), but it does set iRow to 2. The final line fails because iRowis 2 and there is only one paragraph in the selection. I failed in this code because I didn’t defend it againstuser failure (me being the user in this case), where the selection was only a single paragraph.
The corrected code is as follows:
Private Sub FormatParas(First As String, Middle As String, Last As String)
If Selection.Paragraphs.Count = 1 ThenSelection.Paragraphs(1).Style = LastExit Sub
End If
Dim iRow As Integer
Selection.Paragraphs(1).Style = FirstFor iRow = 2 To Selection.Paragraphs.Count - 1
Selection.Paragraphs(iRow).Style = MiddleNextSelection.Paragraphs(iRow).Style = Last
End Sub
561
Dealing with Errors
18_588508 ch15.qxd 10/10/05 6:25 PM Page 561

With this code, a check is made for the number of paragraphs before the loop is done, and if there is onlya single paragraph, no looping is done.
This is a surprisingly common occurrence — errors made because of simple assumptions. This particularcode has been in use for several years without failure, but today although it was user error that causedthe problem, the failure is in the code for not protecting itself. The dumb user (me) had what looked likemultiple paragraphs, but because of soft carriage returns in fact only had one. So the user was wrong,but the code didn’t protect against it.
Query ParametersIf you build your applications using the wizards and data source controls then you won’t run into thisproblem, because the generated SQL statements contain parameters. But if you manually construct SQL,or inherit an application, you may see code like this:
Dim SQL As String = “SELECT * FROM Products “ & _“WHERE ProductID=” & Request.QueryString(“ProductID”)
Or like this:
Dim SQL As String = “SELECT * FROM Employee “ & _“WHERE LastName=’” & LastName.Text & “‘“
Both of these dynamically construct a SQL statement, concatenating strings together; the first uses avalue from the QueryString, the second from a TextBox. The problem here is that there’s no validationon the user input, so it’s easy to perform what’s known as SQL injection, where rogue SQL statements areinjected into existing ones. With the second example, if the user enters a last name, the SQL would be
SELECT * FROM Employee WHERE LastName=’Paton’
However, the user could enter
Paton’ OR 1=1 --
This would turn the SQL into
SELECT * FROM Employee WHERE LastName=’Paton’ OR 1=1 --’
The first thing to know is that -- is a comment in SQL, so the trailing quote is ignored. The SQL state-ment matches any LastName that is Paton, which is the intended match, but also the 1=1 statement,which will always be true. The result is that all employees would be shown, which is definitely not theintended purpose. This is mild, however, compared to the user who enters this:
Paton’ ; DROP TABLE Employee –
The SQL statement is now
SELECT * FROM Employee WHERE LastName= ‘Paton’ ; DROP TABLE Employee --’
562
Chapter 15
18_588508 ch15.qxd 10/10/05 6:25 PM Page 562

The SELECT statement works as expected, but there’s now a second SQL statement — the semicolon separates statements in SQL. So the query runs, and then the table is dropped — no more employees. Uh-oh, serious trouble. This could easily have been any other SELECT statement to find out more infor-mation about the database, or even dropping the entire database.
The solution to SQL injection is to use parameters, because these automatically prevent this type ofattack. If you’re using stored procedures, which you should be, then parameters are required for passinginformation into the procedure, but when building SQL dynamically you can still use parameters. So ifyou were running a SqlCommand, you could do this:
Dim SQL As String = “SELECT * FROM Employee “ & _“WHERE LastName=@LastName”
Dim cmd As New SqlCommand(SQL, conn)
cmd.Parameters.Append(“@LastName”, SqlDbType.VarChar, 50)
cmd.Paramaters(“@LastName”).Value = LastName.Text
Here @LastName is the parameter name, and because the value is assigned via the parameter no SQLinjection can take place. This is because ADO.NET protects against SQL injection attacks when usingparameters — the values passed into parameters are checked for specific content that would signify anattack.
ValidationWe’ve already mentioned that any user input is automatically suspicious, and one of the things that canbe done to mitigate the risk is to validate that input; let’s stop the user from entering bad input in thefirst place. This is good for two reasons: first, it means the code is safer and second, users won’t have todeal with potentially confusing error messages. They might still get messages telling them that theirinput is incorrect, but at least they won’t get an obscure error message because your code failed.
To help with this problem there is a suite of five validation controls with ASP.NET 2.0 that can checkuser input before it even gets to your code.
❑ RequiredFieldValidator, which ensures that a field is not left empty.
❑ CompareValidator, which compares the entered text with a value, or with another control.
❑ RangeValidator, which ensures the entered text is within a specified range.
❑ RegularExpressionValidator, which matches the entered text against a regular expression.
❑ CustomValidator, which runs custom code to validate the entered text.
These are standard ASP.NET controls that are placed on the page, generally alongside the control theyare validating. There is also a ValidationSummary control that allows display of error messages in oneplace. You add these in the following Try It Out.
Try It Out Validation Controls1. In VWD in the Wrox United project for this chapter (C:\BegASPNET2\Chapters\Begin\
Chapter15\WroxUnited) open FanClub\FanClubMatchReport.aspx.
563
Dealing with Errors
18_588508 ch15.qxd 10/10/05 6:25 PM Page 563

2. Find FormView1 and find TextBox1 in the <EditItemTemplate>. Between TextBox1 and the<br />, add the following:
<br /><asp:RequiredFieldValidator id=”rfv1” runat=”server”
ControlToValidate=”TextBox1”Text=”You haven’t entered the report!” />
3. Do the same for the <InsertItemTemplate>— enter exactly the same code between TextBox1and the <br />.
4. Save the file and run the application, logging in as a fan club member (use Dave or Lou as theuser — the passwords are dave@123 and lou@123).
5. Select the Add Match Report from the Fan Club menu, pick a match, and select the Add NewReport link.
6. Don’t enter any text in the text area, but press the Save New Report link, and you’ll see an errormessage, shown in Figure 15-1.
Figure 15-1
7. Now enter some text and save the report.
8. Click the Add New Report link again to add another report.
9. Don’t enter any text, but click the Cancel New Report link instead. Notice that the error messageis displayed again. You can’t cancel unless some text has been entered, so let’s correct that.
10. Stop the application and back in VWD edit the page. Find btnCancelReport (a LinkButtonthat is in both the <EditItemTemplate> and <InsertItemTemplate>), and for both occur-rences add the following attribute:
CausesValidation=”False”
11. Save the file and repeat Steps 5 and 6. Notice that you can now cancel even if no text has beenentered.
564
Chapter 15
18_588508 ch15.qxd 10/10/05 6:25 PM Page 564

How It WorksThis works because the validation control is linked to the text box and won’t allow the page to be postedback to the server until some text has been entered. Here’s a look at the validator in more detail:
<asp:RequiredFieldValidator id=”rfv1” runat=”server”ControlToValidate=”TextBox1”Text=”You haven’t entered the report!” />
The two properties you’re interested in are the ControlToValidate and the Text. The first is whatlinks the controls together — in this case it’s TextBox1 that the validator will check. If no text is entered,the contents of the Text property are displayed. If text has been entered, the validator does nothing andno output is shown.
Validation occurs whenever a control would cause the page to be posted back to the server — this couldbe a Button, a LinkButton, and so forth, but what’s important to note is that by default no postbackoccurs because the validation is done client-side in the browser. This means that the user sees a responsivedisplay without that refresh that can be so annoying. However, you don’t want the validation to takeplace when you’re trying to cancel an edit — if you’re canceling it doesn’t matter whether there’s anythingin the text box. By default all means of posting back cause validation to occur, but by setting theCausesValidation property to False for the cancel link, no validation takes place.
Validating Multiple ControlsThe previous example showed how to validate a single control, with the error message shown directly bythe control. However, there are times when you want to validate several controls, and in these cases it’s notalways sensible to have the error message presented directly by the control. For example, you might have agrid of data, or the data you are editing might be neatly aligned. Under these circumstances you might notwant to have the message displayed, because it would change the layout of the screen. However you probably still want some form of indication as to which editable field failed the validation, as well as having the full error message displayed somewhere. For that you use the ValidationSummary control.The following Try It Out shows how this can be done.
Try It Out The ValidationSummary Control1. Open FanClub.aspx and add RequiredFieldValidator controls between the end of the text
boxes and the </td>. You’ll need the following validators,
<asp:RequiredFieldValidator id=”rfv1” runat=”server”ControlToValidate=”txtName” Text=”*” ErrorMessage=”You must enter a value for your name” />
<asp:RequiredFieldValidator id=”rfv2” runat=”server”ControlToValidate=”txtAddress” Text=”*” ErrorMessage=”You must enter a value for the address” />
<asp:RequiredFieldValidator id=”rfv3” runat=”server” ControlToValidate=”txtCity”
Validation should always be done server-side, but can optionally be done client-sideas well. You should never rely solely upon client-side validation, because it’s easyfor hackers to post data directly to a page, bypassing the client-side validation. Thedefault settings in ASP.NET 2.0 are for both client- and server-side validation.
565
Dealing with Errors
18_588508 ch15.qxd 10/10/05 6:25 PM Page 565

Text=”*” ErrorMessage=”You must enter a value for the city” /><asp:RequiredFieldValidator id=”rfv4” runat=”server”
ControlToValidate=”txtCounty “ Text=”*” ErrorMessage=”You must enter a value for the county” />
<asp:RequiredFieldValidator id=”rfv5” runat=”server”ControlToValidate=” txtPostCode “ Text=”*” ErrorMessage=”You must enter a value for the post code” />
<asp:RequiredFieldValidator id=”rfv6” runat=”server”ControlToValidate=”txtCountry” Text=”*” ErrorMessage=”You must enter a value for the country” />
<asp:RequiredFieldValidator id=”rfv7” runat=”server”ControlToValidate=”txtEmail” Text=”*” ErrorMessage=”You must enter a value for the email address” />
<asp:RequiredFieldValidator id=”rfv8” runat=”server”ControlToValidate=”txtAlias” Text=”*” ErrorMessage=”You must enter a value for the membership alias” />
For example, the Name would be
<tr><td>Name:</td><td><asp:TextBox id=”txtName” runat=”server” />
<asp:RequiredFieldValidator id=”rfv1” runat=”server”ControlToValidate=”txtName”
Text=”*” ErrorMessage=”You must enter a value for the name” /></td>
</tr>
2. After the validator for the e-mail address, add the following:
<asp:RegularExpressionValidator id=”rev1” runat=”server”ControlToValidate=”txtEmail”Text=”*” ErrorMessage=”Please enter a valid email address” />
3. Switch the page into Design View and select the LoginView control, FCLoginView. From theCommon Tasks menu select RoleGroup[0]–FanClubMember from the Views list (see Figure 15-2).This will show the controls in the RoleGroup for users in the FanClubMemberRole.
Figure 15-2
4. Scroll down the page to find the RegularExpressionValidator; this is the right-hand validatornext to the Email text box. Select this validator and in the Properties area click theValidationExpression property. Then click the button that appears, as shown in Figure 15-3.
566
Chapter 15
18_588508 ch15.qxd 10/10/05 6:25 PM Page 566

Figure 15-3
5. The window that appears is the Regular Expression Editor, which comes pre-filled with a selec-tion of common expressions. Select Internet e-mail address and click OK, and the selectedexpression will be filled into the ValidationExpression property.
6. Switch the page back to Source View, and before the LinkButton (btnSaveChanges), add thefollowing:
<asp:ValidationSummary id=”vs” runat=”server” DisplayMode=”BulletList” /><br />
7. Save the file and run the application. Log in as either Dave (using the password dave@123) orLou (using the password lou@123), and navigate to the Fan Club home page.
8. Add text to the fields, but leave the City and Email fields blank. Click the Save Changes linkand you’ll see Figure 15-4.
Figure 15-4
9. Now enter some text into the Email field, but make sure it isn’t a valid e-mail address. Click theSave Changes link again and notice how the error message has changed.
567
Dealing with Errors
18_588508 ch15.qxd 10/10/05 6:25 PM Page 567

10. Delete the text from the Name field and press the Tab key to move to the next field — noticehow as soon as you tab out of the field a red star appears next to the field, indicating an error.
How It WorksSeveral differences exist between this example and the first one where you used only oneRequiredFieldValidator. In this example there are several, each for different fields, as well as othervalidation controls. One thing you’ll have noticed about the required field validators is that no errormessage was displayed alongside the field they are validating. That’s because the Text property was setto *— just a simple marker to indicate an error in the field. The Text property is displayed inline —that is, wherever the validator is placed. The ErrorMessage property is used wherever the error is displayed, and in this case that is shown by the ValidationSummary.
The ValidationSummary is fairly obvious in its purpose, because it simply displays in one location allerror messages from validators. This allows the validators to be discrete, showing just a simple asteriskto mark the field in error without causing displacement on the screen, but still to have a full error message. The DisplayMode for the summary can be a list, bulleted list, or a paragraph.
The other validator used was the RegularExpressionValidator, which checks the entered text against a regular expression — this is a format for defining character sequences. If you want to use regular expressions for other fields, such as postal codes, then the Regular Expression Editor has some expres-sions, otherwise you can find many others at www.regexlib.com, which has a searchable database of expressions freely available. You’ll have noticed that the Email field had two validators, one to ensuresome text was entered, and one to ensure that the entered text was valid. Both validate the same controlbecause they both have their ControlToValidate property set to txtEmail. You can mix and match theother validators in the same way, which gives great flexibility in ensuring that entered data is correct.
The other thing you’ll have noticed was that tabbing from field to field also showed the asterisk, but notthe error message in the summary. Because validation is being done client-side, the client script knowsthat text is required for a field, so if left empty it can signal an error. But because the summary isintended to show all errors, this isn’t filled in unless a postback is tried. So you get the best of bothworlds — dynamic error handling with full error messages.
Exception HandlingException handling is the term given to anything out of the ordinary that happens in your application — itis exceptional circumstances. Although handling exceptions is part of defensive coding, there’s a differ-ence between programming for things that could quite easily go wrong, or are even expected to go wrong,such as incorrect passwords, and those things over which you have no control. For example, considerwhat happens if you can’t connect to the database — what would you do? How would you handle thatsituation? Now it’s likely that there’s nothing you can really do in your application, because it may wellbe dependent upon the database, but you still don’t want your users to see an ugly error message — youwant to display your own message, maybe letting them know that there is a problem and they can tryagain later.
So the trick is to have a strategy, to work out in advance what you’re going to do when something goeswrong.
568
Chapter 15
18_588508 ch15.qxd 10/10/05 6:25 PM Page 568

What Are Exceptions?Exceptions are a range of classes, all deriving from the same base class called Exception. Many differentexceptions exist such as FileNotFoundException, which would occur when trying to access a file thatdoesn’t exist; and SqlException, which would occur when there is a database problem. For example, atsome stage while working through the examples in the book you may have seen something like Figure 15-5.
Figure 15-5
This occurred because of an incorrect SQL statement — one of the column names was wrong. This sort ofexception is unlikely to get out into a live application, but other exceptions are, so you need to learn howto trap them.
The Exception ObjectThe Exception object is the base class for all exceptions and defines the base properties that all exceptionshave. These properties are explained in the following table.
Property Description
Data A collection of key/value pairs that provide additional details about the exception.
HelpLink The link to the help file that contains a descriptionof the exception.
InnerException The underlying exception that caused the problem.
Message Text that describes the exception.
Source The name of the application or object that causedthe problem.
StackTrace The trace of method calls that lead up to the problem.
TargetSite The method that threw the current exception.
569
Dealing with Errors
18_588508 ch15.qxd 10/10/05 6:25 PM Page 569

One thing that that you might notice is that there is an InnerException property. This allows exceptionsto be stacked, which is useful when you have layers of code. For example, an underlying part of the .NETFramework may raise an exception, but that might be wrapped within another exception to provide moreinformation.
Other exceptions might define additional properties to describe the specifics on the exception. For example,SqlException also defines the following properties:
Property Description
Class The severity of the error, as defined by SQL Server.
Errors A collection of SqlError objects detailing the problem.
LineNumber The line number within the SQL or stored procedurewhere the problem occurred.
Number The error number.
Procedure The name of the stored procedure where the problemoccurred.
Server The name of the SQL Server machine.
Source The name of the data provider.
State The error code from SQL Server.
You can see that when exceptions occur you have a certain amount of information regarding the problem,but that if you use the correct type of exception you get more information. This is discussed later in thechapter.
How to Trap ExceptionsTrapping exceptions is crucial to maintaining control of your application, and is done by way of TryCatch statements. This is easiest to understand through an example, using some code you saw earlier inthe book (Chapter 14) — the code that generates thumbnails for uploaded images:
Public Shared Sub GenerateThumbnail(ByVal SourceImagePath As String, _ByVal TargetImagePath As String)
Dim newHeight As ShortDim newWidth As Short
Using sourceImage As Image = Image.FromFile(SourceImagePath)
newHeight = CShort(sourceImage.Height * 0.25)newWidth = CShort(sourceImage.Width * 0.25)
Dim cb As New Image.GetThumbnailImageAbort(AddressOf ThumbnailCallback)Using targetImage As Image = _
sourceImage.GetThumbnailImage(newWidth, newHeight, cb, IntPtr.Zero)targetImage.Save(TargetImagePath, Imaging.ImageFormat.Gif)
570
Chapter 15
18_588508 ch15.qxd 10/10/05 6:25 PM Page 570

End UsingEnd Using
End Sub
At the moment this code doesn’t protect itself in any way, but you can add both defensive coding andexception handling. The source image, for example, must exist before it can be converted, so that can bechecked first, but the target image doesn’t exist, so you need to protect against some problem when savingit. Here’s how the code could look:
Public Shared Sub GenerateThumbnail(ByVal SourceImagePath As String, _ByVal TargetImagePath As String)
If Not File.Exists(sourceImagePath) ThenReturn
End If
Dim newHeight As ShortDim newWidth As Short
Using sourceImage As Image = Image.FromFile(SourceImagePath)
newHeight = CShort(sourceImage.Height * 0.25)newWidth = CShort(sourceImage.Width * 0.25)
Dim cb As New Image.GetThumbnailImageAbort(AddressOf ThumbnailCallback)Using targetImage As Image = _
sourceImage.GetThumbnailImage(newWidth, newHeight, cb, IntPtr.Zero)Try
targetImage.Save(TargetImagePath, Imaging.ImageFormat.Gif)Catch ex As Exception
Tools.Log(“ImageHandling.GenerateThumbnail”, ex)End Try
End UsingEnd Using
End Sub
The first thing to note is the defensive coding for the source image; this uses the Exists method of theFile class to see if the file exists, and if it doesn’t you simply exit silently. The exception handling iswrapped around the saving of the target file and follows this general principle:
TryPlace the code here that you need to trap exceptions for
Catch ex As ExceptionPlace the code here to handle the exceptionThis could be displaying a tidy message or logging the exception
End Try
So in the code targetImage.Save is the line that could potentially cause an exception — it might not bepossible to save the file for a variety of reasons: an incorrect file name, permissions, and so on. If an
571
Dealing with Errors
18_588508 ch15.qxd 10/10/05 6:25 PM Page 571

exception does occur, execution immediately transfers to the Catch block, so any lines within the Trythat were after the line in fault would not be executed.
The Catch block is interesting because there can be more than one of them. For example:
Trycode to read from a database
Catch sqlEx As SqlExceptionA SQL exception, so something is wrong with the database
Catch ex As ExceptionAny other error
End Try
When there is more than one Catch block and an exception occurs, the exceptions are compared in the order in which they are declared. So if an exception was raised it would be tested to see if it was aSqlException— if it was, the SqlException Catch block would be run. If the exception wasn’t aSqlException, the next one down would be tried until a match was found or until the End Try wasreached. Because all exceptions ultimately inherit from Exception, this is the last chance saloon — thedefault exception if you will.
It’s important that when using multiple Catch blocks you place the most granular first. For example, inthe previous code example, consider if this had been done:
Trycode to read from a database
Catch ex As ExceptionAny other error
Catch sqlEx As SqlExceptionA SQL exception, so something is wrong with the database
End Try
Even if a SqlException was raised it would never be trapped because the Catch for Exception wouldtrap it. This is because Exception matches all exceptions, which is why you should always place it lastwhen using multiple Catch blocks.
There is also another part to Try Catch, which is the Finally block. This is optional, and is a block ofcode that always runs, whether or not an exception is raised. Again, this is easier to see as code:
Trycode to read from a database
Catch ex As ExceptionCode to handle the exception
FinallyThis code will always run
End Try
What happens here depends upon whether an exception is raised. If not, then all of the lines of code in theTry block are run, followed by the code in the Finally block. If an exception is raised, the appropriateCatch block is run, followed by the Finally block. This gives you a chance to perform any clean-upoperations that might be required. A typical example of this is when performing some database action,and you want to close the database connection whether or not an exception was raised:
572
Chapter 15
18_588508 ch15.qxd 10/10/05 6:25 PM Page 572

Dim conn As SqlConnection
Tryconn = New SqlConnection(“ . . . “)conn.Open()
‘ do some database actionCatch sqlEx As Exception
‘ log the exceptionTools.Log(“A database exception occurred”, sqlEx)
FinallyIf conn IsNot Nothing Then
conn.Close()End If
End Try
In this code the connection is declared outside of the Try block, allowing it to be referenced from within allcode blocks (such as the Catch and Finally blocks). In the Finally block you don’t just automaticallyclose the connection because the exception might have been raised when trying to open the connection, sothe connection object (conn) might not have a value. So conn is first checked to see if it has a value, andonly then is it closed.
The following Try It Out gives you a better feel for how it can be used. You’re going to update theCheckout page for the Wrox United shop to ensure that any database errors are handled gracefully andthat they don’t leave the database in an inconsistent state.
Try It Out Trapping Exceptions1. In the Wrox United application for the chapter, open the code file for Checkout.aspx and move
to the Wizard1_FinishButtonClick event. This is the event that runs when the checkout wizardhas finished collecting information from the user and will move the order from the shopping cartinto the database.
2. Add the following variable declaration at the top of the method:
Dim trans As SqlTransaction = Nothing
3. Modify the first few lines after the variable declarations so it looks like the following code — thenew lines to add are shaded:
Tryconn = New SqlConnection( . . . )conn.Open()
trans = conn.BeginTransaction
cmd = New SqlCommand()cmd.Connection = conncmd.Transaction = trans. . .
573
Dealing with Errors
18_588508 ch15.qxd 10/10/05 6:25 PM Page 573

4. Now you need to do the same at the end of the method, so modify the code to look like this:
cmd.ExecuteNonQuery()Next
trans.Commit()
Catch SqlEx As SqlExceptionIf trans IsNot Nothing Then
trans.Rollback()End If
CreateOrderErrorLabel.Visible = TrueReturn
FinallyIf conn IsNot Nothing Then
conn.Close()End If
End Try
Profile.Cart.Items.Clear()End Sub
5. To ensure that the exception is seen in practice there actually needs to be some error, so you’llforce one by making the SQL statement incorrect. Change the SQL statement that inserts into theOrders table to insert into no_Orders:
cmd.CommandText = “INSERT INTO no_ORDERS(MemberName ...”
6. Save the file and run the application.
7. Go to the shop and add some items to your cart and then go to the Checkout page. Step throughthe checkout wizard and after clicking the Finish button you’ll see the message stating that anerror has occurred. Although it says that the administrator and shop know about this, you’ll becoding those bits later in the chapter.
How It WorksThe code to trap any database exceptions is fairly straightforward, but you’ve added in something else toensure the integrity of the database, and this is a transaction. A transaction, in database terms, ensures thateither all commands succeed or none of them do. The problem is that an order is being created in theOrders table and the items being ordered are created in the Order Items table. So at least two commandsare being run, one for each table, but there will be a command for each order line. With any databaseoperation there is a chance of failure, and you need to ensure that both operations succeed, inserting thedata into the Orders and Order Items table. You wouldn’t want the order to be created but no order items,nor would you want the reverse. Both are problems. With only an order line, the system thinks that anorder is there, but there are no items. The reverse means there would be order lines, but no correspondingorder, and thus no way to access those order lines.
Wrapping all of these commands within a transaction means that the order and order lines are not onlydirectly written to their tables but they are also placed in a transaction log, a special table handled by thedatabase. If there are no problems during the transaction, it is committed and all is as expected. If thereare problems, however, the transaction is rolled back, which means that the rows that were added as partof the transaction are removed. So there are only two outcomes — all rows are added, or none are added.
574
Chapter 15
18_588508 ch15.qxd 10/10/05 6:25 PM Page 574

This means that an exception will leave the database in a consistent state, as it was when the transactionstarted. It’s a bit like time travel, but without all those weird states of seeing your parents when theywere your age.
Look at the code to see how this fits in with the exception handling. You saw the creation of this code inChapter 13, when looking at e-commerce and the creation of the checkout process, but the explanation ofthe exception handling was postponed until this chapter.
The first thing is the declaration of a new variable, of type SqlTransaction:
Dim trans As SqlTransaction = Nothing
It is assigned an initial value of Nothing to avoid potential runtime errors. In your code this isn’t a problem, but if you remove = Nothing from the declaration you can see that VWD displays a warningstating that Variable ‘trans’ is used before it has been assigned a value. A null reference exception could result atruntime. The reason is that the compiler cannot be sure that the variable will have an assigned value, so itgives a warning. You’ll see where this assigned value of Nothing comes in later.
After the declaration, the code is wrapped within a Try Catch block:
Tryconn = New SqlConnection( . . . )conn.Open()
Once the connection is open, a transaction is started. This gives you the marker point for the databasecommands, and it’s to this state of the database that you will roll back to if an exception occurs. TheBeginTransaction method of the SqlConnection returns a SqTransaction object, so later in the code this can be used to commit or rollback the database changes:
trans = conn.BeginTransaction
With the transaction created it is then assigned to the command using the Transaction property:
cmd = New SqlCommand()cmd.Connection = conncmd.Transaction = trans
Now that the transaction has been assigned, the code can insert the required data into the tables. Oncethat has happened the transaction can be committed:
trans.Commit()
That’s all the code for a successful operation, but if there is a problem the exception needs to be caught:
Catch SqlEx As SqlException
Within the Catch block the transaction needs to be rolled back because some problem arose. But, beforethe transaction can be rolled back the trans object needs to be checked to see if it contains a value.Remember that when the SqlTransaction object was declared it was given a value of Nothing. Withinthe Try statement, the first lines of code create and open a connection, and these two lines of code couldraise an exception. If that happened, the SqlTransaction object wouldn’t have been created, so the
575
Dealing with Errors
18_588508 ch15.qxd 10/10/05 6:25 PM Page 575

trans variable would still have its default value of Nothing. That’s why the compiler gives a warningand why the default value is set. So you only want to roll back the transaction if it was actually started,in which case the trans variable would not be Nothing:
If trans IsNot Nothing Thentrans.Rollback()
End If
Once the transaction has been rolled back an error message is displayed, by simply making a Label controlvisible. Once done, you can return from the method:
CreateOrderErrorLabel.Visible = TrueReturn
Before you return, though, the connection needs to be closed, and this needs to be done whether or notan exception occurred, so a Finally block is used. Remember that the Finally block is always run.Like the transaction, the connection also has an initial value of Nothing, and this is used to ensure thatthere is a connection before you try to close it:
FinallyIf conn IsNot Nothing Then
conn.Close()End If
End Try
The final thing to do is to clear the items from the cart, because they’ve now been added to the Ordersand Order Items tables.
Profile.Cart.Items.Clear()
You can see that in use the Try Catch block is quite simple, and that in conjunction with transactions itallows the integrity of the database to remain. Displaying an error on the screen to let users know aproblem occurred is a good thing, but the site administrators also need to know, so the next section looksat how these details could be logged to a file.
Logging ExceptionsTrapping exceptions is all very well, but you generally need to log them somehow. After all, if things gowrong you really want to know about it. Logging can be performed in many ways, with the log filebeing written to a variety of places, including a database table; the Event Log, either under Applicationevents or a custom log; and a log file. There are advantages and disadvantages to all forms of logging.For example, you might not be able to write to the Event Log, because you might not have permission,or if you can write to the Event Log how would you then view the entries? Most web servers are tightlyguarded and viewing the Event Log might not be allowed. The advantage of the Event Log is that excep-tions are contained along with other application errors.
This section looks at the log file option, because it provides an easy way to log exceptions. A simple textfile will be used to store details of exceptions, showing the time and the details of the exception. Eachexception is appended to the existing file, or if no file exists it will be created. Although you are using alog file, the technique works for the other ways of logging; the difference is simply where you log theexception. Give this a try in the following Try It Out, modifying the exception code you added to thecheckout.
576
Chapter 15
18_588508 ch15.qxd 10/10/05 6:25 PM Page 576

Try It Out Logging Exceptions1. In the Wrox United application for the chapter, open the code file for Checkout.aspx and move
to the Wizard1_FinishButtonClick event.
2. In the section where the SqlException is caught, modify the code so that it looks like this:
Catch SqlEx As SqlExceptionIf trans IsNot Nothing Then
trans.Rollback()End If
Tools.Log(“An error occurred while creating the order”, SqlEx)
CreateOrderErrorLabel.Visible = TrueReturn
3. Save the file.
4. In the App_Code directory, create a new class called Tools (right-click App_Code and selectAdd New Item...).
5. In the new Tools.vb class file, add the following Imports statements after the initial one thatimports the Microsoft.VisualBasic namespace:
Imports System.IOImports System.Web
6. Within the Tools class, add the following methods:
Public Shared Sub Log(ByVal Message As String)
Log(Message, Nothing)
End Sub
Public Shared Sub Log(ByVal Message As String, ByVal Ex As Exception)
Dim fileName As String = Path.Combine( _HttpContext.Current.Request.PhysicalApplicationPath, “WroxUnited.log”)
Using logFile As New StreamWriter(fileName, True)logFile.WriteLine(“{0}: {1}”, DateTime.Now, Message)If Ex IsNot Nothing Then
logFile.WriteLine(Ex.ToString())End IflogFile.Close()
End UsingEnd Sub
7. Save the file and run the application. Log in and add some items to the shopping cart, then followthe checkout procedure. When you finish the checkout, the screen will say that an error occurred.
8. Navigate to the directory in which the web site is running and open WroxUnited.log andyou’ll see the exception details logged.
577
Dealing with Errors
18_588508 ch15.qxd 10/10/05 6:25 PM Page 577

9. Don’t forget to change the SQL statement back to a correct one after you’ve run this example.Just remove the no_ from the table name:
cmd.CommandText = “INSERT INTO ORDERS(MemberName ...”
How It WorksThe first code modification was to log the exception from within the Catch block in the Checkout page:
Tools.Log(“An error occurred while creating the order”, SqlEx)
This calls the Log method of the Tools class, passing into it a string describing the problem, and theexception SqlException object. The Log method is a Shared method so you haven’t had to create aninstance of the Tools class.
The exception will now be logged, so the logging class is created. This is a class file and is placed in theApp_Code directory, which means that it will automatically be compiled. Within the Tools class the firstthing that is done is to add some namespaces:
Imports System.IOImports System.Web
System.IO is required because that is where the file handling routines are stored, and System.Web willallow you access to details of the current web site.
Next is the routine that trapped the exception, where the following was added:
Tools.Log(“An error occurred while creating the order”, SqlEx)
This calls the Log method of the Tools class, passing in an error message and the exception. Notice that itwasn’t necessary to create an instance of the Tools class; because the class is just a container for simplemethods, those methods have been made Shared, so a class instance isn’t required – Shared methodswere explained in Chapter 9. The code for these is fairly simple, too, and shows a good case of overloadedmethods.
The first method accepts a single argument, the error message to log. It doesn’t actually do any loggingitself, but calls another Log method, passing the message into that. It also passes Nothing as a secondparameter:
Public Shared Sub Log(ByVal Message As String)
Log(Message, Nothing)
End Sub
The second method, also called Log, is where the real work is done. This method accepts two parameters.The first is the error message and the second is an Exception object:
Public Shared Sub Log(ByVal Message As String, ByVal Ex As Exception)
578
Chapter 15
18_588508 ch15.qxd 10/10/05 6:25 PM Page 578

Next, the file name needs to be worked out. This can be placed in any suitable location, but keeping it inthe home directory of the web site is a good idea. The path for that directory can be retrieved by thePhysicalApplicationPath property of the current Request. However, because this code isn’t withinan ASP.NET page, but is a class, the Request property isn’t directly available. To get access to it,HttpContext.Current is used; this is the context of the current HTTP request that the ASP.NET page isrunning under.
The full file name needs to contain both the path and the file, so these are combined using the Combinemethod of the Path class. This will append a directory separator (the \ symbol) if one is required:
Dim fileName As String = Path.Combine( _HttpContext.Current.Request.PhysicalApplicationPath, “WroxUnited.log”)
Once the full file name is available, the file can be opened, and for this a StreamWriter is used:
Using logFile As New StreamWriter(fileName, True)
Streams can be of different types, such as memory, but passing in the fileName parameter when theStreamWriter is created allows you to write directly to a file. The second parameter, True, indicatesthat data should be appended to the file, rather than a new file being created (which is the default). TheUsing statement ensures that the reference to this file is disposed of when the code block is closed —this frees up the file resource as soon as it is no longer used, a technique that should always be followed.
Once the file is opened the WriteLine method is used to write data to the file:
logFile.WriteLine(“{0}: {1}”, DateTime.Now, Message)
WriteLine is an interesting method, because it can take many parameters. It always takes at least oneparameter, but there can be others. The first parameter is the string to be written, but you want the current date and time, plus the message to be written as well. Rather than concatenating a string withthese details, they can be added as parameters and placeholders used in the string to identify where theyshould go. The placeholders are identified by a number within curly braces, so {0} will be replaced bythe current date and time, and {1} will be replaced by the message.
After the main message has been written to the file, the exception, passed into the Log method as aparameter, is tested. If it is not Nothing then an exception has been passed in, so this is also written tothe file. The ToString method of the exception is used to get the descriptive text of the exception:
If Ex IsNot Nothing ThenlogFile.WriteLine(Ex.ToString())
End If
The file is closed when all of the details have been written to the file:
logFile.Close()
Once the Using code block is ended, the file resources will be freed:
End UsingEnd Sub
579
Dealing with Errors
18_588508 ch15.qxd 10/10/05 6:25 PM Page 579

At the end of this procedure there is a Log method that can be called in two ways:
Log(“error message”)
Or:
Log(“error message”, exception)
This sort of overloaded method brings extra flexibility, because it allows you to use the same routine fordifferent types of logging; if there’s no exception, you use a different form of the Log method.
One thing you might have noticed is that the second parameter of the Log method is of type Exception,but when this method was called, a variable of type SqlException was passed in. This is acceptablebecause SqlException is derived from Exception— remember in Chapter 9 where inheritance wascovered. SqlException inherits from DbException, which inherits from ExternalException, whichinherits from Exception. It seems a long chain of inheritance, but that doesn’t matter for parametermethods; as long as the type passed into a parameter ultimately derives from the type declared in theparameter, there will be no compilation errors. The types are compatible.
Mailing ExceptionsLog files are a great way to store exceptions, but they are generally passive — you have to go and look atthem. A more active option for dealing with exceptions is to have them mailed to someone, perhaps theweb site administrator. This is also easy to achieve in ASP.NET 2.0, because classes are built in for sendingmail messages, and these live in the System.Net.Mail namespace. Here’s some code that could be usedas well as, or instead of, the file logging:
Public Shared Sub SendMail(ByVal Message As String, ByVal Ex As Exception)
Using msg As New MailMessage(“[email protected]”, “[email protected]”)
msg.Subject = “WroxUnited.net Web Site Error”
If Ex Is Nothing Thenmsg.Body = “There was an error on the website”
Elsemsg.Body = Ex.ToString()
End If
Dim client As New SmtpClient(“MyMailServer”)client.UseDefaultCredentials = Trueclient.Send(msg)
End Using
End Sub
Two classes are in use here. The MailMessage class defines the message to be sent — the constructor setsthe “from” and “to” addresses for the message, and the Subject and Body properties set the subject lineand the contents. The second class is the SmtpClient, the constructor of which defines the name of themail server. Setting UseDefaultCredentials to True allows the ASP.NET code to connect to the serverusing Windows network credentials. Finally, the Send method actually sends the mail.
580
Chapter 15
18_588508 ch15.qxd 10/10/05 6:25 PM Page 580

You can configure some of these properties in the web configuration file, Web.config, which is whereyou can also set authentication settings if they are required for connection to the mail server:
<configuration xmlns=”http://schemas.microsoft.com/.NetConfiguration/v2.0”><system.net>
<mailSettings><smtp deliveryMethod=”Network”><network
defaultCredentials=”False”host=”MyMailServer”password=”MyPassword”port=”25”userName=”MyUserName”from=”[email protected]”/>
</smtp></mailSettings>
</system.net></configuration>
The properties for configuring mail are fairly simple. Setting defaultCredentials to false ensuresthat the user name (userName) and password (password) specified are used to connect to the e-mailserver (host), and from sets the e-mail address of whom the e-mail is from. The port number is to dowith TCP networking — e-mail uses port number 25 and you don’t need to know any more about portsapart from that number.
Sending mail isn’t just for notifying administrators of exceptions, and you can use it for all sorts ofthings. The security framework will use these settings when it sends out forgotten password requests ifusers request them.
You could use the e-mail code instead of, or in conjunction with, the logging to a file. For example youcould have the following:
Tools.Log(“My error message”, SqlEx)Tools.SendMail(“My error message”, SqlEx)
This would perform both actions, but includes repeated code — the error message. An alternative would beto add the e-mail code into the Log method, but that would always send the e-mail, which might not berequired. A better option might be only sending an e-mail if required, perhaps adding another parameter tothe Log method to indicate if the e-mail is to be sent:
Tools.Log(“My error message”, SqlEx, True)
The Log method could then have:
Public Shared Sub Log(ByVal Message As String, ByVal Ex As Exception, _ByVal SendEmailMessage As Boolean)
If SendEmailMessage ThenSendEmail(Message, Ex)
End If
‘ rest of logging codeEnd Sub
581
Dealing with Errors
18_588508 ch15.qxd 10/10/05 6:25 PM Page 581

This gives a combination of the passive reporting to a log file, and the active, which lets the administra-tor know of problems as they occur.
Raising ExceptionsYou’ve seen that you can trap exceptions, but you can also raise your own exceptions. One use for this isthat you can use the same exception handling mechanism to deal with custom errors as you use for.NET errors. However, this comes with a warning, in that you should still adhere to the rule of onlyusing exceptions for exceptional circumstances. If you can handle the problem gracefully without usingexceptions, you should do so.
To raise an exception you use the Throw statement. For example:
Throw New Exception(“exception description”)
You can also pass in an underlying exception:
Throw New Exception(“exception description”, ex)
If you are within a Catch block you can also re-throw the existing exception by just calling the Throwstatement on its own. You’ll see how this can be used a little later when handling exceptions globally isdiscussed.
Exceptions Best PracticesUsing exceptions is good practice, but certain rules should be followed when dealing with exceptions.
❑ For example, you should only catch an exception if you actually expect the exception. This doesn’tmean that it will happen, but that it could. A database failure is a good example, because thesearen’t unheard of. If you can understand why an exception would occur and you know how todeal with it, then that’s a good case for catching it.
❑ Dealing with the exception doesn’t mean that you know how to cure it, but that something canbe done. For example, in the Checkout page modified earlier in the chapter, catchingSqlException was necessary to allow the use of transactions so the database wouldn’t be leftin an inconsistent state. That is dealing with the exception, even if there is nothing that can bedone about the underlying problem.
❑ As a general rule it’s a good idea to avoid catching only the base Exception. Because this is thebase class for all exceptions, it’s not narrow enough in its focus.
❑ If you are performing database work, catch the appropriate exception (SqlException for SQLServer).
582
Chapter 15
18_588508 ch15.qxd 10/10/05 6:25 PM Page 582

Global Exception HandlingHandling exceptions where they happen is both good and bad. In the Checkout page the exception hadto be dealt with locally because of the transaction, but in many cases you might want some form of centralized exception handling. You also might want some way to handle exceptions not trapped else-where. The Checkout page is again a good example, because there is handling for SqlException, butnot for anything else. What happens if some other exception occurs? This is an important point becauseit really isn’t sensible to put Try Catch around every piece of code just in case an exception might occur.In fact, that would be bad practice because it would make the code hard to read and isn’t required at all.
The way global exception handling is managed is with the Global.asax file, which contains code forthe application. In this case the term application has a special meaning, because code in Global.asaxresponds to application-level events; these are events that are raised at specific points during the run-ning of the application, events that are raised by ASP.NET. Global.asax is a code-only page, and has nouser interaction.
Several events are contained in the Global.asax page:
❑ Application_Start, which is raised when the application first starts. This will be when thefirst user accesses the site and should be used to set any initial start conditions.
❑ Application_End, which is raised when the application stops.
❑ Session_Start, which is raised when a user starts a session. This will be when the user startsaccessing the site for the first time, and will include the time when a user closes the browserwindow and opens it again.
❑ Session_End, which is raised when a user session ends. This isn’t when the browser window isclosed, because sessions have a timeout — if there is no user activity within that time, the session ends.
❑ Application_Error, which is raised when an unhandled error occurs.
❑ Profile_OnMigrateAnonymous, which is raised when an anonymous user logs in, and allowsmigration of any Profile properties. The Profile is covered in Chapter 11.
As you can see, the event you’re interested in is the Application_Error event, which is where you canadd code to centrally handle untrapped exceptions. You see how the Application_Error event can beused in the following Try It Out.
Try It Out Handling Global Errors1. Using Windows Explorer, navigate to the web site directory, C:\BegASPNET\Chapters\Begin\
Chapter15\WroxUnited, and check the WroxUnited.log.
2. In the Wrox United application, open the global.asax file.
3. Add the following code to the Application_Error event procedure:
Dim ex As Exception = Server.GetLastError()
Tools.Log(“An unhandled error was caught by Application_Error”, ex)
583
Dealing with Errors
18_588508 ch15.qxd 10/10/05 6:25 PM Page 583

4. Save the file.
5. Open checkout.aspx.vb and move to the Wizard1_FinishButtonClick event.
6. Comment out the code that logs the error and replace it with the following:
Throw
7. To ensure that the exception is seen in practice, there actually needs to be some error, so you’llforce one by making the SQL statement incorrect. Change the SQL statement that inserts into theOrders table to insert into no_Orders:
cmd.CommandText = “INSERT INTO no_ORDERS(MemberName ...”
8. Save the file and run the application.
9. Go to the Wrox United shop and add some items to your cart. Proceed to the Checkout page.Step through the checkout wizard and after clicking the Finish button you’ll see the messagestating that an error has occurred.
10. Using Windows Explorer, navigate to the web site directory, C:\BegASPNET\Chapters\Begin\Chapter15\WoxUnited, and check the WroxUnited.log file (or you can press the refreshbutton in the Solution Explorer, and the new file will appear). You’ll notice that the exceptionhas been logged. Check the first line and see that it states that an error was caught byApplication_Error. Also notice that the next line states that an HttpUnhandledExceptionwas thrown, followed by details of the SqlException.
11. Delete WroxUnited.log and switch back to the global.asax code.
12. Change the Throw statement to this:
Throw New SqlException(“An error occurred while creating the order”, SqlEx)
13. Run the application again and follow the same procedure to generate the error.
14. Open WroxUnited.log again and look at the details. First there is the HttpUnhandledException,then Exception with the text you added, then the SqlException.
How It WorksThe first thing to understand is that the Application_Error in global.asax is raised when anyunhandled error occurs. In this event in your code you need to find out what the error was that causedthe event to be raised, and for that you use the GetLastError method of the Server object; thisreturns an exception object. This is passed into the Log method to log the error. So if you had a TryCatch block around your code, how was it that you got to the Application_Error event? Well, it’sbecause you re-threw the error using the Throw statement — although you handled the initialSqlException, the re-thrown exception wasn’t handled.
The important thing to note about what happened is that the exception is wrapped in another exception —an HttpUnhandledException. All exceptions you get from within Application_Error will be like this.The actual SqlException is shown because in the Log method you used ToString to write out all ofthe details of the exception. If you didn’t want the HttpUnhandledException shown you could use theInnerException property of the exception:
Dim ex As Exception = Server.GetLastError().InnerException
584
Chapter 15
18_588508 ch15.qxd 10/10/05 6:25 PM Page 584

When the exception is logged, now it would only show the actual exception that was unhandled.
In the second case you used the following:
Throw New SqlException(“An error occurred while creating the order”, SqlEx)
This throws a new SqlException but passes into that the actual exception that caused the problem. Soyou’ve wrapped the original exception within your own — a useful technique if you need to store moredetails than are available in the original exception. Here you are just detailing that the problem arosewhen an order was being created.
Don’t correct the SQL statement, leave it incorrect; you’ll need this in a later exercise when you look atdebugging.
In general, using this simple code in Application_Error and logging exceptions to a file means thatyou always have details of problems that occur during the normal running of a site. You can use thestack trace (more on them later) to see exactly where the problem was, and you don’t have to rely onusers telling you what they think the problem was (the two vary rarely match).
Custom Error PagesOne problem with the error handling code shown so far is that the user still sees a confusing message.Ideally you’d like to present the user with something less shocking than a stack trace (a list of the methodscalled so far — you’ll look at these later), for two very good reasons. First, a stack trace is not what usersneed to see — if something has gone wrong then they need to see a clear description, explaining that itwasn’t their problem, and that something is being done about it. Second, showing a stack trace givesaway a lot of information about your site, details that can be used by hackers. Even if your site is secure,they could cause unnecessary slowdowns as they try to hack the site.
As well as exceptions there are also other types of errors that aren’t nice for a user to see. For example,what if you rename a page but don’t update the links to it, or perhaps the user types in the wrong namefor a page. In these cases you’d see the 404 — the error number that indicates a page could not be found.ASP.NET applications can be configured to redirect the user to other pages, depending on the type oferror.
Configuring Custom Error PagesConfiguration of custom error pages is done in the Web.config file using the customErrors section.For example:
<customErrors mode=”On” defaultRedirect=”customError.aspx”><error statusCode=”404” redirect=”missingPage.aspx”/>
</customErrors>
585
Dealing with Errors
18_588508 ch15.qxd 10/10/05 6:25 PM Page 585

The mode attribute can be one of the following:
❑ Off, in which case the ASP.NET error details are always shown, even if a custom error pageexists.
❑ On, in which case the custom error is always shown, and the ASP.NET error details are nevershown.
❑ RemoteOnly, where the ASP.NET error details are only shown to local users, meaning userslogged on locally to the machine. For remote users (everyone else using the site) one of twothings is shown: a default page telling the user that an error has occurred, but without showingany error details, or a custom error page if one exists.
The values of On or RemoteOnly should be used for a live site, whereas Off can be used for debuggingpurposes.
The defaultRedirect attribute defines the page that is shown if an unhandled error occurs.
The error element details specific errors and the page to redirect to if that error occurs. In this case thestatusCode is 404, which means a missing page, so the user will be redirected to missingPage.aspx ifthe page they are looking for cannot be found. This allows you to have detailed pages for individualerrors, so you can help the user correct the problem. The missing page example could explain that thepage cannot be found and perhaps get users to check that they typed in the correct URL.
In the following Try It Out, you create your own custom error page.
Try It Out Custom Error Pages1. In the Wrox United application for the chapter, open Web.config and add the following within
the <system.web> section.
<customErrors mode=”On”><error statusCode=”404” redirect=”missingPage.aspx”/>
</customErrors>
2. Save the file.
3. Create a new Web Form called missingPage.aspx, making sure that the code isn’t placed in aseparate file, but that you pick the site.master file for the Master page.
4. Within the <asp:Content> controls, add the following text:
We’re sorry but the page you were looking for cannot be found. It’s probably hiding behind the couch. We’ll tell the Web site administrator to go and fetch it.
5. Save the file and run the application.
6. Navigate to a page that doesn’t exist — perhaps abc.aspx. You’ll need to type this page into theaddress bar of the browser. Notice that the text you entered is displayed rather than the normalmessage for a missing page.
586
Chapter 15
18_588508 ch15.qxd 10/10/05 6:25 PM Page 586

How It WorksThe working of this is quite simple, because when custom errors are enabled ASP.NET intercepts theerrors. What it does depends on how you’ve configured the customErrors section. In this case the modehas been set to On, which means that custom errors will always be shown — this is required because youare logged on to the machine locally, so remoteOnly wouldn’t work.
You’ve also configured a custom page for the statusCode of 404, so whenever a page cannot be found,ASP.NET doesn’t show the normal error message but instead redirects to the custom error page. Thistechnique makes your site friendlier to use, which means that if an error does occur, the user isn’t leftwith a frightening error message, but is presented with something more reassuring. Also, because this isan ASP.NET page you could make the error message more helpful. For example, you could check thename of the file the user was looking for and see if something similar exists on the site, perhaps by looking up the pages in the SiteMap or from a database. You could then either take the user to the near-est matching page, or present her with a list of possible matches.
Error pages can be combined with the logging to give very proactive feedback of problems within thesite. For example, sites often expand or change and the names of pages sometimes change, but youmight forget to change a link to the changed page. If a user clicks a link on your site and that page isn’tfound, then sending an e-mail to the site administrator is very useful; the page in error can be quicklycorrected so that no other users see the problem.
Debugging and TracingControlling how errors are shown to the user is only part of the story when developing web sites, andtracking down those errors is just as important. Ideally errors should be found during development andtesting, and in many ways testing is just as specialized a job as development. Many companies, Microsoftincluded, have teams of testers running through development projects shaking out those errors.
As a developer you are bound to make mistakes, ranging from simple typing errors to more complexcoding problems. The typing problems are usually easy to track down because they often cause compilation errors, but runtime errors can be more problematic. Tracing and debugging are the twomain techniques to finding errors.
Using ASP.NET TracingTracing is the technique of adding code to your pages, for a few reasons: for debugging purposes, to outputvalues of variables, or simply to find out where in your code certain things happen. The great thing aboutASP.NET tracing is that not only is it extremely simple to do, but also it’s easily configurable and doesn’trequire tracing code to be removed if you don’t want the trace information shown. What’s also great is thatyou get a wealth of additional information about the page, which can be useful for both debugging pur-poses and for learning about ASP.NET.
Tracing Individual PagesTracing can be turned on for individual pages by adding the Trace attribute to the Page directive:
<%@ Page Trace=”true” %>
587
Dealing with Errors
18_588508 ch15.qxd 10/10/05 6:25 PM Page 587

On its own, this outputs a great deal of information about the page, but you can also add your own outputby use of the Trace class, which has methods to write output to the trace log:
Trace.Write(“my information”)
The following Try It Out shows tracing in action.
Try It Out Page Level Tracing1. In the Wrox United application for the chapter, open Checkout.aspx in Source View.
2. Add the Trace attribute to the Page directive:
<%@ Page Trace=”True” %>
3. Save the file and run the application.
4. Add some items from the shop to your shopping cart and navigate to the Checkout page, whereyou’ll see that the bottom of the page has lots of information added. You might have to scrolldown the page to see all of the information.
5. Switch back to VWD and open the code file for the Checkout page.
6. At the top of the Page_Load event add the following line of code:
Trace.Write(“In Page_Load”)
7. Before the check to see if the user is authenticated, add the following:
Trace.Write(“In page_Load”, User.Identity.IsAuthenticated.ToString())If User.Identity.IsAuthenticated Then
8. Save the page and run the application, once more navigating to the Checkout page.
9. Scroll the page down so you can see the Trace Information section, as shown in Figure 15-6.
Figure 15-6
588
Chapter 15
18_588508 ch15.qxd 10/10/05 6:25 PM Page 588

10. Here you can see that the output from the Trace.Write statements is mixed in with the outputthat ASP.NET puts into the trace. Take a look at how this works and look at what informationthe trace output produces.
11. Edit Checkout.aspx again and set the Trace attribute to False:
<%@ Page Trace=”False” %>
12. Save the page and run the application, once more navigating to the Checkout page. Notice thatthe trace information has gone from the page, even though the Trace.Write statements are stillin the code.
How It WorksThe first thing to look at is what all of this trace information is, and what it is useful for. There are manysections, as detailed in the following table.
Section Contains
Request Details Details of the request, such as the status code.
Trace Information The flow of page events, showing the category, message,and time from the first to last byte of information sent tothe browser.
Control Tree The hierarchy of controls in the page.
Session State Any session variables in use.
Application State Any application variables in use.
Request Cookies Collection The cookies stored for the current site.
Response Cookies Collection Any cookies set during the page processing.
Headers Collection The HTTP headers.
Response Headers Collection Any headers set during the page processing.
Form Collection Contents of the form.
QueryString Collection Any querystring parameters for the request.
Server Variables The HTTP server variables.
All of this information is useful, although some is more useful than others. The Control Tree, for example,clearly shows the hierarchy of controls. You saw this in Chapter 14 when you looked at performance, butit’s useful for understanding how the page is made up from the hierarchy of controls. At the top is thePage object, beneath that the Master page, and then controls within the Master page. This continues withall of the page objects, and shows the unique name of the control as well as its type.
The Trace Information section shows the events in the order in which they are raised, so it is great for seeingexactly when things happen. Without any trace information of your own, the standard page events areshown, and anything you write is slotted into its correct space. So take a look what you actually did:
589
Dealing with Errors
18_588508 ch15.qxd 10/10/05 6:25 PM Page 589

Sub Page_Load(ByVal sender As Object, ByVal e As System.EventArgs) Handles Me.Load
Trace.Write(“In Page_Load”)
If Not Page.IsPostBack ThenIf Profile.Cart Is Nothing Then
NoCartlabel.Visible = TrueWizard1.Visible = False
End If
Trace.Write(“In Page_Load”, User.Identity.IsAuthenticated.ToString())If User.Identity.IsAuthenticated Then
Wizard1.ActiveStepIndex = 1Else
Wizard1.ActiveStepIndex = 0End If
End If
In the first statement you used Trace.Write to output a single string and this is displayed in the Messagecolumn. With the second Trace.Write you passed in two parameters, and in this case the first becomesthe Category and the second the Message. You can put trace statements anywhere within your code andthe output will be displayed in the Trace Information section, so it’s a great way to simply see what’s happening in your code. There is a also a Warn method of the Trace class, which outputs in the same wayas Write, but the content is in red. This is useful for picking out statements within the trace output.
The other thing you’ll have noticed is that by changing the value of the Trace attribute at the top of pageto False, no trace output is displayed. You didn’t have to remove the Trace.Write statements from thecode, because these are simply ignored if tracing isn’t enabled. This is great during development,because you can liberally sprinkle Trace.Write statements throughout your code to give you a goodunderstanding of the program flow, and you can turn on or off the tracing without having to remove orcomment out these statements.
Tracing All PagesAlthough tracing in individual pages is useful, what’s great is being able to control tracing for the entireapplication. This is done by a configuration setting in Web.config, within the <system.web> section:
<trace enabled=”True” />
When the enabled attribute is set to True, tracing is enabled for the application, but the output isn’tshown in the pages. Instead, it is stored for viewing by way of a special URL —Trace.axd— whichdoesn’t point to a physical file, but is instead interpreted by ASP.NET. You give application tracing a goin the next Try It Out.
Try It Out Application Level Tracing1. In Source View in Checkout.aspx, remove the Trace attribute from the Page directive at the
top of the page.
2. Open Web.config and add the following within the <system.web> section:
<trace enabled=”True” />
3. Save the file and run the application, navigating to the Checkout page.
590
Chapter 15
18_588508 ch15.qxd 10/10/05 6:25 PM Page 590

4. Within Internet Explorer select File ➪ New ➪ Window (or press control+N) to launch a new window from the same site.
5. In the address bar change Checkout.aspx to Trace.axd and press Enter. You should see something like Figure 15-7.
Figure 15-7
6. Click the View Details link on the Checkout.aspx line, and you will see the trace page you’vealready seen. Notice that it contains the two pieces of data that were added to Checkout.aspxin the Page_Load event.
How It WorksThe working of this is simple; by enabling the trace element in Web.config you are instructingASP.NET to keep track of the trace information, but not to show it in the page. When you navigate toTrace.axd, ASP.NET recognizes this special URL and instead of returning the standard 404 error page(or a custom page if you have one configured), it returns a list of pages that have been accessed in theapplication. Clicking the View Details link displays the trace information for that page.
The <trace> element has several attributes in Web.config:
591
Dealing with Errors
18_588508 ch15.qxd 10/10/05 6:25 PM Page 591

Attribute Description
enabled Indicates whether or not application tracing is enabled. Thedefault value is False.
localOnly When set to True ensures that Trace.axd is only accessiblefrom the local machine. True is the default value, and stopsremote users of the site from accessing the trace information.
mostRecent Indicates whether or not the most recent trace requests arekept. The default is False, which keeps the first n items,where n is determined by the requestLimit attribute. IfTrue then the most recent n items are kept.
pageOutput When set to True the trace output is shown in the actualpage, as well as being stored for show by Trace.axd. Thedefault is False, although this doesn’t affect pages thathave tracing enabled on them directly.
requestLimit The number of trace requests to store.
traceMode Indicates the order in which the trace requests are shown.The default is SortByTime, where the order is time-based,but this can also be SortByCategory where the requestsare shown alphabetically.
The greatest thing about application tracing is that it can be invaluable in finding bugs in a running system. You can edit pages to add Trace.Write and turn on application tracing; the trace informationwill be stored but the users won’t see any of it. You can then examine the trace details to help diagnoseany problems.
Using the DebuggerThe tracing features of ASP.NET 2.0 provide a great way to trace the flow of the application, but probablythe most important weapon in your coding arsenal is the debugger. This allows you to halt the applicationwhile it is running, examine variables, and step through the code line by line. The debugger is built intoVisual Web Developer and Visual Studio 2005, so you don’t have to run a separate application; you simplyrun the application from the development tool. The best way to learn debugging is to actually use it, sogive this a go in the following Try It Out.
Try It Out Debugging1. In the Wrox United application for the chapter, open Checkout.aspx.vb.
2. In the Page_Load event, place the cursor on the line that checks to see if the cart has a value:
If Profile.Cart Is Nothing Then
3. Set a breakpoint on this line. You can do this in one of three ways. The first is by selecting theToggle Breakpoint option from the Debug menu. The next is by pressing F9, and the last is byclicking the gray border at the left of the line of code:
592
Chapter 15
18_588508 ch15.qxd 10/10/05 6:25 PM Page 592

4. Whichever method you use, this is a toggle, so performing the same action again removes thebreakpoint. When a breakpoint is set the gray border will show a red circle and the line will behighlighted, as shown in Figure 15-8.
Figure 15-8
5. Scroll down to the Wizard1_FinishButtonClick event, and place a breakpoint on the following line:
For Each item As CartItem In Profile.Cart.Items
6. Run the application from VWD or VS and navigate to the Checkout page. The page will not display; you’ll see that you are stopped in the debugger (see Figure 15-9).
Figure 15-9
7. Press F5, or select Continue from the Debug menu. You’ll see that the page now displays.
8. Add some items to the shopping cart and then navigate to the Checkout page again. When thebreakpoint is reached, press F5 and you’ll see the error message shown in Figure 15-10.
593
Dealing with Errors
18_588508 ch15.qxd 10/10/05 6:25 PM Page 593

Figure 15-10
9. You’ve hit an exception so the debugger halts. This is because of a change to the checkout codeyou did earlier, where you had an incorrect SQL statement so that you could force an exception.
10. Click the View Detail link to show the details of the exception. Click the plus sign to expand thedetails (see Figure 15-11), and you’ll see that the exception shows your custom text and thatthere is an InnerException.
Figure 15-11
594
Chapter 15
18_588508 ch15.qxd 10/10/05 6:25 PM Page 594

11. Clicking this open shows the original exception, in that there isn’t a table called no_Orders.This isn’t something that can be corrected while running the application, so you need to stopdebugging.
12. From the Debug menu select Stop Debugging, or press Shift+F5.
13. Edit the code to correct the error, changing no_Orders back to Orders:
cmd.CommandText = “INSERT INTO ORDERS(MemberName ...”
14. Run the application again, and navigate to the Checkout page again, making sure you havelogged in and there are at least three items in your shopping cart.
15. When the breakpoint is reached in Page_Load, press F5 to continue.
16. Continue through the checkout process, noticing that the breakpoint doesn’t get hit when clickingthe Next button. This is because the breakpoint in Page_Load will only be reached the first timethe page is loaded because the code block in which the breakpoint is set is only when IsPostBackis False.
17. When you get to the end of the checkout process, click Finish, and another breakpoint will bereached, as shown in Figure 15-12.
Figure 15-12
18. From the Debug menu select Step Over, or press F10. Notice that execution moves to the next line.
19. Keep pressing F10 until you get to the line that sets the @Quantity parameter. Notice how execution moves to the next line each time you step.
20. Hover the cursor over the item of item.Quantity and you’ll see the tooltip showing the valueof the variable.
21. Without moving the currently active line, hover the cursor over the item of the For Each lineand you’ll see another tooltip, but this time there isn’t a value. That’s because this is a complextype, a CartItem, but notice that there is a little plus sign on the left.
595
Dealing with Errors
18_588508 ch15.qxd 10/10/05 6:25 PM Page 595

22. Hover over or click the plus sign, and the properties (both public and private) are shown for theitem (see Figure 15-13).
Figure 15-13
23. From the Debug menu select Step Into, or press F11. This will step into the line of code, openingup the code for the shopping cart, in the property Get, as depicted in Figure 15-14.
Figure 15-14
24. Keep pressing F11 until you are back into the checkout code.
25. Right-click the trans.Commit() line, and select the Run To Cursor option. Notice how all inter-mediate code is run, but that the next line is the trans.Commit() line.
26. From the Debug menu select Delete All Breakpoints, or select Control+Shift+F9.
27. Press F5 to continue the code, and you’ll be back in the browser.
How It WorksDebugging works because VWD controls the interaction of code. Normally the code runs without interruption, but a breakpoint tells VWD to suspend code at the appropriate line. And because VWD isin control, its debugging capabilities allow you to view variables, step through code line by line, and soon. Stepping through code is further enhanced by the fact that you can step into code called from the
596
Chapter 15
18_588508 ch15.qxd 10/10/05 6:25 PM Page 596

current routine. In this example you stepped from the code in Checkout.aspx.vb into Shopping.vb,allowing you to follow the program flow line by line.
Debugging is extremely useful for not only tracking down problems in code, but also for understandingthe flow of code. You can use it to understand which methods are called, the order in which they arecalled, and what code does in those methods. It’s a practical skill that will make you a good program-mer, so it’s worthwhile spending time getting used to the debugger.
It’s worth pointing out the difference between the various actions of the debug toolbar, and these aresummarized in the following table. An empty entry for the shortcut key means that there is no defaultkey for that action.
Toolbar Icon Shortcut Key Description
F5 Run the application if it currently isn’t running, orcontinue running the application if it is currentlypaused at a breakpoint.
Pause the running of the application.
Shift+F5 Stop debugging the application.
Ctrl+Shift+F5 Restart the application.
Show the next statement, which highlights the nextstatement to be executed.
F11 Step into a method. If the current line contains amethod or property from another class, then stepping into that method will load the code filefor the class and allow stepping through the codefor the method or property.
F10 Step over a method. If the current line contains amethod or property from another class, then stepping over will execute the line without allowing stepping through the code for the method or property.
Shift+F11 Step out, which steps out of the current method orproperty. This is useful if you have stepped into amethod but don’t want to continue steppingthough the lines; stepping out will take you back tothe calling routine.
Hex display, which displays the output in hexadecimal.
Show the output window, which shows the actionsVWD or VS take during debugging.
597
Dealing with Errors
18_588508 ch15.qxd 10/10/05 6:25 PM Page 597

It’s worth getting used to using both the buttons and the shortcut keys because it makes debuggingquicker.
During the debugging exercise you saw how you could hover the cursor over a variable to see the contentsof that variable, but the viewing of variables is not just restricted to hovering the cursor over them, becausethere are special debugging windows that help with this. One of these is the Locals window (see Figure15-15), which shows the local variables for the current procedure.
Figure 15-15
Here you have all of the local variables, and those that are complex types can be expanded to show theproperties.
The Watch window allows variables to be watched. When in Debug mode you can highlight a variable,right-click it and select Add Watch from the menu. The use of the Watch window is the same as theLocals window, the only difference being that the Watch window only shows variables that you choose.
The Call Stack shows the current stack trace, which is the hierarchy of methods; which methods havebeen called from other methods. You can see the Call Stack at the bottom right of the screen when youare debugging. For example, in the shopping cart code, the stack trace displayed in Figure 15-16 mightbe shown.
Figure 15-16
598
Chapter 15
18_588508 ch15.qxd 10/10/05 6:25 PM Page 598

Here the highlighted line is the current line of code, and you can see that it is the Quantity property of the CartItem (get_Quantity is shown because this is actually how the underlying code works,showing it is the Get part of the property). The second line shows the method that called this Quantityproperty, and this is Wizard1_FinishButtonClick.
There are other windows, but Locals, Watch, and Call Stack will be the most common, and to get the bestfrom the debugger you really have to practice. It’s worth experimenting and playing around just to get afeel for how the debugger works, and the sort of things that are possible.
SummaryIt may seem odd that we’ve had a whole chapter on the negative aspects of building web sites, but ultimately this will make you a better developer. After all, possessing knowledge is all well and good, but knowing how to cope with problems that arise is just as important. So this chapter looked atdefensive coding, where you must take a pessimistic attitude. This takes the view that your code shouldbe as robust as possible, not making assumptions about anything, such as parameters passed into methods. This is especially true when dealing with SQL statements that take data from the user, so youlooked at how to replace the building of a SQL statement using concatenation with SqlParameterobjects to prevent hacking attacks.
Another part of defensive coding is the use of validation controls, which provide a simple way to ensurethat data entered by users is correct. Because these controls give both client- and server-side validation,users gets a great experience because the validation notifies them of problems before posting back to theserver.
Additionally, this chapter discussed the following topics:
❑ Exceptions, where you learned how to cope with the unexpected (cue the inquisition leaping infrom off frame — ”Nobody expects the exception” — apologies to the Monty Python team).Dealing with exceptions is a tricky business, and should be limited to those situations whereyou can gracefully recover from the problem. One of the key tenets is that you should alwaysleave the application in a stable state when recovering from exceptions.
❑ Handling exceptions globally or at least how to manage their details globally, by use of theglobal.asax file. Here you saw that for both trapped and untrapped exceptions the details can be centrally logged, ensuring that you always know of errors wherever they happen withthe application.
❑ Tracing and debugging, and how you can track down problems within code. Tracing gives thecapability to write the status of the running code, with the capability to switch the trace outputon and off without affecting the trace statements themselves. Debugging delves into the code inmore detail, allowing you to step through the code as it runs. These are the key techniques oflearning how to find errors.
You’re very nearly at the end of the book, and a lot of material has been covered. The final chapter looks attopics that will lead you from the book content to further learning and at topics of how to move forwardwith the knowledge you have. It also covers how to deploy your application so that it can be hosted by anISP, allowing your great code to be seen by the whole world.
599
Dealing with Errors
18_588508 ch15.qxd 10/10/05 6:25 PM Page 599

Exercises1. Add defensive coding to the GenerateThumbnail method of the ImageHandling class stored
in the App_Code directory.
2. Add validation controls to the Checkout page, the part that accepts the delivery address. Thereis a checkbox to copy the address from the membership details of the user, but there is nothingto ensure that all of the fields are filled in.
3. Use the debugger. No really, use it.
600
Chapter 15
18_588508 ch15.qxd 10/10/05 6:25 PM Page 600

16Deployment, Builds, and
Finishing Up
It’s been a long journey since you started this book by building a quick example web site, beforestarting to build your fully fledged Wrox United application. You now have a web site that uses e-commerce to take customer details and credit card numbers, displays up-to-the-minute content,allows users to view (and listen to) multimedia, and references a multitude of data sources, allwithin the course of 15 chapters. This is the kind of thing that could have taken six months in thepast and a whole team of developers. However, it doesn’t end here. I’m often tempted at the endof a project to put my feet up and say, well I’ve done all the hard work, it’s all smooth sailing now.However, I have been painfully disabused of this notion on more than one occasion. Even if you’reconfident of the extremely unlikely scenario of your application having no bugs, being simple tomaintain, and your client never having any further questions to ask or features to add, you stillhave to deploy your site. Visual Web Developer has a feature that allows you to copy your website from a local folder to a remote location, and you’ll make use of that in this chapter.
After you’ve deployed your site, well, what next? If you succeed in becoming a professional developer you will undoubtedly talk to plenty of companies who will set the final deadline as theday you deliver the working code to them. If you pencil in another project the day after this deadline you might end up getting into trouble, when you find yourself required back on site atyour old project when something breaks down or doesn’t work in the way it was intended. Testingis often completely overlooked by both companies and developers. Chapters 14 and 15 talkedabout various ways for testing your code as you create it, but testing your code after you’vedeployed the site should also feature in your timeline. If possible you should also test it alongsideyour proposed user base. Even if everything goes fine, you should be prepared to maintain thissite, making adjustments, making sure that the site owners can run it in your absence.
And lastly, what should you do next after reading this book? Do you run out and apply for a set ofdeveloper jobs? Or do you have to go out and buy another book? You’ll get a thorough groundingin what you should be looking to do next.
19_588508 ch16.qxd 10/10/05 6:34 PM Page 601

This chapter discusses the following topics:
❑ Deploying your site
❑ Testing and maintaining your site
❑ Where to now?
Site DeploymentSite deployment is the process of installing your site on the customer’s machine and making your siteavailable and accessible to the outside world; in other words, broadcasting it to the masses. In the veryfirst versions of ASP, and indeed with any pure HTML site, the idea of deployment went little beyond“parcel up all your files in a zip file, and unzip them to the correct folder on the site.” For simple sitesthis approach still works, but for more complex ones, you’re asking for trouble if you follow this methodand expect no problems.
One of the weaknesses of Visual Web Developer is that, unlike Visual Studio.NET, there isn’t a specialdeployment wizard that can wrap up all the different bits and pieces into a single installation file.However, there is an option in VWD that allows you to take your existing web site and publish the website on a remote machine. There is also a second method that can be used if you so prefer, which youlearn about later in the chapter.
Before you do that, you should make sure you have everything necessary to ensure your site will workon another machine by compiling a checklist.
ChecklistHere’s a simple checklist of common things you would normally expect to feature in a typical deployment.
❑ HTML and CSS files: Your design and structure.
❑ ASPX files: Your main pages.
❑ ASPX.VB or ASPX.CS files: The code-behind files.
❑ ASCX and ASCX.VB/.CS files: The user controls.
❑ Database files (.MDB or .MDF): The back end of the site.
❑ Image files (.JPG, .GIF, .PNG): Easily forgotten but vital to the sites working.
❑ Multimedia files: Includes both video and audio files.
❑ XML files: .XML and .XSD files.
❑ Third-party components or controls: ActiveX controls, Java applets or such like.
❑ License files: Required to make your components work.
602
Chapter 16
19_588508 ch16.qxd 10/10/05 6:34 PM Page 602

Quite often you will find that despite your best intentions files can become spread out across folders allover your machine. It’s a great idea to centralize them first and even try to deploy them on another localmachine of your own if you have one.
Compiling and Running Your ApplicationThe next step is to make sure that your site actually compiles and runs. In Chapter 15 you looked at sim-ple reasons why a site might not compile, and there is no point in deploying a site that doesn’t compile.Also be aware that even if your site happily compiles on your machine, it might not compile or run onyour host’s or client’s machine. You must make sure that things like local references are changed so thatfile references are specific to the new machine and that the requisite components are installed. This is themost likely reason for your code failing on your host’s machine. The best way to do this is to place anymachine-specific information within the Web.config file and then reference it from inside theappSettings, as discussed in Chapter 2. Then you can change any information in the Web.config filewithout affecting your application.
Say, for example, you put a reference to a folder in the <appSettings> section of Web.config and adda key and a value attribute as follows:
<appSettings>...<add key=”WroxUnited” value=”C:\Program Files\Wrox United” />...</appSettings>
You can then access these values from your code as follows:
Dim WroxULocation As String = _System.ConfigurationManager.Configuration.AppSettings(“WroxUnited”)
Of course you will probably be faced with a scenario where you want to have a reference to a local file andalso a reference to that same file in a location on your remote server. In this case you can place a referenceto both locations in Web.config. Here LOCALHOST is the active file location:
<appSettings><!-- LOCALHOST --><add key=”WroxUnited” value=”C:\Program Files\Wrox United” />
...<!-- REMOTE
603
Deployment, Builds, and Finishing Up
19_588508 ch16.qxd 10/10/05 6:34 PM Page 603

<add key=”WroxUnited” value=”D:\Websites\Wrox United” />-->
</appSettings>
All you need to do then is uncomment the REMOTE settings and comment out the LOCALHOST settingsinstead. In this way no code needs to change. Make sure you comment which of the locations is localand which is remote, because it might not be entirely obvious to anyone else who uses the code. If youhave reason to change the location of the file, you only have to change it once in Web.config and notevery time it is mentioned within your code.
This doesn’t just stop with remote file locations, but also with connection strings too. If you are using alocal database to test your code, you will have to change the connection settings as well. Your localdatabase might use SQL Express, but your main server might be SQL Server 2005; once again, no extracode is needed, it can just be worked by commenting the line out:
<ConnectionStrings><!-- LOCALHOST --><add key=”WroxUnitedConnectionString” value=”Data
Source=.\SQLEXPRESS;AttachDbFileName=|Data Directory|\WroxUnited.mdf;IntegratedSecurity=True;User Instance=True;” providername=”System.Data.SqlDataClient”/>...
<!-- REMOTE <add key=”WroxUnitedConnectionString” value=” Data
Source=MainSQLServer;AttachDbFileName=|Data Directory|\WroxUnited.mdf;IntegratedSecurity=True;User Instance=True;User ID=auser;Password=56gTR4£s “providername=”System.Data.SqlDataClient” />
-->
</ConnectionStrings >
Once again LOCALHOST in this example is the active string. If you tweaked the provider name you couldpass connection strings to other databases such as Access or MySQL or even Oracle.
Publishing the SiteOnce you’re sure everything is ready and that everything compiles, you can use Visual Web Developerto publish your web site for you. There isn’t much more to say on the subject, it’s literally easier to goahead and do it!
604
Chapter 16
19_588508 ch16.qxd 10/10/05 6:34 PM Page 604

Try It Out Publishing the Wrox United Web Site1. Open the chapter copy of WroxUnited (C:\BegASPNET2\Chapters\Begin\Chapter16\
WroxUnited) and select the Web Site ➪ Copy Web Site option (see Figure 16-1).
Figure 16-1
605
Deployment, Builds, and Finishing Up
19_588508 ch16.qxd 10/10/05 6:34 PM Page 605

2. Click the Connections: Connect to box and enter WroxUnited2 into the text box, as shown inFigure 16-2.
Figure 16-2
Notice that to actually deploy to a remote site, you need to select the Remote Site icon on theleft-hand menu and then supply the URL or IP address of the location of the site, possibly enter-ing relevant user ID and password details in along the way. It is unfortunately not possible tosupply test web space for readers to deploy their sites to.
3. Click Open and click Yes when asked whether you would like to create a new folder.
4. Next select all the files, as shown in Figure 16-3.
606
Chapter 16
19_588508 ch16.qxd 10/10/05 6:34 PM Page 606

Figure 16-3
5. Then click the blue single right-arrow button to copy them across (see Figure 16-4).
Figure 16-4607
Deployment, Builds, and Finishing Up
19_588508 ch16.qxd 10/10/05 6:34 PM Page 607

6. Close the web site down, by selecting Close Project from the File menu.
7. Select Open ➪ Web Site and select WroxUnited2.
8. Run the new web site; it should look just like the old one (see Figure 16-5).
Figure 16-5
How It WorksIn this Try It Out you have used the Copy Web Site option of Visual Web Developer to produce a complete,identical copy of the Wrox United site on your local machine. This mirrors the way in which you would goabout deploying a web site to a remote location. In fact, if you have a remote machine that is also runningASP.NET 2.0, we would recommend that you try deploying the Wrox United site on it yourself.
There really is very little to the physical act of deployment; it should work out of the hat. The problemsyou may encounter are either caused by elements in your application that are locked in to your currentsetup (such as referencing files on a C:\ drive, when the host uses E:\ instead) or if you attempt to copyfiles into a folder or location where some files already exist. In this case, a blue question mark will appearnext to the offending file in the left-hand dialog, and you will get a dialog (see Figure 16-6) asking youwhether you want to copy over the existing file.
608
Chapter 16
19_588508 ch16.qxd 10/10/05 6:34 PM Page 608

Figure 16-6
Before .NET, if you needed to install a component or control, this would require copying your component to the appropriate folder and registering that component via some ugly low-level tools wedon’t want to talk about here. In .NET, to install the component all you have to do is to copy the compo-nent’s file into the bin folder of your application which occasionally had some unexpected and unpleas-ant side-effects, however in .NET 2.0 dropping components into the App_Code folder is all you need todo to be able to start using the component immediately.
XCOPY DeploymentThere is a second way to deploy applications in .NET, if you don’t have Visual Studio.NET. This isknown as XCOPY deployment. This is a command-line tool that can be used to copy your site from onelocation to another. It takes a number of options, as detailed in the next section.
XCopy Options❑ / E copies folders, subfolders, and files, including empty ones.
❑ / H copies both hidden files and system files in addition to the unhidden and non-system files.
❑ / I specifies that the destination is a folder and to create the folder if it does not already exist.
❑ / K keeps all of the existing file and folder attributes such as read-only, which would otherwisebe lost.
❑ / O retains all of the security-related permission ACLs (Access Control Lists — rules for whogets access to a particular resource) of the file and folders.
❑ / R overwrites files marked as read-only.
All you need to do is provide the location of where you want to copy the web site from and where youneed to copy the web site to, and along with the relevant options, it will copy everything that you need.So typing in the following command would copy all files and folders to the WroxUnited3 folder:
XCOPY C:\Inetpub\wwwroot\WroxUnited C:\Inetpub\wwwroot\WroxUnited3 /E
You can see how that works in the following Try It Out.
609
Deployment, Builds, and Finishing Up
19_588508 ch16.qxd 10/10/05 6:34 PM Page 609

Try It Out Publishing Wrox United Using XCOPY1. Click Start ➪ Run and type in CMD to bring up the command prompt.
2. Type the following command and press Enter:
XCOPY C:\Inetpub\wwwroot\WroxUnited C:\Inetpub\wwwroot\WroxUnited3 /E
3. You are presented with the screen shown in Figure 16-7, and asked whether the target is a filename or directory. Press d because it is a directory. XCOPY will now copy all the files over.
Figure 16-7
4. Close the command prompt.
5. Open Visual Web Developer, choose File ➪ Open ➪ Web Site, and select WroxUnited3.
6. Run the new web site; it should look just like the last one (see Figure 16-8).
610
Chapter 16
19_588508 ch16.qxd 10/10/05 6:34 PM Page 610

Figure 16-8
How It WorksThe XCOPY option works in the exactly the same way as the Copy Web Site option in Visual WebDeveloper. It copies all of the files from one location to another. The two main differences are that youdon’t need Visual Web Developer installed to do it, which is useful if you have been forwarded a web sitefrom someone else in a zip file and want to, say, install it locally and test it and then deploy it. The seconddifference is that because it is a command-line tool it gives you more options on which files to copy andwhich files not to copy, with settings like /R to overwrite existing files that are marked as read-only.
Common Problems Encountered When Deploying a SiteSo, you shouldn’t have any problems with the physical act of deployment itself. However, what happensif you copy all of the files over, install all of the relevant components and install the third-party ones, anddo it correctly and deployment still doesn’t work?
With a fairly new technology it’s harder to compile a definitive list of problems, bugs, and glitches theuser might experience; these things are put together from years of user frustrations. However, on ourtravels in the beta versions of ASP.NET 2.0 we came across a couple of gotchas that could break your sitethat are worth talking about now.
611
Deployment, Builds, and Finishing Up
19_588508 ch16.qxd 10/10/05 6:34 PM Page 611

Enabling App Data PermissionsIf you are getting errors whenever the user runs a page that accesses a database, then suspect permissionsproblems immediately. Every time you move a database to a new server that uses SQL Server, you have toset up the relevant permissions for the NETWORK SERVICE for the App_Data folder. The reason youhave to do this is ASP.NET 2.0 runs under this particular service, and so if ASP.NET 2.0 wants to accessthe database, a request to access it will come from this particular service.
You can enable these permissions in two ways, either via Windows Explorer or via SQL ServerEnterprise Manager.
Enabling Permissions via Windows ExplorerGo to the folder of your web application in Windows Explorer, right-click your application and select theProperties, and click the Security tab, which is shown in Figure 16-9.
Figure 16-9
In ASP.NET 1.1 you would add permissions for the ASPNET account to do this; inASP.NET 2.0 the NETWORK SERVICE account does the same. However, there havebeen occasions in the beta where enabling NETWORK SERVICE didn’t work andASPNET permissions had to be enabled as well. If, after enabling permissions forNETWORK SERVICE, things still don’t work in the way intended, you might wantto enable permissions for the ASPNET account as well, in the same way as outlinednext for the NETWORK SERVICE account.
612
Chapter 16
19_588508 ch16.qxd 10/10/05 6:34 PM Page 612

Click the Add button to bring up the Select Users or Groups dialog (see Figure 16-10). Type NetworkService and click Check Names (if you don’t type in the correct case, it will capitalize the name for you).
Figure 16-10
Click OK. In the Properties dialog (refer to Figure 16-9), make sure the Write checkbox is checked (it isunchecked by default) and click Apply. It’s as simple as that.
If the machine is joined to a domain, the user must select the Locations button and pick the currentmachine, rather than the domain. That’s because NETWORK SERVICE is an account on your machine.By default the dialog will attempt to add the domain name, rather than the machine name.
Enabling Permissions via SQL Server Enterprise ManagerThe alternative way will only work if you have SQL Server installed. If you bring up SQL QueryAnalyzer you can run the following script (just type in the following code to SQL Analyzer), substitutingin the name of the database you want to grant access to:
sp_grantlogin ‘NT AUTHORITY\NETWORK SERVICE’
USE aspnetdbGOsp_grantdbaccess ‘NT AUTHORITY\Network Service’, ‘NETWORK SERVICE’
USE aspnetdbGOsp_addrolemember ‘database_you_wish_to_grant_access_to, ‘NETWORK SERVICE’
Important note for Windows XP Home Edition users: There is no Security tab visiblebecause something called Simple File Sharing is enabled by default. To turn offSimple File Sharing, you need to restart your PC in Safe Mode (by pressing F8before XP starts) and then log in as Administrator. You’ll get a warning about running in Safe Mode. Click Yes to accept it and locate the folder whose permissionsyou want to change, then right-click that folder, select Properties, and change thepermissions. You can find more details about this in Appendix B.
613
Deployment, Builds, and Finishing Up
19_588508 ch16.qxd 10/10/05 6:34 PM Page 613

Click Run to run the query, and this will have the same effect as the previous instructions.
Is Your Application Offline? (Using App_Offline.htm)This is one of those things that I saw in the beta that really tripped me up; on one occasion I ran myWrox United application to test it and was staggered to find that every single page returned an HTTP404 error. Even stranger, I was browsing them from within Visual Web Developer at the time. It took mea few hours and help from the other people on the book to figure out what had happened. It actuallyturned out to be a really useful feature.
If you need to take your site offline very quickly, you can place a file called app_offline.htm in yourmain application folder to make your web site unavailable to everybody. You can place in the HTML filethe text that you want your users to be able to view for the duration of the site’s downtime. The advantageis that ASP.NET is working throughout this downtime, and you are able to test the site without having toworry about what users can see in the outside world. However, there are times when this file is created foryou, which led to the problems I had.
Apparently during some operations, the app_offline.htm file is temporarily copied to your applicationfolder and then in theory it should be removed when the operation is completed. A crash during an operation can leave the file behind. Unfortunately, this was a zero-length file in beta 2, and this providedno clue to the user as to what occurred. The user was just left with every single page in his or her sitereturning 404 errors. Normally, the app_offline.htm file should not be left behind, but unfortunately insome cases it gets left over. In the final release of ASP.NET 2.0 there is a message informing users of whathappened so they know to remove the offending item (see Figure 16-11).
Figure 16-11
This can turn up quite a few times if your application is being unruly, so be warned. It will turn up in theroot folder of your application folder. In Figure 16-11 you see the version of it that comes with VisualWeb Developer by default.
Trial and ErrorIf there’s still no joy, go back, delete all the files, and try it again. If you are getting a particular error consistently, look up that error on http://support.microsoft.com and see if that has any solutions.If not, try posting on one of the online forums recommended later in this chapter.
614
Chapter 16
19_588508 ch16.qxd 10/10/05 6:34 PM Page 614

Testing and MaintenanceOnce you’ve successfully negotiated deployment, you might be excused for doing a quick double take.Testing, haven’t you already done that? Given this is the 21st century you would have perhaps expectedattitudes toward testing to have improved considerably; however, if anything, trends have reversed. Ican name-check several very popular games that arrived on the market in a practically unusable statebecause they hadn’t been tested correctly. Hastily compiled patches of 20–50MB were required to rectifythe situation. However, as a developer you will probably not have this luxury. You will probably seeyour client week in and week out, and if the application doesn’t work they will tell you about it andmaybe withhold payment until the problem is rectified. They might still not grant you any extra time totest, but that is the name of the game.
Testing Before and AfterOf course while you’re building an application you should test every component, but once the build isdeployed and completed you should also make time to test the application as a whole. In particular, youshould sit alongside your prospective users and watch them test it. Some clients believe that testing isthe whole responsibility of the developer, but the relationship the developer shares with his code is similar to that between the author and his text. You wouldn’t expect an author to be able to adequatelyedit his own text, and if an author uses incorrect grammar, then it’s quite likely that he won’t be able tospot their own incorrect grammar usage. If a developer creates a piece of logically unsound code, there’s a fair chance he might not be able to spot it either. Only in hard testing, when a user who puts in often totally unpredictable values, are some errors revealed. Some textbooks will tell you to put asideas much time as you took to develop the application for testing it. This isn’t over-cautious; the bigger the application, the greater the likelihood of bugs creeping in, and the longer it can take to find them. If possible with a web site for a client, get them to test it in-house, on a test server before they put it on alive server. And don’t be worried to admit to bugs. Finding bugs isn’t the sign of a bad developer; a baddeveloper is one who refuses to admit to the possibility of any bugs in the first place. The best advice I can give is get your clients to test the application thoroughly and make sure they have time to do it. A couple of testing methods are worth mentioning here.
Unit TestsUnit tests are a particular form of testing where you write a test for every non-trivial function or methodin the code. You can separate out the different sections of the program and demonstrate which parts areworking in this way. Unit tests make it easier for programmers to change individual pieces of codebecause they can go back to the code and test the unit independently. So if you suddenly think of a newfeature, you can add it without worrying about having to break the entire application.
Writing a Test PlanBecause unit tests, or indeed the whole practice of testing, can be time consuming, it’s best to have a testplan up front to aid the organization of testing. A test plan is simply a systematic written approach totesting, detailing the experiments and tests you want to perform on the code. Test plans don’t just applyto computer programs; they can apply to any kind of engineering. A single test case in a test plan for adishwasher might be, “Test what happens when you open the dishwasher door halfway through aworking cycle.” Some dishwashers would shower you with scalding water, some would refuse to open,and some would stop mid-cycle and let you retrieve the last cup in the house. There isn’t necessarily aright answer to what should happen, but you should write a list of scenarios that you would like to test,
615
Deployment, Builds, and Finishing Up
19_588508 ch16.qxd 10/10/05 6:34 PM Page 615

and record the outcomes and check that the scenarios and outcomes are what you both want, and whatyour end-user thinks is satisfactory.
MaintenanceMaintenance is the practice of keeping your site up and running once it has been successfully deployed.In some ways it’s like a glorified debugging process — some bugs might not show up until long after thesite’s deployment, but you’ll still be expected to fix them. In other ways maintenance will be about performance monitoring: how fast is your site running? How many users is it handling? Can it copewith that? This is a science in itself. This is one area where ASP.NET 2.0 has come on in leaps andbounds, with the addition of instrumentation, and the capability to instrument your application.
Instrumentation and Health MonitoringInstrumentation or instrumenting is a term you will come across if you have to do any monitoring ormaintenance of your system. It doesn’t refer to anything musical, though. Rather, the instrumenting ofyour application is the monitoring of your system or your application’s function, checking to see that allis working the way it should be.
ASP.NET 2.0 has a lot of instrumentation features for the developer. You’ve already looked at the abilityto run traces and logging and learned that there are performance counters that you can use, but arebeyond the scope of this book. However, there is another new feature that is of great interest and of particular use after your application has been deployed, and that is the introduction of the<healthMonitoring> element.
The <healthMonitoring> element can be used at system or application level and allows you to monitorwhen specific events have occurred and write notifications of these events to either an event log, a SQLServer database, or even to e-mail the administrator. Events that might be of interest could be a failedlogin, or an error occurring in the application. Besides logging events the <healthMonitoring> elementallows you to test the “health” of the system via a heartbeat attribute, which sets up an event that isgenerated at a predefined interval — if you can “hear” the heartbeat, you know your application is working fine. If you don’t receive this heartbeat, you know there might well be problems.
To enable health monitoring, all you need to do is place the <healthMonitoring> element in yourWeb.config file and set the enabled attribute to true. Health monitoring is handled by three elementswithin <healthMonitoring>, which have a close relationship with each other:
❑ The <providers> element specifies where you want to send the information you have collected;this can be an event log or a database.
❑ The <rules> element specifies the name of the provider you want to write your information toand the event name you want to instrument.
❑ The <eventMappings> element specifies a name of event you want to monitor, and maps it toan actual event or set of events. The settings of this element must correspond to a valid eventtype. A list of valid types is contained within the <eventMappings> element in the Web.config.comments file.
It just takes a couple of attribute changes to alter an application that writes to the event log for failedlogins, to one that e-mails the administrator with details.
616
Chapter 16
19_588508 ch16.qxd 10/10/05 6:34 PM Page 616

Monitoring for EventsYou can test for a range of events using the <healthMonitoring> element. These are as follows:
Event Name Description of Event
WebHeartbeatEvent A regular event that provides statistics about theapplication or system.
WebManagementEvent A base class event for all events that carry application and worker process information.
WebApplicationLifetimeEvent An event generated by every significant event thatoccurs in an application’s lifetime, such as startup,restart, and shutdown.
WebRequestEvent An event raised with every web request; containsinformation about the request and the thread onwhich it’s executing.
WebBaseErrorEvent A base class event for all health monitoring errorevents.
WebErrorEvent An event generated when there are problems withconfiguration or application code.
WebRequestErrorEvent An event raised when an error occurs during aweb request. This ignores common types of errorsuch HTTP 404, and focuses on things like unhandled exceptions.
WebFailureAuditEvent An event generated upon the failure of a security-related event, such as a file authorization, a URLauthorization, or a login authentication.
WebSuccessAuditEvent An event generated upon the success of a security-related event, such as a file authorization,a URL authorization, or a login authentication.
WebAuthenticationFailureAuditEvent An event generated upon an unsuccessful loginauthentication.
WebAuthenticationSuccessAuditEvent An event generated upon a successful loginauthentication.
WebAuditEvent A base class for all audit events, both authentication and authorization.
WebViewStateFailureAuditEvent An event that is generated on view state failure.The failure may indicate an attempt to tamper withthe view state, or its reuse from another machinewith a different key.
617
Deployment, Builds, and Finishing Up
19_588508 ch16.qxd 10/10/05 6:34 PM Page 617

There is also a broad range of providers (sources) to which you can write your event information. Thesecan all be found in the System.Web.Management namespace, and are detailed in the following table:
Provider Name What the Provider Holds
MailWebEventProvider Writes to an e-mail.
SimpleMailWebEventProvider Writes to a simplified e-mail.
TemplatedMailWebEventProvider Writes to a templated e-mail.
TraceWebEventProvider Writes to a trace.
EventLogWebEventProvider Writes to the Event Log.(the default provider)
SqlWebEventProvider Writes to a SQL Server database.
Which Events Are You Interested In?So you have a list of events, and a list of possible places where you can write the events about how theywere monitored. However, at the moment this is information overkill; you need to get back to basics andanswer a simple question: Which events are you interested in monitoring?
Unfortunately, the answer is open-ended. This depends on what you want to monitor your applicationfor. A lot of the events in your list generate huge numbers of events, both when working correctly, orwhen the application isn’t.
A good place to start would be security. If you aren’t regularly changing code in your application, thenmost likely the greatest threat to your application’s longevity and well-being is someone trying to hack.A key to finding good security events to instrument for is to locate which events under normal circum-stances shouldn’t be generating a large number, but in the event of an attack or suspicious data beingprovided, will generate a lot of events. When your system is being attacked, you are likely to see a number of such events, which in turn can help act as an early warning system.
The key events that monitor the security-related aspects of the application might be as follows:
❑ WebErrorEvent
❑ WebAuthenticationFailureAuditEvent
❑ WebRequestErrorEvent
❑ WebViewStateFailureAuditEvent
The WebError event should be monitored because any code failure is suspicious; theWebAuthenticationFailureAuditEvent should be monitored because any suspicious login activityshould be carefully monitored. The last two might have failures if a hacker is trying to interceptresponses from the server and forwarding his or her own fraudulent page in response. By default, theWebErrorEvent and WebAuthenticationFailureAuditEvent are turned on. This means that in thecase of any failure they are automatically logged to the Event Log. So if such an error (for example, adivision by zero error) occurs in your application you would see what’s shown in Figure 16-12 in yourEvent Log under Application, under the source ASP.NET version.
618
Chapter 16
19_588508 ch16.qxd 10/10/05 6:34 PM Page 618

Figure 16-12
Because failed logins are written to the event log by default, take a look at how you could also log success-ful logins to your application in the Event Log. In this Try It Out you track when a user logs in to WroxUnited successfully, and you write details about it to the Event Log.
Try It Out Adding Health Monitoring to Wrox United1. Open Web.config and in <system.web>, add a <healthMonitoring>element as follows:
<healthMonitoring enabled=”true”></healthMonitoring>
2. Create another child element inside <healthMonitoring> called <rules>:
<rules><add provider=”EventLogProvider” name=”Success Audits” eventName=” LoginSuccess” /></rules>
3. Create another child element inside <healthMonitoring> underneath <rules> called<eventMappings>:
<eventMappings><add name=”LoginSuccess”type=”System.Web.Management.WebAuthenticationSuccessAuditEvent,System.Web,Version=2.0.0.0,Culture=neutral,PublicKeyToken=b03f5f7f11d50a3a”startEventCode=”0” endEventCode=”2147483647”/> </eventMappings>
4. Create a <providers> child element in the <healthMonitoring> element. The provider specifieswhere you want the event information to be sent; in this case you are specifying the Event Log:
619
Deployment, Builds, and Finishing Up
19_588508 ch16.qxd 10/10/05 6:34 PM Page 619

<providers><add name=”EventLogProvider” type=”System.Web.Management.EventLogWebEventProvider,System.Web,Version=2.0.0.0,Culture=neutral,PublicKeyToken=b03f5f7f11d50a3a” /></providers>
5. Run the application and login as Dave, password dave@123.
6. Go to the Control Panel and select Administrative Tools ➪ Event Log, and you’ll see the screenshown in Figure 16-13.
Figure 16-13
How It WorksThe <health Monitoring> element in the Web.config file does all of the work for you. You start byenabling <healthMonitoring> and then placing three elements inside it to make it work.
The <rules> element is used to map an event onto a provider. The <rules> element has three compulsoryattributes: provider, name, and eventName. The provider attribute matches the name attribute specifiedin the <providers> element. You specify the Event Log in this element and a name for your rule, “SuccessAudits.”
<rules><add provider=”EventLogProvider” name=”Success Audits” eventName=”LoginSuccess” /></rules>
The <eventMappings> element specifies a user-friendly name for the event and the specific type of theevent you want to monitor. The type has to contain the system assembly details as well as informationabout that assembly such as the Version number, Culture, and PublicKeyToken:
620
Chapter 16
19_588508 ch16.qxd 10/10/05 6:34 PM Page 620

<eventMappings><add name=”LoginSuccess”type=”System.Web.Management.WebAuthenticationSuccessAuditEvent,System.Web,Version=2.0.0.0,Culture=neutral,PublicKeyToken=b03f5f7f11d50a3a” startEventCode=”0” endEventCode=”2147483647”/> </eventMappings>
The <providers> element specifies which source to write the error information to, such as Event Log orSQL Server database. Providers always have two compulsory attributes: name and type. The<provider> must use a name attribute corresponding with a name specified in <eventMappings>.Providers may have other compulsory attributes, but these will vary depending on the type of provider.The EventLogProvider only requires the name and type attributes:
<providers><add name=”EventLogProvider” type=”System.Web.Management.EventLogWebEventProvider,System.Web,Version=2.0.0.0,Culture=neutral,PublicKeyToken=b03f5f7f11d50a3a” /></providers>
If you scroll down the Event Log entry you will see a whole stack of useful information about the login.This information includes the event message, the time the error occurred, the location of the error, theerror message, the user’s IP address, whether or not they were authenticated, and much more.
Mailing an AdministratorWrox United now writes to an Event Log, but this is only of use if the administrator is on hand to checkthe Event Log. A more proactive approach might involve e-mailing the administrator each time the monitored event takes place. Doing this requires only minimal alteration of the <healthMonitoring>element. You only need to change the rules of which provider you are indicating and the provider itself,and also add a SMTP section to the web.config file (if there isn’t an existing one). You can change thedetails of the <rules> element and the <providers> element and add an SMTP section very simply.
Please note that this Try It Out also requires a working SMTP server. Only if you have IIS installed withthe SMTP service (done via the Add or Remove Programs section of Control Panel) will you be able todo this.
Try It Out Mailing the Administrator1. Open Web.config and alter the <rules> element so that it now reads as follows:
<add provider=”EmailProvider” name=”My Failure Audit” eventName=”Failure Audits” />
2. Go to the <providers> element and change it so that it now reads as follows:
<add name=”EmailProvider” type=”System.Web.Management.SimpleMailWebEventProvider”from=”[email protected]” to=”[email protected]”subjectPrefix=”Failed Login Attempt:” buffer=”true” bufferMode=”Notification” />
Replace [email protected] with your own SMTP server’s domain name. If yourmachine is TESTONE, replace it with [email protected].
621
Deployment, Builds, and Finishing Up
19_588508 ch16.qxd 10/10/05 6:34 PM Page 621

3. You’ll also need to add a section to web.config to configure the SMTP section. An example settingwould look like this, of course you’d need to substitute in your own mail server’s settings:
4. To send an email successfully, you might also have to enable relaying on IIS. To do this open theInternet Information Services management console in the Administrative Tools window in theControl Panel. Set the properties for the Default SMTP Virtual Server as follows, on the Accesstab, click Relay. Select Only the list below and then click Add and then under IP address type127.0.0.1 and click OK. Click Apply, click OK, and then exit the Internet Information Servicesmanagement console.
<system.net><mailSettings>
<!-- these settings define the mail server settingsfrom: the user name from which the email is sent - this is the application that is sending the messagehost: the name of your mail serveruserName: the name the application will use to log into the mail serverpassword: the password for the above user name
--><smtp from=”[email protected]”>
<network host=”your-mail-server-name”userName=”your-user-name”password=”your-password” />
</smtp> </mailSettings>
</system.net>
5. Run the application and wait. You should receive an e-mail within the minute.
How It WorksInstead of placing something in the Event Log, you are now e-mailed the details that you previouslyviewed in the Application section of the Event Log. To do this you changed the rules and provider elements to specify a different provider.
The health monitoring features of ASP.NET 2.0 are a real godsend for those of us trying to maintain anapplication and for either tracking down security breaches or hard-to-find bugs.
ScalabilityThe last scenario you might have to consider is what happens if the web site takes off. What happens ifinstead of the anticipated hundreds or thousands, you get millions of visitors? On one level this mighthit the performance of your application, it might exceed limits within your application, and it also mightexceed the limits of your hardware.
For the former you should always consider when you create arrays and databases not to impose smalllimits on them. For the latter you might end up having to move your site onto a web farm (a collection ofservers, any one of which can receive a request and deal with it). However, when creating your first siteyou’re unlikely to have to worry about these considerations, but it never hurts to make sure.
622
Chapter 16
19_588508 ch16.qxd 10/10/05 6:34 PM Page 622

Where To Now?Perhaps the most difficult question to answer in this entire book is what to do next. You’ve built anapplication, and if you’ve managed to do the exercises as well you will have a fairly good grounding inASP.NET 2.0 already, but probably not one that will let you walk into a well-paid job, so how can youimprove on it? If you follow some philosophies you can find yourself signed up for thousand-dollarcourses, or with a booklist the size of a wardrobe next, but while possibly helpful I don’t think these areessential or advised courses of action.
I’m often asked by readers what is the most important part of becoming a developer or programmer,and the answer I give is hands-on experience. You read about coding and coding techniques until you’reblue in the face but until you’re faced with a problem that you have to solve, you can’t really get a feelfor coding. I think the first tentative steps on most coders’ route are taking an existing application andmodifying it. Improving it. Adding to it. That’s what you should start now. Go back to the Wrox Unitedapplication and start amending it. Think how you could improve it. Would you change the design, theway it works? Add some news articles, some new players, some new graphics, and get comfortable withthe way it works. Then go away and think of an application that would be useful to you, but not tooambitious, and start creating that. If you can’t think of anything then e-mail your friends to see if they’vegot anything that needs doing.
Developing is a very proactive job. The idea of a coder sitting in a room with no contact to the outsideworld is an outdated one. If your code is being used by thousands of people, you should at least be talk-ing to a fraction of them. If you talk to people, they will undoubtedly have a million ideas you’d neverhave considered.
ReferencesA lot of a developer’s time will be spent on the Web looking up new concepts or error messages. Here’s alist of some good places to start, if you get stuck:
❑ http://p2p.wrox.com: The Wrox forums and first place to ask with trouble on the book.
❑ http://www.developerfusion.co.uk: The UK developer community for ASP.NET.
❑ http://www.asp.net: The official Microsoft ASP.NET web site.
❑ http://msdn.microsoft.com/asp.net/: The MSDN reference for all things ASP.NET-related.
❑ http://www.15seconds.com: Great magazine-like site with loads of free articles on ASP.NET 2.0.
❑ http://beta.asp.net: Microsoft’s coverage of the latest version of ASP.NET.
❑ http://www.dotnet247.com: A compendium, online cross-reference of all the Usenet news-groups, including all of the ASP.NET 2.0 ones.
❑ http://msdn.microsoft.com/coding4fun/default.aspx: MSDN’s site on fun codingtopics.
623
Deployment, Builds, and Finishing Up
19_588508 ch16.qxd 10/10/05 6:34 PM Page 623

SummaryThis hasn’t really been a chapter about a particular subject, but rather an extended wrapping up andwelcome to the real world. To those ends, this chapter discussed the following:
❑ How you can go about deploying the Wrox United site with both Visual Web Developer and thecommand-line prompt tool.
❑ The importance of testing your application once it has been deployed and getting your potentialusers or your customer to test it as well.
❑ Maintenance, and introduced very briefly ASP.NET 2.0’s new instrumenting features, the<healthMonitoring> element, and how you might go about using it.
❑ A quick recheck of the Wrox United application and what you learned from it.
❑ Some suggestions about what you should do next after finishing this book.
You’re now ready to start developing without our help. Please begin.
Exercises1. You are now developer and maintainer of the Wrox United web site. What else would you add
to the Wrox United site? Make a list of possible add-ons, and prioritize them with the simplestto do first. Implement some of these add-ons. Just to get you thinking, you could add a facilityto post pictures or video clips from Wrox United matches, or you could add player biographies.The possibilities are limitless here, so be creative!
624
Chapter 16
19_588508 ch16.qxd 10/10/05 6:34 PM Page 624

AExercise Answers
Chapter 1
Exercise 1
Explain the differences among the .NET 2.0 Framework, ASP.NET 2.0, VWD, and IIS.
Solution
The .NET 2.0 Framework is a very broad set of code (contained in classes) that is used by manyMicrosoft products, including servers, database managers, and web servers.
ASP.NET 2.0 is a subset of the .NET 2.0 Framework that holds the classes used to create dynamicweb pages.
VWD is a tool used to create ASP.NET 2.0 web pages.
IIS is a web server that can execute the ASP.NET 2.0 code to create dynamic web pages.
Exercise 2
List some differences between Cassini and IIS.
Solution
IIS is a powerful web server designed to support publicly deployed sites. IIS scales to heavy loads,multiple servers, and multi-processor machines. It has a robust security model. The user of IIS is aspecial account named ASPNET. IIS does not expect pages to be in development while it is servingthem, so it does not lock pages.
Cassini is a lightweight web server designed to give developers a quick and easy way to serve apage on their development machine. Cassini cannot handle more than one of visitors at once. Theuser of Cassini is whoever is logged in to Windows at the time, and thus the security model isweak. Cassini locks a page in VWD while it is being served.
20_588508 appa.qxd 10/10/05 6:27 PM Page 625

Exercise 3
When you drag the title bar of the toolbar it will only go to certain locations and certain sizes. How canyou put the title bar where you want it?
Solution
Select the toolbar and choose Menu ➪ Windows ➪ Floating. You can now place the toolbar in the sizeand location you desire.
Exercise 4
How can you copy a .jpg file in C:\MyPhotos into your site for display on a page?
Solution
From VWD Solution Explorer you can right-click the receiving folder and then select Add Existing Item.Navigate to C:\Photos and select the photo of interest. Click OK.
A less powerful technique is to start from Windows Explorer and you can copy the .jpg file from its original folder to C:\Website\MyWebName. However, the file will be not immediately visible in VWDSolution Explorer.
Exercise 5
You want to add a subfolder to your site, but folder is not one of the items listed in Add Items. Why?
Solution
Adding a folder has its own entry in the menu that appears by right-clicking a folder in the SolutionExplorer.
Exercise 6
Microsoft has written extensive code to make it easier for programmers to create web pages. How does aprogrammer actually use that code?
Solution
The code is available in server-side controls. These are tags that look like HTML but start with <asp: ... >.Within the control you can set properties to determine the appearance and behavior of the control.
Exercise 7
Why are there no tools in the General panel of the Toolbox?
Solution
The General panel is a place for you to place snippets of code that you copy from a page and expect touse again later. It starts out empty.
626
Appendix A
20_588508 appa.qxd 10/10/05 6:27 PM Page 626

Chapter 2
Exercise 1
Describe the functional difference between the Web.config file and Global.asax.
Solution
Web.config contains values (settings), whereas Global.asax contains code.
Exercise 2
What files discussed in this chapter are in XML format?
Solution
Web.config and webSite.map.
Exercise 3
Take a look at the code below for a Content page. Why does it lack directives and tags?
<!DOCTYPE HTML PUBLIC “-//W3C//DTD XHTML 1.0 Transitional//EN”“http://www.w3.org/TR/xhtml1/DTD/xhtml1-transitional.dtd”><html xmlns=”http://www.w3.org/1999/xhtml”><head ></head>
Solution
This code lacks directives and tags because those are supplied by the Master page.
Exercise 4
What values must match between a set of Master and Content pages?
Solution
The Content page’s first line directive of MasterPageFile must match the name of the master file.
The value of xxx in the Content page’s <asp:content ... ContentPlaceHolder ID=”xxx”> mustmatch the ID of the Master page’s <asp:ContentPlaceHolder ID=”xxx”>.
Chapter 3
Exercise 1
Practice using the drag-and-drop functionality of VWD to put together a simple web page that displaysthe following information:
❑ The WroxUnited Logo (available for free download from www.wrox.com— or just use any smallimage of your choice).
627
Exercise Answers
20_588508 appa.qxd 10/10/05 6:27 PM Page 627

❑ The names of the players and some information about each of them, arranged in a table. Refer toFigure 3-44 for visual reference.
Solution
The finished page should look like Figure A-1 when it is run.
Figure A-1
The HTML that generates this page will vary according to how you set up your table, but it should besimilar to the following code:
<html xmlns=”http://www.w3.org/1999/xhtml” ><head runat=”server”>
<title>Untitled Page</title></head><body>
<form id=”form1” runat=”server”><img src=”badge.gif” /><br />This is my fan site for the Wrox United football team! I’ve met a few of the team- here’s my notes from my meetings:<br /><br /><table width=”600” cols=”2”>
<tr><td style=”width: 150px”>
Player</td><td style=”width: 400px”>
Notes</td></tr>
628
Appendix A
20_588508 appa.qxd 10/10/05 6:27 PM Page 628

<tr><td style=”width: 150px”>
Chris Hart</td><td style=”width: 400px”>
Signed my book!</td></tr><tr>
<td style=”width: 150px”>Chris Ullman</td>
<td style=”width: 400px”>Signed my football!</td>
</tr></table>
</form></body></html>
Exercise 2
Head back to Wrox United and go to the Master page. Try deleting the Menu control and replacing itwith a TreeView control. Bind that control to the siteData data source, and bingo — you should see afully populated tree of items, both in Design View (refer to Figure 3-45) and when you run the page(refer to Figure 3-43).
Solution
Changing the Menu control to a TreeView control is a swift process, and you can see the results in Figure A-2.
Figure A-2
Once you have a siteMap data source, it’s simple to plug in compatible controls and change the func-tionality of the site with minimal effort.
629
Exercise Answers
20_588508 appa.qxd 10/10/05 6:28 PM Page 629

Chapter 4
Exercise 1
Change the configuration of your Chapter 4 web site to allow anonymous access, but to deny access toone specific user account.
Solution
Run through the Security wizard for the site and change the permissions as described, or modify theWeb.config file. If you are successful, you will have code similar to the following in your Web.configfile:
<roleManager enabled=”true” /><authorization>
<allow users=”?” /><deny users=”chrishart” />
</authorization>
Exercise 2
Add a subfolder to the Chapter 4 web site called Admin. Within this folder, add a page calledMainAdmin.aspx with a LoginName control on it and any other controls you might want. Change theaccess permissions for that specific folder so that only members of the Administrators group can viewthe page.
Solution
The MainAdmin.aspx page should have code similar to the following:
<form id=”form1” runat=”server”><div>This is the administration page for the Chapter 4 site.<br /><asp:LoginView ID=”LoginView1” Runat=”server”>
<LoggedInTemplate>You are logged in as <asp:LoginName ID=”LoginName1” Runat=”server” /> <br />
</LoggedInTemplate><AnonymousTemplate>
You are currently anonymous.</AnonymousTemplate>
</asp:LoginView><asp:LoginStatus ID=”LoginStatus1” Runat=”server” /></div>
</form>
And the Web.config file for the Admin folder should have the following code:
<?xml version=”1.0” encoding=”utf-8”?><configuration>
<system.web><authorization>
<allow roles=”administrators” />
630
Appendix A
20_588508 appa.qxd 10/10/05 6:28 PM Page 630

<deny users=”*” /></authorization>
</system.web></configuration>
Chapter 5
Exercise 1
You have an ASP.NET Label control on a page. The label has a font-italic=”true” attribute, and aCssClass=”maintext” attribute:
<asp:label id=”myLabel” CssClass=”maintext” font-italic=”true” text=”This is a label”></asp:label>
The page has an associated CSS style sheet (not associated with a theme) that defines a .maintext styleclass has the following attributes:
.maintext{
color: Navy;font-family: Verdana;font-weight: Bold;font-style: normal;
}
How will the label appear when it is rendered?
Solution
You should see some text rendered in bold, blue Verdana, and in italic, as shown in Figure A-3.
Figure A-3
The font-style attribute in the CSS style sheet is overridden by the element-specific style in the page.
631
Exercise Answers
20_588508 appa.qxd 10/10/05 6:28 PM Page 631

Exercise 2
You now add a Theme=”ExerciseTheme” to the preceding page. You place the CSS style sheet from theprevious exercise within the ExerciseTheme theme folder. How will the label control appear now?
Solution
The Theme attribute specifies that the page should now inherit all styles within the ExerciseThemetheme folder, but the style attribute added to the element remains, and the font appears in italic.
Exercise 3
You define a skin for all labels within the ExerciseTheme theme folder and specify the followingattributes:
<asp:Label CssClass=”maintext” runat=”server” font-italic=”false”></asp:Label>
How will the label appear now?
SolutionThis time around, the Label control’s italic style will override the page’s style, so you will see whatappears in Figure A-4.
Figure A-4
Chapter 6
Exercise 1
In the Chapter06 project create a new Web Form called Lists.aspx and add a ListBox control to thepage, and add three list items with values of One, Two, and Three. Add a Label control and a Buttoncontrol to the page. In the Click event of the Button, display the selected value of the ListBox in theLabel.
Solution
The controls you add to the page should be:
632
Appendix A
20_588508 appa.qxd 10/10/05 6:28 PM Page 632

<asp:ListBox ID=”ListBox1” runat=”server”><asp:ListItem Text=”One” /><asp:ListItem Text=”Two” /><asp:ListItem Text=”Two” />
</asp:ListBox><br /><asp:Button ID=”Button1” runat=”server” Text=”Button” /><asp:Label ID=”Label1” runat=”server” Text=”Label” />
For the Click event of the button you should have:
Protected Sub Button1_Click(ByVal sender As Object, _ByVal e As System.EventArgs) Handlers Butto1.Click
Label1.Text = ListBox1.SelectedValueEnd Sub
This event procedure relies on the fact that there is a property on the ListBox that identifies what thevalue is for the selected item — the SelectedValue property. In fact there is also a SelectedTextvalue, because a ListBox has both a Text and a Value property; the Text is what’s displayed, whereasthe Value is stored in the page and not shown to the user. This is useful for values that come from adatabase, where the Value would be the ID of the item and the Text would be the description. Thesame is true for a DropDownList control.
Exercise 2
Modify Exercise 1 so that just selecting an item in the list posts back to the server (meaning you don’t needto click the button). You’ll need to add an event procedure to the ListBox, and in that event procedure youcan use the same code from the Click event of the Button to display the selected value in the Label. Hint:The terms postback and automatic might be useful in your hunt for correct properties.
Solution
To allow the ListBox to post back automatically, you set the AutoPostBack property to True. Nowwhen a list item is selected, the postback will happen right away, rather than waiting for a button to beclicked. On its own, this just posts back, so you also need an event procedure for the ListBox, and forthis you use the SelectedIndexChanged event, which is raised when the selected item changes. Theevent is only raised when the selected item changes, so repeated clicking of the same item will not causeunnecessary postbacks. The event procedure should be
Protected Sub ListBox1_SelectedIndexChanged(ByVal sender As Object, _ByVal e As System.EventArgs) Handlers ListBox1.SelectedIndexChanged
Label1.Text = ListBox1.SelectedValueEnd Sub
The advantage of this event over a postback from a button event is that you can have your page changedepending upon the user selection. For example, you could have a grid filter the data shown dependingon the value in a list box.
Exercise 3
Modify the EditSquad.aspx example so that the GridView is refreshed when a new player is added tothe squad. The technique is similar to the code you already have, but you’ll need to use a different event.Remember that you can use the drop-down lists in the code view to find the events.
633
Exercise Answers
20_588508 appa.qxd 10/10/05 6:28 PM Page 633

Solution
To refresh the GridView when a new player is added to the squad, you need to use the Inserted event.Just as when the data for a SqlDataSource control is updated, the Updated event is raised, when a newrow is inserted, the Inserted event is raised. You can create this in exactly the same way as you did forthe Updated event, and use the same code in the event procedure.
The code for the Inserted event procedure is
Protected Sub DetailsDataSource_Updated(ByVal sender As Object, _ByVal e As System.Web.UI.WebControls.SqlDataSourceStatusEventArgs) _Handles DetailsDataSource.Inserted
GridView1.DataBindEnd Sub
Chapter 7
Exercise 1
Describe the general capabilities of data source and data-bound controls.
Solution
Data source controls connect to the source of data and enable communicating to the database the information for behaviors such as reading, editing, and deleting.
Data-bound controls render spaces on the page that interact with the user, either to display values or toaccept input for changes to the data.
Exercise 2
Which data-bound controls render data in tables?
Solution
GridView (one datum in each cell), DataList, and Repeater (all fields of one record in each cell).
Exercise 3
Compare and contrast the DetailsView and FormView controls.
Solution
Both present data in a tabular form with only one record displayed at a time. Both support reading andchanging values, as well as creating and deleting entire records. The DetailsView control has a built-indefault template, whereas FormView has no default template.
Exercise 4
Describe how a GridView control can limit its records to only those that match a player’s name selectedin a DropDownList of last names.
634
Appendix A
20_588508 appa.qxd 10/10/05 6:28 PM Page 634

Solution
The DropDownList control displays names in its Text property, and also holds the player’s ID numberin the Value property. The GridView control has a SelectCommand that contains a WHERE clause thatsets the ID equal to a parameter (prefaced by the @ sign). The GridView control also has a parameter tabcontaining a parameter that is filled with the value of the selected item of the DropDownList. SetAutoPostBack to TRUE in the DropDownList box so the following behavior is automatic. When a userchanges a selection in the DropDownList, ASP.NET 2.0 automatically places the value of that selectioninto the GridView control’s parameter tag, which means it will be employed in the SelectCommandWHERE clause. ASP.NET 2.0 will then cause the GridView control to create a new request for data usingthe new SelectCommand. The data returned will only have records that match the ID of the playerselected in the DropDownList.
Exercise 5
Which data source control is best suited for the Menu or SiteMapPath data-bound controls?
Solution
The SiteMapDataSource is best suited because it is optimized to read the XML file holding the sitedescription information.
Chapter 8
Exercise 1
Enabling the capability to write to a database requires changes to the properties of a data source control,a data-bound control, or both?
Solution
Both.
Exercise 2
Describe the difference between an asp:Parameter and an asp:ControlParameter.
Solution
An asp:Parameter holds the value that came from the record of the database. Anasp:ControlParameter holds a value that was entered by the user into a control.
Exercise 3
What problem does the DataKeyNames property solve?
Solution
Some fields hold values that uniquely identify them among all the records. When a user changes valuesin those fields there is a conundrum in that ASP.NET 2.0 needs the old values in order to find the recordand the new values for the writing. DataKeyNames are those fields for which ASP.NET 2.0 will hold bothoriginal and new values. When an update is made and a change is made to an ID field, ASP.NET 2.0 uses
635
Exercise Answers
20_588508 appa.qxd 10/10/05 6:28 PM Page 635

the new value for the SET part of the command (which writes) and the old value for the WHERE part ofthe command (which finds the one record to change).
Exercise 4
A page needs to delete the date of birth value from one record. Which command should be used?
Solution
Update. Delete would only be used to eliminate the entire record, not just one value in the record.
Exercise 5
What tags must be added to a page to allow a GridView to create new records?
Solution
This is a trick question because a GridView cannot perform inserts. But the GridView can have a buttonthat opens a DetailsView in Insert mode, which can create a new record.
Chapter 9
Exercise 1
Create a class and shared method (called DeliveryDate) to calculate delivery date given the date of anorder. All deliveries should be made within three days of the order.
SolutionPublic Class Orders
Public Shared Function DeliveryDate(OrderDate As DateTime) As DateTimeReturn OrderDate.AddDays(3)
End FunctionEnd Class
This simply uses the AddDays method of the DateTime data type to add the required number of days.
Exercise 2
Continuing from Exercise 1, modify the DeliveryDate method to take into account that deliveries donot happen on the weekend.
SolutionPublic Class Orders
Public Shared Function DeliveryDate(OrderDate As DateTime) As DateTime
Dim deliveryDay As DateTime = OrderDate.AddDays(3)
If deliveryDate.DayOfWeek = DayOfWeek.Saturday ThendeliveryDate = deliveryDate.AddDays(2)
ElseIf deliveryDate.DayOfWeek = DayOfWeek.Sunday ThendeliveryDate = deliveryDate.AddDays(2)
636
Appendix A
20_588508 appa.qxd 10/10/05 6:28 PM Page 636

End If
Return deliveryDayEnd Function
End Class
Here the delivery date is calculated and checked to see if it falls on a Saturday or Sunday, in which casethe delivery date is moved to the following Monday.
Exercise 3
Modify the DeliveryDate method to take into account that an order takes three working days to process. So orders falling on a Thursday will be delivered on the following Monday, and orders fromFriday will be delivered on the following Tuesday.
SolutionPublic Class Orders
Public Shared Function DeliveryDate(OrderDate As DateTime) As DateTime
Select Case OrderDate.DayOfWeekCase DayOfWeek.Monday, DayOfWeek.Tuesday, DayOfWeek.Wednesday
Return OrderDate.AddDays(3)Case DayOfWeek.Thursday, DayOfWeek.Friday, DayOfWeek.Saturday
Return OrderDate.AddDays(5)Case DayOfWeek.Sunday
Return OrderDate.AddDays(4)End Select
End FunctionEnd Class
This version of the method uses the Select Case statement to calculate different dates depending onthe day of week on which the order was placed.
Exercise 4
For each of the following Boolean expressions, say for what integer values of A each of them will evaluate to True and when they will evaluate to False:
a. NOT A=0
b. A > 0 OR A < 5
c. NOT A > 0 OR A < 5
d. A > 1 AND A < 5 OR A > 7 AND A < 10
e. A < 10 OR A > 12 AND NOT A > 20
637
Exercise Answers
20_588508 appa.qxd 10/10/05 6:28 PM Page 637

Solution
a. True for all integers except zero. Without the NOT, the answer would only be zero. When youadd the NOT, it reverses to be all numbers except zero.
b. True for all integers. The left side alone would be True for all integers greater than zero (onlyzero and negative integers would be false). The right side includes all integers that are less than5, including zero and negative integers. With the OR clause an integer has to be within one of thetwo expressions in order for the entire expression to be True. When you combine these two setsof answers you get all integers. (The integers 1 through 4 are included by both expressions.)
c. True for integers 5 and below. Integers 6 and above will evaluate to False. The issue here isprecedence between the NOT and OR operators. The NOT is only applied to the expression on theleft of the OR. Think of this problem as (NOT A > 0) OR (A < 5). On the left you have True forany numbers that are not greater than zero, so True is for zero and negative numbers. On theright you have True for any number that is less than 5. With the two sides of the OR combined,you have True for all negative numbers and zero and positive numbers up to 5. Numbersgreater than and including 6 are True for either side and thus resolve to False.
d. True for 2, 3, 4, 8, and 9 only. Like the previous problem, the issue is to establish the precedenceof the operators. Think of this as (A > 1 AND A < 5) OR (A > 7 AND A < 10). On the left of the ORyou can see that only integers 2, 3, and 4 would fit both criteria. On the right side of the OR thesituation is similar; only 8 and 9 meet both criteria. When you consider the OR you have to combine those two answer sets.
e. True for all integers 9 and below (including zero and negatives) and for 13 through 20 inclusive.False for 10, 11, 12, and all integers above (and inclusive of) 21. Think of this problem withsome parentheses. The OR is the last to be evaluated, so your parentheses are (A < 10) OR (A >12 AND NOT A > 20). First look at the right side of the OR. Integers must meet both tests whenthere is an AND clause, so that would be 13 through 20 are True. Now look at the left side of theOR. Any number less than 10 will be True. The final answer is the combination of those twoanswer sets.
Chapter 10
Exercise 1
Create a new web site and a new page called CodeBehind.aspx with a single label, but making surethat you don’t check the box marked Placed Code in a Separate File. Now create a code-behind file manually for that page that displays the content of the label.
Solution
Create a class called CodeBehind.cs. Add the following line of code to the CodeBehind.aspx:
<@Page CodeFile=”CodeBehind.cs” Class=”CodeBehind” %>
In the CodeBehind.aspx file, add the following within the Page_Load event:
Label1.Text = “Hello World”
638
Appendix A
20_588508 appa.qxd 10/10/05 6:28 PM Page 638

Exercise 2
How would you go about adding an image to accompany each news item? Note that it shouldn’t display if there is no news image present for that article.
Solution
Add the following to newsusercontrol.ascx:
<span class=”newsContent”><asp:Image style=”float:right” ID=”NewsImage” Runat=”server”
ImageUrl=’<%# Eval(“PictureURL”, “~/NewsImages/{0}”) %>’ /><%#Eval(“Description”) %>
</span>
Add the following event handler that is called when an item of news is bound:
Sub NewsItem_DataBound(ByVal sender As Object, ByVal e As System.Web.UI.WebControls.RepeaterItemEventArgs)
Dim row As DataRowViewDim img As ImageIf e.Item.ItemType = ListItemType.Item Or e.Item.ItemType =
ListItemType.AlternatingItem Then
row = CType(e.Item.DataItem, DataRowView)
If row(“PictureUrl”).ToString().Trim() = “” Thenimg = CType(e.Item.FindControl(“NewsImage”), Image)img.Visible = False
End IfEnd If
End Sub
Chapter 11
Exercise 1
Create a new user account called Admin, and make this user a member of all of the groups. Log in to theWrox United site as Admin and test to see whether you can access all of the different pages in both thefan club and the administration section.
Solution
Launch the ASP.NET Web Site Administration Tool and configure the Admin user as shown in Figure A-5.
639
Exercise Answers
20_588508 appa.qxd 10/10/05 6:28 PM Page 639

Figure A-5
Exercise 2
Remove the Admin user from any role other than the Administrator role and test the site again. Ensurethat you can access the following pages:
❑ Admin.aspx
❑ EditNews.aspx
❑ UpdateProducts.aspx
640
Appendix A
20_588508 appa.qxd 10/10/05 6:28 PM Page 640

Solution
The Admin user account should now have the configuration shown in Figure A-6.
Figure A-6
And if you try to access the Wrox United site, you’ll see the links in Figure A-7 within theAdministration section.
641
Exercise Answers
20_588508 appa.qxd 10/10/05 6:28 PM Page 641

Figure A-7
Not only can you see these links, but clicking these links will take you to the appropriate pages.
Exercise 3
The Admin user has had a request by a reporter out in the field — he’s uploaded a score for a match, butthe score has just changed! Unfortunately, the reporter’s laptop has run out of battery, so he’s asked theAdmin to update the score for him. Make sure that the Admin user can update the score of a match.
Solution
You have two options. First, you could add the Admin user to the Reporters role, thereby enabling theaccess to the page as desired. The alternative is to enable access to the UpdateScore.aspx page on thesite to all site Administrators by making the following change to the Web.config file within the root ofthe Admin folder:
<location path=”UpdateScore.aspx”><system.web>
<authorization><allow roles=”Administrator, Reporter” />
</authorization></system.web>
</location>
642
Appendix A
20_588508 appa.qxd 10/10/05 6:28 PM Page 642

Whichever method you decide on, the Admin user needs to be able to access the UpdateScore.aspxpage. If you are successful, you will see Figure A-8.
Figure A-8
Exercise 4
Add a field to the user profile for the Wrox United application called DateOfBirth. Give this property adata type of System.DateTime. Add an input field to the FanClub.aspx page so that users can updatetheir date of birth. Note that you will need to convert the value entered in a text box to a DateTime valuewhen you save the data — you might want to try the DateTime.Parse() function for this purpose. Toretrieve the data, use the Profile.DateOfBirth.ToShortDateString() function.
Solution
1. First, add the following highlighted line to Web.config:
<profile enabled=”true”><properties>
<add name=”MemberName”/><add name=”Name”/><add name=”Address”/><add name=”City”/>
643
Exercise Answers
20_588508 appa.qxd 10/10/05 6:28 PM Page 643

<add name=”County”/><add name=”PostCode”/><add name=”Country”/><add name=”Mailings” type=”System.Boolean”/><add name=”Email”/><add name=”DateOfBirth” type=”System.DateTime”/><add name=”Theme”/><add name=”Cart” serializeAs=”Binary” type=”Wrox.Commerce.ShoppingCart”
allowAnonymous=”true”/></properties>
</profile>
2. Next, modify FanClub.aspx to include a text box for entering and displaying the date of birth:
<span class=”boxFloat”>Name:<br />Address:<br /><br /><br /><br />City:<br />County:<br />Postcode:<br />Country:<br />Subscribe to email updates:<br />Email:<br />Date of Birth: <br />Membership Alias:<br />Theme:</span><span>
<asp:TextBox ID=”txtName” runat=”server” Columns=”30” /><br />...<asp:TextBox ID=”txtEmail” runat=”server” /><br /><asp:TextBox ID=”txtDoB” runat=”server” /><br /><asp:TextBox ID=”txtAlias” runat=”server” /><br />...
</span>
3. The code file for the FanClub.aspx page also needs some changes. First, modify thebtnSaveChanges_Click event handler code:
Sub btnSaveChanges_Click(ByVal sender As Object, ByVal e As System.EventArgs)
Profile.Name = CType(FCLoginView.FindControl(“txtName”), TextBox).TextProfile.Address = CType(FCLoginView.FindControl(“txtAddress”), TextBox).TextProfile.City = CType(FCLoginView.FindControl(“txtCity”), TextBox).TextProfile.County = CType(FCLoginView.FindControl(“txtCounty”), TextBox).Text
644
Appendix A
20_588508 appa.qxd 10/10/05 6:28 PM Page 644

Profile.PostCode = CType(FCLoginView.FindControl(“txtPostCode”), TextBox).TextProfile.Country = CType(FCLoginView.FindControl(“txtCountry”), TextBox).TextProfile.Mailings = CType(FCLoginView.FindControl(“chkMailing”), CheckBox).CheckedProfile.Email = CType(FCLoginView.FindControl(“txtEmail”), TextBox).TextProfile.MemberName = CType(FCLoginView.FindControl(“txtAlias”), TextBox).TextProfile.Theme = CType(FCLoginView.FindControl(“ThemeList”),
DropDownList).SelectedValueDim DoB As TextBox = CType(FCLoginView.FindControl(“txtDoB”), TextBox)If DoB.Text <> “” Then
Profile.DateOfBirth = DateTime.Parse(DoB.Text)End If
Server.Transfer(SiteMap.CurrentNode.Url)
End Sub
Note that you need to check that the text box is not empty (if you try to save with an empty textbox, you’ll see an error page due to an exception).
4. Finally, add the following code to the DisplayProfileProperties() method:
Private Sub DisplayProfileProperties()Dim NameBox As TextBox = CType(FCLoginView.FindControl(“txtName”), TextBox)If Not (NameBox Is Nothing) Then
CType(FCLoginView.FindControl(“txtName”), TextBox).Text = Profile.NameCType(FCLoginView.FindControl(“txtAddress”), TextBox).Text = Profile.AddressCType(FCLoginView.FindControl(“txtCity”), TextBox).Text = Profile.CityCType(FCLoginView.FindControl(“txtCounty”), TextBox).Text = Profile.CountyCType(FCLoginView.FindControl(“txtPostCode”), TextBox).Text = Profile.PostCodeCType(FCLoginView.FindControl(“txtCountry”), TextBox).Text = Profile.CountryCType(FCLoginView.FindControl(“chkMailing”), CheckBox).Checked = _
Profile.MailingsCType(FCLoginView.FindControl(“txtEmail”), TextBox).Text = Profile.EmailCType(FCLoginView.FindControl(“txtAlias”), TextBox).Text = Profile.MemberNameCType(FCLoginView.FindControl(“ThemeList”), DropDownList).SelectedValue = _
Profile.ThemeCType(FCLoginView.FindControl(“txtDoB”), TextBox).Text = _
Profile.DateOfBirth.ToShortDateString()End If
End Sub
This code will convert the DateTime value stored in the user’s profile into its string representation so that it can be displayed on the screen. Because users are unlikely to know theexact time they were born, you can ignore the time part of the date — hence why you’ve usedthe ToShortDateString() instead of ToString() method. Once finished, you can test it outon the user of your choice. In Figure A-9, I’ve used Alan the Admin.
645
Exercise Answers
20_588508 appa.qxd 10/10/05 6:28 PM Page 645

Figure A-9
Chapter 12
Exercise 1
What is the role of SOAP in web services?
Solution
SOAP is a framework for exchanging messages. Its role in web services is to parcel up function calls andparameters to enable you to call the web services remotely in a standardized way.
Exercise 2
Create a web service that retrieves a Wrox United score wherever they’ve scored more than one goal.
646
Appendix A
20_588508 appa.qxd 10/10/05 6:28 PM Page 646

Solution<WebMethod()> _Public Function Fixtures() As DataSet
Dim conn As New _SqlConnection(ConfigurationManager.ConnectionStrings(“WroxUnited”).ConnectionString)
Dim adapter As New SqlDataAdapter(“SELECT FixtureDate, Opponents, _FixtureType, GoalsFor, GoalsAgainst FROM Fixtures WHERE GoalsFor>1 ORDER BY _FixtureDate”, conn)
Dim ds As New DataSet()
adapter.Fill(ds, “Fixtures”)
Return ds
End Function
End Class
Exercise 3
Create a page that consumes the third-party weather forecast for Birmingham, United Kingdom. (Hint:You will also need to discover this service first.)
Solution
Add a Web Reference first via the Add Web Reference function and discover the service by typing theURL www.webservicex.net/globalweather.asmx.
Create a blank page and add a label called Weather Label to it. Then add the following code to the code-behind:
Partial Class WeatherPageInherits System.Web.UI.Page
Protected Sub Page_Load(ByVal sender As Object, ByVal e As EventArgs) Handles Me.Load
Dim wsConvert As New net.webservicex.www.GlobalWeatherwsConvert.Credentials = System.Net.CredentialCache.DefaultCredentialsWeatherLabel.Text = wsConvert.GetWeather(“Birmingham”, “United
Kingdom”).ToString()End Sub End Class
Chapter 13
Exercise 1
The member discount is something that is applied to the shopping cart as you add items to the cart.What do you need to add to the ShoppingCart object to make sure it can store a discount of 10% for fanclub members? You can assume that you can detect a fan club member with the property:HttpContext.Current.User.IsInRole(“FanClubMember”).
Hint: You will need to create a subtotal as well. 647
Exercise Answers
20_588508 appa.qxd 10/10/05 6:28 PM Page 647

Solution
You need to create a MemberDiscount property first:
Public Class ShoppingCart
Private Const MemberDiscountPercentage As Single = 0.1...
Public ReadOnly Property MemberDiscount() As DoubleGet
If HttpContext.Current.User.IsInRole(“FanClubMember”) ThenReturn SubTotal * MemberDiscountPercentage
ElseReturn 0
End IfEnd Get
End Property
Then you need to create a SubTotal property because between the total and the individual prices of theitems, you need to show how you arrive at your figures — otherwise, it will just look like your shoppingcart doesn’t add up correctly:
Public ReadOnly Property SubTotal() As DoubleGet
Dim t As DoubleIf _items Is Nothing Then
Return 0End IfFor Each Item As CartItem In _items
t += Item.LineTotalNextReturn t
End GetEnd Property
Then you’ll need in SourceView to add a Panel called DiscountPanel and add two labels, one calledSubTotalLabel and another called MemberDiscount and make sure both contain nothing to begin withand that both are visible.
You’ll also need to add some extra parameters to the checkout.aspx page called @subtotal and @memberdiscount and make sure they are added as part of the INSERT clause in this page as well.
Exercise 2
How can you display the member discount details on the Shopping Cart page so that only a fan clubmember will see them?
Solution
You need to check to see whether a user is in the role FanClubMember and only if they are do you thenapply the extra formatting to show the subtotal and the member discount items. Last, you display thediscount panel:
648
Appendix A
20_588508 appa.qxd 10/10/05 6:28 PM Page 648

If Context.User.IsInRole(“FanClubMember”) ThenSubTotalLabel.Text = String.Format(“Sub-Total:{0,35:C}”, Profile.Cart.SubTotal)MemberDiscount.Text = String.Format(“Member Discount:{0:C}”, Profile.Cart.MemberDiscount)DiscountPanel.Visible = True
End If
Chapter 14
Exercise 1
Convert the two shop pages, Shop.aspx and ShopItem.aspx, from using SQL statements to stored procedures.
Solution
For Shop.aspx you need to create the following stored procedure:
CREATE PROCEDCURE dbo.usp_ShopAS
SELECT ProductID, Name, Description, Price, PictureURLFROM ProductsORDER BY Name
Next, change the SelectCommand from the SQL to usp_Shop.
For ShopItem.aspx the stored procedure should be
CREATE PROCEDURE dbo.usp_ShopItem@ProductID int
ASSELECT *FROM ProductsWHERE ProductID = @ProductID
Next, change the SelectCommand from the SQL to usp_ShopItem.
Exercise 2
Add caching to the ShopItem.aspx page, so that the page is cached. Note that you need to take intoaccount that this page shows different products, so the cache needs to be varied by the product beingshown.
Solution
For this you simply add the OutputCache directive to the page, but because the product being shown isdefined in the querystring, you need to vary by the following querystring:
<%@ OutputCache Duration=”3600” VaryByParam=”ProductID” %>
649
Exercise Answers
20_588508 appa.qxd 10/10/05 6:28 PM Page 649

Chapter 15
Exercise 1
Add defensive coding to the GenerateThumbnail method of the ImageHandling class stored in theApp_Code directory.
Solution
Having learned what you have about defensive coding and exceptions, you might be tempted to changethe code for GenerateThumbnail to that shown in the chapter, where both defensive coding and exception handling were used. However, during the chapter you used the Application_Error event tocentrally log exceptions, so the explicit logging within GenerateThumbnail isn’t required. But you stillneed to code against a missing source file, so the code could be changed to the following:
Public Shared Sub GenerateThumbnail(ByVal SourceImagePath As String, _ByVal TargetImagePath As String)
If Not File.Exists(sourceImagePath) ThenReturn
End If
Dim newHeight As ShortDim newWidth As Short
Using sourceImage As Image = Image.FromFile(SourceImagePath)
newHeight = CShort(sourceImage.Height * 0.25)newWidth = CShort(sourceImage.Width * 0.25)
Dim cb As New Image.GetThumbnailImageAbort(AddressOf ThumbnailCallback)Using targetImage As Image = _
sourceImage.GetThumbnailImage(newWidth, newHeight, cb, IntPtr.Zero)targetImage.Save(TargetImagePath, Imaging.ImageFormat.Gif)
End UsingEnd Using
End Sub
This does assume that a failure generating the thumbnail isn’t critical, which may not be a correctassumption. Thumbnails are generated when pictures are uploaded to the site, pictures such as productsfor the shop, match photos, and so on. The site can run quite happily when these images are missing, soit isn’t critical, and any exception would be logged by the central code so the site administrators wouldknow about it.
Exercise 2
Add validation controls to the Checkout page, the part that accepts the delivery address. There is acheckbox to copy the address from the membership details of the user, but there is nothing to ensure thatall of the fields are filled in.
650
Appendix A
20_588508 appa.qxd 10/10/05 6:28 PM Page 650

Solution
To ensure data is entered into the address boxes, RequiredFieldValidator controls can be used. Youcan add a validator for each TextBox, adding it next to the field it validates:
<tr><td><asp:TextBox id=”txtName” runat=”server” /><asp:RequiredFieldValidator id=”rfv1” runat=”server”
ControlToValidate=”txtName” Text=”*”ErrorMessage=”You must enter a value for the delivery name” />
</td></tr>
You will also need a ValidationSummary, which can be put after the table containing the address fields:
</table><asp:ValidationSummary id=”vs” runat=”server” DisplayMode=”BulletList” />
</asp:WizardStep>
Exercise 3
Use the debugger. No really, use it.
Solution
This exercise is more important than you realize, because learning how to debug is critical, especially asa beginner. When learning, you tend to make more mistakes, or perhaps code less efficiently than you dowith years of experience. That’s only natural, and learning how to quickly track down bugs will makeyou a better developer, not only because you’ll be good at finding bugs, but also because in findingthose bugs you learn what the problem was and how to avoid it next time. So in finding bugs youbecome a better coder.
Chapter 16
Exercise 1
You are now developer and maintainer of the Wrox United web site. What else would you add to theWrox United site? Make a list of possible add-ons, and prioritize them with the simplest to do first.Implement some of these add-ons.
Solution
There is no hard and fast solution to this exercise, but to get some ideas for add-ons to your site, or tocompare notes with other developers and the authors of this book, head over to http://p2p.wrox.comand look for this book’s discussion board. Note that this forum is purely for this topic and not for cus-tomer feedback or book problems.
651
Exercise Answers
20_588508 appa.qxd 10/10/05 6:28 PM Page 651

20_588508 appa.qxd 10/10/05 6:28 PM Page 652

BSetup
The ASP.NET 2.0 runtime comes as part of the Visual Web Developer Express download. ASP hasundergone an evolution in terms of setup, each version being simpler (although often larger andlengthier) to install than the previous one. In classic ASP 2.0, ASP was separate even from the IIS webserver itself, both of which had to be downloaded and attached manually to IIS. By version 3.0 ofclassic ASP, ASP had been integrated with the web server. With ASP.NET 1.x you had to downloadthe .NET Framework separately to get ASP, and enable IIS, which by then was part of the operatingsystem. However, throughout each of these iterations you still had to download and install adatabase solution separately.
With ASP.NET 2.0, all four parts come together in one easy-to-install package — Visual WebDeveloper Express 2005. ASP.NET 2.0, web server, development tools, and database are allinstalled at the same time. The web server is a test-development server nicknamed Cassini (afterthe discoverer of the gaps and particular matter in the rings of Saturn) and can run without IIS,alongside IIS, or you can choose to use IIS in place of Cassini instead.
System RequirementsBefore you install VWD Express, you should check that your system meets the minimum requirements. We have taken the requirements from the Microsoft web site. They are as follows:
Processor❑ Minimum: 600 megahertz (MHz) Pentium processor.
❑ Recommended: 1 gigahertz (GHz) Pentium processor.
21_588508 appb.qxd 10/10/05 6:30 PM Page 653

Operating SystemVWD Express can be installed on any of the following systems:
❑ Microsoft Windows 2003 Server.
❑ Windows XP (Home Edition and Professional), Service Pack 2.
❑ Windows 2000 (Professional and Server), Service Pack 4.
RAM❑ Minimum: 128 megabytes (MB).
❑ Recommended: 256 MB.
Hard DiskUp to 1.3 GB of available space may be required.
CD or DVD DriveNot required.
Display❑ Minimum: 800×600 256 colors.
❑ Recommended: 1024×768 High Color — 16-bit.
MouseMicrosoft mouse or compatible pointing device.
As with plenty of Microsoft technologies, you’ll find that it may well work on other older setups; however, we cannot recommend this and we won’t answer questions about it either.
Visual Web Developer Express Installation1. Go to the following URL: http://lab.msdn.microsoft.com/express/vwd/.
2. Click the link to download from here, and you will see the page shown in Figure B-1 asking youwhether you want to run or save the file.
654
Appendix B
21_588508 appb.qxd 10/10/05 6:30 PM Page 654

Figure B-1
3. Click Run and you will see the dialog shown in Figure B-2 once the vwdsetup.exe file has fullydownloaded.
Figure B-2
4. Next, you will be asked whether you want to submit anonymous information about your setupexperiences (see Figure B-3). If you want to send information about your setup experience,check the box. If not, click Next.
If you’re using a dialup connection, please remain connected after you have downloaded this file, because you will still need an active connection later duringthe installation process.
655
Setup
21_588508 appb.qxd 10/10/05 6:30 PM Page 655

Figure B-3
5. In the next screen, shown in Figure B-4, you will see the end-user license agreement (EULA).You have to agree to this to continue, so check the box and click Next:
Figure B-4
656
Appendix B
21_588508 appb.qxd 10/10/05 6:30 PM Page 656

6. After accepting the terms of the EULA, you then specify which installation options you want toinstall in addition to .NET 2.0 and Visual Web Developer Express. The only compulsory option forthis book is SQL Server 2005 Express. As shown in Figure B-5, select that option and click Next.
Figure B-5
7. Next, you have to specify where to install VWD (see Figure B-6). I suggest selecting the default,which is C:\Program Files\Microsoft Visual Studio 8, and clicking Install to begin the setup.
Figure B-6 657
Setup
21_588508 appb.qxd 10/10/05 6:30 PM Page 657

Unfortunately, downloading of all the components must now commence (see Figure B-7), andwith 102MB this can take quite a while.
Figure B-7
Don’t be surprised to see Microsoft .NET Framework 2.0 continue to download for quite a whileafter reaching the 102MB; this isn’t unusual. Once it has completed this stage, it will begininstallation of the downloaded components, shown in Figure B-8.
Figure B-8658
Appendix B
21_588508 appb.qxd 10/10/05 6:30 PM Page 658

8. At the end of this installation, you should see the screen shown in Figure B-9, asking you torestart your machine. You should oblige by clicking Restart Now.
By chance, you may not see this screen. As a general rule, you shouldn’t restart more often than necessary, so if you’re not prompted to restart, don’t do it.
Figure B-9
9. After your machine has restarted, the dialog depicted in Figure B-10 will be displayed, notifyingyou of a successful install (or any problems that were encountered) and reminding you to regis-ter the software within 30 days.
Figure B-10
10. Click Exit and you will now be able to start up both Visual Web Developer and SQL Express.
SQL Server needs Internet access during installation, so please make sure it canaccess the Internet. Otherwise the installation will fail.
659
Setup
21_588508 appb.qxd 10/10/05 6:30 PM Page 659

Web Site Folder SetupNext, set up the Websites folder with Windows Explorer, and create the folders C:\Websites\WroxUnited (or use whichever drive is appropriate to your setup).
IIS Setup (Optional)As we’ve already mentioned, Visual Web Developer Express comes with its own web server, nicknamedCassini. However, some of you might want to use IIS anyway. To use IIS, you must have Windows XPProfessional, Windows 2000, or Windows 2003 Server installed. Windows XP Home Edition comes without IIS, and it isn’t possible to install it on Home Edition if you do manage to get a copy of IIS. Tobegin the install, follow these steps:
1. To install IIS go to the Start menu, navigate to Settings ➪ Control Panel, and click Add orRemove Programs. From the left-hand menu of the dialog (shown in Figure B-11), select theAdd/Remove Windows Components icon.
Figure B-11
To create a folder in Windows Explorer, select File ➪ New Folder and type in thename Websites.
660
Appendix B
21_588508 appb.qxd 10/10/05 6:30 PM Page 660

2. This will bring up the Windows Components Wizard. Make sure the Internet InformationServices option is selected, as shown in Figure B-12.
Figure B-12
3. Click Details and you can select which of the options to install (see Figure B-13). You won’t needall of the options, though you can install them separately at a later point. However, you mustmake sure that you select the Common Files, the IIS snap-in, the Front Page Extensions, and theWorld Wide Web Services options, because these are necessary to work with ASP.NET 2.0 andVisual Web Developer Express.
Figure B-13
4. Click OK and make sure you have the Windows CD handy for the installation.
661
Setup
21_588508 appb.qxd 10/10/05 6:30 PM Page 661

Create AliasIf you choose to install IIS and want to use the Wrox United sample web site on IIS, you will need to an alias so that IIS can recognize which application you mean and serve it accordingly. The followingsteps walk you through creating an alias:
1. From the Start menu, select Run, and type MMC in the text box and click OK. In the MMC dia-log that appears, select File ➪ Add/Remove Snap In. Click the Add button and select IIS VirtualDirectory Management from the dialog that appears, as depicted in Figure B-14.
Figure B-14
2. Next, as shown in Figure B-15, expand the IIS Virtual Directory Management. Underneath thatwill be your computer’s name; expand that as well.
662
Appendix B
21_588508 appb.qxd 10/10/05 6:30 PM Page 662

Figure B-15
3. Right-click Default Web Site, and select New ➪ Virtual Directory from the menu to start the wizard. Type in WroxUnited as the Virtual Directory Name and C:\Websites\WroxUnited asthe local path, as in Figure B-16.
Figure B-16
663
Setup
21_588508 appb.qxd 10/10/05 6:30 PM Page 663

4. Click Apply and then OK, which will finish the wizard. Close the MMC Console. A save isoptional; you can supply a name if you so want.
Wrox United InstallationGo to www.wrox.com and search for the dedicated page for Beginning ASP.NET 2.0. Once there, you candownload the Wrox United code, which comes as a single downloadable zip file containing the databaseand application. Download the file WroxUnited.zip and save to the C:\Website\WroxUnited folderyou created earlier. Next, unzip this file to C:\Website\WroxUnited. After extraction, you should have146 files and 5632kb total size. Check with Windows Explorer that inside your C:\WebSites\WroxUnitedis an App_Data folder and that it has four files.
In particular, make sure that the following file names are present:
❑ WroxUnited.mdf
❑ ASPNET.mdf
❑ WroxUnited_log.mdf
❑ ASPNET_log.mdf
If not, go back and try downloading the zip file again.
Network Service EnablingThe last step before you can test the application is that you might need to add Write permissions to theNetwork Service account. This will allow ASP.NET to use the database and to read data from it andwrite data to it, as routinely required throughout the course of this book. You can skip this step if you areusing Windows Server 2003, because the Network Service account has these permissions alreadyenabled by default. If not, then you will almost certainly have to enable Write permissions first. Let’sbegin, shall we?
1. To enable Write permissions, go to Windows Explorer and select the C:\WebSites\WroxUnited\App_Data folder. Right-click it and select Sharing and Security. Select the Security tab, shown inFigure B-17.
664
Appendix B
21_588508 appb.qxd 10/10/05 6:30 PM Page 664

Figure B-17
If you can’t see the Security tab this is because you have Simple File Sharing switched on. Todisable it select Tools ➪ Folder Options from Windows Explorer, and select the View tab. Scrollto the bottom and uncheck the Use Simple File Sharing option (see Figure B-18). If you can’t seethe Simple File Sharing option, this is because you have Windows XP Home Edition installedand it has Simple File Sharing switched on permanently, and you cannot change it. Instead, youwill have to take another course as outlined in the next section.
665
Setup
21_588508 appb.qxd 10/10/05 6:30 PM Page 665

Figure B-18
2. Click the Add button in the Wrox United Properties dialog and in the Select Users or Groupsdialog that appears. Type NETWORK SERVICE into the text box and click Check Names. NETWORK SERVICE will become underlined, as shown in Figure B-19.
Figure B-19
If the machine is joined to a domain, the user must select the Locations button firstand pick the current machine, rather than the domain. That’s because NETWORKSERVICE is an account on your machine. By default the dialog will attempt to addthe domain name, rather than the machine name.
666
Appendix B
21_588508 appb.qxd 10/10/05 6:30 PM Page 666

3. Click OK. You are returned to the Wrox United Properties dialog once more. This time select thenew NETWORK SERVICE option. Scroll down and check the box next to Write (see Figure B-20).Click Apply, and then click OK.
Figure B-20
This will enable your account to access the database.
Windows XP Home Edition Users OnlyIf, when you come to browse for a Security tab in Windows Explorer, you can’t find one, this is becauseyou have Windows XP Home Edition installed and you have a slightly more complex route to enable thecorrect permissions. Apparently, Windows XP Home Edition users just aren’t allowed to have the samekind of power as their XP Professional counterparts. To get around it, restart your computer in Safe Mode.
To do this, restart your machine, and before the Windows XP logo appears, hold down the F8 key andselect Safe Mode. Let XP continue and then log in as Administrator. You’ll receive a warning about runningin Safe Mode, but click Yes anyway. Locate the C:\WebSites\WroxUnited folder in Windows Explorer andright-click the App_Data folder. Select Properties and select the Security tab that has now appeared. Nowgo back to Step 1 in the previous section and follow the instructions from there on. At the end, though, shutdown and restart your machine in normal mode before you continue to the next step.
667
Setup
21_588508 appb.qxd 10/10/05 6:30 PM Page 667

Checking the Installation with VWD and Cassini (theDefault Web Server)
Once you have successfully downloaded the Wrox United zip file, unzipped it, and enabled theNetwork Service, you are ready to check your installation:
1. Select the Start menu and navigate to All Programs. Select the Visual Web Developer 2005Express Edition Icon at the bottom of the menu.
2. VWD will open. Select File ➪ Open Web Site, and browse to C:\Websites\WroxUnited and clickOK. When the website has loaded into Solution Explorer, Double-click default.aspx to openthe file. Last, press the F5 key to run the page and observe in a browser. You should see whatappears in Figure B-21 in your browser.
Figure B-21
Checking the Installation with IISFollow this step only if you have installed IIS and intend to use it as your main web server. To openWroxUnited with IIS, start Internet Explorer and type http://localhost/WroxUnited into theAddress line. The web site should start and display what’s shown in Figure B-22.
668
Appendix B
21_588508 appb.qxd 10/10/05 6:30 PM Page 668

Figure B-22
Please note that while Figure B-22 is seemingly identical to Figure B-21, the Address lines reveals a smalldifference. If you are running your site on Cassini (the free web server with VWD), you will get the following line (potentially with a different number): http://localhost:1231/WroxUnited.
This indicates that the web server is running on port 1231. Cassini will arbitrarily assign a port number inthe URL. If you are running the web site on IIS, then you see the following line: http://localhost/WroxUnited.
IIS by default runs on port 80, and this doesn’t need to be specified in the URL.
Occasionally, if port 80 is taken by another process, IIS will default to http://localhost:8080, or youmight have to specify it yourself if you get an error message saying Unexpected error 0x8ffe2740occurred.
This means that another application is using port 80. To alter this, you need to start the IIS manager fromAdministrative Tools in the Control Panel, right-click the Default Web site in the left panel, and selectProperties. From the Web Site tab, change the number there from 80 to 8080, or if 8080 is taken then 8081or the first one free above that number.
669
Setup
21_588508 appb.qxd 10/10/05 6:30 PM Page 669

TroubleshootingUnlike with previous versions of ASP and ASP.NET there are no specific gotchas in the installation process. If you encounter a problem go to http://forums.asp.net and check to see if your problem isanswered there.
670
Appendix B
21_588508 appb.qxd 10/10/05 6:30 PM Page 670

CWrox United Database
Design
Throughout this book we’ve presented examples based on the fictional Wrox United soccer teamweb site. The application relies on a SQL Server database, supplied with the code downloads forthis book (available at www.wrox.com). This database stores details of the players in the team, fixtures and results, news items, orders from the shop, and so on.
This appendix is not intended to provide a thorough overview of database design principles, andas such, I recommend reading Wrox’s Beginning Database Design.
The database schema looks like Figure C-1.
Figure C-1
22_588508 appc.qxd 10/10/05 6:26 PM Page 671

This diagram illustrates the tables that exist within the database, and the relationships between thosetables. For example, players score goals, goals are scored at fixtures, match reports are written about specific fixtures, and so on. Many tables relate to other tables in the database, but equally, there are sometables that stand on their own; for example, the News table, which stores news articles. This table doesn’tlink to data stored in any other table. Notice also that the Orders, Products, and OrderLines tables areseparate from the rest of the database — these tables are used to store data relating to orders from theWrox United shop.
This appendix walks through the structure of each of the tables in the database and describes the relationships between them.
Players and MatchesThe players on the Wrox United team are involved in many fixtures, and several related tables in thedatabase store related data for matches. Take a look at these tables first.
The Players TableThe structure of the Players table is as follows:
Field Data Type Allow Nulls
PlayerID (Primary Key) int No
FirstName varchar(25) No
LastName varchar(25) No
Position varchar(50) Yes
PictureURL varchar(255) Yes
DateJoined datetime Yes
DateLeft datetime Yes
This table is typical of all database tables in that it has the following:
❑ A primary key field that uniquely identifies each row in the database.
❑ Fields designed to store textual data about each player (in varchar fields).
❑ Fields that store date and time information.
❑ Flags indicating whether or not different fields require values.
In this table, the primary key is the PlayerID field, which stores numeric values (integers) that areunique to each player in the database. This field, along with the FirstName and LastName fields, ismarked as not allowing null values; in other words, if you enter a row of data in the table, you must
672
Appendix C
22_588508 appc.qxd 10/10/05 6:26 PM Page 672

enter values for each of these fields. However, the PlayerID field will be filled with an auto-generatednumber for you automatically (due to the way it is configured), so the only data you must enter whenyou create a new row is the full name of the new player. The remaining information describing theplayer is optional. You don’t have to specify which position the player occupies, and you don’t have tospecify when he or she joined.
Note that a varchar field is a field that stores character data of varying length. The number in bracketsis the maximum number of characters that can be stored in that field. If the field contains less than themaximum length, it occupies less space in the database. A char field, by comparison, always takes upthe same size in the database, no matter how much of the available space is filled with data.
Figure C-2 shows an example of some data from the Players table.
Figure C-2
This screenshot comes straight from Visual Web Developer; you can right-click any database table in theDatabase Explorer and select Show Table Data to try this out for yourself.
The Goals TableThe Goals table relates directly to the Players table, because players score goals during a match. Here’sthe structure of the Goals table:
673
Wrox United Database Design
22_588508 appc.qxd 10/10/05 6:26 PM Page 673

Field Data Type Allow Nulls
GoalID (Primary Key) int No
FixtureID (Foreign Key) int Yes
PlayerID (Foreign Key) int Yes
Time int Yes
Notice that one of the fields in this table is the PlayerID field, which will store an integer value corre-sponding to the ID of one of the players in the Players table, so if Dave Dickenson scored the first-evergoal for Wrox United, the goal in the table with GoalID of 1 will have a PlayerID of 4. Dave could laterscore another goal for Wrox United, so another record in the Goal table would be created with anotherunique value for GoalID, but with the same PlayerID. This type of field is called a foreign key because itrelates directly to a primary key in another table.
There is another field in the Goals table for storing ID values, which is the FixtureID field. This links eachgoal to a particular fixture. Because players could score many goals at a single fixture, the relationshipbetween the Fixtures table and the Goals table is similar to that of the Players table and the Goals table.
The Fixtures TableThe Fixtures table is structured as follows:
Field Data Type Allow Nulls
FixtureID (Primary Key) int No
FixtureDate datetime No
FixtureType varchar(10) Yes
GoalsFor smallint Yes
GoalsAgainst smallint Yes
Notes text Yes
Opponents varchar(50) No
For each match played by the Wrox United team, there is an entry in the Fixtures table. Because fixturescan be arranged several months in advance, the fixture date has to be entered as soon as the fixture isarranged, and the opponents have to be entered. The number of goals scored can be entered later oncethe match has been played.
This sort of relationship — where one fixture can contain many goals, or where oneplayer could score many goals — is known as a one-to-many relationship.
674
Appendix C
22_588508 appc.qxd 10/10/05 6:26 PM Page 674

The MatchReports TableAfter each match has taken place, it’s up to the reporters to write up the details of the match so that fanscan read all about it later. These reports are stored in the MatchReports table, which is structured like this:
Field Data Type Allow Nulls
ReportID (Primary Key) int No
FixtureID (Foreign Key) int No
Report text Yes
MemberName varchar(50) No
This table also links to the Fixtures table by including a FixtureID field in this table, linking a matchreport to a specific fixture. The MemberName field stores the name of the reporter.
The Gallery TableThe Gallery table is used to store details of pictures uploaded by fan club members. Here are the fieldsdefined in this table:
Field Data Type Allow Nulls
PictureID (Primary Key) int No
FixtureID (Foreign Key) int Yes
UploadedByMemberName varchar(50) Yes
Notes text Yes
PictureURL varchar(50) No
Each picture can relate to a specific fixture (notice the FixtureID field); however, because this field allowsthe use of null values, this implies that pictures do not necessarily have to relate to fixtures.
Standalone TablesThe two standalone tables in the database are the Opponents table and the News table.
The Opponents TableThe Opponents table stands on its own in the database, and is defined as follows:
675
Wrox United Database Design
22_588508 appc.qxd 10/10/05 6:26 PM Page 675

The reason the Opponents table is on its own is a bit unfortunate, but the opposing team may decide tochange its name at some point in the future, which would change the name of all fixtures that WroxUnited played against them in the past if they were related. By keeping the tables separate, and onlyusing a name for each team, the name of the opponent in any particular match is preserved.
Field Data Type Allow Nulls
OpponentID (Primary Key) int No
Name varchar(50) Yes
Won int Yes
Drawn int Yes
Lost int Yes
Points int Yes
TotalGoalsFor int Yes
TotalGoalsAgainst int Yes
This table can be updated with results of matches to maintain a tally of how well the Wrox United teamis performing in the league.
The News TableThe News table contains all of the stories from the front page of the Wrox United site:
Field Data Type Allow Nulls
NewsID (Primary Key) int No
DateToShow datetime No
Description text Yes
PictureURL varchar(50) Yes
Category varchar(50) Yes
Title varchar(50) Yes
Notice that each news item requires that a date be entered for each story, so that a story can remain hid-den until a certain date has passed.
676
Appendix C
22_588508 appc.qxd 10/10/05 6:26 PM Page 676

Wrox United Store TablesThe online shopping experience on the Wrox United site relies on data stored in three tables: the Orderstable, the Products table, and the OrderLines table. These tables are heavily reliant on each other, so thissection considers these now.
The Orders TableThe Orders table contains a unique ID containing the main order details for an order:
Field Data Type Allow Nulls
OrderID (Primary Key) int No
OrderDate datetime No
OrderSentDate datetime Yes
MemberName varchar(50) No
Name varchar(50) No
Address varchar(255) No
County varchar(50) No
PostCode varchar(15) No
Country nchar(10) No
SubTotal money Yes
Discount money Yes
Total money Yes
In this table, you’ll notice that most of the fields are marked as mandatory (not allowing null values).This highlights the fact that orders must have full address details before an order can be fulfilled. Acouple of less familiar field types are in here too. The nchar data type will always take up 10 charactersspace in the database, and the n in the name indicates that the data stored could contain Unicode characters. The other unfamiliar data type is money, which (as the name implies) can be used to storemonetary values.
Notice that there are no details in this table about which products have been bought in a particularorder; this information is stored in the OrderLines table.
The OrderLines TableThis table links the Products table to the Orders table, indicating which items have been bought in a particular order:
677
Wrox United Database Design
22_588508 appc.qxd 10/10/05 6:26 PM Page 677

Field Data Type Allow Nulls
OrderLineID (Primary Key) int No
OrderID (Foreign Key) int No
ProductID (Foreign Key) int No
Quantity smallint No
Price money No
Because an order can contain one or many products, there is a foreign key link here to the Products table.However, because many different orders can be for the same product, there is also a foreign key link hereto the Orders table. This means that an individual line in this table stores details of one item, and oneorder number. If you order more than one of a specific product, the Quantity is increased for the orderline, but you won’t end up with a new OrderLineID.
The Products TableThe Products table contains details of all of the products that can be bought from the shop:
Field Data Type Allow Nulls
ProductID (Primary Key) int No
Name varchar(50) No
Description varchar(255) Yes
Price money No
PictureURL varchar(255) Yes
This simple table provides data about products, and is used both when browsing the shop and whenbuying items from the shop.
The relationship between the Orders table and the Products table is a many-to-manyrelationship. In this situation, there has to be a central table that has one-to-manyrelationships to both tables, and this is called the Join table.
678
Appendix C
22_588508 appc.qxd 10/10/05 6:26 PM Page 678

DVWD Database Explorer
When designing pages that work with data you frequently need to check the metadata, for example, to confirm the data type of a field. You also want to test your pages by quickly modifyingthe data in tables. Furthermore, in some cases you want to add a small and simple table to adatabase, such as a list of shippers. In the past these database tasks required leaving your web editor to open a second window with a database management tool. Visual Web Developer offers abuilt-in tool named the Database Explorer that can perform these tasks without the need for a separate management tool. Some functions are performed directly and others invoke a wizard tostep you through the task.
This appendix covers the various techniques for working with the Database Explorer.
Open the Database ExplorerThe Database Explorer can be viewed either by choosing Menu ➪ View or by pressing Ctrl+Alt+S.Once open, the Database Explorer by default stacks on top of the Solution Explorer on the rightside of the screen. You can move it to a new dock location by dragging its title bar.
Add an Existing Database to theDatabase Explorer
The technique to connect the Database Explorer to a database depends on the type of database.The following three sections cover the Microsoft databases. Most other databases (such as Oracleor MySQL) will be the same as connecting to a SQL Server.
If you mess up the layout you can return to the default by choosing Menu ➪
Windows ➪ Reset Windows Layout.
23_588508 appd.qxd 10/10/05 6:24 PM Page 679

Access Files1. On the Database Explorer toolbar, click Connect to Database, and from the first page of the wiz-
ard select Microsoft Access Database File, as shown in Figure D-1.
Figure D-1
2. Browse to the file, then add logon information if needed (see Figure D-2).
Figure D-2
3. You have the option to test the connection and then it is added to your list in the DatabaseExplorer.
SQL Databases on a SQL Server (Including SQL Server Express)
1. On the Database Explorer toolbar, click Connect to Database, and in the first page of the wizard(shown in Figure D-3) select Microsoft SQL Server.
680
Appendix D
23_588508 appd.qxd 10/10/05 6:24 PM Page 680
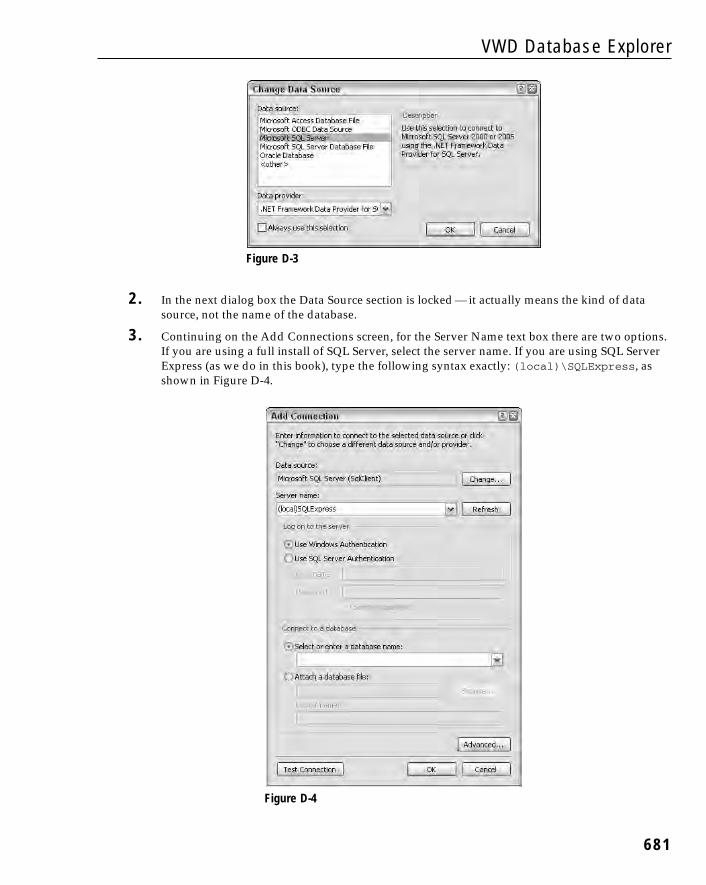
Figure D-3
2. In the next dialog box the Data Source section is locked — it actually means the kind of datasource, not the name of the database.
3. Continuing on the Add Connections screen, for the Server Name text box there are two options.If you are using a full install of SQL Server, select the server name. If you are using SQL ServerExpress (as we do in this book), type the following syntax exactly: (local)\SQLExpress, asshown in Figure D-4.
Figure D-4
681
VWD Database Explorer
23_588508 appd.qxd 10/10/05 6:24 PM Page 681

Note the potential confusion when using SQL Server Express. Your PC name will be listed in thedrop-down box of servers, but that is not the server you want to specify. You must type into the server name box the specific syntax to point to your local machine’s instance of SQL ServerExpress.
4. Keep the choice for logon information set to Windows (see Figure D-5) unless you have developed an authentication table in SQL Server.
Figure D-5
5. Once you have selected the server name, you can drop-down the list of databases. Test the connection and then click Finish to see your new data connection.
SQL Databases Saved as an MDF FileFor highest performance, data is kept in SQL Server without an external file structure. But for portability,a database can be configured to save its data in a Windows file that can be copied to a new server. Thefile will have an extension of .mdf. We use an .mdf file to distribute data in this book. (The alternativewould be to have you download a long SQL script that would build the entire database internally inyour server and populate its data.) Connections to an .mdf file are very similar to connecting to AccessFiles, as explained here:
1. On the Database Explorer toolbar, click Connect to Database, and select Microsoft AccessDatabase File, as shown in Figure D-6.
Figure D-6
682
Appendix D
23_588508 appd.qxd 10/10/05 6:24 PM Page 682

2. Browse to the file and add logon information if needed (see Figure D-7).
Figure D-7
3. You have the option to test the connection and then it is added to your list in the Database Explorer.
Database Diagrams for an OverviewThe VWD Database Explorer provides a visual presentation of your database’s objects along with thecapability to drill down into each object’s properties. Follow these steps to walk through a diagram ofyour database:
1. Within the Database Explorer, expand your Data Connections and then expand your database.When you expand the Database Diagrams (see Figure D-8) the first time you may be asked toestablish yourself as the dbo (database owner). Click Yes. Right-click the Database Diagram objectand add a new diagram. If asked, accept the creation of elements needed to build the diagram.
683
VWD Database Explorer
23_588508 appd.qxd 10/10/05 6:24 PM Page 683

Figure D-8
2. Add tables as desired and close the Add Table dialog (see Figure D-9).
Figure D-9
The diagram can be so large that it is easy to miss tables. Note the Windows-standard horizontaland vertical scroll bars to navigate the diagram. See Figure D-10.
684
Appendix D
23_588508 appd.qxd 10/10/05 6:24 PM Page 684

Figure D-10
3. Once you see the tables, you can rearrange them (the relationship lines will automaticallyadjust). Start by changing the zoom size to 30% or so to be sure you see all of the tables and thendo some rearranging. The zoom window can be found on the diagram toolbar, shown in FigureD-11 set to 30%.
685
VWD Database Explorer
23_588508 appd.qxd 10/10/05 6:24 PM Page 685

Figure D-11
4. Next, increase the zoom size to be able to read the data. For example, after rearrangement, 70%shows all the tables for Wrox United, as shown in Figure D-12.
686
Appendix D
23_588508 appd.qxd 10/10/05 6:24 PM Page 686

Figure D-12
5. Right-click the title bar of a table (for example Players) and select Properties from the menu. Inthe Properties box (lower right of the monitor), you can view parameters such as the Identitycolumn. Right-click one field (see Figure D-13) of a table and select Properties to see how that column has been configured, including the data type and length.
687
VWD Database Explorer
23_588508 appd.qxd 10/10/05 6:24 PM Page 687

Figure D-13
6. Last, carefully place the tip of the mouse arrow on a relationship line (for example betweenFixtures and MatchReports) so that the mouse arrow changes to a horizontal double-endedarrow. Right-click this relationship and select Properties to view data on the relationship, including enforcement rules, as shown in Figure D-14.
Figure D-14
The Database Diagram can also be printed or saved to include in documentation for the site.Note that there are tools to position page breaks at specific axes of the diagram, as well as a toolthat allows you to add a text box of notes.
688
Appendix D
23_588508 appd.qxd 10/10/05 6:24 PM Page 688

Explore a Table’s StructureIn addition to the Database Diagram, you can look at tables through the Table node of the DatabaseExplorer:
1. Starting in Database Explorer, expand the list of databases and then the database of interest.Expand the Tables node and select a table name (for example MatchReports). In the Propertieswindow, shown in Figure D-15, you will see the approximate number of records.
Figure D-15
2. Double-click a table name to open a list of the columns (fields) and populate the Properties windows with data on the table as a whole, as shown in Figure D-16.
689
VWD Database Explorer
23_588508 appd.qxd 10/10/05 6:24 PM Page 689

Figure D-16
These metadata can be changed in this view, assuming that you have the rights to make changesto the database structure.
Observe and Edit Data of Existing TablesIf you right-click a table name in the Tables node of Database Explorer, you’ll see an option to ShowTable Data. This is a quick way to find out if your data-enabled web pages are actually carrying out theirtasks. You can also add, modify, or delete records by hand to test results in data-reading pages.
Be extremely careful about changing data in the Show Table Data tool. For example, deletions or changesof customers may divorce them from their orders. In some databases, the addition of a record mayrequire the addition of a partner record in another table. A simple correction to a spelling mistake maycause a failure to properly look up data that is based on the old spelling. If you thoroughly understandthe schema and are changing independent data, you may avoid trouble. But in most cases it is better tomake revisions based on the interface that ensconces proper validation, limits, and controls.
690
Appendix D
23_588508 appd.qxd 10/10/05 6:24 PM Page 690

Create a New DatabaseIt is rare that you will use VWD to create a database from scratch. Good databases require the kind of planning and implementation tools that are strongest in the tools that come with your database management system. However, in the case of a small and simple database, VWD does offer the necessaryplanning and implementation tools. You can add a new database in two ways: directly in the DatabaseExplorer or by adding a SQL Database through the Add New Item menu in Solution Explorer.
1. In the Database Explorer, right-click Data Connections and select Create New SQL ServerDatabase.
2. Select a server. If using SQL Server Express, use this exact syntax for the server name: (local)\SQLExpress. Use Windows authentication unless you have created an authentication schemeinternal to SQL Server Express. Type the name of the new database into the bottom text box.
3. Database Explorer will automatically add the database to its list and you are ready to createtables and add data.
You can also create a new database directly in the Solution Explorer. This technique is very similar to thepreceding except for the first few steps:
1. Start in the Solution Explorer and right-click the root of the web site. Select Add New Item andselect the template of type SQL Database.
2. When prompted, agree to add to the App_Data folder.
3. VWD will now roll you over to the Database Explorer where you will see the new database andfolders for its objects (albeit empty). You can now create tables, add data, and perform other tasks.
Create a New Table and Add DataTables can be added and populated in the Database Explorer:
1. Expand the database, right-click the Tables node, and select Add New Table from the menushown in Figure D-17.
Figure D-17
691
VWD Database Explorer
23_588508 appd.qxd 10/10/05 6:24 PM Page 691

2. In the resulting list of columns, enter the names and data types. For example, as shown inFigure D-18, a new table that holds a schedule of reporter’s interviews with the players wouldstart with a column (field) for InterviewID.
Figure D-18
Note that under Data Type you can scroll down to find the UniqueIdentifier type, which is similar to AutoNumber in Access.
3. In the panel below the columns list you will find additional properties for the current columnsuch as default value and length.
4. Set the primary key by selecting a field and clicking the key tool in the table’s toolbar.
5. Finish by choosing Menu ➪ File ➪ Save Table.
Examine and Create ViewsViews provide a set of data. Instead of returning information directly from a table, a view returns onlycertain fields or modified fields, or only certain records. In many databases the security rules will allowa web site to request a view but not directly request data from a table; this provides a level of control for
692
Appendix D
23_588508 appd.qxd 10/10/05 6:24 PM Page 692

the database administrator. For example, a table of employees may hold a field for salary level. A viewthat is authorized for the accounting department would include that field, but other users only haveaccess to views that do not include the salary data. Views are also useful for creating hybrid data, suchas combining a NameFirst field and a NameLast field to show both names in a single field of a list box.
You can do a basic exercise where you create a view that would support a selection ListBox of Players.You want the view to create two fields; the first is the player’s ID and the second is a combination of theplayer’s last and first names, separated by a comma.
1. In Database Explorer, expand your database, right-click the Views node, and select Add a NewView. This opens the designer for a new view in the background, and in the foreground the AddTable dialog (see Figure D-19) will open.
Figure D-19
2. In the Add Table dialog box, select Players and click Add. Close the dialog.
3. Before you go on, play with turning on and off the panels to display a view. From left to right,they are the Diagram, Query, SQL Statement, and Results. Because you are making a small viewyou can display all four. Figure D-20 shows the four panels. Topmost is the pane of tables,showing just the Players table with the single field of PlayerID selected. The next panel down isthe query designer showing the single field selected. The next panel below shows the very simple SQL statement: SELECT PlayerID FROM dbo.Players. The bottom panel shows theresults of choosing Query Designer ➪ Run to produce the results table.
693
VWD Database Explorer
23_588508 appd.qxd 10/10/05 6:24 PM Page 693

Figure D-20
4. Click the checkbox next to the PlayerID field in the Player table of the Diagram View (the top-most panel) and note that the field is added to the Query and SQL Statement panels.
5. In the Query panel, go to the second row and type FullName into the alias cell. In the leftmostcolumn, type in LastName + ‘, ‘ + FirstName.
6. Click the execute SQL tool (the red exclamation point) to see the results, displayed in Figure D-21.
7. To finish, order the players’ names by last name. SQL does not like to order on a created (oralias) field, so go to the third row of the Query panel and add the LastName field. Turn off itsOutput option. Set the Sort Order column to 1, meaning this is the first criterion for sorting. Inthe Sort Type VWD will automatically set the order to Ascending. These four changes are shownin figure D-22 below. This step tells SQL to sort according to the last name, but not to output theLastName as its own field. Execute the SQL.
694
Appendix D
23_588508 appd.qxd 10/10/05 6:24 PM Page 694

Figure D-21
Figure D-22695
VWD Database Explorer
23_588508 appd.qxd 10/10/05 6:24 PM Page 695

8. Press Ctrl+S to save the view as PlayersForSelectionList. You now have a new view that can beused in a selection list of a web page; for example, PlayerDetails.aspx, for which the datacontrols follow. Note that in the DataSource1 (supporting the list box), you are not readingfrom the Players table. Rather, you read from the PlayerSelection view. That view includes yournew field FullName, which you can set as the DataTextField in ListBox1:
<asp:ListBox ID=”ListBox1” runat=”server” DataSourceID=”SqlDataSource1” DataTextField=”FullName”DataValueField=”PlayerID” AutoPostBack=true>
</asp:ListBox>
<asp:SqlDataSource ID=”SqlDataSource1” runat=”server”ConnectionString=”<%$ ConnectionStrings:WroxUnitedConnectionString1 %>” SelectCommand=”SELECT [PlayerID], [FullName] FROM [PlayerSelection]”></asp:SqlDataSource><br /><asp:DetailsView ID=”DetailsView1” runat=”server” DataSourceID=”SqlDataSource2” ...
</asp:DetailsView>
<asp:SqlDataSource ID=”SqlDataSource2” runat=”server” ConnectionString=”<%$ ConnectionStrings:WroxUnitedConnectionString1 %>”SelectCommand=”SELECT * FROM [Players] WHERE ([PlayerID] = @PlayerID)”>
<SelectParameters><asp:ControlParameter ControlID=”ListBox1” DefaultValue=”1” Name=”PlayerID” PropertyName=”SelectedValue”Type=”Int32” />
</SelectParameters></asp:SqlDataSource></asp:Content>
Examine a Stored Procedure (SPROC)Like the other objects explored in this appendix, you can examine, edit, and create stored procedures, orSPROCs. SPROCs are a set of one or more SQL commands that, as a group, carry out a task. TheDatabase Explorer offers a node for SPROCs, which can be expanded. A single click selects a SPROC andshows, in the Properties window, if it is encrypted. A double-click opens the SPROC, which can then beedited (assuming you have the rights to change the object).
The design of SPROCs is beyond the scope of this text, but you can take a quick look at one. For example, in the Database Explorer you can expand the WroxUnited database and then expand StoredProcedures. Then you can double-click usp_OrderAdd to open it and view the following code. In thissimple SPROC, only one actual SQL statement gets executed.
696
Appendix D
23_588508 appd.qxd 10/10/05 6:24 PM Page 696

ALTER PROCEDURE dbo.usp_OrderAdd(@MemberName varchar(5),@Name varchar(50),@Address varchar(255),@PostCode varchar(15),@County varchar(50),@country varchar(50),@SubTotal money,@Discount money,@Total money
)ASINSERT INTO Orders(MemberName, OrderDate, Name, Address, County, PostCode,
Country, SubTotal, Discount, Total)VALUES (@MemberName, GETDATE(), @Name, @Address, @County, @PostCode, @Country,
@SubTotal, @Discount, @Total)
RETURN SCOPE_IDENTITY()
This SPROC has three parts. The first and last lines establish the frame of the procedure and declare itsname. The second section, within parentheses, names the parameters that will be used to carry out theprocedure. The third part, the INSERT INTO statement following the AS command, describes the oneSQL statement to actually execute.
In summary, VWD provides the Database Explorer for the creation, modification, and examination ofdatabases. Generally, a web site will use an existing database, so the examination features are most useful. However, when testing a new site you can hop to the VWD Database Explorer to see if yourpages are updating data correctly, or you can modify data to see how the pages handle the rendering. Inaddition to introducing the Database Explorer, this appendix discussed the following topics:
❑ You can examine both data and metadata. The latter includes the list of fields in a table anddetails about how those fields are structured, including their exact spelling, data type, size, andother parameters that will be important when designing a page to use the fields.
❑ When creating a database, table or view, or SPROC, the Database Explorer will kick off a wizardto guide you through the process. Keep in mind that when referring to your SQL Server Expressinstall, you must use the syntax of (local)\SQLExpress.
❑ For two reasons, use particular caution when modifying data or metadata for existingdatabases. First, others may be expecting the database to be in its original state for their WebForms or Windows forms. Second, you may not be aware of the constraints and relationshipsthat can be ruined by incorrect changes in the data or structure.
697
VWD Database Explorer
23_588508 appd.qxd 10/10/05 6:24 PM Page 697

23_588508 appd.qxd 10/10/05 6:24 PM Page 698

ECSS and HTML Quick
Reference
This appendix provides a quick reference to CSS and HTML. It’s not meant to be an exhaustiveand complete list of all HTML controls, their properties and the CSS properties, but rather to givethe most common uses.
Styling Pages and ControlsYou can style controls, or change their look and feel, in two ways: with properties of the control or with Cascading Style Sheets (CSS). Ultimately, both achieve the same thing, making thecontrol look how you want it to, but in practice they are very different. Both Visual Web Developerand Visual Studio 2005 use properties when setting the style for controls. For example, if you drop a GridView onto your page and autoformat it with the Autumn format you get:
<asp:GridView ID=”GridView1” runat=”server” BackColor=”White”BorderColor=”#CC9966” BorderStyle=”None” BorderWidth=”1px” CellPadding=”4”><FooterStyle BackColor=”#FFFFCC” ForeColor=”#330099” /><RowStyle BackColor=”White” ForeColor=”#330099” /><PagerStyle BackColor=”#FFFFCC” ForeColor=”#330099”
HorizontalAlign=”Center” /><SelectedRowStyle BackColor=”#FFCC66” Font-Bold=”True” ForeColor=”#663399”
/><HeaderStyle BackColor=”#990000” Font-Bold=”True” ForeColor=”#FFFFCC” />
</asp:GridView>
Here the BackColor sets the background color, and BorderColor sets the color of the border. Thesame sort of thing applies to the style for parts of the control, such as the FooterStyle andRowStyle.
Although the approach of including the individual style attributes works fine, there are some issues:
24_588508 appe.qxd 10/10/05 6:38 PM Page 699

❑ It makes the code hard to read. Not only is it more text to read through, but the properties aren’talways in a logical order. For example, on FooterStyle and RowStyle the BackColor andForeColor are next to each other, but on the HeaderStyle there is a Font-Bold attributebetween them.
❑ There is extra text, bulking out the page. With lots of styling applied to lots of controls, the pagesize can increase, which can lead to performance degradation.
❑ It’s hard to amend if you decide to change colors. AutoFormat works fine, but if you want custom colors you have to change each property individually.
CSS solves this problem by abstracting the actual styling away from the control, leaving the control withjust a simple reference to the styles being used; this is the CssClass property for web controls or theclass property for HTML controls. The GridView could now be as follows:
<asp:GridView ID=”GridView1” runat=”server” CssClass=”MyGrid”><FooterStyle CssClass=”MyGridFooter” /><RowStyle CssClass=”MyGridRow” /><PagerStyle CssClass=”MyGridPager” /><SelectedRowStyle CssClass=”MyGridSelectedRow” /><HeaderStyle CssClass=”MyGridHeader” />
</asp:GridView>
Immediately you can see that this is easier to read. The class names can be anything you want, and it isbest not to be control-specific, because CSS classes can be used across controls. For example, if theFooterStyle and RowStyle needed the same styling you could do the following:
<FooterStyle CssClass=”MyGridStandard” /><RowStyle CssClass=”MyGridStandard” />
Here the same style name has been used, allowing the centralization of the styling. Style names shouldalso not contain things like color names. For example, don’t call a style TextRed just because it outputstext in red. What happens if you want to change that text from red to blue? You can simply change thestyle, but the class name would be misleading. Calling it TextHighlight is acceptable.
Creating Inline StylesTo create inline styles you use the <style> element, which is usually placed within the <head> element.For example:
<head><title>My Styled Page</title><style>
styling goes here</style>
</head>
When using Master pages you have to put the styling in the Master page, because Content pages don’tallow a <head> element. Adding the style to the Master page is sensible though, because if all pages usethe Master page, they automatically get the styles.
700
Appendix E
24_588508 appe.qxd 10/10/05 6:38 PM Page 700

Linking Style Sheets to a PageAnother, and better, way to add styles is to use linked style sheets. In these cases the style sheet is created as a separate file (with a .css suffix) and linked to the page like so:
<head><title>My Styled Page</title><link rel=”stylesheet” type=”text/css” href=”site.css” />
</head>
The CSS is stored in site.css and the <link> element links this style sheet into the page at runtime.Another great advantage of linked style sheets is that they can be cached by the browser, so the first timea page is requested the style sheet is loaded and cached. Subsequent pages that use the same style sheetwon’t need to reload it from the server because it’s already loaded.
CSS InheritanceOne of the core concepts of CSS is that inheritance is implicit in the styles. In many ways the concept isthe same as inheritance in classes, in which a child class can inherit features from its parent. CSS worksthe same way. This allows styling to be applied at the top level and inherited by contained controls. Forexample, if you defined the paragraph tag (<p>) to have blue text like so:
p {color: blue;
}
Any child tags would inherit that style, so:
<p>Hello everyone. I’m a paragraph with a <b>bold</b> word.</p>
The paragraph would appear in blue, including the bold word, because it inherits styles from the parent.A bold tag not inside a paragraph would not be blue, so:
<b>this is bold</b><p>this is blue <b>and bold</b></p>
The first line would be bold only, whereas the second line would be blue, including the bold word. The<b> tag changes its style depending upon context.
The technique of inherited styles reduces the amount of styling that needs to be done, and is especiallyuseful for setting default fonts and font sizes.
CSS StylesWhichever method you use to add CSS styles, the styles themselves are the same, and are best seen byan example. Take the example of blue text on a paragraph. The style could be as follows:
p {color: blue;font-weight: bold;
}
701
CSS and HTML Quick Reference
24_588508 appe.qxd 10/10/05 6:38 PM Page 701

Every paragraph would now appear in bold blue because this style sets the style for the <p> element.Only the element name is used, and the angled brackets aren’t included. So p defines the element forwhich the style applies, and the styling is surrounded by curly braces. Styles appear as a list separatedby semicolons — styles are context independent, so they can be all on one line or on separate lines.Likewise, the curly braces can be on separate lines.
In this example two style properties are set, and the style is separated from the value by a colon. Thefirst, color, defines the color of the text, and its value is set to blue. The second, font-weight, definesthe weight of the font — how heavy it looks — and this is set to bold.
This technique allows styles to be set for HTML elements, and is typically used for the base elements.For example, the Wrox United style sheet defines the following:
html, body {background-color: #fff;color: #000;font: normal 90%/1.8em ‘Lucida Grande’, Verdana, Geneva, Lucida, Helvetica,
Arial, sans-serif;margin: 0;
}h1 {
font-size: 1.8em;font-weight: bold;margin-top: 0em;margin-bottom: 0em;color: #a83930;
}h2 {
font-size: 1.6em;margin: 1.0em 0em 1.0em 0em;font-weight: bold;color: #a83930;
}h3 {
font-size: 1.2em;margin: 1.0em 0em 1.0em 0em;font-weight: bold;color: #a83930;
}p {
font-size: 1.1em;line-height: 1.8em;margin: 1.1em 0em 1.1em 0em;text-align: left;
}
This defines the styles for the html and body elements, which due to inheritance become the default forthe rest of the page. Next are the headings and then the paragraph. The colors are described in the“Colors” section later in the appendix.
702
Appendix E
24_588508 appe.qxd 10/10/05 6:38 PM Page 702

CSS SizesOne thing you’ll have noticed in the previous style sheet is the use of em as a size, for both fonts andmargins. There are many ways of sizing things, including points, pixels, inches, and percentages or forfonts, predefined sizes. One of the problems with defining sizes is that they mean different things to different people, especially if they use different browsers or different platforms (get used to that word; I’mgoing to use it a lot!). The sizings you can use are as follows:
❑ Points (pt), which are a unit of print rather than a unit of the screen. Different browsers renderthe same point size differently, giving different font sizes.
❑ Pixels (px), which represent an individual pixel on the screen. This again depends on the platform and screen, because they define how many pixels per inch there are. The biggest drawback with pixels is that they are not user scalable. For example, in Internet Explorer youcan select Text Size from the View menu and change the size of the text being browsed, but ifthe page designer used pixels, you have no way to resize the text.
❑ Physical units (in, cm, mm), which is a physical size. This again gives different results on different sized screens.
❑ Named sizes, such as small, medium, large, x-large. These provide relative sizes, with smallbeing smaller than medium, and so on.
❑ Percentages (%), which define the size as a percentage of the default size (medium). So a font sizeof 200% is twice the size of the default size.
❑ Ems (em), which represent the default font setting. Ems are user resizable. 1 em represents oneunit of the default font size.
In the Wrox United application, ems have been used because they provide the best flexibility, and aresuitable for user resizing, which allows users with visual impairments to change the size of the text. Youmay read much on the pros and cons of setting sizes for fonts, but as Frog Box Design (who did the CSSand images for the Wrox United site) says:
We use relative sizes and em units because they scale better for people using larger fonts, but we do set arelative percentage size, too.
Percentages are particularly useful when defining the width of block elements. For example, a width of100% means the element will be the full width of its parent element. This is useful for things like gridswhere you want them to be the full width of the screen.
Oh, and I’ve now finished with all the difference stuff, so you can relax again.
FontsDeciding on which fonts to use can make a big difference to the readability of your site, because certainfonts are easier to read on the screen than others. You can define many different aspects of the fontincluding the style (normal, bold, and so forth), the size, and the family. In the Wrox United style sheetthe main font is defined as follows:
font: normal 90%/1.8em ‘Lucida Grande’, Verdana, Geneva, Lucida, Helvetica, Arial,sans-serif;
703
CSS and HTML Quick Reference
24_588508 appe.qxd 10/10/05 6:38 PM Page 703

This has three parts:
❑ The style, which is normal.
❑ The size, which is 90%/1.8em. This means a font size of 90% and a line height of 1.8em (1.8times the normal font size), giving us nice spacing between the lines. The size of the font isn’tdirectly related to the line height, and this declaration is a shortcut that allows us to specify thetwo at the same time.
❑ The family, which defines the fonts to be used, if they are available. If a font is not available onthe browser, the next in line is tried. Here Lucida Grande will be tried first, Verdana next, andso on. Fonts that have spaces in their names must have quotes around them.
These three parts could also have been defined like this:
font-style: normal;font-size: 90%;font-family: ‘Lucida Grande’, Verdana, Geneva, Lucida, Helvetica, Arial, sans-serif;line-height: 1.8em;
The single-line form is just a shortcut.
ColorsColors can be predefined or you can specify the red, green, and blue values. For example, for blue textany of the following could be used:
color: blue;color: #0000ff;color: rgb(0, 0, 255)color: rgb(0%, 0%, 100%);
They all produce the same result. The first uses a defined name, whereas the second uses a hexadecimalnotation where 00 represents no color and ff represents full colors. There are two digits for the red com-ponent, two for green, and two for blue. So 0000ff means:
❑ 00 for red, so no red
❑ 00 for green, so no green
❑ ff for blue, so full blue
Using rgb allows you to specify this either in decimal (0 is no color and 255 is full color), or as percentages.
You might also see a shortcut form of the hexadecimal notation consisting of only three digits. This canbe used if the two digits for a color part are the same. So blue could be 00f.
704
Appendix E
24_588508 appe.qxd 10/10/05 6:38 PM Page 704

CSS SelectorsEarlier you saw how a paragraph could be styled:
p {color: blue;font-weight: bold;
}
The p part is defined as the selector, and this can be an element, an element ID, or a class name, and theyway they are defined is different. To define an element ID you place a hash sign (#) before the selector:
#header {height: 100px;padding: 0 10px 0 10px;. . .
}
This would then correspond to an element with that ID:
<div id=”header”>
ID-based selectors can only be used by a single element because IDs have to be unique, so this should bereserved for things that will only ever appear once. In the Wrox United style sheet this is used for itemssuch as the header, sidebar, and so on.
To use a class name, you precede the selector with a period:
.title {color: #a83930;text-align: center;. . .
}
This matches a CssClass property for a web server control, or the class property for an HTML control:
<asp:Label id=”Label1” runat=”server” CssClass=”title”>My Page</asp:Label><div class=”title>My Page</div>
Because the class name can be used by multiple controls, you should use it for common styling acrosselements. The named selector can be designed to apply to all elements (as in the previous code), or justselected elements:
div.title {color: #a83930;
}
Here the selector only applies if a div element is given a class of title; any other element would notget the style. The following line will be styled:
<div class=”title”>This will be styled</div>
705
CSS and HTML Quick Reference
24_588508 appe.qxd 10/10/05 6:38 PM Page 705

Whereas this line will not be styled:
<span class=”title”>While this will not be styled</span>
Selector names are case sensitive.
Multiple SelectorsYou can also define multiple selectors to have the same style by having them as a comma-separated listat their definition:
span, div {color: #a83930;
}
This defines both the span and div elements to have the same style. Multiple selectors work with elements, ID-based and class-named forms.
Contextual SelectorsSelectors can also be contextual, meaning that they can be defined to only apply depending on the context in which the element appears. For example, what if you wanted to style list elements (li andul), but only if they appear within the navigation bar at the left of the screen (#nav)? Your style could be
#nav li {color: #a83930;
}#nav ul {
color: #a83930;}
With these rules the li and ul elements will only be styled if they are within a control with an ID of#nav. Outside of the #nav control no style will be applied.
Floating ElementsSometimes you want to position elements to the left or right of others, and can’t achieve this with placing them one after another, because HTML is a flow-based layout, and elements are placed in theirdeclaration order. One way around this is fixed position, which positions elements directly, but this hasproblems with users resizing their browser window, because the positioned elements may be outside thenew window size.
An easy way is to use floating elements, and although they are restricted in what they do, they can oftenprovide the solution. For example, on the Wrox United home page there are news items, and the date ofthe item is shown at the right of the page. Resizing the browser keeps this at the right, because we havefloated it to the right. The style for this is as follows:
.newsDate {font: normal 0.9em/0.9em ‘Lucida Grande’, Verdana, Geneva, Lucida, Helvetica,
Arial, sans-serif;float: right;color: #666666;
}
706
Appendix E
24_588508 appe.qxd 10/10/05 6:38 PM Page 706

Ignore the font and color; the important point is the float element:
float: right;
This states that the element should be placed at the right of its containing control. So however wide theparent control is, the news date will always appear at its right. Elements can also be floated to the left ofothers, and if you want to learn more about floating elements it’s best to consult a specialized CSS book,but details of some are included at the end of this appendix.
Pseudo ClassesIn addition to standard classes, some special classes (called pseudo classes) apply to actions rather than theanchor element. These allow specific classes to be applied to links. For example, consider the following:
a:hover {text-decoration: none;
}#nav a:hover {
text-decoration: none;color: #a83930;background-color: #fdea12;
}
Here the hover pseudo class is used, which indicates the style to be applied when the cursor is hoveringover a link. The first class sets the text-decoration to none, which removes the underline from links,but only when they are hovered over. For links in the navigation area though, additional styling is done.
In addition to hover, three pseudo classes exist for links:
❑ link defines how an unclicked and unvisited link should be styled.
❑ visited defines how a link that has been visited should be styled.
❑ active defines how a currently active line should be styled.
Other pseudo classes exist, but support for these in Internet Explorer is limited, so coding to use themalways requires a lot of effort. For that reason we haven’t described them here.
CSS ReferenceThe following table describes the CSS properties, but does not include the aural properties for screenreaders. These should be supported on most modern browsers.
707
CSS and HTML Quick Reference
24_588508 appe.qxd 10/10/05 6:38 PM Page 707

Property Description
background Changes the background color and image.
background-attachment Determines how background images should scroll.background-attachment supports three values:scroll, fixed, and inherit. The default value isscroll, which indicates that images scroll.Specifying fixed means that images are fixed.Specifying inherit indicates that images inheritbehavior from their parent.
background-color Defines the background color.
background-image Defines the image to show in the background ofthe element.
background-position Defines the position of a background image.Defined as two values to specify the horizontal andvertical positioning. These can be top, center, orbottom for vertical alignment; left, center, orright for horizontal alignment; percentages; orfixed values.
background-repeat Indicates whether a background image is repeatedand can be repeat, repeat-x, repeat-y, no-repeat, or inherit.
border Defines the properties of the border of an element.
border-color Defines the color of a border.
border-collapse Indicates whether borders in tables collapse ontoeach other. Can be one of collapse, separate, orinherit.
border-spacing Defines the amount of space between borders in atable.
border-style Defines the style of a border, and can be one ofnone, dotted, dashed, solid, double, groove,ridge, inset, outset, or inherit.
border-top Define the properties of a single border of an border-bottom element.border-leftborder-right
border-top-color Define the color for an individual border of an border-bottom-color element.border-left-colorborder-right-color
708
Appendix E
24_588508 appe.qxd 10/10/05 6:38 PM Page 708

Property Description
border-top-style Define the style for an individual border of an border-bottom-style element.border-left-styleborder-right-style
border-top-width Define the width for an individual border of an border-bottom-width element.border-left-widthborder-right-width
border-width Defines the width of the border for an element.
bottom Defines the distance to offset an element from thebottom edge of its parent element.
caption-side Defines where a caption is placed in relation to atable, and can be one of top, bottom, left, right,or inherit.
clear Clears any floating in action, and can be one ofnone, left, right, both, or inherit.
clip Defines how much of an element is visible and canbe a rectangle rect[n,n,n,n], auto, or inherit.
color Defines the foreground color of an element.
content Defines the type of content and how it is to be dis-played.
counter-increment Defines the property and amount for auto-incrementing lists.
counter-reset Resets the numerical value of auto-incrementinglists.
cursor Sets the shape of the cursor when over the element.Can be one of auto, crosshair, default,pointer, move, e-resize, ne-resize, nw-resize, n-resize, se-resize, sw-resize,s-resize, w-resize, text, wait, help, inherit,or a URL to an image.
direction Indicates the direction for letters, and can be one ofltr (left to right, the default), rtl (right to left), orinherit.
display Determines how to display an element, and can beone of: block, inline, list-item, none, orinherit.
empty-cells Defines how empty table cells are shown, and canbe one of hide, show, or inherit.
Table continued on following page
709
CSS and HTML Quick Reference
24_588508 appe.qxd 10/10/05 6:38 PM Page 709

Property Description
float Indicates how this element floats within the parentelement, and can be one of left, right, none, orinherit.
font Defines the attributes of the font for the element.
font-family Defines the font family for text.
font-size Defines the size of the font for text.
font-size-adjust Defines the aspect value for a font element.
font-stretch Defines how expanded or condensed a font is.
font-style Defines the style of the font, and can be one ofitalic, normal, oblique, or inherit.
font-variant Defines whether the font is displayed in capital letters, and can be normal, small-caps, orinherit.
font-weight Defines the thickness of the font, and can be absolute weight values (100 to 900 in steps of 100),bold or normal, bolder or lighter, or inherit.
height Defines the height of an element.
left When using absolute positioning, this defines howfar from the left edge of the parent the element isplaced.
letter-spacing Defines the amount of space between letters.
line-height Defines the height between lines.
list-style Defines the properties for list elements.
list-style-image Defines the image to be used as the marker for alist element.
list-style-position Defines the positioning of the list relative to the listitself, and can be one of inside, outside, orinherit.
list-style-type Defines the type of marker for the list, and can beone of circle, decimal, disc, square, lower-roman, upper-roman, lower-alpha,upper-alpha, none, or inherit.
margin Defines the amount of space between the borderand the parent element.
margin-top Define the amount of space between the border margin-bottom and the parent element for an individual side of an margin-left element.margin-right
710
Appendix E
24_588508 appe.qxd 10/10/05 6:38 PM Page 710

Property Description
marker-offset Defines the distance between the border of a listmarker and the list itself.
marks Defines whether crop marks are shown, and can beone of crop, cross, both, none, or inherit.
max-height Define the maximum height and width of an max-width element.
min-height Define the minimum height and width of an min-width element.
orphans Defines the minimum number of lines or paragraph that must be left at the bottom of a page.
outline Defines the properties of a button or form field thathas focus.
outline-color Defines the color of a button or form field that hasfocus.
outline-style Defines the border style of a button or form fieldthat has focus.
outline-width Defines the border width of a button or form fieldthat has focus.
overflow Defines the visibility of content if it doesn’t fitwithin the element, and can be one of auto, hidden, scroll, visible, or inherit.
padding Defines the distance between one or more sides ofthe content area and its border.
padding-top Define the distance between a side of the content padding-bottom area and its border.padding-leftpadding-right
page Defines the page type (such as regular or landscape) for printed content.
page-break-after Define how the browser should insert page breaks, page-break-before and can be one of always, auto, avoid, left,
right or inherit.
page-break-inside Defines whether page breaks split an elementacross pages, and can be auto, avoid, or inherit.
position Defines how an element is positioned relative tothe flow of the document, and can be absolute,fixed, relative, static, or inherit.
quotes Defines the type of quotation mark to be usedwithin embedded quotes.
711
CSS and HTML Quick Reference
24_588508 appe.qxd 10/10/05 6:38 PM Page 711

Property Description
right Defines the distance an element should be from itsparent’s right edge.
size Defines the size of the printing area in a page.
table-layout Defines how the width of table cells is calculated,and can be auto, fixed, or inherit.
text-align Defines the alignment of text, and can be one ofcenter, justify, left, right, or inherit.
text-decoration Defines the decoration on text, and can be one of blink, line-through, none, overline,underline, or inherit.
text-indent Defines the amount of space to indent the first lineof a paragraph.
text-shadow Defines the amount of shadow to apply to text.
text-transform Defines the casing to use on text, and can be one ofcapitalize, lowercase, none, uppercase, orinherit.
top Defines the distance between an element and itsparent’s top edge.
Unicode-bidi Defines Unicode text as having bidirectional characteristics.
vertical-align Defines the vertical alignment of the element.
visibility Defines how, or if, the element is shown, and canbe one of collapse, hidden, visible, orinherit.
white-space Defines how white space should be treated, andcan be one of normal, nowrap, pre, or inherit.
widows Defines the minimum number of lines that must beleft at the top of a page.
width Defines the width of the element.
word-spacing Defines the distance between words.
z-index Defines the depth of an element to allow overlapping elements.
Common HTML Tags by CategoryFollowing is a list of some of the most commonly used HTML tags by category. When you know whatyou want to do, but you’re not sure which tag will achieve the desired effect, use the following referencetables to put you on the right track.
712
Appendix E
24_588508 appe.qxd 10/10/05 6:38 PM Page 712

Document Structure
Tag Meaning
<! > Allows authors to add comments to code.
<!DOCTYPE> Defines the document type. This is required by allHTML documents.
<base> Specifies the document’s base URL — its originallocation. It’s not normally necessary to include thistag. It can only be used in <HEAD> section.
<body> Contains the main part of the HTML document.
<comment> Allows authors to add comments to code.
<div> Defines a block division of the <BODY> section ofthe document.
<head> Contains information about the document itself.
<html> Signals the beginning and end of an HTMLdocument.
<link> Defines the current document’s relationship withother resources. Used in <HEAD> section only.
<meta> Describes the content of a document.
<nextid> Defines a parameter in the <HEAD> section of thedocument.
<span> Defines an area for reference by a style sheet.
<style> Specifies the style sheet for the page.
Titles and Headings
Tag Meaning
<h1> Heading level 1.
<h2> Heading level 2.
<h3> Heading level 3.
<h4> Heading level 4.
<h5> Heading level 5.
<h6> Heading level 6.
<title> Defines the title of the document.
713
CSS and HTML Quick Reference
24_588508 appe.qxd 10/10/05 6:38 PM Page 713

Paragraphs and Lines
Tag Meaning
<br> Line break.
<center> Centers subsequent text/images.
<hr> Draws a horizontal rule.
<nobr> Prevents a line of text breaking.
<p> Defines a paragraph.
<wbr> Inserts a soft line break in a block of <NOBR> text.
Text Styles
Tag Meaning
<address> Indicates an address. The address is typically displayed in italics.
<b> Emboldens text.
<basefont> Sets font size to be used as default.
<big> Changes the physical rendering of the font to onesize larger.
<blockquote> Formats a quote — typically by indentation.
<cite> Renders text in italics.
<code> Renders text in a font resembling computer code.
<dfn> Indicates the first instance of a term or importantword.
<em> Emphasized text — usually italic.
<font> Changes font properties.
<i> Defines italic text.
<kbd> Indicates typed text. Useful for instruction manualsand the like.
<listing> Renders text in a fixed-width font.
<plaintext> Renders text in a fixed-width font without processing any other tags it may contain.
<pre> Preformatted text. Renders text exactly how it istyped — carriage returns, styles, and so forth, willbe recognized.
714
Appendix E
24_588508 appe.qxd 10/10/05 6:38 PM Page 714

Tag Meaning
<s> or <strike> Strikethrough. Renders the text as deleted (crossedout).
<samp> Specifies sample code.
<small> Changes the physical rendering of a font to onesize smaller.
<strong> Strong emphasis — usually bold.
<style> Specifies the style sheet for the page.
<sub> Subscript.
<sup> Superscript.
<tt> Renders text in fixed width, typewriter-style font.
<u> Underlines text. Not widely supported at present,and not recommended, because it can cause confusion with hyperlinks, which also normallyappear underlined.
<var> Indicates a variable.
<xmp> Renders text in fixed-width type, used for exampletext.
Lists
Tag Meaning
<dd> Definition description. Used in definition lists with<DT> to define the term.
<dir> Denotes a directory list by indenting the text.
<dl> Defines a definition list.
<dt> Defines a definition term. Used with definitionlists.
<li> Defines a list item in any type of list other than adefinition list.
<menu> Defines a menu list.
<ol> Defines an ordered (numbered) list.
<ul> Defines an unordered (bulleted) list.
715
CSS and HTML Quick Reference
24_588508 appe.qxd 10/10/05 6:38 PM Page 715

Tables
Tag Meaning
<caption> Puts a title above a table.
<col> Defines column width and properties for a table.
<colgroup> Defines properties for a group of columns in atable.
<table> Defines a series of columns and rows to form atable.
<tbody> Defines the table body.
<td> Specifies a cell in a table.
<tfoot> Defines table footer.
<th> Specifies a header column. Text will be centeredand bold.
<thead> Used to designate rows as the table’s header.
<tr> Defines the start of a table row.
Links
Tag Meaning
<a> Used to insert an anchor, which can be either alocal reference point or a hyperlink to anotherURL.
<a href=”url”> Hyperlink to another document, the location ofwhich is specified by the url.
<a name=”name”> Link to a local reference point, the location ofwhich is specified by the name.
Graphics, Objects, Multimedia, and Scripts
Tag Meaning
<applet> Inserts an applet.
<area> Specifies the shape of a hot spot in a client-sideimage map.
<bgsound> Plays a background sound.
716
Appendix E
24_588508 appe.qxd 10/10/05 6:38 PM Page 716

Tag Meaning
<embed> Defines an embedded object in an HTMLdocument.
<img> Embeds an image or a video clip in a document.
<map> Specifies a collection of hot spots for a client-sideimage map.
<marquee> Sets a scrolling marquee.
<noscript> Specifies HTML to be displayed in browsers thatdon’t support scripting.
<object> Inserts an object.
<param> Defines parameters for a Java applet.
<script> Inserts a script.
Forms
Tag Meaning
<button> Creates an HTML-style button.
<fieldset> Draws a box around a group of controls.
<form> Defines part of the document as a user fill-outform.
<input> Defines a user input box.
<label> Defines a label for a control.
<legend> Defines the text label to use in box created by a<FIELDSET> tag.
<option> Used within the <SELECT> tag to present the userwith a number of options.
<select> Denotes a list box or drop-down list.
<textarea> Defines a text area inside a <FORM> element.
Frames
Tag Meaning
<frame> Defines a single frame in a frameset.
<frameset> Defines the main container for a frame.
Table continued on following page
717
CSS and HTML Quick Reference
24_588508 appe.qxd 10/10/05 6:38 PM Page 717

Tag Meaning
<iframe> Defines a floating frame within a document.
<noframes> Allows for backward compatibility with non-frame-compliant browsers.
HTML Common Attributes to CSS PropertyCross Reference
Attribute CSS Values Description
align text-align Specifies how the element is alignedwith respect to its containing element, or to the rest of the page.
alink :link pseudo class The color for active links in thepage. A link is active while themouse button is held down over thelink.
background background: Specifies a background picture thatis tiled behind text and graphics.
bgcolor background-color Specifies the background color to beused for an element.
bgproperties background-attachment Specifies a background picture as awatermark, which does not scroll.
border border Specifies if a border is to be drawnaround the element, and sets itsthickness.
bordercolor border-color The color of all or some of the borders for an element.
clear clear Causes the next element or text tobe displayed below left-aligned orright-aligned images.
color color The text or foreground color of anelement.
face font-family Sets the font family or typeface ofthe current font or base font.
height height Specifies the height of the elementthat is to be drawn on the page.
hidden visibility Forces the embedded object to beinvisible in an <EMBED> tag.
718
Appendix E
24_588508 appe.qxd 10/10/05 6:38 PM Page 718

Attribute CSS Values Description
hspace margin Specifies the horizontal spacing ormargin between an element and itsneighbors.
link :link pseudo class The color for links.
left left Position in pixels of the left-handside of the object in relation to itscontainer.
leftmargin margin-left Specifies the left margin for theentire body of the page, overridingthe default margin.
marginheight margin-top Specifies the top and bottom margins for displaying text in aframe.
marginwidth margin-left Specifies the left and right margins margin-right for displaying text in a frame.
nowrap white-space Indicates that the browser shouldnot perform automatic word wrapping of the text.
rightmargin margin-right Specifies the right margin for theentire body of the page, overridingthe default margin.
size size Specifies the size of the element.
top top Position of the top of the element.Also returns topmost windowobject.
topmargin margin-top Specifies the margin for the top ofthe page, overriding the default topmargin.
valign vertical-align Specifies how the contents shouldbe aligned vertically within the element.
visibility {visibility: visible | Defines whether the element shouldhidden} be displayed on the page.
vlink :visited pseudo class The color for visited links in thepage.
vspace margin Specifies the vertical spacing ormargin between an element and itsneighbors.
Table continued on following page
719
CSS and HTML Quick Reference
24_588508 appe.qxd 10/10/05 6:38 PM Page 719

Attribute CSS Values Description
weight font-weight Defines the weight of the font usedto render the text.
width width Specifies the width of the elementthat will be drawn in the page.
z-index z-index Position in the z-order or stackingorder of the page — the z coordinate.
Recommended ReadingIf you’d like to learn more about CSS, and we recommend you do, the following books will be useful:
Title Beginning CSS: Cascading Style Sheets for Web Design
Author Richard York
Publisher Wrox Press
ISBN 0-7645-7642-9
Description As part of the Beginning series this is a natural companion to this book,covering all aspects of how to use CSS for web site design.
Author Jon Duckett
Publisher Wrox Press
ISBN 0-7645-8306-9
Description This book is aimed more at how to make your web site accessible topeople with visual impairments or who use screen readers rather thanstandard browsers. It’s something we should all aim to do when creating web sites.
Title Core CSS Second Edition
Author Keith Schengili-Roberts
Publisher Prentice Hall
ISBN 0-13-009278-9
Description This is a pure reference book to the whole of CSS, including some of thefuture enhancements. It’s definitely not a learning book, but does provide good examples as well as being an excellent reference.
720
Appendix E
24_588508 appe.qxd 10/10/05 6:38 PM Page 720

Title Designing with Web Standards
Author Jeffrey Zeldman
Publisher New Riders
ISBN 0-7357-1201-8
Description A book for the more advanced user, but this contains a wealth of information, especially around the practicalities of CSS and their use inthe real world. It includes lots of material on cross-browser issues, suchas sizes.
Another good resource is the Web, and there are plenty of CSS tutorials. A good place to start iswww.w3schools.com/css/.
721
CSS and HTML Quick Reference
24_588508 appe.qxd 10/10/05 6:38 PM Page 721

24_588508 appe.qxd 10/10/05 6:38 PM Page 722

Inde
x
Index
SYMBOLS& (ampersand)
precedence, 316strings, joining, 310, 544
* (asterisk), 311\ (backslash)
directory separator, 579operator, 311
^ (carat), 311{} (curly braces)
CSS, 143list items, binding, 227
= (equals sign)comparison, 313statements, testing, 310
/ (forward slash)division operator, 311precedence, 316
> (greater than operator), 313>= (greater than or equal to operator), 313# (hash symbol)
color, hexadecimal, 176values, assigning, 292
\ (integer division operator)described, 311, 312precedence, 316
< (less than operator), 312<= (less than or equal to operator), 312- (minus sign), 311<> (not equal to operator), 313
+ (plus sign), 311“ (quotation marks)
CSS, 711values, assigning, 292
_ (underscore), 318
Aaccess controls
coding, 111, 120–121described, 5–6, 107e-commerce checkout, 506, 519events, 193home page sample, 3page-level, configuring
described, 397–398visibility, controlling, 399–406
personalized site, 108–111user account configuration, 111–119viewing, 394–395web service, 463Wrox United application, 9
Access (Microsoft), 212accessibility
class, defining, 331layout and styling best practices, 178–179
account, usercoding, 406–407described, 5–6, 385importance, 386–387login controls, 111–119
25_588508 bindex.qxd 10/10/05 6:31 PM Page 723

account, user (continued)in Wrox United
described, 387–388Fan Club, 389–397viewing, 10
actionsclasses, 330, 336–338parameter checking, 560–561
addingcontrols to page, 17data to collections, 303–304data-bound controls to page, 224default themes to Web.config file, 168–171Fixtures sample web service to application, 451–453function to e-commerce shopping cart, 323–324,
500–505GridView data-bound controls, 231–232items from selection lists, 226–230navigation menu functions, 94–98new records to database, 273–275users to roles, 124–125web reference, 448–450
addition operator (+)described, 311precedence, 316
address/delivery details, e-commerce checkout, 506Administration Tool, 54–55administrator
importance, 387mailing
exceptions, 580–582maintenance, 621–622
roles, adding users, 124–125alias, 662–664aligning, 718all pages, tracing, 590ampersand (&)
precedence, 316strings, joining, 310, 544
anchor tags, 143, 716And operator, 314AndAlso operator, 314, 315anonymous shopping carts, 424–425anonymous site access
cart, associating, 490–492disallowing, 119template, displaying, 395
App_Code folder, 359App_Data permissions, enabling, 612–614
appearance. See properties; themesapplet, 716, 717application
business rules, 359–361Fixtures sample web service, adding, 451–453global events, 206–207tracing, 590–592
arithmetic operatorsdescribed, 311–312precedence, 316
arraychoosing which to use, 307collections, 303–307looping through, 323–328multi-dimensional, 302–303selection lists, binding items to, 225–226single dimensional, 301–302
ArrayList collectionadding data, 303stored procedures, modifying, 540when to use, 546
ASP.NETcode, 6componentization, 6consistency and personalization, 5data connection, 6deployment, 7development tools, 7errors and exception handling, 7history, 4–5login, security, and roles, 5–6navigation, 5other server software, relationship to, 8performance and caching, 7Web services, 6
assemblies, 382–383assigning values, 292–293asterisk (*), 311attributes, element
HTML, 64shopping cart objects, 482site path, 93XHTML, 68
authenticationanonymous shopping carts, checking out, 506database access, 210–211described, 129Forms model, 129–131security, 106web service security, 463
724
account, user (continued)
25_588508 bindex.qxd 10/10/05 6:31 PM Page 724

authorizationpage-level, configuring
described, 397–398visibility, controlling, 399–406
rolescoding, 406–407described, 5–6, 385importance, 386–387login controls, 111–119Wrox United Fan Club, 10, 387–397
security, 106–107automating
e-commerce shopping cart, 496–500e-mail, 51lists, incrementing, 709
Bbackground graphics, 699, 708background sound, 716backslash (\)
directory separator, 579operator, 311
baseline performance, establishing, 553basket, e-commerce shopping
adding function, 323–324, 500–505anonymous, 424–425automating, 496–500CartItem object, 331, 334, 346, 482–483control, 492–496current user’s, storing data, 409described, 481discount, applying, 309methods, 336profile, 490–492visibility, 524writing items to database, 313–314WroxShoppingCart object, 483–490
Begin directory, 14Beginning CSS: Cascading Style Sheets for Web Design
(York), 720behavior. See propertiesbinding
data controls to business control, 361data events, 193performance, 543selection list items to array, 225–226shopping cart, 498syntax, data reading, 262–263
blank spaces, stripping from strings, 295–296body
table, 716web page, 64, 713
bold text, 714Boolean data type
converting to, 293described, 290
border, 176, 699, 708–709breadcrumb navigation controls, 86–87breakpoint, debugging, 595, 597breaks
line (<br />), 67, 714page, 711
browserediting configuration information and code files, 52–55HTML understanding, 181HTTP GET and POST commands, 182server controls, converting, 82uploading pictures, 278–281XHTML, importance of, 69
BTClick&Buy, 508bulleted list, 715bureau services, credit card handling, 508business control
separate data controls, binding (ObjectDataSourcecontrol), 364–367
Wrox United sample, 367–369business objects, 212business rules, 359–361buttons
add to shopping cart, 501–505click events, 193, 194–195commands, executing, 269dynamic page content
client and server codes, 71–72described, 70–71
event handlers, 342images, 161, 162logout, displaying, 109pages, loading, 191round, radio-style
events, 193list events, 193server control, 83
server control, 83styles, 711
Byte data type, 290
725
Byte data type
Inde
x
25_588508 bindex.qxd 10/10/05 6:31 PM Page 725

CC# language
types, mapping to CLR, 291web service, 440
caching, pagedata invalidation, 7described, 7fragment technique, 551output technique, 549–550performance and, 547–549post cache substitution, 551–552
Calendar
enumerating, 307–309events, 193style skins, 154–156, 161, 162sub-page, creating, 45–46
calling web services, 433–434canceling
events, 203–206loops, 321shopping cart entries, 497
captions, 709, 716carat (^), 311cart, e-commerce shopping
adding function, 323–324, 500–505anonymous, 424–425automating, 496–500CartItem object, 331, 334, 346, 482–483control, 492–496current user’s, storing data, 409described, 481discount, applying, 309methods, 336profile, 490–492visibility, 524writing items to database, 313–314WroxShoppingCart object, 483–490
CartItem object, 331, 334, 346, 482–483Cascading Style Sheets. See CSSCassini web server
ASP.NET, running, 8page, running, 16–17setup, checking with, 668VWD Express, 11
casting data, 294–295catalog
design, 467–468implementation, 468–475
improving, 524item page, 475–481stored procedures, 532–534structure, 467
Catch block, 572, 575–576CD drive, 654cell, table, 712, 716certificates, secure transaction, 523Chapters directory, 14character, 66, 67CheckBox
events, 193server control, 83
CheckBoxList events, 193checkout, e-commerce
address/delivery details, 506application level tracing, 590–592debugging, 592–596exceptions
logging, 577–580trapping, 573–576
login, 506mechanics, 518–523order processing, 506page level tracing, 588–589sample, 509–518shortening process, 524stages overview, 505–506, 508–509stateless nature of HTTP, 182–183
child control, 252, 701classes
codeactions, 336–338constructors, 331–332creating, 330–331described, 329–330inheritance, 339–344properties, 332–334properties versus public variables, 335read-only properties, 334shared methods and properties, 338write-only properties, 335
CSS selectors, 705defined, 4partial, 353published ASP.NET, 8
client codesdynamic content, 71–72validation, 565
726
C# language
25_588508 bindex.qxd 10/10/05 6:31 PM Page 726

CLR (Common Language Runtime) typesperformance, 7variables and data types, 291
cm physical unit, 703code
classesactions, 336–338constructors, 331–332creating, 330–331described, 329–330inheritance, 339–344properties, 332–334properties versus public variables, 335read-only properties, 334shared methods and properties, 338write-only properties, 335
content, separating from, 350–351described, 6generics, 345–346login controls, 111, 120–121related code, grouping, 328–329roles, 406–407separating from design, 351–352server controls, 76–77, 81–83site design files
described, 47–48editing in Web browser, 52–55Global.asax, 52Web.config, 48–52
SiteMapPath navigation control, 92statements
decisions, 317–320described, 310loops, 320–328operators, 310–317
themes, 163–164user controls, viewing, 376–377variable scope and lifetime, 344–345variables and data types
arrays and collections, 301–307assigning values, 292–293CLR, 291constants, 309converting data, 293–295dates, working with, 297–301declaring variables, 292described, 289–291enumerations, 307–309null values, 295
strings, working with, 295–297Wrox United application, 9
code inline, 184code-behind fileApp_Code folder, 359automating shopping cart, 497–500compiling, 357–358creating, 354–357described, 352event handlers/functions, 353–354events, 184Page directive, 352–353partial classes, 353user controls, 373
collectionsarrays versus, 307choosing correct, performance and, 546collections, 303–307looping through, 323–328multi-dimensional, 302–303references, improving performance through, 544single dimensional, 301–302strongly typed, performance and, 540–541totaling, 490
colors. See also themesborder, 176CSS, 699, 704, 708, 709HTML, 718text, 701–702
columnsdatabase, adding or removing, 231displaying, 232–233sorting, 233styles, 716table, viewing, 689–690wrong name error, 569
comments, 49, 713Common Language Runtime (CLR) types
performance, 7variables and data types, 291
comparing strings, 296comparison operators
described, 312–314precedence, 316
compilingapplication, 603–604file, separate code, 357–358in MSIL, 16
727
compiling
Inde
x
25_588508 bindex.qxd 10/10/05 6:31 PM Page 727

componentsassemblies and custom server controls, 382–383code
separating from content, 350–351separating from design, 351–352
composite controls, 382data controls
binding, 364–367Wrox United sample, 9, 367–369
data layersthree-tier applications, 360–361two-tier applications, 359–360
described, 6file, separate codeApp_Code folder, 359compiling, 357–358creating, 354–357described, 352event handlers/functions, 353–354Page directive, 352–353partial classes, 353
history, 349–350user controls
code, viewing, 376–377creating, 373–376described, 370–372structure, 372–373Wrox United news, 377–382
composite controls, 382concatenation
operator precedence, 316strings, 310–311
configurationmembership process, 128site design
described, 47–48editing in Web browser, 52–55Global.asax, 52Web.config, 48–52
conflict detection, 26connection string
details of, 223–224hiding, 221–223placing, 218–221wrapping, 49–50
consistency, 5constants, 309constructors, 331–332
contentcode, separating from, 350–351placeholders, multiple on master pages, 43–44
Content pagecreating, 40–41described, 31Master page link, 35site design
creating, 33–35, 40–41described, 31sample, 36
themes, applying, 159–163contextual selectors, 706controls
adding to page, 17CSS
colors, 704described, 699–700floating elements, 706–707fonts, 703–704inheritance, 701inline, 700linking to page, 701pseudo classes, 707sample, 701–702sizes, 703
e-commerce shopping cart, 492–496errors, 565–568
converting datacasting, 294–295to string values, 293using framework classes, 294
cookiestracing, 589user authentication, 130–131
copydata code, 251page caching
data invalidation, 7described, 7fragment technique, 551output technique, 549–550performance and, 547–549post cache substitution, 551–552
XCOPY publishing, 609–611Core CSS Second Edition (Schengili-Roberts), 720Corporate Master page, 42–43counting, 322
728
components
25_588508 bindex.qxd 10/10/05 6:31 PM Page 728

credit card handlingbureau services, 508e-commerce ID, merchant number, or IMA, 507in-house transactions, 507payment gateways, 507
CSS (Cascading Style Sheets)HTML tags, common attributes, 718–720master pages, importing, 36–40pages and controls, styling
colors, 704described, 699–700floating elements, 706–707fonts, 703–704inheritance, 701inline, 700linking to page, 701pseudo classes, 707sample, 701–702selectors, 705–706sizes, 703
properties listed, 708–712recommended reading, 720–721themes
integrating, 166–168server controls, 164–166styling, 142–150
curly braces ({})CSS, 143list items, binding, 227
cursor shape, 709
Ddata reads
binding syntax, 262–263connection, 6databases, 210data-bound controls
adding to page, 224DataList and Repeater, 236–243described, 6, 212–213DetailsView and FormView, 244–247GridView, 230–236postback performance, 543relational and hierarchical, optimizing, 265selection lists, 214, 224–230to separate business control or data component
(ObjectDataSource control), 364–369single record display, 213–214
with source controls, 216–217tabular, 213tree, 214–216VWD, configuring with, 217
described, 209multiple controls working together, 252–258source controls
binding and postback, 543connection string, hiding, 221–223data reading, 211–212described, 6, 217with parameters, 247–252properties, 218–221provider and connection string, details of, 223–224relational and hierarchical, optimizing, 265selection lists, adding items from, 226–230standards, 211–212
Wrox United application, 9data types
arrays and collectionschoosing which to use, 307collections, 303–307multi-dimensional, 302–303single dimensional, 301–302
assigning values, 292–293CLR types, 291constants, 309converting data
casting, 294–295to string values, 293using framework classes, 294
dates, working with, 297–301declaring variables, 292described, 289–291enumerations, 307–309events, 196–198null values, 295stored procedures, modifying, 536–540strings, working with, 295–297writes, 9XML data
creating, 258–260reading, 260–262
databaseAccess, 680connections
closing, 576comparisons and, 313–314performance, 531
729
database
Inde
x
25_588508 bindex.qxd 10/10/05 6:31 PM Page 729

database (continued)creating new with VWD Database Explorer, 691data reading, 210diagrams, 683–688events, triggering, 195–200MDF file, SQL databases saved as, 682–683non-listed, 679order, writing, 520–521records, changing, 267–272SQL Server, SQL databases on, 680–682Wrox United sample
errors, 51Fixtures table, 674Gallery table, 675Goals table, 673–674MatchReports table, 675News table, 676Opponents table, 675–676OrderLines table, 677–678Orders table, 677Players table, 672–673Products table, 678schema, 671–672
Database Explorer, VWDcreating new database, 691described, 25existing database, adding
Access, 680diagrams, 683–688MDF file, SQL databases saved as, 682–683non-listed, 679SQL Server, SQL databases on, 680–682
GridView control, adding, 231–232multiple controls, 253–257opening, 679stored procedures
data and parameters, 537–540examining (SPROC), 696–697modifying, 534
tablesexamining structure, 689–690existing, caution about observing and editing, 690new, creating and adding data, 691–692
uploading pictures, 281–286views, examining and creating, 692–696
data-bound controlsadding to page, 224DataList and Repeater, 236–243described, 6, 212–213
DetailsView and FormView, 244–247GridView
adding, 231–232described, 230–231paging and sorting, 233–236
postback performance, 543relational and hierarchical, optimizing, 265selection lists, 214, 224–230to separate business control or data component
(ObjectDataSource control), 364–369single record display, 213–214with source controls, 216–217tabular, 213tree, 214–216VWD, configuring with, 217
DataKeyNames, writing data, 266–267DataList control
binding, 262–263data-bound controls, 236–243events, 193item template, 505table, 213
datesassigning values, 292–293comparing, 313data type, 290events, canceling, 205–206working with, 297–301
debuggingall pages, tracing, 590application level tracing, 590–592described, 587enabling, 187individual pages, tracing, 587–589information, viewing, 589–590toolbar actions, listed, 597–599Wrox United sample, 592–597
Decimal data type, 290declaration, 188declaring variables, 292default themes, adding to Web.config file, 168–171defensive coding
assumptions, avoiding, 561–562described, 559–560parameter checking, 560–561
definition lists, 715deleting
canceling, 203–204columns, 231
730
database (continued)
25_588508 bindex.qxd 10/10/05 6:31 PM Page 730

events, 193records, 275–278rows by method, 336section of string, 297shopping cart items, 498
delivery address, 519deployment
checklist, 602–603compiling and running application, 603–604described, 7, 10files, organizing, 14maintenance
administrator, mailing, 621–622event monitoring, 617–619health monitoring, enabling, 616, 619–621instrumentation, 616scalability, 622
pre-compilation, 359problems, commonApp_Data permissions, enabling, 612–614offline application (App_Offline.htm), 614
publishing, 604–609testing
plan, writing, 615–616unit, 615
XCOPY, 609–611description, site map, 45design
accessibility, 178–179code, separating from, 351–352e-commerce product catalog, 467–468for performance, 552–553usability, 177–178
design, Content pagecreating, 40–41described, 31Master page link, 35site design
creating, 33–35, 40–41described, 31sample, 36
themes, applying, 159–163design, Master page
consistency and personalization, 5Content page link, 35site design
content placeholders, multiple, 43–44creating, 31–33CSS, importing, 36–40
described, 31multiple levels, 42–43sample, 35–36
themes, applying, 157–163web service, adding to application, 451–452Wrox United application, 9
Design Surface, VWD, 17–18Designing with Web Standards (Zeldman), 721DetailsView
data-bound controls, 244–247deleting records, 276–277multiple controls, 252–258single record, displaying, 213–214uses, 216writing data, 266
development tools. See VWD; VWD Database Explorer;VWD Solution Explorer
dictionariesDataKeyNames, 267ListDictionary collection, 546StringDictionary, 546
directories, sample, 14–16directory list, 715DISCO (local machine availability) web services
discovery, 448discount
applying, 309generating, 406
discovery, web servicedescribed, 447DISCO (local machine availability), 448UDDI (big company directory), 448web reference, adding, 448–450
displaycatalog, 470–471computer system requirement, 654CSS, 709
division operator (/)described, 311precedence, 316
Do loops, 320–322dockable windows, 13document structure, 713drag and drop, enabling, 20–21DropDownList
events, 193items, adding, 225multiple controls, 252–258multiple selections, 318–320
731
DropDownList
Inde
x
25_588508 bindex.qxd 10/10/05 6:31 PM Page 731

DropDownList(continued)server control, 83uses, 216
DVD drive, 654dynamic page content
client and server codes, 71–72described, 70–71
Eearlier or later dates, 313e-commerce
checkoutaddress/delivery details, 506application level tracing, 590–592credit card handling, 507–508debugging, 592–596logging exceptions, 577–580login, 506mechanics, 518–523order processing, 506page level tracing, 588–589sample, 509–518stages overview, 505–506, 508–509stateless nature of HTTP, 182–183trapping exceptions, 573–576
credit card ID, 507other improvements, 524pipeline, 466–467process described, 465–466product catalog
design, 467–468implementation, 468–475item page, 475–481stored procedures, 532–534structure, 467
secure transactions, 523shopping cart
adding function, 323–324, 500–505automating, 496–500CartItem object, 331, 334, 346, 482–483control, 492–496current user’s, storing data, 409described, 481discount, applying, 309methods, 336profile, 490–492WroxShoppingCart object, 483–490
Wrox United site, 10
editingconfiguration information and code files, 52–55data controls, 217data templates, 243shopping cart, 497SQL in stored procedure, 536
elementsCSS, 142HTML, 64–65table, 65–67
ElseIf statement, 318e-mail
address, validating, 566–568to administrator, 621–622automated, allowing, 51exceptions, sending to administrator, 580–582
embedded object, 717ems (em), 703encryption
secure transactions, 523web service security, 463
End directory, 14ending, string, 297endpoint, 429end-user license agreement (EULA), 656–657enumerations, 307–309equals sign (=)
comparison operator, 313statements, testing, 310
Error List window, 22–25errors
custom error pagesconfiguring, 585–587described, 585
debuggingtoolbar actions, listed, 597–599Wrox United sample, 592–597
defensive codingassumptions, avoiding, 561–562described, 559–560parameter checking, 560–561query parameters, 562–563
described, 7exception handling
best practices, 582described, 568–569Exception object, 569–570global, 583–585logging, 576–580
732
DropDownList (continued)
25_588508 bindex.qxd 10/10/05 6:31 PM Page 732

mailing, 580–582order processing, 522raising, 582trapping, 570–576Wrox site, 50–51
permissions problems, 612–614raising (Throw statement), 582site design, troubleshooting, 55tracing
all pages, 590application level, 590–592described, 587individual pages, 587–589information, viewing, 589–590
validationcontrols, 563–565described, 563login, 520multiple controls, 565–568
XHTML compliance, viewing, 70EULA (end-user license agreement), 656–657events
adding to page, 184–189available, listed, 191–193canceling, 203–206data, 196–198described, 181functions, 353–354global, 206–207handlers/functions
file, separate code, 353–354inheritance, 342
handling, 189–190HTML images, handling, 198–200indirect, 200–202manually creating, 194–195monitoring, 617–619postback
checking for, 190–191mechanics, 191
server-side, 183–184shopping cart, automating, 497Source View, 195Wrox United application, 9
Evjen, Bill (Professional ASP.NET 2.0), 383exception handling
best practices, 582described, 7, 568–569details, viewing, 594
Exception object, 569–570global, 583–585logging, 576–580mailing, 580–582order processing, 522raising (Throw statement), 582, 585trapping, 570–576Wrox site, 50–51
Exception object, 569–570exponentiation operator
described, 311precedence, 316
Extensible HyperText Markup Language (XHTML) rulesadvantages, 67page design, 68–70
Extensible Markup Language. See XML
FFan Club
discount, generating, 406roles, creating, 389–397security, configuring, 133–134theme, storing preferred, 418–424validating multiple controls, 565–568
fields, 23. See also DataList controlfiles
adding from computer and network, 12–13MDF file, SQL databases saved as, 682–683placeholders, writing data to, 579remote locations, 604separate codeApp_Code folder, 359compiling, 357–358creating, 354–357described, 352event handlers/functions, 353–354Page directive, 352–353partial classes, 353
single-file code, editing, 354site configuration information and code
described, 47–48editing in Web browser, 52–55Global.asax, 52Web.config, 48–52
skin (.skin)creating, 151–154, 157IDs, 156properties, 155
733
files
Inde
x
25_588508 bindex.qxd 10/10/05 6:31 PM Page 733

files (continued)uploading, 280viewing
Solution Explorer, 12TreeView, 101–102
Web.config
anonymous users and shopping carts, 491–492compiling and running application, 603connection string, hiding, 221–223custom error pages, configuring, 585–586debugging, enabling, 187default themes, adding, 168–171editing, 54–55mail, configuring, 581page-level authorization, 397–398profile, building, 408–417roles, enabling, 128site design information and code files, 48–52site settings, holding, 48stress testing, 556themes, adding default, 168–171tracing all pages, 590–592user-specific information, displaying, 121–123
XSD, 361–364FileUpload tool, 278–281firing events, 183fixed values, 309Fixtures sample
web servicesadding to application, 451–453creating, 441–444testing, 444–446WSDL contract, 446–447
Wrox United database, 674floating elements, 706–707, 710floating windows, 13floating-point numbers (Double data type), 290, 487folders, creating web site, 659–660fonts
CSS, 142, 164–165, 703–704, 710default, setting, 714HTML, 719–720style, setting, 140–141
football team sample site. See Wrox United siteFor Each loops, 323–328, 345For loops, 322Ford, obtaining information about, 6formatting dates, 297–301
formsauthentication, 129–131HTML tags, 66, 717trace information, 589
FormView
binding, 262–263data-bound controls, 216, 244–247single record, displaying, 213–214uses, 216
forward slash (/)division operator, 311precedence, 316
fragment caching, 7, 551frames, 717–718framework classes, 294Friend class, defining, 331front page
appearance, 137–138going to, 174
FrontPage (Microsoft), 8, 67functions
adding, e-commerce shopping cart, 500–505inheritance, 342menu links, 99navigation menu controls
adding, 94–98customizing, 100–101described, 94links, 99properties, adding, 98submenu items, viewing, 99
page design menu, 94–101separate code, 353–354
GGallery table, Wrox United
described, 675modifying, 237–240, 243uploading pictures, 281–286
gamesbinding source to list, 226–230XML data
creating, 258–260reading, 260–262
genericscode, 345–346typing, 540
734
files (continued)
25_588508 bindex.qxd 10/10/05 6:31 PM Page 734

GET commanddescribed, 182web service, transmitting, 434
getter, 333global errors, 583–585global events, 206–207Global.asax
configuration information and code files, 52exception handling, 583–585
Goals table, Wrox United database, 673–674graphics
background style, 708buttons, 161, 162catalog, displaying, 470–471disposal, need for, 528embedding, 717HTML
events, handling, 198–200tags, 65, 716–717
linking to database, 241, 243links, adding, 62local, listing, 79news items, adding, 195–200server control, 83thumbnails
creating, 528–530exceptions, trapping, 570–576
uploading, 278–286greater than operator (>), 313greater than or equal to operator (>=), 313GridView table
data-bound controlsadding, 212, 231–232binding, 262–263described, 230–231multiple, 252–258paging and sorting, 233–236performance, improving, 543sources, 216table, 213
deleting records, 276–278events, 193shopping cart, automating, 497styling, 700web services, binding, 453writing data, 266
grouping related code, 328–329, 439
Hhard disk requirement, 654hash marks (#)
color, hexadecimal, 176values, assigning, 292
Hashtable collectionkeys, 303, 304when to use, 546
header. See Master pagesheadings
CSS, 143, 144HTML tags, 713inline styles, 700
health monitoring, enabling, 616, 619–621hexadecimal color symbol, 176hexadecimal debug output, 597hierarchy
site mapdescribed, 5file, identifying, 51site design, 44–47
trace information, 589XML data, 258, 260
History node, site navigationcaching, 549–550creating, 92name, adding, 93
Home pageappearance, 137–138going to, 174
horizontal line (<hr />), 67, 714hot spot, shape of, 716HTML (HyperText Markup Language)
CSS properties, common attributes, 718–720document structure, 713drag and drop, enabling, 20–21elements, setting styles for, 702forms, 717frames, 717–718graphics, objects, multimedia, and scripts, 716–717history, 1images, handling, 198–200links, 716lists, 715page design
Content page, 35described, 64–65, 84–85
735
HTML (HyperText Markup Language)
Inde
x
25_588508 bindex.qxd 10/10/05 6:31 PM Page 735

HTML (HyperText Markup Language) (continued)elements table, 65–67layout, 63–64Master page, 33turning into server controls, 85–86when to use, 86XHTML rules, 68–70
paragraphs and lines, 714performance, improving, 552server controls converting ASP.NET code, 74–77table
body (<body>), 66displaying, 213tags, 716
text styles, 714–715titles and headings, 713
HTTP (HyperText Transfer Protocol) Web server architecture
described, 181–182headers, tracing, 589offline error, 614querystring, 247stateless nature, 182–183web service
calling, 433retrieving, 437–438using, 438
human error, deletes and, 275hyperlink
display text, changing, 80–81HTML tags, 716, 718server control, 83
HyperText Markup Language. See HTMLHyperText Transfer Protocol. See HTTP Web server
architecture
IID
CSS selectors, 705data source controls, 218, 232DataKeyNames, 266object references, 544order, creating, 521–522placeholder, 36, 43–44product
adding to shopping cart, 502displaying, 476index storing, 490linking, 468
shopping cart items, 337, 487skin file (.skin), 156
tracing, 555ID, user
code, 111coding, 120–121described, 5–6, 107e-commerce checkout, 506, 519events, 193home page sample, 3personalized site, 108–111user account configuration, 111–119viewing, 394–395Wrox United application, 9
identityauthentication
described, 129Forms model, 129–131
login controlscoding, 111, 120–121described, 107personalized site, 108–111user account configuration, 111–119
membershipconfiguration process, 128described, 124users, adding to roles, 124–128
need for, 105personalization
described, 121user-specific information, displaying, 121–123
securityauthentication, 106authorization, 106–107identity, 106logging into site, 107
Wrox United site, 131–135IDEs (Integrated Development Environments), 7.
See also VWD; VWD Database Explorer; VWD Solution Explorer
If...Then statement, 317–318IIS (Internet Information Server)
described, 11performance, 553setup
alias, creating, 662–664beginning, 660–661checking, 668–669
Windows authentication, 129
736
HTML (HyperText Markup Language) (continued)
25_588508 bindex.qxd 10/10/05 6:31 PM Page 736

IMA credit card handling, 507images
background style, 708buttons, 161, 162catalog, displaying, 470–471disposal, need for, 528embedding, 717HTML
events, handling, 198–200tags, 65, 716–717
linking to database, 241, 243links, adding, 62local, listing, 79news items, adding, 195–200server control, 83thumbnails
creating, 528–530exceptions, trapping, 570–576
uploading, 278–286in physical unit, 703indirect events, 200–202individual pages, tracing, 587–589information, viewing, 589–590inheritance
classes, 339–344CSS, 701
in-house credit card transactions, 507inline pages and controls, 184, 700input forms
authentication, 129–131HTML tags, 66, 717trace information, 589
insertingcanceling, 206events, 193items by method, 336–338new records, 273–275string at given position, 297
installation, Visual Web Developer Express, 654–659instrumentation, 616Integer data type
casting, 294–295described, 290
integer division operator (\)described, 311, 312precedence, 316
Integrated Development Environments (IDEs), 7.See also VWD; VWD Database Explorer; VWD Solution Explorer
IntelliSense featurelabel style, 168local images, listing, 79variable types, finding, 329web services discovery, adding, 447
intermediate code, 358Internet Information Server. See IISIP address, remote site, 606italic text, 714item page, e-commerce product catalog, 475–481items, list
array, binding to, 225–226selection, adding items from data source, 226–230tags, adding with individual, 225
JJavaScript
dynamic client code, 71HTML page (<script>), 67
JIT (Just In Time) compiling, 16
Kkeys
dictionary holding, 267HashTable collection, 303, 304
Llabel
design, 164–165server control, 83shopping cart, 498
layoutaccessibility, 178–179usability, 177–178
layout, Content pagecreating, 40–41described, 31Master page link, 35site design
creating, 33–35, 40–41described, 31sample, 36
themes, applying, 159–163layout, Master page
consistency and personalization, 5Content page link, 35
737
layout, Master page
Inde
x
25_588508 bindex.qxd 10/10/05 6:31 PM Page 737

layout, Master page (continued)site design
content placeholders, multiple, 43–44creating, 31–33CSS, importing, 36–40described, 31multiple levels, 42–43sample, 35–36
themes, applying, 157–163web service, adding to application, 451–452Wrox United application, 9
League Table web services, 454–458less than operator (<), 312less than or equal to operator (<=), 312levels, navigation site map, 92–93life cycle, web service
calling, 433–434illustrated, 433response
returning, 436–438using, 438
transmitting, 434–436lifetime, code, 344–345limited values, allowing, 307–309line break (<br />), 67, 714lines, HTML tags, 714links
CSS, 143, 145, 701display text, changing, 80–81HTML tags, 713, 716, 718images, adding, 62menu functions, 99page visibility, controlling, 399–406server control, 83
ListBox
adding items from data source, 228–230binding to array, 225–226events, 193multiple controls, 252server control, 83uses, 216
ListDictionary collection, 546listsArrayList collection
adding data, 303stored procedures, modifying, 540when to use, 546
auto-incrementing, 709
DataList
binding, 262–263data-bound controls, 236–243events, 193item template, 505table, 213
DropDownList
events, 193items, adding, 225multiple controls, 252–258multiple selections, 318–320server control, 83uses, 216
HTML tags, 715ListBox
adding items from data source, 228–230binding to array, 225–226events, 193multiple controls, 252server control, 83uses, 216
ListDictionary collection, 546marker, 711profile items, storing, 408–409selection
binding items to array, 225–226data source items, 226–230described, 224–225individual tags, 225single record display, 214
logging errors, 576–580, 585logical operators, 314–316login
coding, 111, 120–121described, 5–6, 107e-commerce checkout, 506, 519events, 193home page sample, 3personalized site, 108–111user account configuration, 111–119viewing, 394–395Wrox United application, 9
logout button, displaying, 109Long data type, 290loopsFor, 322For Each, 323–328While and Do, 320–322
738
layout, Master page (continued)
25_588508 bindex.qxd 10/10/05 6:31 PM Page 738

Mmailing
address, validating, 566–568to administrator, 621–622automated, allowing, 51exceptions, sending to administrator, 580–582
maintenanceadministrator, mailing, 621–622event monitoring, 617–619health monitoring, 616, 619–621instrumentation, 616scalability, 622
margins, 703, 710, 719Master pages
consistency and personalization, 5Content page link, 35site design
content placeholders, multiple, 43–44creating, 31–33CSS, importing, 36–40described, 31multiple levels, 42–43sample, 35–36
themes, applying, 157–163web service, adding to application, 451–452Wrox United application, 9
MatchReports table, Wrox United, 675Members sub-page, 45–46membership
age, requesting, 319–320authentication
described, 129Forms model, 129–131
configuration process, 128described, 124login controls
coding, 111, 120–121described, 107personalized site, 108–111user account configuration, 111–119
tracking and personalization, improving, 524users, adding to roles, 124–128
memory, page cachingdata invalidation, 7described, 7fragment technique, 551output technique, 549–550
performance and, 547–549post cache substitution, 551–552
memory requirement, 654Menu
data types and uses, 216dynamic web sites, 71events, 193home page sample, 3list, 715navigation controls
adding, 94–98customizing, 100–101described, 94links, 99properties, adding, 98submenu items, viewing, 99
need for, 5page design, 94–101
merchant number, credit card handling, 507messages
error, 24SOAP, 437web service security, 463
methodsclasses, 330, 336–338parameter checking, 560–561web, 439–441
MicrosoftASP, introduction of, 1–2web site design objectives, 2
Microsoft Access, 212Microsoft FrontPage, 8, 67Microsoft Intermediate Language (MSIL), 16, 358Microsoft .NET Framework, 1–2, 658Microsoft Passport authentication, 129, 131Microsoft SQL Server
connection details, 223–224data invalidation caching, 7fetching data, 531Query Builder, 535–536source, setting, 219
Microsoft Visual StudioASP.NET, relationship to, 8code-behind file, creating, 352debugging, 593–597stress testing tool, 556
Microsoft Visual Web Developer Express. See VWD;VWD Database Explorer; VWD Solution Explorer
739
Microsoft Visual Web Developer Express
Inde
x
25_588508 bindex.qxd 10/10/05 6:31 PM Page 739

Microsoft Windowsauthentication, 129, 131system requirement, 8
Microsoft Windows Explorerdescribed, 11global exception handling, 583–585Network Service account, adding Write permissions,
664–667web site folder setup, 659–664
Microsoft Windows XP Home Edition setup, 667minus sign (-), 311mm physical unit, 703Mod (modulus) operator
described, 311precedence, 316
mouse, 654MSIL (Microsoft Intermediate Language), 16, 358multi-dimensional arrays and collections, 302–303multimedia HTML tags, 716–717multiple levels, master page, 42–43multiple selectors, 706multiplication operator (*)
described, 311precedence, 316
Nname
displaying in site map, 92–93variables, declaring, 292
named sizes, 703namespaces
related code, grouping, 328–329web services, 439
NamevalueCollection, 546navigation
computer and network to add files, 12–13described, 5Design Surface, 18
navigation controlsGridView, 234menu functions
adding, 94–98customizing, 100–101described, 94links, 99properties, adding, 98submenu items, viewing, 99
site map, creating, 44–47
SiteMapPath
adding to page, 87–91breadcrumb functions, 86–87code, 92levels, modifying, 92–93
tree nodes (SiteMapDataSource)adding, 93–94described, 93
TreeView, 101–102.NET Framework (Microsoft), 1–2, 658Network Service, enabling, 664–667new records, adding to database, 273–275news items
home page sample, 3pictures, adding, 195–200updating with most recent, 377–382Wrox United database, 676
newsletter, sending out, 318node, data holding
described, 44tree controls, 214–216
not equal to operator (<>), 313Not operator, 314Notepad, 8, 353–354null values, 295numbered list, 715numbers
auto-incrementing lists, 709casting, 294–295comparison operator, 313counting actions, 322described, 290
OObject Linking and Embedding for Databases (OLEDB)
standard, 211object orientation programming (OOP)
importance, 329inheritance, 339
objects. See also componentscomparing, 313data type, 290disposal
described, 528Try/Catch, 528–530Using, 530
HTML tags, 716–717references, 544
740
Microsoft Windows
25_588508 bindex.qxd 10/10/05 6:31 PM Page 740

odd or even, testing, 311–312offline application (App_Offline.htm), 614old and new field values, holding, 266–267OLEDB (Object Linking and Embedding for Databases)
standard, 211online store
checkoutaddress/delivery details, 506application level tracing, 590–592credit card handling, 507–508debugging, 592–596logging exceptions, 577–580login, 506mechanics, 518–523order processing, 506page level tracing, 588–589sample, 509–518stages overview, 505–506, 508–509stateless nature of HTTP, 182–183trapping exceptions, 573–576
credit card ID, 507other improvements, 524pipeline, 466–467process described, 465–466product catalog
design, 467–468implementation, 468–475item page, 475–481stored procedures, 532–534structure, 467
secure transactions, 523shopping cart
adding function, 323–324, 500–505automating, 496–500CartItem object, 331, 334, 346, 482–483control, 492–496current user’s, storing data, 409described, 481discount, applying, 309methods, 336profile, 490–492WroxShoppingCart object, 483–490
Wrox United site, 10OOP (object orientation programming)
importance, 329inheritance, 339
openingtags, XML, 52VWD Database Explorer, 679
web browser, 54web sites and pages in VWD Express, 14
operating system requirement, 8, 654operators
arithmetic, 311–312comparison, 312–314logical, 314–316precedence, 316–317strings, joining together, 310–311
Opponents table, Wrox United database, 675–676Or operator, 314Oracle databases. See also SqlDataSource controlorder processing, e-commerce, 506ordered list, 715OrderLines table, Wrox United database, 677–678Orders table, Wrox United database, 677OrElse operator, 314, 315output page caching, 549–550overlapping elements, 712overloading
constructors, 332error logging method, 580
Ppadding, 711page
authorization, configuringdescribed, 397–398visibility, controlling, 399–406
breaks, 711caching, 547–549creating, opening, and using, 14CSS
colors, 704described, 699–700floating elements, 706–707fonts, 703–704inheritance, 701inline, 700linking to page, 701pseudo classes, 707sample, 701–702sizes, 703
custom errorconfiguring, 585–587described, 585
data-bound controls, adding, 224events, adding, 184–190
741
page
Inde
x
25_588508 bindex.qxd 10/10/05 6:31 PM Page 741

page (continued)GridView controls, 233–236item, e-commerce product catalog, 475–481running in VWD Express, 16–17
page designdynamic content
client and server codes, 71–72described, 70–71
HTML controlsdescribed, 64–65, 84–85elements table, 65–67layout, 63–64as server controls, 85–86when to use, 86XHTML rules, 68–70
server controlsadding in Design View, 74–76adding in Source View, 78–81code, displaying, 76–77, 81–83described, 72, 74files, viewing (TreeView), 101–102menu functions, 94–101navigation (SiteMapPath), 86–93standard, 83–84Toolbox, 72–73tree nodes (SiteMapDataSource), 93–94when to use, 86
single, styling, 144SiteMapPath navigation controls, adding, 87–91static
creating, 58–63described, 57–58HTML layout, 63–64
themes, applying, 157–163title bar (<title>), 67
Page directive, 352–353paragraphs
CSS inheritance, 701HTML tags, 65, 714
parametersdata source controls, 247–252error checking, 560–561stored procedures, 536–540
parent page controlsconsistency and personalization, 5Content page link, 35site design
content placeholders, multiple, 43–44creating, 31–33CSS, importing, 36–40
described, 31multiple levels, 42–43sample, 35–36
themes, applying, 157–163web service, adding to application, 451–452Wrox United application, 9
Parse method, 294partial classes, 353Passport authentication (Microsoft), 129, 131password. See also login
forgotten, sending in e-mail, 51, 519security, 107
payment gateways, credit card handling, 507PayPal, 507, 508percentages, 703performance
caching, 547database connections, 531described, 7designing for, 552–553object disposal
described, 528Try/Catch, 528–530Using, 530
page cachingdescribed, 547–549fragment technique, 551output technique, 549–550post cache substitution, 551–552
pages and codecollections, choosing correct, 546data binding and postback, 543object references, 544strings, joining, 544–546
session state, 541stored procedures
creating and using, 532–533data and parameters, modifying, 536–540mechanics, 534modifying, 534need, 531–532Query Builder, 535–536
strongly typed collections, 540–541testing
described, 553performance monitor tool, 557stress testing tools, 556tracing, 554–556
view state, 542
742
page (continued)
25_588508 bindex.qxd 10/10/05 6:31 PM Page 742

performance monitor tool, 557permissions
adding by roles, 127–128Network Service account, adding, 664–667users, adding directly to site, 117, 120–121
personalizationdescribed, 5, 121logged-in users, displaying, 408login controls, 108–111user-specific information, displaying, 121–123
physical units (cm, in, mm), 703pictures
background style, 708buttons, 161, 162catalog, displaying, 470–471disposal, need for, 528embedding, 717HTML
events, handling, 198–200tags, 65, 716–717
linking to database, 241, 243links, adding, 62local, listing, 79news items, adding, 195–200server control, 83thumbnails
creating, 528–530exceptions, trapping, 570–576
uploading, 278–286pipeline
e-commerce, 466–467order processing, 506
pixels (px), 703placeholders
described, 31ID, 36multiple on master pages, 43–44styling, 160writing data to file, 579
plan, writing, 615–616Players table, Wrox United site
binding to data source, 364–367canceling changes, 202–206changing, 200–202, 693–694database, 672–673
plus sign (+), 311points (pt), 703position, characters within string, 297post cache substitution, 551–552
POST command, 182, 183postback
data controls, multiple, 252events
checking for, 190–191mechanics, 191
performance, 543precedence, operator, 316–317preferences, storing, 418–424previous sites visited
caching, 549–550creating, 92name, adding, 93
private class, 331problemsApp_Data permissions, enabling, 612–614custom error pages
configuring, 585–587described, 585
debuggingtoolbar actions, listed, 597–599Wrox United sample, 592–597
defensive codingassumptions, avoiding, 561–562described, 559–560parameter checking, 560–561query parameters, 562–563
described, 7exception handling
best practices, 582described, 568–569Exception object, 569–570global, 583–585logging, 576–580mailing, 580–582order processing, 522raising, 582trapping, 570–576Wrox site, 50–51
offline application (App_Offline.htm), 614permissions problems, 612–614raising (Throw statement), 582site design, troubleshooting, 55tracing
all pages, 590application level, 590–592described, 587individual pages, 587–589information, viewing, 589–590
743
problems
Inde
x
25_588508 bindex.qxd 10/10/05 6:31 PM Page 743

problems (continued)validation
controls, 563–565described, 563login, 520multiple controls, 565–568
XHTML compliance, viewing, 70procedures, stored
examining with VWD Database Explorer, 696–697modifying, 536–540performance
creating and using, 532–533mechanics, 534modifying, 534need, 531–532
processing directive, 438processor requirement, 653product catalog
design, 467–468implementation, 468–475improving, 524item page, 475–481stored procedures, 532–534structure, 467
Products table, Wrox United database, 678Professional ASP.NET 2.0 (Evjen), 383profiles
building, 408–409described, 385displaying personalized information, 121–123e-commerce shopping cart, 490–492enabling, 407–408preferences, storing, 418–424updating, 414–415
propertiesclasses, 330, 332–334CSS listed, 708–712data source controls, 218–221events, 192mail, configuring, 581menu functions, 98public variables versus, 335server controls, 80shared classes, 338shopping cart objects, 487–488skin file (.skin), 155Table control, 98
Properties window, VWD Express, 21–22protected class, 331Protected Friend class, defining, 331provider, data source control, 223–224pseudo classes, CSS, 707pt (points), 703public class
defining, 331web services, 439
public variables, 335publishing application, 604–609px (pixels), 703
QQuery Builder, 535–536query parameters, 562–563querystring
data source control parameter, 247, 249–250output caching, 550trace information, 589
Queue collection, 303, 546quotation marks (“)
CSS, 711values, assigning, 292
quotations, formatting, 714
RRadioButton
events, 193server control, 83
RadioButtonList events, 193raising events, 183raising exceptions (Throw statement), 582, 585RAM requirement, 654reading data
binding syntax, 262–263connection, 6databases, 210data-bound controls
adding to page, 224DataList and Repeater, 236–243described, 6, 212–213DetailsView and FormView, 244–247GridView, 230–236postback performance, 543
744
problems (continued)
25_588508 bindex.qxd 10/10/05 6:31 PM Page 744

relational and hierarchical, optimizing, 265selection lists, 214, 224–230to separate business control or data component
(ObjectDataSource control), 364–369single record display, 213–214with source controls, 216–217tabular, 213tree, 214–216VWD, configuring with, 217
described, 209multiple controls working together, 252–258source controls
binding and postback, 543connection string, hiding, 221–223data reading, 211–212described, 6, 217with parameters, 247–252properties, 218–221provider and connection string, details of, 223–224relational and hierarchical, optimizing, 265selection lists, adding items from, 226–230standards, 211–212
tables, increasing size to ease, 686Wrox United application, 9XML, 260–262
read-only class properties, 334rearranging tables, 685records, relational database, 210reference, web, 448–450relational databases
Access, 680connections
closing, 576comparisons and, 313–314performance, 531
creating new with VWD Database Explorer, 691data reading, 210described, 210diagrams, 683–688events, triggering, 195–200MDF file, SQL databases saved as, 682–683non-listed, 679order, writing, 520–521records, changing, 267–272SQL Server, SQL databases on, 680–682SqlDataSource control
deleting records, 278described, 211
events, 193grid, updating, 202inserting records, 275ListBox, adding items, 229matching, 216stored procedures, 531–534
viewing relationships, 688Wrox United sample
errors, 51Fixtures table, 674Gallery table, 675Goals table, 673–674MatchReports table, 675News table, 676Opponents table, 675–676OrderLines table, 677–678Orders table, 677Players table, 672–673Products table, 678schema, 671–672
remotefile locations, 604PocketPC web services application, 458–463site, deploying to, 606
removingcolumns, 231events, 193records, 275–278rows by method, 336section of string, 297shopping cart items, 498
renderingcolors, 176HTML code, 65
Repeater data-bound control, 236–243replacing characters in string, 297required fields, validating, 565–568Research department Master page, 42–43resource use
caching, 547database connections, 531described, 7designing for, 552–553object disposal
described, 528Try/Catch, 528–530Using, 530
745
resource use
Inde
x
25_588508 bindex.qxd 10/10/05 6:31 PM Page 745

resource use (continued)page caching
described, 547–549fragment technique, 551output technique, 549–550post cache substitution, 551–552
pages and codecollections, choosing correct, 546data binding and postback, 543object references, 544strings, joining, 544–546
session state, 541stored procedures
creating and using, 532–533data and parameters, modifying, 536–540mechanics, 534modifying, 534need, 531–532Query Builder, 535–536
strongly typed collections, 540–541testing
described, 553performance monitor tool, 557stress testing tools, 556tracing, 554–556
view state, 542response, web services
returning, 436–438using, 438
restarting application, 597roles
coding, 406–407described, 5–6, 385importance, 386–387login controls, 111–119in Wrox United
described, 387–388Fan Club, 389–397viewing, 10
round buttonevents, 193list events, 193server control, 83
rows, databasebinding to server control, 199described, 210HTML tags, 716
running application, 603–604
Ssample site
checkoutapplication level tracing, 590–592debugging, 592–596exceptions, trapping, 573–576logging exceptions, 577–580page level tracing, 588–589
components, 9–10Content pages, creating, 40–41creating on desktop, 10creating with two practice pages, 15–16databases
Fixtures table, 674Gallery table, 237–240, 243, 675Goals table, 673–674MatchReports table, 244–247, 675News table, 676Opponents table, 675–676OrderLines table, 677–678Orders table, 677Players table, 364–367, 672–673Products table, 678schema, 671–672
debugging, 592–597design
objectives, 30themes, 171–177user news controls, 377–382user profiles, building, 410–418Web.config file, viewing, 49–52
events, triggering from database, 195–200exception handling
custom error pages, 586–587global, 583–585
health monitoring, 619–621identity, 131–135navigation controlsMenu, 94–99SiteMapPath, 86–93TreeView, 101–102
news user control, 377–382newsletter, sending out, 318publishing
with VWD, 605–609with XCOPY, 610–611
results and fixtures, web service returning, 441–446
746
resource use (continued)
25_588508 bindex.qxd 10/10/05 6:31 PM Page 746
rolesdescribed, 387–388Fan Club, 389–397
sample, introduced, 3–4setup, 664Site Map, creating, 46–47style sheet, 702web service
adding to application, 451–453League Table mini view, creating, 454–458for PocketPC, 458–463
Sbyte data type, 290scalability, 622schema
Wrox United database, 671–672XSD file, 361–364
Schengili-Roberts, Keith (Core CSS Second Edition),720
scriptsHTML tags, 67, 716–717Master page, 33
secure transactions, e-commerce, 523security
authentication, 106authorization, 106–107Cassini web server, limitations of, 11described, 5–6identity, 106logging into site, 107web services, 463Wrox United application
configuring, 132–135described, 9settings in, 50
Select statement, 319selection list
binding items to array, 225–226data source items, 226–230described, 224–225individual tags, 225single record, displaying, 214
selectorscontextual, 706described, 705–706multiple, 706
serialization, 434server controls
custom, 382–383described, 5
events, 183–184HTML page design controls as, 85–86page design
adding in Design View, 74–76adding in Source View, 78–81code, displaying, 76–77, 81–83described, 72, 74files, viewing (TreeView), 101–102menu functions, 94–101navigation (SiteMapPath), 86–93standard, 83–84Toolbox, 72–73tree nodes (SiteMapDataSource), 93–94when to use, 86
themes, 164–166Wrox United application, 9
serversCassini
ASP.NET, running, 8page, running, 16–17setup, checking with, 668VWD Express, 11
dynamic content, 71–72IIS
described, 11performance, 553setup, 660–661, 662–664, 668–669Windows authentication, 129
log, viewing, 576other, relationship to, 8SharePoint Portal Server, 408SQL Server
connection details, 223–224data invalidation caching, 7fetching data, 531Query Builder, 535–536source, setting, 219
stateless nature of HTTP, 182services, web
described, 6, 427–428discovery
described, 447DISCO (local machine availability), 448UDDI (big company directory), 448web reference, adding, 448–450
drawbacks, 428Fixtures sample
adding to application, 451–453creating, 441–444
747
services, web
Inde
x
25_588508 bindex.qxd 10/10/05 6:31 PM Page 747

services, web (continued)testing, 444–446WSDL contract, 446–447
League Table mini view, 454–458life cycle
calling, 433–434illustrated, 433response, returning, 436–438response, using, 438transmitting, 434–436
namespaces, 439processing directive, 438public class, 439remote PocketPC application, 458–463security, 463third-party, consuming, 429–432web methods, 439–441
session state, 541setup
checking with VWD and Cassini, 668folders, creating web site, 659–660IIS
alias, creating, 662–664beginning, 660–661checking, 668–669
Network Service, enabling, 664–667system requirements
CD or DVD drive, 654display, 654hard disk, 654mouse, 654operating system, 654processor, 653RAM, 654
troubleshooting, 670Visual Web Developer Express installation, 654–659Windows XP Home Edition, 667Wrox United, 664
shared methods and properties, 338SharePoint Portal Server, 408shopping cart
adding function, 323–324, 500–505anonymous, 424–425automating, 496–500CartItem object, 331, 334, 346, 482–483control, 492–496current user’s, storing data, 409described, 481discount, applying, 309methods, 336
profile, 490–492visibility, 524writing items to database, 313–314WroxShoppingCart object, 483–490
Short data type, 290sign-in
coding, 111, 120–121described, 5–6, 107e-commerce checkout, 506, 519events, 193home page sample, 3personalized site, 108–111user account configuration, 111–119viewing, 394–395Wrox United application, 9
Simple Object Access Protocol. See SOAPSimplified Mail Transfer Protocol (SMTP)
administrator, mailing, 621–622declaring, 51web service, calling, 433
Single data type, 290single dimensional arrays and collections, 301–302single record display, 213–214single-file scenario, 351site deployment
checklist, 602–603compiling and running application, 603–604described, 7, 10files, organizing, 14maintenance
administrator, mailing, 621–622event monitoring, 617–619health monitoring, enabling, 616, 619–621instrumentation, 616scalability, 622
pre-compilation, 359problems, commonApp_Data permissions, enabling, 612–614offline application (App_Offline.htm), 614
publishing, 604–609testing
plan, writing, 615–616unit, 615
XCOPY, 609–611site design
concepts, general, 47configuration information and code files
described, 47–48editing in Web browser, 52–55
748
services, web (continued)
25_588508 bindex.qxd 10/10/05 6:31 PM Page 748

Global.asax, 52Web.config, 48–52
content pagescreating, 33–35, 40–41described, 31sample, 36
described, 29errors, troubleshooting, 55implementation phase, 30master pages
content placeholders, multiple, 43–44creating, 31–33CSS, importing, 36–40described, 31multiple levels, 42–43sample, 35–36
process, 30site map, 44–47WROX United sample objectives, 30
site mapdescribed, 5file, identifying, 51site design, 44–47
site membershipage, requesting, 319–320authentication
described, 129Forms model, 129–131
configuration process, 128described, 124login controls
coding, 111, 120–121described, 107personalized site, 108–111user account configuration, 111–119
tracking and personalization, improving, 524users, adding to roles, 124–128
SiteMapDataSource server controlcustomizing, 100Menu control, 94–95, 99page design, 93–94TreeView, 101–102
SiteMapDataSource tree nodes, 93–94SiteMapPath
navigation controlsadding to page, 87–91breadcrumb functions, 86–87code, 92levels, modifying, 92–93
server controlsdata uses, 216page design, 158
skin file (.skin)creating, 151–154, 157IDs, 156properties, 155
SMTP (Simplified Mail Transfer Protocol)administrator, mailing, 621–622declaring, 51web service, calling, 433
SOAP (Simple Object Access Protocol)described, 6retrieving, 437transmitting, 434–435using, 438WSDL contract, 446–447
soccer time sample site. See Wrox United sitesoftware, server, 8Solution Explorer, VWD
componentizationcode-behind file, creating, 355–357user control, creating, 373–376
Content page, creating, 33–35data controls with parameters, 249–252described, 11–13e-commerce site, creating
adding to shopping cart, 493–496check out, 509–518creating shopping cart, 483–490product page, building, 475–481
Master page, creating, 31themes, viewing, 161–163web service
adding to application, 451–453League Table mini view, creating, 454–458
Web.config file, editing, 54–55SortedList collection, 303, 546sorting GridView data, 233–236sound, playing, 716source controls, 216–217Source View
events, 195server controls, adding, 78–81
sources, dataAccess, 680connections
closing, 576comparisons and, 313–314performance, 531
749
sources, data
Inde
x
25_588508 bindex.qxd 10/10/05 6:31 PM Page 749

sources, data (continued)creating new with VWD Database Explorer, 691data reading, 210diagrams, 683–688events, triggering, 195–200MDF file, SQL databases saved as, 682–683non-listed, 679order, writing, 520–521records, changing, 267–272SQL Server, SQL databases on, 680–682Wrox United sample
errors, 51Fixtures table, 674Gallery table, 675Goals table, 673–674MatchReports table, 675News table, 676Opponents table, 675–676OrderLines table, 677–678Orders table, 677Players table, 672–673Products table, 678schema, 671–672
speedcaching, 547database connections, 531described, 7designing for, 552–553object disposal
described, 528Try/Catch, 528–530Using, 530
page cachingdescribed, 547–549fragment technique, 551output technique, 549–550post cache substitution, 551–552
pages and codecollections, choosing correct, 546data binding and postback, 543object references, 544strings, joining, 544–546
session state, 541stored procedures
creating and using, 532–533data and parameters, modifying, 536–540mechanics, 534modifying, 534
need, 531–532Query Builder, 535–536
strongly typed collections, 540–541testing
described, 553performance monitor tool, 557stress testing tools, 556tracing, 554–556
view state, 542SQL injection, 562–563SQL Server (Microsoft)
connection details, 223–224data invalidation caching, 7fetching data, 531Query Builder, 535–536source, setting, 219
SqlConnection, 531SqlDataSource control
deleting records, 278described, 211events, 193grid, updating, 202inserting records, 275ListBox, adding items, 229matching, 216stored procedures, 531–534
Stack collection, 303, 546start/end tags, 33starting, string, 297stateless nature, HTTP, 182–183statements
decisionsmultiple selections, 318–320single selections, 317–318
loopsFor, 322For Each, 323–328While and Do, 320–322
operatorsarithmetic, 311–312comparison, 312–314logical, 314–316precedence, 316–317strings, joining together, 310–311
static page designcreating, 58–63described, 57–58HTML layout, 63–64
750
sources, data (continued)
25_588508 bindex.qxd 10/10/05 6:31 PM Page 750

stepping out of method, 597stock, checking for item, 506store, online
checkoutaddress/delivery details, 506application level tracing, 590–592credit card handling, 507–508debugging, 592–596logging exceptions, 577–580login, 506mechanics, 518–523order processing, 506page level tracing, 588–589sample, 509–518stages overview, 505–506, 508–509stateless nature of HTTP, 182–183trapping exceptions, 573–576
credit card ID, 507other improvements, 524pipeline, 466–467process described, 465–466product catalog
design, 467–468implementation, 468–475item page, 475–481stored procedures, 532–534structure, 467
secure transactions, 523shopping cart
adding function, 323–324, 500–505automating, 496–500CartItem object, 331, 334, 346, 482–483control, 492–496current user’s, storing data, 409described, 481discount, applying, 309methods, 336profile, 490–492WroxShoppingCart object, 483–490
Wrox United site, 10stored procedures
examining with VWD Database Explorer, 696–697modifying, 536–540performance
creating and using, 532–533mechanics, 534modifying, 534need, 531–532
storingcatalog images, 487ID product index, 490list profile items, 408–409user preferences, 418–424
streams, 579stress testing tools, 556strikethrough text, 715StringCollection, 303, 304, 546StringDictionary, 546strings
data type, described, 289, 290declaring, 292joining together, 310–311, 544–546text, line break (<br />), 67values
assigning, 292converting, 293
working with, 295–297strongly typed collections, 540–541style attribute, 138–141stylesheet. See CSSstyling best practices
accessibility, 178–179usability, 177–178
styling themesCSS, 142–150style attribute, 138–141
submenu items, viewing, 99subscript, 715substring, returning, 297subtraction operator (-)
described, 311, 312precedence, 316
superscript, 715system performance
caching, 547database connections, 531described, 7designing for, 552–553object disposal
described, 528Try/Catch, 528–530Using, 530
page cachingdescribed, 547–549fragment technique, 551output technique, 549–550post cache substitution, 551–552
751
system performance
Inde
x
25_588508 bindex.qxd 10/10/05 6:31 PM Page 751

system performance (continued)pages and code
collections, choosing correct, 546data binding and postback, 543object references, 544strings, joining, 544–546
session state, 541stored procedures
creating and using, 532–533data and parameters, modifying, 536–540mechanics, 534modifying, 534need, 531–532Query Builder, 535–536
strongly typed collections, 540–541testing
described, 553performance monitor tool, 557stress testing tools, 556tracing, 554–556
view state, 542system requirements
CD or DVD drive, 654display, 654hard disk, 654mouse, 654operating system, 654processor, 653RAM, 654
Ttable
adding, 212, 231–232, 684, 691–692anchor element (</table><a>), 66binding, 262–263data-bound controls, 213deleted records, 275described, 230–231empty cells, displaying, 709existing, observing and editing, 690HTML tags, 716multiple, 252–258new, creating and adding data, 60–61, 691–692padding and attributes, modifying, 61–62paging and sorting, 233–236performance, improving, 543populating, 692relational databases, 210, 216
rows and cells (<tr> and <td>), 66sources, 216structure, examining, 689–690table, 213
tags. See also HTMLselection lists, adding items with individual, 225server controls, 72user controls, 372XHTML
advantages, 67page design, 68–70
XML opening and closing, 52templates. See also classes
data layoutappearance, 244binding, 262–263described, 236–237editing, 243
DataList item, 505SOAP message, 437
testingdata source, 220, 228Fixtures web service, 444–446performance, 553plan, writing, 615–616statements, 310unit, 615
text. See also fonts; label; Master pagesalignment, 712box, splitting into components, 304–305characters (<span>), 66color, 701–702, 704data type, 289, 290HTML tags, 714–715hyperlink display, changing, 80–81line break (<br />), 67paragraph block (<div>), 65server control, 83spacing, 710style, defining, 176
themesapplying to pages, 157–163coding, 163–164creating, 151–157CSS
integrating, 166–168server controls, 164–166
customizing, 164default, adding to Web.config file, 168–171
752
system performance (continued)
25_588508 bindex.qxd 10/10/05 6:31 PM Page 752

described, 151layout and styling best practices
accessibility, 178–179usability, 177–178
stylesheet and customization, 166styling
CSS, 142–150described, 137–138style attribute, 138–141
successful use, 137users, storing preferred, 418–424Wrox United site sample, 171–177
third-party web services, consuming, 429–432three-tier application data layers, 360–361thumbnail images
creating, 528–529exceptions, trapping, 570–576
timecookies, expiring, 130–131output caching, 550
titlesHTML tags, 713site map, 45tables, 687
toolbar actions, debugging, 597–599Toolbox
HTML controls, 84–85server controls, 72–73VWD Express, 11–12, 18–21
totaling price in cart, 490tracing
all pages, tracing, 590application level tracing, 590–592described, 587individual pages, tracing, 587–589information, viewing, 589–590stack, viewing, 598testing performance, 554–556
transactiondescribed, 574–575rolling back, 575–576
transmitting web services, 434–436trapping errors, 570–576tree nodes (SiteMapDataSource)
navigation controlsadding, 93–94described, 93
server controls, 93–94
TreeView
data-bound controls, 214–216navigation controls, 101–102server controls
data type and uses, 216page design, 101–102
styling, 156–157, 158XML data, reading, 260–262
troubleshootingApp_Data permissions, enabling, 612–614offline application (App_Offline.htm), 614setup, 670
true/falselogical operators, 314–316single selections, 317–318
Try/Catch object disposal, 528–530two-tier application data layers, 359–360type styles
CSS, 142, 164–165, 703–704, 710default, setting, 714HTML, 719–720style, setting, 140–141
UUDDI (big company directory) web services
discovery, 448UK e-commerce ID sites, 507underline text, 715underscore (_), 318Unicode text, 712Uniform Resource Locator. See URLunit testing, 615unordered list, 715unsigned data types, 290updating
canceling, 206data records, 268–269events, 193, 202total price of cart items, 489, 504user profiles, 414–415
uploading pictures, 278–286URL (Uniform Resource Locator)
arbitrary assignment, 669catalog images
adding to shopping cart, 502displaying, 470–471storing, 487
HTML tag, 713
753
URL (Uniform Resource Locator)
Inde
x
25_588508 bindex.qxd 10/10/05 6:31 PM Page 753

URL (Uniform Resource Locator) (continued)hyperlinks, mapping, 82–83querystring, 247, 251remote site, deploying, 606site, accessing by, 74site map, 45web service, calling, 433
U.S. e-commerce ID sites, 507usability, layout and styling, 177–178user account
coding, 406–407described, 5–6, 385importance, 386–387login controls, 111–119in Wrox United
described, 387–388Fan Club, 389–397viewing, 10
user authenticationanonymous shopping carts, checking out, 506database access, 210–211described, 130Forms model, 130–132security, 106web service security, 463
user authorizationpage-level, configuring
described, 397–398visibility, controlling, 399–406
rolescoding, 406–407described, 5–6, 385importance, 386–387login controls, 111–119Wrox United Fan Club, 10, 387–397
security, 106–107user controls. See also selection list
creating, 373–376described, 370–372
user input formsauthentication, 129–131HTML tags, 66, 717trace information, 589
user profilesbuilding, 408–409described, 385displaying personalized information, 121–123e-commerce shopping cart, 490–492enabling, 407–408
preferences, storing, 418–424updating, 414–415
Using statementfetching data, 531object disposal, 530
utility methods, 338
Vvalidation errors
controls, 563–565described, 563multiple controls, 565–568
values, assigning, 292–293variables
arrays and collectionschoosing which to use, 307collections, 303–307multi-dimensional, 302–303single dimensional, 301–302
assigning values, 292–293CLR types, 291constants, 309converting data
casting, 294–295to string values, 293using framework classes, 294
dates, working with, 297–301debugging, 598declaring variables, 292described, 289–291enumerations, 307–309null values, 295scope and lifetime, 344–345strings, working with, 295–297
VB.NET web service, 440VBScript, 67video clip, 717View Page Source link, 3–4view state performance, 542views
Design or Source, choosing, 18examining and creating, 692–696
visibility, page, 399–406Visual Basic
continued line, 318history, 14null values, representing, 295types, mapping to CLR, 291
754
URL (Uniform Resource Locator) (continued)
25_588508 bindex.qxd 10/10/05 6:31 PM Page 754

Visual Studio (Microsoft)ASP.NET, relationship to, 8code-behind file, creating, 352debugging, 593–597stress testing tool, 556
VWD (Visual Web Developer Express) DatabaseExplorer
creating new database, 691described, 25existing database, adding
Access, 680diagrams, 683–688MDF file, SQL databases saved as, 682–683non-listed, 679SQL Server, SQL databases on, 680–682
GridView control, adding, 231–232multiple controls, 253–257opening, 679stored procedures
data and parameters, 537–540examining (SPROC), 696–697modifying, 534
tablesexamining structure, 689–690existing, caution about observing and editing, 690new, creating and adding data, 691–692
uploading pictures, 281–286views, examining and creating, 692–696
VWD (Visual Web Developer Express)adding to shopping cart, 501–505caching output, 549–550Cassini web server, 11creating, opening, an using web sites and pages, 14CSS and themes, integrating, 166–168data reading controlsGridView control, adding, 231–232ListBox control, adding, 230personalized site, 108–111postback, checking for, 190–191security, 132–135setup, checking with, 668static page, creating, 58–63style attribute, 138–141XHTML standards, complying with, 69–70XML data, 258–260
data writing controls, 267–272Database Explorer, 25data-bound controls, configuring with, 217debugging, 593–597
deleting records, 276–278described, 2, 8, 10–11design surface, 17–18Error List window, 22–25events
adding to page, 184–190available, 192canceling changes, 203–204grid, updating, 201–202triggering from database, 196–198
installation, 654–659page, running, 16–17product catalog, building, 468–475Properties window, 21–22publishing site, 604–609sample code directories, 14–16single-file code, editing, 354Solution Explorer, 11–13Toolbox, 18–21tracing, 554uploading files, 280validation controls, 563–565web services discovery, adding, 447–450
VWD (Visual Web Developer) Solution Explorercomponentization
code-behind file, creating, 355–357user control, creating, 373–376
Content page, creating, 33–35data controls with parameters, 249–252described, 11–13e-commerce site, creating
adding to shopping cart, 493–496check out, 509–518creating shopping cart, 483–490product page, building, 475–481
Master page, creating, 31themes, viewing, 161–163web service
adding to application, 451–453League Table mini view, creating, 454–458
Web.config file, editing, 54–55
Wwarnings, 24weather service, 429–432web browser
editing configuration information and code files, 52–55HTML understanding, 181
755
web browser
Inde
x
25_588508 bindex.qxd 10/10/05 6:31 PM Page 755

web browser (continued)HTTP GET and POST commands, 182server controls, converting, 82uploading pictures, 278–281XHTML, importance of, 69
web pageauthorization, configuring
described, 397–398visibility, controlling, 399–406
breaks, 711caching, 547–549creating, opening, and using, 14CSS
colors, 704described, 699–700floating elements, 706–707fonts, 703–704inheritance, 701inline, 700linking to page, 701pseudo classes, 707sample, 701–702sizes, 703
custom errorconfiguring, 585–587described, 585
data-bound controls, adding, 224events, adding, 184–190GridView controls, 233–236item, e-commerce product catalog, 475–481running in VWD Express, 16–17
web page designdynamic content
client and server codes, 71–72described, 70–71
HTML controlsdescribed, 64–65, 84–85elements table, 65–67layout, 63–64as server controls, 85–86when to use, 86XHTML rules, 68–70
server controlsadding in Design View, 74–76adding in Source View, 78–81code, displaying, 76–77, 81–83described, 72, 74files, viewing (TreeView), 101–102
menu functions, 94–101navigation (SiteMapPath), 86–93standard, 83–84Toolbox, 72–73tree nodes (SiteMapDataSource), 93–94when to use, 86
single, styling, 144SiteMapPath navigation controls, adding, 87–91static
creating, 58–63described, 57–58HTML layout, 63–64
themes, applying, 157–163title bar (<title>), 67
web Page directive, 352–353web server architecture, HTTP
described, 181–182headers, tracing, 589offline error, 614querystring, 247stateless nature, 182–183web service
calling, 433retrieving, 437–438using, 438
web servicesdescribed, 6, 427–428discovery
described, 447DISCO (local machine availability), 448UDDI (big company directory), 448web reference, adding, 448–450
drawbacks, 428Fixtures sample
adding to application, 451–453creating, 441–444testing, 444–446WSDL contract, 446–447
League Table mini view, 454–458life cycle
calling, 433–434illustrated, 433response, returning, 436–438response, using, 438transmitting, 434–436
namespaces, 439processing directive, 438public class, 439
756
web browser (continued)
25_588508 bindex.qxd 10/10/05 6:31 PM Page 756

remote PocketPC application, 458–463security, 463third-party, consuming, 429–432web methods, 439–441
Web Services Description Language (WSDL) contract,446–447
Web Site Administration Toollaunching, 48, 52Properties window, 53security settings, 112–117user accounts
administering, 84login, creating, 120
users, adding to roles, 124–128web browser, opening, 54
web site deploymentchecklist, 602–603compiling and running application, 603–604described, 7, 10files, organizing, 14maintenance
administrator, mailing, 621–622event monitoring, 617–619health monitoring, enabling, 616, 619–621instrumentation, 616scalability, 622
pre-compilation, 359problems, commonApp_Data permissions, enabling, 612–614offline application (App_Offline.htm), 614
publishing, 604–609testing
plan, writing, 615–616unit, 615
XCOPY, 609–611web site design
concepts, general, 47configuration information and code files
described, 47–48editing in Web browser, 52–55Global.asax, 52Web.config, 48–52
content pagescreating, 33–35, 40–41described, 31sample, 36
described, 29errors, troubleshooting, 55implementation phase, 30
master pagescontent placeholders, multiple, 43–44creating, 31–33CSS, importing, 36–40described, 31multiple levels, 42–43sample, 35–36
process, 30site map, 44–47WROX United sample objectives, 30
web site mapdescribed, 5file, identifying, 51site design, 44–47
web site membershipage, requesting, 319–320authentication
described, 129Forms model, 129–131
configuration process, 128described, 124login controls
code, 111coding, 120–121described, 107personalized site, 108–111user account configuration, 111–119
tracking and personalization, improving, 524users, adding to roles, 124–128
Web.config filecompiling and running application, 603connection string, hiding, 221–223custom error pages, configuring, 585–586debugging, enabling, 187default themes, adding, 168–171editing, 54–55mail, configuring, 581page-level authorization, 397–398personalization
anonymous users and shopping carts, 491–492profile, building, 408–417roles, enabling, 128user-specific information, displaying, 121–123
site design information and code files, 48–52site settings, holding, 48stress testing, 556themes, adding default, 168–171tracing all pages, 590–592
757
Web.config file
Inde
x
25_588508 bindex.qxd 10/10/05 6:31 PM Page 757

WebErrorEvent, 618web.sitemap file. See site mapWhile loop, 320–322white and yellow fatal error page, 23white space
stripping from strings, 295–296styling, 712
Windows Explorer (Microsoft)described, 11global exception handling, 583–585Network Service account, adding Write permissions,
664–667web site folder setup, 659–664
Windows (Microsoft)authentication, 130, 132system requirement, 8
Windows XP Home Edition (Microsoft) setup, 667World Wide Web (WWW), 4write-only class properties, 335writing dataDataKeyNames, 266–267deleting records, 275–278described, 265–266existing records, changing, 267–272to file (WriteLine method), 579new records, adding, 273–275options, 266uploading pictures, 278–286
Wrox United sitecheckout
application level tracing, 590–592debugging, 592–596exceptions, trapping, 573–576logging exceptions, 577–580page level tracing, 588–589
components, 9–10Content pages, creating, 40–41creating on desktop, 10creating with two practice pages, 15–16databases
Fixtures table, 674Gallery table, 237–240, 243, 675Goals table, 673–674MatchReports table, 244–247, 675News table, 676Opponents table, 675–676OrderLines table, 677–678Orders table, 677
Players table, 364–367, 672–673Products table, 678schema, 671–672
debugging, 592–597design
objectives, 30themes, 171–177user news controls, 377–382user profiles, building, 410–418Web.config file, viewing, 49–52
events, triggering from database, 195–200exception handling
custom error pages, 586–587global, 583–585
health monitoring, 619–621identity, 131–135navigation controlsMenu, 94–99SiteMapPath, 86–93TreeView, 101–102
news user control, 377–382newsletter, sending out, 318publishing
with VWD, 605–609with XCOPY, 610–611
results and fixtures, web service returning, 441–446roles
described, 387–388Fan Club, 389–397
sample, introduced, 3–4setup, 664Site Map, creating, 46–47style sheet, 702web service
adding to application, 451–453League Table mini view, creating, 454–458for PocketPC, 458–463
WroxShoppingCart object, 483–490WSDL (Web Services Description Language) contract,
446–447WWW (World Wide Web), 4
XXCOPY, 609–611XHTML (Extensible HyperText Markup Language) rules
advantages, 67page design, 68–70
758
WebErrorEvent
25_588508 bindex.qxd 10/10/05 6:31 PM Page 758

XML (Extensible Markup Language). See also site map;web.config
data readingcreating, 258–260reading, 260–262
files, relational databases versus, 210Master page, 33optimal use, 212source control, 212web service
described, 6returning response, 436–438transmitting, 434–436
Xor operator, 314, 315XSD (XML Schema Definition) file, 361–364
YYork, Richard (Beginning CSS: Cascading Style Sheets
for Web Design), 720
ZZeldman, Jeffrey (Designing with Web Standards), 721
759
Zeldman, Jeffrey
Inde
x
25_588508 bindex.qxd 10/10/05 6:31 PM Page 759

25_588508 bindex.qxd 10/10/05 6:31 PM Page 760

25_588508 bindex.qxd 10/10/05 6:31 PM Page 761

Take your library wherever you goNow you can access more than 70 complete Wrox books online, wherever you happen to be! Every diagram, description, screen capture, and code sample is available with your subscription to the Wrox Reference Library. For answers when and where you need them, go to wrox.books24x7.com and subscribe today!
Programmer to ProgrammerTM
• ASP• C• Databases• .NET• Java• Macromedia
• Open Source• Visual Basic
and VBA• Web
Development• XML
Find books on
www.wrox.com
25_588508 bindex.qxd 10/14/05 2:20 PM Page 762