Beginning SAP Fiori
376
Beginning SAP Fiori — Bince Mathew
-
Upload
khangminh22 -
Category
Documents
-
view
2 -
download
0
Transcript of Beginning SAP Fiori

F O R P R O F E S S I O N A L S B Y P R O F E S S I O N A L S®
www.apress.com
Shelve inDatabases /SAP
User levelBeginning–Advanced
9 781484 213360
54399ISBN 978-1-4842-1336-0
SOURCE CODE ONLINE
Take a deep dive into SAP Fiori and discover Fiori architecture, Fiori landscape installation, Fiori standard applications, Fiori Launchpad con� guration, tools for developing Fiori applications and extending standard Fiori applications.
You will learn:
• Fiori architecture and its applications• Setting up a Fiori landscape and Fiori Launchpad• Con� guring, customizing and enhancing standard Fiori applications• Developing Fiori native applications for mobile• Internet of Things-based custom Fiori applications with the HANA cloud platform
Bince Mathew, a SAP mobility expert working for an MNC in Germany, shows you how SAP Fiori, based on HTML5 technology, addresses the most widely and frequently used SAP transactions like purchase order approvals, sales order creation, information lookup, and self-service tasks. This set of HTML5 apps provides a very simple and accessible experience across desktops, tablets, and smartphones.
Beginning SAP Fiori
Mathew
Beginning SAP Fiori Beginning SAP Fiori
—
Bince Mathew

Beginning SAP Fiori
Bince Mathew

Beginning SAP Fiori
Bince MathewBangalore, Karnataka, India
ISBN-13 (pbk): 978-1-4842-1336-0 ISBN-13 (electronic): 978-1-4842-1335-3DOI 10.1007/978-1-4842-1335-3
Library of Congress Control Number: 2015958352
Copyright © 2015 by Bince Mathew
This work is subject to copyright. All rights are reserved by the Publisher, whether the whole or part of the material is concerned, specifically the rights of translation, reprinting, reuse of illustrations, recitation, broadcasting, reproduction on microfilms or in any other physical way, and transmission or information storage and retrieval, electronic adaptation, computer software, or by similar or dissimilar methodology now known or hereafter developed. Exempted from this legal reservation are brief excerpts in connection with reviews or scholarly analysis or material supplied specifically for the purpose of being entered and executed on a computer system, for exclusive use by the purchaser of the work. Duplication of this publication or parts thereof is permitted only under the provisions of the Copyright Law of the Publisher’s location, in its current version, and permission for use must always be obtained from Springer. Permissions for use may be obtained through RightsLink at the Copyright Clearance Center. Violations are liable to prosecution under the respective Copyright Law.
Trademarked names, logos, and images may appear in this book. Rather than use a trademark symbol with every occurrence of a trademarked name, logo, or image we use the names, logos, and images only in an editorial fashion and to the benefit of the trademark owner, with no intention of infringement of the trademark.
The use in this publication of trade names, trademarks, service marks, and similar terms, even if they are not identified as such, is not to be taken as an expression of opinion as to whether or not they are subject to proprietary rights.
While the advice and information in this book are believed to be true and accurate at the date of publication, neither the authors nor the editors nor the publisher can accept any legal responsibility for any errors or omissions that may be made. The publisher makes no warranty, express or implied, with respect to the material contained herein.
Managing Director: Welmoed SpahrAcquisitions Editor: Celestin Suresh JohnDevelopmental Editor: Matthew MoodieTechnical Reviewer: Rajanidhi RajasekaranEditorial Board: Steve Anglin, Mark Beckner, Ewan Buckingham, Gary Cornell, Louise Corrigan,
James DeWolf, Jonathan Gennick, Robert Hutchinson, Celestin Suresh John, Michelle Lowman, James Markham, Susan McDermott, Matthew Moodie, Jeffrey Pepper, Douglas Pundick, Ben Renow-Clarke, Gwenan Spearing, Matt Wade, Steve Weiss
Coordinating Editor: Rita FernandoCopy Editor: Tiffany Taylor Compositor: SPi GlobalIndexer: SPi Global
Distributed to the book trade worldwide by Springer Science+Business Media New York, 233 Spring Street, 6th Floor, New York, NY 10013. Phone 1-800-SPRINGER, fax (201) 348-4505, e-mail [email protected], or visit www.springeronline.com. Apress Media, LLC is a California LLC and the sole member (owner) is Springer Science + Business Media Finance Inc (SSBM Finance Inc). SSBM Finance Inc is a Delaware corporation.
For information on translations, please e-mail [email protected] or visit www.apress.com.
Apress and friends of ED books may be purchased in bulk for academic, corporate, or promotional use. eBook versions and licenses are also available for most titles. For more information, reference our Special Bulk Sales–eBook Licensing web page at www.apress.com/bulk-sales.
Any source code or other supplementary materials referenced by the author in this text is available to readers at www.apress.com. For detailed information about how to locate your book’s source code, go to www.apress.com/source-code/.
Printed on acid-free paper

Dedicated to My Parents and My Brother

Contents at a Glance
About the Author ��������������������������������������������������������������������������������������������������� xiii
About the Technical Reviewer ���������������������������������������������������������������������������������xv
Acknowledgments �������������������������������������������������������������������������������������������������xvii
Introduction ������������������������������������������������������������������������������������������������������������xix
■Chapter 1: Introduction to SAP Fiori ���������������������������������������������������������������������� 1
■Chapter 2: Setting Up the Fiori Landscape ���������������������������������������������������������� 25
■Chapter 3: Fiori Launchpad and Applications������������������������������������������������������ 55
■Chapter 4: Customizing and Extending Standard Fiori Applications ������������������� 97
■Chapter 5: Fiori OData Customization and NetWeaver Gateway Overview �������� 177
■Chapter 6: Fiori Custom Application Development and Tools ���������������������������� 217
■Chapter 7: Introduction to HANA Smart Business and the Internet of Things ����� 281
■Chapter 8: Debugging and Troubleshooting Fiori Applications ������������������������� 323
■Chapter 9: Developing Fiori Applications Using Cordova and Kapsel ���������������� 337
Index ��������������������������������������������������������������������������������������������������������������������� 359
v

Contents
About the Author ��������������������������������������������������������������������������������������������������� xiii
About the Technical Reviewer ���������������������������������������������������������������������������������xv
Acknowledgments �������������������������������������������������������������������������������������������������xvii
Introduction ������������������������������������������������������������������������������������������������������������xix
■Chapter 1: Introduction to SAP Fiori ���������������������������������������������������������������������� 1
Why Fiori? ������������������������������������������������������������������������������������������������������������������������ 1
Introduction to the SAP UX Strategy and the SAP Fiori UX ����������������������������������������������� 3
SAP UX Strategy ������������������������������������������������������������������������������������������������������������������������������������� 3
SAP Fiori UX �������������������������������������������������������������������������������������������������������������������������������������������� 4
SAP Fiori Design Inspiration ������������������������������������������������������������������������������������������� 10
Introduction to SAP Fiori������������������������������������������������������������������������������������������������� 13
Fiori Architecture for Analytical Applications ������������������������������������������������������������������ 14
Fiori Architecture for Fact Sheet Applications ���������������������������������������������������������������� 16
Fiori Applications Overview �������������������������������������������������������������������������������������������� 18
Fiori Wave 1 ������������������������������������������������������������������������������������������������������������������������������������������ 18
Fiori Wave 2 ������������������������������������������������������������������������������������������������������������������������������������������ 19
Fiori Architecture for Transactional Applications ������������������������������������������������������������ 22
■Chapter 2: Setting Up the Fiori Landscape ���������������������������������������������������������� 25
Fiori Prerequisites ���������������������������������������������������������������������������������������������������������� 25
Prerequisites for the Front-End Server (SAP NetWeaver Gateway) ������������������������������������������������������ 25
User Interface Add-on Components ������������������������������������������������������������������������������������������������������ 26
Prerequisites for the Back-End Server for SAP ERP ����������������������������������������������������������������������������� 27
vii

■ Contents
viii
Initial Configuration �������������������������������������������������������������������������������������������������������� 27
Creating Fiori Users and Assigning Authorizations ������������������������������������������������������������������������������� 27
Connecting SAP NetWeaver Gateway with the Back-End SAP Suite ���������������������������������������������������� 36
Configuring SAP Web Dispatcher ����������������������������������������������������������������������������������� 44
Setting Up the Fiori Launchpad, Fiori Launchpad Designer, and Fiori Admin Page �������� 45
Activating ICF Nodes ����������������������������������������������������������������������������������������������������������������������������� 46
Configuring the Logon Screen for the Fiori Launchpad and Fiori Launchpad Designer (Admin page) ������������������������������������������������������������������������������������������������������������������������� 48
Configuring the Logout Screen ������������������������������������������������������������������������������������������������������������� 51
Fiori Application Add-Ons ����������������������������������������������������������������������������������������������� 52
■Chapter 3: Fiori Launchpad and Applications������������������������������������������������������ 55
The Fiori Launchpad and Launchpad Designer �������������������������������������������������������������� 55
Fiori Launchpad ������������������������������������������������������������������������������������������������������������������������������������ 55
Fiori Launchpad Designer ��������������������������������������������������������������������������������������������������������������������� 60
Configuring the Fiori Home Page ����������������������������������������������������������������������������������� 71
Creating Groups in Fiori Launchpad Designer �������������������������������������������������������������������������������������� 74
Assigning Groups to End Users ������������������������������������������������������������������������������������������������������������� 77
Configuring the Fiori Approval Application Workflow ����������������������������������������������������� 87
Configuring Wave 1 Approval Applications ������������������������������������������������������������������������������������������ 88
Configuring Wave 2 Approval Apps ������������������������������������������������������������������������������������������������������� 92
Fiori My Inbox ��������������������������������������������������������������������������������������������������������������������������������������� 94
■Chapter 4: Customizing and Extending Standard Fiori Applications ������������������� 97
Installing Eclipse and UI5 Add-Ons ��������������������������������������������������������������������������������� 97
Downloading the Standard Fiori Application Code ��������������������������������������������������������� 99
Importing Fiori Standard Application Code into Eclipse ����������������������������������������������� 108
Redefining a Standard OData Service �������������������������������������������������������������������������� 116
Fiori Apps Reference Library �������������������������������������������������������������������������������������������������������������� 124
Extending the Fiori Standard Application UI in Eclipse ������������������������������������������������� 127
Creating a Fiori Extension Project ������������������������������������������������������������������������������������������������������ 127
Adding Extensions to the Project �������������������������������������������������������������������������������������������������������� 130

■ Contents
ix
Uploading the Extension Project to the Gateway Server ���������������������������������������������� 141
Creating a Custom Tile in the Fiori Launchpad ����������������������������������������������������������������������������������� 147
Assigning Roles to End Users ������������������������������������������������������������������������������������������������������������� 151
Adding a Custom Tile to the Home Page��������������������������������������������������������������������������������������������� 153
Extending a Fiori Standard Application in Web IDE ������������������������������������������������������ 159
Connecting Web IDE to Back-End Systems ���������������������������������������������������������������������������������������� 159
Creating a New Extension Project in Web IDE ������������������������������������������������������������������������������������ 160
Adding Extensions to the Project �������������������������������������������������������������������������������������������������������� 162
■Chapter 5: Fiori OData Customization and NetWeaver Gateway Overview �������� 177
OData Overview ������������������������������������������������������������������������������������������������������������ 177
OData Development Using NetWeaver Gateway ����������������������������������������������������������� 178
Custom Table for the OData Service ��������������������������������������������������������������������������������������������������� 178
Creating an OData Service in Gateway ����������������������������������������������������������������������������������������������� 179
Implementing Business Logic in the OData Service ��������������������������������������������������������������������������� 185
Activating and Testing an OData Service ���������������������������������������������������������������������� 190
Building a UI5 App to Consume the OData Service ����������������������������������������������������������������������������� 196
Previewing and Testing the UI5 App ��������������������������������������������������������������������������������������������������� 203
Error Log Monitoring and Troubleshooting Techniques ������������������������������������������������ 207
Using REST Clients ���������������������������������������������������������������������������������������������������������������������������� 215
■Chapter 6: Fiori Custom Application Development and Tools ���������������������������� 217
Eclipse �������������������������������������������������������������������������������������������������������������������������� 217
AppBuilder �������������������������������������������������������������������������������������������������������������������� 219
Web IDE ������������������������������������������������������������������������������������������������������������������������ 220
Theme Designer ����������������������������������������������������������������������������������������������������������� 224
Launching the Theme Designer ���������������������������������������������������������������������������������������������������������� 224
Customizing the Home Screen Background Image ���������������������������������������������������������������������������� 226
Customizing Standard Tiles ���������������������������������������������������������������������������������������������������������������� 228
Customizing the Login Screen Background Image ����������������������������������������������������������������������������� 234

■ Contents
x
Fiori Prototyping Kit and Axure Wireframe Tool ������������������������������������������������������������ 238
Fiori Application Architecture Overview ����������������������������������������������������������������������� 242
Visualizing the App ����������������������������������������������������������������������������������������������������������������������������� 245
Designing a Wireframe/Mockup ��������������������������������������������������������������������������������������������������������� 245
Building the Final App ������������������������������������������������������������������������������������������������������������������������� 248
Developing a Custom Fiori Application ������������������������������������������������������������������������� 249
Creating a New UI5 Project ����������������������������������������������������������������������������������������������������������������� 249
Adding Views to the App ��������������������������������������������������������������������������������������������������������������������� 254
Creating Custom Controls ������������������������������������������������������������������������������������������������������������������� 259
Deploying the Custom Application to HANA Cloud ������������������������������������������������������������������������������ 263
Web IDE Basics ����������������������������������������������������������������������������������������������������������������������������������� 273
■Chapter 7: Introduction to HANA Smart Business and the Internet of Things ����� 281
Analytical and Fact Sheet Applications Overview �������������������������������������������������������� 281
Smart Business Apps Overview ����������������������������������������������������������������������������������� 281
KPI Modeler Overview �������������������������������������������������������������������������������������������������� 283
Internet of Things ��������������������������������������������������������������������������������������������������������� 283
UI5 Apps with SAP HANA and Raspberry Pi ������������������������������������������������������������������ 284
Setting Up the Raspberry Pi ��������������������������������������������������������������������������������������������������������������� 287
Detecting the Digital Sensor ��������������������������������������������������������������������������������������������������������������� 290
Connecting Sensors to the Raspberry Pi �������������������������������������������������������������������������������������������� 290
Deploying the Java Persistence API in HANA Cloud Platform ������������������������������������������������������������� 294
Python Scripts for Passing Data from the Raspberry Pi to HANA Cloud ��������������������������������������������� 309
Creating a Fiori Front End for IoT �������������������������������������������������������������������������������������������������������� 311
■Chapter 8: Debugging and Troubleshooting Fiori Applications ������������������������� 323
Supported Web Browsers ��������������������������������������������������������������������������������������������� 323
Debugging Methods ���������������������������������������������������������������������������������������������������� 324
Debug Mode in UI5 Apps��������������������������������������������������������������������������������������������������������������������� 327
Logging and Network Tracing ������������������������������������������������������������������������������������������������������������� 328
Diagnostics ����������������������������������������������������������������������������������������������������������������������������������������� 330

■ Contents
xi
Simulating Mobile Devices ������������������������������������������������������������������������������������������� 332
Troubleshooting Errors in Fiori Apps ���������������������������������������������������������������������������� 333
Troubleshooting Errors in the Fiori Configuration ��������������������������������������������������������� 334
■Chapter 9: Developing Fiori Applications Using Cordova and Kapsel ���������������� 337
Connecting to the SMP Architecture with Fiori������������������������������������������������������������� 337
Fiori Client Application for Mobile �������������������������������������������������������������������������������� 341
Introduction to Cordova and Kapsel ����������������������������������������������������������������������������� 341
Creating a New Project with Cordova and Kapsel Plugins ������������������������������������������� 343
Building Fiori Apps Using Cordova�������������������������������������������������������������������������������� 350
Example App Using the Device’s Camera, GPS, and Google Maps ������������������������������� 355
Accessing the Camera ������������������������������������������������������������������������������������������������������������������������ 355
Accessing the Barcode Scanner ��������������������������������������������������������������������������������������������������������� 355
Accessing the GPS and Google Maps ��������������������������������������������������������������������������� 356
Index ��������������������������������������������������������������������������������������������������������������������� 359

About the Author
Bince Mathew is a SAP Mobility Technology Consultant who has more than 7 years of expertise in developing Mobile applications and executing various projects in SAP Mobility. He is an expert in SAP Fiori, SMP, SYCLO, AFARIA and native Android application developments. Bince was given the Best Speaker award for SAP Fiori in SAP Inside track 2014 held by SAP. He blogs about various articles on topics related to SAP Mobility in SAP Developer Network site (SDN) and other developer communities. He is also an expert in the field of Internet of Things and connected devices.
xiii

About the Technical Reviewer
Rajanidhi Rajasekaran has 15 years of Techno Functional experience in SAP including 8 years of experience in CRM and 2 years of experience in SAP FIORI. Have worked more than 10 projects of End to End implementation and support in ECC and CRM. Have worked in 4 SAP FIORI projects including developing custom app and also enhancing standard apps. Have worked on SAP 4.6B, 4.6 C, 4.7, ECC 5.0, ECC 6.0, ISU CCS version of SAP R/3 and CRM 5.0, CRM 6.0 (CRM 2007), CRM 7.0 (EHP 1 & EHP 2) version of SAP CRM, Gateway 2.0 SP08, SAP_UI SP09, SAPUI5 1.22.4, SAP WEBIDE, Hana Cloud Platform.
xv

Acknowledgments
This book would not have been possible without the support of the following people.Friends and FamilyMy Parents - Without them I would not be in this position to write about this book, it’s because of them I
am what I am today.Bivin Mathew (My Brother) - Who always motivated me to find time for writing the book. He kept asking
me every week about how far have I completed with my book and that kept me on track.Arun Kumar (My college friend) - He invested his time for giving me his suggestions on improving the
contents of the book.Sreehari V Pillai - He is an expert in SAP HANA and Ui5. He had helped me with the HANA Topics
and gave me some suggestions regarding the custom applications chapter for Fiori. He has also helped me with the custom control development for the fiori application mentioned in this book.
Final ThanksCelestin Suresh John - Senior Manager Editor of Apress who gave me the opportunity to write this book.Rita Fernando - Coordinating Editor of Apress, she helped with preparing a complete schedule on the
timeframe to complete each chapter and helped me with all the technical hiccups I faced during the chapter preparations.
Matt Moodie - Developmental Editor of Apress, Matt basically pointed out my mistakes with drafting a proper chapter, He helped me to effectively represent my ideas in a formatted and professional way. His comments basically made me understand how to write a chapter with clarrity.
Rajanidhi Rajasekaran - Our Technical reviewer for this book, Rajnidhi pointed out the missing parts and mistakes in the book. He also suggested me with the additional topics that I should cover in the book.
xvii

Introduction
When SAP initially launched its ERP software, the GUI for SAP was a very powerfull piece of software at that time. But in this day and age of powerful smartphones, tablets and ultabooks, the old desktop based SAP GUI is getting outdated. In addition to that, the user experience on the old GUI was not able to stand against the fleet of HTML5 based powerfull and more appealing modern UI which is being adopted by many other software products. SAP’s solution to their ageing GUI is know as SAP Fiori. It was one of the first initiative by SAP to achieve their new goal of “One UX for all SAP Products”. Fiori is based on a framework known as UI5 which is built on top of HTML5. Fiori is also compatable with any device with any screen size.
Today almost every software and websites has a mobile compatible version. 4 or 5 years ago this wasn’t the case. Now whenever we hear about an interesting website or a product, we autmotically checks for its mobile app in the app store. The reason for this shift is because, today our smartphones are much more powerfull and even comparable to a 3 or 4 year old PC. Which enables us to browse websites, play graphic intensive games, edit word or PowerPoint presentations on the go and we even consume a huge amount of multimedia content using our phone rather than a pc these days. We need everything on the go and in the palm of our hand. We are using mobile devices on a regular basis, it has become a part of our life. You will hardly find a person who doesn’t have a mobile device in this day and age. Nowadays if your software product don’t have a mobile version, then you are missing out a huge part of your business in the mobile space.
When SAP came up with the new UX strategy to cater to all platforms and devices, they not only made it compatable with all devices, they also made the UI less complicated. This was very crucial because accessing a particular application with too much data or too many options in one single screen might not be an issue in a desktop or in a tablet to a certain extend, but it’s definitely an issue in a much smaller smartphone screen. So they made the new UX simpler and more appealing to the users.
SAP Fiori started with 25 applications which was based on frequently used transactions and processes in SAP. Today Fiori has more than 500 apps and its still growing. And with the release of S/4 HANA, SAP is moving closer to their goal of replacing the old GUI with a new UX standard set by Fiori for all its products. Fiori is being widely accepted by SAP users everywhere around the globe.
Like every niche technology, the developers will need some time to understand the Fiori architecture so that they can utilize Fiori to its full potential. This book will help you to get a more insight to the Fiori architecture, develop custom applications, extend standard Fiori Applications and customize fiori applications. The book takes you on a tour on everything related to SAP Fiori, it also helps you understand to build Fiori applications for Internet of Things, develop native applications using cordova and developing OData services using SAP Netweaver Gateway. The book is divided into 9 chapters, I have tried my best to keep these chapters simple and yet detailed enough for you to understand.
xix

1© Bince Mathew 2015 B. Mathew, Beginning SAP Fiori, DOI 10.1007/978-1-4842-1335-3_1
Chapter 1
Introduction to SAP Fiori
SAP Fiori is a new offering from SAP, based on the HTML5 framework. A great deal of help regarding Fiori is available on the Internet, but the information is scattered across many web sites and sources. Users who are new to SAP Fiori may find it difficult to get an overall idea of what Fiori is. This book provides an overview and gives you the knowledge you need to configure, implement, and extend Fiori applications.
This chapter covers the history of SAP Fiori and examines SAP’s roadmap to a unified user experience (UX) for all of its products.
Why Fiori?In the past, SAP customers complained about the old-fashioned look and feel of the standard screen and the fact that SAP can only be accessed via its desktop GUI for most transactions. SAP listened to this feedback from all over the world and launched a set of applications, based on the HTML5 framework, that includes the most widely and frequently used SAP transactions: purchase order approval, sales order creation, information lookup, self-service tasks, and so on. These HTML5 applications are easy to access seamlessly across desktops, tablets, and smartphones (see Figure 1-1). This collections of apps is named Fiori.
Figure 1-1. The Fiori user experience as seen on all types of devices

Chapter 1 ■ IntroduCtIon to Sap FIorI
2
The term Fiori is an Italian word that means “flowers.” SAP wanted a beautiful UI for its current GUI, and it also wanted to create a simple, elegant user experience. Initially, SAP charged a license fee per Fiori user. After receiving complaints from customers about paying for an additional license on top of their existing ERP license, and from service companies who found it difficult to convince customers to pay the additional cost, SAP announced at the February 2014 SAPPHIRE event that Fiori would be free for any customer with an SAP license. This decision resulted in a higher adoption rate for Fiori and increased market demand for Fiori-based custom UI5 applications.
One drawback of current SAP transactions is that some transactions are complex, and the same transactions are used to perform multiple tasks. As a result, transactions may have many fields and configurations and become difficult to use. For example, suppose a sales and distribution (SD) consultant accesses transaction VA01 to perform SD-related tasks (see Figure 1-2). The transaction works fine if the user is familiar with the complex steps and fields required to complete the task. But a sales representative whose priority is making sales rather than spending time creating a sales order in the complex GUI, this transaction may be difficult, and many of the fields and options may seem confusing and irrelevant.
To avoid such cases, SAP simplified its complex UIs and split them into multiple simple UIs whose elements make sense to the user. For example, when a sales representative uses the Fiori Sales Order application shown in Figure 1-3, all the elements are useful. The sales rep can create sales orders without using the SAP GUI—the rep can even create a sales order on the go, from a mobile phone.
Figure 1-2. An example scenario with the VA01 Create Sales Order transaction

Chapter 1 ■ IntroduCtIon to Sap FIorI
3
In addition, to perform simple operations, SAP users sometimes have to execute multiple transactions. SAP split these complex transactions into smaller apps, simplifying them and making them specific to the roles of particular users. At the same time, SAP merged repetitive transactions. Using this approach, SAP created role-based applications: the first wave of Fiori applications (known as Fiori Wave 1 apps) consisted of a set of 25 applications targeted at users such as managers, employees, sales representatives, and purchasing agents.
Introduction to the SAP UX Strategy and the SAP Fiori UXThe new UX for SAP simplifies the old GUI and makes it compatible with any device of any screen size that supports HTML5, including mobile devices. This change was a big step for SAP—it adopted an entirely new technology and strategy for its UI.
SAP UX StrategyEnterprise resource planning (ERP) software was developed to provide increased functionality. Although ERP solutions have powerful features, end users sometimes find the UI complex and even intimidating. Most of the time, users don’t use ERP software based on its features and its ability to handle complicated tasks; they give priority to UI ease of use and the ability to complete their required tasks with the least amount of effort.
For example, consider Facebook. A user may find it easy to use the Facebook web site when they have access to a desktop or laptop. But when the user is on the move, accessing the same fully featured web site via a mobile device can be complex and frustrating. Using the Facebook mobile app gives the user a simpler UI and easier layout to update their status, check notifications, see what their friends are up to, and so on. The most powerful and sophisticated UI is not always the best answer for providing users with a good UX. For this reason, SAP put its users first and developed an intuitive, consistent, simple UX. It saves users time and increases their productivity. The UX provides benefits like these:
• Fewer user errors
• Decreased user training costs
• Higher satisfaction rates
Figure 1-3. The Fiori Sales Order application simplifies the VA01 transaction by including only the minimum required fields to complete the task

Chapter 1 ■ IntroduCtIon to Sap FIorI
4
To achieve the goal of providing this enhanced UX, SAP has three primary areas of focus:
• New: It’s all about providing consumer-grade user experiences for new applications.
• Renew: SAP provides an improved UX for its existing applications. As a start, SAP based the Fiori apps on some of the most commonly used SAP applications.
• Enable: SAP helps its partners and customers improve the UX of other existing SAP software.
Initially, SAP developed Fiori apps with the Renew strategy in mind by creating a new UX for the existing and most commonly used business scenarios in SAP software. But later, this approach evolved into a new standard UX strategy for all SAP software. With the release of S/4HANA, SAP is moving closer to its goal of “one UX for all SAP solutions.”
SAP Fiori UXThe SAP Fiori UX is the new face of SAP for its business users across devices, platforms, and deployment options. It provides optimal usability and simple business interactions and ease of use. Fiori is not just a new UI or a new theme on top of existing SAP transactions; it’s a new concept of providing user-centric applications.
A traditional SAP transaction generally has numerous screens, fields, and tabs that encompass multiple features and types of functionality and can serve multiple users. These transactions end up with many fields, navigations, and features that don’t apply to all users—rather, each part, tab, or area of the transaction is targeted at a different type of user (see Figure 1-4).
Figure 1-4. A sample standard SAP transaction

Chapter 1 ■ IntroduCtIon to Sap FIorI
5
With SAP Fiori, apps are developed from a user’s perspective: the apps are user-centric. These apps are simple, relevant to a particular user role, and designed to carry out specific tasks and activities. Basically, Fiori apps break the big, standard SAP transactions into multiple small, easy-to-use apps that make more sense to individual users (see Figure 1-5).
Figure 1-5. Standard transaction converted into smaller, simple, role-based, user-centric Fiori apps
In addition to having apps for specific tasks, with Fiori, the user has access to a fleet of apps based on the roles that particular user handles. For example, suppose a user is handling multiple roles in an organization: the user is an employee but also approves finance-related activities as a manager. As a manager, the user needs access to certain approval-related apps; and as an employee, the user needs to request leave, update timesheets, submit claims for travel expenses, and so on. Fiori gives the end user a single point of entry to access all apps relevant to their roles: the Fiori launchpad (Chapter 2 goes into more depth about it). When users log in to the Fiori launchpad, they see all the apps that have been authorized for them, based on their roles (see Figure 1-6).

Chapter 1 ■ IntroduCtIon to Sap FIorI
6
Apps in the Fiori launchpad are displayed as tiles, as shown in Figure 1-7. Each tile is like a shortcut icon on your desktop that opens an app when you click it.
Figure 1-6. Sample Fiori launchpad running on a tablet

Chapter 1 ■ IntroduCtIon to Sap FIorI
7
When you click a tile, the app opens as master-detail page or as a full-screen app. In a master-detail view, the master page is on the left and the detail is on the right (see Figure 1-8).
Figure 1-7. Fiori launchpad
Figure 1-8. Master-detail view

Chapter 1 ■ IntroduCtIon to Sap FIorI
8
Users can drill down into detail pages to navigate to other pages. For example, in Figure 1-9, additional details about a material are shown on a new page that loads in the same area as the previous detail page. This enables users to navigate to more detailed views while also letting the UI developer minimize the amount of data that must be shown on a single screen—too much data on a single screen leads to a complex, confusing UX.
An app can also use the full screen, as shown in Figure 1-10. The choice of whether to use a master-detail app or a full-screen app is based on the scenario and the type of data that needs to be presented.
Figure 1-9. Line-item page
Figure 1-10. Master list page

Chapter 1 ■ IntroduCtIon to Sap FIorI
9
In a full-screen app, unlike in the master-detail page design, the detail page is loaded as a new page (see Figure 1-11). Further drill-down pages—such as item details or additional information about items on the detail pages—are also loaded full-screen (see Figure 1-12).
Figure 1-11. Detail page/list
Figure 1-12. Line item/detail

Chapter 1 ■ IntroduCtIon to Sap FIorI
10
SAP Fiori Design InspirationThe inspiration for the design of Fiori came from a web design and graphic design trend that is standard in most web-based applications today: flat design. You can see flat design everywhere, from the latest IOS 7 flat icons; to Android’s material design; to web pages that use simple, flat designs and avoid the complicated, graphics-heavy, skeuomorphic look of the past.
What is a skeuomorphic design? It’s a method or style in which the physical characteristics of an actual object are captured in digital form. For example, look at the calculator shown in Figure 1-13. Such a design places unnecessary load on the device’s CPU/GPU, which in turn can result in a laggy experience when many such designs are loaded at the same time. Web pages that use skeuomorphic designs have heavy page sizes, which results in slower loading times.
Figure 1-13. A calculator based on skeuomorphic design
A flat design is light and simple. It has a minimalist look, with the emphasis on usability. For example, look at the calculator in Figure 1-14.

Chapter 1 ■ IntroduCtIon to Sap FIorI
11
Microsoft was one of the first tech companies to adopt flat design, with its tile (formerly known as Metro UI) design in Windows 8 (see Figure 1-15). This design trend was quickly followed by other tech companies including Apple and Google. One of the main advantages of flat design in mobile devices is that it uses fewer resource such as battery life and GPU. And because the design is light in size, loading times and animations when navigating from one screen to another are smooth. No shadow effects on icons or in the apps tax the GPU. Figure 1-16 shows the transition of iOS from a skeuomorphic design to a flat design.
Figure 1-14. A calculator based on flat design

Chapter 1 ■ IntroduCtIon to Sap FIorI
12
Figure 1-16. Skeuomorphic design in iOS 6 (left) vs. flat design in iOS 7
Figure 1-15. Windows 8 flat design

Chapter 1 ■ IntroduCtIon to Sap FIorI
13
Here are the primary things customers associate with a flat design:
• Simple
• Clean
• Colorful
• Modern
• Trendy
And these are the advantages of flat design:
• Ease of use
• Modern appearance
• Responsive designs that are more efficient
• Faster loading times
• Straightforward design with no special effects that affect performance
Introduction to SAP FioriAs mentioned earlier, Fiori was developed based on the HTML5 framework, with an emphasis on a flat UI design and user-centric apps. This helped SAP create a responsive UI that’s compatible with all screen sizes and runs on any device that has an HTML5-compatible browser. Fiori was developed based on the design principles shown in Figure 1-17:
• Role-based
• Each app is specific to a user’s role: manager, employee, salesperson, and so on.
• The role-based approach helps in developing user-centric apps.
• A user may have multiple roles. Depending on the nature of their responsibilities, the same user may perform different tasks across multiple business domains. Apps that are developed to carry a specific task that belongs to different modules (HR, SRM, CRM, and so on) can be assigned to users based on their roles.
• Developers can visualize a specific user’s task and develop a UI that relates to the nature of the user’s work.
Figure 1-17. Fiori design principles

Chapter 1 ■ IntroduCtIon to Sap FIorI
14
• Responsive
• Because it’s HTML5-based, Fiori works seamlessly across all screen sizes and devices that have an HTML5-compatible browser.
• Fiori apps adjust their layout based on the available screen real estate.
• Fiori supports multiple interaction modes, such as keyboards, mice, and touch-based inputs.
• Fiori works independently of platform or ecosystem (Windows, Android, or iOS). The apps work and respond the same across all platforms.
• Simple
• The simple UI helps the user complete tasks quickly and easily.
• Fiori apps emphasize a 1:1:3 approach: one user, one use case, and three screens (desktop, tablet, and mobile).
• Coherent
• No matter how many apps Fiori has, they all have the same design footprint and thus the same look and feel.
• This helps users become familiar with Fiori apps. After using one Fiori app, users feel comfortable with other Fiori apps, because every app speaks the same design language.
• Instant value
• The time required to train users in the new UI is minimal for Fiori. The UI is simple and follows the same design pattern across apps, which makes it easier for users to adopt the new UI quickly. Hence the cost of training users is also minimized.
Fiori Architecture for Analytical ApplicationsAnalytical applications give users access to real-time data regarding the business. These apps collect and process a huge amount of data in a matter of seconds and present the results in a simplified format that the user can understand and relate to easily. Analytical apps use the huge data-processing and analytical power of SAP HANA. Figure 1-18 shows the architecture layout of a Fiori analytical app.

Chapter 1 ■ IntroduCtIon to Sap FIorI
15
Monitoring options are also available by using key point indicators (KPIs) in real time. For example, users can keep track of stock values in the market or pressure gauge readings from instruments, and take action immediately in real time. To configure KPIs, SAP provides a set of KPI modeler tools (discussed later in this book).
Analytical apps run only on SAP HANA. They use virtual data models (VDMs): structured representations of SAP HANA database views. VDMs provide direct access to SAP business data by using standard SQL/OData requests.
Similar to transactional apps, the ABAP front-end server contains the UI layer, which holds product-specific UI components related to ERP (MM, SD, FI), SRM, CRM, SCM, and so on. The infrastructure layer contains the SAP UI libraries, Fiori launchpad, and SAP Gateway with the OData service enabled.
Figure 1-18. Fiori analytical app architecture

Chapter 1 ■ IntroduCtIon to Sap FIorI
16
The front-end components use trusted RFC to communicate with the respective ABAP back-end server, which contains the business logic. SAP HANA XS also contains Fiori app content for the relevant business suite products, the framework for KPI modeling, a generic drill-down app, and the VDM.
The Web Dispatcher is the entry point for all HTTPS requests in the system. It basically reroutes incoming HTTPS requests to the appropriate servers. For example, some Fiori apps may send HTTPS requests to hit the ABAP front-end server, and other requests may hit the SAP HANA XS; the Web Dispatcher identifies the incoming requests’ targets and reroutes the requests accordingly.
Fiori Architecture for Fact Sheet ApplicationsFact sheet apps display information and key facts about central objects used in the user’s business operations. From a fact sheet tile, users can drill down into details and navigate from one fact sheet to another: for example, from a document to the related business partner. Figure 1-19 shows the architecture of a Fiori fact sheet app.

Chapter 1 ■ IntroduCtIon to Sap FIorI
17
Figure 1-19. Fiori fact sheet app architecture
From a fact sheet app, users can start transactions by navigating into transactional apps, access back-end systems, and so on. Users can access fact sheets from the search bar in the Fiori launchpad, from other fact sheets, or from transactional and analytical apps. Fact sheet apps run only on SAP HANA.
The fact sheet’s ABAP front-end server is the same as for transactional and analytical apps: it contains product-specific UI components, the SAP UI5 library, the Fiori launchpad, and SAP Gateway.
The front-end server has read access to the ABAP back-end server via trusted RFC connections. The back-end server contains the business suite with relevant business logic, OData services for the apps, and search models.

Chapter 1 ■ IntroduCtIon to Sap FIorI
18
Web Dispatcher reroutes incoming HTTPS requests that hit the system. It selects the appropriate server for each request. For example, a fact sheet’s INA protocol may request access to the search models that reside in the ABAP back-end server.
Fiori Applications OverviewThe Fiori apps have been launched in waves. The first wave was called Wave 1 and included 25 apps. The next wave was called Wave 2, and so on.
Fiori Wave 1The initial 25 Fiori apps were categorized as follows:
1. Manager
• Approve Leave Requests (HR-based)
• Approve Purchase Contracts (MM-based)
• Approve Purchase Orders (MM-based)
• Approve Requests (generic workflow application)
• Approve Requisitions (MM-based)
• Approve Shopping Cart (SRM-based)
• Approve Time Sheets(HR-based)
• Approve Travel Expenses (HR-based)
• Approve Travel Requests (HR-based)
• My Spend
2. Employee
• My Benefits (HR-based)
• My Leave Requests (HR-based)
• My Paystubs (HR-based)
• My Shopping Cart (SRM-based)
• My Timesheet (HR-based)
• My Travel Requests (HR-based)
• Track Shopping Carts (SRM-based)
3. Sales Representative
• Change Sales Order (SD-based)
• Check Price And Availability (SD-based)
• Create Sales Order (SD-based)

Chapter 1 ■ IntroduCtIon to Sap FIorI
19
• Customer Invoices (SD-based)
• Track Sales Order (SD-based)
• Track Shipments (SD-based)
4. Purchasing Agent
• Order From Requisitions (MM-based)
• Track Purchase Order (SD-based)
Fiori Wave 2As mentioned previously in the architecture section, from Fiori Wave 2 on, Fiori apps are primarily classified as follows:
• Transactional apps
• Analytical apps
• Fact sheets
Transactional ApplicationsTransactional applications are used for task-based access. Figure 1-20 shows a sample transactional app.
Figure 1-20. Sample transactional app

Chapter 1 ■ IntroduCtIon to Sap FIorI
20
These apps give you access to transactions that let you create or change an entire functional process. Because the Fiori UI gives priority to simplifying tasks, such apps provide guidance on how to complete the tasks. Transactional apps are compatible with the SAP HANA database and any other database used by SAP ERP.
Analytical ApplicationsThese apps give you insight into a particular area and provide reports that let you drill down into the app for further KPI analysis of the data (see Figure 1-21). The data used to generate these reports may be huge, ranging from several hundred megabytes to gigabytes. By using the processing power of HANA, these apps generates reports in seconds.
Figure 1-21. Sample analytical application
Fact SheetsThese apps are used for searching and exploring objects (see Figure 1-22). They’re also used to navigate between related objects. For example, if you search in the Fiori search window for a certain material, Fiori displays the material’s details in the search result. It searches the ERP back end for the material and shows you the result.

Chapter 1 ■ IntroduCtIon to Sap FIorI
21
Figure 1-22. Search scenario in Fiori
When you click a result in the search window, you see a fact sheet app containing a summary of the material (see Figure 1-23).
Figure 1-23. Fiori fact sheet

Chapter 1 ■ IntroduCtIon to Sap FIorI
22
Fiori Architecture for Transactional ApplicationsFiori transactional applications let users perform transactional tasks like creating leave requests, creating travel requests, approving purchase orders, and so on. Transactional apps support the HANA database and all other traditional databases that SAP ERP supports.
The architecture shown in Figure 1-24 gives a generic overview of how Fiori apps are deployed and consumed by end users. The first block shows the devices (desktops, tablets, and mobile devices) that access the Fiori launchpad (the entry point to all Fiori apps, covered in Chapter 2). When a user accesses the Fiori apps for the first time, the apps are downloaded into the web browser on the desktop, mobile device, or tablet, just as if a web page is being accessed.
Figure 1-24. Fiori transactional app architecture

Chapter 1 ■ IntroduCtIon to Sap FIorI
23
The ABAP front-end server contains the UI layer, which has product-specific UI components for the Fiori apps. For example, the UI add-ons can be for ERP-specific tasks (FI, MM, SD), customer relationship management (CRM), supplier relationship management (SRM), supply chain management (SCM), governance risk control (GRC), and so on. The infrastructure contains the SAP UI5 libraries (required to run UI5 apps), Fiori launchpad components (which come preinstalled from NetWeaver 7.4), and SAP Gateway with the OData service enabled.
The front-end components access and communicate with the ABAP back-end server through trusted RFC connections. Although it is recommended that you run Fiori transactional apps with the HANA database, they work with any database supported by SAP R/3.
In the next chapter, you learn about the prerequisites for the Fiori landscape, how to set up the Fiori landscape, and how to configure the Fiori launchpad.

25© Bince Mathew 2015 B. Mathew, Beginning SAP Fiori, DOI 10.1007/978-1-4842-1335-3_2
Chapter 2
Setting Up the Fiori Landscape
The latest version of the SAP software comes with the Fiori launchpad and Gateway services preinstalled. For older versions, you need to install Gateway and back-end Fiori components separately. This chapter covers this process, including the prerequisites and how to set up the Fiori landscape.
Fiori PrerequisitesOlder versions of SAP (ECC6 with EHP version less than 7) require two primary types of add-ons before you can set up the Fiori landscape:
• SAP NetWeaver Gateway and user interface add-ons
• The NetWeaver Gateway version for SAP ERP with NetWeaver 7.31 or less should be NetWeaver Gateway 2.0 SP 06 with add-on IW_DEP 200 and SAP Notes 1799722 and 1805831. (You can check this link to find out how to search for SAP Notes relevant to your system version: https://scn.sap.com/community/mobile/blog/2013/06/25/sap-fiori-ll03--apply-all-sap-notes-before-implementation.)
• You should also have SAP NetWeaver AS ABAP 7.00 SPS21 or above with SAP Note 1774246 (prerequisites for this note are 1799549, 1805986, 1754533, and 1809628).
• Back-end system add-ons (for ECC, SRM, CRM, and so on).
You can configure the Fiori landscape as an embedded or hub-based system. SAP Gateway is on a separate system that is connected to the respective back-end system. This chapter covers the hub-based system configuration.
Prerequisites for the Front-End Server (SAP NetWeaver Gateway)Table 2-1 shows the SAP NetWeaver Gateway 2.0 components for the SAP NetWeaver installation.

Chapter 2 ■ Setting Up the Fiori LandSCape
26
User Interface Add-on ComponentsTable 2-2 lists user interface add-on components for the SAP NetWeaver installation. These components are relevant only for NetWeaver versions prior to SAP NetWeaver 7.4.
Table 2-1. SAP Gateway Components
Prerequisite NetWeaver Product Version Software Components
SAP NetWeaver 7.0 for SAP EhP1 Gateway Server Core NW 700/701 GW_CORE 190SAP IWFND 240
Gateway PGW IW_PGW 100IW_PGW 200
SAP NetWeaver 7.0 for SAP EhP2 Gateway Server Core NW 702 GW_CORE 200SAP IW FND 250SAP WEB UIF 7.01
Gateway PGW IW_PGW 100IW_BEP 200
SAP NetWeaver 7.0 for SAP EhP3 Gateway Server Core NW 703/731 GW_CORE 200SAP IW FND 250SAP WEB UIF 7.31
Gateway PGW IW_PGW 100IW_BEP 200
SAP NetWeaver 7.4 Gateway Server is a built-in part of NetWeaver 7.4.
GW_FND 740
Gateway PGW IW_PGW 100
Table 2-2. UI Add-On Components for SAP NetWeaver
SAP NetWeaver Version Required UI Software Components Support Package Level
All installations prior to SAP NetWeaver 7.4 UI_INFRA 100UI2_700 100UI2_FND 100UI2_SRVC 100UISAPUI5 100
SP06
SAP EhP1 for SAP NetWeaver 7.0 or higher UI2_701 100UI2_702 100
SP06
SAP EhP3 for SAP NetWeaver 7.1 or higherSAP EhP1 for SAP NetWeaver 7.3 or higher
UI2_731 100 SP06

Chapter 2 ■ Setting Up the Fiori LandSCape
27
Initial ConfigurationAfter you set up the SAP Gateway, UI add-ons, and the back-end server add-ons, you can begin your Fiori configuration:
1. Create Fiori users, and assign authorizations.
2. Connect the SAP NetWeaver Gateway with the back-end SAP suite.
3. Configure Web Dispatcher (required only for fact sheets and analytical apps).
4. Set up the Fiori launchpad and the launchpad designer.
Creating Fiori Users and Assigning AuthorizationsBefore you can start using Fiori, you need to set up two primary types of users: admin users and end users. These users must be created in both the front-end server and the respective back-end SAP suite. Follow these steps:
1. Log in to the front-end server (SAP Gateway server).
2. Execute the following transaction: SU01.
Table 2-3. SAP NetWeaver Gateway 2.0 Components
Prerequisites
SAP NetWeaver 7.0 SPS 21 or higher
For SAP Fiori apps based on SAP ERP:
· SAP Enterprise Resource Planning (ERP) 6.0 SPS 15 or higher
· SAP ERP 6.0 SPS 15 or higher
· SAP ERP 6.0 EhP2 SPS 06 or higher
· SAP ERP 6.0 EhP3 SPS 05 or higher
· SAP ERP 6.0 EhP4 SPS 05 or higher
· SAP ERP 6.0 EhP5 SPS 03 or higher
· SAP ERP 6.0 EhP6 SPS 01 or higher
ERP installations prior to SAP NetWeaver 7.4:
· Back-end event provider: software component IW_BEP 200 SP 07
Prerequisites for the Back-End Server for SAP ERPTable 2-3 lists the SAP NetWeaver Gateway 2.0 components for the SAP NetWeaver installation.

Chapter 2 ■ Setting Up the Fiori LandSCape
28
Once you’ve created the users, you need to give them the authorizations that make them admin and end users:
4. Log in to the front-end server (SAP Gateway server).
5. Execute the transaction PFCG (see Figure 2-2).
Figure 2-1. SAP transaction User Maintenance SU01
3. In this example, you create two users named FIORI_ADMIN (see Figure 2-1) and FIORI_USER. Log in to the SAP back-end suite (SAP ECC, SRM, CRM, and so on), and create these users.

Chapter 2 ■ Setting Up the Fiori LandSCape
29
6. Under Role Maintenance, make a copy of the role SAP_UI2_ADMIN_700(see Figure 2-3).
Figure 2-2. Role Maintenance PFCG transaction
Figure 2-3. Making a custom role for the admin user

Chapter 2 ■ Setting Up the Fiori LandSCape
30
7. On the Menu tab, click Authorization Default (see Figure 2-4). On the pop-up screen, select TADIR Service from the drop-down list.
Figure 2-4. Click Authorization Default
8. Make the following entries, as shown in Figure 2-5:
• Program ID: R3TR
• Object Type: IWSG Gateway: Service Groups Metadata

Chapter 2 ■ Setting Up the Fiori LandSCape
31
Add the following TADIR service values:
• ZINTEROP_0001
• ZPAGE_BUILDER_CUST_0001
• ZPAGE_BUILDER_PERS_0001
• ZPAGE_BUILDER_CONF_0001
• ZTRANSPORT_0001
Figure 2-5. TADIR Service pop-up screen

Chapter 2 ■ Setting Up the Fiori LandSCape
32
Figure 2-6. Authorizations tab
9. Click the Copy button. On the Authorizations tab (see Figure 2-6), click Change Authorization Data. Then, click Generate (see Figure 2-7).

Chapter 2 ■ Setting Up the Fiori LandSCape
33
10. Similarly, for the end user, copy the SAP_UI2_USER_700 role and add the TADIR service with the following values (see Figure 2-8):
• ZINTEROP_0001
• ZPAGE_BUILDER_PERS_0001
Figure 2-7. Generating authorizations

Chapter 2 ■ Setting Up the Fiori LandSCape
34
Once you’ve created these roles, you need to assign them to FIORI_ADMIN and FIORI_USER:
11. Execute the transaction PFCG.
12. Under Role Maintenance, give the custom role name you created:ZFIORI_ADMIN_ROLE.
13. Go to the User tab, add the FIORI_ADMIN user to the list, and click Save(see Figure 2-9).
Figure 2-8. TADIR service for the end user

Chapter 2 ■ Setting Up the Fiori LandSCape
35
14. Follow the same steps to assign ZFIORI_END_USER_ROLE to FIORI_USER(see Figure 2-10).
Figure 2-9. Assigning a role to the admin user

Chapter 2 ■ Setting Up the Fiori LandSCape
36
Connecting SAP NetWeaver Gateway with the Back-End SAP SuiteIn order to make SAP Gateway communicate with your back-end SAP system, you need to assign a few roles and set up a trusted RFC connection between the two systems.
Assigning a Role Template for Administrators (SAP Gateway System)Here are the steps:
1. Execute the transaction PFCG.
2. Create a new custom role: in this example, Z_TMPL_ADMIN.
3. Click Single Role.
4. On the Authorizations tab, click Change Authorization Data.
5. In the dialog box, select /IWFND/RT_ADMIN, and click the Adopt Reference button (see Figure 2-11).
Figure 2-10. Assigning a role to the end user

Chapter 2 ■ Setting Up the Fiori LandSCape
37
6. Click the Generate button.
7. On the Users tab, add the administrative user ID.
Creating Trusted RFCs in SAP Gateway to Connect with the SAP Back-End SystemIn order for Fiori apps to communicate between SAP Gateway and SAP back-end systems, a trust relationship must be maintained between the systems. You can do this by configuring the SAP Gateway system as the trusting system and the SAP back-end system as the trusted system. Here are the steps:
1. Execute the transaction SM59.
2. Click the Create button.
3. Under RFC Destination, give the destination name (preferably in the format <system id>CLNT<client>).
4. In the Connection Type field, enter the value 3.
5. Enter a description for the connection in the Description 1 field.
6. Click Save.
7. On the Technical Settings tab (see Figure 2-12), enter the values listed in Table 2-4.
Figure 2-11. Creating an admin role template

Chapter 2 ■ Setting Up the Fiori LandSCape
38
Figure 2-12. Trusted RFC technical settings
Table 2-4. Technical Settings for the RFC Destination
Name Value
Load Balancing Status No
Target Host abcd.myserver.corp (server name of the back-end system)
Instance No. 00 (system number of the back-end system)

Chapter 2 ■ Setting Up the Fiori LandSCape
39
On the Logon & Security tab (see Figure 2-13), enter the values listed in Table 2-5, and then click Save.
Figure 2-13. Trusted RFC Logon & Security settings
Table 2-5. Logon & Security Settings for the RFC Destination
Name Value
Language EN
Client 400 (client of the back-end system)
User Select the Current User check box.
Trust Relationship Yes

Chapter 2 ■ Setting Up the Fiori LandSCape
40
Defining a Trusted Connection between the SAP Back-End System and the SAP Gateway SystemSimilar to the previous step, a trusted connection must be maintained in the opposite direction. In this case, you have to configure the SAP back-end system to be the trusting system and SAP Gateway as the trusted system:
1. Execute the transaction SM59.
2. Click Create.
3. Under RFC Destination, give the destination name (preferably in the format <system id>CLNT<client>).
4. In the Connection Type field, enter the value 3.
5. Enter a description for the connection in the Description 1 field.
6. Click Save.
7. On the Technical Settings tab, enter the values listed in Table 2-6.
Table 2-6. Technical Settings for the RFC Destination between the SAP Back End and SAP Gateway
Name Value
Load Balancing Status No
Target Host abcd.mygatewayserver.corp (server name of the SAP Gateway system)
Instance No. 00 (system number of the SAP Gateway system)
8. On the Logon & Security tab, enter the values listed in Table 2-7, and click Save.
Table 2-7. Logon & Security Settings for the RFC Destination between the SAP Back End and SAP Gateway
Name Value
Language EN
Client 200 (client of the SAP Gateway system)
User Select the Current User check box.
Trust Relationship Yes
Now do the following in the SAP back-end system:
1. Execute the transaction SMT1.
2. Click Create.
3. Proceed with the wizard (see Figure 2-14), and give the RFC destination name that you created to connect to the SAP gateway system. An RFC logon occurs, and the required information is exchanged between the two systems.
4. Click Save.

Chapter 2 ■ Setting Up the Fiori LandSCape
41
Creating a System AliasA system alias is a unique name you give a system that points to other systems. You’re required to maintain system aliases so you can activate a service that resides on another system by connecting to the system based on its system alias. Follow these steps:
1. Execute the transaction SPRO.
2. Go to the path SAP NetWeaver ➤ Gateway ➤ OData Channel ➤ Configuration ➤Connection Settings ➤ SAP NetWeaver Gateway to SAP System ➤ Manage SAP System Aliases, as shown in Figure 2-15.
Figure 2-14. Create Trusting Relationships Wizard

Chapter 2 ■ Setting Up the Fiori LandSCape
42
3. On the screen showing the list of existing entries, click New Entry (see Figure 2-16).
Table 2-8. System Alias Settings on the SAP Gateway System to Connect with the SAP ERP System
Setting Value
SAP System Alias ECCCLNT201 (RFC destination name)
Description Description of the RFC destination
RFC Destination ECCCLNT201 (RFC destination name)
Software Version DEFAULT
Figure 2-15. SPRO path for maintaining system aliases
Figure 2-16. Creating a system alias
4. Add the entry shown in Table 2-8.

Chapter 2 ■ Setting Up the Fiori LandSCape
43
If the Local system alias for SAP Gateway does not exist, add the entry shown in Table 2-9 (see Figure 2-17).
Table 2-9. Settings for the Local System Alias
Name Value
SAP System Alias LOCAL
Description Local System Alias
Local GW Select the Local GW check box.
RFC Destination NONE
Software Version DEFAULT
Figure 2-17. Creating a default local system alias
Figure 2-18. Activating SAP Gateway
Activating SAP GatewayIn the Gateway front-end server, you need to activate Gateway. Follow these steps:
1. Execute the transaction SPRO.
2. Go to path SAP NetWeaver ➤ Gateway ➤ OData Channel ➤ Configuration ➤Connection Settings ➤ Activate or Deactivate SAP NetWeaver Gateway(see Figure 2-18).

Chapter 2 ■ Setting Up the Fiori LandSCape
44
Configuring SAP Web DispatcherSAP Fiori apps connect to multiple SAP back-end systems. But these apps are based on the HTML5 framework and JavaScript. When they access multiple back-end systems, the apps are blocked by a same-origin-policy error. To overcome this issue, you can use SAP Web Dispatcher to combine all the back-end hostnames/IPs, ports, and so on in a single origin. Doing so also provides a certain level of security. SAP Web Dispatcher is not mandatory for Fiori transactional apps, but it is mandatory for fact sheets and analytical apps. Web Dispatcher must be configured as an SSL client.
Because Web Dispatcher is a big topic, this section covers only the parts of the configuration that are related to Fiori. Follow these steps:
1. Edit the instance profile of the Web Dispatcher:WDP_W<InstanceNumber>_<hostname>.
2. To enable the HTTPS protocol for Web Dispatcher, install the sapcrypto.dll file. Make the entries listed in Table 2-10 in the Web Dispatcher instance profile.
Table 2-10. Settings for Web Dispatcher
Parameter Value
DIR_INSTANCE <SECUDIR_Directory>
ssl/ssl_lib <Location_of_SAP_Cryptographic_Library>
ssl/client_pse <Location_of_SSL_server_PSE>
ssl/server_pse < Location_of_SSL_client_PSE >
wdisp/ssl_encrypt 1
wdisp/ssl_auth 1
wdisp/add_client_protocol_header 1
wdisp/ping_protocol https
icm/HTTPS/verify_client 1
Table 2-11. ICM Port Settings
Parameter Value
icm/server_port_0 PROT=HTTPS,PORT=<Web Dispatcher Port>,TIMEOUT=120
Enter the values listing in Table 2-11 in the ICM ports.

Chapter 2 ■ Setting Up the Fiori LandSCape
45
Include the parameters from Table 2-12 in the Web Dispatcher routes profile.
After making these changes, you can test the Web Dispatcher using the following URL in your browser: https://<Web Dispatcher Hostname> :<Web Dispatcher Port>/sap/admin/public/default.html.
Setting Up the Fiori Launchpad, Fiori Launchpad Designer, and Fiori Admin PageYou need to activate the OData services required for the launchpad to communicate with and fetch business data from the SAP back-end servers. Follow these steps:
1. Log on to the SAP Gateway Server (front-end server).
2. Execute the transaction SPRO.
3. Go to the path SAP NetWeaver ➤ Gateway ➤ OData Channel ➤ Administration ➤ General Settings ➤ Activate and Maintain Services (see Figure 2-19).
Table 2-12. Routes Profile Settings
Parameter Value
wdisp/system_0 SID=<Front-End SID>, MSHOST=<Front-End Hostname>, MSPORT=<Front-End Messaging Port>, SRCSRV=*:<Web Dispatcher Port>,SRCURL=/sap/opu/;/sap/public/;/sap/bc/;/sap/saml2/;/ui2/nwbc/, CLIENT=<Front-End client>
wdisp/system_1 SID=<Back-End SID>, MSHOST=<Back-End Hostname>, MSPORT=<Back-End Messaging Port>, SRCSRV=*:<Web Dispatcher Port>,SRCURL=/sap/es/, CLIENT= <Back-End client>
wdisp/system_2 SID=<HANA SID>, EXTSRV=<HANA XS URL>,SRCSRV=*:<Web Dispatcher Port>,SRCURL=/sap/hba/;/sap/hana/;/sap/bi/;/sap/viz/;/sap/vi/;/sap/ui5/

Chapter 2 ■ Setting Up the Fiori LandSCape
46
4. Click the Add Service button.
5. Select Local as the System Alias.
6. From the list of services displayed, select the technical service /UI2/LAUNCHPAD.
7. In the Add Service dialog box, enter the package name and choose ICF Node as Standard Mode.
8. Add the technical services listed in Table 2-13.
Table 2-13. Settings for the ICF Node
Technical Service Name Description
/UI2/PAGE_BUILDER_CONF Page Builder - Configuration Level
/UI2/PAGE_BUILDER_CUST Page Builder - Customizing Level
/UI2/PAGE_BUILDER_PERS Page Builder - Personalization Level
/UI2/INTEROP Gateway Service of Interoperability
/UI2/TRANSPORT UI2: Transport Service
Figure 2-19. Activating OData services for the launchpad
Activating ICF NodesYou need to activate the ICF nodes related to Fiori in order to access the relevant Fiori URLs. Here are the steps:
1. Execute the Transaction SICF.
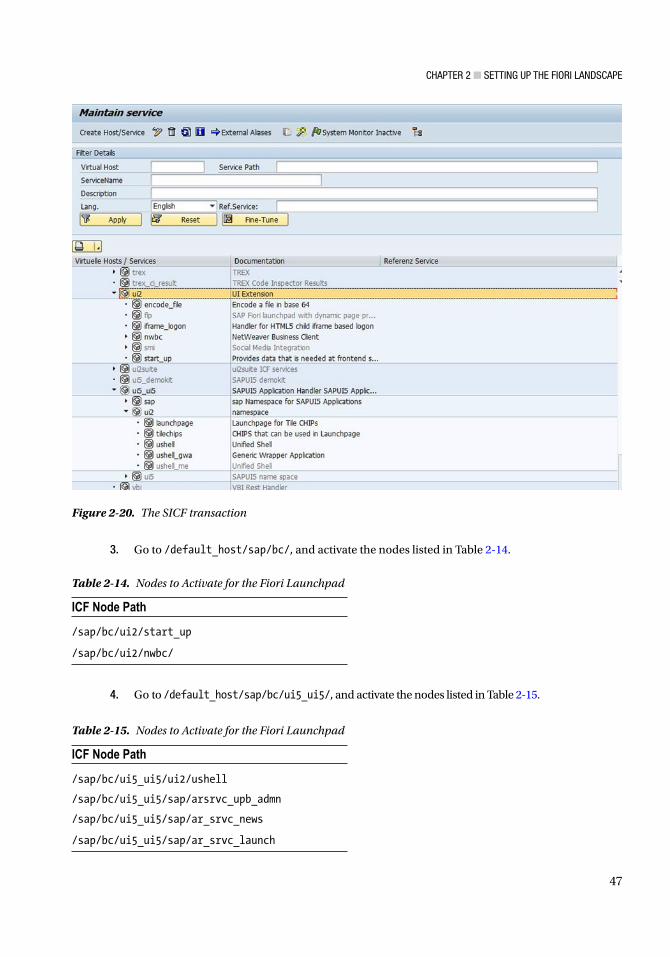
2. Select the services in Tables 2-14, 2-15, and 2-16; click Maintain Service; and activate each of those services (see Figure 2-20).
Chapter 2 ■ Setting Up the Fiori LandSCape
47
3. Go to /default_host/sap/bc/, and activate the nodes listed in Table 2-14.
Table 2-14. Nodes to Activate for the Fiori Launchpad
ICF Node Path
/sap/bc/ui2/start_up
/sap/bc/ui2/nwbc/
Table 2-15. Nodes to Activate for the Fiori Launchpad
ICF Node Path
/sap/bc/ui5_ui5/ui2/ushell
/sap/bc/ui5_ui5/sap/arsrvc_upb_admn
/sap/bc/ui5_ui5/sap/ar_srvc_news
/sap/bc/ui5_ui5/sap/ar_srvc_launch
Figure 2-20. The SICF transaction
4. Go to /default_host/sap/bc/ui5_ui5/, and activate the nodes listed in Table 2-15.

Chapter 2 ■ Setting Up the Fiori LandSCape
48
5. Go to /default_host/sap/public/bc/, and activate the nodes listed in Table 2-16.
Configuring the Logon Screen for the Fiori Launchpad and Fiori Launchpad Designer (Admin page)Initially, the Fiori logon page does not have a default background image or theme. To make the Fiori logon page appear as shown in Figure 2-21, you need to do some configuration in SICF. Follow these steps:
1. Log in to SAP Gateway (front-end server).
2. Execute the transaction SICF.
3. Go to the path /sap/bc/ui5_ui5/ui2/ushell, and double-click ushell.
4. Click the Error Pages tab (see Figure 2-22).
Figure 2-21. Fiori logon screen
Table 2-16. Nodes to Activate for the Fiori Launchpad
ICF Node Path
/sap/public/bc/ui5_ui5/
/sap/public/bc/ui2/
/sap/public/bc/icf/logoff

Chapter 2 ■ Setting Up the Fiori LandSCape
49
5. Choose System Logon, and then click the Configuration button.
6. In the dialog box, select Custom Implementation. In the ABAP Class field, enter the value /UI2/CL_SRALOGIN (see Figure 2-23).
Figure 2-22. Fiori launchpad page configuration

Chapter 2 ■ Setting Up the Fiori LandSCape
50
7. Click Save.
8. For the Admin page and Fiori Launchpad Designer page, go to the path /sap/bc/ui5_ui5/sap/arsrvc_upb_admn and perform the same configuration steps.
Figure 2-23. Fiori launchpad logon configuration

Chapter 2 ■ Setting Up the Fiori LandSCape
51
Configuring the Logout ScreenWhen a user logs out from the Fiori launchpad, a logoff page is displayed. This particular page can be replaced with any custom page you wish. Here are the steps:
1. Execute the transaction SICF.
2. Go to the path /default_host/sap/public/bc/icf/logoff.
3. Double-click the logoff service.
4. Click the Change icon.
5. On the Error Pages tab, select the Logoff Page tab.
6. Select the option Redirect to URL, and enter the custom logoff pageURL (see Figure 2-24).
Figure 2-24. Customizing the Fiori logoff page

Chapter 2 ■ Setting Up the Fiori LandSCape
52
In NetWeaver 7.4, you can automate some of the manual configuration steps by using a predefined task list. The task list must be carried out in the order shown in Table 2-17.
Fiori Application Add-OnsYou can download Fiori app-specific add-ons from the SAP Service Marketplace at http://service.sap.com/support and install them using the SAINT t-code. From the SAP Service Marketplace, navigate to Software Download ➤ Installation and Upgrades ➤ A-Z Index ➤ F ➤ SAP Fiori ➤ SAP Fiori for Suite. Here, you can download all the Fiori apps for ERP, CRM, SRM, EHS, and so on.
The most common Fiori apps are the transactional apps for ERP (found under FIORI ERP APPLICATIONS X2, as shown in Figure 2-25). You can find further details for configuring these add-ons at https://fioriappslibrary.hana.ondemand.com/sap/fix/externalViewer/.
Table 2-17. Predefined Task List for NetWeaver 7.4
Task List Manual Configuration Steps Automated Using the Task List
SAP_GATEWAY_BASIC_CONFIG Activating SAP NetWeaver Gateway
SAP_FIORI_LAUNCHPAD_INIT_SETUP Activating the launchpad OData services
Configuring ICF nodes
SAP_SAP2GATEWAY_TRUSTED_CONFIG Creating trusted RFCs in NetWeaver Gateway to the SAP business suite
Defining trust RFCs between the SAP business suite and SAP NetWeaver Gateway
SAP_GATEWAY_ADD_SYSTEM Creating system aliases
SAP_BASIS_SSL_CHECK No equivalent manual step

Chapter 2 ■ Setting Up the Fiori LandSCape
53
The next chapter discusses the Fiori launchpad and Fiori app configuration in detail.
Figure 2-25. Fiori app-specific add-ons

55© Bince Mathew 2015 B. Mathew, Beginning SAP Fiori, DOI 10.1007/978-1-4842-1335-3_3
Chapter 3
Fiori Launchpad and Applications
After setting up Fiori Landscape, now we can customize the Fiori Launchpad and set up the standard applications. In this chapter you will learn about different applications available for Fiori, Fiori Launchpad basics, Fiori Launchpad administration, Configuring Tiles, assigning roles to users, End user launchpad customizations and Fiori Approval workflow application configurations.
The Fiori Launchpad and Launchpad DesignerThe Fiori launchpad is the single point of entry for end users to access Fiori apps. Fiori has a launchpad designer for the use of Fiori administrators.
End users can access the apps assigned to them based on their roles. For example, if you are a manager, when you log in to the Fiori launchpad, you see manager-related apps in addition to the default apps.
Fiori administrators can do the following:
• Create catalogs and groups
• Assign catalogs and groups to end users
• Create custom tiles
• Configure and modify standard tiles
• Edit launchpad settings, configure target mappings, and so on
The default URL for the Fiori launchpad is as follows:
http://<host>.<domain>:<port>/sap/bc/ui5_ui5/ui2/ushell/shells/abap/Fiorilaunchpad.html? sap-client=<client>&sap-language=EN
The default URL for the Fiori launchpad designer is as follows:
http://<host>.<domain>:<port>/sap/bc/ui5_ui5/sap/arsrvc_upb_admn/main.html? sap-client=<client>?scope=CUST
Fiori LaunchpadIn the Fiori launchpad, each app is represented as a tile. Figure 3-1 shows an example of what end users see when they log in to their Fiori home page.

Chapter 3 ■ Fiori LaunChpad and appLiCations
56
Fiori Launchpad BasicsYou need to be familiar with a few concepts about the Fiori launchpad. First, the launchpad has different types of tiles:
• Static tiles: Display predefined contents that are static in nature, such as text and icons (see Figure 3-2).
Figure 3-1. Fiori launchpad for end users

Chapter 3 ■ Fiori LaunChpad and appLiCations
57
• Dynamic tiles: Show dynamic number values such as pending purchase order approvals, travel requests, and so on (see Figure 3-3).
• KPI tiles: Key performance indicator tiles, which display alerts or reports. The tile gives a short summary of the data in the form of a micro chart (see Figure 3-4).
Figure 3-2. Static tile
Figure 3-3. Dynamic tile

Chapter 3 ■ Fiori LaunChpad and appLiCations
58
• News tiles: Bring RSS feeds into the Fiori launchpad. You can configure these tiles to display photos and live feeds from multiple RSS feeds. You can also configure the refresh rate for each feed (see Figure 3-5).
• Jam tiles: Display SAP Jam content. Jam is a social collaboration platform that connects across all SAP technologies such as ABAP, SAPUI5, and Web Dynpro.
Groups and CatalogsAnother concept in the Fiori launchpad are groups and catalogs. Catalogs are like books with a variety of contents, as shown in Figure 3-6:
• Tiles are the contents that go in each catalog.
• Each tile can represent a particular Fiori app or point to another page containing a group of tiles.
Figure 3-5. News tile
Figure 3-4. KPI tile

Chapter 3 ■ Fiori LaunChpad and appLiCations
59
Groups are similar to favorites. Users can create them in the Fiori launchpad, or a Fiori administrator can create a group and pin it to the user’s home page for easy access (see Figure 3-7).
Figure 3-6. Different tiles that go into catalogs

Chapter 3 ■ Fiori LaunChpad and appLiCations
60
Fiori Launchpad DesignerFiori launchpad administrators have access to the Fiori launchpad designer (the Fiori administrator consoler), where they can control and assign roles, catalogs, and tiles to end users. The tiles a user sees on their launchpad are assigned to their ID by the launchpad admin.
Before making any changes in the Fiori launchpad designer, the Fiori admin needs a transport request that lets them transport the changes made in the development system to the QA and production systems later:
1. To assign a transport request, click the settings icon on the upper-right corner of the Fiori launchpad designer (see Figure 3-8).
Figure 3-7. Fiori launchpad groups

Chapter 3 ■ Fiori LaunChpad and appLiCations
61
Figure 3-8. Click the Settings icon
2. Deselect the None (Local Object) check box, and assign your new transport request for the launchpad designer from the drop-down list (see Figure 3-9).
Figure 3-9. Assign your transport request
Every tile an end users accesses on their Fiori home page has an invisible target mapping tile linked to it (see Figure 3-10). The target mapping carries out the navigation of the tile to the Fiori app the user wants to access.

Chapter 3 ■ Fiori LaunChpad and appLiCations
62
The administrator can modify the target mappings of any standard apps and also create custom tiles with the corresponding target mapping for custom apps. You learn in detail about target mapping in the next section.
Assigning Catalogs and Tiles to End Users In order for end users to see and access tiles, a Fiori administrator must configure the catalog and assign it to the end users in the Fiori launchpad designer. Here are the steps:
1. In the launchpad designer, click the + icon at lower-left (see Figure 3-11).
Figure 3-10. Fiori launchpad designer tiles and target mappings

Chapter 3 ■ Fiori LaunChpad and appLiCations
63
2. Give the catalog a title and a unique ID, as shown in Figure 3-12. This ID will be later used in the back-end system to assign the catalog to the users.
Figure 3-11. Click + in the launchpad designer
Figure 3-12. Give the catalog a title and ID

Chapter 3 ■ Fiori LaunChpad and appLiCations
64
3. Click the + icon to add a new tile (see Figure 3-13).
Figure 3-13. Add a tile
Figure 3-14. Choosing the dynamic tile type
4. You see a set of tile types that you can choose from. Click Dynamic (see Figure 3-14). You can also add static and news tiles.

Chapter 3 ■ Fiori LaunChpad and appLiCations
65
5. After creating tiles, you need to configure their properties. To begin, click the new dynamic tile (see Figure 3-15).
Figure 3-16. Configure the dynamic tile
Figure 3-15. Click the new tile
6. In this example, you configure the dynamic tile with one of the standard Fiori apps (see Figure 3-16):
a. In the General section, give the tile a title, subtitle, keywords (which help Fiori know where to show the app in search results in the launchpad),and icon.
b. Because this is a dynamic tile, you must provide a OData service URL in order to show dynamic data.

Chapter 3 ■ Fiori LaunChpad and appLiCations
66
c. The Navigation section is where you indicate whether users can open the app via semantic object-based navigation or directly provide the URL of the app they want to launch. The semantic object is the link between the tile and the target-mapping tile that opens the app. The Action option specifies the type of action the user will carry out with the app: Display, Create, and so on.
d. The Tile Actions feature lets the tile execute additional actions.
7. You configure the same settings for a static tile, with the exception of the Dynamic Data field (see Figure 3-17).
Figure 3-17. Configuring a static tile
8. You can configure a news tile with multiple RSS feeds and set the refresh interval for each feed (see Figure 3-18).
Figure 3-18. Configuring a news tile

Chapter 3 ■ Fiori LaunChpad and appLiCations
67
9. You need to configure the target mappings for dynamic and static tiles.(News tiles don’t require a target mapping.) To do so, click the Create Target Mapping button at lower-right (see Figure 3-19).
Figure 3-19. Click Create Target Mapping
10. Give the target mapping settings for the dynamic tile (see Figure 3-20):
• In the Intent area, you link the tile and the target-mapping tile. If you check Figure 3-16, you see a semantic object and an action in the Navigation area.This is how semantic objects are linked between tiles and target mappings.
• The Target area has two options for the navigation source. The SAPUI5 Fiori App option has a direct URL and a component name, which is maintained in component.js in the Fiori app source code. The Other SAP Fiori App option specifies an app in the LPD_CUST transaction with a launchpad role and launchpad instance.
• The General area is used to specify device types supported by the app and to enter additional parameters.

Chapter 3 ■ Fiori LaunChpad and appLiCations
68
11. Figure 3-21 shows the target-mapping screen with Other SAP Fiori App selected in the Target area.
Figure 3-21. Target mapping with the Other SAP Fiori App option selected
Figure 3-20. Target mapping settings

Chapter 3 ■ Fiori LaunChpad and appLiCations
69
Assigning and Maintaining Roles for End UsersOnce you’ve configured tiles, you need to log in to the SAP Gateway server and assign the catalog to the end user’s ID:
1. Go to transaction PFCG in the SAP Gateway system (see Figure 3-22).
2. Create a new role for the user (see Figure 3-23).
Figure 3-22. Go to transaction PFCG
Figure 3-23. Create a user role

Chapter 3 ■ Fiori LaunChpad and appLiCations
70
3. Switch to edit mode, and click the Menu tab. Click the Transaction button, and select SAP Fiori Tile Catalog (see Figure 3-24).
4. In the pop-up, give the catalog ID that you created earlier in the launchpad designer (see Figure 3-25).
Figure 3-25. Enter the catalog ID
Figure 3-24. Select SAP Fiori Tile Catalog

Chapter 3 ■ Fiori LaunChpad and appLiCations
71
5. On the User tab, give the end user’s ID to assign the role to the user (see Figure 3-26). Now the user has access to the tiles in the custom catalog you created in the launchpad designer.
Configuring the Fiori Home PageEven though the app is accessible to the end user, it isn’t visible when they log in to the launchpad. To see the app on the home page, the user must assign the app to an existing group or create a custom group and add the app to it (see Figure 3-27). Here are the steps:
Figure 3-26. Assign the role to the user

Chapter 3 ■ Fiori LaunChpad and appLiCations
72
1. Click the Edit icon at lower-right in the launchpad. Give the group a new name: for example, My Custom Group (see Figure 3-28).
Figure 3-27. The user needs to add the app to a home-page group
Figure 3-28. Name the new group

Chapter 3 ■ Fiori LaunChpad and appLiCations
73
3. The new tile now appears in the custom group (see Figure 3-30).
Figure 3-29. Add the app to the group
Figure 3-30. The group displays the new tile
2. Click the + icon and add the app assigned. Then, in the catalog list, click the + icon to add the app to your custom group (see Figure 3-29).

Chapter 3 ■ Fiori LaunChpad and appLiCations
74
Creating Groups in Fiori Launchpad DesignerThis process of creating a custom group and adding apps to it may be confusing or frustrating for some users. To avoid this, Fiori launchpad admins can create groups in the Fiori launchpad designer the same way you create a catalog:
1. Click the Groups tab in the launchpad designer, and then click the + icon at lower-left (see Figure 3-31).
Figure 3-31. Add a new group
2. Give the group a title and a unique ID. This group ID will be assigned to the user ID in the back end in PFCG. Check the Enable Users To Personalize Their Group check box if you want users to have the right to modify the contents of this predefined group (see Figure 3-32).

Chapter 3 ■ Fiori LaunChpad and appLiCations
75
3. Click the + icon to start adding tiles to the group (see Figure 3-33).
Figure 3-32. Letting users modify the group
Figure 3-33. The empty group

Chapter 3 ■ Fiori LaunChpad and appLiCations
76
4. Select the tiles for the group (see Figure 3-34).
5. The selected tiles are added to the new group (see Figure 3-35).
Figure 3-34. Select tiles for the group
Figure 3-35. The completed group

Chapter 3 ■ Fiori LaunChpad and appLiCations
77
Assigning Groups to End UsersSimilar to assigning catalog IDs to user IDs, the Fiori admin must assign group IDs to user IDs in the Gateway system. Follow these steps:
1. Open the SAP Gateway system, execute transaction PFCG, and create a new role (see Figure 3-36).
2. On the Menu tab, click Transaction, and select SAP Fiori Tile Group(see Figure 3-37).
Figure 3-36. Create a new role

Chapter 3 ■ Fiori LaunChpad and appLiCations
78
3. In the pop-up, select the group ID you created in the launchpad designer(see Figure 3-38).
4. Go to the User tab, and assign the end user to the group (see Figure 3-39).
Figure 3-37. Select SAP Fiori Tile Group
Figure 3-38. Select the group ID

Chapter 3 ■ Fiori LaunChpad and appLiCations
79
5. When the user logs in to their home page, they see the predefined group(see Figure 3-40).
Figure 3-39. Assign the user to the group
Figure 3-40. The group appears on the user’s home page

Chapter 3 ■ Fiori LaunChpad and appLiCations
80
Fiori Launchpad End User CustomizationsEnd users can customize their launchpad by creating custom groups and adding tiles from the catalog. To customize the end-user launchpad, follow these steps:
1. Click the Tile Catalog icon in the lower-left corner of the launchpad (see Figure 3-41).
Figure 3-41. Click the Tile Catalog icon
2. Select the desired tile from the Tile Catalog page (see Figure 3-42).

Chapter 3 ■ Fiori LaunChpad and appLiCations
81
Figure 3-42. Select a tile
3. Click New Group to add the tile to your custom group (see Figure 3-43).
Figure 3-43. Click New Group
4. Give the group a name (see Figure 3-44).

Chapter 3 ■ Fiori LaunChpad and appLiCations
82
Figure 3-44. Name the group
On the launchpad, you can see the new group with the tile selected from the catalog, as shown in Figure 3-45.
Figure 3-45. The tile appears on the launchpad

Chapter 3 ■ Fiori LaunChpad and appLiCations
83
In the latest version of Fiori launchpad, you can alternatively add new tiles and create groups by clicking the Edit icon at lower-right (see Figure 3-46). Then follow these steps:
1. In Edit mode, create a new group by entering a name for the group (see Figure 3-47).
Figure 3-46. Click the Edit icon

Chapter 3 ■ Fiori LaunChpad and appLiCations
84
Figure 3-47. Enter a group name
2. To navigate to the Tile Catalog page, click the + icon (see Figure 3-48).
Figure 3-48. Click + to go to the Tile Catalog page

Chapter 3 ■ Fiori LaunChpad and appLiCations
85
Figure 3-49. Select tiles to add
3. On the Tile Catalog page, select the tiles you want to add to the group(see Figure 3-49).
4. Once a tile has been added, you can edit its properties by right-clicking it and choosing Settings (see Figure 3-50).
Figure 3-50. Right-click the tile to edit its properties

Chapter 3 ■ Fiori LaunChpad and appLiCations
86
Figure 3-51. Editing a tile’s properties
5. You can change the tile’s title, subtitle, and info text (see Figure 3-51).
6. You can also move tiles from one group to the other by selecting Move(see Figure 3-52).
Figure 3-52. Moving a tile

Chapter 3 ■ Fiori LaunChpad and appLiCations
87
7. From the list, select the group to which you want to move the tile (see Figure 3-53).
Figure 3-53. Choose the group to move a tile to
Configuring the Fiori Approval Application WorkflowApproval apps are a set of standard apps from Fiori that integrate with the standard approval workflows in the SAP system, such as leave approval, timesheet approval, PO approval, and so on (the next section gives a full list of these apps). Although these are standard apps, the standard workflows may be different for each customer in each scenario; and some customers may use a custom workflow for a specific scenario. You can configure Fiori approval apps in order to integrate them with the workflows customers use.
There are some differences in the way you configure approval apps in Wave 1 and Wave 2. So, first let’s look at the differences between Wave 1 and Wave 2 apps (see Table 3-1).

Chapter 3 ■ Fiori LaunChpad and appLiCations
88
Table 3-1. Wave 1 vs. Wave 2 Apps
Wave 1 Wave 2
Released in May 2013 (ola Architecture) Released in November 2013 (new architecture)
All the apps were coded using HTML views, and every app had an index.html page like a normal web page.
All the apps, including the Wave 1 apps, were ported to XML views, and the index.html pages were replaced by shells. Wave 2 apps no longer require an index.html page while running in the Fiori launchpad.
Navigation between apps was not possible. Cross-app navigation was introduced in the new architecture of the Wave 2 apps.
Extensibility options for the UI were not available. Developers had to download the app’s original source code, modify the app, and upload it to the server.
UI extension points were introduced, enabling developers to enhance, replace, or modify the UI of any Fiori app.
Every app had a separate UI package that needed to be installed.
UI packages were grouped based on modules like CRM, GRC, MRP, and so on.
Wave 1 packages are no longer supported by SAP. These packages are valid only for customers that went live before November 2013.
Wave 2 packages are valid for all customers and are supported by SAP.
Configuring Wave 1 Approval Applications The Wave 1 approval apps are as follows:
• Approve Requests (a generic approval app that can be configured with any custom approval workflows)
• Approve Leave Requests
• Approve Timesheets
• Approve Travel Requests
• Approve Travel Expenses
• Approve Shopping Carts
• Approve Purchase Orders
• Approve Requisitions
• Approve Purchase Contracts
Each standard approval app must be configured initially to link it with the standard/custom workflow the customer is using in their SAP landscape for that scenario. To configure the apps, follow these steps:
1. Execute the transaction SPRO, and navigate to SAP Reference IMG ➤ SAP NetWeaver ➤ Gateway Service Enablement ➤ Content ➤ Task Gateway ➤ Task Gateway Service ➤ Scenario Definition (see Figure 3-54).

Chapter 3 ■ Fiori LaunChpad and appLiCations
89
Figure 3-54. Defining a scenario
2. Click the scenario definition at left, and enter the details for the approval app you want to configure (see Figure 3-55). These values are provided in Table 3-2.
Figure 3-55. Enter the app details

Chapter 3 ■ Fiori LaunChpad and appLiCations
90
Tabl
e 3-
2. F
iori
Wav
e 1
App
rova
l App
Con
figu
rati
on C
hart
Fiel
dA
ppro
ve R
eque
sts
(Cus
tom
Wor
kflo
w)
App
rove
Lea
ve R
eque
sts
App
rove
Sh
oppi
ng C
arts
App
rove
Pur
chas
e R
equi
sitio
nsA
ppro
ve P
urch
ase
Ord
ers
App
rove
Pur
chas
e C
ontr
acts
Scen
ario
Id
enti
fier
<Cu
stom
_ID
>LE
AV
ER
EQ
UE
STA
PP
RO
VA
LC
AR
TAP
PR
OV
AL
PR
_AP
PR
OV
AL
PO
_AP
PR
OV
AL
PC
_AP
PR
OV
AL
Tech
nic
al
Serv
ice
Nam
e
/IW
PG
W/
TASK
PR
OC
ESS
ING
/GB
HC
M/L
EA
VE
AP
PR
OV
AL
/GB
SRM
/C
AR
TAP
PR
OV
AL
GB
AP
P_
PR
AP
PR
OV
AL
GB
AP
P_
PO
AP
PR
OV
AL
SRA
001_
PC
AP
PR
OV
AL
En
tity
Set
Ext
ern
al
Nam
e
Task
Lea
veR
equ
est
Wor
kflo
wTa
skW
orkf
low
Task
Wor
kflo
wTa
skW
orkf
low
Task
Pro
per
ty
Ext
ern
al
Nam
e
Task
Def
init
ion
IDTa
skD
efin
itio
nID
Task
Typ
eTa
skT
ype
Task
Typ
eTa
skT
ype
Cla
ss fo
r Sc
enar
io
Cou
nt
If th
e sc
enar
io is
not
p
art o
f th
e B
usi
nes
s W
orkf
low
en
gin
e,
and
you
wan
t to
see
the
nu
mb
er o
f tas
ks
pen
din
g fo
r th
is
scen
ario
, en
ter
the
nam
e of
the
clas
s th
at im
ple
men
ts th
e /I
WW
RK
/IF_
TG
W_
SCE
NA
RIO
inte
rfac
e in
the
SAP
sys
tem
.
/GB
HC
M/C
L_A
PP
RO
VA
L_IT
EM
_CO
UN
TN
ot a
vaila
ble
CL_
GB
AP
P_A
PV
_P
R_W
OR
KIT
EM
_C
OU
NT
CL_
GB
AP
P_A
PV
_P
O_W
OR
KIT
EM
_C
OU
NT
CL_
SRA
001_
PC
_W
OR
KIT
EM
_C
OU
NT
Qu
ick
Act
Sele
ct th
e Q
uic
k A
ct c
hec
k b
ox to
en
able
qu
ick
app
rova
l of w
orkf
low
item
s (i
Pad
on
ly).

Chapter 3 ■ Fiori LaunChpad and appLiCations
91
3. Click Assign Consumer Type, and enter the device types on which you want the app to be supported (see Figure 3-56).
4. Assign the role to the consumer type (see Figure 3-57).
Figure 3-56. Specify device types
Figure 3-57. Assign the role

Chapter 3 ■ Fiori LaunChpad and appLiCations
92
Configuring Wave 2 Approval AppsBeginning with Wave 2 on the latest ECC EHP7 NetWeaver 7.4, the SPRO settings for approval apps have changed. In the latest stack, approval app configuration is located in specific areas: for example, for purchase order approval, you can find it at Purchasing ➤ Purchase Order ➤ Approve Purchase Orders App ➤ Specify Workflow Task IDs for Approve Purchase Orders App in SPRO (see Figure 3-59).
Figure 3-58. Enter the task ID
5. In the Task Definition For Scenario dialog, enter the task ID of the standard/custom workflow used for that scenario in the back-end system (see Figure 3-58).For example, for purchase-order approval, enter the task ID of the workflow configured for PO approval in the back end.

Chapter 3 ■ Fiori LaunChpad and appLiCations
93
Enter the task ID for the workflow app as shown in Figure 3-60.
Figure 3-59. Locating approval app configuration

Chapter 3 ■ Fiori LaunChpad and appLiCations
94
Fiori My InboxIn addition to the workflow-based approval apps, Fiori has recently added the My Inbox app. This app is basically a unified inbox that can handle all the approval workflows a user receives. Users can now view all pending approvals and tasks in a single app. The My Inbox app tile shows the total number of pending items (see Figure 3-61) for the user rather than only the pending items for a specific approval app (for instance, Approve Leave Requests shows only the number of pending leave approvals).
Figure 3-60. Enter the task ID
Figure 3-61. The My Inbox app tile shows the total number of pending requests

Chapter 3 ■ Fiori LaunChpad and appLiCations
95
Figure 3-62 shows the different types of approval workflows that appear in the My Inbox app.
Users can enter comments on the workflow before approving or rejecting, as in a chat window. Thus if one of the approvers has a comment, they can post it in the app, and the appropriate user can reply (see Figure 3-63).
Figure 3-62. My Inbox approval workflows

Chapter 3 ■ Fiori LaunChpad and appLiCations
96
You can find details about installing My Inbox in the Fiori apps reference library at https://fioriappslibrary.hana.ondemand.com/sap/fix/externalViewer/#/detail/Apps('F0862'). Because the app is a new addition, it has a dedicated SCN page for discussing issues, installation steps, the latest feature updates, and so on: http://scn.sap.com/docs/DOC-62602.
The next chapter discusses how to customize and extend a standard Fiori app.
Figure 3-63. Posting comments on a workflow task from in My Inbox

97© Bince Mathew 2015 B. Mathew, Beginning SAP Fiori, DOI 10.1007/978-1-4842-1335-3_4
Chapter 4
Customizing and Extending Standard Fiori Applications
Fiori standard apps are not always accepted by customers as is. Sometimes developers need to extend or modify an application according to meet the customer’s requirements. SAP Fiori has an enhancement framework that makes this task easier. In this chapter, you learn how to customize and extend the standard Fiori apps.
Installing Eclipse and UI5 Add-OnsThis chapter looks at the steps involved in extending and customizing a standard SAP Fiori app. The two primary IDEs currently used for Fiori development and customization are as follows:
• Eclipse-based IDEs (Juno, Kepler, or Luna)
• Web IDEs (on premises or cloud-based)
To extend a standard app, you need to use the Eclipse Juno 32-bit or 64-bit version. You can go to this web page to download Eclipse:
www.eclipse.org/downloads/packages/eclipse-ide-java-ee-developers/marsr
After installing Eclipse, you need to install the SAP UI5 add-ons to Eclipse. To do so, open Eclipse and then follow these steps.
1. Go to Help ➤ Install New software, and enter the URL https://tools.hana.ondemand.com/juno to install the UI add-on as shown in Figure 4-1.
2. Select the UI Development Toolkit For HTML5 check box.
3. Click Next, and install the add-on.
4. Eclipse prompts you to restart after installing the add-ons. Restart Eclipse, and the add-ons will be successfully added.
Electronic supplementary material The online version of this chapter (doi:10.1007/978-1-4842-1335-3_4) contains supplementary material, which is available to authorized users.

Chapter 4 ■ Customizing and extending standard Fiori appliCations
98
To extend the Fiori applications, we need to add the Fiori Toolkit plugin into eclipse. The fiori toolkit can be downloaded from the below site http://scn.sap.com/docs/DOC-50114. (Click on the "I Agree & Download" link on the page to start the download). Once the plugin has been downloaded open the eclipse and do the following steps to install it :
1. Go to Help ➤ Install New Software.
2. Click the Add button, and then click Archive.
3. Navigate to the folder where you downloaded the Fiori toolkit, and click OK.
4. Select the SAP Fiori Toolkit check box.
5. Click Next, accept the warning and license agreement, and click Finish.
6. Restart Eclipse to complete the installation
Since SAP released Web IDE, the Fiori toolkit add-on version 1.1.4 for Eclipse is no longer being updated. Currently, Eclipse Luna gets the latest Fiori UI5 library add-ons. Detailed steps for downloading and configuring Eclipse and Web IDE are presented in Chapter 6.
Figure 4-1. UI5 add-on screen in Eclipse

Chapter 4 ■ Customizing and extending standard Fiori appliCations
99
Downloading the Standard Fiori Application CodeThis scenario uses the Track Purchase Orders standard app, as shown in Figure 4-2.
First you need to find the BSP app of the Track Purchase Order app to extend it. There are two ways to find the app source code in the system.
First, you can execute the transaction SICF, navigate to /default_host/sap/bc/ui5_ui5/sap, and search for the app manually. In this scenario, the BSP app name is mm_purord_tpo (see Figure 4-3).
Figure 4-2. Screenshot of the standard Track Purchase Orders app

Chapter 4 ■ Customizing and extending standard Fiori appliCations
100
Figure 4-3. Manually searching for the BSP app

Chapter 4 ■ Customizing and extending standard Fiori appliCations
101
Or second, you can open the launchpad designer, and search for the Track Purchase Order app in the business catalog (see Figure 4-4). Then follow these steps:
1. Click the target-mapping icon, select the relevant target mapping, and click Configure at the bottom of the launchpad designer (see Figure 4-5).
2. On the target mapping configuration page, you can find the launchpad role(see Figure 4-6).
Figure 4-4. Launchpad designer catalog tiles
Figure 4-5. Select the target mapping

Chapter 4 ■ Customizing and extending standard Fiori appliCations
102
3. Go to the Gateway system, execute the transaction LPD_CUST, and search for the launchpad role (see Figure 4-7).
Figure 4-6. Find the launchpad role
Figure 4-7. Search for the role

Chapter 4 ■ Customizing and extending standard Fiori appliCations
103
4. Open the launchpad. In the right pane, under Application Parameter, you see the full path of the app (see Figure 4-8).
After you’ve found the app name, you need to download the app’s source code into Eclipse. SAP provides the app /UI5/UI5_REPOSITORY_LOAD to download and upload Fiori apps (both standard and custom). Follow these steps:
1. Go to transaction SE38, and execute the app /UI5/UI5_REPOSITORY_LOAD(see Figure 4-9). Give your UI5 app name in the input field, select Download, and execute the app.
Figure 4-8. LPD_CUST launchpad settings for Track Purchase Order app

Chapter 4 ■ Customizing and extending standard Fiori appliCations
104
2. Select a folder on your system where you want to download the code, as shown in Figure 4-10.
Figure 4-9. Downloading the Track Purchase Order app source code

Chapter 4 ■ Customizing and extending standard Fiori appliCations
105
3. The system asks for permission to access the folder; click Yes to allow access(see Figure 4-11). The system lists all the files that will be downloaded. Click the Click Here To Download link at the bottom of the page.
Figure 4-10. Select a destination directory

Chapter 4 ■ Customizing and extending standard Fiori appliCations
106
4. In the pop-up, leave the External Codepage field blank, and click the checkmark button (see Figure 4-12).
Figure 4-11. Click the Click Here To Download link
Figure 4-12. Leave this field blank

Chapter 4 ■ Customizing and extending standard Fiori appliCations
107
5. You get a confirmation after the source code has been downloaded, as shown in Figure 4-13.
Now that the app has been downloaded to your local PC, you need to import the source code into Eclipse.
Figure 4-13. Download confirmation

Chapter 4 ■ Customizing and extending standard Fiori appliCations
108
Importing Fiori Standard Application Code into EclipseBefore creating an extension Fiori extension project, you have to import into Eclipse the standard code you downloaded from the server. Here are the steps:
1. Open Eclipse, and click New ➤ Other (see Figure 4-14).
Figure 4-14. Creating a UI5 project in Eclipse

Chapter 4 ■ Customizing and extending standard Fiori appliCations
109
2. Select Application Project in the SAPUI5 Application Development folder(see Figure 4-15).
3. Click “Next”, on the second screen give a name for your project and uncheck the “Create an Initial View” check box and click on Finish (Refer Figure 4-16).
Figure 4-15. Select Application Project

Chapter 4 ■ Customizing and extending standard Fiori appliCations
110
4. The new project is created on the left side of Eclipse in the project explorer pane (see Figure 4-17).
Figure 4-16. Deselect Create An Initial View

Chapter 4 ■ Customizing and extending standard Fiori appliCations
111
5. Copy the contents of the WebContent folder of the source code for the standard Fiori Track Purchase Order app you downloaded earlier (see Figure 4-18).
Figure 4-17. Project Explorer
Figure 4-18. Standard Track Purchase Order UI5 source code

Chapter 4 ■ Customizing and extending standard Fiori appliCations
112
6. In Eclipse, right-click the WebContent folder, and paste in the copied code (see Figure 4-19). Select Yes to All in the pop-up screen to overwrite the folder’s contents.
7. The standard app is imported into Eclipse. You can see the source code in the WebContent folder (see Figure 4-20).
Figure 4-19. Overwriting the UI5 Eclipse Project WebContent folder with the downloaded code

Chapter 4 ■ Customizing and extending standard Fiori appliCations
113
If you check one of the standard code’s views, such as S2.view.xml, you see a <core:ExtensionPoint/> tag (see Figure 4-21). This is basically a flag for the Fiori toolkit or Web IDE to find extension points where you can insert custom code into the standard code. Usually, extension points are available for Header, Maint Content, and Footer, but they may differ from view to view. Some views don’t have extension points, in which case you have the option to replace the entire view with custom code.
Figure 4-20. Eclipse project with the standard code

Chapter 4 ■ Customizing and extending standard Fiori appliCations
114
Similarly, you can see the *.controller.js and a *.-dbg.controller.js files for every controller of each view (see Figure 4-22). Files ending with *-dbg.controller.js are the expanded versions of the same code in the *.controller.js files. At runtime, the Fiori apps only load *.controller.js, unless you change the debugger settings to load *.-dbg.controller.js manually.
Figure 4-21. Extension points in the standard code
Figure 4-22. Standard app code
Also, you see Component-preload.js as well as a -dbg version (see Figure 4-23). Component-preload.j is basically a summary of all the code in controller.js for each view, configuration.js, and the component controller in the standard app project. This feature is extremely useful for Fiori client apps running on mobile devices, where space and loading time are critical.

Chapter 4 ■ Customizing and extending standard Fiori appliCations
115
Before you create an extension project, you need a custom OData service to help bring your custom data from the back end into the extended app. To check the standard OData service that is being used by the standard app, open the Configuration-dbg.js file: the OData service name is in the service list (see Figure 4-24).
Figure 4-23. Component-preload.js
Figure 4-24. OData service name
You need to create a custom OData service for the extended app. There are two ways to do it. First, you can create a completely custom OData service for the extended app, but this is not recommended because you have to adapt all the UI code to work with the new OData service entity fields. Second, you can create a new OData project, redefine the standard OData service that’s being used by the app you want to extend, and add custom entities or add fields to existing entities.

Chapter 4 ■ Customizing and extending standard Fiori appliCations
116
Redefining a Standard OData ServiceIn this example, you redefine a standard OData service and add custom fields to the existing entity:
1. Log on to the Gateway server, and execute the transaction SEGW. OData service definitions may reside on the Gateway server, but the actual class implementation for fetching the back-end business data is implemented in the respective back-end system: ECC, SRM, CRM, and so on. Click the New icon to create a new project. Name the project: in this case, name it ZTRCK_PO_EXT. Click the check mark button to create the project (see Figure 4-25).
2. Right-click the data model, and navigate to Redefine ➤ OData Service (GW)(see Figure 4-26).
Figure 4-25. Creating a new OData project

Chapter 4 ■ Customizing and extending standard Fiori appliCations
117
3. Enter the OData service name that you found in the standard app source code (see Figure 4-27). (Alternatively, you can check for OData services in /IWFND/MAINT_SERVICE).
Figure 4-26. Redefining the standard OData service
Figure 4-27. Enter the OData service name
Instead of creating a completely new OData service, you can append additional fields onto the DDIC structure the entities are using. Then use the BAdls to update the OData model provider and data provider classes to add the fields to the standard OData service (see Figure 4-28).

Chapter 4 ■ Customizing and extending standard Fiori appliCations
118
4. In this example you don’t want change the standard app’s functionality and do want to create a custom OData service for the extended app, so you use approach that redefines the OData service. Select the entities you want to use; in this case, select all the entities so you don’t have to adapt the UI5 code to work with the limited entity sets in the custom OData service (see Figure 4-29). This way, you only need to add fields to the extended app.
Figure 4-28. Standard BAdls for extending OData model provider and data provider classes
Figure 4-29. Importing entity sets from the standard OData service

Chapter 4 ■ Customizing and extending standard Fiori appliCations
119
5. For this example, you add your custom fields to the POList entity. To find the DDIC structure associated with the entity, go to SE80, and, under Package, enter the package name P_SRA020_ODATA. In the Structures folder, you see the SRA20_S_PO_LIST structure. Double-click the structure, click the GoTo button, and select Append Structure, as shown in Figure 4-30.
6. In the pop-up, give a name for the structure to append (see Figure 4-31).
Figure 4-30. Appending custom fields to the standard DDIC structure
Figure 4-31. Give a name for the structure to append

Chapter 4 ■ Customizing and extending standard Fiori appliCations
120
7. Create two fields in which to add your custom data. Save and activate the structure (see Figure 4-32).
8. Go back to the SEGW transaction, open the POList entity, and double-click the Properties folder. Click the New button to append rows for your custom fields, as shown in Figure 4-33.
9. Click the F4 help icon in the ABAP Field Name column of your new row, and add the fields (see Figure 4-34).
Figure 4-32. Add your custom fields to the structure
Figure 4-33. Add your custom fields to the OData entity

Chapter 4 ■ Customizing and extending standard Fiori appliCations
121
Now you can see the two new fields appended to your entity (see Figure 4-35).
10. Click the Generate button to commit the changes to the OData service. Open the Runtime Artifacts folder, double-click ZCL_ZTRCK_PO_EXT_DPC_EXT, and then double-click the same class name in the right pane (see Figure 4-36).
Figure 4-34. Fields are now available in the property list
Figure 4-35. The new fields are appended to the entity

Chapter 4 ■ Customizing and extending standard Fiori appliCations
122
11. You need to write the logic to fill the two additional fields in the entity to add your custom data to the OData stream. Choose Methods ➤ Inherited Method, and find the entity named POLISTS_GET_ENTITYSET. Right-click the entity set, and select Redefine, as shown in Figure 4-37.
Figure 4-36. You can see the data provider and model provider class on the right
Figure 4-37. Redefining the inherited method

Chapter 4 ■ Customizing and extending standard Fiori appliCations
123
12. You can see the redefined method in the Redefinitions folder. Copy and paste the original code in the POLISTS_GET_ENTITYSET method (see Figure 4-38).
13. Add your custom code to append the two new fields. Here you are just appending two hard-coded values into the internal table that is returned to the OData stream when the Track Purchase Order app calls the entity to retrieve the list of all purchase orders for the list control on the main page. You can seeET_ENTITYSET on the signature tab, which returns the table to the OData stream (see Figure 4-39).
Figure 4-38. Redefined method POLIST_GET_ENTITYSET
Figure 4-39. Custom code to fill the additional fields in the OData service

Chapter 4 ■ Customizing and extending standard Fiori appliCations
124
Test the OData service either from /IWFND/MAINT_SERVICE or directly in the browser (see Figure 4-40). Your code has appended the two new fields to the entity, and the data is updated in the response.
Fiori Apps Reference LibraryTo learn more about standard Fiori apps such as packages, OData services, BAdl implementations, and UI5 component names, you must either manually search SICF, SEGW, /IWFND/MAINT_SERVICE, and so o n or—the easy way—go to Fiori online apps reference library at https://fioriappslibrary.hana.ondemand.com/sap/fix/externalViewer. Here you can search for any of the Fiori UI5 apps to find the details required for configuring and extending the app (see Figure 4-41).
Figure 4-40. OData service response with the new fields and values

Chapter 4 ■ Customizing and extending standard Fiori appliCations
125
On the Configuration tab, you can see the BSP name for Track Purchase Order (see Figure 4-42).
Similarly, you can see all the extension point names for the app. To view the extensibility documentation, click the Read More link (see Figure 4-43).
Figure 4-41. Fiori reference library entry for Track Purchase Order
Figure 4-42. BSP name

Chapter 4 ■ Customizing and extending standard Fiori appliCations
126
Here you find even more detailed information about the BAdls, extension points, and so on (see Figure 4-44). Basically, the Fiori reference library is a combination of the SAP Help page and the generic information about each standard Fiori app, all in one place. Because the total number the Fiori apps is growing every month, manually searching for the details of each app’s configuration in the Gateway and back-end server is no longer an easy task.
Figure 4-43. Extension details for the Track Purchase Order app
Figure 4-44. Detailed extension document

Chapter 4 ■ Customizing and extending standard Fiori appliCations
127
Extending the Fiori Standard Application UI in EclipseNow that you have a custom OData service, it’s time to create a Fiori extension project from your previously imported standard app. Wave 1 of the Fiori apps did not include the extension project concept. So, in Wave 1, you had to modify the standard code according to your needs and then upload it—a tedious task. From Wave 2 on, SAP Fiori has an enhancement framework implemented in the app source code that lets you enhance, modify or replace any view or controller of the standard app. Here are the steps:
Creating a Fiori Extension Project1. Open Eclipse, right-click on the project which we imported earlier in this chapter,
and click Create SAP Fiori Extension Project (see Figure 4-45). You do not see this option if the Fiori toolkit plug-in has not been added to Eclipse.
2. Give the extension project a new name, and click Next. You can also replacethe standard OData service using this wizard by selecting the check box(see Figure 4-46). But if your OData service is not on the same network, you may want to maintain some certificates so you can access it. In this example, you manually add the new OData URL directly in the extension project afterit is created.
Figure 4-45. Creating an extension project

Chapter 4 ■ Customizing and extending standard Fiori appliCations
128
3. Click Component.js. The code extends the i18n files that contain the language support. If you examine the code, you can recognize a JSON structure starting with metadata: (see Listing 4-1 and Figure 4-47). This structure basically tells the app at runtime what customizations you have made to the standard apps.
Listing 4-1. Metadata Syntax
metadata: { version : "1.0", config : {
"sap.ca.i18Nconfigs": { "bundleName":"ui.s2p.mm.purord.tracking.TrackPurchaseOrder_ v2Extension.i18n.i18n"
}, },
customizing: { }}
Figure 4-46. Give the extension project a name

Chapter 4 ■ Customizing and extending standard Fiori appliCations
129
At runtime, how does an extended app recognize its parent app? If you look closely at the extended app’s folders, you don’t see any of the standard app’s views or code. The idea behind the extended app is that at runtime, it loads the parent app’s source code; and wherever you have extended the app with custom code, it adds that custom code to the <Core:ExtensionPoint/> tag in the standard code or replaces the entire view with your custom view. In order for the extension app to get the parent app’s source code, you need to specify the path of the standard app in the extended app’s Component.js file under jQuery.sap.getModulePath. For example, the name of the BSP app of your standard app is mm_purord_tpo (see Listing 4-2); you must include that name so the extended app can load the parent app at runtime.
Listing 4-2. Referencing the Standard App Path in the Extended App
jQuery.sap.declare("ui.s2p.mm.purord.tracking.TrackPurchaseOrder_v2Extension.Component");
// use the load function for getting the optimized preload file if presentsap.ui.component.load({ name: "ui.s2p.mm.purord.tracking", url: jQuery.sap.getModulePath("ui.s2p.mm.purord.tracking.TrackPurchaseOrder_
v2Extension") + "/../mm_purord_tpo" // provide parent project url
});
4. You have to add your custom OData URL to the extended app. You specifythe custom OData URL in the same metadata JSON structure undersap.ca.serviceConfigs (see Figure 4-48).
Figure 4-47. Metadata structure

Chapter 4 ■ Customizing and extending standard Fiori appliCations
130
Adding Extensions to the Project1. To add extensions to the views where you want to make changes, right-click the
newly created extended app and choose Add SAP Fiori Extension (see Figure 4-49).
Figure 4-48. OData service configuration

Chapter 4 ■ Customizing and extending standard Fiori appliCations
131
2. From the drop-down, select which view to extend. In this case, select S2.view(see Figure 4-50).
Figure 4-49. Creating an extension in the project

Chapter 4 ■ Customizing and extending standard Fiori appliCations
132
3. On the next page, select whether to replace the view, extend the view, or modify the view (Hide Control). In this case, select Replace View (see Figure 4-51).
Figure 4-50. Modifying thef S2 view

Chapter 4 ■ Customizing and extending standard Fiori appliCations
133
4. After the extension is created, in Component.js, you’ll notice a change inthe metadata: JSON structure: an addition under Customizing:. The namesap.ui.viewReplacements indicates that it’s a view replacement, not a modification. If it were a modification, the name would be something likesap.ui.viewModifications; and in the case of an extension, the name would besap.ui.ViewExtensions (see Figure 4-52). You can also make these changes manually rather than using the wizard.
Figure 4-51. Replacing the view code

Chapter 4 ■ Customizing and extending standard Fiori appliCations
134
In addition to the change in Compnent.js, you can see that an additional file has been created in the view folder, named S2Custom.view.xml (see Figure 4-53). In the case of a view extension, the file that’s created is a fragment. Fragments can be dynamically called into the <CoreExtensionPoint/> tag of the view you wants to extend. In S2Custom.view.xml, you add the two fields you get from the OData stream to the existing List control in the UI.
Figure 4-52. Component.js file with view-replacement code
Figure 4-53. Extended a view for the standard S2 view

Chapter 4 ■ Customizing and extending standard Fiori appliCations
135
5. Now you modify a view—in this case, POItem.view, as shown in Figure 4-54.
6. On the next page, select Hide Control, and choose delivery_form (see Figure 4-55).
Figure 4-54. Modifying POItem.view

Chapter 4 ■ Customizing and extending standard Fiori appliCations
136
You can see the changes being made in Component.js. If you modify a control, a separate file is not generated; instead, the property of the control to be modified is defined in Component.js. In this case, it is under sap.ui.ViewModifications, and the form’s Visible property is made false (see Figure 4-56).
Figure 4-55. Hiding delivery_form from the view

Chapter 4 ■ Customizing and extending standard Fiori appliCations
137
7. To extend a view, select S3.view (see Figure 4-57).
Figure 4-56. Component.js updated with the view-modification code

Chapter 4 ■ Customizing and extending standard Fiori appliCations
138
8. Extend detailsHeader (see Figure 4-58).
Figure 4-57. Modifying the S3 view

Chapter 4 ■ Customizing and extending standard Fiori appliCations
139
For the extension, the Component.js file is modified (see Figure 4-59).
Figure 4-58. Extending the detailsHeader of the S3 view

Chapter 4 ■ Customizing and extending standard Fiori appliCations
140
9. Additionally, a fragment file is created under the view folder. In the fragment, add a Text control by entering the code <Text text="Custom Text"></Text>between the <Core:FragmentDefinition></code:FragmentDefinition> tags, as shown in Figure 4-60.
Figure 4-59. Component.js updated with the view-extension code
Figure 4-60. detailsHeader fragment file

Chapter 4 ■ Customizing and extending standard Fiori appliCations
141
Uploading the Extension Project to the Gateway ServerYou have now made all the modifications. It’s time to upload the file to the front-end server. Follow these steps:
1. Log on to the Gateway server, and execute the /UI5/UI5_REPOSITORY_LOADprogram in SE38. In the input field, give a name for the BSP app you are uploading (see Figure 4-61).
Figure 4-61. Enter the name of the app you are uploading
2. Click the Click Here To Upload button. The program uploads the files and registers the BSP app as a UI5 app (see Figure 4-62).

Chapter 4 ■ Customizing and extending standard Fiori appliCations
142
3. Give a description for the app and the package name, and click the check mark button (see Figure 4-63).
Figure 4-62. Uploading the UI5 code to the Gateway server

Chapter 4 ■ Customizing and extending standard Fiori appliCations
143
4. Enter a workbench request, or create a new one if necessary (see Figure 4-64).
5. Give the app permission to access your system files (see Figure 4-65). You can disable this pop-up by making changes in the SAP GUI configuration in the control panel.
Figure 4-63. Specify the package for the app
Figure 4-64. Enter a workbench request for creating the BSP app

Chapter 4 ■ Customizing and extending standard Fiori appliCations
144
Now you can see the uploaded app service in the SICF t-code (see Figure 4-66).
6. You need to create a custom launchpad using the LPD_CUST t-code. Execute LPD_CUST, and enter the role name ZLPD_PO_TR (you can enter any name you want). For Instance, enter TRANSACTIONAL; and enter the description PO Track Extended (see Figure 4-67).
Figure 4-65. Security warning from the system regarding accessing system files
Figure 4-66. SICF with the service activated for the BSP app

Chapter 4 ■ Customizing and extending standard Fiori appliCations
145
7. Click Yes in the pop-up screen (see Figure 4-68).
8. Click the New Application button, and enter the parameter values from Table 4-1in the fields. Click Show Advanced (Optional) Parameters to expand the fields (see Figure 4-69).
Figure 4-67. Creating a new launchpad in LPD_CUST
Figure 4-68. Ignore the namespace warning

Chapter 4 ■ Customizing and extending standard Fiori appliCations
146
Figure 4-69. Creating a new app in the new launchpad
Table 4-1. Parameter Values to Create a New Launchpad in LPD_CUST
Field Value
Link Text PO Track Extended
Description Purchase Order Tracking Extended
Application Type URL
URL /sap/bc/ui5_ui5/sap/zpo_trck_ext
Application Alias zpo_trck_ext (any name you want)
Additional Information SAPUI5.Component=ui.s2p.mm.purord.tracking.TrackPurchaseOrder_v2Extension

Chapter 4 ■ Customizing and extending standard Fiori appliCations
147
You can get the value for the Additional Information field from the app source code (see Figure 4-70).
Creating a Custom Tile in the Fiori LaunchpadLog in to the Fiori launchpad designer (see Figure 4-71). To add a custom tile to the launchpad, you need to create a new catalog and add your custom app. Follow these steps:
Figure 4-70. Value for the Additional Information field in the LPD_CUST app
Figure 4-71. Creating a new catalog in the launchpad designer

Chapter 4 ■ Customizing and extending standard Fiori appliCations
148
1. Click the Create Catalog icon at lower-left.
2. Give the catalog a name and ID in the pop-up (see Figure 4-72).
3. Click the + sign to create a new tile in your catalog (see Figure 4-73).
4. Because your tile does not show data dynamically, select App Launcher – Static, as shown in Figure 4-74.
Figure 4-72. Assign a unique ID for the catalog
Figure 4-73. Creating a tile for the new catalog

Chapter 4 ■ Customizing and extending standard Fiori appliCations
149
5. Give the General and Navigation details for your app (see Figure 4-75). In the Navigation area, enter the same semantic object and action as the standard app; because it’s an extension of the standard app, you don’t need to create a custom semantic object. Click Save.
6. Click the target mapping icon at upper-left, and then click Create Target Mapping at lower-right (see Figure 4-76).
Figure 4-74. Choose App Launcher – Static
Figure 4-75. Static tile configuration for the extended Track Purchase Order app

Chapter 4 ■ Customizing and extending standard Fiori appliCations
150
7. In the Intent area, specify the same semantic object and action that you specified for the app launcher static tile, so that the visible static tile and the target-mapping tile are linked. In the Target area, enter the custom launchpad role you created earlier using LPD_CUST, the Launchpad Instance value TRANSACTIONAL, and the Application Alias zpo_trck_ext (see Figure 4-77).
Figure 4-76. Creating a target mapping
Figure 4-77. Target-mapping configuration for the extended Track Purchase Order app

Chapter 4 ■ Customizing and extending standard Fiori appliCations
151
Assigning Roles to End UsersThe catalog setup is complete in the Fiori launchpad, but in order for end users to access these tiles, you must assign them the catalog ID that you specified when you created the catalog in the launchpad designer. To assign the catalog role to the user, follow these steps:
1. Log on to the Gateway server, and execute the PFCG transaction. Create a new role called zpo_TRCK_ROLE by clicking the Single Role button (see Figure 4-78).
2. On the Menu tab, click the Transaction button, and select SAP Fiori Tile Catalog (see Figure 4-79).
Figure 4-78. Create a new role for the user, to assign the catalog
Figure 4-79. Adding the catalog ID to the new role
3. From the pop-up select the catalog ID ZZPO_TRK_CAT that you created in the Fiori launchpad designer (see Figure 4-80).

Chapter 4 ■ Customizing and extending standard Fiori appliCations
152
4. On the User tab, enter the user ID of the end user you want to give access to the catalog (see Figure 4-81).
Figure 4-80. Enter the Catalog ID created in the launchpad designer
Figure 4-81. Map the role to the end user

Chapter 4 ■ Customizing and extending standard Fiori appliCations
153
Adding a Custom Tile to the Home PageWhen the user logs in to the Fiori launchpad (see Figure 4-82), they need to be able to access the tile you added to the catalog assigned to the user. To add the tile to the home page, follow these steps:
Figure 4-82. Tile Catalog on the end user’s home page

Chapter 4 ■ Customizing and extending standard Fiori appliCations
154
1. Click the icon at upper-left on the home page, and then click the Tile Catalog button at lower-left.
The new tile appears in the catalog you assigned to the user (see Figure 4-83).
2. Click the + icon at the bottom of the tile and add it to an existing group on the home page, or add a new group specifically for this tile. To create a group, click the New Group button on the list (see Figure 4-84).
Figure 4-83. Selecting the custom tile for the home page

Chapter 4 ■ Customizing and extending standard Fiori appliCations
155
3. Give the group a name, and click OK (see Figure 4-85).
Figure 4-84. Select the group to which you want to add the tile

Chapter 4 ■ Customizing and extending standard Fiori appliCations
156
4. On the home page, you can see your new tile (see Figure 4-86).
Figure 4-85. Creating a new group for the tile
Figure 4-86. Extended tile on the end user’s home page

Chapter 4 ■ Customizing and extending standard Fiori appliCations
157
The delivery form is hidden on the Item Details screen (see Figure 4-88).
Figure 4-87. Extended Track Purchase Order app
5. Click the tile to launch the extended app. The custom data appears in the Track Purchase Order app (see Figure 4-87).

Chapter 4 ■ Customizing and extending standard Fiori appliCations
158
In Figure 4-89, the original screen is on the left, and the modified screen is on the right. The Delivery form is hidden on the modified app.
Figure 4-88. Extended Track Purchase Order app’s S3 view
Figure 4-89. S3 view with delivery_form hidden

Chapter 4 ■ Customizing and extending standard Fiori appliCations
159
Extending a Fiori Standard Application in Web IDENow, let’s look at how to extend the Track Purchase Order app using Web IDE. You can get a trial version of Web IDE by registering on the SAP Hana Cloud Platform at https://account.hanatrial.ondemand.com/register. Once you have registered and logged in to Hana Cloud Platform, you can access Web IDE at /subscriptions/webide. You can also install an on-premises version of Web IDE (Chapter 6 covers Web IDE in more detail).
Connecting Web IDE to Back-End SystemsBecause you are using a Web IDE that is deployed on Hana Cloud Platform, you need to do two things to connect Web IDE to your SAP back-end systems:
• Install the HANA Cloud connector on your system (you can download the cloud connector installation file from https://tools.hana.ondemand.com/#cloud). Installation details for the cloud connector can be found at https://help.hana.ondemand.com/help/frameset.htm?204aaad4270245f3baa0c57c8ab1dd60.html.
• Create a new service in your Hana Cloud Platform cockpit.
Let’s get on with creating a new service:
1. Log on to Hana Cloud Platform at https://account.hanatrial.ondemand.com.
2. Click Destinations. At right, click the New Destination link.
3. Enter the data from Table 4-2 in the input fields.
Table 4-2. Hana Cloud Destination Parameter Values
Field Name Value
Name <ServerName>
Type HTTP
Description MyServer
URL Your local SAP system URL, which you configured while installing the cloud connector in step 1
ProysType OnPremise
Cloud Connector Version 2
Authentication NoAuthentication
4. Click the New Property button next to the input fields, and add the parameter values from Table 4-3.
Table 4-3. Hana Cloud Destination Additional Parameter Values
Field Name Value
WebIDEEnabled True
WebIDEUsage odata_abap,dev_abap,ui5_execute_abap
WebIDESystem <ServerName>

Chapter 4 ■ Customizing and extending standard Fiori appliCations
160
Creating a New Extension Project in Web IDEOne of the advantages of Web IDE is that you can download and upload standard UI5 apps directly from the Web IDE interface. You can download apps directly in Eclipse; but when you upload apps, the app folder structure is not exactly the same, because the Fiori architecture is designed to run standard apps. To create an extension project, open Web IDE in the browser and then follow these steps:
1. Click New Extension Project (see Figure 4-90).
2. Click the Remote button, and select SAPUI5 ABAP Repository (see Figure 4-91).
Figure 4-90. Web IDE home page
Figure 4-91. Creating an extension project using Web IDE

Chapter 4 ■ Customizing and extending standard Fiori appliCations
161
3. Select the Gateway server from the list, enter the standard app’s name, and click OK (see Figure 4-92).
4. Select the check box to import the original app (see Figure 4-93).
Figure 4-92. Selecting the back-end system to choose a standard app for extension
Figure 4-93. Give the details for the extension project

Chapter 4 ■ Customizing and extending standard Fiori appliCations
162
5. Click Finish to create the extension project (see Figure 4-94).
Adding Extensions to the ProjectAfter the standard app is downloaded, just as in the Eclipse version, you can create extensions. Here are the steps:
1. Right-click the project, and create an extension on it (see Figure 4-95). The phrases extension project and adding an extension may be confusing: the extension project you created previously is just a blank project with the standard source code imported into it. After you import the code, you can tell Web IDE what type of extensions you want to add to this standard app.
Figure 4-94. Completing the creation of the extension project

Chapter 4 ■ Customizing and extending standard Fiori appliCations
163
2. Give your extension project a name (see Figure 4-96).
3. Define the type of extension you want to perform on the standard app. In this case, select Replace View (see Figure 4-97).
Figure 4-95. Creating an extension for the custom app
Figure 4-96. Give the extension project a name

Chapter 4 ■ Customizing and extending standard Fiori appliCations
164
4. To replace the S2 view, copy the code of the original view into your replacement view; then you can modify it (see Figure 4-98).
5. Click Finish to create the extension project (see Figure 4-99).
Figure 4-97. Select the Replace View extension
Figure 4-98. Creating an extension for the S2 view

Chapter 4 ■ Customizing and extending standard Fiori appliCations
165
6. Open the S2Custom view in the view folder, and add the custom fields as you did earlier in Eclipse (see Figure 4-100).
7. In addition to manual coding, Web IDE has a drag-and-drop feature you can use to add controls to views. To add controls via drag-and-drop, right-click the view, select Open With, and select Layout Editor (see Figure 4-101).
Figure 4-99. Completing the extension
Figure 4-100. Extension view for the S2 view

Chapter 4 ■ Customizing and extending standard Fiori appliCations
166
8. In the left pane, select the desired control; drag to the preview pane to add the control (see Figure 4-102).
9. Next you can extend an existing control. Just as you did for the S2 view, right-click the project, select New ➤ Extension, select Extend View/Fragment, and click Next (see Figure 4-103).
Figure 4-101. Layout editor for the S2Custom view
Figure 4-102. Drag and drop controls in the layout editor

Chapter 4 ■ Customizing and extending standard Fiori appliCations
167
10. Select the S3 view, and choose detailsHeader as the extension point(see Figure 4-104).
11. Click Finish to complete the extension (see Figure 4-105).
Figure 4-103. Extending a view
Figure 4-104. detailsHeader extension for the S3 view

Chapter 4 ■ Customizing and extending standard Fiori appliCations
168
12. The extension for the controller is created in the view folder as a fragment(see Figure 4-106).
13. You can choose to manually code the page or open the fragment in the layout editor (see Figure 4-107).
Figure 4-105. Completing the extension for the S3 view
Figure 4-106. Fragment file for the detailsHeader extension

Chapter 4 ■ Customizing and extending standard Fiori appliCations
169
14. Drag and drop the custom controls you want to add to the fragment(see Figure 4-108).
15. To replace the standard OData service of the extended project, click Replace Service from the extension view (see Figure 4-109).
Figure 4-107. Open the S3 extension view in the layout editor
Figure 4-108. Adding custom controls to the S3 extension view via the layout editor

Chapter 4 ■ Customizing and extending standard Fiori appliCations
170
16. On the next screen, select the desired back-end system. From the drop-down list, select your OData service (see Figure 4-110).
17. The new OData service is added to the metadata: JSON body along with other extensions and modifications you chose earlier (see Figure 4-111).
Figure 4-109. Creating a Replace Service extension
Figure 4-110. Select the custom OData service from the back-end server

Chapter 4 ■ Customizing and extending standard Fiori appliCations
171
18. You can also hide an existing control as you did in the Eclipse project. Select Hide Control from the extension view (see Figure 4-112).
19. Select the control you want to hide. In this example, hide delivery_form(see Figure 4-113).
Figure 4-111. Component.js updated with the replaced OData service URL
Figure 4-112. Hiding a control in the view

Chapter 4 ■ Customizing and extending standard Fiori appliCations
172
Figure 4-113. Hiding delivery_form
20. Click Finish to complete the extension (see Figure 4-114).
21. All the enhancements, customizations, and modifications are now complete(see Figure 4-115).
Figure 4-114. Completing the extension

Chapter 4 ■ Customizing and extending standard Fiori appliCations
173
Figure 4-115. Component.js updated with all the extensions in the metadata: JSON
22. To preview the app, select the project’s main folder or Component.js, and click the green Run button on the toolbar (see Figure 4-116).
Figure 4-116. Previewing the app

Chapter 4 ■ Customizing and extending standard Fiori appliCations
174
23. You need to deploy this extended project back to the Gateway server as a BSP app and activate the service for the app. To deploy the app, right-click it, select Deploy, and click Deploy To SAPUI5 ABAP Repository (see Figure 4-117).
Figure 4-117. Deploy the app to the ABAP repository
Figure 4-118. Select the Gateway system to deploy the app
24. Select the Gateway system from the drop-down list, and click Next (see Figure 4-118).

Chapter 4 ■ Customizing and extending standard Fiori appliCations
175
26. Click Finish to deploy the project (see Figure 4-120).
The next chapter covers Fiori OData customizations and NetWeaver Gateway in detail.
Figure 4-119. Give the package and details for the app
Figure 4-120. Completing the deployment of the app
25. Enter the app name, a description, and a package name to deploy the app to the Gateway server (see Figure 4-119).

177© Bince Mathew 2015 B. Mathew, Beginning SAP Fiori, DOI 10.1007/978-1-4842-1335-3_5
Chapter 5
Fiori OData Customization and NetWeaver Gateway Overview
In addition to the Fiori UI, to make changes to the standard data from SAP ERP, you need to modify the standard OData service or develop a custom OData service for Fiori apps. In this chapter, you learn about the basics of OData, creating a custom OData service from scratch, and building a UI5 application to use that custom OData service.
OData OverviewOData (Open Data Protocol) is standard for generating and consuming RESTful APIs. SAP has the NetWeaver Gateway you can use to build an OData service so that it can be consumed by UI5 applications. RESTful APIs are easy to consume. These services enable UI5 apps to perform CRUD (create read update delete) operations on the SAP back end via the NetWeaver Gateway server.
The NetWeaver Gateway allows even developers who are new to SAP to consume or modify SAP data from SAP business applications. Basically, SAP NetWeaver Gateway (now called as just SAP Gateway) is a RESTful service provider based on OData technology that connects applications to the SAP business suite.
The OData service is not limited to UI5 apps. It is a generic standard used by many websites, cloud services, and even social media sites like Facebook and Twitter. The apps uses OData services to receive data from their respective back-end data sources and send data to the front-end UI. Similarly, SAP allows apps like enterprise software, social media apps, cloud-based services, and so on to access the SAP data source with NetWeaver Gateway as the service provider and authenticator of these services from SAP’s side. From SAP 2.3, OData support has been introduced to the SDK; now, with SMP 3.0, offline OData support also has been added. Figure 5-1 shows how OData helps the SAP Gateway to communicate with different back-end and front-end services.
Electronic supplementary material The online version of this chapter (doi:10.1007/978-1-4842-1335-3_5) contains supplementary material, which is available to authorized users.

Chapter 5 ■ Fiori oData Customization anD netWeaver GateWay overvieW
178
OData Development Using NetWeaver GatewayIn this section, you learn how to implement a custom OData service to fetch business data from the SAP business suite. You create an OData service that supports CRUD operations; later, you build a simple UI5-based app as an interface for the new OData service.
Custom Table for the OData ServiceLog in to the NetWeaver Gateway, and create a new OData service. For this scenario, you are fetching a few records from a custom table created in the back end (see Figure 5-2), You can download the details of the table elements and field names from the Apress website (this book doesn’t cover ABAP basics about creating database tables in the SAP back end).
Figure 5-1. OData architecture using NetWeaver Gateway

Chapter 5 ■ Fiori oData Customization anD netWeaver GateWay overvieW
179
The table contains records you will fetch with the OData service via the GetEntitySet method (see Figure 5-3).
After you create the table, it’s time to create a new OData service to fetch the data from this table.
Creating an OData Service in GatewayGo to the SEGW t-code, and create a new OData Project. Then, follow these steps:
1. Give the new OData project a name, as shown in Figure 5-4. Here the name is ZEMP_RECORDS.
Figure 5-2. ZUSERS table created for the custom OData service
Figure 5-3. The table is filled with records to fetch via OData

Chapter 5 ■ Fiori oData Customization anD netWeaver GateWay overvieW
180
2. You need to tell the OData service project about the structure of the table and the fields it needs to populate with the data. Right-click the Data Model folder of the new project, and choose Import ➤ DDIC Structure (see Figure 5-5).
Figure 5-4. New project for the OData service in SEGW

Chapter 5 ■ Fiori oData Customization anD netWeaver GateWay overvieW
181
3. Create a new entity, and select your custom table from the DDIC in order for the OData service to get the structure definitions it needs to create the new entity. Name the entity table Users and the ABAP structure ZUSERS, and click Next (see Figure 5-6).
Figure 5-5. Importing the DDIC structure to define OData entity fields
Figure 5-6. Defining the entity name and DDIC structure

Chapter 5 ■ Fiori oData Customization anD netWeaver GateWay overvieW
182
4. Select the required fields for the entity. When creating entities, sometimes you may not need all the fields to implement your logic. For the OData service, choose the fields as shown in Figure 5-7.
5. After you select the entity fields, you must define the key fields for the entity.At least one key field is mandatory. Here, make Userid as the key field(see Figure 5-8).
Figure 5-7. Selecting entity fields for the service

Chapter 5 ■ Fiori oData Customization anD netWeaver GateWay overvieW
183
6. Activate the OData service by clicking the Generate button (see Figure 5-9).
Figure 5-8. Define the key field for your entity
Figure 5-9. Activate the OData definition

Chapter 5 ■ Fiori oData Customization anD netWeaver GateWay overvieW
184
7. When you activate the service, you see a pop-up with the class names that will be created for the OData service. There are primarily two classes that are linked to every OData service.
• Model Provider Class (MPC): This class defines the structure for your entities when you activate the OData service. These entity structures are created at runtime via the Model Provider Classes when the service is called. Basically, these classes create the metadata or the channel through which you send and receive data via each entity.
• Data Provider Class (DPC): In this class, you write the business logic to fill the entity and its fields with data from the back-end SAP business suite.
8. In addition to the Data and Model Provider Classes, you also define the technical model name and the service name (see Figure 5-10). The technical service name will be the OData service name when you call the OData service later.
Figure 5-10. Data Provider and Model Provider Class definitions

Chapter 5 ■ Fiori oData Customization anD netWeaver GateWay overvieW
185
9. When you activate the service, you see the list of classes associated withyour OData service in the Runtime Artifacts folder of your OData project(see Figure 5-11). Double-click the ZCL_ZEMP_RECORDS_DPC_EXT class. Here you see a set of classes that will help you fetch the data required for your OData service. You can directly activate the OData service without editing these classes, but then your OData service will not return any valid data based on your business logic. In the next section, you see how to implement your custom logic in these classes to fetch the data from your custom table.
Figure 5-11. Runtime Artifacts folder
The standard methods of an OData DPC are mainly for CRUD functionalities. You can find these classes in the Methods ➤ Inherited Methods folder of your DPC. By default, these methods have standard code that raises an exception whenever they’re called, saying that the method has not been defined. You need to redefine these classes and write custom code to fill the entity structure you defined earlier.
You can write custom code in the inherited methods without redefining them, but when you modify the OData project to edit any of the entity fields or create a new entity and then click Generate in the OData service, all the code you wrote in the inherited methods will be reinitialized. To avoid that, you must first redefine the methods and then write your business logic in those methods.
Implementing Business Logic in the OData ServiceIn this section, you redefine the USERSET_GET_ENTITYSET method. GET_ENTITYSET is equivalent to firing up a select * query to a database table. This method is usually implemented to fetch all the data from a table without any conditions. But, of course, you can control what data you receive at the consuming end by using filter conditions that ensure you aren’t bombarded with thousands if not millions of records. To learn more about OData and the URI operations, visit www.odata.org, and see the PDF http://docs.oasis-open.org/odata/odata/v4.0/odata-v4.0-part2-url-conventions.pdf.
Now, follow these steps:
1. Right-click USERSET_GET_ENTITYSET, and redefine the method (see Figure 5-12).

Chapter 5 ■ Fiori oData Customization anD netWeaver GateWay overvieW
186
2. Here you can implement the logic to fetch the data from the back end. In this example, you are fetching the records from the custom table. On the Signature tab, notice the ET_ENTITYSET of type ZCL_ZEMP_RECORDS_MPC=>TT_USERS(see Figure 5-13): this is a returning data that you give to the OData query as a response. The data type for the ET_ENTITYSET is a table type that is created in the MPC of your OData service, and it is the same type as your custom table.
Figure 5-12. Redefining the GET_ENTITYSET method

Chapter 5 ■ Fiori oData Customization anD netWeaver GateWay overvieW
187
3. Similarly, you redefine the GET_ENTITY method. To get a new record, you need thekey fields in order to carry out the fetch. All the key fields passed from the OData calls are stored in the IT_KEY_TAB parameter, which you can see on the Signaturetab (see Figure 5-14). You need to loop the internal table and search for the key fields. Notice the data type of the returned data, ER_ENTITY: it’s a table structure thatwas generated in the MPC. So, based on the key fields you get from IT_KEY_TAB, youpopulate the ER_ENTITY parameter and send it back as the response.
Figure 5-13. GET_ENTITYSET method for fetching all records
Figure 5-14. GET_ENTITY method for fetching a single record based on a condition
4. To create a new record, you need all the required fields, including the key fields. In the case of CREATE_ENTITY, you can retrieve the fields sent via the OData service call from the IO_DATA_PROVIDER in the Signature field. Based on the records from IO_DATA_PROVIDER, you can create a new record in your table, as shown in Figure 5-15.

Chapter 5 ■ Fiori oData Customization anD netWeaver GateWay overvieW
188
5. Updating a record is similar to creating a new record. You get the full record value, including the changes to the fields that need to be updated, fromIO_DATA_PROVIDER (see Figure 5-16).
Figure 5-15. Creating a new entry in the custom table
Figure 5-16. Updating an existing record in the custom table
6. To delete a record, you need a key field value. You can get the key field from IT_KEY_TAB, similar to the GET_ENTITY method (see Figure 5-17).

Chapter 5 ■ Fiori oData Customization anD netWeaver GateWay overvieW
189
In addition to redefining the methods just discussed, you can also use functionalities including expand, deep inserts, function imports, media resources, and others:
• Expand is used to access or view results from multiple entities/entity sets using a single service call. This is especially useful when you have multiple service calls at the same time. To invoke an expansion, you use $expand after the primary entity name followed by the entity you want to expand. For example, the sample OData service is /sap/opu/odata/sap/ZEMP_RECORDS_SRV/Users(ID='1822')?$expand=UserDetails. This calls the Get_Entity/Get_EntitySet method of the appropriate entity and gives you a nested structure as a result.
• A deep insert is the opposite of $expand. Instead of giving you a nested structure as a result, it creates (POST) a nested record at the back end. An example is creating multiple purchase orders and posting the header and multiple items to the back end in a single service call.
• You can use function imports when you cannot use the CRUD methods. For example, if you want to start a workflow based on a custom flag, you can use a function import to pass data to the back end and trigger the workflow. To learn more about function imports, see http://scn.sap.com/docs/DOC-55336.
• Media resources are used mainly to post or retrieve media files such as images and videos; you can also use them to access binary data files (PDF, Word files, and so on). You can use any normal entity as a media resource: set a flag in the OData service builder by selecting the M check box on the entity type page, or change the code in the MPC of your OData service by using set_is_media() method.
Figure 5-17. Deleting a record from the custom table

Chapter 5 ■ Fiori oData Customization anD netWeaver GateWay overvieW
190
Activating and Testing an OData ServiceOnce your logic has been implemented and activated in the DPC, you can activate the service in SEGW:
1. Open the Service Maintenance folder, double-click the service, and click the Register button. If the Gateway system is a hub-based system, the wizard will show a warning that it will be redirected to the corresponding server. Click Yes to continue, as shown in Figure 5-18.
2. A pop-up appears with the OData service name and version details. Click the check mark to activate your service as, shown in Figure 5-19.
Figure 5-18. Registering the OData service

Chapter 5 ■ Fiori oData Customization anD netWeaver GateWay overvieW
191
3. Go to the maintenance view to test your OData service. Click the Maintain button, as shown in Figure 5-20.
Figure 5-19. Activating the OData service
Figure 5-20. Maintaining the registered service

Chapter 5 ■ Fiori oData Customization anD netWeaver GateWay overvieW
192
4. On the Activate and Maintain Services screen, you can choose to test the service on a browser or the built-in Gateway client. Click the Gateway client to test the service in the NetWeaver Gateway (see Figure 5-21).
5. Yours OData service appears in the Request URI path. You have the option to set the OData call method as GET, POST, PUT, PATCH, MERGE, or DELETE. These options are your CRUD methods, so when you click the Get radio button and execute the OData service along with your required entity-set name, the GET_ENTITYSETmethod is invoked in the DPC of your OData service. Similarly, if you click the Post radio button, it invokes the CREATE_ENTITY method in the DPC(see Figure 5-22).
Figure 5-21. You can choose to test the service in a browser or in the Gateway
Figure 5-22. NetWeaver Gateway client

Chapter 5 ■ Fiori oData Customization anD netWeaver GateWay overvieW
193
6. To test your entity, click the EntitySets button; you get the list of entities available in your OData service. In this case, you have created only one entity, so you see UsersSet in the pop-up (see Figure 5-23).
7. You can also see the list of available standard OData URIs by clicking the Add URI Option button (see Figure 5-24).
Figure 5-23. List of available entity sets in the OData service

Chapter 5 ■ Fiori oData Customization anD netWeaver GateWay overvieW
194
8. To see the OData service’s metadata, select the URI option $metadata(see Figure 5-25).
Figure 5-24. List of available URI options for the OData service
Figure 5-25. List of available entity sets in the OData service

Chapter 5 ■ Fiori oData Customization anD netWeaver GateWay overvieW
195
9. Click the Execute button. Your entity invokes the GET_ENTITYSET method in the back end, and you get all the records from your custom table in response(see Figure 5-26).
10. If you pass the key field value along with the entity set name, in this case the URI is /UserSet('3323'); it in turn invokes the GET_ENTITY method, which listens tothe incoming key fields according to your logic and fetches the records based on the key field (see Figure 5-27).
Figure 5-26. GET_ENTITYSET method being invoked
Figure 5-27. GET_ENTITY method being invoked

Chapter 5 ■ Fiori oData Customization anD netWeaver GateWay overvieW
196
Building a UI5 App to Consume the OData ServiceAfter testing the app on the Gateway client, you can build a simple UI5 app to consume the OData service and use the CRUD features. In this section, you create a UI5 app in Eclipse. You can find the steps to create a UI5 app in Chapter 4.
The example app has one screen with buttons for Create, Edit, and Delete options. When the page loads, a GET method is invoked to bring all the data from the custom table and load it into a UI5 table on the screen. In this app, the starting page is index.html because you are running it locally on Eclipse. But Fiori UI5 apps are designed to start from Component.js because they’re called in the Fiori launchpad in the scenario. To make a UI5 app run locally, you need to write reroute logic in index.html so it invokes the Component.js file in the app.
In index.html, you need to bootstrap a few things in order for the UI5 app to access the required libraries (see Listing 5-1). You enter those in src and data-sap-ui-libs in the script tag, as shown in Figure 5-28. Next you need to make a call to the ComponentContainer() method of the standard UI5 library so it will in turn call the Component.js file. After calling ComponentContainer(), you place the response in a div in index.html so that at runtime, the entire app will be loaded under that div.
Listing 5-1. index.html
<!DOCTYPE HTML><html> <head>
<meta http-equiv="X-UA-Compatible" content="IE=edge"><meta http-equiv='Content-Type' content='text/html;charset=UTF-8'/>
<link type="text/ccss" rel="stylesheet" href="css/style.css" /><script type="text/javascript" src="./Js/jquery-1.11.2.min.js"></script>
<script src="resources/sap-ui-core.js"id="sap-ui-bootstrap"
data-sap-ui-libs="sap.ui.commons,sap.m, sap.ui.table,sap.ui.ux3,sap.ui.layout,sap.viz" data-sap-ui-theme="sap_bluecrystal" data-sap-ui-resourceroots='{ "ui5.odata.demo": "./"
}' ></script>
<script>new sap.ui.core.ComponentContainer({name : "ui5.odata.demo"
}).placeAt("content");</script>
</head> <body class="sapUiBody" role="application">
<div id="content"></div> </body></html>

Chapter 5 ■ Fiori oData Customization anD netWeaver GateWay overvieW
197
In the Component.js file, you have to bind the OData service to the model, because UI5 apps use model-view-controller (MVC) architecture. (Chapter 6 gets into more detail about MVC architecture.) Here you define the OData service URL and set it to the model of your root view (see Listing 5-2).
Listing 5-2. Component.js (Binding the OData Service to the Root View)
var url = "http://ui5server.fiori.com:8006/sap/opu/odata/sap/ZEMP_RECORDS_SRV/"; if(!oModel)
{oModel = new sap.ui.model.odata.ODataModel(url, true, "username", "password");
}// Set the model
oView.setModel(oModel);
In app.view.js, you define what type of app you are going to use as a view (see Listing 5-3). The two main app types are SplitApp and the normal App. Because you only need one screen for this app, you use App. You also need to specify the path of the view/screen for this app.
Listing 5-3. App.view.js (Defining the Type of App)
//create app this.app = new sap.m.App();//load the master pagevar master = sap.ui.jsview("users","ui5.odata.demo.view.Users");master.getController().nav = this.getController();this.app.addPage(master);
Figure 5-28. index.html start page for the custom app

Chapter 5 ■ Fiori oData Customization anD netWeaver GateWay overvieW
198
Listing 5-4 shows the code for the controller file of App.js, which handles context binding and navigation.
Listing 5-4. App.controller.js (Controller for App.js)
var master = ("Master" === pageId);if (app.getPage(pageId, master) === null) {
var page = sap.ui.view({id : pageId,viewName : "ui5.odata.demo.view." + pageId,type : "JS"
});page.getController().nav = this;app.addPage(page, master);
}
// show the pageapp.to(pageId);
// set data context on the pageif (context) {
var page = app.getPage(pageId);page.setBindingContext(context);
} },
In the Users view, you add the controls required for the app view (see Listing 5-5). First you declare a Layout container to hold all the buttons, and then you add the buttons for the CRUD functions.
Listing 5-5. Users.view.js (Users View Page Code Containing the App UI Design)
sap.ui.jsview("ui5.odata.demo.view.Users", {
getControllerName : function() {return "ui5.odata.demo.view.Users";
},
createContent : function(oController) {
var oLayout1 = new sap.ui.commons.layout.MatrixLayout({id:"matrix1",layoutFixed: true,width : "50%",widths : [ "10%","10%", "80%" ]
});
var oLayout2 = new sap.ui.commons.layout.MatrixLayout({id:"matrix2",layoutFixed: true,width : "80%",widths : [ "80%","20%" ]
});

Chapter 5 ■ Fiori oData Customization anD netWeaver GateWay overvieW
199
var oButton1 = new sap.ui.commons.Button({id:"Create",style:"Accept",text: "Create",press: oController.Create
});var oButton2 = new sap.ui.commons.Button({
id:"Edit",text: "Edit",style:"Emph",press: oController.Edit
});var oButton3 = new sap.ui.commons.Button({
id:"Delete",style:"Reject",text: "Delete",press: oController.Delete
});
Now you create a Form control for creating a new record in the Users view (see Listing 5-6). This form contains all the fields from your custom table as input fields so users can enter new records. Then you add a Save button to the form: when clicked, it invokes the CREATE_ENTITY method. You also add a Close button with some JQuery animations for sliding, because this form will be invisible when the screen is loaded. Only when the user clicks Create or Edit on the screen will this form be made visible.
Listing 5-6. Users.view.js (Creating an Input Form)
//Create a Simple Form
var oForm = new sap.ui.layout.form.SimpleForm("form1",{ content:[
new sap.ui.commons.Label({text:"Userid"}),new sap.ui.commons.TextField("Userid",{width:'200px',editable:true}),
new sap.ui.commons.Label({text:"Name"}),new sap.ui.commons.TextField("Name",{width:'200px',editable:true}),
new sap.ui.commons.Label({text:"Designation"}),new sap.ui.commons.TextField("Designation",{width:'200px',editable:true}),
new sap.ui.commons.Label({text:""}),new sap.ui.commons.Button({text:"Save",style:"Emph",press: oController.Save,width:'200px'
}),new sap.ui.commons.Button({id:"btn_close",text:"Close",style:"Reject",

Chapter 5 ■ Fiori oData Customization anD netWeaver GateWay overvieW
200
press: function(){$('#form1').slideUp('1000');
},width:'200px'
}) ]});
On the same Users page, add a new UI5 table similar to your custom back-end table to show the contents of the table when the app loads (see Listing 5-7). This table is added to a new Layout container. Now you have a Layout container holding the CRUD buttons, a Form container with fields for creating new records, and another Layout holding the Table control. You put these three controls in a single main VerticalLayout control so they’re grouped properly in the UI.
Listing 5-7. Users.view.js (Groups All Controls in a Single VerticalLayout Control)
//Create an instance of the table controlvar oTable = new sap.ui.table.Table("Table1",{
title: "User List",editable:true,visibleRowCount: 15,firstVisibleRow: 10,selectionMode: sap.ui.table.SelectionMode.Single
});//Define the columns and the control templates to be usedoTable.addColumn(new sap.ui.table.Column({
label: new sap.ui.commons.Label({text: "UserID"}),template: new sap.ui.commons.TextView().bindProperty("text", "Userid"),sortProperty: "Userid",filterProperty: "Userid",width: "75px",hAlign: "Center"
}));oTable.addColumn(new sap.ui.table.Column({
label: new sap.ui.commons.Label({text: "Name"}),template: new sap.ui.commons.TextField().bindProperty("value", "Name"),sortProperty: "Name",filterProperty: "Name",width: "75px",hAlign: "Center"
}));oTable.addColumn(new sap.ui.table.Column({
label: new sap.ui.commons.Label({text: "Designation"}),template: new sap.ui.commons.TextField().bindProperty("value", "Designation"),sortProperty: "Designation",filterProperty: "Designation",width: "75px",hAlign: "Center"
}));

Chapter 5 ■ Fiori oData Customization anD netWeaver GateWay overvieW
201
oTable.bindRows("/UsersSet");oTable.attachRowSelectionChange(oController.selectedRow);oLayout1.createRow(oButton1,oButton2,oButton3);oLayout2.createRow(oTable);
var oVerticalLayout = new sap.ui.layout.VerticalLayout("Layout1", {content: [oLayout1,oForm, oLayout2]
});return oVerticalLayout;
} });
Next you create the controller page for your Users view, to handle events like button clicks, page loads, and so on (see Listing 5-8). The selectedRow function gets the details of any row the user clicks in the table. Similarly, you use JQuery functions to read values directly from fields and toggle the visibility of the form that contains the input fields for creating and editing records based on button clicks.
Listing 5-8. Users.controller.js (Controller Page to Handle the Events of the View)
selectedRow: function(oEvent){currentRowContext = oEvent.getParameter("rowContext").sPath;var start = currentRowContext.lastIndexOf('/') + 1;value = currentRowContext.substring(start, currentRowContext.length);
var oTable = sap.ui.getCore().byId('Table1');index = oTable.getSelectedIndex();var data= oTable.getModel().oData[value];mode = "Update";$('#Userid').val(data.Userid);$('#Name').val(data.Name);$('#Designation').val(data.Designation);var userId = sap.ui.getCore().byId('Userid');userId.setEditable(false);
}, Create: function(){
$('#form1').slideDown();mode = "Create";$('#Userid').val("");$('#Name').val("");$('#Designation').val("");var userId = sap.ui.getCore().byId('Userid');userId.setEditable(true);
}, Edit: function(){
$('#form1').slideDown('1000');mode = "Update";var oTable = sap.ui.getCore().byId('Table1');index = oTable.getSelectedIndex();var data= oTable.getModel().oData[value];$('#Userid').val(data.Userid);

Chapter 5 ■ Fiori oData Customization anD netWeaver GateWay overvieW
202
$('#Userid').editable = false;$('#Name').val(data.Name);$('#Designation').val(data.Designation);
},
Based on the action required (Create, Delete, or Update), you call the OData service along with the parameters that need to be sent to the Gateway server. The OData service is invoked by oModel.create() for Create (oModel is the name of the variable created in Component.js that holds ODataModel). For Delete, the method is oModel.remove(); and for Update, it is oModel.update()(see Listing 5-9). When you have finished coding, right-click index.html and choose Run As ➤ Web App Preview to run the UI5 app.
Listing 5-9. Users.controller.js (Invoking OData Operations)
Save: function(){ var oParameters = {
"Userid" : $('#Userid').val(),"Name" : $('#Name').val(),"Designation" : $('#Designation').val(),
};
if(mode=="Update"){ var sServiceUrl = currentRowContext; oModel.update(sServiceUrl, oParameters,null,function(odata,response){
console.log("success"); },function(err){ console.log(err); }); }else if(mode=="Create"){ var sServiceUrl = "/UsersSet"; oModel.create(sServiceUrl, oParameters,null,function(odata,response){
console.log("success");},function(err){
console.log(err);});
}},Delete: function(){ mode="Delete"; var sServiceUrl = currentRowContext; oModel.remove(sServiceUrl, null,null,function(odata,response){
mode = "";console.log("success");
},function(err){mode = "";console.log(err);
});
},

Chapter 5 ■ Fiori oData Customization anD netWeaver GateWay overvieW
203
When you test the app on a Chrome browser, you may sometimes face issues with an Allow-Access-Origin security issue when the app is run locally. To bypass this security check, edit the Target properties in Chrome and add the --disable-web-security line shown in Figure 5-29 to the end of the target path.
Previewing and Testing the UI5 AppWhen you run the application, the initial GET_ENTITYSET method brings all the records from the back end to the Table control you created for the UI (see Figure 5-30).
Figure 5-29. Disabling Chrome web security checks for local testing

Chapter 5 ■ Fiori oData Customization anD netWeaver GateWay overvieW
204
When you click the Create button, the JQuery animation brings the form sliding down with the fields for creating a new record (see Figure 5-31).
The new record appears in the table instantly when you click Save (see Figure 5-32). This is because the table is bound to the model, which you update with the button click.
Figure 5-30. CRUD application invoking the GET_ENTITYSET method on load
Figure 5-31. Creating a new record

Chapter 5 ■ Fiori oData Customization anD netWeaver GateWay overvieW
205
The back-end table is updated with a new row via the OData CREATE_ENTITY method (see Figure 5-33).
When you click the Edit button and select a row in the table (see Figure 5-34), you can update values in that row. The UserID field is non-editable so the key field is not changed accidently.
Figure 5-32. New record updated instantly in the table
Figure 5-33. The back-end custom table gets a new row

Chapter 5 ■ Fiori oData Customization anD netWeaver GateWay overvieW
206
Your modifications are also reflected instantly in the table rows (see Figure 5-35).
When you click the Delete button (see Figure 5-36), the DELETE_ENTITY method is invoked, and the data is removed from the model as well as from the back-end table.
Figure 5-34. Updating an existing record
Figure 5-35. Table row updated successfully

Chapter 5 ■ Fiori oData Customization anD netWeaver GateWay overvieW
207
The deletion of the records is also instantly reflected in the table (see Figure 5-37).
Error Log Monitoring and Troubleshooting TechniquesSome times you set up your OData service and everything is working fine, but suddenly, out of nowhere, you don’t get a response, or you’re getting errors in the app or in the browser (see Figure 5-38). It can be really frustrating to pinpoint the error if you don’t use proper debugging methods.
Figure 5-36. Deleting a record
Figure 5-37. Successful record deletion

Chapter 5 ■ Fiori oData Customization anD netWeaver GateWay overvieW
208
There are two primary approaches to debugging OData services to find errors. One is to use the browser’s Debug mode. In Chrome, you can press F12 or right-click the page and click Inspect Element (see Figure 5-39).
In Debug mode, on the Network tab, you can see the OData request that was fired from the browser to the back end (see Figure 5-40). In this case, that request is red because it failed.
Figure 5-38. Failed OData request
Figure 5-39. Switching to Debug mode in the browser

Chapter 5 ■ Fiori oData Customization anD netWeaver GateWay overvieW
209
If you double-click the request, you see a detailed description of what went wrong (see Figure 5-41). In this case, the requested entity was not found, and the type of request fired was a GET method.
If you want more details about what went wrong, the second option is to log in to the Gateway server and check the error logs using the t-code /n/IWFND/ERROR_LOG, as shown in Figure 5-42.
Figure 5-40. Network tab in the Chrome browser’s Developer tools
Figure 5-41. Detailed error description in response to the failed OData request

Chapter 5 ■ Fiori oData Customization anD netWeaver GateWay overvieW
210
If you click the Response Data button, you see the details of the request from the browser to the Gateway in XML format (see Figure 5-43).
You can also see a detailed technical error description by clicking the Application Log button in the Error Log console (see Figure 5-44).
Figure 5-42. Error Log console in the Gateway server
Figure 5-43. Inbound browser OData request in an XML view

Chapter 5 ■ Fiori oData Customization anD netWeaver GateWay overvieW
211
Some other useful tools are available to explore the OData service and its features. You can use the online tools offered by www.odata.org (see Figure 5-45); they come in handy especially when you are a front-end developer and you don’t have proper authorizations to check the OData properties in SEGW in the back-end SAP system.
OData API Explorer is one such tool. It lets you traverse all the entity sets and execute queries that you want to test (see Figure 5-46).
Figure 5-44. Application log
Figure 5-45. Tools for exploring OData services

Chapter 5 ■ Fiori oData Customization anD netWeaver GateWay overvieW
212
In Figure 5-47, you see the list of all entities for the Northwind OData service. This is a free OData service offered by odata.org for developers to test apps or explore the features of OData services.
Figure 5-46. OData API Explorer
Figure 5-47. Entity list of the OData service in OData API Explorer

Chapter 5 ■ Fiori oData Customization anD netWeaver GateWay overvieW
213
You can even type custom queries in the input field on the Execute Query tab (see Figure 5-48).
Another useful tool is XOData (see Figure 5-49). It presents a visual, chart-like overview of all entities and their relations with other entities, such as associations. This tool helps front-end developers design their app navigation effectively by giving them an overall picture of how one entity is linked to another.
Figure 5-48. Query result for the Categories entity of the Northwind OData service
Figure 5-49. XOData service diagram view

Chapter 5 ■ Fiori oData Customization anD netWeaver GateWay overvieW
214
The API Details tab gives you a better understanding of each entity’s properties and fields (see Figure 5-50). You can easily check the field type: whether it’s a DateTime field or String, and so on.
The Data Explorer helps you build queries with conditions and expand associated entities with the click of a few buttons, without knowing the URI conventions of the OData queries (see Figure 5-51).
Figure 5-52 shows the result of the custom query string you built. You can use this tool to build complex query strings with filter conditions and then copy the query code back into your app.
Figure 5-50. XOData API Details view
Figure 5-51. XOData Data Explorer

Chapter 5 ■ Fiori oData Customization anD netWeaver GateWay overvieW
215
Using REST Clients A REST client is a browser plug-in that is a dedicated tool you can use instead of a website to test OData services. There are many REST clients in the Chrome plug-ins list. The one I use most often is the Postman client (see Figure 5-53). The choice of REST clients depends on how comfortable you are with the UI.
Figure 5-52. Custom OData query result
Figure 5-53. The Postman REST client

Chapter 5 ■ Fiori oData Customization anD netWeaver GateWay overvieW
216
Using the Postman client, you can choose the method (POST, PUT, PATCH, and so on) of the request you are sending to the back end (see Figure 5-54). You can also attach payloads such as PDF files or image files to test OData services that accept attachments.
Another useful Chrome plug-in is JSONView, which lets you see the OData response in JSON format that your UI app understands. This helps developers create mock JSON files to test without an actual OData service, when it is difficult to access the live OData service.
You can also explore the Fiori Stars Chrome plug-in, which lets developers explore the UI5 controls used in an app without checking the source code.
The next chapter explores IDEs used for UI5 app development. You develop a full-fledged UI5 app with the latest Fiori architecture.
Figure 5-54. Using Postman

217© Bince Mathew 2015 B. Mathew, Beginning SAP Fiori, DOI 10.1007/978-1-4842-1335-3_6
Chapter 6
Fiori Custom Application Development and Tools
Before you can start developing custom Fiori UI5 applications, you must first install and configure an IDE and a few required tools.
EclipseOne of the main IDEs used for developing Fiori apps is Eclipse. The recommended version of Eclipse is Luna. You can download Eclipse Luna (32-bit and 64-bit) from https://eclipse.org/downloads/packages/release/luna/sr2. The download page is shown in Figure 6-1.
Electronic supplementary material The online version of this chapter (doi:10.1007/978-1-4842-1335-3_6) contains supplementary material, which is available to authorized users.

Chapter 6 ■ Fiori Custom appliCation Development anD tools
218
Open the Eclipse.exe file from the extracted folder. In Eclipse, go to Help ➤ Install New Software. Enter the URL https://tools.hana.ondemand.com/luna/ in the input field, and click Add (see Figure 6-2). You see a list of files to be installed. For UI5 development, you only need to select the UI Development Toolkit for HTML5; the rest are optional. Click Next, and accept the terms and conditions. Eclipse will download and install the files and then restart.
Figure 6-1. Eclipse Luna download page
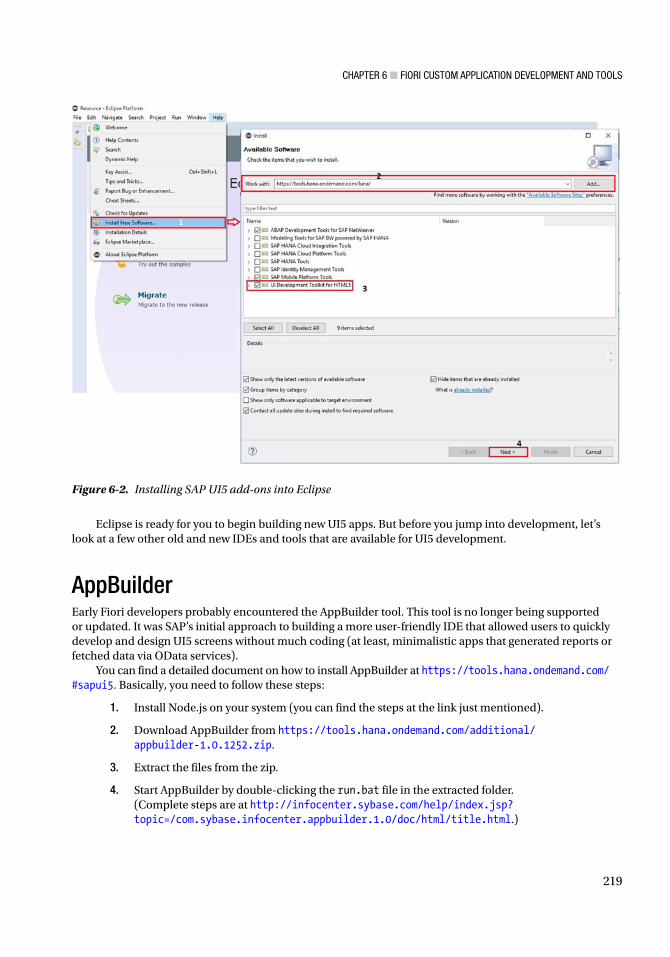
Chapter 6 ■ Fiori Custom appliCation Development anD tools
219
Eclipse is ready for you to begin building new UI5 apps. But before you jump into development, let’s look at a few other old and new IDEs and tools that are available for UI5 development.
AppBuilderEarly Fiori developers probably encountered the AppBuilder tool. This tool is no longer being supported or updated. It was SAP’s initial approach to building a more user-friendly IDE that allowed users to quickly develop and design UI5 screens without much coding (at least, minimalistic apps that generated reports or fetched data via OData services).
You can find a detailed document on how to install AppBuilder at https://tools.hana.ondemand.com/ #sapui5. Basically, you need to follow these steps:
1. Install Node.js on your system (you can find the steps at the link just mentioned).
2. Download AppBuilder from https://tools.hana.ondemand.com/additional/appbuilder-1.0.1252.zip.
3. Extract the files from the zip.
4. Start AppBuilder by double-clicking the run.bat file in the extracted folder. (Complete steps are at http://infocenter.sybase.com/help/index.jsp?topic=/com.sybase.infocenter.appbuilder.1.0/doc/html/title.html.)
Figure 6-2. Installing SAP UI5 add-ons into Eclipse

Chapter 6 ■ Fiori Custom appliCation Development anD tools
220
5. Open AppBuilder in the browser using http://127.0.0.1:9009/ide/ares/index.html(see Figure 6-3).
Web IDEThis is the latest IDE solution from SAP (see Figure 6-4). This book doesn’t say much about AppBuilder because Web IDE is now available. Web IDE has inherited and integrated the features of Eclipse, the UI development toolkit for UI5, AppBuilder, the Gateway Productivity Accelerator, the Fiori toolkit, and AppDesigner. It is an all-in-one tool for everything and anything related to Fiori development and extensions.
Figure 6-3. AppBuilder home page

Chapter 6 ■ Fiori Custom appliCation Development anD tools
221
At the time of writing, I am not a big fan of Web IDE. The main reason I don’t feel at home with it is that it does not have the flexibility of a native desktop app (the feeling of using a web-based whatsapp compared to your native whatsapp). You cannot even drag-and-drop files from your desktop to the project folder or realign the order of open view tabs. Web IDE also lacks support for other third-party development plug-ins, which you can easily install in Eclipse. (Yes, this IDE is specific to SAP Fiori, but then why should I use Web IDE when I already have a platform that acts as an IDE for almost all programming languages under the Sun?) Another bottleneck I face with Web IDE is the inability to use SAP’s HANA SDK for developing persistent Java apps to use the Internet of Things platform offered by HANA Cloud. I could easily install the same SDK in Eclipse.
Because Web IDE is in its beta stage, it has many bugs. One annoying issue in the cloud-based Web IDE is the session timeout (something I don’t have to bother about while using the native desktop-based Eclipse). Another issue with Web IDE that I have noticed is that it doesn’t allow you to check or navigate through the project source code while in Debug mode. I find this a little frustrating, especially because it is possible in Eclipse.
Web IDE has its positive points, too. Creating a Fiori app extension is a breeze with this tool compared to Eclipse, and it also has native git support (maybe not as powerful as in Eclipse, but it’s getting there). Going forward, this will most likely be the single IDE that SAP will support; we will all have to move to Web IDE eventually (when the Fiori 2.0 architecture is released, Web IDE will be a more powerful option due to its native support for the new architecture).
This chapter covers how to port to Web IDE a custom app developed in Eclipse. Based on the current Web IDE bugs and limitations, I am still inclined toward Eclipse rather than Web IDE; but I am sure my view will change once the tool becomes more mature.
To use Web IDE, you have two options:
• On-premises installation
• Cloud-based Web IDE trial or full version
Figure 6-4. Web IDE, the new superhero in town

Chapter 6 ■ Fiori Custom appliCation Development anD tools
222
The easiest way to access Web IDE is to use the cloud-based solution. But to connect the Web IDE cloud to your on-premises or local network-based SAP back end, you need to configure the cloud connector.
To install Web IDE locally, follow these steps:
1. Download Web IDE from the SAP store (see Figure 6-5) at https://store.sap.com/sap/cp/ui/resources/store/html/SolutionDetails.html?pid=0000013489&catID=&pcntry=US&sap-language=EN&_cp_id=id-1413816705087-0.
2. Download the Developer Guide, which provides detailed information about Web IDE solution: https://scn.sap.com/docs/DOC-58848.
3. Make sure you have Java Runtime 7 (at least version 1.7) or higher.
4. Create a new folder named SAPWebIDE.
5. Download Orion from http://www.eclipse.org/downloads/download.php?file=/orion/drops/R-10.0-201510301610/eclipse-orion-10.0-win32.win32.x86.zip.
6. Unzip the contents into the SAPWebIDE folder.
7. Download Director from http://www.eclipse.org/downloads/download.php?file=/tools/buckminster/products/director_latest.zip.
8. Unzip the contents into the SAPWebIDE folder.
Figure 6-5. Download Web IDE from the SAP Store

Chapter 6 ■ Fiori Custom appliCation Development anD tools
223
9. Unzip the Web IDE file downloaded in step 1 into a folder. You find twomore zip files: one for Web IDE (updates.zip) and one for Hybrid App Toolkit(see Figure 6-6).
10. Open the command line (press the Windows button + R, type CMD, and then press Enter). Navigate to the directory folder in the SAPWebIDE folder via cd: for example , cd C:\SAPWebIDE\director.
11. Execute
director -repository jar:file:/<Full path of the SAP Web IDE file youunzipped in step 9>!/ -installIU
and
com.sap.webide.orionplugin.feature.feature.group -destinationc:\SAPWebIDE\eclipse
12. Go to C:\SAPWebIDE\eclipse and start orion.exe.
13. To start Web IDE after installation, execute the following URL in your browser (see Figure 6-7): http://localhost:8080/webide/index.htm. You are asked to create a new account in Orion; create the account, and log in.
Figure 6-6. Extract Web IDE files

Chapter 6 ■ Fiori Custom appliCation Development anD tools
224
Theme DesignerThe theme designer is a very useful tool that lets you change the look and feel of the launchpad and Fiori apps. You can add a custom background, change the default logo, and so on. Let’s start with a scenario in which you modify the home page background image and the login page image and add custom CSS to standard tiles.
Launching the Theme DesignerYou can launch the theme designer from the Gateway SAP system by executing the t-code /UI5/THEME_DESIGNER. When you do, the theme designer opens in a web browser automatically. From the list of standard themes, select the SAP Blue Crystal theme, and click Open (see Figure 6-8).
Figure 6-7. Web IDE main page

Chapter 6 ■ Fiori Custom appliCation Development anD tools
225
When you open the theme, the name of the project changes to Custom Blue Crystal. This is a copy of the standard Blue Crystal theme. For Link to Application, enter /sap/bc/ui5/ui2/ushell/shells/abap/FioriLaunchpad.html; and for Name of Application, enter Home. Click Add (see Figure 6-9).
Figure 6-8. Theme designer home page

Chapter 6 ■ Fiori Custom appliCation Development anD tools
226
Customizing the Home Screen Background ImageNow you can begin customizing the Fiori launchpad. To add a custom background image, click the image field; you see a pop up screen in which to upload your custom image (see Figure 6-10).
Figure 6-9. Creating a custom theme for the launchpad

Chapter 6 ■ Fiori Custom appliCation Development anD tools
227
When you upload the custom image, the background image of the Fiori home page changes immediately, as shown in Figure 6-11.
Figure 6-10. Uploading a custom background image
Figure 6-11. Fiori home page with the modified background
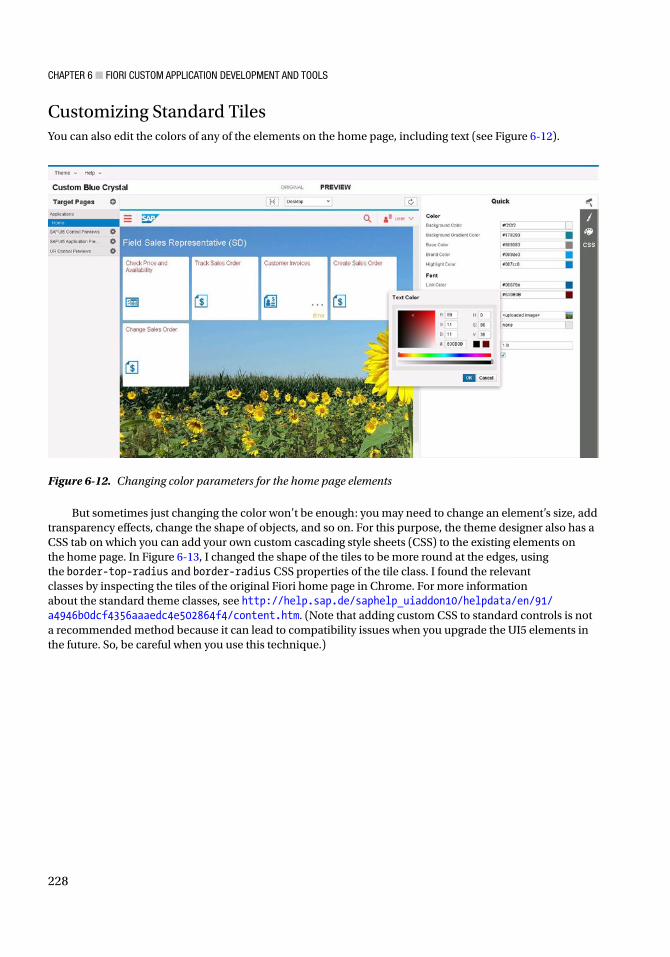
Chapter 6 ■ Fiori Custom appliCation Development anD tools
228
Customizing Standard TilesYou can also edit the colors of any of the elements on the home page, including text (see Figure 6-12).
But sometimes just changing the color won’t be enough: you may need to change an element’s size, add transparency effects, change the shape of objects, and so on. For this purpose, the theme designer also has a CSS tab on which you can add your own custom cascading style sheets (CSS) to the existing elements on the home page. In Figure 6-13, I changed the shape of the tiles to be more round at the edges, using the border-top-radius and border-radius CSS properties of the tile class. I found the relevant classes by inspecting the tiles of the original Fiori home page in Chrome. For more information about the standard theme classes, see http://help.sap.de/saphelp_uiaddon10/helpdata/en/91/a4946b0dcf4356aaaedc4e502864f4/content.htm. (Note that adding custom CSS to standard controls is not a recommended method because it can lead to compatibility issues when you upgrade the UI5 elements in the future. So, be careful when you use this technique.)
Figure 6-12. Changing color parameters for the home page elements

Chapter 6 ■ Fiori Custom appliCation Development anD tools
229
After you make customizations, continue with these steps to add them to the launchpad:
1. Save the changes, and go to Theme ➤ Save & Build to build the theme, as shown in Figure 6-14.
Figure 6-13. Apply custom CSS to alter the home page elements

Chapter 6 ■ Fiori Custom appliCation Development anD tools
230
2. Once the build is complete, test the new theme for your home page (see Figure 6-15).
Figure 6-14. Save and build the custom theme

Chapter 6 ■ Fiori Custom appliCation Development anD tools
231
3. To get the theme URL parameters for your custom theme, log in to the Gateway system and execute the transaction /UI5/THEME_TOOL. Click the Info button next to the theme’s name (see Figure 6-16).
Figure 6-15. The custom theme has been successfully built

Chapter 6 ■ Fiori Custom appliCation Development anD tools
232
4. Copy the sap-theme-custom-bluecrystal@XXXXXXX URL parameters(see Figure 6-17).
Figure 6-16. UI5 theme tool
Figure 6-17. URL parameters for the custom theme

Chapter 6 ■ Fiori Custom appliCation Development anD tools
233
5. Add?sap-theme-custom-bluecrystal@XXXXXXX to the end of your standard Fiori launchpad URL to see the custom theme. You can also change the standardFiori launchpad URL to show the custom theme by executing the transaction/UI2/NWBC_CFG_CUST in the Gateway system. On the NetWeaver Business Client (NWBC) configuration screen, add the following values (see Figure 6-18):
Field Name Value
Filter SAP_FLP
Parameter Name THEME
Value Custom_blue_crystal (the name of your custom theme)
Be aware that these changes make the default standard Fiori launchpad always launch with your custom theme.
Figure 6-18. Fiori launchpad with the custom theme

Chapter 6 ■ Fiori Custom appliCation Development anD tools
234
Customizing the Login Screen Background ImageYour home page displays the new theme, but the Fiori login screen remains the standard one. To change the background wallpaper of your Fiori login screen, follow these steps:
1. Go to transaction SE80, click MIME Repository, and then navigate to SAP ➤ PUBLIC ➤ BC ➤ UI2 ➤ Logon ➤ img. Here you can see the Fiori login screen default background image for different screen sizes. Make a backup of the standard image. Then right-click the login_background.jpg image and select Upload/Download ➤ Download (see Figure 6-19).
2. Enter a path on your system, and save the image as shown in in Figure 6-20.
Figure 6-19. MIME repository files for the Fiori login page

Chapter 6 ■ Fiori Custom appliCation Development anD tools
235
3. Replace the standard image with your custom wallpaper (see Figure 6-21).
Figure 6-20. Backing up the standard login screen image

Chapter 6 ■ Fiori Custom appliCation Development anD tools
236
4. Once the upload is complete, you can preview the changed image in the MIME repository (see Figure 6-22).
Figure 6-21. Replacing the standard image with a custom image

Chapter 6 ■ Fiori Custom appliCation Development anD tools
237
5. Go to your standard login screen to see the new background image (see Figure 6-23). You may have to clear your browser cache to see the new image if the login page was already loaded with the old image.
Figure 6-22. Custom image uploaded

Chapter 6 ■ Fiori Custom appliCation Development anD tools
238
Fiori Prototyping Kit and Axure Wireframe ToolThe Fiori prototyping kit was one of the first files released by SAP to help designers make a mockup screen without any coding. It was a PowerPoint file containing all the UI5 controls as images, so you could combine the images to make a mockup screen. Now SAP has replaced the prototyping kit with a new solution: a third-party wireframing/prototyping tool called Axure (see Figure 6-24). You can download an Axure trial version at http://www.axure.com/download.
Figure 6-23. Fiori login screen with custom wallpaper

Chapter 6 ■ Fiori Custom appliCation Development anD tools
239
SAP provides a set of stencil files and icon fonts that you can import into Axure so the Axure wireframe library is updated with SAP Fiori UI5 controls and icons (see Figure 6-25). You can download the stencils from https://experience.sap.com/fiori-design/resources/downloads/.
Figure 6-24. Axure tool for creating wireframe designs
Figure 6-25. Importing Fiori stencils into the Axure library

Chapter 6 ■ Fiori Custom appliCation Development anD tools
240
Once you import the libraries, you can re-create every Fiori UI5 control and even the Fiori login screen (see Figure 6-26).
You can create multiple pages in a single project. Tiles with custom icons can also be added from the SAP icons pack, which is added to the Axure library as shown in Figure 6-27.
Figure 6-26. Fiori login screen wireframe added from the Axure library

Chapter 6 ■ Fiori Custom appliCation Development anD tools
241
There is even an action builder wizard that lets you create a website-like navigation from one screen to the next. This is helpful for making interactive presentations of the mockup screen (see Figure 6-28).
Figure 6-27. SAP standard icon set added to the wireframe design
Figure 6-28. Action builder wizard for adding interactions to wireframes

Chapter 6 ■ Fiori Custom appliCation Development anD tools
242
Fiori Application Architecture OverviewWhen it comes to developing Fiori apps, there are ten golden rules:
• SAP Fiori apps must have an approved UX design.
• SAP Fiori UIs are built with SAP UI5.
• SAP Fiori apps must be based on OData services.
• An SAP Fiori app should have only one OData service.
• SAP Fiori UIs and OData services must be defined in different software components.
• Every SAP Fiori app is defined by a set of metadata.
• No custom CSS is allowed for SAP Fiori apps.
• Every SAP Fiori app must run as a web app.
• Every SAP Fiori app must run in the SAP Fiori launchpad.
• Every SAP Fiori app must run on mobile devices along with the native app paradigm.
When you’re doing custom app development, in some scenarios you may choose to use custom CSS (especially when you need to meet a customer’s specific design requirements). But using of lot of custom CSS may prevent the app from qualifying as a Fiori app—especially if the CSS customization crosses the line of being a simple UI with flat design.
Fiori apps are based on the model-view-controller (MVC) architecture. Before explaining MVC, let’s first consider how a normal web page works (see Figure 6-29). Let’s say you are accessing a website. The browser requests the HTML page and renders it on screen. When you interact with the page, it may require a back-end call to fetch the data from a database. This single web page has all the code to render the view, listen to user interactions, navigate, and handle database requests. After processing user input, the web page returns the result to the browser, and the browser renders the UI logic received from the web page. This is fine, but a single page cluttered with all the presentation logic, user event-handling, and business data logic is difficult to debug or modify.
Figure 6-29. Browser loading a regular web page

Chapter 6 ■ Fiori Custom appliCation Development anD tools
243
What if you split this code into different files, each of which has a specific role in making the web page work? For example, you can have a model that encapsulates the data from the database or holds the business data logic, a view file that holds the presentation layer logic or UI code to render the GUI, a file controller that handles all the user interactions and page navigations, and so on. This makes the code more readable and modularized, giving developers a better understanding of and control over the app’s source code. This approach is called MVC (see Figure 6-30).
Now let’s see how this MVC architecture is embedded into a typical Fiori app. A Fiori app, when run locally from an Eclipse IDE, starts from index.html like any normal website. But when the app is loaded in the Fiori launchpad, the app starts from Component.js. This is mainly due to the way the Fiori launchpad is designed (see Figure 6-31 for the architecture and Table 6-1 for a file-name reference).
Figure 6-30. Web page with MVC architecture

Chapter 6 ■ Fiori Custom appliCation Development anD tools
244
The second layer, Component.js, is the file that creates the model for your app. In addition to the model, Component.js contains the routing: a map or set of routes that specify how one page navigates to the next. Component.js also initializes a root view.
The third layer is the root view, which holds all the views for your app. The fourth layer is the app file, which defines what type of app this is: for example, a split app or a full-screen app. The fifth layer consists of the pages: a collection of view and controllers that are added to the app as pages.
The innermost layer shows the individual pages, each of which has a controller and a view. This layer implements the view controller architecture. You will understand the architecture better once you reach the app development section of the chapter.
Now it’s time to begin developing a custom app. This section walks through how I made an app for workforce monitoring; that’s a fancy name for an app that lets managers monitor employee attendance and working hours and analyze productivity.
Figure 6-31. Fiori app architecture
Table 6-1. Fiori Application Folder Structure Details
Layer Name Example File Name in Project
1 Index.html index.html file under the WebContent folder
2 Component.js Component.js file under the WebContent folder
3 Root view View folder under WebContent
4 App App.controller.js file under WebContent\View
5 Pages Pages including Compare.view.xml, EmpDetails.view.xml, and Employess.view.xml under WebContent\View
6 Views and controller All the *.controller.js and *.view.xml files under WebContent\View

Chapter 6 ■ Fiori Custom appliCation Development anD tools
245
The basic steps used to design the app are similar to the Personas approach used for SAP design; it’s a thinking approach for building a Fiori app. These steps are as follows:
1. Visualize what the app is and whom it is for, and design a rough sketch on paper.
2. Design a wireframe/mockup design to give you a clearer idea of what UI controls you need to choose to build the app.
3. Build the final app.
Visualizing the AppAs part of visualizing this example app, I thought about what a manager is interested in if they want to analyze an employee’s productivity, check whether an employee is billable or non-billable, or analyze working hours to find a pattern for how best to utilize employees. I came up with a rough design that I drew on a piece of paper (see Figure 6-32), just to have an idea of how the app might work.
Designing a Wireframe/MockupNow that I had a rough sketch, I needed to finalize the exact UI5 elements required for this app. For this purpose, I used the Axure wireframe tool discussed earlier. I designed the first screen of the app (see Figure 6-33), which showed how the app would look with UI5 controls.
Figure 6-32. I need more practice with my drawing skills

Chapter 6 ■ Fiori Custom appliCation Development anD tools
246
Then I designed the second screen, referring to my sketches. I added the table and chart controls to display employee comparison data, as shown in Figure 6-34.
Figure 6-33. Workforce monitor app home screen

Chapter 6 ■ Fiori Custom appliCation Development anD tools
247
Finally, I added a Fiori login screen and home page with a tile pointing to my app. I also added some screen interactions by using the wizard to make the mockup navigate from the login screen to the app mockup screens (see Figure 6-35).
Figure 6-34. Employee Details screen

Chapter 6 ■ Fiori Custom appliCation Development anD tools
248
Building the Final AppNow that I had a final render, it was time to build the app. See https://experience.sap.com/fiori-design/ for more detailed guidelines on how to build a custom Fiori app and what factors you need to consider. For example, Figure 6-36 shows you some UI design consideration when you’re using a grid layout.
Figure 6-35. Interactive prototype design for the workforce monitor

Chapter 6 ■ Fiori Custom appliCation Development anD tools
249
Developing a Custom Fiori ApplicationNow you have all the information required to begin development. Let’s start building the example app!
Creating a New UI5 ProjectOpen Eclipse Luna, and create a new blank project as shown in Figure 6-37.
Figure 6-36. Fiori design guidelines for creating a grid layout

Chapter 6 ■ Fiori Custom appliCation Development anD tools
250
Modify index.html as shown in Figure 6-38 (you can download the source code from the Apress website). As explained earlier, in Figure 6-31, index.html is used to run the app locally in Eclipse. In Figure 6-38, the first highlighted block bootstraps the SAP UI5 libraries in the src parameter. Similarly, you specify the theme, the library files used for this app, the complex binding syntax type (this helps bind multiple OData entity fields in one control, such as a text control), and the resource root name. Here, the resource root name is given as com.wfm , which is an alias for the actual root of the folder ./. This enters a unique name for the app’s root folder.
Figure 6-37. Creating a new project for the WorkForceMonitor app

Chapter 6 ■ Fiori Custom appliCation Development anD tools
251
The second highlighted section in Figure 6-38 is where you make index.html call the Component.js file, which you will create in the app folder. This rerouting is required because the app starts from Component.js in the Fiori launchpad. Fiori launchpad apps run in a shell, so you declare a new shell sap.m.shell. Within the shell, you call the contents of Component.js, so you declare a component container (sap.ui.core.ComponentContainer). The controls you declare are placed on a div in index.html, so you place the response in a div named content using the PlaceAt() method. The third highlighted area is the content div that shows the contents you place in Component.js.
Now, create a new file named Component.js in the root folder. Component.js holds the Fiori app’s references to include files, routing configurations, the root view containing app type details, resource bundles (i18n), model resources, and so on.
Figure 6-39 shows the jQuery.sap.declare (com.wfm.Component) declaration. It identifies the Component.js file’s name and path. com.wfm is the name of the root folder declared under resourceroots in the index.html file.
Figure 6-38. Index.html modified to run the app locally

Chapter 6 ■ Fiori Custom appliCation Development anD tools
252
The component.js file contains the metadata; it is a faceless component that tells component.js about various resources and configurations required to run this app. (In the Fiori V2 architecture, this metadata will be a separate JSON file.) Some of the commonly used metadata parameters are as follows:
• abstract: Whether your component class is abstract or not
• version: Version of your component
• include: Custom CSS classes or third-party JS files
• dependencies: External dependencies
• library: Library the component belongs to
• config: Can be used to store static value pairs if you need to access them in the component level (kind of like declaring a global variable)
Figure 6-39. Component.js with metadata definitions

Chapter 6 ■ Fiori Custom appliCation Development anD tools
253
• customizing: Specific to Fiori extensions; not required for your custom app
• routes: Routes used to navigate to and between pages
In Figure 6-39, you can see the metadata JSON structure with the includes parameter, which holds the path to all the custom CSS and the third-party JS files used for this app.
The routing parameter holds the root view path under the config parameter. You can also see targetControl, with the value SplitApp; this is the name of the SplitApp control defined on the App.view.xml page (you see this page later in this chapter).
The targetAggregation for one of the routes is masterPages and for the remaining routes is detailsPages. This tells the router which view should be placed in the master view of the SplitApp control and which views are detail views.
The pattern parameter of routes is the path for each view, if the pattern value is "", then the page is the default view. If pattern has the value employees/{data}, it means the page name for the EmpDetails view can be accessed via the path employees/{data}. The {data} part is a dynamic variable that you need to pass at runtime; you could give the pattern value as employees, but you need to send an employee ID from the master page to the detail page as part of the logic to show the subsequent data in the Employees page.
Component.js uses two methods to control initial Instantiation (see Figure 6-40):
• init: Overwrites the standard init method. You can use it to call the createContentmethod and initialize your router.
• createContent: Inserts all the code to fill the component with your content. For example, you can use this method to replace the default view with your starting view (in this case, the app view), set the model for your view (JSON/OData), set the i18n resource bundle (DefaultBindingMode), and so on.
Figure 6-40. Setting the model for the views

Chapter 6 ■ Fiori Custom appliCation Development anD tools
254
Adding Views to the AppNext, create a folder named View. Right-click the folder, and choose New ➤ Other. Under SAPUI5 Application Development, select View, and click Next (see Figure 6-41).
For the view name, enter App. Select the XML radio button, and click Finish (see Figure 6-42).
Figure 6-41. Adding new files to the project

Chapter 6 ■ Fiori Custom appliCation Development anD tools
255
Open the default generated code in the view App.view.xml file and its corresponding controller file App.controller.js. The ControllerName for the view is View.App by default, but you need to change the path reference to com.wfm.View.App. This is important because com.wfm is the path of your root folder; in order for Component.js to find App.view, you must enter the full path from the root view to the View folder. Similarly, you need to modify the sap.ui.controller(View.App) of App.controller.js to sap.ui.controller (com.wfm.View.App). This change is mandatory for every new file you add to your project.
Figure 6-42. Create a new XML view

Chapter 6 ■ Fiori Custom appliCation Development anD tools
256
Now you can add the main page for the WorkForceMonitor app. Create a new view under the View folder, and name it Employees. In the Employees.view.xml file (see Figure 6-44), add the controls required to create your first screen. Within the <Page></Page> control, add a SearchField control for searching employees based on their names. Next, add a List control to show the list of employees. Finally, add a <Footer></Footer> area to add custom buttons in the footer. The select event in the List control has another press event for the <objectListItem></objectListItem> control. Ideally, there should be only one event to handle user input for a list. But when you access the same page on a mobile device, the press event of objectListItem is triggered instead of the select event of the List control, and vice versa on a desktop. How the app detects which device it is working on is based on the device model you set in Component.js (see Figure 6-40). That model is bound to the mode property of the List control of the Employees view.
In addition to changing the controller name, in App.view you need to add an additional controller <SplitApp> </SplitApp> (see Figure 6-43). This makes your App view return a SplitApp controller to Component.js. In Figure 6-39, you can see a targetControl parameter in the metadata JSON in Component.js, so Component.js can find the application type in that target control. This is how you add the app type and the master view (handled by the parameter targetAggregation:masterPages) and detail view(handled by the parameter targetAggregation:detailPages) to the app via the routes in Component.js.
Figure 6-43. Define the full path for the view and controller

Chapter 6 ■ Fiori Custom appliCation Development anD tools
257
Figure 6-44. Employees XML view code
In the controller file of the Employees view (see Listing 6-1), in the onInit hook method, you get the reference for your router using sap.ui.core.UIComponent.getRouterFor(this). This reference is required in order to carry out page navigation.
The handleListSelect and handleListItemPress methods trigger based on the device. In those methods, the router method navTo is called. In the navTo method, you pass the pattern for the EmployeeDetails view defined in the component.js file. The handleLiveChange method is used to handle search queries based on the employee names in the search field in the view.
Listing 6-1. Employees.controller.js (Handles the Logic for the Employee List on the Master Page)
jQuery.sap.require("com.wfm.util.Formatter");sap.ui.controller("com.wfm.View.Employees", {
onInit: function() {this.router = sap.ui.core.UIComponent.getRouterFor(this);
},
handleListSelect: function(evt) {var context = evt.getParameter("listItem").getBindingContext().sPath;sViewId = context.substring(context.lastIndexOf("/") + 1);this.router.navTo("empDetails", {
data: sViewId});
}, handleListItemPress: function(evt) {
var context = evt.getSource().getBindingContext().sPath;sViewId = context.substring(context.lastIndexOf("/") + 1);this.router.navTo("empDetails", {data: sViewId});
},

Chapter 6 ■ Fiori Custom appliCation Development anD tools
258
handleLiveChange: function(evt) {
// create model filtervar filters = [];var sQuery = evt.getParameters().newValue;if (sQuery && sQuery.length > 0) {
var filter = new sap.ui.model.Filter("empName", sap.ui.model.FilterOperator .Contains, sQuery);filters.push(filter);
}
// update list bindingvar list = this.getView().byId("list");var binding = list.getBinding("items");binding.filter(filters);
},});
Similarly, create the remaining views for the app, as shown in Figure 6-45. You can download the complete source code for all the examples in this book from the Apress website.
Figure 6-45. Create all the views required for the app

Chapter 6 ■ Fiori Custom appliCation Development anD tools
259
The compare.view.xml source code includes <core:Fragment> </core:Fragment> and <viz:VizFrame></viz:VizFrame> controls (see Listing 6-2). The Fragment control loads another file that contains the code for the Table control dynamically at runtime. To learn more about fragments, see http://scn.sap.com/docs/DOC-55801. In short, a fragment is a method to modularize a page’s code into multiple files so that if a group of people are working on the same view and developing multiple controls, they can work on the individual parts of the same page simultaneously. The viz control is required to show the graphs on the page.
Listing 6-2. Compare.view.xml (Shows the Comparison Chart and Calls the Fragment Containing the Employee Details Table)
<core:View controllerName="com.wfm.View.Compare" xmlns:viz="sap.viz.ui5.controls"xmlns:core="sap.ui.core" xmlns:html="http://www.w3.org/1999/xhtml" xmlns:mvc="sap.ui.core.mvc" xmlns="sap.m" xmlns:l="sap.ui.layout"> <Page navButtonPress="backToEmpDetails" showNavButton="true"
title="{i18n>CompareTitle}"<content><core:Fragment fragmentName="com.wfm.fragments.CompareTable" type="XML" /> <Panel><ScrollContainer height="100%" width="100%" horizontal="false" vertical="true"
focusable="true"><viz:Popover id="idPopOver"></viz:Popover>< viz:VizFrame id="idVizFrameColumn" uiConfig="{applicationSet:'fiori'}" vizType="column" width="100%" height="700px"></viz:VizFrame
</ScrollContainer</Panel>
</content> <footer>
<Bar><contentRight>
<Button icon="sap-icon://email" press="onEditBtn" text="Send Email" type="Transparent"></Button> </contentRight> </Bar> </footer></Page></core:View>
Creating Custom ControlsThis example also uses two third-party JS files from http://d3js.org/ (see Figure 6-46). I created custom controls based on these third-party JS files to show the percentage and total hours worked by employees. For more information about creating custom controls from scratch, see https://sapui5.netweaver.ondemand.com/#docs/guide/d12d2ee6a5454d799358d425f9e7c4db.html.

Chapter 6 ■ Fiori Custom appliCation Development anD tools
260
You can see the custom controls rendered on the EmployeeDetails output page (see Figure 6-47).
Figure 6-46. Creating custom controls for the app

Chapter 6 ■ Fiori Custom appliCation Development anD tools
261
When you click an employee name on the list and check the address bar, you can see the router pattern passing to the next page (see Figure 6-48).
Figure 6-47. Custom controls preview on the view page

Chapter 6 ■ Fiori Custom appliCation Development anD tools
262
Because this is a split app, when the screen size is reduced, the master view is hidden automatically (see Figure 6-49).
Figure 6-48. Pattern-based navigation using routing
Figure 6-49. The master view switches to Hide mode on smaller screens

Chapter 6 ■ Fiori Custom appliCation Development anD tools
263
Deploying the Custom Application to HANA CloudOnce you are done with your development, you can preview the app locally as a web app. But in this case, you want to port the app to Web IDE and deploy it in HANA Cloud.
This example uses the cloud Web IDE with a HANA trial account. You can register for a free HANA trial account at https://account.hanatrial.ondemand.com/.
Once you register the for the HANA trial, go to the HANA cockpit and click Subscriptions. At right, you can see sapwebide under Subscribed HTML5 Applications. Click the Web IDE link (see Figure 6-50).
Figure 6-50. HANA trial account
Figure 6-51. HANA Cloud Web IDE
You see a cloud Web IDE URL, as shown in Figure 6-51.
Importing a UI5 App into Web IDE Before you import your code into Web IDE, you have to first create a blank HTML5 app in HANA Cloud:
1. Click the HTML5 Applications link at left in the HANA Cloud portal, click New Application, enter the name of your new app, and click Save (see Figure 6-52).

Chapter 6 ■ Fiori Custom appliCation Development anD tools
264
2. Click the Edit icon in the Actions column to open your new app in Web IDE(see Figure 6-53).
Figure 6-52. Creating a new HTML5 app in HANA Cloud
Figure 6-53. Open your app in Web IDE

Chapter 6 ■ Fiori Custom appliCation Development anD tools
265
3. You are asked for your HANA trial credentials. This is required for Web IDE to connect to your HANA trial account and link the HTML5 app to its workspace (see Figure 6-54).
Figure 6-54. Connecting the HTML5 app with the Web IDE workspace

Chapter 6 ■ Fiori Custom appliCation Development anD tools
266
5. Click the Git repository icon at right on the page, and click Commit and Push. This saves the files into the HANA Cloud (see Figure 6-56).
Figure 6-55. Importing the local UI5 app to Web IDE
4. Now that you have an app in Web IDE, it’s time to upload your local app to Web IDE. To do this, make a zip file of the webapp folder of your local app. Right-click your Web IDE project, click Import, and select the project zip file, as shown in Figure 6-55.

Chapter 6 ■ Fiori Custom appliCation Development anD tools
267
6. Your files are saved to HANA Cloud as an HTML5 app. To access the app, you still need to activate it. To do so, right-click the project and choose Deploy ➤ Deploy to SAP HANA Cloud Platform, as shown in Figure 6-57.
Figure 6-56. Committing files to HANA Cloud

Chapter 6 ■ Fiori Custom appliCation Development anD tools
268
7. A wizard pops up with details about the app to be activated. Click Deploy(see Figure 6-58).
Figure 6-57. Deploy the app to HANA Cloud

Chapter 6 ■ Fiori Custom appliCation Development anD tools
269
8. Once the app is deployed, you get a confirmation message. Click Open The App’s Page In The SAP HANA Cloud Platform Cockpit, as shown in Figure 6-59.
Figure 6-58. Details of the app to be deployed to HANA Cloud

Chapter 6 ■ Fiori Custom appliCation Development anD tools
270
Running the App from HANA CloudIn the HANA Cloud Platform Cockpit, you see the list of HTML5 apps deployed in HANA Cloud. Click the workforcemonitor app (see Figure 6-60).
Figure 6-59. The WorkForceMonitor app successfully deployed on HANA Cloud
Figure 6-60. Activated HTML5 apps in HANA Cloud
From here, you get the URL link of your deployed app (see Figure 6-61).

Chapter 6 ■ Fiori Custom appliCation Development anD tools
271
Figure 6-61. URL link of your activated app
If you directly open this URL, you get an error page. This is because HANA Cloud recognizes the app as an HTML5 app, unlike the Fiori launchpad, which opens the Component.js file in the app. You have to manually add the index.html path to the end of this URL (see Figure 6-62). For example, the URL for the WorkForceMonitor app is something like https://workforcemonitor-yourhanatrialusername.dispatcher.hanatrial.ondemand.com/WebContent/index.html.

Chapter 6 ■ Fiori Custom appliCation Development anD tools
272
Figure 6-62. WorkForceMonitor app opened in HANA Cloud
Now you can see your app via the cloud and access it from anywhere (see Figure 6-63).

Chapter 6 ■ Fiori Custom appliCation Development anD tools
273
Figure 6-63. Now your app is completely deployed in the cloud
Web IDE BasicsIf you want to develop UI5 apps using Web IDE, you have multiple options:
• Create a project from a template
• Create a project based on a sample app
• Use the Quick Start option with the Layout Editor
• Create an extension project
You saw how to create an extension project using Web IDE in Chapter 4. This section looks at the remaining options. You can access a trial version of Web IDE from the Hana Cloud Cockpit under Subscriptions ➤ Web IDE. By default, the URL for your cloud-based Web IDE is https://webide-<yourHANATrialId>.dispatcher.hanatrial.ondemand.com.
Creating a New Project from a Template Creating a project from a template saves you the time of setting up a skeleton UI5 app. Follow these steps:
1. To create a new project, go to File ➤ New ➤ Project From Template. On the wizard page, you can choose from various preset templates to start your app(see Figure 6-64). In this case, select the SAPUI5 Application Project, which creates a blank project with one sample view.

Chapter 6 ■ Fiori Custom appliCation Development anD tools
274
Figure 6-64. Creating a Fiori app from a template in Web IDE
2. Click Next, enter a name for your project on the next page, and click Next again. Now you have the option to specify a view type (XML, JSON, JavaScript, or HTML). In this example, select the XML view. Then enter a namespace and a name for your view (see Figure 6-65). Click Next and then click Finish.

Chapter 6 ■ Fiori Custom appliCation Development anD tools
275
Figure 6-65. Creating a UI5 app project from a template
Figure 6-66. The new app is created in Web IDE
3. The app appears in the project explorer pane of Web IDE. It has a new view and a controller named FirstView (see Figure 6-66).

Chapter 6 ■ Fiori Custom appliCation Development anD tools
276
4. To add controls to the UI, Web IDE has a built-in Layout Editor (this feature is not available in Eclipse). You can drag-and-drop any control you want directly into the preview pane in the middle of the Layout Editor (see Figure 6-67). To the right of the preview pane are the properties of all the controls you have added. To its left are all the available UI5 controls. This is a useful feature for beginners to check the code that is generated for each control, but it only allows you to build basic controls.
Figure 6-67. Layout Editor in Web IDE
5. Once you have added the controls, click the green Run icon on the toolbar to preview the app (see Figure 6-68).

Chapter 6 ■ Fiori Custom appliCation Development anD tools
277
Figure 6-68. Application preview in Web IDE
Creating a Sample Application Using Web IDEYou also have the option to generate a fully functional UI5 app from a set of samples. Doing so will help you understand how a full-fledged app is built and the coding standards used in these apps. Here are the steps to create a sample app:
1. Go to File ➤ New ➤ Project From Sample Application. On the wizard page, select the sample app you want to create. In this case, choose the Manage Products app (see Figure 6-69). Click Next, accept the terms and conditions, and click Finish.

Chapter 6 ■ Fiori Custom appliCation Development anD tools
278
Figure 6-69. Creating a sample app in Web IDE
2. The sample app’s source code appears in Web IDE (see Figure 6-70). You can run the app just as you previewed the template project app earlier.

Chapter 6 ■ Fiori Custom appliCation Development anD tools
279
Figure 6-70. Sample app in Web IDE
Using Quick Start with the Layout EditorInstead of creating a project from a template or sample, you can jump directly into app development using the Layout Editor in Web IDE. To create a Quick Start project, go to File ➤ New ➤ Quick Start With Layout Editor. A Quick Start app is immediately created and opens in the Layout Editor (see Figure 6-71).

Chapter 6 ■ Fiori Custom appliCation Development anD tools
280
In the next chapter, you learn about SAP Smart Business and how to create a project on the Internet of Things using a Raspberry Pi connected to a UI5 app.
Figure 6-71. Quick Start app in the Layout Editor in Web IDE
281© Bince Mathew 2015 B. Mathew, Beginning SAP Fiori, DOI 10.1007/978-1-4842-1335-3_7
Chapter 7
Introduction to HANA Smart Business and the Internet of Things
HANA Smart Business apps give users the option to analyze and evaluate strategic or operational key performance indicators (KPIs) in real time and help users make the right decisions based on the data. Because SAP HANA is designed to process real-time data, it can be used in the Internet of Things. SAP HANA Cloud Platform provides the necessary tools to use this feature. The Internet of Things is the next big step toward connected devices via the Internet. This chapter shows you how to build your own UI5 application and connect it to different sensors using a Raspberry Pi, with SAP HANA as the channel between UI5 and the sensors.
Analytical and Fact Sheet Applications OverviewIn addition to Fiori transactional apps, which primarily deal with task-based activities like changing, creating, or approving a set of processes, there are Fiori fact sheets and analytical apps. These apps require a HANA back-end DB to run:
• Fact sheets: Used to search and explore essential information, such as viewing details about an object and navigating between similar objects.
• Analytical apps: Help you to visualize a complex scenario by processing a huge amount of data in a short time for tracking or monitoring purposes. For example, you can see the purchase history of a certain commodity over the last ten years as a chart by processing the data in a few seconds. Analyzing such an immense volume of data helps you monitor the purchase pattern and make decisions based on the data.
Smart Business Apps OverviewSmart Business apps show real-time information such as charts and analytics. These apps are represented by a set of KPI tiles (for of HANA Smart Business installation details, see http://help.sap.de/ssb). Although it may look similar to a dynamic tile, a KPI tile can show much more than just a number. KPI tiles can show micro-charts and other real-time data, as shown in Figure 7-1.
Electronic supplementary material The online version of this chapter (doi:10.1007/978-1-4842-1335-3_7) contains supplementary material, which is available to authorized users.

Chapter 7 ■ IntroduCtIon to hana Smart BuSIneSS and the Internet of thIngS
282
These tiles process gigabytes of data every second and give you a summary. You can drill down to see more information, just like clicking any other Fiori tile. For example, suppose you are looking at a KPI tile that shows an expense report in real time, and suddenly the expense begins to increase and turns red. You feel something is not right, and you want to investigate further. This is where drilldown views come into play. These views let you analyze critical KPIs in real time, as shown in Figure 7-2.
Figure 7-1. KPI tiles
Figure 7-2. Drilldown views giving further insight into KPI tiles

Chapter 7 ■ IntroduCtIon to hana Smart BuSIneSS and the Internet of thIngS
283
KPI Modeler OverviewAlthough prebuilt Smart Business apps are available, you may want to make custom apps to meet your business requirements. You cannot build KPI tiles with the usual Fiori launchpad designer; to create Smart Business apps, you need to use the KPI Modeler. The KPI Modeler is a set of eight apps that helps you create KPI tiles (for configuration information, see http://help.sap.com/fiori_bs2013/helpdata/en/d1/c44b527fb7077de10000000a445394/content.htm). You can see the KPI Modeler tools in Figure 7-3. They are as follows:
• Create KPI: Creates KPI or OPI definitions
• Create Evaluation: Defines filters and targets
• Configure KPI Drill-Down: Creates further drilldown views for KPI tiles by defining charts or tables
• Configure KPI Tiles: Configures the controls needed to visualize KPI tiles, such as using micro-charts or comparison charts to represent information
• Manage KPI Authorizations: Grants access rights for KPIs and KPI evaluations
• Manage KPI Associations: Sets associations for managing KPI relationships
• KPI Workspace: Shows KPIs and evaluations
• Migration Tool: Migrates existing KPIs to the new data model
Internet of ThingsSAP HANA Cloud Platform has native support for the Internet of Things, so let’s look at how you can use it. The Internet of Things is perhaps the most talked about tech in the connected world. It simply means communicating with devices over the Internet: for example, reading measurements such as temperature, humidity, water pressure, and so on from a fleet of sensors over the Internet; or automating your home and connecting devices like your garage door, bedroom lamps, water sprinklers in the garden, and the smoke detector. These smart devices can receive data over the Internet and send data to your smartphone or computer in any part of the world.
Figure 7-3. KPI Modeler tiles

Chapter 7 ■ IntroduCtIon to hana Smart BuSIneSS and the Internet of thIngS
284
In the world of SAP, this concept of connected devices can be used for scenarios like real-time tracking of a customer’s shipping freighter, monitoring the temperature of high-value items, tracking the gas pressure in an oil rig, monitoring the RPM of heavy machinery in a plant, and so on. Today, whoever has the latest real-time data has the upper hand in the market.
Anyone can make their own Internet of Things–based devices, thanks to affordable miniature PCs designed to communicate with digital and analog sensors. Two of the leading and most widely used such miniature PCs are the Raspberry Pi and BeagleBone Black. There are other cost-effective alternatives, such as the ESP8266 WiFi module with a programmable 32-bit microcontroller on board, but setting up this dongle to meet your requirements is more complicated than going with a Raspberry Pi (there is a lot of wiring and programming involved). The examples in this chapter use a Raspberry Pi. Your aim is to switch on an LED light from a smartphone and get the room temperature from a digital thermometer connected to the Raspberry Pi.
To send and receive data between a smartphone and the Raspberry Pi device over the Internet, you need a mediator in the cloud that can store and send data between the smartphone and the device. This example uses an SAP UI5 app as the mobile app so it will work on any device. The cloud mediator is the excellent SAP HANA Cloud Platform, which has a service dedicated to the Internet of Things (IoT). The architecture diagram in Figure 7-4 shows my vision of achieving this scenario.
There are of course alternatives to HANA Cloud Platform (HCP) to connect your devices. A few that are worthy of mentions are as follows:
• Parse: www.parse.com
• Firebase: www.firebase.com
• PubNub: www.pubnub.com
• Scaledrone: www.scaledrone.com
• Pusher: www.pusher.com
• ThingSpeak: https://thingspeak.com
To get an idea of the ever-growing list of IoT-based devices on the market, check out http://iotlist.co.
UI5 Apps with SAP HANA and Raspberry PiBefore starting the tutorial, this section presents a summary of what a Raspberry Pi device is. The latest model, Raspberry Pi 2, is a credit-card-sized PC with 1GB RAM, a 900MHz processor, four USB ports, one HDMI out, and an Ethernet port. It can run multiple operating systems from Linux to Windows 10 (not full-fledged Windows 10—Microsoft custom-developed a version for the Raspberry Pi).
Figure 7-4. Raspberry Pi– and HANA Cloud–based IoT architecture

Chapter 7 ■ IntroduCtIon to hana Smart BuSIneSS and the Internet of thIngS
285
When I started testing with HCP, I used an XSJS service to send and receive data between my UI5 app and the Raspberry Pi device. It worked fine, because the UI5 app was hosted on HCP. But problems began when I tried to consume the XSJS service from my Raspberry Pi. The reason was that I was using a HANA Cloud Platform trial, and SAP redirects incoming XSJS service requests after authenticating; when I tried to get the response in my Raspberry Pi Python app, it received the SAML 2.0 authentication key. This is a known issue with the HCP trial in the SCN community. If you have a fully licensed version of HCP, you will not face this issue. Because most readers of this book will have access to an HCP trial account rather than an on-premises or fully licensed cloud edition, I had to figure out an alternative.
After some digging around in http://help.hana.ondemand.com, I found an option to deploy a Java app with a persistence storage option. I downloaded some tutorials from the HANA help website (https://help.hana.ondemand.com/help/frameset.htm?e4c52854bb571014aeb88753d0dad158.html) and modified the sample Java App to meet my custom requirements.
I used the following components for this project:
• Raspberry Pi 2 (see Figure 7-5); older models should also work fine.
• 16GB microSD card. The Raspberry Pi doesn’t come with internal memory, so you have to buy a card.
• Digital thermometer (DS18B20; see Figure 7-6). The Raspberry Pi doesn’t have an analog input, so you have to use digital sensors. Otherwise you have to buy an analog-to-digital convertor chip.
Figure 7-5. Raspberry Pi 2

Chapter 7 ■ IntroduCtIon to hana Smart BuSIneSS and the Internet of thIngS
286
• LED lights, a breadboard, and a basic wiring kit. I used the Sunfounder Project Super Kit for Raspberry Pi (see Figure 7-7).
• Case for the Raspberry Pi (optional; see Figure 7-8).
Figure 7-6. DS18B20 digital thermometer
Figure 7-7. Sunfounder Project Super Kit for Raspberry Pi

Chapter 7 ■ IntroduCtIon to hana Smart BuSIneSS and the Internet of thIngS
287
• HANA Cloud Platform trial account. You can create a new HANA trial account at https://account.hanatrial.ondemand.com.
Now that know what hardware and software you need to develop your own IoT project, let’s look at the steps involved:
1. Set up the Raspberry Pi.
2. Connect sensors to the Raspberry Pi.
3. Deploy the Java Persistence API in HANA Cloud Platform.
4. Write Python scripts to pass data from the Raspberry Pi to HANA Cloud.
5. Create a Fiori front end for IoT.
Setting Up the Raspberry Pi Setting up the Raspberry Pi is a fairly simple task. The Raspberry Pi doesn’t comes with a preinstalled operating system, so you need to install the OS first.
My choice of OS for the Raspberry Pi is Raspbian. It is the most commonly used OS for the Raspberry. And because it’s Linux based, it has more open source community support. Although Microsoft’s Windows 10 flavor for the Raspberry Pi is also available, it is a newcomer to the IoT, and open source community support for it is not large at the moment.
You can download and install the Raspbian OS from https://www.raspbian.org/RaspbianImages, but the recommended method is to install it via NOOBS. NOOBS is an installer with Raspbian built in; it’s much easier to install Raspbian with NOOBS than to install it yourself. You can download NOOBS from https://www.raspberrypi.org/downloads. Detailed steps for installing the Raspbian OS via NOOBS is available at https://www.raspberrypi.org/documentation/installation/noobs.md.
I connect my Raspberry Pi directly to a monitor via its HDMI port. There are other ways to connect to the Raspberry Pi via apps like PuTTY, but I prefer to boot into the Raspbian GUI. Figure 7-9 shows the Raspbian home screen.
Figure 7-8. Custom case for the Raspberry Pi

Chapter 7 ■ IntroduCtIon to hana Smart BuSIneSS and the Internet of thIngS
288
Once you have logged in to Raspbian, you need to install the following libraries in Python. (One advantage of Raspbian is that is comes preloaded with Python 2.7 and Python 3.0, so you don’t have to set up Python from scratch.)
pipTo install pip, go to https://pip.pypa.io/en/stable/installing.html and download the get-pip.py file. Open the terminal window in Raspbian (similar to cmd in Windows), and navigate to the downloaded get-pip.py folder via sudo python get-pip.py (see Figure 7-10).
Figure 7-9. Raspberry Pi Raspbian OS

Chapter 7 ■ IntroduCtIon to hana Smart BuSIneSS and the Internet of thIngS
289
Requests LibraryAfter pip is installed, you can install any Python plug-in without downloading the Python file manually from the website. To install Requests, type sudo pip install requests in the terminal.
Parse Type sudo pip install parse in the terminal.
RequestsType sudo pip install requests in terminal.
W1ThermSensorThis is an open source library for reading digital thermometers. Type sudo pip install w1thermsensor in the terminal.
Figure 7-10. Installing pip for Python

Chapter 7 ■ IntroduCtIon to hana Smart BuSIneSS and the Internet of thIngS
290
Detecting the Digital SensorFor the digital sensor, you need to do a little more configuration to make the Raspberry Pi detect it. First you need to edit one of the system files. Type sudo nano /boot/config.txt in the terminal, scroll to the bottom of the page, and add dtoverlay=w1-gpio. Press Ctrl + X to save the file. This change makes the Raspberry Pi detect any new digital thermometer sensor connected to it when it restarts.
Once these plug-ins are installed, you can begin connecting the sensors.
Connecting Sensors to the Raspberry PiTo connect sensors to the Raspberry Pi, you need to be familiar with some basics of electronics. It’s not rocket science, though it may seem that way at the beginning; you just need some patience to read and understand the wiring concepts.
You can solder the sensors onto a board with the required wirings, but I prefer the much less complicated approach of using a breadboard. Figure 7-11 shows the layout of a breadboard. You can align your sensors on the breadboard with zero soldering and get the system up and running in less than ten minutes.
Before connecting sensors to the Raspberry Pi, you need an introduction to its pins. The Raspberry Pi has a set of digital input and output pins, generally referred to as GPIO (general pin input output) ports. Any digital sensors connected to these pins can be read into a program running on the Raspberry Pi (the most commonly used programs are Python and Java). You can get the readings from the digital sensors or send commands to a digital device connected to any of these ports (for example, you can send a 0 or 1 digital signal to one of the pins and switch on an LED light or a fan, and so on.). Each pin has a unique number assigned to it. The Raspberry Pi has a total of 40 pins, including the GPIO pins as well as a few 3.3V and 5V pins for powering small digital devices like LED displays, small DC motors, and LED lights.
When you access the GPIO pins via programs like Python, you have multiple choices of third-party plug-ins that give you direct access without much coding. One commonly used plug-in is RPi. Generally, there is a difference between the pin number on the Raspberry Pi and the name of the GPIO port. For example, the 11th pin on the Raspberry Pi (the 11th pin from the top of the Raspberry Pi, where the top is the side closest to the display port for connecting LCD devices; see Figure 7-8) has the GPIO name GPIO17. With the help of plug-ins like RPi, you can use pin number 11 in the code, which matches the actual port number.
■ Note for a detailed reference to the gpIo ports, see www.element14.com/community/docs/DOC-73950/l/raspberry-pi-2-model-b-gpio-40-pin-block-pinout.
You can see the GPIO wiring layout chart in Figure 7-11.

Chapter 7 ■ IntroduCtIon to hana Smart BuSIneSS and the Internet of thIngS
291
Now, let’s start connecting the sensors and the LED:
1. First let’s connect the LED. I am using a different color of wire for each pin(see Table 7-1). Figure 7-12 shows the wires from the LED to the Raspberry Pi.
Table 7-1. Wire Color Connected to Each Pin
Wire Color PIN Number
Red 11
Brown 17 (3.3V power)
Figure 7-11. GPIO layout for the Raspberry Pi

Chapter 7 ■ IntroduCtIon to hana Smart BuSIneSS and the Internet of thIngS
292
2. Connect the other end of the wires to the LED. Instead of soldering the wires and the resistor required to connect to the LED, use a breadboard to connect the wires to the LED and a 220-ohm resistor (you can check the resistor’s ohms by checking its color code at https://physics.ucsd.edu/neurophysics/courses/physics_120/resistorcharts.pdf). A breadboard is a solderless board you can use to connect the ends of wires and other electronic devices via a series of underlying vertical and horizontal wires. In Figure 7-13, you can see that the underlying wires on either side of the breadboard are marked with + and - at the top and are vertically connected; the middle section of the breadboard is horizontally connected.
3. Place the LED on the middle portion of the breadboard. Connect the red wire (the wire connected to pin 11 on the Raspberry Pi) to the short side of the LED pin (one leg of the LED is shorter than the other), and connect the brown wire to one side of the breadboard marked with a + sign (you can connect to any hole on that row vertically). Now connect one end of the 220-ohm resistor to any one of the holes in the vertical row on the same side where you plugged the brown wire. Connect the other end of the resistor to the longer leg of the LED in the horizontal row. See Figure 7-14.
Figure 7-12. Connecting wires to the Raspberry Pi GPIO pins
Figure 7-13. Breadboard generic wiring layout

Chapter 7 ■ IntroduCtIon to hana Smart BuSIneSS and the Internet of thIngS
293
Figure 7-15 shows the layout for the LED connection on the breadboard.
4. Similarly, you need to connect your digital temperature sensor (DS18B20).I wired it to the Raspberry Pi with colored wires, as shown in Table 7-2. Connect the wires to the Raspberry Pi pins.
Figure 7-14. Breadboard wiring for the LED
Figure 7-15. LED connection layout
Table 7-2. Digital Sensor Wire Colors
Wire Color pin Number
Purple 1 (3.3V DC power port)
Grey 7 (GPIO04)
Blue 6 (ground)
5. The advantage of this particular version of DS18B20 is that it can be directly connected to the Raspberry Pi without using a breadboard as a mediator. Connect the other end of the wires to the three pins of the digital thermometer. Connect the purple wire to the + pin, the grey wire to the middle pin (the data pin),and the blue wire to the - pin. See Figure 7-16.

Chapter 7 ■ IntroduCtIon to hana Smart BuSIneSS and the Internet of thIngS
294
Once you have made all the connections, reboot your Raspberry Pi so that it will detect the connected digital thermometer.
Deploying the Java Persistence API in HANA Cloud PlatformTo deploy the Java Persistence API in the cloud, you need to develop the app using Eclipse and then directly publish it into HCP from Eclipse.
Installing the HANA Cloud Platform SDKTo develop the Java Persistence API, download the SAP HANA Cloud Platform SDK (Java web version) from the HANA Cloud support page at https://tools.hana.ondemand.com/#cloud and extract the file. You will need the extracted file later to add Server Runtime in Eclipse.
In addition, you need to add a few plug-ins to Eclipse Luna. To do so, go to Help ➤ Install New Software, and enter the URL https://tools.hana.ondemand.com/luna in the wizard (see Figure 7-17). Select the following check boxes:
• SAP HANA Cloud Integration Tools
• SAP HANA Cloud Platform Tools
• SAP HANA Tools
Figure 7-16. DS18B20 wiring layout

Chapter 7 ■ IntroduCtIon to hana Smart BuSIneSS and the Internet of thIngS
295
When the installation is finished, download the MyIot zip file from the Apress website and import the project into Eclipse. This example does not go into the basics of developing a Java Persistence API program; instead, I have built the app, and you need to modify parts of the project to make it work with your HANA trial account. (To learn about using the Java Persistence API from scratch, see http://hcp.sap.com/developers/TutorialCatalog/jav100_01_java_setup_eclipse.html.)
Once you have installed the required plug-ins, it’s time to set up the SDK as a Runtime environment:
1. Go to Window ➤ Preferences in Eclipse (see Figure 7-18).
Figure 7-17. Install the required HANA tools

Chapter 7 ■ IntroduCtIon to hana Smart BuSIneSS and the Internet of thIngS
296
2. Go to Server ➤ Runtime Environments, and click the Add button (see Figure 7-19).
Figure 7-18. Setting up the SDK for JPA app development

Chapter 7 ■ IntroduCtIon to hana Smart BuSIneSS and the Internet of thIngS
297
3. In the New Server Runtime Environment window, expand the SAP tree, select Java Web, and click Next (see Figure 7-20).
Figure 7-19. Adding Runtime environments

Chapter 7 ■ IntroduCtIon to hana Smart BuSIneSS and the Internet of thIngS
298
4. On the next screen, click Browse, and select the neo-java-web-sdk-1.86.27folder where you downloaded the SAP HANA Cloud Platform SDK(https://tools.hana.ondemand.com/#cloud). Click Finish (see Figure 7-21).
Figure 7-20. Add the Java web server

Chapter 7 ■ IntroduCtIon to hana Smart BuSIneSS and the Internet of thIngS
299
Importing the Java App Source Code into Eclipse You are all set to develop a Java Persistence app. If you are familiar with Java programming, you can refer to the sample app for the Java Persistence API on the SAP HANA help page https://help.hana.ondemand.com/help/frameset.htm?e4c52854bb571014aeb88753d0dad158.html and make the modifications I have made to the app manually. If you are from an ABAP or HTML5 background, you can download the modified version of the project, named MyIoT_Java_App, from the Apress website. Go to File ➤ Import in Eclipse, and select General ➤ Existing Projects into Workspace (see Figure 7-22).
Figure 7-21. Add the Java web SDK path

Chapter 7 ■ IntroduCtIon to hana Smart BuSIneSS and the Internet of thIngS
300
5. On the next screen, browse to the path of the project file you downloaded from the Apress website, select the Copy Projects Into Workspace check box, and click Finish (see Figure 7-23).
Figure 7-22. Import the sample project into Eclipse

Chapter 7 ■ IntroduCtIon to hana Smart BuSIneSS and the Internet of thIngS
301
6. After the project is imported, navigate to the project folder in the project explorer pane at left in Eclipse. In the project, navigate to Java Resources ➤ src ➤ com.sap.cloud.sample.persistence. Here you can see two files (see Figure 7-24): PersistenceWithJPAServlet.java and Raspberry.java.
Figure 7-23. Copy the sample project into your workspace

Chapter 7 ■ IntroduCtIon to hana Smart BuSIneSS and the Internet of thIngS
302
These two files act as a web server when deployed into the HANA Cloud. PersistenceWithJPAServlet.java acts as the server, and Raspberry.java contains the structure of the database table in which you will store the values from your sensors; and it also contains the JPA SQL queries required to fetch data from or post data to the database. Listing 7-1 shows the code snippet from Raspberry.java containing the database name and the JPA SQL queries for retrieving and saving data. If you want to further explore the JPA SQL queries, see www.objectdb.com/java/jpa/query/jpql/structure.
Listing 7-1. Raspberry.java Code Snippet
@Entity@Table(name = "RaspberryTable") //The name of your Database Table@NamedQueries({@NamedQuery(name = "AllReadings", query = "select p from Raspberry p ORDER BY p.id DESC"), //JPA SQL Queries@NamedQuery(name = "SpecificReadings", query = "select p from Raspberry p where p.raspberrydevice = :valueRaspberrydevice"),@NamedQuery(name = "CurrentReading", query = "select p from Raspberry p wherep.raspberrydevice = :valueRaspberrydevice and p.id = (SELECT MAX(v.id) from Raspberry vwhere v.raspberrydevice = :valueRaspberrydevice)")})
Figure 7-24. Persistence Java files

Chapter 7 ■ IntroduCtIon to hana Smart BuSIneSS and the Internet of thIngS
303
Deploying a Java App to HANA CloudTo deploy the app into HANA Cloud, you need to register for a HANA trial account. You can go to https://account.hanatrial.ondemand.com and simply register for a new account. Once you have created an account, you can deploy the app to HANA Cloud from Eclipse:
1. Right-click your project, and go to Run As ➤ Run on Server (see Figure 7-25).
Figure 7-25. Deploy the app on the HANA Cloud

Chapter 7 ■ IntroduCtIon to hana Smart BuSIneSS and the Internet of thIngS
304
2. On the next screen, select the SAP HANA Cloud Platform under the SAP tree,and enter the Landscape Host value hanatrial.ondemand.com. For Sever Name, enter a one letter word in lowercase; for some reason, the HANA Cloud trial platform is not accepting the default long name that appears in the field(This might be a bug in the server). Click Next (see Figure 7-26).
Figure 7-26. Select the HANA Cloud Platform for deployment

Chapter 7 ■ IntroduCtIon to hana Smart BuSIneSS and the Internet of thIngS
305
3. On the next screen, give the app a name; keep it short. In the Account Name field, enter your HANA trial account name (for example, the HANA trial account name p12345trial and the username p12345). After you enter the account name, a new blue hyperlink appears at the bottom. Click it; this is very important, because otherwise the wizard will try to reach hana.ondemand.com instead of hanatrial.ondemand.com. Fill in your username and password, and click finish (see Figure 7-27).
Figure 7-27. Enter your HANA trial credentials to deploy the app in the cloud

Chapter 7 ■ IntroduCtIon to hana Smart BuSIneSS and the Internet of thIngS
306
4. You can see the status of the server upload in the Servers tab at the bottom in Eclipse. When the upload is complete, right-click the server, and go to Application URL ➤ Open (see Figure 7-28).
5. When you open the URL, you can see the Java app URL giving you the list of all values in the database (see Figure 7-29). I created a few records in the database.
Figure 7-28. Check the status of the server
Figure 7-29. The JPA app is up and running from the HANA server

Chapter 7 ■ IntroduCtIon to hana Smart BuSIneSS and the Internet of thIngS
307
6. To see the app from your HANA Cloud Cockpit, log in to https://accounts.sap.com/saml2/idp/sso/accounts.sap.com with your HANA trial ID and go to Java Apps. There you see the list of Java apps running in HANA Cloud (see Figure 7-30). Click your app at right, and you get the same app URL that you got in the previous step. In this example, the URL is https://s<yourhanatrialaccountname>.hanatrial.ondemand.com/persistence-with-jpa/. If the URL starts with s, thisis the app name you specified while deploying to the HANA Cloud from Eclipse.
Figure 7-30. Java apps running in HANA Cloud
7. With the app up and running, there are few parameters you should be aware of in order to modify the app logic for your custom requirements. First, the app accepts a set of commands other than the standard OData CRUD methods. For example, I have modified the JPA app to use an HTML interface to manually create records instead of passing all the necessary fields in the URL (which is tedious). When you run the app for the first time, be sure to make at least one entry. To get the HTML interface for the JPA app, pass the URL like this:
https://s<yourhanatrialaccountname>.ondemand.com/persistence- with-jpa/?action=ShowUI
Be sure you replace <yourhanatrialaccountname> with your HANA trial account name.You see an interface like the one shown in Figure 7-31. On the web page, make entry shown in Table 7-3, and click Add Readings.
Figure 7-31. JPA App URL with HTML interface

Chapter 7 ■ IntroduCtIon to hana Smart BuSIneSS and the Internet of thIngS
308
Now let’s look at the logic behind these values. The aim is to make an interface with a button to switch on the LED; in addition, you want to activate the thermometer only when you need to get a reading and then switch it off to prevent data overload on the server (the app posts data to HANA Cloud every second to make the app switch on the LED without any latency). You also switch off the Raspberry Pi from the UI5 app. The logic chart for the values is shown in Table 7-4.
With the Java app built, it’s time to build the app that will run on the Raspberry Pi and communicate with your Java App running on the HANA server. Table 7-5 shows the features supported by the custom Java Persistence app. All the app features can be accessed via https://s<yourhanatrialaccountname>.ondemand.com/persistence-with-jpa/?action=<feature>. For example, to get the current latest entry in the database table based on the Raspberrydevice field, the URL is https://s<yourhanatrialaccountname>.ondemand.com/persistence-with-jpa/?action==GetCurrentReading&Raspberrydevice=<device name>. To get all the readings, use the URL https://s<yourhanatrialaccountname>.ondemand.com/persistence-with-jpa/; it returns all the records in the database.
Table 7-3. Make One Entry Each for the LED and the Thermometer
Raspberrydevice Reading1 Reading2 Reading3
LED HIGH OFF ON
THERMOMETER 0 0 0
Table 7-4. Logic Value Chart for the IoT UI5 App
Value in Raspberrydevice Field
Data Value Field Name Value and Logic
LED Reading1 HIGH: LED is switched off.
LED Reading1 LOW: LED is switched on.
LED Reading2 OFF/ON: This field is constantly monitored by the Thermometer Python app to know when it should start. When the value is ON, the thermometer starts posting values to the HANA Cloud DB. It keeps posting the temperature every second until a new record is created in the table with the value OFF.
LED Reading3 ON/OFF: This value tells the Raspberry Pi to switch on or shut down.
THERMOMETER Reading1 Temperature in Celsius.
THERMOMETER Reading2 Temperature in Fahrenheit.
THERMOMETER Reading3 Temperature in Kelvin.

Chapter 7 ■ IntroduCtIon to hana Smart BuSIneSS and the Internet of thIngS
309
Python Scripts for Passing Data from the Raspberry Pi to HANA CloudTo communicate between the Raspberry Pi and HANA Cloud, I chose Python as the programming language instead of Java due to the sheer amount of open source community support and the number of open source plug-ins available for Python. You don’t need to do much coding other than some simple if and else conditions due to the strong third-party open source plug-ins. All the plug-ins were described in the section “Connecting Sensors to the Raspberry Pi.”
I wrote three Python scripts. Initially I put all the code in a single Python app, but that led to a lag in the app while listening to commands from the UI5 app (for example, the LED light took close to 1.5 seconds to switch on after I gave the command from the UI5 app). So, I wrote an app for each sensor to run separately:
• LED_Single.py
• DSb8120.py
• SystemPower.py
I used Pushbullet for Android (https://play.google.com/store/apps/details?id=com.pushbullet.android&hl=en) to use a Notify.sh file to push notifications directly to my Android device every time the Raspberry device shut down after receiving the shutdown command from the UI5 app. I used this link to configure Pushbullet with my Android device and the Raspberry Pi (see http://www.pratermade.com/2014/08/use-pushbullet-to-send-notifications-from-your-pi-to-your-phone). This is not a mandatory step; it’s up to you to decide whether to use the Notify.sh file.
All the files, including the Python scripts and other sample projects mentioned in the book, can be downloaded from Apress website. Once you have downloaded the files, open the terminal of your Raspberry Pi, navigate to the path of the downloaded files, and type the following three commands in separate terminals:
sudo python LED_Single.pysudo python DSb8120.pysudo python SystemPower.py
SystemPower.py is configured to call the additional Notify.sh file, which is used to push a notification to your mobile device once it initiates its shutdown procedure. These apps continue to run in the background even if you close the window (see Figure 7-32).
Table 7-5. Java Persistence App Feature List
Feature Description
ShowUI HTML interface
GetCurrentReading&Raspberrydevice=<device name> Gets the latest reading based on a key field
CreateReading&Raspberrydevice=<device name>&Reading1=<Value>Reading2=<value>&Reading3=<value>
Creates a new record

Chapter 7 ■ IntroduCtIon to hana Smart BuSIneSS and the Internet of thIngS
310
Once you execute the scripts in the terminal, you can see them listening and broadcasting values to HANA Cloud, as shown in Figure 7-33. Check your Java app HTML interface to simulate commands for switching on the LED light or activating the thermometer.
Figure 7-32. Start all the Python scripts from the Raspberry Pi

Chapter 7 ■ IntroduCtIon to hana Smart BuSIneSS and the Internet of thIngS
311
Your Raspberry Pi is now communicating with your Java app deployed in HANA Cloud. Next, you build the Fiori UI5 app to send commands to HANA Cloud.
Creating a Fiori Front End for IoTIn this section, you build the UI5 app for the IoT example. Download the MyIoT file from the Apress website, and import it into Eclipse. Let’s look at the main parts of the logic used in the UI5 app to send data to and receive data from HANA Cloud.
IoT UI5 App LogicThe Component.js file of the UI5 app source code you downloaded binds the Java Persistence app service URL from HANA Cloud to the model of the UI5 app. Listing 7-2 shows the URL for the Java app bound to the root view.
Listing 7-2. Component.js
sap.ui.getCore().HANA = new Object();sap.ui.getCore().HANA.URL = "https://<Your Hana Trial Account Name>.hanatrial.ondemand.com/persistence-with-jpa";var url = sap.ui.getCore().HANA.URL;
Figure 7-33. Sensors broadcasting and listening to signals from HANA Cloud
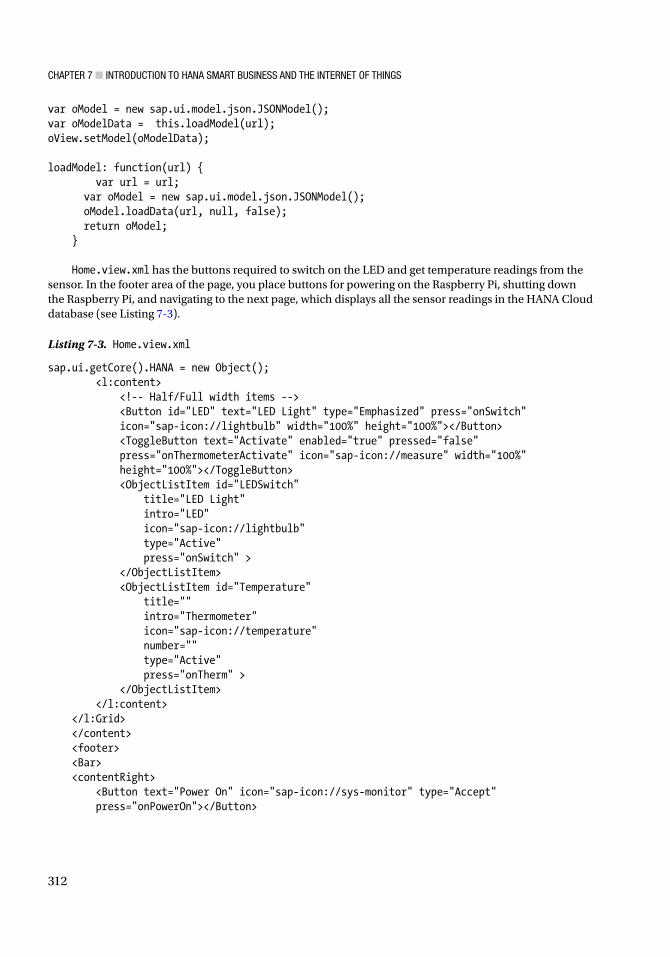
Chapter 7 ■ IntroduCtIon to hana Smart BuSIneSS and the Internet of thIngS
312
var oModel = new sap.ui.model.json.JSONModel();var oModelData = this.loadModel(url);oView.setModel(oModelData);
loadModel: function(url) {var url = url;
var oModel = new sap.ui.model.json.JSONModel(); oModel.loadData(url, null, false); return oModel; }
Home.view.xml has the buttons required to switch on the LED and get temperature readings from the sensor. In the footer area of the page, you place buttons for powering on the Raspberry Pi, shutting down the Raspberry Pi, and navigating to the next page, which displays all the sensor readings in the HANA Cloud database (see Listing 7-3).
Listing 7-3. Home.view.xml
sap.ui.getCore().HANA = new Object();<l:content>
<!-- Half/Full width items --> <Button id="LED" text="LED Light" type="Emphasized" press="onSwitch" icon="sap-icon://lightbulb" width="100%" height="100%"></Button> <ToggleButton text="Activate" enabled="true" pressed="false" press="onThermometerActivate" icon="sap-icon://measure" width="100%" height="100%"></ToggleButton><ObjectListItem id="LEDSwitch"
title="LED Light"intro="LED"icon="sap-icon://lightbulb"type="Active"press="onSwitch" >
</ObjectListItem><ObjectListItem id="Temperature"
title=""intro="Thermometer"icon="sap-icon://temperature"number=""type="Active"press="onTherm" >
</ObjectListItem></l:content>
</l:Grid> </content> <footer> <Bar> <contentRight>
<Button text="Power On" icon="sap-icon://sys-monitor" type="Accept" press="onPowerOn"></Button>

Chapter 7 ■ IntroduCtIon to hana Smart BuSIneSS and the Internet of thIngS
313
<Button text="ALL Readings" type="Emphasized" press="onAllReadings"></Button> <Button text="Shutdown" icon="sap-icon://log" type="Reject" press="onShutDown"> </Button>
</contentRight></Bar>
</footer>
The controller of the Home view (Home.view.controller.js) has six methods (see Listing 7-4):
• onSwitch: Switches the LED on and off
• onPowerOn: Boots up the Raspberry Pi
• onShutdown: Sends a command to the Raspberry Pi to shut down
• onThermometerActivate: Sends a signal to the digital thermometer to start broadcasting temperature readings
• onTherm: Displays the current temperature reading on the screen
• onAllReadings: Navigates to the next view, which displays all the sensor readings in the HANA Cloud database
Listing 7-4. Home.view.controller.js
onSwitch: function(oEvent){var oBtn = this.getView().byId("LED"); var statusModel = this.checkStatus(this.url + "/?action=GetCurrentReading& Raspberrydevice=LED");if(statusModel.oData["result"])
{var LEDStat = statusModel.oData["result"].reading1;var oModel = new sap.ui.model.json.JSONModel();if (LEDStat ==="LOW"){ var result1 = oModel.loadData(this.url + "/?action=CreateReading&Raspberrydevice= LED&Reading1=HIGH&Reading2=OFF&Reading3=ON");var msg = 'Light Switched Off';sap.m.MessageToast.show(msg);}else if(LEDStat ==="HIGH"){ var result1 = oModel.loadData(this.url + "/?action=CreateReading&Raspberrydevice=LED&Reading1=LOW&Reading2=OFF&Reading3=ON");var msg = 'Light Switched On';sap.m.MessageToast.show(msg);}else{
var result1 = oModel.loadData( this.url + "/?action=CreateReading&Raspberry device=LED&Reading1=HIGH&Reading2=OFF&Reading3=ON");var msg = 'Light Switched Off';sap.m.MessageToast.show(msg);
}}
}

Chapter 7 ■ IntroduCtIon to hana Smart BuSIneSS and the Internet of thIngS
314
onPowerOn: function(){var oModel = new sap.ui.model.json.JSONModel(); var result1 = oModel.loadData(this.url + "/?action=CreateReading&Raspberrydevice=LED&Reading1=HIGH&Reading2=OFF&Reading3=ON");var msg = 'Raspberry Is Online';sap.m.MessageToast.show(msg);
},
onShutDown: function(){var oModel = new sap.ui.model.json.JSONModel(); var result1 = oModel.loadData(this.url + "/?action=CreateReading&Raspberrydevice=LED&Reading1=HIGH&Reading2=OFF&Reading3=OFF");var msg = 'Raspberry Shutting Down';sap.m.MessageToast.show(msg);
},
checkStatus: function(url) {var url = url;var oModel = new sap.ui.model.json.JSONModel();oModel.loadData(url, null, false);return oModel;
},
onThermometerActivate: function(oEvent){this.temp; var statusModel = this.checkStatus(this.url + "/?action=GetCurrentReading&Raspberrydevice=LED");var LEDStat = statusModel.oData["result"].reading1this.temp = statusModel.oData["result"].reading2if (this.temp === "ON"){
var deactivateThermometer = this.checkStatus(this.url + "/?action= CreateReading&Raspberrydevice=LED&Reading1="+LEDStat +"&Reading2=OFF& Reading3=ON");oEvent.getSource().setPressed(false);var msg = 'Thermometer Deactivated';sap.m.MessageToast.show(msg);
}else
{ var activateThermometer = this.checkStatus(this.url + "/?action=CreateReading&Raspberrydevice=LED&Reading1="+LEDStat +"&Reading2=ON&Reading3=ON");oEvent.getSource().setPressed(true);var msg = 'Thermometer Activated';sap.m.MessageToast.show(msg);
} },
onTherm: function(oEvent){ var statusModel = this.checkStatus(this.url + "/?action=GetCurrentReading&Raspberrydevice=THERMOMETER");var Temperature = statusModel.oData["result"].reading1

Chapter 7 ■ IntroduCtIon to hana Smart BuSIneSS and the Internet of thIngS
315
Temperature = Temperature + " °C "var oTemp= this.getView().byId("Temperature");oTemp.setNumber(Temperature);
},
onAllReadings: function(oEvent){this.router.navTo("AllReadings");
}
AllReadings.view.xml displays all the sensor readings from HANA Cloud as a List (see Listing 7-5). The total number of records shown at a time is limited to 20; it is a growing list so that it pulls more records as you scroll down. This improves performance on mobile devices because it loads more records only on demand.
Listing 7-5. AllReadings.view.xml
<List id="list" mode="{device>/listMode}" items="{/reading}" select="handleListSelect" growing = "true" busyIndicatorDelay="400" growingThreshold="20">
<ObjectListItem icon="{path: 'raspberrydevice',formatter: 'com.iotApp.util.Formatter.deviceIcon'}"
number="{id}" numberUnit="{path: 'reading1',formatter: 'com.iotApp.util.Formatter.deviceText'}"
press="handleListItemPress" title="{raspberrydevice}" type="Active">
<attributes> <ObjectAttribute text="{path: 'reading2',formatter: 'com.iotApp.util.Formatter.deviceTextF'}"/> <ObjectAttribute text="{path: 'reading3',formatter: 'com.iotApp.util.Formatter.deviceTextK'}"/><ObjectAttribute text="{uniqueDeviceID}"/><ObjectAttribute text="{updatedOn}"/>
</attributes></ObjectListItem></List>
Now that you have gone through the logic used in the IoT app, you need to make a small change in the app before you execute it.
Running the ProgramYou need to replace the URL for the HANA Cloud Java app with your app URL. Open the Component.js file of the project, and edit the line with the app’s default URL (https://<Your HANA Trial Account Name> .hanatrial.ondemand.com/persistence-with-jpa). See Figure 7-34.

Chapter 7 ■ IntroduCtIon to hana Smart BuSIneSS and the Internet of thIngS
316
When the changes are made, you can run the app. Right-click the project, and go to Run As ➤ Web App Preview. You can see the output in Figure 7-35.
Figure 7-34. Replace the URL with your HANA app UR
Figure 7-35. IoT UI5 app

Chapter 7 ■ IntroduCtIon to hana Smart BuSIneSS and the Internet of thIngS
317
Let’s try to switch on the LED light and activate the thermometer. I converted the app into a native app using Cordova; you can try the same thing by referring to Chapter 9.
When you start the app, you see the last recorded temperature and the LED status. Click the LED icon to create a new entry in the HANA Cloud database, which is in turn monitored by the Raspberry Pi (see Figure 7-36).
At the same time, you can also monitor the database records via the HTML interface of your Java app running on HANA Cloud. You can confirm whether it’s the latest entry by checking the UpdatedOn timestamp field in the table. You also see the LED switch on (see Figure 7-37).
Figure 7-36. Switching on the LED via the mobile app
Figure 7-37. A new record is created in HANA Cloud, and the LED switches on

Chapter 7 ■ IntroduCtIon to hana Smart BuSIneSS and the Internet of thIngS
318
Now let’s try activating the thermometer. Click the Activate Toggle button, and you see a toast message saying “Thermometer Activated”. Click the Thermometer button to refresh the temperature. If the temperature is being updated to the server from the Raspberry Pi, you see the new temperature (see Figure 7-38). Click Activate Toggle again to deactivate the thermometer, to avoid too many records being created on the server. The Python app updates the value every second; you can modify the duration and set it to every hour or so if you wish.
You can double-check the data using the HTML interface of the Java app (see Figure 7-39).
Figure 7-38. Activating the digital thermometer

Chapter 7 ■ IntroduCtIon to hana Smart BuSIneSS and the Internet of thIngS
319
You can also see all the records in the table in the app. Click the All Readings button, and you get a list view containing the latest 50 records from the database (see Figure 7-40).
Figure 7-39. New temperature records created by the Raspberry Pi

Chapter 7 ■ IntroduCtIon to hana Smart BuSIneSS and the Internet of thIngS
320
Finally, let’s try to shut down the Raspberry Pi device. Click the Shutdown button: you get a toast message saying “Raspberry Shutting Down”; and, if Pushbullet is configured for your mobile device, you get a push notification directly from the Raspberry Pi when the shutdown sequence is initiated (see Figure 7-41).
Figure 7-40. List of the latest 50 records in the HANA Cloud database

Chapter 7 ■ IntroduCtIon to hana Smart BuSIneSS and the Internet of thIngS
321
Now you have a full-fledged IoT-enabled device connected to the Internet. You can access these sensors from anywhere in the world. A much simpler solution to create an online database using HPC’s IoT service is available, but it’s very basic at the moment (a beta version as of the time of writing). I wanted to execute custom SQL queries and limit the maximum data from HANA Cloud to 50 records at any time due to performance constraints on mobile devices; and I needed an entity that gives me only the latest entry based on the device ID I send to the server. These custom features cannot be implemented on the beta version of the IoT subscription service in HANA Cloud. So I had to stick with the Java Persistence API for this example. You can access the IoT services from your HANA Cloud Cockpit (https://account.hanatrial.ondemand.com/cockpit) under Services (see Figure 7-42). For more information about the IoT service, see https://help.hana.ondemand.com/iot/frameset.htm.
Figure 7-41. Push notifications sent directly to mobile from the Raspberry Pi

Chapter 7 ■ IntroduCtIon to hana Smart BuSIneSS and the Internet of thIngS
322
The next chapter discusses troubleshooting and debugging techniques commonly used in Fiori development.
Figure 7-42. Internet of Things services

323© Bince Mathew 2015 B. Mathew, Beginning SAP Fiori, DOI 10.1007/978-1-4842-1335-3_8
Chapter 8
Debugging and Troubleshooting Fiori Applications
After developing a custom Fiori app or enhancing a standard Fiori app, you need to thoroughly test it. This chapter explains the debugging methods and troubleshooting techniques you can use with Fiori apps.
Supported Web BrowsersBecause SAP Fiori is an HTML5 framework, older browser versions are not compatible with Fiori apps. Table 8-1 shows the compatibility of mobile OSs, different browsers, and Fiori client apps.
Table 8-1. Fiori Browser Compatibility Chart for Mobile OSs
OS Versionn Fiori Client
Apple Safari
Android Native Browser
BlackBerry Native Browser
Microsoft IE Google Chrome
Apple IOS 7.x , 8.x,9.x Yes Yes NA NA NA NA
Android 4.1–5.x Yes NA Yes NA NA Yes
Windows Phone
8.1 GDR1 and above
Yes NA NA NA Yes, from 11.x NA
BlackBerry 10.x NA NA Yes, from 10.x NA NA
For desktop OSs, Table 8-2 shows the compatibility chart.
Table 8-2. Fiori Browser Compatibility Chart for Desktop OSs
OS Type Version IE Safari Chrome Firefox
Microsoft Windows
Desktop 7 9.x–11.x (IE 9 has compatibility issues with some Fiori apps, such as KPI tiles and Modeler tools)
NA Yes (latest version)
Yes (latest version)
Apple Mac OS X Desktop 10.9 and above NA Yes NA NA
Microsoft Windows
Touch + Desktop
8.0 and above 10.x–11.x NA Yes (latest version)
Yes (latest version)

Chapter 8 ■ Debugging anD troubleshooting Fiori appliCations
324
Debugging Methods Debugging is a way of finding out what went wrong with your code. It’s the first thing to do when your app is not functioning the way you want it to. UI5 apps are based on HTML5, so you can debug the code using your browser’s Developer Tools. You can put breakpoints in your JavaScript code via the browser.
Press the F12 key on your UI5 app output in the browser, and the debugger console opens as shown in Figure 8-1. The F12 shortcut is the same for every Fiori-supported browser. For Firefox, you have to download an additional plug-in called Firebug to see the app source code at runtime.
The Developer Tools let you see the source code of your UI5 app and any errors or warnings that happen at runtime (see Figure 8-2).
Figure 8-1. Chrome browser Developer Tools

Chapter 8 ■ Debugging anD troubleshooting Fiori appliCations
325
You can view the UI5 app JavaScript source code on the Sources tab at upper left in the Developer Tools, as shown in Figure 8-3. You can put breakpoints directly in the source code: to do so, click to the left of the line where you want to put the breakpoint. A blue icon appears, indicating that the breakpoint is set.
Figure 8-2. Source code and logs
Figure 8-3. Setting a breakpoint in the browser

Chapter 8 ■ Debugging anD troubleshooting Fiori appliCations
326
After you add the breakpoint, reload the UI5 app URL with the Developer Tools window open. The code will pause at the line where you set the breakpoint. You can view the value loaded into each variable at runtime either by adding the variables to the Watch window at upper right side in the debugger or by adding the variable name in the Console window (see Figure 8-4). Investigating the variable values can help you pinpoint exactly where your code has gone wrong.
Once the code is in Debug mode, you can make the compiler execute the next line and push the code execution step by step or make the compiler step in and out of functions and loops. Table 8-3 lists the keyboard shortcuts for the debugger.
Figure 8-4. Add variables to watch
Table 8-3. Debugger Keyboard Shortcuts
Keyboard Shortcut Description
F11 Step-by-step execution. Makes the compiler step into functions and loops.
F10 Step-by-step execution. The compiler steps over functions, rather than into them.
Shift + F11 Steps out of the current function. Can be used to step out of a function that you made the compiler step into.
F8 Resumes execution.

Chapter 8 ■ Debugging anD troubleshooting Fiori appliCations
327
Debug Mode in UI5 AppsIf you try to debug any of the standard Fiori apps, in the Sources tab, the JavaScript code is a minimized version of the actual code (meaning it’s not written in a developer-friendly way). The reason is that Fiori loads with a minimized, optimized version of the standard code by default, for the sake of faster loading and performance optimization. But this makes the code difficult for developers to debug and understand. Fortunately, Fiori has a Debug mode you can set by sending an additional parameter at the end of the standard app URL with the flag sap-ui-debug=x. Another copy of the source code is loaded with the extension -dbg.js (see Figure 8-5).
You can also manually check and set the debug flag in your UI5 app code, as shown as Listing 8-1.
Listing 8-1. Checking and Setting the Debug Flag
Var checkDebugStatus = jQuery.sap.debug();if (checkDebugStatus === false){ jQuery.sap.debug(true); }
Figure 8-5. Debug mode

Chapter 8 ■ Debugging anD troubleshooting Fiori appliCations
328
Logging and Network TracingYou can use your UI5 app to set logs that let you know a certain piece of functionality has successfully completed, which can help with debugging (see Figure 8-7).
Figure 8-6. Enabling the debug flag using a keyboard shortcut
Another way to easily switch the debug flag is to use the keyboard shortcut Ctrl + Shift + Alt + P. When you do, a pop-up window opens with multiple options in addition to enabling the debug flag. You see information about the SAPUI5 version; you can examine the various UIAreas, controls, and properties of the app; you can enable the log viewer; and so on (see Figure 8-6).

Chapter 8 ■ Debugging anD troubleshooting Fiori appliCations
329
You can push logs to the console using the code snippet in Listing 8-2.
Listing 8-2. Creating Logs
jQuery.sap.log.info("Your custom log message);jQuery.sap.log.warning("Your custom log message);jQuery.sap.log.error("Your custom log message);
To trace a network (OData calls), you can check the Network tabs of the browser Developer Tools. It shows the status of a network call, whether it was successful, the request header, the response message and so on (see Figure 8-8).
Figure 8-7. Different types of logs for an SAPUI5 app

Chapter 8 ■ Debugging anD troubleshooting Fiori appliCations
330
DiagnosticsSAPUI5 has a Diagnostics tool for both desktop and mobile browsers. To enable desktop browser diagnostics, use the keyboard shortcut Ctrl + Alt + Shift + S (see Figure 8-9). The Diagnostics tool helps you toggle Debug mode, trace the JavaScript code, and view the control tree (which contains details of all the controls used in the view you are in). It also has a feature that gets an XML version of the code if the view is written in JavaScript instead of XML; click the root control on the Control Tree tab, and then click the Export button to get the XML code.
Figure 8-8. Network trace in the browser debugger

Chapter 8 ■ Debugging anD troubleshooting Fiori appliCations
331
You can enable the mobile Diagnostics tool by using the multi-touch feature of the mobile device (see Figure 8-10). Follow these steps:
1. Press two fingers on a non-interactive screen area of the UI5 app for at least three seconds.
2. While holding the two fingers on the screen, tap a third finger on the screen.
Figure 8-9. Diagnostics tool for the desktop browser
Figure 8-10. Diagnostics tool for a mobile browser

Chapter 8 ■ Debugging anD troubleshooting Fiori appliCations
332
Simulating Mobile DevicesYou can simulate any mobile device and screen size in the browser Developer Tools. Doing so gives you an idea of how the UI will render and react on a mobile device. To enable the simulation, click the Toggle Device Mode button in the browser Developer Tools, as shown in Figure 8-11.
Figure 8-11. Device simulation in the Chrome browser

Chapter 8 ■ Debugging anD troubleshooting Fiori appliCations
333
Troubleshooting Errors in Fiori AppsSuppose you run the IoT app from Chapter 7 and try to turn on the LED by clicking the LED button, but there is no confirmation message that the LED is switched on. To figure out the issue, open your browser’s debugger and check for errors in the Console window (see Figure 8-12). The Console log shows the error “Uncaught ReferenceError: LEDSta is not defined” for the Home.controller.js file.
Now let’s check the Sources tab of the debugger tool and examine the code in Home.controller.js. It shows that the error is on line 35: it looks like I typed a flag name as LEDSta instead of LEDStat in a condition statement (see Figure 8-13).
Figure 8-12. Error log in the Console window

Chapter 8 ■ Debugging anD troubleshooting Fiori appliCations
334
Similarly, you can use the browser debugger to troubleshoot different types of errors in your UI5 apps.
Troubleshooting Errors in the Fiori ConfigurationAs in any implementation, you may face some errors while implementing SAP Fiori. This section discusses common errors and their possible solutions. Let’s divide the process into the following steps:
1. Fiori installation and add-ons on the front-end server:
a. Double-check whether all the prerequisite components and add-onsare installed. You can check the installation guides for Fiori athttp://help.sap.com/fiori.
b. If a specific Fiori app is not opening or the tile is missing on the Fiori launchpad, check whether the app-specific configuration has been done. You can get app configurations details at https://fioriappslibrary.hana.ondemand.com/sap/fix/externalViewer/#/home.
c. Check the app catalog to find the Fiori applications that are available for your specific ERP system version at http://help.sap.com/fiori_bs2013/helpdata/en/ed/e1e153ddf60466e10000000a423f68/frameset.htm and http://help.sap.com/fiori_bs2013/helpdata/en/59/69c553c9519638e10000000a44176d/frameset.htm.
d. Always check whether a note has been released for your specific issue. (Most issues in Fiori are due to missing notes.) You can keep track of the latest notes for your SAP Fiori apps at http://service.sap.com/notes. If you need to know how to search for a note, see https://websmp101.sap-ag.de/~sapidb/011000358700005576692003.
e. Check whether you are using the latest Support package
Figure 8-13. Source file in the debugger showing a typo in the code

Chapter 8 ■ Debugging anD troubleshooting Fiori appliCations
335
2. SAP Gateway and back-end connectivity:
a. One of the most common mistakes when setting up the Fiori landscape occurs while configuring a trusted RFC. To configure a trusted RFC in Gateway, see https://help.sap.com/saphelp_nw74/helpdata/en/50/f72651c294256ee10000000a445394/content.htm?frameset=/en/88/f72651c294256ee10000000a445394/frameset.htm¤t_toc=/en/ad/612bb3102e4f54a3019697fef65e5e/plain.htm&node_id=28 and Chapter 2.
b. A second common mistake is related to the system alias definition. Make sure your system alias definitions in both Gateway and the back end point to the correct system. See the section “Creating a System Alias” in Chapter 2.
c. If you encounter CSRF token issues, make sure the HTTP and HTTPSfor the SAP Gateway are maintained properly. See note 1896961:https://websmp130.sap-ag.de/sap(bD1lbiZjPTAwMQ==)/bc/bsp/sno/ui_entry/entry.htm?param=69765F6D6F64653D3030312669765F7361706E6F7465735F6E756D6265723D3138393639363126.
SAP back-end server configuration. In some cases, even after you set up a Fiori app and can see it in the Launchpad, users still get errors while trying to execute the apps. For example, when you try to create a leave request using a Fiori app and you get an error in return, chances are a configuration is missing on the functional side. Make sure all the necessary configurations from the back end are done properly for that scenario. The issue may be due to a missing authorization for the user ID you used to log in to the Fiori app for that specific task. For the latest information about Fiori configurations, see https://fioriapps-rds.dispatcher.hana.ondemand.com.
Fiori is a niche technology, but you can find an active forum in SCN that discusses ongoing issues, updates, and documents. The SCN community for Fiori (http://scn.sap.com/community/fiori) is always a good place to begin. You can also follow my blog at http://scn.sap.com/people/bince.mathew2/content.
The below Table 8-4 lists some of the most frequently used t-codes that comes in handy while troubleshooting and maintaining Fiori Applications.
Table 8-4. Fiori T-Codes
T-Code Description
/IWFND/CACHE_CLEANUP Clears the metadata cache on the Gateway
/IWBEP/CACHE_CLEANUP Clears the metadata cache on the Gateway and back end
/UI2/CACHE_DEL Deletes cache entries
/UI2/PERS_DEL Clears the personalization settings on the server
/UI2/SEMOBJ Defines a custom semantic objects
/UI2/SEMOBJ_SAP Defines a custom semantic object—SAP
/UI2/GW_MAINT_SRV Performs Gateway service maintenance
/UI2/GW_SYS_ALIAS Manages Gateway system aliases
/UI2/GW_ACTIVATE Activates the Gateway
/UI2/GW_ERR_LOG Gateway error log
/UI2/GW_APPS_LOG Gateway application log
/UI2/FLPD_CUST Fiori launchpad designer

Chapter 8 ■ Debugging anD troubleshooting Fiori appliCations
336
Table 8-5 shows some useful ABAP report programs related to Fiori.
The next chapter explores how to use Cordova and plug-ins to port UI5 apps into native mobile apps.
Table 8-5. ABAP Report Programs Related to Fiori
Report Name Description
/UI2/CHIP_SYNCHRONIZE_CACHE Synchronizes the chip cache
/UI5/UPDATE_CACHEBUSTER Updates the cache buster information
/UI5/UI5_REPOSITORY_LOAD Uploads and downloads UI5 apps into the Gateway server

© Bince Mathew 2015 B. Mathew, Beginning SAP Fiori, DOI 10.1007/978-1-4842-1335-3_9
337
Chapter 9
Developing Fiori Applications Using Cordova and Kapsel
Fiori is a set of browser-based, platform-independent applications, but Fiori apps can be converted into native mobile applications using Cordova plug-ins and SAP Kapsel plug-ins. This gives the Fiori apps access to native device hardware such as GPS, accelerometer, camera, device orientation, and so on. Using SAP’s Kapsel plug-in, Fiori applications can be used to connect to the SAP Mobile Platform (SMP), which provides access to additional SMP features.
Connecting to the SMP Architecture with FioriSMP is a product line from SAP that offers integration of native mobile apps with SAP. It also has a hybrid web container app available for mobile OSs. The hybrid web container is a client mobile app that is a customized Cordova app, with custom Kapsel plug-ins developed by SAP to access SMP features. SAP offers a solution that lets you deploy Fiori apps with SMP Server. Accessing Fiori apps through SMP Server is more secure and adds many features that are not available natively with the Fiori platform:
• Requiring a PIN to access an app.
• A cross-platform hybrid app for multiple mobile OSs.
• SMP Management Cockpit to monitor all devices connected to SMP Server.
• Ability to add SAP Afaria to the SMP architecture for added security as a mobile device management solution.
• Ability to connect to non-SAP back ends.
• Ability to configure Fiori apps to fetch data from the back end via mobile business objects (MBOs) and OData.
• Support for offline OData.
• Push notification via Fiori Client with the Kapsel Push plug-in.
• Better cache management. Fiori Client detects any changes to Fiori apps and automatically updates its cache.
• Ability to access native mobile hardware and features.

Chapter 9 ■ Developing Fiori appliCations Using CorDova anD Kapsel
338
Figure 9-1 shows a high-level overview of how mobile devices connect to SMP Server. Connections to Fiori apps in the SAP Gateway server happen via SMP Server. This way, you have a more secure connection to the SAP back end, because the initial authentication happens at the SMP Server level.
Figure 9-1. SMP architecture with Fiori
You can monitor devices and apps that access the SMP Server via its SMP Management Cockpit. In Figure 9-2, you see two apps, one user, and one app registration on the SMP Server. The Management Cockpit screen also has a small chart that gives the administrator an overview of the different mobile platforms registered with SMP Server.

Chapter 9 ■ Developing Fiori appliCations Using CorDova anD Kapsel
339
You can configure settings individually for each app. And you have the option to configure the back-end URL and authentication required for each app to connect the SAP Gateway or other back-end systems. When it comes to Fiori on SMP, you configure the hybrid app with your SMP Server URL; on SMP Server, you configure the Fiori back-end URL on the app’s settings page. Figure 9-3 shows the configuration for an app registered with SMP Server.
Figure 9-2. SMP Management Cockpit home page

Chapter 9 ■ Developing Fiori appliCations Using CorDova anD Kapsel
340
There is even an option to log all the activities of apps that connect through SMP Server. Figure 9-4 shows the different kinds of logs you can view via the SMP Management Cockpit. This feature is very handy when it’s critical to monitor data sent through Fiori apps due to security concerns.
Figure 9-4. Log management in the SMP Cockpit
Figure 9-3. SMP hybrid app settings page

Chapter 9 ■ Developing Fiori appliCations Using CorDova anD Kapsel
341
SAP has published a customized hybrid web container based on Cordova specifically for Fiori. It’s called Fiori Client.
Fiori Client Application for MobileThe Fiori Client app is available for download in the iOS, Android, and Windows mobile marketplaces. Fiori Client has all the standard Kapsel plug-ins for SMP preconfigured. It can be installed and accessed like any native app on your mobile device, which makes it easy to use compared with accessing the Fiori Launchpad via your mobile browser. Figure 9-5 shows the Fiori Client app interface. You give the Fiori Launchpad URL on the first screen; the app saves the URL, so you only have to enter it once. It even offers passcode-based security to access the app.
Figure 9-5. Fiori Client mobile app
Introduction to Cordova and KapselOne of the limitations of Fiori UI5 apps is that they’re HTML5-based. Although the UI is optimized to work with mobile devices, it lacks the ability to talk directly to a mobile device’s hardware or native features. This is where Cordova comes into play. You can embed your Fiori apps into a Cordova container app that can interact with your device’s native features and hardware. Cordova acts as a middlemen between your UI5 apps and your mobile OS’s native APIs (camera, accelerometer, location details, network status, and so on). The UI5 apps talk to the device APIs via JavaScript-based plug-ins that can be added to the apps. It’s similar to adding a third-party JavaScript file to an app. Once these plug-ins are added to a UI5 app, you can access a series of methods and functions that let your app access device features.

Chapter 9 ■ Developing Fiori appliCations Using CorDova anD Kapsel
342
Figure 9-6 shows the architecture of a Cordova hybrid app with a UI5 app embedded in it. The UI5 app talks to the Cordova native plug-ins via the added JavaScript plug-ins. The Cordova native plug-ins communicate with the device’s native platform API and finally access hardware features such as the device’s camera.
Figure 9-6. Cordova architecture overview
The Kapsel plug-ins are a set of Cordova-based plug-ins provided by SAP specifically to integrate UI5 apps with SMP (basically, these are Cordova apps with Kapsel plug-ins added to them). The Fiori Client app is a Cordova app with the Kapsel plug-ins already installed. The Kapsel plug-ins provided by SAP are as follows:
• Logon
• AppUpdate
• Push
• EncryptedStorage
• Logger
• Settings
• AuthProxy
• Online Application
• Toolbar
• Barcode Scanner

Chapter 9 ■ Developing Fiori appliCations Using CorDova anD Kapsel
343
• Application Preferences
• Cache Manager
• SAP Fiori Client
• Offline OData
• End-To-End Trace
• Attachment Viewer
• Calendar
• Printer
• Usage
• OData
• i18n
• In App Browser
Creating a New Project with Cordova and Kapsel PluginsThis section looks at creating a Cordova app with Kapsel plug-ins. Before you begin Cordova development, there are a few prerequisites.
To install Cordova, you need the following:
• Node.js, available from https://nodejs.org
• Java Runtime Environment 7, available from www.oracle.com/technetwork/java/javase/downloads/jre7-downloads-1880261.html
• Android SDK or your preferred mobile platform SDK for which you want to generate the native app
• Apache Ant 1.9 or higher, available from http://ant.apache.org/bindownload.cgi
Install the Cordova CLI using Node.js. Then, on Windows, open the command prompt (CMD) on your system and type
npm install –g cordova
Linux users, open the terminal and type
sudo npm install –g cordova
Once you have installed all the prerequisites, ensure that the necessary system environment variables are set. Usually, Node.js and Cordova are automatically registered in the system; make sure the Apache Ant and Android SDK tool paths are registered in the system environment variables as well. Figure 9-7 shows how to enter those values: right-click My Computer, click Properties, and follow the numbered steps in the figure.
[AU1]

Chapter 9 ■ Developing Fiori appliCations Using CorDova anD Kapsel
344
Now you can create your first Cordova-based app. Follow these steps:
1. Open CMD on your PC and type the following, as shown in Figure 9-8
cordova create MyCordovaApp com.sap.mycordova MyCordovaApp
Figure 9-7. Update the Apache Ant and Android paths in your system properties
Figure 9-8. Create a new Cordova project
2. Navigate to the new Cordova app folder. Type the following:
cd MyCordovaApp

Chapter 9 ■ Developing Fiori appliCations Using CorDova anD Kapsel
345
3. You need to add a few Cordova plug-ins to your UI5 app, such as the barcode scanner, camera, geolocation, device, and so on. To do so, type this for the barcode scanner:
cordova plug-in add com.phonegap.plug-ins.barcodescanner
Similarly, for the other plug-ins, type
cordova plug-in add org.apache.cordova.cameracordova plug-in add org.apache.cordova.geolocationcordova plug-in add org.apache.cordova.devicecordova plug-in add org.apache.cordova.filecordova plug-in add org.apache.cordova.network-informationcordova plug-in add org.apache.cordova.battery-statuscordova plug-in add org.apache.cordova.device-motioncordova plug-in add org.apache.cordova.device-orientationcordova plug-in add org.apache.cordova.consolecordova plug-in add org.apache.cordova.inappbrowser
4. To see the list of plug-ins you added to the Cordova app, type
cordova plug-ins
5. To add Kapsel plug-ins, you need to download the SMP SDK fromhttps://store.sap.com/sap/cp/ui/resources/store/html/SolutionDetails.html?pid=0000013098&catID=&pcntry=US&sap-language=EN&_cp_id=id-1409756206625-0.
Once you download and install the SMP SDK, you can see the Kapsel plug-ins in the SAP folder of the drive which you installed the SDK. The path is something like C:\SAP\MobileSDK3\KapselSDK\plugins (see Figure 9-9).

Chapter 9 ■ Developing Fiori appliCations Using CorDova anD Kapsel
346
6. To add the Kapsel plug-ins to your Cordova app, type
cordova plug-ins <path to your specific kapsel plug-in>
For example, to add the Logon Kapsel plug-in to the Cordova app, typeC:\SAP\MobileSDK3\KapselSDK\plug-ins\logon for the path in this command.
7. You need to add platform support for your app. In this case, you are building for the Android platform. To add it, type the following (see Figure 9-10):
cordova platform add android
Figure 9-9. SAP Kapsel plug-ins that come with the SMP SDK

Chapter 9 ■ Developing Fiori appliCations Using CorDova anD Kapsel
347
8. Go to the project folder. You should see the folder structure shown in Figure 9-11. The platforms folder contains individual folders for every platform you add to the Cordova app.
Figure 9-11. Cordova app folder structure
Figure 9-10. Adding the Android platform to your Cordova app
9. To prepare the Cordova project, type
cordova prepare
When you run this command, Cordova copies all the files in the www folder(as shown in Figure 9-12) into the www folder under the path <Your Cordova approot folder>\ \platforms\android\assets\www. In this example, the path is C:\Users\Bince\MyCordovaApp\platforms\android\platform_www.

Chapter 9 ■ Developing Fiori appliCations Using CorDova anD Kapsel
348
10. To compile the Cordova app, type
cordova compile
This command compiles the code and gives you an installable native app file under the platforms folder (see Figure 9-13). This example uses the Android platform, so the installable mobile app package is under C:\Users\Bince\MyCordovaApp\platforms\android\ant-build.
Figure 9-12. Preparing Cordova for the first time

Chapter 9 ■ Developing Fiori appliCations Using CorDova anD Kapsel
349
11. Install the .apk file on your Android device and run it. You see the default Cordova app splash screen, as shown in Figure 9-14.
Figure 9-13. Installable .apk file after compiling the Cordova project

Chapter 9 ■ Developing Fiori appliCations Using CorDova anD Kapsel
350
Your aim next is to replace this standard sample app and put your UI5 app in the Cordova container.
Building Fiori Apps Using CordovaYou’ve created a Cordova project, and it’s time to import this app into Eclipse. Follow these steps:
1. Open Eclipse, go to File ➤ import ➤ Existing Android Code Into Workspace(see Figure 9-15), and click Next.
Figure 9-14. Default splash screen for the Cordova app

Chapter 9 ■ Developing Fiori appliCations Using CorDova anD Kapsel
351
2. Browse to the Android platform project folder of your Cordova app. In this example, the path is C:\Users\Bince\MyCordovaApp\platforms\android. Uncheck CordovaLib on the Projects tab, and check Copy Projects Into Workspace, as shown in Figure 9-16.
Figure 9-15. Import your Cordova project into Eclipse

Chapter 9 ■ Developing Fiori appliCations Using CorDova anD Kapsel
352
3. Go to the properties of the project you imported, and go to Java Build Path ➤Source tab ➤ Add Folder ➤ CordovaLib folder, as shown in Figure 9-17.
Figure 9-16. Do not import CordovaLib

Chapter 9 ■ Developing Fiori appliCations Using CorDova anD Kapsel
353
4. Go to Resource ➤ Resource Filters in the same window, and delete all the Exclude filter values, as shown in Figure 9-18.
Figure 9-17. Add CordovaLib to the project’s source folder
Figure 9-18. Remove all the resource filters

Chapter 9 ■ Developing Fiori appliCations Using CorDova anD Kapsel
354
5. Copy/paste the webcontent folder’s contents for your SAP UI5 app into theCordova project’s www folder, under assets ➤ www. (You can download the UI5 source code shown in this chapter from the Apress web site.) To use the geolocation feature with your app, you need to get the Google Maps API from the Google accounts page. You can find more information about the Google Maps API and key athttps://developers.google.com/maps/documentation/javascript/tutorial. In the below Figure 9-19 where you can see the Google maps Api is being initialized in the index.html, every Google maps Api requires a unique key to use the Google maps services. To know more about obtaining a unique key for your project, go-to this link https://developers.google.com/maps/documentation/javascript/tutorial.
Figure 9-19. Imported Cordova folder structure in Eclipse
6. You need to connect your imported UI5 app to the Cordova plug-ins. To do that, you reference the cordova.js file in your index.html or Component.js file. This example links the cordova.js file in Component.js. You have to add the reference to the metadata section under includes, as shown in Listing 9-1.
Listing 9-1. Code to Link cordova.js in the UI5 App’s Component.js File
sap.ui.core.UIComponent.extend("sap.ui.cordova.app.Component", { metadata: {
"abstract": true,version : "1.0",includes : [
"css/custom.css","/cordova.js","js/index.js",
]}
}
Now you are ready to access the features and hardware of the native Android OS via your UI5 app.

Chapter 9 ■ Developing Fiori appliCations Using CorDova anD Kapsel
355
Example App Using the Device’s Camera, GPS, and Google MapsIn this section’s example app, you access the mobile device’s camera, barcode scanner, geolocation feature, and Google Maps.
Accessing the CameraTo access the camera, you call the navigator.camera.getPicture() method. Listing 9-2 shows the code. Here, the handle_camera method is invoked when the camera button is clicked.
Listing 9-2. Accessing the Camera API in the UI5 App
handle_camera : function (evt){navigator.camera.getPicture( function (imageURL) {
console.log("Entering cameraSuccess");image.setValue(imageURL);img.setSrc(imageURL);success(), fail());
console.log("Leaving cameraSuccess");}, function (error) {
alert("Camera failed: " + error);});
},
Accessing the Barcode ScannerTo access the barcode scanner, you invoke the cordova.plug-ins.barcodeScanner.scan() method. The code is shown in Listing 9-3.
Listing 9-3. Accessing the Barcode Scanner API
cordova.plug-ins.barcodeScanner.scan(function (result) {
barcode_result = result.text;barcode_val.setValue(result.text);
},function (error) {
alert("Scanning failed: " + error);}
);

Chapter 9 ■ Developing Fiori appliCations Using CorDova anD Kapsel
356
Accessing the GPS and Google MapsThe Cordova Geolocation plug-in only gives you access to the GPS. This example uses the Google Maps API along with Geolocation, to display a map on the UI5 app’s screen. You access the geolocation feature using the navigator.geolocation.getCurrentPosition() method. To use Google Maps, you need to reference the Google Maps JavaScript plug-in in your app. For example, reference the Google Maps API in index.html as follows:
<script src="https://maps.googleapis.com/maps/api/js?key=<your Google Maps API key>"></script>
The code for accessing Geolocation and Google Maps in your UI5 app is shown in Listing 9-4.
Listing 9-4. Accessing the Geolocation API
navigator.geolocation.getCurrentPosition(function(position){var mapOptions = {
mapTypeId: google.maps.MapTypeId.ROADMAP};
// Info Window Contentvar infoWindowContent = [
['<div class="info_content">' +'<h3>OST Asset</h3>' +'<p>Property Of Open Source Tech' + '</div>'],['<div class="info_content">' +
'<h3>OST Asset</h3>' +'<p>Property Of Open Source Tech' + '</div>'],
['<div class="info_content">' +'<h3>OST Asset</h3>' +'<p>Property Of Open Source Tech</p>' +'</div>']
];// Display multiple markers on a map
var infoWindow = new google.maps.InfoWindow(), marker_new, i;var MapRef = sap.ui.getCore().Map.Ref;var map_new = new google.maps.Map(document.getElementById(MapRef.byId("maps_new").sId),
mapOptions);map_new.setTilt(45);for( i = 0; i < records.length; i++ ) {
// debugger;var position = new google.maps.LatLng(records[i].Longitude,records[i].Latitude );
bounds.extend(position);marker_new = new google.maps.Marker({
position: position,map: map_new,title:'Location'+i});
// Allow each marker to have an info windowgoogle.maps.event.addListener(marker_new, 'click', (function(marker, i) {
return function() {infoWindow.setContent(infoWindowContent[i][0]);infoWindow.open(map_new, marker);
}})(marker_new, i));

Chapter 9 ■ Developing Fiori appliCations Using CorDova anD Kapsel
357
// Automatically center the map fitting all markers on the screenmap_new.fitBounds(bounds);
}});
When your changes to the UI5 app are complete, copy the contents of your project from Eclipse under the www folder in the Project Explorer, and paste them into the www folder of your Cordova project at the path <defaultpath>\MyCordovaApp\platforms\android\assets\www. Open CMD, navigate to MyCordovaApp, and compile the project once more using this command:
cordova compile
Your new app package file appears on the path <defaultpath>\MyCordovaApp\platforms\android\ant-build. Install it on your mobile device: you now have a Fiori UI5 app, complete with all the features of a native mobile app.
Figure 9-20 shows the custom Cordova-based UI5 app accessing the Google Maps API and displaying coordinates via the Cordova Geolocation plug-in.
Figure 9-20. Accessing Google Maps in the UI5 app

Chapter 9 ■ Developing Fiori appliCations Using CorDova anD Kapsel
358
Figure 9-21. Accessing the device’s camera and barcode scanner via Cordova plug-ins
In Figure 9-21, the UI5 app is accessing the camera and displaying a picture on the UI5 app page. The figure also demonstrates the use of the barcode scanner.

359
��������� AAnalytical applications, 14, 20, 281AppBuilder tool, 219Application architecture, 244
Compare.view.xml, 259Component.js, 244controller, 256custom controls, 259custom CSS, 242Employees.controller.js, 257final render apps, 248grid layout, 249HANA Cloud (see HANA Cloud Platform (HCP))innermost layer, 244employees XML view code, 257MVC architecture, 242–243overview, 242pages, 244root view, 244rules, 242SAP design, 245structure details, 244view creation, 254, 256, 258visualization, 245web page, 242wireframe/mockup design, 245XML view, 255
Application workflowmy inbox, 94wave 1 approval apps, 87–88wave 2 approval apps, 87, 92
Axure wireframe toolaction builder wizard, 241designs, 239interactions, 241library, 239login screen wireframe, 240SAP standard icon set, 241
��������� BBack-end systems, 159
��������� CCascading style sheets (CSS), 228ComponentContainer() method, 196ControllerName method, 255Cordova project
Android platform, 346–347Apache Ant and Android
paths updation, 343–344architecture, 342barcode scanner, 345command prompt, 343compilation, 348–349Component.js file, 354CordovaLib, 352–353creation, 344default splash screen, 349–350Eclipse, 350–351, 354folder structure, 347installation, 343plug-ins, 342–343preparation, 347–348Projects tab, 351–352resource filters, 353SAP folder, 345–346UI5 app, 341
CREATE_ENTITY method, 192, 205Create read update
delete (CRUD) application, 196, 204Custom controls creation
application, 260master view s
witches/hide mode, 262router pattern, 261view page, 261
Index
© Bince Mathew 2015 B. Mathew, Beginning SAP Fiori, DOI 10.1007/978-1-4842-1335-3

■ index
360
��������� DData provider class (DPC), 184Debugging methods, 323
breakpoint, 325Chrome browser tools, 324desktop OSs, 323device simulation, 332diagnostics tool, 330–331keyboard shortcuts, 326logging and network tracing, 328mobile device and screen, 332mobile OSs, 323network trace, 330SAPUI5 app, 329source code and logs, 325troubleshooting
(see Troubleshooting techniques)UI5 apps, 327variables, 326web browsers, 323
Deep insert, 189Design inspiration
advantages, 13flat design, 11iOS 6 vs. iOS 7, 12Metro UI design, 11skeuomorphic design, 10Windows 8 flat design, 12
��������� EEclipse and UI5 add-ons
application project, 109component-preload.js, 115customization, 97download, 97–98extension points, 114extension project, 108initial view, 110installation, 97Luna download page, 217–218OData service name, 115project explorer, 111SAP UI5 add-ons, 219source code, 111standard code, 113–114UI5 project creation, 108WebContent folder, 112
End-user customizationsadd tiles, 64, 85catalog creation, 63catalog icon, 80catalog page, 84
custom group, 81desired tile, 80dynamic tiles configuration, 65dynamic tile type, 64edit icon, 83enter group name, 81, 83list selection, 87menu tab, 77move button, 86new tile configuration, 66+ icon, 62pop-up node, 78properties, 85roles, 69SAP Fiori app option, 68static tile, 66target mapping, 68text editing, 86tiles creation, 65tile selection, 82transaction PFCG, 77user tab, 78
Enterprise resource planning (ERP), 3Error log monitoring techniques
API explorer, 211application log, 211custom query result, 215debug mode, 208details view, 214diagram view, 213entity list, 212error description, 209gateway server, 210network tab, 209OData request, 208online tools, 211query result, 213REST clients, 215XML format, 210XOData data explorer, 214
Expand method, 189Extension project
Component.js update, 137creation, 127, 131delivery_form, 136detailsHeader fragment file, 139–140entering name, 127gateway server (see Gateway server)metadata structure, 129modification, 132OData service configuration, 130POItem view modification, 135replacement code, 134S3 view modification, 138

■ Index
361
source code, 140standard app path, 129standard S2 view, 134view code, 133web IDE (see Web IDE)
��������� FFact sheets
applications, 281architecture, 16result, 21searching and exploring objects, 20
Fiori, 1analytical applications, 14, 20application simplifies, 3coherent, 14Cordova and Kapsel (see Cordova project)design inspiration, 10device’s camera, 355fact sheets, 16, 20flowers, 2GPS and Google Maps, 356–358instant value, 14mobile, 340principles, 13responsive, 14role-based, 13SAP Fiori UX, 4SAP UX strategy, 3simple UI, 14SMP architecture
(see SAP mobile platform (SMP))transactions, 2, 19, 22user experience, 1wave 1, 18wave 2, 19
Fiori home page configurationcatalog list, 73complete group, 76custom group, 72empty group, 75end users, 77group displays, 73groups creation, 74launchpad designer, 74tiles selection, 76users modification, 75
��������� GGateway server
additional information field, 147app creation, 146app launcher–static, 149
catalog creation, 147custom tile selection, 147, 154delivery_form hidden, 158end users, 151extended tile, 156file upload, 141group creation, 156group selection, 155home page, 153LPD_CUST t-code, 144menu tab, 151namespace warning, 145package description, 142parameter values, 146pop-up selection, 151role creation, 151S3 view, 158security warning, 144SICF code, 144static tile configuration, 149target-mapping
configuration, 150tile catalog button, 154tile creation, 148track purchase order app, 157unique ID, 148upload button, 141user tab, 152workbench request, 143
GET_ENTITY method, 195GET_ENTITYSET method, 195
CRUD application, 204fetching records, 187IT_KEY_TAB parameter, 187OData service, 179redefine, 186
��������� HHana Cloud Platform cockpit, 159HANA Cloud Platform (HCP), 284
access code, 272HANA tools, 295HTML5 apps, 270Java application
(see Java application)JPA app development, 296MyIot zip file, 295runtime environments, 297trial account, 263UI5 app, 263URL link, 271Web IDE URL, 263web SDK path, 299WorkForceMonitor app, 272

■ index
362
HANA Smart Business apps, 281analytical application, 281drilldown views, 282fact sheet applications, 281KPI tiles, 282Internet of Things, 283KPI Modeler, 283UI5 applications
(see UI5 applications)handleListItemPress method, 257handleListSelect method, 257handleLiveChange method, 257
��������� IInherited methods, 185Interactive prototype design, 248Internet of Things (IoT)
AllReadings.view.xml, 315Component.js file, 311digital thermometer, 318HANA Cloud database, 320Home.view.controller.js, 313Home.view.xml, 312methods, 313mobile app, 317push notifications, 321Raspberry Pi, 283record creation, 317run program, 315services, 322temperature records, 319UI5 app, 316
��������� JJava application
Eclipse, 299–300HANA trial program, 307HCP, 304HTML interface, 307JPA app, 306logic value chart, 308persistence features, 309persistence Java files, 302Raspberry.java code, 302status server, 306thermometer, 308trial credentials, 305workspace project, 301
��������� KKapsel plug-ins. See Cordova projectKey performance indicators (KPIs), 57, 283
��������� LLandscape
admin page, 48admin user, 35application add-ons, 52authorizations tab, 32back-end servers, 27, 45back-end system add-ons, 25configuration, 27custom role, 29end user, 34, 36front-end servers, 25ICF nodes, 46interface add-ons, 25logon screen, 48logout screen, 51OData services, 46prerequisites, 25role maintenance, 29SAP NetWeaver gateway, 36SICF transaction, 47TADIR service pop-up screen, 31transaction, 27user interface add-on components, 26users and authorizations, 27web dispatcher, 44
Launchpadadministrators, 55default URL, 55designer, 55drop-down list, 61dynamic tiles, 57end users, 56 (See also End users
customizations)Fiori home page (see Fiori home
page configuration)groups and catalogs, 58jam tiles, 58KPI tiles, 57news tile, 58settings icon, 61static tile, 57tiles and target mappings, 62transport request, 60
��������� MMigration tool, 283Model provider class (MPC), 184Model-view-controller (MVC), 242My inbox application
approval workflows, 95pending requests, 94posting comments, 96

■ Index
363
��������� NNetWeaver Gateway server, 25
custom table, 178GetEntitySet method, 179OData architecture, 178OData service project, 179ZUSERS table creation, 179
��������� OOData service
apps reference library, 124BSP name, 125custom code, 123custom fields, 120data provider classes, 118, 122DDIC structure, 119detailed extension document, 126entity data, 120entity sets, 118extension details, 126fields and values, 124fields append, 121inherited method, 122model provider class, 122name structure, 119POLIST_GET_ENTITYSET method, 123project creation, 116property list, 121redefining standard, 117reference library entry, 125service name, 117
onAllReadings method, 313onPowerOn method, 313onShutdown method, 313onSwitch method, 313onTherm method, 313onThermometerActivate method, 313Open Data Protocol (OData) customization
activation, 190, 192Artifacts folder, 185business logic, 185CREATE_ENTITY method, 192custom table, 188DDIC structure, 181deep insert, 189definition, 183deletion, 189DPC and MPC, 184entity fields, 182EntitySets button, 193error log monitoring
(see Error log monitoring techniques)
existing record, 188expand method, 189function imports, 189GET_ENTITY method, 195GET_ENTITYSET method, 186, 195key field, 183maintain services screen, 192maintenance view, 191media resources, 189metadata, 194NetWeaver Gateway
(see NetWeaver Gateway server)overview, 177register button, 190SEGW t-code, 179structure definitions, 181UI5 application (see UI5 application)URI options, 194
��������� P, Qpip installation, 288Prototyping kit. See Axure wireframe toolPython scripts
HANA Cloud, 311Raspberry Pi, 310sensors, 309SystemPower.py, 309terminals, 309
��������� RRaspberry Pi devices
breadboard generic wiring layout, 292custom case, 287digital sensor, 290, 293DS18B20 digital thermometer, 286DS18B20 wiring layout, 294GPIO layout, 291hardware and software, 287IoT architecture, 284LED connection, 292NOOBS, 287parse, 289pip installation, 288Python scripts, 309Raspberry Pi 2, 285Raspbian OS, 287requests, 289sensors connection, 290Sunfounder project, 286w1thermsensor, 289wire color connection, 291XSJS service, 285

■ index
364
REST clientpostman REST client, 215POST, PUT and PATCH request, 216
Roles maintenancesassigning, 71catalog ID entering, 70SAP Fiori tile catalog, 70transaction PFCG, 69
��������� SSAP Fiori UX
detail page/list, 9launchpad, 7line item/detail, 9line-item page, 8master-detail view, 7master list page, 8tablet, 6transaction, 4user-centric Fiori apps, 5
SAP HANA application. See HANA Smart Business apps
SAP mobile platform (SMP), 338Cockpit home page, 338–339configuration, 339–340features, 337log management, 340
SAP NetWeaver gateway systemback-end system, 37gateway front-end server, 43role template, 36system alias, 41technical support, 38trusted connection, 40
set_is_media() method, 189Standard Fiori application, 97
BSP app, 100confirmation, 107destination directory, 105download link, 106Eclipse and UI5 add-ons
(see Eclipse and UI5 add-ons)extension project (see Extension project)Launchpad designer catalog tiles, 101OData service, 116parameter, 103screenshot, 99search option, 102source code, 103target mapping, 101
Standard tilesbuild option, 230color parameters, 228CSS tab, 228
home page elements, 229launchpad, 233save option, 230UI5 theme tool, 232URL parameters, 232
��������� TTheme designer, 224
background image, 226custom image, 236–237custom theme, 226custom wallpaper, 238home page, 225, 227login screen, 234MIME repository files, 234standard login screen image, 235standard tiles (see Standard tiles)
Transactional applications, 19, 22Troubleshooting techniques. See also Error log
monitoring techniquesABAP report programs, 336back-end connectivity, 335error log, 333Fiori configuration, 334niche technology, 335source file, 334t-codes relation, 335
��������� U, VUI5 applications
app.controller.js, 198app.view.js, 197back-end custom table, 205Chrome web security, 203Component.js file, 197, 251component.js file, 252createContent, 253CRUD application, 204CRUD features, 196debug mode, 327delete button, 207deployment, 268details, 269edit icon, 264event handling, 201existing record, 206git repository icon, 266HTML5, 264index.html, 196, 251input form, 199instantiation, 253IoT logics, 311Java Persistence API, 294

■ Index
365
keyboard shortcut, 328metadata definitions, 252metadata parameters, 252modifications, 206OData operations, 202pattern parameter, 253Python scripts, 309Raspberry Pi (see Raspberry Pi devices)record creation, 204root folder, 251routing parameter, 253users.view.js, 198VerticalLayout control, 200webapp folder, 266WorkForceMonitor app, 250, 270workspace connection, 265
USERSET_GET_ENTITYSET method, 185
��������� W, X, Y, ZW1ThermSensor, 289Wave 1 approval application
configuration chart, 88, 90consumer type, 91device types, 91standard/custom workflow, 92transaction SPRO, 88
Wave 2 approval application, 92–93Web browsers, 323Web IDE
ABAP repository, 174add extensions projects, 162back-end systems, 159, 161completion process, 162, 165Component.js updated, 171custom app, 163custom controls, 169custom fields, 165
delivery_form, 172deployment, 175detailsHeader extension, 167details project, 161drag and drop controls, 166existing control, 166, 171extension project, 160fragment file, 168gateway system, 174home page, 160layout editor, 166, 169metadata, 173OData service, 170package and details, 175preview apps, 173process completion, 172project name, 163replace view extension, 164S2 view creation, 164S3 view completion, 168service extension, 170
Web IDE solutionapp creation, 278application preview, 277beta stage, 221extract files, 223layout editor, 276, 280main page, 224multiple options, 221, 273project explorer pane, 275source code, 278superhero, 221template, 273UI5 app project, 275
Wireframe/mockup designemployee details screen, 247interactive prototype design, 248
workforce monitor app, 246