SAP BusinessObjects Business Intelligence ... - SAP Help Portal
Upload
khangminh22Category
view
1download
0
SAP Interfaces V3.6.0.0.0


Meridium APM SAP Interfaces V3.6.0.0.0 Copyright © Meridium, Inc. 2015 All rights reserved. Printed in the U.S.A. This software/documentation contains proprietary information of Meridium, Inc.; it is provided under a license agreement containing restrictions on use and disclosure. All rights including reproduction by photographic or electronic process and translation into other languages of this material are fully reserved under copyright laws. Reproduction or use of this material in whole or in part in any manner without written permission from Meridium, Inc. is strictly prohibited. Meridium is a registered trademark of Meridium, Inc. All trade names referenced are the service mark, trademark or registered trademark of the respective manufacturer.


1
Table of Contents
ABOUT THIS DOCUMENT ___________________________________ 8
DOCUMENTATION CONVENTIONS _____________________________ 9
BASICS ________________________________________________ 11
ABOUT THE SAP INTERFACES _____________________________________ 11
SAP INTERFACES SYSTEM REQUIREMENTS _____________________________ 12 Additional components required for all SAP Interfaces implementations: _ 13 Additional requirements for PI-based SAP Interfaces implementations: ___ 16
OVERVIEW OF SAP INTERFACES ____________________________________ 19
DATA TRANSFER SCENARIOS ____________________________________________ 19
EXTRACTION INTERFACES______________________________________________ 20 About the Equipment and Functional Location Extraction Interfaces _____ 20 Characteristics Extraction Interfaces ________________________________ 22
About the Characteristics Extraction Interfaces _____________________ 22 Characteristics Extraction Interfaces: Actions and Results ____________ 23
Notification and Order Extraction Interface __________________________ 29 About the Notification and Order Extraction Interface _______________ 29 Examples of Extracting Orders and Notifications _____________________ 33
ABOUT THE NOTIFICATION CREATION INTERFACE _____________________________ 44
WORK MANAGEMENT INTERFACE ________________________________________ 45 About the Work Management Interface ______________________________ 45 About Managing Scheduled Work in Meridium APM ____________________ 45
Workflow for Managing Scheduled Work in Meridium APM _____________ 45 How Does Meridium APM Use the Call Horizon? ______________________ 48
About Managing Scheduled Work in SAP _____________________________ 49 Workflow for Managing Scheduled Work in SAP ______________________ 49 How are Intervals and UOMs Derived in Task Records? ________________ 51 About Discontinued Task Records __________________________________ 53
DATA STRUCTURE ____________________________________________ 54
SAP INTERFACES DATA MODEL__________________________________________ 54
HOW ARE EQUIPMENT AND FUNCTIONAL LOCATION RECORDS LINKED TO SITE REFERENCE RECORDS? ________________________________________________________ 56
Meridium APM SAP Interfaces V3.6.0.0.0
2
INSTALLATION, UPGRADE, AND CONFIGURATION _______________ 61
FIRST-TIME DEPLOYMENT WORKFLOW _______________________________ 61
FIRST-TIME DEPLOYMENT CHECKLIST - PI CUSTOMERS _________________________ 61
FIRST-TIME DEPLOYMENT CHECKLIST - NON-PI CUSTOMERS _____________________ 67
UPGRADE WORKFLOW __________________________________________ 72
PI CUSTOMERS _____________________________________________________ 72 PI Customers Upgrade Workflow ____________________________________ 72 Upgrading the SAP Interfaces from V3.5.1 to V3.6.0.0.0 (PI) ____________ 72 Upgrading the SAP Interfaces from V3.5.0 SP1 LP to V3.6.0.0.0 (PI) ______ 75 Upgrading the SAP Interfaces from V3.5.0 to V3.6.0.0.0 (PI) ____________ 78 Upgrading the SAP Interfaces from V3.4.5 to V3.6.0.0.0 (PI) ____________ 81
NON-PI CUSTOMERS _________________________________________________ 85 Non-PI Customers Upgrade Workflow ________________________________ 85 Upgrading the SAP Interfaces from V3.5.1 to V3.6.0.0.0 (Non-PI) ________ 86 Upgrading the SAP Interfaces from V3.5.0 SP1 LP to V3.6.0.0.0 (Non-PI) __ 88 Upgrading the SAP Interfaces from V3.5.0 to V3.6.0.0.0 (Non-PI) ________ 91 Upgrading the SAP Interfaces from V3.4.5 to V3.6.0.0.0 (Non-PI) ________ 94
INSTALLATION, UPGRADE, AND CONFIGURATION STEPS ____________________ 98
MERIDIUM APM WEB SERVICES _________________________________________ 98 Installing Meridium APM Web Services _______________________________ 98 Upgrading Meridium APM Web Services _____________________________ 108
Upgrading Meridium APM Web Services from V3.5.0 and Later to V3.6.0_______________________________________________________________ 108 Upgrading Meridium APM Web Services from V3.4.5 to V3.6.0 ________ 111
THE ABAP ADD-ON ________________________________________________ 122 What is Included in the ABAP Add-On? ______________________________ 122 Installing the ABAP Add-On _______________________________________ 122 Upgrading the ABAP Add-On ______________________________________ 127
THE /MIAPM/PARAMS TABLE ________________________________________ 129 About the /MIAPM/PARAMS Table _________________________________ 129 Creating an Entry in the /MIAPM/PARAMS Table _____________________ 129 Example of Specifying Maintenance Plants __________________________ 138
CONFIGURING FIELD MAPPINGS ________________________________________ 138 About Configuring Field Mappings _________________________________ 138 Custom Mapping Limitations ______________________________________ 139 Viewing the Current Field Mappings ________________________________ 140 Components of Field Mappings ____________________________________ 142 About the Conditional Query ______________________________________ 143 Modifying Field Mappings _________________________________________ 144
Options for Modifying Field Mappings ______________________________ 144 Modifying Existing Field Mappings _________________________________ 144

About This Document
3
Undoing Changes to a Field Mapping ______________________________ 147 Creating New Field Mappings _____________________________________ 147 Copying Existing Field Mappings ___________________________________ 151 Deleting Field Mappings __________________________________________ 154 Reverting to the Baseline Field Mappings ___________________________ 155 Exporting Field Mappings _________________________________________ 158 Importing Field Mappings _________________________________________ 162
CONFIGURING MERIDIUM APM TO EXTRACT CHARACTERISTICS ___________________ 165 About Configuring Meridium APM to Extract Characteristics ___________ 165 Creating CMMS Classification Type Records _________________________ 167 How is the CMMS System ID Field Used? _____________________________ 168 Identifying Which Characteristics to Extract _________________________ 170
Identifying Classifications Whose Characteristics You Want to Extract _ 170 Identifying Characteristics You Want to Extract ____________________ 171
Identifying Which Characteristics to Stop Extracting __________________ 173 I Want to Stop Extracting ALL Characteristics for a Classification _____ 173 I Want to Stop Extracting a Specific Characteristic__________________ 173
Refreshing Meridium APM to Reflect Current SAP Classifications and Characteristics _________________________________________________ 174 About Classification Hierarchies ___________________________________ 175
CONFIGURING THE NOTIFICATION CREATION INTERFACE _______________________ 182 Requirements for Creating SAP Notifications ________________________ 182
Scenario A: Recommendation Record Is not Linked to an Equipment or Functional Location Record ______________________________________ 183 Scenario B: Recommendation Record IS Linked to an Equipment or Functional Location Record ______________________________________ 183
Configuring Meridium APM to Create Notifications from Recommendation Records _______________________________________________________ 184 About the Query Get SAP ID for Equipment _________________________ 185
IDENTIFYING YOUR SAP SYSTEMS _______________________________________ 186 About Identifying Your SAP Systems ________________________________ 186 How are SAP System Records Used? ________________________________ 188
Scenario A: Site Reference Record Used (Standard Practice) _________ 188 Scenario B: Default SAP System Field Used (Non-Standard Practice) __ 189
Creating SAP System Records _____________________________________ 190 Testing the Connection Defined in an SAP System Record _____________ 193 Associating an SAP System with a Site ______________________________ 194 The File CSCS.exe.config _________________________________________ 194
About the File CSCS.exe.config ___________________________________ 194 Defining Your SAP Systems _______________________________________ 196 Changing the Number of Times the Service Will Try to Connect Before Stopping Automatically __________________________________________ 197 Changing the Number of Seconds That Will Pass Between Connection Attempts ______________________________________________________ 198 An Example of the File CSCS.exe.config ___________________________ 199

Meridium APM SAP Interfaces V3.6.0.0.0
4
The Meridium Core SAP Connector Service __________________________ 200 About the Meridium Core SAP Connector Service ___________________ 200 Verifying that the Meridium Core SAP Connector Service is Connected to SAP ___________________________________________________________ 201
CONFIGURING THE WORK MANAGEMENT INTERFACE __________________________ 205 Modifying the Windows Services File _______________________________ 205 Creating an RFC Destination ______________________________________ 210 Identifying Operation Values that Will Trigger the Creation of Task Records ______________________________________________________________ 213
About Identifying Operation Values that Will Trigger the Creation of Task Records _______________________________________________________ 213 Creating Control Keys ___________________________________________ 214 About the /MIAPM/TASK_CNF Table _______________________________ 219 Adding Entries to the /MIAPM/TASK_CNF Table _____________________ 221 Example of the /MIAPM/TASK_CNF Table __________________________ 223
Configuring Meridium APM to Transfer Data Between SAP Items and Task Records _______________________________________________________ 225 Configuring Meridium APM to Create Confirmations from Calibration Event Records _______________________________________________________ 226 Configuring Meridium APM to Create Confirmations from Inspection Event Records _______________________________________________________ 227 Configuring the Query Get Tasks for Work Order Generation ___________ 228 Creating a Scheduled Item to Create SAP Maintenance Orders _________ 228
RUNNING THE REPORT /MIAPM/WH_HARMONIZATION _____________________ 229
RUNNING AN UPGRADE REPORT TO POPULATE THE OBJECT NUMBER AND SUB OBJECT NUMBER FIELDS ___________________________________________________ 231
RUNNING AN UPGRADE REPORT TO MODIFY THE /MIAPM/EXCEPTIONS TABLE TO USE THE INTERNAL ID _____________________________________________________ 233
RUNNING AN UPGRADE REPORT TO POPULATE THE /MIAPM/PLANT_CNF TABLE ____ 235
PI-SPECIFIC STEPS _________________________________________________ 236 The /MIAPM/PI_PARAMS Table ____________________________________ 236
About the /MIAPM/PI_PARAMS Table ______________________________ 236 Accessing the /MIAPM/PI_PARAMS Table ___________________________ 238 Populating the /MIAPM/PI_PARAMS Table __________________________ 245
Deleting Previous Versions of Software Component Versions ___________ 248 Configuring the System Landscape Directory (SLD) ___________________ 250
About Configuring the System Landscape Directory _________________ 250 Creating a New Product Version and Third-Party Technical System and Business System ________________________________________________ 251 Creating a Web AS ABAP Technical System and Business System ______ 260
Managing PI Content _____________________________________________ 270 Importing the Configuration Object _______________________________ 270 Modifying the Baseline Communication Channels ___________________ 278

About This Document
5
Activating the Scenarios _________________________________________ 284 Managing Content for Additional Data Sources _____________________ 284 Associating Scenarios with the Newest Version of the Software Component Version _____________________________________________ 298
Modifying the File Meridium.SAP.CertifiedInterface.Config.xml ________ 300 Notification Creation Interface ____________________________________ 301
Importing PI Content ____________________________________________ 301 Importing the Business Package Contents __________________________ 313 Configuring the APMConfiguration Object __________________________ 316 Configuring the R3Systems Object ________________________________ 318 Granting the Everyone Group Permissions to the PM Notification iView 320 Determining Which Users Can See the APM PBNW Certification Tab ___ 321 Mapping Users to the SAP_R3 System ______________________________ 321 Configuring the Query iView _____________________________________ 321 Configuring Meridium APM to Create SAP Notifications Using PI ______ 323
SAP INTERFACES SECURITY GROUPS _____________________________________ 325
USER INSTRUCTIONS ____________________________________ 327
RUNNING THE EXTRACTION INTERFACES _____________________________ 327
OPTIONS FOR RUNNING THE EXTRACTION INTERFACES _________________________ 327
SCHEDULING ALL EXTRACTION INTERFACES TO RUN AUTOMATICALLY ______________ 328 About Scheduling the Interfaces to Run Automatically ________________ 328 Baseline Variants _______________________________________________ 329 Modifying Baseline Variants _______________________________________ 330 Scheduling the Interfaces to Run Automatically ______________________ 332 The /MIAPM/CTRL_LOG Table _____________________________________ 334
About the /MIAPM/CTRL_LOG Table ______________________________ 334 Accessing the /MIAPM/CTRL_LOG Table ___________________________ 336
RUNNING INDIVIDUAL EXTRACTION INTERFACES MANUALLY _____________________ 338 Running the Interfaces in the Foreground ___________________________ 338
Running the Functional Location Extraction Interface _______________ 338 Running the Functional Location Characteristics Extraction Interface _ 344 Running the Equipment Extraction Interface _______________________ 350 Running the Equipment Characteristics Extraction Interface _________ 356 Running the Notification and Order Extraction Interface ____________ 362
Running Interfaces in the Background ______________________________ 369 Checking the Status of a Background Process ________________________ 371
VIEWING A LOG OF EXTRACTION FAILURES _________________________________ 373 About Viewing a Log of Extraction Failures __________________________ 373 Accessing the /MIAPM/EXCEPTIONS Table ___________________________ 374 Running an Extraction Interface from the /MIAPM/EXCEPTIONS Table ___ 375

Meridium APM SAP Interfaces V3.6.0.0.0
6
RUNNING THE NOTIFICATION CREATION INTERFACE ______________________ 377
CREATING AN SAP NOTIFICATION FROM A RECOMMENDATION RECORD ______________ 377
PI-BASED APPROACH _______________________________________________ 379 About Using PI to Create Notifications ______________________________ 379 Tips for Creating a Query to Display Recommendations that Generated Notifications ___________________________________________________ 379 Viewing the Query Results in SAP __________________________________ 380
RUNNING THE WORK MANAGEMENT INTERFACE _________________________ 381
CREATING A TASK RECORD TO TRANSFER TO SAP ____________________________ 381
TRANSFERRING SAP DATA TO MERIDIUM APM TASK RECORDS ___________________ 383
CREATING AN EVENT RECORD _________________________________________ 388
UPDATING AN SAP CONFIRMATION BY UPDATING A CONFIRMATION RECORD __________ 389
VALIDATING SAP CONFIRMATIONS AGAINST MERIDIUM APM CONFIRMATION RECORDS ___ 390
RUNNING AN INTERFACE IN SIMULATION MODE _________________________ 392
ABOUT RUNNING AN INTERFACE IN SIMULATION MODE _________________________ 392
SIMULATING RESULTS FOR 1,000 ITEMS OR LESS ____________________________ 392
SIMULATING RESULTS FOR MORE THAN 1,000 ITEMS __________________________ 394
REFERENCE INFORMATION ________________________________ 401
SAP INTERFACES CATALOG FOLDER STRUCTURE ________________________ 401
ASSOCIATED PAGES ___________________________________________ 403
SAP SYSTEM ASSOCIATED PAGES _______________________________________ 403
CMMS CLASSIFICATION ASSOCIATED PAGES ________________________________ 403
CMMS CLASSIFICATION TYPE ASSOCIATED PAGES ____________________________ 404
FAMILY FIELD DESCRIPTIONS _____________________________________ 404
CMMS CLASSIFICATION TYPE __________________________________________ 404
CMMS CLASSIFICATION ______________________________________________ 405
CMMS CHARACTERISTIC _____________________________________________ 406
SAP SYSTEM _____________________________________________________ 408
TECHNICAL CHARACTERISTIC __________________________________________ 410
NAVIGATING SAP ____________________________________________ 411
USING THE SAP SYSTEM TO VIEW A LIST OF MERIDIUM-SPECIFIC STEPS _____________ 411
SAP TRANSACTIONS - QUICK REFERENCE __________________________________ 411
VALUES MAPPED BETWEEN SAP AND MERIDIUM ________________________ 413

About This Document
7
SAP --> MERIDIUM APM _____________________________________________ 413 SAP Values Mapped to Functional Location Records __________________ 413 SAP Values Mapped to Equipment Records __________________________ 416 SAP Values Mapped to Technical Characteristic Records ______________ 419 SAP Values Mapped to Work History Records ________________________ 420
Values Mapped to Records that were Created from Orders with Notifications ___________________________________________________ 420 Values Mapped to Records that were Created from Notifications Without Associated Orders_______________________________________________ 423 Values Mapped to Records that were Created from Orders Without Associated Notifications _________________________________________ 425
SAP Values Mapped to Work History Detail Records ___________________ 427 SAP Values Mapped to Task Records ________________________________ 428
MERIDIUM APM --> SAP _____________________________________________ 431 Task Values Mapped to SAP _______________________________________ 431 Recommendation Values Mapped to SAP ____________________________ 434
GLOSSARY ________________________________________________ 435
ABAP__________________________________________________________ 435
EQUIPMENT CHARACTERISTICS EXTRACTION INTERFACE ________________________ 435
EQUIPMENT EXTRACTION INTERFACE _____________________________________ 435
FUNCTIONAL LOCATION CHARACTERISTICS EXTRACTION INTERFACE ________________ 435
FUNCTIONAL LOCATION EXTRACTION INTERFACE ____________________________ 436
NOTIFICATION AND ORDER EXTRACTION INTERFACE __________________________ 436
NOTIFICATION CREATION INTERFACE _____________________________________ 436
SAP PI _________________________________________________________ 436
WORK MANAGEMENT INTERFACE _______________________________________ 436

Meridium APM SAP Interfaces V3.6.0.0.0
8
About This Document
This file is provided so that you can easily print the SAP Interfaces section of the Meridium APM Help system. This document is not meant to be read electronically using the PDF. If you want to read the documentation electronically, you should use the Help system. This file is set up to facilitate double-sided printing and includes blank pages between sections so that each section will begin on an odd page and will be printed on the front of the page.
Because this file represents an excerpt from the Help system, parts of this document may seem incomplete outside of the Help system itself. When you read the documentation via the Help system, you will see links which serve as cross-references to other areas of the documentation. These cross-references are not available in this document.
To access the Meridium APM Help, in the Meridium APM Framework application, click the Help menu, and then click Meridium APM Framework Help.

9
Documentation Conventions
Throughout the documentation, we use various stylistic conventions that make it easier to interpret information and instructions. The following table provides a list and description of the conventions that are used throughout the Meridium APM documentation.
Convention Description Example
Bold Identifies labels that appear on the screen. Identifies folder paths and file names when the folder path or file name is included in step-by-step instructions.
The Save As dialog box appears. Click the Cancel button. In the Catalog folder \\Public\Meridium\Modules\Core\Queries, open the query Field History Records.
All capital letters Identifies keyboard keys.
Press the ALT+F4 keys.
\\ Identifies the beginning of a folder path.
The query is located in the following Catalog folder: \\Public\Meridium\Modules\Core\Queries.
Courier New Identifies text that you must type.
Type root.
<> Indicates that the data inside the angle brackets is variable.
Click Expand/Collapse <Record>'s Children, where <Record> is the ID of the selected record.

Meridium APM SAP Interfaces V3.6.0.0.0
10
Convention Description Example
[ ] Indicates that the data inside the square brackets is optional.
Type the following text: <Meridium APM Catalog Path>,[Query Parameters] ...where:
• <Meridium APM Catalog Path> is the Catalog path of the desired query.
• [Query Prompt Value] is a value that you want to supply for a prompt in the query. If you do not pass in query prompt values, you will be prompted to supply them when you run the query.

11
Basics
About the SAP Interfaces
The SAP Interfaces module allows you to transfer data between your SAP system and Meridium APM. The SAP Interfaces module includes the following interfaces:
• Functional Location Extraction Interface: Allows you to transfer Functional Locations from SAP to Meridium APM.
• Equipment Extraction Interface: Allows you to transfer Equipment from SAP to Meridium APM.
• Functional Location Characteristics Extraction Interface: Allows you to transfer Functional Location characteristics from SAP to Meridium APM.
• Equipment Characteristics Extraction Interface: Allows you to transfer Equipment characteristics from SAP to Meridium APM.
• Notification and Order Extraction Interface: Allows you to transfer Notifications and Orders from SAP to Meridium APM.
• Notification Creation Interface: Allows you to transfer Recommendation records from Meridium APM to SAP in the form of Notifications.
• Work Management Interface: Allows you to manage scheduled work in one of two ways:
Create Task records in Meridium APM and transfer the data to SAP. This option allows you to create and update records in Meridium APM and transfer the data to SAP.
Create and manage data in SAP and transfer it to Meridium APM as Task records. This option allows you to create and update items in SAP and transfer the data to Meridium APM.

Meridium APM SAP Interfaces V3.6.0.0.0
12
SAP Interfaces System Requirements
The SAP Interfaces feature allows you to integrate Meridium APM with your SAP system. Two approaches are available for implementing this functionality:
• Non-PI-based: Allows you to transfer data to and from SAP using the SAP backend system and an SAP database.
• PI-based: Allows you to transfer data to and from SAP through an SAP PI Server.
The SAP Interfaces - Foundation license is required to take advantage of SAP Interfaces functionality. The following additional licenses may also be required to take advantage of additional SAP Interfaces features:
• SAP Interfaces - Foundation
• SAP Interfaces - Process Integration
• SAP Interfaces - Technical Characteristics
• SAP Interfaces - Work Management
In addition, your system must contain the basic Meridium APM system architecture and the following additional components. If you want to use a PI-based SAP Interfaces implementation, note that your system will need to contain both the additional components for all SAP Interfaces implementations and the additional components for PI-based SAP Interfaces implementations.
Note: On each Meridium APM Application Server to which you will transfer SAP data (i.e., each Meridium APM Application Server that is specified in the /MIAPM/PARAMS table), the regional settings must match the decimal notation and date format settings of the SAP users that will run reports to transfer data to and from that Application Server. For example, if the Application Server regional setting is configured to use a comma instead of a period to separate dollars from cents (e.g., 123,50 instead of 123.50), if the SAP user with the user ID JSMITH will be running the Notification and Order Extraction Interface to transfer data to that Application Server, the decimal notation for JSMITH should be set to 1.234.567,89. In SAP, decimal notation and date format settings are available on the Defaults tab of the user information screen, which is accessible from the transaction SU01.

Basics
13
After you have installed and configured the basic Meridium APM system architecture, you will need to perform some configuration steps specifically for SAP Interfaces.
Additional components required for all SAP Interfaces implementations:
• SAP Backend System. An SAP server machine with an ECC system set up. The following versions are supported:
SAP ECC 6.0 (Enhancement Packs [EhP] 1 through 7)
The PI-based interfaces were tested using SAP ECC 6.0.
• SAP Database: A database that houses the SAP data model and data.
• SAP Internet Transaction Server (ITS). Version 6.20 or higher is required.
Note: If you are using SAP ECC 5.0 or ECC 6.0 on the SAP Backend System, a separate ITS is not required, but the WebGUI does need to be activated in the ECC system.
• Meridium APM Web Services: Requires the following components.
Software Name and Version
Where you Can Obtain It
Required? Behavior of Meridium APM
Server and Add-ons Installer
Microsoft.net 3.5 SP1
Microsoft Yes If this is not found, the installer will close.
ReportViewer2008 Microsoft Yes If this is not found, the installer will install it automatically.
Micorosft WSE 3.0 Runtime
Microsoft or Meridium APM 3rd party DVD.
Yes If this is not found, the installer will close.

Meridium APM SAP Interfaces V3.6.0.0.0
14
Software Name and Version
Where you Can Obtain It
Required? Behavior of Meridium APM
Server and Add-ons Installer
Windows 2008R2 or newer
Microsoft Yes If this is not found, the installer will close.
Internet Explorer 8, 9, 10, or 11
Microsoft Yes If this is not found, the installer will close.
IIS 7.0 or later Microsoft Yes If this is not found, an error message will appear, and the installer will close.
MSXML 3.0 MSXML3 Exception INF
Microsoft Internet Explorer. This is installed automatically with Internet Explorer 6.0 and later.
Yes None
IIS 6 WMI Compatibility
Microsoft Yes If this is not found, the installer will close.
Visual C++ 8.0 CRT (x86) WinSXS MSM Visual C++ 8.0 MFC (x86) WinSXS MSM Visual C++ 10.0 CRT (x86) Visual C++ 9.0 CRT (x86) WinSXS MSM Visual C++ 10.0 ATL (x64) Visual C++ 9.0 ATL (x86) WinSXS MSM
Meridium APM Yes If this is not found, the installer will install it automatically.
Basics
15
If you are using a virtual machine (VM) to host your Meridium APM Web Server, we recommend that:
• You increase the physical server CPU and hard drive space requirements by 20% to ensure that the application will perform equivalently in a virtualized environment.
• You double the physical server memory requirements.
• Each VM have its own dedicated processor cores and memory allocation to ensure appropriate performance.
Meridium, Inc. supports Hyper-V and VMWare platforms.
These requirements may not be sufficient, depending upon how your system is configured. Parameters that affect the hardware requirements include the number of users, modules purchased, database size, and other factors that can vary from one customer to another. For help refining your specific system requirements, consult a member of the Meridium Inc. Global Support Services or Professional Services department.
Note: The installation and setup of the SAP machines is beyond the scope of the Meridium APM documentation. Information about installing and configuring the SAP Servers and database can be found in the documentation that is distributed by SAP with the SAP software. Throughout the Meridium APM documentation, we assume that these machines have been set up and properly configured according to the guidelines described in this topic.
The following image shows how these additional machines should be incorporated into the basic Meridium APM system architecture to support the SAP Interfaces.

Meridium APM SAP Interfaces V3.6.0.0.0
16
Additional requirements for PI-based SAP Interfaces implementations:
• SAP PI Server. Contains the PI content that facilitates communication between Meridium APM and SAP for the purpose of extracting SAP items using the PI-based approach. The SAP PI Server must contain the SAP Web Application Server 7.0 (ABAP + Java) with PI 7.0 or higher. Meridium APM has been tested using SAP Web Application Server 7.0 SP9 (ABAP + Java) with PI 7.0 and PI 7.3.
IMPORTANT: For versions prior to SAP PI 7.3, a dual-stack installation (ABAP + Java) was required for all communications. Beginning with SAP PI 7.3, a single-stack Java installation is supported. Meridium APM, however, has been tested successfully only with a dual-stack installation (ABAP + Java) and may not work successfully with a single-stack Java installation.

Basics
17
• SAP Enterprise Portal. Contains the Meridium APM Query iView, which you can use to view Meridium APM Recommendation records in the SAP Portal.
Note: The SAP Enterprise Portal is required only if you are using the Notification Creation Interface.
The SAP Enterprise Portal must meet one set of requirements below:
Option 1:
SAP Web Application Server 6.40 SP22 or higher
SAP Enterprise Portal 6.40 at the same service pack level as the Web Application Server
SAP Portal .NET Runtime 2.5 (PDK for MS.NET 2.5)
Option 2:
SAP Web Application Server (Java) 7.0 SP9 or higher with EP 7.0 at the same service pack level as the Web Application Server
SAP Portal .NET Runtime 2.5 (PDK for MS.NET 2.5)
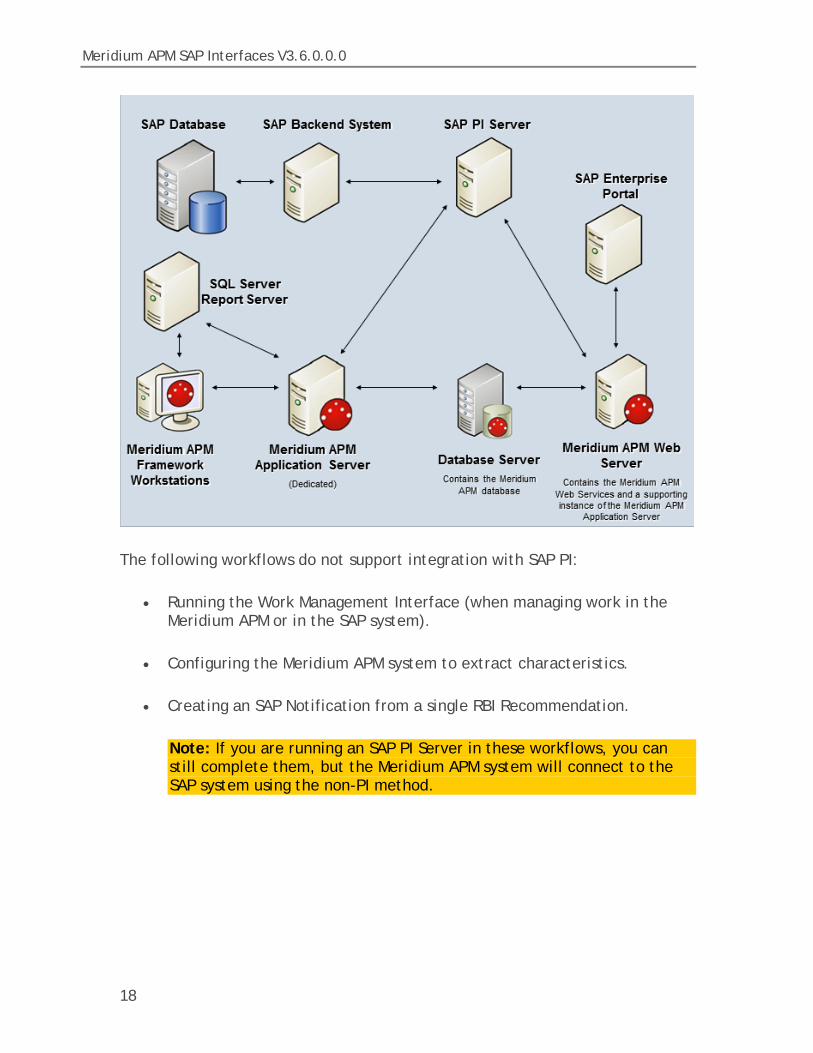
The following image shows how these additional machines should be incorporated into the basic Meridium APM system architecture to support the SAP Interfaces.
Meridium APM SAP Interfaces V3.6.0.0.0
18
The following workflows do not support integration with SAP PI:
• Running the Work Management Interface (when managing work in the Meridium APM or in the SAP system).
• Configuring the Meridium APM system to extract characteristics.
• Creating an SAP Notification from a single RBI Recommendation.
Note: If you are running an SAP PI Server in these workflows, you can still complete them, but the Meridium APM system will connect to the SAP system using the non-PI method.

Basics
19
Overview of SAP Interfaces
Data Transfer Scenarios
You can transfer data between one SAP system and:
• A single Meridium APM data source that is connected to a single Meridium APM Application Server. This scenario is illustrated in the following image.
• Multiple Meridium APM data sources that are connected to the same Meridium APM Application Server. This scenario is illustrated in the following image.
• Multiple Meridium APM data sources that are connected to different Meridium APM Application Servers. This scenario is illustrated in the following image.

Meridium APM SAP Interfaces V3.6.0.0.0
20
Extraction Interfaces
About the Equipment and Functional Location Extraction Interfaces
Note: You can run the Equipment Extraction Interface and Functional Location Extraction Interface successfully only if the SAP Interfaces - Foundation license is active.
The Equipment Extraction Interface lets you extract Equipment items from your SAP system into your Meridium APM system. When you do so, for each SAP Equipment item that meets the criteria defined in the extraction report, a corresponding Equipment record is created in the Meridium APM database.
Likewise, the Functional Location Extraction Interface lets you extract Functional Locations from your SAP system into your Meridium APM system. When you do so, for each Functional Location that meets the criteria defined in the extraction report, a corresponding Functional Location record is created in the Meridium APM database.
Because the SAP system allows you to define a hierarchy, where Functional Locations are related to other Functional Locations and Equipment items are also related to Functional Locations, when you run either the Equipment Extraction Interface or the Functional Location Extraction Interface, the SAP hierarchy is maintained. In some cases, to maintain the hierarchy, placeholder records are created in the Meridium APM database to represent the SAP relationships.

Basics
21
For example, suppose that the SAP system contains the following Functional Locations and Equipment items, where the Functional Locations are shaded red, and the Equipment items are shaded green.
In this case, if you were run the Functional Location Extraction Interface, the following Functional Location records would be created automatically in the Meridium APM database:
• FL-101
• FL-101-A
• FL-101-A
Then, if you were run the Equipment Extraction Interface, the following Equipment record would be created automatically in the Meridium APM database:
• Equipment-1
This Equipment record would be linked automatically to the Function Location record for FL-101-A-01.
Suppose, however, that using the same SAP data structure example, you decide to run the Equipment Extraction Interface before running the Functional Location Extraction Interface. In this case, when running the Equipment Extraction Interface, the Equipment record Equipment-1 would be created automatically to represent that SAP Equipment item. In addition, the following

Meridium APM SAP Interfaces V3.6.0.0.0
22
placeholder Functional Location record would also be created automatically to represent the SAP Functional Location that is directly associated with the Equipment:
• FL-101-A-01
The Equipment record would be linked automatically to the Functional Location record FL-101-A-01. Note that this placeholder record would contain a value only in the Functional Location key fields (defined by the current Functional Location Extraction Interface mappings). You would need to run the Functional Location Extraction Interface to populate the remaining fields in the placeholder Functional Location record.
Characteristics Extraction Interfaces
About the Characteristics Extraction Interfaces
Note: You can run the Characteristics Extraction Interfaces successfully only if the SAP Interfaces - Technical Characteristics license is active.
In SAP, you can assign specific characteristics to Equipment and Functional Locations. Each characteristic belongs to a classification, and each classification belongs to a class type, as illustrated in the following image.

Basics
23
For example, the class type Equipment might contain the classification Storage Tanks, which might contain the characteristics Diameter and Wall Thickness, as illustrated in the following image.
When you extract Equipment and Functional Locations from SAP into the Meridium APM system, only basic, common information is stored in the Equipment and Functional Location records that get created during the extraction process. If you want to extract the corresponding characteristics, you will need to run the Equipment Characteristics Interface and Functional Location Characteristics Interface. When you run these interfaces, Technical Characteristic records are created to store the characteristics that have been configured to be extracted, and these records are linked automatically to the appropriate Equipment and Functional Location records.
Characteristics Extraction Interfaces: Actions and Results
In SAP, you can assign specific characteristics to Equipment and Functional Locations. Each characteristic belongs to a classification, and each classification belongs to a class type. In Meridium APM, you can configure which characteristics you want to extract from SAP. When you do so, various actions that you perform in the Meridium APM system and the SAP system cause

Meridium APM SAP Interfaces V3.6.0.0.0
24
specific results. The tables in this topic describe these actions and their results.
Meridium APM Actions and Results
Action Result Notes
Select the Extract From CMMS System check box in a CMMS Characteristic record.
The next time the Equipment Characteristics Extraction or Functional Location Characteristics Extraction Interface is run, the characteristic is extracted.
During the extraction process, a corresponding Technical Characteristic record is created.
Clear the Extract From CMMS System check box in a CMMS Characteristic record.
If a Technical Characteristic records has been created using this CMMS Characteristic record, it is not deleted automatically when you delete the CMMS Characteristic record. Instead, the next time that the Equipment Characteristics Extraction or Functional Location Characteristics Extraction Interface is run, the corresponding Technical Characteristic record is deleted.
If you want to begin extracting the characteristic again, you will need to select the Extract From CMMS System check box.

Basics
25
Action Result Notes
Delete a CMMS Characteristic record.
If a Technical Characteristic record has been created using this CMMS Characteristic record, it is not deleted automatically when you delete the CMMS Characteristic record. Instead, the next time that the Equipment Characteristics Extraction or Functional Location Characteristics Extraction Interface is run, the corresponding Technical Characteristic record is deleted. In addition, until the CMMS Characteristic record is recreated and flagged for extraction, the characteristic is no longer extracted beginning with the next time the Equipment Characteristics Extraction or Functional Location Characteristics Extraction Interface is run.
If you want to begin extracting the characteristic again, you will need to:
1. Refresh the Meridium APM system to reflect the current SAP characteristics, which will cause the CMMS Characteristic record to be recreated.
2. Select the Extract From CMMS System check box in that CMMS Characteristic record.

Meridium APM SAP Interfaces V3.6.0.0.0
26
Action Result Notes
Delete a CMMS Classification record.
All CMMS Characteristic records that were linked to the CMMS Classification record are deleted automatically. If a Technical Characteristic record has been created using this CMMS Classification record, it is not deleted automatically when you delete the CMMS Classification record. Instead, the next time that the Equipment Characteristics Extraction or Functional Location Characteristics Extraction Interface is run, the corresponding Technical Characteristic records are deleted automatically. In addition, until the CMMS Classification record is recreated and flagged for extraction, characteristics belonging to that classification are no longer extracted beginning with the next time the Equipment Characteristics Extraction or Functional Location Characteristics Extraction Interface is run.
If you want to begin extracting characteristics belonging to this classification again, you will need to:
1. Refresh the Meridium APM system to reflect the current SAP classifications, which will cause the CMMS Classification record to be recreated automatically.
2. Select the Extract From CMMS System check box in the CMMS Classification record.
3. Refresh the Meridium APM system to reflect the current SAP characteristics, which will cause the CMMS Characteristic records that were previously deleted to be recreated automatically.
4. Select the Extract From CMMS System check box in the appropriate CMMS Characteristic records.

Basics
27
Action Result Notes
Delete a CMMS Classification Type record.
All CMMS Classification and CMMS Characteristic records that were linked (directly or indirectly) to the CMMS Classification Type record are deleted automatically. If a Technical Characteristic record has been created using this CMMS Classification Type record, it is not deleted automatically when you delete the CMMS Classification Type record. Instead, the next time that the Equipment Characteristics Extraction or Functional Location Characteristics Extraction Interface is run, the Technical Characteristic record is deleted automatically. In addition, until the CMMS Classification Type record is recreated and its CMMS Classification and CMMS Characteristic records are flagged for extraction, NO characteristics are extracted beginning with the next time the Equipment Characteristics Extraction or Functional Location Characteristics Extraction Interface is run.
If you want to begin extracting characteristics again, you will need to:
1. Recreate the CMMS Classification Type record.
2. Refresh the Meridium APM system to reflect the current SAP classifications and characteristics, which will cause CMMS Classification records to be recreated.
3. Select the Extract From CMMS System check box in the desired CMMS Classification records.
4. Refresh the Meridium APM system to reflect the current SAP classifications and characteristics, which will cause CMMS Classification records to be recreated.
5. Select the Extract From CMMS System check box in that CMMS Characteristic record.

Meridium APM SAP Interfaces V3.6.0.0.0
28
SAP Actions and Results
Action Result
Specify a value for a characteristic that is configured to be extracted.
The next time the Equipment Characteristics Extraction or Functional Location Characteristics Extraction Interface is run, a Technical Characteristic record is created and linked to the corresponding Equipment or Functional Location record.
Remove a value for a characteristic that is configured to be extracted.
The next time the Equipment Characteristics Extraction or Functional Location Characteristics Extraction Interface is run, the corresponding Technical Characteristic record is updated by removing the value from the Value field.
Assign a new classification to an Equipment or Functional Location, and specify values for the characteristics belonging to that class.
The next time the Equipment Characteristics Extraction or Functional Location Characteristics Extraction Interface is run, Technical Characteristic records representing the new characteristic values are created and linked to the corresponding Equipment or Functional Location record.
Unassign a classification from an Equipment or Functional Location.
The next time the Equipment Characteristics Extraction or Functional Location Characteristics Extraction Interface is run or you refresh the Meridium APM system to reflect current SAP characteristics, the corresponding Technical Characteristic record is deleted.
Delete a characteristic from a classification.
The next time the Equipment Characteristics Extraction or Functional Location Characteristics Extraction Interface is run, the corresponding Technical Characteristic record is deleted.
Basics
29
Notification and Order Extraction Interface
About the Notification and Order Extraction Interface
Note: You can run the Notification and Order Extraction Interface only if the SAP Interfaces - Foundation license is active.
You can extract Orders and Notifications from SAP to create Work History records and Work History Detail records in Meridium APM if those Orders and Notifications are associated with a Technical Object. To do so, you will need to run one of the reports that Meridium APM supplies for this purpose. The table in this topic indicates the report that you should run when you perform a certain action on Orders and Notifications in SAP.
When you extract an Order (with or without Notifications), the following Work History records are created:
• One Work History record to represent the Order Header, which appears on the HeaderData tab in SAP. This Work History record will be created for the Technical Objects that appears on the HeaderData tab in SAP. This means that the Work History record will be populated with values representing those Technical Objects, and it will also be linked to the Equipment or Functional Location records representing those objects. Only this Work History record will contain cost values and estimated and actual confirmed hours.
• One Work History record per object that appears in the Order's object list (i.e., on the Objects tab when you are viewing the Order). These Work History records will be created for the Technical Objects that are associated specifically with those items. This means that these Work History records will be populated with values representing those Technical Objects, and they will also be linked to the Equipment or Functional Location records representing those Technical Objects.
When you extract a Notification that is not associated with an Order, one Work History record is created to represent the Notification, and this Work History record will be linked to Equipment and Functional Location records representing the Notification reference objects. Specifically:
• If the Notification has only an Equipment reference object, the Work History record for that Notification will be linked to an Equipment record.

Meridium APM SAP Interfaces V3.6.0.0.0
30
• If the Notification has only a Functional Location reference object, the Work History record for that Notification will be linked to a Functional Location record.
• If the Notification has Equipment and Functional Location reference objects, the Work History record for that Notification will be linked to an Equipment record and a Functional Location record.
If a Notification has items, one Work History Detail record will be created to represent each item.
Note: You can extract Orders and Notifications manually, or you can schedule them to be extracted automatically on a recurring basis. The following tables explain the reports that you will need to run to extract them manually.
Orders Without Notifications
After you: ...Run this report: ...To see this result:
Create an Order that is not associated with a Notification.
/MIAPM/WH_WORK_ORDER A Work History record is created.
Update the Order referenced above.
/MIAPM/WH_WORK_ORDER The corresponding Work History record is updated.
Orders With Notifications
Notifications without items
After you: ...Run this report: ...To see this result:
Create an Order that is associated with a Notification without items.
/MIAPM/WH_NOTIF_WITH_WO A Work History record is created to capture the data in the Order and the Notification.
Update only the Order.
/MIAPM/WH_NOTIF_WITH_WO The corresponding Work History record is updated.

Basics
31
After you: ...Run this report: ...To see this result:
Update only the Notification.
/MIAPM/WH_NOTIF_WITH_WO
The corresponding Work History and Work History Detail records are updated.
Update both the Order and Notification.
/MIAPM/WH_NOTIF_WITH_WO
The corresponding Work History and Work History Detail records are updated.
Notifications with items
After you: ...Run this report: ...To see this result:
Create an Order that is associated with a Notification with items.
/MIAPM/WH_NOTIF_WITH_WO -AND- /MIAPM/WORK_HISTORY_DETAILS
A Work History record to capture the data in the Order and the Notification. -AND- A Work History Detail record is created to capture additional data in the Notification.
Update only the Order.
/MIAPM/WH_NOTIF_WITH_WO The corresponding Work History record is updated.
Update only the Notification.
/MIAPM/WH_NOTIF_WITH_WO -AND- /MIAPM/WORK_HISTORY_DETAILS
The corresponding Work History and Work History Detail records are updated.

Meridium APM SAP Interfaces V3.6.0.0.0
32
After you: ...Run this report: ...To see this result:
Update both the Order and Notification.
/MIAPM/WH_NOTIF_WITH_WO -AND- /MIAPM/WORK_HISTORY_DETAILS
The corresponding Work History and Work History Detail records are updated.
Notifications Without Orders
Notifications without items
After you: ...Run this report: ...To see this result:
Create a Notification without items, but do not associate it with an Order.
/MIAPM/WH_NOTIFICATION A Work History record is created to capture the data in the Notification.
Update the Notification referenced above.
/MIAPM/WH_NOTIFICATION The corresponding Work History record is updated.
Notifications with items
After you: ...Run this report: ...To see this result:
Create a Notification with items, but do not associate it with an Order.
/MIAPM/WH_NOTIFICATION -AND- /MIAPM/WORK_HISTORY_DETAILS
A Work History record and a Work History Detail record are created to capture the data in the Notification.
Update the Notification referenced above.
/MIAPM/WH_NOTIFICATION -AND- /MIAPM/WORK_HISTORY_DETAILS
The corresponding Work History and Work History Detail records are updated.

Basics
33
Examples of Extracting Orders and Notifications
Order Without Notification: No Items on Object List
Suppose the following SAP Order exists, where the red outlines indicate that:
• The Order number is 4000141.
• There is no associated Notification.
• The reference Technical Object is Equipment V100.

Meridium APM SAP Interfaces V3.6.0.0.0
34
In addition, you can see from the Objects tab that there are no items on the object list:
If you were to extract this Order, the following Work History record would be created, where the red outlines indicate that:
• The referenced technical object is V100.
• The Work History record is linked to the Equipment record V100.
Note: The Equipment record V100 is created during the Order extraction process as a placeholder record. You would need to run the Equipment Extraction Interface to populate the Equipment fields.

Basics
35
Order With Notification: Items on Object List
Suppose the following SAP Order exists, where the red outlines indicate that:
• The Order number is 4000483.
• The associated Notification number is 10001363.
• The reference Technical Objects are Functional Location ABC-PQR/12-34-56/8 and Equipment TURBINE.

Meridium APM SAP Interfaces V3.6.0.0.0
36
In addition, you can see from the Objects tab that there are items on the object list:

Basics
37
If you were to extract this Order, two Work History records would be created:
• One for the Order and Notification combination.
• One for the object list item EQABC123.
Work History Record for the Order and Notification Combination
The following image illustrates the Work History record for the Order and Notification combination, where the associated Technical Object is TURBINE. You can see that the Work History record is also linked to the Equipment record TURBINE.
Note: The Equipment record TURBINE is created during the Order extraction process as a placeholder record. You would need to run the Equipment Extraction Interface to populate the Equipment fields.
If the Notification contained items, a Work History Detail record would also be created to capture additional information about that Notification.

Meridium APM SAP Interfaces V3.6.0.0.0
38
Work History Record for the Object List Item EQABC123
The following image illustrates the Work History record for the object list item EQABC123. You can see that the Work History record is also linked to the Equipment record EQABC123.
Note: The Equipment record EQABC123 and the associated Functional Location record ABC-XYZ-DE-VW-123456 are created during the Order extraction process as placeholder records. You would need to run the Equipment Extraction Interface and the Functional Location Extraction Interface to populate the Equipment record and Functional Location record fields.
Notification Without Order
Notification Without Order: Without Notification Items
Suppose the following SAP Notification exists, where the red outlines indicate that:

Basics
39
• The Notification number is 10001364.
• The reference Technical Object is Functional Location A1.
• There are no items.

Meridium APM SAP Interfaces V3.6.0.0.0
40
If you were to extract this Notification, the following Work History record would be created, where the red outlines indicate that:

Basics
41
• The Work History record is associated with the Notification's Technical Object A1.
• The Work History record is linked to the Functional Location record A1.
Note: The Functional Location record A1 is created during the Notification extraction process as a placeholder record. You would need to run the Functional Location Extraction Interface to populate the Functional Location fields.
Notification Without Order: With Notification Items
Suppose the following SAP Notification exists, where the red outlines indicate that:
• The Notification number is 10001365.
• The reference Technical Object is Functional Location F1.

Meridium APM SAP Interfaces V3.6.0.0.0
42
• There are two items.

Basics
43
If you were to extract this Notification, the following records would be created:
• One Work History record.
• Two Work History Detail records: one to capture additional information about the first notification item, and another to capture additional information about the second notification item.
The following images illustrates the Work History record, where the red outlines indicate that:
• The Work History record is associated with the Notification's Technical Object F1.
• The Work History record is linked to the two Work History Detail records.
• The Work History record is linked to the Functional Location record F1.
Note: The Functional Location record F1 is created during the Notification extraction process as a placeholder record. You would need to run the Functional Location Extraction Interface to populate the Functional Location fields.

Meridium APM SAP Interfaces V3.6.0.0.0
44
About the Notification Creation Interface
Note: You can create an SAP Notification from a Meridium APM Recommendation record successfully only if the SAP Interfaces - Foundation license is active.
You can create SAP Notifications from Meridium APM Recommendation records using either of the following options:
• Non-PI-based approach
• PI-based approach
The process that you will use in the Meridium APM Framework application is the same for each approach. The technology that is responsible for creating the SAP Notification, however, differs.

Basics
45
Work Management Interface
About the Work Management Interface
Note: You can run the Work Management Interface only if the SAP Interfaces - Work Management license is active.
The Work Management Interface allows you manage scheduled work in one of two places:
• In Meridium APM: This option allows you to create Task records in Meridium APM and transfer the data to SAP. Doing so allows you to update records in Meridium APM and transfer the updates to SAP.
• In SAP: This option allows you to create and manage data in SAP and transfer it to Meridium APM as Task records. Doing so allows you to make updates in SAP and transfer the updates to Meridium APM.
About Managing Scheduled Work in Meridium APM
Workflow for Managing Scheduled Work in Meridium APM
If you want to manage scheduled work in Meridium APM, you will need to create Task records in Meridium APM, transfer them to SAP as Orders, and view the data in SAP. To do so, you will need to complete the following steps:
1. In the Meridium APM Framework, create an Inspection Task or Calibration Task record. In the Task record, specify a valid SAP Task List in the Task List field, and type the desired call horizon in the Call Horizon field.
Note: To create the Task record, make sure to use the Task Builder and not the Record Manager. Otherwise, the Task record will not be linked to the Equipment or Functional Location record, and the Work Management Interface will not work as expected.
2. In the Meridium APM Schedule Manager, run the Meridium APM scheduled item that is provided for the purpose of creating SAP Orders. This step will create Orders in SAP automatically based on the current date and the Next Date and Call Horizon in the Task record.

Meridium APM SAP Interfaces V3.6.0.0.0
46
Note: Typically, the scheduled item will be configured to run on a recurring basis (e.g., nightly). In this case, each time the item is run, an Order will be created automatically if the Task does not already contain a value in the Work Order Number field and the current date, Next Date, and Call Horizon in a Task record meet the Order creation criteria.
3. In the Meridium APM Framework, create an Inspection record or Calibration Event record, and link it to the Inspection Task or Calibration Task record that you created in step 2. In the Inspection or Calibration Event record, type a value in the Actual Work Time text box, and select the Inspection Task Complete or Calibration Close check box. This step will create a Confirmation record in Meridium APM and a Confirmation in SAP. The SAP Confirmation will be associated with the Operation that is associated with the Order that was generated automatically as a result of performing step 2.
Note: To create the Inspection record Calibration Event record, make sure to use the process defined by the module and not the Record Manager. Otherwise, the record will not be linked to the Equipment or Functional Location record, and the Work Management Interface will not work as expected.
4. In the Meridium APM Framework, if needed, update the Confirmation record that was created and linked to the Task record. This step will update the SAP Confirmation automatically.
You can see steps 1 through 3 outlined in the following image. Note that the numbered squares represent actions that you must perform manually. Hexagons represent actions that are performed automatically.

Basics
47

Meridium APM SAP Interfaces V3.6.0.0.0
48
How Does Meridium APM Use the Call Horizon?
When the scheduled item that Meridium APM delivers for the purpose of creating SAP Orders is executed, the Meridium APM system performs a calculation on the Next Date and Call Horizon values in all Task records. The calculated result is passed into the query Get Tasks for Work Order Generation. If the result meets the criteria defined for the query column ([Task].[Next Date] - [Task].[Call Horizon]), the Task record meets the remaining criteria defined in the query, and the Task does not already contain a value in the Work Order Number field, an Order will be created from the Task record.
Using the baseline query, an SAP Order will be created if the Task record meets all query criteria (e.g., the Maintenance Plan field does not contain a value) and the calculated result meets the following criteria:
Task Next Date - Task Call Horizon = A date between the Last Executed Date and the Next Execution Date of the scheduled item
For example, suppose the scheduled item contains the following values.
Last Executed Date July 1, 2008 1:00:00 A.M.
Next Execution Date July 2, 2008 1:00:00 A.M.
Based on these values, an SAP Maintenance Order will be created automatically if the Next Date of the Task record minus its Call Horizon is between July 1, 12:00:00 A.M. and July 2, 12:00:00 A.M.
Suppose a Task record contains the following values.
Next Date July 11, 2008 3:00:00 A.M.
Call Horizon 10
Using these Task record values, if you subtract the Call Horizon, 10 days, from the Next Date, July 11, 2008 3:00:00 A.M., the result is July 1, 2008 3:00:00 A.M.
Because July 1, 2008 3:00:000 A.M. falls between the Last Executed Date of July 1, 2008 1:00:00 A.M. and July 2, 2008 1:00:00 A.M., the Task record will be used to generate an Order (assuming that the Task record meets the remaining query criteria).
In other words:
Basics
49
July 11, 2008 3:00:00 A.M. (Task Next Date) - 10 (Call Horizon) = July 1, 2008 3:00:00 A.M. (A date between the Last Executed Date and the Next Execution Date of the scheduled item)
Note: If the scheduled item is being executed for the first time, Meridium APM assumes a Last Executed Date of 1/1/1900. Also, if the Call Horizon field does not contain a value, the value is treated as zero (0).
About Managing Scheduled Work in SAP
Workflow for Managing Scheduled Work in SAP
If you currently use SAP to schedule Orders and want to continue doing so, you can transfer data from SAP to Meridium APM, view the data in Meridium APM, and make changes to Meridium APM records that will be transferred back to the master SAP Orders. To do so, you will need to complete the following steps:
1. In SAP, in an Operation that belongs to a Task List on a Maintenance Plan, enter a value or combination of values that has been configured to trigger the creation of a Meridium APM Task record.
2. In SAP, run the /MIAPM/WORK_MANAGEMENT_INF report. This step will create or update Task records automatically in Meridium APM. Additionally, if the Task records are created from Maintenance Plans that are associated with Equipment or Functional Locations, corresponding Equipment and Functional Location records will be created automatically and linked to the new Task records. These Equipment and Functional Location records will contain values only in key fields as defined in the mappings (e.g., Equipment ID, Functional Location Internal ID, CMMS System). You will need to run the Equipment Extraction and Functional Location Extraction Interfaces to populate the remaining fields.
3. In the Meridium APM Framework, create an Inspection record or Calibration Event record, and link it to the Task record that was created automatically as a result of performing step 2. Type a value in the Actual Work Time text box in the Event record, and select the Inspection Task Complete or Calibration Close check box, as appropriate. This step will create a Confirmation record in Meridium APM and a Confirmation in SAP. The SAP Confirmation will be associated with the Operation that is associated with the Order that belongs to the Maintenance Plan that was used to create the Task record.

Meridium APM SAP Interfaces V3.6.0.0.0
50
Note: To create the Inspection record Calibration Event record, make sure to use the process defined by the module and not the Record Manager. Otherwise, the record will not be linked to the Equipment or Functional Location record, and the Work Management Interface will not work as expected.
4. In the Meridium APM Framework, if needed, update the Confirmation record that was created and linked to the Task record. This step will update the SAP Confirmation automatically.
Note: Meridium APM supports integration with Single Cycle Maintenance Plans only.
You can see steps 1 through 3 outlined in the following image. Note that the numbered squares represent actions that you must perform manually. Hexagons represent actions that are performed automatically.

Basics
51
How are Intervals and UOMs Derived in Task Records?
If you create or update Task records from SAP data, the interval and unit of measure values in the Task record will be derived based on the cycle information and unit of measure in the SAP Maintenance Plan and the configuration of the /MIAPM/TASK_CNF table.

Meridium APM SAP Interfaces V3.6.0.0.0
52
For example, suppose the /MIAPM/TASK_CNF table indicates that Inspection Task records that are created from SAP should contain a unit of measure of MON. If a Maintenance Plan has a cycle of 60 Days, the Inspection Task record will contain an interval of 2 months. The following table explains the equations that will be used to convert SAP values and units of measures to Meridium APM values and units of measure.
Maintenance Plan UOM
Task UOM
Conversion Equation Example
HR DAYS Task value = SAP value / 24
SAP value = 12 H Task value = 12 / 24 Task value = 0.5 DAYS
HR MON Task value = (SAP value / 24) / 30
SAP value = 360 H Task value = (360 / 24) / 30 Task value = 0.5 MON
D or DAY DAYS None SAP value = 24 D Task value = 24 DAYS
D or DAY MON Task value = SAP value / 30
SAP value = 60 D Task value = 60 / 30 Task value = 2 MON
D or DAY YEARS Task value = SAP value / 365
SAP value = 730 D Task value = 730 / 365 Task value = 2 YEARS
MON DAYS Task value = SAP value X 30
SAP value = 2 MON Task value = 2 X 30 Task value = 60 DAYS
MON MON None SAP value = 2 MON Task value = 2 MON
MON YEARS Task value = SAP value / 12
SAP value = 24 MON Task value = 24 / 12 Task value = 2 YEARS

Basics
53
Maintenance Plan UOM
Task UOM
Conversion Equation Example
YR DAYS Task value = SAP value X 365
SAP value = 2 YR Task value = 2 X 365 Task value = 730 DAYS
YR MON Task value = SAP value X 12.1667
SAP value = 2 YR Task value = 2 X 12.1667 Task value = 24.3334 MON
YR YEARS None SAP value = 2 YR Task value = 2 YEARS
Note that if you are updating a Task record that was created from an SAP Maintenance Plan whose schedule has changed since the Task was created, when the Task record is updated, Meridium APM will reset all interval values in the Task record to the new interval value in the Maintenance Plan.
About Discontinued Task Records
If a Task record was created from SAP data and you later modify the SAP data in a way that causes that Task record to become obsolete, you can run the /MIAPM/WORK_MANAGEMENT_INF report in SAP to resolve the differences.
When you run the report, Meridium APM will search the database for Task records with a Maintenance Plan, Maintenance Item, Task List, and Operation combination that is no longer valid. If it finds one:
• The Task ID of the invalid Task record will be set to **DISCONTINUED**.
• The value in the Reason field will be pre-pended with the following:
<Date> - <User ID> - Task was discontinued due to changes in SAP. Previous Task ID was '<previous Task ID.'
Where <Date> is the date on which the Task ID was set to **DISCONTINUED** and <User ID> is the user name that is specified in the /MIAPM/PARAMS database table in SAP.

Meridium APM SAP Interfaces V3.6.0.0.0
54
For example, suppose a Calibration Task record was created from an Operation with the control key ZMI2. If you later change the control key and run the report, the Calibration Task record will be discontinued.
Note that when a Task ID in a Task record has already been set to **DISCONTINUED**, if you run the /MIAPM/WORK_MANAGEMENT_INF report again and the Task data is still not valid, the Task record will be skipped. In other words, its Reason field will not contain more than one instance of the text **DISCONTINUED**.
Note: If you modify the SAP data so that it corresponds to the existing Task record again, running the report will cause Meridium APM to update the discontinued Task record instead of creating a new Task record. The value in the Reason field in the updated Task record will be pre-pended with the following: <Date> - <User ID> - Changes in SAP have caused this Task to become active again, where <Date> is the date on which the Task record was updated and <User ID> is the user name that is specified in the /MIAPM/PARAMS database table in SAP.
Data Structure
SAP Interfaces Data Model
Like all Meridium APM modules, the Meridium APM SAP Interfaces feature consists of entity families, relationship families, and business rules. When attempting to understand and make use of the SAP Interfaces functionality, it can be helpful to visualize the SAP Interfaces data model.
Because you should already be familiar with the concept of records and viewing records in the Meridium APM Record Manager, as you attempt to get your bearings in the SAP Interfaces feature, it may be useful to remember that the SAP Interfaces feature simply lets you create, view, and manage records.
The following image illustrates how families used by the Meridium APM SAP Interfaces module are related to one another.

Basics
55
Each interface is responsible for creating or updating one or more records that are displayed in the image. For example, when you run the Equipment Extraction Interface, Equipment records are created or updated.

Meridium APM SAP Interfaces V3.6.0.0.0
56
Note that although the data model image does not show the relationship, Equipment and Functional Location records are also linked to Site Reference records.
How are Equipment and Functional Location Records Linked to Site Reference Records?
Some companies that use the SAP software have multiple sites, or locations, around the world. Each site might use its own SAP system.
You can define your SAP systems, define your sites, and associate each SAP system with the site that uses it. When you extract Equipment and Functional Locations from SAP, the CMMS System field in the Equipment and Functional Location records in Meridium APM will be populated automatically with the name of the source SAP system, using the format <SYSID>-<CLIENT>, where <SYSID> is the System ID of the SAP system and <Client> is the Client number.
Then, if an SAP System record contains the same value in the Name field, that Equipment or Functional Location record will be linked automatically to the Site Reference record to which that SAP System record is linked.
For example, suppose your database contains the following Site Reference records and SAP System records.

Basics
57
From these records, you can see that Site A uses System 1 and Site B uses System 2.
Suppose that the following Equipment exists in System 1 and System 2.
System 1 System 2
Equipment 100 Equipment 200
Equipment 101 Equipment 201
In this case, if you run the Equipment Extraction Interface on System 1, the following Equipment records will be created in Meridium APM:
• Equipment 100
• Equipment 101
The CMMS System field in each of these records will be populated automatically with the value System 1. Because a Site Reference record exists with the same value, System 1, in the Name field, the Equipment records will be linked to that Site Reference record, as shown in the following image.

Meridium APM SAP Interfaces V3.6.0.0.0
58
To facilitate this workflow, the following queries are provided in the Catalog folder \\Public\Meridium\Modules\SAP Integration Interfaces\Queries:
• Get Site Reference for Equipment
• Get Site Reference for Functional Location
When you extract Equipment and Functional Locations from SAP, the values in the Equipment ID field and the CMMS System field are used to ensure that duplicate Equipment records do not get created in the Meridium APM system. For instance, continuing with the previous example, assume that you have two SAP systems: System 1 and System 2. If each one had an Equipment called Equipment 103 and you extracted Equipment 103 from System 1, an Equipment record would be created with the following values:
• Equipment ID: Equipment 103
• CMMS System: System 1

Basics
59
If you extracted Equipment 103 from System 1 again, an additional Equipment record would not get created. Instead, the existing Equipment record would be updated with any changes in SAP.
Likewise, if you extracted Equipment 103 from System 2, a separate Equipment record would be created with the following values:
• Equipment ID: Equipment 103
• CMMS System: System 2


61
Installation, Upgrade, and Configuration
First-Time Deployment Workflow
First-Time Deployment Checklist - PI Customers
If you are using an SAP PI Server, complete the steps in the following table to deploy and configure the SAP Interfaces for the first time. The steps in this section of the documentation provide all the information that you need to deploy and configure the SAP Interfaces on top of the basic Meridium APM system architecture.
Steps are marked as Required in the Required/Optional column if you must perform that step to take advantage of the SAP Interfaces functionality.
The person responsible for completing each task may vary within your organization. We recommend that the steps be performed in relatively the same order in which they are listed in the table.
Step Task Associated Interface Required/Optional
1 Install the Meridium APM Web Services on the Meridium APM Web Server.
All interfaces Required
2 Install the SAP Interfaces ABAP Add-On on your SAP System.
All interfaces Required
3 Configure the System Landscape Directory (SLD) via the SAP Exchange Infrastructure.
All interfaces except the Work Management Interface
Required
4 Import the configuration object. All extraction interfaces
Required
5 Modify the baseline communication channels.
All extraction interfaces
Required

Meridium APM SAP Interfaces V3.6.0.0.0
62
Step Task Associated Interface Required/Optional
6 Activate the scenarios that were created by the configuration object.
All extraction interfaces
Required
7 For each additional Meridium APM data source to and from which you want to transfer data:
1. Create a new receiver determination for each baseline configuration scenario.
2. Create a new interface determination for each baseline configuration scenario.
3. Create a new receiver agreement for each baseline configuration scenario.
4. Activate the changes.
All extraction interfaces
Required

Installation, Upgrade, and Configuration
63
Step Task Associated Interface Required/Optional
8 Deploy and configure the Notification Creation Interface by completing the following steps:
1. Import the notification design object.
2. Import the notification configuration object.
3. Activate the RFCReceiverToECC object.
4. Activate the SOAP Communication Channels.
Note: You must complete this step only if you are using SAP PI 7.3.
5. Import the .EPA file. 6. Import the .PAR file. 7. Configure the APMConfiguration
Object. 8. Configure the R3Systems object. 9. Grant the Everyone group
permissions to the PM Notification iView.
10. Determine which users can see the APM PBNW Certification tab.
11. Map users to the SAP_R3 System. 12. Configure the Query iView.
Notification Creation Interface
Required
9 Create an RFC Destination on your SAP System.
Work Management Interface
Required
10 Create an entry in the /MIAPM/PARAMS table for each unique combination of Meridium APM Application server and data source to and from which you want to transfer data.
All except Notification Creation Interface
Required
11 Populate the /MIAPM/PI_PARAMS table. All extraction interfaces
Required
12 Using the /MIAPM/TASK_CNF table, identify the Operation values that will be used to trigger the creation of Inspection Task and Calibration Task records.
Work Management Interface
Required

Meridium APM SAP Interfaces V3.6.0.0.0
64
Step Task Associated Interface Required/Optional
13 Configure field mappings. All interfaces Required only if you want to modify the baseline field mappings.
14 Modify the Windows Services file on the Meridium APM Application Server.
Work Management Interface
Required
15 Modify the CSCS.exe.config file on the Meridium APM Application Server to define your SAP systems.
Work Management Interface
Required
16 Make sure that the Meridium Core SAP Connector service is running on the Meridium APM Application Server.
Work Management Interface
Required
17 Define the connection information for the SAP PI Server in the file Meridium.SAP.CertifiedInterface.Config.xml on the Meridium APM Application Server.
Notification Creation Interface
Required
18 Review the SAP Interfaces data model to determine which relationship definitions you will need to modify to include your custom equipment and location families.
All interfaces Required only if you store equipment and location information in families other than the baseline Equipment and Functional Location families
19 Assign the desired Security Users to the SAP Interfaces Security Groups via the Configuration Manager application.
All Interfaces Required
20 Configure the Meridium APM system to create Notifications from Recommendation records belonging to customer-defined Recommendation families. You can do so via the Configuration Manager application.
Notification Creation Interface
Required only if you want to generate SAP Notifications from Recommendation records that belong to customer-defined subfamilies of the root Recommendation family.

Installation, Upgrade, and Configuration
65
Step Task Associated Interface Required/Optional
21 Configure the Meridium APM system to use the PI approach for creating Notifications. You can do so via the Configuration Manager application.
Notification Creation Interface
Required
22 Configure the Meridium APM system to transfer data between SAP items and Task records. You can do so via the Configuration Manager.
Work Management Interface
Required
23 Configure the Meridium APM system to create Confirmations from Calibration Event records via the Configuration Manager application.
Work Management Interface
Required
24 Configure the Meridium APM system to create Confirmations from Inspection records. You can do so via the Configuration Manager.
Work Management Interface
Required
25 Create SAP System records to identify your SAP systems. You can do so via the Meridium APM Framework application.
Work Management Interface -and- Functional Location Characteristics Extraction Interface -and- Equipment Characteristics Extraction Interface -and- Notification Creation Interface
Required

Meridium APM SAP Interfaces V3.6.0.0.0
66
Step Task Associated Interface Required/Optional
26 Test the SAP connection information that you specified in your SAP System records. You can do so via the Meridium APM Framework application.
Work Management Interface -and- Functional Location Characteristics Extraction Interface -and- Equipment Characteristics Extraction Interface -and- Notification Creation Interface
Optional
27 Create Site Reference records, and link them to your SAP System records. You can do so via the Meridium APM Framework application.
Work Management Interface -and- Functional Location Extraction Interface -and- Equipment Extraction Interface -and- Notification Creation Interface
Optional

Installation, Upgrade, and Configuration
67
Step Task Associated Interface Required/Optional
28 Configure the Meridium APM system to extract Equipment and Functional Location characteristics from SAP. You can do so via the Meridium APM Framework application.
Functional Location Characteristics Extraction Interface -and- Equipment Characteristics Extraction Interface
Required
29 Configure the Get Tasks for Work Order Generation query via the Meridium APM Framework application.
Work Management Interface
Optional
30 Create a scheduled item in the Schedule Manager application for the purpose of creating Work Orders in SAP.
Work Management Interface
Required only if you are managing scheduled work in the Meridium APM system.
First-Time Deployment Checklist - Non-PI Customers
If you are not using an SAP PI Server, complete the steps in the following table to deploy and configure the SAP Interfaces for the first time. The steps in this section of the documentation provide all the information that you need to deploy and configure the SAP Interfaces on top of the basic Meridium APM system architecture.
Steps are marked as Required in the Required/Optional column if you must perform that step to take advantage of the SAP Interfaces functionality.
The person responsible for completing each task may vary within your organization. We recommend that the steps be performed in relatively the same order in which they are listed in the table.
Step Task Associated Interface Required/Optional
1 Install the Meridium APM Web Services on the Meridium APM Web Server.
All interfaces Required

Meridium APM SAP Interfaces V3.6.0.0.0
68
Step Task Associated Interface Required/Optional
2 Install the SAP Interfaces ABAP Add-On on your SAP System.
All interfaces Required
3 Modify the Windows Services file on the Meridium APM Application Server.
Work Management and Notification Management Interfaces
Required
4 Create an RFC Destination on your SAP System.
Work Management Interface
Required
5 Modify the CSCS.exe.config file on the Meridium APM Application Server to define your SAP systems.
Work Management Interface
Required
6 Make sure that the Meridium Core SAP Connector service is running on the Meridium APM Application Server.
Work Management Interface
Required
7 Create an entry in the /MIAPM/PARAMS table for each unique combination of Meridium APM Application server and data source to and from which you want to transfer data.
All except Notification Creation Interface
Required
8 Using the /MIAPM/TASK_CNF table, identify the Operation values that will be used to trigger the creation of Inspection Task and Calibration Task records.
Work Management Interface
Required
9 Configure field mappings. All interfaces Required only if you want to modify the baseline field mappings.

Installation, Upgrade, and Configuration
69
Step Task Associated Interface Required/Optional
10 Review the SAP Interfaces data model to determine which relationship definitions you will need to modify to include your custom equipment and location families.
All interfaces Required only if you store equipment and location information in families other than the baseline Equipment and Functional Location families
11 Assign the desired Security Users to the SAP Interfaces Security Groups via the Configuration Manager application.
All Interfaces Required
12 Configure the Meridium APM system to create Notifications from Recommendation records belonging to customer-defined Recommendation families. You can do so via the Configuration Manager application.
Notification Creation Interface
Required only if you want to generate SAP Notifications from Recommendation records that belong to customer-defined subfamilies of the root Recommendation family.
13 Configure the Meridium APM system to transfer data between SAP items and Task records. You can do so via the Configuration Manager application.
Work Management Interface
Required
14 Configure the Meridium APM system to create Confirmations from Calibration Event records. You can do so via the Configuration Manager application.
Work Management Interface
Required
15 Configure the Meridium APM system to create Confirmations from Inspection Event records. You can do so via the Configuration Manager application.
Work Management Interface
Required

Meridium APM SAP Interfaces V3.6.0.0.0
70
Step Task Associated Interface Required/Optional
16 Create SAP System records to identify your SAP systems. You can do so via the Meridium APM Framework application.
Work Management Interface -and- Functional Location Characteristics Extraction Interface -and- Equipment Characteristics Extraction Interface -and- Notification Creation Interface
Required
17 Test the SAP connection information that you specified in your SAP System records. You can do so via the Meridium APM Framework application.
Work Management Interface -and- Functional Location Characteristics Extraction Interface -and- Equipment Characteristics Extraction Interface -and- Notification Creation Interface
Optional

Installation, Upgrade, and Configuration
71
Step Task Associated Interface Required/Optional
18 Create Site Reference records, and link them to your SAP System records. You can do so via the Meridium APM Framework application.
Work Management Interface -and- Functional Location Extraction Interface -and- Equipment Extraction Interface -and- Notification Creation Interface
Optional
19 Configure the Meridium APM system to extract Equipment and Functional Location characteristics from SAP. You can do so via the Meridium APM Framework application.
Functional Location Characteristics Extraction Interface -and- Equipment Characteristics Extraction Interface
Required
20 Configure the Get Tasks for Work Order Generation query. You can do so via the Meridium APM Framework application.
Work Management Interface
Optional
21 Create a scheduled item in the Schedule Manager application for the purpose of creating Work Orders in SAP.
Work Management Interface
Required only if you are managing scheduled work in the Meridium APM system.

Meridium APM SAP Interfaces V3.6.0.0.0
72
Upgrade Workflow
PI Customers
PI Customers Upgrade Workflow
You can upgrade to V3.6.0.0.0 using the instructions that are provided in this section of the documentation. To access these instructions, click the starting version from which you are upgrading:
• V3.5.1
• V3.5.0 SP1 LP
• V3.5.0
• V3.4.5
Upgrading the SAP Interfaces from V3.5.1 to V3.6.0.0.0 (PI)
The following table lists the steps that are required to upgrade and configure the SAP Interfaces if you are using an SAP PI Server. These steps assume that you have completed the steps for upgrading the components in the basic Meridium APM system architecture.
Step Task Associated Interface Required/Optional
1 Upgrade the Meridium APM Web Services on the Meridium APM Web Server.
All interfaces Required
2 If you configured custom field mappings in V3.5.1, export your custom field mappings.
All interfaces Required
3 Upgrade the SAP Interfaces ABAP Add-On on your SAP System.
All interfaces Required

Installation, Upgrade, and Configuration
73
Step Task Associated Interface Required/Optional
4 If you configured custom field mappings in V3.5.1, reset the baseline field mappings.
All interfaces Required
5 Delete the previous version of the Software Component Version via the SAP Exchange Infrastructure.
All interfaces except the Work Management Interface
Required
6 If you configured custom field mappings in V3.5.1, import your custom field mappings.
All interfaces Required
7 Run the report /MIAPM/350P3_UPGRADE_EXCEPTION.
All interfaces Required
8 Configure the System Landscape Directory (SLD) on the SAP PI Server, which will create a new Software Component Version.
All interfaces except the Work Management Interface
Optional
9 Import the configuration object. All extraction interfaces
Required
10 Modify the baseline communication channels.
All extraction interfaces
Required
11 Activate the scenarios that were created by the configuration object.
All extraction interfaces
Required
12 For each additional Meridium APM data source to and from which you want to transfer data:
1. Create a new receiver determination for each baseline configuration scenario.
2. Create a new interface determination for each baseline configuration scenario.
3. Create a new receiver agreement for each baseline configuration scenario.
4. Activate the changes.
All extraction interfaces
Required

Meridium APM SAP Interfaces V3.6.0.0.0
74
Step Task Associated Interface Required/Optional
13 Run the report /MIAPM/342P2_UPGRADE_PARAMS.
All except Notification Creation Interface
Required
14 Start the Meridium Core SAP Connector service on the Meridium APM Application Server, and then restart the Meridium APM Application Server.
Work Management Interface -and- Notification and Order Extraction Interface
Required
15 Define settings in the file CSCS.exe.config on the Meridium APM Application Server to define your SAP systems.
Work Management Interface -and- Notification and Order Extraction Interface
Required
16 Restart the Meridium Core SAP Connector service on the Meridium APM Application Server.
Work Management Interface -and- Notification and Order Extraction Interface
Required
17 Define the connection information for the SAP PI Server in the file Meridium.SAP.CertifiedInterface.Config.xml on the Meridium APM Application Server.
Notification Creation Interface
Required

Installation, Upgrade, and Configuration
75
Step Task Associated Interface Required/Optional
18 Create new SAP System records to identify any new SAP systems that you were not using with the previous version of Meridium APM. You can do so via the Meridium APM Framework application.
Work Management Interface -and- Functional Location Characteristics Extraction Interface -and- Equipment Characteristics Extraction Interface
Required
19 Test the SAP connection information that you specified in your SAP System records that you created using the previous step. You can do so via the Meridium APM Framework application.
All interfaces except for the Notification Creation Interface
Optional
20 For each new SAP System record that you created in the previous step, link it to the appropriate Site Reference record. You can do so via the Meridium APM Framework application.
Work Management Interface
Optional
Upgrading the SAP Interfaces from V3.5.0 SP1 LP to V3.6.0.0.0 (PI)
The following table lists the steps that are required to upgrade and configure the SAP Interfaces if you are using an SAP PI Server. These steps assume that you have completed the steps for upgrading the components in the basic Meridium APM system architecture.
Step Task Associated Interface Required/Optional
1 Upgrade the Meridium APM Web Services on the Meridium APM Web Server.
All interfaces Required

Meridium APM SAP Interfaces V3.6.0.0.0
76
Step Task Associated Interface Required/Optional
2 If you configured custom field mappings in V3.5.0, export your custom field mappings.
All interfaces Required
3 Upgrade the SAP Interfaces ABAP Add-On on your SAP System.
All interfaces Required
4 If you configured custom field mappings in V3.5.0, reset the baseline field mappings.
All interfaces Required
5 Delete the previous version of the Software Component Version via the SAP Exchange Infrastructure.
All interfaces except the Work Management Interface
Required
6 If you configured custom field mappings in V3.5.0, import your custom field mappings.
All interfaces Required
7 Run the report /MIAPM/350P3_UPGRADE_EXCEPTION.
All interfaces Required
8 Configure the System Landscape Directory (SLD) on the SAP PI Server, which will create a new Software Component Version.
All interfaces except the Work Management Interface
Required
9 Import the configuration object. All extraction interfaces
Required
10 Modify the baseline communication channels.
All extraction interfaces
Required
11 Activate the scenarios that were created by the configuration object.
All extraction interfaces
Required

Installation, Upgrade, and Configuration
77
Step Task Associated Interface Required/Optional
12 For each additional Meridium APM data source to and from which you want to transfer data:
1. Create a new receiver determination for each baseline configuration scenario.
2. Create a new interface determination for each baseline configuration scenario.
3. Create a new receiver agreement for each baseline configuration scenario.
4. Activate the changes.
All extraction interfaces
Required
13 Run the report /MIAPM/342P2_UPGRADE_PARAMS.
All except Notification Creation Interface
Required
14 Start the Meridium Core SAP Connector service on the Meridium APM Application Server, and then restart the Meridium APM Application Server.
Work Management Interface -and- Notification and Order Extraction Interface
Required
15 Define settings in the file CSCS.exe.config on the Meridium APM Application Server to define your SAP systems.
Work Management Interface -and- Notification and Order Extraction Interface
Required

Meridium APM SAP Interfaces V3.6.0.0.0
78
Step Task Associated Interface Required/Optional
16 Restart the Meridium Core SAP Connector service on the Meridium APM Application Server.
Work Management Interface -and- Notification and Order Extraction Interface
Required
17 Define the connection information for the SAP PI Server in the file Meridium.SAP.CertifiedInterface.Config.xml on the Meridium APM Application Server.
Notification Creation Interface
Required
18 Create new SAP System records to identify any new SAP systems that you were not using with the previous version of Meridium APM. You can do so via the Meridium APM Framework application.
Work Management Interface -and- Functional Location Characteristics Extraction Interface -and- Equipment Characteristics Extraction Interface
Required
19 Test the SAP connection information that you specified in your SAP System records that you created using the previous step. You can do so via the Meridium APM Framework application.
All interfaces except for the Notification Creation Interface
Optional
20 For each new SAP System record that you created in the previous step, link it to the appropriate Site Reference record. You can do so via the Meridium APM Framework application.
Work Management Interface
Optional
Upgrading the SAP Interfaces from V3.5.0 to V3.6.0.0.0 (PI)
The following table lists the steps that are required to upgrade and configure the SAP Interfaces if you are using an SAP PI Server. These steps assume that

Installation, Upgrade, and Configuration
79
you have completed the steps for upgrading the components in the basic Meridium APM system architecture.
Step Task Associated Interface Required/Optional
1 Upgrade the Meridium APM Web Services on the Meridium APM Web Server.
All interfaces Required
2 If you configured custom field mappings in V3.5.0, export your custom field mappings.
All interfaces Required
3 Upgrade the SAP Interfaces ABAP Add-On on your SAP System.
All interfaces Required
4 Delete the previous version of the Software Component Version via the SAP Exchange Infrastructure.
All interfaces except the Work Management Interface
Required
5 If you configured custom field mappings in V3.5.0, reset the baseline field mappings.
All interfaces Required
6 If you configured custom field mappings in V3.5.0, import your custom field mappings.
All interfaces Required
7 Run the report /MIAPM/350P3_UPGRADE_EXCEPTION.
All interfaces Required
8 Configure the System Landscape Directory (SLD) on the SAP PI Server, which will create a new Software Component Version.
All interfaces except the Work Management Interface
Required
9 Import the configuration object. All extraction interfaces
Required
10 Modify the baseline communication channels.
All extraction interfaces
Required
11 Activate the scenarios that were created by the configuration object.
All extraction interfaces
Required

Meridium APM SAP Interfaces V3.6.0.0.0
80
Step Task Associated Interface Required/Optional
12 For each additional Meridium APM data source to and from which you want to transfer data:
1. Create a new receiver determination for each baseline configuration scenario.
2. Create a new interface determination for each baseline configuration scenario.
3. Create a new receiver agreement for each baseline configuration scenario.
4. Activate the changes.
All extraction interfaces
Required
13 Review the entries in the /MIAPM/PARAMS table and make sure one exists for each unique combination of Meridium APM Application server and data source to and from which you want to transfer data.
All except Notification Creation Interface
Required
14 Run the report /MIAPM/342P2_UPGRADE_PARAMS.
All except Notification Creation Interface
Required
15 Start the Meridium Core SAP Connector service on the Meridium APM Application Server, and then restart the Meridium APM Application Server.
Work Management Interface -and- Notification and Order Extraction Interface
Required
16 Define settings in the file CSCS.exe.config on the Meridium APM Application Server to define your SAP systems.
Work Management Interface -and- Notification and Order Extraction Interface
Required

Installation, Upgrade, and Configuration
81
Step Task Associated Interface Required/Optional
17 Restart the Meridium Core SAP Connector service on the Meridium APM Application Server.
Work Management Interface -and- Notification and Order Extraction Interface
Required
18 Define the connection information for the SAP PI Server in the file Meridium.SAP.CertifiedInterface.Config.xml on the Meridium APM Application Server.
Notification Creation Interface
Required
19 Create new SAP System records to identify any new SAP systems that you were not using with the previous version of Meridium APM. You can do so via the Meridium APM Framework application.
Work Management Interface -and- Functional Location Characteristics Extraction Interface -and- Equipment Characteristics Extraction Interface
Required
20 Test the SAP connection information that you specified in your SAP System records that you created using the previous step. You can do so via the Meridium APM Framework application.
All interfaces except for the Notification Creation Interface
Optional
21 For each new SAP System record that you created in the previous step, link it to the appropriate Site Reference record. You can do so via the Meridium APM Framework application.
Work Management Interface
Optional
Upgrading the SAP Interfaces from V3.4.5 to V3.6.0.0.0 (PI)
The following table lists the steps that are required to upgrade and configure the SAP Interfaces if you are using an SAP PI Server. These steps assume that

Meridium APM SAP Interfaces V3.6.0.0.0
82
you have completed the steps for upgrading the components in the basic Meridium APM system architecture.
Step Task Associate Interfac
1 Upgrade the Meridium APM Web Services on the Meridium APM Web Server. All interfac
2 Upgrade the SAP Interfaces ABAP Add-On on your SAP System. All interfac
3 Delete the previous version of the Software Component Version via the SAP Exchange Infrastructure.
All interfac except the Work Managemen Interface
4 Configure the System Landscape Directory (SLD) on the SAP PI Server, which will create a new Software Component Version.
All interfac except the Work Managemen Interface
5 Import the configuration object. All extracti interfaces
6 Modify the baseline communication channels. All extracti interfaces
7 Activate the scenarios that were created by the configuration object. All extracti interfaces
8 For each additional Meridium APM data source to and from which you want to transfer data:
1. Create a new receiver determination for each baseline configuration scenario.
2. Create a new interface determination for each baseline configuration scenario.
3. Create a new receiver agreement for each baseline configuration scenario. 4. Activate the changes.
All extracti interfaces
9 Review the entries in the /MIAPM/PARAMS table and make sure one exists for each unique combination of Meridium APM Application server and data source to and from which you want to transfer data.
All except Notification Creation Interface

Installation, Upgrade, and Configuration
83
Step Task Associate Interfac
10 Run the report /MIAPM/342P2_UPGRADE_PARAMS. All except Notification Creation Interface
11 Configure field mappings on your SAP System. All interfac
12 Start the Meridium Core SAP Connector service on the Meridium APM Application Server, and then restart the Meridium APM Application Server.
Work Managemen Interface -and- Notification and Order Extraction Interface
13 Define settings in the file CSCS.exe.config on the Meridium APM Application Server to define your SAP systems.
Work Managemen Interface -and- Notification and Order Extraction Interface
14 Restart the Meridium Core SAP Connector service on the Meridium APM Application Server.
Work Managemen Interface -and- Notification and Order Extraction Interface
15 Define the connection information for the SAP PI Server in the file Meridium.SAP.CertifiedInterface.Config.xml on the Meridium APM Application Server.
Notification Creation Interface

Meridium APM SAP Interfaces V3.6.0.0.0
84
Step Task Associate Interfac
16 Create new SAP System records to identify any new SAP systems that you were not using with the previous version of Meridium APM. You can do so via the Meridium APM Framework application
Work Managemen Interface -and- Functional Location Characteris Extraction Interface -and- Equipment Characteris Extraction Interface
17 Test the SAP connection information that you specified in your SAP System records that you created using the previous step. You can do so via the Meridium APM Framework application.
All interfac except for Notification Creation Interface
18 For each new SAP System record that you created in the previous step, link it to the appropriate Site Reference record. You can do so via the Meridium APM Framework application.
Work Managemen Interface
19 Configure the Meridium APM system to extract Equipment and Functional Location characteristics from SAP. You can do so via the Meridium APM Framework application.
Functional Location Characteris Extraction Interface -and- Equipment Characteris Extraction Interface
20 Populate the following fields in the /MIAPM/PARAMS table: • WH Project Path: Should be populated with Rules
Library\Meridium\SAPInterfaces\IntegrationInterfaces • WH Rule Name: Should be populated with
Library.Meridium.IntegrationInterfaces.HistoryInterfaces.HaromizeWorkHistory
• WH FM Name: Should be populated with /MIAPM/VALIDATE_WORK_HISTORY
Notification and Order Extraction Interface

Installation, Upgrade, and Configuration
85
Step Task Associate Interfac
21 Run the report /MIAPM/WH_HARMONIZATION. Notification and Order Extraction Interface
22 Run the report /MIAPM/350_UPGRADE_WH. Notification and Order Extraction Interface
23 Run the report /MIAPM/350P3_UPGRADE_EXCEPTION. All interfac
Non-PI Customers
Non-PI Customers Upgrade Workflow
You can upgrade to V3.6.0.0.0 using the instructions that are provided in this section of the documentation. To access these instructions, click the starting version from which you are upgrading:
• V3.5.1
• V3.5.0 SP1 LP
• V3.5.0

Meridium APM SAP Interfaces V3.6.0.0.0
86
• V3.4.5
Upgrading the SAP Interfaces from V3.5.1 to V3.6.0.0.0 (Non-PI)
The following table lists the steps that are required to upgrade and configure the SAP Interfaces if you are not using an SAP PI Server. These steps assume that you have completed the steps for upgrading the components in the basic Meridium APM system architecture.
Step Task Associated Interface Required/Optional
1 Upgrade the Meridium APM Web Services on the Meridium APM Web Server.
All interfaces Required
2 If you configured custom field mappings in V3.5.0, export your custom field mappings.
All interfaces Required
3 Upgrade the SAP Interfaces ABAP Add-On on your SAP System.
All interfaces Required
4 If you configured custom field mappings in V3.5.0, reset the baseline field mappings.
All interfaces Required
5 If you configured custom field mappings in V3.5.0, import your custom field mappings.
All interfaces Required
6 Run the report /MIAPM/350P3_UPGRADE_EXCEPTION.
All interfaces Required
7 Review the entries in the /MIAPM/PARAMS table and make sure one exists for each unique combination of Meridium APM Application server and data source to and from which you want to transfer data.
All except Notification Creation Interface
Required
8 Run the report /MIAPM/342P2_UPGRADE_PARAMS.
All except Notification Creation Interface
Required

Installation, Upgrade, and Configuration
87
Step Task Associated Interface Required/Optional
9 Start the Meridium Core SAP Connector service on the Meridium APM Application Server, and then restart the Meridium APM Application Server.
Work Management Interface -and- Notification and Order Extraction Interface
Required
10 Define settings in the file CSCS.exe.config on the Meridium APM Application Server to define your SAP systems.
Work Management Interface
Required
11 Start the Meridium Core SAP Connector service on the Meridium APM Application Server.
Work Management Interface
Required
12 Create new SAP System records to identify any new SAP systems that you were not using with the previous version of Meridium APM. You can do so via the Meridium APM Framework application.
Work Management Interface -and- Functional Location Characteristics Extraction Interface -and- Equipment Characteristics Extraction Interface -and- Notification Creation Interface
Required

Meridium APM SAP Interfaces V3.6.0.0.0
88
Step Task Associated Interface Required/Optional
13 Test the SAP connection information that you specified in your SAP System records that you created using the previous step. You can do so via the Meridium APM Framework application.
Work Management Interface -and- Functional Location Characteristics Extraction Interface -and- Equipment Characteristics Extraction Interface -and- Notification Creation Interface
Optional
14 For each new SAP System record that you created in the previous step, link it to the appropriate Site Reference record. You can do so via the Meridium APM Framework application.
Work Management Interface -and- Functional Location Extraction Interface -and- Equipment Extraction Interface -and- Notification Creation Interface
Optional
Upgrading the SAP Interfaces from V3.5.0 SP1 LP to V3.6.0.0.0 (Non-PI)
The following table lists the steps that are required to upgrade and configure the SAP Interfaces if you are not using an SAP PI Server. These steps assume

Installation, Upgrade, and Configuration
89
that you have completed the steps for upgrading the components in the basic Meridium APM system architecture.
Step Task Associated Interface Required/Optional
1 Upgrade the Meridium APM Web Services on the Meridium APM Web Server.
All interfaces Required
2 If you configured custom field mappings in V3.5.0, export your custom field mappings.
All interfaces Required
3 Upgrade the SAP Interfaces ABAP Add-On on your SAP System.
All interfaces Required
4 If you configured custom field mappings in V3.5.0, reset the baseline field mappings.
All interfaces Required
5 If you configured custom field mappings in V3.5.0, import your custom field mappings.
All interfaces Required
6 Run the report /MIAPM/350P3_UPGRADE_EXCEPTION.
All interfaces Required
7 Review the entries in the /MIAPM/PARAMS table and make sure one exists for each unique combination of Meridium APM Application server and data source to and from which you want to transfer data.
All except Notification Creation Interface
Required
8 Run the report /MIAPM/342P2_UPGRADE_PARAMS.
All except Notification Creation Interface
Required
9 Start the Meridium Core SAP Connector service on the Meridium APM Application Server, and then restart the Meridium APM Application Server.
Work Management Interface -and- Notification and Order Extraction Interface
Required

Meridium APM SAP Interfaces V3.6.0.0.0
90
Step Task Associated Interface Required/Optional
10 Define settings in the file CSCS.exe.config on the Meridium APM Application Server to define your SAP systems.
Work Management Interface
Required
11 Start the Meridium Core SAP Connector service on the Meridium APM Application Server.
Work Management Interface
Required
12 Create new SAP System records to identify any new SAP systems that you were not using with the previous version of Meridium APM. You can do so via the Meridium APM Framework application.
Work Management Interface -and- Functional Location Characteristics Extraction Interface -and- Equipment Characteristics Extraction Interface -and- Notification Creation Interface
Required

Installation, Upgrade, and Configuration
91
Step Task Associated Interface Required/Optional
13 Test the SAP connection information that you specified in your SAP System records that you created using the previous step. You can do so via the Meridium APM Framework application.
Work Management Interface -and- Functional Location Characteristics Extraction Interface -and- Equipment Characteristics Extraction Interface -and- Notification Creation Interface
Optional
14 For each new SAP System record that you created in the previous step, link it to the appropriate Site Reference record. You can do so via the Meridium APM Framework application.
Work Management Interface -and- Functional Location Extraction Interface -and- Equipment Extraction Interface -and- Notification Creation Interface
Optional
Upgrading the SAP Interfaces from V3.5.0 to V3.6.0.0.0 (Non-PI)
The following table lists the steps that are required to upgrade and configure the SAP Interfaces if you are not using an SAP PI Server. These steps assume

Meridium APM SAP Interfaces V3.6.0.0.0
92
that you have completed the steps for upgrading the components in the basic Meridium APM system architecture.
Step Task Associated Interface Required/Optional
1 Upgrade the Meridium APM Web Services on the Meridium APM Web Server.
All interfaces Required
2 If you configured custom field mappings in V3.5.0, export your custom field mappings.
All interfaces Required
3 Upgrade the SAP Interfaces ABAP Add-On on your SAP System.
All interfaces Required
4 If you configured custom field mappings in V3.5.0, reset the baseline field mappings.
All interfaces Required
5 If you configured custom field mappings in V3.5.0, import your custom field mappings.
All interfaces Required
6 Run the report /MIAPM/350P3_UPGRADE_EXCEPTION.
All interfaces Required
7 Review the entries in the /MIAPM/PARAMS table and make sure one exists for each unique combination of Meridium APM Application server and data source to and from which you want to transfer data.
All except Notification Creation Interface
Required
8 Run the report /MIAPM/342P2_UPGRADE_PARAMS.
All except Notification Creation Interface
Required
9 Start the Meridium Core SAP Connector service on the Meridium APM Application Server, and then restart the Meridium APM Application Server.
Work Management Interface -and- Notification and Order Extraction Interface
Required

Installation, Upgrade, and Configuration
93
Step Task Associated Interface Required/Optional
10 Define settings in the file CSCS.exe.config on the Meridium APM Application Server to define your SAP systems.
Work Management Interface
Required
11 Start the Meridium Core SAP Connector service on the Meridium APM Application Server.
Work Management Interface
Required
12 Create new SAP System records to identify any new SAP systems that you were not using with the previous version of Meridium APM. You can do so via the Meridium APM Framework application.
Work Management Interface -and- Functional Location Characteristics Extraction Interface -and- Equipment Characteristics Extraction Interface -and- Notification Creation Interface
Required

Meridium APM SAP Interfaces V3.6.0.0.0
94
Step Task Associated Interface Required/Optional
13 Test the SAP connection information that you specified in your SAP System records that you created using the previous step. You can do so via the Meridium APM Framework application.
Work Management Interface -and- Functional Location Characteristics Extraction Interface -and- Equipment Characteristics Extraction Interface -and- Notification Creation Interface
Optional
14 For each new SAP System record that you created in the previous step, link it to the appropriate Site Reference record. You can do so via the Meridium APM Framework application.
Work Management Interface -and- Functional Location Extraction Interface -and- Equipment Extraction Interface -and- Notification Creation Interface
Optional
Upgrading the SAP Interfaces from V3.4.5 to V3.6.0.0.0 (Non-PI)
The following table lists the steps that are required to upgrade and configure the SAP Interfaces if you are not using an SAP PI Server. These steps assume

Installation, Upgrade, and Configuration
95
that you have completed the steps for upgrading the components in the basic Meridium APM system architecture.
Step Task Associate Interfac
1 Upgrade the Meridium APM Web Services on the Meridium APM Web Server. All interfac
2 Upgrade the SAP Interfaces ABAP Add-On on your SAP System. All interfac
3 Review the entries in the /MIAPM/PARAMS table and make sure one exists for each unique combination of Meridium APM Application server and data source to and from which you want to transfer data.
All except Notification Creation Interface
4 Run the report /MIAPM/342P2_UPGRADE_PARAMS. All except Notification Creation Interface
5 Configure field mappings on your SAP System. All interfac
6 Start the Meridium Core SAP Connector service on the Meridium APM Application Server, and then restart the Meridium APM Application Server.
Work Managemen Interface -and- Notification and Order Extraction Interface
7 Define settings in the file CSCS.exe.config on the Meridium APM Application Server to define your SAP systems.
Work Managemen Interface
8 Start the Meridium Core SAP Connector service on the Meridium APM Application Server.
Work Managemen Interface

Meridium APM SAP Interfaces V3.6.0.0.0
96
Step Task Associate Interfac
9 Create new SAP System records to identify any new SAP systems that you were not using with the previous version of Meridium APM. You can do so via the Meridium APM Framework application.
Work Managemen Interface -and- Functional Location Characteris Extraction Interface -and- Equipment Characteris Extraction Interface -and- Notification Creation Interface
10 Test the SAP connection information that you specified in your SAP System records that you created using the previous step. You can do so via the Meridium APM Framework application.
Work Managemen Interface -and- Functional Location Characteris Extraction Interface -and- Equipment Characteris Extraction Interface -and- Notification Creation Interface

Installation, Upgrade, and Configuration
97
Step Task Associate Interfac
11 For each new SAP System record that you created in the previous step, link it to the appropriate Site Reference record. You can do so via the Meridium APM Framework application.
Work Managemen Interface -and- Functional Location Extraction Interface -and- Equipment Extraction Interface -and- Notification Creation Interface
12 Configure the Meridium APM system to extract Equipment and Functional Location characteristics from SAP. You can do so via the Meridium APM Framework application.
Functional Location Characteris Extraction Interface -and- Equipment Characteris Extraction Interface
13 Populate the following fields in the /MIAPM/PARAMS table: • WH Project Path: Should be populated with Rules
Library\Meridium\SAPInterfaces\IntegrationInterfaces • WH Rule Name: Should be populated with
Library.Meridium.IntegrationInterfaces.HistoryInterfaces.HaromizeWorkHistory
• WH FM Name: Should be populated with /MIAPM/VALIDATE_WORK_HISTORY
Notification and Order Extraction Interface
14 Run the report /MIAPM/WH_HARMONIZATION. Notification and Order Extraction Interface

Meridium APM SAP Interfaces V3.6.0.0.0
98
Step Task Associate Interfac
15 Run the report /MIAPM/350_UPGRADE_WH. Notification and Order Extraction Interface
16 Run the report /MIAPM/350P3_UPGRADE_EXCEPTION. All interfac
Installation, Upgrade, and Configuration Steps
Meridium APM Web Services
Installing Meridium APM Web Services
The following instructions provide details on installing the Meridium APM Web Services software and a supporting instance of the Meridium APM Application Server on the Meridium APM Web Server machine.
To install Meridium APM Web Services:
1. On the machine that will serve as the Meridium APM Web Server, insert the Meridium APM distribution DVD, and navigate to the folder General Release\Meridium APM Framework and Server Setup\Setup\Meridium APM Server and Add-ons.
2. Double-click the files setup.exe.
The Meridium APM Server and Add-ons installer appears, displaying the Preparing Setup screen, which contains a progress bar.

Installation, Upgrade, and Configuration
99
After the progress bar reaches the end, the Welcome screen appears.

Meridium APM SAP Interfaces V3.6.0.0.0
100
3. Click the Next button.
The License Agreement screen appears.
4. Read the entire license agreement, and then select one of the following options:
• I accept the terms of the license agreement, if you agree to the terms of the license agreement and want to continue. These instructions assume that you want to continue.
• I do not accept the terms of the license agreement. This option is selected by default. If you do not agree to the terms of the license agreement and do not want to continue, click the Cancel button to exit the installer.
The Next button becomes enabled.
Hint: If you want to print the license agreement, click the Print button.
5. Click the Next button.

Installation, Upgrade, and Configuration
101
The Select Installation Location screen appears, prompting you to select the location where the Meridium APM Web Services will be installed. By default, the Meridium APM Web Services software will be saved to the following folder: C\Program Files\Meridium.
6. If you are satisfied with the default location where the software will be installed, click the Next button.
-or-
If you want to change the location where the software will be installed, click the Change button, and navigate to the location where you want to install the Meridium APM Web Services software. The folder path that you select will be displayed in place of the default folder path. When you are satisfied with the installation location, click the Next button.
The Select the features you want to install screen appears, and the Meridium APM Application Server node is highlighted automatically in the tree.

Meridium APM SAP Interfaces V3.6.0.0.0
102
Note: The Select the features you want to install screen lets you specify which features you want to install on the Meridium APM Web Server machine. These instructions assume that you want to deploy only the Meridium APM Web Services software and a supporting instance of the Meridium APM Application Server. When the Meridium APM Web Services software is installed, the Meridium APM System Administration tool is installed automatically. When the Meridium APM Application Server software is installed, the following APM Framework applications are installed automatically: APM Framework, Database Upgrade Manager, Data Source Manager, Schedule Manager, and URL Manager. Corresponding options for these applications are not listed in the tree because these components must be installed with the Meridium APM Application Server software. You can optionally install the Configuration Manager and the APM Framework adapter, Meridium APM Adapter for SSRS Designer.
7. Select the Meridium APM Application Server check box.
The subnodes are selected automatically.

Installation, Upgrade, and Configuration
103
8. Clear the Configuration Manager check box. Keep in mind that you can run this installer again and install the Configuration Manager at a later time.
9. Clear the Meridium APM Adapter for SSRS Designer check box. Keep in mind that you can run this installer again and install the Configuration Manager at a later time.
IMPORTANT: While additional options are available in the tree on the Select the features you want to install screen, these options are not meant to be installed on the Meridium APM Web Server machine, and these instructions are limited to installing the Meridium APM Web Services software and a supporting instance of the Meridium APM Application Server software (with APM Framework applications). This installer is also used to install the additional components on other machines.
10. Scroll down in the list of available components, and select the Meridium APM Web Services check box.
11. Click the Next button.
A message appears, indicating that the installer is checking your machine for the required prerequisites for the features that you want to install.
• If one or more prerequisites are missing on the machine, the Meridium Installer screen will appear and display a message that indicates which prerequisites still need to be installed on the machine before you can install the feature that is dependent on that prerequisite. This message also indicates what you can do to continue.
If you see this screen, you should read the message in detail, and either click the Back button to clear the selection whose

Meridium APM SAP Interfaces V3.6.0.0.0
104
prerequisites are missing, and then continue through the installation without installing that component, or close the installer, install the missing prerequisite, and then run the installer again later.
• If all the prerequisites for the selected components are installed on the machine, or you have selected components that do not require any prerequisites, the Select ZIP File Location screen appears.
The Select ZIP File Location screen lets you specify the location where you want the ZIP file of database content to be installed. This ZIP file is used by the Database Comparison Utility. By default, the ZIP file will be installed in the folder C:\Meridium\DbUpg. You can, however, select a different location.
12. Read the information on this screen and note the estimated size of the extracted files from this ZIP file. You should use this information to determine where you want install the ZIP file.
13. If you want the ZIP file to be installed in the default location, accept the default setting.

Installation, Upgrade, and Configuration
105
-or-
If you want the ZIP file to be installed in a different location, click the Browse button, and navigate to the location where you want the ZIP file to be installed. The selected file path will appear in the Destination Folder section in place of the default file path.
14. Click the Next button.
The Websites screen appears.
The Websites screen lets you specify where the installer will create a virtual directory for Meridium APM. This website is configured in the IIS Manager on the APM Application Server machine. The websites list contains all the websites that are configured on the APM Application Server machine. The default website is Default Web Site. Throughout this documentation, we assume that you have chosen to install Meridium APM under the Default Web Site.
15. In the list of websites, select the website where you want the installer to create a virtual directory.

Meridium APM SAP Interfaces V3.6.0.0.0
106
16. Click the Next button.
The Complete the Installation screen appears.
The Complete the Installation screen contains a message, indicating that if you want to modify any of the settings that you specified in the preceding screens in the installer, you can use the Back button to do so, or if you do not want to complete the installation, you can click Cancel.
These instructions assume that you are ready to complete the installation process.
17. Click the Install button.
The Setup Status screen appears, which displays a progress bar that shows the progress of the installation process.

Installation, Upgrade, and Configuration
107
After the progress bar reaches the end, a message appears, indicating that your server is being configured. After your server is configured, the Installation is Complete screen appears.
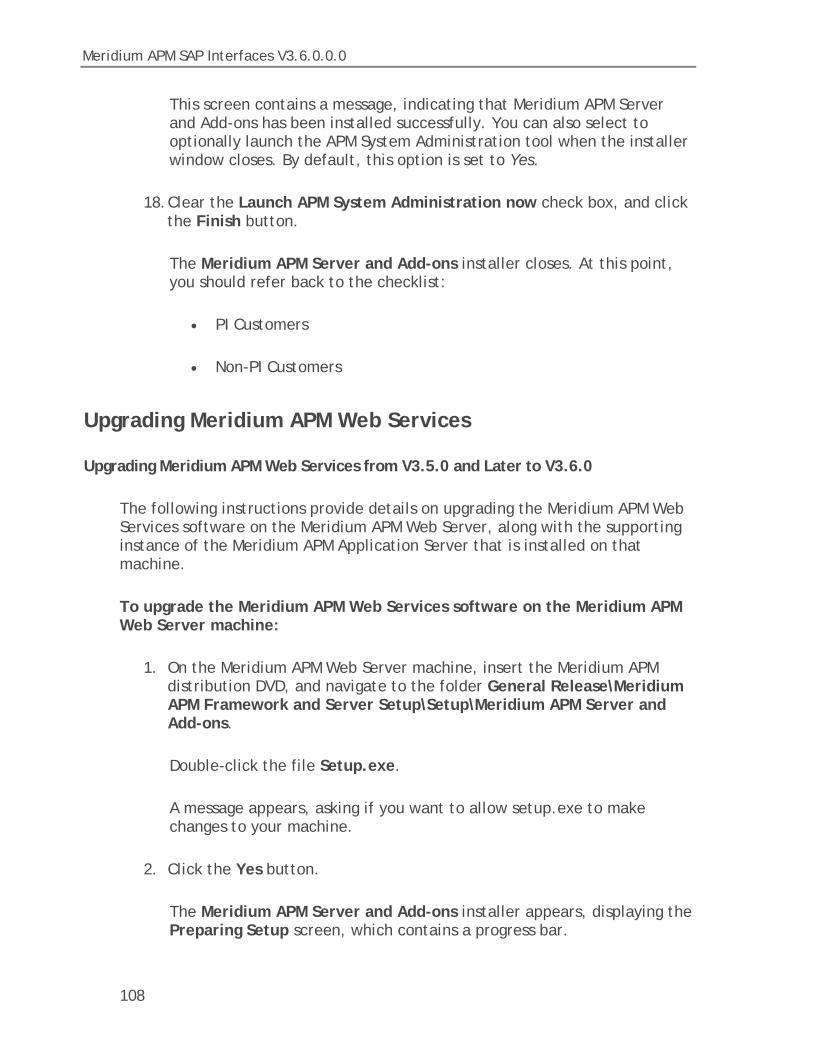
Meridium APM SAP Interfaces V3.6.0.0.0
108
This screen contains a message, indicating that Meridium APM Server and Add-ons has been installed successfully. You can also select to optionally launch the APM System Administration tool when the installer window closes. By default, this option is set to Yes.
18. Clear the Launch APM System Administration now check box, and click the Finish button.
The Meridium APM Server and Add-ons installer closes. At this point, you should refer back to the checklist:
• PI Customers
• Non-PI Customers
Upgrading Meridium APM Web Services
Upgrading Meridium APM Web Services from V3.5.0 and Later to V3.6.0
The following instructions provide details on upgrading the Meridium APM Web Services software on the Meridium APM Web Server, along with the supporting instance of the Meridium APM Application Server that is installed on that machine.
To upgrade the Meridium APM Web Services software on the Meridium APM Web Server machine:
1. On the Meridium APM Web Server machine, insert the Meridium APM distribution DVD, and navigate to the folder General Release\Meridium APM Framework and Server Setup\Setup\Meridium APM Server and Add-ons.
Double-click the file Setup.exe.
A message appears, asking if you want to allow setup.exe to make changes to your machine.
2. Click the Yes button.
The Meridium APM Server and Add-ons installer appears, displaying the Preparing Setup screen, which contains a progress bar.

Installation, Upgrade, and Configuration
109
After the progress bar reaches the end, a message appears, asking if you want to upgrade your server.
4. Click the Yes button.
The Setup Status screen appears, displaying a progress bar that indicates the status of the upgrade process.

Meridium APM SAP Interfaces V3.6.0.0.0
110
After the progress bar reaches the end, a message appears, indicating that your server is being configured. After your servers is configured, the Maintenance Complete screen appears.

Installation, Upgrade, and Configuration
111
This screen contains a message, indicating that your software has been upgraded successfully. You can also select to optionally launch the Meridium APM System Administration tool when the installer window closes. By default, this option is set to Yes.
5. Clear the Launch APM System Administration now check box.
6. Click the Finish button.
The Meridium APM Server and Add-ons installer closes. At this point, you should refer back to the checklist:
• PI Customers
• Non-PI Customers
Upgrading Meridium APM Web Services from V3.4.5 to V3.6.0
The following instructions provide details on upgrading the Meridium APM Web Services software on the Meridium APM Web Server. These instructions assume you understand that the older version of Meridium APM will be uninstalled automatically before the new version is installed.
To upgrade Meridium APM Web Services:
1. On the Meridium APM Web Server machine, insert the Meridium APM distribution DVD, and navigate to the folder General Release\Meridium APM Framework and Server Setup\Setup\Meridium APM Server and Add-ons.
Double-click the file Setup.exe.
A message appears, asking if you want to allow setup.exe to make changes to your machine.
2. Click the Yes button.
The Meridium APM Server and Add-ons installer appears, displaying the Preparing Setup screen, which contains a progress bar.

Meridium APM SAP Interfaces V3.6.0.0.0
112
After the progress bar reaches the end, the Welcome screen appears.

Installation, Upgrade, and Configuration
113
3. Click the Next button.
A message appears, indicating that an older version of Meridium APM is installed on this machine and that it will be uninstalled automatically before you can install the new version.
4. Click the Yes button.
The License Agreement screen appears.
5. Read the entire license agreement, and then select one of the following options:
• I accept the terms of the license agreement, if you agree to the terms of the license agreement and want to continue. These instructions assume that you want to continue.
• I do not accept the terms of the license agreement. This option is selected by default. If you do not agree to the terms of the license agreement and do not want to continue, click the Cancel button to exit the installer.

Meridium APM SAP Interfaces V3.6.0.0.0
114
The Next button is enabled.
Hint: If you want to print the license agreement, click the Print button.
6. Click the Next button.
The Select Installation Location screen appears, prompting you to select the location where the Meridium APM Web Services software will be installed after the older version is uninstalled. The software will be saved to the following folder on the Meridium APM Web Server by default: C\Program Files\Meridium.
7. If you are satisfied with the default location where the software will be installed, click the Next button.
-or-
If you want to change the location where the software will be installed, click the Change button, and navigate to the location where you want to install the Meridium APM Web Services. The folder path that you select will be displayed in place of the default folder path. When you are satisfied with the installation location, click the Next button.

Installation, Upgrade, and Configuration
115
The Select the features you want to install screen appears, and the Meridium APM Application Server node is highlighted automatically in the tree.
IMPORTANT: The Select the features you want to install screen lets you specify which features you want to install on the Web Server machine after the older version is uninstalled. These instructions assume that you want to deploy only the Meridium APM Web Services option and a supporting instance of the Meridium APM Application Server. When you install the Meridium APM Web Services software, the Meridium APM System Administration tool is installed automatically. When you install the Meridium APM Application Server software, the following APM Framework applications are installed automatically: APM Framework, Database Upgrade Manager, Data Source Manager, Schedule Manager, and URL Manager. You can optionally install the Configuration Manager and APM Framework adapter, Meridium APM Adapter for SSRS Designer.
8. Select the Meridium APM Application Server check box.
The subnodes are selected automatically.

Meridium APM SAP Interfaces V3.6.0.0.0
116
9. Clear the Configuration Manager check box. Keep in mind that you can run this installer again and install the Configuration Manager at a later time.
10. Clear the Meridium APM Adapter for SSRS Designer check box. Keep in mind that you can run this installer again and install the Configuration Manager at a later time.
IMPORTANT: While additional options are available in the tree on the Select the features you want to install screen, these options are not meant to be installed on the Meridium APM Web Server machine, and these instructions are limited to installing the Meridium APM Web Services software and a supporting instance of the Meridium APM Application Server software (with APM Framework applications). This installer is also used to install the additional components on other machines.
11. Scroll down in the list of available components, and select the Meridium APM Web Services check box.
12. Click the Next button.
A message appears, indicating that the installer is checking your machine for the required prerequisites for the features that you want to install.
• If one or more prerequisites are missing on the machine, the Meridium Installer screen will appear and display a message that indicates which prerequisites still need to be installed on the machine before you can install the feature that is dependent on that prerequisite. This message also indicates what you can do to continue.
If you see this screen, you should read the message in detail, and either click the Back button to clear the selection whose

Installation, Upgrade, and Configuration
117
prerequisites are missing, and then continue through the installation without installing that component, or close the installer, install the missing prerequisite, and then run the installer again later.
• If all the prerequisites for the selected components are installed on the machine, or you have selected components that do not require any prerequisites, the Select ZIP File Location screen appears.
The Select ZIP File Location screen lets you specify the location where you want the ZIP file of database content to be installed. This ZIP file is used by the Database Comparison Utility. By default, the ZIP file will be installed in the folder C:\Meridium\DbUpg. You can, however, select a different location.
13. Read the information on this screen and note the estimated size of the extracted files from this ZIP file. You should use this information to determine where you want install the ZIP file.
14. If you want the ZIP file to be installed in the default location, accept the default setting.

Meridium APM SAP Interfaces V3.6.0.0.0
118
-or-
If you want the ZIP file to be installed in a different location, click the Browse button, and navigate to the location where you want the ZIP file to be installed. The selected file path will appear in the Destination Folder section in place of the default file path.
15. Click the Next button.
The installer performs a check to make sure that your system meets the requirements of the selected components.
• If one or more prerequisites are missing on the machine, the Meridium Installer screen will appear and display a message that indicates which prerequisites still need to be installed on the machine before you can install the feature that is dependent on that prerequisite. This message also indicates what you can do to continue.
If you see this screen, you should read the message in detail, and either click the Back button to clear the selection whose prerequisites are missing, and then continue through the installation without installing that component, or close the installer, install the missing prerequisite, and then run the installer again later.
• If all the prerequisites are installed on the machine, the Websites screen appears.

Installation, Upgrade, and Configuration
119
When Meridium APM Web Services is installed, the installer creates a virtual directory within a website that is configured in the IIS Manager on the Meridium APM Application Server. If you have more than one website configured on the Meridium APM Application Server, this screen lets you choose which website to use.
Note: Throughout this documentation, we assume that you have chosen to install Meridium APM Web Services under the website Default Web Site. If you install it under a different website, wherever our documentation refers to the Default Web Site, you will need to substitute the website that you selected during this step.
16. In the list of websites, select the website where you want to create a virtual directory for Meridium APM Web Services.
Note: If you have only one website configured, that website will be selected in the list automatically. In this case, you can simply accept the default selection.
17. Click the Next button.
The Complete the Installation screen appears.

Meridium APM SAP Interfaces V3.6.0.0.0
120
18. Click the Install button.
A message appears, indicating that the older version of Meridium APM is being removed. After the older version is removed, the Setup Status screen appears and displays a progress bar, indicating the progress of the installation process.

Installation, Upgrade, and Configuration
121
After the progress bar reaches the end, the Installation is Complete screen appears.

Meridium APM SAP Interfaces V3.6.0.0.0
122
This screen contains a message, indicating that Meridium APM Web Services has been installed successfully. You can also select to optionally launch the APM System Administration tool when the installer window closes. By default, this option is set to Yes.
19. Clear the Launch APM System Administration now check box, and click the Finish button.
The Meridium APM Server and Add-ons installer closes. At this point, you should refer back to the checklist:
• PI Customers
• Non-PI Customers
The ABAP Add-On
What is Included in the ABAP Add-On?
For information about what is included in the SAP Interfaces ABAP Add-on, see the file SAP_Interfaces_<version>_ObjectList.pdf, which is located on the SAP Interfaces installation DVD in the folder \\ABAP Add-on.
Installing the ABAP Add-On
Note: To complete the following instructions successfully, you must use SAP client 000.
To install the SAP Interfaces ABAP Add-On package on the SAP system:
1. On a machine from which you can access the SAP Server, insert the SAP Interfaces installation DVD.
2. Navigate to the folder \\ABAP Add-on\Installation.
3. Navigate to the subfolder ECC6, and copy the .PAT file.
4. On the SAP Server, paste the copied file into the folder \\usr\sap\trans\eps\in.

Installation, Upgrade, and Configuration
123
5. Log in to the SAP system as a user with:
• SCTSIMPSGL and S_CTS_ADMIN authorizations.
-or-
• SAP_ALL authorization.
6. Run the SAINT transaction.
The Add-On Installation Tool screen appears.
7. On the Installation Package menu, point to Load packages, and then click From Application Server.
A message appears, asking if you want to upload OCS packages from the ECS inbox.
8. Click the Yes button.
The SAINT: Uploading Packages from the File System screen appears.
9. Select the .PAT file that you copied in step 3 of these instructions. The message column should read Uploaded successfully.
10. Click the button.
The Add-On Installation Tool screen appears again.

Meridium APM SAP Interfaces V3.6.0.0.0
124
11. Click the Start button.
A new grid appears. MIAPMINT appears in the list of add-on packages that can be installed.
12. Select the row containing the value MIAPMINT in the first column, and click the Continue button.
The Support Package selection tab appears.

Installation, Upgrade, and Configuration
125
13. Click the Continue button.
14. Click the Continue button again.
Note: During the installation, the Add Modification Adjustment Transports to the Queue dialog box might appear. If it does, click the No button.
An indicator appears at the bottom of the screen to indicate the installation progress.
15. When the progress indicator disappears, a message appears, indicating that the add-on package will be installed.
16. Click the button.
The status is updated to indicate that the add-on package will now be imported, and the installation process continues.

Meridium APM SAP Interfaces V3.6.0.0.0
126
When the installation process is complete, the status is updated to indicate that the add-on package was imported successfully.
17. Click the Finish button.
The MIAPMINT add-on package appears in the list of installed add-on packages on the Add-On Installation Tool screen.

Installation, Upgrade, and Configuration
127
Upgrading the ABAP Add-On
To upgrade the SAP Interfaces ABAP Add-On package on the SAP system:
1. On a machine from which you can access the SAP Server, insert the SAP Interfaces installation DVD.
2. Navigate to the folder \\ABAP Add-on\Upgrade.
3. Navigate to the subfolder ECC6, and copy the .PAT file.
4. On the SAP Server, paste the copied file into the folder \\usr\sap\trans\eps\in.
5. Log in to the SAP system as a user with S_CTS_IMPSGL and S_CTS_ADMIN authorization.
6. Run the SAINT transaction.
The Add-On Installation Tool screen appears.
7. On the Installation Package menu, point to Load packages, and then click From Application Server.
A message appears, asking if you want to upload OCS packages from the ECS inbox.
8. Click the Yes button.
The SAINT: Uploading Packages from the File System screen appears.
9. Select the .PAT file that you copied in step 3 of these instructions. The message column should read Uploaded successfully.
10. Click the button.
The Add-On Installation Tool screen appears again.
11. Click the Start button.

Meridium APM SAP Interfaces V3.6.0.0.0
128
A new grid appears. MIAPMINT appears in the list of add-on packages that can be installed.
12. Select the row containing the value MIAPMINT in the first column, and click the Continue button.
The Support Package selection tab appears.
13. Click the Continue button.
14. Click the Continue button again.
Note: During the installation, the Add Modification Adjustment Transports to the Queue dialog box might appear. If it does, click the No button.
An indicator appears at the bottom of the screen to indicate the installation progress.
15. When the progress indicator disappears, a message appears, indicating that the add-on package will be installed.
16. Click the button.
The status is updated to indicate that the add-on package will now be imported, and the installation process continues.
When the installation process is complete, the status is updated to indicate that the add-on package was imported successfully.
17. Click the Finish button.
The MIAPMINT add-on package appears in the list of installed add-on packages on the Add-On Installation Tool screen.

Installation, Upgrade, and Configuration
129
The /MIAPM/PARAMS Table
About the /MIAPM/PARAMS Table
For each unique combination of Meridium APM data source and Application Server that you want to use with the SAP Interfaces, you will need to create a separate entry in the /MIAPM/PARAMS table.
For example, if you wanted to transfer data to two Meridium APM data sources that are connected to the same Meridium APM Application Server, you would need to create two entries in the /MIAPM/PARAMS table. Both entries would identify the same Meridium APM Application Server but different data sources.
Likewise, if you wanted to transfer data to one Meridium APM data source that is connected to two Meridium APM Application Servers, you would need to create two entries in the /MIAPM/PARAMS table. Both entries would identify the same Meridium APM data source but different Meridium APM Application Servers.
Creating an Entry in the /MIAPM/PARAMS Table
To create an entry in the /MIAPM/PARAMS table:
1. On the SAP system, run the following transaction: /n/MIAPM/MIPRO
The Display IMG screen appears.
2. In the tree, expand Configurations In SAP.
3. In the Maintain Meridium APM Parameters row, click the button.
The Manage Meridium APM Parameters screen appears.

Meridium APM SAP Interfaces V3.6.0.0.0
130
4. Click the button.
A separate Manage Meridium APM Parameters window appears, displaying a new form.

Installation, Upgrade, and Configuration
131
5. In the APM Data Source text box, type the name of the Meridium APM data source to which you will transfer data to and from SAP. The data source name must be unique to other entries in the /MIAPM/PARAMS table. In other words, multiple entries cannot contain the same data source name.
6. In the APM App Server text box, type the name of the Meridium APM Application Server to which you will transfer data to and from SAP.
Note: If the Meridium APM Web Server is installed on the same machine as the dedicated Meridium APM Application Server, to improve performance, the value that you type in the APM App Server text box will be ignored when running a report. In addition, when you run the transaction SLG1, you will see an entry in the log indicating that the Application Server value was not used.

Meridium APM SAP Interfaces V3.6.0.0.0
132
7. In the APM Web Service Link text box, delete any existing text, and type the following URL:
http://<IntegrationServicesServer>/MeridiumIntegrationServices/
...where <IntegrationServicesServer> is the name of the Meridium APM Web Server.
8. In the APM Web Service text box, do not type anything.
Note: This setting is not currently used.
9. In the APM User Name text box, type the user name of a Meridium APM Security User with the appropriate family-level privileges needed to create and update records using the SAP Interfaces.
10. In the APM Password text box, type the password that is associated with the Security User that you typed in the APM User Name text box. The characters that you type will be replaced with asterisks automatically.
11. In the Destination text box, type the name of the RFC destination that you created. The value that you type here should match exactly the value that appears in the RFC Destination text box on the RFC Destination screen, as shown in the following image.
Note: If you do not plan to use the Work Management Interface, you can leave the Destination text box empty.
12. Accept the default values in the following text boxes:
• MP Project Path (the default value is Rules Library\Meridium\SAPInterfaces\IntegrationInterfaces)

Installation, Upgrade, and Configuration
133
• MP Rule Name (the default value is Library.Meridium.IntegrationInterfaces.TaskInterfaces.CreateOrUpdateTask)
• HT Rule Name (the default value is Library.Meridium.IntegrationInterfaces.TaskInterfaces.HarmonizeTask)
• WH Project Path (the default value is Rules Library\Meridium\SAPInterfaces\IntegrationInterfaces)
• WH Rule Name (the default value is Library.Meridium.IntegrationInterfaces.HistoryInterfaces.HarmonizeWorkHistory)
13. If you want the reports to call a custom function module rather than the function modules that they are configured to call by default, in the following text boxes, type the name of the function module that you want the reports to call:
Note: If you leave a text box empty, the default function modules will be used when running that report.
• WH FM Name: Indicates the function module to call when running the /MIAPM/WH_HARMONIZATION report. By default, the function module /MIAPM/VALIDATE_WORK_HISTORY is used when running this report.
Note: The /MIAPM/WH_HARMONIZATION report is included in this release to accommodate upgrading customers who did not already run this report in a previous patch version of Meridium APM. The documentation assumes that if you are upgrading from a previous version of Meridium APM, you ran this report in a previous patch version, so you do not need to run it again. The documentation does not include instructions for running this report.
• Equipment FM Name: Indicates the function module to call when running the /MIAPM/EQUIPMENT_INF report. By default, the function module /MIAPM/RETRIEVE_EQUIPMENT is used when running this report.
• Func Loc FM Name: Indicates the function module to call when running the /MIAPM/FUNCTIONAL_LOCATION_INF report. By

Meridium APM SAP Interfaces V3.6.0.0.0
134
default, the /MIAPM/RETRIEVE_FUNCTIONAL_LOC function module is used when running this report.
• Notification FM Name: Indicates the function module to call when running the /MIAPM/WH_NOTIFICATION report. By default, the /MIAPM/RETRIEVE_WORK_HISTORY function module is used when running this report.
• Work Order FM Name: Indicates the function module to call when running the /MIAPM/WH_WORK_ORDER report. By default, the /MIAPM/RETRIEVE_WORK_HISTORY function module is called when running this report.
• Notif Order FM Name: Indicates the function module to call when running the /MIAPM/WH_NOTIF_WITH_WO report. By default, the /MIAPM/RETRIEVE_WORK_HISTORY function module is used when running this report.
• Notif Detail FM Name: Indicates the function module to call when running the /MIAPM/WORK_HISTORY_DETAILS report. By default, the /MIAPM/RETRIEVE_WH_DETAILS function module is used when running this report.
• Work Mgmt FM Name: Indicates the function module to call when running the /MIAPM/WORK_MANAGEMENT_INF report. By default, the /MIAPM/RETRIEVE_TASKS function module is used when running this report.
14. In the Language text box, specify the value that corresponds to the language that you are using in SAP. For example, if you are using English, type: EN
Note: When you run the extraction interfaces, Meridium APM will display the extracted values in the language that you specify in this text box, regardless of the language that is configured for the Meridium APM Security User.
15. In the PI User Name text box, type the user name of any user that can access the SAP PI Server and is assigned to the SAP_XI_APPL_SERV_USER role.
Note: If you are not using an SAP PI Server, you should leave the PI User Name text box empty.

Installation, Upgrade, and Configuration
135
16. In the PI Password text box, type the password that is associated with the Security User that you typed in the PI User Name text box. The characters that you type will be replaced with asterisks automatically.
Note: If you are not using an SAP PI Server, you should leave the PI Password text box empty.
17. If you want to temporarily disable the connection to the Meridium APM data source and Application Server that are specified in this entry, select the Inactive check box.
18. Specify the Maintenance Plants whose data you want to send to and from the specified Meridium APM data source and Application Server. To do so:
a. Click the Assign Plants button.
The Assign Plants window appears. The Data Source column is populated automatically with the value that you typed in the APM Data Source text box on the Manage Meridium APM Parameters window.

Meridium APM SAP Interfaces V3.6.0.0.0
136
b. Select the first Plants cell.
The cell becomes selected, and the button appears to the right of the cell.
c. To the right of the selected Plants cell, click the button.

Installation, Upgrade, and Configuration
137
A list of existing Maintenance Plants appears.
d. In each row representing a Maintenance Plant whose data you want to send to and from the specified Meridium APM data source and Application Server, select the check box.
e. When you are finished specifying the Maintenance Plants, click
the button.
The IDs of the selected Maintenance Plants appear in the grid on the Assign Plants window.
e. Below the grid, click the button.
The selected Maintenance Plants are saved and stored in the /MIAPM/PLANT_CNF table, and the Manage Meridium APM Parameters screen returns to focus.
19. Click OK.
The changes are saved.

Meridium APM SAP Interfaces V3.6.0.0.0
138
Example of Specifying Maintenance Plants
Suppose that the /MIAPM/PARAMS table contains the following two rows, where each row represents a different Meridium APM data source and Application Server.
Row 1
APM Data Source Data Source A
APM App Server Server A
Row 2
APM Data Source Data Source B
APM App Server Server B
If you specify the following Maintenance Plants in these rows:
• Row 1: Plant 1000
• Row 2: Plant 2000
...when a user runs an interface (e.g., the Equipment Extraction Interface) and selects Plant 1000 and Plant 2000, when the equipment is extracted:
• The equipment for Plant 1000 will be extracted to Data Source A, which is connected to Application Server A.
• The equipment for Plant 2000 will be extracted to Data Source B, which is connected to Application Server B.
Configuring Field Mappings
About Configuring Field Mappings
When you run an interface that creates Meridium APM records from SAP data, by default, the Meridium APM system maps certain SAP field values to Meridium APM fields automatically. Specifically, the Meridium APM system maps a standard set of values to the following records during the extraction process:

Installation, Upgrade, and Configuration
139
• Functional Location
• Equipment
• Work History
• Work History Detail
• Inspection and Calibration Task
• Technical Characteristics
If desired, you can accept the baseline mappings without changing them manually. Alternatively, you can modify the baseline mappings, create new mappings, or delete existing mappings. You can modify, create, and delete field mappings using your SAP system. If desired, you can revert to the baseline field mappings at any time.
Note that the Meridium APM system allows you to define a different set of field mappings for each combination of interface and Meridium APM data source to which you are extracting the values (where the data sources are defined in the /MIAPM/PARAMS table). For example, suppose the /MIAPM/PARAMS table contains two rows for the following Meridium APM data sources:
• Data Source A
• Data Source B
In this case, you could configure separate mappings for the Equipment Extraction Interface for Data Source A and Data Source B. For Data Source A, you might decide to accept the default mappings, and for Data Source B, you might decide to modify the mappings.
Custom Mapping Limitations
For a given extraction interface, you can configure up to 50 custom field mappings. When you create custom field mappings, only the first 50 characters of the field values will be extracted.
Any of the following actions will create a custom mapping:

Meridium APM SAP Interfaces V3.6.0.0.0
140
• Creating a new mapping for the purpose of changing the Meridium APM field component of a baseline mapping.
Note: If you create a new mapping for the purpose of changing only the SAP table or field component of a baseline mapping (i.e., you do not change the Meridium APM field component), the mapping is not considered a custom mapping.
• Creating a new mapping that maps a value to a Meridium APM field to which a value is not yet being mapped.
Viewing the Current Field Mappings
The following instructions explain how to access the list of current field mappings, assuming that you have chosen to modify the baseline mappings.
To access the list of current field mappings:
1. On the SAP system, run the following transaction: /n/MIAPM/MIPRO
The Display IMG screen appears.
2. In the tree, expand Configurations In SAP.
3. In the Maintain Field Mappings for Extraction Interfaces row, click the button.
The Field Mapping Parameters screen appears.

Installation, Upgrade, and Configuration
141
4. In the Interface ID text box, click the button.
A list of available interfaces appears.
5. In the Interface ID list, select the interface for which you want to view the current field mappings.
6. In the APM Data Source text box, click the button.
A list of available Meridium APM data sources appears.
7. In the APM Data Source list, select the Meridium APM data source for which you want to view the current field mappings.
8. At the top of the screen, click the button.
The Field Mapping Values screen appears, displaying the list of current field mappings.

Meridium APM SAP Interfaces V3.6.0.0.0
142
Components of Field Mappings
Each field mapping between SAP and Meridium APM consists of the following components.
SAP Table SAP Field Meridium APM Field
Conditional Query Key Indicator
The SAP table containing the field whose value will be mapped to a Meridium APM field.
The SAP field whose value will be mapped to a Meridium APM field.
The Meridium APM field to which the SAP value will be mapped.
The query that is used to map the value from SAP to Meridium APM.
A value indicating whether or not the Meridium APM field is a key field.

Installation, Upgrade, and Configuration
143
About the Conditional Query
If you want to map a value from an SAP table that is not already used in a baseline mapping, you will need to specify a conditional query, which will be used in combination with the other components of the mapping. For example, suppose that you want to map the value NAME1 from the SAP table ADRC, which is not used in any of the baseline mappings. To do so, you would need to specify a conditional query.
The format of the query should be:
<Source SAP Table's Key Field> = <Joined SAP Table>-<Joined SAP Table's Field>
...where:
• <Source SAP Table's Key Field> is a key field in the SAP table from which you want to map a value.
• <Joined SAP Table> is the table to which you want to join the source SAP table.
• <Joined SAP Table's Field> is the SAP field that belongs to the joined SAP table and stores the same value as the source SAP table key field.
Consider the following image, which illustrates two SAP tables:
• ADRC: The table containing the field NAME1, whose value you want to map. This table is not already used in a baseline mapping.
• ILOA: The table containing a field that stores the same value as the key field ADDRNUMBER, which exists in the table ADRC.
Using this example, you would specify the conditional query using the following format:

Meridium APM SAP Interfaces V3.6.0.0.0
144
ADDRNUMBER = ILOA-ADRNR
The complete mapping would look like this (assuming that you want to map the value to the Meridium APM field MI_FNCLOC00_AREA_ID_C):
Note: The list of SAP tables that are included in the baseline mappings are documented in the Reference Information section of this documentation.
Modifying Field Mappings
Options for Modifying Field Mappings
You can modify an existing field mapping if you want to change the key field setting.
If you want to modify any of the following components of a baseline mapping, however, you will need to delete the existing field mapping and create a new field mapping for that purpose:
• The SAP table or field whose value will be mapped to a Meridium APM field.
If you want to map a value from an SAP table that is not already used in a baseline mapping, you will also need to specify a conditional query.
• The Meridium APM field to which the SAP value will be mapped.
Modifying Existing Field Mappings
To modify an existing field mapping:
1. On the SAP system, run the following transaction: /n/MIAPM/MIPRO
The Display IMG screen appears.

Installation, Upgrade, and Configuration
145
2. In the tree, expand Configurations In SAP.
3. In the Maintain Field Mappings for Extraction Interfaces row, click the button.
The Field Mapping Parameters screen appears.
4. In the Interface ID text box, click the button.
A list of available interfaces appears.
5. In the Interface ID list, select the interface for which you want to modify an existing field mapping.
6. In the APM Data Source text box, click the button.

Meridium APM SAP Interfaces V3.6.0.0.0
146
A list of available Meridium APM data sources appears.
7. In the APM Data Source list, select the Meridium APM data source for which you want to modify an existing field mapping.
8. At the top of the screen, click the button.
The Field Mapping Values screen appears. If you have already configured custom mappings, the current field mappings appear in the grid. If, however, you have not configured any custom mappings, the grid is empty by default (as shown in the following image).
9. Click the button.
Additional buttons appear on the toolbar.

Installation, Upgrade, and Configuration
147
10. If you have not configured any custom field mappings (i.e., if the grid is empty), click the Reset button to use the baseline field mappings as a
starting point.
11. In the grid, in the row containing the field mapping that you want to modify, modify the values in either or both of the following cells as desired:
• Condition to Select Query
• Key
12. When you are finished modifying the field mapping, click the button.
The field mapping is saved.
Undoing Changes to a Field Mapping
If you modify a field mapping, you can undo your changes if needed. The following instructions assume that you are viewing the list of current mappings and that you have just made a change that you want to undo.
To undo a change to a field mapping:
1. On the Field Mapping Values screen, in the grid, select the row containing the change that you want to undo.
2. Click the button.
Your changes are undone.
3. Click the button.
The field mappings are saved.
Creating New Field Mappings
To create a new field mapping:
1. On the SAP system, run the following transaction: /n/MIAPM/MIPRO

Meridium APM SAP Interfaces V3.6.0.0.0
148
The Display IMG screen appears.
2. In the tree, expand Configurations In SAP.
3. In the Maintain Field Mappings for Extraction Interfaces row, click the button.
The Field Mapping Parameters screen appears.
4. In the Interface ID text box, click the button.
A list of available interfaces appears.
5. In the Interface ID list, select the interface for which you want to create a new field mapping.

Installation, Upgrade, and Configuration
149
6. In the APM Data Source text box, click the button.
A list of available Meridium APM data sources appears.
7. In the APM Data Source list, select the Meridium APM data source for which you want to create a new field mapping.
8. At the top of the screen, click the button.
Note: If the selected data source is set as inactive in the /MIAPM/PARAMS table, a message appears to indicate that. You can click the Yes button to continue creating new field mappings for this data source.
The Field Mapping Values screen appears. If you have already configured custom mappings, the current field mappings appear in the grid. If, however, you have not configured any custom mappings, the grid is empty by default (as shown in the following image).

Meridium APM SAP Interfaces V3.6.0.0.0
150
9. Click the button.
Additional buttons appear on the toolbar.
10. If you have not configured any custom field mappings (i.e., if the grid is empty), click the Reset button to use the baseline field mappings as a
starting point.
11. Click the New Entries button.
A new screen appears, displaying blank rows.
12. In the first new row, in the Table Name cell, type the desired SAP table
name, or click the button to select an SAP table from a list of available tables.
13. In the first new row, in the Field Name cell, type the desired SAP field
name, or click the button to select an SAP field from a list of available fields.
14. In the Meridium Field Name cell, type the desired Meridium APM field
ID, or click the button to select a Meridium APM field from a list of available fields.

Installation, Upgrade, and Configuration
151
15. In the Condition to Select Query cell, type the desired query syntax. This value is optional.
16. In the Key cell, if the selected Meridium APM field should be used to identify unique records during the extraction process, select the check box.
17. Click the button.
The field mapping is saved.
18. If desired, to return to the list of field mappings, click the button.
Copying Existing Field Mappings
If desired, you can copy a field mapping, which allows you to use that field mapping as the starting point for creating a new field mapping.
To copy an existing field mapping:
1. On the SAP system, run the following transaction: /n/MIAPM/MIPRO
The Display IMG screen appears.
2. In the tree, expand Configurations In SAP.
3. In the Maintain Field Mappings for Extraction Interfaces row, click the button.
The Field Mapping Parameters screen appears.

Meridium APM SAP Interfaces V3.6.0.0.0
152
4. In the Interface ID text box, click the button.
A list of available interfaces appears.
5. In the Interface ID list, select the interface for which you want to copy an existing field mapping.
6. In the APM Data Source text box, click the button.
A list of available Meridium APM data sources appears.
7. In the APM Data Source list, select the Meridium APM data source for which you want to copy an existing field mapping.
8. At the top of the screen, click the button.
Note: If the selected data source is set as inactive in the /MIAPM/PARAMS table, a message appears to indicate that. You can click the Yes button to continue copying field mappings for this data source.

Installation, Upgrade, and Configuration
153
The Field Mapping Values screen appears. If you have already configured custom mappings, the current field mappings appear in the grid. If, however, you have not configured any custom mappings, the grid is empty by default (as shown in the following image).
9. Click the button.
Additional buttons appear on the toolbar.
10. If you have not configured any custom field mappings (i.e., if the grid is empty), to see the baseline field mappings, on the toolbar, click the
Reset button.
11. In the grid, select the row containing the field mapping that you want to copy.

Meridium APM SAP Interfaces V3.6.0.0.0
154
12. Click the button.
A new screen appears, displaying a row for the new field mapping, where the values in the new field mapping match the values in the copied field mapping.
13. In the new row, modify the values as desired for the new field mapping.
14. When you are finished modifying the values for the new field mapping, click the button.
15. Click the button.
The new field mapping is displayed in the grid.
16. Click the button.
The field mappings are saved.
Deleting Field Mappings
The following instructions assume that you are viewing the list of field mappings containing the mappings that you want to delete.

Installation, Upgrade, and Configuration
155
To delete a field mapping:
1. On the Field Mapping Values screen, on the toolbar, click the button.
Additional buttons appear on the toolbar.
2. If you have not configured any custom field mappings (i.e., if the grid is empty), to see the baseline field mappings, click the Reset button.
3. In the grid, select the rows containing the field mappings that you want to delete.
4. On the toolbar, click the button.
The field mappings are deleted.
5. Click the button.
The field mappings are saved.
Reverting to the Baseline Field Mappings
If you have modified the baseline field mappings in any way (i.e., deleted a baseline field mapping, created your own custom field mapping, or modified an existing field mapping), you can revert to the baseline field mappings at any time. After you do so, the next time that an extraction interface is run, the baseline field mappings will be used.
To revert to the baseline field mappings:
1. On the SAP system, run the following transaction: /n/MIAPM/MIPRO
The Display IMG screen appears.

Meridium APM SAP Interfaces V3.6.0.0.0
156
2. In the tree, expand Configurations In SAP.
3. In the Maintain Field Mappings for Extraction Interfaces row, click the button.
The Field Mapping Parameters screen appears.
4. In the Interface ID text box, click the button.
A list of available interfaces appears.
5. In the Interface ID list, select the interface for which you want to revert to the baseline field mappings.
6. In the APM Data Source text box, click the button.

Installation, Upgrade, and Configuration
157
A list of available Meridium APM data sources appears.
7. In the APM Data Source list, select the Meridium APM data source for which you want to revert to the baseline field mappings.
8. At the top of the screen, click the button.
Note: If the selected data source is set as inactive in the /MIAPM/PARAMS table, a message appears to indicate that. You can click the Yes button to continue reverting to the baseline field mappings for this data source.
The Field Mapping Values screen appears, displaying the current field mappings.
9. Click the button.
Additional buttons appear on the toolbar.

Meridium APM SAP Interfaces V3.6.0.0.0
158
10. In the grid, select all of the rows.
11. On the toolbar, click the button.
The field mappings are deleted.
12. Click the button.
The Meridium APM system will now begin using the baseline field mappings.
Exporting Field Mappings
In some cases, you might want to export the current field mappings so that you can import them into another SAP system. For example, you might want to do this if you want to export field mappings from a test system and then import into a production system.
To export field mappings:
1. On the SAP system, run the following transaction: /n/MIAPM/MIPRO
The Display IMG screen appears.
2. In the tree, expand Configurations In SAP.
3. In the Maintain Field Mappings for Extraction Interfaces row, click the button.
The Field Mapping Parameters screen appears.

Installation, Upgrade, and Configuration
159
4. In the Interface ID text box, click the button.
A list of available interfaces appears.
5. In the Interface ID list, select the interface for which you want to export the field mappings.
6. In the APM Data Source text box, click the button.
A list of available Meridium APM data sources appears.
7. In the APM Data Source list, select the Meridium APM data source for which you want to export the field mappings.
8. At the top of the screen, click the button.
Note: If the selected data source is set as inactive in the /MIAPM/PARAMS table, a message appears to indicate that. You can click the Yes button to continue exporting field mappings for this data source.

Meridium APM SAP Interfaces V3.6.0.0.0
160
The Field Mapping Values screen appears, displaying the current field mappings.
9. Click the button.
Additional buttons appear on the toolbar.
10. Click the Export button.
The Save As dialog box appears.

Installation, Upgrade, and Configuration
161
11. In the Save in list, select the folder in which you want to save the field mappings.
12. In the File name text box, type a name for the file that will store the field mappings. The default name is <Interface ID>_<Data Source>.TXT, where <Interface ID> is the interface whose field mappings you are extracting, and <Data Source> is the Meridium APM data source for which you are extracting the mappings.
Note: The value in the Save as type text box is set by default to TXT. You cannot select another value.
13. Click the Save button.
The field mappings are saved as a Text file with the specified file name.
Note: The Text file will contain more rows than are displayed in the field mapping grid in SAP. The additional rows are identified with the value MI_INTERNAL in the last column, and these rows are required in order to create a fully functioning export file that can be imported successfully.

Meridium APM SAP Interfaces V3.6.0.0.0
162
Importing Field Mappings
If you have exported field mappings from an SAP system, you can use the following instructions to import those mappings into another SAP system. When you import field mappings, all existing field mappings in the target SAP system will be overwritten.
To import field mappings:
1. On the SAP system, run the following transaction: /n/MIAPM/MIPRO
The Display IMG screen appears.
2. In the tree, expand Configurations In SAP.
3. In the Maintain Field Mappings for Extraction Interfaces row, click the button.
The Field Mapping Parameters screen appears.
4. In the Interface ID text box, click the button.
A list of available interfaces appears.

Installation, Upgrade, and Configuration
163
5. In the Interface ID list, select the interface for which you want to import field mappings.
6. In the APM Data Source text box, click the button.
A list of available Meridium APM data sources appears.
7. In the APM Data Source list, select the Meridium APM data source for which you want to import field mappings.
8. At the top of the screen, click the button.
Note: If the selected data source is set as inactive in the /MIAPM/PARAMS table, a message appears to indicate that. You can click the Yes button to continue importing field mappings for this data source.
The Field Mapping Values screen appears, displaying the current field mappings.

Meridium APM SAP Interfaces V3.6.0.0.0
164
9. Click the button.
Additional buttons appear on the toolbar.
10. Click the Import button.
The Open dialog box appears.

Installation, Upgrade, and Configuration
165
11. Navigate to the folder containing the Text file that you want to import, select the desired Text file, and click the Open button.
The field mappings that are stored in the selected Text file are imported.
12. Click the button.
The field mappings are saved.
Configuring Meridium APM to Extract Characteristics
About Configuring Meridium APM to Extract Characteristics
In SAP, you can assign specific characteristics to Equipment and Functional Locations. Each characteristic belongs to a classification, and each classification belongs to a class type, as illustrated in the following image.

Meridium APM SAP Interfaces V3.6.0.0.0
166
By default, the Meridium APM system is not configured to extract characteristics. You can, however, complete several manual configuration steps that will cause the characteristics to be extracted when you run the following interfaces:
• Equipment Characteristics Extraction Interface
• Functional Location Characteristics Extraction Interface
To configure the Meridium APM system to extract characteristics, you will need to complete the following steps in the following order:
1. Using CMMS Classification Type records, specify whether you want to extract characteristics for Equipment, Functional Locations, or both. If you want to extract Equipment and Functional Location characteristics, you will need to create two CMMS Classification Type Definition records: one for Equipment characteristics and one for Functional Location characteristics.
2. Using CMMS Classification records, identify the classifications whose characteristics you want to extract.
3. Using CMMS Characteristic records, identify the specific characteristics that you want to extract.

Installation, Upgrade, and Configuration
167
After you complete these steps, when you run the characteristic extraction interfaces, the appropriate characteristics are extracted from SAP and used to create Technical Characteristic records, which are linked automatically to the corresponding Equipment or Functional Location records.
Note: You can configure the Meridium APM system to extract characteristics only if the SAP Interfaces - Technical Characteristics license is active.
Creating CMMS Classification Type Records
Note: You can complete the following instructions successfully only if the SAP Interfaces - Technical Characteristics license is active.
To create a CMMS Classification Type record:
1. In the Meridium APM Framework, on the toolbar, click the New button.
The Select Family dialog box appears.
2. In the list, select CMMS Classification Type, and click OK.
A new blank CMMS Classification Type record appears in the Record Manager.
3. In the CMMS System list, select the SAP system from which you want to extract characteristics. The SAP System list is populated automatically with the value that appears in the Name field in the SAP System record whose Default SAP System field contains the value True.
4. In the Classification Type list, select the item whose characteristics you want to extract: Equipment or Functional Location.
5. On the Common Tasks menu, click the Save link.

Meridium APM SAP Interfaces V3.6.0.0.0
168
The CMMS Classification Type record is saved. At this point in the configuration process, you will need to select the classifications whose characteristics you want to extract.
How is the CMMS System ID Field Used?
When you create CMMS Classification Type records, using the CMMS System list, you must select the SAP system from which you want to extract characteristics belonging to that classification type. The CMMS System list displays the values in the Name field in all existing SAP System records. When you save the CMMS Classification Type record, the Meridium APM system finds the SAP System record whose Name field contains the selected value, and the value in the System ID field in that SAP System record is copied to the CMMS System ID field in the CMMS Classification Type record.
Then, when you create CMMS Classification or CMMS Characteristic records that are associated with that CMMS Classification Type record, the value in the CMMS System ID field in the CMMS Classification Type record is copied automatically to the CMMS System ID field in those records.
Note: The System ID field is available on the baseline SAP System datasheet, but the CMMS System ID field is not available on the baseline CMMS Classification Type, CMMS Classification, or CMMS Characteristic datasheets.
When you run the Equipment Characteristic Extraction Interface or the Functional Location Characteristic Extraction Interface, the Meridium APM code needs to determine which specific characteristics to extract from that system. To do so, it evaluates the CMMS Characteristic records that exist in your Meridium APM database. If it finds any CMMS Characteristic records whose CMMS System ID field value identifies the SAP system from which you are running the interface, it will extract only those characteristics from that SAP system (assuming that the Extract from CMMS System check box is selected in the CMMS Characteristic record).
For example, suppose that your Meridium APM database contains the following CMMS Classification Type records.

Installation, Upgrade, and Configuration
169
Note: In these images, the CMMS System ID field has been added to the datasheet so that you can see the value that is stored in this field.
In these images, you can see that both records will be used to extract Equipment characteristics. One record will be used to extract them from the SAP system D02-000, and the other record will be used to extract them from the SAP system MDM-800.
Suppose that the CMMS Classification Type record for D02-000 is associated with the following CMMS Characteristic records:
...and the CMMS Classification Type record for MDM-800 is associated with the following CMMS Characteristic records:

Meridium APM SAP Interfaces V3.6.0.0.0
170
If you were to run the Equipment Characteristic Extraction Interface from the SAP system D02-000, only the following characteristics would be extracted:
• THREAD TYPE
• Length
• Diameter
Likewise, if you were to run the Equipment Characteristic Extraction Interface from SAP system MDM-800, only the following characteristics would be extracted:
• Number of Threads
• THREAD TYPE
Identifying Which Characteristics to Extract
Identifying Classifications Whose Characteristics You Want to Extract
Note: You can complete the following instructions successfully only if the SAP Interfaces - Technical Characteristics license is active.
To identify a classification whose characteristics you want to extract:
1. Open the CMMS Classification Type record representing the item whose characteristics you want to extract (i.e., Equipment or Functional Location).
2. On the Associated Pages menu, click the Synchronize Classifications link.

Installation, Upgrade, and Configuration
171
CMMS Classification records are created automatically and linked to the CMMS Classification Type record. Each CMMS Classification record is created from a current classification that exists in the specified SAP system (using the CMMS System field in the CMMS Classification Type record). The CMMS Classification records are displayed as detail records on the Classification Type Classifications datasheet, as shown in the following image.
3. In the CMMS Classification detail grid, in the rows representing the classifications whose characteristics you want to extract, select the Extract From CMMS System check box.
4. On the Common Tasks menu, click the Save link.
The CMMS Classification records are saved. At this point in the configuration process, you will need to select the specific characteristics that you want to extract.
Identifying Characteristics You Want to Extract
Note: You can complete the following instructions successfully only if the SAP Interfaces - Technical Characteristics license is active.

Meridium APM SAP Interfaces V3.6.0.0.0
172
To identify a characteristic that you want to extract:
1. Open the CMMS Classification record representing the classification whose characteristics you want to extract.
2. On the Associated Pages menu, click the Synchronize Characteristics link.
CMMS Characteristic records are created automatically and linked to the CMMS Classification record. Each CMMS Characteristic record is created from a current characteristic that exists in the specified SAP system (using the CMMS System field in the CMMS Classification record). The CMMS Characteristic records are displayed as detail records on the Classification Characteristics datasheet, as shown in the following image.
3. In the CMMS Characteristic detail grid, in the rows representing the characteristics that you want to extract, select the Extract From CMMS System check box.
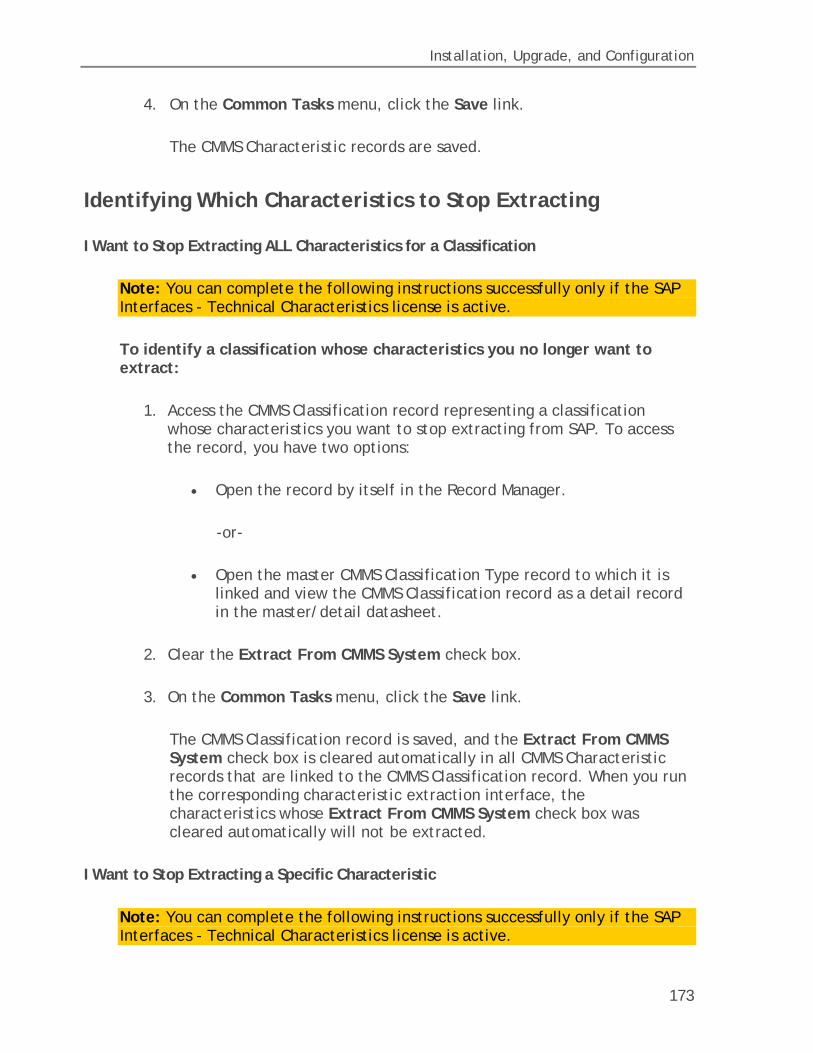
Installation, Upgrade, and Configuration
173
4. On the Common Tasks menu, click the Save link.
The CMMS Characteristic records are saved.
Identifying Which Characteristics to Stop Extracting
I Want to Stop Extracting ALL Characteristics for a Classification
Note: You can complete the following instructions successfully only if the SAP Interfaces - Technical Characteristics license is active.
To identify a classification whose characteristics you no longer want to extract:
1. Access the CMMS Classification record representing a classification whose characteristics you want to stop extracting from SAP. To access the record, you have two options:
• Open the record by itself in the Record Manager.
-or-
• Open the master CMMS Classification Type record to which it is linked and view the CMMS Classification record as a detail record in the master/detail datasheet.
2. Clear the Extract From CMMS System check box.
3. On the Common Tasks menu, click the Save link.
The CMMS Classification record is saved, and the Extract From CMMS System check box is cleared automatically in all CMMS Characteristic records that are linked to the CMMS Classification record. When you run the corresponding characteristic extraction interface, the characteristics whose Extract From CMMS System check box was cleared automatically will not be extracted.
I Want to Stop Extracting a Specific Characteristic
Note: You can complete the following instructions successfully only if the SAP Interfaces - Technical Characteristics license is active.

Meridium APM SAP Interfaces V3.6.0.0.0
174
To identify a specific characteristic that you no longer want to extract:
1. Access the CMMS Characteristic record representing the characteristic that you want to stop extracting from SAP. To access the record, you have two options:
• Open the record by itself in the Record Manager.
-or-
• Open the master CMMS Classification record to which it is linked and view the CMMS Characteristic record as a detail record in the master/detail datasheet.
2. Clear the Extract From CMMS System check box.
3. On the Common Tasks menu, click the Save link.
The CMMS Characteristic record is saved. When you run the corresponding characteristic extraction interface, the characteristic will not be extracted.
Refreshing Meridium APM to Reflect Current SAP Classifications and Characteristics
In some cases, after CMMS Classification and CMMS Characteristic records have been created in the Meridium APM system, classifications and characteristics may get added or deleted in SAP. If this happens, you can refresh your Meridium APM system so that it accurately reflects the most current data in SAP.
Note: You can complete the following instructions successfully only if the SAP Interfaces - Technical Characteristics license is active.
To update the Meridium APM system to reflect current SAP classifications:
1. Open in the Record Manager the CMMS Classification Type record whose CMMS Classification records you want to update.

Installation, Upgrade, and Configuration
175
2. On the Associated Pages menu, click the Synchronize Classifications link.
The Meridium APM system checks the SAP system for any new or deleted classifications that are associated with the specified classification type (i.e., Equipment or Functional Location). If any classifications have been deleted in SAP, the corresponding CMMS Classification record is deleted. Likewise, if any classifications have been added, a new CMMS Classification record is created. Finally, if any classification descriptions have changed in SAP, the corresponding CMMS Classification record is updated with the new description.
To update the Meridium APM system to reflect current SAP characteristics:
1. Open in the Record Manager the CMMS Classification record whose CMMS Characteristic records you want to update.
2. On the Associated Pages menu, click the Synchronize Characteristics link.
The Meridium APM system checks the SAP system for any new or deleted characteristics that are associated with the classification. If any characteristics have been deleted in SAP, the corresponding CMMS Characteristic record is deleted. Likewise, if any characteristics have been added, a new CMMS Characteristic record is created. Finally, if any characteristic descriptions have changed in SAP, the corresponding CMMS Characteristic record is updated with the new description.
About Classification Hierarchies
In SAP, for any given class, one or more if its characteristics can be inherited from another class. For example, consider the following SAP classes:
• EQ_CLASS_0001
• Fasteners
• Bolts
• Hexagonal Bolt

Meridium APM SAP Interfaces V3.6.0.0.0
176
As shown in the following image, EQ_CLASS_0001 has four unique characteristics.
As shown in the following image, Fasteners also has its own unique set of four characteristics.
Bolts, however, inherits all of the characteristics from EQ_CLASS_0001 and FASTENERS. In addition, Bolts has its own two unique characteristics: HEAD_SHAPE and BOLT_TYPE.

Installation, Upgrade, and Configuration
177
Finally, Hexagonal Bolt also inherits all of the characteristics from EQ_CLASS_0001, FASTENERS, and BOLTS. It also has its own unique characteristic: TOLERANCE.

Meridium APM SAP Interfaces V3.6.0.0.0
178
Using these SAP classes, in the Meridium APM system, if you were to select the Extract From CMMS System check box for the HEXAGONALBOLT class:
...when you clicked the Synchronize Characteristics link while viewing the HEXAGONALBOLT CMMS Classification record, the following CMMS Characteristic records would be created automatically:

Installation, Upgrade, and Configuration
179
As highlighted in the following image, you can see from the Classification column that some of the characteristics are inherited from other classes.
Specifically, using the highlighting in the image, you can see that:
• The following characteristics are inherited from the class EQ_CLASS_0001 (yellow highlighting):
COLOR
LOCAL_REG_NUM
OPH
SAP_EHS_1017_003_TEST_TYPE

Meridium APM SAP Interfaces V3.6.0.0.0
180
• The following characteristics are inherited from the class FASTENERS (pink highlighting):
FASTENER_DIAMETER
LENGTH
NUMBEROFTHREADS
THREAD_TYPE
• The following characteristics are inherited from the class BOLTS (blue highlighting):
HEAD_SHAPE
BOLT_TYPE
• The characteristic TOLERANCE is assigned directly to the class HEXAGONALBOLT (no highlighting).
If you selected the Extract From CMMS System check box for ALL of these characteristics, if you were to run the Equipment Characteristics Extraction Interface without filters, ALL of these characteristics would be extracted. The following image shows a subset of these Technical Characteristic records in query results.

Installation, Upgrade, and Configuration
181
If, however, you were to filter the report to extract only characteristics belonging to the HEXAGONALBOLT class:

Meridium APM SAP Interfaces V3.6.0.0.0
182
...only characteristics that are assigned directly at the HEXAGONALBOLT level would be extracted. In other words, because only TOLERANCE is assigned directly to HEXAGONALBOLT, only the TOLERANCE characteristic would be extracted. The following image shows these Technical Characteristic records in query results.
Configuring the Notification Creation Interface
Requirements for Creating SAP Notifications
In order to create an SAP Notification from a Meridium APM Recommendation record, at a minimum, your database must contain an SAP System record that defines the connection information to your SAP system. If the SAP Interfaces and the Oracle EBS eAM Interfaces licenses are both active, in addition to this requirement, certain additional conditions must be met regarding the SAP System and CMMS System records that exist in the database. The exact conditions that must be met depends on the following main factors:
• Whether or not the Recommendation record is linked to an Equipment or Functional Location record.

Installation, Upgrade, and Configuration
183
• Whether or not that Equipment or Functional Location record is linked to a Site Reference record.
The following scenarios describe the conditions that must exist in each of these cases.
Scenario A: Recommendation Record Is not Linked to an Equipment or Functional Location Record
In this scenario, you can create a Notification successfully only if both of the following conditions are true:
• Either NO CMMS System records exist or none of the existing CMMS System records contain the value True in the Enabled field nor the value True in the Is Default field.
-and-
• At least one of the existing SAP System records contains the value True in the Default SAP System field. The Notification will be created in the SAP System represented by this SAP System record.
Scenario B: Recommendation Record IS Linked to an Equipment or Functional Location Record
Option 1: The Equipment or Functional Location record IS linked to a Site Reference record
In this scenario, you can create a Notification successfully only if NO CMMS System records exist in the database. In addition, if the Site Reference record is linked to an SAP System record, the Notification will be created automatically in the SAP system represented by that SAP System, regardless of whether or not the Default SAP System field in that record contains the value True. If, however, the Site Reference record is not linked to an SAP System record, the requirements in option 2 must be met.

Meridium APM SAP Interfaces V3.6.0.0.0
184
Option 2: The Equipment or Functional Location record is not linked to a Site Reference record
In this scenario, you can create a Notification successfully only if both of the following conditions are true:
• Either NO CMMS System records exist or none of the existing CMMS System records contain the value True in the Enabled field nor the value True in the Is Default field.
-and-
• At least one of the existing SAP System records contains the value True in the Default SAP System field. The Notification will be created in the SAP System represented by this SAP System record.
Configuring Meridium APM to Create Notifications from Recommendation Records
The SAP Interfaces feature allows you to create Recommendation records in Meridium APM that will be used to create SAP Notifications automatically. For a Recommendation record to generate an SAP Notification automatically, the Create Work Request field must exist on the Recommendation datasheet. This field is available on the baseline datasheets for the baseline Recommendation families from which you are allowed to create SAP Notifications.
If you want to generate SAP Notifications from Recommendation records that belong to customer-defined subfamilies of the root Recommendation family, in addition to implementing the correct rules (for an example of the rules that you will need to implement, you can look at any active baseline Recommendation family), you will need to add the Create Work Request field to the desired datasheets for that family.
Note that you can create multiple types of SAP Notifications (e.g., M1) from Recommendation records. By default, Meridium APM creates M1 Notifications. If you want to create different Notification types, you will need to:
• Add the Notification Type field to the datasheet.
• Configure the Notification Type field to accept values other than M1. Note, however, that in the baseline SAP Interfaces product, this field is disabled. If desired, you could configure it to be enabled so that users

Installation, Upgrade, and Configuration
185
can type a value directly in the Notification Type cell on the datasheet. You might also consider creating a Valid Values rule that provides a list of acceptable values so that users can select the desired value from the list.
About the Query Get SAP ID for Equipment
When you create an SAP Notification from a Meridium APM Recommendation record, the Meridium APM system locates the Equipment and Functional Location records to which the Recommendation record is linked. After it locates these records, it determines which value in each record should be used to populate the Equipment or Functional Location field in the Notification.
To find the Equipment and Functional Location records to which the Recommendation record is linked, the Meridium APM system looks for any predecessor record that is linked to the Recommendation record through the Has Recommendations relationship family. Then, the Meridium APM system passes the Entity Key of any records it finds in this relationship into the prompts in the following queries, which are stored in the Catalog folder //Public/Meridium/Modules/SAP Integration Interfaces/Queries:
• Get SAP ID for Equipment: Returns the value in the Equipment ID field in the record with the provided Entity Key. In the baseline Meridium APM database, this query returns records in the Equipment family.
• Get SAP ID for Functional Location: Returns the value in the Functional Location field in the record with the provided Entity Key. In the baseline Meridium APM database, this query returns records in the Functional Location family.
When the Meridium APM system runs the queries, it provides the prompts with the Entity Keys of the predecessor records that are linked to the Recommendation record through the Has Recommendations relationship:
• If any of the predecessor Entity Keys identify a record that belongs to the Equipment family, the Equipment ID field in the Equipment record will be used to populate the Equipment field in the Notification.
• If any of the predecessor Entity Keys identify a record that belongs to the Functional Location family, the Functional Location field in the Functional Location record will be used to populate the Functional Location field in the Notification.

Meridium APM SAP Interfaces V3.6.0.0.0
186
For example, suppose a Recommendation record is linked to the following records:
• Equipment record with the value HX-112 in the Equipment ID field.
• Functional Location record the value FL-101 in the Functional Location field.
If you create a Notification record from this Recommendation record, Meridium APM will:
• Identify the Entity Key of the Equipment record HX-112.
• Identify the Entity Key of the Functional Location record FL-101.
• Supply the Entity Keys to the prompt in the Get SAP ID for Equipment and Get SAP ID for Functional Location queries.
• Identify the value in the Equipment ID field in the Equipment record that is returned by the Get SAP ID for Equipment query: HX-112.
• Identify the value in the Functional Location field in the Functional Location record that is returned by the Get SAP ID for Functional Location query: FL-101.
• Populate the Equipment field in the Notification with HX-112.
• Populate the Functional Location field in the Notification with FL-101.
Identifying Your SAP Systems
About Identifying Your SAP Systems
In order for the Meridium APM system to send and receive data to and from your SAP systems, the Meridium APM system must be able to identify which SAP systems you are using. The following table lists the items that are used to identify your SAP systems, the workflows in which those items are used, and notes about which items you must configure manually.

Installation, Upgrade, and Configuration
187
Item Purpose Requires Configuration?
SAP System records Identifies the SAP systems to which you want to send data when you complete any of the following tasks:
• Create or update SAP Notifications from Meridium APM Recommendation records (if you are not using an SAP PI Server).
• Create or update SAP Confirmations from Meridium APM Confirmation records.
• Create SAP Orders from Meridium APM Task records.
SAP System records are also used when you extract Equipment or Functional Location characteristics from SAP.
You must create SAP System records manually.
Meridium APM Core SAP Connector Service -and- The file CSCS.exe.config
Identifies the SAP systems from which you want to receive data when you complete any of the following tasks:
• Create Meridium APM Task records from SAP Maintenance Plans (and their associated Orders).
• Execute the report /MIAPM/WH_HARMONIZATION.
You must modify the file CSCS.exe.config and then start the Meridium APM Core SAP Connector Service.
The file Meridium.SAP.CertifiedInterface.Config.xml
Identifies the SAP PI Server to which you want to send data when you create or update SAP Notifications from Meridium APM Recommendation records if you ARE using an SAP PI Server.
You must modify the XML file.

Meridium APM SAP Interfaces V3.6.0.0.0
188
How are SAP System Records Used?
When you transfer data from Meridium APM to SAP during any of the following workflows, the Meridium APM system uses SAP System records to determine which SAP system to use:
• Creating or updating SAP Notifications from Meridium APM Recommendation records (if you are not using an SAP PI Server).
• Creating or updating SAP Confirmations from Meridium APM Confirmation records.
• Creating SAP Orders from Meridium APM Task records.
In addition, SAP System records are used by the Equipment Characteristics Extraction Interface and the Functional Location Characteristics Extraction Interface in both of the following workflows:
• When you create CMMS Classification Type records, SAP System records are used to determine which SAP system information to use to populate the CMMS System ID field.
• When you refresh the Meridium APM system to reflect the current SAP classifications and characteristics, SAP System records are used to determine the SAP system in which to look for the current classifications and characteristics.
SAP System records can be linked to Site Reference records, or you can specify a default SAP system. Consider the following scenarios.
Scenario A: Site Reference Record Used (Standard Practice)
In this scenario, the Equipment or Functional Location record is linked to a Site Reference record that is linked to an SAP System record.

Installation, Upgrade, and Configuration
189
In this scenario, the Meridium APM system will use the SAP System record to which the Site Reference record is linked.
Note: This scenario reflects the standard SAP Interfaces practice.
Scenario B: Default SAP System Field Used (Non-Standard Practice)
In this scenario, the Equipment or Functional Location record is not linked to a Site Reference record.
In this case, the Meridium APM system will use the SAP System record whose Default SAP System field contains the value True.

Meridium APM SAP Interfaces V3.6.0.0.0
190
Note: This scenario does not reflect the standard SAP Interfaces practice, but because it is an option and will work as described in this topic, it is explained in the documentation.
If no SAP System records contain the value True in the Default SAP System field, an error message will appear, and you will be unable to transfer the data to SAP.
If your SAP landscape includes multiple SAP systems, you can create multiple SAP System records, but only one of these records can be designated as the default record. If you want some users to be able to transfer data to a separate SAP system, you will need to make sure that your SAP System records are linked to Site Reference records, which are also linked to the appropriate Equipment and Functional Location records.
Creating SAP System Records
To create an SAP System record:
1. On the Meridium APM Framework toolbar, click the New button.
The Select Family dialog box appears.
2. In the list, select SAP System.
A new SAP System record appears in the Record Manager.

Installation, Upgrade, and Configuration
191
3. In the Name text box, type the name of the SAP system.
We recommend that you use the format <SYSID>-<CLIENT>, where <SYSID> is the System ID of the SAP system and <CLIENT> is the Client number. By doing so, the value in the Name field will match the value that will be populated automatically in the System ID field when you test the connection to the SAP system.
4. If this SAP system is the system to and from which you want to send data by default, select the Default SAP System? check box.
5. In the User ID text box, type a valid User ID that you can use to log in to the SAP system.
6. In the Password text box, click the button.
The Enter SAP System Password dialog box appears.
7. In the Enter Password text box, type the password that is associated with the specified user ID.
8. In the Confirm Password text box, retype the password that you typed in the Enter Password text box.
9. Click OK.
The password is saved. If needed, you can change the password later.
10. In the Connection String text box:
a. Replace the text SAP_SERVER_IP with the IP address of the SAP Server.

Meridium APM SAP Interfaces V3.6.0.0.0
192
b. Replace the text SAP_SYSTEM_NUMBER with the SAP System number.
c. Replace the text SAP_CLIENT_NUMBER with the SAP Client number.
d. Delete all angle brackets.
11. In the ITS URL text box:
a. Replace the text its_or_integrated_its_server_url with the ITS Server information. To locate the ITS Server information:
i.In SAP, run the following transaction: SE80
Note: If you do not have access to this transaction, contact your SAP BASIS team for assistance.
ii. On the toolbar, click Utilities, and then click Settings.
iii. On the upper-right corner of the screen, click several times until the Internet Transaction Server tab appears.
iv. Click the Internet Transaction Server tab.
The ITS Server information that you must type in the ITS URL text box in Meridium APM is <Log><Path>, where <Log> is the text in the Log section and <Path> is the text in the Path section.

Installation, Upgrade, and Configuration
193
b. Delete the angle brackets.
c. At the end of the URL, type: webgui/!
For example, the ITS URL that corresponds with the values in the image above is http:// DOCROAECC6.meridium.com:8000/sap/bc/gui/sap/its/webgui/!
12. On the Common Tasks menu, click the Save link.
The SAP System record is saved.
Testing the Connection Defined in an SAP System Record
After you have created and saved an SAP System record, you can test the connection information that you provided in the Connection String field.
To test the connection to an SAP system:
1. In the Meridium APM Framework application, open the SAP System record whose connection information you want to test.

Meridium APM SAP Interfaces V3.6.0.0.0
194
2. On the Associated Pages menu, click the Test Connection link.
The connection information that you provided is tested, and a message appears indicating whether or not the test was successful. In addition, the System ID field is populated automatically with the name of the SAP system, using the format <SYSID>-<CLIENT>, where <SYSID> is the System ID of the SAP system and <CLIENT> is the Client number.
Associating an SAP System with a Site
To associate an SAP system with the site that uses it:
1. In the Meridium APM Framework, perform a search for the Site Reference record representing the site with which you want to associate an SAP system.
2. Open the desired Site Reference record.
The Site Reference record appears in the Record Manager.
3. Using the shortcut menu in the Record Explorer pane, link the Site Reference record to the desired SAP System record.
The SAP System record is linked to the Site Reference record.
The File CSCS.exe.config
About the File CSCS.exe.config
When you install the Meridium APM Application Server, the file CSCS.exe.conf is created automatically and stored in the folder <root>\ApplicationServer\Services, where <root> is the root drive and folder into which the Meridium APM Application Server has been installed.
The file CSCS.exe.config stores information that allows the Meridium APM system to communicate with your SAP System when you complete either of the following workflows:
• Run the report /MIAPM/WH_HARMONIZATION. When the report is run, it will validate Meridium APM Work History and Work History Detail records against SAP Notifications and Orders to determine which
Installation, Upgrade, and Configuration
195
Meridium APM Work History and Work History Detail records need to be deleted so that the Meridium APM database will not contain duplicate records.
• Execute the Work Management Interface to create and update Inspection Task and Calibration Task records automatically. Certain actions that are performed in SAP will trigger Meridium APM to create or update Inspection Task and Calibration Task records. The SAP code checks periodically to see if any of these actions have been taken in SAP. If they have, the Meridium Core SAP Connector Service will be used to trigger the appropriate actions in the Meridium APM system.
Before you run the report /MIAPM/WH_HARMONIZATION or execute the Work Management Interface, you must modify this file to define the SAP systems that you are using.
The file also contains settings that are used to determine how often the Meridium Core SAP Connector Service will try to reconnect to your SAP Servers if a connection cannot be established upon the first attempt. Typically, SAP users perform SAP system maintenance on a regular schedule (e.g., every Saturday night). This maintenance can take a significant amount of time, depending upon various factors (e.g., the amount of data in your SAP database). The baseline file is configured to account for this SAP system downtime, and it contains settings that specify that:
• When the service cannot connect to the SAP system, it should try to reconnect a maximum of six times.
• Ten minutes should pass between each of those six reconnection attempts.
Note: If the Meridium Core SAP Connector Service loses its connection to an SAP Server, when it successfully reconnects to that server, an informational message will be logged in the Windows Event Log.
You can modify the file at any time if you want to change the default setting for the number of reconnect attempts or the number of seconds between reconnection attempts.
IMPORTANT: Whenever you modify this file, you must restart the Meridium Core SAP Connector Service for your changes to be applied.

Meridium APM SAP Interfaces V3.6.0.0.0
196
Because this file is stored on the Meridium APM Application Server, it will be deleted whenever you uninstall or upgrade the Meridium APM Application Server.
Because you cannot modify the original file that is installed by the Meridium APM Server and Add-ons installer, we recommend that you make a copy of it, modify the copy, and then replace the originally installed version with the copied version.
Defining Your SAP Systems
To modify the file CSCS.exe.config to define the SAP systems that you are using:
1. On the Meridium APM Application Server, navigate to the folder C:\Program Files\Meridium\Services.
2. Open the file CSCS.exe.config in an application that you can use to modify XML script (e.g., Notepad).
3. In the file, within the </appSettings> tags, locate the following text:
<!--add key="SAP_SYSTEM_NAME" value="TraceLevel=1;ProgramID=MERIDIUM_PROGRAM_ID;GWHost=IP_ADDRESS;GWServer=sapgw00" /-->
4. Replace SAP_SYSTEM_NAME with the name of your SAP Server.
5. Replace MERIDIUM_PROGRAM_ID with the value that you typed in the Program ID text box when you created the RFC destination. If you followed the instructions in this documentation, this value will be MeridiumAPM, as shown in the following image.
Note: This value is case-sensitive, meaning that you must type it using the exact case that is specified for the Program ID of the RFC destination.

Installation, Upgrade, and Configuration
197
6. Replace IP_ADDRESS with the IP address of the specified SAP Server.
7. Replace 00 (in the value sapgw00) with the system number of the specified SAP Server.
8. At the beginning of the line, delete the following characters: !--
9. At the end of the line, delete the following characters: --
10. Save the file.
Your settings are applied.
Changing the Number of Times the Service Will Try to Connect Before Stopping Automatically
To change the number of times the service will try to connect before stopping automatically:
1. On the Meridium APM Application Server, navigate to the folder C:\Program Files\Meridium\Services.
2. Open the file CSCS.exe.config in an application that you can use to modify XML script (e.g., Notepad).
3. In the file, within the </appSettings> tags, locate the following text:

Meridium APM SAP Interfaces V3.6.0.0.0
198
<add key="reconnectAttempts" value="6" />
4. Replace 6 with a number indicating the number of times the Meridium Core SAP Connector should try to reconnect to each of the SAP Servers (identified by the third add key setting) before the Meridium Core SAP Connector Service is stopped automatically.
Regardless of how many SAP Servers you define in the file, the reconnectAttempts key needs to exist only once. The value that is specified for this key will apply to ALL SAP Servers within the file. The reconnectAttempts key and the reconnectDelay key work together, which is best understood through an example.
Hint: To specify that you want the service to attempt to reconnect an infinite number of times, you can change the value to any negative number.
The following image shows the reconnectAttempts key set to 10.
5. Save the file.
Your settings are applied.
Changing the Number of Seconds That Will Pass Between Connection Attempts
To change the number of seconds that will pass between connection attempts:
1. On the Meridium APM Application Server, navigate to the folder C:\Program Files\Meridium\Services.
2. Open the file CSCS.exe.config in an application that you can use to modify XML script (e.g., Notepad).

Installation, Upgrade, and Configuration
199
3. In the file, within the </appSettings> tags, locate the following text:
<add key="reconnectDelay" value="600" />
4. Replace 600 with a number indicating the number of seconds that will pass between connection attempts.
Regardless of how many SAP Servers you define in the file, the reconnectDelay key needs to exist only once. The value that is specified for this key will apply to ALL SAP Servers within the file. The reconnectDelay key and the reconnectAttempts key work together, which is best understood through an example.
Hint: To specify that you want the service to attempt to reconnect an infinite number of times, you can change the value to any negative number.
The following image shows the reconnectAttempts key set to 10.
5. Save the file.
Your settings are applied.
An Example of the File CSCS.exe.config
The following image illustrates an excerpt of the file CSCS.exe.config, where it has been configured to:
• Connect to multiple SAP Servers: Server A and Server B.
• Increase the number of reconnection attempts to ten (10).

Meridium APM SAP Interfaces V3.6.0.0.0
200
• Increase the amount of time between reconnection attempts to 900 seconds (fifteen minutes).
Using the settings of ten reconnect attempts and 900 seconds (fifteen minutes) between those attempts, if the connection to Server A is lost, the Meridium Core SAP Connector Service will try to reconnect six times, where each connection attempt occurs fifteen minutes after the last connection attempt. If a connection cannot be established to Server A after six attempts, the Meridium Core SAP Connector Service will stop trying to connect to Server A. It will, however, continue to connect to Server B until Server B becomes unavailable. If for any reason Server B also becomes unavailable, the Meridium Core SAP Connector Service will try to reconnect to it six times, where each attempt occurs fifteen minutes after the last attempt. If a connection cannot be established to Server B after six attempts, the Meridium Core SAP Connector Service will be stopped automatically and will need to be restarted manually. Whenever the Meridium Core SAP Connector Service is stopped automatically, a corresponding message will be recorded in the Windows Event Log.
The Meridium Core SAP Connector Service
About the Meridium Core SAP Connector Service
The Meridium Core SAP Connector Service is used when you complete either of the following steps:
• Run the report /MIAPM/WH_HARMONIZATION. When the report is run, it will validate Meridium APM Work History and Work History Detail records against SAP Notifications and Orders to determine which Meridium APM Work History and Work History Detail records need to be deleted so that the Meridium APM database will not contain duplicate records.
• Execute the Work Management Interface to create and update Inspection Task and Calibration Task records automatically. Certain actions that are performed in SAP will trigger Meridium APM to create or update Inspection Task and Calibration Task records. The SAP code checks periodically to see if any of these actions have been taken in SAP. If they have, the Meridium Core SAP Connector Service will be used to trigger the appropriate actions in the Meridium APM system.

Installation, Upgrade, and Configuration
201
The Meridium Core SAP Connector Service is installed with the Meridium APM Application Server as a manual service; it must be started manually. Before you run the report /MIAPM/WH_HARMONIZATION or begin using the Work Management Interface within the SAP Interfaces, you may want to verify that the service is running. And if you encounter any problems with the communication between Meridium APM and the SAP system, you should check to make sure that the service has not been stopped.
IMPORTANT: The Meridium Core SAP Connector Service must be restarted whenever you modify the file CSCS.exe.config.
Verifying that the Meridium Core SAP Connector Service is Connected to SAP
After you have modified the file CSCS.exe.config and confirmed that the Meridium Core SAP Connector Service is running, you can verify that the service is correctly connected to SAP.
To verify that the Meridium Core SAP Connector Service is connected to SAP:
1. On the SAP system, run the following transaction: /n/MIAPM/MIPRO
The Display IMG screen appears.
2. In the tree, expand Configurations In SAP.
3. In the Maintain RFC Destination row, click the button.
The Display and maintain RFC destinations screen appears.

Meridium APM SAP Interfaces V3.6.0.0.0
202
4. In the list, expand TCP/IP connections, and then double-click MeridiumAPM.
The RFC Destination screen appears, displaying the contents of the MeridiumAPM RFC destination.

Installation, Upgrade, and Configuration
203
5. Click the Test connection button.
The RFC - Connection Test screen appears, displaying the results of the connection test. If the test was successful, you will see a screen similar to the one in the following image.

Meridium APM SAP Interfaces V3.6.0.0.0
204
If test was not successful, you will see a screen similar to the one in the following image, where the specific text that you see will be different depending upon the cause of the issue.
If the connection test failed, an information message will be logged in the Windows Event Log Application, which is located under the folder \Windows Logs. For example, in the following image, you can see that the information message CSCS: Stopping loop at user request was logged at 9:09:42 AM on 7/30/2012.
Hint: This particular message appears when the Meridium Core SAP Connector Service is not started.

Installation, Upgrade, and Configuration
205
Configuring the Work Management Interface
Modifying the Windows Services File
If you are using the Work Management Interface and the SAP GUI is not installed on the Meridium APM Application Server, before users begin using the Work Management Interface, you will need to modify the Windows Services file by adding entries that specify the port numbers and connection types that should be used when connecting to the SAP System.
To modify the Windows Services file:
1. On the Meridium APM Application Server, navigate to the folder C:\Windows\System32\drivers\etc.
2. Open the file Services.
3. Copy the following text:
sapdp00 3200/tcp sapdp01 3201/tcp sapdp02 3202/tcp sapdp03 3203/tcp sapdp04 3204/tcp sapdp05 3205/tcp sapdp06 3206/tcp sapdp07 3207/tcp sapdp08 3208/tcp sapdp09 3209/tcp sapdp10 3210/tcp sapdp11 3211/tcp sapdp12 3212/tcp sapdp13 3213/tcp sapdp14 3214/tcp sapdp15 3215/tcp sapdp16 3216/tcp sapdp17 3217/tcp sapdp18 3218/tcp sapdp19 3219/tcp sapdp20 3220/tcp sapdp21 3221/tcp sapdp22 3222/tcp
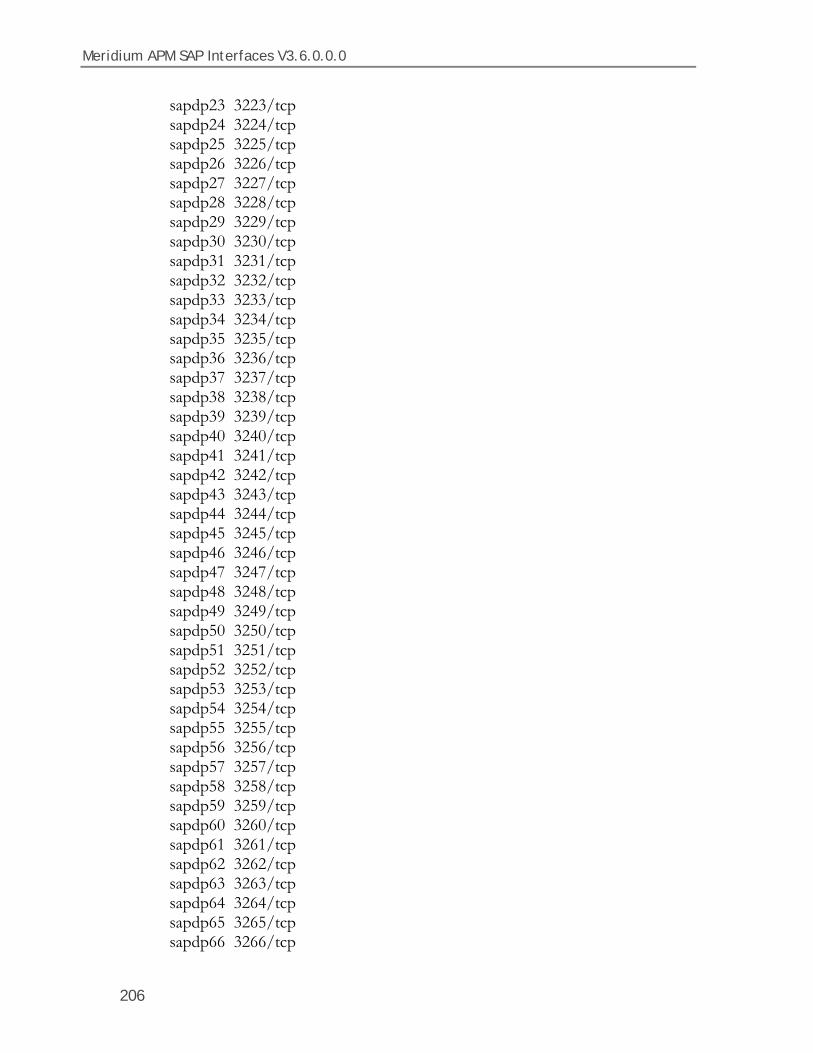
Meridium APM SAP Interfaces V3.6.0.0.0
206
sapdp23 3223/tcp sapdp24 3224/tcp sapdp25 3225/tcp sapdp26 3226/tcp sapdp27 3227/tcp sapdp28 3228/tcp sapdp29 3229/tcp sapdp30 3230/tcp sapdp31 3231/tcp sapdp32 3232/tcp sapdp33 3233/tcp sapdp34 3234/tcp sapdp35 3235/tcp sapdp36 3236/tcp sapdp37 3237/tcp sapdp38 3238/tcp sapdp39 3239/tcp sapdp40 3240/tcp sapdp41 3241/tcp sapdp42 3242/tcp sapdp43 3243/tcp sapdp44 3244/tcp sapdp45 3245/tcp sapdp46 3246/tcp sapdp47 3247/tcp sapdp48 3248/tcp sapdp49 3249/tcp sapdp50 3250/tcp sapdp51 3251/tcp sapdp52 3252/tcp sapdp53 3253/tcp sapdp54 3254/tcp sapdp55 3255/tcp sapdp56 3256/tcp sapdp57 3257/tcp sapdp58 3258/tcp sapdp59 3259/tcp sapdp60 3260/tcp sapdp61 3261/tcp sapdp62 3262/tcp sapdp63 3263/tcp sapdp64 3264/tcp sapdp65 3265/tcp sapdp66 3266/tcp

Installation, Upgrade, and Configuration
207
sapdp67 3267/tcp sapdp68 3268/tcp sapdp69 3269/tcp sapdp70 3270/tcp sapdp71 3271/tcp sapdp72 3272/tcp sapdp73 3273/tcp sapdp74 3274/tcp sapdp75 3275/tcp sapdp76 3276/tcp sapdp77 3277/tcp sapdp78 3278/tcp sapdp79 3279/tcp sapdp80 3280/tcp sapdp81 3281/tcp sapdp82 3282/tcp sapdp83 3283/tcp sapdp84 3284/tcp sapdp85 3285/tcp sapdp86 3286/tcp sapdp87 3287/tcp sapdp88 3288/tcp sapdp89 3289/tcp sapdp90 3290/tcp sapdp91 3291/tcp sapdp92 3292/tcp sapdp93 3293/tcp sapdp94 3294/tcp sapdp95 3295/tcp sapdp96 3296/tcp sapdp97 3297/tcp sapdp98 3298/tcp sapdp99 3299/tcp sapgw00 3300/tcp sapgw01 3301/tcp sapgw02 3302/tcp sapgw03 3303/tcp sapgw04 3304/tcp sapgw05 3305/tcp sapgw06 3306/tcp sapgw07 3307/tcp sapgw08 3308/tcp sapgw09 3309/tcp sapgw10 3310/tcp

Meridium APM SAP Interfaces V3.6.0.0.0
208
sapgw11 3311/tcp sapgw12 3312/tcp sapgw13 3313/tcp sapgw14 3314/tcp sapgw15 3315/tcp sapgw16 3316/tcp sapgw17 3317/tcp sapgw18 3318/tcp sapgw19 3319/tcp sapgw20 3320/tcp sapgw21 3321/tcp sapgw22 3322/tcp sapgw23 3323/tcp sapgw24 3324/tcp sapgw25 3325/tcp sapgw26 3326/tcp sapgw27 3327/tcp sapgw28 3328/tcp sapgw29 3329/tcp sapgw30 3330/tcp sapgw31 3331/tcp sapgw32 3332/tcp sapgw33 3333/tcp sapgw34 3334/tcp sapgw35 3335/tcp sapgw36 3336/tcp sapgw37 3337/tcp sapgw38 3338/tcp sapgw39 3339/tcp sapgw40 3340/tcp sapgw41 3341/tcp sapgw42 3342/tcp sapgw43 3343/tcp sapgw44 3344/tcp sapgw45 3345/tcp sapgw46 3346/tcp sapgw47 3347/tcp sapgw48 3348/tcp sapgw49 3349/tcp sapgw50 3350/tcp sapgw51 3351/tcp sapgw52 3352/tcp sapgw53 3353/tcp sapgw54 3354/tcp

Installation, Upgrade, and Configuration
209
sapgw55 3355/tcp sapgw56 3356/tcp sapgw57 3357/tcp sapgw58 3358/tcp sapgw59 3359/tcp sapgw60 3360/tcp sapgw61 3361/tcp sapgw62 3362/tcp sapgw63 3363/tcp sapgw64 3364/tcp sapgw65 3365/tcp sapgw66 3366/tcp sapgw67 3367/tcp sapgw68 3368/tcp sapgw69 3369/tcp sapgw70 3370/tcp sapgw71 3371/tcp sapgw72 3372/tcp sapgw73 3373/tcp sapgw74 3374/tcp sapgw75 3375/tcp sapgw76 3376/tcp sapgw77 3377/tcp sapgw78 3378/tcp sapgw79 3379/tcp sapgw80 3380/tcp sapgw81 3381/tcp sapgw82 3382/tcp sapgw83 3383/tcp sapgw84 3384/tcp sapgw85 3385/tcp sapgw86 3386/tcp sapgw87 3387/tcp sapgw88 3388/tcp sapgw89 3389/tcp sapgw90 3390/tcp sapgw91 3391/tcp sapgw92 3392/tcp sapgw93 3393/tcp sapgw94 3394/tcp sapgw95 3395/tcp sapgw96 3396/tcp sapgw97 3397/tcp sapgw98 3398/tcp

Meridium APM SAP Interfaces V3.6.0.0.0
210
sapgw99 3399/tcp
4. Paste the copied text into the file after the last existing entry.
5. Save the file.
Creating an RFC Destination
To create an RFC destination:
1. On the SAP system, run the following transaction: /n/MIAPM/MIPRO
The Display IMG screen appears.
2. In the tree, expand Configurations In SAP.
3. In the Maintain RFC Destination row, click the button.
The Display and maintain RFC destinations screen appears.

Installation, Upgrade, and Configuration
211
4. Click the Create button.
The RFC Destination screen appears.

Meridium APM SAP Interfaces V3.6.0.0.0
212
5. In the RFC Destination text box, type a name for the RFC destination.
6. In the Description text box, type a description of the RFC destination.
7. In the Connection type text box, type: T
8. Click the button.
9. On the Technical settings tab, select the Registered Server Program option.

Installation, Upgrade, and Configuration
213
10. On the Technical settings tab, in the Program ID text box, type: MeridiumAPM
When you are finished, the Technical settings tab should look like this:
11. Click the button.
The RFC destination is saved.
Identifying Operation Values that Will Trigger the Creation of Task Records
About Identifying Operation Values that Will Trigger the Creation of Task Records
The Work Management Interface allows you to create Inspection Task and Calibration Task records from SAP Maintenance Plans containing Task Lists with Operations. Each Operation on the Task List is used to create a separate Meridium APM Task record. Before you can use the Work Management Interface to create Task records, you must identify which values in an Operation will trigger the creation of which Task records.
The baseline product is configured such that:
• Operations with the control key ZMI2 will be used to create Calibration Task records.
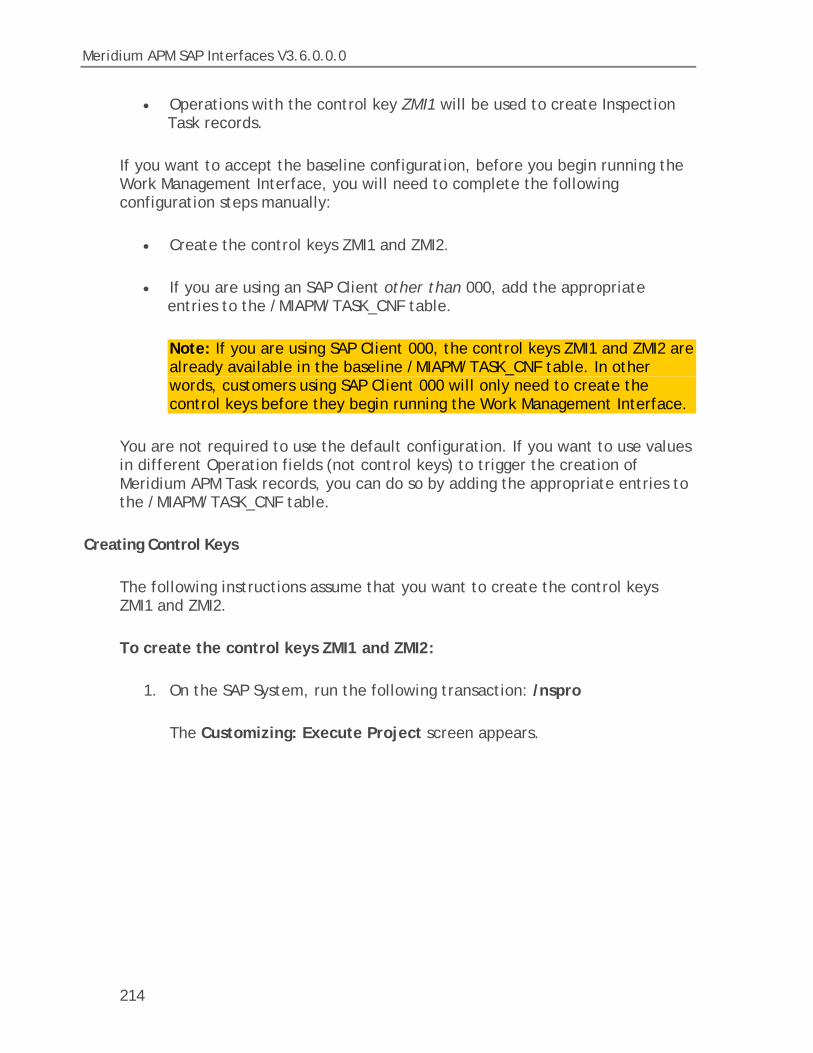
Meridium APM SAP Interfaces V3.6.0.0.0
214
• Operations with the control key ZMI1 will be used to create Inspection Task records.
If you want to accept the baseline configuration, before you begin running the Work Management Interface, you will need to complete the following configuration steps manually:
• Create the control keys ZMI1 and ZMI2.
• If you are using an SAP Client other than 000, add the appropriate entries to the /MIAPM/TASK_CNF table.
Note: If you are using SAP Client 000, the control keys ZMI1 and ZMI2 are already available in the baseline /MIAPM/TASK_CNF table. In other words, customers using SAP Client 000 will only need to create the control keys before they begin running the Work Management Interface.
You are not required to use the default configuration. If you want to use values in different Operation fields (not control keys) to trigger the creation of Meridium APM Task records, you can do so by adding the appropriate entries to the /MIAPM/TASK_CNF table.
Creating Control Keys
The following instructions assume that you want to create the control keys ZMI1 and ZMI2.
To create the control keys ZMI1 and ZMI2:
1. On the SAP System, run the following transaction: /nspro
The Customizing: Execute Project screen appears.

Installation, Upgrade, and Configuration
215
2. Click the SAP Reference IMG button.
The Display IMG screen appears.

Meridium APM SAP Interfaces V3.6.0.0.0
216
3. Expand the tree so that it looks like this, where Plant Maintenance and Customer Service is on the root level of the tree:
4. In the Maintain Control Keys row, click the button.
The Change View "Control Keys for Operations": Overview screen appears.

Installation, Upgrade, and Configuration
217
5. Click the New Entries button.
The New Entries: Details of Added Entries screen appears.
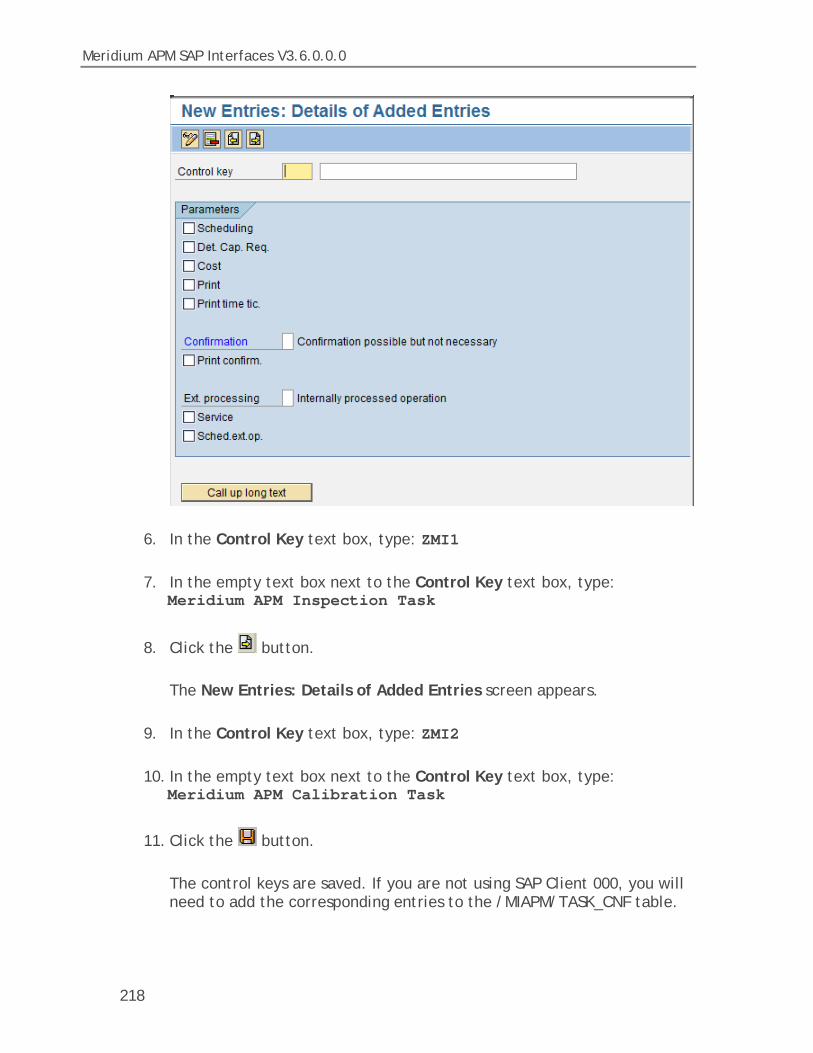
Meridium APM SAP Interfaces V3.6.0.0.0
218
6. In the Control Key text box, type: ZMI1
7. In the empty text box next to the Control Key text box, type: Meridium APM Inspection Task
8. Click the button.
The New Entries: Details of Added Entries screen appears.
9. In the Control Key text box, type: ZMI2
10. In the empty text box next to the Control Key text box, type: Meridium APM Calibration Task
11. Click the button.
The control keys are saved. If you are not using SAP Client 000, you will need to add the corresponding entries to the /MIAPM/TASK_CNF table.

Installation, Upgrade, and Configuration
219
About the /MIAPM/TASK_CNF Table
The /MIAPM/TASK_CNF table allows you to define criteria that will be used to create Inspection Task and Calibration Task records from SAP Operations. The following image illustrates the baseline table in an SAP system whose Client number is 000. Notice that there are two rows: one for Calibration Task records and one for Inspection Task records. This image illustrates the baseline configuration where Operations with the control key ZMI2 are used to create Calibration Task records and Operations with the control key ZMI1 are used to create Inspection Task records.
When you access the table, you will see a grid, where you can add or remove rows to define the desired criteria. The grid contains the following columns:
4. Family ID: The Meridium APM Task family whose records will be created using the criteria defined in that row. Each row should contain the value MI_TASKCALB (for Calibration Task records), MI_TASKINSP (for Inspection Task records), or the ID of another Meridium APM Task family.
5. Group ID: The ID that you can use to create groups of criteria within the condition that this table creates. When you assign the same Group ID to multiple rows in the /MIAPM/TASK_CNF table, the corresponding values are placed within parentheses in the resulting condition.
6. Pos: Specifies the placement of the row's criteria within the corresponding group.
7. Table Name: The name of the SAP table whose field value will be used to trigger the creation of records in the corresponding Meridium APM Task family. You can select PLAS, PLKO, or PLPO.
8. Field Name: The name of the SAP field whose value will be used to create records in the corresponding Meridium APM Task family. In the
Meridium APM SAP Interfaces V3.6.0.0.0
220
baseline table for SAP Client 000 customers, both rows contain the value STEUS, which identifies the Control Key field.
9. Logical Operator: An operator that combines criteria in multiple rows. You can select AND or OR.
10. Relational Operator: An operator that defines the condition to apply to the SAP field value identified by that row. You can select any of the following options:
Equal
Not Equal
Greater than Equals To
Lesser than Equals To
Greater Than
Lesser Than
IN
Not IN
In the baseline table for SAP Client 000 customers, both rows contain the value Equals, which indicates that the value in the Control Key field must equal a certain value in order to trigger the creation of Inspection Task or Calibration Task records.
• Value: The value used to determine which records will be created in the corresponding Meridium APM Task family. In the baseline table for SAP Client 000 customers:
The first row contains the value ZMI2, which indicates that the value in the Control Key field must equal ZMI2.
The second row contains the value ZMI1, which indicates that the value in the Control Key field must equal ZMI1.

Installation, Upgrade, and Configuration
221
Hint: With a field in this column selected, you can press F4 to see the condition that is created by the criteria that is specified for the corresponding Meridium APM family.
4. UOME ID: The unit of measure that will used to populate the Desired Interval UOM, Max Interval UOM, and Min Interval UOM fields in the Meridium APM Task record. You can select DAYS, WEEKS, MON (i.e., months), YEARS, or another unit of measure that you have configured in Meridium APM. In the baseline table for SAP Client 000 customers:
The first row contains the value DAYS, which indicates that the Meridium APM UOM fields will be populated with the value DAYS in Calibration Task records.
The second row contains the value MON, which indicates that the Meridium APM UOM fields will be populated with the value MON in Inspection Task records.
Note: You can specify only one unit of measure per Task family. If you configure multiple rows for same family, then you can specify the UOM ID in any row of that family.
Adding Entries to the /MIAPM/TASK_CNF Table
To add entries to the /MIAPM/TASK_CNF table:
1. On the SAP system, run the following transaction: /n/MIAPM/MIPRO
The Display IMG screen appears.
2. In the tree, expand Configurations In SAP.
3. In the Maintain Task Configuration Parameters row, click the button.

Meridium APM SAP Interfaces V3.6.0.0.0
222
The Task Configuration screen appears.
4. In the APM Data Source list, select the Meridium APM data source for which you want to identify which Operation values will create which Task records.
5. Click the button.
The Display View "Meridium Task Configuration Table": Overview screen appears. The following image illustrates the baseline table in an SAP system whose Client number is 000. Notice that there are two rows: one for Calibration Task records and one for Inspection Task records. This image illustrates a configuration where Operations with the control key ZMI2 are used to create Calibration Task records and Operations with the control key ZMI1 are used to create Inspection Task records.
6. To specify criteria that will be used to trigger the creation of Calibration Task and Inspection Task records, modify the values in the existing rows, or build on top of the current functionality by adding new rows. This documentation assumes that you are familiar with your SAP data structure and that you know how to define the criteria to achieve the desired result. It may be helpful to refer to an example of the /MIAPM/TASK_CNF Table.
7. Click the button.
The criteria is saved.

Installation, Upgrade, and Configuration
223
Example of the /MIAPM/TASK_CNF Table
Suppose that the following Task List exists in your SAP System.
Although the list contains three Operations, only the second Operation, INSPECTION, is an inspection task. Therefore, you would want to configure the /MIAPM/TASK_CNF table such that when you run the Work Management Interface, a Meridium APM Inspection Task record is created for only that Operation.
The following image illustrates how you might configure the /MIAPM/TASK_CNF table in this scenario.
The first row in this table specifies that the value in the control key field (i.e., the STEUS field) of the Operation must equal ZMI1. In addition, the second row

Meridium APM SAP Interfaces V3.6.0.0.0
224
specifies that the description of the Operation (i.e., value in the LTXA1 field) must be INSPECTION.
The criteria specified for the MI_TASKINSP family in this example creates the condition shown in the following image.
Hint: To access the Condition Value for <APM Family ID> dialog box, select a cell in the Value column, and press F4.
The values that you specify in the Group ID column and the Pos column determine how the criteria in each row is arranged within the condition. In this example, each row is assigned to a different group, so the corresponding criteria is placed within different sets of parentheses. Although it is not shown in this example, if multiple rows were assigned to the same group, the value in the Pos column would determine the placement of the corresponding row's criteria within the parentheses.
When you run the Work Management Interface, Meridium records are created for only the Operations that meet the specified criteria. Continuing with this example, an Inspection Task record is created for only the INSPECTION Operation, as shown in the following image.

Installation, Upgrade, and Configuration
225
Configuring Meridium APM to Transfer Data Between SAP Items and Task Records
If you want to use the SAP Interfaces module to transfer data between SAP items and Meridium APM Task records (Inspection Task records or Calibration Task records), you will need to set the following baseline datasheets as the default datasheets on the Inspection Task and Calibration Task families:
• Inspection Task for SAP Integration Interfaces: Defined on the Inspection Task family.
• Calibration Task for SAP Integration: Defined on the Calibration Task family.

Meridium APM SAP Interfaces V3.6.0.0.0
226
Configuring Meridium APM to Create Confirmations from Calibration Event Records
To configure Meridium APM to create SAP Confirmations from Calibration Event records:
1. In the Configuration Manager, on the Entity Family tab, select the Calibration, Analog family (located under Root\Event\Calibration).
2. In the Tasks section, click the Manage Datasheets link.
The Datasheet Builder window appears.
3. In the row containing the ID MI_EVCAANLG_SAP_INTEGRATION, copy the ID.
4. In the row containing the ID Calibration, Analog MDF, in the Custom Form cell, click the button.
The Custom Form Parameters dialog box appears.
In the first row, in the Value cell, delete the value, and paste the value that you copied in step 3.
5. Click OK.
6. Click the Close button to close the Datasheet Builder window.
7. Repeat steps 1 through 6 for all other Calibration Event families. Note the following:
• For the Calibration, Analyzer Multi-Component family, copy the datasheet ID MI_EVCAANMC_SAP_INTEGRATION, and then access the Custom Form Parameters dialog box for the datasheet with the ID Calibration, Analyzer Multi-Component MDF.
• For the Calibration, Analyzer Single Component family, copy the datasheet ID MI_EVCAANSC_SAP_INTEGRATION, and then access the Custom Form Parameters dialog box for the datasheet with the ID Calibration, Analyzer Single Component MDF.

Installation, Upgrade, and Configuration
227
• For the Calibration, Discrete family, copy the datasheet ID MI_EVCADSCT_SAP_INTEGRATION, and then access the Custom Form Parameters window for the datasheet with the ID Calibration, Discrete MDF.
• For the Calibration, Weight Scale family, copy the datasheet ID MI_EVCAWTSC_SAP_INTEGRATION, and then access the Custom Form Parameters dialog box for the datasheet with the ID Calibration, Weight Scale MDF.
Configuring Meridium APM to Create Confirmations from Inspection Event Records
If you want to use the SAP Interfaces module to create SAP Confirmations from Inspection Event records, you will need to set the following baseline datasheets as the default datasheets on the Inspection Event families:
• Bundle Inspection SAP Integration: Defined on the Bundle Inspection family.
• Bundle Sub-Inspection SAP Integration: Defined on the Bundle Sub-Inspection family.
• Visual Inspection SAP Integration: Defined on the Full Inspection family.
• General Inspection SAP Integration: Defined on the General Inspection family.
• Pressure Test Inspection SAP Integration: Defined on the Pressure Test Inspection family.
• Pressure Test Sub-Inspection SAP Integration: Defined on the Pressure Test Sub-Inspection family.

Meridium APM SAP Interfaces V3.6.0.0.0
228
Configuring the Query Get Tasks for Work Order Generation
The query Get Tasks for Work Order Generation, which is stored in the Catalog in the folder \\Public\Meridium\Modules\SAP Integration Interfaces\Queries, is used to determine which Task records to use to create Orders in SAP.
The query contains the Task query source. For each record that is returned by the query, Meridium APM will create an Order in SAP. The baseline query is configured to transfer Task records that meet specific criteria. If desired, you can modify the query to further limit the Task records that you want to transfer.
Note that the query must at least:
• Contain the following column:
• Include one field from the source family.
Creating a Scheduled Item to Create SAP Maintenance Orders
Using the SAP Interfaces, you can create SAP Maintenance Orders using the information in Task records. To enable this functionality, an administrative user must create a scheduled item in the Schedule Manager that will cause Meridium APM to perform a calculation on the value in the Next Date field in the scheduled item and the Call Horizon value in the Task records. The result of the calculation is then compared to the dates in the Task record to determine whether or not to create Maintenance Orders in SAP.

Installation, Upgrade, and Configuration
229
Use the following guidelines for creating a scheduled item that will create SAP Maintenance Orders for SAP Interfaces:
• On the Choose a Meridium APM Assembly dialog box, select the file Meridium.Integration.dll.
• On the Choose an Object Type dialog box, select the file Meridium.Integration.SAP.WorkOrderGeneration.WorkOrderGeneration.
• On the Task tab, define a schedule that will execute the scheduled item on a recurring basis. The frequency by which you want to execute the scheduled item is up to you.
Running the Report /MIAPM/WH_HARMONIZATION
Note: Before you run the report /MIAPM/WH_HARMONIZATION, your Meridium APM database must contain SAP System records identifying the SAP systems that you are currently using.
To run the report /MIAPM/WH_HARMONIZATION:
1. In SAP, run the following transaction: SE38
The ABAP Editor: Initial Screen appears.
2. In the Program text box, type the following text: /MIAPM/WH_HARMONIZATION
3. Click the Display button.
The ABAP Editor: Display Report /MIAPM/WH_HARMONIZATION screen appears.
4. Click the button.
The Program /MIAPM/WH_HARMONIZATION screen appears.

Meridium APM SAP Interfaces V3.6.0.0.0
230
5. In the Work History Creation Date text boxes, type or select the range of creation dates of the Notifications and Orders that you want to reconcile. For example, if you want to reconcile Notifications and Orders that were created on or after January 1, 1900 through June 1, 2012, you would specify the dates as shown in the following image.
Note: We recommend that you specify a date range that captures all Work History data you had extracted in your previous version of Meridium APM. For example, if you previously extracted Notifications and Orders that were created on or after 01/01/1900, you should specify 01/01/1900 here. To indicate today's date, you can leave the text box blank.
6. In the Work History Change Date text boxes, type or select the range of modification dates of the Notifications and Orders that you want to reconcile. For example, if you want to reconcile Notifications and Orders that were modified on or after January 1, 1900 through June 1, 2012, you would specify the dates as shown in the following image.
Note: We recommend that you specify a date range that captures all Work History data you had extracted in your previous version of Meridium APM. For example, if you previously extracted Notifications and Orders that were updated on or after 01/01/1900, you should specify 01/01/1900 here. To indicate today's date, you can leave the text box blank.
7. In the Maintenance Plant text box, type the ID of ALL Maintenance Plants whose associated Notifications and Orders you have extracted and want to reconcile. To
specify multiple Maintenance Plants, you can use the button to access the Multiple Selection for Maintenance Plant window.

Installation, Upgrade, and Configuration
231
Running an Upgrade Report to Populate the Object Number and Sub Object Number Fields
If you are upgrading from V3.4.5, as part of the SAP Interfaces upgrade, you will need to run the report /MIAPM/350_UPGRADE_WH in SAP. This report will populate the Object Number and Sub Object Number fields in Meridium APM Work History records that were created from SAP in a previous release.
Note: This report must be run after the /MIAPM/WH_HARMONIZATION report and before you begin running nightly extraction reports. If you do not run this upgrade report before you begin running nightly extraction reports, the nightly extraction reports will create duplicate records in the Meridium APM database.
To run the upgrade report /MIAPM/350_UPGRADE_WH:
1. In SAP, run the following transaction: SE38
The ABAP Editor: Initial Screen appears.
2. In the Program text box, type: /MIAPM/350_UPGRADE_WH
3. Click the button.
The Meridium interface to upgrade Work History information to 3.5.0 screen appears.
4. In the Work Order text boxes, type or select IDs that define the range of Orders that were used to create the Work History records that you want to update. For example, if you want to update Work History records that were created from Orders with the IDs 1001273 through 1001293, you would specify the Order IDs as shown in the following image.

Meridium APM SAP Interfaces V3.6.0.0.0
232
5. In the Notification text boxes, type or select IDs that define the range of Notifications that were used to create the Work History records that you want to update. For example, if you want to update Work History records that were created from Notifications with the IDs 1001500 through 1001800, you would specify the Order IDs as shown in the following image.
6. In the Work History Create Date text box and the to text box beside it, type or select dates that define a range of creation dates for the Orders and Notifications that were used to create the Work History records that you want to update. For example, if you want to update Work History records that were created from Orders or Notifications that were created on or after January 1, 1990 and on or before January 1, 2008, you would specify the dates as shown in the following image.
7. In the Work History Change Date text box and the to text box beside it, type or select dates that define a range of modification dates for the Orders and Notifications that were used to create the Work History records that you want to update. For example, if you want to update Work History records that were created from Orders or Notifications that were modified on or after January 1, 1990 and on or before January 1, 2008, you would specify the dates as shown in the following image.
8. In the Maintenance Plant text box, type the ID of the Maintenance Plant whose Orders and Notifications were used to create Work History records that you want to update.
9. Click the button.
The report runs, and the Object Number and Sub Object Number field is updated in the appropriate Meridium APM Work History records.

Installation, Upgrade, and Configuration
233
Running an Upgrade Report to Modify the /MIAPM/EXCEPTIONS Table to Use the Internal ID
In some previous versions of Meridium APM, when running reports or when simulating running reports, records that existed in the /MIAPM/EXCEPTIONS table as a result of previous runs of those same reports were not processed. This issue existed because entries that existed in the /MIAPM/EXCEPTIONS table used the external ID of the failed SAP items, but the reports were trying to find the internal IDs in the table. In other words, the reports never detected that any items existed in the /MIAPM/EXCEPTIONS table because they was looking for one value but found another value, which was not considered a match.
This issue existed when running the following reports:
• /MIAPM/WORK_MANAGEMENT_INF
• /MIAPM/EQUIPMENT_INF
• /MIAPM/FUNCTIONAL_LOCATION_INF
• /MIAPM/EQUIPMENT_CHARACT_INF
• /MIAPM/FUNC_LOC_CHARACT_INF
• /MIAPM/WH_WORK_ORDER
• /MIAPM/WH_NOTIF_WITH_WO
• /MIAPM/WH_NOTIFICATION
• /MIAPM/WORK_HISTORY_DETAILS
This issue is now resolved, and the /MIAPM/EXCEPTIONS table has been updated to use the internal ID of the SAP item that failed (which matches the report behavior). As a result of this fix, if you are upgrading from an earlier version of Meridium APM, you will need to run the upgrade report /MIAPM/350P3_UPGRADE_EXCEPTION to modify all existing entries in the /MIAPM/EXCEPTIONS table to use the internal ID instead of the external ID.

Meridium APM SAP Interfaces V3.6.0.0.0
234
Note: If you are upgrading from a version earlier than V3.5.0 (e.g., V3.4.5), this issue does not exist because the /MIAPM/EXCEPTIONS table does not exist in those versions. In other words, if you are upgrading from a version earlier than V3.5.0, you do not need to run the report /MIAPM/350P3_UPGRADE_EXCEPTION.
To run the upgrade report /MIAPM/350P3_UPGRADE_EXCEPTION:
1. In SAP, run the following transaction: SE38
The ABAP Editor: Initial Screen appears.
2. In the Program text box, type: /MIAPM/350P3_UPGRADE_EXCEPTION
3. Click the button.
The 350P3 Upgrade Exception Table Report screen appears.
4. Leave the APM Data Source and Interface ID lists empty so that the upgrade report will update items in the /MIAPM/EXCEPTIONS table for all reports and all active Meridium APM data sources that exist in the /MIAPM/PARAMS table.
5. Click the button.
A message appears, indicating that the external IDs will be converted to internal IDs for the reports for which you have selected to run the upgrade report.

Installation, Upgrade, and Configuration
235
6. Click the Yes button.
The upgrade report runs and converts the external IDs to internal IDs. After the report has finished running, a confirmation message appears.
Running an Upgrade Report to Populate the /MIAPM/PLANT_CNF Table
In some previous releases, in the /MIAPM/PARAMS table, the Plants text box allowed only 255 characters, which was insufficient for customers with a large number of Maintenance Plants (more than 42). This issue is now resolved, and to support more Maintenance Plants, the Plants text box has been removed, and a new table, /MIAPM/PLANT_CNF, has been created to store the Maintenance Plants whose data you want to send to and from the specified Meridium APM data source and Application Server.
As a result of removing the Plants text box, if you are upgrading from an earlier version of Meridium APM, you will need to run an upgrade report (/MIAPM/342P2_UPGRADE_PARAMS) in SAP to transfer the previous values in the Plants text box to the new table, /MIAPM/PLANT_CNF.
Note: If you are upgrading from V3.5.1 or later, you should have already run this report as a result of upgrading to that previous version. In other words, if you are upgrading from V3.5.1 or later, you do not need to run the report /MIAPM/342_UPGRADE_PARAMS.
To run the upgrade report /MIAPM/342P2_UPGRADE_PARAMS:
1. In SAP, run the following transaction: SE38
The ABAP Editor: Initial Screen appears.

Meridium APM SAP Interfaces V3.6.0.0.0
236
2. In the Program text box, type: /MIAPM/342P2_UPGRADE_PARAMS
3. Click the button.
The Meridium program to upgrade Params table to 3.4.2 PI Int. Pack ABAP P2 screen appears.
4. Select the Update Plant Config Table check box.
5. Click the button.
The Maintenance Plant IDs are moved from the /MIAPM/PARAMS table to the /MIAPM/PLANT_CNF table. When the process is complete, a message appears, indicating that the upgrade report ran successfully.
PI-Specific Steps
The /MIAPM/PI_PARAMS Table
About the /MIAPM/PI_PARAMS Table
The /MIAPM/PI_PARAMS table contains information that is used when you run an extraction interface through an SAP PI Server. The table is created automatically when you deploy the ABAP package that is provided with your Meridium APM distribution package. It will be empty by default, though, so you will need to populate the table manually.
You should populate the table after you have created all entries in the /MIAPM/PARAMS table. The way in which you should access the table depends upon how many data sources you have specified in the /MIAPM/PARAMS table.

Installation, Upgrade, and Configuration
237
• If you have specified only one data source in the /MIAPM/PARAMS table, you should access the /MIAPM/PI_PARAMS table from that entry in the /MIAPM/PARAMS table.
-or-
• If you have specified multiple data sources in the /MIAPM/PARAMS table, you should access the /MIAPM/PI_PARAMS table directly.
The following image shows an example of what the table will look like after it is populated:
Each row in the table represents a separate interface that will run through the SAP PI Server. For each row in the table, the following columns of information appear:
• APM Data Source: The name of the Meridium APM data source that will be used when the interface is executed.
• Interface Name: The name of the interface that will run through the SAP PI Server.

Meridium APM SAP Interfaces V3.6.0.0.0
238
• Web Service Link: The URL to the SAP PI Server that will be called to pass data from the SAP PI Server to the Meridium APM system.
The following buttons appear below the table:
• Insert: Adds a new row to the table. This button is meant to support a custom implementation and therefore exceeds the scope of this documentation.
• Delete: Deletes the currently selected row from the table. This button is meant to support a custom implementation and therefore exceeds the scope of this documentation.
• Save: Saves the values in the table.
• Modify Single Entry: Displays the Manage PI Configuration for Meridium Interfaces dialog box, where you can change the value in the Web Service Link text box. This button is meant to support a custom implementation and therefore exceeds the scope of this documentation.
• Reset Default: After prompting you for the PI Server name, port number, and Meridium APM data source name, removes all existing values from the table and repopulates the table based upon the values you provided in the prompts.
Accessing the /MIAPM/PI_PARAMS Table
Accessing the /MIAPM/PI_PARAMS Table from an Entry in the /MIAPM/PARAMS Table
The following instructions explain how to access the /MIAPM/PI_PARAMS table from an entry in the /MIAPM/PARAMS table. You should use these instructions only if the /MIAPM/PARAMS table contains entries for only one Meridium APM data source. If the /MIAPM/PARAMS table contains entries for multiple Meridium APM data sources, you should access the /MIAPM/PI_PARAMS table directly.
Because you will need to access the /MIAPM/PI_PARAMS table for the purpose of populating it with data, these instructions explain how to access the table and populate it with the appropriate data.
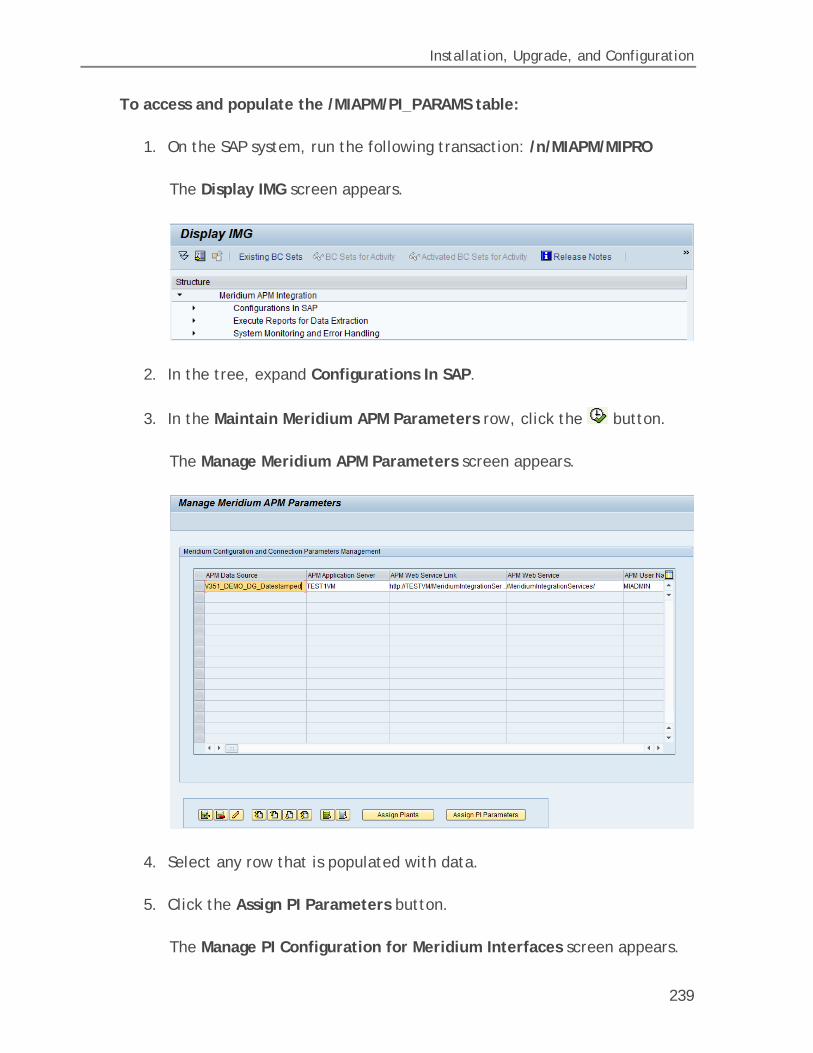
Installation, Upgrade, and Configuration
239
To access and populate the /MIAPM/PI_PARAMS table:
1. On the SAP system, run the following transaction: /n/MIAPM/MIPRO
The Display IMG screen appears.
2. In the tree, expand Configurations In SAP.
3. In the Maintain Meridium APM Parameters row, click the button.
The Manage Meridium APM Parameters screen appears.
4. Select any row that is populated with data.
5. Click the Assign PI Parameters button.
The Manage PI Configuration for Meridium Interfaces screen appears.

Meridium APM SAP Interfaces V3.6.0.0.0
240
6. Below the grid, click the Reset Default button.
A message appears, asking if you want to delete all current configurations.
7. Click the Yes button.
The Manage PI Configuration for Meridium Interfaces dialog box appears. The APM Data Source cell is disabled and populated automatically with the name of the data source from which you accessed the /MIAPM/PI_PARAMS table.

Installation, Upgrade, and Configuration
241
8. In the SAP PI Server text box, type the name of the SAP PI Server.
9. In the Port Number text box, type the port number of the SAP PI Server.
10. Click OK.
The table is populated automatically.
In each row, the Web Service Link column contains a URL that begins with the following text:
http://<PI Server>:<Port>
Where <PI server> is the value that you typed in the SAP PI Server text box, and <Port> is the value that you typed in the Port Number text box.
11. Click the Save button.
A message appears, asking if you want to save your changes.
12. Click the Yes button.

Meridium APM SAP Interfaces V3.6.0.0.0
242
The changes are saved.
Accessing the /MIAPM/PI_PARAMS Table Directly
The following instructions explain how to access the /MIAPM/PI_PARAMS directly. You should use these instructions only if the /MIAPM/PARAMS table contains entries for multiple Meridium APM data sources. If the /MIAPM/PARAMS table contains entries for only one Meridium APM data source, you should access the /MIAPM/PI_PARAMS table from the /MIAPM/PARAMS table.
Because you will need to access the /MIAPM/PI_PARAMS table for the purpose of populating it with data, these instructions explain how to access the table and populate it with the appropriate data.
To access and populate the /MIAPM/PI_PARAMS table:
1. On the SAP system, run the following transaction: /n/MIAPM/MIPRO
The Display IMG screen appears.
2. In the tree, expand Configurations In SAP.
3. In the Maintain SAP PI/XI Parameters (optional) row, click the button.
The Manage PI Configuration for Meridium Interfaces screen appears.

Installation, Upgrade, and Configuration
243
4. Click the Reset Default button.
A message appears, asking if you want to delete all current configurations.
5. Click the Yes button.
The Manage PI Configuration for Meridium Interfaces dialog box appears.

Meridium APM SAP Interfaces V3.6.0.0.0
244
6. In the SAP PI Server text box, type the name of the SAP PI Server.
7. In the Port Number text box, type the port number of the SAP PI Server.
8. In the APM Data Source, type the name of the Meridium APM data source to and from which you want to transfer data. The data source name should match the name of the data source that you specified in the /MIAPM/PARAMS table.
9. Click OK.
The first five rows in the table are populated automatically.
10. Repeat steps 4 through 9 for each additional data source that is defined in the /MIAPM/PARAMS table.
11. For each subsequent data source that you specify after the first one, in each of the five corresponding rows in the table, in the Web Service Link cell, change DSO1 to DSO<n>, where <n> is a number indicating the order in which you added rows for that data source to the table.
For example, suppose that you have created entries for one data source, TEST_DB. In each of the five rows representing TEST_DB, the Web Service Link cell will contain a URL with the text DS01, as illustrated in the following image.

Installation, Upgrade, and Configuration
245
If you were to create entries in the table for a second data source, DEMO_DB, five additional rows would be added to the table for that data source. The URL in the Web Service Link cell would also contain the default value DS01, as illustrated in the following image, where the new rows are selected (highlighted in yellow), and the value DS01 is outlined in red.
In this case, in the rows representing DEMO_DB, you would need to change DS01 to DS02, like this:
Note: The number that you specify in each URL will be used later during the process of creating receiver determinations, interface determinations, and receiver agreements for each additional data source.
Populating the /MIAPM/PI_PARAMS Table
The /MIAPM/PI_PARAMS table is created when you deploy the ABAP package that is provided with your Meridium APM distribution package. It will be empty by default, so you will need to populate the table manually using the following instructions.

Meridium APM SAP Interfaces V3.6.0.0.0
246
To populate the /MIAPM/PI_PARAMS table:
1. On the SAP system, run the following transaction: /n/MIAPM/MIPRO
The Display IMG screen appears.
2. In the tree, expand Configurations In SAP.
3. In the Maintain SAP PI/XI Parameters (optional) row, click the button.
The Manage PI Configuration for Meridium Interfaces screen appears.
4. Click the Reset Default button.
A message appears, indicating that resetting the default values will delete any current values.
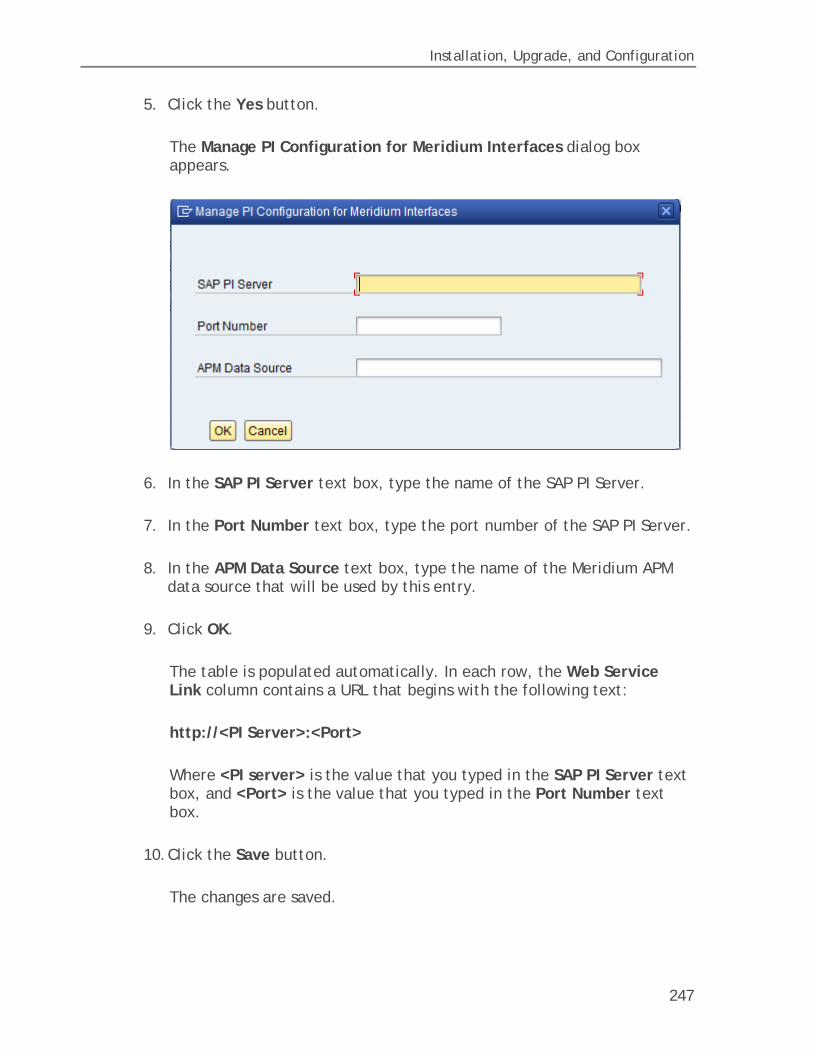
Installation, Upgrade, and Configuration
247
5. Click the Yes button.
The Manage PI Configuration for Meridium Interfaces dialog box appears.
6. In the SAP PI Server text box, type the name of the SAP PI Server.
7. In the Port Number text box, type the port number of the SAP PI Server.
8. In the APM Data Source text box, type the name of the Meridium APM data source that will be used by this entry.
9. Click OK.
The table is populated automatically. In each row, the Web Service Link column contains a URL that begins with the following text:
http://<PI Server>:<Port>
Where <PI server> is the value that you typed in the SAP PI Server text box, and <Port> is the value that you typed in the Port Number text box.
10. Click the Save button.
The changes are saved.

Meridium APM SAP Interfaces V3.6.0.0.0
248
Deleting Previous Versions of Software Component Versions
To delete a previous version of a Software Component Version:
1. In a web browser, navigate to one of the following URLs depending on the SAP PI Server version you are using:
• Version prior to SAP PI 7.3: http://<SAP PI Server>:<port number>/rep/start/index.jsp.
• SAP PI 7.3: http://<SAP PI Server>:<port number>/dir/start/index.jsp.
Where <SAP PI Server> is the name of the SAP PI Server and <port number> is the port number of the specified SAP PI Server.
Depending on the SAP PI Server version you are using, the SAP Exchange Infrastructure window or the Process Integration 7.3 window appears.
2. If you are using a version prior to SAP PI 7.3, click the Integration Repository link.
-or-
If you are using SAP PI 7.3, click the Enterprise Services Builder link.
A Logon screen appears.
3. Log on as an administrator.

Installation, Upgrade, and Configuration
249
Depending on the SAP PI Server version you are using, the Design: Integration Builder window or the Enterprise Services Builder window appears.
4. On the Objects tab, expand MERIDIUM_INTERFACES of meridium.com.
5. Double-click the Software Component Version that you want to delete (e.g., MERIDIUM_INTERFACES, 3.4.0 of meridium.com).
6. In the workspace that appears to the right of the Objects tab, on the Software Component Version menu, click Delete.
A message appears, asking if you are sure you want to delete the object.

Meridium APM SAP Interfaces V3.6.0.0.0
250
7. Click the Delete button to confirm the deletion.
Another message appears, asking you to confirm the deletion.
8. Click the Delete button.
The Software Component Version is deleted.
Note: After you import the new version of the Software Component Version, you will need to associate all pre-existing scenarios with the new version of the Software Component Version.
Configuring the System Landscape Directory (SLD)
About Configuring the System Landscape Directory
If you are using the PI-based approach for the SAP Interfaces, you will need to configure the System Landscape Directory (SLD) using the SAP NetWeaver™ SAP Exchange Infrastructure by:

Installation, Upgrade, and Configuration
251
• Creating a new product version and a third-party Technical System and Business System. This step creates the Software Component Version.
• Creating a Web AS ABAP Technical System and Business System.
Creating a New Product Version and Third-Party Technical System and Business System
The following instructions explain how to create a new product version and third-party Technical System and Business System.
To configure the System Landscape Directory if you are using the Meridium APM SAP Certified Powered By NetWeaver Interface:
1. On the PI Server, open an Internet Explorer window, and navigate to the SAP NetWeaver™ SAP Exchange Infrastructure.
The SAP NetWeaver™ SAP Exchange Infrastructure window appears.
2. Click the System Landscape Directory link.
A login screen like the one in the following image appears.

Meridium APM SAP Interfaces V3.6.0.0.0
252
3. Log in as an administrator.
The SAP NetWeaver™ System Landscape Directory page appears.
4. In the Software Catalog section, click the Products link, which is highlighted in red in the following image.
The Software Catalog screen appears.
5. Click the New Product Version button.
A new screen appears, where you can specify the name, vendor, and version of the new product.

Installation, Upgrade, and Configuration
253
6. Type the following values in the Name, Vendor, and Version text boxes:
• Name: Meridium Asset Performance Management
• Vendor: meridium.com
• Version: V3
7. Click the Create button.
You are prompted to add a new non-SAP software unit.
8. Type the following name: MERIDIUM_APM
9. Click the Create button.
You are prompted to add a new software component to the non-SAP product.
10. Type the following values in the Name, Version, and Product State text boxes:
• Name: MERIDIUM_APM
• Version: 3
• Product State: released
11. Click the Create button.

Meridium APM SAP Interfaces V3.6.0.0.0
254
The Software Catalog screen returns to focus, and the grid is updated to contain the Meridium Asset Performance Management product that you just created.
12. In the upper left corner, click the Home link, which is highlighted in red in the following image.
The SAP NetWeaver™ System Landscape Directory page appears.
13. In the Landscape section, click the Technical Systems link, which is highlighted in red in the following image.
The Technical Systems screen appears.

Installation, Upgrade, and Configuration
255
14. Click the New Technical System button.
Step 1 of the Technical System Wizard appears.
15. Select the Third-Party option, and click the Next button.
Step 2 of the Technical System Wizard appears.

Meridium APM SAP Interfaces V3.6.0.0.0
256
16. In the System Name text box, type: MeridiumAPMSystem
17. In the Host Name text box, type: xi_host
18. Click the Next button.
Step 3 of the Technical System Wizard appears.
19. In the row containing the product Meridium Asset Performance Management, select the Installed Product check box.
20. In the row containing the software component MERIDIUM_APM, select the Installed Software Component check box.
21. Click the Finish button.
The Technical Systems screen appears, displaying the new Technical System.
22. In the upper left corner, click the Home link.
The SAP NetWeaver™ System Landscape Directory page appears.

Installation, Upgrade, and Configuration
257
23. In the Landscape section, click the Business Systems link.
The Business Systems screen appears.
24. Click the New Business System button.
Step 1 of the Business System Wizard appears.
25. Select the Third-Party option, and click the Next button.

Meridium APM SAP Interfaces V3.6.0.0.0
258
Step 2 of the Business System Wizard appears.
26. In the System list, select MeridiumAPMSystem.
27. In the Client list, select the corresponding Client.
28. Click the Next button.
Step 3 of the Business System Wizard appears.
29. In the Name text box, type: MeridiumAPM_D
30. Click the Next button.
Step 4 of the Business System Wizard appears.

Installation, Upgrade, and Configuration
259
31. Click the Next button.
Step 5 of the Business System Wizard appears.
32. In the Business System Role list, accept the default selection, Application System.
33. In the Related Integration Server list, select XI_INTEGRATION_SERVER.
34. Click the Finish button.
You are now finished configuring the System Landscape Directory.

Meridium APM SAP Interfaces V3.6.0.0.0
260
Creating a Web AS ABAP Technical System and Business System
The following instructions explain how to create a Web AS ABAP Technical System and Business System. ALL customers using the PI-based SAP Interfaces will need to complete these steps, regardless of whether or not you are using the Notification Creation Interface.
To configure the System Landscape Directory to create a Web AS ABAP Technical System and Business System:
1. On the PI Server, open an Internet Explorer window, and navigate to the SAP NetWeaver™ SAP Exchange Infrastructure.
The SAP NetWeaver™ SAP Exchange Infrastructure window appears.
2. Click the System Landscape Directory link.
A login screen like the one in the following image appears.

Installation, Upgrade, and Configuration
261
3. Log in as an administrator.
The SAP NetWeaver™ System Landscape Directory page appears.
4. In the upper left corner, click the Home link.
The SAP NetWeaver™ System Landscape Directory page appears.

Meridium APM SAP Interfaces V3.6.0.0.0
262
5. In the Landscape section, click the Technical Systems link, which is highlighted in red in the following image.
The Technical Systems screen appears.
6. Click the New Technical System button.
Step 1 of the Technical System Wizard appears.

Installation, Upgrade, and Configuration
263
7. Select the Web AS ABAP option, and click the Next button.
Step 2 of the Technical System Wizard appears.
8. In the Web AS ABAP Name (SID) text box, type the system ID for the SAP backend system (e.g. ECC).
9. In the Installation Number text box, type the installation number for the SAP backend system (e.g., 0020175581).
10. In the Database Host Name text box, type the database host name for the SAP backend system (e.g., ps4909).
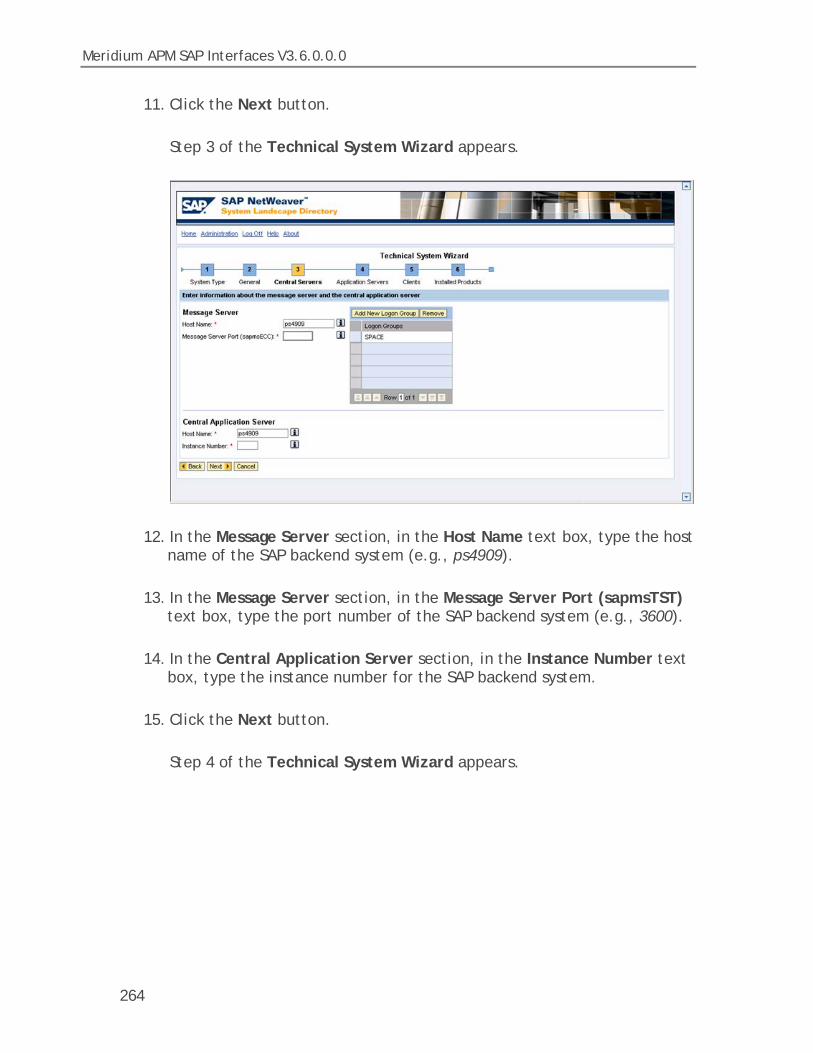
Meridium APM SAP Interfaces V3.6.0.0.0
264
11. Click the Next button.
Step 3 of the Technical System Wizard appears.
12. In the Message Server section, in the Host Name text box, type the host name of the SAP backend system (e.g., ps4909).
13. In the Message Server section, in the Message Server Port (sapmsTST) text box, type the port number of the SAP backend system (e.g., 3600).
14. In the Central Application Server section, in the Instance Number text box, type the instance number for the SAP backend system.
15. Click the Next button.
Step 4 of the Technical System Wizard appears.

Installation, Upgrade, and Configuration
265
16. Click the Add Application Server button.
A new row appears in the grid, and the Instance Number column is populated automatically with the value that you typed in the Instance Number text box on step 3 of the Technical System Wizard.
17. In the Host Name column, in the same row in which the instance number appears, type the host name for the SAP backend system (e.g., ps4909).
18. Click the Next button.
Step 5 of the Technical System Wizard appears.

Meridium APM SAP Interfaces V3.6.0.0.0
266
19. In the first empty row, in the Client Number cell, type the client number for the SAP backend system (e.g., 800).
20. In the first empty row, in the Logical Client Name cell, type the logical system name for your SAP backend system (e.g., ECCCLNT800).
21. Click the Next button.
Step 6 of the Technical System Wizard appears.
22. In the rows containing the products that you want to install, select the Installed Products link, and click the Finish button.

Installation, Upgrade, and Configuration
267
23. In the upper left corner of the screen, click the Home link.
24. In the Landscape section, click the Business Systems link.
The Business Systems screen appears.
25. Click the New Business System button.
Step 1 of the Business System Wizard appears.
26. Select the Web AS ABAP option, and click the Next button.
Step 2 of the Business System Wizard appears.

Meridium APM SAP Interfaces V3.6.0.0.0
268
27. In the System list, select the Technical System that you created in the previous steps.
28. In the Client list, select the corresponding Client.
29. Click the Next button.
Step 3 of the Business System Wizard appears.
30. In the Name text box, type: SAP_ECC
31. Click the Next button.
Step 4 of the Business System Wizard appears.

Installation, Upgrade, and Configuration
269
32. Click the Next button.
Step 5 of the Business System Wizard appears.
33. In the Business System Role list, accept the default selection, Application System.
34. In the Related Integration Server list, select the appropriate value.
35. Click the Finish button.
You are now finished configuring the System Landscape Directory.

Meridium APM SAP Interfaces V3.6.0.0.0
270
Managing PI Content
Importing the Configuration Object
About Importing the Configuration Object
The steps for importing the configuration object are different depending on which SAP PI Server version you are using. To access the appropriate instructions, click the SAP PI Server version that you are using:
• Version prior to SAP PI 7.3
• SAP PI 7.3
Importing the Configuration Object using an SAP PI Version Prior to 7.3
To import the configuration object:
1. Insert the V3.6.0 SAP Interfaces installation DVD.
2. Navigate to the folder SAP PI Transport Files\Integration Directory.
3. Copy the file XI3_0_Meridium_V360.tpz.
4. On the SAP PI Server, paste the copied file to the folder \usr\sap\<SID>\SYS\global\xi\directory_server\import, where <SID> is the system ID of the SAP PI Server.
5. In a web browser, navigate to http://<SAP PI Server>:<port number>/rep/start/index.jsp, where <SAP PI Server> is the name of the SAP PI Server and <port number> is the port number of the specified SAP PI Server.
The SAP Exchange Infrastructure window appears.

Installation, Upgrade, and Configuration
271
6. Click the Integration Directory link.
A Logon screen appears, prompting you to log on to the Configuration: Integration Builder.
7. Log on as an administrator.
The Configuration: Integration Builder window appears.
8. On the Tools menu, click Import configuration objects.
The Choose Import Source window appears.
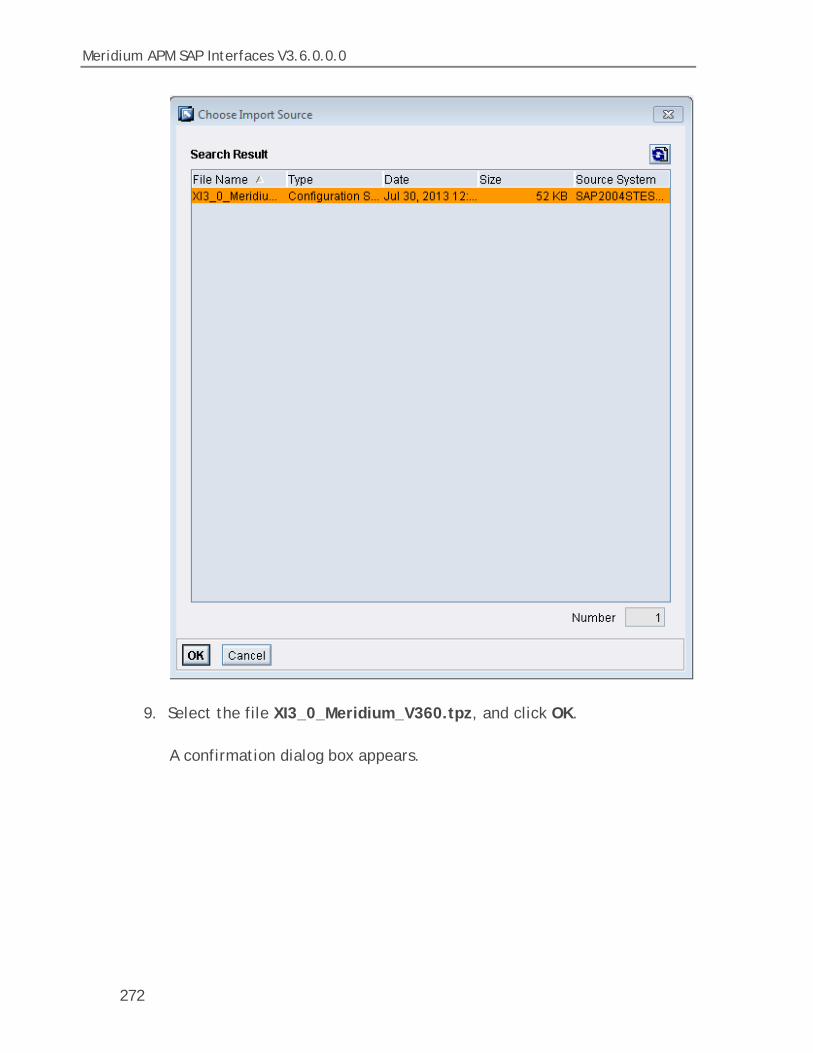
Meridium APM SAP Interfaces V3.6.0.0.0
272
9. Select the file XI3_0_Meridium_V360.tpz, and click OK.
A confirmation dialog box appears.

Installation, Upgrade, and Configuration
273
10. Click the Import button.
The file is imported, and a confirmation message appears.
11. Click the Close button.
You will now need to modify the baseline communication channels. To do so, you will need to remain logged on to the Configuration: Integration Builder.
Importing the Configuration Object using SAP PI 7.3
To import the configuration object:
1. Insert the V3.6.0 SAP Interfaces installation DVD.

Meridium APM SAP Interfaces V3.6.0.0.0
274
2. Navigate to the folder SAP PI Transport Files\Integration Directory.
3. Copy the file XI3_0_Meridium_V360.tpz.
4. On the SAP PI Server, paste the copied file to the folder \usr\sap\<SID>\SYS\global\xi\directory_server\import, where <SID> is the system ID of the SAP PI Server.
5. In a web browser, navigate to http://<SAP PI Server>:<port number>/dir/start/index.jsp, where <SAP PI Server> is the name of the SAP PI Server and <port number> is the port number of the specified SAP PI Server.
The Process Integration 7.3 window appears.
6. Click the Integration Builder link.
A Logon screen appears, prompting you to log on to the Configuration: Integration Builder.
7. Log on as an administrator.
The Configuration: Integration Builder window appears.
8. On the Tools menu, click Import configuration objects.
The Select import source window appears.

Installation, Upgrade, and Configuration
275
9. Click the Server button.
The Choose Import Source window appears.

Meridium APM SAP Interfaces V3.6.0.0.0
276
10. Select the file XI3_0_Meridium_V360.tpz, and click OK.
A confirmation dialog box appears.

Installation, Upgrade, and Configuration
277
11. Click the Import button.
The file is imported, and a confirmation message appears.
12. Click the Close button.

Meridium APM SAP Interfaces V3.6.0.0.0
278
You will now need to modify the baseline communication channels. To do so, you will need to remain logged on to the Configuration: Integration Builder.
Modifying the Baseline Communication Channels
About Modifying the Baseline Communication Channels
The steps for modifying the baseline communication channels are different depending on which SAP PI Server version you are using. To access the appropriate instructions, click the SAP PI Server version that you are using:
• Version prior to SAP PI 7.3
• SAP PI 7.3
Modifying the Baseline Communication Channels using an SAP PI Version Prior to 7.3
To modify the baseline communication channels:
1. In the Configuration: Integration Builder, click the Change Lists tab.
2. On the Change Lists tab, expand XI 3.0 Import, and then double-click MI_EQUIP00_SOAP_RCV_DS01.
The communication channel details appear on the right side of the screen.
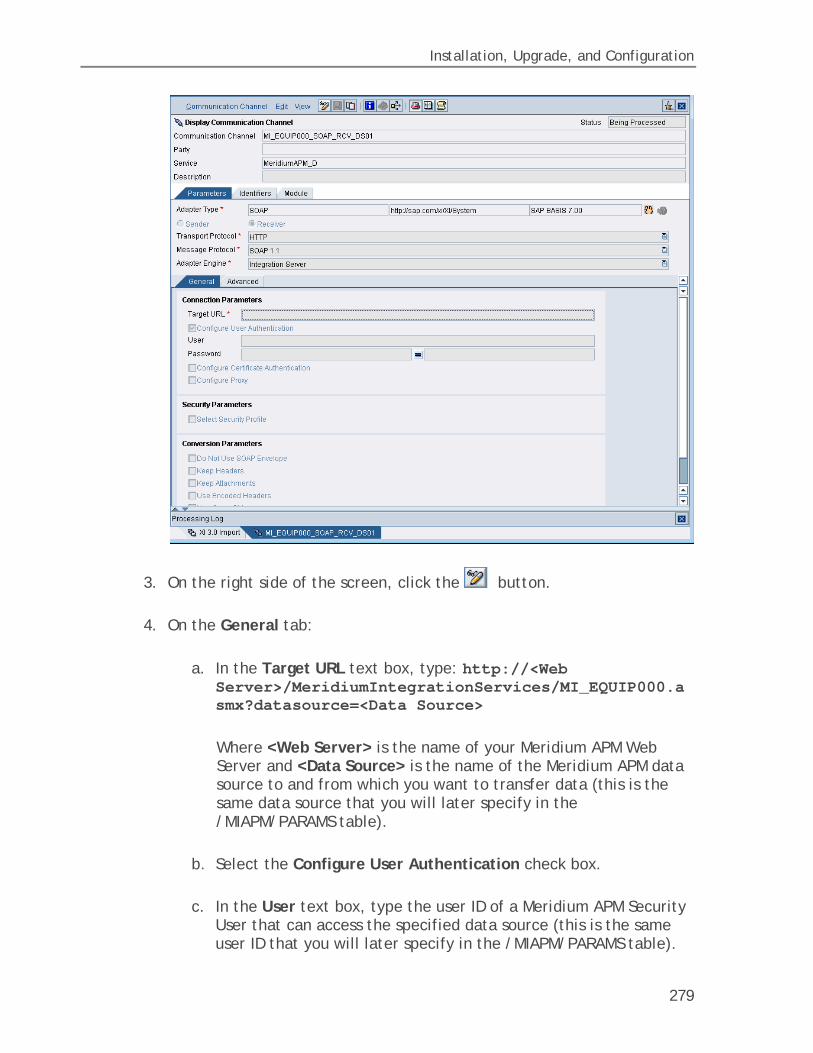
Installation, Upgrade, and Configuration
279
3. On the right side of the screen, click the button.
4. On the General tab:
a. In the Target URL text box, type: http://<Web Server>/MeridiumIntegrationServices/MI_EQUIP000.asmx?datasource=<Data Source>
Where <Web Server> is the name of your Meridium APM Web Server and <Data Source> is the name of the Meridium APM data source to and from which you want to transfer data (this is the same data source that you will later specify in the /MIAPM/PARAMS table).
b. Select the Configure User Authentication check box.
c. In the User text box, type the user ID of a Meridium APM Security User that can access the specified data source (this is the same user ID that you will later specify in the /MIAPM/PARAMS table).

Meridium APM SAP Interfaces V3.6.0.0.0
280
d. In the Password text box that appears to the left of the button, type the password that is associated with the specified user ID.
e. In the Password text box that appears to the right of the button, retype the password.
The button changes to the button.
5. At the top of the screen, click the button.
6. Repeat steps 2 through 4 for each of the following configuration scenarios in the tree on the left:
• MI_FNCLOC00_SOAP_RCV_DS01 (in the Target URL instructions, replace MI_EQUIP000 with MI_FNCLOC00)
• MI_EVWKHIST_SOAP_RCV_DS01 (in the Target URL instructions, replace MI_EQUIP000 with MI_EVWKHIST)
• MI_CHARDEF_SOAP_RCV_DS01 (in the Target URL instructions, replace MI_EQUIP000 with MI_CHARDEF)
• MI_MODULES_SOAP_RCV_DS01 (in the Target URL instructions, replace MI_EQUIP000 with MI_MODULES)
You will now need to activate the changes. To do so, you will need to remain logged on to the Configuration: Integration Builder.
Modifying the Baseline Communication Channels using SAP PI 7.3
To modify the baseline communication channels:
1. In the Configuration: Integration Builder, click the Change Lists tab.

Installation, Upgrade, and Configuration
281
2. On the Change Lists tab, expand XI 3.0 Import, and then double-click MeridiumAPM_D|MI_EQUIP00_SOAP_RCV_DS01.
The Error Loading Adapter Metadata dialog box appears.
3. Click the Close button.
The communication channel details appear on the right side of the screen.

Meridium APM SAP Interfaces V3.6.0.0.0
282
4. On the right side of the screen, click the button.
5. On the Parameters tab, in the Adapter Type row, select the button.
The Choose Adapter Metadata window appears.
6. Select the latest SOAP Adapter from the list, and click the Apply button.

Installation, Upgrade, and Configuration
283
The communication channel details return to focus.
7. On the General tab:
a. In the Target URL text box, type: http://<Web Server>/MeridiumIntegrationServices/MI_EQUIP000.asmx?datasource=<Data Source>
Where <Web Server> is the name of your Meridium APM Web Server and <Data Source> is the name of the Meridium APM data source to and from which you want to transfer data (this is the same data source that you will later specify in the /MIAPM/PARAMS table).
b. Select the Configure User Authentication check box.
c. In the User text box, type the user ID of a Meridium APM Security User that can access the specified data source (this is the same user ID that you will later specify in the /MIAPM/PARAMS table).
d. In the Password text box that appears to the left of the button, type the password that is associated with the specified user ID.
e. In the Password text box that appears to the right of the button, retype the password.
The button changes to the button.
8. At the top of the screen, click the button.
9. Repeat steps 2 through 7 for each of the following configuration scenarios in the tree on the left:
• MI_FNCLOC00_SOAP_RCV_DS01 (in the Target URL instructions, replace MI_EQUIP000 with MI_FNCLOC00)
• MI_EVWKHIST_SOAP_RCV_DS01 (in the Target URL instructions, replace MI_EQUIP000 with MI_EVWKHIST)
• MI_CHARDEF_SOAP_RCV_DS01 (in the Target URL instructions, replace MI_EQUIP000 with MI_CHARDEF)

Meridium APM SAP Interfaces V3.6.0.0.0
284
• MI_MODULES_SOAP_RCV_DS01 (in the Target URL instructions, replace MI_EQUIP000 with MI_MODULES)
You will now need to activate the changes. To do so, you will need to remain logged on to the Configuration: Integration Builder.
Activating the Scenarios
To activate the scenarios:
1. In the Configuration: Integration Builder, on the Change Lists tab, right-click XI 3.0 Import, and click Activate.
A confirmation window appears.
2. Click the Activate button.
A series of confirmation messages appear, and when the scenarios are activated, a final confirmation message appears.
3. Click the Close button.
Managing Content for Additional Data Sources
Creating Receiver Determinations
If you plan to transfer data to and from multiple Meridium APM data sources, for each data source that is not already specified in the baseline communication channels, you will need to create new receiver determinations (one for each baseline configuration scenario). For example, if you plan to transfer data to and from two Meridium APM data sources (TEST_DB and

Installation, Upgrade, and Configuration
285
DEMO_DB), you will have specified one of those data sources (TEST_DB) in the baseline configuration scenarios, and for the other data source (DEMO_DB), you will need to create five new receiver determinations, or one for each of the following baseline configuration scenarios:
• MI_CHARDEF_SOAP_RCV_DS01
• MI_EQUIP00_SOAP_RCV_DS01
• MI_EVWKHIST_SOAP_RCV_DS01
• MI_FNCLOC00_SOAP_RCV_DS01
• MI_MODULES_SOAP_RCV_DS01
The following instructions explain how to create a new receiver determination for the configuration scenario MI_CHARDEF_SOAP_RCV_DS01. You can use these instructions to create a receiver determination for the other baseline configuration scenarios, too.
To create a new receiver determination:
1. In the Configuration: Integration Builder, click the Scenarios tab.
2. In the tree, expand Receiver Determination.
3. Double-click | SAP_ECC | MI_CHARDEF_DS01.
The receiver determination details appear on the right side of the screen.

Meridium APM SAP Interfaces V3.6.0.0.0
286
4. At the top of the screen, click the button.
The Copy Receiver Determination window appears.

Installation, Upgrade, and Configuration
287
5. In the Interface text box, change 01 to 02. When you are finished, it should look like this:
Note: If you have already created at least one receiver determination and are using these instructions to create subsequent receiver determinations, instead of seeing 01, you will see a number indicating the number of receiver determinations that already exist. You will need to increment the number by one. For example, if you see MI_CHARDEF_DS03, you will need to change it to MI_CHARDEF_DS04. Note that the numbers that you specify for the interface for any given data source must match the numbers that you specified in the URLs when populating the /MIAPM/PI_PARAMS table for that data source.
6. In the Add to Scenario list, click the icon, and then select Meridium_V360 from the list.
7. Click the Copy button.

Meridium APM SAP Interfaces V3.6.0.0.0
288
The new receiver determination is saved.
Creating Interface Determinations
If you plan to transfer data to and from multiple Meridium APM data sources, for each data source that is not already specified in the baseline communication channels, you will need to create new interface determinations (one for each baseline configuration scenario). For example, if you plan to transfer data to and from two Meridium APM data sources (TEST_DB and DEMO_DB), you will have specified one of those data sources (TEST_DB) in the baseline configuration scenarios, and for the other data source (DEMO_DB), you will need to create five new interface determinations, or one for each of the following baseline configuration scenarios:
• MI_CHARDEF_SOAP_RCV_DS01
• MI_EQUIP00_SOAP_RCV_DS01
• MI_EVWKHIST_SOAP_RCV_DS01
• MI_FNCLOC00_SOAP_RCV_DS01
• MI_MODULES_SOAP_RCV_DS01
The following instructions explain how to create a new interface determination for the configuration scenario MI_CHARDEF_SOAP_RCV_DS01. You can use these instructions to create an interface determination for the other baseline configuration scenarios, too.
To create a new interface determination:
1. In the Configuration: Integration Builder, click the Scenarios tab.
2. In the tree, expand Interface Determination.

Installation, Upgrade, and Configuration
289
3. Double-click | SAP_ECC | MI_CHARDEF_DS01 | | MeridiumAPM_D.
The interface determination details appear on the right side of the screen.
4. At the top of the screen, click the button.
The Copy Interface Determination window appears.

Meridium APM SAP Interfaces V3.6.0.0.0
290
5. In the Interface text box, change 01 to 02. When you are finished, it should look like this:
Note: If you have already created at least one interface determination and are using these instructions to create subsequent interface determinations, instead of seeing 01, you will see a number indicating the number of interface determinations that already exist. You will need to increment the number by one. For example, if you see MI_CHARDEF_DS03, you will need to change it to MI_CHARDEF_DS04. Note that the numbers that you specify for the interface for any given data source must match the numbers that you specified in the URLs when populating the /MIAPM/PI_PARAMS table for that data source.
6. In the Add to Scenario list, click the icon, and then select Meridium_V360 from the list.
7. Click the Copy button.

Installation, Upgrade, and Configuration
291
The new interface determination is saved.
8. At the top of the screen, click the button.
The details become modifiable.
In the Configured Inbound Interfaces section, in the grid, change the name to reflect the interface value that you specified in step 5. For example, if you changed 01 to 02 in step 5, the name should look like this:
9. At the top of the screen, click the button.
The new interface determination is saved.
Creating Receiver Agreements
If you plan to transfer data to and from multiple Meridium APM data sources, for each data source that is not already specified in the baseline communication channels, you will need to create new receiver agreements (one for each baseline configuration scenario). For example, if you plan to transfer data to and from two Meridium APM data sources (TEST_DB and DEMO_DB), you will have specified one of those data sources (TEST_DB) in the baseline configuration scenarios, and for the other data source (DEMO_DB), you will need to create five new receiver agreements, or one for each of the following baseline configuration scenarios:
• MI_CHARDEF_SOAP_RCV_DS01
• MI_EQUIP00_SOAP_RCV_DS01
• MI_EVWKHIST_SOAP_RCV_DS01
• MI_FNCLOC00_SOAP_RCV_DS01

Meridium APM SAP Interfaces V3.6.0.0.0
292
• MI_MODULES_SOAP_RCV_DS01
The following instructions explain how to create a new receiver agreement for the configuration scenario MI_CHARDEF_SOAP_RCV_DS01. You can use these instructions to create a receiver agreement for the other baseline configuration scenarios, too.
To create a new receiver agreement:
1. In the Configuration: Integration Builder, click the Scenarios tab.
2. In the tree, expand Receiver Agreement.
3. Double-click | SAP_ECC | | MeridiumAPM_D | MI_CHARDEF_DS01.
The receiver agreement details appear on the right side of the screen.

Installation, Upgrade, and Configuration
293
4. At the top of the screen, click the button.
The Copy Receiver Agreement window appears.

Meridium APM SAP Interfaces V3.6.0.0.0
294
5. In the Interface text box, change 01 to 02. When you are finished, it should look like this:
Note: If you have already created at least one receiver agreement and are using these instructions to create subsequent receiver agreements, instead of seeing 01, you will see a number indicating the number of receiver agreement that already exist. You will need to increment the number by one. For example, if you see MI_CHARDEF_DS03, you will need to change it to MI_CHARDEF_DS04. Note that the numbers that you specify for the interface for any given data source must match the numbers that you specified in the URLs when populating the /MIAPM/PI_PARAMS table for that data source.
6. In the Add to Scenario list, click the icon, and then select Meridium_V360 from the list.
7. Click the Copy button.

Installation, Upgrade, and Configuration
295
The new receiver agreement is saved.
8. At the top of the screen, click the button.
The details become modifiable.
9. In the Receiver Communication Channel text box, double-click the value.
The communication channel details appear on a new tab.
10. At the top of the screen, click the button.

Meridium APM SAP Interfaces V3.6.0.0.0
296
The Copy Communication Channel window appears.
11. In the Communication Channel text box, change 01 to 02. When you are finished, it should look like this:
Note: If you have already created at least one receiver agreement and are using these instructions to create subsequent receiver agreements, instead of seeing 01, you will see a number indicating the number of receiver agreement that already exist. You will need to increment the number by one. For example, if you see MI_CHARDEF_SOAP_RCV_DS03, you will need to change it to MI_CHARDEF_SOAP_RCV_DS04. Note that the numbers that you specify for the communication channel for any given data source must match the numbers that you specified in the URLs when populating the /MIAPM/PI_PARAMS table for that data source.
12. In the Add to Scenario list, click the icon, and then select Meridium_V360 from the list.
13. Click the Copy button.
The new communication channel is saved.
14. At the top of the screen, click the button.
The details become modifiable.

Installation, Upgrade, and Configuration
297
15. In the Target URL text box, change the data source name to the name of data source to and from which you want to transfer data.
16. In the User text box, type the user ID of a Meridium APM Security User that can access the specified data source (this is the same user ID that you will later specify in the /MIAPM/PARAMS table).
17. In the Password text box that appears to the left of the button, type the password that is associated with the specified user ID.
18. In the Password text box that appears to the right of the button, retype the password.
The button changes to the button.
19. At the top of the screen, click the button.
The new interface determination is saved.
20. Double-click the new receiver agreement in the tree on the left.
The receiver agreement details appear on the right side of the screen.
21. At the top of the screen, click the button.
The details become modifiable.
22. In the Receiver Communication Channel text box, click the button.
The Choose Communication Channel window appears.
23. Double-click the name of the communication channel that you created in step 10.
The name of the selected communication channel appears in the Receiver Communication Channel text box.
24. At the top of the screen, click the button.
The new receiver agreement is saved.

Meridium APM SAP Interfaces V3.6.0.0.0
298
Activating the Changes
To activate the changes:
1. In the Configuration: Integration Builder, on the Change Lists tab, right-click Standard Change List, and click Activate.
A confirmation window appears.
2. Click the Activate button.
A series of confirmation messages appear, and when the changes are activated, a final confirmation message appears.
3. Click the Close button.
Associating Scenarios with the Newest Version of the Software Component Version
To associate a scenario with the newest version of the Software Component Version:
1. In a web browser, navigate to one of the following URLs depending on the SAP PI Server version you are using:
• Version prior to SAP PI 7.3: http://<SAP PI Server>:<port number>/rep/start/index.jsp.
• SAP PI 7.3: http://<SAP PI Server>:<port number>/dir/start/index.jsp.
Where <SAP PI Server> is the name of the SAP PI Server and <port number> is the port number of the specified SAP PI Server.

Installation, Upgrade, and Configuration
299
Depending on the SAP PI Server version you are using, the SAP Exchange Infrastructure window or the Process Integration 7.3 window appears.
2. If you are using a version prior to SAP PI 7.3, click the Integration Directory link.
-or-
If you are using SAP PI 7.3, click the Integration Builder link.
A Logon screen appears.
3. Log on as an administrator.
The Configuration: Integration Builder window appears.
4. On the Scenarios tab, expand Equipment Extraction, expand Interface Determination, and select the item directly below Interface Determination.
5. In the workspace that appears to the right of the Scenarios tab, click the button.
6. In the grid in the Configured Inbound Interfaces section, to the right of the Software Component Version, click the button.
The Select Mapping window appears.
7. In the grid, select the row containing the Software Component Version MERIDIUM_APM, 3 of meridium.com, and click OK.
8. At the top of the workspace, click the Save button.

Meridium APM SAP Interfaces V3.6.0.0.0
300
Modifying the File Meridium.SAP.CertifiedInterface.Config.xml
If you plan to use the PI-based approach for creating or updating SAP Notifications from Meridium APM Recommendation records, Meridium APM must be able to connect to and communicate with the SAP PI Server. To make this communication possible, you must define the connection information for the SAP PI Server using the file Meridium.SAP.CertifiedInterface.Config.xml, which is stored on the Meridium APM Application Server machine in the folder <root>\ApplicationServer\Bin, where <root> is the root drive and folder into which the Meridium APM Application Server has been installed.
To modify the file Meridium.SAP.CertifiedInterface.Config.xml:
1. On the Meridium APM Application Server, navigate to the folder C:\Program Files\Meridium\ApplicationServer\Bin.
2. Open the file Meridium.SAP.CertifiedInterface.Config.xml in an application that you can use to modify XML script (e.g., Notepad).
3. In the file, within the <XIServerUserName> tags, type the user name associated with the account that will be used for connecting to the SAP PI Server.
4. Using the Meridium.SAP.BAPI.EncryptPassword utility, encrypt the password associated with the user account you specified in step 3.
5. Within the <XIServerPwd> tags, type the encrypted password.
6. Within the <XIServerDomainName> tags, type the domain name of the SAP PI Server.
7. Within the <XIServer> tags, type the name of the SAP PI Server.
8. Within the <XiPort> tags, type the port number of the SAP PI Server.
9. Save the file.
Your settings are applied.

Installation, Upgrade, and Configuration
301
Notification Creation Interface
Importing PI Content
Importing the Notification Design Object
To import the notification design object:
1. Insert the SAP Interfaces DVD.
2. Navigate to the folder SAP PI Transport Files\Integration Repository.
3. Copy the file XI3_0_Repository-Notification-Management_V360.tpz.
4. On the SAP PI Server, paste the copied file to the folder \usr\sap\<SID>\SYS\global\xi\repository_server\import, where <SID> is the system ID of the SAP PI Server.
5. In a web browser, navigate to one of the following URLs depending on the SAP PI Server version you are using:
• Version prior to SAP PI 7.3: http://<SAP PI Server>:<port number>/rep/start/index.jsp.
• SAP PI 7.3: http://<SAP PI Server>:<port number>/dir/start/index.jsp.
Where <SAP PI Server> is the name of the SAP PI Server and <port number> is the port number of the specified SAP PI Server.
Depending on the SAP PI Server version you are using, the SAP Exchange Infrastructure window or the Process Integration 7.3 window appears.

Meridium APM SAP Interfaces V3.6.0.0.0
302
6. If you are using a version prior to SAP PI 7.3, click the Integration Repository link.
-or-
If you are using SAP PI 7.3, click the Enterprise Services Builder link.
A Logon screen appears.
7. Log on as an administrator.
Depending on the SAP PI Server version you are using, the Design: Integration Builder window or the Enterprise Services Builder window appears.
8. On the Tools menu, click Import design objects.
The Choose Import Source dialog box appears.
9. Select the file XI3_0_Repository-Notification-Management_V360.tpz, and click OK.
A confirmation dialog box appears.
10. Click the Import button.
The file is imported.
11. Click the Close button.
Importing the Notification Configuration Object
About Importing the Notification Configuration Object
The steps for importing the notification configuration object are different depending on which SAP PI Server version you are using. To access the appropriate instructions, click the SAP PI Server version that you are using:
• Version prior to SAP PI 7.3
• SAP PI 7.3

Installation, Upgrade, and Configuration
303
Importing the Notification Configuration Object using an SAP PI Version Prior to 7.3
To import the notification configuration object:
1. Insert the SAP Interfaces DVD.
2. Navigate to the folder SAP PI Transport Files\Integration Directory.
3. Copy the file XI3_0_MeridiumNotificationManagemnet_V360.tpz.
4. On the SAP PI Server, paste the copied file to the folder \usr\sap\<SID>\SYS\global\xi\directory_server\import, where <SID> is the system ID of the SAP PI Server.
5. In a web browser, navigate to http://<SAP PI Server>:<port number>/rep/start/index.jsp, where <SAP PI Server> is the name of the SAP PI Server and <port number> is the port number of the specified SAP PI Server.
The SAP Exchange Infrastructure window appears.
6. Click the Integration Directory link.
A Logon screen appears, prompting you to log on to the Configuration: Integration Builder.
7. Log on as an administrator.
The Configuration: Integration Builder window appears.
8. On the Tools menu, click Import configuration objects.

Meridium APM SAP Interfaces V3.6.0.0.0
304
The Choose Import Source window appears.
9. Select the file XI3_0_MeridiumNotificationManagemnet_V360.tpz, and click OK.
A confirmation dialog box appears.
10. Click the Import button.
The file is imported.
11. Click the Close button.
You will now need to activate the RFCReceiverToECC object. To do so, you will need to remain logged on to the Configuration: Integration Builder.
Importing the Notification Configuration Object using SAP PI 7.3
To import the notification configuration object:
1. Insert the SAP Interfaces DVD.
2. Navigate to the folder SAP PI Transport Files\Integration Directory.
3. Copy the file XI3_0_MeridiumNotificationManagemnet_V360.tpz.
4. On the SAP PI Server, paste the copied file to the folder \usr\sap\<SID>\SYS\global\xi\directory_server\import, where <SID> is the system ID of the SAP PI Server.
5. In a web browser, navigate to http://<SAP PI Server>:<port number>/dir/start/index.jsp, where <SAP PI Server> is the name of the SAP PI Server and <port number> is the port number of the specified SAP PI Server.
The Process Integration 7.3 window appears.
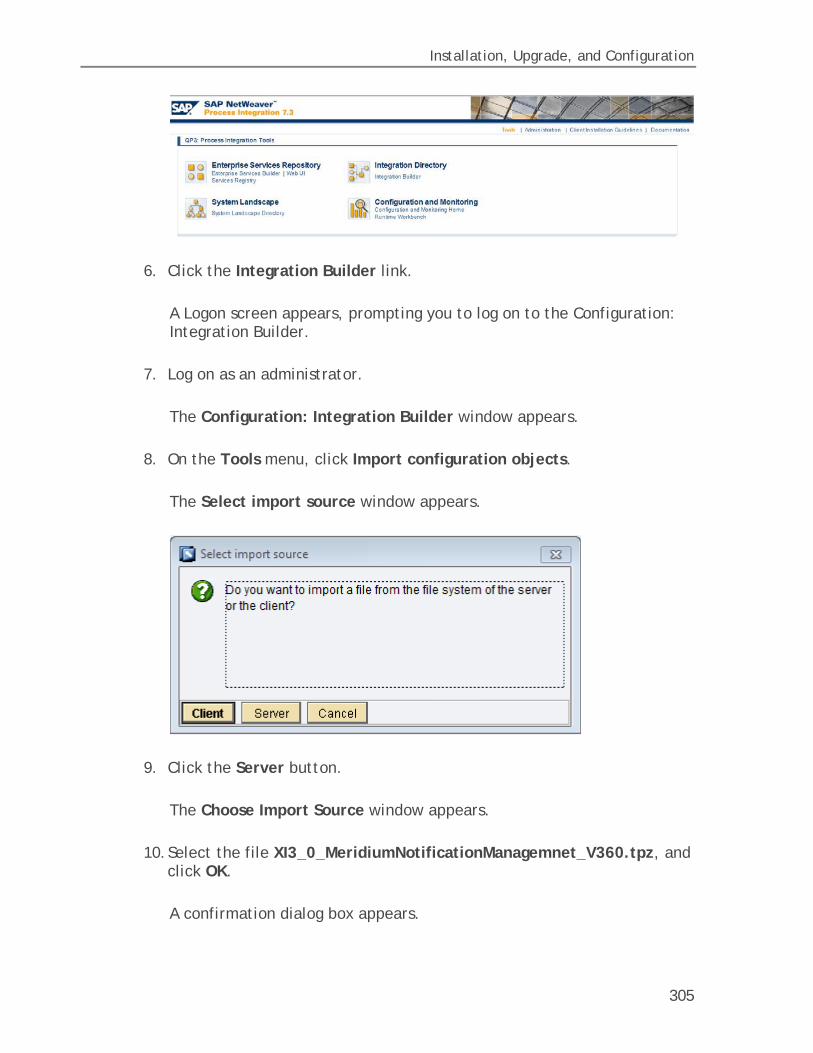
Installation, Upgrade, and Configuration
305
6. Click the Integration Builder link.
A Logon screen appears, prompting you to log on to the Configuration: Integration Builder.
7. Log on as an administrator.
The Configuration: Integration Builder window appears.
8. On the Tools menu, click Import configuration objects.
The Select import source window appears.
9. Click the Server button.
The Choose Import Source window appears.
10. Select the file XI3_0_MeridiumNotificationManagemnet_V360.tpz, and click OK.
A confirmation dialog box appears.

Meridium APM SAP Interfaces V3.6.0.0.0
306
11. Click the Import button.
The file is imported.
12. Click the Close button.
You will now need to activate the RFCReceiverToECC object. To do so, you will need to remain logged on to the Configuration: Integration Builder.
Activating the RFCReceiverToECC Object
About Activating the RFCReceiverToECC Object
The steps for activating the RFCReceiverToECC object are different depending on which SAP PI Server version you are using. To access the appropriate instructions, click the SAP PI Server version that you are using:
• Version prior to SAP PI 7.3
• SAP PI 7.3
Activating the RFCReceiverToECC Object using an SAP PI Version Prior to 7.3
To activate the RFCReceiverToECC object:
1. In the Configuration: Integration Builder, click the Change Lists tab.
2. On the Change Lists tab, select XI 3.0 Import, and then select RFCReceiverToECC.
3. On the right side of the screen, click the button.
4. On the Properties tab, confirm or type values for the following parameters:
• RFC Server Type
Note: This parameter must be set to SAP System.
• Application Server

Installation, Upgrade, and Configuration
307
• System Number
• Authentication Mode
Note: This parameter must be set to Use Logon Data for SAP System.
• Logon User
• Logon Password
• Logon Language
• Logon Client
5. On the Change Lists tab, right-click XI 3.0 Import, and click Activate.
A confirmation message appears.
6. Click the Activate button.
The object is activated.
Activating the RFCReceiverToECC Object using SAP PI 7.3
To activate the RFCReceiverToECC object:
1. In the Configuration: Integration Builder, click the Change Lists tab.
2. On the Change Lists tab, select XI 3.0 Import, and then select | SAP_ECC|RFCReceiverToECC.
3. The Error Loading Adapter Metadata dialog box appears.

Meridium APM SAP Interfaces V3.6.0.0.0
308
4. Click the Close button.
The communication channel details appear on the right side of the screen.
5. On the right side of the screen, click the button.
6. On the Parameters tab, in the Adapter Type row, select the button.
The Choose Adapter Metadata window appears.

Installation, Upgrade, and Configuration
309
7. Select the latest RFC Adapter from the list, and click the Apply button.
The communication channel details return to focus.
8. On the Properties tab, confirm or type values for the following parameters:
• RFC Server Type
Note: This parameter must be set to SAP System.
• Application Server
• System Number
• Authentication Mode
Note: This parameter must be set to Use Logon Data for SAP System.

Meridium APM SAP Interfaces V3.6.0.0.0
310
• Logon User
• Logon Password
• Logon Language
• Logon Client
9. On the Change Lists tab, right-click XI 3.0 Import, and click Activate.
A confirmation message appears.
10. Click the Activate button.
The object is activated.
Activating the SOAP Communication Channels
Note: You must complete the following steps only if you are using SAP PI version 7.3.
To activate the SOAP Communication Channels:
1. In the Configuration: Integration Builder, click the Change Lists tab.
2. On the Change Lists tab, select XI 3.0 Import, and then select | MeridiumAPM_D|SOAPSNDCRTNOTIF.
3. The Error Loading Adapter Metadata dialog box appears.

Installation, Upgrade, and Configuration
311
4. Click the Close button.
The communication channel details appear on the right side of the screen.
5. On the right side of the screen, click the button.
6. On the Parameters tab, in the Adapter Type row, select the button.
The Choose Adapter Metadata window appears.

Meridium APM SAP Interfaces V3.6.0.0.0
312
7. Select the latest SOAP Adapter from the list, and click the Apply button.
The communication channel details return to focus.
8. At the top of the screen, click the button.
9. Repeats steps 2 through 8 for each of the following SOAP Channels:
• | MeridiumAPM_D | SOAPSNDUPDNOTIF
• | MeridiumAPM_D | SOAPSNDUPDNOTIFSYSSTAT
• | MeridiumAPM_D | SOAPSNDUPDNOTIFUSERSTAT
10. On the Change Lists tab, right-click XI 3.0 Import, and click Activate.
A confirmation message appears.
11. Click the Activate button.

Installation, Upgrade, and Configuration
313
The changes are activated.
Importing the Business Package Contents
Importing the .EPA File
To import the .EPA file:
1. On the SAP Web Application Server, insert the SAP Interfaces DVD.
2. Log on to the SAP Portal as an administrator.
3. Click the System Administration tab.
4. Click the Transport tab.
5. In the Detailed Navigation section, expand the Transport Packages folder, and click the Import link.
The Import information appears.
5. For the Source for Package Files option, click Client.
4. Click the Browse button.
The Choose File dialog box appears.
6. Navigate to the appropriate folder on the SAP Interfaces DVD.
• If you are using the SAP Enterprise Portal 2004 or earlier, navigate to Meridium SAP Certified Powered By NetWeaver Interface\SAP EP EPA export files\All (SAP EP 2004 and earlier).
-or-
• If you are using the SAP Enterprise Portal 2004s, navigate to Meridium SAP Certified Powered By NetWeaver Interface\SAP EP EPA export files\Data and ACL (SAP EP 2004s).
7. Select the .EPA file, and click the Open button.

Meridium APM SAP Interfaces V3.6.0.0.0
314
The File text box is populated with the path to the .EPA file.
8. Click the Upload button.
The contents of the Business Package appear in the Import Preview section.
9. Click the Import button.
The contents of the Business Package and the details of the import process are displayed.
After the import process is complete, the following structure should exist under Content Provided by Other Vendors on the Content Administration tab.

Installation, Upgrade, and Configuration
315
Importing the .PAR File
To import the .PAR file:
1. On the SAP Web Application Server, insert the SAP Interfaces DVD.
2. Log on to the SAP Portal as an administrator.
3. Click the System Administration tab.
4. Click the Support tab.
5. In the table on the right side of the screen, in the Area column, click the Portal Runtime link.

Meridium APM SAP Interfaces V3.6.0.0.0
316
The Portal Support Desk: Portal Runtime screen appears.
6. In the table in the Portal Anywhere Admin Tools section, in the Tools column, click the Administration Console link.
A new screen appears.
7. To the right of the first text box, click the Browse button.
8. Navigate to the following folder on the SAP Interfaces DVD: Meridium SAP Certified Powered By NetWeaver Interface\SAP EP PAR file.
9. Select the .PAR file, and click the Open button.
The text box is populated with the path to the .PAR file.
8. Click the Upload button.
The .PAR file is imported. You can confirm the success by searching the Messages section for the text INFO: Meridium APM_APM has been successfully updated.
Configuring the APMConfiguration Object
To configure the APMConfiguration object:
1. Log on to the SAP Portal as an administrator.
2. Click the System Administration tab.
3. Click the System Configuration tab.
4. Use the Search tab to search for the APMConfiguration object.
5. Open the APMConfiguration object.
The APMConfiguration tab appears.
6. In the Property Category list, select Application Settings.
The following text boxes are displayed:

Installation, Upgrade, and Configuration
317
• MissingParameteriViewURL
• QueryWSURL
7. In the MissingParameteriViewURL text box:
a. Replace <Host Name> with the name of the SAP Web Application Server.
b. Replace <Port Number> with the port number of the specified SAP Web Application Server.
8. In the QueryWSURL text box, delete the existing text, and type http://<Meridium APM Web Server>/Meridium APMServices/ETLQuery.asmx, where <Meridium APM Web Server> is the name of the machine on which the Meridium APM Web Services is installed.
9. Click the Save button.
10. In the Property Category list, select User Mapping.
11. In the User Mapping Type list, select User.
12. Click the Save button.
13. In the Display list, select System Aliases.
14. In the Alias Name text box, type: APMPBNWConfiguration
15. Click the Add button.
16. Click the Save button.
17. In the Display list, select Permissions.
18. In the Search for text box, type: *APM*
Note: Make sure that you are searching in Roles, not Users.
19. Click the Add button.

Meridium APM SAP Interfaces V3.6.0.0.0
318
The permissions associated with the returned roles appear in the Assigned Permissions section.
20. In the first row of the Assigned Permissions section:
a. In the Administrator column, select Read.
b. In the End User column, select the check box.
21. Click the Save button.
The changes are saved. A message appears, indicating that the permissions are being changed and asking if you are sure that you want to continue.
22. Confirm the operation.
Configuring the R3Systems Object
To configure the R3Systems object:
1. Log on to the SAP Portal as an administrator.
2. Click the System Administration tab.
3. Click the System Configuration tab.
4. On the Browse tab, navigate to Content Provided by Other Vendors\Content for Specialists\Meridium Business Package for APM PBNW\Systems\R3Systems.
5. Open the R3Systems object.
6. Confirm or type values for the following fields:
• Application Host
• Gateway Host
• Gateway Service

Installation, Upgrade, and Configuration
319
• Logon Method
Note: The logon method must be set to UIDPW.
• SAP Client
• SAP System ID
• SAP System Number
• User Mapping
Note: The user mapping must be set to admin, user.
7. Click the Save button.
8. In the Display list, select System Aliases.
9. In the Alias text box, type: SAP_R3
10. Click the Add button.
11. Click the Save button.
12. In the Display list, select Permissions.
13. In the Search for text box, type: *APM*
Note: Make sure that you are searching in Roles, not Users.
14. Click the Add button.
The permissions associated with the returned roles appear in the Assigned Permissions section.
15. In the first row of the Assigned Permissions section:
a. In the Administrator column, select Read.
b. In the End User column, select the check box.

Meridium APM SAP Interfaces V3.6.0.0.0
320
16. Click the Save button.
The changes are saved. A message appears, indicating that the permissions are being changed and asking if you are sure that you want to continue.
17. Confirm the operation.
Granting the Everyone Group Permissions to the PM Notification iView
Note: The following instructions apply only if you are using SAP NetWeaver 6.40.
To grant the Everyone group permissions to the PM Notification iView:
1. Log on to the SAP Portal as an administrator.
2. Click the Content Administration tab.
3. Click the Portal Content tab.
4. On the Browse tab, select Show PM Notification.
The Show PM Notification tab appears.
5. On the Show PM Notification tab, in the Display list, select Permissions.
6. In the Assign New Permissions section, search for the Everyone group.
7. Click the Add button.
8. In the first row of the Assigned Permissions section:
a. In the Administrator column, select Read.
b. In the End User column, select the check box.
9. Click the Save button.
The changes are saved.

Installation, Upgrade, and Configuration
321
Determining Which Users Can See the APM PBNW Certification Tab
To determine which users can see the APM PBNW Certification tab in the SAP Portal, you will need to assign the Meridium APM PBNW User Showcase Role to the desired users.
To determine which users can see the APM PBNW Certification tab:
1. Log on to the SAP Portal as an administrator.
2. Click the User Administration tab.
3. Assign the Meridium APM PBNW User Showcase Role to the users that you mapped to the SAP_R3 system.
Hint: For more information about assigning roles to users, see the SAP Help on the SAP Help site.
The roles are associated with the selected users. These users will now see the APM PBNW Certification tab in the SAP Portal.
Mapping Users to the SAP_R3 System
After you have determined which users should be allowed to see the APM PBNW Certification tab in the SAP Portal, you will need to map those users to the SAP_R3 system object.
For details on how to map users to a system, see the SAP documentation located on the SAP Help site.
Configuring the Query iView
The following instructions assume that you know the Catalog path to the Meridium APM query that will be referenced by the Query iView.
While the query does not need to exist in the Meridium APM Catalog before you can perform these steps, if it does not exist, when it is eventually created, the query must be saved with the name that you specify using the following steps and to the Catalog folder path that you specify using the following steps.

Meridium APM SAP Interfaces V3.6.0.0.0
322
To configure the Query iView:
1. Log on to the SAP Portal as an administrator.
2. Click the Content Administration tab.
3. Click the Portal Content tab.
4. On the Browse tab, navigate to Portal Content\Content Provided by Other Vendors\Content for Specialists\Meridium Business Package for APM PBNW\iViews.
5. Open the Query object.
The Query tab appears.
6. On the Query tab, in the Parameters to Pass from Page Request (for URL Isolation) text box, delete the existing text, and type:
<Meridium APM Web Server>,<Meridium APM Database Name>,<Merdium User ID>,<Meridium APM Password>,<Meridium APM Catalog Path>,[Query Parameters]
...where:
• <Meridium APM Web Server> is the name of the Meridium APM Web Server.
• <Meridium APM Database Name> is the name of the database in which the query exists (as it appears in the Data Source Manager in the Database Name cell).
• <Merdium User ID> is the user ID of a Meridium APM Security User that can log into the specified database.
• <Meridium APM Password> is the password for the specified Meridium APM Security User.
• <Meridium APM Catalog Path> is the Catalog path of the query whose results should be displayed in SAP.

Installation, Upgrade, and Configuration
323
• [Query Parameters] is a value that you want to supply for a prompt in the query. If you want to pass in multiple prompt values, separate each value with a | (pipe). To type a pipe, you can press the Shift + \ (backspace) keys.
This parameter is optional. If the query contains prompts and you do not pass in prompt values, when a user runs the query from the SAP Portal, the prompts will be displayed, and the user will need to select values manually.
7. Click the Save button.
The changes are saved.
Configuring Meridium APM to Create SAP Notifications Using PI
By default, Meridium APM will create SAP Notifications from Recommendation records using the non-PI-based approach, which requires only an SAP Backend System in the SAP landscape. If desired, you can configure Meridium APM to create SAP Notifications from Recommendation records using the SAP Backend System and an SAP PI Server in the SAP landscape.
Note: After you complete the following steps, you will also need to change the default datasheet setting for the desired families.
To configure Meridium APM to use the PI-based approach for creating SAP Notifications:
1. On the Entity Family tab, select the Recommendation family whose Recommendation records you want to use to generate SAP Notifications.
2. In the Tasks section, click the Manage Family Business Rules link.
The Meridium APM Rules Editor (VSTA) appears, displaying the family rule project for the selected family.
3. Add the reference Library.Meridium.IntegrationInterfaces.
4. In the Project Explorer pane, double-click the family file. For example, if you opened the family rule project for the Meridium General Recommendation family, you would double-click the file MI_GENRECOMM.vb.

Meridium APM SAP Interfaces V3.6.0.0.0
324
The associated code appears.
5. Below the last Imports statement, type Imports Library.Meridium.IntegrationInterfaces.
6. Between the text End Sub and End Class, type the following text:
Public Overrides Sub BeforeInsert() CreateSAPNotification()
End Sub Public Overrides Sub BeforeUpdate()
CreateSAPNotification() End Sub Private Sub CreateSAPNotification()
RecommendationInterfaces.CreateSAPNotification(CurrentEntity, RecommendationInterfaces.Notification_Type, RecommendationInterfaces._URL)
End Sub
The final code should look like this, where the additional code is outlined in red:
7. Build the project.
8. Save the project.
9. Compile the family.

Installation, Upgrade, and Configuration
325
SAP Interfaces Security Groups
Meridium APM provides the following baseline Security Groups for use with the SAP Interfaces:
• MI SAP Interface Administrator
• MI SAP Interface User
The following table lists the family-level privileges that exist for these Security Groups.
Entity Families
Family MI SAP Interface Administrator
MI SAP Interface User
Confirmation View, Update, Insert, Delete
View, Update, Insert
Equipment View, Update, Insert, Delete
View, Update, Insert
Functional Location View, Update, Insert, Delete
View, Update, Insert
SAP System View, Update, Insert, Delete
View
Site Reference View View
Work History View, Update, Insert, Delete
View, Update, Insert
Work History Detail View, Update, Insert, Delete
View, Update, Insert
Relationship Families
Family MI SAP Interface Administrator
MI SAP Interface User
Equipment Has Equipment View, Update, Insert, Delete
View, Update, Insert, Delete
Functional Location Has Equipment
View, Update, Insert, Delete
View, Update, Insert, Delete
Functional Location Has Functional Location(s)
View, Update, Insert, Delete
View, Update, Insert, Delete

Meridium APM SAP Interfaces V3.6.0.0.0
326
Entity Families
Has Confirmation View, Update, Insert, Delete
View, Update, Insert, Delete
Has Event Detail View, Update, Insert, Delete
View, Update, Insert, Delete
Has SAP System View, Update, Insert, Delete
View, Update, Insert, Delete
Has Work History View, Update, Insert, Delete
View, Update, Insert, Delete
User Assignment View, Update, Insert, Delete
View, Update, Insert, Delete
327
User Instructions
Running the Extraction Interfaces
Options for Running the Extraction Interfaces
To run an extraction interface, you can use any of the following options:
• Schedule the interface to be run automatically.
• Run the interface manually in the foreground. This documentation provides individual instructions for running each of the following extraction interfaces manually in the foreground:
Functional Location Extraction
Functional Location Characteristics Extraction
Equipment Extraction
Equipment Characteristics Extraction
Notification and Order Extraction
• Run the interface manually in the background.
Note: You might want to run an interface in the background to avoid SAP time-out errors, which can occur if you are extracting a large amount of data.
Note that if an SAP field that Meridium APM references during the extraction process contains a special character (e.g., an ellipsis), during the extraction process, the character is ignored. For example, consider a scenario where a field contains the following value:
Test ...

Meridium APM SAP Interfaces V3.6.0.0.0
328
In this case, when you run the extraction interface, the ellipsis is ignored, and the Meridium APM field will display only the value Test.
Note: In rare cases, the special characters cannot be removed. In this case, the whole line containing that text is removed and replaced with a message indicating that some lines have been truncated because of unacceptable characters.
Scheduling All Extraction Interfaces to Run Automatically
About Scheduling the Interfaces to Run Automatically
Using the SAP Interfaces module, you can extract items from SAP to create and update records in the Meridium APM system. While we provide reports that you can run manually each time that you want to extract new or updated items in SAP, you will probably want to schedule the items to be extracted on an automatic, recurring basis. This method ensures synchronization between your SAP database and your Meridium APM database.
To schedule SAP items to be extracted automatically, you will need to run the /MIAPM/MASTER_INTERFACE report manually one time to provide information that tells SAP how often to rerun the report automatically. For example, when you run the report the first time, you might specify that you want the report to be rerun every night.
Each time the /MIAPM/MASTER_INTERFACE report is run, it will run the following reports automatically:
• /MIAPM/EQUIPMENT_INF
• /MIAPM/EQUIPMENT_CHARACT_INF
• /MIAPM/FUNCTIONAL_LOCATION_INF
• /MIAPM/FUNC_LOC_CHARACT_INF
• /MIAPM/WH_NOTIF_WITH_WO
• /MIAPM/WH_WORK_ORDER

User Instructions
329
• /MIAPM/WH_NOTIFICATION
• /MIAPM/WORK_HISTORY_DETAILS
The /MIAPM/MASTER_INTERFACE report runs the individual reports using the values that are specified in the baseline variants that are associated with each individual report. For example, when the /MIAPM/MASTER_INTERFACE report runs the /MIAPM/EQUIPMENT_INF, it uses the values that are specified in the baseline variant /MIAPM/EQ_INF. By default, the baseline variants are configured to extract all items for all plants. If you want the /MIAPM/MASTER_INTERFACE report to extract only specific items, you will need to modify the baseline variants to provide the necessary values.
Note: The /MIAPM/MASTER_INTERFACE report will run successfully only if the SAP Interfaces - Foundation license is active.
Baseline Variants
The following table lists the baseline reports and their associated variants that are provided by default for the SAP Interfaces. These variants will be run automatically by the report /MIAPM/MASTER_INTERFACE.
Report Variant
/MIAPM/EQUIPMENT_INF /MIAPM/EQ_INF
/MIAPM/EQUIPMENT_CHARACT_INF /MIAPM/ETC_INF
/MIAPM/FUNCTIONAL_LOCATION_INF /MIAPM/FL_INF
/MIAPM/FUNC_LOC_CHARACT_INF /MIAPM/FTC_INF
/MIAPM/WH_NOTIF_WITH_WO /MIAPM/NTF_WO
/MIAPM/WH_WORK_ORDER /MIAPM/WO_INF
/MIAPM/WH_NOTIFICATION /MIAPM/NTF_INF
/MIAPM/WORK_HISTORY_DETAILS /MIAPM/WHD_INF

Meridium APM SAP Interfaces V3.6.0.0.0
330
Modifying Baseline Variants
To modify a baseline variant:
1. In SAP, run the following transaction: SE38
The ABAP Editor: Initial Screen appears.
2. In the Program text box, type the name of the report whose variant you want to modify. For example, to modify the variant for the /MIAPM/EQUIPMENT_INF report, you would type /MIAPM/EQUIPMENT_INF.
3. Click the button.
A screen appears displaying the parameters for the specified report. For example, the screen for the /MIAPM/EQUIPMENT_INF report looks like this:
4. On the Go To menu, point to Variants, and then click Get.
The Find Variant window appears.

User Instructions
331
5. In the Created by text box, delete the value.
6. Click the button.
The ABAP: Variant Directory of Program <Report Name> window appears, displaying a list of variants, where <Report Name> is the name of the currently displayed report (e.g., /MIAPM/EQUIPMENT_INF).
7. Double-click the row containing the baseline variant that is associated with the currently displayed report. For example, for the report /MIAPM/EQUIPMENT_INF, you would double-click the row containing the variant /MIAPM/EQ_INF.
The screen displaying the report parameters returns to focus, and the values that are defined in the selected variant are displayed. For example, the values that are defined in the baseline variant /MIAPM/EQ_INF look like this:

Meridium APM SAP Interfaces V3.6.0.0.0
332
8. Modify the values as desired.
Note: We recommend that you leave the date text boxes empty. Doing so causes the report /MIAPM/MASTER_INTERFACE to use the values in the /MIAPM/CTRL_LOG table to determine the range of data to include when it runs.
9. When you are finished modifying the values, click the button.
The values are saved with the variant.
Scheduling the Interfaces to Run Automatically
Note: The following instructions will work correctly only if the SAP Interfaces - Foundation license is active.
To schedule the interfaces to run automatically:
1. On the SAP system, run the following transaction: /n/MIAPM/MIPRO
The Display IMG screen appears.

User Instructions
333
2. In the tree, expand Execute Reports for Data Extraction, and then expand Scheduling Background Jobs for Interfaces.
3. In the Schedule background job to run periodically row, click the button.
The Define Background Job screen appears.
4. In the Job name text box, type a name for the job.
5. In the Job class text box, specify the desired job class.
6. In the Exec. Target text box, select the SAP instance on which the background job needs to run.
7. Click the Step button.
The Create Step 1 screen appears.
8. In the Name text box, type /MIAPM/MASTER_INTERFACE.
9. Click the Check button.
10. Click the button.
The Step List Overview screen appears.
11. Click the button.
12. Click the Start Condition button.
The Start Time screen appears.

Meridium APM SAP Interfaces V3.6.0.0.0
334
13. Specify the schedule on which you want the report to be run.
Select the Periodic job check box.
14. When you are finished specifying the schedule, save the job.
The job is saved and set to a Released state. When the schedule that you specified causes the job to be run, the job will be transitioned to the Completed state, and a new Released job will be created.
In addition, each time the job is run without error, a log entry is made in the /MIAPM/CTRL_LOG table (regardless of whether any new or updated data was available in SAP when the job was run).
Hint: To see a log indicating the success or failure of the process, you can run transaction SLG1 and search for the object /MIAPM/INF.
The /MIAPM/CTRL_LOG Table
About the /MIAPM/CTRL_LOG Table
When an extraction interface is executed, an entry is made in the /MIAPM/CTRL_LOG table indicating the number of records that were extracted with errors, warnings, informational messages, and success for a given extraction creation and change date.
The /MIAPM/CTRL_LOG table is used if you have scheduled an extraction interface to be run on a recurring, automatic basis. Each time that the interface is run, the creation and change dates in the previous log entry are used to determine the creation and change dates that should be used for the next execution process.
For example, suppose the Equipment Extraction Interface is run on a nightly basis, and the current day is December 21, 2011. In this case, for the first extraction process that is run, assuming that no dates were specified in the baseline variants, it will extract all Equipment items that were created or changed through December 21, 2011.
For example, consider the following row in the /MIAPM/CTRL_LOG table.

User Instructions
335
Because the End Creation Date and End Change Date is December 21, 2011, the next time it is run, it will attempt to extract Equipment items that were created or updated starting on December 21, 2011.
Consider the following image, which shows that all Equipment created or updated between January 1, 1900 and December 21, 2011 is initially extracted, and the process completes on December 23, 2011 (indicated by the diamond).
In this case, the start dates in the /MIAPM/CTRL_LOG table will be 01/01/1900, and the end dates in the /MIAPM/CTRL_LOG table will be 12/21/2011.
If the interface is scheduled to run nightly, because it finished running on 12/23/2011, it will run again on 12/24/2011. At that time, it will extract all Equipment that was created or updated between 12/21/2011 and 12/24/2011, as indicated in the following image.

Meridium APM SAP Interfaces V3.6.0.0.0
336
Accessing the /MIAPM/CTRL_LOG Table
To access the /MIAPM/CTRL_LOG table:
1. On the SAP system, run the following transaction: /n/MIAPM/MIPRO
The Display IMG screen appears.
2. In the tree, expand System Monitoring and Error Handling.
3. In the View Control Log History row, click the button.
The View Control Log History screen appears.
4. In any of the following filters, provide values to limit the results that are returned in the log:
• Log Number: The log number that was created automatically when the master interface was last run.

User Instructions
337
Hint: This is the same log number that is used to track entries in the SLG1 log.
• Program Name: The name of the interface that was run. Because these instructions assume that you want to view the log for the master interface, which runs multiple individual interfaces automatically, you should leave this text box empty.
• Program Variant: The name of the variant that was used during the execution process.
• Processing Mode: The mode that was used to run the interface. You can select one of the following options:
Batch Processing: The interface was run as a background job. If you followed the documented instructions for running the master interface, you should select this value.
Dialog Processing: The interface was run in the foreground.
Note: The Batch Input Processing value does not apply to the master interface and should not be selected.
• Creation Date:
Start Date: The start date of the Creation Date range that used when the master interface was run.
End Date: The end date of the Creation Date range that was used when the master interface was run.
• Change Date:
Start Date: The start date of the Change Date range that was used when the master interface was run.
End Date: The end date of the Change Date range that was used when the master interface was run.
5. When you are finished providing values in the available filters, click the
icon.

Meridium APM SAP Interfaces V3.6.0.0.0
338
The Display Control Logs screen appears, displaying a row for each log that was created.
Running Individual Extraction Interfaces Manually
Running the Interfaces in the Foreground
Running the Functional Location Extraction Interface
Using the SAP Interfaces module, you can extract Functional Locations manually, or you can schedule them to be extracted automatically on a recurring basis. The following instructions explain how to extract them manually.
Note: You can run the Functional Location Extraction Interface successfully only if the SAP Interfaces - Foundation license is active.
To extract Functional Locations from SAP:
1. On the SAP system, run the following transaction: /n/MIAPM/MIPRO
The Display IMG screen appears.

User Instructions
339
2. In the tree, expand Execute Reports for Data Extraction, and then expand Execute Reports for Data Extraction.
3. In the Functional Location Report row, click the button.
The Meridium interface to extract Functional Locations from SAP screen appears.
4. In the Functional Location text boxes, type or select Functional Location IDs that define the range of Functional Location IDs for the Functional Locations that you want to extract. For example, if you want to extract Functional Locations with the IDs 1001273 through 1001293, you would specify the Functional Locations IDs as shown in the following image.
5. In the Func. Loc. Creation Date text box and the to text box beside it, type or select dates that define a range of creation dates of the Functional Locations that you want to extract. For example, if you want to extract Functional Locations that were created on or after January 1,

Meridium APM SAP Interfaces V3.6.0.0.0
340
1990 and on or before January 1, 2008, you would specify the dates as shown in the following image.
Note: To indicate today's date in either text box, you can leave the text box blank.
6. In the Func. Loc. Change Date text box and the to text box beside it, type or select dates that define a range of modification dates of the Functional Locations that you want to extract. For example, if you want to extract Functional Locations that were updated on or after January 1, 2008 and on or before December 1, 2008, you would specify the dates as shown in the following image.
Note: To indicate today's date in either text box, you can leave the text box blank.
7. In the Maintenance Plant text box, type the ID of the Maintenance Plant whose Functional Location data you want to extract. To specify multiple
Maintenance Plants, you can use the button to access the Multiple Selection for Maintenance Plant window.
When you run the extraction report, the ABAP code will look at the /MIAPM/PARAMS table to determine the Meridium APM system to and from which to send data for this Maintenance Plants. To see an example, click here.
Example
Suppose that two active rows exist in the /MIAPM/PARAMS table, and they contain the entries that are shown in the following tables:
Row 1
APM Data Source Data Source A
APM App Server App Server A

User Instructions
341
APM Data Source Data Source A
Plant Plant 1000
Row 2
APM Data Source Data Source B
APM App Server App Server B
Plant Plant 2000
If you run the Functional Location Extraction Interface and select Plant 1000 and Plant 2000, when the Functional Locations are extracted...
• The Functional Locations for Plant 1000 will be extracted to Data Source A, which is connected to Application Server A.
• The Functional Locations for Plant 2000 will be extracted to Data Source B, which is connected to Application Server B.
Note: The Maintenance Plant text box is required. To specify all Maintenance Plants, type: *
8. In the Func. Loc. Category text box, type the ID of the Functional Location Category that identifies the Functional Locations that you want
to extract. To specify multiple categories, you can use the button to access the Multiple Selection for Func. Loc. Category window.
9. In the Func. Loc. Type text box, type the ID of the Functional Location Type that identifies the Functional Locations that you want to extract.
To specify multiple types, you can use the button to access the Multiple Selection for Func. Loc Type window.
10. In the Func. Loc. Classification text box, type the ID of the Functional Location Classification that identifies the Functional Locations that you

Meridium APM SAP Interfaces V3.6.0.0.0
342
want to extract. To specify multiple classifications, you can use the button to access the Multiple Selection for Func. Loc. Classifications window.
11. If you want to define advanced extraction criteria, click the Advanced
Options button.
The Advanced Options section appears below the Advanced Options button.
12. Click here for details on defining advanced extraction criteria.
a. To change the level of detail that the SLG1 log will contain, in the Trace Level list, select one of the following values:
• Summary and Errors: Causes the log to show basic information about the extraction process, such as the selection criteria that was used in the process. If this option is selected, no success, informational, or warning messages will be recorded in the log. Instead, only error messages will be recorded in the log. The log will, however, display the total number of records that were extracted successfully.
• Summary Only: Causes the log to show basic information about the extraction process, such as the selection criteria that was used in the process. If this option is selected, no success, informational, warning, or error messages will be recorded in the log. The log will, however, display the total number of records that were extracted successfully.
Note that the default value in the Trace Level list is Summary, Errors, and Success, which causes the log to show basic information about the extraction process, such as the selection criteria that was used in the

User Instructions
343
process, all message types, and the total number of records that were extracted successfully.
2. To configure the system to process extractions in parallel, select the Parallel Run (Exe. Background) check box.
The following additional text boxes appear:
• Batch Size: Identifies the number of records that will be extracted during each parallel process. The default value is 5.
• Max. No. of Batches: Identifies the maximum number of batches that will be created before the system stops to check the status of each batch's progress. The default value is 10.
• Wait Time Between Batches (s): Identifies the amount of time (in seconds) that the system will wait before creating a new batch to check the status of each previous batch's progress. The default value is 2.
a. If you selected the Parallel Run (Exe. Background) check box and you want to modify any of the values in the related text boxes, in the related text boxes, delete the existing values, and type the desired values.
b. To simulate an extraction process without actually extracting the records to Meridium APM, select the Simulation Mode check box.
The following additional items become enabled:
• Maximum No. of Objects text box: Identifies the maximum number of records for which the extraction process should be simulated. This value works together with the values in the Selection Parameters section. For example, if you specified a creation date range of 01/01/1900 through 01/01/2008 but you type 20 in the Maximum No. Of Objects text box, the system will simulate the extraction process for only the first twenty Functional Location items that were created within the specified date range.

Meridium APM SAP Interfaces V3.6.0.0.0
344
• APM Data Source list: Identifies the Meridium APM data source to which you want to simulate the extraction process.
Note: You should modify the advanced option settings only if you have significant experience with SAP. Novice and occasional users should not modify the advanced option settings.
13. Click the button.
The report runs, and the Functional Locations that meet the specified criteria are extracted and used to create Functional Location records in Meridium APM. Note that all fields on the Functional Location records are disabled.
Hint: To see a detailed log indicating the success or failure of the process, you can run transaction SLG1 and search for the object /MIAPM/INF.
Running the Functional Location Characteristics Extraction Interface
Using the SAP Interfaces module, you can extract Functional Location characteristics manually, or you can schedule them to be extract automatically on a recurring basis. The following instructions explain how to extract them manually.
Note: You can run the Functional Location Characteristics Extraction Interface successfully only if the SAP Interfaces - Technical Characteristics license is active.
To extract Functional Location characteristics from SAP:
1. On the SAP system, run the following transaction: /n/MIAPM/MIPRO
The Display IMG screen appears.

User Instructions
345
2. In the tree, expand Execute Reports for Data Extraction, and then expand Execute Reports for Data Extraction.
3. In the Functional Location Technical Characteristics Report row, click the button.
The Meridium interface to extract Func. Loc. characteristics from SAP screen appears.
4. In the Functional Location text boxes, type or select Functional Location IDs that define the range of Functional Location IDs for the Functional Locations whose characteristics you want to extract. For example, if you want to extract characteristics for Functional Locations with the IDs 1001273 through 1001293, you would specify the Functional Locations IDs as shown in the following image.
5. In the Func. Loc. Creation Date text box and the to text box beside it, type or select dates that define a range of creation dates of the Functional Locations whose characteristics you want to extract. For example, if you want to extract characteristics for Functional Locations that were created on or after January 1, 1990 and on or before January 1, 2008, you would specify the dates as shown in the following image.
Note: To indicate today's date in either text box, you can leave the text box blank.

Meridium APM SAP Interfaces V3.6.0.0.0
346
6. In the Func. Loc. Change Date text box and the to text box beside it, type or select dates that define a range of modification dates of the Functional Locations whose characteristics you want to extract. For example, if you want to extract characteristics for Functional Locations that were updated on or after January 1, 2008 and on or before December 1, 2008, you would specify the dates as shown in the following image.
Note: To indicate today's date in either text box, you can leave the text box blank.
7. In the Maintenance Plant text box, type the ID of the Maintenance Plant that is associated with the Functional Locations whose characteristics you want to extract. To specify multiple Maintenance Plants, you can
use the button to access the Multiple Selection for Maintenance Plant window.
When you run the extraction report, the ABAP code will look at the /MIAPM/PARAMS table to determine the Meridium APM system to and from which to send data for this Maintenance Plants. To see an example, click here.
Example
Suppose that two active rows exist in the /MIAPM/PARAMS table, and they contain the entries that are shown in the following tables:
Row 1
APM Data Source Data Source A
APM App Server App Server A
Plant Plant 1000
Row 2

User Instructions
347
APM Data Source Data Source B
APM App Server App Server B
Plant Plant 2000
If you run the interface and selects Plant 1000 and Plant 2000, when the Functional Location characteristics are extracted...
• The characteristics for Functional Locations in Plant 1000 will be extracted to Data Source A, which is connected to Application Server A.
• The characteristics for Functional Locations in Plant 2000 will be extracted to Data Source B, which is connected to Application Server B.
Note: The Maintenance Plant text box is required. To specify all Maintenance Plants, type: *
8. In the Func. Loc. Category text box, type the ID of the Functional Location Category that identifies the Functional Locations whose characteristics you want to extract. To specify multiple categories, you
can use the button to access the Multiple Selection for Func. Loc. Category window.
9. In the Func. Loc. Type text box, type the ID of the Functional Location Type that identifies the Functional Locations whose characteristics you
want to extract. To specify multiple types, you can use the button to access the Multiple Selection for Func. Loc. Type window.
10. In the Func. Loc. Classification text box, type the ID of the Functional Location Classification that identifies the Functional Locations whose characteristics you want to extract. To specify multiple classifications,
you can use the button to access the Multiple Selection for Func. Loc. Classifications window. If a Functional Location has multiple classifications, the Functional Location characteristics will be extracted as long as you specify one of those classifications.

Meridium APM SAP Interfaces V3.6.0.0.0
348
11. If you want to define advanced extraction criteria, click the Advanced
Options button.
The Advanced Options section appears below the Advanced Options button.
12. Click here for details on defining advanced extraction criteria.
a. To change the level of detail that the SLG1 log will contain, in the Trace Level list, select one of the following values:
• Summary and Errors: Causes the log to show basic information about the extraction process, such as the selection criteria that was used in the process. If this option is selected, no success, informational, or warning messages will be recorded in the log. Instead, only error messages will be recorded in the log. The log will, however, display the total number of records that were extracted successfully.
• Summary Only: Causes the log to show basic information about the extraction process, such as the selection criteria that was used in the process. If this option is selected, no success, informational, warning, or error messages will be recorded in the log. The log will, however, display the total number of records that were extracted successfully.
Note that the default value in the Trace Level list is Summary, Errors, and Success, which causes the log to show basic information about the extraction process, such as the selection criteria that was used in the process, all message types, and the total number of records that were extracted successfully.

User Instructions
349
2. To configure the system to process extractions in parallel, select the Parallel Run (Exe. Background) check box.
The following additional text boxes appear:
• Batch Size: Identifies the number of records that will be extracted during each parallel process. The default value is 5.
• Max. No. of Batches: Identifies the maximum number of batches that will be created before the system stops to check the status of each batch's progress. The default value is 10.
• Wait Time Between Batches (s): Identifies the amount of time (in seconds) that the system will wait before creating a new batch to check the status of each previous batch's progress. The default value is 2.
a. If you selected the Parallel Run (Exe. Background) check box and you want to modify any of the values in the related text boxes, in the related text boxes, delete the existing values, and type the desired values.
b. To simulate an extraction process without actually extracting the records to Meridium APM, select the Simulation Mode check box.
The following additional items become enabled:
• Maximum No. of Objects text box: Identifies the maximum number of records for which the extraction process should be simulated. This value works together with the values in the Selection Parameters section. For example, if you specified a creation date range of 01/01/1900 through 01/01/2008 but you type 20 in the Maximum No. Of Objects text box, the system will simulate the extraction process for only the first twenty Equipment characteristics that were created within the specified date range.
• APM Data Source list: Identifies the Meridium APM data source to which you want to simulate the extraction process.

Meridium APM SAP Interfaces V3.6.0.0.0
350
Note: You should modify the advanced option settings only if you have significant experience with SAP. Novice and occasional users should not modify the advanced option settings.
13. Click the button.
The report runs, and the characteristics for the Functional Locations that meets the specified criteria are extracted and used to create Technical Characteristic records in Meridium APM. Each Technical Characteristic record is linked automatically to the appropriate Functional Location record. If the appropriate Functional Location record does not already exist in the Meridium APM system, one is created automatically. Its fields will not contain any values, however, until you run the Functional Location Extraction Interface to update them. Note that all fields on the Technical Characteristic records are disabled.
Hint: To see a detailed log indicating the success or failure of the process, you can run transaction SLG1 and search for the object /MIAPM/INF.
Running the Equipment Extraction Interface
Using the SAP Interfaces module, you can extract Equipment manually, or you can schedule them to be extract automatically on a recurring basis. The following instructions explain how to extract them manually.
Note: You can run the Equipment Extraction Interface successfully only if the SAP Interfaces - Foundation license is active.
To extract Equipment from SAP:
1. On the SAP system, run the following transaction: /n/MIAPM/MIPRO
The Display IMG screen appears.

User Instructions
351
2. In the tree, expand Execute Reports for Data Extraction, and then expand Execute Reports for Data Extraction.
3. In the Equipment Report row, click the button.
The Meridium interface to extract Equipment from SAP screen appears.
4. In the Equipment text boxes, type or select Equipment IDs that define the range of Equipment IDs for the Equipment that you want to extract. For example, if you want to extract Equipment with the IDs 1001273 through 1001293, you would specify the Equipment IDs as shown in the following image.
5. In the Equipment Creation Date text box and the to text box beside it, type or select dates that define a range of creation dates of the Equipment that you want to extract. For example, if you want to extract Equipment that was created on or after January 1, 1990 and on or before January 1, 2008, you would specify the dates as shown in the following image.
Note: To indicate today's date in either text box, you can leave the text box blank.
6. In the Equipment Change Date text box and the to text box beside it, type or select dates that define a range of modification dates of the Equipment that you want to extract. For example, if you want to extract Equipment that was updated on or after January 1, 2008 and on or

Meridium APM SAP Interfaces V3.6.0.0.0
352
before December 1, 2008, you would specify the dates as shown in the following image.
Note: To indicate today's date in either text box, you can leave the text box blank.
7. In the Maintenance Plant text box, type the ID of the Maintenance Plant whose Equipment data you want to extract. To specify multiple
Maintenance Plants, you can use the button to access the Multiple Selection for Maintenance Plant window.
When you run the extraction report, the ABAP code will look at the /MIAPM/PARAMS table to determine the Meridium APM system to and from which to send data for this Maintenance Plants. To see an example, click here.
Example
Suppose that two active rows exist in the /MIAPM/PARAMS table, and they contain the entries that are shown in the following tables:
Row 1
APM Data Source Data Source A
APM App Server App Server A
Plant Plant 1000
Row 2
APM Data Source Data Source B
APM App Server App Server B

User Instructions
353
APM Data Source Data Source B
Plant Plant 2000
If you run the Equipment Extraction Interface and selects Plant 1000 and Plant 2000, when the Equipment is extracted...
• The Equipment for Plant 1000 will be extracted to Data Source A, which is connected to Application Server A.
• The Equipment for Plant 2000 will be extracted to Data Source B, which is connected to Application Server B.
Note: The Maintenance Plant text box is required. To specify all Maintenance Plants, type: *
8. In the Equipment Category text box, type the ID of the Equipment Category that identifies the Equipment that you want to extract. To
specify multiple categories, you can use the button to access the Multiple Selection for Equipment Category window.
9. In the Equipment Type text box, type the ID of the Equipment Type that identifies the Equipment that you want to extract. To specify multiple
types, you can use the button to access the Multiple Selection for Equipment Type window.
10. In the Equipment Classification text box, type the ID of the Equipment Classification that identifies the Equipment that you want to extract. To
specify multiple classifications, you can use the button to access the Multiple Selection for Equipment Classifications window. If an Equipment has multiple classification, the Equipment record will be extracted as long as you specify one of those classifications.
11. If you want to define advanced extraction criteria, click the Advanced
Options button.
The Advanced Options section appears below the Advanced Options button.

Meridium APM SAP Interfaces V3.6.0.0.0
354
12. Click here for details on defining advanced extraction criteria.
a. To change the level of detail that the SLG1 log will contain, in the Trace Level list, select one of the following values:
• Summary and Errors: Causes the log to show basic information about the extraction process, such as the selection criteria that was used in the process. If this option is selected, no success, informational, or warning messages will be recorded in the log. Instead, only error messages will be recorded in the log. The log will, however, display the total number of records that were extracted successfully.
• Summary Only: Causes the log to show basic information about the extraction process, such as the selection criteria that was used in the process. If this option is selected, no success, informational, warning, or error messages will be recorded in the log. The log will, however, display the total number of records that were extracted successfully.
Note that the default value in the Trace Level list is Summary, Errors, and Success, which causes the log to show basic information about the extraction process, such as the selection criteria that was used in the process, all message types, and the total number of records that were extracted successfully.
2. To configure the system to process extractions in parallel, select the Parallel Run (Exe. Background) check box.
The following additional text boxes appear:

User Instructions
355
• Batch Size: Identifies the number of records that will be extracted during each parallel process. The default value is 5.
• Max. No. of Batches: Identifies the maximum number of batches that will be created before the system stops to check the status of each batch's progress. The default value is 10.
• Wait Time Between Batches (s): Identifies the amount of time (in seconds) that the system will wait before creating a new batch to check the status of each previous batch's progress. The default value is 2.
a. If you selected the Parallel Run (Exe. Background) check box and you want to modify any of the values in the related text boxes, in the related text boxes, delete the existing values, and type the desired values.
b. To simulate an extraction process without actually extracting the records to Meridium APM, select the Simulation Mode check box.
The following additional items become enabled:
• Maximum No. of Objects text box: Identifies the maximum number of records for which the extraction process should be simulated. This value works together with the values in the Selection Parameters section. For example, if you specified a creation date range of 01/01/1900 through 01/01/2008 but you type 20 in the Maximum No. Of Objects text box, the system will simulate the extraction process for only the first twenty Equipment items that were created within the specified date range.
• APM Data Source list: Identifies the Meridium APM data source to which you want to simulate the extraction process.
Note: You should modify the advanced option settings only if you have significant experience with SAP. Novice and occasional users should not modify the advanced option settings.
13. Click the button.

Meridium APM SAP Interfaces V3.6.0.0.0
356
The report runs, and the Equipment that meets the specified criteria are extracted and used to create Equipment records in Meridium APM. Note that all fields on the Equipment records are disabled.
Hint: To see a detailed log indicating the success or failure of the process, you can run transaction SLG1 and search for the object /MIAPM/INF.
Running the Equipment Characteristics Extraction Interface
Using the SAP Interfaces module, you can extract Equipment characteristics manually, or you can schedule them to be extract automatically on a recurring basis. The following instructions explain how to extract them manually.
Note: You can run the Equipment Characteristics Extraction Interface successfully only if the SAP Interfaces - Technical Characteristics license is active.
To extract Equipment characteristics from SAP:
1. On the SAP system, run the following transaction: /n/MIAPM/MIPRO
The Display IMG screen appears.
2. In the tree, expand Execute Reports for Data Extraction, and then expand Execute Reports for Data Extraction.
3. In the Equipment Technical Characteristics Report row, click the button.
The Meridium interface to extract Equipment characteristics from SAP screen appears.

User Instructions
357
4. In the Equipment text boxes, type or select the Equipment IDs that define the range of Equipment IDs whose characteristic you want to extract. For example, if you want to extract characteristics belonging to Equipment with the IDs 1001273 through 1001293, you would specify the Equipment IDs as shown in the following image.
5. In the Equipment Creation Date text box and the to text box beside it, type or select dates that define a range of creation dates of the Equipment whose characteristics you want to extract. For example, if you want to extract characteristics for Equipment that was created on or after January 1, 1990 and on or before January 1, 2008, you would specify the dates as shown in the following image.
Note: To indicate today's date in either text box, you can leave the text box blank.
6. In the Equipment Change Date text box and the to text box beside it, type or select dates that define a range of modification dates of the Equipment whose characteristics you want to extract. For example, if you want to extract characteristics for Equipment that was updated on or after January 1, 2008 and on or before December 1, 2008, you would specify the dates as shown in the following image.

Meridium APM SAP Interfaces V3.6.0.0.0
358
Note: To indicate today's date in either text box, you can leave the text box blank.
7. In the Maintenance Plant text box, type the ID of the Maintenance Plant that is associated with the Equipment whose characteristics you want to
extract. To specify multiple Maintenance Plants, you can use the button to access the Multiple Selection for Maintenance Plant window.
When you run the extraction report, the ABAP code will look at the /MIAPM/PARAMS table to determine the Meridium APM system to and from which to send data for this Maintenance Plants. To see an example, click here.
Example
Suppose that two active rows exist in the /MIAPM/PARAMS table, and they contain the entries that are shown in the following tables:
Row 1
APM Data Source Data Source A
APM App Server App Server A
Plant Plant 1000
Row 2
APM Data Source Data Source B
APM App Server App Server B
Plant Plant 2000
If you run the interface and selects Plant 1000 and Plant 2000, when the Equipment characteristics are extracted...

User Instructions
359
• The characteristics for Equipment in Plant 1000 will be extracted to Data Source A, which is connected to Application Server A.
• The characteristics for Equipment in Plant 2000 will be extracted to Data Source B, which is connected to Application Server B.
Note: The Maintenance Plant text box is required. To specify all Maintenance Plants, type: *
8. In the Equipment Category text box, type the ID of the Equipment Category that identifies the Equipment whose characteristics you want
to extract. To specify multiple categories, you can use the button to access the Multiple Selection for Equipment Category window.
9. In the Equipment Type text box, type the ID of the Equipment Type that identifies the Equipment whose characteristics you want to extract. To
specify multiple types, you can use the button to access the Multiple Selection for Equipment Type window.
10. In the Equipment Classification text box, type the ID of the Equipment Classification that identifies the Equipment whose characteristics you
want to extract. To specify multiple classifications, you can use the button to access the Multiple Selection for Equipment Classifications window. If an Equipment has multiple classifications, the Equipment characteristics will be extracted as long as you specify one of those classifications.
11. If you want to define advanced extraction criteria, click the Advanced
Options button.
The Advanced Options section appears below the Advanced Options button.

Meridium APM SAP Interfaces V3.6.0.0.0
360
12. Click here for details on defining advanced extraction criteria.
a. To change the level of detail that the SLG1 log will contain, in the Trace Level list, select one of the following values:
• Summary and Errors: Causes the log to show basic information about the extraction process, such as the selection criteria that was used in the process. If this option is selected, no success, informational, or warning messages will be recorded in the log. Instead, only error messages will be recorded in the log. The log will, however, display the total number of records that were extracted successfully.
• Summary Only: Causes the log to show basic information about the extraction process, such as the selection criteria that was used in the process. If this option is selected, no success, informational, warning, or error messages will be recorded in the log. The log will, however, display the total number of records that were extracted successfully.
Note that the default value in the Trace Level list is Summary, Errors, and Success, which causes the log to show basic information about the extraction process, such as the selection criteria that was used in the process, all message types, and the total number of records that were extracted successfully.
2. To configure the system to process extractions in parallel, select the Parallel Run (Exe. Background) check box.
The following additional text boxes appear:
• Batch Size: Identifies the number of records that will be extracted during each parallel process. The default value is 5.
• Max. No. of Batches: Identifies the maximum number of batches that will be created before the system stops to check the status of each batch's progress. The default value is 10.
• Wait Time Between Batches (s): Identifies the amount of time (in seconds) that the system will wait before creating

User Instructions
361
a new batch to check the status of each previous batch's progress. The default value is 2.
a. If you selected the Parallel Run (Exe. Background) check box and you want to modify any of the values in the related text boxes, in the related text boxes, delete the existing values, and type the desired values.
b. To simulate an extraction process without actually extracting the records to Meridium APM, select the Simulation Mode check box.
The following additional items become enabled:
• Maximum No. of Objects text box: Identifies the maximum number of records for which the extraction process should be simulated. This value works together with the values in the Selection Parameters section. For example, if you specified a creation date range of 01/01/1900 through 01/01/2008 but you type 20 in the Maximum No. Of Objects text box, the system will simulate the extraction process for only the first twenty Equipment characteristics that were created within the specified date range.
• APM Data Source list: Identifies the Meridium APM data source to which you want to simulate the extraction process.
Note: You should modify the advanced option settings only if you have significant experience with SAP. Novice and occasional users should not modify the advanced option settings.
13. Click the button.
The report runs, and the characteristics for the Equipment that meets the specified criteria are extracted and used to create Technical Characteristic records in Meridium APM. Each Technical Characteristic record is linked automatically to the appropriate Equipment record. If the appropriate Equipment record does not already exist in the Meridium APM system, one is created automatically. Its fields will not contain any values, however, until you run the Equipment Extraction Interface to update them. Note that all fields on the Technical Characteristic records are disabled.

Meridium APM SAP Interfaces V3.6.0.0.0
362
Hint: To see a detailed log indicating the success or failure of the process, you can run transaction SLG1 and search for the object /MIAPM/INF.
Running the Notification and Order Extraction Interface
Note that you can extract Orders and Notifications manually, or you can schedule them to be extracted automatically on a recurring basis. The following instructions explain how to extract them manually.
Note: You can run the Notification and Order Extraction Interface successfully only if the SAP Interfaces - Foundation license is active.
To run a report to extract Orders and Notifications from SAP:
1. On the SAP system, run the following transaction: /n/MIAPM/MIPRO
The Display IMG screen appears.
2. In the tree, expand Execute Reports for Data Extraction, and then expand Execute Reports for Data Extraction.
3. Click the button in one of the following rows, depending upon the type of data that you want to extract from SAP to create Work History or Work History Detail records in Meridium APM:
• Work History – Work Order with Notification Report (to run the report /MIAPM/WH_NOTIF_WITH_WO)
• Work History Detail Report (to run the report /MIAPM/WORK_HISTORY_DETAILS)
• Work History – Notification Report (to run the report /MIAPM/WH_NOTIFICATION)

User Instructions
363
• Work History – Work Order Report (to run the report /MIAPM/WH_WORK_ORDER)
The Meridium interface to extract <Item> screen appears, where <Item> is the type of item that you are retrieving from SAP. For example, if you ran the report /MIAPM/WH_NOTIF_WITH_WO, the Meridium interface to extract Notification with Work Orders from SAP screen would appear, as shown in the following image.
4. In the Work Order text boxes, type or select Order IDs that define the range of Order IDs for the Orders that you want to extract. For example, if you want to extract Orders with the IDs 1001273 through 1001293, you would specify the Order IDs as shown in the following image.
To specify multiple IDs, you can use the button to access the Multiple Selection for Work Order window.
5. In the Notification text boxes, type or select Notification IDs that define the range of Notification IDs for the Notifications that you want to extract. For example, if you want to extract Notifications with the IDs

Meridium APM SAP Interfaces V3.6.0.0.0
364
1001274 through 1001294, you would specify the Notification IDs as shown in the following image.
To specify multiple IDs, you can use the button to access the Multiple Selection for Notifications window.
6. In the Work History Create Date text box and the to text box beside it, type or select dates that define a range of creation dates of the Orders or Notifications that you want to extract. For example, if you want to extract Notifications that were created on or after January 1, 1990 and on or before January 1, 2008, you would specify the dates as shown in the following image.
Note: To indicate today's date in either text box, you can leave the text box blank.
7. In the Work History Change Date text box and the to text box beside it, type or select dates that define a range of modification dates of the Orders or Notifications that you want to extract. For example, if you want to extract Notifications that were updated on or after January 1, 2008 and on or before December 1, 2008, you would specify the dates as shown in the following image.
Note: To indicate today's date in either text box, you can leave the text box blank.
8. In the Work History Create Time text box and the to text box beside it, type or select times that define a range of creation times of the Orders or Notifications that you want to extract.
9. In the Work History Change Time text box and the to text box beside it, type or select times that define a range of modification times of the Orders or Notifications that you want to extract.
10. In the Maintenance Plant text box, type the ID of the Maintenance Plant whose data you want to extract. To specify multiple Maintenance Plants,

User Instructions
365
you can use the button to access the Multiple Selection for Maintenance Plant window.
When you run the extraction report, the ABAP code will look at the /MIAPM/PARAMS table to determine the Meridium APM system to and from which to send data for this Maintenance Plants. To see an example, click here.
Example
Suppose that two active rows exist in the /MIAPM/PARAMS table, and they contain the entries that are shown in the following tables:
Row 1
APM Data Source Data Source A
APM App Server App Server A
Plant Plant 1000
Row 2
APM Data Source Data Source B
APM App Server App Server B
Plant Plant 2000
If you run the Order Extraction Interface and selects Plant 1000 and Plant 2000, when the Orders are extracted...
• The Orders for Plant 1000 will be extracted to Data Source A, which is connected to Application Server A.

Meridium APM SAP Interfaces V3.6.0.0.0
366
• The Orders for Plant 2000 will be extracted to Data Source B, which is connected to Application Server B.
Note: The Maintenance Plant text box is required. To specify all Maintenance Plants, type: *
11. In the <Item> Type text box, type the ID of the Notification Type or Order Type that identifies the Notifications or Orders that you want to
extract. To specify multiple types, you can use the button to access the Multiple Selection for <Item> Type window.
12. In the <Item> User Status text box, type the ID of the Notification User Status or Order User Status that identifies the Notifications or Orders that you want to extract. To specify multiple statuses, you can use the
button to access the Multiple Selection for <Item> User Status window.
13. In the <Item> System Status text box, type the ID of the Notification System Status or Order System Status that identifies the Notifications or Orders that you want to extract. To specify multiple statuses, you can
use the button to access the Multiple Selection for <Item> System Status window.
14. In the Equipment Category text box, type the ID of the Equipment Category that identifies the Equipment that is associated with the Notifications and Orders that you want to extract. To specify multiple
categories, you can use the button to access the Multiple Selection for Equipment Category window.
15. In the Equipment Type text box, type the ID of the Equipment Type that identifies the Equipment that is associated with the Notifications and Orders that you want to extract. To specify multiple types, you can use
the button to access the Multiple Selection for Equipment Type window.
16. In the Equipment Classification text box, type the ID of the Equipment Classification that identifies the Equipment that is associated with the Notifications and Orders that you want to extract. To specify multiple
classifications, you can use the button to access the Multiple Selection for Equipment Classifications window. If an Equipment has multiple classification, the Equipment record will be extracted as long as you specify one of those classifications.

User Instructions
367
17. In the Func. Loc. Category text box, type the ID of the Functional Location Category that identifies the Functional Locations that are associated with the Notifications and Orders that you want to extract.
To specify multiple categories, you can use the button to access the Multiple Selection for Func. Loc. Category window.
18. In the Func. Loc. Type text box, type the ID of the Functional Location Type that identifies the Functional Locations that are associated with the Notifications and Orders that you want to extract. To specify
multiple types, you can use the button to access the Multiple Selection for Func. Loc. Type window.
19. In the Func. Loc. Classification text box, type the ID of the Functional Location Classification that identifies the Functional Locations that are associated with the Notifications and Orders that you want to extract.
To specify multiple classifications, you can use the button to access the Multiple Selection for Func. Loc. Classifications window.
20. If you want to define advanced extraction criteria, click the Advanced
Options button.
The Advanced Options section appears below the Advanced Options button.
21. Click here for details on defining advanced extraction criteria.
a. To change the level of detail that the SLG1 log will contain, in the Trace Level list, select one of the following values:
• Summary and Errors: Causes the log to show basic information about the extraction process, such as the selection criteria that was used in the process. If this option is selected, no success, informational, or warning

Meridium APM SAP Interfaces V3.6.0.0.0
368
messages will be recorded in the log. Instead, only error messages will be recorded in the log. The log will, however, display the total number of records that were extracted successfully.
• Summary Only: Causes the log to show basic information about the extraction process, such as the selection criteria that was used in the process. If this option is selected, no success, informational, warning, or error messages will be recorded in the log. The log will, however, display the total number of records that were extracted successfully.
Note that the default value in the Trace Level list is Summary, Errors, and Success, which causes the log to show basic information about the extraction process, such as the selection criteria that was used in the process, all message types, and the total number of records that were extracted successfully.
2. To configure the system to process extractions in parallel, select the Parallel Run (Exe. Background) check box.
The following additional text boxes appear:
• Batch Size: Identifies the number of records that will be extracted during each parallel process. The default value is 5.
• Max. No. of Batches: Identifies the maximum number of batches that will be created before the system stops to check the status of each batch's progress. The default value is 10.
• Wait Time Between Batches (s): Identifies the amount of time (in seconds) that the system will wait before creating a new batch to check the status of each previous batch's progress. The default value is 2.
a. If you selected the Parallel Run (Exe. Background) check box and you want to modify any of the values in the related text boxes, in the related text boxes, delete the existing values, and type the desired values.

User Instructions
369
b. To simulate an extraction process without actually extracting the records to Meridium APM, select the Simulation Mode check box.
The following additional items become enabled:
• Maximum No. of Objects text box: Identifies the maximum number of records for which the extraction process should be simulated. This value works together with the values in the Selection Parameters section. For example, if you specified a creation date range of 01/01/1900 through 01/01/2008 but you type 20 in the Maximum No. Of Objects text box, the system will simulate the extraction process for only the first twenty items that were created within the specified date range.
• APM Data Source list: Identifies the Meridium APM data source to which you want to simulate the extraction process.
Note: You should modify the advanced option settings only if you have significant experience with SAP. Novice and occasional users should not modify the advanced option settings.
22. Click the button.
The report runs, and the Orders and Notifications that meet the date criteria are extracted and used to create Work History and Work History Detail records in Meridium APM. Note that all fields on the Work History and Work History Detail records are disabled.
Hint: To see a detailed log indicating the success or failure of the process, you can run transaction SLG1 and search for the object /MIAPM/INF.
Running Interfaces in the Background
To run an interface in the background:
1. In SAP, complete the steps you would complete for running the report in the foreground (configure the interface parameters, such as creation date, change date, and Maintenance Plant), but do not actually execute the report.

Meridium APM SAP Interfaces V3.6.0.0.0
370
2. On the Program menu, click Execute in Background.
The Background Print Parameters window appears.
3. Select the desired settings, and when you are finished, click the button.
The Start Time window appears.

User Instructions
371
At the top of the window, you will see buttons indicating options for starting the execution process. These instructions assume that you want to start the execution process immediately.
4. Click the Immediate button.
5. Click the button.
The interface begins running in the background. You can check the status of the background process at any time.
Checking the Status of a Background Process
The following instructions explain how to check the status of a background process, assuming that you have run an interface in the background.

Meridium APM SAP Interfaces V3.6.0.0.0
372
To check the status of a background process:
1. On the SAP system, run the following transaction: /n/MIAPM/MIPRO
The Display IMG screen appears.
2. In the tree, expand System Monitoring and Error Handling.
3. In the View Job Status row, click the button.
The Simple Job Selection screen appears.

User Instructions
373
4. In the available fields, specify the criteria that will cause the system to display the results of the report whose status you want to view. For example, if you want to view a job that started yesterday, in the From text box, you would need to type yesterday's date.
5. In the Job Status section, select the Sched. check box.
6. Click the Execute button.
The Job Overview screen appears, displaying the background jobs that meet the specified criteria.
In each row, you can see the background jobs that meet the specified criteria. You can use the Status column to determine the status of the execution process. For example, processes that have been completed will show the status Complete.
Viewing a Log of Extraction Failures
About Viewing a Log of Extraction Failures
Each time an extraction interface is run, either manually or automatically as part of a recurring job, an entry is made in the /MIAPM/EXCEPTIONS table for each item that the code attempts to extract. If an item is extracted successfully, the corresponding row is deleted automatically. When the interface is finished running, any remaining rows in the /MIAPM/EXCEPTIONS represent items that were not extracted successfully.
The next time that the same interface is run, if one or more items exist in the /MIAPM/EXCEPTIONS table, meaning that they failed to be extracted during the
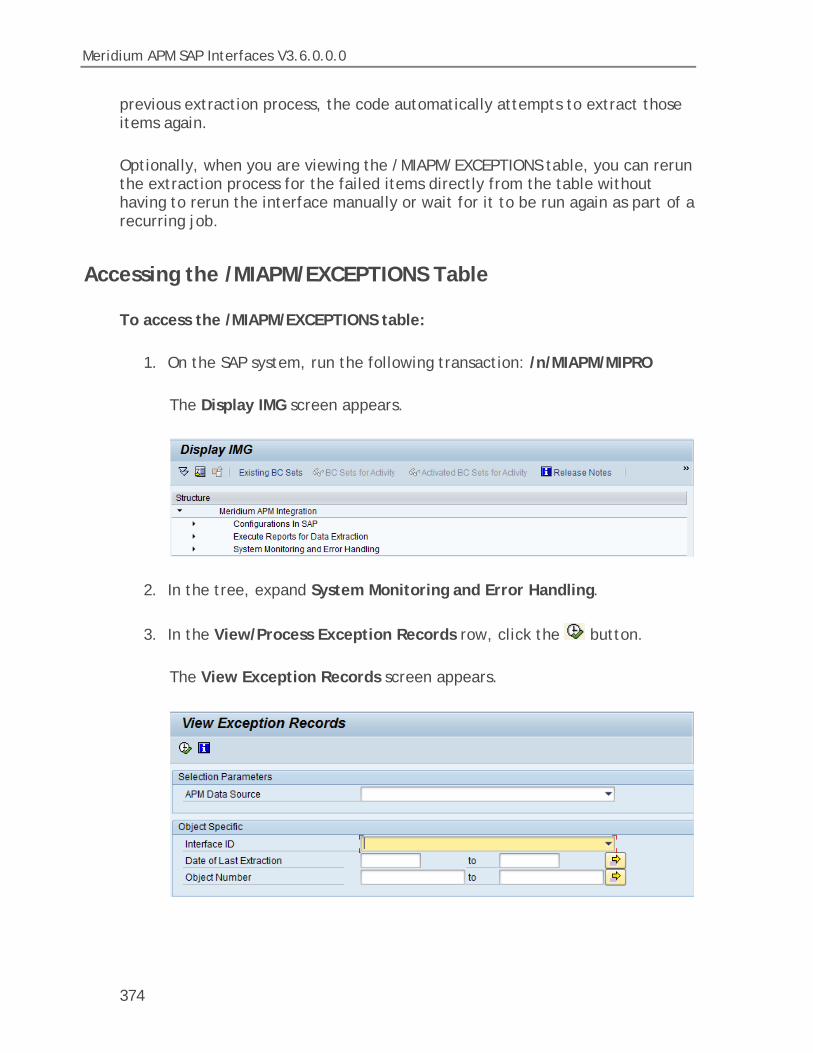
Meridium APM SAP Interfaces V3.6.0.0.0
374
previous extraction process, the code automatically attempts to extract those items again.
Optionally, when you are viewing the /MIAPM/EXCEPTIONS table, you can rerun the extraction process for the failed items directly from the table without having to rerun the interface manually or wait for it to be run again as part of a recurring job.
Accessing the /MIAPM/EXCEPTIONS Table
To access the /MIAPM/EXCEPTIONS table:
1. On the SAP system, run the following transaction: /n/MIAPM/MIPRO
The Display IMG screen appears.
2. In the tree, expand System Monitoring and Error Handling.
3. In the View/Process Exception Records row, click the button.
The View Exception Records screen appears.

User Instructions
375
4. If desired, provide values in the available filters to limit the items that are displayed in the /MIAPM/EXCEPTIONS table.
Note: The APM Data Source list displays only data sources that are listed as active in the /MIAPM/PARAMS table.
5. When you are finished providing values in the available filters, click the
icon.
The View Exception Records screen appears, displaying a row for each item that was not extracted successfully.
Running an Extraction Interface from the /MIAPM/EXCEPTIONS Table
To run an extraction interface while viewing the /MIAPM/EXCEPTIONS table:
1. While viewing the /MIAPM/EXCEPTIONS table, on the toolbar, click either of the following buttons:
•
•
The Process Exception Records screen appears.

Meridium APM SAP Interfaces V3.6.0.0.0
376
2. In the Trace Level list, select the level of detail that you want the SLG1 log to contain about this extraction process. You can choose one of the following options:
• Summary, Errors, and Success: Causes the log to show basic information about the extraction process, such as the selection criteria that was used in the process, all message types, and the total number of records that were extracted successfully. This is the default selection.
• Summary and Errors: Causes the log to show basic information about the extraction process, such as the selection criteria that was used in the process. If this option is selected, no success, informational, or warning messages will be recorded in the log. Instead, only error messages will be recorded in the log. The log will, however, display the total number of records that were extracted successfully.
• Summary Only: Causes the log to show basic information about the extraction process, such as the selection criteria that was used in the process. If this option is selected, no success, informational, warning, or error messages will be recorded in the log. The log will, however, display the total number of records that were extracted successfully.
3. To configure the system to process initial extractions in parallel, select the Parallel Run (Exe. Background) check box.
The following additional text boxes appear:
• Batch Size: Identifies the number of records that will be extracted during each parallel process. The default value is 5.
• Max. No. of Batches: Identifies the maximum number of batches that will be created before the system stops to check the status of each batch's progress. The default value is 40.
User Instructions
377
• Wait Time Between Batches: Identifies the amount of time (in seconds) that the system will wait before creating a new batch to check the status of each previous batch's progress. The default value is 2.
4. If you selected the Parallel Run (Exe. Background) check box and you want to modify any of the values in the related text boxes, in the related text boxes, delete the existing values, and type the desired values.
The selected items are reprocessed, and the View Exception Records screen returns to focus.
Running the Notification Creation Interface
Creating an SAP Notification from a Recommendation Record
The following instructions assume that the Create Work Request field exists in the family of the desired Recommendation record and that it exists on the datasheet. This field is already available on all baseline Recommendation datasheets for the baseline Recommendation families from which you are allowed to create SAP Notifications.
In addition, the following instructions explain how to specify the type of Notification that you want to create.
Note: If you do not specify the type of Notification that you want to create, the Meridium APM system will create M1 Notifications by default.
In order to specify the type of Notification that you want to create, you must use the Notification Type field. These instructions assume, therefore, that the Notification Type field exists in the family of the desired Recommendation record and on the datasheet as an enabled field. In the baseline database, the Notification Type field is already available in all baseline Recommendation families that exist for the purpose of using the SAP Interfaces. It is not, however, included on any baseline datasheets or configured as an enabled field. The following instructions assume, therefore, that an administrative user has enabled the field and added it to the datasheet.

Meridium APM SAP Interfaces V3.6.0.0.0
378
Note: You can create an SAP Notification successfully only if the SAP Interfaces - Foundation license is active.
To create an SAP Notification from a Recommendation record:
1. Create a new Recommendation record or open an existing Recommendation record.
2. Link the Recommendation record to an Equipment or Functional Location record that represents an SAP Equipment or Functional Location.
Note: If you select an Equipment or Functional Location record that does not exist in SAP, after you save the record, a Notification will be created in SAP, but its Equipment or Functional Loc. field will be empty.
3. Select the Create Work Request? check box.
4. In the Notification Type cell, specify the type of Notification that you want to create.
5. On the Common Tasks menu, click the Save link.
The record is saved. In addition, Meridium APM:
• Creates a Notification in SAP.
• Populates the Work Request Reference cell with the ID of the corresponding Notification. Note that after the Work Request Reference cell is populated, the Create Work Request? check box becomes disabled.
• Populates the Work Request Equipment cell with the value in the Equipment field in the SAP Notification.
• Populates the Work Request Functional Location cell with the value in the Functional Loc. field in the SAP Notification.
Note: If a Notification could not be created for any reason, a message appears, indicating the problem. In addition, you will be unable to save the Recommendation record until you clear the Create Work Request? check box.

User Instructions
379
PI-Based Approach
About Using PI to Create Notifications
If you are using the PI-based approach for creating SAP Notifications from Meridium APM Recommendation records, you can also use the Query iView to view the results of a Meridium APM query in the SAP Portal. For example, you can use the Query iView to view Recommendation records from which SAP Notifications were created.
To run a query in SAP that displays a list of Meridium APM records, the query must exist in the Meridium APM Catalog. The full path to the query must also be defined in the Query iView parameters.
Note that while you can use the Query iView to display the results of any Meridium APM query, this documentation assumes that you want to use a query that displays the Recommendation records that were used to generate SAP Notifications.
Specifically, this documentation explains:
• How to create a Notification from a Recommendation record.
• How you might want to configure a query for viewing these Recommendations in SAP.
• How to view the query results from the SAP Portal.
Throughout this documentation, we assume that the Query iView is configured appropriately.
Note: You can use PI to create Notifications only if the SAP Interfaces - Process Integration license is active.
Tips for Creating a Query to Display Recommendations that Generated Notifications
If you create SAP Notifications from Meridium APM Recommendation records, you can create a query that displays these Recommendation records and the Work Request References for the associated Notifications.

Meridium APM SAP Interfaces V3.6.0.0.0
380
Assuming that the Query iView has been configured appropriately, a user can log on to the SAP Portal and see the results of the query.
While you can configure the query any way you like, we recommend that the query at least:
• Provide a link that will open the Recommendation record in the Record Manager. The link should look like this:
meridium://Registry/RecordManager?EntityKey=$ENTY_KEY$&FamilyKey=$FMLY_KEY$
• Provide a link that will open the Notification in SAP. The link should look like this:
http://<SAP Web Application Server Name>:<Port Number>/irj/servlet/prt/portal/prtroot/pcd!3aportal_content!2fother_vendors!2fspecialist!2fcom.meridium.pct.apm.businesspackagefolder!2fcom.meridium.pct.apm.iViews!2fcom.pct.meridium.APM.ShowPMNotificationID?sap-config-mode=true?System=<SAP R/3 Server Name>&TCode=IW23&GuiType=WinGui&ApplicationParameter=RIWO00-QMNUM=$Work Request Reference$
...where:
<SAP Web Application Server Name> is the name of the SAP Web Application Server.
<Port Number> is the port number of the specified SAP Web Application Server.
<SAP R/3 Server Name> is the name of the SAP R/3 Server.
Note: The preceding items are suggestions for how you might want to configure your query. At a minimum, the query must contain the ENTY_KEY and FMLY_KEY fields.
Viewing the Query Results in SAP
After you have created SAP Notifications from Recommendation records and configured a query to display the Recommendation records, you can run the query in the SAP Portal.

User Instructions
381
The following instructions assume that the Query iView has been configured to display the results of the correct query. In addition, it assumes that the query results are configured to be displayed on the APM PBNW Certification tab.
To view the query results in SAP:
1. Log on to the SAP Portal as a user with the Meridium APM PBNW User Showcase Role.
2. Click the APM PBNW Certification tab.
The query results appear. Note that if the query contains prompts whose values were not passed in to the Query iView that is displaying the query results, a dialog box will appear, where you can specify the prompt values.
Running the Work Management Interface
Creating a Task Record to Transfer to SAP
Note: To complete the following steps, you will need to use the Task datasheet that is configured for use with the SAP Interfaces. For Inspection Task records, you will need to use the Inspection Task for SAP Integration Interfaces datasheet. For Calibration Task records, you will need to use the Calibration Task for SAP Integration datasheet. These datasheets are defined on the corresponding Task family in the baseline database, but they are not set as the default datasheets.
Note that you can create an SAP Order from a Task record only if all of the following conditions are true:
• The Work Order Number field in the Task record is empty.
• The Task record was not created automatically from SAP data.
• The SAP Interfaces - Work Management license is active.
• When completing the instructions, you select an SAP Task List that contains an Operation, which will cause the Operation Number field in the Task record to be populated automatically.

Meridium APM SAP Interfaces V3.6.0.0.0
382
To create a Task record to transfer to SAP as an Order:
1. In Meridium APM, create an Inspection Task or Calibration Task record.
2. In the Task record, in the Task List cell, click the button.
The Locate Task List dialog box appears.
3. On the Search Criteria tab, type the desired search criteria. Note that if you accept the default criteria, the search results will return ALL Task Lists.
4. Click the Search button.
The Task Lists that meet the search criteria appear on the Search Results tab.
5. On the Search Results tab, select the row containing the desired Task List, and click OK.
The Task List field on the Task record is updated with the Task List group number.
6. In the Last Date cell, type or select the last date on which the task was executed.
7. In the Desired Interval cell, type the desired interval.
The value in the Next Date field is updated automatically based on the Last Date and the Desired Interval.
8. In the Call Horizon text box, type the desired call horizon.
Hint: For details about call horizons, see the SAP Help, which is located at http://help.sap.com/.
9. Save the Task record.
After the Task record is saved, in the Meridium APM Schedule Manager, you will need to create a scheduled item using the .DLL file that Meridium APM delivers for the purpose of creating Orders in SAP.

User Instructions
383
Transferring SAP Data to Meridium APM Task Records
If an SAP Maintenance Plan has a Task List that has an Operation that meets the criteria defined in the /MIAPM/TASK_CNF table, when you run the /MIAPM/WORK_MANAGEMENT_INF report in SAP, a Task record will be created in Meridium APM. Using the baseline configuration, if the control key for the Operation is ZMI1, an Inspection Task record will be created. Likewise, if the control key for the Operation is ZMI2, a Calibration Task record will be created.
If you later modify that Maintenance Plan, Task List, or Operation and run the report again, the corresponding Task record will be updated automatically in Meridium APM. Likewise, if you add an Order to the Maintenance Plan, the corresponding Task record will also be updated automatically in Meridium APM.
Note: Meridium APM supports integration with Single Cycle Maintenance Plans only.
The following instructions will work correctly only if the SAP Interfaces - Work Management license is active.
To transfer SAP data to Meridium APM Task records:
1. In SAP, save a Maintenance Plan that has a Task List containing an Operation with the control key ZMI1 or ZMI2.
2. Run the following transaction: /n/MIAPM/MIPRO
The Display IMG screen appears.
3. In the tree, expand Execute Reports for Data Extraction, and then expand Execute Reports for Data Extraction.
4. In the Work Management Report row, click the button.

Meridium APM SAP Interfaces V3.6.0.0.0
384
The Work Management Synchronization with Meridium screen appears.
5. In the Maintenance plan text box and the to text beside it, type the IDs that define the range of Maintenance Plans whose data you want to extract to create Task records. To specify multiple Maintenance Plans,
you can use the button to access the Multiple Selection for Maintenance Plan window.
6. In the Work Management Create Date text box and the to text box beside it, type or select dates that define a range of creation dates of the items whose data you want to extract to create Task records. For example, if you want to create Task records from Maintenance Plans, Maintenance Items, Task Lists, or Operations that were created on or after January 1, 1990 and on or before January 1, 2008, you would specify the dates as shown in the following image.
Note: To indicate today's date in either text box, you can leave the text box blank.
7. In the Work Management Change Date text box and the to text box beside it, type or select dates that define a range of modification dates of the items whose data you want to extract to create Task records. For example, if you want to create Task records from Maintenance Plans, Maintenance Items, Task Lists, or Operations that were updated on or after January 1, 1990 and on or before January 1, 2008, you would specify the dates as shown in the following image.

User Instructions
385
Note: To indicate today's date in either text box, you can leave the text box blank.
8. In the Maintenance plant text box, type the ID of the Maintenance Plant that is associated with the Maintenance Plan whose data you want to
extract. To specify multiple Maintenance Plants, you can use the button to access the Multiple Selection for Maintenance Plant window.
When you run the report, the ABAP code will look at the /MIAPM/PARAMS table to determine the Meridium APM system to and from which to send data for this Maintenance Plant. To see an example, click here.
Example
Suppose that two rows exist in the /MIAPM/PARAMS table, and they contain the entries that are shown in the following tables:
Row 1
APM Data Source Data Source A
APM App Server App Server A
Plant Plant 1000
Row 2
APM Data Source Data Source B
APM App Server App Server B
Plant Plant 2000
If you run the Work Management Interface and select Plant 1000 and Plant 2000, when the items are extracted...

Meridium APM SAP Interfaces V3.6.0.0.0
386
• The items for Plant 1000 will be extracted to Data Source A, which is connected to Application Server A.
• The items for Plant 2000 will be extracted to Data Source B, which is connected to Application Server B.
9. If you want to define advanced extraction criteria, click the Advanced
Options button.
The Advanced Options section appears below the Advanced Options button.
10. Click here for details on defining advanced extraction criteria.
a. To change the level of detail that the SLG1 log will contain, in the Trace Level list, select one of the following values:
• Summary and Errors: Causes the log to show basic information about the extraction process, such as the selection criteria that was used in the process. If this option is selected, no success, informational, or warning messages will be recorded in the log. Instead, only error messages will be recorded in the log. The log will, however, display the total number of records that were extracted successfully.
• Summary Only: Causes the log to show basic information about the extraction process, such as the selection criteria that was used in the process. If this option is selected, no success, informational, warning, or error messages will be recorded in the log. The log will, however, display the total number of records that were extracted successfully.
Note that the default value in the Trace Level list is Summary, Errors, and Success, which causes the log to show basic information about the extraction process, such as the selection criteria that was used in the

User Instructions
387
process, all message types, and the total number of records that were extracted successfully.
2. To simulate an extraction process without actually extracting the records to Meridium APM, select the Simulation Mode check box.
The following additional items become enabled:
• Maximum No. of Objects text box: Identifies the maximum number of records for which the extraction process should be simulated. This value works together with the values in the Selection Parameters section. For example, if you specified a creation date range of 01/01/1900 through 01/01/2008 but you type 20 in the Maximum No. Of Objects text box, the system will simulate the extraction process for only the first twenty Equipment items that were created within the specified date range.
• APM Data Source list: Identifies the Meridium APM data source to which you want to simulate the extraction process.
Note: You should modify the advanced option settings only if you have significant experience with SAP. Novice and occasional users should not modify the advanced option settings.
11. Click the button.
For every Operation that meets the date range criteria the task configuration criteria and is associated with the selected Maintenance Plans and Maintenance Plants, an Inspection Task or Calibration Task record is created or updated in Meridium APM.
Note the following:
The Task ID field is populated with the Operation Description from the SAP Operation.
By default, the Task records will not be modifiable. If desired, you can select the Modifiable check box and modify the Task record as needed.

Meridium APM SAP Interfaces V3.6.0.0.0
388
The interval and unit of measure values in the Task record will be derived based on the cycle information and unit of measure in the SAP Maintenance Plan and the configuration of the /MIAPM/TASK_CNF table. For example, suppose the /MIAPM/TASK_CNF table indicates that Inspection Task records that are created from SAP should contain a unit of measure of MON. If a Maintenance Plan has a cycle of 60 Days, the Inspection Task record will contain an interval of 2 months.
The Last Date and Next Date fields are not populated automatically.
Creating an Event Record
Note: The following instructions work correctly only if the SAP Interfaces - Work Management license is active.
To create an Event record:
1. Using the process defined by the module, create an Inspection record or Calibration Event record. As you proceed through the Event Builder on the Task(s) Selection screen, select the appropriate Task record(s). This could be:
• A Task record that was generated from SAP.
-or-
• A Task record that you created manually to generate an SAP Order automatically.
2. In the Event record, in the Actual Work Time text box, type the time (in hours) that you spent completing the work.
3. If the Event record is an Inspection record, select a value in the Commencement Date field and the Completion Date field. Make sure that the Completion Date is a date after the Commencement Date.
4. If the Event record is a Calibration Event record, select the Calibration Close check box.
-or-

User Instructions
389
If the Event record is an Inspection record, select the Inspection Task Complete check box.
2. Save the Event record.
The following things occur:
• A Confirmation record is created and linked to the Event record and the Task records to which it is linked. The number of Confirmation records created equals the number of Task records that are linked to the Event record. In addition, a Confirmation is created in SAP for each Confirmation record that is created in Meridium APM.
If only one Confirmation record is created, the Actual Work Time in the Confirmation record matches the Actual Work Time in the Event record. If more than one Confirmation record is created, the Actual Work Time in the Event record is split evenly between those Confirmation records.
For example, if an Event record is linked to two Task records, two Confirmation records will be created. If the Actual Work Time in the Event record is 14, the Actual Work Time in each Confirmation record will be 7 (14/2).
• The Work Order Number field in the Task records that are linked to the Event record is cleared.
• The Confirmation that is created in SAP is marked as final.
Updating an SAP Confirmation by Updating a Confirmation Record
Note: The following instructions work correctly only if the SAP Interfaces - Work Management license is active.
To update an SAP Confirmation by updating the Actual Work Time in a Confirmation record:
1. Open the Confirmation record that you want to modify.

Meridium APM SAP Interfaces V3.6.0.0.0
390
2. Modify the value in the Actual Work Time record, and save the record when you are finished making changes.
The associated SAP Confirmation is cancelled in SAP, and a new SAP Confirmation is created. The counter in the new SAP Confirmation is one digit higher than the counter in the cancelled SAP Confirmation.
In addition, the Actual Work Time field in the Inspection record or Calibration Event record to which this Confirmation record is linked is updated automatically to reflect the updated value in the Confirmation record. If this is the only Confirmation record that is linked to the Inspection or Calibration Event record, the Actual Work Time in the Inspection or Calibration Event record will match the value in the Confirmation record.
If more than one Confirmation record is linked to the Inspection or Calibration Event record, however, the Actual Work Time in the Event record is updated to be the sum of the values in the Actual Work Time field in all of those Confirmation records.
For example, if an Event record is linked to this Confirmation record and two other Confirmation records, where the final values in the Actual Work Time fields are 7, 6, and 5, the Event record will contain the value 18 (7 + 6 + 5) in the Actual Work Time field.
Validating SAP Confirmations Against Meridium APM Confirmation Records
After you have created SAP Confirmations from Meridium APM Confirmation records, you can validate the information in the SAP Confirmations against the information in the Meridium APM Confirmation records.
To validate SAP Confirmations against Meridium APM Confirmation records:
1. In SAP, run the following transaction: IW43
The Display PM Order Confirmation: Initial Screen appears.
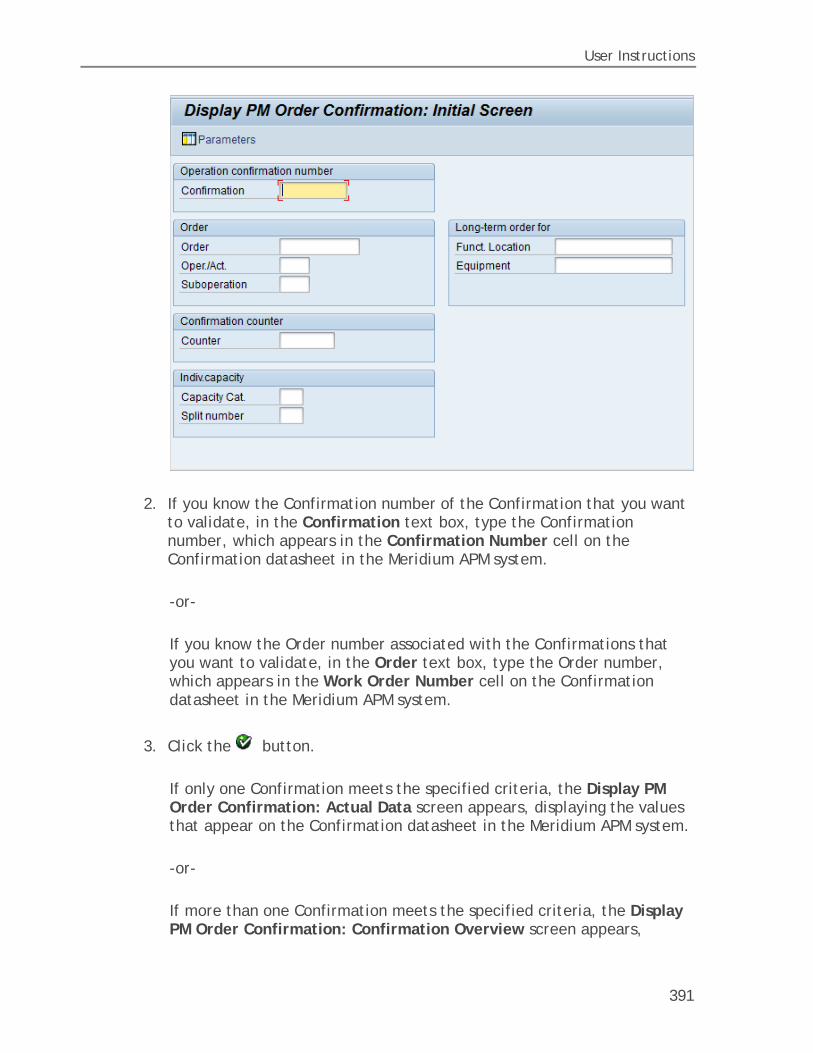
User Instructions
391
2. If you know the Confirmation number of the Confirmation that you want to validate, in the Confirmation text box, type the Confirmation number, which appears in the Confirmation Number cell on the Confirmation datasheet in the Meridium APM system.
-or-
If you know the Order number associated with the Confirmations that you want to validate, in the Order text box, type the Order number, which appears in the Work Order Number cell on the Confirmation datasheet in the Meridium APM system.
3. Click the button.
If only one Confirmation meets the specified criteria, the Display PM Order Confirmation: Actual Data screen appears, displaying the values that appear on the Confirmation datasheet in the Meridium APM system.
-or-
If more than one Confirmation meets the specified criteria, the Display PM Order Confirmation: Confirmation Overview screen appears,

Meridium APM SAP Interfaces V3.6.0.0.0
392
displaying a list of the Confirmations that meet the specified criteria. In the list, you can see the values that appear on the Confirmation datasheet in the Meridium APM system.
Running an Interface in Simulation Mode
About Running an Interface in Simulation Mode
In some cases, you might want to see what would happen if you were to run an interface before you actually run it. Doing so allows you to confirm that the field mappings are configured as desired and that the results are what you would expect based upon your knowledge of your SAP data. To do so, you will need to run the interface in simulation mode. You can run any of the interfaces that are initiated from SAP in simulation mode.
The steps that you will need to use to run the simulation differ depending upon whether you are:
• Simulating the results for 1,000 items or less.
-or-
• Simulating the results for more than 1,000 items.
Simulating Results for 1,000 Items or Less
The following instructions assume that you want to run a simulation for 1,000 items or less. If you want to run a simulation for more than 1,000 items, you will need to use a different set of instructions.
To simulate an extraction process for 1,000 items or less:
1. For the desired extraction interface, access the screen that allows you to define extraction criteria (i.e., using transaction SE38).
2. In the Selection Parameters section, define the desired selection criteria.

User Instructions
393
3. Click the Advanced Options button.
The Advanced Options section appears.
4. Select the Simulation Mode check box.
The following additional items become enabled:
• Maximum No. of Objects text box: Identifies the maximum number of records for which the extraction process should be simulated. This value works together with the values in the Selection Parameters section. For example, if you specified a creation date range of 01/01/1900 through 01/01/2008 but you type 20 in the Maximum No. Of Objects text box, the system will simulate the extraction process for only the first twenty Equipment items that were created within the specified date range.
Hint: If you type 0 (zero), ALL records that meet the filtering criteria will be simulated.
• APM Data Source list: Identifies the Meridium APM data source for which you want to simulate the extraction process.
5. In the Maximum No. of Objects text box, type the number of records for which you want to simulate the extraction process. You should type a value less than 1,000. While the user interface does not enforce this limitation, if you type a value greater than 1,000, only the first 1,000 items will be included in the simulation.
6. In the APM Data Source list, select the Meridium APM data source for which you want to simulate the extraction process.

Meridium APM SAP Interfaces V3.6.0.0.0
394
7. Click the button.
The simulation process runs, and when it is finished running, the Simulation Results screen appears.
Note: If you try to simulate an extraction process when the corresponding license is not active, a message will appear, and you will be unable to complete the process.
Each row in the grid represents one item (e.g., Equipment) whose extraction process was simulated. In each row, you can see the SAP field values that would be mapped to the Meridium APM system if you were to actually extract these items. Above the grid, you can see the total number of records whose extraction process was simulated and the Maintenance Plants that are associated with the items whose extraction process was simulated.
Simulating Results for More than 1,000 Items
The following instructions assume that you want to run a simulation for more than 1,000 items. If you want to run a simulation for 1,000 items or less, you will need to use a different set of instructions.
To simulate an extraction process for more than 1,000 items:
1. For the desired extraction interface, access the screen that allows you to define extraction criteria (i.e., using transaction SE38).

User Instructions
395
2. In the Selection Parameters section, define the desired selection criteria.
3. Click the Advanced Options button.
The Advanced Options section appears.
4. Select the Simulation Mode check box.
The following additional items become enabled:
• Maximum No. of Objects text box: Identifies the maximum number of records for which the extraction process should be simulated. This value works together with the values in the Selection Parameters section. For example, if you specified a creation date range of 01/01/1900 through 01/01/2008 but you type 20 in the Maximum No. Of Objects text box, the system will simulate the extraction process for only the first twenty Equipment items that were created within the specified date range.
Hint: If you type 0 (zero), ALL records that meet the filtering criteria will be simulated.
• APM Data Source list: Identifies the Meridium APM data source for which you want to simulate the extraction process.
5. In the Maximum No. of Objects text box, type the number of records for which you want to simulate the extraction process.
6. In the APM Data Source list, select the Meridium APM data source for which you want to simulate the extraction process.
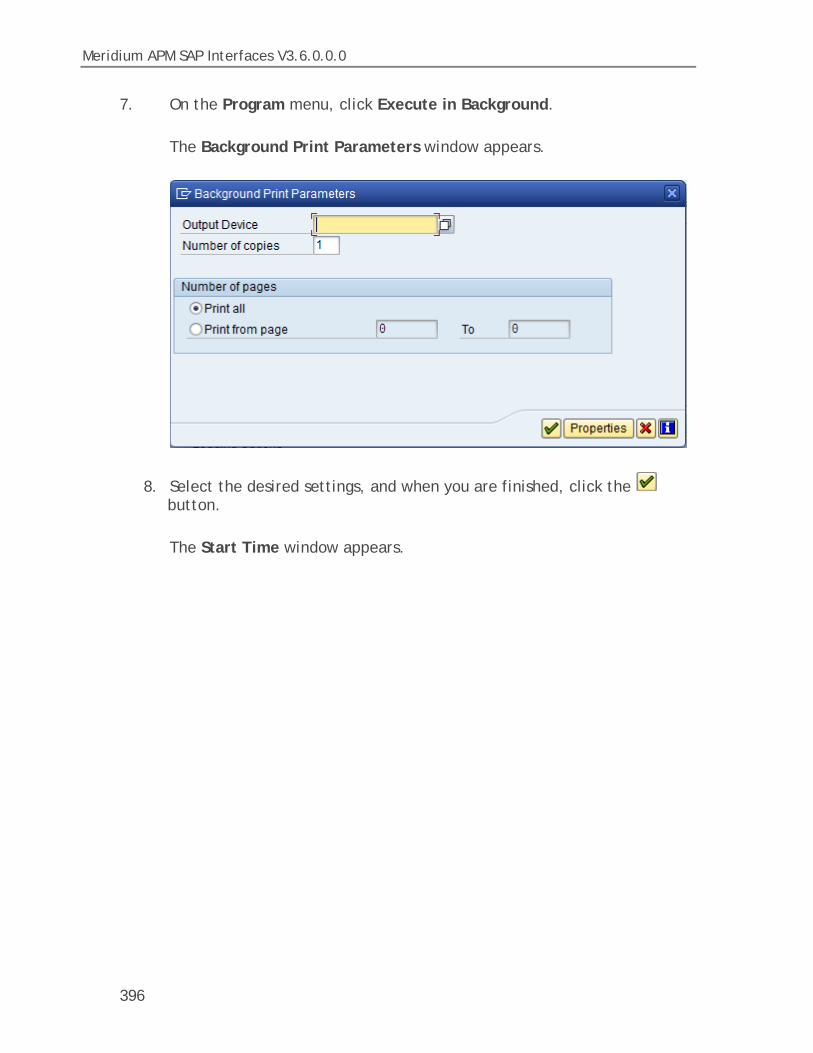
Meridium APM SAP Interfaces V3.6.0.0.0
396
7. On the Program menu, click Execute in Background.
The Background Print Parameters window appears.
8. Select the desired settings, and when you are finished, click the button.
The Start Time window appears.

User Instructions
397
At the top of the window, you will see buttons indicating options for starting the simulation process. These instructions assume that you want to start the simulation process immediately.
9. Click the Immediate button.
10. Click the button.
The simulation process runs.
Note: If you try to simulate an extraction process when the corresponding license is not active, a message will appear, and you will be unable to complete the process.
11. Run the following transaction: /n
The SAP Easy Access screen appears.

Meridium APM SAP Interfaces V3.6.0.0.0
398
12. Run the following transaction: SM37
The Simple Job Selection screen appears.
13. In the available fields, specify the criteria that will cause the system to display the results of the report whose status you want to view.
14. In the Job Status section, select the Sched. check box.
15. Click the Execute button.
The Job Overview screen appears, displaying the background jobs that meet the specified criteria.

User Instructions
399
In each row, you can see the background jobs that meet the specified criteria. You can use the Status column to determine the status of the execution process. For example, processes that have been completed will show the status Complete.
16. In the row representing the interface that you just ran in simulation mode, to the left of the job name, select the check box.
17. Click the button.
The Output Controller: List of Spool Results screen appears.
18. In the row representing the simulation whose results you want to view, in the Type cell, click the button.
The Graphical display of spool request <n> in system <SYSID> screen appears, where <n> is a number identifying the request and <SYSID> is the System id of the SAP system.

Meridium APM SAP Interfaces V3.6.0.0.0
400
Each row on the screen represents one item (e.g., Equipment) whose extraction process was simulated. In each row, you can see the SAP field values that would be mapped to the Meridium APM system if you were to actually extract these items. At the top of the screen, you can see the total number of records whose extraction process was simulated and the Maintenance Plants that are associated with the items whose extraction process was simulated.

401
Reference Information
SAP Interfaces Catalog Folder Structure
The queries listed in the following table are provided in the Catalog folder \\Public\Meridium\Modules\SAP Integration Interfaces\Queries. In this table, the values listed in the Query column refer to the query names. The baseline query captions are the same as the query names.
Query Behavior and Usage
Get ABC Indicator for Functional Location
Returns the ABC Indicator value (stored in the Criticality Indicator field) in the Functional Location record that is identified by the value supplied for the Functional Location Key prompt. This query is used when you update criticality indicator values in SAP via the Asset Criticality Analysis (ACA) module.
Get ABC Indicator for Equipment Returns the ABC Indicator value (stored in the Criticality Indicator field) in the Equipment record that is identified by the value supplied for the Equipment Key prompt. This query is used when you update criticality indicator values in SAP via the Asset Criticality Analysis (ACA) module.
Get Equipment for SAP ID Returns the Equipment record that: • Contains the ID corresponding to
the value supplied for the SAP Equipment ID prompt.
- and - • Is linked to the SAP System
record identified by the value supplied for the SAP System prompt.
In the baseline Meridium APM database, the query returns records in the Equipment family.

Meridium APM SAP Interfaces V3.6.0.0.0
402
Query Behavior and Usage
Get Functional Location for SAP ID Returns the Functional Location record that:
• Contains the ID corresponding to the value supplied for the SAP Functional Location ID prompt.
- and - • Is linked to the SAP System
record identified by the value supplied for the SAP System prompt.
In the baseline Meridium APM database, the query returns records in the Functional Location family.
Get Long Text for Notification Transfers values from an RBI Recommendation record to the Description field in a Notification record that is created from that RBI Recommendation record. The Notification record is then used to generate a Notification in SAP.
Get SAP ID for Equipment Returns the value in the Equipment ID field in the record with the provided Entity Key. In the baseline Meridium APM database, this query returns records in the Equipment family.
Get SAP ID for Functional Location Returns the value in the Functional Location field in the record with the provided Entity Key. In the baseline Meridium APM database, this query returns records in the Functional Location family.
Get Site Reference for Equipment Returns the name of the source SAP system in the CMMS System field in an Equipment record. The SAP system name uses the format <SYSID>-<CLIENT>, where <SYSID> is the System ID of the SAP system and <Client> is the Client number.

Reference Information
403
Query Behavior and Usage
Get Site Reference for Functional Location
Returns the name of the source SAP system in the CMMS System field in a Functional Location record. The SAP system name uses the format <SYSID>-<CLIENT>, where <SYSID> is the System ID of the SAP system and <Client> is the Client number.
Get Tasks for Work Order Generation Determines which Task records to use to create Orders in SAP.
Associated Pages
SAP System Associated Pages
The following Associated Page is configured by default for the SAP System family. This link is available only when ONE SAP System record is selected (e.g., on the shortcut menu in search results).
• meridium://REGISTRY/MACROS?project=Public\Rules Library\Meridium\SAPInterfaces\IntegrationInterfaces¯o=TestConnection&p0=[ENTY_KEY]
Tests the connection information that is stored in the Connection String field in the SAP System record.
CMMS Classification Associated Pages
The following Associated Page is configured by default for the CMMS Classification family.
• meridium://REGISTRY/MACROS?project=Public\Rules Library\Meridium\SAPInterfaces\IntegrationInterfaces¯o=SynchronizeClassificationKeyMacro&p0=[ENTY_KEY]
Refreshes the Meridium APM system to reflect the current characteristics that exist in the SAP system for the classification represented by the CMMS Classification record.

Meridium APM SAP Interfaces V3.6.0.0.0
404
CMMS Classification Type Associated Pages
The following Associated Page is configured by default for the CMMS Classification Type family.
• meridium://REGISTRY/MACROS?project=Public\Rules Library\Meridium\SAPInterfaces\IntegrationInterfaces¯o=SynchronizeClassificationTypeKeyMacro&p0=[ENTY_KEY]
Refreshes the Meridium APM system to reflect the current classifications that exist in the SAP system for the classification type represented by the CMMS Classification Type record.
Family Field Descriptions
CMMS Classification Type
The following table provides an alphabetical list and description of the fields that exist for the CMMS Classification Type family. The information in the table reflects the baseline state and behavior of these fields.
Field Data Type Description Behavior and Usage
Classification Type
Character The item whose characteristics will be extracted.
On the datasheet, this field displays a list, from which you can select one of the following values:
• Equipment • Functional Location
This field is required.
Classification Type Code
Character A value that is used internally by the Meridium APM system.
This value is set automatically. This field is not available on the baseline datasheets.
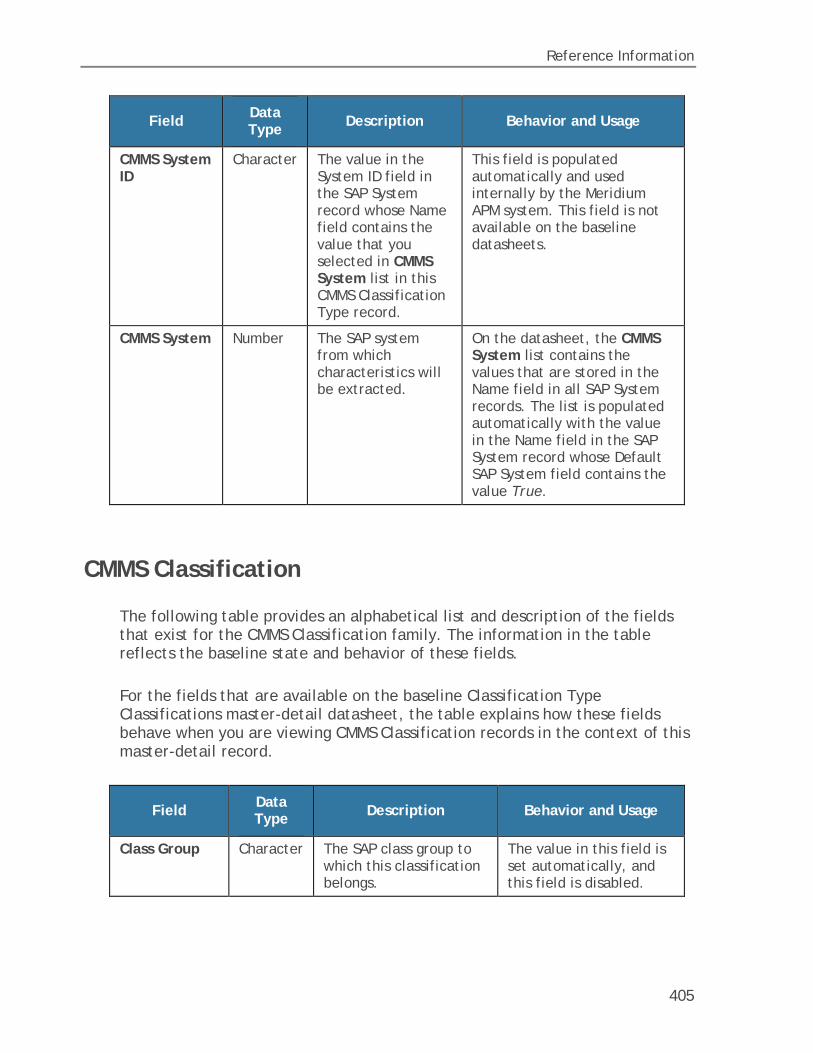
Reference Information
405
Field Data Type Description Behavior and Usage
CMMS System ID
Character The value in the System ID field in the SAP System record whose Name field contains the value that you selected in CMMS System list in this CMMS Classification Type record.
This field is populated automatically and used internally by the Meridium APM system. This field is not available on the baseline datasheets.
CMMS System Number The SAP system from which characteristics will be extracted.
On the datasheet, the CMMS System list contains the values that are stored in the Name field in all SAP System records. The list is populated automatically with the value in the Name field in the SAP System record whose Default SAP System field contains the value True.
CMMS Classification
The following table provides an alphabetical list and description of the fields that exist for the CMMS Classification family. The information in the table reflects the baseline state and behavior of these fields.
For the fields that are available on the baseline Classification Type Classifications master-detail datasheet, the table explains how these fields behave when you are viewing CMMS Classification records in the context of this master-detail record.
Field Data Type Description Behavior and Usage
Class Group Character The SAP class group to which this classification belongs.
The value in this field is set automatically, and this field is disabled.

Meridium APM SAP Interfaces V3.6.0.0.0
406
Field Data Type Description Behavior and Usage
Classification Character The ID of the classification (as it is defined in the SAP system).
On the datasheet, the value in this field is formatted as a hyperlink, which you can click to see all of the characteristics that belong to this classification. This field is disabled.
Classification Description
Character The description of the classification (as it is defined in the SAP system).
This field is disabled.
CMMS System Number This value is used internally by the Meridium APM system.
This field is not available on the baseline datasheets.
CMMS System ID
Character The value in the System ID field in the SAP System record whose Name field contains the value that is stored in the CMMS System field in this record.
This field is populated automatically and used internally by the Meridium APM system. This field is not available on the baseline datasheets.
Internal Classification Number
Character This value is used internally by the Meridium APM system.
The value in this field is set automatically, and this field is disabled.
Extract From CMMS System
Logical A value that identifies whether or not characteristics for this classification will be extracted from the SAP system.
On the datasheet, you can select this check box if you want to extract characteristics belonging to this classification.
CMMS Characteristic
The following table provides an alphabetical list and description of the fields that exist for the CMMS Characteristic family. The information in the table reflects the baseline state and behavior of these fields.
For the fields that are available on the baseline Classification Characteristics master-detail datasheet, the table explains how these fields behave when you

Reference Information
407
are viewing CMMS Characteristic records in the context of their master-detail record.
Field Data Type Description Behavior and Usage
Class Group Character The SAP class group to which this characteristic belongs.
The value in this field is set automatically, and this field is disabled.
Characteristic Name
Character The ID of the characteristic (as it is defined in the SAP system).
On the datasheet, the value in this field is formatted as a hyperlink, which you can click to open the CMMS Characteristic by itself, outside of the context of its master CMMS Classification record. This field is disabled.
Characteristic Description
Character The description of the characteristic (as it is defined in the SAP system).
This field is disabled.
Classification Character The classification to which this characteristic belongs.
On the datasheet, the value in this field is formatted as a hyperlink, which you can click to open the CMMS Classification record representing the classification to which this characteristic belongs. This field is disabled.
CMMS System ID
Character The ID of the SAP System from which this characteristic will be extracted.
This field is populated automatically and used internally by the Meridium APM system. This field is not available on the baseline datasheets.
Internal Classification Number
Character This value is used internally by the Meridium APM system.
The value in this field is set automatically, and this field is disabled.

Meridium APM SAP Interfaces V3.6.0.0.0
408
Field Data Type Description Behavior and Usage
Extract From CMMS System
Logical A value that identifies whether or not this characteristic will be extracted.
On the datasheet, you can select this check box if you want to extract this characteristic.
SAP System
The following table provides an alphabetical list and description of the fields that exist for the SAP System family and are available on the baseline SAP System datasheet (unless otherwise noted). The information in the table reflects the baseline state and behavior of these fields.
Field Data Type Description Behavior and Usage
Connection String
Character The connection information for the SAP system.
In new SAP System records, you will need to delete all angle brackets and:
• Replace the text SAP_SERVER_IP with the IP address of the SAP Server.
• Replace the text SAP_SYSTEM_NUMBER with the SAP System number.
• Replace the text SAP_CLIENT_NUMBER with the SAP Client number.
Connection Type
Character The type of connection that will be used to connect to the SAP system.
The default value is RFC. This field is not available on the baseline datasheet.
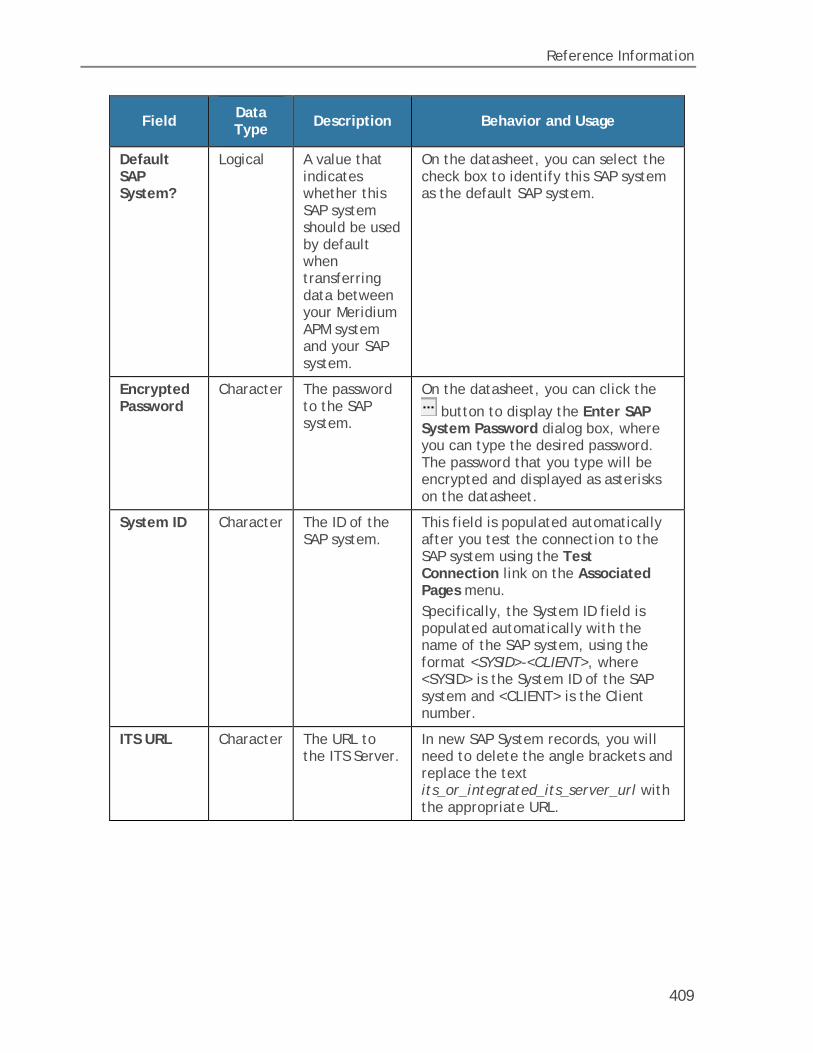
Reference Information
409
Field Data Type Description Behavior and Usage
Default SAP System?
Logical A value that indicates whether this SAP system should be used by default when transferring data between your Meridium APM system and your SAP system.
On the datasheet, you can select the check box to identify this SAP system as the default SAP system.
Encrypted Password
Character The password to the SAP system.
On the datasheet, you can click the
button to display the Enter SAP System Password dialog box, where you can type the desired password. The password that you type will be encrypted and displayed as asterisks on the datasheet.
System ID Character The ID of the SAP system.
This field is populated automatically after you test the connection to the SAP system using the Test Connection link on the Associated Pages menu. Specifically, the System ID field is populated automatically with the name of the SAP system, using the format <SYSID>-<CLIENT>, where <SYSID> is the System ID of the SAP system and <CLIENT> is the Client number.
ITS URL Character The URL to the ITS Server.
In new SAP System records, you will need to delete the angle brackets and replace the text its_or_integrated_its_server_url with the appropriate URL.

Meridium APM SAP Interfaces V3.6.0.0.0
410
Field Data Type Description Behavior and Usage
Name Character The name of the SAP system.
You can type any name, but we recommend that you use the format <SYSID>-<CLIENT>, where <SYSID> is the System ID of the SAP system and <CLIENT> is the Client number. By doing so, the value in the Name field will match the value that will be populated automatically in the System ID field.
User ID Character The User ID of a user that can log into the SAP system.
None.
Technical Characteristic
The following table provides an alphabetical list and description of the fields that exist for the Technical Characteristics family and are available on the Technical Characteristic datasheet. Other fields are defined for the family but are not available on the datasheet and store data that is used internally by the Meridium APM system during the extraction process. The information in the table reflects the baseline state and behavior of these fields.
Field Data Type Description Behavior and Usage
Name Character The name of the characteristic.
None
Value Character The value assigned to the characteristic.
If multiple values are assigned to a characteristic in SAP, all of those values will be displays in the Value field, separated by a comma, as shown in the following image.

Reference Information
411
Navigating SAP
Using the SAP System to View a List of Meridium-Specific Steps
To use the SAP system to view a list of steps that can be performed in SAP:
• On the SAP system, run the following transaction: /n/MIAPM/MIPRO
The Display IMG screen appears.
You can expand the tree to see a list of steps that you can perform in SAP. When you see the button, you can click it to access the screen you can use for completing that step.
SAP Transactions - Quick Reference
The following table provides a list of SAP transactions and their functions.
Note: The Meridium APM documentation assumes that you will perform Meridium-specific steps in SAP via the /n/MIAPM/MIPRO transaction. The direct transactions for these steps are included in the following table only for users who prefer to use them.
This transaction: ...Lets you:
/n/MIAPM/MIPRO View a list of Meridium-specific steps that can be performed in SAP.
/n/MIAPM/MANAGE_PARAMS Access and manage the /MIAPM/PARAMS table.
/n/MIAPM/MANAGE_FIELDS View baseline field mappings and configure custom field mappings.

Meridium APM SAP Interfaces V3.6.0.0.0
412
This transaction: ...Lets you:
/n/MIAPM/MANAGE_PI_CNF Access and manage the /MIAPM/PI_PARAMS table, where you can specify your PI Server (e.g., name and port number).
/n/MIAPM/MANAGE_TSKCNF Access the /MIAPM/TASK_CNF table.
/n/MIAPM/SLG1 Access the Analyze Application Log screen.
/n/MIAPM/EXCEPTIONS Access the /MIAPM/EXCEPTIONS table.
/n/MIAPM/VIEW_HISTORY Access the /MIAPM/CTRL_LOG table.
/n/MIAPM/DOC_FLOC Run the Functional Location Extraction Interface.
/n/MIAPM/DOC_FCHAR Run the Functional Location Characteristics Extraction Interface.
/n/MIAPM/DOC_EQUI Run the Equipment Extraction Interface.
/n/MIAPM/DOC_ECHAR Run the Equipment Characteristics Extraction Interface.
/n/MIAPM/DOC_NOTI_WO Run the Notification and Order Extraction Interface for Notifications with Orders.
/n/MIAPM/DOC_WO Run the Notification and Order Extraction Interface for Orders without Notifications.
/n/MIAPM/DOC_WHD Run the Notification and Order Extraction Interface for Orders that are associated with Notifications with items.
/n/MIAPM/DOC_NOTI Run the Notification and Order Extraction Interface for Notifications without Orders.
/n/MIAPM/DOC_WMGMT Transfer SAP data to Meridium APM Task records.
SM37 Check the status of a background process.
SM36 Schedule one or more interfaces to be run automatically.
SM59 Create an RFC destination.
IW43 Validate SAP Confirmations against that data in Meridium APM Confirmation records.

Reference Information
413
Values Mapped Between SAP and Meridium
SAP --> Meridium APM
SAP Values Mapped to Functional Location Records
The following table explains the SAP fields that are used to populate the baseline Functional Location fields when you extract SAP Functional Locations to create Functional Location records in Meridium APM.
Meridium APM Field Caption
SAP Table
SAP Field ID
Functional Location
IFLOT None. This value is retrieved using the SAP Conversion Exit CONVERSION_EXIT_TPLNR_OUTPUT.
Functional Location Internal ID
IFLOT TPLNR
Functional Location Description
IFLOTX PLTXT
Superior Function Location
IFLOT TPLMA
Business Area ILOA GSBER
Business Area Description
TGSBT GTEXT
Catalog Profile IFLOT RBNR
Catalog Profile Description
T352B_T RBNRX
Category IFLOT FLTYP
Category Description
T370F_T TYPTX
CMMS Creation Date
IFLOT ERDAT

Meridium APM SAP Interfaces V3.6.0.0.0
414
Meridium APM Field Caption
SAP Table
SAP Field ID
CMMS Last Changed Date
IFLOT AEDAT
CMMS System None <SY-SID> + <SY-MANDT>
CO Area ILOA KOKRS
CO Area Description
TKA01 BEZEI
Company Code ILOA BUKRS
Company Code Description
T001 BUTXT
Construction Type
IFLOT SUBMT
Construction Type Description
MAKT MAKTX
Cost Center ILOA KOSTL
Cost Center Description
CSKT KTEXT
Criticality Indicator
ILOA ABCKZ
Criticality Indicator Description
T370C_T ABCTX
Installation Allowed
IFLOT IEQUI
Location ILOA STORT
Location Description
T499S KTEXT
Maintenance Plant
ILOA SWERK
Maintenance Plant Description
T001W NAME1
Object Type IFLO EQART
Object Type Description
T370K_T EARTX

Reference Information
415
Meridium APM Field Caption
SAP Table
SAP Field ID
Planning Plant IFLOT IWERK
Planning Plant Description
T001W NAME1
Planner Group IFLOT INGRP
Planner Group Description
T024I INNAM
Plant Section ILOA BEBER
Plant Section Description
T357 FING
Room ILOA MSGRP
SAP Class KLAH CLASS Note:
• If a Functional Location has a standard classification, that classification is mapped to Meridium APM.
• If a Functional Location has no standard classification and only one other classification, that classification is mapped to Meridium APM.
• If a Functional Location has no standard classification and more than one other classification, NO classification is mapped to Meridium APM.
SAP Class Description
SWOR KSCHL Note:
• If a Functional Location has a standard classification, that classification is mapped to Meridium APM.
• If a Functional Location has no standard classification and only one other classification, that classification is mapped to Meridium APM.
• If a Functional Location has no standard classification and more than one other classification, NO classification is mapped to Meridium APM.
Sort Field ILOA EQFNR

Meridium APM SAP Interfaces V3.6.0.0.0
416
Meridium APM Field Caption
SAP Table
SAP Field ID
Structure Indicator
IFLOT TPLKZ
System Status TJ02T TXT04
Work Center CRHD ARBPL
Work Center Description
CRTX KTEXT
SAP Values Mapped to Equipment Records
The following table explains the SAP fields that are used to populate the baseline Equipment fields when you extract SAP Equipment to create Equipment records in Meridium APM.
Meridium APM Field Caption
SAP Table
SAP Field ID
Catalog Profile EQUZ RBNR
Catalog Profile Description
T352B_T RBNRX
CMMS Creation Date EQUI ERDAT
CMMS Last Changed Date
EQUI AEDAT
CMMS System None <SY-SID> + <SY-MANDT>
Construction Type EQUZ SUBMT
Construction Type Description
MAKT MAKTX
Criticality Indicator ILOA ABCKZ
Criticality Indicator Description
T370C_T ABCTX
Sort Field ILOA EQFNR
Equipment ID EQUI EQUNR
Equipment Short Description
EQKT EQKTX

Reference Information
417
Meridium APM Field Caption
SAP Table
SAP Field ID
Equipment Long Description
EQUI None. This value is retrieved using an SAP BAPI.
Equipment Technical Number
EQUZ TIDNR
Equipment Vendor EQUI ELIEF
Functional Location ILOA TPLNR
Functional Location Description
IFLOTX PLTXT
Maintenance Plant ILOA SWERK
Maintenance Plant Description
T001W NAME1
Inventory Number EQUI INVNR
Main Work Center CRHD ARBPL
Main Work Center Description
CRTX KTEXT
Manufacturer EQUI HERST
Model Number EQUI TYPBZ
Object Type EQUI EQART
Object Type Description
T370K_T EARTX
Part Number EQUZ MAPAR
Planner Group EQUZ INGRP
Planner Group Description
T024I INNAM
Planning Plant EQUZ IWERK
Planning Plant Description
T001W NAME1
Plant Section ILOA BEBER
Person Responsible for Plant Section
T357 FING
Purchase Date EQUI ANSDT

Meridium APM SAP Interfaces V3.6.0.0.0
418
Meridium APM Field Caption
SAP Table
SAP Field ID
Purchase Order Number
EQBS KDAUF
SAP Category EQUI EQTYP
SAP Category Description
T370U TYPTX
SAP Class KLAH CLASS Note:
• If an Equipment has a standard classification, that classification is mapped to Meridium APM.
• If an Equipment has no standard classification and only one other classification, that classification is mapped to Meridium APM.
• If an Equipment has no standard classification and more than one other classification, no classification is mapped to Meridium APM.
SAP Class Description
SWOR KSCHL Note:
• If an Equipment has a standard classification, that classification is mapped to Meridium APM.
• If an Equipment has no standard classification and only one other classification, that classification is mapped to Meridium APM.
• If an Equipment has no standard classification and more than one other classification, no classification is mapped to Meridium APM.
SAP Last Changed Date
EQUI AEDAT
Serial Number EQUI SERGE
Size/Dimension EQUI GROES
System Status TJ02T TXT04
Technical Drawing Number
EQUI HZEIN

Reference Information
419
Meridium APM Field Caption
SAP Table
SAP Field ID
Valid From Date EQUZ DATAB
Warranty Expired Date
BGMKOBJ GWLEN
WBS Element ILOA POST1
Year Constructed EQUI BAUJJ
SAP Values Mapped to Technical Characteristic Records
The following table explains the SAP fields that are used to populate the baseline Technical Characteristic fields when you extract SAP characteristics to create Technical Characteristic records in Meridium APM.
Meridium APM Field Caption
SAP Table
SAP Field ID
Note
Character Value AUSP ATWRT None
CMMS System None <SY-SID> + <SY-MANDT>
None
Currency Value AUSP ATFOR None
Data Type CABN ATFOR None
Description CABNT ATBEZ None
Equipment ID EQUI EQUNR A value is mapped to this field only if the Technical Characteristic record is linked to an Equipment record.
ID CABN ATINN None
Interval Value AUSP ATFLB, ATFLV
None
Functional Location
ILOA TPLNR A value is mapped to this field only if the Technical Characteristic record is linked to a Functional Location record.

Meridium APM SAP Interfaces V3.6.0.0.0
420
Meridium APM Field Caption
SAP Table
SAP Field ID
Note
Functional Location Internal ID
KSSK OBJEK A value is mapped to this field only if the Technical Characteristic record is linked to a Functional Location record.
Multi Value Characteristic
AUSP ATWRT None
Name CABN ATNAM None
Number of Characters
CABN ANZST None
Number of Decimal Places
CABN ANZDZ None
Numeric Value AUSP ATFLV None
Unit of Measure T006A MSEH6 None
SAP Values Mapped to Work History Records
The following tables explain the SAP fields that are used to populate the baseline Work History fields when you extract Orders and Notifications from SAP. The tables are divided into sections, depending on the source of the Work History records. Keep in mind that Work History records can be created from:
• Orders with Notifications
• Notifications without associated Orders
• Orders without associated Notifications
Values Mapped to Records that were Created from Orders with Notifications
Meridium APM Field Caption SAP Table SAP Field ID
Event ID VIQMEL, VIAUFKST
QMNUM, AUFNR
Event Short Description VIQMEL QMTXT
Event Long Description QMEL, AUFK LTXT, KOPF

Reference Information
421
Meridium APM Field Caption SAP Table SAP Field ID
Request ID VIQMEL QMNUM
Request Description VIQMEL QMTXT
Request Priority VIQMEL PRIOK
Request Priority Description T356_T PRIOKX
Request Type Code VIQMEL QMART
Request Type Description TQ80_T QMARTX
Request System Status TJ02T TXT04
Request User Status TJ30T TXT04
Request Creation Date VIQMEL ERDAT, ERZEIT
Request Last Change Date VIQMEL AEDAT, AEZEIT
Location ID VIQMEL/OBJK TPLNR
Location Short Description IFLOTX PLTXT
Asset Tech ID EQUZ TIDNR
Equipment ID VIAUFKST/OBJK EQUNR
SAP Class KLAH CLASS
SAP Category EQUI EQTYP
Equipment Category Description T370U typtx
Equipment Short Description EQKT EQKTX
Equipment Class Description SWOR KSCHL
SAP Type EQUI EQART
Equipment Type Description T370K_T EARTX
Assembly VIAUFKST BAUTL
Order ID VIAUFKST AUFNR
Order Description VIAUFKST KTEXT
Order Maintenance Item VIAUFKST WAPOS
Order Creation Date VIAUFKST ERDAT, ERFZEIT

Meridium APM SAP Interfaces V3.6.0.0.0
422
Meridium APM Field Caption SAP Table SAP Field ID
Order Last Change Date VIAUFKST AEDAT, AEZEIT
Order Type Code VIAUFKST AUART
Order Type Description T003P TXT
Order Priority VIAUFKST PRIOK
Order Priority Description T356_T PRIOKX
Order System Status TJ02T TXT04
Order User Status TJ30T TXT04
Order PM Activity Type VIAUFKST ILART
Asset Activity Description T353I_T ILATX
Order System Condition VIAUFKST ANLZU
Order System Condition Description T357M_T ANLZUX
Order Maintenance Plan VIAUFKST WARPL
Order Call Number VIAUFKST ABNUM
Maintenance Cost PMCO Σ(WRT00 - WRT16)
Maintenance Cost UOM PMCO COCUR
Assembly Description MAKT MAKTX
Failure Mode Code VIQMEL QMCOD
Failure Mode Description QPCT KURZTEXT
Effect Code VIQMEL AUSWK
Effect Description T357A_T AUSWKT
Event Start Date VIQMEL QMDAT, MZEIT
Event Date Description VIQMEL QMDAT, MZEIT
Breakdown Indicator VIQMEL MSAUS
Mechanically Unavailable Date VIQMEL AUSVN, AUZTV
Mechanically Available Date VIQMEL AUSBS, AUZTB

Reference Information
423
Meridium APM Field Caption SAP Table SAP Field ID
Mechanical Down Time VIQMEL AUSZT
Maintenance Start Date VIAUFKST GSTRI, GSUZI
Maintenance Completion Date VIAUFKST GETRI, GEUZI
Estimated Labor Note: The value in the Estimated Labor field is calculated as the sum of all planned hours across ALL Operations that are associated with the Order (in the SAP user interface, this value is visible in the Work text box on the Internal tab of the Operation).
AFVV ARBEI
Actual Labor Note: The value in the Actual Labor field is calculated as the sum of all actual hours across ALL Operations that are associated with the Order (in the SAP user interface, this value is visible in the Actual work text box on the Act. Data tab of the Operation).
AFVV ISMNW
Maintenance Cost PMCO Σ(WRT00 - WRT16)
CMMS System None <SY-SID> + <SY-MANDT>
Values Mapped to Records that were Created from Notifications Without Associated Orders
Meridium APM Field Caption SAP Table SAP Field ID
Event ID VIQMEL QMNUM
Event Short Description VIQMEL QMTXT
Event Long Description QMEL LTXT
Request ID VIQMEL QMNUM
Request Description VIQMEL QMTXT

Meridium APM SAP Interfaces V3.6.0.0.0
424
Meridium APM Field Caption SAP Table SAP Field ID
Request Type Code VIQMEL QMART
Request Type Description TQ80_T QMARTX
Request Priority VIQMEL PRIOK
Request Priority Description T356_T PRIOKX
Request System Status TJ02T TXT04
Request User Status TJ30T TXT04
Request Creation Date VIQMEL ERDAT, ERZEIT
Request Last Change Date VIQMEL AEDAT, AEZEIT
Location ID VIQMEL TPLNR
Location Short Description IFLOTX PLTXT
Equipment ID VIQMEL EQUNR
Asset Tech ID EQUZ TIDNR
Equipment Short Description EQKT EQKTX
SAP Category EQUI EQTYP
Equipment Category Description T370U TYPTX
SAP Class KLAH CLASS
Equipment Class Description SWOR KSCHL
SAP Type EQUI EQART
Equipment Type Description T370K_T EARTX
Assembly VIQMEL BAUTL
Assembly Description MAKT MAKTX
Failure Mode Code VIQMEL QMCOD
Failure Mode Description QPCT KURZTEXT
Effect Code VIQMEL AUSWK
Effect Description T357A_T AUSWKT
Event Start Date VIQMEL QMDAT, MZEIT
Event Date Description VIQMEL QMDAT
Breakdown Indicator VIQMEL MSAUS
Mechanically Unavailable Date VIQMEL AUSVN, AUZTV

Reference Information
425
Meridium APM Field Caption SAP Table SAP Field ID
Mechanically Available Date VIQMEL AUSBS, AUZTB
Mechanical Down Time VIQMEL AUSZT
CMMS System None <SY-SID> + <SY-MANDT>
Values Mapped to Records that were Created from Orders Without Associated Notifications
Meridium APM Field Caption SAP Table SAP Field ID
Event ID VIAUFKST AUFNR
Event Short Description VIAUFKST KTEXT
Event Long Description AUFK KOPF
Order ID VIAUFKST AUFNR
Order Description VIAUFKST KTEXT
Order Type Code VIAUFKST AUART
Order Type Description T003P TXT
Order Priority VIAUFKST PRIOK
Order Priority Description T356_T PRIOKX
Order System Status TJ02T TXT04
Order User Status TJ30T TXT04
Order PM Activity Type VIAUFKST ILART
Asset Activity Description T3531_T ILATX
Order System Condition VIAUFKST ANLZU
Order System Condition Description T357M_T ANLZUX
Order Maintenance Plan VIAUFKST WARPL
Order Call Number VIAUFKST ABNUM
Order Maintenance Item VIAUFKST WAPOS
Event Start Date VIAUFKST GSTRI, GSUZI
Event Date Description VIQMEL QMDAT

Meridium APM SAP Interfaces V3.6.0.0.0
426
Meridium APM Field Caption SAP Table SAP Field ID
Order Creation Date VIAUFKST ERDAT, ERFZEIT
Order Last Change Date VIAUFKST AEDAT, AEZEIT
Location ID VIAUFKST/OBJK TPLNR
Location Short Description IFLOTX PLTXT
Equipment ID VIAUFKST/OBJK EQUNR
Asset Tech ID EQUZ TIDNR
Equipment Short Description EQKT EQKTX
SAP Category EQUI EQTYP
Equipment Category Description T370U TYPTX
SAP Class KLAH CLASS
Equipment Class Description SWOR KSCHL
SAP Type EQUI EQART
Equipment Type Description T370K_T EARTX
Asset Tech ID EQUZ TIDNR
Assembly VIAUFKST BAUTL
Assembly Description MAKT MAKTX
Request ID OBJK IHNUM
Maintenance Start Date VIAUFKST GSTRI, GSUZI
Maintenance Completion Date VIAUFKST GETRI, GEUZI
Estimated Labor Note: The value in the Estimated Labor field is calculated as the sum of all planned hours across ALL Operations that are associated with the Order (in the SAP user interface, this value is visible in the Work text box on the Internal tab of the Operation).
AFVV ARBEI

Reference Information
427
Meridium APM Field Caption SAP Table SAP Field ID
Actual Labor Note: The value in the Actual Labor field is calculated as the sum of all actual hours across ALL Operations that are associated with the Order (in the SAP user interface, this value is visible in the Actual work text box on the Act. Data tab of the Operation).
AFVV ISMNW
Maintenance Cost PMCO Σ(WRT00 - WRT16)
Maintenance Cost UOM PMCO COCUR
CMMS System None <SY-SID> + <SY-MANDT>
SAP Values Mapped to Work History Detail Records
The following table explains the SAP fields that are used to populate the baseline Work History Detail fields when you extract Orders and Notifications from SAP.
Note that if a Technical Object in the object list is associated with a Notification that has items, separate Work History Detail records will be created for each of those items. The Work History Detail records will be linked to the Work History record that was created using that Technical Object.
Meridium APM Field Caption SAP Table SAP Field ID
Work History Detail ID QMEL QMNUM
Work History Detail Description VIQMEL QMTXT
Work History ID VIAUFKS QMNUM
CMMS Creation Date VIAUFKS ERDAT, ERZEIT
CMMS Last Changed Date VIAUFKS AEDAT, AEZEIT
CMMS System None <SY-SID> + <SY-MANDT>
Request ID VIQMEL QMNUM
Order ID VIAUFKS AUFNR

Meridium APM SAP Interfaces V3.6.0.0.0
428
Meridium APM Field Caption SAP Table SAP Field ID
Location ID VIAUFKS, VIQMEL, OBJK
TPLNR
Equipment ID VIAUFKS, VIQMEL, OBJK
EQUNR
Equipment Category EQUI EQTYP
Equipment Category Description
T370U TYPTX
Equipment Class KLAH CLASS
Equipment Class Description SWOR KSCHL
Equipment Type EQUI EQART
Equipment Type Description T370K_T EARTX
Maintainable Item Code QMFE OTEIL
Maintainable Item Description QPCT KURZTEXT
Condition Code QMFE FECOD
Condition Description QPCT KURZTEXT
Cause Code QMUR URCOD
Cause Description QPCT KURZTEXT
Maintenance Action Code QMMA MNCOD
Maintenance Action Description QPCT KURZTEXT
Detail Narrative QMFE LTXT
SAP Values Mapped to Task Records
The following table explains the SAP fields that are used to populate the baseline Task fields when you create Task records using the SAP Interfaces module.

Reference Information
429
Meridium APM Field Caption
SAP Table SAP Field ID Notes
Task ID PLPO LTXA1, LTXA2 The Task ID is populated using the sum of the values in LTXA1 and LTXA2
None
Task Description
VIMPOS, PLKO EQNR, TPLNR The Task Description is populated using a concatenation of the values in EQUNR or TPLNR and PLPO.LTXA1 + PLPO.LTXA2
None
Maintenance Plan
MPLA WARPL None
Maintenance Item
MPOS WAPOS None
SAP Last Changed Date1
PLPO AEDAT This field is not available on any baseline Task datasheets.
SAP Creation Date1
PLPO ANDAT This field is not available on any baseline Task datasheets.
Task List Group1
PLKO PLNNR This field is not available on any baseline Task datasheets.
Task List Group Counter1
PLKO PLNAL This field is not available on any baseline Task datasheets.
Task List Type1
PLKO PLNTY This field is not available on any baseline Task datasheets.
Operation Number
PLPO VORNR None

Meridium APM SAP Interfaces V3.6.0.0.0
430
Meridium APM Field Caption
SAP Table SAP Field ID Notes
Work Order Number2
VIMPOS LAUFN The Work Order Number field is not populated if the Task record was used to create an Order in SAP.
Desired Interval3
MMPT, T006 MMPT.ZYKL1, T006.ZAEHL
The value for ZYKL1 is converted from the UOM type stored in the T006.MSEH3 field to the UOM stored in the /MIAPM/TASK_CNF table in the UOME_ID field.
Desired Interval UOM
/MIAPM/TASK_CNFG UOME_ID None
Min Interval3 MMPT, T006 MMPT.ZYKL1, T006.ZAEHL
The value for ZYKL1 is converted from the UOM type stored in the T006.MSEH3 field to the UOM stored in the /MIAPM/TASK_CNF table in the UOME_ID field.
Min Interval UOM
/MIAPM/TASK_CNFG UOME_ID None
Max Interval3 MMPT, T006 MMPT.ZYKL1, T006.ZAEHL
The value for ZYKL1 is converted from the UOM type stored in the T006.MSEH3 field to the UOM stored in the /MIAPM/TASK_CNF table in the UOME_ID field.
Max Interval UOM
/MIAPM/TASK_CNFG UOME_ID None

Reference Information
431
Meridium APM --> SAP
Task Values Mapped to SAP
When you use the Work Management Interface to create Orders from Meridium APM Task records, several values in the Meridium APM Task record are passed to the SAP Order and its associated Operations. The following table explains the Task fields whose values are passed to the SAP Function Module /MIAPM/MAINTAIN_ORDER (which calls the SAP BAPI BAPI_ALM_ORDER_MAINTAIN).
Meridium APM Field Caption SAP BAPI Field
Work Order Type ORDER_TYPE
Task Description SHORT_TEXT
Task List Type TASKLIST_TYPE
Task List Group TASKLIST_GROUP
Task List Group Counter TASKLIST_GROUP_CTR
Task Details IT_TEXT_LINES
Work Order Number ORDER_NUMBER
The Meridium APM system maps a value from the Equipment record to which the Task record is linked, based upon the configuration of the query Get SAP ID for Equipment, which is stored in the Catalog folder \\Public\Meridium\Modules\SAP Integration Interfaces\Queries.
EQUIPMENT
The Meridium APM system maps a value from the Functional Location record to which the Task record is linked, based upon the configuration of the query Get SAP ID for Functional Location, which is stored in the Catalog folder \\Public\Meridium\Modules\SAP Integration Interfaces\Queries.
FUNCT_LOC
After these values are passed to the SAP BAPI, the Function Module then sends additional data from the associated SAP Task List to the SAP Order, as described in the following table.

Meridium APM SAP Interfaces V3.6.0.0.0
432
Task List Field Order Field
WERKS PLANT
ARBPL MN_WK_CTR
None. The value 4 is always mapped. SCHED_TYPE
IWERK PLANPLANT
Also, for each Operation that belongs to the Task List, a corresponding Operation will belong to the Order. The following table identifies the values that are mapped from each Operation that is attached to the Task List to each Operation that is attached to the Order.
Task List Field Order Field
ARPBL WORK_CNTR
VORNR ACTIVITY
STEUS CONTROL_KEY
WERKS PLANT
LTXA1 DESCRIPTION
TXTSP LANGU
KTSCH STANDARD_TEXT_KEY
LOANZ NO_OF_TIME_TICKETS
LOART WAGETYPE
QUALF SUITABILITY
LOGRP WAGEGROUP
SORTL SORT_FLD
LIFNR VENDOR_NO
BMSCH QUANTITY
MEINH BASE_UOM
PREIS PRICE
PEINH PRICE_UNIT
SAKTO COST_ELEMENT
WAERS CURRENCY
INFNR INFO_REC

Reference Information
433
Task List Field Order Field
EKORG PURCH_ORG
EKGRP PUR_GROUP
MATKL MATL_GROUP
ANZZL NUMBR_OF_CAPACITIES
PRZNT PERCENT_OF_WORK
INDET CALC_KEY
LARNT ACTTYPE
ANLZU SYSTCOND
ISTRU ASSEMBLY
VERTN INT_DISTR
PLIFZ PLND_DELRY
DAUNO DURATION_NORMAL
DAUNE DURATION_NORMAL_UNIT
EINSA CONSTRAINT_TYPE_START
EINSE CONSTRAINT_TYPE_FINISH
ARBEI WORK_ACTIVITY
ARBEH UN_WORK
AUFKT EXECFACTOR
SLWID FIELD_KEY
USR00 USR00
USR01 USR01
USR02 USR02
USR03 USR03
USR04 USR04
USR05 USR05
USE05 USE05
USR06 USR06
USE06 USE06
USR08 USR08

Meridium APM SAP Interfaces V3.6.0.0.0
434
Task List Field Order Field
USR09 USR09
USR10 USR10
USR11 USR11
Recommendation Values Mapped to SAP
The following table explains the Recommendation fields that are used to populate SAP Notification fields when you use the Notification Creation Interface.
Meridium APM Field Caption
SAP Table
SAP Field
ID
SAP Field Caption
Notes
Recommendation Headline
VIQMEL QMTXT Short Text None
Functional Location ID
VIQMEL TPLNR Functional Location
None
Asset ID VIQMEL EQUNR Equipment Number
None
Recommendation Description
None None Notification Long Text
None
None VIQMEL QMART Notification Type
By default, the Notification Type field in SAP is always populated with the value M1. You can, however, configure the Meridium APM system to create other notification types.

Reference Information
435
Meridium APM Field Caption
SAP Table
SAP Field
ID
SAP Field Caption
Notes
None QMEL QMNAM Reported By
The Reported By field in SAP is populated with the first twelve characters of the user ID of the Security User that was logged in to the Meridium APM Framework when the Notification was created.
Glossary
ABAP
Advanced Business Application Programming, a high-level programming language created by SAP for programming the SAP Application Server.
Equipment Characteristics Extraction Interface
Allows you to transfer Equipment characteristics from SAP to Meridium APM.
Equipment Extraction Interface
Allows you to transfer Equipment from SAP to Meridium APM.
Functional Location Characteristics Extraction Interface
Allows you to transfer Functional Location characteristics from SAP to Meridium APM.

Meridium APM SAP Interfaces V3.6.0.0.0
436
Functional Location Extraction Interface
Allows you to transfer Functional Locations from SAP to Meridium APM.
Notification and Order Extraction Interface
Allows you to transfer Notifications and Orders from SAP to Meridium APM.
Notification Creation Interface
Allows you to transfer Recommendation records from Meridium APM to SAP in the form of Notifications.
SAP PI
SAP's enterprise application integration software. PI (Process Integration) is used to exchange information among both internal and external software and systems.
Work Management Interface
Allows you to manage scheduled work in one of two ways:
• Create Task records in Meridium APM and transfer the data to SAP. This option allows you to create and update records in Meridium APM and transfer the data to SAP.
• Create and manage data in SAP and transfer it to Meridium APM as Task records. This option allows you to create and update items in SAP and transfer the data to Meridium APM.
Copyright © 2022 FDOKUMEN