
Banner Student Letter Generation Training Workbook
116
Banner Student Letter Generation Training Workbook Release 8.0 - April 2008 Updated 5/30/2008 HIGHER EDUCATION What can we help you achieve?
-
Upload
khangminh22 -
Category
Documents
-
view
1 -
download
0
Transcript of Banner Student Letter Generation Training Workbook

Banner Student Letter Generation Training Workbook
Release 8.0 - April 2008 Updated 5/30/2008
HIGHER EDUCATION What can we help you achieve?

_________________________________________________________________________________________________________________ SunGard Higher Education 4 Country View Road Malvern, Pennsylvania 19355 United States of America (800) 522 - 4827 Customer Support Center website http://connect.sungardhe.com Distribution Services e-mail address [email protected] Other services In preparing and providing this publication, SunGard Higher Education is not rendering legal, accounting, or other similar professional services. SunGard Higher Education makes no claims that an institution's use of this publication or the software for which it is provided will insure compliance with applicable federal or state laws, rules, or regulations. Each organization should seek legal, accounting and other similar professional services from competent providers of the organization's own choosing. Trademark Without limitation, SunGard, the SunGard logo, Banner, Campus Pipeline, Luminis, PowerCAMPUS, Matrix, and Plus are trademarks or registered trademarks of SunGard Data Systems Inc. or its subsidiaries in the U.S. and other countries. Third-party names and marks referenced herein are trademarks or registered trademarks of their respective owners. Revision History Log Publication Date Summary
Original Date New version that supports 8.0 software.
Notice of rights Copyright © SunGard Higher Education 2005-8. This document is proprietary and confidential information of SunGard Higher Education Inc. and is not to be copied, reproduced, lent, displayed or distributed, nor used for any purpose other than that for which it is specifically provided without the express written permission of SunGard Higher Education Inc.

Table of Contents
Introduction ............................................................................................................... 5 Process Introduction...................................................................................................... 7 Letter Generation Overview............................................................................................ 9
Printed Letter Set Up................................................................................................ 10 Rules and Validation Forms Used in Letter Generation ....................................................11 Population Selection Definition Rules .............................................................................12 System Indicator Validation...........................................................................................13 Creating an Application .................................................................................................14 Creating a Paragraph Code ...........................................................................................16 Creating a Letter Code..................................................................................................19 Creating Simple Variable Rules ......................................................................................21 Defining Single Variable Rules Using Several Data Elements............................................25 Copying the Rules From an Existing Variable to a New One.............................................27 Creating a Variable Using a Join ....................................................................................30 Self Check....................................................................................................................32 Answer Key for Self Check ............................................................................................33
Printed Letter Day-to-Day Operations ..................................................................... 34 Process Introduction.....................................................................................................35 Defining the Contents of a Paragraph ............................................................................37 Reviewing and Changing the Contents of a Paragraph ....................................................40 Creating a Letter by Adding Paragraphs .........................................................................42 Using the Letter Extract Process ....................................................................................45 Using the Letter Generation Print Report........................................................................50 Summary .....................................................................................................................56 Self Check....................................................................................................................57 Answer Key for Self Check ............................................................................................59
Downloaded Letter Set Up ....................................................................................... 62 Rules and Validation Forms Used in Letter Generation ....................................................63 Population Selection Definition Rules .............................................................................64 System Indicator Validation...........................................................................................65 Creating an Application .................................................................................................66 Creating a Paragraph Code ...........................................................................................68 Creating a Letter Code..................................................................................................70 Creating Simple Variable Rules ......................................................................................72 Defining Single Variable Rules Using Several Data Elements............................................76 Copying the Rules From an Existing Variable to a New One.............................................79 Creating a Variable Using a Join ....................................................................................82 Self Check....................................................................................................................84 Answer Key for Self Check ............................................................................................85
Downloaded Letter Day-to-Day Operations............................................................. 86 Process Introduction.....................................................................................................87 Defining the Contents of a Paragraph ............................................................................89 Reviewing and Changing the Contents of a Paragraph ....................................................92 Creating a Letter by Adding Paragraphs .........................................................................94 Using the Letter Extract Process ....................................................................................96 Using the Letter Generation Print Report......................................................................101

© SunGard 2008 Banner Student Letter Generation Workbook Page 4
Summary ...................................................................................................................106 Self Check..................................................................................................................107 Answer Key for Self Check ..........................................................................................109
Appendix................................................................................................................. 112 Forms Job Aid ............................................................................................................113 Terminology...............................................................................................................115

Introduction
Course goal
This course is intended to teach you to identify key forms, tables, and reports used in Banner Student Letter Generation. The workbook is divided into these sections:
• Introduction
• Printed Letter Set Up
• Printed Letter Day-to-Day Operations
• Downloaded Letter Set Up
• Downloaded Letter Day-to-Day Operations
• Reference
Course objectives
At the end of this course you will be able to
• create the rules, codes, and set parameters used to generate
o bulk letters
o award letters
o postcard information
o labels
• create the structure of your letter
• extract the population you have identified
• generate the letter
• print the letter.
© SunGard 2008 Banner Student Letter Generation Workbook Page 5

© SunGard 2008 Banner Student Letter Generation Workbook Page 6
Intended audience
Student Administrators and Staff
Prerequisites
To complete this course, you should have
• completed the Education Practices computer-based training (CBT) tutorial Banner 8 Fundamentals, or have equivalent experience navigating in the Banner system
• administrative rights to create and perform the necessary set up in Banner
• familiarity with Banner Population Selection, and an existing defined population.

Process Introduction
Introduction
The Student Letter Generation course demonstrates how to generate a letter for a particular population in Banner Student. The letter is produced by combining Banner data generated from the results of a Population Selection or a Communication Plan rule and merging it with the letter generation template.
This data can be exported to an external file which can later be retrieved and inserted into the “mail merge” function in Word or WordPerfect or be generated from within Banner itself. Banner-generated letters will be referred to as “printed” letters. Exported letters will be known as “downloaded” letters.
Flow diagram
This diagram highlights the overall Student process. The Letter Generation process can occur anywhere within this process.
© SunGard 2008 Banner Student Letter Generation Workbook Page 7

© SunGard 2008 Banner Student Letter Generation Workbook Page 8
About the process
To produce a letter, you will
• dissect a letter into paragraphs and identify variables
• create the variables
• create the letter code
• create the paragraph code(s)
• build the paragraphs
• build the letter
• identify the Population to receive the letter
• extract variable data
• generate the letter.
Note: Some of the above will apply only to letters generated within Banner, not to letters downloaded to third-party software.

Letter Generation Overview
What is Letter Generation?
Letter Generation allows you to extract data from Banner based on a given population, merge extracted data with text, print the results, and maintain a log of printed letters.
How does Letter Generation work?
Letter Generation extracts specific data from the PIDMs, which are extracted during a Population Selection.
SELECT spriden_first_name,
spriden_last_name
FROM spriden
WHERE pop_sel criteria
Next, it merges the extracted data with paragraphs customized for your implementation.
© SunGard 2008 Banner Student Letter Generation Workbook Page 9

Printed Letter Set Up
Introduction
The purpose of this section is to outline the set up process and detail the procedures to set up your Banner system to handle Letter Generation for printed letters.
Objectives
At the end of this section, you will be able to create the rules, codes, and set parameters used to generate printed
o bulk letters
o award letters
o postcard information
o labels
© SunGard 2008 Banner Student Letter Generation Workbook
Page 10

Rules and Validation Forms Used in Letter Generation
Introduction
Before completing day-to-day tasks associated with Banner Letter Generation, there are several forms and rules that need to be set or created.
Rule and validation forms
These forms are used to set the rules and parameters in Banner for handling generated letters.
Form Description Banner Name
Population Selection Definition Rules GLRSLCT
System Indicator Validation GTVSYSI
Application Definition Rules GLRAPPL
Letter Code Validation GTVLETR
Paragraph Code Validation GTVPARA
Variable Rules Definition GLRVRBL
© SunGard 2008 Banner Student Letter Generation Workbook
Page 11

Population Selection Definition Rules
Description
The Population Selection Definition Rules Form (GLRSLCT) defines a Population Selection, which is a set of rules used to select IDs from the Banner database for reports, processes and letters.
Note: Knowing how to define a population is a prerequisite to this course, and is not covered in this workbook.
Banner form
© SunGard 2008 Banner Student Letter Generation Workbook
Page 12

System Indicator Validation
Description
The System Indicator Validation Form (GTVSYSI) defines codes that identify the Banner applications used at your institution.
Banner form
© SunGard 2008 Banner Student Letter Generation Workbook
Page 13

Creating an Application
Introduction
The Application Definition Rules Form (GLRAPPL) defines an application, which is a functional area that controls Population Selections, populations and variables.
Note: Each application has to be created only once.
Banner form
Steps
You defined the letters required by your organization but would like to build them in a new application. You also have determined that you need to use the name prefix in some letters. You have researched where this data is stored in the system and you know the name of the table (SPBPERS) and the data element (SPBPERS_NAME_PREFIX).
Follow these steps to create an application.
1. Access the Application Inquiry Form (GLIAPPL) to review the list of applications already defined.
2. Access the Application Definition Rules Form (GLRAPPL).
3. Enter XXX_APPLICATION in the Application field.
Example: XXX = your initials. Therefore, James C. Quick would enter JCQ_APPLICATION.
4. Perform a Next Block function.
5. Enter [Your Name] Application in the Description field.
© SunGard 2008 Banner Student Letter Generation Workbook
Page 14
Example: James Quick would enter James Quick’s Application.
6. Perform a Next Block function.
7. Enter the code applicable to your system in the System field:
A Alumni F Finance G General H Human Resources R Financial Aid S Student.
Note: No rules need to be entered in the Application Level Rules block. An application can be created with or without application level rules.
8. Click the Save icon.
9. Click the Exit icon.
© SunGard 2008 Banner Student Letter Generation Workbook
Page 15

Creating a Paragraph Code
Introduction
Your organization has decided to convert all basic person data for all known persons. You are assisting in the verification effort and want to send a letter to all persons for whom data was converted. You have prepared your letter and need to determine how many paragraphs you have.
Banner form
The Paragraph Code Validation Form (GTVPARA) is used to define codes that identify the paragraphs used in Banner letters. Paragraph codes can be assigned to letters on the Letter Process Form (GUALETR).
© SunGard 2008 Banner Student Letter Generation Workbook
Page 16

Letter example
Your letter will look like this:
Date
<Prefix> <First Name> <Middle Name><Last Name>, <Suffix>
<Address Line 1>
<Address Line 2>
<Address Line 3>
<City>, <State> <Zip>
Dear <Preferred Name>,
We recently converted our database information to the Banner system.
Please verify the information below. If there are any errors, contact our office at 1-800-555-5555.
<Gender>
<Current ID>
<Marital Status>
Sincerely,
Ms. Sue Doe
Setting up your paragraphs
All letters printed by Banner begin with two paragraphs. The first will determine that a new page is to be printed and the second will determine the table settings for the paragraphs to be printed. The paragraphs for your letter follow. You must determine if a paragraph code exists on GTVPARA. If not, a code must be generated.
Each paragraph will have a specific purpose:
1. New page
2. Defining your table settings
© SunGard 2008 Banner Student Letter Generation Workbook
Page 17

3. Date, address and salutation
4. The body of the letter
5. The closing
Steps
In this exercise, you will create your first paragraph code using your initials. For a printed letter, it is your initials and an identifying number.
Note: You can use the same paragraph for either printed letters or downloaded letters. The system will extract only variables from the paragraphs when using the download feature.
Warning: Poll the other participants in the class to prevent duplicate paragraph codes. Choose other initials if necessary.
Follow these steps to create a paragraph code.
1. Access the Paragraph Code Validation Form (GTVPARA).
2. Enter and execute a query to determine that the paragraph code you would like to create does not already exist.
3. Perform an Insert Record function to enter a new code.
4. Enter your paragraph code in the Code field.
Example: James Quick would create either paragraph JQ1 or JQ_DLP.
5. Enter a description for the code in the Description field.
6. Enter text that describes your paragraph in the Comment field.
7. Create a code in the same manner for the paragraph listed in the explanation preceding the exercise. This will be for the third paragraph (date, inside address and salutation). Name it XX_IA, where XX= your initials.
Note: This paragraph code is used in later exercises.
8. Click the Save icon.
9. Click the Exit icon.
© SunGard 2008 Banner Student Letter Generation Workbook
Page 18

Creating a Letter Code
Introduction
You will use the Letter Code Validation Form (GTVLETR) to define codes that identify the letters you can generate in Banner. Examples of letters include acknowledgement, applicant, and financial aid offers.
Banner form
Steps
You have finished defining the individual paragraphs for your letter and you are ready to create the letter itself. The first step is to create a letter code.
Follow these steps to create a letter code.
1. Access the Letter Code Validation Form (GTVLETR).
2. Enter and execute a query to ensure that the letter code you intend to create does not already exist.
Note: Search for the code XX_LETR (XX = your initials).
3. Click the Insert Record icon.
4. Enter the name of your letter in the Letter Code field.
Example: James Quick would enter JQ_LETR.
5. Enter a name for your letter in the Description field, using your name in the text.
Example: James Quick would enter James Quick's Test Letter.
© SunGard 2008 Banner Student Letter Generation Workbook
Page 19

6. Leave the Allow Duplicates checkbox empty. Checking this box will allow duplicates of this letter to be requested or produced for a person.
Note: If the Allow Duplicates checkbox is empty, you may enter an alternate letter code. The alternate letter code will be created for a person if they are selected to receive a duplicate letter via the Dues Acknowledgement Process (AAPACKN) or the Pledge Gift Acknowledgement Process (AGPACKN), or if they have already received the letter in the primary key field.
Note: If the Allow Duplicates checkbox is empty and the Alternate Letter Code field is empty, no letter is generated for an ID selected to receive a duplicate letter.
7. Click the Save icon.
8. Click the Exit icon.
© SunGard 2008 Banner Student Letter Generation Workbook
Page 20

Creating Simple Variable Rules
Introduction
The Variable Rules Definition Form (GLRVRBL) is used to define, maintain, and copy a variable. A variable is a specific piece of data in the database and the set of rules used to select that data. Variables are used to insert variable data into letters and reference subqueries in application rules, population selection rules, and variable rules.
Banner form
Variables
A variable is a specific piece of data in the database and the set of rules used to select that data. Variables are used to insert variable data into letters and reference subqueries in application rules, population selection rules, and variable rules. Any data element associated with an ID can be defined as a variable.
Note: Each variable has to be created only once.
© SunGard 2008 Banner Student Letter Generation Workbook
Page 21

Steps
Follow these steps to create a variable.
1. Access the Variable Rules Definition Form (GLRVRBL).
2. Enter your application name in the Application field.
3. Enter the name for your variable in the Variable field. Start your variable name with an asterisk (*).
Note: For easy identification, include your initials.
Example: James Quick would create current ID variable *JQ_ID.
4. Perform a Next Block function.
5. Enter a description for your variable in the Description field.
6. Click the down arrow next to the Type field, to designate this variable as First, meaning the first variable to be processed by GLBLSEL. You will have to choose one variable to use as a first. We recommend your first variable to be a field that will always contain data; for example, first name or last name.
Note: Depending on how you are logged into the system, the Alternate Logon Verification Form (GUAUIPW) may or may not display. If it does, enter the alternate user ID and alternate password as instructed. You are returned to the Variable Rules Definition Form.
7. Perform a Next Block function.
8. Enter SPBPERS_NAME_PREFIX in the Select field. This is the prefix column from the SPBPERS table.
9. Enter SPBPERS in the From field. This is the table name.
10. Enter Name Prefix in the Description field. This is a description for the logic in the sequence.
Note: No values need to be entered in the Rules block.
11. Click the Save icon.
© SunGard 2008 Banner Student Letter Generation Workbook
Page 22

12. Click the Exit icon.
Note: You see the message Performing Variable Compilation, please wait. If your variable is compiled successfully, the form will exit automatically.
Note: If your variable does not compile successfully, an error message displays. An acknowledgement is required. The Process Results Form (GJARSLT) displays and the error that caused the compilation to terminate displays along with any other previous error messages.
Note: Using the steps above, create variables for the other data elements that you are using in your letter. Remember to click the Save icon and click the Exit icon after creating each variable so your variables compile successfully.
List of variables
Here is a list of variables that you may find useful as well as what you will enter in the Select and From fields in the Variable Rules Definition Form (GLRVRBL).
Note: XX equals the initials you chose to enter.
Variable Select and From Fields
Today’s Date:
*XX_DATE
SELECT: RTRIM(TO_CHAR(SYSDATE,’Month’)||’’||TO_CHAR(SYSDATE,’DD,YYYY’)
FROM: DUAL
*Note The SELECT line should be continuous
First Name: *XX_FNAM
SELECT: SPVADDS_FIRST_NAME FROM: SPVADDS
Middle Name: *XX_MI
SELECT: SPVADDS_MI FROM: SPVADDS
Last Name: *XX_LNAM
SELECT: SPVADDS_LAST_NAME FROM: SPVADDS
Prefix: *XX_PFX
SELECT: SPBPERS_NAME_PREFIX FROM: SPBPERS
© SunGard 2008 Banner Student Letter Generation Workbook
Page 23

Variable Select and From Fields
Suffix: *XX_SUFF
SELECT: SPBPERS_NAME_SUFFIX FROM: SPBPERS
Address Line 1: *XX_ADD
SELECT: SPVADDS_STREET_LINE1 FROM: SPVADDS
Address Line 2: *XX_ADD2
SELECT: SPVADDS_STREET_LINE2 FROM: SPVADDS
Address Line 3: *XX_ADD3
SELECT: SPVADDS_STREET_LINE3 FROM: SPVADDS
City: *XX_CITY
SELECT: SPVADDS_CITY FROM: SPVADDS
State: *XX_STATE
SELECT: SPVADDS_STAT_CODE FROM: SPVADDS
Zip: *XX_ZIP
SELECT: SPVADDS_ZIP FROM: SPVADDS
Preferred First Name: *XX_PFN
SELECT: SPBPERS_PREF_FIRST_NAME FROM: SPBPERS
Gender: *XX_GEND
SELECT: SPBPERS_SEX FROM: SPBPERS
Current ID: *XX_ID (first type variable)
SELECT: SPVADDS_ID FROM: SPVADDS
Marital Status: *XX_MRTL
SELECT: SPBPERS_MRTL_CODE FROM: SPBPERS
Nation: *XX_NATN
SELECT: SPVADDS_NATN_DESC FROM: SPVADDS
© SunGard 2008 Banner Student Letter Generation Workbook Page 24
Defining Single Variable Rules Using Several Data Elements
Introduction
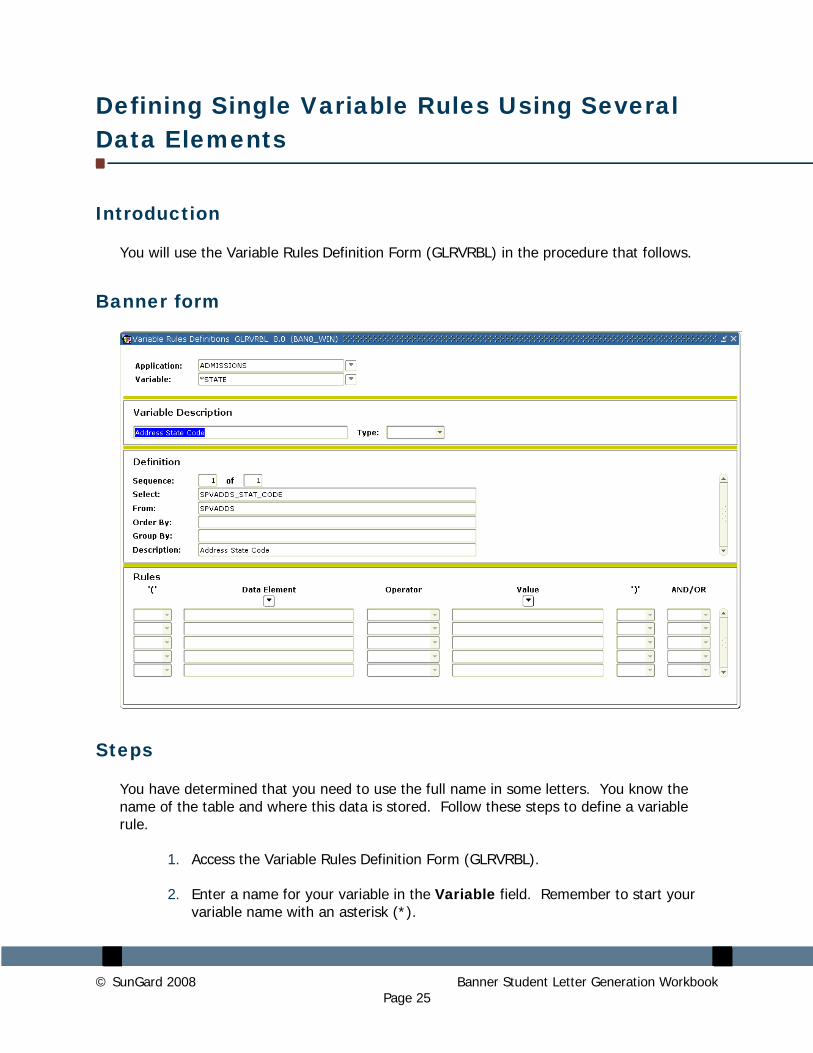
You will use the Variable Rules Definition Form (GLRVRBL) in the procedure that follows.
Banner form
Steps
You have determined that you need to use the full name in some letters. You know the name of the table and where this data is stored. Follow these steps to define a variable rule.
1. Access the Variable Rules Definition Form (GLRVRBL).
2. Enter a name for your variable in the Variable field. Remember to start your variable name with an asterisk (*).
© SunGard 2008 Banner Student Letter Generation Workbook
Page 25

Note: Use the variable name *NAME_FULL_W_PREFIX.
3. Enter a description for your variable in the Description field.
Note: This field is limited to 30 characters including spaces.
4. Leave the Type field empty because your variable is not a special variable type.
5. Perform a Next Block function.
6. Enter the following in the Select field In the Definition block:
SPBPERS_NAME_PREFIX||' '||SPVADDS_FIRST_NAME||' '||SPVADDS_LAST_NAME||', '||SPBPERS_NAME_SUFFIX
Note: Enter this line of rules on one line. There are spaces between the single quotes (' ') and, on the third line, after the comma (,) where the lines break. You are using SPVADDS for the first and last names so that you retrieve only the current name.
7. Navigate to the From field.
8. Enter SPBPERS.
9. Enter a description for this variable.
Example: Name Prefix.
10. Click the Save icon
11. Click the Exit icon.
Note: See the previous lesson for messages that may display.
Note: If you are creating an actual select statement, you also need to specify that the PIDM in SPBPERS equal the PIDM in SPVADDS. However, unless you specify that your variable is type M (requiring manual PIDM joins), the system creates the required PIDM join statements for you when the variable is compiled.
© SunGard 2008 Banner Student Letter Generation Workbook
Page 26

Copying the Rules From an Existing Variable to a New One
Introduction
You will use the Variable Rules Definition Form (GLRVRBL) to copy the rules from an existing variable to a new one.
Banner form
Scenario
You determine that you need to use the first name in some letters. You have researched this data element and know that it already is defined within the application Admissions.
© SunGard 2008 Banner Student Letter Generation Workbook
Page 27

Steps
Follow these steps to copy a rule.
1. Access the Variable Rules Definition Form (GLRVRBL).
2. Enter the code for Admission in the Application field.
3. Review the list of variables defined within the application. Select the variable *FNAME.
Note: You will copy the rules for the variable *FNAME to the application you created and defined in the previous exercises.
4. Select the Copy Variable option from the Options menu.
5. Enter the application code you created in the Application field of the Copy To block, or select it from the List of Values.
6. Enter the new variable name in the Variable field.
Note: Remember to put an asterisk at the beginning.
7. Click the Save icon.
Note: You automatically return to the Variable Rules Definition Form (GLRVRBL).
8. Change the description, definition, or rules, if necessary.
9. Click the Save icon.
10. Click the Exit icon.
11. Copy all of the variables used in your sample letter from the application Admissions to your personal application.
Note: Don’t forget to save each time you copy or the new variable does not compile. All saved variables will be compiled at one time when you exit.
© SunGard 2008 Banner Student Letter Generation Workbook
Page 28

Variables
Use these variables.
*NAME_PREFIX *STATE
*MNAME *ZIPC
*LNAME *NATN
*NAME_SUFFIX *PNAM
*STR1 *GENDER
*STR2 *ID
*STR3 *MRTL
*CITY
© SunGard 2008 Banner Student Letter Generation Workbook
Page 29

Creating a Variable Using a Join
Introduction
This time you need to use the marital status description in some letters. You have researched this data element and know that the code for a person's marital status is stored in the table SPBPERS but that the description is stored in the table STVMRTL.
Banner form
Steps
Follow these steps to create a variable using a join.
1. Access the Variable Rules Definition Form (GLRVRBL).
2. Enter your application in the Application field.
Note: Make sure that the application code represents your personal application.
3. Enter *MRTL_DESC in the Variable field to create a new variable code for
© SunGard 2008 Banner Student Letter Generation Workbook
Page 30

marital status.
4. Perform a Next Block function.
5. Enter Marital Status Description in the Description field.
6. Perform a Next Block function.
7. Enter STVMRTL_DESC in the Select field of the Definition block.
8. Enter STVMRTL, SPBPERS in the From field.
Note: You must list all tables that are referenced in the From field.
9. Enter a description for this line of your variable in the Description field.
Example: Marital Status Description.
10. Click the Save icon.
11. Perform a Next Block function.
12. Enter these values in the Rules block.
Data Element SPBPERS_MRTL_CODE Operator = Value STVMRTL_CODE
13. Leave all other fields empty.
14. Click the Save icon.
15. Click the Exit icon.
Note: Your join was defined in the Rules block. Your rule stated that the marital status description you wanted was the description of the code for the person. In this case, you are required to perform the join because only PIDM joins are performed automatically.
Result: You see the message Performing Variable Compilation, please wait. If your variable is compiled successfully, you will exit the form automatically.
© SunGard 2008 Banner Student Letter Generation Workbook
Page 31

Self Check
Directions
Use the information you have learned in this workbook to complete this self-check activity.
Question 1
How many characters can be used when creating paragraph codes?
Question 2
Is a comment required to create a paragraph?
Question 3
On what form would you define a variable?
© SunGard 2008 Banner Student Letter Generation Workbook
Page 32

Answer Key for Self Check
Question 1
How many characters can be used when creating paragraph codes?
Up to seven characters can be used to create a paragraph code.
Question 2
Is a comment required to create a paragraph?
No, a comment is not required. However, it should be used to describe what is in your paragraph. The comment can be 240 characters in length.
Question 3
On what form would you define a variable?
A variable is defined on the Variable Rules Definition Form (GLRVRBL).
© SunGard 2008 Banner Student Letter Generation Workbook
Page 33

Printed Letter Day-to-Day Operations
Introduction
The purpose of this section is to explain the day-to-day or operational procedures to generate bulk letters printed from Banner.
Objectives
At the end of this section, you will be able to
• create the structure of your letter
• extract the population you have identified
• generate the letter
• print the letter.
© SunGard 2008 Banner Student Letter Generation Workbook
Page 34

Process Introduction
About the process
Initially when you are creating letters and paragraphs, you will structure your letter and create your paragraphs to attach to your letter.
Once this has been accomplished, when you need letters created, you will start with step 4 (identify the population to receive the letter).
Process diagram
© SunGard 2008 Banner Student Letter Generation Workbook
Page 35

What happens
The stages of the process are described in this table.
Stage Description
Administrator
1 Dissect the letter into paragraphs.
2 Lay out the structure of your letter.
3 Create your letter using rule and validation forms.
4 Identify the population you wish to select for your letter using Population Selection, Pending Mail, or Manual Selection.
5 Extract the variables.
6 Generate your letter.
7 Send your letter to the printer.
© SunGard 2008 Banner Student Letter Generation Workbook
Page 36

Defining the Contents of a Paragraph
Introduction
The Paragraph Form (GUAPARA) is used to build a paragraph that can be inserted in letters on the Letter Process Form (GUALETR). A paragraph can include text, variables, and formatting commands.
Banner form
About the letters
All letters have two separate initial paragraphs that indicate a new page and the table definitions.
We are using system delivered paragraphs for our exercise.
• Newpage (New Page) contains only one line with the formatting command #NP.
• TB_RECR (Table Definitions) contains a line for each paragraph number defining the table settings. Table definitions are standard RPF commands. Table definitions include a table number and the boundaries of each column in the letter. Paragraphs 1, 2, and 3 of your letter might be defined like this:
#T 1 40 75#
#T 2 10 75#
#DT 3 38 65#
Note: Variables that contain no data are suppressed if using Banner print functions. Microsoft Word, for example, will remove the space from a null variable. In the example below, if there is no address line #2 or #3 for the person, the City, State, Zip will move up.
© SunGard 2008 Banner Student Letter Generation Workbook
Page 37

Printed paragraph example
The paragraph you define will look as follows when printed:
Today’s Date
Mr. James Quick (your name)
Street Address Line 1
Street Address Line #2
Street Address Line #3
City, State, Zip Code
Dear James,
(Text would go here.)
Steps
Follow these steps to define the contents of the paragraph you created previously.
1. Access the Paragraph Form (GUAPARA).
2. Use the combination of text, variable inserts, and formatting commands found in the table that follows.
Note: The cursor does not advance to the next line if an invalid variable is entered.
Note: If you plan to download data to support your word processing needs see the topic, Using the Letter Generation Print Report.
Example: When you see XX, XX = your initials.
© SunGard 2008 Banner Student Letter Generation Workbook
Page 38

Fields: printed letter
These fields are used when defining a printed letter.
Field Name Description Value
Paragraph
Enter a paragraph code (up to 7 characters)
XX_IA (XX = your initials)
Text/Variable/Formatting Command
Enter the combination of text, variables, and formatting commands for the contents of your paragraph (up to 60 characters each line).
Note: There is a space after CONCAT and before the comma (,) in each instance.
#T 1 *XX_DATE #S 2 ^IF NULL *XX_PFX &NOPREFIX *XX_PFX &NOPREFIX *XX_FNAM ^IF NULL *XX_MI &NOMNAME *XX_MI &NOMNAME *XX_LNAM #N *XX_ADD1 #N *XX_ADD2 #N *XX_ADD3 #N *XX_CITY #CONCAT , *XX_STAT *XX_ZIP #S 2
Dear
*FNAME
#S2 #TE
Activity Date System generated [today's date]
© SunGard 2008 Banner Student Letter Generation Workbook
Page 39

Reviewing and Changing the Contents of a Paragraph
Introduction
The Paragraph Form (GUAPARA) is used to build a paragraph that can be inserted in letters on the Letter Process Form (GUALETR). A paragraph can include text, variables, and formatting commands.
Banner form
Scenario
After printing a sample copy of the letter you plan to send, you realize that you did not include the nation in the address format. You need to change the paragraph to include the variable for nation.
Steps
Follow these steps to make the changes.
1. Access the Paragraph Form (GUAPARA).
2. Enter the paragraph code created in the previous lesson in the Paragraph field.
3. Perform a Next Block function.
4. Click the Insert Record icon.
Note: For generated letters, the nation code needs to be inserted in the proper sequence in the commands as shown below.
© SunGard 2008 Banner Student Letter Generation Workbook
Page 40

5. Insert another new line to add the nation code variable.
6. Click the Save icon.
7. Click the Exit icon.
Fields
These fields are used when modifying the printed letter.
Field Name Description Value
Paragraph
Define a paragraph code (up to 7 characters)
XX_P1 (XX = your initials)
Text/Variable/Formatting Command
Enter the combination of text,variables, and formatting commands for the contents of your paragraph (up to 60 characters)
… *XX_ZIP #N *XX_NATN #S 2 …
Activity Date System generated [today's date]
© SunGard 2008 Banner Student Letter Generation Workbook
Page 41

Creating a Letter by Adding Paragraphs
Introduction
You will use the Letter Process Form (GUALETR) to build a letter from paragraphs created on the Paragraph Form (GUAPARA).
Banner form
Discussion
You finished defining the individual paragraphs for the post conversion verification letter and defining a code for the letter. You are ready to define the contents of the letter.
© SunGard 2008 Banner Student Letter Generation Workbook
Page 42

Steps
Follow these steps to create a letter using a paragraphs.
1. Access the Letter Process Form (GUALETR). Here you will combine your paragraph codes to form a letter.
2. Enter values found in the table that follows for a printed letter.
3. Click the Save icon.
4. Click the Exit icon.
Fields: printed letter
These fields are used when adding paragraphs to a printed letter.
Field Name Description Value
Letter
15 character code Define a letter code
XX_ LETR (XX = your initials)
Paragraph 7 character code List the paragraph codes
TB_RECR
NEWPAGE
XX_IA
For the body, select from the following:
Alumni = DUE_ACK
FA = TRACK
Student = ACCEPT
CLOSING
TB_RECR
NEWPAGE
XX_IA
(DUE_ACK OR TRACK OR ACCEPT
CLOSING)
Description 30 character description System populated
[my] paragraph code
© SunGard 2008 Banner Student Letter Generation Workbook
Page 43
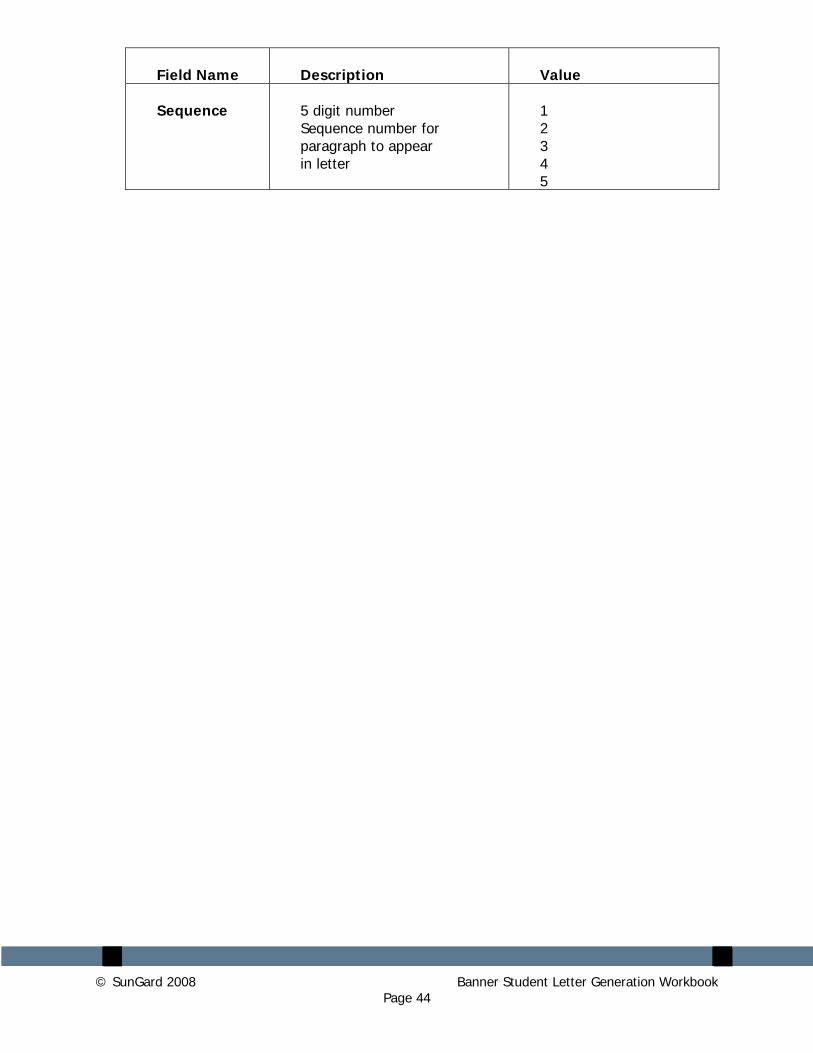
Field Name Description Value
Sequence 5 digit number Sequence number for paragraph to appear in letter
1 2 3 4 5
© SunGard 2008 Banner Student Letter Generation Workbook Page 44

Using the Letter Extract Process
Introduction
The Letter Extract Process (GLBLSEL) extracts variable data from the Banner database to be included when letters are printed. This COBOL program is run before executing the Letter Generation Print Process (GLRLETR). GLBLSEL can be run for all pending letters (letters waiting to be printed) for a letter code or for a letter code for a specific population. This form will also inform users if a letter cannot be created because the ID did not match the selection or address criteria. The log file will list the names and ID’s for those who did not receive the letter because of the missing address or because other non-address selection criteria was not met.
Banner form
© SunGard 2008 Banner Student Letter Generation Workbook
Page 45

Overview
You finished setting up your letter. It is time to produce your letters. The Letter Extract Process (GLBLSEL) extracts the data as specified in the variables that are in the requested letter. The extracted data is inserted into the Letter Collector Table (GLRCOLR).
Parameters
These parameters are needed for the procedure that follows, Parameters Values block.
Req? Parameter Description
01 Application Select List of Values to find your application. James Quick would select JCQ_APPLICATION.
02 Process Pending Letters
N is the default. N only processes a specific letter. Y produces all pending letters for the letter code entered in the next parameter. Procedurally, pending letters should be printed for only a specific letter code. If you select Y, you cannot use the Population Selection parameters.
© SunGard 2008 Banner Student Letter Generation Workbook
Page 46

Req? Parameter Description
03 Letter Code James Quick would enter JQ_LETR.
04 Selection ID Letters are produced from this Population Selection. You cannot use a Population Selection if you selected Y in parameter 02 Process Pending Letters.
05 Creator ID Required only if using a Population
Selection. This is the ID of the person who created the Population Selection ID.
06 User ID Required only if using a Population
Selection. It is the user ID of the person who ran GLBDATA to create the Population Selection.
07 Term Code Student System only. Required only when
extracting Pending Student System letters (when parameter 02 = Y). One term can be processed per run.
08 Aid Year Financial Aid System only. Required for
those letters that are pending for the aid year specified. Only one aid year is extracted per run.
09 Address Selection Date
Enter the address date for which the address of choice must be effective. If no date is entered, the current date is used.
If you want to use a value other than the system date, you can enter a not-null value on GJAPCTL.
© SunGard 2008 Banner Student Letter Generation Workbook Page 47

Req? Parameter Description
10 Address Type The address selection is a three-character field. The first character is the priority of the address and the remaining two characters are the address type from the Address Type Code Validation Form (STVATYP).
Example: 1MA, 2PR, 3SE In this example, the mailing address (MA) is the first choice and the permanent address (PR) is the second choice. Each type must be entered on a separate line. Use the Insert Record function to create a new line. Enter parameter number 10 and the description defaults. Enter the new address type in the Values field.
11 Detailed Error Report
Valid values are Y or N.
12 Detailed Execution Report
Valid values are Y or N.
Steps
Follow these steps to run the Letter Extract Process (GLBSEL).
1. Access the Letter Extract Process (GLBLSEL).
2. Navigate to the Printer Control block and select the printer that you are using.
3. Navigate to the Parameter Values block and enter the parameters for the job submission. Use the table on the previous pages.
4. Navigate to the Submission block.
5. Select the Submit radio button, if necessary.
6. Click the Save icon.
Note: Note the number in the auto hint line after saving.
7. Review the output by selecting Review Output from the Options menu.
Note: Use the number you noted in the previous step to review the output of
© SunGard 2008 Banner Student Letter Generation Workbook Page 48

the GLBSEL run. By reviewing the output, you can see the IDs that did not have addresses and will not have letters created for them.
8. Click the Exit icon.
© SunGard 2008 Banner Student Letter Generation Workbook
Page 49

Using the Letter Generation Print Report
Introduction
After you have run the Letter Generation Extract Process (GLBLSEL), the Letter Generation Print Report (GLRLETR) should be executed.
You may
• generate either letters or a file that can be downloaded to Word or WordPerfect
• print a summary report
• update the General Mail Table (GURMAIL).
The Letter Generation Print Report (GLRLETR) is used for printing or downloading a letter. GLRLETR reads the results of the extract process (GLBLSEL) and combines the results with the format of the letter as defined in GUALETR to create the printed material or extract file.
Banner form
© SunGard 2008 Banner Student Letter Generation Workbook
Page 50

Parameters
These parameters are needed for the procedure that follows, Parameters Values block.
Req? Parameter Description
01 Application Code
Select the List of Values to find your application.
02 Word Processor Extract Option
Enter the number corresponding to the extract needed:
0 – Banner “printed” letter (default)
1 – Microsoft Word “download” file
2 – WordPerfect “download” file
Choosing 1 or 2 produces an output file that contains a header record containing all of the variables that are used in the letter and the records for each ID in the population separated by commas.
Note: If this option is 1 (Word) or 2 (WordPerfect), you do not need a #DT paragraph.
03 Print ALL Pending Letters
Enter Y to print all pending letters for the application code.
Note: When running GLBLSEL from the operating system only, you can process all pending letters in a single application. When running from job submission, you will be able to print only a single letter code for each run.
Enter N to print a specific letter. The default value is N.
04 Letter Code Enter the letter code of the letter to be
printed.
© SunGard 2008 Banner Student Letter Generation Workbook
Page 51

Req? Parameter Description
05 Sort Variable To sort the printed letters in a specific order, enter the name of a variable that determines the order. The sort variable must be contained in the letter.
Note: If using the download option, this parameter will be left blank.
06 Term Code Required for the Student System only. All other systems use the default value of 999999.
07 Module Code Enter the one character module code associated with the letter being produced. This code updates the print date of published materials in the mail table that matches the module code entered and produces a list of the recipients and their materials in the report control information.
Published materials are items that are sent to individuals but are not printed by Banner Letter Generation, such as college catalogs, sports brochures, and preprinted forms.
A Admissions B Billing C Constituent G Gifts/Pledges F Registration H History R Recruiting
© SunGard 2008 Banner Student Letter Generation Workbook Page 52
Req? Parameter Description
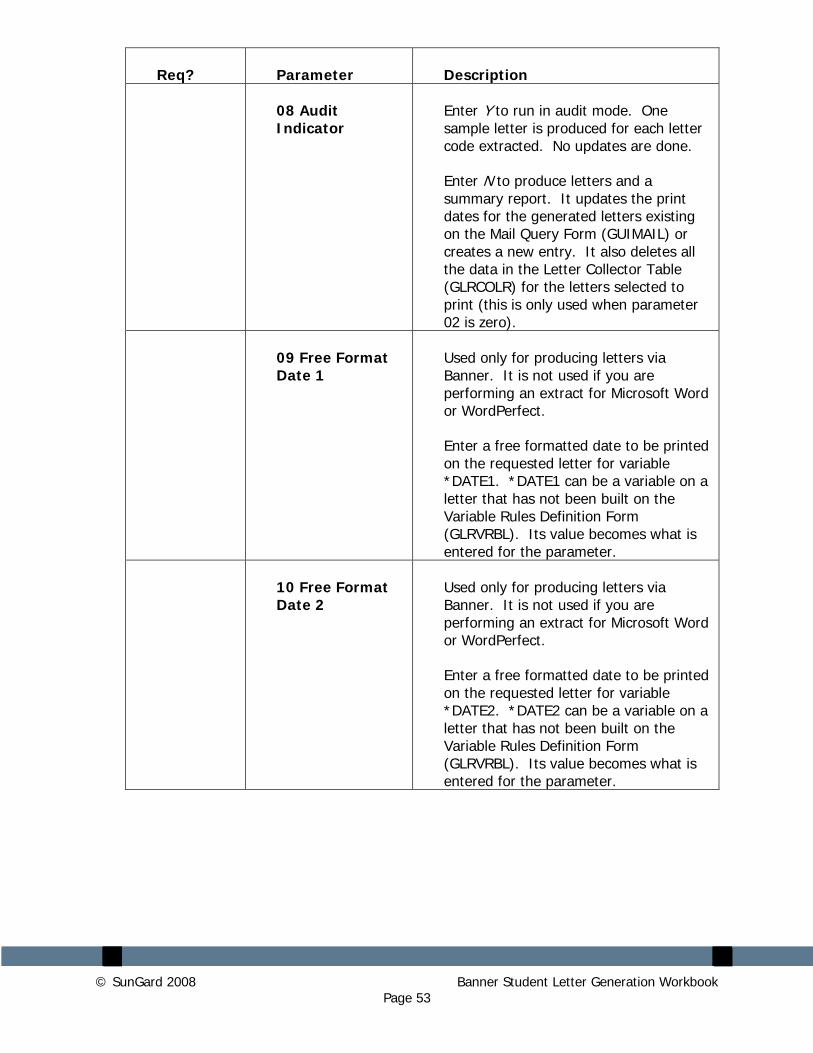
08 Audit Indicator
Enter Y to run in audit mode. One sample letter is produced for each letter code extracted. No updates are done.
Enter N to produce letters and a summary report. It updates the print dates for the generated letters existing on the Mail Query Form (GUIMAIL) or creates a new entry. It also deletes all the data in the Letter Collector Table (GLRCOLR) for the letters selected to print (this is only used when parameter 02 is zero).
09 Free Format Date 1
Used only for producing letters via Banner. It is not used if you are performing an extract for Microsoft Word or WordPerfect.
Enter a free formatted date to be printed on the requested letter for variable *DATE1. *DATE1 can be a variable on a letter that has not been built on the Variable Rules Definition Form (GLRVRBL). Its value becomes what is entered for the parameter.
10 Free Format Date 2
Used only for producing letters via Banner. It is not used if you are performing an extract for Microsoft Word or WordPerfect.
Enter a free formatted date to be printed on the requested letter for variable *DATE2. *DATE2 can be a variable on a letter that has not been built on the Variable Rules Definition Form (GLRVRBL). Its value becomes what is entered for the parameter.
© SunGard 2008 Banner Student Letter Generation Workbook Page 53

Req? Parameter Description
11 Free Format Date 3
Used only for producing letters via Banner. It is not used if you are performing an extract for Microsoft Word or WordPerfect.
Enter a free formatted date to be printed on the requested letter for variable *DATE3. *DATE3 can be a variable on a letter that has not been built on the Variable Rules Definition Form (GLRVRBL). Its value becomes what is entered for the parameter.
12 Aid Year Code Required only for the Financial Aid
System.
© SunGard 2008 Banner Student Letter Generation Workbook Page 54

Steps
Follow these steps to run the Letter Generation Print Report.
1. Access the Letter Generation Print Report (GLRLETR).
2. Navigate to the Printer block and select the printer that you are using or enter DATABASE in the Printer field.
Note: You can review the output on the Saved Output Review Form (GJIREVO) where job outputs can be viewed regardless of file extension. The log file can be viewed for GLBLSEL. The log, list and doc (for mail merge) files can be viewed for GLRLETR. These files can be written to the database, if so requested, and can be displayed or saved to your local desktop machine.
3. Navigate to the Parameter Values block to enter the parameters for your job. Use the table on the previous pages.
4. Navigate to the Submission block.
5. Select the Submit radio button, if necessary.
6. Click the Save icon.
7. Click the Exit icon.
© SunGard 2008 Banner Student Letter Generation Workbook
Page 55

Summary
Let’s review
As a result of completing this section of the workbook, you have
• defined the contents of a paragraph
• reviewed and changed the contents of a paragraph
• created a letter by adding paragraphs
• defined the rules for a single variable using several data elements
• copied the rules from an existing variable to a new one
• created a variable using a join
• generated a print report.
Now you are ready to create code validation forms and control and rules forms, and set the values needed on these forms. The selections you make will be dependent on your organization’s needs.
© SunGard 2008 Banner Student Letter Generation Workbook
Page 56

Self Check
Directions
Use the information you have learned in this workbook to complete this self-check activity.
Question 1
The formatting command #CONCAT x places ‘x’ next to the preceding word without inserting a space between them.
True or False
Question 2
What does a formatting command start with?
Question 3
What does a variable start with and where should it be positioned?
Question 4
Why do you use the Print Command field?
Question 5
What function does the sequence number perform?
Question 6
What is the difference between using SPVADDS verses SPRIDEN?
Question 7
Can I copy a variable into the same application?
© SunGard 2008 Banner Student Letter Generation Workbook
Page 57

Question 8
If all tables referenced in the variable must be listed in the From field, why aren’t they joined in the rules?
Question 9
How does selecting a value in the variable sub-query work differently here than in other parts of the system?
Question 10
What is the function of the Mail Query Form (GUIMAIL)?
Question 11
The Letter blocks on what Student forms can also be used to add letters to the system?
© SunGard 2008 Banner Student Letter Generation Workbook
Page 58

Answer Key for Self Check
Question 1
The formatting command #CONCAT x places ‘x’ next to the preceding word without inserting a space between them. (True or False)
True
Question 2
What does a formatting command start with?
A formatting command always starts with the pound (#) sign.
Question 3
What does a variable start with and where should it be positioned?
A variable always starts with an asterisk (*) and is placed in the first position of a line.
Question 4
Why do you use the Print Command field?
This field identifies the alternate print command for the associated letter. If you wanted to override the default print command to Portrait, you would enter PL (Print Landscape). This is for Banner generated letters only.
Question 5
What function does the sequence number perform?
The sequence number tells Banner the order in which you would like your paragraphs printed in the letter.
© SunGard 2008 Banner Student Letter Generation Workbook
Page 59
Question 6
What is the difference between using SPVADDS verses SPRIDEN?
SPVADDS is a view. It is a collection of data from various tables. SPRIDEN is a table where the actual data resides.
Question 7
Can I copy a variable into the same application?
Yes, you can copy a variable into any application. However, if you copy it into the same application, rename the variable.
Question 8
If all tables referenced in the variable must be listed in the From field, why aren’t they joined in the rules?
PIDM joins will automatically occur for the tables referenced in the From field. All other joins must be done manually in the rules.
Question 9
How does selecting a value in the variable sub-query work differently here than in other parts of the system?
Normally, when you select a value, only the actual value is returned. In this case, the value was returned, prefixed with "(*SUB" and followed by ")".
Question 10
What is the function of the Mail Query Form (GUIMAIL)?
The Mail Query Form (GUIMAIL) is used to display and maintain correspondence with a person. This is a display-only form – you can’t update correspondence here. It also displays all letters associated with the person, regardless of system (i.e., Student, Alumni, Financial Aid, etc.)
© SunGard 2008 Banner Student Letter Generation Workbook
Page 60

Question 11
The Letter blocks on what Student forms can also be used to add letters to the system?
Admissions Form (SAAADMS)
Admission Decision Form (SAADCRV)
© SunGard 2008 Banner Student Letter Generation Workbook
Page 61
Downloaded Letter Set Up
Section goal
The goal of this section is to outline the setup process and detail the procedures to set up your Banner system to handle Letter Generation at your institution for downloaded letters.
Objectives
In this section you will learn how to create the rules, codes, and set parameters used to generate downloaded:
o bulk letters
o award letters
o postcard information
o labels
© SunGard 2008 Banner Student Letter Generation Workbook
Page 62

Rules and Validation Forms Used in Letter Generation
Introduction
Before Banner can process Letter Generation, there are several forms and rules that need to be set or created.
Rule and validation forms
These forms are used to set the rules and parameters in Banner for handling generated letters.
Form Description Banner Name
Population Selection Definition Rules GLRSLCT
System Indicator Validation GTVSYSI
Application Definition Rules GLRAPPL
Paragraph Code Validation GTVPARA
Letter Code Validation GTVLETR
Variable Rules Definition GLRVRBL
© SunGard 2008 Banner Student Letter Generation Workbook
Page 63

Population Selection Definition Rules
Description
The Population Selection Definition Rules Form (GLRSLCT) defines a Population Selection, which is a set of rules used to select IDs from the Banner database for reports, processes and letters.
Note: Knowing how to define a population is a prerequisite to this course, and is not covered in this workbook.
Banner form
© SunGard 2008 Banner Student Letter Generation Workbook
Page 64

System Indicator Validation
Description
The System Indicator Validation Form (GTVSYSI) defines codes that identify the Banner applications used at your institution.
Banner form
© SunGard 2008 Banner Student Letter Generation Workbook
Page 65

Creating an Application
Introduction
The Application Definition Rules Form (GLRAPPL) defines an application, which is a functional area that controls Population Selections, populations, and variables. You can use this form to create a unique application.
Banner form
Steps
You defined the letters required by your organization but would like to build them in a new application. You also have determined that you need to use the name prefix in some letters. You have researched where this data is stored in the system and you know the name of the table (SPBPERS) and the data element (SPBPERS_NAME_PREFIX). Follow these steps to reate an application. c
1. Access the Application Inquiry Form (GLIAPPL) to review the list of applications already defined.
2. Access the Application Definition Rules Form (GLRAPPL).
3. Enter XXX_APPLICATION in the Application field.
Example: XXX = your initials. Therefore, James C. Quick would enter JCQ_APPLICATION.
4. Perform a Next Block function.
5. Enter [Your Name] Application in the Description field.
© SunGard 2008 Banner Student Letter Generation Workbook
Page 66

Example: James Quick would enter James Quick’s Application.
6. Perform a Next Block function.
7. Enter the code applicable to your system in the System field:
A Alumni F Finance G General H Human Resources R Financial Aid S Student.
Note: No rules need to be entered in the Application Level Rules block.
8. Click the Save icon.
9. Click the Exit icon.
© SunGard 2008 Banner Student Letter Generation Workbook
Page 67

Creating a Paragraph Code
Introduction
The Paragraph Code Validation Form (GTVPARA) is used to define codes that identify the paragraphs used in Banner letters. Paragraph codes can be assigned to letters on the Letter Process Form (GUALETR).
Banner form
© SunGard 2008 Banner Student Letter Generation Workbook
Page 68

Steps
Follow these steps to create your first paragraph code using your initials.
Note: You can use the same paragraph for either printed letters or downloaded letters. The system will extract only variables from the paragraphs when using the download feature.
Warning: Poll the other participants in the class to prevent duplicate paragraph codes. Choose other initials if necessary.
1. Access the Paragraph Code Validation Form (GTVPARA).
2. Enter and execute a query to determine that the paragraph code you would like to create does not already exist.
3. Perform an Insert Record function to enter a new code.
4. Enter your paragraph code in the Code field, starting with your initials.
Example: James Quick would create paragraph JQ_DLP.
5. Enter a description for the code in the Description field.
6. Enter text that describes your paragraph Comment field.
7. Click the Save icon.
8. Click the Exit icon.
© SunGard 2008 Banner Student Letter Generation Workbook
Page 69

Creating a Letter Code
Introduction
The Letter Code Validation Form (GTVLETR) is used to define codes that identify the letters you can generate in Banner. Examples of letters include acknowledgement, applicant, and financial aid offer letters.
Banner form
Steps
Follow these steps to create the letter code.
1. Access the Letter Code Validation Form (GTVLETR).
2. Enter and execute a query to ensure that the letter code you intend to create does not already exist.
Note: Search for the code XX_ DLP. (XX = your initials)
3. Click the Insert Record icon.
4. Enter the name of your letter in the Letter Code field.
Example: James Quick would enter JQ_DLP.
5. Enter a name for your letter in the Description field, using your name in the text.
Example: James Quick would enter James Quick's Download Letter.
© SunGard 2008 Banner Student Letter Generation Workbook
Page 70

6. Leave the Allow Duplicates checkbox empty. Checking this box will allow duplicates of this letter to be requested or produced for a person.
Note: If the Allow Duplicates checkbox is empty, you may enter an alternate letter code. The alternate letter code will be created for a person if they are selected to receive a duplicate letter via the Dues Acknowledgement Process (AAPACKN) or the Pledge Gift Acknowledgement Process (AGPACKN), or if they have already received the letter in the primary key field.
Note: If the Allow Duplicates checkbox is empty and the Alternate Letter Code field is empty, no letter is generated for an ID selected to receive a duplicate letter.
7. Click the Save icon
8. Click the Exit icon
© SunGard 2008 Banner Student Letter Generation Workbook
Page 71

Creating Simple Variable Rules
Introduction
The Variable Rules Definition Form (GLRVRBL) is used to define, maintain, and copy a variable. A variable is a specific piece of data in the database and the set of rules used to select that data. Variables are used to insert variable data into letters and reference subqueries in application rules, population selection rules, and variable rules.
Banner form
Variables
A variable is a specific piece of data in the database and the set of rules used to select that data. Variables are used to insert variable data into letters and reference subqueries in application rules, population selection rules, and variable rules. Any data element associated with an ID can be defined as a variable.
Note: Each variable has to be created only once.
© SunGard 2008 Banner Student Letter Generation Workbook
Page 72

Steps
Follow these steps to create a variable.
1. Access the Variable Rules Definition Form (GLRVRBL).
2. Enter your application name in the Application field.
3. Enter the name for your variable in the Variable field, starting with an asterisk (*).
Note: For easy identification, include your initials.
Example: James Quick would create current ID variable *JQ_ID.
4. Perform a Next Block function.
5. Enter a description for your variable in the Description field.
6. Click the down arrow next to the Type field, to designate this variable as First, meaning the first variable to be processed by GLBLSEL. You will have to choose one variable to use as a first. We recommend your first variable to be a field that will always contain data; for example, first name or last name.
Note: Depending on how you are logged into the system, the Alternate Logon Verification Form (GUAUIPW) may or may not display. If it does, enter the alternate user ID and alternate password as instructed. You are returned to the Variable Rules Definition Form.
7. Perform a Next Block function.
8. Enter SPVADDS_STAT_CODE in the Select field. This is the prefix column from the SPVADDS table.
9. Enter SPVADDS in the From field. This is the table name.
10. Enter Address State Code in the Description field. This is a description for the logic in the sequence.
Note: No values need to be entered in the Rules block.
11. Click the Save icon.
12. Click the Exit icon.
Note: You see the message Performing Variable Compilation, please wait. If your variable is compiled successfully, the form will exit automatically.
© SunGard 2008 Banner Student Letter Generation Workbook
Page 73

Note: If your variable does not compile successfully, an error message displays. An acknowledgement is required. The Process Results Form (GJARSLT) displays and the error that caused the compilation to terminate displays along with any other previous error messages.
Note: Using the steps above, create variables for the other data elements that you are using in your letter. Remember to click the Save icon and click the Exit icon after creating each variable so your variables compile successfully.
List of variables
Here is a list of variables that you may find useful as well as what you will enter in the Select and From fields in the Variable Rules Definition Form (GLRVRBL).
Note: XX equals the initials you chose to enter.
Variable Select and From Fields
Today’s Date:
*XX_DATE
SELECT: RTRIM(TO_CHAR(SYSDATE,’Month’)||’’||TO_CHAR(SYSDATE,’DD,YYYY’)
FROM: DUAL
*Note The SELECT line should be continuous
First Name: *XX_FNAM
SELECT: SPVADDS_FIRST_NAME FROM: SPVADDS
Middle Name: *XX_MI
SELECT: SPVADDS_MI FROM: SPVADDS
Last Name: *XX_LNAM
SELECT: SPVADDS_LAST_NAME FROM: SPVADDS
Prefix: *XX_PFX
SELECT: SPBPERS_NAME_PREFIX FROM: SPBPERS
Suffix: *XX_SUFF
SELECT: SPBPERS_NAME_SUFFIX FROM: SPBPERS
© SunGard 2008 Banner Student Letter Generation Workbook
Page 74
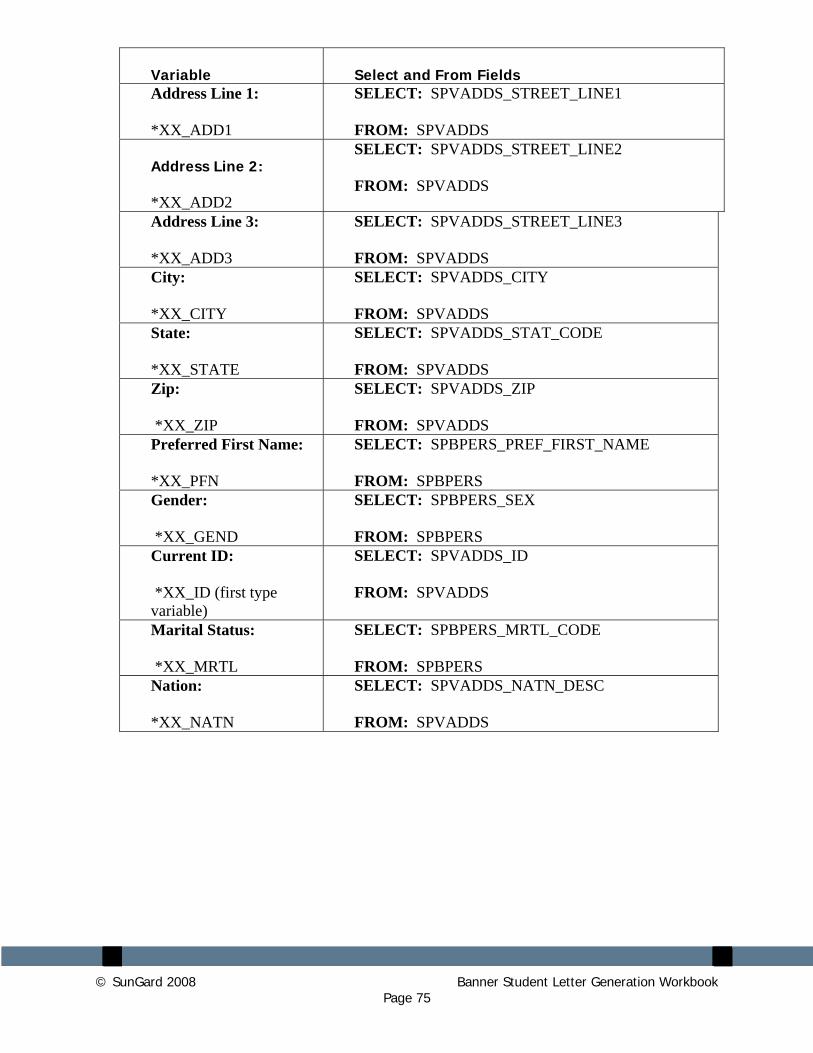
Variable Select and From Fields Address Line 1: *XX_ADD1
SELECT: SPVADDS_STREET_LINE1 FROM: SPVADDS
Address Line 2: *XX_ADD2
SELECT: SPVADDS_STREET_LINE2 FROM: SPVADDS
Address Line 3: *XX_ADD3
SELECT: SPVADDS_STREET_LINE3 FROM: SPVADDS
City: *XX_CITY
SELECT: SPVADDS_CITY FROM: SPVADDS
State: *XX_STATE
SELECT: SPVADDS_STAT_CODE FROM: SPVADDS
Zip: *XX_ZIP
SELECT: SPVADDS_ZIP FROM: SPVADDS
Preferred First Name: *XX_PFN
SELECT: SPBPERS_PREF_FIRST_NAME FROM: SPBPERS
Gender: *XX_GEND
SELECT: SPBPERS_SEX FROM: SPBPERS
Current ID: *XX_ID (first type variable)
SELECT: SPVADDS_ID FROM: SPVADDS
Marital Status: *XX_MRTL
SELECT: SPBPERS_MRTL_CODE FROM: SPBPERS
Nation: *XX_NATN
SELECT: SPVADDS_NATN_DESC FROM: SPVADDS
© SunGard 2008 Banner Student Letter Generation Workbook Page 75
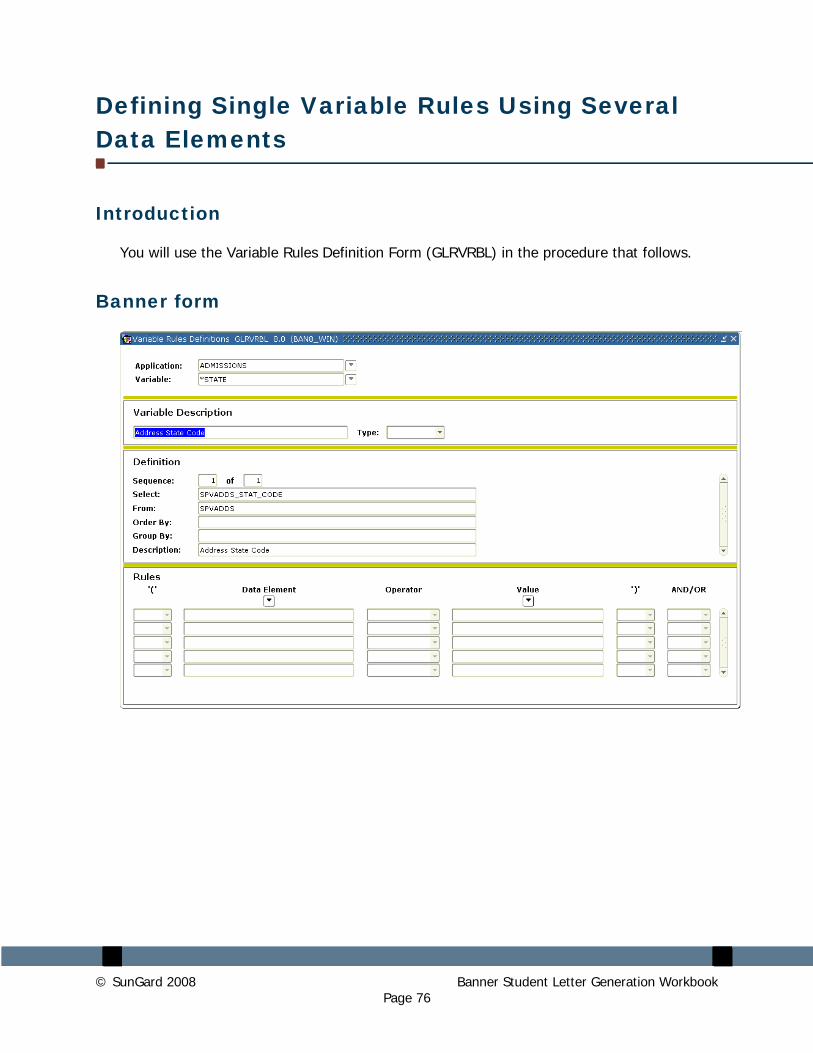
Defining Single Variable Rules Using Several Data Elements
Introduction
You will use the Variable Rules Definition Form (GLRVRBL) in the procedure that follows.
Banner form
© SunGard 2008 Banner Student Letter Generation Workbook
Page 76

Steps
You have determined that you need to use the full name in some letters. You know the name of the table and where this data is stored. Follow these steps to define a variable rule.
1. Access the Variable Rules Definition Form (GLRVRBL).
2. Enter a name for your variable in the Variable field. Remember to start your variable name with an asterisk (*).
Note: Use the variable name *NAME_FULL_W_PREFIX.
3. Enter a description for your variable in the Description field.
Note: This field is limited to 30 characters including spaces.
4. Leave the Type field empty because your variable is not a special variable type.
5. Perform a Next Block function.
6. Enter the following in the Select field In the Definition block:
SPBPERS_NAME_PREFIX||' '||SPVADDS_FIRST_NAME||' '||SPVADDS_LAST_NAME||', '||SPBPERS_NAME_SUFFIX
Note: Enter this line of rules on one line. There are spaces between the single quotes (' ') and after the comma (,). You are using SPVADDS for the first and last names so that you retrieve only the current name.
7. Navigate to the From field.
8. Enter SPBPERS.
9. Enter a description for this variable.
Example: Name Prefix.
10. Click the Save icon.
11. Click the Exit icon.
Note: See the previous lesson for messages that may display.
Note: If you are creating an actual select statement, you also need to specify that the PIDM in SPBPERS equal the PIDM in SPVADDS. However, unless you specify that your variable is type M (requiring manual PIDM joins), the system
© SunGard 2008 Banner Student Letter Generation Workbook
Page 77

creates the required PIDM join statements for you when the variable is compiled.
© SunGard 2008 Banner Student Letter Generation Workbook
Page 78

Copying the Rules From an Existing Variable to a New One
Introduction
You will use the Variable Rules Definition Form (GLRVRBL) to copy the rules from an existing variable to a new one.
Banner form
Scenario
You determine that you need to use the first name in some letters. You have researched this data element and know that it already is defined within the application Admissions.
© SunGard 2008 Banner Student Letter Generation Workbook
Page 79

Steps
Follow these steps to copy a rule.
1. Access the Variable Rules Definition Form (GLRVRBL).
2. Enter the code for Admission. in the Application field.
3. Review the list of variables defined within the application. Select the variable *FNAME.
Note: You will copy the rules for the variable FNAME to the application you created and defined in the previous exercises.
4. Select the Copy Variable option from the Options menu.
5. Enter the application code you created in the Application field of the Copy To block, or select it from the List of Values.
6. Enter the new variable name in the Variable field.
Note: Remember to put an asterisk at the beginning.
7. Click the Save icon.
Note: You automatically return to the Variable Rules Definition Form (GLRVRBL).
8. Change the description, definition, or rules, if necessary.
9. Click the Save icon.
10. Click the Exit icon.
11. Copy all of the variables used in your sample letter from the application Admissions to your personal application.
Note: Don’t forget to save each time you copy or the new variable does not compile. All saved variables will be compiled at one time when you exit.
© SunGard 2008 Banner Student Letter Generation Workbook
Page 80

Variables
Use these variables.
*NAME_PREFIX *STATE
*MNAME *ZIPC
*LNAME *NATN
*NAME_SUFFIX *PNAM
*STR1 *GENDER
*STR2 *ID
*STR3 *MRTL
*CITY
© SunGard 2008 Banner Student Letter Generation Workbook
Page 81

Creating a Variable Using a Join
Introduction
This time you need to use the marital status description in some letters. You have researched this data element and know that the code for a person's marital status is stored in the table SPBPERS but that the description is stored in the table STVMRTL.
Banner form
Steps
Follow these steps to create a variable using a join.
1. Access the Variable Rules Definition Form (GLRVRBL).
2. Enter your application in the Application field.
Note: Make sure that the application code represents your personal application.
© SunGard 2008 Banner Student Letter Generation Workbook
Page 82

3. Enter *MRTL_DESC in the Variable field to create a new variable code for marital status.
4. Perform a Next Block function.
5. Enter Marital Status Description in the Description field.
6. Perform a Next Block function.
7. Enter STVMRTL_DESC in the Select field of the Definition block.
8. Enter STVMRTL, SPBPERS in the From field.
Note: You must list all tables that are referenced in the From field.
9. Enter a description for this line of your variable in the Description field.
Example: Marital Status Description.
10. Click the Save icon.
11. Perform a Next Block function.
12. Enter these values in the Rules block.
Data Element SPBPERS_MRTL_CODE Operator = Value STVMRTL_CODE
13. Leave all other fields empty.
14. Click the Save icon.
15. Click the Exit icon.
Note: Your join was defined in the Rules block. Your rule stated that the marital status description you wanted was the description of the code for the person. In this case, you are required to perform the join because only PIDM joins are performed automatically.
Result: You see the message Performing Variable Compilation, please wait. If your variable is compiled successfully, you will exit the form automatically.
© SunGard 2008 Banner Student Letter Generation Workbook
Page 83

Self Check
Directions
Use the information you have learned in this workbook to complete this self-check activity.
Question 1
How many characters can be used when creating paragraph codes?
Question 2
Is a comment required to create a paragraph?
Question 3
On what form would you define a variable?
© SunGard 2008 Banner Student Letter Generation Workbook
Page 84

Answer Key for Self Check
Question 1
How many characters can be used when creating paragraph codes?
Up to seven characters can be used to create a paragraph code.
Question 2
Is a comment required to create a paragraph?
No, a comment is not required. However, it should be used to describe what is in your paragraph. The comment can be 240 characters in length.
Question 3
On what form would you define a variable?
A variable is defined on the Variable Rules Definition Form (GLRVRBL).
© SunGard 2008 Banner Student Letter Generation Workbook
Page 85

Downloaded Letter Day-to-Day Operations
Section goal
The goal of this section is to explain the day-to-day or operational procedures to generate bulk letters at your institution.
Objectives
At the end of this section, you will be able to
• create the structure of your letter
• extract the population you have identified
• generate the letter
• print the letter.
© SunGard 2008 Banner Student Letter Generation Workbook
Page 86

Process Introduction
About the process
Initially when you are creating letters and paragraphs, you will structure your letter and create your paragraphs to attach to your letter.
Once this has been accomplished, when you need letters created, you will start with step 4 (identify the population to receive the letter).
Process diagram
© SunGard 2008 Banner Student Letter Generation Workbook
Page 87

What happens
The stages of the process are described in this table.
Stage Description
Administrator
1 Dissect the letter into paragraphs.
2 Lay out the structure of your letter.
3 Create your letter using rule and validation forms.
4 Identify the population you wish to select for your letter using Population Selection, Pending Mail, or Manual Selection.
5 Extract the variables.
6 Generate your letter.
7 Send your letter to the printer.
© SunGard 2008 Banner Student Letter Generation Workbook
Page 88

Defining the Contents of a Paragraph
Introduction
The Paragraph Form (GUAPARA) is used to build a paragraph that can be inserted in letters on the Letter Process Form (GUALETR). A paragraph can include text, variables, and formatting commands.
Banner form
About the letters
All letters to be downloaded must have at least one paragraph defined. Additional paragraphs may be created for organizing variables to be downloaded.
Paragraph example
The paragraph you define will contain the following information:
Today’s Date
Mr. James Quick (your name)
Street Address Line 1
Street Address Line #2
Street Address Line #3
City, State, Zip Code
Dear James,
© SunGard 2008 Banner Student Letter Generation Workbook
Page 89

(Text would go here. The text is defined in the mail merge letter of the chosen word processing application, such as Microsoft Word or Corel WordPerfect.)
Steps
Follow these steps to define the contents of the paragraph you created previously.
1. Access the Paragraph Form (GUAPARA).
2. Use the variable inserts found in the table that follows.
Note: The cursor does not advance to the next line if an invalid variable is entered.
Note: If you plan to download data to support your word processing needs see the topic, Using the Letter Generation Print Report.
Example: When you see XX, XX = your initials.
Fields: downloaded letter
These fields are used when defining a downloaded letter example.
Field Name Description Value
Paragraph
Enter a paragraph code (up to 7 characters)
XX_DLP (XX = your initials)
Variables Enter only the variables for the contents of your paragraph (up to 60 characters each line)
Note: XX_ID is a first type variable that will eliminate multiples.
When using downloaded letters, the order of the variables in the paragraphs is not important. The variable extract into the word processing software will resequence the variables into alphabetical order.
*XX_ID *XX_PFX *XX -FNAM *XX_MI *XX_LNAM *XX_ADD1 *XX_ADD2 *XX_ADD3 *XX_CITY *XX_STAT *XX_ZIP *XX_PFN
© SunGard 2008 Banner Student Letter Generation Workbook
Page 90

Field Name Description Value
Activity Date System generated [today's date]
© SunGard 2008 Banner Student Letter Generation Workbook Page 91

Reviewing and Changing the Contents of a Paragraph
Introduction
The Paragraph Form (GUAPARA) is used to build a paragraph that can be inserted in letters on the Letter Process Form (GUALETR). A paragraph can include text, variables, and formatting commands.
Banner form
Scenario
After printing a sample copy of the letter you plan to send, you realize that you did not include the nation in the address format. You need to change the paragraph to include the variable for nation.
© SunGard 2008 Banner Student Letter Generation Workbook
Page 92

Steps
Follow these steps to make the changes.
1. Access the Paragraph Form (GUAPARA).
2. Enter the paragraph code created in the previous lesson in the Paragraph field.
3. Perform a Next Block function.
4. Click the Insert Record icon.
5. Add the nation code variable.
6. Click the Save icon.
7. Click the Exit icon.
© SunGard 2008 Banner Student Letter Generation Workbook
Page 93
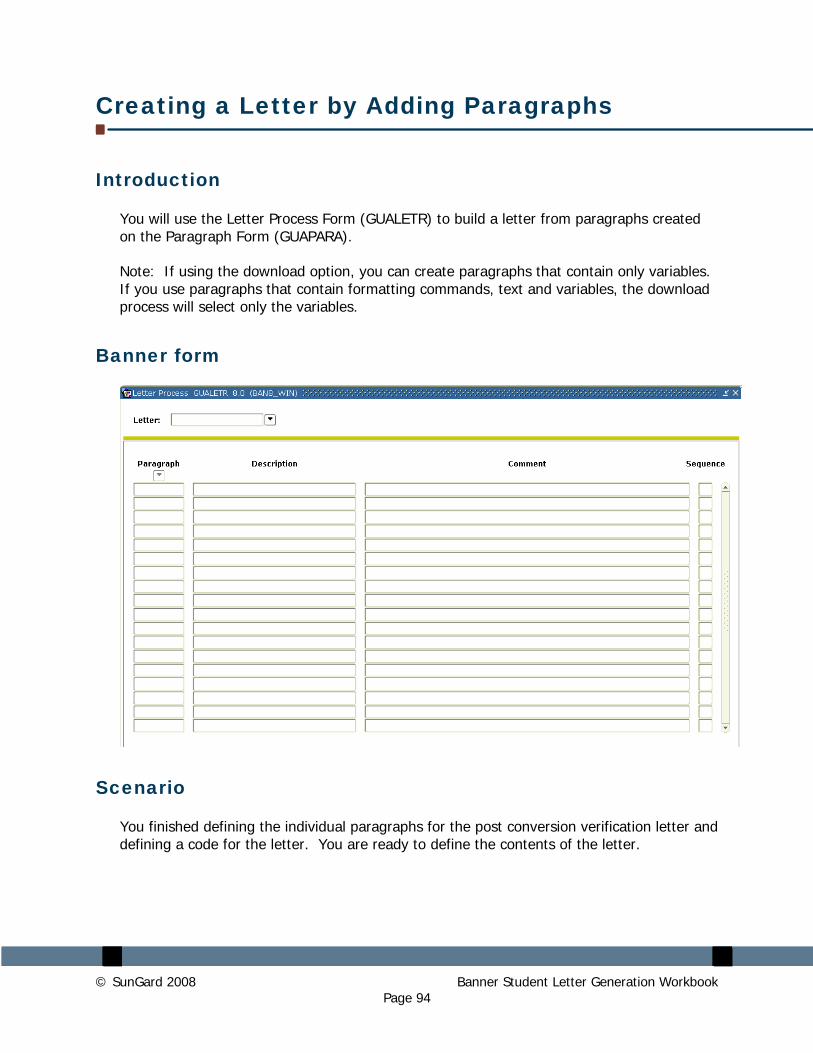
Creating a Letter by Adding Paragraphs
Introduction
You will use the Letter Process Form (GUALETR) to build a letter from paragraphs created on the Paragraph Form (GUAPARA).
Note: If using the download option, you can create paragraphs that contain only variables. If you use paragraphs that contain formatting commands, text and variables, the download process will select only the variables.
Banner form
Scenario
You finished defining the individual paragraphs for the post conversion verification letter and defining a code for the letter. You are ready to define the contents of the letter.
© SunGard 2008 Banner Student Letter Generation Workbook
Page 94

Steps
Follow these steps to complete the process.
1. Access the Letter Process Form (GUALETR). Here you will combine your paragraph codes to form a letter.
2. Enter values found in the table that follows for a downloaded letter.
3. Click the Save icon.
4. Click the Exit icon.
Fields: downloaded letter
These fields are used when adding paragraphs to a downloaded letter.
Field Name Description Value
Letter
Define a letter code (up to 15 characters)
XX_DLP (XX = your initials)
Paragraph List the paragraph codes (up to 7 characters)
XX_DLP (XX = your initials)
Description 30 character description System populated
[my] paragraph code
Sequence 5 digit number Sequence number for paragraph to appear in letter
1
© SunGard 2008 Banner Student Letter Generation Workbook
Page 95

Using the Letter Extract Process
Introduction
The Letter Extract Process (GLBLSEL) extracts variable data from the Banner database to be included in the download. This COBOL program is run before executing the Letter Generation Print Process (GLRLETR). GLBLSEL can be run for all pending letters (letters waiting to be printed) for a letter code or for a letter code for a specific population. This form will also inform users if a letter cannot be created because the ID did not match the selection or address criteria. The log file will list the names and IDs for those who did not receive the letter because of the missing address or because other non-address selection criteria was not met.
Banner form
© SunGard 2008 Banner Student Letter Generation Workbook
Page 96

Overview
You finished setting up your letter. It is time to produce your letters. The Letter Extract Process (GLBLSEL) extracts the data as specified in the variables that are in the requested letter. The extracted data is inserted into the Letter Collector Table (GLRCOLR).
Parameters
These parameters are needed for the procedure that follows, Parameters Values block.
Req? Parameter Description
01 Application Select List of Values to find your application. James Quick would select JCQ_APPLICATION.
02 Process Pending Letters N is the default. N only processes a specific letter. Y produces all pending letters for the letter code entered in the next parameter. Procedurally, pending letters should be printed for only a specific letter code. If you select Y, you cannot use the Population Selection parameters.
© SunGard 2008 Banner Student Letter Generation Workbook
Page 97
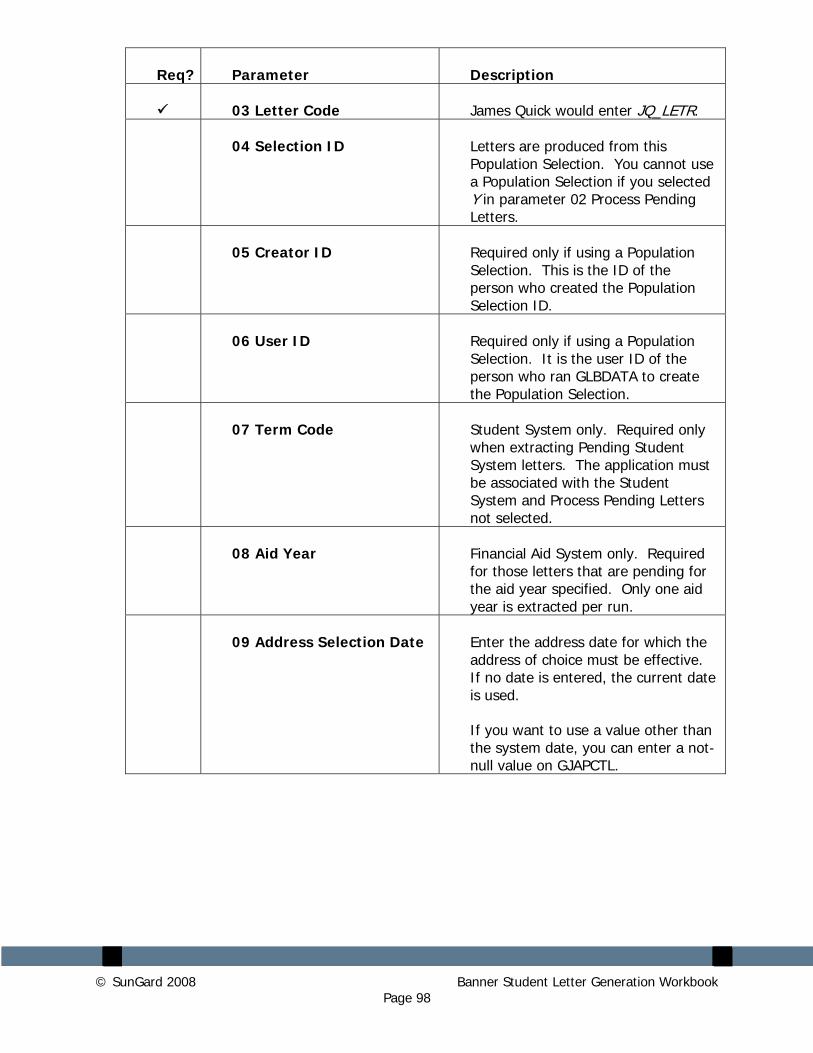
Req? Parameter Description
03 Letter Code James Quick would enter JQ_LETR.
04 Selection ID Letters are produced from this Population Selection. You cannot use a Population Selection if you selected Y in parameter 02 Process Pending Letters.
05 Creator ID Required only if using a Population
Selection. This is the ID of the person who created the Population Selection ID.
06 User ID Required only if using a Population
Selection. It is the user ID of the person who ran GLBDATA to create the Population Selection.
07 Term Code Student System only. Required only
when extracting Pending Student System letters. The application must be associated with the Student System and Process Pending Letters not selected.
08 Aid Year Financial Aid System only. Required
for those letters that are pending for the aid year specified. Only one aid year is extracted per run.
09 Address Selection Date Enter the address date for which the
address of choice must be effective. If no date is entered, the current date is used.
If you want to use a value other than the system date, you can enter a not-null value on GJAPCTL.
© SunGard 2008 Banner Student Letter Generation Workbook Page 98

Req? Parameter Description
10 Address Type The address selection is a three-character field. The first character is the priority of the address and the remaining two characters are the address type from the Address Type Code Validation Form (STVATYP). Example: 1MA, 2PR, 3SE In this example, the mailing address (MA) is the first choice and the permanent address (PR) is the send choice. Each type must be entered on a separate line. Use the Insert Record function to create a new line. Enter parameter number 10 and the description defaults. Enter the new address type in the Values field.
11 Detailed Error Report Valid values are Y or N.
12 Detailed Execution Report
Valid values are Y or N.
© SunGard 2008 Banner Student Letter Generation Workbook Page 99

Steps
Follow these steps to run the Letter Extract Process.
1. Access the Letter Extract Process (GLBLSEL).
2. Navigate to the Printer Control block and select the printer that you are using in the Printer field.
3. Navigate to the Parameter Values block and enter the parameters for the job submission. Use the table on the previous pages.
4. Navigate to the Submission block.
5. Select the Submit radio button, if necessary.
6. Click the Save icon.
Note: Note the number in the auto hint line after saving.
7. Review the output by selecting Review Output from the Options menu.
Note: Use the number you noted in the previous step to review the output of the GLBSEL run. By reviewing the output, you can see the IDs that did not have addresses and will not have letters created for them.
8. Click the Exit icon.
© SunGard 2008 Banner Student Letter Generation Workbook
Page 100

Using the Letter Generation Print Report
Introduction
After you have run the Letter Generation Extract Process (GLBLSEL), the Letter Generation Print Report (GLRLETR) needs to be executed.
You may
• generate either letters or a file that can be downloaded to Word or WordPerfect
• print a summary report
• update the General Mail Table (GURMAIL).
The Letter Generation Print Report (GLRLETR) is used for printing or downloading a letter. GLRLETR reads the results of the extract process (GLBLSEL) and combines the results with the format of the letter as defined in GUALETR to create the printed material or extract file.
Banner form
© SunGard 2008 Banner Student Letter Generation Workbook
Page 101

Parameters
These parameters are needed for the procedure that follows, Parameters Values block.
Req? Parameter Description
01 Application Code
Select the List of Values to find your application.
02 Word Processor Extract Option
Enter the number corresponding to the extract needed:
• 0 – Banner “printed” letter (default)
• 1 – Microsoft Word “download” file
• 2 – WordPerfect “download” file
Choosing 1 or 2 produces an output file that contains a header record containing all of the variables that are used in the letter and the records for each ID in the population separated by commas.
Note: If this option is 1 (Word) or 2 (WordPerfect), you do not need a #DT paragraph.
03 Print ALL Pending Letters
Enter Y to print all pending letters for the application code.
Enter N to print a specific letter. The default value is N.
04 Letter Code
Enter the letter code of the letter to be printed.
05 Sort Variable
To sort the printed letters in a specific order, enter the name of a variable that determines the order. The sort variable must be contained in the letter.
06 Term Code
Required for the Student System only. All other systems use the default value of 999999.
© SunGard 2008 Banner Student Letter Generation Workbook
Page 102

Req? Parameter Description
07 Module Code
Enter the one character module code associated with the letter being produced. This code updates the print date of published materials in the mail table that matches the module code entered and produces a list of the recipients and their materials in the report control information.
Published materials are items that are sent to individuals but are not printed by Banner Letter Generation, such as college catalogs, sports brochures, and preprinted forms.
A Admissions B Billing C Constituent G Gifts/Pledges F Registration H History R Recruiting
08 Audit Indicator
Enter Y to run in audit mode. One sample letter is produced for each letter code extracted. No updates are done.
Enter N to produce letters and a summary report. It updates the print dates for the generated letters existing on the Mail Query Form (GUIMAIL) or creates a new entry. It also deletes all the data in the Letter Collector Table (GLRCOLR) for the letters selected to print.
09 Free Format Date 1
Used only for producing letters via Banner. It is not used if you are performing an extract for Microsoft Word or WordPerfect.
Enter a free formatted date to be printed on the requested letter for variable *DATE1. *DATE1 can be a variable on a letter that has not been built on the Variable Rules Definition Form (GLRVRBL). Its value becomes what is entered for the parameter.
© SunGard 2008 Banner Student Letter Generation Workbook Page 103

Req? Parameter Description
10 Free Format Date 2
Used only for producing letters via Banner. It is not used if you are performing an extract for Microsoft Word or WordPerfect.
Enter a free formatted date to be printed on the requested letter for variable *DATE2. *DATE2 can be a variable on a letter that has not been built on the Variable Rules Definition Form (GLRVRBL). Its value becomes what is entered for the parameter.
11 Free Format Date 3
Used only for producing letters via Banner. It is not used if you are performing an extract for Microsoft Word or WordPerfect.
Enter a free formatted date to be printed on the requested letter for variable *DATE3. *DATE3 can be a variable on a letter that has not been built on the Variable Rules Definition Form (GLRVRBL). Its value becomes what is entered for the parameter.
12 Aid Year Code
Required only for the Financial Aid System.
© SunGard 2008 Banner Student Letter Generation Workbook Page 104

Steps
Follow these steps to run the Letter Generation Print Report.
1. Access the Letter Generation Print Report (GLRLETR).
2. Navigate to the Printer block and enter DATABASE in the Printer field.
Note: To do a download of data, you would always want to use DATABASE.
Note: You can review the output on the Save Output Review Form (GJIREVO) where job outputs can be viewed regardless of file extension. The log file can be viewed for GLBLSEL. The log, list and doc (for mail merge) files can be viewed for GLRLETR. These files can be written to the database, if so requested, and can be displayed or saved to your local desktop machine.
3. Navigate to the Parameter Values block to enter the parameters for your job. Use the table on the previous pages.
4. Navigate to the Submission block.
5. Select the Submit radio button, if necessary.
6. Click the Save icon.
7. Click the Exit icon.
© SunGard 2008 Banner Student Letter Generation Workbook
Page 105

Summary
Let’s review
As a result of completing this section of the workbook, you have
• defined the contents of a paragraph
• reviewed and change the contents of a paragraph
• created a letter by adding paragraphs
• defined the rules for a single variable using several data elements
• copied the rules from an existing variable to a new one
• created a variable using a join
• generated a print report.
Now you are ready to create code validation forms and control and rules forms, and set the values needed on these forms. The selections you make will be dependent on your organization’s needs.
© SunGard 2008 Banner Student Letter Generation Workbook
Page 106

Self Check
Directions
Use the information you have learned in this workbook to complete this self-check activity.
Question 1
The formatting command #CONCAT x places ‘x’ next to the preceding word without inserting a space between them.
True or False
Question 2
What does a formatting command start with?
Question
What does a variable start with and where should it be positioned?
Question 4
Why do you use the Print Command field?
Question 5
What function does the sequence number perform?
Question 6
What is the difference between using SPVADDS verses SPRIDEN?
Question 7
Can I copy a variable into the same application?
© SunGard 2008 Banner Student Letter Generation Workbook
Page 107

Question 8
If all tables referenced in the variable must be listed in the From field, why aren’t they joined in the rules?
Question 9
How does selecting a value in the variable sub-query work differently here than in other parts of the system?
Question 10
What is the function of the Mail Query Form (GUIMAIL)?
Question 11
The Letter blocks on what Student forms can also be used to add letters to the system?
© SunGard 2008 Banner Student Letter Generation Workbook
Page 108

Answer Key for Self Check
Question 1
The formatting command #CONCAT x places ‘x’ next to the preceding word without inserting a space between them. (True or False).
True
Question 2
What does a formatting command start with?
A formatting command always starts with the pound (#) sign.
Question 3
What does a variable start with and where should it be positioned?
A variable always starts with an asterisk (*) and is placed in the first position of a line.
Question 4
Why do you use the Print Command field?
This field identifies the alternate print command for the associated letter. If you wanted to override the default print command to Portrait, you would enter PL (Print Landscape). This is for Banner generated letters only.
Question 5
What function does the sequence number perform?
The sequence number tells Banner the order in which you would like your paragraphs printed in the letter.
© SunGard 2008 Banner Student Letter Generation Workbook
Page 109

Question 6
What is the difference between using SPVADDS verses SPRIDEN?
SPVADDS is a view. It is a collection of data from various tables. SPRIDEN is a table where the actual data resides.
Question 7
Can I copy a variable into the same application?
Yes, you can copy a variable into any application. However, if you copy it into the same application, rename the variable.
Question 8
If all tables referenced in the variable must be listed in the From field, why aren’t they joined in the rules?
PIDM joins will automatically occur for the tables referenced in the From field. All other joins must be done manually in the rules.
Question 9
How does selecting a value in the variable sub-query work differently here than in other parts of the system?
Normally, when you select a value, only the actual value is returned. In this case, the value was returned, prefixed with "(*SUB" and followed by ")".
Question 10
What is the function of the Mail Query Form (GUIMAIL)?
The Mail Query Form (GUIMAIL) is used to display and maintain correspondence with a person. This is a display-only form – you can’t update correspondence here. It also displays all letters associated with the person, regardless of system (i.e., Student, Alumni, Financial Aid, etc.).
© SunGard 2008 Banner Student Letter Generation Workbook
Page 110

© SunGard 2008 Banner Student Letter Generation Workbook Page 111
Question 11
The Letter blocks on what Student forms can also be used to add letters to the system?
Admissions Form (SAAADMS)
Admission Decision Form (SAADCRV)
Appendix
Section goal
The purpose of this section is to provide reference materials related to this workbook.
© SunGard 2008 Banner Student Letter Generation Workbook
Page 112

Forms Job Aid
Form Full Name Use this Form to... GLRSLCT Population Selection Definition Rules define, maintain, and copy a population selection. A population
selection is a set of rules used to select IDs from the Banner database for reports, processes, and letters. For example, you can use a population selection to select a group of applicants for an orientation letter.
GTVSYSI System Indicator Validation display codes that identify the various Banner systems used at your institution. Examples of systems include Human Resources, Student, and Finance.
GLRAPPL Application Definition Rules to define and maintain an application. An application is a functional area with similar characteristics that can be applied to population selections, populations, and variables.
GTVLETR Letter Code Validation define codes that identify the letters you can generate in Banner.
GTVPARA Paragraph Code Validation to define codes that identify the paragraphs used in Banner letters. Paragraph codes can be assigned to letters on the Letter Process Form (GUALETR).
GLRVRBL Variable Rules Definition define, maintain, and copy a variable. A variable is a specific piece of data in the database and the set of rules used to select that data.
GLIAPPL Application Inquiry Form display a list of all applications defined on the Application Definition Rules Form (GLRAPPL). An application is a functional area with similar characteristics that can be applied to population selections, populations, and variables.
© SunGard 2008 Banner Student Letter Generation Workbook
Page 113

Form Full Name Use this Form to... GUALETR Letter Process Form build a letter from paragraphs created on the Paragraph Form
(GUAPARA). You must specify the sequence in which the paragraphs appear.
GUAPARA Paragraph Form build a paragraph that can be inserted in letters on the Letter Process Form (GUALETR).
GLBLSEL Letter Extract Process extract variable data from the Banner database to be included when letters are printed, such as names and addresses.
GLRLETR Letter Generation Print Process print or download a letter. GLRLETR reads the results of the extract process (GLBLSEL) and combines the results with the format of the letter as defined in GUALETR to create the printed material or extract file.
GUIMAIL Mail Query Form list printed letters and pending letters (those waiting to be sent) for an ID. The form displays different types of information depending on which Banner system created the letter.
GUAUIPW Alternate Logon Verification Form enter a user ID and password when a job or report requires an extra security check.
© SunGard 2008 Banner Student Letter Generation Workbook Page 114

Terminology
Application
A functional area with similar characteristics that can be applied to population selections and variables. An application “owns” the population selection rules and variables and can be used to define global rules for either.
Formatting commands
Commands that affect the appearance of the letter such as margins, tabs, underlines and centers.
Note: These are not necessary if you are downloading the letter from Banner and using word processing software to produce your final letter.
Letter
Information that is extracted from Banner, that is either formatted into a letter within Banner, or used to create a file exported to a word processing application. A letter can contain a single paragraph or a series of paragraphs.
There are two types of letters:
Downloaded Letter: Letter that is downloaded from Banner to a third-party word processing application (Word or WordPerfect).
Printed Letter: Letter generated within Banner.
Letter code
Code that identifies the name and description of the letter
© SunGard 2008 Banner Student Letter Generation Workbook
Page 115
© SunGard 2008 Banner Student Letter Generation Workbook Page 116
Paragraph
A paragraph within Banner contains text, variables and formatting commands.
Note: If the letter is to be downloaded to Word or WordPerfect, it will contain only variables.
Paragraph code
Code that identifies the name and description of the paragraph
PIDM
Person Identification Master is the internal identifier used to identify a person or a non-person in the Banner database. Multiple external IDs and names may be associated with a single PIDM.
Text
Boilerplate text that surrounds the variables and is formatted via formatting commands.
Note: This is not used if the letter is to be downloaded to Word or WordPerfect.
Variable
Lines of SQL code which are rules for extracting the information that you need.