Banner Document Management Suite
44
Banner Document Management Suite Guide to Scanning and Indexing Page 1 BDMS Guide to Scanning and Indexing Documents, Rev 1 Contents Definitions .................................................................................................................................................. 2 Prepare Documents for Scanning ............................................................................................................. 2 Getting Started - How to Access BDMS .................................................................................................... 3 How to Access BDMS from Catsweb ........................................................................................................ 3 How to Access BDMS from Banner .......................................................................................................... 4 BDMS Welcome Page ............................................................................................................................... 4 BDMS Home Page .................................................................................................................................... 5 How to Create/Run Queries ...................................................................................................................... 6 BDMS Query Overview ............................................................................................................................. 6 How to Create and Run a New BDMS Query ........................................................................................... 7 Methods of entering Query Search Criteria Values ................................................................................... 9 1. Single value search criteria ........................................................................................................... 9 2. Multiple select/Input and enter Search Criteria ........................................................................... 10 3. Search Range Search Criteria .................................................................................................... 10 4. Search List Search Criteria ......................................................................................................... 12 Query Results Window ............................................................................................................................ 13 Printing a Document from the Query Results Window ............................................................................ 14 Scanning Documents to a Batch ............................................................................................................. 15 Select the Scanner .................................................................................................................................. 16 Settings for ALL Scanned Images ........................................................................................................... 17 Settings for Different Types of Images .................................................................................................... 17 Black and White Pages ........................................................................................................................ 17 Pages of Various Colors ...................................................................................................................... 18 Save Settings for Future Use .................................................................................................................. 19 Using Saved Settings: Black and White Duplex .................................................................................. 19 Scan the Pages ....................................................................................................................................... 20 Inspect the Images .................................................................................................................................. 20 Index All Pages to Same ID and Document Code .................................................................................. 21 Index Each Page Separately to Different ID or Code.............................................................................. 21 Batch Processing..................................................................................................................................... 22 Index the First Image ............................................................................................................................... 24 Copy or Move documents from One Cabinet to Another ........................................................................ 26 Attach Pages to an Existing Document ................................................................................................... 27 Pages not yet scanned ........................................................................................................................ 27 Already scanned, still in a batch .......................................................................................................... 27 Delete a Document .............................................................................................................................. 28 Index Fields Incorrect .......................................................................................................................... 28 Document Pages Out of Sequence ..................................................................................................... 29 Rotation - Change and Save ............................................................................................................... 31 Importing an Electronic Document .......................................................................................................... 34 Prepare/Create an Electronic Document ............................................................................................. 34 Check Batch List .................................................................................................................................. 34 Prepare to Import an Electronic Document ............................................................................................. 35 Import an Electronic File .......................................................................................................................... 35 Detailed Scanner Settings - Canon DR-3010C ....................................................................................... 36 Basic Tab ............................................................................................................................................. 36 Brightness Tab and Gamma Settings .................................................................................................. 39 Image Processing Tab ......................................................................................................................... 40 Scanning FAQs ....................................................................................................................................... 41
-
Upload
khangminh22 -
Category
Documents
-
view
1 -
download
0
Transcript of Banner Document Management Suite

Banner Document Management Suite Guide to Scanning and Indexing
Page 1 BDMS Guide to Scanning and Indexing Documents, Rev 1
Contents Definitions .................................................................................................................................................. 2 Prepare Documents for Scanning ............................................................................................................. 2 Getting Started - How to Access BDMS .................................................................................................... 3 How to Access BDMS from Catsweb ........................................................................................................ 3 How to Access BDMS from Banner .......................................................................................................... 4 BDMS Welcome Page ............................................................................................................................... 4 BDMS Home Page .................................................................................................................................... 5 How to Create/Run Queries ...................................................................................................................... 6 BDMS Query Overview ............................................................................................................................. 6 How to Create and Run a New BDMS Query ........................................................................................... 7 Methods of entering Query Search Criteria Values ................................................................................... 9
1. Single value search criteria ........................................................................................................... 9 2. Multiple select/Input and enter Search Criteria ........................................................................... 10 3. Search Range Search Criteria .................................................................................................... 10 4. Search List Search Criteria ......................................................................................................... 12
Query Results Window ............................................................................................................................ 13 Printing a Document from the Query Results Window ............................................................................ 14 Scanning Documents to a Batch ............................................................................................................. 15 Select the Scanner .................................................................................................................................. 16 Settings for ALL Scanned Images ........................................................................................................... 17 Settings for Different Types of Images .................................................................................................... 17
Black and White Pages ........................................................................................................................ 17 Pages of Various Colors ...................................................................................................................... 18
Save Settings for Future Use .................................................................................................................. 19 Using Saved Settings: Black and White Duplex .................................................................................. 19
Scan the Pages ....................................................................................................................................... 20 Inspect the Images .................................................................................................................................. 20 Index All Pages to Same ID and Document Code .................................................................................. 21 Index Each Page Separately to Different ID or Code .............................................................................. 21 Batch Processing ..................................................................................................................................... 22 Index the First Image ............................................................................................................................... 24 Copy or Move documents from One Cabinet to Another ........................................................................ 26 Attach Pages to an Existing Document ................................................................................................... 27
Pages not yet scanned ........................................................................................................................ 27 Already scanned, still in a batch .......................................................................................................... 27 Delete a Document .............................................................................................................................. 28 Index Fields Incorrect .......................................................................................................................... 28 Document Pages Out of Sequence ..................................................................................................... 29 Rotation - Change and Save ............................................................................................................... 31
Importing an Electronic Document .......................................................................................................... 34 Prepare/Create an Electronic Document ............................................................................................. 34 Check Batch List .................................................................................................................................. 34
Prepare to Import an Electronic Document ............................................................................................. 35 Import an Electronic File .......................................................................................................................... 35 Detailed Scanner Settings - Canon DR-3010C ....................................................................................... 36
Basic Tab ............................................................................................................................................. 36 Brightness Tab and Gamma Settings .................................................................................................. 39 Image Processing Tab ......................................................................................................................... 40
Scanning FAQs ....................................................................................................................................... 41
Page 2 BDMS Guide to Scanning and Indexing Documents, Rev 1
Definitions ADF - Automatic Document Feeder on the scanner.
BDM - Banner Document Management is an imaging and electronic document management system for institutions that use Banner products.
Canon DR-3010C - Scanner used for most scanning on campus. Instructions are relevant to most Canon Models.
Document - File or group of files stored in an application and identified by one unique set of index information. Each page of a document is a single object, such as a scanned image file or a word processing document.
Document Type - Category for documents.
Image - A single entity, such as a scanned page, displayed when ready to index.
Index - The set of fields containing information by which documents are associated with an ID.
Page - One sheet of paper, which will become part of a document.
Scanner - A device that scans images for storage as a digital file.
WebXtender - Web access to documents.
Prepare Documents for Scanning
Check for Completeness Verify each page is legible.
Ensure pages are complete: Signature, date stamp, other important items are present and legible.
Check for Social Security Numbers. Ask your supervisor if you are to mark through the entire SSN or all but the last 4 digits. Use a Sharpie or other black marker.
Remove Staples and Paper Clips Staples – remove all staples and paper clips. Fan the pages to ensure they will be pulled through scanner separately.
Check Back of Document Is there anything on the back of any documents that is to be kept? If so, place these documents in a separate stack to run with ADF set to Duplex.
Readability Verify documents are legible, especially pink and yellow NCR paper. Sort any that are barely legible into a separate stack.
Quantity Separate work to be done into small stacks no more than 20 in a stack. With experience, this number can be increased.
BDMS Guide to Scanning and Indexing Documents, Rev 1 Page 3
Getting Started - How to Access BDMS
There are 2 ways to access BDMS:
1. From the Catsweb menu.
2. From Banner.
Both access methods require a BDMS profile, which can be granted by completing a Security Request Form:
https://tim.txstate.edu/securityrequestapplication/
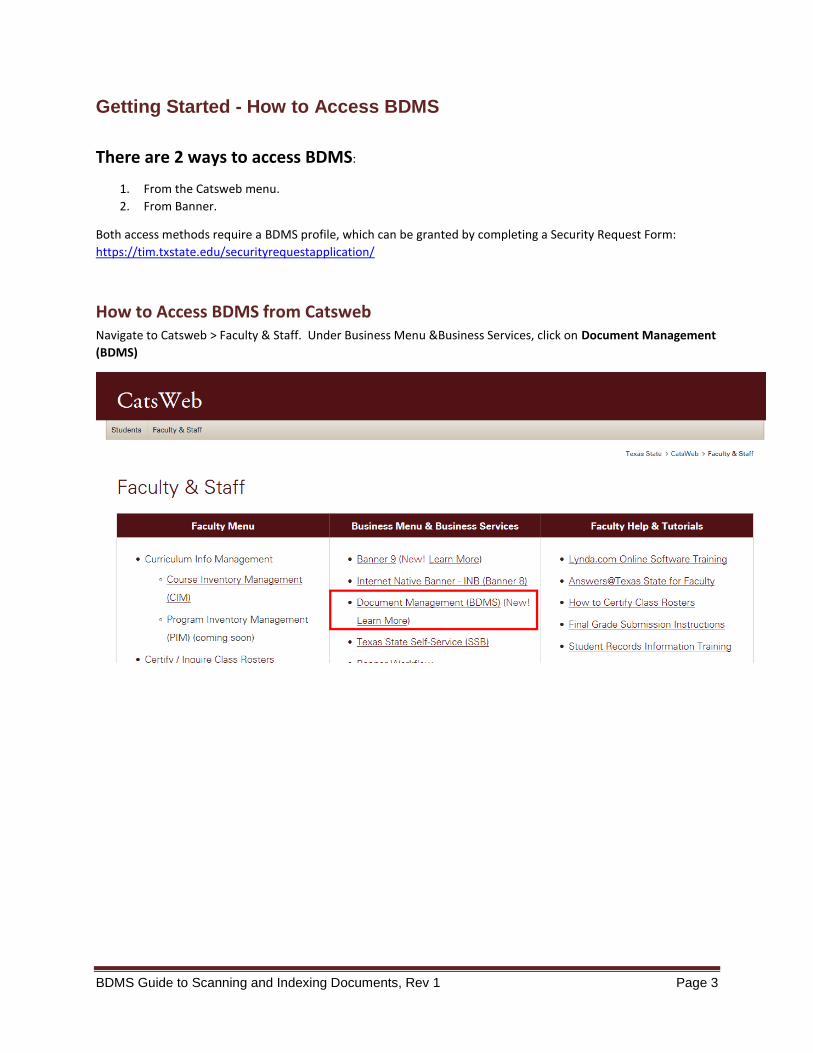
How to Access BDMS from Catsweb Navigate to Catsweb > Faculty & Staff. Under Business Menu &Business Services, click on Document Management
(BDMS)
Page 4 BDMS Guide to Scanning and Indexing Documents, Rev 1
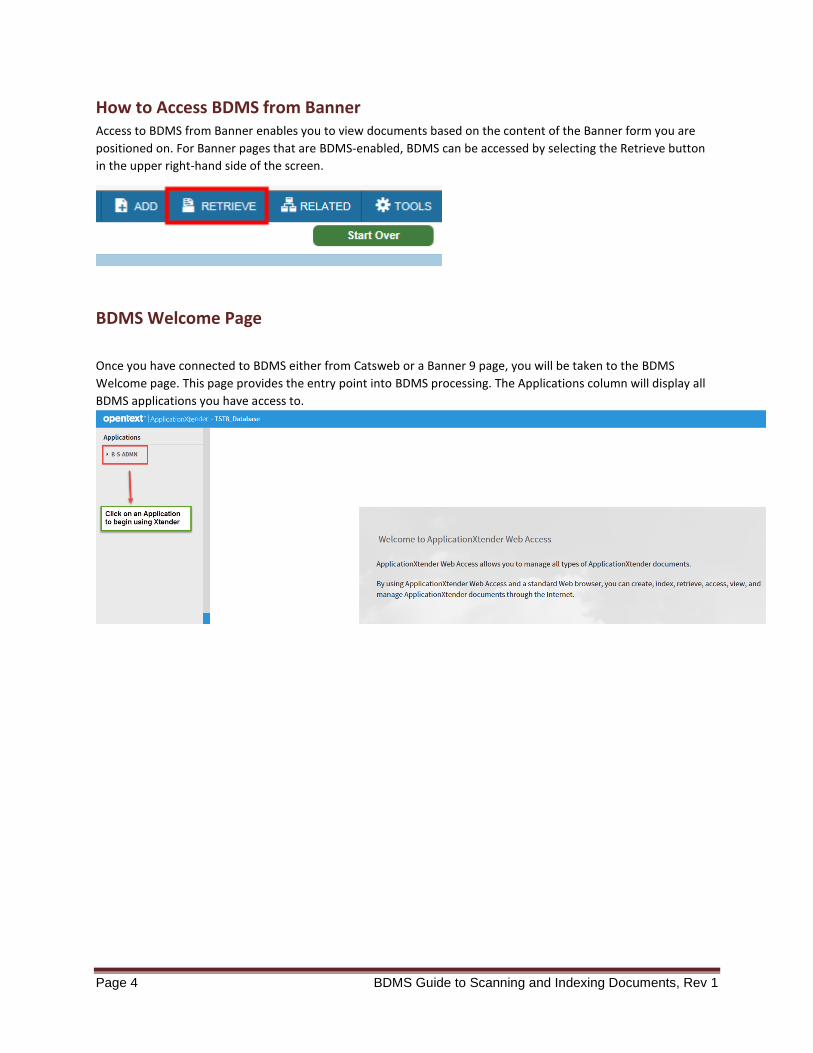
How to Access BDMS from Banner Access to BDMS from Banner enables you to view documents based on the content of the Banner form you are
positioned on. For Banner pages that are BDMS-enabled, BDMS can be accessed by selecting the Retrieve button
in the upper right-hand side of the screen.
BDMS Welcome Page
Once you have connected to BDMS either from Catsweb or a Banner 9 page, you will be taken to the BDMS
Welcome page. This page provides the entry point into BDMS processing. The Applications column will display all
BDMS applications you have access to.
BDMS Guide to Scanning and Indexing Documents, Rev 1 Page 5
BDMS Home Page
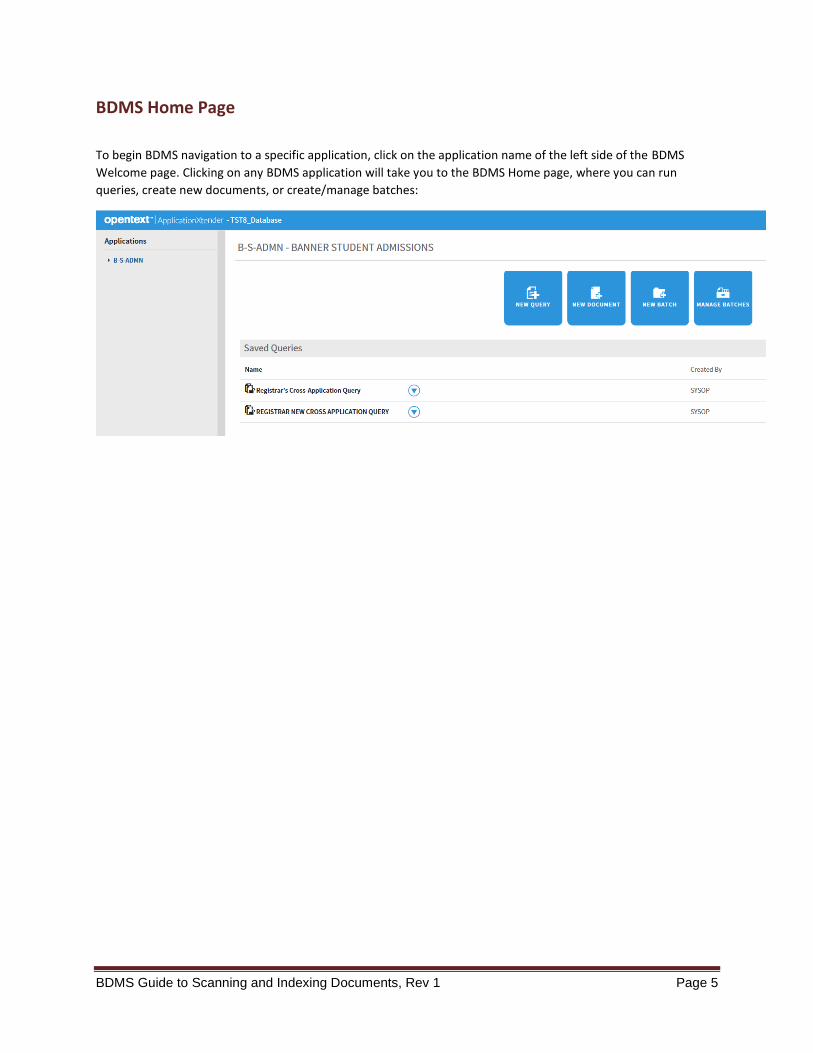
To begin BDMS navigation to a specific application, click on the application name of the left side of the BDMS
Welcome page. Clicking on any BDMS application will take you to the BDMS Home page, where you can run
queries, create new documents, or create/manage batches:
Page 6 BDMS Guide to Scanning and Indexing Documents, Rev 1
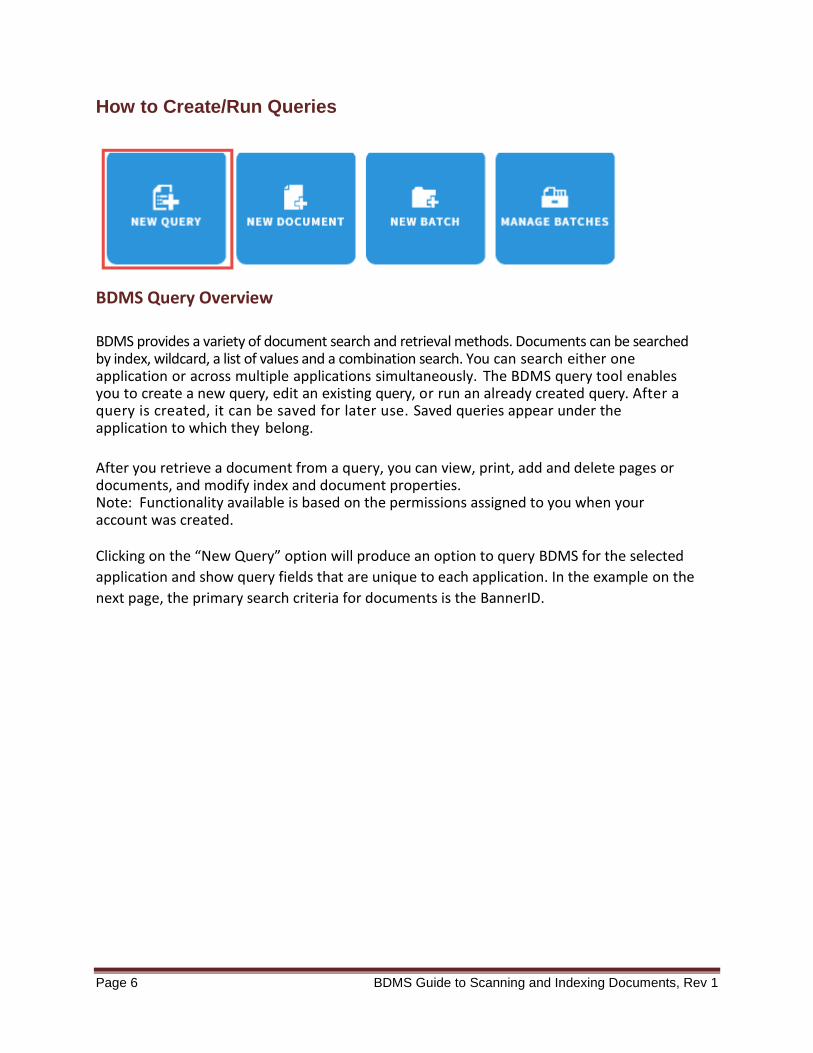
How to Create/Run Queries
BDMS Query Overview BDMS provides a variety of document search and retrieval methods. Documents can be searched by index, wildcard, a list of values and a combination search. You can search either one application or across multiple applications simultaneously. The BDMS query tool enables you to create a new query, edit an existing query, or run an already created query. After a query is created, it can be saved for later use. Saved queries appear under the application to which they belong.
After you retrieve a document from a query, you can view, print, add and delete pages or documents, and modify index and document properties. Note: Functionality available is based on the permissions assigned to you when your account was created.
Clicking on the “New Query” option will produce an option to query BDMS for the selected
application and show query fields that are unique to each application. In the example on the
next page, the primary search criteria for documents is the BannerID.
BDMS Guide to Scanning and Indexing Documents, Rev 1 Page 7
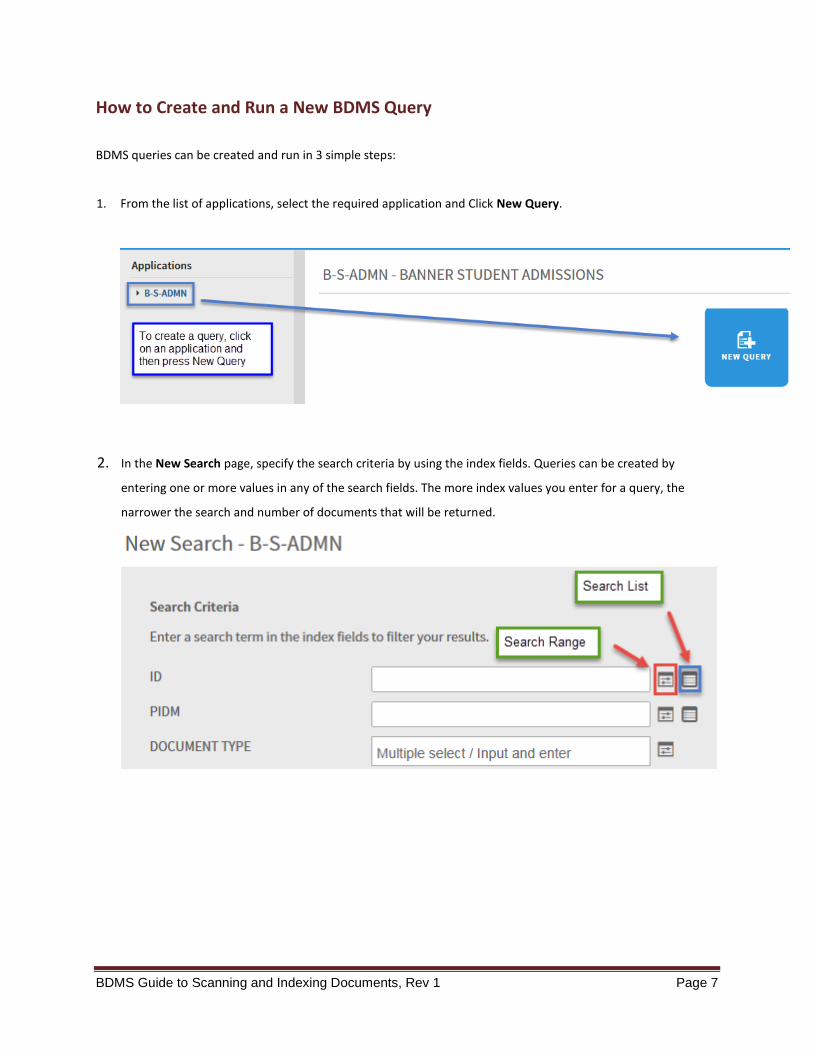
How to Create and Run a New BDMS Query
BDMS queries can be created and run in 3 simple steps:
1. From the list of applications, select the required application and Click New Query.
2. In the New Search page, specify the search criteria by using the index fields. Queries can be created by
entering one or more values in any of the search fields. The more index values you enter for a query, the
narrower the search and number of documents that will be returned.
Page 8 BDMS Guide to Scanning and Indexing Documents, Rev 1
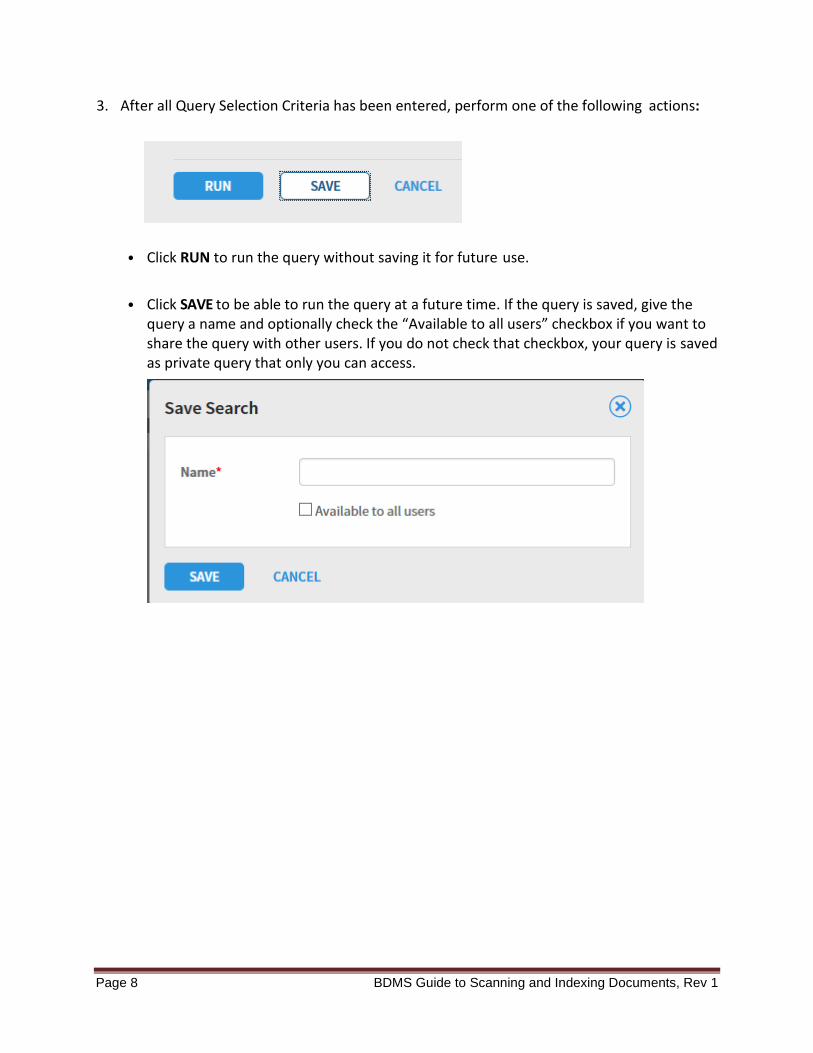
3. After all Query Selection Criteria has been entered, perform one of the following actions:
• Click RUN to run the query without saving it for future use.
• Click SAVE to be able to run the query at a future time. If the query is saved, give the query a name and optionally check the “Available to all users” checkbox if you want to share the query with other users. If you do not check that checkbox, your query is saved as private query that only you can access.
BDMS Guide to Scanning and Indexing Documents, Rev 1 Page 9
Methods of entering Query Search Criteria Values
BDMS offers a sophisticated range of options for selecting search criteria. The search criteria can be as simple as one field value, like a BannerID, or a complex combination of multiple values. This section describes the different methods of entering your search criteria.
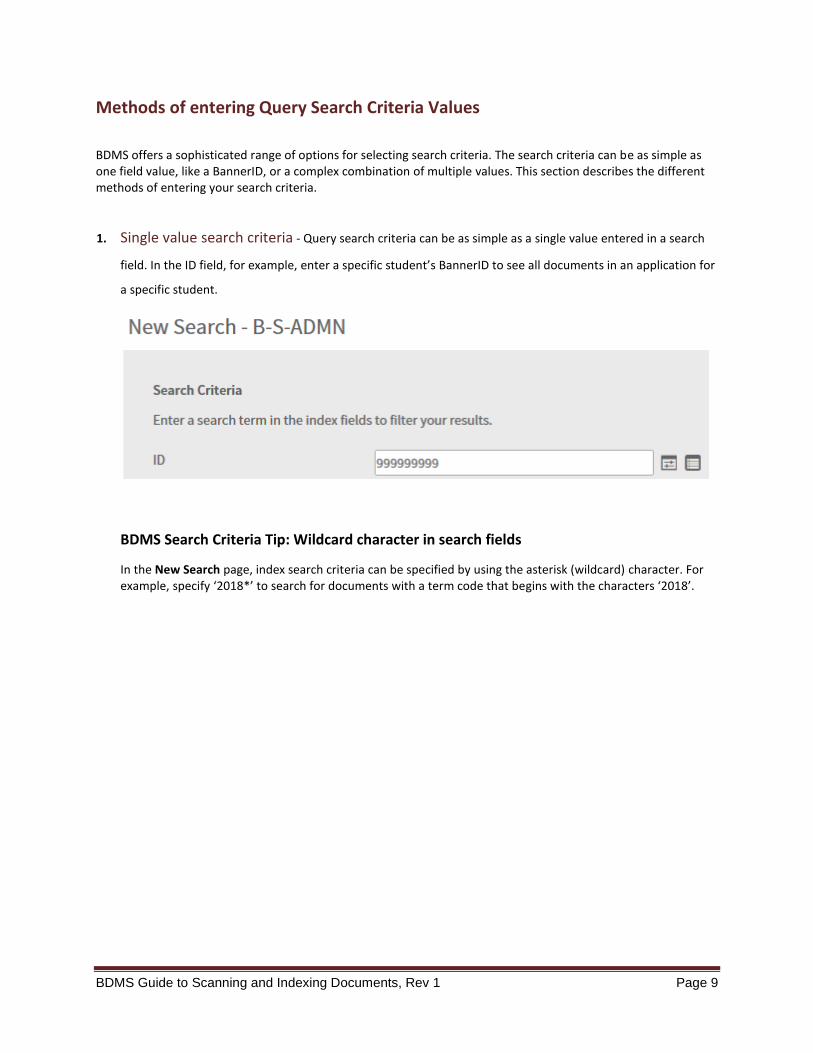
1. Single value search criteria - Query search criteria can be as simple as a single value entered in a search
field. In the ID field, for example, enter a specific student’s BannerID to see all documents in an application for
a specific student.
BDMS Search Criteria Tip: Wildcard character in search fields
In the New Search page, index search criteria can be specified by using the asterisk (wildcard) character. For example, specify ‘2018*’ to search for documents with a term code that begins with the characters ‘2018’.
Page 10 BDMS Guide to Scanning and Indexing Documents, Rev 1
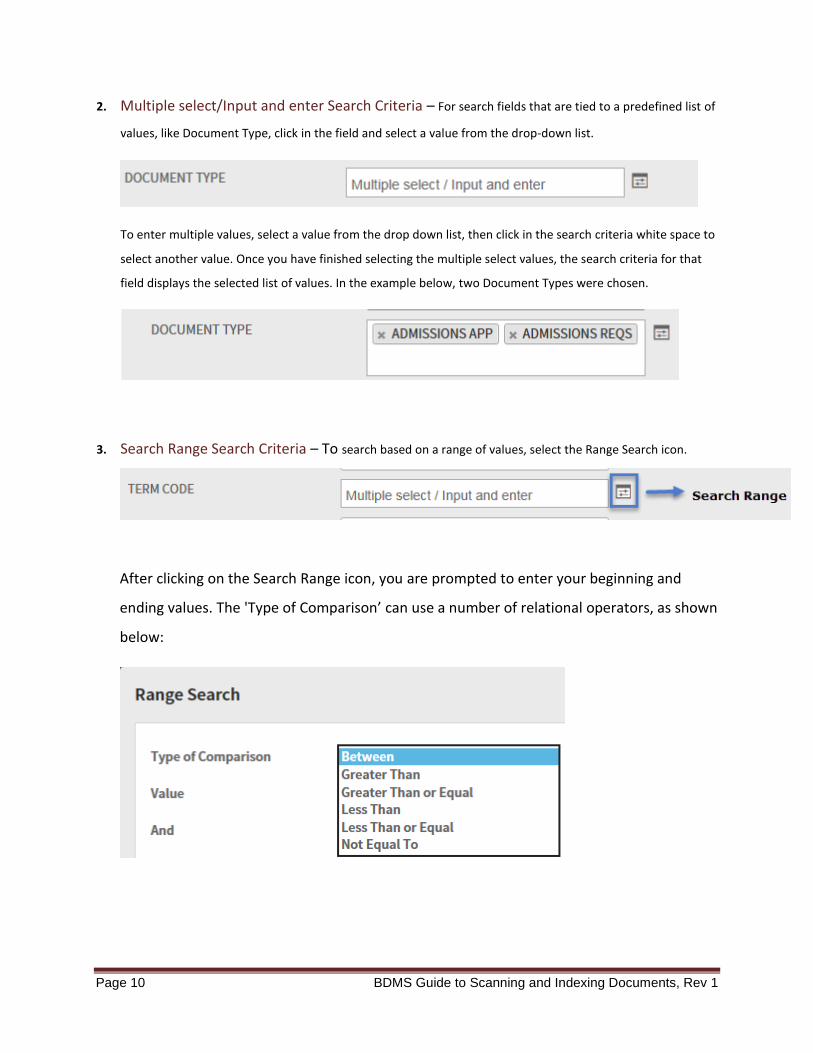
2. Multiple select/Input and enter Search Criteria – For search fields that are tied to a predefined list of
values, like Document Type, click in the field and select a value from the drop-down list.
To enter multiple values, select a value from the drop down list, then click in the search criteria white space to
select another value. Once you have finished selecting the multiple select values, the search criteria for that
field displays the selected list of values. In the example below, two Document Types were chosen.
3. Search Range Search Criteria – To search based on a range of values, select the Range Search icon.
After clicking on the Search Range icon, you are prompted to enter your beginning and
ending values. The 'Type of Comparison’ can use a number of relational operators, as shown
below:
BDMS Guide to Scanning and Indexing Documents, Rev 1 Page 11
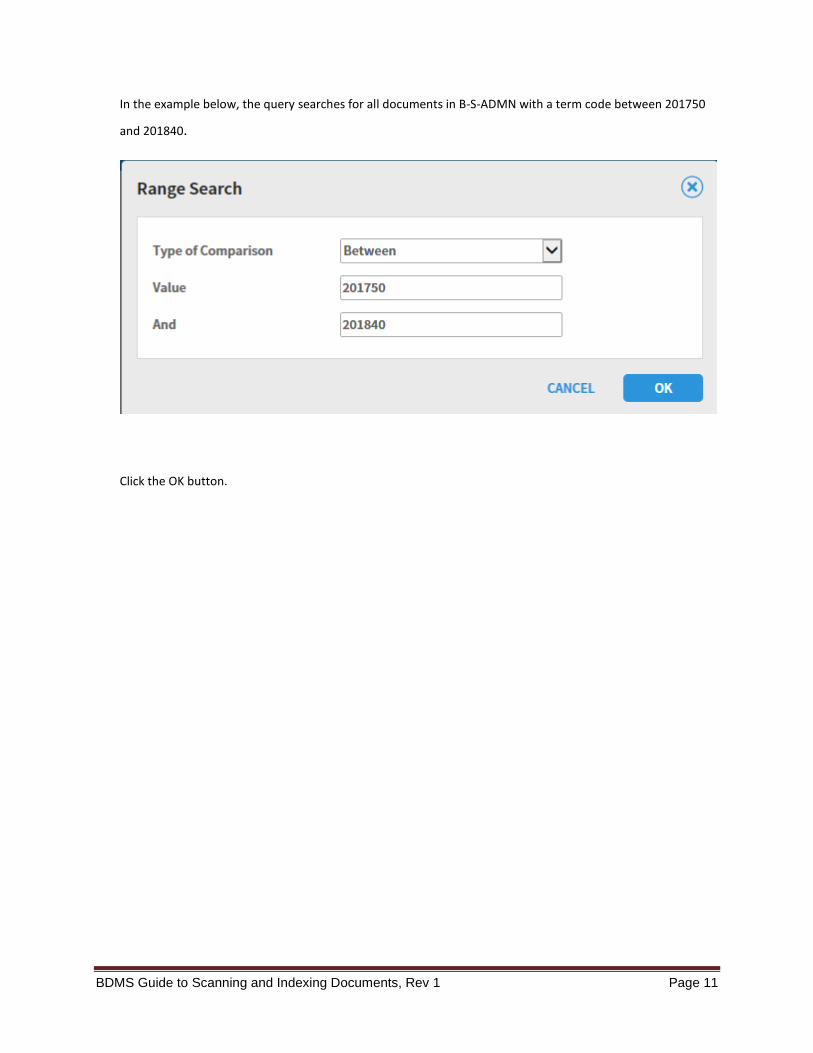
In the example below, the query searches for all documents in B-S-ADMN with a term code between 201750
and 201840.
Click the OK button.
Page 12 BDMS Guide to Scanning and Indexing Documents, Rev 1
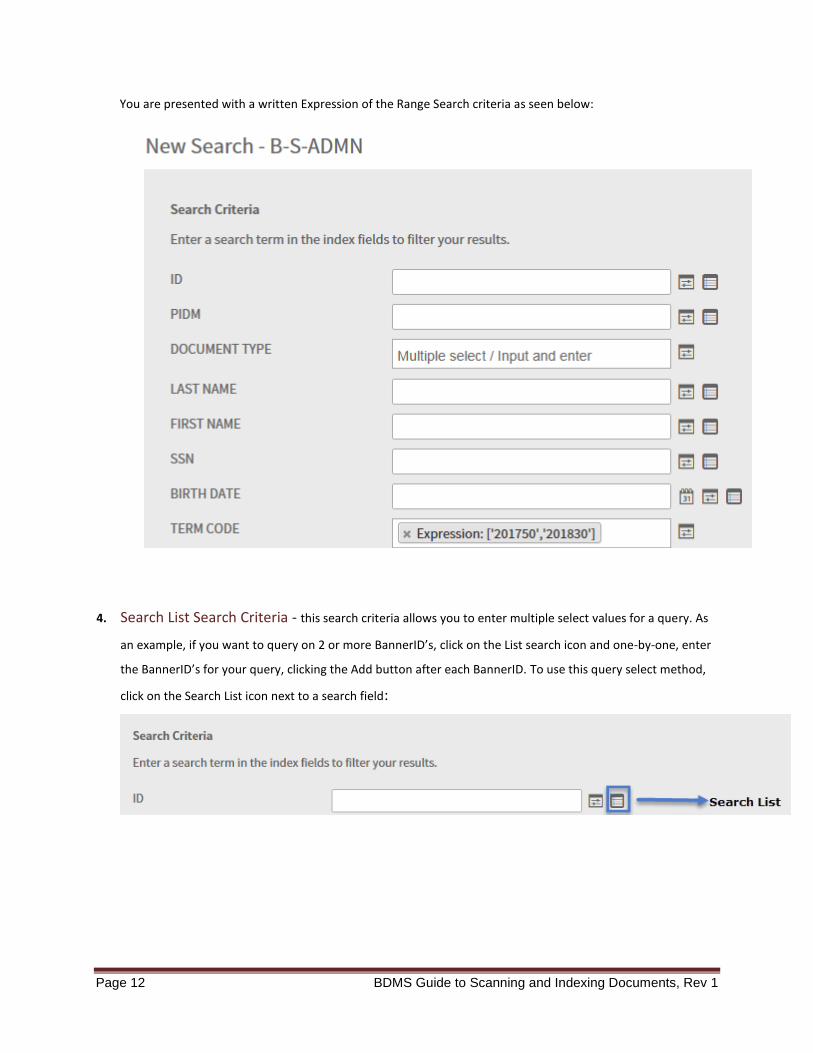
You are presented with a written Expression of the Range Search criteria as seen below:
4. Search List Search Criteria - this search criteria allows you to enter multiple select values for a query. As
an example, if you want to query on 2 or more BannerID’s, click on the List search icon and one-by-one, enter
the BannerID’s for your query, clicking the Add button after each BannerID. To use this query select method,
click on the Search List icon next to a search field:
BDMS Guide to Scanning and Indexing Documents, Rev 1 Page 13
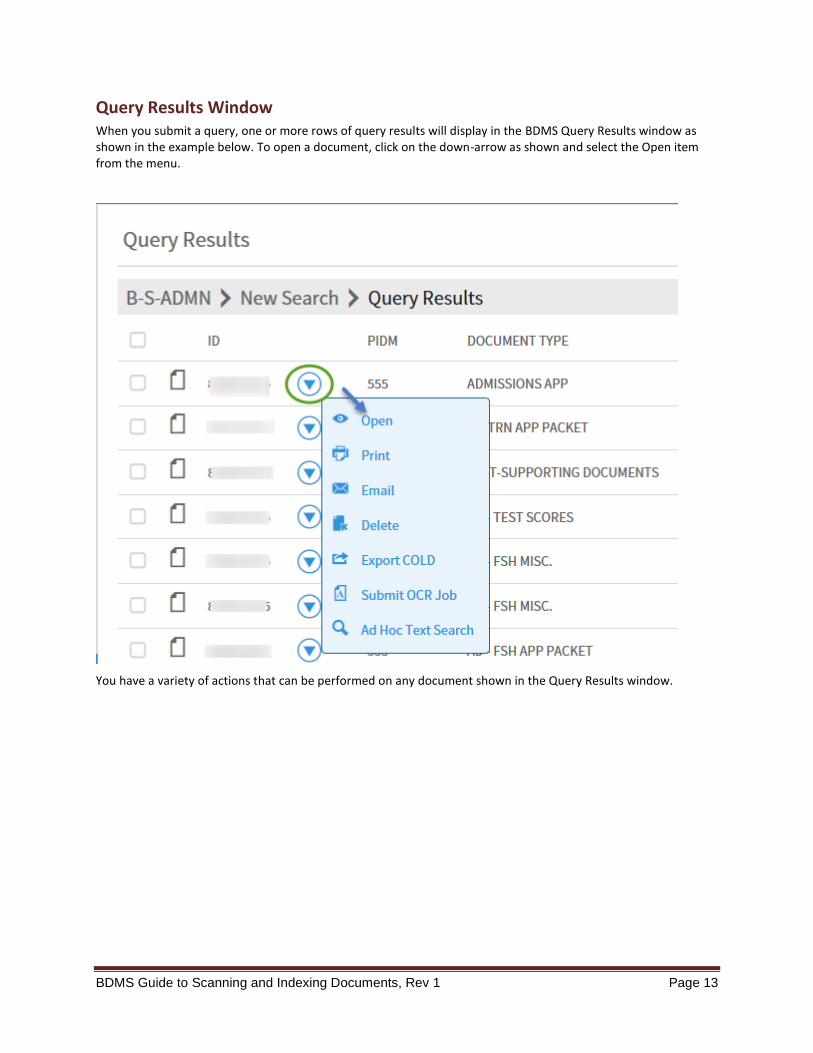
Query Results Window When you submit a query, one or more rows of query results will display in the BDMS Query Results window as shown in the example below. To open a document, click on the down-arrow as shown and select the Open item from the menu.
You have a variety of actions that can be performed on any document shown in the Query Results window.
Page 14 BDMS Guide to Scanning and Indexing Documents, Rev 1
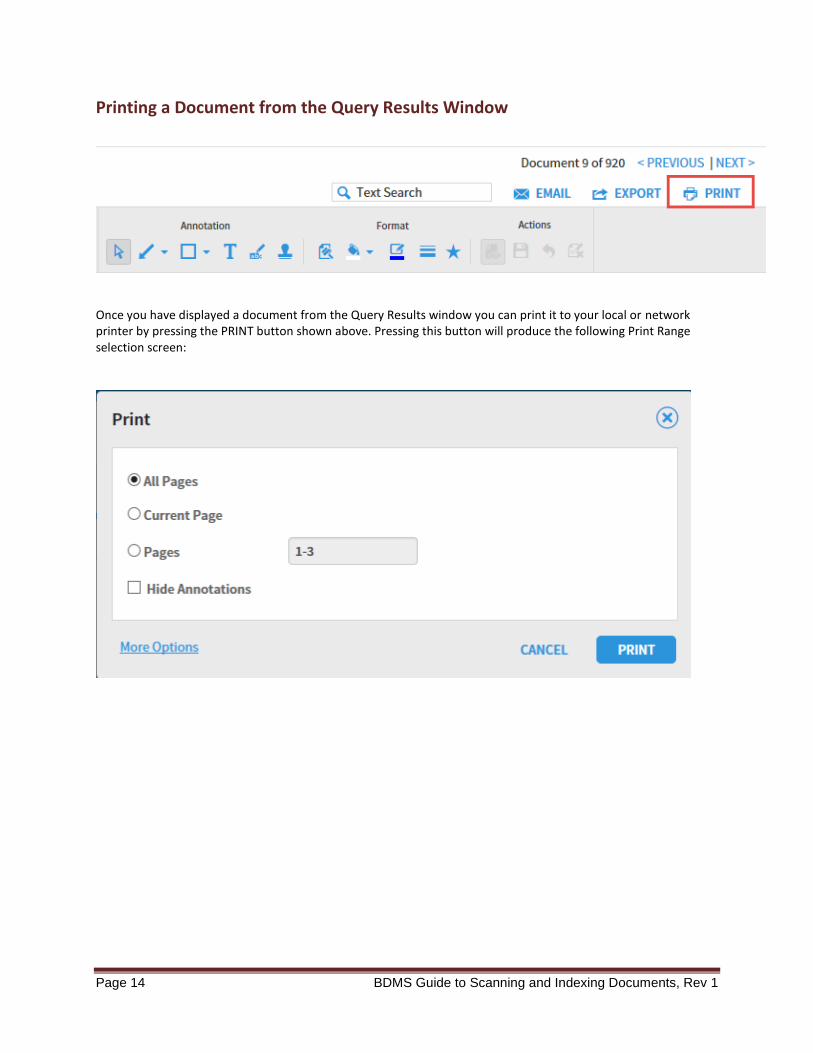
Printing a Document from the Query Results Window
Once you have displayed a document from the Query Results window you can print it to your local or network printer by pressing the PRINT button shown above. Pressing this button will produce the following Print Range selection screen:
BDMS Guide to Scanning and Indexing Documents, Rev 1 Page 15
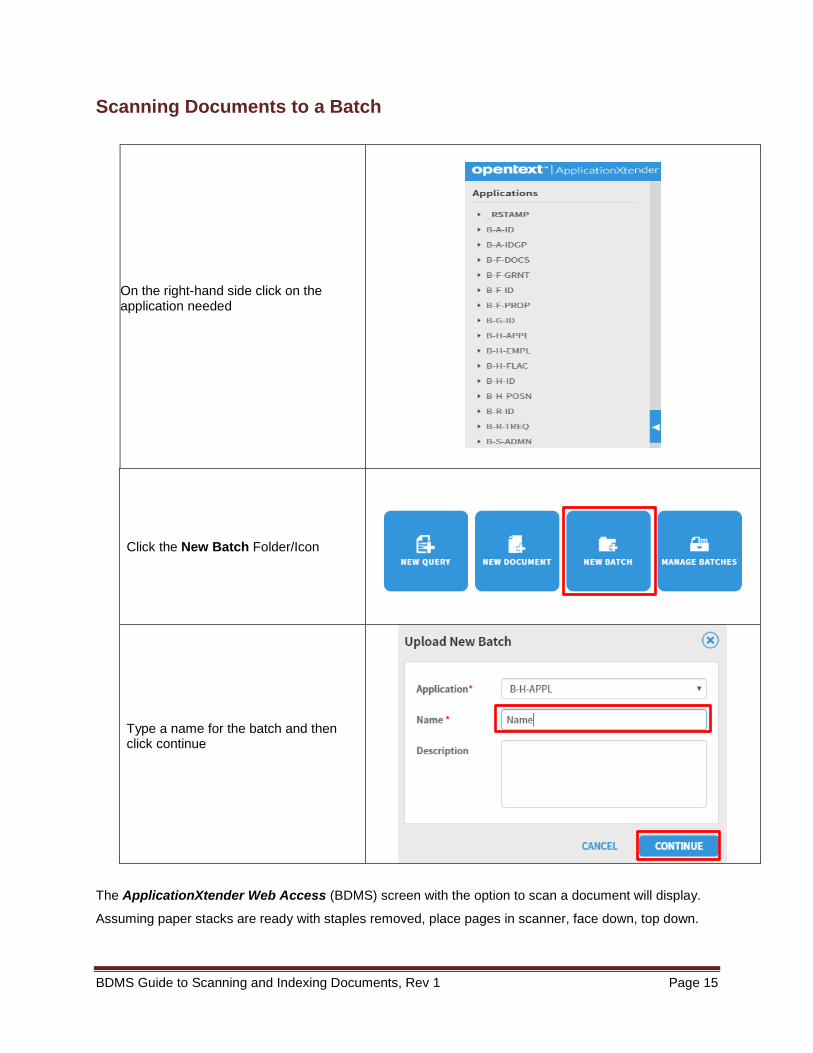
Scanning Documents to a Batch
On the right-hand side click on the application needed
Click the New Batch Folder/Icon
Type a name for the batch and then click continue
The ApplicationXtender Web Access (BDMS) screen with the option to scan a document will display.
Assuming paper stacks are ready with staples removed, place pages in scanner, face down, top down.

Page 16 BDMS Guide to Scanning and Indexing Documents, Rev 1
Note: Scanner version covered in this document is the Canon DR-3010C. The functionality is similar for all models, but may be organized differently on the tabs
Select the Scanner
If the Scanner button is grayed out, you must select your scanner.
Click Select Scanner.
A Scanner Access pop-up module will appear. Click Allow. The program will then access your scanner drivers.
Choose the ISIS: Canon DR-3010C, click OK If that option is not available, DO NOT SCAN. Call ITAC at 512.245.4822 and report a missing scanner driver. If the display only includes the WIA:[model] option or TWAIN, notify the BDMS Administrator immediately. Do not use this option. There is software to be installed on your computer that will ensure the ISIS: [model] driver is available. WIA and TWAIN drivers do not provide the desired compression for scanned documents.
The Scan button should no longer be grayed out. If the Scan button is still grayed out, ensure the scanner is on and ready. If the scanner does not appear on the list, ensure there are no other BDMS windows open. Once a window is open that could be using the scanner (even if it is not currently using it), the scanner may not be available in another window.
BDMS Guide to Scanning and Indexing Documents, Rev 1 Page 17
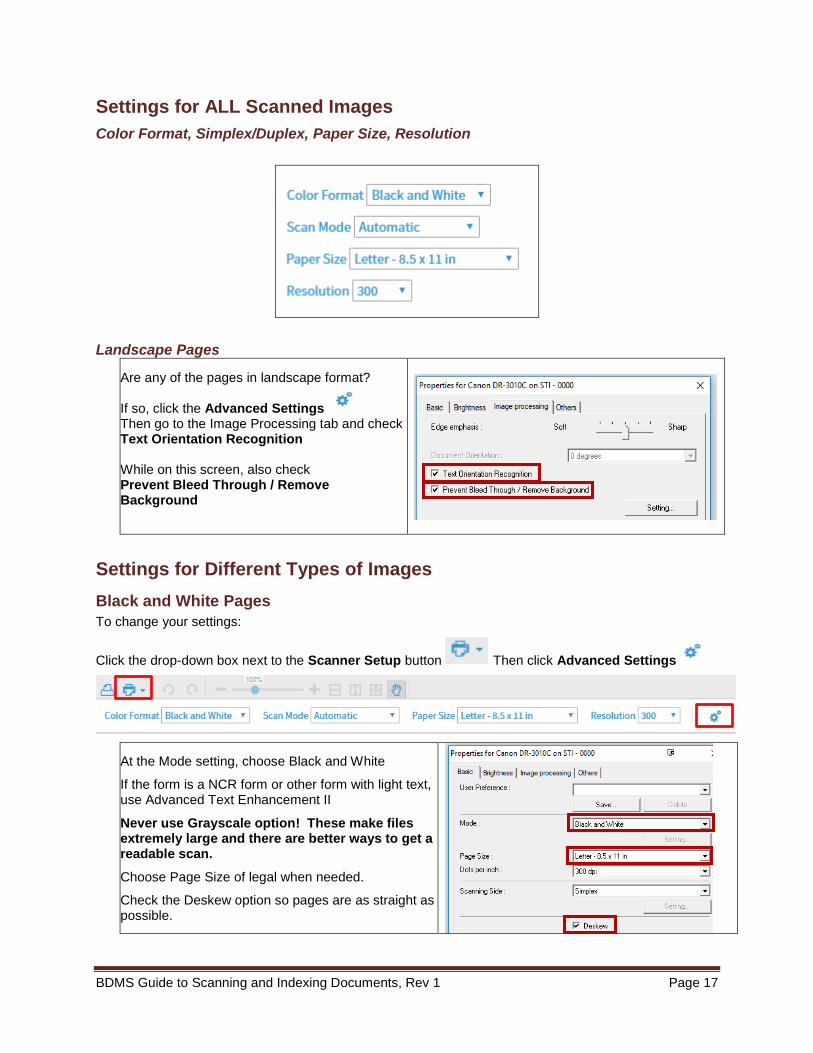
Settings for ALL Scanned Images
Color Format, Simplex/Duplex, Paper Size, Resolution
Landscape Pages
Are any of the pages in landscape format?
If so, click the Advanced Settings Then go to the Image Processing tab and check Text Orientation Recognition While on this screen, also check Prevent Bleed Through / Remove Background
Settings for Different Types of Images
Black and White Pages
To change your settings:
Click the drop-down box next to the Scanner Setup button Then click Advanced Settings
At the Mode setting, choose Black and White
If the form is a NCR form or other form with light text, use Advanced Text Enhancement II
Never use Grayscale option! These make files extremely large and there are better ways to get a readable scan.
Choose Page Size of legal when needed.
Check the Deskew option so pages are as straight as possible.
Page 18 BDMS Guide to Scanning and Indexing Documents, Rev 1
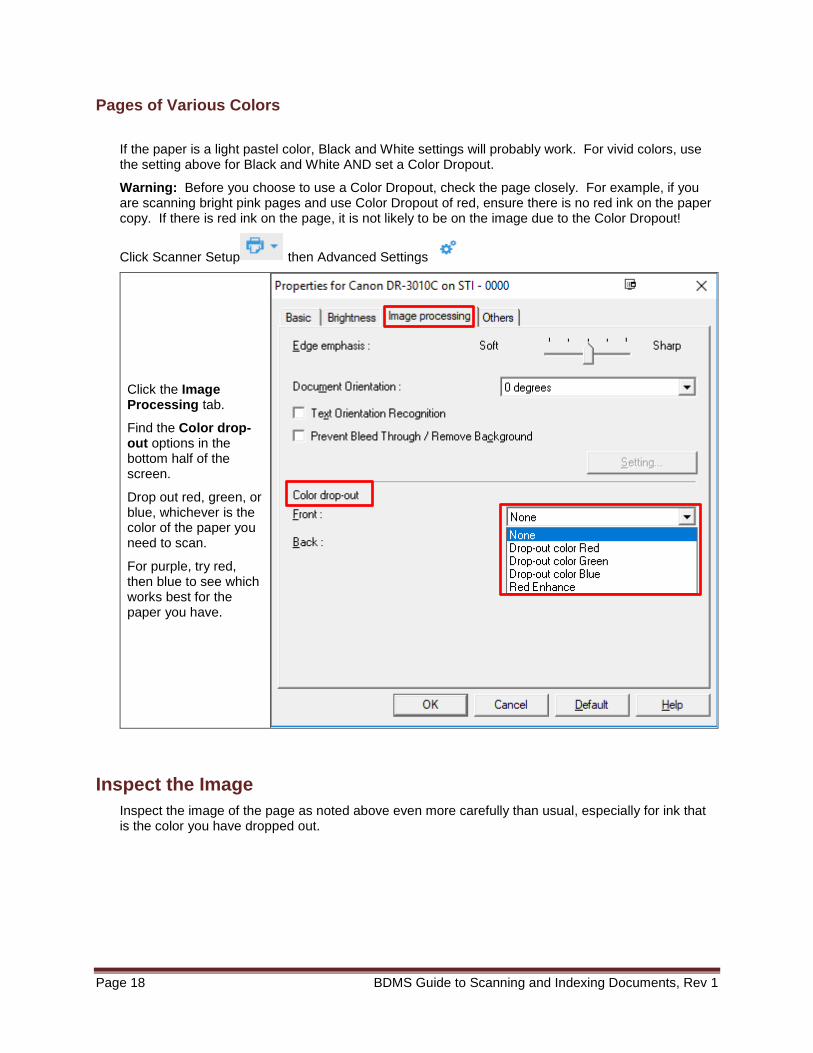
Pages of Various Colors
If the paper is a light pastel color, Black and White settings will probably work. For vivid colors, use the setting above for Black and White AND set a Color Dropout.
Warning: Before you choose to use a Color Dropout, check the page closely. For example, if you are scanning bright pink pages and use Color Dropout of red, ensure there is no red ink on the paper copy. If there is red ink on the page, it is not likely to be on the image due to the Color Dropout!
Click Scanner Setup then Advanced Settings
Click the Image Processing tab.
Find the Color drop-out options in the bottom half of the screen.
Drop out red, green, or blue, whichever is the color of the paper you need to scan.
For purple, try red, then blue to see which works best for the paper you have.
Inspect the Image
Inspect the image of the page as noted above even more carefully than usual, especially for ink that is the color you have dropped out.
BDMS Guide to Scanning and Indexing Documents, Rev 1 Page 19
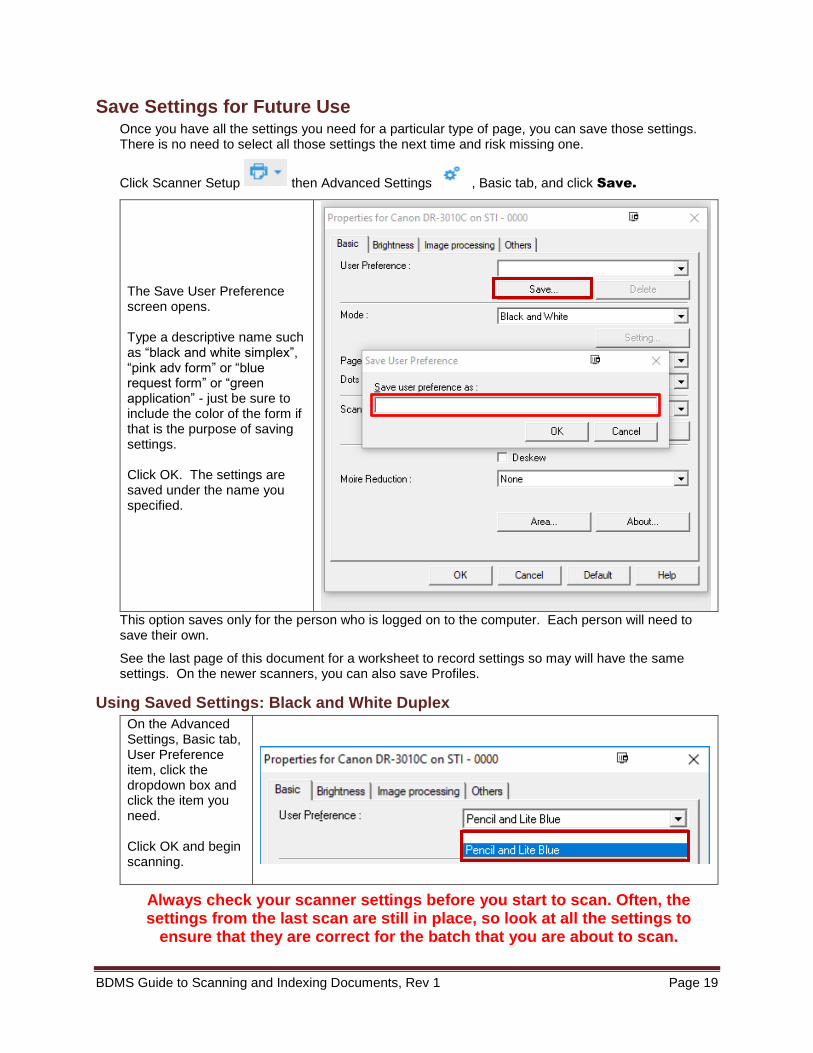
Save Settings for Future Use Once you have all the settings you need for a particular type of page, you can save those settings. There is no need to select all those settings the next time and risk missing one.
Click Scanner Setup then Advanced Settings , Basic tab, and click Save.
The Save User Preference screen opens. Type a descriptive name such as “black and white simplex”, “pink adv form” or “blue request form” or “green application” - just be sure to include the color of the form if that is the purpose of saving settings. Click OK. The settings are saved under the name you specified.
This option saves only for the person who is logged on to the computer. Each person will need to save their own.
See the last page of this document for a worksheet to record settings so may will have the same settings. On the newer scanners, you can also save Profiles.
Using Saved Settings: Black and White Duplex
On the Advanced Settings, Basic tab, User Preference item, click the dropdown box and click the item you need. Click OK and begin scanning.
Always check your scanner settings before you start to scan. Often, the settings from the last scan are still in place, so look at all the settings to
ensure that they are correct for the batch that you are about to scan.
Page 20 BDMS Guide to Scanning and Indexing Documents, Rev 1
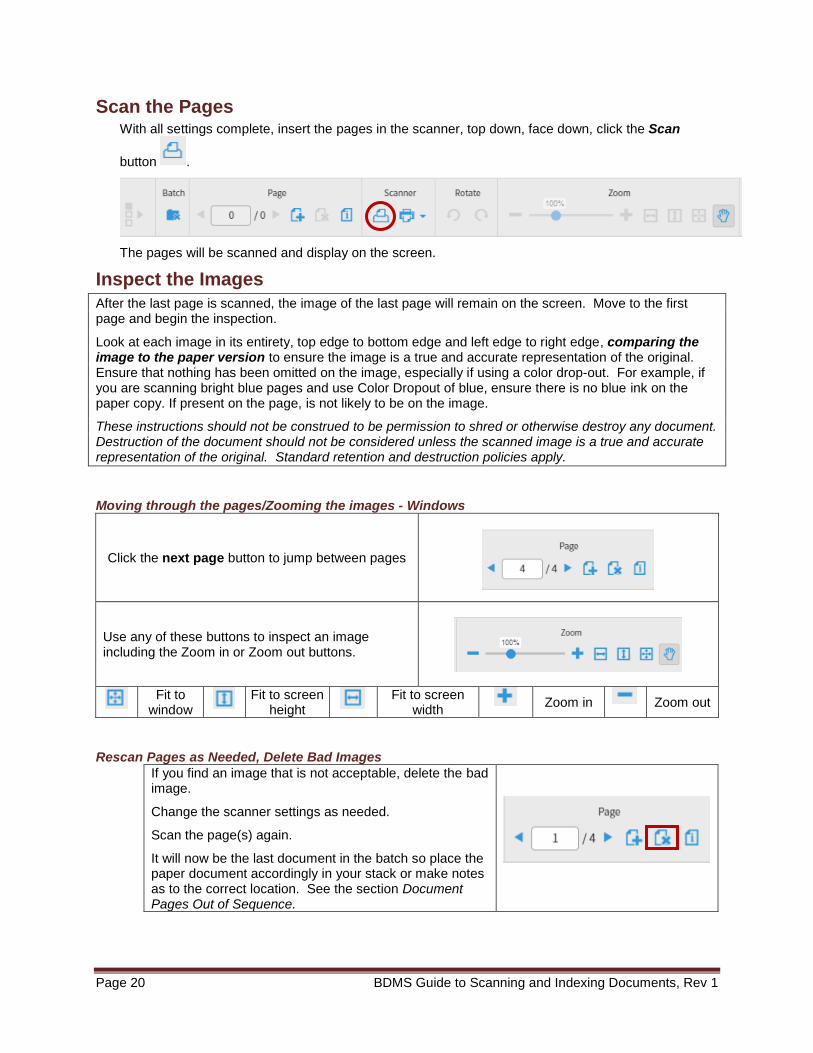
Scan the Pages With all settings complete, insert the pages in the scanner, top down, face down, click the Scan
button .
The pages will be scanned and display on the screen.
Inspect the Images
After the last page is scanned, the image of the last page will remain on the screen. Move to the first page and begin the inspection.
Look at each image in its entirety, top edge to bottom edge and left edge to right edge, comparing the image to the paper version to ensure the image is a true and accurate representation of the original. Ensure that nothing has been omitted on the image, especially if using a color drop-out. For example, if you are scanning bright blue pages and use Color Dropout of blue, ensure there is no blue ink on the paper copy. If present on the page, is not likely to be on the image.
These instructions should not be construed to be permission to shred or otherwise destroy any document. Destruction of the document should not be considered unless the scanned image is a true and accurate representation of the original. Standard retention and destruction policies apply.
Moving through the pages/Zooming the images - Windows
Click the next page button to jump between pages
Use any of these buttons to inspect an image including the Zoom in or Zoom out buttons.
Fit to
window Fit to screen
height Fit to screen
width Zoom in Zoom out
Rescan Pages as Needed, Delete Bad Images
If you find an image that is not acceptable, delete the bad image.
Change the scanner settings as needed.
Scan the page(s) again.
It will now be the last document in the batch so place the paper document accordingly in your stack or make notes as to the correct location. See the section Document Pages Out of Sequence.
BDMS Guide to Scanning and Indexing Documents, Rev 1 Page 21
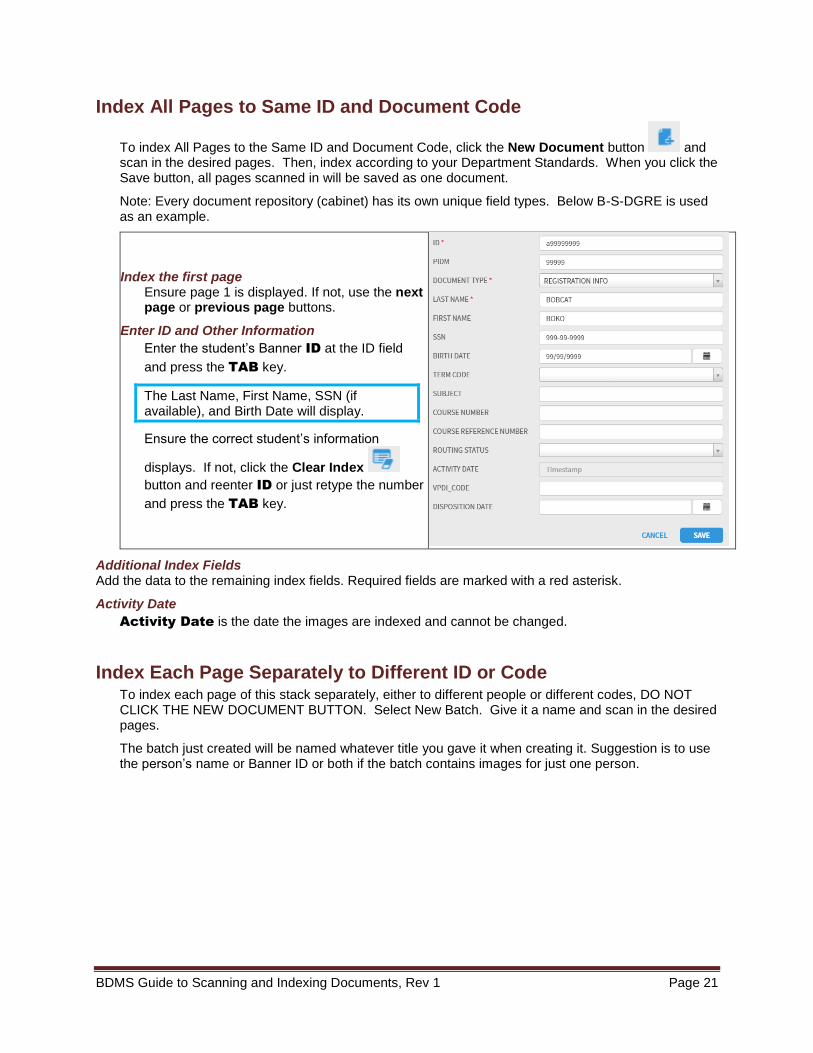
Index All Pages to Same ID and Document Code
To index All Pages to the Same ID and Document Code, click the New Document button and scan in the desired pages. Then, index according to your Department Standards. When you click the Save button, all pages scanned in will be saved as one document.
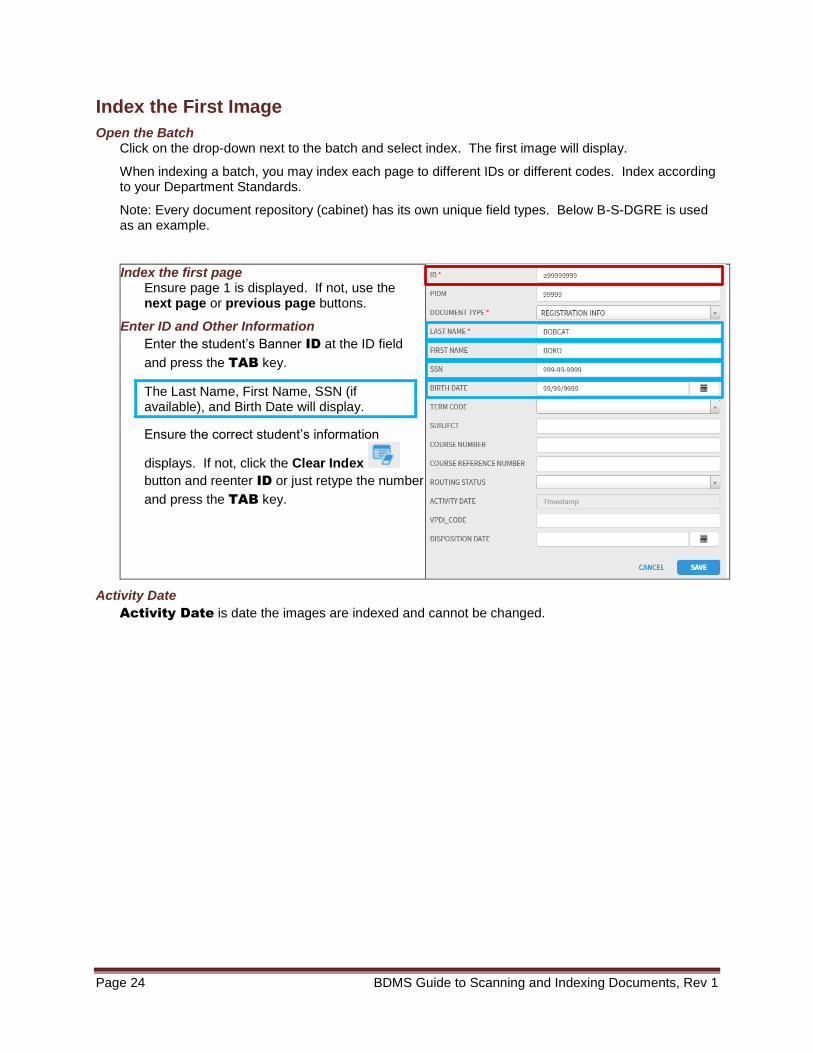
Note: Every document repository (cabinet) has its own unique field types. Below B-S-DGRE is used as an example.
Index the first page Ensure page 1 is displayed. If not, use the next page or previous page buttons.
Enter ID and Other Information
Enter the student’s Banner ID at the ID field
and press the TAB key.
The Last Name, First Name, SSN (if available), and Birth Date will display.
Ensure the correct student’s information
displays. If not, click the Clear Index
button and reenter ID or just retype the number
and press the TAB key.
Additional Index Fields Add the data to the remaining index fields. Required fields are marked with a red asterisk.
Activity Date
Activity Date is the date the images are indexed and cannot be changed.
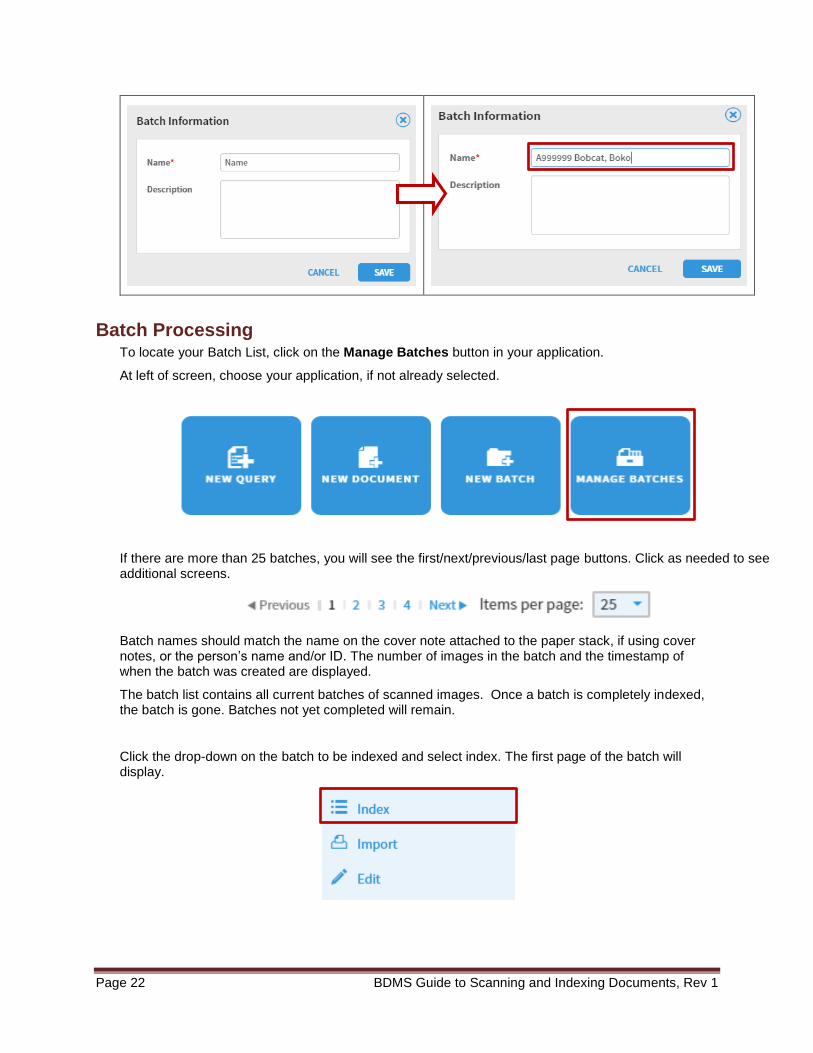
Index Each Page Separately to Different ID or Code To index each page of this stack separately, either to different people or different codes, DO NOT CLICK THE NEW DOCUMENT BUTTON. Select New Batch. Give it a name and scan in the desired pages.
The batch just created will be named whatever title you gave it when creating it. Suggestion is to use the person’s name or Banner ID or both if the batch contains images for just one person.
Page 22 BDMS Guide to Scanning and Indexing Documents, Rev 1
Batch Processing To locate your Batch List, click on the Manage Batches button in your application.
At left of screen, choose your application, if not already selected.
If there are more than 25 batches, you will see the first/next/previous/last page buttons. Click as needed to see additional screens.
Batch names should match the name on the cover note attached to the paper stack, if using cover notes, or the person’s name and/or ID. The number of images in the batch and the timestamp of when the batch was created are displayed.
The batch list contains all current batches of scanned images. Once a batch is completely indexed, the batch is gone. Batches not yet completed will remain.
Click the drop-down on the batch to be indexed and select index. The first page of the batch will display.
BDMS Guide to Scanning and Indexing Documents, Rev 1 Page 23
Ensure accuracy of the electronic batch Before indexing any page, use the next page and previous page buttons to review each page in the electronic batch against the stack of pages to ensure each page is legible, a true and accurate representation of the original paper page(s), and that no pages are missing. If there are any problems, pull those pages out of the batch to be re-processed.
Sort a Batch List Click “Name” to sort the batch in ascending order by batch name. Click again to sort in descending order. Batches can be also sorted by Timestamp.
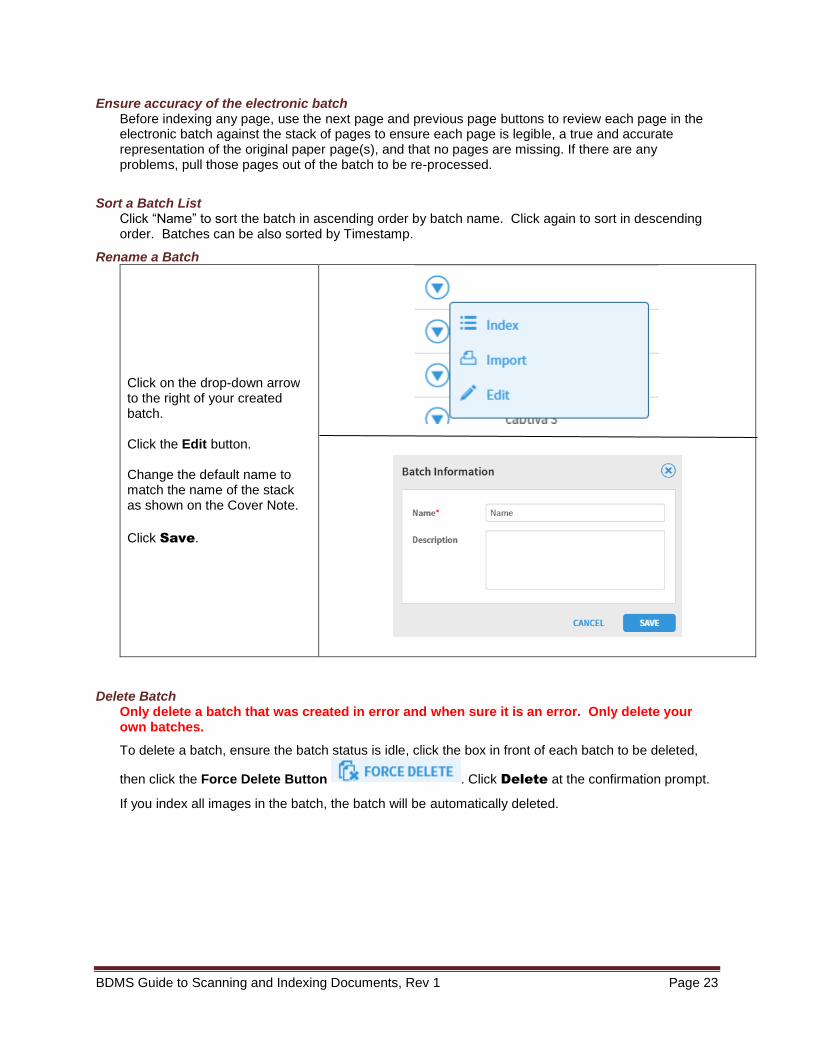
Rename a Batch
Click on the drop-down arrow to the right of your created batch. Click the Edit button. Change the default name to match the name of the stack as shown on the Cover Note.
Click Save.
Delete Batch Only delete a batch that was created in error and when sure it is an error. Only delete your own batches.
To delete a batch, ensure the batch status is idle, click the box in front of each batch to be deleted,
then click the Force Delete Button . Click Delete at the confirmation prompt.
If you index all images in the batch, the batch will be automatically deleted.
Page 24 BDMS Guide to Scanning and Indexing Documents, Rev 1
Index the First Image
Open the Batch Click on the drop-down next to the batch and select index. The first image will display.
When indexing a batch, you may index each page to different IDs or different codes. Index according to your Department Standards.
Note: Every document repository (cabinet) has its own unique field types. Below B-S-DGRE is used as an example.
Index the first page Ensure page 1 is displayed. If not, use the next page or previous page buttons.
Enter ID and Other Information
Enter the student’s Banner ID at the ID field
and press the TAB key.
The Last Name, First Name, SSN (if available), and Birth Date will display.
Ensure the correct student’s information
displays. If not, click the Clear Index
button and reenter ID or just retype the number
and press the TAB key.
Activity Date
Activity Date is date the images are indexed and cannot be changed.
BDMS Guide to Scanning and Indexing Documents, Rev 1 Page 25
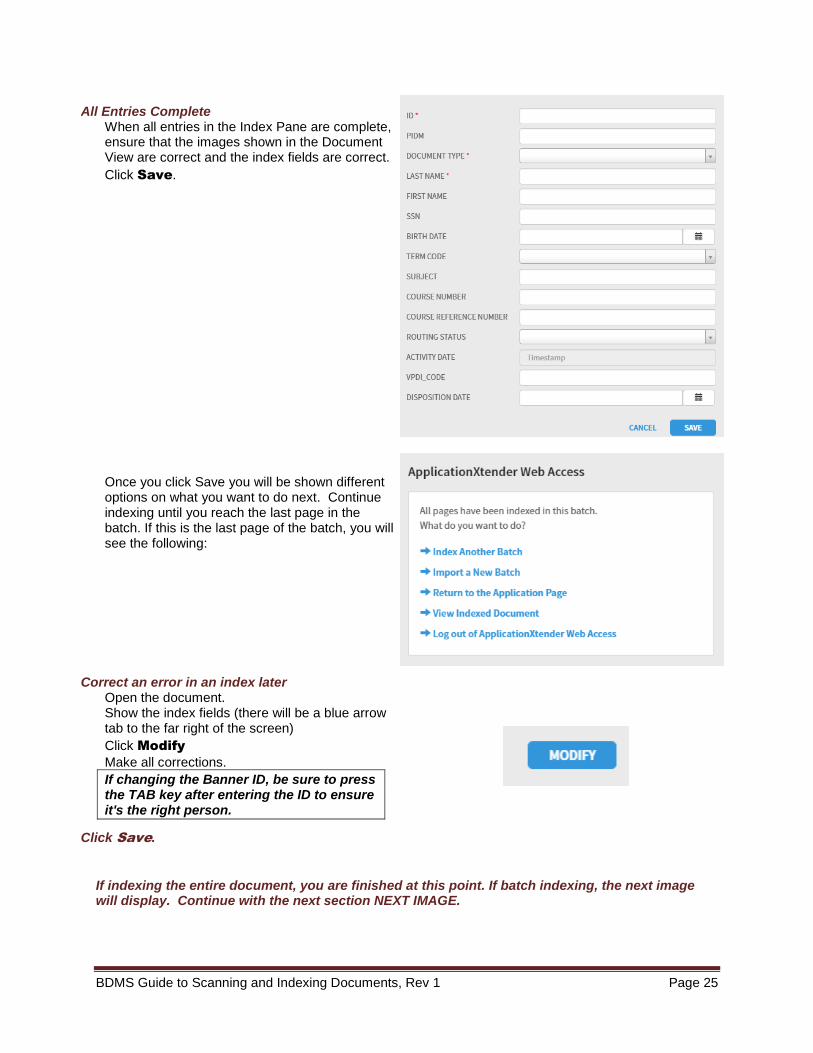
All Entries Complete When all entries in the Index Pane are complete, ensure that the images shown in the Document View are correct and the index fields are correct.
Click Save.
Once you click Save you will be shown different options on what you want to do next. Continue indexing until you reach the last page in the batch. If this is the last page of the batch, you will see the following:
Correct an error in an index later Open the document. Show the index fields (there will be a blue arrow tab to the far right of the screen)
Click Modify
Make all corrections.
If changing the Banner ID, be sure to press the TAB key after entering the ID to ensure it's the right person.
Click Save.
If indexing the entire document, you are finished at this point. If batch indexing, the next image will display. Continue with the next section NEXT IMAGE.
Page 26 BDMS Guide to Scanning and Indexing Documents, Rev 1
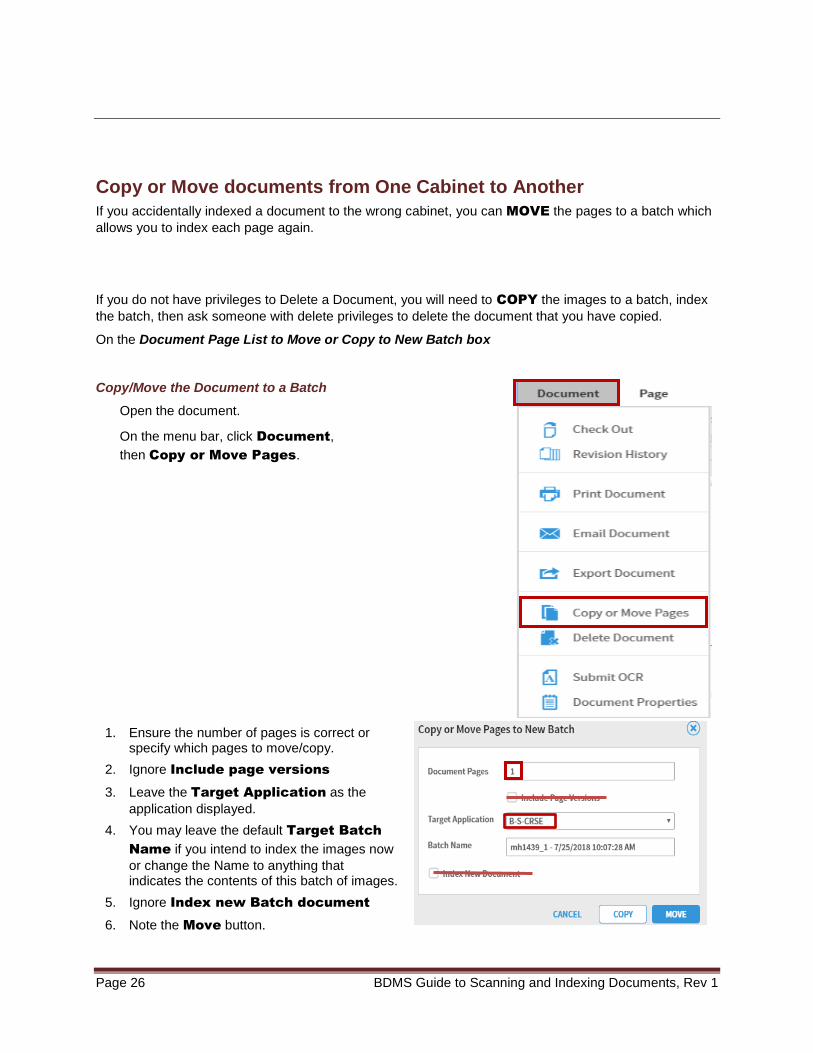
Copy or Move documents from One Cabinet to Another
If you accidentally indexed a document to the wrong cabinet, you can MOVE the pages to a batch which
allows you to index each page again.
If you do not have privileges to Delete a Document, you will need to COPY the images to a batch, index
the batch, then ask someone with delete privileges to delete the document that you have copied.
On the Document Page List to Move or Copy to New Batch box
1. Ensure the number of pages is correct or specify which pages to move/copy.
2. Ignore Include page versions
3. Leave the Target Application as the
application displayed.
4. You may leave the default Target Batch
Name if you intend to index the images now
or change the Name to anything that indicates the contents of this batch of images.
5. Ignore Index new Batch document
6. Note the Move button.
Copy/Move the Document to a Batch
Open the document.
On the menu bar, click Document,
then Copy or Move Pages.
BDMS Guide to Scanning and Indexing Documents, Rev 1 Page 27
a. If Move is not grayed out, click
Move.
b. If Move is grayed out, click Copy.
c. Note that the original document will still exist, and you will need to ask someone in your department with the ability to DELETE a document to delete the document indexed in error.
Either way, a batch with just this document will be on the Batch List with the Target Batch Name as entered. Now you can call up the batch and index the batch page by page. See Index Images, for instructions.
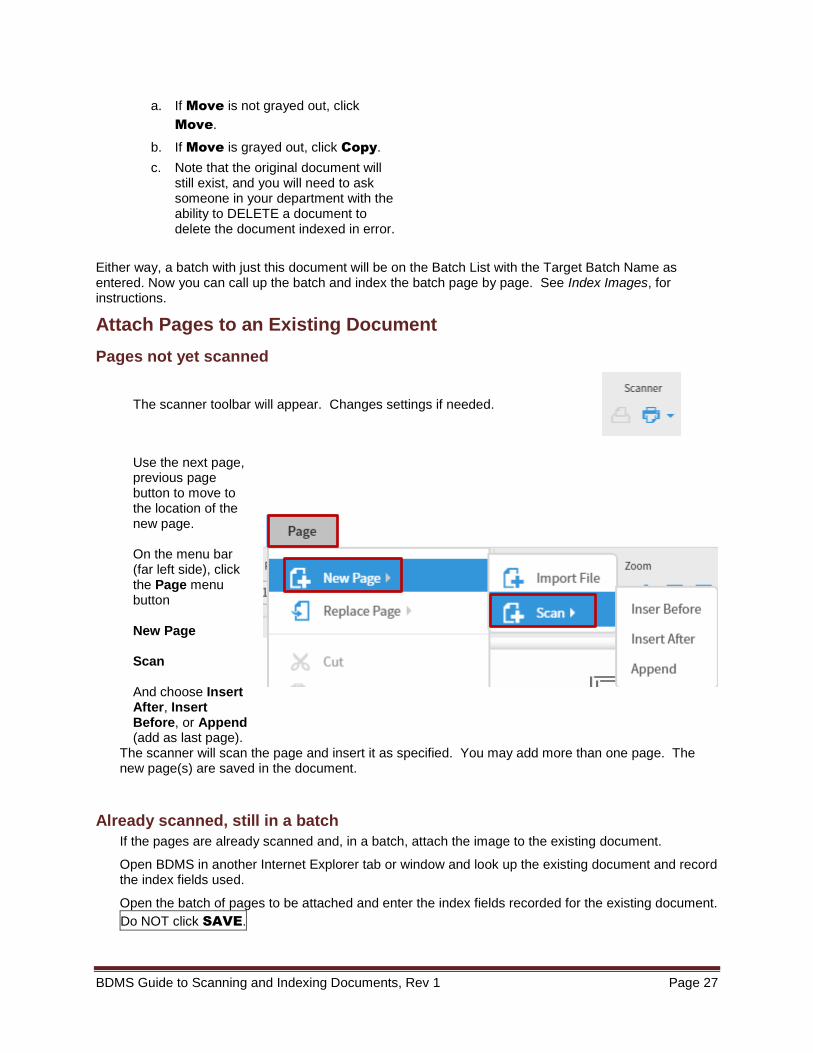
Attach Pages to an Existing Document
Pages not yet scanned
The scanner toolbar will appear. Changes settings if needed.
Use the next page, previous page button to move to the location of the new page. On the menu bar (far left side), click the Page menu button New Page Scan And choose Insert After, Insert Before, or Append (add as last page).
The scanner will scan the page and insert it as specified. You may add more than one page. The new page(s) are saved in the document.
Already scanned, still in a batch
If the pages are already scanned and, in a batch, attach the image to the existing document.
Open BDMS in another Internet Explorer tab or window and look up the existing document and record the index fields used.
Open the batch of pages to be attached and enter the index fields recorded for the existing document.
Do NOT click SAVE.

Page 28 BDMS Guide to Scanning and Indexing Documents, Rev 1
On the toolbar, click the Select Indexes button. Documents that match the index fields you just entered will be listed.
Find the row needed. Click Attach
This will index the current image as an additional page/s.
Delete a Document
There are 2 ways to delete a document.
Query Result List Find the record to be deleted. (Open the query screen and enter the student’s ID. Click Submit.)
Click the check box in front of the document to be deleted and click the Delete button. If you
do not have the authority to do this, notify your supervisor.
Document Already Open If the document is open, on the menu bar, click
Document, then click Delete.
Make Corrections in Banner, DegreeWorks
Make any needed corrections related to the corrections on the documents.
Index Fields Incorrect
If any index fields are incorrect, including the Banner ID, correcting the error is easy.
When viewing the document, display the index using the Document Index button on right-hand side off the screen.

BDMS Guide to Scanning and Indexing Documents, Rev 1 Page 29
Click Modify and make the needed changes.
If changing the Banner ID, be sure to press the TAB key after entering the ID to ensure you have entered the correct ID before you click save.
Do not omit this step.
Click Save.
Document Pages Out of Sequence
This process addresses the situation when a page is out of order. This may be discovered during the indexing process or later when reviewing the document.
When indexing, if an error is discovered that a page will be out of sequence, continue indexing pages and make the correction to the document after completion of the batch.
To review the page sequence, use the next page and previous page buttons.
There are two ways to re-order pages, Reorder pages and Thumbnail view. Instructions for
each follow.
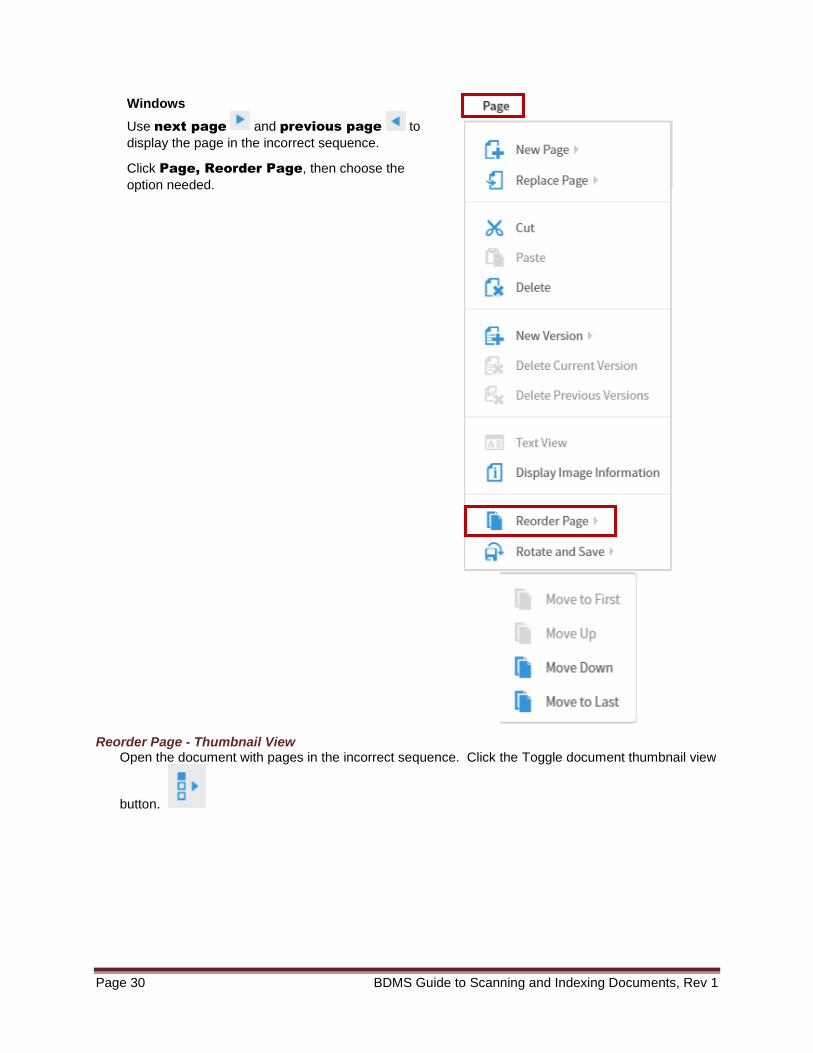
Reorder Page - Move Up/Down Open the document with pages in the incorrect sequence.
Page 30 BDMS Guide to Scanning and Indexing Documents, Rev 1
Windows
Use next page and previous page to
display the page in the incorrect sequence.
Click Page, Reorder Page, then choose the
option needed.
Reorder Page - Thumbnail View Open the document with pages in the incorrect sequence. Click the Toggle document thumbnail view
button.
BDMS Guide to Scanning and Indexing Documents, Rev 1 Page 31
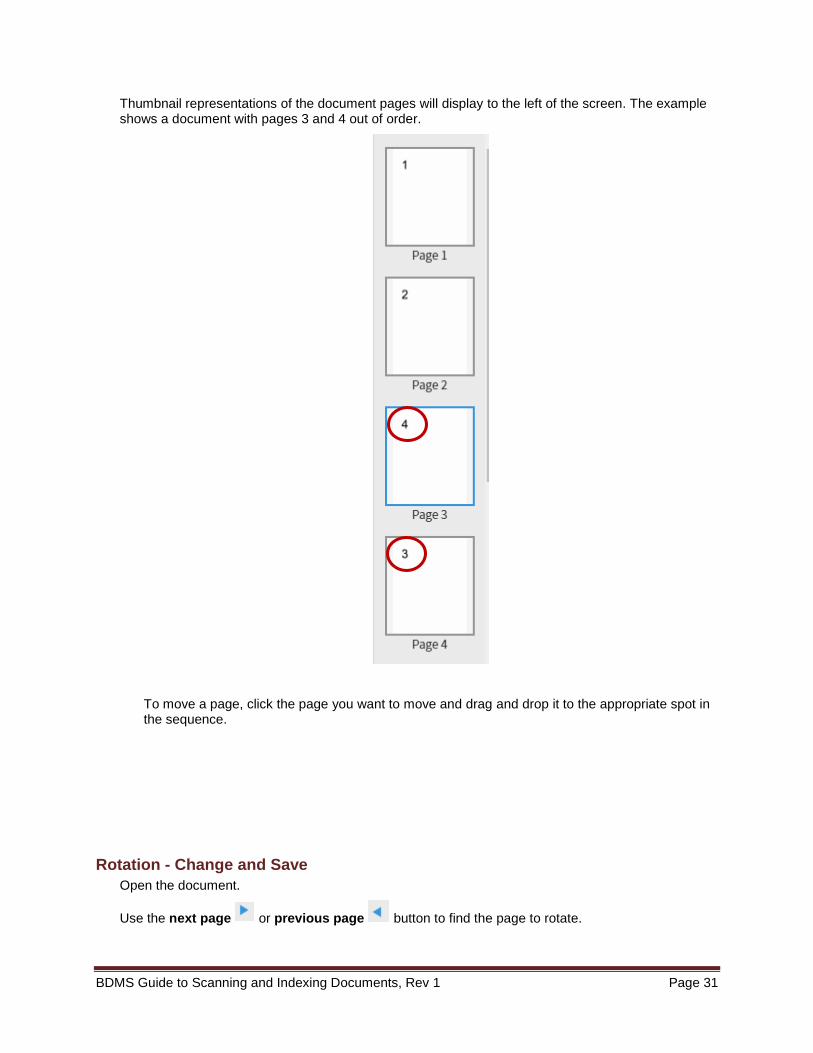
Thumbnail representations of the document pages will display to the left of the screen. The example shows a document with pages 3 and 4 out of order.
To move a page, click the page you want to move and drag and drop it to the appropriate spot in the sequence.
Rotation - Change and Save
Open the document.
Use the next page or previous page button to find the page to rotate.
Page 32 BDMS Guide to Scanning and Indexing Documents, Rev 1
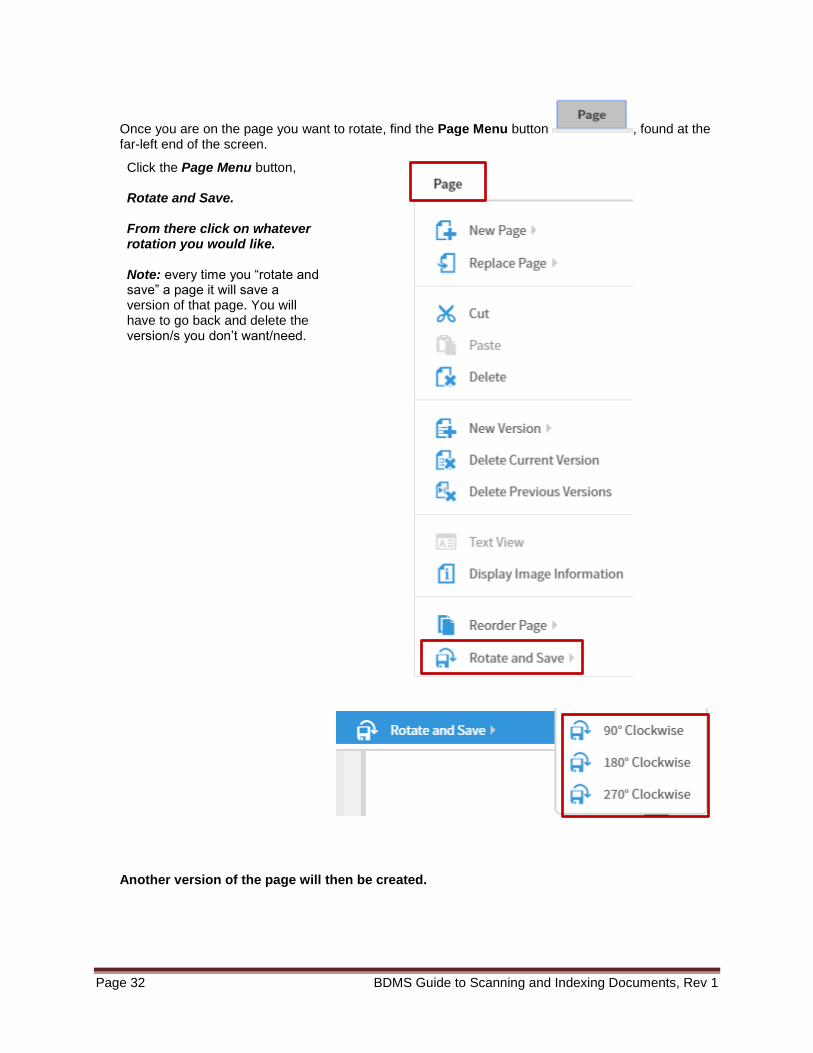
Once you are on the page you want to rotate, find the Page Menu button , found at the far-left end of the screen.
Click the Page Menu button, Rotate and Save. From there click on whatever rotation you would like. Note: every time you “rotate and save” a page it will save a version of that page. You will have to go back and delete the version/s you don’t want/need.
Another version of the page will then be created.
BDMS Guide to Scanning and Indexing Documents, Rev 1 Page 33
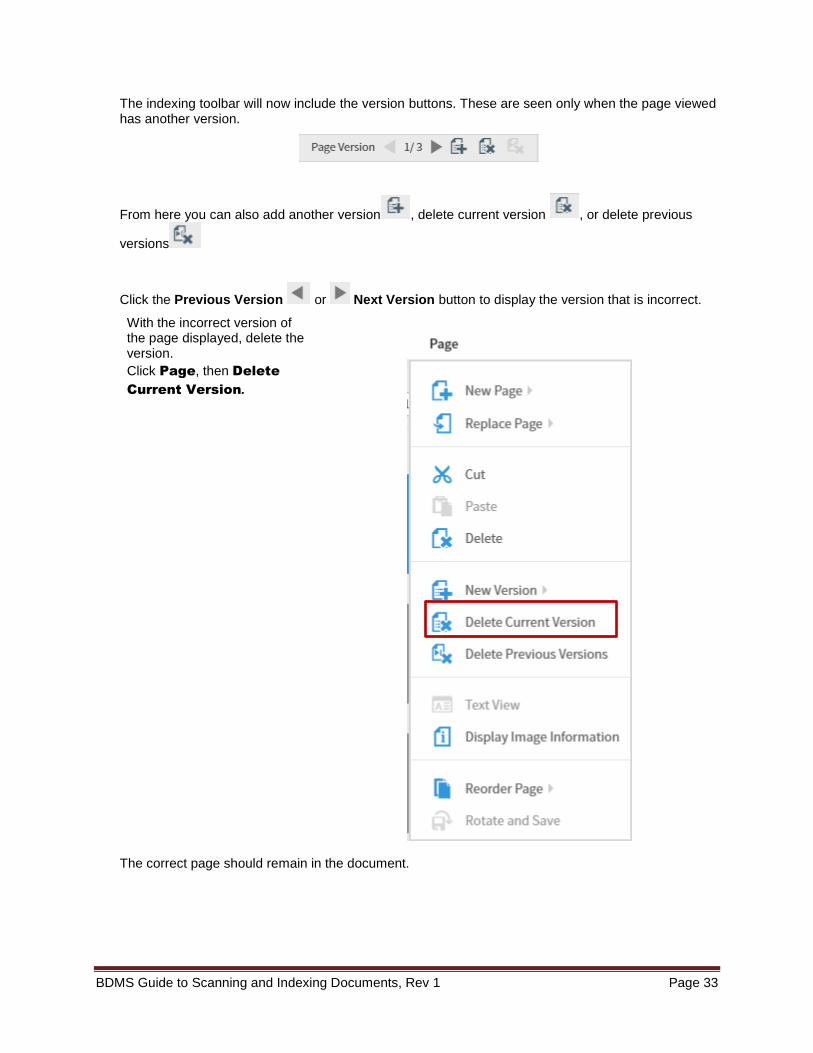
The indexing toolbar will now include the version buttons. These are seen only when the page viewed has another version.
From here you can also add another version , delete current version , or delete previous
versions
Click the Previous Version or Next Version button to display the version that is incorrect.
With the incorrect version of the page displayed, delete the version.
Click Page, then Delete
Current Version.
The correct page should remain in the document.
Page 34 BDMS Guide to Scanning and Indexing Documents, Rev 1
Importing an Electronic Document
Prepare/Create an Electronic Document
If a document is available electronically, it can easily be indexed. See below for instructions for creating a PDF from a document and processing email for importing.
Email Attachment
If the document was attached to an email message, save the attachment to a folder and rename the document, if needed.
1. In Outlook, open the message.
2. Right click the attachment needed and choose Save As.
3. Choose the folder provided by your department for this purpose.
4. Name the document such that you will know what it is, per Department Standards.
5. Click Save.
Email, No Attachment
If an email message is what is to be indexed (no attachment), save the message first.
1. In Outlook, click on the message. (Do not open it.)
2. Click File, Save as. Choose the folder provided by your department for this purpose.
Name the file as specified above.
a) PDF Click on the message, click File/Save as Adobe PDF. Choose the folder provided
by your department for this purpose. Name the file as specified above. Create a PDF
from Microsoft® Word Document
To create a PDF from Microsoft® Word, use the Office button (top left corner), Save As, and Adobe
PDF. A PDF document created using this method is much smaller than printing the document and then scanning it. And there’s no paper to recycle.
Other Electronic Document If the document is one that you created or is already on your computer, ensure that you know the location (folder) and name of the file. Documents that are not in PDF format will be considered “foreign” documents. Anyone using that document must have the same software (example, Microsoft® Word) to open the document. Opening a foreign document takes longer than opening a PDF. Generally, do not import/index a document that is not a TXT, HTML, or PDF format.
Check Batch List
A batch is created each time a document is imported, whether by an electronic import or by scanning. If the document is indexed when displayed, the batch is processed and deleted. If the document is NOT immediately indexed, the batch remains, even if the document rescanned.
These batches are easily identified because the Username is the user’s NetID. Users or supervisors should review the batch list periodically to process or delete these batches.
BDMS Guide to Scanning and Indexing Documents, Rev 1 Page 35
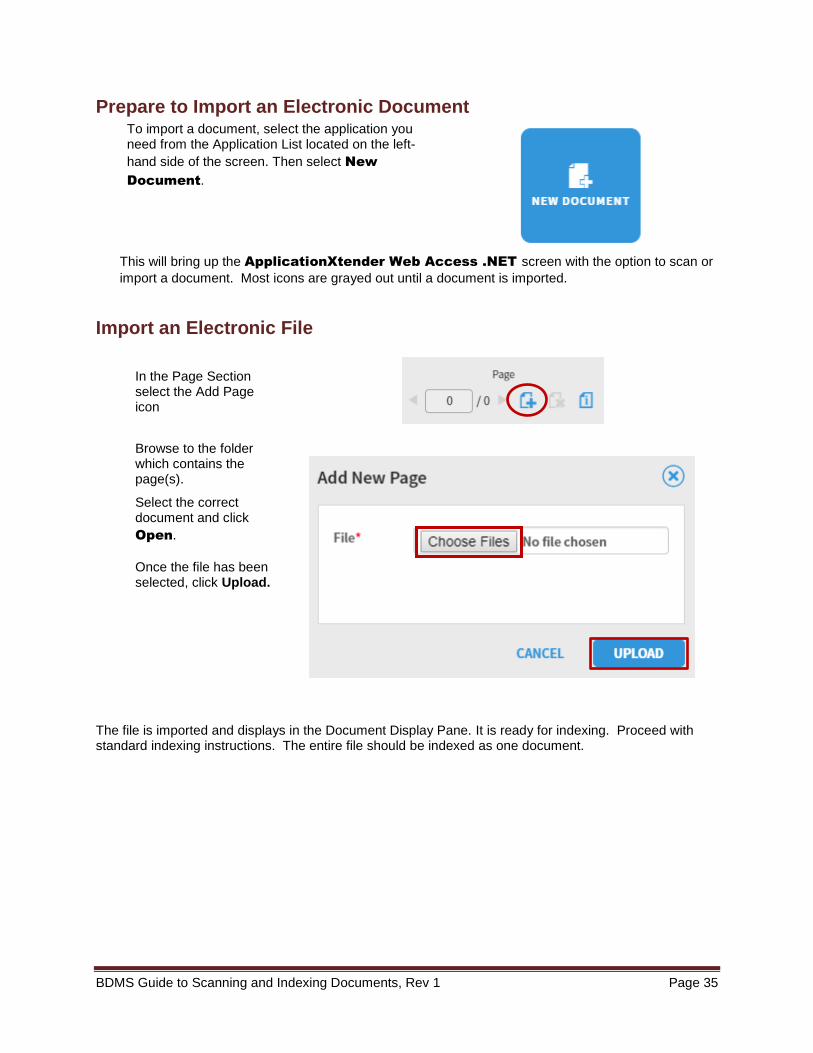
Prepare to Import an Electronic Document To import a document, select the application you need from the Application List located on the left-
hand side of the screen. Then select New
Document.
This will bring up the ApplicationXtender Web Access .NET screen with the option to scan or
import a document. Most icons are grayed out until a document is imported.
Import an Electronic File
In the Page Section select the Add Page icon
Browse to the folder which contains the page(s).
Select the correct document and click
Open.
Once the file has been selected, click Upload.
The file is imported and displays in the Document Display Pane. It is ready for indexing. Proceed with standard indexing instructions. The entire file should be indexed as one document.
Page 36 BDMS Guide to Scanning and Indexing Documents, Rev 1
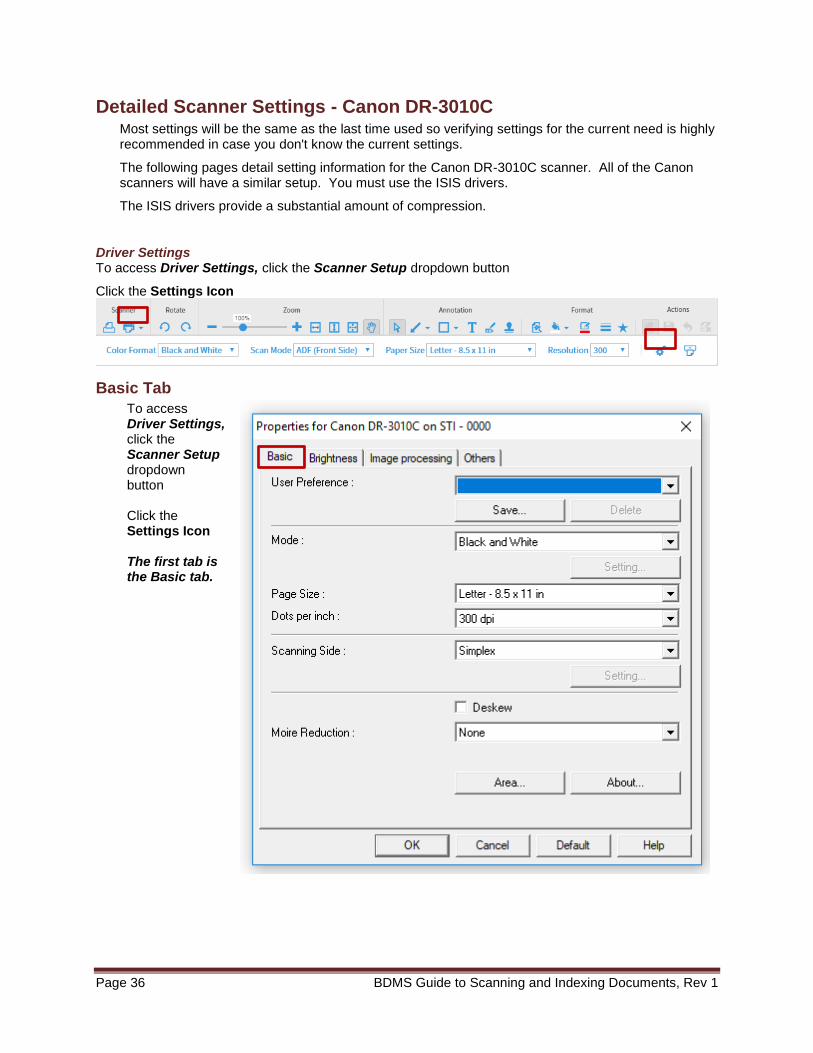
Detailed Scanner Settings - Canon DR-3010C Most settings will be the same as the last time used so verifying settings for the current need is highly recommended in case you don't know the current settings.
The following pages detail setting information for the Canon DR-3010C scanner. All of the Canon scanners will have a similar setup. You must use the ISIS drivers.
The ISIS drivers provide a substantial amount of compression.
Driver Settings To access Driver Settings, click the Scanner Setup dropdown button
Click the Settings Icon
Basic Tab
To access Driver Settings, click the Scanner Setup dropdown button Click the Settings Icon The first tab is the Basic tab.
BDMS Guide to Scanning and Indexing Documents, Rev 1 Page 37
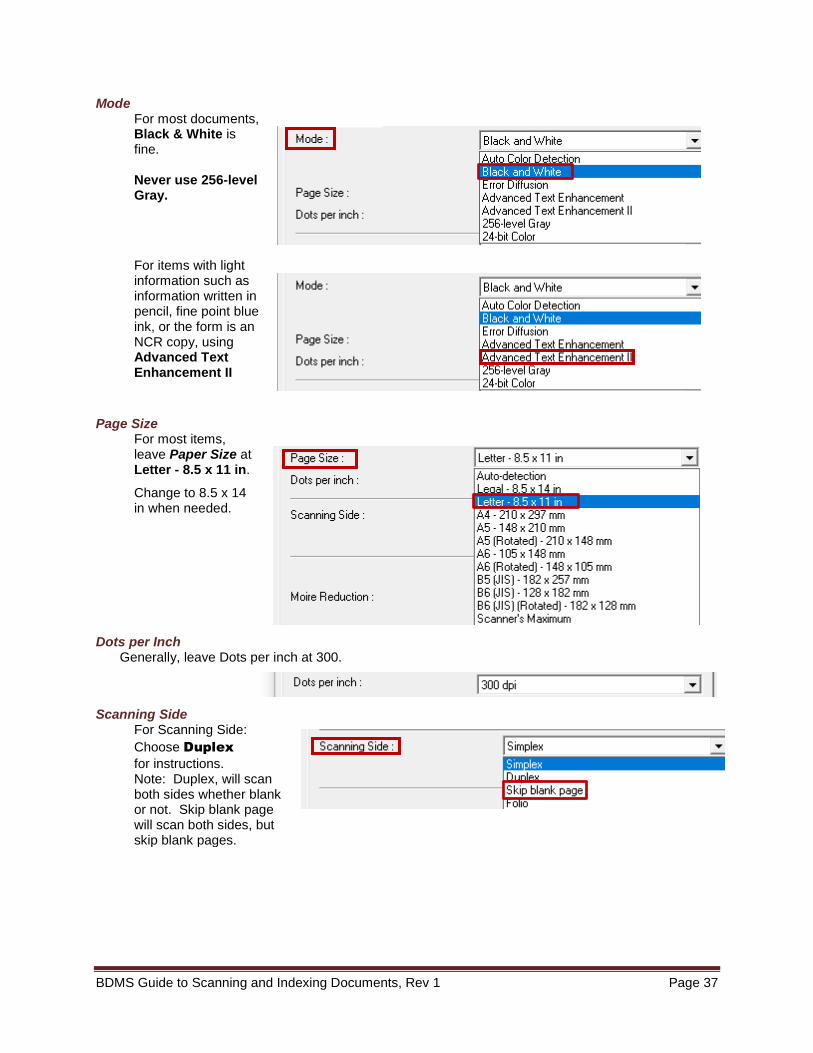
Mode For most documents, Black & White is fine. Never use 256-level Gray.
For items with light information such as information written in pencil, fine point blue ink, or the form is an NCR copy, using Advanced Text Enhancement II
Page Size For most items, leave Paper Size at Letter - 8.5 x 11 in.
Change to 8.5 x 14 in when needed.
Dots per Inch Generally, leave Dots per inch at 300.
Scanning Side For Scanning Side:
Choose Duplex
for instructions. Note: Duplex, will scan both sides whether blank or not. Skip blank page will scan both sides, but skip blank pages.
Page 38 BDMS Guide to Scanning and Indexing Documents, Rev 1
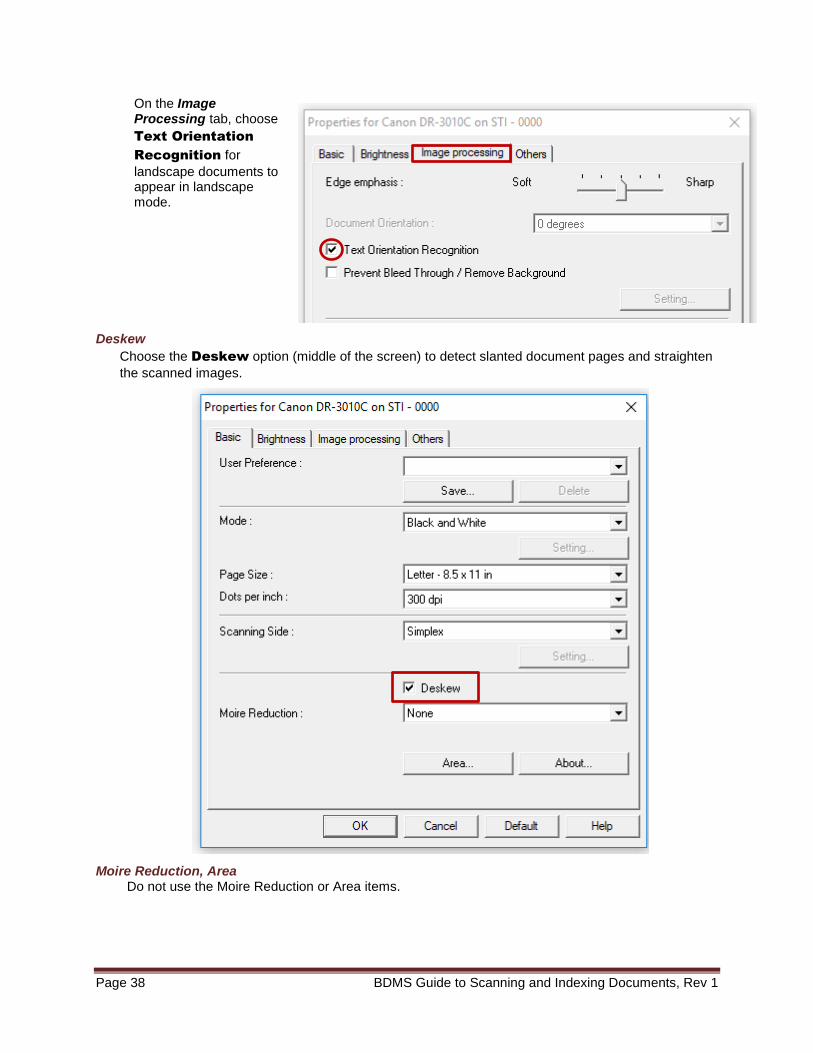
On the Image Processing tab, choose
Text Orientation
Recognition for
landscape documents to appear in landscape mode.
Deskew
Choose the Deskew option (middle of the screen) to detect slanted document pages and straighten
the scanned images.
Moire Reduction, Area Do not use the Moire Reduction or Area items.
BDMS Guide to Scanning and Indexing Documents, Rev 1 Page 39
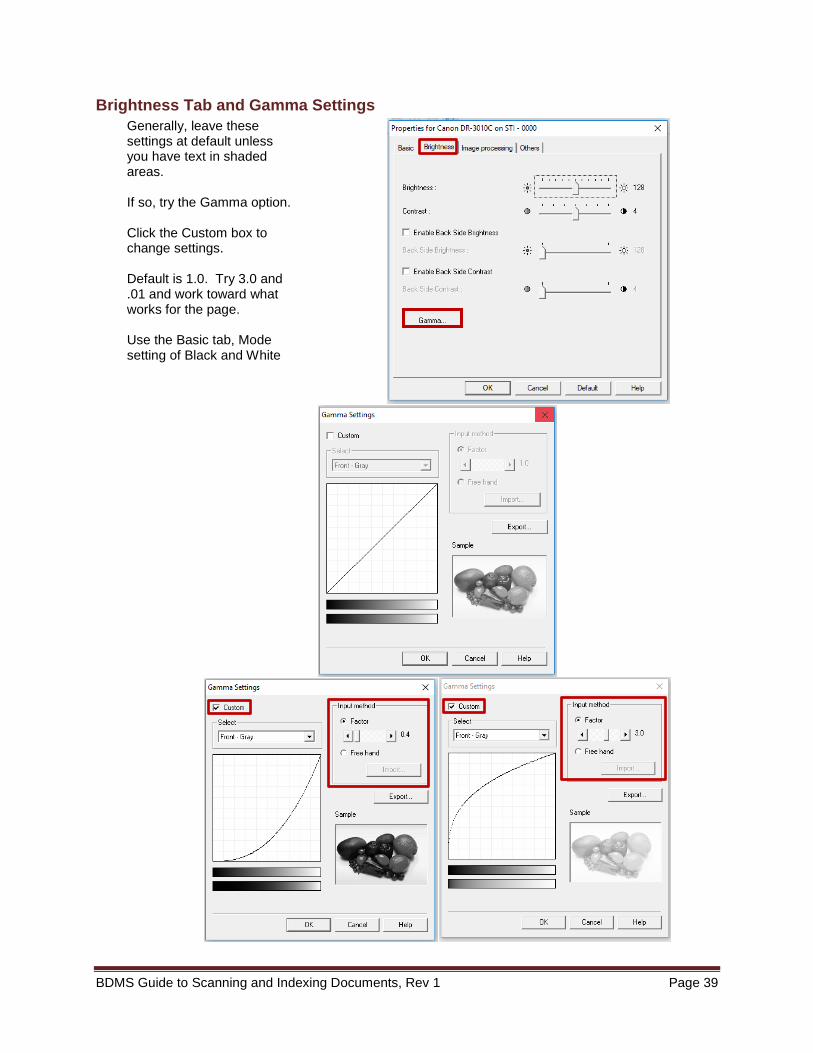
Brightness Tab and Gamma Settings
Generally, leave these settings at default unless you have text in shaded areas. If so, try the Gamma option. Click the Custom box to change settings. Default is 1.0. Try 3.0 and .01 and work toward what works for the page. Use the Basic tab, Mode setting of Black and White

Page 40 BDMS Guide to Scanning and Indexing Documents, Rev 1
Image Processing Tab
Check Text
Orientation
Recognition and the
scanner will automatically use landscape mode.
Check Prevent
Bleed
Through/Remove
Background for
pages with a lot of background color present.
Use Color drop-out
when you have color paper OR there is a background of color, such as on a transcript. Choices are Red, Blue, and Green. Use this with Basic tab, Mode option of Black and White
Others Tab
Do not use the Others Tab.

BDMS Guide to Scanning and Indexing Documents, Rev 1 Page 41
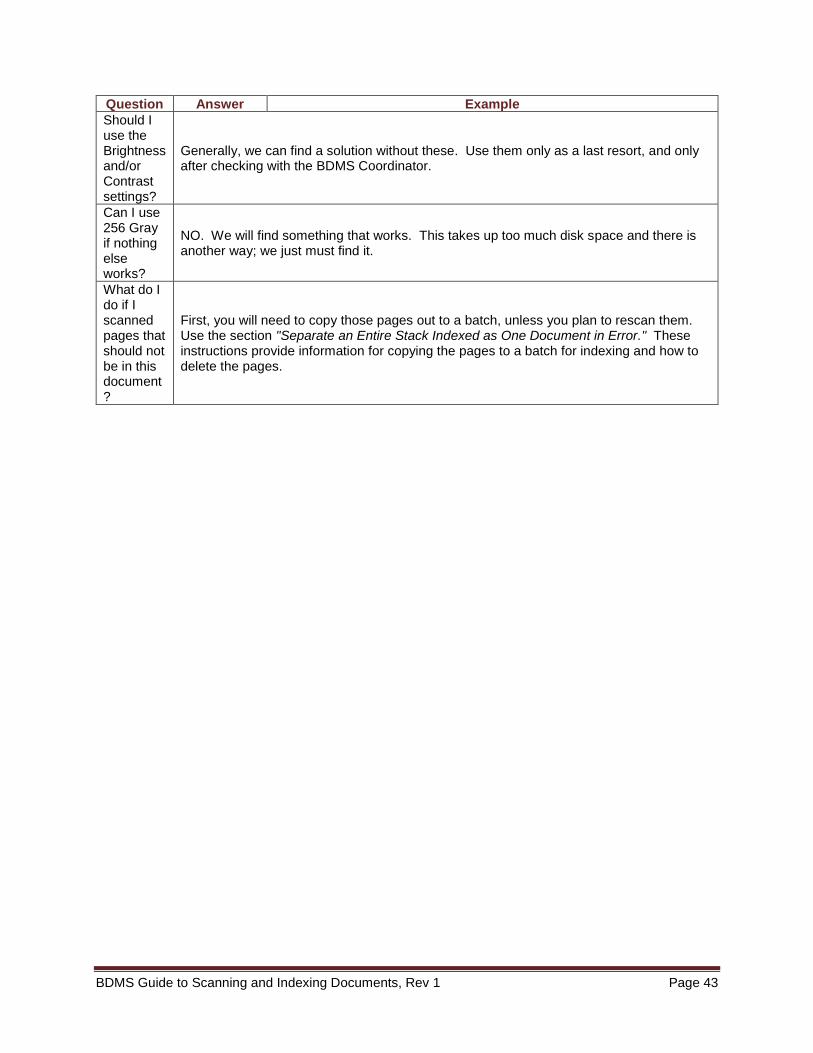
Scanning FAQs Question Answer Example
When do I need to check settings?
Every time you start to scan.
How to scan the yellow sheet of a multi-copy form (NCR) so we can read it?
Basic tab, Mode of Advanced Text Enhancement II
How to get landscape pages rotated properly?
Image Processing tab, Text Orientation Recognition
What to do with pages on color paper?
Image Processing tab, Color drop-out option. Options are blue, green, and red.
Page 42 BDMS Guide to Scanning and Indexing Documents, Rev 1
Question Answer Example
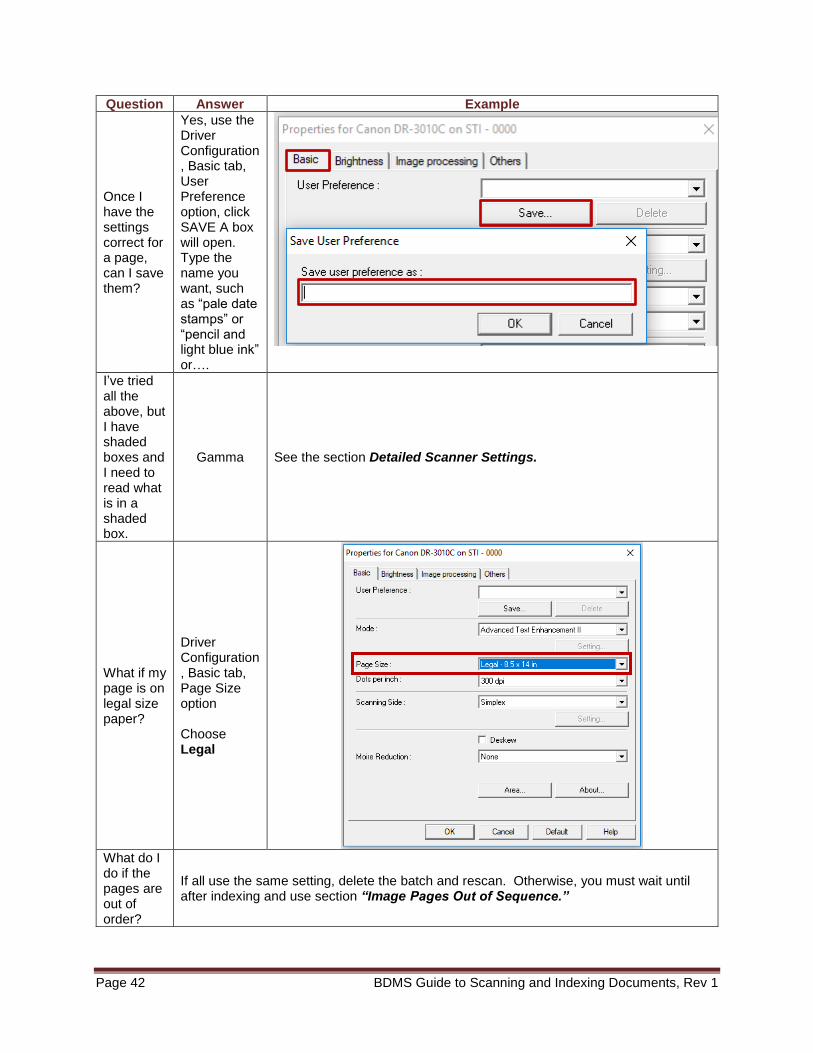
Once I have the settings correct for a page, can I save them?
Yes, use the Driver Configuration, Basic tab, User Preference option, click SAVE A box will open. Type the name you want, such as “pale date stamps” or “pencil and light blue ink” or….
I’ve tried all the above, but I have shaded boxes and I need to read what is in a shaded box.
Gamma See the section Detailed Scanner Settings.
What if my page is on legal size paper?
Driver Configuration, Basic tab, Page Size option Choose Legal
What do I do if the pages are out of order?
If all use the same setting, delete the batch and rescan. Otherwise, you must wait until after indexing and use section “Image Pages Out of Sequence.”
BDMS Guide to Scanning and Indexing Documents, Rev 1 Page 43
Question Answer Example
Should I use the Brightness and/or Contrast settings?
Generally, we can find a solution without these. Use them only as a last resort, and only after checking with the BDMS Coordinator.
Can I use 256 Gray if nothing else works?
NO. We will find something that works. This takes up too much disk space and there is another way; we just must find it.
What do I do if I scanned pages that should not be in this document?
First, you will need to copy those pages out to a batch, unless you plan to rescan them. Use the section "Separate an Entire Stack Indexed as One Document in Error." These instructions provide information for copying the pages to a batch for indexing and how to delete the pages.
Page 44 BDMS Guide to Scanning and Indexing Documents, Rev 1
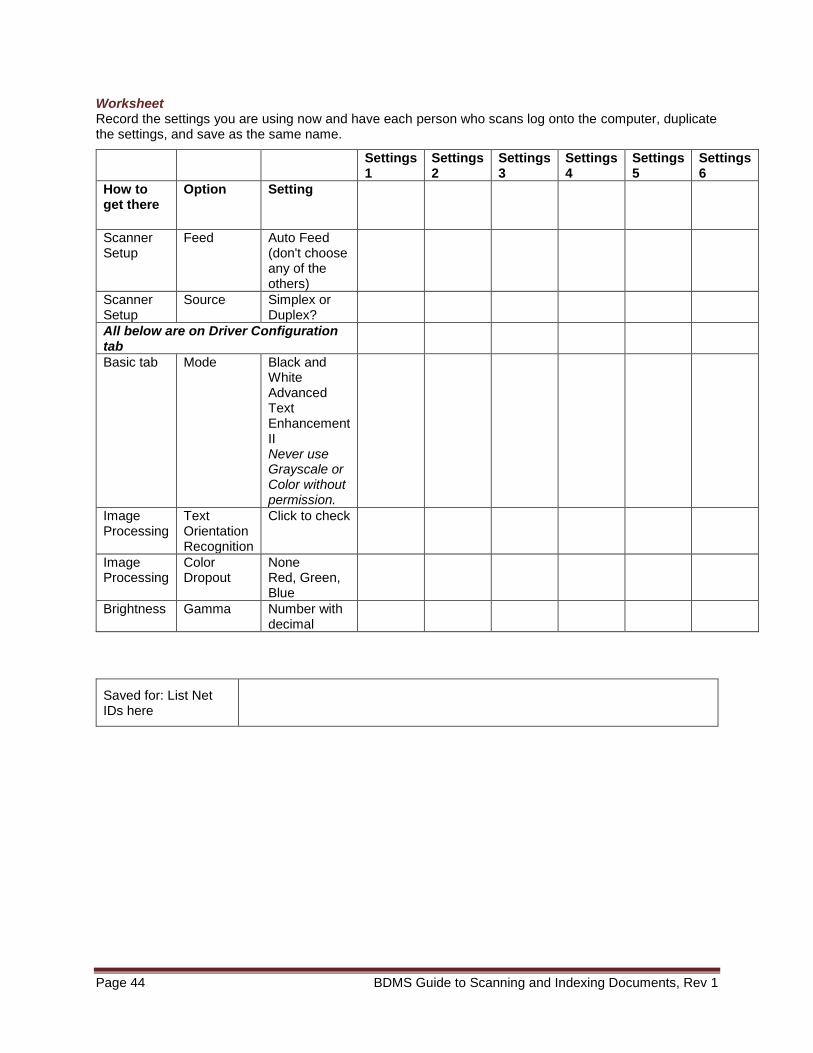
Worksheet Record the settings you are using now and have each person who scans log onto the computer, duplicate the settings, and save as the same name.
Settings 1
Settings 2
Settings 3
Settings 4
Settings 5
Settings 6
How to get there
Option Setting
Scanner Setup
Feed Auto Feed (don't choose any of the others)
Scanner Setup
Source Simplex or Duplex?
All below are on Driver Configuration tab
Basic tab Mode Black and White Advanced Text Enhancement II Never use Grayscale or Color without permission.
Image Processing
Text Orientation Recognition
Click to check
Image Processing
Color Dropout
None Red, Green, Blue
Brightness Gamma Number with decimal
Saved for: List Net IDs here