army tm 9-2320-387-24- 1 - air force to 36a12
1206
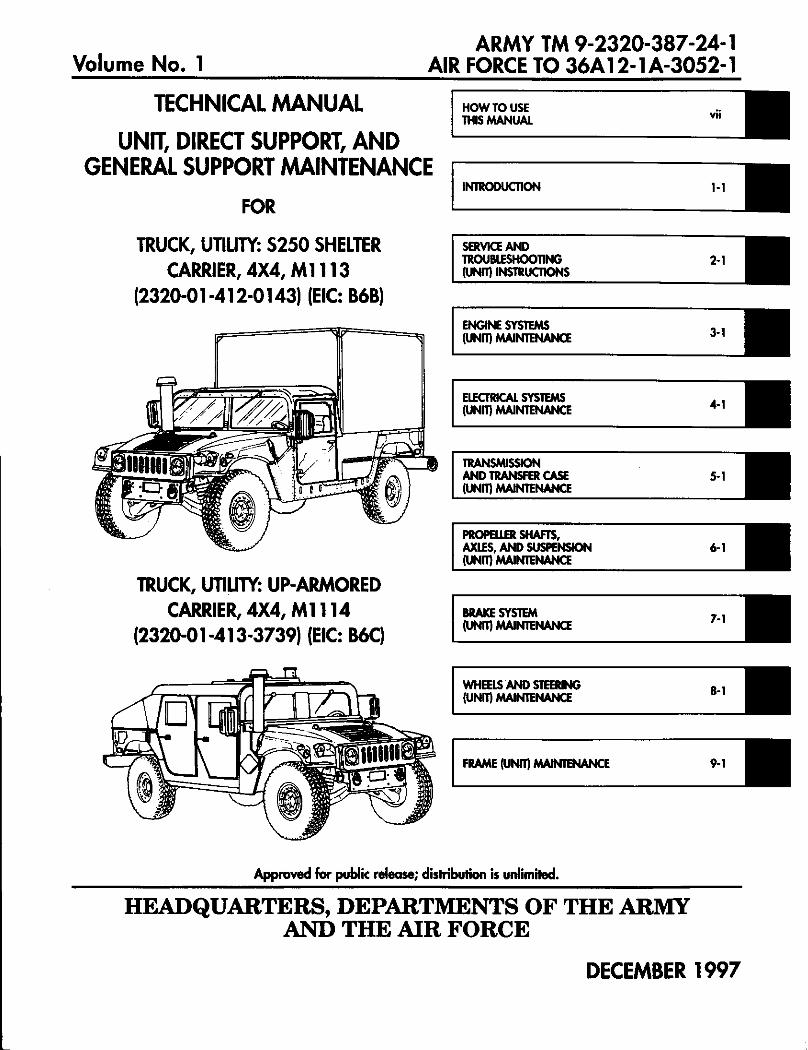
Volume No. 1 ARMY TM 9-2320-387-24- 1 AIR FORCE TO 36A12- 1 A-3052- 1 TECHNICAL MANUAL UNIT, DIRECT SUPPORT, AND GENERAL SUPPORT MAINTENANCE FOR TRUCK, UTIUM: S250 SHELTER CARRIER, 4X4, Ml 113 (2320-01-412-0143) (EIC: 868) TRUCK, UTlun: UP-ARMORED CARRIER, 4X4, Ml 114 (2320-01-413-3739) (EIC: B6C) HOW TO USE nil.5 MANUAL SERVICE AND TROUBlESHOOllNG (UNItI INSlRUCDONS ENGINE !mlEMS [UNill MAlNlENAME TRAN!iMwON ANDTRANMIRCASE 5-l wm MAtNlENANQ FlK4’EUERSHAFB. AXLES, AND SU.%MSlON wNnlM4lNlENANcE RRAuESYSlEM @NlqMAlNlEw FRAME (UNbT)MMENANCE Appmved for public release; dishibuh is unlimited. HEADQUARTERS, DEPARTMENTS OF THE ARMY AN-b THE AIR FORCE DECEMBER 1997
-
Upload
khangminh22 -
Category
Documents
-
view
1 -
download
0
Transcript of army tm 9-2320-387-24- 1 - air force to 36a12
Volume No. 1 ARMY TM 9-2320-387-24- 1
AIR FORCE TO 36A12- 1 A-3052- 1
TECHNICAL MANUAL
UNIT, DIRECT SUPPORT, AND GENERAL SUPPORT MAINTENANCE
FOR
TRUCK, UTIUM: S250 SHELTER CARRIER, 4X4, Ml 113
(2320-01-412-0143) (EIC: 868)
TRUCK, UTlun: UP-ARMORED CARRIER, 4X4, Ml 114
(2320-01-413-3739) (EIC: B6C)
HOW TO USE nil.5 MANUAL
SERVICE AND TROUBlESHOOllNG (UNItI INSlRUCDONS
ENGINE !mlEMS [UNill MAlNlENAME
TRAN!iMwON ANDTRANMIRCASE 5-l wm MAtNlENANQ
FlK4’EUERSHAFB. AXLES, AND SU.%MSlON wNnlM4lNlENANcE
RRAuESYSlEM @NlqMAlNlEw
FRAME (UNbT)MMENANCE
Appmved for public release; dishibuh is unlimited.
HEADQUARTERS, DEPARTMENTS OF THE ARMY AN-b THE AIR FORCE
DECEMBER 1997
ARMY TM 9-2320-387-24-1AIR FORCE TO 36A12-1A-3052-1
TECHNICAL MANUALVOLUME 1 OF 2
UNIT, DIRECT SUPPORT, ANDGENERAL SUPPORT MAINTENANCE
FOR
TRUCK, UTILITY: S250 SHELTER CARRIER, 4X4, M1113 (2320-01-412-0143) (EIC: B6B)
TRUCK, UTILITY: UP - ARMORED CARRIER, 4X4, M1114 (2320-01-413-3739) (EIC: B6C)
Remove pages Insert page
Warning c/(d blank) Warning c/(d blank)None A through D (after warning d blank)i through iv i through iv1-1 and 1-2 1-1 and 1-21-21 and 1-22 1-21 and 1-221-33 and 1-34 1-33 and 1-341-39 and 1-40 1-39 and 1-402-5 through 2-10 2-5 through 2-102-13 and 2-14 2-13 and 2-142-19 and 2-20 2-19 and 2-202-23 through 2-28 2-23 through 2-282-97 and 2-98 2-97 and 2-982-199 through 2-202 2-199 through 2-2022-207 through 2-210 2-207 through 2-210None 2-210.1 through 2-210.42-211/(2-212 blank) 2-211/(2-212 blank)2-385 and 2-386 2-385 and 2-3862-407 and 2-408 2-407 and 2-4082-419 and 2-420 2-419 and 2-4202-441 through 2-444 2-441 through 2-4442-449 and 2-450 2-449 and 2-4503-11 through 3-16 3-11 through 3-163-21 through 3-38 3-21 through 3-383-55 through 3-60 3-55 through 3-60
TM 9-2320-387-24-1, December 1997, is changed as follows:
CHANGE
NO. 1
Approved for public release; distribution is unlimited.
1. Remove old pages and insert new pages as indicated below.2. New or changed material is indicated by a vertical bar in the margin of the page.3. File this change sheet in front of the publication for reference purposes.
HEADQUARTERS,DEPARTMENTS OF THE ARMY, AND
THE AIR FORCEWashington, D.C., 31 OCTOBER 2001

3-81 through 3-94 3-81 through 3-943-109 through 3-130 3-109 through 3-1303-133 and 3-134 3-133 and 3-1343-141 and 3-142 3-141 and 3-142None 3-142.1 and 3-142.23-143 through 3-146 3-143 through 3-1464-1 through 4-18 4-1 through 4-18None 4-18.1 through 4-18.124-19 through 4-24 4-19 through 4-244-65 and 4-66 4-65 and 4-664-73 through 4-76 4-73 through 4-764-79/(4-80 blank) 4-79 and 4-804-99 through 4-102 4-99 through 4-1024-109 and 4-110 4-109 and 4-1105-7 through 5-12 5-7 through 5-125-23 and 5-24 5-23 and 5-245-27 through 5-30 5-27 through 5-306-13 through 6-26 6-13 through 6-266-29 through 6-38 6-29 through 6-386-51 and 6-52 6-51 and 6-52None 6-52.1 and 6-52.26-53 and 6-54 6-53 and 6-547-1 and 7-2 7-1 and 7-27-5 through 7-22 7-5 through 7-227-25 through 7-46 7-25 through 7-468-11 and 8-12 8-11 and 8-128-15 and 8-16 8-15 and 8-168-23 through 8-34 8-23 through 8-348-63 and 8-64 8-63 and 8-648-69 and 8-70 8-69 and 8-708-73 and 8-74 8-73 and 8-74INDEX 1 through INDEX 1 through INDEX 45/(INDEX 46 blank) INDEX 53/(INDEX 54 blank)DA Form 2028-2 DA Form 2028
Remove pages Insert pages
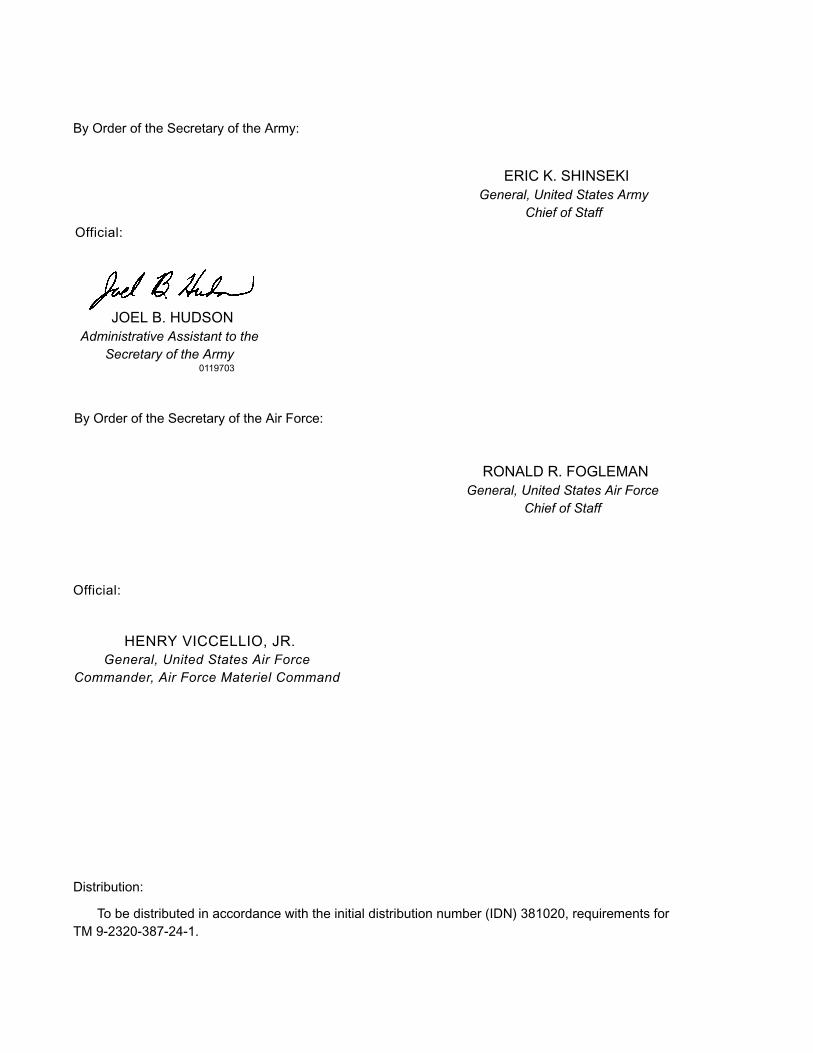
Distribution:
To be distributed in accordance with the initial distribution number (IDN) 381020, requirements for TM 9-2320-387-24-1.
Official:
By Order of the Secretary of the Army:
JOEL B. HUDSONAdministrative Assistant to the
Secretary of the Army0119703
By Order of the Secretary of the Air Force:
ERIC K. SHINSEKIGeneral, United States Army
Chief of Staff
RONALD R. FOGLEMANGeneral, United States Air Force
Chief of Staff
HENRY VICCELLIO, JR.General, United States Air Force
Commander, Air Force Materiel Command
Official:
TM9-2320-387-24-l
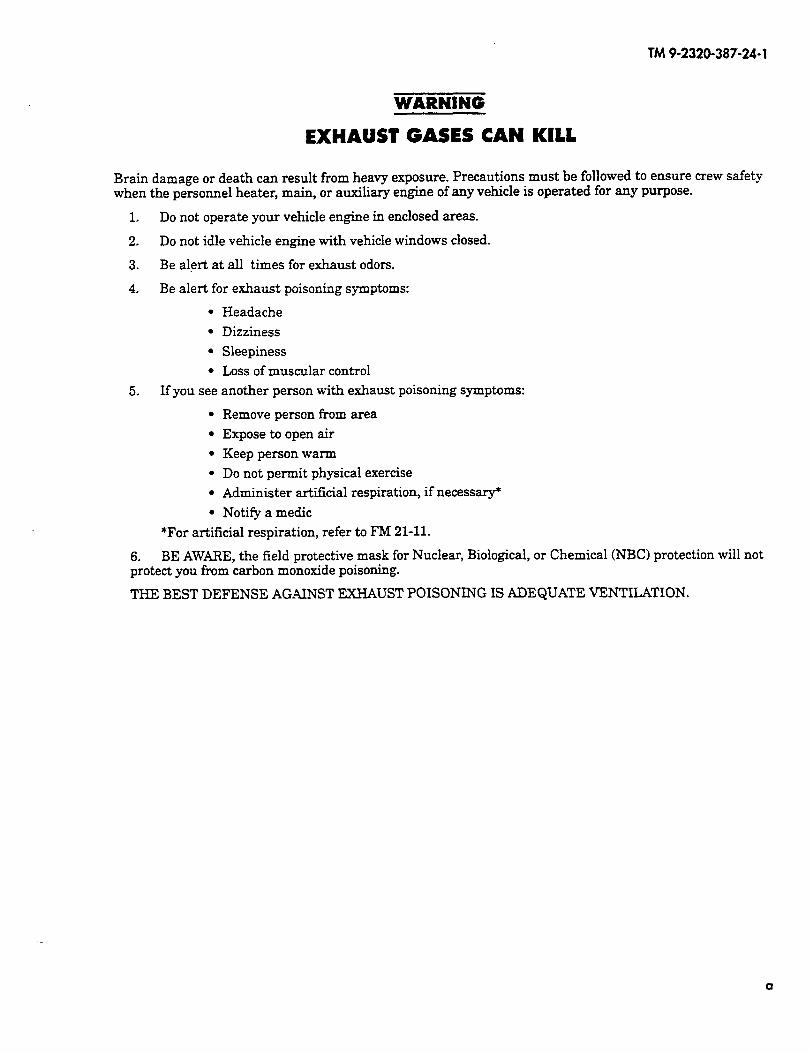
WARNING
EXHAUST GASES CAN KILL
Brain damage or death can result from heavy exposure. Precautions must be followed to ensure crew safety when the personnel heater, main, or auxiliary engine of any vehicle is operated for any purpose.
1. Do not operate your vehicle engine in enclosed areas.
2. Do not idle vehicle engine with vehicle windows closed.
3. Be alert at all times for exhaust odors.
4. Be alert for exhaust poisoning symptoms:
.
.
.
.
5. If you see
.
.
.
.
.
.
Headache
Dizziness
Sleepiness
Loss of muscular control
another person with exhaust poisoning symptoms:
Remove person from area
Expose to open air
Keep person warm
Do not permit physical exercise
Administer artificial respiration, if necessary*
Notify a medic
*For artificial respiration, refer to FM 21-11.
6. BE AWARE, the field protective mask for Nuclear, Biological, or Chemical (NBC) protection will not protect you from carbon monoxide poisoning.
THE BEST DEFENSE AGAINST EXHAUST POISONING IS ADEQUATE VENTILATION.
a

TM9-2320-387-24-l
WARNING SUMMARY
l Drycleaning solvent is flammable and will not be used near an open flame. A fire extinguisher will be kept nearby when the solvent is used. Use only in well-ventilated places. Failure to do this may result in injury to personnel and/or damage to equipment.
l Compressed air used for cleaning purposes will not exceed 30 psi (207 kPa). Use only with effective chip guarding and personal protective equipment (goggles/shield, gloves, etc.).
l Diesel fuel is highly flammable. Do not perform any procedure near fire, flames, or sparks. Severe injury or death will result.
l Do not touch.hot exhaust system components with bare hands. Severe injury will result.
l Do not remove surge tank filler cap before releasing internal pressure when engine temperature is above 190°F (88°C). Steam or hot coolant under pressure will cause injury.
l Do not drain oil when engine is hot. Severe injury to personnel will result.
l Always wear eye protection when bleeding brakes. Failure to do this may cause injury if brake fluid comes in contact with eyes.
l Do not perform battery system checks or inspections while smoking or near fire, flames, or sparks. Batteries may explode, causing damage to vehicle, injury, or death to personnel.
l Remove all jewelry such as rings, dog tags, bracelets, etc. If jewelry or disconnected battery ground cable contacts battery terminal, a direct short will result, causing injury to personnel or damage to equipment.
l Use caution when testing thermostat. Hot water will cause bums.
l Negative battery cable must be disconnected before disconnecting any harness from protective control box or serious injury to personnel or damage to equipment will result.
l Keep hands and arms away from fan blade and drivebelts while engine is running or serious injury may result.
l Battery acid (electrolyte) is extremely harmful. Always wear safety goggles and rubber gloves, and do not smoke when performing maintenance on batteries. Injury will result if acid contacts eyes or skin.
l When removing battery cable clamps, disconnect ground cable first. Ensure all switches are in OFF position before disconnecting ground cable. Do not allow tools to come in contact with vehicle when disconnecting cable clamps. A direct short can result, causing instant heating of tools, tool damage, battery damage, or battery explosion.
l Allow transmission/transfer case to cool before performing maintenance. Failure to do this may cause injury.
l Always apply parking brake and chock opposite wheel before removing wheel. Avoid removing wheel when vehicle is on sloping terrain. Injury to personnel or damage to equipment may result.
l Gloves must be worn whenever handling winch cable. Severe injury may result.
l Hydraulic jacks are used for raising and lowering, and are not used to support vehicle. Never work under vehicle unless wheels are blocked and it is properly supported. Injury or damage to equipment may result if vehicle suddenly shifts or moves.
l Remove only the inner group of nuts when removing a wheel from the vehicle. Removing the outer nuts which hold the rim together while the assembly is inflated could result in serious injury or death.
l In all disassembly of the wheel assembly operations, ensure the tire is totally deflated before removing wheel nuts. Failure to follow proper safety precautions could cause serious injury or death.
l Never inflate a wheel assembly with the wheel locknuts removed in an attempt to separate inner and outer rim halves. The assembly will separate under pressure, resulting in serious injury or death.
b
WARNING SUMMARY (Cont'd)
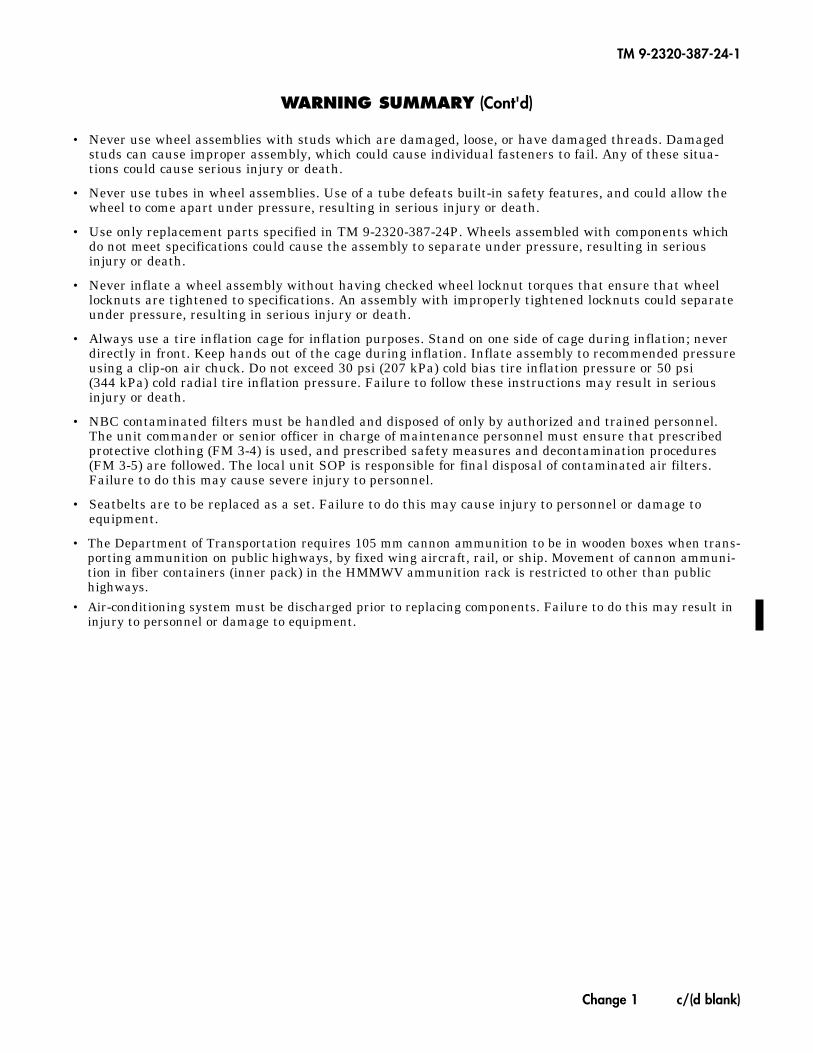
• Never use wheel assemblies with studs which are damaged, loose, or have damaged threads. Damagedstuds can cause improper assembly, which could cause individual fasteners to fail. Any of these situa-tions could cause serious injury or death.
• Never use tubes in wheel assemblies. Use of a tube defeats built-in safety features, and could allow thewheel to come apart under pressure, resulting in serious injury or death.
• Use only replacement parts specified in TM 9-2320-387-24P. Wheels assembled with components whichdo not meet specifications could cause the assembly to separate under pressure, resulting in seriousinjury or death.
• Never inflate a wheel assembly without having checked wheel locknut torques that ensure that wheellocknuts are tightened to specifications. An assembly with improperly tightened locknuts could separateunder pressure, resulting in serious injury or death.
• Always use a tire inflation cage for inflation purposes. Stand on one side of cage during inflation; neverdirectly in front. Keep hands out of the cage during inflation. Inflate assembly to recommended pressureusing a clip-on air chuck. Do not exceed 30 psi (207 kPa) cold bias tire inflation pressure or 50 psi(344 kPa) cold radial tire inflation pressure. Failure to follow these instructions may result in seriousinjury or death.
• NBC contaminated filters must be handled and disposed of only by authorized and trained personnel.The unit commander or senior officer in charge of maintenance personnel must ensure that prescribedprotective clothing (FM 3-4) is used, and prescribed safety measures and decontamination procedures(FM 3-5) are followed. The local unit SOP is responsible for final disposal of contaminated air filters.Failure to do this may cause severe injury to personnel.
• Seatbelts are to be replaced as a set. Failure to do this may cause injury to personnel or damage toequipment.
• The Department of Transportation requires 105 mm cannon ammunition to be in wooden boxes when trans-porting ammunition on public highways, by fixed wing aircraft, rail, or ship. Movement of cannon ammuni-tion in fiber containers (inner pack) in the HMMWV ammunition rack is restricted to other than publichighways.
• Air-conditioning system must be discharged prior to replacing components. Failure to do this may result ininjury to personnel or damage to equipment.
TM 9-2320-387-24-1
Change 1 c/(d blank)
Dates of issue for original andchanged pages of volume 1 are:
Original ......0 31 December 1997Change ...... 1 .. 31 October 2001Volume 1 contains 1238 pages
VOLUME 1a - b . . . . . . . . . . . . . . . . . . . . .0c . . . . . . . . . . . . . . . . . . . . . . .1 d Blank . . . . . . . . . . . . . . . . . .0A-D Added . . . . . . . . . . . . . . . .1i . . . . . . . . . . . . . . . . . . . . . . .1ii - iii . . . . . . . . . . . . . . . . . . . .0iv . . . . . . . . . . . . . . . . . . . . . .1v-xiii . . . . . . . . . . . . . . . . . . . .0xiv Blank . . . . . . . . . . . . . . . . .01-1 . . . . . . . . . . . . . . . . . . . . . .11-2 - 1-20 . . . . . . . . . . . . . . . . .01-21 . . . . . . . . . . . . . . . . . . . . .11-22 - 1-33 . . . . . . . . . . . . . . . .01-34 . . . . . . . . . . . . . . . . . . . . .11-35 - 1-39 . . . . . . . . . . . . . . . .01-40 . . . . . . . . . . . . . . . . . . . . .12-1 - 2-4 . . . . . . . . . . . . . . . . . .02-5 - 2-10 . . . . . . . . . . . . . . . . .12-11 - 2-12 . . . . . . . . . . . . . . . .02-13 . . . . . . . . . . . . . . . . . . . . .12-14 - 2-18 . . . . . . . . . . . . . . . .02-19 . . . . . . . . . . . . . . . . . . . . .12-20 - 2-22 . . . . . . . . . . . . . . . .02-23 - 2-25 . . . . . . . . . . . . . . . .12-26 - 2-27 . . . . . . . . . . . . . . . .02-28 . . . . . . . . . . . . . . . . . . . . .12-29 - 2-49 . . . . . . . . . . . . . . . .02-50 Blank . . . . . . . . . . . . . . . .02-51 - 2-59 . . . . . . . . . . . . . . . .02-60 Blank . . . . . . . . . . . . . . . .02-61 - 2-67 . . . . . . . . . . . . . . . .02-68 Blank . . . . . . . . . . . . . . . .02-69 - 2-73 . . . . . . . . . . . . . . . .02-74 Blank . . . . . . . . . . . . . . . .02-75 - 2-97 . . . . . . . . . . . . . . . .02-98 . . . . . . . . . . . . . . . . . . . . .12-99 - 2-139 . . . . . . . . . . . . . . .02-140 Blank . . . . . . . . . . . . . . .02-141 - 2-145 . . . . . . . . . . . . . .02-146 Blank . . . . . . . . . . . . . . .0
2-147 - 2-157 . . . . . . . . . . . . . .02-158 Blank . . . . . . . . . . . . . . .02-159 - 2-189 . . . . . . . . . . . . . .02-190 Blank . . . . . . . . . . . . . . .02-191 - 2-197 . . . . . . . . . . . . . .02-198 Blank . . . . . . . . . . . . . . .02-199 . . . . . . . . . . . . . . . . . . . .12-200 . . . . . . . . . . . . . . . . . . . .02-201 - 2-202 . . . . . . . . . . . . . .12-203 - 2-207 . . . . . . . . . . . . . .02-208 - 2-210 . . . . . . . . . . . . . .12-210.1 - 2-210.4 Added . . . . .12-211 . . . . . . . . . . . . . . . . . . . .12-212 Blank . . . . . . . . . . . . . . .02-213 - 2-235 . . . . . . . . . . . . . .02-236 Blank . . . . . . . . . . . . . . .02-237 - 2-245 . . . . . . . . . . . . . .02-246 Blank . . . . . . . . . . . . . . .02-247 - 2-287 . . . . . . . . . . . . . .02-288 Blank . . . . . . . . . . . . . . .02-289 - 2-303 . . . . . . . . . . . . . .02-304 Blank . . . . . . . . . . . . . . .02-305 - 2-373 . . . . . . . . . . . . . .02-374 Blank . . . . . . . . . . . . . . .02-375 - 383 . . . . . . . . . . . . . . .02-384 Blank . . . . . . . . . . . . . . .02-385 . . . . . . . . . . . . . . . . . . . .12-386 - 2-407 . . . . . . . . . . . . . .02-408 . . . . . . . . . . . . . . . . . . . .12-409 - 2-417 . . . . . . . . . . . . . .02-418 Blank . . . . . . . . . . . . . . .02-419 . . . . . . . . . . . . . . . . . . . .12-420 - 2-431 . . . . . . . . . . . . . .02-432 Blank . . . . . . . . . . . . . . .02-433- 2-440 . . . . . . . . . . . . . .02-441 . . . . . . . . . . . . . . . . . . . .12-442 . . . . . . . . . . . . . . . . . . . .02-443 . . . . . . . . . . . . . . . . . . . .12-444 - 2-449 . . . . . . . . . . . . . .02-450 . . . . . . . . . . . . . . . . . . . .12-451 . . . . . . . . . . . . . . . . . . . .0
2-452 Blank . . . . . . . . . . . . . . .02-453 - 2-469 . . . . . . . . . . . . . .02-470 Blank . . . . . . . . . . . . . . .02-471 - 2-477 . . . . . . . . . . . . . .02-478 Blank . . . . . . . . . . . . . . .02-479 - 2-487 . . . . . . . . . . . . . .02-488 Blank . . . . . . . . . . . . . . .02-489- 2-522 . . . . . . . . . . . . . .03-1 - 3-11 . . . . . . . . . . . . . . . . .03-12 - 3-16 . . . . . . . . . . . . . . . .13-17 - 3-21 . . . . . . . . . . . . . . . .03-22 - 3-31 . . . . . . . . . . . . . . . .13-32 . . . . . . . . . . . . . . . . . . . . .03-33 - 3-38 . . . . . . . . . . . . . . . .13-39 - 3-55 . . . . . . . . . . . . . . . .03-56 - 3-59 . . . . . . . . . . . . . . . .13-60 - 3-81 . . . . . . . . . . . . . . . .03-82 - 3-85 . . . . . . . . . . . . . . . .13-86 . . . . . . . . . . . . . . . . . . . . .03-87 - 3-89 . . . . . . . . . . . . . . . .13-90 - 3-91 . . . . . . . . . . . . . . . .03-92 - 3-93 . . . . . . . . . . . . . . . .13-94 - 3-107 . . . . . . . . . . . . . . .03-108 Blank . . . . . . . . . . . . . . .03-109 . . . . . . . . . . . . . . . . . . . .13-110 . . . . . . . . . . . . . . . . . . . .03-111 - 3-117 . . . . . . . . . . . . . .13-118 . . . . . . . . . . . . . . . . . . . .03-119 - 3-130 . . . . . . . . . . . . . .13-131 - 3-132 . . . . . . . . . . . . . .03-133 . . . . . . . . . . . . . . . . . . . .13-134 - 3-140 . . . . . . . . . . . . . .03-141 - 3-142 . . . . . . . . . . . . . .13-142.1 - 3-142.2 Added . . . . .13-143 - 3-145 . . . . . . . . . . . . . .13-146 . . . . . . . . . . . . . . . . . . . .04-1 - 4-4 . . . . . . . . . . . . . . . . . .14-5 . . . . . . . . . . . . . . . . . . . . . .04-6 - 4-18 . . . . . . . . . . . . . . . . .14-18.1 - 4-18.12 Added . . . . . .14-19 - 4-20 . . . . . . . . . . . . . . . .1
TOTAL NUMBER OF PAGES IN THIS PUBLICATION IS 2814, CONSISTING OF THE FOLLOWING:
Dates of issue for original andchanged pages of volume 2 are:
Original ........ 0 31 December 1997Change ........ 1 ...... 31 October 2001Volume 2 contains 1611 pages
NOTE: The portion of the text affected by the changes is indicated by a vertical line in the outer margins of the page.
LIST OF EFFECTIVE PAGES
Page No. . . . . . . . .*Change No. Page No. . . . . . . . .*Change No. Page No. . . . . . . . .*Change No.
*Zero in this column indicates original page.
Change 1 A
TM 9-2320-387-24-1
4-21 . . . . . . . . . . . . . . . . . . . . .04-22 . . . . . . . . . . . . . . . . . . . . .14-23 . . . . . . . . . . . . . . . . . . . . .04-24 . . . . . . . . . . . . . . . . . . . . .14-25 - 4-27 . . . . . . . . . . . . . . . .04-28 Blank . . . . . . . . . . . . . . . .04-29 - 4-64 . . . . . . . . . . . . . . . .04-65 . . . . . . . . . . . . . . . . . . . . .14-66 - 4-73 . . . . . . . . . . . . . . . .04-74 - 4-75 . . . . . . . . . . . . . . . .14-76 - 4-78 . . . . . . . . . . . . . . .04-79 - 4-80 . . . . . . . . . . . . . . . .14-81 - 4-99 . . . . . . . . . . . . . . . .04-100 - 4-101 . . . . . . . . . . . . . .14-102 - 4-109 . . . . . . . . . . . . . .04-110 . . . . . . . . . . . . . . . . . . . .14-111 - 4-148 . . . . . . . . . . . . . .05-1 - 5-6 . . . . . . . . . . . . . . . . . .05-7 - 5-11 . . . . . . . . . . . . . . . . .15-12 - 5-23 . . . . . . . . . . . . . . . .05-24 . . . . . . . . . . . . . . . . . . . . .15-25 - 5-27 . . . . . . . . . . . . . . . .05-28 - 5-29 . . . . . . . . . . . . . . . .15-30 - 5-39 . . . . . . . . . . . . . . . .05-40 Blank . . . . . . . . . . . . . . . .06-1 - 6-12 . . . . . . . . . . . . . . . . .06-13 . . . . . . . . . . . . . . . . . . . . .16-14 - 6-15 . . . . . . . . . . . . . . . .06-16 . . . . . . . . . . . . . . . . . . . . .16-17 . . . . . . . . . . . . . . . . . . . . .06-18 - 6-20 . . . . . . . . . . . . . . . .16-21 . . . . . . . . . . . . . . . . . . . . .06-22 . . . . . . . . . . . . . . . . . . . . .16-23 . . . . . . . . . . . . . . . . . . . . .06-24 - 6-25 . . . . . . . . . . . . . . . .16-26 - 6-29 . . . . . . . . . . . . . . . .06-30 - 6-37 . . . . . . . . . . . . . . . .16-38 - 6-50 . . . . . . . . . . . . . . . .06-51 - 6-52 . . . . . . . . . . . . . . . .16-52.1 - 6.52.2 Added . . . . . . .16-53 . . . . . . . . . . . . . . . . . . . . .06-54 . . . . . . . . . . . . . . . . . . . . .16-55 - 6-66 . . . . . . . . . . . . . . . .07-1 . . . . . . . . . . . . . . . . . . . . . .17-2 - 7-5 . . . . . . . . . . . . . . . . . .07-6 - 7-15 . . . . . . . . . . . . . . . . .17-16 - 7-17 . . . . . . . . . . . . . . . .07-18 - 7-21 . . . . . . . . . . . . . . . .17-22 - 7-25 . . . . . . . . . . . . . . . .07-26 - 7-29 . . . . . . . . . . . . . . . .17-30 - 7-31 . . . . . . . . . . . . . . . .07-32 - 7-33 . . . . . . . . . . . . . . . .1
7-34 - 7-35 . . . . . . . . . . . . . . . .07-36 . . . . . . . . . . . . . . . . . . . . .17-37 . . . . . . . . . . . . . . . . . . . . .07-38 - 7-45 . . . . . . . . . . . . . . . .17-46- 7-57 . . . . . . . . . . . . . . . .07-58 Blank . . . . . . . . . . . . . . . .08-1 - 8-10 . . . . . . . . . . . . . . . . .08-11 . . . . . . . . . . . . . . . . . . . . .18-12 - 8-14 . . . . . . . . . . . . . . . .08-15 . . . . . . . . . . . . . . . . . . . . .18-16 - 8-23 . . . . . . . . . . . . . . . .08-24 - 8-25 . . . . . . . . . . . . . . . .18-26 - 8-27 . . . . . . . . . . . . . . . .08-28 - 8-32 . . . . . . . . . . . . . . . .18-33 . . . . . . . . . . . . . . . . . . . . .08-34 . . . . . . . . . . . . . . . . . . . . .18-35 - 8-63 . . . . . . . . . . . . . . . .08-64 . . . . . . . . . . . . . . . . . . . . .18-65- 8-69 . . . . . . . . . . . . . . . .08-70 . . . . . . . . . . . . . . . . . . . . .18-71 - 8-73 . . . . . . . . . . . . . . . .08-74 . . . . . . . . . . . . . . . . . . . . .18-75 - 8-76 . . . . . . . . . . . . . . . .09-1 - 9-17 . . . . . . . . . . . . . . . . .09-18 Blank . . . . . . . . . . . . . . . .0Index 1 - Index 45 . . . . . . . . . .1Index 46 - Index 53 Added . . .1Index 54 Blank Added . . . . . .1FP-1 . . . . . . . . . . . . . . . . . . . .0FP-2 Blank . . . . . . . . . . . . . . .0FP-3 . . . . . . . . . . . . . . . . . . . .0FP-4 Blank . . . . . . . . . . . . . . .0FP-5 . . . . . . . . . . . . . . . . . . . .0FP-6 Blank . . . . . . . . . . . . . . .0FP-7 . . . . . . . . . . . . . . . . . . . .0FP-8 Blank . . . . . . . . . . . . . . .0FP-9 . . . . . . . . . . . . . . . . . . . .0FP-10 Blank . . . . . . . . . . . . . .0FP-11 . . . . . . . . . . . . . . . . . . .0FP-12 Blank . . . . . . . . . . . . . .0FP-13 . . . . . . . . . . . . . . . . . . .0FP-14 Blank . . . . . . . . . . . . . .0FP-15 . . . . . . . . . . . . . . . . . . .0FP-16 Blank . . . . . . . . . . . . . .0FP-17 . . . . . . . . . . . . . . . . . . .0FP-18 Blank . . . . . . . . . . . . . .0FP-19 . . . . . . . . . . . . . . . . . . .0FP-20 Blank . . . . . . . . . . . . . .0FP-21 . . . . . . . . . . . . . . . . . . .0FP-22 Blank . . . . . . . . . . . . . .0FP-23 . . . . . . . . . . . . . . . . . . .0FP-24 Blank . . . . . . . . . . . . . .0
FP-25 . . . . . . . . . . . . . . . . . . .0FP-26 Blank . . . . . . . . . . . . . .0FP-27 . . . . . . . . . . . . . . . . . . .0FP-28 Blank . . . . . . . . . . . . . .0FP-29 . . . . . . . . . . . . . . . . . . .0FP-30 Blank . . . . . . . . . . . . . .0
VOLUME 2a . . . . . . . . . . . . . . . . . . . . . . .0b . . . . . . . . . . . . . . . . . . . . . . .1A - C Added . . . . . . . . . . . . . . .1D Blank Added . . . . . . . . . . . .1i - ii . . . . . . . . . . . . . . . . . . . . .1iii-iv . . . . . . . . . . . . . . . . . . . . .010-1 - 10-5 . . . . . . . . . . . . . . . .110-6 . . . . . . . . . . . . . . . . . . . . .010-7 - 10-8 . . . . . . . . . . . . . . . .110-9 - 10-10 . . . . . . . . . . . . . . .010-11 - 10-12 . . . . . . . . . . . . . .110-13 . . . . . . . . . . . . . . . . . . . .010-14 . . . . . . . . . . . . . . . . . . . .110-15 - 10-17 . . . . . . . . . . . . . .010-18 . . . . . . . . . . . . . . . . . . . .110-18.1 Added . . . . . . . . . . . . .110-18.2 Blank Added . . . . . . . .110-19 - 10-26 . . . . . . . . . . . . . .110-27 - 10-48 . . . . . . . . . . . . . .010-49 - 10-51 . . . . . . . . . . . . . .110-52 - 10-55 . . . . . . . . . . . . . .010-56 . . . . . . . . . . . . . . . . . . . .110-57 - 10-58 . . . . . . . . . . . . . .010-59 . . . . . . . . . . . . . . . . . . . .110-60 - 10-63 . . . . . . . . . . . . . .010-64 . . . . . . . . . . . . . . . . . . . .110-65 - 10-68 . . . . . . . . . . . . . .010-69 . . . . . . . . . . . . . . . . . . . .110-70 - 10-75 . . . . . . . . . . . . . .010-76 . . . . . . . . . . . . . . . . . . . .110-76.1 Added . . . . . . . . . . . . .110-76.2 Blank Added . . . . . . . .110-77 - 10-79 . . . . . . . . . . . . . .110-80 - 10-86 . . . . . . . . . . . . . .010-87 - 10-88 . . . . . . . . . . . . . .110-89- 10-90 . . . . . . . . . . . . . .010-91 . . . . . . . . . . . . . . . . . . . .110-92 - 10-95 . . . . . . . . . . . . . .010-96 . . . . . . . . . . . . . . . . . . . .110-97 - 10-98 . . . . . . . . . . . . . .010-98.1 - 10-98.16 Added . . . .110-99 - 10-100 . . . . . . . . . . . . .110-101 - 10-102 . . . . . . . . . . . .0
TM 9-2320-387-24-1
LIST OF EFFECTIVE PAGES (Contd)
Page No. . . . . . . . .*Change No. Page No. . . . . . . . .*Change No. Page No. . . . . . . . .*Change No.
*Zero in this column indicates original page.
B Change 1
10-103 . . . . . . . . . . . . . . . . . . .110-104 - 10-107 . . . . . . . . . . . .010-108 - 10-110 . . . . . . . . . . . .110-111 - 10-113 . . . . . . . . . . . .010-114 - 10-120 . . . . . . . . . . . .110-121 - 10-128 . . . . . . . . . . . .010-129 - 10-131 . . . . . . . . . . . .110-132 - 10-157 . . . . . . . . . . . .010-158 . . . . . . . . . . . . . . . . . . .110-159 - 10-160 Added . . . . . .111-1 - 11-4 . . . . . . . . . . . . . . . .111-4.1- 11-4.2 Added . . . . . . . .111-5 - 11-17 . . . . . . . . . . . . . . .111-18 . . . . . . . . . . . . . . . . . . . .011-19 - 11-20 . . . . . . . . . . . . . .111-21 . . . . . . . . . . . . . . . . . . . .011-22 - 11-29 . . . . . . . . . . . . . .111-30 - 11-39 . . . . . . . . . . . . . .011-40 . . . . . . . . . . . . . . . . . . . .111-40.1 Added . . . . . . . . . . . . .111-40.2 Blank Added . . . . . . . .111-41 . . . . . . . . . . . . . . . . . . . .111-42 . . . . . . . . . . . . . . . . . . . .011-43 - 11-46 . . . . . . . . . . . . . .111-47 - 11-48 . . . . . . . . . . . . . .011-49 . . . . . . . . . . . . . . . . . . . .111-50 - 11-51 . . . . . . . . . . . . . .011-52 - 11-55 . . . . . . . . . . . . . .111-56 - 11-57 . . . . . . . . . . . . . .011-58 - 11-68 . . . . . . . . . . . . . .111-68.1 - 11-68.10 Added . . . .111-69 - 11-82 . . . . . . . . . . . . . .111-82.1 - 11-82.2 Added . . . . .111-83 - 11-84 . . . . . . . . . . . . . .111-84.1 - 11-84.6/
(11-85 blank) Added . . . . . .111-86 - 11-94 . . . . . . . . . . . . . .111-95 . . . . . . . . . . . . . . . . . . . .011-96 - 11-99 . . . . . . . . . . . . . .111-100 - 11-102 . . . . . . . . . . . .011-103 - 11-104 . . . . . . . . . . . .111-105 - 11-107 . . . . . . . . . . . .011-108 - 11-110 . . . . . . . . . . . .111-111 . . . . . . . . . . . . . . . . . . .011-112 . . . . . . . . . . . . . . . . . . .111-113 . . . . . . . . . . . . . . . . . . .011-114 . . . . . . . . . . . . . . . . . . .111-115 . . . . . . . . . . . . . . . . . . .011-116 . . . . . . . . . . . . . . . . . . .111-117 - 11-123 . . . . . . . . . . . .011-124 . . . . . . . . . . . . . . . . . . .111-125 . . . . . . . . . . . . . . . . . . .0
11-126 - 11-132 . . . . . . . . . . . .111-133 - 11-143 . . . . . . . . . . . .011-144 Blank . . . . . . . . . . . . .011-145 . . . . . . . . . . . . . . . . . . .011-146 - 11-147 . . . . . . . . . . . .111-148 - 11-151 . . . . . . . . . . . .011-152 - 11-155 . . . . . . . . . . . .111-156 - 11-157 . . . . . . . . . . . .011-158 . . . . . . . . . . . . . . . . . . .111-159 - 11-161 . . . . . . . . . . . .011-162 Blank . . . . . . . . . . . . . .012-1 - 12-2 . . . . . . . . . . . . . . . .112-2.1 - 12-2.2 Added . . . . . . .112-3 - 12-24 . . . . . . . . . . . . . . .112-25 Blank Deleted . . . . . . . .112-26 Blank Deleted . . . . . . . .112-27 - 12-32 . . . . . . . . . . . . . .112-33 - 12-46 . . . . . . . . . . . . . .012-47 - 12-49 . . . . . . . . . . . . . .112-50 Blank . . . . . . . . . . . . . . .012-51 . . . . . . . . . . . . . . . . . . . .112-52 - 12-54 . . . . . . . . . . . . . .012-54.1 - 12-54.6 Added . . . . .112-55 - 12-56 . . . . . . . . . . . . . .112-56.1 - 12-56.2 Added . . . . .112-57 . . . . . . . . . . . . . . . . . . . .112-58 - 12-60 . . . . . . . . . . . . . .012-60.1 - 12-60.6 Added . . . . .112-61 - 12-62 . . . . . . . . . . . . . .112-62.1 - 12.62.8 Added . . . . . .112-63 - 12-68 . . . . . . . . . . . . . .012-68.1 - 12-68.29 Added . . . .112-68.30 Blank Added . . . . . . .112-69 - 12-71 . . . . . . . . . . . . . .012-72 - 12-73 . . . . . . . . . . . . . .112-74 - 12-84 . . . . . . . . . . . . . .013-1 - 13-3 . . . . . . . . . . . . . . . .013-4 Blank . . . . . . . . . . . . . . . .014-1 . . . . . . . . . . . . . . . . . . . . .114-2 - 14-3 . . . . . . . . . . . . . . . .014-4 - 14-5 . . . . . . . . . . . . . . . .114-6 . . . . . . . . . . . . . . . . . . . . .014-7 . . . . . . . . . . . . . . . . . . . . .114-8 - 14-22 . . . . . . . . . . . . . . .015-1 - 15-9 . . . . . . . . . . . . . . . .015-10 . . . . . . . . . . . . . . . . . . . .115-11 . . . . . . . . . . . . . . . . . . . .015-12 - 15-13 . . . . . . . . . . . . . .115-14 - 15-26 . . . . . . . . . . . . . .015-27 . . . . . . . . . . . . . . . . . . . .115-28 - 15-36 . . . . . . . . . . . . . .015-37 . . . . . . . . . . . . . . . . . . . .1
15-38 - 15-43 . . . . . . . . . . . . . .015-44 . . . . . . . . . . . . . . . . . . . .115-45 - 15-47 . . . . . . . . . . . . . .015-48 . . . . . . . . . . . . . . . . . . . .115-49 - 15-58 . . . . . . . . . . . . . .015-59 - 15-62 . . . . . . . . . . . . . .115-63 - 15-73 . . . . . . . . . . . . . .015-74 . . . . . . . . . . . . . . . . . . . .115-75 - 15-82 . . . . . . . . . . . . . .015-83 . . . . . . . . . . . . . . . . . . . .115-84 - 15-92 . . . . . . . . . . . . . .015-93 . . . . . . . . . . . . . . . . . . . .115-94 - 15-97 . . . . . . . . . . . . . .015-98 . . . . . . . . . . . . . . . . . . . .115-99 - 15-100 . . . . . . . . . . . . .015-101 . . . . . . . . . . . . . . . . . . .115-102 - 15-111 . . . . . . . . . . . .015-112 - 15-113 . . . . . . . . . . . .115-114 . . . . . . . . . . . . . . . . . . .015-115 - 15-116 . . . . . . . . . . . .115-117 - 15-127 . . . . . . . . . . . .015-128 Blank . . . . . . . . . . . . . .016-1 - 16-10 . . . . . . . . . . . . . . .016-11 . . . . . . . . . . . . . . . . . . . .116-12 - 16-21 . . . . . . . . . . . . . .016-22 Blank . . . . . . . . . . . . . . .017-1 . . . . . . . . . . . . . . . . . . . . .017-2 Blank . . . . . . . . . . . . . . . .018-1 . . . . . . . . . . . . . . . . . . . . .118-2 - 18-10 . . . . . . . . . . . . . . .018-10.1 - 18-10.12 Added . . . .118-11 . . . . . . . . . . . . . . . . . . . .118-12 - 18-29 . . . . . . . . . . . . . .018-30 . . . . . . . . . . . . . . . . . . . .118-31 - 18-33 . . . . . . . . . . . . . .018-34 . . . . . . . . . . . . . . . . . . . .118-35 - 18-37 . . . . . . . . . . . . . .018-38 . . . . . . . . . . . . . . . . . . . .118-39 - 18-41 . . . . . . . . . . . . . .018-42 . . . . . . . . . . . . . . . . . . . .118-43 - 18-45 . . . . . . . . . . . . . .018-46 Blank . . . . . . . . . . . . . . .019-1 - 19-15 . . . . . . . . . . . . . . .019-16 Blank . . . . . . . . . . . . . . .020-1 - 20-9 . . . . . . . . . . . . . . . .020-10 Blank . . . . . . . . . . . . . . .021-1 . . . . . . . . . . . . . . . . . . . . .021-2 . . . . . . . . . . . . . . . . . . . . .121-3 - 21-5 . . . . . . . . . . . . . . . .021-6 . . . . . . . . . . . . . . . . . . . . .121-7 . . . . . . . . . . . . . . . . . . . . .021-8 . . . . . . . . . . . . . . . . . . . . .1
Page No. . . . . . . . .*Change No. Page No. . . . . . . . .*Change No. Page No. . . . . . . . .*Change No.
TM 9-2320-387-24-1
LIST OF EFFECTIVE PAGES (Contd)
*Zero in this column indicates original page.
Change 1 C
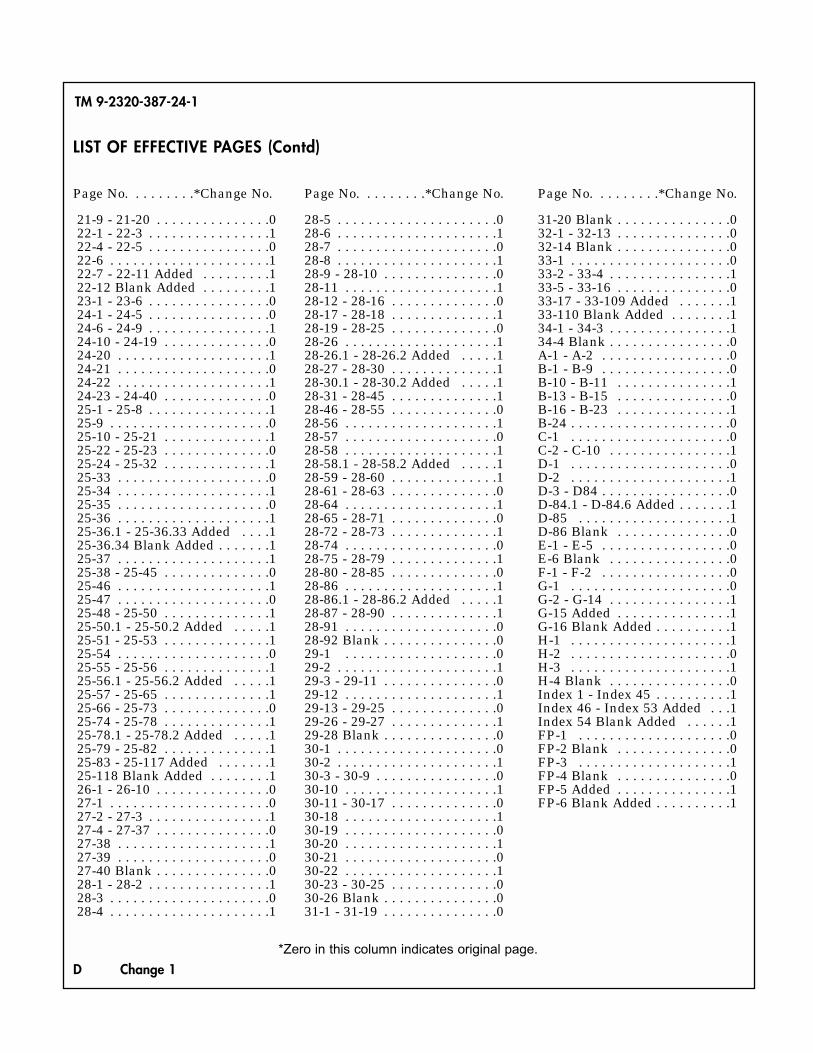
21-9 - 21-20 . . . . . . . . . . . . . . .022-1 - 22-3 . . . . . . . . . . . . . . . .122-4 - 22-5 . . . . . . . . . . . . . . . .022-6 . . . . . . . . . . . . . . . . . . . . .122-7 - 22-11 Added . . . . . . . . .122-12 Blank Added . . . . . . . . .123-1 - 23-6 . . . . . . . . . . . . . . . .024-1 - 24-5 . . . . . . . . . . . . . . . .024-6 - 24-9 . . . . . . . . . . . . . . . .124-10 - 24-19 . . . . . . . . . . . . . .024-20 . . . . . . . . . . . . . . . . . . . .124-21 . . . . . . . . . . . . . . . . . . . .024-22 . . . . . . . . . . . . . . . . . . . .124-23 - 24-40 . . . . . . . . . . . . . .025-1 - 25-8 . . . . . . . . . . . . . . . .125-9 . . . . . . . . . . . . . . . . . . . . .025-10 - 25-21 . . . . . . . . . . . . . .125-22 - 25-23 . . . . . . . . . . . . . .025-24 - 25-32 . . . . . . . . . . . . . .125-33 . . . . . . . . . . . . . . . . . . . .025-34 . . . . . . . . . . . . . . . . . . . .125-35 . . . . . . . . . . . . . . . . . . . .025-36 . . . . . . . . . . . . . . . . . . . .125-36.1 - 25-36.33 Added . . . .125-36.34 Blank Added . . . . . . .125-37 . . . . . . . . . . . . . . . . . . . .125-38 - 25-45 . . . . . . . . . . . . . .025-46 . . . . . . . . . . . . . . . . . . . .125-47 . . . . . . . . . . . . . . . . . . . .025-48 - 25-50 . . . . . . . . . . . . . .125-50.1 - 25-50.2 Added . . . . .125-51 - 25-53 . . . . . . . . . . . . . .125-54 . . . . . . . . . . . . . . . . . . . .025-55 - 25-56 . . . . . . . . . . . . . .125-56.1 - 25-56.2 Added . . . . .125-57 - 25-65 . . . . . . . . . . . . . .125-66 - 25-73 . . . . . . . . . . . . . .025-74 - 25-78 . . . . . . . . . . . . . .125-78.1 - 25-78.2 Added . . . . .125-79 - 25-82 . . . . . . . . . . . . . .125-83 - 25-117 Added . . . . . . .125-118 Blank Added . . . . . . . .126-1 - 26-10 . . . . . . . . . . . . . . .027-1 . . . . . . . . . . . . . . . . . . . . .027-2 - 27-3 . . . . . . . . . . . . . . . .127-4 - 27-37 . . . . . . . . . . . . . . .027-38 . . . . . . . . . . . . . . . . . . . .127-39 . . . . . . . . . . . . . . . . . . . .027-40 Blank . . . . . . . . . . . . . . .028-1 - 28-2 . . . . . . . . . . . . . . . .128-3 . . . . . . . . . . . . . . . . . . . . .028-4 . . . . . . . . . . . . . . . . . . . . .1
28-5 . . . . . . . . . . . . . . . . . . . . .028-6 . . . . . . . . . . . . . . . . . . . . .128-7 . . . . . . . . . . . . . . . . . . . . .028-8 . . . . . . . . . . . . . . . . . . . . .128-9 - 28-10 . . . . . . . . . . . . . . .028-11 . . . . . . . . . . . . . . . . . . . .128-12 - 28-16 . . . . . . . . . . . . . .028-17 - 28-18 . . . . . . . . . . . . . .128-19 - 28-25 . . . . . . . . . . . . . .028-26 . . . . . . . . . . . . . . . . . . . .128-26.1 - 28-26.2 Added . . . . .128-27 - 28-30 . . . . . . . . . . . . . .128-30.1 - 28-30.2 Added . . . . .128-31 - 28-45 . . . . . . . . . . . . . .128-46 - 28-55 . . . . . . . . . . . . . .028-56 . . . . . . . . . . . . . . . . . . . .128-57 . . . . . . . . . . . . . . . . . . . .028-58 . . . . . . . . . . . . . . . . . . . .128-58.1 - 28-58.2 Added . . . . .128-59 - 28-60 . . . . . . . . . . . . . .128-61 - 28-63 . . . . . . . . . . . . . .028-64 . . . . . . . . . . . . . . . . . . . .128-65 - 28-71 . . . . . . . . . . . . . .028-72 - 28-73 . . . . . . . . . . . . . .128-74 . . . . . . . . . . . . . . . . . . . .028-75 - 28-79 . . . . . . . . . . . . . .128-80 - 28-85 . . . . . . . . . . . . . .028-86 . . . . . . . . . . . . . . . . . . . .128-86.1 - 28-86.2 Added . . . . .128-87 - 28-90 . . . . . . . . . . . . . .128-91 . . . . . . . . . . . . . . . . . . . .028-92 Blank . . . . . . . . . . . . . . .029-1 . . . . . . . . . . . . . . . . . . . .029-2 . . . . . . . . . . . . . . . . . . . . .129-3 - 29-11 . . . . . . . . . . . . . . .029-12 . . . . . . . . . . . . . . . . . . . .129-13 - 29-25 . . . . . . . . . . . . . .029-26 - 29-27 . . . . . . . . . . . . . .129-28 Blank . . . . . . . . . . . . . . .030-1 . . . . . . . . . . . . . . . . . . . . .030-2 . . . . . . . . . . . . . . . . . . . . .130-3 - 30-9 . . . . . . . . . . . . . . . .030-10 . . . . . . . . . . . . . . . . . . . .130-11 - 30-17 . . . . . . . . . . . . . .030-18 . . . . . . . . . . . . . . . . . . . .130-19 . . . . . . . . . . . . . . . . . . . .030-20 . . . . . . . . . . . . . . . . . . . .130-21 . . . . . . . . . . . . . . . . . . . .030-22 . . . . . . . . . . . . . . . . . . . .130-23 - 30-25 . . . . . . . . . . . . . .030-26 Blank . . . . . . . . . . . . . . .031-1 - 31-19 . . . . . . . . . . . . . . .0
31-20 Blank . . . . . . . . . . . . . . .032-1 - 32-13 . . . . . . . . . . . . . . .032-14 Blank . . . . . . . . . . . . . . .033-1 . . . . . . . . . . . . . . . . . . . . .033-2 - 33-4 . . . . . . . . . . . . . . . .133-5 - 33-16 . . . . . . . . . . . . . . .033-17 - 33-109 Added . . . . . . .133-110 Blank Added . . . . . . . .134-1 - 34-3 . . . . . . . . . . . . . . . .134-4 Blank . . . . . . . . . . . . . . . .0A-1 - A-2 . . . . . . . . . . . . . . . . .0B-1 - B-9 . . . . . . . . . . . . . . . . .0B-10 - B-11 . . . . . . . . . . . . . . .1B-13 - B-15 . . . . . . . . . . . . . . .0B-16 - B-23 . . . . . . . . . . . . . . .1B-24 . . . . . . . . . . . . . . . . . . . . .0C-1 . . . . . . . . . . . . . . . . . . . . .0C-2 - C-10 . . . . . . . . . . . . . . . .1D-1 . . . . . . . . . . . . . . . . . . . . .0D-2 . . . . . . . . . . . . . . . . . . . . .1D-3 - D84 . . . . . . . . . . . . . . . . .0D-84.1 - D-84.6 Added . . . . . . .1D-85 . . . . . . . . . . . . . . . . . . . .1D-86 Blank . . . . . . . . . . . . . . .0E-1 - E-5 . . . . . . . . . . . . . . . . .0E-6 Blank . . . . . . . . . . . . . . . .0F-1 - F-2 . . . . . . . . . . . . . . . . .0G-1 . . . . . . . . . . . . . . . . . . . . .0G-2 - G-14 . . . . . . . . . . . . . . . .1G-15 Added . . . . . . . . . . . . . . .1G-16 Blank Added . . . . . . . . . .1H-1 . . . . . . . . . . . . . . . . . . . . .1H-2 . . . . . . . . . . . . . . . . . . . . .0H-3 . . . . . . . . . . . . . . . . . . . . .1H-4 Blank . . . . . . . . . . . . . . . .0Index 1 - Index 45 . . . . . . . . . .1Index 46 - Index 53 Added . . .1Index 54 Blank Added . . . . . .1FP-1 . . . . . . . . . . . . . . . . . . . .0FP-2 Blank . . . . . . . . . . . . . . .0FP-3 . . . . . . . . . . . . . . . . . . . .1FP-4 Blank . . . . . . . . . . . . . . .0FP-5 Added . . . . . . . . . . . . . . .1FP-6 Blank Added . . . . . . . . . .1
Page No. . . . . . . . .*Change No. Page No. . . . . . . . .*Change No. Page No. . . . . . . . .*Change No.
LIST OF EFFECTIVE PAGES (Contd)
TM 9-2320-387-24-1
*Zero in this column indicates original page.
D Change 1
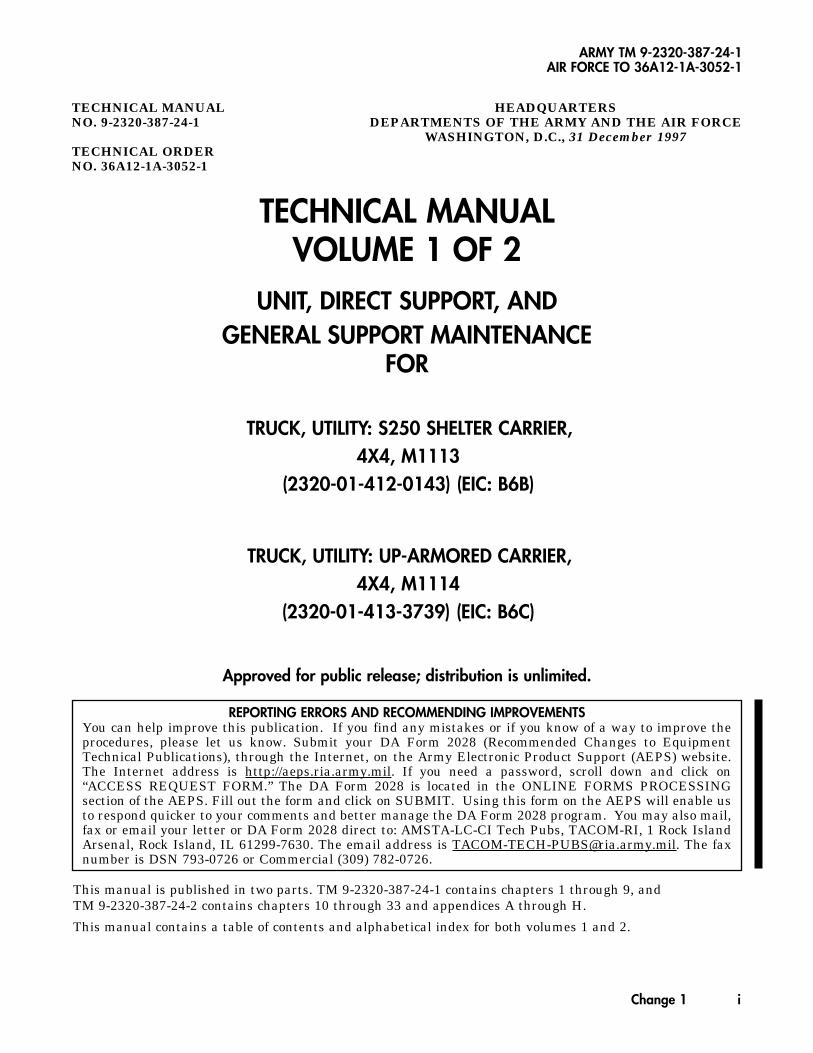
ARMY TM 9-2320-387-24-1AIR FORCE TO 36A12-1A-3052-1
TECHNICAL MANUAL HEADQUARTERSNO. 9-2320-387-24-1 DEPARTMENTS OF THE ARMY AND THE AIR FORCE
WASHINGTON, D.C., 31 December 1997TECHNICAL ORDERNO. 36A12-1A-3052-1
TECHNICAL MANUALVOLUME 1 OF 2
UNIT, DIRECT SUPPORT, ANDGENERAL SUPPORT MAINTENANCE
FOR
TRUCK, UTILITY: S250 SHELTER CARRIER, 4X4, M1113
(2320-01-412-0143) (EIC: B6B)
TRUCK, UTILITY: UP-ARMORED CARRIER,4X4, M1114
(2320-01-413-3739) (EIC: B6C)
This manual is published in two parts. TM 9-2320-387-24-1 contains chapters 1 through 9, and TM 9-2320-387-24-2 contains chapters 10 through 33 and appendices A through H.
This manual contains a table of contents and alphabetical index for both volumes 1 and 2.
Change 1 i
Approved for public release; distribution is unlimited.
REPORTING ERRORS AND RECOMMENDING IMPROVEMENTSYou can help improve this publication. If you find any mistakes or if you know of a way to improve theprocedures, please let us know. Submit your DA Form 2028 (Recommended Changes to EquipmentTechnical Publications), through the Internet, on the Army Electronic Product Support (AEPS) website.The Internet address is http://aeps.ria.army.mil. If you need a password, scroll down and click on“ACCESS REQUEST FORM.” The DA Form 2028 is located in the ONLINE FORMS PROCESSING section of the AEPS. Fill out the form and click on SUBMIT. Using this form on the AEPS will enable usto respond quicker to your comments and better manage the DA Form 2028 program. You may also mail,fax or email your letter or DA Form 2028 direct to: AMSTA-LC-CI Tech Pubs, TACOM-RI, 1 Rock IslandArsenal, Rock Island, IL 61299-7630. The email address is [email protected]. The faxnumber is DSN 793-0726 or Commercial (309) 782-0726.
TM9-2320-387-24-1
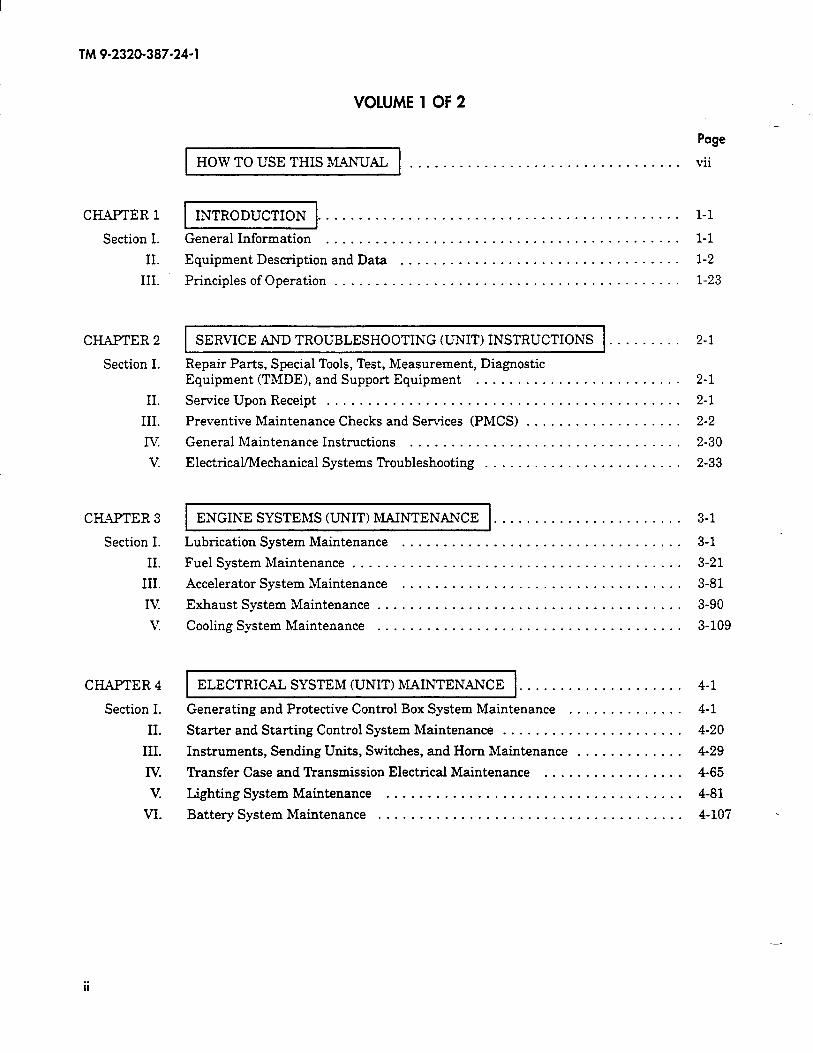
CHAPTER 1
Section I.
II.
III.
CHAPTER 2
Section I.
II.
III.
Iv.
v.
CHAPTER 3
Section I.
II.
III.
Iv.
v.
CHAPTER 4
Section I.
II.
III.
n?
V.
VI.
VOLUME 1 OF 2
1 HOWTOUSETHISMANUAL 1 . . . . . . . . . . . . . . . . . . . . . . . . . . . . . . . . .
1 INTRODUCTION I. . . . . . . . . . . . . . . . . . . . . . . . . . . . . . . . . . . . . . . . . . . .
General Information ...........................................
Equipment Description and Data ..................................
Principles of Operation ..........................................
SERVICE AND TROUBLESHOOTING (UNIT) INSTRUCTIONS .........
Repair Parts, Special Tools, Test, Measurement, Diagnostic Equipment (TMDE), and Support Equipment .........................
Service Upon Receipt ...........................................
Preventive Maintenance Checks and Services (PMCS) ...................
General Maintenance Instructions .................................
Electrical/Mechanical Systems Troubleshooting ........................
ENGINE SYSTEMS (UNIT) MAINTENANCE .......................
Lubrication System Maintenance ..................................
Fuel System Maintenance ........................................
Accelerator System Maintenance ..................................
Exhaust System Maintenance .....................................
Cooling System Maintenance .....................................
ELECTRICAL SYSTEM (UNIT) MAINTENANCE . . . . . . . . . . . . . . . . . . . .
Generating and Protective Control Box System Maintenance ..............
Starter and Starting Control System Maintenance ......................
Instruments, Sending Units, Switches, and Horn Maintenance .............
Transfer Case and Transmission Electrical Maintenance .................
Lighting System Maintenance ....................................
Battery System Maintenance .....................................
Page
vii
1-l
l-1
l-2
l-23
2-1
2-l
2-l
2-2
2-30
2-33
3-l
3-l
3-21
3-81
3-90
3-109
4-l
4-1
4-20
4-29
4-65
4-81
4-107
ii
TM9-2320-387-24-l
Page
CHAPTER 5
Section I.
II.
TRANSMISSION AND TRANSFER CASE (UNIT) MAINTENANCE . . . . . . .
Transmission hlaintenance . . . . . . . . . . . . . . . . . . . . . . . . . . . . . . . . . . . . . . .
Transfer Case Maintenance . . . . . . . . . . . . . . . . . . . . . . . . . . . . . . . . . . . . . .
5-l
5-l
5-31
CHAPTER 6
Section I.
II.
III.
PROPELLER SHAFTS, AXLES, AND SUSPENSION (UNIT) MAINTENANCE
Propeller Shafts hlaintenance .....................................
Front and Rear Axles hlaintenance. .................................
Suspension Maintenance .........................................
6-l
6-l
6-12
6-48
CHAPTER 7
I.
II.
1 BRAKE SYSTEM (UNIT) MAINTENANCq. . . . . . . . . . . . . . . . . . . . . . . . . I I
Service Brake System Maintenance . . . . . . . . . . . . . . . . . . . . . . . . . . . . . . . . .
Rear Dual Service/Parking Brake System Maintenance . . . . . . . . . . . . . . . . . . .
7-l
7-l
7-37
CHAPTER 8
Section I.
II.
WHEELS AND STEERING (UNIT) MAINTENANCE ..................
Wheel and Runflat System Maintenance .............................
Steering Components hlaintenance .................................
8-l
8-l
8-35
CHAPTER 9 1 FRAME (UNIT) hlAINTENANCE I. . . . . . . . . . . . . . . . . . . . . . . . . . . . . . . . 9-l
. . . III
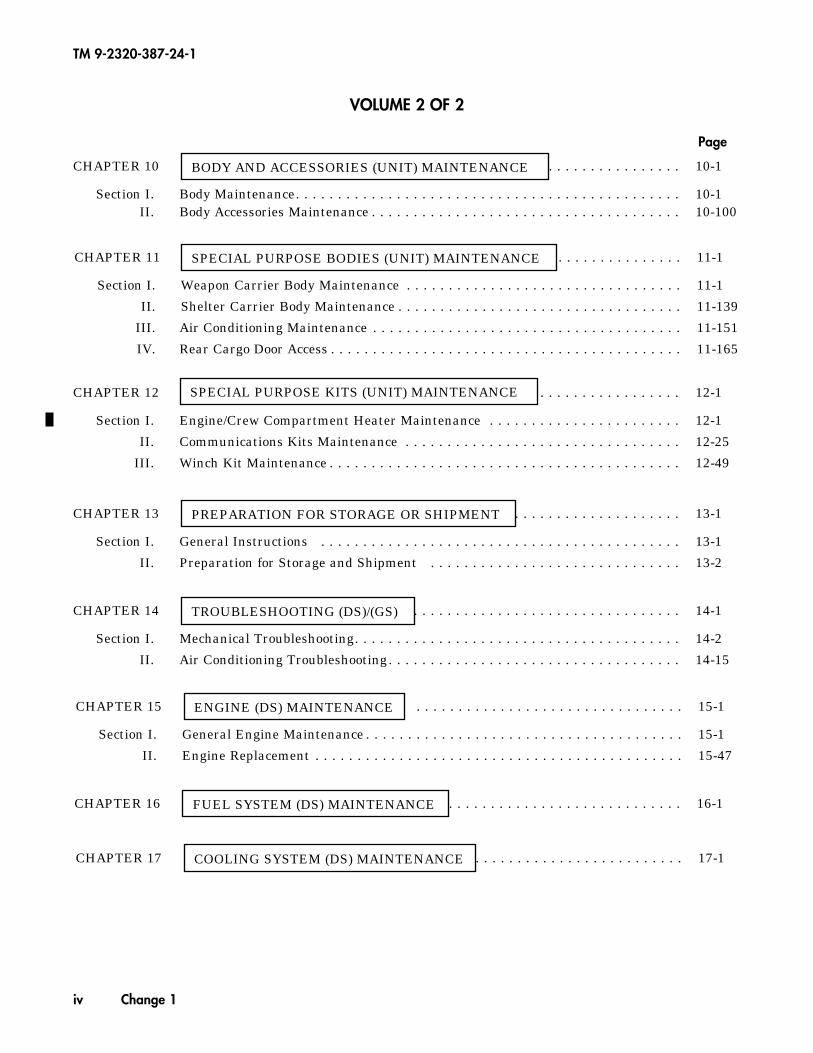
CHAPTER 12 . . . . . . . . . . . . . . . . . . . . . . . 12-1
Section I. Engine/Crew Compartment Heater Maintenance . . . . . . . . . . . . . . . . . . . . . . . 12-1
II. Communications Kits Maintenance . . . . . . . . . . . . . . . . . . . . . . . . . . . . . . . . . 12-25
III. Winch Kit Maintenance . . . . . . . . . . . . . . . . . . . . . . . . . . . . . . . . . . . . . . . . . . 12-49
SPECIAL PURPOSE KITS (UNIT) MAINTENANCE
CHAPTER 13 . . . . . . . . . . . . . . . . . . . . 13-1
Section I. General Instructions . . . . . . . . . . . . . . . . . . . . . . . . . . . . . . . . . . . . . . . . . . . 13-1
II. Preparation for Storage and Shipment . . . . . . . . . . . . . . . . . . . . . . . . . . . . . . 13-2
PREPARATION FOR STORAGE OR SHIPMENT
CHAPTER 14 . . . . . . . . . . . . . . . . . . . . . . . . . . . . . . . . 14-1
Section I. Mechanical Troubleshooting. . . . . . . . . . . . . . . . . . . . . . . . . . . . . . . . . . . . . . . 14-2
II. Air Conditioning Troubleshooting. . . . . . . . . . . . . . . . . . . . . . . . . . . . . . . . . . . 14-15
TROUBLESHOOTING (DS)/(GS)
CHAPTER 15 . . . . . . . . . . . . . . . . . . . . . . . . . . . . . . . . 15-1
Section I. General Engine Maintenance . . . . . . . . . . . . . . . . . . . . . . . . . . . . . . . . . . . . . . 15-1
II. Engine Replacement . . . . . . . . . . . . . . . . . . . . . . . . . . . . . . . . . . . . . . . . . . . . 15-47
ENGINE (DS) MAINTENANCE
CHAPTER 16 . . . . . . . . . . . . . . . . . . . . . . . . . . . . . . . . 16-1FUEL SYSTEM (DS) MAINTENANCE
CHAPTER 17 . . . . . . . . . . . . . . . . . . . . . . . . . . . . . . . . 17-1COOLING SYSTEM (DS) MAINTENANCE
Page
TM 9-2320-387-24-1
iv Change 1
CHAPTER 11 . . . . . . . . . . . . . . . . . . . . . . . 11-1
Section I. Weapon Carrier Body Maintenance . . . . . . . . . . . . . . . . . . . . . . . . . . . . . . . . . 11-1
II. Shelter Carrier Body Maintenance . . . . . . . . . . . . . . . . . . . . . . . . . . . . . . . . . . 11-139
III. Air Conditioning Maintenance . . . . . . . . . . . . . . . . . . . . . . . . . . . . . . . . . . . . . 11-151
IV. Rear Cargo Door Access . . . . . . . . . . . . . . . . . . . . . . . . . . . . . . . . . . . . . . . . . . 11-165
SPECIAL PURPOSE BODIES (UNIT) MAINTENANCE
VOLUME 2 OF 2
CHAPTER 10 . . . . . . . . . . . . . . . . . . . . . . . . 10-1
Section I. Body Maintenance. . . . . . . . . . . . . . . . . . . . . . . . . . . . . . . . . . . . . . . . . . . . . . 10-1II. Body Accessories Maintenance . . . . . . . . . . . . . . . . . . . . . . . . . . . . . . . . . . . . . 10-100
BODY AND ACCESSORIES (UNIT) MAINTENANCE
TM 9-2320-387-24-l
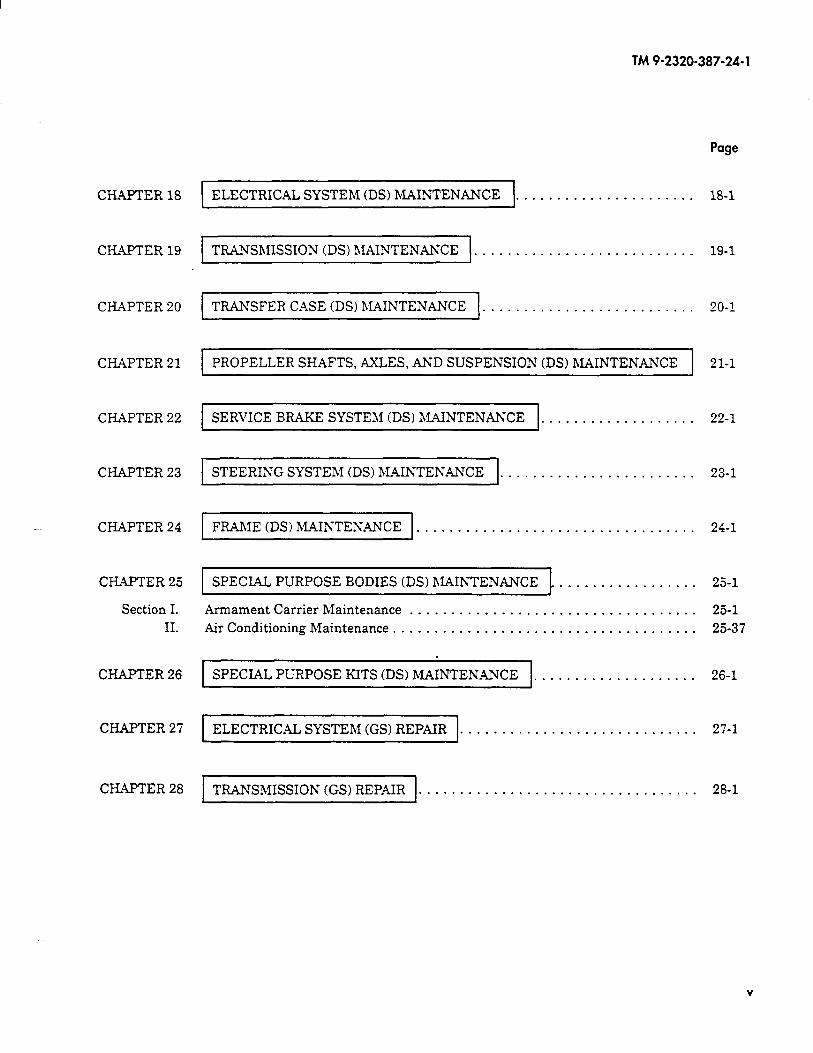
CHAPTER 18 ELECTRICAL SYSTEM (DS) MAINTENANCE . . . . . . . . . . . . .
CHAPTER 19 1 TRANSRIISSION (DS) hlAINTENANCE I. . . . . . . . . . . . . . . . . .
CHAPTER 20 1 TRANSFER CASE CDS) RfAINTENANCE I. . . . . . . . . . . . . . . . . . . . . . . . . .
CHAPTER 21
CHAPTER 22
CHAPTER 23
CHAPTER 24
CHAPTER 25
Section I.
II.
CHAPTER 26
CHAPTER 27
CHAPTER 28 TRANSMISSION (GS) REPAIR . . . . . . . . . . . . . . . . . . . . . . . . . . . . . . . . . .
1 PROPELLER SHAFTS, AXLES, AND SUSPENSION CDS) hfAINTENANCE 21-l I
1 I
1 SERVICE BRAKE SYSTEhl (DS) RIAINTENANCE I. . . . . . . . . . . . . . . . . . . 22-l
1 STEERING SYSTEhl CDS) hlAINTENANCE I. . . . . . . . . . . . . . . . . . . . . . . . 23-l
FRAhIE (DS) MAINTENANCE . . . . . . . . . . . . . . . . . . . . . . . . . . . . . . . . . . 24-l
SPECIAL PURPOSE BODIES CDS) hI.AINTENANCE . .................
Armament Carrier Maintenance ...................................
Air Conditioning Maintenance .....................................
SPECIAL PURPOSE KITS (DS) hfAINTENANCE I. . . . . . . . . . . . . . . . . . . . 26-1
ELECTRICAL SYSTEhf (GS) REPAIR . . . . . . . . . . . . . . . . . . . . . . . . . . . . . 27-l
Page
18-l
19-l
20-l
25-l
25-l
25-37
28-l
V
TM 9-2320-387-24-l
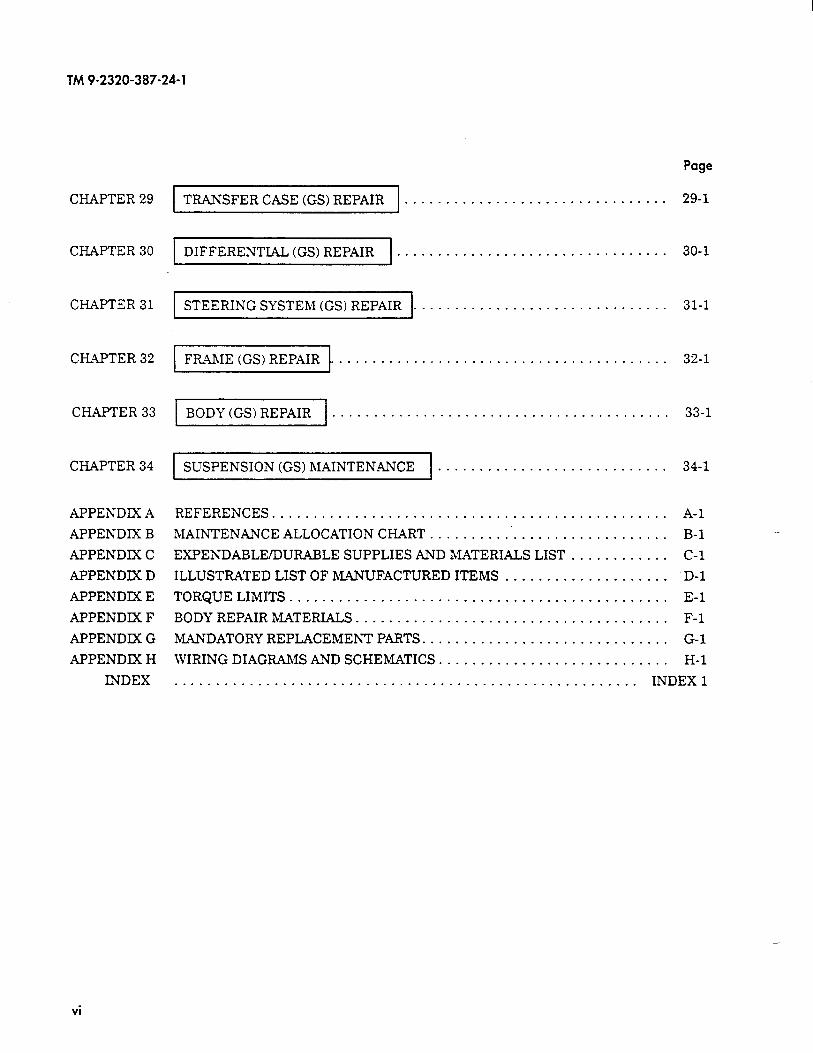
CHAPTER 29
CHAPTER 30
CHAPTER 31
CHAPTER 32
CHAPTER 33
CHAPTER 34
APPENDIX A
APPENDIX B
APPENDIX C
APPENDIX D
APPENDIX E
APPENDIX F
APPENDIX G
APPENDIX H
INDEX
1 TRANSFER CASE (GS) REPAIR 1 . . . . . . . . . . .
1 DIFFERENTIAL (GS) REPAIR I. . . . . . . . . . . .
. ,...................
. . . . . . . . . . . . . . . . . . . .
STEERING SYSTEM (GS) REPAIR . . . . . . . . . . . . . . .
1 FRAME (GS) REPAIR I. . . . . . . . . . . . . . . . . . . . . . . . . .
1 BODY(GS) REPAIR 1. . . . . . . . . . . . . . . . . . . . . . . . . . . . . . . . . . . . . . .
1 SUSPENSION (GS) hZAINTENANCE 1 . . . . . . . . . . . . . . . . . . . . . . . . . . . .
REFERENCES ................................................
MAINTENANCE ALLOCATION CHART ..............................
EXPENDABLE/DURABLE SUPPLIES AND hIATERIALS LIST ............
ILLUSTRATED LIST OF hI.ANUFACTURED ITEMS ....................
TORQUELIMITS ..............................................
BODY REPAIR MATERIALS. .....................................
MANDATORY REPIACEMEhT PARTS. .............................
WIRING DIAGRAMS AND SCHEMATICS. ...........................
Page
29-l
30-l
32-1
33-1
34-1
A-l
B-l
C-l
D-l
E-l
F-l
G-l
H-l
. . . . . . . . . . . . . . . . . . . . . . . . . . . . . . . . . . . . . . . . . . . . . . . . . . . . . . . . INDEX 1
vi
TM 9-2320-387-24- 1
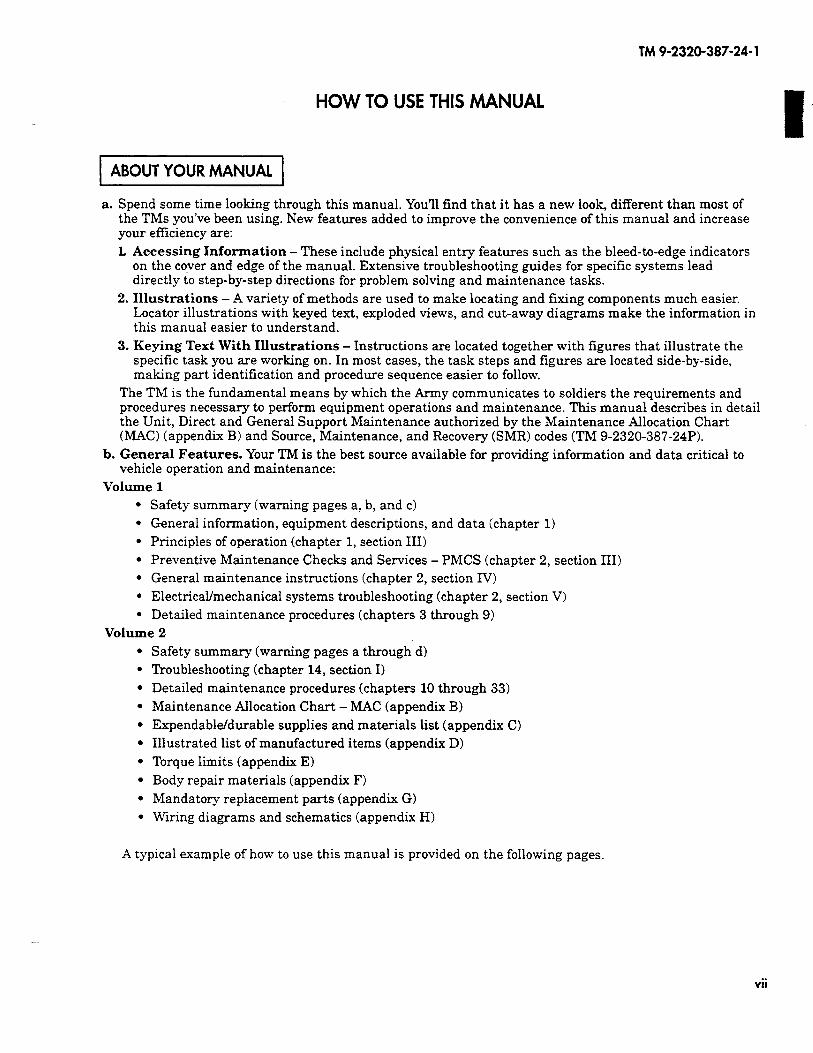
HOW TO USE THIS MANUAL
1 ABOUTYOURMANUAL 1
a. Spend some time looking through this manual. You’ll find that it has a new look, different than most of the TMs you’ve been using. New features added to improve the convenience of this manual and increase your efficiency are: L Accessing Information - These include physical entry features such as the bleed-to-edge indicators
on the cover and edge of the manual. Extensive troubleshooting guides for specific systems lead directly to step-by-step directions for problem solving and maintenance tasks.
2. Illustrations - A variety of methods are used to make locating and fixing components much easier. Locator illustrations with keyed text, exploded views, and cut-away diagrams make the information in this manual easier to understand.
3. Keying Text With Illustrations - Instructions are located together with figures that illustrate the specific task you are working on. In most cases, the task steps and figures are located side-by-side, making part identification and procedure sequence easier to follow.
The TM is the fundamental means by which the Army communicates to soldiers the requirements and procedures necessary to perform equipment operations and maintenance. This manual describes in detail the Unit, Direct and General Support Maintenance authorized by the Maintenance Allocation Chart (MAC) (appendix B) and Source, Maintenance, and Recovery (SMR) codes (TM 9-2320-387-24P).
b. General Features. Your TM is the best source available for providing information and data critical to vehicle operation and maintenance:
Volume 1
Safety summary (warning pages a, b, and c) General information, equipment descriptions, and data (chapter 1) Principles of operation (chapter 1, section III) Preventive Maintenance Checks and Services - PMCS (chapter 2, section III) General maintenance instructions (chapter 2, section IV) Electrical/mechanical systems troubleshooting (chapter 2, section V) Detailed maintenance procedures (chapters 3 through 9)
Volume 2 .
.
.
.
.
.
.
.
.
.
Safety summary (warning pages a through d) Troubleshooting (chapter 14, section I) Detailed maintenance procedures (chapters 10 through 33) Maintenance Allocation Chart - MAC (appendix B)
Expendable/durable supplies and materials list (appendix C) Illustrated list of manufactured items (appendix D)
Torque limits (appendix E) Body repair materials (appendix F) Mandatory replacement parts (appendix G) Wiring diagrams and schematics (appendix H)
A typical example of how to use this manual is provided on the following pages.
vii
TM 9-2320-387-24-l
USING YOUR MANUAL: AN EXAMPLE
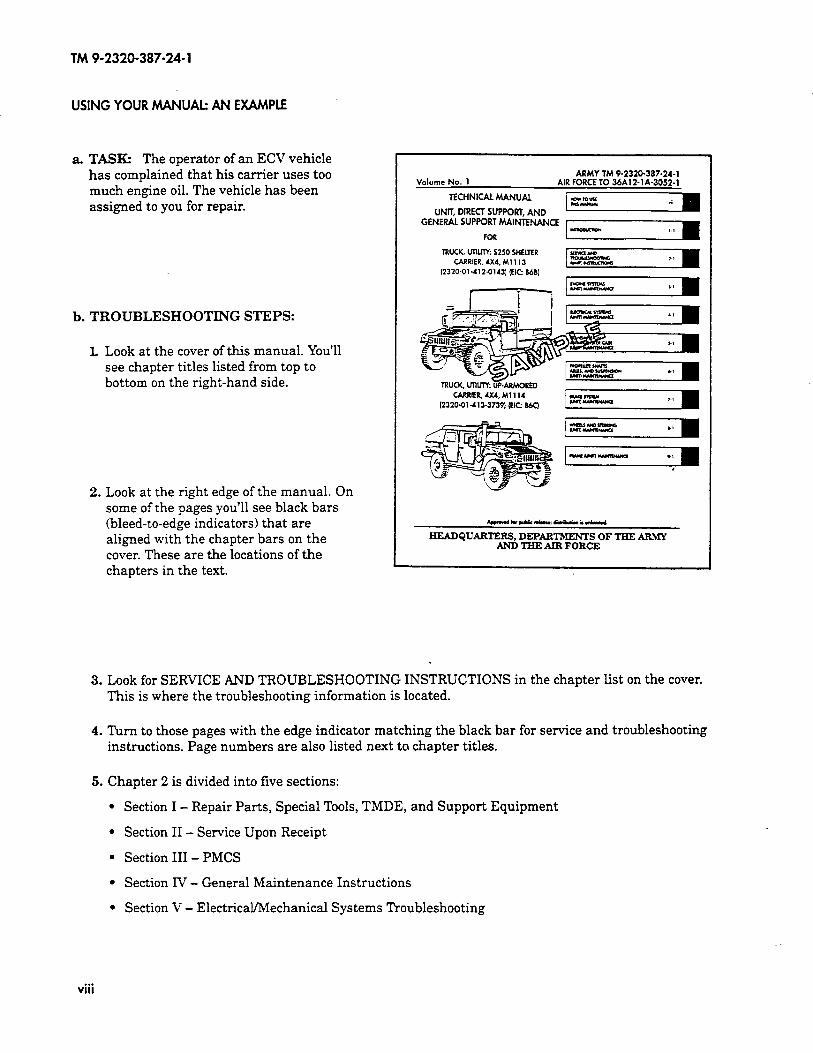
a. TASKz The operator of an ECV vehicle has complained that his carrier uses too much engine oil. The vehicle has been assigned to you for repair.
b. TROUBLESHOOTING STEPS:
L Look at the cover of this manual. You’ll see chapter titles listed from top to bottom on the right-hand side.
2. Look at the right edge of the manual. On some of the pages you’ll see black bars (bleed-to-edge indicators) that are aligned with the chapter bars on the cover. These are the locations of the chapters in the text.
ARMY TM 9-2320-387-24-1 Volume No. 1 AIR FORCE TO 36A12-l A-3052-l
TECHNICAL MANUAL
UNIT, DIRECT SUPPORT, AND ciE~~w SUPPORT ~~J~WIPFJANCE
FOR
TRUCK, UWl-t 5250 SHELTER CARRIER,4X4,Mll,3
12320-01-4124141] fEr:B.58]
bW.dCWUZd8W- i-
HFADQUARTERS. DEPARTMENTS OF THE AR!! AND THE AIR FORCE
3. Look for SERVICE AND TROUBLESHOOTING INSTRUCTIONS in the chapter list on the cover. This is where the troubleshooting information is located.
4. Turn to those pages with the edge indicator matching the black bar for service and troubleshooting instructions. Page numbers are also listed next to chapter titles.
5. Chapter 2 is divided into five sections:
l Section I - Repair Parts, Special Tools, TMDE, and Support Equipment
l Section II - Service Upon Receipt
l Section III - PMCS
l Section IV - General Maintenance Instructions
l Section V - Electrical/Mechanical Systems Troubleshooting
. . . VIII
I TM902320-387-24-l
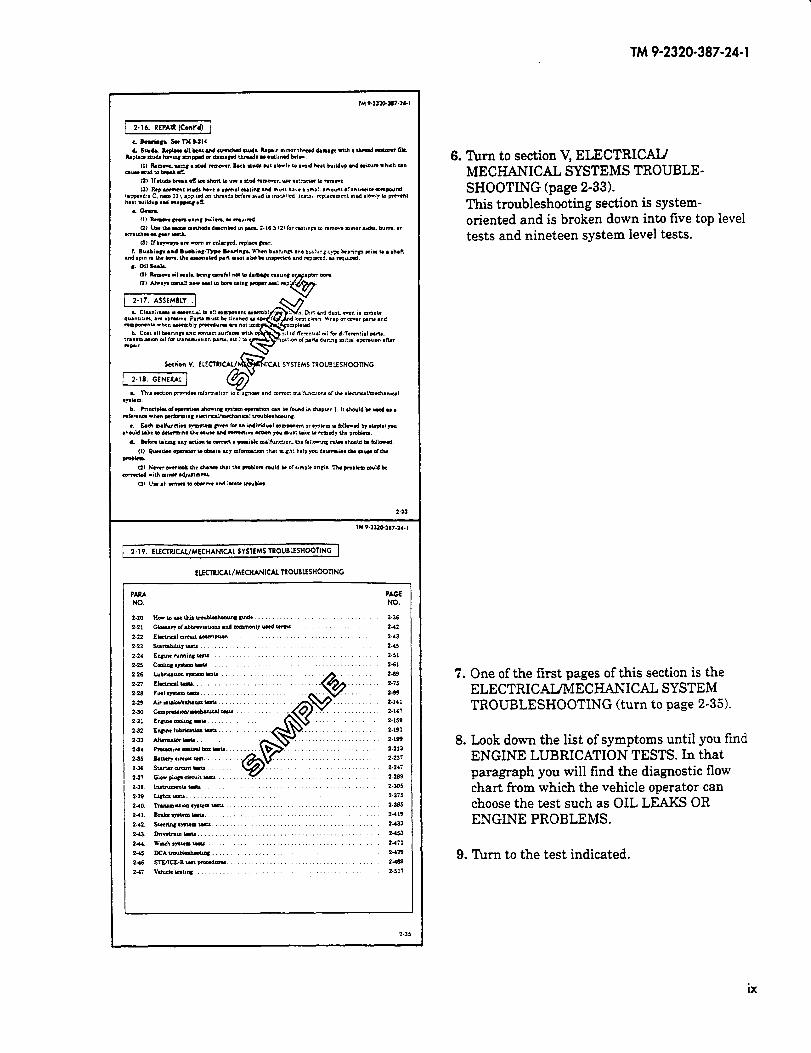
6. Turn to section V, ELECTRICAL MECHANICAL SYSTEMS TROUBLE- SHOOTING (page 2-33). This troubleshooting section is system- oriented and is broken down into five top level tests and nineteen system level tests.
7. One of the first pages of this section is the ELECTRICAL/MECHANICAL SYSTEM TROUBLESHOOTING (turn to page 2-35).
8. Look down the list of symptoms until you find ENGINE LUBRICATION TESTS. In that paragraph you will find the diagnostic flow chart from which the vehicle operator can choose the test such as OIL LEAKS OR ENGINE PROBLEMS.
9. Turn to the test indicated.
ix
TM9-2320-387-24-l
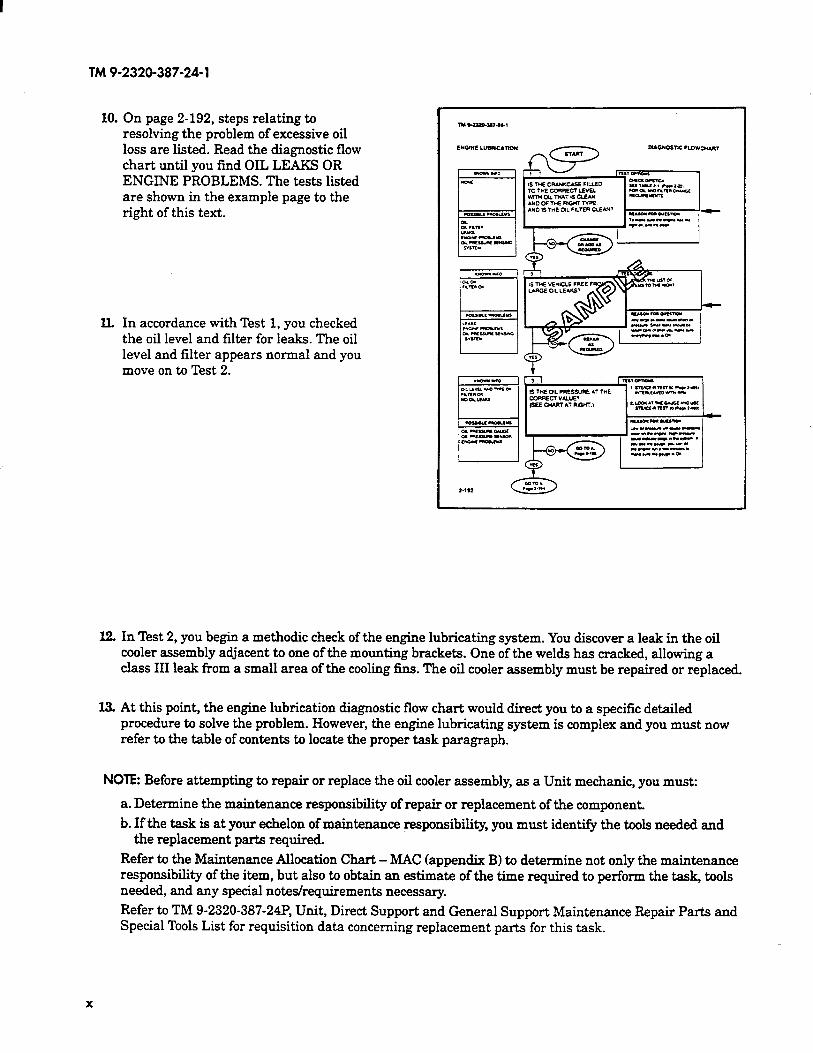
10. On page 2-192, steps relating to resolving the problem of excessive oil loss are listed. Read the diagnostic flow chart until you find OIL LEAKS OR ENGINE PROBLEMS. The tests listed are shown in the example page to the right of this text.
IL In accordance with Test 1, you checked the oil level and filter for leaks. The oil level and filter appears normal and you move on to Test 2.
12. In Test 2, you begin a methodic check of the engine lubricating system. You discover a leak in the oil cooler assembly adjacent to one of the mounting brackets. One of the welds has cracked, allowing a class III leak from a small area of the cooling fins. The oil cooler assembly must be repaired or replaced.
13. At this point, the engine lubrication diagnostic flow chart would direct you to a specific detailed procedure to solve the problem. However, the engine lubricating system is complex and you must now refer to the table of contents to locate the proper task paragraph.
NOTE: Before attempting to repair or replace the oil cooler assembly, as a Unit mechanic, you must:
a. Determine the maintenance responsibility of repair or replacement of the component.
b. If the task is at your echelon of maintenance responsibility, you must identify the tools needed and the replacement parts required.
Refer to the Maintenance Allocation Chart - MAC (appendix B) to determine not only the maintenance responsibility of the item, but also to obtain an estimate of the time required to perform the task, tools needed, and any special notes/requirements necessary.
Refer to TM 9-2320-387-24P, Unit, Direct Support and General Support Maintenance Repair Parts and Special Tools List for requisition data concerning replacement parts for this task.
X
TM 9-2320-387-24-l
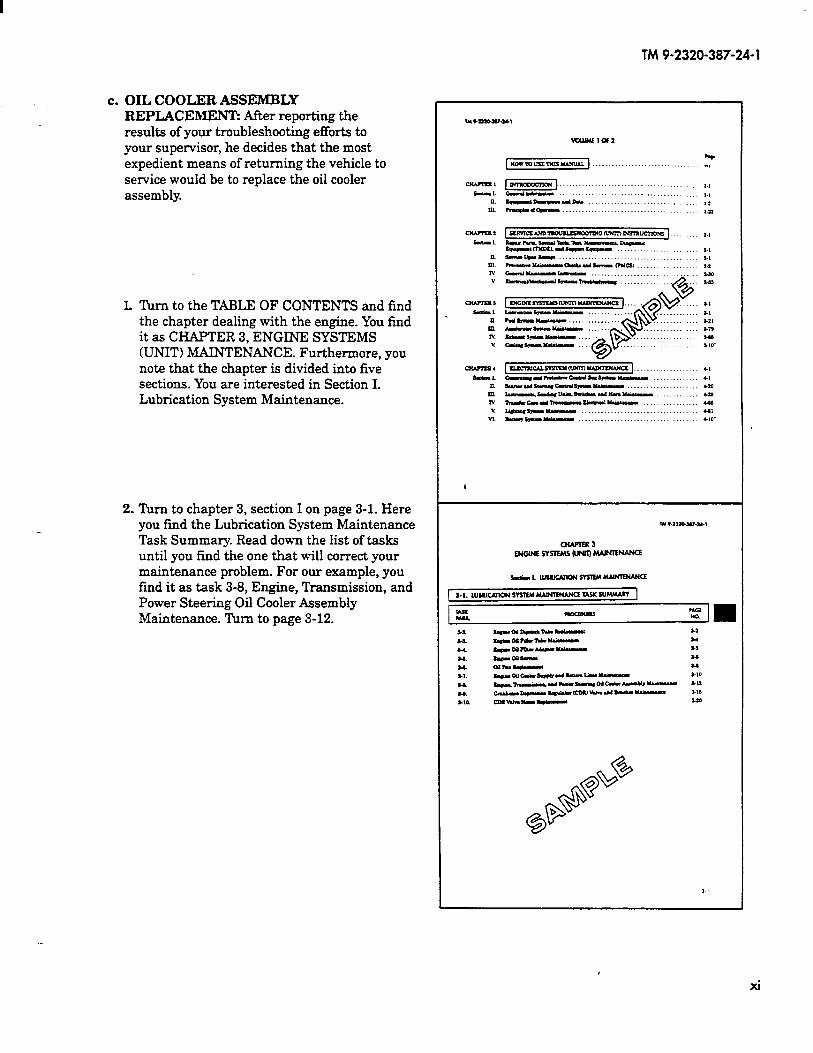
c. OIL COOLER ASSEMBLY REPLACEMENT: After reporting the results of your troubleshooting efforts to your supervisor, he decides that the most expedient means of returning the vehicle to service would be to replace the oil cooler assembly.
L Turn to the TABLE OF CONTENTS and find the chapter dealing with the engine. You find it as CHAPTER 3, ENGINE SYSTEMS (UNIT) MAINTENANCE. Furthermore, you note that the chapter is divided into five sections. You are interested in Section I. Lubrication System Maintenance.
2. Turn to chapter 3, section I on page 3-1. Here you find the Lubrication System Maintenance Task Summary. Read down the list of tasks until you find the one that will correct your maintenance problem. For our example, you find it as task 3-8, Engine, Transmission, and Power Steering Oil Cooler Assembly Maintenance. Turn to page 3-12.
xi
TM 9-2320-387-24-l
.I,
- -
3.1. ENG&dE,_tNE, ANO rOmR SEERING 011 COOLER ASEMILY
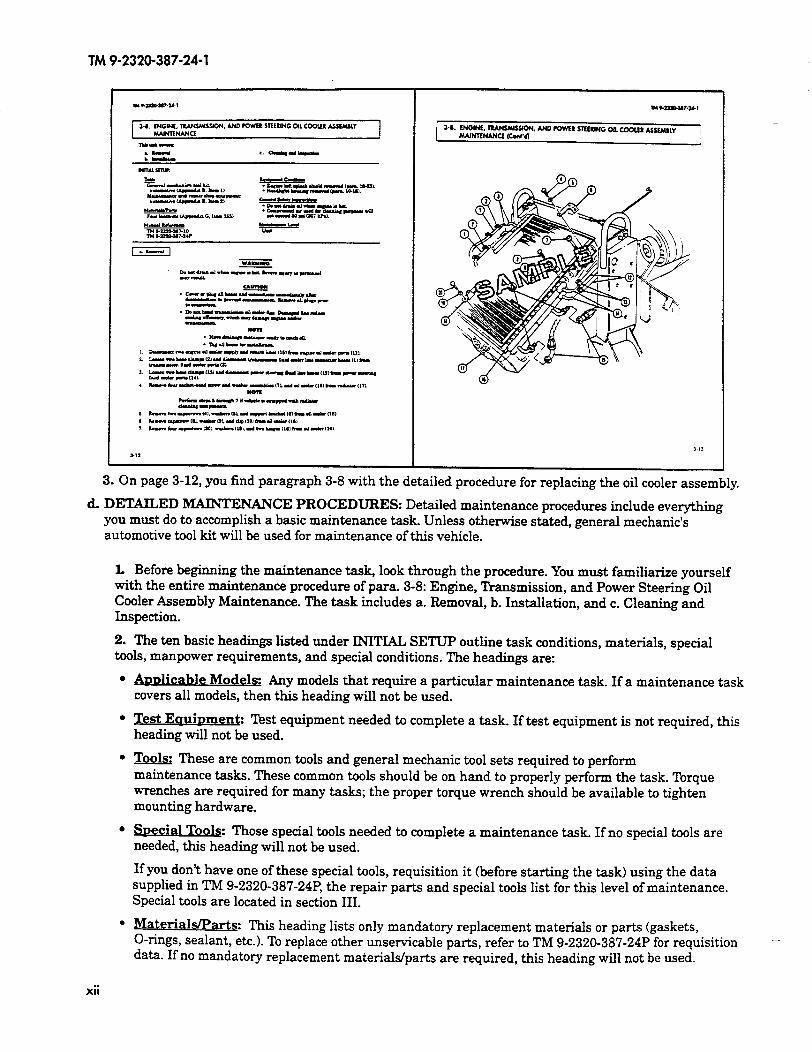
3. Un page 3-12, you find paragraph 3-8 with the detailed procedure for replacing the oil cooler assembly
d. DETAILED MAINTE NANCE PROCEDURES: Detailed maintenance procedures include everything you must do to accomplish a basic maintenance task. Unless otherwise stated, general mechanic’s automotive tool kit will be used for maintenance of this vehicle.
L Before beginning the maintenance task, look through the procedure. You must familiarize yourself with the entire maintenance procedure of para. 3-8: Engine, ‘D-ansmission, and Power Steering Oil Cooler Assembly Maintenance. The task includes a. Removal, b. Installation, and c. Cleaning and Inspection.
2. The ten basic headings listed under INITIAL SETUP outline task conditions, materials, special tools, manpower requirements, and special conditions. The headings are:
ADDlicable Models: Any models that require a particular maintenance task. If a maintenance task covers all models, then this heading will not be used.
Test Eauinment: Test equipment needed to complete a task. If test equipment is not required, this heading will not be used.
Tools: These are common tools and general mechanic tool sets required to perform maintenance tasks. These common tools should be on hand to properly perform the task. Torque wrenches are required for many tasks; the proper torque wrench should be available to tighten mounting hardware.
SDecial Tools: Those special tools needed to complete a maintenance task. If no special tools are needed, this heading will not be used.
If you don’t have one of these special tools, requisition it (before starting the task) using the data supplied in TM 9-2320-387-24P, the repair parts and special tools list for this level of maintenance. Special tools are located in section III.
Materials/Parts: This heading lists only mandatory replacement materials or parts (gaskets, O-rings, sealant, etc.). To replace other unservicable parts, refer to TM 9-2320-387-2413 for requisition data. If no mandatory replacement materials/parts are required, this heading will not be used.
xii
TM 9-2320-387-24-l
l Personnel Reauired: The number of personnel needed to perform a task. If only one mechanic is needed, this heading will not be used.
NOTE If you think that you need more help to adequately or safely complete a task, perhaps as the result of unusual conditions, etc., alert your supervisor and ask for help.
l Manual References: Those TMs needed to complete the task.
l EauiDment Condition: Notes the conditions that must exist before starting the task. If none are required, this heading will not be used. For oil cooler assembly replacement, the left-hand engine splash shield should be removed before we can start the task. If not already done, follow the procedure for splash shield removal in para. lo-23 before proceeding with this task.
. General Safetv Instructions: Summarizes all safety warnings for the maintenance task. If none are required, this heading will not be used.
l Maintenance Level: Identifies maintenance level required to perform task.
3. A step-by-step maintenance procedure follows the INITIAL SETUP and gives detailed instructions for the procedure. These instructions give the part’s general location and name and action performed. In the example Engine, Transmission, and Power Steering Oil Cooler Assembly Replacement, a. Removal, step 1 is “Disconnect two engine oil cooler supply and return lines (7) from engine oil cooler ports (9).” Note that the numbers in parentheses correspond to the part’s callout number in the accompanying illustration.
NOTE Warnings, cautions, and notes provide supplemental information:
l Waminps: Indicate conditions, practices, or procedures which must be observed to avoid personnel injury, loss of life, or long-term health hazard.
l Cautions: Indicate condition, practices, or procedures which must be observed to avoid damage to equipment or destruction of equipment.
l Notes: Include essential information of special importance, interest, or aid in job performance, which should be remembered and would be otherwise difficult to find or incorporate into the text.
4. At the end of a procedure, FOLLOW-ON TASKS will list those additional tasks that must be performed to complete the procedure. The follow-on tasks for engine, transmission, and power steering oil cooler assembly replacement are:
l Fill power steering fluid to proper level (TM 9-2320-387-10). l Fill transmission oil to proper level (TM 9-2320-387-10). l Fill engine oil to proper level (TM 9-2320-387-10). l Install headlight housing (para. 10-18). l Install left-hand splash shield (para. 10-23). l Start engine (TM 9-2320-387-10) and check for leaks.
e. Refer to the example pages for para. 3-8, Engine, Transmission, and Power Steering Oil Cooler Assembly Maintenance as we review the following points:
I. Modular Text: Both pages of text and illustrations are to be used together. This manual was designed so the two pages would be visible at once, making part identification and procedure sequence easy to follow.
2. Initial Setup: Outlines task conditions.
3. Illustrations: An exploded diagram of the component shows part locations, attachments, and spatial relationships. Cutaway views (part of the vehicle is erased) show the location and orientation of screws and attachments.
f. Your manual is easy to use once you understand its design. We hope it will encourage you to use your TM more often as an aid to maintenance support.
xiii/(xiv blank)

TM 9-2320-387-24-1
Change 1 1-1
CHAPTER 1INTRODUCTION
Section I. GENERAL INFORMATION
a. This technical manual contains instructions for unit, direct, and general support maintenance ofthe 4x4, M1113 and M1114 vehicles.
b. Models included are:(1) M1113, S250 Shelter Carrier(2) M1114, Up-Armored
Department of the Army forms and procedures used for equipment maintenance will be those prescribedby DA Pam 738-750, The Army Maintenance Management System (TAMMS).
Refer to TM 750-244-6, Procedures for Destruction of Army Tank-automotive Equipment to PreventEnemy Use.
Refer to TM 740-90-1, Administrative Storage of Equipment and TM 746-10, Marking, Packaging, andShipment of Supplies and Equipment: General Packaging Instructions for Field Use.
If your vehicle needs improvement, let us know. Send us an EIR. You, the user, are the only one who can tellus what you don’t like about your equipment. Let us know why you don’t like the design or performance. Thepreferred method for submitting QDRs is through the Army Electronic Product Support (AEPS) websiteunder the Electronic Deficiency Reporting System (EDRS). The web address is: https://aeps.ria.army.mil.This is a secured site requiring a password which can be applied for on the front page of the website. If theabove method is not available to you, put it on an SF 368, Product Quality Deficiency Report (PQDR), andmail it to us at: U.S. Army Tank-automotive and Armaments Command, ATTN: AMSTA-TR-E/PQDR MS267, 6501 E. 11 Mile Road, Warren, MI 48397-5000. We’ll send you a reply.
The quarterly Equipment Improvement Report and Maintenance Digest, TB 43-0001-62 series, contains valuable field information on the equipment covered in this manual. The information in the TB 43-0001-62 series is compiled from some of the Equipment Improvement Reports that you prepared on the vehicles covered in this manual. Many of these articles resulted from comments, suggestions, and improvement recommendations that you submitted to the EIR program. The TB 43-0001-62 seriescontains information on equipment improvements, minor alterations, proposed Modification Work Orders(MWOs), warranties (if applicable), actions taken on some of your DA Form 2028s (RecommendedChanges to Publications), and advance information on proposed changes that may affect this manual. The information will help you in doing your job better and will help in keeping you advised of the latestchanges to this manual. Also refer to DA Pam 25-30, Consolidated Index of Army Publications and BlankForms and appendix A, References, of this manual.
1-6. EQUIPMENT IMPROVEMENT REPORT AND MAINTENANCE DIGEST (EIR MD)
1-5. REPORTING EQUIPMENT IMPROVEMENT RECOMMENDATIONS (EIR)
1-4. PREPARATION FOR STORAGE AND SHIPMENT
1-3. DESTRUCTION OF ARMY EQUIPMENT TO PREVENT ENEMY USE
1-2. MAINTENANCE FORMS, RECORDS, AND REPORTS
1-1. SCOPE

TM 9-2320-387-24-l
1-7. METRIC SYSTEM
The equipment described herein contains metric components and requires metric common and special tools; therefore, metric units in addition to standard units will be used throughout this publication. In addition, a metric conversion table is located on the inside back cover of this publication.
l-8. MANDATORY REPLACEMENT PARTS
The maintenance instructions contained herein make reference to removing and discarding piece parts such as: gaskets, lockwashers, cotter pins, O-rings, seals, etc.; these items should be considered mandatory replacement items and replaced with new parts during assembly/installation.
l-9. BREAK-IN PROCEDURE
Upon receipt of vehicles, or after engine replacement, break-in procedures must be observed during the first 500 miles (804 kilometers) of operation. For break-in procedure, refer to TM 9-2320-387-10.
Section II. EQUIPMENT DESCRIPTION AND DATA
1-l 0. EQUIPMENT CHARACTERISTICS, CAPABILITIES, AND FEATURES
The 4x4, Ml113 and Ml114 vehicles are tactical vehicles designed for use over all types of roads, as well as cross-country terrain, in all weather conditions. The vehicles have four driving wheels powered by a V-8, liquid-cooled, turbocharged diesel engine. Four-wheel hydraulic service brakes and a mechanical parking brake are common to all models. Ml113 and Ml114 vehicles are equipped with a pintle hook for towing. Tiedown and lifting eyes are provided for air, rail, or sea shipment.
1-2
TM 9-2320-387-24-l
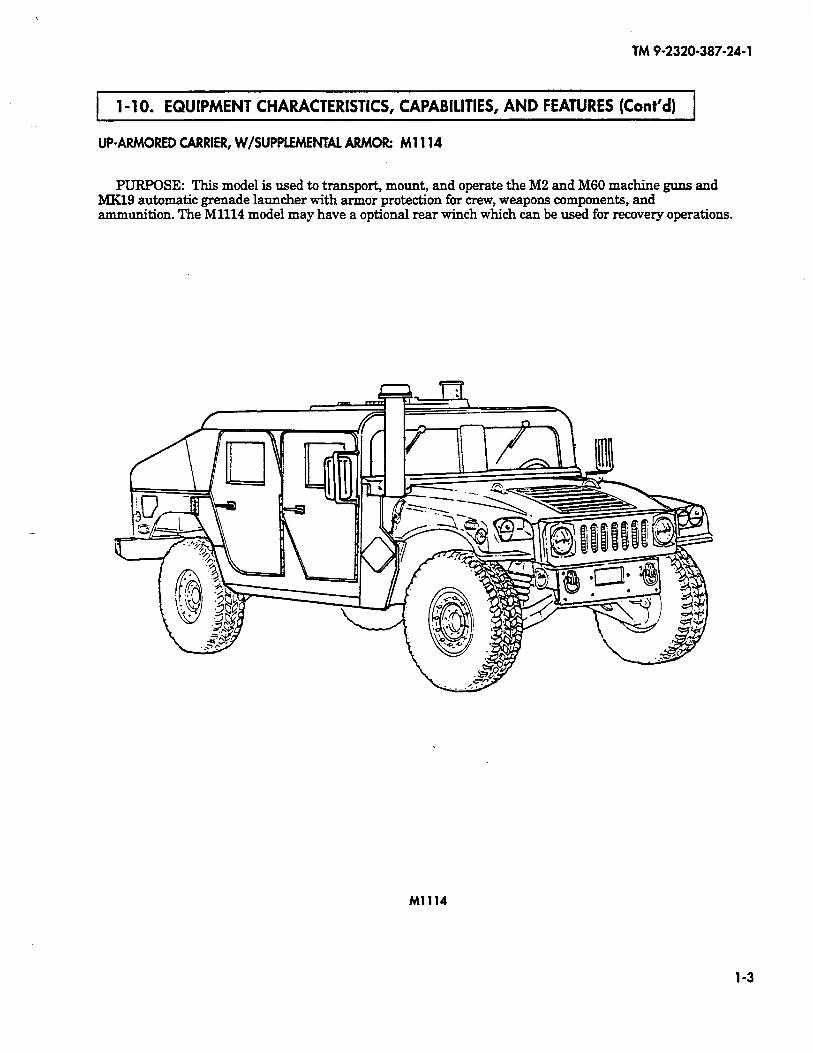
1 l-1 0. EQUIPMENT CHARACTERISTICS, CAPABILITIES, AND FEATURES Kont’dl 1
UP-ARMORED CARRIER, W/SUPPLEMENTAL ARMOR: Ml 114
PURPOSE: This model is used to transport, mount, and operate the M2 and M60 machine guns and MKl9 automatic grenade launcher with armor protection for crew, weapons components, and ammunition. The Ml114 model may have a optional rear winch which can be used for recovery operations.
Ml114
1-3
TM9-2320-387-24-l
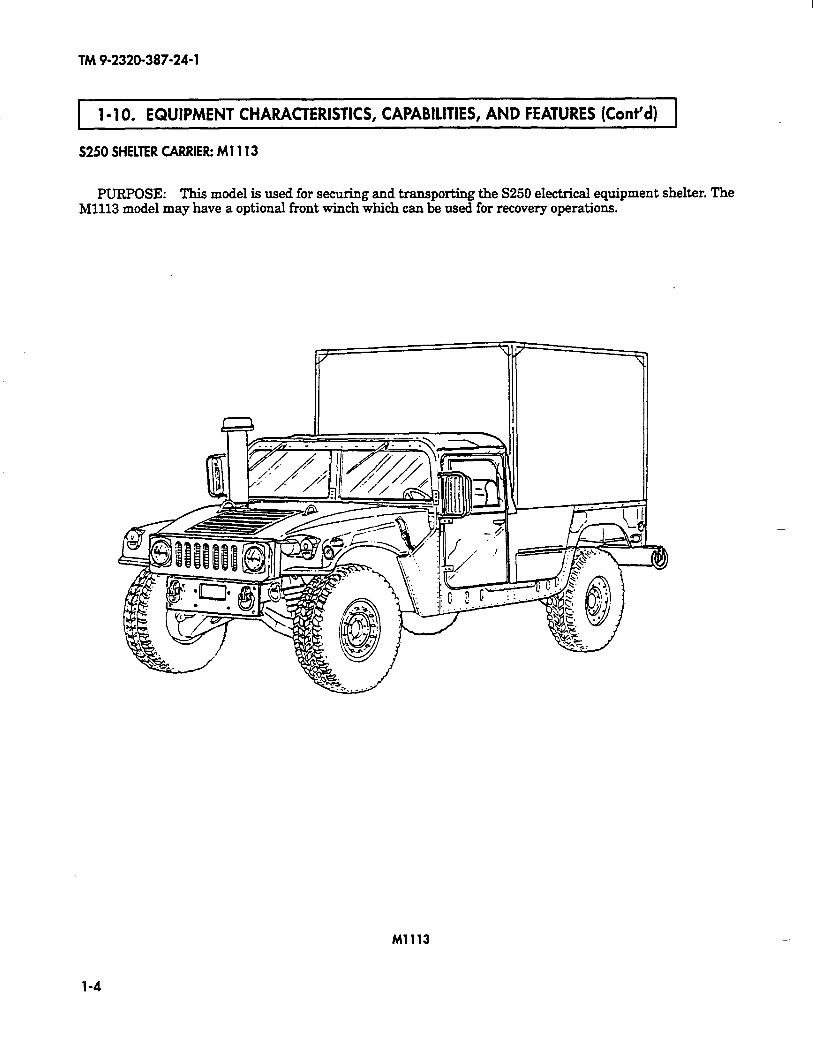
l-1 0. EQUIPMENT CHARACTERISTICS, CAPABILITIES, AND FEATURES (Cont‘d)
S250SHELlYERCARRIEkM1113
PURPOSE: This model is used for securing and transporting the S250 electrical equipment shelter. The Ml113 model may have a optional front winch which can be used for recovery operations.
Ml113
l-4
TM 9-2320-387-24-l
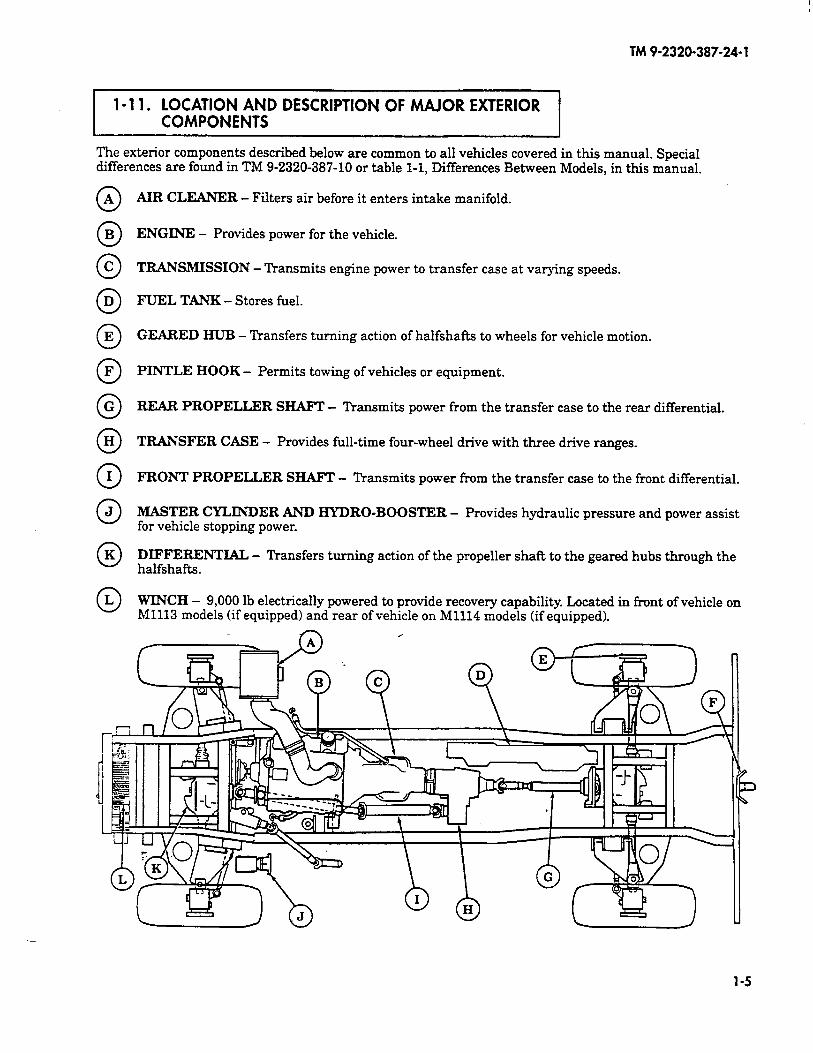
l- 11. LOCATION AND DESCRIPTION OF MAJOR COMPONENTS
The exterior components described below are common to all vehicles covered in this manual. Special differences are found in TM 9-2320-387-10 or table l-l, Differences Between Models, in this manual.
0 A
0 B
0 C
0 D
0 E
0 F
0 G
0 H
0 I
0 J
0 K
0 L
AIR CLEANER - Filters air before it enters intake manifold.
ENGINE - Provides power for the vehicle.
TRANSMISSION - Transmits engine power to transfer case at varying speeds.
FUEL TANK - Stores fuel.
GEARED I-IUB - Transfers turning action of halfshafts to wheels for vehicle motion.
PINTLE HOOK - Permits towing of vehicles or equipment.
REAR PROPELLER SHAFT - Transmits power from the transfer case to the rear differential.
TRANSFER CASE - Provides full-time four-wheel drive with three drive ranges.
FRONT PROPELLER SHAFT - Transmits power from the transfer case to the front differential.
MASTER CYLINDER AND HYDRO-BOOSTER - Provides hydraulic pressure and power assist for vehicle stopping power.
DIFFERENTIAL - Transfers turning action of the propeller shaft to the geared hubs through the halfshafts.
WINCH - 9,000 lb electrically powered to provide recovery capability. Located in front of vehicle on Ml113 models (if equipped) and rear of vehicle on Ml114 models (if equipped).
m /
7i-m A
F _- - n n
TM 9-2320-387-24-l
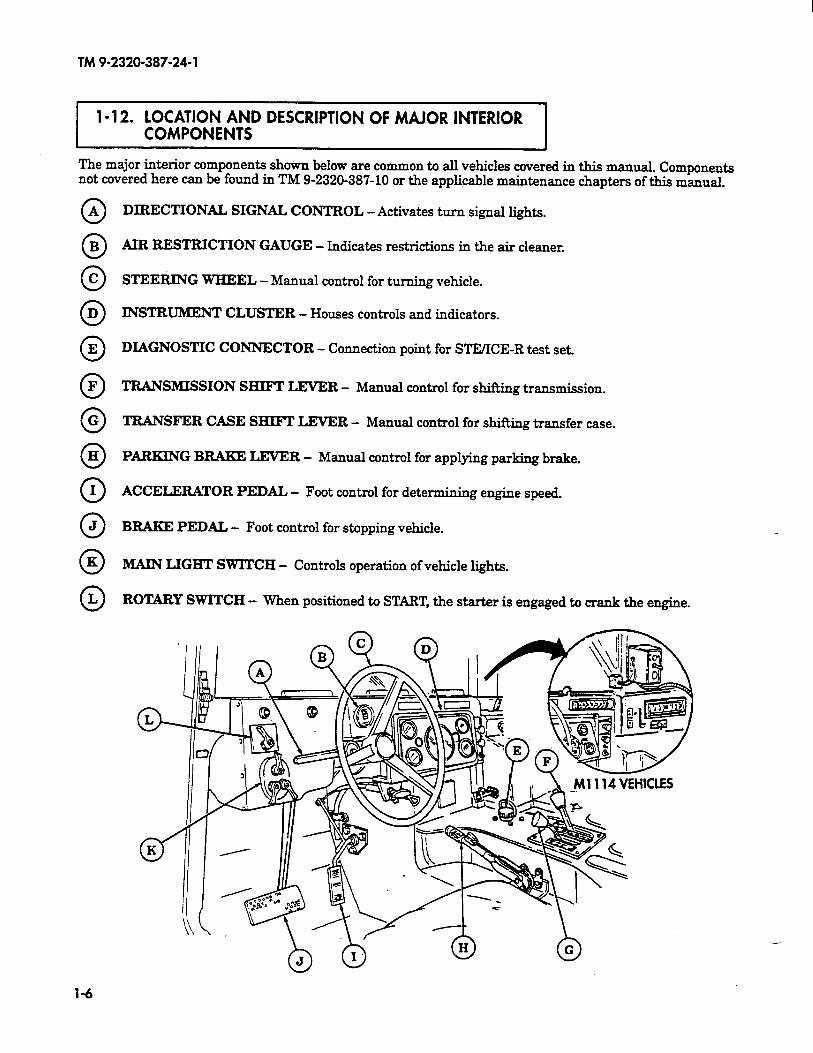
l-1 2. LOCATION AND DESCRIPTION OF MAJOR INTERIOR COMPONENTS I
The major interior components shown below are common to all vehicles covered in this manual. Components not covered here can be found in TM 9-2320-387-10 or the applicable maintenance chapters of this manual.
0 A
0 B
0 C
0 D
0 E
0 F
0 G
0 H
0 I
0 J
0 K
0 L
DIRECTIONAL SIGNAL CONTROL - Activates turn signal lights.
AIR RESTRICTION GAUGE - Indicates restrictions in the air cleaner.
STEERING WHEEL - Manual control for turning vehicle.
INSTRUMENT CLUSTER - Houses controls and indicators.
DIAGNOSTIC CONNECTOR - Connection point for STE/ICE-R test set.
TRANSMISSION SHIFT LEVER - Manual control for shifting transmission.
TRANSFER CASE SHIFT LEVER - Manual control for shifking transfer case.
PARKING BRAKE LEVER - Manual control for applying parking brake.
ACCELERATOR PEDAL - Foot control for determining engine speed.
BRAKE PEDAL - Foot control for stopping vehicle.
MAIN LIGHT SWITCH - Controls operation of vehicle lights.
ROTARY SWITCH - When positioned to START, the starter is engaged to crank the engine.
-
l-6
TM 9-2320-387-24-l
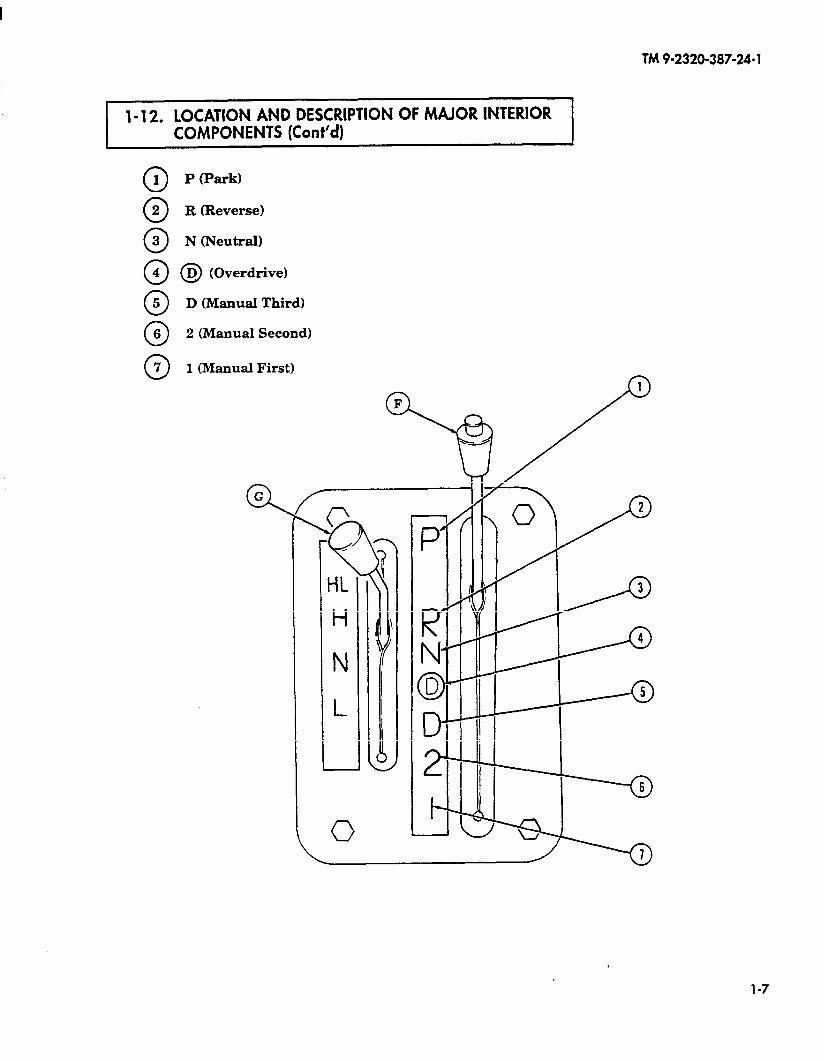
l-1 2. LOCATION AND DESCRIPTION OF MAJOR INTERIOR COMPONENTS (Cont’d)
.
0 1 P (Park)
0 2 R (Reverse)
0 3 N (Neutral)
@ @ (Overdrive)
0 5 D (Manual Third)
0 6 2 (Manual Second)
0 7 1 UGnual First)
0, G
-iL
H
N
L
I \ /
1
P
I? N
$3 D
2 I-
1-7

TM 9-2320-387-24-I
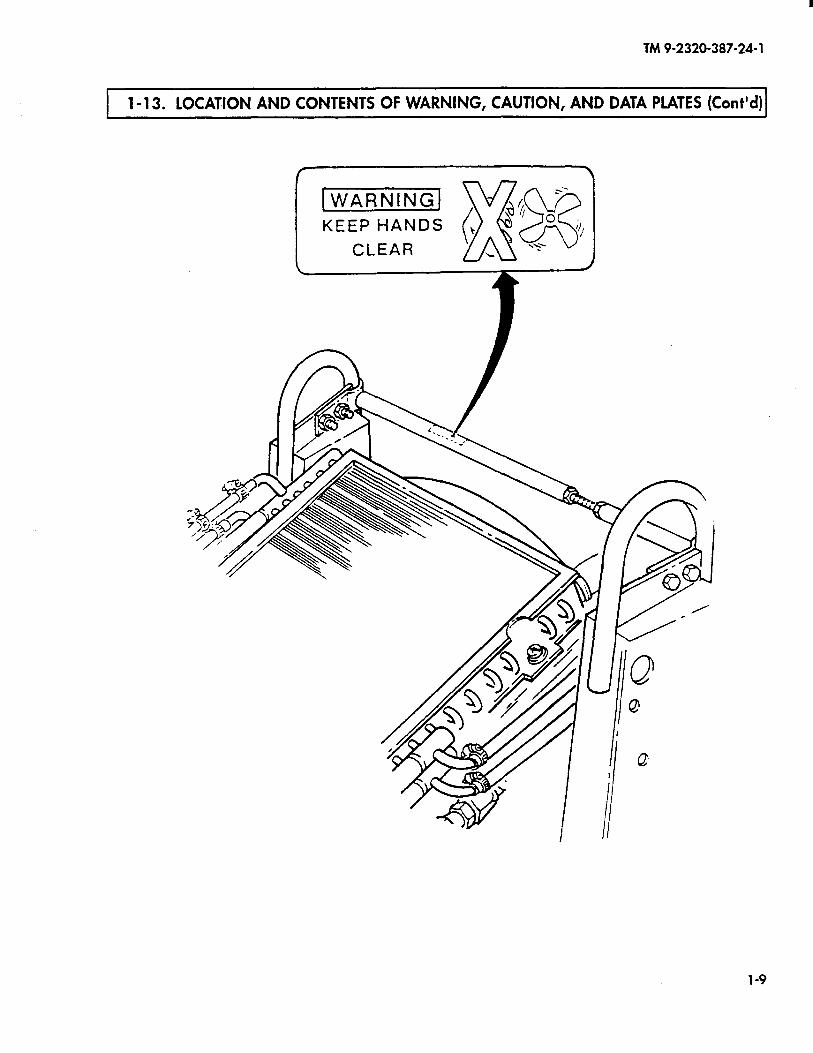
1 1- 13. LOCATION AND CONTENTS OF WARNING, CAUTION, AND DATA PLATES I
The location and contents of caution, data, and warning plates are provided in this paragraph. If any of these plates are worn, broken, painted over, missing, or unreadable, they must be replaced. Information on data plate may vary with the model.
piJimmq DO NOT REMOVE CAP OR TOUCH
WHEN HOT
1-8
I
TM9-2320-387-24-l
1 1 - 13. LOCATION AND CONTENTS OF WARNING, CAUTION, AND DATA PLATES (Co&d) 1 I I
1 WARNINGI KEEP HANDS
CLEAR
1-9
TM 9-2320-387-24-l
1 l-13. LOCATION AND CONTENTS OF WARNING, CAUTION, AND DATA PLATES (Cont’d)
A 72 WS.
MAX. TOWED LOAD ,200 LSS. “EmlcA~ PMLE LOAD E LSS.
SHIPPIN CUBAGE cu. FT. SH,PPi?G wssm DRY s%o LE..
\ I
l-10
TM9-2320-387-24-l
1-13. LOCATION AND CONTENTS OF WARNING, CAUTION, AND DATA PLATES (Cont’d)
, I I \
ICAUTION~ 1 I I
HIGH INTENSITY NOISE HEARING PROTECTION
.REQUIRED
i j I I I I
’ FRESH AIR INTAKE
OPERATING LEVER LOCATED UNDER DUCT ON GRILLE
PULL
O-%N
l-11
TM 9-2320-387-24-l
l-1 3. LOCATION AND CONTENTS OF WARNING, CAUTION, AND DATA PLATES (Cont’d)J _,
o/o ‘MAX. VEHICLE OPERATING SPEEDS\
TRANSFER CASE RANGE SELECTON
TRANSFER RANGE I’ “IT “H/L-
SELECTION Low Lock High High Lock
‘R” Reverse 10 MPH 27 MPH 27 MPH
0 D Overdrive 28 MPH 55 MPH 55 MPH
‘D” Drive 21 MPH 55 MPH 55 MPH
r” Second 14 MPH 38 MPH 38 MPH
‘I” First a MPH 23 MPH 23 MPH
TRANSFER CASE IN HIGH ‘H” WHEN
OPERATING ON HARD SURFACE
FORDING SHALLOW FORDING DEPTH
30 INCHES or
VEHICLE BREAK-IN SERVICE
DURING THE FIRST 500 Ml. (804 KM) OF OPERATION: l DO NOT EXCEED A SPEED
OF 55 MPH (88 KPH) l DO NOT DRIVE FOR LONG
PERIODS OF TIME AT CONSTANT SPEED
. AVOID RAPID ACCELERA- TION OR DECELERATION
l DRIVE AT MODERATE SPEED UNTIL THE ENGINE IS FULLY WARMED UP
l NO TRAILER TOWING
-
TM 9-2320-387-24-l
1 1 - 13. LOCATION AND CONTENTS OF WARNING, CAUTION, AND DATA PLATES Konr’dll
~F$~lWl&~~ fE-f:ORED HEAVY VARIANT I
19207/8TTOO15 - MFR O’GARAHESS& EISENHARDT
MFR’S. SERIAL NUMBER
REGISTRATION NUMBER rm
NATIONAL STOCK NUMBER - 2320-01-413-3739
VEHICLE CURB WEIGHT - 9800 LBS
PAYLOAD MAXIMUM - 2300 LBS
GROSS WEIGHT MAXIMUM - 12100 LBS
DATE OF DELIVERY -I
CONTRACT NUMBER - DAAE07-94CO4106
U.S. PROPERTY
VENT
,O 0
0 DEEP FORD
Ml 114 VEHICLES
19207/87T0014 - MFR A.M.GENERAL
MFR’S. SERIAL NUMBER --I
REGISTRATION NUMBER - s
NATIONAL STOCK NUMBER - 2320-01412-0143
VEHiCLE CURB WEIGHT - 6100 LBS
PAYLOAD MAXIMUM - 5400 LBS
GROSS WEIGHT MAXIMUM - 11500 LBS
DATE OF DELIVERY --I
CONTRACT NUMBER WA-X001 -96-0045
U.S. PROPERTY
TRUCK UTILITY: EXPANDED CAPACITY 4X4, W/E, HMMWV, XM 1113
M 1113 VEHICLES
1-13
TM 9-2320-387-24-l
1 - 13. LOCATION AND CONTENTS OF WARNING, CAUTION, AND DATA PLATES (Co&d) -
MANUALS
MAINTENANCE TM g-2320-387-24
MANUAL
OPERATORS
MANUAL
TM g-2320-387-1 0
PARTS LIST TM 9-2320-387-24P
-
i
1-14
TM 9 2320-387-24-l
1-l 3. LOCATION AND CONTENTS OF WARNING, CAUTION, AND DATA PLATES (Cont’d)
ENG RUN START
M1114VEHlCLES
0
TEMP
WN M
0 FAN
0
l-15
TM 9-2320-387-24-l
l- 13. LOCATION AND CONTENTS OF WARNING, CAUTION, AND DATA PLATES (Cont’d) -
WARNING DO NOT USE HAND THROTTLE AS AN
AUTOMATIC VEHICLE SPEED OR CRUISE CONTROL. THE HAND THROTTLE WILL NOT DISENGAGE AUTOMATICALLY WHEN BRAKE IS APPLIED.
9 WARNING c
SEAT BELT HAS NON-LOCKING RETRACTORS. FOR PROPFR
USE, WEBBING MUST FIRST BE COMPLETELY EXTENDED FROM THE NON-LOCKING RET-RACIOR DEVICE. ALL EXCESS
&WEBBING MUST THEN BE ADJUSTED AT THE BUCKLE. /c
Ml 114 VEHICLES
1-16

TM 9-2320-387-24-l
l-1 3. LOCATION AND CONTENTS OF WARNING, CAUTION, AND DAfA PLATES (Cont’d)
’ CONNECTING BAlTERY CABLES CAUTION
COWWVED REUABIUPI OF ELECTWCIL SmEY REOUlRES ,“A, ROUTINE YAIUTEWAWCE BE PERFOAYED TO ASSURE GOOD ELECTRICAL CONHECTKHIS &ND SLFE CAGLE POSRDNS.
,. SA’tTERI A.NO C-ISLES Y”ST SE lNSTULED AS snom.
?A CABLES ““ST L&I DOWN FLAT ON TOP OF GATTERIES.
,. lEEP TERYINILS AND CONNECTIONS CLEAN A,,D TlGHl. IPPLY . “EN” COAT OF GREASE TO BATTERY IERWtMS.
1-17 .
TM 9-2320-387-24-l
1 1-14. DIFFERENCES BETWEEN MODELS 1
The differences between models are provided in this paragraph.
Table l-l. Differences Between Models.
Equipment/
Function
Armament Mounting
S250 Shelter Configuration
Vehicle Winch (if equipped)
Supplemental Armor
Ml113
X
X
Ml 114
X
X
X
1-18
TM-9-2320-387-24-l
ITABULATED DATA 1
Vehicle performance data for the ECV vehicles is listed in table 1-2. Information not covered can be found in TM-9-2320-387-10.
NOTE Standard and metric measurements will be used in this table. A list of their abbreviations is provided below.
TABULATED DATA ABBREVIATIONS
MEASUREMENT ABBREVIATION Ampere ......................... A Celsius. ......................... C Centimeter. ...................... cm Fahrenheit ....................... F Gallon gal. .......................... Gallons Per Minute. ................ gpm Horsepower ...................... hp Inch. ........................... in. Kilogram ........................ kg Kilometers Per Hour. ............... kph Kilometers Per Liter. ............... km/L KiloPascal ....................... kPa Kilowatt. ........................ kW Liters. L ..........................
1. PAKOAD
MEASUREMENT ABBREVIATION Liters Per Minute .................. L/m Maximum. ....................... max Miles Per Gallon. .................. mpg Miles Per Hour. ................... mph Millimeter ....................... mm Minimum ........................ min Newton-Meter. .................... N-m Pint ............................ pt Pound ........................... lb Pound-Feet. ...................... lb-ft Pounds Per Square Inch ............. psi Quart. .......................... qt Revolutions Per Minute. ............. rpm Volt ............................ v
STANDARD METRIC
Ml113 ........................................... 5,400 lb 2,450 kg M1114. .......................................... 2,300 lb 1,044 kg
2. CAPACITIES*
Cooling System .................................... Engine
Crankcase Only ................................. Crankcase and Filter. .............................
FuelTank ........................................ Differential (each) ....... : .......................... Transmission:
DrainandRefill ................................. W/DryConverter .................................
Transfer Case. ..................................... GearedHub ....................................... Steering Hydraulic System with Steering Cooler ............ Brake Hydraulic System ............................. Brake Master Cylinder .............................. Windshield Washer Reservoir. .........................
*ALL HYDRAULIC SYSTEMS AND ALL FUEL CAPACITIES ARE CALCULATED APPROXIMATIONS
26 qt 24.6 L
7 qt 6.6 L 6 qt 7.6 L 25 gal. 94.6 L 2 qt 1.9 L
7.7 qt 13.5 qt 3.35 qt 1 Pt 1.25 qt 1.63 pt 1.12 pt 2-1/2 qt
7.3 L 12.8 L 3.17 L 0.47 L 1.18 L 0.77 L 0.53 L 2.37 L
l-19
TM 9-2320-387-24-l
Table 1-2. Tabulated Data (Cont’d).
!STANDARD METRIC _
3. ENGINE
Model ......................................... GM 6.5 L Type ..................... Diesel, Turbocharged Liquid-Cooled, VB Brake Horsepower. ......................... 190 hp @ 3,400 rpm IdleSpeed ................................... .700*25rpm Operating Speed. ............................. 1,500-2,300 rpm Oil Pressure
@Idle ......................................... ..2Ops i @ Operating Speed .............................. .40-50 psi
4. FUEL SYSTEM
Fuel Pump (Mechanical): Type ............................. Cam-Driven Diaphragm
Fuel Filter Type ............................... Fuel/Water Separator
Air Cleaner: Type ....................................... Dry Element
Glowplug Type ........................................ FastStart
5. COOLING SYSTEM
Surge Tank Cap Pressure. ............................. 15 psi Thermostat:
Starts to Open. .................................... 190°F Fully Open. ...................................... 212°F
Radiator: Type ........................................ Downflow
Fan: Type. ....................................... Ten Blade Diameter ........................................ 19in.
6. ELECTRICAL SYSTEM
Alternator: Manufacturer ....................... : ............ Neihoff Model ........................................ 12447109 Output. ......................... .2OOA@ 1,600 rpm (engine) Bated Voltage .................................. .24Vl12V
Starter: Manufacturer. .................................. Presto& Model............................................M FY Capacity.........................................9.5h p Voltage .......................................... 24V
Batteries (21: Voltage.................................~ ........ 12V
119.4 kW @ 3,400 rpm
138 kPa 276-345 kPa
103 kPa
88°C 100°C -
48.26 cm
l-20
TM 9-2320-387-24-1
Change 1 1-21
STANDARD METRIC
7. TRANSMISSION
Manufacturer . . . . . . . . . . . . . . . . . . . . . . . . . . . . . . . . . . . HydramaticModel . . . . . . . . . . . . . . . . . . . . . . . . . . . . . . . . . . . . . . . . . . . . 4L80-EType . . . . . . 4-Speed, Automatic, Torque Converter Stall Ratio of 2.1 and
Direct Drive w/Lock-Up Clutch in Fourth GearGear Ratios
First . . . . . . . . . . . . . . . . . . . . . . . . . . . . . . . . . . . . . . . . . . . . . 2.48:1Second . . . . . . . . . . . . . . . . . . . . . . . . . . . . . . . . . . . . . . . . . . . 1.48:1Third . . . . . . . . . . . . . . . . . . . . . . . . . . . . . . . . . . . . . . . . . . . . 1.00:1Fourth . . . . . . . . . . . . . . . . . . . . . . . . . . . . . . . . . . . . . . . . . . . 0.75:1Reverse. . . . . . . . . . . . . . . . . . . . . . . . . . . . . . . . . . . . . . . . . . . 2.08:1
Oil Type . . . . . . . . . . . . . . . . . . . . . . . . . . . . . . . . . . . . . . . Dexron® IIIOil Pressure . . . . . . . . . . . . . . . . . . . . . . . . . . . . . . . . . . . . . 35-324 psi 241-2,234 kPa
8. TRANSFER CASE
Manufacturer . . . . . . . . . . . . . . . . . . . . . . . . . . . . . New Venture GearModel . . . . . . . . . . . . . . . . . . . . . . . . . . . . . . . . . . . . 242 w/IntercoolerGear Ratios:High and High Lock . . . . . . . . . . . . . . . . . . . . . . . . . . . . . . . . . . 1.0:1Low Lock . . . . . . . . . . . . . . . . . . . . . . . . . . . . . . . . . . . . . . . . . 2.72:1
9. DIFFERENTIAL
Manufacturer. . . . . . . . . . . . . . . . . . . . . . . . . . . . . . . . . . . AM GeneralType . . . . . . . . . . . . . . . . . . . . . . . . . . . . . . . . . . . . . . . . Hypoid GearsGear Ratio . . . . . . . . . . . . . . . . . . . . . . . . . . . . . . . . . . . . . . . . . 3.08:1
10. GEARED HUB
Manufacturer. . . . . . . . . . . . . . . . . . . . . . . . . . . . . . . . . . . AM GeneralType . . . . . . . . . . . . . . . . . . . . . . . . . . . . . . . . . . . . . . . . . . Spur GearsGear Ratio . . . . . . . . . . . . . . . . . . . . . . . . . . . . . . . . . . . . . . . . . 1.92:1
11. SERVICE BRAKE CALIPER (FRONT)
Manufacturer. . . . . . . . . . . . . . . . . . . . . . . . . . . . . . . . . Kelsey-HayesPiston Diameter. . . . . . . . . . . . . . . . . . . . . . . . . . . . . . . . . . . . 2.6 in. 66 mm
SERVICE/PARKING BRAKE CALIPER (REAR)
Manufacturer . . . . . . . . . . . . . . . . . . . . . . . . . . . . . . . . . Kelsey-HayesPiston Diameter . . . . . . . . . . . . . . . . . . . . . . . . . . . . . . . . . . . . . 2.6 in. 66 mm
12. SERVICE BRAKE ROTOR (FRONT)
Manufacturer . . . . . . . . . . . . . . . . . . . . . . . . . . . . . . . . . Kelsey-HayesDiameter. . . . . . . . . . . . . . . . . . . . . . . . . . . . . . . . . . . . . . . . . . . 12 in. 304 mmThickness . . . . . . . . . . . . . . . . . . . . . . . . . . . . . . . . . . . . . . . . 0.866 in. 22 mm
13. SERVICE/PARKING BRAKE ROTOR (REAR)
Manufacturer . . . . . . . . . . . . . . . . . . . . . . . . . . . . . . . . . Kelsey-HayesDiameter. . . . . . . . . . . . . . . . . . . . . . . . . . . . . . . . . . . . . . . . . . . 12 in. 304 mmThickness . . . . . . . . . . . . . . . . . . . . . . . . . . . . . . . . . . . . . . . . 0.866 in. 22 mm
Table 1-2. Tabulated Data (Cont'd).
TM 9-2320-387-24-l
Table l-2. Tabulated Data (Cont’d).
STANDARD METRIC -
14. WHEELS AND TIRES
Tire Size (Radial). ...................... 37 in. x 12.5 in. x 16.5 in.
Wheels: Type ......................................... Offset Disc
Runflat Insert: Type............................................Rubbe r
93.98 cm x 31.75 cm x 41.9 cm
15. STEERING SYSTERI
Steering Gear: Manufacturer. ..................................... Delphi Type. ...................................... Variable Ratio Ratio. ........................................... 13/16:1
Power Steering Pump: hlanufacturer. ..................................... Delphi Model..............................................12 5 Output Pressure (max) ............................. 1,450 psi Capacity (engine 1,500 rpm) ......................... .2.6 gpm FlowRate(max). ................................. .3_5gpm
Toe-In (Front/Rear @ Curb Weight): ............ 0.375 in. + 0.1875 in.
16. FRAME
9,998 kPa
13.2 L/m 11 mm + 3.2 mm
Manufacturer. .................................. AM General Type.. ........................................... ..Bo x No. of Crossmembers. .................................. Five
17. WINCH (optional)
Model. ......................................... M&9000 Type ...................... Electric Drive, Thermal Cutoff Switch Capacity ........................................ .9,000 lb
18. AIR-CONDITIONING COMPRESSOR
Manufacturer .................................... Harrison Model .............................................. 510 FieldCoil.. ......................................... 24V
4,086 kg
-
l-22
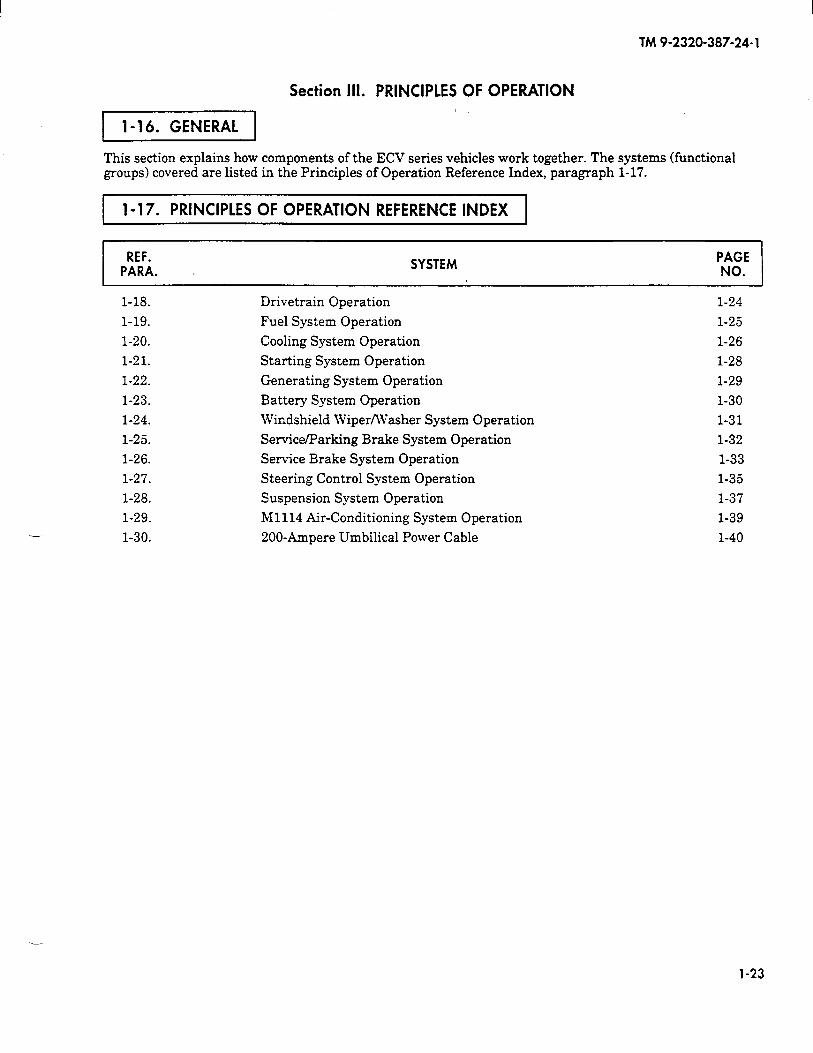
TM 9-2320-387-24-l
Section III. PRINCIPLES OF OPERATION I
This section explains how components of the ECV series vehicles work together. The systems (functional groups) covered are listed in the Principles of Operation Reference Index, paragraph l-17.
/ l-1 7. PRINCIPLES OF OPERATION REFERENCE INDEX 1
REF. PARA. SYSTEM PAGE
NO.
-
l-18. Drivetrain Operation
l-19. Fuel System Operation
l-20. Cooling System Operation
l-21. Starting System Operation
l-22. Generating System Operation
l-23. Battery System Operation
l-24. Windshield Wiper/Washer System Operation
l-25. Service/Parking Brake System Operation
l-26. Service Brake System Operation
l-27. Steering Control System Operation
l-28. Suspension System Operation
l-29. Ml114 Air-Conditioning System Operation
l-30. 200Anpere Umbilical Power Cable
l-24
l-25
l-26
l-28
l-29
l-30
l-31
l-32
l-33
l-35
l-37
l-39
l-40
l-23
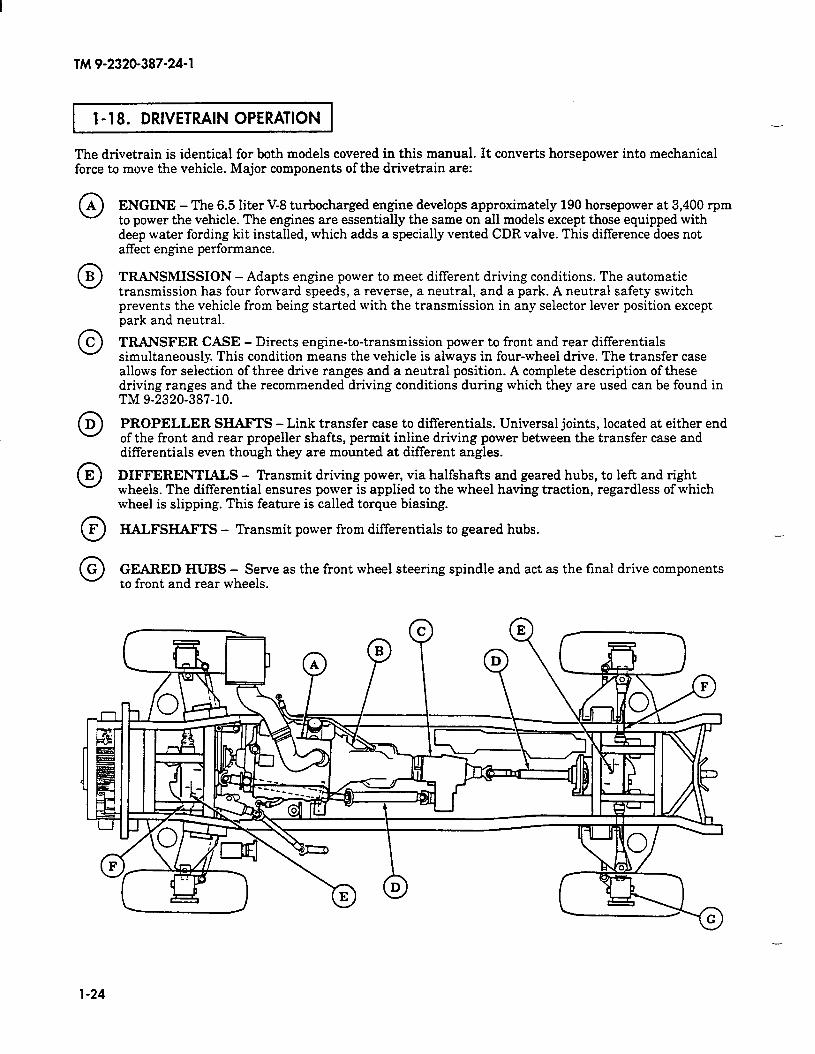
TM 9-2320-387-24-l
l- 18. DRIVETRAIN OPERATION 1
The drivetrain is identical for both models covered in this manual. It converts horsepower into mechanical force to move the vehicle. Major components of the drivetrain are:
0 A
0 B
0 C
0 D
0 E
0 F
0 G
ENGINE - The 6.5 liter V-8 turbocharged engine develops approximately 190 horsepower at 3,400 rpm to power the vehicle. The engines are essentially the same on all models except those equipped with deep water fording kit installed, which adds a specially vented CDR valve. This difference does not affect engine performance.
TRANSMISSION - Adapts engine power to meet different driving conditions. The automatic transmission has four forward speeds, a reverse, a neutral, and a park. A neutral safety switch prevents the vehicle from being started with the transmission in any selector lever position except park and neutral.
TRANSFER CASE - Directs engine-to-transmission power to front and rear differentials simultaneously. This condition means the vehicle is always in four-wheel drive. The transfer case allows for selection of three drive ranges and a neutral position. A complete description of these driving ranges and the recommended driving conditions during which they are used can be found in TM 9-2320-387-10.
PROPELLER SHAFTS - Link transfer case to differentials. Universal joints, located at either end of the front and rear propeller shafts, permit inline driving power between the transfer case and differentials even though they are mounted at different angles.
DIFFERENTIALS - Transmit driving power, via halfshafts and geared hubs, to left and right wheels. The differential ensures power is applied to the wheel having traction, regardless of which wheel is slipping. This feature is called torque biasing.
HALFSHAFTS - Transmit power from differentials to geared hubs. -
GEARED HUBS - Serve as the front wheel steering spindle and act as the final drive components to front and rear wheels.
n n
-
l-24

TM 9-2320-387-24-l
b-1 9. FUEL SYSTEM OPERATION 1
The HMMWV diesel fuel system operation is identical for both models covered in this manual. The system cleans and supplies fuel for the engine. Major components of the fuel system are:
0 A
0 B
0 C
0 D
0 E
0 F
0 G
0 H
FUEL PUMP - Draws fuel from fuel tank through the supply line and pumps it to the fuel filter.
FUEL RETURN LINE - Carries unused fuel from the injection pump back to the fuel tank.
FLJEL SUPPLY LINE - Carries fuel from fuel tank to the system.
FUEL TANK - Stores 25 gallons (95 liters) of diesel fuel.
FUEL FILLER CAP - Located at right rear side of vehicle, the cap is removed to permit fuel tank servicing.
FUEL INJECTORS - Receive metered fuel from the injection pump and spray fuel into the combustion chambers.
FUEL FILTER/WATER SEPARATOR - Filters water and sediment from fuel before fuel enters the injection pump.
INJECTION PUMP - Directs metered and pressurized fuel to the eight injector nozzles. It is mounted on top of the engine under the intake manifold.
l-25
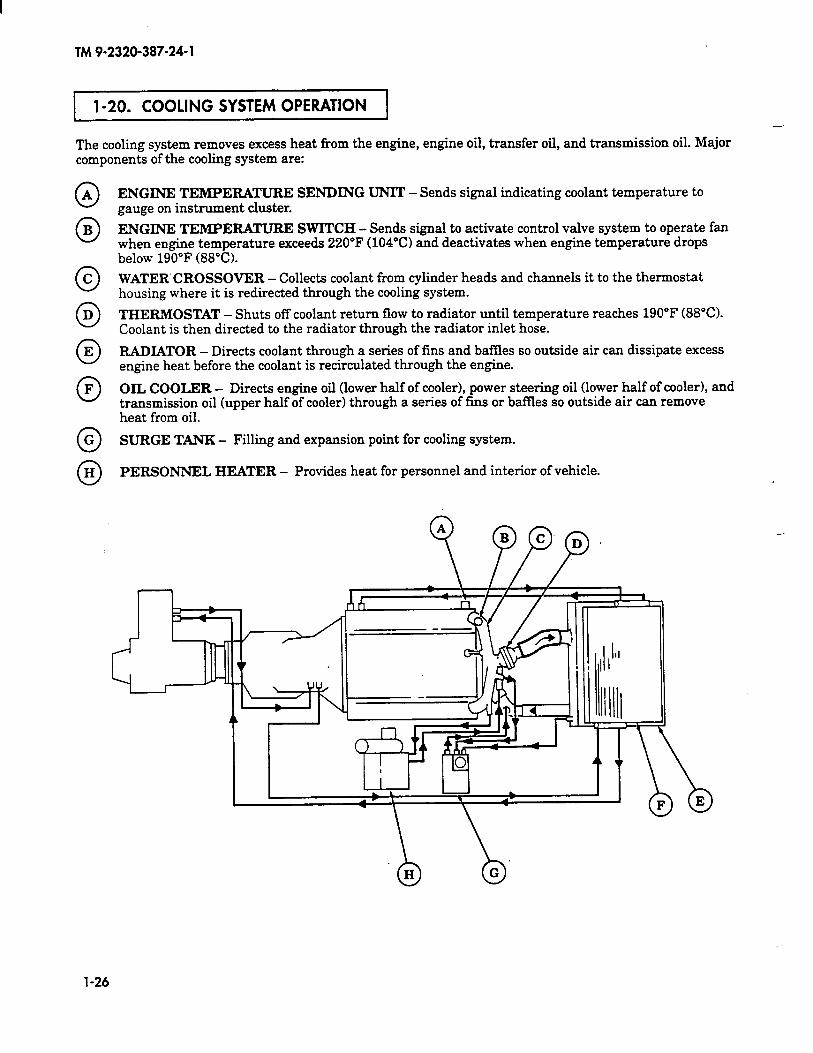
TM 9-2320-387-24-l
1 l-20. COOLING SYSTEM OPERATION 1 I 1
--
The cooling system removes excess heat from the engine, engine oil, transfer oil, and transmission oil. Major components of the cooling system are:
0 A
0 B
0 C
0 D
0 E
0 F
0 G
0 H
ENGINE TEMPERATURE SENDING UNIT - Sends signal indicating coolant temperature to gauge on instrument cluster.
ENGINE TEMPERATURE SWITCH - Sends signal to activate control valve system to operate fan when engine temperature exceeds 220°F (104°C) and deactivates when engine temperature drops below 190°F (88°C).
WATERCROSSOVER - Collects coolant from cylinder heads and channels it to the thermostat housing where it is redirected through the cooling system.
THERMOSTAT - Shuts off coolant return flow to radiator until temperature reaches 190°F (88°C). Coolant is then directed to the radiator through the radiator inlet hose.
RADIATOR - Directs coolant through a series of fins and baffles so outside air can dissipate excess engine heat before the coolant is recirculated through the engine.
OIL COOLER - Directs engine oil (lower half of cooler), power steering oil (lower half of cooler), and transmission oil (upper half of cooler) through a series of fins or battles so outside air can remove heat from oil.
SURGE TANR - Filling and expansion point for cooling system.
PERSONNEL HEATER - Provides heat for personnel and interior of vehicle.
-
1-26
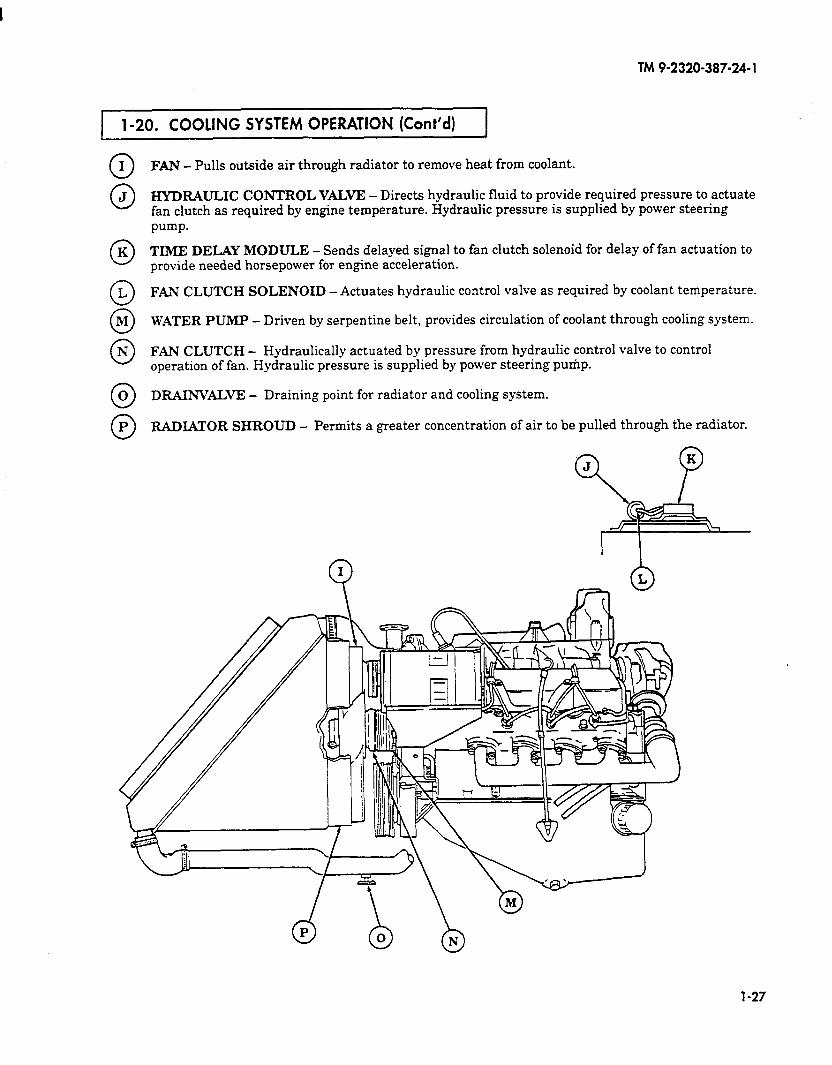
TM 9-2320-387-24-l
1 l-20. COOLING SYSTEM OPERATION (Cont’d) 1
0 I
0 J
0 K
0 L
0 M
0 N
0 0
0 P
FAN - Pulls outside air through radiator to remove heat from coolant.
HYDRAULIC CONTROL VALVE - Directs hydraulic fluid to provide required pressure to actuate fan clutch as required by engine temperature. Hydraulic pressure is supplied by power steering pump.
TIME DELAY MODULE - Sends delayed signal to fan clutch solenoid for delay of fan actuation to provide needed horsepower for engine acceleration.
FAN CLUTCH SOLENOID - Actuates hydraulic control valve as required by coolant temperature.
WATER PUMP - Driven by serpentine belt, provides circulation of coolant through cooling system.
FAN CLUTCH - Hydraulically actuated by pressure from hydraulic control valve to control operation of fan. Hydraulic pressure is supplied by power steering pump.
DR.AINVAIXE - Draining point for radiator and cooling system.
RADIATOR SHROUD - Permits a greater concentration of air to be pulled through the radiator.
1-27
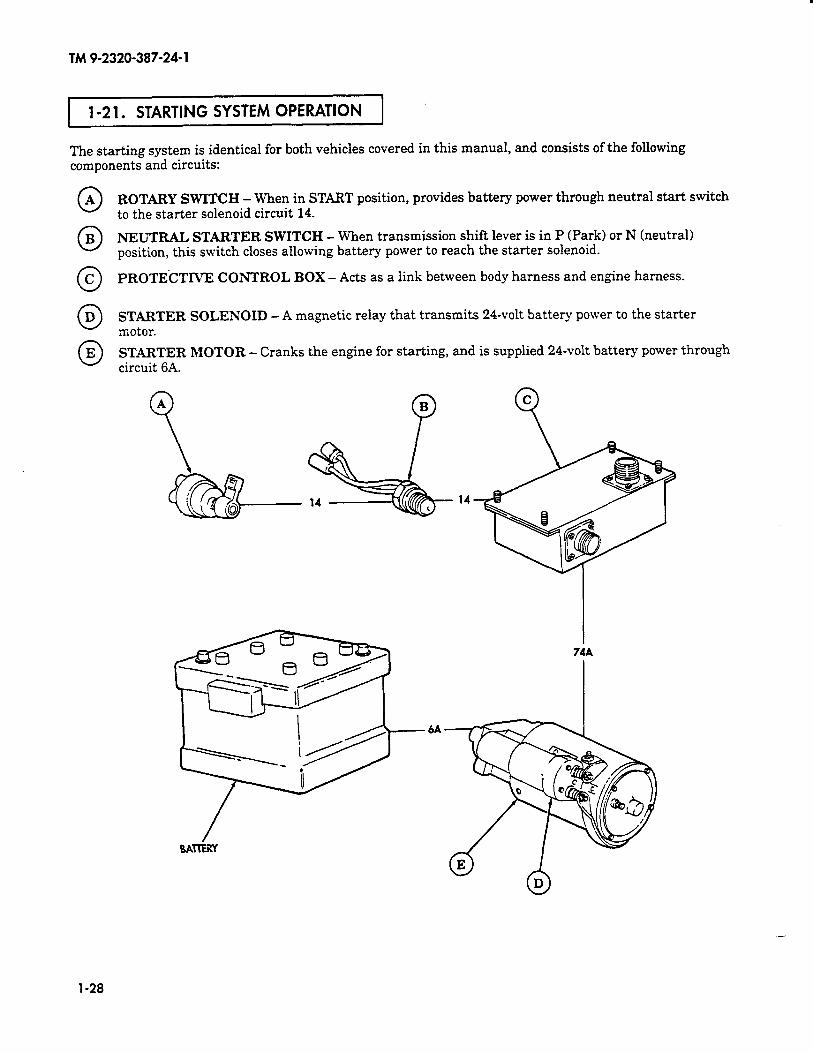
TM 9-2320-387-24-l
l-2 1. STARTING SYSTEM OPERATION
The starting system is identical for both vehicles covered in this manual, and consists of the following components and circuits:
0 A ROTARY SWITCH - When in START position, provides battery power through neutral start switch to the starter solenoid circuit 14.
0 B NEUTRAL STARTER SWITCH - When transmission shift lever is in P (Park) or N (neutral) position, this switch closes allowing battery power to reach the starter solenoid.
0 C PROTECTIVE CONTROL BOX - Acts as a link between body harness and engine harness.
0 xl STARTER SOLENOID - A magnetic relay that transmits 24-volt battery power to the starter motor.
0 E STARTER MOTOR - Cranks the engine for starting, and is supplied 24-volt battery power through circuit 6A.
l-28
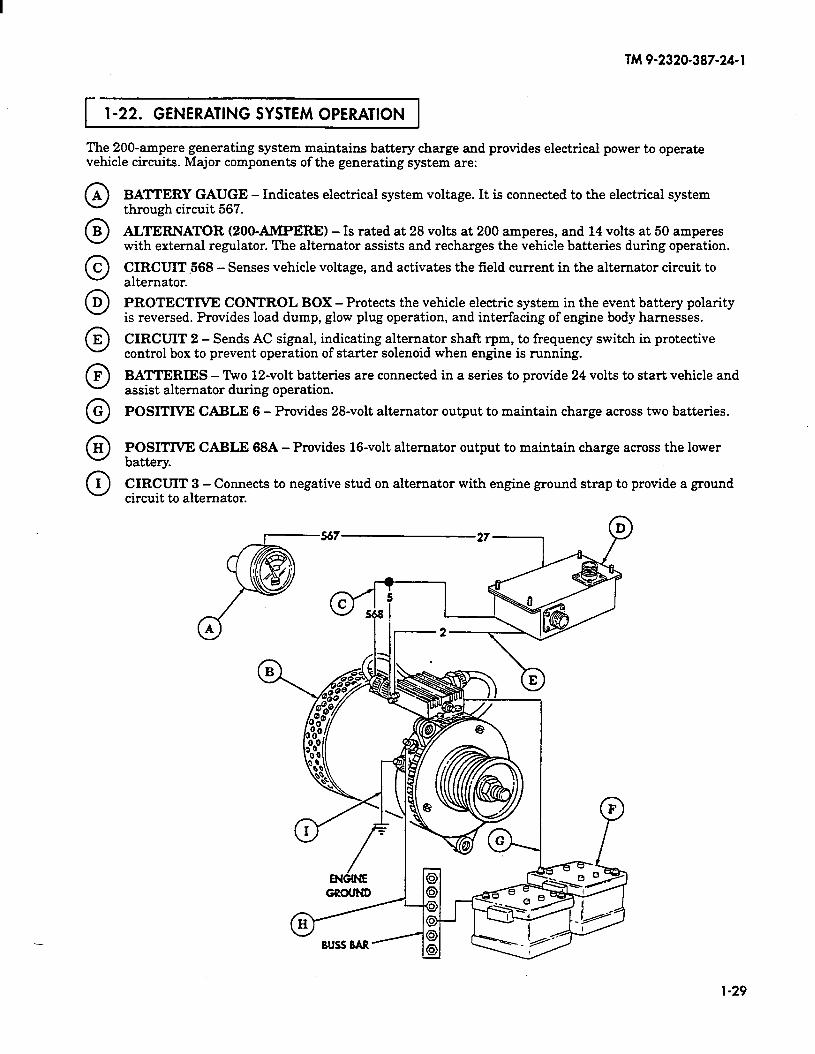
TM 9-2320-387-24-l
f- 1
.-
1 l-22. GENERATING SYSTEM OPERATION 1 I I
The 200-ampere generating system maintains battery charge and provides electrical power to operate vehicle circuits. Major components of the generating system are:
0 A
0 B
0 C
0 D
0 E
0 F
0 G
0 H
0 I
BATTERY GAUGE - Indicates electrical system voltage. It is connected to the electrical system through circuit 567.
ALTERNATOR (ZOO-AMPERE1 - Is rated at 28 volts at 200 amperes, and 14 volts at 50 amperes with external regulator. The alternator assists and recharges the vehicle batteries during operation.
CIRCUIT 568 - Senses vehicle voltage, and activates the field current in the alternator circuit to alternator.
PROTECTIVE CONTROL BOX - Protects the vehicle electric system in the event battery polarity is reversed. Provides load dump, glow plug operation, and interfacing of engine body harnesses.
CIRCUIT 2 - Sends AC signal, indicating alternator shaft rpm, to frequency switch in protective control box to prevent operation of starter solenoid when engine is running.
BATTERIES - Two 12-volt batteries are connected in a series to provide 24 volts to start vehicle and assist alternator during operation.
POSITIVE CABLE 6 - Provides 28-volt alternator output to maintain charge across two batteries.
POSITIVE CABLE 68A - Provides 16-volt alternator output to maintain charge across the lower battery.
CIRCUIT 3 - Connects to negative stud on alternator with engine ground strap to provide a ground circuit to alternator.
l-29
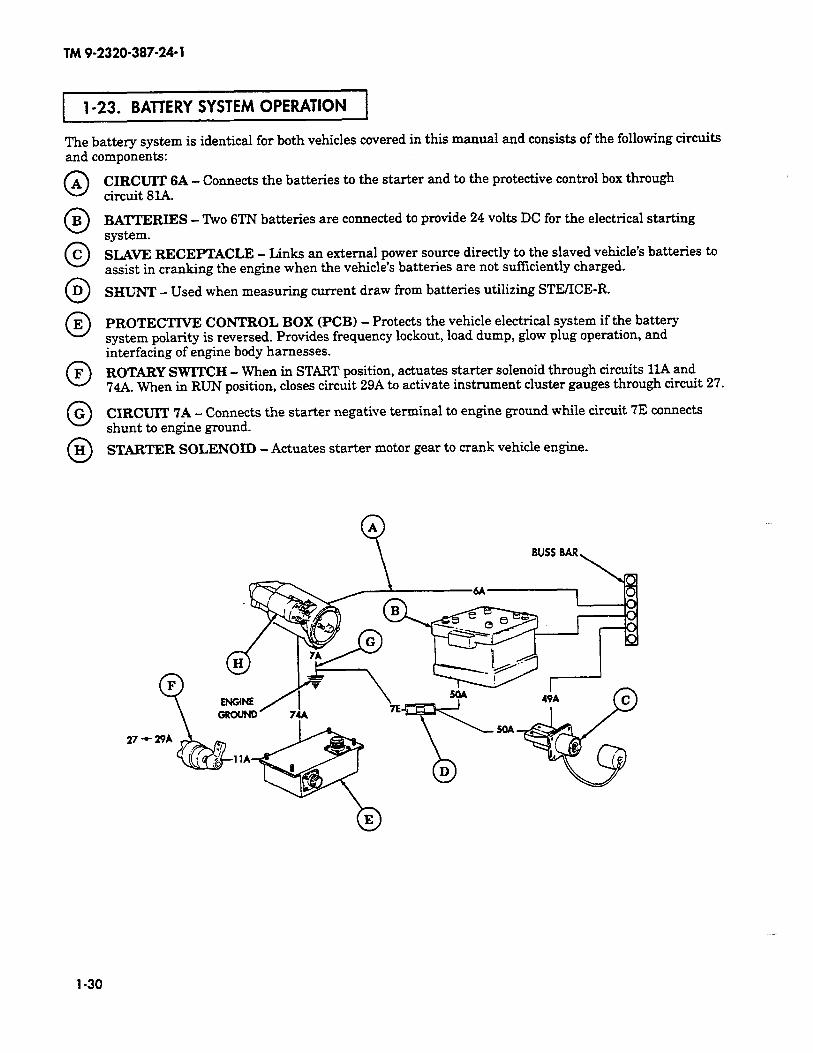
TM 9-2320-387-24-l
l-23. BATTERY SYSTEM OPERATION
The battery system is identical for both vehicles covered in this manual and consists of the following circuits and components:
0 A
0 B
0 C
0 D
0 E
0 F
0 G
0 H
CIRCUIT 6A - Connects the batteries to the starter and to the protective control box through circuit 8%
BATTERIES - Two 6TN batteries are connected to provide 24 volts DC for the electrical starting system.
SLAVE RECEPTACLE - Links an external power source directly to the slaved vehicle’s batteries to assist in cranking the engine when the vehicle’s batteries are not suffkiently charged.
SHUNT - Used when measuring current draw from batteries utilizing STEACE-R.
PROTECTIVE CONTROL BOX (PCB) - Protects the vehicle electrical system if the battery system polarity is reversed. Provides frequency lockout, load dump, glow plug operation, and interfacing of engine body harnesses.
ROTARY SWITCH - When in START position, actuates starter solenoid through circuits 1lA and 744. When in RUN position, closes circuit 29A to activate instrument cluster gauges through circuit 27.
CIRCUIT 7A - Connects the starter negative terminal to engine ground while circuit 7E connects shunt to engine ground.
STARTER SOLENOID - Actuates starter motor gear to crank vehicle engine.
27 *
l-30
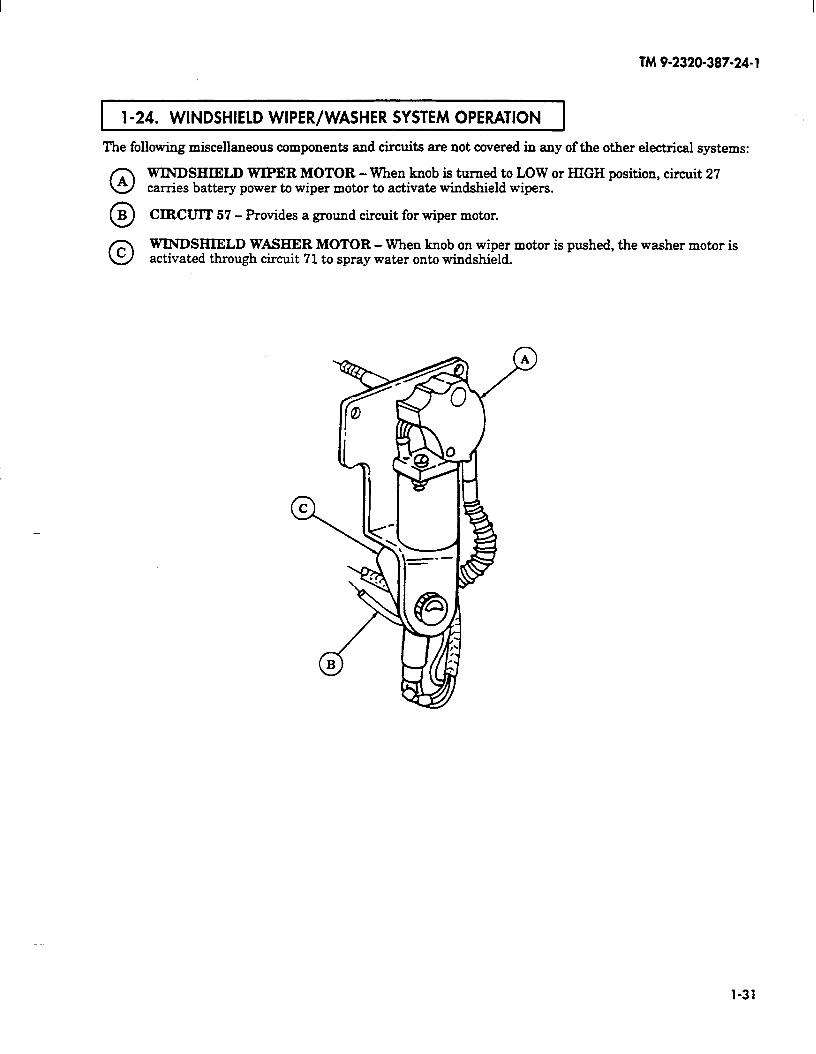
TM9-2320-387-24-l
1 l-24. WINDSHIELD WIPER/WASHER SYSTEM OPERATION 1
The following miscellaneous components and circuits are not covered in any of the other electrical systems:
0 A
0 B
0 C
WINDSHIELD WIPER MOTOR - When knob is turned to LOW or HIGH position, circuit 27 carries battery power to wiper motor to activate windshield wipers.
CIRCUIT 57 - Provides a ground circuit for wiper motor.
WINDSHIELD WASHER MOTOR - When knob on wiper motor is pushed, the washer motor is activated through circuit 71 to spray water onto windshield.
1-31

TM 9-2320-387-24-l
l-25. SERVICE/PARKING BRAKE SYSTEM OPERATION
The parking brake system is a mechanically-actuated system that provides a means of keeping the vehicle still once it stops. It also assists in emergency stopping if there is a complete service brake system failure. Major components of the parking brake system are:
0 A
0 B
0 C
0 D
0 E
0 F
0 G
0 H
PARKING BRAKE ROTORS - Attached to output flanges on rear differential, rotors prevent output flanges from turning when parking brake is applied.
BRAKE PADS - Apply friction to rotors when hand lever is applied.
pm-G BRAgE CALIPERS - Force brake pads against rotors when hand lever is applied.
PARKING BRAKE CABLES - ‘Connect parking brake hand lever to equalizer bar.
EQUALIZER BAR - Evenly distributes braking pressure to the rear brake rotors.
PARKING BRAISE ROD - Connects parking brake hand lever to equalizer bar.
PARKING BRAKE HAND LEVER - Permits operator to engage the parking brake.
PARKING BRAKE HAND LEVER ADJUSTING CAP - Permits operator to make minor tension adjustment of parking brake.
IHF /I’
l-32
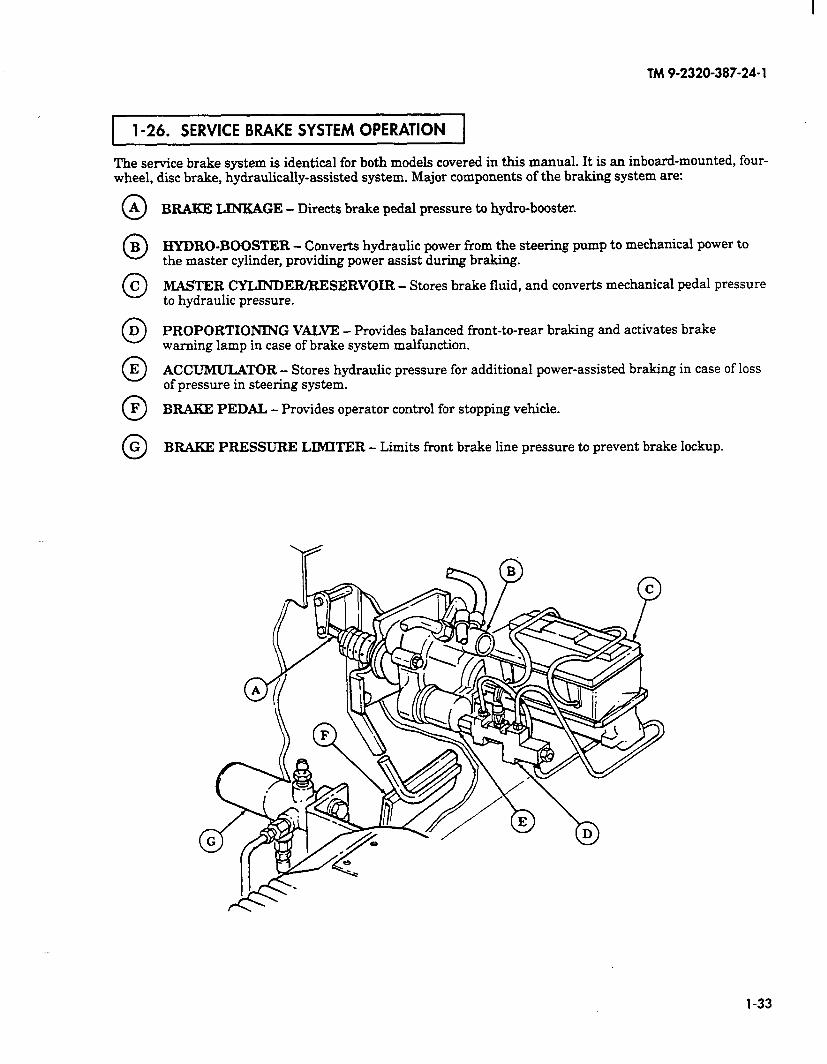
TM9-2320-387-24-l
1 l-26. SERVICE BRAKE SYSTEM OPERATION 1
The service brake system is identical for both models covered in this manual. It is an inboard-mounted, four- wheel, disc brake, hydraulically-assisted system. Major components of the braking system are:
0 A
0 B
0 C
0 D
0 E
0 F
0 G
BRAKE LINEAGE - Directs brake pedal pressure to hydro-booster.
HYDRO-BOOSTER - Converts hydraulic power from the steering pump to mechanical power to the master cylinder, providing power assist during braking.
MASTER CYLINDEIURESERVOIR - Stores brake fluid, and converts mechanical pedal pressure to hydraulic pressure.
PROPORTIONING VALVE - Provides balanced front-to-rear braking and activates brake warning lamp in case of brake system malfunction.
ACCUMIJLATOR - Stores hydraulic pressure for additional power-assisted braking in case of loss of pressure in steering system.
BRARE PEDAL - Provides operator control for stopping vehicle.
BRAKE PRESSURE LIMITER - Limits front brake line pressure to prevent brake lockup.
1-33

TM 9-2320-387-24-1
1-34 Change 1
1-26. SERVICE BRAKE SYSTEM OPERATION (Cont’d)
A HYDRAULIC BRAKE LINES – Direct brake fluid under pressure to all four brake calipers frommaster cylinder.
B BRAKE CALIPER – Converts hydraulic pressure to mechanical force to compress brake padsagainst brake rotors.
C BRAKE ROTOR – Attached to output flange on front and rear differentials, rotor prevents outputflange from turning when brakes are applied.
D BRAKE PADS – Apply friction to brake rotor when brake pedal is depressed.

TM 9-2320-387-24-l
l-27. STEERING CONTROL SYSTEM OPERATION
The steering system is identical for both models covered in this manual. Major components of the steering system are:
0 A
0 B
0 C
0 D
0 E
0 F
HYDRAULIC CONTROL VALVE - Directs hydraulic fluid to provide required pressure to actuate and deactuate fan clutch as required by engine temperature. Hydraulic pressure is supplied by power steering pump.
HYDRO-BOOSTER - Converts hydraulic power from the steering pump to mechanical power to the master cylinder, providing power assist during braking.
POWER STEERING COOLER - Is part of oil cooler which directs power steering fluid through a series of fins or baffles so outside air can dissipate excess heat before the fluid is recirculated through the steering system.
SERPENTINE BELT - Transmits mechanical driving power from crankshaft drive pulley to steering pump pulley which drives the steering pump.
OIL RESERVOIR AND STEERING PUMP - Combined in one unit, the reservoir serves as an oil filling point and the pump supplies the oil under pressure throughout the steering system.
FAN CLUTCH - Hydraulically-actuated by pressure from hydraulic control valve to control operation of fan. Hydraulic pressure is supplied by power steering pump.
1-35
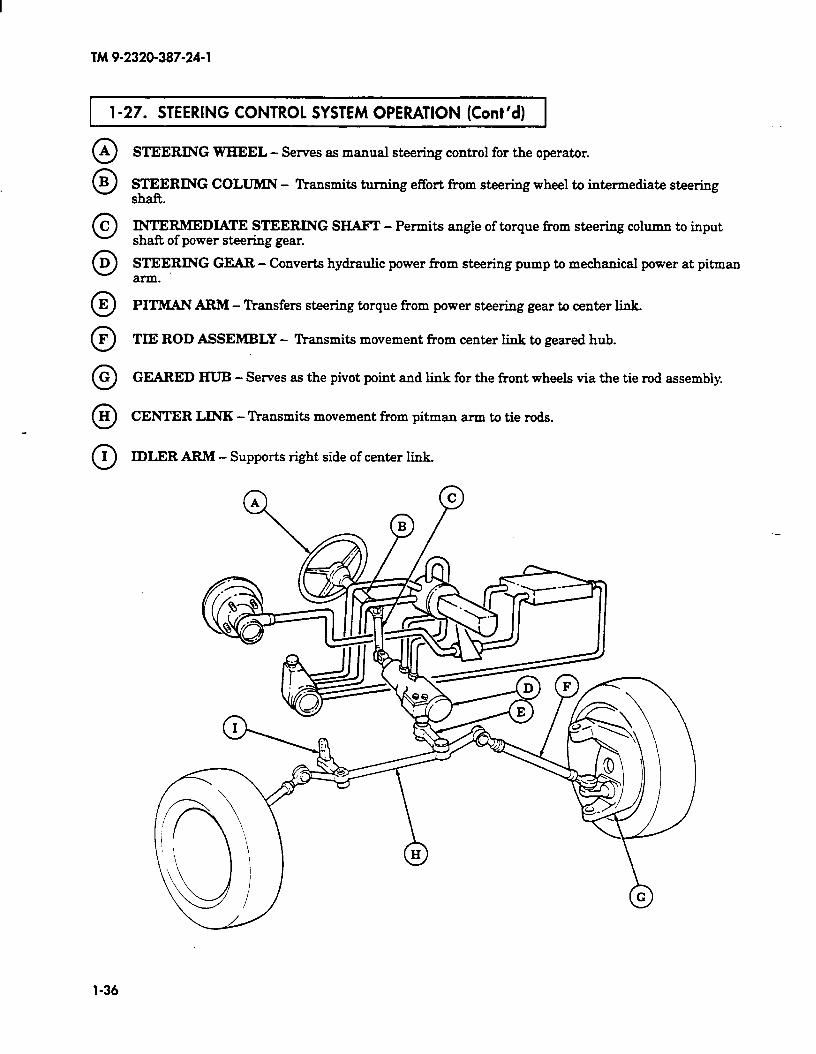
TM9-2320-387-24-l
l-27. STEERING CONTROL SYSTEM OPERATION (Cont’d)
0 A
B
0 C
0 D
0 E
0 F
0 G
0 H
0 I
STEERING WHEEL - Serves as manual steering control for the operator.
STEERING COLUMN - Transmits turning effort from steering wheel to intermediate steering sh&.
INTERMBDIATB STEERING SIIAFT - Permits angle of torque from steering column to input shaft of power steering gear.
STEERING GEAR - Converts hydraulic power from steering pump to mechanical power at pitman arm.
PITMAN ARM - Transfers steering torque from power steering gear to center link.
TIE ROD ASSEMBLY - Transmits movement from center link to geared hub.
GEARED HUB - Serves as the pivot point and link for the front wheels via the tie rod assembly.
CENTER LINR - Transmits movement from pitman arm to tie rods.
IDLER ARM - Supports right side of center link.
1-36
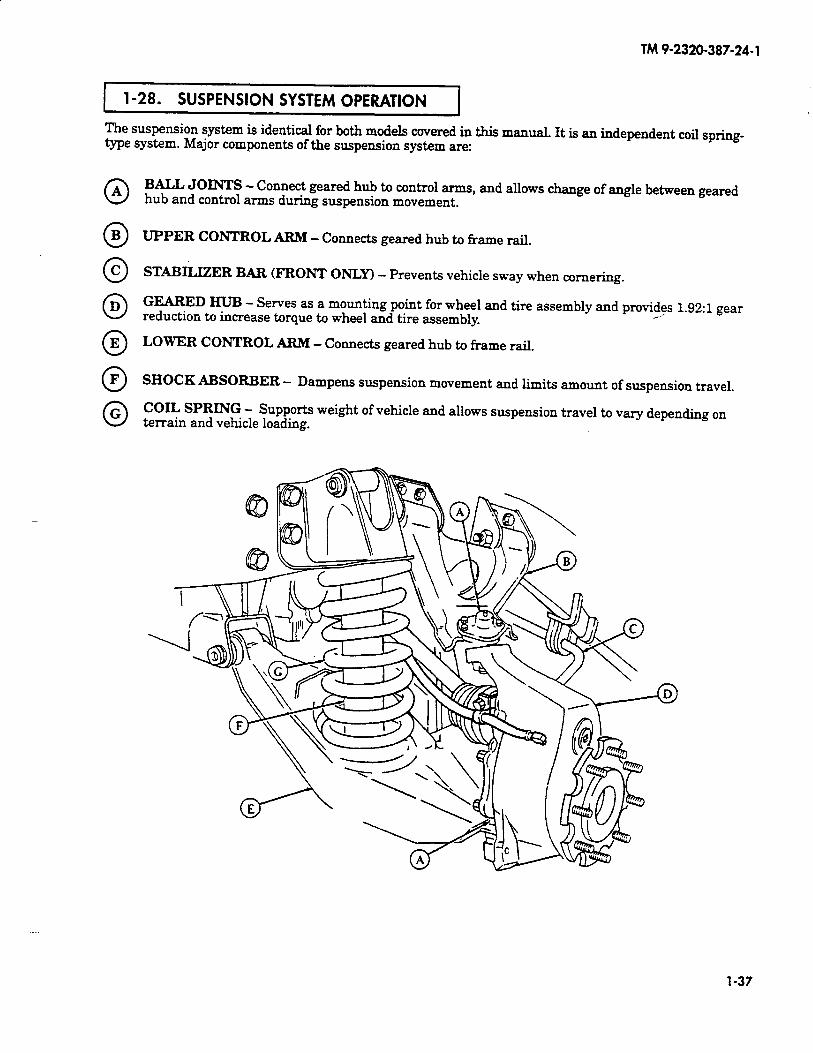
TM 9-2320-387-24-l
l-28. SUSPENSION SYSTEM OPERATION I The suspension system is identical for both models covered in this manual. It is an independent coil spring- type system. Major components of the suspension system are:
0 A
0 B
0 C
0 D
0 E
0 F
0 G
BALL JOINTS - Connect geared hub to control arms, and allows change of angle between geared hub and control arms during suspension movement.
UPPER CONTROL ARM - Connects geared hub to frame rail.
STABILIZER BAR (FRONT ONLY) - Prevents vehicle sway when cornering.
GEARED HUB - Serves as a mounting point for wheel and tire assembly and provides 1.92:1 gear reduction to increase torque to wheel and tire assembly.
LOWER CONTROL ARM - Connects geared hub to frame rail.
SHOCK ABSORBER - Dampens suspension movement and limits amount of suspension travel.
COIL SPRING - Supports weight of vehicle and allows suspension travel to vary depending on terrain and vehicle loading.
1-37
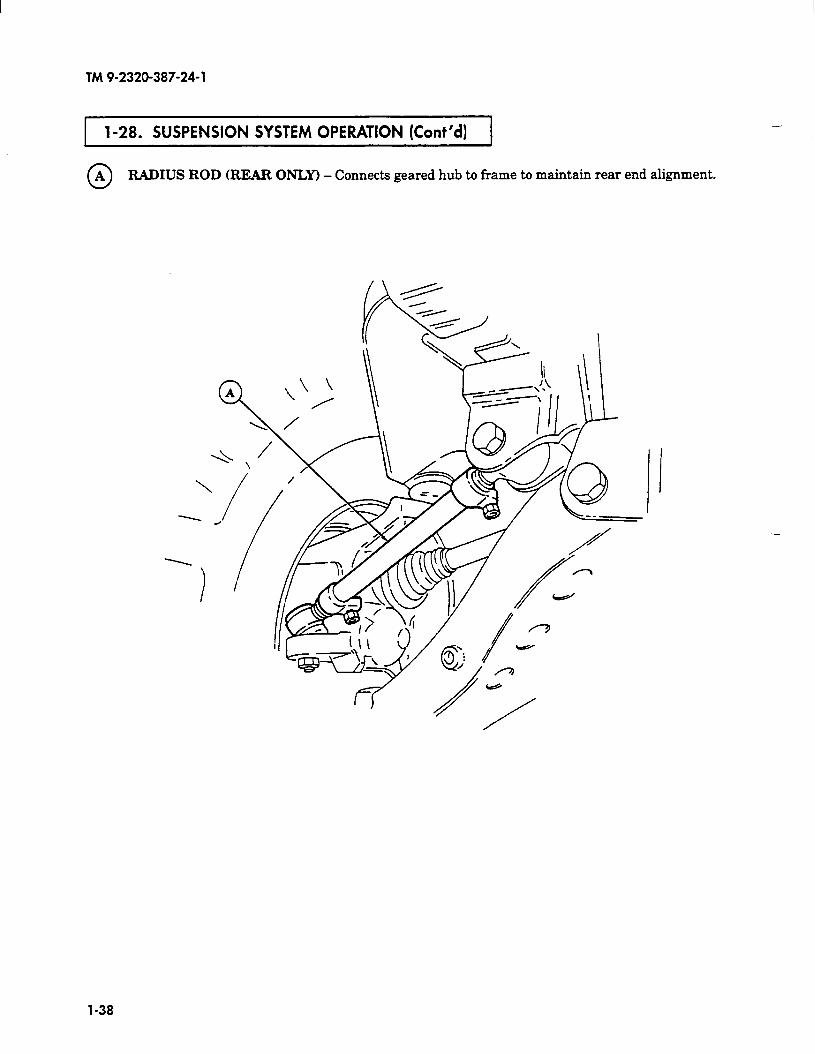
TM9-2320-387-24-l
1 l-28. SUSPENSION SYSTEM OPERATION (Cont’d) 1 -
0 A RADIUS ROD (REAR ONLY) - Connects geared hub to frame to maintain rear end alignment.
1-38
TM 9-2320-387-24-l
l-29. Ml 114 AIR-CONDITIONING SYSTEM OPERATION
The air-conditioning system covered in this manual applies only to the Ml114 vehicle and consists of the following major components:
0 A
0 B
0 C
0 D
0 E
0 F
0 G
DISCHARGE LINE - High-pressure gas is carried through the discharge line from the compressor to the condenser.
COMPRESSOR - Inside the compressor, low-pressure gas refrigerant is compressed into a high-pressure gas that is pushed into the condenser by the compressor.
SUCTION LINE - Refrigerant, in low-pressure gas form, is drawn from the evaporator by the suction action of the compressor.
EXPANSION VALVE - High-pressure liquid refrigerant enters a nonadjustable expansion valve where the refrigerant is formed into a liquid spray.
EVAPORATOR - Refrigerant enters evaporator as a liquid spray. It absorbs heat from the air in the crew compartment and vaporizes into a low-pressure gas.
LIQUID LINE - High-pressure liquid refrigerant is carried back to the evaporator by the liquid line to repeat the evaporation/condensation cycle.
CONDENSER - Refrigerant enters the condenser as a high-pressure gas. When condensed, it gives up its heat to the outside air and becomes a high-pressure liquid.
P B
1 . :
‘. ; ;
: ., : : ., :
: : ‘_
. . ;
~ ,. :
: : :
. . -
,. . . .
: : f
: : _. 1
* : :
‘_ :. :, : . .
‘...
COMPRESSOR
LOW-PRESSURE GAS
- HIGH-PRESSURE GAS
- HIGH-PRESSURE LIQUID
I REAR
FRONT EVAPORATOR
AND HEATER CORE
CONDENSER
l-39
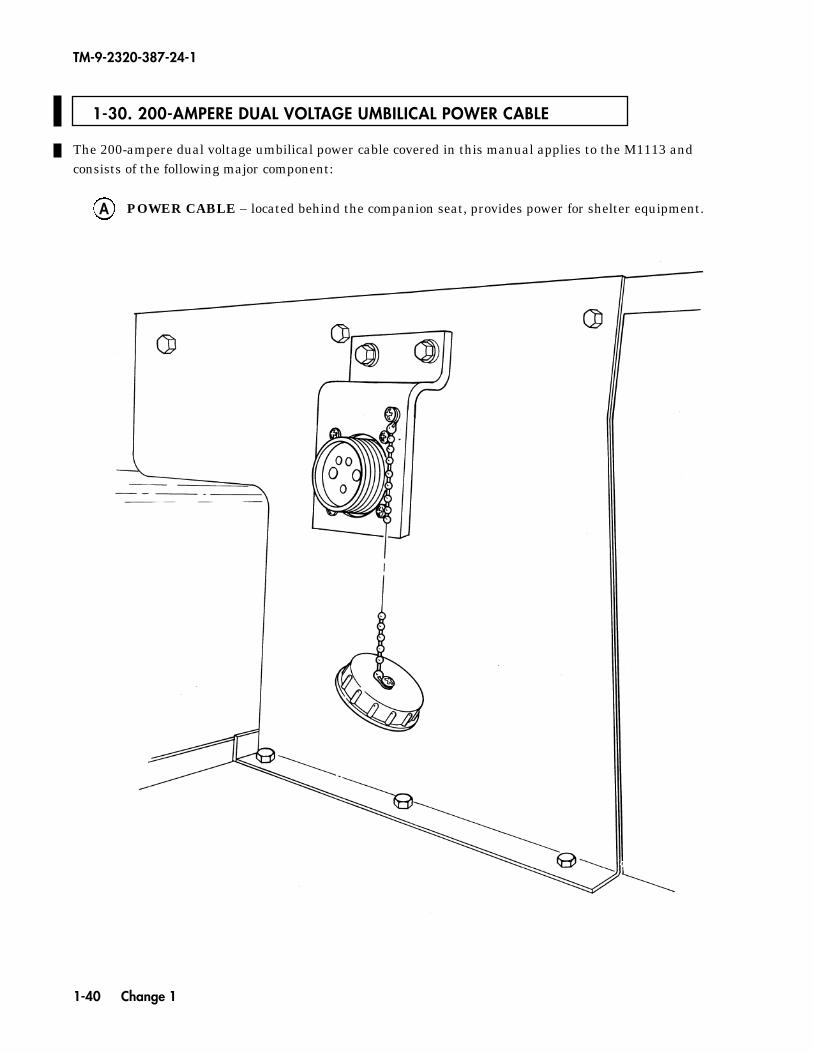
1-30. 200-AMPERE DUAL VOLTAGE UMBILICAL POWER CABLE
TM-9-2320-387-24-1
1-40 Change 1
The 200-ampere dual voltage umbilical power cable covered in this manual applies to the M1113 andconsists of the following major component:
POWER CABLE – located behind the companion seat, provides power for shelter equipment.A
TM 9-2320-387-24-l
-
CHAPTER 2 SERVICE AND TROUBLESHOOTING (UNIT) INSTRUCTIONS
Section I. REPAIR PARTS, SPECIAL TOOLS, TEST, MEASUREMENT, DIAGNOSTIC EQUIPMENT (TMDE), AND SUPPORT EQUIPMENT
1 2-l. COMMON TOOLS AND EQUIPMENT 1
For authorized common tools and equipment, refer to the Modified Table of Organization and Equipment (MTOE) applicable to your unit.
1 2-2. SPECIAL TOOLS, TMDE, AND SUPPORT EQUIPMENT 1
Special Tools, Test, Measurement, and Diagnostic Equipment (TMDE), and Support Equipment used to maintain the vehicles covered in this manual can be found in TM S-2320.387-24P. Calibrate all measuring and test equipment used to determine equipment conformance in accordance with TB 43-1800.
2-3. FABRICATED TOOLS
Fabricated tools needed to maintain the equipment in this manual can be found in appendix D. These tools are not available for issue, but must be fabricated and applied by unit, direct, and general support personnel only.
2-4. REPAIR PARTS
Repair parts are listed and illustrated in TM S-2320-387.24P.
Section II. SERVICE UPON RECEIPT
a. Upon receipt of a new, used, or reconditioned vehicle, you must determine if the vehicle has been properly prepared for service. The following steps should be followed:
(1) Inspect all assemblies, subassemblies, and accessories to ensure they are in proper working order.
(2) Secure, clean, lubricate, or adjust as needed.
(3) Check all basic issue items (TM 9-2320-387-10) to ensure every item is present, in good condition, and properly mounted or stowed.
(4) Follow general procedures for all services and inspections given in TM 9-2320-387-10.
b. The operator will assist when performing service upon receipt inspections.
c. See TM S-2320-387-10 when checking equipment for proper operation.
d. Refer to TM S-2320-387-10 for information concerning break-in procedures.
2-l
TM 9-2320-387-24-I
2-6. GENERAL INSPECTION AND SERVICING INSTRUCTIONS
The following steps should be taken while performing general inspection and services:
NOTE Cooler fin and engine protective covers can be used to prevent damage to the vehicle components during maintenance. Refer to appendix D, figures D-40 and D-41 for fabrication instructions.
(1) Use TM 9-2320-387-10 as well as other sections of this manual when servicing and inspecting equipment.
WARNING
Drycleaning solvent is flammable and will not be used near an open flame. A fire extinguisher will be kept nearby when the solvent is used. Use only in well-ventilated places. Failure to do this may result in injury to personnel and/or damage to equipment.
(2) Clean all exterior surfaces coated with rust-preventive compounds. Use drycleaning solvent (appendix C, item 261.
(3) Clean fittings before lubrication. Clean parts with drycleaning solvent (SD), type II, or equivalent. Dry before lubricating. Relubricate all items found contaminated after fording.
(4) Inspect electrical connectors for corrosion and/or damage (i.e., bent pins>. Clean and repair damage. Apply sealing compound (appendix C, item 60) before reconnecting plugs.
(5) Read Processing and Deprocessing Record of Shipping, Storage, and Issue of Vehicles and Spare Engines, tag (DD Form 1397) and follow all precautions listed. This tag should be attached to steering wheel, steering column or rotary switch.
1 2-7. SPECIFIC INSPiiTlON AND SERVICING INSTRUCTIONS j
The following steps should be taken while performing specific inspections and services:
(1) Do the semiannual preventive maintenance checks and services listed in section III in this chapter.
(2) Lubricate the vehicle. Do not lubricate gear cases and engine unless processing tag states that the oil is unsuitable for 500 mi (805 km) operation. If oil is suitable, just check level.
(3) Schedule semiannual service on DD Form 314 (Preventive Maintenance Schedule and Record Card).
(41 If vehicle is delivered with a dry, charged battery, activate it according to TM 9-6140-200-14.
(5) Check vehicle coolant level and determine if solution is proper for climate (refer to TB 750-651 for preparation of antifreeze solutions1.
(61 Remove towing brackets from their stowed position behind the bumper and install them in their proper location (para. 9-2).
Section III. PREVENTIVE MAINTENANCE CHECKS AND SERVICES
The best way to maintain vehicles covered by this manual is to inspect them on a regular basis so minor faults can be discovered and corrected before they result in serious damage, failure, or injury. All intervals are based on normal operation. Hard time intervals may be shortened if lubricants are contaminated or if you are operating the equipment under adverse conditions, including longer-than-usual operating hours. Hard-time intervals may be extended during periods of low activity, though adequate preservation precautions must be taken. This section contains systematic instructions of inspection, adjustment, lubrication, and correction of vehicle components to avoid costly repairs or major breakdowns. This is Preventive Maintenance Checks and Services (PMCS).
2-2
TM 9-2320-387-24-l
a. Unit maintenance, assisted by operator/crew, will perform checks and services contained in table 2-l at the following intervals:
(1) Semiannually. Every 6 months or 3,000 miles (4,828 km), whichever comes first.
(2) Annually. Every 12 months or 6,000 miles (9,656 km), whichever comes first.
(3) Biennially. Every 24 months or 12,000 miles (19,310 km), whichever comes first.
b. Refer to following steps when performing lubrication checks and services:
(1) Intervals. Lubrication services coincide with the vehicle’s semiannual preventive maintenance service. For this purpose, a 10% tolerance (variation) in specified lubrication point mileage is permissible. Those vehicles not accumulating 1,000 mi (1,609 km) in a 6-month period will be lubricated at the time of semiannual preventive maintenance service.
(21 For Operation of Equipment in Protracted Cold Temperatures Below -15°F (-26°C). Remove lubricants prescribed in lubrication table for temperatures above -15°F (-26°C). Relubricate with lubricants specified in lubrication table for temperatures below -15°F (-26°C). If OEA lubricant is required, see the temperature ranges prescribed in the lubrication table. OEA lubricant is to be used in place of OE/HDO 10 lubricant for all temperature ranges where OE/HDO 10 is specified in the lubrication table.
c. Perform all semiannual inspections in addition to annual inspections at the time of the annual inspection. Perform all annual and semiannual inspections in addition to biennial inspections at the time of the biennial inspection.
2-10. REPORTING REPAIRS
-
All vehicle shortcomings will be reported on DA form 2404 (DA Pam 738-7501, Equipment Inspection and Maintenance Worksheet, immediately after the PMCS, and before taking corrective action. All vehicle deficiencies will be reported in the equipment record.
1 2-l 1. GENERAL SERVICE AND INSPECTION PROCEEI
a. While performing specific PMCS procedures, ensure items are correctly assembled, secure, not worn, serviceable, not leaking, and adequately lubricated as defined below:
(1) An item is CORRECTLY ASSEMBLED when it is in proper position and all parts are present.
(21 When wires, nuts, washers, hoses, or attaching hardware cannot be moved by hand, they are SECURE.
(31 An item is WORN if there is too much play between joining parts or when marking data, warning, and caution plates are not readable.
(4) An item is UNSERVICEABLE if it is worn beyond repair and is likely to fail before the next scheduled inspection.
(5) LEAKS. TM 9-2320-387-10 contains definitions of class I, II, and III leaks and their effect on vehicle operation.
(61 If an item meets the specified lubrication requirements, then it is ADEQUATELY LUBRICATED.
b. Where the instruction tighten appears in a procedure, you must tighten with a wrench to the given torque value even when the item appears to be secure.
-
2-3
TM 9-2320-387-24-l
1 2-11. GENERAL SERVICE AND INSPECTION PROCEDURES (Cont’d) 1
WARNING
Drycleaning solvent is flammable and will not be used near an open flame. A fire extinguisher will be kept nearby when the solvent is used. Use only in well-ventilated places. Failure to do this may result in injury to personnel and/or damage to equipment.
c. Where the instruction clean appears in a procedure, you must use drycleaning solvent (appendix C, item 26) to clean grease or oil from metal parts. After the item is cleaned, rinsed, and dried, apply a light grade of oil to unprotected surfaces to prevent rusting.
d. Clean rubber and plastic materials with soap and water. Refer to TM 9-2320-387-10 for general vehicle cleaning instructions.
2- 12. SPECIFIC PMCS PROCEDURES
a. The preventive maintenance for which you are responsible is provided in table 2-l. The checks and services listed are arranged in logical order, requiring minimal time and effort on your part.
b. The following columns read across on the PMCS schedule:
(1) Item Number. Provides logical order of PMCS performance and is used as a source number for DA Form 2404, on which your PMCS results will be recorded.
(2) Interval. Shows the interval next to each item number to indicate when that check is to be performed. The interval will be repeated when consecutive item numbers are to be inspected during the same interval. Interval columns include:
(a) Semiannual (six month) checks;
(b) Annual (yearly) checks; and
(c) Biennial (every two years) checks.
(3) Item To Be Inspected. Lists the system, common name, or location of the item to be inspected.
(4) Procedures Provides instructions for servicing, inspection, lubrication, replacement, or adjustment and, in some cases, having item repaired at a higher level.
NOTE Always do your preventive maintenance checks and services in the order prepared. Once it gets to be a habit, you will be able to spot anything wrong in a hurry.
(5) Not Fully Mission Capable If. If vehicle meets criteria in this column, vehicle is Not Mission Capable (NMC).
2-4
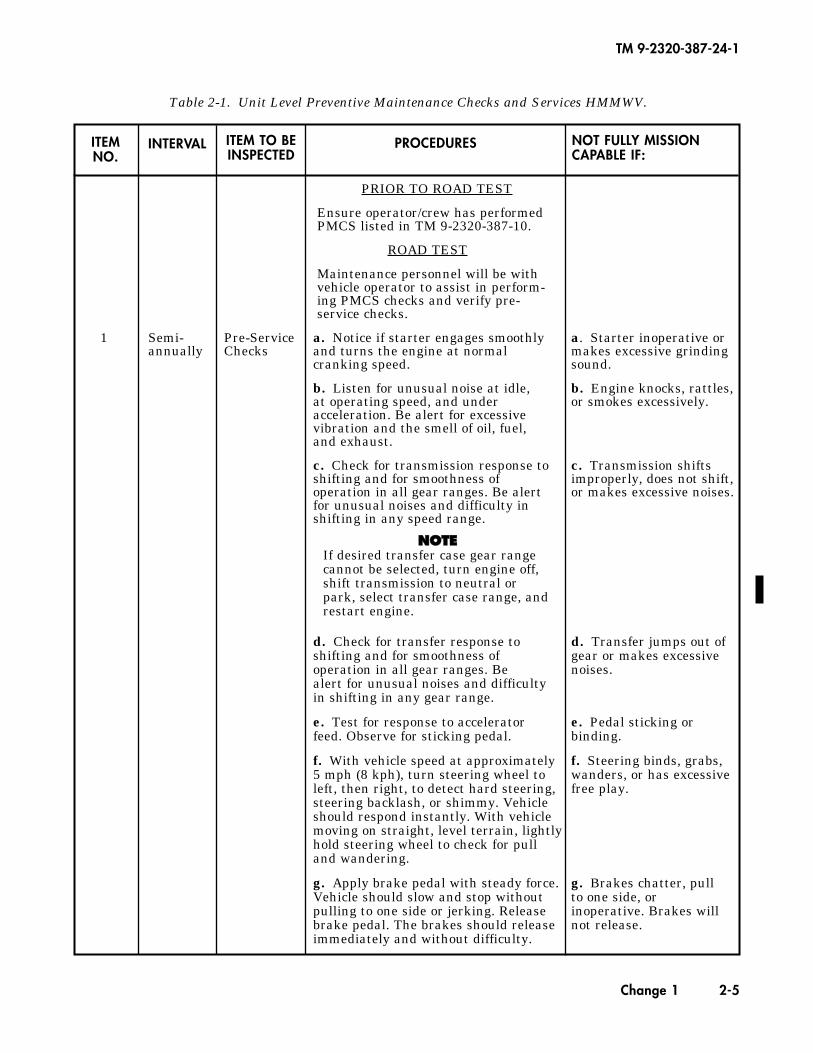
Table 2-1. Unit Level Preventive Maintenance Checks and Services HMMWV.
ITEMNO.
INTERVAL ITEM TO BEINSPECTED
PROCEDURES
PRIOR TO ROAD TEST
Ensure operator/crew has performed PMCS listed in TM 9-2320-387-10.
ROAD TEST
Maintenance personnel will be withvehicle operator to assist in perform-ing PMCS checks and verify pre-service checks.
1 Semi- Pre-Service a. Notice if starter engages smoothly a. Starter inoperative orannually Checks and turns the engine at normal makes excessive grinding
cranking speed. sound.
b. Listen for unusual noise at idle, b. Engine knocks, rattles,at operating speed, and under or smokes excessively.acceleration. Be alert for excessivevibration and the smell of oil, fuel,and exhaust.
c. Check for transmission response to c. Transmission shiftsshifting and for smoothness of improperly, does not shift,operation in all gear ranges. Be alert or makes excessive noises.for unusual noises and difficulty inshifting in any speed range.
d. Check for transfer response to d. Transfer jumps out ofshifting and for smoothness of gear or makes excessiveoperation in all gear ranges. Be noises.alert for unusual noises and difficultyin shifting in any gear range.
e. Test for response to accelerator e. Pedal sticking orfeed. Observe for sticking pedal. binding.
f. With vehicle speed at approximately f. Steering binds, grabs,5 mph (8 kph), turn steering wheel to wanders, or has excessiveleft, then right, to detect hard steering, free play.steering backlash, or shimmy. Vehicleshould respond instantly. With vehiclemoving on straight, level terrain, lightlyhold steering wheel to check for pulland wandering.
g. Apply brake pedal with steady force. g. Brakes chatter, pullVehicle should slow and stop without to one side, orpulling to one side or jerking. Release inoperative. Brakes willbrake pedal. The brakes should release not release.immediately and without difficulty.
TM 9-2320-387-24-1
Change 1 2-5
NOT FULLY MISSIONCAPABLE IF:
NNOOTTEEIf desired transfer case gear rangecannot be selected, turn engine off,shift transmission to neutral orpark, select transfer case range, andrestart engine.
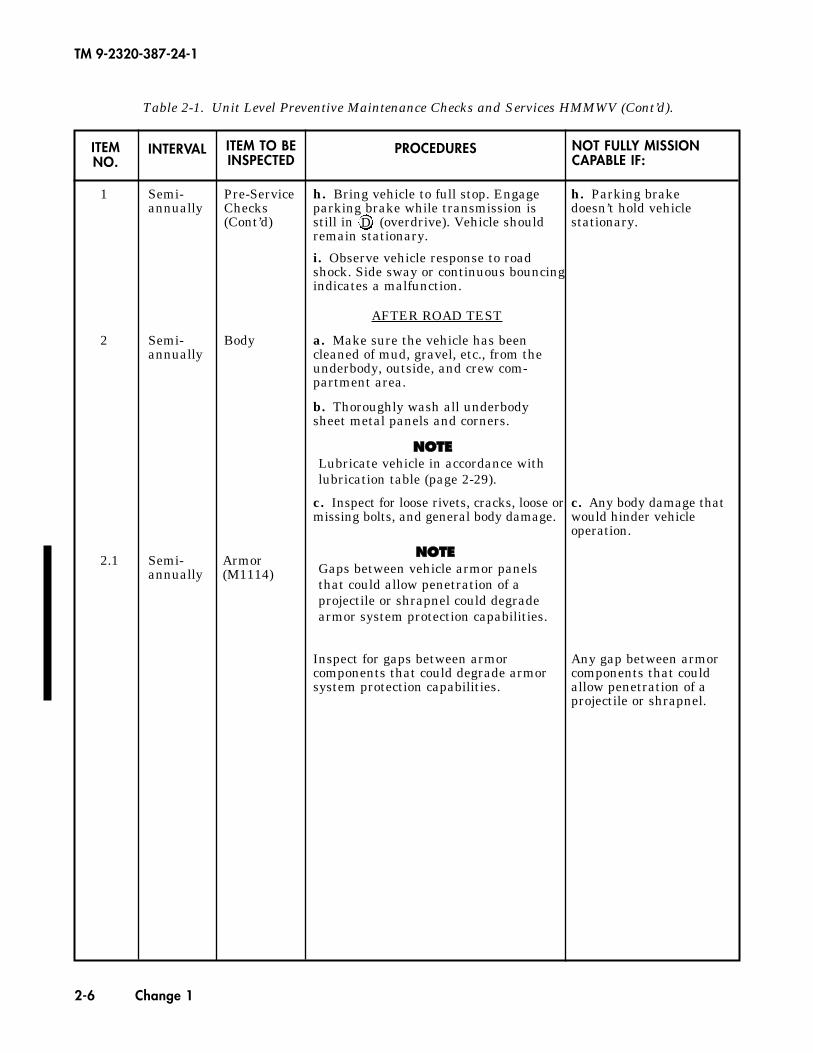
Table 2-1. Unit Level Preventive Maintenance Checks and Services HMMWV (Cont’d).
ITEMNO.
INTERVAL ITEM TO BEINSPECTED
PROCEDURES
1 Semi- Pre-Service h. Bring vehicle to full stop. Engage h. Parking brakeannually Checks parking brake while transmission is doesn’t hold vehicle
(Cont’d) still in (overdrive). Vehicle should stationary.remain stationary.
i. Observe vehicle response to roadshock. Side sway or continuous bouncingindicates a malfunction.
AFTER ROAD TEST
2 Semi- Body a. Make sure the vehicle has beenannually cleaned of mud, gravel, etc., from the
underbody, outside, and crew com-partment area.
b. Thoroughly wash all underbodysheet metal panels and corners.
c. Inspect for loose rivets, cracks, loose or c. Any body damage thatmissing bolts, and general body damage. would hinder vehicle
operation.
2.1 Semi- Armorannually (M1114)
Inspect for gaps between armor Any gap between armorcomponents that could degrade armor components that couldsystem protection capabilities. allow penetration of a
projectile or shrapnel.
TM 9-2320-387-24-1
2-6 Change 1
NOT FULLY MISSIONCAPABLE IF:
NNOOTTEELubricate vehicle in accordance withlubrication table (page 2-29).
D
NNOOTTEEGaps between vehicle armor panelsthat could allow penetration of aprojectile or shrapnel could degradearmor system protection capabilities.
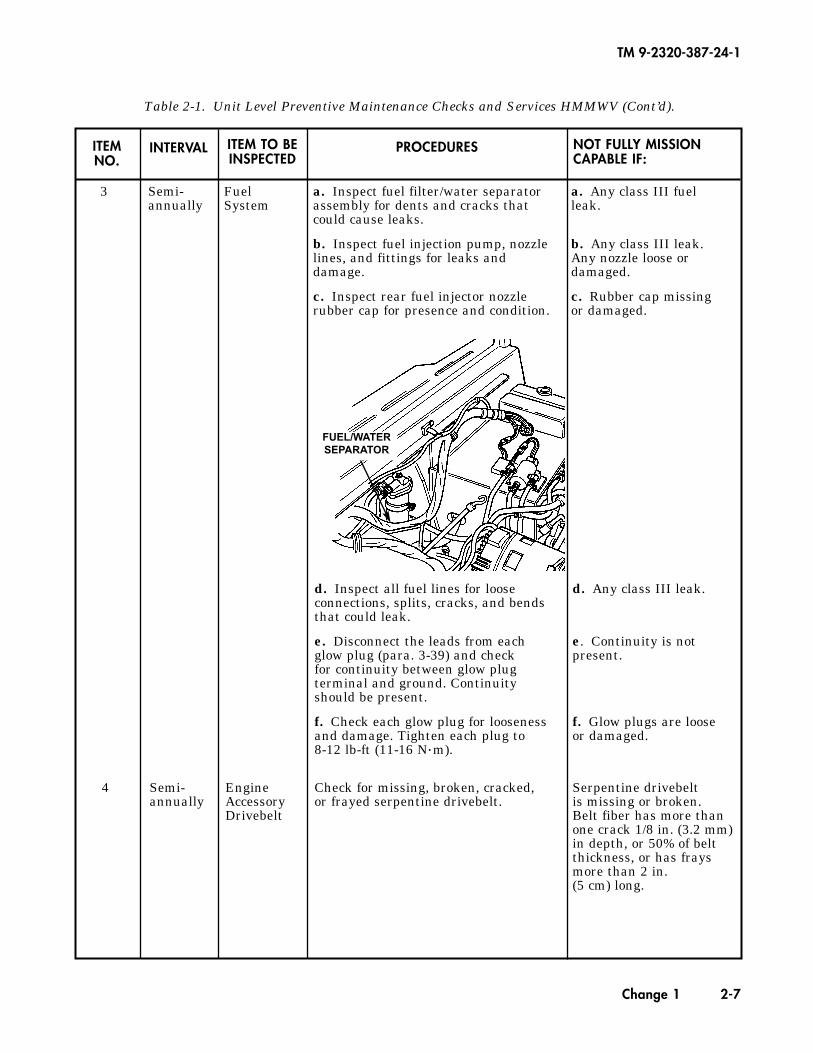
Table 2-1. Unit Level Preventive Maintenance Checks and Services HMMWV (Cont’d).
ITEMNO.
INTERVAL ITEM TO BEINSPECTED
PROCEDURES
d. Inspect all fuel lines for loose d. Any class III leak.connections, splits, cracks, and bends that could leak.
e. Disconnect the leads from each e. Continuity is notglow plug (para. 3-39) and check present.for continuity between glow plug terminal and ground. Continuity should be present.
f. Check each glow plug for looseness f. Glow plugs are looseand damage. Tighten each plug to or damaged.8-12 lb-ft (11-16 N•m).
4 Semi- Engine Check for missing, broken, cracked, Serpentine drivebeltannually Accessory or frayed serpentine drivebelt. is missing or broken.
Drivebelt Belt fiber has more than one crack 1/8 in. (3.2 mm)in depth, or 50% of belt thickness, or has frays more than 2 in. (5 cm) long.
TM 9-2320-387-24-1
Change 1 2-7
NOT FULLY MISSIONCAPABLE IF:
FUEL/WATERSEPARATOR
3 Semi- Fuel a. Inspect fuel filter/water separator a. Any class III fuelannually System assembly for dents and cracks that leak.
could cause leaks.
b. Inspect fuel injection pump, nozzle b. Any class III leak.lines, and fittings for leaks and Any nozzle loose ordamage. damaged.
c. Inspect rear fuel injector nozzle c. Rubber cap missingrubber cap for presence and condition. or damaged.
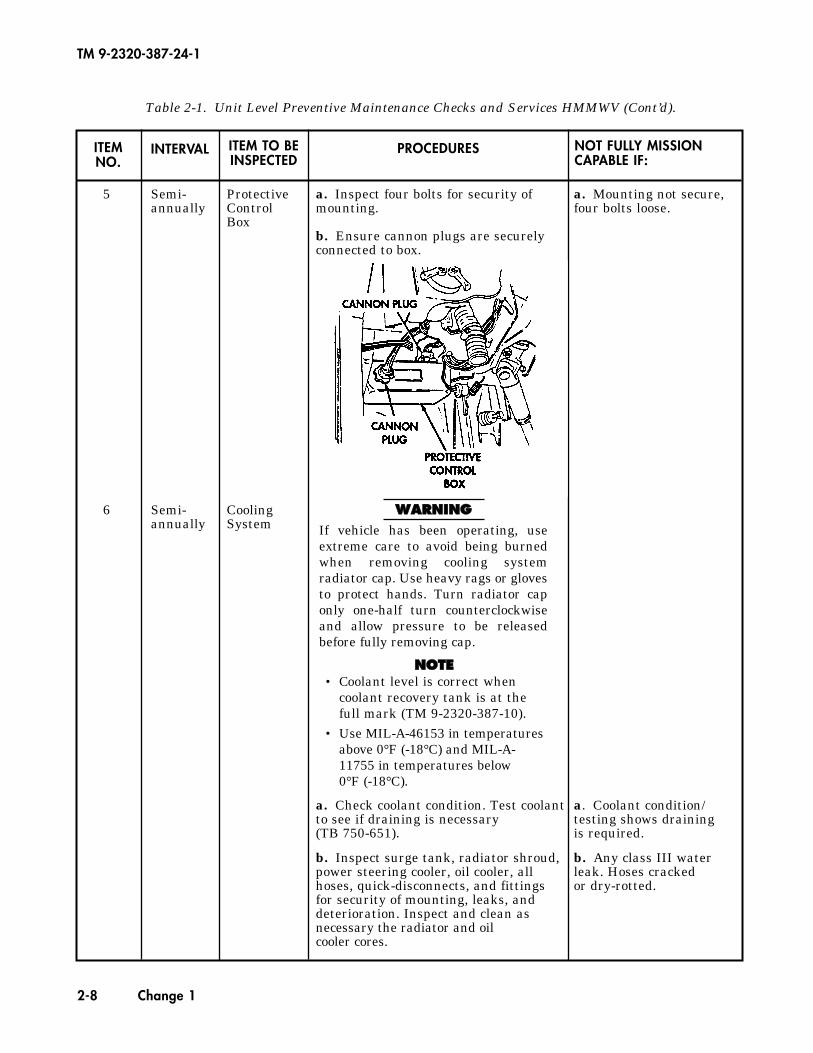
Table 2-1. Unit Level Preventive Maintenance Checks and Services HMMWV (Cont’d).
ITEMNO.
INTERVAL ITEM TO BEINSPECTED
PROCEDURES
5 Semi- Protective a. Inspect four bolts for security of a. Mounting not secure,annually Control mounting. four bolts loose.
Boxb. Ensure cannon plugs are securelyconnected to box.
6 Semi- Coolingannually System
a. Check coolant condition. Test coolant a. Coolant condition/to see if draining is necessary testing shows draining(TB 750-651). is required.
b. Inspect surge tank, radiator shroud, b. Any class III waterpower steering cooler, oil cooler, all leak. Hoses cracked hoses, quick-disconnects, and fittings or dry-rotted.for security of mounting, leaks, and deterioration. Inspect and clean as necessary the radiator and oil cooler cores.
NNOOTTEE• Coolant level is correct when
coolant recovery tank is at thefull mark (TM 9-2320-387-10).
• Use MIL-A-46153 in temperaturesabove 0°F (-18°C) and MIL-A-11755 in temperatures below 0°F (-18°C).
TM 9-2320-387-24-1
2-8 Change 1
NOT FULLY MISSIONCAPABLE IF:
WWAARRNNIINNGGIf vehicle has been operating, useextreme care to avoid being burnedwhen removing cooling systemradiator cap. Use heavy rags or glovesto protect hands. Turn radiator caponly one-half turn counterclockwiseand allow pressure to be releasedbefore fully removing cap.
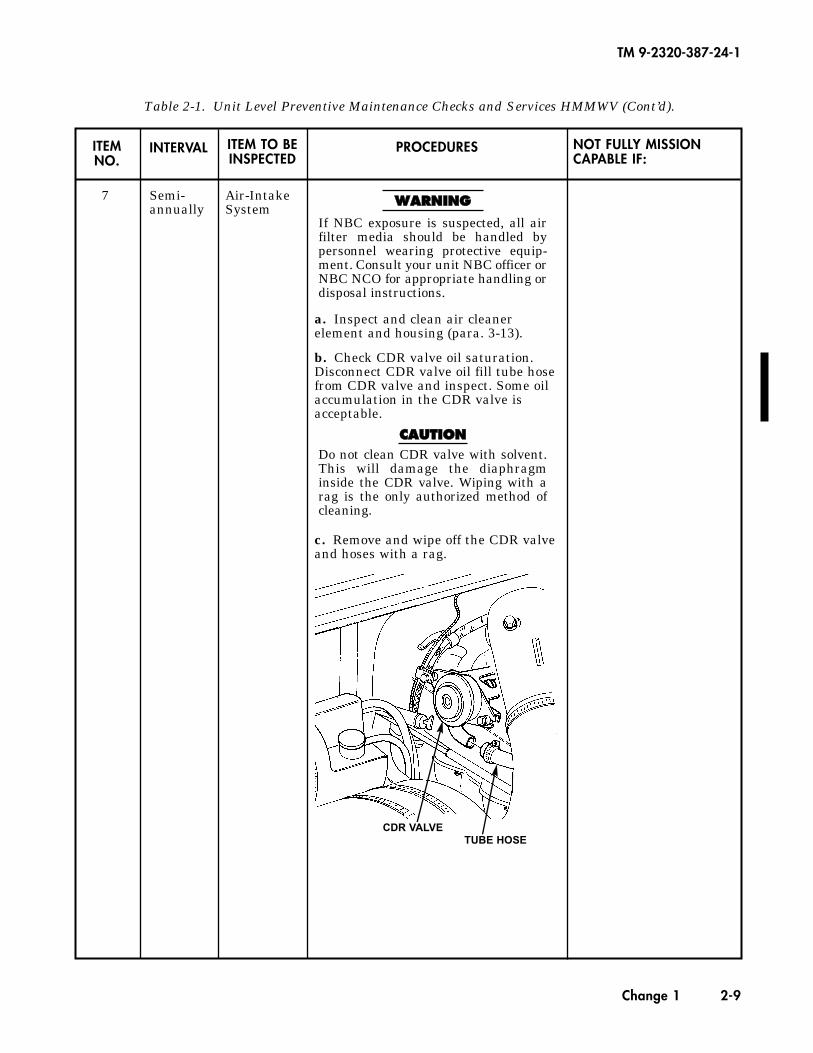
Table 2-1. Unit Level Preventive Maintenance Checks and Services HMMWV (Cont’d).
ITEMNO.
INTERVAL ITEM TO BEINSPECTED
PROCEDURES
7 Semi- Air-Intakeannually System
a. Inspect and clean air cleaner element and housing (para. 3-13).
b. Check CDR valve oil saturation.Disconnect CDR valve oil fill tube hosefrom CDR valve and inspect. Some oilaccumulation in the CDR valve isacceptable.
c. Remove and wipe off the CDR valveand hoses with a rag.
CCAAUUTTIIOONNDo not clean CDR valve with solvent.This will damage the diaphragm inside the CDR valve. Wiping with arag is the only authorized method ofcleaning.
TM 9-2320-387-24-1
Change 1 2-9
NOT FULLY MISSIONCAPABLE IF:
WWAARRNNIINNGG
If NBC exposure is suspected, all airfilter media should be handled bypersonnel wearing protective equip-ment. Consult your unit NBC officer orNBC NCO for appropriate handling ordisposal instructions.
CDR VALVETUBE HOSE
Table 2-1. Unit Level Preventive Maintenance Checks and Services HMMWV (Cont’d).
ITEMNO.
INTERVAL ITEM TO BEINSPECTED
PROCEDURES
8 Semi- 200-Amp a. Inspect alternator and voltage a. Mounting boltsannually Alternator regulator for condition, proper missing or alternator
installation, and security of mounting. damaged.
b. Inspect electrical wiring for b. Wiring frayed, broken,broken strands, frayed, cracked, or worn or loose connections.insulation, and loose connections.
c. Check pulley for damage. c. Pulley damaged or pulley nut is loose.
d. Check alternator mounting bolts d. Any alternator for security of mounting. Tighten mounting bolt is loose.bolts to 40 lb-ft (54 N•m).
9 Semi- Accelerator Inspect for bends, excessive play, cracks, Linkage damaged, bent,annually Linkage and damage that could cause failure. or cracked.
10 Semi- Suspensionannually and Steering
System
a. Remove wheel and tire assembly a. Capscrews or locknuts(para. 8-3). Check front and rear are finger or handlower ball joint mounting. Tighten turnable.lower ball joint to lower control armlocknuts to 60-65 lb-ft (81-88 N•m). Tighten ball joint slotted nut to 73 lb-ft (99 N•m) and ensure cotter pin is present.
b. Check front and rear upper ball joint b. Capscrews or locknutsmounting. Tighten upper ball joint to are finger or handupper control arm locknuts to turnable.26-30 lb-ft (35-41 N•m). Tighten uppercontrol arm-to-bracket locknuts to260 lb-ft (353 N•m). Tighten ball jointslotted nut to 73 lb-ft (99 N•m) andensure cotter pin is present.
c. Lubricate front and rear upper and lower ball joints with GAA.
NNOOTTEEIf access to lower ball joint locknut isa problem, remove geared hub fromcontrol arm (para. 6-9).
TM 9-2320-387-24-1
2-10 Change 1
NOT FULLY MISSIONCAPABLE IF:
NNOOTTEEDo not overlubricate ball joints; one ortwo shots is adequate.
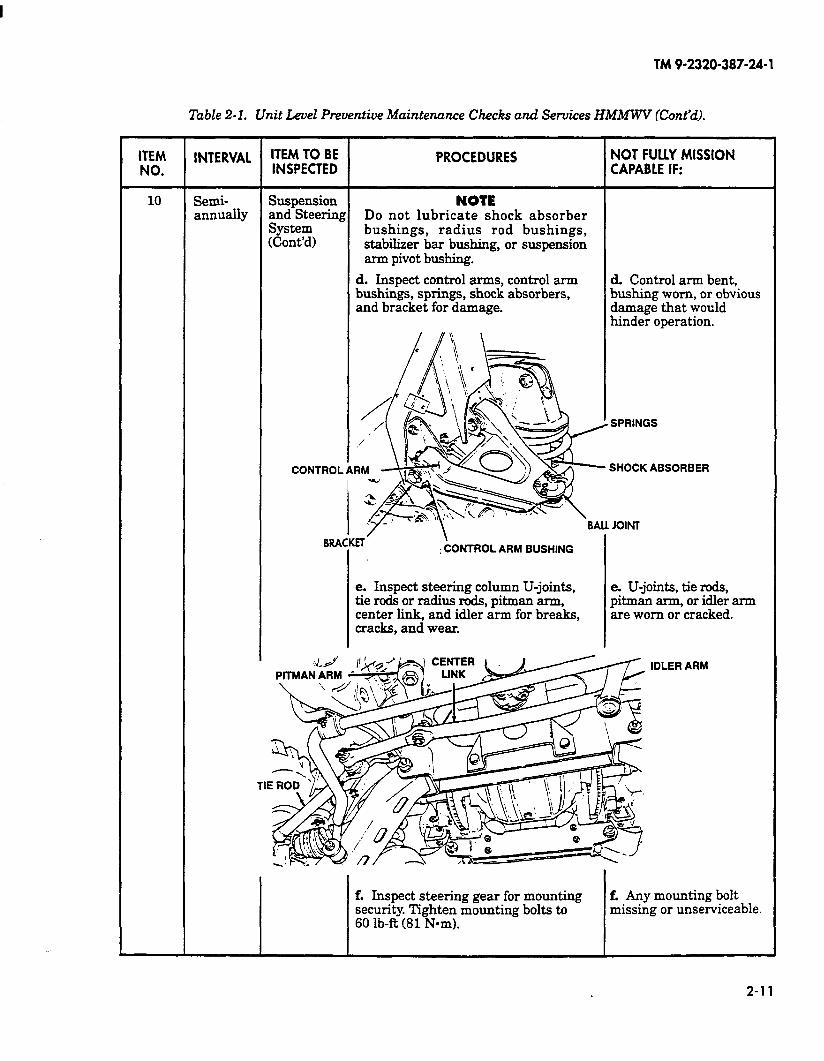
TM 9-2320-387-24- 1
Table 2-1. Unit Level Preventive Maintenance Checks and Services HMMWV (Cont’d).
d. Inspect control arms, control arm bushings, springs, shock absorbers, and bracket for damage.
d. Control arm bent, bushing worn, or obvious damage that would hinder operation.
SHOCK ABSORBER
e. Inspect steering column U-joints, tie rods or radius rods, pitman arm, center link, and idler arm for breaks, cracks, and wear.
e. U-joints, tie rods, pitman arm, or idler arm are worn or cracked.
f. Inspect steering gear for mounting security. Tighten mounting bolts to 60 lb-R (81 N-m).
f. Any mounting bolt missing or unserviceable.
2-11
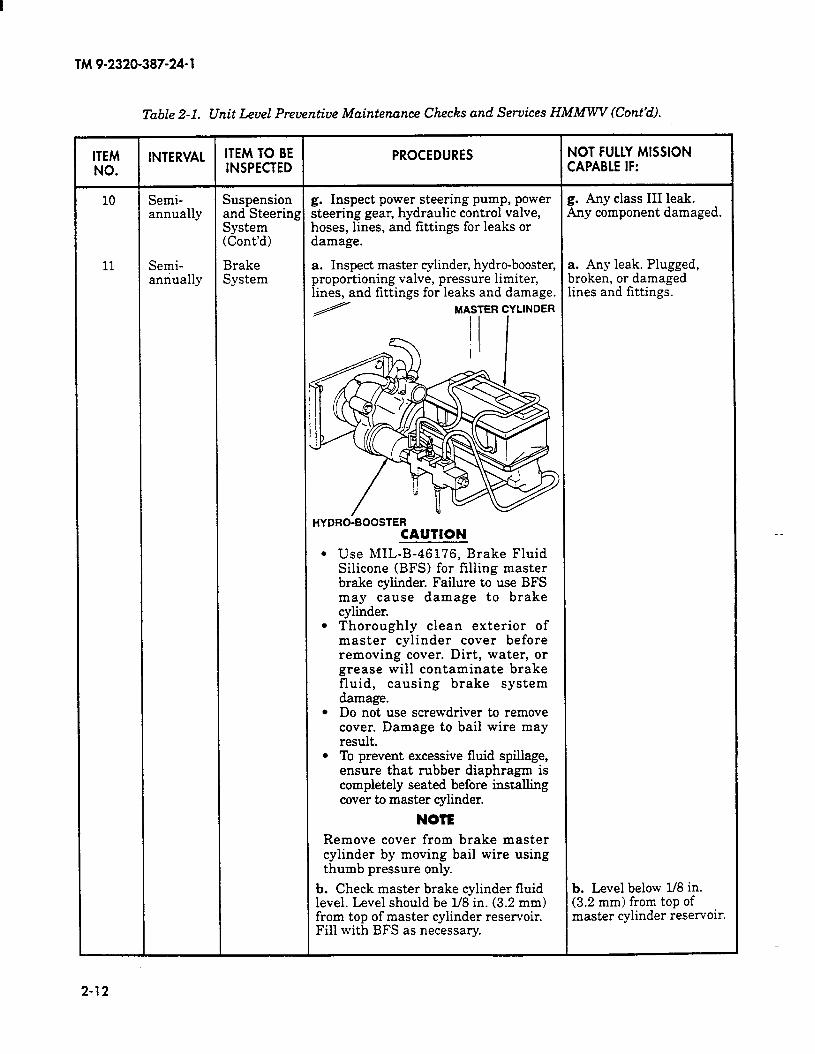
TM 9-2320-387-24-l
Table 2-l. Unit Level Preventive Maintenance Checks and Services HMMWV (Cont’d).
ITEM INTERVAL ITEM TO 8E NO. INSPECTED
PROCEDURES NOT FULLY MISSION CAPABLE IF:
10
11
Semi- Suspension g. Inspect power steering pump, power g. Any class III leak. annually and Steering steering gear, hydraulic control valve, Any component damaged.
System hoses, lines, and fittings for leaks or (Cont’d) damage.
Semi- Brake a. Inspect master cylinder, hydro-booster, a. Any leak. Plugged, annually System proportioning valve, pressure limiter, broken, or damaged
lines, and fittings for leaks and damage. lines and fittings. MASTER CYLINDER
HYDRO-BOOSTER CAUTION
l Use MIL-B-46176, Brake Fluid Silicone (BFS) for filling master brake cylinder. Failure to use BFS may cause damage to brake cylinder.
l Thoroughly clean exterior of master cylinder cover before removing cover. Dirt, water, or grease will contaminate brake fluid, causing brake system damage.
l Do not use screwdriver to remove cover. Damage to bail wire may result.
l ‘lb prevent excessive fluid spillage, ensure that rubber diaphragm is completely seated before installing cover to master cylinder.
NOTE
Remove cover from brake master cylinder by moving bail wire using thumb pressure only.
b. Check master brake cylinder fluid level. Level should be l/8 in. (3.2 mm) from top of master cylinder reservoir. Fill with BFS as necessary.
b. Level below If8 in. (3.2 mm) from top of master cylinder reservoir.
2-12
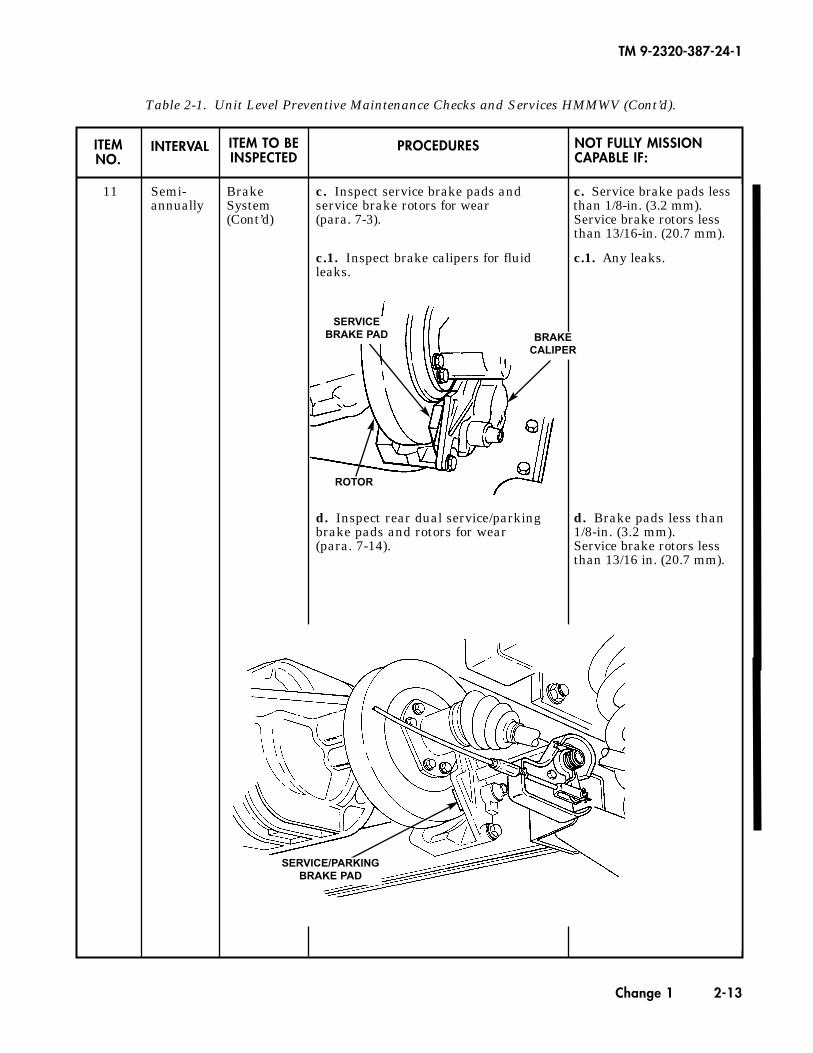
Table 2-1. Unit Level Preventive Maintenance Checks and Services HMMWV (Cont’d).
ITEMNO.
INTERVAL ITEM TO BEINSPECTED
PROCEDURES
11 Semi- Brake c. Inspect service brake pads and c. Service brake pads less annually System service brake rotors for wear than 1/8-in. (3.2 mm).
(Cont’d) (para. 7-3). Service brake rotors lessthan 13/16-in. (20.7 mm).
c.1. Inspect brake calipers for fluid c.1. Any leaks.leaks.
d. Inspect rear dual service/parking d. Brake pads less thanbrake pads and rotors for wear 1/8-in. (3.2 mm).(para. 7-14). Service brake rotors less
than 13/16 in. (20.7 mm).
TM 9-2320-387-24-1
Change 1 2-13
NOT FULLY MISSIONCAPABLE IF:
SERVICEBRAKE PAD
ROTOR
SERVICE/PARKINGBRAKE PAD
BRAKECALIPER
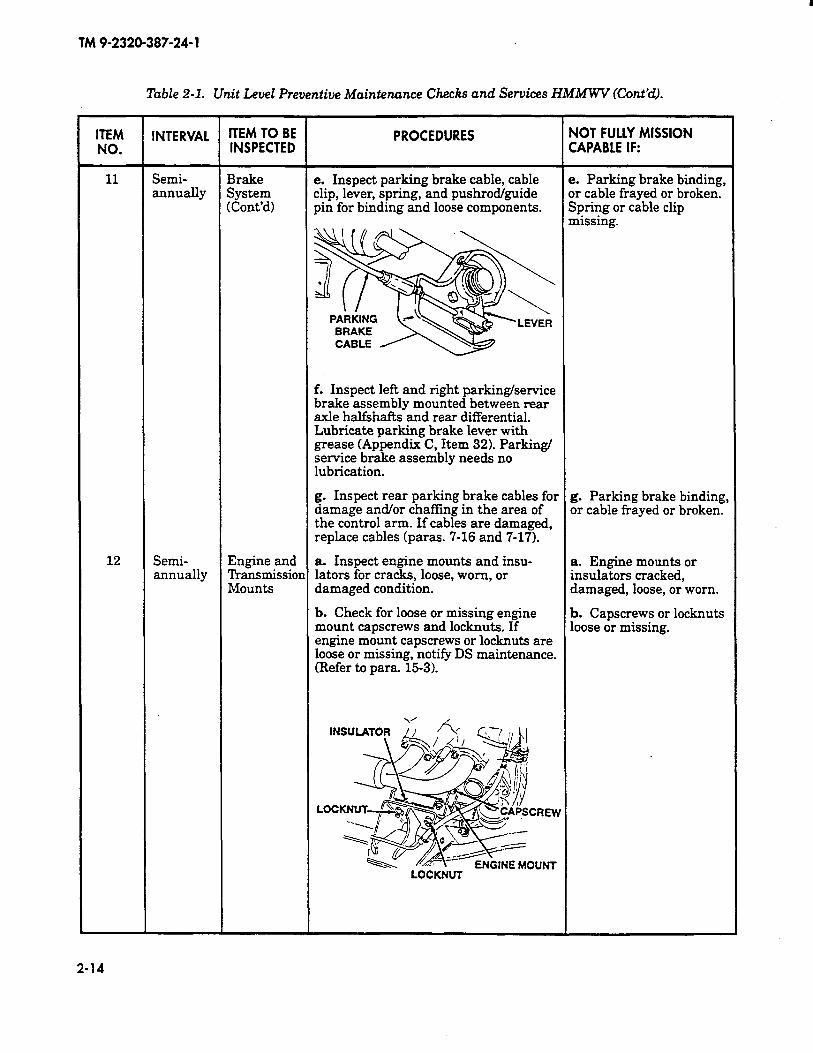
TM 9-2320-387-24-l
Table 2-1. Unit Level Preventive Maintenance Checks and Services HMMWV (Cont’d).
ITEM INTERVAL ITEM TO 8E PROCEDURES NOT FULLY MISSION
NO. INSPECTED CAPABLE IF:
11 Semi- Brake annually System
e. Inspect parking brake cable, cable e. Parking brake binding, clip, lever, spring, and pushrod/guide or cable frayed or broken.
(Cont’d) pin for binding and loose components. Spring or cable clip missing.
f. Inspect left and right parking/service brake assembly mounted between rear axle halfshafts and rear differential. Lubricate parking brake lever with grease (Appendix C, Item 32). Parking/ service brake assembly needs no lubrication.
12
g. Inspect rear parking brake cables for damage and/or chaffing in the area of
g. Parking brake binding
the control arm. If cables are damaged, or cable frayed or broken.
replace cables (paras. 7-16 and 7-17).
Semi- Engine and a. Inspect engine mounts and insu- annually
a. Engine mounts or Transmission lators for cracks, loose, worn, or insulators cracked, Mounts damaged condition. damaged, loose, or worn.
b. Check for loose or missing engine mount capscrews and locknuts. If
b. Capscrews or locknuts loose or missing.
engine mount capscrews or locknuts are loose or missing, notify DS maintenance. (Refer to para. 15-3).
LOCKNUT
I
2-14

TM 9-2320-387-24-l
Table 2-1. Unit Level Preventive Maintenynce CheFks and Services HMMWV (Cont’d).
ITEM INTERVAL iTEM TO 8E PROCEDURES NOT FULLY MISSION NO. INSPECTED CAPABLE IF:
12 Semi- Engine and c. Using 314-h torque adapter c. TYansmission mount annually Transmission (appendix B, item 1341,
Mounts loose, cracked, or
(Cont’d) tighten two capscrews securing damaged. transmission mount-to-adapter to 65 lb-R (88 N-m). Tighten two locknuts securing transmission mount-to- crossmember to 28 lb-R (38 Nom).
CROSSMEMBER
13 Semi- Starter CAUTION annually Disconnect negative cable.
a. Inspect starter for mounting security. Tighten mounting bolts to
a. Mounting bolt
40 lb-R (54 N*m). missing or will not torque.
b. Inspect cables and studs for loose nuts and damage.
b. Stud nut loose.
14 Semi- annually
Transmission a. Inspect vent lines and connectors for security, cracks, and deterioration.
a Vent line cracked, plugged, or missing.
b. Inspect transmission shift linkage for bends, excessive play, cracks, and
b. Shift linkage is unserviceable.
damage that could cause failure.
15 Semi- Transfer annually Case
a. Inspect transfer ease vent lines and a Vent line cracked, connectors for security, cracks, and deterioration.
plugged, or missing.
b. Inspect transfer case shift linkage for bends, excessive play, cracks, and
b. Shift linkage is unserviceable.
damage that could cause failure.
-
2-15
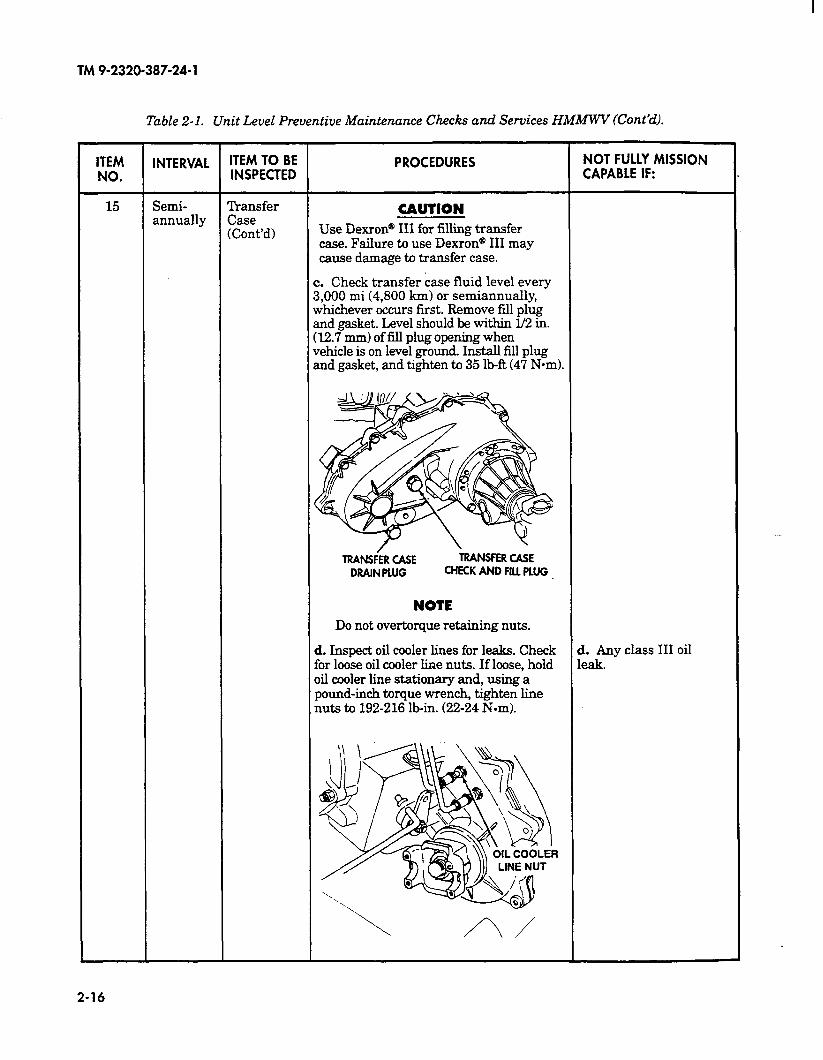
TM 9-2320-387-24-l
Table 2-l. Unit Level Preventive Maintenance Checks and Services HMMWV(Cont’&.
ITEM INTERVAL ITEM TO BE PROCEDURES NOT FULLY MISSION NO. INSPECTED CAPABLE IF:
15 Semi- Transfer annually
CAUTION Case (Cont’d) Use Dexrone III for filling transfer
case. Failure to use Dexrone III may cause damage to transfer case.
c. Check transfer case fluid level every 3,000 mi (4,800 km) or semiannually, whichever occurs first. Remove fill plug and gasket. Level should he within l/2 in. (12.7 mm) of fill plug opening when vehicle is on level ground. Install fill plug and gasket, and tighten to 35 lbft (47 N-m).
DRAIN PLUG CHECK AND FILL PLUG
NOTE Do not over-torque retaining nuts.
d. Inspect oil cooler lines for leaks. Check d. Any class III oil for loose oil cooler line nuts. If loose, hold leak. oil cooler line stationary and, using a pound-inch torque wrench, tighten line nuts to 192-216 lb-in. (22-24 N-m).
2-16
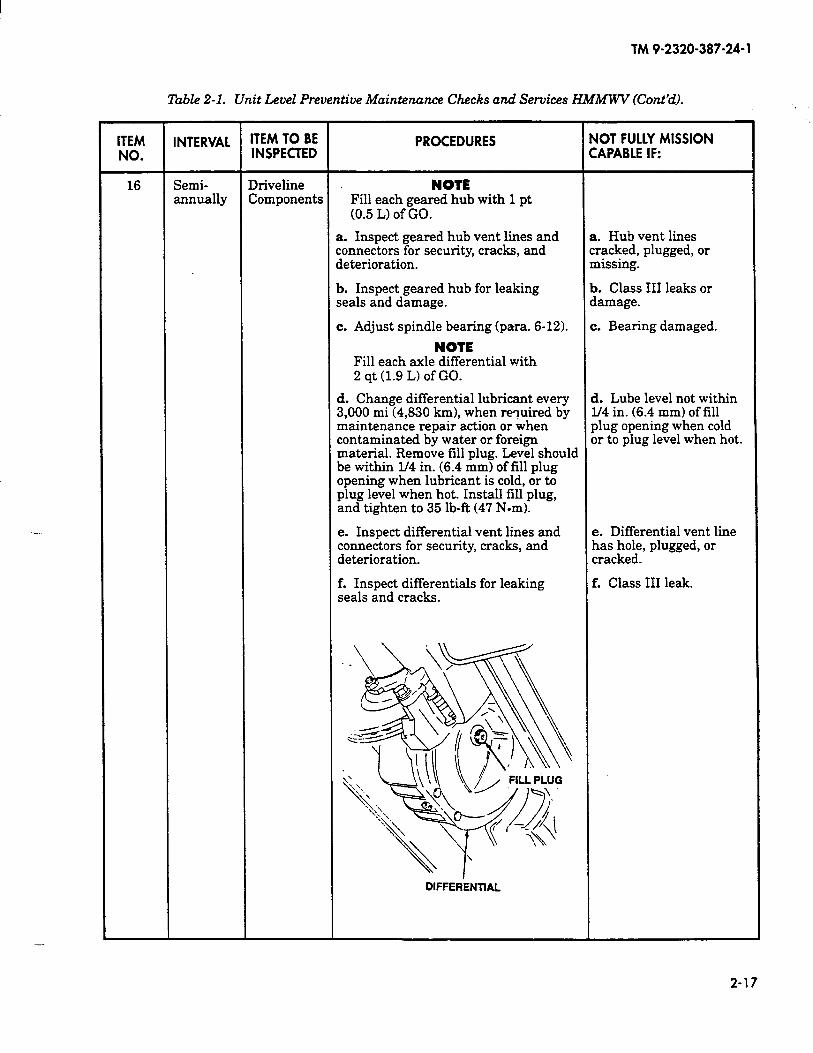
-.
TM 9-2320-387-24-l
Table 2-l. Unit Level Preventive Maintenance Checks and Services HMMWV (Cont’d).
ITEM INTERVAL iTEM TO 8E PROCEDURES NOT FULLY MISSION NO. INSPECTED CAPABLE IF:
16 Semi- Driveline NOTE annually Components Fill each geared hub with 1 pt
(0.5 L) of GO.
a. Inspect geared hub vent lines and a. Hub vent lines connectors for security, cracks, and cracked, plugged, or deterioration. missing.
b. Inspect geared hub for leaking b. Class III leaks or seals and damage. damage.
c. Adjust spindle bearing (para. 6-12). c. Bearing damaged.
NOTE Fill each axle differential with 2 qt (1.9 L) of Go.
d. Change differential lubricant every d. Lube level not within 3,000 mi (4,830 km), when required by l/4 in. (6.4 mm) of fill maintenance repair action or when plug opening when cold contaminated by water or foreign or to plug level when hot. material. Remove fill plug. Level should be within I./4 in. (6.4 mm) of fill plug opening when lubricant is cold, or to plug level when hot. Install fill plug, and tighten to 35 lb-R (47 N-ml.
e. Inspect differential vent lines and connectors for security, cracks, and deterioration.
f. Inspect differentials for leaking seals and cracks.
e. Differential vent line has hole, plugged, or cracked.
f. Class III leak.
DIFFERENTIAL
2-17
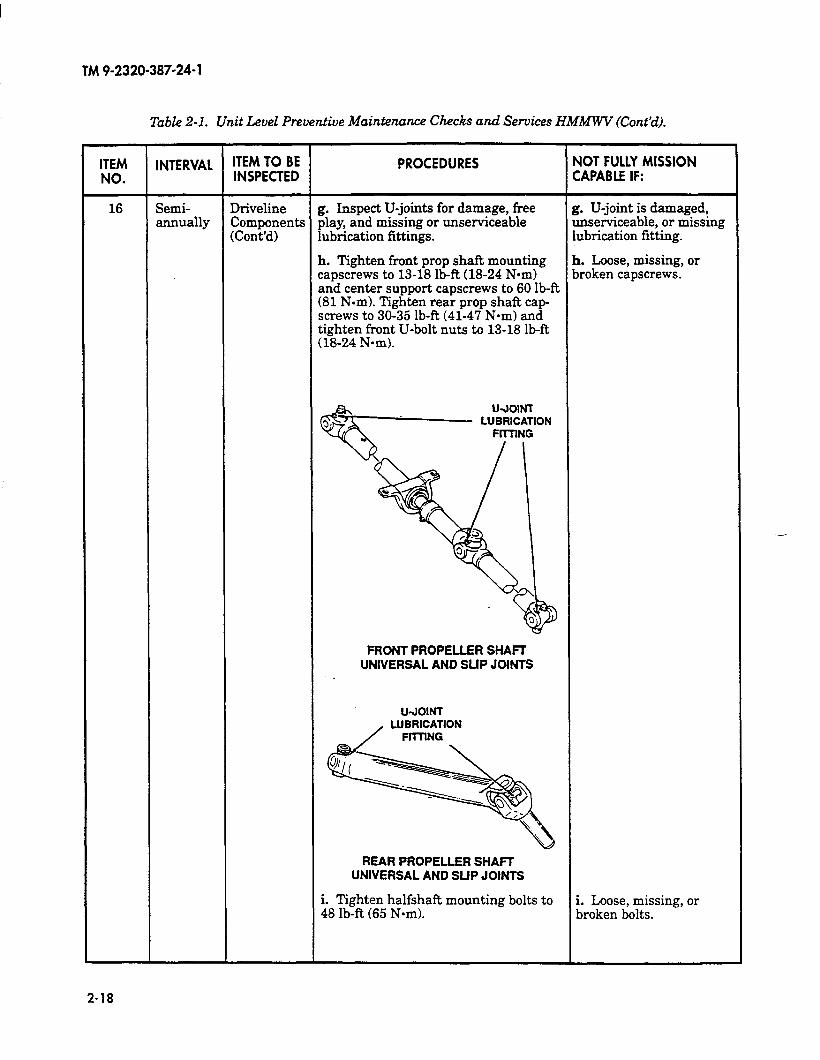
TM 9-2320-387-24-l
Table 2-1. Unit Level Preventive Maintenance Checks and Services HMMWV (Cont’d).
ITEM NO.
16
INTERVAL iTEM TO 8E PROCEDURES NOT FULLY MISSION INSPECTED CAPABLE IF:
Semi- Driveline g. Inspect U-joints for damage, free g. U-joint is damaged, annually Components play, and missing or unserviceable unserviceable, or missing
(Cont’d) lubrication fittings. lubrication fitting.
h. Tighten front prop shaft mounting h. Loose, missing, or capscrews to 13-18 lb-R (18-24 Nom) broken capscrews. and center support capscrews to 60 lb-R (81 N-m). Tighten rear prop shaft cap screws to 30-35 lb-R (41-47 Nom) and tighten front U-bolt nuts to 13-18 lb-R (18-24 N-m).
FRONT PROPELLER SHAFT UNIVERSAL AND SUP JOINTS
REAR PROPELLER SHAFT UNIVERSAL AND SUP JOtNlS
i. Tighten halfshaft mounting bolts to 48 lb-R (65 N*m).
i. Loose, missing, or broken bolts.
-
2-18
Table 2-1. Unit Level Preventive Maintenance Checks and Services HMMWV (Cont’d).
ITEMNO.
INTERVAL ITEM TO BEINSPECTED
PROCEDURES
17 Semi- Exhaust Inspect for cracked and loose pipes, Cracked, loose, or holes inannually Components muffler, and hangers. Check for pipes or muffler. Exhaust
exhaust leaks. leak.
18 Semi- Frame, a. Inspect frame side rails for cracks, a. Any loose or missingannually Support breaks, bends, wear, deterioration, fasteners. Cracks, bends,
Braces and missing or loose fasteners. or breaks in frame.andCross-members
b. Inspect support braces and b. Any loose or missingcrossmembers for cracks, fasteners. Cracks, bends,breaks, bends, deterioration, and or breaks in crossmembersloose or missing fasteners. or support braces.
19 Semi- Tiresannually
a. Check tread depth of tires with tire a. Tread depth is lessgauge. If tread depth is less than than 1/16 in. (1.59 mm).1/16 in.(1.59 mm), replace tire. Radial tires will take approximately 1,300 miles(2,092 km) to wear 1/32 in. (0.79 mm).If mission will require the vehicle totravel this distance within a month,replace tire if it measures 3/32 in.(2.38 mm).
TM 9-2320-387-24-1
Change 1 2-19
NOT FULLY MISSIONCAPABLE IF:
WWAARRNNIINNGG
Changing tire pressures or wheelalignment out of the recommendedspecification may adversely affectthe vehicle’s handlingcharacteristics. Loss of vehiclecontrol may result, causing seriousinjury or death to personnel anddamage to equipment.
NNOOTTEEVehicle must be up on jack standsfor the following checks.

TM 9-2320-387-24-l
!&ble 2-1. Unit Level Preventive Maintenance Checks and Services HMMWV (Cont’d).
cause excessrve wear on the outer edge of the tread pattern. If this pattern develops, turn tires around on the rims (para. 8-4).
c. Rotate tires as diagram shows.
ROTATION DIAGRAM
TlGHTENlNG SEGUENCE
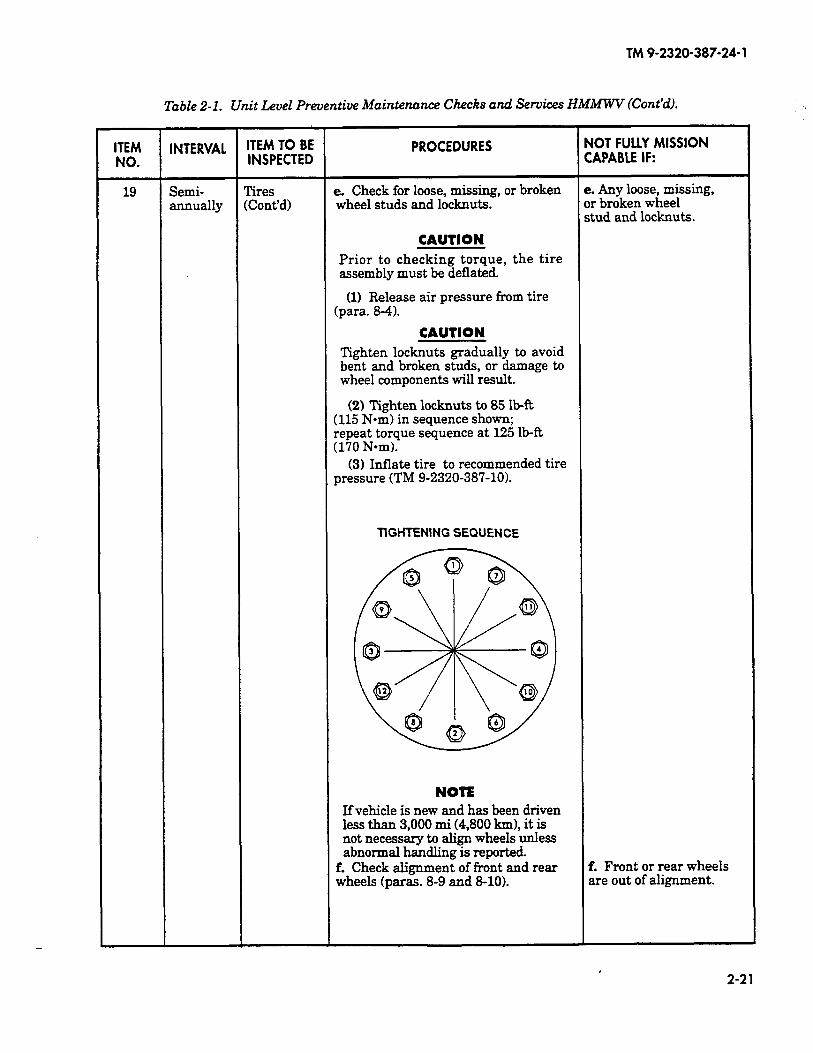
TM 9-2320-387-24-l
Table 2-1. Unit Level Preventive Maintenance Checks and Services HMMWV (Cont’d).
ITEM NO.
19
INTERVAL ‘TEM TO BE PROCEDURES NOT FULLY MISSION INSPECTED CAPABLE IF:
Semi- Tires e. Check for loose, missing, or broken e. Any loose, missing, annually (Cont’d) wheel studs and locknuts. or broken wheel
stud and locknuts.
CAUTION Prior to checking torque, the tire assembly must be deflated
(1) Release air pressure from tire (para. 8-4).
CAUTlbN Tighten locknuts gradually to avoid bent and broken studs, or damage to wheel components will result.
(2) Tighten locknuts to 85 lb-R (115 N-m) in sequence shown; repeat torque sequence at 125 lb-ft (170 Nom).
(31 Inflate tire to recommended tire pressure (TM 9-2320-387-10X
TIGHTENING SEQUENCE
NOTE If vehicle is new and has been driven less than 3,000 mi (4,800 km), it is not necessary to align wheels unless abnormal handling is reported.
f. Check alignment of front and rear wheels (paras. 8-9 and 8-10).
f. Front or rear wheels are out of alignment.
, 2-21
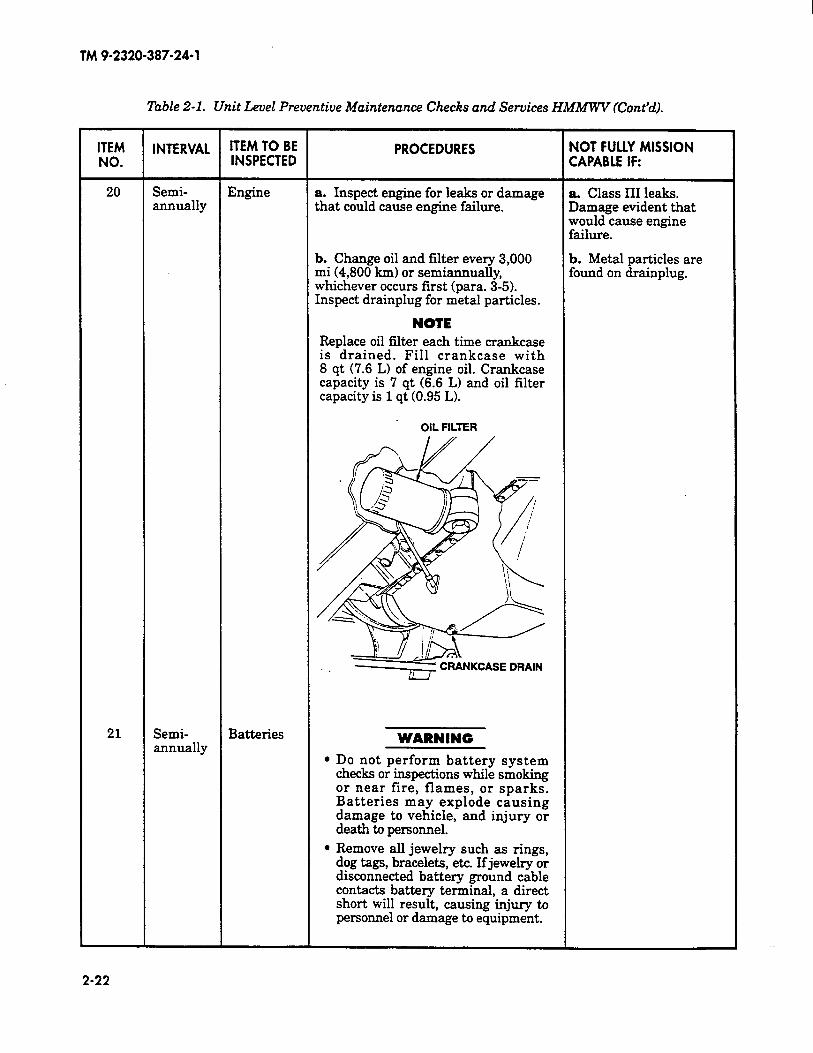
TM 9-2320-387-24-l
Table 2-1. Unit Level Preventive Maintenance Checks and Services HMMWV (Cont’d).
ITEM INTERVAL ITEM TO 8E PROCEDURES NOT FULLY MISSION NO. INSPECTED CAPABLE IF:
20 Semi- Engine a. Inspect engine for leaks or damage a. Class III leaks. annually that could cause engine failure. Damage evident that
would cause engine failure.
b. Change oil and filter every 3,000 mi (4,800 km) or semiannually, whichever occurs first (para. 3-5). Inspect drainplug for metal particles.
NOTE
b. Metal particles are found on drainplug.
Replace oil filter each time crankcase is drained. Fill crankcase with 8 qt (7.6 L) of engine oil. Crankcase capacity is 7 qt (6.6 L) and oil filter capacity is 1 qt (0.95 L).
OIL FILTER
KCASE DRAIN
21 Semi- Batteries annually
WARNING l Do not perform battery system
checks or inspections while smoking or near fire, flames, or sparks. Batteries may explode causing damage to vehicle, and injury or death to personnel.
l Remove all jewelry such as rings, dog tags, bracelets, etc. If jewelry or disconnected battery ground cable contacts battery terminal, a direct short will result, causing injury to personnel or damage to equipment.
2-22
Table 2-1. Unit Level Preventive Maintenance Checks and Services HMMWV (Cont’d).
ITEMNO.
INTERVAL ITEM TO BEINSPECTED
PROCEDURES
21 Semi- Batteriesannually (Cont’d)
a. Inspect battery box for corrosion and a. Corrosion has made debris. holes in metal battery
box.
b. Clean slave receptacle and coat b. Terminals corroded.with corrosion-resistant compound(appendix C, item 61).
c. Check and record specific gravity c. Cell is below 1.225of each cell. specific gravity.
d. Inspect battery cables for frays, d. Cables frayed, split,splits, or looseness. or loose.
SPECIAL PURPOSE BODIES
21.1 Semi- Doors Inspect door latches/strikes for proper Doors do not seal againstannually adjustment (para. 11-9). body.
22 Semi- Cargo Shell Check adjustment of cargo shell doorannually Door (para. 11-15).
23 Semi- Rear Cargo Check rear cargo door for properannually Door operation. Rotate gas springs (para. 11-23)
180° every six months and move leftspring to right side and right springto left side.
23.1 Semi- Weapon a. Ensure brushes are present and are a. Brushes are missingannually Station not curled upward. or curled upward more
Turret than 1/4 inch (6.34 mm).
b. Inspect turret brake for cracked b. Turret brake ismounting bracket welds and for correct misaligned or mounting adjustment (para. 11-55). bracket welds cracked.
c. Inspect for damage or bending of stop c. Stop rings notches willring notches at 0 degrees, 90 degrees, not stop at required180 degrees, and 270 degrees position.stop positions.
TM 9-2320-387-24-1
Change 1 2-23
NOT FULLY MISSIONCAPABLE IF:
NNOOTTEERefer to TM 9-6140-200-14 for morespecific details on battery maintenance.
NNOOTTEEAdd 4 points (.004) to specific gravityreading for every 10° above 80°F.
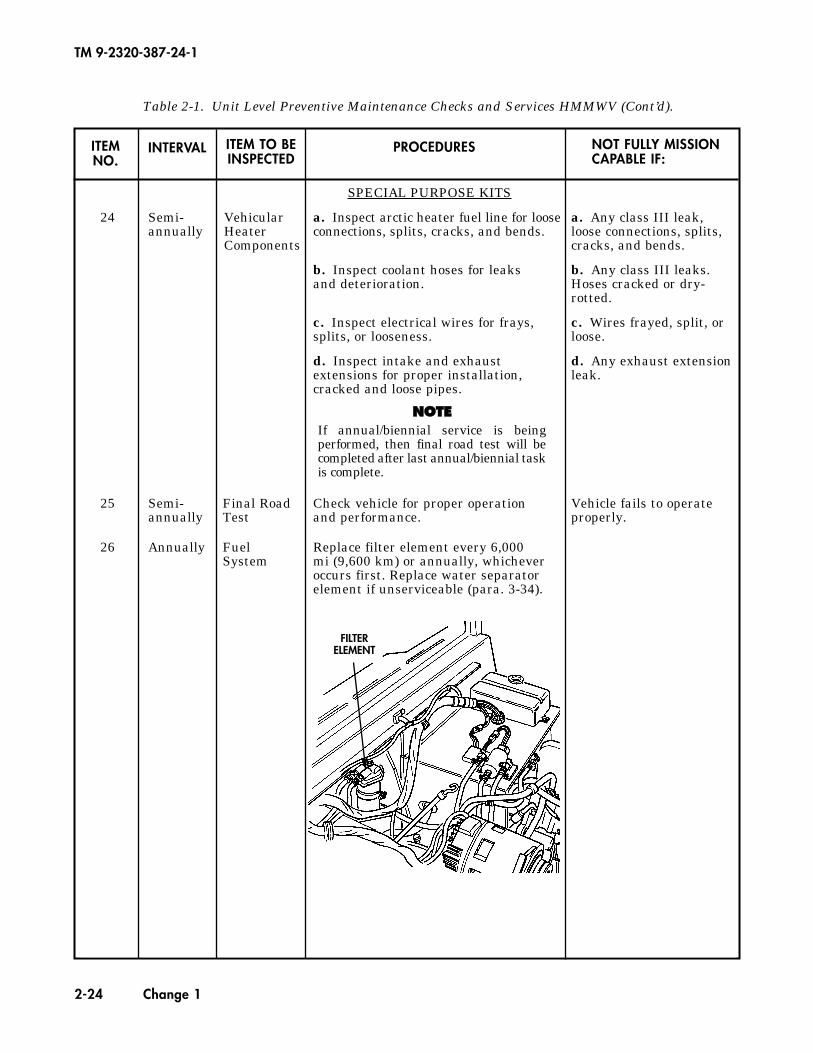
Table 2-1. Unit Level Preventive Maintenance Checks and Services HMMWV (Cont’d).
ITEMNO.
INTERVAL ITEM TO BEINSPECTED
PROCEDURES
SPECIAL PURPOSE KITS
24 Semi- Vehicular a. Inspect arctic heater fuel line for loose a. Any class III leak,annually Heater connections, splits, cracks, and bends. loose connections, splits,
Components cracks, and bends.
b. Inspect coolant hoses for leaks b. Any class III leaks.and deterioration. Hoses cracked or dry-
rotted.
c. Inspect electrical wires for frays, c. Wires frayed, split, or splits, or looseness. loose.
d. Inspect intake and exhaust d. Any exhaust extension extensions for proper installation, leak.cracked and loose pipes.
25 Semi- Final Road Check vehicle for proper operation Vehicle fails to operateannually Test and performance. properly.
26 Annually Fuel Replace filter element every 6,000System mi (9,600 km) or annually, whichever
occurs first. Replace water separatorelement if unserviceable (para. 3-34).
TM 9-2320-387-24-1
2-24 Change 1
NOT FULLY MISSIONCAPABLE IF:
NNOOTTEEIf annual/biennial service is beingperformed, then final road test will becompleted after last annual/biennial taskis complete.
FILTERELEMENT
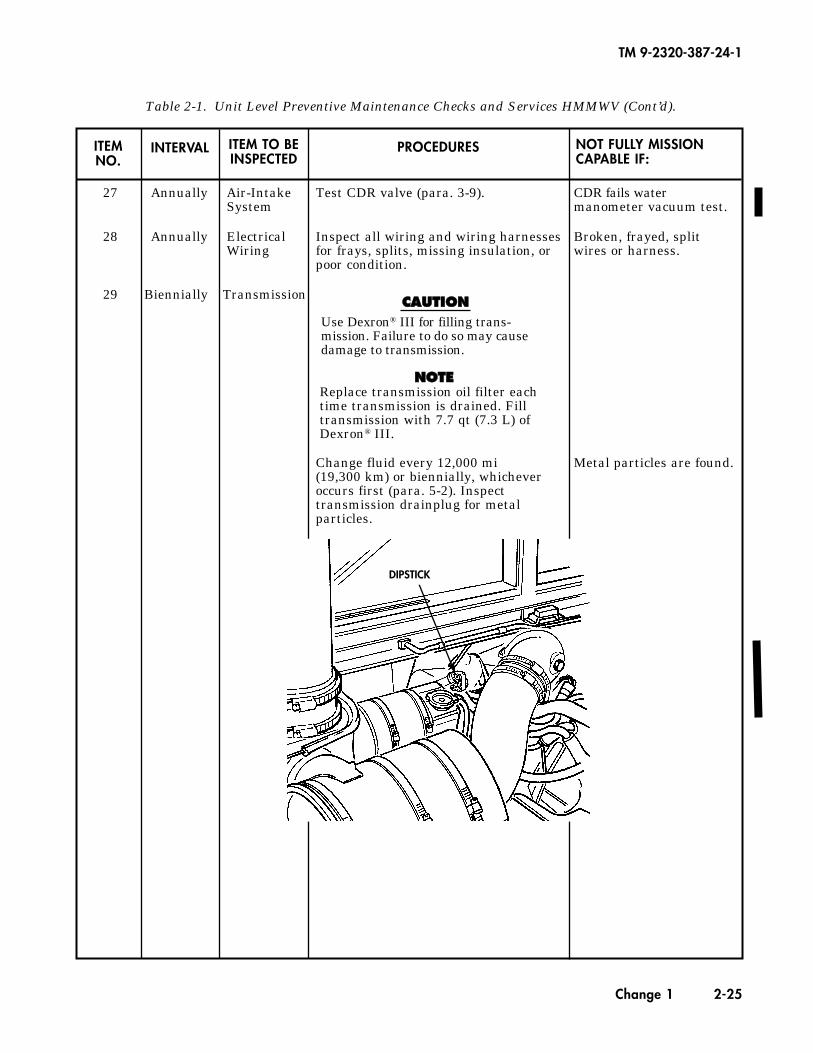
Table 2-1. Unit Level Preventive Maintenance Checks and Services HMMWV (Cont’d).
ITEMNO.
INTERVAL ITEM TO BEINSPECTED
PROCEDURES
27 Annually Air-Intake Test CDR valve (para. 3-9). CDR fails water System manometer vacuum test.
28 Annually Electrical Inspect all wiring and wiring harnesses Broken, frayed, splitWiring for frays, splits, missing insulation, or wires or harness.
poor condition.
29 Biennially Transmission
Change fluid every 12,000 mi Metal particles are found.(19,300 km) or biennially, whicheveroccurs first (para. 5-2). Inspect transmission drainplug for metal particles.
TM 9-2320-387-24-1
Change 1 2-25
NOT FULLY MISSIONCAPABLE IF:
CCAAUUTTIIOONNUse Dexron® III for filling trans-mission. Failure to do so may causedamage to transmission.
NNOOTTEEReplace transmission oil filter eachtime transmission is drained. Filltransmission with 7.7 qt (7.3 L) ofDexron® III.
DIPSTICK
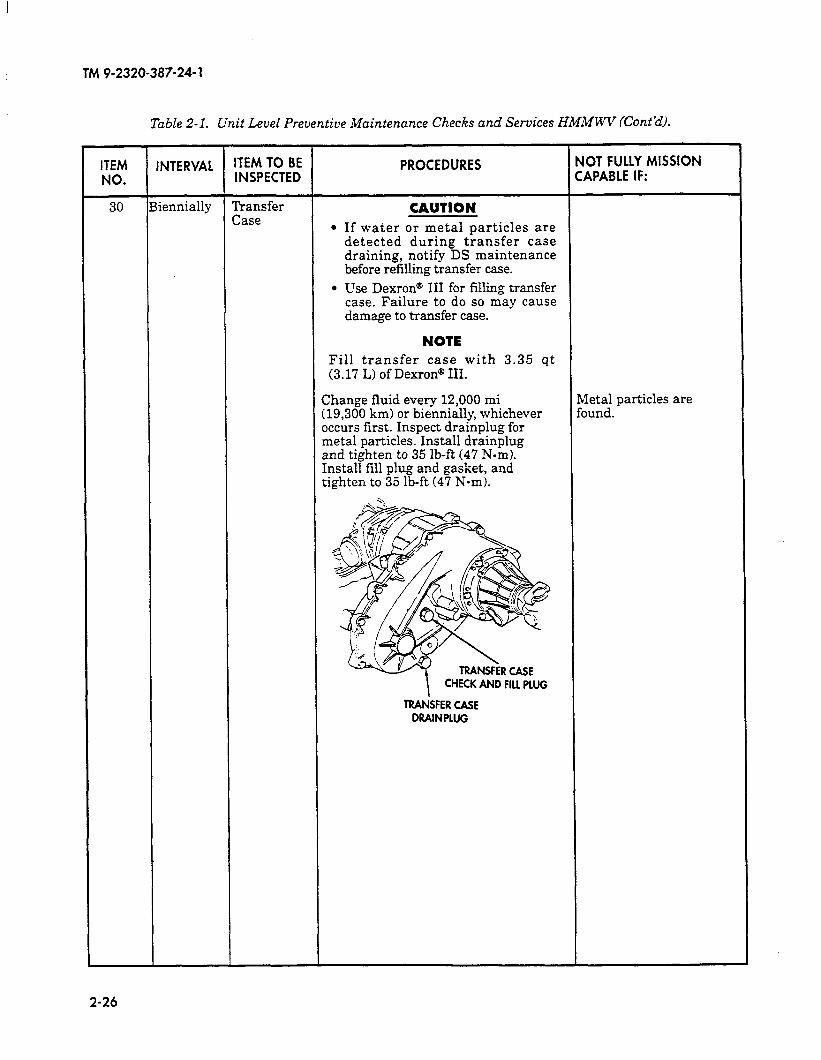
TM 9-2320-387-24-l
Table 2-l. Unit Level Preventive Maintenance Checks and Services HMMWV (Cont’d).
ITEM INTERVAL ITEM TO BE PROCEDURES NOT FULLY MISSION
NO. INSPECTED CAPABLE IF:
30 Biennially zazsfer CAUTION l If water or metal particles are
detected during transfer case draining, notify DS maintenance before refilling transfer case.
l Use Dexron@ III for filling transfer case. Failure to do so may cause damage to transfer case.
NOTE Fill transfer case with 3.35 qt (3.17 L) of Dexrone III.
Change fluid every 12,000 mi (19,300 km) or biennially, whichever occurs first. Inspect drainplug for metal particles. Install drainplug and tighten to 35 lb-ft (47 N=m). Install fill plug and gasket, and tighten to 35 lb-ft (47 Nom).
Metal particles are found.
MSFER CASE DRAINPLUG
2-26
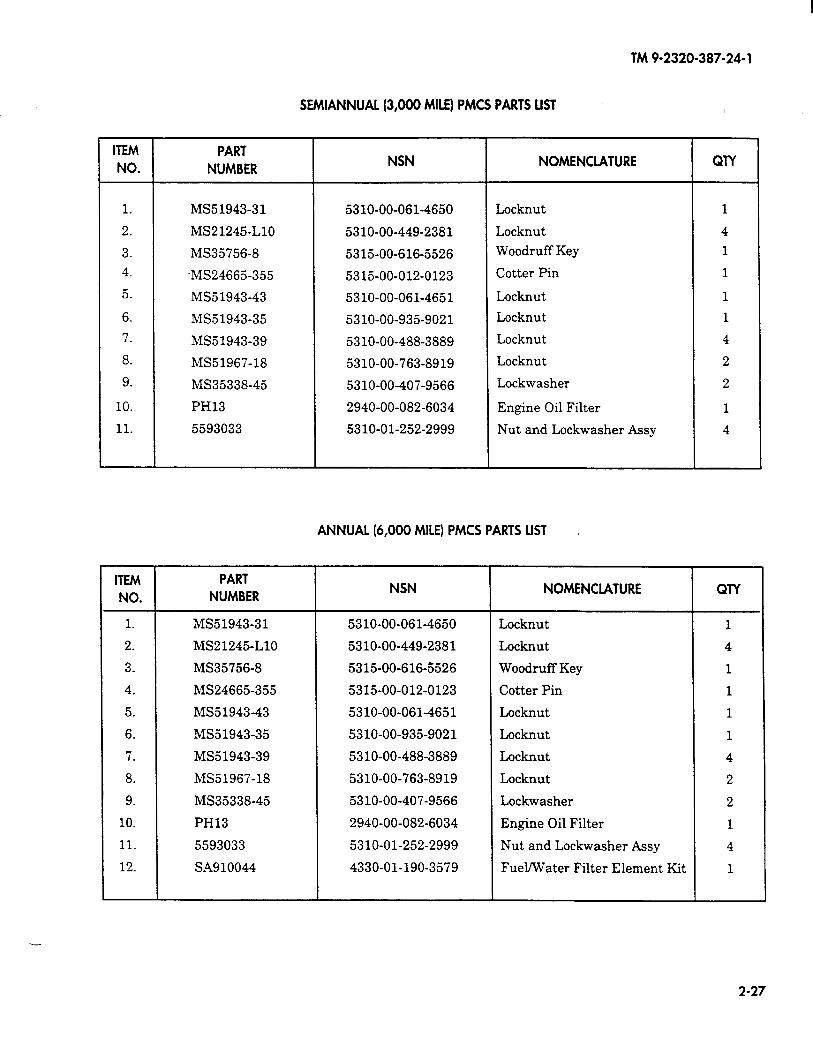
TM 9-2320-387-24- 1
SEMIANNUAL (3,000 MILE) PMCS PARTS LIST I
ITEM NO.
PART NUMBER
NSN NOMENCLATURE QlY
1. MS5 1943-31
2. MS21245LlO
3. MS35756-8
4. .MS24665-355
5. MS51943-43
6. MS51943-35
7. MS51943-39
8. MS51967-18
9. MS35338-45
10. PH13
11. 5593033
5310-00-061-4650 Locknut 1
5310-00-449-2381 Locknut 4
5315-00-616-5526 Woodruff Key 1
5315-00-012-0123 Cotter Pin 1
5310-00-061-4651 Locknut 1
5310-00-935-9021 Locknut 1
5310-00-488-3889 Locknut 4
5310-00-763-8919 Locknut 2
53 10-00-407-9566 Lockwasher 2
2940-00-082-6034 Engine Oil Filter 1
5310-01-252-2999 Nut and Lockwasher Assy 4
ANNUAL (6,000 MILE) PMCS PARTS LIST
ITEM PART
NO. NUMBER NSN NOMENCLATURE QlY
1. MS51943-31 5310-00-061-4650 Locknut 1
2. MS21245-L10 5310-00-449-2381 Locknut 4
3. MS35756-8 5315-00-616-5526 Woodruff Key 1
4. MS24665-355 5315-00-012-0123 Cotter Pin 1
5. MS51943-43 5310-00-061-4651 Locknut 1
6. MS51943-35 5310-00-935-9021 Locknut 1
7. MS51943-39 5310-00-488-3889 Locknut 4
8. MS51967-18 5310-00-763-8919 Locknut 2
9. MS35338-45 5310-00-407-9566 Lockwasher 2
10. PH13 2940-00-082-6034 Engine Oil Filter 1
11. 5593033 5310-01-252-2999 Nut and Lockwasher Assy 4
12. SA910044 4330-01-190-3579 Fuel/Water Filter Element Kit 1
2-27
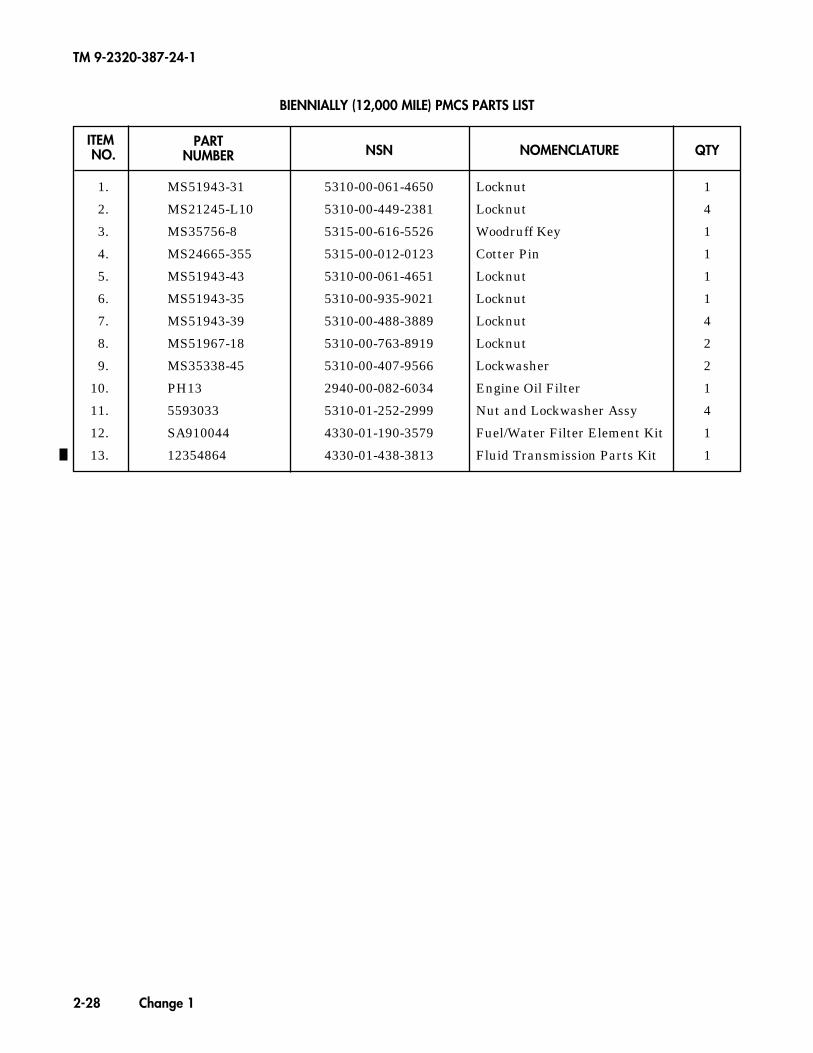
2-28 Change 1
TM 9-2320-387-24-1
BIENNIALLY (12,000 MILE) PMCS PARTS LIST
ITEMNO.
PARTNUMBER NSN NOMENCLATURE QTY
1. MS51943-31 5310-00-061-4650 Locknut 1
2. MS21245-L10 5310-00-449-2381 Locknut 4
3. MS35756-8 5315-00-616-5526 Woodruff Key 1
4. MS24665-355 5315-00-012-0123 Cotter Pin 1
5. MS51943-43 5310-00-061-4651 Locknut 1
6. MS51943-35 5310-00-935-9021 Locknut 1
7. MS51943-39 5310-00-488-3889 Locknut 4
8. MS51967-18 5310-00-763-8919 Locknut 2
9. MS35338-45 5310-00-407-9566 Lockwasher 2
10. PH13 2940-00-082-6034 Engine Oil Filter 1
11. 5593033 5310-01-252-2999 Nut and Lockwasher Assy 4
12. SA910044 4330-01-190-3579 Fuel/Water Filter Element Kit 1
13. 12354864 4330-01-438-3813 Fluid Transmission Parts Kit 1
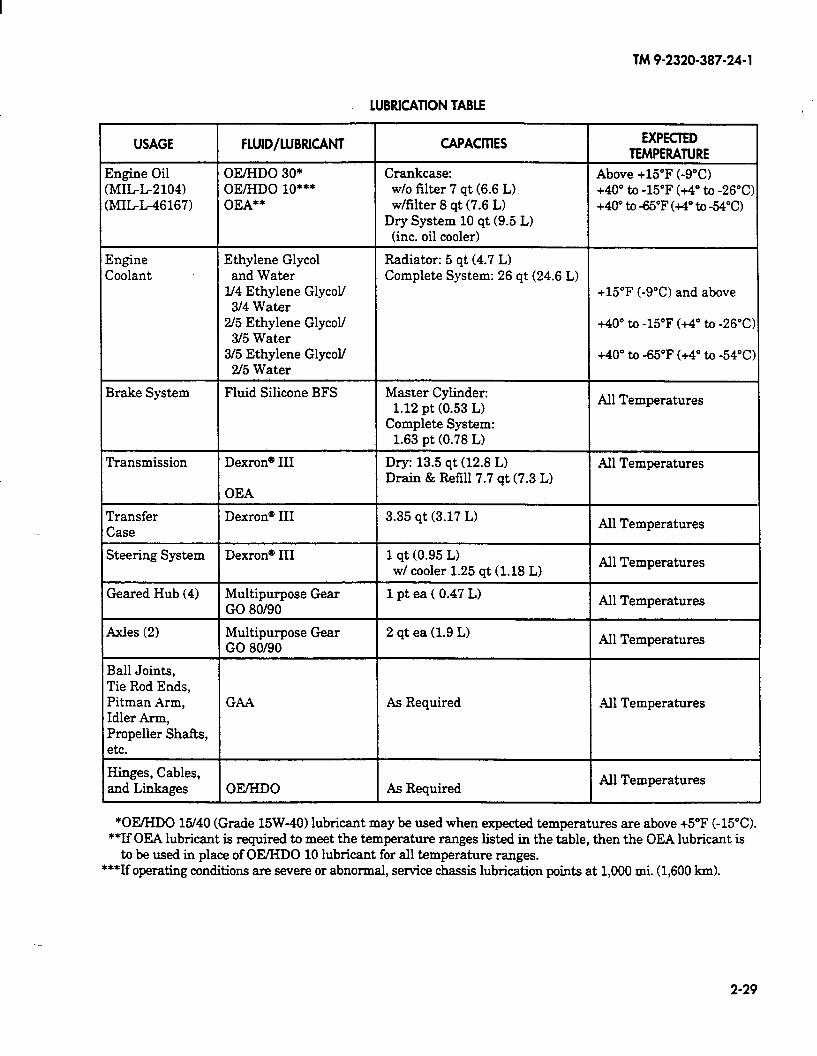
TM 9-2320-387-24-l
LUBRICATION TABLE
USAGE FLUID/LUBRICANT CAPACITIES EXPECTED TEMPERATURE
ibove +15”F (-9°C) ~40” to -15°F (+4” to -26°C ~40” to 65°F (+4” to -54°C)
Engine Oil (MILL-21041 (MILL-461671
Crankcase: w/o filter 7 qt (6.6 L) w/filter 8 qt (7.6 Ll
Dry System 10 qt (9.5 L) (inc. oil cooler)
X/I-ID0 30* XYHDO lo*** 1EA**
Engine Coolant
Ethylene Glycol and Water
I./4 Ethylene GlycoY 314 Water
Z/5 Ethylene GlycoY 315 Water
I/5 Ethylene GlycoV 2f5 Water
Radiator: 5 qt (4.7 L) Complete System: 26 qt (24.6 L)
t15”F (-9°C) and above
t40” to -15°F (+4” to -26°C
t40” to -65°F (+4” to -54°C
Brake System Fluid Silicone BFS Master Cylinder: 1.12 pt (0.53 L)
Complete System: 1.63 pt (0.78 L)
Ml Temperatures
Transmission Dexrone III
3EA
Dry: 13.5 qt (12.8 L) Drain & Refill 7.7 qt (7.3 L)
All Temperatures
Transfer Case
DexronQ III 3.35 qt (3.17 L) All Temperatures
All Temperatures
All Temperatures
All Temperatures
Steering System DexronQ III 1 qt (0.95 L) w/ cooler 1.25 qt (1.18 L)
1 pt ea ( 0.47 L) Geared Hub (4) Multipurpose Gear Go 80/90
Axles (2) Multipurpose Gear GO 80190
2 qt ea (1.9 L)
Ball Joints, Tie Rod Ends, Pitman Arm, Idler Arm, Propeller ShaRs, etc.
GAL4 As Required All Temperatures
Hinges, Cables, and Linkages As Required
All Temperatures olvHDo
*OE/HDO 15/40 (Grade 15W-40) lubricant may be used when expected temperatures are above +5”F (-15°C). **If OEA lubricant is required to meet the temperature ranges listed in the table, then the OEA lubricant is
to be used in place of OE/HDO 10 lubricant for all temperature ranges. ***If operating conditions are severe or abnormal, service chassis lubrication points at 1,000 mi. (1,600 km).
2-29

TM 9-2320-387-24-l
Section IV. GENERAL MAINTENANCE INSTRUCTIONS
1 2-13. GENERAL MAINTENANCE INSTRUCTIONS TASK SUMMARY 1
TASK PARA.
PROCEDURES PAGE NO.
2-14. Cleaning 2-30
2-15. Inspection 2-31
2-16. Repair 2-32
2-17. Assembly 2-33
2- 14. CLEANING
a. General Instructions. Cleaning procedures will be the same for the majority of parts and components which make up the vehicle subassemblies. General cleaning procedures are detailed in steps b through h.
b. The Importance of Cleaning. Great care and effort are required in all cleaning operations. The presence of dirt and foreign material is a constant threat to satisfactory vehicle operation and maintenance. The following will apply to all cleaning operations:
(1) Hands must be kept free of any accumulation of grease which can collect dust and grit.
(2) Clean all parts before inspection, aRer repair, and before assembly.
(3) After cleaning, all parts must be covered or wrapped in plastic or paper to protect them from dust and/or dirt.
c. Disassembled Parts Cleaning. Place all disassembled parts in wire baskets for cleaning.
(1)
(2)
(31
(41
Dry and cover all cleaned parts.
Place on or in racks and hold for inspection or repair.
All parts subject to rusting must be lightly oiled and wrapped.
Keep all related parts and components together. Do not mix parts.
WARNING
Improper cleaning methods and use of unauthorized cleaning solutions may injure personnel and damage equipment. Refer to TM 9-247 for correct information.
d. Castings.
(1) Clean inner and outer surfaces of castings and all areaa subject to grease and oil with cleaning solvents. Refer to TM 9-247.
(2) Use a stiff brush to remove sludge and gum deposits.
WARNING
Compressed air used for cleaning purposes will not exceed 30 psi (207 kPa). Use only with effective chip guarding and personal protective equipment (goggles/shield, gloves, etc.).
(3) Use compressed air to blow out all tapped capscrew holes and dry castings after cleaning.
2-30
TM 9-2320-387-24-l
2- 14. CLEANING (Cont’d) \
e. Oil Passagea Particular attention must be given to all oil passages in castings and machined parts. Oil passages must be clean and free of any obstructions.
(1) Clean passages with wire probes to break up any sludge or gum deposits.
(2) Wash passages by flushing with solvents. Refer to TM 9-247.
(3) Dry passages with compressed air.
CAUTION
Do not allow solvents to come in contact with seals, cables, or flexible hoses. These cleaners cause leather, rubber, and synthetic materials to dry out, rot, and lose pliability, making them unserviceable.
f. Nonmetallic Parts. Clean hoses and other nonmetallic part6 with soap and water.
g. Bearings.
WARNING
Do not use compressed air to dry bearings. Spinning a dry bearing with compressed air may cause injury to personnel or damage to equipment.
(1) Bearings require special cleaning. After removing surface oil and gum deposits, place bearings in hot oil, 140°F (6O”C), to loosen congealed oil and grease. Wipe bearings dry with a lint-free cloth; do not use compressed air.
(2) See TM 9-214 for information and care of bearings.
h. Electrical Component6
(1) Clean electrical components with clean cloth dampened with drycleaning solvent. Care must be taken not to damage protective insulation.
WARNING
Compressed air used for cleaning purposes will not exceed 30 psi (207 kPa). Use only with effective chip guarding and personal protective equipment (goggles/shield, gloves, etc.).
(2) Use compressed air to dry electrical components.
2- 15. INSPECTION
a. General Instruction& Procedure6 for inspections will be the same for many parts and components which make up the vehicle subassemblies. General procedures are detailed in steps b through IL Dimensional standards for parts have been 6xed at extremely close tolerances, so use specification tables. Use specified inspection equipment for inspection where cracks and other damage cannot be spotted visually. Exercise extreme care in all phases of inspection. Repair or replace all un6erviceable components (para. 2-16).
b. Castings.
(1) Inspect all ferrous and nonferrous castings for cracks. See MIL-STD-6866, Inspection, Penetrant Methods. Particularly check areas around studs, pipe plugs, threaded inserts, and sharp comers. Replace cracked &&ings.
(2) Inspect machined surfaces for nicks, burrs, and raised metal. Mark damaged areas for repair or replacement.
(3) Inspect all pipe plugs, pipe plug openings, capscrews, and capscrew openings for damage and stripped threads. Replace if damaged or threads are stripped.
(4) Check all gasket mating surfaces, flanges on housings, and supports for warpage with a straight- edge or surface plate. Inspect mating flanges for discolorations which may indicate leakage. Replace if warped.
(5) Check all castings for conformance to applicable repair standards.
2-31
TM 9-2320-387-24-l
2- 15. INSPECTION (Co&d)
c. Bearings. Check all bearings for conformance to applicable repair standards. Refer to TM 9-214.
d. Bushings and Bushing-Type Bearings.
(1) Check all bushings and bushing-type bearings for secure fit, evidence of heating, wear, burrs, nicks, and out-of-round condition.
(2) Check for dirt in lubrication holes or grooves. Holes and grooves must be clean and free from damage.
e. Machined Parts.
(1) Check machined parts for cracks, distortion, and damage.
(2) Check all surfaces for nicks, burrs, and raised metal.
f. Studs, Bolts, Capscrews, and Nuts. Replace if bent, loose, stretched, or threads are damaged.
g. Gears. NOTE
When gear teeth wear limits are not established, good judgment is required to determine if gear replacement is necessary
(1) Inspect all gears for cracks and missing teeth Replace if cracked or teeth are missing.
(2) Inspect gear teeth for wear, sharp fins, burrs, and galled or pitted surfaces.
(3) Inspect splines for wear, burrs, and galled or pitted surfaces.
(4) Check keyway slots for wear and/or damage.
h. Oil Seals. Oil seals are mandatory replacement items.
i. Casting Plugs. Inspect for leakage. Replace plugs when leakage is present.
j. Springs. Inspect for damaged, distorted, and collapsed coils.
k. Snaprings, Retaining Rings, and Washers. Many of these parts are mandatory replacement items. Inspect all others for obvious damage.
2- 16. REPAIR :
a General Instructions. Repair of most parts and components is limited to general procedures outlined in applicable maintenance instructions and the following detailed procedures b through g.
CAUTION
Repaired items must be thoroughly cleaned to remove metal chips and abrasives to prevent them from entering working parts of vehicle components.
b. Castings.
(1) All cracked castings will be replaced.
(2) Only minor repairs to machined surfaces, flanges, and gasket mating surfaces are permitted. Remove minor nicks, burrs, and/or scratches br:
(a) Using fine mill file.
(b) Using abrasive cloth dipped in cleaning solvent.
(cl Lapping across a surface plate.
(d) Remachining of machined surfaces to repair damage, warpage, or uneven surfaces is not permitted. Replace castings.
(3) Repair damaged threaded pipe plug and/or capscrew holes with a thread tap, or repair oversize holes with threaded inserts.
2-32
TM 9-2320-387-24-l
2-16. REPAIR (Cont’d)
c. Bearings. See TM 9-214.
d. Studs. Replace all bent and stretched studs. Repair minor thread damage with a thread restorer file. Replace studs having stripped or damaged threads as outlined below:
(11 Remove using a stud remover. Back studs out slowly to avoid heat buildup and seizure which can cause stud to break off.
(2) If studs break off too short to use a stud remover, use extractor to remove.
(3) Replacement studs have a special coating and must have a small amount of antiseize compound (appendix C, item 161 applied on threads before stud is installed. Install replacement stud slowly to prevent heat buildup and snapping off.
e. Gears.
(11 Remove gears using pullers, as required.
(21 Use the same methods described in procedure b, step 2 for castings to remove minor nicks, burrs, or scratches on gear teeth.
(31 If keyways are worn or enlarged, replace gear.
f. Bushings and Bushing-Type Bearings. When bushings and bushing-type bearings seize to a shaft and spin in the bore, the associated part must also be inspected and replaced, as required.
g. Oil Seals.
(11 Remove oil seals being careful not to damage casting or adapter bore.
(21 Always install new seal in bore using proper seal-replacing tool.
2- 17. ASSEMBLY
a. Cleanliness is essential in all component assembly operations. Dirt and dust, even in minute quantities, are abrasive. Parts must be cleaned as specified, and kept clean. Wrap or cover parts and components when assembly procedures are not immediately completed.
b. Coat all bearings and contact surfaces with operating oil (differential oil for differential parts, transmission oil for transmission parts, etc.) to ensure lubrication of parts during initial operation after repair.
Section V. ELECTRICAL/MECHANICAL SYSTEMS TROUBLESHOOTING
pKxK--2_18. ‘-
a. This section provides information to diagnose and correct malfunctions of the electrical/mechanical system.
b. Principles of operation showing system operation can be found in chapter 1. It should be used as a reference when performing electrical/mechanical troubleshooting.
c. Each malfunction symptom given for an individual component or system is followed by step(s) you should take to determine the cause and corrective action you must take to remedy the problem.
d. Before taking any action to correct a possible malfunction, the following rules should be followed:
(11 Question operator to obtain any information that might help determine the cause of the problem.
(2) Never overlook the chance that the problem could be of simple origin. The problem could be corrected with minor adjustment.
(3) Use all senses to observe and locate troubles.
2-33
TM 9-2320-387-24-l
2- 18. GENERAL (Cont’d) -.
(4) Use test instruments or gauges to help determine and isolate problem.
(5) Always isolate the system where the malfunction occurs and then locate the defective component.
(6) Use standard automotive theories and principles when troubleshooting the vehicles covered in this manual.
_ e. The STE/ICE-R is an integral part of these troubleshooting procedures. It should be used whenever
possible, although other options are given when available. The Vehicle Identification Number MN) assigned to the ECV vehicles is 2104 is the temporary VIN). On page 2-557, you will find information on STEKE-R description and operation. Use this information to become familiar with STEKE-R operation and the equipment contained in the test set. On page 2-537, you will find STE/ICE-R setup and internal checks. These must be performed prior to performing tests.
2-34
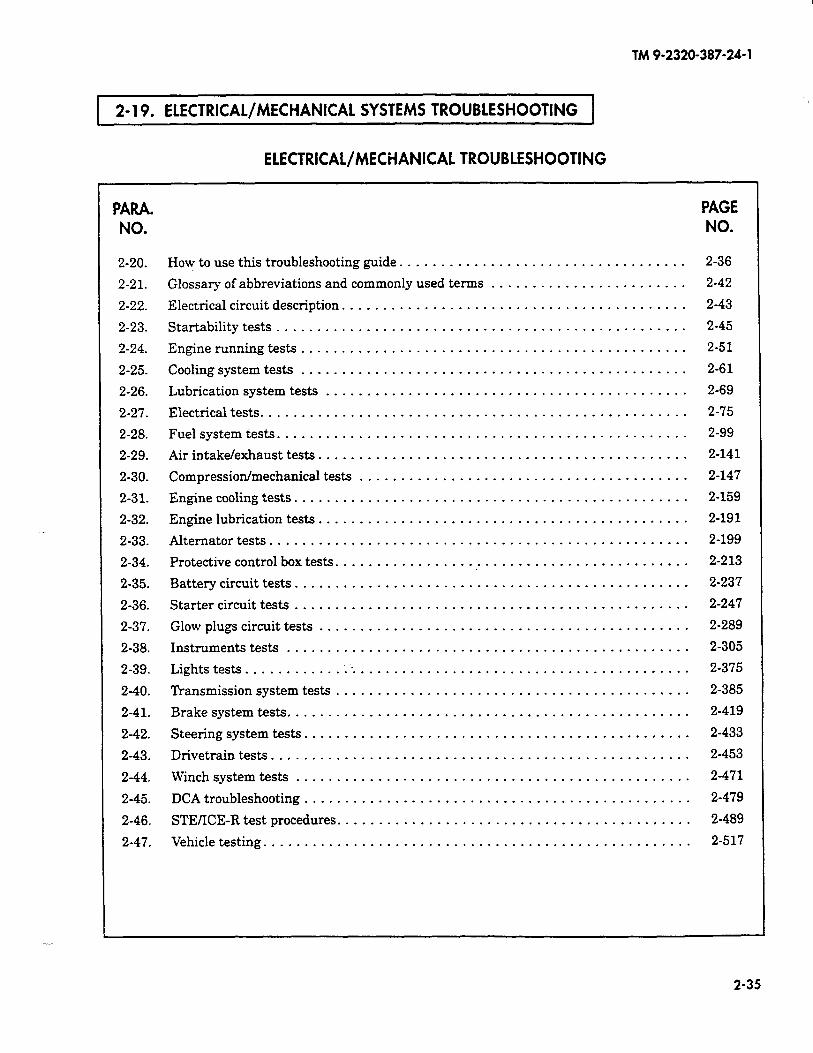
TM9-2320-387-24-l
1 2-l 9. ELECTRICAL/MECHANICAL SYSTEMS TROUBLESHOOTING 1
ELECTRICAL/MECHANICAL TROUBLESHOOTING
PARA. PAGE NO. NO.
2-20. How to use this troubleshooting guide. .................................. 2-36
2-2 1. Glossary of abbreviations and commonly used terms ........................ 2-42
2-22. Electrical circuit description. ......................................... 2-43
2-23. Startability tests .................................................. 2-45
2-24. Engine running tests ............................................... 2-51
2-25. Cooling system tests ............................................... 2-61
2-26. Lubrication system tests ............................................ 2-69
2-27. Electricaltests .................................................... 2-75
2-28. Fuel system tests. ................................................. 2-99
2-29. Air intake/exhaust tests. ............................................ 2-141
2-30. Compression/mechanical tests ........................................ 2-147
2.31. Engine cooling tests. ............................................... 2-159
2.32. Engine lubrication tests. ............................................ 2-191
2.33. Alternator tests. .................................................. 2-199
2.34. Protective control box tests. ........................................... 2-213
2.35. Battery circuit tests. ............................................... 2-237
2.36. Starter circuit tests ................................................ 2-247
2-37. Glow plugs circuit tests ............................................. 2-289
2.38. Instruments tests ................................................. 2-305
2-39. Lightstests............;- ........................................ 2-375
2-40. Transmission system tests ........................................... 2-385
2.41. Brake system tests. ................................................ 2-419
2.42. Steering system tests. .............................................. 2-433
2.43. Drivetrain tests. .................................................. 2-453
2.44. Winch system tests ................................................ 2-471
2.45. DCA troubleshooting ............................................... 2-479
2.46. STE/ICE-R test procedures. .......................................... 2-489
2.47. Vehicle testing. ................................................... 2-517
2-35
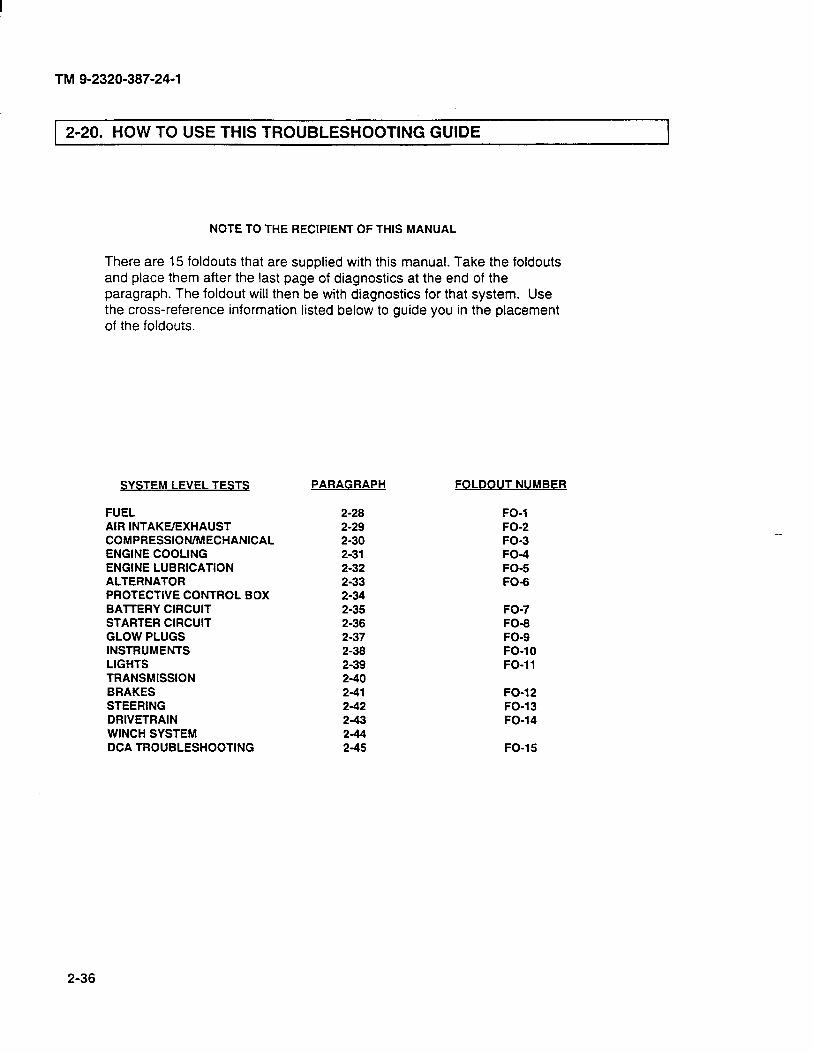
TM Q-2320-387-24-1
1 2-20. HOW TO USE THIS TROUBLESHOOTING GUIDE 1
NOTE TO THE RECIPIENT OF THIS MANUAL
There are 15 foldouts that are supplied with this manual. Take the foldouts and place them after the last page of diagnostics at the end of the paragraph. The foldout will then be with diagnostics for that system. Use the cross-reference information listed below to guide you in the placement of the foldouts.
SYSTEM LEVEL TESTS
FUEL 2-28 AIR INTAKE/EXHAUST 2-29 COMPRESSION/MECHANICAL 2-30 ENGINE COOLING 2-31 ENGINE LUBRICATION 2-32 ALTERNATOR 2-33 PROTECTIVE CONTROL BOX 2-34 BAlTERY CIRCUIT 2-35 STARTER CIRCUIT 2-36 GLOW PLUGS 2-37 INSTRUMENTS 2-38 LIGHTS 2-39 TRANSMISSION 2-40 BRAKES 2-41 STEERING 2-42 DRIVETRAIN 2-43 WINCH SYSTEM 2-44 DCA TROUBLESHOOTING 2-45
PARAGRAPH FOLDOUT NUMBER
FO-1 FO-2 FO-3 FO-4 FO-5 FO-6
FO-7 FO-9 FO-9 FO-10 FO-11
FO-12 FO-13 FO-14
FO-15
2-36
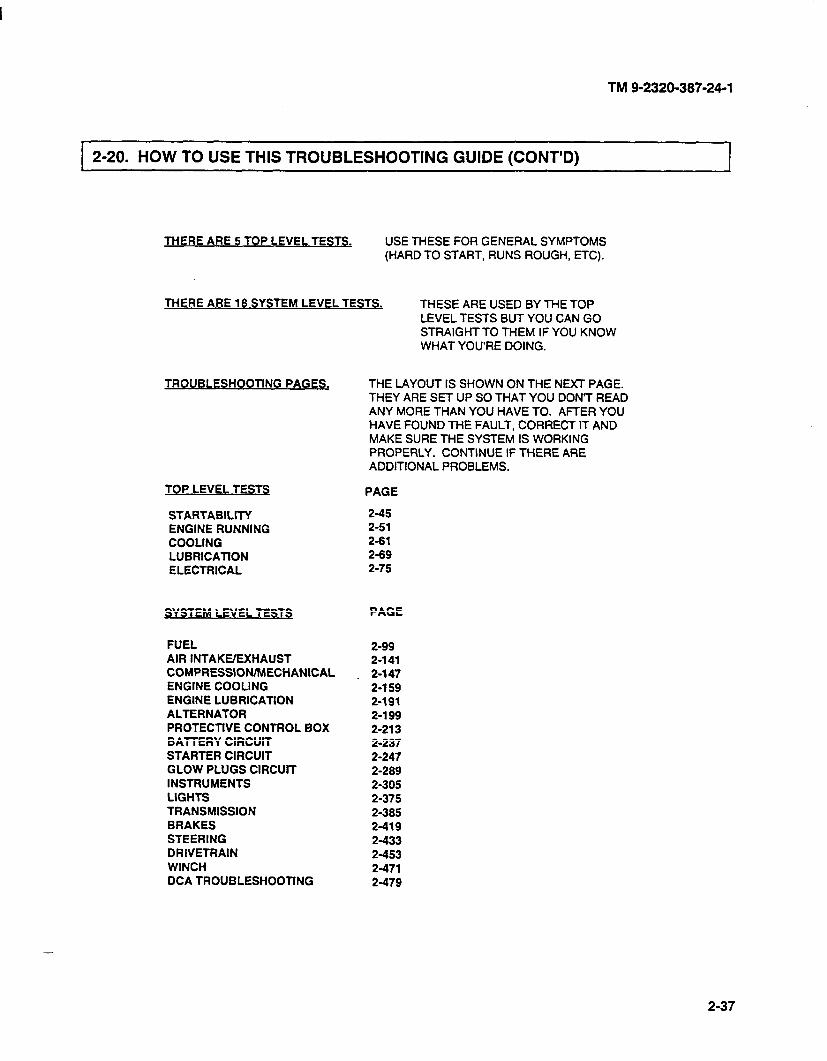
TM 9-2320-387-24-l
2-20. HOW TO USE THIS TROUBLESHOOTING GUIDE (CONT’D)
THERE ARE 5 TOP LEVEL TESTS. USE THESE FOR GENERAL SYMPTOMS (HARD TO START, RUNS ROUGH, ETC).
THERE ARE 18 SYSTEM LEVEL TESTS. THESE ARE USED BY THE TOP LEVEL TESTS BUT YOU CAN GO STRAIGHTTO THEM IF YOU KNOW WHAT YOU’RE DOING.
TROUBLESHOOTlNG PAGES.
TOP LEVEL TESTS PAGE
STARTABlLlTY 2-45
ENGINE RUNNING 2-51
COOLING 2-61
LUBRlCATlON 2-69
ELECTRICAL 2-75
SYSTEM LEVEL TESTS PAGE
FUEL 2-99 AIR INTAKE/EXHAUST 2-l 41 COMPRESSION/MECHANICAL 2-147 ENGINE COOLING 2-159 ENGINE LUBRlCATlON 2-191 ALTERNATOR 2-l 99 PROTECTlVE CONTROL BOX 2-213 BAITERY CIRCUIT 2-237 STARTER CIRCUIT 2-247 GLOW PLUGS CIRCUIT 2-289 INSTRUMENTS 2-305 LIGHTS 2-375 TRANSMISSION 2-385 BRAKES 2-419 STEERING 2-433 DRIVETRAIN 2-453 WINCH 2-471 DCA TROUBLESHOOTING 2-479
THE LAYOUT IS SHOWN ON THE NEXT PAGE. THEY ARE SET UP SO THAT YOU DON7 READ ANY MORE THAN YOU HAVE TO. AFTER YOU HAVE FOUND THE FAULT, CORRECT IT AND MAKE SURE THE SYSTEM IS WORKING PROPERLY. CONTINUE IF THERE ARE ADDITIONAL PROBLEMS.
2-37

TM 9-2320-387-24-l
1 2-20. HOW TO USE THIS TROUBLESHOOTING GUIDE (CONT’D)
PAGE LAYOUT All diagnostic logic and flowcharts are on the left-hand page, with supporting information, help, test, instructions, and vehicle operation on the right.
1
Question number, so you know where you are and where to go when entering or leaving a test chain.
\
/
Question to be answered.
I
Notes, warnings, and cautions about a particular question.
Instructions for how to perform a test or make a measurement,
-n-
usually in a box.
t--/
-L
“I11”L*sI” m r --i
.-_I_ “_W__.. __._-__ -“-
.__--._
_.__.“..I.
_“..m”“.___.
_-_-
--I D--c-“.._ ..,..“*__._“.
___.mel-m._ _.__“.._I .“_, w--B “.1._1.-._ ___I_ “” _I_-
.-- -rmr iL=i .a.-.--
,_._-_- _.- __I_ --_I -I-_ . . .
/ \ Known info and possible Reason for question: problems with the system. This is to help by telling you why
‘Test options: Multiple choice of
it’s being asked. This is especially methods you can use to obtain
helpful when something’s the answer to the question.
‘just a little bit bad’ and you’re not sure if it passed or failed.
. ”
, \ V /
DlAGNOSTtC REFERENCE FLOWCHART INFORMATION
HOW TO TROUBLESHOOT
PICK THE TESTS:
DIAGNOSTIC PROCEDURE:
Select either a top level or a system level test.
Just answer the questions on the left-hand page and follow the YES or NO path. Helpful information about the question is also on the right-hand page. If you aren’t sure about a question or procedure, look on the right page for notes, instructions, and help.
-.
2-38
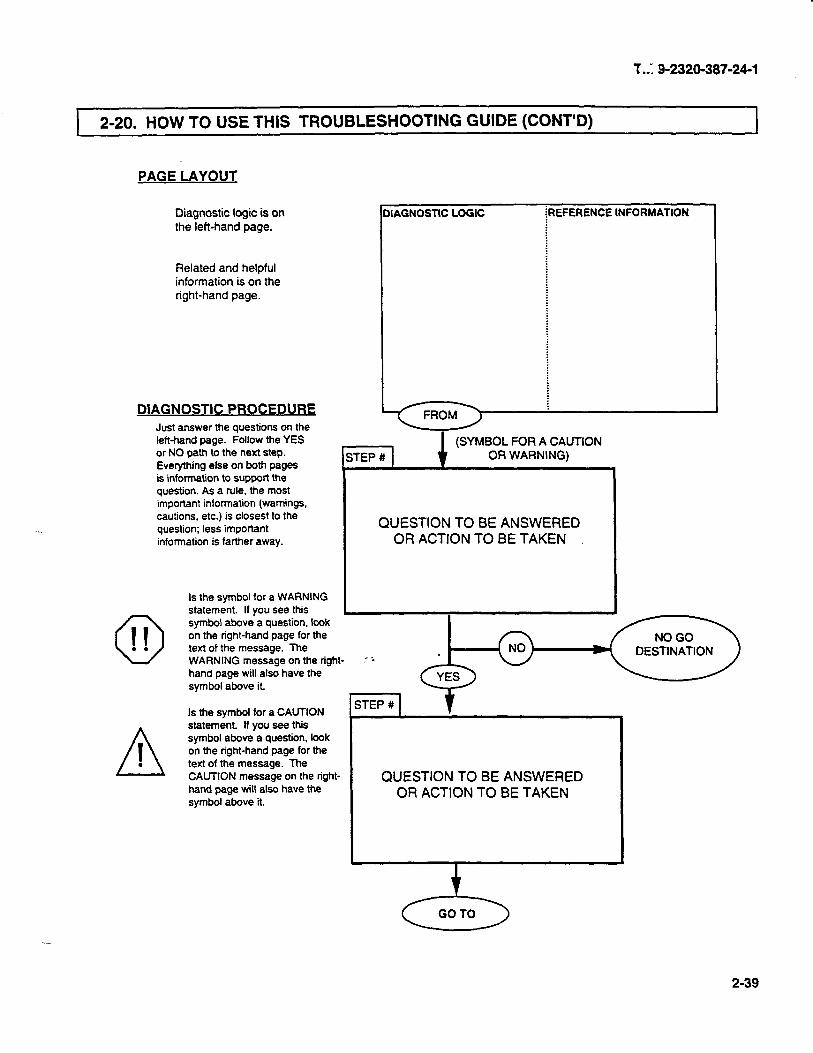
I
T ..: 9-2320-387-24-l
1 2-20. HOW TO USE THIS TROUBLESHOOTING GUIDE (CONT’D) 1
PAGE LAYOUT
Diagnostic logic is on the left-hand page.
Related and helpful information is on the right-hand page.
DIAGNOSTIC PROCEDURE Just answer the questions on the left-hand page. Follow the YES or NO path to the next step. Everything else on both pages is information to support the question. As a rule, the most important information (warnings, cautions, etc.) is closest to the question; less important information is farther away.
0 II . .
A I .
DIAGNOSTIC LOGIC PREFERENCE INFOR~~ATI~N
_i_
jTEP# (SYMBOL FOR A CAUTION
OR WARNING)
QUESTION TO BE ANSWERED OR ACTION TO BE TAKEN
Is the symbol for a WARNING statement. If you see this symbol above a question, look on the right-hand page for the text of the message. The WARNING message on the right- hand page will also have the symbol above it.
Is the symbol for a CAUTION statement. If you see this symbol above a question. look on the right-hand page for the text of the message. The CAUTlON message on the right- hand page will also have the symbol above it.
QUESTION TO BE ANSWERED OR ACTION TO BE TAKEN
23 GO TO
2-39
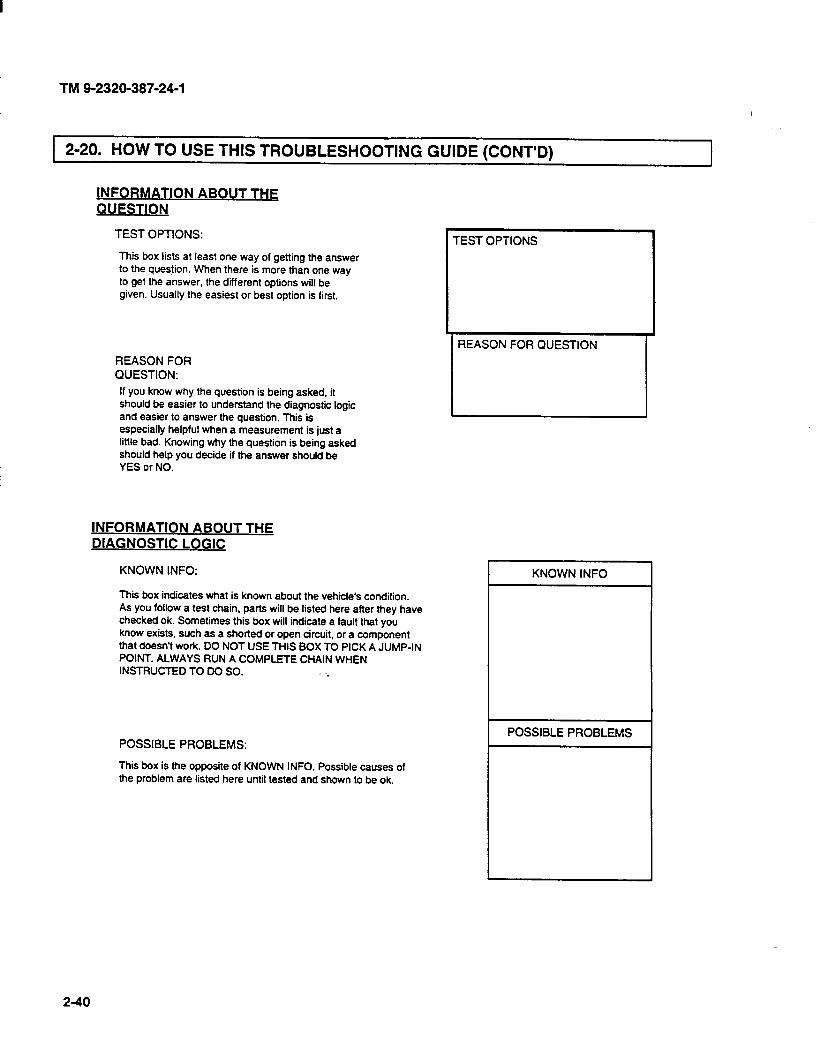
TM 9-2320-387-24-l
2-20. HOW TO USE THIS TROUBLESHOOTING GUIDE (CONT’D)
INFORMATION ABOUT THE QUESTION
TEST OPTIONS:
This box lists at least one way of getting the answer to the question. When there is more than one way to get the answer, the different options will be given. Usually the easiest or best option is first.
REASON FOR QUESTION:
If you know why the question is being asked, it should be easier to understand the diagnostic logic and easier to answer the question. This is especially helpful when a measurement is just a little bad. Knowing why the question is being asked should help you decide if the answer should be YES or NO.
INFORMATION ABOUT THE DIAGNOSTIC LOGIC
KNOWN INFO:
This box indicates what is known about the vehicle’s condition. As you follow a test chain, parts will be listed here after they have checked ok. Sometimes this box will indicate a fault that you know exists, such as a shorted or open drcuit, or a component that doesn’t work. DO NOT USE THIS BOX TO PICK A JUMP-IN POINT. ALWAYS RUN A COMPLETE CHAIN WHEN INSTRUCTED TO DC SO. ’ :
POSSIBLE PROBLEMS:
This box is the opposite of KNOWN INFO. Possible causes of the problem are listed here until tested and shown to be ok.
TEST OPTIONS
KNOWN INFO
POSSIBLE PROBLEMS
2-40

TM 9-2320-387-24-l
1 2-20. HOW TO USE THIS TROUBLESHOOTING GUIDE (CONT’D)
INFORMATION ABOUT THE QUESTION
All warnings and cautions are given next to (or as close as possible to) the arrow pointing to the particular question. Look for the symbol that is in the box for the question in order to locate the particular note. Helpful notes, test procedures, or other information related to the question are provided here. These notes are provided as supporting information only; you don’t usually need them to answer the question. The more skilled you become, the less you’ll have to read these.
NOTES, WARNINGS, AND CAUTfONS ARE IN BOLDFACE TYPE.
Additional information, notes, and/or suggestions are in normal type so as not to draw too much attention.
Any cross references to other manuals will be located in this area.
TEST PROCEDURES
These are special notes about how to make measurements with the test equipment. Ocassionally. if space is limited on a page, the easiest procedure will be listed with a page reference for the other procedures if you would rather use them. The procedures presume a basic working knowledge of the equipment to be used, but references are included for the less experienced operator.
PICTURES
The pictures are supposed to make it easier to find what you’re looking for, such as a pin in a connector or a particular wire or component.
TYPE OF MEASUREMENT TYPE OF EQUIPMENT
%ocedure for performing the measurement using he type of equipment listed above.
PICTURES ARE PROVIDED WHEREVER POSSIBLE.
2-41
TM 9-2320-387-24-l
2-21. GLOSSARY OF ABBREVIATIONS AND COMMONLY USED TERMS -
PCB - Protective Control Box, located on the firewall above the brake pedal.
STE/ICE-R - Simplified Test Equipment for Internal Combustion Engines - Reprogrammable, a testing system used for performing tests and measurements on the vehicle. In addition to acting as a conventional digital multimeter to measure voltage, current, and resistance, it is also capable of measuring pressure, speed,.compression unbalance, engine power, and some specialized battery and starter evaluations. It is powered from the vehicle batteries. The complete system includes a vehicle test meter (VTM), a transducer kit (TK), cables, transit case, and technical publications.
DCA - Diagnostic Connector Assembly, an electrical harness on the vehicle which allows the STE/ICE-R to be powered and to make measurements of key vehicle signals from a single connection. In addition to many basic electrical signals such as starter voltage and current, it includes engine speed and fuel supply pressure. The STE/ICE-R can make TK measurements at the same time that it is connected to the DCA.
VTM - Vehicle Test Meter, a box which performs the measurement and analysis functions of the STE/ICE-R systems.
TK (and TK mode) - Transducer Kit, a collection of transducers, adapters, and fittings which permit the STE/ICE-R to be used as a general purpose measurement system for any application. This allows the STE/ICE-R to be used anywhere that you want to measure voltage, current, resistance, pressure, or speed. TK mode of operation is what you are doing when you use this kit (as opposed to DCA mode where you are using the vehicle’s built-in sensors to make measurements).
Compression unbalance - A STE/ICE-R test that gives an indication of any engine cylinders that have lower compression then the average. It does this by monitoring the battery voltage during cranking. As each cylinder goes into compression, the extra load on the starter shows up as a drop in voltage. This works well for finding one or more cylinders that have a compression problem, but don’t forget that it doesn’t give the average compression. If all cylinders are low by the same amount, this test doesn’t find it.
Troubleshooting - The process of making measurements and observing the operation of the vehicle to find out if anything is wrong with it and then to locate any problem that exists.
Diagnostics - Troubleshooting by following an exact procedure.
Test Chain - A series of tests to be followed in a particular order or sequence. It is referred to as a ‘chain” of tests because they are all connected one after another like the links of a chain.
System - A collection of devices which are all related to each other because they depend on each other to do some function or job. For instance, the function of the fuel system is to inject fuel into the cylinders at the correct time in the correct amount and with the correct quality. The collection of devices that are required to do this include the fuel pump, fuel lines, lift pump, fuel filter, injection pump, and injectors.
2-42

TM 9-2320-387-24-l
12-21. GLOSSARY OF ABBREVIATIONS AND COMMONLY USED TERMS (CONT’D) 1
Functional flow schematic - A diagram which is much like a normal electrical circuit diagram, except that its purpose is to show the flow of information through the system (or the flow of a signal or the flow of some material such as the fuel). This kind of diagram shows how each component or device depends on the others. It is called functional flow because it shows the function (purpose of each component) and how the output of one component flows into the next. For troubleshooting, the functional flow schematic is better than the usual circuit diagram because it allows you to quickly see how the system works and what to expect when you make measurements on a system that has faults. You can’t expect the output of a device to be good when it has a bad input.
12-22. ELECTRIC CIRCUIT DESCRIPTION
An electrical circuit is a collection of electrical devices which are connected in a loop from a positive voltage source (the battery positive) to a negative source ( the battery negative). It must be continuous, with no breaks (no opening in the loop) so that electrical current can flow from the positive to the negative. You can think of it like the plumbing in your house. There must be a source of water under pressure or nothing will flow through the pipes. Water pressure is like the positive voltage of the battery. There may be branches (tees) in the pipes going to several different places, but if you don’t connect the pipes, you don’t get water. The same thing is true with the electrical circuit. If the wires aren’t connected, no electricity will flow through them.
In the plumbing of a house, all of the water must go to the drain (you won’t permit it to be spilled on the floor). With the vehicle electrical circuit, the drain is the negative terminal of the battery. With the water pipes, the water always flows from high pressure to low pressure (another way of saying that water always flows downhill). The electrical current is the same as the water flow - it always goes from positive to negative voltage. Voltage is to electricity what pressure is to water. Just like the pressure in the water pipe, the greater the voltage, the more electricity will flow through the wires. Unlike the water pipes that will spill the water if they break, you can’t spill the electricity. The closest thing to this in an electrical circuit is when two wires touch that aren’t supposed to and the current flows to some place that it shouldn’t (this is called a short circuit or a short). Shorts often happen where the wire touches the vehicle body (the body is connected to the negative terminal of the battery). Since the current always flows through the easiest path to negative, it will bypass the rest of the circuit where it was supposed to go, and go through the short directiy to the battery. Because this new path to the battery negative is shorter, the malfunction is called a short circuit or a short.
If you put a valve in a water pipe, you can control how much water flows by closing the valve. What you are doing is pinching off the pipe with the valve which restricts the flow. if you shut it off completely, you can stop all water from flowing. In the electrical circuit, a resistor acts like a valve. If you make the resistor extremely large, you can stop the current from flowing. The resistance is measured in ohms.
2-43
. Atl 9-2328-387-24-l
-
1 2-22. ELECTRIC CIRCUIT DESCRIPTION (CONT’D)
When there is no electrical connection, such as when a wire is disconnected, the resistance is infinite (too large to be measured). No current will flow through the wires, because the circuit is no longer continuously connected. This is referred to as an open circuit or simply an open. Remember that an electrical circuit is formed by continuous loops of devices connected together. When you are troubleshooting, you are often asked to check for continuity, which simply means that you need to find out if there is a continuous path from one place in the circuit to another. Since you are trying to see if the path is continuous, you must check wires and switches rather than any special or active devices. You will usually just measure the resistance between two points. If the resistance is zero (or the value of any resistance that is supposed to be there), then there is continuity. In the case of looking for a short, this may mean that you have found the short. If the resistance is off-scale on the meter (infinite resistance) then there is no connection and you have found an open. A continuity test is the same whether you are looking for an open or a short, the only difference being what resistance values you are looking for and where you make the measurements.
You are familiar with the typical light switch which allows you to turn a light on and off. A switch of any kind in an electrical circuit is simply a way of opening the loop so that no current will flow through it. Something to remember while troubleshooting is that everything on the positive side of the switch still has full battery voltage while everything from the switch on through the rest of the circuit is (or should be) connected to the battery negative terminal and you will measure zero volts. This is easy to remember if you think of the faucet on a sink. If you shut off the faucet, there is no water flowing into the sink, but the water in the pipe is still under pressure.
Sometimes a switch is turned on and off automatically. An example is a circuit breaker, which is a device that measures how much current is flowing through it. If the current goes too high (possibly damaging equipment or melting the wires), then it opens an internal switch to stop the current flow. A relay is another form of switch that is turned on and off under remote control using a signal in another wire. When a device which requires a very large amount of current (such as the starter motor) must be turned on and off, a power relay is used. The idea is to use a small switch to turn on a larger switch. Thus, you don’t have very large wires going all over the vehicle or large switches on the instrument panel. In the case of the starter’s power relay, it is also called a solenoid. A solenoid is any device that changes the electrical current into a forward and backward motion. It is something like an electrical motor except that instead of continuously going around in the same direction, it goes in or out. For the starter, the solenoid is used to push a very large switch into the ON position.
When testing a circuit, you will need to know how much current is flowing. Current is easily measured with the STOICE-FL A device called a shunt is connected to the negative terminal of the battery. A shunt is a very precise resistor designed so that for every 1,000 amps of current that flow through it, there is a drop of .1 volt from one side to the other (different shunts may have different values). By measuring the voltage across the shunt, you know how much current is flowing through the circuit. The shunt is placed on the negative side because it is safer (less chance of accidents which may short out the batteries). Since all of the current eventually goes through the negative battery terminal anyway, the shunt gives the same measurement as if it were connected to the positive terminal. You can think of the shunt as doing the same thing as the water meter in your house. As you turn devices such as lights on or off, you can use the shunt to measure how much current they are using.
2-44
TM 9-2329-387-24-l
12-23. STARTABILITY TESTS I
This is a top level test for problems with an engine that doesn’t start, or starts but immediately stops, or is very hard to start. If the engine starts but doesn’t run well after starting, try the STARTABILITY tests first.
FOR THE ENGINE TO START, ALL OF THE BASIC SYSTEMS SHOWN BELOW MUST BE WORKING. THESE STARTABILITY TESTS WILL HELP YOU TO
VERIFY THE CONDITION OF EACH OF THESE SYSTEMS.
BAlTERY I I ClRCUrr
I ENGINE MECHANICAL (CRANKING, COMPRESSION, ETC.) I
I ENGINE STARTED, AVAILABLE FOR POWER I
. :
A functional flow schematic is not applicable to this section. However, so that you may refer to sections as you need them, a
quick index to the systems required for starting is given here.
PARAGRAPH I PAGE
BAlTERY ClRCUlT 2-237
GLOW PLUGS CIRCUIT 2-289
STARTER CIRCUIT 2-247
FUEL SYSTEM 2-99
AIR INTAKE/EXHAUST I 2-141
COMPRESSION/MECHANICAL 1 2-147
2-45

TM 9-2320-387-24-l
STARTABILITY
I KNOWN INFO I
NOTHING
FUEL SYSTEM AIR INTAKE/EXHAUST GLOW PLUGS ENG MECHANICAL
KNOWN INFO
STARTER SYSTEM OK tl BATTERIES OK ENGINE NOT LOCKED
1 POSSIBLE PROBLEMS 1
FUEL SYSTEM AIR INTAKE/EXHAUST GLOW PLUGS COMPRESSION
I I
I KNOWN INFO I ENGINE NOT LOCKED BATTERIES OK STARTING SYSTEM OK FUEL SYSTEM OK
POSSIBLE PROBLEMS
AIR INTAKE/EXHAUST COMPRESSION GLOW PLUGS
I I
DOES THE ENGINE CRANK NORMALLY? (STARTER ENGAGES, CRANKS ENGINE AT LEAST 100 RPM. STARTER DISENGAGES)
good enough to start the engrne.
2 1 TEST OPTIONS
RUN THE FUEL SYSTEM TESTS. RETURN HERE.
REASON FOR TESTS
If the fuel system doesn’t , work, the vehicle won’t
start.
3 1 TEST OPTIONS
RUN THE AIR INTAKE/EXHAUST AIR INTAKE/EXHAUST TESTS
TESTS. RETURN HERE. (Page 2-141)
REASON FOR TESTS
The air intake/exhaust system tests are easy to run and can cause starting problems.
REFERENCE INFORMATION
Make sure all of the vehicle’s fluids are at the proper level.
You could still have battery or starter problems with a cranking speed over 100 rpm. but that shouldn’t stop the engine from starting. Tests for the battery and starter can be run separately, if you want to run them.
TM 9-2X%387-24-l
STARTABILITY
ENGINE RPM STEIICE-R TEST 10
1. Start Test 10, Engine RPM 2. Crank or start the engine. Displayed
reading is RPM. Cranking rpm should be aooroximatelv 1 W-200. Idle rpm should be
I 7bG750. *
247
TM 9-2320-387-24-l
STARTABILITY
KNOWN INFO 1 ENGINE NOT LOCKED BATTERIES OK
I I
RUN THE GLOW PLUGS CIRCUIT
STARTING SYSTEM OK TESTS. RETURN HERE. FUEL SYSTEM OK AIR INTAKE/EXHAUST OK
I I
GLOW PLUGS COMPRESSION
L
KNOWN INFO
fNGlNE NOT LOCKED 3AlTERIES OK 3TARTlNG SYSTEM OK SLOW PLUGS OK AIR NTAKEEXHAUST -UEL SYSTEM OK
POSSIBLE PROBLEMS
COMPRESSION
DIAGNOSTIC FLOWCHART
REASON FOR QUESTION
If the engine is hard to start it may be the glow plugs.
RUN COMPRESSION UNBALANCE. IS THE COMPRESSION UNBALANCE
STE/ICE-R TEST 14 (Page 2493)
OK?
REASON FOR QUESTION If cylinder compression is far enough out of balance, it could prevent the vehicle from starting. The lower the unbalance, the
MAINTENANCE
YES
Y
2-48
REFERENCE INFORMATION
TM 9-2320-387-24-l
STARTABILITY
0 11 . . WARNING
A hot engine may cause serious burns. Always use caution when approaching a hot engine.
NOTE When using the vehicle’s temperature gauge to determine engine temperature, don’t forget to turn the rotary switch to RUN. The gauges don’t work when power is off.
The colder the engine (and air temperature), the more you need the glowplugs for starting. There are some times when you don’t need to run the glow plugs test. If the engine is warm and the problem is there on a hot day, then the problem is probably NOT the glow plugs or cold start advance, and these tests may be bypassed. If its colder than 50°F, run the glow plugs circuit test, because just a few bad glow plugs can make a minor starting problem much worse.
If the vehicle passes the STUICE-R compression unbalance test, it may still have a compression problem, but it would mean that every cylinder has low compression. This is possible, but not too likely. If you’re confident that everything else is working properly, notify DS maintenance (chapter 14).
COMPRESSION UNBALANCE STEKE-R TEST 14
1. Run tests 72. 73. and 74 to verify that the batteries are OK.
CAUTION
THE GLOW PLUGS CONTROLLER AND THE CONTROL VALVE ELECTRICAL CONNECTOR MUST BE DISCONNECTED PRIOR TO RUNNING THIS TEST.
2. Disconnect wire 54A at injection pump to prevent starting.
3. Disconnect glow plugs controller and control valve electrical connector (to keep waveform clean).
4. Start Test 14. compression unbalance. 5. Wait for the GO message. Crank the engine. 6. Release the rotary switch when the VTM
displays OFF. A number less than 25%
is passing.
GLOW PLUG CONTROLLER HARNESS
TIME-DELAY MODULE
TIME-DELAY MODULE LECTRICAL CONNECT0
NO STEP
2-49/(2-50 blank)

TM 9-2320-387-24-l
2-24. ENGINE RUNNING TESTS
This is a top level test for problems with an engine that starts but doesn’t run well after starting. This includes an engine that starts but doesn’t stay running for very long. If the engine doesn’t start, or starts but immediately stops, or is very hard to start, try the STARTABILITY tests first.
A functional flow schematic is not applicable to this section. However, so that you may refer to sections as you need them, a
quick index to the systems relating to engine running is given here.
I PARAGRAPH I PAGE I
I FUEL SYSTEM I 2-99 I
AIR INTAKE/EXHAUST 2-141
COMPRESSIONhfECHANlCAL 2-147
2-51
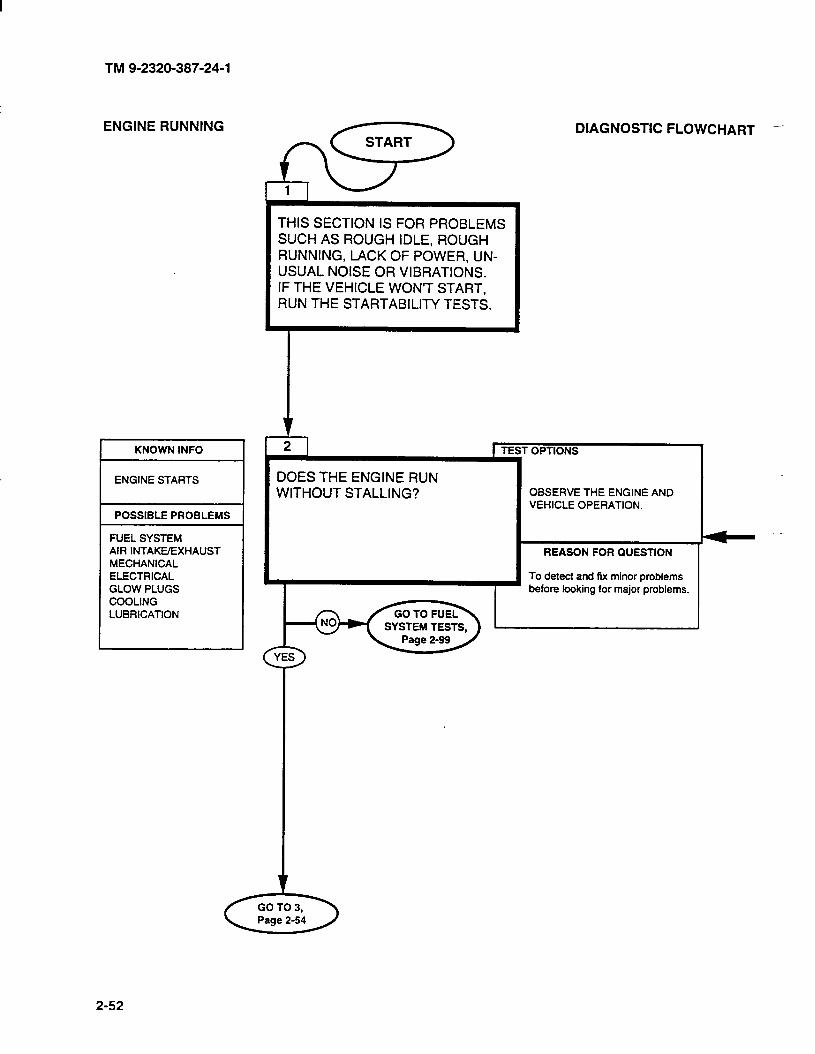
TM 9-2320-387-24-l
ENGINE RUNNING DIAGNOSTIC FLOWCHART
KNOWN INFO I
ENGINE STARTS
POSSIBLE PROBLEMS
FUEL SYSTEM AIR INTAKE/EXHAUST MECHANICAL ELECTRICAL GLOW PLUGS
~ THIS SECTION IS FOR PROBLEMS SUCH AS ROUGH IDLE, ROUGH RUNNING, LACK OF POWER, UN- USUAL NOISE OR VIBRATIONS. IF THE VEHICLE WON‘T START, RUN THE STARTABILITY TESTS.
DOES THE ENGINE RUN WITHOUT STALLING?
’ OPTIONS
OBSERVE THE ENGINE AND VEHICLE OPERATION.
REASON FOR QUESTION
To detect and fix minor problems before looking for major problems.
L
w-
2-52

REFERENCE INFORMATION
I This is a check for all of those problems which
_-- 1 can cause the engine to stop when it shouldn’t. This includes fuel, air, and electrical problems. If the engine starts and then stops immediately, run the staftability tests first
TM 9-2320-387-24-l
ENGINE RUNNING
2-53

TM 9-2320-387-24-l
ENGINE RUNNING
KNOWN INFO
ENGINE STARTS AND STAYS RUNNING
FUEL SYSTEM OK AIR INTAKE/EXHAUST OK
POSSIBLE PROBLEMS
MECHANICAL ELECTRICAL GLOW PLUGS COOLING LUBRlCATlON
DOES THE ENGINE SOUND NORMAL AND HAVE NORMAL VIBRATIONS AT ALL SPEEDS ?
DIAGNOSTIC FLOWCHART -
T OPTIONS
OBSERVE THE ENGINE WHILE RUNNING THE VEHICLE AT VARIOUS SPEEDS.
REASON FOR QUESTtON
There could be problems which would make it unsafe to continue operating or could cause further damage.
RUN THE FUEL SYSTEM TESTS, Page 2-99. IF NO FAULTS FOUND, GO TO COMPRESSION/MECHANICAL TESTS, I
I Page 2-147. I YES 9
2-54
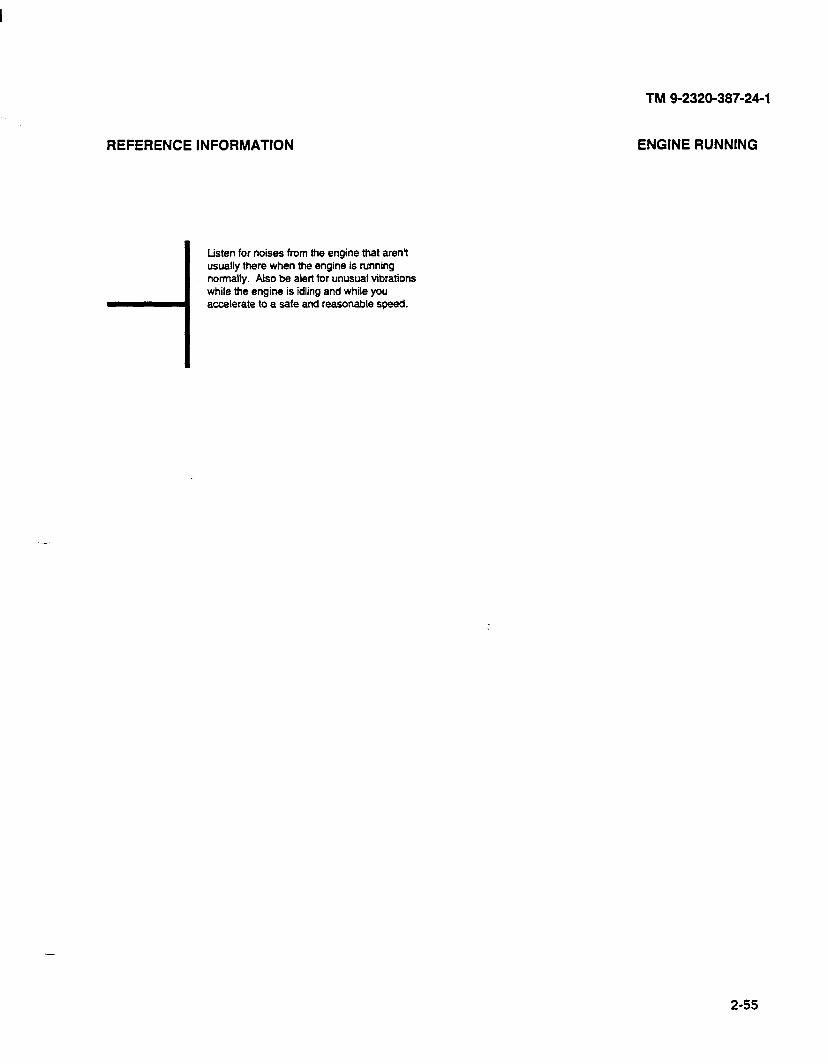
REFERENCE INFORMATION
Listen for noises from the engine that aren’t usually there when the engine is running notmalty. Also be alert for unusual vibrations while the engine is idling and while you accelerate to a safe and reasonable speed.
TM 9-2320-387-24-l
ENGINE RUNNING
2-55
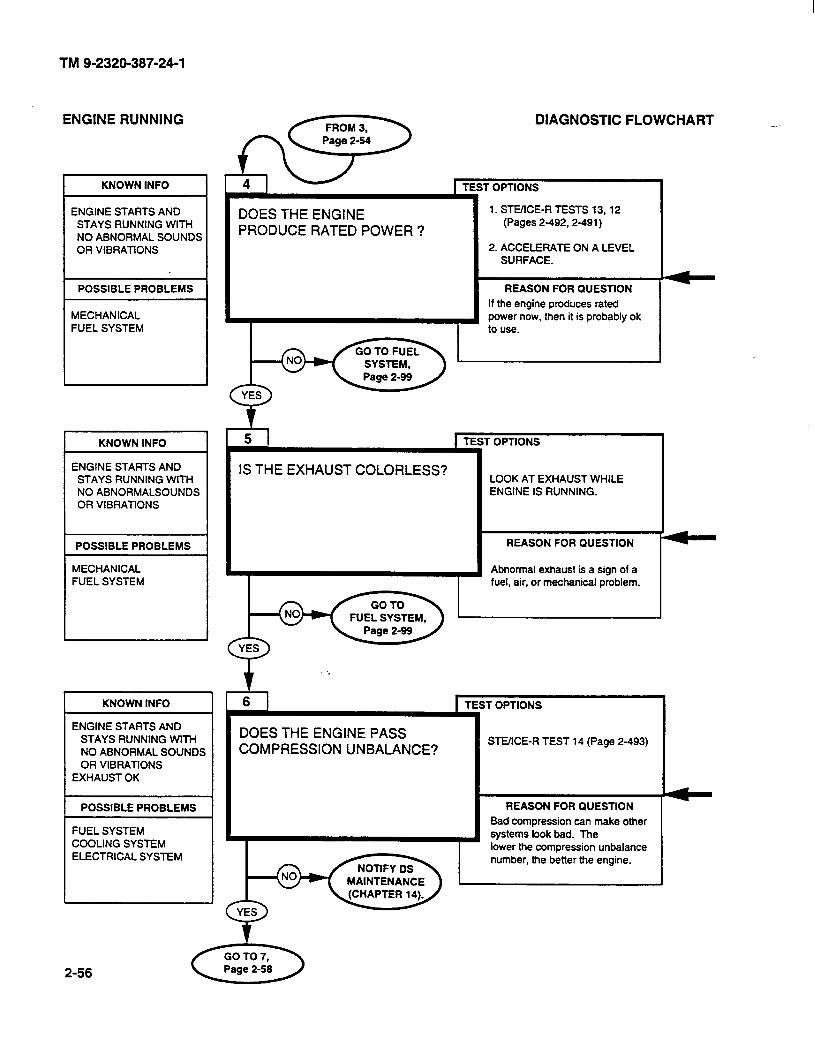
TM g-2320-387-24-1
ENGINE RUNNING
KNOWN INFO
ENGINE STARTS AND STAYS RUNNING WITH NO ABNORMAL SOUNDS OR VIBRATIONS
1 POSSIBLE PROBLEMS 1
MECHANICAL FUEL SYSTEM
I KNOWN INFO I
ENGINE STARTS AND STAYS RUNNING WITH NO ABNORMALSOUNDS OR VIBRATIONS
MECHANICAL FUEL SYSTEM
KNOWN INFO
ENGINE STARTS AND STAYS RUNNING WtTH NO ABNORMAL SOUNDS OR VlBRATfONS
EXHAUST OK
POSSIBLE PROBLEMS
FUEL SYSTEM COOLING SYSTEM ELECTRICAL SYSTEM
DOES THE ENGINE PRODUCE RATED POWER ?
DIAGNOSTIC FLOWCHART
T OPTlONS
1. STEIICE-R TESTS 13.12 (Pages 2-492,2-491)
2. ACCELERATE ON A LEVEL SURFACE.
REASON FOR QUESTlON
If the engine produces rated power now, then it is probably ok to use.
IS THE EXHAUST COLORLESS?
q 6 r
: OPTIONS
LOOK AT EXHAUST WHILE ENGINE IS RUNNING.
REASON FOR QUESTION
Abnormal exhaust is a sign of a fuel, air, or mechanical problem.
1 TEST OPTIONS
88”:“““““‘,,- STEIlCE-R TEST 14 (Page 2-493)
systems look bad. The lower the compression unbalance number, the better the engine.
I REASON FOR QUESTION
Bad compression can make other
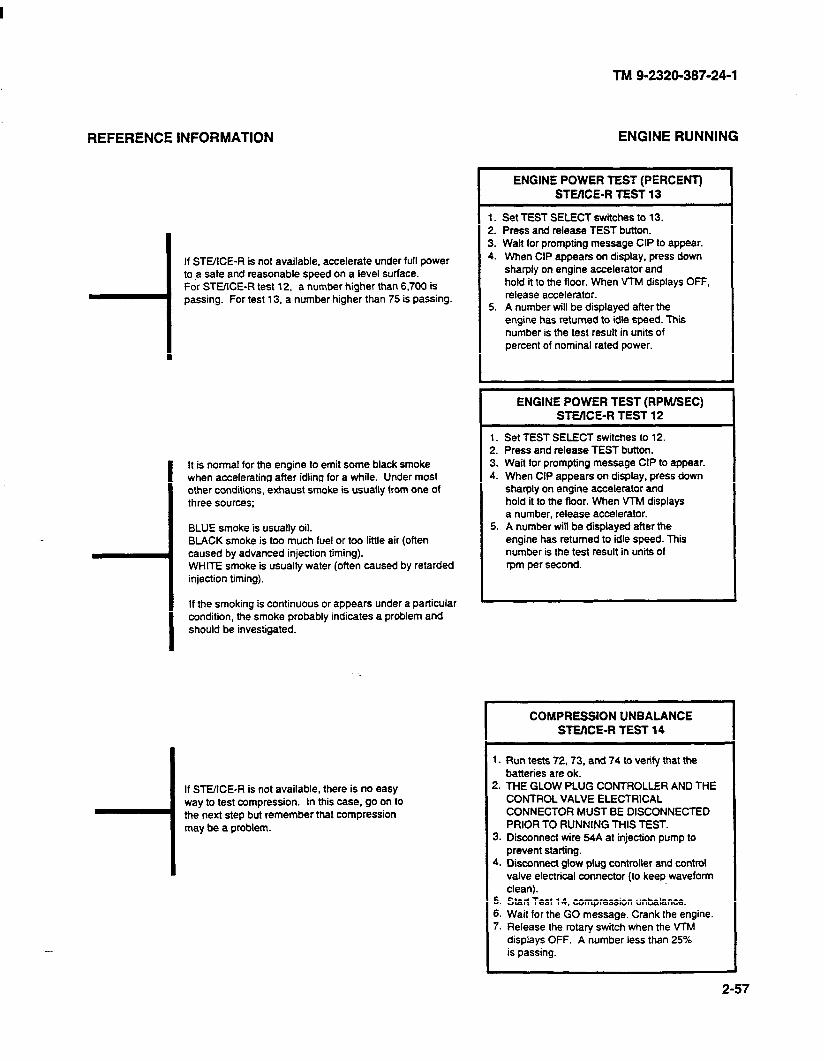
TM 9-2320-387-24-l
REFERENCE INFORMATION
If STUICE-R is not available, accelerate under full power to .a safe and reasonable speed on a level surface. For STUICE-R test 12. a number higher than 6.700 is passing. For test 13. a number higher than 75 is passing. I
I It is normal for the engine to emit some black smoke when accelerating after idling for a while. Under most other conditions, exhaust smoke is usually from one of three sources;
BLUE smoke is usually oil. BLACK smoke is too much fuel or too little air (often caused by advanced injection timing). WHITE smoke is usually water (often caused by retarded injection timing).
If the smoking is continuous or appears under a particular condition, the smoke probably indicates a problem and should be investigated.
If STEXE-R is not available, there is no easy way to test compression. In this case, go on to the next step but remember that compression may be a problem.
ENGINE RUNNING
ENGINE POWER TEST (PERCENT) STMCE-R TEST 13
1. Set TEST SELECT switches to 13. 2. Press and release TEST button. 3. Wait for prompting message CIP to appear. 4. When CIP appears on display, press down
sharply on engine accelerator and hold it to the floor. When VIM displays OFF. release accelerator.
5. A number will be displayed after the engine has returned to idle speed. This number is the test result in units of percent of nominal rated power.
ENGINE POWER TEST (RPM/SEC) STMCE-R TEST 12
1. Set TEST SELECT switches to 12. 2. Press and release TEST button. 3. Wait for prompting message CIP to appear. 4. When CIP appears on display, press down
sharply on engine accelerator and hold it to the floor. When VTM displays a number, release accelerator.
5. A number will be displayed after the engine has returned to idle speed. This number is the test result in units of rpm per second.
.
COMPRESSION UNBALANCE STUICE-R TEST 14 I
1. Run tests 72,73, and 74 to verify that the batteries are ok.
2. THE GLOW PLUG CONTROLLER AND THE CONTROL VALVE ELECTRICAL CONNECTOR MUST BE DISCONNECTED PRIOR TO RUNNING THIS TEST.
3. Disconnect wire 64A at injection pump to prevent starting.
4. Disconnect glow plug controller and control valve electrical connector (to keep waveform clean).
6. Start Test 14. compression unbalance. 6. Wait for the GO message. Crank the engine. 7. Release the rotary switch when the VTM
displays OFF. A number less than 25% is passing.
2-57

TM 9-2320-387-24-l
ENGINE RUNNING
KNOWN INFO
ENGINE RUNS NO ABNORMAL NOISES
OR VIBRATIONS EXHAUST OK COMPRESSION OK
POSSIBLE PROBLEMS 1
FUEL SYSTEM COOLING SYSTEM ELECTRICAL SYSTEM
KNOWN INFO
ENGINE RUNS NO ABNORMAL NOISES
OR VIBRATIONS EXHAUST OK COMPRESSION OK ENGINE POWER OK
POSSIBLE PROBLEMS
COOLING SYSTEM FUEL SYSTEM
KNOWN INFO
MOST SYSTEMS SEEM TO BE RUNNING OK.
POSSIBLE PROBLEMS
DRIVETRAIN
DOES THE ENGINE OPERATE AT NORMAL TEMPERATURE ?
DIAGNOSTIC FLOWCHART
T OPTIONS
1. CHECK TEMPERATURE GAUGE.
2. RUN ENGINE COOLING TESTS (Page 2-159).
REASON FOR QUESTION
A hot or cold engine may run rough and cause problems later
REFERENCE INFORMATION
Because the engine cooling tests can take a long time (mostly letting a cold engine warm up), you don’t have to run them unless there is or may be a problem in the cooling system.
-
TM 9-2320-387-24-l
ENGINE RUNNING
2-59/(2-60 blank)
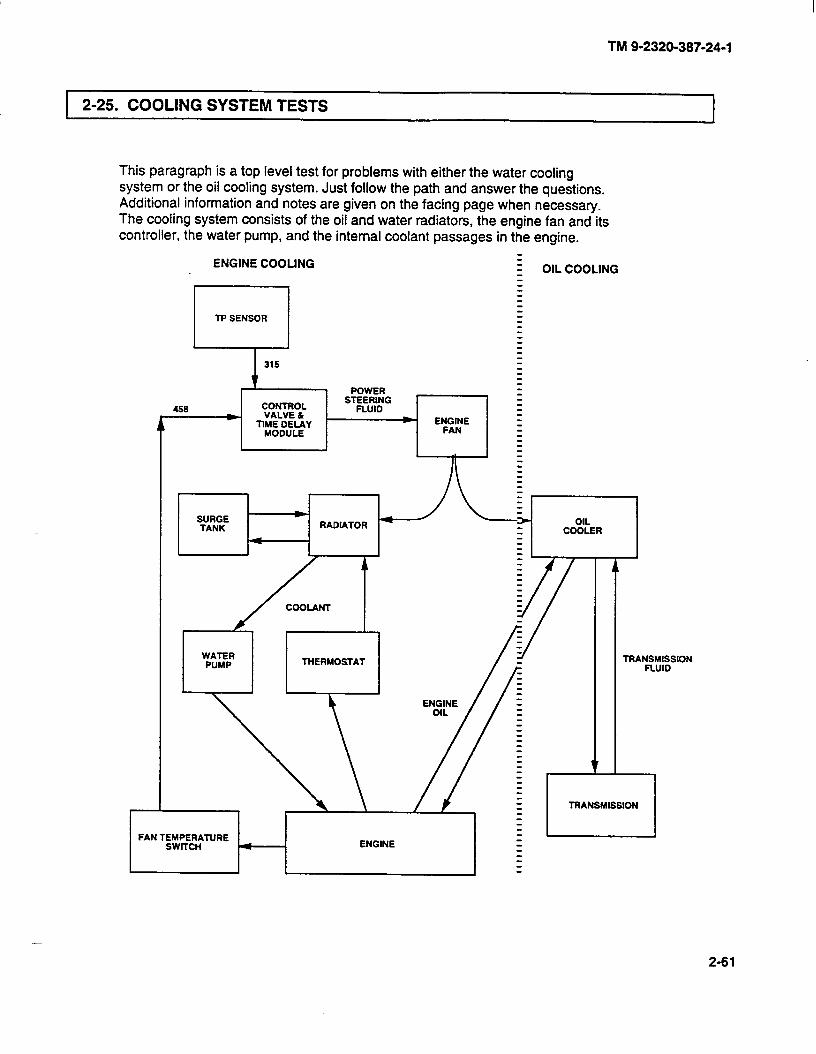
TM 9-2320-387-24-l
2-25. COOLING SYSTEM TESTS
This paragraph is a top level test for problems with either the water cooling system or the oil cooling system. Just follow the path and answer the questions. Additional information and notes are given on the facing page when necessary. The cooling system consists of the oil and water radiators, the engine fan and its controller, the water pump, and the internal coolant passages in the engine.
ENGINE COOLING
SURGE w
TANK RADIATOR
4
4
WATER PUMP
\
THERMOSTAT
L
OIL COOLING
J LgT- COOLER
FAN TEMPERATURE SWITCH
I ----I ENGINE I
TRANSMISSION FLUID
TRANSMISSION
2-61
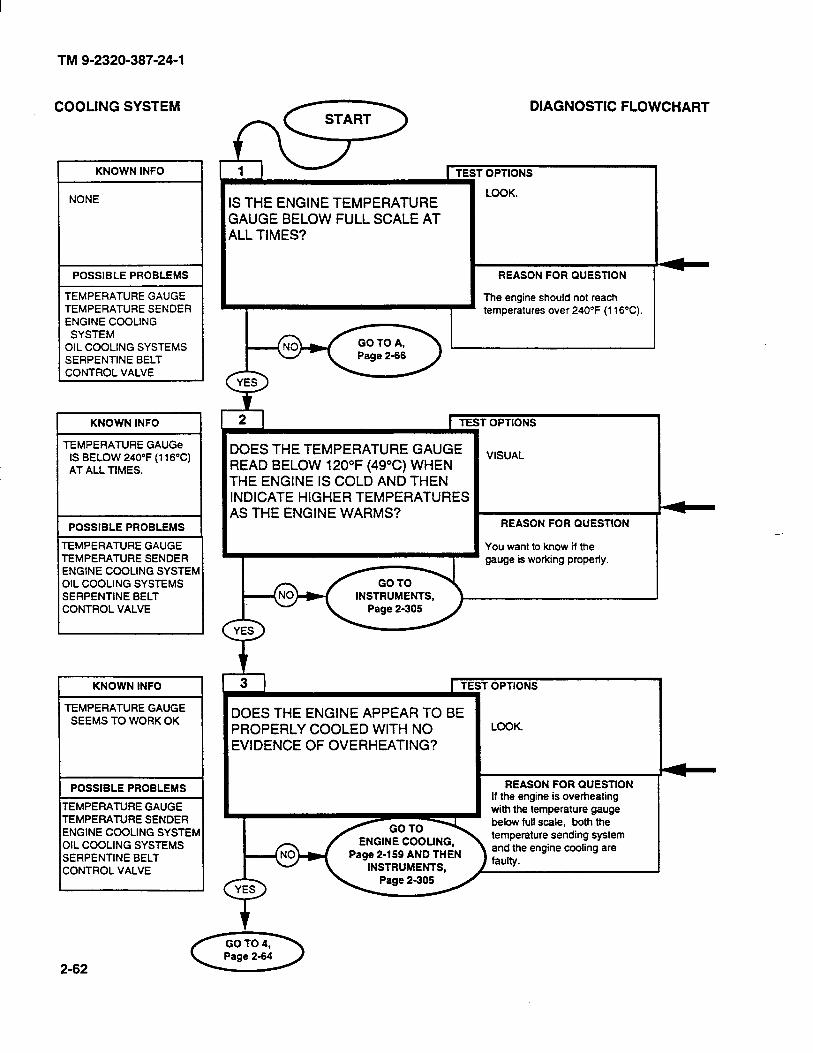
TM 9-2320-387-24-l
COOLING SYSTEM
I KNOWN INFO I
NONE
1 POSSIBLE PROBLEMS 1
TEMPERATURE GAUGE TEMPERATURE SENDER ENGINE COOLING
SYSTEM OIL COOLING SYSTEMS SERPENTINE BELT CONTROL VALVE
KNOWN INFO
TEMPERATURE GAUGe IS BELOW 240°F (116°C) AT ALL TIMES.
POSSIBLE PROBLEMS 1
TEMPERATURE GAUGE TEMPERATURE SENDER ENGINE COOLING SYSTEM OIL COOLING SYSTEMS SERPENTlNE BELT CONTROL VALVE
KNOWN INFO
I-EMPERATURE GAUGE SEEMS TO WORK OK
POSSIBLE PROBLEMS
-EMPERATIJRE GAUGE ‘EMPERATURE SENDER ENGINE COOLING SYSTEh XL COOLING SYSTEMS SERPENTINE BELT :ONTROL VALVE
2-62
I
S THE ENGINE TEMPERATURE ;AUGE BELOW FULL SCALE AT ALL TIMES?
DIAGNOSTIC FLOWCHART
r OPTIONS
LOOK.
REASON FOR QUESTION
The engine should not reach temperatures over 240°F (116%).
DOES THE TEMPERATURE GAUGE READ BELOW 120°F (49°C) WHEN THE ENGINE IS COLD AND THEN INDICATE HIGHER TEMPERATURES AS THE ENGINE WARMS?
r OPTIONS
VISUAL
REASON FOR QUESTION
You want to know if the gauge is working properly.
INSTRUMENTS,
.- I
I DOES THE ENGINE APPEAR TO BE I PROPERLY COOLED WITH NO I EVIDENCE OF OVERHEATING?
OPTIONS
LOOK.
REASON FOR QUESTION If the engine is overtreating with the temperature gauge below full scale, both the
ENGINE COOLING, Page 2-159 AND THEN
INSTRUMENTS,
temperature sending system and the engine cooling are faulty.
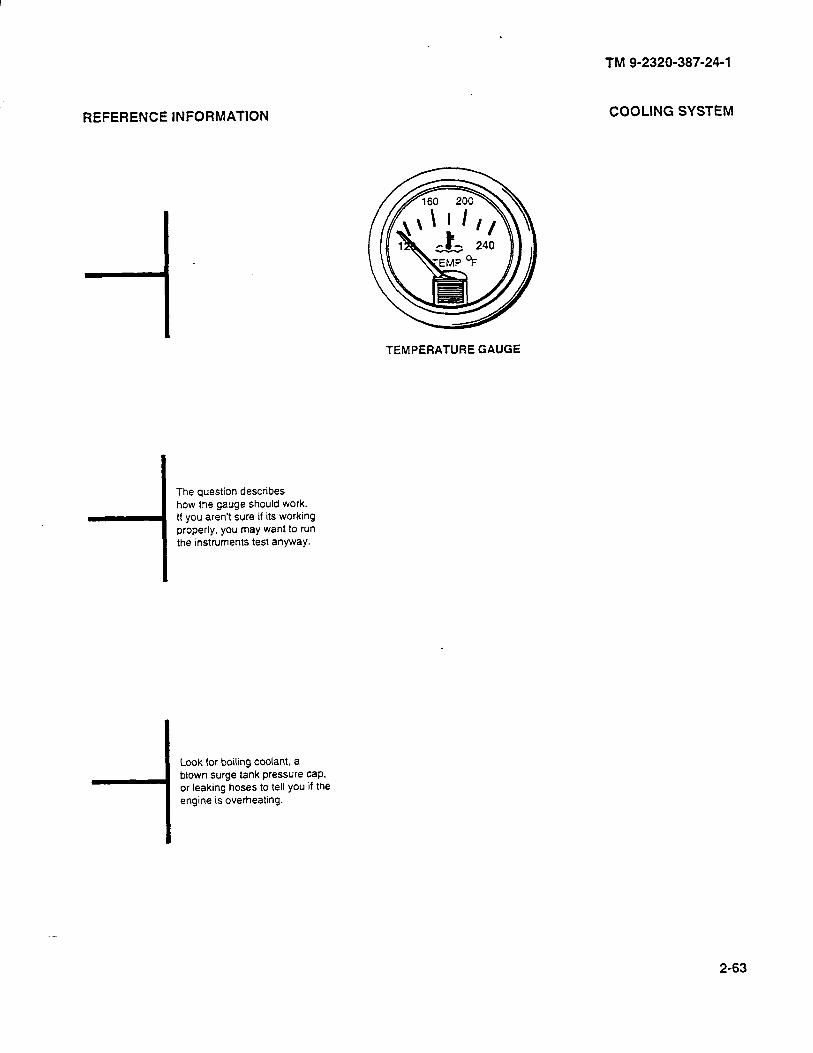
REFERENCE INFORMATION
TEMPERATURE GAUGE
__
i
The question describes how the gauge should work. If you aren’t sure if its working properly, you may want to run the instruments test anyway.
I
--I Look for boiling coolant, a blown surge tank pressure Cap. or leaking hoses to tell you if the engine is overheating.
TM 9-2320-387-24-l
COOLING SYSTEM
2-63
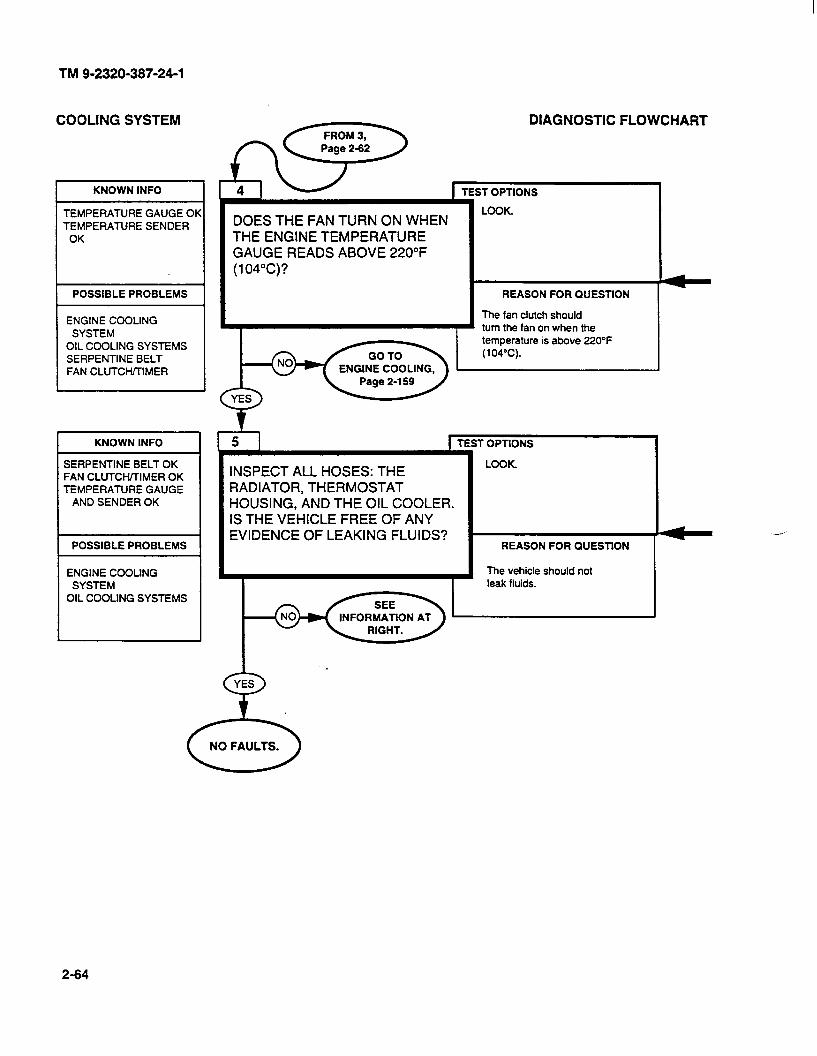
TM
COOLING SYSTEM
KNOWN INFO
TEMPERATURE GAUGE Ok TEMPERATURE SENDER
OK
POSSIBLE PROBLEMS
ENGINE COOLING SYSTEM
OIL COOLING SYSTEMS SERPENTINE BELT FAN CLUTCWTIMER
L
S F 1
I
KNOWN INFO
;ERPENTINE BELT OK ‘AN CLUTCH/TIMER OK EMPERATURE GAUGE AND SENDER OK
POSSIBLE PROBLEMS
ENGINE COOLING SYSTEM
OIL COOLING SYSTEMS
, .
J
DOES THE FAN TURN ON WHEN THE ENGINE TEMPERATURE GAUGE READS ABOVE 220°F (104%)?
DIAGNOSTIC FLOWCHART
t 5 I Ir
REASON FOR QUESTtON
The fan clutch should turn the fan on when the
I temperature is above 220°F (104%).
INSPECT ALL HOSES: THE RADIATOR, THERMOSTAT HOUSING, AND THE OIL COOLER. IS THE VEHICLE FREE OF ANY EVIDENCE OF LEAKING FLUIDS?
r OPTIONS
LOOK.
REASON FOR QUESTlON
The vehicle should not leak fluids.
2-64
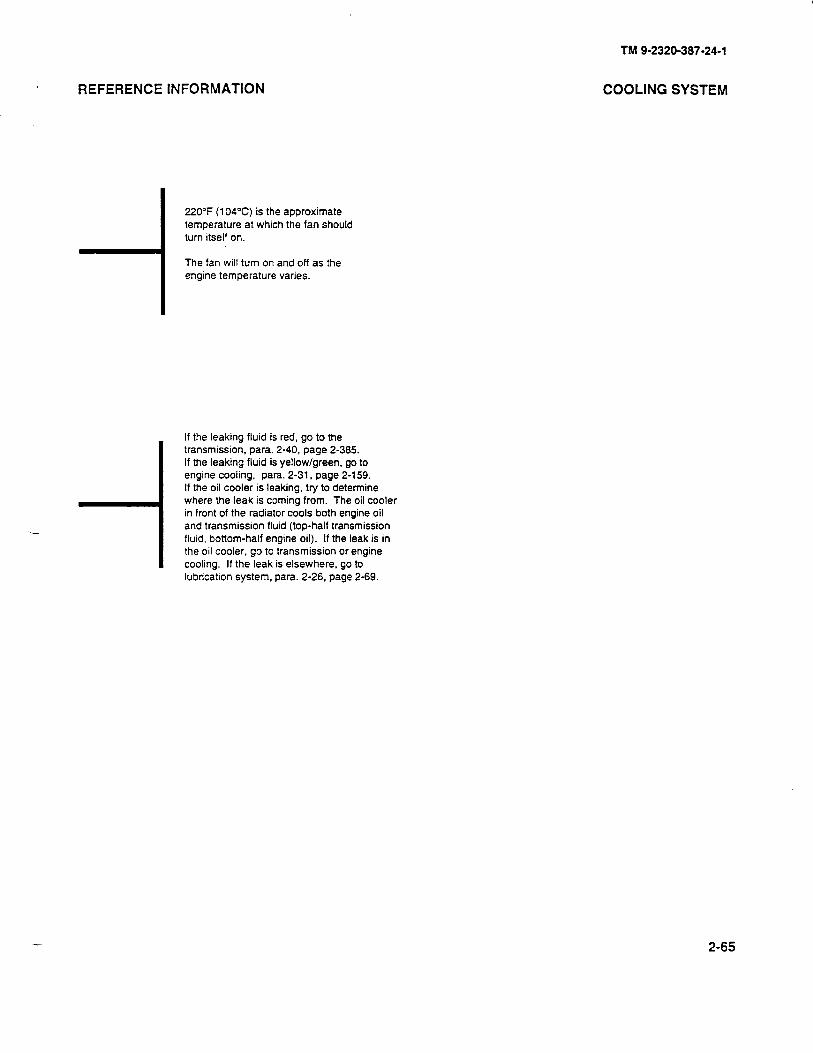
REFERENCE INFORMATION
220°F (104%) is the approximate temperature at which the fan should turn itself on.
The fan will turn on and off as the engine temperature varies.
-
i
If the leaking fluid is red, go to the transmission, para. 2-40. page 2-385. If the leaking fluid is yellow/green. go to engrne cooling, para. 2-31, page 2-159. If the oil cooler is leaking, try to determine where the leak is coming from. The oil cooler in front of the radiator cools both engine oil and transmission fluid (top-half transmission fluid, bottom-half engine oil). If the leak is in the oil cooler, go to transmission or engine cooling. If the leak is elsewhere, go to lubrication system, para. 2-26. page 2-69.
TM 9-2320-387-24-l
COOLING SYSTEM
2-65
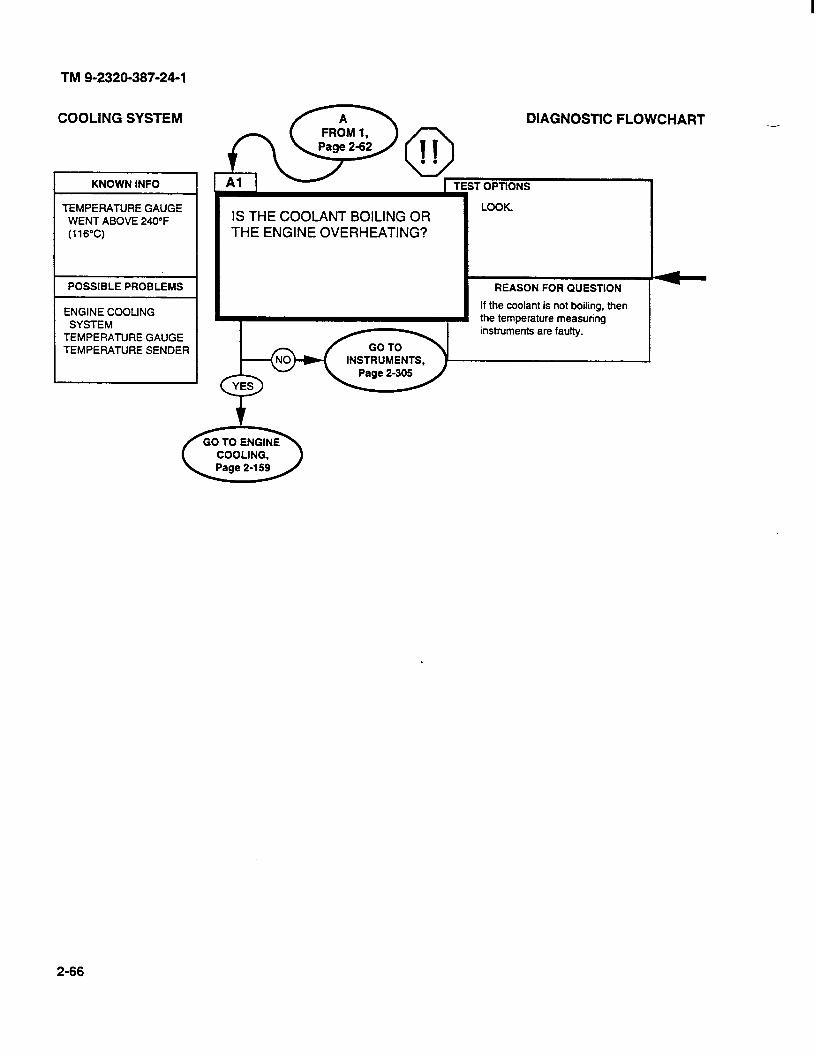
TM 9-2320-387-24-l
COOLING SYSTEM
KNOWN INFO
TEMPERATURE GAUGE WENT ABOVE 240°F (116%)
POSSIBLE PROBLEMS
ENGINE COOUNG SYSTEM
TEMPERATURE GAUGE TEMPERATURE SENDER
I IS THE COOLANT BOILING OR
I
LOOK.
THE ENGINE OVERHEATING?
INSTRUMENTS,
REASON FOR QUESllON
If the coolant is not boiling, then
instruments are faulty.
DIAGNOSTIC FLOWCHART _
2-66
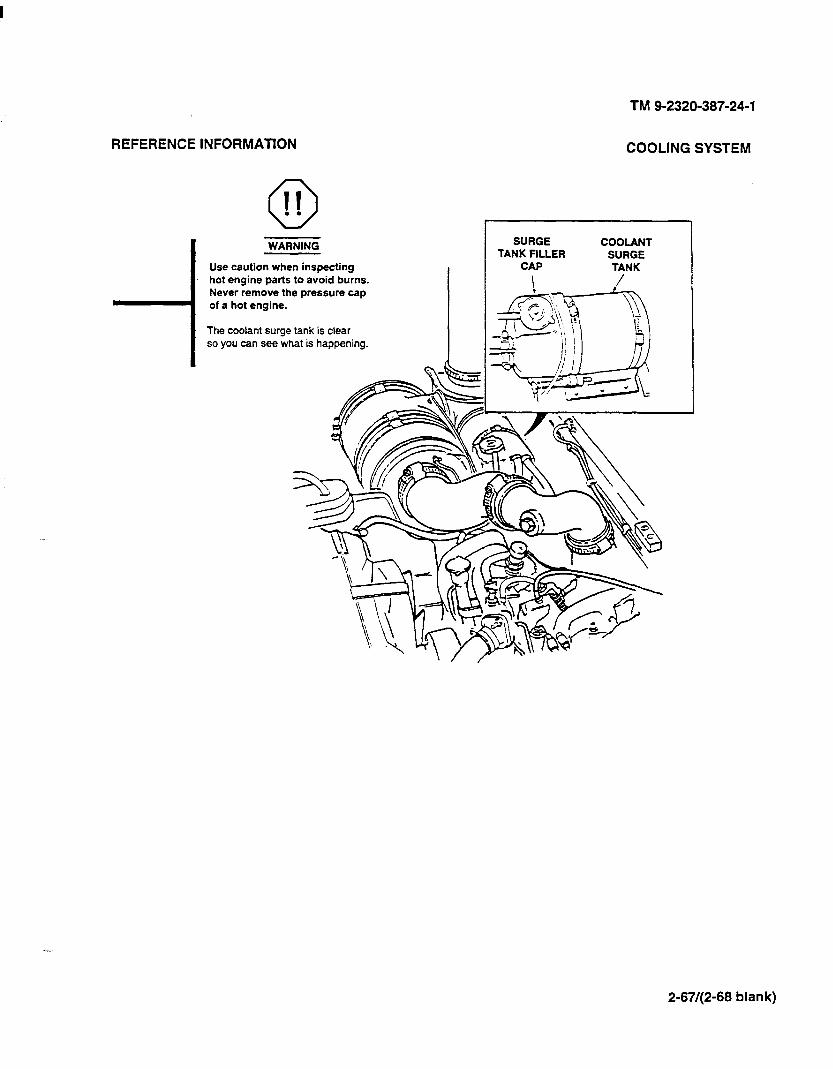
REFERENCE INFORMATION COOLING SYSTEM
0 II l .
WARNING
Use caution when inspecting hot engine parts to avoid burns. Never remove the pressure cap of a hot engine.
The coolant surge tank is clear so you can see what is happening.
TM 9-2320-387-24-l
SURGE TANK FILLER
CAP
COOLANT SURGE TANK
2-67/(2-68 blank)
TM 9-2329-387-24-l
p-26. LUBRICATION SYSTEM TESTS 1
This paragraph is a top level test for all of the lubrication systems in the vehicle. Just follow the path and answer the questions. Additional information and notes are given on the facing page when necessary.
The H&lMWV includes a venting system that is also checked in this paragraph. The purpose of the vent system is to allow vapor to escape to the atmosphere under normal operation, and to prevent venting during deep-water fording operations. If the vents were left open, water would enter the engine and other systems and cause damage. The location of the vent lines is shown below. The location of the other parts in the lubrication system are shown in other lower level paragraph as required.
NOTE
Bold lines represent ventilation system.
GEARED HUB VENT flLTER FUEL TANK VENT GEARED HUB
FRONT DIFFERENTIAL n
REAR DIFFERENTIAL
GEARED IlUB MASER
-
2-69
TM 9-2320-387-24-l
LUBRICATION SYSTEM
KNOWN INFO I
_I POSSIBLE PROBiEhlS
ENGINE LUBRICATION TRANSMISSION
LUBRICATION CHASSIS LUBRICATION VENTING SYSTEM
KNOWN INFO
ENGINE LUBRICATION OK
POSSIBLE PROBLEMS
TRANSMISSION LUBRICATION
CHASSIS LUBRICATION VENTING SYSTEM
KNOWN INFO
ENGINE LUBRlCATlON OK TRANSMISSION
LUBRICATION OK
CHECK ALL OF THE REMAINING VEHICLE LUBRICATION POINTS. ARE THEY ALL PROPERLY LUBRICATED AND IN GOOD REPAIR?
POSSIBLE PROBLEMS REASON FOR QUESTtON
CHASSIS LUBRICATION VENTING SYSTEM
The chassis and drivetrain need to be properly lubricated in order to keep the vehicle in good repair.
2-70
DIAGNOSTIC FLOWCHART
RUN THE ENGINE LUBRICATION TESTS. WERE YOU ABLE TO CORRECT ALL OF THE FAULTS?
ENGINE LUBRICATION TESTS (Page 2-191).
REASON FOR QUESTION
The tests in para. 2-32 are easy
m engine lubrication system. 3 ( YES
t 2 TEST OPTIONS
CHECK THE TRANSMISSION VISUAL - SEE NOTE AT RIGHT. IF YOU SUSPECT PROBLEMS
FLUID. IS IT OK ? WfTH THE TRANSMISSION. YOU CAN RUN THE TESTS IN PARA. 2-40. PAGE 2-385.
REASON FOR QUESTtON
Transmission fluid level and appearance give a good indication of the system’s condition.
r OPTtONS
SEE TM 9-2320-387-10 FOR LDCATlON AND LUBRICATION INSTRUCTIONS.
__

TM 9-2320-387-24-l
REFERENCE INFORMATION
The tests in para. 2-32 test the oil level, cleanliness. leaks in the system, and the CDR valve. Return here when you’ve fixed everything you can or if no faults were found.
f=BOCEDURE FOR CHECKING TRANSMISSION FLUID
1. Start engine. 2. Hold down brake pedal
and move transmission shift lever through all ranges including reverse.
3. Engage parking brake and place shift lever in neutral. Check fluid level on dipstick.
4. Proper level is between FULL and ADD marks on dipstick.
NOTE
Check fluid for a burnt smell, grit, discoloration, air bubbles, or a milky appearance.
l Burnt smell, discoloration, or grit indicates worn or damaged internal components. Notify OS maintenance (chapter 14).
l Bubbles indicate an overfilled system or air leaks - : in the system. Drain the fluid and refill to proper level (para. 5-2).
l Milky appearance is due to water in the system. Drain the fluid from the entire transmission and transmission cooling system and install a new filter (para. 5-2).
l Check fill tube for indications of fluid being blown out. If fluid is being blown out, check vent line for obstructions, and refill transmission to proper level (para. 5-2).
Among the items are the driveshafts. suspension, differentials, and geared hubs.
LUBRICATION SYSTEM
2-71
TM 9-2320-387-24-l
LUBRICATION SYSTEM
KNOWN INFO
ENGINE LUBRlCATlON 0 1 TRANSMISSION LUBE OK CHASSIS AND DRIVEUNE
LUBE OK
I POSSIBLE PROBLEMS
VENT SYSTEM
I KNOWN INFO
ENGINE LUBRlCATlON OK TRANSMISSION LUBE OK CHASSIS AND DRIVE LINE
LUBE OK VENT LINES OK
1 POSSIBLE PROBLEMS
VENT FILTER
CHECK ALL OF THE VENT LINES IN THE VEHICLE. ARE THEY AU OK?
SEE THE FOLDOUT PAGE IN THIS PARAGRAPH FOR LOCATlONS OF THE VENT UNES.
CHECK THE VENT FILTER. VISUAL INSPECTlON - THE
IS IT OK? VENT FILTER IS LOCATED BEHIND THE COOLANT SURGE TANK.
REASON FOR QUESTION A clogged vent filter will cause the fuel tank to be at a vacuum. This could lead to problems with the fuel system.
2-72
TM 9-2320-387-24-l
REFERENCE INFORMATION
I There are vent lines attached to all parts of the vehicle with a lubrication reservoir. These parts are the engine, transmission, tra’nsfer case, differentials, geared hubs, and the fuel tank.
I Removal procedures for the vent lines are given in the repair procedure for the particular component to which the line is attached.
LUBRICATION SYSTEM
2-73/(2-74 blank)
TM 9-2328-387-24-l
2-27. ELECTRICAL TESTS I
Most of the electrical circuits in the vehicle are included in one of the major systems covered by this manual. This is a top level paragraph to help you pick the right one. A number of schematics are also included to help you find the problem. If you go through the flow chart and can’t solve the problem, use the schematics to find wires which may be causing trouble.
The electrical system consists of the batteries, which produce electrical power by a chemical reaction between the lead plates and the electrolyte solution (a mixture of acid and water). This power is carried by wires and cables to those parts of the vehicle which require electrical power. The batteries get recharged by the alternator, which generates electrical power by using some of the engine’s mechanical power, produced when the engine is running. If you are not too confident about electrical concepts and terminology, you should read para. 2-22, page 2-43.
All electrical systems require a connection to ground (called grounding), which is the completion of the circuit to the battery negative. Pages 2-90, 2-91, and 2-92 are diagrams of the grounding. If your vehicle exhibits strange symptoms that seem to defy all efforts to fix them, the vehicle may have a grounding problem. Grounding problems cause strange symptoms usually because more than one circuit is using the same ground, or because a circuit has more than one ground. For example, looking at the body ground diagram, if wire 58D (a ground for the instruments) is disconnected from the left-side cylinder head, the instruments may still function due to the separate ground, but they would probably be erratic and inaccurate. Usually the problem will be a loose or corroded connection between the circuit, through body ground to battery negative terminal. Be sure to check continuity to battery negative cable rather than simply to the vehicle body or engine block.
After the grounding diagrams are functional flow schematics of the major systems in the vehicle. The shaded areas are the wires and components of the vehicle master power distribution. These are designed to help you find the system giving you problems.
6A
J 61A
t
I VEHICLE MASTER POWER CIRCUIT 1
FROM ALL SYSTEMS
t
16A
3 LIGHTS
i
VEHICLE GROUND SYSTEM I
2-75
TM 9-2320-387-24-l
ELECTRICAL DIAGNOSTIC FLOWCHART -
KNOWN INFO 1 OPTIONS
1. LOOK.
2. STEIICE-R TEST 90 (Page 2-507).
NOTHING WITH THE ROTARY SWITCH TURNED TO STOP, ARE ALL CIRCUITS EXCEPT THE LIGHTS UNPOWERED?
POSSIBLE PROBLEMS REASON FOR QUESTION
It’s important to verify that there are no shorts which SHORTS
OPENS
1 OPTIONS
TURN LIGHTS ON AND LOOK
KNOWN INFO
POWER IS OFF WHEN IT SHOULD BE
DO ANY OF THE LIGHTS WORK WITH THE ROTARY SWITCH IN THE STOP POSITION?
REASON FOR QUESTlON POSSIBLE PROBLEMS
The lights should work with the rotary switch at STOP. If the lights work, power is making it from the batteries through the PCB to the light circuit.
OPENS
1 KNOWN INFO T OPTIONS
TURN LIGHTS ON AND LOOK. DO ALL OF THE LIGHTS WORK WITH THE ROTARY SWITCH IN ANY POSITION?
POWER TO THE LIGHT CIRCUIT IS OK
REASON FOR QUESTION
There may be problems which only affect one light. rather than all of them.
POSSIBLE PROBLEMS
tNDtVlDUAL UGHTS MAY HAVE BURNT BULBS, BAD WIRES, ETC.
2-76
TM 9-2320-387-24-l
REFERENCE INFORMATION
The lights are the only circuit on the vehicle which should work or be drawing any power when the switch is in the STOP position. Check the instruments, try turning on the heater fan, listen for any relay clicking or other sign (includes engine running) that power is on when it shouldn’t be. It’s best if you use the STEKE-R in TK mode to verify that there is no current draw from the batteries. You can’t use the DCA mode for this because it will measure this current during the calibration part of the test and read that this is just an offset in the sensor.
The lights should work with the rotary switch in any position.
ELECTRICAL
DC CURRENT 9-l ,590 AMPS
STMCE-R TEST 90
1. Connect probe.
2. Start Test 90, DC amps.
3. Displayed reading is in amps.
2-77
TM 9-2320-387-24-l
ELECTRICAL
KNOWN INFO
POWER CAN BE TURNED OFF
POSSIBLE PROBLEMS
PCB ROTARY SWITCH BATTERY STARTER CIRCUIT BREAKERS WIRING
KNOWN INFO I
ROTARY SWITCH OK
CIRCUIT BREAKER 2 OK PCB ALTERNATOR WIRING
DIAGNOSTIC FLOWCHART --
WITH THE ROTARY SWITCH IN THE RUN POSITION, IS THE INSTRUMENT CLUSTER VOLTMETER IN THE YELLOW OR GREEN ZONE? REASON FOR QUESTION
This quickly verffies that power is getting from the batteries to the rotary switch and the batteries aren’t discharged.
DO ALL OF THE GAUGES WORK PROPERLY WITH THE ENGINE RUNNING?
KNOWN INFO
ROTARY SWITCH OK ClRCUlT BREAKER 2 OK
POSSIBLE PROBLEMS
PCB ALTERNATOR WIRING
iT OPTIONS
l.TRYlT.
2. LOCK.
REASON FOR QUESTION
Power may not be making it through circuit breaker 2 to the instrument panel.
1 TEST OPTIONS
DOES THE HEATER FAN WORK
I
TURN HEATER ON AND CHECK
WITH THE ROTARY SWITCH IN FOR AIRFLOW.
THE RUN POSITION?
REASON FOR QUESTlON
The heater fan should work
I with the rotary switch in the

REFERENCE INFORMATION
With engine off, turn switch. If the voltmeter is slightly in the yellow zone, you can continue down the YES path, but beware of possible test tailures due to the low battery charge.
TM 9-2320-387-24-l
ELECTRICAL
2-79
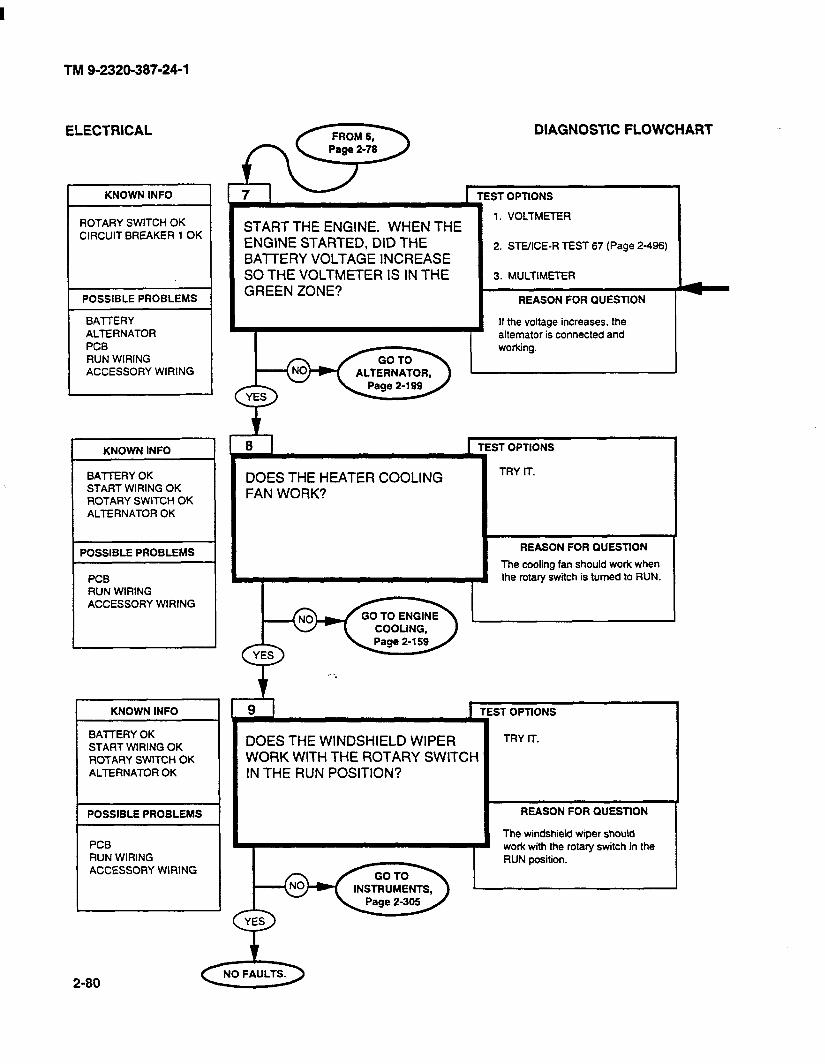
TM 9-2320-387-24-l
ELECTRICAL
KNOWN INFO
ROTARY SWITCH OK CIRCUIT BREAKER 1 OK
POSSIBLE PROBLEMS
BATTERY ALTERNATOR PCB RUN WIRING ACCESSORY WIRING
KNOWN INFO
BATTERY OK START WIRING OK ROTARY SWITCH OK ALTERNATOR OK
POSSIBLE PROBLEMS
PCB RUN WIRING ACCESSORY WIRING
KNOWN INFO
BATTERY OK START WIRING OK ROTARY SWITCH OK ALTERNATOR OK
POSSIBLE PROBLEMS
PCB RUN WIRING ACCESSORY WIRING
DIAGNOSTIC FLOWCHART
TEST OPTIONS
1. VOLTMETER START THE ENGINE. WHEN THE ENGINE STARTED, DID THE BAlTERY VOLTAGE INCREASE SO THE VOLTMETER IS IN THE GREEN ZONE?
2. STEXE-R TEST 67 (Page 246)
3. MULTIMETER
REASON FOR QUESTtON
If the voltage increases, the alternator is connected and
DOES THE HEATER COOLING FAN WORK?
ST OPTIONS 1 TE!
I
TRY IT.
REASON FOR QUESTlON
The cooling fan should work when the rotary switch is turned to RUN.
DOES THE WINDSHIELD WIPER WORK WITH THE ROTARY SWITCH IN THE RUN POSITION?
I
TE! ST OPTIONS
TRY IT.
The windshield wiper should work with the rotary switch in the RUN Position.
2-80
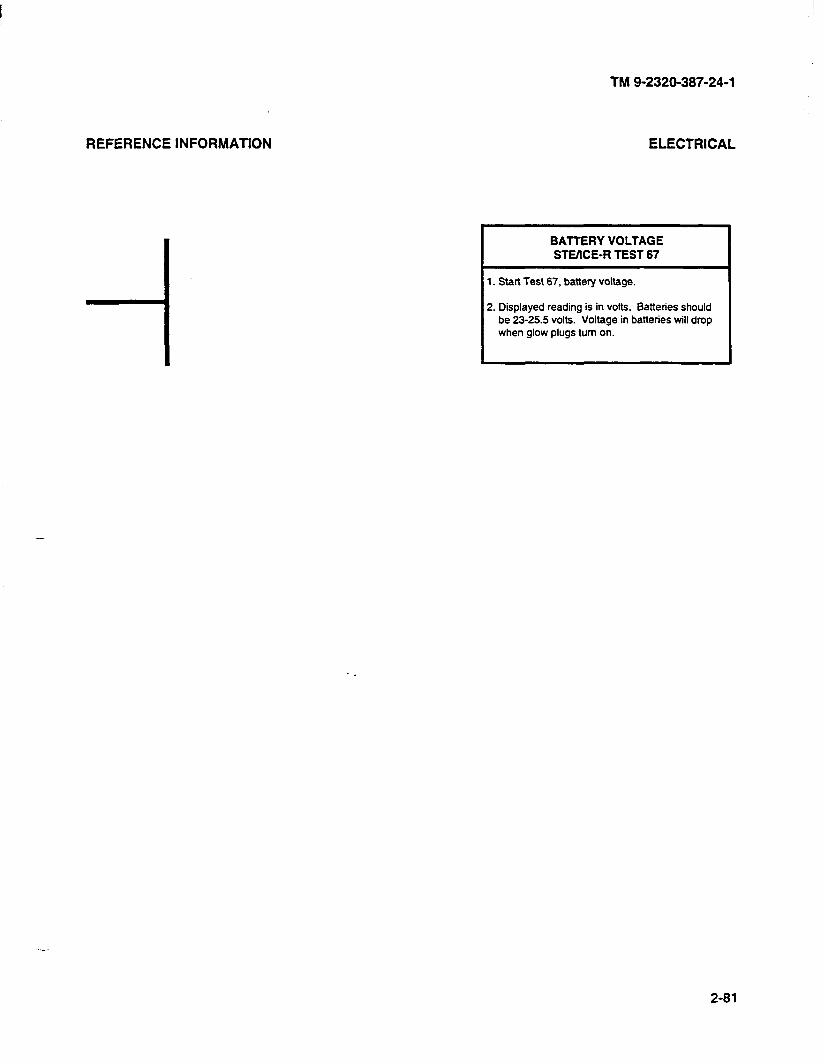
REFERENCE INFORMATION
TM 9-2320-387-24-l
ELECTRICAL
VOLTAGE STMCE-R TEST
1. Start Test 67, battery voltage.
2. Displayed reading is in volts. Batteries should be 23-25.5 volts. Voltage in batteries will drop when glow plugs turn on.
-
2-81
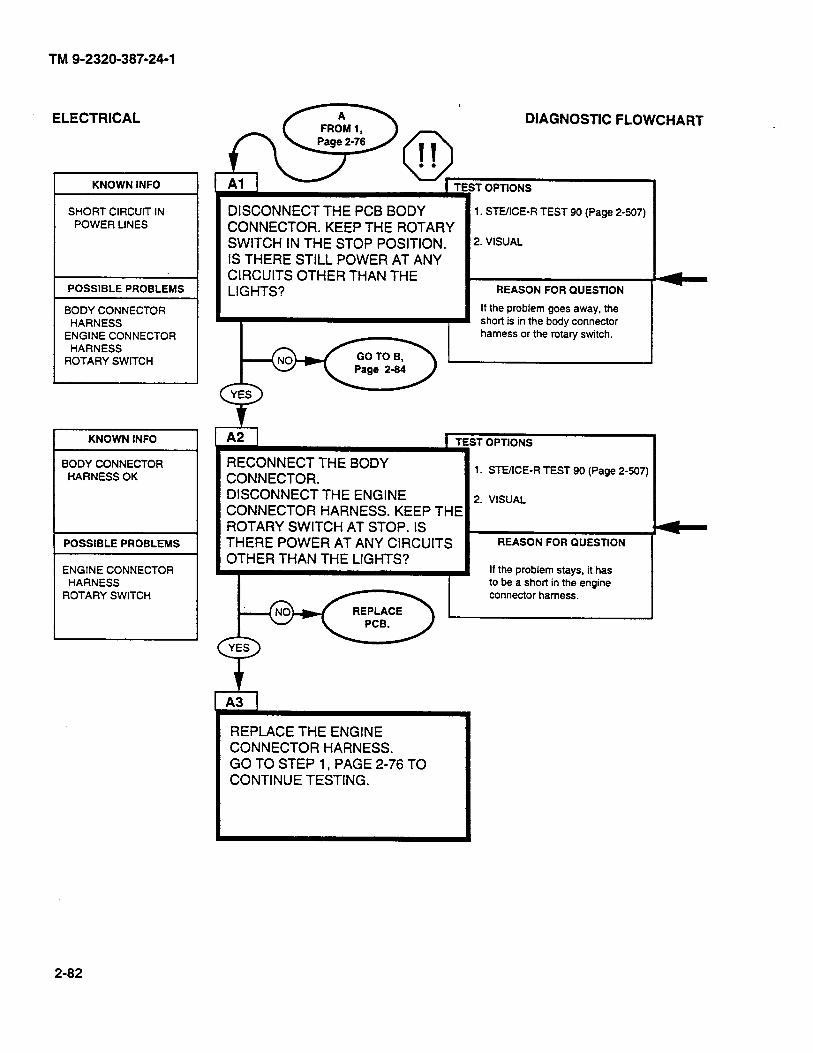
TM 9-2320-387-24-l
ELECTRICAL
KNOWN INFO I
SHORT CIRCUlT IN POWER LINES
POSSIBLE PROBLEMS
BODY CONNECTOR HARNESS
ENGINE CONNECTOR HARNESS
ROTARY SWITCH
KNOWN INFO
BODY CONNECTOR HARNESS OK
POSSIBLE PROBLEMS
ENGINE CONNECTOR HARNESS
ROTARY SWITCH
DISCONNECT THE PCB BODY CONNECTOR. KEEP THE ROTARY SWITCH IN THE STOP POSITION. IS THERE STILL POWER AT ANY CIRCUITS OTHER THAN THE LIGHTS?
DIAGNOSTIC FLOWCHART -
1. STE/lCE-R TEST 90 (Page 2-507)
2. VISUAL
REASON FOR QUESTION
If the problem goes away, the short is in the body connector harness or the rotary switch.
A2 1 Ir
RECONNECT THE BODY CONNECTOR. DISCONNECT THE ENGINE CONNECTOR HARNESS. KEEP THE ROTARY SWITCH AT STOP. IS THERE POWER AT ANY CIRCUITS OTHER THAN THE LIGHTS?
ST OPTIONS
1. STE/lCE-R TEST 90 (Page 2-507)
2. VISUAL
REASON FOR QUESTION
If the problem stays, it has to be a short in the engine connector harness.
REPLACE THE ENGINE CONNECTOR HARNESS. GO TO STEP 1, PAGE 2-76 TO CONTINUE TESTING.
2-82

REFERENCE INFORMATION ELECTRICAL
0 II . . WARNING
Disconnect negative battey cable before disconnecting and reconnecting protective control box harness.
WARNING
There is battery voltage at the PCB at all times. Failure to disconnect battery cable will result in damage to equipnwtnt or injury to personnel.
Replace PCB (para. 4-4).
TM 9-2320-387-24-l
DC CURRENT O-1.500 AMPS STVICE-R TEST 90
1. Connact probe.
2. Start Test 90, DC amps.
3. Displayed reading is in amps.
2-83
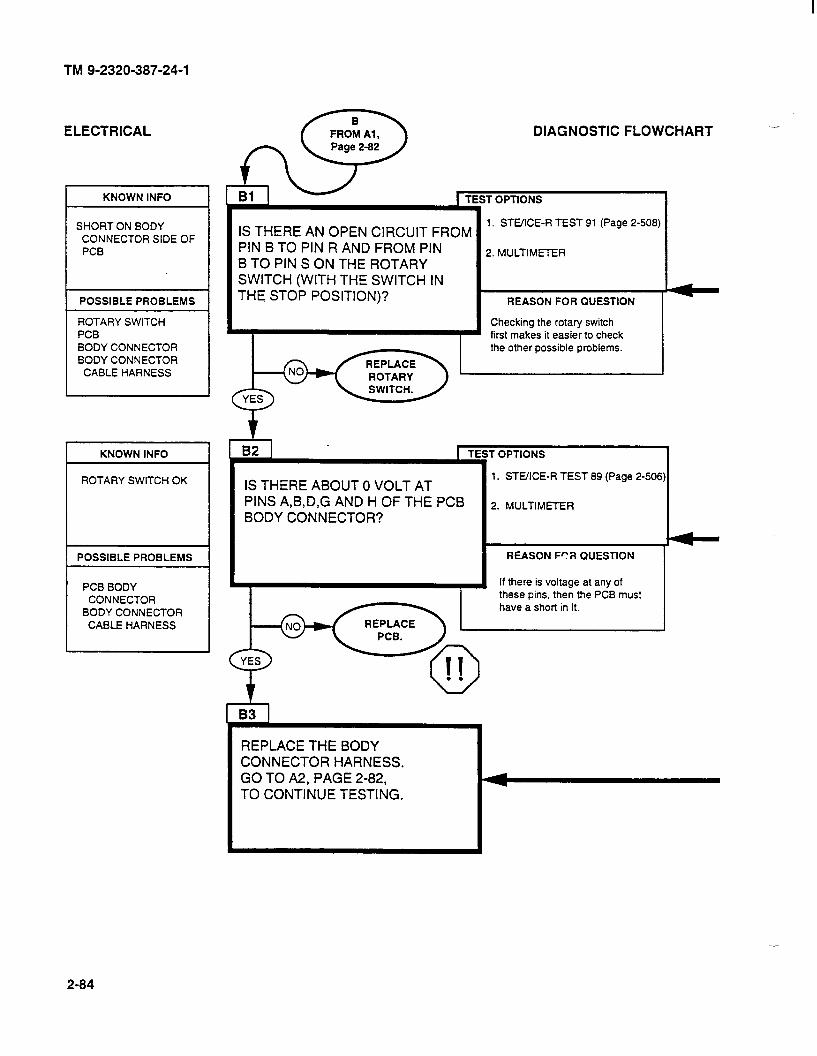
TM 9-2320-387-24-l
ELECTRICAL
SHORT ON BODY CONNECTOR SIDE OF
( POSSIBLE PROBLEMS 1
ROTARY SWITCH PCB BODY CONNECTOR BODY CONNECTOR
CABLE HARNESS
KNOWN INFO I
ROTARY SWITCH OK
POSSIBLE PROBLEMS
PCB BODY CONNECTOR
BODY CONNECTOR CABLE HARNESS
fiz?J DIAGNOSTIC FLOtiCHART --
IS THERE AN OPEN CIRCUIT FROM 1. STUICE-R TEST 91 (Page 2-508)
PIN B TO PIN R AND FROM PIN 2. MULTIMETER B TO PIN S ON THE ROTARY SWITCH (WITH THE SWITCH IN THE STOP POSITION)? REASON FOR QUESTION
Checking the rotary switch
1 1 first makes it easier to check
IS THERE ABOUT 0 VOLT AT PINS A,B,D,G AND H OF THE PCB BODY CONNECTOR?
r OPTIONS
1. STEXE-R TEST 89 (Page 2-506)
2. MULTIMETER
REASON F?R QUESTION
If there is voltage at any of these pins, then the PCB must have a short in it.
0 YES
REPLACE THE BODY CONNECTOR HARNESS. GO TO A2, PAGE 2-82, TO CONTINUE TESTING.
2-84
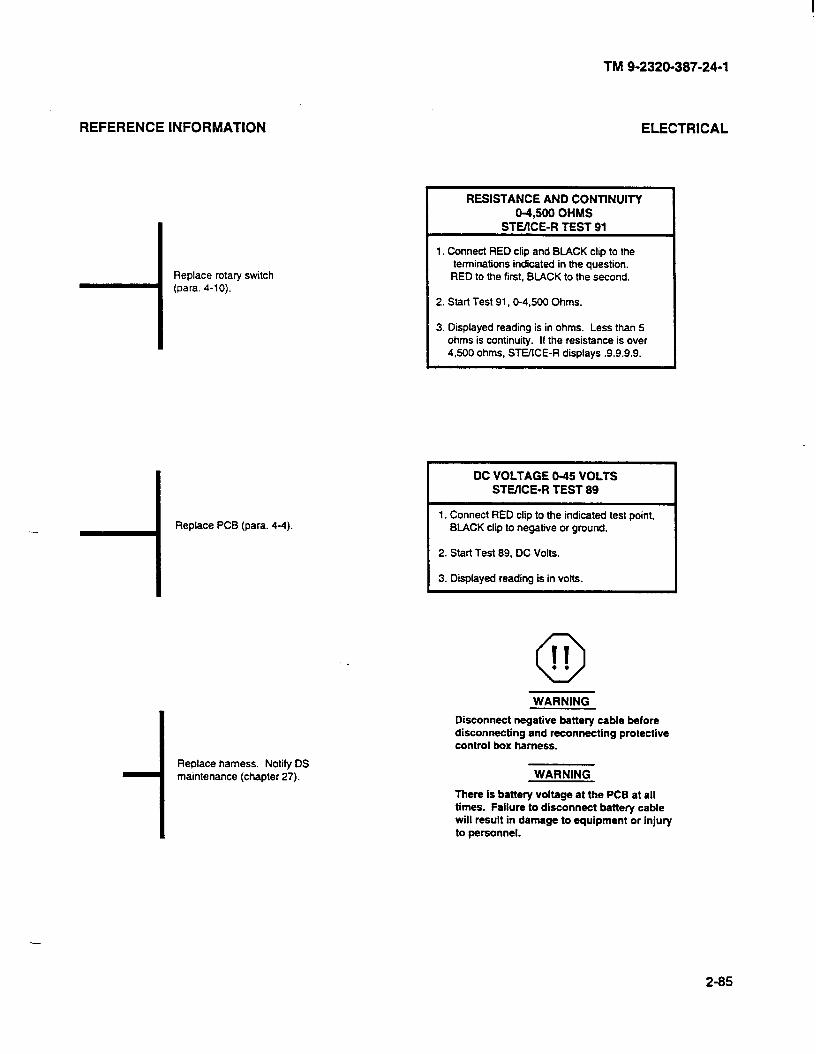
TM 9-2320-387-24-l
REFERENCE INFORMATION ELECTRICAL
Replace rotary switch (para. 4-10).
- -I Replace PCB (para. 4-4).
Replace harness. Notify DS maintenance (chapter 27).
RESISTANCE AND CONTINUITY 04,500 OHMS
STVICE-R TEST 91
1. Connect RED clip and BLACK clip to the terminations indicated in the question. RED to the first, BLACK to the second.
2. Start Test 91,0-4.500 Ohms.
3. Displayed reading is in ohms. Less than 5 ohms is continuity. If the resistance is over 4.500 ohms, STEIICE-R displays .9.9.9.9.
DC VOLTAGE 045 VOLTS STE!lCE-R TEST 89
1. Connect RED clip to the indicated test point, BLACK clip to negative or ground.
2. Start Test 89. DC Volts.
3. Displayed reading is in volts.
0 11 . .
WARNING
Disconnect negative battery cable before disconnecting and reconnecting protective control box harness.
WARNING
There is battery voltage at the PCB at all times. Failure to disconnect battery cable will result in damage to equipment or injury to Personnel.
2-85
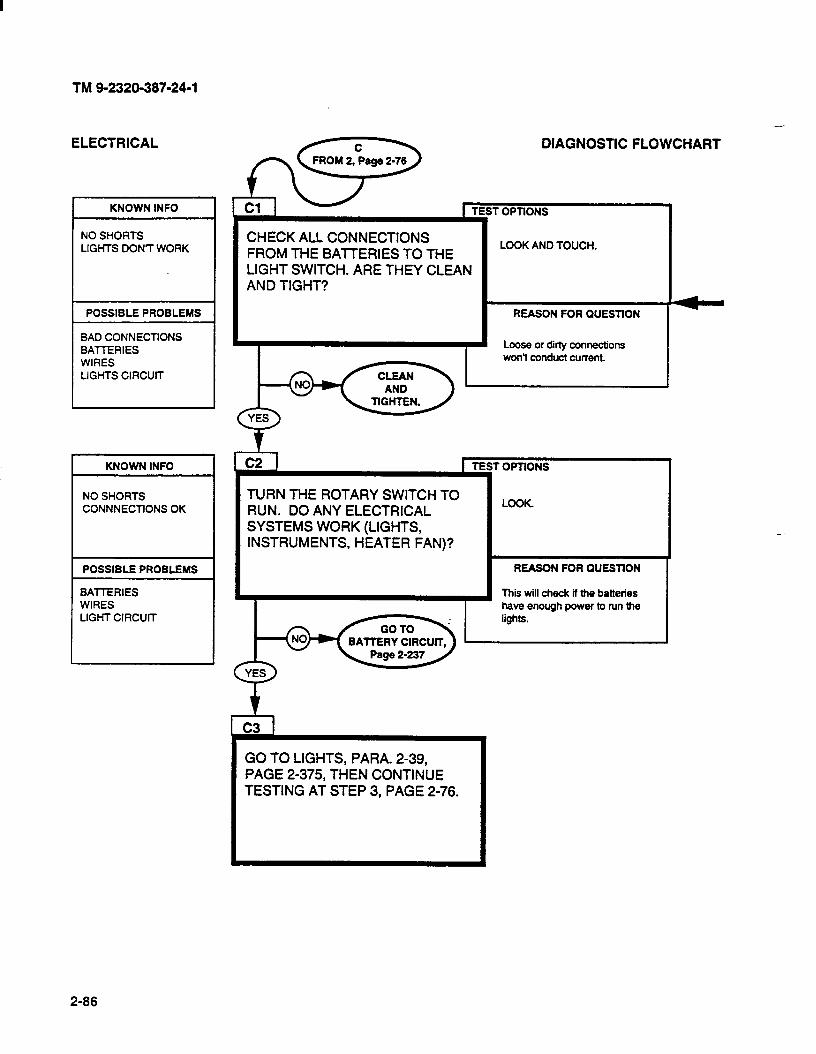
TM 9-2320-387-24-l
ELECTRICAL
KNOWN INFO
NO SHORTS LIGHTS DON’T WORK
POSSIBLE PROBLEMS
BAD CONNECTlONS BATTERIES WIRES LIGHTS ClRCUlT
KNOWN INFO
NO SHORTS CONNNECTlONS OK
POSSIBLE PROBLEMS
BAllERIES WIRES LIGHT ClRCUll
CHECK ALL CONNECTIONS FROM THE BAlTERIES TO THE LIGHT SWITCH. ARE THEY CLEAN AND TIGHT?
DIAGNOSTIC FLOWCHART
;T OPTIONS
LOOK AND TOUCH.
REASON FOR QUESTlON
Loose or dirty connections won’t conduct current.
TURN THE ROTARY SWITCH TO RUN. DO ANY ELECTRICAL SYSTEMS WORK (LIGHTS, INSTRUMENTS, HEATER FAN)?
’ OPTIONS
LOOK.
REASON FOR QUESTION
This will check if the batteries have enough power to run the lights.
GO TO LIGHTS, PARA. 2-39, PAGE 2-375, THEN CONTINUE TESTING AT STEP 3, PAGE 2-76.
2-86
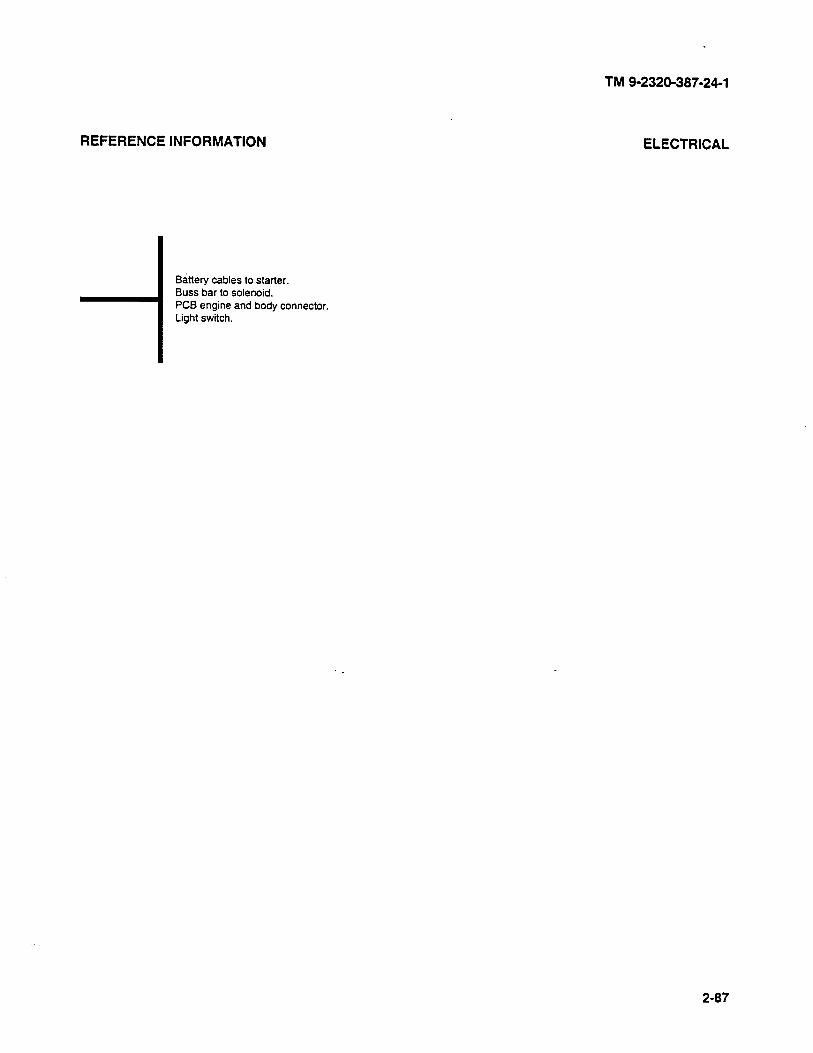
REFERENCE INFORMATION
i
Battery cables to starter. Buss bar to solenoid. PCB engine and body connector. Light switch.
TM 9-2320-387-24-l
ELECTRICAL
2-87

TM 9-2320-387-24-l
ELECTRICAL
I KNOWN INFO
POWER CAN BE TURNED OFF
POSSIBLE PROBLEMS
BA-t-fERIES INSTRUMENT CIRCUIT
J
IS THE BATTERY VOLTAGE 23.5 TO 25.5 VOLTS?
1 TES 4
T OPTIONS
1
1. STE/ICE-R TEST 67 (Page 2-496)
2. MULTIMETER
REASON FOR QUESTION
If the battery is supplying full voltage, then there is something wrong with the instrument circuit.
DIAGNOSTIC FLOWCHART -
GO TO INSTRUMENTS, PARA. 2-38, PAGE 2-305, THEN CONTINUE TESTING AT STEP 4, PAGE 2-78.
2-88
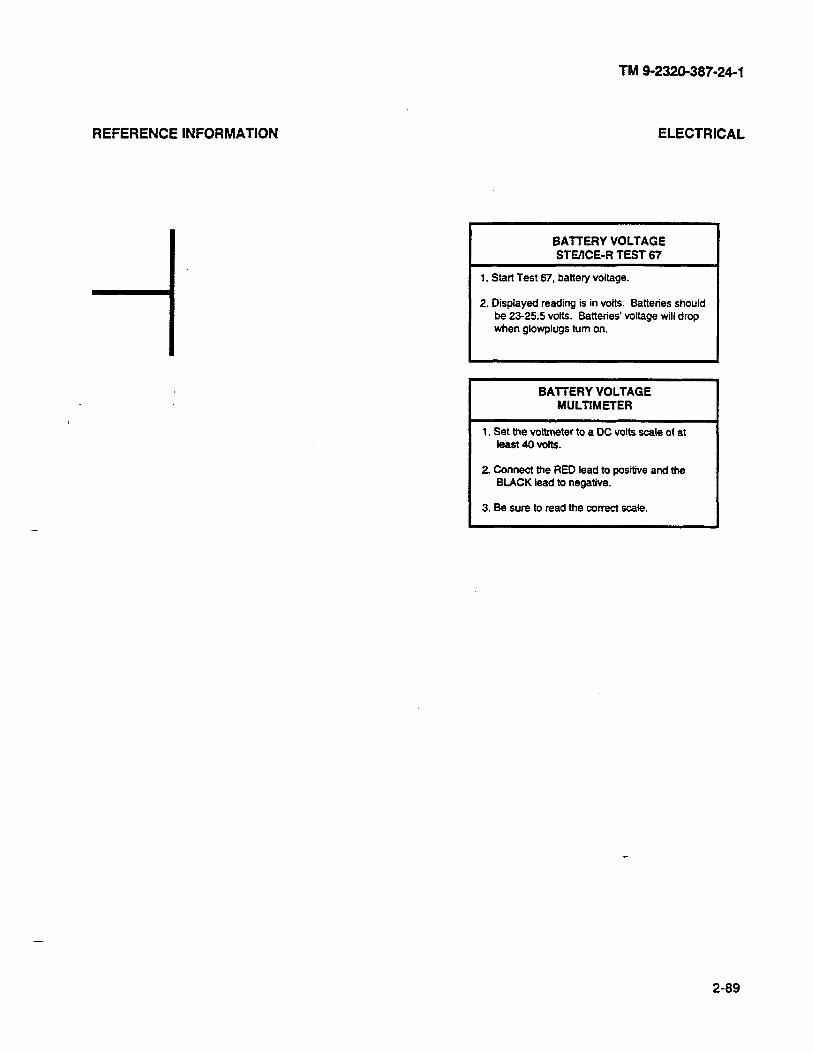
REFERENCE INFORMATION
TM 9-2320-387-24-l
ELECTRICAL
BAlTERY VOLTAGE STVICE-R TEST 67
1. Start Test 67, battery voltage.
2. Displayed reading is in volts. Batteries should be 23-25.5 volts. Batteries’ voltage will drop when glowplugs turn on.
I BAlTERY VOLTAGE MULTIMETER
I
1. Set the voltmeter to a DC volts scale of at least 40 votts.
2. Connect the RED lead to positive and the BLACK lead to negative.
3. Be sure to read the correct scale.
-
2-89
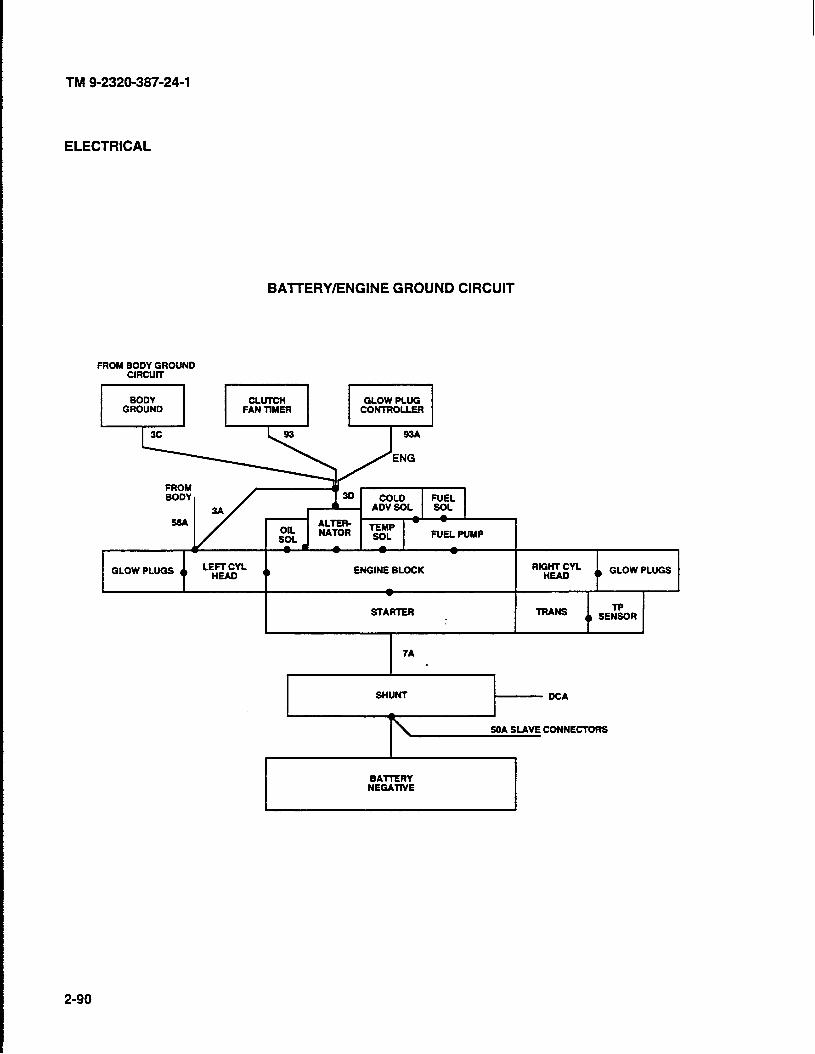
TM 9-2320-387-24-l
ELECTRICAL
BAlTERYIENGlNE GROUND CIRCUIT
FROM ~CM’;ROUND
.
BODY CLUTCH GLOW PLUG GROUND FAN TIMER CONTROLLER
93A
FUEL PUMP
GLOW PLUGS ENGINE BLOCK GLOW PLUGS
I ?A
I . , ,
I SHUNT I--
BATTERY NEGATIVE
Z-90
r 5OA SLAVE CONNECTORS
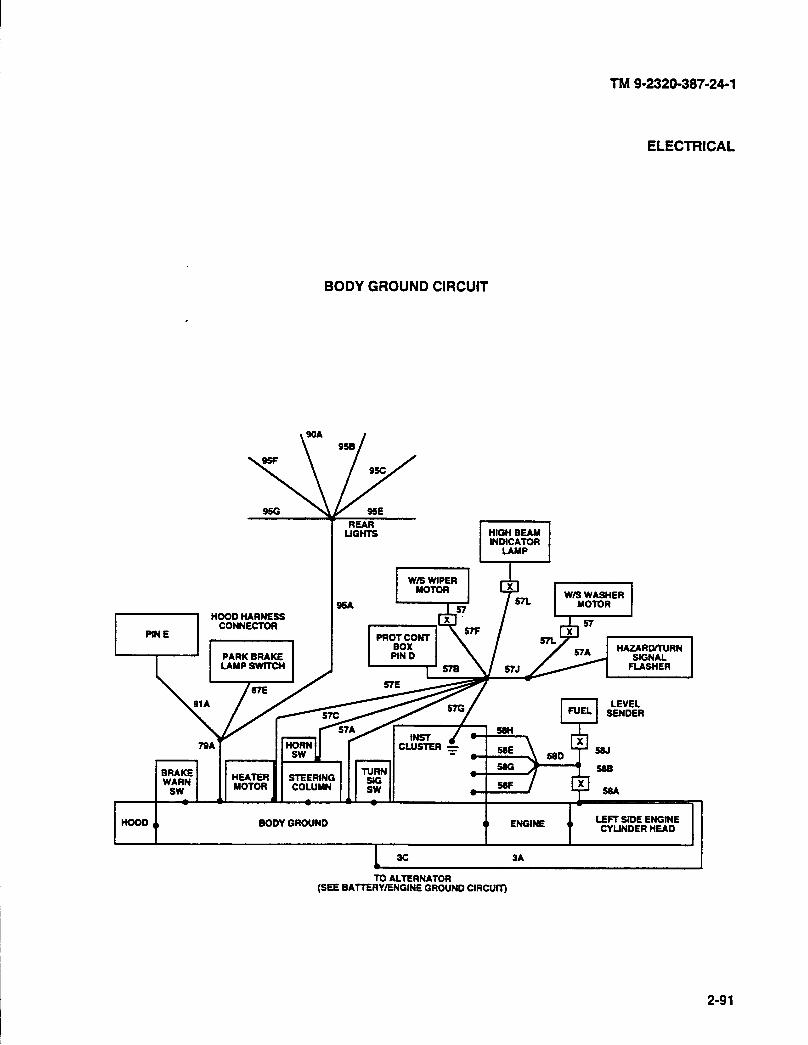
9SF si
TM 9-2320-387-24-l
ELECTRICAL
BODY GROUND CIRCUIT
In
95B
0 99E
REAR UGHTS
I w/s WlPER MOTDR
I
TO ALTERNATOR (SEE BATTERY/ENGINE GROUND ClRClJfT)
2-91
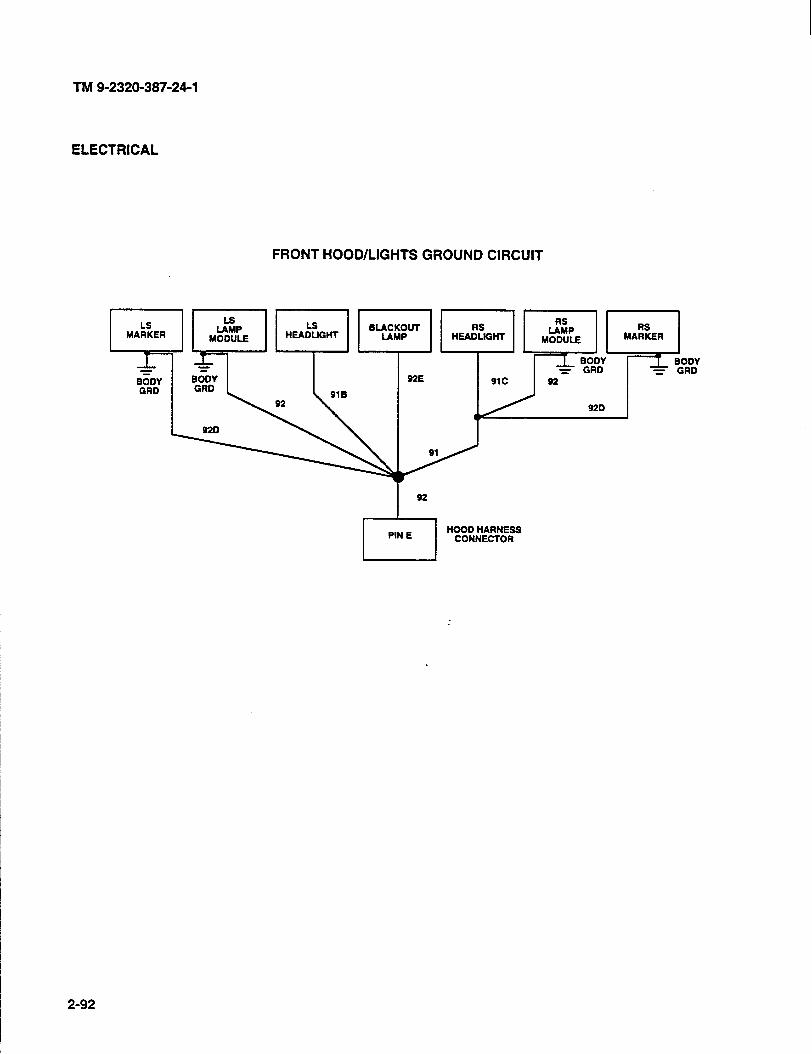
TM 9-2320-387-24-l
ELECTRICAL
FRONT HOOD/LIGHTS GROUND CIRCUIT
92E 91c
7
HOOD HARNESS CONNECTOR
2-92
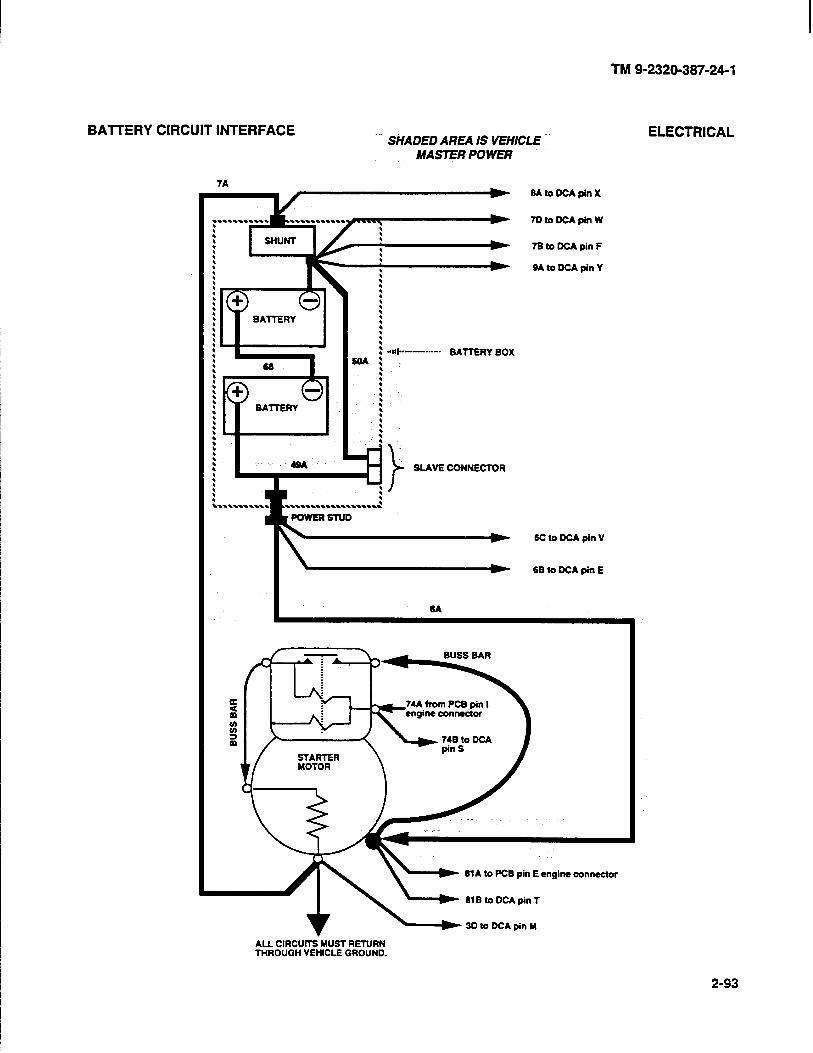
BAlTERY CIRCUIT INTERFACE , ̂ _ SHADED AREA IS VEHICLE
: : : : ( : : : [ i : : : z :
: BAlTERY :
: :
: :
: : ~(((..“.-.-_...... BATTERY BOX
b =: : : : : : :
\ . i.
SLAVE CONNECTOR
MASER POWER
POWER STUD
TM 9-2320-387-24-l
ELECTRICAL
6AtoDCApinX
7DtoDCApinW
7B to DCA pin F
9AtoDCApinY
6C to DCA pin V
\ 6BtoDCApinE
6A
74A from PCB pin I engine connector
6lAtoPCBpinEcngineconnector
61B toDCApinf
ALL CIRCUITS MUST RETURN THROUGH VEHICLE GROUND.
2-93
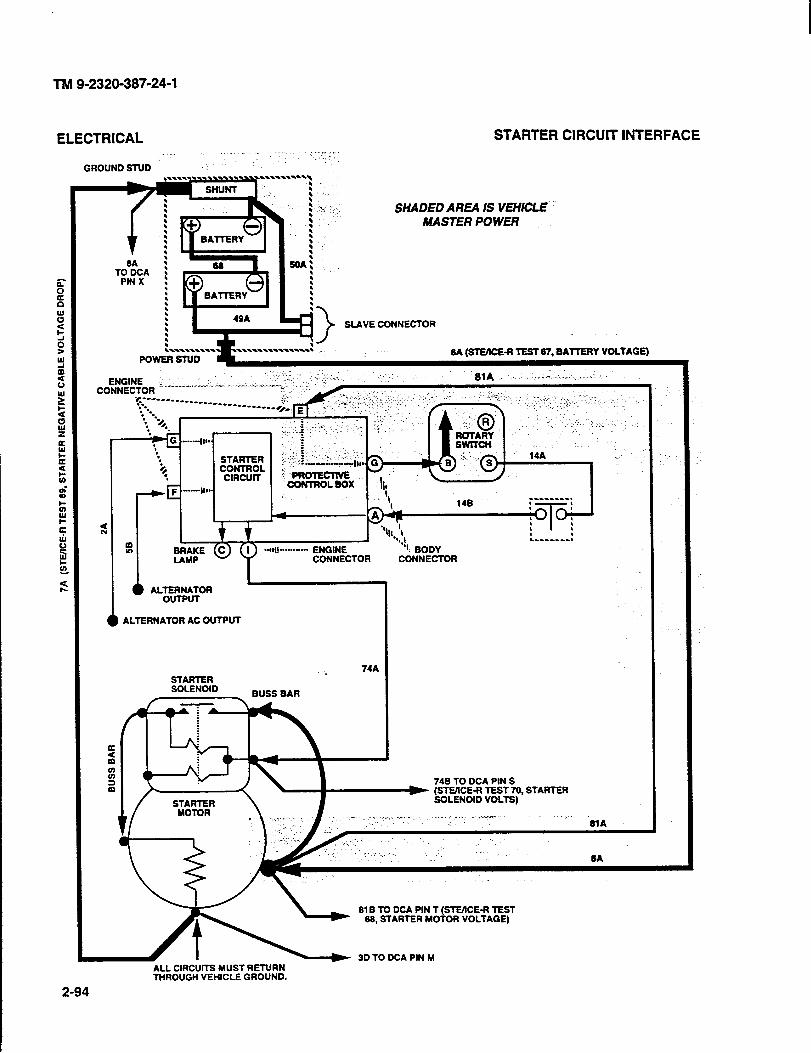
TM 9-2320-387-24-l
ELECTRICAL STARTER CIRCUIT INTERFACE , 1 ^ ” . ^h^. I ,
GROUND STUD _
SHADED AREA IS VEHICLE’ MASTER POWER
SLAVE CONNECTOR
POWER SlUD 6A (STEXE-R TEST 67, BAlTERY VOLTAGE)
“I, BODY CONNECTOR
l ALTERNATOR AC OUTPUT
_ 74A STARTER SOLENOID BUSS BAR
- _
61 B TO DCA PIN 1 (STEKE-R TEST 66, STARTER MOTOR VOLTAGE)
ALL CIRCUITS MUST RETURN THROUGH VEHICLE GROUND.
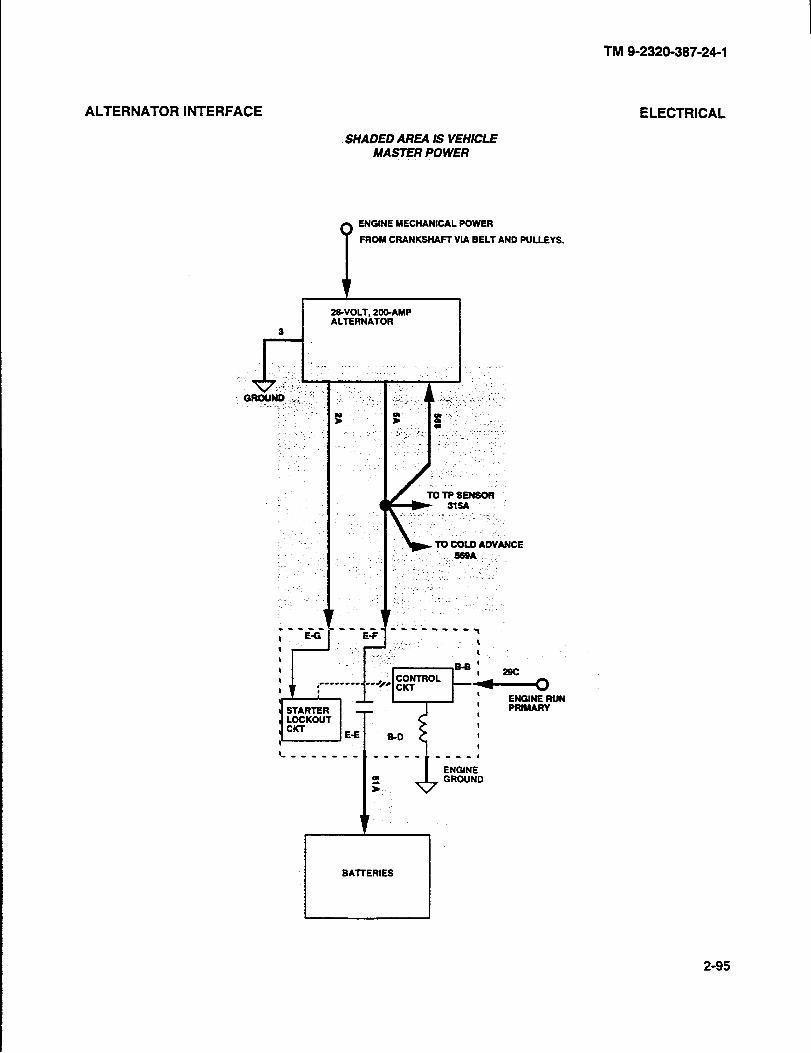
ALTERNATOR INTERFACE ELECTRICAL
SHADED AREA IS VEHICLE MAS7ER POWER
ENGINE MECHANICAL POWER
FROM CRANKSHAFT VIA BELT AND PULLEYS.
TM 9-2320-387-24-l
-a --..-.~. ,. .
I ”
(I-VOLT, 2 rLlERNA1
AMP
To COLD ADVANCE
=A , I .
BAITERIES
2-95
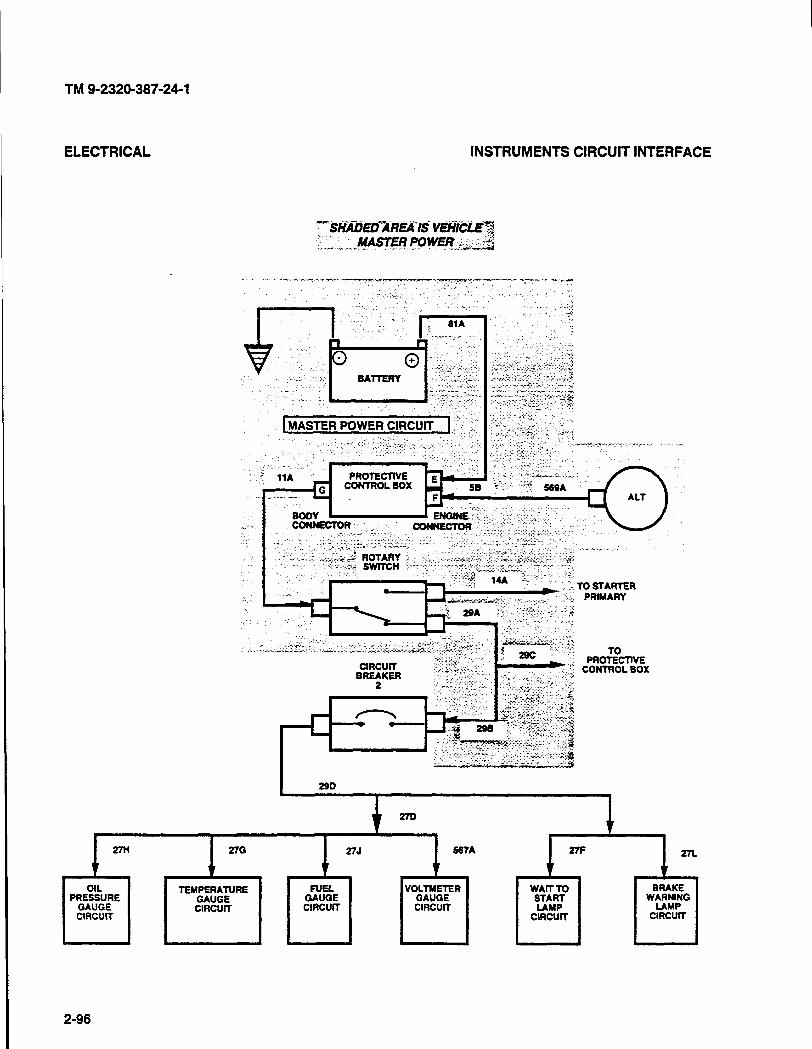
TM 9-2320-387-24-l
ELECTRICAL INSTRUMENTS CIRCUIT INTERFACE
2-96
1 MASTER POWER ClRCUlT 1 ~. x *.?
PRIMARY
PR0i%lvE CONTROL BOX
TEMPERATURE GAUGE CIRCUIT
G?i!k V”k2i~R CIRCUIT CIRCUIT
/ 1 I
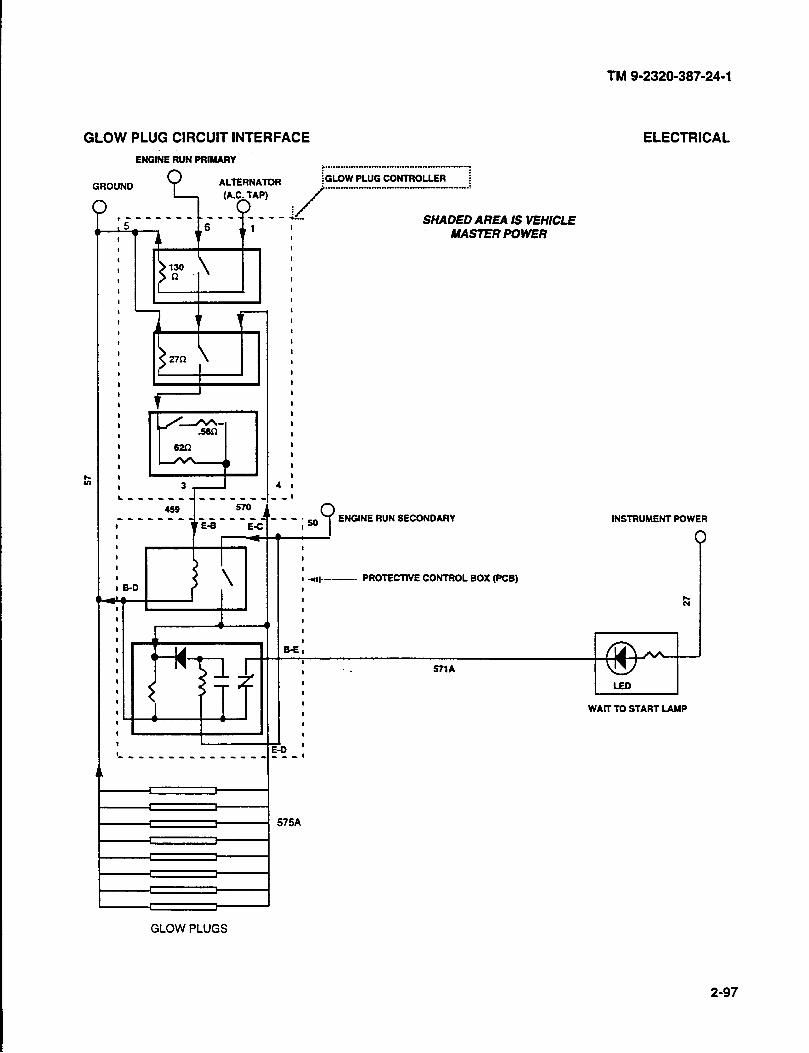
GLOW PLUG CIRCUIT INTERFACE ELECTRICAL
ENGINE RUN PRIMARY ,......r-r-rr~.“.~.~....~~~~~~-,
GROUND ALTERNATOR f GLOW PLUG CONTROLLER i . . . . . . ..--.-..r.“-.---...--~.-..
r~---~-- .I_ IS_
SHADED AREA IS VEHICLE v
I
I MASER POWER
Edi 27R
469
4
570 a-_--w_ ,,--a-: b E-B E-C
GLOW PLUGS
I
I
I
I
I
4 I
_- I
e-a.
1% 9
ENGINE RUN SECONDARY
c : I
TM 9-2320-387-24-l
INSTRUMENT POWER
I
I
I
I ..~I+.---.. PROTECTlYE CONTROL BOX (PCB) I
I
I
I
I . 67IA I LED I
I I I WAtT TO START LAMP
1 I I
E-D ’ ,,,I
2-97
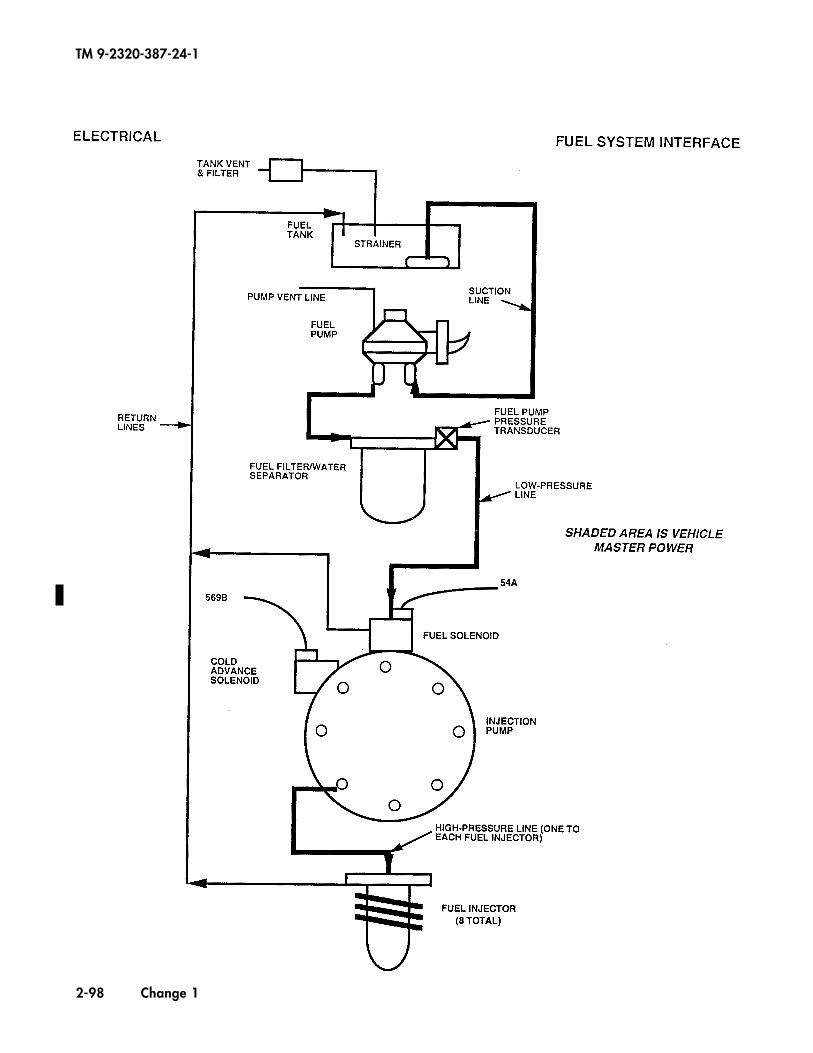
TM 9-2320-387-24-1
2-98 Change 1

TM 9-2320-387-24-l
2-28. FUEL SYSTEM TESTS
These fuel system tests can be run any time you think there may be a problem with the fuel system or if you were sent here from another test.
If you are running this test because the engine runs rough, remember that air intake and exhaust as well as internal mechanical problems can also cause this condition.
At the bottom of this page is a simplified block diagram which shows how the different fuel system components relate to each other. Refer to fold-out page FP-1 and leave open for reference while you are testing.
k
v 4 ENGINE GOVERNOR
4 E;lEANICAL
-I INJECTORS
FUEL PUMP 4
7
MECHANICAL DRIVE
FUEL FILTER
BAl7ERYI _ ALTERNATOR
INJECTION PUMP
COLD 4 . ADVANCE
SOLENOID 4
2-99

TM 9-2320-387-24-l
-
DIAGNOSTIC FLOWCHART FUEL SYSTEM
KNOWN INFO T OPTIONS
NOTHING IS THE FUEL SUPPLY AND QUALITY OK?
POSSIBLE PROBLEMS
VISUAL INSPECTION, SAMPLED WHILE CRANKING OR RUNNING. THIS QUESTION ONLY CHECKS THE SUPPLY OF FUEL IN THE TANK AND TESTS TO SEE IF IT IS GRTING TO THE INJECTOR PUMP. THIS IS NOT A TEST OF FUEL PRESSURE.
FUEL LINES FUEL FILTER FUEL PUMP FUEL SOLENOID INJECTION PUMP INJECTORS
,ml
REASON FOR OUESTtON
Without a supply of good fuel, none of the components in the fuel system can be expected to work properly.
OPTtONS
TRY STARTlNG ME ENGINE.
KNOWN INFO
FUEL AVAILABLE AND NOT CONTAMINATED
DOES THE ENGINE START AND STAY RUNNING?
POSSIBLE PROBLEMS
SOLD ADVANCE SLOW PLUGS FUEL LINES FUEL FILTER FUEL PUMP INJECTlON PUMP FUEL SOLENOID REl-URN CHECK VALVE
REASON FOR QUESTlON
:I If it starts, you know that there is fuel available and the fuel solenoid is working.
r ir KNOWN INFO
1 TRY STARTlNG THE ENGINE WHILE l-l-S COLD.
FUEL SOLENOID OK FUEL OK DOES THE ENGINE START
EASILY WHEN COLD?
]z I advance circuit.
POSSIBLE PROBLEMS
COLD ADVANCE
FUEL LINES FUEL FILTER FUEL PUMP INJECTION PUMP INJECTORS
2-100
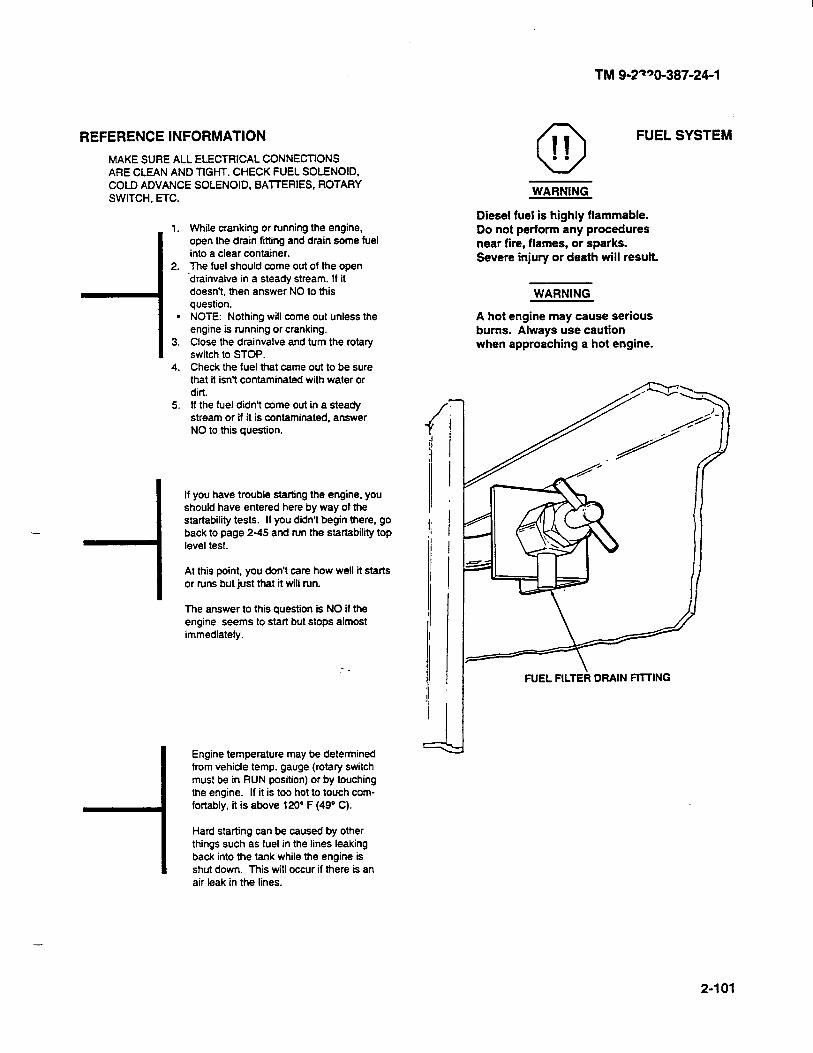
TM 9-21’O-387-24-1
REFERENCE INFORMATION
MAKE SURE AU ELECTRICAL CONNECTtONS ARE CLEAN AND TIGKT. CHECK FUEL SOLENOID, COLD ADVANCE SOLENOID. BAll-ERIES. ROTARY SWITCH, ETC.
1. While cranking or running the engine, open the drain fitting and drain some fuel into a clear container.
2. The fuel should come out of the open -drainvalve in a steady stream. If it doesn’t, then answer NO to this question.
l NOTE: Nothing will come out unless the engine is running or cranking.
3. Close the drainvalve and turn the rotary switch to STOP.
4. Check the fuel that came out to be sure that it isn’t contaminated with water or dirt.
5. If the fuel didn’t come out in a steady stream or if it is contaminated, answer NO to this question.
-
i
If you have trouble starting the engine, you should have entered here by way of the startability tests. If you didn’t begin there, go back to page 2-45 and run the startability top level test.
At this point, you don’t care how well it starts or runs but just that it will run.
The answer to this question is NO if the engine seems to start but stops almost immediately.
- :
Engine temperature may be determined from vehicle temp. gauge (rotary switch must be in RUN position) or by touching the engine. If it is too hot to touch com- fortably, it is above 120° F (49O C).
Hard starting can be caused by other things such as fuel in the lines leaking back into the tank while the engine is shut down. This will occur if there is an air leak in the lines.
0 II FUEL SYSTEM
. .
WARNING
Diesel fuel is highly flammable. Do not perform any procedures near fire, flames, or sparks. Severe injury or death will result.
WARNING
A hot engine may cause serious burns. Always use caution when approaching a hot engine.
FUEL FILTER DRAIN FtlTlNG
2-101

TM 9-2320-387-24-l
FUEL SYSTEM
I KNOWN INFO I
DIAGNOSTIC FLOWCHART
FUEL SOLENOID OK COLD ADVANCE OK
FUEL LINES FUEL FILTER FUEL PUMP
KNOWN INFO
FUEL SOLENOID OK COLD ADVANCE OK
-1 FUEL LINES FUEL FILTER FUEL PUMP
KNOWN INFO
FUEL PUMP -7 AND FILTER OK
POSSIBLE PROBLEMS 1
INJECTION PUMP INJECTORS FUEL SUPPLY LINES 1 FUEL RETURN LINES RETURN CHECK VALVE
I KNOWN INFO
FUEL LINES, PUMP AND FILTER OK
POSSIBLE PROBLEMS
INJECTION PUMP INJECTORS EXHAUST RESTRICTED
4 1 t TEST OPTIONS
IS THE FUEL SUPPLY PRESSURE 1. STE/ICE-R TEST 24 GREATER THAN 3 PSI (20.69 kPa) (Page 2-494)
AT ALL SPEEDS? 2. PRESSURE GAUGE
REASON FOR QUESTION
This is to verify that the fuel supply lines, fuel pump, and fuel filter are OK.
5 1 TEST OPTIONS
IS THE FUEL VOLUME AT THE Fuel pump volume test
INJECTION PUMP INLET 1 PINT IN 30 SECONDS WHILE CRANKING?
This is to verify that the fuel sup~lv lines. fuel oumo. and fuel
I filter are OK. ’
6 1 1 TEST OPTIONS
DOES THE ENGINE RUN SMOOTHLY? F;zN;PND LsTEN To
REASON FOR QUESTION
If it runs smoothly, then it is not an individual cylinder fault such as a bad injector.
TEST OPTIONS
IS THE IDLE SPEED 700 TO 750 ST&ICE-R TEST 10 (Page 2-490)
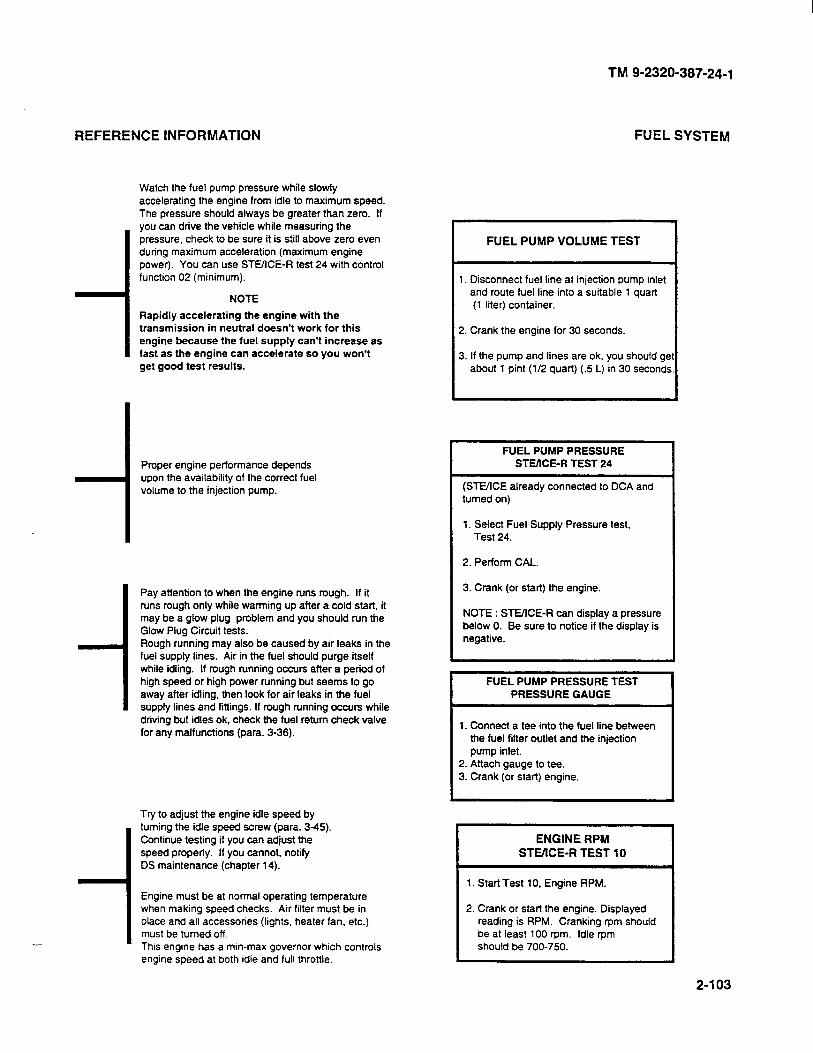
TM 9-2320-387-24-l
--
REFERENCE INFORMATION
Watch the fuel pump pressure while slowly accelerating the engine from idle to maximum speed. The pressure should always be greater than zero. If you can drive the vehicle while measuring the pressure, check to be sure it is still above zero even during maximum acceleration (maximum engine power). You can use STUICE-R test 24 with control function 02 (minimum).
NOTE
Rapidly accelerating the engine with the transmission in neutral doesn’t work for this engine because the fuel supply can’t increase as fast as the engine can accelerate so you won’t get good test results.
Proper engine performance depends upon the availability of the correct fuel volume to the injection pump.
Pay attention to when the engine runs rough. If it runs rough only while warming up after a cold start, it may be a glow plug problem and you should run the Glow Plug Circuit tests. Rough running may also be caused by air leaks in the fuel supply lines. Air in the fuel should purge itself while idling. If rough running occurs after a period of high speed or high power running but seems to go away after idling, then look for air leaks in the fuel supply lines and fittings. If rough running occurs while driving but idles ok, check the fuel return check valve for any malfunctions (para. 3-36).
Try to adjust the engine idle speed by turning the idle speed screw (para. 3-45). Continue testing if you can adjust the speed property. If you cannot, notify DS maintenance (chapter 14).
Engine must be at normal operating temperature when making speed checks. Air filter must be in place and all accessories (lights, heater fan, etc.) must be turned off. Thts engme has a min-max governor which controls engine speed at both idle and full thronle.
FUEL SYSTEM
I FUEL PUMP VOLUME TEST
1. Disconnect fuel line at injection pump inlet and route fuel line into a suitable 1 quart (1 liter) container.
I 2. Crank the engine for 30 seconds.
3. If the pump and lines are ok, you should gE about 1 pint (l/2 quart) (.5 L) in 30 second5
FUEL PUMP PRESSURE STE/lCE-R TEST 24
(SLUICE already connected to DCA and turned on)
1. Select Fuel Supply Pressure test, Test 24.
2. Perform CAL.
3. Crank (or start) the engine.
NOTE : STE/ICE-R can display a pressure below 0. Be sure to notice if the display is negative.
I FUEL PUMP PRESSURE TEST PRESSURE GAUGE
1. Connect a tee into the fuel line between the fuel filter outlet and the injection pump inlet.
2. Attach gauge to tee. 3. Crank (or start) engine.
ENGINE RPM STEIICE-R TEST 10
1. Start Test 10. Engine RPM.
2. Crank or start the engine. Displayed reading is RPM. Cranking rpm should be at least 100 rpm. Idle rpm should be 700-750.
2-103
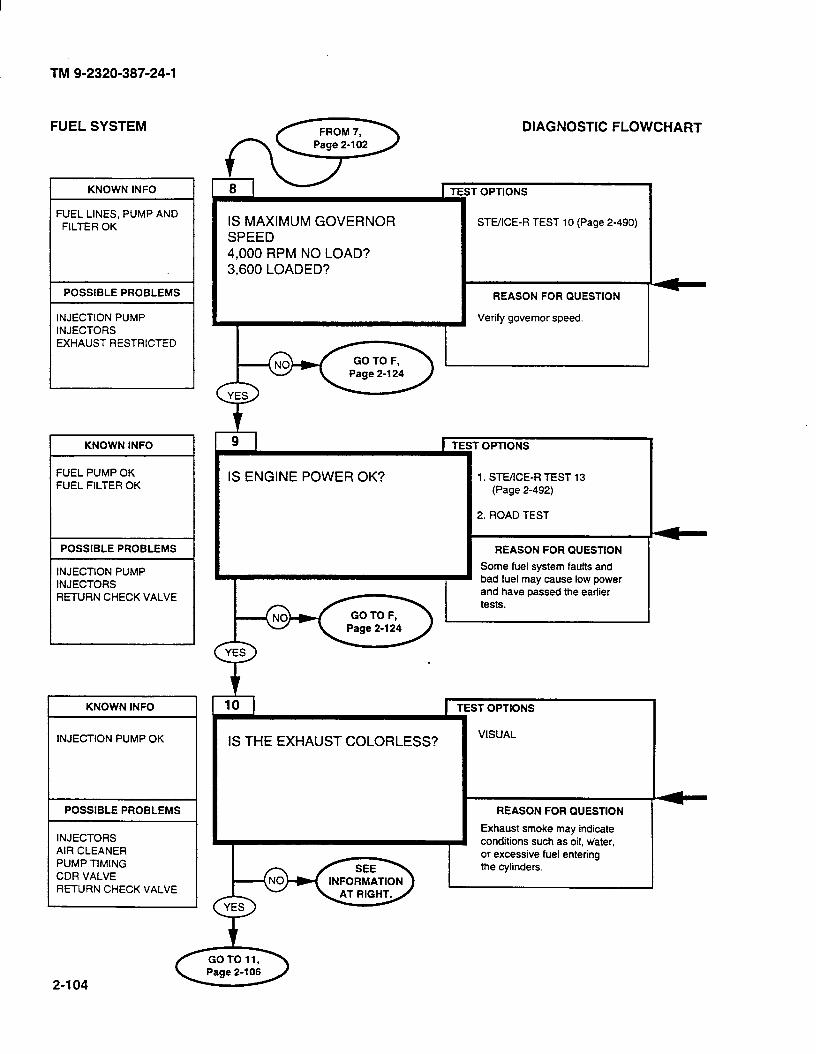
TM 9-2320-387-24-l
FUEL SYSTEM
KNOWN INFO I
FUEL LINES, PUMP AND FILTER OK
POSSIBLE PROBLEMS
INJECTION PUMP INJECTORS EXHAUST RESTRICTED
KNOWN INFO
FUEL PUMP OK FUEL FILTER OK
POSSIBLE PROBLEMS
INJECTION PUMP INJECTORS RETURN CHECK VALVE
INJECTION PUMP OK
POSSIBLE PROBLEMS
INJECTORS AIR CLEANER PUMP TIMING CDR VALVE RETURN CHECK VALVE
IS MAXIMUM GOVERNOR SPEED 4,000 RPM NO LOAD? 3.600 LOADED?
DIAGNOSTIC FLOWCHART
TEST OPTIONS
1 STEIICE-R TEST 10 (Page 2-490)
REASON FOR QUESTION
~ Verify governor speed.
IS ENGINE POWER OK?
r OPTIONS
1. STEIICE-R TEST 13 (Page 2-492)
2. ROAD TEST
REASON FOR QUESTION
Some fuel system faults and bad fuel may cause low power
IS THE EXHAUST COLORLESS?
ST OPTIONS
VISUAL
1 TE!
REASON FOR QUESTlON
Exhaust smoke may indicate conditions such as oil, water. or excessive fuel entering the cylinders.
L 2-104
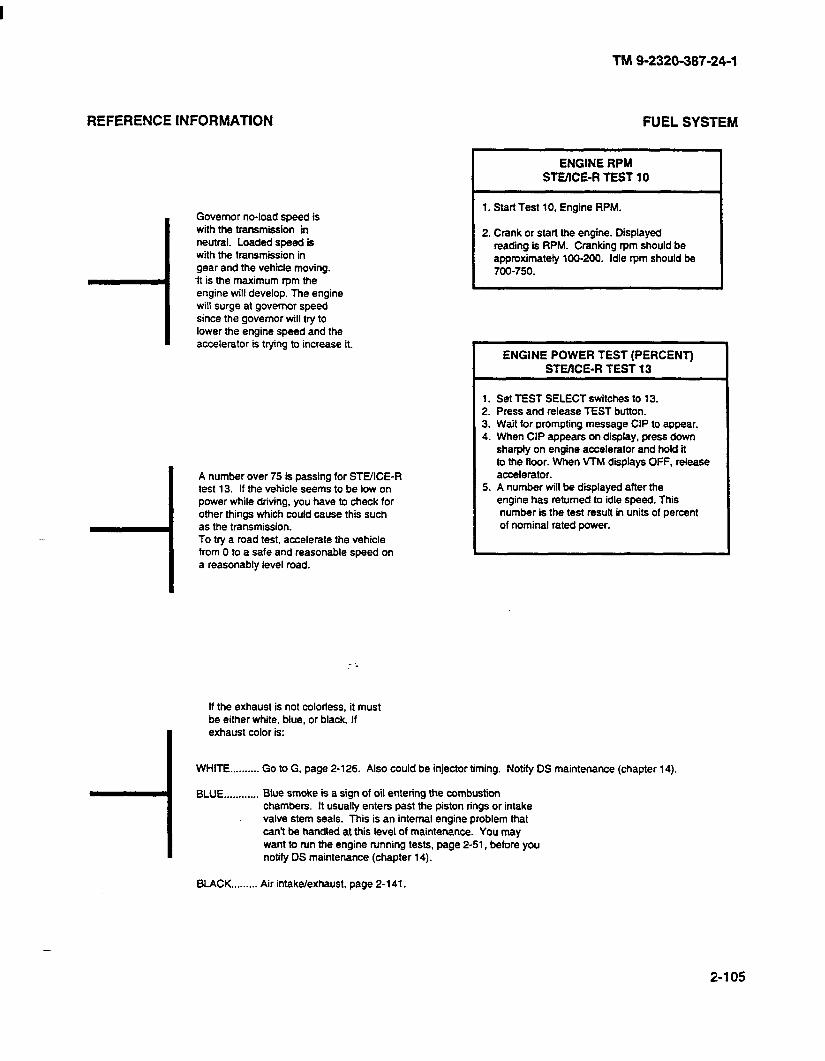
REFERENCE INFORMATION
TM 9-2320-387-24-l
FUEL SYSTEM
._ -I
Governor no-load speed is with the transmission in neutral. Loaded speed is with the transmission in gear and the vehicle moving. -It is the maximum rpm the engine will develop. The engine will surge at governor speed since the governor will try to lower the engine speed and the accelerator is trying to increase it.
A number over 75 is passing for STE/lCE-R test 13. If the vehicle seems to be low on power while driving, you have to check for other things which could cause this such as the transmission. To try a road test, accelerate the vehicle from 0 to a safe and reasonable speed on a reasonably level road.
ENGINE RPM STEIICE-R TEST 10
1. Start Test 10, Engine RPM.
2. Crank or start the engine. Displayed reading is RPM. Cranking rpm should be approximately 1 W-200. Idle rpm should be 700-750.
ENGINE POWER TEST (PERCENTI STUICE-R TESi 13 ’
1. Set TEST SELECT switches to 13. 2. Press and release TEST button. 3. Watt for prompting message CIP to appear. 4. When CIP appears on display, press down
sharply on engine accelerator and hold it to the floor. When VTM displays OFF, release accelerator.
5. A number will be displayed after the engine has returned to idle speed. This number is the test result in units of percent of nominal rated power.
- :
If the exhaust is not colorless. it must be either white, blue, or black. If exhaust color is:
WHITE .._....... Go to G. page 2-126. Also could be injector timing. Notify DS maintenance (chapter 14).
BLUE . . . . . . . . . . . . Blue smoke is a sign of oil entering the combustion chambers. It usually enters past the piston rings or intake valve stem seals. This is an internal engine problem that can’t be handled at this level of maintenance. You may want to run the engine running tests, page 2-51, before you notify DS maintenance (chapter 14).
BUCK . . . . . . . . . Air intake/exhaust, page 2-l 41.
2-105
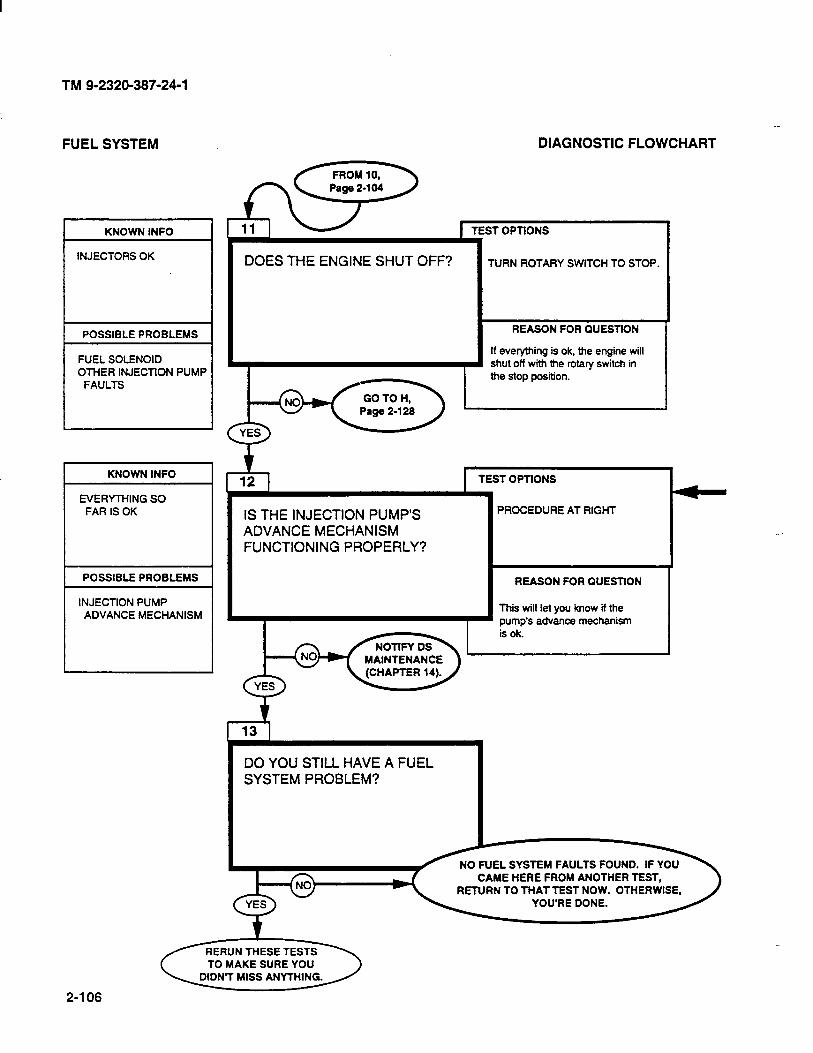
TM 9-2320-387-24-l
FUEL SYSTEM
FUEL SOLENOID OTHER INJECTlON PUMP
KNOWN INFO I
EVERYTHING SO FAR IS OK
POSSIBLE PROBLEMS
INJECTlON PUMP ADVANCE MECHANISM
2-106
DOES THE ENGINE SHUT OFF?
_
DIAGNOSTIC FLOWCHART
;T OPTlONS
TURN ROTARY SWITCH TO STOP.
REASON FOR QUESTlON
If everything is ok, the engine will shut off with the rotary switch in the stop position.
TEST OPTlONS
IS THE INJECTION PUMP’S ADVANCE MECHANISM FUNCTIONING PROPERLY? I
PROCEDURE AT RIGHT
REASON FOR QUESTlON
This will let you know if the pump’s advance mechanism is ok.
DO YOU STILL HAVE A FUEL SYSTEM PROBLEM?
CAME HERE FROM ANOTHER TEST, RETURN TO THAT TEST NOW. OTHERWISE.
YOU’RE DONE.
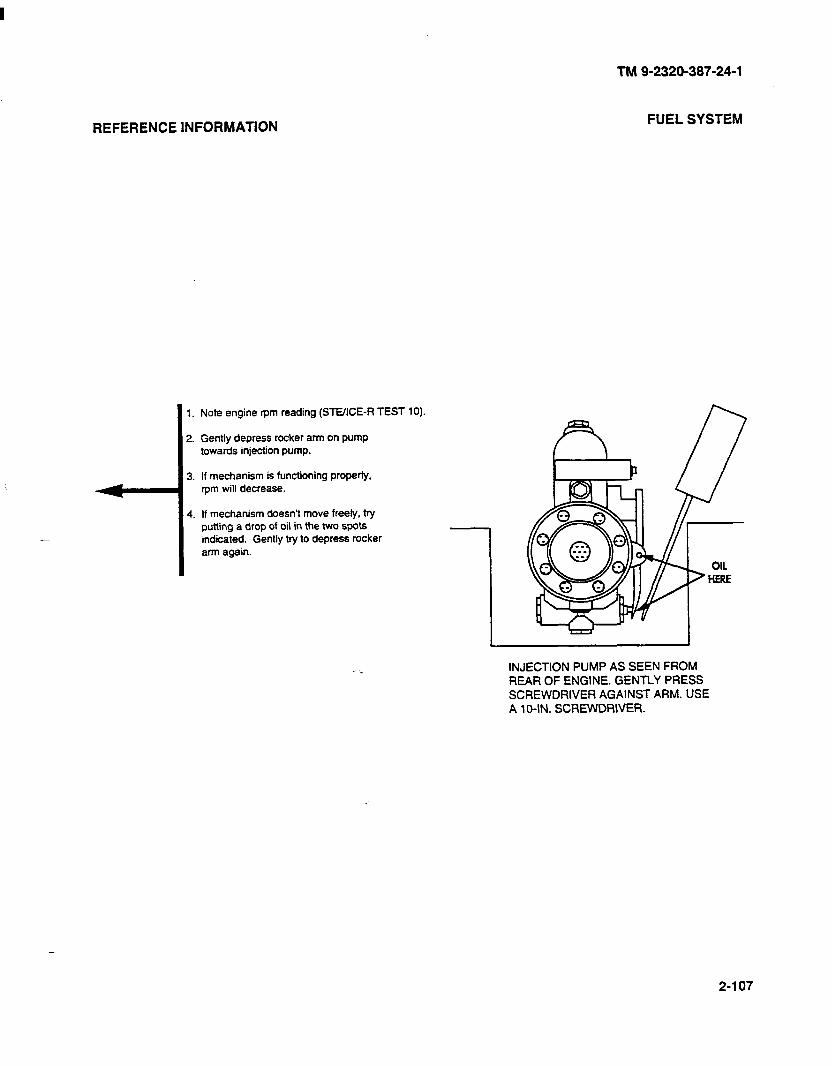
-
REFERENCE INFORMATION
1. Note engine rpm reading (SWICE-R TEST 10).
2. Gently depress rocker arm on pump towards injection pump.
3. If mechanism is functioning properly, rpm will decrease.
4. If mechanism doesn’t move freely. try putting a drop of oil in the two spots indicated. Gently try to depress rocker arm again.
TM 9-2320-387-24-l
FUEL SYSTEM
INJECTION PUMP AS SEEN FROM REAR OF ENGINE. GENTLY PRESS SCREWDRIVER AGAINST ARM. USE A 1 O-IN. SCREWDRIVER.
2-107
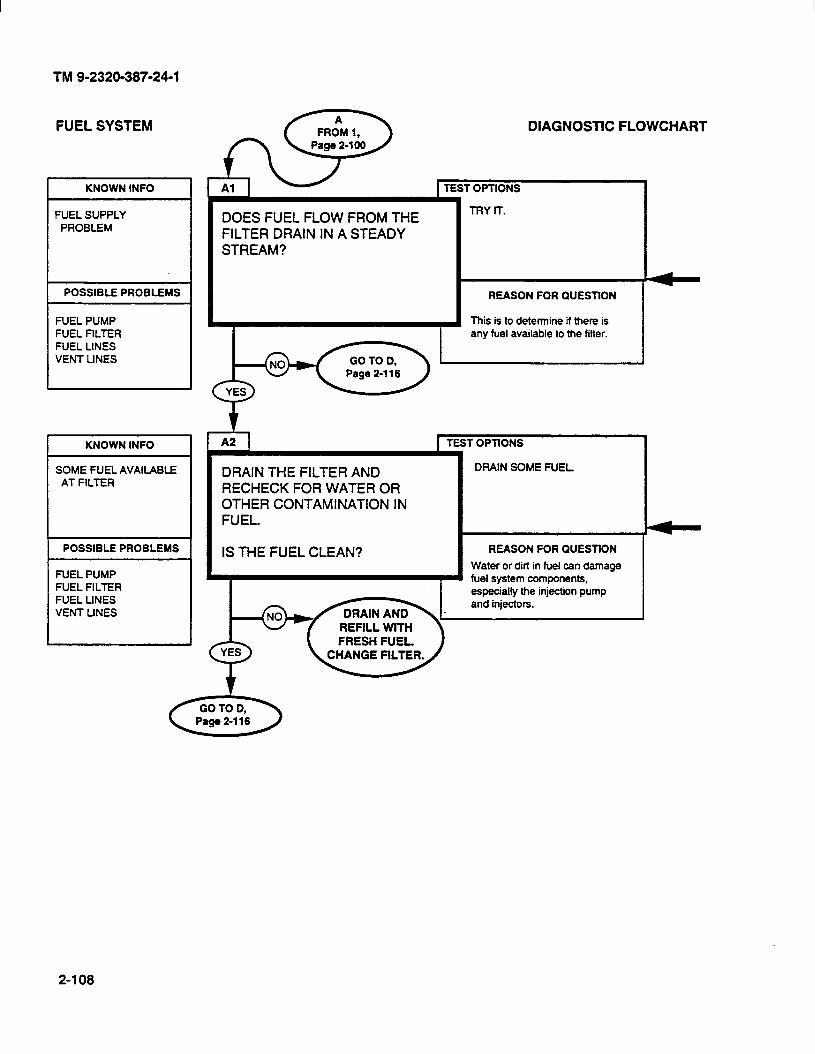
TM 9-2320-387-24-l
r
FUEL SYSTEM
KNOWN INFO I
FUEL SUPPLY PROBLEM
POSSIBLE PROBLEMS
FUEL PUMP FUEL FILTER FUEL LINES VENT LINES
KNOWN INFO
SOME FUEL AVAILABLE AT FILTER
POSSIBLE PROBLEMS
FUEL PUMP FUEL FILTER FUEL LINES VENT UNES
DOES FUEL FLOW FROM THE FILTER DRAIN IN A STEADY STREAM?
TRY IT.
REASON FOR QUESTION
This is to determine if there is any fuel available to the filter.
DRAIN THE FILTER AND RECHECK FOR WATER OR OTHER CONTAMINATION IN FUEL.
IS THE FUEL CLEAN?
DRAIN SOME FUEL
t A2 TEST OPTIONS
REASON FOR QUESTION
1 Water or dirt in fuel can damage fuel system components, especially the injection pump and injectors.
2-l 08
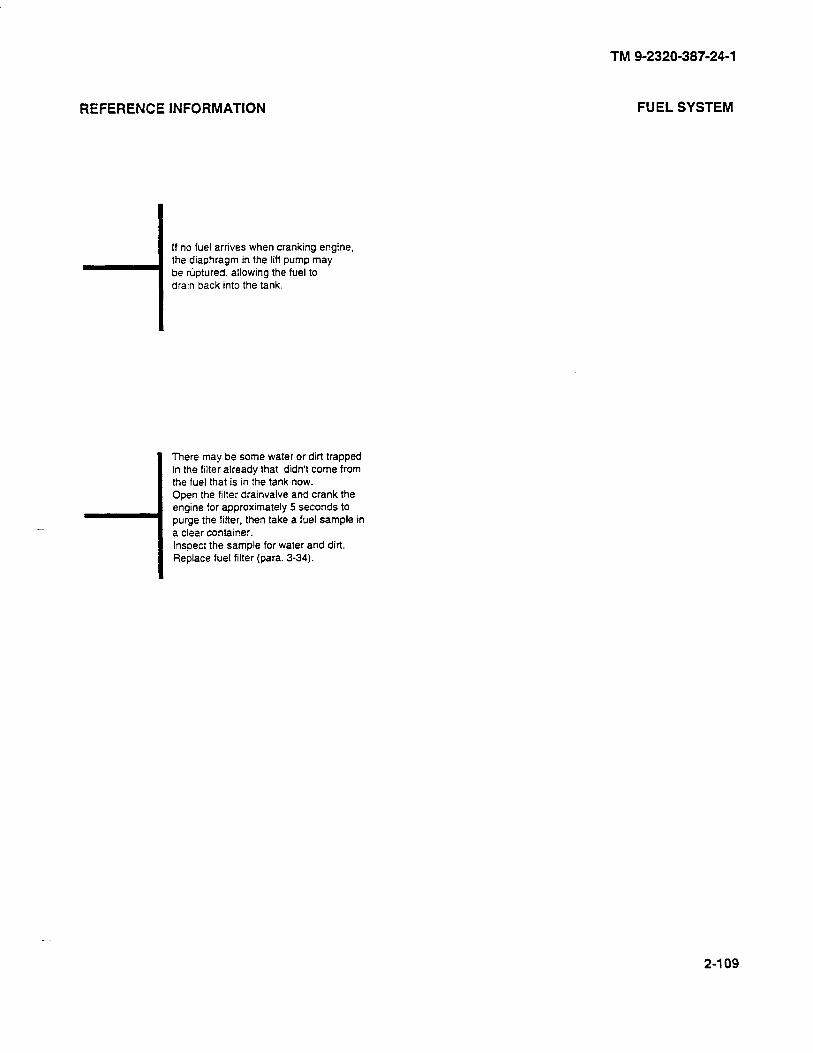
REFERENCE INFORMATION
i
If no fuel arrives when cranking engine, the diaphragm in the lift pump may be ruptured, allowing the fuel to drain back into the tank.
There may be some water or dirt trapped in the filter already that didn’t come from the fuel that is in the tank now. Open the filter drainvalve and crank the engine for approximately 5 seconds to purge the filter, then take a fuel sample in a c!ear container. Inspect the sample for water and dirt. Replace fuel filter (para. 3-34).
TM 9-2320-387-24-l
FUEL SYSTEM
2-109
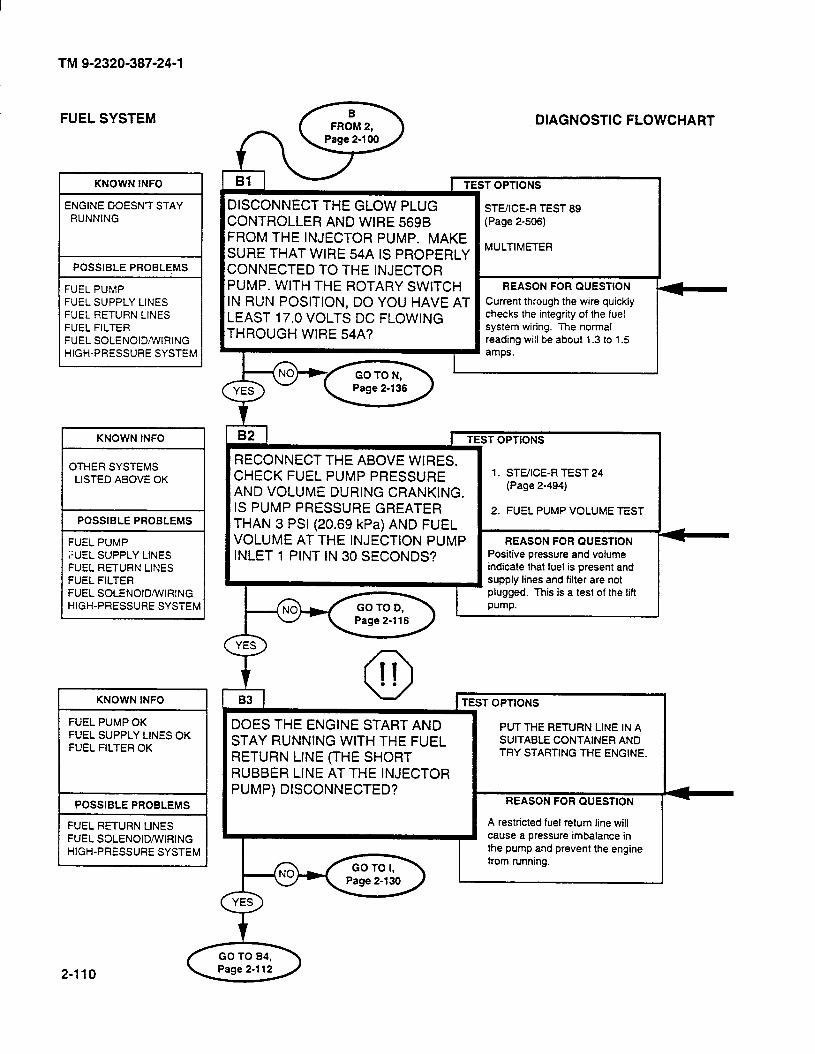
TM 9-2320-387-24-l
FUEL SYSTEM
r
KNOWN INFO I
ENGINE DOESN’T STAY RUNNING
POSSIBLE PROBLE.hlS
FUEL PUMP FUEL SUPPLY LINES FUEL RETURN LINES FUEL FILTER FUEL SOLENOID/WIRING HIGH-PRESSURE SYSTEM
FUEL PUMP ?UEL SUPPLY LINES FUEL RETURN LINES FUEL FILTER FUEL SOLENOID/WIRING HIGH-PRESSURE SYSTEM
KNOWN INFO
FUEL PUMP OK FUEL SUPPLY LINES OK FUEL FILTER OK
DISCONNECT THE GLOW PLUG CONTROLLER AND WIRE 5698 FROM THE INJECTOR PUMP. MAKE SURE THAT WIRE 54A IS PROPERLY CONNECTED TO THE INJECTOR PUMP. WITH THE ROTARY SWITCH IN RUN POSITION, DO YOU HAVE AT LEAST 17.0 VOLTS DC FLOWING THROUGH WIRE 54A?
DIAGNOSTIC FLOWCHART
;T OPTIONS
STE/lCE-R TEST 89 (Page 2-508)
MULTIMETER
REASON FOR QUESTION
Current through the wire quickly checks the integrity of the fuel system wiring. The normal reading will be about 1.3 to 1.5 amps.
RECONNECT THE ABOVE WIRES. CHECK FUEL PUMP PRESSURE AND VOLUME DURING CRANKING. IS PUMP PRESSURE GREATER THAN 3 PSI (20.69 kPa) AND FUEL VOLUME AT THE INJECTION PUMP INLET 1 PINT IN 30 SECONDS?
1. STE/ICE-R TEST 24 (Page 2-494)
2. FUEL PUMP VOLUME TEST
REASON FOR QUESTION Positive pressure and volume indicate that fuel is present and supply lines and filter are not plugged. This is a test of the lift
pump.
0 II . . 83 TEST OPTIONS
DOES THE ENGINE START AND PUT THE RETURN LINE IN A
STAY RUNNING WITH THE FUEL SUITABLE CONTAINER AND
RETURN LINE (THE SHORT TRY STARTING THE ENGINE.
RUBBER LINE AT THE INJECTOR PUMP) DISCONNECTED?
REASON FOR QUESTION
A restricted fuel return line will
I I cause a pressure imbalance in the pump and prevent the engine
2-110
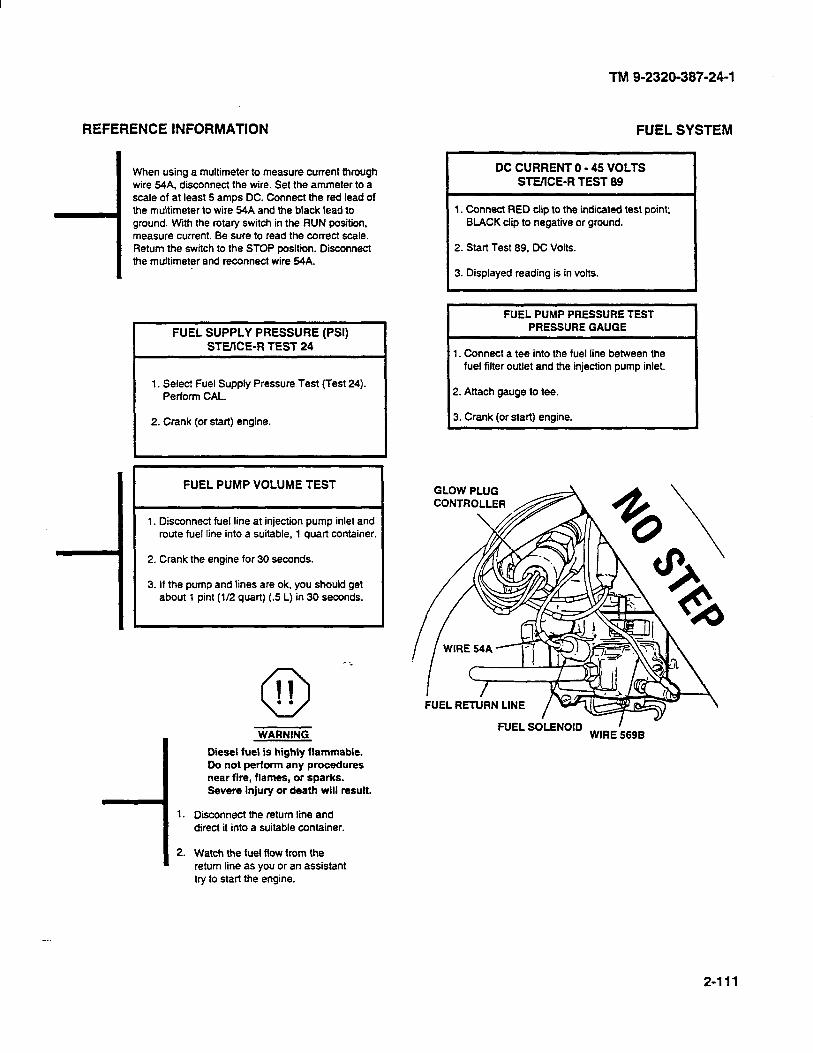
TM 9-2320-387-24-l
REFERENCE INFORMATION FUEL SYSTEM
When using a multimeter to measure current through wire 84A. disconnect the wire. Set the ammeter to a scale of at least 5 amps DC. Connect the red lead of the multimeler to wire 84A and the black lead to ground. With the rotary switch in the RUN position. measure current. Be sure to read the correct scale. Return the switch to the STOP position. Disconnect the multimeter and reconnect wire 84A.
FUEL SUPPLY PRESSURE (PSI)
STEIICE-R TEST 24
1. Select Fuel Supply Pressure Test (Test 24). Perform CAL.
2. Crank (or start) engine.
FUEL PUMP VOLUME TEST
1. Disconnect fuel line at injection pump inlet and route fuel line into a suitable, 1 quart container.
2. Crank the engine for 30 seconds.
3. If the pump and lines are ok, you should get about 1 pint (l/2 quart) (8 L) in 30 seconds.
-1 1.
2.
WARNING
Diesel fuel is highly flammable. Do not perform any procedures near fire, flames, or sparks. Severe injury or death will result.
Disconnect the return line and direct it into a suitable container.
Watch the fuel flow from the return line as you or an assistant try to start the engine.
DC CURRENT 0 - 45 VOLTS STVICE-R TEST 89
1. Connect RED clip to the indicated test point; BLACK clip to negative or ground.
2. Start Test 89. DC Volts.
3. Displayed reading is in volts.
. FUEL PUMP PRESSURE TEST
PRESSURE GAUGE
1. Connect a tee into the fuel line between the fuel filter outlet and the injection pump inlet.
2. Attach gauge to tee.
3. Crank (or start) engine.
FUEL SOLENOID WIRE:89B
2-111
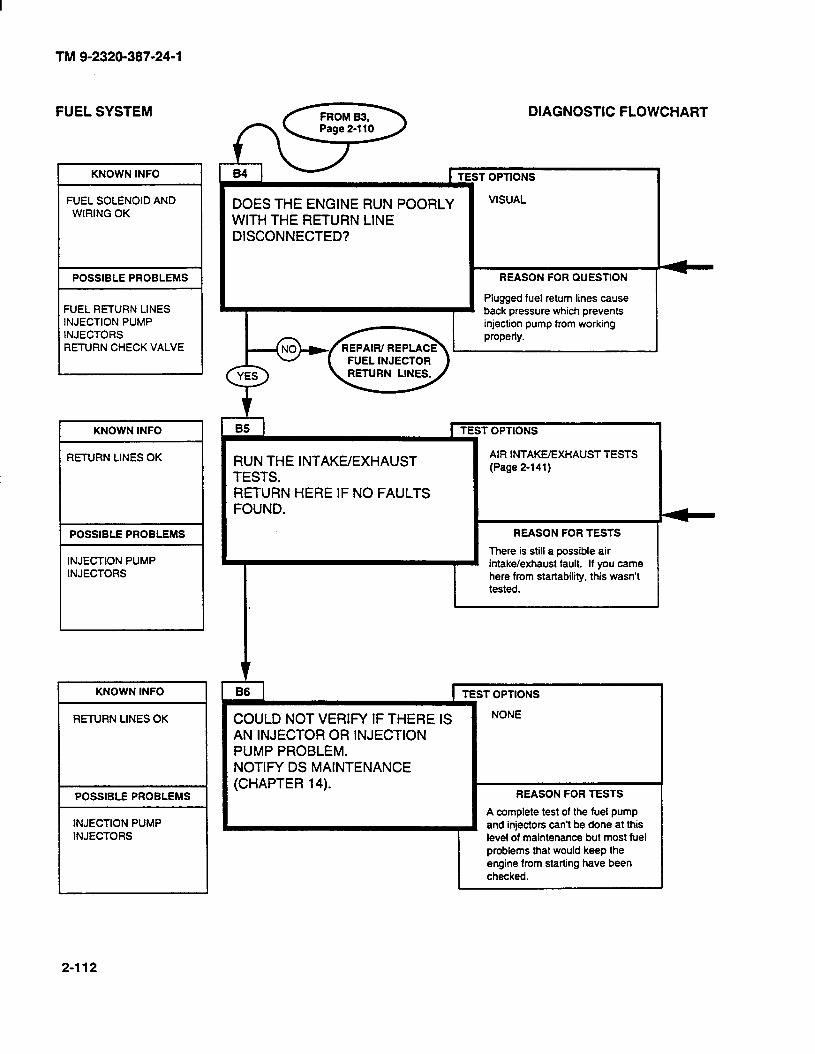
TM 9-2320-387-24-l
FUEL SYSTEM
I KNOWN INFO
FUEL SOLENOID AND WIRING OK
POSSIBLE PROBLEMS
FUEL RETURN LINES INJECTION PUMP INJECTORS RETURN CHECK VALVE
KNOWN INFO
RETURN LINES OK
POSSIBLE PROBLEMS
INJECTION PUMP INJECTORS
KNOWN INFO I
RETURN LINES OK
POSSIBLE PROBLEMS 1 I
INJECTION PUMP INJECTORS
DOES THE ENGINE RUN POORLY WITH THE RETURN LINE DISCONNECTED?
DIAGNOSTIC FLOWCHART
VISUAL
REASON FOR QUESTION
Plugged fuel return lines cause back pressure which prevents injection pump from working properly.
RUN THE INTAKE/EXHAUST TESTS. RETURN HERE IF NO FAULTS FOUND.
L AIR INTAKE/EXHAUST TESTS (Page 2-141)
intake/exhaust fault. If you came here from startability. this wasn’t
t B6
COULD NOT VERIFY IF THERE IS AN INJECTOR OR INJECTION PUMP PROBLEM. NOTIFY DS MAINTENANCE (CHAPTER 14).
1 OPTIONS
NONE
REASON FOR TESTS
A complete test of the fuel pump and injectors can’t be done at this level of maintenance but most fuel problems that would keep the engine from starting have been checked.
2-112
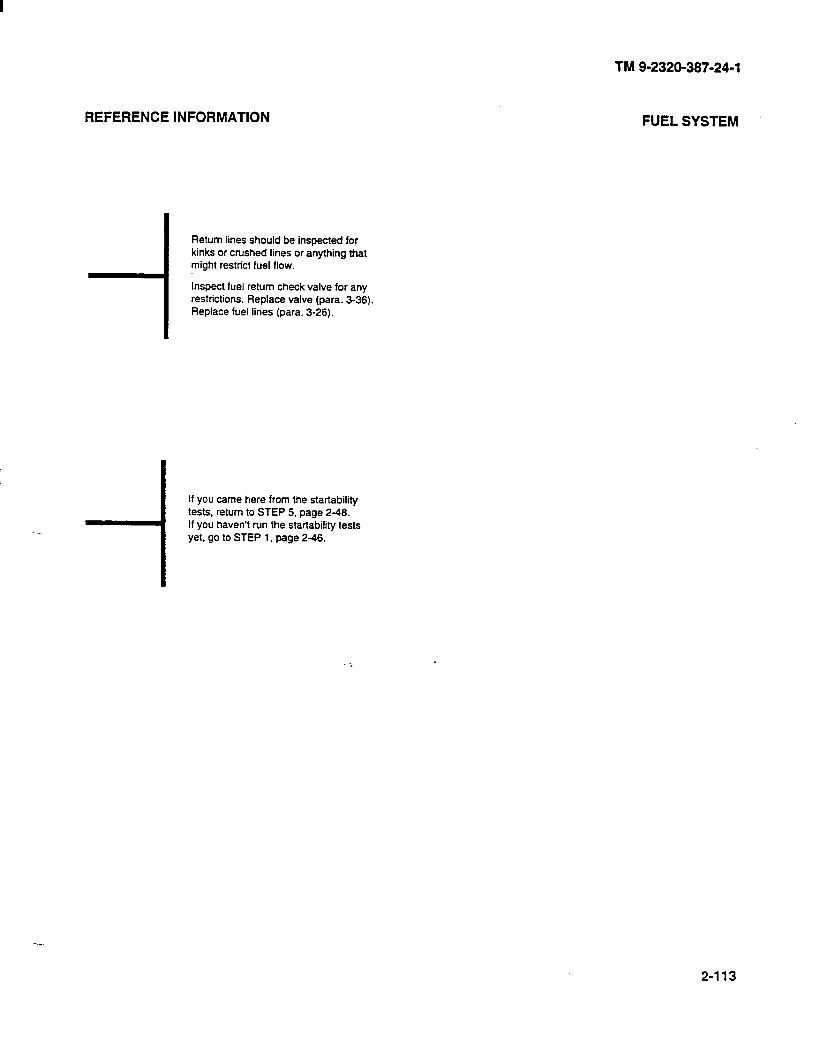
REFERENCE INFORMATION
I Return lines should be inspected for kinks or crushed lines or anything that might restrict fuel flow.
1 inspect fuel return check valve for any restrictions. Replace valve (para. 3-36). Replace fuel lines (para. 3-26).
If you came here from the startability tests, return to STEP 5. page 248. If you haven’t run the startability tests yet, go to STEP 1, page 246.
TM 9-2320-387-24-l
FUEL SYSTEM
2-113
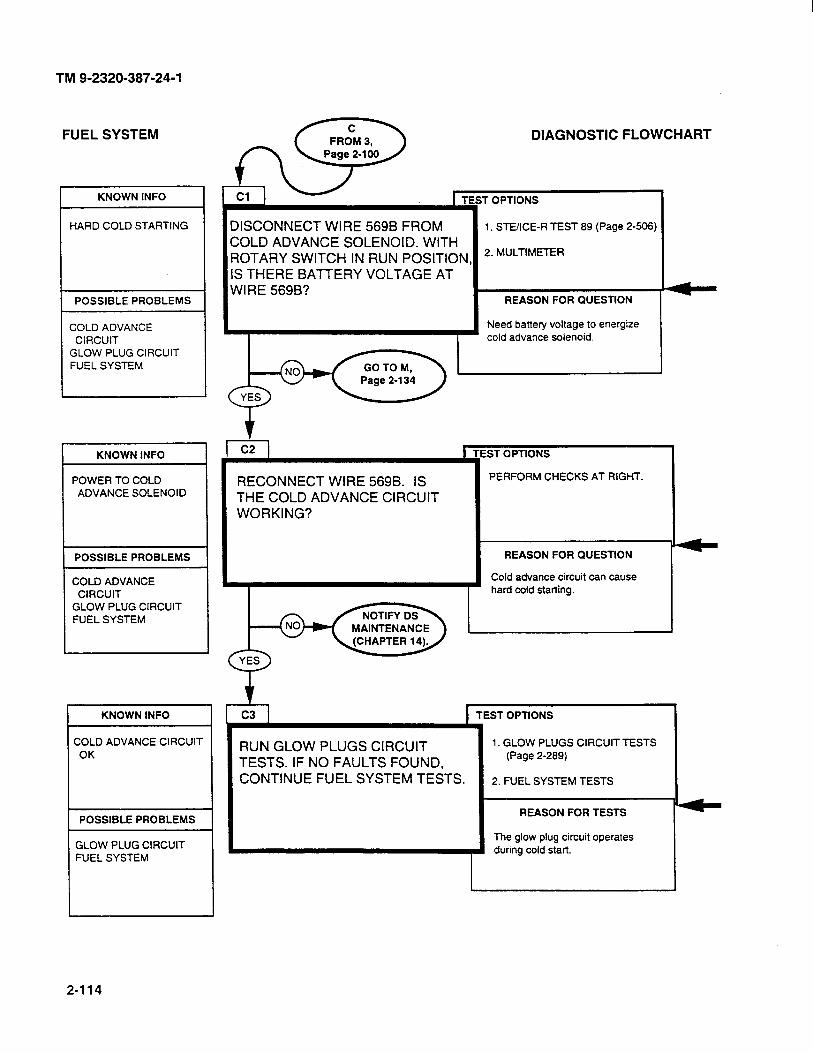
TM 9-2320-387-24-l
FUEL SYSTEM
I KNOWN INFO I
HARD COLD STARTING
COLD ADVANCE
GLOW PLUG CIRCUIT FUEL SYSTEM
KNOWN INFO
POWER TO COLD ADVANCE SOLENOID
POSSIBLE PROBLEMS
COLD ADVANCE CIRCUIT
GLOW PLUG CIRCUIT FUEL SYSTEM
KNOWN INFO
COLD ADVANCE CIRCUIT OK
POSSIBLE PROBLEMS
GLOW PLUG CIRCUIT FUEL SYSTEM
DIAGNOSTIC FLOWCHART
DISCONNECT WIRE 5698 FROM COLD ADVANCE SOLENOID. WITH ~ROTARY SWITCH IN RUN POSITION IS THERE BA-tTERY VOLTAGE AT WIRE 569B?
1. STUICE-R TEST 89 (Page 2-508)
2. MULTIMETER
I REASON FOR QUESTION
‘( cold advance solenoid.
Need battery voltage to energize
c2 1 r
RECONNECT WIRE 5698. IS THE COLD ADVANCE CIRCUIT WORKING?
ST OPTIONS
PERFORM CHECKS AT RIGHT.
REASON FOR QUESTION
Cold advance circuit can cause hard cold starting.
f c3 1 TEST OPTIONS
RUN GLOW PLUGS CIRCUIT TESTS. IF NO FAULTS FOUND, CONTINUE FUEL SYSTEM TESTS.
1. GLOW PLUGS CIRCUIT TESTS (Page 2-289)
2. FUEL SYSTEM TESTS
REASON FOR TESTS
The glow plug circuit operates duhng cold start.
2-114
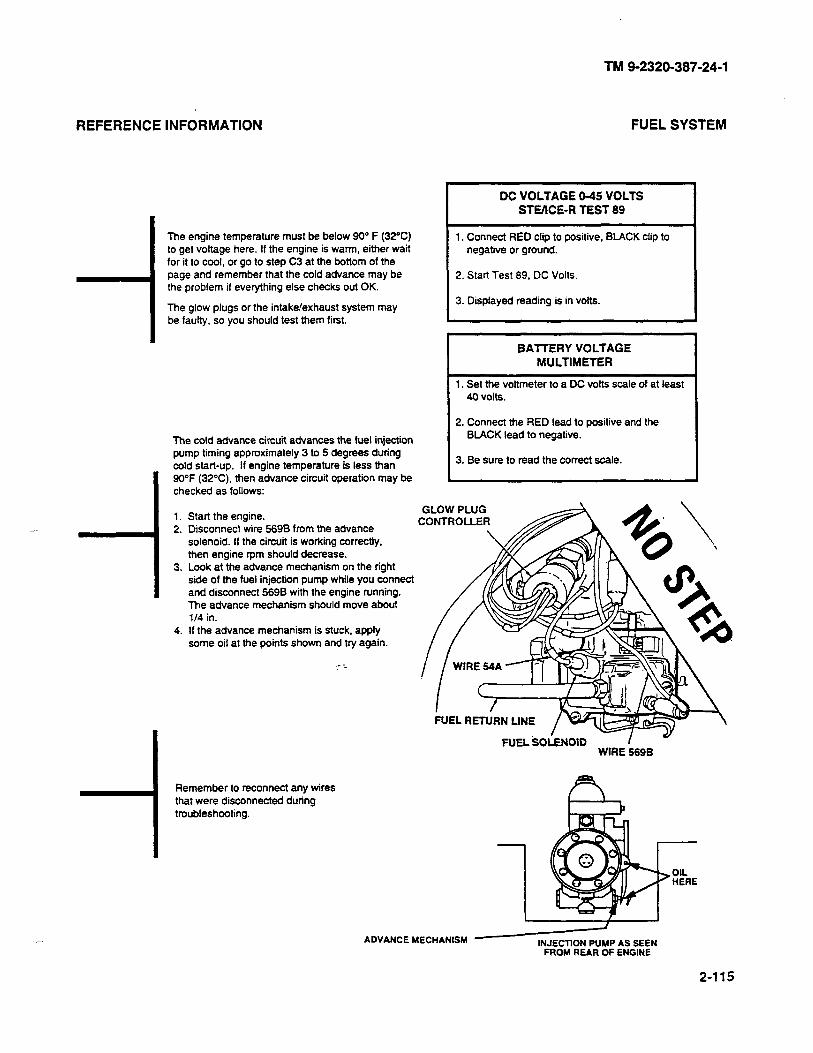
TM 9-2320-387-24-l
REFERENCE INFORMATION FUEL SYSTEM
The engine temperature must be below 90° F (32°C) to get voltage here. If the engine is warm, either wait for it to cool, or go to step C3 at the bottom of the page and remember that the cold advance may be the problem if everything else checks out OK.
The glow plugs or the intake/exhaust system may be faulty, so you should test them first.
DC VOLTAGE O-45 VOLTS STEIICE-R TEST 99
1. Connect RED clip to positive, BLACK clip to negative or ground.
2. Start Test 89, DC Volts.
3. Displayed reading is in volts.
BAlTERY VOLTAGE MULTIMETER
1. Set the voltmeter to a DC volts scale of at least 40 volts.
The cold advance circuit advances the fuel injectton pump timing approximately 3 to 5 degrees during
I
cold start-up. If engine temperature is less than 90°F (32°C). then advance circuit operation may be 1 checked as follows:
4.
Start the engine. Disconnect wire 6698 from the advance solenoid. If the circuit is working correctly, then engine rpm should decrease. Look at the advance mechanism on the right side of the fuel injection pump while you connect and disconnect 5698 with the engine running. The advance mechanism should move about l/4 in. If the advance mechanism is stuck, apply some oil at the points shown and try again.
Remember to reconnect any wires that were disconnected during troubleshooting.
2. Connect the RED lead to positive and the BLACK lead to negative.
3. Be sure to read the correct scale.
GLOW PLUG CONTROLLER
NEL i301i~010 I ” WIRE 569B
ADVANCE MECHANISM INJECllON PUMP AS SEEN FROM REAR OF ENGINE
2-115
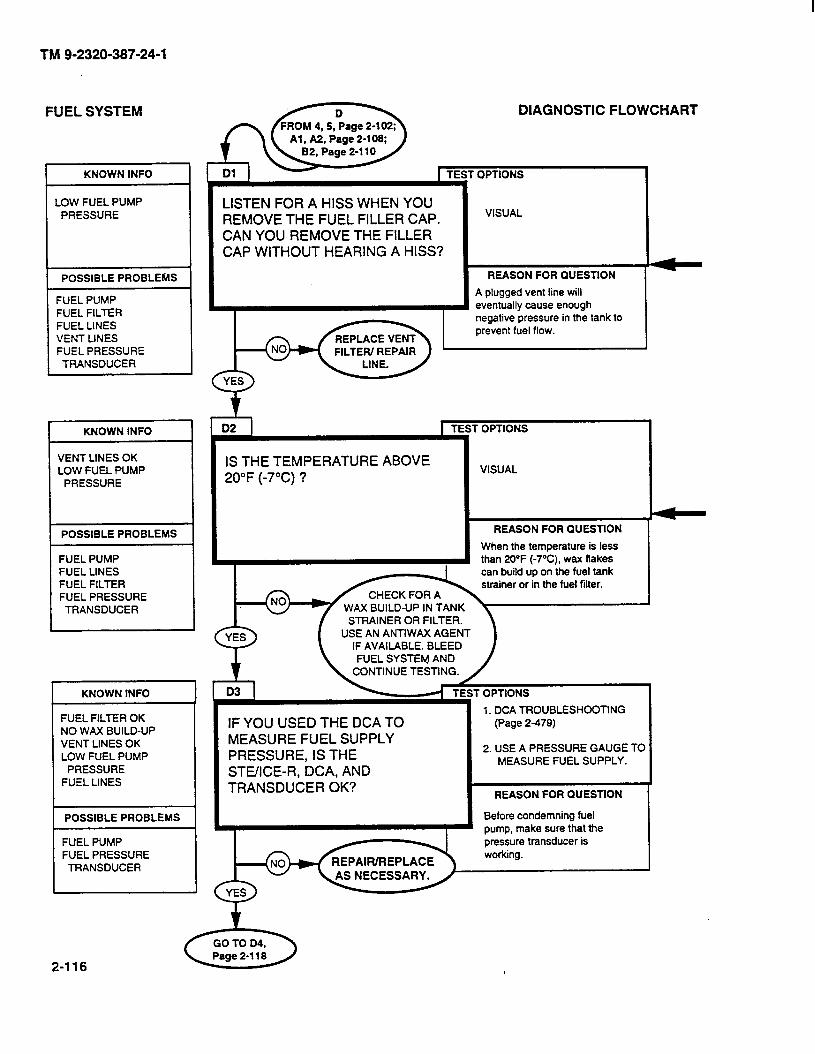
TM 9-2320-387-24-l
FUEL SYSTEM
KNOWN INFO
LOW FUEL PUMP PRESSURE
POSSIBLE PROBLEMS
FUEL PUMP FUEL FILTER FUEL LINES VENT LINES FUEL PRESSURE TRANSDUCER
KNOWN INFO
VENT LINES OK LOW FUEL PUMP
PRESSURE
POSSIBLE PROBLEMS
FUEL PUMP FUEL LINES FUEL FILTER FUEL PRESSURE TRANSDUCER
KNOWN INFO
FUEL FILTER OK NO WAX BUILD-UP VENT LINES OK LOW FUEL PUMP
PRESSURE FUEL LINES
POSSIBLE PROBLEMS
FUEL PUMP FUEL PRESSURE
TRANSDUCER
2-116
LISTEN FOR A HISS WHEN YOU REMOVE THE FUEL FILLER CAP. CAN YOU REMOVE THE FILLER CAP WITHOUT HEARING A HISS?
DIAGNOSTIC FLOWCHART
OPTIONS
VISUAL
REASON FOR QUESTlON
A plugged vent line will eventually cause enough negative pressure in the tank to prevent fuel flow.
r I
IS THE TEMPERATURE ABOVE 20°F (-7°C) ?
r OPTIONS
VISUAL
REASON FOR QUESTION
When the temperature is less than 20°F (-7%). wax flakes can build up on the fuel tank strainer or in the fuel filter.
CHECK FOR A WAX BUILD-UP IN TANK STRAINER OR FILTER.
USE AN ANTIWAX AGENT IF AVAILABLE. BLEED
IF YOU USED THE DCA TO MEASURE FUEL SUPPLY PRESSURE, IS THE STUICE-R, DCA, AND TRANSDUCER OK?
* OPTIONS
1. DCA TROUBLESHOOTING (Page 2479)
2. USE A PRESSURE GAUGE TC MEASURE FUEL SUPPLY.
REASON FOR QUESTION
Before condemning fuel pump, make sure that the pressure transducer is working.
1,
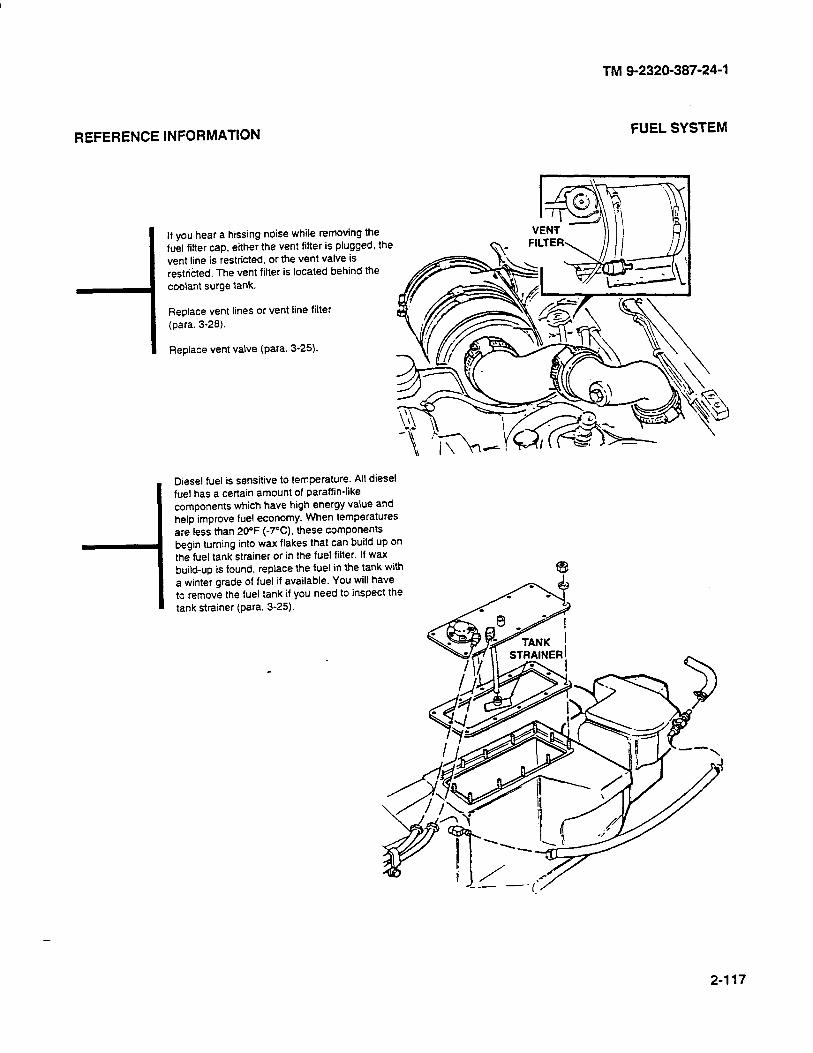
TM 9-2320-387-24-l
REFERENCE INFORMATION
If you hear a hissing noise while removing the fuel filter cap, either the vent filter is plugged, the
vent line is restricted, or the vent valve is restricted. The vent filter is located behind the coolant surge tank.
Replace vent lines or vent line filter (para. 3-28).
Replace vent valve (para. 3-25).
FUEL SYSTEM
Diesel fuel is sensitive to temperature. All diesel fuel has a certain amount of paraffin-like components which have high energy value and help improve fuel economy. When temperatures are less than 20°F (-7°C) these components begin turning into wax flakes that can build up on the fuel tank strainer or in the fuel filter. If wax build-up is found, replace the fuel in the tank with a winter grade of fuel if available. You will have to remove the fuel tank if you need to inspect the tank strainer (para. 3-25).
2-117

TM 9-2320-387-24-l
FUEL SYSTEM DIAGNOSTIC FLOWCHART
KNOWN INFO r OPTIONS
VISUAL INSPECT THE FUEL LINES. ARE THE LINES OK?
FUEL FILTER OK NO WAX BUILD-UP VENT LINES OK LOW FUEL PUMP
PRESSURE
POSSIBLE PROBLEMS
FUEL PUMP FUEL LINES FUEL PRESSURE TRANSDUCER
REASON FOR QUESTION
Kinked fuel lines will restrict fuel flow.
I
DS TEST OPTlONS
INSPECT THE FUEL FILTER. VISUAL
REMOVE THE FILTER ELEMENT AND CHECK IT FOR DIRT AND OTHER CONTAMINATION.
KNOWN INFO
NO WAX BUILD-UP VENT LINES OK LOW FUEL PUMP
PRESSURE
POSSIBLE PROBLEMS IS THE FILTER ELEMENT CLEAN? REASON FOR QUESTION
FUEL PUMP FUEL LINES FUEL FILTER FUEL PRESSURE TRANSDUCER
A dirty filter will restrict fuel flow. I
OPTIONS
VISUAL
KNOWN INFO
FUEL LINES OK FUEL FILTER OK NO WAX BUILD-UP VENT LINES OK LOW FUEL PUMP
PRESSURE TRANSDUCEROK
POSSIBLE PROBLEMS
FUEL PUMP
REMOVE FUEL PUMP. INSPECT FUEL PUMP PUSHROD AND CAMSHAFT LOBE. ARE ALL OF THESE PARTS IN GOOD CONDITION?
REASON FOR QUESTION
If the components that drive the fuel pump are worn. the pump will not operate
properly.
2-118
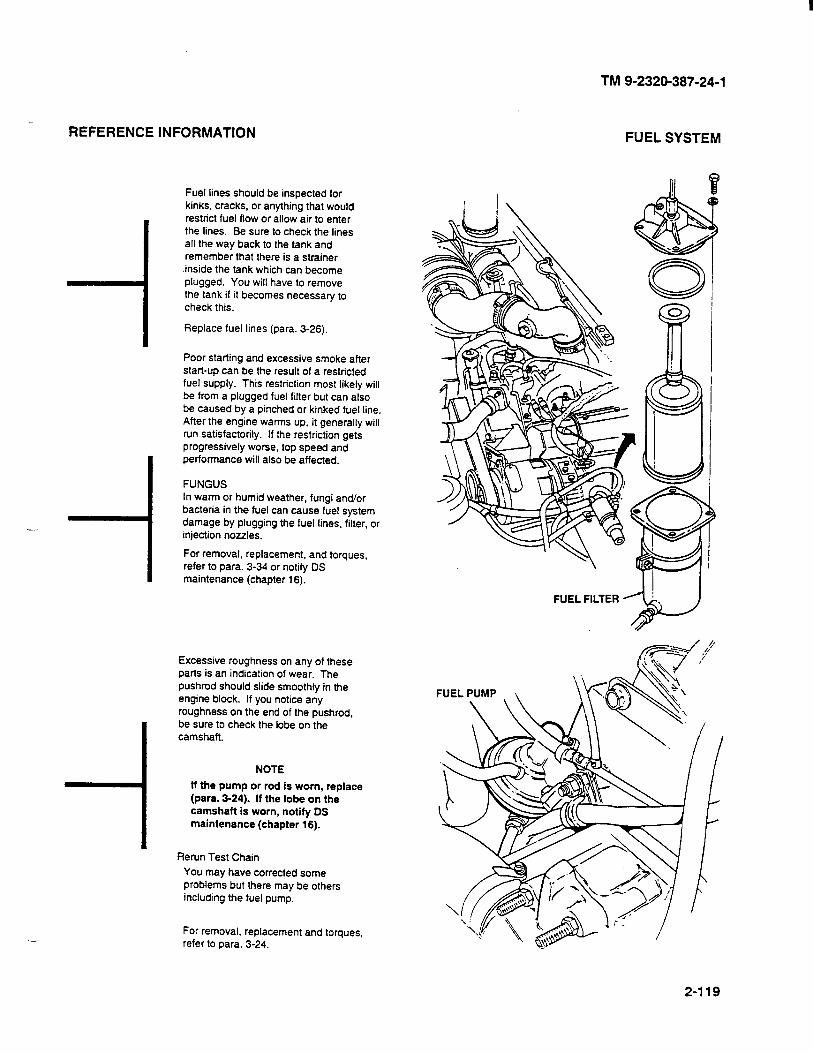
TM 9-2320-387-24-l
REFERENCE INFORMATION
-4 Fuel lines should be inspected for kinks, cracks, or anything that would restrict fuel flow or allow air to enter the lines. Be sure to check the lines all the way back to the tank and remember that there is a strainer .inside the tank which can become plugged. You will have to remove the tank if it becomes necessary to check this.
I Replace fuel lines (para. 3-26).
Poor starting and excessive smoke after start-up can be the result of a restticted fuel supply. This restriction most likely will be from a plugged fuel filter but can also be caused by a pinched or kinked fuel line. After the engine warms up. it generally will run satisfactorily. If the restriction gets progressively worse, top speed and performance will also be affected.
-. --I FUNGUS In warm or humid weather, fungi and/or bacteria in the fuel can cause fuel system damage by plugging the fuel lines, filter, or injection noules.
FUEL SYSTEM
I For removal, replacement, and torques, refer to para. 3-34 or notify DS maintenance (chapter 16).
Excessive roughness on any of these pans is an indication of wear. The pushrod should slide smoothly in the engine block. If you notice any roughness on the end of the pushrod, be sure to check the lobe on the camshaft.
NOTE
H the pump or rod is worn, replace (para. 3-24). If the lobe on the camshaft is worn, notify DS maintenance (chapter 16).
Rerun Test Chain
You may have corrected some problems but there may be others including the fuel pump.
For removal, replacement and torques, refer to para. 3-24.
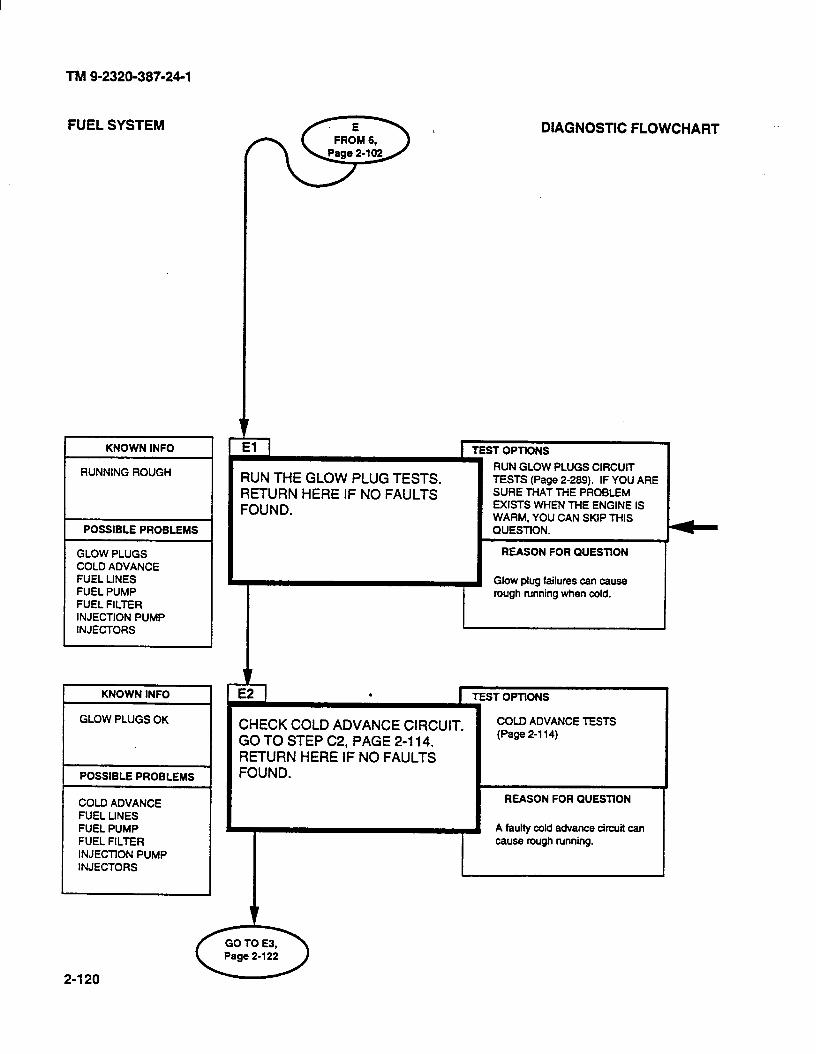
TM 9-2320-387-24-l
FUEL SYSTEM
RUNNING ROUGH
POSSIBLE PROBLEMS 1
GLOW PLUGS COLD ADVANCE FUEL LINES FUEL PUMP FUEL FILTER INJECTION PUMP INJECTORS
KNOWN INFO
GLOW PLUGS OK
POSSIBLE PROBLEMS
COLD ADVANCE FUEL UNES FUEL PUMP FUEL FILTER INJECTlON PUMP INJECTORS
r
RUN THE GLOW PLUG TESTS. RETURN HERE IF NO FAULTS FOUND.
DIAGNOSTIC FLOWCHART
ST OPTfONS
RUN GLOW PLUGS CIRCUIT TESTS (Page 2-289). IF YOU ARE SURE THAT THE PROBLEM EXISTS WHEN THE ENGINE IS WARM, YOU CAN SKIP THIS QUESTlON.
REASON FOR QUESTION
Glow plug failures can cause rough running when cold.
CHECK COLD ADVANCE CIRCUIT. GO TO STEP C2, PAGE 2-114. RETURN HERE IF NO FAULTS FOUND.
COLD ADVANCE TESTS (Page 2-114)
TEST OPTIONS
REASON FOR QUESTlON
A faulty cold advance circuit can cause rough running.
2-120
REFERENCE INFORMATION
Injection pump timing that is too far advanced can cause glow plugs failure because it increases cyfinder temperature. Usually several, buf not all. glow plugs will fail.
TM 9-2320-387-24-l
FUEL SYSTEM
2-l 21
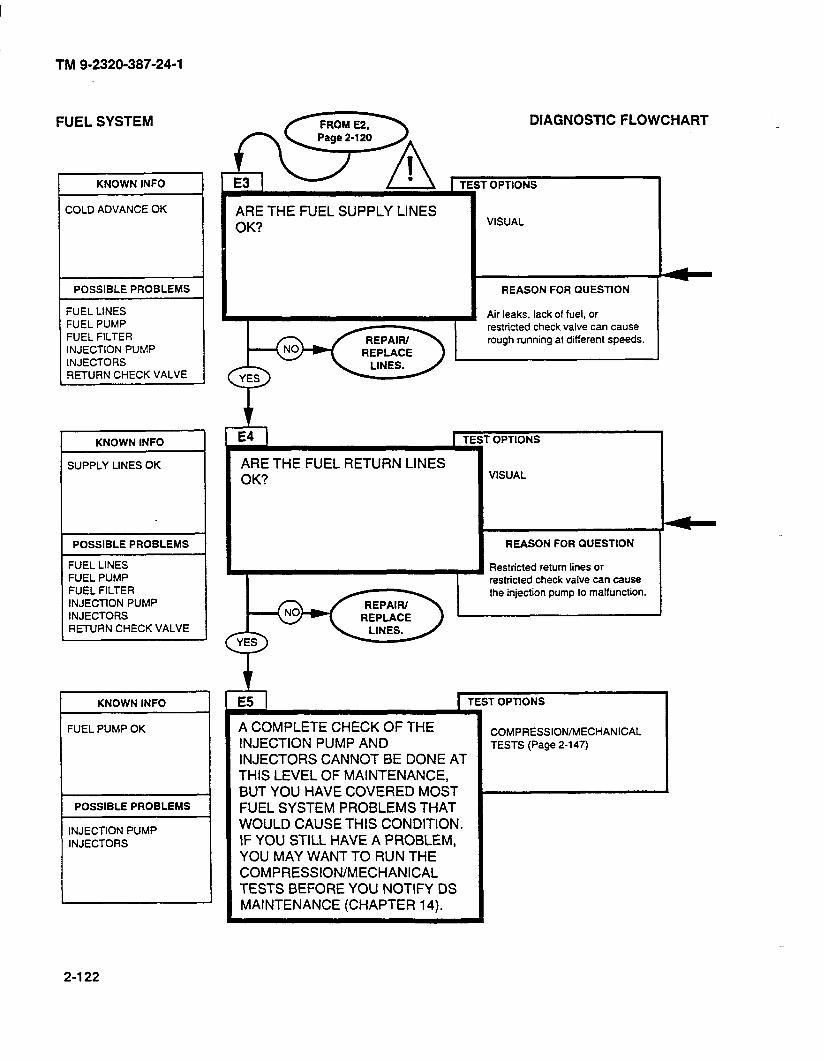
TM 9-2320-387-24-l
FUEL SYSTEM
KNOWN INFO
COLD ADVANCE OK
DIAGNOSTIC FLOWCHART
TEST OPTIONS
ARE THE FUEL SUPPLY LINES OK?
I REASON FOR QUESTION
, [ Air leaks: lack pf fuel. or ,
restncted cneck valve can cause rough running at different speeds.
POSSIBLE PROBLEMS
FUEL LINES FUEL PUMP FUEL FILTER INJECTION PUMP INJECTORS RETURN CHECK VALVE [
KNOWN INFO
SUPPLY LINES OK
- OPTIONS
ARE THE FUEL RETURN LINES OK? VISUAL
POSSIBLE PROBLEMS REASON FOR QUESTION
FUEL LINES FUEL PUMP FUEL FILTER fNJECTlON PUMP INJECTORS
Restricted return lines or restricted check valve can cause the injection pump to malfunction.
RETURN CHECK VALVE ,#(z&w
KNOWN INFO
=UEL PUMP OK
POSSIBLE PROBLEMS
INJECTION PUMP INJECTORS
A COMPLETE CHECK OF THE INJECTION PUMP AND INJECTORS CANNOT BE DONE AT THIS LEVEL OF MAINTENANCE, BUT YOU HAVE COVERED MOST FUEL SYSTEM PROBLEMS THAT WOULD CAUSE THIS CONDITION. IF YOU STILL HAVE A PROBLEM, YOU MAY WANT TO RUN THE COMPRESSION/MECHANICAL TESTS BEFORE YOU NOTIFY DS MAINTENANCE (CHAPTER 14).
COMPRESSlON/MECHANlCAL TESTS (Page 2-l 47)
TEST OPTIONS
2-122
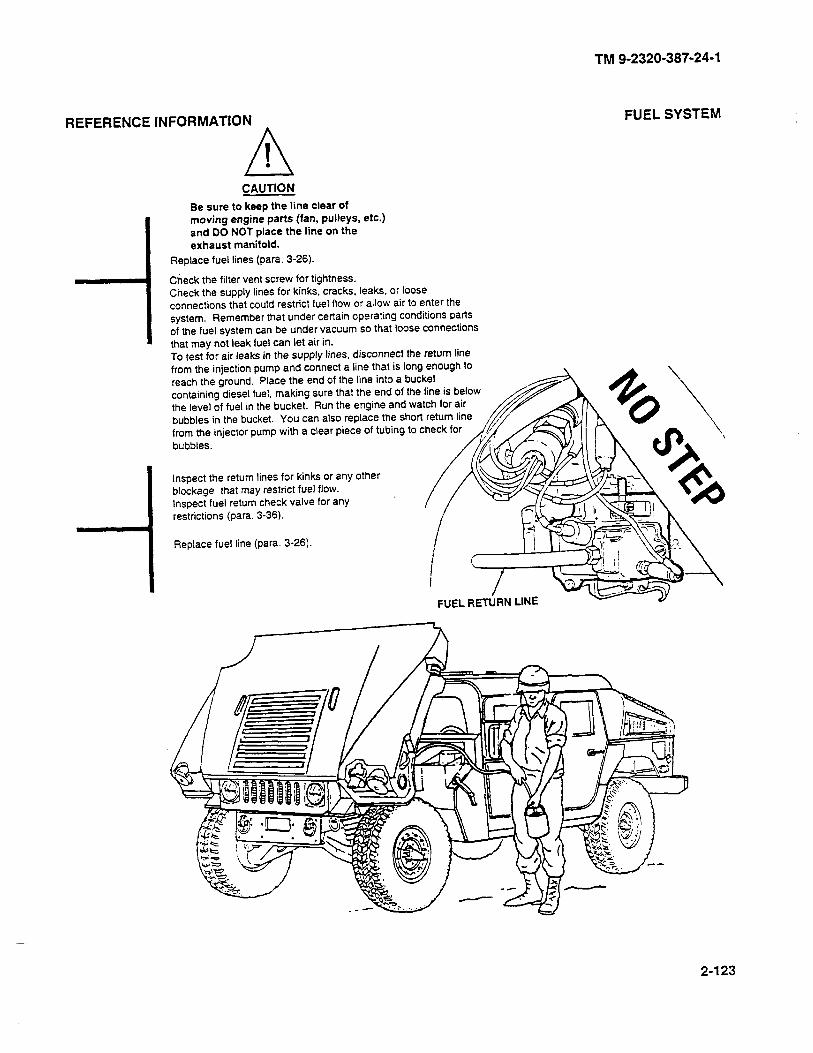
REFERENCE
-I
i
INFORMATION
TM 9-2320-387-24-l
FUEL SYSTEM
A 1 . CAUTION
Be sure to keep the line clear of moving engine parts (fan, pulleys, etc.) and DO NOT place the line on the exhaust manifold.
Replace fuel lines (para. 3-26).
Check the filter vent screw for tightness. Check the supply lines for kinks, cracks. leaks, or loose connections that could restrict fuel flow or allow air to enter the system. Remember that under certain operating conditions parts of the fuel system can be under vacuum so that loose connections that may not leak fuel can let air in. To test for air leaks in the supply lines, disconnect the return line from the injection pump and connect a line that is long enough to reach the ground. Place the end of the line into a bucket containing diesel fuel, making sure that the end of the line is below the level of fuel in the bucket. Run the engine and watch for air bubbles in the bucket. You can also replace the short return line from the injector pump with a clear piece of tubing to check for bubbles.
Inspect the return lines for kinks or any other blockage that may restrict fuel flow. Inspect fuel return check valve for any restrictions (para. 3-36).
Replace fuel line (para. 3-26).
2-123
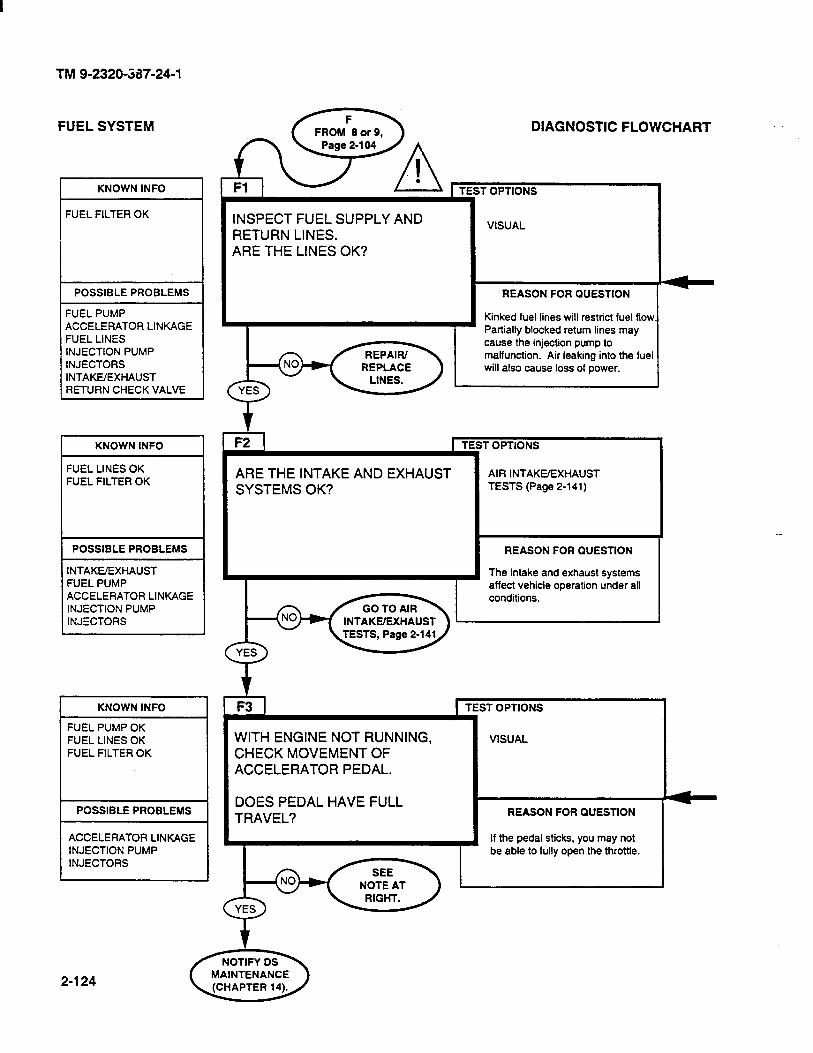
TM 9-2320587-24-1
FUEL SYSTEM
KNOWN INFO
FUEL FILTER OK
POSSIBLE PROBLEMS
FUEL PUMP ACCELERATOR LINKAGE FUEL LINES INJECTION PUMP INJECTORS INTAKE/EXHAUST RETURN CHECK VALVE
KNOWN INFO
FUEL LINES OK FUEL FILTER OK
POSSIBLE PROBLEMS
INTAKE/EXHAUST FUEL PUMP ACCELERATOR LINKAGE INJECTION PUMP INJECTORS
I KNOWN INFO
FUEL PUMP OK FUEL LINES OK FUEL FILTER OK
POSSIBLE PROBLEMS
2-124
INSPECT FUEL SUPPLY AND RETURN LINES. ARE THE LINES OK?
DIAGNOSTIC FLOWCHART _
r OPTIONS
VISUAL
REASON FOR QUESTION
Kinked fuel lines will restrict fuel flow.
ARE THE INTAKE AND EXHAUST SYSTEMS OK?
r OPTIONS
AIR INTAKE/EXHAUST TESTS (Page 2-141)
REASON FOR QUESTfON
The intake and exhaust systems affect vehicle operation under all
&@+z& conditions.
WITH ENGINE NOT RUNNING, CHECK MOVEMENT OF ACCELERATOR PEDAL.
DOES PEDAL HAVE FULL TRAVEL?
VISUAL
TEST OPTIONS
REASON FOR QUESTION
If the pedal sticks, you may not be able to fully open the throttle.
MAINTENANCE

TM 9-2320-387-34-l
REFERENCE INFORMATION FUEL SYSTEhl
A I /‘\ CAUllON
Be sure to keep the line clear of moving engine parts (fan, pulleys, etc.) and DO NOT place the line on the exhaust manffold.
Fuel lines should be inspected for kinks, cracks, or anything that would restrict fuel flow or allow air into the lines. Se sure to check the lines all the way back to the tank and remember that there is a strainer inside the tank which can also become
plugged. To test for air leaks in the suppty lines. disconnect the return line from the injection pump and connect a line that is long enough to reach the ground. Place the end of the line into a bucket containing diesel fuel, making sure that the end of the line is below the level of fuel in the bucket. Run the engine and watch for air bubbles in the bucket. Replace fuel line (para. 3-26).
Check the accelerator pedal for full movement with no sticking or binding. If you have sticking or binding, lubricate accelerator pedal bushing and bearing with seasonal grade OE oil (TM 9-2320-367-10). If you do not have full pedal travel, disconnect the accelerator linkage from the fuel injection pump and recheck the travel. If you now have full travel, the problem is in the fuel injection pump and cannot be handled at this level of maintenance.
An important function of all hoses, lines, and fittings is to carry fuel without admitting air to the system. When the fuel tank cap is in place and the fuel pump and injection pump are drawing fuel through the lines. a low vacuum of 6-l PSI is created. This occurs because the fuel which the engine uses must be replaced by air. During this vacuum condition, the slightest leak, which may not leak fuel out, could draw air into the system and, depending on the volume of air, cause a wide variety of engine malfunctions.
COLD WEATHER OPERATION Diesel fuel is sensitive to temperature. All diesel fuel has a certain amount of wax-like components which have high energy value and help improve fuel economy. When temperatures are less than 20°F (-7°C). these components begin turning into flakes that can build up on the fuel tank strainer or in the fuel filter.
FUNGUS In warm or humid weather, fungi and/or bacteria can cause fuel system damage by plugging the fuel lines, filter, or injection nozzles.
ODOR Old fuel smells like varnish.
Operation of the injection pump and injectors cannot be verified at this level of maintenance.
2-125

TM 9-2320-387-24-l
DIAGNOSTIC FLOWCHART
r OPTIONS
DOES THE EXHAUST SMELL LIKE RAW FUEL?
PUT A PIECE OF PAPER IN THE EXHAUST STREAM THEN LOOK AT AND SMELL IT FOR SIGNS OF UNBURNT FUEL.
I REASON FOR QUESTION
White smoke indicates fuel not being burned in the cylinders, or possible loss of coolant to the exhaust.
FUEL SYSTEM
KNOWN INFO I
WHITE SMOKE
INTERNAL ENGINE PROBLEMS
FUEL QUALITY
r KNOWN INFO TEST OPTIONS
VISUAL WHITE SMOKE DOES THE EXHAUST SMOKE FOR MORE THAN 2 OR 3 MINUTES AFTER STARTING THE ENGINE? REASON FOR QUESTtON
Some white smoke after a cold start is normal. The colder it is, the more white smoke you’ll see. The glow plugs keep cycling after the engine starts which will reduce this smoking. If you think that there is too much smoke after a cold start, run the glow plugs circuit tests (page 2-299) paying special attention to the afterglow operation.
POSSIBLE PROBLEMS
INJECTION TIMING INTERNAL ENGINE
PROBLEMS FUEL QUALITY RETURN CHECK VALVE
KNOWN INFO ST OPTIONS
GLOW PLUGS CIRCUIT TESTS
(Page 2-289)
GLOW PLUGS OK WHITE SMOKE RUN THE GLOW PLUGS CIRCUIT
TESTS. IF NO FAULTS FOUND, NOTIFY OS MAINTENANCE (CHAPTER 14).
POSSIBLE PROBLEMS REASON FOR QUESTION
If the glow plugs are not functioning properly, the cylinders will not warm up as rapidly as they should.
ENGINE MECHANICAL
2-126
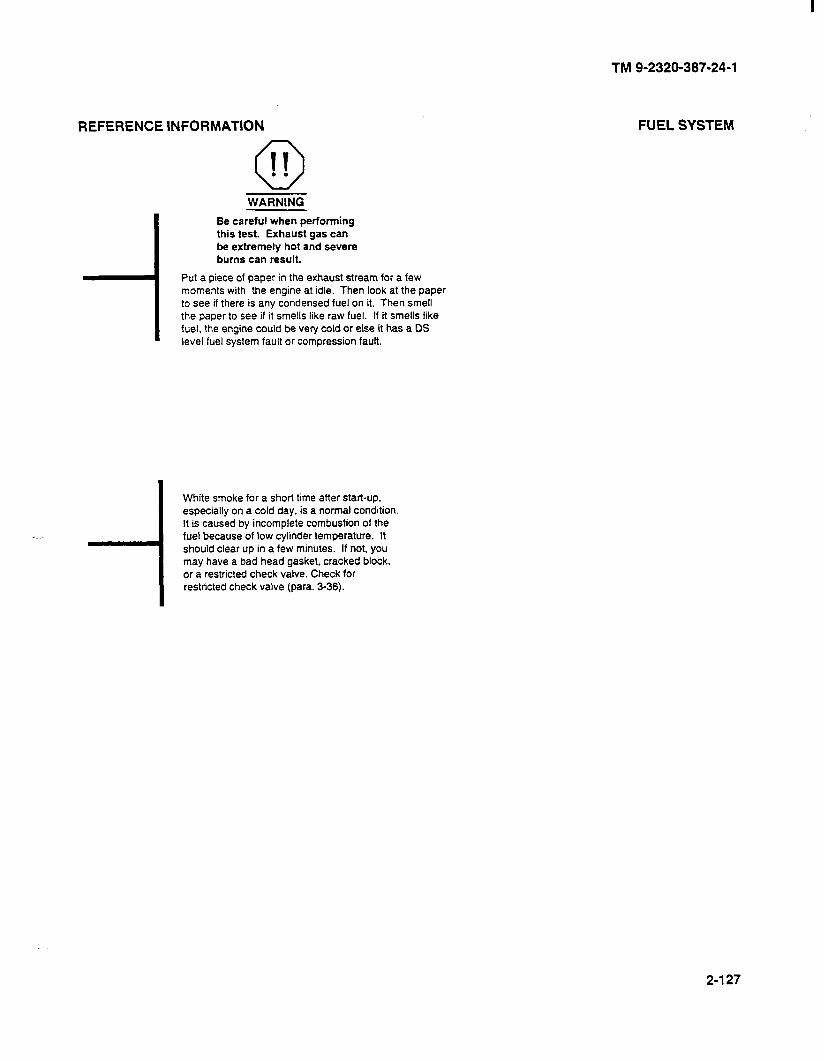
REFERENCE INFORMATION
0 II . . WARNING
i
Be careful when performing this test. Exhaust gas can be extremely hot and severe burns can result.
Put a piece of paper in the exhaust stream for a few moments with the engine at idle. Then look at the paper to see if there is any condensed fuel on it. Then smell the paper to see if it smells like raw fuel. If it smells like fuel, the engine could be very cold or else it has a DS level fuel system fault or compression fault.
-._ -I White smoke for a short time after start-up, especially on a cold day, is a normal condition. It is caused by incomplete combustion of the fuel because of low cylinder temperature. It should clear up in a few minutes. If not, you may have a bad head gasket, cracked block, or a restricted check valve. Check for
1 restricted check valve (para. 3-36).
TM 9-2320-387-24-l
FUEL SYSTEM
2-127
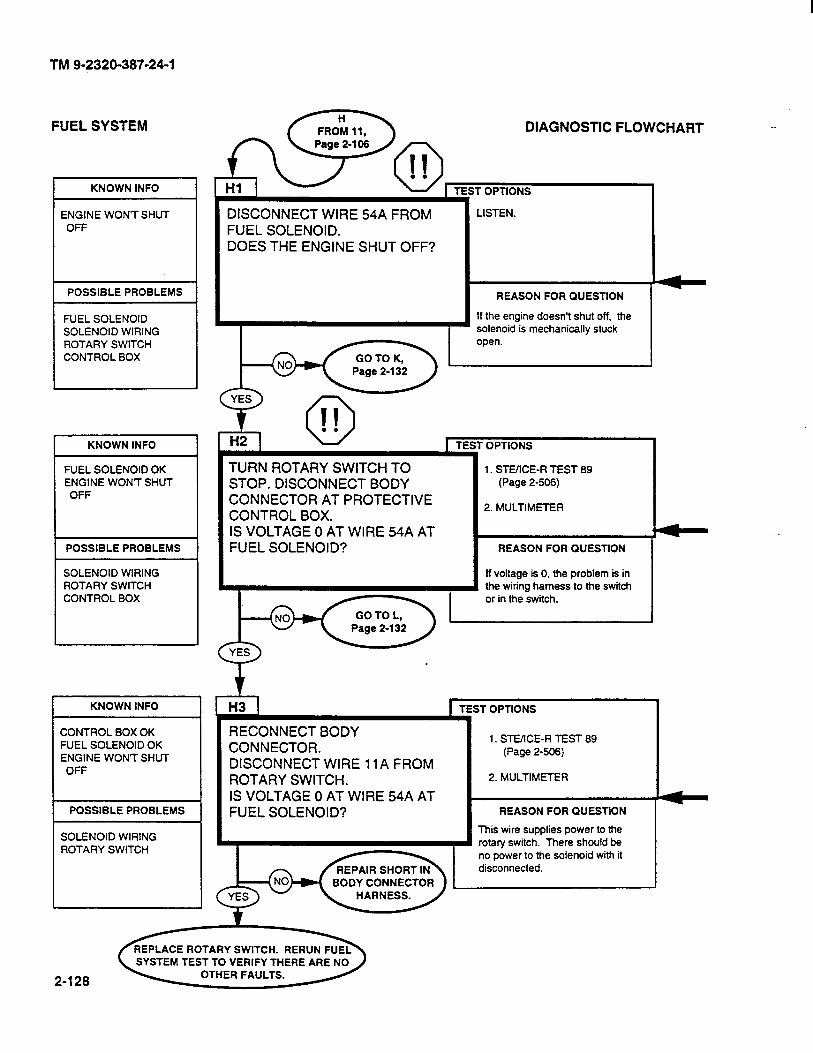
TM Q-2320-387-24-1
FUEL SYSTEM DIAGNOSTIC FLOWCHART
KNOWN INFO T OPTIONS
LISTEN. ENGINE WONT SHUT OFF
DISCONNECT WIRE 54A FROM FUEL SOLENOID. DOES THE ENGINE SHUT OFF?
POSSIBLE PROBLEMS REASON FOR QUESTION
If the engine doesnr shut off, the solenoid is mechanically stuck open.
FUEL SOLENOID SOLENOID WIRING ROTARY SWITCH CONTROL BOX
KNOWN INFO OPTIONS
1. STE/ICE-R TEST 69 (Page 2-506)
2. MULTIMETER
TURN ROTARY SWITCH TO STOP. DISCONNECT BODY CONNECTOR AT PROTECTIVE CONTROL BOX. IS VOLTAGE 0 AT WIRE 54A AT FUEL SOLENOID?
FUEL SOLENOID OK ENGINE WON’T SHUT OFF
REASON FOR QUESTION
If voltage is 0. the problem is in the wiring harness to the switch or in the switch.
POSSIBLE PROBLEMS
SOLENOID WIRING ROTARY SWITCH CONTROL BOX
iT OPTIONS
1. STE/fCE-R TEST 69 (Page 2-506)
2. MULTIMETER
RECONNECT BODY CONNECTOR. DISCONNECT WIRE 11A FROM ROTARY SWITCH. IS VOLTAGE 0 AT WIRE 54A AT FUEL SOLENOID? REASON FOR QUESTlON
This wire supplies power to the rotary switch. There should be no power to the solenoid with it disconnected.
SOLENOID WIRING ROTARY SWITCH
SYSTEM TEST TO VERIFY THERE ARE NO
2-128 OTHER FAULTS.
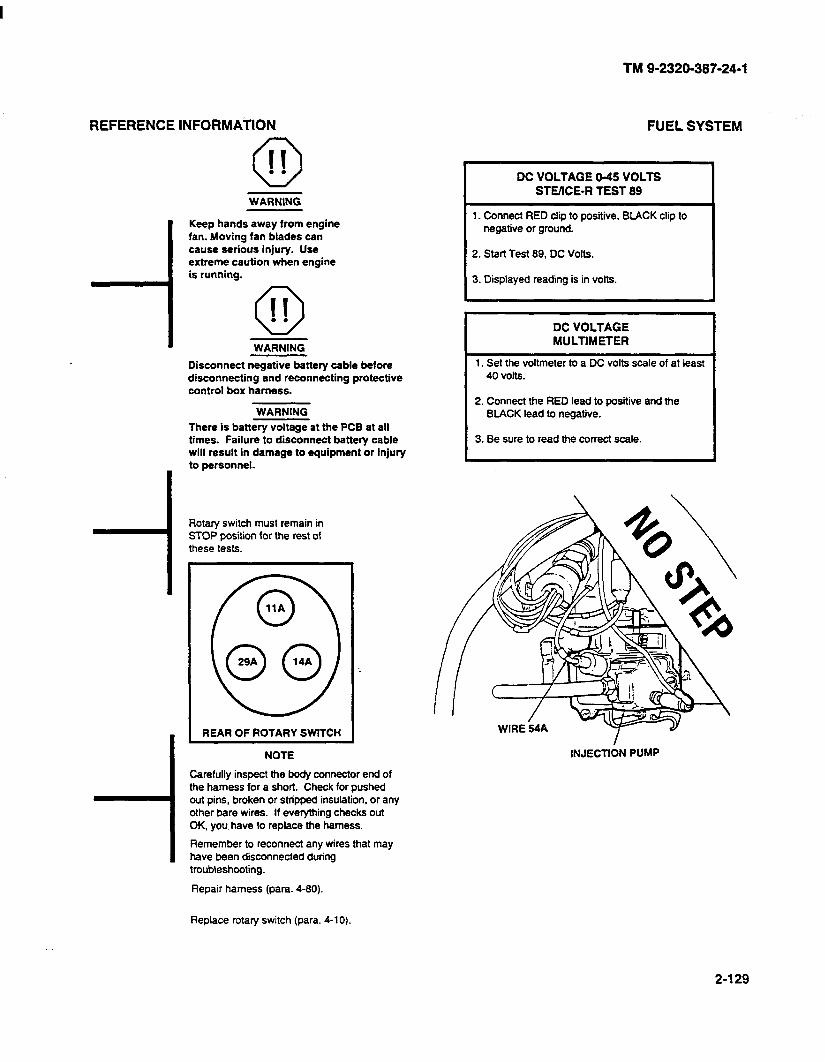
TM 9-2320-387-24-l
REFERENCE INFORMATION FUEL SYSTEM
0 II . . WARNING
Keep hands away from engine fan. Moving fan blades can cause serious injury. Use extreme caution when engine is running.
0 II . . WARNING
Disconnect negative battery cable before disconnecting and reconnecting protective control box harness.
WARNING
There is battery voltage at the PCB at all times. Failure to disconnect battery cable will result in damage to equipment or injury to personnel.
Rotary switch must remain in STOP position for the rest of these tests.
REAR OF ROTARY SWfTCH
NOTE
Carefully inspect the body connector end of the harness for a short. Check for pushed out pins, broken or stripped insulation, or any other bare wires. If everything checks out OK, you have to replace the harness.
Remember to reconnect any wires that may have been disconneded during troubleshooting.
Repair harness (para. 4-80).
DC VOLTAGE O-45 VOLTS STEIICE-R TEST 89
1. Connect RED clip to positive, BLACK clip to negative or ground.
2. Start Test 89. DC Volts.
3. Displayed reading is in volts.
DC VOLTAGE MULTIMETER
1. Set the voltmeter to a DC volts scale of at least 40 volts.
2. Connect the RED lead to positive and the BLACK lead to negative.
3. Be sure to read the correct scale.
INJECTfCN PUMP
Replace rotary switch (para. 4-10).
2-l 29
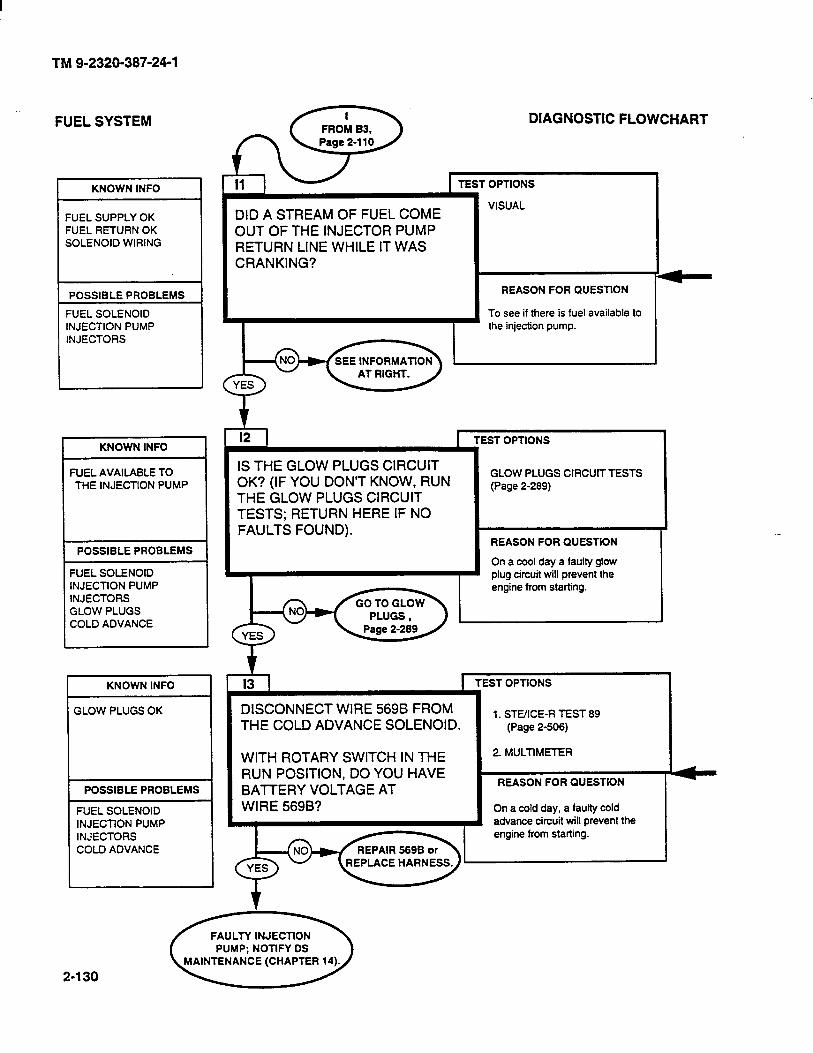
TM 9-2320-387-24-l
KNOWN INFO
FUEL SUPPLY OK
t-i
FUEL RETURN OK SOLENOID WIRING
FUEL SOLENOID INJECTION PUMP
DID A STREAM OF FUEL COME OUT OF THE INJECTOR PUMP RETURN LINE WHILE IT WAS CRANKING?
FUEL SYSTEM
4
REASON FOR QUESTION
To see if there is fuel available to the injection pump.
12 ] 1 TEST OPTIONS 1
IS THE GLOW PLUGS CIRCUIT OK? (IF YOU DON’T KNOW, RUN THE GLOW PLUGS CIRCUIT TESTS; RETURN HERE IF NO FAULTS FOUND).
GLOW PLUGS ClRCUlT TESTS (Page 2-289)
J
REASON FOR QUESTION
KNOWN INFO
FUEL AVAILABLE TO THE INJECTION PUMP
POSSIBLE PROBLEMS
FUEL SOLENOID INJECTION PUMP INJECTORS GLOW PLUGS COLD ADVANCE
KNOWN INFO
GLOW PLUGS OK
POSSIBLE PROBLEMS
FUEL SOLENOID INJECTION PUMP
IR I I
DISCONNECT WIRE 5698 FROM THE COLD ADVANCE SOLENOID.
WITH ROTARY SWITCH IN THE RUN POSITION, DO YOU HAVE BATTERY VOLTAGE AT WIRE 569B?
:ST OPTlONS
1. STEIICE-R TEST 89 (Page 2-506)
2. MULTIMETER
REASON FOR QUESTION
On a cold day, a faulty cold advance circuit will prevent the engine from starting.
2-l 30

REFERENCE INFORMATION
Check the rubber return line from the injection pump to the steel tubing return line.
If the rubber line is not clogged, go to 01, page 2-116.
If the line is clogged. replace it. Start the engine and see if it stays running. If it doesn’t start or stay running, return to Ji and continue testing. There may be another fuel system fault preventing fuel from reaching this point.
If the cold advance solenoid is getting power, the only possibilities that would keep the engine from starting are that fuel is not reaching the cylinders due to a fault in the high-pressure side of the fuel system or nearly all the cylinders have very low compression. It is unlikely that all the cylinders would lose compression at the same time, but you may want to run a Compression Unbalance test (STEIICE-R Test 14) to check this.
Repair/replace harness (para. 4-80).
TM 9-2320-387-24-l
FUEL SYSTEM
I DC VOLTAGE O-45 VOLTS
STUICE-R TEST 89
clip to the indicated test point, BLACK clip to negative or ground.
Start Test 89, DC Volts.
reading is in volts.
I BAl7ERY VOLTAGE MULTIMETER
1. Set the voltmeter to a DC volts scale of at least 40 volts.
2. Connect the RED lead to positive and the BLACK lead to negative.
3. Be sure to read the correct scale.
INJECTfbN PUMP WIRE 5898
2-l 31
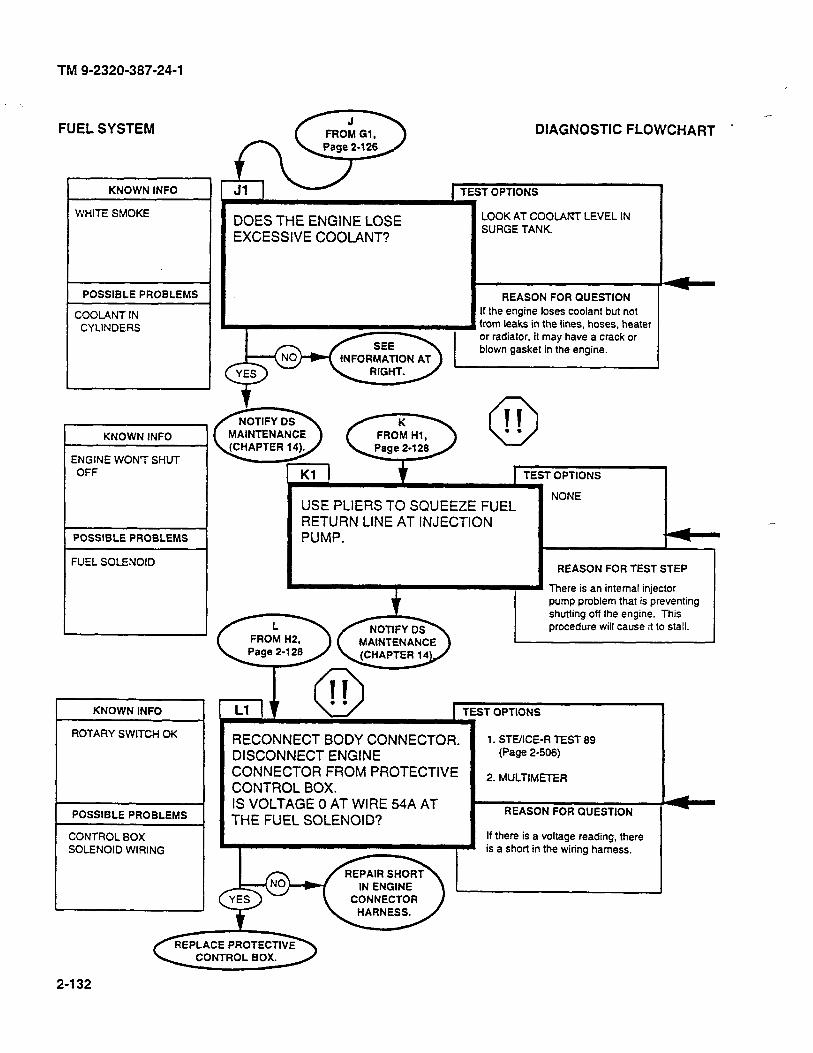
TM 9-2320-387-24-l
FUEL SYSTEM
KNOWN INFO
WHITE SMOKE
POSSIBLE PROBLEMS
COOlANT IN CYLINDERS
K II
KNOWN INFO MAINTENANCE . .
I i> 0 FROM Hl, Page 2-128
ENGINE WONT SHUT OFF TEST OPTIONS
POSSIBLE PROBLEMS 1
DOES THE ENGINE LOSE EXCESSIVE COOLANT?
I
DIAGNOSTIC FLOWCHART .
iT OPTIONS
LOOK AT COOLANT LEVEL IN SURGE TANK.
REASON FOR QUESTION
If the engine loses coolant but not from leaks in the lines, hoses, heater or radiator, it may have a crack or
I blown gasket in ihe engine.
FUEL SOLENOID
I ROTARY SWITCH OK
SOLENOID WIRING
USE PLIERS TO SQUEEZE FUEL RETURN LINE AT INJECTION PUMP.
NONE
REASON FOR TEST STEP
\ There is an internal injector pump problem that is preventing
procedure will cause it’to stall.
Ll 1 TEST OPTIONS
1
I RECONNECT BODY CONNECTOR. I
1. STEIICE-R TEST 89
DISCONNECT ENGINE (Page 2-505)
I CONNECTOR FROM PROTECTIVE CONTROL BOX. I
2. MULTIMETER
I IS VOLTAGE 0 AT WIRE 54A AT THE FUEL SOLENOID? I REASON FOR QUESTION
If there is a voltage reading, there is a short in the wiring harness.
REPAIR SHORT
CONNECTOR
2-132
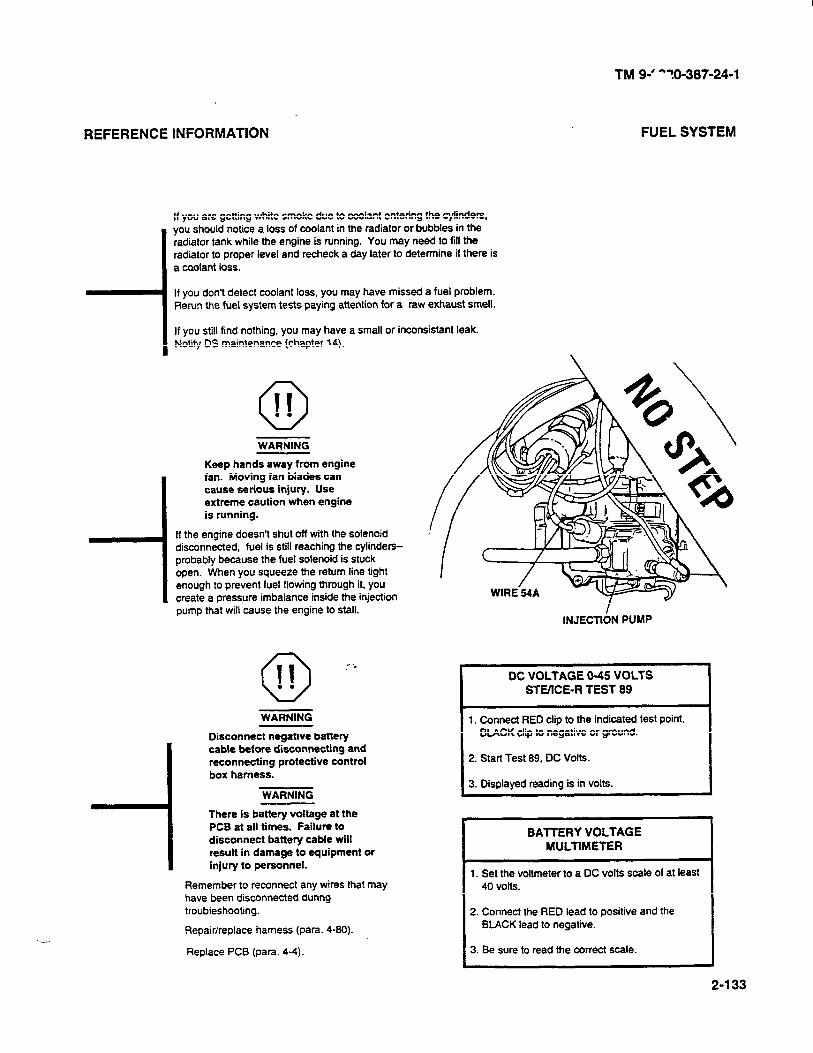
TM 9-’ ‘70-387-24-l
REFERENCE INFORMATION FUEL SYSTEM
i
i
If you are getting white smoke due to coolant entering the cylinders. you should notice a loss of coolant in the radiator or bubbles in the radiator tank while the engine is running. You may need to fill the radiator to proper level and recheck a day later to determine if there is a coolant loss.
If you don’t detect coolant loss, you may have missed a fuel problem. Rerun the fuel system tests paying attention for a raw exhaust smell.
If you still find nothing, you may have a small or inconsistant leak. Notify OS maintenance (chapter 14).
0 II . . WARNING
Keep hands away from engine fan. Moving fan blades can cause serious injury. Use extreme caution when engine is running.
If the engine doesn’t shut off with the solenoid disconnected, fuel is still reaching the cylinders- probably because the fuel solenoid is stuck open. When you squeeze the return line tight enough to prevent fuel flowing through it, you create a pressure imbalance inside the injection pump that will cause the engine to stall.
0 II .- :
. . WARNING
Disconnect negative battery cable before disconnecting and reconnecting protective control box harness.
WARNING
There is battery voltage at the PCB at all times. Failure to disconnect battery cable will result in damage to equipment or injury to personnel.
Remember to reconnect any wires that may have been disconnected during troubleshooting.
Repair/replace harness (para. 4-90).
Replace PCS (para. 4-4).
INJECTtGN PUMP
DC VOLTAGE 0-45 VOLTS STEKE-R TEST 89
I
1. Connect RED clip to the indicated test point, BLACK clip to negative or ground.
I 2. Start Test 89. DC Volts. I
3. Displayed reading is in volts.
BATTERY VOLTAGE MULTIMETER
1. Set the voltmeter to a DC volts scale of at least 40 volts.
2. Connect the RED lead to positive and the BLACK lead to negative.
3. Be sure to read the correct scale.
2-133
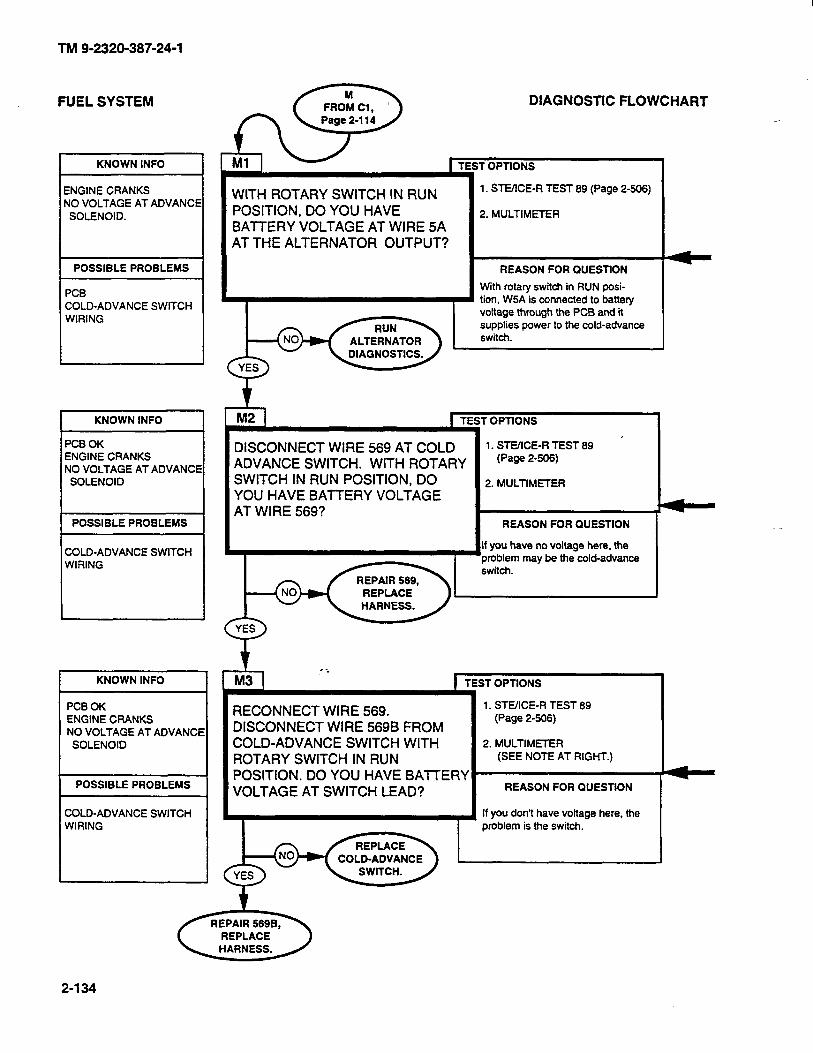
TM 9-2320-387-24-l
FUEL SYSTEM
KNOWN INFO
ENGINE CRANKS -1 NO VOLTAGE AT ADVANCE SOLENOID.
1 POSSIBLE PROBLEMS 1
PCB COLD-ADVANCE SWlTCH WIRING
WITH ROTARY SWITCH IN RUN POSITION, DO YOU HAVE BAlTERY VOLTAGE AT WIRE 5A AT THE ALTERNATOR OUTPUT?
I KNOWN INFO I
PCB OK ENGINE CRANKS NO VOLTAGE AT ADVANCE
SOLENOID
DIAGNOSTIC FLOWCHART
l.----J ALTERNATOR
1 POSSfBLEPROBLEMS 1
COLD-ADVANCE SWITCH WIRING
KNOWN INFO
PCB OK ENGINE CRANKS NO VOLTAGE AT ADVANCE SOLENOID
POSSIBLE PROBLEMS
COLD-ADVANCE SWITCH WIRING
I 1. STEIlCE-R TEST 89 (Page 2-606)
I 2. MULTIMETER
voltage through the PCB and it supplies power to the cold-advance switch.
1 TEST OPTlONS
’ DISCONNECT WIRE 569 AT COLD 1. STEIICE-R TEST 89
ADVANCE SWITCH. WITH ROTARY (Page 2-606)
SWITCH IN RUN POSITION, DO 2. MULTMETER
YOU HAVE BAlTERY VOLTAGE AT WIRE 569? c
REASON FOR QUESTION
If you have no voltage here, the problem may be the cold-advance
RECONNECT WIRE 569. DISCONNECT WIRE 5698 FROM COLD-ADVANCE SWITCH WITH ROTARY SWITCH IN RUN POSITION. DO YOU HAVE BATTER! VOLTAGE AT SWITCH LEAD?
9T OPTIONS
1. STEXE-R TEST 89 (Page 2-606)
2. MULTIMETER (SEE NOTE AT RIGHT.)
REASON FOR QUESTfON
If you don’t have voltage here, the problem is the switch.
2-134
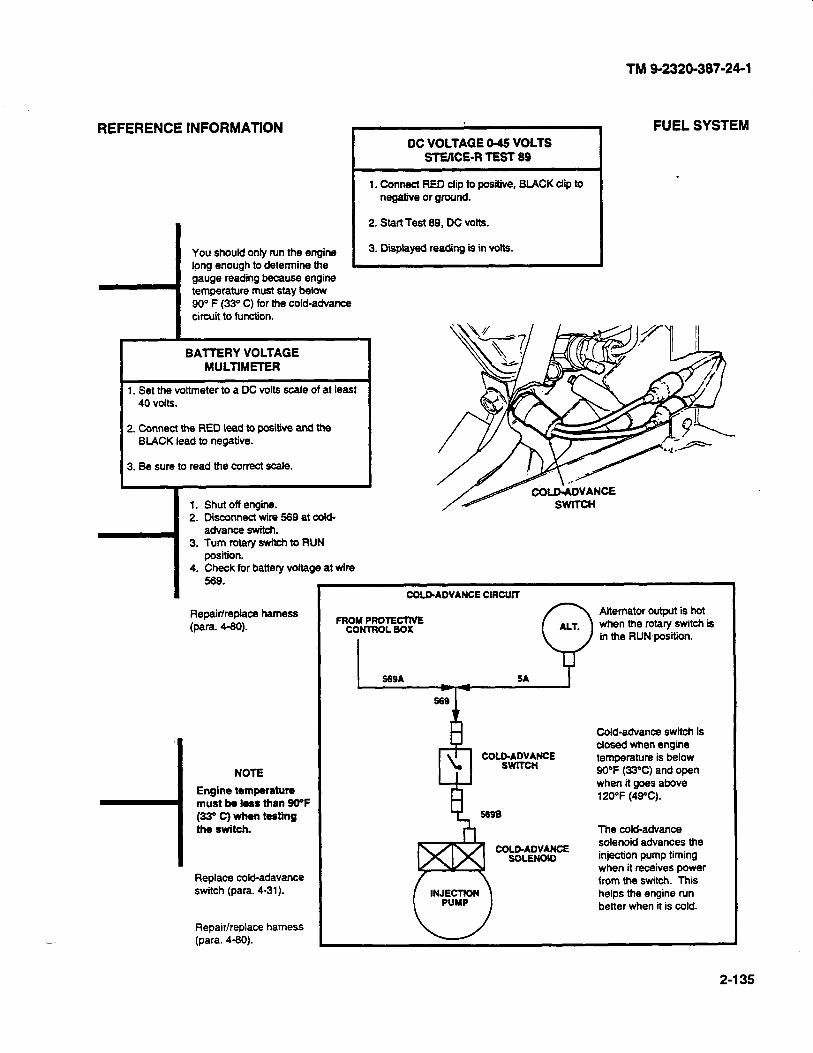
REFERENCE INFORMATION FUEL SYSTEM
You should only run the engine lpng enough to determine the gauge reading because engine temperature must stay below 90° F (33O C) for the cold-advance circuit to function.
BATTERY VOLTAGE MULTlMElER
I. Set the voltmeter to a DC volts scale of at least 40 volts.
2. Connect the RED lead to positive and the BLACK lead to negative.
3. Be sure to read the correct scale.
DC VOLTAGE 9-45 VOLTS STUICE-R TEST 89
1. Connect RED clip to positive. BLACK dip to negative or ground.
2. Start Test 99, DC volts.
3. Displayed reading is in volts.
1. 2.
3.
4.
Shut off engine. Disconnect wire 569 at cotd- advance switch. Turn rotary switch to RUN oosition. ‘Check for battery 569.
voltage at wire
Repair/replace harness (para. 4-90).
NOTE
Engine temperature must be less than WF (330 C) when testing the switch.
Replace cold-adavance swftch (para. 4-31).
Repair/replace harness (para. 4-30).
TM 9-2320-387-24-l
.
COLD-ADVANCE CIRCLET
FROM PROTECTWE CONTROL BOX
I
Alternator output is hot when the rotary switch is in the RUNposition.
Cold-advance switch is closed when engine temperature is below 90°F (33°C) and open when it goes above 120°F (49%).
The cold-advance solenoid advances the injection pump timing when it receives power from the switch. This helps the engine run better when it is cold.
2-l 35
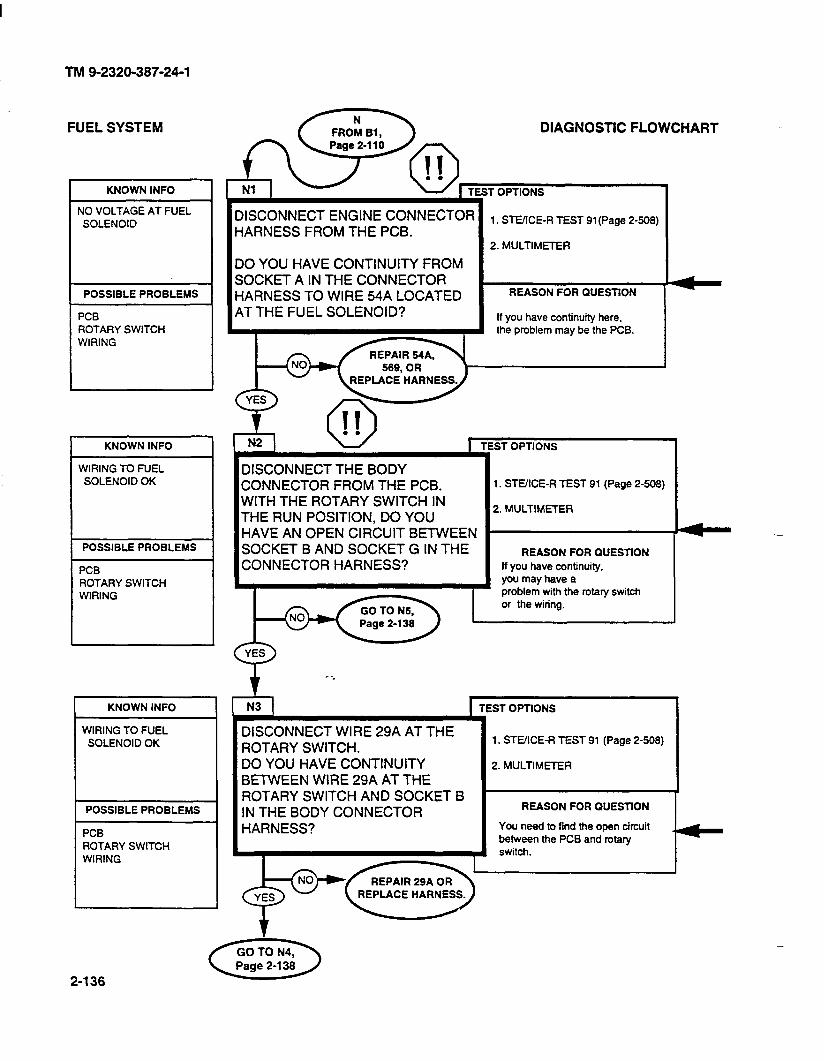
TM 9-2320-387-24-l
FUEL SYSTEM
KNOWN INFO
NO VOLTAGE AT FUEL SOLENOID
POSSIBLE PROBLEMS
PC0 ROTARY SWITCH WIRING
L
KNOWN INFO
WIRING TO FUEL SOLENOID OK
POSSIBLE PROBLEMS
PCB ROTARY SWITCH WIRING
KNOWN INFO
WIRING TO FUEL SOLENOID OK
POSSIBLE PROBLEMS
PCB ROTARY SWITCH WIRING
DIAGNOSTIC FLOWCHART -.
TEST OPTIONS
DISCONNECT ENGINE CONNECTOR HARNESS FROM THE PCB.
,. S,-“,CE_R TEST 9,tPage 2_5o8j
2. MULTIMETER
DO YOU HAVE CONTINUITY FROM SOCKET A IN THE CONNECTOR HARNESS TO WIRE 54A LOCATED REASON FOR QUESTION
AT THE FUEL SOLENOID? If you have continuity here, the problem may be the PCB.
DISCONNECT THE BODY CONNECTOR FROM THE PCB. 1. STEIICE-R TEST 91 (Page 2-509)
WITH THE ROTARY SWITCH IN THE RUN POSITION, DO YOU
2. MULTIMETER
HAVE AN OPEN CIRCUIT BETWEEN SOCKET B AND SOCKET G IN THE REASON FOR QUESTION
CONNECTOR HARNESS?
or the wiring.
TEST OPTIONS
DISCONNECT WIRE 29A AT THE ROTARY SWITCH. DO YOU HAVE CONTINUITY BETWEEN WIRE 29A AT THE ROTARY SWITCH AND SOCKET B IN THE BODY CONNECTOR HARNESS? You need to find the open circuit
between the PC5 and rotary switch. I
4-- -
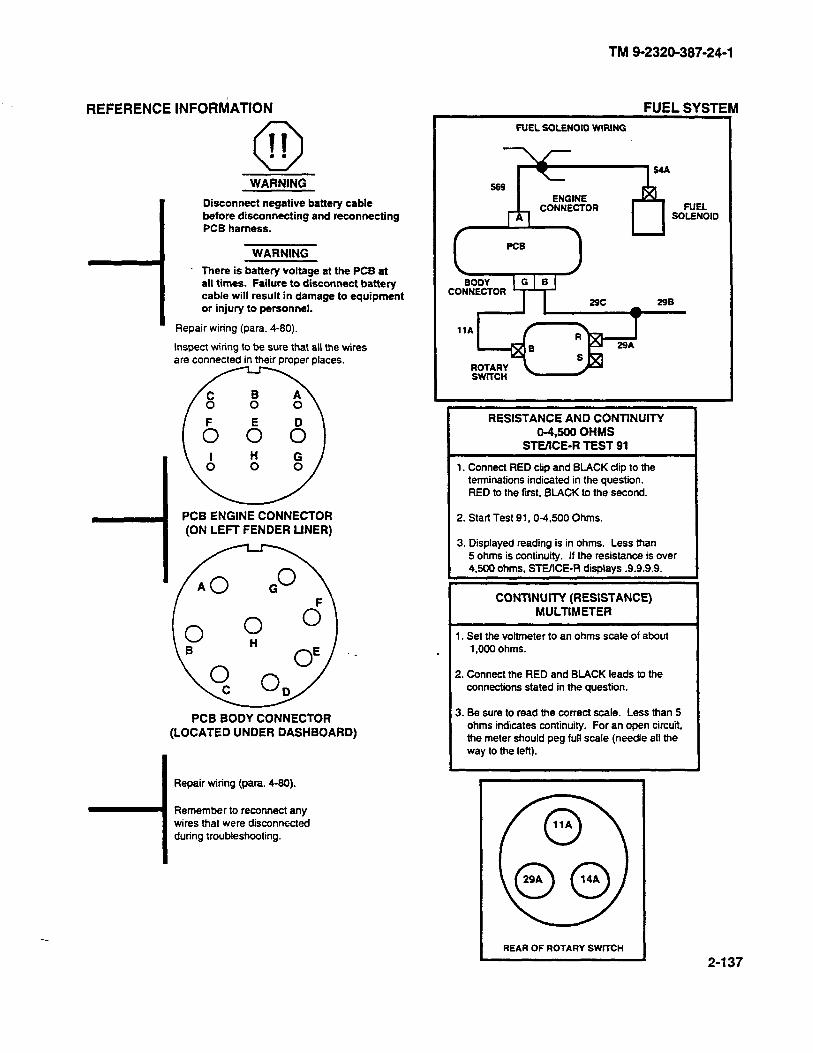
TM 9-2320-387-24-l
REFERENCE INFORMATION
0 II . . WARNING
Disconnect negative battery cable before disconnecting and reconnecting PCB harness.
WARNING
There is battery voltage at the PCB at all times. Failure to disconnect battery cable will result in damage to equipment or injury to personnel.
Repair wiring (para. 4-80).
Inspect wiring to be sure that all the wires are connected in their proper places.
PCB ENGINE CONNECTOR (ON LEFT FENDER LINER)
PCB BODY CONNECTOR (LOCATED UNDER DASHBOARD)
I Repair wiring (para. 4-80).
Remember to reconnect any wires that were disconnected
I during troubleshooting.
-
FUEL SGLENOID WIRING
FUEL SOLENOID
RESISTANCE AND CONTlNUlTY 04.500 OHMS
STUICE-R TEST 91 I
1. Connect RED clip and BLACK clip to the terminations indicated in the question. RED to the first, BLACK to the second.
CONTINUITY (RESISTANCE) MULTIMETER
1. Set the voltmeter to an ohms scale of about 1,000 ohms.
2. Connect the RED and BLACK leads to the connectiins stated in the question.
3. Be sure to read the correct scale. Less than 5 ohms indicates continuity. For an open circuit, the meter should peg full scale (needle all the way to the left).
REAR OF ROTARY SWITCH
2-137
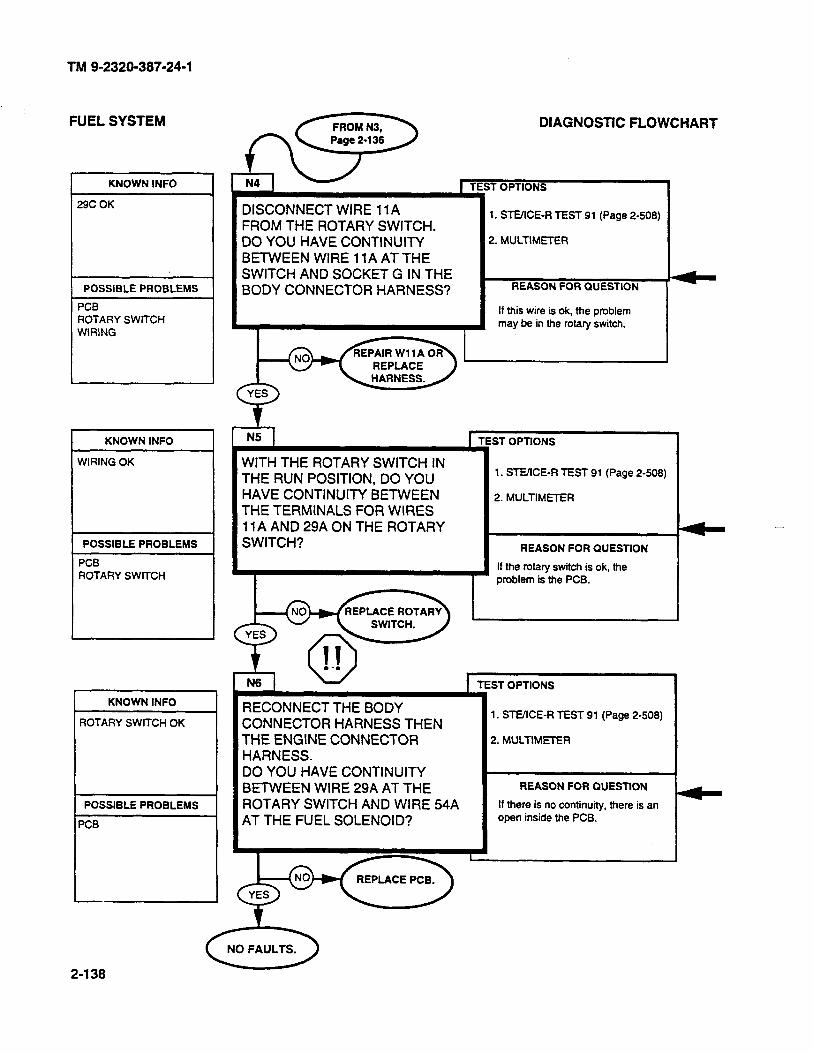
TM 9-2320-387-24-l
FUEL SYSTEM DIAGNOSTIC FLOWCHART
KNOWN INFO T OPTIONS
1. STEXE-R TEST 91 (Page 2-508)
2. MULTIMETER
29C OK DISCONNECT WIRE 11A FROM THE ROTARY SWITCH. DO YOU HAVE CONTINUITY BETWEEN WIRE 11A AT THE SWITCH AND SOCKET G IN THE BODY CONNECTOR HARNESS? POSSIBLE PROBLEMS REASON FOR QUESTION
PCB ROTARY SWITCH WIRING
If this wire is ok, the problem may be in the rotary switch.
KNOWN INFO iT OPTlONS
1. STUICE-R TEST 91 (Page 2-808)
2. MULTlMl3ER
WIRING OK WITH THE ROTARY SWITCH IN THE RUN POSITION, DO YOU HAVE CONTINUITY BETWEEN THE TERMINALS FOR WIRES 11A AND 29A ON THE ROTARY SWITCH? POSSIBLE PROBLEMS REASON FOR QUESTION
If the rotary switch is ok, the problem is the PCB.
PCB ROTARY SWITCH
ST OPTIONS
1. STEIICE-R TEST 91 (Page 2-508)
2. MULTIMETER
I
RECONNECT THE BODY CONNECTOR HARNESS THEN THE ENGINE CONNECTOR HARNESS. DO YOU HAVE CONTINUITY BETWEEN WIRE 29A AT THE ROTARY SWITCH AND WIRE 54A AT THE FUEL SOLENOID?
KNOWN INFO
ROTARY SWITCH OK
REASON FOR QUESTlON
If there is no continuity, there is an open inside the PCB.
POSSIBLE PROBLEMS
PCB
REPLACE PCB.
2-138
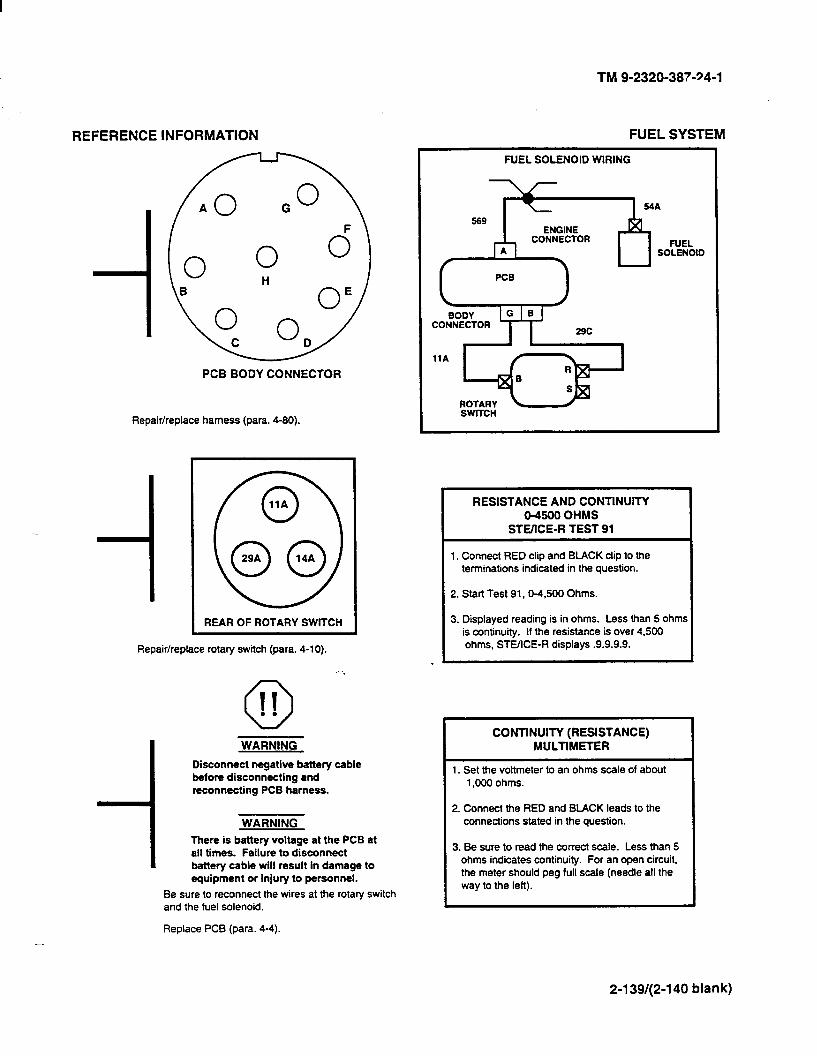
TM 9-2320-387-34-l
REFERENCE INFORMATION FUEL SYSTEli/j
PCS BODY CONNECTOR
Repair/replace harness (para. 4-80).
Repair/replace rotary switch (para. 4-10). : 0 11 . .
I WARNING
REAR OF ROTARY SWflCH
Disconnect negative battery cable before disconnecting and reconnecting PCB harness.
WARNING
There is battery voltage at the PCB at all times. Failure to disconnect battery cable will result in damage to equipment or injury to personnel.
Be sure to reconnect the wires at the rotary switch and the fuel solenoid.
FUEL SOLENOID WIRING
RESISTANCE AND CONTINUITY O-4500 OHMS
STE/lCE-R TEST 91
1. Connect RED clip and BLACK clip to the terminations indicated in the question.
2. Start lest 91, o-4.500 Ohms.
3. Displayed reading is in ohms. Less than 5 ohms is continuity. If the resistance is over 4.500 ohms, STEACE-R displays .9.9.9.9.
CONTINUITY (RESISTANCE) MULTIMETER
1. Set the voltmeter to an ohms scale of about 1,000 ohms.
2. Connect the RED and BLACK leads to the connections stated in the question.
3. Be sure to read the correct scale. Less than 5 ohms indicates continuity. For an open circuit, the meter should peg full scale (needle all the way to the left).
-. Replace PCB (para. 4-4).
2-l 39/(2-l 40 blank)
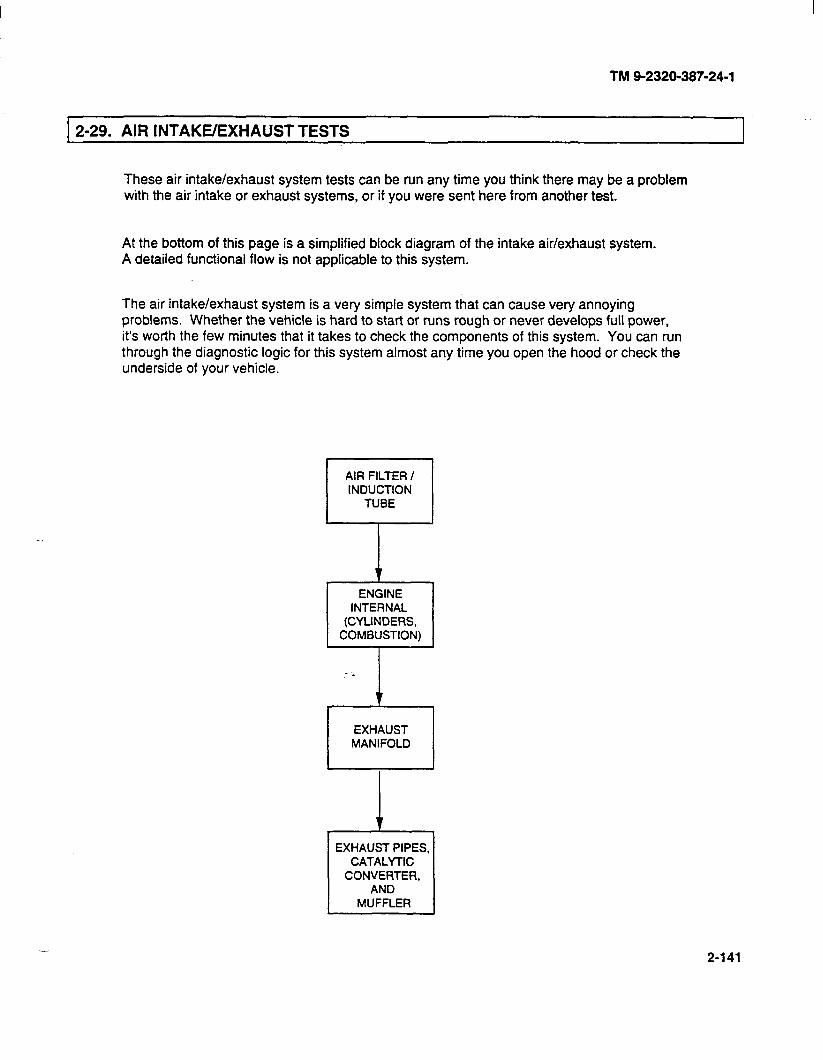
TM 9-2320-387-24-l
12-29. AIR INTAKE/EXHAUST TESTS
These air intake/exhaust system tests can be run any time you think there may be a problem with the air intake or exhaust systems, or if you were sent here from another test.
At the bottom of this page is a simplified block diagram of the intake air/exhaust system. A detailed functional flow is not applicable to this system.
The air intake/exhaust system is a very simple system that can cause very annoying problems. Whether the vehicle is hard to start or runs rough or never develops full power, it’s worth the few minutes that it takes to check the components of this system. You can run through the diagnostic logic for this system almost any time you open the hood or check the underside of your vehicle.
AIR FILTER / INDUCTION
TUBE
1 ENGINE
INTERNAL (CYLINDERS,
COMBUSTION)
EXHAUST PIPES, CATALYTIC
CONVERTER, AND
MUFFLER
2-141
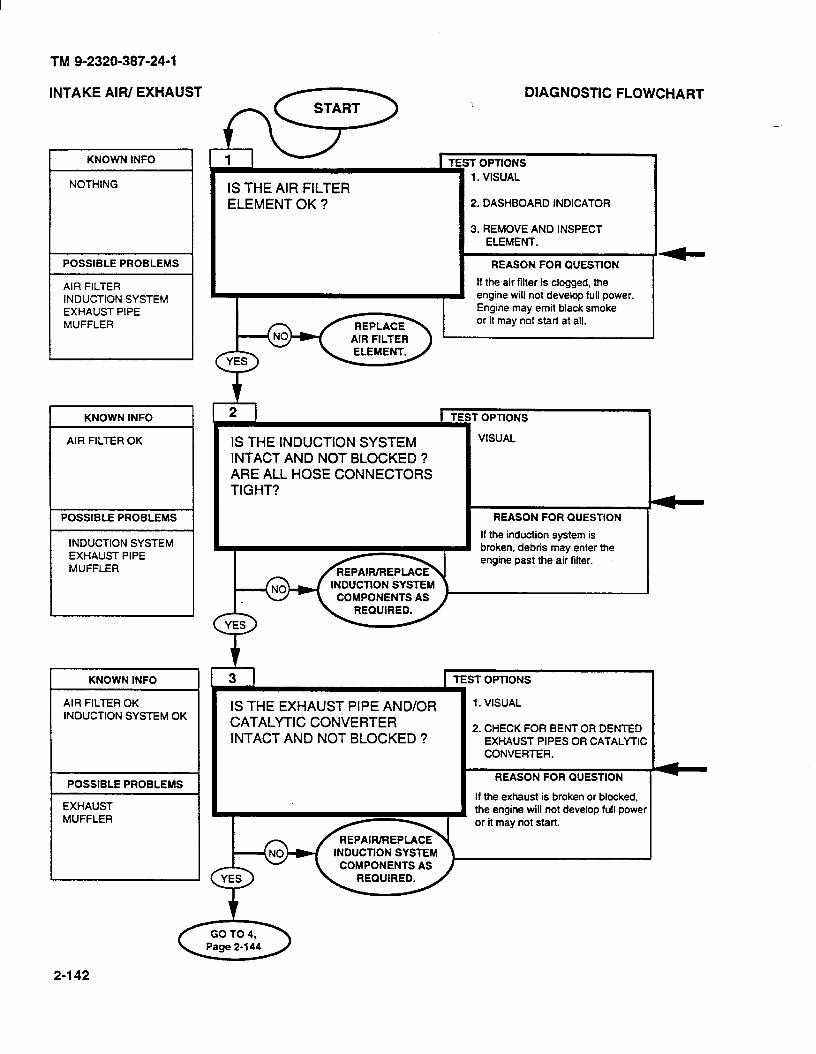
TM 9-2320-387-24-1
INTAKE AIR/ EXHAUST
~
P
A If E k
KNOWN INFO
NOTHING
OSSIBLE PROBLEMS
JR FILTER ‘JDUCTION SYSTEM :XHAUST PIPE IUFFLER
I KNOWN INFO
AIR FILTER OK
POSSIBLE PROBLEMS
INDUCTION SYSTEM EXHAUST PIPE MUFFLER
I KNOWN INFO
AIR FILTER OK INDUCTION SYSTEM OK
IS THE AIR FILTER ELEMENT OK ?
DIAGNOSTIC FLOWCHART
t TEST OPTIONS
1 1. VISUAL
2. DASHBOARD INDICATOR
3. REMOVE AND INSPECT ELEMENT.
.
REASON FOR QUESTION
If the air filter is clogged, the engine will not develop full power.
IS THE INDUCTION SYSTEM INTACT AND NOT BLOCKED ? ARE ALL HOSE CONNECTORS TIGHT?
0 PTIONS
VISUAL
REASON
r IS THE EXHAUST PIPE AND/OR CATALYTIC CONVERTER INTACT AND NOT BLOCKED ?
;T OPTIONS
2. CHECK FOR BENT OR DENTED EXHAUST PIPES OR CATALYTIC CONVERTER.
REASON FOR QUESTION
If the exhaust is broken or blocked, the engine will not develop full power or it may not start.
INDUCTtON SYSTEM COMPONENTS AS
G
2-142
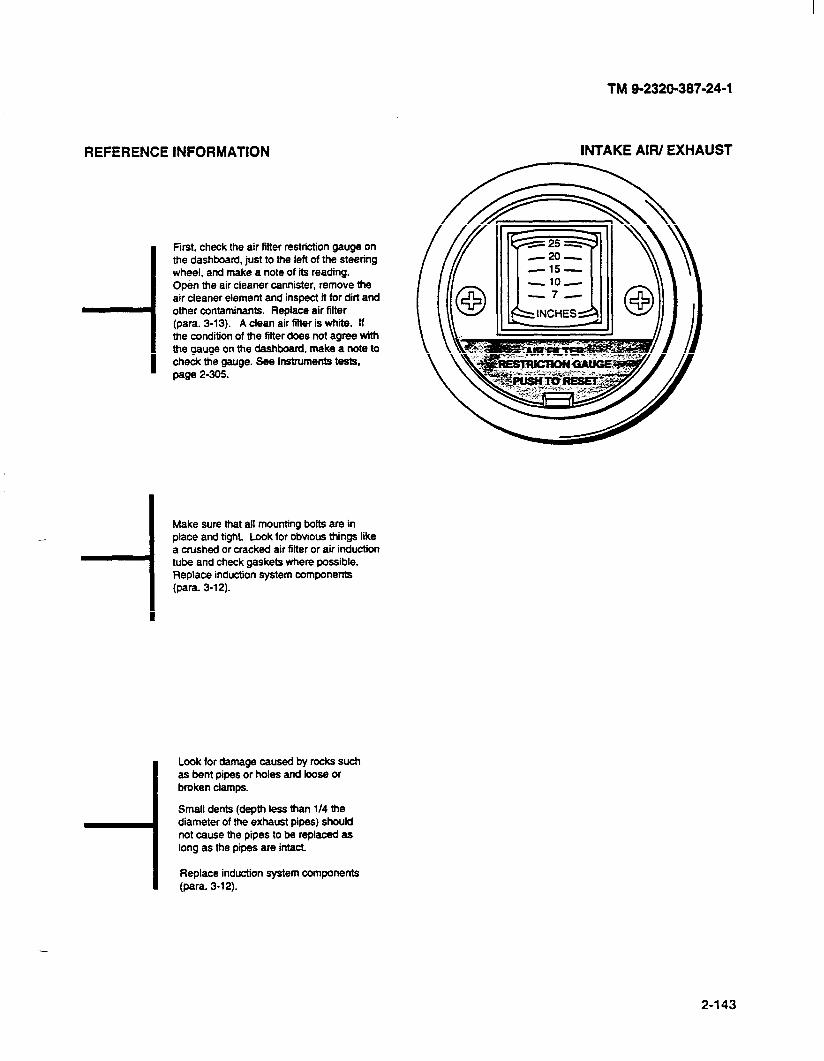
TM 9-2320-387-24-l
REFERENCE INFORMATION
-- -I
First, check the air fitter restriction gauge on the dashboard, just to the left of the steerlng wheel. and make a note of its reading. Open the air cleaner cannister, remove the air cleaner element and inspect it for dirt and other contaminants. Replace air filter (para. 3-13). A clean air filter is whlte. If me condition of me filter does not agree wtth the gauge on me dashboard, make a note to check me gauge. See Instruments tests. page 2-305.
Make sure that all mounting bolts are in place and tight. Look for obvious things like a crushed or cracked air filter or air induction tube and check gaskets where possible. Replace induction system components (para. 3-12).
i
Look for damage caused by rocks such as bent pipes or holes and loose or broken clamps.
Small dents (depth less than l/4 the diameter of the exhaust pipes) should not cause the pipes to be replaced as long as me pipes are intact
Replace induction system components (para. 3-12).
INTAKE AIR/ EXHAUST
2-143
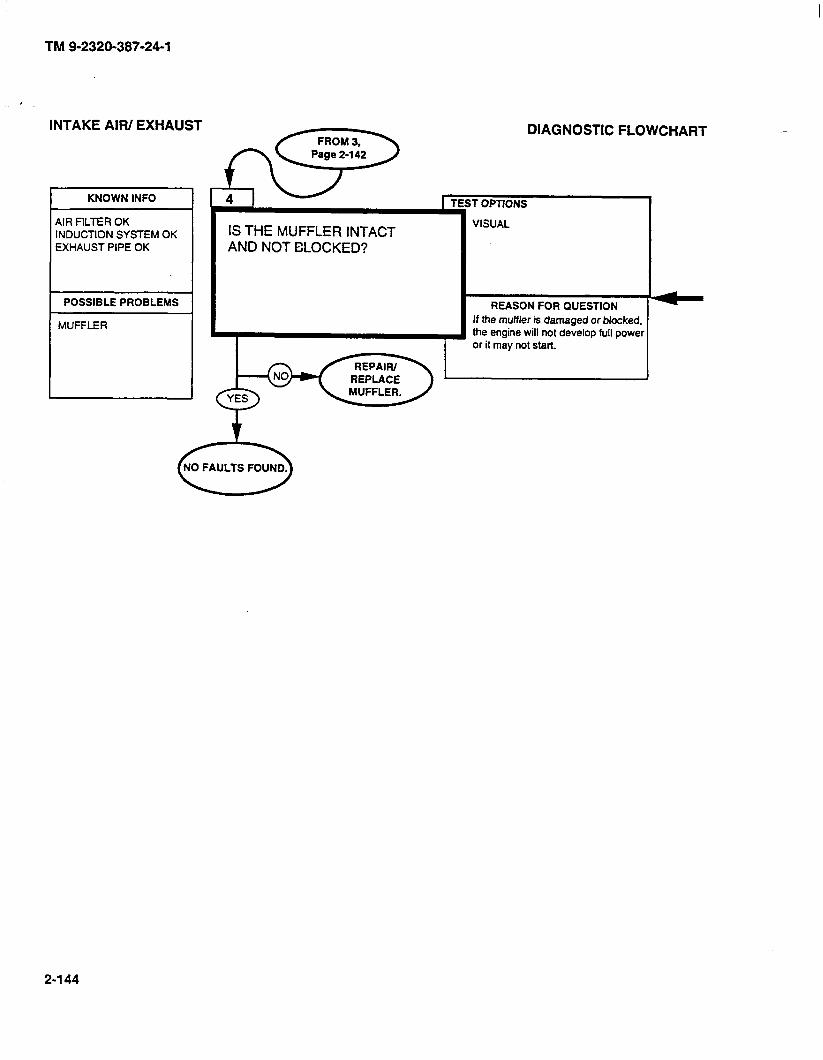
TM 9-2320-387-24-l
INTAKE AIR/ EXHAUST
KNOWN INFO
AIR FILTER OK INDUCTION SYSTEM OK EXHAUST PIPE OK
POSSIBLE PROBLEMS
MUFFLER
DIAGNOSTIC FLOWCHART
IS THE MUFFLER INTACT AND NOT ELOCKED?
I REASON FOR QUESTION I-
If the muffler is damaged or blocked, 3 oritmaynotstart. the engme WIII not develop full power
2-l 44
REFERENCE INFORMATION
Look for damage caused by rocks such bent pipes or holes, loose or broken
Replace muffler (para. 3-49).
TM 9-2320-387-24-l
INTAKE AIR/ EXHAUST
2-145/(2-l 46 blank)

I
TM 9-2320-387-24-1
2-30. COMPRESSION/MECHANICAL TESTS I
The main intent of this paragraph is to determine if the engine has internal compression or mechanical problems and to fix everything possible without having to notify DS maintenance (chapter 14).
.-
2-1 47
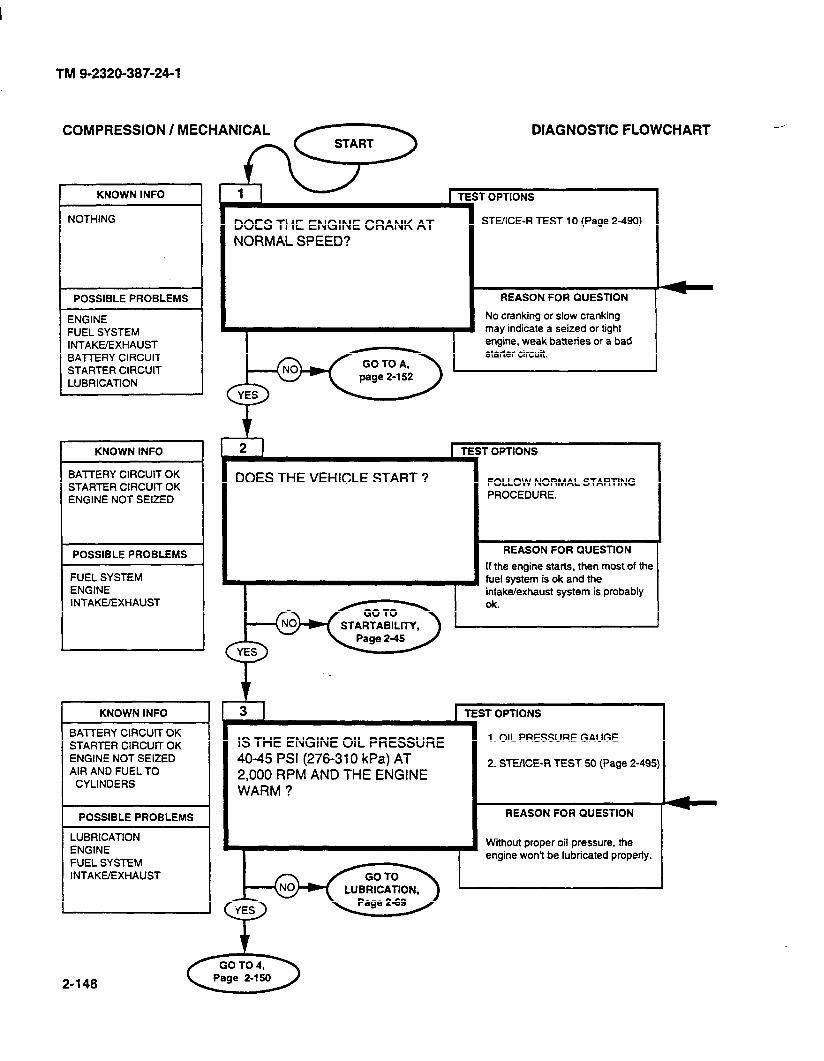
TM 9-2320-387-24-l
COMPRESSION / MECHANICAL
KNOWN INFO t
DIAGNOSTIC FLOWCHART -
T OPTIONS
STEIICE-R TEST 10 (Page 2490) NOTHING DOES THE ENGINE CRANK AT NORMAL SPEED?
POSSIBLE PROBLEMS REASON FOR QUESTfON
No cranking or slow cranking may indicate a seized or tight engine, weak baneties or a bad starter circuit.
ENGINE FUEL SYSTEM INTAKE/EXHAUST BATTERY CIRCUIT STARTER CIRCUIT LUBRICATION
I
KNOWN INFO T OPTIONS
BATTERY CIRCUIT OK STARTER CIRCUIT OK ENGINE NOT SEIZED
DOES THE VEHICLE START ? FOLLOW NORMAL STARTING PROCEDURE.
REASON FOR QUESTION
If the engine starts, then most of the fuel system is ok and the intake/exhaust system is probably ok.
POSSIBLE PROBLEMS
FUEL SYSTEM ENGINE INTAKE/EXHAUST
4 3
IS THE ENGINE OIL PRESSURE 40-45 PSI (276-310 kPa) AT 2,000 RPM AND THE ENGINE WARM ?
1
KNOWN INFO iT OPTIONS
1. OIL PRESSURE GAUGE
2. STEIICE-R TEST 50 (Page 2495 1
BATTERY CIRCUIT OK STARTER CIRCUIT OK ENGINE NOT SEIZED AIR AND FUEL TO
CYLINDERS
REASON FOR QUESTION
Without proper oil pressure, the engine won’t be lubricated property.
POSSIBLE PROBLEMS
LUBRICATION ENGINE FUEL SYSTEM INTAKE/EXHAUST
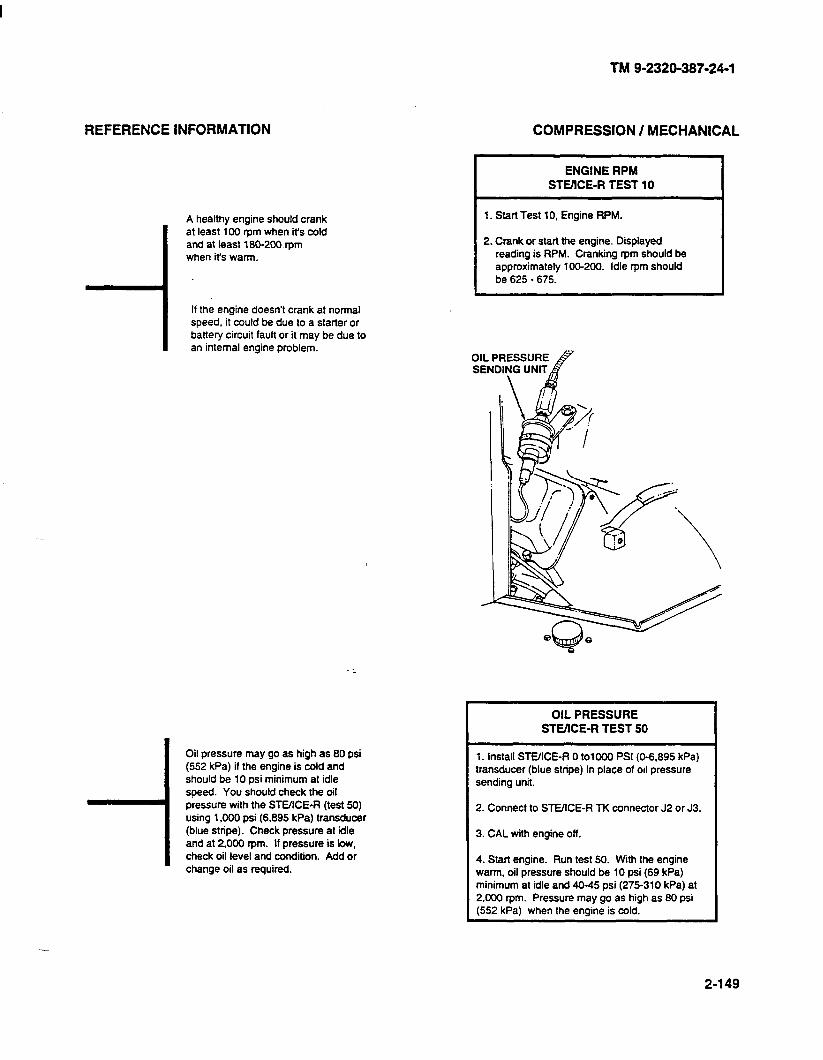
TM 9-2320-387-24-l
REFERENCE INFORMATION
A healthy engine should crank at least 100 mm when it‘s cold and at least 180-206 rpm when it’s warm.
If the engine doesn’t crank at normal speed, it could be due to a starter or battery circuit fault or it may be due to an internal engine problem.
Oil pressure may go as high as 60 psi (552 kPa) if the engine is cold and should be 10 psi minimum at idle speed. You should check the oil pressure with the STEIICE-R (test 50) using 1,000 psi (6,895 kPa) transducer (blue stripe). Check pressure at idle and at 2,000 rpm. If pressure is low, check oil level and condition. Add or change oil as required.
COMPRESSION / MECHANICAL
ENGINE RPM STOICE-R TEST 10 I
1. Start Test 10, Engine RPM.
2. Crank or start the engine. Displayed reading is RPM. Cranking rpm should be approximately 100-200. Idle rpm should be 625 - 675.
OIL PRESSURE fl
OIL PRESSURE STEhCE-R TEST 50
1. Install STEIfCE-A 0 to1000 PSI (O-6.895 kPa) transducer (blue stripe) in place of oil pressure sending unit.
2. Connect to STEIICE-R TK connector J2 or J3.
3. CAL with engine off.
4. Start engine. Run test 50. With the engine warm, oil pressure should be 10 psi (69 kPa) minimum at idle and 40-45 psi (275-310 kPa) at 2.000 rpm. Pressure may go as high as 80 psi (552 kPa) when the engine is cold.
2-149
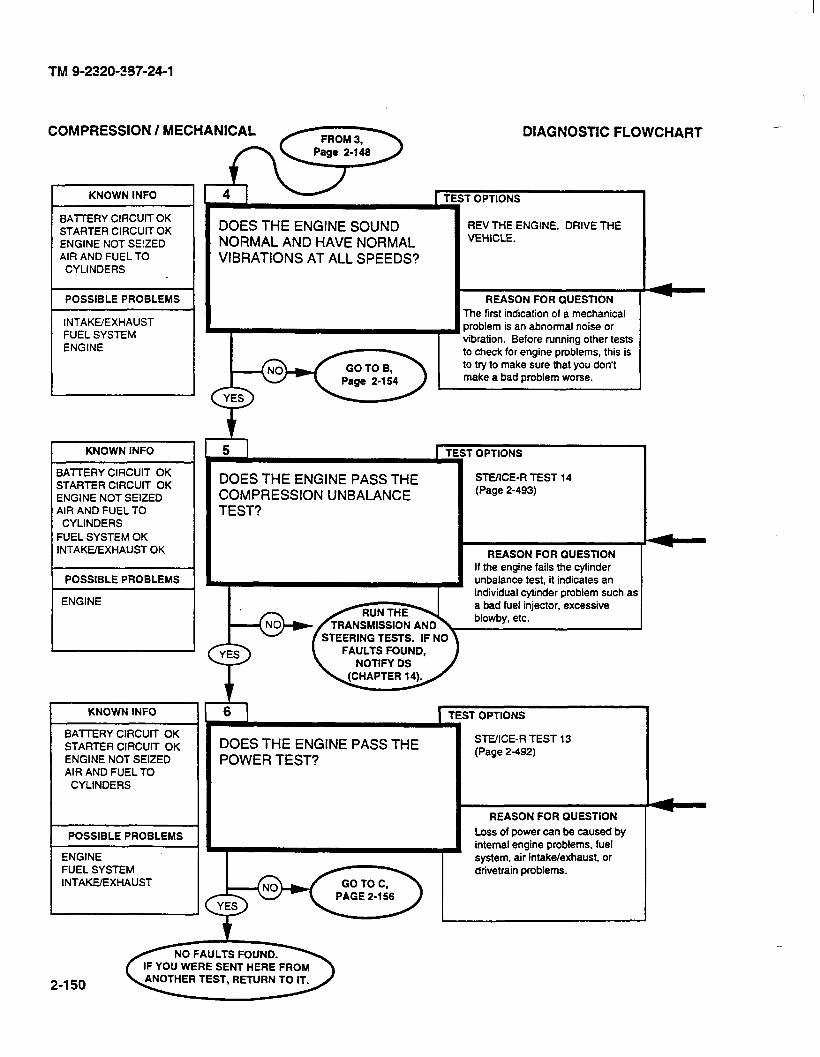
TM 9-2320-257-24-l
COMPRESSION / MECHANICAL DIAGNOSTIC FLOWCHART
BATTERY ClRCUlT OK STARTER CIRCUIT OK ENGINE NOT SE!ZED AIR AND FUEL TO
;T OPTIONS
1
DOES THE ENGINE SOUND NORMAL AND HAVE NORMAL VIBRATIONS AT ALL SPEEDS?
REV THE ENGINE. DRIVE THE VEHICLE.
1 POSSIBLE PROBLEMS 1 REASON FOR QUESTION I I-
]I , The first indication of a mechanical problem is an abnormal noise or vibration. Before running other tests to check for engine problems, this is to try to make sure that you don’t make a bad problem worse.
INTAKE/EXHAUST FUEL SYSTEM ENGINE L-l
-t, 5 KNOWN INFO r OPTIONS
STUICE-R TEST 14 (Page 2-493)
BATTERY CIRCUIT OK STARTER CIRCUlT OK ENGINE NOT SEIZED AIR AND FUEL TO
CYLINDERS
FUEL SYSTEM OK INTAKE/EXHAUST OK
DOES THE ENGINE PASS THE COMPRESSION UNBALANCE TEST?
REASON FOR QUESTION If the engine fails the cylinder unbalance test, it indicates an individual cylinder problem such as a bad fuel injector, excessive blowby. etc.
POSSIBLE PROBLEMS
ENGINE
KNOWN INFO TEST OPTIONS
DOES THE ENGINE PASS THE POWER TEST?
St-E/ICE-R TEST 13 (Page 2-492)
REASON FOR QUESTION
Loss of power can be caused by internal engine problems, fuel system, air intake/exhaust, or drivetrain problems.
BATTERY CIRCUIT OK STARTER CIRCUIT OK ENGINE NOT SEIZED AIR AND FUEL TO
CYLINDERS
POSSIBLE PROBLEMS
ENGINE FUEL SYSTEM INTAKE/EXHAUST
IF YOU WERE SENT HERE FROM
2-l 50
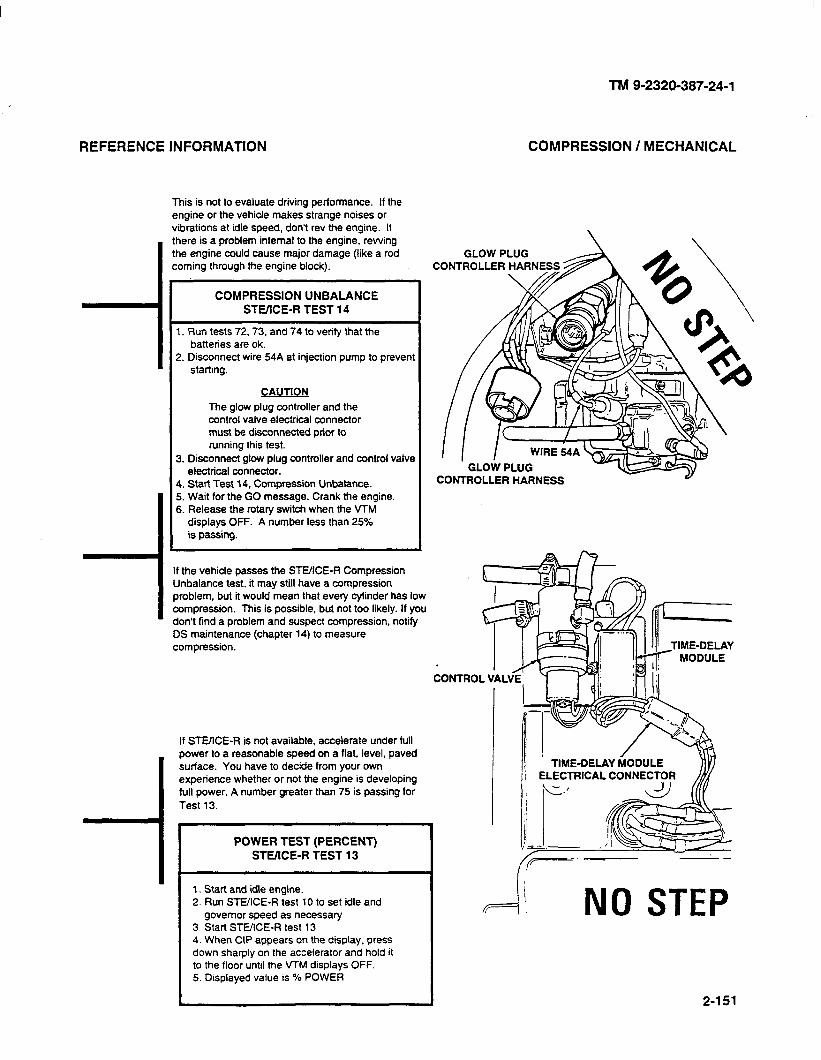
REFERENCE INFORMATION COMPRESSION / MECHANICAL
i
_ -I
i
This is not to evaluate driving performance. If the engine or the vehicle makes strange noises or vibrations at idle speed, don’t rev the engine. If there is a problem internal to the engine, rewing
11 he engine could cause major damage (like a rod C :oming through the engine block).
TM 9-2320-387-24-l
CONTROLLER
COMPRESSION UNBALANCE
STEIICE-R TEST 14
1. Run tests 72.73. and 74 to verify that the batteries are ok.
2. Disconnect wire 54A at injection pump to prevent starting.
CAUllON
The glow plug controller and the control valve electrical connector must be disconnected prior to running this test.
3. Disconnect glow plug controller and control valve electrical connector. GLOW PLUG
4. Start Test 14, Compression Unbalance. CONTROLLER HARNESS
5. Wait for the GO message. Crank the engine. 6. Release the rotary switch when the VfM
displays OFF. A number less than 25% is passing.
f the vehicle passes the STEKE-R Compression Jnbalance test, it may still have a compression jroblem, but it would mean that every cylinder has low nmpression. This is possible, but not too likely. If you tori’‘’ find a problem and suspect compression, notify IS maintenance (chapter 14) to measure :ompression.
If STEXE-R is not available, accelerate under full power to a reasonable speed on a flat, level, paved surface. You have to decide from your own experience whether or not the engine is developing full power. A number greater than 75 is passing for
Test 13.
POWER TEST (PERCENT)
STEIICE-R TEST 13
1. Start and idle engine. 2. Run STE/ICE-R test 10 to set idle and
governor speed as necessary 3. Start STUICE-R test 13 4. When CIP appears on the display. press down sharply on the accelerator and hold it to the floor until the VTM displays OFF. 5. Drsplayed value is % POWER
2-151
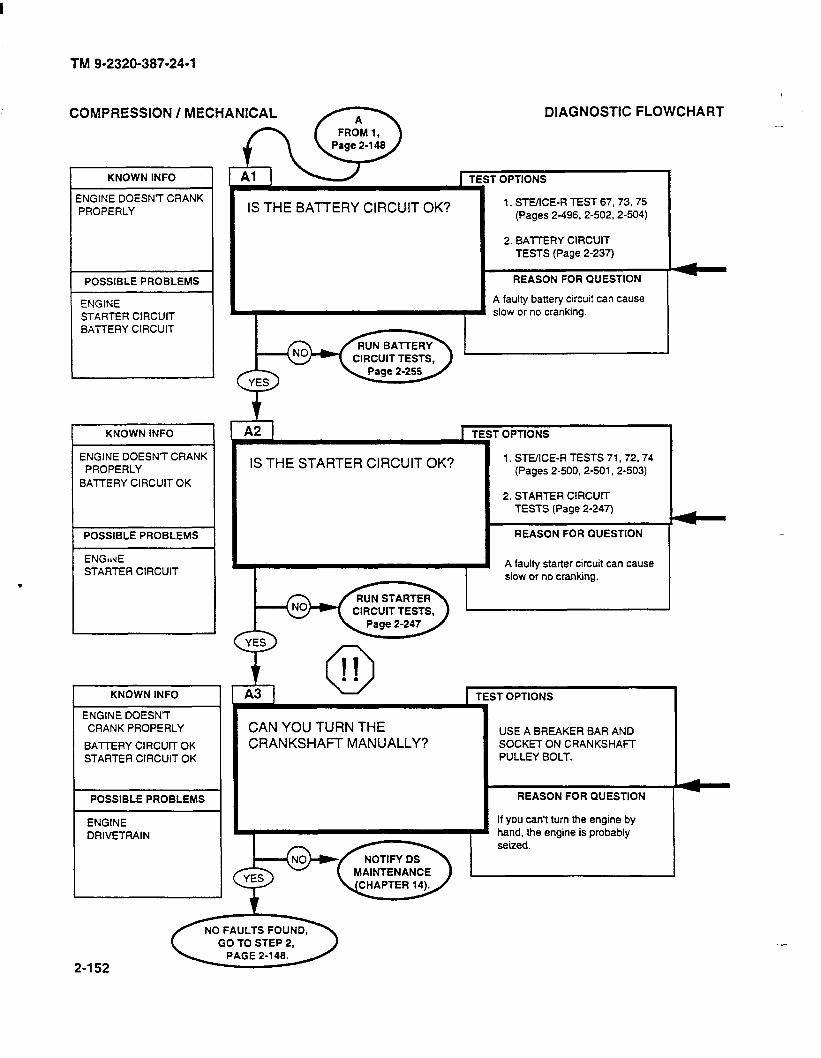
TM 9-2320-387-24-l
.
KNOWN INFO
.NGINE DOESN’T CRANK PROPERLY
COMPRESSION/MECHANICAL
POSSIBLE PROBLEMS
ENGINE STARTER CIRCUIT BATTERY CIRCUIT
KNOWN INFO
ENGINE DOESN’T CRANK PROPERLY
BATTERY CIRCUIT OK
POSSIBLE PROBLEMS
ENG~JE STARTER CIRCUIT
BATTERY CIRCUIT OK STARTER CIRCUIT OK
POSSIBLE PROBLEMS
ENGINE DRIVETRAIN
IS THE BATTERY CIRCUIT OK?
DIAGNOSTIC FLOWCHART
T OPTIONS
1. ST-E/ICE-R TEST 67,73.75 (Pages 2-496,2-502.2-504)
2. BATTERY CIRCUIT TESTS (Page 2-237)
REASON FOR QUESTION
A faulty battery circuit can cause slow or no cranking.
IS THE STARTER CIRCUIT OK?
T OPTIONS
1. STE/ICE-R TESTS 71,72.74 (Pages 2-500.2-501,2-503)
2. STARTER CIRCUIT TESTS (Page 2-247)
REASON FOR QUESTION
A faulty starter circuit can cause
I
slow or no cranking.
CAN YOU TURN THE CRANKSHAFT MANUALLY?
ST OPTIONS
USE A BREAKER BAR AND SOCKET ON CRANKSHAFT PULLEY BOLT.
REASON FOR QUESTION
If you can’t turn the engine by hand, the engine is probably seized.
2-152
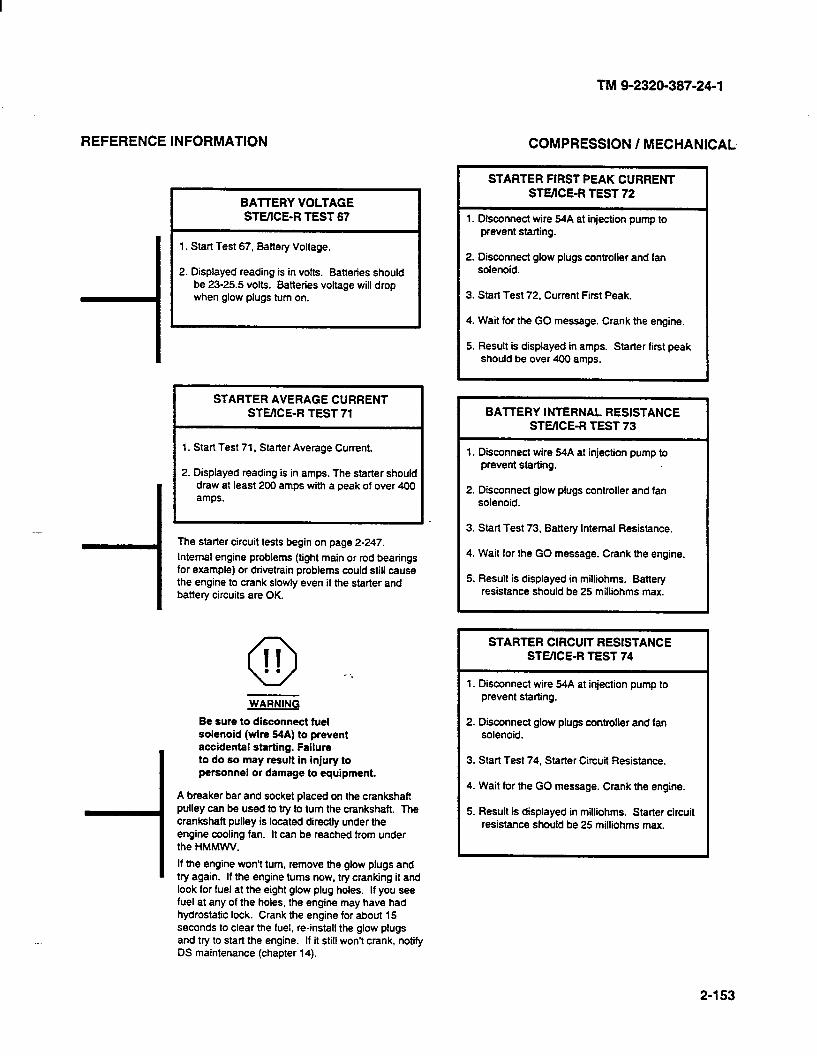
TM 9-2320-387-24-l
REFERENCE INFORMATION COMPRESSION / MECHANICAL
- -I
BAlTERY STEIICE-R
1. Start Test 67, Battery Voltage.
2. Displayed reading is in volts. Batteries should be 23-25.5 volts. Batteries voltage will drop when glow plugs turn on.
STARTER AVERAGE CURRENT STEIICE-R TEST 71
a peak of over 400 amps.
I
d
The starter circuit tests begin on page 2-247.
Internal engine problems (tight main or rod bearings for example) or drivetrain problems could still cause the engine to crank slowly even if the starter and battery circuits are OK.
0 11 . . - : WARNING
Be sure to disconnect fuel solenoid (wire 54A) to prevent accidental starting. Failure to do so may result in injury to personnel or damage to equipment.
A breaker bar and socket placed on the crankshaft pulley can be used to try to turn the crankshaft. The crankshaft pulley is located directly under the engine cooling fan. It can be reached from under the HMMWV.
If the engine won’t turn. remove the glow plugs and try again. If the engine turns now, try cranking it and look for fuel at the eight glow plug holes. If you see fuel at any of the holes, the engine may have had hydrostatic lock. Crank the engine for about 15 seconds to clear the fuel, re-install the glow plugs and try to start the engine. If it still won’t crank, notify DS maintenance (chapter 14).
STARTER FIRST PEAK CURRENT STUICE-R TEST 72
1. Dtsconnect wire 54A at injection pump to prevent starting.
2. Disconnect glow plugs controller and fan solenoid.
3. Start Test 72. Current First Peak.
4. Wait for the GO message. Crank the engine.
5. Result is displayed in amps. Starter first peak should be over 400 amps.
BAlTERY INTERNAL RESISTANCE STEIICE-R TEST 73
1. Disconnect wire 54A at injection pump to prevent starting.
2. Disconnect glow plugs controller and fan solenoid.
3. Start Test 73. Battery Internal Resistance.
4. Wait for the GO message. Crank the engine.
5. Result is displayed in milliohms. Battery resistance should be 25 milliohms max.
STARTER CIRCUIT RESISTANCE STEIICE-R TEST 74
1. Disconnect wire 54A at injection pump to prevent starting.
2. Disconnect glow plugs controller and fan solenoid.
3. Start Test 74, Starter Circuit Resistance.
4. Wait for the GO message. Crank the engine.
5. Result is displayed in milliohms. Starter circuit resistance should be 25 milliohms max.
2-153
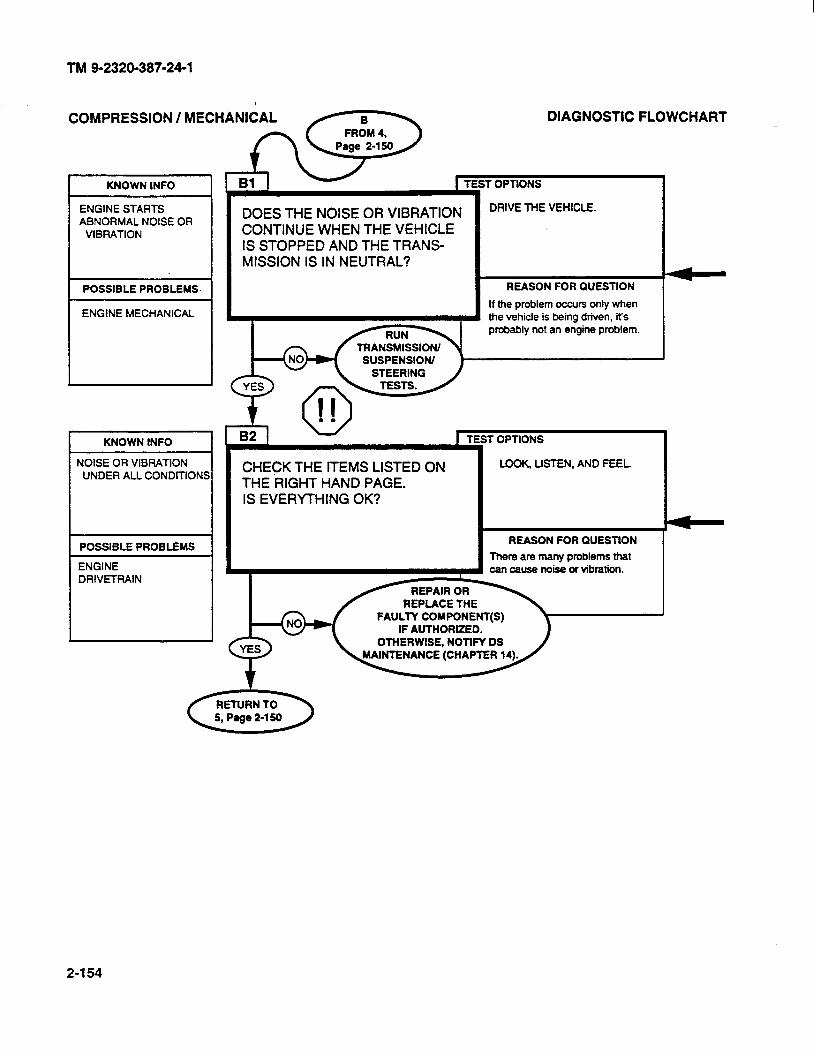
TM 9-2320-387-24-l
COMPRESSION / MECHANICAL /BY
KNOWN INFO
ENGINE STARTS ABNORMAL NOISE OR
VIBRATION
POSSIBLE PROBLEMS.
ENGINE MECHANICAL
KNOWN INFO
NOISE OR VIBRATION UNDER ALL CONDITION:
POSSIBLE PROBLEMS
ENGINE DRIVETRAIN
S
DOES THE NOISE OR VIBRATION CONTINUE WHEN THE VEHICLE IS STOPPED AND THE TRANS- MISSION IS IN NEUTRAL?
CHECK THE fTEMS LISTED ON THE RIGHT HAND PAGE. IS EVERYTHING OK?
DIAGNOSTIC FLOWCHART
T OPTIONS
DRIVE THE VEHICLE.
REASON FOR QUESTION
If the problem occurs only when the vehicle is being driven, it’s probably not an engine problem.
T OPTlONS
LOOK, LISTEN. AND FEEL
REPLACE THE FAULTY COMPONENT(S)
IF AUTHORIZED. OTHERWISE, NOTlFY DB
REASON FOR QUESTION
There are many problems that can cause noise or vibration.
2-l 54
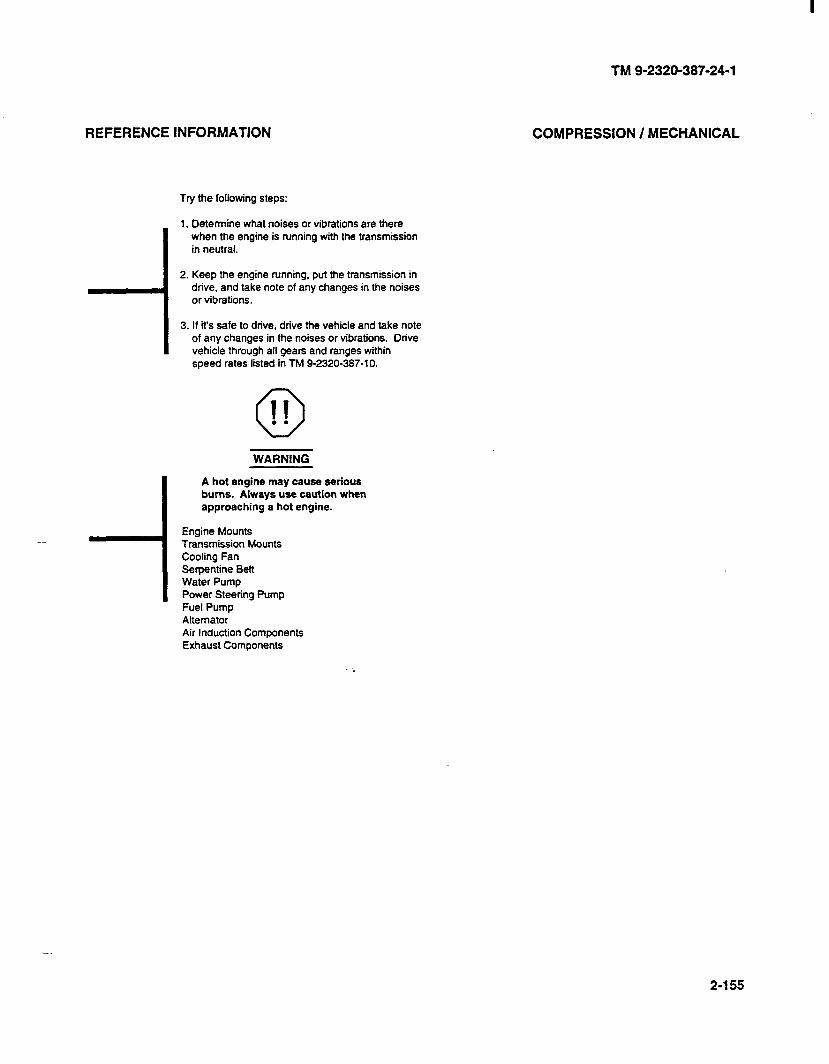
REFERENCE INFORMATION
i
- -I
Try the following steps:
1. Determine what noises or vibrations are there when the engine is running with the transmission in neutral.
2. Keep the engine running. put the transmission in drive, and take note of any changes in the noises or vibrations.
3. If it’s safe to drive, drive the vehicle and take note of any changes in the noises or vibrations. Drive vehicle through all gears and ranges within speed rates listed in TM 9-2320-387-10.
0 II . .
WARNING
A hot engine may cause serious burns. Always use caution when approaching a hot engine.
Engine Mounts Transmission Mounts Cooling Fan Serpentine Belt Water Pump Power Steering Pump Fuel Pump Alternator Air Induction Components Exhaust Components
TM 9-2320-387-24-l
COMPRESSION / MECHANICAL
2-l 55
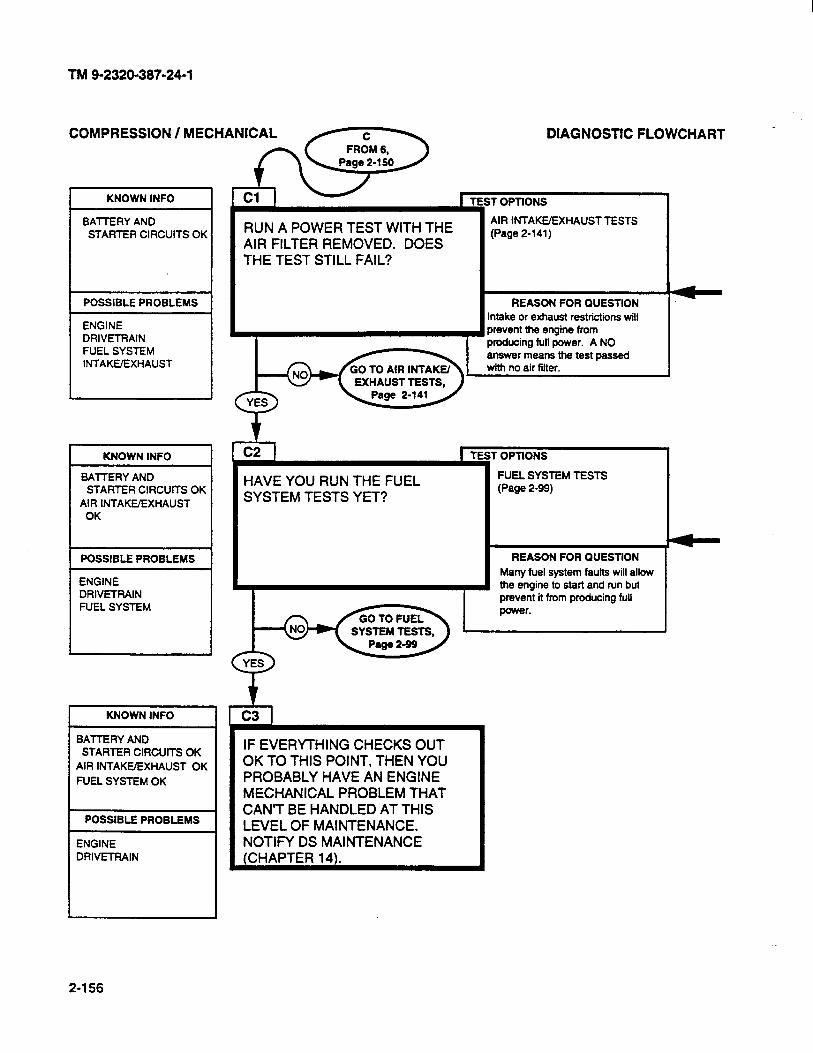
TM 9-2320-367-24-l
COMPRESSION / MECHAN;&~‘-
KNOWN INFO
~
BATIERY AND STARTER ClRCUlTS OK
RUN A POWER TEST WITH THE AIR FILTER REMOVED. DOES THE TEST STILL FAIL?
POSSIBLE PROBLEMS
ENGINE DRlVETFiAlN FUEL SYSTEM INTAKE/EXHAUST
KNOWN INFO
BATTERY AND STARTER ClRCUlTS OK
AIR INTAKE/EXHAUST OK
POSSIBLE PROBLEMS
ENGINE DRIVETRAIN FUEL SYSTEM
KNOWN INFO
BAllERY AND STARTER ClRCUlTS OK
AIR INTAKE/EXHAUST OK
FUEL SYSTEM OK
POSSIBLE PROBLEMS
ENGINE DRIVETRAIN
DIAGNOSTIC FLOWCHART _
iT OPTlONS
AIR INTAKUEXHAUST TESTS (Page 2-141)
REASON FOR QUESTION
Intake or exhaust restrictions will prevent the engine from
HAVE YOU RUN THE FUEL SYSTEM TESTS YET?
’ OPTIONS
FUEL SYSTEM TESTS (Page 2-99)
REASON FOR QUESTION
Many fuel system faults will allow the engine to start and run but prevent it from producing full power.
IF EVERYTHING CHECKS OUT OK TO THIS POINT, THEN YOU PROBABLY HAVE AN ENGINE MECHANICAL PROBLEM THAT CAN’T BE HANDLED AT THIS LEVEL OF MAINTENANCE. NOTIFY DS MAINTENANCE (CHAPTER 14).
2-l 66
REFERENCE INFORMATION
If faults are found and corrected. 90 to STEP 2. page 2-148.
If no faults are found, go to 82, page 2-154.
If faults are found and comcted, go to STEP 2, page 2-148.
I If no faults are found, go to 82, page 2-154.
TM 9-2320-387-24-l
COMPRESSION / MECHANICAL
2-157/(2-l 58 blank)
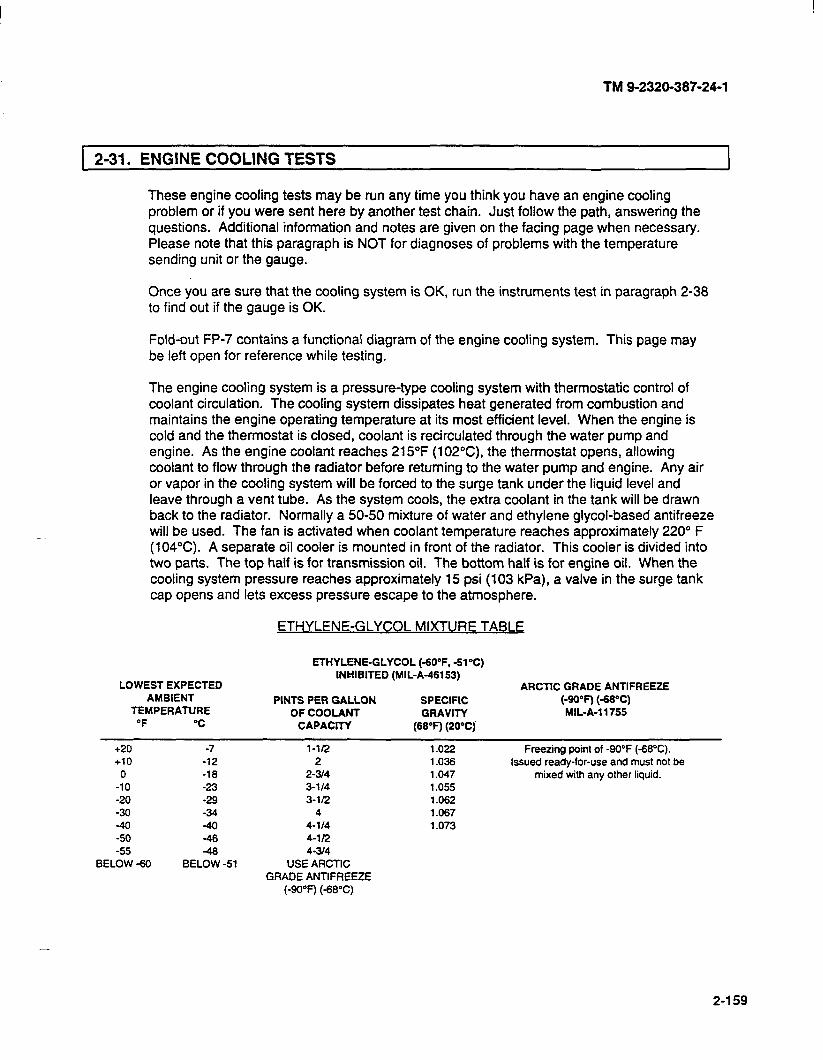
TM 9-2328-387-24-l
1 2-31. ENGINE COOLING TESTS
These engine cooling tests may be run any time you think you have an engine cooling problem or if you were sent here by another test chain. Just follow the path, answering the questions. Additional information and notes are given on the facing page when necessary. Please note that this paragraph is NOT for diagnoses of problems with the temperature sending unit or the gauge.
Once you are sure that the cooling system is OK, run the instruments test in paragraph 2-38 to find out if the gauge is OK.
Fold-out FP-7 contains a functional diagram of the engine cooling system. This page may be left open for reference while testing.
The engine cooling system is a pressure-type cooling system with thermostatic control of coolant circulation. The cooling system dissipates heat generated from combustion and maintains the engine operating temperature at its most efficient level. When the engine is cold and the thermostat is closed, coolant is recirculated through the water pump and engine. As the engine coolant reaches 215°F (102”C), the thermostat opens, allowing coolant to flow through the radiator before returning to the water pump and engine. Any air or vapor in the cooling system will be forced to the surge tank under the liquid level and leave through a vent tube. As the system cools, the extra coolant in the tank will be drawn back to the radiator. Normally a 50-50 mixture of water and ethylene glycol-based antifreeze will be used. The fan is activated when coolant temperature reaches approximately 220” F (104°C). A separate oil cooler is mounted in front of the radiator. This cooler is divided into two parts. The top half is for transmission oil. The bottom half is for engine oil. When the cooling system pressure reaches approximately 15 psi (103 kPa), a valve in the surge tank cap opens and lets excess pressure escape to the atmosphere.
ETHYLENE-GLYCOL MIXTURE TABLE
ETHYLENE-GLYCOL (-6O”F, -51°C)
LOWEST EXPECTED AMBIENT
TEMPERATURE “F “C
+20 -7 +lO -12
0 -18 -10 -23 -20 -29 -30 -34 -40 40 -50 46 -55 -48
BELOW -60 BELOW -51
INHIBITED (MIL-A-46153)
PINTS PER GALLON SPECIFIC OF COOLANT GRAVITY
CAPACfTY (68°F) (20°C)
l-112 1.022 2 1.036
2-3J4 1.047 3-l/4 1.055 3-l/2 1.062
4 1.067 4-114 1.073 4-112 4-3J4
USE ARCTK GRADE ANTIFREEZE
(-9O’F) (-68%)
ARCTfC GRADE ANTIFREEZE (-96v) (-66%) ML-A-1 1755
Freezing point of -90°F (-68%). Issued ready-for-use and must not be
mixed with other liquid. any
2-159
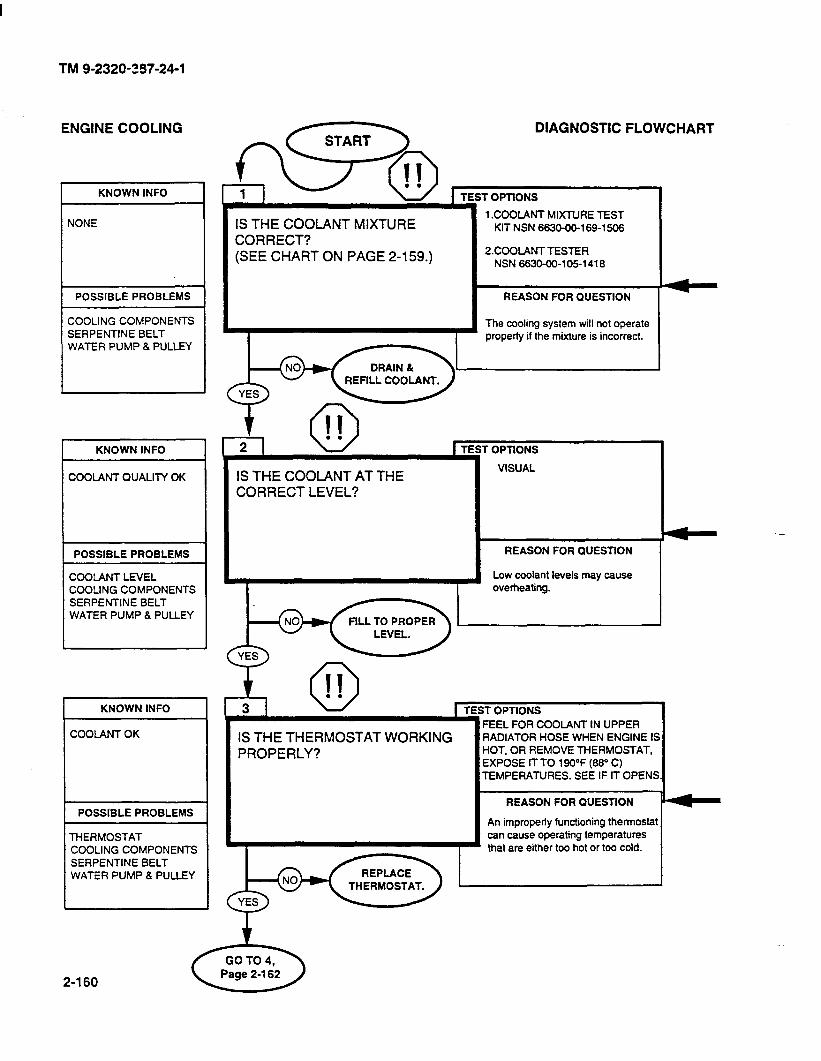
TM 9-2320-297-24-1
ENGINE COOLING DIAGNOSTIC FLOWCHART
KNOWN INFO
NONE
POSSIBLE PROBLEMS
COOLING COMPONENTS SERPENTINE BELT WATER PUMP 8 PULLEY
KNOWN INFO
COOLANT QUALITY OK
POSSIBLE PROBLEMS
COOLANT LEVEL COOLING COMPONENTS SERPENTINE BELT WATER PUMP 8 PULLEY
I KNOWN INFO
COOLANT OK
1 POSSIBLE PROBLEMS
THERMOSTAT COOLING COMPONENTS SERPENTINE BELT WATER PUMP & PULLEY
IS THE COOLANT MIXTURE CORRECT? (SEE CHART ON PAGE 2-159.)
IS THE COOLANT AT THE CORRECT LEVEL?
IS THE THERMOSTAT WORKING PROPERLY?
;T OPllONS
1 .COOLANT MIXTURE TEST KIT NSN 6630-0@169-1 SO6
P.CDOlANT TESTER NSN 6630-00-105-1416
REASON FOR QUESTION
The cooling system will not operate property if the mixture is incorrect.
r OPTIONS
VISUAL
REASON FOR QUESTION
Low coolant levels may cause overheating.
;T OPTIONS
FEEL FOR COOLANT IN UPPER RADIATOR HOSE WHEN ENGINE IS HOT, OR REMOVE THERMOSTAT, EXPOSE f-f- TO 190°F (66’ C) TEMPERATURES. SEE IF IT OPENS.
REASON FOR QUESTION
An improperly functioning thermostat can cause operating temperatures that are either too hot or too cold.

TM 9-2320-387-24-l
REFERENCE INFORMATION
0 11 . . WARNING
Do not remove surge tank filler cap before releasing internal pressure when engine temperature is above 190°F (8S°C). Steam or hot coolant under pressure will cause injury.
I Drain and refill coolant (para. 3-61).
_ -I WARNING
Do not remove surge tank filler cap before releasing internal pressure when engine temperature is above 190°F (88T). Steam or hot coolant under pressure will cause injury.
Fill coolant to proper level (Pat’& 3-61).
0 II . . WARNING
Always use caution when approaching a hot engine. Failure to do so may result in serious bums.
Remove and replace the thermostat (para. 3-76).
ENGINE COOLING
SURGE COOLANT TANK FILLER SURGE
CAP TANK
2-161

TM 9-2320-387-24-l
ENGINE COOLING
I KNOWN INFO I
COOLANT OK THERMOSTAT OK
POSSIBLE PROBLEMS
COOLING COMPONENTS SERPENTINE BELT WATER PUMP & PULLEY
KNOWN INFO I
COOLANT OK PRESSURE CAP OK THERMOSTAT OK
POSSIBLE PROBLEMS
HOSES SURGE TANK RADIATOR THERMOSTAT ENGINE FAN WATER PUMP & PULLEY
KNOWN INFO
COOLANT OK PRESSURE CAP OK THERMOSTAT OK HOSES OK SURGE TANK OK OIL COOLER OK
POSSIBLE PROBLEMS
RADIATOR ENGINE FAN WATER PUMP 8 PULLEY
DIAGNOSTIC FLOWCHART fla@ I TEST OPTIONS
/
INSPECT THE PRESSURE CAP. PRESSURE TESTER
IS IT IN GOOD CONDITION?
I REASON FOR QUESTION
TEST OPTIONS
INSPECT ALL RADIATOR HOSES, LOOK.
COOLANT HOSES, SURGE TANK, RADIATOR, OIL COOLER, AND FllTlNGS FOR DAMAGE, BLOCKAGE, OR LARGE LEAKS. IS EVERYTHING IN GOOD SHAPE? REASON FOR QUESTION
Physical damage and blocked
I I passages can cause cooling
IF BLOCKED. OTHERWISE, NOTIFY DS MAINTENANCE
-CHAPTER i
r -7 6
IS THE ENGINE FAN WORKING PROPERLY?
I- OPTIONS
LOOK -- SEE DESCRIPTION OF OPERATION AT RIGHT.
REASON FOR QUESTION
The engine fan helps cool the engine.
2-162
--

TM 9-2320-387-24-l
REFERENCE INFORMATION
0 11 . .
ENGINE COOLING
I SURGE COOLANT TANK FILLER SURGE
I CAP TANK
WARNING
Do not remove surge tank filler cap before releasing internal pressure when engine temperature is above IW’F (WC). Steam or hot coolant under pressure will cause injury.
Check seal and spring on pressure cap.
Replace pressure cap (para. 361).
- i
Flush cooling system (para. 3-61).
For surge tank and radiator support replacement procedures, refer to paras. 3-64 and 3-65.
For oil cooler and oil cooler hose replacement procedures, refer to paras. 3-7 and 3-6.
Notify DS maintenance to repair radiator (chapter 17).
- :
ENGINE COOLING FAN DESCRIPTION OF OPERATION
An external line from the power steering gear brings hydraulic fluid to the clutch fan solenoid through
i
control valve (normally open) and then to the fan drive. keeping it disengaged. The action of the valve is controlled by the time-delay module and the fan temperature switch.
During normal operation, the fan timer switch is closed. This keeps the control valve in the open position and the drive disengaged. As the engine reaches a temperature of about 215°F (102%). the temperature switch opens and the control valve closes. This engages the fan. If the fan is engaged and the accelerator is floored, the throttle position sensor disengages the fan drive for a period of 20 seconds.
The easiest way to determine if the fan is engaged is to stand outside the drivers door and gently work the accelerator. If the fan is engaged, you will feel a breeze from the engine area. If the fan is not engaged, you won’t feel the breeze.
2-163
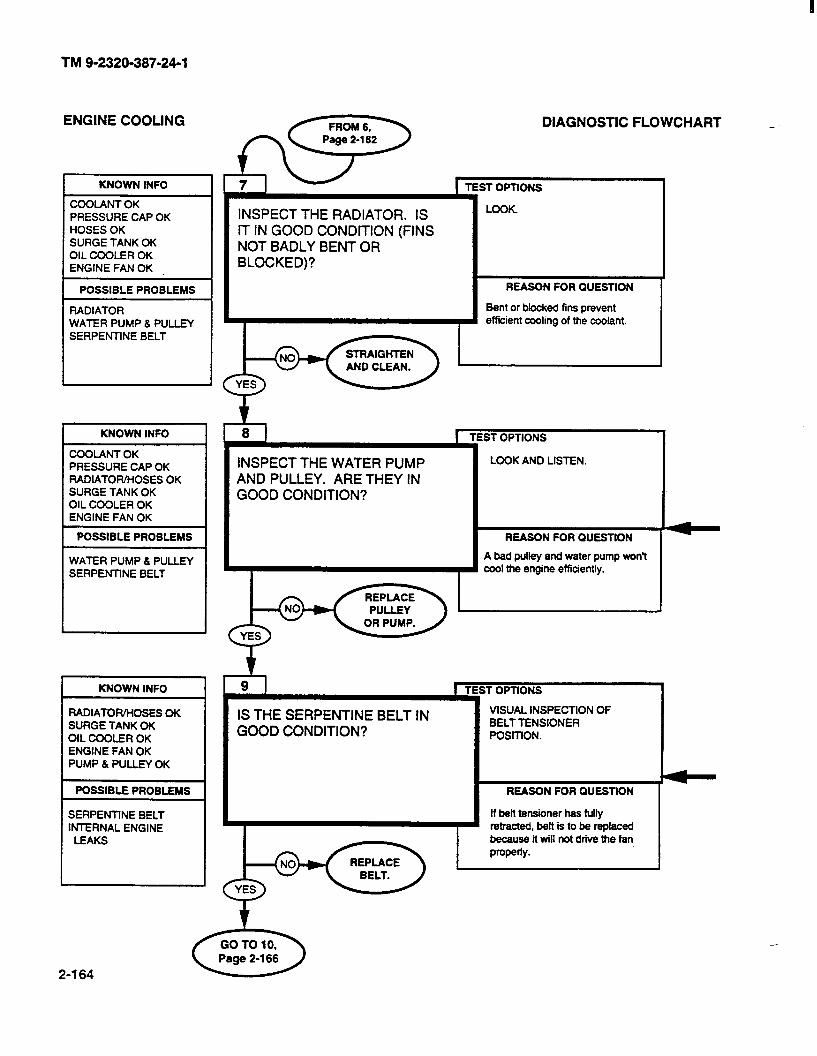
TM 9-2320-387-24-l
ENGINE COOLING / FROM 6, \ DIAGNOSTIC FLOWCHART _
KNOWN INFO
COOLANTOK PRESSURE CAP OK HOSES OK SURGE TANK OK OIL COOLER OK ENGINE FAN OK
POSSIBLE PROBLEMS
RADIATOR WATER PUMP 8 PULLEY SERPENTINE BELT
INSPECT THE RADIATOR. IS IT IN GOOD CONDITION (FINS NOT BADLY BENT OR BLOCKED)?
ST OPTIONS
LOCK
REASON FOR QUESTION
Bent or blocked fins prevent efficient cooling of the coolant.
KNOWN INFO
COOLANT OK PRESSURE CAP OK RADIATOFUHOSES OK SURGE TANK OK OIL COOLER OK ENGINE FAN OK
POSSIBLE PROBLEMS
WATER PUMP 8 PULLEY SERPENTlNE BELT
KNOWN INFO
RADIATORMOSES OK SURGE TANK OK OIL COOLER OK ENGINE FAN OK PUMP 8 PULLEY OK
POSSIBLE PROBLEMS
SERPENTlNE BELT MERNAL ENGINE
LEAKS
INSPECT THE WATER PUMP AND PULLEY. ARE THEY IN GOOD CONDITION?
LOOK AND LISTEN.
IS THE SERPENTINE BELT IN GOOD CONDITION?
VISUAL INSPECTION OF BELT TENSIONER PosmoN.
REASON FOR QUESllON
If belt tensioner has fully retracted, belt is to be replaced because it will not drive the fan
PwedY.
2-164
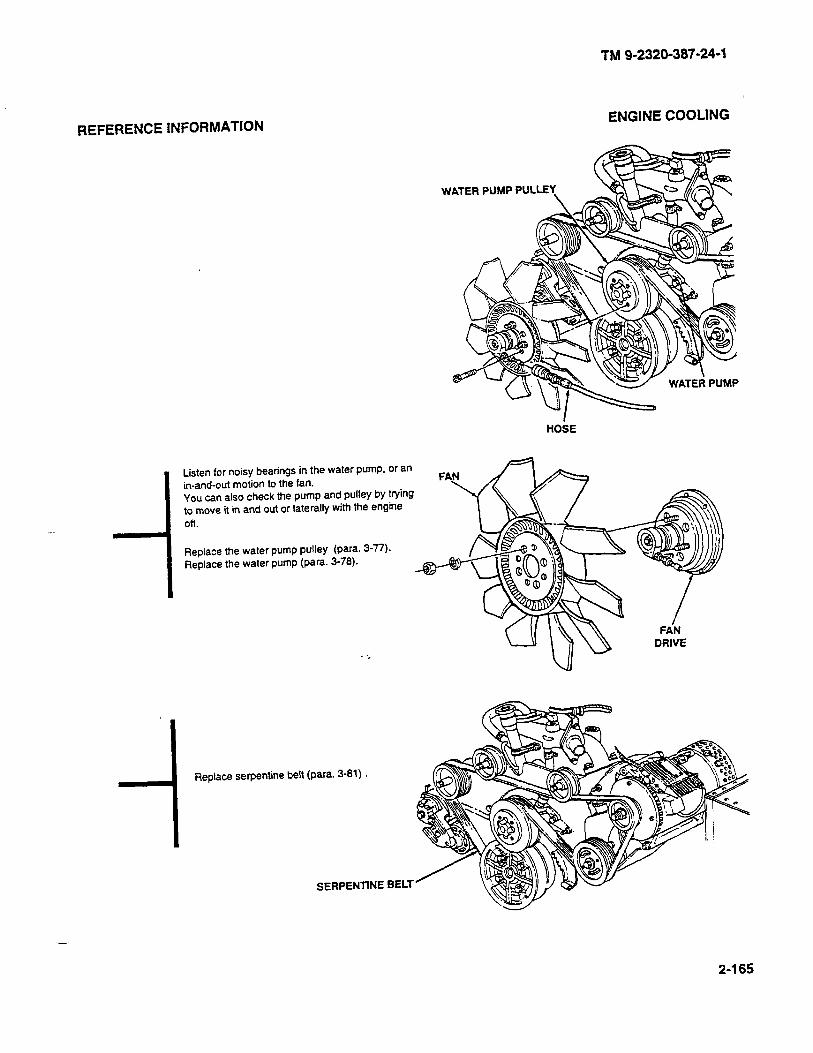
TM g-2320-387-24-1
ENGINE COOLING REFERENCE INFORMATION
WATER PUMP PULLE
HOSE
- i
Listen for noisy bearings in the water pump, or an in-and-out motion to the fan. You can also check the pump and pulley by trying to move it in and out or laterally with the engine
Off.
Replace the water pump pulley (para. 3-77). Replace the water pump (para. 3-78).
- i
-I Replace serpentine belt (para. 3-81) .
SERPENTINE BELT
-
2-165
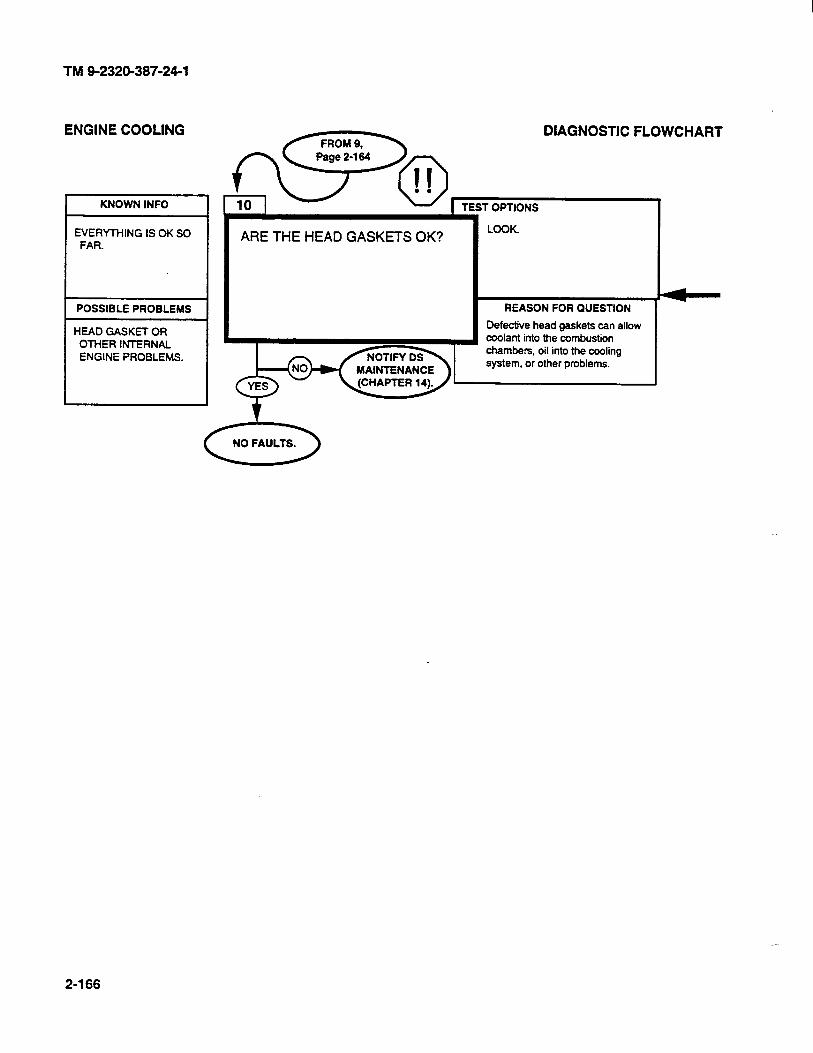
TM 9-2320-387-24-l
ENGINE COOLING
KNOWN INFO
EVERYTHING IS OK SO FAR.
POSSIBLE PROBLEMS
HEAD GASKET OR OTHER INTERNAL ENGINE PROBLEMS.
ARE THE HEAD GASKETS OK?
I
LOOK.
MAINTENANCE
REASON FOR QUESTION
Defective head gaskets can allow coolant into the combustion chambers, oil into the cooling system, or other problems.
t
JO NO FAULTS.
2-166
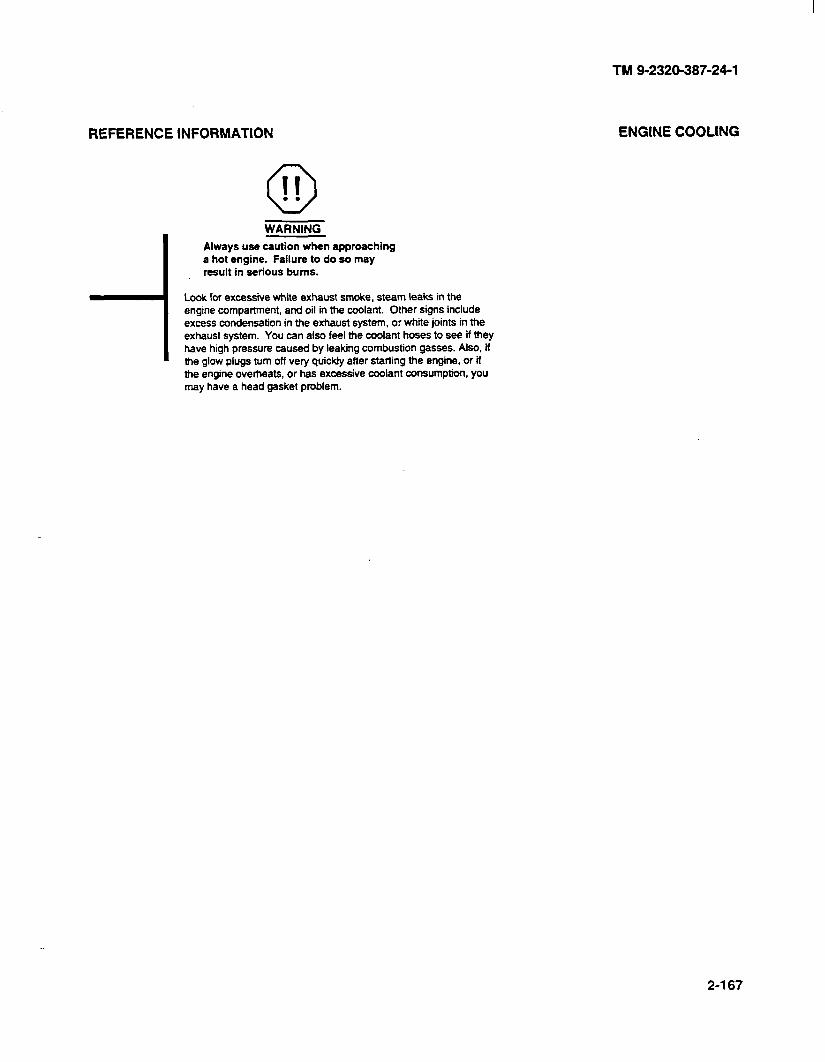
TM 9-2320-387-24-l
REFERENCE INFORMATION
0 II . . WARNING
a
I Always use caution when approaching a hot engine. Failure to do so may result in serious bums.
1 Look for excessive whiie exhaust smoke, steam leaks in the engine compartment, and oil in the coolant. Other signs include excess condensation in the exhaust system, or white joints in the exhaust system. You can also feel the coolant hoses to see if they have high pressure caused by leaking combustion gasses. Also. if the glow plugs turn off very quickfy after starting the engine, or if the engine overheats, or has excessive coolant consumption, you may have a head gasket problem.
ENGINE COOLING
2-167
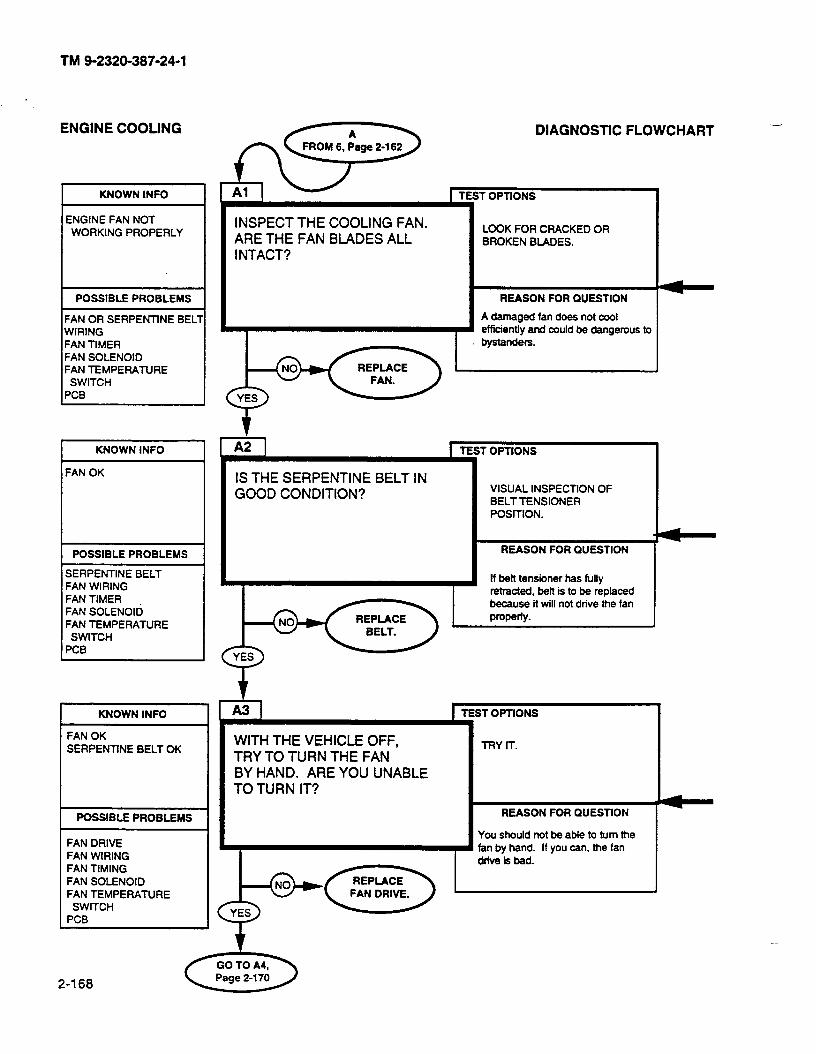
TM 9-2320-387-24-l
ENGINE COOLING DIAGNOSTIC FLOWCHART -
ENGINE FAN NOT WORKING PROPERLY
T OPTlONS
LOOK FOR CRACKED OR BROKEN BLADES.
INSPECT THE COOLING FAN. ARE THE FAN BLADES ALL INTACT?
I POSSIBLE PROBLEMS REASON FOR QUESTION
A damaged fan doas not cool efficiently and could be dangerous to
FAN OR SERPENTlNE BEL- WIRING FAN TIMER FAN SOLENOID FAN TEMPERATURE
SWITCH PCB
r
t A2 ] ITI I KNOWN INFO T OPTIONS
IS THE SERPENTINE BELT IN GOOD CONDITION?
FAN OK
VISUAL INSPECTION OF BELT TENSIONER POSITION.
1 POSSIBLE PROBLEMS 1 REASON FOR QUESTION
SERPENTINE BELT FAN WIRING FAN TIMER FAN SOLENOld FAN TEMPERATURE
SWlTCH PCB
lf belt tensioner has fully retracted, belt is to be replaced ttxause it will not drive the fan
PwedY.
T OPTIONS
TRY rr.
KNOWN INFO
L FAN OK SERPENTINE BELT OK
WITH THE VEHICLE OFF, TRY TO TURN THE FAN BY HAND. ARE YOU UNABLE TO TURN IT?
REASON FOR QUESTION
fou should not be able to turn the hn by hand. If you can, the fan
POSSIBLE PROBLEMS
FAN DRIVE FAN WIRING FAN TIMING FAN SOLENOID FAN TEMPERATURE
SWITCH PCB
-
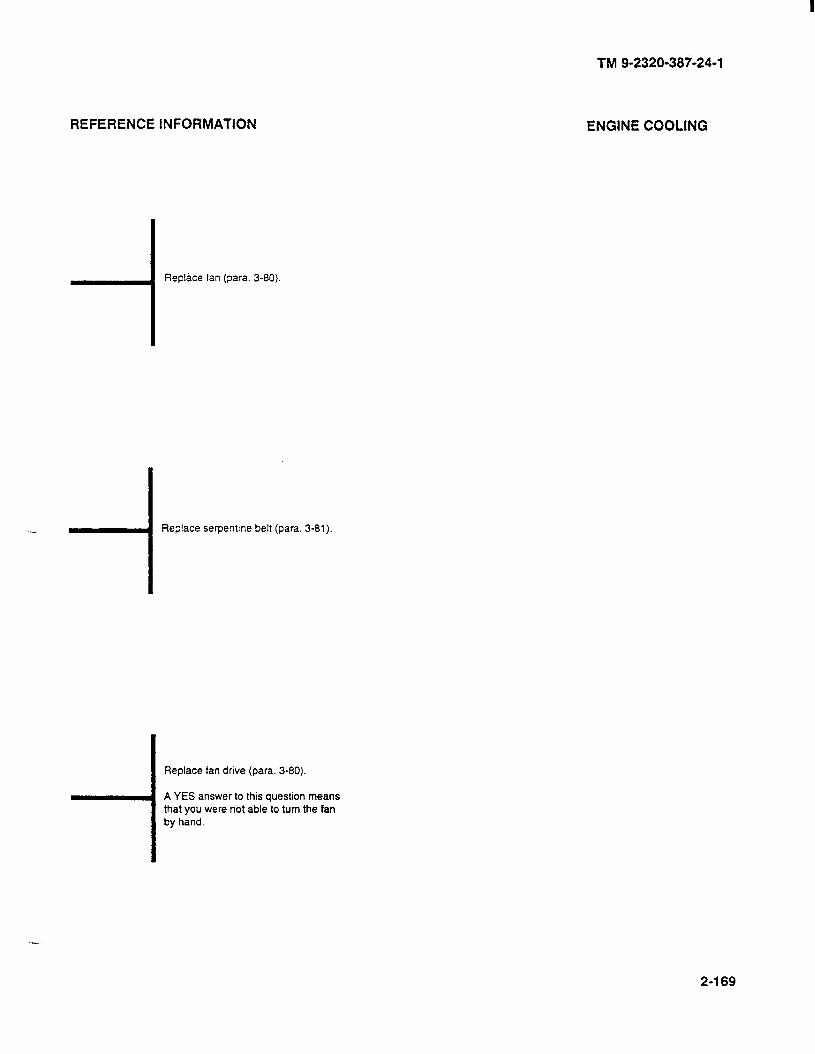
REFERENCE INFORMATION ENGINE COOLING
-I Replace fan (para. 3-80)
Replace serpentine belt (para. 3-81).
I Replace fan drive (para. 3-80).
TM 9-2320-387-24-l
I A YES answer to this question means that you were not able to turn the fan by hand.
2-169
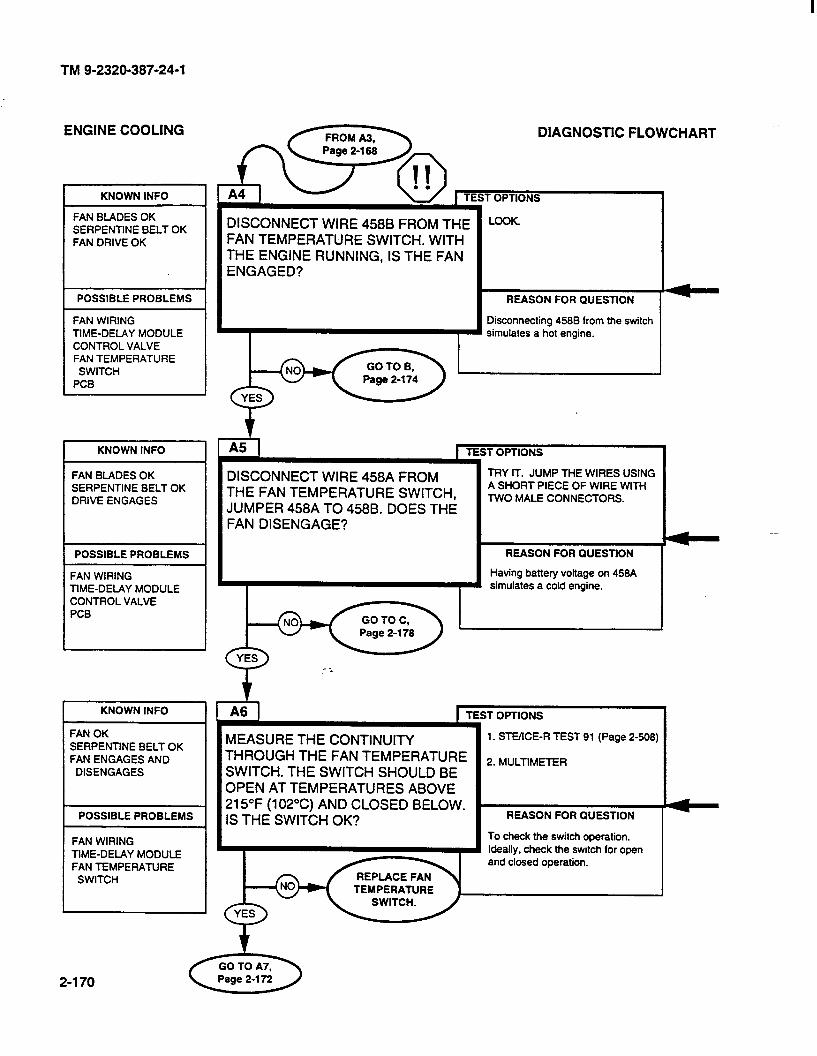
TM 9-2320-387-24-l
ENGINE COOLING
L
KNOWN INFO
FAN BLADES OK SERPENTINE BELT OK FAN DRIVE OK
POSSIBLE PROBLEMS
FAN WIRING TIME-DELAY MODULE CONTROL VALVE FAN TEMPERATURE SWITCH
PCB
KNOWN INFO
FAN BLADES OK SERPENTINE BELT OK DRIVE ENGAGES
POSSIBLE PROBLEMS
FAN WIRING TIME-DELAY MODULE CONTROL VALVE PCE
KNOWN INFO
=AN OK SERPENTINE BELT OK FAN ENGAGES AND DISENGAGES
POSSIBLE PROBLEMS
FAN WIRING TIME-DELAY MODULE FAN TEMPERATURE
SWITCH
DISCONNECT WIRE 458A FROM THE FAN TEMPERATURE SWITCH, JUMPER 458A TO 4588. DOES THE FAN DISENGAGE?
TEST OPTIONS
1. STUICE-R TEST 91 (Page 2-508) MEASURE THE CONTINUITY THROUGH THE FAN TEMPERATURE SWITCH. THE SWITCH SHOULD BE OPEN AT TEMPERATURES ABOVE 215°F (102°C) AND CLOSED BELOW. IS THE SWITCH OK?
DISCONNECT WIRE 4588 FROM THE FAN TEMPERATURE SWITCH. WITH THE ENGINE RUNNING, IS THE FAN ENGAGED?
DIAGNOSTIC FLOWCHART
TEST OPTIONS
REASON FOR QUESTION
Disconnecting 4588 from the switch simulates a hot engine.
_
REASON FOR QUESTION
Having battery voltage on 458A simulates a cold engine.
I
2. MULTlMmR
REASON FOR QUESTION
To check the switch operation. Ideally. check the switch for open and closed operation.
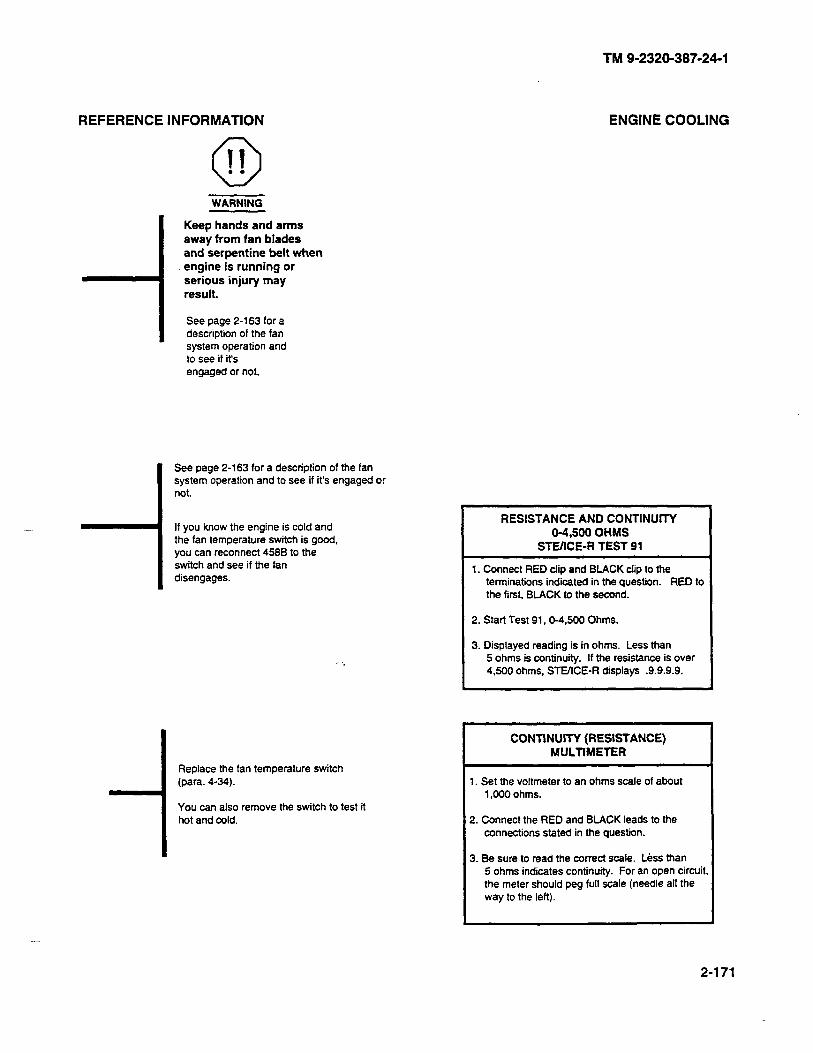
REFERENCE INFORMATION
0 II . .
Keep hands and arms away from fan blades and serpentine belt when engine is running or serious injury may result.
See page 2-163 for a description of the fan system operation and to see if ifs engaged or not.
See page 2-163 for a description of the fan system operation and to see if it’s engaged or not.
If you know the engine is cold and the fan temperature switch is good, you can reconnect 4500 to the switch and see if the fan disengages.
Replace the fan temperature switch (para. 4-34).
You can also remove the switch to test it hot and cold.
TM 9-2320-387-24-l
ENGINE COOLING
RESISTANCE AND CONTINUITY 04,500 OHMS
STEIICE-R TEST 91
1. Connect RED clip and BLACK clip to the terminations indicated in the question. RED to the first, BLACK to the second.
2. Start Test 91,04,500 Ohms.
3. Displayed reading is in ohms. Less than 5 ohms is continuity. If the resistance is over 4,560 ohms, STWICE-R displays .9.9.9.9.
*
CONTINUITY (RESISTANCE) MULTIMETER
1. Set the voltmeter to an ohms scale of about 1.000 ohms.
2. Connect the RED and BLACK leads to the connections stated in the question.
3. Be sure to read the correct scale. Less than 5 ohms indicates continuity. For an open circuit the meter should peg full scale (needle all the way to the left).
L
2-l 71
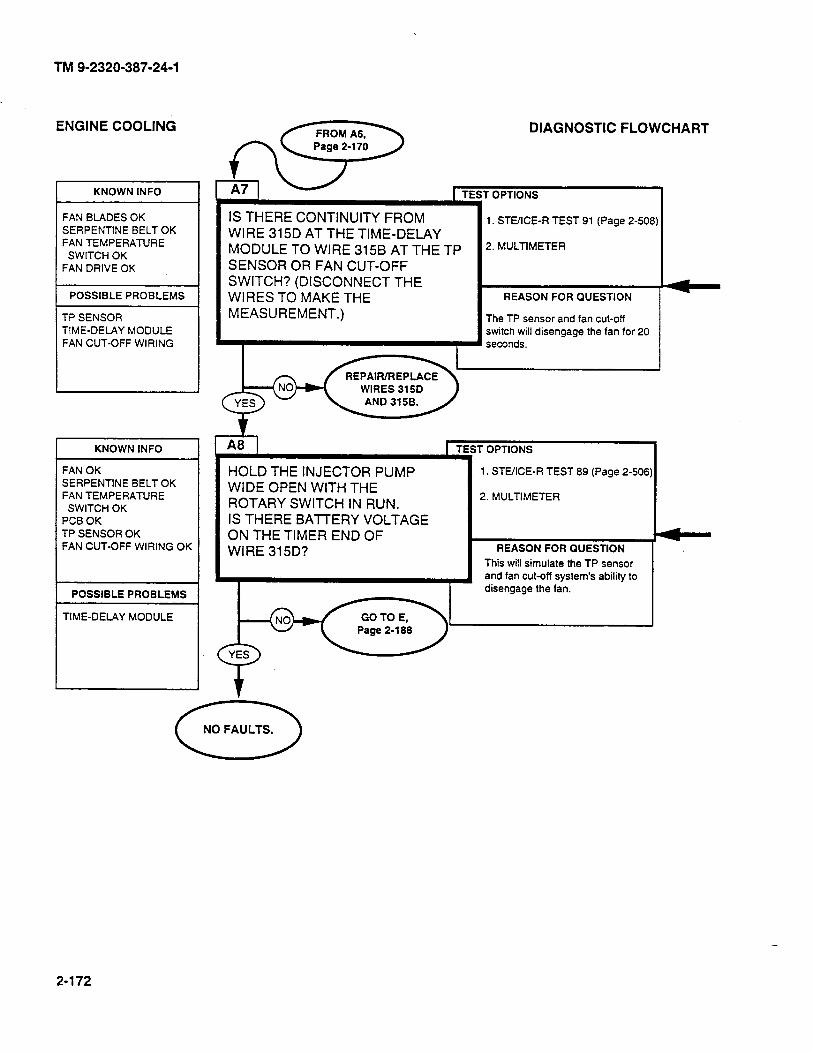
TM 9-2320-387-24-l
ENGINE COOLING
KNOWN INFO I
FAN BLADES OK SERPENTINE BELT OK FAN TEMPERATURE
SWITCH OK FAN DRIVE OK
POSSIBLE PROBLEMS
TP SENSOR TIME-DELAY MODULE FAN CUT-OFF WIRING
KNOWN INFO
FAN OK SERPENTINE BELT OK FAN TEMPERATURE
SWITCH OK PCB OK TP SENSOR OK FAN CUT-OFF WIRING OK
POSSIBLE PROBLEMS
TIME-DELAY MODULE
IS THERE CONTINUITY FROM WIRE 315D AT THE TIME-DELAY MODULE TO WIRE 3158 AT THE TP SENSOR OR FAN CUT-OFF SWITCH? (DISCONNECT THE WIRES TO MAKE THE MEASUREMENT.)
DIAGNOSTIC FLOWCHART
T OPTIONS
1. STVICE-R TEST 91 (Page 2-508:
2. MULTfMETER
REASON FOR QUESTION
The TP sensor and fan cut-off switch will disengage the fan for 20 seconds.
HOLD THE INJECTOR PUMP WIDE OPEN WITH THE ROTARY SWITCH IN RUN. IS THERE BATTERY VOLTAGE ON THE TIMER END OF WIRE 315D?
;T OPTIONS
1. STE/ICE-R TEST 69 (Page 2-506
2. MULTIMETER
REASON FOR QUESTION
This will simulate the TP sensor and fan cut-off system’s ability to disengage the fan.
2-l 72

REFERENCE INFORMATION
CONTINUITY (RESISTANCE) MULTIMETER
1. Set the voltmeter to an ohms scale of about 1,000 ohms.
2. Connect the RED and BLACK leads to the connections stated in the question.
3. Be sure to read the correct scale. Less than 5 ohms indicates continuity. For an open circuit, the meter should peg full scale (needle all the way to the left).
Disconnect the four-way connector at the time-delay module and measure the voltage on wire 315D.
I DC VOLTAGE O-45 VOLTS STEIICE-R TEST 89
1. Connect RED clip to the indicated test point, BLACK clip to negative or ground.
2. Start Test 89. DC Volts.
3. Displayed reading is in volts. r ’
TM 9-2320-387-24-l
ENGINE COOLING
RESISTANCE AND CONTINUITY 04500 OHMS
STEIICE-R TEST 91
1. Connect RED clip and BLACK clip to the terminations indicated in the question. RED to the first, BLACK to the second.
2. Start Test 91,0-4.500 Ohms.
3. Displayed reading is in ohms. Less than 5 ohms is continuity. If the resistance is over 4,500 ohms, STUICE-R displays -9.9.9.9.
NO STEP
2-l 73
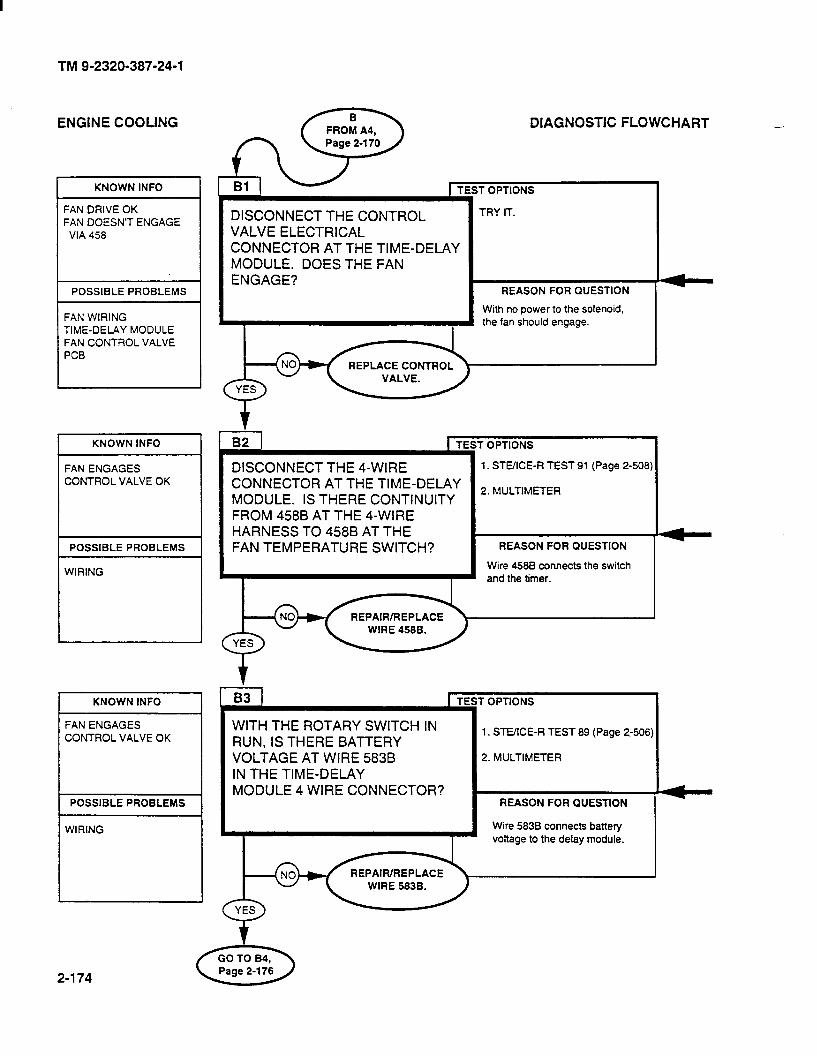
TM 9-2320-387-24-l
ENGINE COOLING DIAGNOSTIC FLOWCHART -
KNOWN INFO T OPTIONS
TRY IT. FAN DRIVE OK FAN DOESN’T ENGAGE
VIA 458
DISCONNECT THE CONTROL VALVE ELECTRICAL CONNECTOR AT THE TIME-DELAY MODULE. DOES THE FAN ENGAGE?
POSSIBLE PROBLEMS REASON FOR QUESTION
With no power to the solenoid, the fan should engage. FAN WIRING
TIME-DELAY MODULE FAN CONTROL VALVE PCB
REPLACE CONTROL
I r OPTIONS KNOWN INFO
DISCONNECT THE 4-WIRE CONNECTOR AT THE TIME-DELAY MODULE. IS THERE CONTINUITY FROM 4588 AT THE 4-WIRE HARNESS TO 458B AT THE FAN TEMPERATURE SWITCH?
1. STE/ICE-R TEST 91 (Page 2-508)
2. MULTIMETER
REASON FOR QUESTION
Wire 4566 connects the switch and the timer.
FAN ENGAGES CONTROL VALVE OK
POSSIBLE PROBLEMS
WIRING
REPAIR/REPLACE
7 1 STE/ICE-R TEST a9 (Page 2-506)
2. MULTIMETER
KNOWN INFO
WITH THE ROTARY SWITCH IN RUN, IS THERE BATTERY VOLTAGE AT WIRE 5838 IN THE TIME-DELAY MODULE 4 WIRE CONNECTOR?
FAN ENGAGES CONTROL VALVE OK
REASON FOR QUESTION
Wire 5638 connects battery voltage to the delay module.
POSSIBLE PROBLEMS
WIRING
REPAIWREPLACE
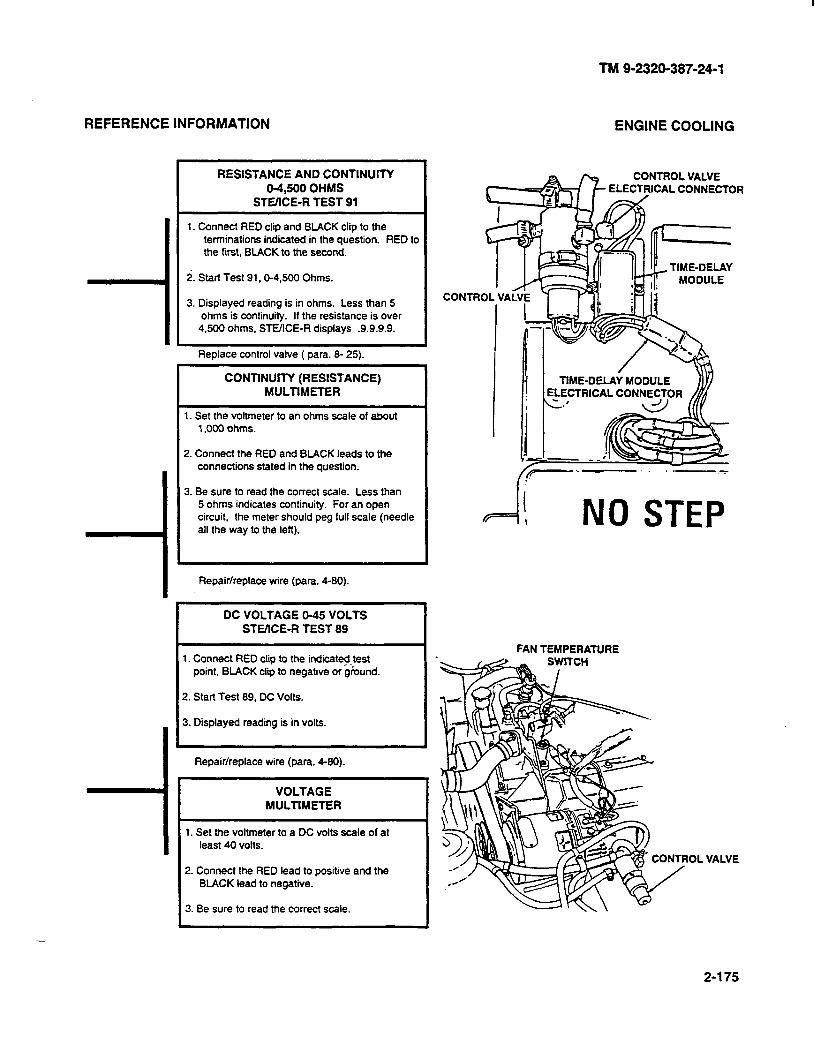
TM 9-2320-387-24-l
REFERENCE INFORMATION ENGINE COOLING
(I RESISTANCE AND CONTINUITY
04,500 OHMS STVICE-R TEST 91
1. Connect RED clip and BLACK clip to the terminations indicated in the question. RED to the first, BLACK to the second.
2. Start Test 91.0-4.500 Ohms.
3. Displayed reading is in ohms. Less than 5 ohms is continuity. If the resistance is over
4,500 ohms, SLUICE-R displays .9.9.9.9.
Replace control valve ( para. 8 25).
CONTINUITY (RESISTANCE) MULTIMETER
1. Set the voltmeter to an ohms scale of about 1,000 ohms.
2. Connect the RED and BLACK leads to the connections stated in the question.
3. Be sure to read the correct scale. Less than 5 ohms indicates continuity. For an open circuit, the meter should peg full scale (needle all the way to the left).
Repair/replace wire (para. 4-80).
DC VOLTAGE O-45 VOLTS STEKE-R TEST 89
1, Connect RED clip to the indicated-test point, BLACK clip to negative or ground.
2. Start Test 89. DC Volts.
3. Displayed reading is in volts.
Repair/replace wire (para. 4-80).
VOLTAGE MULTIMETER
1. Set me voltmeter to a DC volts scale of at least 40 volts.
2. Connect the RED lead to positive and the BLACK lead to negative.
3. Be sure to read the correct scale. I
CONTROL VALVE w t_ ELECTRICAL CONNECTOR
P -
5 . .-,-
.’
v=i! NO STEP
FAN TEMPERATURE
VALVE
2-175

TM 9-2320-387-24-l
I
DIAGNOSTIC FLOWCHART ENGINE COOLING
FAN ENGAGES CONTROL VALVE OK
r OPTIONS
1. STUICE-R TEST 91 (Page 2-508)
!. MULTIMETER
REASON FOR QUESTION
Wire 93 provides the time-delay module’s connection to ground.
IS THERE CONTINUITY FROM WIRE 936 IN THE 4-WAY CONNECTOR TO ENGINE GROUND?
I POSSIBLE PROBLEMS
WIRING r KNOWN INFO . OPTIONS
1. STE/ICE-R TEST 91 (Page 2-508)
2. MULTIMETER
FAN ENGAGES CONTROL VALVE OK
IS THERE CONTINUITY OF ENGINE WIRING HARNESS WIRE 315B BETWEEN THE TIME-DELAY MODULE AND THE FAN CUT-OFF SWITCH?
REASO’d FOR QUESTION POSSIBLE PROBLEMS
The fan cut-off switch has some control of the engine fan. WIRING
I
2. MULTIMETER
KNOWN INFO
FAN ENGAGES CONTROL VALVE OK
IS THERE ABOUT ZERO VOLTAGE ON THE TIMER END OF WIRE 4586 WITH WIRE 458A DISCONNECTED FROM THE FAN TEMPERATURE SWITCH?
REASON FOR QUESTION
If wire 4588 is shorted to some other live wire, the fan will not
engage.
POSSIBLE PROBLEMS
WIRING
REPAIR/REPLACE
OR HARNESS.
2-l 76
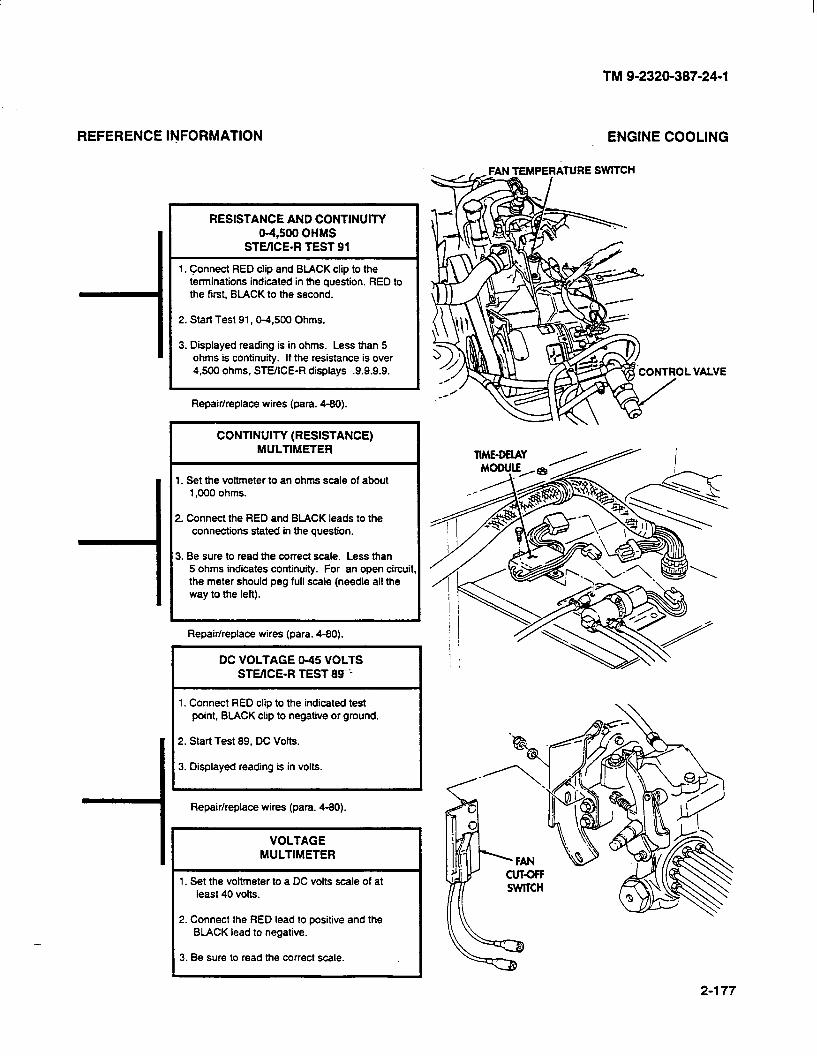
TM 9-2320-387-24-l
REFERENCE ItjFORMATlON ENGINE COOLING
FAN =PERATlJRE SWITCH
1
2 1: c
1:
RESISTANCE AND CONTINUITY 04,500 OHMS
STEilCE-R TEST 91
1. Connect RED clip and BLACK clip to the teminations indicated in the question. RED to the first, BLACK to the second.
2. Start Test 91,0-4.500 Ohms.
3. Displayed reading is in ohms. Less than 5 ohms is continuity. If the resistance is over 4,500 ohms, STEXE-R displays .9.9.9.9.
Repair/replace wires (para. 4-90).
CONTINUITY (RESISTANCE) MULTIMETER
. Set the voltmeter to an ohms scale of about 1,000 ohms.
!. Connect the RED and BLACK leads to the connections stated in the question.
). Be sure to read the correct scale. Less than 5 ohms indicates continuity. For an open circ the meter should peg full scale (needle all the way to the left).
Repair/replace wires (para. 4-80).
DC VOLTAGE O-45 VOLTS STUICE-R TEST 89 ’
1. Connect RED clip to the indicated test point, BLACK clip to negative or ground.
2. Start Test 89. DC Volts.
3. Displayed reading is in volts.
Repair/replace wires (para. 4-80).
VOLTAGE MULTIMETER
1. Set the voltmeter to a DC volts scale of at least 40 volts.
2. Connect the RED lead to positive and the BLACK lead to negative.
3. Be sure to read the correct scale.
. VALVE
2-177

TM 9-2320-387-24-l
. ENGINE COOLING
FAN ENGAGES BUT WON-T DISENGAGE
1 POSSIBLE PROBLEMS 1
PCB TIME-DELAY MODULE WIRING HYDRAULIC SYSTEM
I I
KNOWN INFO
DRIVE OK FAN ENGAGES BUT
WONT DISENGAGE
POSSIBLE PROBLEMS
PCB TIME-DELAY MODULE WIRING HYDRAULIC SYSTEM
KNOWN INFO
DRIVE OK FAN ENGAGES BUT WONT DISENGAGE
POSSIBLE PROBLEMS
PCB TIME-DELAY MODULE WIRING HYDRAULIC SYSTEM
REMOVE THE JUMPER BETWEEN WIRE 458A AND WIRE 4588. TURN THE ROTARY SWITCH TO THE RUN POSITION. DOES WIRE 458A HAVE BAITERY VOLTAGE?
DIAGNOSTIC FLOWCHART
REASON FOR QUESTION
IS THERE CONTINUITY FROM WIRE 4588 AT THE HARNESS SIDE OF THE TIME-DELAY MODULE 4-WAY CONNECTOR TO WIRE 458B AT THE FAN TEMPERATURE SWITCH?
Wire 458A connects battery voltage to the switch.
1. STE/ICE-R TEST 91 (Page 2-50
2. MULTIMETER
REASON FOR QUESTION
Li c3
TURN THE ROTARY SWITCH TO RUN. IS THERE BAlTERY VOLTAGE AT THE HARNESS SIDE OF WIRE 583B IN THE 4-WAY CONNECTOR OF THE TIME-DELAY MODULE?
Wire 4588 connects the switch and the time delay.
1. STUICE-R TEST 89 (Page 2-506)
2. MULTIMETER
REASON FOR QUESTION
Wire 5838 connects battery voltage to the delay module.
REPAIR/REPLACE
2-178
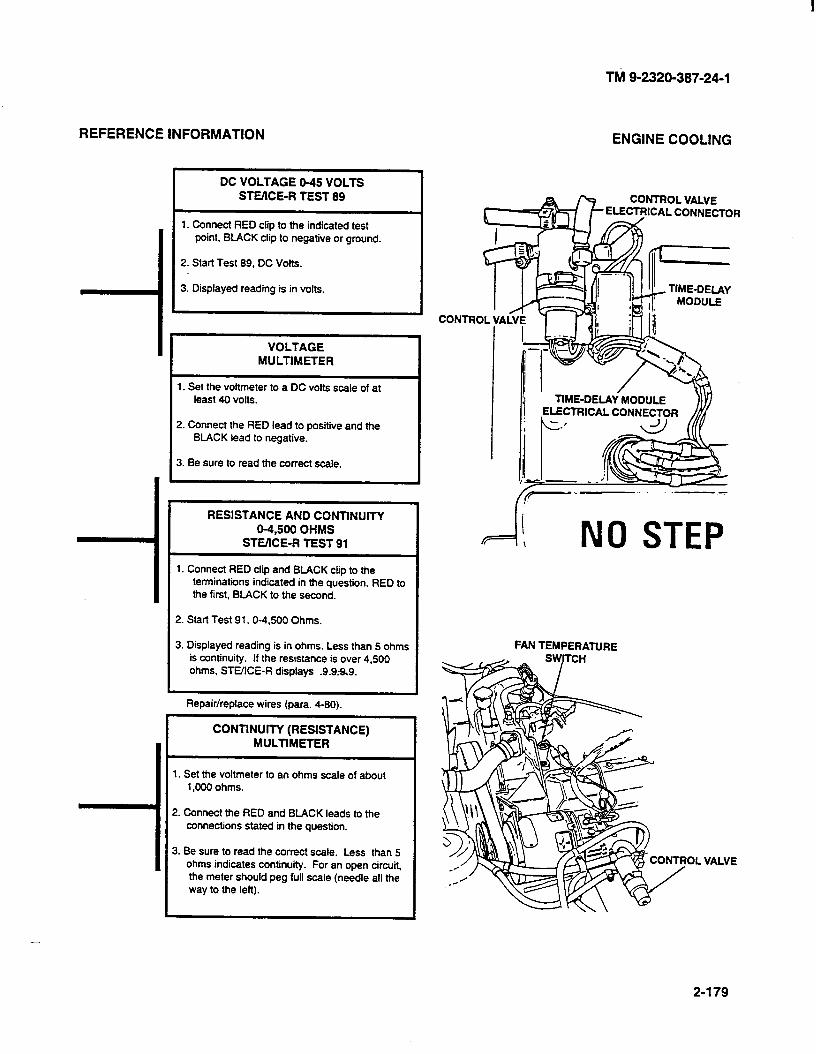
REFERENCE INFORMATION
DC VOLTAGE O-45 VOLTS STOICE-R TEST 89
1. Connect RED clip to the indicated test point, BLACK clip to negative or ground.
2. Start Test 99. DC Volts.
3. Displayed reading is in volts.
VOLTAGE MULTIMETER
1. Set the voltmeter to a DC volts scale of at least 40 volts.
2. Connect the RED lead to positive and the BLACK lead to negative.
3. Be sure to read the correct scale.
RESISTANCE AND CONTINUITY
O-4,500 OHMS
STOICE-R TEST 91
1. Connect RED clip and BLACK clip to the terminations indicated in the question. RED to the first, BLACK to the second.
2. Start Test 91, o-4.500 Ohms.
3. Displayed reading is in ohms. Less than 5 ohms is continuity. If the resistance is over 4.500 ohms, STWlCE-R displays .9.9.9,9.
Repair/replace wires (para. 4-80).
CONTtNUlTY (RESISTANCE)
MULTIMETER
1. Set the voltmeter to an ohms scale of about 1,000 ohms.
2. Connect the RED and BLACK leads to the connections stated in the question.
3. Be sure to read the correct scale. Less than 5 ohms indicates continuity. For an open circuit, the meter should peg full scale (needle all the way to the left).
Tti 9-2320-387-24-l
ENGINE COOLING
CONTROL VALVE ELECTfilCAL CONNECTOR
-li NO STEP
FAN TEMPERATURE
VALVE
2-179
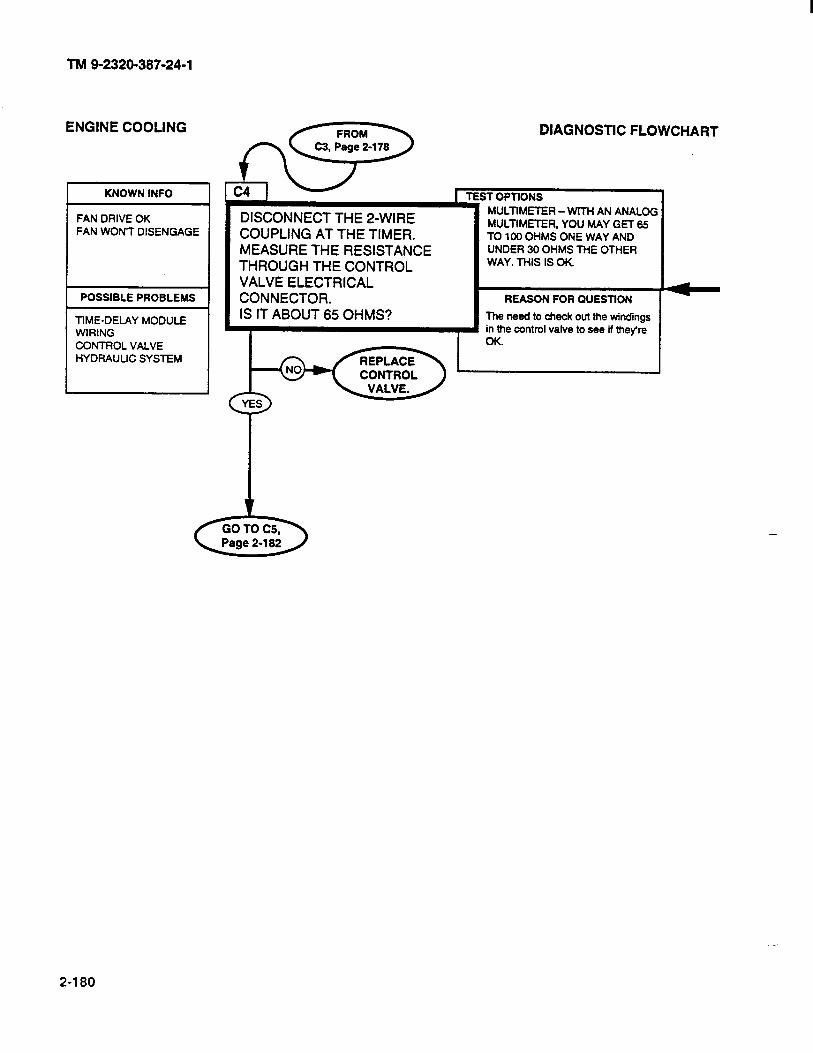
TM 9-2320-387-24-l
ENGINE COOLING
KNOWN INFO
FAN DRIVE OK FAN WON? DISENGAGE
POSSIBLE PROBLEMS
TIME-DELAY MODULE WIRING
CONTROL VALVE HYDRAULIC SYSTEM
DISCONNECT THE 2-WIRE COUPLING AT THE TIMER. MEASURE THE RESISTANCE THROUGH THE CONTROL VALVE ELECTRICAL CONNECTOR. IS IT ABOUT 65 OHMS?
DIAGNOSTIC FLOWCHART
MULTIM-R -WITH AN ANALOG MULTIMETER, YOU MAY GET 65 TO 100 OHMS ONE WAY AND UNDER 30 OHMS THE OTHER WAY. THIS IS OK
REASON FOR OUESTION
The need to check out the windings in the control valve to see if they?e OK. r
2-180
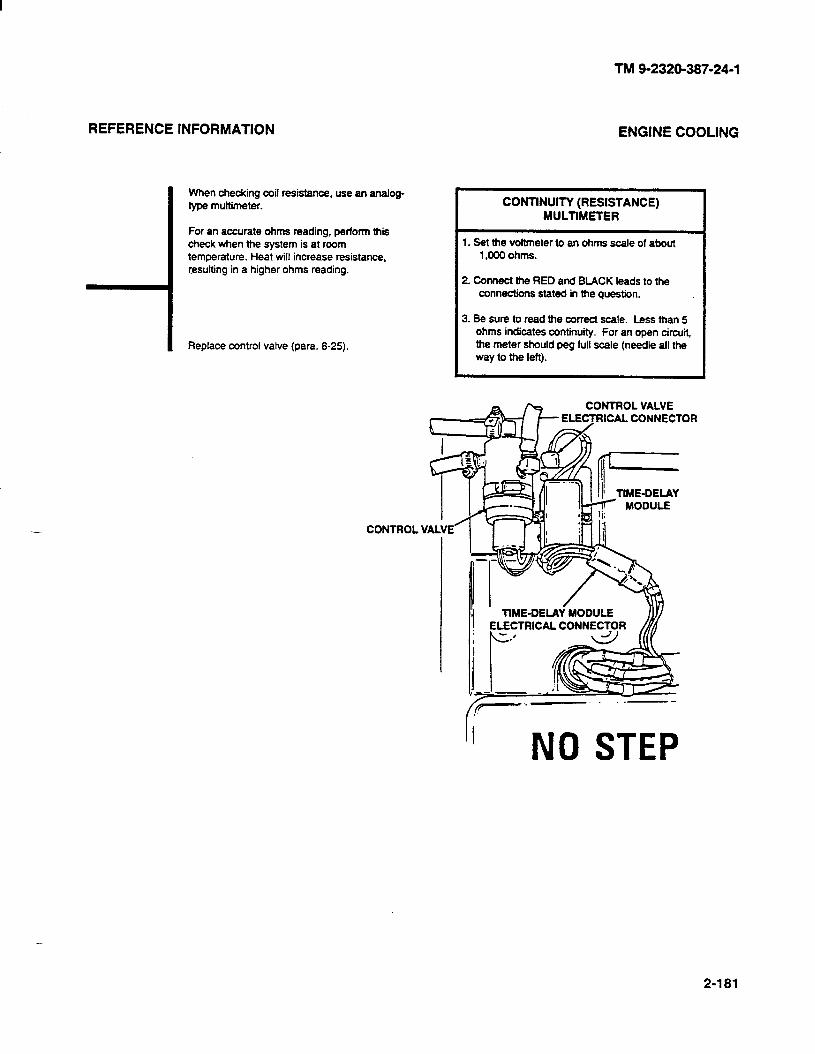
TM 9-2320-387-24-l
REFERENCE lNFOf?MAllON
When checking coil resistance, use an analog- type multimeter.
For an accurate ohms reading, perform this check when the system is at room temperature. Heat will increase resistance, resulting in a higher ohms reading.
Replace control valve (para. 8-25).
CONTROL
ENGINE COOLING
CONTINUITY (RESISTANCE) MULTIMETER
1. Bet the vottmeter to an ohms scale of about 1 .OW ohms.
2. Connect the RED and BLACK leads to the connections stated in the question.
3. Be sure to read the correct scale. Less than 5 ohms indicates continuity. For an open circuit, the meter should peg full scale (needle all the way to the left).
CONTROL VALVE ELECTRICAL CONNECTOR
I VALVE
u-
NO STEP
ELECTRICAL CONNECTOR
2-181
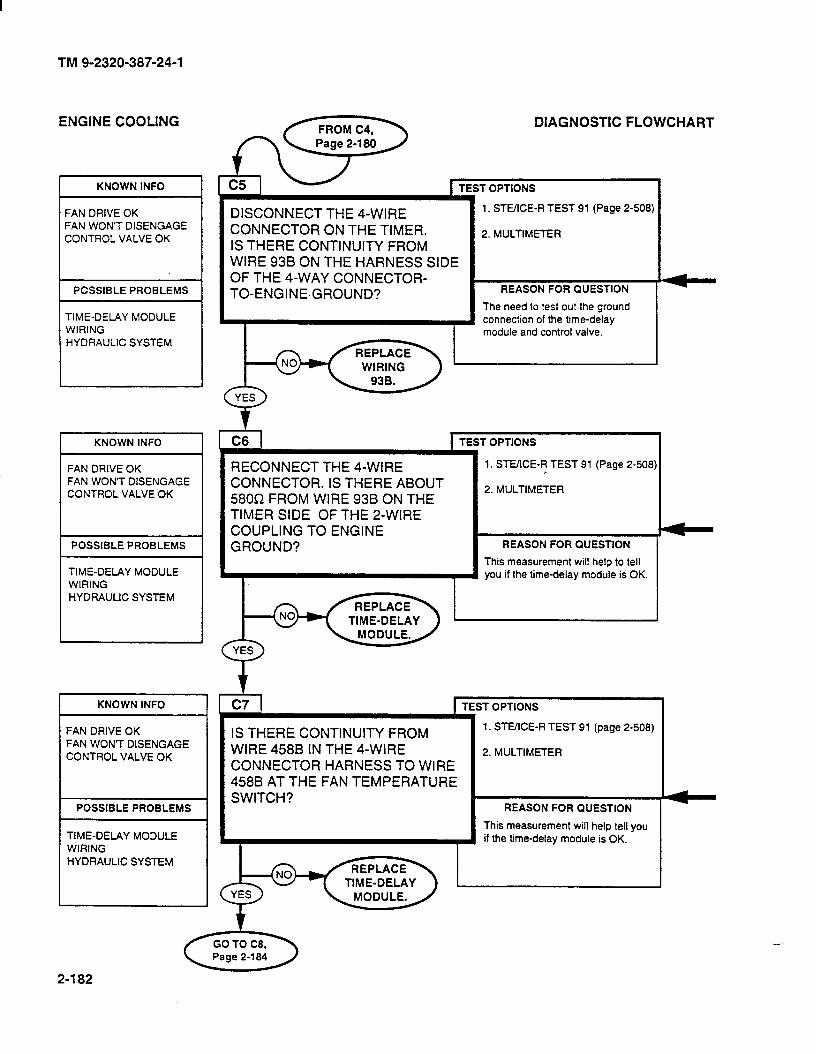
TM 9-2320-387-24-l
ENGINE COOLING DIAGNOSTIC FLOWCHART
TEST OPTIONS
1. STE/ICE-R TEST 91 (Page 2-508)
2. MULTIMETER
REASON FOR QUESTlON
KNOWN INFO
FAN DRIVE OK FAN WON’T DISENGAGE CONTROL VALVE OK
The need to test out the ground connection of the time-delay module and control valve.
DISCONNECT THE 4-WIRE CONNECTOR ON THE TIMER. IS THERE CONTINUITY FROM WIRE 938 ON THE HARNESS SIDE OF THE 4-WAY CONNECTOR- TO-ENGINE,GROUND? PCSSIBLE PROBLEMS
TIME-DELAY MODULE WIRING HYDRAULIC SYSTEM
C6 t KNOWN INFO T OPTIONS
1. STEIICE-R TEST 91 (Page 2-508) ,
2. MULTIMETER
FAN DRIVE OK FAN WON’T DISENGAGE CONTROL VALVE OK
RECONNECT THE 4-WIRE CONNECTOR. IS THERE ABOUT 580R FROM WIRE 938 ON THE TIMER SIDE OF THE 2-WIRE COUPLING TO ENGINE GROUND? POSSIBLE PROBLEMS REASON FOR QUESTION
This measurement will help to tell you if the time-delay module is OK. TIME-DELAY MODULE
WIRING HYDRAULIC SYSTEM
TIME-DELAY
I KNOWN INFO I I C7 I TEST OPTIONS
IS THERE CONTINUITY FROM WIRE 458B IN THE 4-WIRE CONNECTOR HARNESS TO WIRE 4588 AT THE FAN TEMPERATURE SWITCH?
1. STUICE-R TEST 91 (page 2-508)
2. MULTIMETER
FAN DRIVE OK FAN WONT DISENGAGE CONTROL VALVE OK
1 POSSIBLE PROBLEMS 1 REASON FOR QUESTION
This measurement will help tell you if the trme-delay module is OK. TIME-DELAY MODULE
WIRING HYDRAULIC SYSTEM
2-l 82
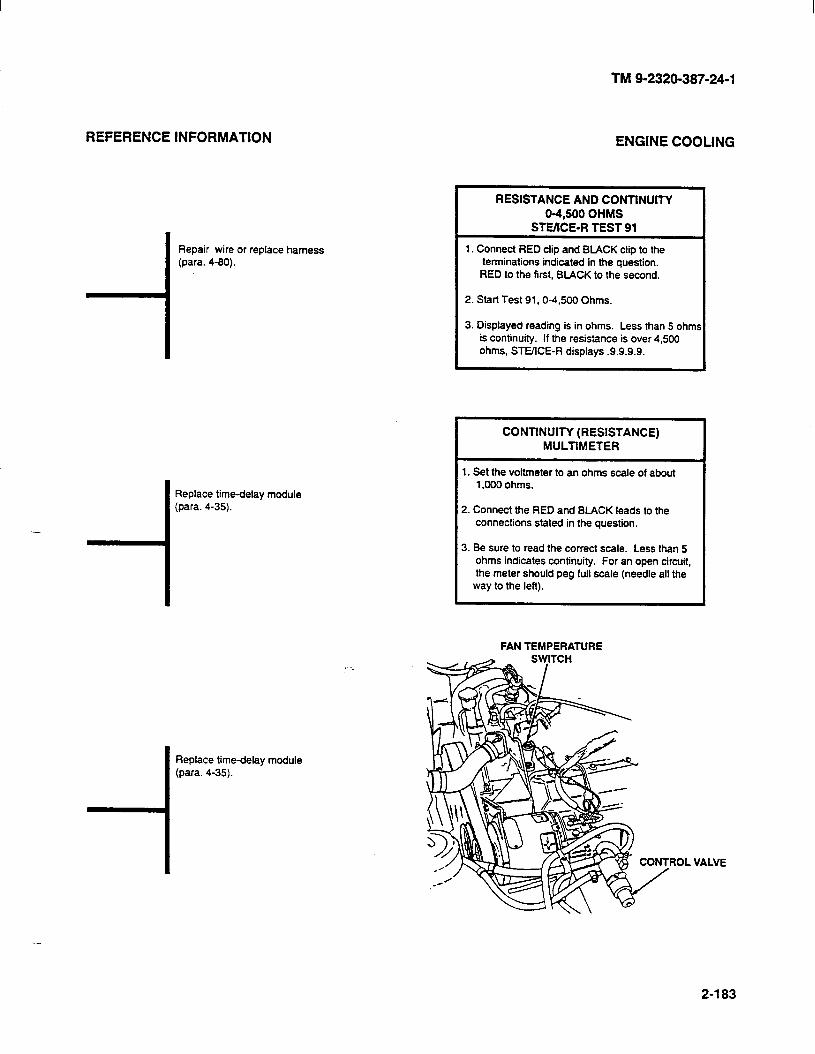
REFERENCE INFORMATION
Repair wire or replace harness
-
i
Replace time-delay module (para. 4-35).
i
Replace time-delay module (para. 4-35).
I RESISTANCE AND CONTINUITY
I 04,500 OHMS
SfMkE-R TEST 91
1. Connect RED clip and BLACK clip to the terminations indicated in the question. RED to the first, BLACK to the second.
I 2. Start Test 91,0-4,500 Ohms.
I 3. Displayed reading is in ohms. Less than 5 ohm
is continuity. If the resistance is over 4.500 ohms, STEIICE-R displays .9.9.9.9.
TM 9-2320-387-24-l
ENGINE COOLING
S
I CONTINUITY (RESISTANCE) MULTIMETER
I 1. Set the voltmeter to an ohms scale of about 1,000 ohms.
I 2. Connect the RED and BLACK leads to the connections stated in the question.
3. Be sure to read the correct scale. Less than 5 ohms indicates continuity. For an open circuit, the meter should peg full scale (needle all the
way to the left).
FAN TEMPERATURE
VALVE
2-183
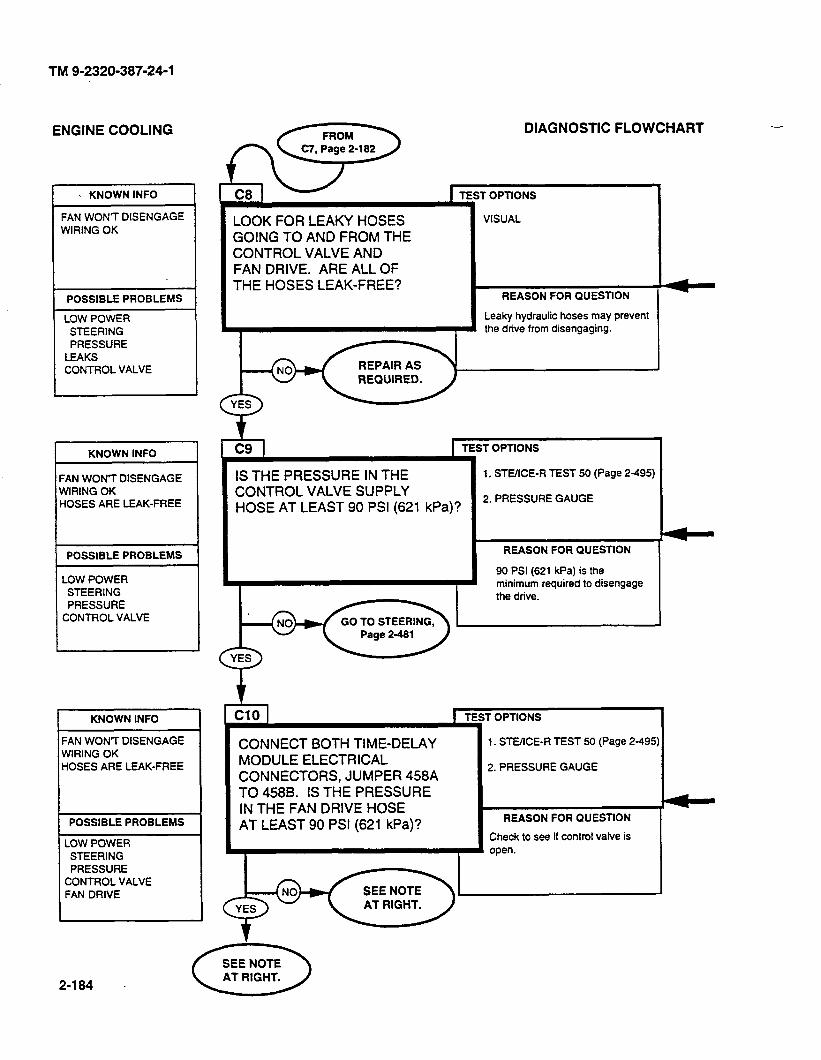
TM 9-2320-387-24-l
. KNOWN INFO
:AN WONT DISENGAGE NIRING OK
POSSIBLE PROBLEMS
LOW POWER STEERING PRESSURE
LEAKS CONTROL VALVE
I KNOWN INFO
FAN WONT DISENGAGE WIRING OK HOSES ARE LEAK-FREE
LOW POWER STEERING PRESSURE
CONTROL VALVE
KNOWN INFO
-AN WON’T DISENGAGE NIRING OK iOSES ARE LEAK-FREE
POSSIBLE PROBLEMS
LOW POWER STEERING PRESSURE
CONTROL VALVE FAN DRIVE
LOOK FOR LEAKY HOSES GOING TO AND FROM THE CONTROL VALVE AND FAN DRIVE. ARE ALL OF THE HOSES LEAK-FREE?
IS THE PRESSURE IN THE CONTROL VALVE SUPPLY HOSE AT LEAST 90 PSI (62 1 kPa)?
DIAGNOSTIC FLOWCHART -
r OPTIONS
VISUAL
REASON FOR QUESTION
Leaky hydraulic hoses may prevent the drive from disengaging.
TEST OPTIONS
1, STE/lCE-R TEST 50 (Page 2-495)
2. PRESSURE GAUGE
REASON FOR QUESTION
90 PSI (621 kPa) is the minimum required to disengage the drive.
f tin
CONNECT BOTH TIME-DELAY MODULE ELECTRICAL CONNECTORS, JUMPER 458A TO 4588. IS THE PRESSURE IN THE FAN DRIVE HOSE AT LEAST 90 PSI (621 kPa)?
f OPTIONS
1. STEXE-R TEST 50 (Page 2-495
2.PRESSUREGAUGE
REASON FOR QUESTION
Check to see if control valve is open.
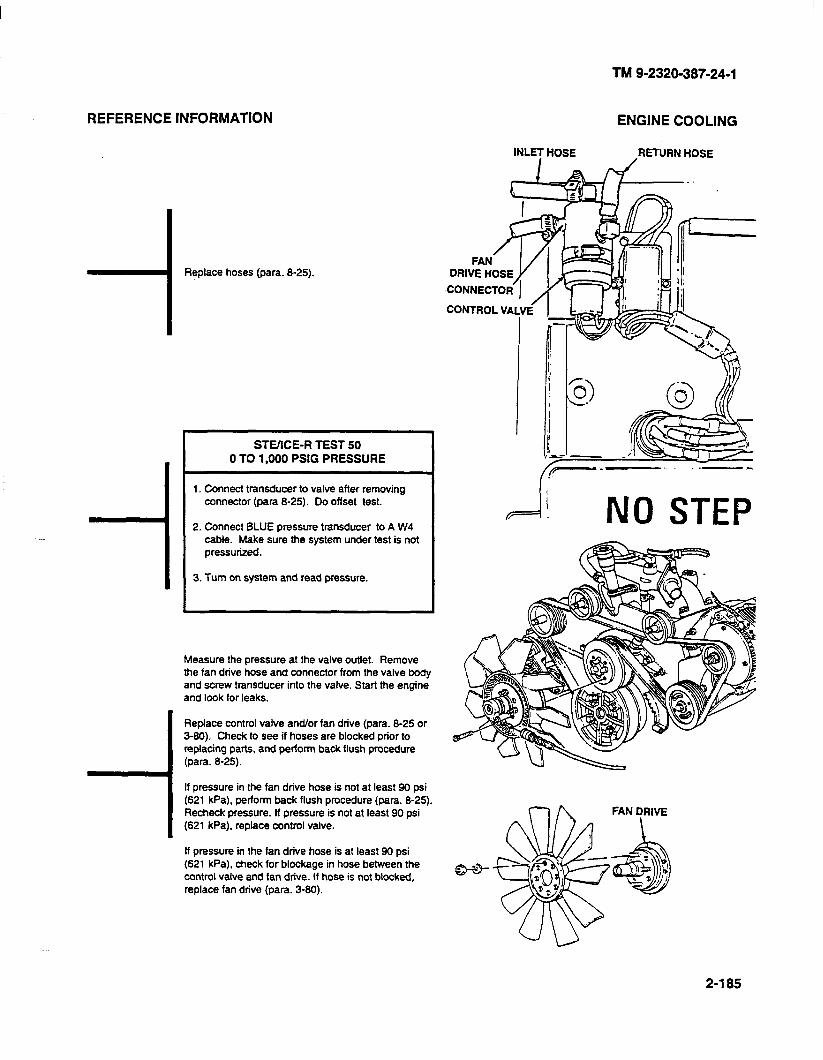
TM 9-2320-387-24-l
REFERENCE INFORMATION
-I Replace hoses (para. 8-25).
.
i
-I
STEKE-R TEST 50 0 TO 1,000 PSIG PRESSURE
1. Connect transducer to valve after removing connector (para 8-25). Do offset test.
2. Connect BLUE pressure transducer to A W4 cable. Make sure the system under test is not pressurized.
3. Turn on system and read pressure.
Measure the pressure at the valve outlet. Remove the fan drive hose and connector from the valve body and screw transducer into the valve. Start the engine and look for leaks.
Replace control valve and/or fan drive (para. 8-25 or 3-60). Check to see if hoses are blocked prior to replacing parts, and perform back flush procedure (para. 8-25).
If pressure in the fan drive hose is not at least 90 psi (621 kPa). perform back flush procedure (para. 8-25). Recheck pressure. If pressure is not at least 90 psi (621 kPa). replace control valve.
ff pressure in the fan drive hose is at least 90 psi (621 kPa). check for blockage in hose between the control valve and fan drive. If hose is not blocked, replace fan drive (para. 3-60).
ENGINE COOLING
INLET HOSE ,AETURN HOSE
NO STEP
FAN DRIVE
2-l 85

I
TM 9-2320-387-24-l
ENGINE COOLING
KNOWN INFO
NO BAl-fERY VOLTAGE AT 458A
POSSIBLE PROBLEMS
WIRE 458A ELECTRICAL SYSTEM
ART
DISCONNECT PCB ENGINE 1. STE/ICE-R TEST 91 (Page 2-508)
CONNECTOR HARNESS. IS THERE 2. MULTIMETER CONTINUITY FROM WIRE 458A AT THE FAN TEMPERATURE SWITCH TO THE PCB ENGINE CONNECTOR HARNESS SOCKET A?
REASON FOR QUESTION
Wire 458A connects the switch
I I to the PCB.
2-186
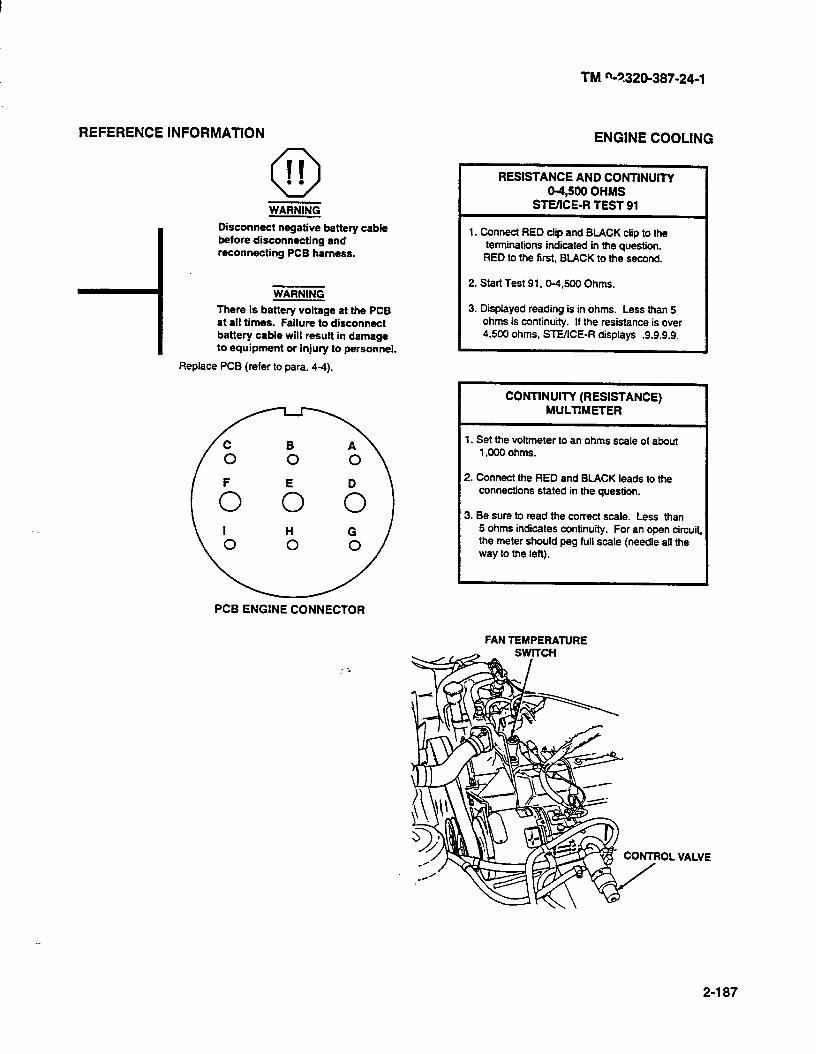
REFERENCE INFORMATION
0 II . . WARNING
I Disconnect negative battery cable before disconnecting and reconnecting PCB harness.
1 WARNING
I There is battery voltage at the PC6 at all times. Failure to disconnect battery cable will result in damage to equipment or injury to personnel.
Replace PCB (refer to para. 44).
I RESISTANCE AND CONTINUITY 04,500 OHMS
STEIICE-R TEST 91
1. Connect RED clip and BLACK clip to the terminations indicated in the question. RED to the first, BLACK to the second.
I 2. Start Test 91,04,500 Ohms.
I 3. Displayed reading is in ohms. Less than 5 ohms is continuity. If the resistance is over 4.500 ohms, STEACE-R displays .S.S.S.S.
I CONTINUITY (RESISTANCE) MULTIMETER
I 1. Set the voltmeter to an ohms scale of about 1,000 ohms.
I 2. Connect the RED and BLACK leads to the connections stated in the question.
3. Be sure to read the correct scale. Less than 5 ohms indicates continuity. For an open circuit the meter should peg full scale (needle all the way to the left).
TM “-3.320-387-24-l
ENGINE COOLING
PCB ENGINE CONNECTOR
FAN TEMPERATURE
, VALVE
2-l 87
TM 9-2320-387-24-l
ENGINE COOUNG
L
KNOWN INFO
FAN DOESN7 DISENGAGE WHEN FAN CUT-OFF SWITCH ACTIVATES
POSSIBLE PROBLkMS
TIME-DELAY MODULE WIRING FAN CUT-OFF
SWITCH
J
DIAGNOSTIC FLOWCHART
TEST OPTIONS
WITH THE VEHICLE OFF AND THE ROTARY SWITCH IN RUN, HOLD THE INJECTOR PUMP WIDE OPEN. IS THERE BATTERY VOLTAGE IN THE WIRE 3158 END OF THE FAN CUT-OFF SWITCH?
1. SmCE-R TEST 99 (Page 2-506)
REASON FOR QUESTION
This will tell you if the time-delay module is getting an input from the fan cut-off switch.
TRANSMISSION,
2-188
TM 9-2320-387-24-l
-
REFERENCE INFORMATION
Replace time-delay module (para. 4-35).
-I. ENGINE COOLING
I DC VOLTAGE O-45 VOLTS STVICE-R TEST 89 I
1. Connect RED clip to the indicated test point, BLACK clip to negative or ground.
I
2. Start Test 89, DC Volts.
3. Displayed reading is in volts. I
I VOLTAGE MULTIMETER I
1. Set the voltmeter to a DC volts scale of at least 40 volts.
2. Connect the RED lead to positive and the BLACK lead to negative.
3. Be sure to read the correct scale.
-
2-189/(2-l 90 blank)

TM 9-2320-387-24-l
2-32. ENGINE LUBRICATION TESTS 1
These engine lubrication tests may be run any time there is an engine lubrication problem or if you were sent here by another test chain. Just follow the path, answering the questions. Additional information and notes are given on the facing page when necessary.
Fold-out page FP-9 shows the location of the major components of the engine lubrication system in case you are not familiar with them. This page may be left open for reference while testing.
-
2-191
TM 9-2320-387-24-l
ENGINE LUBRICATION
L
KNOWN INFO I
NONE
POSSIBLE PROBLEMS
OIL OIL FILTER LEAKS ENGINE PROBLEMS OIL PRESSURE SENSING
SYSTEM
KNOWN INFO I
OIL OK FILTER OK
POSSIBLE PROBLEMS
LEAKS ENGINE PROBLEMS 1 OIL PRESSURE SENSING
SYSTEM
KNOWN INFO
OIL LEVEL AND TYPE OK FILTER OK NO OIL LEAKS
POSSIBLE PROBLEMS
OIL PRESSURE GAUGE OIL PRESSURE SENSOR ENGINE PROBLEMS
IS THE CRANKCASE FILLED TO THE CORRECT LEVEL WITH OIL THAT IS CLEAN AND OF THE RIGHT TYPE, AND IS THE OIL FILTER CLEAN?
DIAGNOSTIC FLOWCHART -
r OPTIONS 1 CHECK DIPSTICK. SEE TABLE 2-l. (Page 2-22) FOR OIL AND FILTER CHANGE REQUIREMENTS.
REASON FOR QUESTlON
To make sure the engine has the right oil, and its dean.
IS THE VEHICLE FREE FROM LARGE OIL LEAKS?
T OPTfONS
CHECK THE LIST OF D-EMS TO THE RIGHT.
REASON FOR QUESllON
Any large oil leaks could affect oil pressure. Small leaks should be
IS THE OIL PRESSURE AT THE CORRECT VALUE? (SEE CHART AT RIGHT.)
1 TE!
I
ST OPTlONS
1. STEIICE-R TEST 50 (Page 2-495) INTERLEAVED WITH RPM.
2. LOOK AT THE GAUGE AND USE STEIICE-R TEST 10 (Page 2-490).
REASON FOR QUESTlON
Low oil pressure will cause excessive wear on the engine. High pressure could indicate clogs in the system. If you use the gauge, you can let the engine run a few minutes to make sure the gauge is OK.
4-- -
TM 9-2320-387-24-l
REFERENCE INFORMATION ENGINE LUBRICATION
Incorrect oil level and type can cause pressure problems, leaks, excessive blowby. and other problems.
Inspect the oil cooler, oil cooler supply return lines, CDR valve hoses, oil pan, and oil filter. Test CDR valve (para. 3-9). See the location on parts page to find these parts.
ENGINE RPM STMCE-R TEST 10
1. Start Test 10, Engine RPM.
2. Crank or start the engine. Displayed reading is mm. Cranking rpm should be approximately 200. Idle rpm should be 700-750.
Remove sending unit (para. 4-29).
ENGINE RPM INTERLEAVE WITH O-l,000 PSI PRESSURE
I. Connect BLUE transducer in place of oil pressure sending unit. Dial test 50 (O-l ,000 psi (O-5.995 kPa)). Perform offset test.
2. Dial test 01, interleave with RPM. Dial test 50.
3. Stan engine and observe display. VIM will display RPM, then PSI.
OIL PRESSURE GAUGE
OIL PRESSURE
SENDING UNlT
2-193
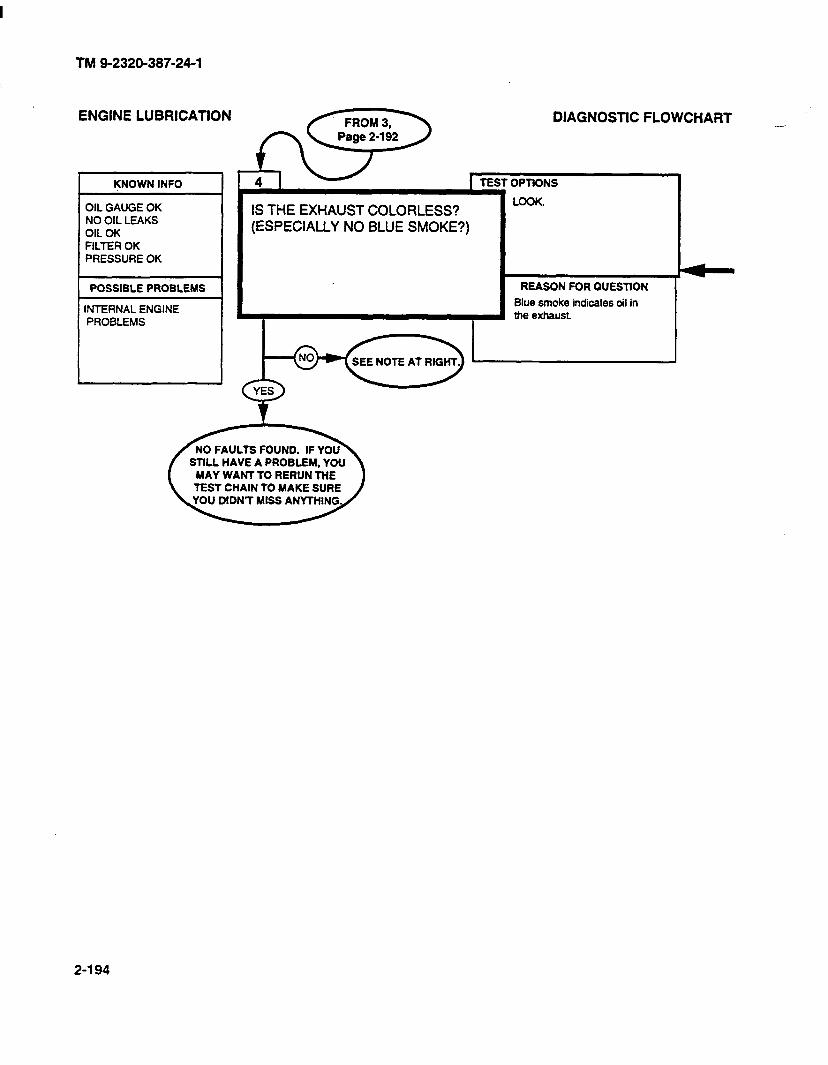
TM 9-2320-387-24-l
ENGINE LUBRICATION
KNOWN INFO
OIL GAUGE OK NO OIL LEAKS OIL OK FILTER OK PRESSUREOK
POSSIBLE PRObLEMS 1
INTERNAL ENGINE PROBLEMS
I
1 LOOK.
DIAGNOSTIC FLOWCHART _
REASON FOR QUESllON
Blue smoke indicates oil in the exhaust
STILL HAVE A PROBLEM, YOU MAY WANT TO RERUN THE
2-194
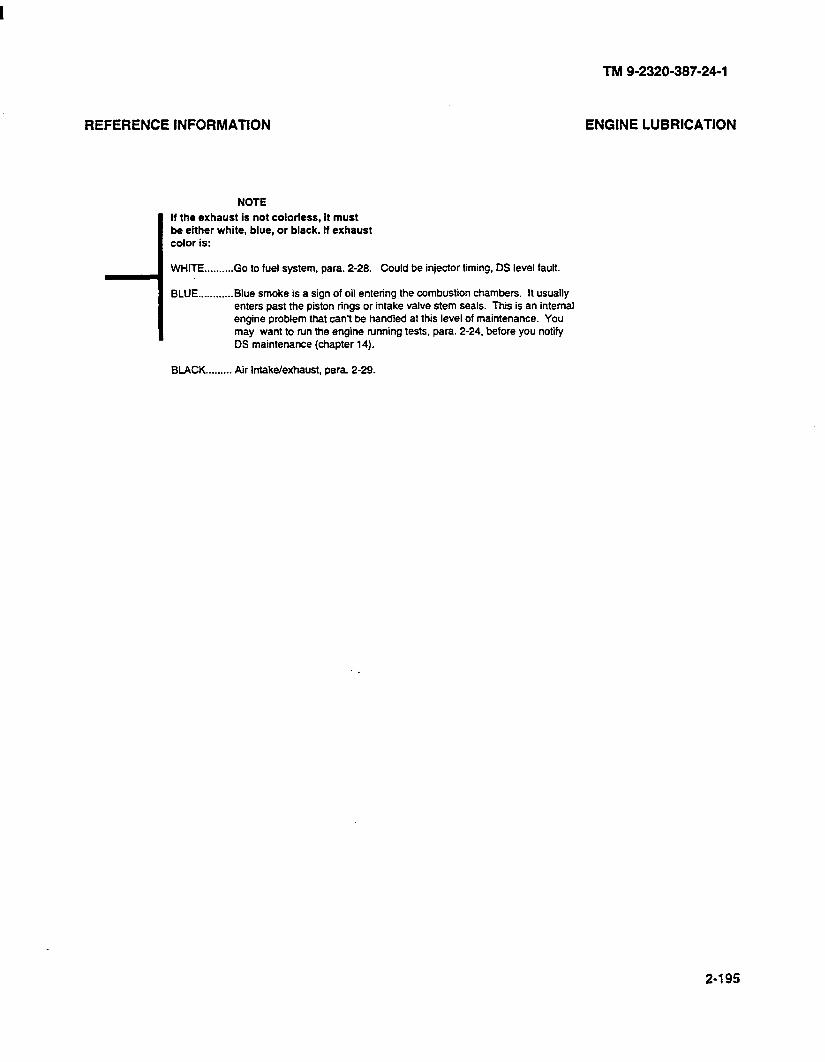
REFERENCE INFORMATION
NOTE
If the exhaust is not colorless, it must be either white, blue, or black. If exhaust color is:
WHITE . . . . . .._._ Go to fuel system, para. 2-28. Could be injector timing, DS level fault.
BLUE..... . . . . . ..Blue smoke is a sign of oil entering the combustion chambers. It usually enters past the piston rings or intake valve stem seals. This is an internal engine problem that can’t be handled at this level of maintenance. You may want to run the engine running tests, para. 2-24, before you notify DS maintenance (chapter 14).
BLACK. . . . . . . . . Air Intake/exhaust. para. 2-29.
TM 9-2320-387-24-l
ENGINE LUBRICATION
2-195

TM 9-2320-387-24-l
ENGINE LUBRICATION
KNOWN INFO 1 WRONG OIL PRESSURE
POSSIBLE PROBLEMS
OIL PRESSURE GAUGE OIL PRESSURE SENSOR INTERNAL ENGINE
PROBLEMS
KNOWN INFO I
WRONG PRESSURE USING VEHICLE GAUGE
POSSIBLE DROBLEMS
GAUGE AND SENDER ENGINE PROBLEMS
OIL PRESSURE OK
GAUGE SENDER WIRING
DID YOU USE THE VEHICLE’S ON-BOARD GAUGE TO MEASURE THE PRESSURE IN QUESTION 3?
* OPTIONS
NONE
REASON FOR QUESTION
If you used the STUICE-R to measure the pressure, then the engine has an internal fault.
MEASURE THE OIL PRESSURE DIRECTLY. IS IT CORRECT?
T OPTIONS
1. STUICE-R TEST 50 AND RPM INTERLEAVED (Page 2-495)
2. EXTERNAL GAUGE AND STEIICE-R TEST 10 (Page 2-490
REASON FOR QUESTlON
Direct verification of the engine’s oil pressure wilt tell you if the problem
-t? A3
THE PROBLEM IS IN THE OIL PRESSURE SENDING SYSTEM. GO TO INSTRUMENTS, Page 2-305.
2-l 96
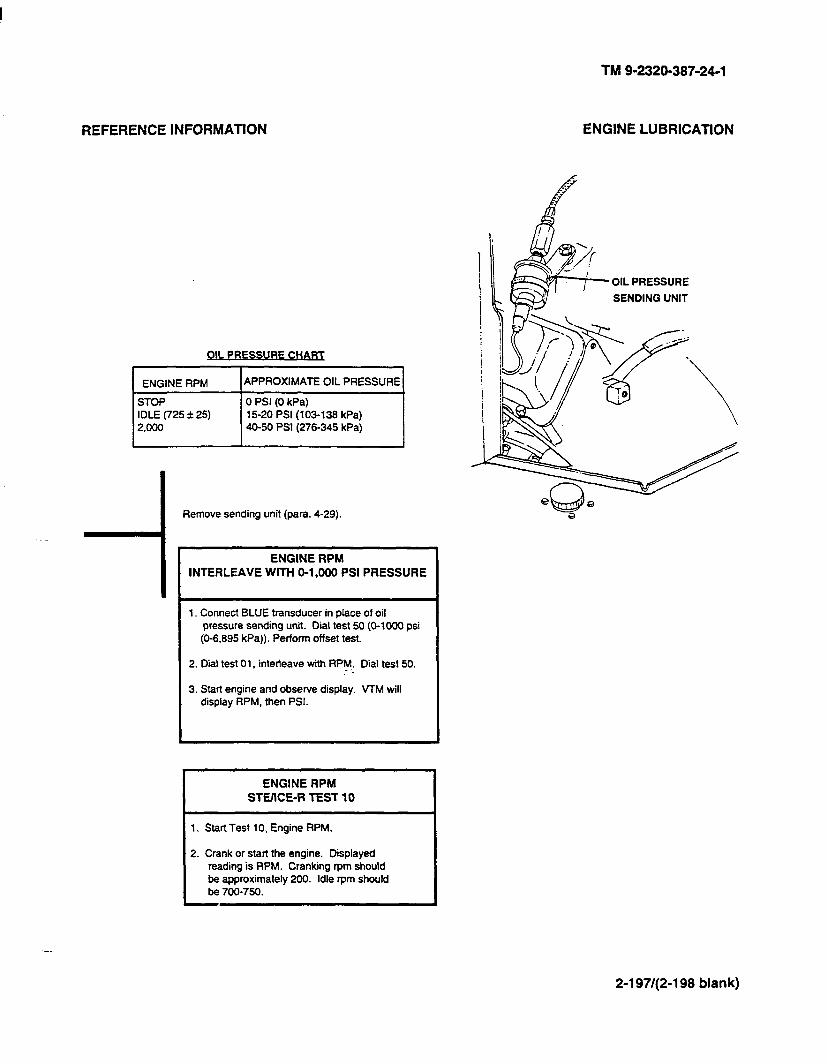
TM 9-2320-387-24-l
REFERENCE INFORMATION ENGINE LUBRICATION
IL QR
~1
- -I Remove sending unit (para. 4-29).
ENGINE RPM INTERLEAVE WITH fl-1,000 PSI PRESSURE
1. Connect BLUE transducer in place of oil pressure sending unit. Dial test 50 (O-1000 psi (08.895 kPa)). Perform offset test.
I
2. Dial test 01, interleave with RPv.: Dial test 50.
3. Start engine and observe display. VTM will display RPM. then PSI.
ENGINE RPM STEIICE-R TEST 10
1. Start Test 10, Engine RPM.
I 2. Crank or start the engine. Displayed
reading is RPM. Cranking rpm should be approximately 200. Idle rpm should be 700-750.
OIL PRESSURE
SENDING UNIT
2-l 97/(2-l 98 blank)
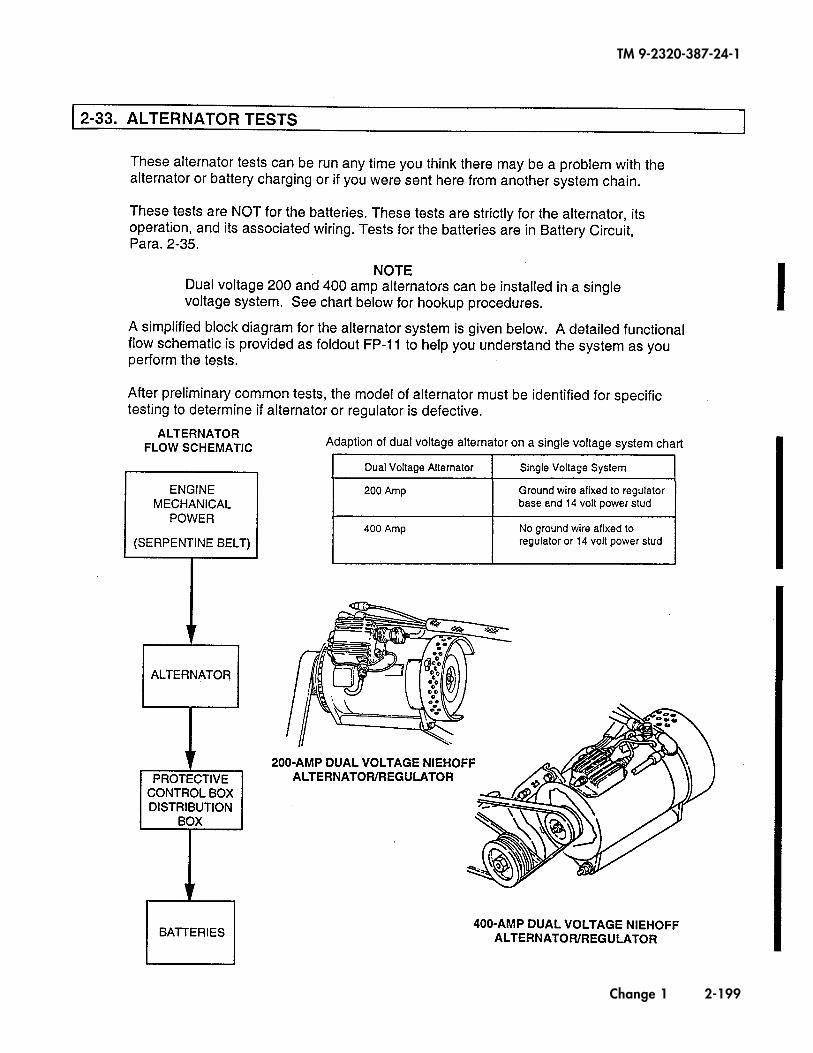
TM 9-2320-387-24-1
Change 1 2-199

TM 9-2320-387-24-l
ALTERNATOR
KNOWN INFO
NOTHING
POSSIBLE PROBLEMS
ALTERNATOR CONTROL BOX WIRING SERPENTINE BELT
KNOWN INFO
SERPENTINE BELT OK
POSSIBLE PROBLEMS
WIRING ALTERNATOR ZONTROL BOX
KNOWN INFO
SERPENTINE BELT OK WIRING CONNECtIONS OI(
POSSIBLE PROBLEMS
ALTERNATOR CONTROL BOX WIRING
S SERPENTINE BELT IN GOOD ZONDITION (NO CRACKS, FRAYS, 3R GLAZE)?
r OPTIONS
VISUAL INSPECTlON OF BELT TENSIONER POSITION.
REASON FOR QUESTlON
If belt tensioner has fully retracted, belt will not drive the alternator fast enough to recharge the . .
TEST OPTlONS
4RE ALL WIRE CONNECTIONS VISUAL
TO ALTERNATOR CLEAN, TIGHT, 4ND MAKING GOOD CONNECTION?
REASON FOR OUESTION
Loose or dirty connections can \ prevent a good alternator from
charging the batteries.
IF YOU STlLL
\
I I 1
:
L L
WITH ROTARY SWITCH IN RUN POSITION (ENGINE NOT RUNNING), DO YOU HAVE BAlTERY VOLTAGE AT ALTERNATOR OUTPUT l-ERMINAL ?
T OPTIONS
I. STE/ICE-R TESTS 67.69 (INTERLEAVE) (Pages 2496. 2-606)
!. MULTIMETER
REASON FOR QUESTlON
The alternator must be connected to batteries to be able to recharge the batteries.
-
2-200
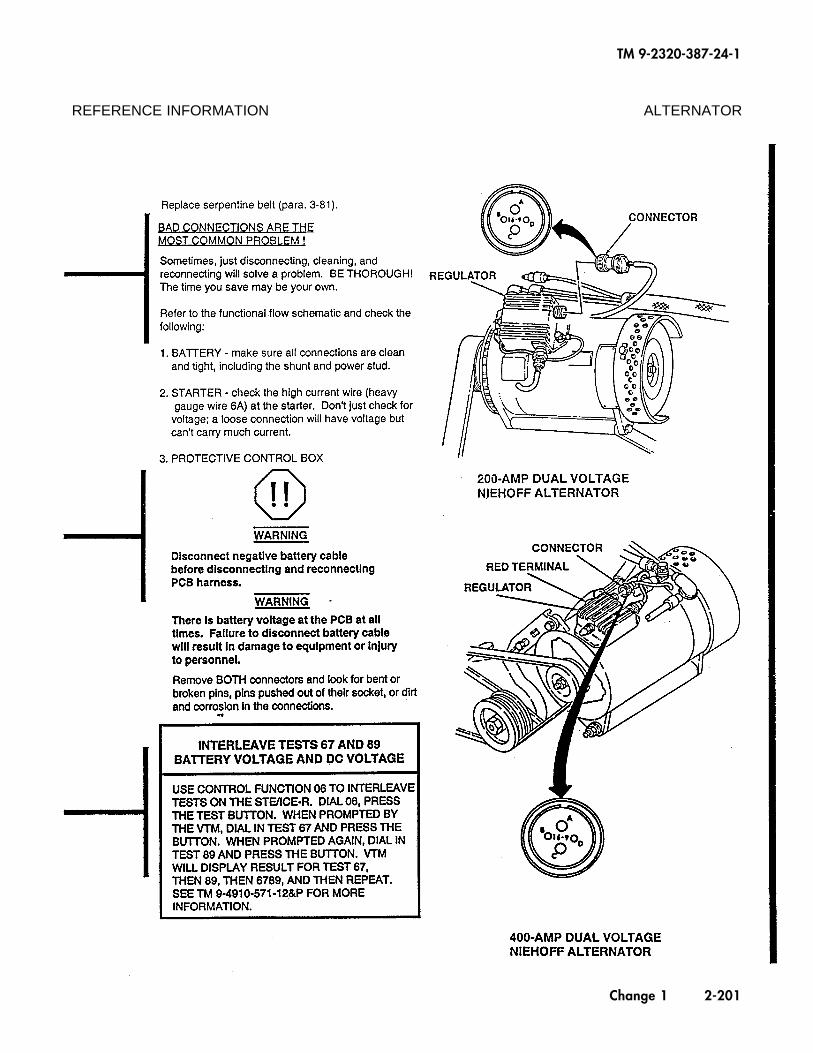
TM 9-2320-387-24-1
Change 1 2-201
REFERENCE INFORMATION ALTERNATOR
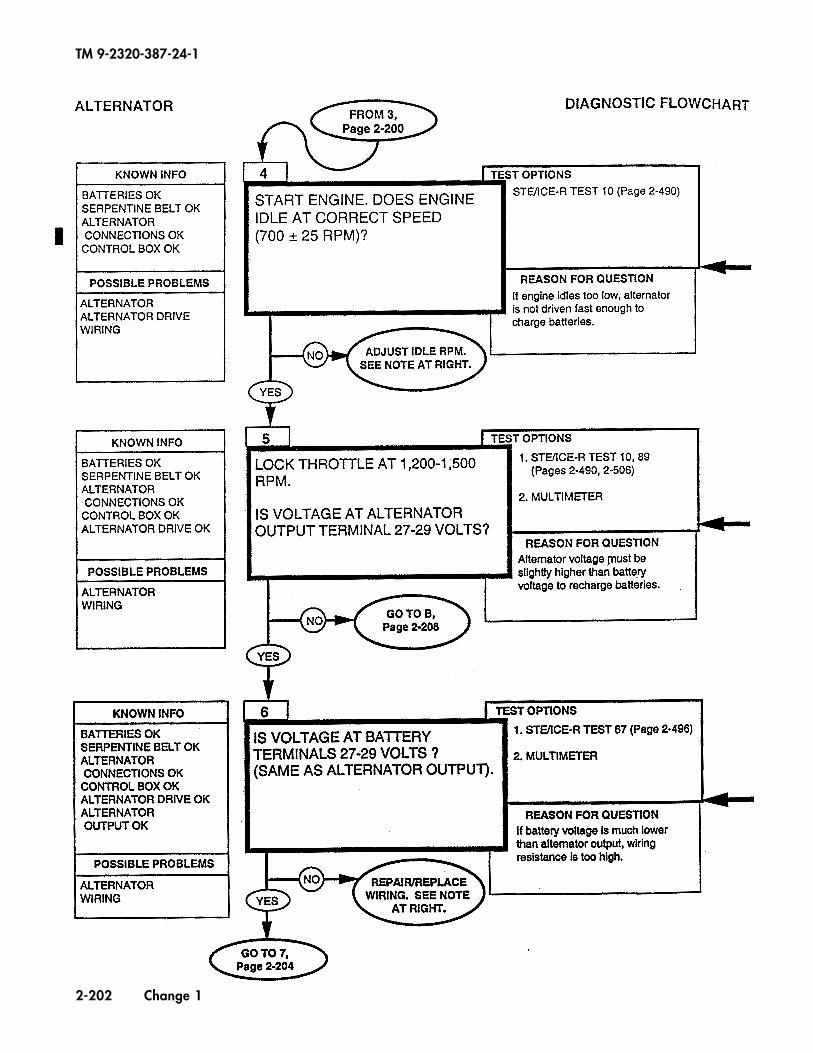
TM 9-2320-387-24-1
2-202 Change 1
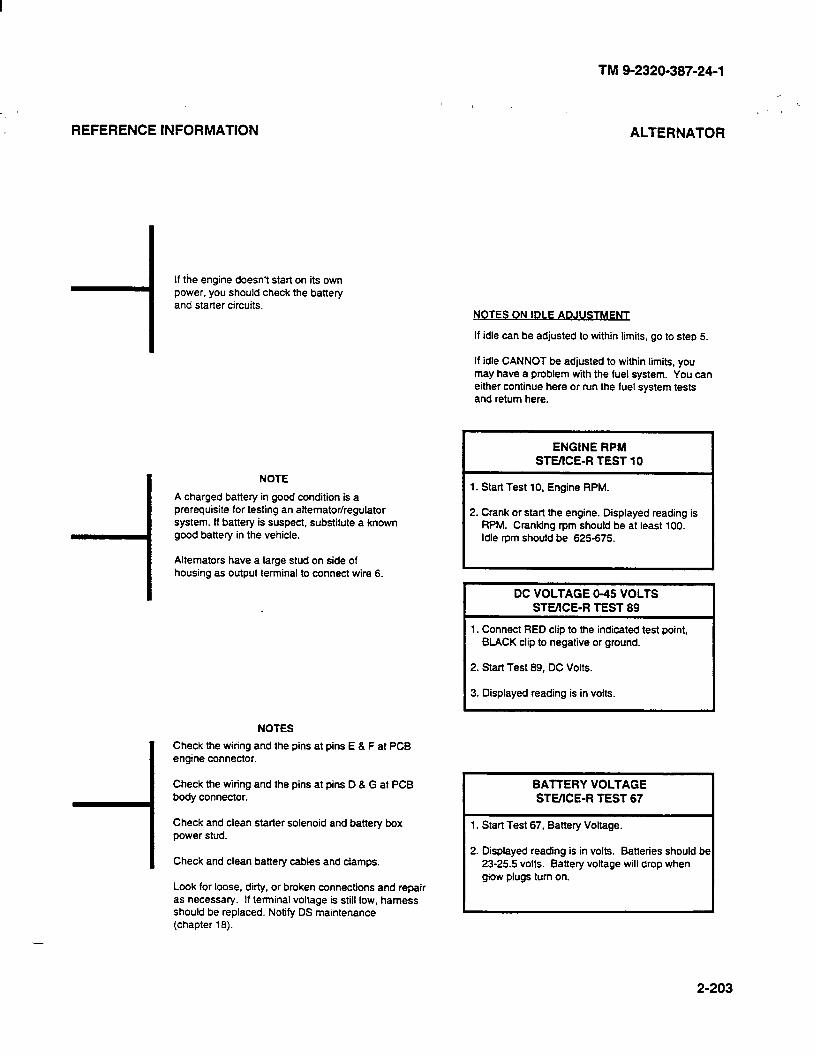
TM 9-2320-387-24-l
REFERENCE INFORMATION ALTERNATOR
If the engine doesn’t start on its own power, you should check the battery and starter circuits.
A charged battery in good condition is a prerequisite for testing an alternator/regulator system. If battery is suspect, substitute a known good battery in the vehicle.
Alternators have a large stud on side of housing as output terminal to connect wire 6.
i
NOTES
Check the wiring and the pins at pins E 8 F at PCB engine connector.
Check the wiring and the pins at pins D 8 G at PCB body connector.
Check and clean starter solenoid and battery box power stud.
Check and clean battery cables and clamps.
Look for loose, dirty, or broken connections and repair as necessary. If terminal voltage is still low, harness should be replaced. Notify DS maintenance (chapter 16).
NOTES ON IDLE ADJUSTMENT
If idle can be adjusted to within limits, go to step 5.
If idle CANNOT be adjusted to within limits, you may have a problem with the fuel system. You can either continue here or run the fuel system tests and return here.
ENGINE RPM
STEXE-R TEST 10
1. Start Test 10, Engine RPM.
2. Crank or start the engine. Displayed reading is RPM. Cranking rpm should be at least 100. Idle rpm should be 625-675.
.I
, DC VOLTAGE O-45 VOLTS
STEWE-R TEST 89
1. Connect RED clip to the indicated test point, BLACK clip to negative or ground.
2. Start Test 89, DC Volts.
3. Displayed reading is in volts.
BATTERY VOLTAGE
STEIICE-R TEST 67 I
1. Start Test 67, Battery Voltage.
2. Displayed reading is in volts. Batteries should be 23-25.5 volts. Battery voltage will drop when glow plugs turn on.
2-203
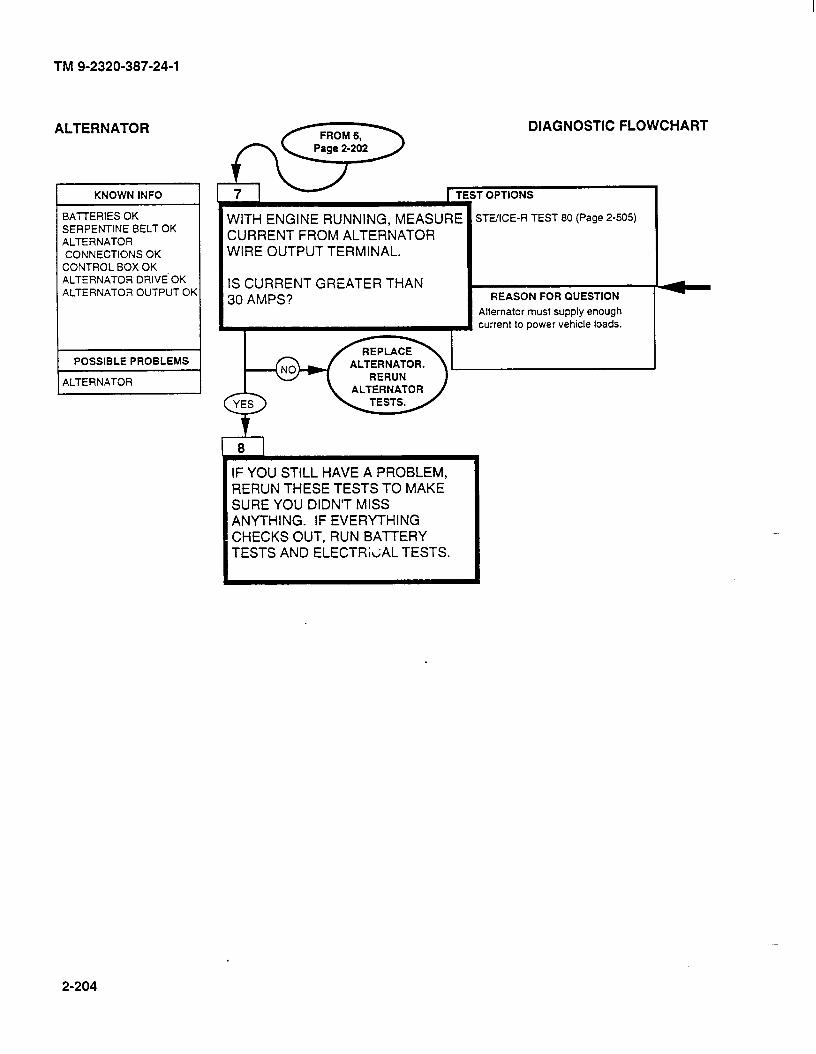
TM 9-2320-387-24-l
ALTERNATOR
KNOWN INFO I
BAl-TERIES OK SERPENTINE BELT OK ALTERNATOR CONNECTIONS OK
CONTROL BOX OK ALTERNATOR DRIVE- OK ALTERNATOR OUTPUT Ok
POSSIBLE PROBLEMS 1
ALTERNATOR I
DIAGNOSTIC FLOWCHART
STE/lCE-R TEST 80 (Page z-505)
I IS CURRENT GREATER THAN 30 AMPS?
Alternator must supply enough current to power vehicle loads.
ALTERNATOR.
0 YES
IF YOU STILL HAVE A PROBLEM, RERUN THESE TESTS TO MAKE SURE YOU DIDN’T MISS
~ ANYTHING. IF EVERYTHING ~ CHECKS OUT, RUN BAlTERY TESTS AND ELECTRICAL TESTS.
2-204
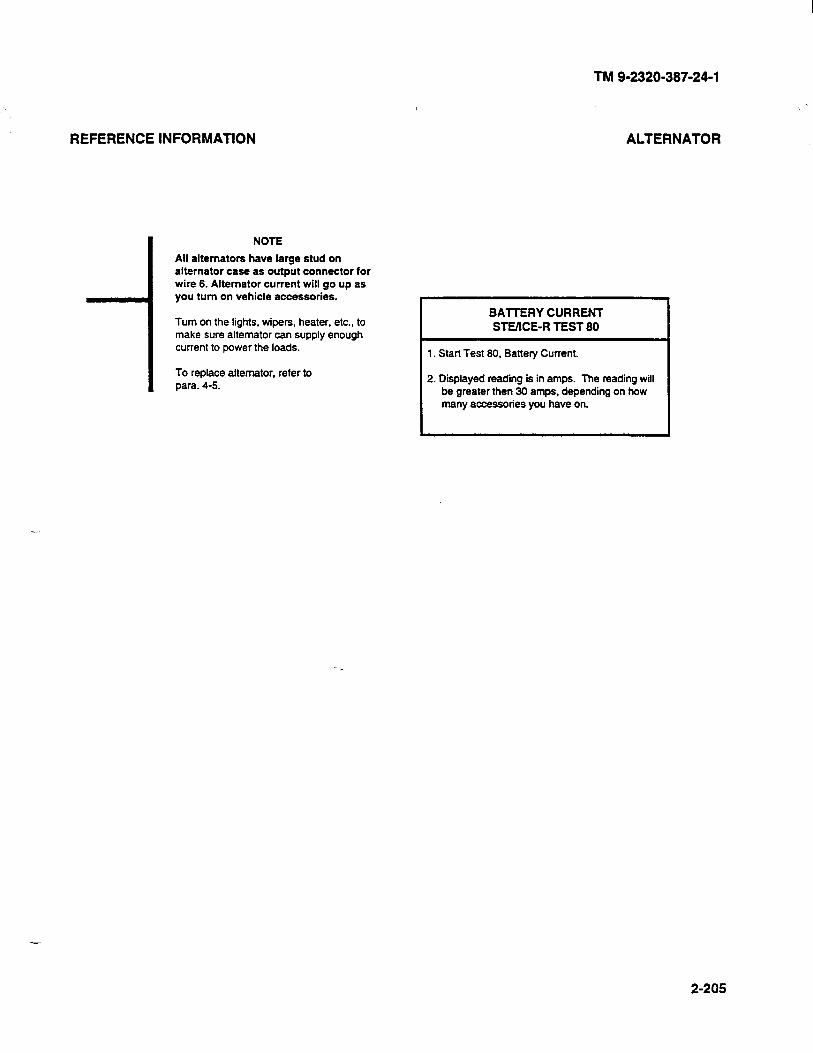
TM 9-2320-387-24-l
REFERENCE INFORMATION
NOTE
All alternators have large stud on alternator case as output connector for wire 6. Alternator current will go up as you turn on vehicle accessories.
Turn on the lights, wipers, heater, etc., to make sure alternator can supply enough current to power the loads.
To replace alternator. refer to para. 4-S.
ALTERNATOR
BAlTERY CURRENT STMCE-R TEST 80
1. Start Test 80, Battery Current.
2. Diiplayed reading is in amps. The reading will be greater then 30 amps, depending on how many accessories you have on.
2-205
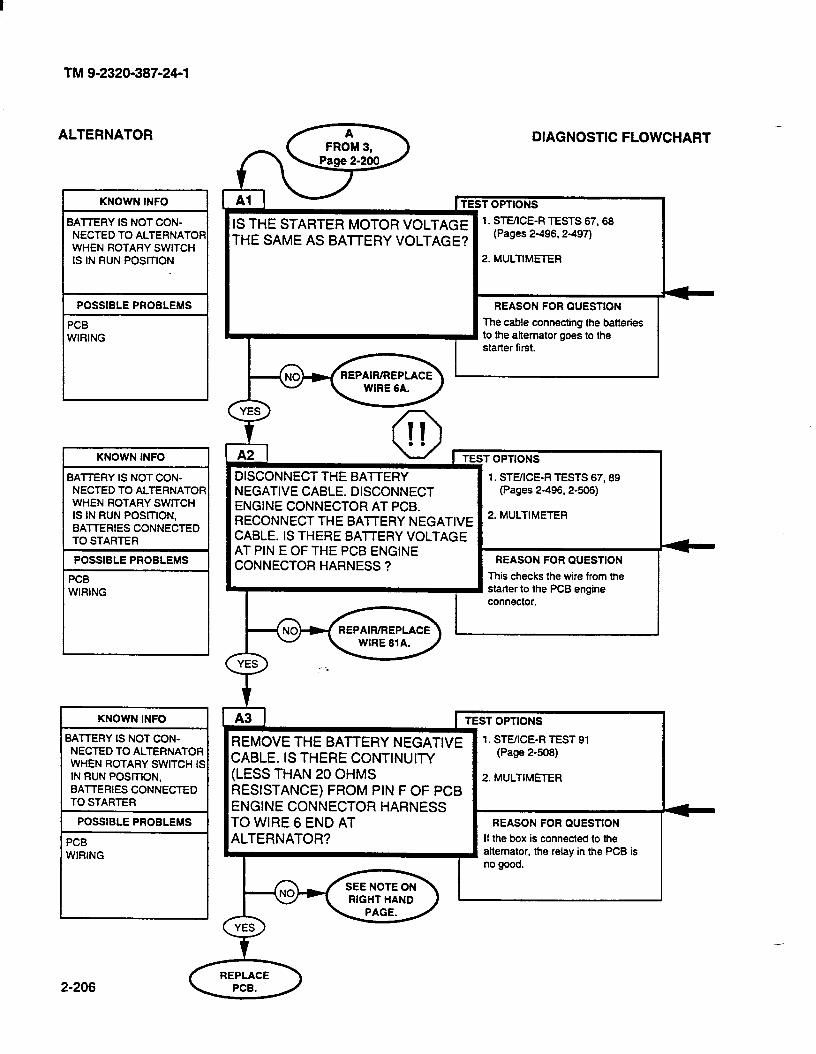
I
TM 9-2320-387-24-l
ALTERNATOR DIAGNOSTIC FLOWCHART
KNOWN INFO 1 OPTIONS
1. STEIlCE-R TESTS 67,68 (Pages 2496,2497)
2. MULTIMEI-ER
BAllERY IS NOT CON- NECTED TO ALTERNATC WHEN ROTARY SWITCH IS IN RUN POSITION
IS THE STARTER MOTOR VOLTAGE THE SAME AS BATTERY VOLTAGE?
POSSIBLE PROBLEMS REASON FOR QUESTION
PCB The cable connecting the batteries
WIRING to the alternator goes to the starter first.
KNOWN INFO . OPTIONS
3AlTERY IS NOT CON- NECTED TO ALTERNATOf WHEN ROTARY SWITCH IS IN RUN POSITION. BAllERIES CONNECTED TO STARTER
1. STE/ICE-R TESTS 67.89 (Pages 2496.2-506)
DISCONNECT THE BAlTERY NEGATIVE CABLE. DISCONNECT ENGINE CONNECTOR AT PCB. RECONNECT THE BAITERY NEGATIVE CABLE. IS THERE BAITERY VOLTAGE AT PIN E OF THE PCB ENGINE CONNECTORHARNESS?
2. MULTIMETER
REASON FOR QUESTION
This checks the wire from the starter to the PCB engine connector.
POSSIBLE PROBLEMS
PCB WIRING
I KNOWN INFO TEST OPTIONS
REMOVE THE BATTERY NEGATIVE ‘. STUICE-R TEST g1 CABLE. IS THERE CONTINUITY
(Page 2-508) BATTERY IS NOT CON-
NECTED TO ALTERNATOR WHEN ROTARY SWlTCH IS IN RUN POSITION. BAl-fERIES CONNECTED TO STARTER
2. MULTIMETER
-c I POSSIBLE PROBLEMS REASON FOR QUESTION
If the box is connected to the alternator, the relay in the PCB is
PCB WIRING
SEE NOTE ON RIGHT HAND c
2-206

TM 9-2320-387-24-l \
REFERENCE INFORMATION ALTERNATOR
INTERLEAVE TEST 67 AND 68 BAITERY VOLTAGE AND DC VOLTAGE
I
USE CONTROL NNCTION 66 TO INTERLEAVE TESTS ON THE STEIICE-R. DIAL 06, PRESS THE TEST BUTTON. WHEN PROMPTED BY THE VTM. DIAL IN TEST 67 AND PRESS THE BUTTON. WHEN PROMPTED AGAIN. DIAL IN TEST 68 AND PRESS THE BUTTON. V-TM WILL DISPLAY RESULT FOR TEST 67. THEN 68, THEN 6768, AND THEN REPEAT. SEE TM 94910-571-12&P FOR MORE INFORMATION.
I
0 II . .
-
-I
i
WARNING
Disconnect negative battery cable before disconnecting and reconnecting PCB harness.
INTERLEAVE TEST 67 AND 89 BATTERY VOLTAGE AND DC VOLTAGE
USE CONTROL FUNCTION 06 TO INTERLEAVE TESTS ON THE STEACE-R. DIAL 06, PRESS THE TEST BUTTON. WHEN PROMPTED BY THE VTM, DIAL IN TEST 67 AND PRESS THE BUTTON. WHEN PROMPTED AGAIN, DIAL IN TEST 89 AND PRESS THE BUTTON. VTM WILL DISPLAY RESULT FOR TEST 67. THEN 89. THEN 6789, AND THEN REPEAT. SEE TM 94910-571-12&P FOR MORE INFORMATtON.
RESISTANCE AND CONTINUITY 04,500 OHMS
STEilCE-R TEST 91
1. Connect RED clip and BLACK clip to the terminations indicated in the question. RED to the first, BLACK to the second.
2. Start Test 91,04.500 Ohms.
3. Displayed reading is in ohms. Less than 5 ohms is continuity. If the resistance is over 4.509 ohms, STEACE-R displays .9.9.9.9.
WARNING
There is battery voltage at the PCB at all times. Failure to disconnect battery cable will result in damage to equipment or injury to personnel.
- -a
NOTE
When checking for voltage or continuity in a harness connector (steps A2 and A3), check the wiring at the connector carefully for broken wires. Check to see that the connector pins are not bent, broken, or pushed out of place. Check that the connections are clean and tight. Use the STUICE-R in TK mode for this measurement. DO NOT USE THE DCA. Leave the negative battery cable off for the measurement. If there is an open circuit, the STUICE-R will measure close to 500 ohms. If you don’t have continuity or voltage, and the wires and connections are all OK, then the harness must have a broken wire. In this case, you have to replace the wiring harness. Replace harness and notify DS maintenance (chapter 18).
Replace PCB (para. 44).
2-207
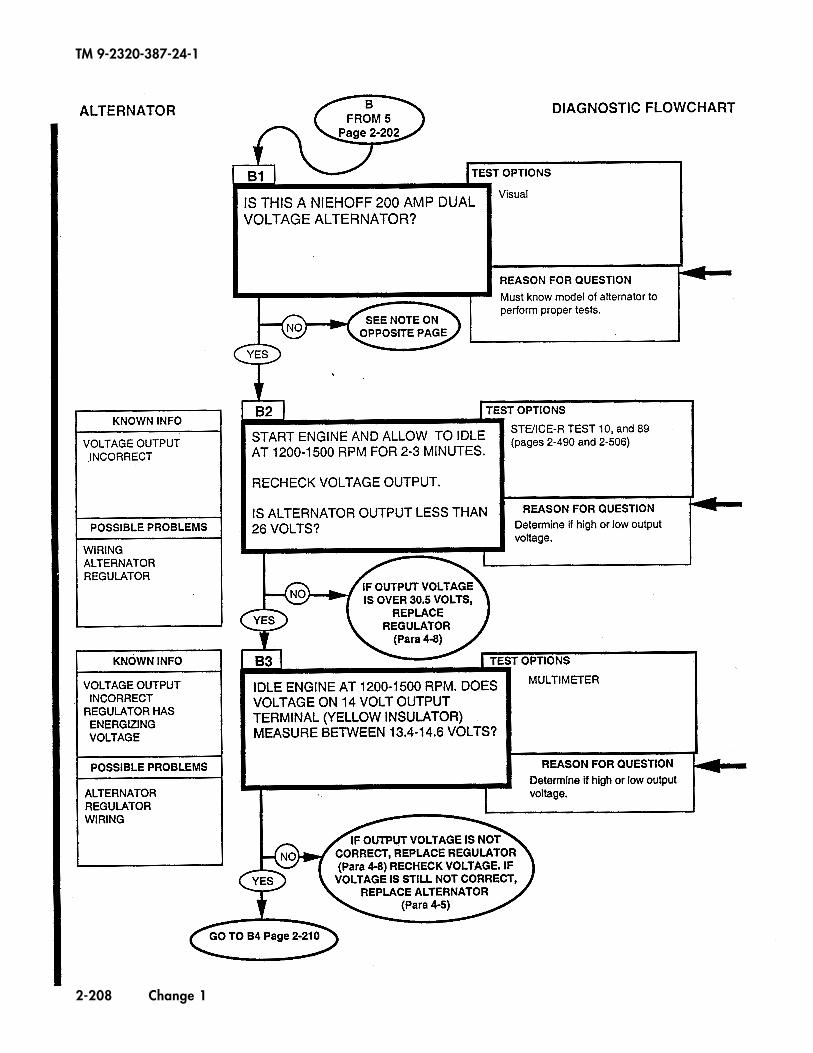
TM 9-2320-387-24-1
2-208 Change 1
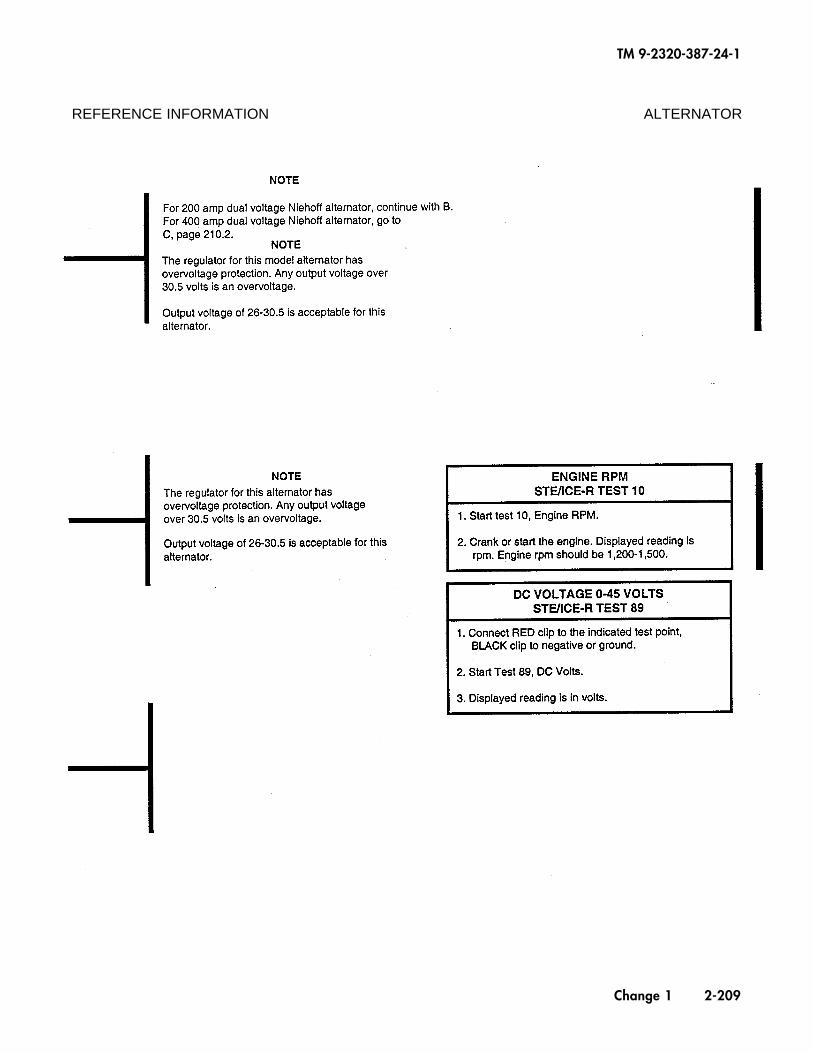
TM 9-2320-387-24-1
Change 1 2-209
REFERENCE INFORMATION ALTERNATOR

TM 9-2320-387-24-1
2-210 Change 1
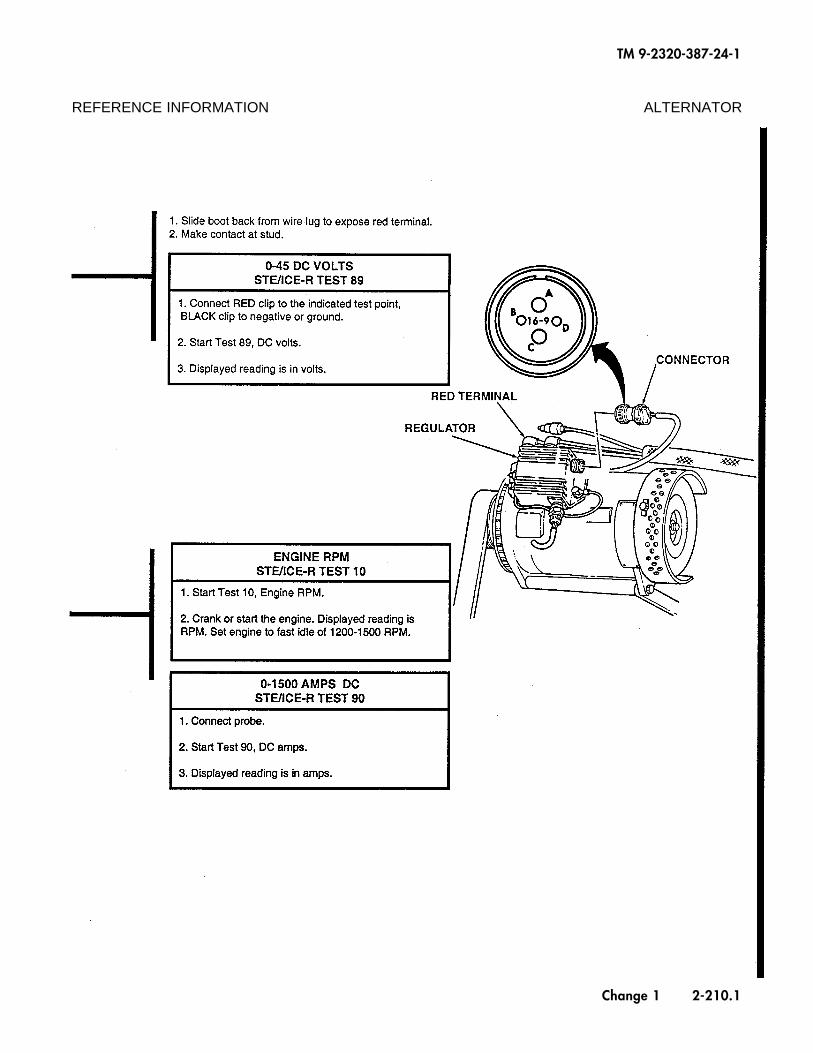
TM 9-2320-387-24-1
Change 1 2-210.1
REFERENCE INFORMATION ALTERNATOR
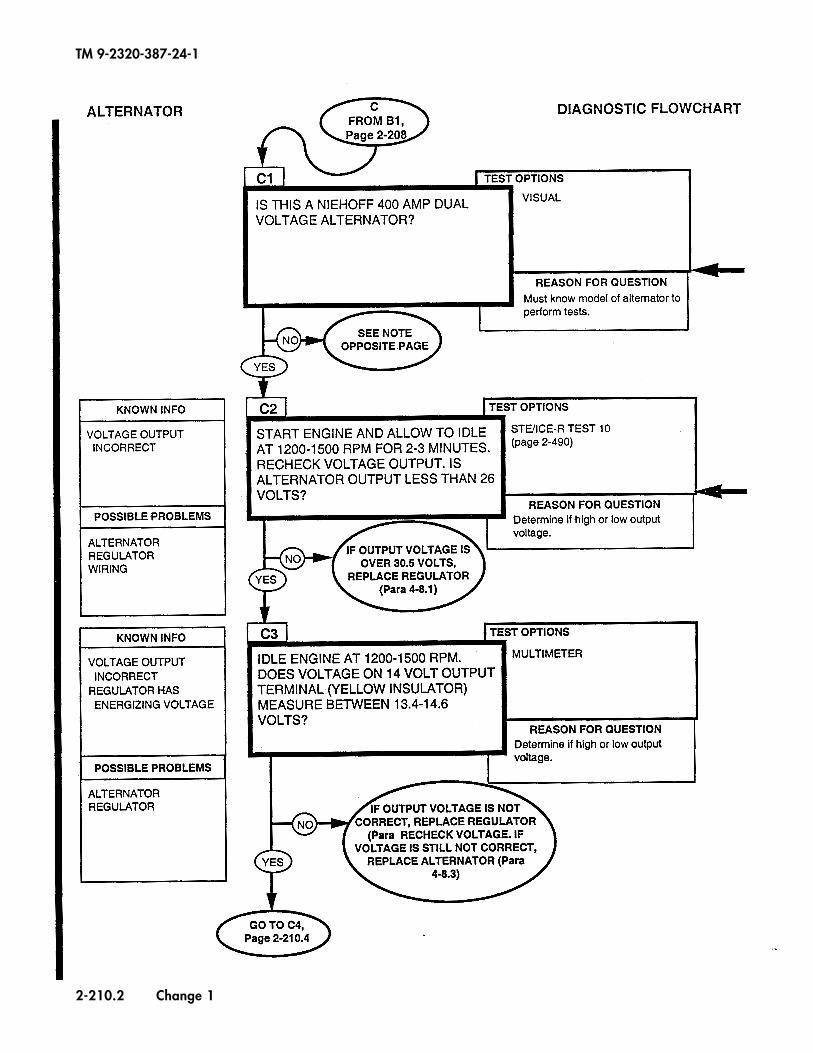
TM 9-2320-387-24-1
2-210.2 Change 1
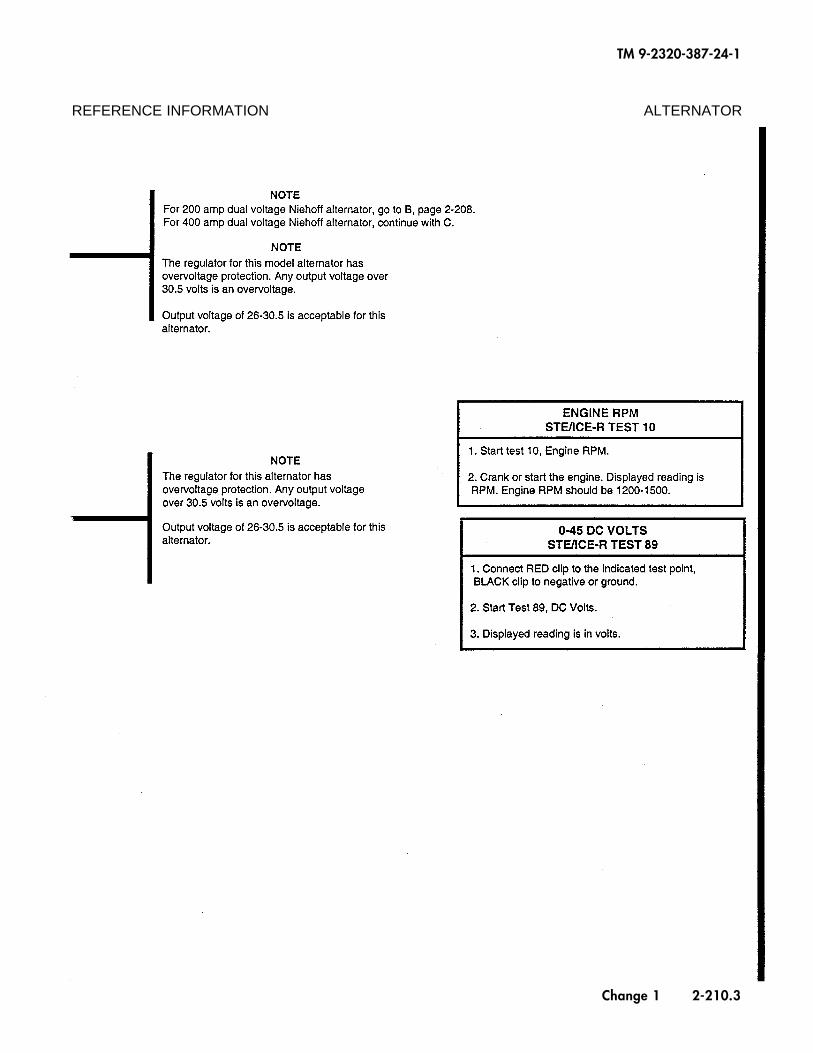
TM 9-2320-387-24-1
Change 1 2-210.3
REFERENCE INFORMATION ALTERNATOR
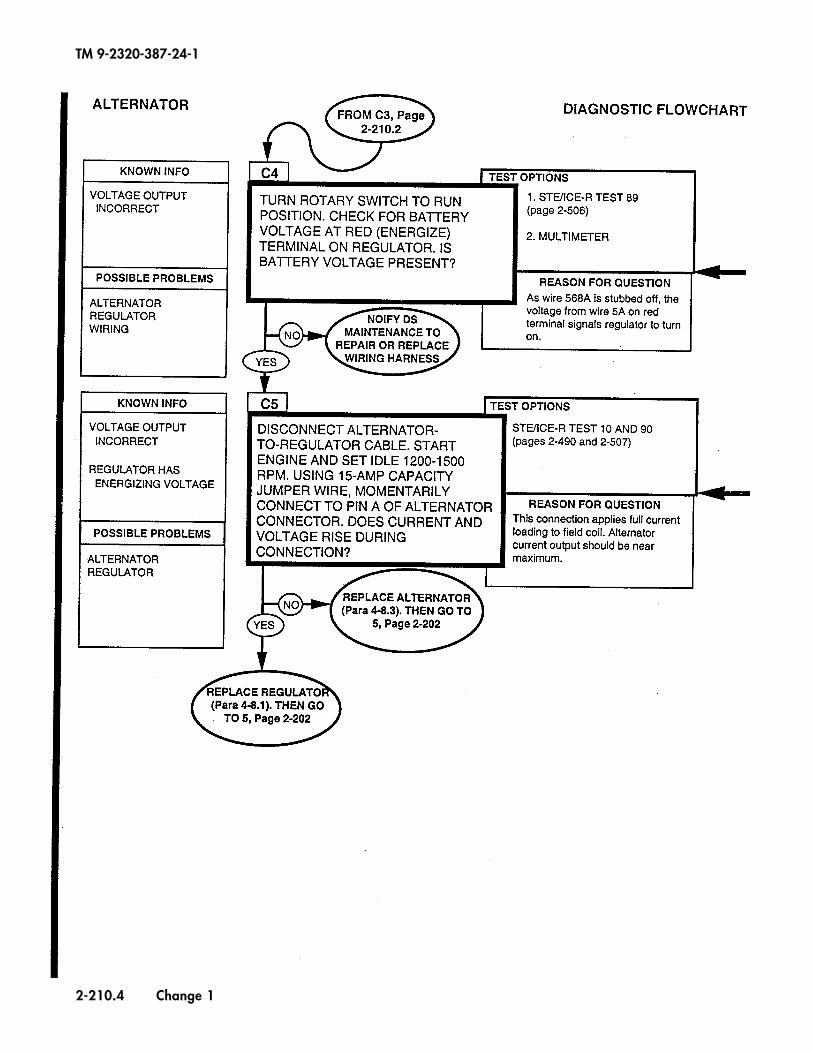
TM 9-2320-387-24-1
2-210.4 Change 1
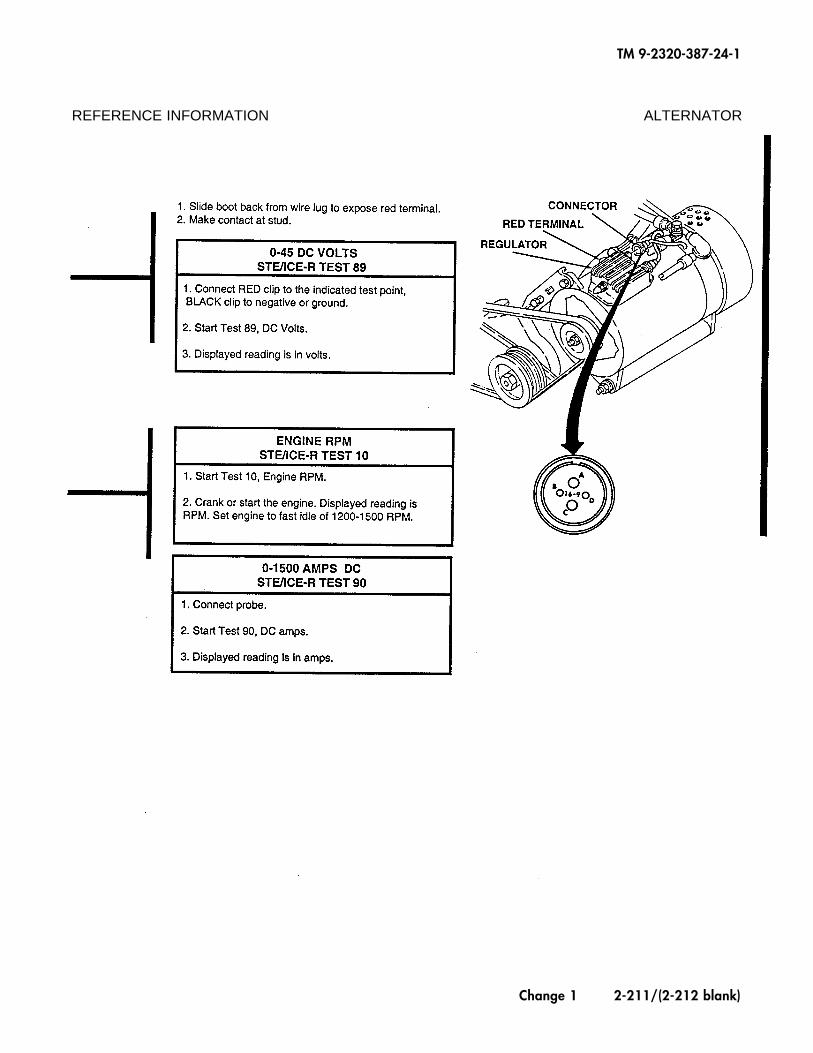
TM 9-2320-387-24-1
Change 1 2-211/(2-212 blank)
REFERENCE INFORMATION ALTERNATOR

TM 8-2320-387-24-l
2-34. PROTECTIVE CONTROL BOX TESTS
These Protective Control Box tests can be run any time you think there may be a problem with the protective control box, or if you were sent here from another system chain.
NOTE
l To perform PCB diagnostics, a PCB test module is needed.
l For fabrication of PCB test module, refer to Appendix D, Figures 4780.
-
2-213
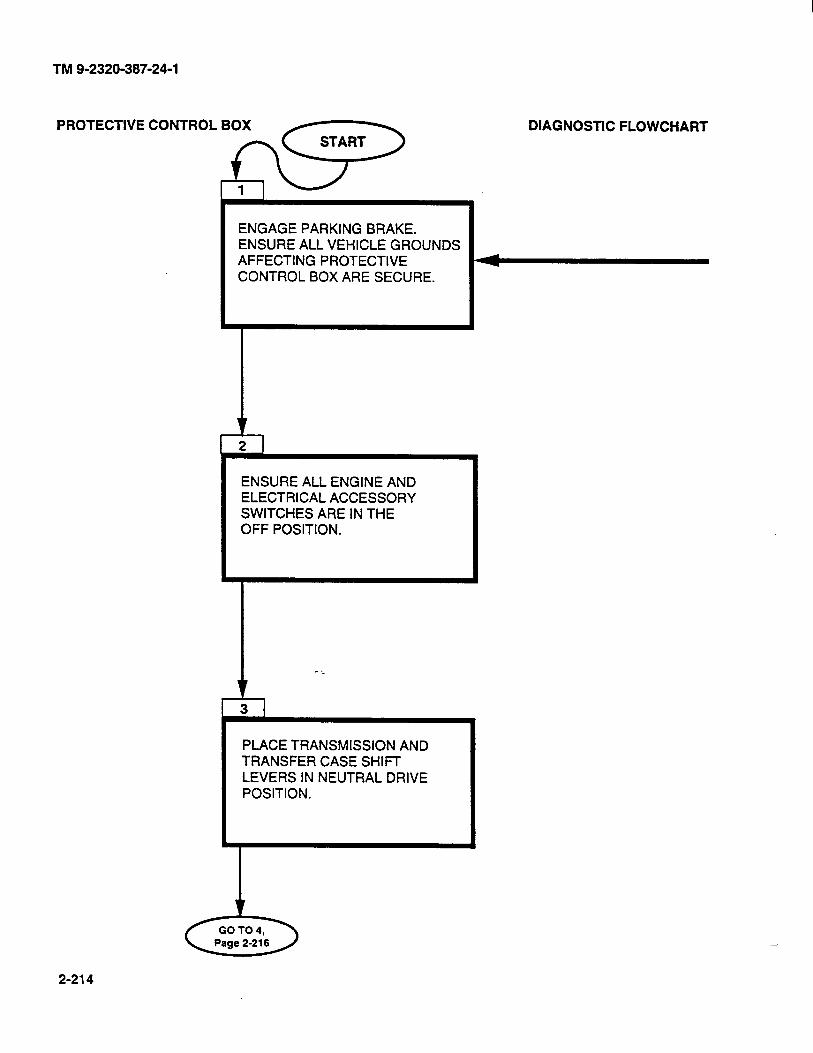
TM 9-2320-397-24-1
PROTECTIVE DIAGNOSTIC FLOWCHART
ENGAGE PARKING BRAKE. ENSURE ALL VEHICLE GROUNDS AFFECTING PROTECTIVE CONTROL BOX ARE SECURE.
ENSURE ALL ENGINE AND ELECTRICAL ACCESSORY SWITCHES ARE IN THE OFF POSITION.
PLACE TRANSMISSION AND TRANSFER CASE SHIFT LEVERS IN NEUTRAL DRIVE POSITION.
2-214
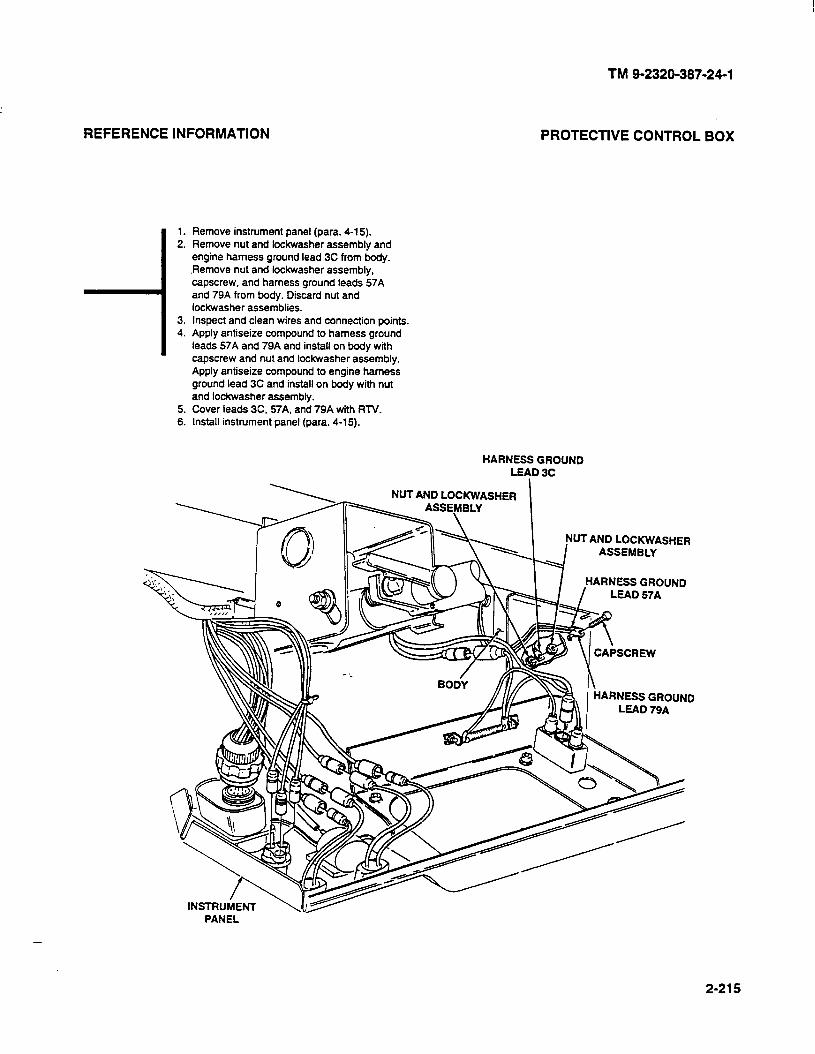
REFERENCE INFORMATION
-I 1. 2.
3. 4.
5. 6.
Remove instrument panel (para. 4-15). Remove nut and to&washer assembly and engine harness ground lead 3C from body. .Remove nut and to&washer assembly, capscrew. and harness ground leads 57A and 79A from body. Discard nut and lockwasher assemblies. Inspect and clean wires and connection points. Apply antiseize compound to harness ground leads 57A and 79A and install on body with capscrew and nut and lo&washer assembly. Apply antiseize compound to engine harness ground lead 3C and install on body with nut and lo&washer assembly. Cover lea& 3C, S7A, and 79A with RTV. Install instrument panel (para. 4-15).
TM 9-2320-387-24-l
PROTECTIVE CONTROL BOX
HARNESS GROUND LEAD 3C
\_ NUT AND LOCKWASHER I
SCREW
HARNESS GROUND LEAD 79A
PANEL
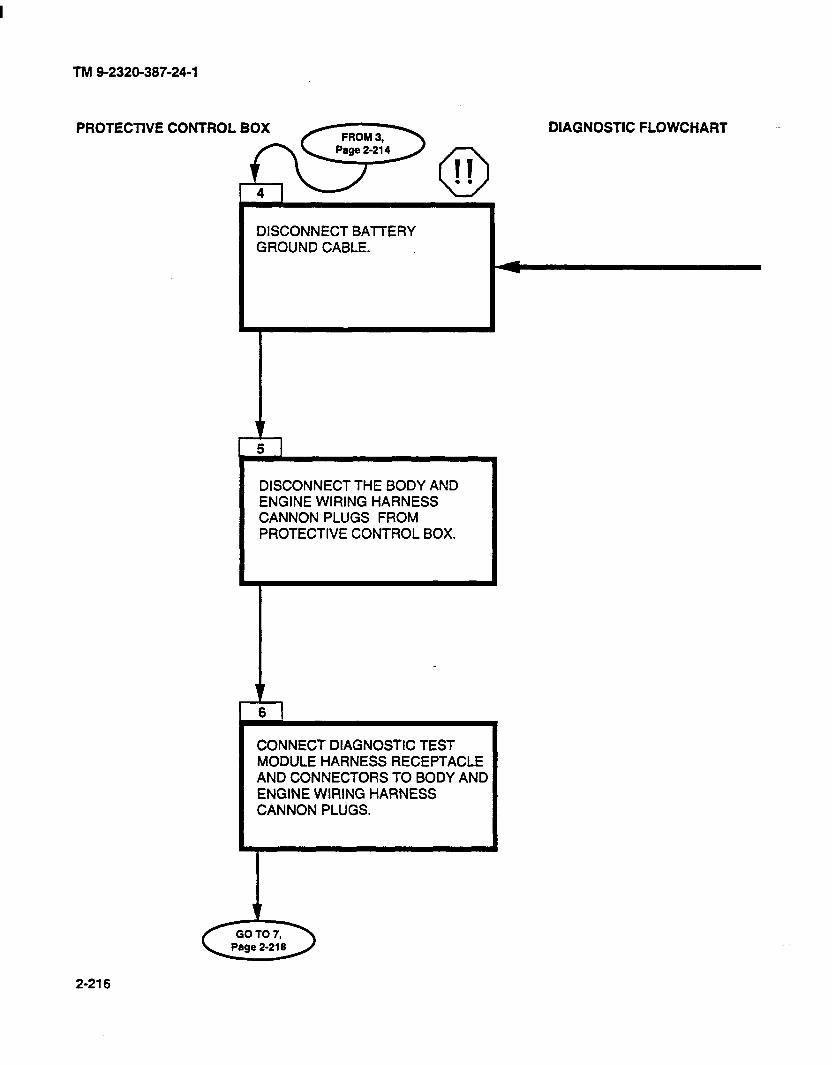
TM 9-2320-387-24-l
PROTECTIVE CONTROL BOX DIAGNOSTIC FLOWCHART
DISCONNECT BAlTERY GROUND CABLE.
DISCONNECT THE BODY AND ENGINE WIRING HARNESS CANNON PLUGS FROM PROTECTIVE CONTROL BOX.
CONNECT DIAGNOSTIC TEST MODULE HARNESS RECEPTACLE AND CONNECTORS TO BODY AND ENGINE WIRING HARNESS CANNON PLUGS.
2-216
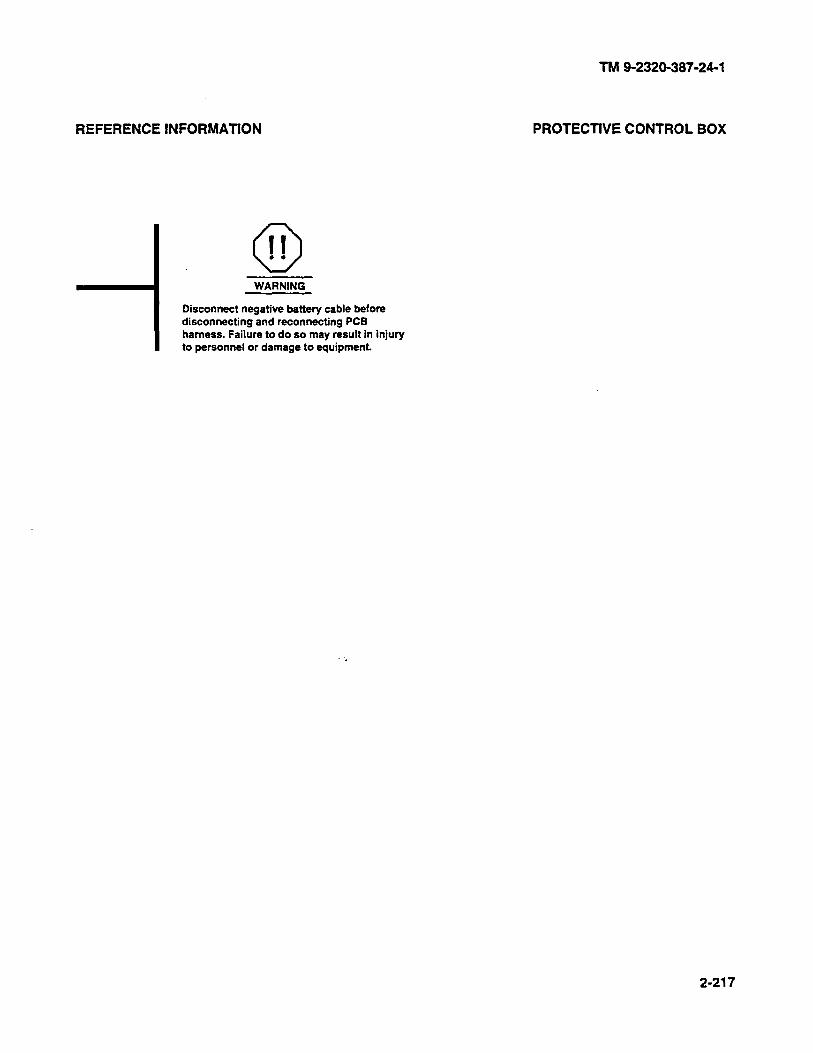
REFERENCE INFORMATION
I Disconnect negative battery cable before disconnecting and reconnecting PCB harness. Failure to do so may result in injury to personnel or damage to equipment.
TM 9-2320-387-24-l
PROTECTIVE CONTROL BOX
2-217
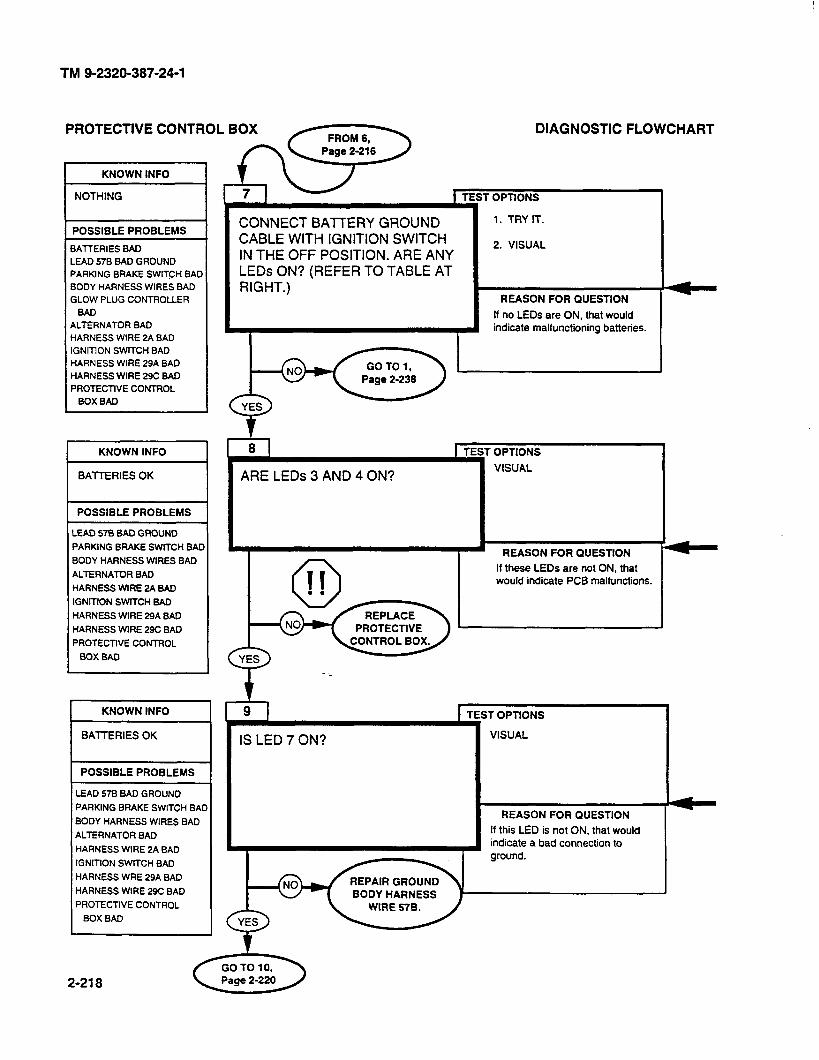
TM 9-2320-387-24-l
PROTECTIVE CONTROL BOX
KNOWN INFO
&iii
NOTHING
POSSIBLE PROBLEMS
BAlTERIES BAD
LEAD 578 BAD GROUND
PARKING BRAKE SWITCH BAD
BODY HARNESS WIRES BAD
GLOW PLUG CONTROLLER
BAD
ALTERNATOR BAD
HARNESS WIRE 2A BAD
IGNlTlON SWITCH BAD
HARNESS WIRE 29A BAD
HARNESS WIRE 29C BAD
PROTECTIVE CONTROL
Box BAD
KNOWN INFO
BATTERIES OK
POSSIBLE PROBLEMS
LEAD 570 BAD GROUND
PARKING BRAKE SWITCH BAD
BODY HARNESS WIRES BAD
ALTERNATOR BAD
HARNESS WIRE 2A BAD
IGNITION SWITCH BAD
HARNESS WIRE 29A BAD
HARNESS WlRE 29C BAD
PROTECTIVE CONTROL
BOX BAD
KNOWN INFO
BATTERIES OK
POSSIBLE PROBLEMS
LEAD 578 BAD GROUND
PARKING BRAKE SWITCH BAD
BODY HARNESS WIRES BAD
ALTERNATOR BAD
HARNESS WIRE 2A BAD
IGNITION SWITCH BAD
HARNESS WRE 29A BAD
HARNESS WIRE 29C BAD
PROTECTIVE CONTROL
BOX BAD
I
CONNECT BAlTERY GROUND CABLE WITH IGNITION SWITCH IN THE OFF POSITION. ARE ANY LEDs ON? (REFER TO TABLE AT RIGHT.)
DIAGNOSTIC FLOWCHART
r OPTIONS
1. TRY IT.
2. VISUAL
REASON FOR QUESTION
If no LEDs are ON, that would indicate malfunctioning batteries.
8 1 1 TEST OPTIONS
ARE LEDs 3 AND 4 ON? VISUAL
If these LEDs are not ON, that would indicate PCB malfunctions.
IS LED 7 ON?
iT OPTIONS
VISUAL
TEQ
REASON FOR QUESTION
If this LED is not ON, that would indicate a bad connection to ground.
REPAIR GROUND
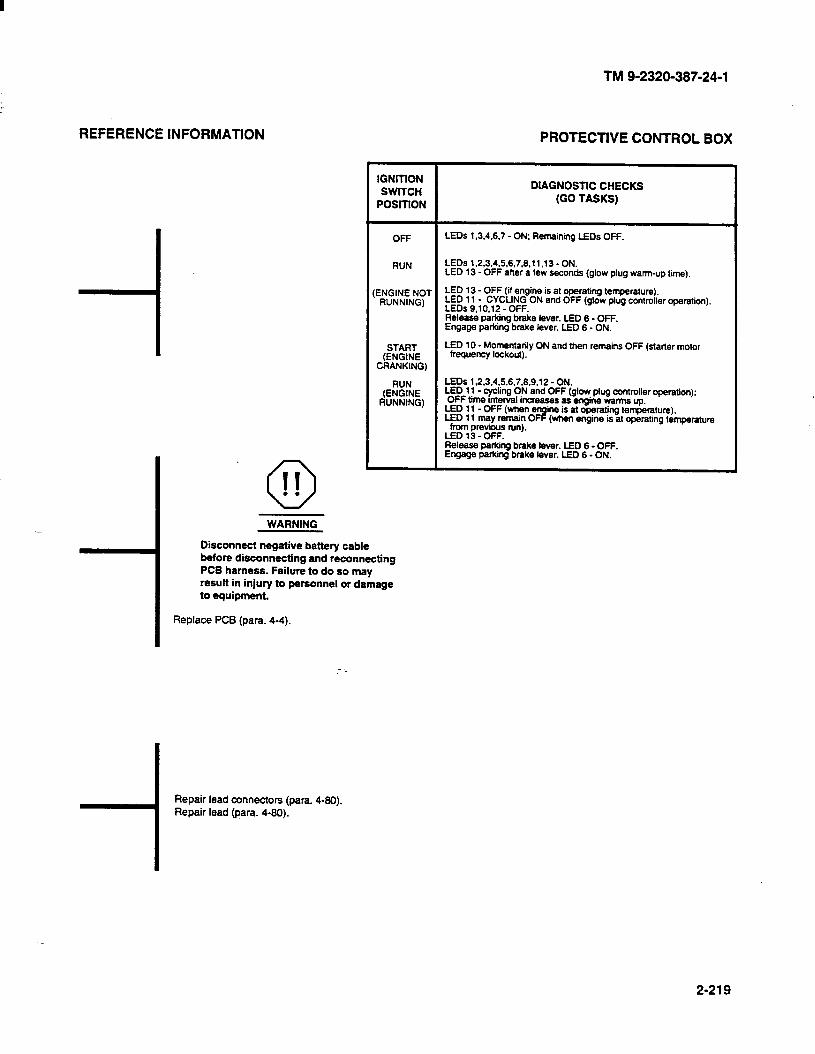
TM 9-2320-387-24-l
REFERENCE INFORMATION
0 II . . WARNING
PROTECTIVE CONTROL BOX
IGNITION SWITCH
POSrnON
DIAGNOSTIC CHECKS (GO TASKS)
OFF LEDs 1.3.4.6.7 - ON; Remaining LEDs OFF.
RUN LEDs 1.2.3.4.5.6.7.6.11.13 -ON. LED 13 - OFF after a few seconds (glow plug warm-up time).
ENGINE NOT LED 13 - OFF (if engine is at operating temperature). RUNNING) LED 11 - CYCLING ON and OFF (glow ptug controller operation).
LEDs 9.10.12 -OFF. Release parking brake lever. LED 6 - Off. Engage parking brake lever. LED 6 - ON.
START (ENGINE
CRANKING)
LED 10 - Momentarily ON and then remains OFF (starter motor frequency lockout).
RUN (ENGINE
RUNNING)
LEDs 1.2.3.4.5.6.7.6.9.12 - ON. LED 11 - cycling ON and OFF (glow plug controller operation): OFF time tnterval i ncreases as engine warms up. LED 11 - OFF (when en LED 11 may remain OF !
ine is at operating temperature).
from previous run). (when engine is at operating temperature
LEDl3-OFF. Release parking brake lever. LED 6 - Off. Engage palking brake fever. LED 6 - ON.
1 Disconnect negative battery cable before disconnecting and reconnecting PCB harness. Failure to do so may result in injury to personnel or damage to equipment.
Replace PCB (para. 4-4).
- :
Repair lead connectors (paa. 4-80).
Repair lead (para. 4-80).
2-219
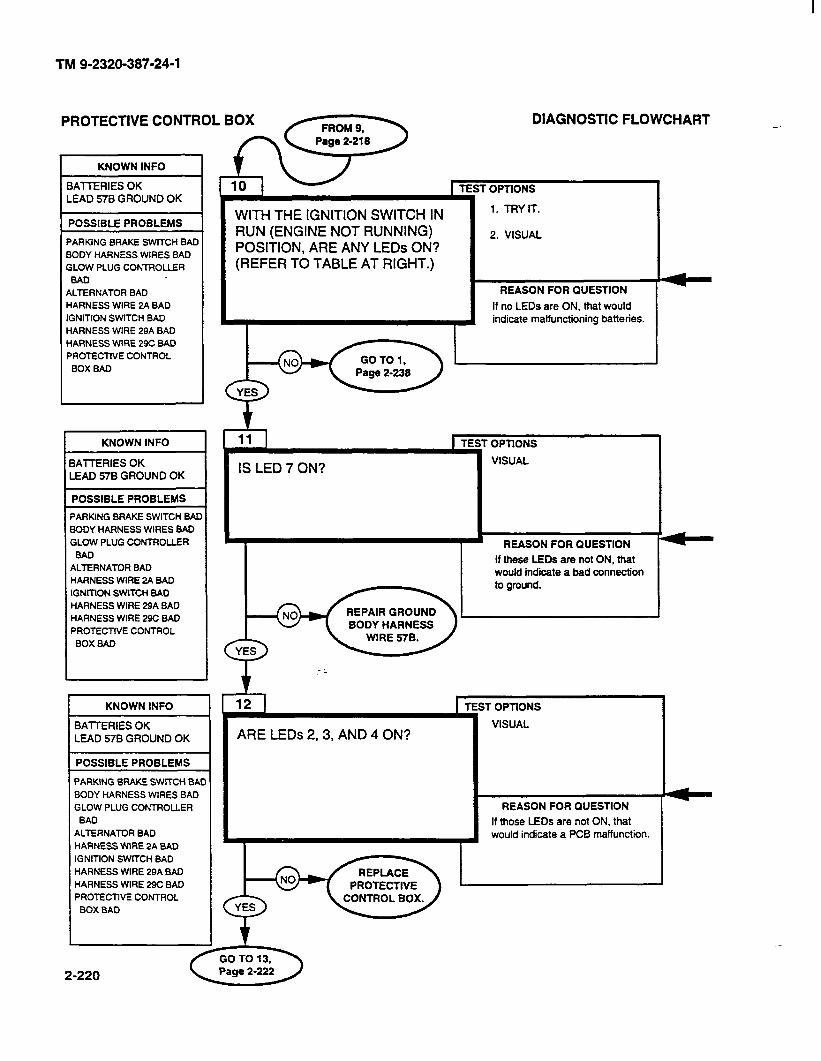
TM 9-2320-387-24-l
PROTECTIVE CONTROL BOX
KNOWN INFO
BATTERIES OK LEAD 578 GROUND OK
POSSIBLE PROBLEMS
PARKING BRAKE SWITCH BAD
BODY HARNESS WIRES BAD
GLOW PLUG COMROLLER
BAD
ALTERNATOR BAD
HARNESS WIRE 2A BAD
IGNITION SWITCH BAD
HARNESS WIRE 29A BAD
HARNESS WIRE 29C BAD
PROTECTIVE CONTROL
BOX BAD
KNOWN INFO
BATTERIES OK LEAD 578 GROUND OK
POSSIBLE PROBLEMS
PARKING BRAKE SWITCH BAD
BODY HARNESS WIRES BAD
GLOW PLUG CONTROLLER
BAD
ALTERNATOR BAD
HARNESS WIRE 2A BAD
IGNITION SWITCH BAD
HARNESS WIRE 29A BAD
HARNESS WIRE 29C BAD
PROTECTIVE CONTROL
BOX BAD
KNOWN INFO
BATTERIES OK LEAD 578 GROUND OK
POSSIBLE PROBLEMS
PARKING BRAKE SWITCH BAD
BODY HARNESS WIRES BAD
GLOW PLUG CONTROLLER
BAD
ALTERNATOR BAD
HARNESS WIRE 2A BAD
IGNITION SWITCH BAD
HARNESS WIRE 29A BAD
HARNESS WIRE 29C BAD
PROTECTIVE CONTROL
BOX BAD
WITH THE IGNITION SWITCH IN RUN (ENGINE NOT RUNNING) POSITION, ARE ANY LEDs ON? (REFER TO TABLE AT RIGHT.)
DIAGNOSTIC FLOWCHART
r OPTlONS
1. TRYrr.
2. VISUAL
REASON FOR QUESTION
If no LEDs are ON, that would indicate malfunctioning batteries.
IS LED 7 ON? VISUAL
If these LEDs are not ON, that would indicate a bad connection to ground.
REPAIR GROUND BODY HARNESS
ARE LEDs 2,3, AND 4 ON?
T OPTlONS
VISUAL
REASON FOR QUESTION
If those LEDs are not ON, that would indicate a PC6 malfunction.
2-220
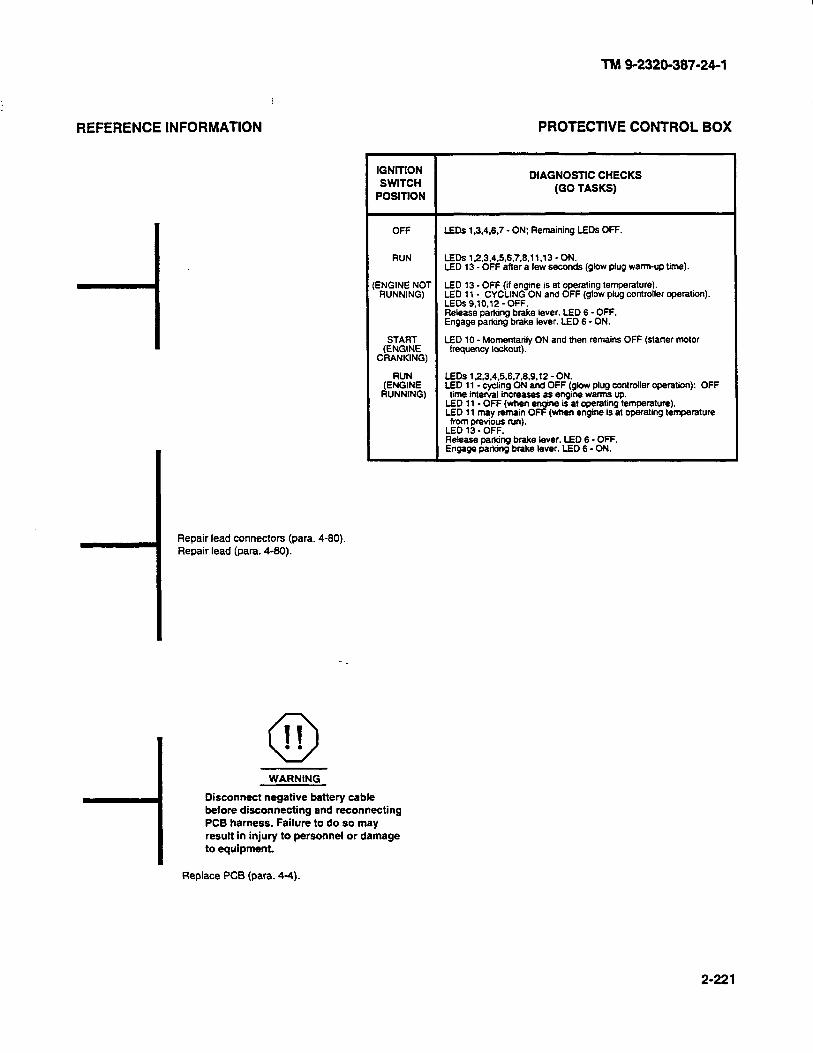
TM 9-2320-387-24-l
REFERENCE INFORMATION
, Repair lead connectors (para. 4-80).
Repair lead (para. 4-80).
0 11 . .
PROTECTIVE CONTROL BOX
IGNITION SWITCH
POSlTlON
DIAGNOSTIC CHECKS (GO TASKS)
OFF LEDs l&4.6,7 - ON: Remaining LEDs OFF.
RUN LEDs 12.3.4.5.6,7.6.11.13-ON. LED 13 - OFF aher a few seconds (glow plug warm-up tie).
ENGINE NOT RUNNING)
LED 13 -OFF (if engine is at operating temperature). LED 11 - CYCLING ON and OFF (glow plug controller operation). LEDs 9.10.12 - OFF. Release parking brake lever. LED 6 -OFF. Engage parking brake lever. LED 6 - ON.
START (ENGINE
CRANKING)
LED 10 - Momentarily ON and then remains OFF (stafier motor hequenoy lookout).
RUN (ENGINE RUNNING)
LEDs 12.3.4.6.6.7.6.9.12 -ON. LED 11. cycling ON and OFF (glow plug controller operation): OFF time interval inoreases as engine warms up.
LED 11 - OFF (v&en en LED 11 may remain OF P
‘ne is at operating temperature).
from previous run). (when engine is at operating temperature
LED 13 -OFF. Release pa&icing brake lever. LED 6 - OFF. Engage parking brake lever. LED 6 -ON.
WARNING
Disconnect negative battery cable before disconnecting and reconnecting PCS harness. Failure to do so may result in injury to personnel or damage to equipment.
Replace PC6 (para. 44).
2-221

TM 9-2320-387-24-l
PROTECTIVE CONTROL BOX 6~0~ 12.y
DIAGNOSTIC FLOWCHART
KNOWN INFO
BATTERIES OK LEAD 578 GROUND OK
POSSIBLE PROBLEMS
PARKING BRAKE SWITCH BAD
BODY HARNESS WIRES BAD
~ GLOW PLUG CONTROLiER
~ BAD
~ ALTERNATOR BAD
HARNESS WIRE 2A BAD
IGNlTlON SWITCH BAD
HARNESS WIRE 29A BAD
HARNESS WIRE 29C BAD
PROTECTIVE CONTROL
BOX BAD
LEAD 578 GROUND OK IGNlTlON SWITCH OK HARNESS WIRE 29A OK HARNESS WIRE 29C OK
POSSIBLE PROBLEMS
PARKING BRAKE SWITCH
BAD
BODY HARNESS WIRES BAD
GLOW PLUG CONTROLLER
BAD
ALTERNATOR BAD
HARNESS WIRE 2A BAD
PROTECTIVE CONTROL
BOX BAD
KNOWN INFO
BATTERIES OK LEAD 578 GROUND OK IGNITION SWITCH OK HARNESS WIRE 29A OK HARNESS WIRE 29C OK
POSSIBLE PROBLEMS
PARKING BRAKE SWITCH
BAD
BODY HARNESS WIRES BAD
GLOW PLUG CONTROLLER
BAD
ALTERNATOR BAD
HARNESS WIRE 2A BAD
PROTECTIVE CONTROL
BOX BAD
IS LED 13 ON? IF ENGINE IS AT OPERATING TEMPERATURE, LED 13 WILL NOT COME ON.
r OPTlONS
1. TRY IT.
2. VISUAL
REASON FOR QUESTlON
If this LED is not ON, that would indicate either malfunctioning ignition switch, damaged harness wires 29A and 29C, or malfunctioning PCB.
IS LED 5 ON? VISUAL
I REASON FOR QUESTION
If this LED is not ON, that would indicate PCB malfunctions.
IS LED 6 ON?
if OPTIONS
VISUAL
BRAKE SWITCH AND/
REASON FOR QUESTION
If this LED is not ON, that would indicate a parking brake switch malfunction or damage to body harness wires.

Repair lead connectors (para. 4-80).
Repair leads (para. 4-80).
TM 9-2320-387-24-l
PROTECTIVE CONTROL BOX
0 IT . . WARNING
Disconnect negative battery cable before disconnecting and reconnecting PCB harness. Failure to do so may result in injury to personnel or damage to equipment.
Replace PCB (para. 4-4).
2-223
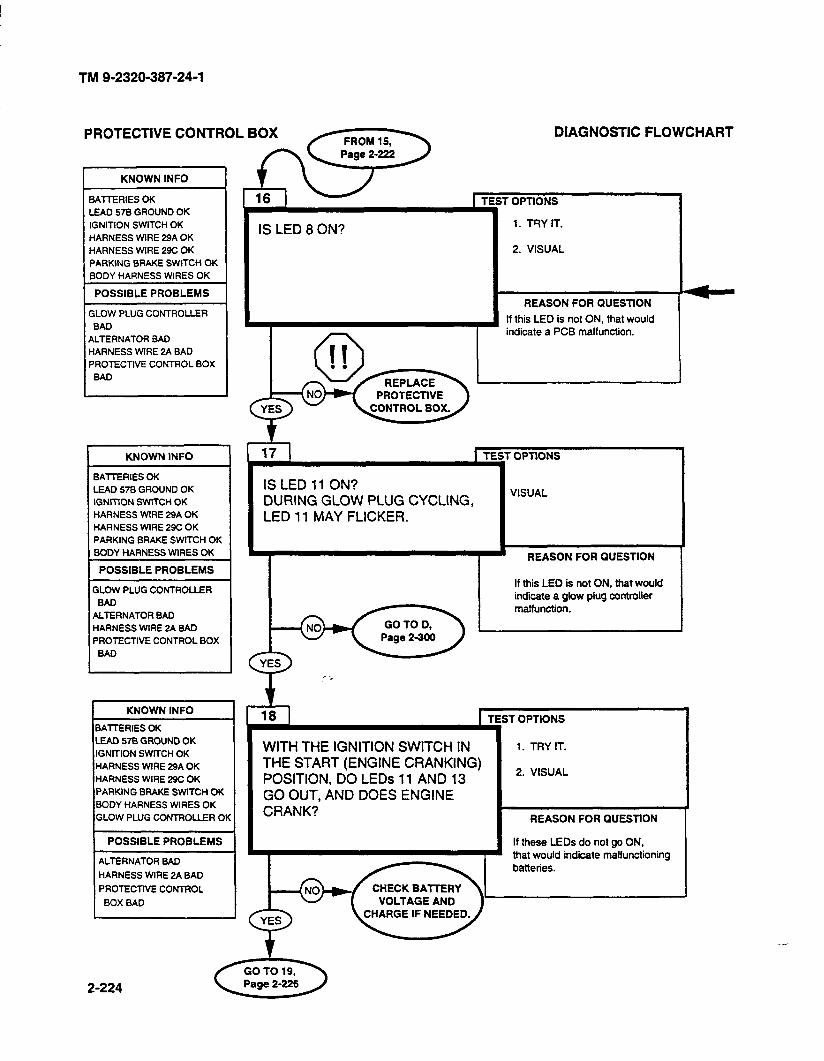
TM 9-2320-387-24-l
PROTECTIVE CONTROL BOX
KNOWN INFO
BAllERlES OK
LEAD 578 GROUND OK
IGNITION SWITCH OK
HARNESS WIRE 29A OK
HARNESS WIRE 29C OK
PARKING BRAKE SWITCH OK
BODY HARNESS WIRES OK
POSSIBLE PROBLEMS
GLOW PLUG CONTROLLER
BAD
ALTERNATOR BAD
HARNESS WIRE 2A BAD
PROTECTIVE CONTROL BOX
BAD
KNOWN INFO
BAllERIES OK
LEAD 578 GROUND OK
IGNITION SWII%H OK
HARNESS WIRE 29A OK
HARNESS WIRE 29C OK
PARKING BRAKE SWlTCH OK
BODY HARNESS WIRES OK
POSSIBLE PROBLEMS
GLOW PLUG CONTROLLER
BAD
ALTERNATOR BAD
HARNESS WIRE 2A BAD
PROTECTlVE CONTROL BOX
BAD
I KNOWN INFO
BAllERlES OK
LEAD 578 GROUND OK
IGNITION SWlTCH OK
HARNESS WIRE 29A OK
i
HARNESS WIRE 29C OK
PARKING BRAKE SWITCH OK
BODY HARNESS WIRES OK
GLOW PLUG CONTROLLER OK
POSSIBLE PROBLEMS
ALTERNATOR BAD
HARNESS WIRE 2A BAD
PRO?ECTlVE CONTROL
BOX BAD
r IS LED 8 ON?
DIAGNOSTIC FLOWCHART --
1 OPTIONS
1. TSY rr.
2. VISUAL
REASON FOR QUESTlON
If this LED is not ON, that would indicate a PCB malfunction.
PROTECTIVE
IS LED 11 ON? DURING GLOW PLUG CYCLING, LED 11 MAY FLICKER.
VISUAL
/ 7 REASON FOR QUESTION
WITH THE IGNITION SWITCH IN THE START (ENGINE CRANKING) POSITION, DO LEDs 11 AND 13 GO OUT, AND DOES ENGINE CRANK?
18 1 TEST OPTIONS 1
1. TRY rr.
2. VISUAL
i REASON FOR QUESTlON
If these LEDs do not go ON, that would indicate malfunctioning batteries.
CHECK BATTERY VOLTAGE AND
YES
?
2-224
REFERENCE INFORMATION
-I 0 II . . WARNING
Disconnect negative battery cable before disconnecting and reconnecting PCS harness. Failure to do so may result in injury to Personnel or damage to equipment.
’ Replace PCB (para. 4-4).
TM 9-2320-387-24-l
PROTECTIVE CONTROL BOX
-
2-225
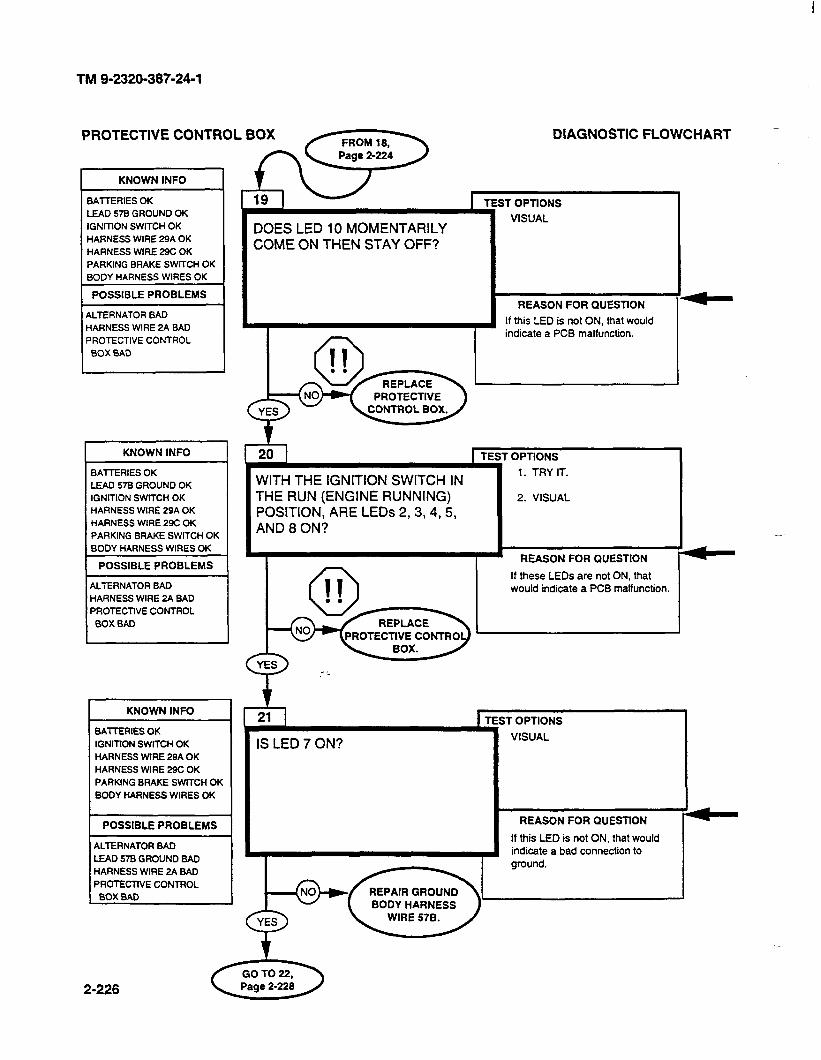
TM 9-2320-387-24-l
PROTECTIVE CONTROL BOX DIAGNOSTIC FLOWCHART _
KNOWN INFO
BA?TERlESOK LEAD 578 GROUND OK
IGNITION SWITCH OK
HARNESS WIRE 29A OK
HARNESS WIRE 29C OK
PARKING BRAKE SWITCH OK
BODY HARNESS WIRES OK
POSSIBLE PROBLEMS
ALTERNATOR BAG HARNESS WIRE 2A BAD
PROTECTIVE CONTROL
BOX BAD
KNOWN INFO I
BATTERIES OK
LEAD 578 GROUND OK
IGNITION SWITCH OK
HARNESS WIRE 29A OK
HARNESS WIRE 29C OK
PARKING BRAKE SWKCH OK
BODY HARNESS WIRES OK
POSSIBLE PROBLEMS t
ALTERNATOR BAD
HARNESS WIRE 2A BAD
PROTECTlVE CONTROL
BOX BAD
KNOWN INFO
BAtTERIES OK
IGNlTlON SWITCH OK
HARNESS WIRE 29A OK
HARNESS WIRE 29C OK
PARKING BRAKE SWITCH OK
BODY HARNESS WIRES OK
POSSIBLE PROBLEMS
ALTERNATOR BAG LEAD 578 GROUND BAD
HARNESS WIRE 2A BAD
PROTECTlVE CONTROL
BOX BAD
DOES LED 10 MOMENTARILY COME ON THEN STAY OFF?
PROTECTIVE
;T OPllONS
VISUAL
1 TES
1
REASON FOR QUESTION
If this LED is not ON, that would indicate a PCB malfunction.
WITH THE IGNITION SWITCH IN THE RUN (ENGINE RUNNING) 2. VISUAL
POSITION, ARE LEDs 2,3,4,5, AND 8 ON?
- REASON FOR QUESTION
If these LEDs are not ON, that would indicate a PCB malfunction.
IS LED 7 ON?
T OPTIONS
VISUAL
REASON FOR QUESTION
If this LED is not ON, that would indicate a bad connection to ground.
/_
2-226
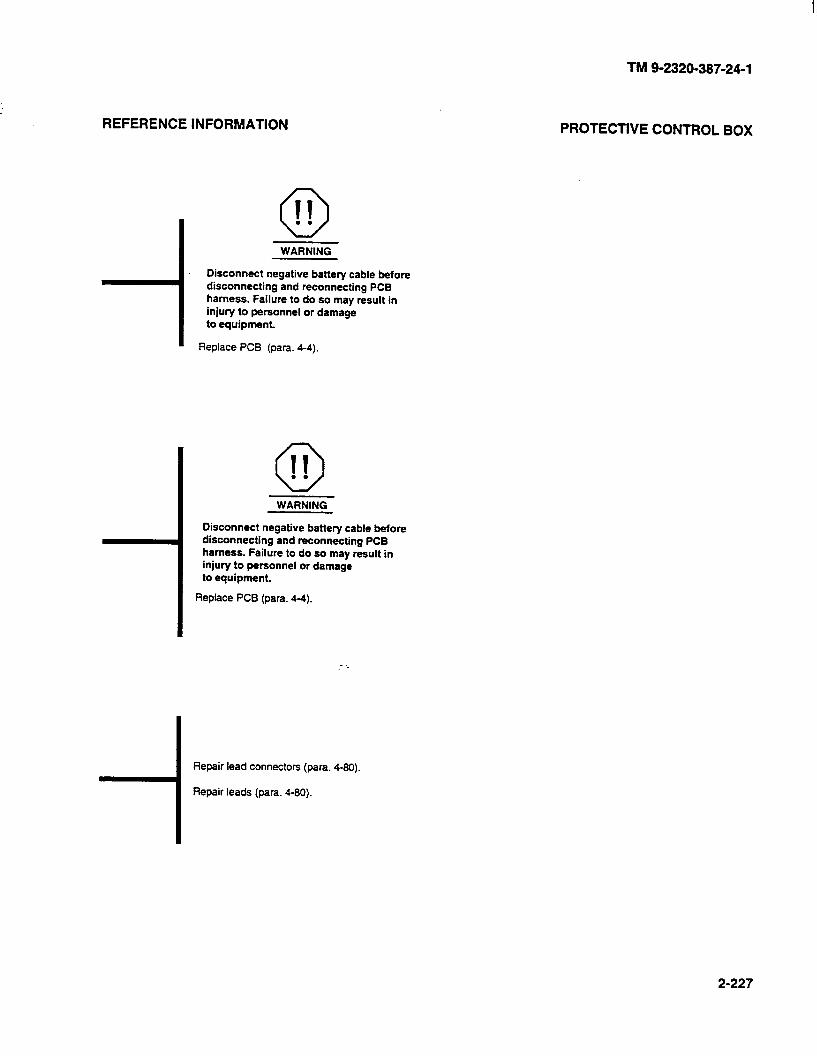
TM 9-2320-387-24-l
REFERENCE INFORMATION
0 II . . WARNING
Disconnect negative battery cable before disconnecting and reconnecting PCB harness. Failure to do so may result in injury to personnel or damage to equipment.
Replace PCB (para. 4-4).
0 11 . . WARNING
Disconnect negative battery cable before disconnecting and reconnecting PCB harness. Failure to do so may result in injury to personnel or damage to equipment.
Replace PCB (para. 4-4).
Repair lead connectors (para. 4-80).
Repair leads (para. 4-80).
PROTECTIVE CONTROL BOX
2-227
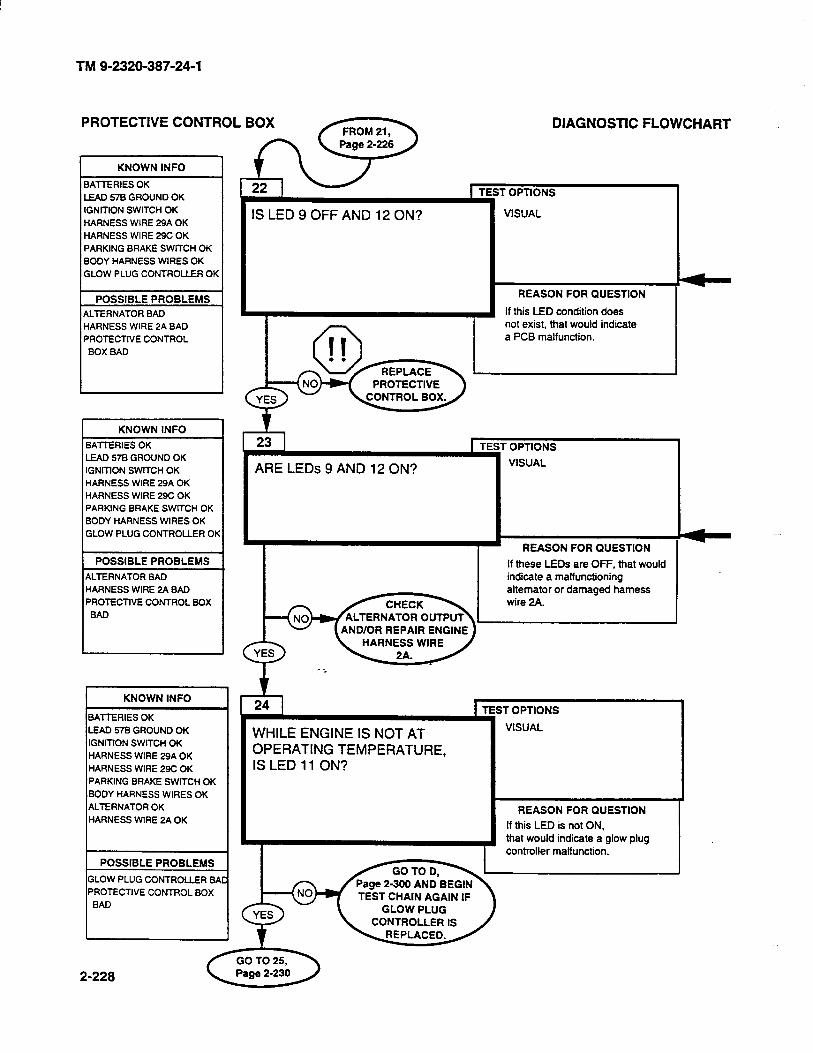
TM 9-2320-387-24-l
I KNOWN INFO 1 BAllERIES OK
LEAD 578 GROUND OK
IGNITION SWlTCH OK
HARNESS WIRE 29A OK
HARNESS WIRE 29C OK
PARKING BRAKE SWITCH OK
BODY HARNESS WIRES OK
GLOW PLUG CONTROLLER OK
PROTECTIVE CONTROL BOX
IS LED 9 OFF AND 12 ON?
BOX BAD
I KNOWN INFO I BATI-ERIES OK
WD 578 GROUND OK
IGNlTlON SWITCH OK
HARNESS WIRE 29A OK
HARNESS WIRE 29C OK
PARKING BRAKE SWITCH OK
BODY HARNESS WIRES OK
GLOW PLUG CONTROLLER OK
POSSIBLE PROBLEMS
ALTERNATOR BAD
I HARNESS WIRE 2A BAD
PROTECTlVE CONTROL BOX I
KNOWN INFO
BATIERIES OK
LEAD 578 GROUND OK
IGNlTlON SWITCH OK
HARNESS WIRE 29A OK
HARNESS WIRE 29C OK
PARKING BRAKE SWITCH OK
BODY HARNESS WIRES OK
ALTERNATOR OK
HARNESS WIRE 2A OK
POSSIBLE PROBLEMS
I GLOW PLUG CONTROLLER BA
PROTECTIVE CONTROL BOX
BAD
DIAGNOSTIC FLOWCHART
T OPTIONS
VISUAL
PROTECTIVE
REASON FOR QUESTlON
If this LED condition does not exist, that would indicate a PCB malfunction.
ARE LEDs 9 AND 12 ON? VISUAL
If these LEDs are OFF, that would indicate a malfunctioning alternator or damaged harness
HARNESS WIRE
WHILE ENGINE IS NOT AT OPERATING TEMPERATURE, IS LED 11 ON?
’ TEST OPTIONS
1
VISUAL
REASON FOR QUESTION
If this LED is not ON, that would indicate a glow plug controller malfunction.
TEST CHAIN AGAIN IF GLOW PLUG
CONTROLLER IS
2-228
REFERENCE INFORMATION
0 II . . WARNING
Disconnect negative battery cable before disconnecting and reconnecting PCB harness. Failure to do so may result in injury to personnel or damage to equipment.
Replace PCB (pat-a. 44).
1 Repair lead connectors (para. 4-80). Repair leads (para. 4-80).
TM 9-2320-387-24-I
PROTECTIVE CONTROL BOX
2-229
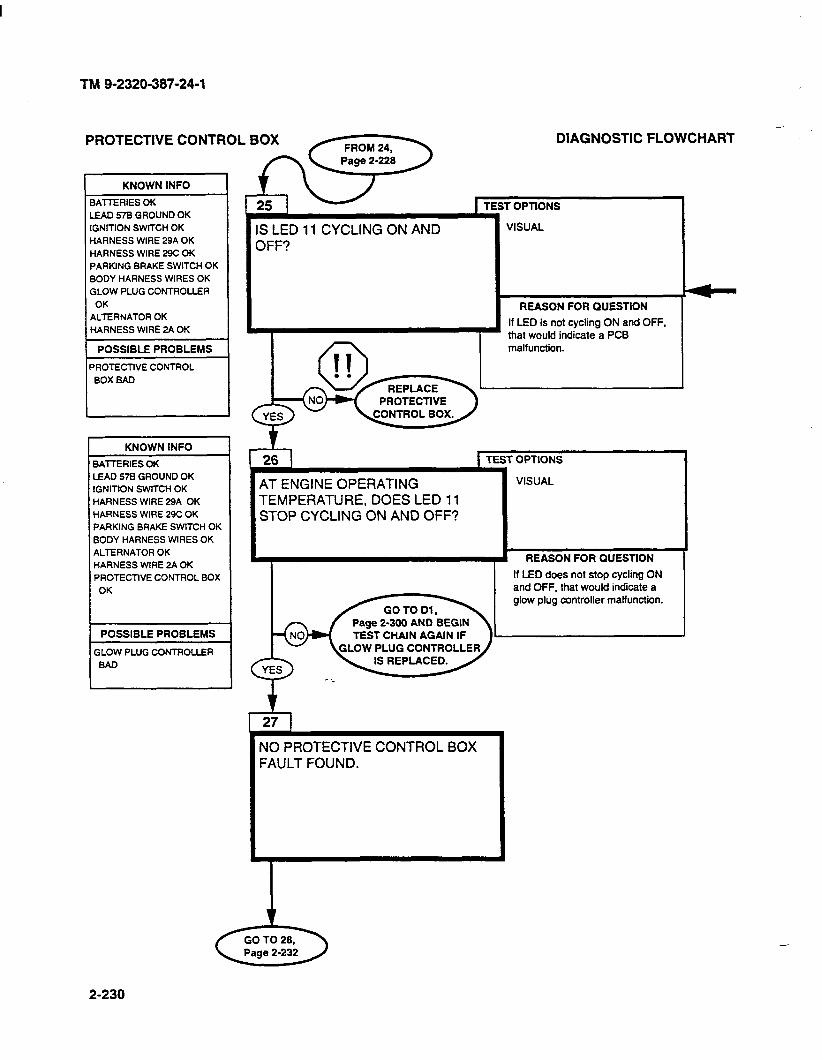
TM 9-2320-387-24-l
PROTECTIVE CONTROL BOX
KNOWN INFO
BAllERlES OK
LEAD 578 GROUND OK
IGNITION SWlTCH OK
HARNESS WIRE 29A OK
HARNESS WIRE 29C OK
PARKING BRAKE SWITCH OK
BODY HARNESS WIRES OK
GLOW PLUG CONTROLLER
OK
ALTERNATOR OK
HARNESS WIRE 2A OK
POSSIBLE PROBLEMS
PROTECTlVE CONTROL
BOX BAD
I KNOWN INFO
BAlTERIES OK
LEAD 578 GROUND OK
IGNlTlON SWTCH OK
HARNESS WIRE 29A OK
HARNESS WIRE 29C OK
PARKING BRAKE SWITCH OK
BODY HARNESS WIRES OK
ALTERNATOR OK
HARNESS WIRE 2A OK
PROTECTIVE CONTROL BOX
OK
POSSIBLE PROBLEMS
GLOW PLUG CONTROLLER
BAD
S LED 11 CYCLING ON AND 3FF?
DIAGNOSTIC FLOWCHART -
I OPTlONS
VISUAL
REASON FOR QUESTION
If LED is not cycling ON and OFF,
that would indicate a PCB malfunction.
1 TEST OPTIONS
AT ENGINE OPERATING TEMPERATURE, DOES LED 11 STOP CYCLING ON AND OFF?
VISUAL
I REASON FOR QUESTION
If LED does not stop cycling ON
IF
1 glow plug controller malfunction.
TEST CHAIN AGAIN
and OFF, that woulb indicate a
IS REPLACED.
NO PROTECTIVE CONTROL BOX FAULT FOUND.
2-230
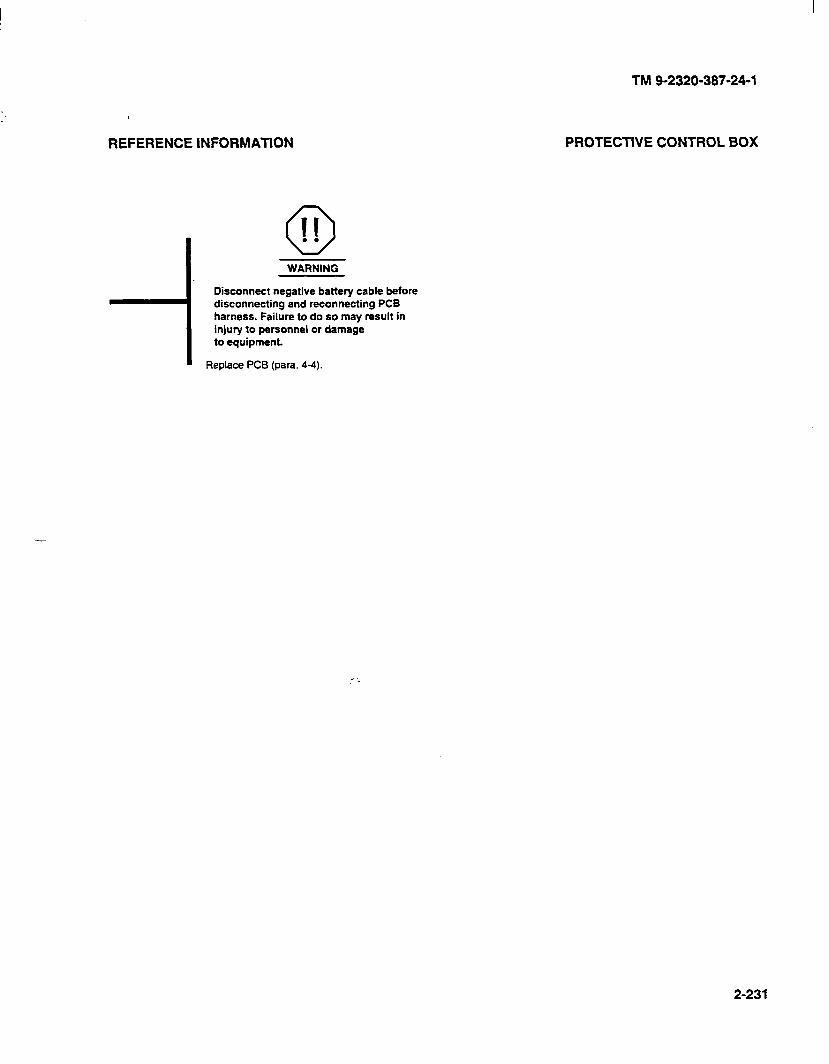
REFERENCE INFORMATION
0 II . . WARNING
Disconnect negative battery cable before disconnecting and reconnecting PCB harness. Failure to do so may result in injury to personnel or damage to equipment.
Replace PCB (para. 4-4).
TM 9-2320-387-24-l
PROTECTIVE CONTROL BOX
-
- :
2-231
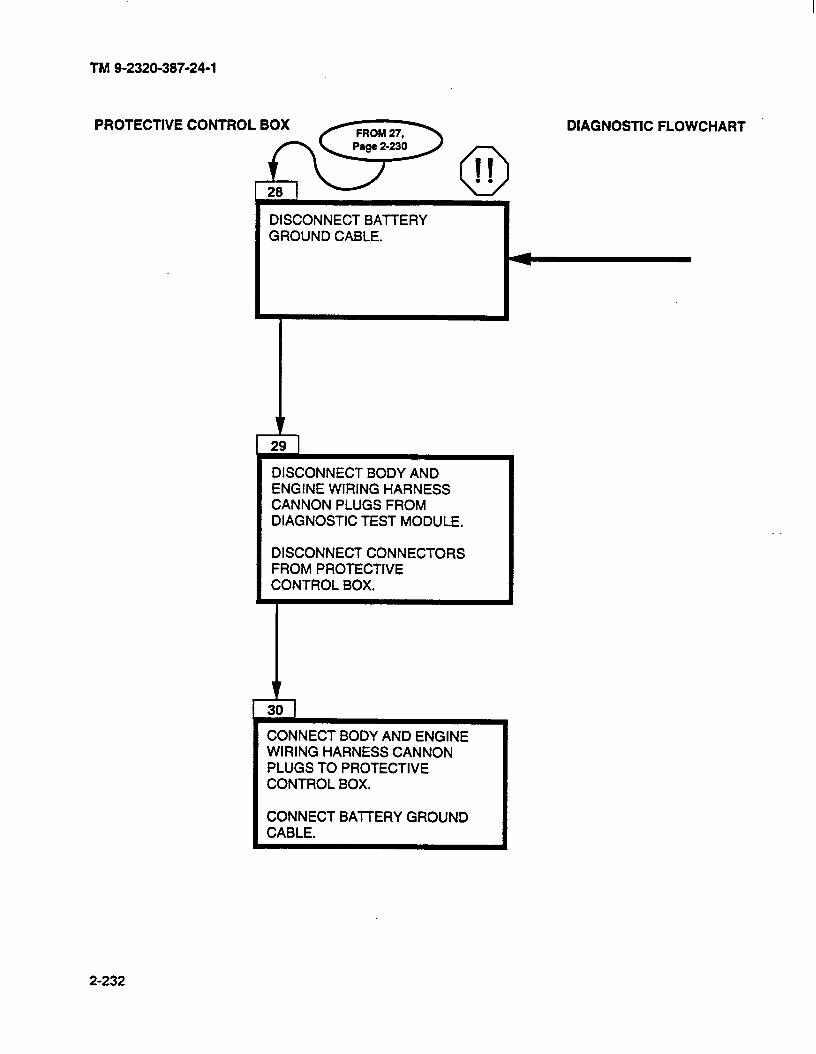
TM 9-2320-387-24-l
DISCONNECT BA-I-I-ERY GROUND CABLE.
.
PROTECTIVE CONTROL BOX
DISCONNECT BODY AND ENGINE WIRING HARNESS CANNON PLUGS FROM DIAGNOSTIC TEST MODULE.
DISCONNECT CONNECTORS FROM PROTECTIVE CONTROL BOX.
CONNECT BODY AND ENGINE WIRING HARNESS CANNON PLUGS TO PROTECTIVE CONTROL BOX.
CONNECT BATTERY GROUND CABLE.
DIAGNOSTIC FLOWCHART
-
2-232
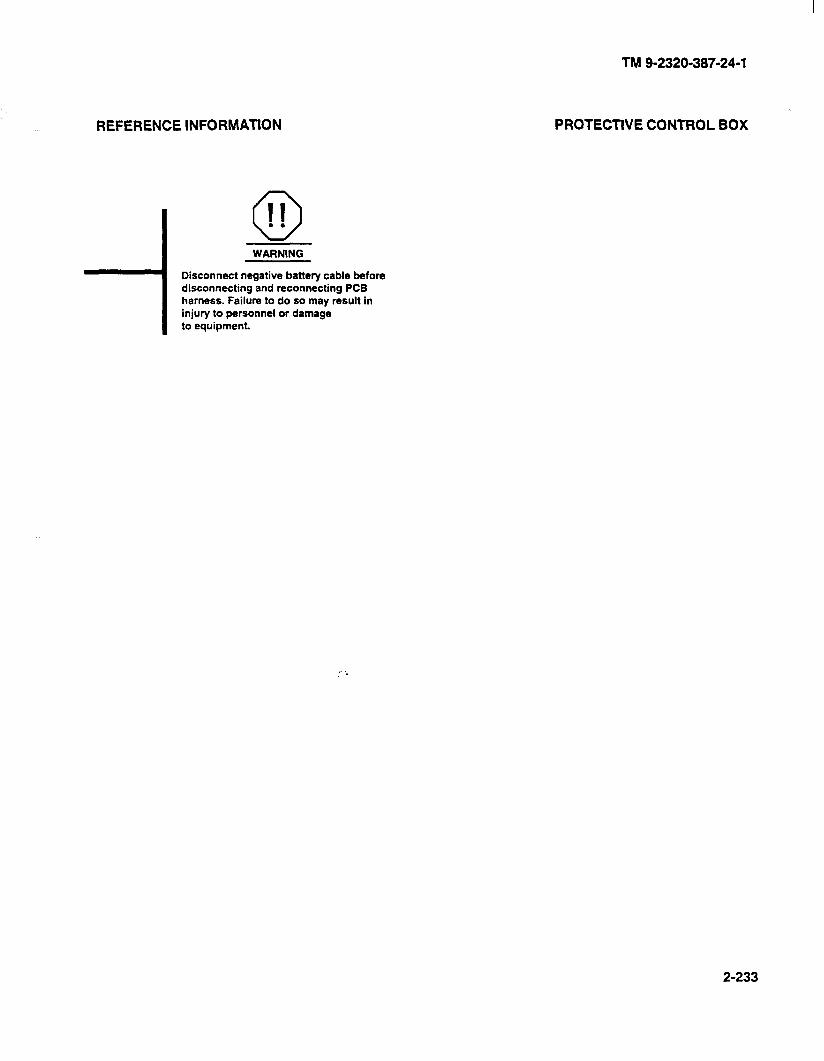
REFERENCE INFORMATION
0 II . . WARNING
Disconnect negative battery cable before disconnecting and reconnecting PCB harness. Failure to do so may result in injury to personnel or damage to equipment.
TM 9-2320-387-24-l
PROTECTIVE CONTROL BOX
2-233
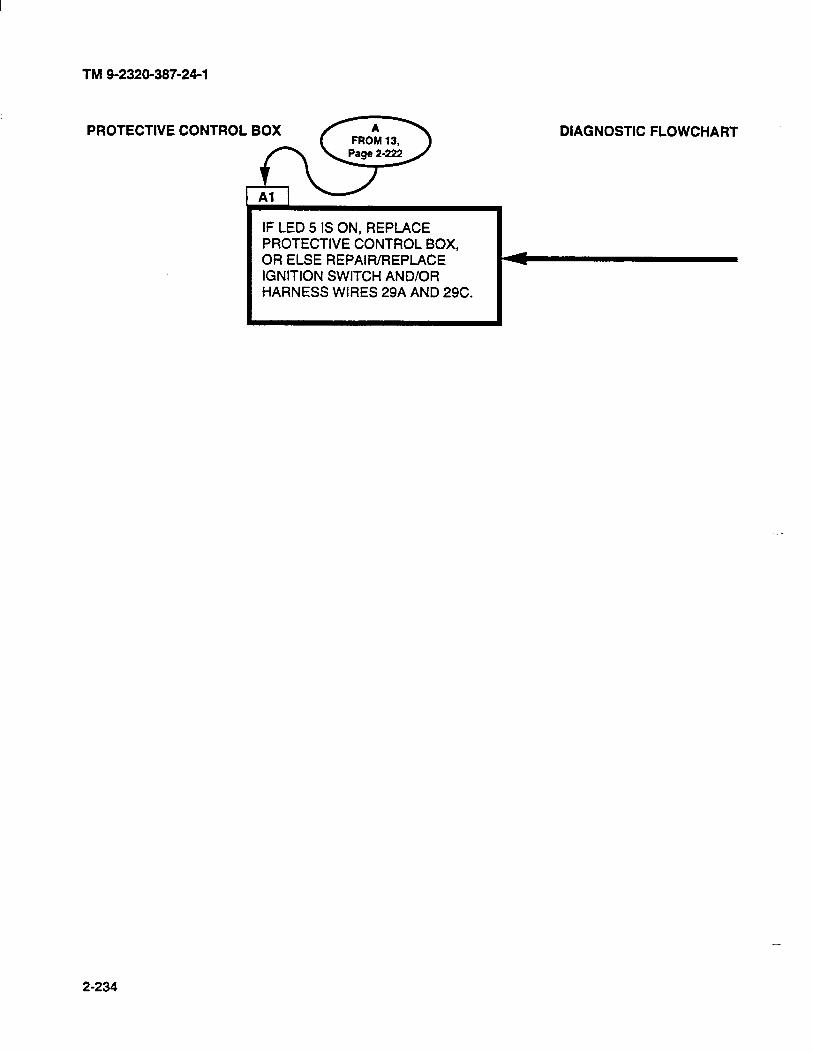
TM 9-2320-387-24-l
PROTECTIVE
IF LED 5 IS ON, REPLACE PROTECTIVE CONTROL BOX, OR ELSE REPAIWREPLACE IGNITION SWITCH AND/OR HARNESS WIRES 29A AND 29C.
DIAGNOSTIC FLOWCHART
-
-
2-234
REFERENCE INFORMATION
i
Replace PCB (para. 44). Repair/replace rotary switch (para. 4-10). fiepairheplace leads 29A and 29C (para. 4-80).
TM 9-2320-387-24-l
PROTECTIVE CONTROL BOX
2-236/(2-236 blank)
TM 9-2320-387-24-l
2-35. BATTERY CIRCUIT TESTS
These battery circuit tests may be run any time you think you have a battery problem of if you were sent here by another test chain. Just follow the path, answering the questions. Additional information and notes are given on the facing page when necessary.
The fold-out page shows the location of the major components of the battery circuit in case you are not familiar with them. Fold-out page FP-13 may be left open for reference while testing.
,- :
2-237
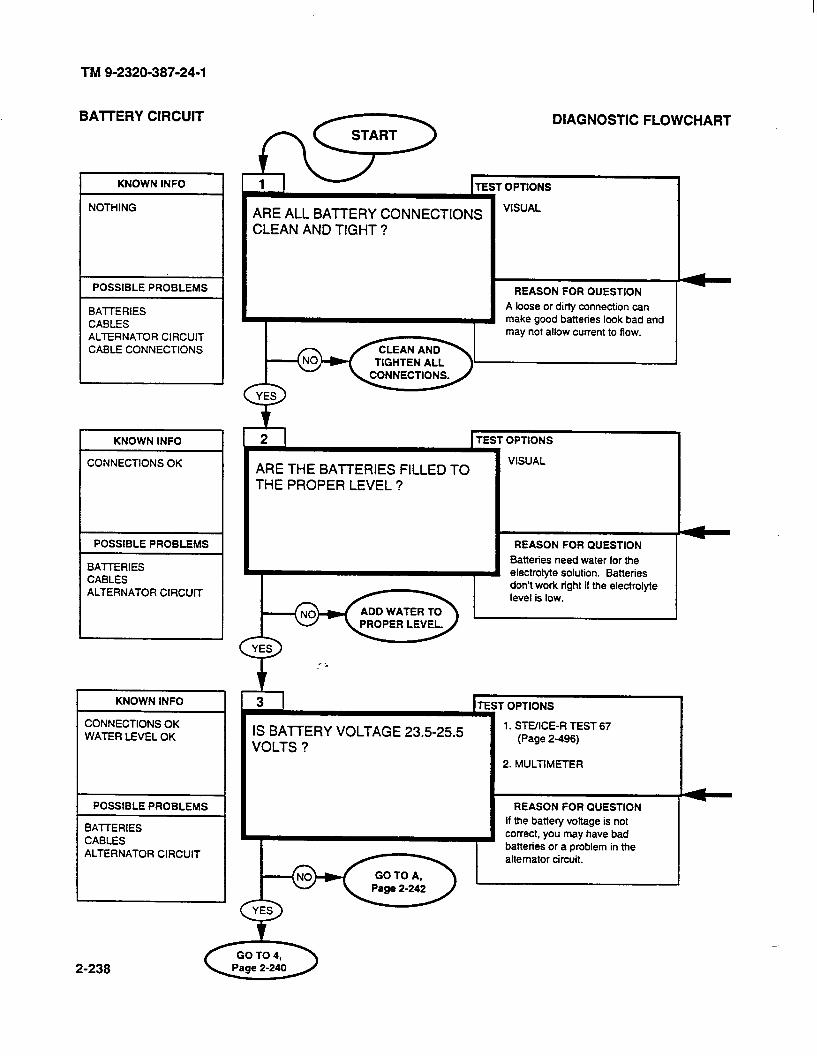
TM 9-2320-387-24-l
BAlTERY CIRCUIT
KNOWN INFO
NOTHING
POSSIBLE PROBLEMS
BAlTERlES CABLES ALTERNATOR CIRCUIT CABLE CONNECTIONS
KNOWN INFO
CONNECTIONS OK
POSSIBLE PROBLEMS
BAlTERlES CABLES ALTERNATOR CIRCUIT
KNOWN INFO
CONNECTIONS OK WATER LEVEL OK
POSSIBLE PROBLEMS
BAlTERIES CABLES ALTERNATOR CIRCUlT
ARE ALL BAlTERY CONNECTIONS CLEAN AND TIGHT ?
DIAGNOSTIC FLOWCHART
TEST OPTIONS
REASON FOR QUESTION
A loose or dirty connection can make good batteries look bad and may not allow current to flow.
VISUAL
ARE THE BATTERIES FILLED TO THE PROPER LEVEL ?
TEST OPTlONS
VISUAL
REASON FOR QUESTION
Batteries need water for the electrolyte solution. Batteries don’t work right if the electrolyte level is low.
TEST OPTIONS
IS BATTERY VOLTAGE 23.5-25.5
I
1. STEIICE-R TEST 67
VOLTS ? (Page 2-496)
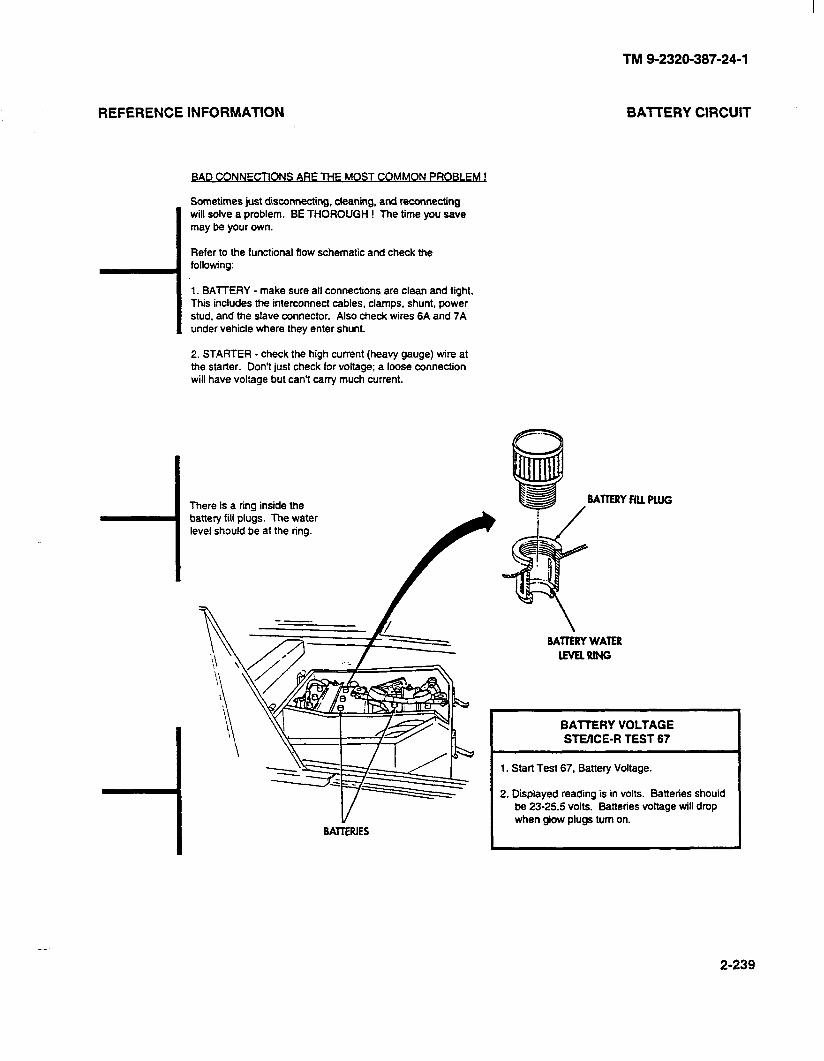
REFERENCE INFORMATION
BAD CONNFCTIONS ARF MF MOST COMMON PRO61 FM !
Sometimes just disconnecting, cleaning, and reconnecting will solve a problem. BE THOROUGH ! The time you save may be your own.
Refer to the functional flow schematic and check the following:
1. BAlTERY - make sure all connections are clean and tight. This includes the interconnect cables, clamps, shunt, power stud, and the slave connector. Also check wires 6A and 7A under vehicle where they enter shunt.
2. STARTER - check the high current (heavy gauge) wire at the starter. Don’t just check for voltage; a loose connection will have voltage but can’t carry much current.
There is a ring inside the battery fill plugs. The water level should be at the ring.
BATTERIES
TM 9-2320-387-24-l
BAJTERY CIRCUIT
BATTERY FILL PUJG
BATTERY WATER
lEvElRlNG
BATTERY VOLTAGE
STEKE-R TEST 67
1. Start Test 67. Battery Voltage.
2. Displayed reading is in volts. Batteries should be 23-25.5 volts. Batteries voltage will drop when glow plugs turn on.
2-239
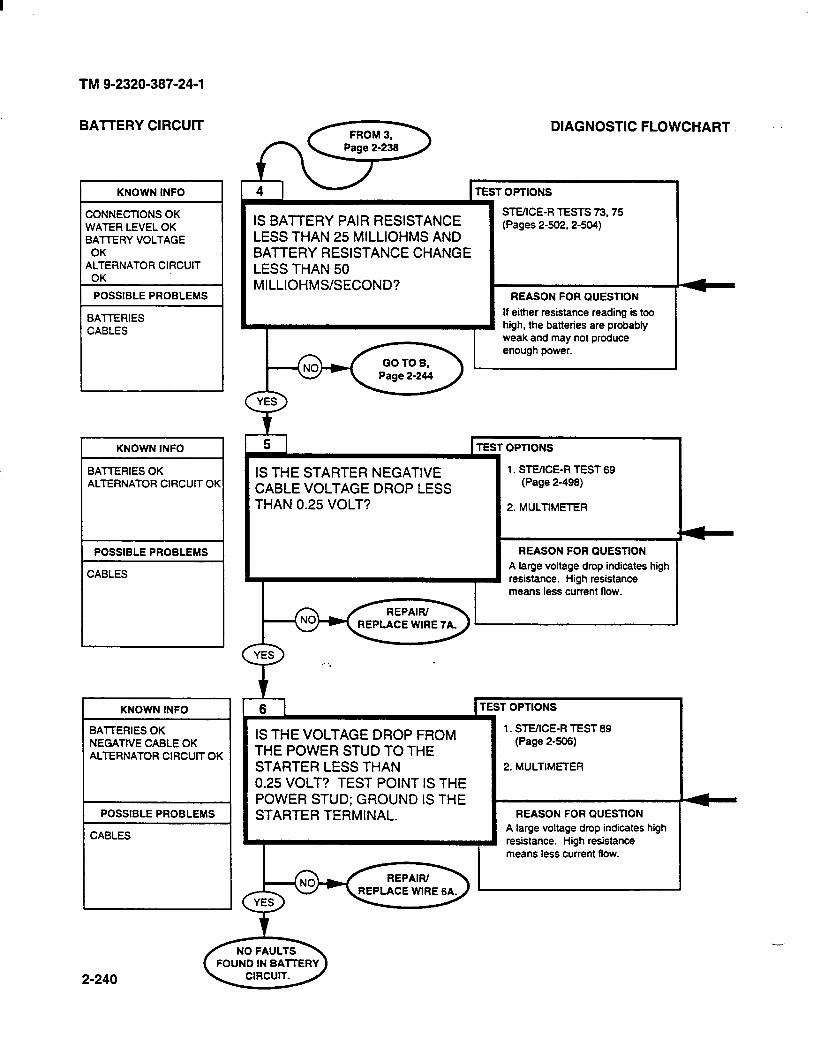
TM 9-2320-387-24-l
BAlTERY CIRCUIT
KNOWN INFO I
CONNECTlONS OK WATER LEVEL OK BATTERY VOLTAGE
OK ALTERNATOR CIRCUIT
POSSIBLE PROBLEMS
BATTERIES CABLES
I KNOWN INFO
BATTERIES OK ALTERNATOR CIRCUIT OK
POSSIBLE PROBLEMS
CABLES
KNOWN INFO I
BATTERIES OK NEGATIVE CABLE OK ALTERNATOR CIRCUIT OK
POSSIBLE PROBLEMS
CABLES
’ OPTIONS
IS BATTERY PAIR RESISTANCE LESS THAN 25 MlLLlOHMS AND BATTERY RESISTANCE CHANGE LESS THAN 50 MILLIOHMS/SECOND?
STE/lCE-R TESTS 73,75 (Pages 2-602.2-504)
REASON FOR QUESTION
If either resistance reading is too high, the batteries are probabty weak and may not produce enough power.
5 ] TEST OPTtONS /
IS THE STARTER NEGATIVE 1. STEIICE-R TEST 69
CABLE VOLTAGE DROP LESS (Page 2-496)
THAN 0.25 VOLT? 2. MULTIMETER
REASON FOR QUESTION
A large voltage drop indicates high resistance. High resistance means less current flow.
IS THE VOLTAGE DROP FROM THE POWER STUD TO THE STARTER LESS THAN 0.25 VOLT? TEST POINT IS THE POWER STUD; GROUND IS THE STARTER TERMINAL.
TEST OPTIONS
1. St-EXE-R TEST 89 (Page 2-606)
2. MULTIMETER
REASON FOR QUESTtON
A large voltage drop indicates high resistance. High resistance means less current flow.
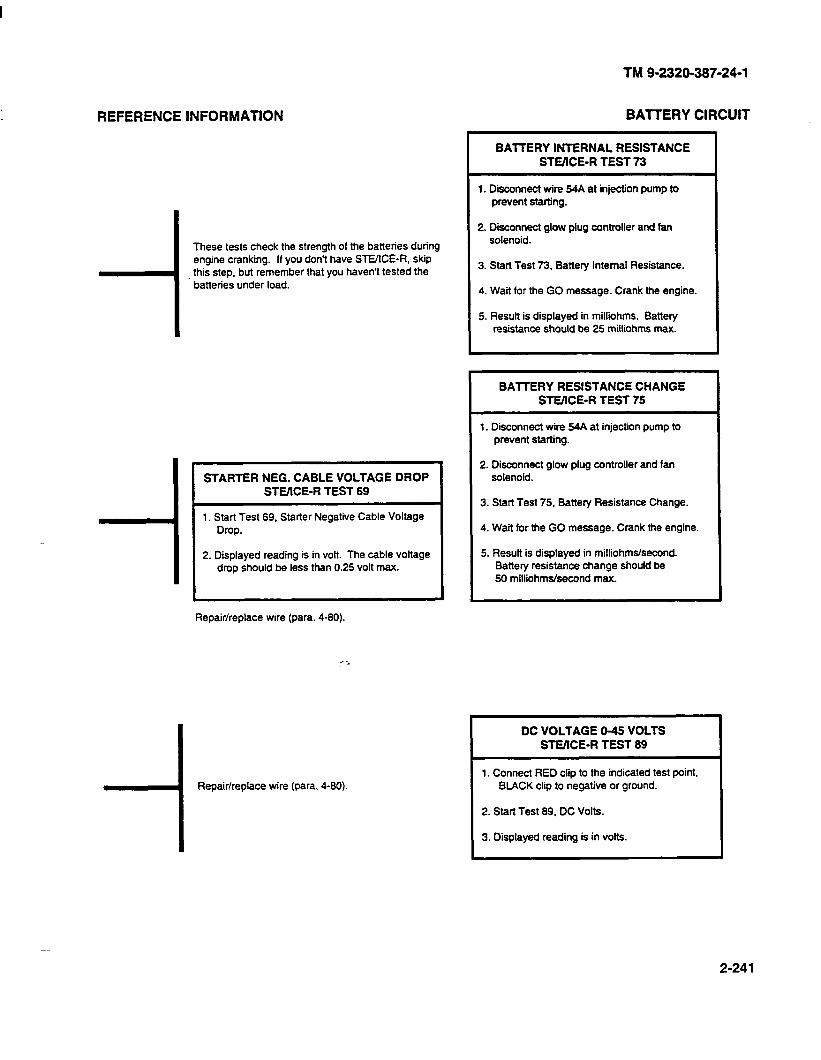
REFERENCE INFORMATION
-I
I
These tests check the strength of the batteries during engine cranking. If you don’t have STUICE-R, skip this step, but remember that you haven’t tested the batteries under load.
STARTER NEG. CABLE VOLTAGE DROP STE/lCE-R TEST 69
1. Start Test 69, Starter Negative Cable Voltage Drop.
2. Displayed reading is in volt. The cable voltage drop should be less than 0.25 volt max.
Repair/replace wire (para. 4-80).
-I Repair/replace wire (para. 4-60).
TM 9-2320-387-24-1
BAITERY CIRCUIT
BAlTERY INTERNAL RESISTANCE STOICE-R TEST 73
1. Diinnect wire 54A at injection pump to prevent starting.
2. Disconnect glow plug controller and fan solenoid.
3. Start Test 73, Battery Internal Resistance.
4. Wait for the GO message. Crank the engine.
5. Result is displayed in milliihms. Battery resistance should be 25 milliohms max.
BATTERY RESISTANCE CHANGE STUICE-R TEST 75
1. Disconnect wire 54A at injection pump to prevent starting.
2. Disconnect glow plug controller and fan solenoid.
3. Start Test 75, Battery Resistance Change.
4. Wait for the GO message. Crank the engine.
5. Result is displayed in milliohms&cond. Battery resistance change should be 50 milliohms/second max.
DC VOLTAGE O-45 VOLTS STEIICE-R TEST 69
1. Connect RED clip to the indicated test point, BLACK clip to negative or ground.
2. Start Test 69, DC Volts.
3. Displayed reading is in volts.
2-241
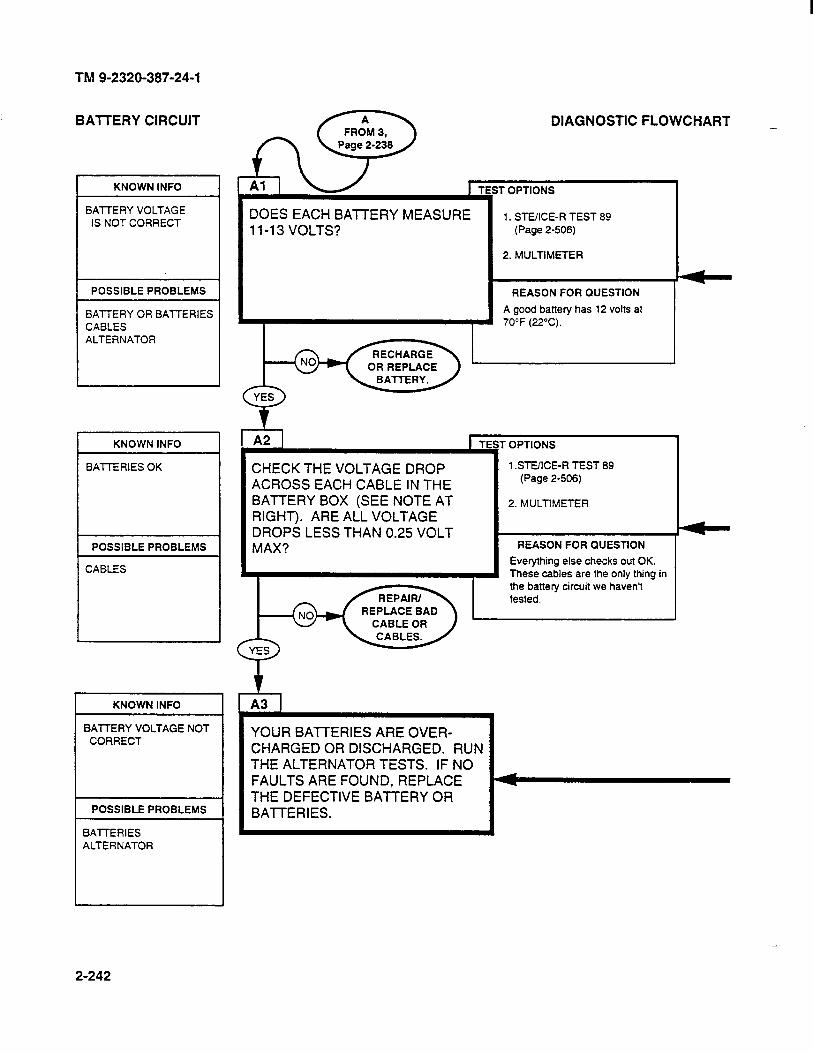
TM 9-2320-387-24-l
BATTERY CIRCUIT
KNOWN INFO
BATTERY VOLTAGE IS NOT CORRECT
POSSIBLE PROBLEMS
BATTERY OR BATTERIES CABLES ALTERNATOR
KNOWN INFO
BATTERIES OK
POSSIBLE PROBLEMS
CABLES
KNOWN INFO
BATTERY VOLTAGE NOT CORRECT
POSSIBLE PROBLEMS
BATTERIES ALTERNATOR
DOES EACH BATTERY MEASURE 11-13 VOLTS?
T OPTIONS
1. STUICE-R TEST 69 (Page 2-506)
2. MULTIMETER
REASON FOR QUESTION
A good battery has 12 volts at 70’F (22°C).
A2 t r=
CHECK THE VOLTAGE DROP ACROSS EACH CABLE IN THE BATTERY BOX (SEE NOTE AT RIGHT). ARE ALL VOLTAGE DROPS LESS THAN 0.25 VOLT MAX?
OPTIONS
1 .STE/lCE-R TEST 69 (Page 2-506)
2. MULTIMETER
REASON FOR QUESTION
Everything else checks out OK. These cables are the only thing in the battery circuit we haven’t tested.
A3 1
YOUR BAlTERlES ARE OVER- CHARGED OR DISCHARGED. RUN THE ALTERNATOR TESTS. IF NO FAULTS ARE FOUND, REPLACE THE DEFECTIVE BAlTERY OR BATTERIES.
2-242
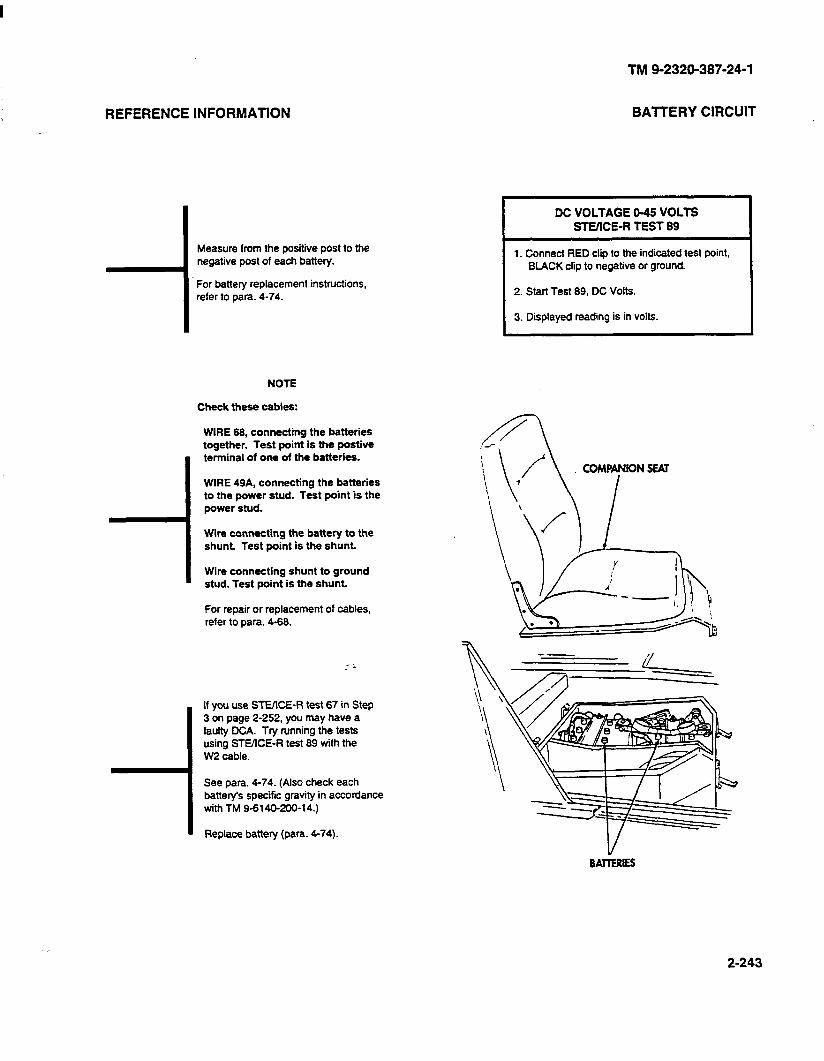
REFERENCE INFORMATION
Measure from the positive post to the negative post of each battery.
For battery replacement instructions, refer to para. 4-74.
NOTE
Check these cables:
WIRE 68, connecting the batteries together. lest point is the postive terminal of one of the batteries.
WIRE 49A, connecting the batteries to the power stud. lest point is the power stud.
Wire connecting the battery to the shunt. Test point is the shunt.
Wire connecting shunt to ground stud. Test point is the shunt.
For repair or replacement of cables, refer to para. 4-68.
If you use STEZE-R test 67 in Step 3 on page 2-252, you may have a faufty DCA. Try running the tests using STE/ICE-R test 89 with the W2 cable.
See para. 4-74. (Also check each battery’s specific gravity in accordance with TM 9-6140-200-14.)
Replace battery (para. 4-74).
TM 9-2320-387-24-l
BA’lTERY CIRCUIT
DC VOLTAGE O-45 VOLTS STEYICE-R TEST 89
1. Connect RED clip to the indicated test point. BLACK dip to negative or ground.
2. Start Test 89, DC Volts.
3. Displayed reading is in volts.
2-243
TM 9-2320-387-24-l
BATTERY CIRCUIT
I KNOWN INFO I
BATTERY RESISTANCE NO GOOD
1 POSSIBLE PROBLEMS 1
BATTERIES CABLES
KNOWN INFO
BATTERIES OK
POSSIBLE PROBLEMS
CABLES
lB* IS EACH BAlTERY RESISTANCE LESS THAN 25 MILLIOHMS AND EACH BATTERY RESISTANCE CHANGE LESS THAN 50 MILLIOHMS/SECOND ?
DIAGNOSTIC FLOWCHART
1 TEST OPTIONS
1. REARRANGE BATTERY BOX TO TEST ONE BATTERY.
2. RUN STEIICE-R TESTS 73.75. (Pages 2-502,2-6&l).
REASON FOR QUESTlON
If either resistance reading is too high, the batteries are probably weak and may not produce enough power.
r 82 1
CHECK THE VOLTAGE DROP ACROSS ALL CABLES IN THE BAll-ERY BOX (SEE NOTE AT RIGHT) AND THE POSITIVE AND NEGATIVE CABLES TO THE STARTER. ARE ALL VOLTAGE DROPS LESS THAN 0.25 VOLT?
ITEST
I
OPTIONS
1. STEIlCE-R TEST 69 (Page 2-506)
2. STEIlCE-R TEST 74 (STARTER CIRCUIT RESISTANCE) OR TEST 69 (NEGATIVE CABLE DROP) OR TEST 66 (STARTER MOTOR. VOLTAGE) (Pages 2-503,2-496, 2-497)
3. MULTIMETER
REASON FOR QUESTION
Everything else has checked OK. These cables are the only thing in the battery circuit we haven’t tested.
1 I
NO FAULTS FOUND. (IF YOU USED TESTS 73 & 75 IN STEP 4, P. 2-240, YOU MAY HAVE A PROBLEM WITH THE DCA. CHECK THE DCA CONNECTIONS AND TRY RUNNING STEP 4 USING TESTS 77 & 79.) SEE NOTE TO RIGHT.
2-244
REFERENCE INFORMATION
-I Replace batteries (para. 4-74).
NOTE
Check these cables: WIRE 66, connecting the batteries together. Test point is the positive terminal of one of the batteries. WIRE 49A, connecting the battery to the power stud. Test point is the power stud. Wire connecting the battery to the shunt. Test point is the negative terminal of the battery. Wire connecting shunt to ground stud. Test point is the shunt.
Replace batteries (para. 4-74).
I NOTE
Tests T7 and 79 are TK tests that do the
-I same thing that DCA tests 73 and 76 do. See TM 9-491M71-12&P for instructions on how to run these tests.
TM 9-2320-387-24-l
BATTERY CIRCUIT
BAlTERY INTERNAL RESISTANCE STUICE-R TEST 73
1. Disconnect wire 54A at injection pump to prevent starting.
2. Disconnect glow plug controller and fan solenoid (to keep waveform clean).
3. Start Test 73. Battery Internal Resistance.
4. Wait for the GO message. Crank the engine.
5. Result is displayed in milliohms. Battery resistance should be 25 milliohms max.
BAlTERY RESISTANCE CHANGE STUICE-R TEST 75 I
1. Disconnect wire 54A at injection pump to prevent stating.
2. Disconnect glow plug controller and fan solenoid (to keep waveform clean).
3. Start Test 75. Battery Resistance Change.
4. Wait for the GO message. Crank the engine.
5. Result is displayed in milliohms/second. Battery resistance change should be 50 milliohms/second max.
DC VOLTAGE O-45 VOLTS STEllCE-R TEST 89 I
1. Connect RED clip to the indicated test point, BLACK clip lo negative or ground.
I
2. Start Test 69. DC Volts.
3. Displayed reading is in volts.
2-245/(2-246 blank)
TM 9-2320-387-24-1
2-36. STARTER CIRCUIT TESTS
The starter circuit consists of the batteries, starter solenoid, starter motor, rotary switch, parts of the Protective Control Box (PCB) and related electrical wiring. The relationship of these parts is shown in the block diagram below, and a simplified functional flow schematic is provided on the foldout FP-15.
The starter solenoid and starter motor are enclosed in housings to protect them from dirt, icing conditions, and other road hazards.
When the rotary switch is turned to START, the PCB checks if the engine is running. If the engine is not running, the PCB sends a signal to the starter solenoid which energizes the solenoid windings and causes the solenoid contacts to close, sending battery power to the starter motor. The battery power causes the starter motor pinion gear to engage the engine flywheel ring gear and the engine cranks. When the engine starts, the rotary switch should be released, allowing it to return to the RUN position. This tells the PCB to release the starter solenoid which, in turn, disengages the starter motor from the engine.
PROTECTIVE CONTROL BOX I 1
ALTERNATOR
+ A < z
STARTER F
SOLENOID -: STARTER 4- ROTARY CONTROL 4 A SWITCH CIRCUIT
1 f 1, 4
STARTER
1
t
ENGINE MECHANICAL
2-247
TM 9-2320-387-24-l
STARTER CIRCUIT
KNOWN INFO
ENGINE WON’T CRANK OR CRANKS SLOWLY
POSSIBLE PROBLEMS
WIRING BATTERIES STARTER SOLENOID ROTORY SWITCH ENGINE LOCKED PCB
I
KNOWN INFO
CABLES & CONNECTORS APPEAR OK
POSSIBLE PROBLEMS
WIRING BAlTERIES STARTER/SOLENOID ROTARY SWITCH ENGINE LOCK PCB
CHECK ALL CABLES AND CONNECTIONS (BATTERY, STARTER, SOLENOID, ROTARY SWITCH, PCB). ARE ABOVE COMPONENTS OK?
VISUAL
REASON FOR QUESTION
Bad connections are a very common problem.
CHECK BATTERY VOLTAGE WHILE TRYING TO CRANK THE ENGINE. IS THE BATTERY VOLTAGE AT LEAST 18 VOLTS?
r OPTIONS
1. STEXE-R TEST 67 (Page 246)
2. MULTIMETER
3. VOLTMETER
REASON FOR QUESTlON
If the engine cranks, you know the engine is not locked and the rotary switch is OK.
2-248
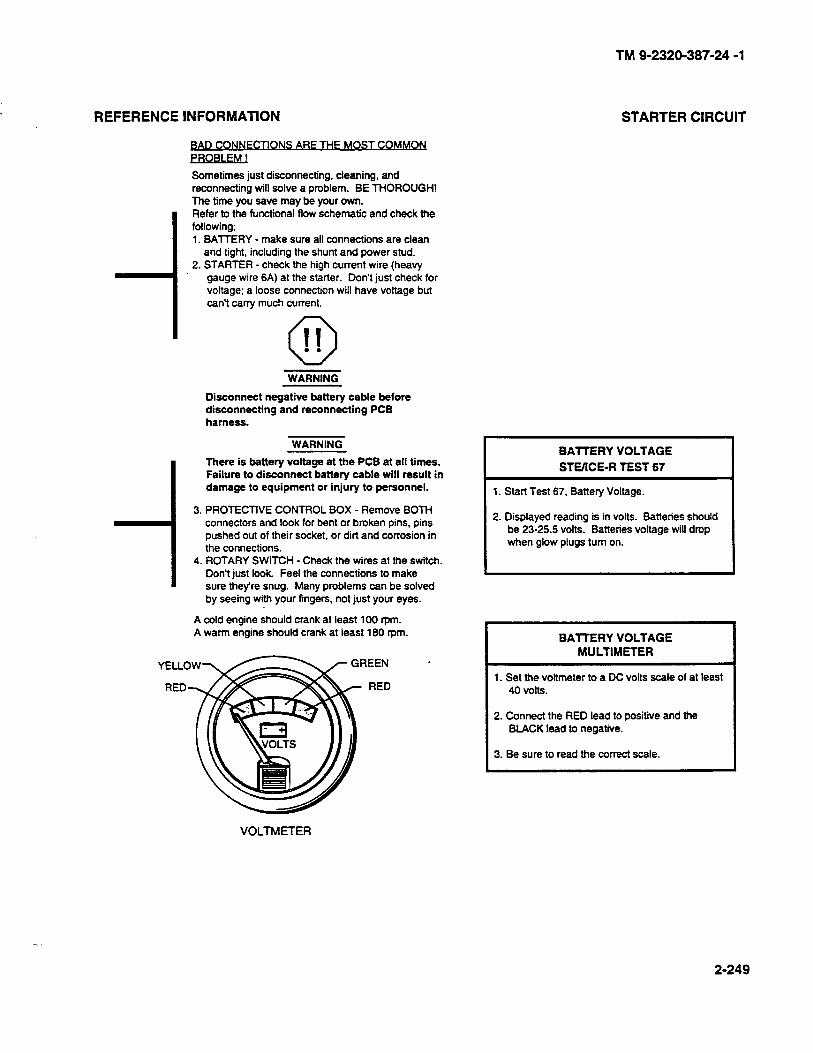
REFERENCE INFORMATION
BAD CONNFCTIONS ARF THF MOST COMMON PAOPt FM !
Sometimes just disconnecting. cleaning, and reconnecting will solve a problem. BE THOROUGH! The time you save may be your own. Refer to the functional flow schematic and check the following; 1. BATTERY - make sure all connections are clean
and tight, including the shunt and power stud. 2. STARTER - check the high current wire (heavy
gauge wire 6A) at the starter. Don’t just check for voltage; a loose connection will have voltage but can’t carry much current.
A
0 11 . . WARNING
Disconnect negative battery cable before disconnecting and reconnecting PCB harness.
WARNING
I
There is battery voltage at the PCB at all times. Failure to disconnect battery cable will result in damage to equipment or injury to personnel.
1 3. PROTECTlVE CONTROL BOX - Remove BOTH
connectors and look for bent or broken pins, pins pushed out of their socket, or dirt and corrosion in the connections.
4. ROTARY SWITCH - Check the wires at the switch. Don’t just look Feel the connections to make sure they’re snug. Many problems can be solved by seeing with your fingers, not just your eyes.
A cold engine should crank at least 100 rpm. A warm engine should crank at least 180 mm.
3EEN -
RED
TM g-2320-387-24 -1
STARTER CIRCUIT
I BAlTERY VOLTAGE
STEIICE-R TEST 67 I
1. Start Test 67, Battery Voltage.
2. Displayed reading is in volts. Batteries should be 23-25.5 volts. Batteries voltage will drop when glow plugs turn on.
I BAlTERY VOLTAGE MULTIMETER I
I 1. Set the voltmeter to a DC volts scale of at least I 40 volts.
2. Connect the RED lead to positive and the BLACK lead to negative.
I 3. Be sure to read the correct scale. I
VOLTMETER
2-249
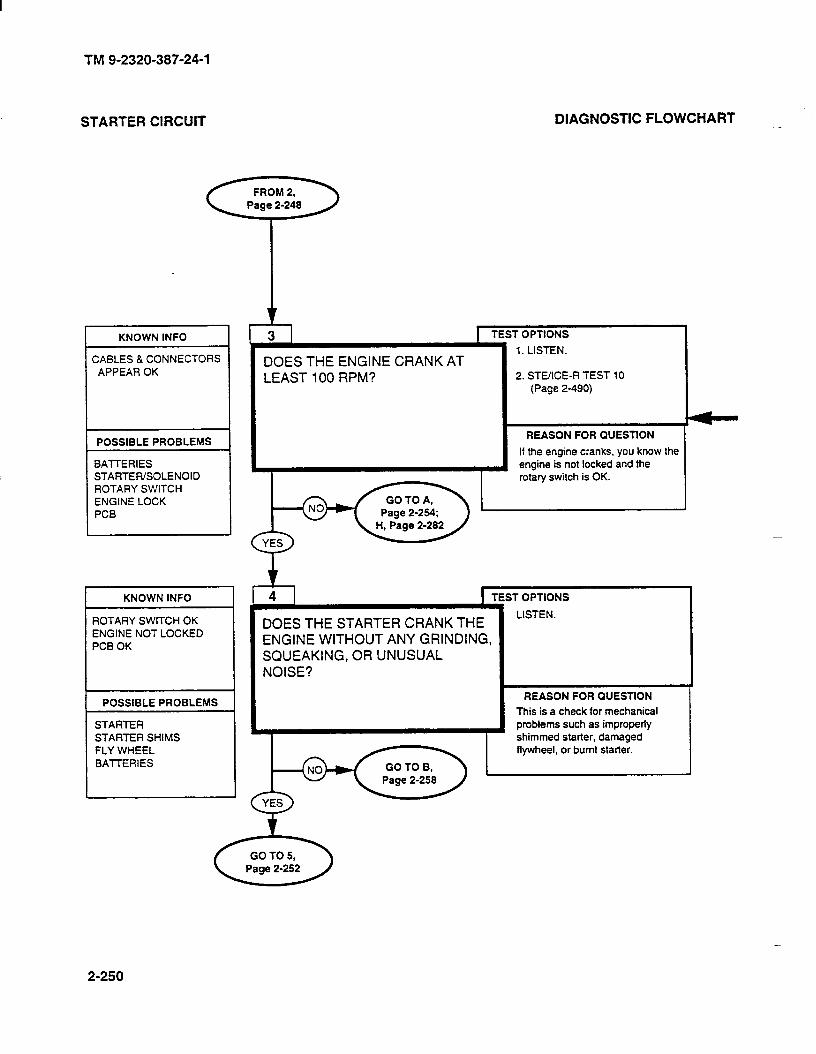
TM 9-2320-387-24-l
STARTER CIRCUIT
KNOWN INFO
>ABLES & CONNECTORS APPEAR OK
POSSIBLE PROBLEMS
BATTERIES STARTEWSOLENOID ROTARY SWITCH ENGINE LOCK PCB
KNOWN INFO
ROTARY SWITCH OK ENGINE NOT LOCKED PCB OK
POSSIBLE PROBLEMS
STARTER STARTER SHIMS FLY WHEEL BATTERIES
DOES THE ENGINE CRANK AT LEAST 100 RPM?
DIAGNOSTIC FLOWCHART
TEST OPTIONS
1. LISTEN.
2. STE/ICE-R TEST 10 (Page 2-490)
DOES THE STARTER CRANK THE ENGINE WITHOUT ANY GRINDING, SQUEAKING, OR UNUSUAL NOISE?
REASON FOR QUESTION
If the engine cranks, you know the engine is not locked and the rotary switch is OK.
;T OPTIONS
LISTEN.
REASON FOR QUESTION
This is a check for mechanical problems such as improperly shimmed starter, damaged flywheel, or burnt starter.
I,
2-250

REFERENCE INFORMATION
TM 9-2320-387-24-l
STARTER CIRCUIT
ENGINE RPM STVICE-R TEST 10
1. Start Test 10. Engine RPM.
2. Crank or start the engine. Displayed reading is RPM. Cranking rpm should be approximately 100. Idle tpm should ba 625 - 675.
2-251
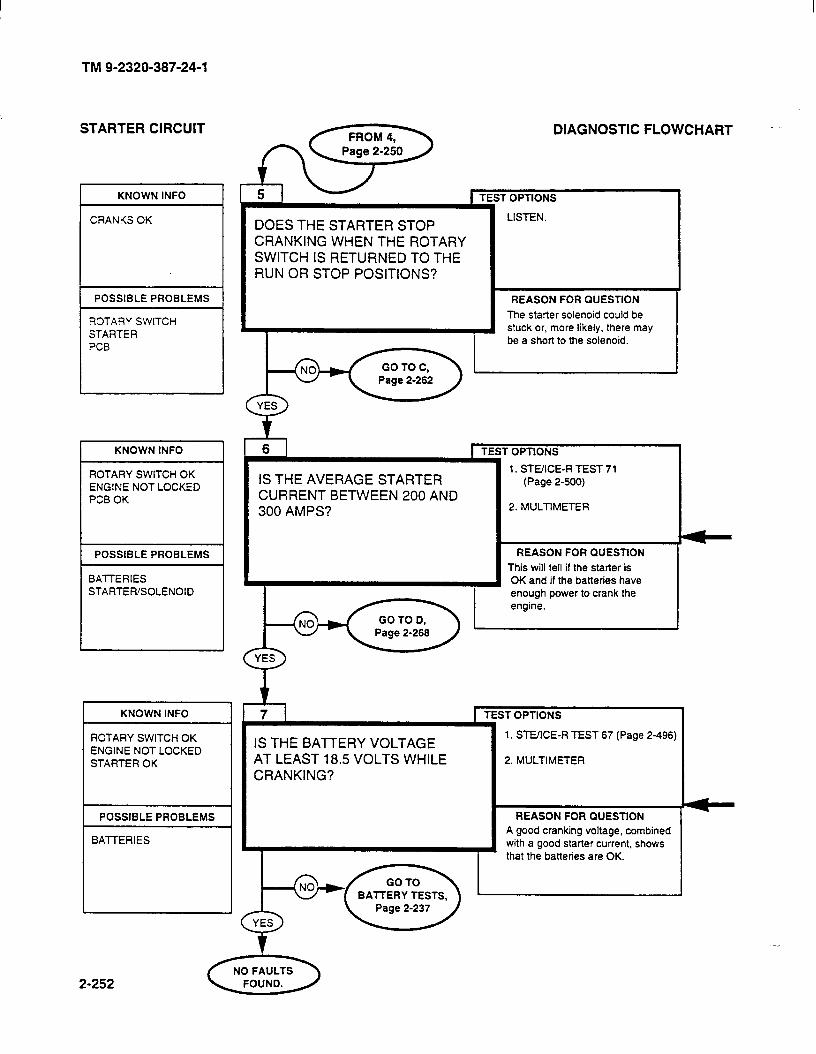
TM 9-2320-387-24-l
STARTER CIRCUIT
KNOWN INFO
CRANKS OK
POSSIBLE PROBLEMS
ROTARY SWITCH STARTER PCB
KNOWN INFO
ROTARY SWITCH OK ENGINE NOT LOCKED PCB OK
POSSIBLE PROBLEMS
BATTERIES STARTERSOLENOID
J
KNOWN INFO
ROTARY SWITCH OK ENGINE NOT LOCKED STARTER OK
POSSIBLE PROBLEMS
BATTERIES
DOES THE STARTER STOP CRANKING WHEN THE ROTARY SWITCH IS RETURNED TO THE RUN OR STOP POSITIONS?
DIAGNOSTIC FLOWCHART -
T OPTIONS
LISTEN.
REASON FOR QUESTION
The starter solenoid could be stuck or, more likely, there may
IS THE AVERAGE STARTER CURRENT BETWEEN 200 AND 300 AMPS?
OPTIONS
1. STEIICE-R TEST 71 (Page 2-500)
2. MULTIMETER
REASON FOR QUESTION
This will tell if the starter is OK and if the batteries have enough power to crank the engine.
IS THE BATTERY VOLTAGE AT LEAST 18.5 VOLTS WHILE CRANKING?
1 TEST OPTIONS
1. STUICE-R TEST 67 (Page 2-496)
2. MULTIMETER
REASON FOR QUESTION
A good cranking voltage, combined with a good starter current, shows that the batteries are OK.
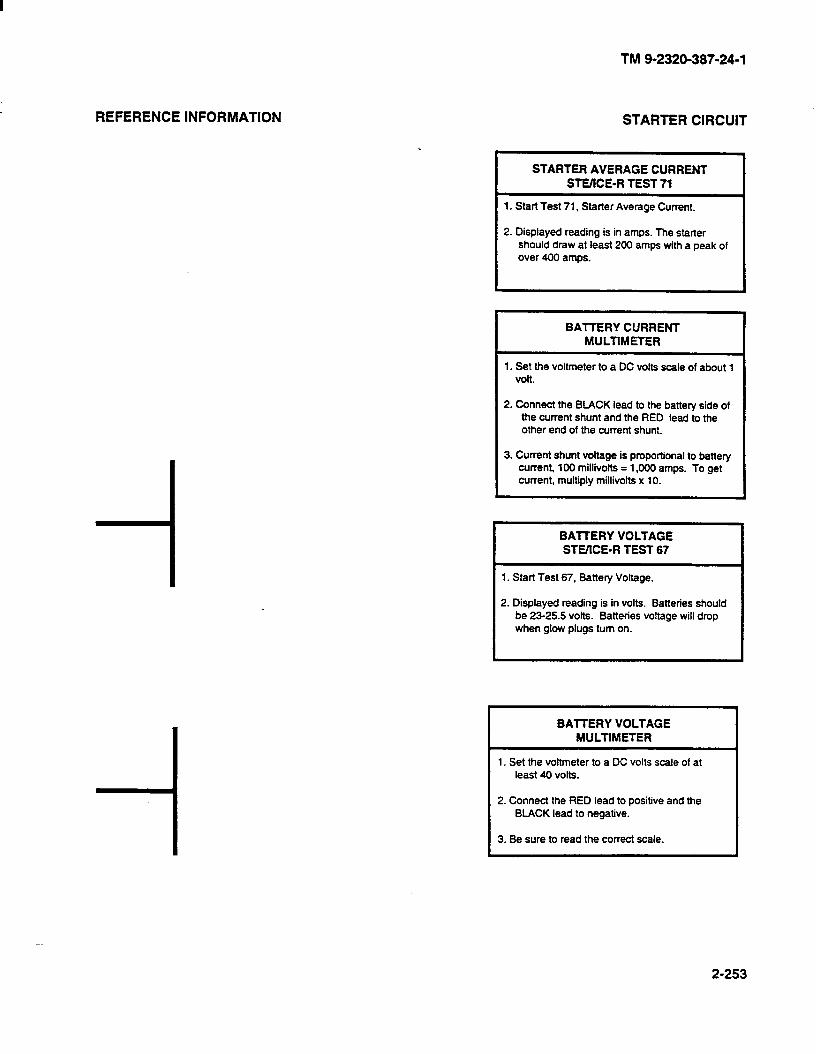
REFERENCE INFORMATION
TM 9-2320-387-24-l
STARTER CIRCUIT
STARTER AVERAGE CURRENT SlWlCE-R TEST 71
1. Start Test 71, Starter Average Current.
2. Displayed reading is in amps. The starter should draw at least 200 amps with a peak of over 400 amps.
I BATTERY CURRENT MULTIMETER
1 1. Bet the voltmeter to a DC volts scale of about 1
I volt.
2. Connect the BLACK lead to the battery side of the current shunt and the RED lead to the other end of the current shunt.
3. Current shunt voltage is proportional to battery current, 100 milliiolts = 1,000 amps. To get current, multiply millivolts x 10.
BAlTERY VOLTAGE SIB/ICE-R TEST 67
1. Start Test 67, Battery Voltage.
2. Displayed reading is in volts. Batteries should be 23-25.5 volts. Batteries voltage will drop when glow plugs turn on.
BAlTERY VOLTAGE MULTIMETER I
1. Set the voltmeter to a DC volts scale of at least 40 volts.
2. Connect the RED lead to positive and the BLACK lead to negative.
3. Be sure to read the correct scale.
2-253
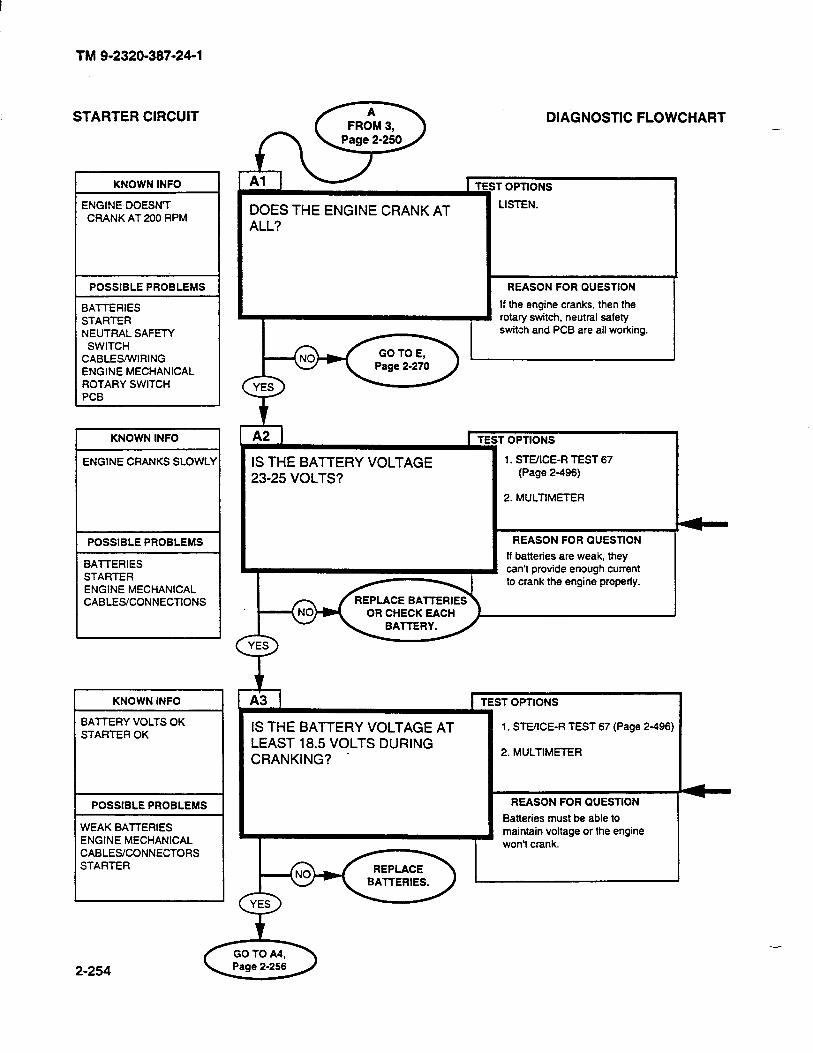
TM 9-2320-387-24-l
STARTER CIRCUIT
KNOWN INFO
ENGINE DOESN7 CRANK AT 200 RPM
POSSIBLE PROBLEMS
BATTERIES STARTER NEUTRAL SAFETY
SWITCH CABLESWIRING ENGINE MECHANICAL ROTARY SWITCH PCB
KNOWN INFO
ENGINE CRANKS SLOWL’
POSSIBLE PROBLEMS
BATTERIES STARTER ENGINE MECHANICAL CABLES/CONNECTIONS
KNOWN INFO
BATTERY VOLTS OK STARTER OK
POSSIBLE PROBLEMS
WEAK BATTERIES ENGINE MECHANICAL CABLES/CONNECTORS STARTER
DOES THE ENGINE CRANK AT ALL?
DIAGNOSTIC FLOWCHART -
r OPTTONS
LISTEN.
REASON FOR QUESTION
If the engine cranks, then the rotary switch, neutral safety switch and PCB are all working.
IS THE BATTERY VOLTAGE 23-25 VOLTS?
r OPTIONS
1. STEIICE-R TEST 67 (Page 2496)
2. MULTIMETER
REASON FOR QUESTION
If batteries are weak, they can’t provide enough current to crank the engine property.
OR CHECK EACH
IS THE BAlTERY VOLTAGE AT LEAST 18.5 VOLTS DURING CRANKING? .
;T OPTIONS
1. STWCE-R TEST 67 (Page 2496
2. MULTIMETER
REASON FOR QUESTION
Batteries must be able to maintain voltage or the engine won’t crank.
1 1 2-254
-
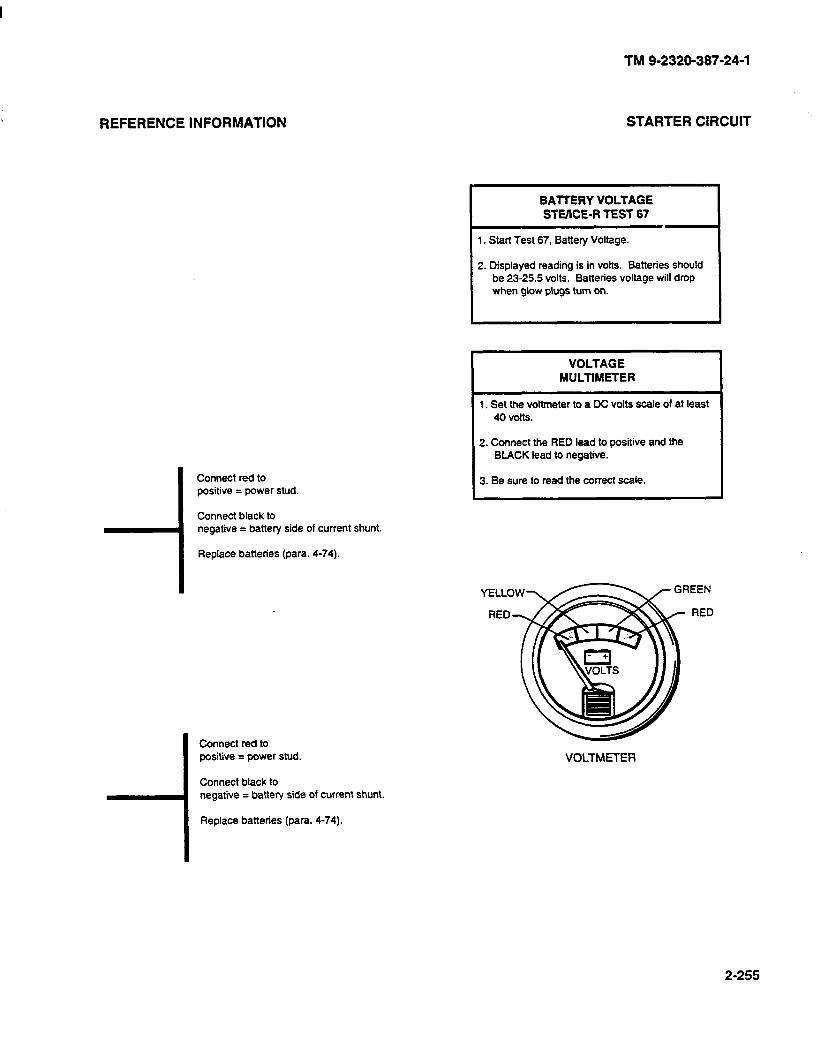
REFERENCE INFORMATION
TM 9-2320-387-24-l
STARTER CIRCUIT
Connect red to positive = power stud.
Connect black to negative = battery side of current shunt.
Replace batteries (para. 4-74).
i
Connect red to positive = power stud.
Connect black to negative = battery side of current shunt.
Replace batteries (para. 4-74).
I BATTERY VOLTAGE STMCE-R TEST 67 I
1. Start Test 67, Battery Voltage.
2. Displayed reading is in volts. Batteries should be 23-25.5 volts. Batteries voltage will drop when glow plugs turn on.
I VOLTAGE MULTIMETER I
1. Set the voltmeter to a DC volts scale of at least 40 volts.
2. Connect the RED lead to positive and the BLACK lead to negative.
3. Be sure to read the correct scale.
VOLTMETER
2-255
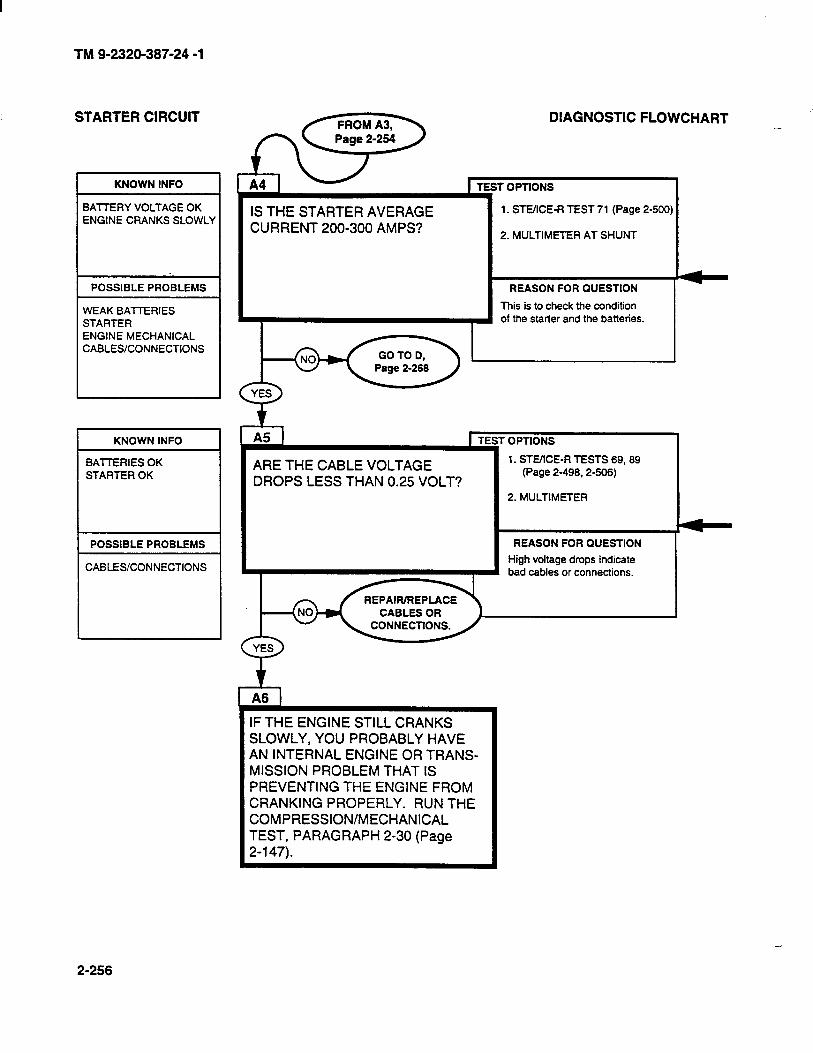
TM 9-2320-387-24 -1
STARTER CIRCUIT
BATTERY VOLTAGE OK ENGINE CRANKS SLOWLY
1 POSSIBLE PROBLEMS 1
WEAK BAlTERIES STARTER ENGINE MECHANICAL CABLES/CONNECTIONS
I I
KNOWN INFO
BAlTERIES OK STARTER OK
POSSIBLE PROBLEMS
CABLES/CONNECTIONS
IS THE STARTER AVERAGE CURRENT 200-300 AMPS?
DIAGNOSTIC FLOWCHART -
1 OPTIONS
1. STEXE-R TEST 71 (Page 2-500;
2. MULTIMETER AT SHUNT
REASON FOR QUESTION
This is to check the condition of the starter and the batteries.
AS 1 I
ARE THE CABLE VOLTAGE DROPS LESS THAN 0.25 VOLT?
CABLES OR
IF THE ENGINE STILL CRANKS SLOWLY, YOU PROBABLY HAVE AN INTERNAL ENGINE OR TRANS- MISSION PROBLEM THAT IS PREVENTING THE ENGINE FROM CRANKING PROPERLY. RUN THE COMPRESSION/MECHANICAL TEST, PARAGRAPH 2-30 (Page 2-l 47).
OPTIONS
1. STEIICE-R TESTS 69,69 (Page 2-496.2-506)
2. MULTIMETER
, REASON FOR QUESTION
High voltage drops indicate bad cables or connections.
2-256
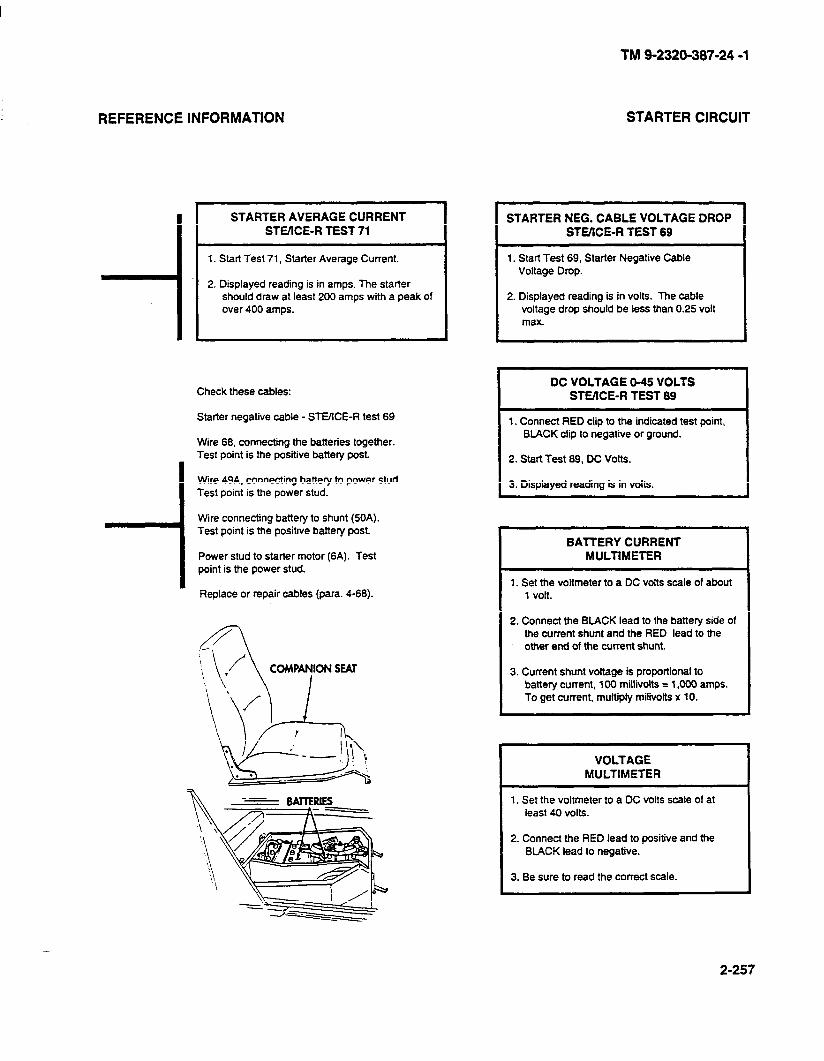
REFERENCE INFORMATION
TM 9-2320-387-24 -1
STARTER CIRCUIT
I STARTERAVERAGECURRENT STEIICE-R TEST 71
1, Start Test 71, Starter Average Current.
2. Displayed reading is in amps. The starter should draw at least 200 amps with a peak of over 400 amps.
Check these cables:
Starter negative cable - STBifCE-R test 69
Wire 66. connecting the batteries together. Test point is the positive battery post.
Wire 49A. connecting battery to power stud. Test point is the power stud.
Wire connecting battery to shunt (50A). Test point is the positive battery post.
Power stud to starter motor (6A). Test point is the power stud.
Replace or repair cables (para. 466).
COMPANION SEAT
I 1 \ / \
r _b . _’ /\ --I, _ h
. . .
_I. ’ .-
STARTER NEG. CABLE VOLTAGE DROP STEWE-R TEST 69
1. Start Test 69. Starter Negative Cable Voltage Drop.
2. Displayed reading is in volts. The cable voltage drop should be less than 0.25 volt max.
DC VOLTAGE O-46 VOLTS STEIlCE-R TEST 69
1. Connect RED clip to the indicated test point, BLACK clip to negative or ground.
2. Start Test 69. DC Volts.
3. Displayed reading is in volts.
BAlTERY CURRENT MULTIMETER
1. Set the voftmeter to a DC volts scale of about 1 volt.
2. Connect the BLACK lead to the battery side of the current shunt and the RED lead to the other end of the current shunt.
3. Current shunt voltage is proportional to battery current, 100 millivolts = 1.000 amps. To get current, multiply miliiolts x 10.
VOLTAGE MULTIMETER
1. Set the voltmeter to a DC volts scale of at least 40 volts.
2. Connect the RED lead to positive and the BLACK lead to negative.
3. Be sure to read the correct scale.
2-257
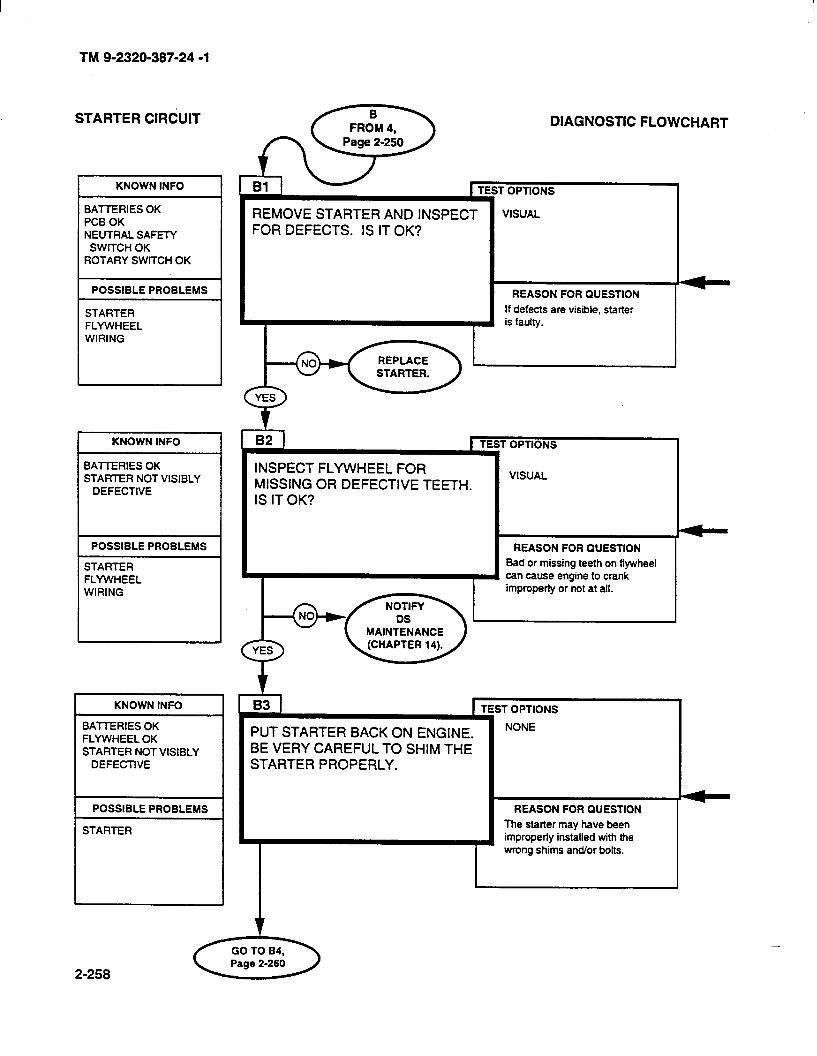
TM g-2320-387-24 -1
STARTER CIRC’UIT
KNOWN INFO
BATTERIES OK PCB OK NEUTRAL SAFETY
SWITCH OK ROTARY SWlTCH OK
POSSIBLE PROBLEMS
STARTER FLYWHEEL WIRING
KNOWN INFO I
BATTERIES OK STARTER NOT VISIBLY
DEFECTIVE
POSSIBLE PROBLEMS 1
STARTER FLYWHEEL WIRING
KNOWN INFO
BAlTERIES OK FLYWHEEL OK STARTER NOT VISIBLY
DEFECTIVE
POSSIBLE PROBLEMS
STARTER
REMOVE STARTER AND INSPECT FOR DEFECTS. IS IT OK?
1
DIAGNOSTIC FLOWCHART
r OPTlONS
VISUAL
REASON FOR QUESTION
If defects are visible, starter is faulty.
INSPECT FLYWHEEL FOR MISSING OR DEFECTIVE TEETH. IS IT OK?
-tl 83
OPTIONS
VISUAL
REASON FOR QUESTION
Bad or missing teeth on flywheel can cause engine to crank improperly or not at all.
I.
PUT STARTER BACK ON ENGINE. BE VERY CAREFUL TO SHIM THE STARTER PROPERLY.
iT OPTIONS
NONE
REASON FOR QUESTION
The starter may have been improperly installed with the wrong shims and/or bolts.
2-258
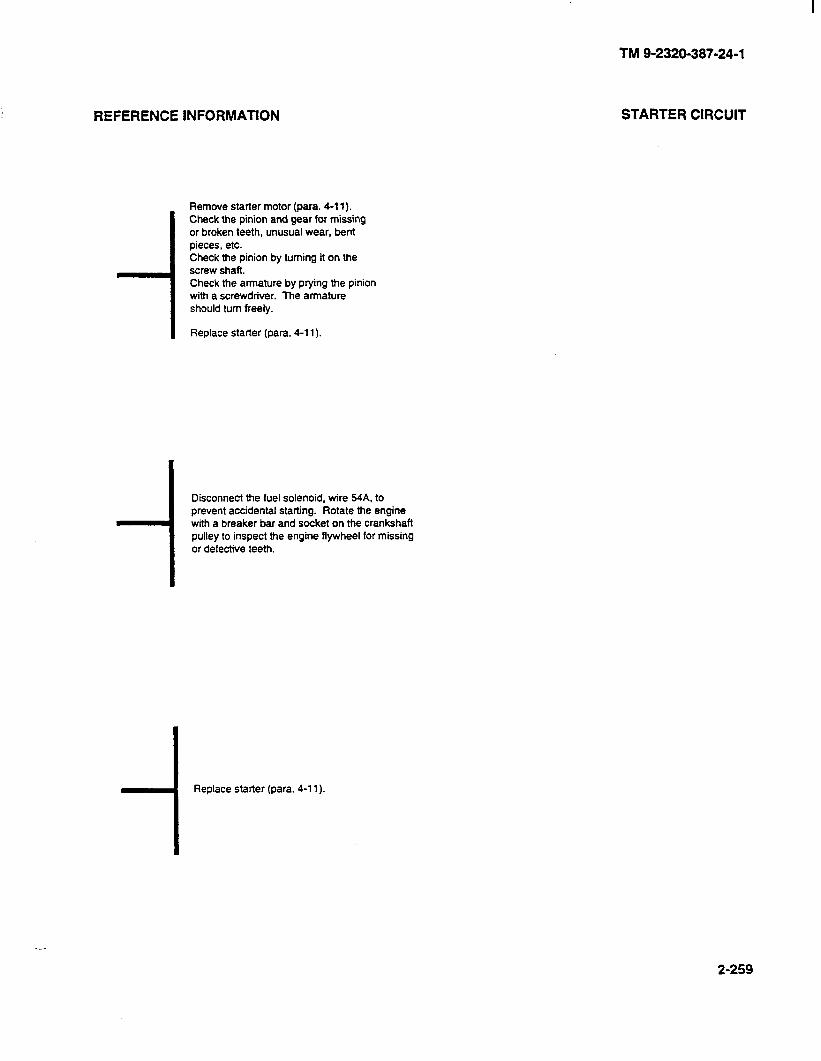
TM 9-2320-387-24-l
REFERENCE INFORMATION
Remove starter motor (para. 4-l 1). Check the pinion and gear for missing or broken teeth, unusual wear, bent pieces, etc. Check tfte pinion by turning lt on the screw shaft. Check the armature by prying the pinion with a screwdriver. The armature should turn freely.
Replace starter (para. 4-11).
Disconnect the fuel solenoid, wire 54A, to prevent accidental starting. Rotate the engine with a breaker bar and socket on the crankshaft pulley to inspect the engine flywheel for missing or defective teeth.
-I Replace starter (para. 4-l 1).
STARTER CIRCUIT
-.
2-259
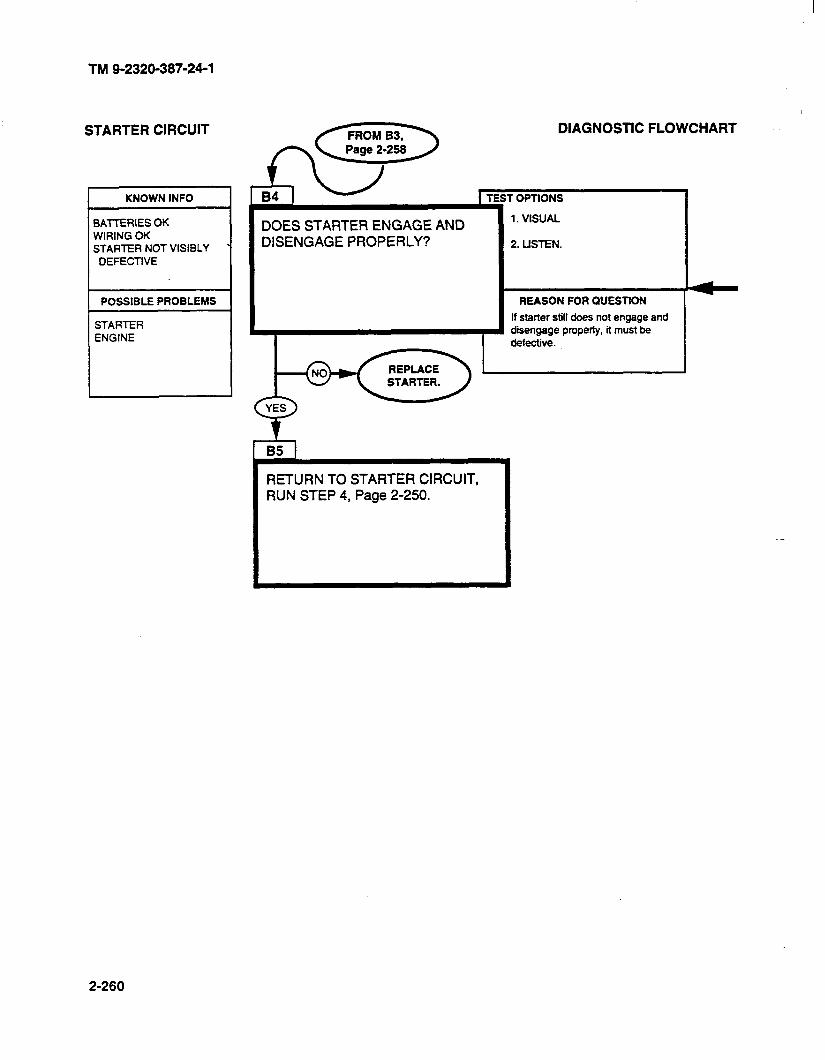
TM 9-2320-387-24-l
STARTER CIRCUIT
KNOWN INFO
BATTERIES OK WIRING OK STARTER NOT VISIBLY
DEFECTIVE
POSSIBLE PROBLEMS
STARTER ENGINE
DOES STARTER ENGAGE AND DISENGAGE PROPERLY?
DIAGNOSTIC FLOWCHART
2. LISTEN.
RETURN TO STARTER CIRCUIT, RUN STEP 4, Page 2-250.
2-260
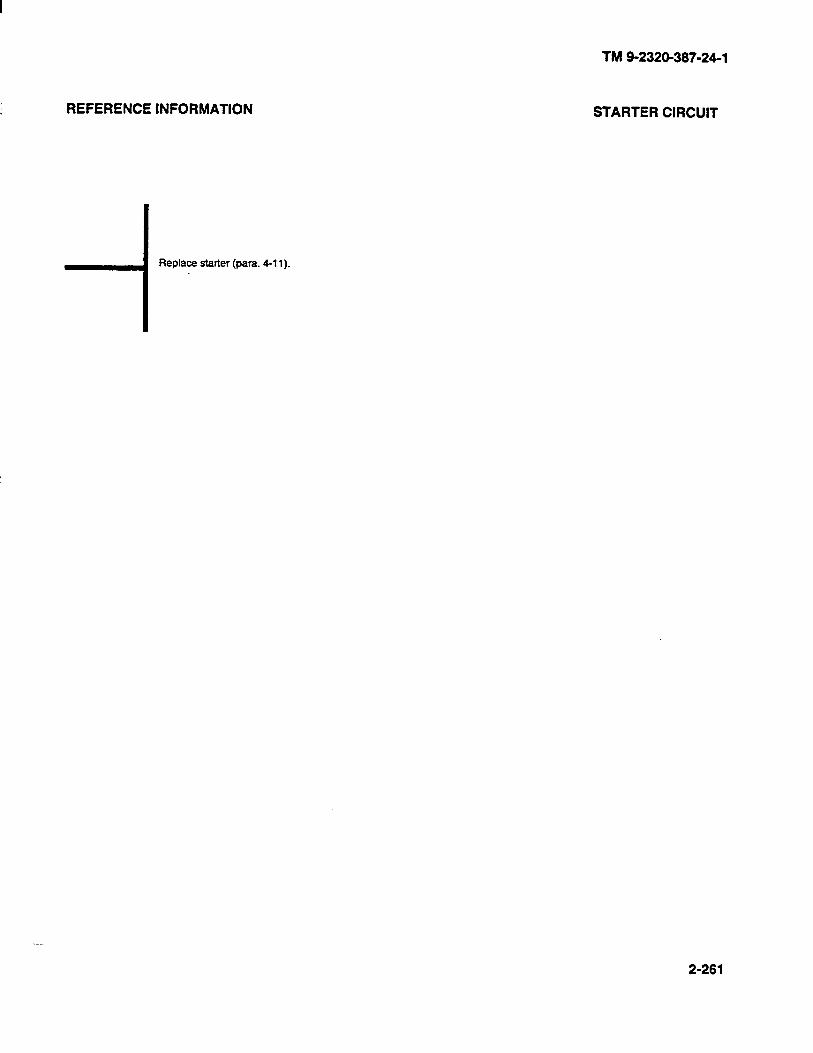
REFERENCE INFORMATION
-i
Replace starter(para.4-11).
TM 9-2320-387-24-l
STARTER CIRCUIT
2-261
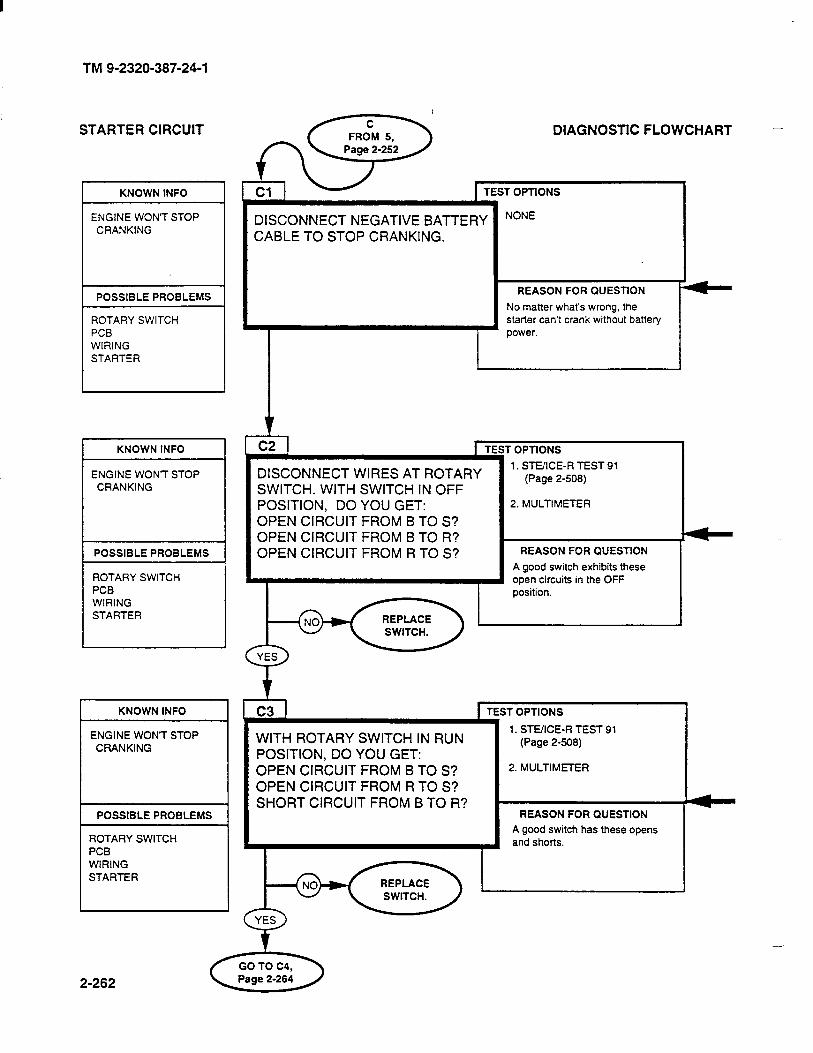
TM 9-2320-387-24-l
STARTER CIRCUIT
I KNOWN INFO
ENGINE WON’T STOP CRANKING
POSSIBLE PROBLEMS
ROTARY SWITCH PCB WIRING STARTER
ENGINE WON‘T STOP CRANKING
POSSIBLE PROBLEMS
ROTARY SWITCH PCB WIRING STARTER
DISCONNECT NEGATIVE BATTERY CABLE TO STOP CRANKING.
NONE
DIAGNOSTIC FLOWCHART -
I REASON FOR QUESTION
No matter what’s wrong, the starter can’t crank without battery power.
,
DISCONNECT WIRES AT ROTARY SWITCH. WITH SWITCH IN OFF POSITION, DO YOU GET: OPEN CIRCUIT FROM B TO S? OPEN CIRCUIT FROM B TO R? OPEN CIRCUIT FROM R TO S?
i r OPTIONS
1. STE/ICE-R TEST 91 (Page 2-508)
2. MULTIMETER
. REASON FOR QUESTION
A good switch exhibits these open circuits in the OFF position. I-
KNOWN INFO
ENGINE WON’T STOP CRANKING
POSSIBLE PROBLEMS
ROTARY SWITCH PCB WIRING STARTER
WITH ROTARY SWITCH IN RUN POSITION, DO YOU GET: OPEN CIRCUIT FROM B TO S? OPEN CIRCUIT FROM R TO S? SHORT CIRCUIT FROM B TO R?
TE! I
I
#T OPTIONS
1. STEIICE-R TEST 91 (Page 2-508)
2. MULTIMETER
REASON FOR QUESTION
A good switch has these opens and shorts.
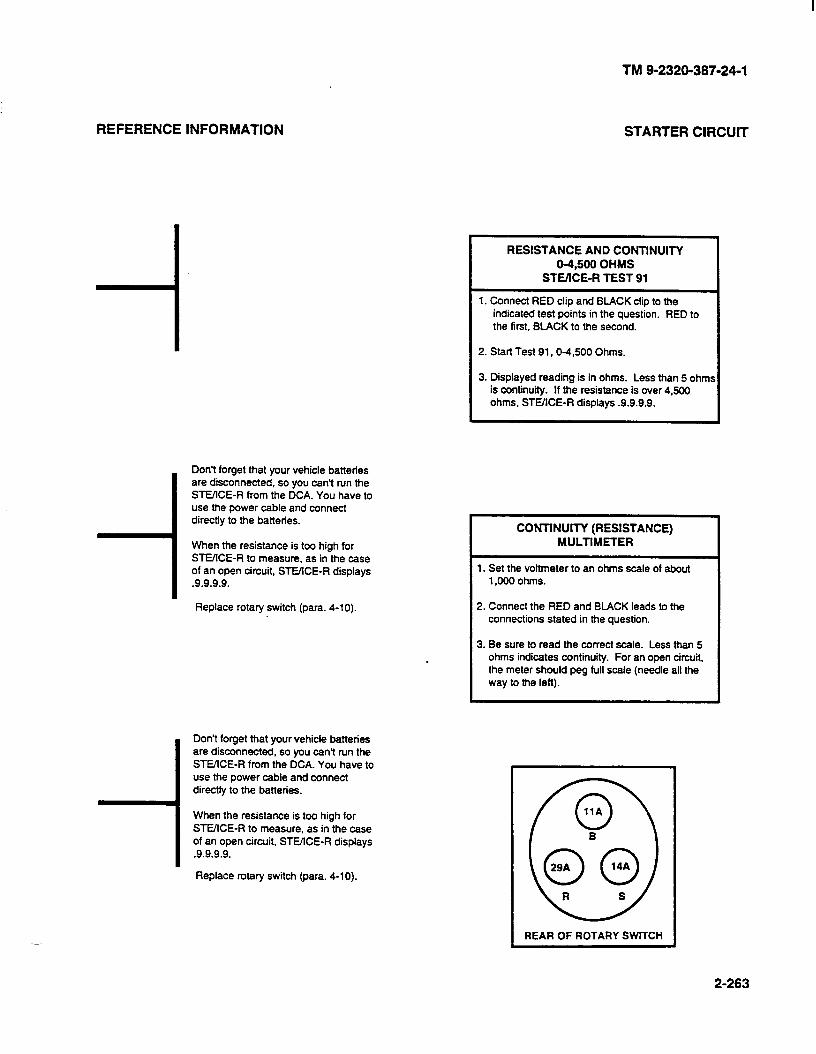
TM 9-2320-387-24-l
REFERENCE INFORMATION
Don’t forget that your vehicle batteries are disconnected, so you can’t run the SLUICE-R from the DCA. You have to use the power cable and connect directly to the batteries.
When the resistance is too high for STEXE-R to measure, as in the case of an open circuit, STEACE-R displays .9.9.9.9.
Replace rotary switch (para. 4-10).
Dont forget that your vehicle batteries are disconnected, so you can’t run the STMCE-R from the DCA. You have to use the power cable and connect directly to the batteries.
When the resistance is too high for SLUICE-R to measure, as in the case of an open circuit, STUICE-R displays .9.9.9.9.
Replace rotary switch (para. 4-10).
STARTER CIRCUIT
RESISTANCE AND CONTINUITY 04,500 OHMS
STfYlCE-R TEST 91 I
1. Connect RED clip and BLACK clip to the indicated test points in the question. RED to the first, BUCK to the second.
2. Start Test 91,0-4.500 Ohms.
3. Displayed reading is in ohms. Less than 5 is continuity. If the resistance is over 4,500 ohms, STEXE-R displays .9.9.9.9.
CONTINUITY (RESISTANCE) MULTIMETER
1. Set the voltmeter to an ohms scale of about 1,000 ohms.
2. Connect the RED and BLACK leads to the connections stated in the question.
3. Be sure to read the correct scale. Less than 5 ohms indicates continuity. For an open circuit, the meter should peg full scale (needle all the way to the left).
REAR OF ROTARY SWtTCH
2-263
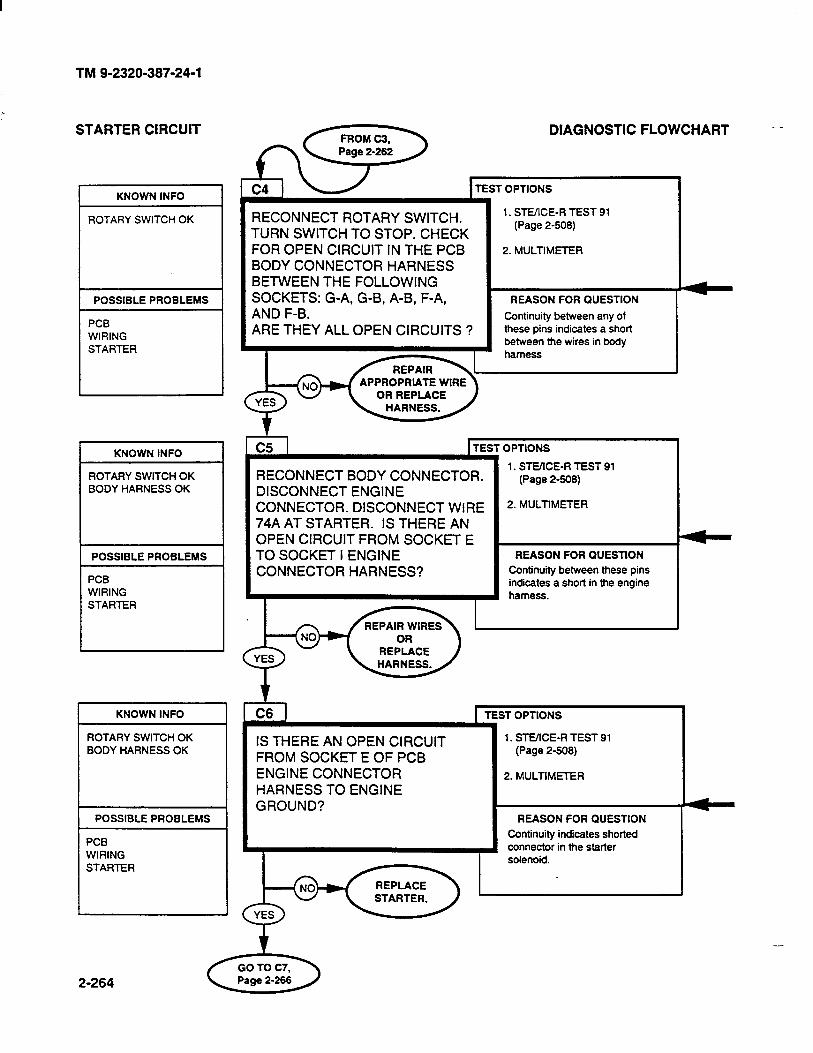
TM 9-2320-387-24-l
KNOWN INFO
ROTARY SWITCH OK
POSSIBLE PROBLEMS
PCB WIRING STARTER
KNOWN INFO
ROTARY SWITCH OK BODY HARNESS OK
POSSIBLE PROBLEMS
PCB WIRING STARTER
KNOWN INFO
ROTARY SWITCH OK BODY HARNESS OK
POSSIBLE PROBLEMS
PCB WIRING STARTER
, cfiEz ,TEsTopTloNsDIAGNosT’c FLowr -
1. STE/ICE-R TEST 91 (Page 2-505)
2. MULTIMETER
t
- I
RECONNECT ROTARY SWITCH. TURN SWITCH TO STOP. CHECK FOR OPEN CIRCUIT IN THE PCB BODY CONNECTOR HARNESS BETWEEN THE FOLLOWING SOCKETS: G-A, G-B, A-B, F-A, AND F-B.
REASON FOR QUESTION
Continuity between any of these pins indicates a short between the wires in body
ARE THEY ALL OPEN CIRCUITS ?
RECONNECT BODY CONNECTOR. DISCONNECT ENGINE CONNECTOR. DISCONNECT WIRE 74A AT STARTER. IS THERE AN OPEN CIRCUIT FROM SOCKET E TO SOCKET I ENGINE CONNECTOR HARNESS?
L I I 1
9PTIONS
1. STEIICE-R TEST 91 (Page 2-508)
2. MULTIMETER
c5 I TEST r
REASON FOR QUESTlON
Continuity between these pins indicates a short in the engine harness.
IS THERE AN OPEN CIRCUIT FROM SOCKET E OF PCB ENGINE CONNECTOR HARNESS TO ENGINE GROUND?
TEST OPTIONS I
1. STE/lCE-R TEST 91 (Page 2-505)
2. MULTIMETER
REASON FOR QUESTION
Continuity indicates shorted connector in the starter solenoid.
2-264
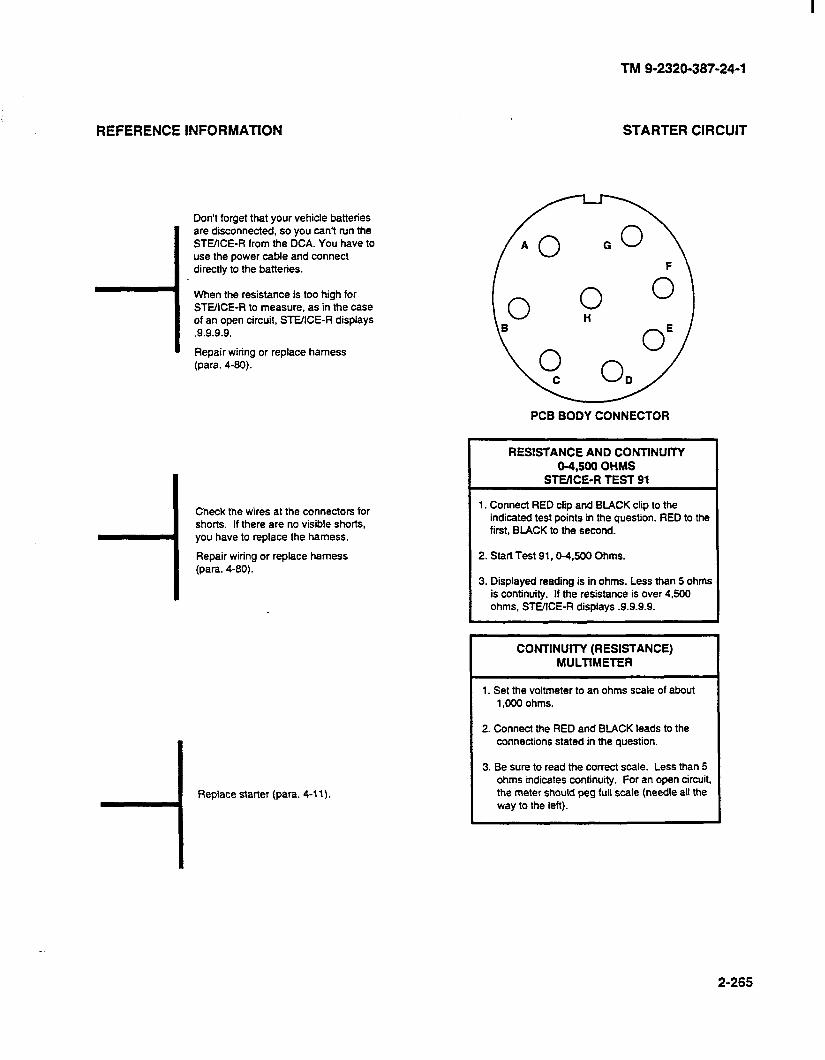
TM 9-2320-387-24-l
REFERENCE INFORMATION STARTER CIRCUIT
Don’t forget that your vehicle batteries are disconnected. so you can’t run the STEACE-R from the DCA. You have to use the power cable and connect directly to the batteries.
When the resistance is too high for STUICE-R to measure, as in the case of an open circuit, STEXE-R displays .9.9.9.9.
Repair wiring or replace harness (para. 4-80).
Check the wires at the connectors for shorts. If there are no visible shorts, you have to replace the harness.
I Repair wiring or replace harness (para. 4-80).
-1 Replace starter (para. 4-11).
PCB BODY CONNECTOR
RESISTANCE AND CONTINUITY 04,500 OHMS
STE/lCE-R TEST 91
1. Connect RED clip and BLACK clip to the indicated test points in the question. RED to the first, BLACK to the second.
I 2. Start Test 91,0-4.800 Ohms.
3. Displayed reading is in ohms. Less than 5 ohms is continuity. If the resistance is over 45OCl ohms, STEIICE-R displays .9.9.9.9.
CONTINUITY (RESISTANCE) MULTIMETER I
1. Set me voltmeter to an ohms scale of about 1 .OOO ohms.
2. Connect the RED and BLACK leads to the connections stated in the question.
3. Be sure to read the correct scale. Less than 5 ohms indicates continuity. For an open circuit, the meter should peg full scale (needle all the way to the left).
2-265

TM 9-2320-387-24-l
STARTER CIRCUIT
I KNOWN INFO I
ENGINE HARNESS OK u POSSIBLE PROBLEMS
-I POSSIBLE PROBLEMS
PCB BAlTERY
RECONNECT WIRE 74A TO STARTER. IS BAlTERY VOLTAGE LESS THAN 20 VOLTS ?
i TES T OPTIONS
I
1. STE/ICE-R TEST 67 (Page 2-496)
2. MULTIMETER
I
REASON FOR QUESTION
Low battery voltage may, under the proper conditions, cause the starter solenoid to remain energized.
DIAGNOSTIC FLOWCHART -
YES 2 DISCONNECT BATTERY NEGATIVE CABLE. RECONNECT ENGINE CONNECTOR. REPLACE BATTERY NEGATIVE CABLE. REPLACE BATTERIES. TRY CRANKING ENGINE. IF IT WON’T STOP CRANKING, REPLACE PCB. RERUN STARTER CIRCUIT TEST CHAIN (STEP 1, Page 2-248).
2-266
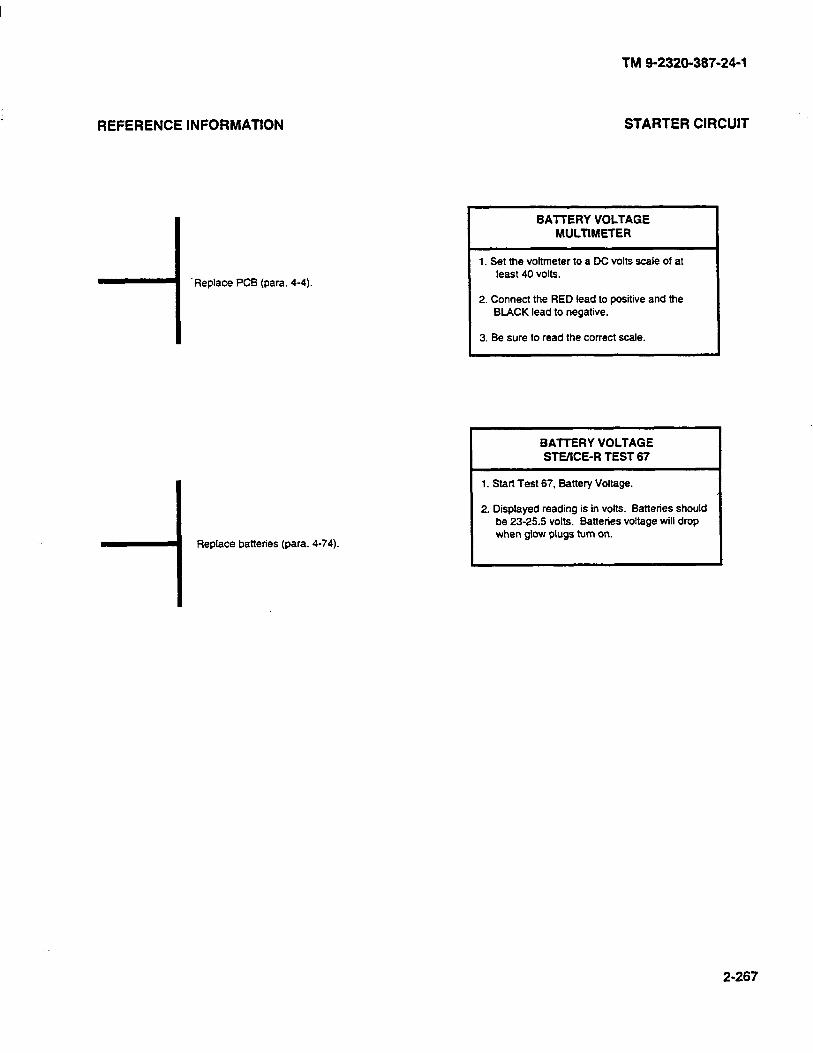
REFERENCE INFORMATION
-I ‘Replace PCB (para. 44).
-I Replace batteries (para. 4-74).
TM 9-2320-387-24-l
STARTER CIRCUIT
BAlTERY VOLTAGE MULTIMETER
1. Set the voltmeter to a DC volts scale of at least 40 volts.
2. Connect the RED lead to positive and the BLACK lead to negative.
3. Be sure to read the correct scale.
BAlTERY VOLTAGE STEKE-R TEST 67
1. Start Test 67, Battery Voltage.
2. Displayed reading is in volts. Batteries should be 23-25.5 volts. Batteries voltage will drop when glow plugs turn on.
2-267
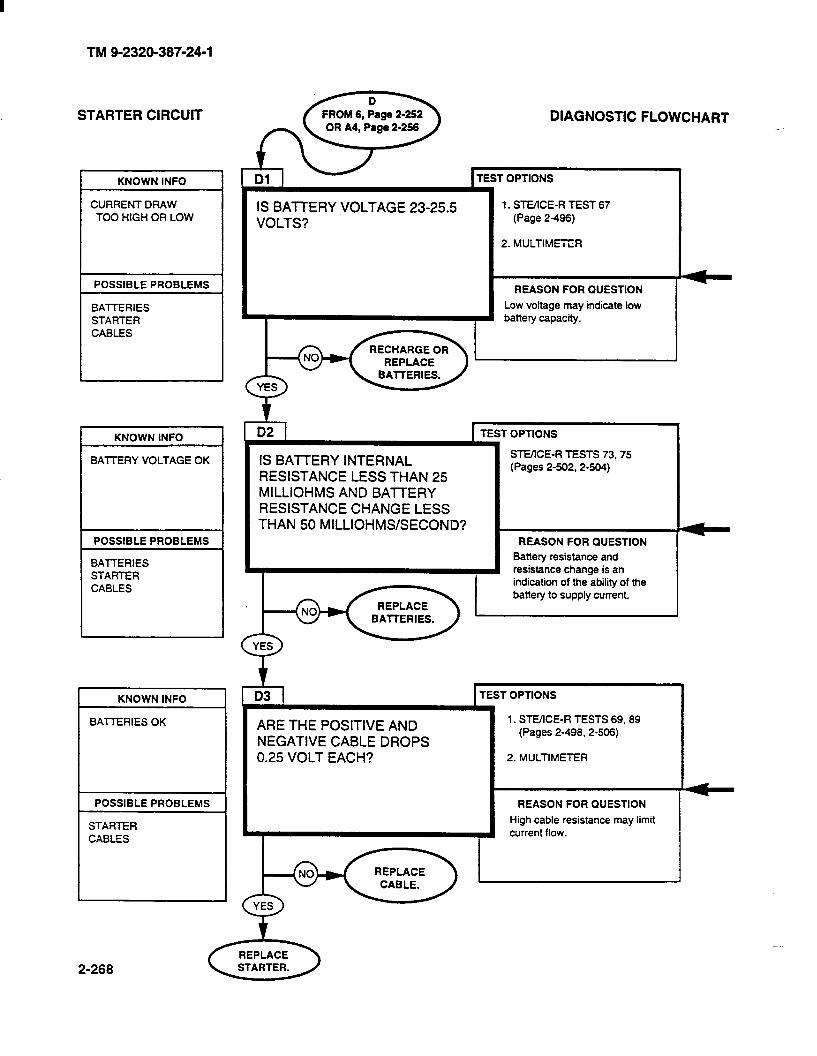
TM 9-2320-387-24-l
STARTER CIRCUIT
KNOWN INFO I
CURRENT DRAW IS BAlTERY VOLTAGE 23-25.5 TOO HIGH OR LOW I VOLTS?
POSSIBLE PROBLEMS
BATTERIES STARTER CABLES
KNOWN INFO
BATTERY VOLTAGE OK
POSSIBLE PROBLEMS
BATTERIES STARTER CABLES
BATTERIES OK
POSSIBLE PROBLEMS
STARTER CABLES
2-268
, D&g3 TEST opT,oN~NOSTIC FLOWCHART
I
1. STE/lCE-R TEST 67 (Page 2496)
2. MULTIMETER
REASON FOR QUESTION
Low voltage may indicate low battery capacity.
IS BATTERY INTERNAL RESISTANCE LESS THAN 25 MILLIOHMS AND BA-ITERY RESISTANCE CHANGE LESS THAN 50 MILLIOHMWSECOND?
TEST OPTIONS
STEXE-R TESTS 73.75 (Pages 2-502.2-504)
REASON FOR QUESTION
Battery resistance and ti resistance change is an
-
ARE THE POSITIVE AND NEGATIVE CABLE DROPS 0.25 VOLT EACH?
TEST OPTIONS
1. STE/ICE-R TESTS 69,69 (Pages 2-498.2-506)
2. MULTIMETER
REASON FOR QUESTION
High cable resistance may limit current flow.
-
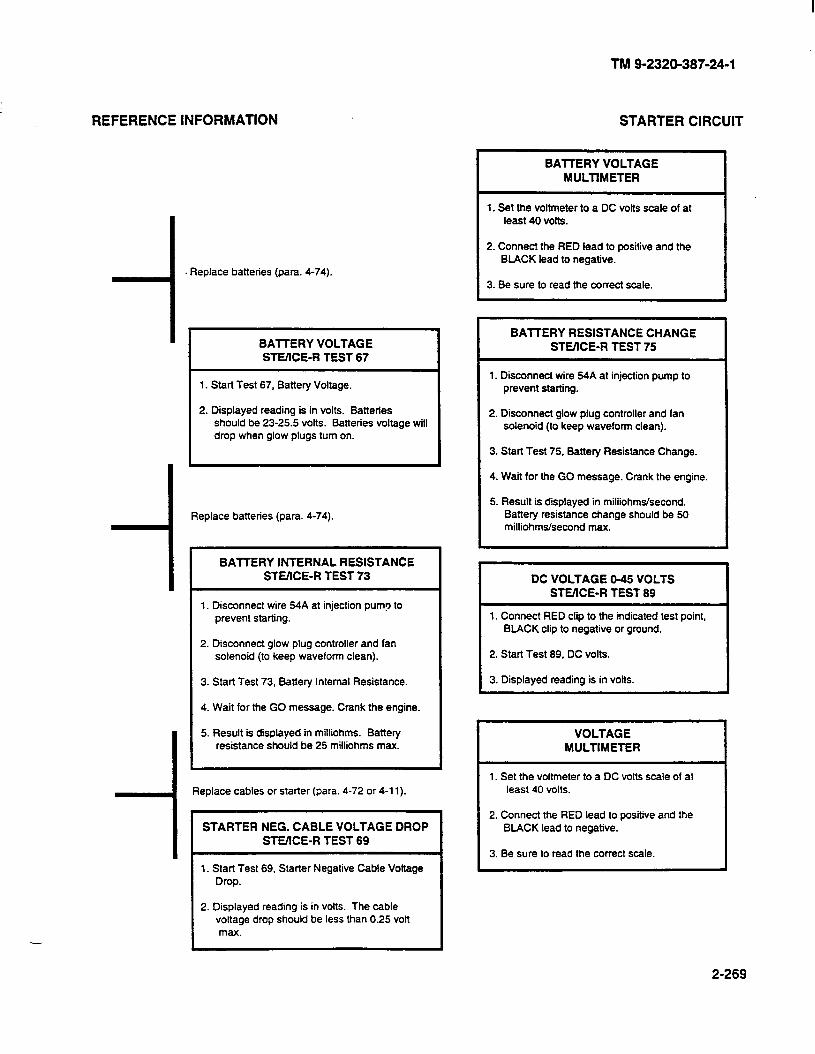
TM 9-2320-387-24-l
REFERENCE INFORMATION STARTER CIRCUIT
BAlTERY VOLTAGE STEIICE-R TEST 67
1. Start Test 67, Battery Voltage.
2. Displayed reading is in volts. Batteries should be 23-25.5 volts. Batteries voltage will drop when glow plugs turn on.
Replace batteries (para. 4-74).
BAlTERY INTERNAL RESISTANCE STEIICE-R TEST 73
1. Disconnect wire 64A at injection pump to prevent starting.
2. Disconnect glow plug controller and fan solenoid (to keep waveform clean).
3. Start Test 73, Battery Internal Resistance.
4. Wait for the GO message. Crank the engine.
5. Result is displayed in milliohms. Battery resistance should be 25 milliohms max.
STARTER NEG. CABLE VOLTAGE DROP STEIlCE-R TEST 69
Replace cables or starter (para. 4-72 or 4-l 1).
1. Start Test 69. Starter Negative Cable Voltage Drop.
2. Displayed reading is in volts. The cable voltage drop should be less than 0.25 volt max.
I MULTIMETER
1. Set the voltmeter to a DC volts scale of at least 40 volts.
2. Connect the RED lead to positive and the BLACK lead to negative.
3. Be sure to read the correct scale.
BAlTERY RESISTANCE CHANGE STE/lCE-R TEST 75
1. Disconnect wire 64A at injection pump to prevent starting.
2. Disconnect glow plug controller and fan solenoid (to keep waveform clean).
3. Start Test 75. Battery Resistance Change.
4. Wait for the GO message. Crank the engine.
5. Result is displayed in milliohms/second. Battery resistance change should be 60 milliohms/second max.
DC VOLTAGE O-45 VOLTS STEXE-R TEST 69
1. Connect RED clip to the indicated test point, BLACK clip to negative or ground.
2. Start Test 69, DC volts.
3. Displayed reading is in volts.
VOLTAGE MULTIMETER
1. Set the voltmeter to a DC volts scale of at least 40 volts.
2. Connect the RED lead to positive and the BLACK lead to negative.
3. Be sure to read the correct scale.
2-269
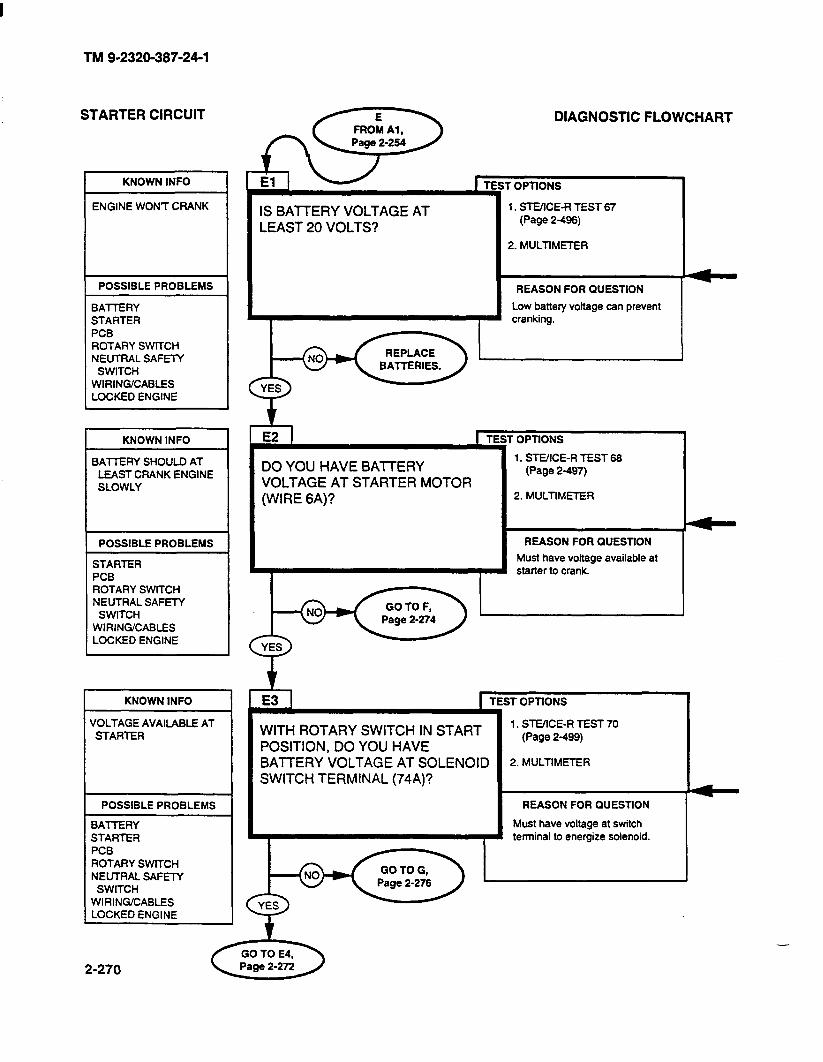
TM 9-2320-387-24-l
STARTER CIRCUIT
KNOWN INFO
ENGINE WON’T CRANK
POSSIBLE PROBLEMS
BAlTERY STARTER PCB ROTARY SWITCH NEUTRAL SAFETY
SWITCH WIRING/CABLES LOCKED ENGINE
KNOWN INFO
BAl-lERY SHOULD AT LEAST CRANK ENGINE SLOWLY
POSSIBLE PROBLEMS
STARTER PCB ROTARY SWITCH NEUTRAL SAFETY
SWITCH WIRING/CABLES LOCKED ENGINE
KNOWN INFO
VOLTAGE AVAILABLE AT STARTER
POSSIBLE PROBLEMS
BATTERY STARTER PCB ROTARY SWITCH NEUTRAL SAFElY
SWlTCH WIRING/CABLES LOCKED ENGINE
IS BATTERY VOLTAGE AT LEAST 20 VOLTS?
DIAGNOSTIC FLOWCHART
IT OPllONS
1. STEflCE-R TEST 67 1 (Page 2-496)
2. MULTlMETER
DO YOU HAVE BAITERY VOLTAGE AT STARTER MOTOR (WIRE 6A)?
- OPTIONS
1. STEIICE-R TEST 66 (Page 2497)
2. MULTIMETER
REASON FOR QUESTlON
Must have voltage available at starter to crank.
WITH ROTARY SWITCH IN START POSITION, DO YOU HAVE BA-ITERY VOLTAGE AT SOLENOID SWITCH TERMINAL (74A)?
E3 ] TEST OPTlONS
1. STEXE-R TEST 70 (Page 2-499)
2. MULTIMETER
REASON FOR QUESTION
Must have voltage at switch terminal to energize solenoid.
2-270
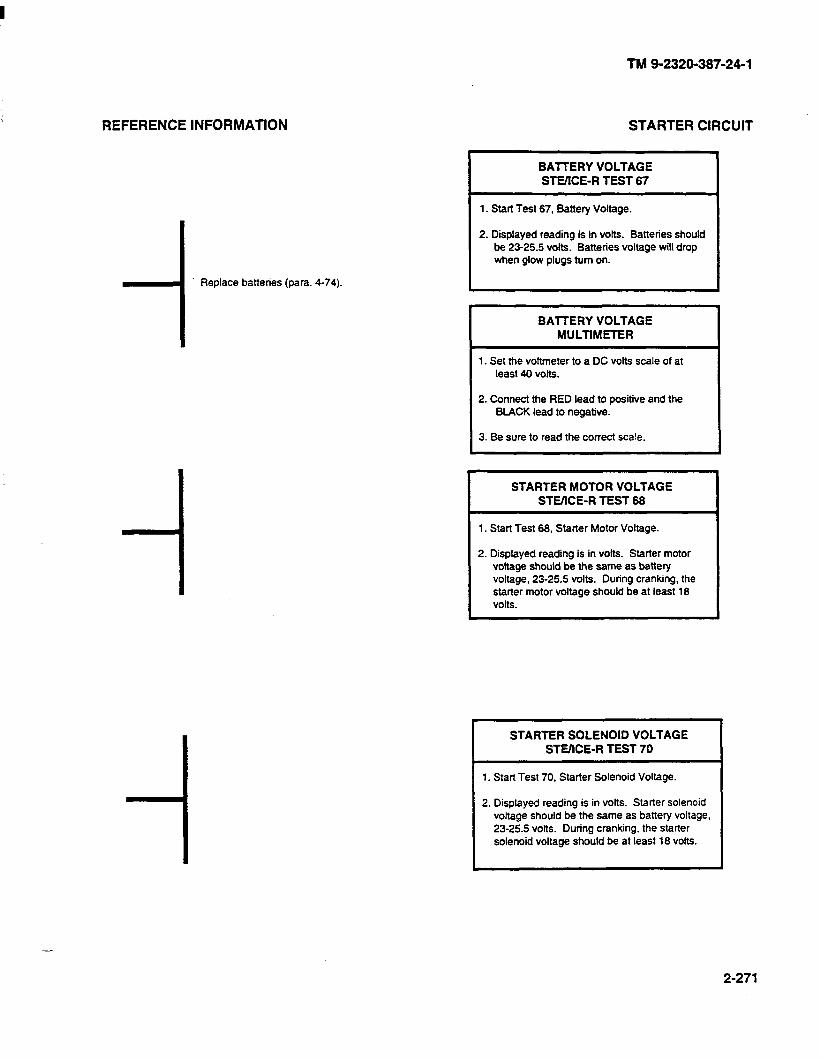
TM 9-2320-387-24-l
REFERENCE INFORMATION
-I Replace batteries (para. 4-74).
STARTER CIRCUIT
BAlTERY VOLTAGE STUICE-R TEST 67
1. Start Test 67. Battery Voltage.
2. Displayed reading is in volts. Batteries should be 23-25.5 volts. Batteries voltage will drop when glow plugs turn on.
BAlTERY VOLTAGE MULTIMETER
1. Set the voltmeter to a DC volts scale of at least 40 volts.
2. Connect the RED lead to positive and the BLACK lead to negative.
3. Be sure to read the correct state.
STARTER MOTOR VOLTAGE STVICE-R TEST 68
1. Start Test 66, Starter Motor Voltage.
2. Displayed reading is in volts. Starter motor voltage should be the same as battery voltage, 23-25.5 volts. During cranking, the starter motor voltage should be at least 16 volts.
STARTER SOLENOID VOLTAGE STUICE-R TEST 70
1. Start Test 70. Starter Solenoid Voltage.
2. Displayed reading is in volts. Starter solenoid voltage should be the same as battery Voltage,
solenoid voltage should be at least 16 volts.
2-271
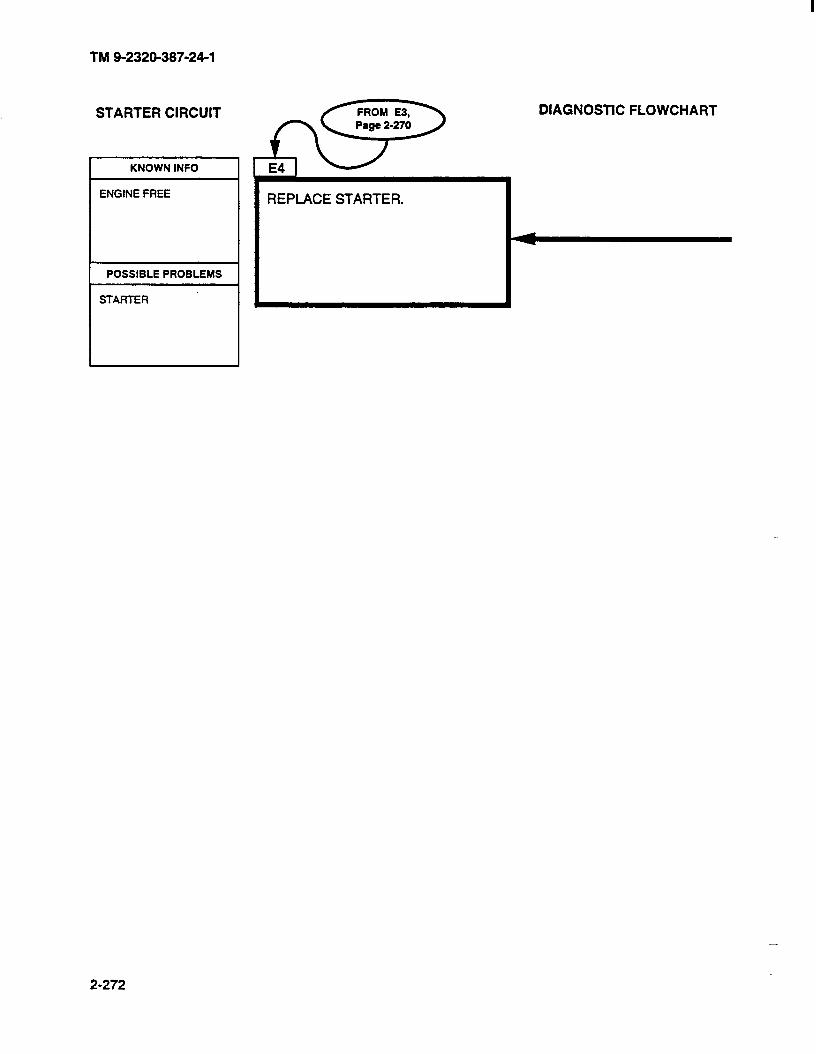
TM 9-2320-387-24-l
STARTER CIRCUIT
KNOWN INFO
ENGINE FREE
POSSIBLE PROBLEMS
STARTER
DIAGNOSTIC FLOWCHART
REPLACE STARTER.
2-272
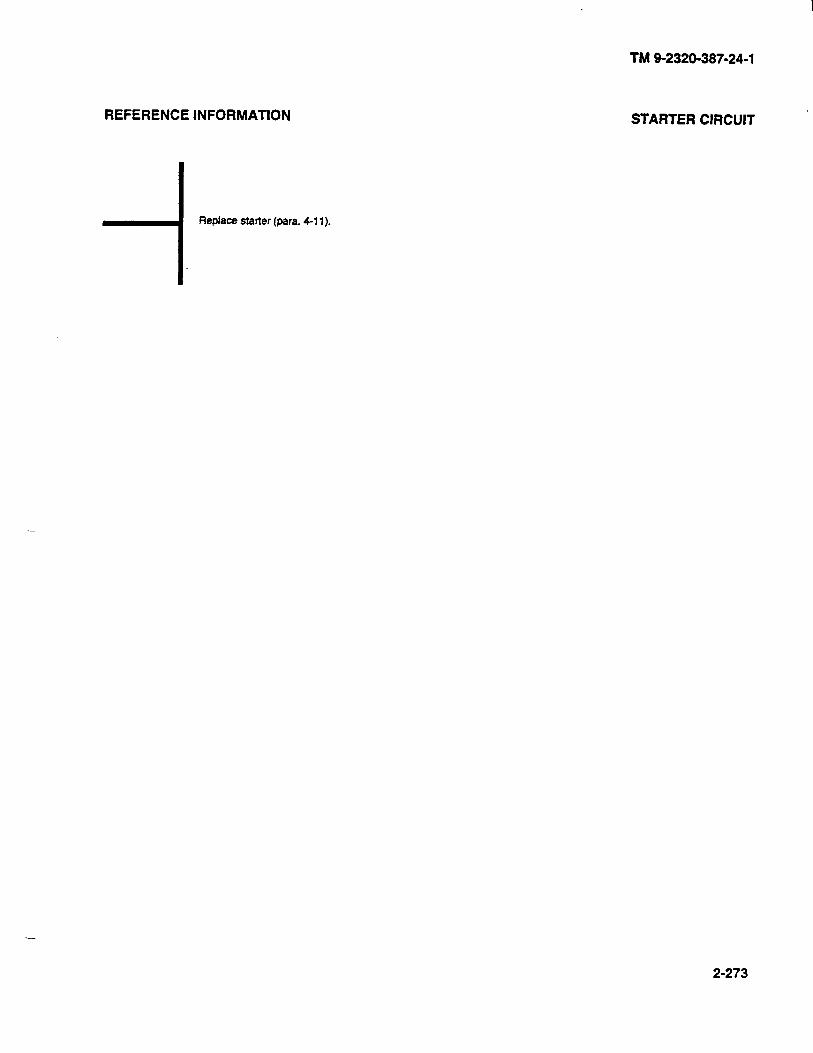
REFERENCE INFORMATION
Replace starter (para. 4-l 1).
TM 9-2320-387-24-l
STARTER CIRCUIT ’
2-273
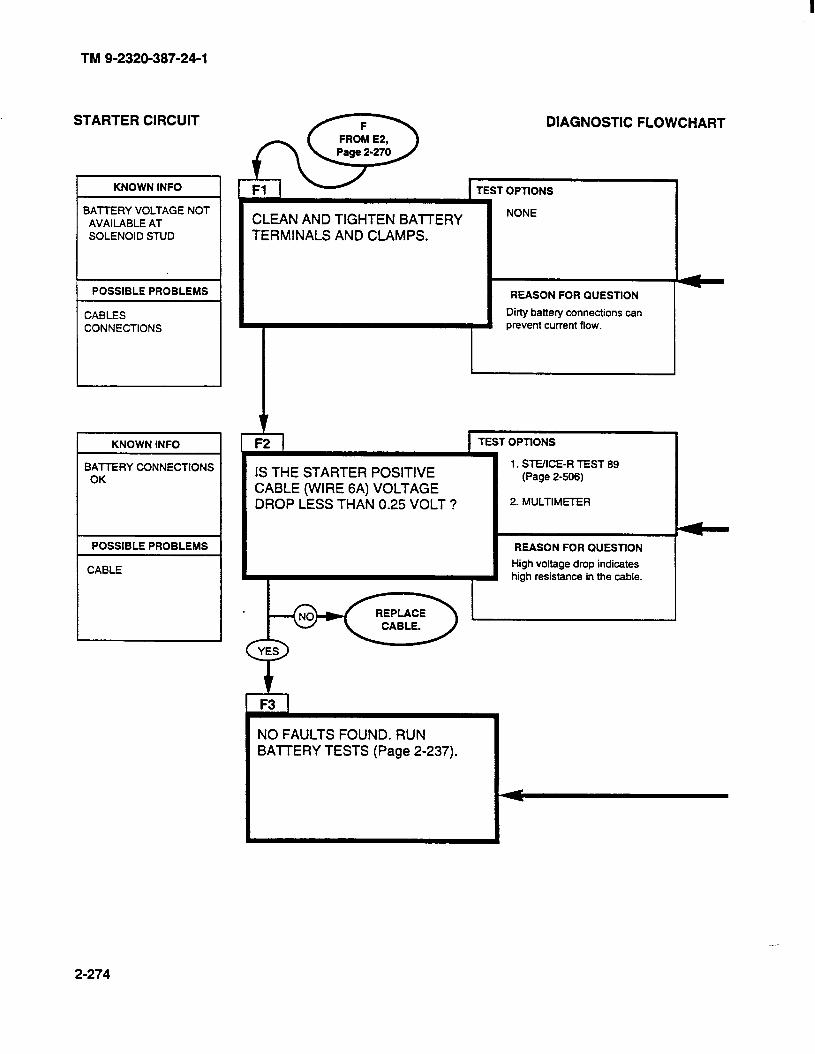
TM 9-2320-387-24-l
STARTER CIRCUIT
KNOWN INFO
BATTERY VOLTAGE NOT AVAILABLE AT SOLENOID STUD
POSSIBLE PROBLEMS
CABLES CONNECTIONS
KNOWN INFO
BAllERY CONNECTIONS OK
POSSIBLE PROBLEMS
CABLE
r
CLEAN AND TIGHTEN BAlTERY TERMINALS AND CLAMPS.
NONE
DIAGNOSTIC FLOWCHART
REASON FOR QUESTION
Dirty battery connections can prevent current flow.
I ,
TEST OPTIONS
IS THE STARTER POSITIVE CABLE (WIRE 6A) VOLTAGE DROP LESS THAN 0.25 VOLT ?
1. STEIICE-R TEST 89 (Page 2-506)
2. MULTIMETER
REASON FOR QUESTION
High voltage drop indicates high resistance in the cable.
1 F3 1
NO FAULTS FOUND. RUN BATTERY TESTS (Page 2-237).
2-274

TM 9-2320-387-24-l
REFERENCE INFORMATION
-I
i Replace cable (para. 4-72).
Put the red lead on the power stud, and the black on the terminal of the starter in order to measure the voltage along wire 6A.
BATTERY BOX
STARTER SOLENOID
STARTER CIRCUIT ’
DC VOLTAGE O-45 VOLTS SfEilCE-R TEST 89
1. Connect RED clip to the indicated test point, BLACK clip to negative or ground.
2. Start Test 69. DC Volts.
3. Displayed reading is in volts.
VOLTAGE MULTIMETER
1. Set the voltmeter to a DC volts scale of at least 40 volts.
2. Connect the RED lead to positive and the BLACK lead to negative.
3. Be sure to read the correct scale.
WfRE 6A
2-275
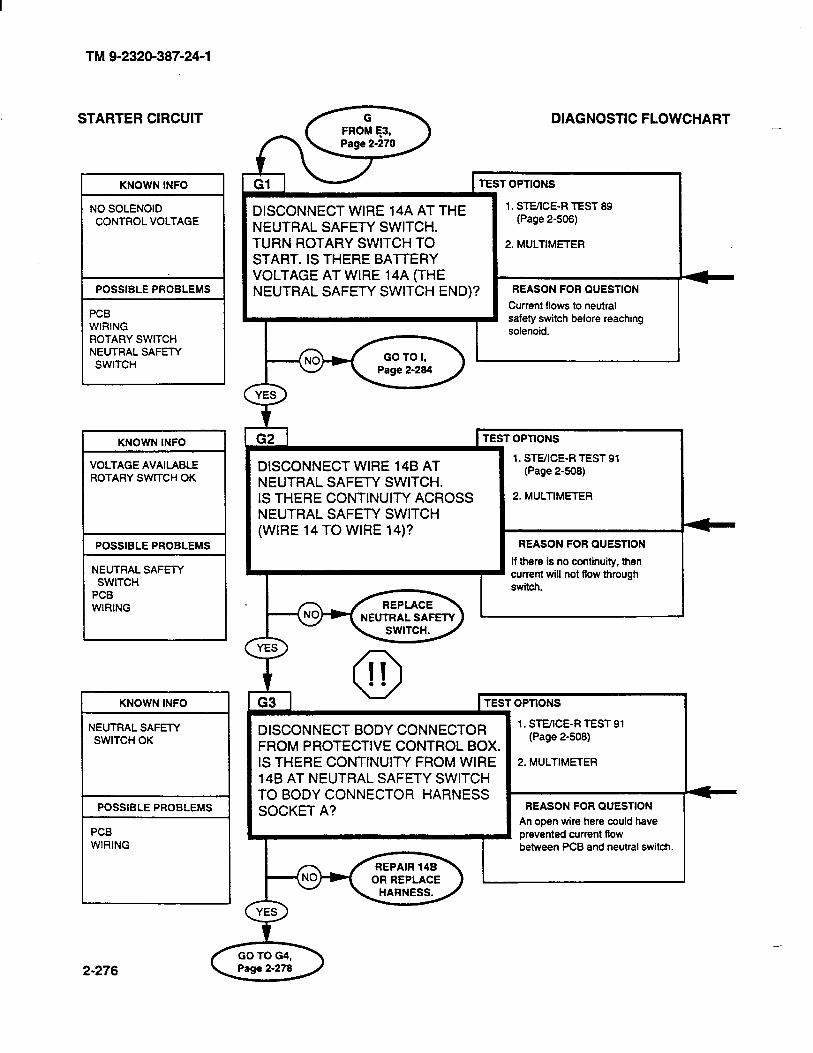
TM 9-2320-387-24-l
STARTER CIRCUIT DIAGNOSTIC FLOWCHART
TEST OPTIONS
-
KNOWN INFO
NO SOLENOID CONTROL VOLTAGE
1. STEXE-R TEST 89 (Page 2-508)
2. MULTIMETER
DISCONNECT WIRE 14A AT THE NEUTRAL SAFETY SWITCH. TURN ROTARY SWITCH TO START. IS THERE BAlTERY VOLTAGE AT WIRE 14A (THE NEUTRAL SAFETY SWITCH END)? POSSIBLE PROBLEMS REASON FOR QUESTION
Current flows to neutral safety switch before reaching solenoid.
PCB WIRING ROTARY SWITCH NEUTRAL SAFETY
SWITCH
n3 I I TE KNOWN INFO I
1. STE/ICE-R TEST 91 (Page 2-508)
2. MULTIMETER
DISCONNECT WIRE 148 AT NEUTRAL SAFETY SWITCH. IS THERE CONTINUI-lY ACROSS NEUTRAL SAFETY SWITCH (WIRE 14 TO WIRE 14)?
VOLTAGE AVAIlABLE ROTARY SWITCH OK
POSSIBLE PROBLEMS REASON FOR QUESTlON
If there is no continuity, then current will not flow through switch.
NEUTRAL SAFETY SWITCH
PCB WIRING
, G3 1 TEST OPTlONS
DISCONNECT BODY CONNECTOR 1. STE/lCE-R TEST 91
FROM PROTECTIVE CONTROL BOX. (Page 2-508)
IS THERE CONTINUITY FROM WIRE 14B AT NEUTRAL SAFETY SWITCH TO BODY CONNECTOR HARNESS SOCKET A?
OR REPLACE
KNOWN INFO
NEUTRAL SAFETY SWITCH OK
2. MULTIMETER
REASON FOR QUESTION
An open wire here could have prevented current flow between PCB and neutral switch.
POSSIBLE PROBLEMS
PC6 WIRING
2-276
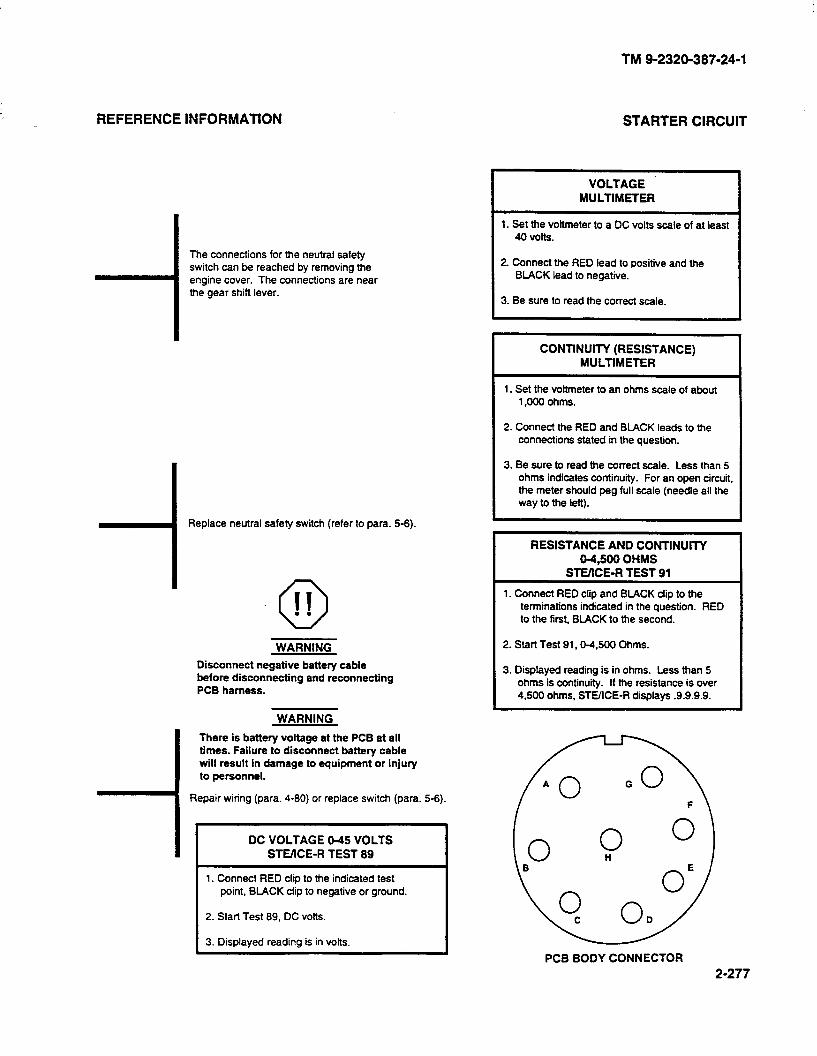
TM 9-2320-387-24-l
REFERENCE INFORMATION STARTER CIRCUIT
The connections for the neutral safety switch can be reached by removing the
-engine cover. The connections are near
I the gear shift lever.
Replace neutral safety switch (refer to para. 5-6).
0 II . . WARNING
Disconnect negative battery cable before disconnecting and reconnecting PCB harness.
WARNING
There is battery voltage at the PCB at all times. Failure to disconnect battery cable will result in damage to equipment or injury to personnel.
Repair wiring (para. 4-60) or replace switch (para. 5-6).
DC VOLTAGE O-45 VOLTS STVICE-R TEST 88
1. Connect RED clip to the indicated test point, BLACK clip to negative or ground.
2. Start Test 69, DC volts.
3. Displayed reading is in volts.
VOLTAGE MULTIMETER
1. Set the voltmeter to a DC volts scale of at least 40 volts.
2. Connect the RED lead to positive and the BLACK lead to negative.
I 3. Be sure to read the correct scale.
CONTINUITY (RESISTANCE) MULTlMETER
1. Set the vottmeter to an ohms scale of about 1.000 ohms.
2. Connect the RED and BLACK leads to the connections stated in the question.
3. Be sure to read the correct scale. Less than 5 ohms indicates continuity. For an open circuit, the meter should peg full scale (needle all the way to the left).
I RESISTANCE AND CONTINUITY
I 04.5DO OHMS
STE/lkE-R TEST 81
1. Connect RED clip and BLACK clip to the terminations indicated in the question. RED to the first, BLACK to the second.
I 2. Start Test 91,0-4.500 Ohms.
3. Displayed reading is in ohms. Less than 5 ohms is continutty. If the resistance is over 4.500 ohms, STEACE-R displays .9.9.9.9.
PCB BODY CONNECTOR
2-277
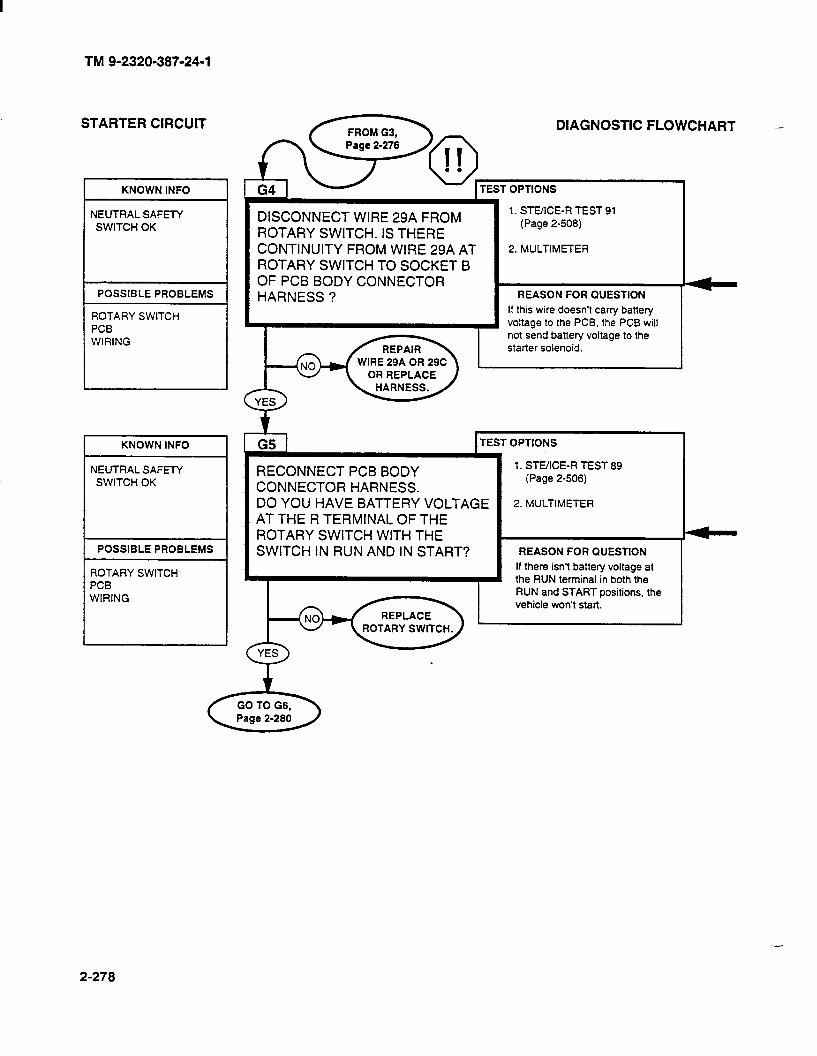
TM 9-2320-387-24-l
STARTER CIRCUIT
I KNOWN INFO
NEUTRAL SAFE-I?’ SWITCH OK
POSSIBLE PROBLEMS
ROTARY SWITCH PCB WIRING
KNOWN INFO
NEUTRAL SAFETY SWITCH OK
POSSIBLE PROBLEMS
ROTARY SWITCH, PCB WIRING
DISCONNECT WIRE 29A FROM ROTARY SWITCH. IS THERE CONTINUITY FROM WIRE 29A AT ROTARY SWITCH TO SOCKET B OF PCB BODY CONNECTOR HARNESS ?
1. STE/ICE-R TEST 91 (Page 2-508)
2. MULTIMETER
REASON FOR QUESTION
If this wire doesn’t carry battery voltage to the PCB. the PCB will not send battery voltage to the starter solenoid.
TEST OPTIONS
RECONNECT PCB BODY 1. STEIICE-R TEST 69
CONNECTOR HARNESS. (Page 2-506)
DO YOU HAVE BATTERY VOLTAGE 2. MULTIMETER
AT THE R TERMINAL OF THE ROTARY SWITCH WITH THE c SWITCH IN RUN AND IN START? REASON FOR QUESTION
If there isn’t battery voltage at the RUN terminal in both the RUN and START positions, the vehicle won’t start.
ROTARY SWITCH.
2-278
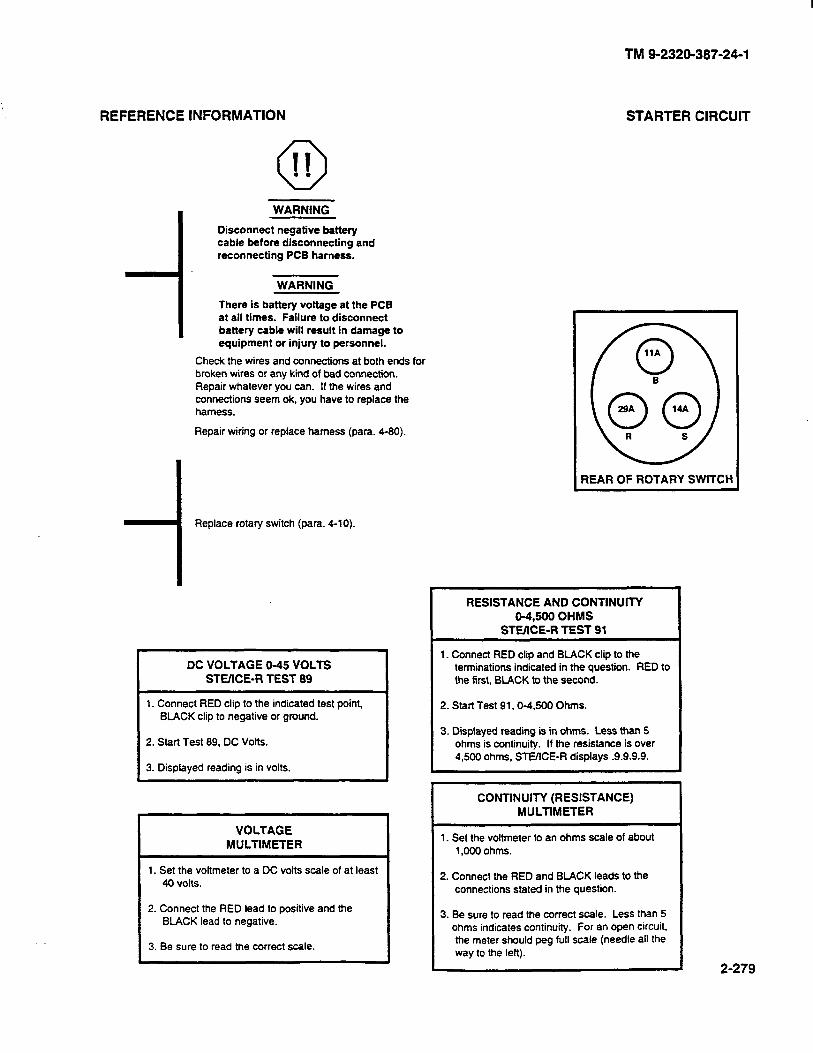
REFERENCE INFORMATION STARTER CIRCUIT
0 II . .
I WARNING
I Disconnect negative battery cable before disconnecting and reconnecting PC0 harness.
1 WARNING
There is battery voltage at the PCB at all times. Failure to disconnect battery cable will result in damage to equipment or injury to personnel.
Check the wires and connections at both ends for broken wires or any kind of bad connection. Repair whatever you can. If the wires and connections seem ok, you have to replace the harness.
Repair wiring or replace harness (para. 4-80).
-I Replace rotary switch (para. 4-10).
I 1
I DC VOLTAGE O-45 VOLTS STUICE-R TEST 89 I
1. Connect RED clip to the indicated test point, BLACK clip to negative or ground.
2. Start Test 89. DC Volts.
3. Displayed reading is in volts.
VOLTAGE MULTIMETER
1. Set the voltmeter to a DC volts scale of at least 40 volts.
2. Connect the RED lead to positive and the BLACK lead to negative.
3. Be sure to read the correct scale.
TM 9-2320-387-24-l
REAR OF ROTARY SWlTCH
RESISTANCE AND CONTINUITY 04,500 OHMS
STEXE-R TEST 91
1. Connect RED clip and BLACK clip to the terminations indicated in the question. RED to the first, BLACK to the second.
/ 2.StartTest91,0-4,8000hms., . 1
3. Displayed reading is in ohms. Less than 5 ohms is continuity. If the resrstance IS over 4.500 ohms, STUICE-R displays .9.9.9.9.
CONTINUITY (RESISTANCE) MULTIMETER
1. Set the voltmeter to an ohms scale of about 1,000 ohms.
2. Connect the RED and BLACK leads to the connections stated in the question.
3. Be sure to read the correct scale. Less than 5 ohms indicates continuity. for an open circuit, the meter should peg full scale (needle all the way to the left).
2-279

TM 9-2320-387-24-l
STARTER CIRCUIT
KNOWN INFO
POWER AVAILABLE TO PCB
/ ;PlBLE PROBLEMS
WIRING
KNOWN INFO
WIRING OK
POSSIBLE PROBLEMS
PCB
DISCONNECT BATTERY NEGATIVE CABLE. RECONNECT NEUTRAL SAFETY SWITCH. DISCONNECT ENGINE CONNECTOR FROM PCB. IS THERE CONTINUITY FROM ENGINE CONNECTOR HARNESS PIN I TO THE STARTER SOLENOID WIRE 74A?
% G7
REPLACE PCB. IF YOU STILL HAVE A PROBLEM, RERUN THE TEST CHAIN (Page 2-247).
DIAGNOSTIC FLOWCHART -
OPTIONS
1. STEXE-R TEST 91
(Page 2-508)
2. MULTIMETER
REASON FOR QUESTION
If there is continuity there, you know all the wiring is good and the problem is in the PCB.
2-280
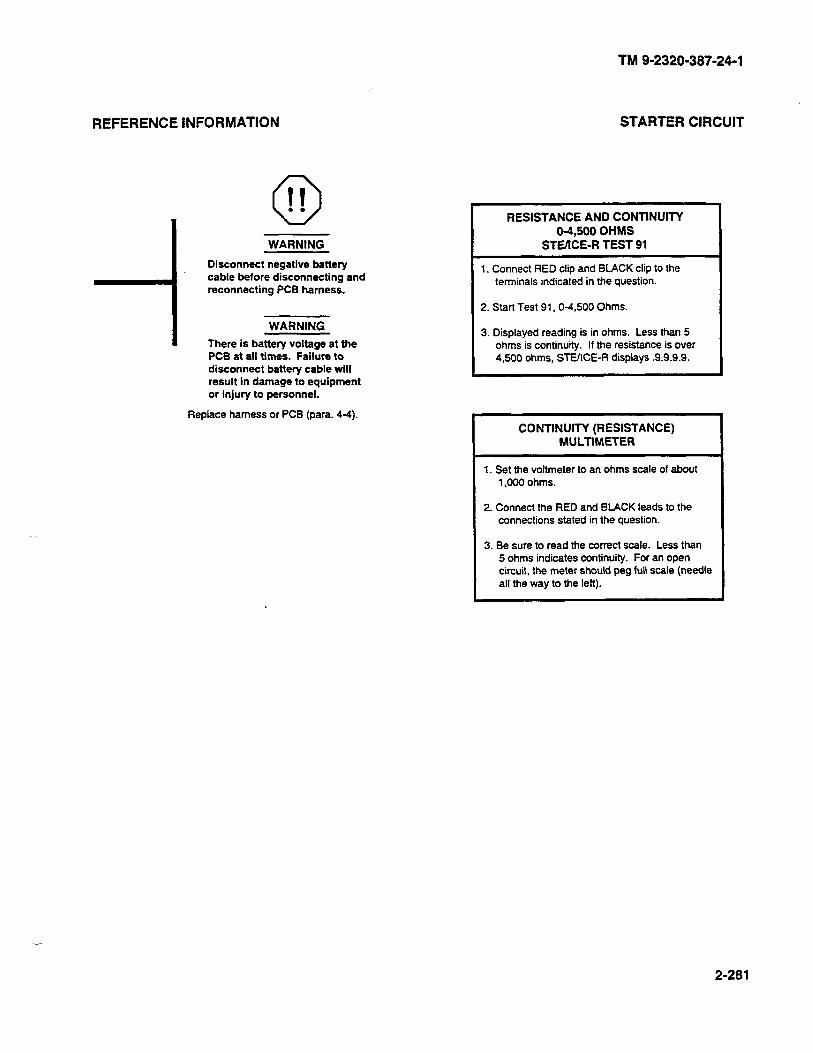
TM 9-2320-387-24-l
REFERENCE INFORMATION
0 II . .
WARNING
-i
Disconnect negative battery cable before disconnecting and reconnecting PCB harness.
.
I WARNING I There is battery voltage at the
PCB at all times. failure to disconnect battery cable will result in damage to equipment or injury to personnel.
Replace harness or PCB (para. 4-4).
STARTER CIRCUIT
RESISTANCE AND CONTINUITY 04,500 OHMS
STEIICE-R TEST 91
1. Connect RED clip and BLACK clip to the terminals indicated in the question.
2. Start Test 91, o-4500 Ohms.
3. Displayed reading is in ohms. Less than 5 ohms is continuity. If the resistance is over 4,500 ohms, STUICE-R displays .9.9.9.9.
CONTINUITY (RESISTANCE) MULTIMETER I
1. Set the voltmeter to an ohms scale of about 1,000 ohms.
2. Connect the RED and BACK leads to the connections stated in the question.
3. Be sure to read the correct scale. Less than 5 ohms indicates continuity. For an open circuit, the meter should peg full scale (needle all the way to the left).
2-281
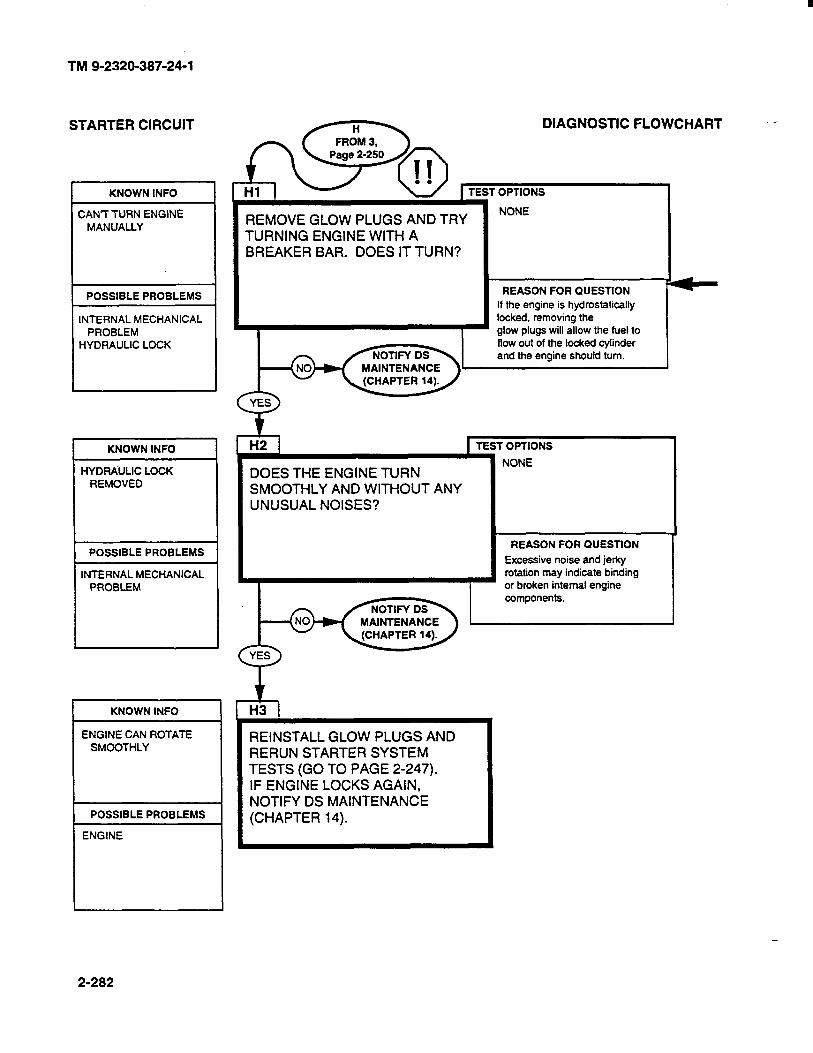
TM 9-2320-387-24-l
STARTER CIRCUIT
KNOWN INFO
CAN’T TURN ENGINE MANUALLY
POSSIBLE PROBLEMS
INTERNAL MECHANICAL PROBLEM
HYDRAULIC LOCK
KNOWN INFO
HYDRAULIC LOCK REMOVED
POSSIBLE PROBLEMS
INTERNAL MECHANICAL PROBLEM
KNOWN INFO
ENGINE CAN ROTATE SMOOTHLY
POSSIBLE PROBLEMS
ENGINE
REMOVE GLOW PLUGS AND TRY TURNING ENGINE WITH A BREAKER BAR. DOES IT TURN?
DIAGNOSTIC FLOWCHART -
OPTIONS
NONE
REASON FOR QUESTION
If the engine is hydrostatically locked, removing the glow plugs will allow the fuel to flow out of the locked cylinder and the engine should turn.
1 TEST OPTIONS 1
1 NONE DOES THE ENGINE TURN SMOOTHLY AND WITHOUT ANY UNUSUAL NOISES?
I REASON FOR QUESTION
Excessive noise and jerky I
REINSTALL GLOW PLUGS AND RERUNSTARTERSYSTEM TESTS (GO TO PAGE 2-247). IF ENGINE LOCKS AGAIN, NOTIFY DS MAINTENANCE (CHAPTER 14).
2-282
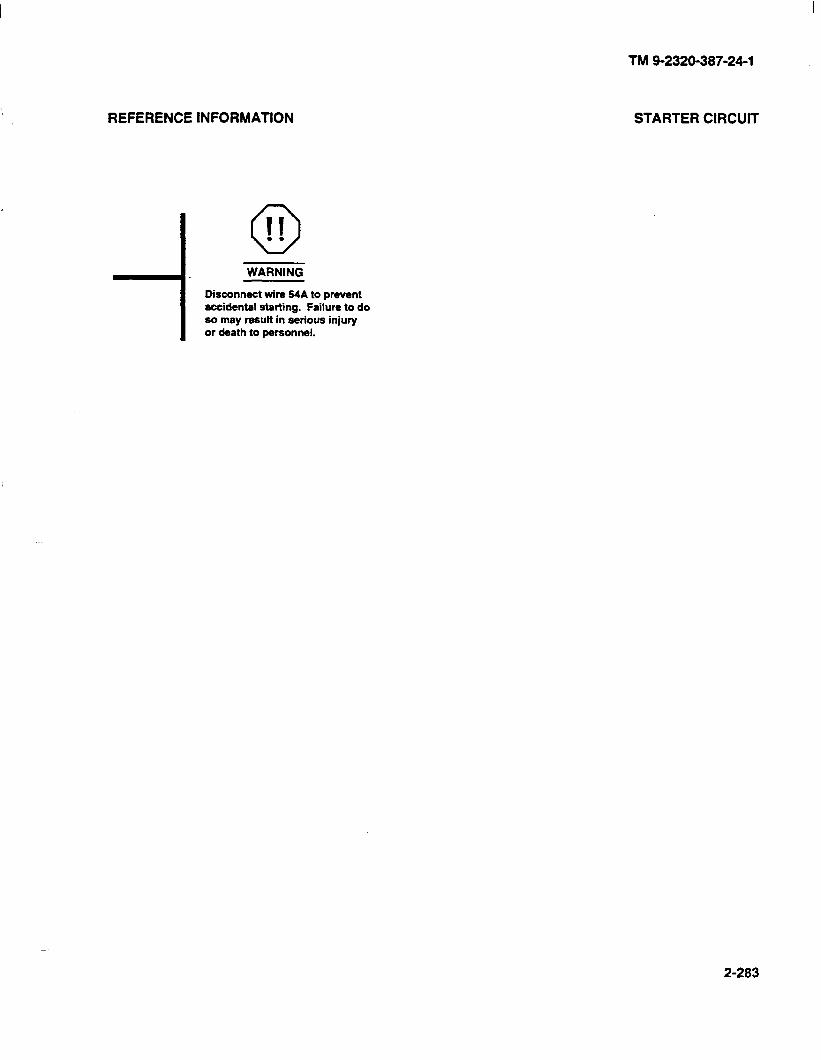
REFERENCE INFORMATION
0
II . .
WARNING
I Disconnect wire !%A to prevent accidental stating. Failure to do so may result in serious injury or death to personnel.
TM 9-2320-387-24-l
STARTER CIRCUIT
2-283
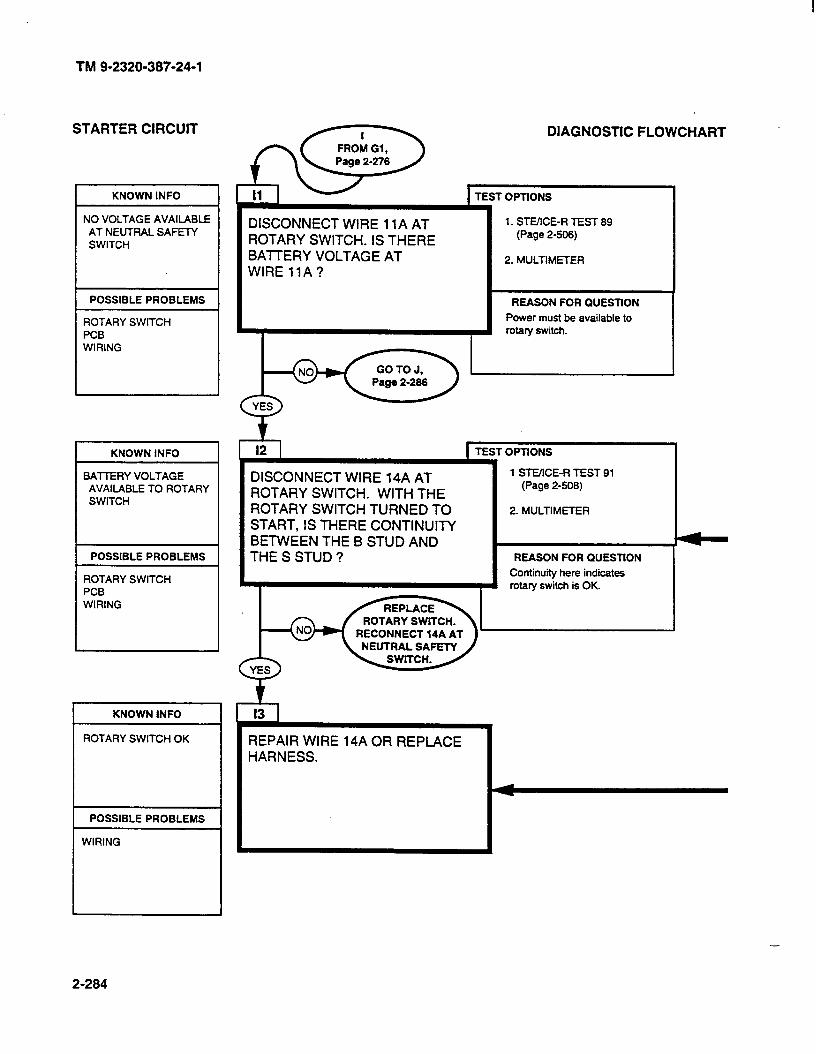
TM 9-2320-387-24-l
STARTER CIRCUIT
KNOWN INFO
NO VOLTAGE AVAILABLE AT NEUTRAL SAFETY SWITCH
POSSIBLE PROBLEMS
ROTARY SWITCH PCB WIRING
KNOWN INFO I
BATTERY VOLTAGE AVAILABLE TO ROTARY SWITCH
POSSIBLE PROBLEMS
ROTARY SWITCH PCB WIRING
KNOWN INFO
ROTARY SWITCH OK
POSSIBLE PROBLEMS
WIRING
DISCONNECT WIRE 11A AT ROTARY SWITCH. IS THERE BATTERY VOLTAGE AT WIRE llA?
DIAGNOSTIC FLOWCHART
T OPTIONS
1. STE/ICE-R TEST 89 (Page 2-506)
2. MULTIMETER
REASON FOR QUESTION
Power must be available to rotary switch.
DISCONNECT WIRE 14A AT ROTARY SWITCH. WITH THE ROTARY SWITCH TURNED TO START, IS THERE CONTINUITY BETWEEN THE B STUD AND THE S STUD ?
TEST OPTlONS
1 STEilCE-R TEST 91 (Page 2-508)
2. MULTIMETER
L
REASON FOR QUESTlON
Continuity here indicates rotary switch is OK.
REPAIR WIRE 14A OR REPLACE HARNESS.
-
2-284
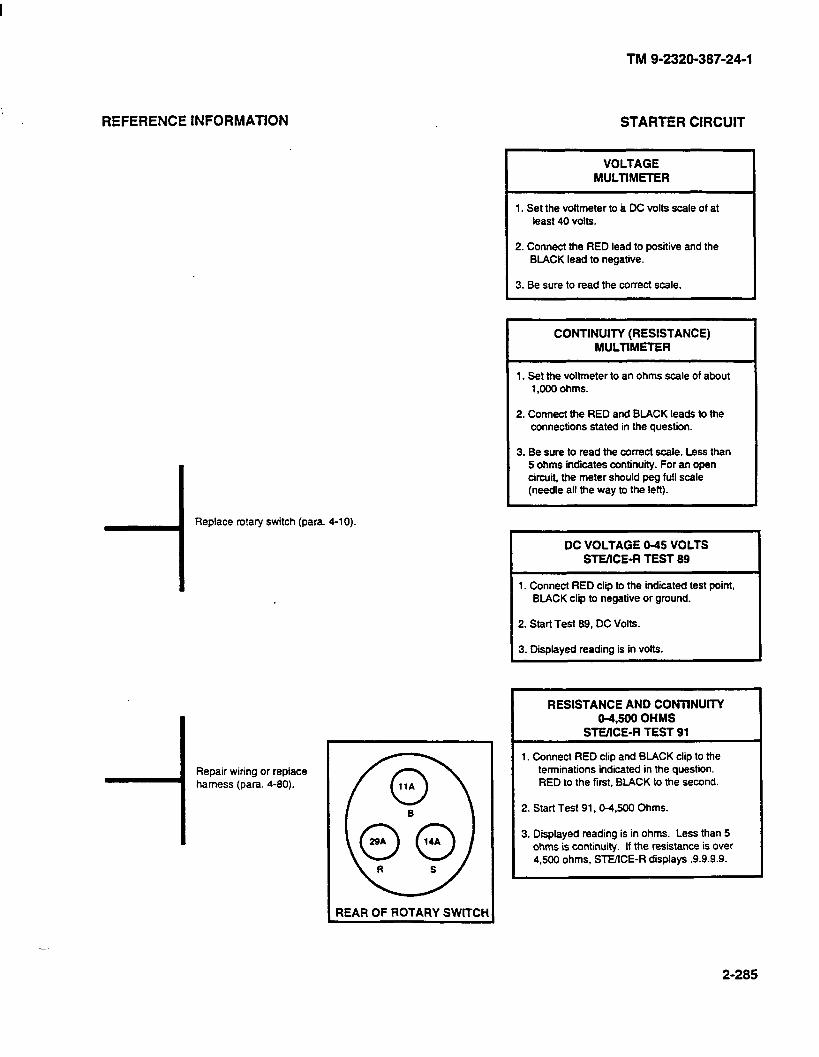
TM 9-2320-387-24-l
REFERENCE INFORMATION STARTER CIRCUIT
-I Replace rotary switch (para. 4-10).
-1 Repair wiring or replace harness (para. 4-80).
REAR OF ROTARY SWITCH
VOLTAGE MULTIMETER I
1. Set the voltmeter to a DC volts scale of at least 40 volts.
2. Connect the RED lead to positive and the BLACK lead to negative.
3. Be sure to read the correct scale.
CONTINUITY (RESISTANCE) MULTIMETER
1. Set the voltmeter to an ohms scale of about 1,000 ohms.
2. Connect the RED and BLACK leads to the connections stated in the question.
3. Be sure to read the correct scale. Less than 5 ohms indicates continuity. For an open circuit, ttre meter should peg full scale (needle all the way to the left).
DC VOLTAGE O-45 VOLTS STEKE-R TEST 89
1. Connect RED clip to the indicated test point, BLACK clip to negative or ground.
2. Start Test 89. DC Volts.
3. Displayed reading is in volts.
RESISTANCE AND CONTINUITY 04,500 OHMS
STMCE-R TEST 91
1. Connect RED clip and BLACK clip to the terminations indicated in the question. RED to the first. BLACK to the second.
2. Start Test 91.04.500 Ohms.
3. Displayed reading is in ohms. Less than 5 ohms is continuity. If the resistance is over 4.500 ohms, STEACE-R displays .9.9.9.9.
2-285
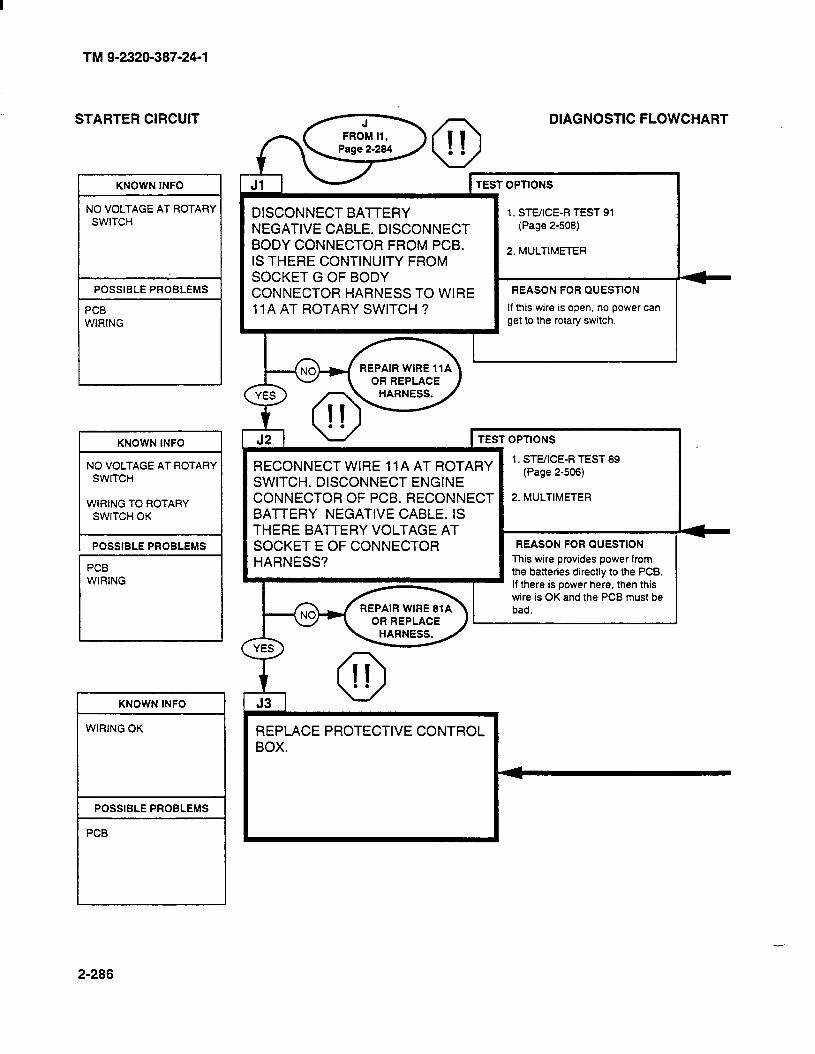
TM 9-2320-387-24-l
STARTER CIRCUIT
r KNOWN INFO
NO VOLTAGE AT ROTARY SWITCH
POSSIBLE PROBLEMS
PCB WIRING
KNOWN INFO
NO VOLTAGE AT ROTARY SWITCH
WIRING TO ROTARY SWITCH OK
POSSIBLE PROBLEMS
PCB WIRING
/IRING OK
‘CB
,CiZY~ DIAGNOSTIC FLOWCH
DISCONNECT BATTERY NEGATIVE CABLE. DISCONNECT BODY CONNECTOR FROM PCB. IS THERE CONTINUITY FROM SOCKET G OF BODY CONNECTOR HARNESS TO WIRE 11 A AT ROTARY SWITCH ?
-
1. STE/ICE-R TEST 91 (Page 2-508)
2. MULTIMETER
REASON FOR QUESTION
If this wire is open, no power can get to the rotary switch.
REPAIR WIRE 11A OR REPLACE
TEST OPTIONS I
RECONNECT WIRE 11A AT ROTARY SWITCH. DISCONNECT ENGINE CONNECTOR OF PCB. RECONNECT BATTERY NEGATIVE CABLE. IS THERE BATTERY VOLTAGE AT SOCKET E OF CONNECTOR HARNESS?
REPLACE PROTECTIVE CONTROL BOX.
ART
1. STUICE-R TEST 89 (Page 2-506)
2. MULTIMETER
REASON FOR QUESTION
This wire provides power from the batteries directly to the PCB. If there is power here, then this wire is OK and the PCB must be bad.
2-286

REFERENCE
TM 9-2320-387-24-I
INFORMATION STARTER ClRCUlT
0 II . l
I
WARNING
Disconnect negative battery cable before disconnecting and reconnecting PCB harness.
WARNING
There is battery voltage at the PC6 at all times. Failure to disconnect battery cable will result in damage to equipment or injury to personnel.
Replace harness or repair wiring (para. 4-80). n
0 II . .
WARNING
Disconnect negative battery cable before disconnecting and reconnecting PCB harness.
WARNING
There is battery voltage at the PCB at all times. Failure to disconnect battery cable will result in damage to equipment or injury to personnel.
Replace harness or repair wiring (Pam. 4-80). b
REAR OF ROTARY SWlTCl-
WARNING
Disconnect negative battery cable before disconnecting and reconnecting PC6 harness.
WARNING
There is battery voltage at the PCB at all times. Failure to disconnect battery cable will result in damage to equipment or injury to personnel.
Replace PCB (refer to para. 4-4).
VOLTAGE MULTlMETER
1. Set the voltmeter to a DC volts scale of at least 40 volts.
2. Connect the RED lead to positive and the BLACK lead to negative.
3. Be sure to read the correct scale.
CONTINUITY (RESISTANCE) MULTIMETER
1. Set the voltmeter to an ohms scale of about 1,000 ohms.
2. Connect the RED and BLACK leads to the connections stated in the question.
3. Be sure to read the correct scale. Less than 5 ohms indicates continuity. For an open circuit. the meter should peg full scale (needle all the way to the left).
DC VOLTAGE O-45 VOLTS STEIICE-R TEST 89 I
1. Connect RED clip to the indicated test point, BUCK clip to negative or ground.
2. Start Test 89, DC Volts.
3. Displayed reading is in volts.
RESISTANCE AND CONTINUITY 04,500 OHMS
STE/lCE-R TEST 91 I
1. Connect RED ctip and BLACK clip to the indicated terminals in the question. RED to the first, BlACK to the second.
2. Start Test 91,0-4,500 Ohms.
3. Displayed reading is in ohms. Less than 5 ohms is continuity. If the resistance is over 4,500 ohms, STE/ICE-R displays .9.9.9.9.
2-287/(2-288 blank)
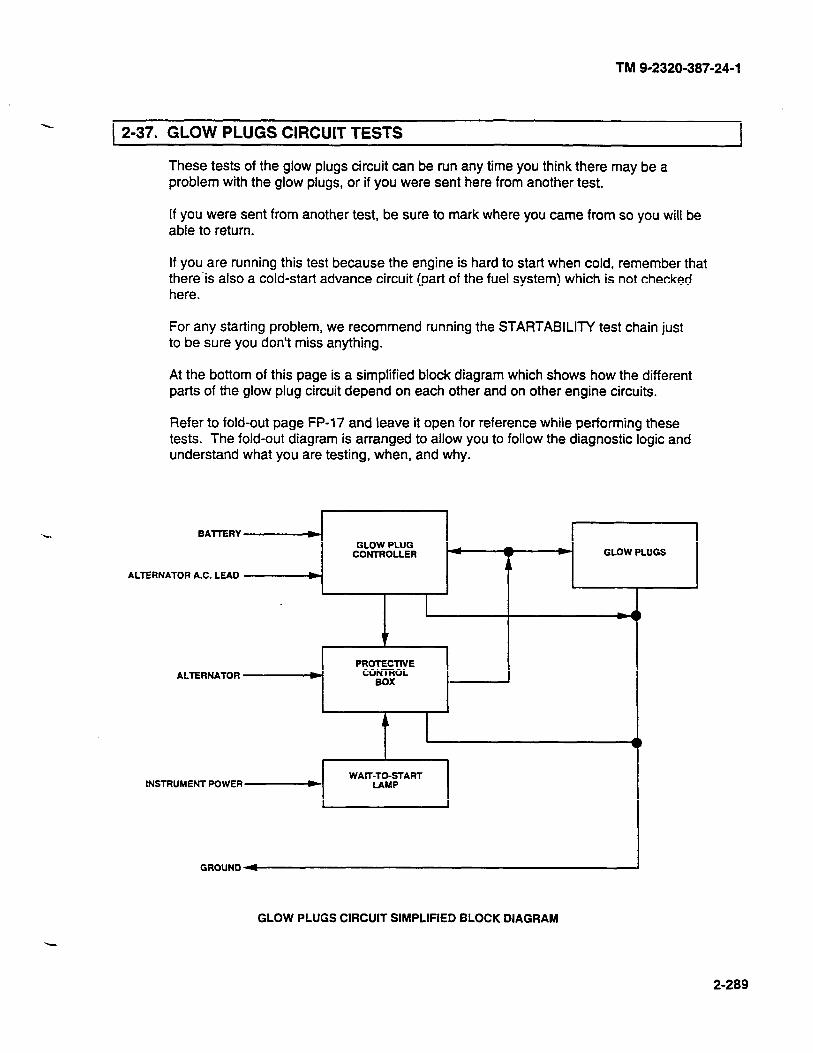
TM 9-2320-387-24-l
2-37. GLOW PLUGS CIRCUIT TESTS
These tests of the glow plugs circuit can be run any time you think there may be a problem with the glow plugs, or if you were sent here from another test.
If you were sent from another test, be sure to mark where you came from so you will be able to return.
If you are running this test because the engine is hard to start when cold, remember that there’is also a cold-start advance circuit (part of the fuel system) which is not checked here.
For any starting problem, we recommend running the STARTABILITY test chain just to be sure you don’t miss anything.
At the bottom of this page is a simplified block diagram which shows how the different parts of the glow plug circuit depend on each other and on other engine circuits.
Refer to fold-out page FP-17 and leave it open for reference while performing these tests. The fold-out diagram is arranged to allow you to follow the diagnostic logic and understand what you are testing, when, and why.
BAllERY t
c GLOW PLUG
CONTROLLER 4 v b GLOW PLUGS
ALTERNATORA.C.LEAD ~-4 . 1 1 1
--i
PROTECTIVE ALTERNATOR CONTROL
BOX
INSTRUMENT POWER----------t (1
GROUND 4
GLOW PLUGS CIRCUIT SlMPLlFlED BLOCK DIAGRAM
2-289

TM 9-2320-387-24-l
GLOW PLUGS CIRCUIT TEST OPT,ONS D’AGNoSnC FLoWCHART @>
I r KNOWN INFO
NOTHING
POSSIBLE PROBLEMS
GLOW PLUGS GLOW PLUG
CONTROLLER PCB CABLES
TO RUN THE GLOW PLUG CIRCUIT TESTS, THE BAlTERIES MUST BE IN A GOOD STATE OF CHARGE. IF YOU AREN’T SURE, RUN THE BAlTERY CIRCUIT TESTS. IF YOU ARE HERE BECAUSE THE WAIT-TO-START LAMP DOESN’T WORK PROPERLY, SEE THE NOTE ON THE RIGHT-HAND PAGE.
CHECK ALL THE GLOW PLUG CIRCUIT CONNECTIONS (GLOW PLUGS, GLOW PLUG CONTROLLER, PROTECTIVE CONTROL BOX). ARE ALL THE CONNECTIONS CLEAN AND TIGHT?
BATTERY TESTS (Page 2-237)
REASON FOR QUESTION
The glow plugs and their control circuits require battery power to work.
KNOWN INFO
VISUAL BATTERIES OK
I
I I I
REASON FOR QUESTION
Loose or dirty connections
signals.
can hinder current flow or cause mixups in the control
POSSIBLE PROBLEMS
GLOW PLUGS GLOW PLUG
CONTROLLER PCB CABLES
r KNOWN INFO I TEST OPTlONS
BATTERIES OK CABLES/CONNECTIONS
SEEM OK
1. STEIICE-R TEST SO (Page 2-505)
TURN THE ROTARY SWITCH TO RUN. DO THE GLOW PLUGS DRAW 75-125 AMPS? (SEE NOTE ON RIGHT-HAND PAGE). I 2. MULTIMETER
I REASON FOR QUESTION
If the current is OK, then the
POSSIBLE PROBLEMS
GLOW PLUGS
GLOW PLUG CONTROLLER
PCB CABLES
control box are OK.

TM 9-2320-387-24-l
REFERENCE INFORMATION
If the engine cranks ok (or starts), then the batteries are good enough for testing the glow plugs. If the engine starts, shut it off.
You can use STEXE Test 10 to measure cranking speed. The engine should crank at least 100 rpm in cold weather and at least 180 rpm in warm weather.
GLOW PLUGS CIRCUIT
NOTE
The WAIT-TO-START lamp is NOT diagnosed in this section. If the lamp does not work properly, the glow plug circuit may be affecting Its operation. Run these tests to check out the glow plug circuit. If the lamp still does not work properly, go to the INSTRUMENT section for a full diagnosis of the lamp’s problem.
WARNING
Disconnect negative battery cable before disconnecting and reconnecting PCB harness.
WARNING There is battery voltage at the PCB at all times. Failure to disconnect battery cable will result in damage to equipment or injury to Personnel.
BAD CONNECTIONS ARE THF MOST COMMON PROBLEM !
Sometimes just disconnecting, cleaning, and reconnecting will solve a problem. BE THOROUGH! The time you save may be your own. Refer to the functional flow schematic and check the following: 1. BAlTERY - make sure all connections are clean and
tight. including the shunt and power stud. 2. PROTECTIVE CQNTROL BOX - remove BOTH
connectors and look for bent or broken pins, pins pushed out of their socket. or dirt and corrosion in the connections.
3. GLOW PLUG CONTROLLER - pop the controller connector off (squeeze the sides) and check the pins in both the controller and the connector. Look for bent. broken or pushed out pins, die, or corrosion. Check for broken wires at the connector. Take note that pin 2 of the glow plugs controller connector has no pin in it.
4. GLOW PLUGS - check that all the glow plug wires are snug. Don’t just look with your eyes. Many problems are solved by looking with your fingers to be sure a connection is snug.
NORMAL GLOW PLUG OPERATION
The glow plugs first come ON when the engine temperature is below 120 “F (49°C) and the rotary switch is turned lo RUN. They stay ON for up to 9 seconds and then go OFF.
They will stay OFF for about 7-15 sewnds then come ON
CONTROLLER HARNESS
again for about 1 second. NOTE
BAlTERY CURRENT MULTIMETER
1. Set the voltmeter to a DC volts scale of about 1 volt.
2. Connect the BLACK lead to the battery side of the current shunt and the RED lead to the other end of the current shunt.
3. Current shunt voltage is proportional lo battery current, 100 millivolts = 1,000 amps. To get current, multiply millivolts x 10.
I BAlTERY CURRENT STEIICE-R TEST 80 I
To check for glow plug current draw, start STE/lCE-R Test 80, Battery Current. Turn off all accessories (lights, heater, wipers, etc.). STE/ICE-R should immediately measure at least 74 amps. Take note, however, that if all your glow plugs are working, the current draw should be close to or more than 100 amps, especially if it’s cold. If it’s near freezing and the glow plugs only draw 75-60 amps, you probably have a few bad glow plugs.
2-291
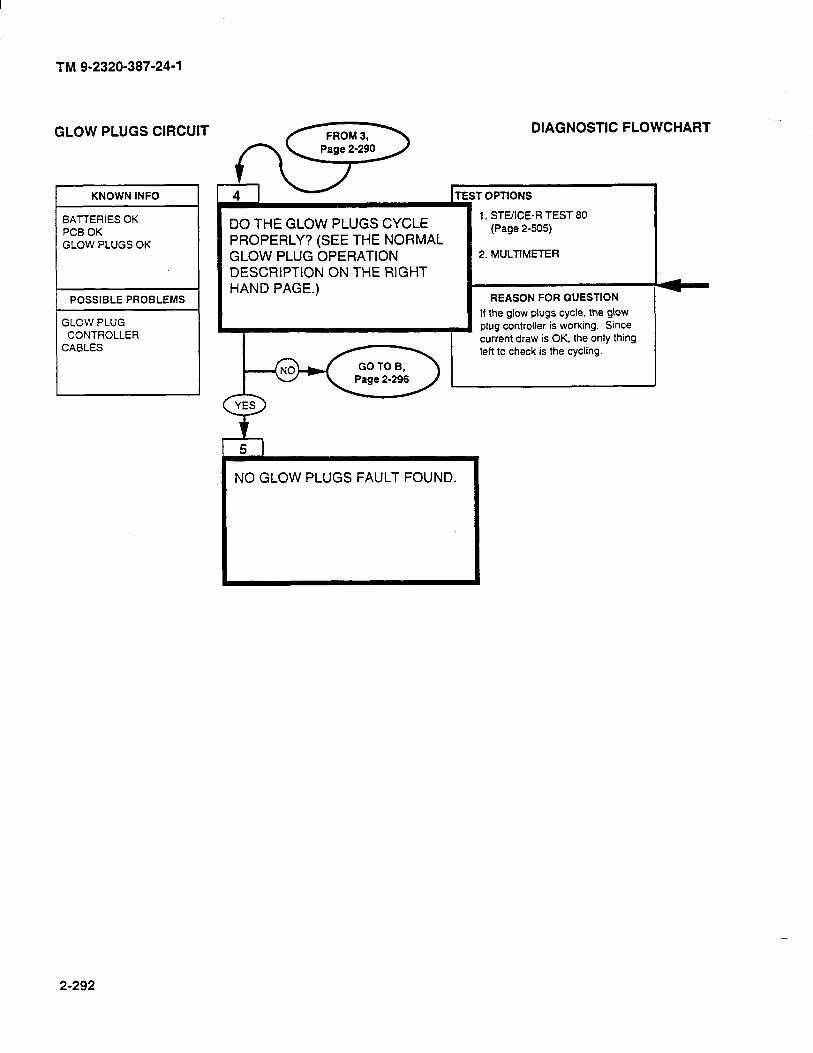
TM 9-2320-387-24-l
GLOW PLUGS CIRCUIT
KNOWN INFO
BAlTERlES OK PCB OK GLOW PLUGS OK
POSSIBLE PROBLEMS
GLOW PLUG CONTROLLER
CABLES
fli rES
I
DO THE GLOW PLUGS CYCLE PROPERLY? (SEE THE NORMAL GLOW PLUG OPERATION DESCRIPTION ON THE RIGHT HAND PAGE.) I
DIAGNOSTIC FLOWCHART
T OPTIONS
1. STUICE-R TEST 80 (Page 2-505)
2. MULTIMETER
REASON FOR QUESTION
If the glow plugs cycle, the glow plug controller is working. Since current draw is OK, the only thing left to check is the cycling.
NO GLOW PLUGS FAULT FOUND.
2-292
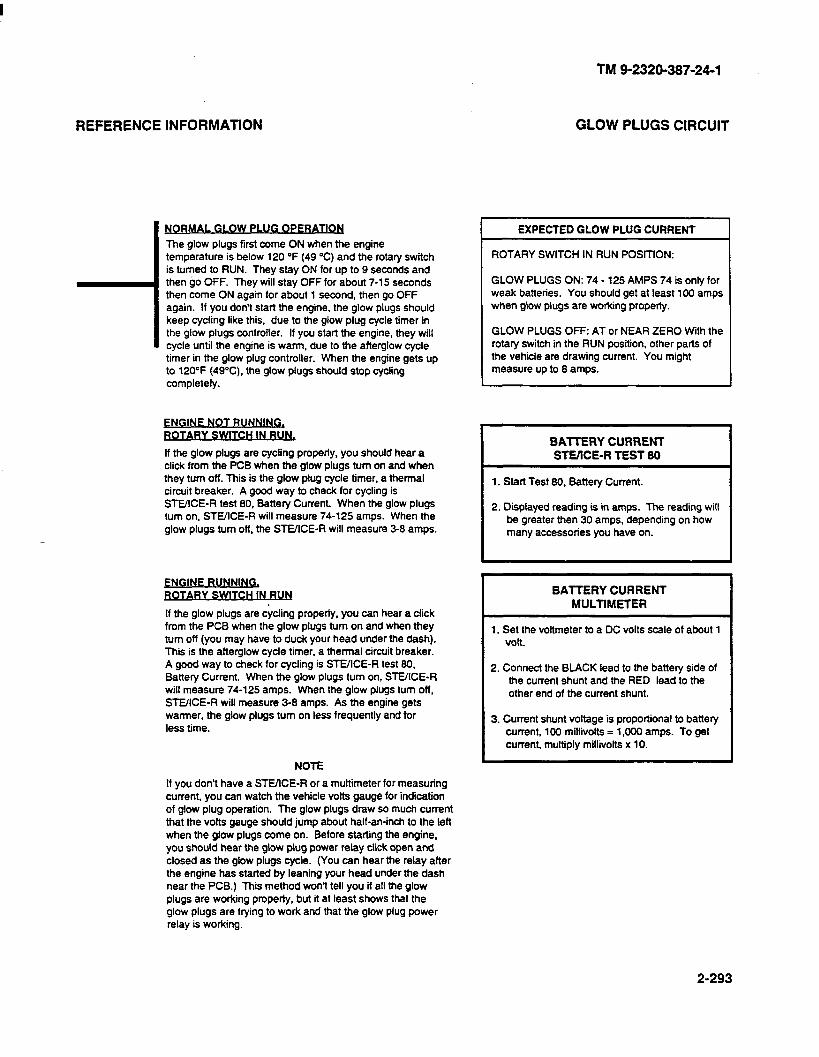
REFERENCE INFORMATION
I NoRMALGLoWP- 1
The glow plugs first come ON when the engine temperature is below 120 OF (49 “C) and the rotary switch is turned to RUN. They stay ON for up to 9 seconds and then go OFF. They will stay OFF for about 7-l 5 seconds then come ON again for about 1 second, then go OFF again. If you don’t start the engine, the glow plugs should keep cycling like this, due to the glow plug cycle timer in the glow plugs controller. If you start the engine, they will cycle until the engine is warm, due to the afterglow cycle timer in the glow plug controller. When the engine gets up to 120°F (49°C) the glow plugs should stop cyckng completely.
If the glow plugs are cycling properly, you should hear a click from the PCB when the glow plugs turn on and when they turn off. This is the glow plug cycle timer, a thermal circuit breaker. A good way to check for cycling is STE/ICE-R test 80, Battery Current. When the glow plugs turn on, STE/lCE-R will measure 74-125 amps. When the glow plugs turn off, the STEIICE-R will measure 3-8 amps.
FNGINF RUNNING. ROTARY SWITCH IN RUN
If the glow plugs are cycling property, you can hear a click from the PCB when the glow plugs turn on and when they turn off (you may have to duck your head under the dash). This is the afterglow cycle timer, a thermal circuit breaker. A good way to check for cycling is STEIICE-R test 80, Battery Current. When the glow plugs turn on, STEIlCE-R will measure 74-125 amps. When the glow plugs turn off, STE/ICE-R will measure 3-8 amps. As the engine gets warmer, the glow plugs turn on less frequently and for less time.
NOTE
If you don’t have a STEACE-R or a multimeter for measuring current, you can watch the vehicle volts gauge for indication of glow plug operation. The glow plugs draw so much current that the volts gauge should jump about half-an-inch to the left when the glow plugs come on. Before starting the engine, you should hear the glow plug power relay click open and closed as the glow plugs cycle. (You can hear the relay after the engine has started by leaning your head under the dash near the PCB.) This method won’t tell you if all the glow plugs are working property, but it at least shows that the glow plugs are trying to work and that the glow plug power relay is working.
TM 9-2320-387-24-l
GLOW PLUGS CIRCUIT
I EXPECTED GLOW PLUG CURRENT
ROTARY SWITCH IN RUN POSITION:
GLOW PLUGS ON: 74 - 125 AMPS 74 is only for weak batteries. You should get at least 100 amps when glow plugs are working property.
GLOW PLUGS OFF: AT or NEAR ZERO With the rotary switch in the RUN position, other parts of the vehicle are drawing current. You might measure up to 8 amps.
I BATTERY CURRENT STMCE-R TEST 80
1. Start Test 80. Battery Current.
2. Displayed reading is in amps. The reading will be greater then 30 amps, depending on how many accessories you have on.
I BATTERY CURRENT MULTIMETER
I 1. Set the voltmeter to a DC volts scale of about 1
I volt.
2. Connect the BLACK lead to the battery side of the current shunt and the RED lead to the other end of the current shunt.
3. Current shunt voltage is proportional to battery current, 100 millivolts = 1 ,ooO amps. To get current, multiply millivolts x 10.
2-293

TM 9-2320-387-24-l
GLOW PLUGS CIRCUIT
KNOWN INFO
GLOW PLUGS DC NOT DRAW ENOUGH CURRENT
POSSIBLE PROBLEMS
GLOW PLUGS GLOW PLUG
CONTROLLER CABLES
KNOWN INFO
BUT NOT ENOUGH CURRENT
PCB OK
GLOW PLUGS GLOW PLUG I
CONTROLLER CABLES
I KNOWN INFO
GLOW PLUGS DRAW SOME BUT NOT ENOUGH
POSSIBLE PROBLEMS
GLOW PLUGS CABLES
TURN THE ROTARY SWITCH TO RUN. DO THE GLOW PLUGS DRAW AT LEAST 15 AMPS?
1. STEIfCE-R TEST 80 (Page 2-505)
2. MULTIMETER
REASON FOR QUESTION
A working glow plug draws 12-15 amps. If at least one glow plug is working, the PCB is OK.
DO THE GLOW PLUGS CYCLE PROPERLY?
TEST OPTIONS 1
CHECK THE GLOW PLUGS AND WIRES USING THE PROCEDURE ON THE RIGHT-HAND PAGE. REPAIR OR REPLACE PARTS AS REQUIRED. RERUN THE MAIN TEST CHAIN.
1. STEIlCE-R TEST 80 (Page 2-505)
2. MULTlMETER
REASON FOR QUESTlON
If the glow plugs cycle property, the glow plug controller is OK
T OPTtONS
SEE THE PROCEDURE ON THE RIGHT-HAND PAGE AND USE: 1. STEXE-R TEST 91
(Page 2-598)
2. MULTIMETER
REASON FOR OUESTION
Since the glow plugs draw some current and cycle property, the only reason they wouldn’t draw enough current is that the glow plugs themselves are bad or the wires are no good.
2-294

TM 9-2320-387-24-I
REFERENCE INFORMATION GLOW PLUGS CIRCUIT
Dead glow plugs draw virtually no current, but other parts of the vehicle are drawing some current-up to 8 amps. If any glow plugs are drawing any current, then the PCB is probably OK.
I For a good description of how glow plugs cycle and how to check for proper cycling, refer to page 2-293.
--I @ WARNING
Disconnect negative battery cable before disconnecting and reconnecting PCB harness.
WARNING There is battery voltage at the PCB at all times. Failure to disconnect battery cable will nsult in damage to equipment or injury to Personnel.
If most or all of the glow plugs are bad, you may also have a problem with the PCB or the glow plug controller which caused them to go bad (usually they bum out from being on too long or not turning off at all). After replacing the bad glow plugs, rerun the glow plugs test chain paying special attention to the glow plugs cycling, especially that they turn OFF when they should.
1 Replace glow plugs, wires, or harness (para. 3-39).
BATTERY CURRENT STE’ICE-R TEST 80
1. Start Test 80. Battery Current.
2. Displayed reading is in amps. The reading will be greater then 30 amps, depending on how many accessories you have on.
BATTERY CURRENT MULTIMETER
1. Set the voltmeter to a DC volts scale of about 1 volt.
2. Connect the BLACK lead to the battery side of the current shunt and the RED lead to the other end of the current shunt.
3. Current shunt voltage is proportional to battery current, 100 millivolts = 1.000 amps. To get current, multiply millivolts x 10.
CHECKING GLOW PLUGS 8 THEIR WIRFS
1. Disconnect ALL the glow plugs.
2. Disconnect the neoative battery cable. Disconnect the PCB connector harnessfrom the PdB. Reconnect the negative battery cable. Measure me resistance between pin D in the engine connector harness of the PCB and ground. There should NOT be continuity (resistance reading off the scale). If there is continuity, repair or replace me harness.
Repeat the following for each glow plug: 3.
a. Reconnect the wiring harness to the glow plug while you repeat the resistance measurement described in step 2. When you reconnect the wire to the glow plug, the resistance should drop to between 1 and 2 ohms (glow plugs are typically 1.6 ohms).
b. If step A passed: disconnect the glowptug again, making sure the resistance goes off scale again. Repeat step A for me next glow
plug.
C. If step A failed: then either the glow plug or its wire is no good. Take the wire off the glow plug again and measure the resistance from the glow plug to the engine block. If the resistance is 1 - 2 ohms, then the cable is no good. Otherwise replace the glow plug and check the cable for continuity, just to be sure.
4. Reconnect the PCB and all wires.
2-295
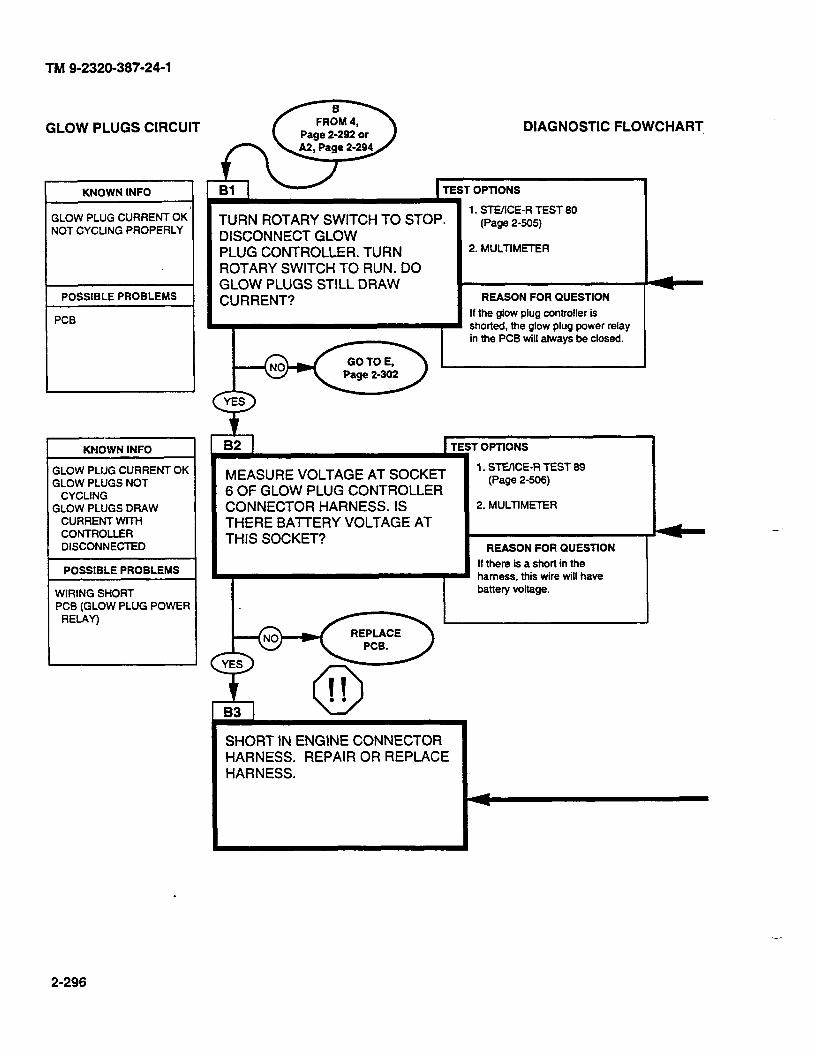
I
TM 9-2320-387-24-l
GLOW PLUGS CIRCUIT DIAGNOSTIC FLOWCHART
I KNOWN INFO I
GLOW PLUG CURRENT OK NOT CYCLING PROPERLY
KNOWN INFO I
SLOW PLUG CURRENT OK SLOW PLUGS NOT
CYCLING SLOW PLUGS DRAW
CURRENT WITH CONTROLLER DISCONNECTED
POSSIBLE PROBLEMS
WIRING SHORT PCB (GLOW PLUG POWER
RELAY)
1
Bl [ - TEST OPTIONS
TURN ROTARY SWITCH TO STOP. 1. STE/lCE-R TEST 80
(Page 2-505) DISCONNECT GLOW PLUG CONTROLLER. TURN ROTARY SWITCH TO RUN. DO GLOW PLUGS STILL DRAW CURRENT?
2. MULTlMElER
REASON FOR QUESTION
If the glow plug controller is shorted, the glow plug power relay
&GE9 in the PCB will always be closed-
MEASURE VOLTAGE AT SOCKET 6 OF GLOW PLUG CONTROLLER CONNECTOR HARNESS. IS THERE BATTERY VOLTAGE AT THIS SOCKET?
r OPTIONS
1. STEXE-R TEST 89 (Page 2-508)
2. MULTIMETER
REASON FOR QUESTION
If there is a short in the harness, this wire will have battery voltage. I
SHORT IN ENGINE CONNECTOR HARNESS. REPAIR OR REPLACE HARNESS.
-
2-296

TM 9-2320-387-24-l
REFERENCE INFORMATION GLOW PLUGS CIRCUIT
-
Refer to the functional flow schematic. If the glow plug controller is shorted (continuity from pin 6 to pin 3) the glow plug power relay will always be energized and the glow plugs will always be drawing current.
BATTERY CURRENT STEIICE-R TEST 80
1. Start Test 80. Battery Current.
2. Displayed reading is in amps. The reading will be greater then 30 amps, depending on how many accessories you have on.
Since the glow plugs draw current without the glow plug controller connected, there must be a short in the harness or a stuck relay in the PCB. If there were a short in the harness directly to the glow plugs, the glow plugs would have burned out long ago and you wouldn’t be here. The only other short in the harness that
3O 4. so 0 0 l 6 lo
would make the glow GLOW PLUG CONTROLLER
plugs turn on without the HARNESS SCHEMATIC
glow plug controller installed would show. up as battery voltage at pin 6 of the controller’s connector.
Replace PCB (para. 4-4).
Check the end of the harness at the PCB, glow plugs, etc., for shorts. Repair whatever you can. If you don’t see anything wrong, the short must be in the main body of the harness. which means that you have to replace the harness.
WARNING
Disconnect negative battery cable before disconnecting and reconnecting PCB harness.
WARNING
There is battery voltage at the PCB at all times. Failure to disconnect battery cable will result in damage to equipment or injury to personnel.
Repair or replace wiring (para. 4-80).
BAITERY CURRENT
MULTIMETER
1. Set the voltmeter to a DC volts scale of about 1 v0n.
2. Connect the BLACK lead to the battery side of the current shunt and the RED lead to the other end of the current shunt
3. Current shunt voltage is proportional to battery current, 100 millivolts = 1,000 amps. To get current, multiply miltiilts x 10.
DC VOLTAGE O-45 VOLTS STE/lCE-R TEST 89
1. Connect RED clip to the indicated test point, BLACK clip to negative or ground.
2. Stan Test 89. DC Votts.
3. Displayed reading is in volts.
VOLTAGE MULTIMETER
1. Set the voltmeter to a DC volts scale of at least 40 volts.
2. Connect the RED lead to positive and the BLACK lead to negative.
3. Be sure to read the correct scale.
2-297
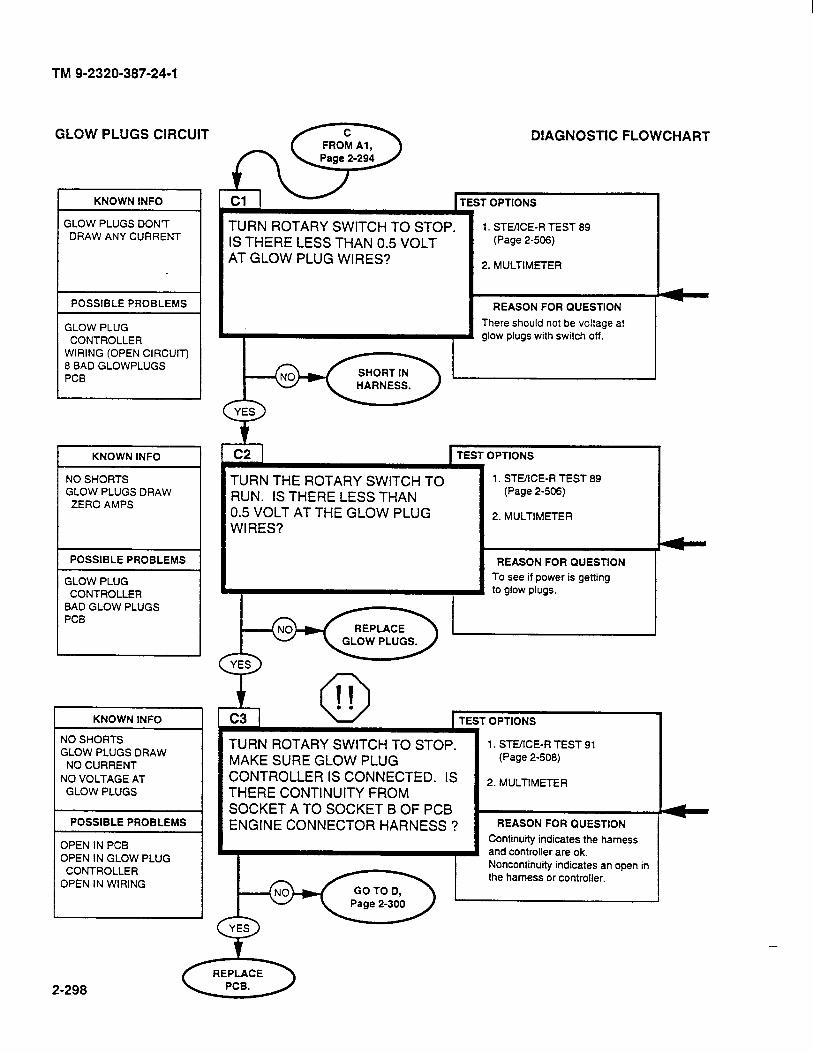
TM 9-2320-387-24-l
GLOW PLUGS CIRCUIT DIAGNOSTIC FLOWCHART
KNOWN INFO T OPTIONS
1. STE/lCE-R TEST 89 (Page 2-506)
2. MULTIMETER
GLOW PLUGS DON’T DRAW ANY CURRENT
TURN ROTARY SWITCH TO STOP. IS THERE LESS THAN 0.5 VOLT AT GLOW PLUG WIRES?
REASON FOR QUESTION
There should not be voltage at glow plugs with switch off.
POSSIBLE PROBLEMS
GLOW PLUG CONTROLLER
WIRING (OPEN CIRCUIT) 8 BAD GLOWPLUGS PCB
t c2 1 TEST 1 KNOWN INFO OPTIONS
1. STEIICE-R TEST 89 (Page 2-506)
2. MULTIMETER
NO SHORTS GLOW PLUGS DRAW ZERO AMPS
TURN THE ROTARY SWITCH TO RUN. IS THERE LESS THAN 0.5 VOLT AT THE GLOW PLUG WIRES?
POSSIBLE PROBLEMS REASON FOR QUESTION
To see if power is getting to glow plugs.
GLOW PLUG CONTROLLER
BAD GLOW PLUGS PCB
KNOWN INFO OPTIONS
1. STEIICE-R TEST 91 (Page 2-508)
2. MULTIMETER
TURN ROTARY SWITCH TO STOP. MAKE SURE GLOW PLUG CONTROLLER IS CONNECTED. IS THERE CONTINUITY FROM SOCKET A TO SOCKET B OF PCB ENGINE CONNECTOR HARNESS ?
NO SHORTS GLOW PLUGS DRAW
NO CURRENT
NO VOLTAGE AT GLOW PLUGS
POSSIBLE PROBLEMS REASON FOR QUESTION
Continuity indicates the harness and controller are ok. Noncontinuity indicates an open in the harness or controller.
OPEN IN PCB OPEN IN GLOW PLUG
CONTROLLER OPEN IN WIRING
L
-
2-298
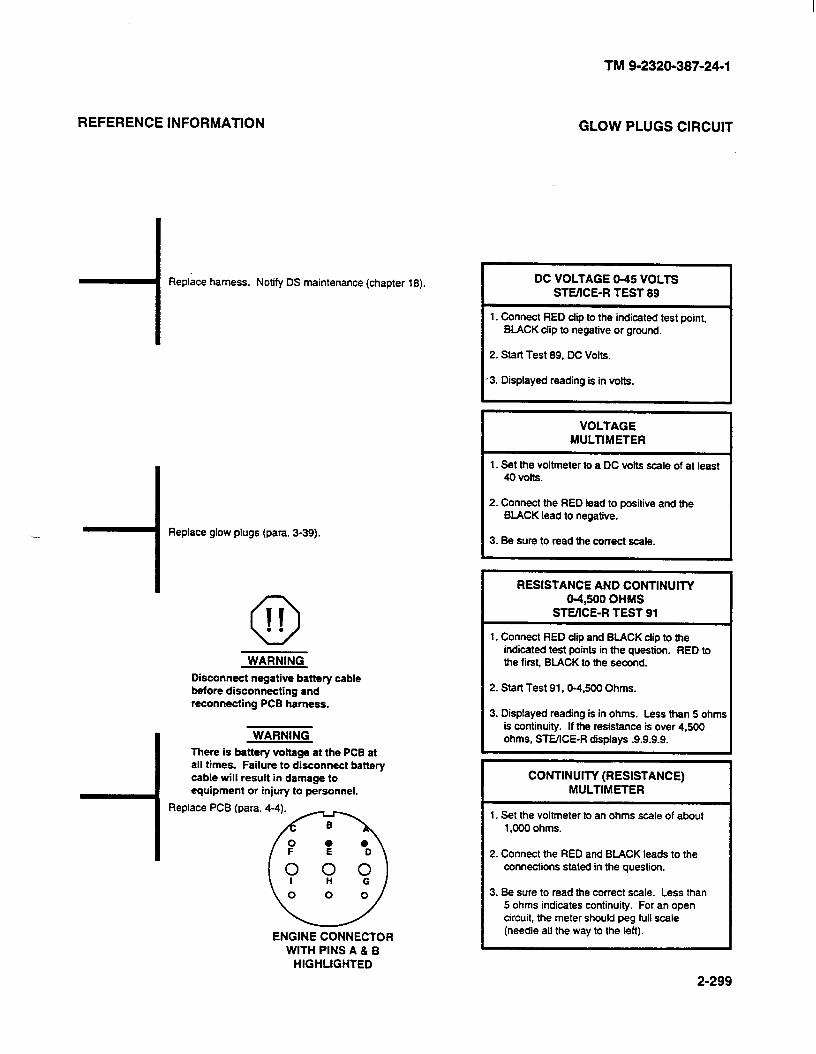
REFERENCE INFORMATION
-I Replace harness. Notify DS maintenance (chapter 18).
- -I Replace glow plugs (para. 3-39).
0 II . . WARNING
Disconnect negative battery cable before disconnecting and reconnecting PCB harness.
_J
WARNING
There is battery voltage at the PCB at all times. Failure to disconnect battery cable will result in damage to equipment or injury to Personnel.
1 Replace PCB (para. am
ENGINE CONNECTOR WITH PINS A & B
HIGHLIGHTED
TM 9-2320-387-24-l
GLOW PLUGS CIRCUIT
DC VOLTAGE O-45 VOLTS STEdCE-R TEST 89
1. Connect RED dip to the indicated test point, BLACK clip to negative or ground.
2. Start Test 89, DC Volts.
-3. Displayed reading is in volts.
VOLTAGE MULTIMETER
1. Bet the voltmeter to a DC volts scale of at least 40 volts.
2. Connect the RED lead to positive and the BLACK lead to negative.
3. Be sure to read the correct scale.
RESISTANCE AND CONTINUITY 04,500 OHMS
STEnCE-R TEST 91
1. Connect RED dip and BLACK clip to the indicated test points in the question. RED to the first, BLACK to the second.
2. Start Test 91,0-4.500 Ohms.
3. Displayed reading is in ohms. Less than 5 ohms is continuity. If the resistance is over 4.800 ohms, STEXE-R displays .9.9.9.9.
CONTlNUllY (RESISTANCE) MULTIMETER
1. Set the voltmeter to an ohms scale of about 1.000 ohms.
2. Connect the RED and BLACK leads to the connections stated in the question.
3. Be sure to read the correct scale. Less than 5 ohms indicates continuity. For an open circuit, the meter should peg full scale (needle all the way to the left).
2-299
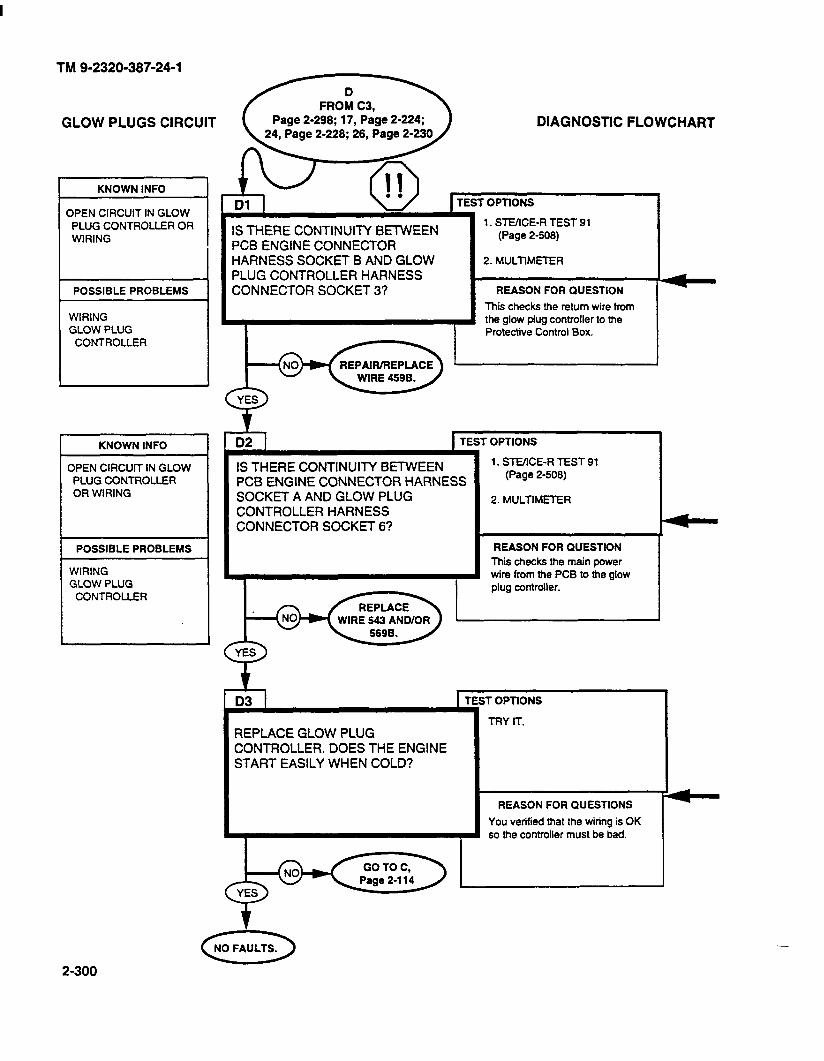
TM 9-2320-387-24-l
GLOW PLUGS CIRCUIT
KNOWN INFO
OPEN CIRCUIT IN GLOW PLUG CONTROLLER OR WIRING
POSSIBLE PROBLEMS
WIRING GLOW PLUG
CONTROLLER
KNOWN INFO
3PEN CIRCUlT IN GLOW PLUG CONTROLLER OR WIRING
POSSIBLE PROBLEMS
WIRING GLOW PLUG
CONTROLLER
IS THERE CONTINUITY BETWEEN PCB ENGINE CONNECTOR HARNESS SOCKET B AND GLOW PLUG CONTROLLER HARNESS CONNECTOR SOCKET 3?
b
Page 2-298; 17, Page 2-224; DIAGNOSTIC FLOWCHART
TEST OPTlONS
1. St-E/ICE-R TEST 91 (Page 2-508)
REASON FOR QUESTION
This checks the return wire from the glow plug controller to the Protective Control Box.
02 t 1 TEST OPTIONS
IS THERE CONTINUITY BETWEEN PCB ENGINE CONNECTOR HARNESS SOCKET A AND GLOW PLUG CONTROLLER HARNESS CONNECTOR SOCKET 6?
,y
REASON FOR QUESTION
This checks the main power wire from the PCB to the glow plug controller.
1
r; REPLACE GLOW PLUG CONTROLLER. DOES THE ENGINE START EASILY WHEN COLD?
1. 91 (Page
2. MULTIMETER
T OPTlONS
TRY rr.
REASON FOR QUESTIONS
You verified that the wiring is OK be bad.
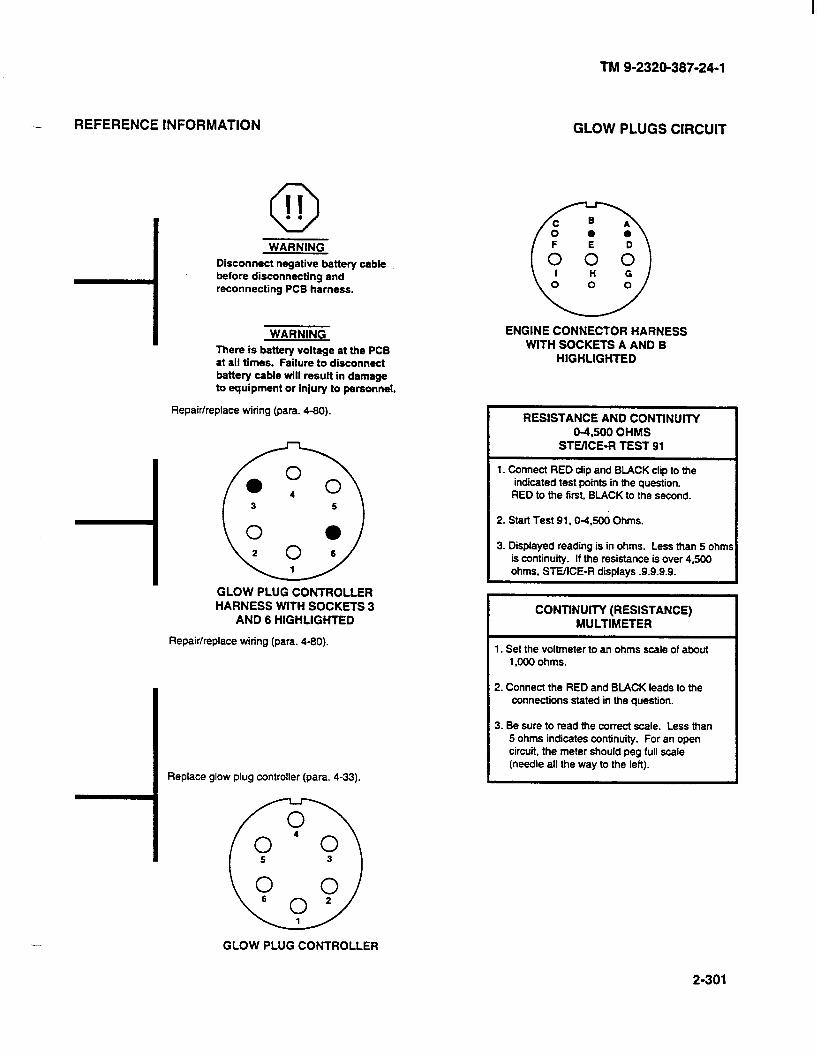
TM 9-2320-387-24-l
- REFERENCE INFORMATION GLOW PLUGS CIRCUIT
Disconnect negative battery cable before disconnecting and reconnecting PCB harness.
I WARNING I
There is battery voltage at the PCB at all times. Failure to disconnect battery cable will result in damage to equipment or injury to personnel.
Repair/replace wiring (para. 4-80).
GLOW PLUG CONTROLLER HARNESS WITH SOCKETS 3
AND 6 HIGHLIGHTED
Repair/replace wiring (para. 4-80).
Replace glow plug controller (para. 4-33).
0
0 4 0 0 ;> ; 6 o2
1
ENGINE CONNECTOR HARNESS WITH SOCKETS A AND B
HIGHLIGHTED
I RESISTANCE AND CONTlNUlTY 04.500 OHMS
STEIICE-R TEST 91
1. Connect RED clip and BLACK clip to the indicated test points in the question. RED to the first, BLACK to the second.
2. Start Test 91.9-4.5Ou Ohms.
3. Displayed reading is in ohms. Less than 5 ohm is continuity. If the resistance is over 4.500 ohms, WE/ICE-R displays .9.9.9.9.
I CONTlNUlTY (RESISTANCE) MULTIMETER
1. Set the voltmeter to an ohms scale of about 1 .fIOO ohms.
2. Connect the RED and BLACK leads to the connections stated in the question.
3. Be sure to read the correct scale. Less than 5 ohms indicates continuity. For an open circuit, the meter should peg full scale (needle all the way to the left).
GLOW PLUG CONTROLLER
2-301
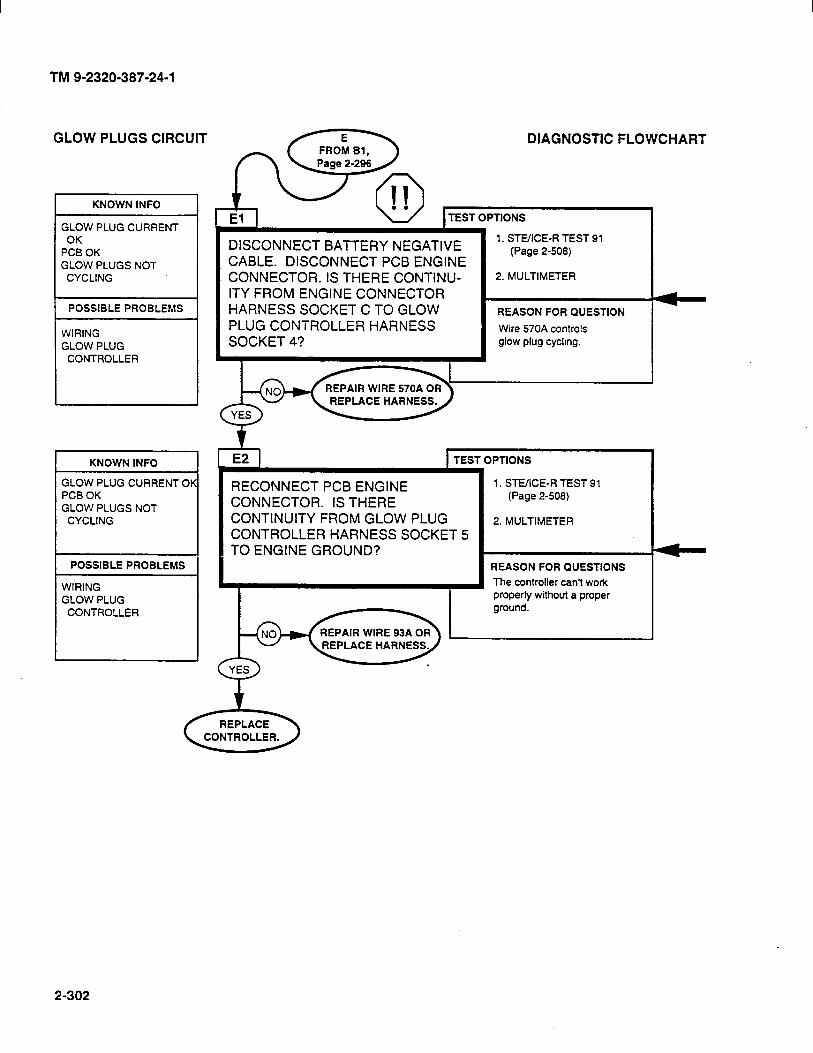
TM 9-2320-387-24-l
GLOW PLUGS CIRCUIT
KNOWN INFO
GLOW PLUG CURRENT OK
PCB OK GLOW PLUGS NOT
CYCLING
POSSIBLE PROBLEMS
WIRING GLOW PLUG
CONTROLLER
KNOWN INFO
GLOW PLUG CURRENT Or PCB OK GLOW PLUGS NOT
CYCLING
POSSIBLE PROBLEMS
WIRING GLOW PLUG
CONTROLLER
DIAGNOSTIC FLOWCHART
1 DISCONNECT BAll-ERY NEGATIVE CABLE. DISCONNECT PCB ENGINE CONNECTOR. IS THERE CONTINU- ITY FROM ENGINE CONNECTOR HARNESS SOCKET C TO GLOW PLUG CONTROLLER HARNESS SOCKET 4?
1. STEIICE-R TEST 91 (Page 2-509)
2. MULTIMETER
REASON FOR QUESTION
Wire 570A controls glow plug cycling.
RECONNECT PCB ENGINE CONNECTOR. IS THERE CONTINUITY FROM GLOW PLUG CONTROLLER HARNESS SOCKET 5 TO ENGINE GROUND?
TEST OPTIONS
1. STUICE-R TEST 91 (Page 2-508)
2. MULTIMETER
REASON FOR QUESTIONS
The controller can’t work properly without a proper ground.
2-302
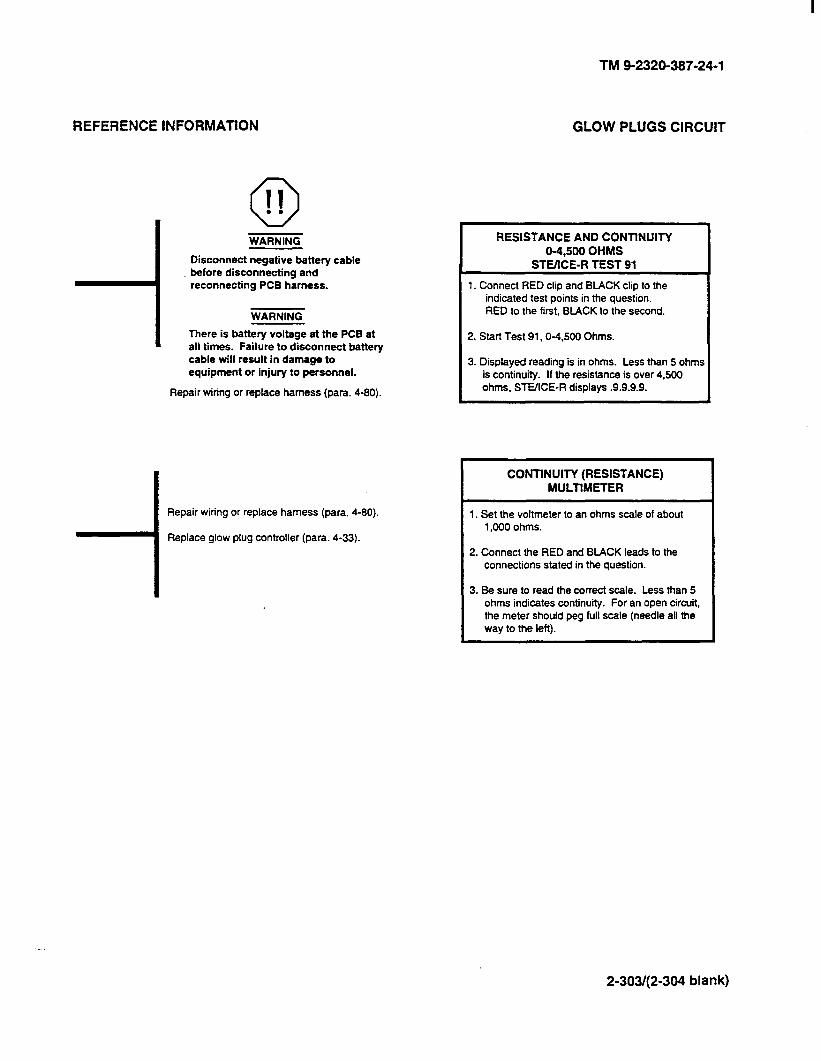
REFERENCE INFORMATION
TM 9-2320-387-24-l
GLOW PLUGS CIRCUIT
WARNING
Disconnect negative battery cable before disconnecting and reconnecting PCB harness.
I WARNING
I battery the all times. Failure to disconnect battery cable will result in damage to equipment or injury to personnel.
Repair wiring or replace harness (para. 4-90).
Repair wiring or replace harness (para. 4-80).
Replace glow plug controller (para. 4-33).
RESISTANCE AND CONTtNUlTY O-4,509 OHMS
STMCE-R TEST 91
1. Connect RED clip and BLACK clip to the indicated test points in the question. RED to the first, BLACK to the second.
I
2. Start Test 91,0-4.500 Ohms.
3. Displayed reading is in ohms. Less than 5 ohms is continuity. If the resistance is over 4,500 ohms, STUICE-R displays -9.9.9.9.
CONTINUITY (RESISTANCE) MULTIMETER I
1. Set the voltmeter to an ohms scale of about 1 JO0 ohms.
2. Connect the RED and BLACK leads to the connections stated in the question.
3. Be sure to read the correct scale. Less than 5 ohms indicates continuity. For an open circuit, the meter should peg full scale (needle all the way to the left).
2-303/(2-304 blank)
TM 9-2320-387-24-l
12-38. INSTRUMENTS TESTS 1
These instrument tests can be run any time you think there is a problem with the instruments or if you were sent here from another test.
If you get an unusual gauge reading, it is a good idea to check out the system that the gauge monitors to be sure that it is a gauge problem and not a real problem in the engine or electrical system.
Refer to fold-out page FP-19 and leave fold-out open for reference during testing. Diagrams of the individual gauge circuits will be found on the page that deals with that circuit.
2-305
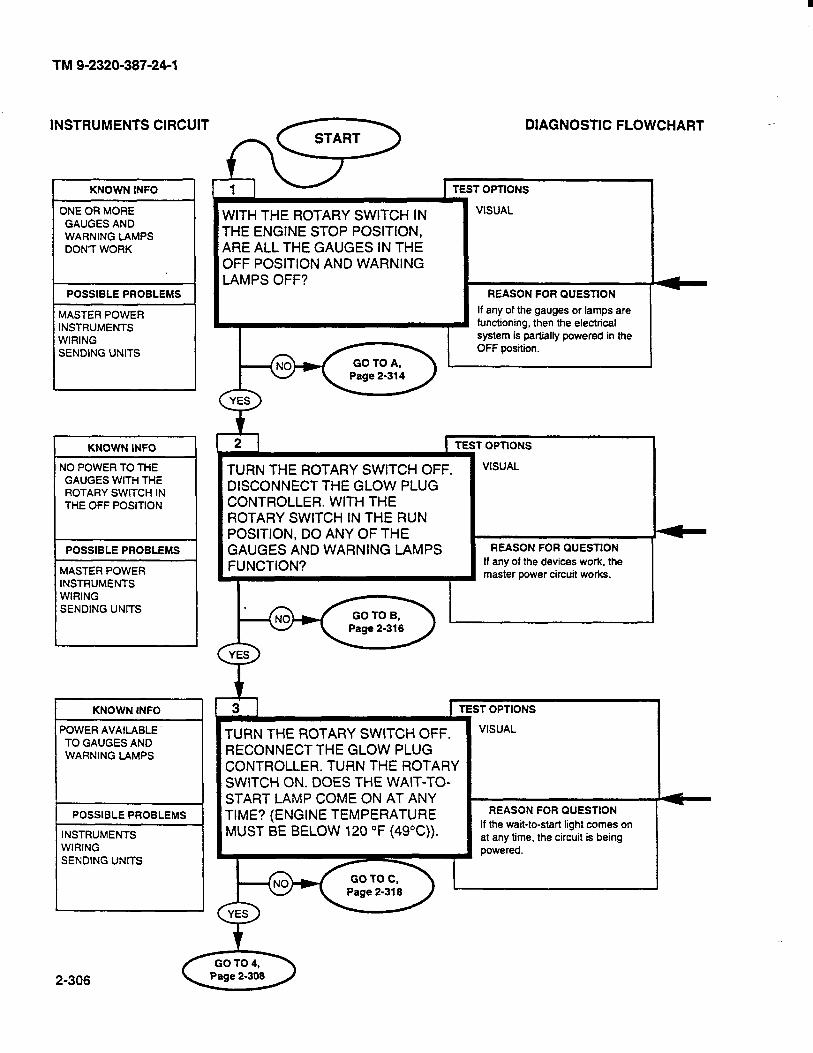
TM 9-2320-387-24-I
INSTRUMENTS CIRCUIT &‘-> -
I
fEST opT,o~lAGNOSTIC FLOWCHART
I KNOWN INFO
ONE OR MORE GAUGES AND WARNING LAMPS DON7 WORK
VISUAL
REASON FOR QUESTION
WITH THE ROTARY SWITCH IN THE ENGINE STOP POSITION, ARE ALL THE GAUGES IN THE OFF POSITION AND WARNING LAMPS OFF?
POSSIBLE PROBLEMS
If any of the gauges or lamps are functioning, then the electrical system is partially powered in the OFF position.
MASTER POWER INSTRUMENTS WIRING SENDING UNITS
KNOWN INFO ’ OPTIONS
VISUAL TURN THE ROTARY SWITCH OFF. DISCONNECT THE GLOW PLUG CONTROLLER. WITH THE ROTARY SWITCH IN THE RUN POSITION, DO ANY OF THE GAUGES AND WARNING LAMPS FUNCTION?
NO POWER TO THE GAUGES WITH THE ROTARY SWITCH IN THE OFF POSlTlON
REASON FOR QUESTION
If any of the devices work, the master power circuit works.
POSSIBLE PROBLEMS
MASTER POWER
r KNOWN INFO TEST OPTIONS
VISUAL ‘OWER AVAIlABLE TO GAUGES AND WARNING LAMPS
TURN THE ROTARY SWITCH OFF. RECONNECT THE GLOW PLUG CONTROLLER. TURN THE ROTARY SWITCH ON. DOES THE WAIT-TO- START LAMP COME ON AT ANY TIME? (ENGINE TEMPERATURE MUST BE BELOW 120 “F (49°C)).
REASON FOR QUESTION
If the wait-to-start light comes on at any time. the circuit is being powered.
POSSIBLE PROBLEMS
INSTRUMENTS WIRING SENDING UNITS
2-306
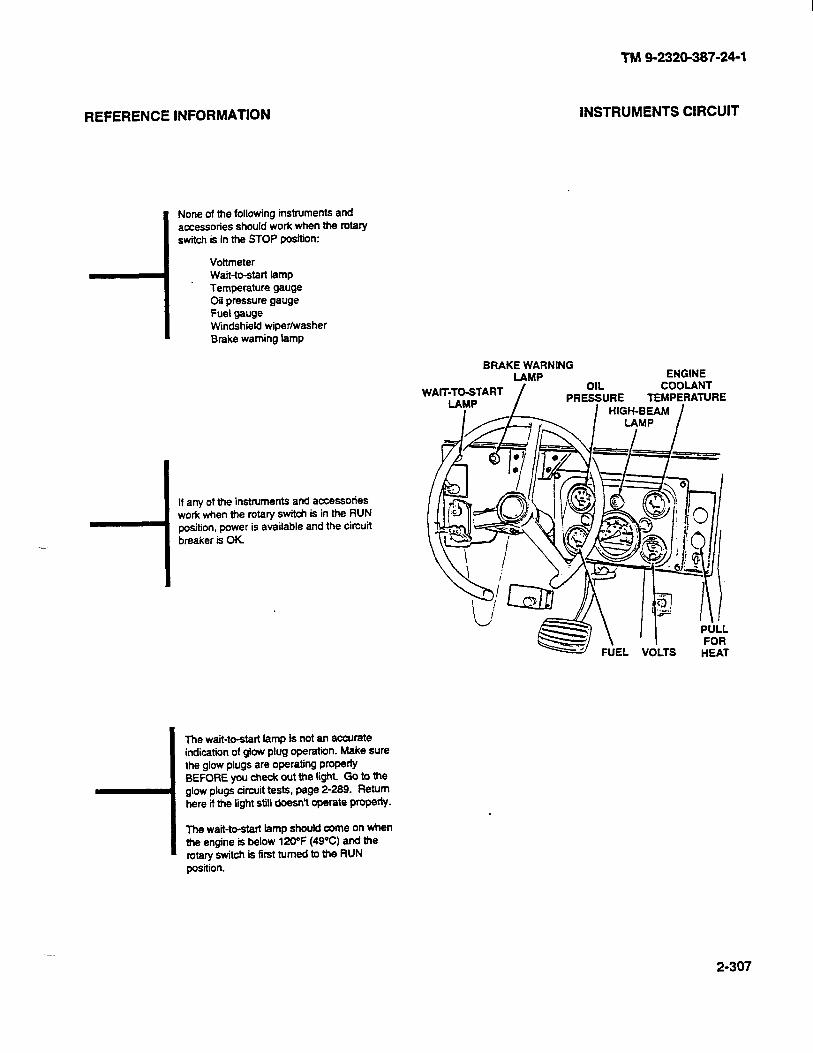
REFERENCE INFORMATION INSTRUMENTS CIRCUIT
None of the following instruments and accessories should work when the fOtary switch is in the STOP position:
Voltmeter Wait-to-start lamp Temperature gauge Oil pressure gauge Fuel gauge Wrndshield wiper/washer Brake warning tamp
If any of the instruments and accessories work when the rotary switch is in the RUN position, power is available and the circuit
I breaker is OK
The wait-to-start tamp is not an accurate indication of glow plug operation. Make sure the glow plugs are Operating PrOPeIfY BEFORE you check out the light. Go to the glow plugs circuit tests, page 2-289. Return here if the light still doesn’t operate property.
The wait-to-start lamp should come on when the engine is below 120°F (49%) and the rotary switch is first turned to the RUN position.
BRAKE \ lli
NARNING LMMP
WATT-TO --- ”
TM 9-2320-387-24-I
ENGINE
2-307
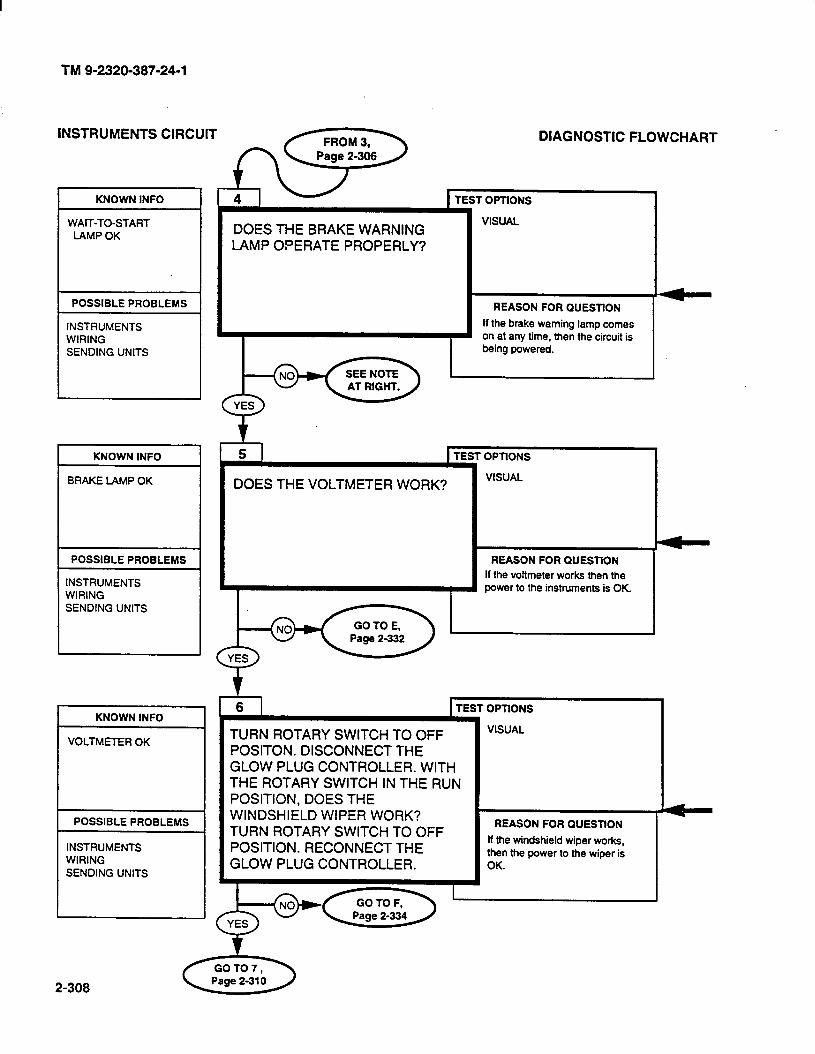
TM 9-2320-387-24-l
DIAGNOSTIC FLOWCHART
I KNOWN INFO r OPTIONS
DOES THE BRAKE WARNING LAMP OPERATE PROPERLY?
WATT-TO-START LAMP OK
INSTRUMENTS
SENDING UNITS
REASON FOR QUESnON
If the brake warning lamp comes on at any time, then the circuit is being powered.
KNOWN INFO OPflONS
VISUAL BRAKE LAMP OK DOES THE VOLTMETER WORK?
REASON FOR QUESnON
If the voltmeter works then the power to the instruments is OK.
POSSIBLE PROBLEMS
INSTRUMENTS WIRING SENDING UNITS
6 1 TEST OPnONS KNOWN INFO
VOLTMETER OK VISUAL TURN ROTARY SWITCH TO OFF
POSITON. DISCONNECT THE GLOW PLUG CONTROLLER. WITH THE ROTARY SWITCH IN THE RUN POSITION, DOES THE WINDSHIELD WIPER WORK? TURN ROTARY SWITCH TO OFF POSITION. RECONNECT THE GLOW PLUG CONTROLLER.
REASON FOR QUESnON
If the windshield wiper works, then the power to the wiper is OK.
POSSIBLE PROBLEMS
INSTRUMENTS WIRING SENDING UNITS
2-308
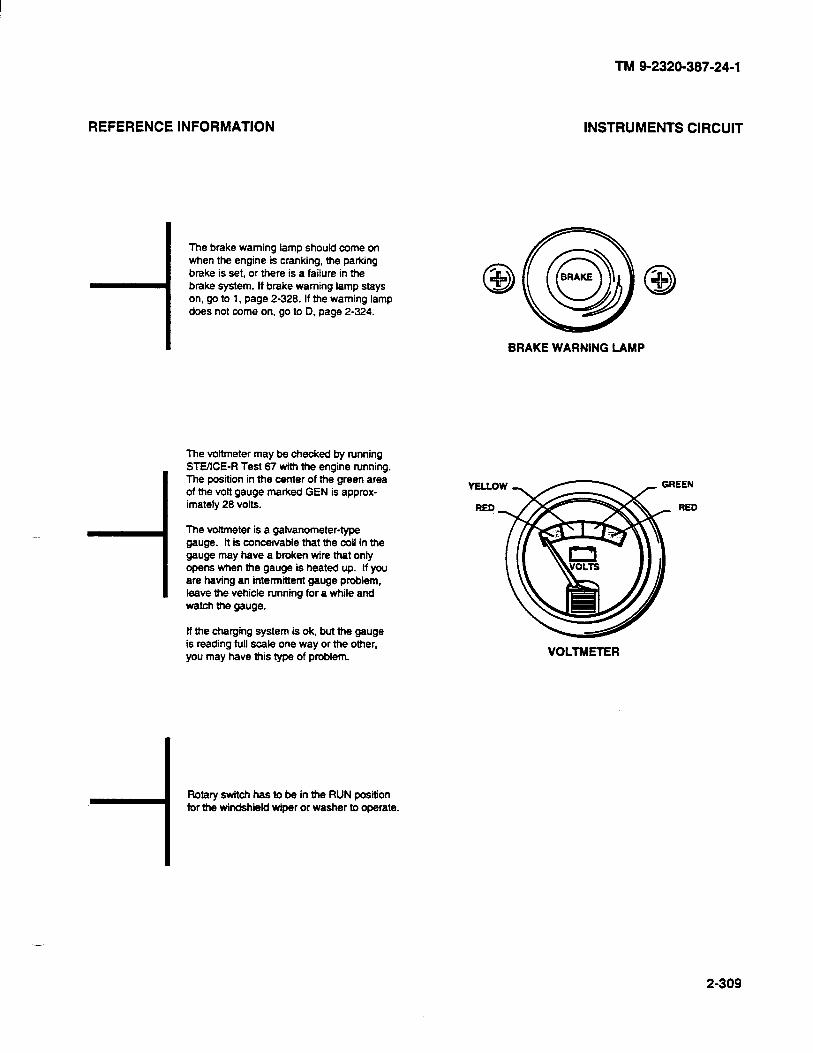
REFERENCE INFORMATION
TM 9-2320-387-24-l
INSTRUMENTS CIRCUIT
The brake warning lamp should come on when the engine is cranking, the parking brake is set, or there is a failure in the brake system. If brake warning lamp stays on, go to 1, page 2-323. If the warning lamp does not come on, go to D. page 2-324.
BRAKE WARNING LAMP
The voltmeter may be checked by running STEACE-R Test 67 wtth the engine running. The position in the center of the green area of the volt gauge marked GEN is approx- imately 28 volts.
The voltmeter is a galvanometer-type gauge. It is conceivable that the coil in the gauge may have a broken wire that only opens when the gauge is heated up. If you are having an intermittent gauge problem, leave the vehicle running for a while and watch the gauge.
ff the charging system is ok, but the gauge is reading full scale one way or the other, you may have this type of problem.
Rotary switch has to be in the RUN position for the windshield wiper or washer to operate.
VOLTMETER
2-309

TM 9-2320-387-24-l
INSTRUMENTS CIRCUIT DIAGNOSTIC FLOWCHART FROM 6. Y w IT
L r OPTIONS
VISUAL
KNOWN INFO
WINDSHIELD WIPERS OK
WITH THE IGNITION SWITCH IN THE RUN POSITION, DOES THE FUEL GAUGE WORK PROPERLY ?
POSSIBLE PROBLEMS
FUEL GAUGE OIL PRESSURE GAUGE TEMPERATURE GAUGE WIRING SENDING UNITS
REASON FOR QUESTlON
If the fuel gauge works, the power to the gauge is OK.
KNOWN INFO P I I+1 r OPTIONS
VISUAL FUEL GAUGE OK DOES THE ENGINE OIL
PRESSURE GAUGE WORK WITH THE ENGINE RUNNING?
REASON FOR QUESTlON
lf the oil pressure gauge works, then the power to the gauge is OK.
POSSIBLE PROBLEMS
FUEL GAUGE OIL PRESSURE GAUGE TEMPERATURE GAUGE WIRING SENDING UNITS
TEST OPTIONS KNOWN INFO
REASON FOR QUESTlON
If the temperature gauge works, the power to the gauge is OK
DOES THE ENGINE TEMPERATURE GAUGE WORK WITH THE ENGINE WARM?
OIL PRESSURE GAUGE OK
POSSIBLE PROBLEMS
TEMPERATURE GAUGE WIRING SENDING UNITS
2-310

I
REFERENCE INFORMATION
TM 9-2320-387-24-l
INSTRUMENTS CIRCUIT
These gauges are galvanometer-type gauges. It is conceivable that the coil in the gauge may have a broken wire that only opens when the gauge is warmed up. If you are having an intermittent gauge problem, leave the vehicle running for a while and watch the gauge. If the system the gauge monitors is OK, but the gauge is reading full scale one way or the other, then you may have this type of problem.
Fill the fuel tank, if necessary, to obtain a reading greater than empty.
GAUGE
With engine running, the oil pressure should be approximately psi kPa)
psi (276310 kPa) at 2.000 rpm, it should when stopped.
I Make sure shift lever is in neutral before running this test.
With the engine cold, the gauge should read off scale to the left and, when warm, the reading should be 190”- 230°F (86” - 110%).
OIL PRESSURE GAUGE
TEMPERATURE GAUGE
-
2-311
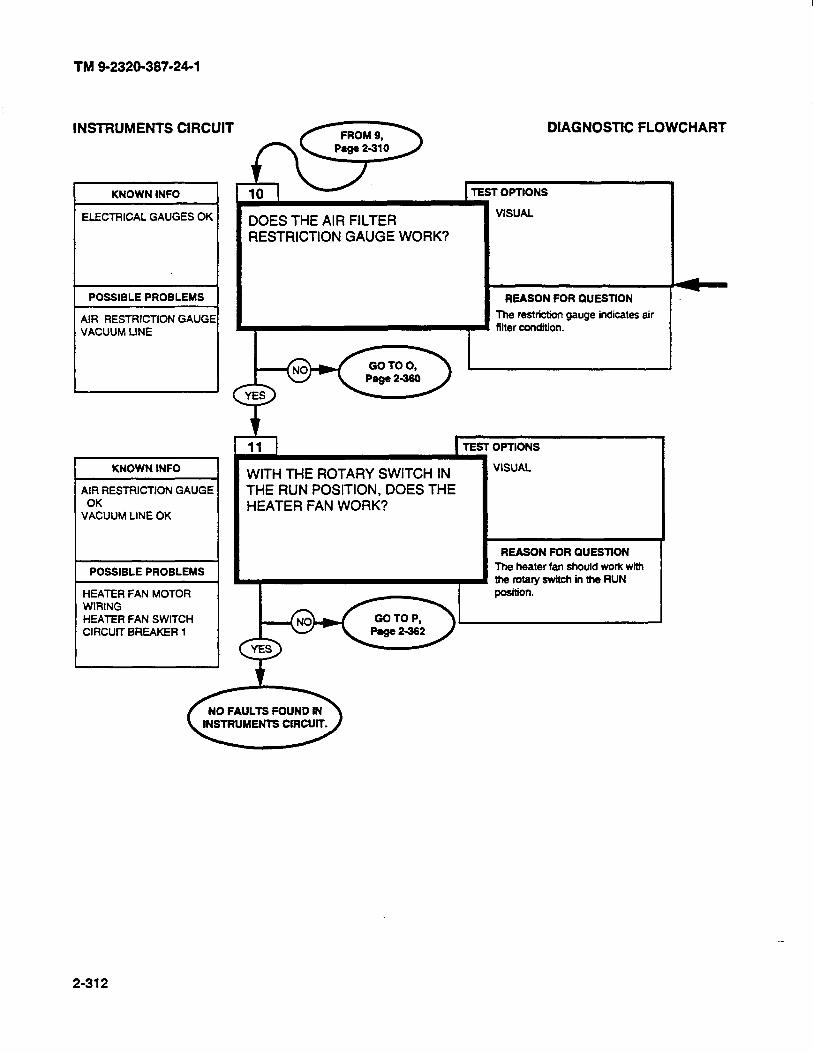
TM 9-2320-387-24-l
INSTRUMENTS Cli?C;i ,&s>
KNOWN INFO
~Sf .,o~sDIAGNOSllC FLOWCHART
I 1
ELECTRICAL GAUGES OK
POSSIBLE PROBLEMS
AIR RESTRICTION GAUGt VACUUM LINE
KNOWN lNF0
AIR RESTRlCTlON GAUGE OK
VACUUM LINE OK
POSSIBLE PROBLEMS
HEATER FAN MOTOR WIRING HEATER FAN SWmCH ClRCUlT BREAKER 1
DOES THE AIR FILTER RESTRICTION GAUGE WORK?
WITH THE ROTARY SWITCH IN THE RUN POSITION, DOES THE HEATER FAN WORK?
OPTIONS
VISUAL
REASON FOR QlJESllON
/
The heater fan should wok with therotaryswitchintheRUN
&@_(c& -On.
2-312
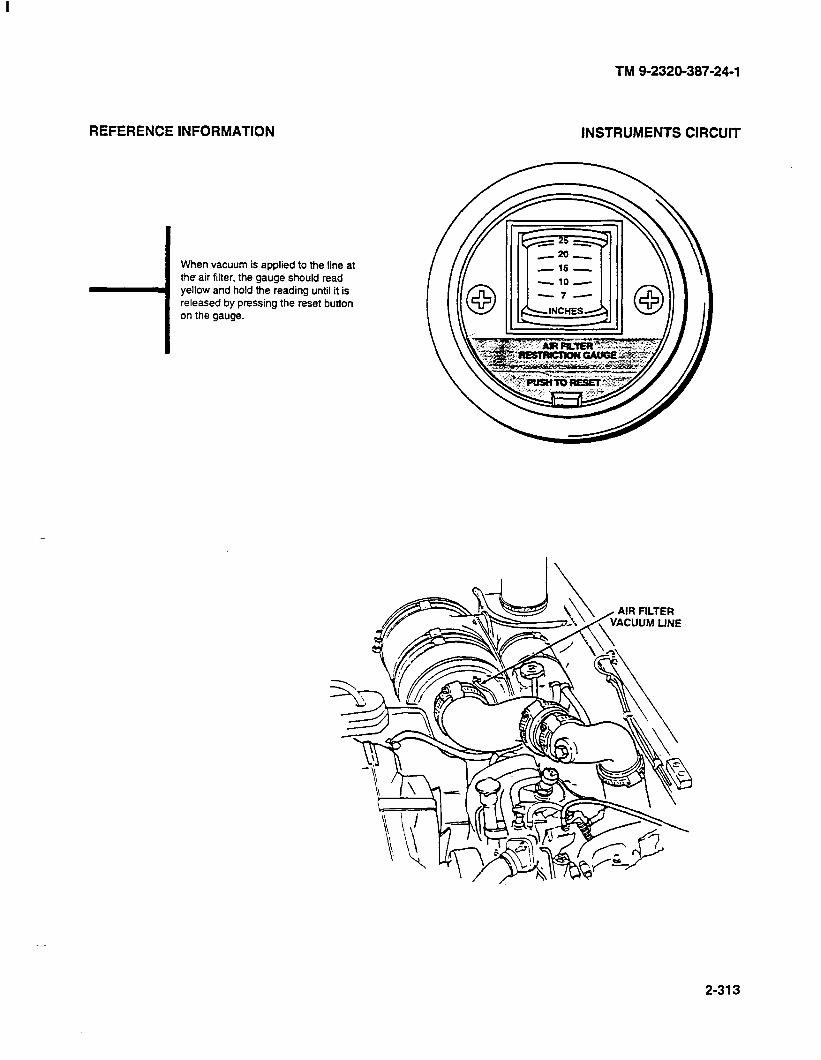
TM 9-2320-387-24-l
REFERENCE INFORMATION
When vacuum is applied to the line at the air filter, the gauge should read yellow and hold the reading until it is released by pressing the reset button
INSTRUMENTS CIRCUIT
I on the gauge.
2-313
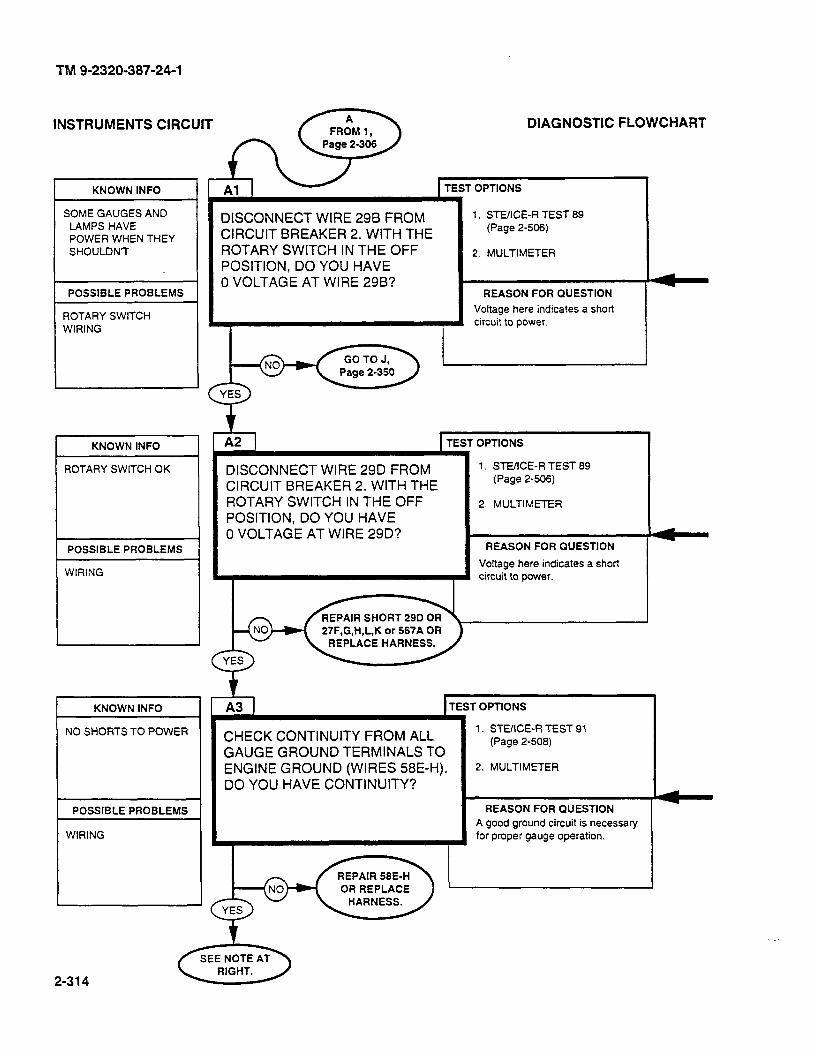
TM 9-2320-387-24-l
INSTRUMENTS C,RCUI; A@
I-
KNOWN INFO I
TEST OPT,ONS DIAGNOSTIC FLOWCHART
I
DISCONNECT WIRE 296 FROM CIRCUIT BREAKER 2. WITH THE ROTARY SWITCH IN THE OFF POSITION, DO YOU HAVE 0 VOLTAGE AT WIRE 29B?
1. STEXE-R TEST 89 (Page 2-506)
2. MULTIMETER
SOME GAUGES AND LAMPS HAVE POWER WHEN THEY SHOULDN’T
POSSIBLE PROBLEMS 1 REASON FOR QUESTION
Voltage here indicates a short circuit to power.
ROTARY SWITCH WIRING
ROTARY SWITCH OK
POSSIBLE PROBLEMS
1 TEST
I
OPTIONS
1. STE/ICE-R TEST 89 (Page 2-506)
2. MULTIMETER
DISCONNECT WIRE 29D FROM CIRCUIT BREAKER 2. WITH THE ROTARY SWITCH IN THE OFF POSITION, DO YOU HAVE 0 VOLTAGE AT WIRE 29D?
REASON FOR QUESTION
Voltage here indicates a short circuit to power. WIRING
A3 I 1 TEST OPTIONS KNOWN INFO
CHECK CONTINUITY FROM ALL 1. STUICE-R TEST 91
GAUGE GROUND TERMINALS TO (Page 2-508)
ENGINE GROUND (WIRES 58E-H). 2. MULTIMETER
DO YOU HAVE CONTINUITY?
REASON FOR QUESTION
A good ground circuit is necessary for proper gauge operation.
REPAIR 58E-H OR REPLACE
NO SHORTS TO POWER
POSSIBLE PROBLEMS
WIRING
2-314
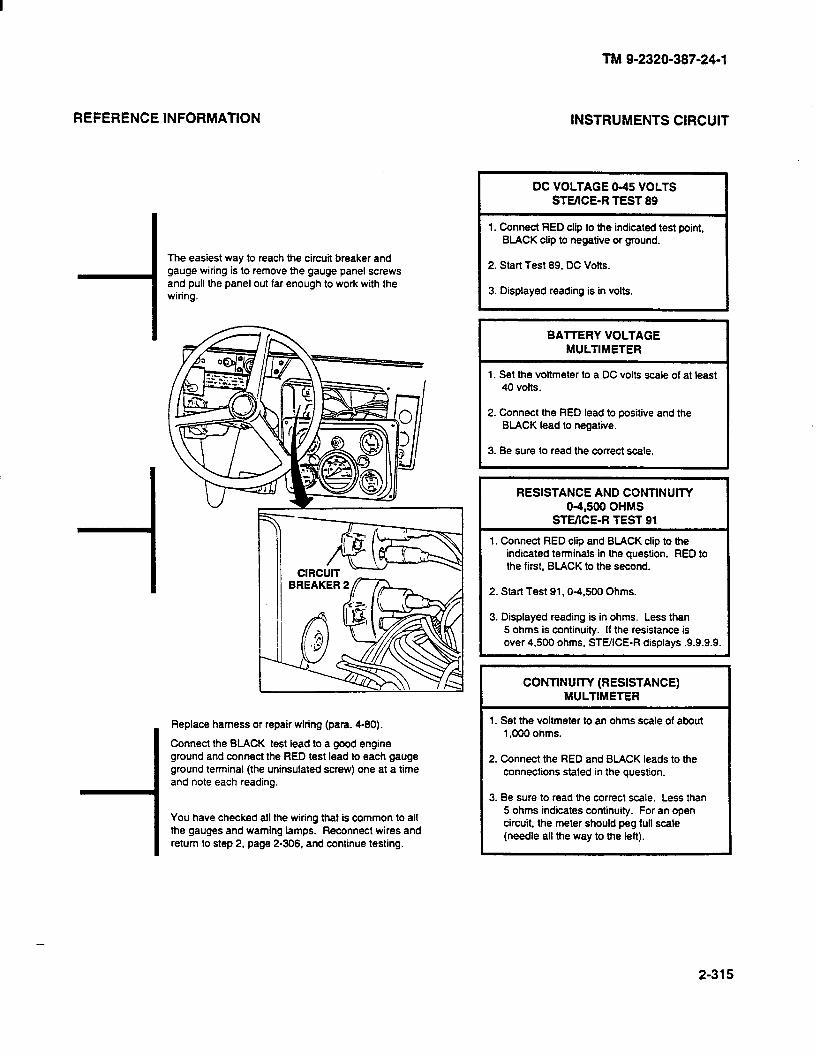
REFERENCE INFORMATION INSTRUMENTS CIRCUIT
TM 9-2320-387-24-l
-I
-1
I DC VOLTAGE O-45 VOLTS STMCE-R TEST 89
1. Connect RED clip to the indicated test point, BLACK clip to negative or ground.
The easiest way to reach the circuit breaker and gauge wiring is to remove the gauge panel screws and pull the panel out far enough to work with the wiring.
2. Start lest 89, DC Volts.
3. Displayed reading is in volts.
Replace harness or repair wiring (para. 4-90).
Connect the BLACK test lead to a good engine ground and connect the RED test lead to each gauge ground terminal (the uninsulated screw) one at a time and note each reading.
You have checked all the wiring that is common to all the gauges and warning lamps. Reconnect wires and return to step 2. page 2-306. and continue testing.
BAITERY VOLTAGE MULTIMETER
1. Set the voltmeter to a DC volts scale of at least 40 volts.
2. Connect the RED lead to positive and the BLACK lead to negative.
3. Be sure to read the correct scale.
I STE/lCE-R TEST 91
1. Connect RED clip and BLACK clip to the indicated terminals in the question. RED to the first, BLACK to the second.
I 2. Start Test 91,0-4,500 Ohms.
3. Displayed reading is in ohms. Less than 5 ohms is continuity. If the resistance is over 4,500 ohms, SWICE-R displays .9.9.9.9.
RESISTANCE AND CONTINUlTY O-4.500 OHMS
I CONTINUITY (RESISTANCE) MULTIMETER
I 1. Set the voltmeter to an ohms scale of about 1,000 ohms.
I 2. Connect the RED and BLACK leads to the connections stated in the question.
3. Be sure to read the correct scale. Less than 5 ohms indicates continuity. For an open circuit, the meter should peg full scale (needle all the way to the left).
2-315
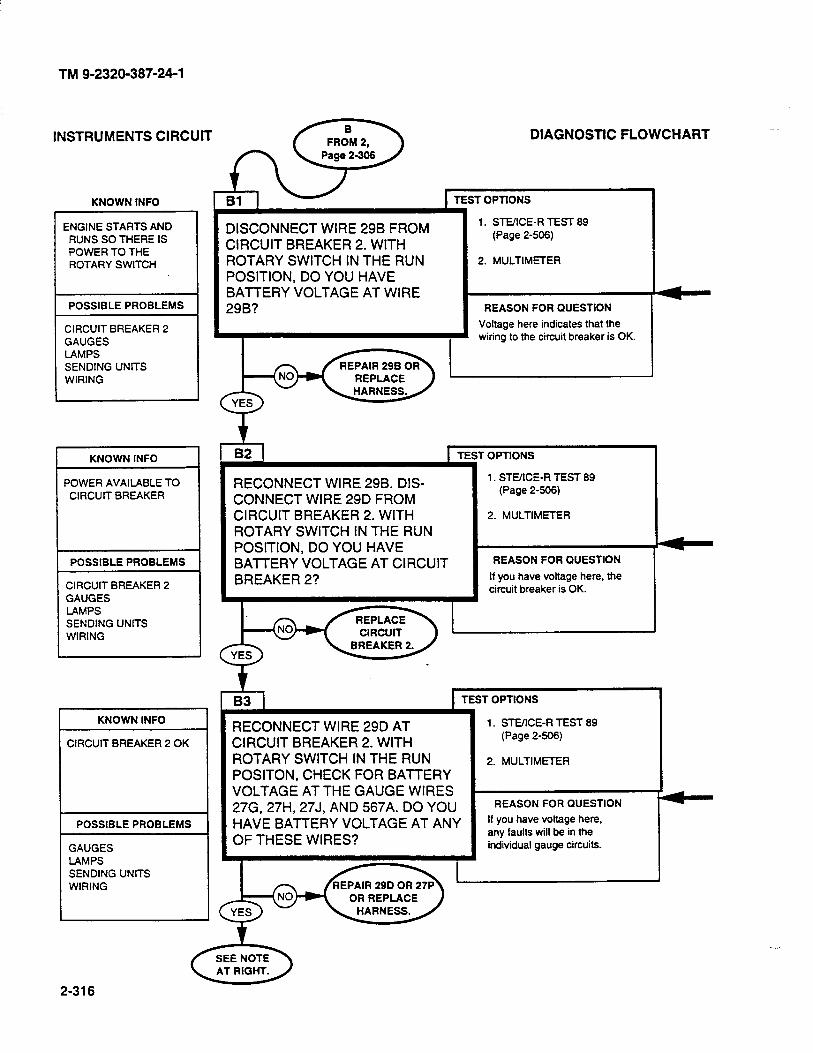
TM 9-2320-387-24-l
INSTRUMENTS CIRCUIT
KNOWN INFO
ENGINE STARTS AND RUNS SO THERE IS POWER TO THE ROTARY SWITCH
POSSIBLE PROBLEMS
CIRCUIT BREAKER 2 GAUGES LAMPS SENDING UNITS WIRING
KNOWN INFO
POWER AVAltABLE TO CIRCUIT BREAKER
POSSIBLE PROBLEMS
CIRCUIT BREAKER 2 GAUGES LAMPS SENDING UNITS WIRING
KNOWN INFO
CIRCUIT BREAKER 2 OK
POSSIBLE PROBLEMS
GAUGES LAMPS SENDING UNITS WIRING
DIAGNOSTIC FLOWCHART _
w I TESTOPT~ONS
DISCONNECT WIRE 29B FROM CIRCUIT BREAKER 2. WITH ROTARY SWITCH IN THE RUN POSITION, DO YOU HAVE BATTERY VOLTAGE AT WIRE 29B?
1. St-E/ICE-R TEST 89 (Page 2-508)
2. MULTIMETER
REASON FOR QUESTION
Voltage here indicates that the wiring to the circuit breaker is OK.
RECONNECT WIRE 298. DIS- CONNECT WIRE 29D FROM CIRCUIT BREAKER 2. WITH ROTARY SWITCH IN THE RUN POSITION, DO YOU HAVE BATTERY VOLTAGE AT CIRCUIT BREAKER 2?
’ OPTIONS
1. STUICE-R TEST 89 (Page 2-808)
2. MULTIMETER
REASON FOR QUESTION
If you have voltage here, the circuit breaker is OK.
RECONNECT WIRE 29D AT CIRCUIT BREAKER 2. WITH ROTARY SWITCH IN THE RUN POSITON, CHECK FOR BAlTERY VOLTAGE AT THE GAUGE WIRES 27G, 27H, 27J, AND 567A. DO YOU HAVE BAlTERY VOLTAGE AT ANY OF THESE WIRES?
OR REPLACE
1. STE/ICE-R TEST 89 (Page 2-808)
2. MULTIMETER
REASON FOR QUESTION
If you have voltage here, any faults will be in the individual gauge circuits.
2-316
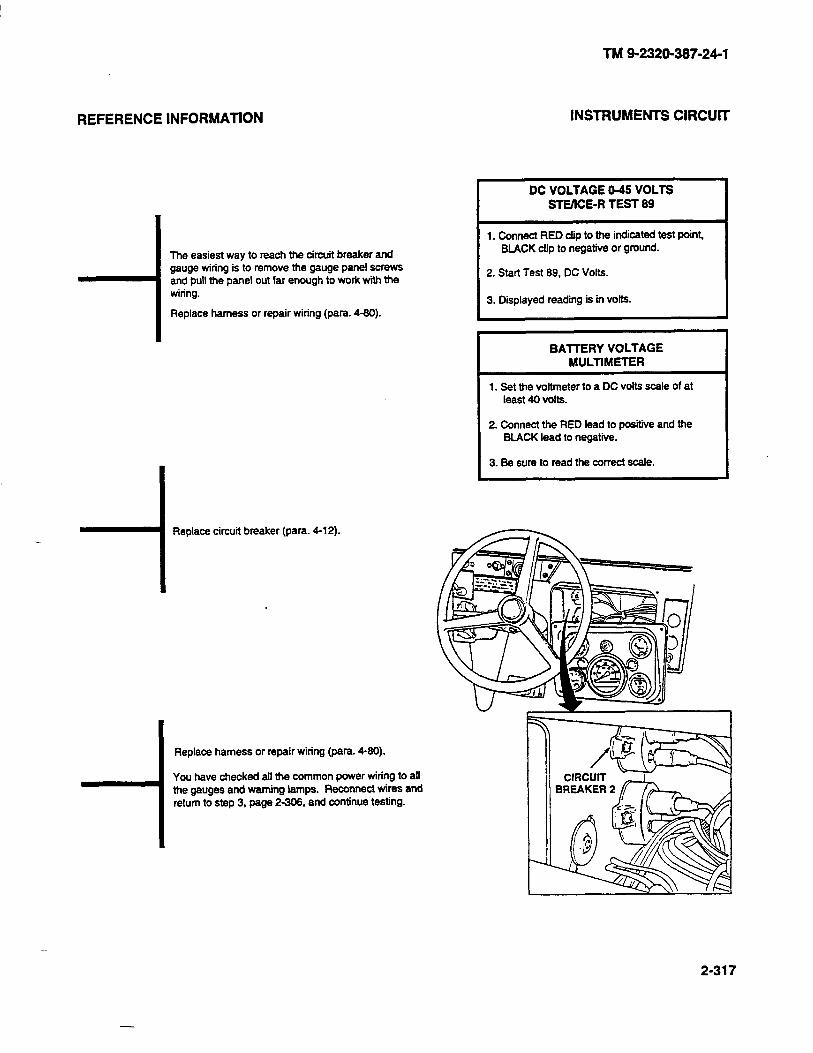
REFERENCE INFORMATION
The easiest way to reach the circuit breaker and gauge wiring is to remove the gauge panel screws and pull the panel out far enough to work with the wiring.
Replace harness or repair wiring (para. 4-80).
- -I Replace circuit breaker (para. 4-12).
I Replace harness or repair wiring (para. 4-80).
TM 9-2320-387-24-l
INSTRUMENTS CIRCUIT
DC VOLTAGE O-45 VOLTS Sl-EKE-R TEST 99
1. Connect RED dip to the indicated test point, BLACK clip to negative or ground.
2. Start lest 89. DC Volts.
3. Displayed reading is in volts.
I BATTERY VOLTAGE MULTIMETER I
1. Set the voltmeter to a DC volts scale of at least 40 volts.
2. Connect the RED lead to positive and the BLACK lead to negative.
3. Be sure to read the correct scale.
1 You have checked all the common power wking to all the gauges and warning lamps. Reconnect wires and return to step 3, page 2-308. and continue testing.
2-317
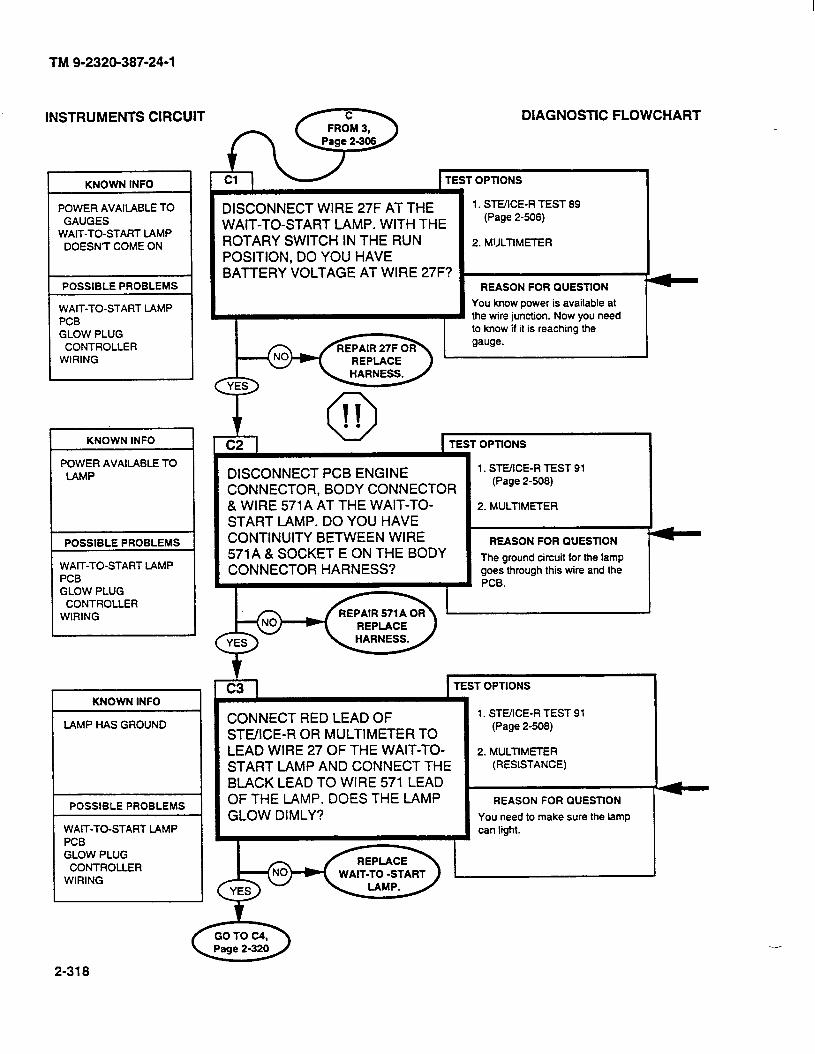
TM 9-2320-387-24-l
INSTRUMENTS CIRCUIT DIAGNOSTIC FLOWCHART fi9 TESTOPnONS
I 1 r POWER AVAIlABLE TO
WAIT-TO-START LAMP DOESN’T COME ON
1. STE/ICE-R TEST 69 (Page 2-506)
2. MtJLTlMETER
DISCONNECT WIRE 27F AT THE WAIT-TO-START LAMP. WITH THE ROTARY SWITCH IN THE RUN POSITION, DO YOU HAVE BAl-t-ERY VOLTAGE AT WIRE 27F?
1 POSSIBLE PROBLEMS REASON FOR QUESTION
You know power is available at the wire junction. Now you need to know if it is reaching the gauge.
WAIT-TO-START LAMP
PCB GLOW PLUG
CONTROLLER WIRING
1 TEST OPTlONS
DISCONNECT PCB ENGINE CONNECTOR, BODY CONNECTOR & WIRE 571A AT THE WAIT-TO- START LAMP. DO YOU HAVE CONTINUITY BETWEEN WIRE 571 A & SOCKET E ON THE BODY CONNECTOR HARNESS?
1. St-EXE-R TEST 91 (Page 2-506)
2. MULTIMETER
REASON FOR QUESTION
The ground circuit for the lamp goes through this wire and the PCB.
POSSIBLE PROBLEMS
WAIT-TO-START LAMP PCB GLOW PLUG
CONTROLLER WIRING
1
I TEST OPTIONS
LAMP HAS GROUND CONNECT RED LEAD OF STE/ICE-R OR MULTIMETER TO LEAD WIRE 27 OF THE WAIT-TO- START LAMP AND CONNECT THE BLACK LEAD TO WIRE 571 LEAD OF THE LAMP. DOES THE LAMP GLOW DIMLY?
1. STEXE-R TEST 91 (Page 2-606)
2. MULTIMETER (RESISTANCE)
REASON FOR QUESTION
You need to make sure the lamp can light.
POSSIBLE PROBLEMS 1
WAIT-TO-START LAMP PCB GLOW PLUG
CONTROLLER WIRING
--
2-318
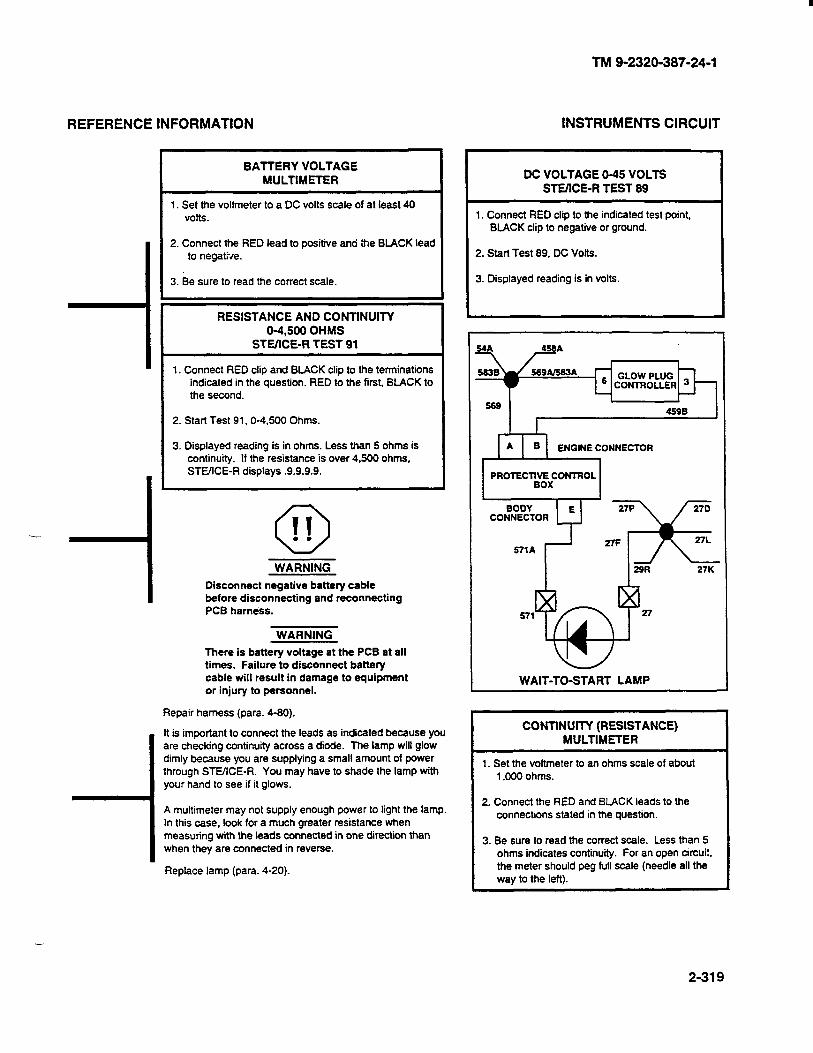
TM 9-2320-387-24-l
REFERENCE INFORMATION INSTRUMENTS CIRCUIT
2. Connect the RED lead to positive and the BLACK lead to negative.
3. Be sure to read the correct scale.
RESISTANCE AND CONTINUITY 04,500 OHMS
STEIICE-R TEST 91
1. Connect RED clip and BLACK clip to the terminations indicated in the question. RED to the first, BLACK to the second.
2. Start Test 91, 04.500 Ohms.
3. Displayed reading is in ohms. Less than 5 ohms is continuity. If the resistance is over 4.500 ohms, SLUICE-R displays .9.9.9.9.
1: I-
f
0 II . . WARNING
Disconnect negative battery cable before disconnecting and reconnecting PCB harness.
WARNING
There is battery voltage at the PC9 at all times. Failure to disconnect battery cable will result in damage to equipment or injury to personnel.
Repair harness (para. 4-80).
It is important to connect the leads as indicated because you are checking continuity across a diode. The lamp will glow dimly because you are supplying a small amount of power through STUICE-R. You may have to shade the lamp with your hand to see if it glows.
A multimeter may not supply enough power to light the lamp. In this case, look for a much greater resistance when measuring with the leads connected in one direction than when they are connected in reverse.
BATTERY VOLTAGE
MULTIMETER
1. Set the voltmeter to a DC volts scale of at least 40 volts.
Replace lamp (para. 4-20).
DC VOLTAGE O-45 VOLTS STE/lCE-R TEST 89
1. Connect RED clip to the indicated test point, BLACK clip to negative or ground.
2. Start Test 89. DC Volts.
3. Displayed reading is in volts.
54A 458A
CONTROLLER
WAIT-TO-START LAMP
CONllNUlM (RESISTANCE) MULTIMETER
1. Set the voltmeter to an ohms scale of about 1,000 ohms.
2. Connect the RED and BUCK leads to the connections stated in the question.
3. Be sure to read the correct scale. Less than 5 ohms indicates continuity. For an open circuit, the meter should peg full scale (needle all the
way to the left).
2-319
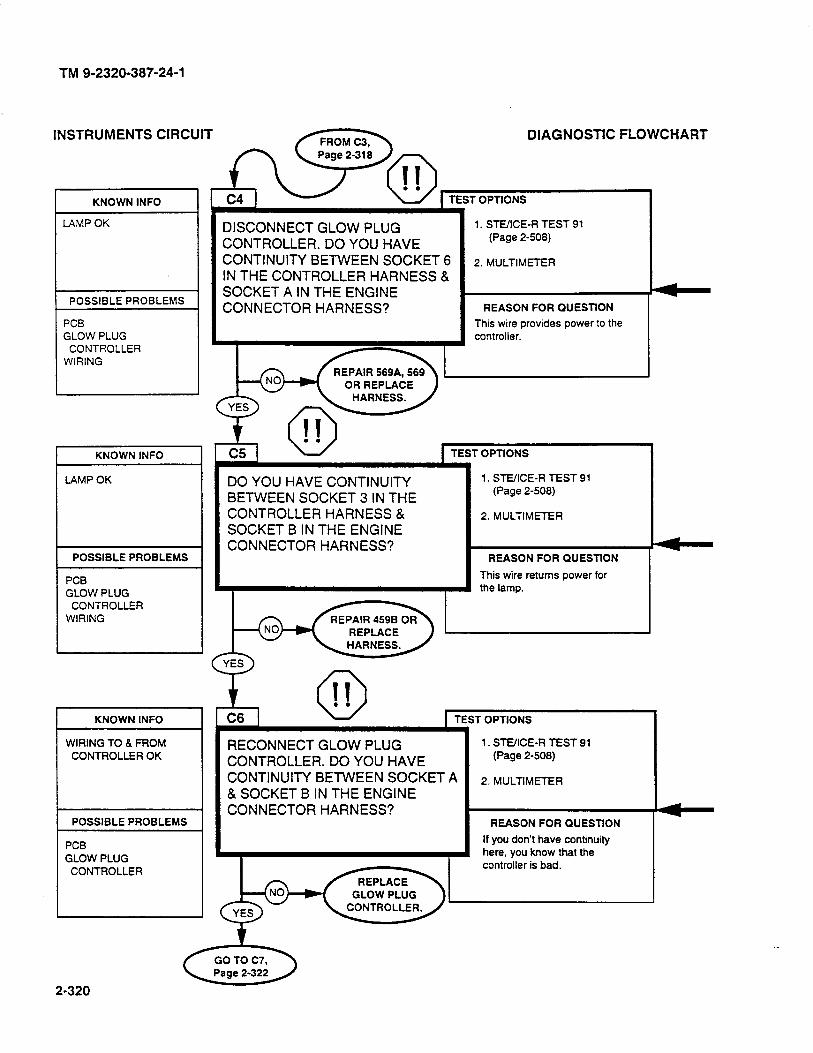
TM 9-2320-387-24-l
INSTRUMENTS DIAGNOSTIC FLOWCHART
t TEST OPTIONS KNOWN INFO - I
DISCONNECT GLOW PLUG CONTROLLER. DO YOU HAVE CONTINUITY BETWEEN SOCKET 6 IN THE CONTROLLER HARNESS & SOCKET A IN THE ENGINE CONNECTOR HARNESS?
LAMP OK 1. STUICE-R TEST 91 (Page 2-508)
2. MULTIMETER
POSSIBLE PROBLEMS REASON FOR QUESTION
This wire provides power to the controller.
PCB GLOW PLUG
CONTROLLER WIRING
I
OR REPLACE
TEST OPTIONS 1 KNOWN INFO
LAMP OK 1. STE/ICE-R TEST 91 (Page 2-508)
2. MULTIMETER
DO YOU HAVE CONTINUITY BETWEEN SOCKET 3 IN THE CONTROLLER HARNESS & SOCKET B IN THE ENGINE CONNECTOR HARNESS?
POSSIBLE PROBLEMS REASON FOR QUESTION
This wire returns power for the lamp.
PCB GLOW PLUG
CONTROLLER WIRING
KNOWN INFO T OPTIONS
WIRING TO 8 FROM CONTROLLER OK
RECONNECT GLOW PLUG CONTROLLER. DO YOU HAVE CONTINUITY BETWEEN SOCKET A & SOCKET B IN THE ENGINE CONNECTOR HARNESS?
1. STEIICE-R TEST 91 (Page 2-508)
G 2. MULTIMETER
POSSIBLE PROBLEMS REASON FOR QUESTION
PCB GLOW PLUG
CONTROLLER
If you don’t have continuity here, you know that the controller is bad.
2-320
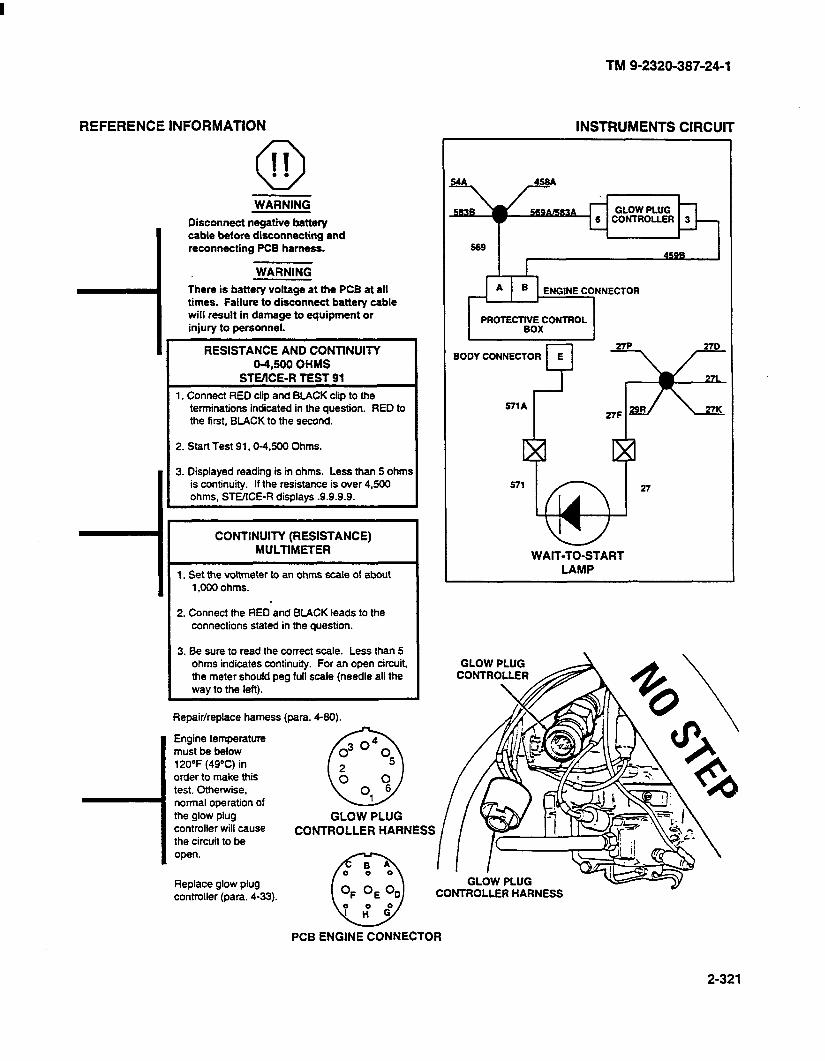
TM 9-2320-387-24-l
INSTRUMENTS CIRCUIT REFERENCE INFORMATION
w WARNING
Disconnect negative battery cable before disconnecting and reconnecting PCB harness.
WARNING
There is battery voltage at the PCB at all times. Failure to disconnect battery cable will result in damage to equipment or injury to personnel.
6 CONTROLLER 3
27F 27D RESISTANCE AND CONTINUITY
04,500 OHMS STEIlCE-R TEST 91
1. Connect RED clip and BLACK clip to the terminations indicated in the question. RED to the first, BLACK to the second.
2. Start Test 91,0-4.500 Ohms.
3. Displayed reading is in ohms. Less than 5 ohms is continuity. If the resistance is over 4.500 ohms, STEIICE-R displays .9.9.9.9.
CONTINUITY (RESISTANCE) MULTMETER
1. Set the voltmeter to an ohms scale of about 1,000 ohms.
2. Connect the RED and BLACK leads to the connections stated in the question.
3. Be sure to read the correct scale. Less than 5 ohms indicates continuity. For an open circuit, the meter should peg full scale (needle all the way to the left).
WAIT-TO-START LAMP
I GLOW PLUG CONTROLLER /%
) \
1 Repair/replace harness (para. 4-90).
controller will cause the circuit to be
I open.
CONTROLLER HARNESS
GLOW PLUG CONTROLLER HARNESS
Replace glow plug controller (para. 4-33). w
PCB ENGINE CONNECTOR
2-321
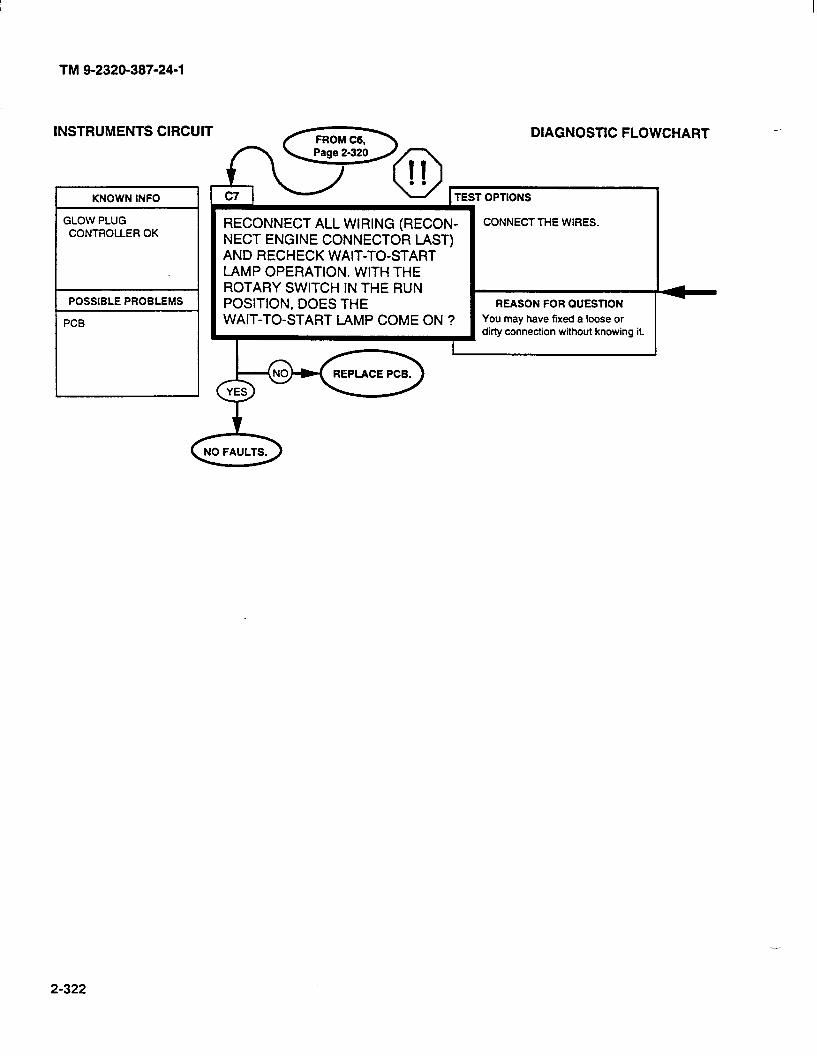
TM 9-2320-387-24-l
KNOWN INFO
INSTRUMENTS CIRCUIT
GLOW PLUG CONTROLLER OK
POSSIBLE PROBLEMS
PCB
RECONNECT ALL WIRING (RECON- NECT ENGINE CONNECTOR LAST) AND RECHECK WAIT-TO-START LAMP OPERATION. WITH THE ROTARY SWITCH IN THE RUN POSITION, DOES THE WAIT-TO-START LAMP COME ON ?
I I
CONNECT THE WIRES.
REASON FOR OUESTION
You may have fixed a loose or dirty connection without knowing it.
6 NO FAULTS.
2-322
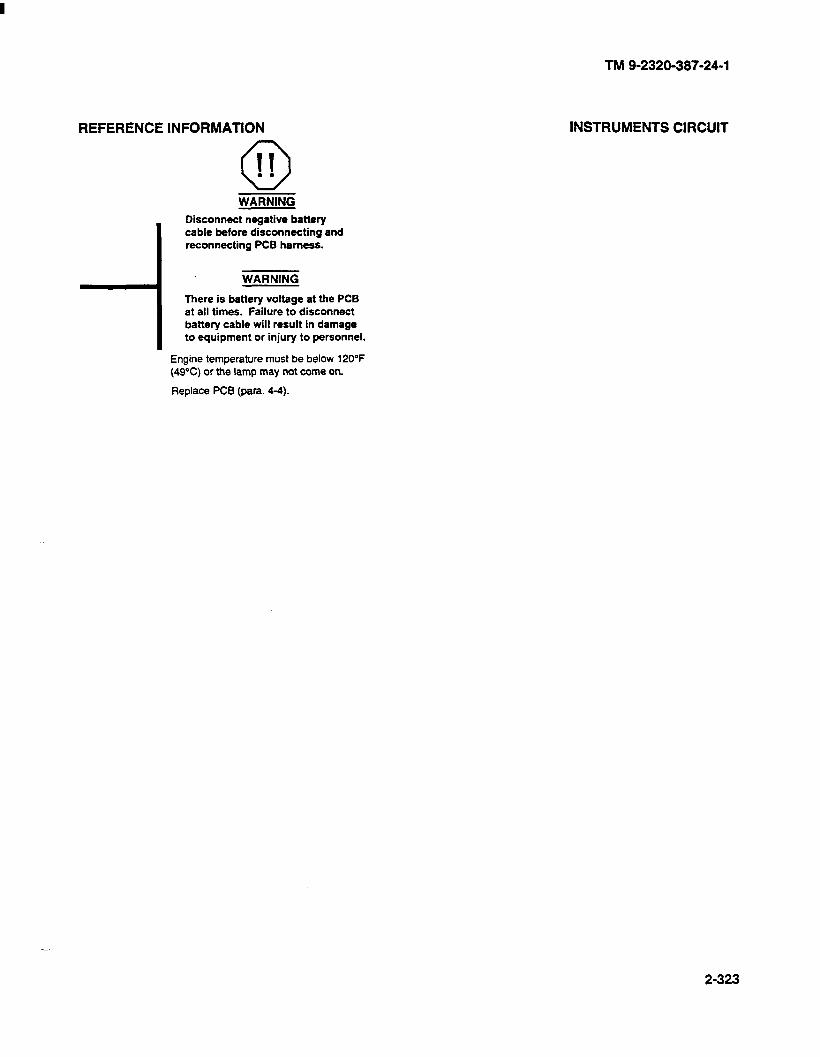
TM 9-2320-387-24-l
INSTRUMENTS CIRCUIT
WARNING
Disconnect negative battery cable before disconnecting and reconnecting PCB harness.
WARNING
There is battery voltage at the PCB at all times. Failure to disconnect battery cable will result in damage to equipment or injury to personnel.
Engine temperature must be below 120°F (49%) or the lamp may not come on.
Replace PCB (para. 4-4).
2-323
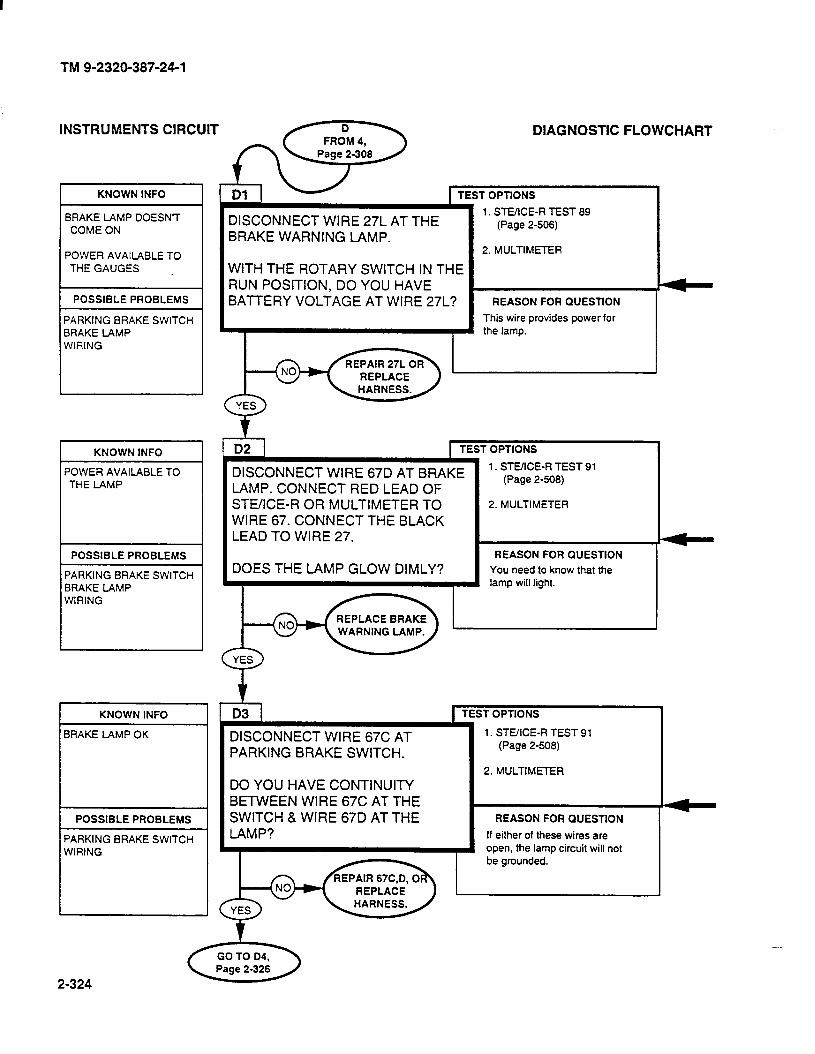
TM 9-2320-387-24-l
DIAGNOSTIC FLOWCHART INSTRUMENTS CIRCUIT
KNOWN INFO I TEST OPTtONS
BRAKE LAMP DOESN’T 1. STUICE-R TEST 89
COME ON DISCONNECT WIRE 27L AT THE BRAKE WARNING LAMP.
(Page 2-508)
POWER AVAilABLE TO 2. MULTIMETER
THE GAUGES WITH THE ROTARY SWITCH IN THE RUN POSITION, DO YOU HAVE
POSSIBLE PROBLEMS BATTERY VOLTAGE AT WIRE 27L? REASON FOR QUESTION
This wire provides power for
I I the lamp.
PARKING BRAKE SWITCH BRAKE LAMP WIRING
r % D2 i TEST OPTIONS
1. STEXE-R TEST 91 (Page 2-508) DISCONNECT WIRE 67D AT BRAKE
LAMP. CONNECT RED LEAD OF STE/ICE-R OR MULTIMETER TO WIRE 67. CONNECT THE BLACK LEAD TO WIRE 27.
2. MULTIMETER
KNOWN INFO
POWER AVAILABLE TO THE LAMP
DOES THE LAMP GLOW DIMLY? POSSIBLE PROBLEMS REASON FOR QUESTION
You need to know that the lamp will light.
PARKING BRAKE SWITCH BRAKE LAMP WIRING
r TEST OPTIONS KNOWN INFO
BRAKE LAMP OK 1. STEIICE-R TEST 91 (Page 2508)
2. MULTIMETER
DISCONNECT WIRE 67C AT PARKING BRAKE SWITCH.
DO YOU HAVE CONTINUITY BETWEEN WIRE 67C AT THE SWITCH & WIRE 67D AT THE LAMP?
REASON FOR QUESTION
If either of these wires are open, the lamp circuit will not be grounded.
POSSIBLE PROBLEMS
PARKING BRAKE SWITCH WIRING
2-324
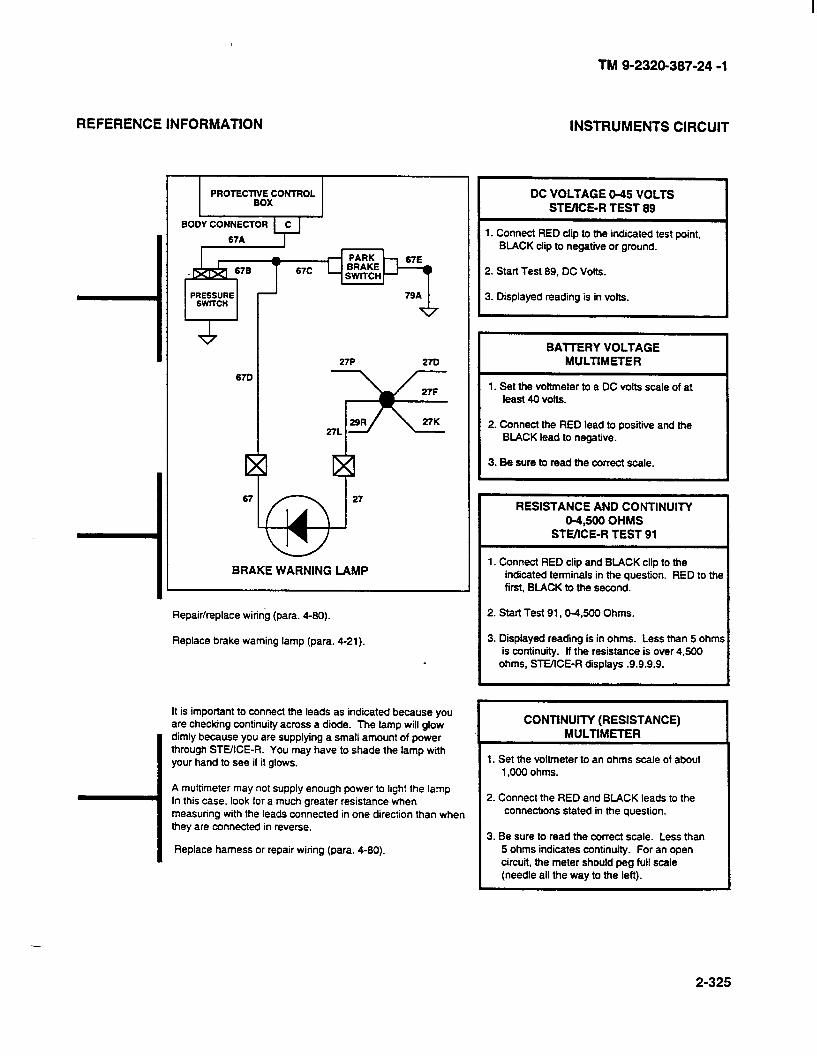
REFERENCE INFORMATION INSTRUMENTS CIRCUIT
TM g-2320-387-24 -1
I PROTECnvvxcONTl?OL
PRESSURE SWllCli
I
670
79A & 27P 270
67 27
BRAKE WARNING LAMP
Repair/replace wiring (para. 4-80).
Replace brake warning lamp (para. 4-21).
It is important to connect the leads as indicated because you are checking continuity across a diode. The lamp will glow dimly because you are supplying a small amount of power through STE/ICE-R. You may have to shade the lamp with your hand to see if it glows.
A multimeter may not supply enough power to light the lamp. In this case, look for a much greater resistance when measuring with the leads connected in one direction than when they are connected in reverse.
Replace harness or repair wiring (para. 4-80).
DC VOLTAGE O-45 VOLTS STUICE-R TEST 89
1. Connect RED clip to the indicated test point, BLACK dip to negative or ground.
2. Start Test 89. DC Volts.
3. Displayed reading is in volts.
BAlTERY VOLTAGE MULTlMETER
1. Set the voltmeter to a DC volts scale of at least 40 volts.
2. Connect the RED lead to positive and the BLACK lead to negative.
3. Be sure to read the correct scale.
RESISTANCE AND CONTINUITY 04,500 OHMS
STE/lCE-R TEST 91
1. Connect RED clip and BLACK clip to the indicated terminals in the question. RED to the first, BLACK to the second.
2. Start Test 91,0-4,500 Ohms.
3. Displayed reading is in ohms. Less than 5 ohm is continuity. If the resistance is over 4.500
ohms, STE/tCE-R displays .9.9.9.9.
S
CONTINUITY (RESISTANCE) MULTIMETER
1. Set the voltmeter to an ohms scale of about 1,000 ohms.
2. Connect the RED and BLACK leads to the connections stated in the question.
3. Be sure to read the correct scale. Less than 5 ohms indicates continuity. For an open circuit, the meter should peg full scale (needle all the way to the left).
2-325
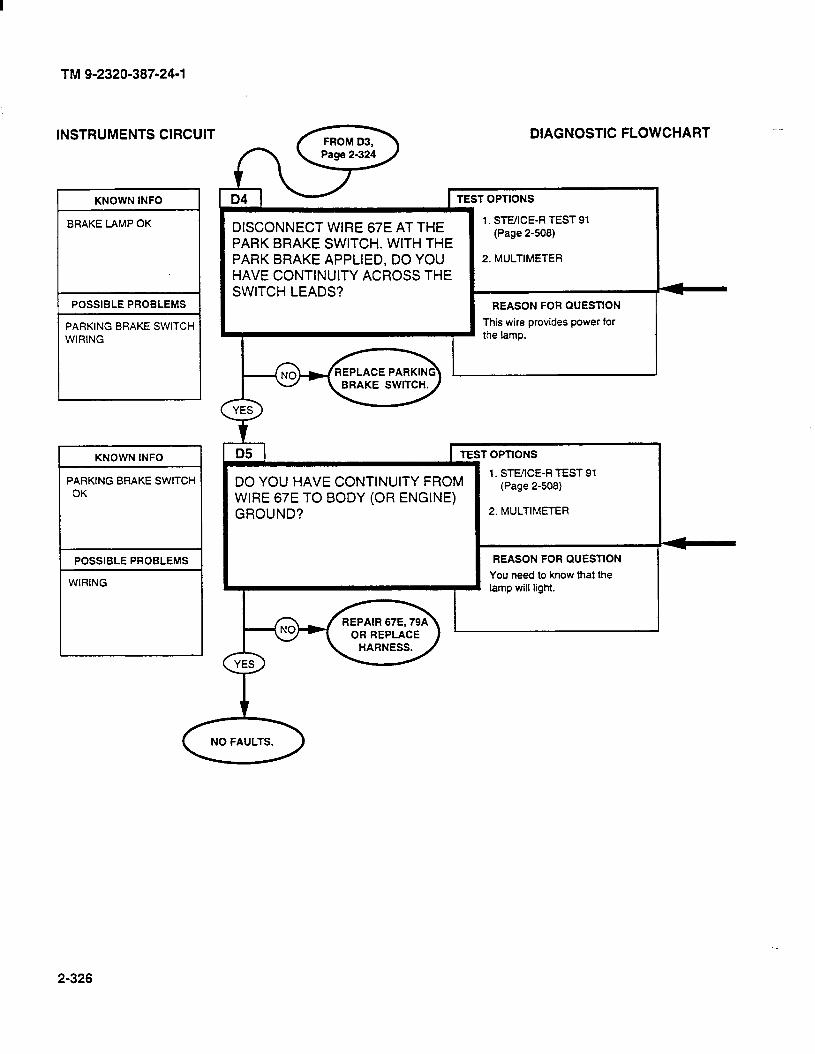
TM 9-2320-387-24-l
IN3 I WJMtN IS LIHLUI I
KNOWN INFO I
BRAKE LAMP OK
POSSIBLE PROBLEMS
PARKING BRAKE SWITCH WIRING
DISCONNECT WIRE 67E AT THE PARK BRAKE SWITCH. WITH THE PARK BRAKE APPLIED, DO YOU HAVE CONTINUITY ACROSS THE SWITCH LEADS?
KNOWN INFO
PARKING BRAKE SWITCH OK
POSSIBLE PROBLEMS
WIRING
J
1. STEXE-R TEST 91 (Page 2-508)
2. MULTIMETER
REASON FOR QUESTION
This wire provides power for the lamp.
D5- 1 1 TEST OPTIONS
DO YOU HAVE CONTINUITY FROM WIRE 67E TO BODY (OR ENGINE) GROUND?
1. STUICE-R TEST 91 (Page 2-508)
2. MULTIMETER
OR REPLACE
REASON FOR QUESTION
You need to know that the lamp will light.
2-326
TM 9-2320-387-24-l
REFERENCE INFORMATION I
RESISTANCE AND CONTINUITY 04,500 OHMS
STEIICE-R TEST 91
1. Connect RED clip and BLACK clip to the terminations indicated in the question. RED to the first, BLACK to the second.
2. Start Test 91,04,500 Ohms.
3. Displayed reading is in ohms. Less than 5 ohms is continuity. If the resistance is over 4,590 ohms, STVICE-R displays .9.9.9.9.
Replace parking brake switch (para. 4-23).
-I Replace harness or repair wiring (para. 4-80).
Reconnect all wiring. Connect glow plug controller hst.
INSTRUMENTS CIRCUIT
CONTINUITY (RESISTANCE) MULTIMETER
1. Set the voltmeter to an ohms scale of about 1 ,ooO ohms.
2. Connect the RED and BLACK leads to the connections stated in the question.
3. Be sure to read the correct scale. Less than 5 ohms indicates continuity. For an open circuit, the meter should peg full scale (needle all the way to the left).
PROTECTWE CONTROL BOX
BODY CONNECTOR
67D
BRAKE WARNING LAMP
2-327
TM 9-2320-387-24-l
INSTRUMENTS CIRCUIT DIAGNOSTIC FLOWCHART
1 TES T OPTIONS
NONE BLEED BRAKE SYSTEM. DOES THE LIGHT STAY ON?
POSSIBLE PROBLEMS) REASON FOR QUESTION
If the lamp stays on, it could be that the hydraulic brake system has a fault and might require bleeding.
PROPORTIONING VALVE WIRING PARKING BRAKE SWITCH
BOX BRAKE WARNING
PRESSURE SWITCH
TEST OPTIONS
BRAKE WARNING LIGHT WON’T GO OFF
- I
ZHECK PROPORTIONING VALVE ‘OR PROPER OPERATION. (GO l-0 B-7 PAGE 2-428). IS PROPOR- rlONlNG VALVE OPERATING ‘ROPERLY?
NONE
REASON FOR QUESTION
If the lamp stays on after bleeding the brake system, the proportioning valve could be malfunctioning.
1 POSSIBLE PROBLEMS
PROPORTIONING VALVE WIRING PARKING BRAKE SWITCH BOX BRAKE WARNING
PRESSURE SWITCH
r .
3RAKE WARNING LIGHT WON’T GO OFF
3 1 1 TEST OPTIONS
VISUAL IISCONNECT WIRE 67A AND 67B FROM BRAKE WARNING PRESSURE SWITCH, AND WIRE 67C FROM PARKING BRAKE SWITCH. DISCON- NECT THE PCB BODY HARNESS CONNECTOR. CONNECT A JUMPER WIRE BETWEEN WIRES 67A AND 67B. DOES THE LIGHT GO OUT?
REASON FOR QUESTION
If the lamp stays on with the PCB, valve switch, and park brake switch disconnected, the problem is in the wiring.
I
POSSIBLE PROBLEMS 1
WIRING PARKING BRAKE SWITCH
BOX BRAKE WARNING
PRESSURE SWITCH
2-328
REFERENCE INFORMATION
-I Bleed brake system (para. 7-2).
-I Replace propofiioning valve (para. 7-10).
-I Replace harness or repair wiring (para. 4-60).
TM 9-2320-387-24-l
INSTRUMENTS CIRCUIT
PROTECTIVE CONTROI. BOX
IODY CONNECTOR i
67A I
1 , I I
* 678 67C
1
67D
BRAKE WARNING LAMP
2-329

TM 9-2320-387-24-l
INSTRUMENTS CIRCUIT . DIAGNOSTIC FLOWCHART
KNOWN INFO
WIRING OK
POSSIBLE PROBLEMS
PROTECTIVE CONTROL BOX
BRAKE WARNING PRESSURE SWlTCH
PARKING BRAKE SWITCH
KNOWN INFO
WIRING OK PCB OK BRAKE WARNING VALVE
SWlTCH OK
POSSIBLE PROBLEMS
PARKING BRAKE SWITCH
KNOWN INFO
PROTECTIVE CONTROL BOX OK
WIRING OK
POSSIBLE PROBLEMS
BRAKE WARNING PRESSURE SWITCH
PARKING BRAKE SWITCH
ZONNECT PCB BODY HARNESS. IOES THE LIGHT STAY OFF?
I TESTOPTIONS
TEST OPTfONS
VISUAL CONNECT PARKING BRAKE SWITCH. MAKE SURE THE PARKING BRAKE IS DISENGAGED. DOES THE LIGHT STAY OFF?
VISUAL
REASON FOR QUESTlON
When the PCB is connected, the light should not come on. If it does, the PCB is faulty.
REASON FOR QUESTION
The light will only come on when the parking brake switch is connected if the parking brake switch has a problem. &-@-+5&L--
--L h r 6 I I 1
REMOVE JUMPER WIRE. CONNECT BRAKE WARNING PRESSURE SWITCH. DOES LIGHT STAY OFF?
rEST OPTlONS
VISUAL
REASON FOR QUESTION
PROPORTIONING
2-330
REFERENCE INFORMATION
-i
Replace PCB (para. 4-4).
4 Replace parking brake switch (para. 4-23).
TM 9-2320-387-24-l
INSTRUMENTS CIRCUIT
When the brake warning pressure switch is defective, the proportioning valve must be replaced (para. 7-10).
2-331

TM 9-2320-387-24-l
KNOWN INFO
POWER AVAILABLE TO GAUGES
VOLTMETER DOESN’T WORK
POSSIBLE PROBLEMS
VOLTMETER WIRING
I KNOWN INFO
POWER AVAILABLE AT VOLTMETER
POSSIBLE PROBLEMS
VOLTMETER WIRING
DISCONNECT WIRE 567A AT THE VOLTMETER. WITH THE ROTARY SWITCH IN THE RUN POSITION, DO YOU HAVE BA-ITERY VOLTAGE AT WIRE 567A?
1 TEST OPTIONS
1. STE/ICE-R TEST 89 (Page 2-508)
2. MULTIMETER
REASON FOR QUESTION
The voltmeter reads voltage on this wire.
DIAGNOSTIC FLOWCHART -
IS THERE CONTINUITY BETWEEN WIRE 58F AND ENGINE (OR BODY) GROUND?
OPTIONS
1. STEIICE-R TEST 91 (Page 2-508)
2. MULTIMETER
REASON FOR QUESTION
This wire is the ground reference for the voltmeter.
REPLACE VOLTMETER.
2-332
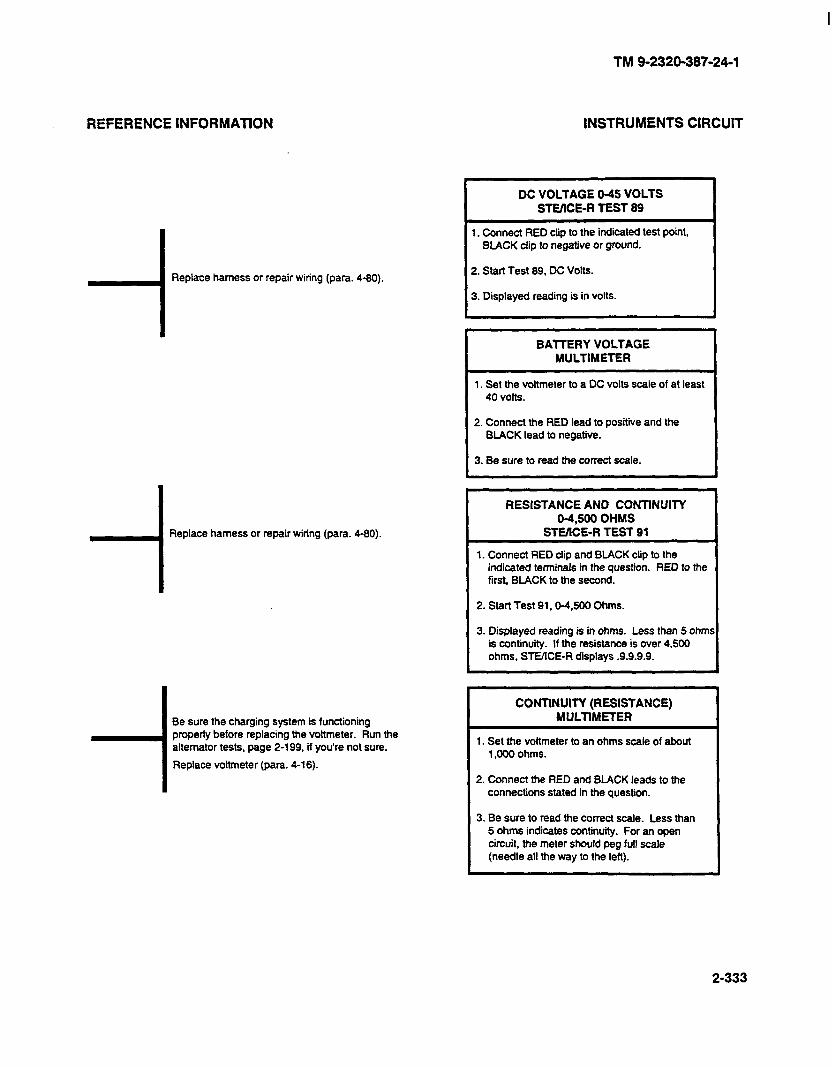
I
REFERENCE INFORMATION
--i
Replace harness or repair wiring (para. 4-80).
-I Replace harness or repair wiring (para. 4-80).
Be sure the charging system is functioning properly before replacing the voltmeter. Run the alternator tests, page Z-199, if you’re not sure.
Replace voltmeter (para. 4-16).
TM 9-2320-387-24-l
INSTRUMENTS CIRCUIT
DC VOLTAGE O-45 VOLTS STE/lCE-R TEST 89
1. Connect RED clip to the indicated test point, BLACK clip to negative or ground.
2. Start Test 89. DC Volts.
3. Displayed reading is in volts.
BAITERY VOLTAGE MULTIMETER
1. Set the voltmeter to a DC volts scale of at least 40 volts.
2. Connect the RED lead to positive and the BLACK lead to negative.
3. Be sure to read the correct scale.
I RESISTANCE AND CONTINUITY
I 04.500 OHMS
STEkE-R TEST 91
1. Connect RED dip and BLACK clip to the indicated terminals in the question. RED to the first, BLACK to the second.
I 2. Start Test 91,0-4,500 Ohms.
3. Displayed reading is in ohms. Less than 5 ohmr is continuity. If the resistance is over 4,500 ohms, STEIfCE-R displays .9.9.9.9.
CONTINUITY (RESISTANCE) MULTIMETER
I 1. Set the voltmeter to an ohms scale of about 1,000 ohms.
2. Connect the RED and BLACK leads to the connections stated in the question.
3. Be sure to read the correct scale. Less than 5 ohms indicates continufty. For an open circuit, the meter should peg full scale (needle all the way to the left).
2-333
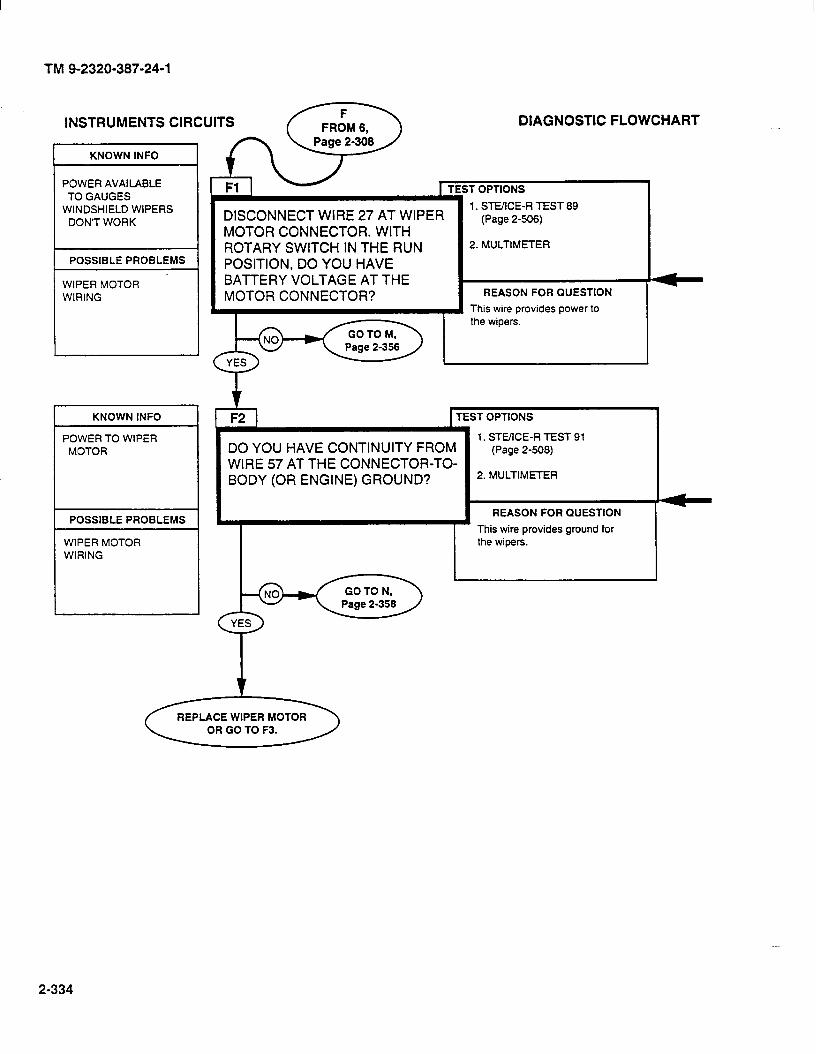
TM 9-2320-387-24-l
INSTRUMENTS CIRCUITS cxa DIAGNOSTIC FLOWCHART
KNOWN INFO
POWER AVAIlABLE TO GAUGES
WINDSHIELD WIPERS DON’T WORK
POSSIBLE PROBLEMS
WIPER MOTOR WIRING
I KNOWN INFO
1 POWER TO WIPER MOTOR
1 POSSIBLE PROBLEMS
1 WIPER MOTOR WIRING
DISCONNECT WIRE 27 AT WIPER MOTOR CONNECTOR. WITH ROTARY SWITCH IN THE RUN POSITION, DO YOU HAVE BATTERY VOLTAGE AT THE MOTOR CONNECTOR?
v
F2 1 TEST OPTIONS
1. STUICE-R TEST 91 DO YOU HAVE CONTINUITY FROM (Page 2-508)
WIRE 57 AT THE CONNECTOR-TO- BODY (OR ENGINE) GROUND? 2. MULTIMETER
REASON FOR QUESTION
I 1 This wire provides ground for
2-334
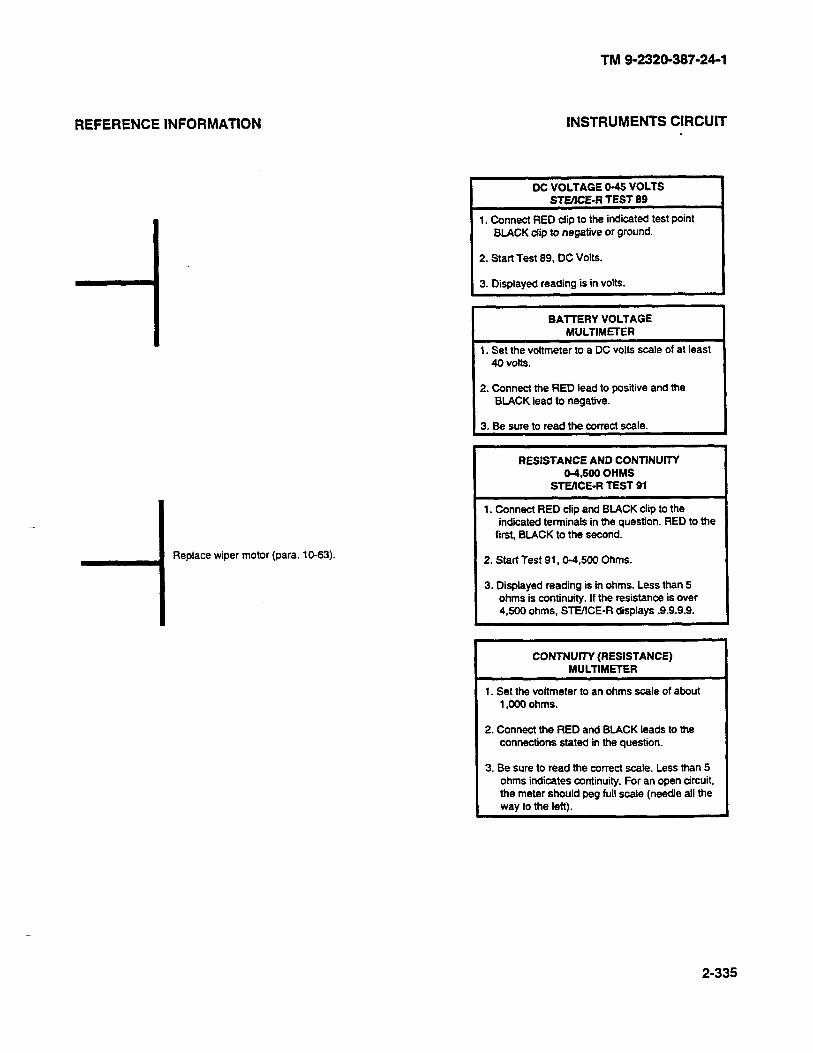
TM 9-2320-387-24-l
REFERENCE INFORMATION
-I Replace wiper motor (para. 10-63).
INSTRUMENTS CIRCUIT
DC VOLTAGE O-45 VOLTS STWICE-R TEST 89
1. Connect RED clip to the indicated test point BUCK clip to negative or ground.
2. Start Test 89, DC Volts.
3. Displayed reading is in volts.
BATTERY VOLTAGE MULTIMETER
1. Set the voltmeter to a DC volts scale of at least 40 volts.
2. Connect the RED lead to positive and the BLACK lead to negative.
3. Be sure to read the correct scale.
RESISTANCE AND C0NllNUll-Y 0-4,!XKl OHMS
STEllCE-R TEST 91
1. Connect RED clip and BLACK clip to the indicated terminals in the question. RED to the
first, BLACK to the second.
2. Start Test 91,045tXJ Ohms.
3. Displayed reading is in ohms. Less than 5 ohms is continuity. If the resistance is over 4.606 ohms, STEACE-R displays .9.9.9.9.
CONTNUITY (RESISTANCE) MULTIMETER
1. Set the voltmeter to an ohms scale of about 1 ,ooO ohms.
2. Connect the RED and BLACK leads to the connections stated in the question.
3. Be sure to read the correct scale. Less than 5 ohms indicates continuity. For an open circuit, the meter should peg full scale (needle all the way to the left).
2-335
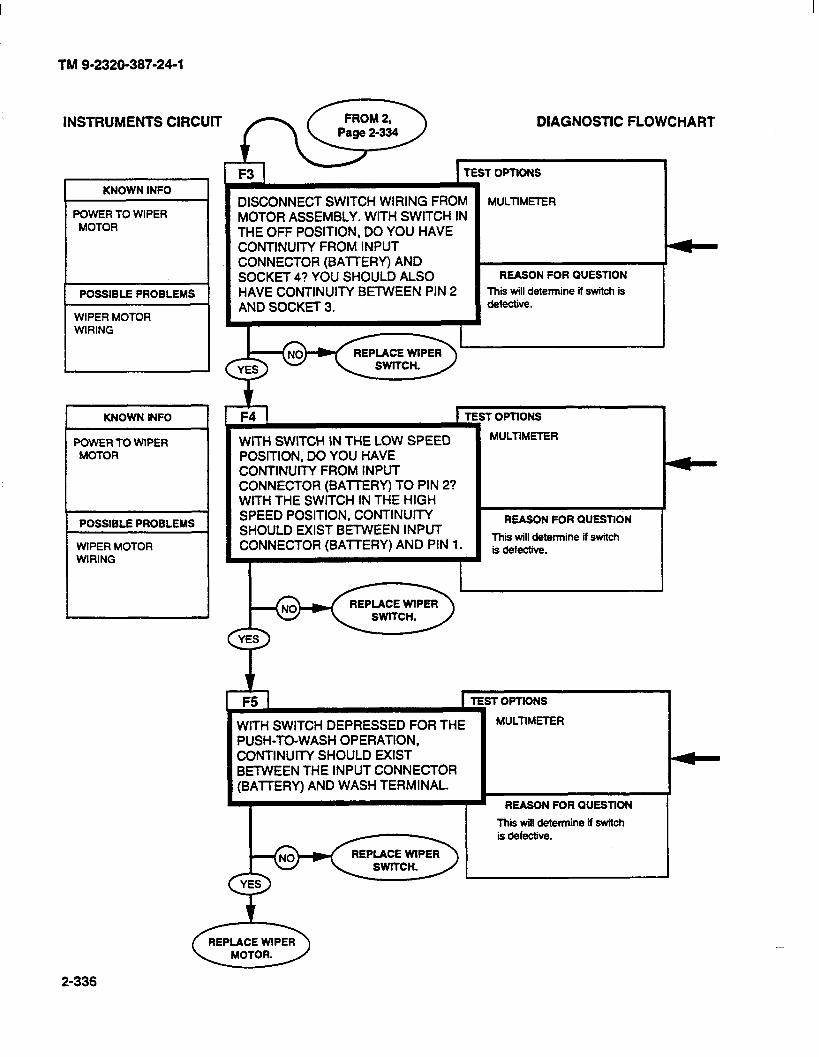
TM 9-2320-387-24-l
lNSTR”MENTS ClilculTl 653 TEsT omoNIAGNOSTIC FLOWCHART
I KNOWN INFO
POWER TO WIPER MOTOR
DISCONNECT SWITCH WIRING FROM MOTOR ASSEMBLY. WITH SWITCH IN THE OFF POSITION, DO YOU HAVE CONTINUITY FROM INPUT CONNECTOR (BATTERY) AND SOCKET 4? YOU SHOULD ALSO HAVE CONTINUITY BElWEEN PIN 2 AND SOCKET 3.
MULTtMETER I- POSSIBLE PROBLEMS
WIPER MOTOR WIRING
L
KNOWN INFO
POWER TO WIPER MOTOR
POSSIBLE PROBLEMS
WIPER MOTOR WIRING
i REASON FOR OUESTlON
This will determine if switch is defective.
WITH SWITCH IN THE LOW SPEED POSITION, DO YOU HAVE CONTlNUlTY FROM INPUT CONNECTOR (BAmRY) TO PIN 2? WITH THE SWITCH IN THE HIGH SPEED POSITION, CONTINUITY SHOULD EXIST BETWEEN INPUT CONNECTOR (BATTERY) AND PIN 1.
T OPTlONS
MULTlMEiER
REASON FOR QUESTldN
This will determine if switch is defective.
I REPLACE WlPER
WITH SWITCH DEPRESSED FOR THE PUSH-TO-WASH OPERATION, CONTINUITY SHOULD EXIST BETWEEN THE INPUT CONNECTOR (BAlTERY) AND WASH TERMINAL.
MULTlMETER
2-336

TM 9-2320-387-24-l
REFERENCE INFORMATION INSTRUMENTS CIRCUIT
-I. Replace wiper switch (para. 1 O-63).
i
Replace wiper switch (para. 1 O-63).
i
Replace wiper switch (para. 1 O-63).
Replace wiper motor (para. 10-63).
CONTINUITY (RESISTANCE) MULTIMETER
1. Set the voltmeter to an ohms scale of about 1,000 ohms.
2. Connect the RED and BLACK leads to the connections stated in the question.
3. Be sure to read the correct scale. Less than 5 ohms indicates continuity. For an open circuit, the meter should peg full scale (needle all the way to the left).
PIN 2 ILOW SPEED)
PIN 1 (HIGH SPEED)
P’N5 \ (PARK) -PIN 4
(BATTERY)
MOTOR CONNECTOR
WASH
INPUT CONNECTOR BATTERY
-
2-337
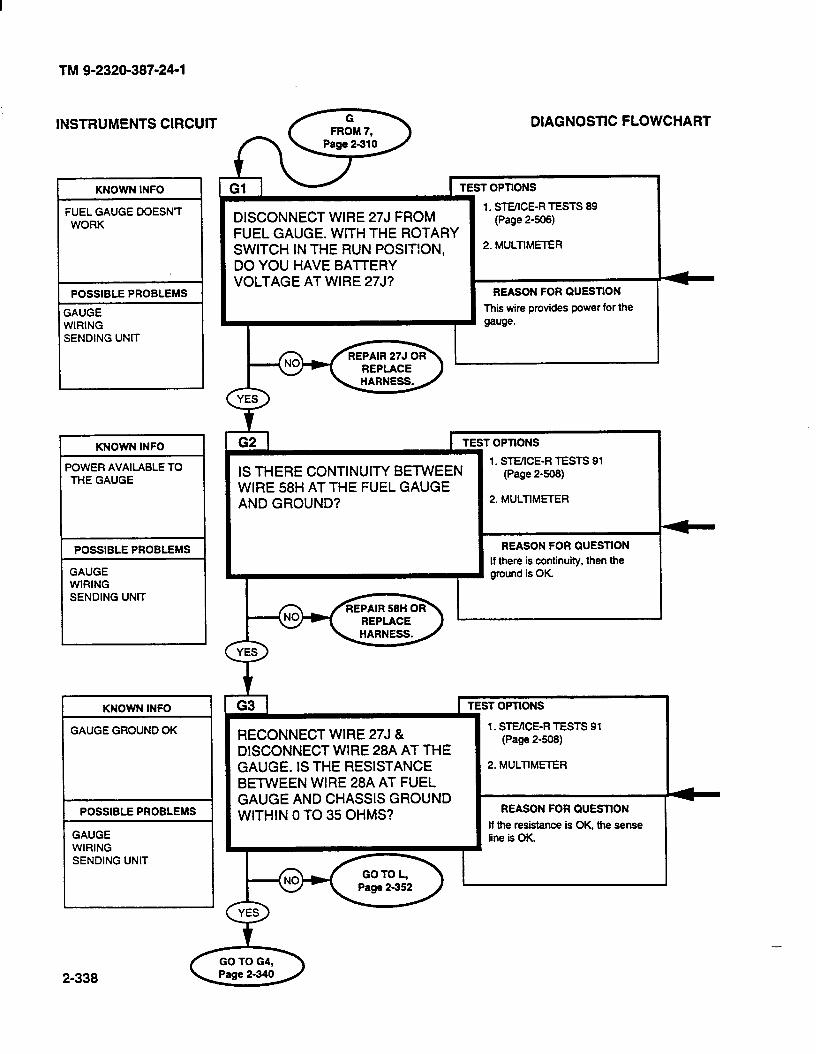
TM 9-2320-387-24-l
INSTRUMENTS CIRCUIT DIAGNOSTIC FLOWCHART
1 TEST OPTlONS I KNOWN INFO
1. STE/lCE-R TESTS 89 (Page 2-906)
2. MULTIMETER
FUEL GAUGE DOESNIT WORK
DISCONNECT WIRE 27J FROM FUEL GAUGE. WITH THE ROTARY SWITCH IN THE RUN POSITION, DO YOU HAVE BAlTERY VOLTAGE AT WIRE 27J?
REASON FOR QUESTlON
Thii wire provides power for the gauge.
POSSIBLE PROBLEMS
GAUGE WIRING SENDING UNIT
Eq TEST OPTlONS
IS THERE CONTINUITY BETWEEN 1. STE/lCE-R TESTS 91
(Page 2-508)
WIRE 58H AT THE FUEL GAUGE AND GROUND? 2. MULTlMETER
KNOWN INFO
POWER AVAILABLE TO THE GAUGE
REASON FOR QUESTION
If there is continuity, then the ground is OK
POSSIBLE PROBLEMS
GAUGE WIRING SENDING UNlT
I T OPTIONS
1. STE/lCE-R TESTS 91 (Page 2-508)
2. MULTiMETER
ES KNOWN INFO
GAUGE GROUND OK RECONNECT WIRE 27J & DISCONNECT WIRE 28A AT THE GAUGE. IS THE RESISTANCE BETWEEN WIRE 28A AT FUEL GAUGE AND CHASSIS GROUND WITHIN 0 TO 35 OHMS? REASON FOR QUESTION
If the resistance is OK the sense line is OK
POSSIBLE PROBLEMS
GAUGE WIRING SENDING UNIT
2-338
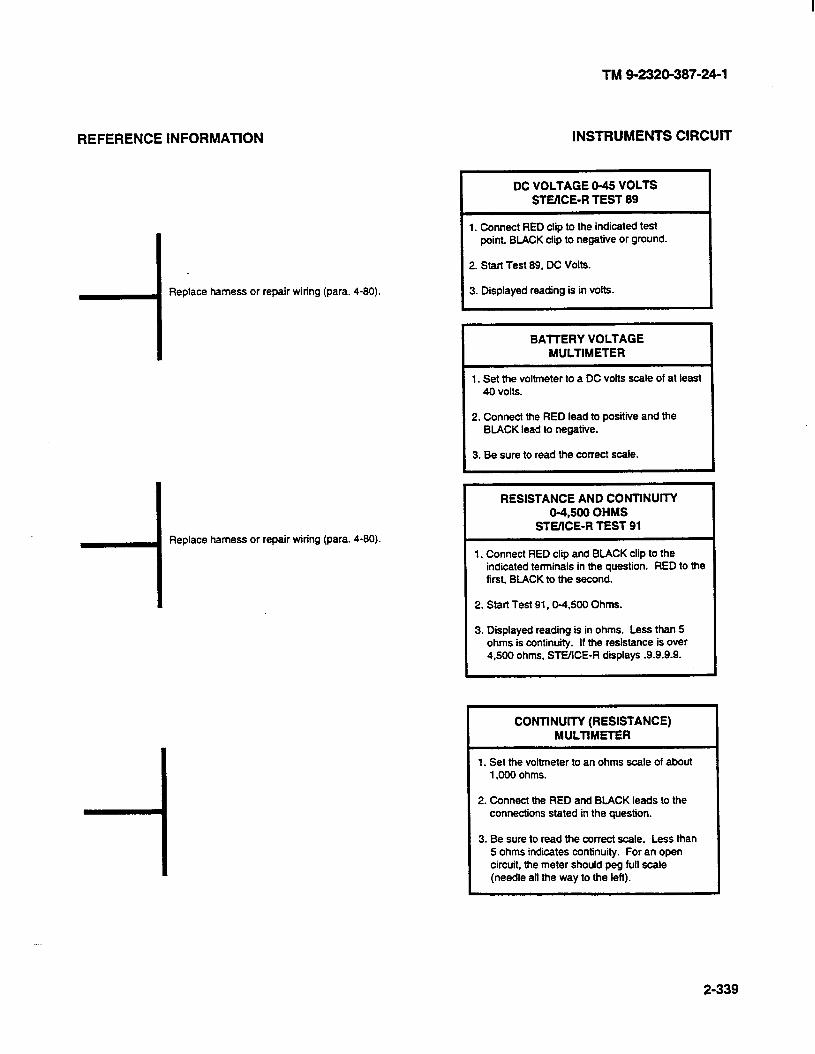
TM 9-2320-387-24-l
REFERENCE INFORMATION INSTRUMENTS CIRCUIT
-I- Replace harness or repair wiring (para. 4-80).
-I Replace harness or repair wiring (para. 4-80).
DC VOLTAGE 045 VOLTS STVICE-R TEST 89
1. Connect RED clip to the indicated test point, BLACK dip to negative or ground.
2. Start Test 89. DC Volts.
3. Displayed reading is in volts.
BAlTERY VOLTAGE MULTIMETER
1. Set the voltmeter to a DC volts scale of at least 40 volts.
2. Connect the RED lead to positive and the BLACK lead to negative.
3. Be sure to read the correct scale.
RESISTANCE AND C0NTlNUI-W 04,500 OHMS
STEIICE-R TEST 91
1. Connect RED clip and BLACK clip to the indicated terminals in the question. RED to the first, BLACK to the second.
2. Start Test 91,04,500 Ohms.
3. Displayed reading is in ohms. Less than 5 ohms is continuity. If the resistance is over 4.500 ohms, STEACE-R displays .9.9.9-g.
CONTINUITY (RESISTANCE) MULTIMETER
1. Set the voltmeter to an ohms scale of about 1,000 ohms.
2. Connect the RED and BLACK leads to the connections stated in the question.
3. Be sure to read the correct scale. Less than 5 ohms indicates continuity. For an open circuit, the meter should peg full scale (needle all the way to the left).
2-339
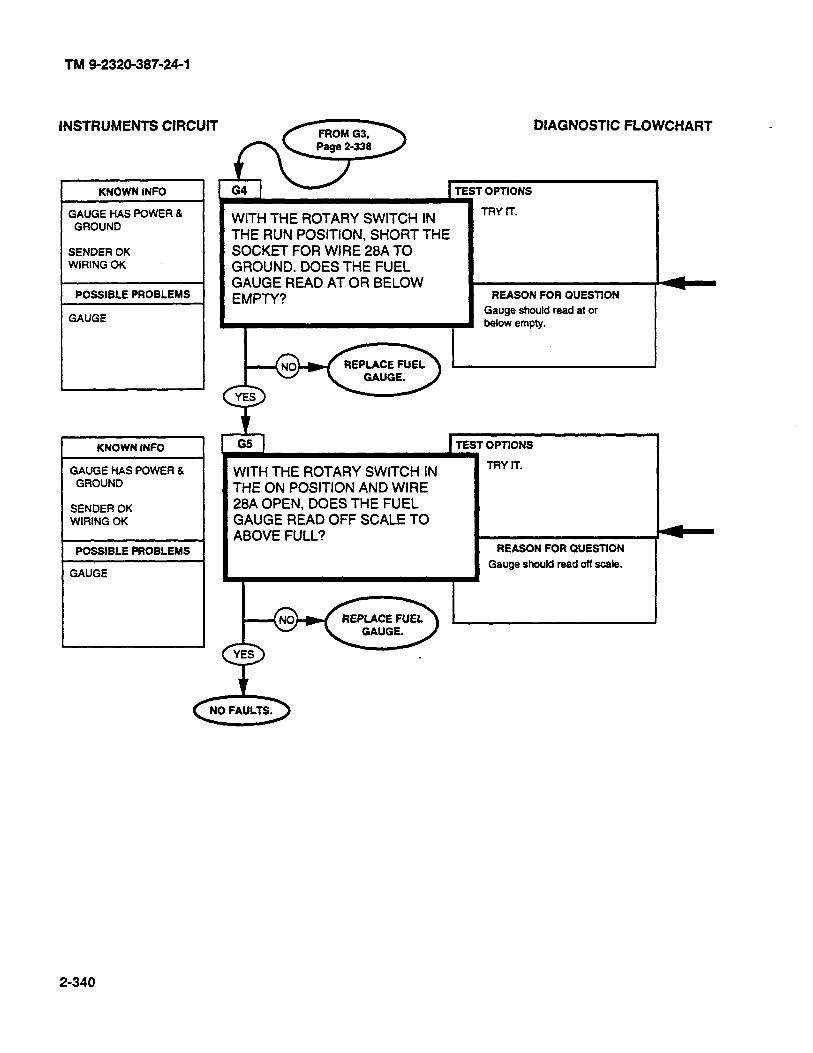
TM 9-2320-387-24-l
INSTRUMENTS ClRCUfl/ G&s> TEST OPT,ONS DIAGNOSTIC FLOWCHART
1 r L
KNOWN INFO I
TRY IT.
I
L GAUGE HAS POWER 8
GROUND I
SENDER OK WIRING OK
POSSIBLE PROBLEMS
WITH THE ROTARY SWITCH IN THE RUN POSITION, SHORT THE SOCKET FOR WIRE 28A TO GROUND. DOES THE FUEL GAUGE READ AT OR BELOW EMPTY? REASON FOR QUESTION
Gauge should read at or below empty.
KNOWN INFO
GAUGE HAS POWER & GROUND
SENDER OK WIRING OK
POSSIBLE PROBLEMS 1
GAUGE
WITH THE ROTARY SWITCH IN THE ON POSITION AND WIRE 28A OPEN, DOES THE FUEL GAUGE READ OFF SCALE TO ABOVE FULL?
OPTIONS
TRY IT.
REASON FOR QUESTtON
Gauge should read off scale.
2-340
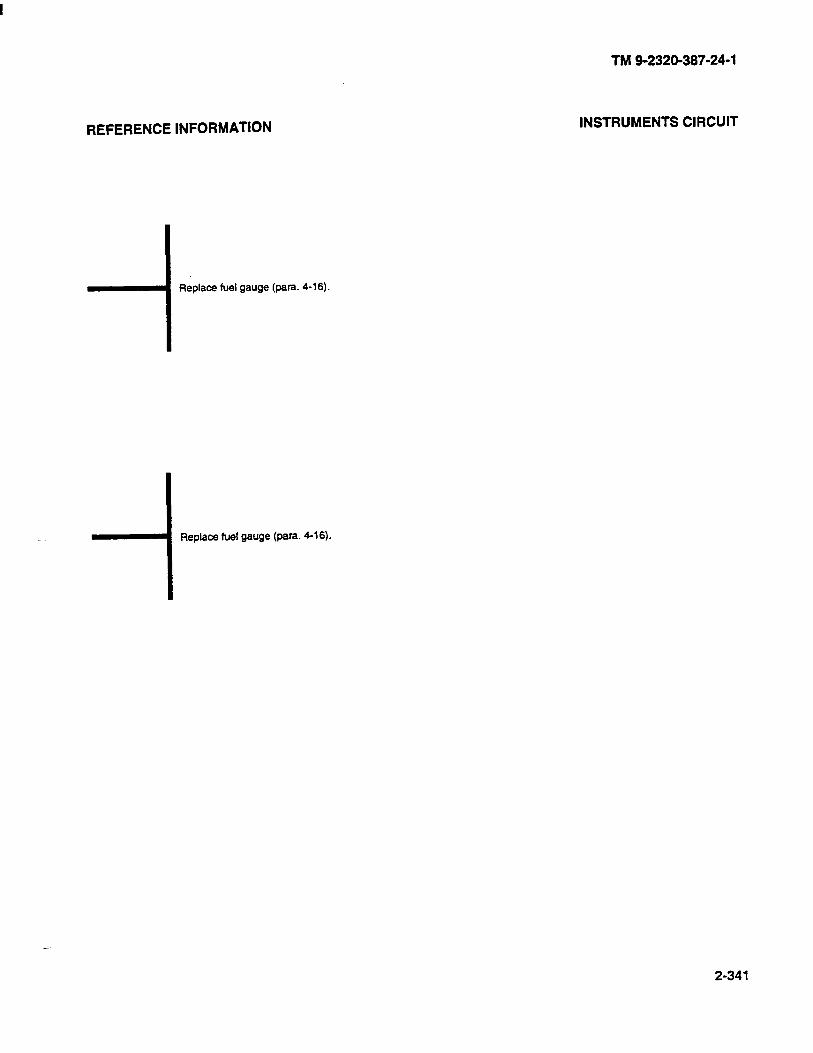

TM 9-2320-387-24-l
INSTRUMENTS CIRCUIT, H&s9 TEST opT,olAGNOSTIC FLOWCHART
I I KNOWN INFO I
POWER AVAILABLE TO THE GAUGES
OIL PRESSURE GAUGE DOESNT WORK
WIRING
OIL PRESSURE GAUGE HAS POWER
POSSIBLE PROBLEMS
SENDING UNIT
KNOWN INFO
GAUGE GROUND OK
POSSIBLE PROBLEMS
OIL PRESSURE GAUGE SENDING UNIT WIRING
DISCONNECT WIRE 27H AT THE OIL PRESSURE GAUGE. WITH THE ROTARY SWITCH IN THE RUN POSITION, DO YOU HAVE BATTERY VOLTAGE AT WIRE 27H?
I I
1 1. STE/ICE-R TEST 89 (Page 2-506)
2. MULl-lMETER
REASON FOR QUESTION
This is the cower wire for the gauge.
t H2 I TES
WITH THE ROTARY SWITCH IN THE OFF POSITION, DO YOU HAVE CONTINUITY BETWEEN WIRE 58G AT THE GAUGE AND ENGINE (OR BODY) GROUND?
I
r OPTIONS
1. ST&ICE-R TEST 91 (PAGE 2-508)
2. MULTIMETER
REASON FOR QUESTION
This is the ground wire for the gauge.
r TEST OPTIONS
1. STE/lCE-R TEST 91 DISCONNECT WIRE 36A AT THE GAUGE AND AT THE OIL
(Page 2-508)
PRESSURE SENDING UNIT. DO 2. MULTIMETER
YOU HAVE CONTINUITY THROUGH WIRE 36A? RECONNECT WIRE 36A AFTER MAKING THE MEASUREMENT.
REASON FOR QUESTION
If this wire is open, the gauge will always read offscale to the
2-342
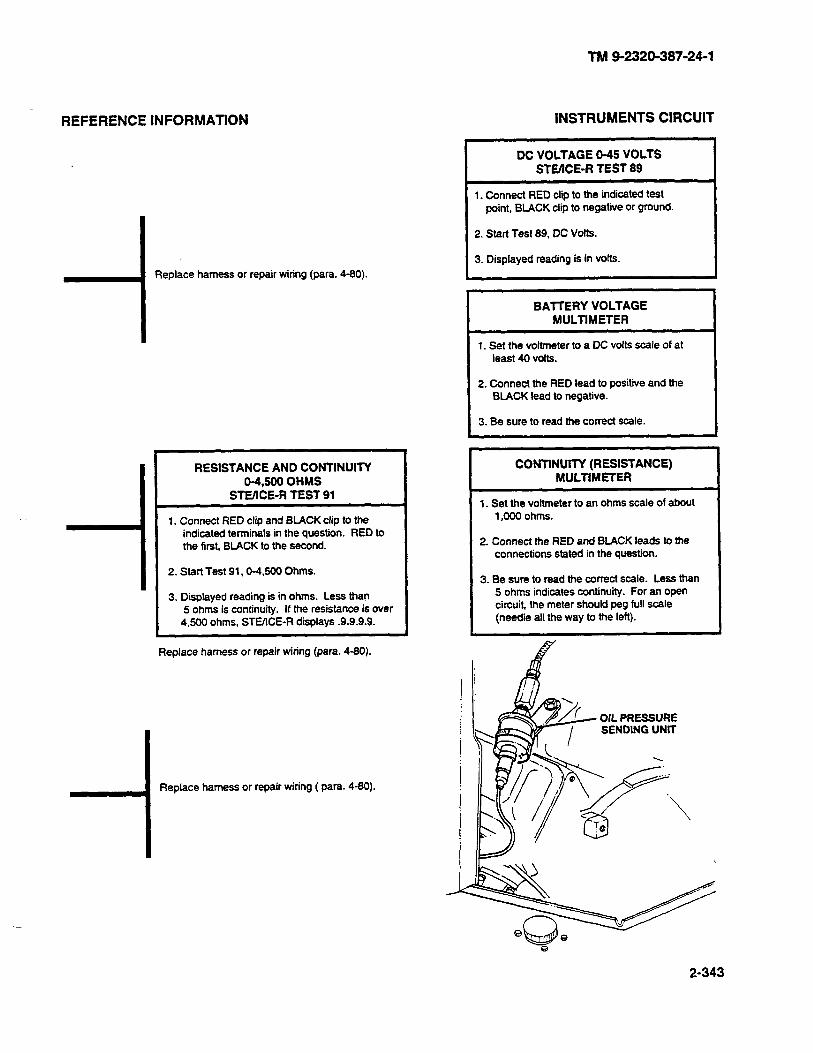
I
TNI 9-2320-387-24-l
REFERENCE INFORMATION
-i
Replace harness or repair wiring (para. 4-90).
RESISTANCE AND CONII-NUIM 04,500 OHMS
STEIICE-R TEST 91
1. Connect RED clip and BLACK clip to the indicated terminals in the question. RED to the first, BLACK to the second.
2. Start Test 91,0-4,500 Ohms.
3. Displayed reading is in ohms. Less than 5 ohms is cdntinuity. If the resistance is over
4.500 ohms, STVICE-R displays .9.9.9.9.
INSTRUMENTS CIRCUIT
DC VOLTAGE O-45 VOLTS SWlCE-R TEST 99
1. Connect RED clip to the indicated test point, BLACK clip to negative or ground.
2. Start Test 89, DC Volts.
3. Displayed reading is in volts.
BATTERY VOLTAGE MULTIMETER I
1. Set the voltmeter to a DC volts scale of at least 40 volts.
2. Connect the RED lead to positive and the BLACK lead to negative.
3. Be sure to read the correct scale.
CONTINUITY (RESISTANCE) MULTIMETER
1. Set the voltmeter to an ohms scale of about 1,000 ohms.
2. Connect the RED and BLACK leads to the connections stated in the question.
3. Be sure to read the correct scale. Less than 5 ohms indicates continuity. For an open circuit, the meter should peg full scale (needle all the way to the left).
Replace harness or repair wiring (para. 4-90).
-I Replace harness or repair wiring ( para. 4-80).
OIL PRESSURE SENDING UNIT
2-343
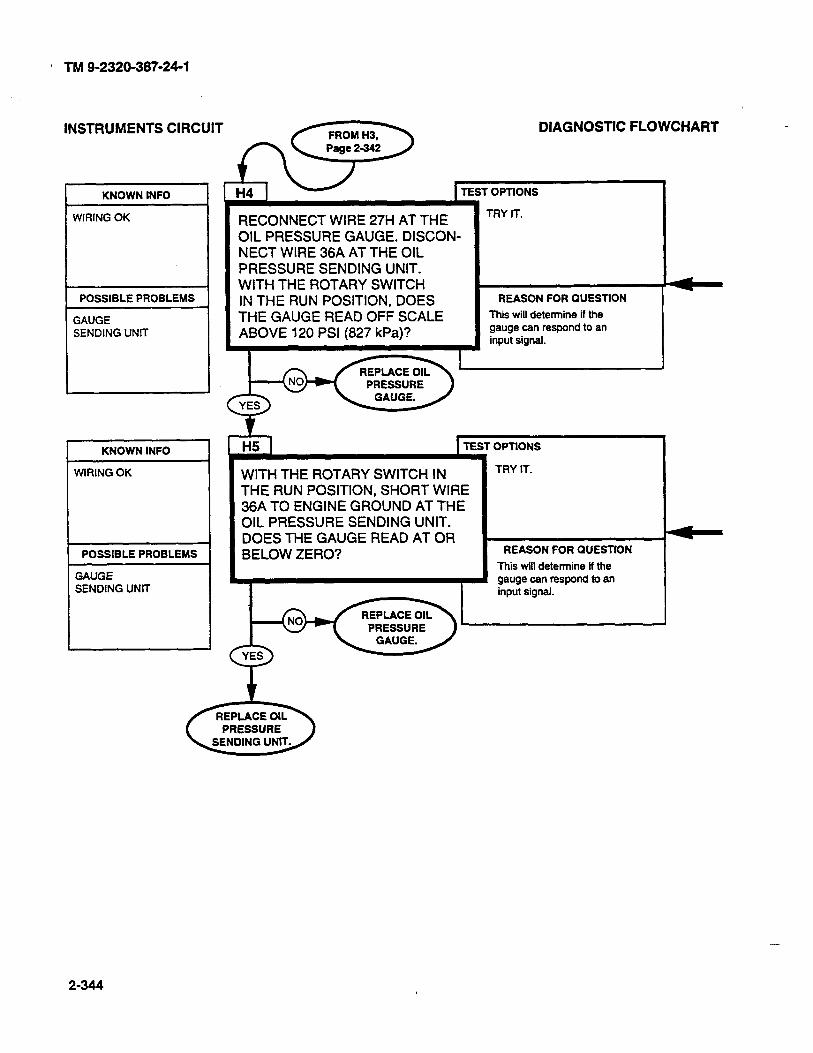
* TM 9-2320-387-24-l
INSTRUMENTS CIRCUIT
KNOWN INFO
WIRING OK
POSSIBLE PROBLEMS
GAUGE SENDING UNIT
KNOWN INFO
WlRlNG OK
POSSIBLE PROBLEMS
GAUGE SENDING UNlT
RECONNECT WIRE 27H AT THE OIL PRESSURE GAUGE. DISCON- NECT WIRE 36A AT THE OIL PRESSURE SENDING UNIT. WITH THE ROTARY SWITCH IN THE RUN POSITION, DOES THE GAUGE READ OFF SCALE ABOVE 120 PSI (827 kPa)?
DIAGNOSTIC FLOWCHART
r OPTIONS
TRY IT.
REASON FOR QUESTlON
This will detemine if the gauge can respond to an input signal.
TEST OPTIONS
WITH THE ROTARY SWITCH IN TRY rr.
THE RUN POSITION, SHORT WIRE 36A TO ENGINE GROUND AT THE OIL PRESSURE SENDING UNIT. DOES THE GAUGE READ AT OR BELOW ZERO? REASON FOR QUESTION
This will determine if the
I gauge can respond to an . .
2-344
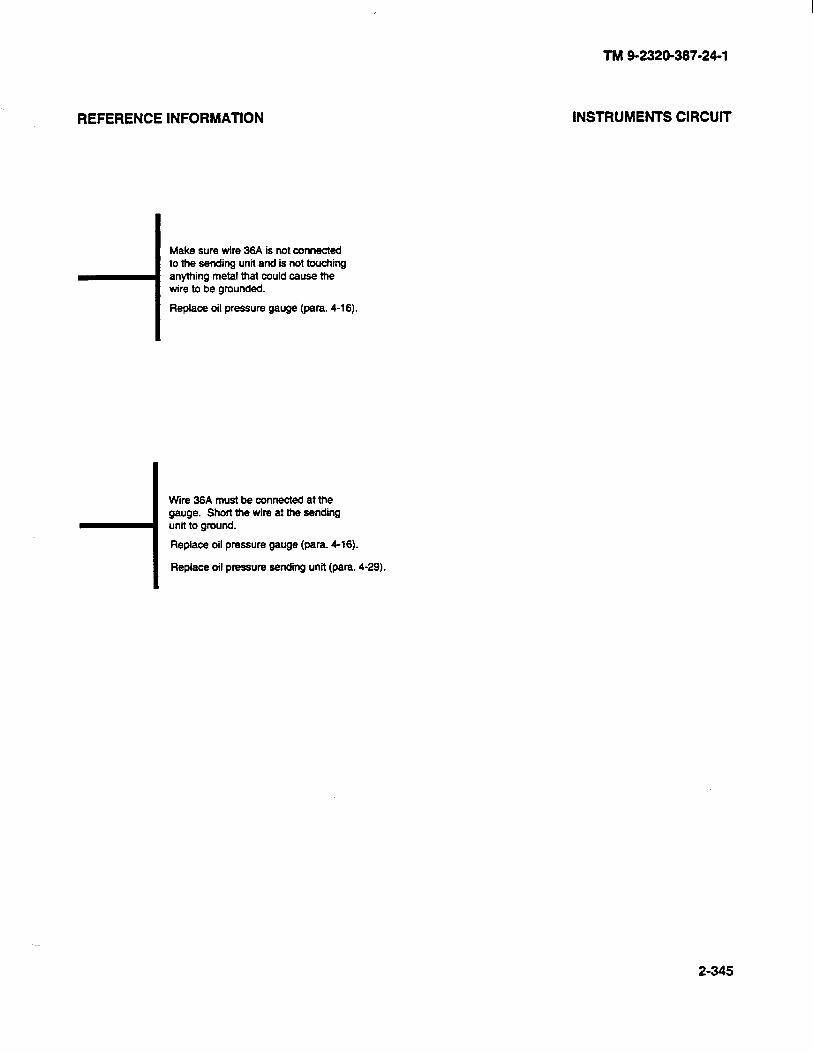
REFERENCE INFORMATION _
--i
Make sure wire 36A is not connected to the sending unit and is not touching anything metal that could cause the wire to be grounded.
Replace oil pressure gauge (para. 4-16).
-i
Wire 36A must be connected at the gauge. Short the wire at the sending unit to ground.
Replace oil pressure gauge (para. 4-16).
Replace oil pressure sending unit (para. 4-29).
TM 9-2320-387-24-l
INSTRUMENTS CIRCUIT
2-345
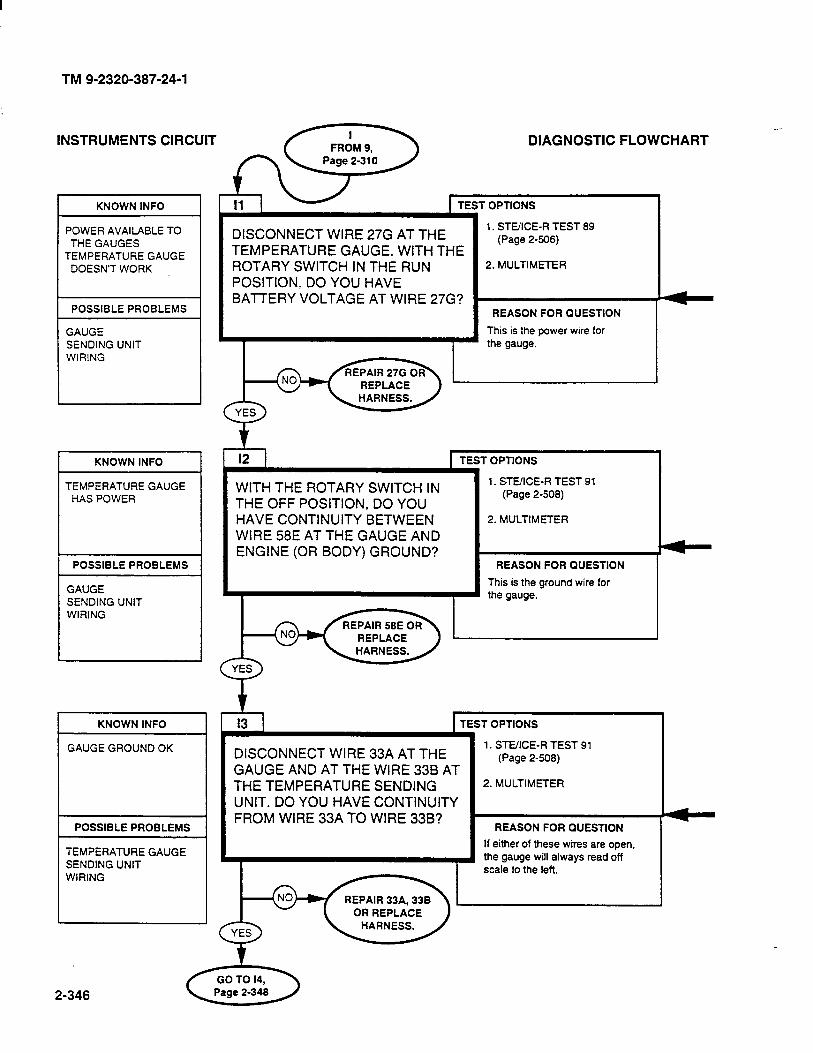
KNOWN INFO I TEST OPTIONS 1
POWER AVAIlABLE TO THE GAUGES
DISCONNECT WIRE 27G AT THE 1. STEXE-R TEST 89
TEMPERATURE GAUGE. WITH THE (Page 2506)
TEMPERATURE GAUGE DOESN’T WORK ROTARY SWITCH IN THE RUN 2. MULTIMETER
POSITION, DO YOU HAVE BAlTERY VOLTAGE AT WIRE 27G? r
REASON FOR QUESTION
This is the power wire for
I ’ the gauge.
POSSIBLE PROBLEMS
GAUGE SENDING UNIT WIRING
TM 9-2320-387-24-l
~_ INSTRUMENTS CIRCUIT DIAGNOSTIC FLOWCHART
I KNOWN INFO
1 TEMPERATURE GAUGE 1 HAS POWER
1 POSSIBLE PROBLEMS 1
I GAUGE UNIT I
KNOWN INFO
GAUGE GROUND OK
POSSIBLE PROBLEMS
TEMPERATURE GAUGE SENDING UNIT WIRING
I2 1 1 TEST OPTIONS
WITH THE ROTARY SWITCH IN THE OFF POSITION, DO YOU I
1. STVICE-R TEST 91 (Page 2-509)
HAVE CONTINUITY BETWEEN WIRE 58E AT THE GAUGE AND ENGINE (OR BODY) GROUND?
2. MULTIMETER
REASON FOR QUESTION
This is the ground wire for the gauge.
TEST OPTIONS
DISCONNECT WIRE 33A AT THE I
1. STEIICE-R TEST 91 (Page 2-509)
GAUGE AND AT THE WIRE 33B AT THE TEMPERATURE SENDING
I
2. MULTIMETER
UNIT. DO YOU HAVE CONTINUITY FROM WIRE 33A TO WIRE 33B?
REASON FOR QUESTION
I If etther of these wires are open, 1 the gauge will always read off
scale to the left.
REPAIR 33A, 33B OR REPLACE
YES
?
2-346
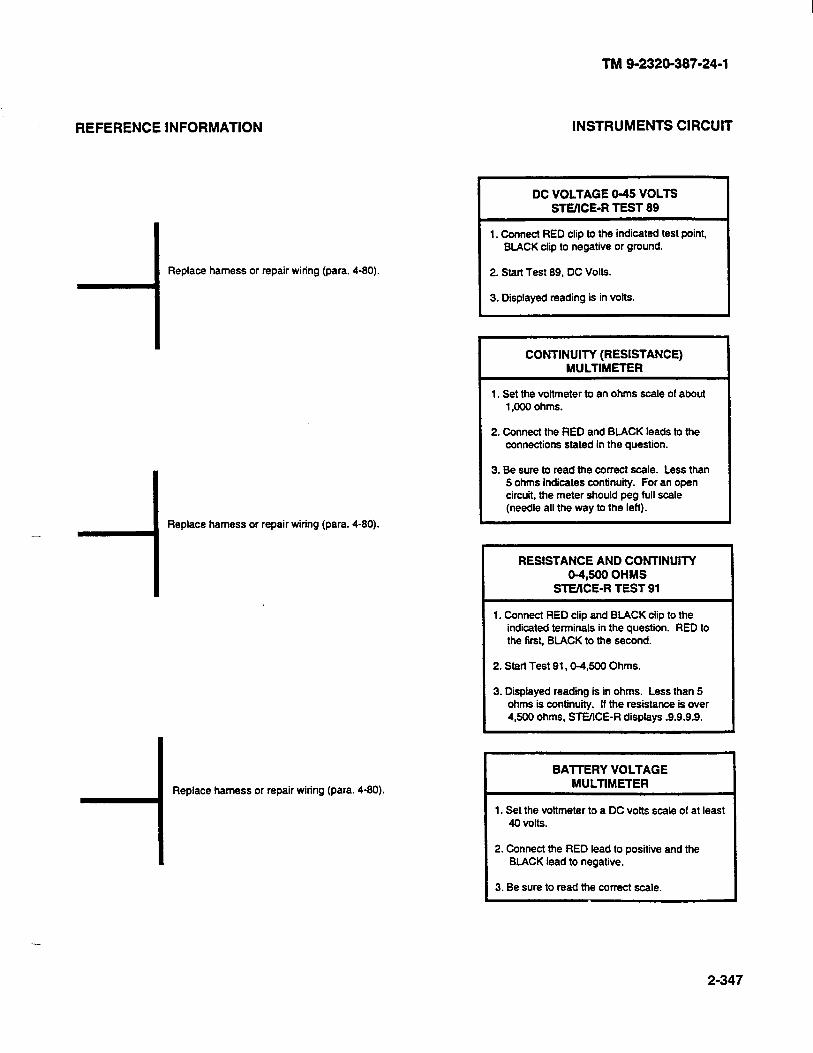
REFERENCE INFORMATION
TM 9-2320-387-24-l
INSTRUMENTS CIRCUIT
-I Repl.ace harness or repair wiring (para. 4-80).
-- -I Replace harness or repair wiring (para. 4-80).
-I Replace harness or repair wiring (para. 4-80).
DC VOLTAGE O-45 VOLTS STEIlCE-R TEST 89
1. Connect RED clip to the indicated test point, BLACK clip to negative or ground.
2. Start Test 89, DC Vofts.
3. Displayed reading is in volts.
CONTINUITY (RESISTANCE) MULTIMETER
1. Set the voltmeter to an ohms scale of about 1.000 ohms.
2. Connect the RED and BLACK leads to the connections stated in the question.
3. Be sure to read the correct scale. Less than 5 ohms indicates continuity. For an open circuit, the meter should peg full scale (needle all the way to the left).
RESISTANCE AND CONTINUITY 04,500 OHMS
STEKE-R TEST 91
1. Connect RED clip and BLACK clip to the indicated terminals in the question. RED to the first, BLACK to the second.
2. Start Test 91.04500 Ohms.
3. Displayed reading is in ohms. Less than 5 ohms is continuity. If the resistance is over 4.800 ohms, STEXE-R displays -9.9.9.9.
BAlTERY VOLTAGE MULTMETER
1. Set the voltmeter to a DC volts scale of at least 40 volts.
2. Connect the RED lead to positive and the BLACK lead to negative.
3. Be sure to read the correct scale.
2-347
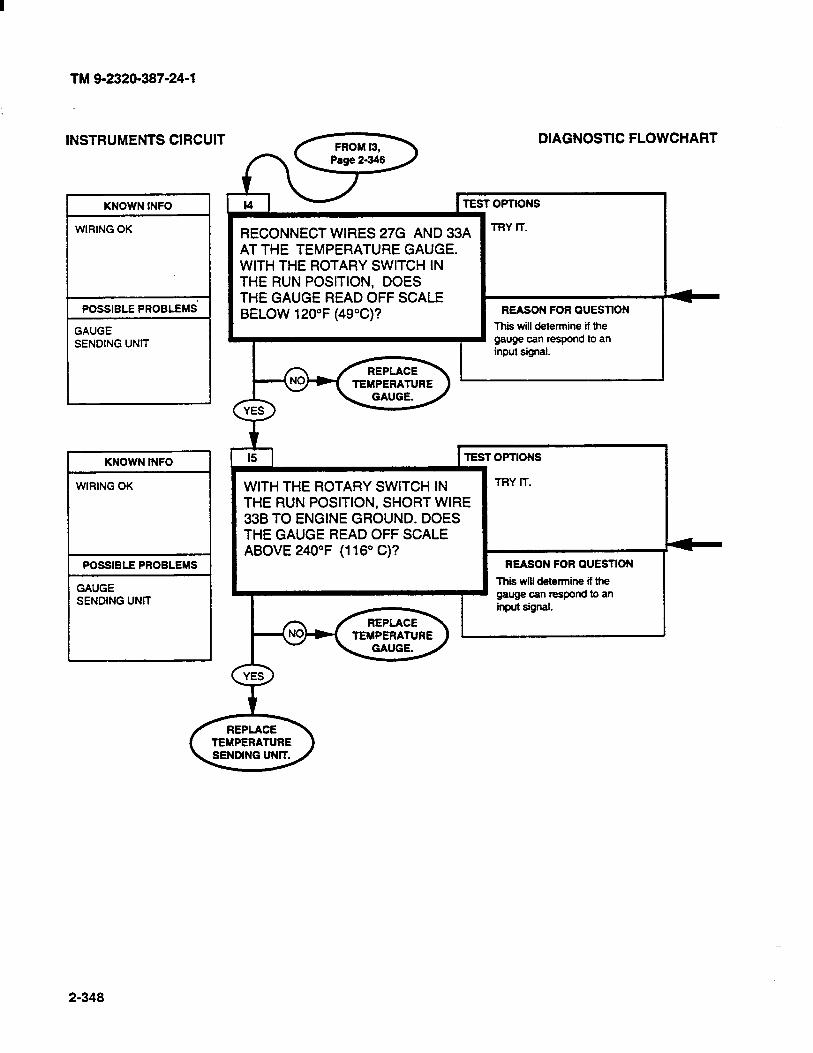
TM 9-2320-387-24-l
INSTRUMENTS CIRCUIT1 &SD TEsT om,elAGNOSW FLOWCHART
I r KNOWN INFO I
TRY IT. WIRING OK
POSSIBLE PROBLEMS’
GAUGE SENDING UNIT
L
KNOWN INFO
WIRING OK
POSSIBLE PROBLEMS
GAUGE SENDING UNIT
RECONNECT WIRES 27G AND 33A AT THE TEMPERATURE GAUGE. WITH THE ROTARY SWITCH IN THE RUN POSITION, DOES THE GAUGE READ OFF SCALE BELOW 120°F (49”C)? REASON FOR QUESTlON
This will determine if the gauge can respond to an input signal.
1 TEST OPTIONS
WITH THE ROTARY SWITCH IN THE RUN POSITION, SHORT WIRE 338 TO ENGINE GROUND. DOES THE GAUGE READ OFF SCALE ABOVE 240°F (116” C)?
TRY IT.
REASON FOR OUESllON
Thii will determine if the gauge can respond to an input signal.
TEMPERATURE
2-348
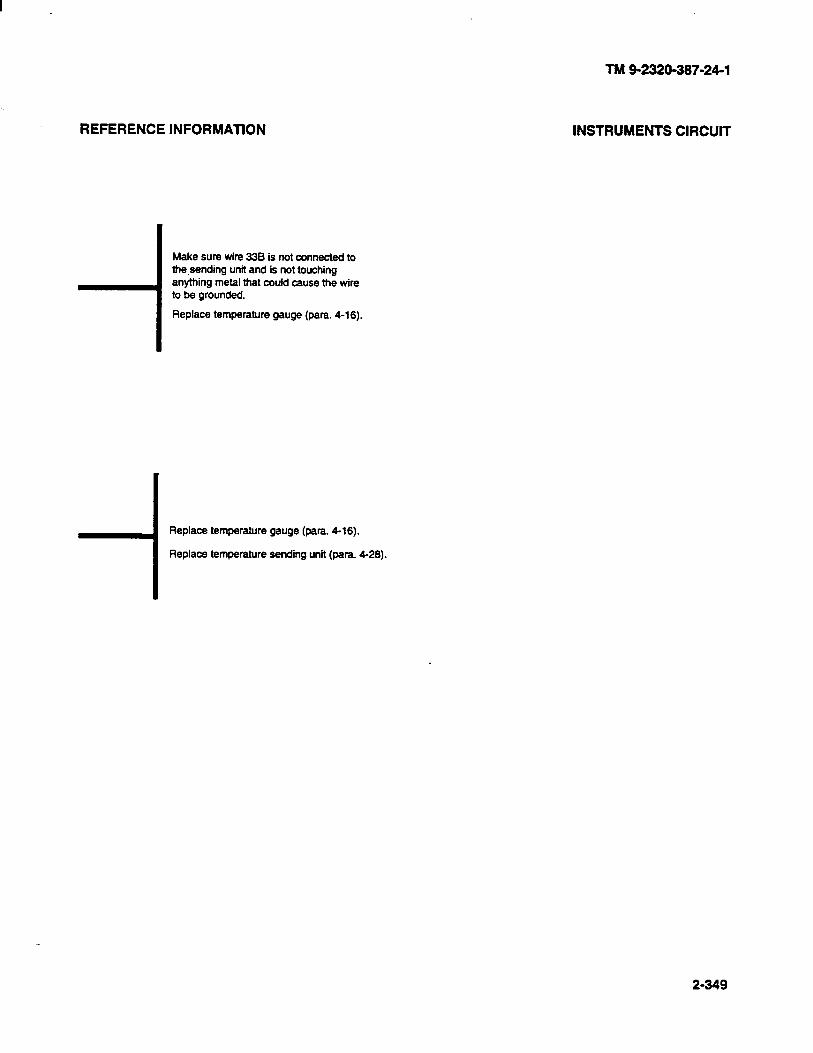
REFERENCE INFORMATION
-i
Make sure wire 338 is not connacted to the.sending unit and is not touching anything metal that could cause the wire to be grounded.
Replace temperature gauge (para. 4-16).
Replace temperature gauge (para. 4-16).
Replace temperature sending unit (para. 4-26).
TM 9-2320-387-24-l
INSTRUMENTS CIRCUIT
2-349
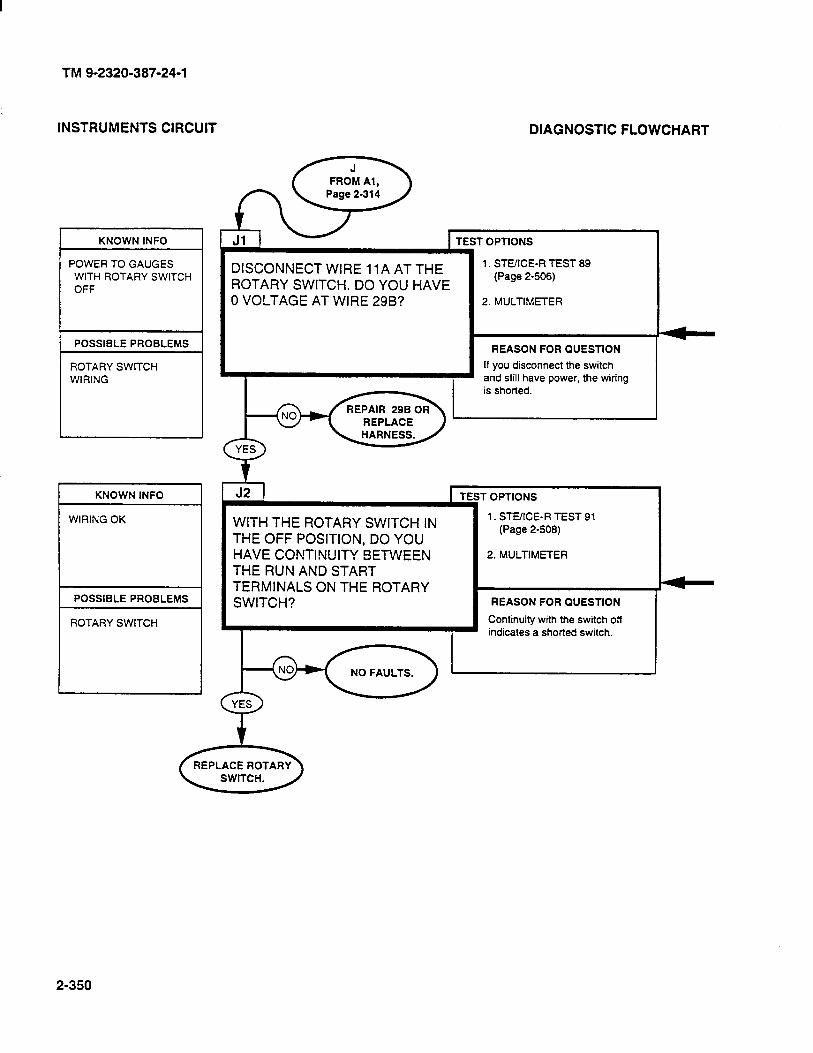
TM 9-2320-387-24-l
INSTRUMENTS CIRCUIT DIAGNOSTIC FLOWCHART
KNOWN INFO
POWER TO GAUGES WITH ROTARY SWITCH OFF
POSSIBLE PROBLEMS
ROTARY SWITCH WIRING
KNOWN INFO
WIRING OK
~
ROTARY SWITCH
TEST OPTIONS
DISCONNECT WIRE 11A AT THE
I
1. STEXE-R TEST 89
ROTARY SWITCH. DO YOU HAVE (Page 2-506)
0 VOLTAGE AT WIRE 29B? 2. MULTIMETER
I I
J2 1 i TEST OPTIONS
WITH THE ROTARY SWITCH IN 1. STUICE-R TEST 91
THE OFF POSITION, DO YOU (Page 2-508)
HAVE CONTINUITY BETWEEN 2. MULTIMETER
THE RUN AND START TERMINALS ON THE ROTARY SWITCH? REASON FOR QUESTION
Continuity with the switch off indicates a shorted switch.
NO FAULTS.
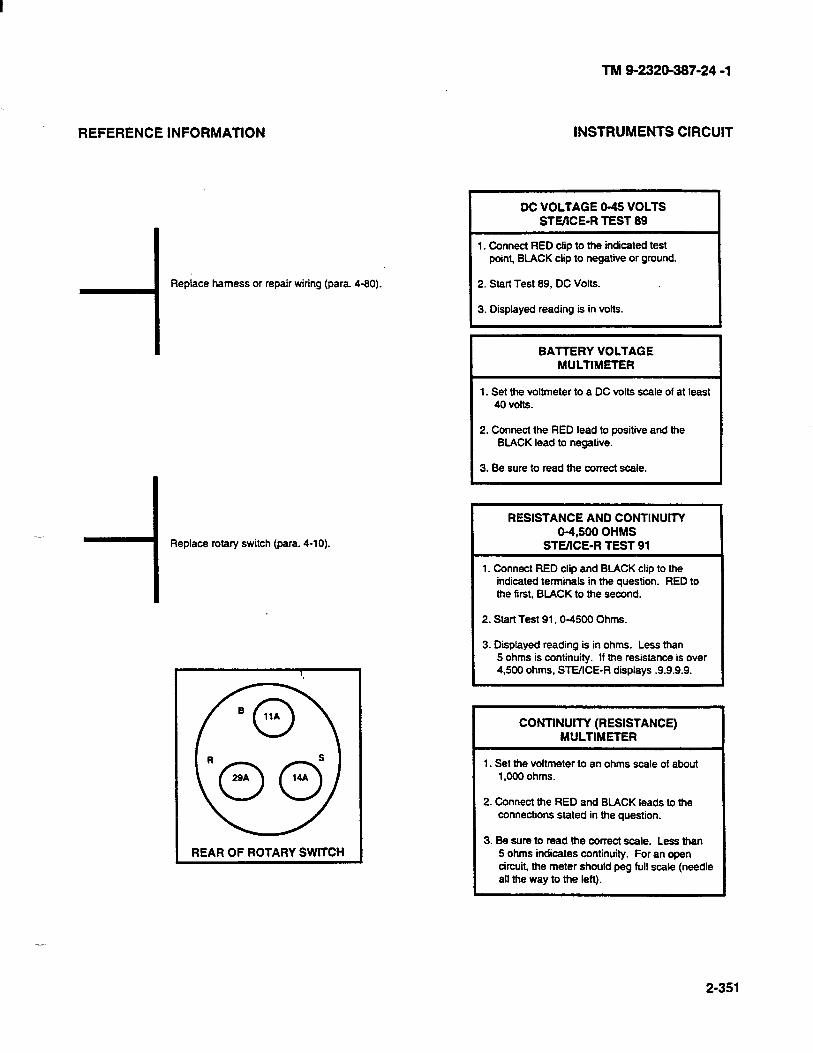
TM 9-2320-387-24 -1
REFERENCE INFORMATION INSTRUMENTS CIRCUIT
-I Replace harness or repair wiring (para. 4-80).
Replace rotary switch (para. 4-10).
REAR OF ROTARY SWITCH
DC VOLTAGE O-45 VOLTS SWICE-R TEST 89
1. Connect RED clip to the indicated test point, BLACK clip to negative or ground.
2. Stan Test 89, DC Volts.
3. Displayed reading is in volts.
BAlTERY VOLTAGE MULTIMETER
1. Set the voltmeter to a DC volts scale of at least 40 volts.
2. Connect the RED lead to positive and the BLACK lead to negative.
3. Be sure to read the comxt scale.
RESISTANCE AND CONTINUITY 04,500 OHMS
STEKE-R TEST 91
1. Connect RED clip and BLACK clip to the indicated terminals in the question. RED to the first. BLACK to the second.
2. Start Test 91,0-4500 Ohms.
3. Displayed reading is in ohms. Less than 5 ohms is continuity. If the resistance is over 4,500 ohms, STE/lCE-R displays .9.9.9.9.
CONTINUITY (RESISTANCE) MULTIMETER
1. Set the voltmeter to an ohms scale of about 1,000 ohms.
2. Connect the RED and BLACK leads to the connections stated in the question.
3. Be sure to read the correct scale. Less than 5 ohms indicates continuity. For an open circuit, the meter should peg full scale (needle all the way to the left).
2-351
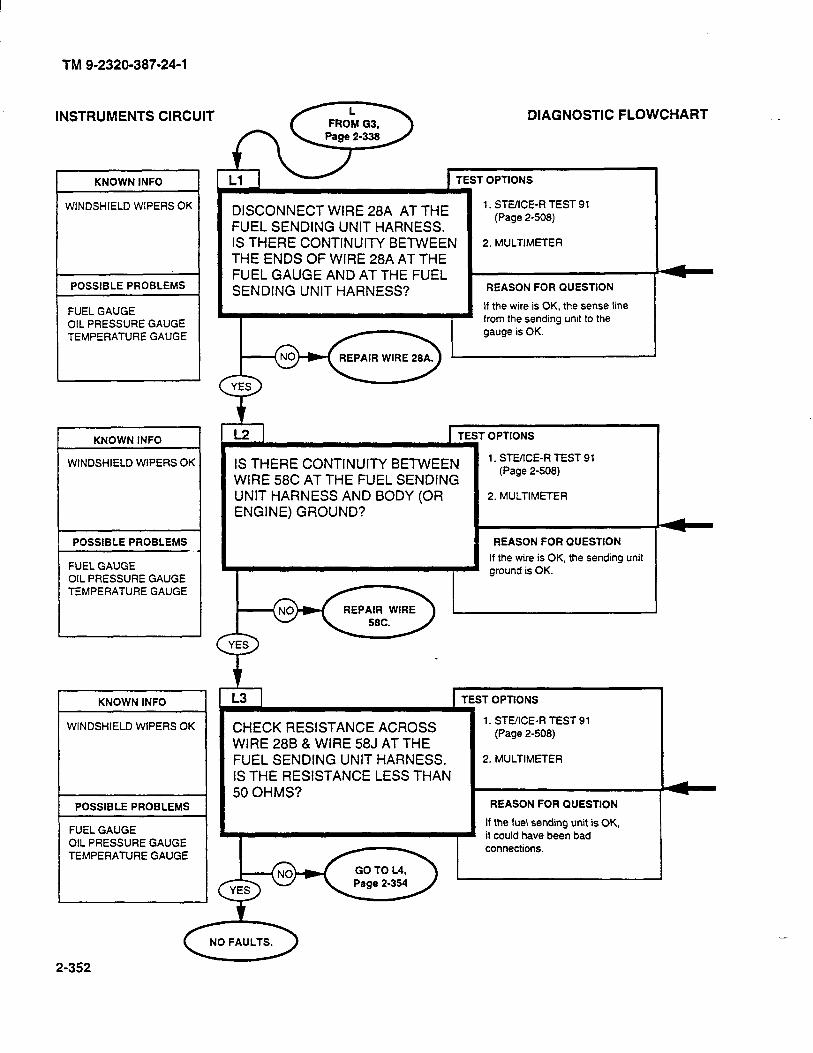
TM 9-2320-387-24-l
INSTRUMENTS CIRCUIT DIAGNOSTIC FLOWCHART -
WINDSHIELD WIPERS OK
POSSIBLE PROBLEMS
;T OPTIONS
DISCONNECT WIRE 28A AT THE FUEL SENDING UNIT HARNESS. IS THERE CONTINUITY BETWEEN THE ENDS OF WIRE 28A AT THE FUEL GAUGE AND AT THE FUEL SENDING UNIT HARNESS?
1. STE/ICE-R TEST 91 (Page 2-508)
2. MULTIMETER
REASON FOR QUESTION
If the wire is OK, the sense line from the sending unit to the
FUEL GAUGE OIL PRESSURE GAUGE TEMPERATUREGAUGE I gauge is OK.
I I
1 it
WINDSHIELD WIPERS OK
1 TEST OPTIONS
IS THERE CONTINUITY BETWEEN WIRE 58C AT THE FUEL SENDING UNIT HARNESS AND BODY (OR ENGINE) GROUND?
1. STE/tCE-R TEST 91 (Page 2-508)
2. MULTIMETER
REASON FOR QUESTION
If the wire is OK, the sending un ground is OK. FUEL GAUGE
OIL PRESSURE GAUGE TEMPERATURE GAUGE
I I
KNOWN INFO I ;T OPTIONS
1. STE/ICE-R TEST 91 (Page 2-508)
2. MULTIMETER
WINDSHIELD WIPERS OK CHECK RESISTANCE ACROSS WIRE 28B & WIRE 58J AT THE FUEL SENDING UNIT HARNESS. IS THE RESISTANCE LESS THAN 50 OHMS?
REASON FOR QUESTION
If the fuel sending unit is OK, it could have been bad connections.
POSSIBLE PROBLEMS 1
FUEL GAUGE OIL PRESSURE GAUGE TEMPERATURE GAUGE
2-352
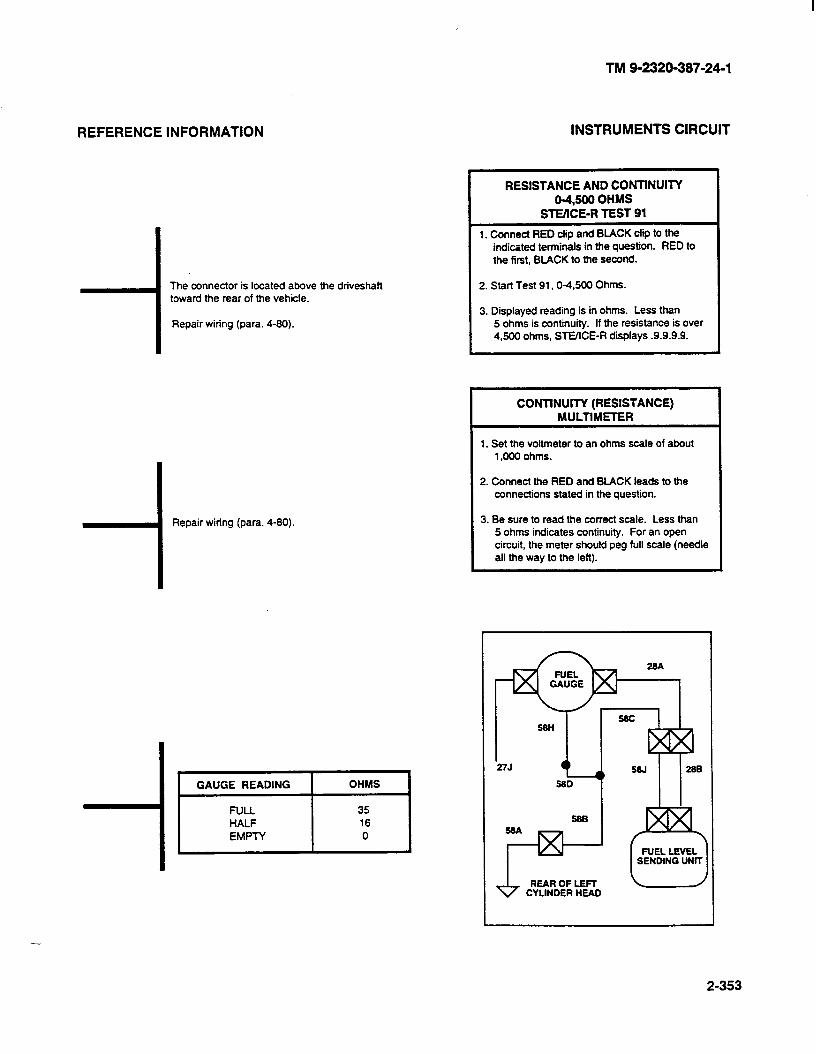
TM 9-2320-387-24-l
REFERENCE INFORMATION
The connector is located above the driveshaft toward the rear of the vehicle.
Repair wiring (para. 4-80).
-I Repair wiring (para. 4-80).
RESISTANCE AND CONTINUITY 04,500 OHMS
SlWlCE-R TEST 91
I. Connect RED dip and BLACK clip to the in&&d terminals in the question. RED to the first, BLACK to the Second.
2. Start Test 91,0-4,500 Ohms.
3. Displayed reading is in ohms. Less than 5 ohms is continuity. If the resistance is over 4,500 ohms, STEIICE-R displays .9.9.9.9.
CONTINUITY (RESISTANCE) MULTIMETER
1. Set the voltmeter to an ohms scale of about 1,000 ohms.
2. Connect the RED and BLACK leads to the connections stated in the question.
3. Be sure to read the correct scale. Less than 5 ohms indicates continuity. For an open circuit, the meter should peg full scale (needle all the way to the left).
INSTRUMENTS CIRCUIT
REAR OF LEFT CYLINDER HEAD
-
2-353
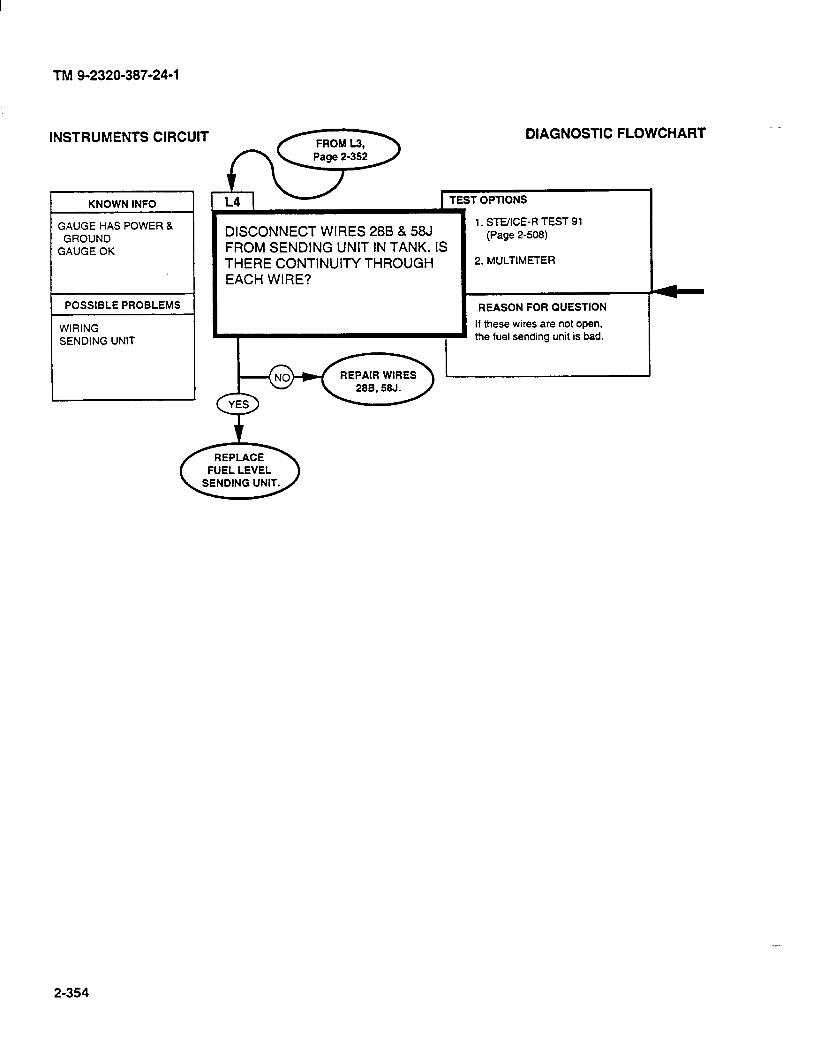
TM 9-2320-387-24-l
INSTRUMENTS CIRCUIT
I KNOWN INFO I
GAUGE HAS POWER 8 GROUND
GAUGE OK
1 POSSIBLE PROBLEMS 1
WIRING SENDING UNIT
r DISCONNECT WIRES 288 & 58J FROM SENDING UNIT IN TANK. IS THERE CONTINUITY THROUGH EACH WIRE?
I. EXE/ICE-R TEST 91
(Page 2-508)
2. MULTIMETER
REASON FOR QUESTION
If these wires are not open, the fuel sending unit is bad.
FUEL LEVEL
2-354
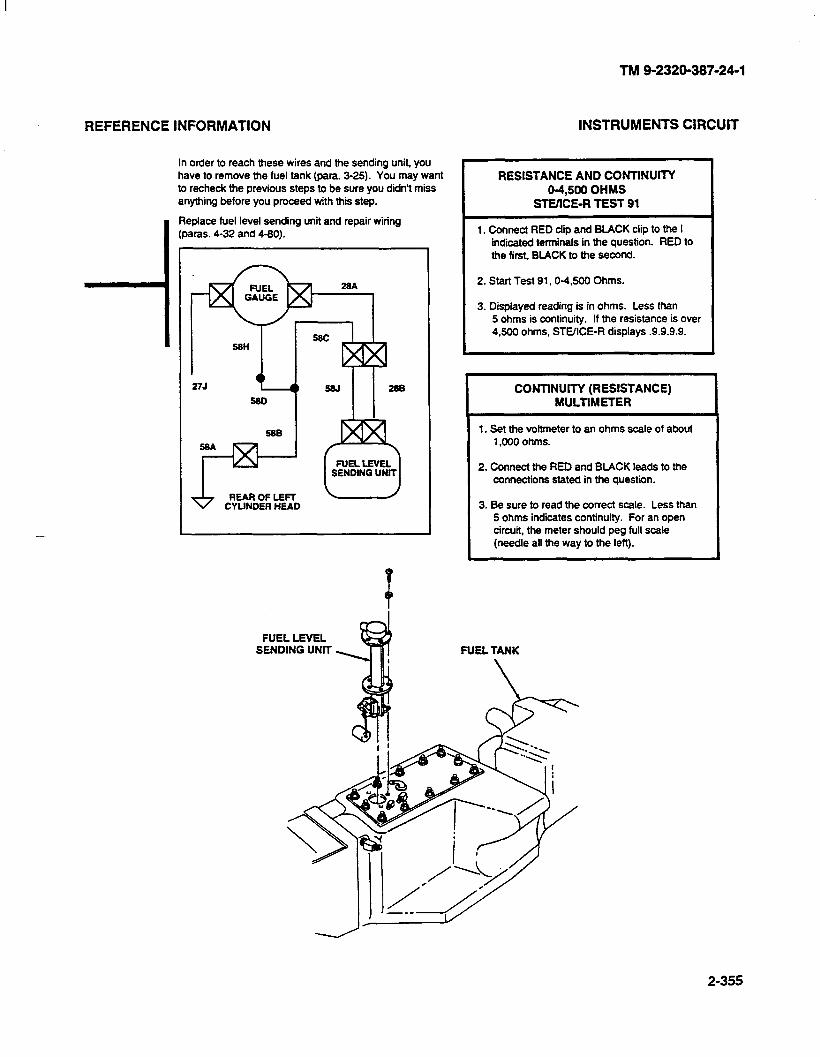
REFERENCE INFORMATION
In order to reach these wires and the sending unit, you have to remove the fuel tank (para. 3-25). You may want to recheck the previous steps to be sure you didn’t miss anything before you proceed with this step.
Replace fuel level sending unit and repair wiring (paras. 4-32 and 4-90).
REAR OF LEFT CYLINDER HEAD
-
FUEL LEVEL SENDING UNIT
TM 9-2320-387-24-l
INSTRUMENTS CIRCUIT
RESISTANCE AND CONTINUITY 04,500 OHMS
STUICE-R TEST 91
I. Connect RED clip and BLACK clip to the I indicated terminals in the question. RED to the first. BLACK to the second.
2. Start lest 91,0-4.500 Ohms.
3. Displayed reading is in ohms. Less than 5 ohms is continuity. If the resistance is over 4,500 ohms, STOICE-R displays .9.9.9.9.
CONTINUITY (RESISTANCE) MULTIMETER
1. Set the voltmeter to an ohms scale of about 1,000 ohms.
2. Connect the RED and BLACK leads to the connections stated in the question.
3. Be sure to read the correct scale. Less than 5 ohms indicates continuity. For an open circuit, the meter should peg full scale (needle all the way to the left).
FUEL TANK
2-355
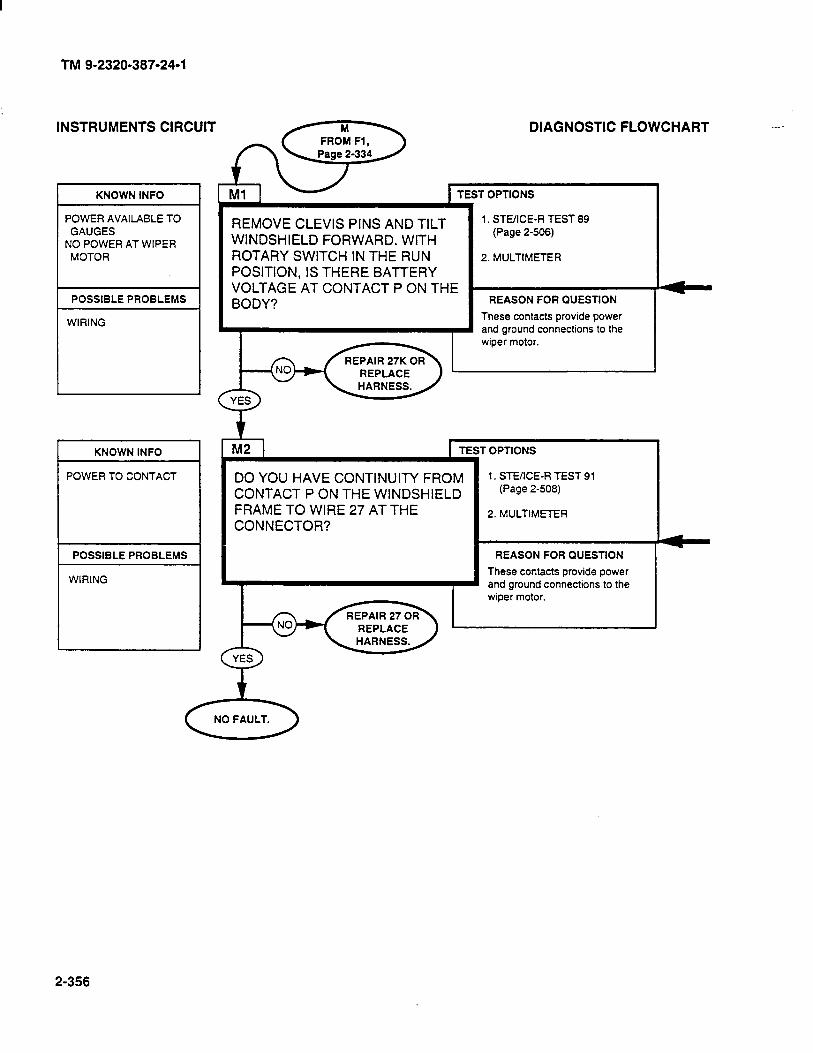
TM 9-2320-387-24-l
I KNOWN INFO
POWER AVAILABLE TO GAUGES
NO POWER AT WIPER MOTOR
/
WIRING
REMOVE CLEVIS PINS AND TILT 1. STEXE-R TEST 89
WINDSHIELD FORWARD. WITH (Page 2-508)
ROTARY SWITCH IN THE RUN 2. MULTIMETER
POSITION, IS THERE BA-lTERY VOLTAGE AT CONTACT P ON THE BODY? REASON FOR QUESTION
These contacts provide power and ground connections to the wiper motor.
INSTRUMENTS CIRCUIT DIAGNOSTIC FLOWCHART -
TEST OPTIONS
POWER TO CONTACT
WIRING
!
% M2
DO YOU HAVE CONTINUITY FROM CONTACT P ON THE WINDSHIELD FRAME TO WIRE 27 AT THE CONNECTOR?
TESl
1
r OPTIONS
1. STEIICE-R TEST 91 (Page 2-508)
2. MULTIMETER
REASON FOR QUESTION
These contacts provide power and ground connections to the wiper motor.
2-356
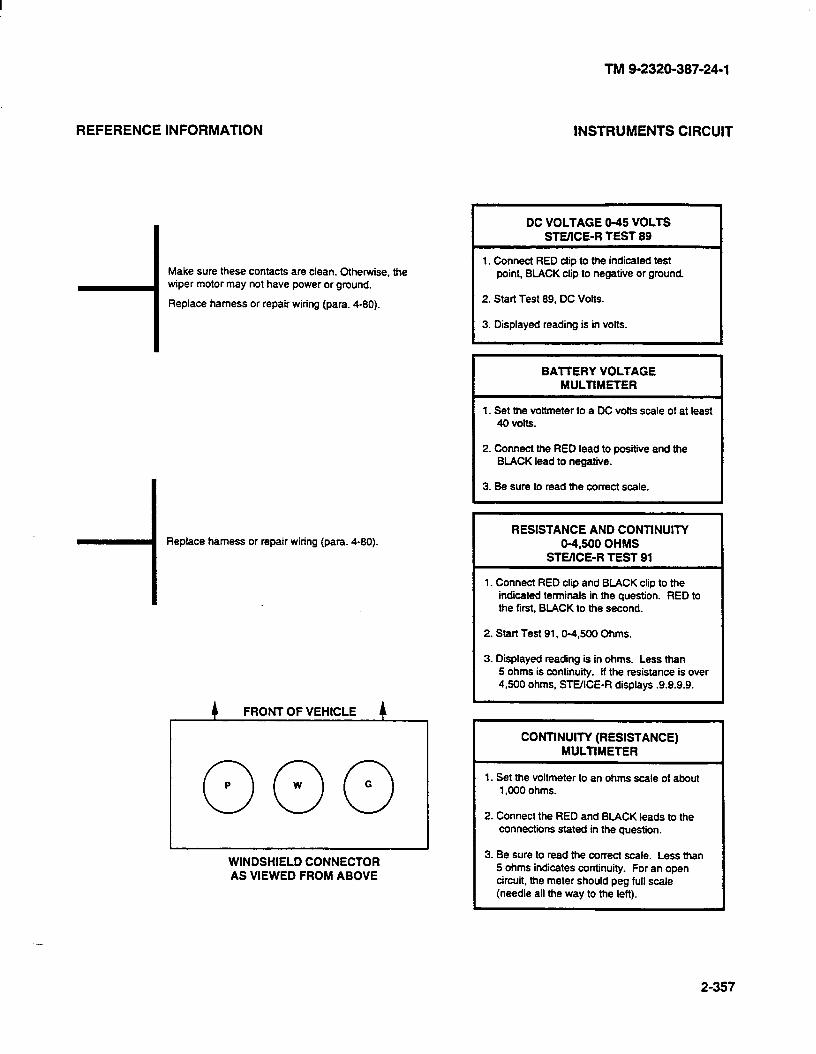
TM 9-2320-387-24-l
REFERENCE INFORMATION INSTRUMENTS CIRCUIT
Make sure these contacts are clean. Otherwise, the wiper motor may not have power or ground.
Replace harness or repair wiring (para. 4-80).
-I Replace harness or repair wiring (para. 4-80).
, 4 FRONTOF VEHICLE 4 ,
I I
WINDSHIELD CONNECTOR AS VIEWED FROM ABOVE
DC VOLTAGE o-45 VOLTS STVICE-R TEST 89 I
1. Connect RED clip to the indicated test point, BLACK clip to negative or ground
2. Start Test 89. DC Volts.
3. Displayed reading is in vofts.
BAlTERY VOLTAGE MULTIMETER
1. Set the voftmeter to a DC vofts scale of at least 40 volts.
2. Connect the RED lead to positive and the BLACK lead to negative.
3. Be sure to read the correct scale.
RESISTANCE AND CONTlNUlIY 04,500 OHMS
STUICE-R TEST 91
1. Connect RED clip and BLACK clip to ttte indicated terminals in the question. RED to the first, BLACK to the second.
2. Start Test 91,0-4,500 Ohms.
3. Displayed reading is in ohms. Less than 5 ohms is continuity. If the resistance is over 4,500 ohms, STEIICE-R displays .9.9.9.9.
CONTlNUlTY (RESISTANCE) MULTIMETER
1. Set the voltmeter to an ohms scale of about 1,000 ohms.
2. Connect the RED and BLACK leads to the connectiins stated in the question.
3. Be sure to read the correct scale. Less than 5 ohms indicates continuity. For an open circuit, the meter should peg full scale (needle all the way to the left).
2-357
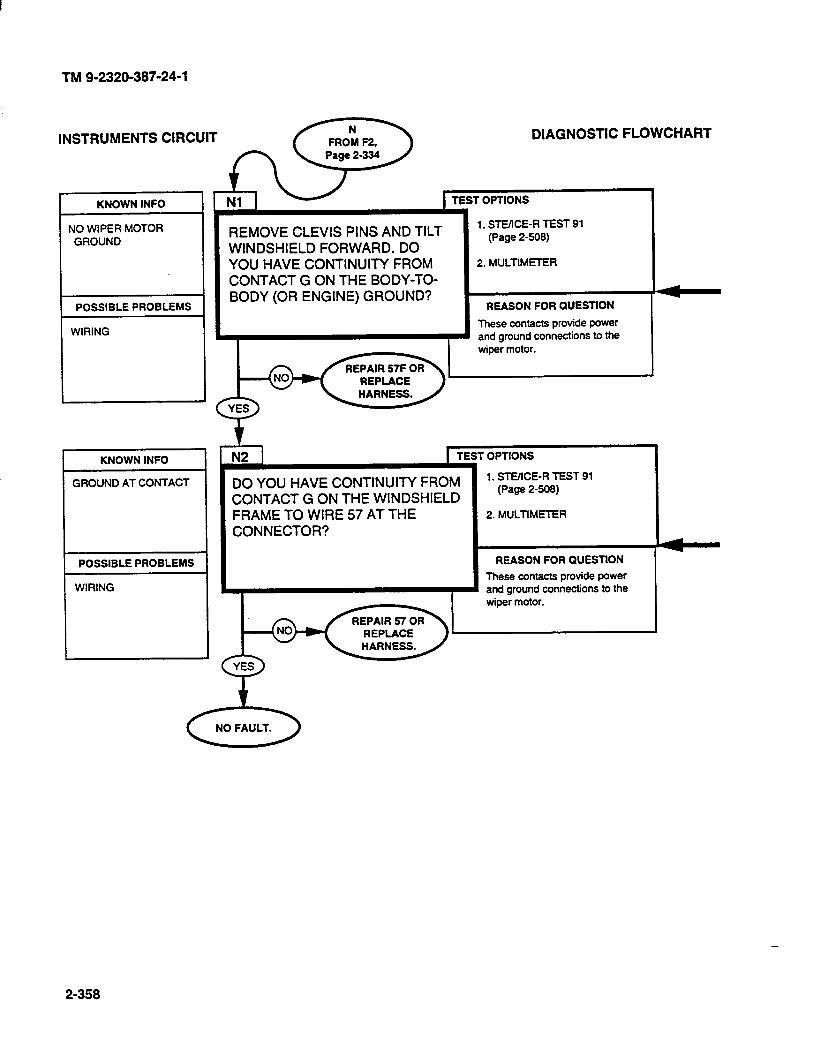
TM 9-2320-387-24-l
INSTRUMENTS CIRCUIT m DIAGNOSTIC FLOWCHART
KNOWN INFO
NO WIPER MOTOR GROUND
TEST OPTIONS
REMOVE CLEVIS PINS AND TILT 1. STEKE-R TEST 91
WINDSHIELD FORWARD. DO (Page 2-508)
YOU HAVE CONTINUITY FROM 2. MULTIMEI-ER
CONTACT G ON THE BODY-TO-
POSSIBLE PROBLEMS BODY (OR ENGINE) GROUND?
REASON FOR QUESTION
WIRING These contacts provide power and ground connections to the wiper motor.
KNOWN INFO
GROUND AT CONTACT
POSSIBLE PROBLEMS
WIRING
DO YOU HAVE CONTINUITY FROM CONTACT G ON THE WINDSHIELD FRAME TO WIRE 57 AT THE CONNECTOR?
OPTIONS
1. STEXE-R TEST 91 (Page 2-508)
2. MULTIMETER
REASON FOR QUESTION
These contacts provide power and ground connections to the wiper motor.
-
2-358
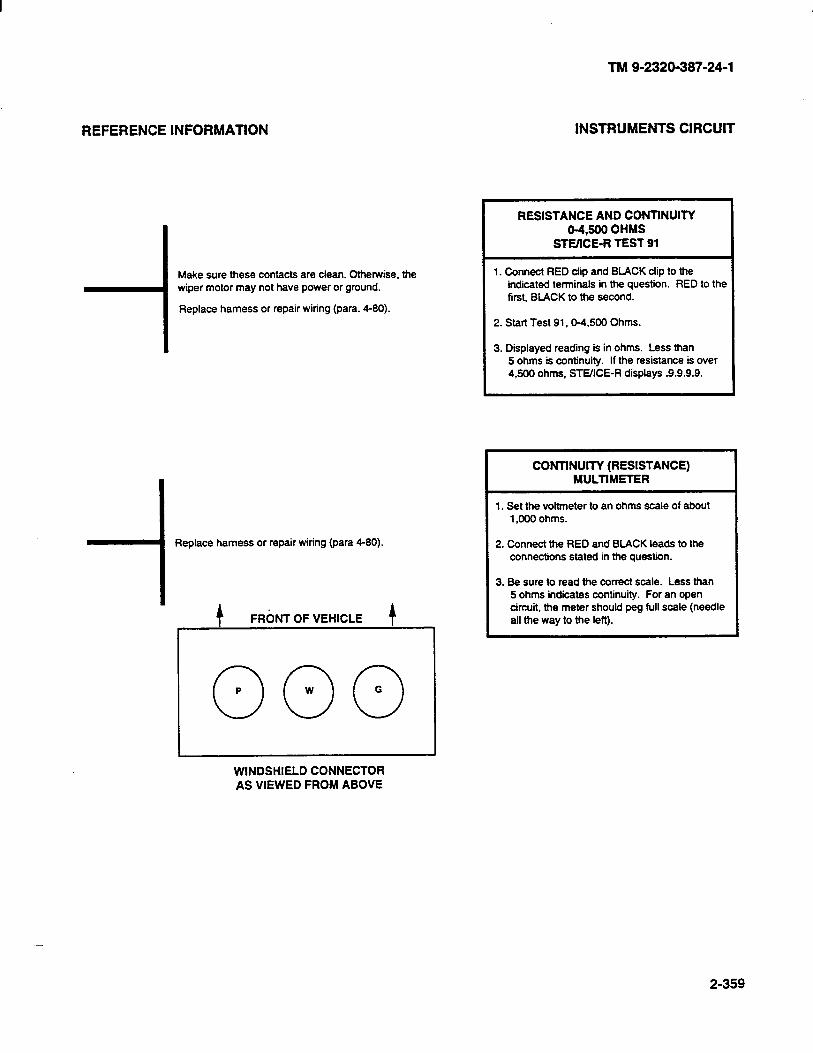
TM 9-2320-387-24-l
REFERENCE INFORMATION INSTRUMENTS CIRCUIT
Make sure these contacts are clean. Otherwise, the wiper motor may not have power or ground.
Replace harness or repair wiring (para. 4-80).
Replace harness or repair wiring (para 4-90).
t FRbNT OF VEHICLE t
I
WINDSHIELD CONNECTOR AS VIEWED FROM ABOVE
RESISTANCE AND CONTINUITY 04,500 OHMS
STE/lCE-R TEST 91
1. Connect RED dip and BLACK clip to the indicated terminals in the question. RED to the first, BLACK to the second.
2. Start Test 91,0-4,500 Ohms.
3. Displayed reading is in ohms. Less than 5 ohms is continuity. If the resistance is over 4,500 ohms, STEXE-R displays .9.9.9.9.
CONTINUITY (RESISTANCE) MULTIMETER
1. Bet the voltmeter to an ohms scale of about 1.000 ohms.
2. Connect the RED and BLACK leads to the connections stated in the question.
3. Be sure to read the correct scale. Less than 5 ohms indicates continuity. For an open cinxit. the meter should peg full scale (needle all the way to the left).
2-359
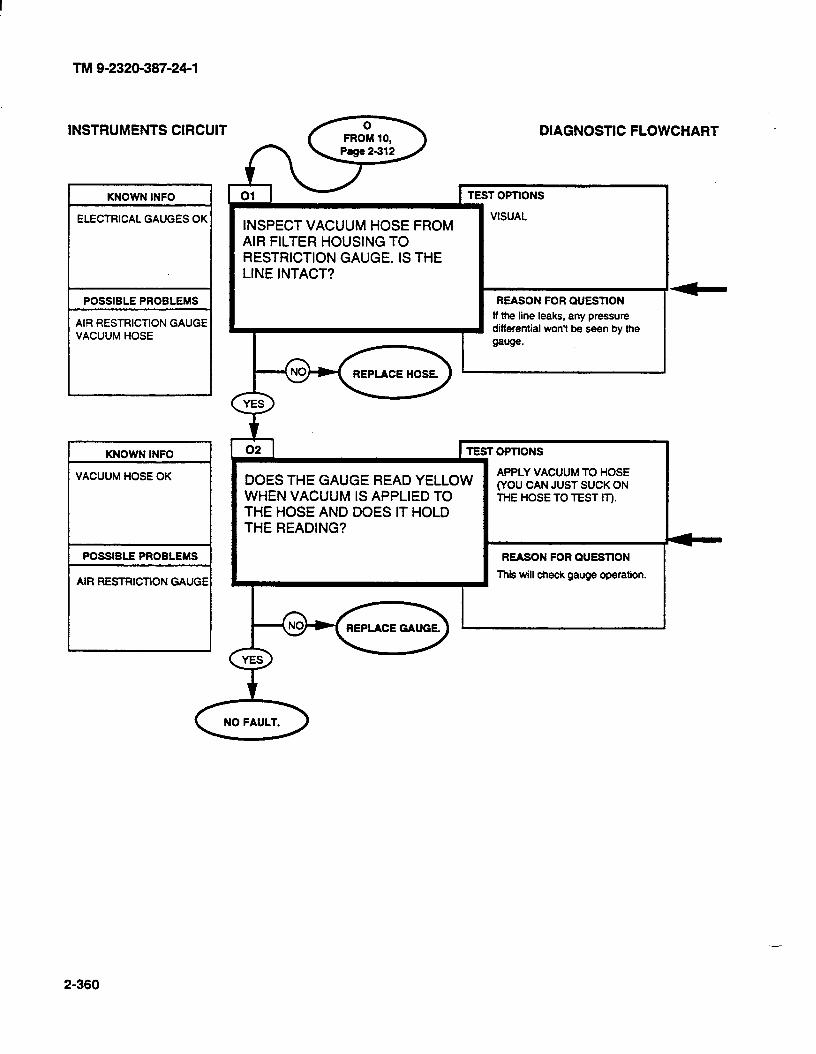
TM 9-2320-387-24-l
INSTRUMENTS CIRCUIT DIAGNOSTIC FLOWCHART
KNOWN INFO
ELECTRICAL GAUGES OK INSPECT VACUUM HOSE FROM AIR FILTER HOUSING TO RESTRICTION GAUGE. IS THE LINE INTACT?
POSSIBLE PROBLEMS
AIR RESTRICTION GAUGE VACUUM HOSE
I REASON FOR QUESTION
R the line leaks, any pressure differential won’t be seen by the
gauge.
I KNOWN INFO I
VACUUM HOSE OK
POSSIBLE PROBLEMS
AIR RESTFtICTlON GAUGE
DOES THE GAUGE READ YELLOW WHEN VACUUM IS APPLIED TO THE HOSE AND DOES IT HOLD THE READING?
OPTIONS
APPLY VACUUM TO HOSE (YOU CAN JUST SUCK ON THE HOSE TO TEST IT).
REASON FOR QUESTlON
Thii will check gauge operation.
-
2-360

REFERENCE INFORMATION
You can provide enough vacuum to operate the gauge by sucking on the hose.
Replace vacuum hose (para. 3-20).
-I I
Replace air restriction gauge (para. 3-17).
TM 9-2320-387-24-l
INSTRUMENTS CIRCUIT
2-361
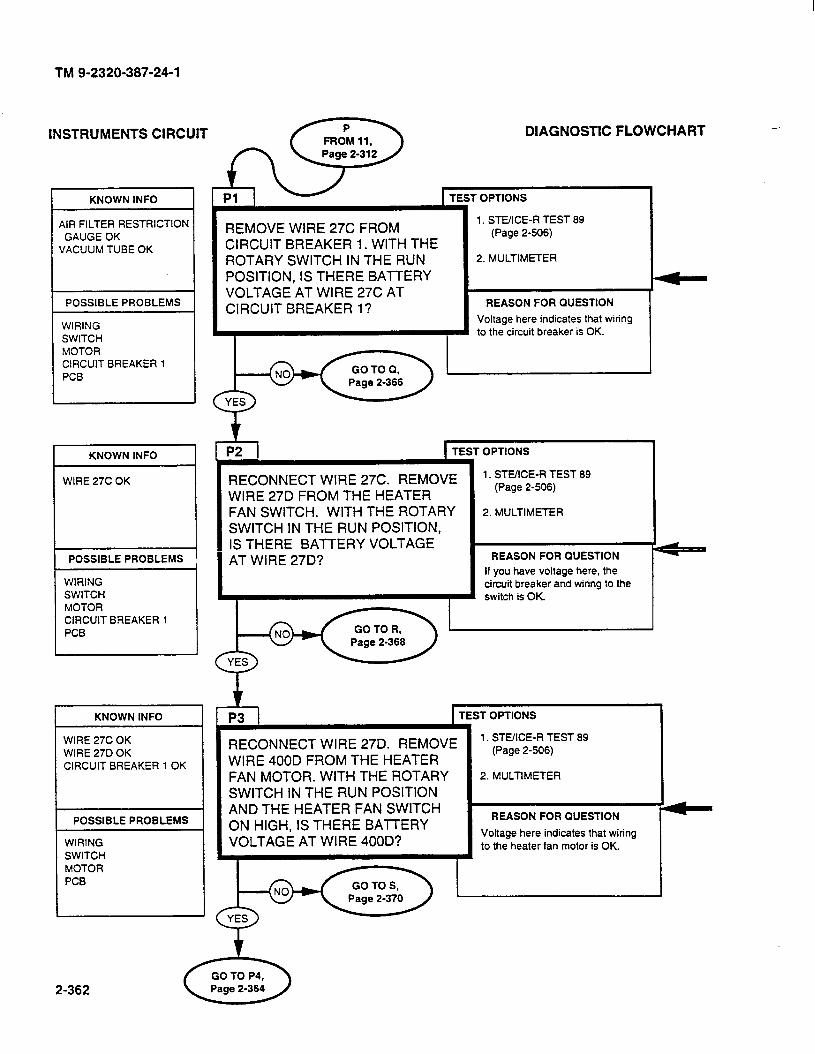
TM 9-2320-387-24-l
INSTRUMENTS CIRCUIT
AIR FILTER RESTRICTION GAUGE OK
VACUUM TUBE OK
1 POSSIBLE PROBLEMS 1
WIRING SWITCH MOTOR CIRCUIT BREAKER 1 PCB
KNOWN INFO
WIRE 27C OK
POSSIBLE PROBLEMS ,
WIRING SWITCH MOTOR CIRCUIT BREAKER 1 PCB
KNOWN INFO
WIRE 27C OK WIRE 27D OK CIRCUIT BREAKER 1 OK
POSSIBLE PROBLEMS
WIRING SWITCH MOTOR PCB
REMOVE WIRE 27C FROM CIRCUIT BREAKER 1. WITH THE ROTARY SWITCH IN THE RUN POSITION, IS THERE BATTERY VOLTAGE AT WIRE 27C AT CIRCUIT BREAKER 1 ?
T OPTIONS
1. STEIICE-R TEST 89 (Page 2-506)
2. MULTIMETER
REASON FOR QUESTION
Voltage here indicates that wiring to the circuit breaker is OK.
p2 1 TEST OPTIONS I
RECONNECT WIRE 27C. REMOVE WIRE 27D FROM THE HEATER FAN SWITCH. WITH THE ROTARY SWITCH IN THE RUN POSITION, IS THERE BAI-l-ERY VOLTAGE AT WIRE 27D?
I 1. STIYICE-R TEST 89
(Page 2-506) I
2. MULTIMETER 1 I- REASON FOR QUESTION
If you have voltage here, the circuit breaker and wiring to the switch is OK.
FAN MOTOR. WITH THE ROTARY
I
2. MULTIMETER
SWITCH IN THE RUN POSITION AND THE HEATER FAN SWITCH ON HIGH, IS THERE BATTERY VOLTAGE AT WIRE 400D?
2-362
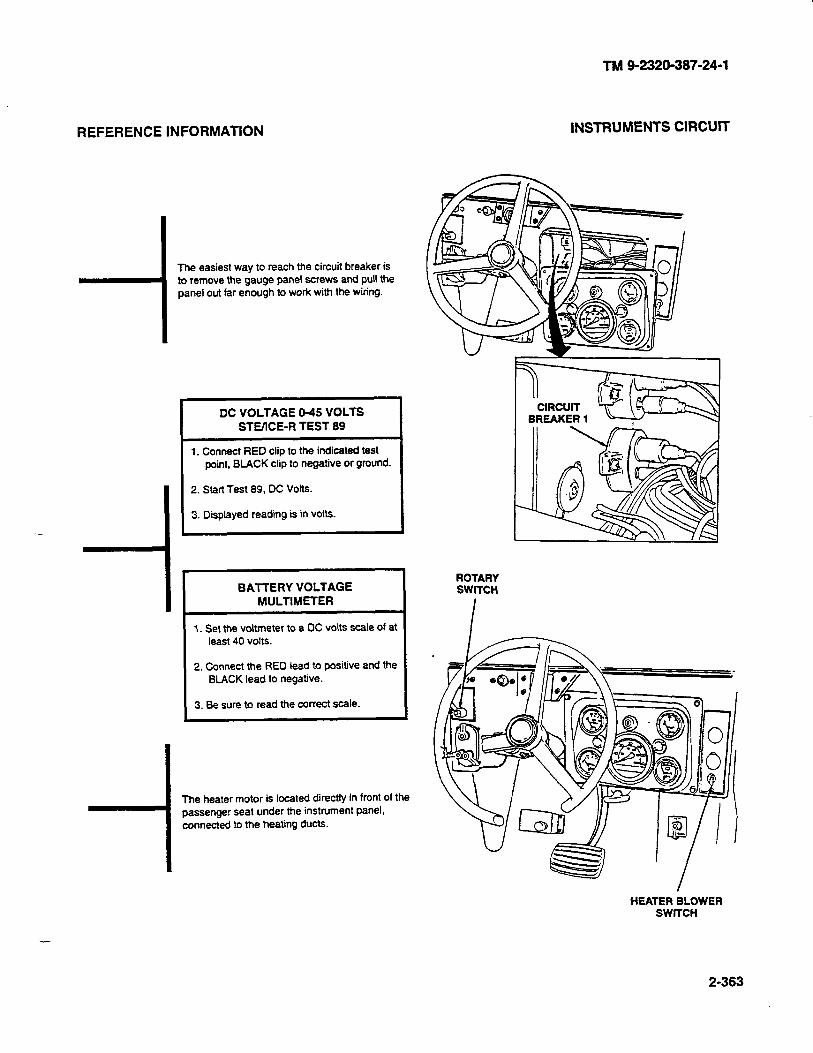
TM 9-2320-387-24-l
REFERENCE INFORMATION INSTRUMENTS CIRCUIT
The easiest way to reach the circuit breaker is to remove the gauge panel screws and pull the panel out far enough to work with the wiring.
-
i
-I
DC VOLTAGE O-45 VOLTS STEIICE-R TEST 89
1. Connect RED clip to the indicated test point. BLACK clip to negative or ground.
2. Start Test 89, DC Votts.
3. Displayed reading is in volts.
BAtTERY VOLTAGE MULTIMETER
1. Set the voltmeter to a DC volts scale of at least 40 volts.
2. Connect the RED lead to positive and the BLACK lead to negative.
3. Be sure to read the correct scale.
The heater motor is located directly in front of the passenger seat under the instrument panel, connected to the heating ducts.
ROTARY SWITCH
HEATER BLOWER SWITCH
-
2-363
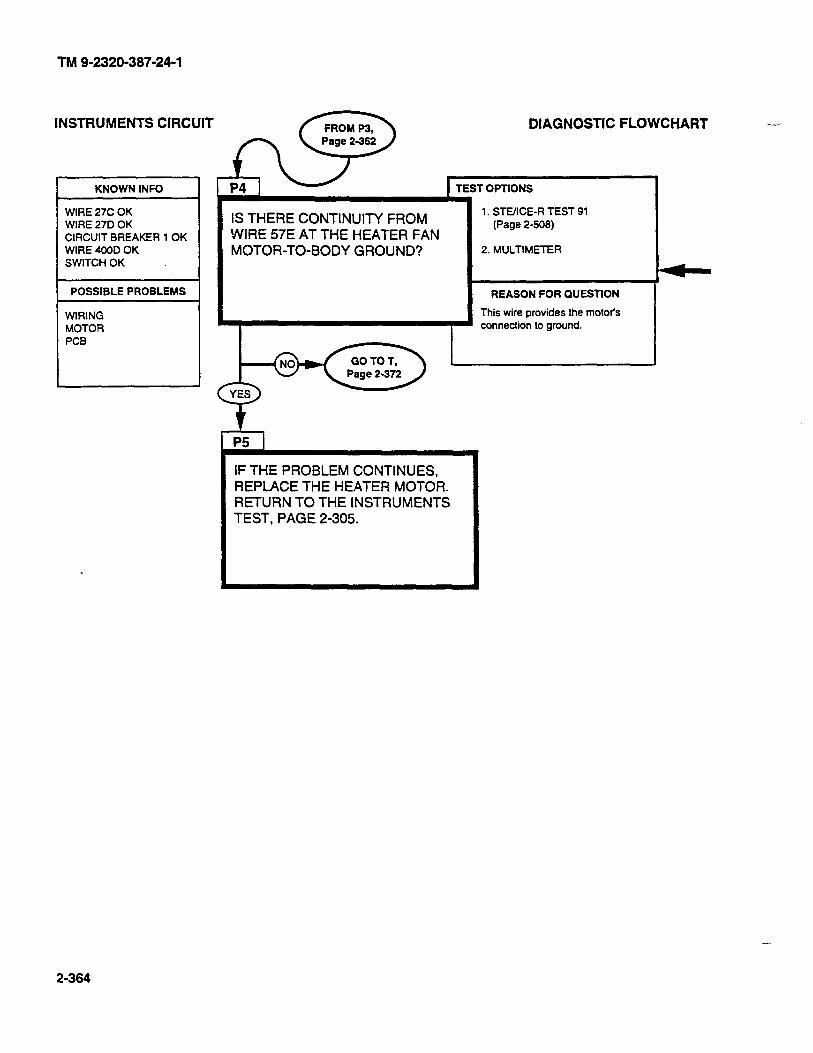
TM 9-2320-387-24-l
INSTRUMENTS CIRCUIT DIAGNOSTIC FLOWCHART -
KNOWN INFO
WIRE 27C OK WIRE 27D OK CIRCUIT BREAKER 1 OK WIRE 400D OK SWITCHOK
POSSIBLE PROBLEMS
WIRING MOTOR PCB
IS THERE CONTINUITY FROM WIRE 57E AT THE HEATER FAN MOTOR-TO-BODY GROUND?
1. STEXE-R TEST 91 (Page 2-508)
2. MULTlMElER
REASON FOR OUESTION
This wire provides the motor’s connection to ground.
I P5 I I
IF THE PROBLEM CONTINUES, REPLACE THE HEATER MOTOR. RETURN TO THE INSTRUMENTS TEST, PAGE 2-305.
2-364
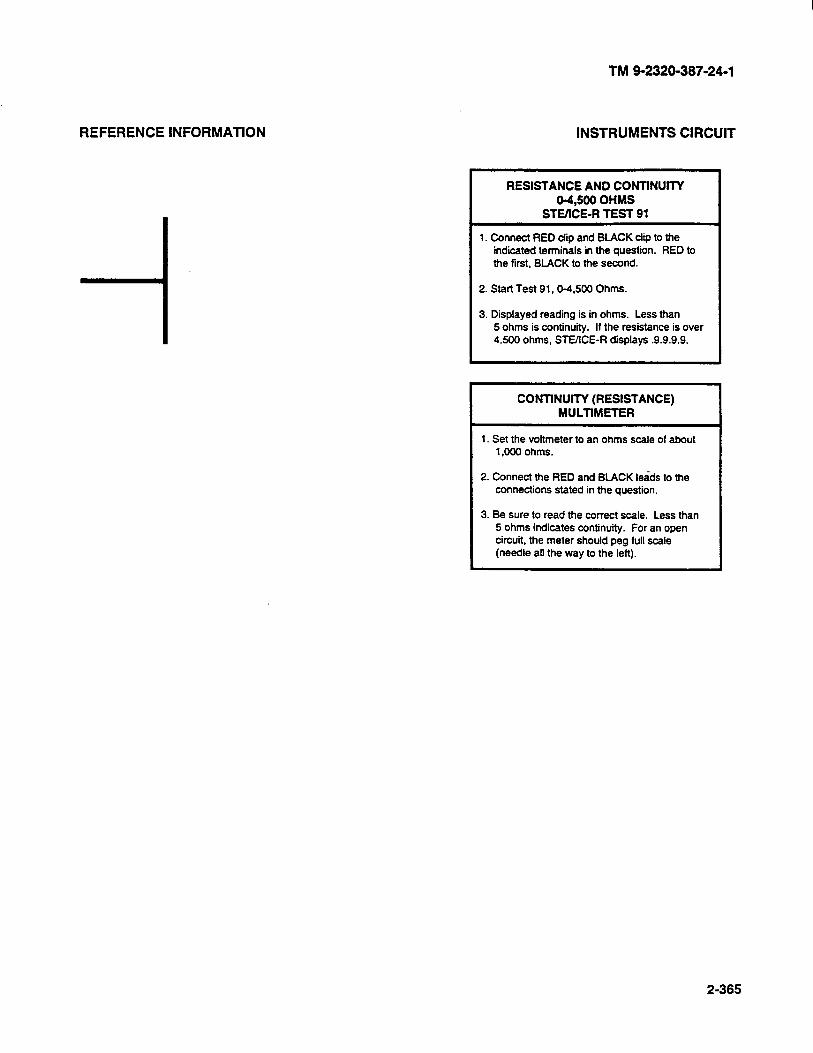
TM 9-2320-387-24-l
REFERENCE INFORMATION INSTRUMENTS CIRCUIT
RESISTANCE AND CONTINUITY 0-4,SOO OHMS
STOICE-R TEST 91
1. Connect RED dip and BLACK clip to the indicated terminals in the question. RED to the first, BLACK to the second.
2. Start Test 91,04,5W Ohms.
3. Displayed reading is in ohms. Less than 5 ohms is continuity. If the resistance is over 4.500 ohms, STEACE-R displays .9.9.9.9.
CONTINUITY (RESISTANCE) MULTIMETER
1. Set the voltmeter to an ohms scale of about 1,000 ohms.
2. Connect the RED and BLACK leads to the connections stated in the question.
3. Be sure to read the correct scale. Less than 5 ohms indicates continuity. For an open circuit, the meter should peg full scale (needle all the way to the left).
2-365
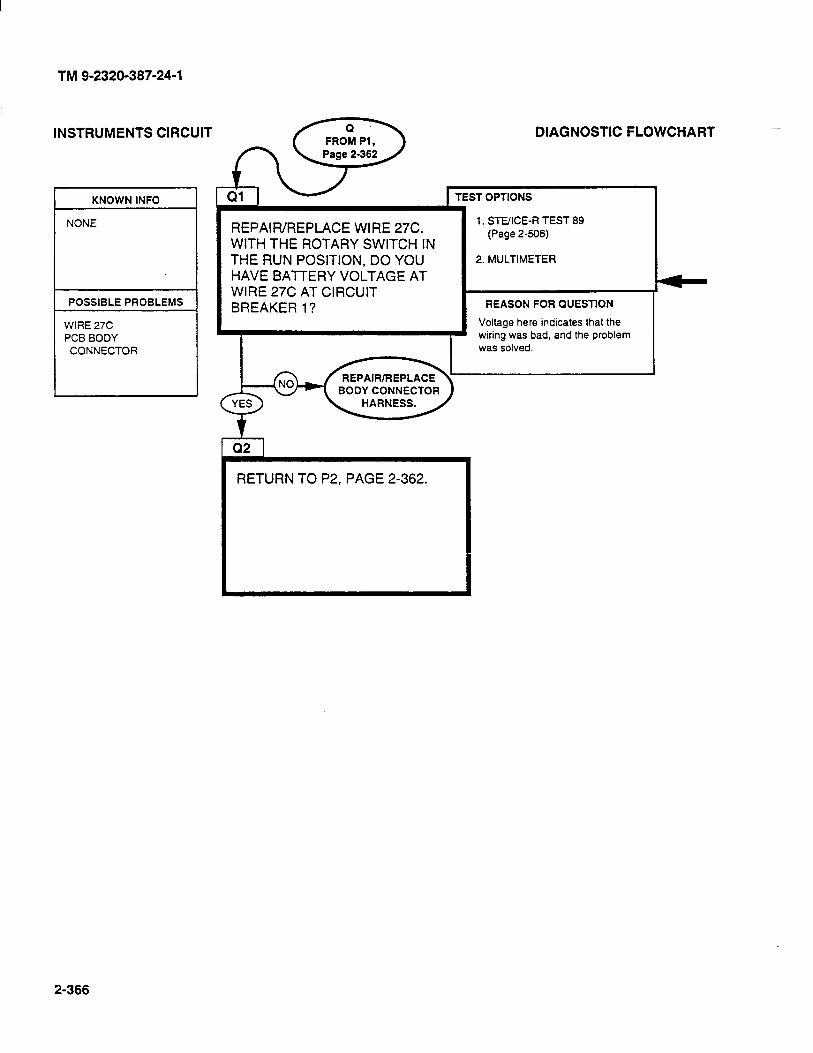
TM 9-2320-387-24-l
._._--.._*-_.__ _.__..._ INSTRUMtN IS c;lHCAJI I
KNOWN INFO
NONE
POSSIBLE PROBLEMS
WIRE 27C PCB BODY
CONNECTOR
REPAIR/REPLACE WIRE 27C. WITH THE ROTARY SWITCH IN THE RUN POSITION, DO YOU HAVE BAlTERY VOLTAGE AT WIRE 27C AT CIRCUIT BREAKER l?
DIAGNOSTIC FLOWCHART
i TEST OPTIONS I
1. STE/ICE-R TEST 69 (Page 2-606)
2. MULTIMETER
REASON FOR QUESTION
Voltage here indicates that the wiring was bad, and the problem was solved.
RETURN TO P2, PAGE 2-362.
2-366
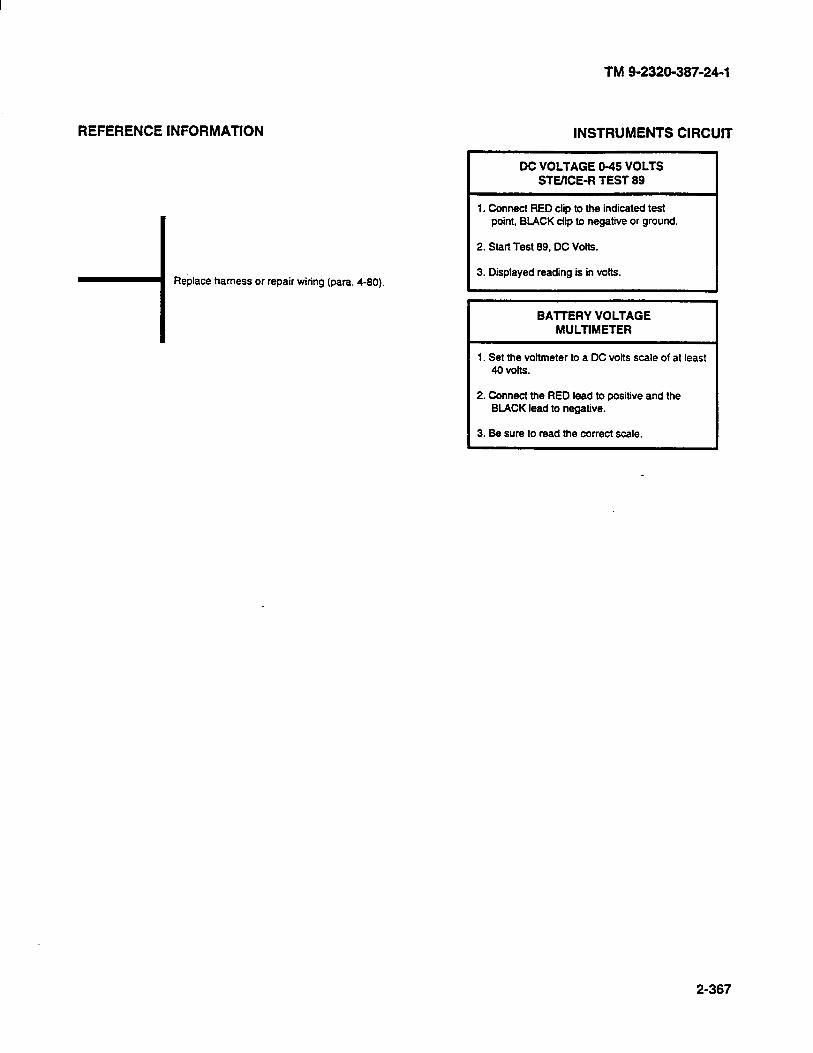
REFERENCE INFORMATION
-I Replace harness or repair wiring (para. 4-80).
TM 9-2320-387-24-l
INSTRUMENTS CIRCUIT
I DC VOLTAGE O-45 VOLTS STWICE-R TEST 99 I
1. Connect RED clip to the indicated test point, BUCK clip to negative or ground.
2. Start Test 89. DC Volts.
3. Displayed reading is in volts.
BAlTERY VOLTAGE MULTIMETER
1. Set the voltmeter to a DC volts scale of at least 40 volts.
2. Connect the RED lead to positive and the BLACK lead to negative.
3. Be sure to read the correct scale.
2-367
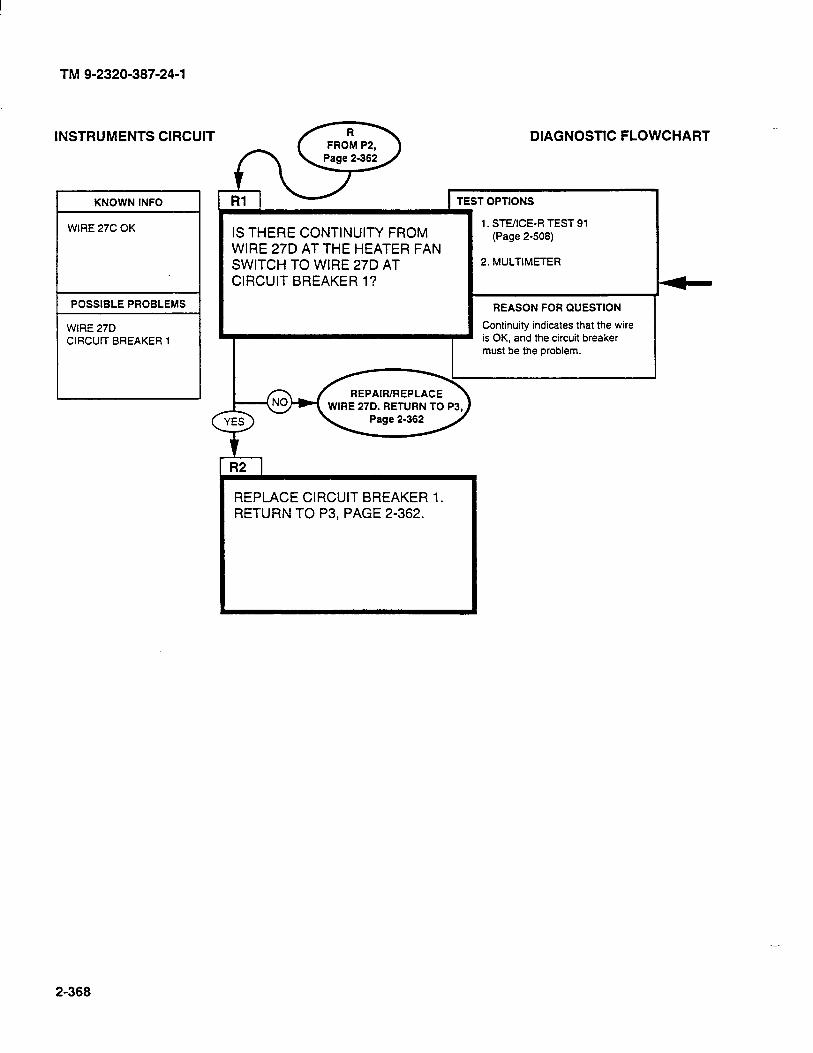
TM 9-2320-387-24-l
KNOWN INFO
WIRE 27C OK
POSSIBLE PROBLEMS
WIRE 27D CIRCUIT BREAKER 1
IS THERE CONTINUITY FROM WIRE 27D AT THE HEATER FAN SWITCH TO WIRE 27D AT CIRCUIT BREAKER l?
DIAGNOSTIC FLOWCHART
1 TEST OPTIONS
1 1. SIX/ICE-R TEST 91
(Page 2-508)
2. MULTIMETER
REASON FOR QUESTION
Continuity indicates that the wire is OK, and the circuit breaker must be the problem.
1
REPLACE CIRCUIT BREAKER 1. RETURN TO P3, PAGE 2-362.
2-368
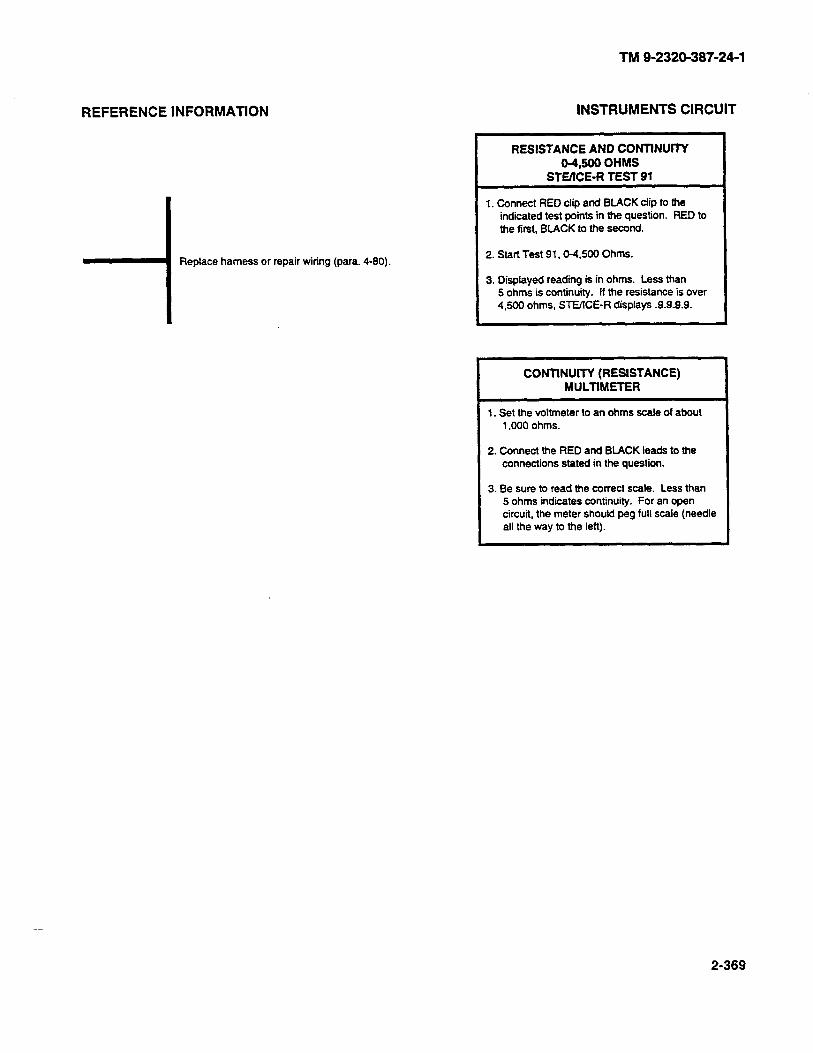
REFERENCE INFORMAnON
-I Replace harness or repair wiring (para. 4-90).
TM 9-2320-387-24-l
INSTRUMENTS CIRCUIT
I RESISTANCE AND CONTINWTY 04.500 OHMS
I STUIiZE-R TEST 91
1. Connect RED clip and BLACK dip to the indicated test points in the question. RED to the first, BLACK to the second.
2. Start Test 91,04,500 Ohms.
3. Displayed reading is in ohms. Less than 5 ohms is continuity. If the resistance is over 4,500 ohms, STEXE-R displays .9.9.9.9.
I CONTINUITY (RESISTANCE) MULTIMETER
I 1. Set the voltmeter to an ohms scale of about 1.000 ohms.
2. Connect the RED and BLACK leads to the connections stated in the question.
3. Be sure to read the correct scale. Less than 5 ohms indicates continuity. For an open circuit. the meter should peg full scale (needle all the way to the left).
2-369
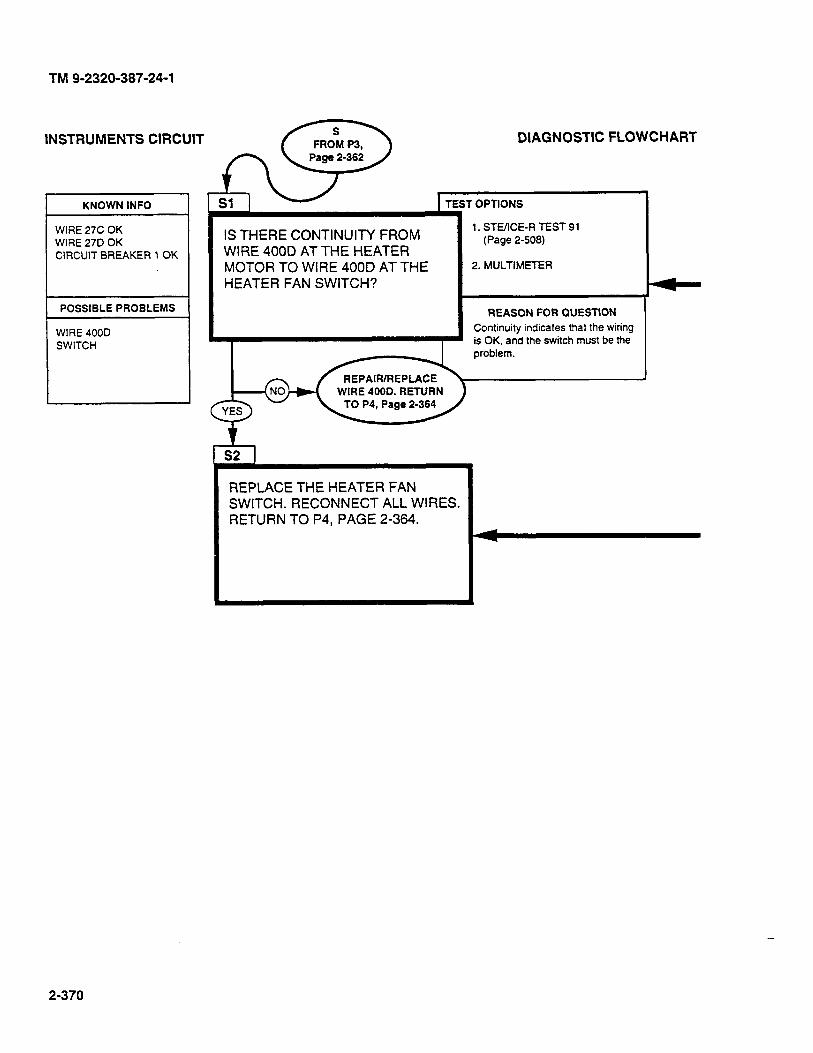
TM 9-2320-387-24-l
INSTRUMENTS CIRCUIT
KNOWN INFO
WIRE 27C OK WIRE 27D OK CIRCUIT BREAKER 1 OK
POSSIBLE PROBLEMS
WIRE 400D SWITCH
DIAGNOSTIC FLOWCHART
TEST OPTIONS
IS THERE CONTINUITY FROM WIRE 400D AT THE HEATER MOTOR TO WIRE 400D AT THE HEATER FAN SWITCH?
1. STEXE-R TEST 91 (Page 2-508)
2. MULTIMETER
REASON FOR QUESTION
Continuity indicates that the wiring is OK, and the switch must be the
REPAIR/REPLACE WIRE 400D. RETURN
REPLACE THE HEATER FAN SWITCH. RECONNECT ALL WIRES. RETURN TO P4, PAGE 2-364.
1
2-370
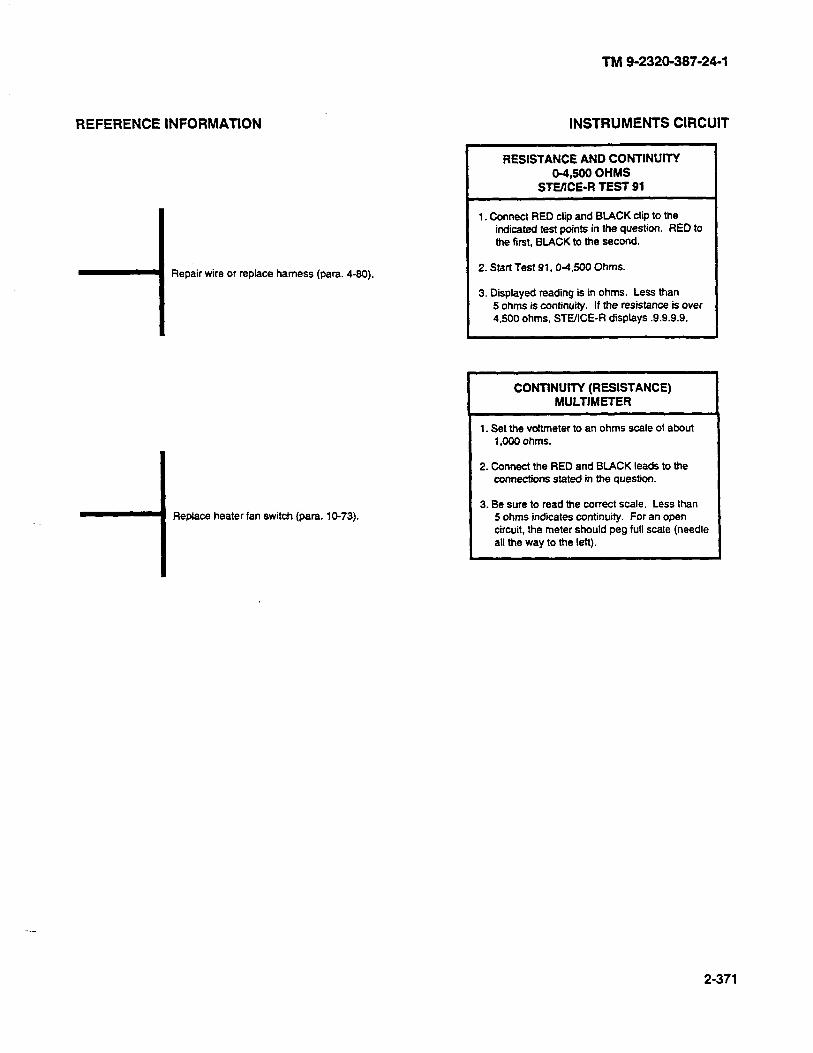
TM 9-2320-387-24-l
REFERENCE INFORMATION
-I Repair wire or replace harness (para. 4-90).
i
Replace heater fan switch (para. 1 O-73).
INSTRUMENTS CIRCUIT
RESISTANCE AND CONTlNUrrY 04,500 OHMS
STVICE-R TEST 91
1. Connect RED clip and BLACK clip to the indicated test points in the question. RED to
the first, BLACK to the second.
2. Start Test 91,04.500 Ohms.
3. Disphyed reading is in ohms. Less than 5 ohms is continuity. If the resistance is over 4.500 ohms, STWICE-R displays .9.9.9.9.
CONTINUITY (RESISTANCE) MULTIMETER
1. Set the voltmeter to an ohms scale of about 1,000 ohms.
2. Connect the RED and BLACK leads to the connections stated in the question.
3. Be sure to read the correct scale. Less than 5 ohms indicates continuity. For an open circuit, the meter should peg full scale (needle all the way to the left).
2-371
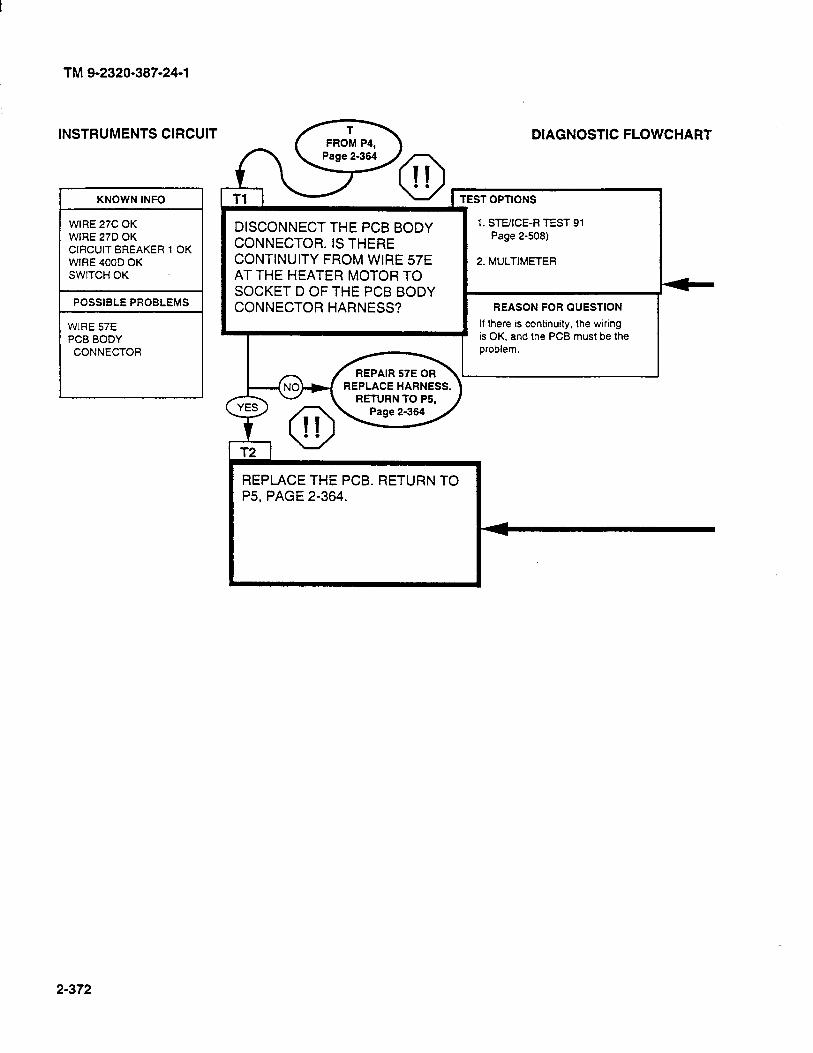
TM 9-2320-387-24-l
INSTRUMENTS
KNOWN INFO
WIRE 27C OK WIRE 27D OK CIRCUIT BREAKER 1 OK WIRE 400D OK SWITCH OK
POSSIBLE PROBLEMS
WIRE 57E PCB BODY
CONNECTOR
DIAGNOSTIC FLOWCHART
TEST OPTIONS I
DISCONNECT THE PCB BODY CONNECTOR. IS THERE CONTINUITY FROM WIRE 57E AT THE HEATER MOTOR TO SOCKET D OF THE PCB BODY CONNECTOR HARNESS?
REPAIR 57E OR REPLACE HARNESS.
RETURN TO PS,
1. STVICE-R TEST 91 Page 2-508)
2. MULTIMETER
REASON FOR QUESTION
If there is continuity, the wiring is OK, and the PCB must be the problem.
REPLACE THE PCB. RETURN TO P5, PAGE 2-364.
I
2-372

TM 9-2320-387-24-l
REFERENCE INFORMATION
0 II . .
i-
WARNING Disconnect negative battery cable before disconnecting and reconnecting PCB harness.
WARNING
There is battery voltage at the PCB at all times. Failure to disconnect battery cable will result in damage to equipment or injury to personnel.
Replace harness or repair wiring (para. 4-80).
- 4 0 II . . WARNING
Disconnect negative battery cable before disconnecting and reconnecting PCB harness.
I WARNING
There is battery voltage at the PCB at all times. Failure to disconnect battery cable will result in damage to equipment or injury to Personnel.
Replace the PCB (para. 4-4).
INSTRUMENTS CIRCUIT
RESISTANCE AND CONTINUITY 04,500 OHMS
STMCE-R TEST 91
1. Connect RED clip and BLACK clip to the indicated terminals in the question. RED to the first. BLACK to the second.
2. Start Test 91,0-4,500 Ohms.
3. Displayed reading is in ohms. Less than 5 ohms is continuity. If the resistance is over 4.500 ohms, STUICE-R displays .9.9.9.9.
CONTINUITY (RESISTANCE) MULTIMETER
1. Set the voltmeter to an ohms scale of about 1 .OOO ohms.
2. Connect the RED and BLACK leads to the connections stated in the question.
3. Be sure to read the correct scale. Less than 5 ohms indicates continuity. For an open circuit, the meter should peg full scale (needle all the way to the left).
2-373/(2-374 blank)
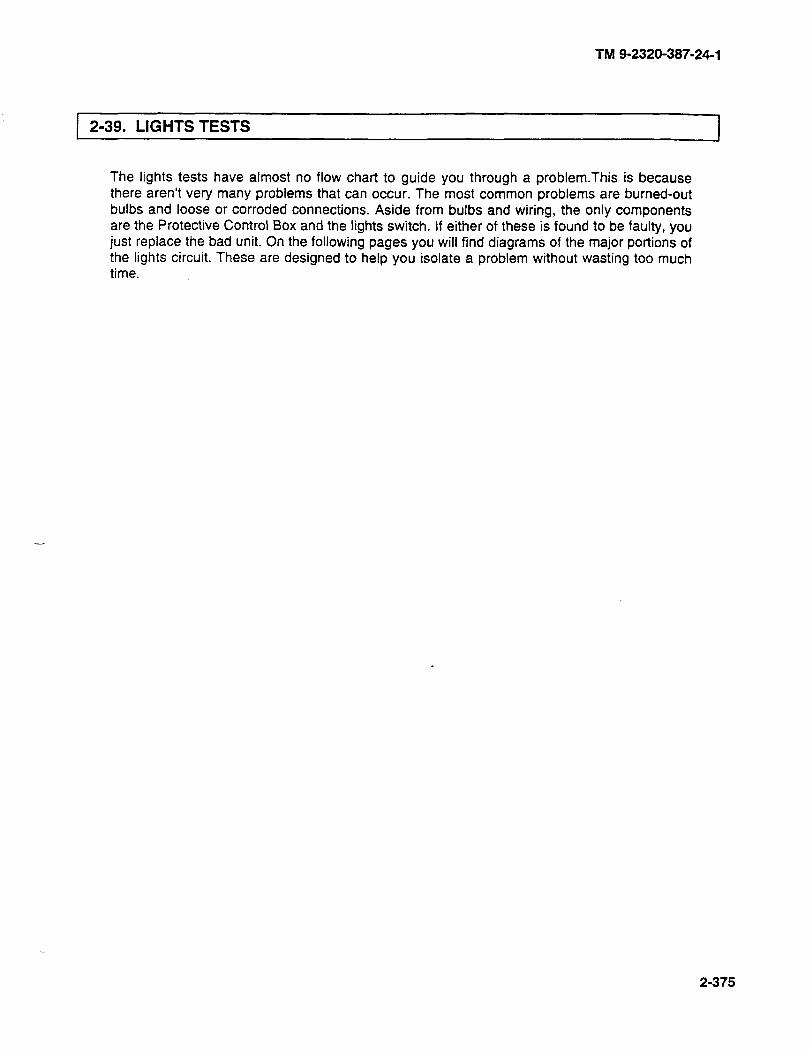
TM 9-2320-387-24-l
1 2-39. LIGHTS TESTS I
The lights tests have almost no flow chart to guide you through a problem.This is because there aren’t very many problems that can occur. The most common problems are burned-out bulbs and loose or corroded connections. Aside from bulbs and wiring, the only components are the Protective Control Box and the lights switch. If either of these is found to be faulty, you just replace the bad unit. On the following pages you will find diagrams of the major portions of the lights circuit. These are designed to help you isolate a problem without wasting too much time.
2-375
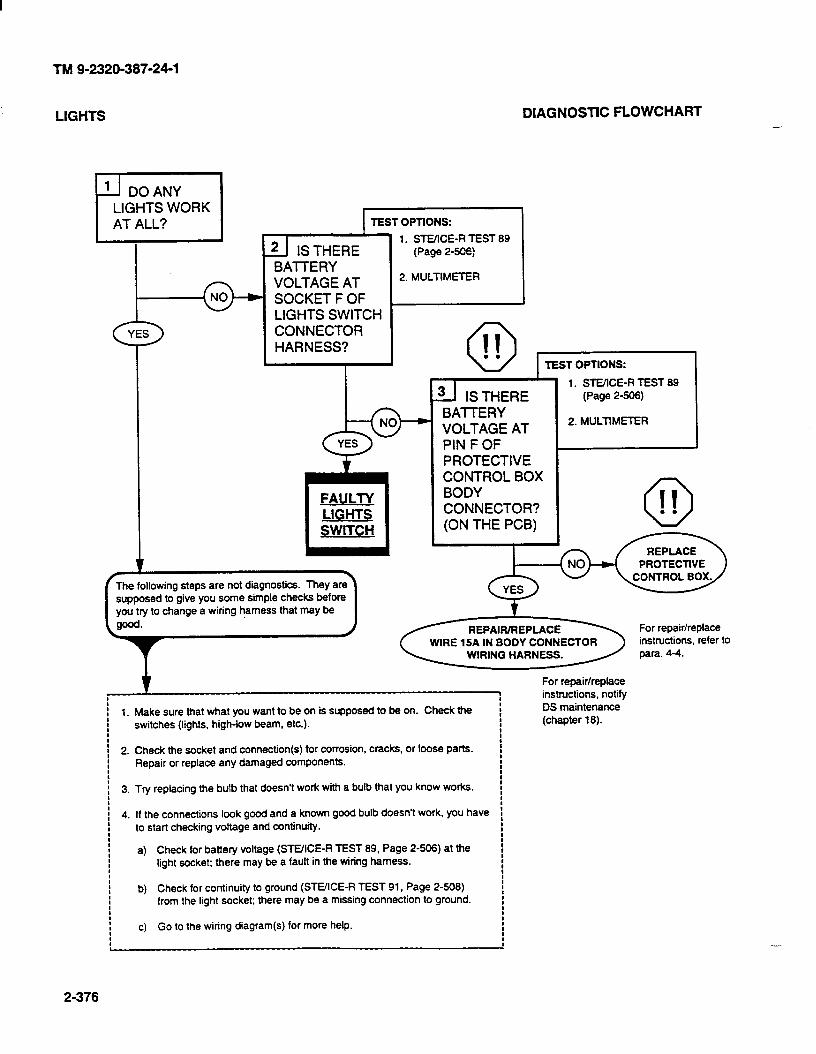
TM 9-2320-387-24-l
LIGHTS DIAGNOSTIC FLOWCHART -
II DO ANY LIGHTS WORK AT ALL? TEST OPTIONS:
BATTERY VOLTAGE AT SOCKET F OF LIGHTS SWITCH CONNECTOR HARNESS?
Y
1. STEACE-R TEST 89 (Page 2-53.X)
2. MULTIMlZl-ER
FAULTY LIGHTS SWITCH
\
I The following steps are not diagnostics. They are supposed to give you some simple checks before you try to change a wiring harness that may be
~. 1
r TEST OPTIONS:
El-zz- BAlTERY VOLTAGE AT PIN F OF PROTECTIVE CONTROL BOX BODY CONNECTOR? (ON THE PCB)
I. STEIICE-R TEST 89 (Page 2306)
1
t For repair/replace
-I I :
instructions, notify I I 1. Make sure that what you want to be on is supposed to be on. Check the ; DS maintenance
t switches (lights, high-low beam, etc.). i (chapter 18).
I I : 1 2. Check the socket and connection(s) for corrosion, cracks, or loose parts.
Repair or replace any damaged components.
i
I : I I
; 3. Try replacing the bulb that doesn’t work with a bulb that you know works. I
i
i 4. If the connections look good and a known good bulb doesn’t work, you have : ;
I I to start checking voltage and continuity. : I : I I : 1 a) Check for battery voltage (STEXE-R TEST 89, Page 2-506) at the I : I
light socket; there may be a fault in the wiring harness. : I I
I b) Check for continuity to ground (STWICE-R TEST 91, Page 2-508) I :
i I
from the light socket; there may be a missing connection to ground. i I I I I I 1 c) Go to the wiring diagram(s) for more help. I
I I i c
For repair/replace instructions, refer to para. 4-4.
-
2-376
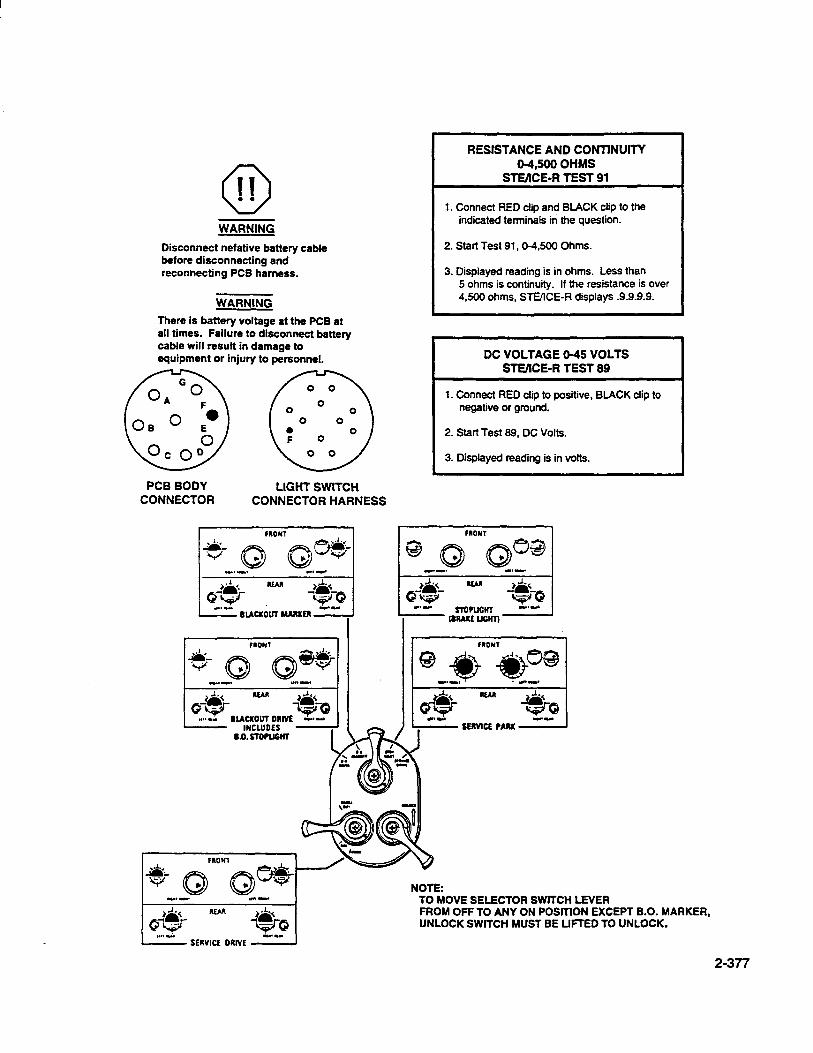
0 II . . WARNING
Disconnect nefative battery cable before disconnecting and reconnecting PCB harness.
There is battery voltage at the PC8 at all times. Failure to disconnect battery cable will result in damage to equipment or injury to personnel.
PCB BODY LIGHT SWITCH CONNECTOR CONNECTOR HARNESS
I RESISTANCE AND CONTINUITY
I 8-4.500 OHMS
STEACE-R TEST 91
1. Connect RED clip and BLACK clip to the indicated terminals in the question.
2. Stan Test 91,0-4.500 Ohms.
3. Displayed reading is in ohms. Less than 5 ohms is continuity. If the resistance is over 4,500 ohms, STE/lCE-R displays .9.9.9.9.
I DC VOLTAGE W5 VOLTS
STEIICE-R TEST 89
1. Connect RED clip to positive, BLACK clip to negative or ground.
2. Start Test 99, DC Volts.
3. Displayed reading is in volts.
FROM OFF TO ANY ON POSlTlON EXCEPT B.O. MARKER, UNLOCK SWITCH MUST BE UFTED TO UNLOCK.
2-377
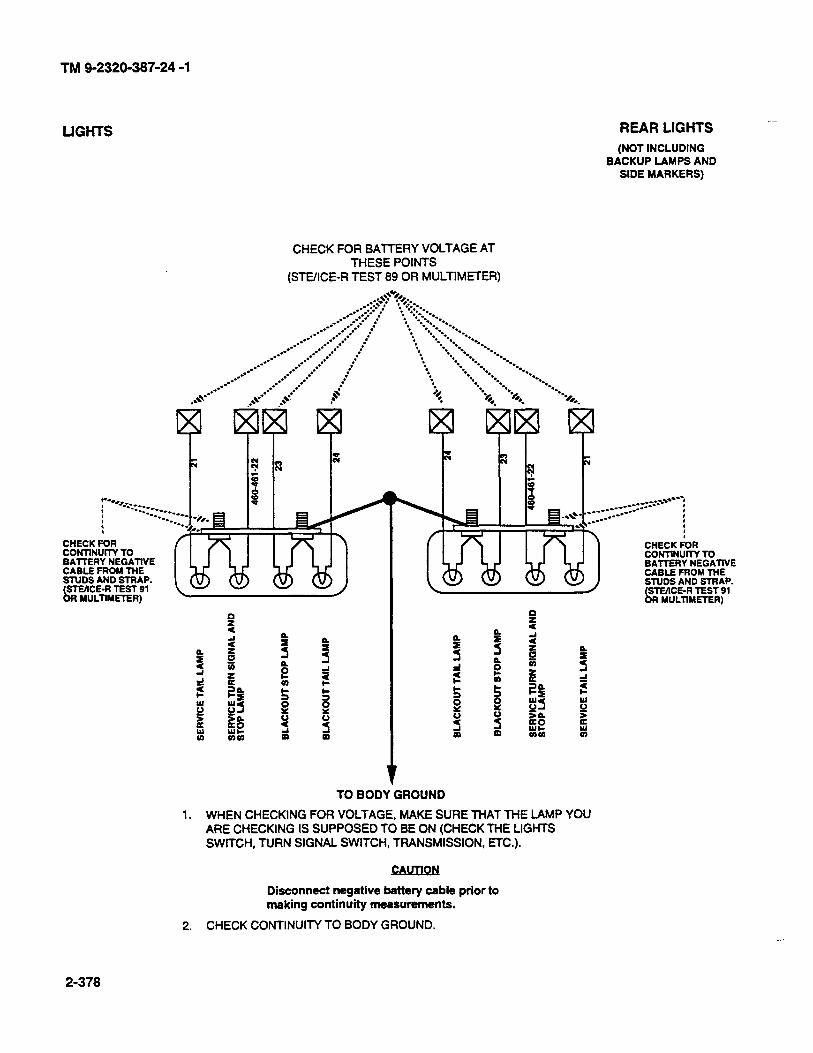
TM 9-2320-387-24 -1
LIGHTS REAR LIGHTS -
(NOT INCLUDING BACKUP LAMPS AND
SIDE MARKERS)
CHECK FOR BA’lTERY VOLTAGE AT THESE POINTS
(STUICE-R TEST 89 OR MULTIMETER)
CHECK FOR CONTlNUlTY TO BAHERY NEGAnVE CABLE FROM THE STUDS AND STRAP. STEilCE-R TEST 91
6R MULTlMErER)
CHECK FOR CONTINUITY TO EAlTERY NEGATIVE CABLE FROM THE
TO BODY GROUND
1. WHEN CHECKING FOR VOLTAGE, MAKE SURE THAT THE LAMP YOU ARE CHECKING IS SUPPOSED TO BE ON (CHECK THE LIGHTS SWITCH, TURN SIGNAL SWITCH, TRANSMISSION, ErC.).
ON
Disconnect negative battery cable prior to making continuity measurements.
2. CHECK CONTINUITY TO BODY GROUND.
2-378
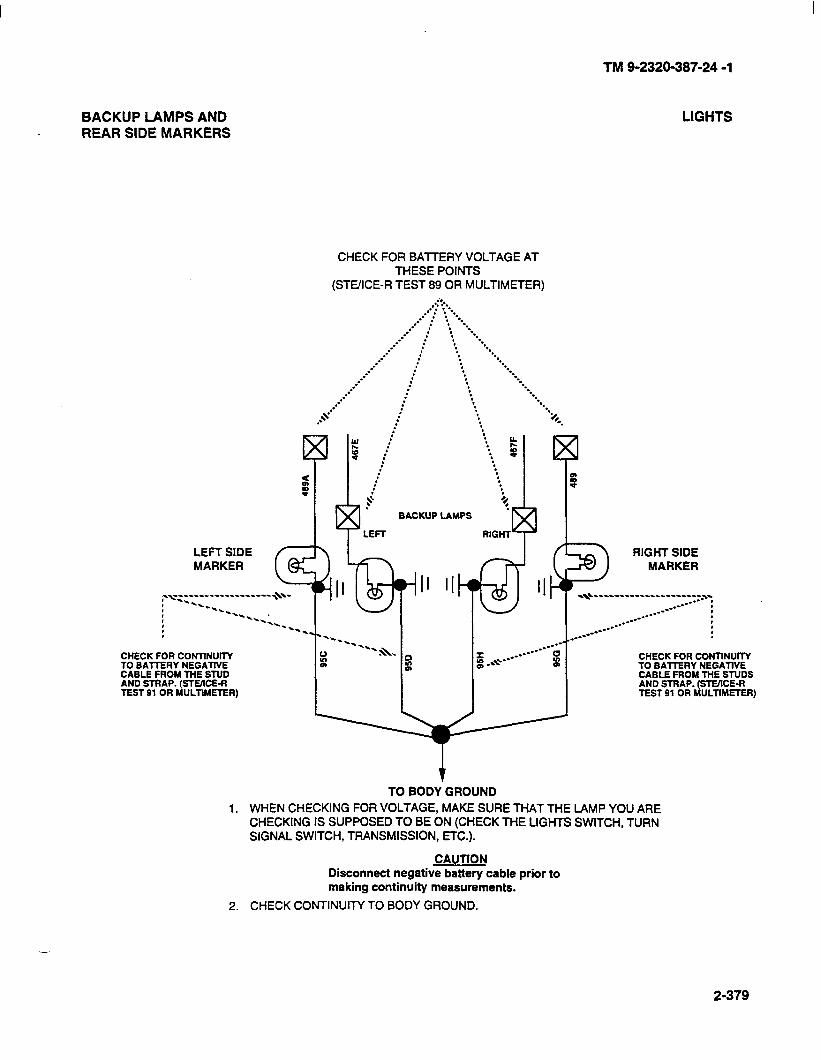
BACKUP LAMPS AND REAR SIDE MARKERS
LEFT SIDE MARKER
CHECK FOR CONTINUITY TO BATTERY NEGATIVE CABLE FROM THE STUD AND STRAP. (STVICE-R TEST 91 OR MULTIMETER)
TM g-2320-387-24 -1
LIGHTS
CHECK FOR BA-ITERY VOLTAGE AT THESE POINTS
(STEIICE-R TEST 89 OR MULTIMETER)
..::-. ,.* . l -. 2.. :
: : -.._ : ._
-.-- : : -..- .- : :
-.= : : -. *. _.-- : : -.
_.-- : : -. -. : :
-.-- : : --._
-. -.= :
: : -.
.- : : -. -.
-.-- -.
+-• : :
: l . : -.
.- : : :
%. :
w ; : : IL
‘0 : g ’ : : f
: : u : :
: : -0 : : 5
B .
? ? ’ BACKUP LAMPS
LEFT
RIGHT SIDE MARKER
II II II .~~_~_~~~~~~____~~~~~~_,~ ..-- I _--- , _--- , _.-- _--- _.--
_--- *\. -\.
__---- _.---
0 I
*“*. o I g
3 _.\c’--- _.---- Q
0 CHECK FOR CONTINUITY TO BAllERY NEGATlVE CABLE FROM THE STUDS AND STRAP. (!3EllCE-R TEST 91 OR MULTIMETER)
1
TO BODY GROUND
1. WHEN CHECKING FOR VOLTAGE, MAKE SURE THAT THE IAMP YOU ARE CHECKING IS SUPPOSED TO BE ON (CHECK THE LIGHTS SWITCH. TURN SIGNAL SWITCH, TRANSMISSION, ETC.).
CAUTION Disconnect negative battery cable prior to making continuity measurements.
2. CHECK CONTINUITY TO BODY GROUND.
2-379
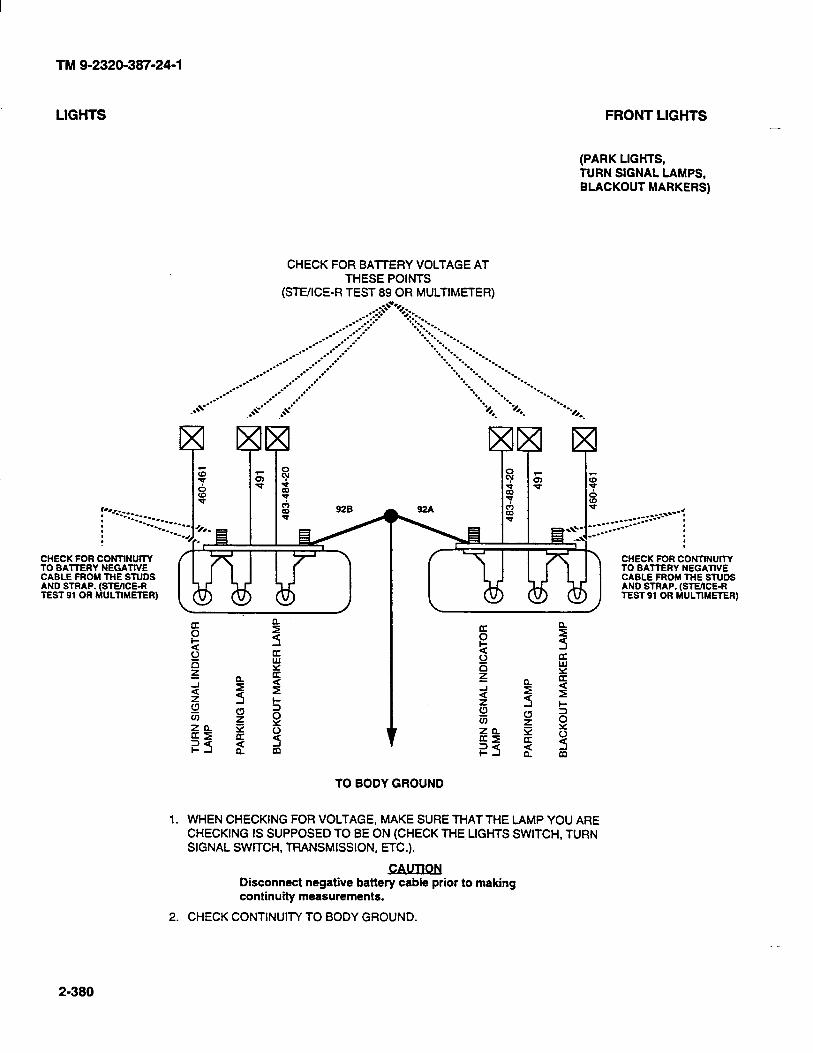
TM 9-2320-387-24-l
LIGHTS FRONT LIGHTS -
(PARK LIGHTS, TURN SIGNAL LAMPS, BLACKOUT MARKERS)
CHECK FOR BATTERY VOLTAGE AT THESE POINTS
(STVICE-R TEST 89 OR MULTIMETER)
CHECK FOR CONTINUITY TO BAllERY NEGATIVE CABLE FROM THE STUDS AND STRAP. (STMCE-R TEST 91 OR MULTIMETER)
CHECK FOR CONTINUITY TO BATTERY NEGATIVE CABLE FROM THE STUDS AND STRAP. (STWICE-R TEST 91 OR MULTIMETER)
TO BODY GROUND
1. WHEN CHECKING FOR VOLTAGE, MAKE SURE THAT THE LAMP YOU ARE CHECKING IS SUPPOSED TO BE ON (CHECK THE LIGHTS SWITCH, TURN SIGNAL SWITCH, TRANSMISSION, ETC.).
Disconnect negative battery cable prior to making continuity measurements.
2. CHECK CONTINUITY TO BODY GROUND.
2-380
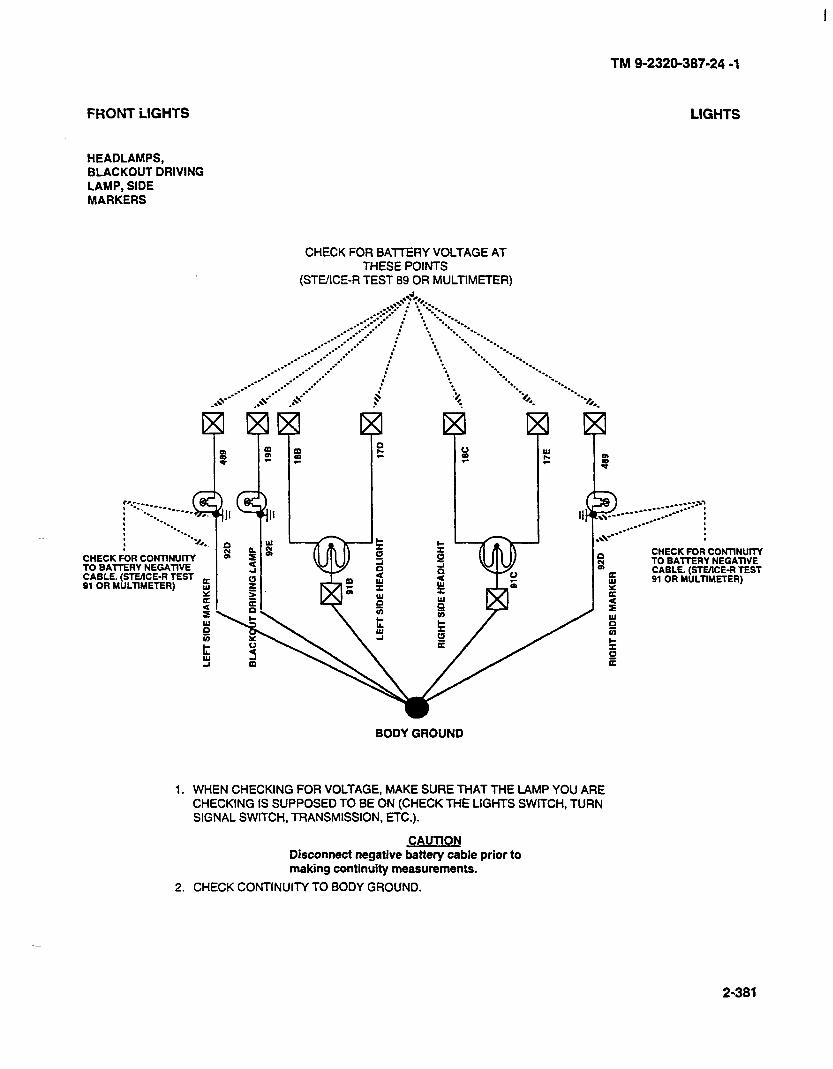
FRONT LIGHTS
HEADLAMPS, BLACKOUT DRIVING LAMP, SIDE MARKERS
CHECK FOR BAlTERY VOLTAGE AT THESE POINTS
(STEfICE-R TEST 89 OR MULTIMETER)
TM 9-2320-387-24 -1
LIGHTS
_,__---J-‘- _____---- __.--
_.-- 1
._-- _.--
:
CHECK FOR CONTINUITY TO BATTERY NEGATIVE CABLE. (SWCE-R TEST 91 OR MULTIMETER)
BODY GROUND
1. WHEN CHECKING FOR VOLTAGE, MAKE SURE THAT THE LAMP YOU ARE CHECKING IS SUPPOSED TO BE ON (CHECK THE LIGHTS SWITCH, TURN SIGNAL SWITCH, TRANSMISSION, ETC.).
CAUTION Disconnect negative battery cable prior to making continuity measurements.
2. CHECK CONTINUIlY TO BODY GROUND.
2-381
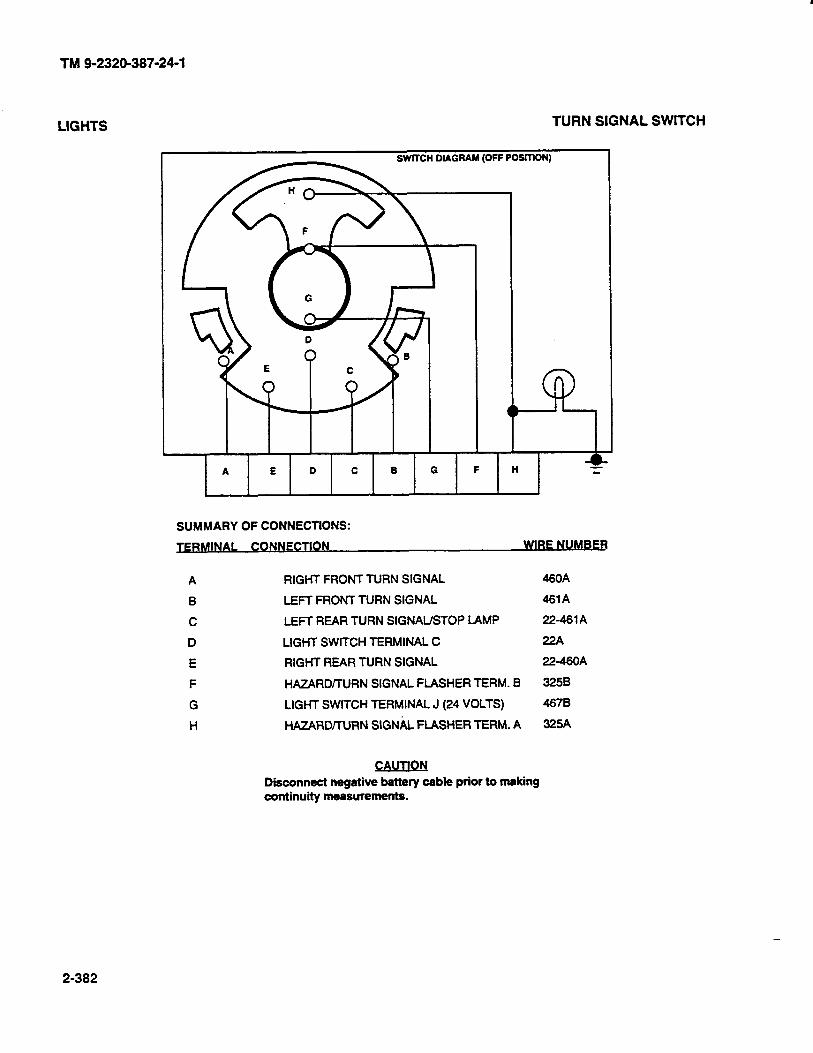
TM 9-2320-387-24-l
LIGHTS
SUMMARY OF CONNECTIONS:
JFRMINAL CONNECTION WIRE NUMB&t
A RIGHT FRONT TURN SIGNAL 460A
B LEFT FRONT TURN SIGNAL 461A
C LEFT REAR TURN SIGNAL’STOP LAMP 22-461A
D LIGHT SWITCH TERMINAL C 22A
E RIGHT REAR TURN SIGNAL 22-46OA
F HAZARDKURN SIGNAL FLASHER TERM. B 3258
G LIGHT SWITCH TERMINAL J (24 VOLTS) 4678
H HAZARDKURN SIGNAL FLASHER TERM. A 325A
CAUflON Disconnect negative battery cable prior to making continuity measurements.
2-382
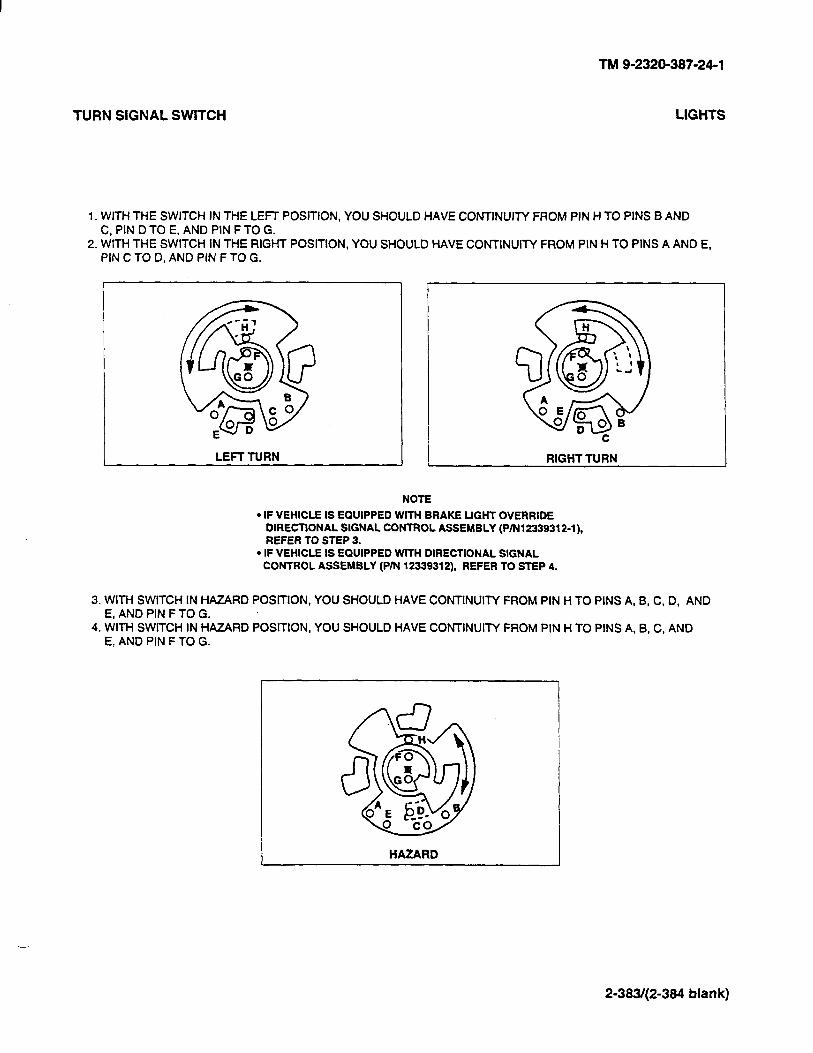
TURN SIGNAL SWITCH
TM 9-2320-387-24-l
LIGHTS
1. WITH THE SWITCH IN THE LEFT POSITION, YOU SHOULD HAVE CONTINUITY FROM PIN H TO PINS B AND C, PIN D TO E, AND PIN F TO G.
2. WITH THE SWITCH IN THE RIGHT POSlTlON, YOU SHOULD HAVE CONTINUITY FROM PIN H TO PINS A AND E. PIN C TO D, AND PIN F TO G.
LEFT TURN
C
RIGHT TURN
NOTE
l IF VEHICLE IS EQUIPPED WITH BRAKE LIGHT OVERRIDE DlRECllONAL SIGNAL CONTROL ASSEMBLY (P/Nl2339312-1). REFER TO STEP 3.
. IF VEHICLE IS EQUIPPED WllH DIRECTIONAL SIGNAL CONTROL ASSEMBLY (PIN 12339312), REFER TO STEP 4.
3. WITH SWITCH IN HAZARD POSlTiON, YOU SHOULD HAVE CONTINUITY FROM PIN H TO PINS A, B, C, 0, AND E, AND PIN F TO G.
4. WITH SWITCH IN HAZARD POSITION. YOU SHOULD HAVE CONTINUITY FROM PIN H TO PINS A, B, C, AND E. AND PIN F TO G.
-.
2-383/(2-384 blank)

TM 9-2320-387-24-1
Change 1 2-385
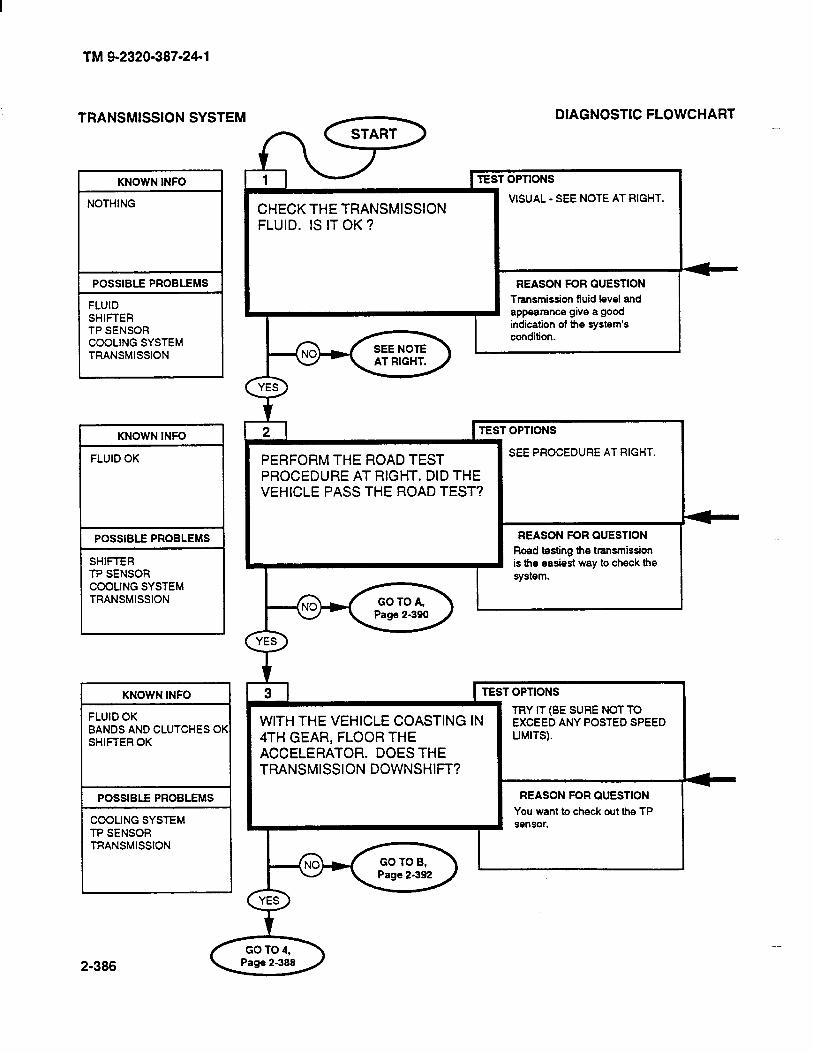
TM 92320-387-24-l
TRANSMISSION SYSTEM DIAGNOSTIC FLOWCHART
KNOWN INFO
NOTHING
I TEST OPTIONS
CHECK THE TRANSMISSION FLUID. IS IT OK ?
VISUAL - SEE NOTE AT RIGHT.
POSSIBLE PROBLEMS
FLUID SHIFTER TP SENSOR COOLING SYSTEM TRANSMISSION
KNOWN INFO
FLUID OK
POSSIBLE PROBLEMS
SHIFTER TP SENSOR COOLING SYSTEM TRANSMISSION
KNOWN INFO
FLUID OK BANDS AND CLUTCHES Of SHIFTER OK
POSSIBLE PROBLEMS
COOLING SYSTEM TF’ SENSOR TRANSMISSION
REASON FOR QUESTION
Transmission fluid level and appearance give a good indication of the system’s condition.
PERFORM THE ROAD TEST SEE PROCEDURE AT RIGHT.
PROCEDURE AT RIGHT. DID THE VEHICLE PASS THE ROAD TEST?
WITH THE VEHICLE COASTING IN 4TH GEAR, FLOOR THE ACCELERATOR. DOES THE TRANSMISSION DOWNSHIFT?
TRY IT (BE SURE NOT TO EXCEED ANY POSTED SPEED UMITS).
TEST OPTIONS
REASON FOR QUESTION
You want to check out the TP sensor.
2-386
-

TM 9-2320-387-24-l
REFERENCE INFORMATION TRANSMISSION SYSTEM
Procedure for checkina transmission fluid flUTUBE DIPSTICK
1. Start engine. 2. Hold down brake pedal and move transmission shift lever through all ranges including
reverse. Leave the lever in each range for 2 seconds. 3. Engage parking brake and place shit lever in neutral. Check fluid level on dipstick. 4. Proper level is between FULL and ADD marks on dipstick
NOTE
Check fluid for a burnt smell, grit, discoloration, air bubbles, or a milky appearance.
l Burnt smell, discoloration, or grit indicates worn or damaged internal components. Notify DS maintenance (chapter 14).
l Bubbles indicate an overfilled system or air leaks in the system. Drain the fluid and refill to proper level (para. 5-2).
l Milky appearance is due to water in the system. Change the fluid and filter (para. 5-2). l Check fill tube for indications of fluid being blown out. If fluid is being blown out, check
vent line for obstructions, and refill transmission to proper level (para. 5-2).
MARKINGS
Jload Test Procedure u
1. Position shift lever in 0 (overdrive) and accelerate vehicle from 0 mph. A l-2.2-3. and 3-4 shift should occur at all
i
throttle openings. Allow vehicle to coast down to about 0 mph; 4-3.3-2, and 2-1 shifts should occur. 2. Position transmission shii lever in D (drive) and accelerate vehicle from 0 mph. A l-2 and 2-3 shift should occur at
all throttle openings. Allow vehicle to coast down to about 0 mph; 3-2 and 2-l shifts should occur. 3. Position transmission shi lever in 2 (low two) and accelerate vehicle from 0 mph. A l-2 shift should occur at all
throttle openings. No 2-3 shitt can be obtained in this range. A l-2 shift in 2 is somewhat firmer than in D. This is normal.
4. Position shift lever in 1 and accelerate the vehicle from 0 mph. No upshifts should occur in this range. 5. Position shift lever in 8, and with the vehicle speed at approximately 45 mph, close throttle and move lever to 3.
Transmission should downshift to 3rd gear. An increase in engine rpm and engine braking effect should be noticed.
6. Position shift lever in @, and with the vehicle speed at approximately 35 mph, close throttle and move lever to 2. Transmission should downshift to 2nd gear. An increase in engine rpm and engine braking effect shordd be noticed.
7. Position shift lever 2 and, with the vehicle speed at approximately 25 mph, close the throttle and move lever to 1. Transmission should downshift to 1st gear. An increase in engine rpm and engine braking effect should be noticed.
6. Position shift lever in R and check for reverse operation. 9. Hard shifting may be indicative of an under-filled or clogged system.
i
The TP sensor is used to shift the transmission to a lower gear under heavy acceleration.
2-387
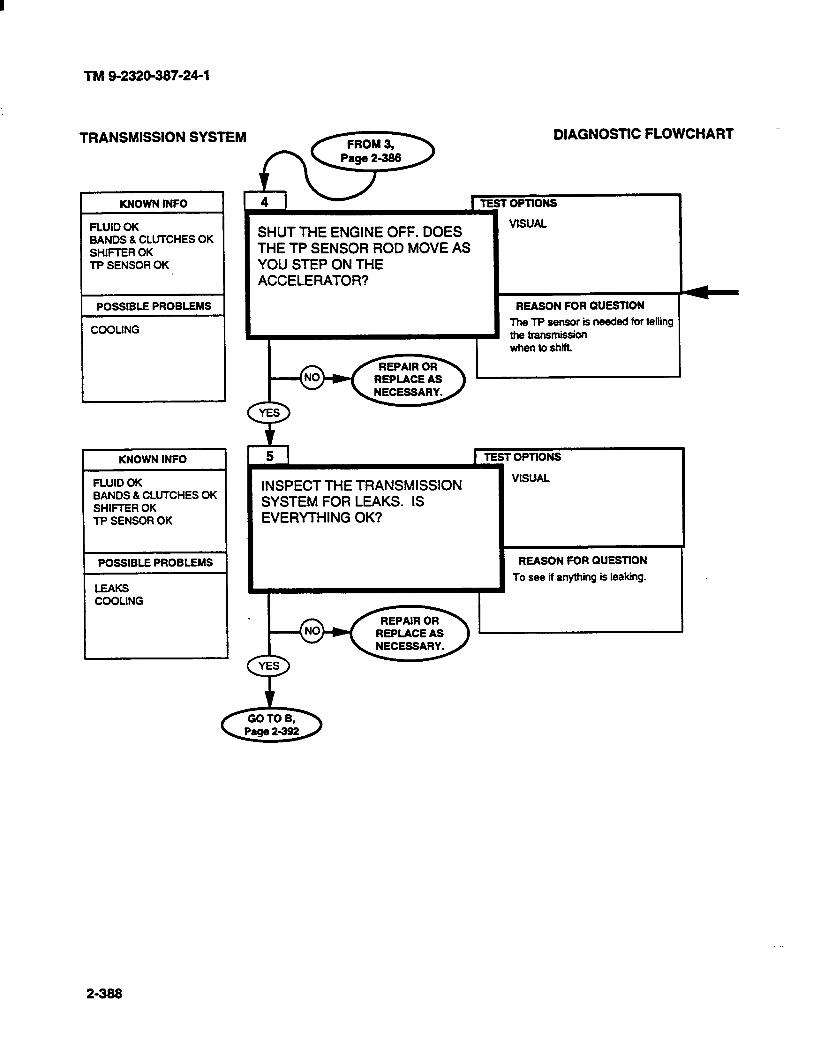
TM 9-2320-387-24-l
TRANSMISSION SYSTEM DIAGNOSTIC FLOWCHART
KNOWN INFO
FLUID OK BANDS b CLUTCHES OK SHIFTER OK TP SENSOR OK
POSStBLE PROBLEMS
COOUNG
KNOWN INFO
FLUID OK BANDS 8 CLUTCHES OK SHIFTER OK TP SENSOR OK
POSSIBLE PROBLEMS
LEAKS COOLING
SHUT THE ENGINE OFF. DOES THE TP SENSOR ROD MOVE AS YOU STEP ON THE ACCELERATOR?
VISUAL
REASON FOR QUESTION
The TP sensor is needed for telling the transmission I ._.
INSPECT THE TRANSMISSION SYSTEM FOR LEAKS. IS EVERnHlNG OK?
OPTtONS
VISUAL
REASON FOR QUESTION
To see it anything is leaking.
2-388
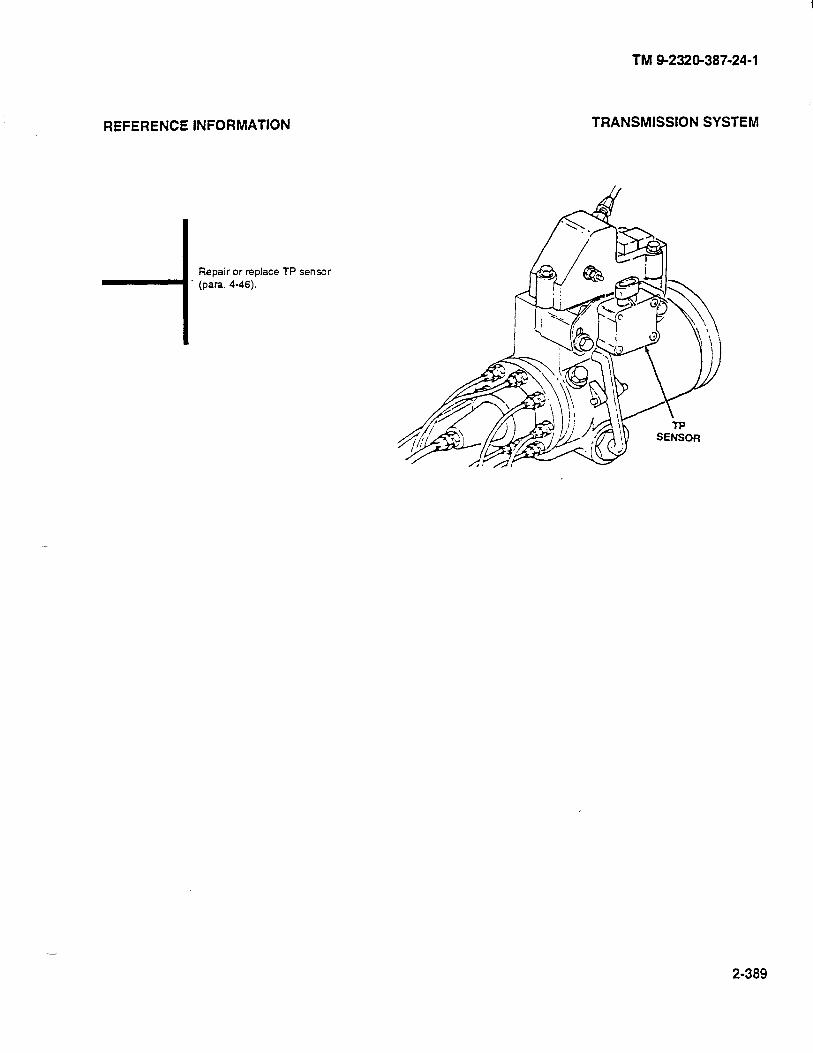
REFERENCE INFORMATION
Repair or replace TP sensor (para. 4-46).
TM 9-2320-387-24-l
TRANSMISSION SYSTEM
2-389
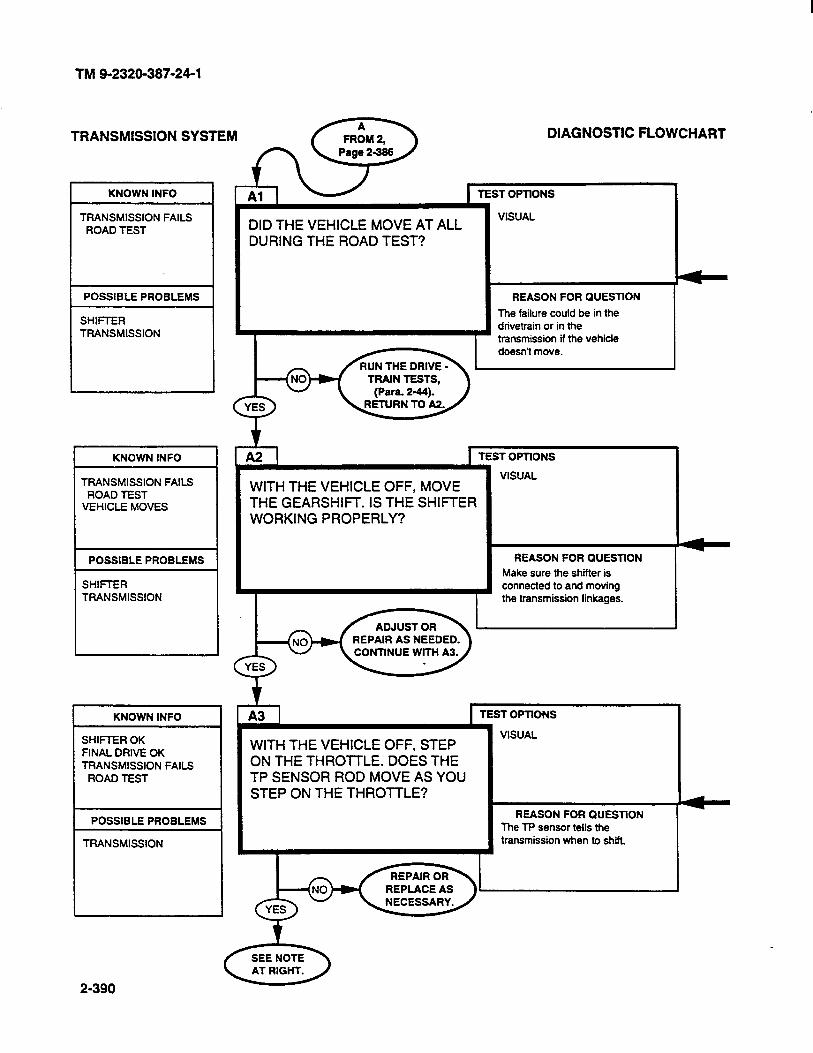
TM 9-2320-387-24-l
TRANSMISSION SYSTEM
KNOWN INFO
TRANSMISSION FAILS ROAD TEST
POSSIBLE PROBLEMS
SHIFTER TRANSMISSION
KNOWN INFO
TRANSMISSION FAILS ROAD TEST
VEHICLE MOVES
POSSIBLE PROBLEMS
SHIFTER TRANSMISSION
KNOWN INFO
SHIFTER OK FINAL DRIVE OK TRANSMISSION FAILS
ROAD TEST
POSSIBLE PROBLEMS
TRANSMISSION
2-390
DIAGNOSTIC FLOWCHART
TEST OPllONS
DID THE VEHICLE MOVE AT ALL VISUAL
DURING THE ROAD TEST?
I
REASON FOR QUESTlON
The failure could be in the drivetrain or in the transmission if the vehicle
1 TEST OPTlONS
WITH THE VEHICLE OFF, MOVE THE GEARSHIFT. IS THE SHIFTER WORKING PROPERLY?
VISUAL
REASON FOR QUESTION
Make sure the shifter is connected to and moving the transmission linkages.
WITH THE VEHICLE OFF, STEP ON THE THROTTLE. DOES THE TP SENSOR ROD MOVE AS YOU STEP ON THE THROlTLE?
VISUAL
TEST OPTtONS
REASON FOR OUESTlON The TP senscr tells the transmission when to shift.
-
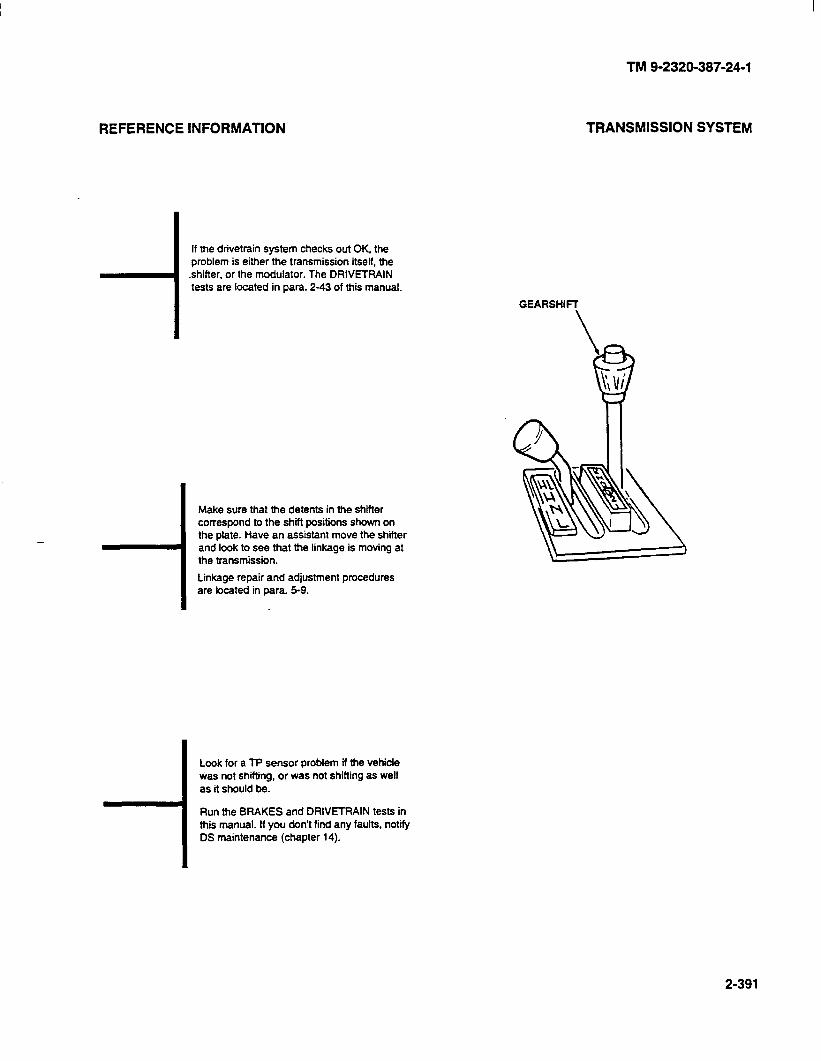
If the drivetrain system checks out OK, the problem is either the transmission itself, the shifter. of the modulator. The DRlVETFtAlN tests are located in para. 2-43 of this manual.
- -I Make sure that the detents in the shifter correspond to the shift positions shown on the plate. Have an assistant move the shifter and look to see that the linkage is moving at the transmission.
Linkage repair and adjustment procedures are located in para. 5-Q.
i
Look for a TP sensor problem if the vehicle was hot shifting. or was not shifting as well as it should be.
Run the BRAKES and DRIVETRAIN tests in this manual. If you don’t find any faults, notify DS maintenance (chapter 14).
TM 9-2320-387-24-l
TRANSMISSION SYSTEM
GEARSHIR
2-391
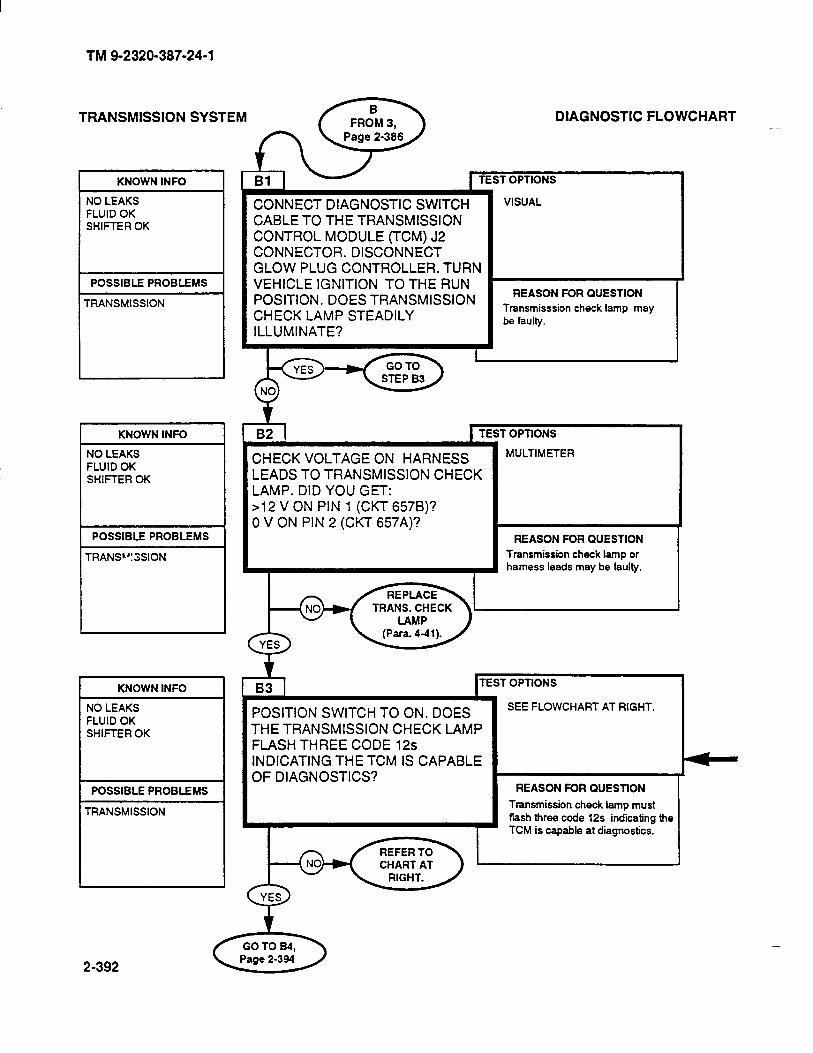
TM 9-2320-387-24-l
TRANSMISSION SYSTEM DIAGNOSTIC FLOWCHART
r& 1 TESTOPTIONS KNOWN INFO .
CONNECT DIAGNOSTIC SWITCH CABLE TO THE TRANSMISSION CONTROL MODULE (TCM) J2 CONNECTOR. DISCONNECT GLOW PLUG CONTROLLER. TURN VEHICLE IGNITION TO THE RUN POSITION. DOES TRANSMISSION CHECK LAMP STEADILY ILLUMINATE?
VISUAL
1 REASON FOR QUESTION
Ttansmisssion check lamp may be faulty.
NO LEAKS FLUID OK SHIFTER OK
POSSIBLE PROBLEMS
TRANSMISSION
1 TEST OPTIONS KNOWN INFO I
MULTIMETER NO LEAKS FLUID OK SHIFTER OK
CHECK VOLTAGE ON HARNESS LEADS TO TRANSMISSION CHECK LAMP. DID YOU GET: >12 V ON PIN 1 (CKT 657B)? 0 V ON PIN 2 (CKT 657A)?
POSSIBLE PROBLEMS 1 REASON FOR QUESTION
Transmission check lamp or harness leads may be faulty.
TRANSh’!XION
0 YES
t 83 1 TEST OPTIONS
POSITION SWITCH TO ON. DOES THE TRANSMISSION CHECK LAMP FLASH THREE CODE 12s INDICATING THE TCM IS CAPABLE OF DIAGNOSTICS?
SEE FLOWCHART AT RIGHT.
KNOWN INFO
NO LEAKS FLUID OK SHIFTER OK
POSSIBLE PROBLEMS REASON FOR QUESTION
Transmission check lamp must flash three code 12s indicating the TCM is capable at diagnostics.
TRANSMISSION
2-392
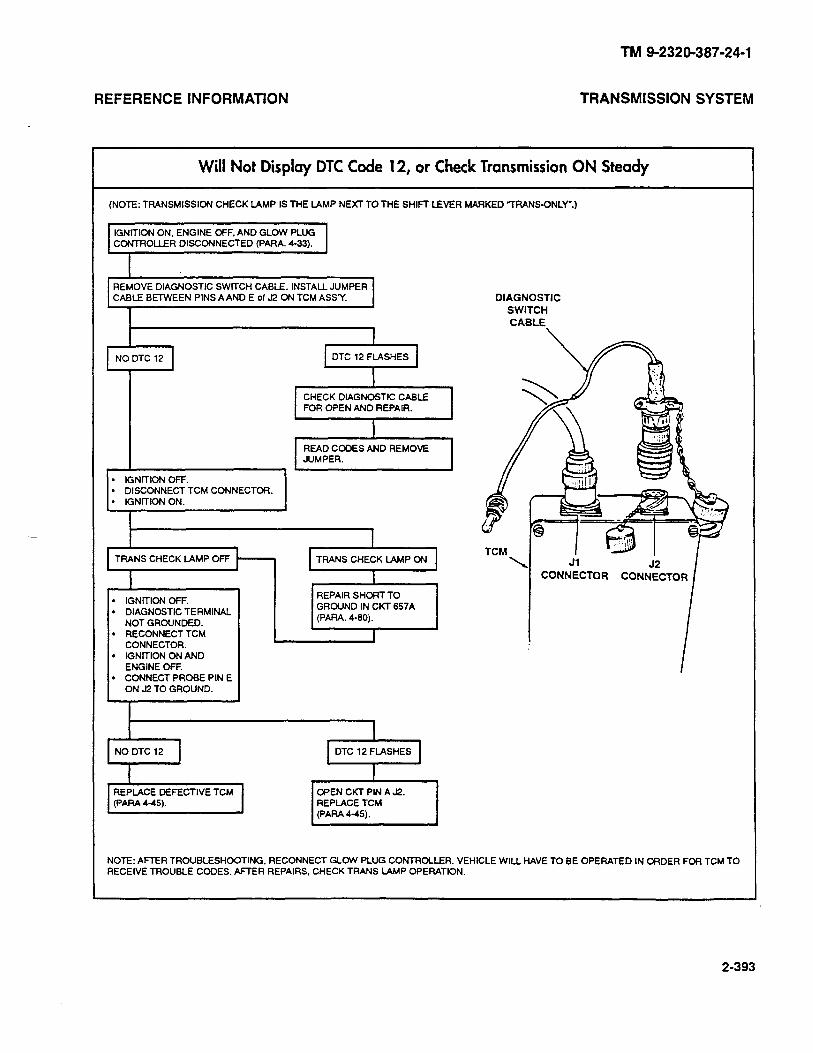
REFERENCE INFORMATION TRANSMISSION SYSTEM
TM 9-2320-387-24-l
Will Not Display DTC Code 12, or Check Transmission ON Steady
(NOTE: TRANSMISSION CHECK IAMP IS THE LAMP NEXT TO THE SHln LEVER MARKED 7RANS-ONLY’.)
REMOVE DIAGNOSTIC SWITCH CABLE. INSTALL JUMPER CABLE BETWEEN PINS AAND E of J2 ON TCM ASSY.
CHECK DlAGNOSTlC CABLE FOR OPEN AND REPAIR.
READ CCOES AND REMOVE JUMPER.
l IGNlTlON OFF. l DISCONNECT TCM CONNECTOR. . IGNlTlON ON.
l IGNITION OFF. l DIAGNOSTIC TERMINAL
NOT GROUNDED. l RECONNECT TCM
CONNECTOR. . IGNlTlON ON AND
ENGINE OFF. . CONNECT PROBE PIN E
ON J2 TO GROUND.
DIAGNOSTIC
SWITCH
CABLE \
Ji 52 CONNECTOR CONNECTOR
I
REPLACE DEFECTIVE TCM (PARA 4-45).
DTC 12 FLASHES
I
OPEN CKT PIN A J2. REPLACE TCM (PARA 4-45).
NOTE: AFTER TROUBLESHOOTING. RECONNECT GLOW PLUG CONTROLLER. VEHICLE WILL HAVE TO BE OPERATED IN ORDER FOR TCM TO RECEIVE TROUBLE CODES. AFTER REPAIRS, CHECK TRANS LAMP OPERATION.
2-393
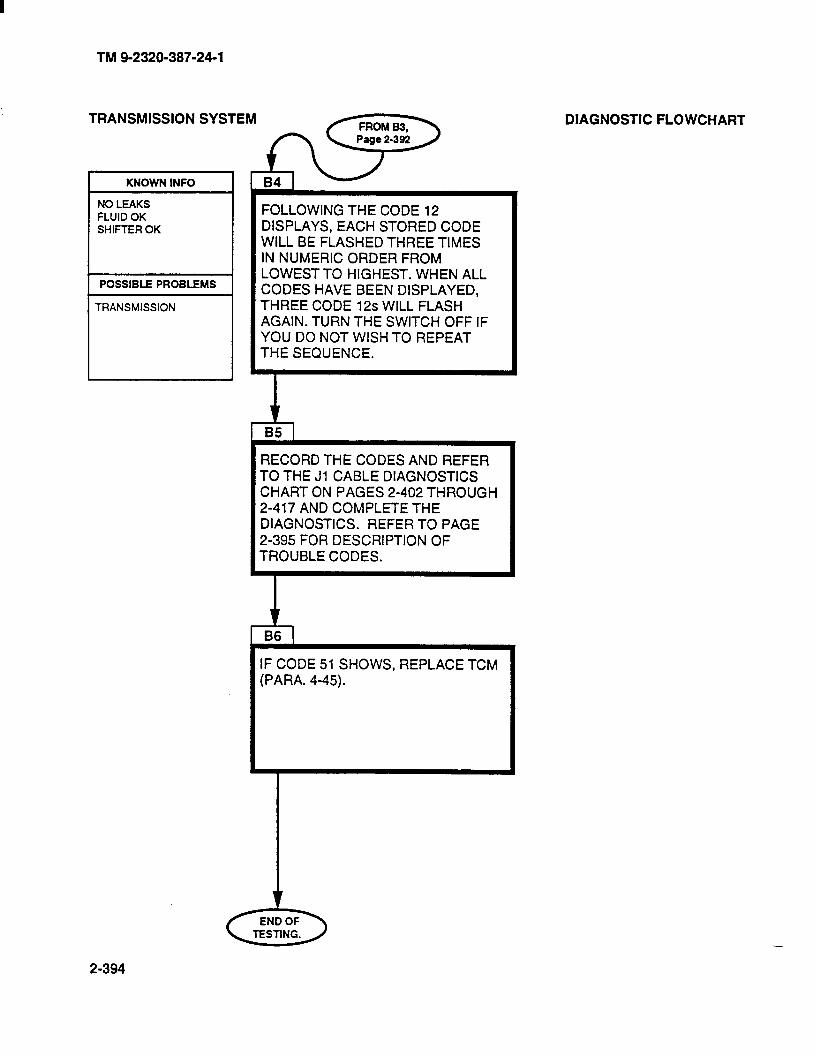
TM 9-2320-387-24-l
TRANSMISSION
FOLLOWING THE CODE 12 DISPLAYS, EACH STORED CODE WILL BE FLASHED THREE TIMES IN NUMERIC ORDER FROM LOWEST TO HIGHEST. WHEN ALL CODES HAVE BEEN DISPLAYED, THREE CODE 12s WILL FLASH AGAIN. TURN THE SWITCH OFF IF YOU DO NOT WISH TO REPEAT THE SEQUENCE.
RECORD THE CODES AND REFER TO THE Jl CABLE DIAGNOSTICS CHART ON PAGES 2-402 THROUGH 2-417 AND COMPLETE THE DIAGNOSTICS. REFER TO PAGE 2-395 FOR DESCRIPTION OF TROUBLE CODES.
I
1
I IF CODE 51 SHOWS, REPLACE TCM (PARA. 4-45).
DIAGNOSTIC FLOWCHART
2-394
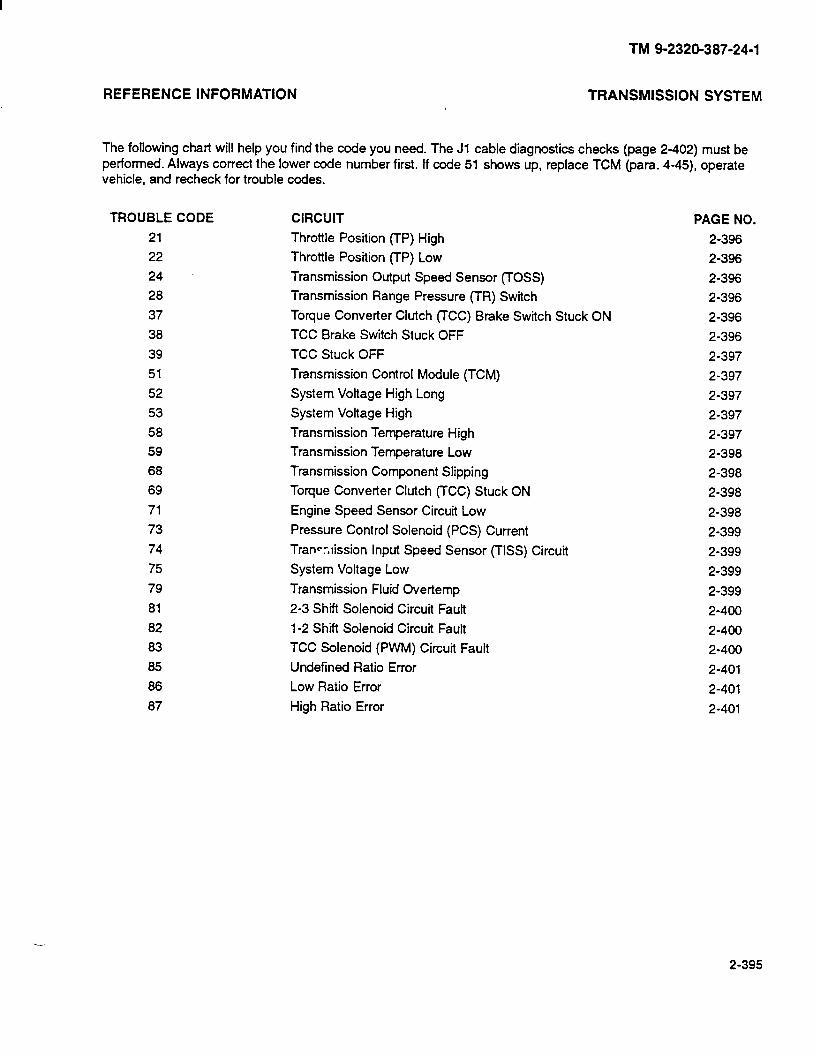
TM 9-2320-387-24-l
REFERENCE INFORMATION TRANSMISSION SYSTEM
The following chart will help you find the code you need. The Jl cable diagnostics checks (page 2-402) must be performed. Always correct the lower code number first. If code 51 shows up, replace TCM (para. 4-45) operate vehicle, and recheck for trouble codes.
TROUBLE CODE
21
22
24
28
37
38
39
51
52
53
58
59
68
69
71
73
74
75
79
81
82
83
85
86
87
CIRCUIT
Throttle Position (TP) High
Throttle Position (TP) Low
Transmission Output Speed Sensor (TOSS)
Transmission Range Pressure (TR) Switch
Torque Converter Clutch (TCC) Brake Switch Stuck ON
TCC Brake Switch Stuck OFF
TCC Stuck OFF
Transmission Control Module (KM)
System Voltage High Long
System Voltage High
Transmission Temperature High
Transmission Temperature Low
Transmission Component Slipping
Torque Converter Clutch (TCC) Stuck ON
Engine Speed Sensor Circuit Low
Pressure Control Solenoid (PCS) Current
Trancr,lission Input Speed Sensor (TISS) Circuit
System Voltage Low
Transmission Fluid Overtemp
2-3 Shift Solenoid Circuit Fault
l-2 Shift Solenoid Circuit Fault
TCC Solenoid (PWM) Circuit Fault
Undefined Ratio Error
Low Ratio Error
High Ratio Error
PAGE NO.
2-396
2-396
2-396
2-396
2-396
2-396
2-397
2-397
2-397
2-397
2-397
2-398
2-398
2-398
2-398
2-399
2-399
2-399
2-399
2-400
2-400
2-400
2-401
2-401
2-401
2-395
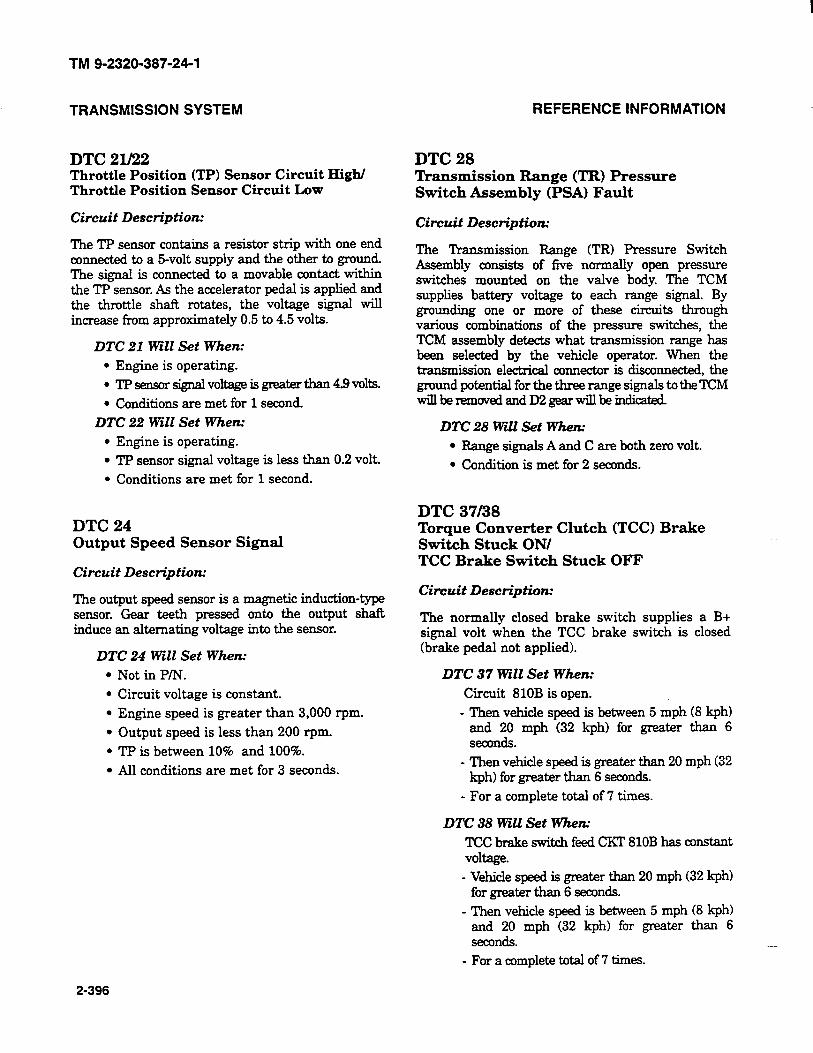
TM 9-2320-387-24-l
TRANSMISSION SYSTEM
DTC 2l/22 Throttle Position (TP) Sensor Circuit High/ Throttle Position Sensor Circuit Low
Circuit Description:
The TP sensor contains a resistor strip with one end connected to a 5-volt supply and the other to ground. The signal is connected to a movable contact within the TP sensor. As the accelerator pedal is applied and the throttle shaft rotates, the voltage signal will increase from approximately 0.5 to 4.5 volts.
DTC 21 Will Set When:
l Engine is operating. l TPsensorsignalvolulgeisgn?aterthan4.9volts.
l Conditions are met for 1 second.
DTC 22 will Set When:
l Engine is operating. l TP sensor signal voltage is less than 0.2 volt.
l Conditions are met for 1 second.
DTC 24 Output Speed Sensor Signal
Circuit Desctiption:
The output speed sensor is a magnetic induction-type sensor. Gear teeth pressed -onto the output shaft induce an alternating voltage into the sensor.
DTC 24 Will Set Whem
Not in P/N.
Circuit voltage is constant.
Engine speed is greater than 3,000 rpm.
Output speed is less than 200 rpm.
TP is between 10% and 100%.
All conditions are met for 3 seconds.
REFERENCE INFORMATION
DTC 28 Transmission Range (TR) Pressure Switch Assembly (PSA) Fault
Circuit Description:
The Transmission Range (TR) Pressure Switch Assembly consists of five normally open pressure switches mounted on the valve body. The TCM supplies battery voltage to each range signal. By grounding one or more of these circuits through various combinations of the pressure switches, the TCM assembly detects what transmission range has been selected by the vehicle operator. When the transmission electrical connector is disconnected, the ground potential for the three range signals to the TCM willbemmovedandD2gearwiUbeindicated_
DTC 28 Wd Set W7aen.z
l Range signals A and C are both zero volt.
l Condition is met for 2 seconds.
DTC 37/38 Torque Converter Clutch (TCC) Brake Switch Stuck ON/ TCC Brake Switch Stuck OFF
Circuit Description:
The normally closed brake switch supplies a B+ signal volt when the TCC brake switch is closed (brake pedal not applied).
DTC 37 Will Set When-
Circuit 810B is open. - Then vehicle speed is between 5 mph (8 kph)
and 20 mph (32 kph) for greater than 6 seconds.
- Then vehicle speed is greater than 20 mph (32 kph) for greater than 6 seconds.
- For a complete total of 7 times.
DTC 38 Will Set Whew
‘ICC brake switch feed CRT 810B has constant voltage. - Vehicle speed is greater than 20 mph (32 kph)
for greater than 6 seconds.
- Then vehicle speed is between 5 mph (8 kph) and 20 mph (32 kph) for greater than 6 seconds.
- For a complete total of 7 tunes.
2-396

REFERENCE INFORMATION
DTC 39 TCC Stuck OFF
Circuit Description:
The TCM commands the TCC FWM solenoid ON by modulating TCC signal fluid acting on the converter clutch shift valve. Then TCC fluid applies the torque converter clutch;
DTC 39 Will Set When..
l TCC is commanded ON.
l TCC slip speed greater than 65 r-pm.
l Trans range in D3 or D4.
l 2nd or 3rd gear.
l All conditions are met for 2 seconds.
DTC 51 Transmission Control Module (TCM) Faulty or Incorrect
Circuit description:
The Transmission Control Module (TCM), an on-board computer, receives and processes input signals from sensors on the vehicle and delivers output signals to the solenoids located on the control valve assembly. These solenoids control the transmission operating pressures, upshift and downshift patterns and Torque Converter Clutch (TCC) operation.
DTC 51 Wdl Set Whew
l There is an uncorrectable computational error, or an input is in error intermittently.
TM 9-2320-387-24-l
TRANSMISSION SYSTEM ’
DTC 52/53 System Voltage High Long/ System Voltage High
Circuit Description:
Ignition voltage is supplied to the control module to indicate the status of the ignition switch_ Battery voltage is supplied to the control module to, in part, maintain memory of learned functions and parameters.
DTC 52 Will Set When.*
l The ignition is ON and the system voltage is greater than 16 volts.
l Condition is met for 109 minutes.
DTC 53 WZZZ Set When:
l The ignition is ON and the system voltage is greater than 19.5 volts.
l Condition is met for 2 minutes.
DTC 58 Transmission Fluid Temperature (TFT) Sensor Circuit Low (High Temperature Indicated)
Circuit Description.-
The TFI! sensor is a thermistor that controls the signal voltage to the TCM. The TCM supplies a 5-volt reference signal to the sensor on TWC pin L. When the transmission fluid is cold, the sensor resistance is high and the TCM will sense high signal voltage.
As the transmission fluid temperature warms to normal transmission operating temperature 212°F (lOO”C), the sensor resistance becomes less and the voltage decreases to approximately 1.5 to 2.0 volts. With DTC 79 also set, check the transmission cooling system.
DTC 58 will Set When.-
* Signal voltage indicates TFT greater than 304°F (151°C).
l Condition is met for 1 second.
2-397
TM 9-2320-387-24-l
TRANSMISSION SYSTEM
DTC 59 Transmission Fluid Temperature (‘IXT) Sensor Circuit High (Low Temperature Indicated)
Circuit Description:
The TFT sensor is a thermistor that controls the signal voltage to the TCM. The TCM supplies a &volt reference signal to the sensor on TWC pin L. When the transmission fluid is cold, the sensor re.sistanceishighandtheTCMwillsensehighsignal voltage.
As the transmission fluid temperature warms to normal transmission operating temperature 212°F (lOO”C), the sensor resistance becomes less and the voltage decreases to approximately 1.5 to 2.0 volts
DTC 59 Wall Set Whenz
l Signal voltage indicates TFT less than -34°F (-37°C).
l Condition is met for 1 second.
DTC 68 Transmission Component Slipping
Circuit Description:
The TCM monitors the difference in engine speed and input speed.
DTC 68 WzZZ Set Whew
TCC slip speed is greater than 200 rpm.
Fourth gear is indicated.
TCC is locked.
Not in park/neutral.
All conditions are met for 2 seconds.
Transmission range switch indicates D3 or D4.
Commanded gear indicates 2nd or 3rd gear.
All conditions are met for 2 seconds.
REFERENCE INFO#‘.?ATION
DTC 69 Torque Converter Clutch (‘ICC) Stuck ON
Circuit Descriptions
The TCM commands the TCC PWM solenoid ON by modulating TCC signal fluid acting on the converter clutch shift valve. Then TCC fluid applies the torque converter clutch
DTC 69 Will Set When:
l ‘RX slip speed rpm indicates between -5 and +lO rpm.
l TCC solenoid is commanded OFF.
l TP sensor signal is greater than 25%.
DTC 71 Engine Speed Sensor Circuit Low
Circuit Description:
The Camsha& Position Sensor (CPS) detects the rotational speed of the camshaft. As the camshaft rotates, an AC signal is generated in the circuit. This signal provides the input to determine engine speed for use in various calculations including TCC slip speed and overdrive ratio.
DTC 71 Wdl Set Whew.
l Engine speed is leas than 50 rpm.
l Transmission range indicates R, D4, D3, or Dl.
l Conditions are met for 2 seconds.
2-398
REFERENCE INFORMATION TRANSMISSION SYSTEM
DTC 73 Pressure Control Solenoid (PCS) Circuit Current Error (Force Motor Circuit)
Circuit Description:
The Pressure Control Solenoid (PCS) is a TCM- controlled device used to regulate transmission line pressure. The TCM compares TP voltage, engine rpm, and other inputs to determine the appropriate line pressure of a given load. The TCM will regulate the pressure by applying a varying amperage to the PCS. The applied amperage can vary from 0.1 to 1.1 amp. The TCM then monitors the amperage at the return line.
DTC 73 Will Set When:
l The return amperage varies greater than 0.16 amp from the commanded amperage.
l All conditions are met for 1 second.
DTC 74 Transmission Input Speed Sensor (TISS) Circuit
Circuit Description:
The Transmission Input Speed Sensor (TISS) consists of a permanent magnet surrounded by a coil of wire. As the forward clutch housing rotates, an AC voltage is induced in the circuit. The signal voltage and frequency vary directly with the forward clutch rotational speed.
DTC 74 WZL Set When:
l Transmission range is not in park or neutral.
l Engine speed is greater than 300 r-pm.
TM 9-2320-387-24-1
DTC 75 System Voltage Low
Circuit Des&p tiorx
Ignition voltage is supplied to the control module to indicate the status of the ignition switch Battery voltage is supplied to the control module to, in part, maintain memory of learned functions and parameters.
DTC 75 Will Set When:
l The ignition is ON.
l Ignition feed voltage to the control module is less than the graduated scale of:
- -40°F (-40°C) = 7.3 volts.
- 194°F (-90°C) = 10.3 volts.
- 302°F (-150°C) = 11.7 volts.
l Engine speed is greater than 1,000 r-pm.
l All conditions are met for 4 seconds.
DTC 79 Transmission Fluid Overtemp
Circuit Description:
The Transmission Fluid Temperature (TFT) sensor is a thermistor that controls the signal voltage to the TCM. The TCM supplies a &volt reference signal to the sensor on Circuit 923A. When the transmission fluid is cold, the sensor resistance is high and the TCM will sense high signal voltage.
As the transmission fluid temperature warms to normal transmission operating temperature 212°F (lOO”C), the sensor resistance becomes less and the voltage decreases to approximately 1.5 to 2.0 volts.
l Transmission output speed is greater than 200 rpm.
l Transmission input speed less than 50 rpm.
l AI1 conditions are met for 2 seconds.
DTC 79 Will Set When:
l Transmission fluid temperature is greater than 295°F (146°C).
l All conditions are met for 30 minutes.
2-399

TM 9-2320-387-24-l
TRANSMISSION SYSTEM
DTC 81 2-3 Shift Solenoid Circuit Fault
Circuit Description:
Ignition voltage is supplied directly to the 2-3 shirk solenoid. The TCM controls the solenoid by providing the ground path through Circuit 315A to TCM.
DTC 81 Will Set When:
l The TCM commands the solenoid ON and voltage remains high.
l The TCM commands the solenoid OFF and voltage remains low.
l All conditions are met for 2 seconds.
DTC 82 1-2 Shift Solenoid Circuit Fault
Circuit Description:
Ignition voltage is supplied directly to the l-2 shit% solenoid. The TCM controls the solenoid by providing the ground path through Circuit 237A to TCM.
DTC 82 Will Set Whex
l The TCM commands the solenoid ON and voltage remains high.
l The TCM commands the solenoid OFF and voltage remains low.
l All conditions are met for 2 seconds.
REFERENCE INFORMATION _
DTC 83 TCC Solenoid (PWM) Circuit Fault
Circuit Description:
The control module supplies a ground through an internal Quad-Driver Module (QDM), allowing current to flow through the solenoid coil according to the duty cycle (percentage of ON and OFF time). This current flow through the solenoid coil creates a magnetic field that magnetizes the solenoid core. The magnetized core attracts the checkball to seat against spring pressure. This blocks the exhaust for the TCC signal fluid and allows 2-3 drive fluid to feed the TCC signal circuit. The TCC signal fluid pressure acts on the TCC regulator valve to regulate line pressure and to apply fluid pressure to the TCC shift valve. When the TCC shift valve is in the apply position, regulated applied fluid pressure is directed through the TCC valve to apply the torque converter clutch.
DTC 83 Will Set When:
The TCM commands the solenoid ON and voltage remains high. The TCM commands the solenoid OFF and voltage remains low. All conditions are met for 2 seconds.
2-400
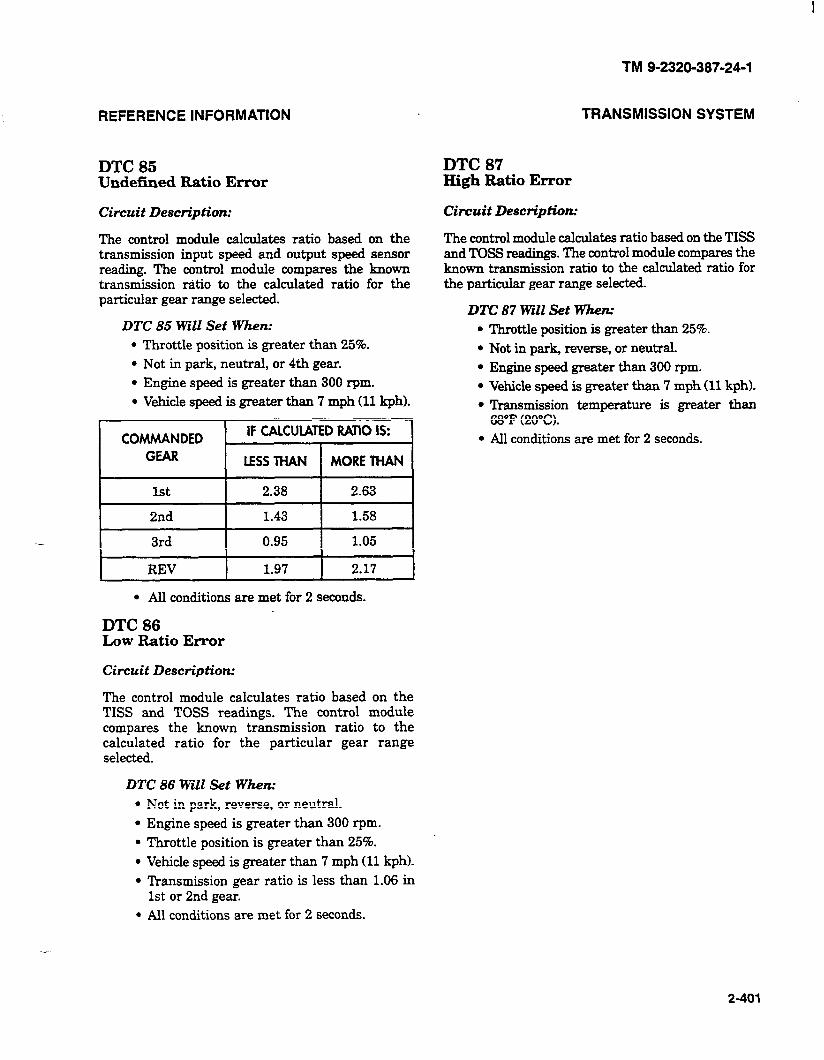
REFERENCE INFORMATION TRANSMISSION SYSTEM
DTC 85 Undefined Ratio Error
DTC 87 High Ratio Error
Circuif Descriptions
The control module calculates ratio based on the transmission input speed and output speed sensor reading. The control module compares the known transmission ratio to the calculated ratio for the particular gear range selected.
DTC 85 Will Set When-
* Throttle position is greater than 25%.
l Not in park, neutral, or 4th gear.
l Engine speed is greater than 300 r-pm.
l Vehicle speed is greater than 7 mph (11 kphl.
I COMMANDED lFCAlCUlATEDRATlOIS:
I GEAR I LESS THAN I MORE THAN I
I 1st I 2.38 I 2.63 I
I 2nd I 1.43 I 1.58 I I 3rd I 0.95 I 1.05 I
I REV I 1.97 I 2.17 I
l All conditions are met for 2 seconds.
-
DTC 86 Low Ratio Error
Circuit Description:
The control module calculates ratio based on the TISS and TOSS readings. The control module compares the known transmission ratio to the calculated ratio for the particular gear range selected.
DTC 86 Will Set Whenr
l Not in park, reverse, or neutral.
l Engine speed is greater than 300 x-pm.
l Throttle position is greater than 25%.
l Vehicle speed is greater than 7 mph (11 kphl.
l Transmission gear ratio is less than 1.06 in 1st or 2nd gear,
l All conditions are met for 2 seconds.
TM 9-2320-387-24-l
Circuit Description:
The control module calculates ratio based on the TISS and TOSS readings. The control module compares the known transmission ratio to the calculated ratio for the particular gear range selected.
DTC 87 Will Set When-
* Throttle position is greater than 25%.
l Not in park, reverse, or neutral.
l Engine speed greater than 300 rpm.
l Vehicle speed is greater than 7 mph (11 kphl.
l Transmission temperature is greater than 68°F (20°C).
l All conditions are met for 2 seconds.
2-401
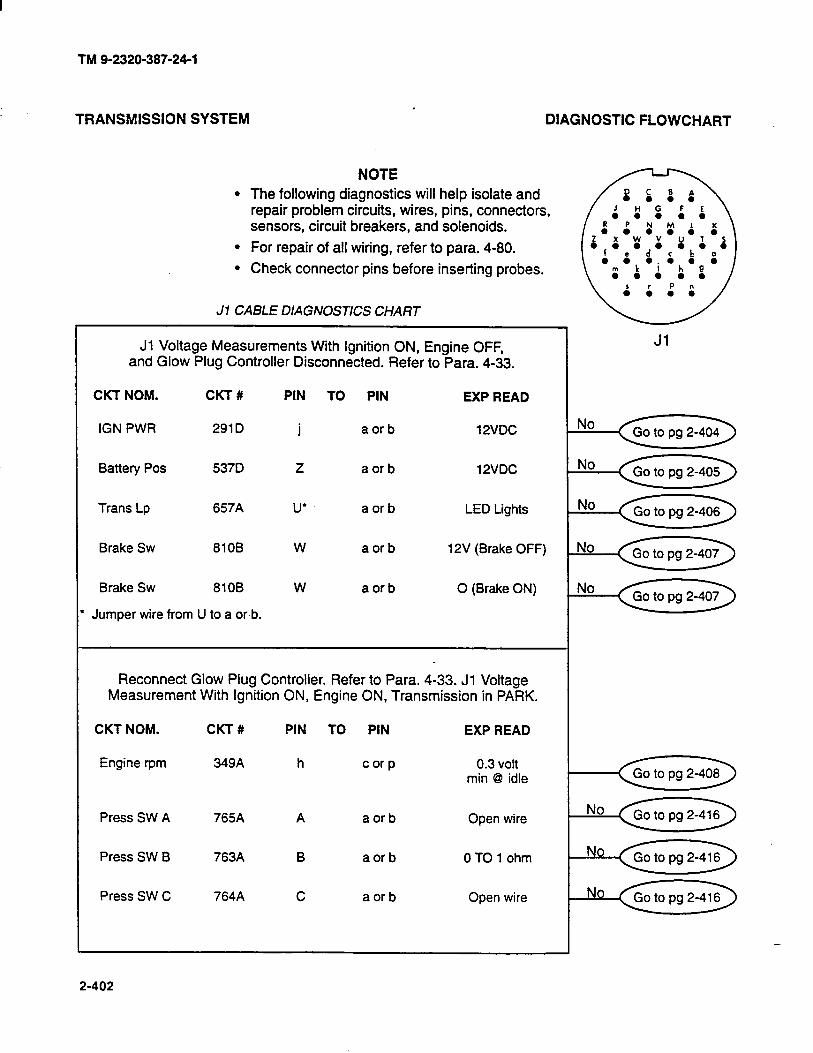
TM 9-2320-387-24-l
TRANSMISSION SYSTEM DIAGNOSTIC FLOWCHART
NOTE
The following diagnostics will help isolate and repair problem circuits, wires, pins, connectors, sensors, circuit breakers, and solenoids.
For repair of all wiring, refer to para. 4-80.
Check connector pins before inserting probes.
Jl CABLE DIAGNOSTICS CHART
Jl Voltage Measurements With Ignition ON, Engine OFF, and Glow Plug Controller Disconnected. Refer to Para. 4-33.
CKT NOM. CKT# PIN TO PIN EXP READ
IGN PWR 291 D i a or b 12VDC
Battery Pos 537D Z a or b 12VDC
Trans Lp 657A U’ a or b LED Lights
Brake SW 8108 W a or b 12V (Brake OFF)
Brake SW 8108 W aorb 0 (Brake ON)
Jumper wire from U to a or b.
Reconnect Glow Plug Controller. Refer to Para. 4-33. Jl Voltage Measurement With Ignition ON, Engine ON, Transmission in PARK.
CKT NOM. CKT# PIN TO PIN EXP READ
Engine rpm 349A h c or p 0.3 volt min @I idle
Press SW A 765A
Press SW B 763A
Press SW C 764A
a or b
a or b
a or b
Open wire
OTO 1 ohm
Open wire
Jl
-
2-402
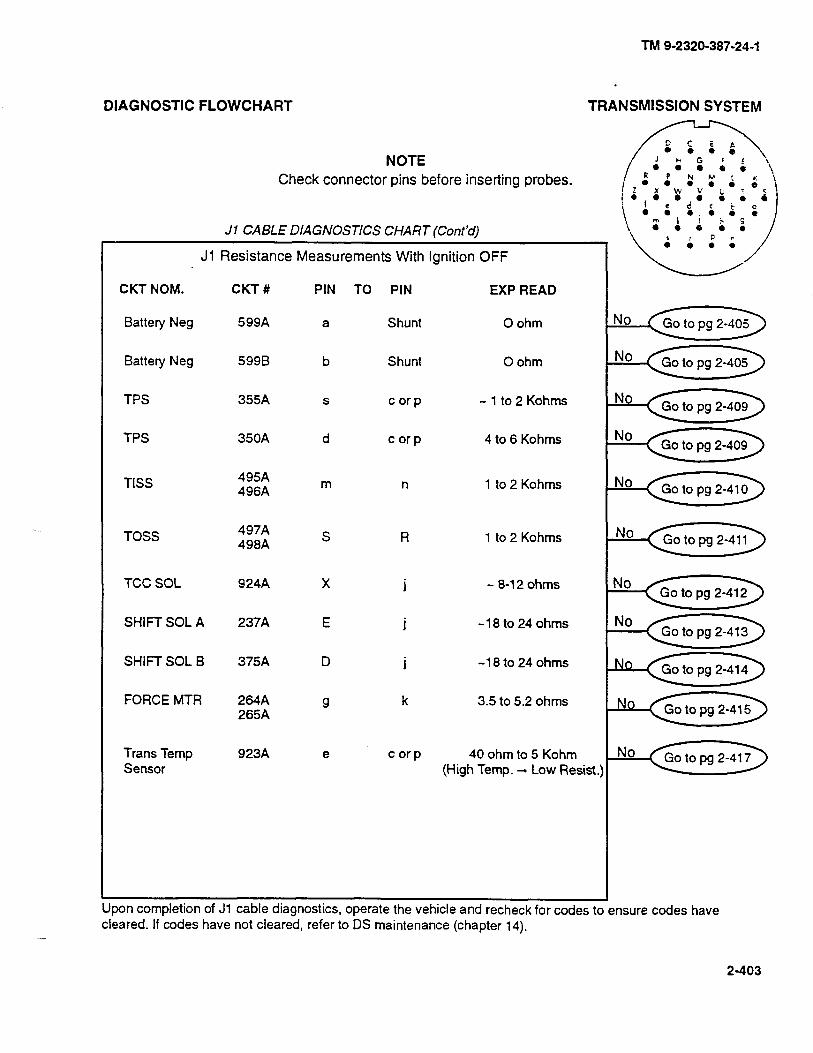
TM 9-2320-387-24-I
.
DIAGNOSTIC FLOWCHART TRANSMISSION SYSTEM
UF
NOTE Check connector pins before inserting probes.
Jl CABLE DIAGNOSTICS CHART /Cont’dI
Jl Resistance Measurements With Ignition OFF
CKT NOM. CKT# PIN TO PIN EXP READ
Battery Neg 599A a Shunt 0 ohm
Battery Neg 5998 b Shunt 0 ohm
TPS 355A s carp -1 to2Kohms
TPS 350A d c or p 4 to 6 Kohms
TISS 495A 496A
m n 1 to 2 Kohms
TOSS 497A 498A
S R 1 to 2 Kohms
TCC SOL 924A X i - 8-12 ohms
SHIFT SOL A 237A E i -18to24ohms
SHIFT SOL B 375A D i -18to24ohms
FORCE MTR 264A 265A
g k 3.5 to 5.2 ohms
Trans Temp Sensor
923A e carp 40 ohm to 5 Kohm (High Temp. + Low Resist.
Don completion of Jl cable diagnostics, operate the vehicle and recheck for codes to ensure codes have cleared. If codes have not cleared, refer to DS maintenance (chapter 14).
2-403
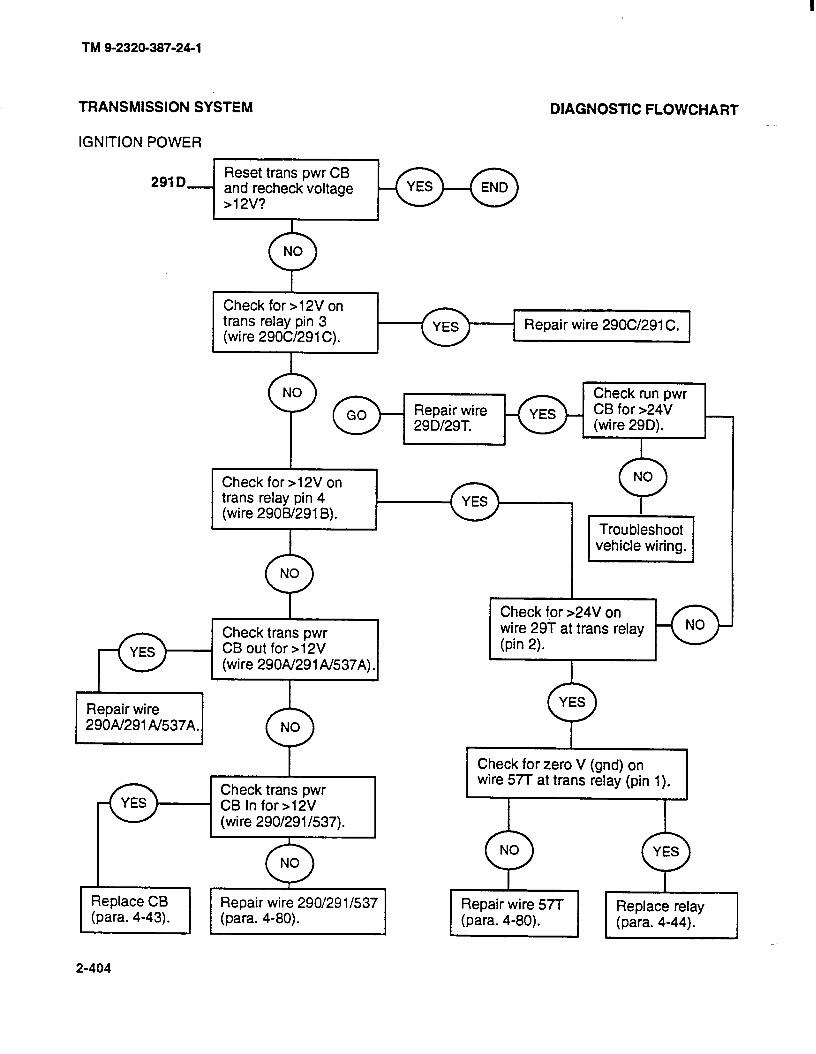
TM 9-2320-387-24-l
TRANSMISSION SYSTEM DIAGNOSTIC FLOWCHART
IGNITION POWER
291 D
i
Reset tram pwr CB and recheck voltage >12V?
0 NO
Check for >12V on tram relay pin 3 (wire 29OC/291 C).
Repair wire 2906/291 C.
Repair wire 29D/29T.
Check run pwr CB for >24V (wire 29D).
I I
Check for >12V on tram relay pin 4 (wire 2908/291 B). , Check trans pwr CB out for >12V (wire 290A/291/%37A).
Check f,or >24V on wire 29T at trans relay (pin 2).
Repair wire 29OAf291 Af537A.
I
Check trans pwr CB In for >12V (wire 290/291/537).
Check for zero V (gnd) on wire 57T at trans relay (pin 1).
2-404
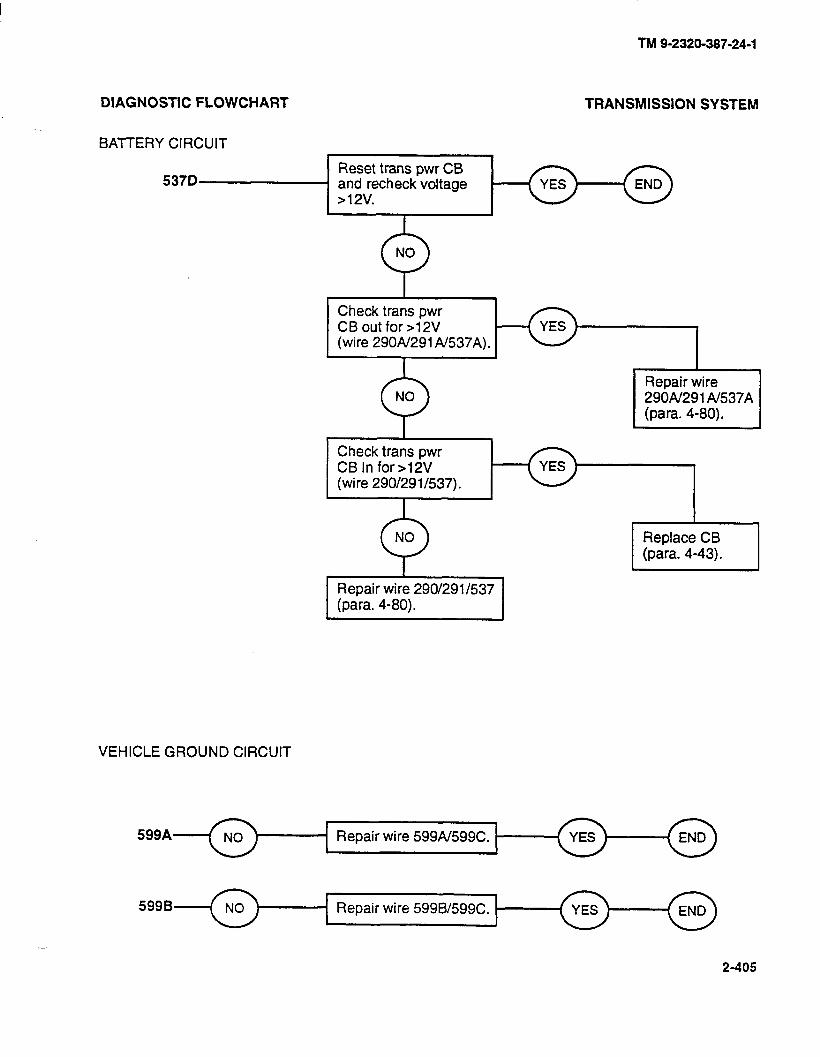
TM 9-2320-387-24-l
DIAGNOSTIC FLOWCHART TRANSMISSION SYSTEM
BATTERY CIRCUIT
537D Reset trans pwr CB
1 and recheck voltage >12v.
Check trans pwr CB
CB .
Replace CB
r Repair wire 290/291/537 (para. 4-80).
VEHICLE GROUND CIRCUIT
599A Repair wire 599A/599C.
5998
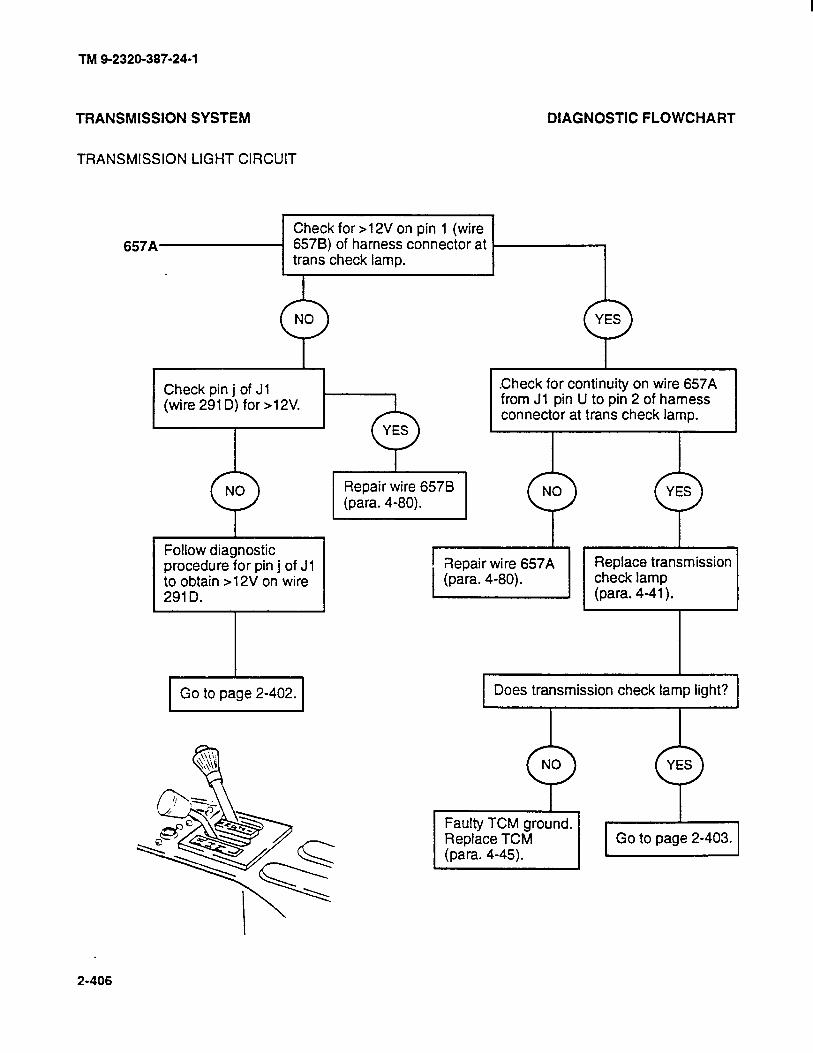
TM 9-2320-387-24-l
TRANSMISSION SYSTEM DIAGNOSTIC FLOWCHART
TRANSMISSION LIGHT CIRCUIT
657A Check for >12V on pin 1 (wire 6578) of harness connector at trans check lamp.
I
NO Q n YES
Y .Check for continuity on wire 657A from Jl pin U to pin 2 of harness connector at trans check lamp.
Check pin j of Jl (wire 291 D) for >12V.
NO
? Follow diagnostic procedure for pin j of Jl to obtain >12V on wire 291 D.
Replace transmission check lamp (para. 4-41).
1 Does transmission check lamp light? 1 1 Gotopage2-402.1
2-406

DIAGNOSTIC FLOWCHART TRANSMISSION SYSTEM
BRAKE SWITCH CIRCUIT
TM 9-2320-387-24-l
8108 Check for following resistance across brake switch leads pins 1 and 2 (wires 81 OA and 81 OB): o R - Brakes Off = R - Brakes On.
1 Check pin j of Jl (wire 291 D) for >12V. 1
NO 9 Follow diagnostic procedure for pin j of Jl to obtain >12V on wire 291 D.
YES 0 I Repair wire 81 OA
(para. 4-80).
2-407

TM 9-2320-387-24-1
2- 408 Change 1
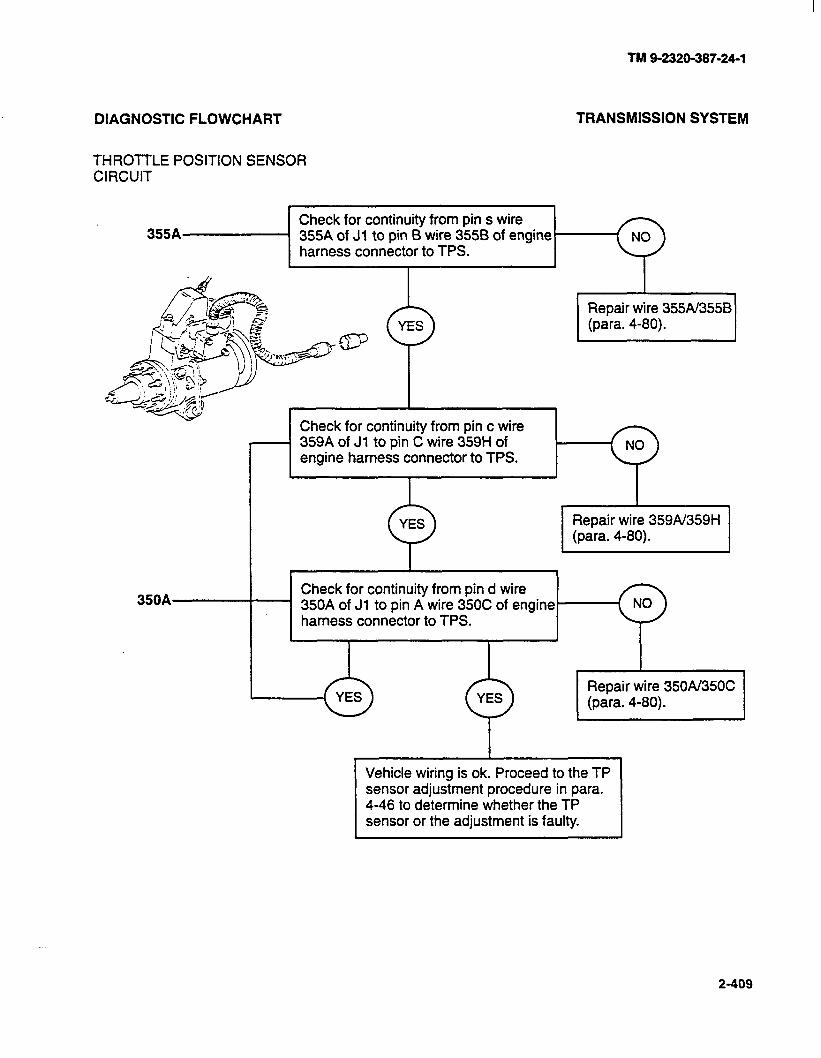
DIAGNOSTIC FLOWCHART TRANSMISSION SYSTEM
TM 9-2320-387-24-l
THROTTLE POSITION SENSOR CIRCUIT
Check for continuity from pin s wire 355A of Jl to pin B wire 3558 of engine harness connector to TPS.
Repair wire 355AI355B (para. 4-80).
Check for continuity from pin c wire 359A of Jl to pin C wire 359H of engine harness connector to TPS.
Repair wire 359A/359H (para. 4-80).
35QA Check for continuity from pin d wire
’ 350A of Jl to pin A wire 350C of engine harness connector to TPS.
Repair wire 35OA135OC (para. 4-80).
Vehicle wiring is ok. Proceed to the TP
4-46 to determine whether the TP sensor or the adjustment is faulty.
2-409
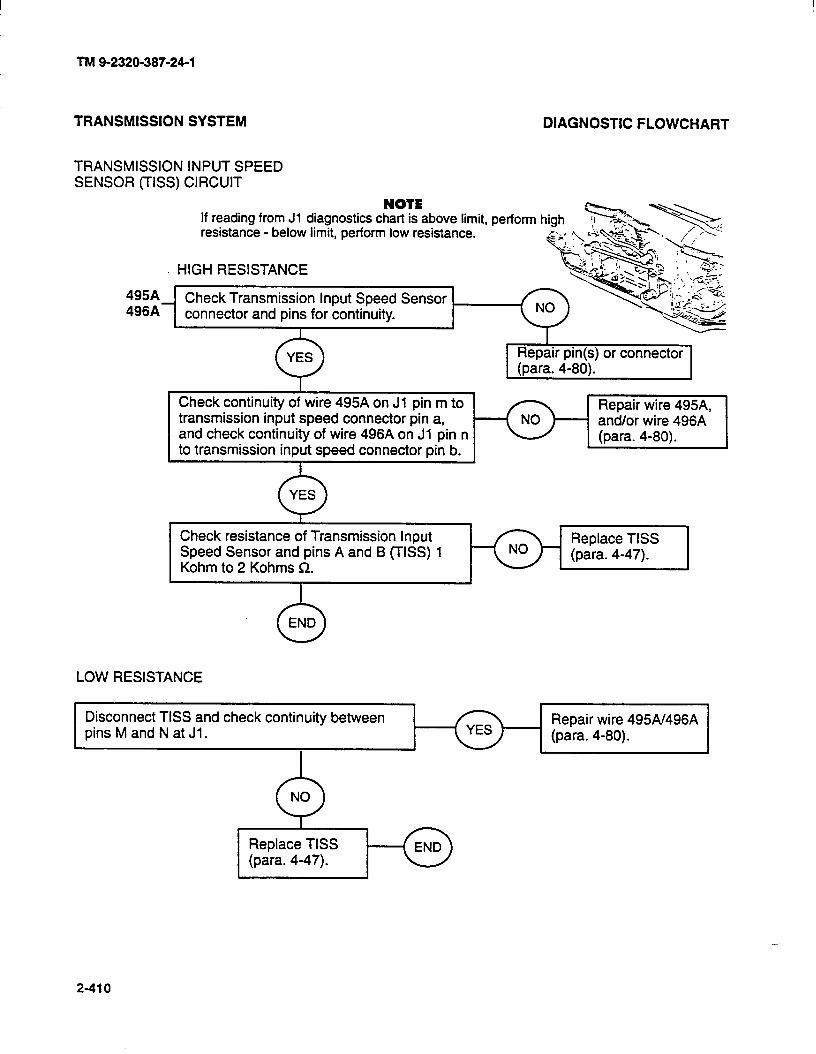
TM 9-2320-387-24-l
TRANSMISSION SYSTEM DIAGNOSTIC FLOWCHART
TRANSMISSION INPUT SPEED SENSOR (TISS) ClRCUlT
495A 496A
NOTE If reading from Jl diagnostics chart is above limit, resistance - below limit, perform low resistance.
HIGH RESISTANCE
_ Check Transmission Input Speed Sensor connector and pins for continuity.
Check continuity of wire 495A on Jl pin m to transmission input speed connector pin a,
Repair wire 495A, and/or wire 496A
and check continuity of wire 496A on Jl pin n to transmission inout soeed connector oin b.
(para. 4-80).
Check resistance of Transmission Input Speed Sensor and pins A and B (TISS) 1 Kohm to 2 Kohms R.
Replace TISS (para. 4-47).
6 END
LOW RESISTANCE
Disconnect TISS and check continuity between pins M and N at Jl .
I
Repair wire 495A/496A (para. 4-80).
0 NO
2410

TM 9-2320-387-24-l
DIAGNOSTIC FLOWCHART TRANSMISSION SYSTEM
TRANSMISSION OUTPUT SPEED SENSOR (TOSS) CIRCUIT
NOTE If reading from Jl diagnostics chart is above limit, perform high resistance - below limit, perform low resistance.
HIGH RESISTANCE
497A Check Transmission Output Speed 498A Sensor connector and pins for continuity.
0 YES
I
Disconnect and check continuity of wire 495A on Jl pin S to transmission output speed connector pin A, and check continuity of wire 498A on Jl pin R to transmission output speed connector pin B.
Repair wire 497A, and/or wire 498A (para. 4-80).
Check resistance of Transmission Output Speed Sensor and pins A and B (TOSS) 1 Kohm to 2 Kohms R.
Replace TOSS (para. 4-47).
LOW RESISTANCE
Disconnect TOSS and check continuity between pins M and N at Jl .
Repair wire 497Al498A (para. 4-80).
Replace TOSS ’ (para. 4-47).
2-411
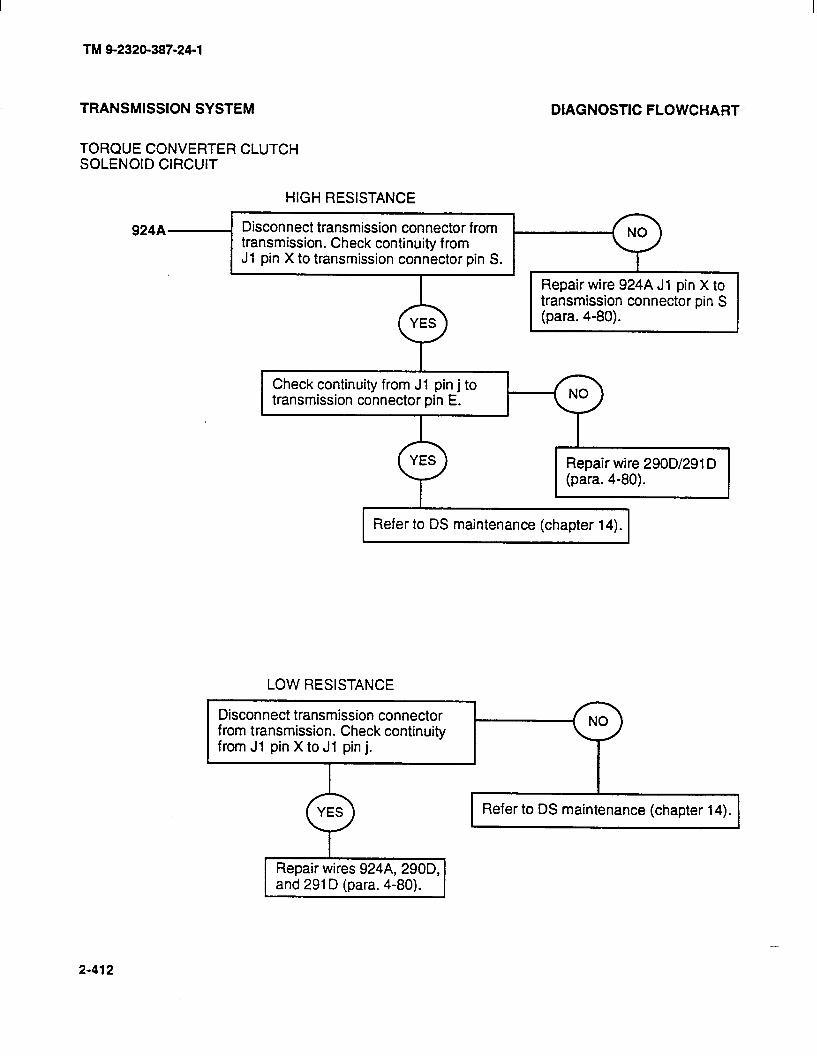
TM 9-2320-387-24-l
TRANSMISSION SYSTEM DIAGNOSTIC FLOWCHART
TORQUE CONVERTER CLUTCH SOLENOID CIRCUIT
HIGH RESISTANCE
924A Disconnect transmission connector from transmission. Check continuity from Jl pin X to transmission connector pin S.
Repair wire 924A Jl pin X to transmission connector pin S (para. 4-80).
;p Check continuity from Jl pin j to
1 Refer to DS maintenance (chapter 14). 1
LOW RESISTANCE
Disconnect transmission connector from transmission. Check continuity from Jl pin X to Jl pin j.
.
Refer to DS maintenance (chapter 14).
Repair wires 924A, 290D, and 291 D (para. 4-80). I
2-412
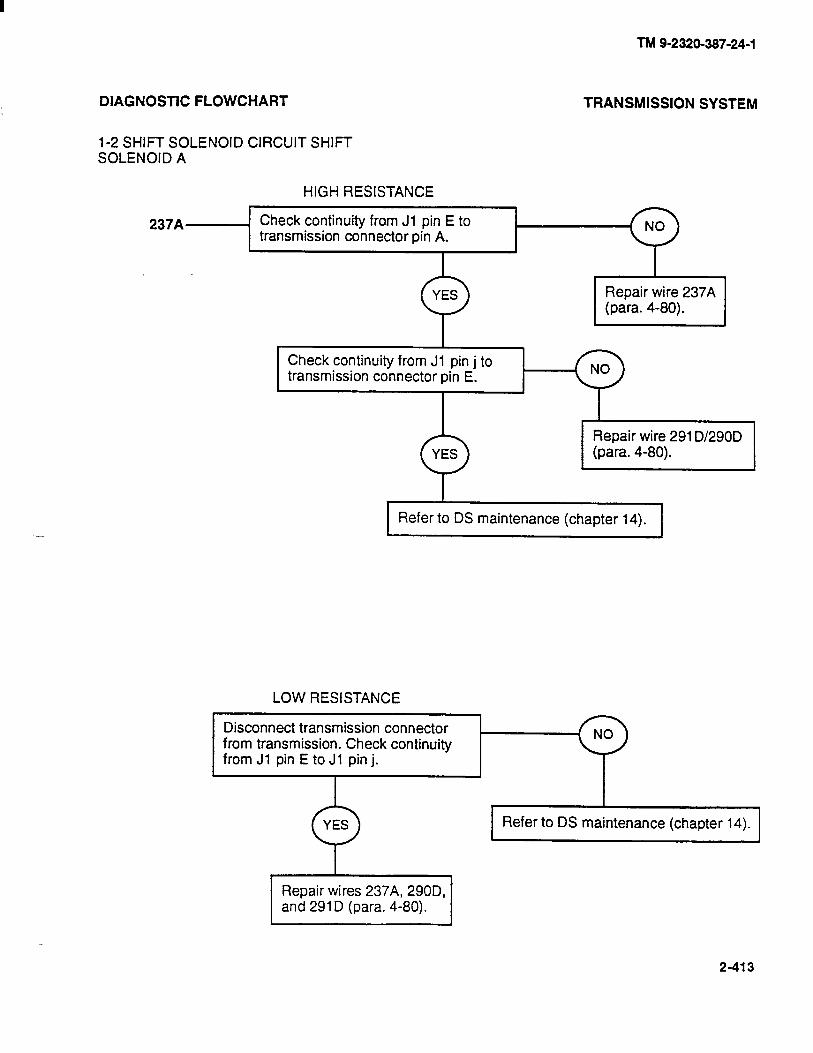
TM 9-2320-397-24-l
DIAGNOSTIC FLOWCHART TRANSMISSION SYSTEM
1-2 SHIFT SOLENOID CIRCUIT SHIFT SOLENOID A
HIGH RESISTANCE
237A Check continuity from Jl pin E to transmission connector pin A.
I
YES 0 Repair wire 237A (para. 4-80).
Check continuity from Jl pin j to ]l-Gq
1 Refer to DS maintenance (chapter 14). 1
LOW RESISTANCE
Disconnect transmission connector from transmission. Check continuity from Jl pin E to Jl pin j.
YES Q Repair wires 237A, 290D, and 291 D (para. 4-80).
1 Refer to DS maintenance (chapter 14). 1
2-413
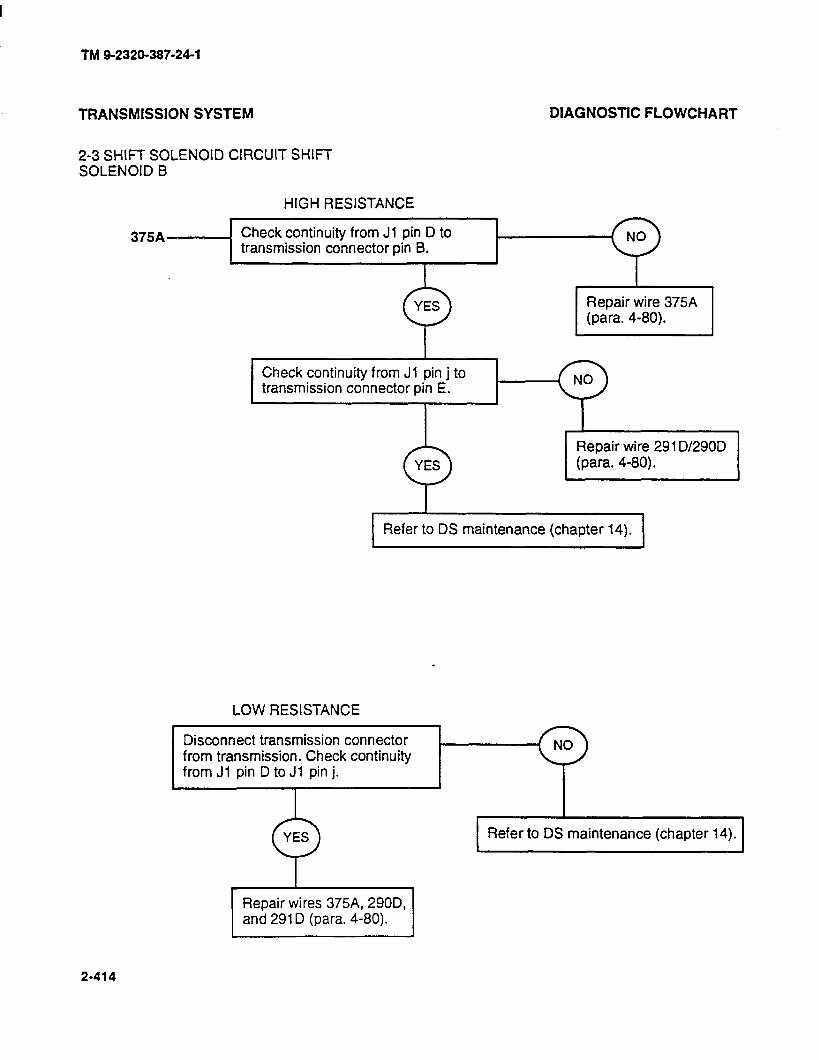
TM 9-2320-387-24-l
TRANSMISSION SYSTEM DIAGNOSTIC FLOWCHART
2-3 SHIFT SOLENOID CIRCUIT SHIFT SOLENOID 6
HIGH RESISTANCE
375A Check continuity from Jl pin D to transmission connector pin B.
Check continuity from Jl pin j to \l-y Q (1
1 Refer to DS maintenance (chapter 14). 1
LOW RESISTANCE ,
Disconnect transmission connector from transmission. Check continuity from Jl pin D to Jl pin j.
Refer to DS maintenance (chapter 14).
Repair wires 375A, 290D, and 291 D (para. 4-80).
2-414
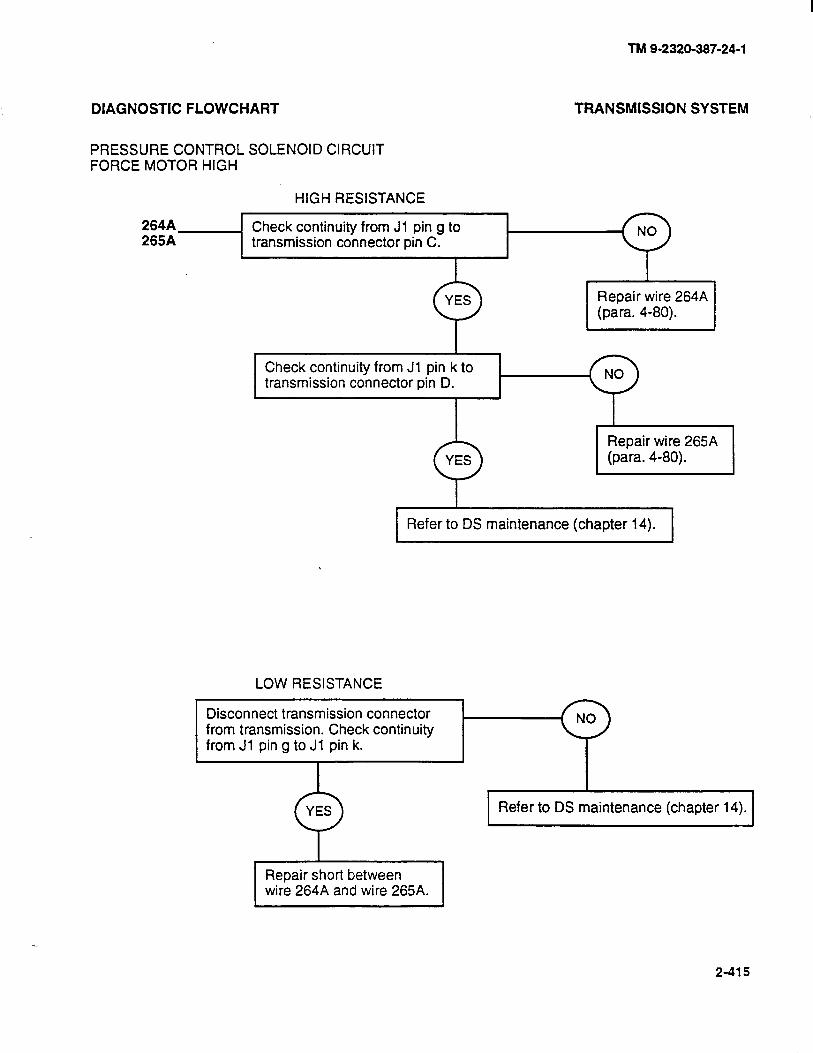
-iWl9-2320-387-24-l
DIAGNOSTIC FLOWCHART TRANSMISSION SYSTEM
PRESSURE CONTROL SOLENOID CIRCUIT FORCE MOTOR HIGH
264A 265A
HIGH RESISTANCE
. Check continuity from Jl pin g to transmission connector pin C.
Repair wire 264A (para. 4-80).
Check continuity from Jl pin k to transmission connector pin D.
Refer to DS maintenance (chapter 14).
LOW RESISTANCE
Disconnect transmission connector from transmission. Check continuity from Jl pin g to Jl pin k.
Refer to DS maintenance (chapter 14).
Repair short between wire 264A and wire 265A.
2-415

TM 9-2320-387-24-l
TRANSMISSION SYSTEM DIAGNOSTIC FLOWCHART
TRANSMISSION RANGE PRESSURE SWITCH, CIRCUIT PRESSURE SWITCH A
765A . Disconnect the transmission connector . from transmission. Check continuity from Jl pin A to chassis ground at shunt.
Refer to DS maintenance (chapter 14).
Repair short to ground in wire 765A (para. 4-80).
TRANSMISSION RANGE PRESSURE SWITCH, CIRCUIT PRESSURE SWITCH B
763A Disconnect the transmission connector , from transmission. Check continuity from Jl pin B to chassis ground at shunt.
Repair short to ground in wire 763A (para. 4-80).
Refer to DS maintenance (chapter 14).
TRANSMISSION RANGE PRESSURE SWITCH, CIRCUIT PRESSURE SWITCH C
Jl pin C to chassis ground at shunt.
Repair short to ground in wire 764A (para. 4-80).
764A Disconnect the transmission connector from transmission. Check continuity from
2-416
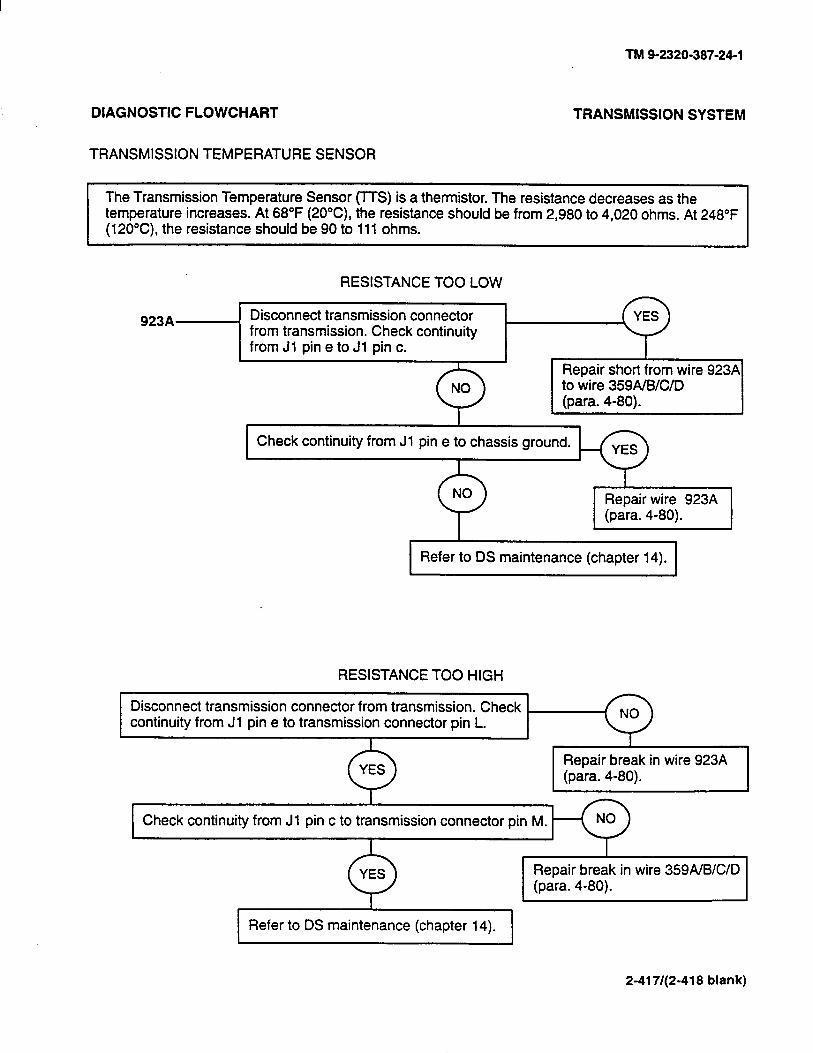
TM 9-2320-387-24-l
DIAGNOSTIC FLOWCHART TRANSMISSION SYSTEM
TRANSMISSION TEMPERATURE SENSOR
The Transmission Temperature Sensor (ITS) is a thermistor. The resistance decreases temperature increases. At 68°F (2O”C), the resistance should be from 2,980 to 4,020 ohms. At 248°F (12O”C), the resistance should be 90 to 111 ohms.
RESISTANCE TOO LOW
923A Disconnect transmission connector from transmission. Check continuity from Jl pin e to Jl pin c.
Repair short from wire 923P to wire 359A/B/C/D (para. 4-80).
I Check continuity from Jl pin e to chassis ground. I&& I ‘U
Q NO
1
I Repair wire 923A (para. 4-80). I
I I I
1 Refer to DS maintenance (chapter 14). 1
RESISTANCE TOO HIGH
Disconnect transmission connector from transmission. Check , continuity from Jl pin e to transmission connector pin L.
I
0 YES Repair break in wire 923A (para. 4-80).
1~
Check continuity from Jl pin c to transmission connector pin M.
I
Repair break in wire 359A/B/C/D
1 Refer to DS maintenance (chapter 14). 1
2-417/(2-418 blank)
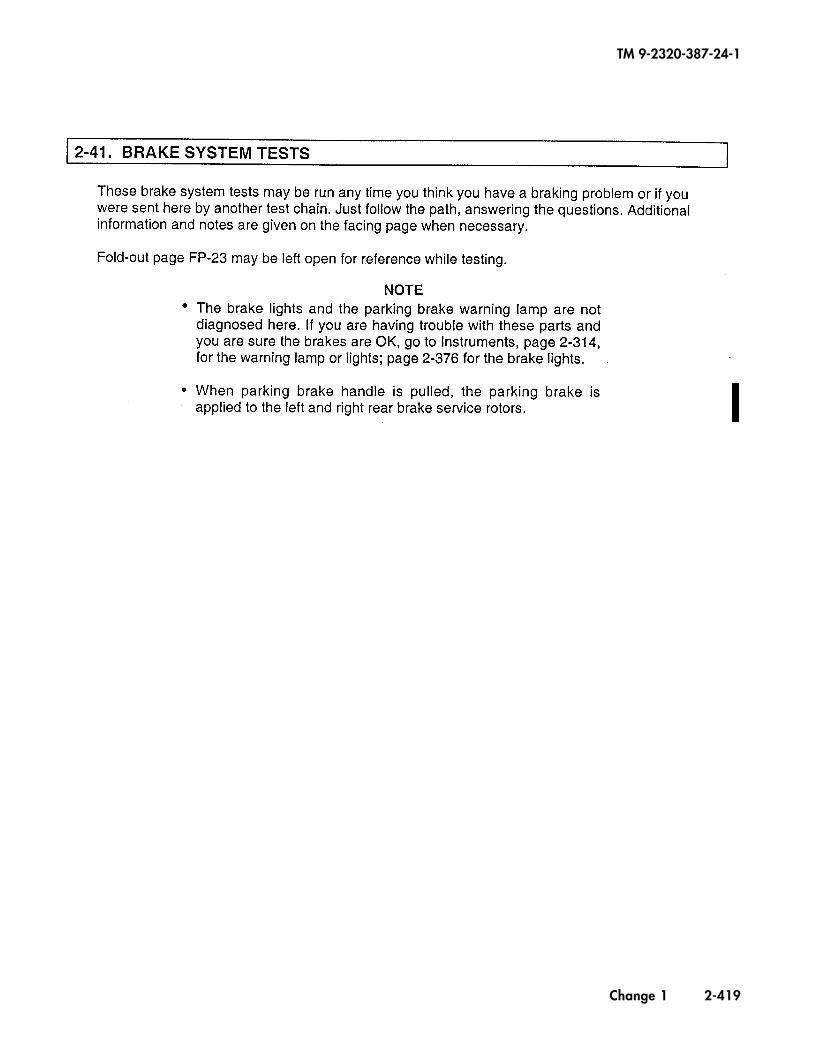
TM 9-2320-387-24-1
Change 1 2-419
TM 9-2320-387-24-l
BRAKE SYSTEM
KNOWN INFO
NONE
POSSIBLE PROBLEMS
PARKING BRAKES SERVICE BRAKES HYDRAULIC SYSTEM TIRE PRESSURE
KNOWN INFO
PARKING BRAKE OK
POSSIBLE PROBLEMS
TIRE PRESSURE SERVICE BRAKES HYDRAULIC SYSTEM
DOES THE VEHICLE REMAIN STATIONARY USING THE PROCEDURE AT THE RIGHT? (DOES THE PARKING BRAKE WORK?)
TEST PARKING BRAKE USING PROCEDURE AT RIGHT.
REASON FOR QUESTlON
A working parking brake is necessary for safety.
DO THE SERVICE BRAKES PASS THE ROAD TEST PROCEDURE AT THE RIGHT?
OPTIONS
TEST SERVICE BRAKES USING PROCEDURE AT THE RIGHT.
REASON FOR QUESTlON
It is impossible to operate a vehicle safely if the service brakes don’t work well.
-.
2-420
REFERENCE INFORMATION
1 WARNING
Make sure the area is clear of personnel and obstacles prior to performing this test. Failure to do so may result in serious injury.
PARKING BRAKF TEST PROCFDURE:
1. Depress service brake pedal and start engine. 2. Place transmission shift lever in D (drive) and transfer
case shift lever in H (high). 3. Apply parking brake. Slowly let up on service brake
pedal. Vehicle should remain stationary.
SFRVICF BRAKF ROAD TEST PROCFDURF-
1. On an open, smooth, flat surface, accelerate to a steady, reasonable, safe speed (below posted limits).
2. Apply pressure on the brake pedal and bring the vehicle to a stop.
3. Repeat this procedure several times, applying a different brake pedal pressure each time. Look for the following symptoms, which may indicate a problem with the service brakes:
1) Spongy or pulsating brake pedal. 2) Incomplete brake pedal return. 3) Excessive pull to one side. 4) Unusually long braking distance. 5) Front wheels lock up before rear wheels. 6) Brake warning light comes on while braking. 7) A squealing, grinding, or chattering noise while
braking.
TM 9-2320-387-24-l
BRAKE SYSTEM
2-421
TM 9-2320-387-24-l
BRAKE SYSTEM
PARKING BRAKE INOPERATIVE
POSSIBLE PROBLEMS
PADS CALIPER ROTOR CABLE BRAKE LEVER
HAVE YOU TRIED ADJUSTING THE PARKING BRAKE?
PARKING BRAKE INOPERATtVE
I POSSIBLE PROBLEMS
PADS CALIPER ROTOR CABLE BRAKE LEVER
DIAGNOSTIC FLOWCHART
--l 1 SEE TEST PROCEDURE AT
RIGHT.
1 TEST OPTlONS
PARKING BRAKE INOPERATlVE
PADS OK CALIPER OK ROTOR OK CABLE OK
REASON FOR QUESTlON
Parking brake may not be broken; it may just need adjustment.
ARE THE PARKING BRAKE PADS, CALIPER, ROTOR, AND CABLE IN GOOD WORKING ORDER?
POSSIBLE PROBLEMS
PARKING BRAKE LEVER AND LINKAGE
VISUAL
REASON FOR QUESTION
If there is a problem with any one of these components, the
J
KNOWN INFO r IS THE PARKING BRAKE SHIFTING LINKAGE IN GOOD WORKING ORDER?
TEST OPTlONS
OPERATE PARKING BRAKE FOR VISUAL INSPECTION.
REASON FOR QUESTION
If the linkage is broken or binding, 1 the parking brake will not function
properly.
REFERENCE INFORMATION
PARKING BRAKF
A.
B.
C.
D.
E.
Chock wheels and release parking brake handle.
Turn adjusting knob at the tip of the brake handle clockwise as tight as possible by hand. Apply parking brake handle.
If parking brake cannot be applied, turn adjusting knob counterclockwise until parking brake can be applied.
Test parking brake.
A
Make sure the area is clear of personnel and obstacles prior to performing this test. Failure to do so may result in serious injury.
(1) (2)
(3)
(4)
Remove chocks. Depress service brake pedal and start engine. Place transmission shift lever in D (drive) and transfer case shift lever in H (high). Apply parking brake and slowly let up on service brake pedal. Vehicle should remain stationary.
Replace or repair parts (para. 7-l).
-I Repair or replace linkage (para. 7-19).
TM 9-2320-387-24-l
BRAKE SYSTEM
ADJUSTMENT KNOB I
PARKING BRAKE ROTOR
\
PARKlNG BRAKE
PARKING BRAKE
.--
2-423
TM 9-2320-387-24-l
DIAGNOSTIC FLOWCHART BRAKE SYSTEM
PARKING BRAKES OK
T OPTIONS
VISUAL IS THE FLUID IN THE MASTER CYLINDER FREE OF CONTAMINATION AND FILLED TO THE PROPER LEVEL?
REASON FOR QUESTION
Contaminants in fluid or low fluid level decreases braking efficfency, resulting in little or no braking action.
1 POSSIBLE PROBLEMS 1
SERVICE BRAKES HYDRAULIC SYSTEM
I I
I KNOWN INFO I TEST OPTlONS
IS THE MASTER CYLINDER 1. VISUAL
WORKING PROPERLY AND 2. FOLLOW TEST PROCEDURE
FREE OF LEAKS? ATTHE RIGHT.
PARKING BRAKE OK FLUID CLEAN AND FULL
I REASON FOR QlJESTlON POSSIBLE PROBLEMS
BRAKE COMPONENTS HYDRAULIC
COMPONENTS MECHANICAL
COMPONENTS
83 1 1 TEST OPTIONS KNOWN INFO
PARKING BRAKE OK MASTER CYUNDER OK
ARE THE BRAKE LINES, HYDRAULIC LINES, AND CALIPER PISTON SEALS FREE OF EVIDENCE OF LEAKING AND STRUCTURAL DAMAGE?
VISUAL CHECK FOR LEAKS, DAMAGE, BINDING, KINKING, ETC.
REASON FOR QUESTION
If the braking system is losing fluid, stopping distances will increase
I
until the brakes fail due to lack of fluid and fluid pressure.
POSSIBLE PROBLEMS
BRAKE COMPONENTS HYDRO-BOOSTER MECHANICAL
COMPONENTS
TM 9-2320-387-24-l
REFERENCE INFORMATION BRAKE SYSTEM
-I .Flush and bleed the brake system (para. 7-2).
&laster cvlinder test aroced~
1. With the engine off, pump the brake pedal six or seven times, or until the pedal becomes noticeably stiffer and harder to depress.
2. Press hard on the brake pedal. If the pedal keeps going down to the floor, either the master cylinder is bad or there is a leak in the hydraulic system.
Replace master cylinder (para. 7-S).
I Check the individual tines going to each brake. Check the supply and return lines to the hvdro-booster unit. Replace brake line (pa& 7-7).
NOTE
I Brake hydraulic system must be bled of air whenever hydraulic lines are broken.
Bleed service brake (para. 7-2).
MASTER CYLINDER COVEY
PI
- \
MA!SlER CYLtNDEk
PISTON SEAL
PISTON .
DUST BOOT
2-425

TM 9-2320-387-24-l
BRAKE SYSTEM
PARKING BRAKE MASTER CYLINDER NO VISIBLE
POSSIBLE PROBLEMS
PADS CALIPERS
PROPORTIONING VALVE
MECHANICAL COMPONENTS
INFO
PARKING OK MASTER OK BRAKE OK
POSSIBLE
ROTORS CALIPERS
VALVE HYDRO-BOOSTER
COMPONENTS
KNOWN
PARKING BRAKE MASTER CYLINDER BRAKE PADS
POSSIBLE PROBLEMS
BINDING CALIPERS PROPORTIONING VALVE
MECHANICAL COMPONENTS
DIAGNOSTIC FLOWCHART
zi+J TEST OPTIONS
ARE THE BRAKE PADS FREE VISUAL
FROM CONTAMINATION, DIRT, DISTORTION, AND EXCESSIVE WEAR?
REPLACE PADS IN
REASON FOR QUESTtON
Dirty, bent, or thin brake pads could cause problems such as noisy brakes, erratic braking, or excessive pedal pressure.
85 1 i TE!
ARE THE FOUR SERVICE BRAKE ROTORS FREE FROM HEAVY SCORING, EXCESSIVE WEAR, WARPING, HEAT-SPOTTING, GLAZING, AND CHIPPING?
OPTIONS
VISUAL
REASON FOR QUESTION
Damaged rotors reduce braking ability and speed up brake failure due to excessive heat buildup.
(YES>
TEST OPTIONS
DO THE FOUR SERVICE BRAKE TRY TO ROTATE ROTORS WHILE WHEELS ARE RAISED.
ROTORS ROTATE FREELY?
REASON FOR QUESTION
Sticky rotors can cause erratic braking behavior.
2-426
REFERENCE INFORMATION
Replace brake pad (para. 7-3).
The minimum brake pad thickness is l/8 in. (3.2 mm).
-I Replace service brake rotor(s) (para. 7-12).
The only way the rotors can be sticking is if the calipers are not releasing fully.
Remove. calipers. Clean and lubricate guide pins with grease.
Replace and clean brake caliper (para. 74).
TM 9-2320-387-24-l
BRAKE SYSTEM
INNER PAD
PAD
2-427

TM 9-2320-387-24-l
BRAKE SYSTEM
KNOWN INFO
PARKlNG BRAKE OK MASTER CYLINDER OK BRAKE PADS OK ROTORS OK CALIPERS OK
POSSIBLE PROBLEMS
PROPORTIONING VALVE HYDRO-BOOSTER MECHANICAL
COMPONENTS
KNOWN INFO
PARKING BRAKE OK MASTER CYLINDER OK BRAKE PADS OK ROTORS OK CALIPERS OK PROPORTIONING VALVE
OK
POSSIBLE PROBLEMS
HYDRO-BOOSTER MECHANICAL
COMPONENTS
KNOWN INFO
PARKING BRAKE OK MOST BRAKE SYSTEM
COMPONENTS OK
POSSIBLE PROBLEMS-
DOES THE PROPORTIONING SEE TEST EXPLANATION AT RIGHT.
VALVE WORK PROPERLY?
REASON FOR QUESTION
This valve regulates the flow of , hydraulic fluid. If it’s broken, the
brakes may behave erratically.
PROPORTfONlNG
TEST OPTIONS
IS THE HYDRO-BOOSTER WORKING PROPERLY? I SEE INSTRUCTlONS AT RIGHT.
REASON FOR QUESTION
The hydra-booster is an integral
I A part of the braking system.
TEST OPTIONS
LOOK AT THE BRAKE PEDAL. VISUAL INSPECTtON - SPECIFICALLY CHECK PEDAL
DOES IT MOVE THROUGH ITS RETURN SPRING AND
FULL OPERATING RANGE? BUSHING.
REASON FOR QUESTfON
A brake pedal that doesn’t return to its normal position
I could cause the brakes to drag.
2-428
GO TO 0 STEERING, Page 2433
REFERENCE INFORMATION
Test for faulty proportioning valve:
Drive the vehicle and have an assistant observe during the performance of this test.
With vehicle at curb weight, decelerate vehicle from 45 to 40 mph (72 to 69 kph) on dry concrete road and apply sufficient pressure to lock up front brakes. If rear brakes lock up before front brakes, the proportioning valve should be replaced.
Replace proportioning valve (para. 7-10).
Method for checking hydra-booster:
Depress brake pedal several times to exhaust accumulator pedal. Depress brake pedal and start engine. Brake pedal should fall, then push back against operatoh foot.
Replace hydro-booster (para. 7-6).
Replace service brake pedal (para. 7-9).
The steering tests will check for suspension problems that will affect braking.
TM 9-2320-387-24-l
BRAKE SYSTEM
HYDRO-BOOSTE
PB~P~BTIONING VALVE
BRAKE PEDAL
BUSHING
2-429
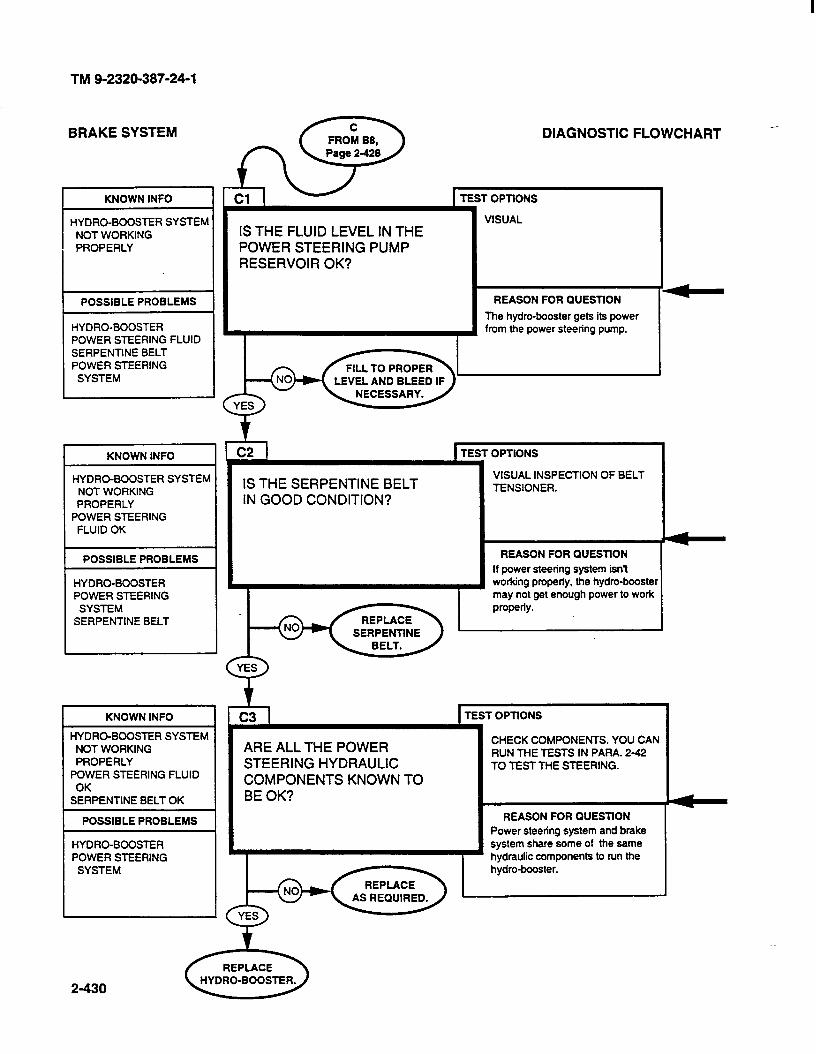
TM
BRAKE SYSTEM
l PROPERLY
HYDRO-BOOSTER POWER STEERING FLUID SERPENTINE BELT POWER STEERING
KNOWN INFO I
HYDRO-BOOSTER SYSTEM NOT WORKING PROPERLY
POWER STEERING FLUID OK
POSSIBLE PROBLEMS
HYDRO-BOOSTER POWER STEERING
SYSTEM SERPENTINE BELT
KNOWN INFO
HYDRO-BOOSTER SYSTEM NOT WORKING PROPERLY
POWER STEERING FLUID OK
SERPENTINE BELT OK
POSSIBLE PROBLEMS
HYDRO-BOOSTER POWER STEERING
SYSTEM
IS THE FLUID LEVEL IN THE POWER STEERING PUMP RESERVOIR OK?
DIAGNOSTIC FLOWCHART -
TEST OPTlONS
VISUAL
REASON FOR QUESTION
The hydra-booster gets its power
I from the power steering pump.
IS THE SERPENTINE BELT IN GOOD CONDITION?
OPTIONS
VISUAL INSPECTlON OF BELT TENSIONER.
REASON FOR QUESllON
If power steering system isnY working properly, the hydro-booster may not get enough power to work
PropedY.
TEST OPTlONS
ARE ALL THE POWER STEERING HYDRAULIC COMPONENTS KNOWN TO BE OK?
CHECK COMPONENTS. YOU CAN RUN THE TESTS IN PARA. 242 TO TEST THE STEERING.
REASON FOR QtJESllON
Power steering system and brake system share some of the same
I hydraulic components to run the hydro-booster.
AS REQUIRED.
2-430
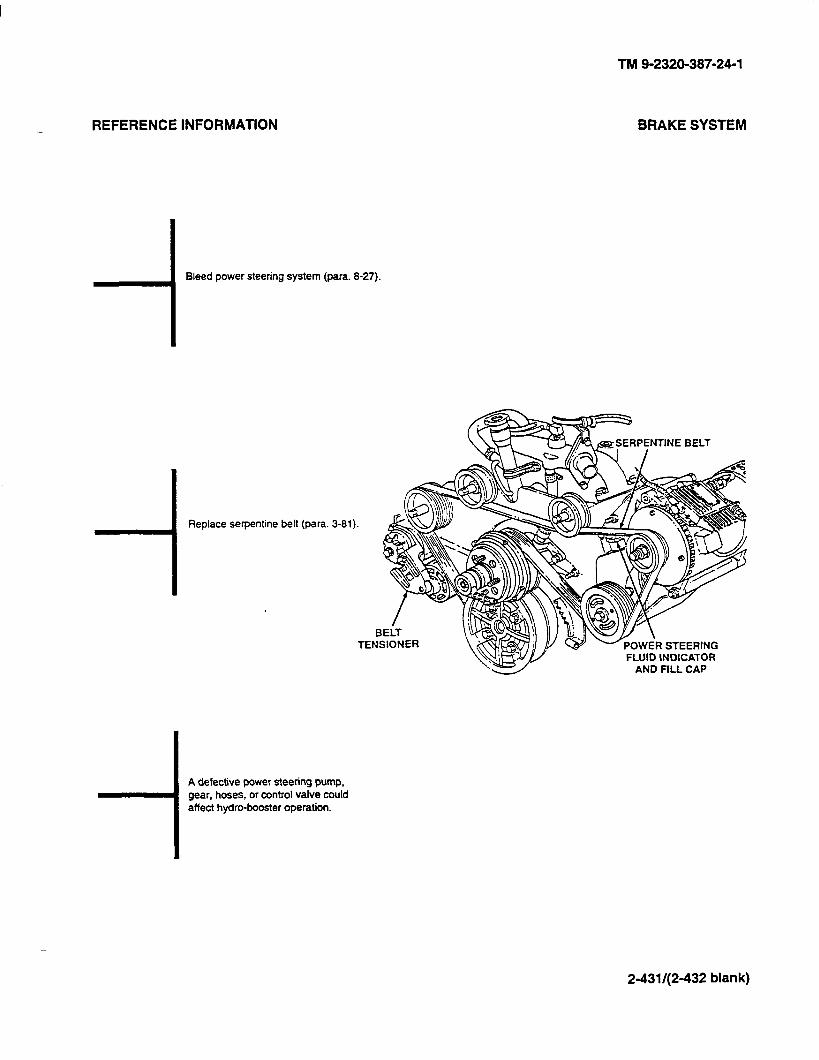
REFERENCE INFORMATION BRAKE SYSTEM
-I Bleed power steering system (para. 8-27).
Replace serpentine belt (para. 3-81).
TM 9-2320-387-24-l
AND FILL CAP
A defective power steering pump, gear, hoses, or control valve could affect hydra-booster operation.
2-431/(2-432 blank)

TM 9-2320-387-24-l
I 2-42. STEERING SYSTEM TESTS
These steering system tests may be run any time you have a steering problem or if you were sent here by another test chain. Just follow the path, answering the questions. Additional information and notes are given on the facing page when necessary.
The fold-out page shows the location of the major components of the steering in case you are not familiar with them. These parts are shown in a schematic manner. Illustrations of the actual components are given wherever applicable on the reference pages of the diagnostics.
Fold-out page FP-25 may be left open for reference while testing. The functional flow diagram shows the mechanical and hydraulic parts of the system and how they interact. Even if the hydraulic system fails, you will still be able to steer the vehicle, although it will require more effort.
2-433
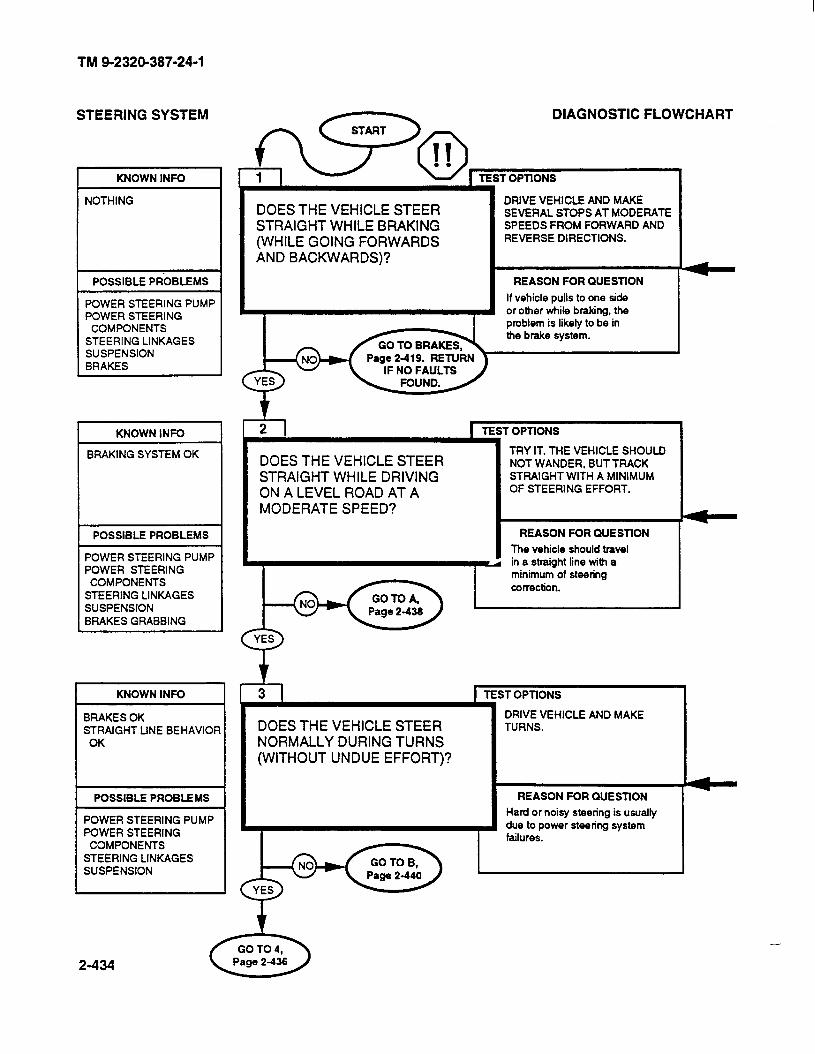
TM 9-2320-387-24-l
STEERING SYSTEM
KNOWN INFO
NOTHING
POSSIBLE PR-OBLEMS
POWER STEERING PUMP POWER STEERING
COMPONENTS STEERING LINKAGES SUSPENSION BRAKES
KNOWN INFO
BRAKING SYSTEM OK
POSSIBLE PROBLEMS
POWER STEERING PUMP POWER STEERING COMPONENTS
STEERING LINKAGES SUSPENSION BRAKES GRABBING
KNOWN INFO
BRAKES OK STRAIGHT UNE BEHAVIOR
OK
POSSIBLE PROBLEMS
POWER STEERING PUMP POWER STEERING
COMPONENTS STEERING LINKAGES SUSPENSION
Tfi@, TEST OPTIONS
DOES THE VEHICLE STEER STRAIGHT WHILE BRAKING (WHILE GOING FORWARDS AND BACKWARDS)?
DIAGNOSTIC FLOWCHART
1
I
DRIVE VEHICLE AND MAKE SEVERAL STOPS AT MODERATE SPEEDS FROM FORWARD AND REVERSE DIRECTIONS.
REASON FOR QUESllON
If vehicle pulls to one side or other while braking, the problem is likely to be in the brake system.
DOES THE VEHICLE STEER STRAIGHT WHILE DRIVING ON A LEVEL ROAD AT A MODERATE SPEED?
r OPTIONS
TRY IT. THE VEHICLE SHOULD NOT WANDER, BUT TRACK STRAIGHT WITH A MINIMUM OF STEERING EFFORT.
REASON FOR QUESllON The vehicle should travel in a straight line with a minimum of steering correction.
1 TEST OPTlONS
DRIVE VEHICLE AND MAKE TURNS. DOES THE VEHICLE STEER
NORMALLY DURING TURNS (WITHOUT UNDUE EFFORT)?
REASON FOR QUESTION Hard or noisy steering is usually due to power steering system failures.
L
L
2-434
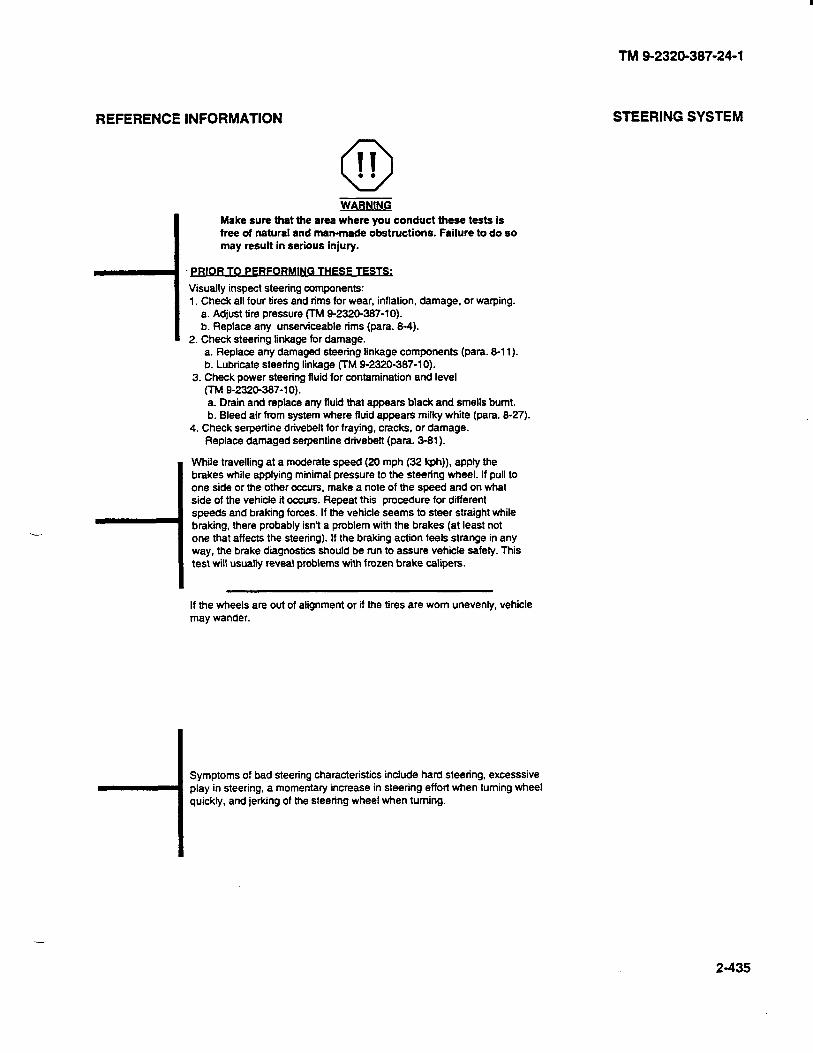
I
REFERENCE INFORMATION
-I
-1
WARNING
Make sure that the am where you conduct these tests is free of natural and man-made obstructions. Failure to do so may result in serious injury.
. JJRIOR TO PERFORMI~THESE TESTS,
Visually inspect steering components: 1. Check all four tires and rims for wear, inflation, damage, or warping.
a. Adjust tire pressure (TM Q-2320-387-10). b. Replace any unserviceable rims (para. 8-4).
2. Check steering linkage for damage. a. Replace any damaged steering linkage components (para. 8-11). b. Lubricate steering linkage (TM 9-2320-387-10).
3. Check power steering fluid for contamination and level (TM 9-2320-387-l 0).
may wander.
a. Drain and replace any Ruid that appears black and smells burnt. b. Bleed air from system where fluid appears milky white (para. 8-27).
4. Check serpertine drivebelt for fraying, cracks, or damage. Replace damaged serpentine drivebelt (para. 3-81).
While travelling at a moderate speed (20 mph (32 kph)). apply the brakes while applying minimal pressure to the steering wheel. If pull to one side or the other occurs, make a note of the speed and on what side of the vehicle it occurs. Repeat this procedure for different speeds and braking forces. If the vehicle seems to steer straight while braking, there probably isn’t a problem with the brakes (at least not one that affects the steering). If the braking action feels strange in any way, the brake diagnostics should be run to assure vehicle safety. This test will usually reveal problems with frozen brake calipers.
If the wheels are out of alignment or if the tires are worn unevenly, vehicle
Symptoms of bad steering characteristics include hard steering, excesssive play in steering, a momentary increase in steering effort when turning wheel quickly, and jerking of the steering wheel when turning.
TM 9-2320-387-24-l
STEERING SYSTEM
2-435
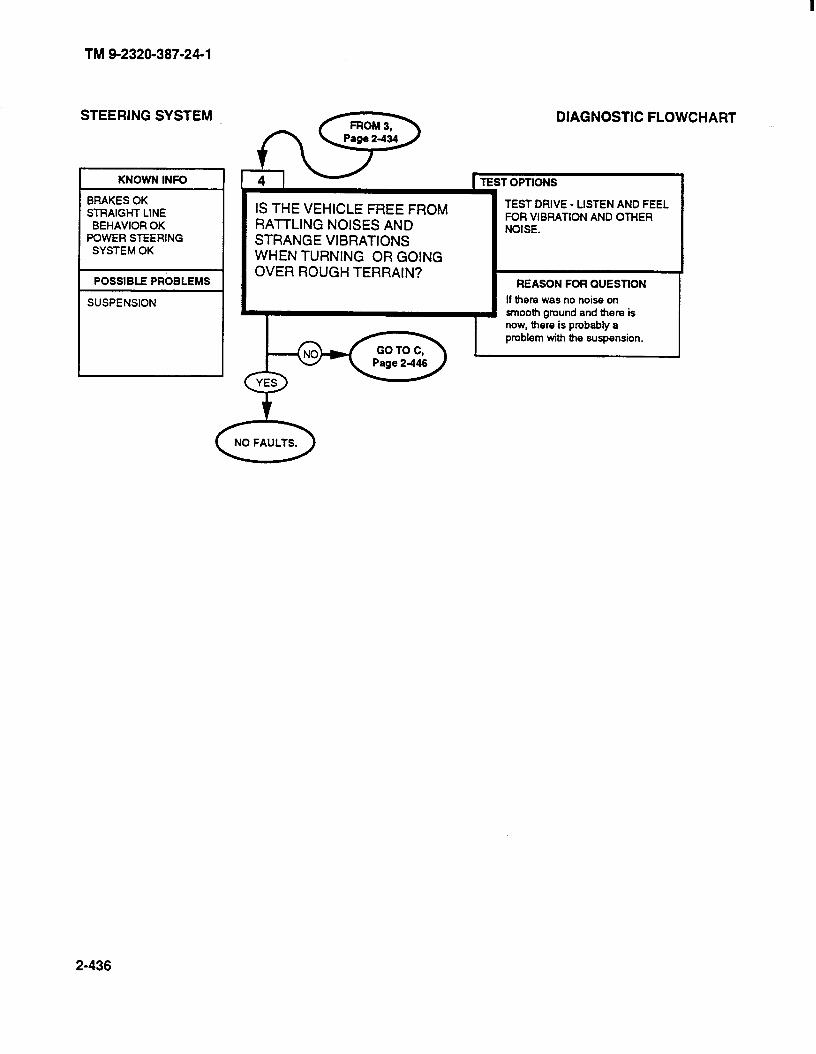
TM 9-2320-387-24-l
STEERING SYSTEM
I KNOWN INFO
BRAKES OK STRAIGHT LINE
BEHAVIOR OK POWER STEERING
SYSTEM OK
SUSPENSION
IS THE VEHICLE FREE FROM RATTLING NOISES AND STRANGE VIBRATIONS WHEN TURNING OR GOING OVER ROUGH TERRAIN?
DIAGNOSTIC FLOWCHART
T OPTIONS
TEST DRIVE - LISTEN AND FEEL FOR VIBRATION AND OTHER NOISE.
REASON FOR QUESllON
If there was no noise on smooth ground and there is now, there is probably a problem with the suspension.
2-436
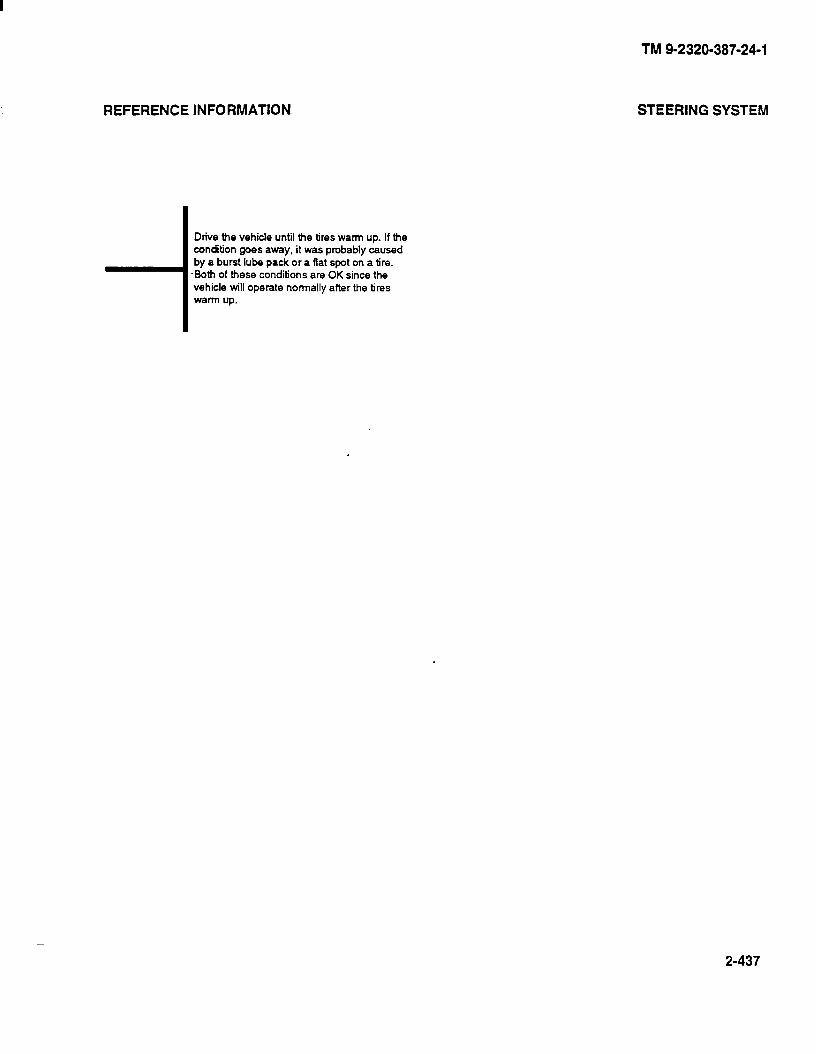
REFERENCE INFORMATION
Drive the vehicle until the tires warm up. If the condition goes away, it was probably caused by a burst lube pack or a flat spot on a tire.
-Both of these conditions are OK since the vehicle will operate normally after the tires warm up.
TM 9-2320-387-24-l
STEERING SYSTEM
2-437
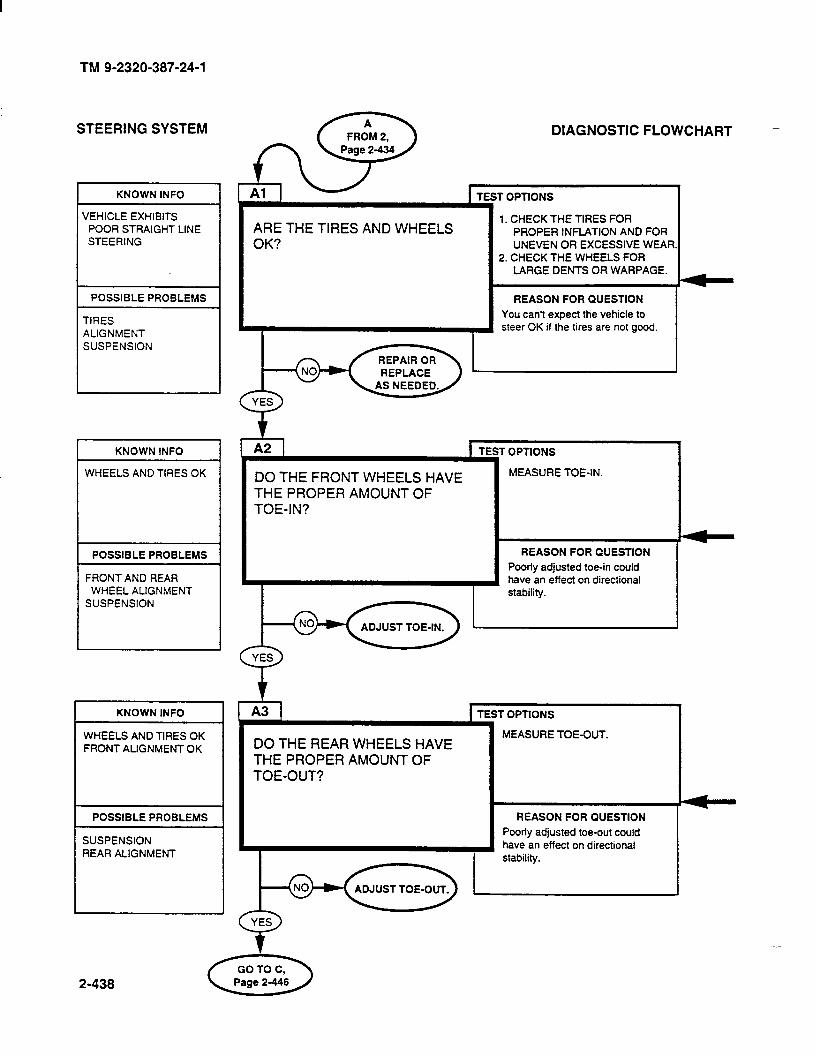
TM 9-2320-387-24-l
STEERING SYSTEM
KNOWN INFO
VEHICLE EXHIBITS POOR STRAIGHT LINE STEERING
POSSIBLE PROBLEMS
TIRES ALIGNMENT SUSPENSION
J L
KNOWN INFO ~
WHEELS AND TIRES OK
POSSIBLE PROBLEMS
FRONT AND REAR WHEEL ALIGNMENT
SUSPENSION
KNOWN INFO
WHEELS AND TIRES OK FRONT ALIGNMENT OK
POSSIBLE PROBLEMS
SUSPENSION REAR ALIGNMENT
ARE THE TIRES AND WHEELS OK?
T OPTIONS
1. CHECK THE TIRES FOR PROPER INFLATION AND FOR UNEVEN OR EXCESSIVE WEAR
2. CHECK THE WHEELS FOR LARGE DENTS OR WARPAGE.
REASON FOR QUESTION
You can’t expect the vehicle to steer OK if the tires are not good.
DIAGNOSTIC FLOWCHART
’ ‘ES
DO THE FRONT WHEELS HAVE THE PROPER AMOUNT OF TOE-IN?
OPTIONS
MEASURE TOE-IN.
REASON FOR QUESTION
Poorly adjusted toe-in could have an effect on directional stability.
DO THE REAR WHEELS HAVE THE PROPER AMOUNT OF TOE-OUT?
r OPTIONS
MEASURE TOE-OUT.
REASON FOR QUESTION
Poorly adjusted toe-out could have an effect on directional stability.

REFERENCE INFORMATION
can be caused
wheel imbalance. For wheel and tire replacement and maintenance procedures, refer to para. 8-3.
For refer to para. 8-9.
For instructions on adjusting rear wheel toe-out, referto para. E-10. Part C will test out the suspension parts to see if they are OK.
TM 9-2320-387-24-l
STEERING SYSTEM
2-439
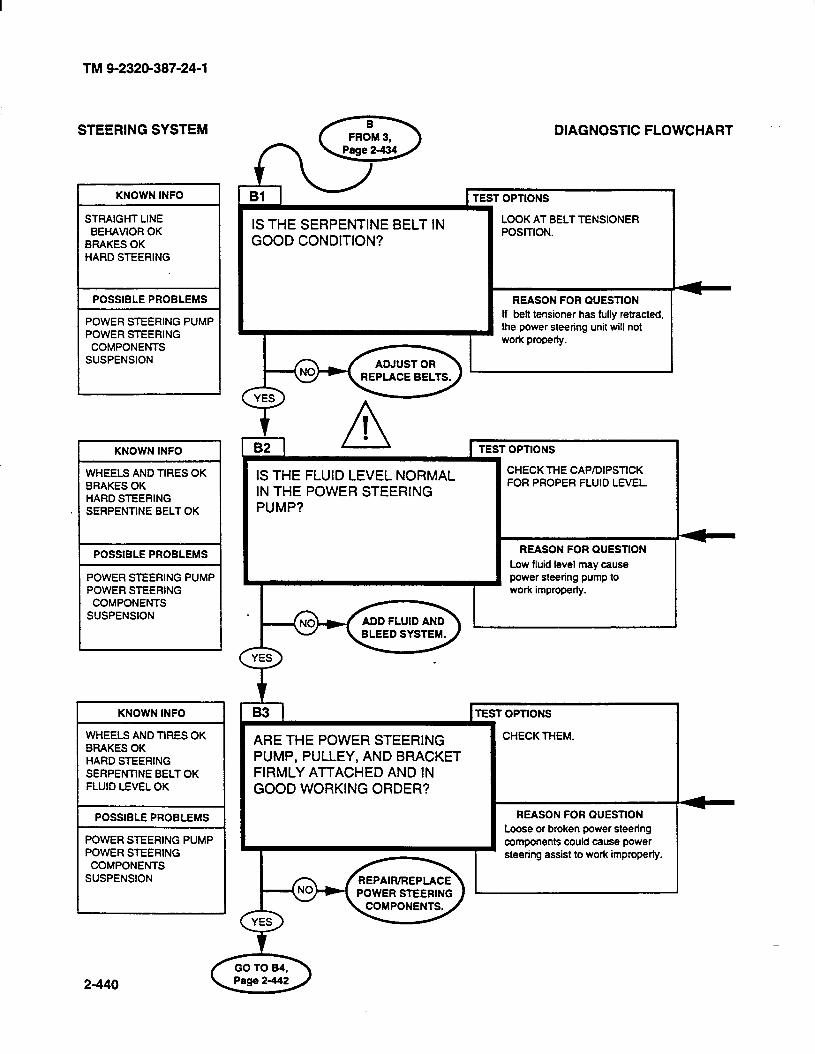
TM 9-2320-387-24-l
STEERING SYSTEM
KNOWN INFO
STRAIGHT LINE BEHAVIOR OK
BRAKES OK HARD STEERING
POSSIBLE PROBLEMS
POWER STEERING PUMF , POWER STEERING
COMPONENTS SUSPENSION
KNOWN INFO
WHEELS AND TtRES OK BRAKES OK HARD STEERING SERPENTlNE BELT OK
POSSIBLE PROBLEMS
POWER STEERING PUMP POWER STEERING
COMPONENTS SUSPENSION
KNOWN INFO
WHEELS AND TlRES OK BRAKES OK HARD STEERING SERPENTlNE BELT OK FLUID LEVEL OK
POSSIBLE PROBLEMS
POWER STEERING PUMP POWER STEERING
COMPONENTS SUSPENSION
r
DIAGNOSTIC FLOWCHART --
TEST OPTIONS
IS THE SERPENTINE BELT IN GOOD CONDITION?
LOOK AT BELT TENSIONER POSITION.
IS THE FLUID LEVEL NORMAL IN THE POWER STEERING PUMP?
REASON FOR QUESTtON
If bett tensioner has fully retracted, the power steering unit will not
TEST OPTlONS
CHECK THE CAPlDlPSTlCK FOR PROPER FLUID LEVEL
1
REASON FOR QUESTlON
Low fluid level may cause power steering pump to work improperly.
ARE THE POWER STEERING PUMP, PULLEY, AND BRACKET FIRMLY All-ACHED AND IN GOOD WORKING ORDER?
’ OPTIONS
CHECK THEM.
REASON FOR QUESTlON
Loose or broken power steering components coutd pause power steering assist to work improperly.
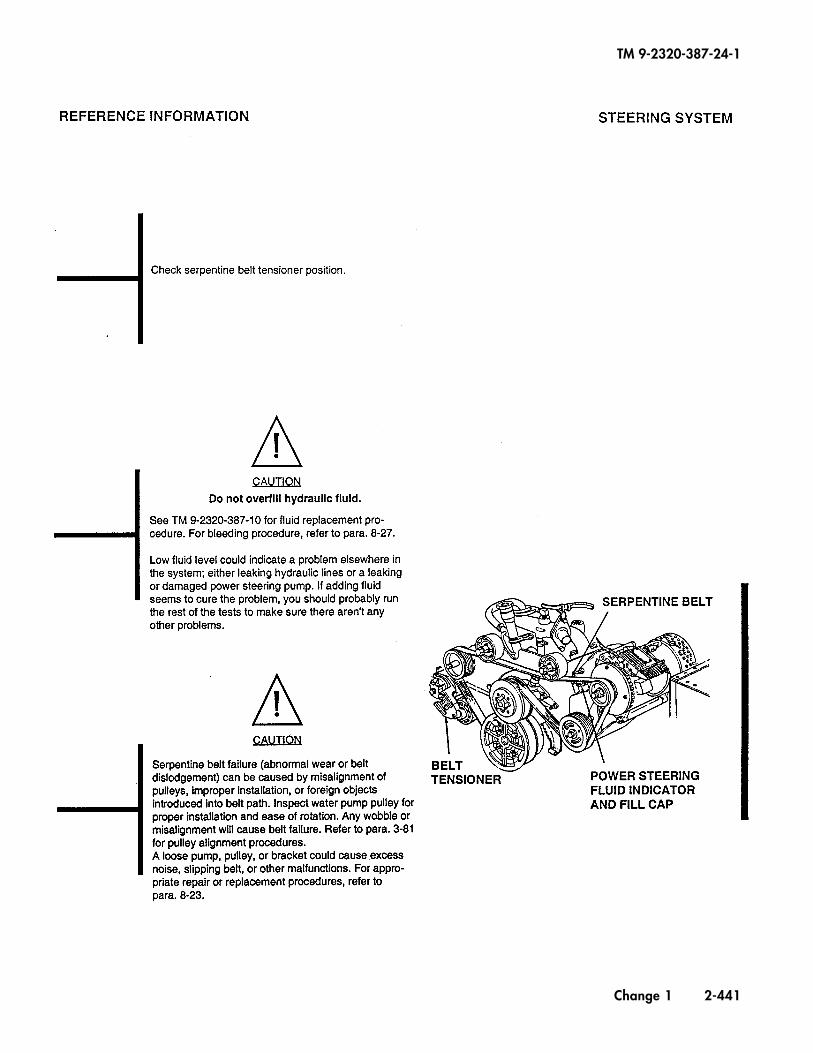
TM 9-2320-387-24-1
Change 1 2-441
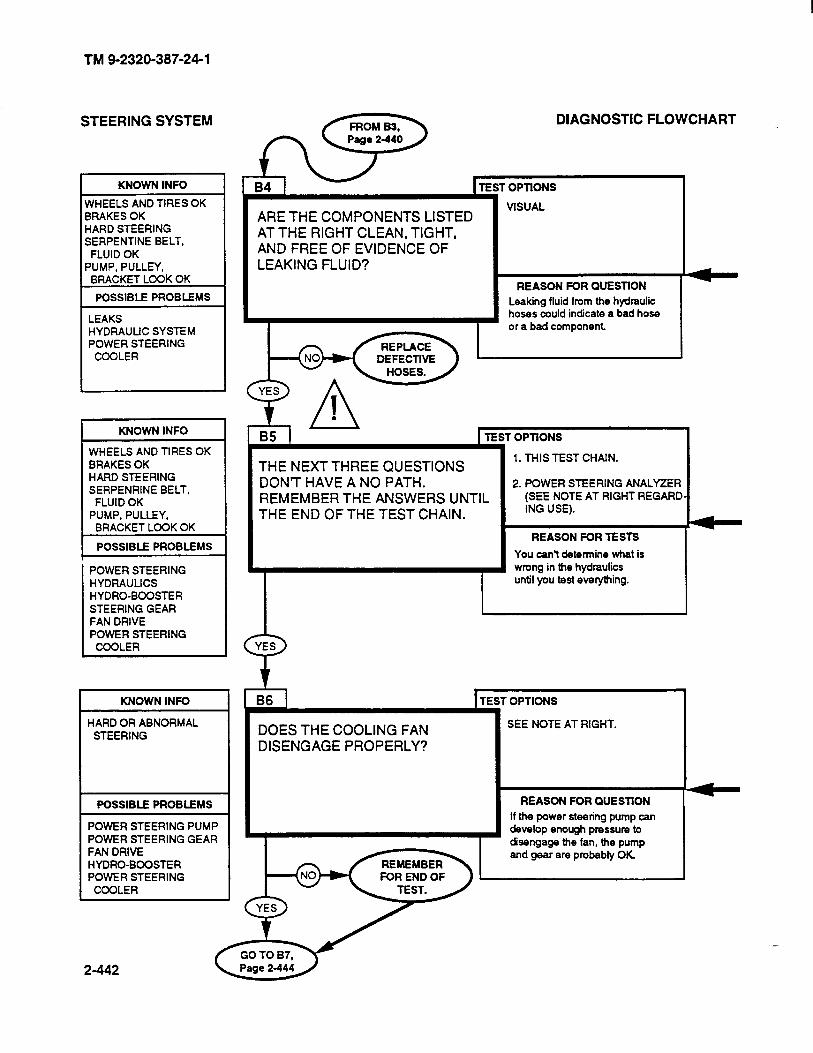
TM 9-2320-387-24-l
STEERING SYSTEM
KNOWN INFO
WHEELS AND TIRES OK 3RAKES OK iARD STEERING 3ERPENTlNE BELT, FLUID OK
‘UMP. PULLEY, BRACKET LOOK OK
POSSIBLE PROBLEMS
LEAKS HYDRAULIC SYSTEM POWER STEERING
COOLER
I KNOWN INFO
HARD STEERING SERPENRINE BELT,
PUMP, PULLEY.
POWER STEERING HYDRAULICS HYDRO-BOOSTER STEERING GEAR FAN DRIVE POWER STEERING
COOLER
KNOWN INFO
HARD OR ABNORMAL STEERING
POSSIBLE PROBLEMS
POWER STEERING PUMP POWER STEERING GEAR FAN DRIVE HYDRO-BOOSTER POWER STEERING
COOLER
ARE THE COMPONENTS LISTED AT THE RIGHT CLEAN, TIGHT, AND FREE OF EVIDENCE OF LEAKING FLUID?
L
DIAGNOSTIC FLOWCHART
OPTfONS
VISUAL
REASONFORQUESTfON
Leaking fluid from the hydraulic hoses could indicate a bad hose or a bad component.
THE NEXTTHREE QUESTIONS DON7 HAVE A NO PATH. REMEMBER THE ANSWERS UNTIL THE END OF THE TEST CHAIN.
OPTlONS
1. THIS TEST CHAIN.
2. POWER STEERING ANALYZER (SEE NOTE AT RIGHT REGARD- ING USE).
REASON FOR TESTS
You can? determine what is wrong in the hydraulics until you test everything.
+ YES
B6 1 I
DOES THE COOLING FAN DISENGAGE PROPERLY?
OPTIONS
SEE NOTE AT RIGHT.
REASON FOR QUESllON
If the power steering pump can 1 develop enough pressure to
disengage the fan, the pump and gear are probably OK

TM 9-2320-387-24-1
Change 1 2-443

TM 9-2320-387-24-l
STEERING SYSTEM
KNOWN INFO
HARD OR ABNORMAL STEERING
POSSIBLE PROBLEMS
POWER STEERING PUMP POWER STEERING GEAR FAN DRIVE HYDRO-BOOSTER
KNOWN INFO
HARD OR ABNORMAL STEERING
POSSIBLE PROBLEMS
POWER STEERING PUMF POWER STEERING GEAR FAN DRIVE HYDRO-BOOSTER
KNOWN INFO
HARD OR ABNORMAL STEERING
POSSIBLE PROBLEMS
POWER STEERING PUMP POWER STEERING GEAR FAN DRIVE HYDRO-BOOSTER
IS THE HYDRO-BOOSTER WORKING PROPERLY?
DIAGNOSTIC FLOWCHART
SEE PROCEDURES AT RIGHT.
REASON FOR QUESTION
The hydra-booster will affect the m operation of the steering system.
TURN STEERING WHEEL SLIGHTLY TO LEFT OR RIGHT AND RELEASE WHEEL QUICKLY. THE STEERING WHEEL SHOULD CENTER ITSELF. DOES THIS HAPPEN?
B9 1
OPTIONS
TRY IT.
REASON FOR QUESTION
The steering gear is working properly if this happens.
c
LOOK AT THE CHART TO THE RIGHT TO DETERMINE WHAT IS WRONG AND REPAIR IT AS DIRECTED.
2-444
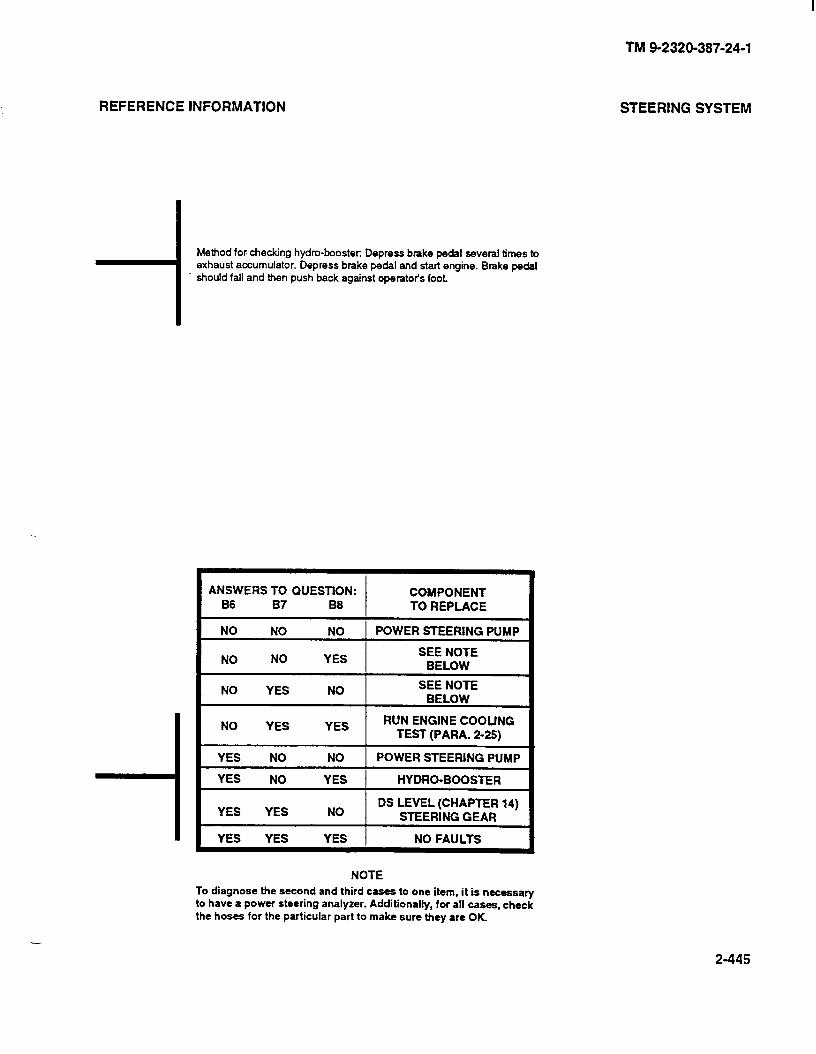
REFERENCE INFORMATION STEERING SYSTEM
i
Method for checking hydro-booster: Depress brake pedal several times to exhaust accumulator. Depress brake pedal and start engine. Brake pedal should fall and then push back against operatots foot.
YES NO
YES NO
NO
YES
POWER STEERING PUMP
HYDRO-BOOSTER
YES YES NO DS LEVEL (CHAPTER 14)
STEERING GEAR
YES YES YES NO FAULTS
NOTE
To diagnose the second and third caws to one item, it is necessary to have a power steering analyzer. Additionally, for all cases, check the hoses for the particular part to make sure they are OK.
TM 9-2320-387-24-l
-
2-445
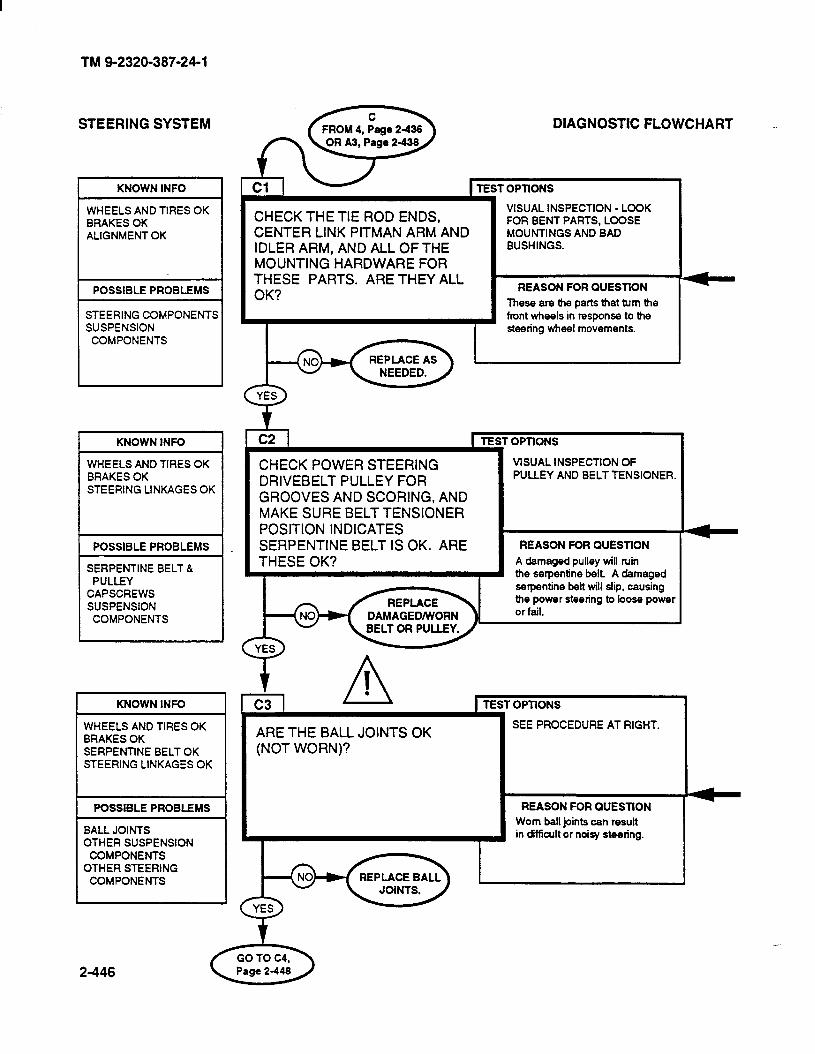
TM 9-2320-387-24-l
STEERING SYSTEM
KNOWN INFO
WHEELS AND TIRES OK BRAKES OK ALIGNMENT OK
POSSIBLE PROBLEMS
STEERING COMPONENTS SUSPENSION
COMPONENTS
I KNOWN INFO I
WHEELS AND TIRES OK BRAKES OK STEERING LINKAGES OK
DIAGNOSTIC FLOWCHART
CHECK THE TIE ROD ENDS, CENTER LINK PITMAN ARM AND IDLER ARM, AND ALL OF THE MOUNTING HARDWARE FOR THESE PARTS. ARE THEY ALL OK?
TEST OPTlONS
VISUAL INSPECTION - LOOK FOR BENT PARTS, LOOSE MOUNTINGS AND BAD BUSHINGS.
REASON FOR QUESTION
These are the parts that turn the front wheels in response to the steering wheel movements.
CHECK POWER STEERING DRIVEBELT PULLEY FOR GROOVES AND SCORING, AND MAKE SURE BELT TENSIONER POSITION INDICATES SERPENTINE BELT IS OK. ARE THESE OK?
POSSIBLE PROBLEMS
SERPENTINE BELT & PULLEY
CAPSCREWS SUSPENSION
COMPONENTS DAMAGED/WORN BELT OR PULLEY.
OPTIONS I
REASON FOR QUESTlON A damaged pulley will ruin the serpentine belt. A damaged serpentine belt will slip, causing the power steering to loose power or fail.
4
KNOWN INFO
WHEELS AND TIRES OK BRAKES OK SERPENTlNE BELT OK STEERING LINKAGES OK
POSSIBLE PROBLEMS
BALL JOINTS OTHER SUSPENSION
COMPONENTS OTHER STEERING
COMPONENTS
VISUAL INSPECTION OF PULLEY AND BELT TENSIONER.
1 TEST OPTIONS
SEE PROCEDURE AT RIGHT. ARE THE BALL JOINTS OK (NOT WORN)?
REPLACE BALL
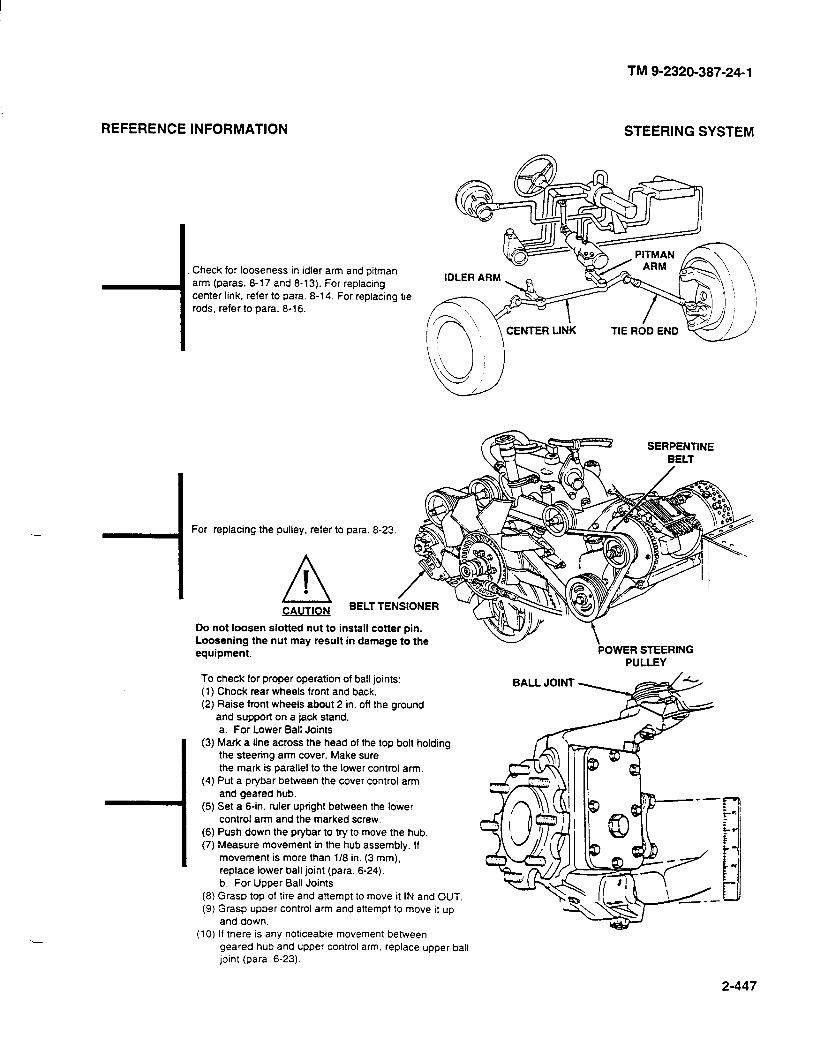
TM 9-2320-387-24-l
REFERENCE INFORMATION STEERING SYSTEM
i
Check for looseness in idler arm and pitman arm (paras. 8-17 and 8-13). For replacing center link, refer to para. 8-14. For replacing be rods, refer to para. 8-16.
TIE ROD END
i
For replacing the pulley, refer to para. 8-23.
A
I .
CAUTION BELT TE
Do not loosen slotted nut to install cotter Din. Loosening the nut may result in damage to the equipment.
To check for proper operation of ball joints: (1) Chock rear wheels front and back. (2) Raise front wheels about 2 in. off the ground
and support on a jack stand. a. For Lower Ball Joints
(3) Mark a line across the head of the top bolt holding the steering arm cover. Make sure the mark is parallel to the lower control arm.
(4) Put a prybar between the cover control arm and geared hub.
(5) Set a 6-in. ruler upright between the lower control arm and the marked screw.
(6) Push down the prybar to try to move the hub. (7) Measure movement in the hub assembly. If
movement is more than l/8 in. (3 mm), replace lower ball joint (para. 6-24). b. For Upper Ball Joints
(8) Grasp top of tire and attempt to move it IN and OUT. (9) Grasp upper control arm and attempt to move it up
and down. (10) If there IS any noticeable movement between
geared hub and upper control arm. replace upper bail jotnt (para. 6-23).
\ POWER STEERING
PULLEY
2-447
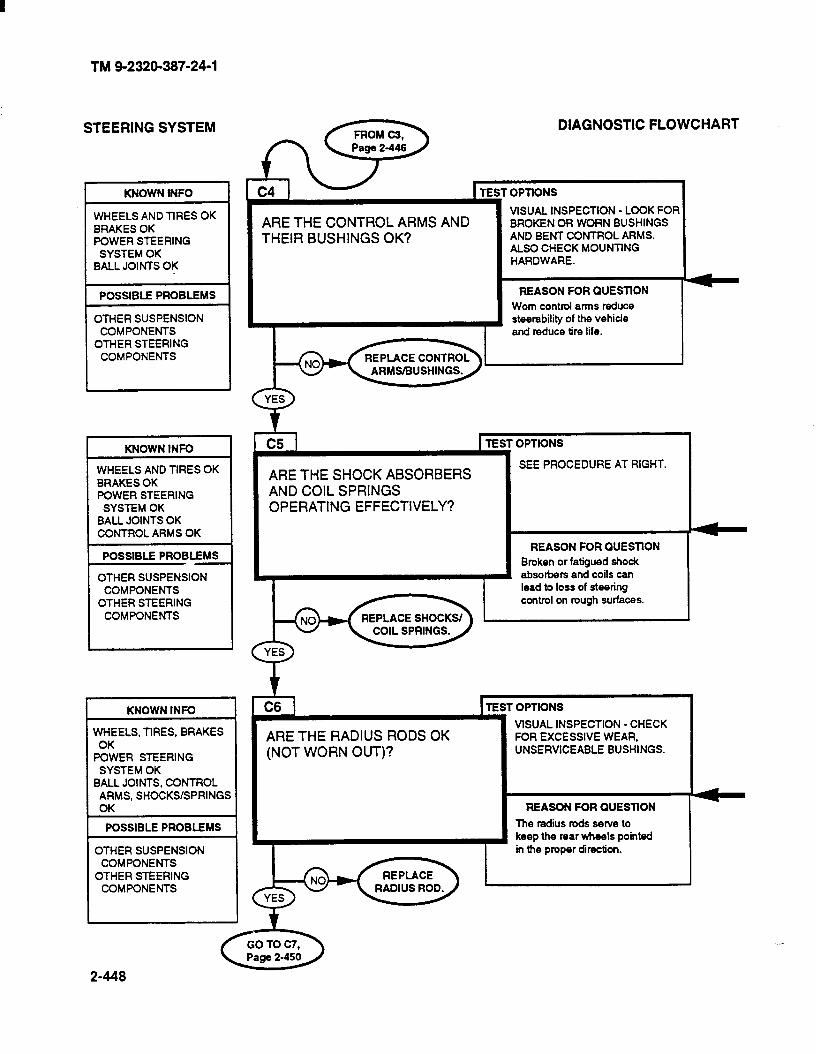
TM 9-2320-387-24-l
STEERING SYSTEM
WHEELS AND TlRES OK BRAKES OK POWER STEERING
SYSTEM OK BALL JOINTS OK
POSSIBLE PROBLEMS
OTHER SUSPENSION COMPONENTS
OTHER STEERING COMPONENTS
KNOWN INFO
WHEELS AND TIRES OK BRAKES OK POWER STEERING
SYSTEM OK BALL JOINTS OK CONTROL ARMS OK
POSSIBLE PROBLEMS
OTHER SUSPENSION COMPONENTS
OTHER STEERING COMPONENTS
KNOWN INFO
WHEELS, TIRES, BRAKES OK
POWER STEERING SYSTEM OK
BALL JOINTS, CONTROL ARMS, SHOCKS/SPRINGS OK
POSSIBLE PROBLEMS
OTHER SUSPENSION COMPONENTS
OTHER STEERING COMPONENTS
ARE THE CONTROL ARMS AND THEIR BUSHINGS OK?
DIAGNOSTIC FLOWCHART
OPTfONS
VISUAL INSPECTION - LOOK FOI BROKEN OR WORN BUSHINGS AND BENT CONTROL ARMS. ALSO CHECK MOUNTING HARDWARE.
REASON FOR QUESTfON
Worn control arms reduce steerability of the vehicle and reduce tire life.
L ARE THE SHOCK ABSORBERS AND COIL SPRINGS OPERATING EFFECTIVELY?
OPTIONS
SEE PROCEDURE AT RIGHT.
REASON FOR QUESTION
Broken or fatigued shock absorbers and coils can
C6 1 ITE
ARE THE RADIUS RODS OK (NOT WORN OUT)?
OPTIONS
VISUAL INSPECTION - CHECK FOR EXCESSIVE WEAR, UNSERVICEABLE BUSHINGS.
REASON FOR QUESTION
The radius rods sarve to keep the mar wheels pointed in the proper direction.
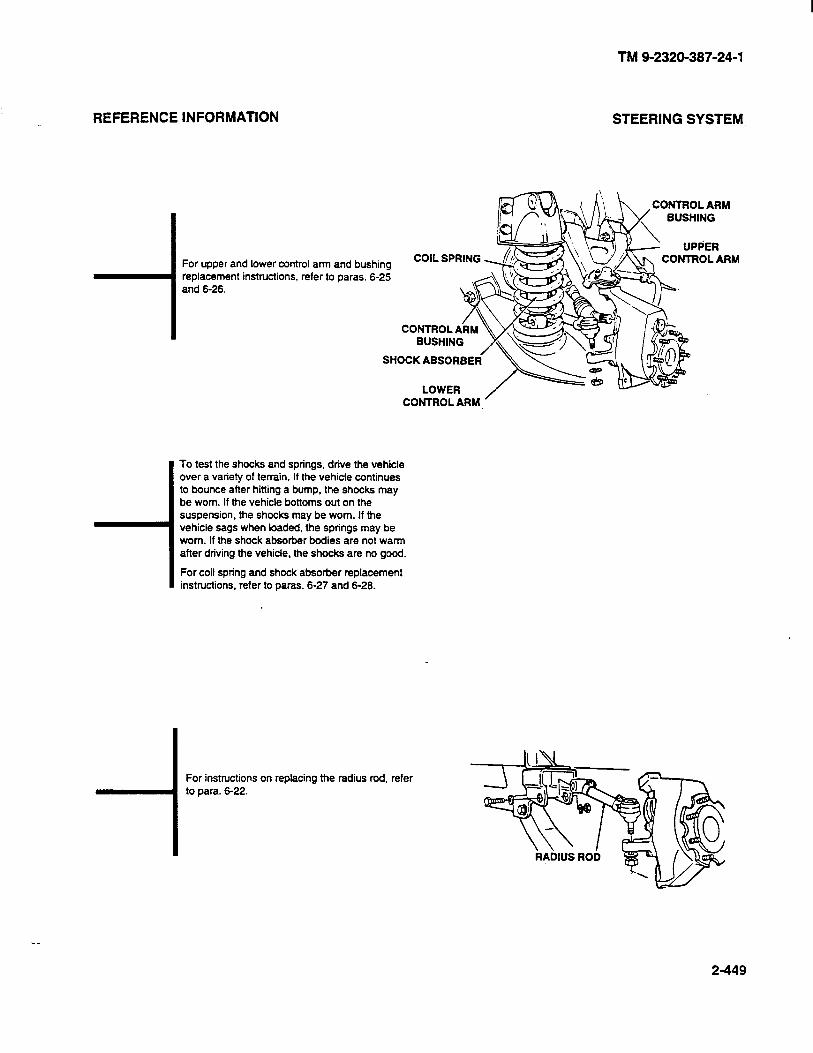
REFERENCE INFORMATION STEERING SYSTEM
TM 9-2320-387-24-l
CONTROL ARM
For upper and lower control arm and bushing replacement instructions, refer to paras. 6-25 and 6-26.
CONTROL ARM
SHOCK ABSORBER
CONTROL ARM_’
To test the shocks and springs, drive the vehicle over a variety of terrain. If the vehicle continues to bounce after hitting a bump, the shocks may be worn. If the vehicle bottoms out on the suspension, the shocks may be worn. If the vehicle sags when loaded, the springs may be worn. If the shock absorber bodies are not warm after driving the vehicle, the shocks are no good.
For coil spring and shock absorber replacement instructions, refer to paras. 6-27 and 6-26.
i
For instructions on replacing the radius rod, refer to para. 6-22.
2-449

TM 9-2320-387-24-1
2-450 Change 1
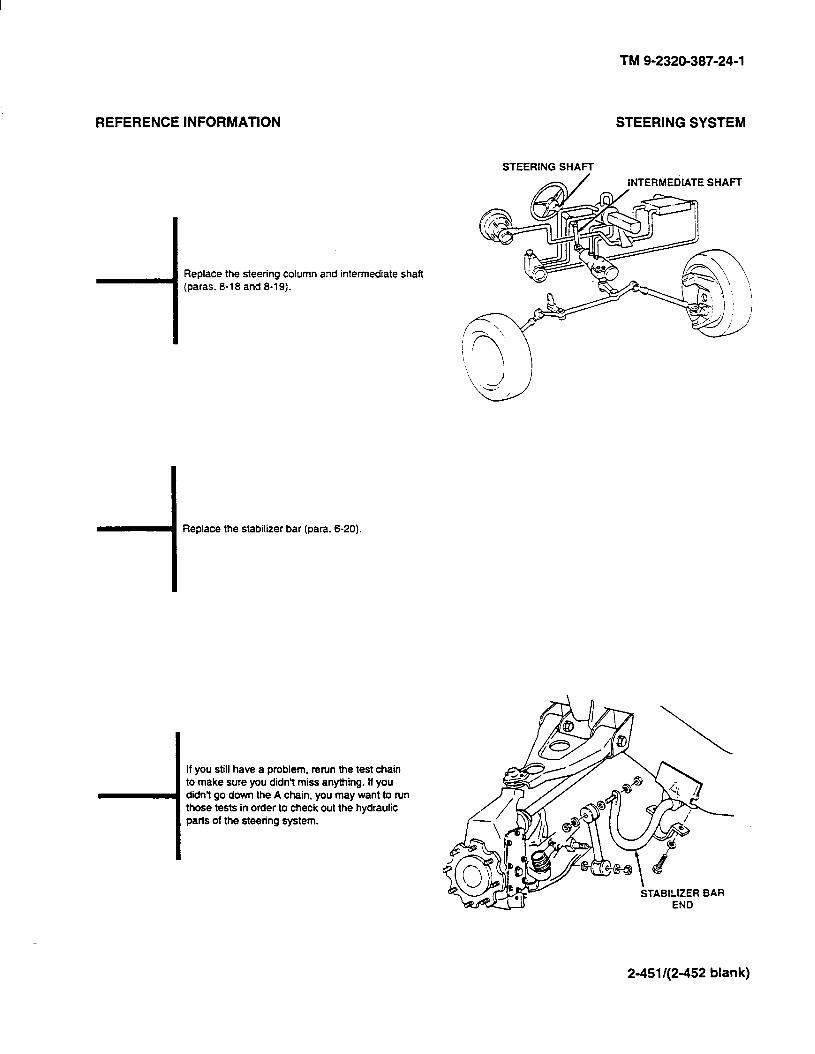
TM 9-2320-387-24-l
REFERENCE INFORMATION
Replace the steering column and intermediate shaft (paras. 8-18 and 8-19).
STEERING SYSTEM
STEERING SHAFT
NTERMEDIATE SHAFT
-I Replace the stabilizer bar (para. 6-20).
If you still have a problem, rerun the test chain to make sure you didn’t miss anything. If you didn’t go down the A chain, you may want to run those tests in order to check out the hydraulic parts of the steering system.
TABILIZER BAR
2-451/(2-452 blank)
TM 9-2320-387-24-l
2-43. DRIVETRAIN TESTS I
These drivetrain tests may be run any time you think you have a drivetrain problem or if you were sent here by another test chain. Just follow the path, answering the questions. Additional information and notes are given on the facing page when necessary.
The fold-out page shows the location of the major components of the drivetrain system in case you are not familiar with them.
Fold-out page FP-27 may be left open for reference while testing. Also, due to the design of the functional flow diagram, it is not necessary to have a location of parts diagram so it has been omitted.
NOTE
Problems with the transmission and drivetrain cooling system are dealt with in para. 240.
-
2-453
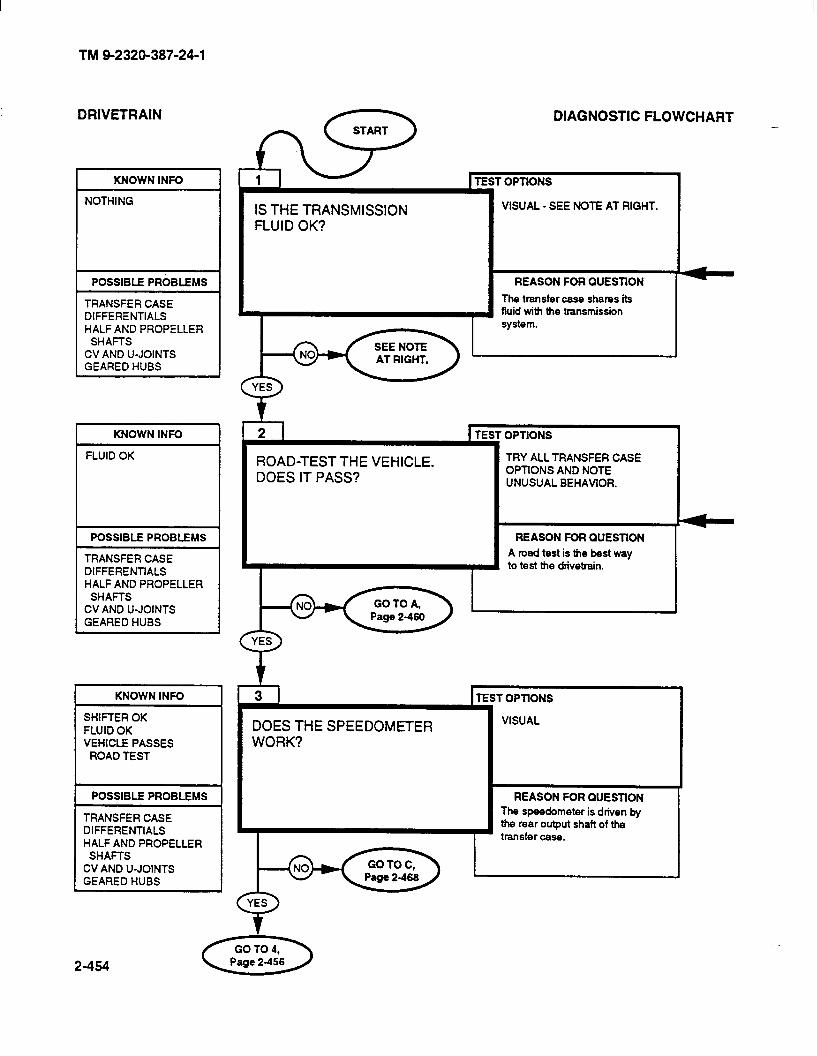
TM 9-2320-387-24-l
DRIVETRAIN
L
KNOWN INFO
NOTHING
POSSIBLE PROBlEMS
TRANSFER CASE DIFFERENTIALS HALF AND PROPELLER
SHAFTS CV AND U-JOINTS GEARED HUBS
KNOWN INFO
FLUID OK
POSSIBLE PROBLEMS
TRANSFER CASE DlFFERENTlALS HALF AND PROPELLER
SHAFTS CV AND U-JOINTS GEAREDHUBS
KNOWN INFO
SHIFTER OK FLUID OK VEHICLE PASSES
ROAD TEST
POSSIBLE PROBLEMS
TRANSFERCASE DIFFERENTIALS HALF AND PROPELLER
SHAFTS CV AND U-JOINTS GEARED HUBS
IS THE TRANSMISSION FLUID OK?
DIAGNOSTIC FLOWCHART -
OPTIONS
VISUAL - SEE NOTE AT RIGHT.
REASON FOR OUESTION
The transfer case shares its fluid with the transmission system.
ROAD-TEST THE VEHICLE. DOES IT PASS?
OPTIONS
TRY ALL TRANSFER CASE OPTIONS AND NOTE UNUSUAL BEHAVIOR.
REASON FOR QUESTION
A mad test is the best way to test the drivetrain.
DOES THE SPEEDOMETER WORK?
TEST OPTIONS
VISUAL
REASON FOR QUESTfON
The speedometer is driven by the rear output shaft of the transfer casa.
2-454
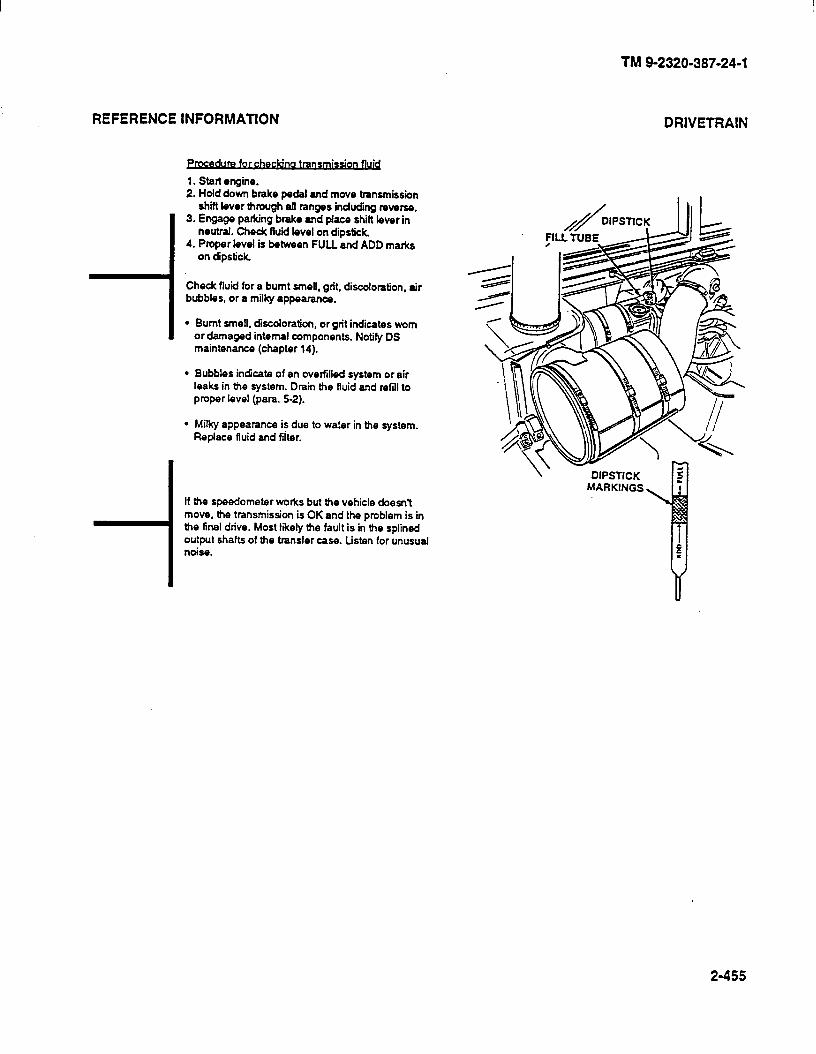
REFERENCE INFORMATION
. . . tlae
1. Start engine. 2. Hold down brake pedal and move transmission
shift lever thmugh afl ranges induding rowso.
-i
3. Engage parking brake and place shift lever in neutral. Check fluid bvel on dipstick.
4. Proper level is between FULL and ADD marks on dipstick
Check fluid for a burnt smott, grit. discoloration. air bubbles, or a milky appearance.
l Burnt smell, discoforation, or gn’t indicates worn or damaged internal components. Notify DS maintenance (chapter 14).
l Bubbles indicate of an overfilled system or air leaks in the system. Drain the fluid and refill to proper level (para. 5-2).
l Milky appearance is due to water in the system. Replace fluid and fiiter.
If the speedometer works but the vehicle doesn’t move, the transmission is OK and the problem is in the final drive. Most likely the fault is in the splined output shafts of the transfer case. Listen for unusual
I noise.
TM 9-2320-387-24-l
DRIVETRAIN
\ DIPSTICK MARKINGS
2-455
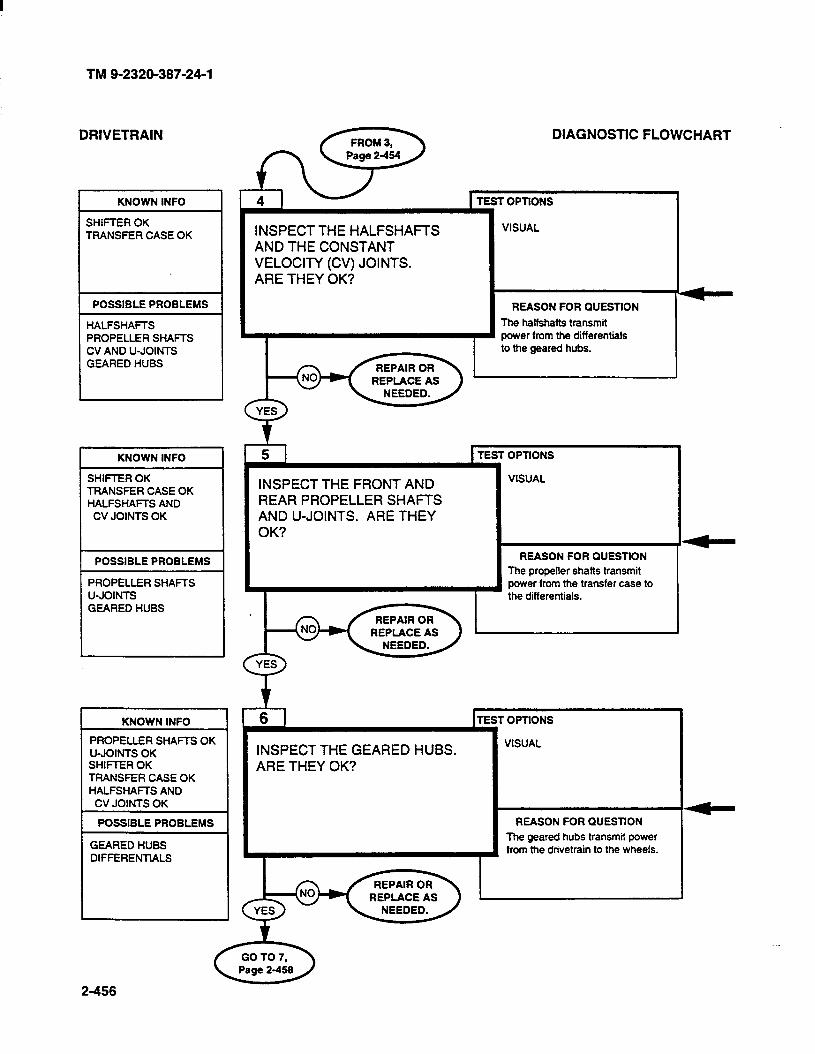
TM 9-2320-387-24-l
DRIVETRAIN DIAGNOSTIC FLOWCHART
KNOWN INFO TEST OPTfONS
SHIFTER OK TRANSFER CASE OK INSPECT THE HALFSHAFTS
AND THE CONSTANT VELOCITY (CV) JOINTS. ARE THEY OK?
VISUAL
REASON FOR QUESTION
The halfshafts transmit power from the differentials to the geared hubs.
POSSIBLE PROBLEMS
HALFSHAFTS PROPELLER SHAFTS CV AND U-JOINTS GEARED HUBS
REPLACE AS
151 i TEST OPTIONS
VISUAL
KNOWN INFO
SHIFTER OK TRANSFER CASE OK HALFSHAFTS AND
CV JOINTS OK
INSPECT THE FRONT AND REAR PROPELLER SHAFTS AND U-JOINTS. ARE THEY OK?
REASON FOR QUESTfON
The propeller shafts transmit power from the transfer case to the differentials.
POSSIBLE PROBLEMS
PROPELLER SHAFTS U-JOINTS GEARED HUBS
6 1 TEST OPTIONS
VISUAL
KNOWN INFO
PROPELLER SHAFTS OK U-JOINTS OK SHIFTER OK TRANSFER CASE OK HALFSHAFTS AND
CV JOINTS OK
POSSIBLE PROBLEMS
INSPECT THE GEARED HUBS. ARE THEY OK?
REASON FOR QUESTTON
The geared hubs transmit power from the drivetrain to the wheels. GEARED HUBS
DlFFERENTlALS
2-456

REFERENCE INFORMATION
TM 9-2320-387-24-l
DRIVETRAIN
Check for tom boots on the CV joints, stripped splines. smooth joint operation, and proper mounting torques.
Replace halfshafts and CV joints (para. 6-7).
Lubricate in accordance with TM Q-2320-387-10. A[W
I
Check for smooth operation of U-joints, stripped splines, bent yokes, or other problems. Also check to see if the shaft itself is bent. Replace propeller shafts or U-joints (paras. 6-2 through 6-5).
Lubricate in accordance with TM Q-2320-387-10.
CV J&NT BOOT
GEAR:D HUB
TRANSFER CASE OUTPUT YOKE
Make sure the geared hubs turn freely. Check mounting hardware for proper installation.
Lubricate in accordance with TM 9-2320-367-l 0.
Replace geared hubs (para. 6-Q).
PROPELLER SHAFT
DlFFERENTtAL INPUT
2-457
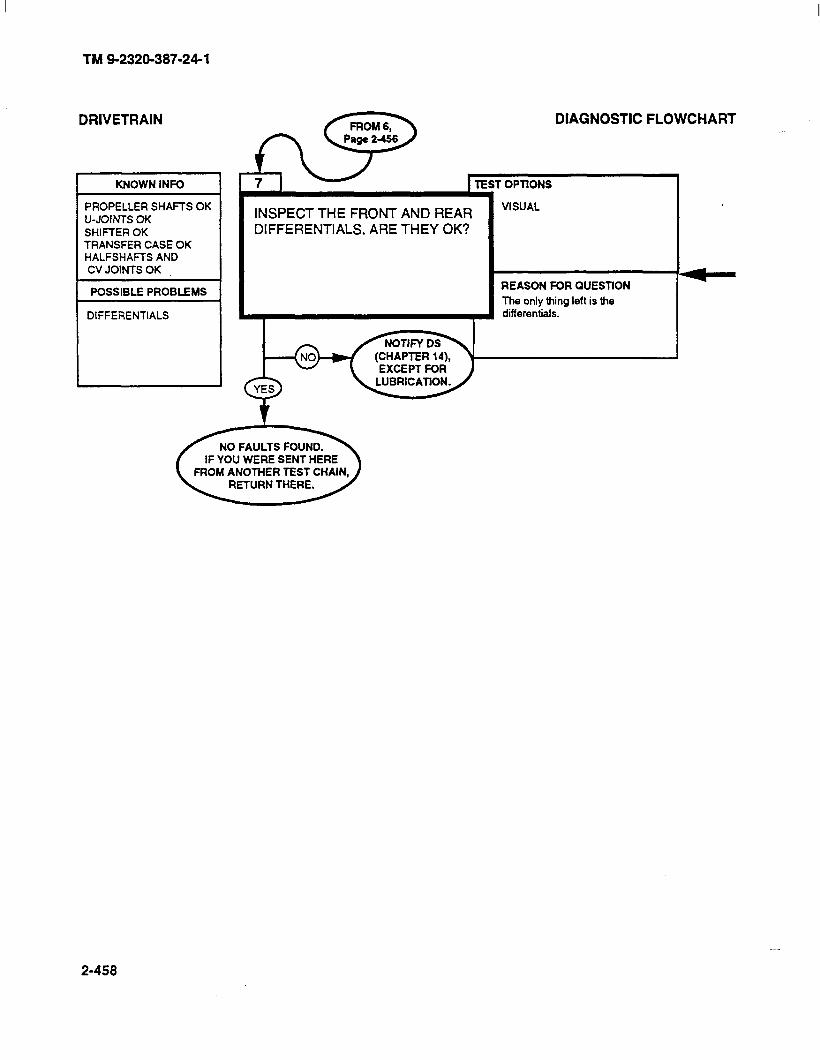
TM 9-2320-387-24-l
DRIVETRAIN
KNOWN INFO
PROPELLER SHAFTS OK U-JOINTS OK SHIFTER OK TRANSFER CASE OK HALFSHAFTS AND CV JOINTS OK
POSSIBLE PROBLEMS
DIFFERENTIALS
DIAGNOSTIC FLOWCHART
TEST OPTIONS
INSPECT THE FRONT AND REAR DIFFERENTIALS. ARE THEY OK?
VISUAL
REASON FOR QUESTION
The only thing left is the differentials.
EXCEPT FOR
NO FAULTS FOUND. IF YOU WERE SENT HERE
RETURN THERE.
2-458
-

REFERENCE INFORMATION
.,. DRAIN PLUG
I Check for loose mounting and broken parts.
Check fluid in accordance with TM g-2320-387-10.
I Notify DS maintenance (chapter 14) for other faults.
TM 9-2320-387-24-l
DRIVETRAIN
iILL PLUG
2-459
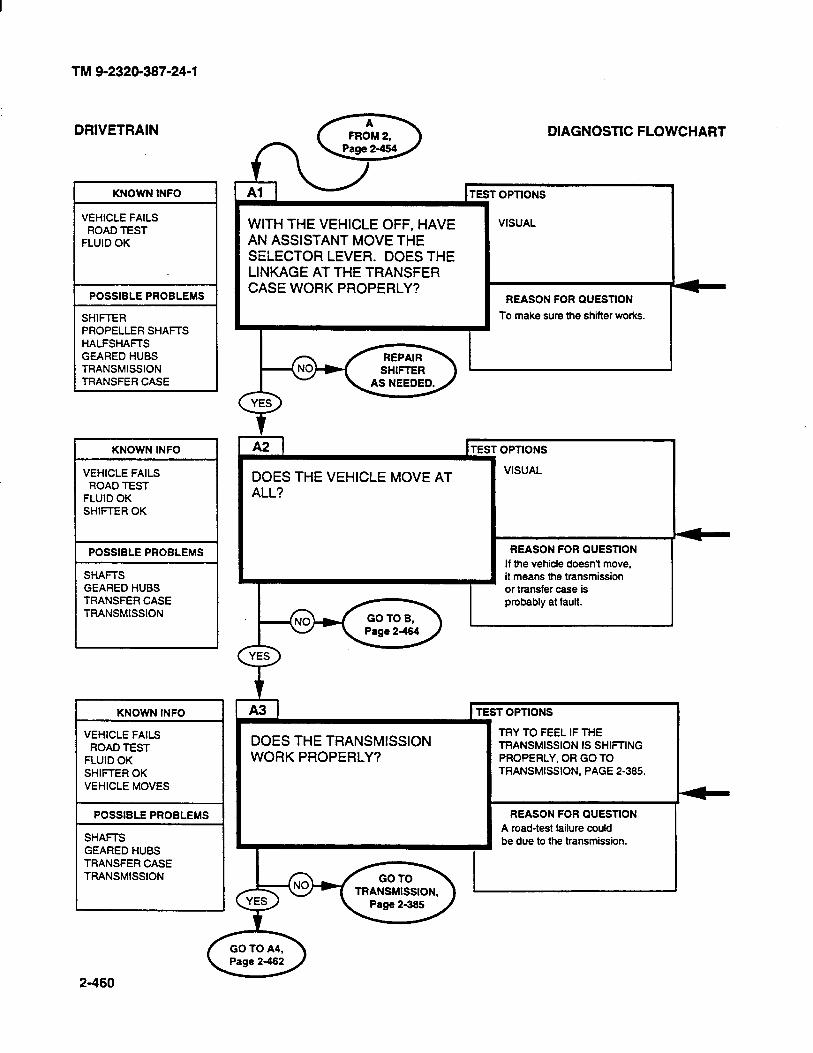
TM 9-2320-387-24-l
DRIVETRAIN
KNOWN INFO I
c
r
VEHICLE FAILS ROAD TEST
FLUID OK
POSSIBLE PROBLEMS
SHIFTER PROPELLER SHAFTS HALFSHAFTS GEARED HUBS TRANSMISSION TRANSFERCASE
1
KNOWN INFO
VEHICLE FAILS ROAD TEST
FLUID OK SHIFTER OK
POSSIBLE PROBLEMS
SHAFTS GEAREDHUBS TRANSFERCASE TRANSMISSION
KNOWN INFO
VEHICLE FAILS ROAD TEST
FLUID OK SHIFTER OK VEHICLE MOVES
POSSIBLE PROBLEMS
SHAFTS GEARED HUBS TRANSFERCASE TRANSMISSION
Fizh DIAGNOSTIC FLOWCHART
TEST OPTIONS
WITH THE VEHICLE OFF, HAVE AN ASSISTANT MOVE THE SELECTOR LEVER. DOES THE LINKAGE AT THE TRANSFER CASE WORK PROPERLY?
VISUAL
REASON FOR QUESTtON
To make sure the shier works.
DOES THE VEHICLE MOVE AT ALL?
TEST OPTIONS
VISUAL
I I
REASON FOR QUESTtON
If the vehicle doesn’t move, it means the transmission or transfer case is probably at fault.
DOES THE TRANSMISSION WORK PROPERLY?
TRY TO FEEL IF THE TRANSMISSION IS SHIFTING PROPERLY, OR GO TO TRANSMISSION. PAGE 2-385.
EST OPTtONS
REASON FOR QUESTtON
A road-test failure could be due to the transmission.
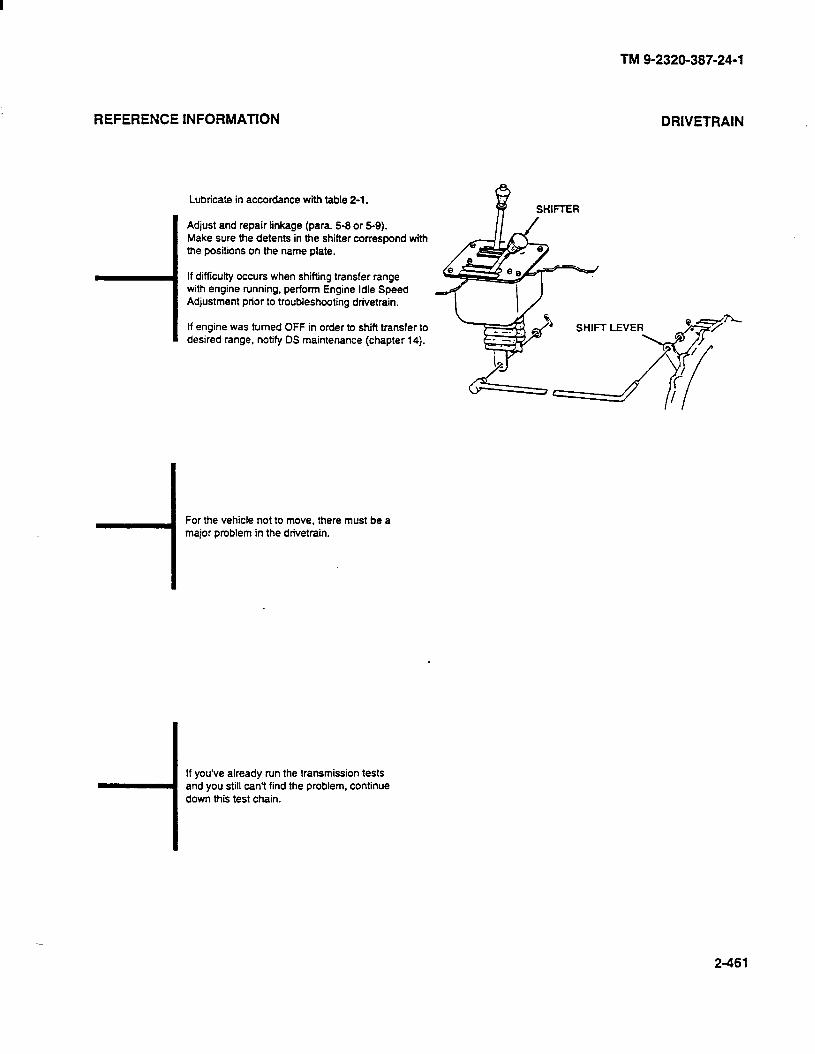
REFERENCE INFORMATION
TM 9-2320-387-24-l
DRIVETRAIN
i
Lubricate in accordance with table 2-1.
Adjust and repair linkage (para. 5-8 or 5-g). Make sure the detents in the shifter correspond with the positions on the name plate.
If difficulty occurs when shifting transfer range with engine running, perform Engine Idle Speed Adjustment prior to troubleshooting drivetrain.
If engine was turned OFF in order to shift transfer to desired range, notify DS maintenance (chapter 14).
For the vehicle not to move, there must be a major problem in the drivetrain.
If you’ve already run the transmission tests and you still can’t find the problem, continue down this test chain.
2-461
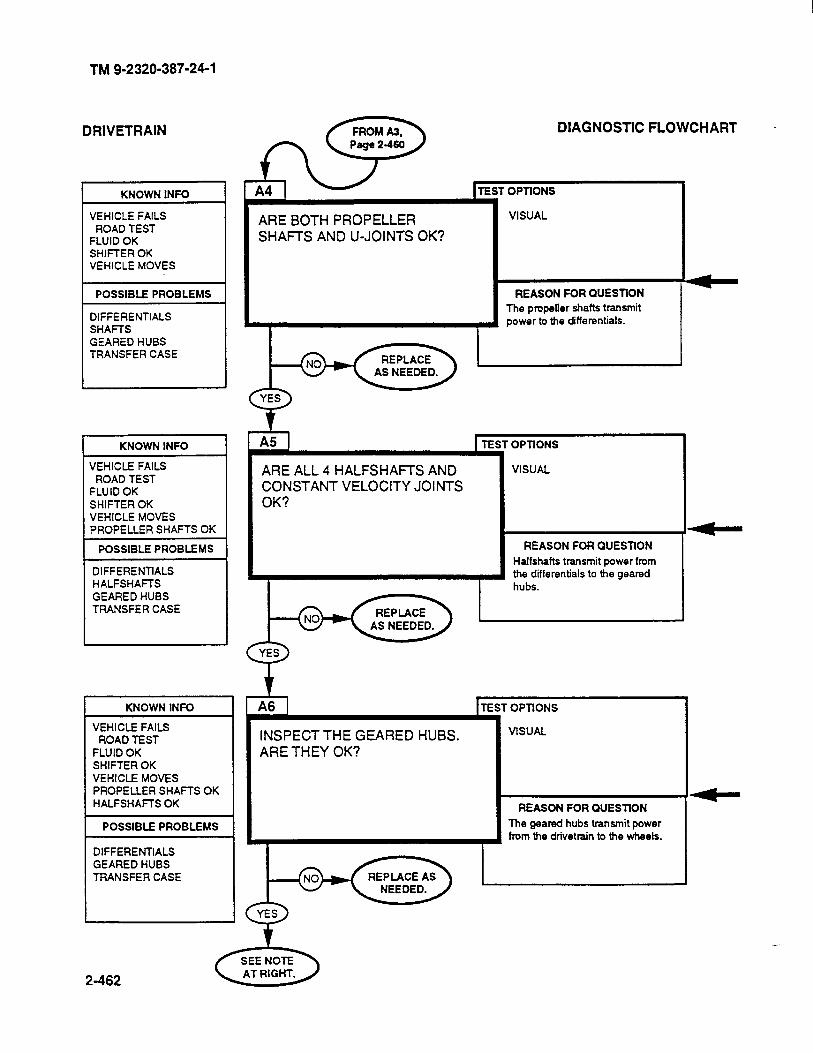
TM 9-2320-387-24-l
DRIVETRAIN DIAGNOSTIC FLOWCHART -
INFO
ARE BOTH PROPELLER SHAFTS AND U-JOINTS OK?
VEHICLE FAILS ROAD TEST
FLUID OK SHIFTER OK VEHICLE MOVES
REASON FOR QUESTtON
The propeller shafts transmit power to the differentials.
POSSIBLE PROBLEMS
DIFFERENTIALS SHAFTS GEARED HUBS TRANSFER CASE
KNOWN INFO OPTIONS
VISUAL ARE ALL 4 HALFSHAFTS AND CONSTANT VELOCITY JOINTS OK?
JEHICLE FAILS ROAD TEST
-LU ID OK SHIFTER OK rlEHlCLE MOVES ‘ROPELLER SHAFTS OK
POSSIBLE PROBLEMS REASON FOR QUESTION
Haffshafts transmit power from the differentials to the geared hubs.
DIFFERENTIALS HALFSHAFTS GEARED HUBS TRANSFER CASE
ITEST omotds
VISUAL INSPECT THE GEARED HUBS. ARE THEY OK?
KNOWN INFO
VEHICLE FAILS ROAD TEST
FLUID OK SHIFTER OK VEHICLE MOVES PROPELLER SHAFTS OK HALFSHAFTS OK REASON FOR QUESTION
The geared hubs transmit power from the drivetrain to the wheels.
POSSIBLE PROBLEMS
DIFFERENTIALS GEARED HUBS TRANSFER CASE
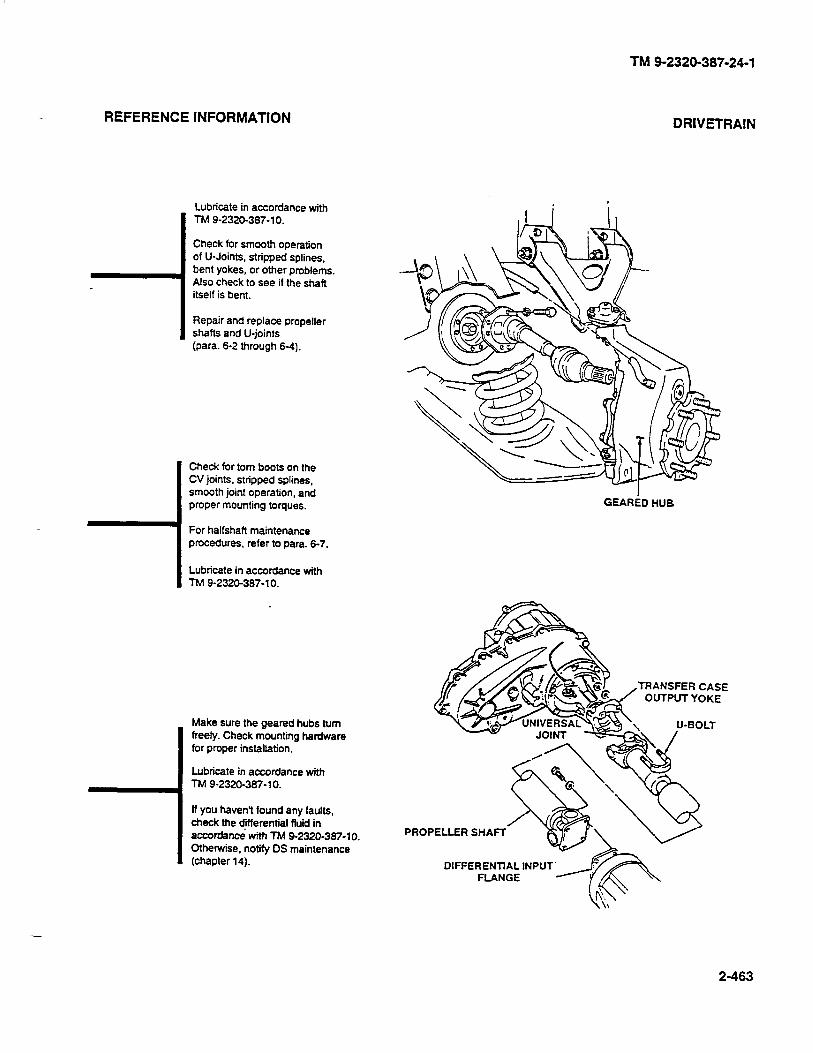
REFERENCE INFORMATION
Lubricate in accordance with TM 9-2320-387-l 0.
Check for smooth operation of U-Joints, stripped splines, bent yokes, or other problems. Also check to see if the shaft itself is bent.
Repair and replace propeller shafts and U-joints (para. 6-2 through 6-4).
Check for tom boots on the CV joints, stripped splines, smooth joint operation, and proper mounting torques.
For halfshaft maintenance procedures, refer to para. 6-7.
Lubricate in accordance with TM 9-2320-387-l 0.
i
Make sure the geared hubs turn freely. Check mounting hardware for proper installation.
Lubricate in accordance with TM 9-2320-387-l 0.
If you haven’t found any faults, check the differential fluid in accordance wfth TM g-2320-387-10. Otherwise, notify OS maintenance (chapter 14).
TM 9-2320-387-24-l
DRIVETRAIN
GEARED HUB
TRANSFER CASE OUTPUT YOKE
PROPELLER SHAFT
2-463

TM 9-2320-387-24-l
DRIVETRAIN
KNOWN INFO
VEHICLE DOESNT MOVE SHIFTER OK FLUID OK
POSSIBLE PROBLEMS
TRANSFER CASE TRANSMISSION HALFSHAFTS AND
PROPELLER SHAFTS GEARED HUBS
KNOWN INFO I
SHIFTER OK TRANSFER CASE OK TRANSMISSION OK SPEEDOMETER WORKS
POSSIBLE PROBLEMS
PROPELLER SHAFTS U-JOINTS GEAREDHUBS HALFSHAFTS AND
CV JOINTS
KNOWN INFO
SHIFTER OK TRANSFER CASE OK TRANSMISSION OK SPEEDOMETER WORKS PROPELLER SHAFTS OK U-JOINTS OK
POSSIBLE PROBLEMS
GEARED HUBS
HALFSHAFTS AND CV JOINTS
&iii@ Bl
THE PROBLEM IS MOST LIKELY IN THE TRANSFER CASE OR TRANSMISSION. IF YOU FIND NO FAULTS IN THIS TEST CHAIN AND YOU CAME FROM TRANSMISSION, NOTIFY DS MAINTENANCE (CHAPTER 14).
DIAGNOSTIC FLOWCHART
I TEST OPTIONS
INSPECT THE FRONT AND REAR VISUAL
PROPELLER SHAFTS AND U-JOINTS. ARE THEY OK?
REASON FOR CXJESTION
The propeller shafts transmit power from the transfer case
I to the differentials.
INSPECT THE HALFSHAFTS AND THE CONSTANT VELOCITY JOINTS. ARE THEY OK?
REASON FOR QUESTION
The halfshafts transmit power from the differentials to the geared hubs.
1
2-464
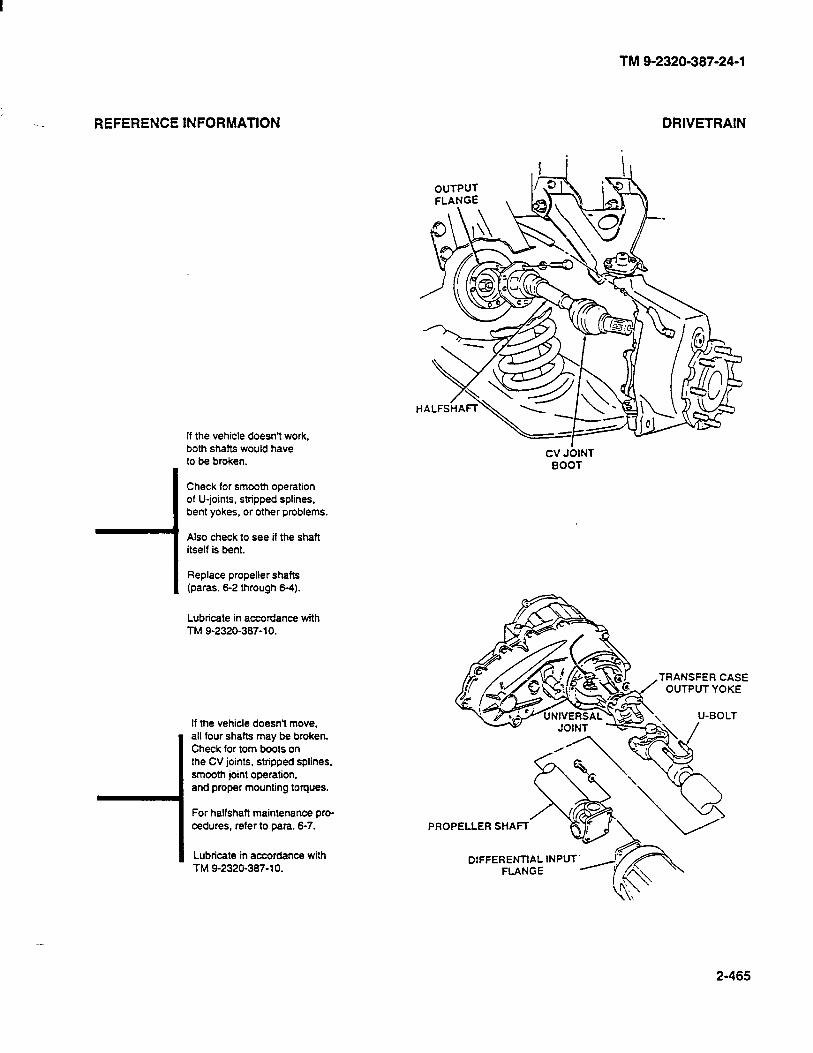
TM 9-2320-397-24-l
REFERENCE INFORMATION DRIVETRAIN
If the vehicle doesn’t work, both shafts would have to be broken.
Check for smooth operation of U-joints, stripped splines, bent yokes, or other problems.
Also check to see if the shaft itself is bent.
Replace propeller shafts (paras. 6-2 through 64).
Lubricate in accordance with TM 9-2320-367-10.
--I If the vehicle doesn’t move, all four shafts may be broken. Check for tom boots on the CV joints, stripped splines. smooth joint operation, and proper mounting torques.
For halfshaft maintenance pro- cedures, refer to para. 6-7.
I Lubricate in accordance with TM 9-2320-367-10.
CV JOINT BOOT
TRANSFER CASE OUTPUT YOKE
PROPELLER SHAFT
DlFFERENTfAL INPUT.
2-465
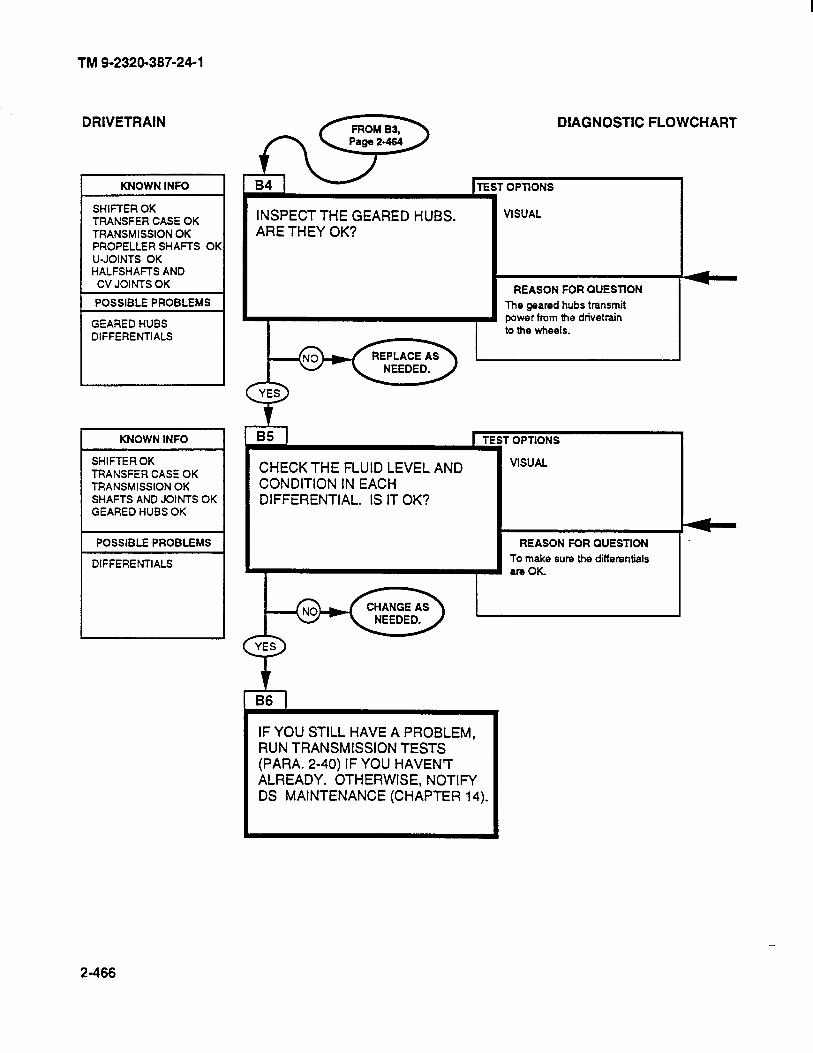
TM 9-2320-387-24-l
DRIVETRAIN
KNOWN INFO
SHIFTER OK TRANSFER CASE OK TRANSMlSSlON OK PROPELLER SHAFTS OK U-JOINTS OK HALFSHAFTS AND
CV JOINTS OK
POSSIBLE PROBLEMS
GEARED HUBS DIFFERENTIALS
INSPECT THE GEARED HUBS. ARE THEY OK?
DIAGNOSTIC FLOWCHART
OPTIONS
VISUAL
REASON FOR QUESTION
The geared hubs transmit power from the drivetrain to the wheels.
KNOWN INFO
SHIFTER OK TRANSFER CASE OK TRANSMISSION OK SHAFTS AND JOINTS OK GEARED HUBS OK
POSSIBLE PROBLEMS
DIFFERENTIALS
CHECK THE FLUID LEVEL AND CONDITION IN EACH DIFFERENTIAL. IS IT OK?
r OPTIONS
VISUAL
REASON FOR OUESTION
To make sure the differentials are OK.
IF YOU STILL HAVE A PROBLEM, RUN TRANSMISSION TESTS (PARA. 2-40) IF YOU HAVEN’T ALREADY. OTHERWISE, NOTIFY DS MAINTENANCE (CHAPTER 14).
2-466

REFERENCE INFORMATION
Make sure the geared hubs turn freely. For geared hub replacement procedure, refer to para. 8-9. Check mounting hardware for proper installation.
Lubricate in accordance with TM g-2320-387-1 0.
TM 9-2320-387-24-l
DRIVETRAIN
Check for loose mounting and broken parts. Notify GS maintenance (chapter 30).
Check fluid level in accordance with TM g-2320-387-10.
Notify DS maintenance (chapter 14) for other faults.
DRAIN PLUG
GEARiD HUB
FILL PLUG
2-467

TM 42320-387-24-l
DRIVETRAIN
KNOWN INFO
SPEEDOMETER DOESN’T WORK
POSSIBLE PROBLEMS
DRIVEN GEAR CABLE SPEEDOMETER HEAD
I- ~~ KNOWN INFO
DOESN’T WORK DRIVEN GEAR OK
I ~~~ ~~~ POSSIBLE PROBLEMS
CABLE SPEEDOMETER
DISCONNECT THE SPEEDOMETER CABLE FROM THE TRANSFER CASE. TURN THE CABLE BY HAND. DOES THE SPEEDOMETER RESPOND TO THE CABLE?
DIAGNOSTIC FLOWCHART
TURN THE CABLE AND HAVE AN ASSISTANT SEE IF THE NEEDLE MOVES. IT WILL ONLY MOVE A LImE. SO WATCH CLOSELY.
~ REASON FOR QUESTION
1 1
If the speedometer moves in response to the cable, it means the driven gear or the drive gear &_@_qz& I isnogwd.
t E-l
DISCONNECT THE SPEEDOMETER CABLE FROM THE SPEEDOMETER. AGAIN, TURN THE CABLE BY HAND AT THE TRANSFER CASE. DID THE SPEEDOMETER END OF THE CABLE TURN?
ITESTC .
)PTIONS
I
HAVE AN ASSISTANT TURN ONE END WHILE YOU WATCH THE OTHER.
REASON FOR QUESllON
This will tell you if the cable is OK.
2-468

TM 9-2320-387-24-l
REFERENCE INFORMATION DRIVETRAIN
I A NO answer means the speedometer did move.
NOTE If you answer NO, check the driven gear in the transfer case. If it’s OK, the problem is the drive gear. Notify DS maintenance (chapter 14).
I Replace the driven gear (para. S-17).
Replace the cable (para. 4-18).
Replace speedometer (pafa. 4-17).
CABLE ADAPTER
\ SPEEDOMETER
TRANSFER CASE
PINION ADAPTER
CABLE
2-469/(2-470 blank)

TM 9-2320-387-24-l
12-44. WINCH SYSTEM TESTS 1
These winch system tests may be run any time you think you have a winch problem or if you were sent here by another test chain. Just follow the path and answer the questions. Additional information and notes are given on the facing page when necessary.
2-471

TM 9-2320-387-24-l
WINCH SYSTEM
KNOWN INFO
NOTHING
FOSSIBLE PROBLEMS
WINCH CABLE WINCH CONTROL CABLE
CONNECTOR WINCH POWER CABLES WINCH WINCH CONTROL
KNOWN INFO
WINCH CABLE OK
POSSIBLE PROBLEMS
WINCH CONTROL CABLE CONNECTOR
WINCH POWER CABLES WINCH WINCH CONTROL
KNOWN INFO I
WINCH CABLE OK WINCH CONTROL CABLE
CONNECTOR OK
POSSIBLE PROBLEMS 1
WINCH POWER CABLES WINCH I WINCH CONTROL
DIAGNOSTIC FLOWCHART
IS WINCH CABLE BOUND?
OPTIONS
VISUAL
REASON FOR QUESTION
A loose winch cable may cause the winch not to operate properly.
I
2 1 TEST OPTIONS
IS WINCH CONTROL CABLE VISUAL
CONNECTOR FREE FROM LOOSENESS OR CORROSION?
REASON FOR QUESTION
Looseness and corrosion at winch cables and connectors will interfere with the proper operation of the winch.
CONNECTOROR SECURE LOOSE
r -l 3 [TEST OPTIONS I
ARE WINCH POWER CABLES FIRMLY SECURED AND NOT DAMAGED? IS BATTERY VOLTAGE PRESENT IN POSITIVE LEAD 6 AND NEGATIVE LEAD 7?
1. STEXE-R TEST 89 (Page 2-508)
2. MULTIMETER
3. VISUAL
REASON FOR QUESTION
When winch power cables are loose or damaged. winch will not operate properly.
2-472
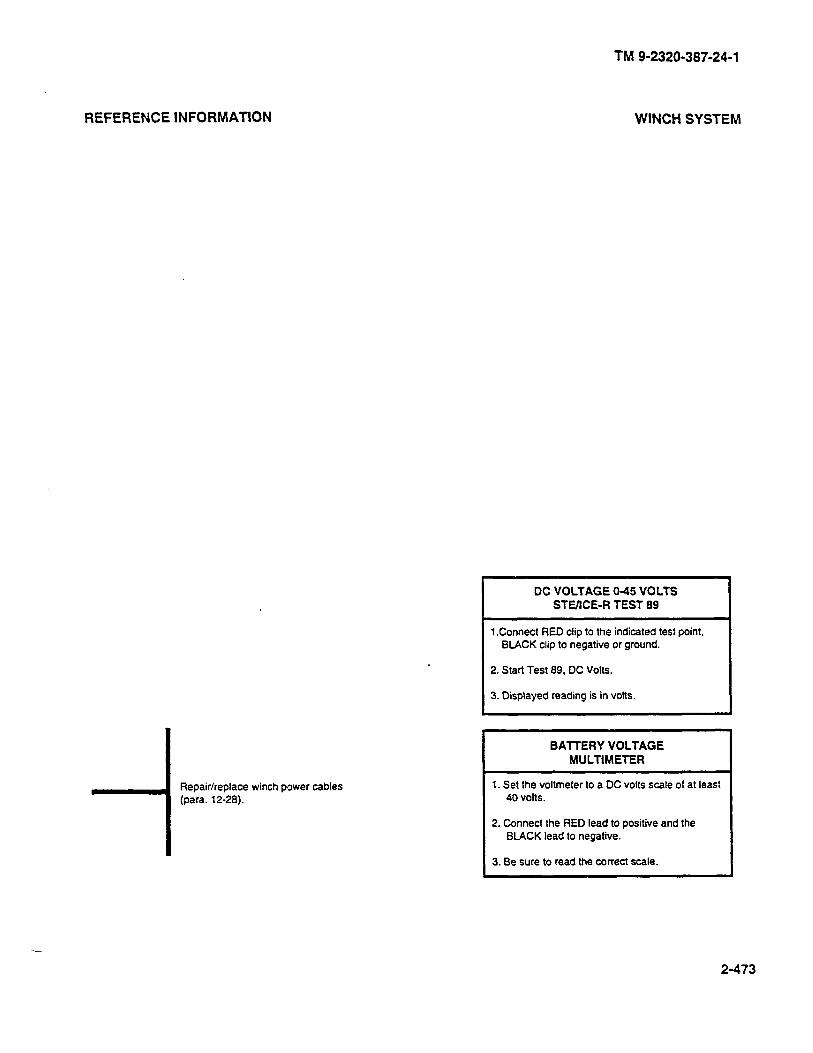
REFERENCE INFORMATION
TM 9-2320-387-24-l
WINCH SYSTEM
Repair/replace winch power cables (para. 12-28).
DC VOLTAGE O-45 VOLTS
SWlCE-R TEST 89 I
1 .Connect RED clip to the indicated test point, BLACK clip to negative or ground.
2. Start Test 89. DC Volts.
3. Displayed reading is in votts.
I BAlTERY VOLTAGE MULTIMETER I
1. Set the voltmeter to a DC volts scale of at least 40 volts.
2. Connect the RED lead to positive and the BLACK lead to negative.
3. Be sure to read the correct scale.
2-473

TM 9-2320-387-24-l
WINCH SYSTEM
r KNOWN INFO
WINCH POWER CABLES OK
WINCH CABLE OK WINCH CONTROL
CABLE CONNECTOR OK
POSSIBLE PROBLEMS
WINCH WINCH CONTROL
r DISCONNECT WINCH CONTROL CABLE. IS CONTINUITY PRESENT BETWEEN COMMON TERMINAL 471 AND 472 IN AND 471 AND 473 OUT?
- OPTIONS
1. STEIICE-R TEST 91 (Page 2-508)
2. MULTIMEIER
REASON FOR QUESTION
If continuity is present in both positions, winch is inoperative. If continuity in not present in both positions, winch control is inoperative.
2-474

REFERENCE INFORMATION
i.
Replace winch or winch control (para. 12-27).
TM 9-2320-387-24-l
WINCH SYSTEM
RESISTANCE AND CONTINUITY 04,500 OHMS
STOICE-R TEST 91
1. Connect RED clip and BLACK clip to the indicated terminals in question; RED to the first, BLACK to the second.
2. Start Test 91, o-4.500 Ohms.
3. Displayed reading is in ohms. Less than 5 ohms is continuity. If the resistance is over 4,509 ohms, STEXE-R displays .9.9.9.9.
CONTINUITY (RESISTANCE) MULTIMETER
1. Set the vottmeter to an ohms scale of about 1,000 ohms.
2. Connect the RED and BLACK leads to the connections stated in the question.
3. Be sure to read the correct scale. Less than 5 ohms indicates continuity. For an open circuit, the meter should peg full scale (needle all the way to the left).
2-475
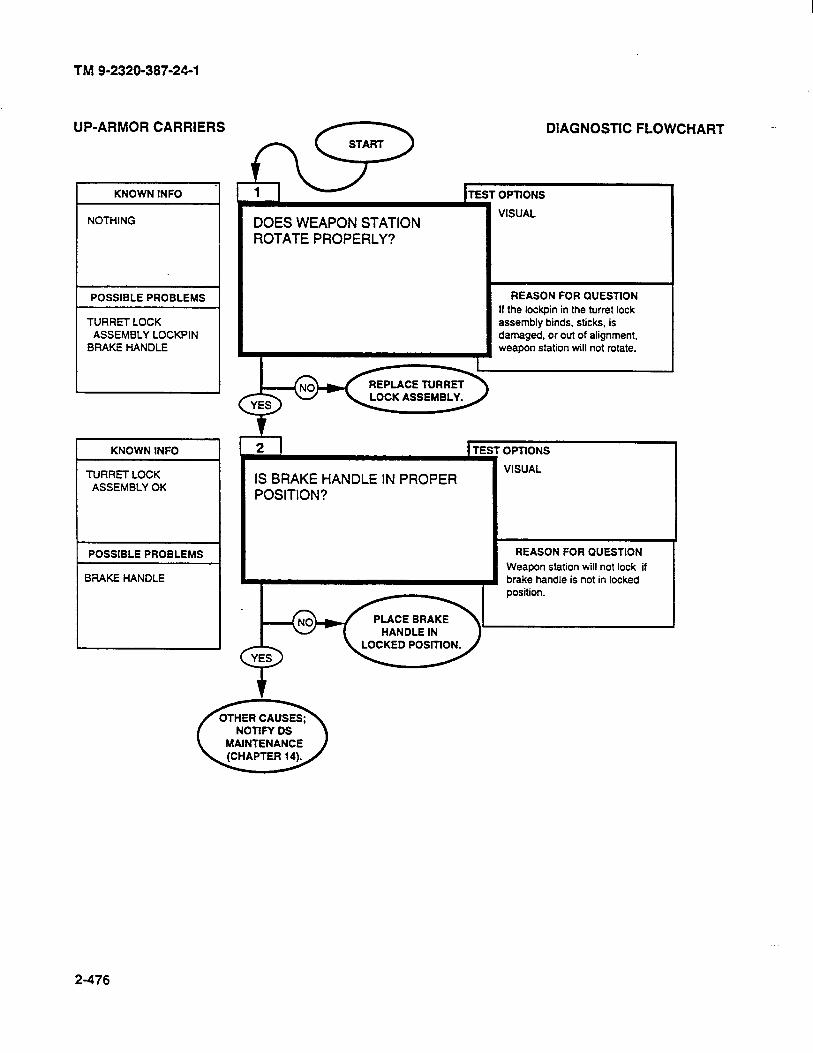
TM 9-2320-387-24-l
UP-ARMOR CARRIERS
KNOWN INFO
NOTHING
POSSIBLE PROBLEMS
TURRET LOCK ASSEMBLY LOCKPIN
BRAKE HANDLE
KNOWN INFO
TURRET LOCK ASSEMBLY OK
POSSIBLE PROBLEMS
BRAKE HANDLE
DOES WEAPON STATION ROTATE PROPERLY?
VISUAL
DIAGNOSTIC FLOWCHART
TEST OPTlONS
REASON FOR QUESTlON
If the lockpin in the hrrret lock assembly binds, sticks, is damaged, or out of alignment, weapon station will not rotate.
r IS BRAKE HANDLE IN PROPER I
VISUAL
POSITION?
REASON FOR QUESTION
Weapon station will not lock if brake handle is not in locked
OTHER CAUSES; NOTlFY DS 0 MAINTENANCE
(CHAPTER 14).
2-476

REFERENCE INFORMATION
i.
Replace turret lock assembly (para. 11-56).
Place brake handle in locked position (TM 9-2320-367-10).
TM 9-2320-387-24-l
UP-ARMOR CARRIERS
2-477/(2-478 blank)
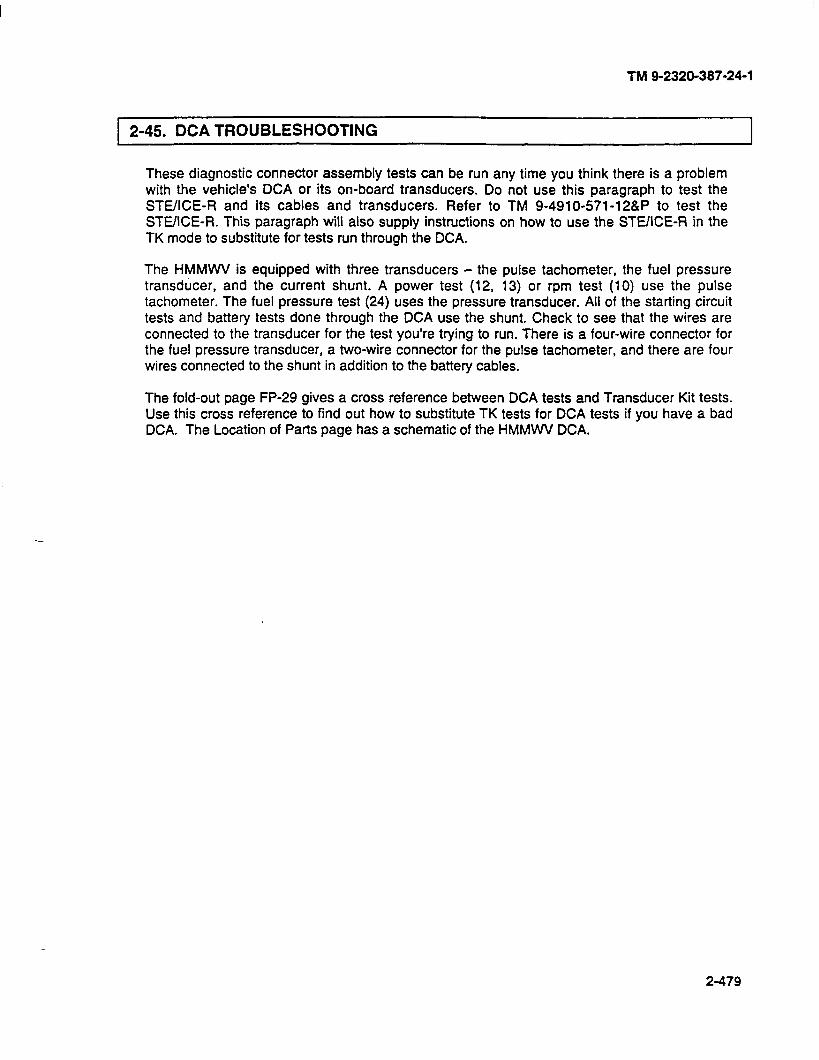
TM g-2320-387-24-1
1 2-45. DCA TROUBLESHOOTING I
These diagnostic connector assembly tests can be run any time you think there is a problem with the vehicle’s DCA or its on-board transducers. Do not use this paragraph to test the STE/ICE-R and its cables and transducers. Refer to TM 9-4910-571-12&P to test the STWICE-Ft. This paragraph will also supply instructions on how to use the STUICE-R in the TK mode to substitute for tests run through the DCA.
The HMMWV is equipped with three transducers - the pulse tachometer, the fuel pressure transducer, and the current shunt. A power test (12, 13) or rpm test (10) use the pulse tachometer. The fuel pressure test (24) uses the pressure transducer. All of the starting circuit tests and battery tests done through the DCA use the shunt. Check to see that the wires are connected to the transducer for the test you’re trying to run. There is a four-wire connector for the fuel pressure transducer, a two-wire connector for the pulse tachometer, and there are four wires connected to the shunt in addition to the battery cables.
The fold-out page FP-29 gives a cross reference between DCA tests and Transducer Kit tests. Use this cross reference to find out how to substitute TK tests for DCA tests if you have a bad DCA. The Location of Parts page has a schematic of the HMMWV DCA.
2479
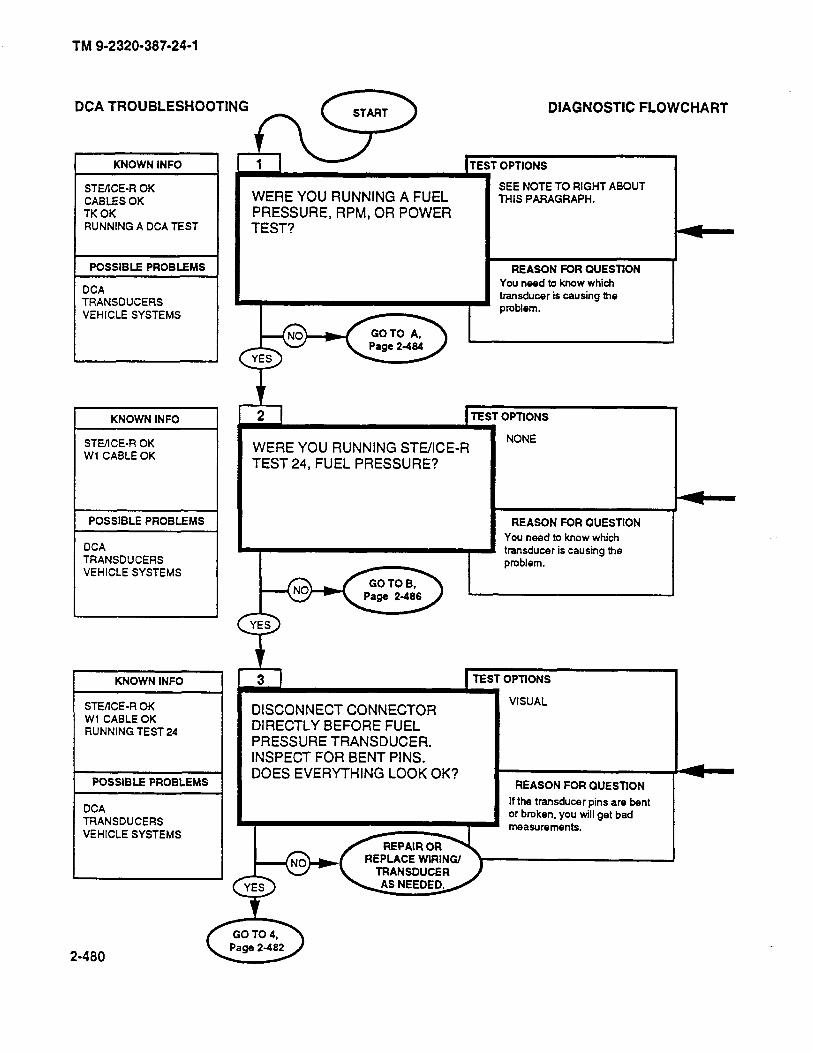
TM 9-2320-387-24-l
KNOWN INFO
STE/lCE-R OK CABLES OK TK OK RUNNING A DCA TEST
DCA TROUBLESHOOTING DIAGNOSTIC FLOWCHART
TEST OPTIONS
WERE YOU RUNNING A FUEL SEE NOTE TO RIGHT ABOUT THIS PARAGRAPH.
PRESSURE, RPM, OR POWER
POSSIBLE PROBLEMS REASON FOR OUESTfON
DCA TRANSDUCERS VEHICLE SYSTEMS
You need to know which transducer is causing the oroblem.
KNOWN INFO
STEIICE-A OK Wt CABLE OK
POSSIBLE PROBLEMS
DCA TRANSDUCERS VEHICLE SYSTEMS
KNOWN INFO
STEACE-R OK Wl CABLE OK RUNNING TEST 24
DCA TRANSDUCERS VEHICLE SYSTEMS
POSSIBLE PROBLEMS
2-480
1 TEST OPTfONS I
NONE WERE YOU RUNNING STE/ICE-R TEST 24, FUEL PRESSURE?
REASON FOR QUESTION
You need to know which - transducer is causing the
DISCONNECT CONNECTOR DIRECTLY BEFORE FUEL PRESSURE TRANSDUCER. INSPECT FOR BENT PINS. DOES EVERYTHING LOOK OK?
VISUAL
TEST OPTIONS
REASON FOR QUESTfON
If the transducer pins are bent or broken, you will get bad measurements.
REPLACE WIRING/ TRANSDUCER

REFERENCE INFORMATION
NOTE The diagnostics in this chapter assume you have already run a test through the DCA. If you haven’t run a test and are here to test the entire DCA, run Tests 10 (RPM), 24 (Fuel Pressure), and 80 (Battery Current). Make note of the results for later.
If YOIJ want to test the entire DCA harness. answer YES here and then return and answer NO when you’ve finished the test chain. Answer NO here to test the shunt.
i
Answer NO here to test the pulse tachometer.
i
Repair wiring (para. 4-80) or replace transducer (para. 4-30).
TM 9-2320-387-24-l
DCA TROUBLESHOOTING
2-481
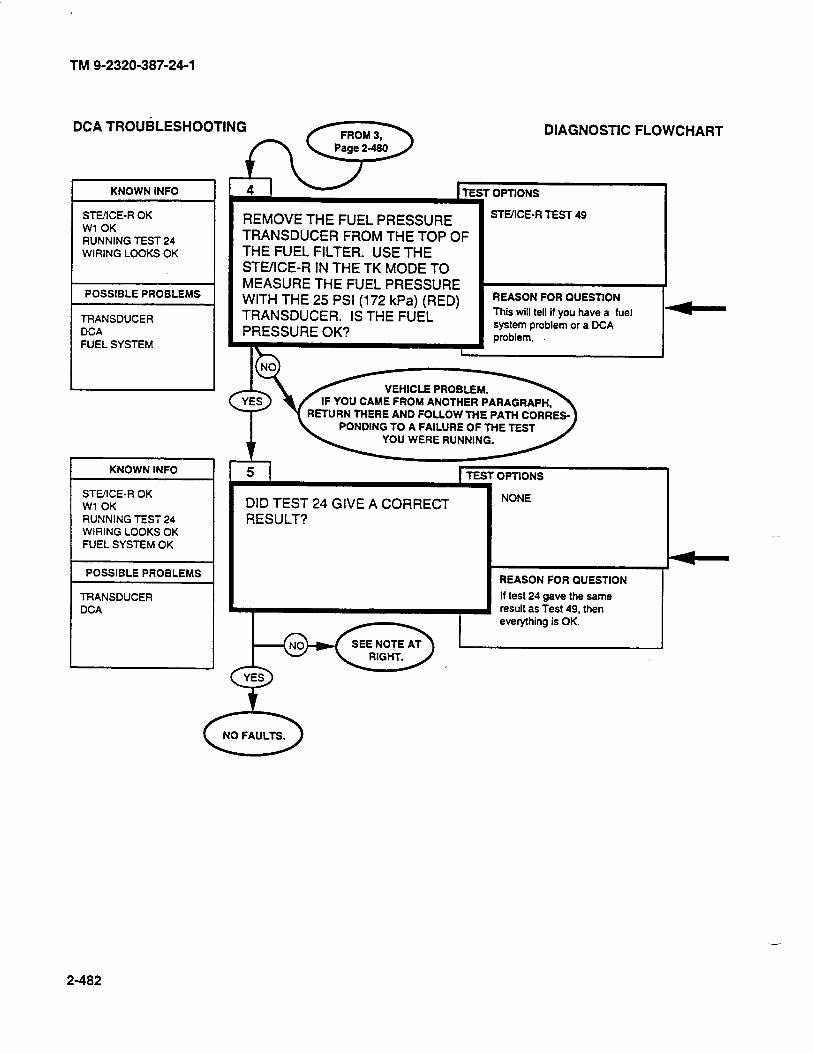
TM 9-2320-387-24-l
DCA TROUiLESHOOTlNG DIAGNOSTIC FLOWCHART
KNOWN INFO
STUICE-R OK Wl OK RUNNING TEST 24 WIRING LOOKS OK
POSSIBLE PROBLEMS
TRANSDUCER DCA FUEL SYSTEM
REMOVE THE FUEL PRESSURE TRANSDUCER FROM THE TOP OF THE FUEL FILTER. USE THE STUICE-R IN THE TK MODE TO MEASURE THE FUEL PRESSURE WITH THE 25 PSI (172 kPa) (RED) TRANSDUCER. IS THE FUEL PRESSURE OK?
I\ ,
STE/ICE-R TEST 49
REASON FOR QUESTtON
This will tell if you have a fuel system problem or a DCA problem.
VEHICLE PROBLEM.
KNOWN INFO
STE/ICE-R OK Wl OK RUNNING TEST 24 WIRING LOOKS OK FUEL SYSTEM OK
POSSIBLE PROBLEMS
TRANSDUCER DCA
DID TEST 24 GIVE A CORRECT RESULT?
PONDING TO A FAILURE OF THE TEST YOU WERE RUNNING.
TEST OPTlONS
REASON FOR QUESTION
If test 24 Qave the same result as Test 49. then
I_
-
2-482
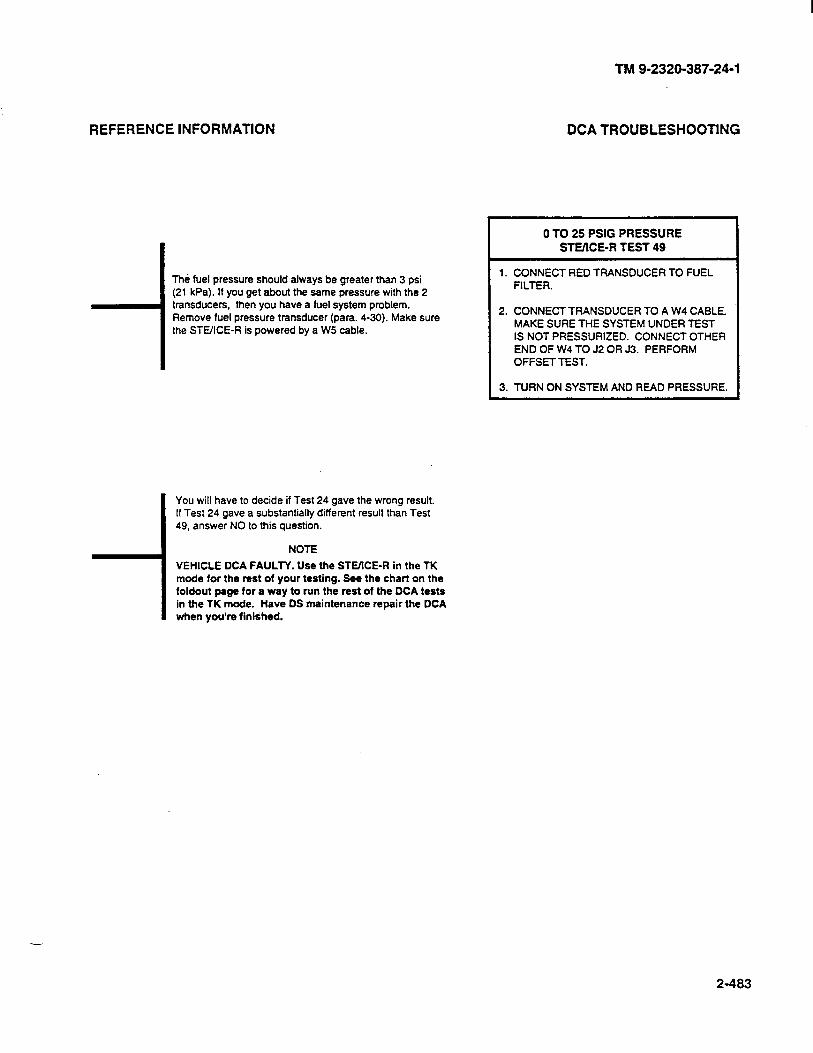
REFERENCE INFORMATION
The fuel pressure should always be greater than 3 psi (21 kPa). If you get about the same pressure with the 2 transducers, then you have a fuel system problem. Remove fuel pressure transducer (para. 4-30). Make sure the STE/ICE-R is powered by a W5 cable.
You will have to decide if Test 24 gave the wrong result. If Test 24 gave a substantially different result than Test 49, answer NO to this question.
NOTE
VEHICLE DCA FAULTY. Use the STEIICE-R in the TK mode for the rest of your testing. See the chart on the foldout page for a way to run the rest of the DCA tests in the TK mode. Have DS maintenance repair the DCA when you’re finished.
L
TM 9-2320-387-24-l
DCA TROUBLESHOOTING
0 TO 25 PSIG PRESSURE STE/lCE-R TEST 49
1. CONNECT RED TRANSDUCER TO FUEL FILTER.
2. CONNECTTRANSDUCER TO A W4 CABLE MAKE SURE THE SYSTEM UNDER TEST IS NOT PRESSURIZED. CONNECT OTHER END OF W4 TO J2 OR 53. PERFORM OFFSET TEST.
3. TURN ON SYSTEM AND READ PRESSURE.
2-483
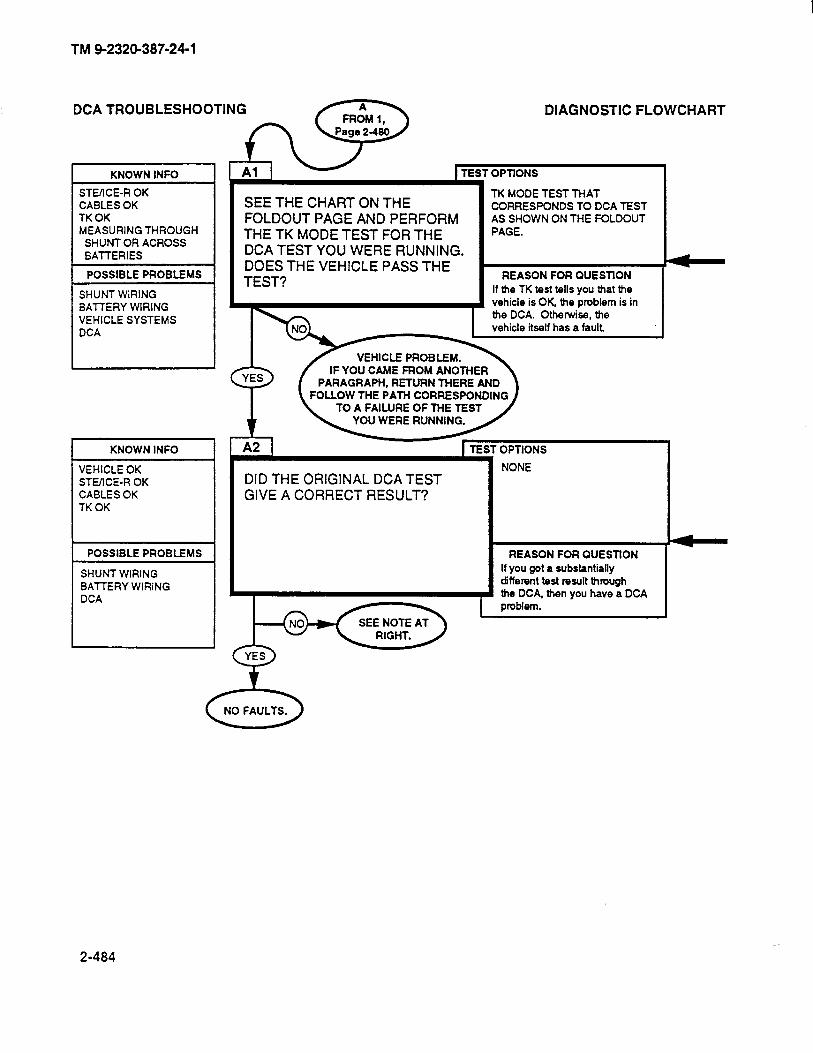
TM 9-2320-387-24-l
KNOWN INFO
STOICE-R OK CABLES OK TK OK MEASURING THROUGH
SHUNT OR ACROSS BATTERIES
DCA TROUBLESHOOTING
POSSIBLE PROBLEMS
SHUNT WIRING BATTERY WIRING VEHICLE SYSTEMS DCA
KNOWN INFO
VEHICLE OK STEXE-R OK CABLES OK TK OK
POSSIBLE PROBLEMS
SHUNT WIRING BA-ITERY WIRING DCA
SEE THE CHART ON THE FOLDOUT PAGE AND PERFORM THE TK MODE TEST FOR THE DCA TEST YOU WERE RUNNING. DOES THE VEHICLE PASS THE TEST?
DID THE ORIGINAL DCA TEST GIVE A CORRECT RESULT?
DIAGNOSTIC FLOWCHART
OPTlONS
TK MODE TEST THAT CORRESPONDS TO DCA TEST AS SHOWN ON THE FOLDOUT PAGE.
REASON FOR QUESTlON
If the TK test tells you that the vehicle is OK the problem is in the DCA. Otherwise, the vehicle itself has a fault.
VEHICLE PROBLEM. IF YOU CAME FROM ANOTHER
OPTIONS
NONE
REASON FOR OUESTION
If you got a substantially different test result through the DCA. then you have a DCA problem.
6 NO FAULTS.
2-484
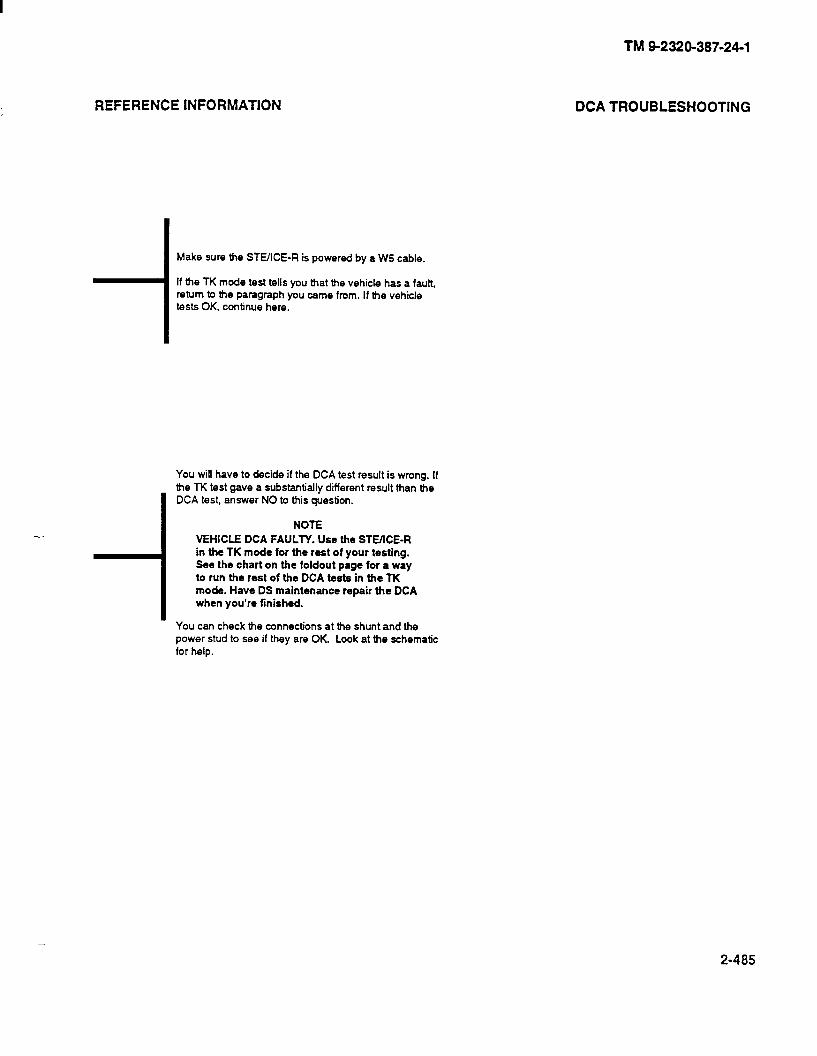
REFERENCE INFORMATION
Make sure the STEXE-R is powered by a W5 cable.
If t&e TK mode test tells you that the vehicle has a fault, return to the paragraph you came from. If the vehicle tests OK, continue here.
- -I You will have to decide if the DCA test result is wrong. If the TK test gave a substantially different result than the DCA test. answer NO to this question.
NOTE
VEHICLE DCA FAULTY. Use the STEACE-R in the TK mode for the rest of your testing. See the chart on the foldout page for a way to run the rest of the DCA tests in the TK mode. Have DS maintenance repair the DCA when you’re finished
You can check the connections at the shunt and the power stud to see if they are OK. Look at the schematic for help.
TM 9-2320-387-24-l
DCA TROUBLESHOOTING
2-485
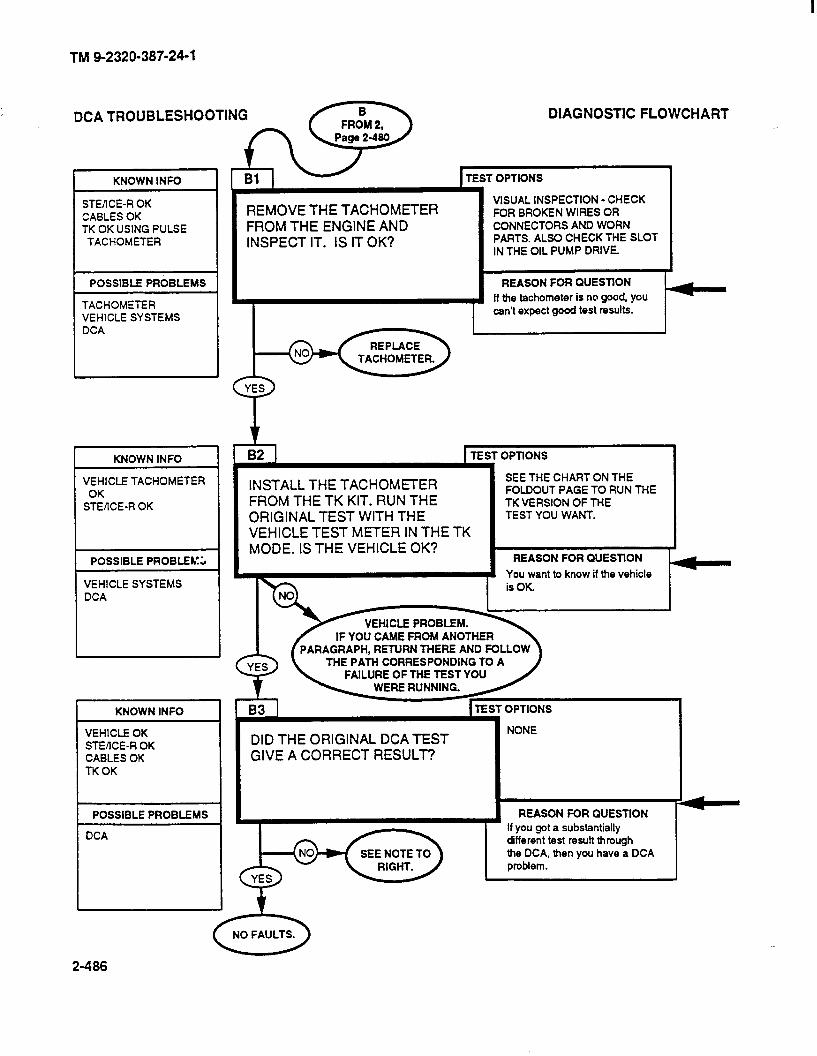
TM 42320-387-24-l
DCA TROUBLESHOOTING DIAGNOSTIC FLOWCHART
KNOWN INFO
STEXE-R OK CABLES OK TK OK USING PULSE TACHOMETER
POSSIBLE PRbBLEMS
VEHICLE SYSTEMS
REMOVE THE TACHOMETER FROM THE ENGINE AND INSPECT IT. IS IT OK?
VISUAL INSPECTION - CHECK FOR BROKEN WIRES OR CONNECTORS AND WORN PARTS. ALSO CHECK THE SLOT IN THE OIL PUMP DRIVE.
REASON FOR OUESllON
If the tachometer is no good. you can’t expect good test results.
/_ I I
TACHOMETER.
VEHICLE TACHOMETER
STE/lCE-R OK
I POSSIBLE PROBLEh!;
VEHICLE SYSTEMS DCA
t 82 1 TEST OPllONS
/
INSTALL THE TACHOMETER FROM THE TK KIT. RUN THE ORIGINAL TEST WITH THE VEHICLE TEST METER IN THE TK MODE. IS THE VEHICLE OK?
SEE THE CHART ON THE FOLDOUT PAGE TO RUN THE TK VERSION OF THE TEST YOU WANT.
REASON FOR OUESTlON
You want to know if the vehicle
is OK
IF YOU CAME FROM ANOTHER
L PARAGRAPH, RETURN THERE AND FOLLOW
83 1 TEST OPTIONS
DID THE ORIGINAL DCA TEST NONE
STEIICE-R OK GIVE A CORRECT RESULT?
POSSIBLE PROBLEMS I-
2-486
REFERENCE INFORMATION
Remove tachometer (paa. 4-16). If you find the tachometer defective, replace it and return to where you came from and rerun the original DCA test. If it fails again, return to this question and answer YES.
Make sure the STE/lCE-R is powered by the W5 cable.
If you don’t find any faults in the vehicle, the slot in the oil pump drive could be too worn to drive the tachometer. If you see this, notify DS maintenance (chapter 14).
I You will have to decide if the DCA test result is wrong.
I If the TK test gave a substantially different result than the DCA test, answer NO to this question.
NOTE
VEHICLE DCA FAULTY. Use the STEACE-R in the
I TK mode for the rest of your testing. See the chart on the fofdout page for 8 way to run the rsst of the DCA tests in the TK mode. Have DS maintenance repair the DCA when you’re finished.
TM 9-2320-387-24-l
DCA TROUBLESHOOTING
2-487/(2-488 blank)
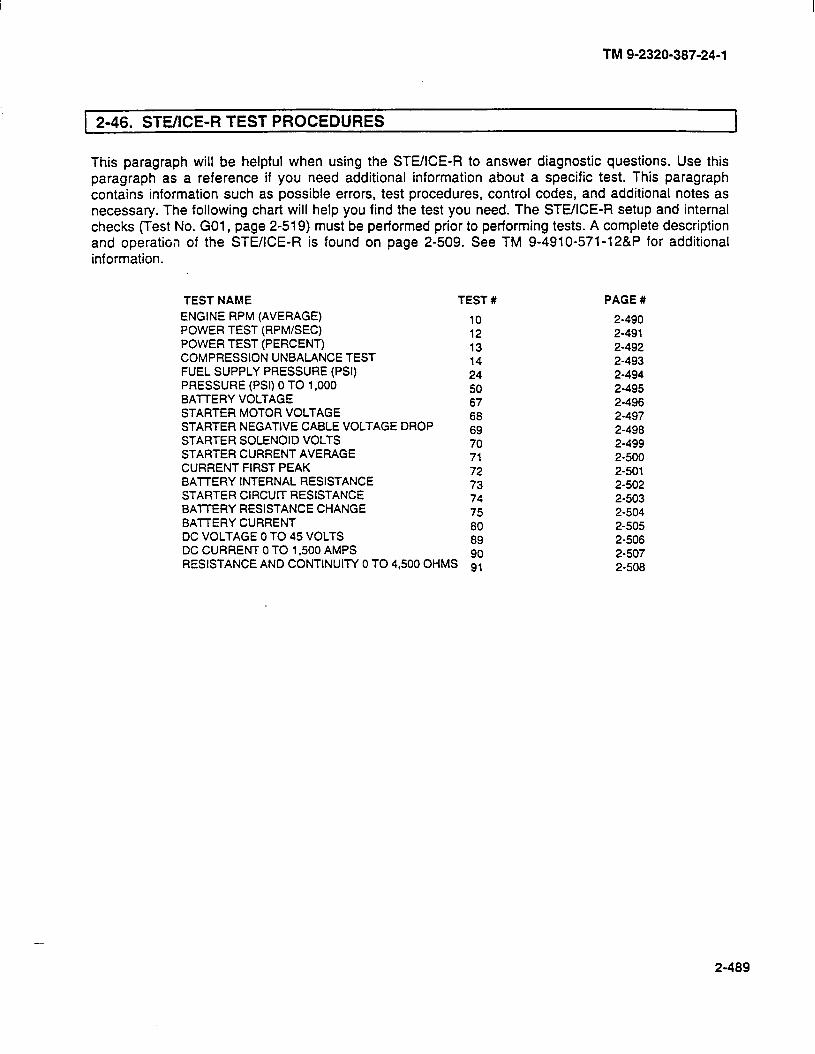
TM 9-2320-387-24-l
1 2-46. STEACE-F? TEST PROCEDURES 1
This paragraph will be helpful when using the STE/ICE-R to answer diagnostic questions. Use this paragraph as a reference if you need additional information about a specific test. This paragraph contains information such as possible errors, test procedures, control codes, and additional notes as necessary. The following chart will help you find the test you need. The STE/ICE-R setup and internal checks (Test No. GO1 , page 2-519) must be performed prior to performing tests. A complete description and operation of the STEXE-R is found on page 2-509. See TM 9-4910-571-12&P for additional information.
TEST NAME TEST # PAGE #
ENGINE RPM (AVERAGE) POWER TEST (RPM/SEC) POWER TEST (PERCENT) COMPRESSION UNBALANCE TEST FUEL SUPPLY PRESSURE (PSI) PRESSURE (PSI) 0 TO 1,000 BAITERY VOLTAGE STARTER MOTOR VOLTAGE STARTER NEGATIVE CABLE VOLTAGE DROP STARTER SOLENOID VOLTS STARTERCURRENTAVERAGE CURRENT FIRST PEAK BAl-l-ERY INTERNAL RESISTANCE STARTER CIRCUIT RESISTANCE BATTERY RESISTANCE CHANGE BATTERY CURRENT DC VOLTAGE 0 TO 45 VOLTS DC CURRENT 0 TO 1,500 AMPS
10 12 13 14 24 50 67 68 69 70 71 72 73 74 75 80 89 90 . . _^
2-490 2-491 2-492 2-493 2-494 2-495 2-496 2-497 2-498 2-499 2-500 2-501 2-502 2-503 2-504 2-505 2-506 2-507
RESISTANCE AND CONTINUITY 0 TO 4,500 OhMS g, 2-508
-
2-489
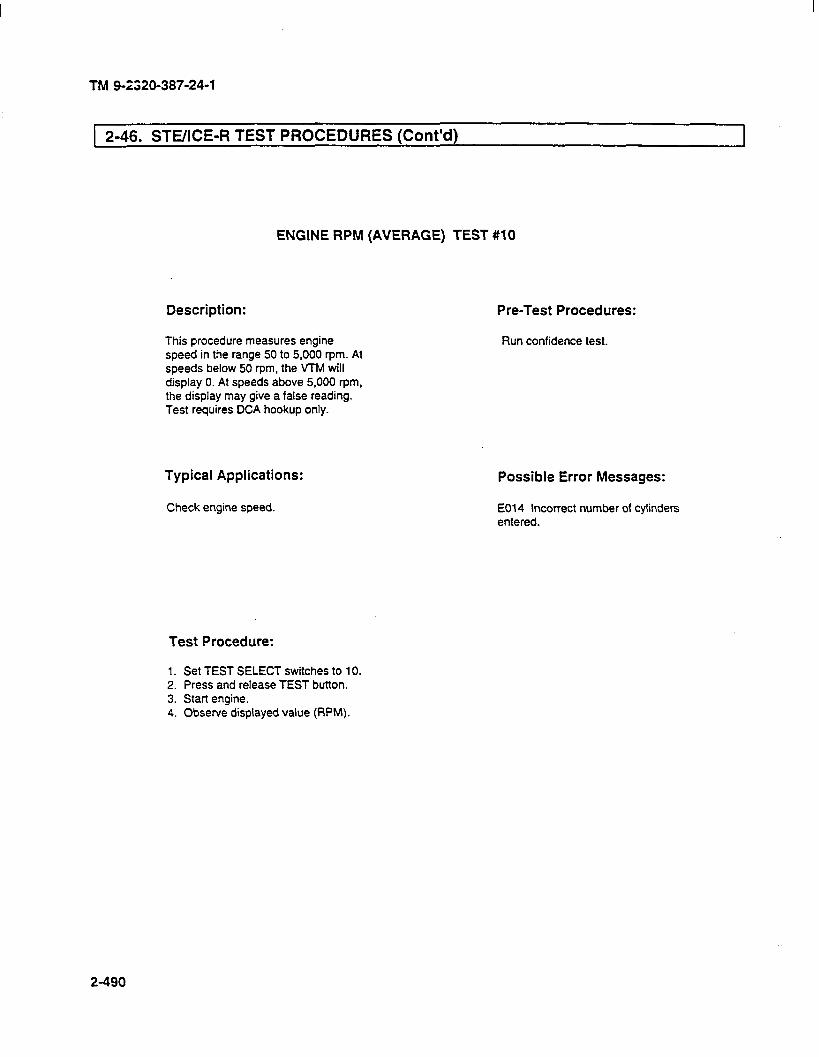
TM 9-2320-387-24-l
1 2-46. STE/ICE-R TEST PROCEDURES (Cont’d)
ENGINE RPM (AVERAGE) TEST #lO
Description:
This procedure measures engine speed in the range 50 to 5,000 rpm. At speeds below 50 rpm, the VTM will display 0. At speeds above 5.000 rpm, the display may give a false reading. Test requires DCA hookup only.
Typical Applications:
Check engine speed.
Test Procedure:
Pre-Test Procedures:
Run confidence test.
Possible Error Messages:
EO14 Incorrect number of cylinders entered.
1. Set TEST SELECT switches to 10. 2. Press and release TEST button. 3. Start engine. 4. Observe displayed value (RPM).
2-490
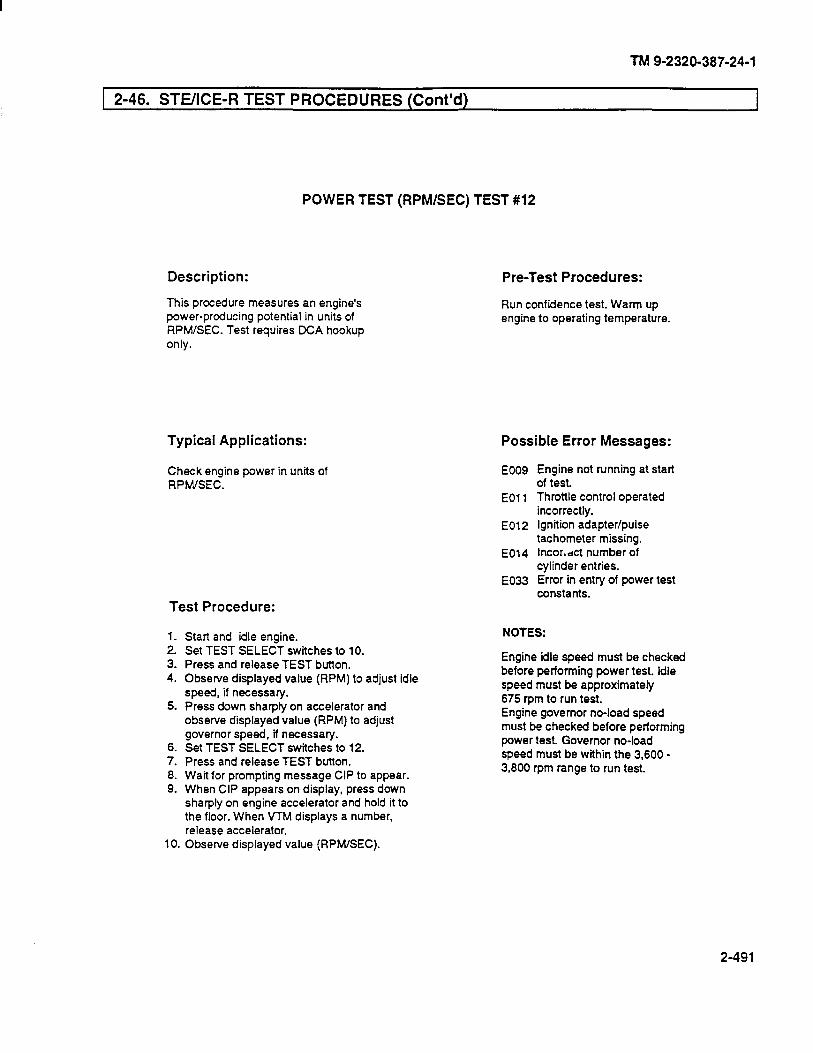
TM 9-2320-387-24-l
2-46. STUICE-R TEST PROCEDURES (Cont’d)
POWER TEST (RPM/SEC) TEST #12
Description:
This procedure measures an engine’s power-producing potential in units of RPM/SEC. Test requires DCA hookup only.
Typical Applications:
Check engine power in units of RPM/SEC.
Test Procedure:
1. Start and idle engine. 2. Set TEST SELECT switches to 10. 3. Press and release TEST button. 4. Observe displayed value (RPM) to adjust idle
speed, if necessary. 5. Press down sharply on accelerator and
observe displayed value (RPM) to adjust governor speed, if necessary.
6. Set TEST SELECT switches to 12. 7. Press and release TEST button. 8. Wait for prompting message CIP to appear. 9. When CIP appears on display, press down
sharply on engine accelerator and hold it to the floor. When VTM displays a number, release accelerator.
10. Observe displayed value (RPM/SEC).
Pre-Test Procedures:
Run confidence test. Warm up engine to operating temperature.
Possible Error Messages:
Eoog Engine not running at start of test.
Eel 1 Throttle control operated incorrectly.
E012 Ignition adapter/pulse tachometer missing.
E014 Incor..&t number of cylinder entries.
E033 Error in entry of power test constants.
NOTES:
Engine idle speed must be checked before performing power test. Idle speed must be approximately 675 rpm to run test. Engine governor no-load speed must be checked before performing power test. Governor no-load speed must be within the 3.600 - 3,800 rpm range to run test.
2-491

TM 9-2320-387-24-l
p-46. STUICE-R TEST PROCEDURES (Cont’d) I
POWER TEST (PERCENT) TEST #13
Description:
This procedure measures the percen- tage of engine’s power-producing potential as compared to a good engine. Test requires DCA hookup only.
Typical Applications:
Check engine power.
Test Procedure:
1. Start and idle engine. 2. Set TEST SELECT switches to 10. 3. Press and release TEST button. 4. Observe displayed value (RPM) to adjust idle
speed, if necessary. 5. Press down sharply on on engine accelerator
and observe displayed value (RPM) to adjust governor speed, if necessary.
6. Set TEST SELECT switches to 13. 7. Press and release TEST button. 8. Wait for prompting message CIP to appear. 9. When CIP appears on display, press down
sharply on engine accelerator and hold it to the floor. When VTM displays OFF, release accelerator.
10. A number will be displayed after the engine has returned to idle speed. This number is the test result in units of percent of nominal-rated power.
Pre-Test Procedures:
Run confidence test. Warm up engine to operating temperature.
Possible Error Messages:
. EOO9 Engine not running at start of test.
E011 Throttle control operated incorrectly.
E012 Ignition adapter/pulse tachometer miss;,rg.
E024 Test not valid for VID entered.
NOTE:
Engine idle speed must be checked before performing power test. Idle speed must be approximately 675 rpm to run test. Engine governor no-load speed must be checked before performing power test. Governor no-load speed must be within the 3,900 - 4,100 rpm range to run test.
2-492
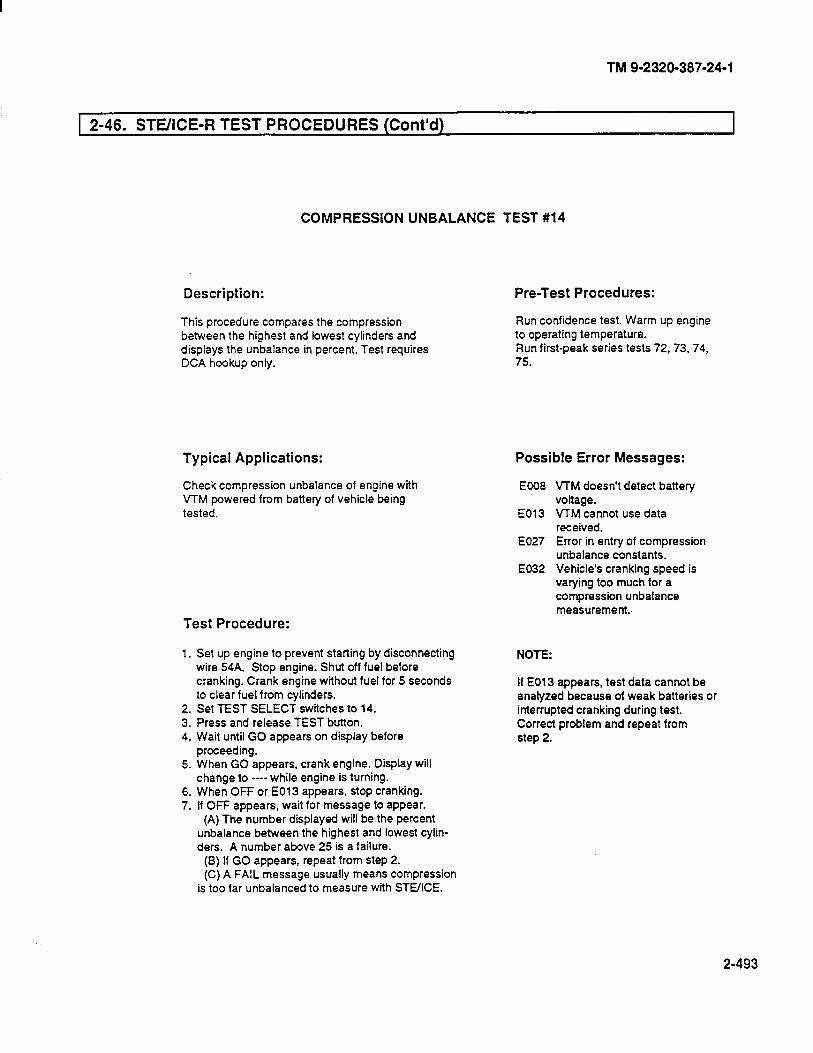
TM 9-2320-387-24-l
1 2-46. STEIICE-R TEST PROCEDURES (Cont’d)
COMPRESSION UNBALANCE TEST #14
Description:
This procedure compares the compression between the highest and lowest cylinders and displays the unbalance in percent. Test requires DCA hookup only.
Typical Applications:
Check compression unbalance of engine with VTM powered from battery of vehicle being tested.
Test Procedure:
1. Set up engine to prevent starting by disconnecting wire 54A. Stop engine. Shut off fuel before cranking. Crank engine without fuel for 5 seconds to clear fuel from cylinders.
2. Set TEST SELECT switches to 14. 3. Press and release TEST button. 4. Wait until GO appears on display before
proceeding. 5. When GO appears, crank engine. Display will
change to ---- while engine is turning. 6. When OFF or E013 appears, stop cranking. 7. If OFF appears, wait for message to appear.
(A) The number displayed will be the percent unbalance between the highest and lowest cylin- ders. A number above 25 is a failure.
(B) If GO appears, repeat from step 2. (C) A FAIL message usually means compression
is too far unbalanced to measure with STEIICE.
Pre-Test Procedures:
Run confidence test. Warm up engine to operating temperature. Run first-peak series tests 72, 73.74, 75.
Possible Error Messages:
E006 VTM doesn’t detect battery voftage.
E013 VTM cannot use data received.
E027 Error in entry of compression unbalance constants.
E032 Vehicle’s cranking speed is varying too much for a compression unbalance measurement..
NOTE:
If E013 appears, test data cannot be anafyzed because of weak batteries or interrupted cranking during test. Correct problem and repeat from step 2.
2-493

TM 9-2320-387-24-l
2-46. STUICE-R TEST PROCEDURES (Cont’d)
FUEL SUPPLY PRESSURE (PSI) TEST #24
Description:
This procedure measures the return pressure in order to detect line blockage, leaks, or insufficient restrictor back-pressure. Test requires DCA hookup only.
Typical Applications:
Fuel supply pressure
Test Procedure:
1. Turn off vehicle. 2. Set TEST SELECT switch to 24. 3. Press and hold TEST button until
CAL appears on display. 4. Release TEST button and wait for
offset value to appear on display. If offset is within -15 lo 1.5, proceed. If not, go to DCA Troubleshooting Procedure.
5. Press and release TEST button. 6. Start engine. 7. Observe displayed value.
Pre-Test Procedures:
Run confidence test. Wait for 1 minute after turning engine off to run this test.
Control Functions:
01,02,03,04,06
Possible Error Messages:
E005 Offset not performed.
2-494
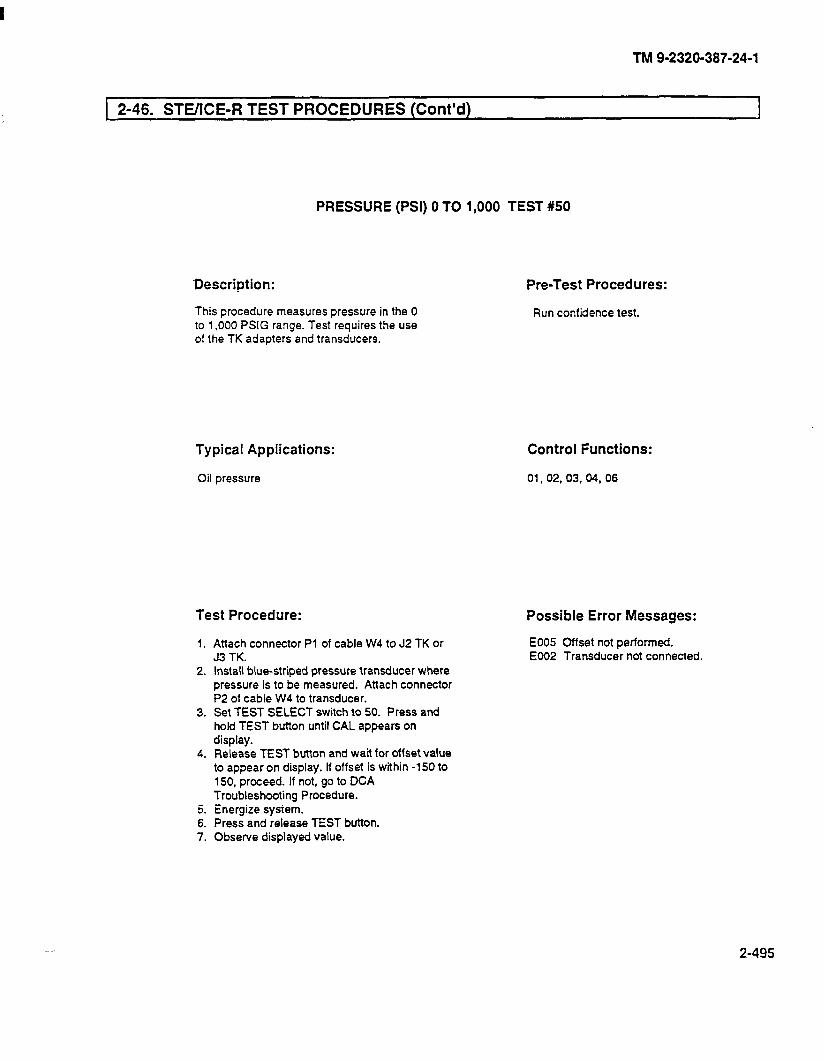
TM 9-2320-387-24-l
1 2-46. STEACE-R TEST PROCEDURES (Cont’d) I
PRESSURE (PSI) 0 TO 1,000 TEST #50
‘Description: Pre-Test Procedures:
This procedure measures pressure in the 0 to 1,000 PSIG range. Test requires the use of the TK adapters and transducers.
Run confidence test.
Typical Applications:
Oil pressure
Control Functions:
01,02,03.04, 06
Test Procedure: Possible Error Messages:
1. Attach connector Pi of cable W4 to J2 TK or J3 TK.
2. Install blue-striped pressure transducer where pressure is to be measured. Attach connector P2 of cable W4 to transducer.
3. Set TEST SELECT switch to 50. Press and hold TEST button until CAL appears on display.
4. Release TEST button and watt for offset value to appear on display. If offset is within -150 to 150, proceed. If not, go to DCA Troubleshooting Procedure.
5. Energize system. 6. Press and release TEST button. 7. Observe displayed value.
E005 Offset not performed. E002 Transducer not connected.
2-495
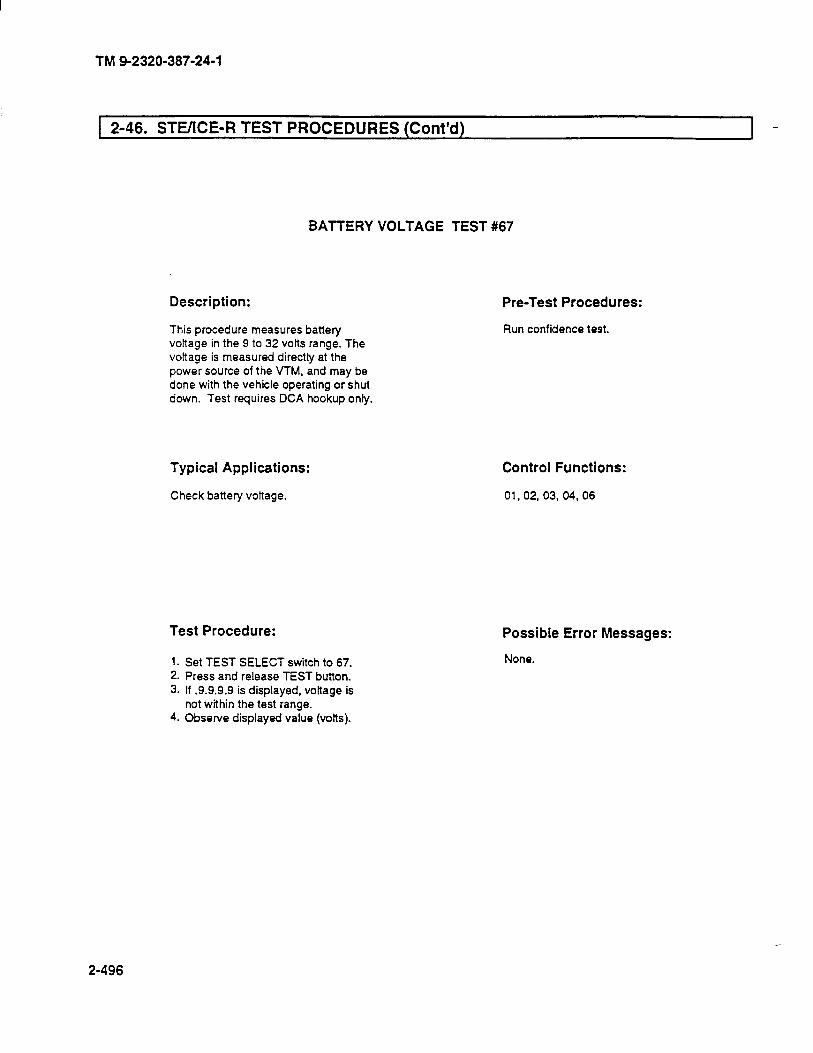
TM g-2320-387-24-1
1 2-46. STEIICE-R TEST PROCEDURES (Cont’d)
BATTERY VOLTAGE TEST #67
Description:
This procedure measures battery voltage in the 9 to 32 vofts range. The voltage is measured directly at the power source of the VTM, and may be done with the vehicle operating or shut down. Test requires DCA hookup only.
Typical Applications: Control Functions:
Check battery voltage. 01.02, 03, 04, 06
Test Procedure:
1. Set TEST SELECT switch to 67. 2. Press and release TEST button. 3. If .9.9.9.9 is displayed, voftage is
not within the test range. 4. Observe displayed value (volts).
Pre-Test Procedures:
Run confidence test.
Possible Error Messages:
None.
2-496
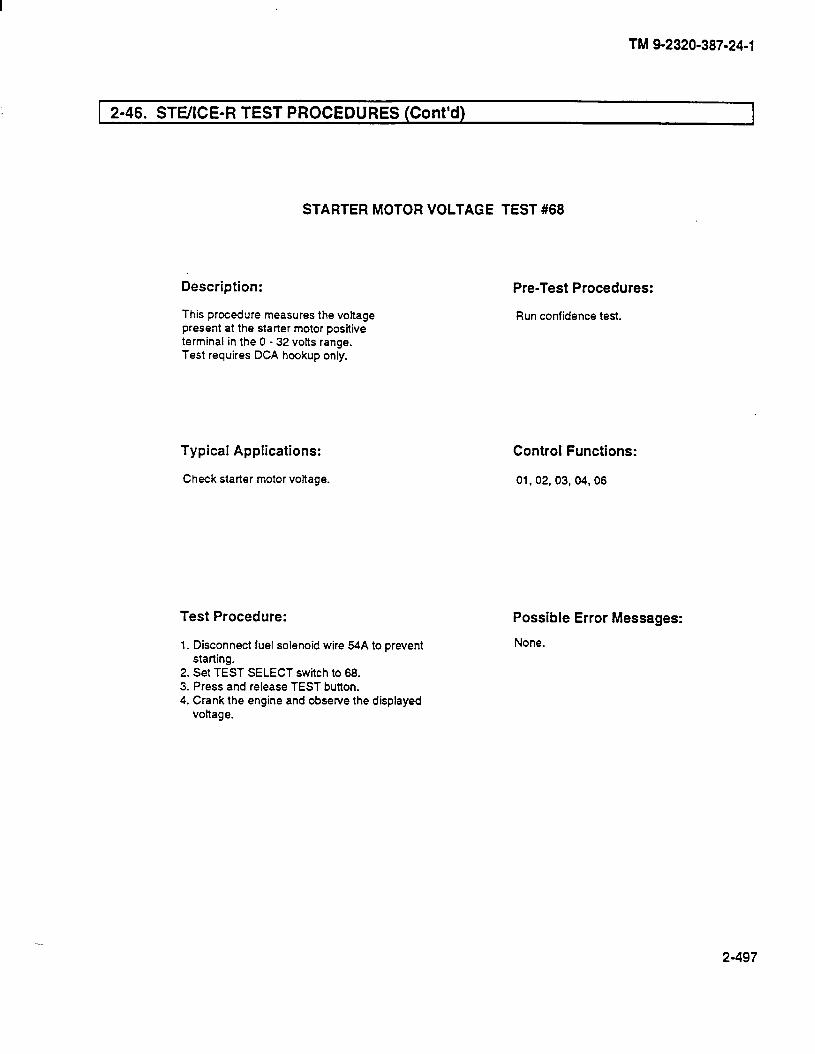
TM 9-2320-387-24-l
1 2-46. STUICE-R TEST PROCEDURES (Cont’dl
STARTER MOTOR VOLTAGE TEST #68
Description: Pre-Test Procedures:
This procedure measures the voltage present at the starter motor positive terminal in the 0 - 32 volts range. Test requires DCA hookup only.
Run confidence test.
Typical Applications:
Check starter motor vottage.
Test Procedure:
1. Disconnect fuel solenoid wire 64A to prevent starting.
2. Set TEST SELECT switch to 68. 3. Press and release TEST button. 4. Crank the engine and observe the displayed
voltage.
Control Functions:
01.02,03, 04,06
Possible Error Messages:
None.
2-497
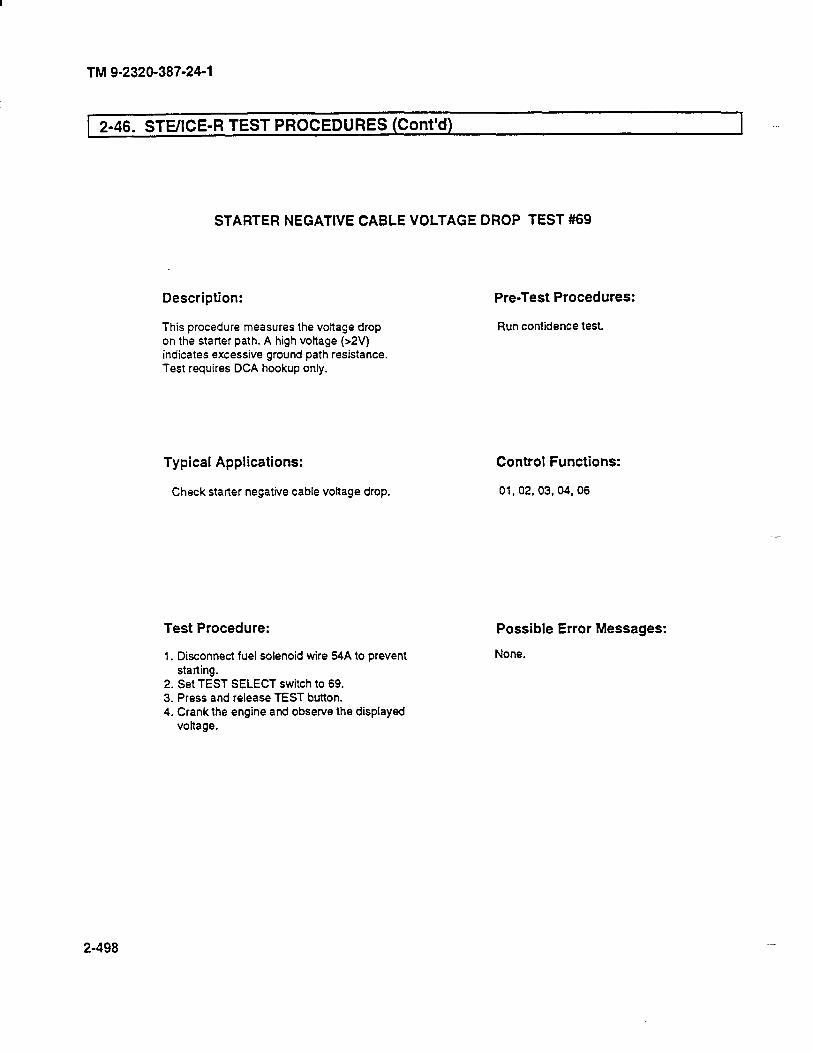
TM 9-2320-387-24-l
1 2-46. STEIICE-R TEST PROCEDURES (Cont’d)
STARTER NEGATIVE CABLE VOLTAGE DROP TEST #69
Description: Pre-Test Procedures:
This procedure measures the voltage drop on the starter path. A high voltage (>2V) indicates excessive ground path resistance. Test requires DCA hookup only.
Run confidence test.
Typical Applications:
Check starter negative cable voltage drop.
Test Procedure:
1. Disconnect fuel solenoid wire 64A to prevent starting.
2. Set TEST SELECT switch to 69. 3. Press and release TEST button. 4. Crank the engine and observe the displayed
vottage.
Control Functions:
01.02, 03,04, 06
Possible Error Messages:
None.
2-498
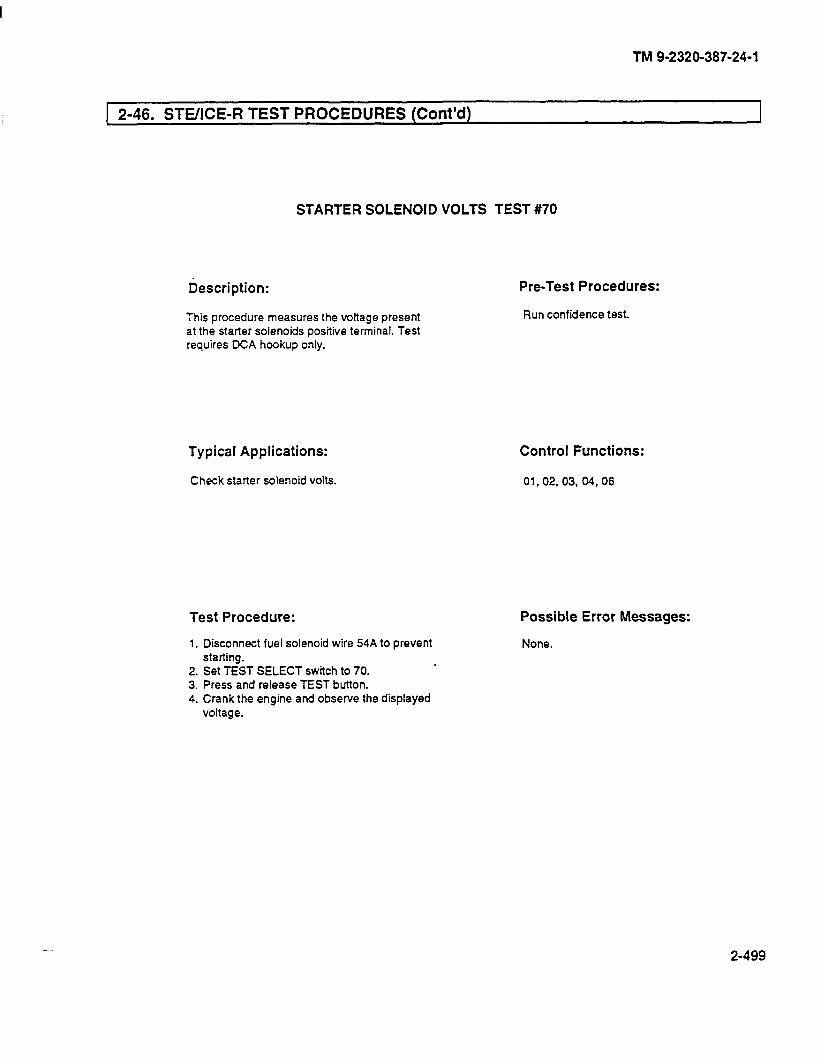
TM 9-2320-387-24-l
2-46. STEKE-R TEST PROCEDURES (Cont’d)
STARTER SOLENOID VOLTS TEST #70
Description:
This procedure measures the voltage present at the starter solenoids positive terminal. Test requires DCA hookup only.
Typical Applications: Control Functions:
Check starter solenoid volts. 01,02, 03, 04,06
Test Procedure:
1. Disconnect fuel solenoid wire 54A to prevent starting.
2. Set TEST SELECT switch to 70. 3. Press and release TEST button. 4. Crank the engine and observe the displayed
voltage.
Pre-Test Procedures:
Run confidence test.
Possible Error Messages:
None.
2-499
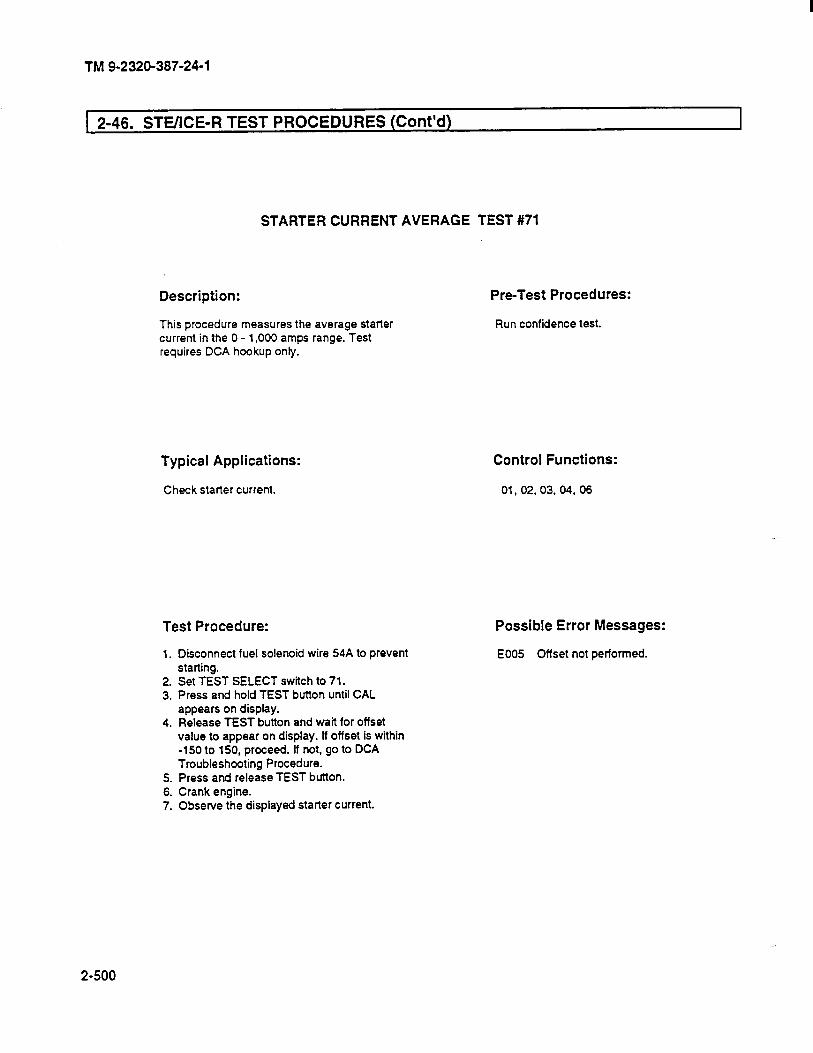
TM 9-2320-387-24-l
1 2-46. STEACE-R TEST PROCEDURES (Cont’d)
STARTER CURRENT AVERAGE TEST #71
Description:
This procedure measures the average starter current in the 0 - 1,000 amps range. Test requires DCA hookup only.
Typical Applications: Control Functions:
Check starter current. 01, 02,03.04,06
Test Procedure:
1. Disconnect fuel solenoid wire 54A to prevent starting.
2. Set TEST SELECT switch to 71. 3. Press and hold TEST button until CAL
appears on display. 4. Release TEST button and wait for offset
value to appear on display. If offset is within -150 to 150, proceed. ff not, go to DCA Troubleshooting Procedure.
5. Press and release TEST button. 6. Crank engine. 7. Observe the displayed starter Current.
Pre-Test Procedures:
Run confidence test.
Possible Error Messages:
E005 Offset not performed.
2-500
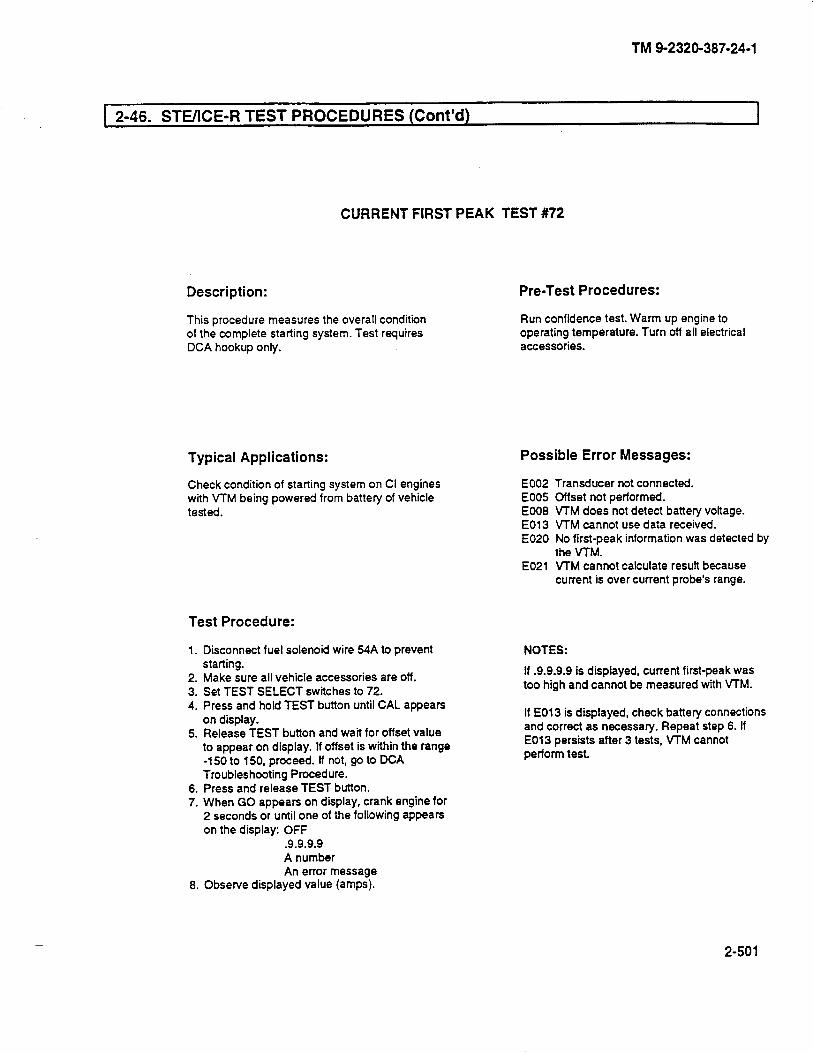
TM g-2320-387-24-1
2-46. STE/lCE-R TEST PROCEDURES (Cont’d)
CURRENT FIRST PEAK TEST #72
Description: Pre-Test Procedures:
This procedure measures the overall condition of the complete starting system. Test requires DCA hookup only.
Run confidence test. Warm up engine to operating temperature. Turn off all electrical accessories.
Typical Applications:
Check condition of starting system on Cl engines with VTM being powered from battery of vehicle tested.
Test Procedure:
1. Disconnect fuel solenoid wire 54A to prevent starting.
2. Make sure all vehicle accessories are off. 3. Set TEST SELECT switches to 72. 4. Press and hold TEST button until CAL appears
on display. 5. Release TEST button and wait for offset value
to appear on display. If offset is within the range -150 to 150, proceed. If not, go to DCA Troubleshooting Procedure.
6. Press and release TEST button. 7. When GO appears on display, crank engine for
2 seconds or until one of the following appears on the display: OFF
.9.9.9.9 A number An error message
8. Observe displayed value (amps).
Possible Error Messages:
E002 E005 E008 E013 E020
E021
Transducer not connected. Offset not performed. VTM does not detect battery voltage. VTM cannot use data received. No first-peak information was detected by the VTM. VTM cannot calculate result because current is over current probe’s range.
NOTES:
11 .9.9.9.9 is displayed, current first-peak was too high and cannot be measured with VTM.
If E013 is displayed, check battery connections and correct as necessary. Repeat step 6. If E013 persists after 3 tests, VTM cannot perform test.
2-501
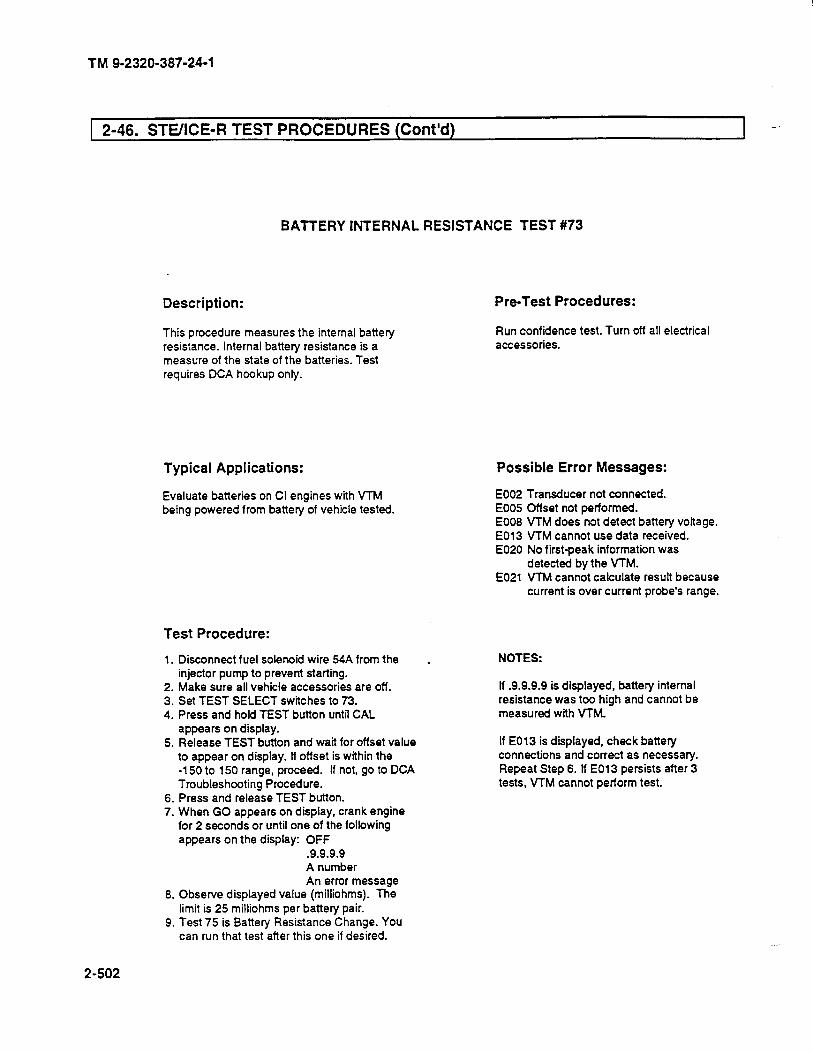
TM 9-2320-387-24-l
1 2-46. STEKE-R TEST PROCEDURES (Cont’d) I _
BATTERY INTERNAL RESISTANCE TEST #73
Description:
This procedure measures the internal battery resistance. Internal battery resistance is a measure of the state of the batteries. Test requires DCA hookup only.
Typical Applications: Possible Error Messages:
Evaluate batteries on Cl engines with VTM being powered from battery of vehicle tested.
E002 Transducer not connected. E005 Cffset not performed. E006 VTM does not detect battery voltage. E013 VTM cannot use data received. E020 No first-peak information was
detected by the VTM. E021 VTM cannot calculate result because
current is over current probe’s range.
Test Procedure:
1. Disconnect fuel solenoid wire 54A from the injector pump to prevent starting.
2. Make sure all vehicle accessories are off. 3. Set TEST SELECT switches to 73. 4. Press and hold TEST button until CAL
appears on display.
.
5. Release TEST button and wait for offset value to appear on display. If offset is within the -150 to 150 range, proceed. If not, go to DCA Troubleshooting Procedure.
6. Press and release TEST button. 7. When GO appears on display, crank engine
for 2 seconds or until one of the following appears on the display: OFF
.s.s.s.s A number An error message
8. Observe displayed value (milliohms). The limit is 25 milliohms per battery pair.
9. Test 75 is Battery Resistance Change. You can run that test after this one if desired.
Pm-Test Procedures:
Run confidence test. Turn off all electrical accessories.
NOTES:
If .S.S.S.S is displayed, battery internal resistance was too high and cannot be measured with VTM.
If E013 is displayed, check battery connections and correct as necessary. Repeat Step 6. If E013 persists after 3 tests, VTM cannot perform test.
2-502
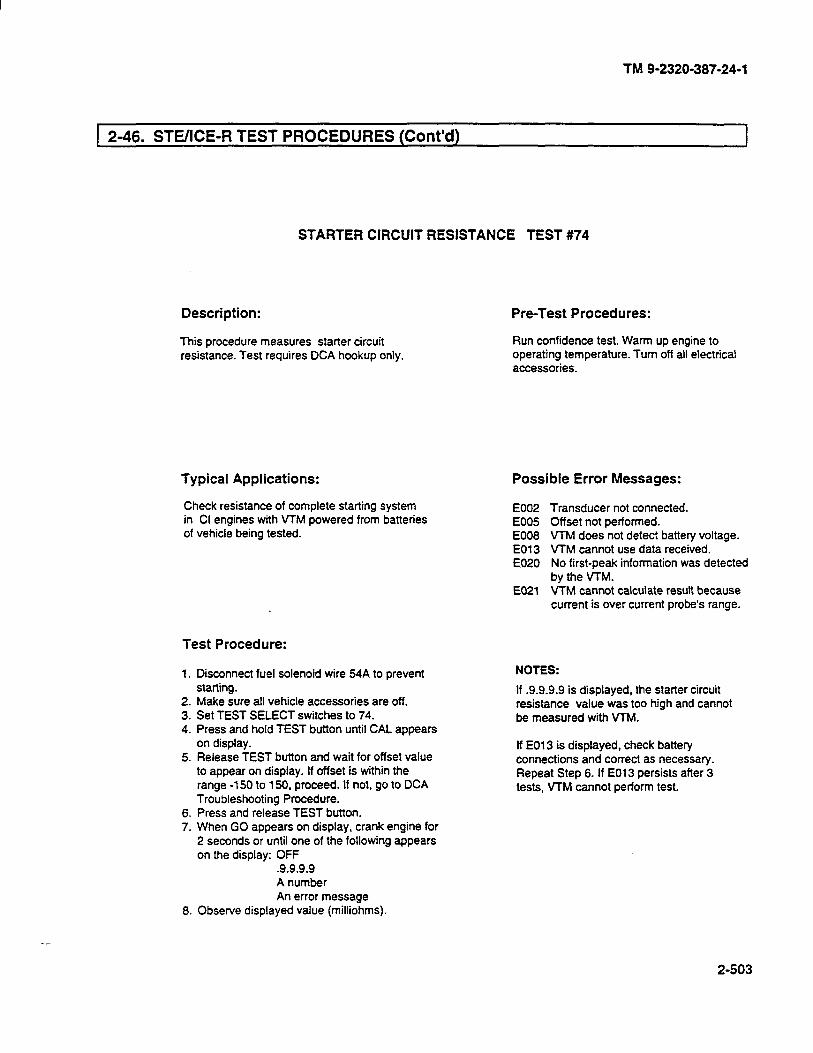
TM 9-2320-387-24-l
1 2-46. STE/ICE-R TEST PROCEDURES (Cont’d)
STARTER CIRCUIT RESISTANCE TEST #74
Description: Pm-Test Procedures:
This procedure measures starter circuit resistance. Test requires DCA hookup only.
Run confidence test. Warm up engine to operating temperature. Turn off all electrical accessories.
Typical Applications: Possible Error Messages:
Check resistance of complete starting system in Cl engines with VTM powered from batteries of vehicle being tested.
E002 Transducer not connected. E005 Offset not performed. E008 VTM does not detect battery voltage. E013 VTM cannot use data received. E020 No first-peak information was detected
by the VTM. E021 VTM cannot calculate result because
current is over current probe’s range.
Test Procedure:
1.
2. 3. 4.
5.
6. 7.
Disconnect fuel solenoid wire 54A to prevent starting. Make sure all vehicle accessories are off. Set TEST SELECT switches to 74. Press and hold TEST button until CAL appears on display. Release TEST button and wait for offset value to appear on display. If offset is within the range -150 to 150, proceed. If not, go to DCA Troubleshooting Procedure. Press and release TEST button. When GO appears on display, crank engine for 2 seconds or until one of the following appears on the display: Off
.9.9.9.9 A number An error message
8. Observe displayed value (milliohms).
NOTES:
If .9.9.9.9 is displayed, the starter circuit resistance value was too high and cannot be measured with VTM.
If EO13 is displayed, check battery connections and correct as necessary. Repeat Step 6. If E013 persists after 3 tests, VTM cannot perform test.
2-503

TM 9-2320-387-24-l
2-46. STUICE-R TEST PROCEDURES (Cont’d)
BAlTERY RESISTANCE CHANGE TEST #75
Description:
This procedure measures the change of battery resistance. Test requires DCA hookup only.
Pre-Test Procedures:
Run confidence test. Warm up engine to operating temperature. Turn off all electrical accessories.
Typical Applications: Possible Error Messages:
Evaluate batteries in Cl engines with VTM powered from batteries of vehicle being tested.
EO02 EO05 E008 E013 E020
Transducer not connected. Cffset not performed. VTM does not detect battery voltage. VTM cannot use data received. No first-peak information was detected by the VTM. VTM cannot calculate result because current is over current probe’s range.
Test Procedure:
1.
2. 3. 4.
5.
6. 7.
8.
Disconnect fuel solenoid wire 54A to prevent starting. Make sure all vehicle accessories are off. Set TEST SELECT switches to 75. Press and hold TEST button until CAL appears on display. Release TEST button and wait for offset value to appear on display. If offset is within the -150 to 150 range, proceed. If not, go to DCA Troubleshooting Procedure. Press and release TEST button. When GO appears on display, engage starter for 2 seconds or until one of the following appears on the display: OFF
.9.9.9.9 A number An error message
Observe displayed value (milliohms/seconds). The limit is 50 milliohms per battery pair. A lower number is better than a higher one.
E021
NOTES:
If .9.9.9.9 is displayed, the battery resis- tance change value is beyond the range of the VTM and cannot be measured with the VTM.
If E013 is displayed, check battery connections and correct as necessary. Repeat Step 6. If EO13 persists after 3 tests, VTM cannot perform test.
2-504
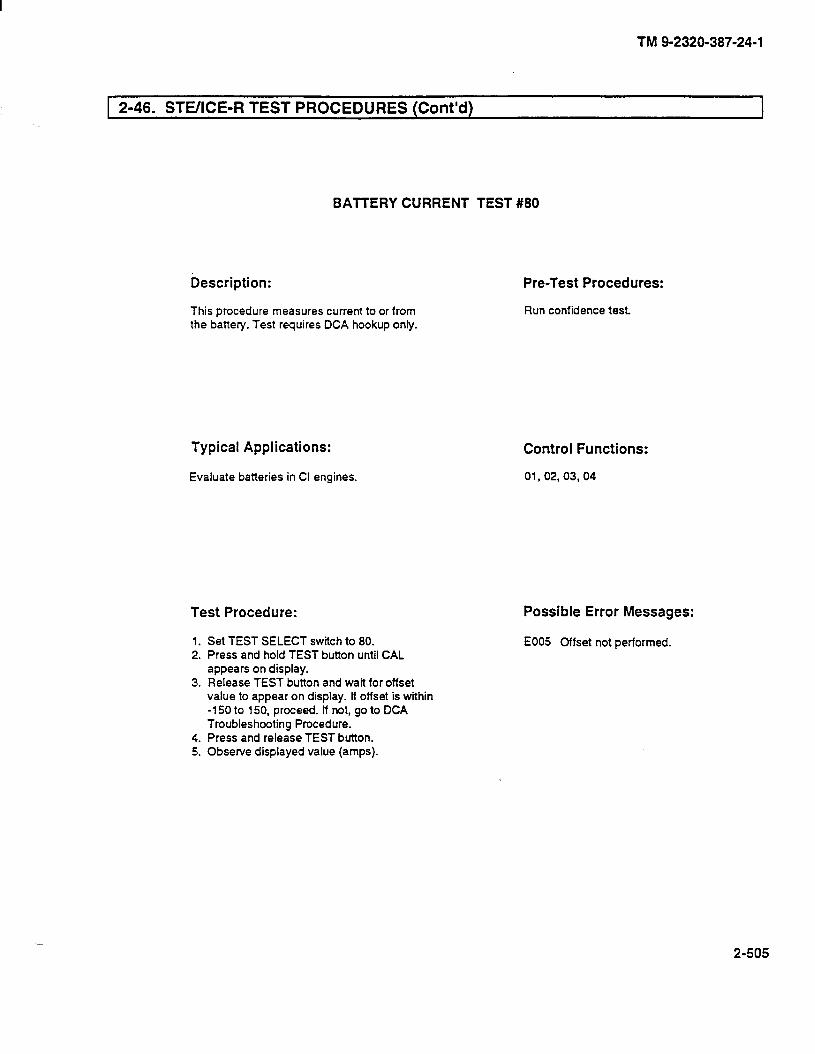
TM g-2320-387-24-1
1 2-46. STUICE-R TEST PROCEDURES (Cont’dl I
BATTERY CURRENT TEST #80
Description:
This procedure measures current to or from the battery. Test requires DCA hookup only.
Typical Applications: Control Functions:
Evaluate batteries in Cl engines. 01(02,03,04
Test Procedure:
1. Set TEST SELECT switch to 80. 2. Press and hold TEST button until CAL
appears on display. 3. Release TEST button and wait for offset
value to appear on display. If offset is within -150 to 150, proceed. If not, go to DCA Troubleshooting Procedure.
4. Press and release TEST button. 5. Observe displayed value (amps).
Pre-Test Procedures:
Run confidence test.
Possible Error Messages:
EOOS Offset not performed.
2-505
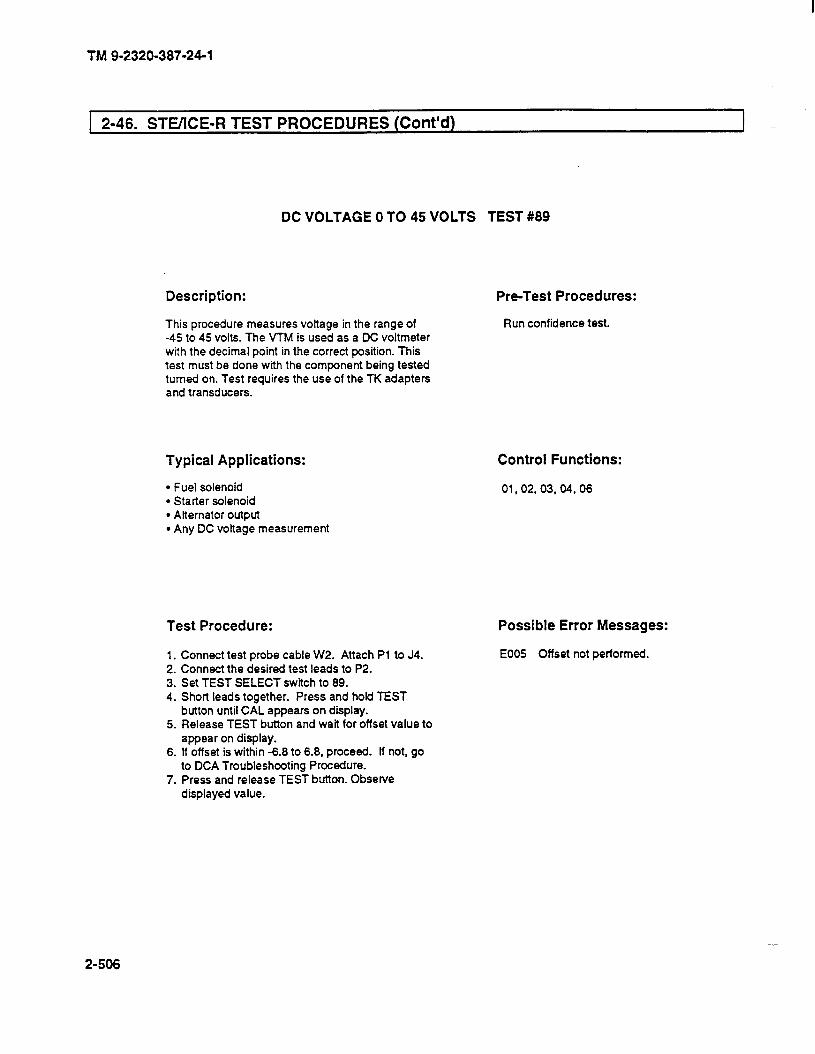
TM 9-2320-387-24-l
1 2-46. STUlCE-R TEST PROCEDURES (Cont’d)
DC VOLTAGE 0 TO 45 VOLTS TEST #89
Description: Pm-Test Procedures:
This procedure measures voftage in the range of -45 to 45 volts. The VTM is used as a DC voltmeter with the decimal point in the correct position. This test must be done with the component being tested turned on. Test requires the use of the TK adapters and transducers.
Run confidence test.
Typical Applications:
l Fuel solenoid l Starter solenoid l Alternator output l Any DC voltage measurement
Test Procedure:
1. Connect test probe cable W2. Attach Pl to J4. 2. Connect the desired test leads to P2. 3. Set TEST SELECT switch to 89. 4. Short leads together. Press and hold TEST
button until CAL appears on display. 5. Release TEST button and wait for offset value to
appear on display. 6. If offset is within -6.8 to 6.8, proceed. If not, go
to DCA Troubleshooting Procedure. 7. Press and release TEST button. Observe
displayed value.
Control Functions:
01,02, 03, 04. 06
Possible Error Messages:
E005 Offset not performed.
2-506
TM 9-2320-387-24-l
1 2-46. STEIICE-R TEST PROCEDURES (Cont’d) I
DC CURRENT 0 TO 1,500 AMPS TEST #90
Description: Pre-Test Procedures:
This procedure measures DC current in the range of 0 to 1,500 amps. The VTM is used as an ammeter with the decimal point in the right position. This test may be done with the vehicle/equipment operating. Test requires the use of the TK adapters and transducers.
Typical Applications: Control Functions:
l Alterator output l Average starter current l Battery current 9 Any DC current up to 1,500 amps
Test Procedure: Possible Error Messages:
1. 2.
3. 4. 5.
6.
7.
8.
Connect test probe cable W4. Attach Pl to J2 or J3. Connect the current probe to P2. Set TEST SELECT switch to 90. Clamp probe to de-energized wire. Press and hold TEST button until CAL appears on display. Release TEST button and wait for offset value to appear on display. If offset is within 225 to -225, proceed. If not, go to DCA Troubleshooting Procedure. Energize circuit. Press and release TEST button. Observe displayed value. A negative reading indicates the probe is backwards. Reverse and repeat from Step 4.
Run confidence test.
01, 02, 03,04.06
EOO2 Transducer not connected. EOOS Offset not performed.
2-507
TM 9-2320-387-24-l
1 2-46. STUICE-R TEST PROCEDURES (Cont’d)
RESISTANCE AND CONTINUITY 0 TO 4,500 OHMS TEST ##91
Description:
procedure measures resistance in the range of 0 to 4,500 ohms. The VTM is used as an ohm- meter, and test results are always displayed with the decimal point in the right position. Additionaky, any voltage present in the device being tested will adversely affect test results. Make sure the circuit or component being tested is shut off. Test re- quires the use of the TK adapters and transducers.
Typical Applications: Control Functions:
l Continuity checks l Resistance measurements l Switch and relay functions
01,02, 03,04,06
Test Procedure:
1. Connect test probe cable W2. Attach Pl to J4. 2. Connect the desired test leads to P2. 3. Set TEST SELECT switch to 91. 4. Short leads together. Press and hold TEST
button until CAL appears on display. 5. Release TEST button and wait for offset value to
appear on display. 6. If offset is within -225 to 225, proceed. If not, go
to DCA Troubleshooting Procedure. 7. Press and release TEST button. Observe
displayed value.
Pre-Test Procedures:
Run confidence test.
Possible Error Messages:
E005 Offset not performed. E022 External voftage
detected while measuring resistance.
2-508
TM 9-2320-387-24-l
1 2-46. STEACE-R TEST PROCEDURES (Cont’d) I
a. SIX/ICE-R Description and Operation. The following describes the operation of the Simplified Test Equipment/Internal Combustion Engines-Reprogrammable WE/ICE-R1 system and contains detailed operating procedures. It is used to test the serviceability of HMMWV vehicles and to perform primary fault detection and isolation. At& the technician has identified a faulty part or subsystem, he is referred to’ a paragraph number for replacement or repair procedures for individual parts.
b. Description and Operatim. STEACE-R is a testing system that performs tests and measurements on internal combustion engines. SlWICE-R measures standard voltage, current, resistance, pressure, temperature, and speed. Special tests, such as compression balance tests and starter system evaluations, are performed by STlYICE-R. Standard equipment functions, including vacuum pressure gauge, compression gauge, low- current tester and multimeter, are features of the STEACE-R set. STE/ICE-R is portable and operates on either 12. or 24.volt vehicle batteries or equivalent power source. The STEJCE-R system consists of a Vehicle Test Meter WTM), a Transducer Kit (TK), four electrical cables, a transit case, and technical publications.
c. Vehicle Test Meter.
L General. The VTM provides a method for the technician to test vehicle electrical and mechanical components. Readings are either pass/fail indications or digital displays in units familiar to the technician (psi, rpm, volts, ohms, amps, etc.). The Diagnostic Connector Assembly (DCA) is permanently mounted in the vehicle and provides accessibility to the most frequently needed test points. The use of the VTM through the DCA is referred to as DCA mode. The VTM interfaces with the vehicle directly with a transducer(s) from the Transducer Kit (TK). The use of the VTM through the TK is referred to as TK mode. The DCA and the TK can be used at the same time. This may be necessary when the diagnostic connector assembly has a missing transducer. If a transducer is missing, a no sensor indication (E002) is displayed when a measurement is made. If this happens, the TK mode can be used to make the measurement. The use of the VTM through the DCA and TK is referred to as the combined mode. Additional tests can be done that involve manually probing and/or connecting transducers to appropriate test points. Operating power for the VTM is drawn from the vehicle batteries or some equivalent battery source. Power is routed to the VTM through the DCA connected to the battery. The STE/ICE-R general purpose testing capabilities that may be applied to the vehicle are: O-1,000 psi pressure, O-45 volts DC, and 0-40k ohms resistance. The following control functions can be performed in conjunction with the special tests: Interleave (displays rpm with next test), Display Maximum Value, Display Minimum Value, and Display Peak-to-Peak Value.
2. Controls and Indicators. The controls and readout display on the VTM are illustrated. The following paragraphs describe how the controls are used and how the display functions:
(a) Power Switch (PUSH ON/PULL OFF). The power switch controls DC power to the VTM. The WM can operate from a 12.or 24volt battery system. When the power switch is pushed in (PUSH ON), the VTM power is on. To shut the VTM off, pull out the power switch (PULL OFF). The power switch contains a Pamp circuit breaker. The power switch will pop out automatically if something is wrong which causes the VTM to use more power than it should. If the switch pops out, check your hookup carefully and try again before returning the VTM to direct support maintenance.
(b) TEST SELECT Switches. The TEST SELECT switches are used to select the actual test to be performed. There are 10 positions on each switch numbered 0 through 9. The number dialed into these switches is read by the WM when you press the test button. Changing the TEST SELECT switch positions has no effect until the TEST button is pushed.
(cl TEST Button. Depressing and releasing the TEST button causes the test measurement to begin. Observe the measured value on the readout display. The reading will be in units normally used for the particular vehicle measurement. These units are listed on the flip cards. The TEST button must be pressed and immediately released. Depressing and holding the TEST button down initiates an offset test. Offset tests are described in TM 9-4910-571-12&P.
2-509

TM 9-2320.387.24- 1
1 2-46. STE/ICE-R TEST PROCEDURES (Cont’d)
(d) Readout Display. The readout display will show different types of readouts during testing up to a maximum of four characters (for example, .8.8.8.8). The types of readouts are described in detail in paragraph 3andaresumma rized as follows:
(1) Status Readout. This type of readout keeps the technician informed of what is happening, such as power applied, failed test, etc.
(2) Numerical Readout. This type of readout is the measured value in units of the measurement being made. If you are measurin g O-45 volts DC, the number 24 on the display indicates 24 volts.
(3) E&-or Readout. This type of readout indicates that the wrong t&t number was selected, the transducer is not connected, or the VTM is faulty.
(e) Flip Cards. The flip cards list the 2-digit test number system for selecting the various tests. The cards also summarize the test and operating instructions contained herein.
(0 Power/DCA Connector Jl. Connector Jl connects the VI’h4 to either a vehicle diagnostic connector using the DCA cable or to the vehicle batteries using the power cable. Operating power and signals from the installed transducers are supplied to the VTM through the DCA cable.
POWEWDCA TRANSDUCER CONNECTOR CABLE CONNECTORS
/ I h I /\ \
TEST PROBE CABLE
CONNECTOR ,
FLIP
-sc
@ PUSHON
VTM CONTROLS AND READOUT DISPLAY
/ READOUT DISPLAY
- szI!T SWITCHES
- TEST BUTTON
2-510
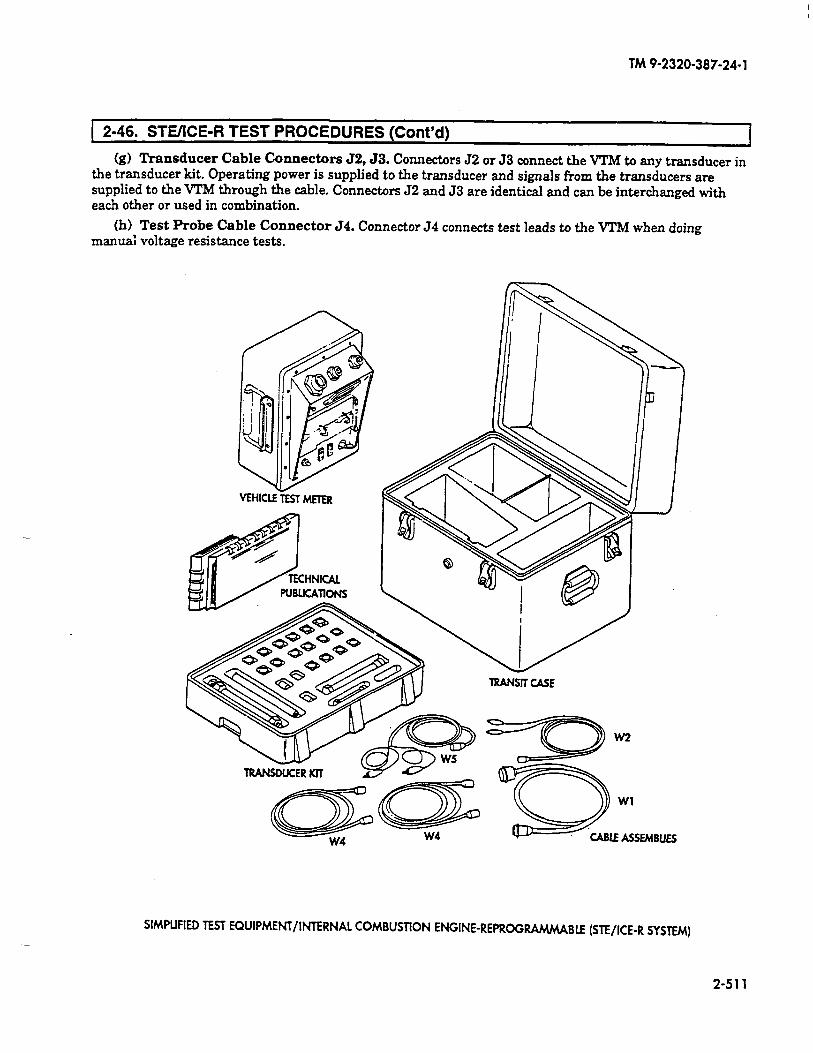
TM 9-2320-387-24-l
1 2-46. STE/lCE-R TEST PROCEDURES (Cont’d) I
(g) Transducer Cable Conneckms J2,53. Counectors 52 or 53 connect the VTM to any transducer in the transducer kit. Operating power is supplied to the transducer and signals from the transducers are supplied to the VIM through the cable. Connectors 52 and 53 are identical and can be interchanged with each other or used in combination.
(h) Test Probe Cable Connector 54. Connector 54 connects test leads to the VTM when doing manua; voltage resistance tests.
SIMPLIFIED TEST EQUIPMENT/INTERNAL COMBUSTION ENGINE-REPROGRAMMABLE (STE/ICE-R SYSTEM)
2-511
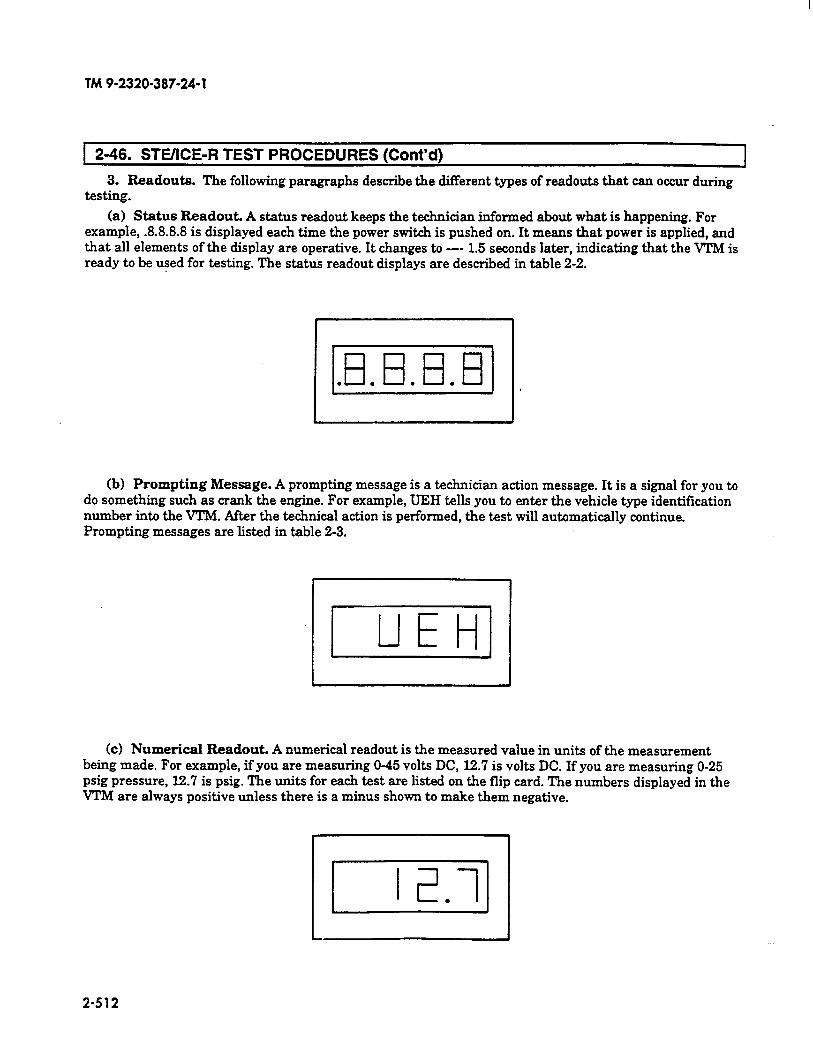
TM 9-2320-387-24-l
1 246. STE/lCE-R TEST PROCEDURES (Cont’d)
3. Readouts. The following paragraphs describe the different types of readouts that can occur during testing.
(a) Status Readout. A status readout keeps the technician informed about what is happening. For example, .8.8.8.8 is displayed each time the power switch is pushed on. It means that power is applied, and that all elements of the display are operative. It changes to --- 1.5 seconds later, indicating that the VTh4 is ready to be used for testing. The status readout displays are described in table 2-2.
(b) Prompting Message. A prompting message is a technician action message. It is a signal for you to do something such as crank the engine. For example, UJZH tells you to enter the vehicle type identification number into the VTM. After the technical action is performed, the test will automatically continue. Prompting messages are listed in table 2-3.
(c) Numerical Readout. A numerical readout is the measured value in units of the measurement being made. For example, if you are measuring O-45 volts DC, 12.7 is volts DC. If you are measuring O-25 psig pressure, 12.7 is psig. The units for each test are listed on the flip card. The numbers displayed in the VTM are always positive unless there is a minus shown to make them negative.
2-512

TM 9-2320-387-24-l
[ 2-46. STE/ICE-R TEST PROCEDURES (Cont’d) I
(d) Error Readout. EOOl is a typical error readout. There are 15 different readouts. All error readouts start with E. An error readout is a warning that you forgot to connect the transducer, selected a wrong test number, failed to start the engine, etc. All of the error messages mean you must correct the problem before continuing testing. Error readouts are listed in table 2-4. If the error message does not go away after corrective action, refer to TM 9-4910-571-12&P.
(e) Confidence Error Readouts. COO4 is a typical error readout resulting from the detection of a faulty VTM during confidence test. For detailed information concerning confidence error readouts, refer to TM 9-4910-571-1&P.
I
Table 2-2. Status Readouts.
VTM Readout Interpretation
-8.8.8.8 A readout of .8.8.8.8 appears for 1 to 2 seconds each time the power is applied to the VTM. It means that there is power to the VIM, and that all elements of the readout display are operative.
_--
-9.9.9.9
A readout of -- indicates the following:
(1) After power turn-on, it signifies that the VTM is ready for testing.
(2) During a compression unbalance test, it signifies testing is in progress.
A readout of .9.9.9.9 indicates that the VTM is reading a test value beyond the range of its measurement capability. Either (1) the wrong test number is selected for the parameter being measured, or (2) there is a fault in the vehicle. .
PASS FAIL
A PASS or FAIL readout is the result of a test that checks the condition of a component being measured. A PASS/FAIL readout means just that fails the test.
- the component either passes or
2-513
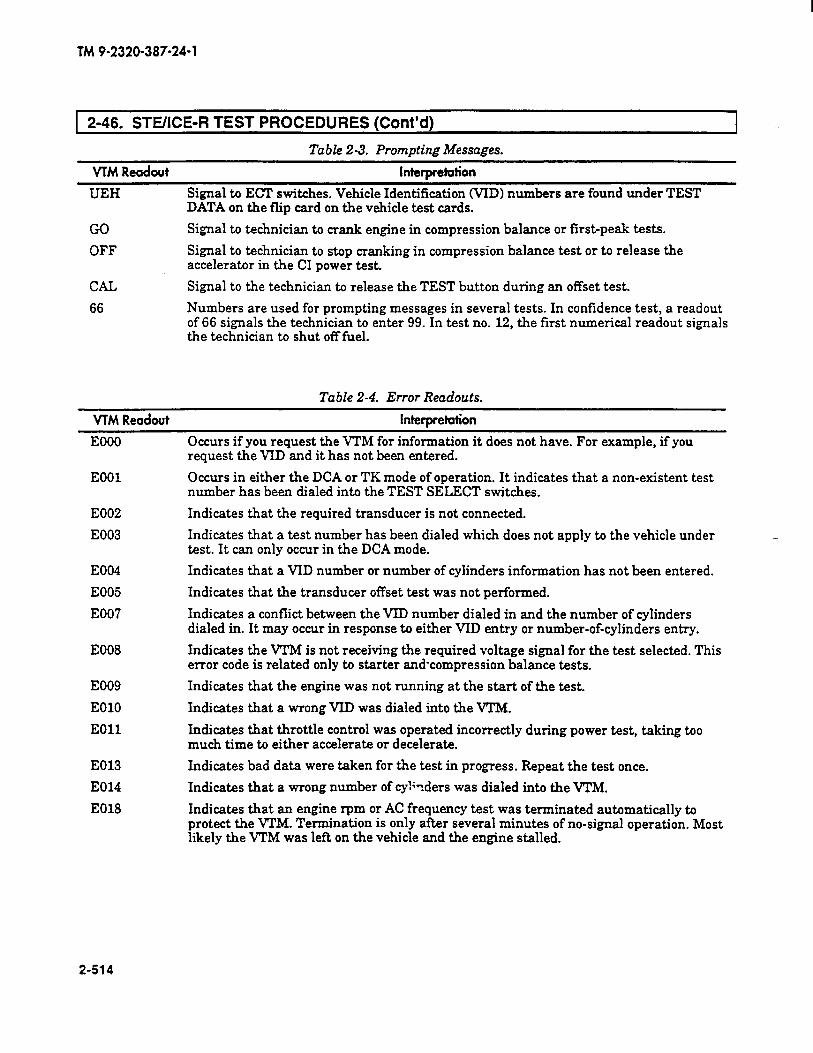
TM 9-2320-387-24-l
1 2-46. STE/ICE-R TEST PROCEDURES (Cont’d)
Table 2 -3. Prompting Messages.
VTM Readout Interpretation
UEH Signal to ECT switches. Vehicle Identification WID) numbers are found under TEST DATA on the flip card on the vehicle test cards.
CC Signal to technician to crank engine in compression balance or first-peak tests.
OFF Signal to technician to stop cranking in compression balance test or to release the accelerator in the CI power test.
CAL Signal to the technician to release the TEST button during an offset test.
66 Numbers are used for prompting messages in several tests. In confidence test, a readout of 66 signals the technician to enter 99. In test no. 12, the first numerical readout signals the technician to shut off fuel.
Table 2-4. Error Readouts.
VlM Readout Interpret&ion
EOOO
EOOl
EOOZ
E003
E004
E005
EO07
E008
E009
EOlO
EOll
E013
E014
E018
Occurs if you request the VTM for information it does not have. For example, if you request the VID and it has not been entered.
Occurs in either the DCA or TK mode of operation. It indicates that a non-existent test number has been dialed into the TEST SELECT switches.
Indicates that the required transducer is not connected.
Indicates that a test number has been dialed which does not apply to the vehicle under test. It can only occur in the DCA mode.
Indicates that a VID number or number of cylinders information has not been entered.
Indicates that the transducer offset test was not performed.
Indicates a conflict between the VID number dialed in and the number of cylinders dialed in. It may occur in response to either VID entry or number-of-cylinders entry.
Indicates the VTM is not receiving the required voltage signal for the test selected. This error code is related only to starter and-compression balance tests.
Indicates that the engine was not running at the start of the test.
Indicates that a wrong VID was dialed into the VIM.
Indicates that throttle control was operated incorrectly during power test, taking too much time to either accelerate or decelerate.
Indicates bad data were taken for the test in progress. Repeat the test once.
Indicates that a wrong number of cya ‘+ders was dialed into the VTM.
Indicates that an engine x-pm or AC frequency test was terminated automatically to protect the VTM. Termination is only after several minutes of no-signal operation. Most likely the VTM was left on the vehicle and the engine stalled.
2-514
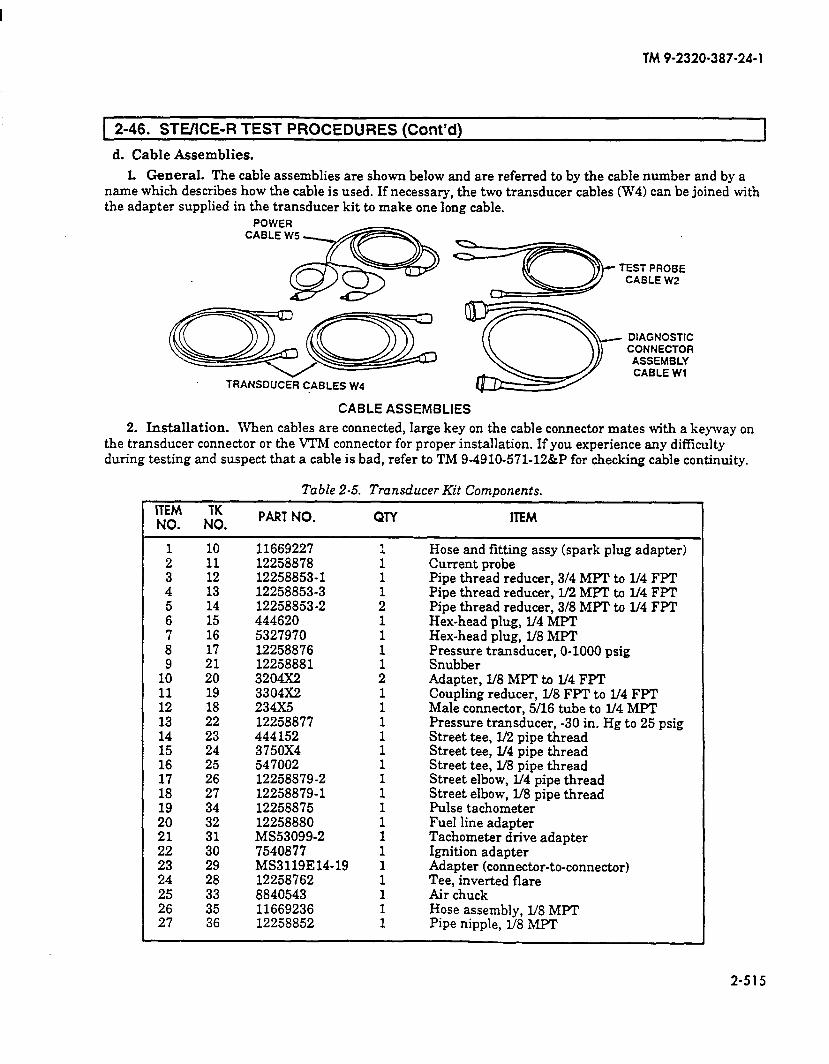
TM 9-2320-387-24-l
1 2-46. STEIICE-R TEST PROCEDURES (Cont’d) I
d. Cable Assemblies.
L General. The cable assemblies are shown below and are referred to by the cable number and by a name which describes how the cable is used. If necessary, the two transducer cables (W4) can be joined with the adapter supplied in the transducer kit to make one long cable.
TRANSDUCER CABLES W4
TEST PROBE CABLE W2
c DIAGNOSTIC CONNECTOR ASSEMBLY CABLE Wl
CABLE ASSEMBLIES
2. Installation. When cables are connected, large key on the cable connector mates with a keyway on the transducer connector or the VTM connector for proper installation. If you experience any difficulty during testing and suspect that a cable is bad, refer to TM 9-4910-571-12&P for checking cable continuity.
ITEM TK NO. NO.
Table 2-5. Transducer Kit Components.
PART NO. QTY ITEM
f 3 4
:
87 9
10 11 12 13
:t 16 17 18
:: 21 22 23 24 25 26 27
10 11 12 13 14 15 16 17
4; 19 18 22 23 24 25 26 27 34 32
iii 29 28 33 35 36
11669227 12258878 12258853-1 12258853-3 12258853-2 444620 5327970 12258876 12258881 3204X2 3304X2 234X5 12258877 444152 3750x4 54 7002 12258879-2 12258879-1 12258875 12258880 MS53099-2 7540877 MS3119E14-19 12258762 8840543 11669236 12258852
: 1 1
; 1 1 1 1 2 1 1 1 1 1
: 1 1 1 1 1 1 1 1 1 1
Hose and fitting assy (spark plug adapter) Current probe Pipe thread reducer, 3i4 MPT to l/4 FPT Pipe thread reducer, 1/2 MPT to l/4 FPT Pipe thread reducer, 3/8 MPT to l/4 FPT Hex-head plug, l/4 MPT Hex-head plug, l/8 MPT I?;;;;.; transducer, O-1000 psig
Adapter, L/8 MPT to l/4 FPT Coupling reducer, V8 FPT to l/4 FPT Male connector, 5/16 tube to lf4 MPT Pressure transducer, -30 in. Hg to 25 psig Street tee, l/2 pipe thread Street tee, l/4 pipe thread Street tee, l/8 pipe thread Street elbow, lf4 pipe thread Street elbow, 1/8 pipe thread Pulse tachometer Fuel line adapter Tachometer drive adapter Ignition adapter Adapter (connector-to-connector) Tee, inverted flare Air chuck Hose assembly, L/8 MPT Pipe nipple, L/8 MPT
2-515
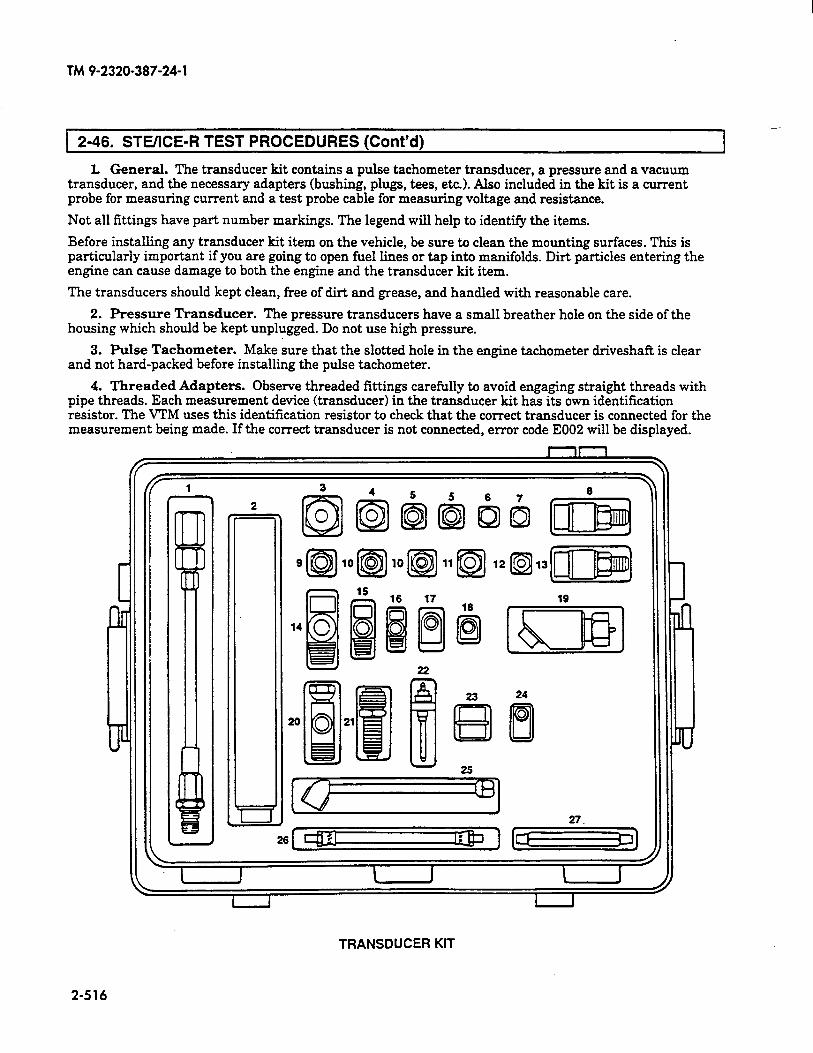
TM 9-2320-387-24-l
- 1 2-46. STEACE-R TEST PROCEDURES (Cont’d) 1
L General. The transducer kit contains a pulse tachometer transducer, a pressure and a vacuum transducer, and the necessary adapters (bushing, plugs, tees, etc.). Also included in the kit is a current probe for measuring current and a test probe cable for measuring voltage and resistance.
Not all fittings have part number markings. The legend will help to identify the items.
Before installing any transducer kit item on the vehicle, be sure to clean the mounting surfaces. This is particularly important if you are going to open fuel lines or tap into manifolds. Dirt particles entering the engine can cause damage to both the engine and the transducer kit item.
The transducers should kept clean, free of dirt and grease, and handled with reasonable care.
2. Pressure Transducer. The pressure transducers have a small breather hole on the side of the housing which should be kept unplugged. Do not use high pressure.
3. Pulse Tachometer. Make sure that the slotted hole in the engine tachometer driveshaft is clear and not hard-packed before installing the pulse tachometer.
4. Threaded Adapters. Observe threaded fittings carefully to avoid engaging straight threads with pipe threads. Each measurement device (transducer) in the transducer kit has its own identification resistor. The VTM uses this identification resistor to check that the correct transducer is connected for the measurement being made. If the correct transducer is not connected, error code E002 will be displayed.
2
24
20 21 0 Ii3
TRANSDUCER KIT
2-516
TM 9-2320-387-24-l
-_ 1 2-47. VEHICLE TESTING 1
a. General. To troubleshoot a vehicle problem, the technician can use the STE/ICE-R (vehicle test meter and transducers) and the vehicle test card.
b. Data Entry Tests. For information regarding Data Entry, Cylinder Entry, VID Entry, and Data Display Tests, refer to TM 9-4910-571-12&P.
c. Offset Tests. The STEACE-R VTM performs a test by setting the TEST select switches to the test number and pressing the TEST button. For some tests, an offset test is required before the test itself can be performed. This is done by selecting the number of the desired test and holding the TEST button down for several seconds;
The offset test nullities characteristic differences in the VTM, test leads, and transducers. It zeros the meter. Once the offset is performed, the VTM automatically corrects for the offset before displaying measured values. The displayed offset value should be checked against limits on the vehicle test card. If the displayed value is outside these limits, either the transducer or the test cable is faulty and must be replaced. This is another form of self-test. The offset is performed when each transducer is connected. All tests requiring offset are identified by an asterisk (*) on the flip cards and by OFFSET LIMITS on the vehicle test cards. The offset test is performed with the test probe cable or transducer connected to the VTM. Care should be taken to see that no stimulus is applied to the transducer. Test probe cable leads should be shorted together. To perform an offset test, dial the test number into the TEST SELECT switches. Press and hold the TEST button until the prompting message CAL appears on the display. A few seconds after release of the TEST button, a number will appear. This is the measured offset value associated with the test probe cable or transducer and cable.
d. Control Tests. These tests are used to change (or control) the way a vehicle test is displayed or the way it is run. There are four control tests:
01 Interleave (displays rpm with next test).
02 Display Minimum Value for next test.
03 Display Maximum Value for next test.
04 Display Peak-to-Peak Value for next test.
Control tests 01, 02, 03, and 04 specify the action to be taken by the next test only. A subsequent test will reset the control.
1. Interleave (Test 01). This test alternately measures engine speed and a second parameter such as fuel pressure or alternator voltage. To initiate interleave, dial 01 into the TEST SELECT switches and press and release the TEST button. The prompting message PASS will signal the technician to dial in the second test number and again press and release the TEST button.
2. Minimum Value (Test 02). This test displays the minimum value measured during a test. To initiate a minimum value display, dial 02 into the TEST SELECT switches and press and release the TEST button. The prompting message PASS will signal the technician to dial in the desired test number and again press and release the TEST button. The minimum value is displayed and updated whenever a lower minimum value is measured. Entering 02 and the test number again will reset the process and a new minimum value will be displayed.
2-517

TM 9-2320-387-24-l
2-47. VEHICLE TESTING (Cont’d)
3. Maximum Value (Test 03). This test displays the maximum value measured during a test. To initiate a maximum value display, dial 03 into the TEST SELECT switches and press and release the TEST button. The prompting message PASS will signal the technician to dial in the desired test number and again press and release the TEST button. The maximum value is displayed and updated whenever a higher maximum value is measured. Entering 03 and the test number again will reset the process and a new maximum value will be displayed.
4. Peak-to-Peak Value (Test 04). This test displays the peak-to-peak value of O-45 volts DC (891, O-1,500 amps DC (901, and battery volts (67). To start a peak-to-peak measurement, dial 04 into the TEST SELECT switches and press the TEST button. The prompting message PASS will signal the operator to dial in one of the three numbers (89,90,67) and again press the TEST button.
SHOWS LOCAllO
CONNECTOR KEY LOCATION
2-518
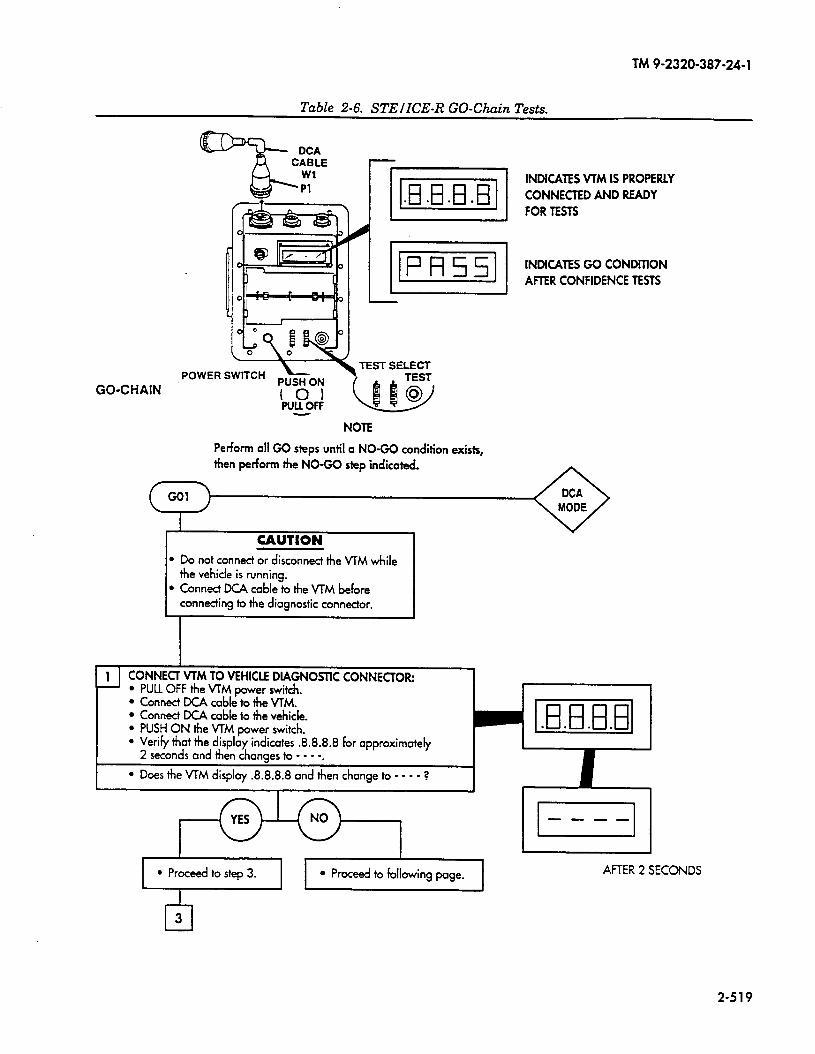
TM 9-2320-387-24-l
Table 2-6. STE IKE-R GO-Chain Tests.
INDICATES VTM IS PROPERLY
I= 1 FORTESTS
CONNECTED AND READY
GO-CHAIN
INDICATES GO CONDiTlON
AFTER CONFIDENCE TESTS
NOTE
Perform all GO steps until a NO-GO condition exists,
then perform the NO-GO step indicated.
1 V
CAUTION I l Do not connect or disconnect the VTM while
the vehicle is running.
l Connect DCA cable to the VTM before
connecting to the diagnostic connector.
CONNECT VTM TO VEHICLE DIAGNOSTTC CONNECTOR: l PULL OFF the VTM power switch. l Connect DCA cable to the VTM. l Connect DCA cable to the vehicle. l PUSH ON the VTM power switch. l Verify that the display indicates .8.8.8.8 for opproximotely
2 seconds and then changes to - - - -.
l Does the VTM display .8.8.8.8 and then change to - - - - ?
II I
1 l Proceed to step 3. 1 1 l Proceed to following page.
-27’ I
J
J
AFTER 2 SECONDS
2-519
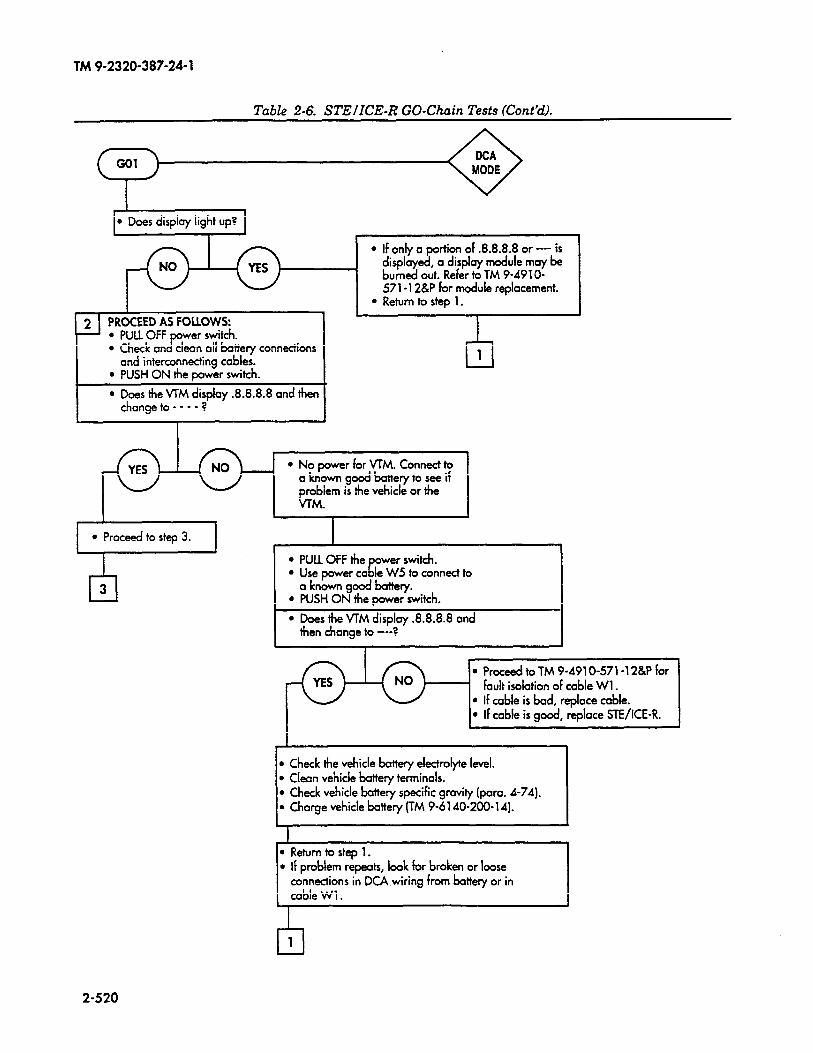
TM9-2320-387-24-l
Table 2-6. STEIICE-R GO-Chain Tests (Cont’d).
l Does display light up?
PROCEED AS FOLLOWS: l PULL OFF wer switch. l Check an Jo clean all battery connections
and interconnecting cables. l PUSH ON the power switch.
l Does the VTM display .8.8.8.8 and then change to - - - - ?
l No power for VFM. Connect to a known good battery to see if problem is the vehicle or the VTM
l Proceed to step 3.
l PULL OFF the wer switch. . Use power co le W5 to connect to r
a known good battery. l PUSH ON the power switch.
l Does the VTM display .8.8.8.8 and then change to ----?
,
l Proceed to TM 9-491 O-571 -‘I 2&P for fault isolation of cable Wl .
l If cable is bad, replace cable.
l If cable is good, replace STE/ICE-R. 1
l Check the vehicle battery electrolyte level.
l Clean vehicle battery terminals.
l Check vehicle battery specific gravity (para. A-74). l Charge vehicle battery (TM 9-6140-200-l A).
2-520
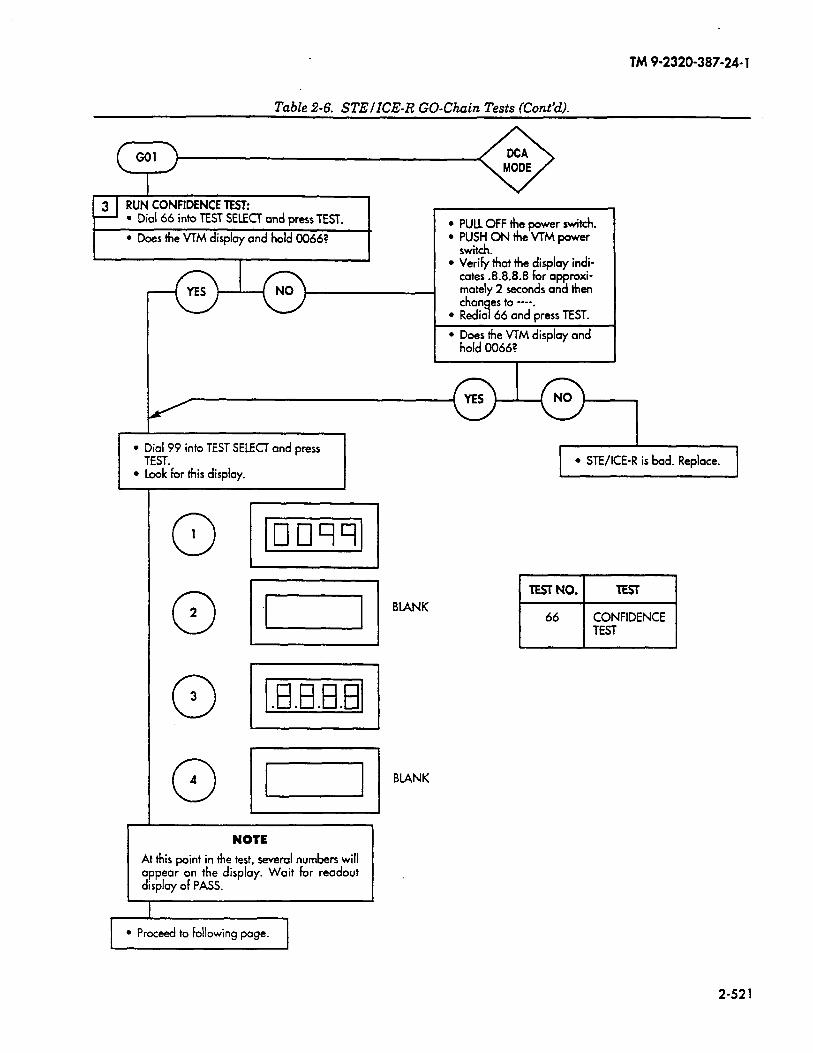
TM9-2320-387-24-l
Table 2-6. STE IICE-R GO-Chain Tests (Cont’d).
)I l Dioi 66 into TEST SELE& ond press TEST r
l Dial 99 into TEST SELECT and press TEST.
l Look far this display.
r NOTE
j
At this point in the test, several numbers will appear on the display. Wait for readout d:lployofPAss.
l PULL OFF the pawer switch. l PUSH ON the VTM poww
switch. l Verify that the display indi-
cates .8.8.8.8 for appraxi- mately 2 seconds and then than es to ----.
l Red10 66 and press TEST. 4
l Does the VTM display and hold 0066?
I
I l Proceed to following page. I
BLANK
BLANK
I l STE/ICE-R is bad. Replace. I
TE5TNO.l TEST
66
I
CONFIDENCE TEST
2-52 1

TM 9-2320-387-24-l
Table 2-6. STEIICE-R W-Chain Tests (Cont’d).
MODE
/IPA ONon
MESSAGE
l Does the VTM display PASS? I
I
The VTM can fail Confidence Test if a bad transducer is connected
to it. If the VTM fails Confidence Test when powered by Wl (IXA
mode), remove all cable from the VTM and connect only WS, then
clip W5 to the vehicle batteries. If it passes Confidence Test this
way, there is a bad transducer in the vehicle’s DCA. If it fails, the
VTM has failed internally. Repeat TM 9-491 O-571 -12&P.
l STE/ICE-R is bad. Replace.
I NOTE
I 4 ENTER VEHICLE IDENTlFlCATtON NUMBER (VIN):
l Dial 60 into TEST SELECT and press TEST. l When UEH appears, dial vehicle identification number (21) into
TEST SELECT and press TEST.
If message EOlO appears,
either wrong number is
entered or VTM is conned-
ed to wrong DCA con-
I l VIN entered should appear on the display. I
I nector.
l Does the VTM display the number 2l? 3 llUEH I PROMPTING -
MESSAGE
11 l Does the VTM display the number 213
l STE/ICE-R is bad. Replace.
I l Proceed to troubleshooting procedures. I
2-522
TM 9-232D-387-24- 1
CHAPTER 3 ENGINE SYSTEMS (UNIT) MAINTENANCE
Section I. LUBRICATION SYSTEM MAINTENANCE
1 3-1. LUBRICATION SYSTEM MAINTENANCE TASK SUMMARY 1 I 4
, 1
I TASK PARA.
PROCEDURES PAGE NO. I
I 1
-
3-2. Engine Oil Dipstick Tube Replacement 3-2
3-3. Engine Oil Filler Tube Maintenance 3-4
3-4. Engine Oil Filter Adapter Maintenance 3-5
3-5. Engine Oil Service 3-6
3-6. Oil Pan Replacement 3-8
3-7. Engine Oil Cooler Supply and Return Lines Maintenance 3-10
3-8. Engine, ‘kansmission, and Power Steering Oil Cooler Assembly Maintenance 3-12
3-9. Crankcase Depression Regulator (CDR) Valve and Bracket Maintenance 3-16
3-10. CDR Valve Hoses Replacement 3-20
3-1

TM 9-2320-387-24-l
c 1 3-2. ENGINE OIL DIPSTICK TUBE REPLACEMENT
This task covers:
a. Removal b. Installation
INITIAL SETUP:
ToOlS General mechanic’s tool kit: automotive (Appendix B, Item 1)
Maintenance and repair shop equipment: automotive (Appendix B, Item 2)
Materials/Parts
Manual References TM 9-2320-387-10 TM 9-2320-387-24P
Equipment Condition Hood raised and secured (TM 9-2320-387-10).
O-ring seal (Appendix G, Item 279) Nut and lockwasher assembly
(Appendix G, Item 244)
Maintenance Level unit
Silicone compound (Appendix C, Item 74)
1. Remove oil dipstick (7) from oil dipstick tube (6).
2. Remove nut and lockwasher assembly (5) and capscrew (2) from harness clamp (3) and upper dipstick tube bracket (81. Discard nut and lockwasher assembly (5).
3. Remove two screw-assembled washers (4) from upper dipstick tube bracket (8) and fuel line bracket (1).
4. Remove oil dipstick tube (6) from engine oil pan (10).
5. Remove and discard O-ring seal (9).
-1
1. Apply RTV silicone compound to O-ring seal (9) and install O-ring seal (9) on oil dipstick tube (6).
2. Install oil dipstick tube (6) in engine oil pan (10).
3. Install upper dipstick tube bracket (8) on fuel line bracket (1) with two screw-assembled washers (4). Tighten screw-assembled washers (4) to 3-4 lb-R (4-5 N-m).
4. Secure harness clamp (31 to upper dipstick tube bracket (81 with capscrew (2) and nut and lockwasher assembly (5).
5. Install oil dipstick (7) into oil dipstick tube (6).
3-2

lM9-2320-387-24-l
1 3-2. ENGINE OIL DIPSTICK TUBE REPLACEMENT (Cont’d) I
FOLLOW-ON TASKS: l Start engine (TM 9-2320-387-10) and check for oil leaks. . Lower and secure hood (TM 9-2320-387-10).
3-3
TM 9-2320-387-24-l
1 ENGINE OIL FILLER TUBE MAINTENANCE I
This task covers:
a. Removal b. Inspection
c. Installation
INITIAL SETUP:
Tools General mechanic’s tool kit:
automotive (Appendix B, Item 1)
hIaterials/Parts
Lubricating oil (Appendix C, Item 44)
hIanua1 References
TM 9-2320-387-10 TM 9-2320-387-24P
Equipment Condition
Hood raised and secured (TM 9-2320-387-102
Rlaintenance Level
Unit
1 a. Removal 1
1. Loosen clamp (2) and disconnect CDR valve hose (1) from engine oil filler tube (3).
2. Remove two nuts (41, washers (51, and engine oil filler tube (3) from timing chain cover (7) and studs (8).
-1
Inspect grommet (6) for breaks or cracks. Replace if defective.
c. Installation
1. Coat grommet (6) with lubricating oil.
2. Install engine oil filler tube (3) on timing chain cover (7) and studs (8) with two washers (5) and nuts (4). Tighten nuts (4) to 13-20 lb-ft (18-27 N=m).
3. Connect CDR valve hose (1) to engine oil filler tube (3) and tighten clamp (2).
.-
0 6
FOLLOW-ON TASK: Lower and secure hood (TM 9-2320-387-10).
3-4
TM 9-2320-387-24-l
r 3-4. ENGINE OIL FILTER ADAPTER MAINTENANCE
This task covers:
a. Removal h. Inspection
c. Installation
INITIAL SETUP:
Tools Manual References
?&era1 mechanic’s tool kit: TM 9-2320-387-24P automotive (Appendix B, Item 1)
Materials/Parts Gasket (Appendix G, Item 70) Two O-ring seals (Appendix G, Item 280) Adapter seal (Appendix G, Item 2)
Equipment Condition Engine oil filter removed (para. 3-5).
Maintenance Level Unit
1 a. Removal 1
1. Remove adapter bolt (61, gasket (51, two O-ring seals (41, engine oil filter adapter (31, and adapter seal (1) from cylinder block (2). Discard adapter seal (11, two O-ring seals (41, and gasket (5).
2. Remove reducer boss (7) from oil filter adapter (3).
b. Inspection
Inspect reducer boss (7) for damaged threads or cracks. Replace if defective.
)I
1. Install reducer boss (7) on oil filter adapter (3) and tighten to 25 lb-ft (34 Nom).
2. Install adapter seal (1) and engine oil filter adapter (3) on cylinder block (2) with two O-ring seals (41, gasket (51, and adapter bolt (6). Tighten adapter bolt (6) to 50 lbfi (68 N-m).
-- FOLLOW-ON TASK: Install engine oil filter (para. 3-5).
3-5
TM 9-2320-387-24-l
3-5. ENGINE Of1 SERVICE
This task covers:
a. Oil Draining b. Filter Removal
c. Filter Installation d. Oil Replenishing
INiTlAL SETUP:
Tools General mechanic’s tool kit:
automotive (Appendix B, Item 1) Maintenance and repair shop equipment:
automotive (Appendix B, Item 2)
Materials/Parts Oil filter (Appendix G, Item 254) Lubricating oil (Appendix C, Item 44)
Manual References TM 9-2320-387-10 TM 9-2320-387-24P
Equipment Condition Hood raised and secured (TM 9-2320-387-10X
General Safety Instructions Do not drain oil when engine is hot.
Maintenance Level Unit
a. Oil Draining
WARNING
Do not drain oil when engine is hot. Severe injury to personnel may result.
NOTE l Park vehicle on a firm, level surface.
l Have drainage container ready to catch oil. 1. Remove drainplug (5) and gasket (4) from oil pan (3). Allow oil to drain completely.
2. Install gasket (4) and drainplug (5) on oil pan (3). Tighten drainplug (5) to 20 lb-R (27 Nom).
b. Filter Removal
NOTE Have drainage container ready to catch oil.
Remove oil filter (1) from filter adapter (2). Discard filter (1).
c. Filter Installation
1. Apply a light coat of oil to filter gasket prior to installation.
2. Install oil filter (1) on oil filter adapter (2) until gasket contacts filter adapter (2). Tighten an additional l/2-3/4 turn by hand.
d. Oil Replenishing
CAUTION Install a non-vented filler cap only. An incorrect filler cap will not seal properly, allowing water to enter and damage engine.
1. Remove filler cap (6) from filler tube (7). Fill with oil according to TM 9-2320-387-10.
2. Install filler cap (6) on filler tube (7).
3-6
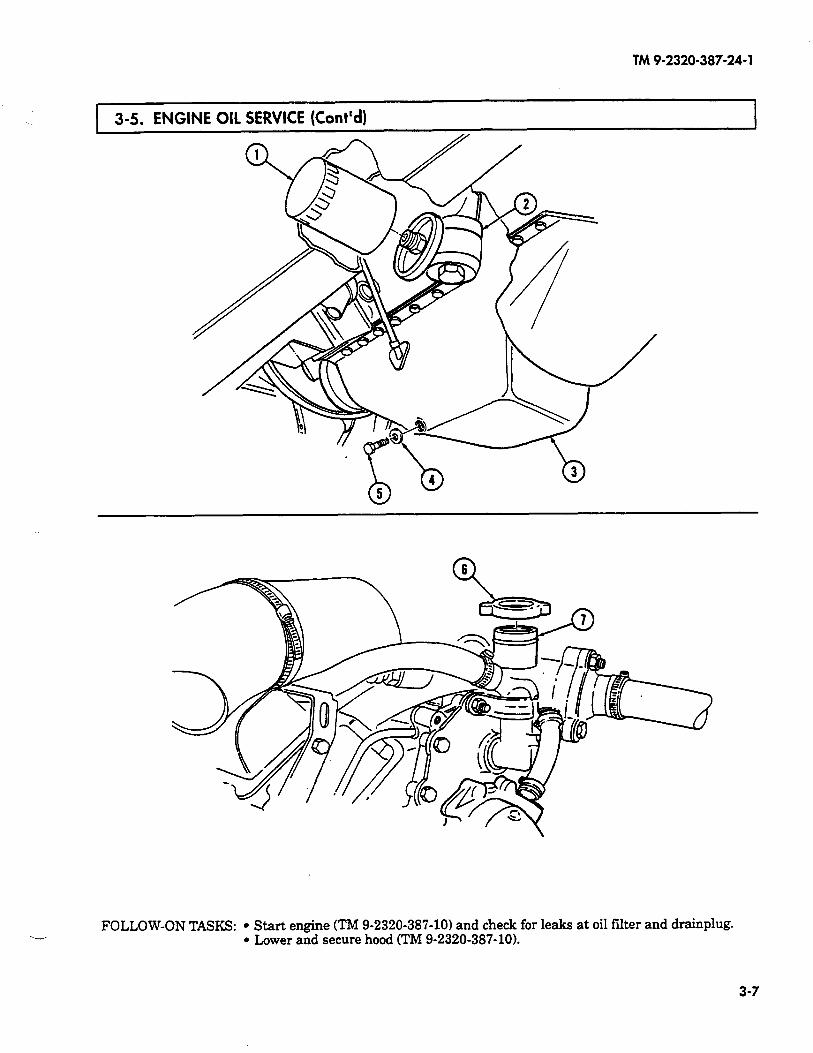
TM 9-2320-387-24-l
-- FOLLOW-ON TASKS: l Start engine (TM 9-2320-387-10) and check for leaks at oil filter and drainplug.
l Lower and secure hood (TM 9-2320-387-10).
3-7
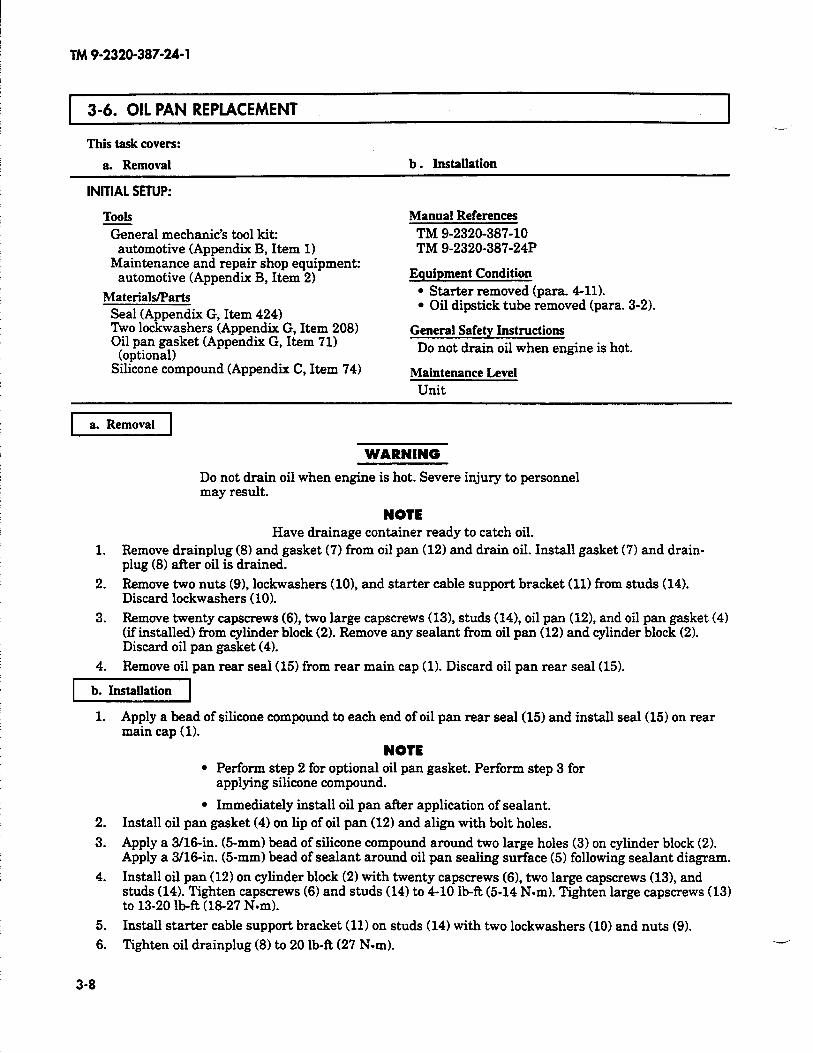
TM 9-2320-387-24-l
3-6. OIL PAN REPLACEMENT --~
This task covers:
a. Removal b . Installation
INITIAL SETUP:
General mechanic’s tool kit: automotive (Appendix B, Item 1)
Maintenance and repair shop equipment: automotive (Appendix B, Item 2)
Materials/Parts Seal (Appendix G, Item 424) Two lockwashers (Appendix G, Item 208) Oil pan gasket (Appendix G, Item 71)
(optional) Silicone compound (Appendix C, Item 74)
Manual References TM 9-2320-387-10 TM 9-2320-387-24P
Equipment Condition l Starter removed (para. 411). l Oil dipstick tube removed (para. 3-2).
General Safety Instructions Do not drain oil when engine is hot.
Maintenance Level Unit
1 a. Removal 1
WARNING
Do not drain oil when engine is hot. Severe injury to personnel may result.
NOTE Have drainage container ready to catch oil.
1. Remove drainplug (8) and gasket (7) from oil pan (12) and drain oil. Install gasket (7) and drain- plug (8) after oil is drained.
2. Remove two nuts (9), lockwashers (101, and starter cable support bracket (11) from studs (14). Discard lockwashers (10).
3. Remove twenty capscrews (61, two large capscrews (131, studs (141, oil pan (121, and oil pan gasket (4) (if installed) from cylinder block (2). Remove any sealant from oil pan (12) and cylinder block (2). Discard oil pan gasket (4).
4. Remove oil pan rear seal (15) from rear main cap (1). Discard oil pan rear seal (15).
rYxzizF1
1. Apply a bead of silicone compound to each end of oil pan rear seal (15) and install seal (15) on rear main cap (1).
NOTE l Perform step 2 for optional oil pan gasket. Perform step 3 for
applying silicone compound.
2. 3.
4.
l Immediately install oil pan after application of sealant. Install oil pan gasket (4) on lip of oil pan (12) and align with bolt holes.
Apply a 3/16-m (5-mm) bead of silicone compound around two large holes (3) on cylinder block (2). Apply a 3/16-in. (5-mm) bead of sealant around oil pan sealing surface (5) following sealant diagram.
Install oil pan (12) on cylinder block (2) with twenty capscrews (61, two large capscrews (13), and studs (14). Tighten capscrews (6) and studs (14) to 4-10 lb-R (5-14 N-m). Tighten large capscrews (13) to 13-20 lb-R (1827 N-m).
5. Install starter cable support bracket (11) on studs (14) with two lockwashers (10) and nuts (9).
6. Tighten oil drainplug (8) to 20 lb-R (27 Nom).
3-8
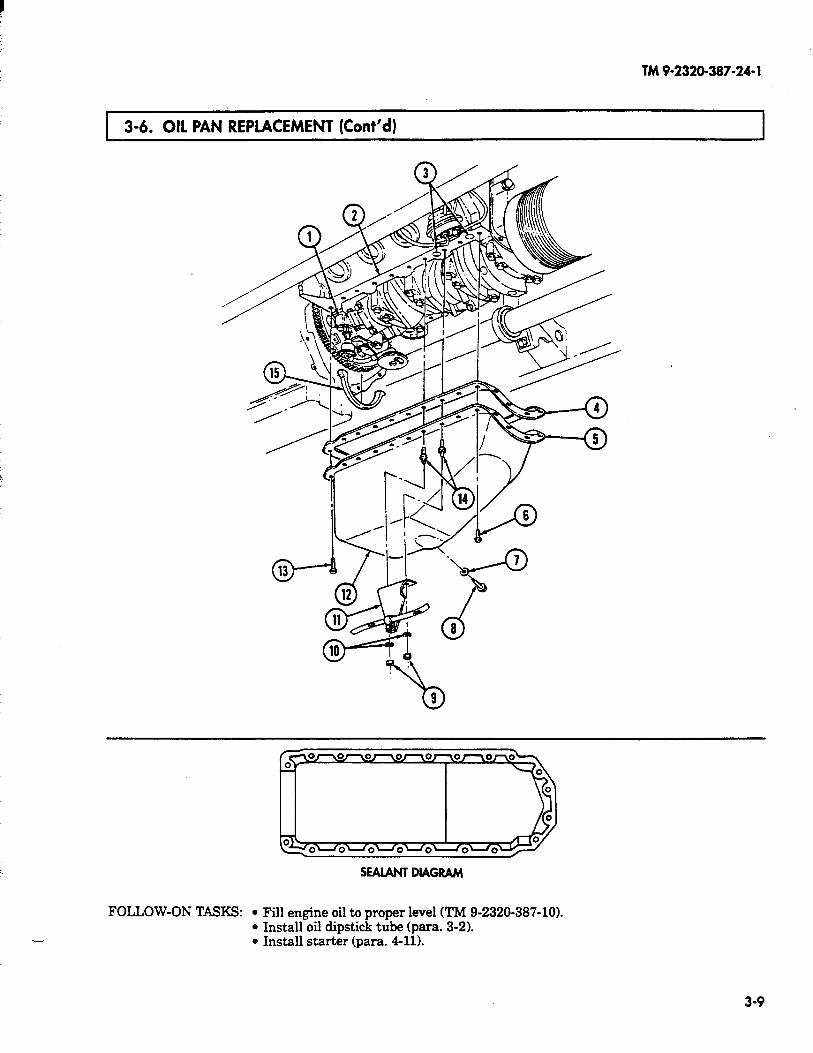
TM9-2320-387-24-l
3-6. OIL PAN REPLACEMENT (Cont’d)
FOLLOW-ON TASKS: . Fill engine oil to proper level (TM 9-2320-387-10). . Install oil dipstick tube (para. 3-2). . Install starter (para. 4-11).
3-9
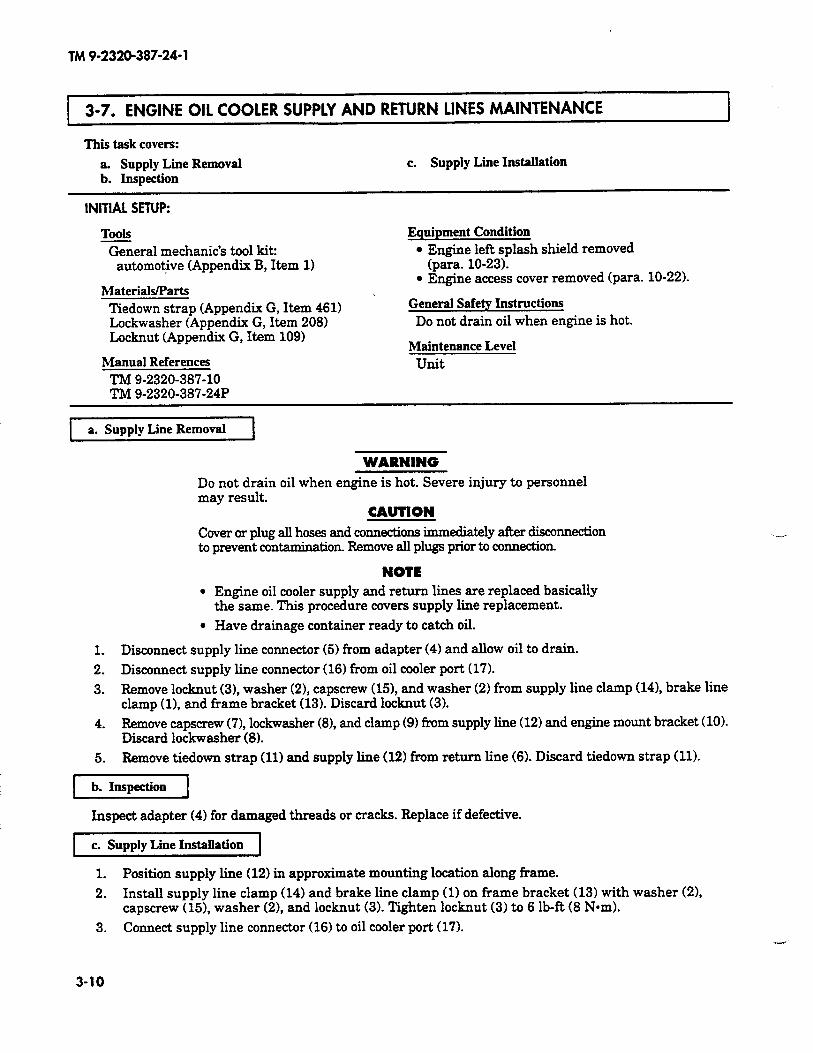
TM 9-2320-387-24-l
3-7. ENGINE OIL COOLER SUPPLY AND RETURN LINES MAINTENANCE
This task covers:
a. Supply Line Removal b. Inspection
c. Supply Lime Installation
INITIAL SETUP:
Tools General mechanic’s tool kit:
automotive (Appendix B, Item 1)
Materials/Parts Tiedown strap (Appendix G, Item 461) Lockwasher (Appendix G, Item 208) Locknut (Appendix G, Item 109)
Manual References TM 9-2320-387-10 TM 9-2320-387-24P
Equipment Condition l Engine left splash shield removed
(para. 10-23). l Engine access cover removed (para. 10-22).
General Safety Instructions Do not drain oil when engine is hot.
Maintenance Level unit
a. Supply Line Removal I
WARNING Do not drain oil when engine is hot. Severe injury to personnel may result.
CAUTION Cover or plug all hoses and connections immediately a&r disconnection to prevent contamination. Remove all plugs prior to c4mnection.
NOTE l Engine oil cooler supply and return lines are replaced basically
the same. This procedure covers supply line replacement.
l Have drainage container ready to catch oil.
1. Disconnect supply line connector (5) from adapter (4) and allow oil to drain.
2. Disconnect supply line connector (16) from oil cooler port (17).
3. Remove locknut (31, washer (21, capscrew (151, and washer (2) from supply line clamp (141, brake line clamp (11, and frame bracket (13). Discard locknut (3).
4. Remove capscrew (71, lockwasher (81, and clamp (9) from supply line (12) and engine mount bracket (10). Discard lo&washer (8).
5. Remove tiedown strap (11) and supply line (12) from return line (6). Discard tiedown strap (11).
1 b. Inspection f
Inspect adapter (4) for damaged threads or cracks. Replace if defective.
c. Supply Line Installation
1. Position supply line (12) in approximate mounting location along frame.
2. Install supply line clamp (14) and brake line clamp (1) on frame bracket (13) with washer (2), capscrew (151, washer (21, and locknut (3). Tighten locknut (3) to 6 lb-R (8 N-m).
3. Connect supply line connector (16) to oil cooler port (17).
3-10
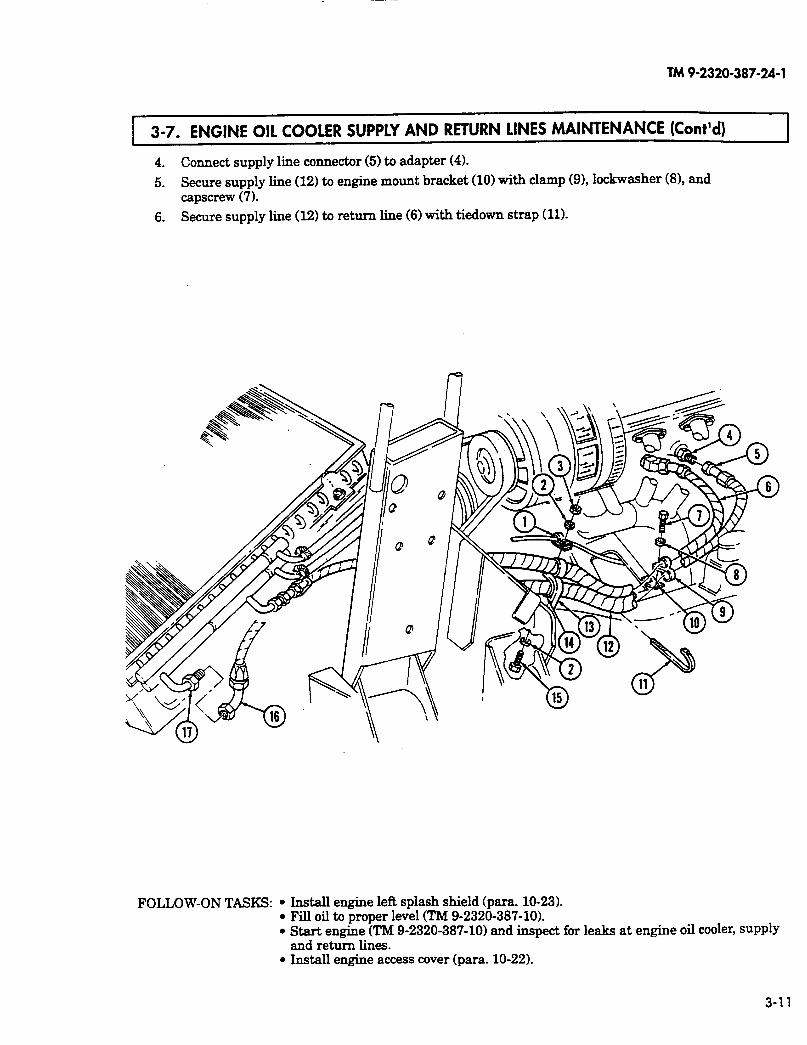
TM 9-2320-387-24-l
3-7. ENGINE OIL COOLER SUPPLY AND RETURN LINES MAINTENANCE [Cont’d) ,
4. Connect supply line
l Install engine left splash shield (para. 10-23). l Fill oil to proper level (TM 9-2320-387-10). l Start engine (TM g-2320-387-10) and inspect for leaks at engine oil cooler, supply
and return lines. l Install engine access cover (para. 10-22).
3-l 1
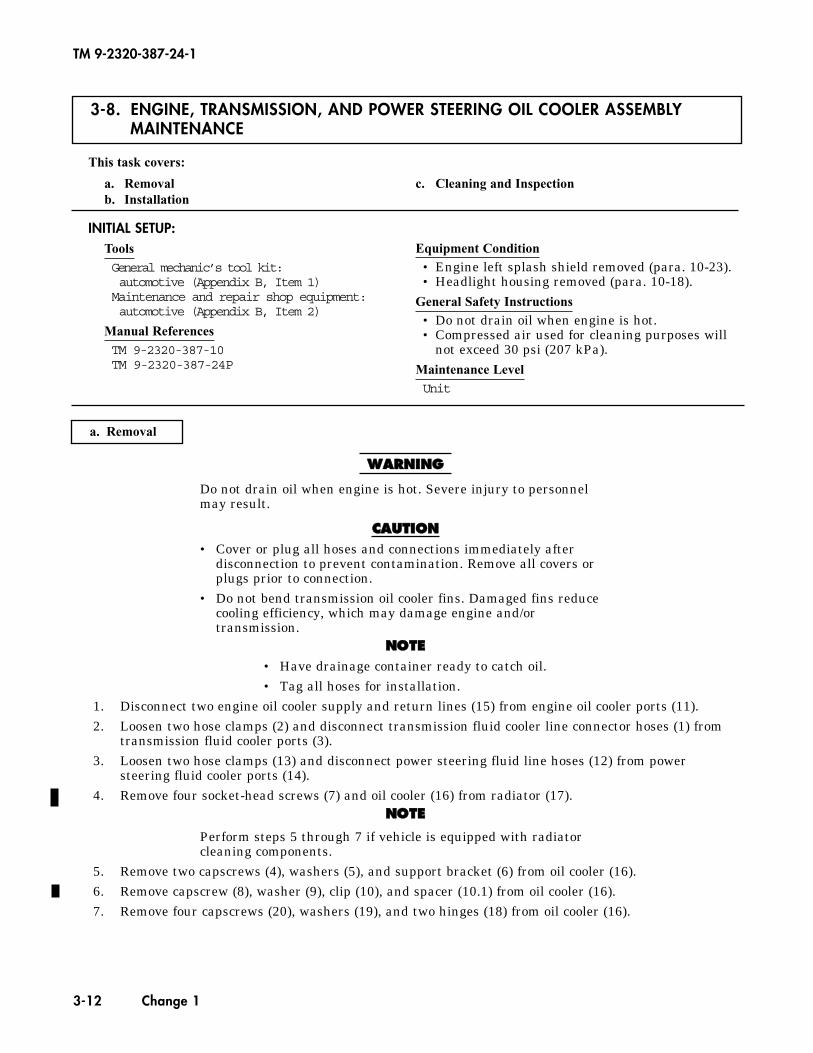
3-8. ENGINE, TRANSMISSION, AND POWER STEERING OIL COOLER ASSEMBLY MAINTENANCE
TM 9-2320-387-24-1
3-12 Change 1
This task covers:
a. Removal c. Cleaning and Inspectionb. Installation
a. Removal
WWAARRNNIINNGG
Do not drain oil when engine is hot. Severe injury to personnelmay result.
CCAAUUTTIIOONN• Cover or plug all hoses and connections immediately after
disconnection to prevent contamination. Remove all covers orplugs prior to connection.
• Do not bend transmission oil cooler fins. Damaged fins reducecooling efficiency, which may damage engine and/ortransmission.
NNOOTTEE• Have drainage container ready to catch oil.• Tag all hoses for installation.
1. Disconnect two engine oil cooler supply and return lines (15) from engine oil cooler ports (11).2. Loosen two hose clamps (2) and disconnect transmission fluid cooler line connector hoses (1) from
transmission fluid cooler ports (3).3. Loosen two hose clamps (13) and disconnect power steering fluid line hoses (12) from power
steering fluid cooler ports (14).4. Remove four socket-head screws (7) and oil cooler (16) from radiator (17).
NNOOTTEE
Perform steps 5 through 7 if vehicle is equipped with radiatorcleaning components.
5. Remove two capscrews (4), washers (5), and support bracket (6) from oil cooler (16).6. Remove capscrew (8), washer (9), clip (10), and spacer (10.1) from oil cooler (16).7. Remove four capscrews (20), washers (19), and two hinges (18) from oil cooler (16).
INITIAL SETUP:ToolsGeneral mechanic’s tool kit:automotive (Appendix B, Item 1)Maintenance and repair shop equipment:automotive (Appendix B, Item 2)
Manual ReferencesTM 9-2320-387-10TM 9-2320-387-24P
Equipment Condition• Engine left splash shield removed (para. 10-23).• Headlight housing removed (para. 10-18).
General Safety Instructions• Do not drain oil when engine is hot.• Compressed air used for cleaning purposes will
not exceed 30 psi (207 kPa).Maintenance LevelUnit
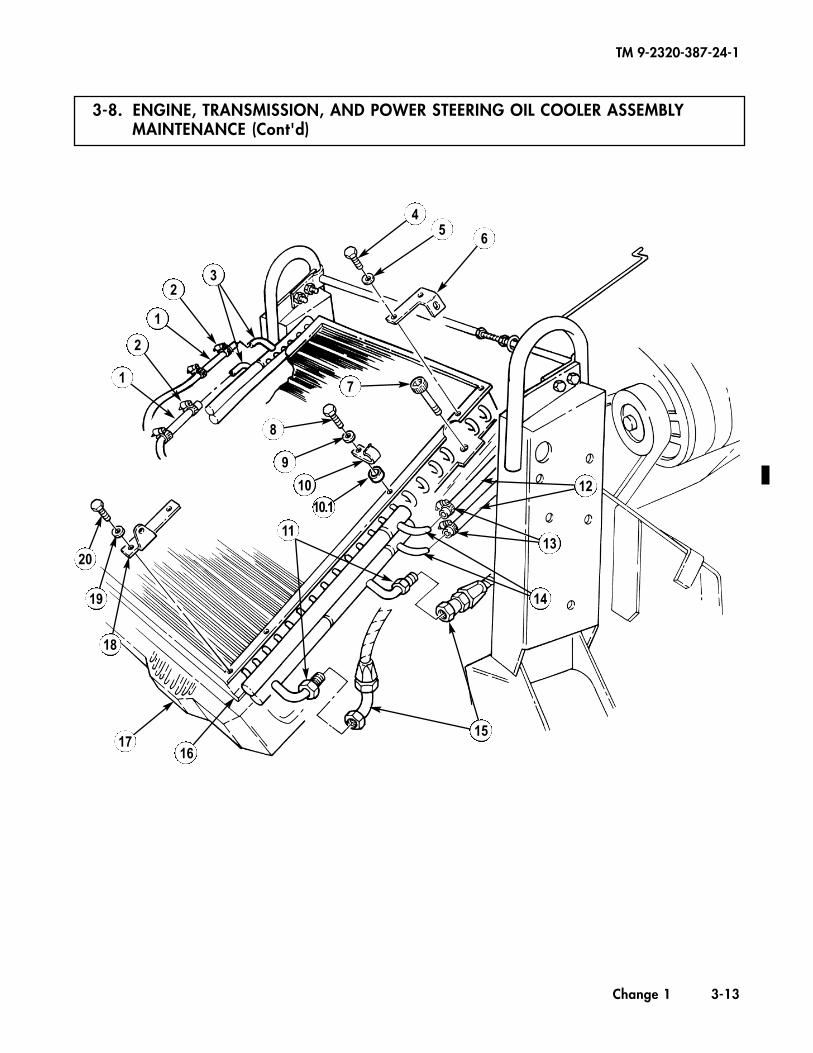
TM 9-2320-387-24-1
Change 1 3-13
3-8. ENGINE, TRANSMISSION, AND POWER STEERING OIL COOLER ASSEMBLYMAINTENANCE (Cont'd)
1
2
1
23
45
6
7
8
9
10.1
20
19
18
1716
12
13
14
15
11
10
TM 9-2320-387-24-1
3-14 Change 1
3-8. ENGINE, TRANSMISSION, AND POWER STEERING OIL COOLER ASSEMBLYMAINTENANCE (Cont'd)
c. Cleaning and Inspection
1. Remove four socket-head screws (7) securing oil cooler (16) to radiator (17).2. Remove prop rod (6.1) from clip (10), raise oil cooler (16) and secure oil cooler (16) in place using
prop rod (6.1).
WWAARRNNIINNGGCompressed air used for cleaning purposes will not exceed 30 psi(207 kPa). Use only with effective chip guarding and personalprotective equipment (goggles/shield, gloves, etc.).
3. Using water and compressed air, remove dirt, trash, and insects embedded in oil cooler (16) andradiator (17) fins.
4. Inspect oil cooler (16) for breaks, punctures, cracks, and splits. Replace oil cooler (16), if damaged.5. Lower oil cooler (16) and secure on radiator (17) with four socket-head screws (7).6. Secure prop rod (6.1) in clip (10).
b. Installation
NNOOTTEE
Perform steps 1 through 3 if vehicle is equipped with radiatorcleaning components.
1. Install two hinges (18) on oil cooler (16) with four washers (19) and capscrews (20).2. Install spacer (10.1) and clip (10) on oil cooler (16) with washer (9) and capscrew (8).3. Install support bracket (6) on oil cooler (16) with two washers (5) and capscrews (4).4. Install oil cooler (16) on radiator (17) with four socket-head screws (7).5. Connect two transmission fluid cooler line connector hoses (1) to transmission fluid cooler ports (3)
with hose clamps (2) and tighten hose clamps to 10-20 lb-in. (1-2 N•m).6. Connect two engine oil cooler supply and return lines (15) to engine oil cooler ports (11).7. Connect two power steering fluid line hoses (12) to power steering fluid cooler ports (14) and
tighten hose clamps (13) to 10-20 lb-in. (1-2 N•m).
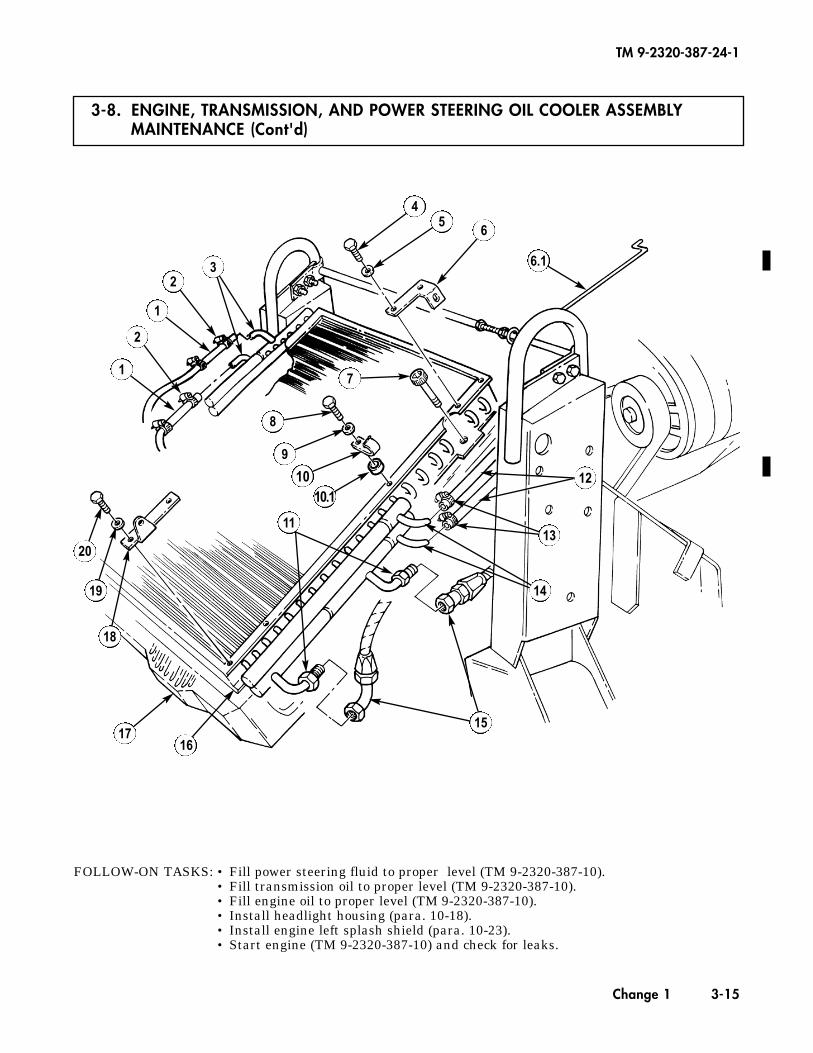
TM 9-2320-387-24-1
Change 1 3-15
FOLLOW-ON TASKS: • Fill power steering fluid to proper level (TM 9-2320-387-10).• Fill transmission oil to proper level (TM 9-2320-387-10).• Fill engine oil to proper level (TM 9-2320-387-10).• Install headlight housing (para. 10-18).• Install engine left splash shield (para. 10-23).• Start engine (TM 9-2320-387-10) and check for leaks.
3-8. ENGINE, TRANSMISSION, AND POWER STEERING OIL COOLER ASSEMBLYMAINTENANCE (Cont'd)
1
2
1
23
45
6
7
8
9
20
19
18
1716
12
13
14
15
11
10.1
6.1
10
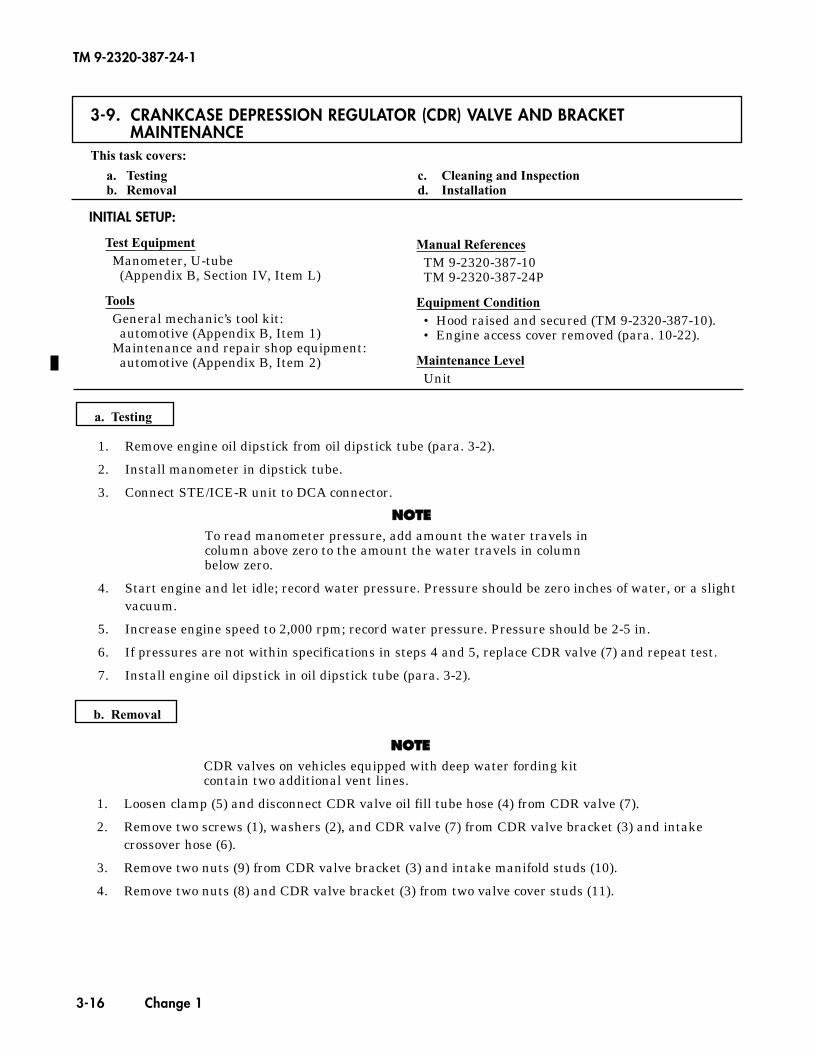
3-9. CRANKCASE DEPRESSION REGULATOR (CDR) VALVE AND BRACKETMAINTENANCE
This task covers:
a. Testing c. Cleaning and Inspectionb. Removal d. Installation
b. Removal
NNOOTTEECDR valves on vehicles equipped with deep water fording kitcontain two additional vent lines.
1. Loosen clamp (5) and disconnect CDR valve oil fill tube hose (4) from CDR valve (7).
2. Remove two screws (1), washers (2), and CDR valve (7) from CDR valve bracket (3) and intakecrossover hose (6).
3. Remove two nuts (9) from CDR valve bracket (3) and intake manifold studs (10).
4. Remove two nuts (8) and CDR valve bracket (3) from two valve cover studs (11).
1. Remove engine oil dipstick from oil dipstick tube (para. 3-2).
2. Install manometer in dipstick tube.
3. Connect STE/ICE-R unit to DCA connector.
NNOOTTEETo read manometer pressure, add amount the water travels incolumn above zero to the amount the water travels in columnbelow zero.
4. Start engine and let idle; record water pressure. Pressure should be zero inches of water, or a slightvacuum.
5. Increase engine speed to 2,000 rpm; record water pressure. Pressure should be 2-5 in.
6. If pressures are not within specifications in steps 4 and 5, replace CDR valve (7) and repeat test.
7. Install engine oil dipstick in oil dipstick tube (para. 3-2).
INITIAL SETUP:
Test EquipmentManometer, U-tube
(Appendix B, Section IV, Item L)
ToolsGeneral mechanic’s tool kit:
automotive (Appendix B, Item 1)Maintenance and repair shop equipment:
automotive (Appendix B, Item 2)
Manual ReferencesTM 9-2320-387-10TM 9-2320-387-24P
Equipment Condition• Hood raised and secured (TM 9-2320-387-10).• Engine access cover removed (para. 10-22).
Maintenance LevelUnit
TM 9-2320-387-24-1
3-16 Change 1
a. Testing
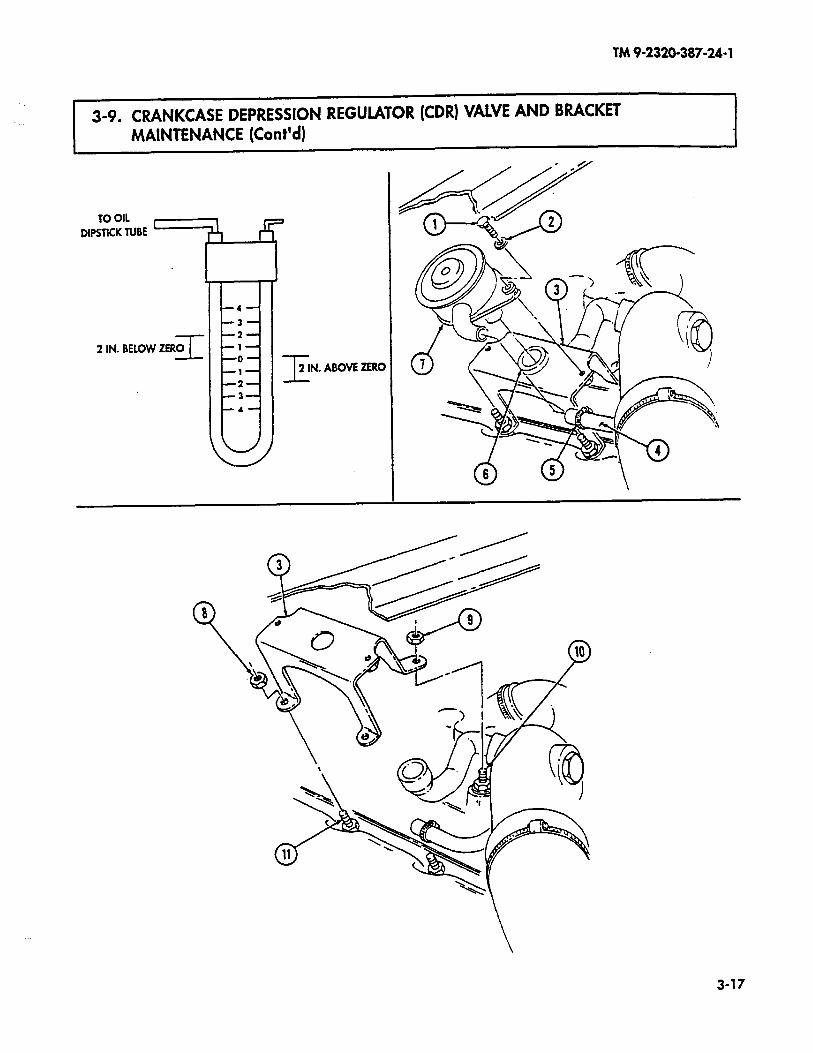
TM9-2320-387-24-l
1 3-9. CRANKCASE DEPRESklON REGULATOR (CDR) VALVE AND BRACKET I MAINTENANCE (Cont’d) 1
2 IN.
I 2 IN. ABOVE ZERO
3-17
TM 9-2320-387-24-l
3-9. CRANKCASE DEPRESSION REGULATOR (CDR) VALVE AND BRACKET MAINTENANCE (cont’d)
1
c. Cleaning and Inspection
CAUTlON Do not clean CDR valve with drycleaning solvent. Drycleaning solvent may damage the diaphragm inside CDR valve.
1. Clean oil and carbon deposits from CDR valve (12) with a clean, lint-free cloth.
2. Inspect CDR valve (12) and lines for leaks, cracks, and restrictions. Replace if damaged
d Installation
1. Install CDR valve bracket (2) on two intake manifold studs (4) and valve cover studs (61.
2. Secure CDR valve bracket (2) to intake manifold (5) with two nuts (3). Tighten nuts (3) to 15 lb-R (20 N-m).
3. Secure CDR valve bracket (2) to valve cover studs (6) with two nuts (1). Tighten nuts (1) to 10 lb-R (14 Nom).
4. Install CDR valve (12) on CDR valve bracket (2) and intake crossover hose (11) with two washers (8) and screws (7). Tighten screws (71 to 15 lb-R (20 Nom).
5. Connect CDR valve oil fill tube hose (9) to CDR valve (12) and tighten clamp (10).
3-18
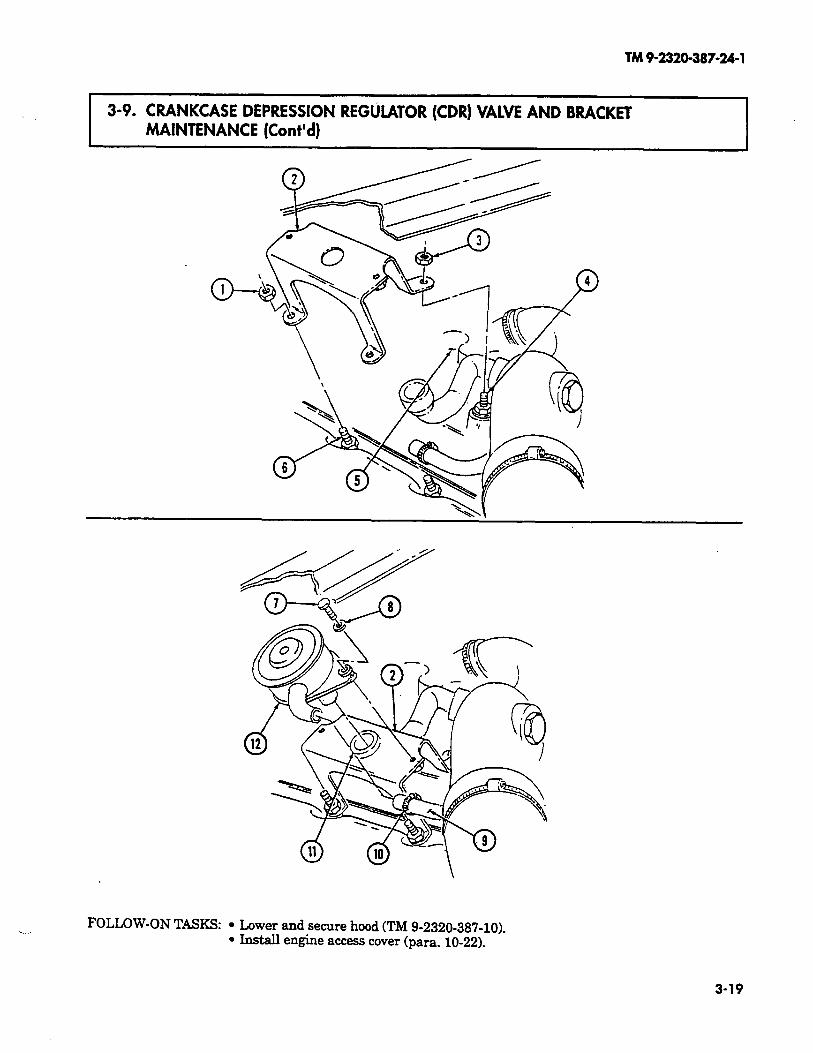
TM9-2320-387-24-l
3-9. CRANKCASE DEPRESSION REGULATOR (CDR) VALVE AND BRACKET MAINTENANCE (Cont’d)
FOLLOW-ON TASKS: l Lower and secure hood (TM 9-2320-387-10). l Install engine access cover (para. 10-22).
3-19
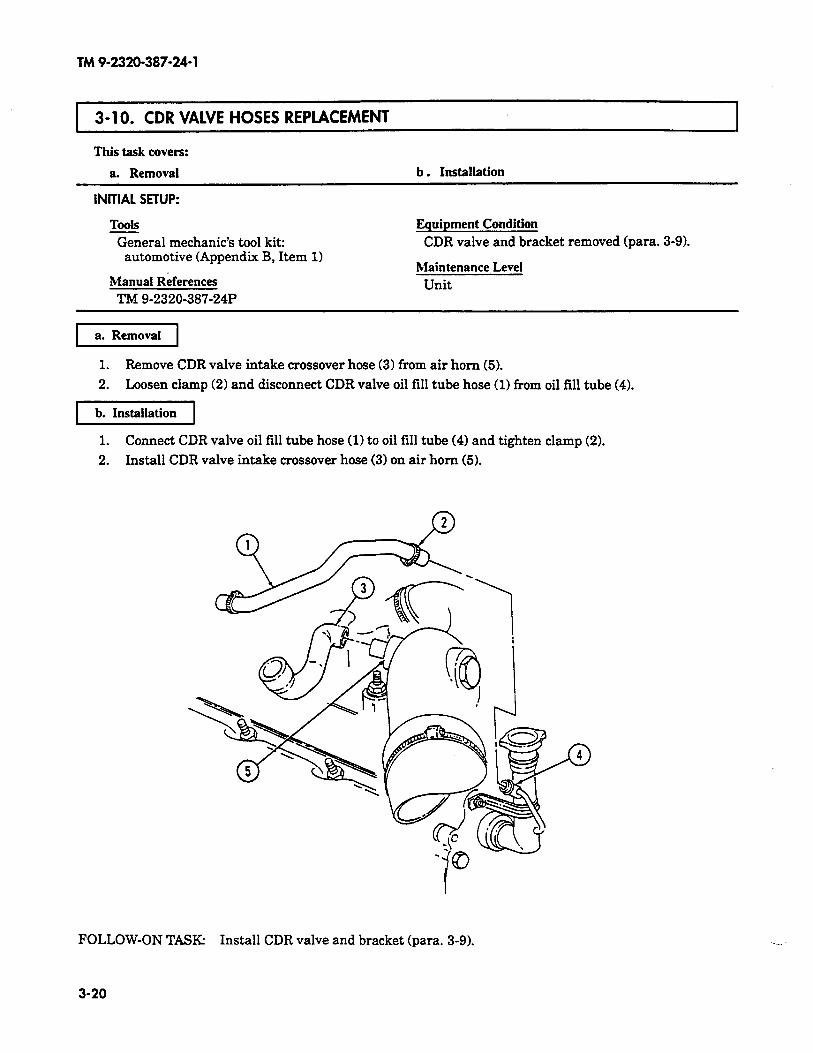
TM 9-2320-387-24-l
1 3-l 0. CDR VALVE HOSES REPLACEMENT
This task covers:
a. Removal b . Installation
INITIAL SETUP:
Tools General mechanic’s tool kit:
automotive (Appendix B, Item 1)
Manual References TM 9-2320-387-24P
Equipment Condition CDR valve and bracket removed (para. 3-9).
Maintenance Level Unit
1. Remove CDR valve intake crossover hose (3) from air horn (5).
2. Loosen clamp (2) and disconnect CDR valve oil fill tube hose (1) from oil fill tube (4).
1 b. Installation 1
1. Connect CDR valve oil fill tube hose (1) to oil fill tube (4) and tighten clamp (2).
2. Install CDR valve intake crossover hose (3) on air horn (5).
FOLLOW-ON TASK: Install CDR valve and bracket (para. 3-9).
3-20
TM 9-2320-387-24-l
Sextion II. FUEL SYSTEM MAINTENANCE
1 3-11. FUEL SYSTEM MAINTENANCE TASK SUMMARY 1
TASK PAUA.
PROCEDURES PAGE 1 NO.
3-12.
3-13.
3-14.
3-15.
3-16.
3-17.
3-18.
3-19.
3-20.
3-21.
3-22.
3-23.
3-24.
3-25.
3-26.
3-27.
3-28.
3-29.
3-30.
3-31.
3-32.
3-33.
3-34.
3-3s.
3-36.
3-37.
3-38.
3-39.
3-40.
3-41.
Air Cleaner Assembly and Dust Unloader Maintenance
Air Cleaner Filter Element Servicing
Air Horn Replacement
Air Horn-to-Air Cleaner Elbow Replacement
Air Horn Support Bracket Replacement
Air Restriction Gauge Replacement
Weathercap Replacement
Air Intake Assembly and Bracket Replacement
Air Restriction Gauge Hose Replacement
Air Intake and Fuel Pump Vent Lines Replacement
Drainage Bracket Replacement
Fuel Injection Pump Boot Replacement
Fuel Pump Replacement
Fuel Tank and Shield Maintenance
Fuel Tank Supply and Return Lines Replacement
Auxiliary Fuel Pickup and Return Lines Replacement
Fuel Tank Vent Line and Filter Replacement
Fuel Tank Filler Cap and Spout Maintenance
Fuel Tank Filler Spout Vent Line Replacement
Filler Spout Hose Replacement
Fuel Tank Hangers Replacement
Fuel Filter Maintenance
Fuel Filter Element Maintenance
Fuel Filter Drain Hose and Valve Replacement
Fuel Injection Pump Return Hose Check Valve Maintenance
Fuel Injection Return Hoses Replacement
Fuel Drain-Back Tube Replacement
Glow Plug Replacement
Right Fuel Injection Lines Bracket Replacement
Left Fuel Injection Lines Bracket Replacement
3-22
3-24
3-28
3-30
3-31
3-32
3-33
3-34
3-36
3-37
3-38
3-39
3-40
3-42
3-52
3-54
3-56
3-58
3-60
3-62
3-63
3-64
3-66
3-68
3-70
3-72
3-76
3-78
3-79
3-80
3-21
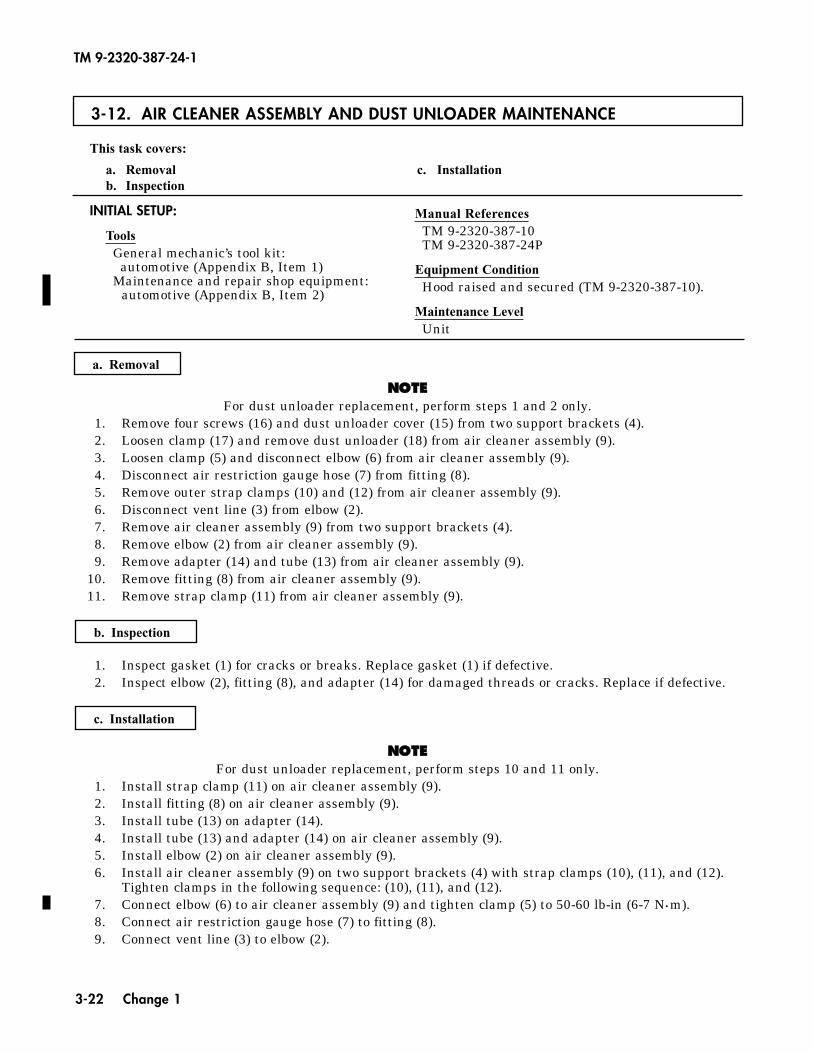
This task covers:
a. Removal c. Installationb. Inspection
NNOOTTEEFor dust unloader replacement, perform steps 1 and 2 only.
1. Remove four screws (16) and dust unloader cover (15) from two support brackets (4). 2. Loosen clamp (17) and remove dust unloader (18) from air cleaner assembly (9).3. Loosen clamp (5) and disconnect elbow (6) from air cleaner assembly (9).4. Disconnect air restriction gauge hose (7) from fitting (8).5. Remove outer strap clamps (10) and (12) from air cleaner assembly (9).6. Disconnect vent line (3) from elbow (2).7. Remove air cleaner assembly (9) from two support brackets (4).8. Remove elbow (2) from air cleaner assembly (9).9. Remove adapter (14) and tube (13) from air cleaner assembly (9).
10. Remove fitting (8) from air cleaner assembly (9).11. Remove strap clamp (11) from air cleaner assembly (9).
1. Inspect gasket (1) for cracks or breaks. Replace gasket (1) if defective.2. Inspect elbow (2), fitting (8), and adapter (14) for damaged threads or cracks. Replace if defective.
NNOOTTEEFor dust unloader replacement, perform steps 10 and 11 only.
1. Install strap clamp (11) on air cleaner assembly (9).2. Install fitting (8) on air cleaner assembly (9).3. Install tube (13) on adapter (14).4. Install tube (13) and adapter (14) on air cleaner assembly (9).5. Install elbow (2) on air cleaner assembly (9).6. Install air cleaner assembly (9) on two support brackets (4) with strap clamps (10), (11), and (12).
Tighten clamps in the following sequence: (10), (11), and (12).7. Connect elbow (6) to air cleaner assembly (9) and tighten clamp (5) to 50-60 lb-in (6-7 N•m).8. Connect air restriction gauge hose (7) to fitting (8).9. Connect vent line (3) to elbow (2).
c. Installation
b. Inspection
a. Removal
INITIAL SETUP:
ToolsGeneral mechanic’s tool kit:
automotive (Appendix B, Item 1)Maintenance and repair shop equipment:
automotive (Appendix B, Item 2)
Manual ReferencesTM 9-2320-387-10TM 9-2320-387-24P
Equipment ConditionHood raised and secured (TM 9-2320-387-10).
Maintenance LevelUnit
3-12. AIR CLEANER ASSEMBLY AND DUST UNLOADER MAINTENANCE
TM 9-2320-387-24-1
3-22 Change 1
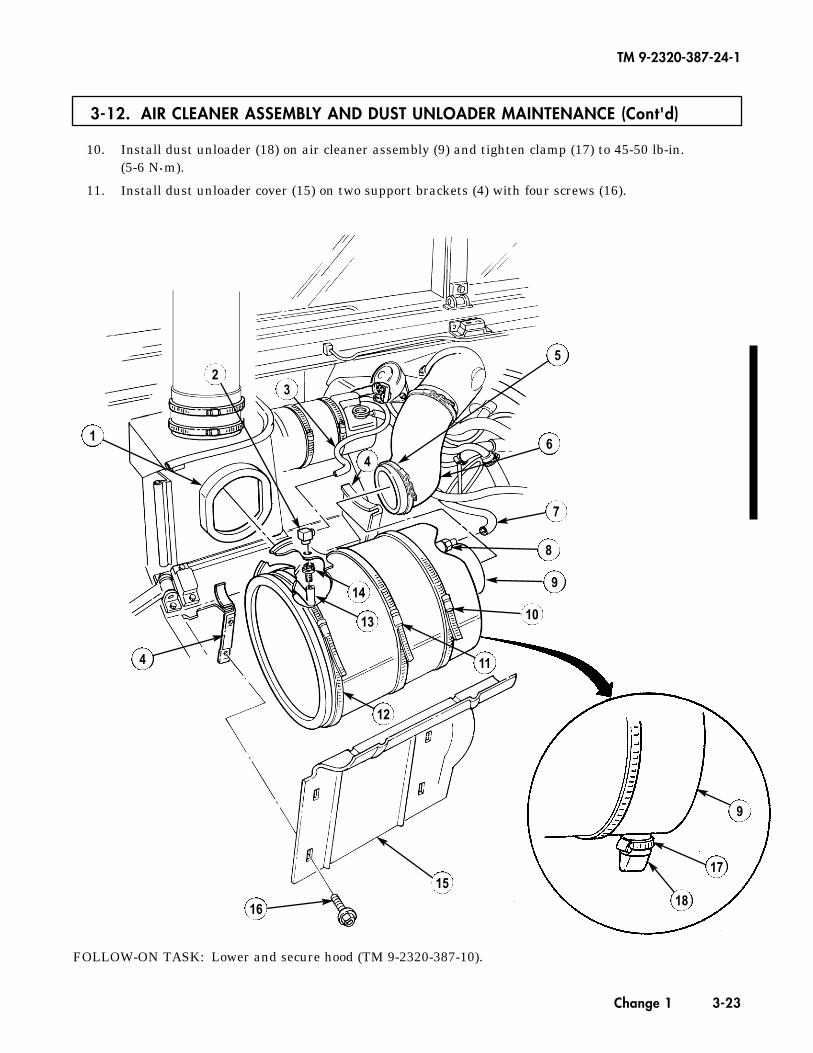
FOLLOW-ON TASK: Lower and secure hood (TM 9-2320-387-10).
3-12. AIR CLEANER ASSEMBLY AND DUST UNLOADER MAINTENANCE (Cont'd)
10. Install dust unloader (18) on air cleaner assembly (9) and tighten clamp (17) to 45-50 lb-in.(5-6 N•m).
11. Install dust unloader cover (15) on two support brackets (4) with four screws (16).
TM 9-2320-387-24-1
Change 1 3-23
2
1
4
3
4
5
6
7
8
9
10
11
12
13
14
15
16
9
17
18

This task covers:
a. Removal d. Cleaningb. Inspection e. Installationc. Emergency Cleaning
INITIAL SETUP:Tools
General mechanic’s tool kit:automotive (Appendix B, Item 1)
Maintenance and repair shop equipment:automotive (Appendix B, Item 2)
Materials/PartsDetergent (Appendix C, Item 25)
Manual ReferencesTM 9-2320-387-10TM 9-2320-387-24P
Equipment ConditionHood raised and secured (TM 9-2320-387-10).
General Safety Instructions• Do not use unauthorized cleaning methods or
liquids.• Compressed air used for cleaning purposes will
not exceed 30 psi (207 kPa).
Maintenance LevelUnit
3-13. AIR CLEANER FILTER ELEMENT SERVICING
TM 9-2320-387-24-1
3-24 Change 1
WWAARRNNIINNGG
• Improper cleaning methods and use of unauthorized cleaning liquids caninjure personnel and cause damage to equipment. Do not use anythingother than compressed air, water, and detergent to clean elements.
• If NBC contamination is suspected, consult NBC officer or NBC NCO forappropriate handling instructions.
NNOOTTEEThe vehicle air cleaner may be configured with either a ring clamp or over-center clamp.
1. Loosen screw (8), or unlatch and remove clamp (1), cover (2), and gasket (3) from air cleaner assembly (6).CCAAUUTTIIOONN
Cover housing opening with screen or rag to prevent contaminants fromentering air intake system and damaging engine.
2. Remove nut and washer assembly (7) and filter element (4) from stud (5) of air cleaner assembly (6).
1. Check gasket (3) for dents, tears, rips, and other damage. Ensure gasket has not taken a set. Ensurethere are no hard dirt ridges on sealing surfaces.
2. Inspect filter element (4) for holes and tears by looking through element toward a bright light. Ifpinpoints of light shine through, replace element. Holes that are large enough to let light throughare large enough to let contaminants through. Another way to check for leaks or damage is to lookfor uneven dirt patterns. Ensure there is no rust or flaking paint on metal parts of filter. If the filterhas already been cleaned three times, or if damaged, replace filter element (4).
3. Check air cleaner assembly (6) for holes, dents, rust, or any other damage that will interfere withproper sealing and allow unfiltered air to enter and destroy engine.
CCAAUUTTIIOONNDo not strike ends of filter element on hard surface, or damage to filterelement may result.
Remove dust or sand from filter element (4) by holding it so neither end faces ground, and gently taparound filter element (4).
c. Emergency Cleaning
b. Inspection
a. Removal
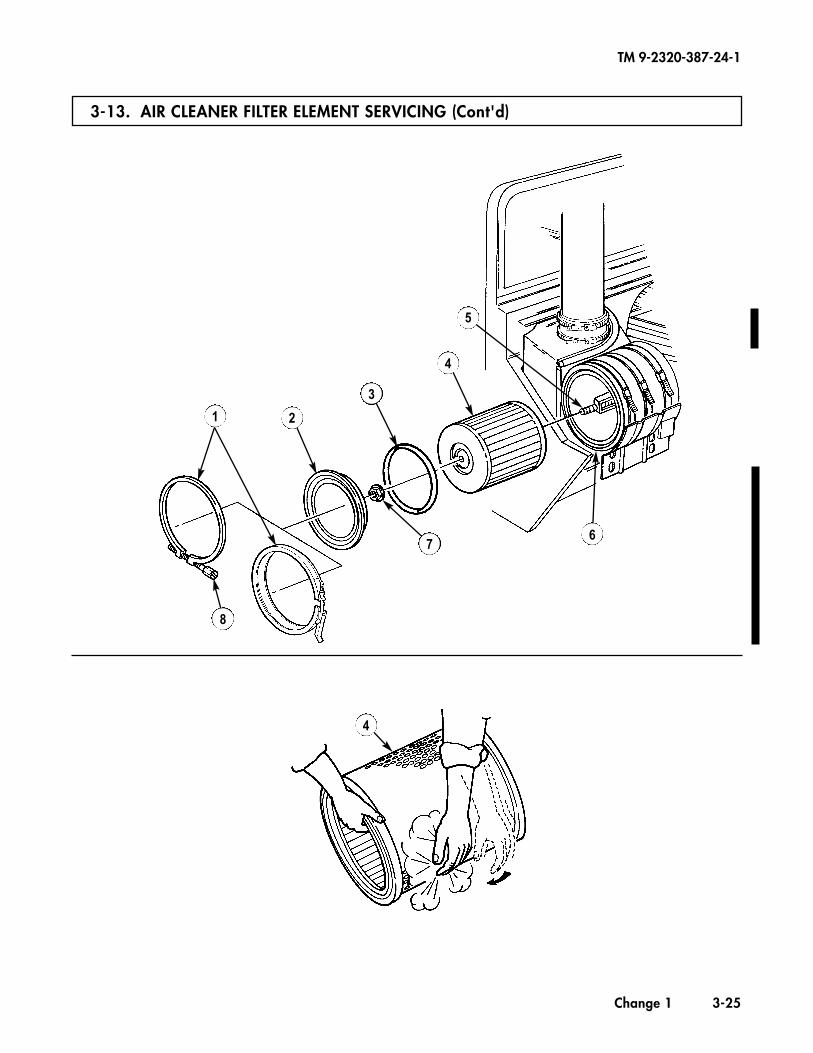
3-13. AIR CLEANER FILTER ELEMENT SERVICING (Cont'd)
TM 9-2320-387-24-1
Change 1 3-25
4
8
2
7
3
4
6
5
1
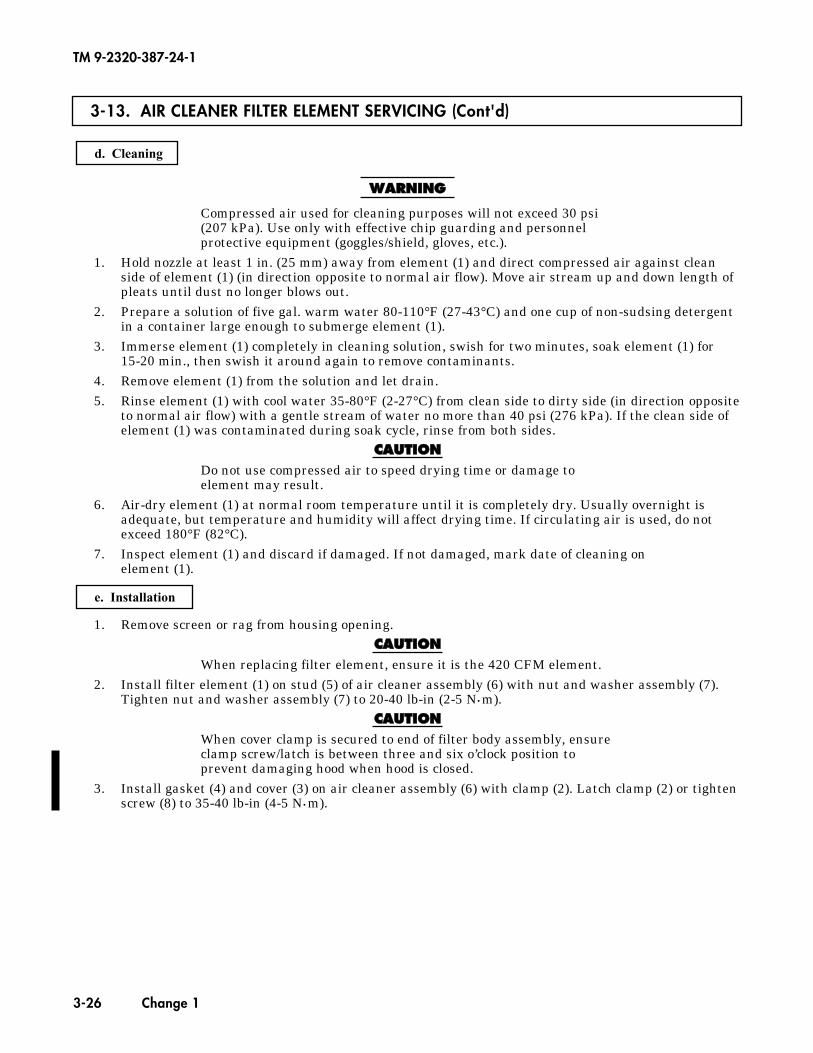
3-13. AIR CLEANER FILTER ELEMENT SERVICING (Cont'd)
TM 9-2320-387-24-1
3-26 Change 1
WWAARRNNIINNGG
Compressed air used for cleaning purposes will not exceed 30 psi(207 kPa). Use only with effective chip guarding and personnelprotective equipment (goggles/shield, gloves, etc.).
1. Hold nozzle at least 1 in. (25 mm) away from element (1) and direct compressed air against cleanside of element (1) (in direction opposite to normal air flow). Move air stream up and down length ofpleats until dust no longer blows out.
2. Prepare a solution of five gal. warm water 80-110°F (27-43°C) and one cup of non-sudsing detergentin a container large enough to submerge element (1).
3. Immerse element (1) completely in cleaning solution, swish for two minutes, soak element (1) for 15-20 min., then swish it around again to remove contaminants.
4. Remove element (1) from the solution and let drain.5. Rinse element (1) with cool water 35-80°F (2-27°C) from clean side to dirty side (in direction opposite
to normal air flow) with a gentle stream of water no more than 40 psi (276 kPa). If the clean side ofelement (1) was contaminated during soak cycle, rinse from both sides.
CCAAUUTTIIOONNDo not use compressed air to speed drying time or damage toelement may result.
6. Air-dry element (1) at normal room temperature until it is completely dry. Usually overnight isadequate, but temperature and humidity will affect drying time. If circulating air is used, do notexceed 180°F (82°C).
7. Inspect element (1) and discard if damaged. If not damaged, mark date of cleaning on element (1).
1. Remove screen or rag from housing opening.CCAAUUTTIIOONN
When replacing filter element, ensure it is the 420 CFM element.2. Install filter element (1) on stud (5) of air cleaner assembly (6) with nut and washer assembly (7).
Tighten nut and washer assembly (7) to 20-40 lb-in (2-5 N•m).CCAAUUTTIIOONN
When cover clamp is secured to end of filter body assembly, ensureclamp screw/latch is between three and six o’clock position toprevent damaging hood when hood is closed.
3. Install gasket (4) and cover (3) on air cleaner assembly (6) with clamp (2). Latch clamp (2) or tightenscrew (8) to 35-40 lb-in (4-5 N•m).
e. Installation
d. Cleaning
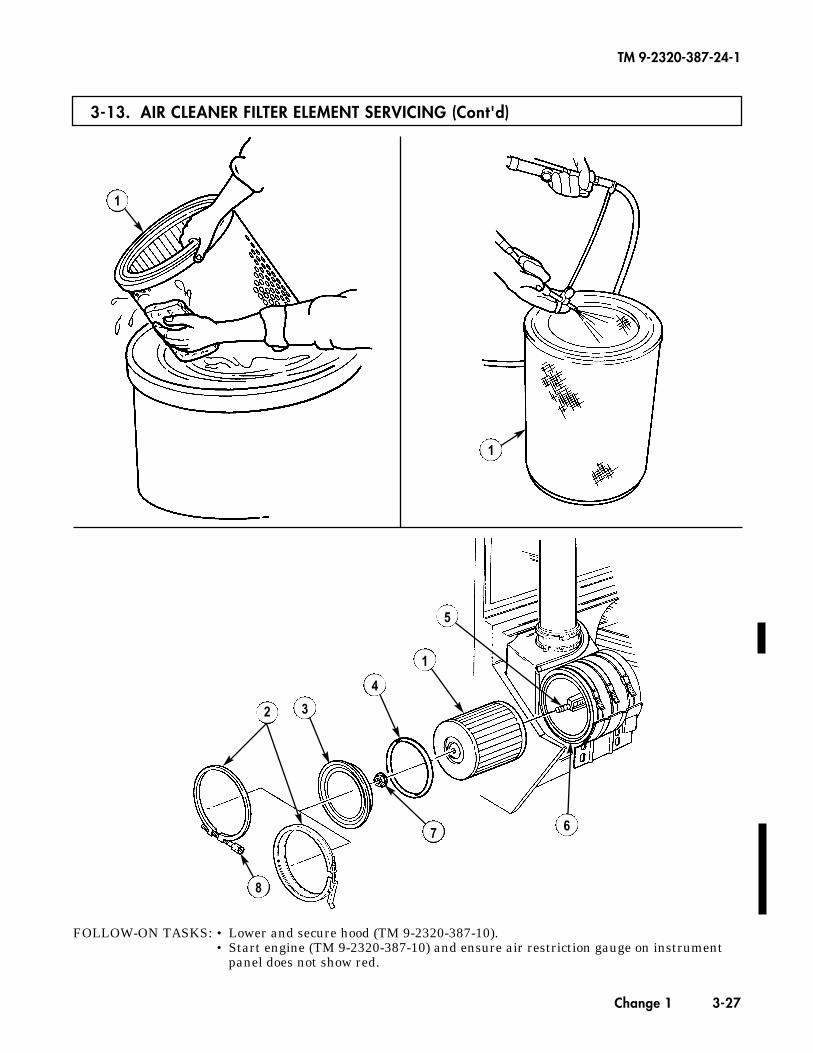
FOLLOW-ON TASKS: • Lower and secure hood (TM 9-2320-387-10).• Start engine (TM 9-2320-387-10) and ensure air restriction gauge on instrument
panel does not show red.
3-13. AIR CLEANER FILTER ELEMENT SERVICING (Cont'd)
TM 9-2320-387-24-1
Change 1 3-27
1
1
8
2
7
3
4
6
5
1

This task covers:
a. Removal b. Installation
INITIAL SETUP:
ToolsGeneral mechanic’s tool kit:
automotive (Appendix B, Item 1)Maintenance and repair shop equipment:
(Appendix B, Item 2)
Materials/PartsTwo lockwashers (Appendix G, Item 206)Adhesive (Appendix C, Item 10)
Manual ReferencesTM 9-2320-387-10TM 9-2320-387-24P
Equipment ConditionHood raised and secured (TM 9-2320-387-10).
Maintenance LevelUnit
3-14. AIR HORN REPLACEMENT
1. Disconnect CDR hose (1) from air horn (2).2. Loosen clamp (4) and disconnect air intake elbow (3) from air horn (2).
CCAAUUTTIIOONNCover opening of turbocharger intake to prevent foreignmaterial from entering turbocharger and damaging engine.
3. Loosen clamp (5) and remove air horn (2) from turbocharger intake hose (6).4. Remove adapter (7) from air horn (2).5. Remove inserts (8) and (9) from air horn (2).
1. Install inserts (8) and (9) on air horn (2).1.1 Apply adhesive to adapter (7) and install adapter (7) on air horn (2).2. Install air horn (2) on turbocharger intake hose (6) and tighten clamp (5) to 50-60 lb-in. (6-7 N•m). 3. Connect elbow (3) to air horn (2) and tighten clamp (4) to 50-60 lb-in. (6-7 N•m). 4. Connect CDR hose (1) to air horn (2).
b. Installation
a. Removal
TM 9-2320-387-24-1
3-28 Change 1

FOLLOW-ON TASK: Lower and secure hood (TM 9-2320-387-10).
3-14. AIR HORN REPLACEMENT (Cont'd)
TM 9-2320-387-24-1
Change 1 3-29
1
2
3
4
5
67 8
2
9
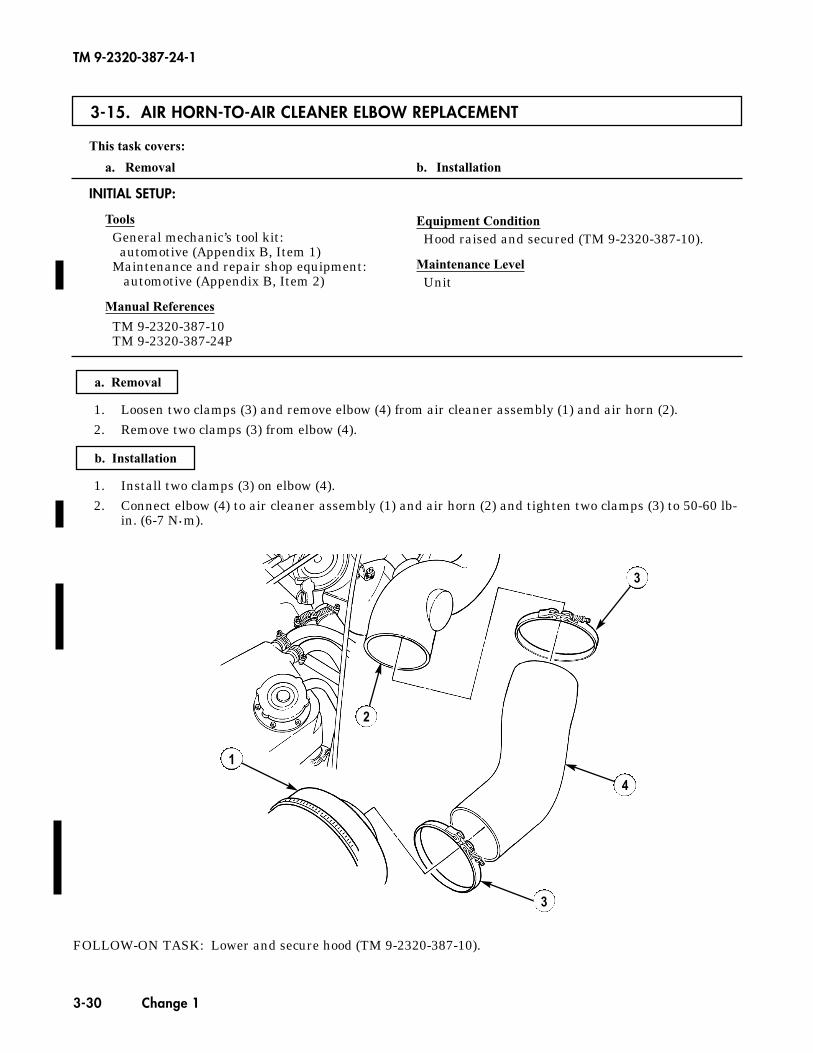
This task covers:
a. Removal b. Installation
INITIAL SETUP:
ToolsGeneral mechanic’s tool kit:
automotive (Appendix B, Item 1)Maintenance and repair shop equipment:
automotive (Appendix B, Item 2)
Manual References
TM 9-2320-387-10TM 9-2320-387-24P
Equipment ConditionHood raised and secured (TM 9-2320-387-10).
Maintenance LevelUnit
3-15. AIR HORN-TO-AIR CLEANER ELBOW REPLACEMENT
1. Loosen two clamps (3) and remove elbow (4) from air cleaner assembly (1) and air horn (2).2. Remove two clamps (3) from elbow (4).
1. Install two clamps (3) on elbow (4).2. Connect elbow (4) to air cleaner assembly (1) and air horn (2) and tighten two clamps (3) to 50-60 lb-
in. (6-7 N•m).
b. Installation
a. Removal
FOLLOW-ON TASK: Lower and secure hood (TM 9-2320-387-10).
TM 9-2320-387-24-1
3-30 Change 1
3
4
3
1
2
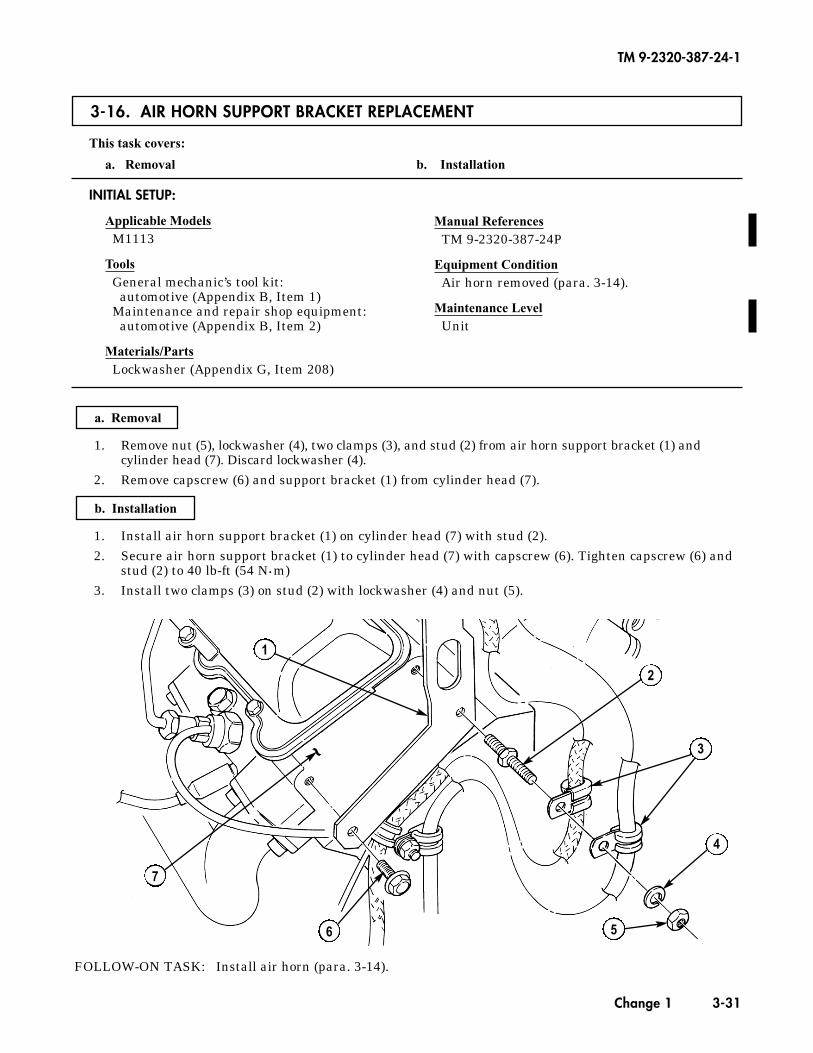
This task covers:
a. Removal b. Installation
INITIAL SETUP:
Applicable ModelsM1113
ToolsGeneral mechanic’s tool kit:
automotive (Appendix B, Item 1)Maintenance and repair shop equipment:
automotive (Appendix B, Item 2)
Materials/PartsLockwasher (Appendix G, Item 208)
Manual ReferencesTM 9-2320-387-24P
Equipment ConditionAir horn removed (para. 3-14).
Maintenance LevelUnit
3-16. AIR HORN SUPPORT BRACKET REPLACEMENT
1. Remove nut (5), lockwasher (4), two clamps (3), and stud (2) from air horn support bracket (1) andcylinder head (7). Discard lockwasher (4).
2. Remove capscrew (6) and support bracket (1) from cylinder head (7).
1. Install air horn support bracket (1) on cylinder head (7) with stud (2).2. Secure air horn support bracket (1) to cylinder head (7) with capscrew (6). Tighten capscrew (6) and
stud (2) to 40 lb-ft (54 N•m)3. Install two clamps (3) on stud (2) with lockwasher (4) and nut (5).
b. Installation
a. Removal
TM 9-2320-387-24-1
Change 1 3-31
1
2
3
4
56
7
~
FOLLOW-ON TASK: Install air horn (para. 3-14).
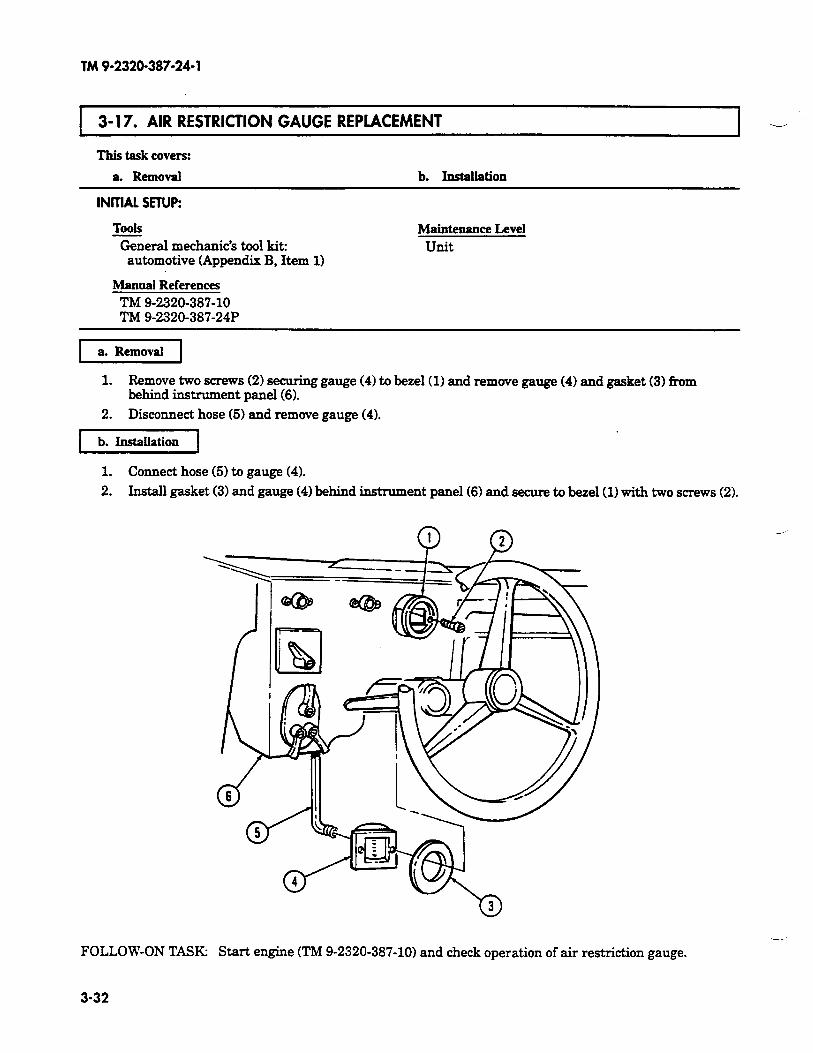
TM 9-2320-387-24-l
3-17. AIR RESTRICTION GAUGE REPLACEMENT
This task covers:
a. Removal b. Installation
INITIAL SETUP:
TOOIS
?&era1 mechanic’s tool kit: automotive (Appendix B, Item 1)
Maintenance Level
unit
Manual References
TM 9-2320-387-10 TM 9-2320-387-24P
pii&Gq 1. Remove two screws (2) securing gauge (4) to bezel (1) and remove gauge (4) and gasket (3) from
behind instrument panel (6).
2. Disconnect hose (5) and remove gauge (4).
-1
1. Connect hose (5) to gauge (4).
2. Install gasket (3) and gauge (4) behind instrument panel (6) and secure to bezel (1) with two screws (2).
FOLLOW-ON TASK: Start engine (TM 9-2320-387-10) and check operation of air restriction gauge.
3-32
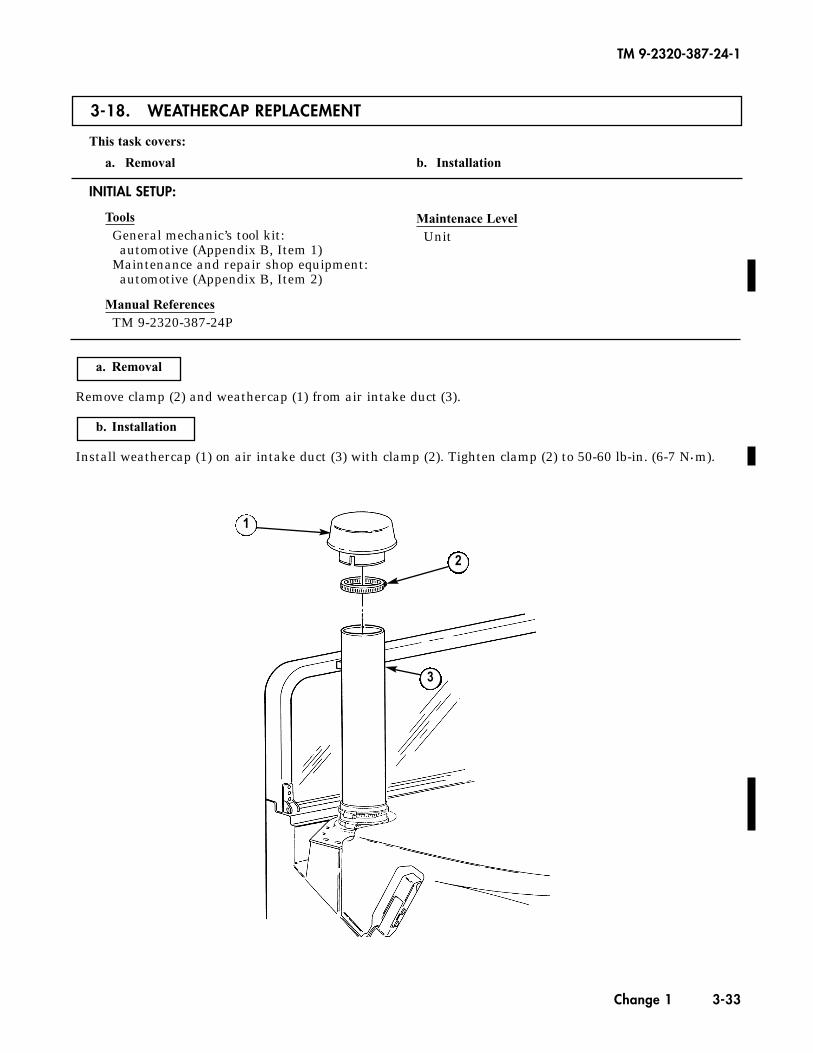
3-18. WEATHERCAP REPLACEMENT
This task covers:
a. Removal b. Installation
Remove clamp (2) and weathercap (1) from air intake duct (3).
Install weathercap (1) on air intake duct (3) with clamp (2). Tighten clamp (2) to 50-60 lb-in. (6-7 N•m).
b. Installation
a. Removal
INITIAL SETUP:
ToolsGeneral mechanic’s tool kit:
automotive (Appendix B, Item 1)Maintenance and repair shop equipment:
automotive (Appendix B, Item 2)
Manual ReferencesTM 9-2320-387-24P
Maintenace LevelUnit
TM 9-2320-387-24-1
Change 1 3-33
1
2
3
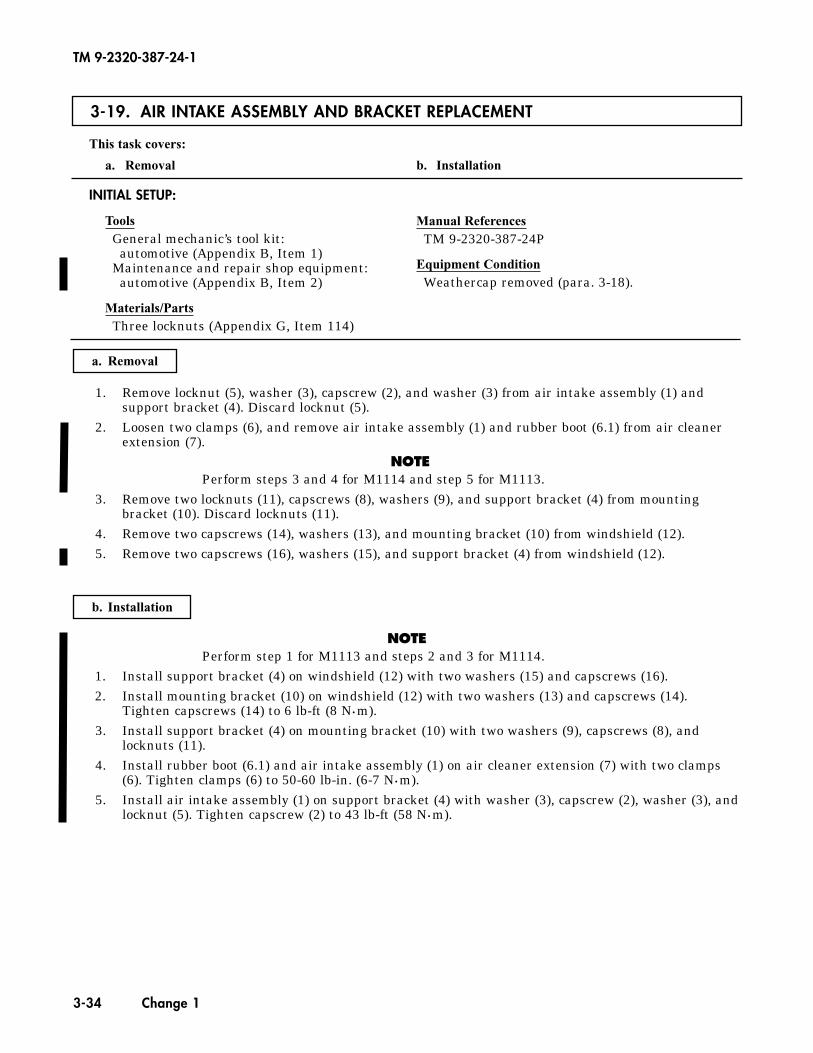
3-19. AIR INTAKE ASSEMBLY AND BRACKET REPLACEMENT
This task covers:
a. Removal b. Installation
a. Removal
1. Remove locknut (5), washer (3), capscrew (2), and washer (3) from air intake assembly (1) andsupport bracket (4). Discard locknut (5).
2. Loosen two clamps (6), and remove air intake assembly (1) and rubber boot (6.1) from air cleaner extension (7).
NOTEPerform steps 3 and 4 for M1114 and step 5 for M1113.
3. Remove two locknuts (11), capscrews (8), washers (9), and support bracket (4) from mountingbracket (10). Discard locknuts (11).
4. Remove two capscrews (14), washers (13), and mounting bracket (10) from windshield (12).5. Remove two capscrews (16), washers (15), and support bracket (4) from windshield (12).
INITIAL SETUP:
ToolsGeneral mechanic’s tool kit:
automotive (Appendix B, Item 1)Maintenance and repair shop equipment:
automotive (Appendix B, Item 2)
Materials/PartsThree locknuts (Appendix G, Item 114)
Manual ReferencesTM 9-2320-387-24P
Equipment ConditionWeathercap removed (para. 3-18).
b. Installation
NOTEPerform step 1 for M1113 and steps 2 and 3 for M1114.
1. Install support bracket (4) on windshield (12) with two washers (15) and capscrews (16).2. Install mounting bracket (10) on windshield (12) with two washers (13) and capscrews (14).
Tighten capscrews (14) to 6 lb-ft (8 N•m).3. Install support bracket (4) on mounting bracket (10) with two washers (9), capscrews (8), and
locknuts (11).4. Install rubber boot (6.1) and air intake assembly (1) on air cleaner extension (7) with two clamps
(6). Tighten clamps (6) to 50-60 lb-in. (6-7 N•m).5. Install air intake assembly (1) on support bracket (4) with washer (3), capscrew (2), washer (3), and
locknut (5). Tighten capscrew (2) to 43 lb-ft (58 N•m).
TM 9-2320-387-24-1
3-34 Change 1
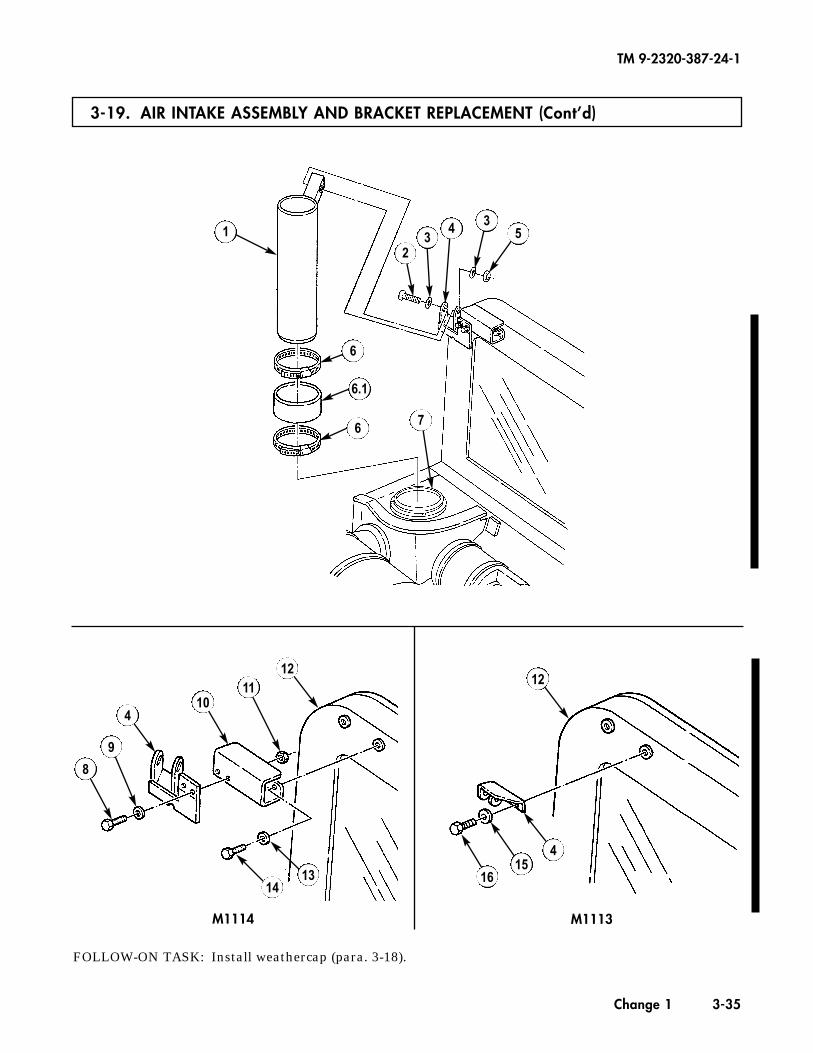
3-19. AIR INTAKE ASSEMBLY AND BRACKET REPLACEMENT (Cont’d)
TM 9-2320-387-24-1
Change 1 3-35
FOLLOW-ON TASK: Install weathercap (para. 3-18).
1
23
4 35
7
6
6.1
6
9
8
410
1112
1413 16
4
12
15
M1114 M1113
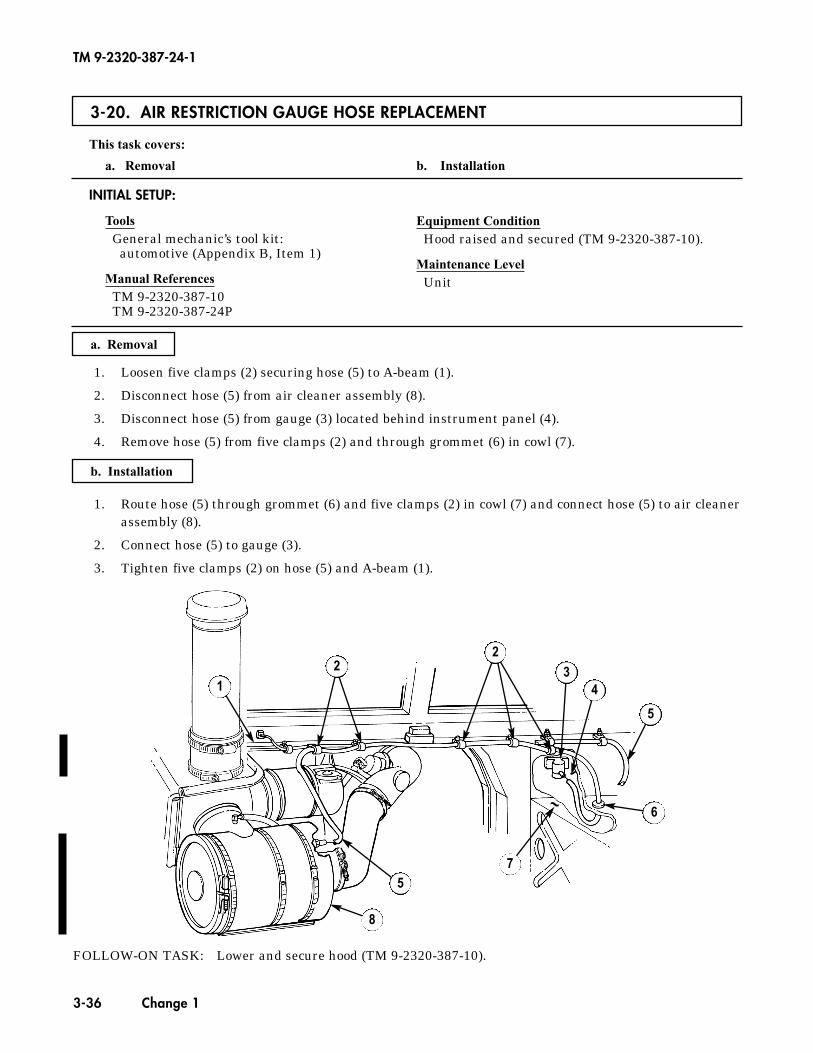
3-20. AIR RESTRICTION GAUGE HOSE REPLACEMENT
This task covers:
a. Removal b. Installation
a. Removal
1. Loosen five clamps (2) securing hose (5) to A-beam (1).
2. Disconnect hose (5) from air cleaner assembly (8).
3. Disconnect hose (5) from gauge (3) located behind instrument panel (4).
4. Remove hose (5) from five clamps (2) and through grommet (6) in cowl (7).
INITIAL SETUP:
ToolsGeneral mechanic’s tool kit:
automotive (Appendix B, Item 1)
Manual ReferencesTM 9-2320-387-10TM 9-2320-387-24P
Equipment ConditionHood raised and secured (TM 9-2320-387-10).
Maintenance LevelUnit
b. Installation
1. Route hose (5) through grommet (6) and five clamps (2) in cowl (7) and connect hose (5) to air cleanerassembly (8).
2. Connect hose (5) to gauge (3).
3. Tighten five clamps (2) on hose (5) and A-beam (1).
TM 9-2320-387-24-1
3-36 Change 1
FOLLOW-ON TASK: Lower and secure hood (TM 9-2320-387-10).
13
4
5
6
75
8
~
22
~
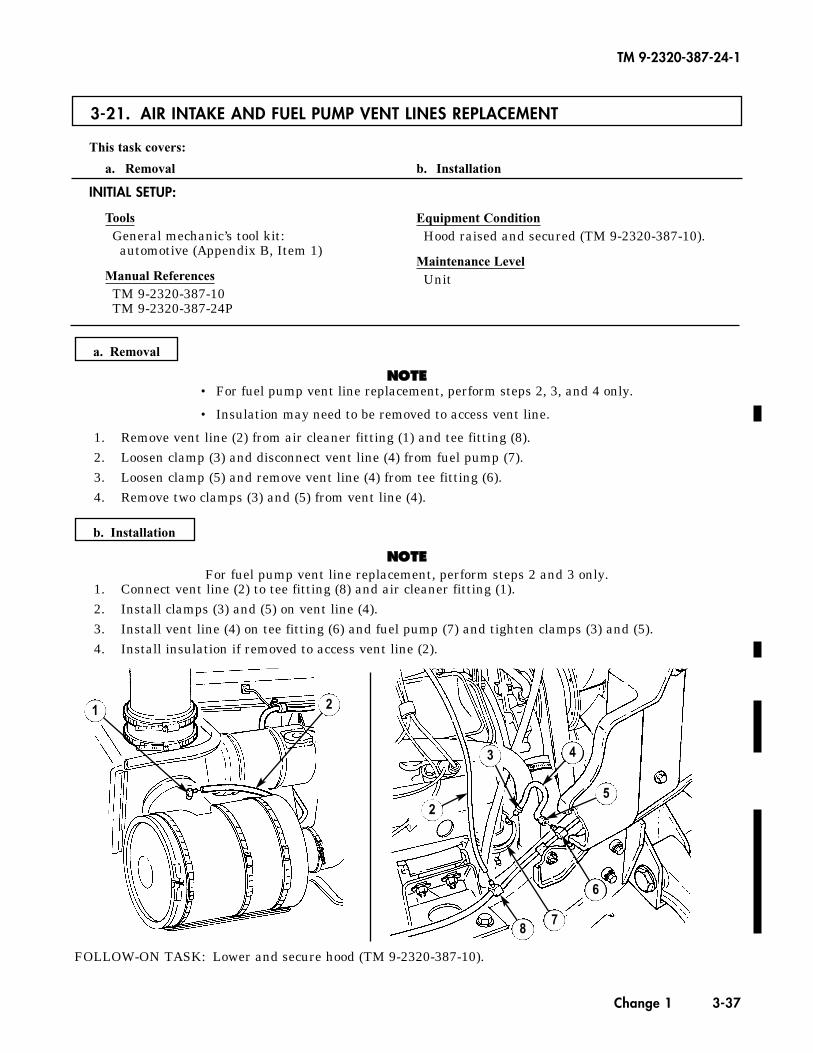
3-21. AIR INTAKE AND FUEL PUMP VENT LINES REPLACEMENT
This task covers:
a. Removal b. Installation
INITIAL SETUP:
ToolsGeneral mechanic’s tool kit:
automotive (Appendix B, Item 1)
Manual ReferencesTM 9-2320-387-10TM 9-2320-387-24P
Equipment ConditionHood raised and secured (TM 9-2320-387-10).
Maintenance LevelUnit
FOLLOW-ON TASK: Lower and secure hood (TM 9-2320-387-10).
TM 9-2320-387-24-1
Change 1 3-37
1 2
3
2
4
5
6
78
NNOOTTEE• For fuel pump vent line replacement, perform steps 2, 3, and 4 only.
• Insulation may need to be removed to access vent line.
1. Remove vent line (2) from air cleaner fitting (1) and tee fitting (8).2. Loosen clamp (3) and disconnect vent line (4) from fuel pump (7).3. Loosen clamp (5) and remove vent line (4) from tee fitting (6).4. Remove two clamps (3) and (5) from vent line (4).
NNOOTTEEFor fuel pump vent line replacement, perform steps 2 and 3 only.
1. Connect vent line (2) to tee fitting (8) and air cleaner fitting (1).2. Install clamps (3) and (5) on vent line (4).3. Install vent line (4) on tee fitting (6) and fuel pump (7) and tighten clamps (3) and (5).4. Install insulation if removed to access vent line (2).
b. Installation
a. Removal
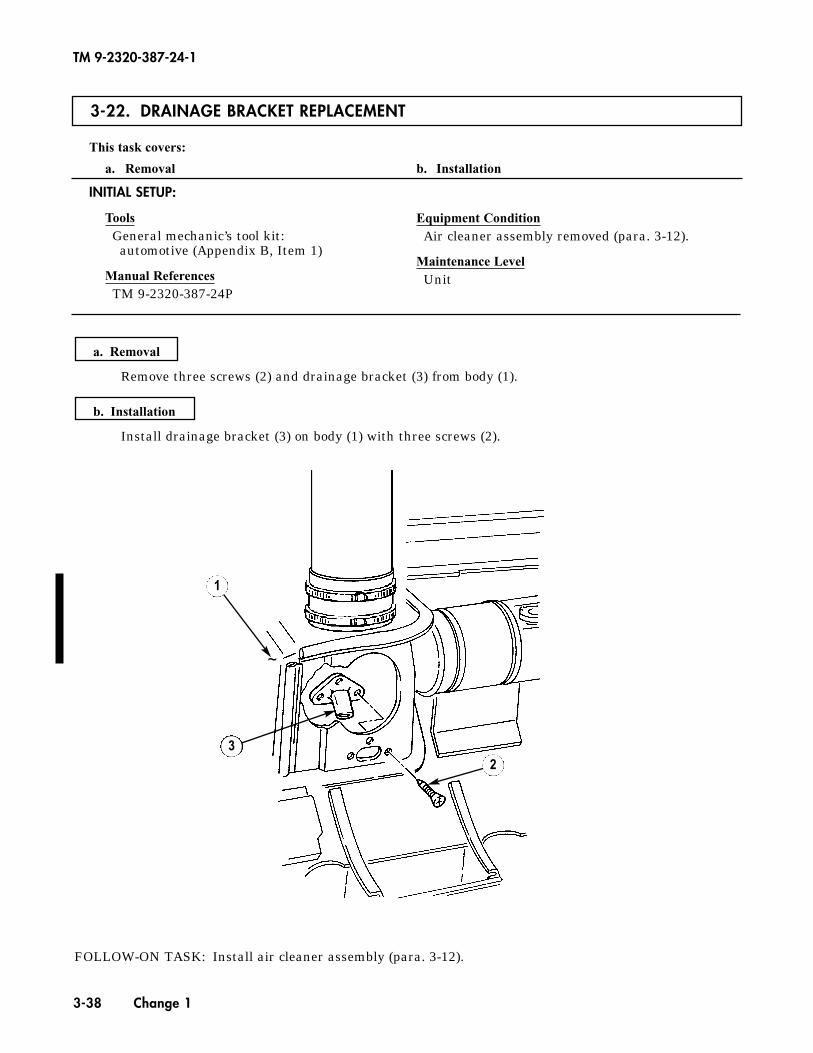
3-22. DRAINAGE BRACKET REPLACEMENT
This task covers:
a. Removal b. Installation
INITIAL SETUP:
ToolsGeneral mechanic’s tool kit:
automotive (Appendix B, Item 1)
Manual ReferencesTM 9-2320-387-24P
Equipment ConditionAir cleaner assembly removed (para. 3-12).
Maintenance LevelUnit
FOLLOW-ON TASK: Install air cleaner assembly (para. 3-12).
TM 9-2320-387-24-1
3-38 Change 1
1
32
Remove three screws (2) and drainage bracket (3) from body (1).
Install drainage bracket (3) on body (1) with three screws (2).
b. Installation
a. Removal
~

TM 9-2320-387-24-l
-- 3-23. FUEL INJECTION PUMP BOOT REPLACEMENT
Thii task covers:
a. Removal b. Installation
INITIAL SETUP:
TOOIS ?&era1 mechanic’s tool kit:
automotive (Appendix B, Item 1)
Manual References TM 9-2320-387-10 TM 9-2320-387-24P
Equipment Condition Hood raised and secured (TM 9-2320-387-10).
Maintenance Level Unit
Remove clamp (3) and boot (2) from injection pump (1).
r-ixzz-1
Install boot (2) on injection pump (1) with clamp (3).
FOLLOW-ON TASK: Lower and secure hood (TM 9-2320-387-102
3-39
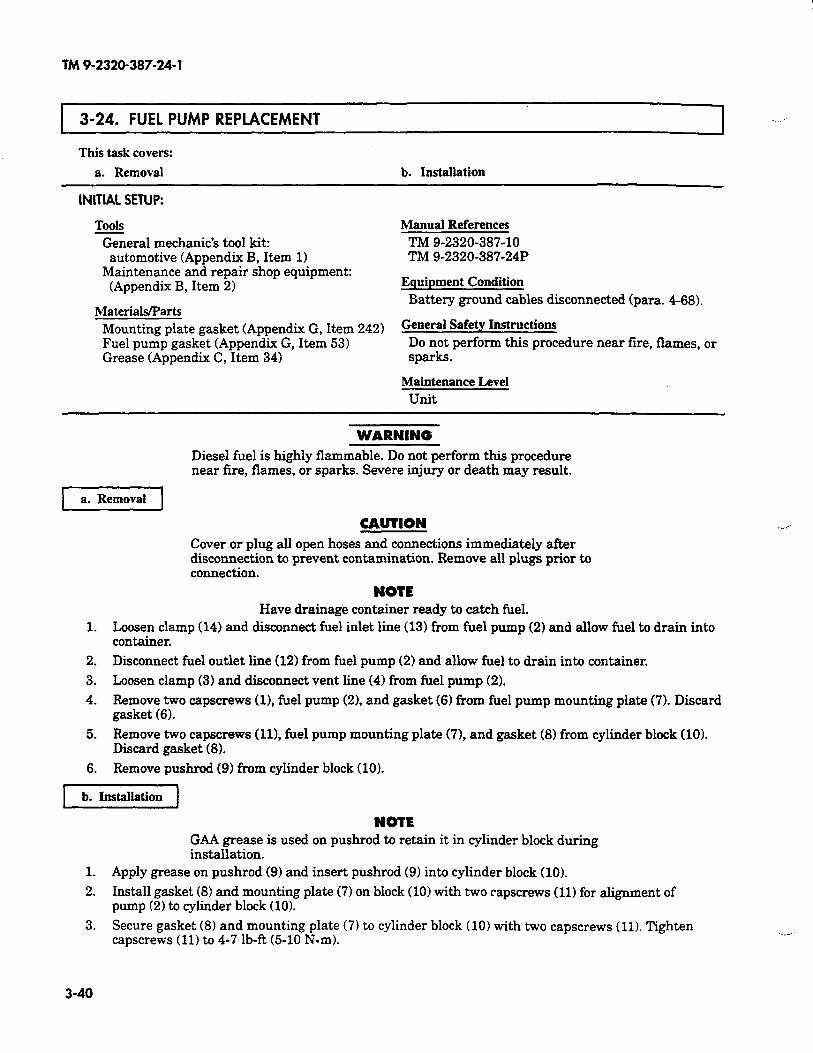
TM 9-2320-387-24-l
3-24. FUEL PUMP REPLACEMENT
This task covers:
a. Removal b. Installation ~-
INITIAL SETUP:
Tools
General mechanic’s tool kit: automotive (Appendix B, Item 1)
Manual References TM 9-2320-387-10 TM 9-2320-387-24P
Maintenance and repair shop equipment: (Appendix B, Item 2) Equipment Condition
Materials/Parts Battery ground cables disconnected (para. 4-68).
Mounting plate gasket (Appendix G, Item 242) Genera1 Safety Instructions Fuel pump gasket (Appendix G, Item 53) Do not perform this procedure near fire, flames, or Grease (Appendix C, Item 34) sparks.
Maintenance Level
unit
WARNING Diesel fuel is highly flammable. Do not perform this procedure near fire, flames, or sparks. Severe injury or death may result.
1 a. Removal 1
CAUTION --
Cover or plug all open hoses and connections immediately aEter disconnection to prevent contamination. Remove all plugs prior to connection.
NOTE Have drainage container ready to catch fuel.
1. Loosen clamp (14) and disconnect fuel inlet line (13) from fuel pump (2) and allow fuel to drain into container.
2. Disconnect fuel outlet line (12) from fuel pump (2) and allow fuel to drain into container.
3. Loosen clamp (3) and disconnect vent line (4) from fuel pump (2).
4. Remove two capscrews (l), fuel pump (2), and gasket (6) from fuel pump mounting plate (7). Discard gasket (6).
5. Remove two capscrews (ll), fuel pump mounting plate (7), and gasket (8) from cylinder block (10). Discard gasket (8).
6. Remove pushrod (9) from cylinder block (10).
b. Installation
1.
2.
3.
3-40
NOTE GAA grease is used on pushrod to retain it in cylinder block during installation.
Apply grease on pushrod (9) and insert pushrod (9) into cylinder block (10).
Install gasket (8) and mounting plate (7) on block (10) with two capscrews (11) for alignment of pump (2) to cylinder block (10).
Secure gasket (8) and mounting plate (7) to cylinder block (10) with two capscrews (11). Tighten capscrews (11) to 4-7 lb-ft (5-10 N-m).
..-
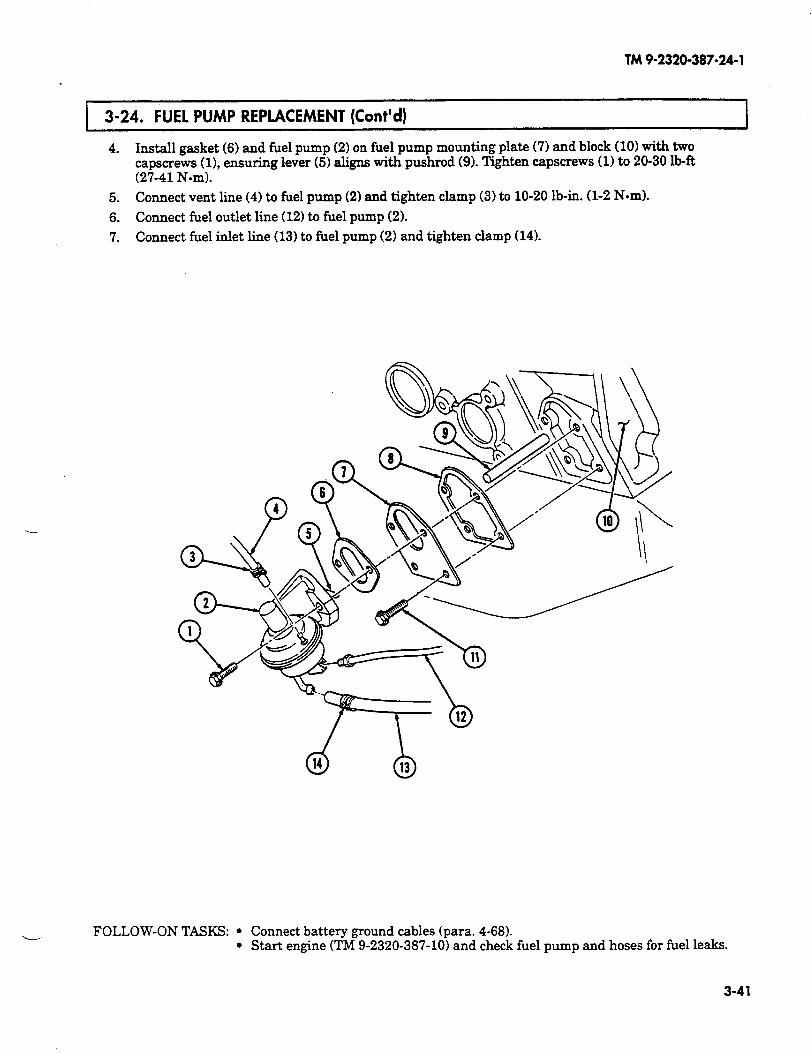
TM 9-2320-387-24-l
1 3-24. FUEL PUMP REPLACEMENT (Cont’d) I
4. Install gasket (6) and fuel pump (2) on fuel pump mounting plate (71 and block (10) with two capscrews (11, ensuring lever (5) aligns with pushrod (9). Tighten capscrews (1) to 20-30 lb-R (27-41 Nom).
5. Connect vent line (4) to fuel pump (2) and tighten clamp (3) to lo-20 lb-in. (l-2 N-m).
6. Connect fuel outlet line (121 to fuel pump (2).
7. Connect fuel inlet line (13) to fuel pump (2) and tighten clamp (14).
.- FOLLOW-ON TASKS: l Connect battery ground cables (para. 4-68). l Start engine (TM 9-2320-387-10) and check fuel pump and hoses for fuel leaks.
3-41
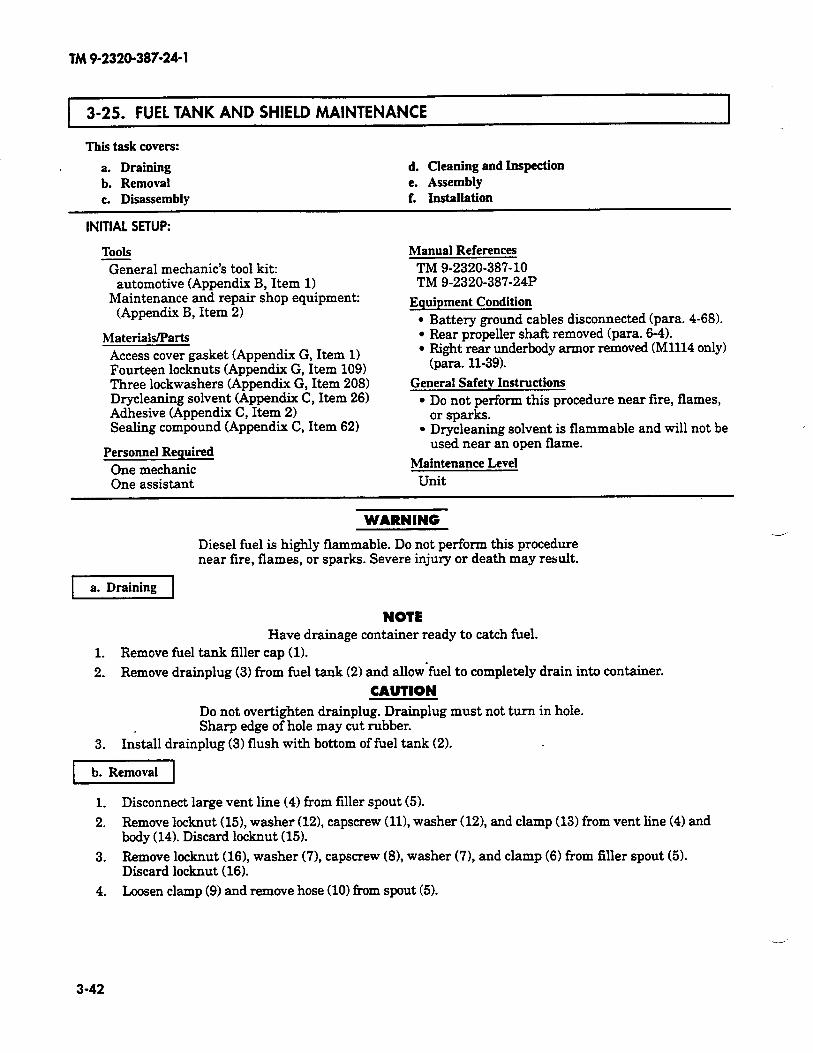
TM 9-2320-387-24-l
3-25. FUEL TANK AND SHIELD MAINTENANCE
This task covers:
a. Draining d. Cleaning and Inspection b. Removal e. Assembly c. Disassemblv f. Installation
I
INITIAL SETUP:
Tools General mechanic’s tool kit:
automotive (Appendix B, Item 1) Maintenance and repair shop equipment:
(Appendix B, Item 2)
Materials/Parts Access cover gasket (Appendix G, Item 1) Fourteen locknuts (Appendix G, Item 109) Three lockwashers (Appendix G, Item 208) Drycleaning solvent (Appendix C, Item 26) Adhesive (Appendix C, Item 2) Sealing compound (Appendix C, Item 62)
Personnel Required One mechanic One assistant
Manual References TM 9-2320-387-10 TM 9-2320-387-24P
Equipment Condition l Battery ground cables disconnected (para. 4-68). l Rear propeller sh& removed (para. 6-4). l Right rear underbody armor removed (Ml114 only)
(para. 11-39).
General Safety Instructions l Do not perform this procedure near fire, flames,
or sparks. l Drycleaning solvent is flammable and will not be
used near an open flame.
Maintenance Level Unit
Diesel fuel is highly flammable. Do not perform this procedure near fire, flames, or sparks. Severe injury or death may result.
a. Draining
NOTE Have drainage container ready to catch fuel.
1. Remove fuel tank filler cap (1).
2. Remove drainplug (3) from fuel tank (2) and allow-fuel to completely drain into container.
CAUTION Do not over-tighten drainplug. Drainplug must not turn in hole. Sharp edge of hole may cut rubber.
3. Install drainplug (3) flush with bottom of fuel tank (2).
1 b. Removal 1
1. Disconnect large vent line (4) from filler spout (5).
2. Remove locknut (151, washer (121, capscrew W, washer (121, and clamp (13) fkom vent line (4) and body (14). Discard locknut (151.
3. Remove locknut (161, washer (71, capscrew (81, washer (71, and clamp (6) from filler spout (51. Discard locknut (16).
4. Loosen clamp (9) and remove hose (10) from spout (5).
3-42
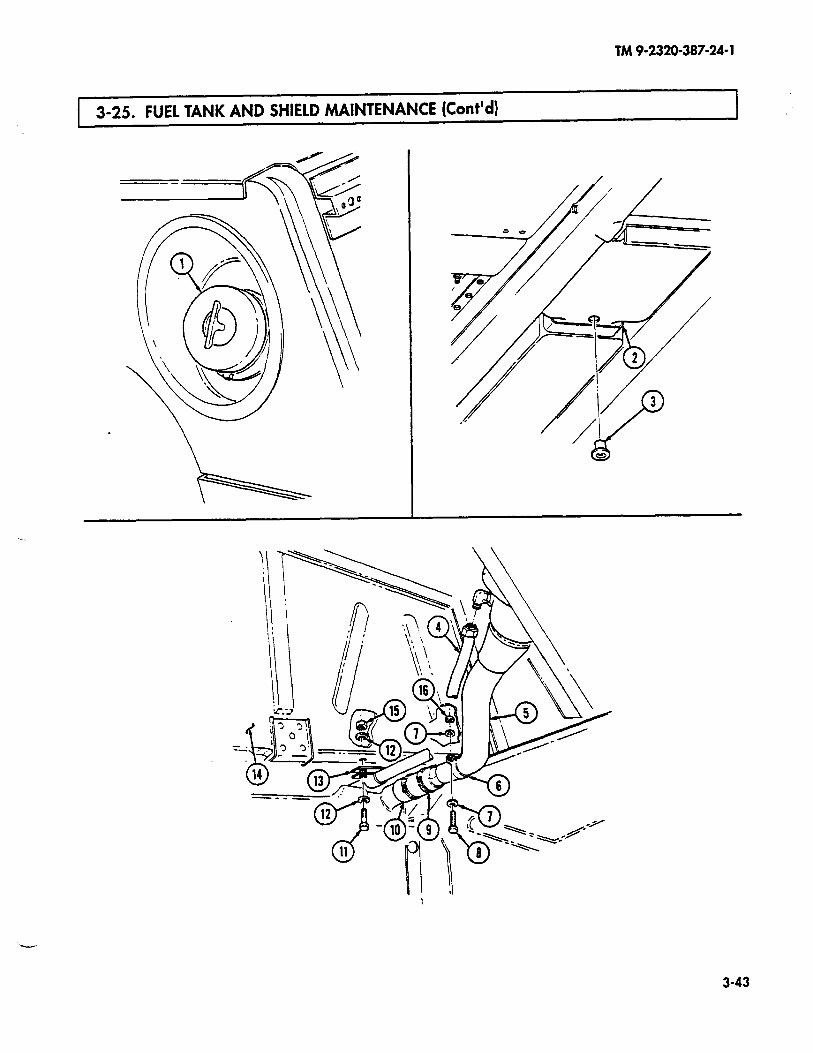
TM9-2320-387-24-l
3-25. FUEL TANK AND SHIELD MAINTENANCE (Cont’d) I
3-43
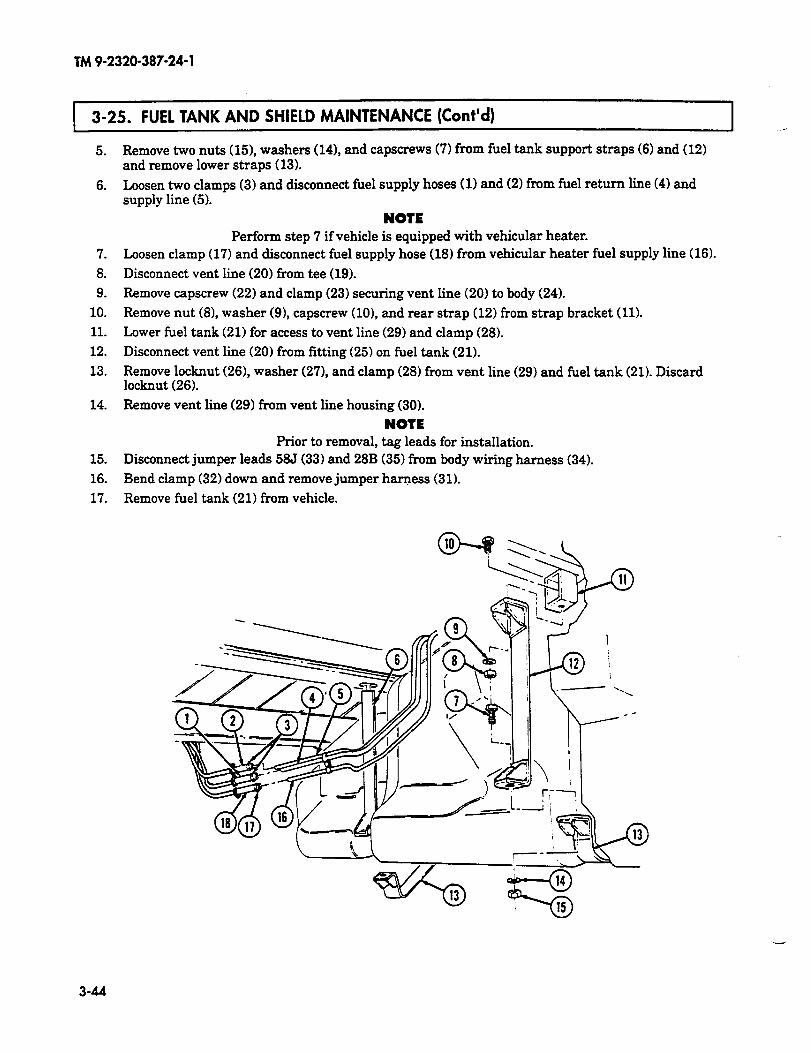
i TM 9-2320-387-24-l
3-25. FUEL TANK AND SHIELD MAINTENANCE (Cont’d)
5.
6.
7.
8.
9.
10.
11.
12.
13.
14.
15. i 16.
17.
Remove two nuts (15), washers (141, and capscrews (7) from fuel tank support straps (6) and (12) and remove lower straps (13).
Loosen two clamps (3) and disconnect fuel supply hoses (1) and (2) from fuel return line (4) and supply line (5).
NOTE Perform step 7 if vehicle is equipped with vehicular heater.
Loosen clamp (17) and disconnect fuel supply hose (18) from vehicular heater fuel supply line (16).
Disconnect vent line (20) from tee (19).
Remove capscrew (22) and clamp (23) securing vent line (20) to body (24).
Remove nut (81, washer (91, capscrew (101, and rear strap (12) from strap bracket (11).
Lower fuel tank (21) for access to vent line (29) and clamp (28).
Disconnect vent line (20) from fitting (25) on fuel tank (21).
Remove locknut (261, washer (271, and clamp (28) from vent line (29) and fuel tank (21). Discard locknut (26).
Remove vent line (29) from vent line housing (30).
NOTE Prior to removal, tag leads for installation.
Disconnect jumper leads 585 (33) and 28B (35) from body wiring harness (34).
Bend clamp (32) down and remove jumper harness (31).
Remove fuel tank (21) from vehicle.
3-44

TM 9-2320-387-24-l
3-25. FUEL TANK AND SHIELD MAINTENANCE, (Cont’d)
n
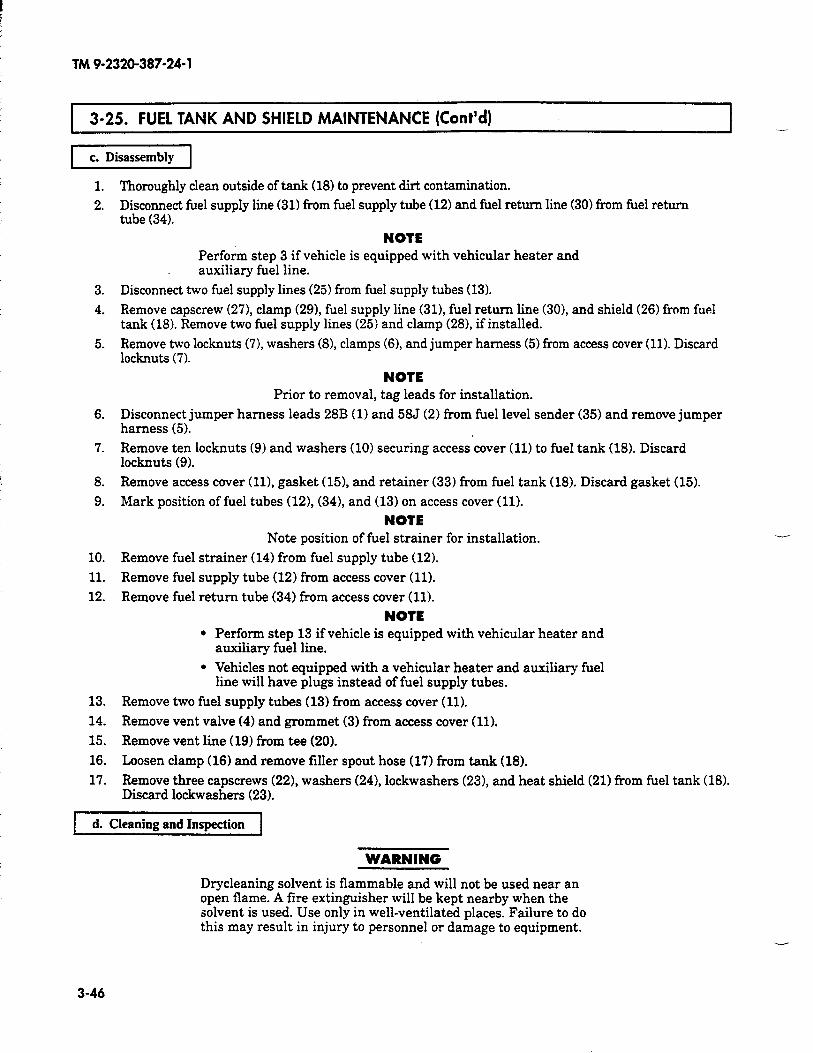
TM 9-2320-387-24-l
3-25. FUEL TANK AND SHIELD MAINTENANCE (Cont’d)
c. Disassembly
1.
2.
3.
4.
5.
6.
7.
8. 9.
10.
11.
12.
13. 14. 15.
16. 17.
Thoroughly clean outside of tank (18) to prevent dirt contamination.
Disconnect fuel supply line (31) from fuel supply tube (12) and fuel return line (30) from fuel return tube (34).
NOTE Perform step 3 if vehicle is equipped with vehicular heater and auxiliary fuel line.
Disconnect two fuel supply lines (25) from fuel supply tubes (13).
Remove capscrew (271, clamp (291, fuel supply line (311, fuel return line (301, and shield (26) from fuel tank (18). Remove two fuel supply lines (25) and clamp (281, if installed.
Remove two locknuts (71, washers (81, clamps (61, and jumper harness (5) from access cover (11). Discard locknuts (7).
NOTE Prior to removal, tag leads for installation.
Disconnect jumper harness leads 28B (1) and 585 (2) from fuel level sender (35) and remove jumper harness (5).
Remove ten locknuts (9) and washers (10) securing access cover (11) to fuel tank (18). Discard locknuts (9).
Remove access cover (111, gasket (151, and retainer (33) from fuel tank (18). Discard gasket (15).
Mark position of fuel tubes (121, (341, and (13) on access cover (11).
NOTE Note position of fuel strainer for installation.
Remove fuel strainer (14) from fuel supply tube (12).
Remove fuel supply tube (12) from access cover (11).
Remove fuel return tube (34) from access cover (11).
NOTE l Perform step 13 if vehicle is equipped with vehicular heater and
auxiliary fuel line.
l Vehicles not equipped with a vehicular heater and auxiliary fuel line will have plugs instead of fuel supply tubes.
Remove two fuel supply tubes (13) from access cover (11).
Remove vent valve (4) and grommet (3) from access cover (11).
Remove vent line (19) from tee (20).
Loosen clamp (16) and remove filler spout hose (17) from tank (18).
Remove three capscrews (221, washers (241, lockwashers (23), and heat shield (21) from fuel tank (18). Discard lockwashers (23).
d. Cleaning and Inspection
WARNING
Drycleaning solvent is flammable and will not be used near an open flame. A tire extinguisher will be kept nearby when the solvent is used. Use only in well-ventilated places. Failure to do this may result in injury to personnel or damage to equipment.
3-46
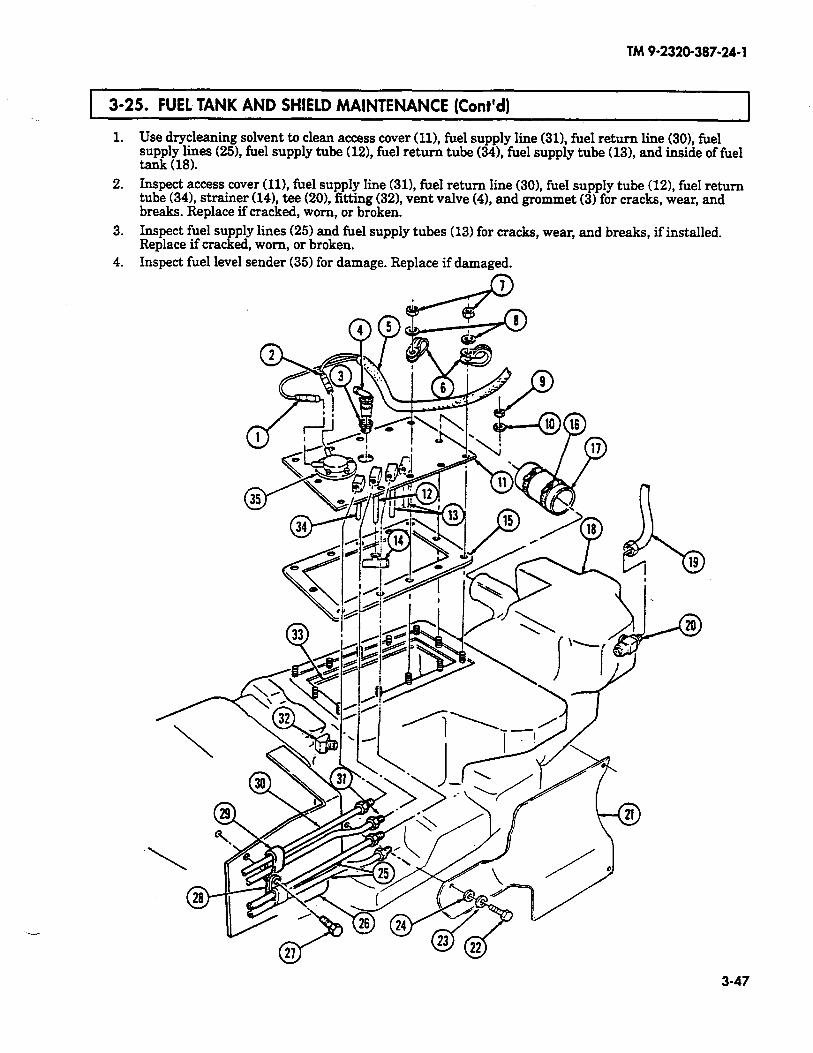
1.
2.
3.
4.
TM9-2320-387-24-l
3-25. FUEL TANK AND SHIELD MAINTENANCE (Cont’d)
Use drycleaning solvent to clean access cover (111, fuel supply line (311, fuel return line (301, fuel supply lines (251, fuel supply tube (121, fuel return tube (341, fuel supply tube (131, and inside of fuel tank (18).
Inspect access cover (ll), he1 supply line (311, fuel return line (301, heI supply tube (121, fuel return tube (341, strainer (141, tee (201, fitting (321, vent valve (41, and grommet (3) for cracks, wear, and breaks. Replace if cracked, worn, or broken.
Inspect fuel supply lines (25) and fuel supply tubes (13) for cracks, wear, and breaks, if installed. Replace if cracked, worn, or broken. Inspect fuel level sender (35) for damage. Replace if damaged.
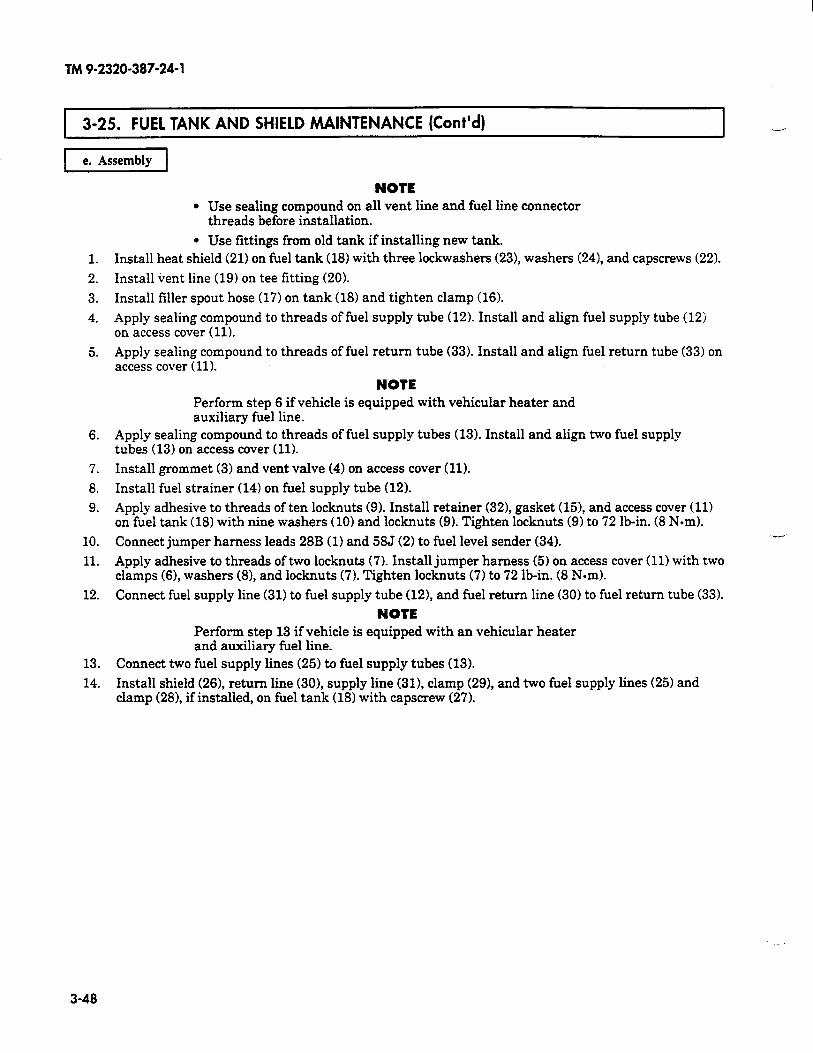
TM9-2320-387-24-l
3-25. FUEL TANK AND SHIELD MAINTENANCE (Cont’d) I --
I e. Assembly 1
1.
2.
3.
4.
5.
6.
7.
8.
9.
10.
11.
12.
13.
14.
NOTE l Use sealing compound on all vent line and fuel line connector
threads before installation.
l Use fittings from old tank if installing new tank. Install heat shield (211 on fuel tank (18) with three lockwashers (23), washers (241, and capscrews (22).
Install vent line (19) on tee fitting (201.
Install filler spout hose (17) on tank (181 and tighten clamp (16).
Apply sealing compound to threads of fuel supply tube (12). Install and align fuel supply tube (123 on access cover (11).
Apply sealing compound to threads of fuel return tube (33). Install and align fuel return tube (33) on access cover (111.
NOTE Perform step 6 if vehicle is equipped with vehicular heater and auxiliary fuel line.
Apply sealing compound to threads of fuel supply tubes (13). Install and align two fuel supply tubes (13) on access cover (11).
Install grommet (31 and vent valve (4) on access cover (111.
Install fuel strainer (14) on fuel supply tube (121.
Apply adhesive to threads of ten locknuts (9). Install retainer (321, gasket (151, and access cover (111 on fuel tank (18) with nine washers (101 and locknuts (9). Tighten locknuts (9) to 72 lb-in. (8 Nom).
Connect jumper harness leads 28B (1) and 585 (2) to fuel level sender (34).
Apply adhesive to threads of two locknuts (7). Install jumper harness (51 on access cover (111 with two clamps (61, washers (81, and locknuts (71. Tighten locknuts (7) to 72 lb-in. (8 N-m).
Connect fuel supply line (31) to fuel supply tube (121, and fuel return line (30) to fuel return tube (331.
NOTE Perform step 13 if vehicle is equipped with an vehicular heater and auxiliary fuel line.
Connect two fuel supply lines (25) to fuel supply tubes (131.
Install shield (261, return line (301, supply line (311, clamp (291, and two fuel supply lines (25) and clamp (281, if installed, on fuel tank (18) with capscrew (27).
3-48
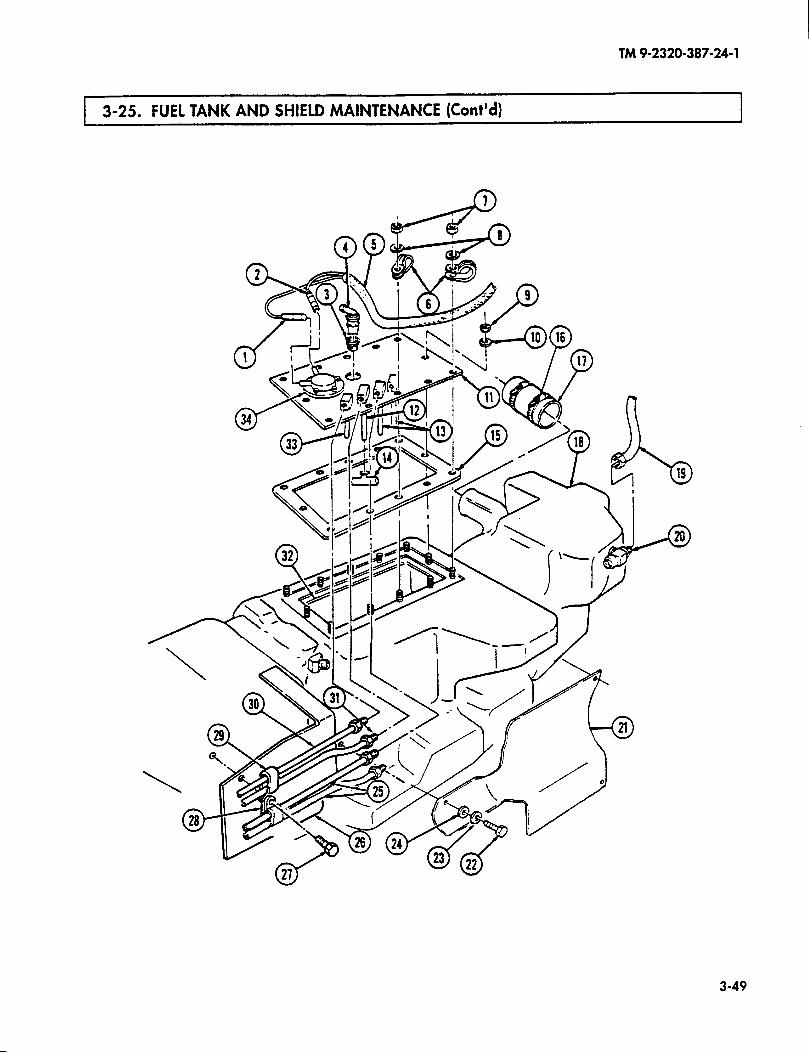
TM 9-2320-387-24-l
3-25. FUEL TANK AND SHIELD MAINTENANCE (Cont’d) I
3-49
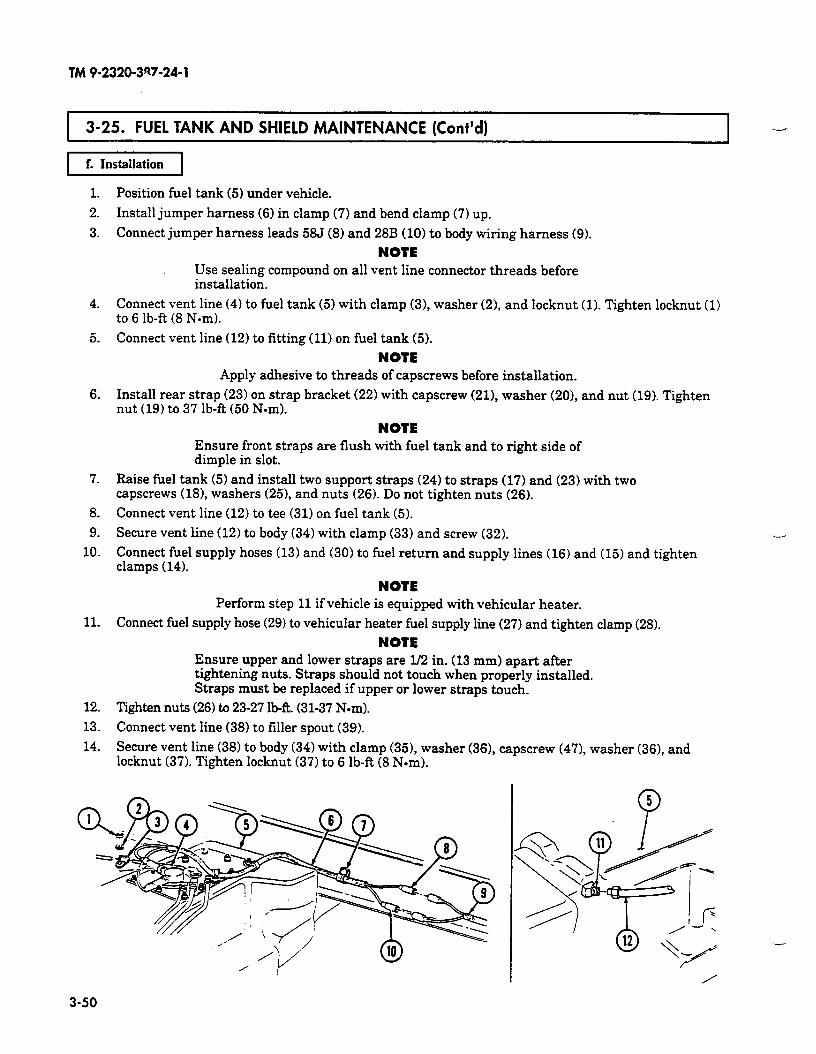
TM?-2320-3W-24-1
1 3-25. FUEL TANK AND SHIELD MAINTENANCE (Cont’d) I
1.
2.
3.
4.
5.
6.
7.
8.
9.
10.
11.
12.
13.
14.
Position fuel tank (5) under vehicle.
Install jumper harness (6) in clamp (7) and bend clamp (7) up.
Connect jumper harness leads 585 (8) and 28B (10) to body wiring harness (9).
NOTE Use sealing compound on all vent line connector threads before installation.
Connect vent line (4) to fuel tank (5) with clamp (3), washer (2), and locknut (1). Tighten locknut (1) to 6 lb-ft (8 N-m).
Connect vent line (12) to fitting (11) on fuel tank (5).
NOTE Apply adhesive to threads of capscrews before installation.
Install rear strap (23) on strap bracket (22) with capscrew (211, washer (201, and nut (19). Tighten nut (19) to 37 lb-R (50 N-m).
NOTE Ensure front straps are flush with fuel tank and to right side of dimple in slot.
Raise fuel tank (5) and install two support straps (24) to straps (17) and (23) with two capscrews (181, washers (251, and nuts (26). Do not tighten nuts (26).
Connect vent line (12) to tee (31) on fuel tank (5).
Secure vent line (12) to body (34) with clamp (33) and screw (32).
Connect fuel supply hoses (13) and (30) to fuel return and supply lines (16) and (15) and tighten clamps (14).
NOTE
--
Perform step 11 if vehicle is equipped with vehicular heater.
Connect fuel supply hose (29) to vehicular heater fuel supply line (27) and tighten clamp (28).
NOTE Ensure upper and lower straps are If2 in. (13 mm) apart after tightening nuts. Straps should not touch when properly installed. Straps must be replaced if upper or lower straps touch.
Tighten nuts (26) to 23-27 lb-R. (31-37 Nom).
Connect vent line (38) to filler spout (39).
Secure vent line (38) to body (34) with clamp (351, washer (361, capscrew (471, washer (361, and locknut (37). Tighten locknut (37) to 6 lb-ft (8 Nom).
3-50

TM 9-2320-387-24-l
1 3-25. FUEL TANK AND SHIELD MAINTENANCE (Cont’d) I
16. ~nst,d filler spout (39) into hose (46) and tighten clamp (46).
16. Install filler spout (39) to body (34) with clamp (421, washer (431, =ps=ew (441, washer (41)~ and locknut (40). Tighten locknut (40) to 6 lb-R (8 Nom).
FOLLOW-ON TASKS: l l
.
.
Install right rear underbody armor (Ml114 only) (para. 11-39). Install rear propeller shaft (para. 6-4). Connect battery ground cables tpara. 4-68). Fill fuel tank (TM 9-2320-38’7-10) and check for leaks.
3-51
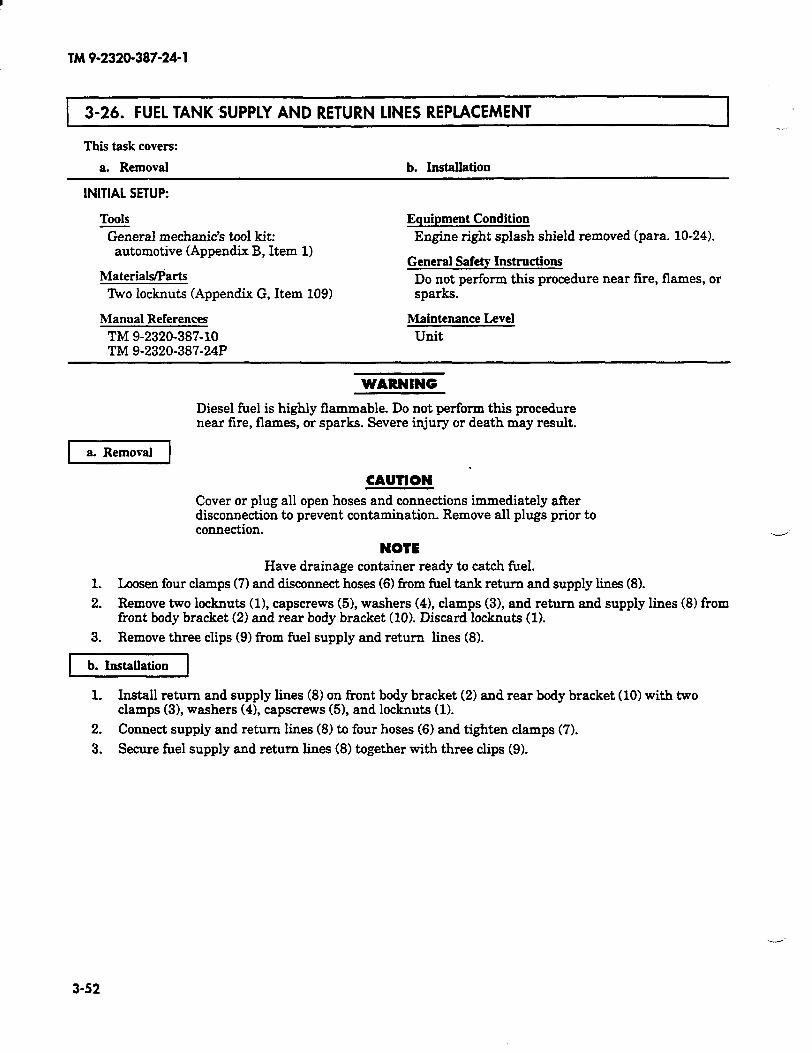
TM 9-2320-387-24-l
3-26. FUEL TANK SUPPLY AND RETURN LINES REPLACEMENT
This task covers:
a. Removal b. Installation
I --
INITIAL SETUP:
Tools
General mechanic’s tool kit: automotive (Appendix B, Item 1)
Materials/Parts
‘ItKo locknuts (Appendix G, Item 109)
Manual References
TM 9-2320-387-10 TM 9-2320-387-24P
Equipment Condition
Engine right splash shield removed (para. 10-24).
General Safety Instructions
Do not perform this procedure near fire, flames, or sparks.
Maintenance Level
unit
WARNING
Diesel fuel is highly flammable. Do not perform this procedure near fire, flames, or sparks. Severe injury or death may result.
[I
CAUTION * Cover or plug all open hoses and connections immediately after disconnection to prevent contamination. Remove all plugs prior to connection.
NOTE Have drainage container ready to catch fuel.
1. Loosen four clamps (71 and disconnect hoses (61 from fuel tank return and supply lines (8).
2. Remove two locknuts (11, capscrews (51, washers (41, clamps (31, and return and supply lines (8) from front body bracket (2) and rear body bracket (101. Discard locknuts (1).
3. Remove three clips (9) from fuel supply and return lines (81.
)I
1. Install return and supply lines (8) on front body bracket (2) and rear body bracket (10) with two clamps (3), washers (41, capscrews (51, and locknuts (11.
2. Connect supply and return lines (8) to four hoses (6) and tighten clamps (7).
3. Secure fuel supply and return lines (8) together with three clips (91.
3-52
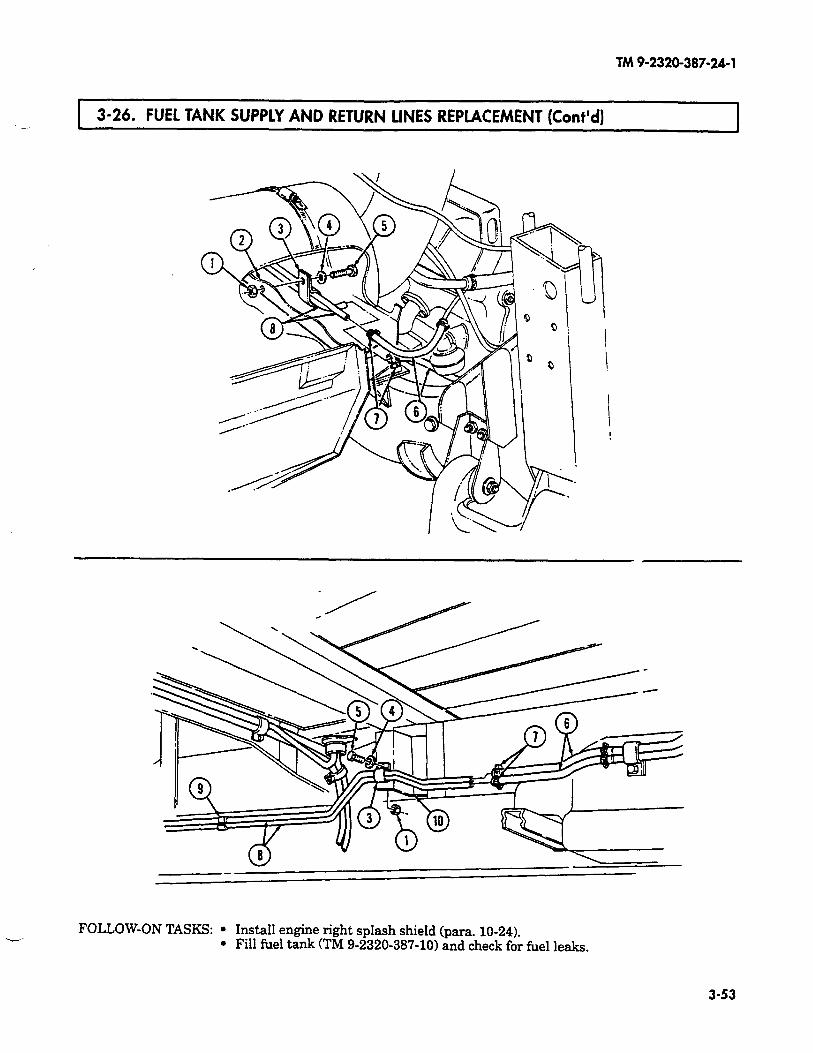
TM 9-2320-387-24-l
3-26. FUEL TANK SUPPLY AND RETURN LINES REPLACEMENT (Cont’d)
FOLLOW-ON TASKS: l InstaII engine right splash shield (para. 10-24). l Fill fuel tank (TM 9-2320-387-10) and check for fuel leaks.
3-53
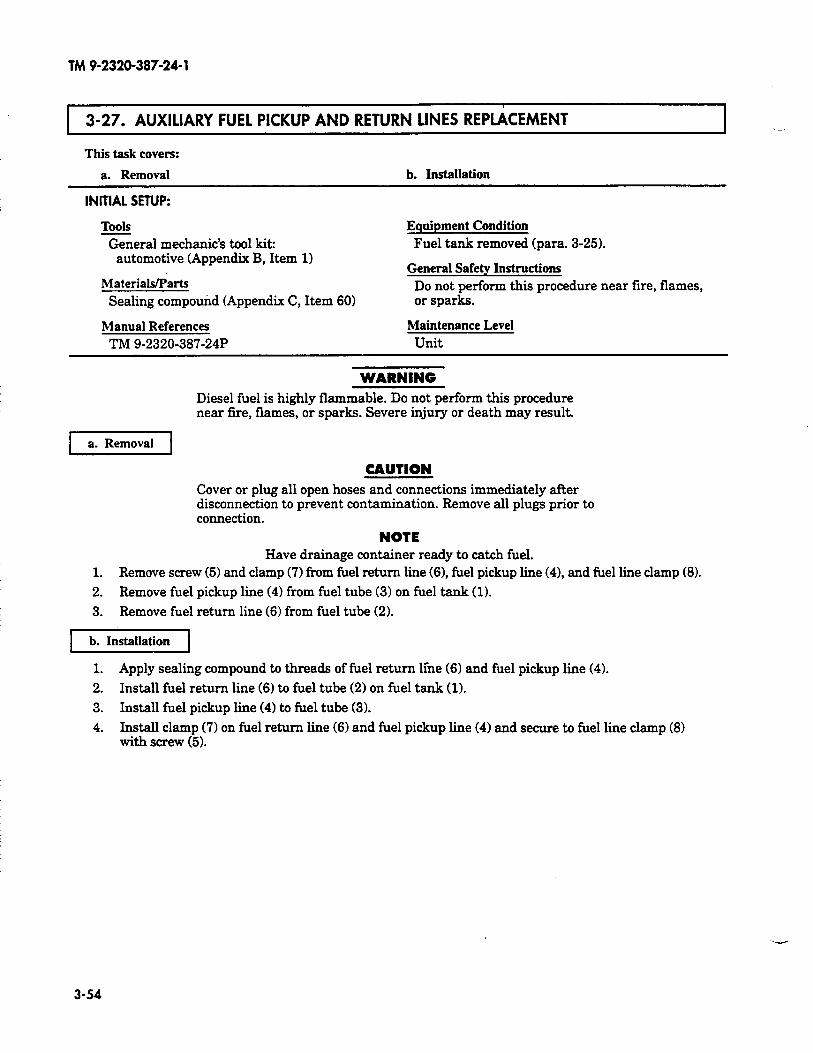
TM 9-2320-387-24-l
1 3-27. AUXILIARY FUEL PICKUP AND RETURN LINES REPLkEMENT
This task covers:
a. Removal b. Installation
INITIAL SETUP:
Tools
General mechanic’s tool kit: automotive (Appendix B, Item 11
Materials/Parts
Sealing compound (Appendix C, Item 60)
Equipment Condition
Fuel tank removed (para. 3-25).
General Safety Instructions
Do not perform this procedure near fire, flames, or sparks.
Manual References Maintenance Level
TM 9-2320-387-24P unit
WARNING Diesel fuel is highly flammable. Do not perform this procedure near fire, flames, or sparks. Severe injury or death may result.
rYxEq
CAUTION Cover or plug all open hoses and connections immediately after disconnection to prevent contamination. Remove all plugs prior to connection.
NOTE Have drainage container ready to catch fuel.
1. Remove screw (5) and clamp (7) from fuel return line (61, fuel pickup line (4), and fuel line clamp (8).
2. Remove fuel pickup line (4) from fuel tube (3) on fuel tank (11.
3. Remove fuel return line (6) from fuel tube (2).
-1
1. Apply sealing compound to threads of fuel return line (61 and fuel pickup line (4).
2. Install fuel return line (6) to fuel tube (2) on fuel tank (11.
3. Install fuel pickup line (4) to fuel tube (3).
4. Install clamp (7) on fuel return line (6) and fuel pickup line (41 and secure to fuel line clamp (8) with screw (5).
3-54
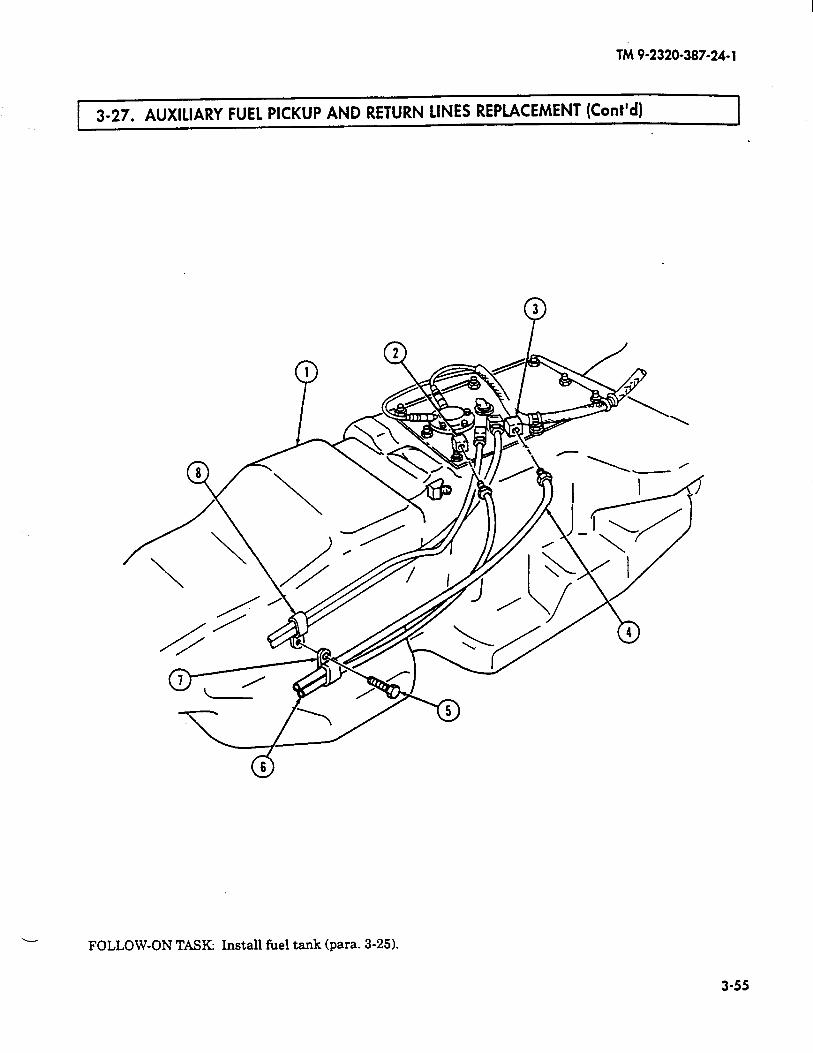
TM 9-2320-387-24-l
3-27. AUXILIARY FUEL PICKUP AND RETURN LINES REPLACEMENT (Cont’d) I
0 6
FOLLOW-ON TASK: Install fuel tank (para. 3-25).
3-55
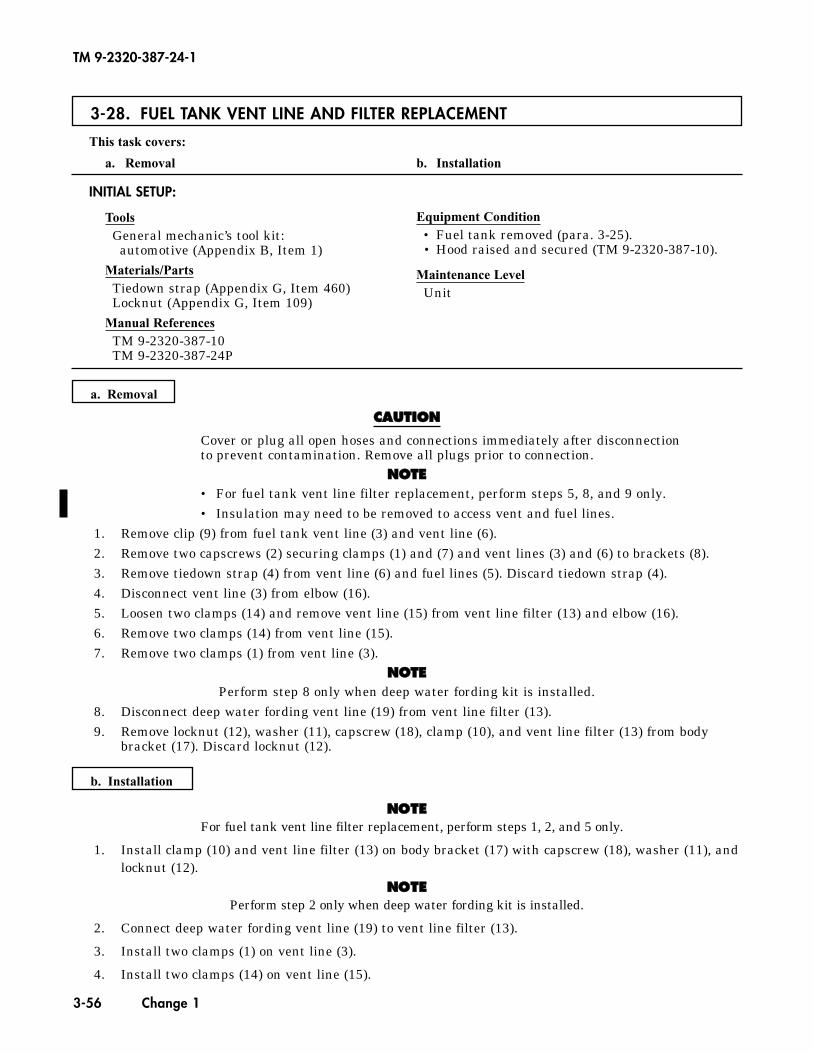
3-28. FUEL TANK VENT LINE AND FILTER REPLACEMENT
This task covers:
a. Removal b. Installation
a. Removal
INITIAL SETUP:
ToolsGeneral mechanic’s tool kit:
automotive (Appendix B, Item 1)Materials/Parts
Tiedown strap (Appendix G, Item 460)Locknut (Appendix G, Item 109)
Manual ReferencesTM 9-2320-387-10TM 9-2320-387-24P
Equipment Condition• Fuel tank removed (para. 3-25).• Hood raised and secured (TM 9-2320-387-10).
Maintenance LevelUnit
b. Installation
NNOOTTEEFor fuel tank vent line filter replacement, perform steps 1, 2, and 5 only.
1. Install clamp (10) and vent line filter (13) on body bracket (17) with capscrew (18), washer (11), andlocknut (12).
NNOOTTEEPerform step 2 only when deep water fording kit is installed.
2. Connect deep water fording vent line (19) to vent line filter (13).
3. Install two clamps (1) on vent line (3).
4. Install two clamps (14) on vent line (15).
TM 9-2320-387-24-1
3-56 Change 1
CCAAUUTTIIOONN
Cover or plug all open hoses and connections immediately after disconnectionto prevent contamination. Remove all plugs prior to connection.
NNOOTTEE• For fuel tank vent line filter replacement, perform steps 5, 8, and 9 only.• Insulation may need to be removed to access vent and fuel lines.
1. Remove clip (9) from fuel tank vent line (3) and vent line (6).2. Remove two capscrews (2) securing clamps (1) and (7) and vent lines (3) and (6) to brackets (8).3. Remove tiedown strap (4) from vent line (6) and fuel lines (5). Discard tiedown strap (4).4. Disconnect vent line (3) from elbow (16).5. Loosen two clamps (14) and remove vent line (15) from vent line filter (13) and elbow (16).6. Remove two clamps (14) from vent line (15).7. Remove two clamps (1) from vent line (3).
NNOOTTEEPerform step 8 only when deep water fording kit is installed.
8. Disconnect deep water fording vent line (19) from vent line filter (13).9. Remove locknut (12), washer (11), capscrew (18), clamp (10), and vent line filter (13) from body
bracket (17). Discard locknut (12).
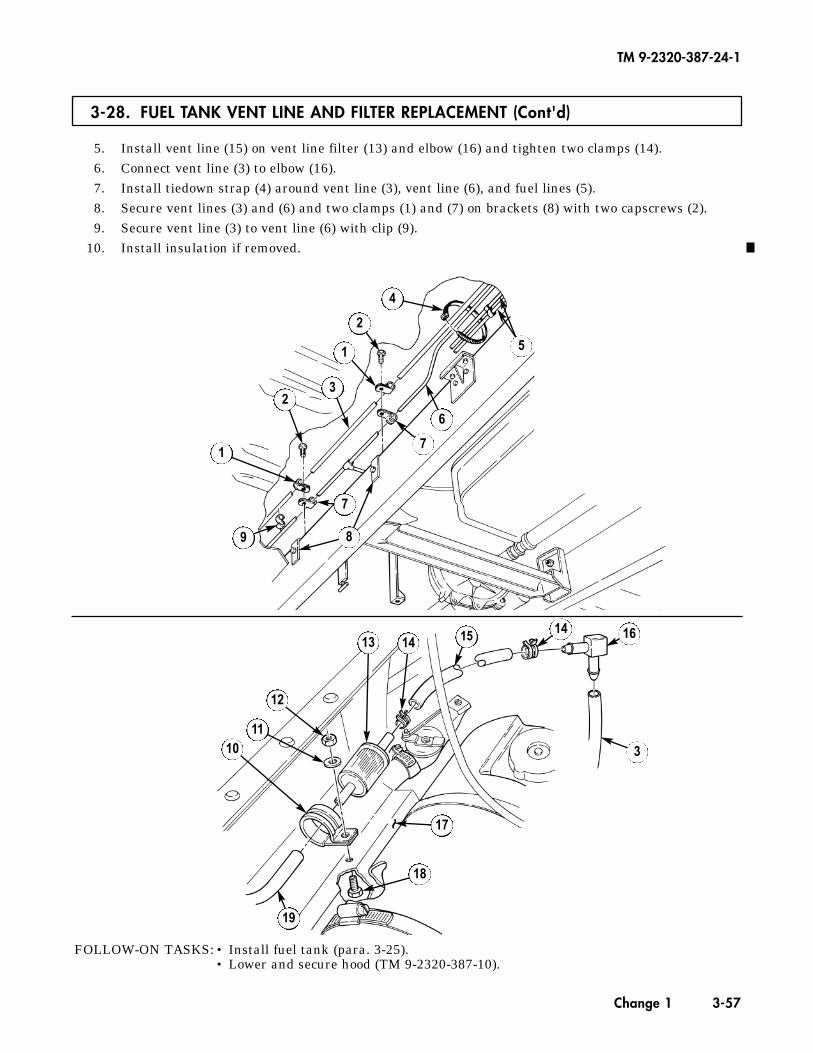
5. Install vent line (15) on vent line filter (13) and elbow (16) and tighten two clamps (14).6. Connect vent line (3) to elbow (16).7. Install tiedown strap (4) around vent line (3), vent line (6), and fuel lines (5).8. Secure vent lines (3) and (6) and two clamps (1) and (7) on brackets (8) with two capscrews (2).9. Secure vent line (3) to vent line (6) with clip (9).
10. Install insulation if removed.
3-28. FUEL TANK VENT LINE AND FILTER REPLACEMENT (Cont'd)
TM 9-2320-387-24-1
Change 1 3-57
FOLLOW-ON TASKS: • Install fuel tank (para. 3-25).• Lower and secure hood (TM 9-2320-387-10).
1
23
1
2
4
5
6
7
9 8
1011
12
13 14 15 14 16
3
17
18
19
7
~

3-29. FUEL TANK FILLER CAP AND SPOUT MAINTENANCE
This task covers:
a. Removal c. Installationb. Inspection
a. Removal
1. Remove filler cap (6) and detach cap chain clip (7) from filler spout (11).2. Disconnect vent line (1) from elbow (2).3. Remove three capscrews (5) and washers (4) from spout mounting ring (8).4. Loosen clamp (16) securing filler spout (11) to hose (17).5. Remove locknut (12, washer (13), capscrew (15), washer (13), and clamp (14) from filler spout (11).
Discard locknut (12).6. Push filler spout (11) out of spout mounting ring (8) and remove filler spout (11) from hose (17).7. Remove elbow (2) from filler spout (11).8. Using handle (9), remove screen (10) from filler spout (11).
INITIAL SETUP:
ToolsGeneral mechanic’s tool kit:
automotive (Appendix B, Item 1)Maintenance and repair shop equipment:
automotive (Appendix B, Item 2)Materials/Parts
Locknut (Appendix G, Item 109)Sealing compound (Appendix C, Item 64)
Manual ReferencesTM 9-2320-387-10TM 9-2320-387-24P
Equipment Condition• Fuel tank drained (para. 3-25).• Right rear underbody armor removed (M1114
only) (para. 11-39).General Safety Instructions
Do not perform this procedure near fire, flames, orsparks.
Maintenance LevelUnit
b. Inspection
1. Inspect screen (10) for damage, debris, or blockage. Replace if damaged, or if debris or blockage isdetected.
2. Inspect three rivnuts (3) for damage, refer to para. 10-56. Replace if damaged.
TM 9-2320-387-24-1
WWAARRNNIINNGG
Diesel fuel is highly flammable. Do not perform this procedurenear fire, flames, or sparks. Severe injury or death may result.
c. Installation
1. Apply sealing compound to elbow (2) and install elbow (2) on filler spout (11).2. Align filler spout (11) with hose (17) and push filler spout (11) into hose (17).3. Install filler spout (11) on spout mounting ring (8) with three washers (4) and capscrews (5).4. Tighten clamp (16) on hose (17).5. Install filler spout (11) on body (18) with clamp (14), washer (13), capscrew (15), washer (13), and
locknut (12). Tighten locknut (12) to 6 lb-ft (8 N•m).6. Connect vent line (1) to elbow (2).7. Using handle (9), install screen (10) in filler spout (11).8. Attach filler cap chain clip (7) to filler spout (11) and install filler cap (6).
3-58 Change 1
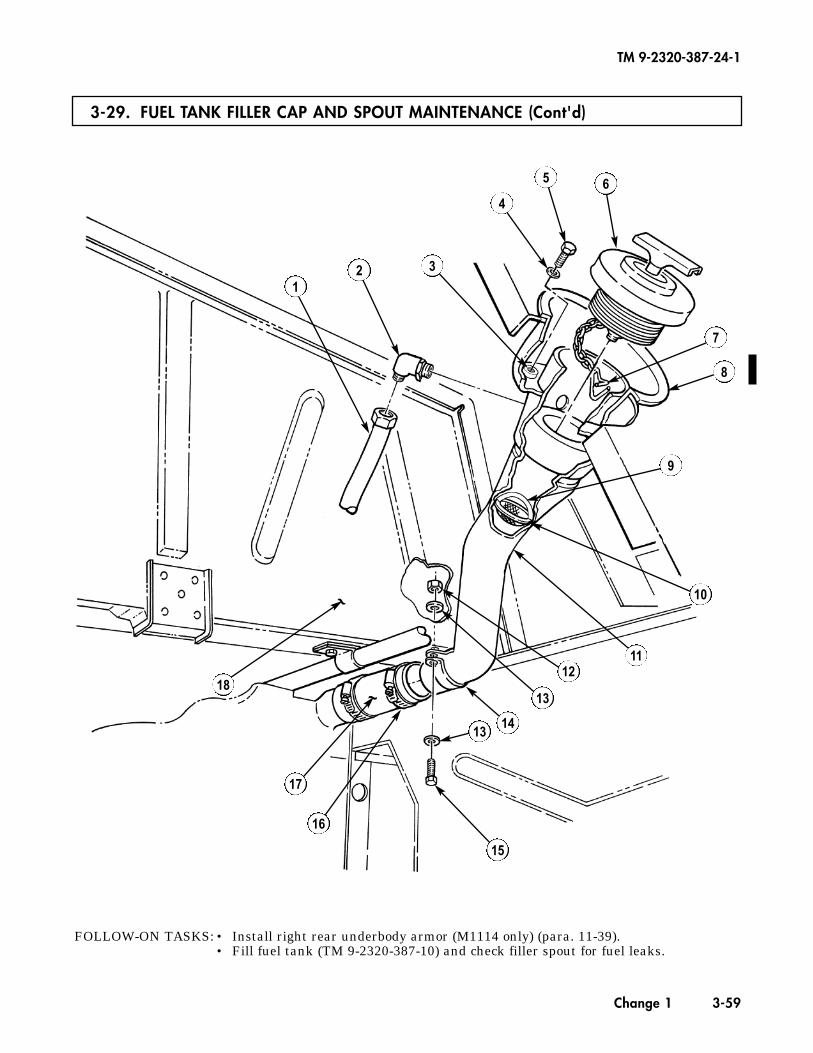
3-29. FUEL TANK FILLER CAP AND SPOUT MAINTENANCE (Cont'd)
TM 9-2320-387-24-1
Change 1 3-59
FOLLOW-ON TASKS: • Install right rear underbody armor (M1114 only) (para. 11-39).• Fill fuel tank (TM 9-2320-387-10) and check filler spout for fuel leaks.
12
4
5 6
7
8
11
13
14
12
13
18
17
16
15
10
9
3
~
~
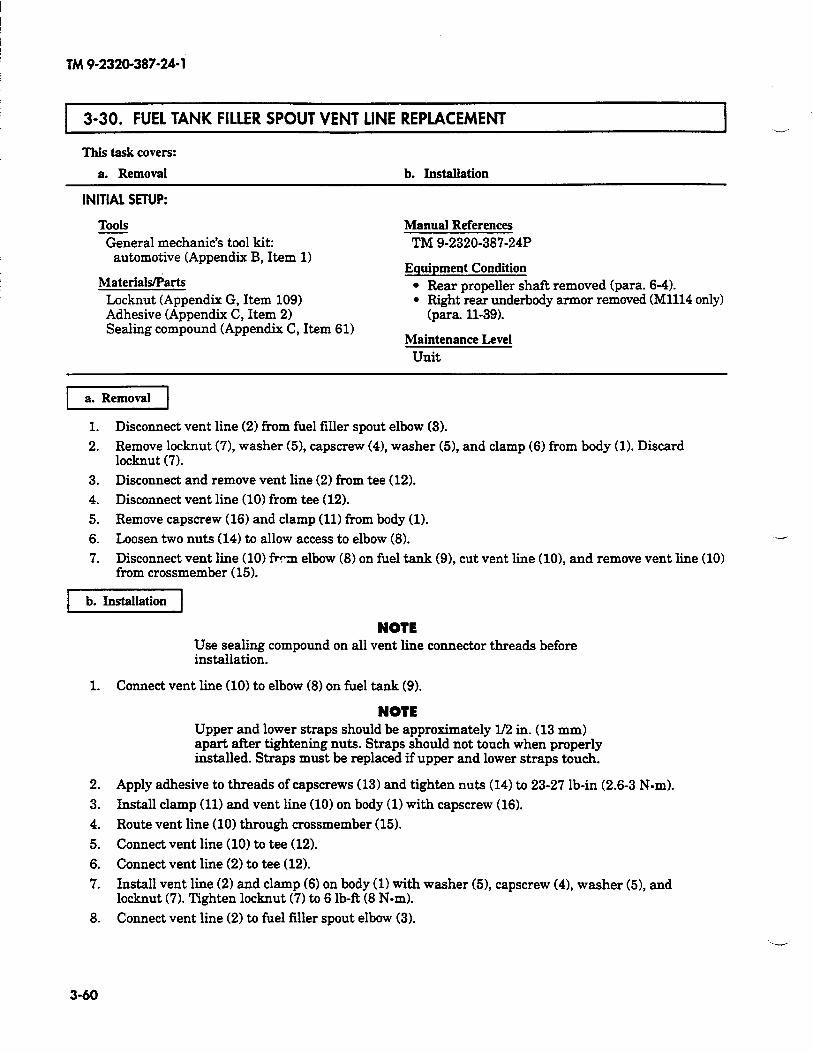
TM 9-2320-387-24-l
3-30. FUEL TANK FILLER SPOUT VENT LINE REPLACEMENT
This task covers:
a. Removal b. Installation
INITIAL SETUP:
Tools ?&era1 mechanic’s tool kit:
automotive (Appendix B, Item 1)
Materials/Parts Locknut (Appendix G, Item 109) Adhesive (Appendix C, Item 2) Sealing compound (Appendix C, Item 61)
Manual References TM 9-2320-387-24P
Equipment Condition l Rear propeller shaft removed (para. 6-4). l Right rear underbody armor removed (Ml114 only)
(para. 11-39).
Maintenance Level unit
1. Disconnect vent line (2) from fuel filler spout elbow (3).
2. Remove locknut (71, washer (51, capscrew (41, washer (51, and clamp (6) from body (1). Discard locknut (7).
3. Disconnect and remove vent line (2) from tee (12).
4. Disconnect vent line (10) from tee (12).
5. Remove capscrew (16) and clamp (11) from body (1).
6. Loosen two nuts (14) to allow access to elbow (8).
7. Disconnect vent line (10) firs elbow (8) on fuel tank (91, cut vent line (101, and remove vent line (10) from crossmember ( 15).
11
1. Connect vent line (10) to elbow (8) on fuel tank (9).
NOTE Upper and lower straps should be approximately l/2 in. (13 mm) apart after tightening nuts. Straps should not touch when properly installed. Straps must be replaced if upper and lower straps touch.
2.
3.
4.
5.
6.
7.
8.
Apply adhesive to threads of capscrews (13) and tighten nuts (14) to 23-27 lb-in (2.63 N-m).
Install clamp (11) and vent line (10) on body (1) with capscrew (16).
Route vent line (10) through crossmember (15).
Connect vent line (10) to tee (12).
Connect vent line (2) to tee (12).
Install vent line (2) and clamp (6) on body (1) with washer (51, capscrew (41, washer (51, and locknut (7). Tighten locknut (7) to 6 lb-R (8 N-m).
Connect vent line (2) to fuel filler spout elbow (3).
NOTE Use sealing compound on ah vent line connector threads before installation.
3-60

TM9-2320-387-24-l
3-30. FUEL TANK FILLER SPOUT VENT LINE REPLACEMENT (Cont’d)
FOLLOU
Y
0 14
T-ON TASKS: l Install right rear underbody armor (Ml114 only) (para. 11-39). l Install rear propeller shaft (para. 6-4).
b 10 '- . .
3-61
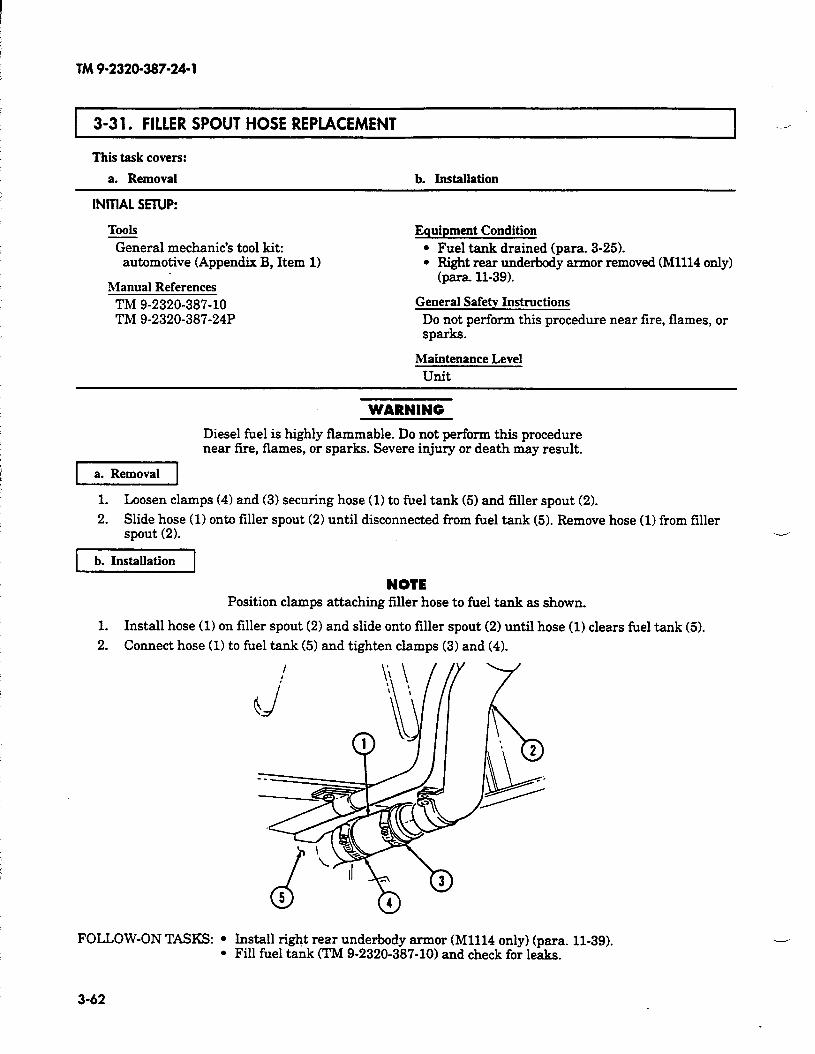
TM 9-2320-387-24-l
3-31. FILLER SPOUT HOSE REPLACEMENT I .-.--
This task covers:
a. Removal b. Installation
INITIAL SETUP:
Tools General mechanic’s tool kit:
automotive (Appendix B, Item 1)
Manual References TM 9-2320-387-10 TM 9-2320-387-24P
Equipment Condition l Fuel tank drained (para. 3-251. l Right rear underbody armor removed (Ml114 only)
(para, 11-39).
General Safety Instructions Do not perform this procedure near fire, flames, or sparks.
Maintenance Level unit
WARNING
Diesel fuel is highly flammable. Do not perform this procedure near fire, flames, or sparks. Severe injury or death may result.
1 a. Removal 1
1. Loosen clamps (4) and (3) securing hose (1) to fuel tank (51 and filler spout (2).
2. Slide hose (11 onto filler spout (21 until disconnected from fuel tank (5). Remove hose (1) from filler spout (2).
b. Installation
NOTE Position clamps attaching filler hose to fuel tank as shown.
1. Install hose (1) on filler spout (2) and slide onto filler spout (2) until hose (11 clears fuel tank (5).
2. Connect hose (1) to fuel tank (5) and tighten clamps (3) and (4).
FOLLOW-ON TASKS: l Install right rear underbody armor (Ml114 only) (para. 11-39). . Fill fuel tank (TM 9-2320-387-10) and check for leaks.
3-62
TM 9-2320-387-24-l
1 3-32. FUEL TANK HANGERS REPLACEMENT
This task covers:
a. Removal b. Installation
INITIAL SETUP:
Tools
General mechanic’s tool kit: automotive (Appendix B, Item 1)
hlaterials/Parts
Equipment Condition
Fuel tank removed (para. 3-25).
Maintenance Level
Unit Adhesive (Appendix C, Item 2)
Manual References TM 9-2320-387-24P
1. Remove two nuts (3), washers (4), capscrews (51, and rear hangers (7) from supports (6).
2. %vist two front hangers (9) until tee handles (2) clear slots (11) in support (1) and remove front hangers (9).
3. Inspect four insulators (8) on front and rear hangers (9) and (7). Remove insulators (81, if damaged.
11
1. Install four insulators (8) on front and rear hangers (9) and (71, if removed.
2. Install two front hangers (9) by inserting tee handles (2) up through slots (11) in support (1). Twist hangers (9) so that tee handles (2) are resting across slots (11) and against side of ridge (10).
NOTE Apply adhesive to threads of screws before installation.
3. Install two rear hangers (7) on supports (6) with capscrews (51, washers (41, and nuts (3). Tighten nuts (3) to 37 lb-ft (50 N-m).
FOLLOW-ON TASK: Install fuel tank (para. 3-25).
3-63
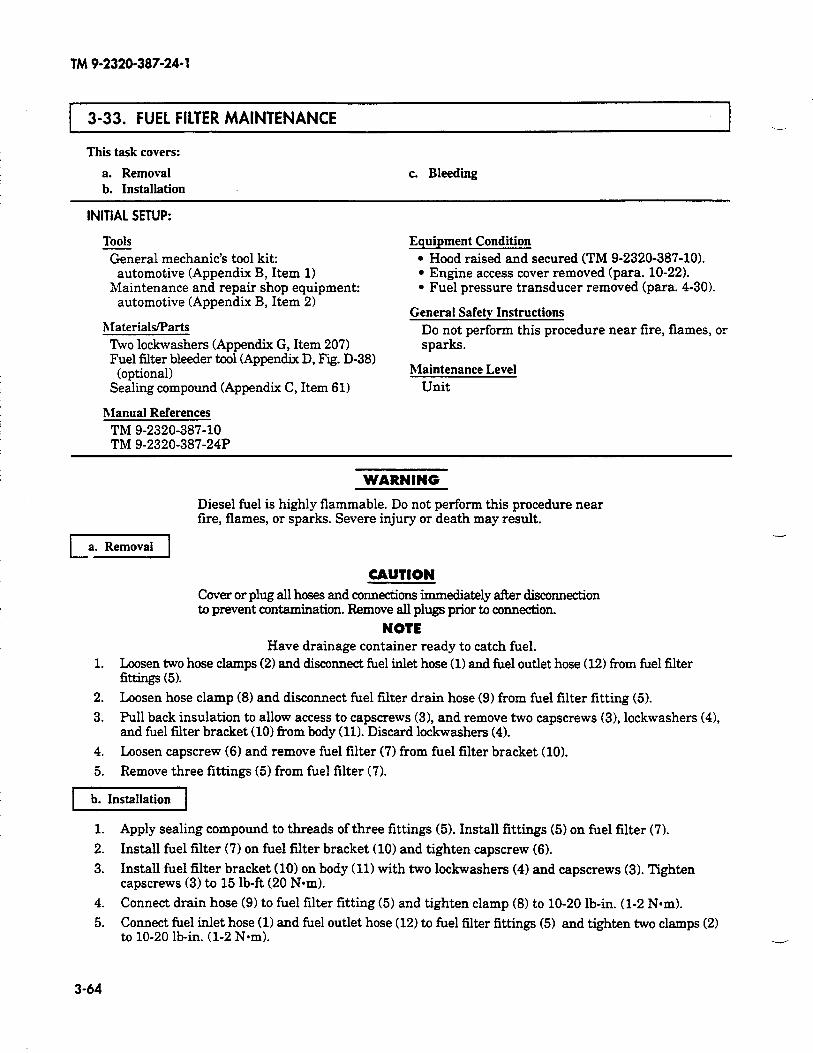
TM 9-2320-387-24-l
3-33. FUEL FILTER MAINTENANCE --
This task covers:
a. Removal b. Installation
c. Bleeding
INITIAL SETUP:
Tools
General mechanic’s tool kit: automotive (Appendix B, Item 1)
Maintenance and repair shop equipment: automotive (Appendix B, Item 2)
hIaterials/Parts
‘Itvo lo&washers (Appendix G, Item 207) Fuel filter bleeder tool (Appendix D, Fig. D-38)
(optional) Sealing compound (Appendix C, Item 61)
Manual References
TM 9-2320-387-10 TM 9-2320-387-24P
Equipment Condition
l Hood raised and secured (TM 9-2320-387-10). l Engine access cover removed (para. 10-22). l Fuel pressure transducer removed (para. 4-30).
General Safety Instructions
Do not perform this procedure near fire, flames, or sparks.
Maintenance Level
Unit
WARNING
Diesel fuel is highly flammable. Do not perform this procedure near fire, flames, or sparks. Severe injury or death may result.
-1
CAUTION Cover or plug all hoses and connections immediately afbar disconnection to prevent contamination. Remove all plugs prior to connection.
NOTE Have drainage container ready to catch fuel.
1. Loosen two hose clamps (2) and disconnect fuel inlet hose (1) and fuel outlet hose (12) from fuel filter fittings (5).
2. Loosen hose clamp (8) and disconnect fuel filter drain hose (9) from fuel filter fitting (5).
3. Pull back insulation to allow access to capscrews (31, and remove two capscrews (3), lockwashers (41, and fuel filter bracket (10) from body (11). Discard lockwashers (4).
4. Loosen capscrew (6) and remove fuel filter (7) from fuel filter bracket (10).
5. Remove three fittings (5) from fuel filter (7).
.-
1 b. Installation 1
1. Apply sealing compound to threads of three fittings (5). Install fittings (5) on fuel filter (7).
2. Install fuel filter (7) on fuel filter bracket (10) and tighten capscrew (6).
3. Install fuel filter bracket (10) on body (11) with two lockwashers (4) and capscrews (3). Tighten capscrews (3) to 15 lb-ft (20 N-m).
4. Connect drain hose (9) to fuel filter fitting (5) and tighten clamp (8) to lo-20 lb-in. (1-2 Nom).
5. Connect fuel inlet hose (1) and fuel outlet hose (12) to fuel filter fittings (5) and tighten two clamps (2) to lo-20 lb-in. (l-2 Nom). -
3-64
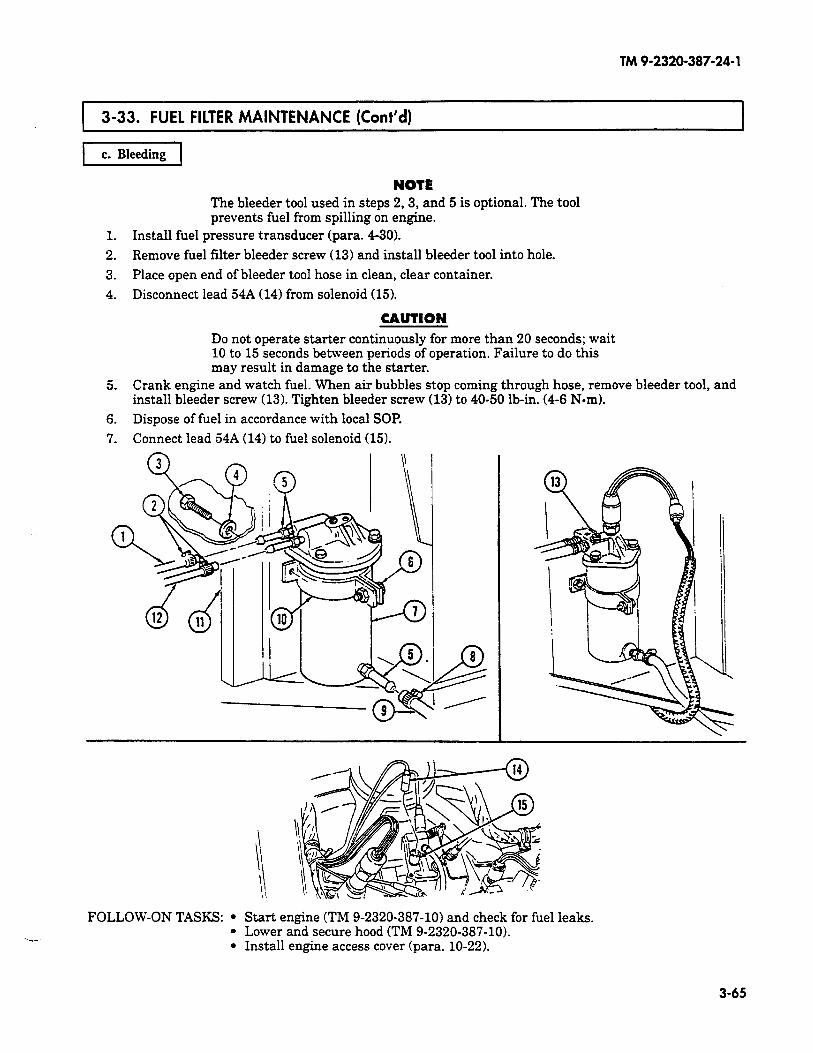
TM 9-2320-387-24-l
--
3-33. FUEL FILTER MAINTENANCE (Cont’d)
r7xizq
NOTE The bleeder tool used in steps 2,3, and 5 is optional. The tool prevents fuel from spilling on engine.
1. Install fuel pressure transducer (para. 4-30).
2. Remove fuel filter bleeder screw (13) and install bleeder tool into hole.
3. Place open end of bleeder tool hose in clean, clear container.
4. Disconnect lead 54A (14) from solenoid (15).
CAUTION Do not operate starter continuously for more than 20 seconds; wait 10 to 15 seconds between periods of operation. Failure to do this may result in damage to the starter.
5. Crank engine and watch fuel. When air bubbles stop coming through hose, remove bleeder tool, and install bleeder screw (13). Tighten bleeder screw (13) to 40-50 lb-in. (4-6 Nom).
6. Dispose of fuel in accordance with local SOI?
7. Connect lead 54A (14) to fuel solenoid (15). . .
FOLLOW-ON TASKS: l Start engine (TM 9-2320-387-10) and check for fuel leaks. l Lower and secure hood (TM 9-2320-387-10). l Install engine access cover (para. 10-22).
3-65

TM 9-2320-387-24-l
3-34. FUEL FILTER ELEMENT MAIhTENANCE -
This task covers: a. Element Removal b. Cleaning and Inspection
c. Element Installation
INlTlAL SETUP:
Tools General mechanic’s tool kit:
automotive (Appendix B, Item 1)
Materials/Parts Filter element kit
(Appendix G, Item 521
Manual References TM 9-2320-387-24P
Equipment Condition Fuel pressure transducer removed (para. 430).
General Safety Instructions l Do not perform this procedure near fire, flames,
or sparks. l Drycleaning solvent is flammable and will not be
used near an open flame.
Maintenance Level unit
WARNING
Diesel fuel is highly flammable. Do not perform this procedure near fire, flames, or sparks. Severe injury or death may result.
a. Element Removal
CAUTlON Cover or plug all hoses and connections immediately after disconnection to prevent contamination. Remove all plugs prior to connection.
-
1. Loosen two hose clamps (2) and disconnect fuel inlet hose (11 and fuel outlet hose (15) from fuel filter cover (31.
2. Loosen hose clamp (7) and disconnect fuel filter drain hose (8) from filter housing (6).
3. Remove nut (111, capscrew (91, and filter housing (6) from fuel filter bracket (10).
4. Remove three capscrews (41, washers (51, and cover (3) from filter housing (6).
5. Remove O-ring seal (141 from filter housing (61. Discard O-ring seal (14).
6. Remove filter element (121 and separator (13) from filter housing (6).
7. Remove separator (131 from filter element (12). Discard filter element (12).
b. Cleaning and Inspection
WARNING
Drycleaning solvent is flammable and will not be used near an open flame. A fire extinguisher will be kept nearby when the solvent is used. Use only in well-ventilated places. Failure to do this may result in injury to personnel and/or damage to equipment.
1. Use drycleaning solvent to clean all metallic parts.
2. Inspect filter housing (61 and cover (31 for distortion or damage. Replace if damaged.
3. Inspect separator (13) for dirt, contamination, or damage. Replace if dirty, contaminated, or damaged.
3-66

TM 9-2320-387-24-l
3-34. FUEL FILTER ELEMENT MAINTENANCE (Cont’d)
c. Element Installation
1. Install filter element (12) into filter housing (6).
2. Install separator (13) on filter element (121.
3. Install O-ring seal (14) on filter housing (6).
4. Install cover (3) on filter housing (6) with three washers (5) and capscrews (41. Tighten capscrews (4) to SO-60 lb-in. (6-7 Nom).
5. Install filter housing (6) in fuel filter bracket (10) with capscrew (9) and nut (11).
6. Connect fuel filter drain hose (81 to filter housing (6) and tighten clamp (71 to lo-20 lb-in. (l-2 N*m).
7. Connect fuel inlet hose (1) and fuel outlet hose (15) to fuel filter cover (3) and tighten clamps (2) to lo-20 lb-in. (l-2 N-m).
/ I’
n
- FOLLOW-ON TASK: Bleed fuel falter (para. 3-33).
3-67
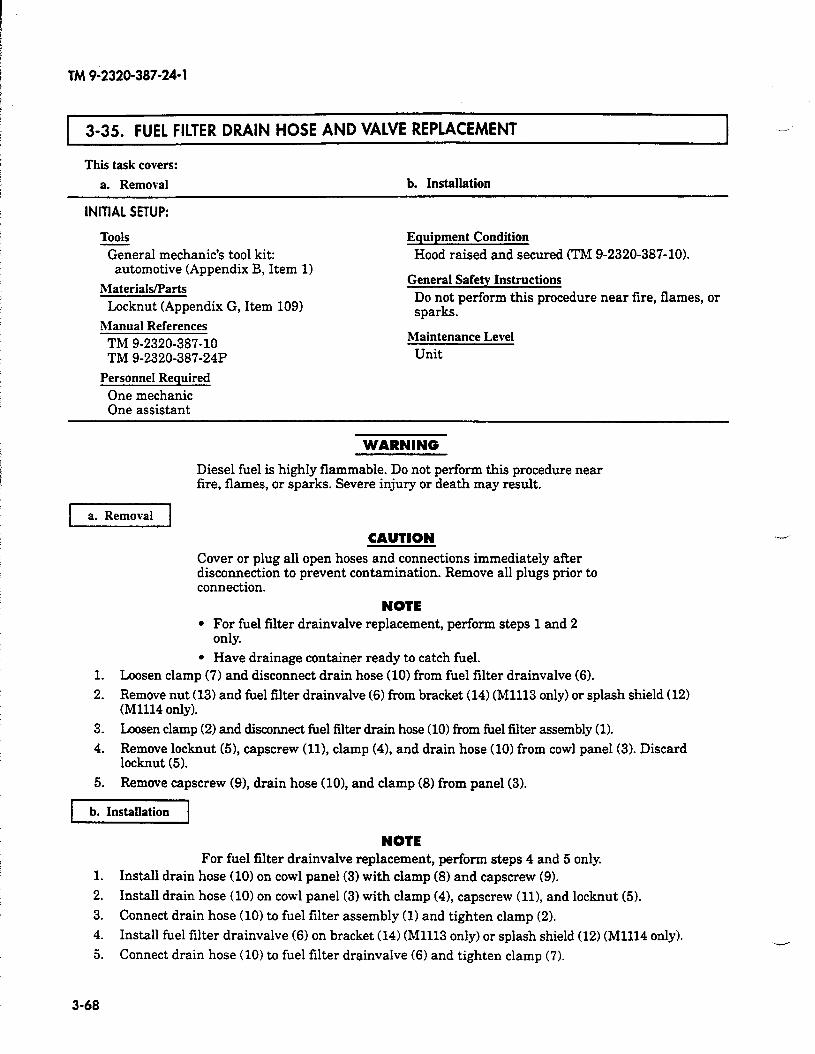
TM 9-2320-387-24-l
3-35. FUEL FILTER DRAIN HOSE AND VALVE REPLACEMENT
This task covers:
a. Removal b. Installation
INITIAL SETUP:
Tools
General mechanic’s tool kit: automotive (Appendix B, Item 1)
Materials/Parts
Locknut (Appendix G, Item 1091
Equipment Condition
Hood raised and secured (TM 9-2320-387-10X
General Safety Instructions
Do not perform this procedure near fire, flames, or sparks.
Manual References
TM 9-2320-387-10 TM 9-2320-387-24P
Personnel Required
One mechanic One assistant
Maintenance Level
Unit
WARNING
Diesel fuel is highly flammable. Do not perform this procedure near fire, flames, or sparks. Severe injury or death may result.
Cover or plug all open hoses and connections immediately after disconnection to prevent contamination. Remove all plugs prior to connection.
NOTE l For fuel filter drainvalve replacement, perform steps 1 and 2
only.
l Have drainage container ready to catch fuel. 1. Loosen clamp (7) and disconnect drain hose (10) from fuel filter drainvalve (6).
2. Remove nut (13) and fuel filter drainvalve (6) from bracket (14) (Ml113 only) or splash shield (12) (Ml114 only).
3. Loosen clamp (2) and disconnect fuel filter drain hose (10) from fuel filter assembly (1).
4. Remove locknut (51, capscrew (111, clamp (41, and drain hose (10) from cowl panel (3). Discard locknut (5).
5. Remove capscrew (91, drain hose (lo), and clamp (8) from panel (3).
b. Installation
NOTE For fuel filter drainvalve replacement, perform steps 4 and 5 only.
1. Install drain hose (10) on cowl panel (3) with clamp (8) and capscrew (9).
2. Install drain hose (10) on cowl panel (3) with clamp (4), capscrew (111, and locknut (5).
3. Connect drain hose (10) to fuel filter assembly (1) and tighten clamp (2).
4. Install fuel filter drainvalve (6) on bracket (14) (Ml113 only) or splash shield (12) (Ml114 only).
5. Connect drain hose (10) to fuel filter drainvalve (6) and tighten clamp (7).
3-68
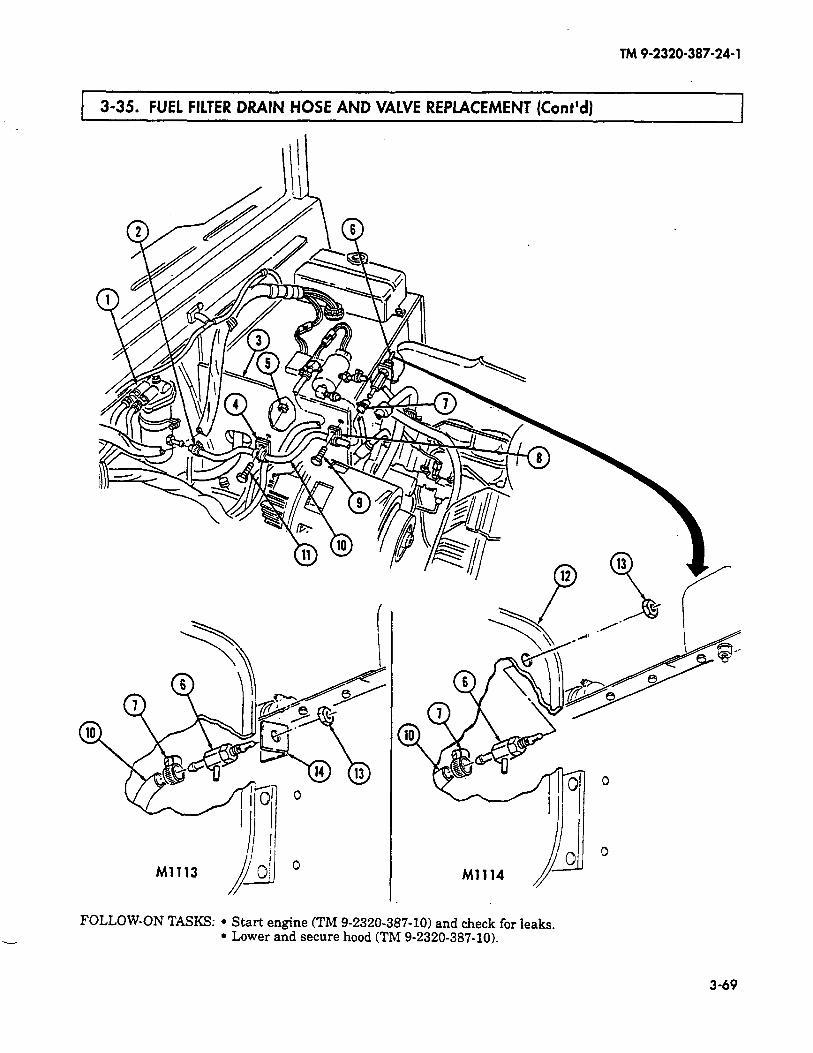
TM9-2320-387-24-l
3-35. FUEL FILTER DRAIN HOSE AND VALVE REPLACEMENT (Cont’d)
-
FOLLOW-ON TASKS: l Start engine (TM 9-2320-387-10) and check for leaks. l Lower and secure hood (TM 9-2320-387-10).
3-69

TM 9-2320-387-24- 1
3-36. FUEL INJECTION PUMP RETURN HOSE CHECK VALVE MAINTENANCE
This task covers:
a. Removal c. Installation b. Cleaning and Inspection
INITIAL SETUP:
Tools
General mechanic’s tool kit: automotive (Appendix B, Item 1)
Manual References
TM 9-2320-387-24P
Material/Parts
O-ring (Appendix G, Item 256)
General Safety Instructions l Do not perform this procedure near tire, flames,
or sparks. l Compressed air used for cleaning purposes will
not exceed 30 psi (207 kPa).
Maintenance Level
Unit
Equipment Condition
Air horn removed (para. 3-14)
WARNING
Diesel fuel is highly flammable. Do not perform this procedure near fire, flames, or sparks. Severe injury or death may result.
1 a. Removal 1
CAUTION Cover or plug all hoses and connections immediately after disconnection to prevent contamination. Remove all plugs prior to connection.
1. Remove clamp (2) and hose (1) from injection pump check valve (3).
2. Remove check valve (3) and O-ring (4) from injection pump (5). Discard O-ring (4).
b. Cleaning and Inspection
WARNING
Compressed air used for cleaning purposes will not exceed 30 psi (207 kPa). Use only with effective chip guarding and personal protective equipment (goggles/shield, gloves, etc.).
Examine lower end of check valve (31, where ball seats, for evidence of debris. If debris is present, blow compressed air through check valve. Replace check valve (3) if debris remains, or if check valve (3) fails to function properly.
[c.l
1. Install O-ring (4) and check valve (3) on injection pump (5).
2. Connect hose (1) to check valve (3) with clamp (2).
3-70

TM9-2320-387-24-l
.- 3-36. FUEL INJECTION PUMP RETURN HOSE CHECK VALVE MAINTENANCE (Cont’d) I
1 P Q 2
.-
FOLLOW-ON TASK: Install air horn (para. 3-14).
3-71
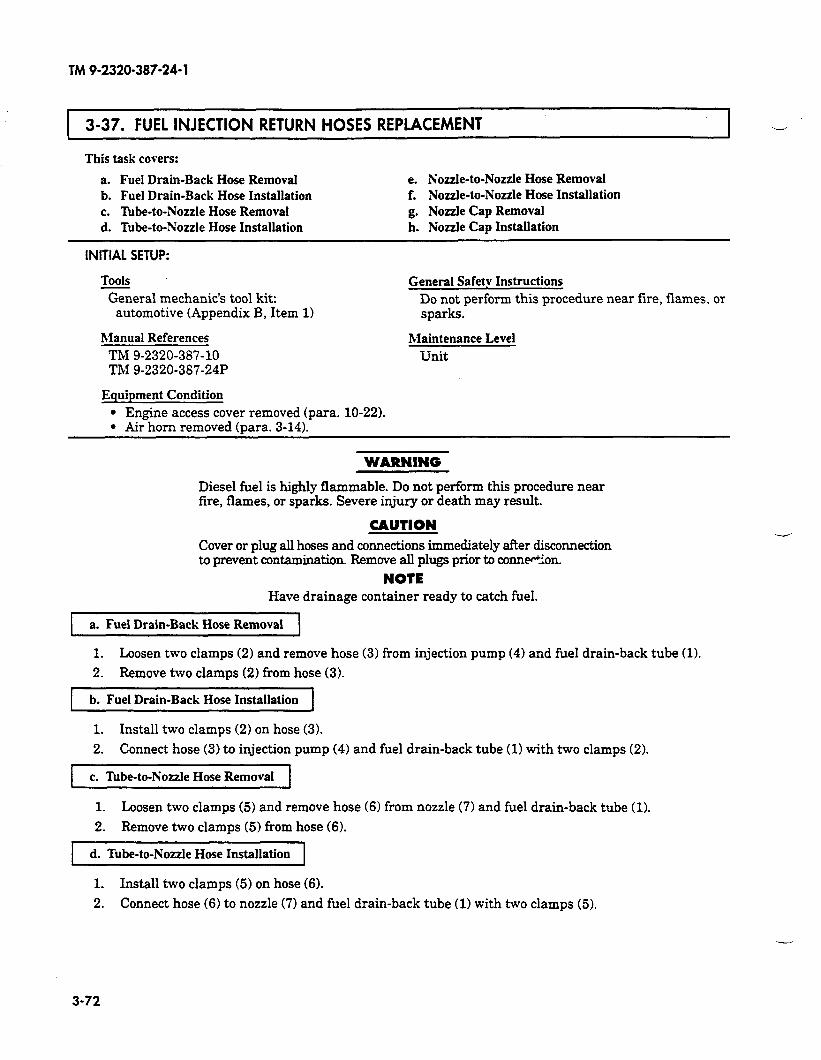
TM 9-2320-387-24- 1
3-37. FUEL INJECTION RETURN HOSES REPLACEMENT
This task covers:
a. Fuel Drain-Back Hose Removal b. Fuel Drain-Back Hose Installation c. Tube-to-Nozzle Hose Removal d. Tube-to-Nozzle Hose Installation
INITIAL SETUP:
e. Nozzle-to-Nozzle Hose Removal f. Nozzle-to-Nozzle Hose Installation
g. Nozzle Cap Removal h. Nozzle Cap Installation
Tools
?&era1 mechanic’s tool kit: General Safety Instructions
Do not perform this procedure near fire, flames, or automotive (Appendix B, Item 1) sparks.
Manual References
TM 9-2320-387-10 TM 9-2320-387-24P
Maintenance Level
Unit
Equipment Condition
l Engine access cover removed (para. 10-22). l Air horn removed (nara. 3-14).
WARNING
Diesel fuel is highly flammable. Do not perform this procedure near fire, flames, or sparks. Severe injury or death may result.
CAUTION Cover or plug all hoses and connections immediately after disconnection to prevent contamination. Remove all plugs prior to conntion.
NOTE Have drainage container ready to catch fuel.
a. Fuel Drain-Back Hose Removal
1. Loosen two clamps (2) and remove hose (3) from injection pump (4) and fuel drain-back tube (1).
2. Remove two clamps (2) from hose (3).
b. Fuel Drain-Back Hose Installation
1. Install two clamps (21 on hose (3).
2. Connect hose (3) to injection pump (4) and fuel drain-back tube (1) with two clamps (2).
c. Tube-to-Nozzle Hose Removal
1. Loosen two clamps (5) and remove hose (6) from nozzle (7) and fuel drain-back tube (1).
2. Remove two clamps (5) from hose (6).
I -l d. Tube-to-hozzle Hose Installation -7 1. Install two clamps (5) on hose (6).
2. Connect hose (6) to nozzle (7) and fuel drain-back tube (1) with two clamps (5).
3-72
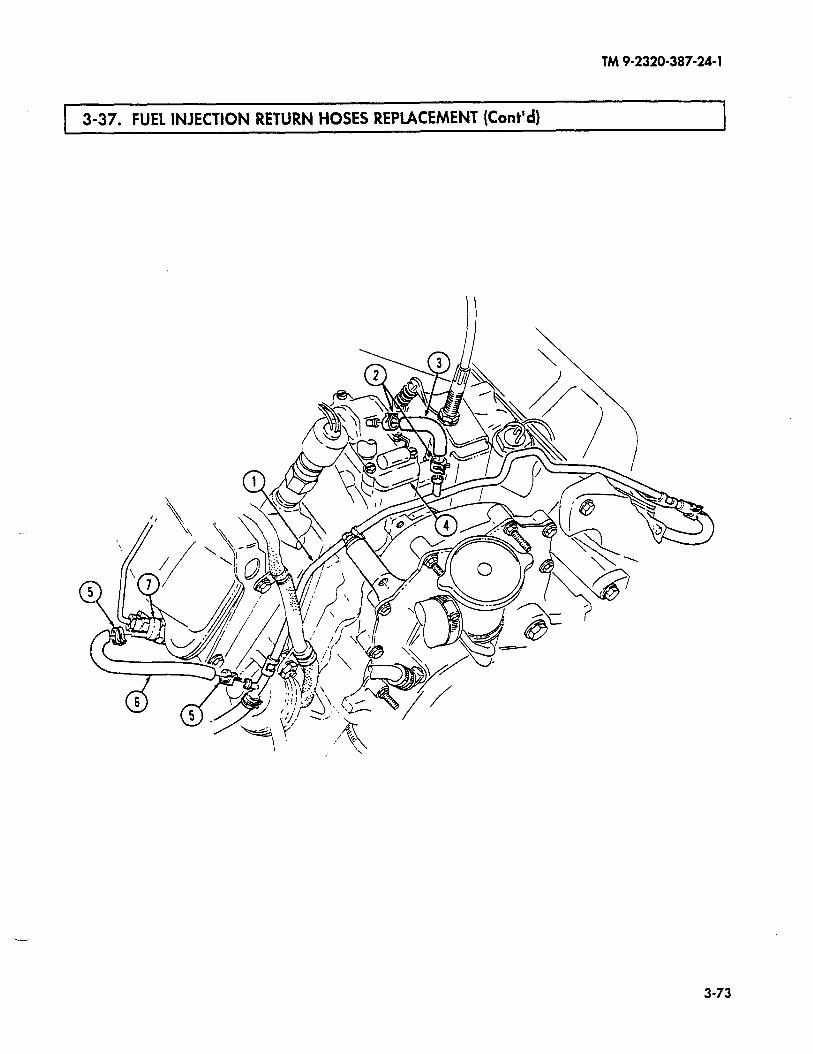
TM 9-2320-387-24- 1
3-37. FUEL INJECTION RETURN HOSES REPLACEMENT (Cont’d)
3-73

TM9-2320-387-24-l
1 3-37. FUEL INJECTION RETURN HOSES REPLACEMENT (Cord)
1 e. Nozzle-to-Nozzle Hose Removal 1
1. Loosen two clamps (5) and disconnect hose (6) from two nozzles (4).
2. Remove two clamps (5) from hose (6).
1 f. Nozzle-to-Nozzle Hose Inst~~lah&l
1. Install two clamps (5) on hose (6).
2. Connect hose (6) to two nozzles (4) with two clamps (5).
g. Nozzle Cap Removal
Remove clamp (2) and cap (1) from rear nozzle nipple (3).
h. Nozzle Cap Installation
Install cap (1) on rear nozzle nipple (3) with clamp (2).
--
3-74

TM 9-2320-387-24-l
I 3-37. FUEL INJECTION RETURN HOSES REPLACEMENT (Cont’d) 1
FOLLOW-ON TASKS: l Install air horn (para. 3-14). l Install engine access cover (para. 10-22). l Start engine (TM 9-2320-387-10) and check for fuel leaks.
3-75

TM 9-2320-387-24-l
3-38. FUEL DRAIkBACK TUBE REPLACEMENT
This task covers:
a. Removal b. Installation
INITIAL SETUP:
Tools
General mechanic’s tool kit: automotive (Appendix B, Item 1)
hIaterials/Parts
Lockwasher (Appendix G, Item 207)
hlanual References TM 9-2320-387-10 TM 9-2320-387-24P
Equipment Condition
Air horn removed (para. 3-14).
General Safety Instructions
Do not perform this procedure near fire, flames, or sparks.
Maintenance Level Unit
WARNING
Diesel fuel is highly flammable. Do not perform this procedure near fire, flames, or sparks. Severe injury or death may result.
1 a. Removal 1
1.
Cover or plug all hoses and connections immediately after disconnection to prevent contamination. Remove all plugs prior to reconnection.
Remove nut (17), lockwasher (181, and engine wiring harness clamp (15) from stud (19). Discard lockwasher (18).
2. Remove stud (191, fuel drain-back tube (51, clamp (201, fuel supply line (14), and clamp (16) from cylinder head (23).
3. Loosen two clamps (10) and disconnect two hoses (11) from fuel drain-back tube (5).
4. Loosen clamp (22) and disconnect fuel return hose (21) from fuel drain-back tube (5).
5. Loosen clamp (4) and disconnect fuel drain-back hose (3) from fuel drain-back tube (5).
6. Remove nut (7), washer (81, clamp (91, and fuel-drain-back tube (5) from valve cover stud (6).
7. Remove capscrew W, washer (241, and clamp (12) from front engine cover (13). .
8. Remove drain-back tube (5).
CAUTION
--
b. Installation
1.
2.
3.
4.
5.
6.
Position fuel drain-back tube (5) in front of injection pump (2).
Connect fuel return hose (21) to fuel drain-back tube (5) with clamp (22).
Connect two hoses (11) to fuel drain-back tube (5) with two clamps (10).
Connect fuel drain-back hose (3) to fuel drain-back tube (5) with clamp (4).
Install fuel drain-back tube (5) on valve cover stud (6) with clamp (91, washer (81, and nut (7). Tighten nut (7) to 13-20 lb-ft (18-27 N-m).
Install fuel drain-back tube (5) on front engine cover (131 with clamp (121, washer (24), and capscrew (1). Tighten capscrew (1) to 40 lb-ft (54 N-m).
7. Install fuel supply line (141, clamp (161, fuel drain-back tube (5), and clamp (20) on cylinder head (23) with stud (19).
8. Install wiring harness clamp (15) on stud (19) with lockwasher (18) and nut (17).
3-76
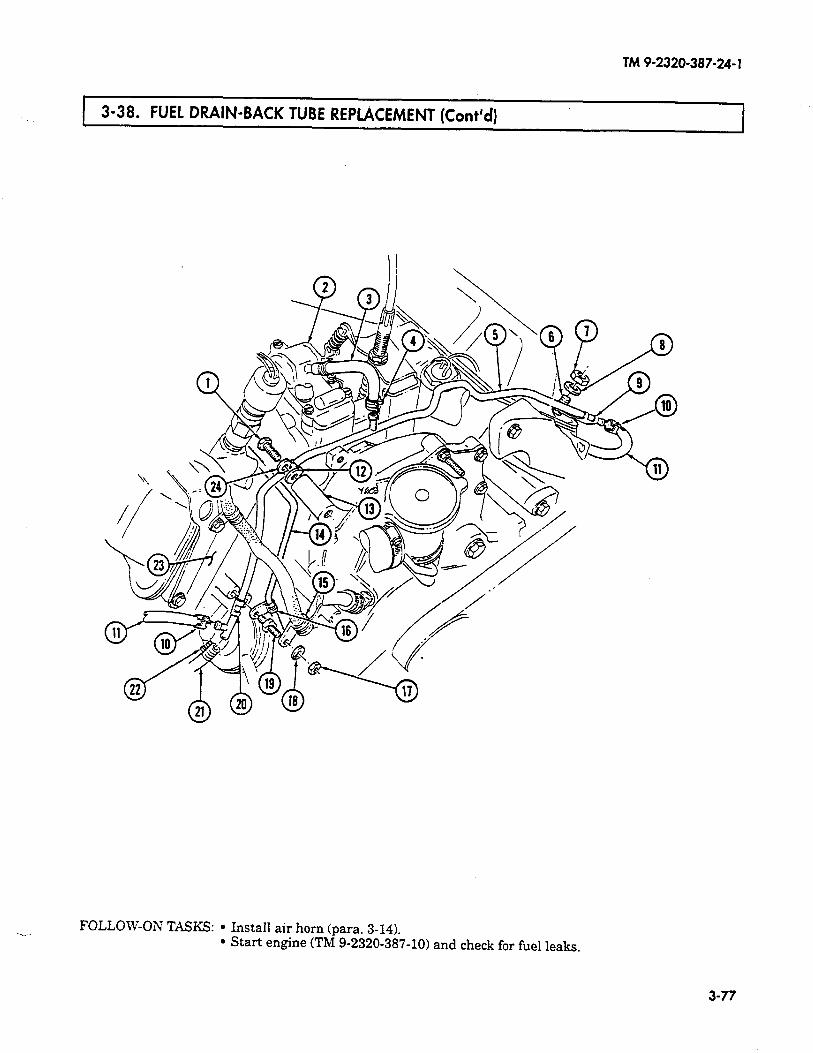
TM ?-2320-387-24- 1
3-38. FUEL DRAIN-BACK TUBE REPLACEMENT (Cont’d) 1
FOLLOW-ON TASKS: l Install air horn (para. 3-14). l Start engine (TM 9-2320-387-10) and check for fuel leaks,
3-77
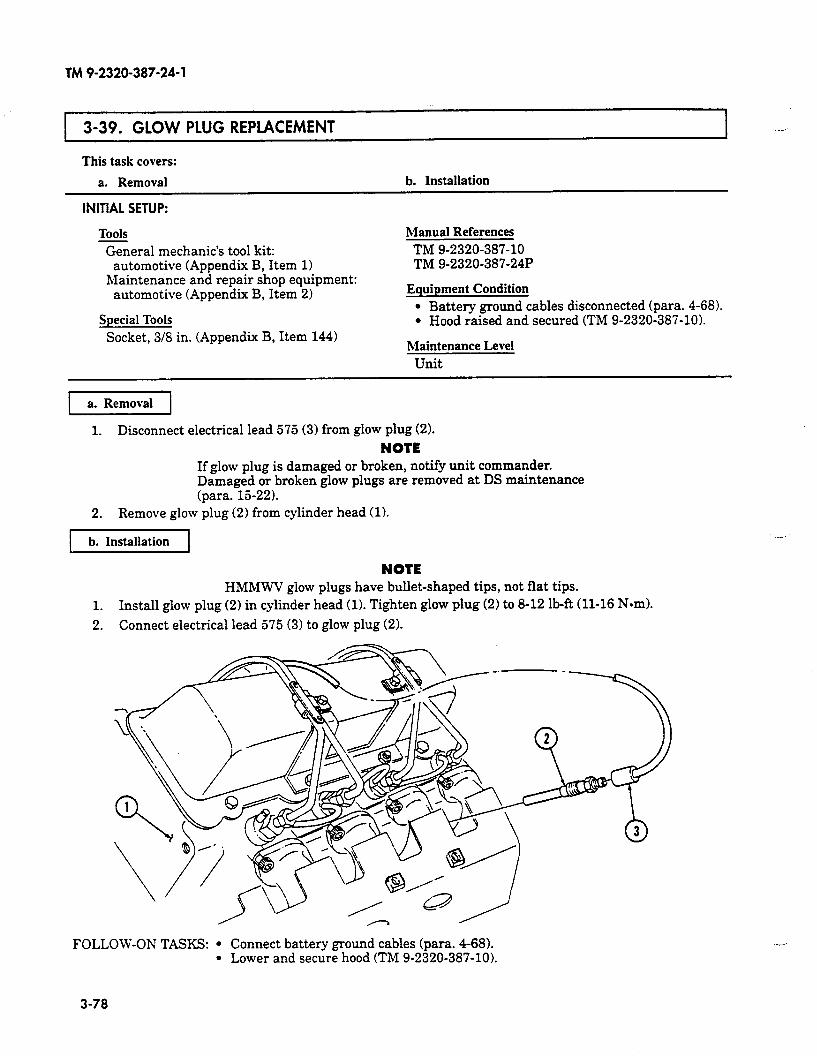
TM 9-2320-387-24-l
3-39. GLOW PLUG REPLACEMENT
This task covers:
a. Removal b. Installation
INITIAL SETUP:
Tools
General mechanic’s tool kit: automotive (Appendix B, Item 1)
Maintenance and repair shop equipment: automotive (Appendix B, Item 2)
Special Tools Socket, 3/8 in. (Appendix B, Item 144)
Manual References
TM 9-2320-387-10 TM 9-2320-387-24P
Equipment Condition
l Battery ground cables disconnected (para. 4-68). l Hood raised and secured (TM 9-2320-387-10).
Maintenance Level
Unit
1. Disconnect electrical lead 575 (3) from glow plug (2).
NOTE If glow plug is damaged or broken, notify unit commander. Damaged or broken glow plugs are removed at DS maintenance (para. E-22).
2. Remove glow plug (2) from cylinder head (11.
b. Installation
NOTE HMMWV glow plugs have bullet-shaped tips, not flat tips.
1. Install glow plug (2) in cylinder head (1). Tighten glow plug (2) to 8-12 lb-ft (11-16 Nom).
2. Connect electrical lead 575 (3) to glow plug (2).
FOLLOW-ON TASKS: l Connect battery ground cables (para. 4-68). l Lower and secure hood (TM 9-2320-387-10).
__
3-78

TM 9-2320-387-24-l
1 3-40. RIGHT FUEL INJECTION LINES BRACKET REPLACEMENT
This task covers:
a. Removal b. Installation
INlTlAl. SETUP:
Tools General mechanic’s tool kiti
automotive (Appendix B, Item 1)
Manual References TM 9-2320-387-24P
Equipment Condition l Engine access cover removed (para. 10-22). l Air horn removed (para. 3-14).
Maintenance Level Unit
[ a. Removal 1
1. Remove two screw-assembled washers (6), clamps (51, and clamp (7) from bracket (1).
2. Inspect two clamps (5) for cracks or breaks. Replace if defective.
3. Remove two nuts (31, washers (21, and bracket (1) from valve cover studs (4).
I b. Installation I
1.
2.
Install bracket (1) on two valve cover studs (4) with washers (2) and nuts (3). 13-20 lb-R (18-27 N-m).
Install two clamps (5) and clamp (7) on bracket (1) with two screw-assembled screw-assembled washers (6) to 3-4 lb-R (4-5 Nom).
-
Tighten nuts (3) to
washers (6). Tighten
FOLLOW-ON TASKS: l Install air horn (para. 3-14). l Install engine access cover (para. 10-22).
3-79

TM 9-2320-387-24- 1
3-41. LEFT FUEL INJECTION LINES BRACKET REPLACEMENT
Thii task covers: a. Removal b. Installation
INITIAL SETUP:
Tools %&era1 mechanic’s tool kit:
automotive (Appendix B, Item 1)
blanual References TM 9-2320-387-10 TM 9-2320-387-24P
Equipment Condition l Hood raised and secured (TM 9-2320-387-10). l Engine access cover removed (para. 10-221.
hlaintenance Level Unit
rY-iizq 1. Remove screw-assembled washer (2) and clamp (1) from bracket (5).
2. Remove screw-assembled washer (8) and clamp (9) from bracket (5).
3. Remove two screw-assembled washers (31 and oil dipstick tube (4) from bracket (5).
4. Remove two nuts (6), washers (7), and bracket (5) from valve cover studs (10).
b. Installation
1. Install bracket (6) on two valve cover studs (10) with washers (7) and nuts (6). Tighten nuts (6) to 13-20 lb-ft (18-27 Nom).
2. Secure oil dipstick tube (4) to bracket (5) with two screw-assembled washers (3). Tighten screw- assembled washers (3) to 3-4 lb-ft (4-5 N-m).
3. Install clamp (9) on bracket (5) with screw-assembled washer (8). Tighten screw-assembled washer (8) to 3-4 lb-ft (4-5 N-m).
4. Install clamp (1) on bracket (5) with screw-assembled washer (2). Tighten screw-assembled washer (2) to 3-4 lb-ft (4-5 N-m).
FOLLOW-ON TASKS: Install Lower
engine access cover (para. 10-22). and secure hood (TM 9-2320-387-10).
--
3-80
TM 9-2320-387-24-l
Section III. ACCELERATOR SYSTEM MAINTENANCE _~
3-42. ACCELERATOR SYSTEM MAINTENANCE TASK SUMMARY
TASK PARA. PROCEDURES
PAGE NO.
Accelerator Linkage Maintenance 3-82
3-44.
3-45.
Accelerator Pedal Replacement 3-86
Engine Idle Speed Adjustment 3-87
3-46. Hand Throttle Control Cable and Bracket Replacement
3-81
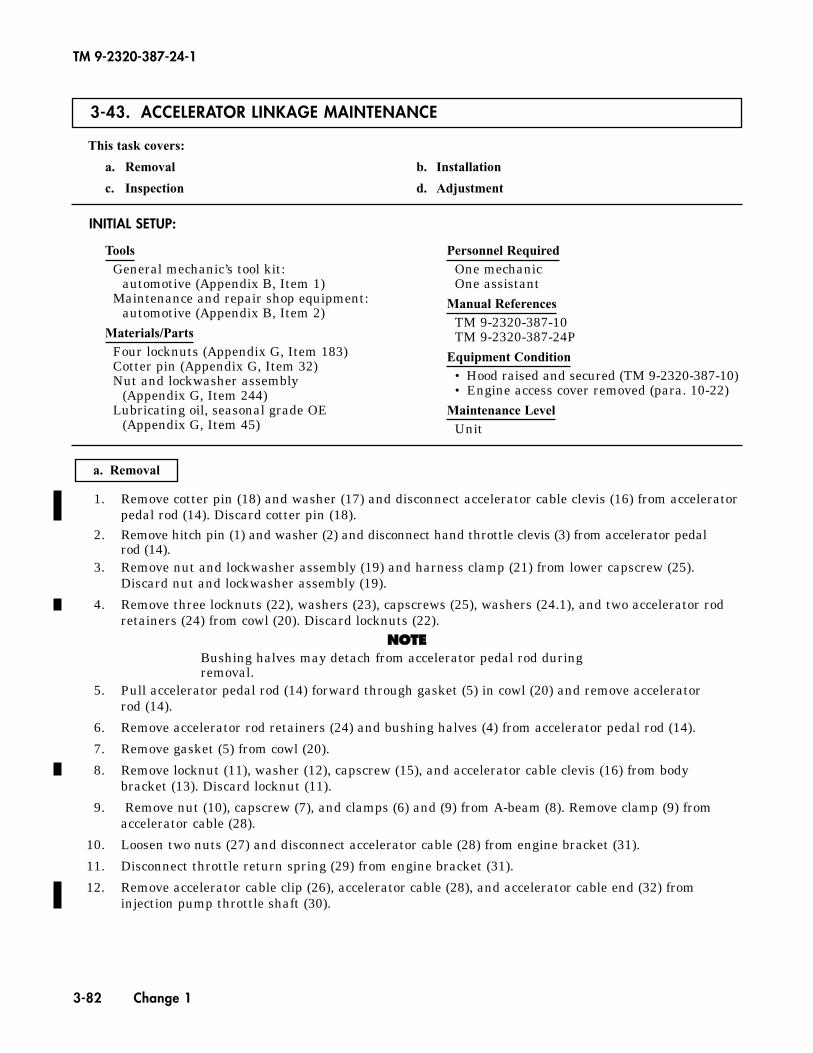
3-43. ACCELERATOR LINKAGE MAINTENANCE
TM 9-2320-387-24-1
3-82 Change 1
This task covers:
a. Removal b. Installation
c. Inspection d. Adjustment
INITIAL SETUP:
1. Remove cotter pin (18) and washer (17) and disconnect accelerator cable clevis (16) from acceleratorpedal rod (14). Discard cotter pin (18).
2. Remove hitch pin (1) and washer (2) and disconnect hand throttle clevis (3) from accelerator pedal rod (14).
3. Remove nut and lockwasher assembly (19) and harness clamp (21) from lower capscrew (25).Discard nut and lockwasher assembly (19).
4. Remove three locknuts (22), washers (23), capscrews (25), washers (24.1), and two accelerator rodretainers (24) from cowl (20). Discard locknuts (22).
NNOOTTEEBushing halves may detach from accelerator pedal rod duringremoval.
5. Pull accelerator pedal rod (14) forward through gasket (5) in cowl (20) and remove accelerator rod (14).
6. Remove accelerator rod retainers (24) and bushing halves (4) from accelerator pedal rod (14).
7. Remove gasket (5) from cowl (20).
8. Remove locknut (11), washer (12), capscrew (15), and accelerator cable clevis (16) from body bracket (13). Discard locknut (11).
9. Remove nut (10), capscrew (7), and clamps (6) and (9) from A-beam (8). Remove clamp (9) fromaccelerator cable (28).
10. Loosen two nuts (27) and disconnect accelerator cable (28) from engine bracket (31).
11. Disconnect throttle return spring (29) from engine bracket (31).
12. Remove accelerator cable clip (26), accelerator cable (28), and accelerator cable end (32) frominjection pump throttle shaft (30).
a. Removal
ToolsGeneral mechanic’s tool kit:
automotive (Appendix B, Item 1)Maintenance and repair shop equipment:
automotive (Appendix B, Item 2)Materials/Parts
Four locknuts (Appendix G, Item 183)Cotter pin (Appendix G, Item 32)Nut and lockwasher assembly
(Appendix G, Item 244)Lubricating oil, seasonal grade OE
(Appendix G, Item 45)
Personnel RequiredOne mechanicOne assistant
Manual ReferencesTM 9-2320-387-10TM 9-2320-387-24P
Equipment Condition• Hood raised and secured (TM 9-2320-387-10)• Engine access cover removed (para. 10-22)
Maintenance LevelUnit
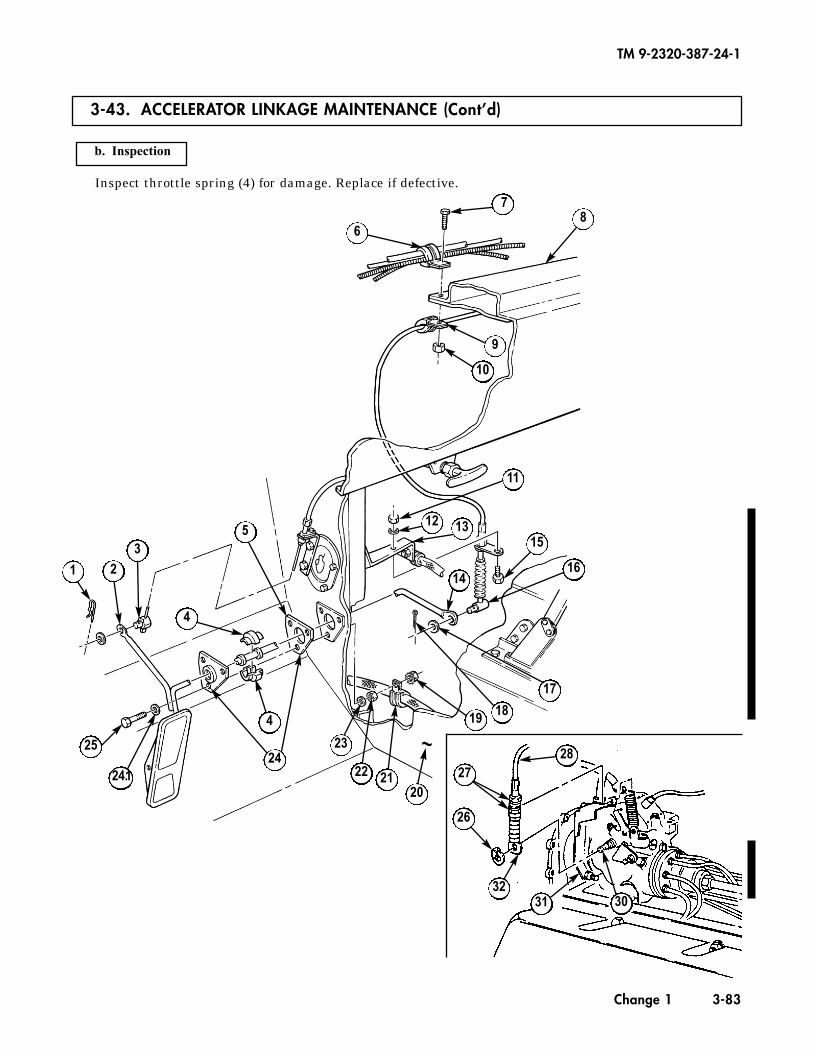
3-43. ACCELERATOR LINKAGE MAINTENANCE (Cont’d)
TM 9-2320-387-24-1
Change 1 3-83
Inspect throttle spring (4) for damage. Replace if defective.
b. Inspection
6
78
9
10
11
12 13
14
15
16
17
1819
28
26
3231 30
2720
2122
23
4
25
1
35
4
2
24.124
~
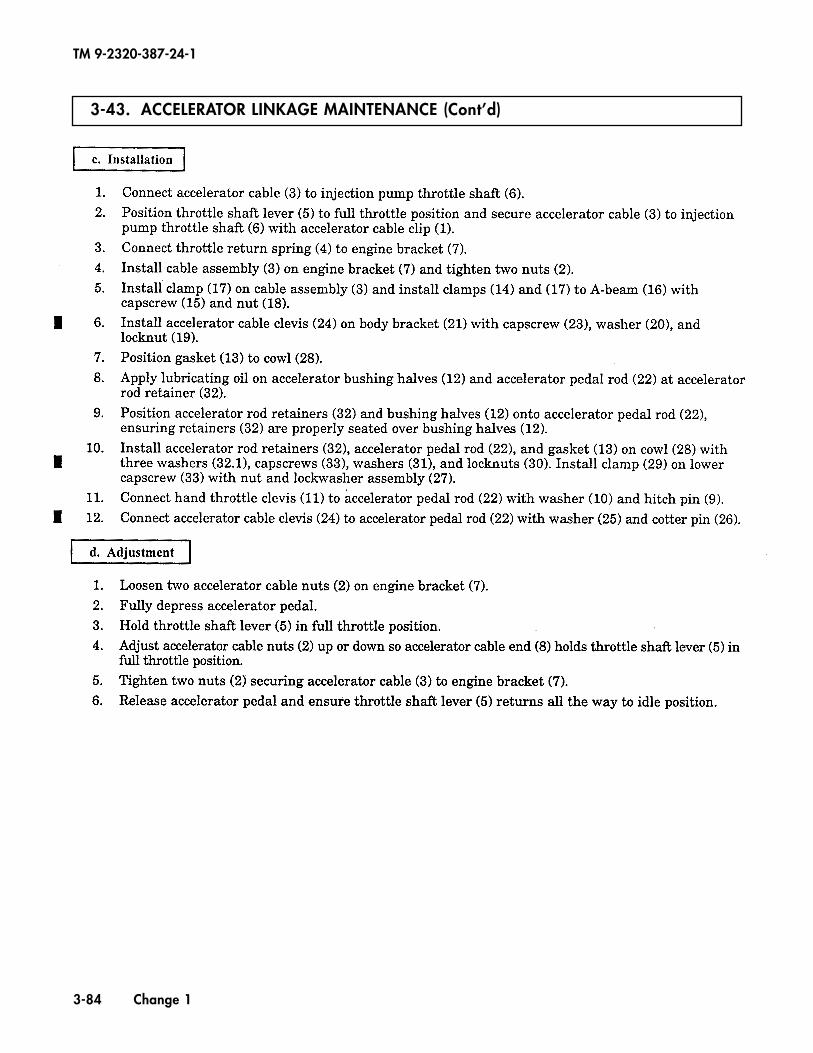
3-43. ACCELERATOR LINKAGE MAINTENANCE (Cont’d)
TM 9-2320-387-24-1
3-84 Change 1
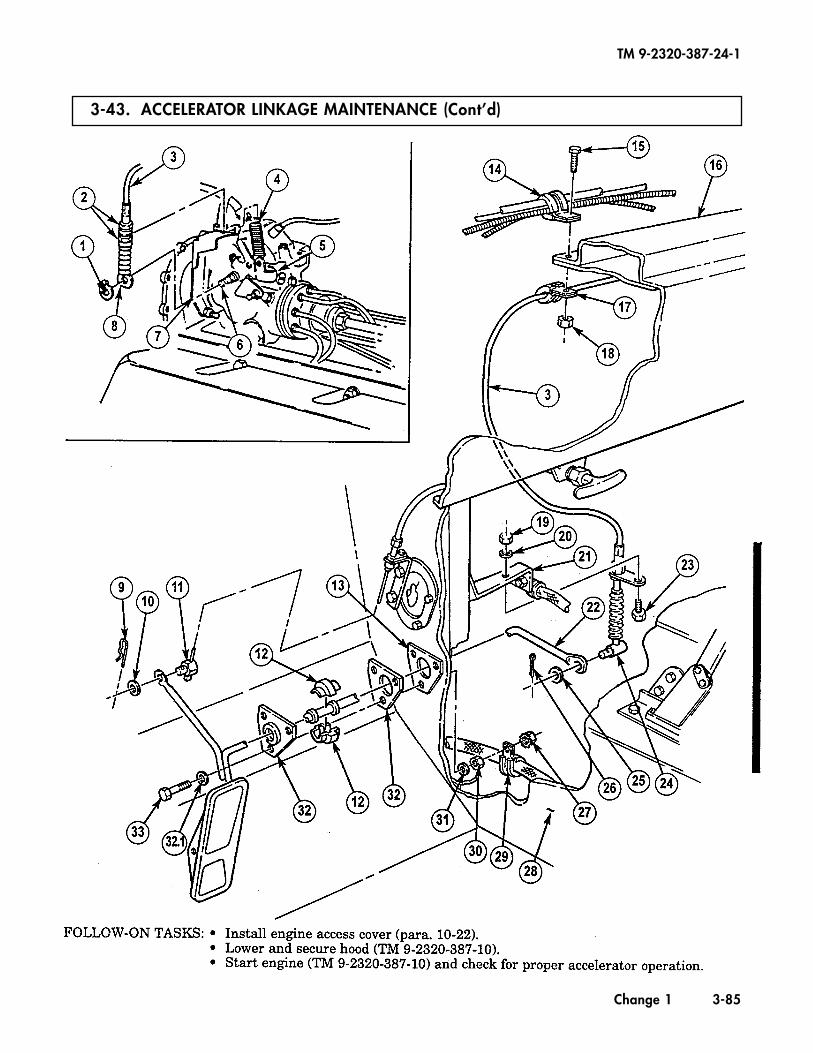
3-43. ACCELERATOR LINKAGE MAINTENANCE (Cont’d)
TM 9-2320-387-24-1
Change 1 3-85
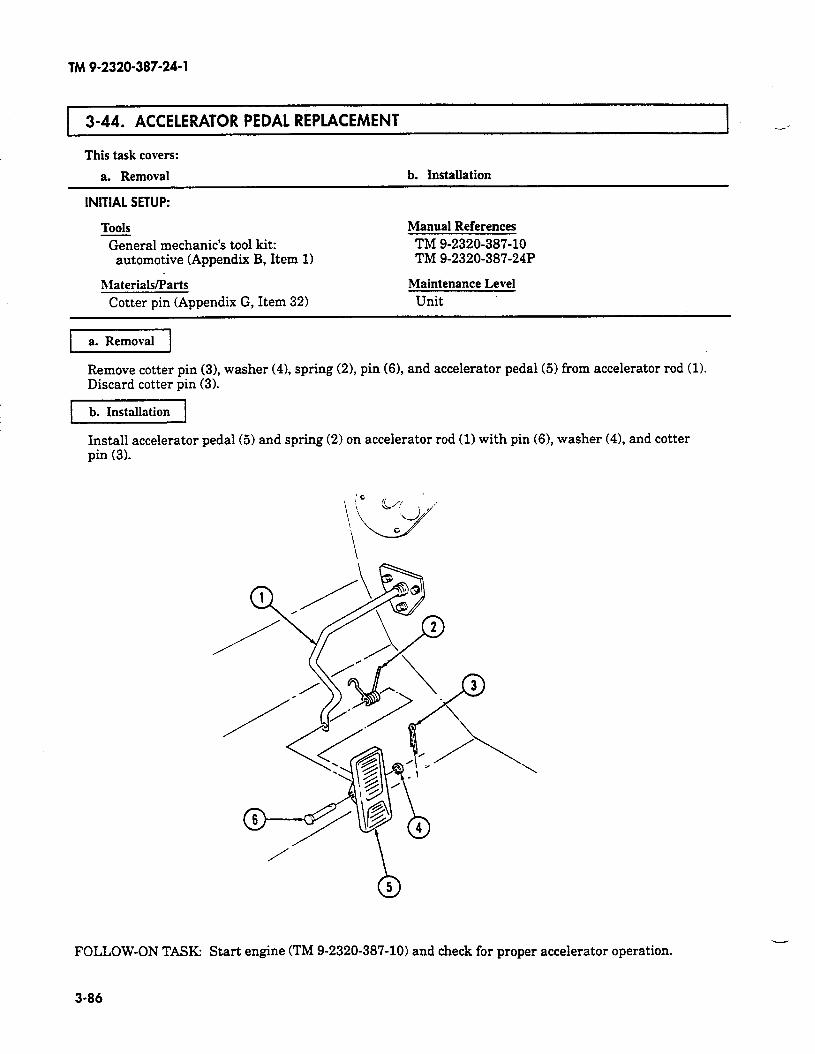
TM 9-2320-387-24-l
3-44. ACCELERATOR PEDAL REPLACEMENT I’ --
This task covers:
a. Removal b. Installation
INITIAL SETUP:
TOOIS Manual References
?&era1 mechanic’s tool kit: TM 9-2320-387-10 automotive (Appendix B, Item 1) TM 9-2320-387-24P
Materials/Parts Maintenance Level
Cotter pin (Appendix G, Item 32) Unit
[ a. Removal 1
Remove cotter pin (s), washer (41, spring (2), pin (61, and accelerator pedal (6) from accelerator rod (1). Discard cotter pin (3).
Install accelerator pedal (5) and spring (2) on accelerator rod (1) with pin (6), washer (41, and cotter pin (3).
‘\
FOLLOW-ON TASK: Start engine (TM 9-2320-387-10) and check for proper accelerator operation.
3-86
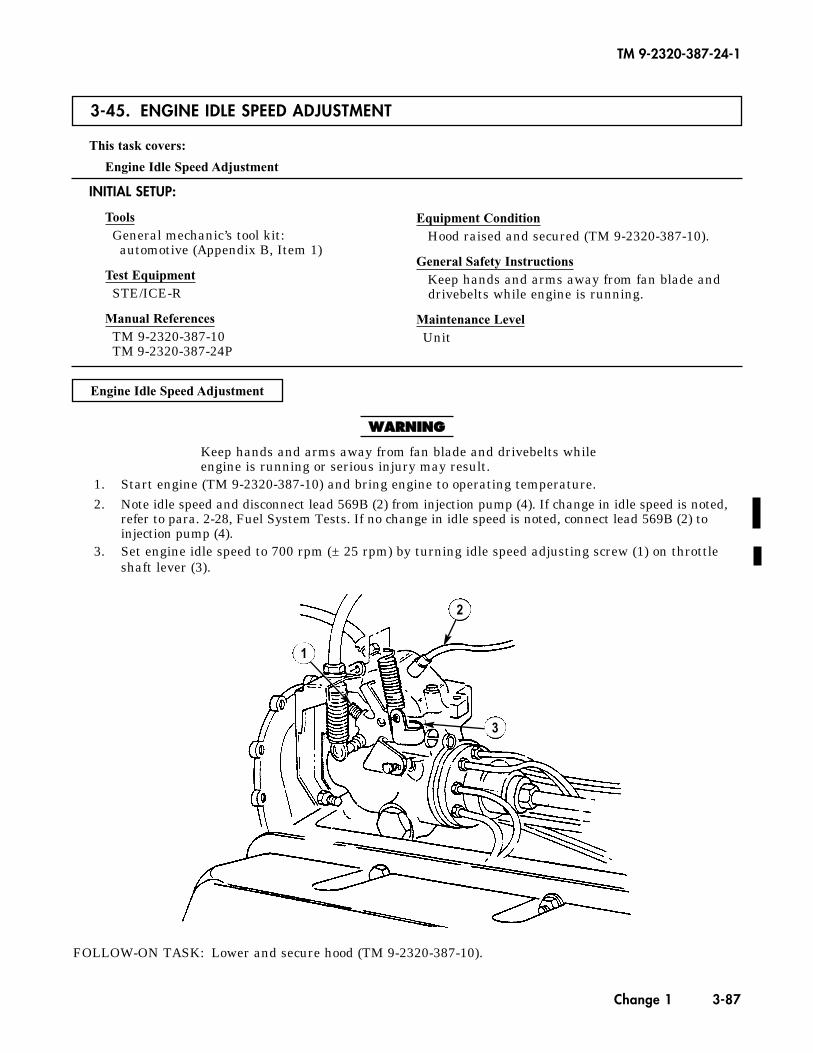
3-45. ENGINE IDLE SPEED ADJUSTMENT
This task covers:
Engine Idle Speed Adjustment
Engine Idle Speed Adjustment
WWAARRNNIINNGG
Keep hands and arms away from fan blade and drivebelts whileengine is running or serious injury may result.
1. Start engine (TM 9-2320-387-10) and bring engine to operating temperature.2. Note idle speed and disconnect lead 569B (2) from injection pump (4). If change in idle speed is noted,
refer to para. 2-28, Fuel System Tests. If no change in idle speed is noted, connect lead 569B (2) toinjection pump (4).
3. Set engine idle speed to 700 rpm (± 25 rpm) by turning idle speed adjusting screw (1) on throttleshaft lever (3).
INITIAL SETUP:
ToolsGeneral mechanic’s tool kit:
automotive (Appendix B, Item 1)
Test EquipmentSTE/ICE-R
Manual ReferencesTM 9-2320-387-10TM 9-2320-387-24P
Equipment ConditionHood raised and secured (TM 9-2320-387-10).
General Safety InstructionsKeep hands and arms away from fan blade anddrivebelts while engine is running.
Maintenance LevelUnit
TM 9-2320-387-24-1
Change 1 3-87
FOLLOW-ON TASK: Lower and secure hood (TM 9-2320-387-10).
1
2
3
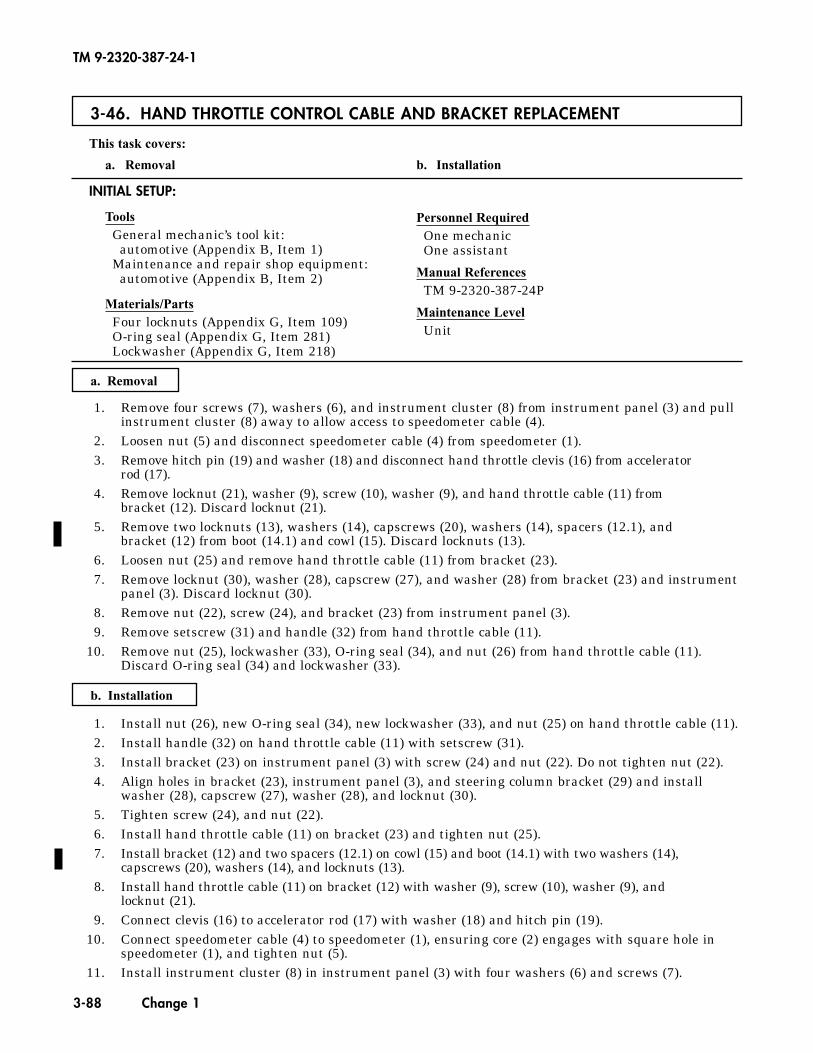
3-46. HAND THROTTLE CONTROL CABLE AND BRACKET REPLACEMENT
This task covers:
a. Removal b. Installation
a. Removal
1. Remove four screws (7), washers (6), and instrument cluster (8) from instrument panel (3) and pullinstrument cluster (8) away to allow access to speedometer cable (4).
2. Loosen nut (5) and disconnect speedometer cable (4) from speedometer (1).3. Remove hitch pin (19) and washer (18) and disconnect hand throttle clevis (16) from accelerator
rod (17).4. Remove locknut (21), washer (9), screw (10), washer (9), and hand throttle cable (11) from
bracket (12). Discard locknut (21).5. Remove two locknuts (13), washers (14), capscrews (20), washers (14), spacers (12.1), and
bracket (12) from boot (14.1) and cowl (15). Discard locknuts (13).6. Loosen nut (25) and remove hand throttle cable (11) from bracket (23).7. Remove locknut (30), washer (28), capscrew (27), and washer (28) from bracket (23) and instrument
panel (3). Discard locknut (30).8. Remove nut (22), screw (24), and bracket (23) from instrument panel (3).9. Remove setscrew (31) and handle (32) from hand throttle cable (11).
10. Remove nut (25), lockwasher (33), O-ring seal (34), and nut (26) from hand throttle cable (11).Discard O-ring seal (34) and lockwasher (33).
INITIAL SETUP:
ToolsGeneral mechanic’s tool kit:
automotive (Appendix B, Item 1)Maintenance and repair shop equipment:
automotive (Appendix B, Item 2)
Materials/PartsFour locknuts (Appendix G, Item 109)O-ring seal (Appendix G, Item 281)Lockwasher (Appendix G, Item 218)
Personnel RequiredOne mechanicOne assistant
Manual ReferencesTM 9-2320-387-24P
Maintenance LevelUnit
TM 9-2320-387-24-1
3-88 Change 1
1. Install nut (26), new O-ring seal (34), new lockwasher (33), and nut (25) on hand throttle cable (11).2. Install handle (32) on hand throttle cable (11) with setscrew (31).3. Install bracket (23) on instrument panel (3) with screw (24) and nut (22). Do not tighten nut (22).4. Align holes in bracket (23), instrument panel (3), and steering column bracket (29) and install
washer (28), capscrew (27), washer (28), and locknut (30).5. Tighten screw (24), and nut (22).6. Install hand throttle cable (11) on bracket (23) and tighten nut (25).7. Install bracket (12) and two spacers (12.1) on cowl (15) and boot (14.1) with two washers (14),
capscrews (20), washers (14), and locknuts (13).8. Install hand throttle cable (11) on bracket (12) with washer (9), screw (10), washer (9), and
locknut (21).9. Connect clevis (16) to accelerator rod (17) with washer (18) and hitch pin (19).
10. Connect speedometer cable (4) to speedometer (1), ensuring core (2) engages with square hole inspeedometer (1), and tighten nut (5).
11. Install instrument cluster (8) in instrument panel (3) with four washers (6) and screws (7).
b. Installation
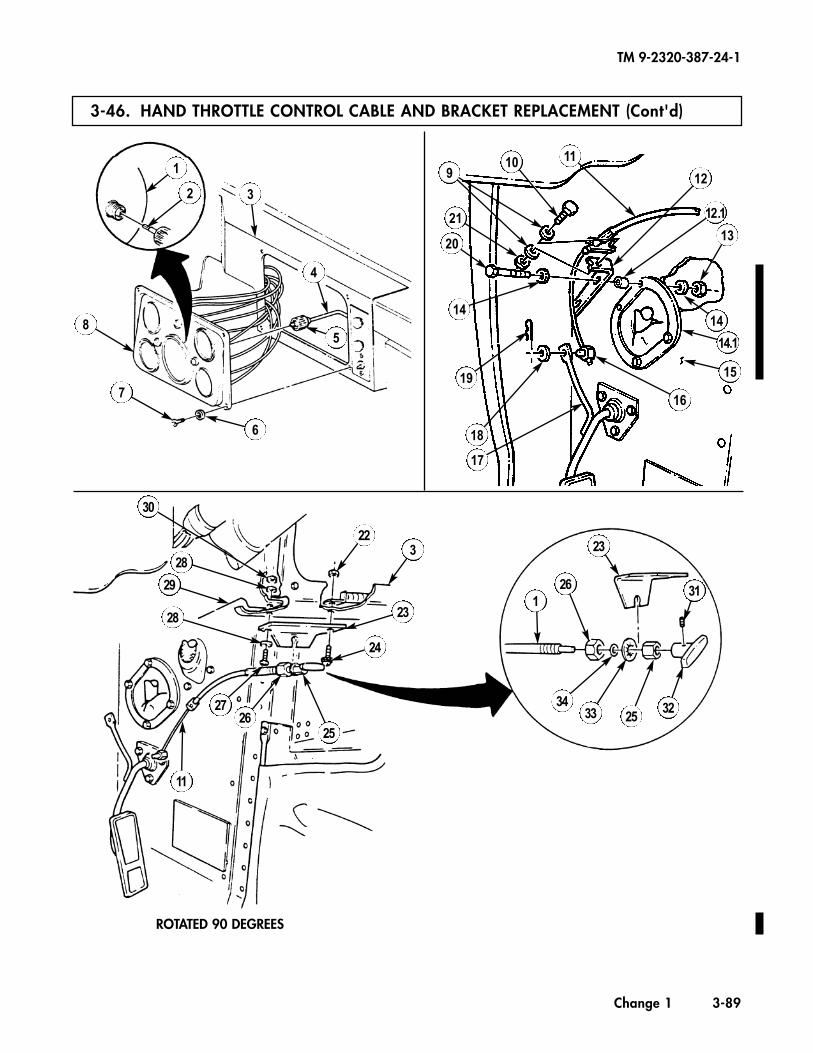
3-46. HAND THROTTLE CONTROL CABLE AND BRACKET REPLACEMENT (Cont'd)
TM 9-2320-387-24-1
Change 1 3-89
1
2 3
5
4
6
7
8
17
18
19
14
20
21
10 11
12.1
13
14
14.1
15
16
30
28
29
28
11
2726
25
24
23
322
126
23
31
3433 25
32
9 12
ROTATED 90 DEGREES
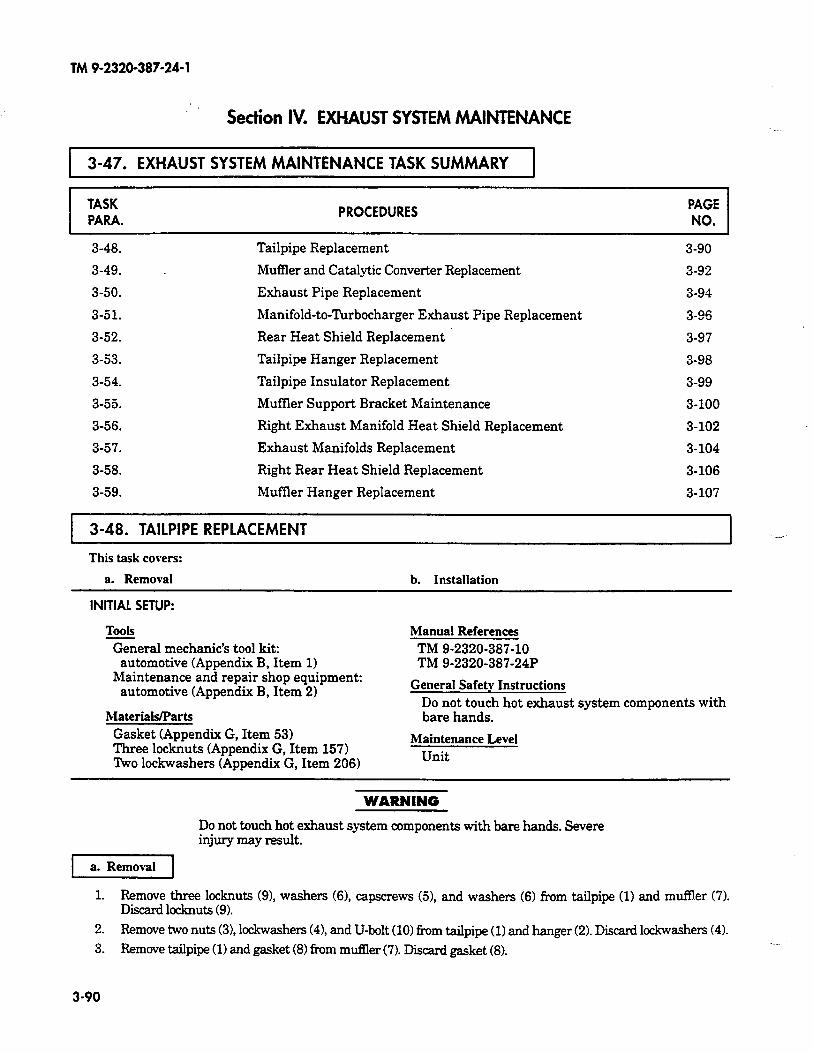
TM 9-2320-387-24-l
Section IV. EXHAUST SYSTEM MAINTENANCE
1 3-47. EXHAUST SYSTEM MAINTENANCE TASK SUMMARY 1
TASK PARA.
PAGE NO.
3-48. Tailpipe Replacement 3-90
3-49. MufBer and Catalytic Converter Replacement 3-92
3-50. Exhaust Pipe Replacement 3-94
3-51. Manifold-to-Turbocharger Exhaust Pipe Replacement 3-95
3-52. Rear Heat Shield Replacement 3-97
3-53. Tailpipe Hanger Replacement 3-98
3-54. Tailpipe Insulator Replacement 3-99
3-55. Muffler Support Bracket Maintenance 3-100
3-56. Right Exhaust Manifold Heat Shield Replacement 3-102
3-57. Exhaust Manifolds Replacement 3-104
3-58. Right Rear Heat Shield Replacement 3-106
3-59. Muffler Hanger Replacement 3-107
I 3-48. TAILPIPE REPLACEMENT I .-
This task covers:
a. Removal b. Installation
INITIAL SETUP:
Tools
General mechanic’s tool kit: automotive (Appendix B, Item 1)
Maintenance and repair shop equipment: automotive (Appendix B, Item 2)
Materials/Parts
Gasket (Appendix G, Item 53) Three locknuts (Appendix G, Item 157) Wo lo&washers (Appendix G, Item 206)
Manual References
TM 9-2320-387-10 TM 9-2320-387-24P
General Safety Instructions
Do not touch hot exhaust system components with bare hands.
Maintenance Level
Unit
Do not touch hot exhaust system components with bare hands. Severe injury may result.
-1
1. Remove three locknuts (9), washers (61, capscrews (51, and washers (6) from tailpipe (1) and mufIler (7). Discard locknuts (9).
2. Remove two nuts (31, lockwashers (41, and U-bolt (10) from tailpipe (1) and hanger (2). Discard lockwashers (4).
3. Remove tailpipe (1) and gasket (8) from mufIler (7). Discard gasket (8).
3-90

TM 9-2320-387-24-1
3-48. TAILPIPE REPLACEMENT (Cont’d) I
1 b. Installation 1
1. Install gasket (8) and tailpipe (1) on muffler (7) with three washers (6), capscrews G), washers (6), and locknuts (9). Tighten locknuts (9) to 26 lb& (35 Nem).
2. Install tailpipe (1) on hanger (2) with U-bolt (lo), two lockwashers (4), and nuts (3).
FOLLOW-ON TASK: Start engine (TM 9-2320-387-10) and check for exhaust leaks.
3-91
3-49. MUFFLER AND CATALYTIC CONVERTER REPLACEMENT This task covers:
a. Removal b. Installation
a. Removal
INITIAL SETUP:Tools
General mechanic’s tool kit:automotive (Appendix B, Item 1)
Maintenance and repair shop equipment:automotive (Appendix B, Item 2)
Material PartsNine locknuts (Appendix G, Item 157)Gasket (Appendix G, Item 55)Seven lockwashers (Appendix G, Item 206)
Manual ReferencesTM 9-2320-387-24P
Equipment ConditionTailpipe removed (para. 3-48).
General Safety InstructionsDo not touch hot exhaust system components withbare hands.
Maintenance LevelUnit
b. Installation
TM 9-2320-387-24-1
3-92 Change 1
WWAARRNNIINNGGDo not touch hot exhaust system components with bare hands.Severe injury may result.
CCAAUUTTIIOONNSupport muffler and catalytic converter during replacement.Failure to do so may result in damage to equipment.
1. Remove two clamps (14) and heat shield (15) from crossover pipe (17).2. Remove two nuts (13), U-bolt (23), and support bracket (20) from heat shield (10) and catalytic
converter (24).3. Remove two nuts (6), lockwashers (5), and washers (4) from heat shield (10). Discard lockwashers (5).4. Remove capscrew (7), lockwasher (8), and Y-clip (9) at location A and screw (12), lockwashers (11)
and (28), and nut (29) at location B and heat shield (10) from bracket (27). Discard lockwashers (8),(11), and (28).
5. Remove two nuts (25), washers (26), capscrews (31), washers (30), and bracket (27) from muffler (32).6. Remove three locknuts (18), washers (19), capscrews (22), and washers (21) from catalytic
converter (24) and crossover pipe (17). Discard locknuts (18).7. Remove two nuts (40), lockwashers (39), and U-bolt (37) from catalytic converter (24) and support
bracket (38). Discard lockwashers (39).8. Remove gasket (16) by pulling catalytic converter (24) towards rear of vehicle. Discard gasket (16).
NNOOTTEEIt may be necessary to lower rear propeller shaft (para. 6-4) to gainaccess to locknuts on muffler hanger.
9. Remove four locknuts (3), washers (2), capscrews (33), washers (34), two retaining plates (35), andmuffler (32) from muffler hanger (1). Discard locknuts (3).
10. Remove two locknuts (41), washers (46), capscrews (44), washers (43), insulator (36), retaining plate (45), and bracket (42) from muffler (32). Discard locknuts (41).
1. Install bracket (42), insulator (36), and retaining plate (45) on muffler (32) with two washers (43),capscrews (44), washers (46), and locknuts (41). Tighten locknuts (41) to 10 lb-ft (14 N•m).
2. Install muffler (32) and two retaining plates (35) on muffler hanger (1) with four washers (34),capscrews (33), washers (2), and locknuts (3).
3. Install catalytic converter (24) on support bracket (38) with U-bolt (37), two lockwashers (39), andnuts (40).
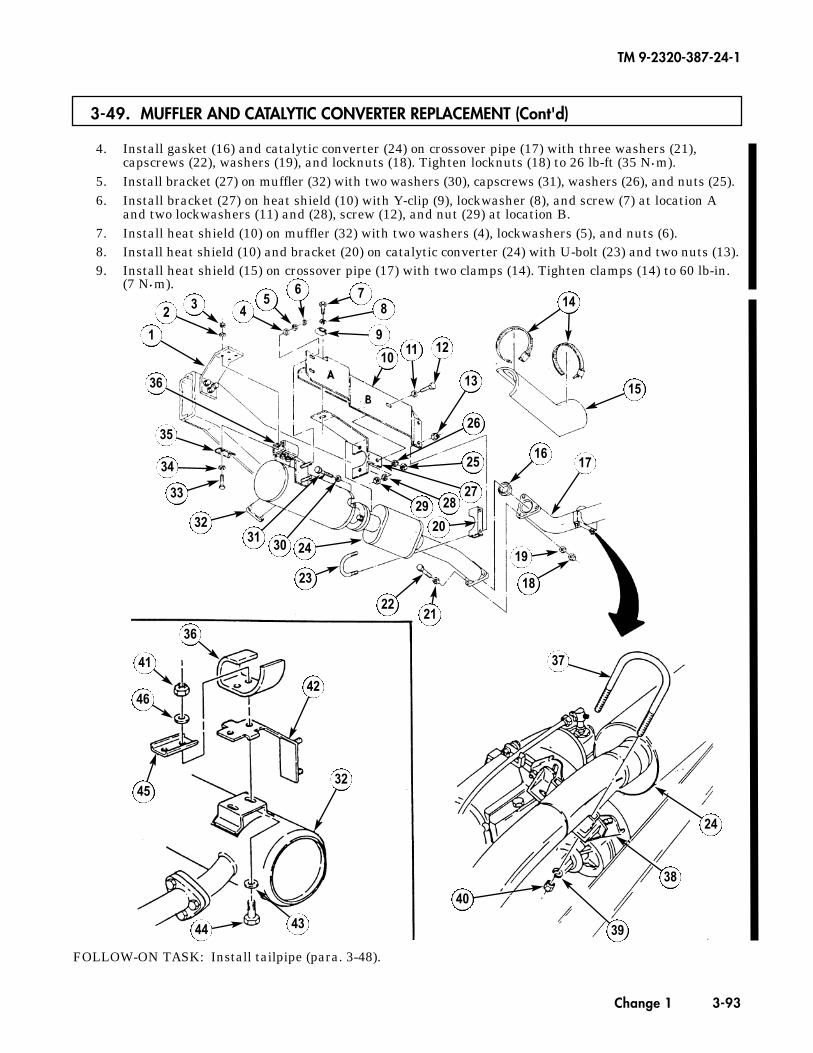
3-49. MUFFLER AND CATALYTIC CONVERTER REPLACEMENT (Cont'd)
TM 9-2320-387-24-1
Change 1 3-93
FOLLOW-ON TASK: Install tailpipe (para. 3-48).
4. Install gasket (16) and catalytic converter (24) on crossover pipe (17) with three washers (21),capscrews (22), washers (19), and locknuts (18). Tighten locknuts (18) to 26 lb-ft (35 N•m).
5. Install bracket (27) on muffler (32) with two washers (30), capscrews (31), washers (26), and nuts (25).6. Install bracket (27) on heat shield (10) with Y-clip (9), lockwasher (8), and screw (7) at location A
and two lockwashers (11) and (28), screw (12), and nut (29) at location B.7. Install heat shield (10) on muffler (32) with two washers (4), lockwashers (5), and nuts (6).8. Install heat shield (10) and bracket (20) on catalytic converter (24) with U-bolt (23) and two nuts (13).9. Install heat shield (15) on crossover pipe (17) with two clamps (14). Tighten clamps (14) to 60 lb-in.
(7 N•m).
1
2 3 45
6 78
9
1011 12
13 15
1716
26
25
272829
20
19
18
2122
23
24303132
33
34
35
36
36
41
46
45
42
32
4344
37
40
39
38
24
14
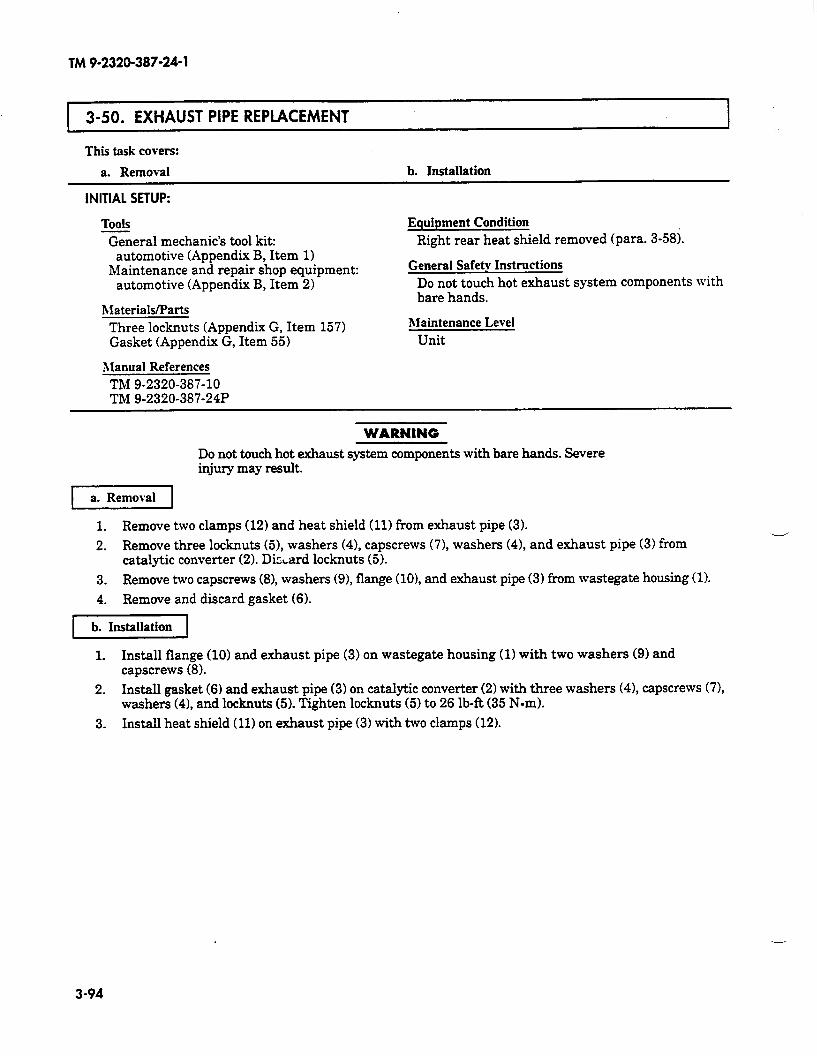
TM 9-2320-387-24-l
3-50. EXHAUST PIPE REPLACEMENT I
This task covers:
a. Removal b. Installation
INITIAL SETUP:
Tools General mechanic’s tool kit:
automotive (Appendix B, Item 1) Maintenance and repair shop equipment:
automotive (Appendix B, Item 21
Materials/Parts
Equipment Condition Right rear heat shield removed (para. 3-58).
General Safety Instructions Do not touch hot exhaust system components with bare hands.
Three locknuts (Appendix G, Item 157) Gasket (Appendix G, Item 55)
Maintenance Level
Unit
>Ianual References TM 9-2320-387-10 TM 9-2320-387-24P
WARNING Do not touch hot exhaust system components with bare hands. Severe injury may result.
1 a. Removal 1
1. Remove two clamps (12) and heat shield (111 from exhaust pipe (3).
2. Remove three locknuts (5), washers (4), capscrews (7), washers (41, and exhaust pipe (3) from catalytic converter (2). DicLard locknuts (5).
3. Remove two capscrews (8), washers (91, flange (lo), and exhaust pipe (31 from wastegate housing (1).
4. Remove and discard gasket (6).
r!zzzzq
1. Install flange (10) and exhaust pipe (3) on wastegate housing (1) with two washers (9) and capscrews (8).
2. Install gasket (6) and exhaust pipe (3) on catalytic converter (2) with three washers (41, capscrews (7), washers (41, and locknuts (5). Tighten locknuts (5) to 26 lb-R (35 N-m).
3. Install heat shield (11) on exhaust pipe (3) with two clamps (12).
3-94

TM 9-2320-387-24-l
\ l
3-50. EXHAUST PIPE REPLACEMENT (Cord)
FOLLOW-ON TASKS: l Start engine (TM 9-2320-387-10) and check for exhaust leaks. l Install right rear heat shield (para. 3-58).
3-95
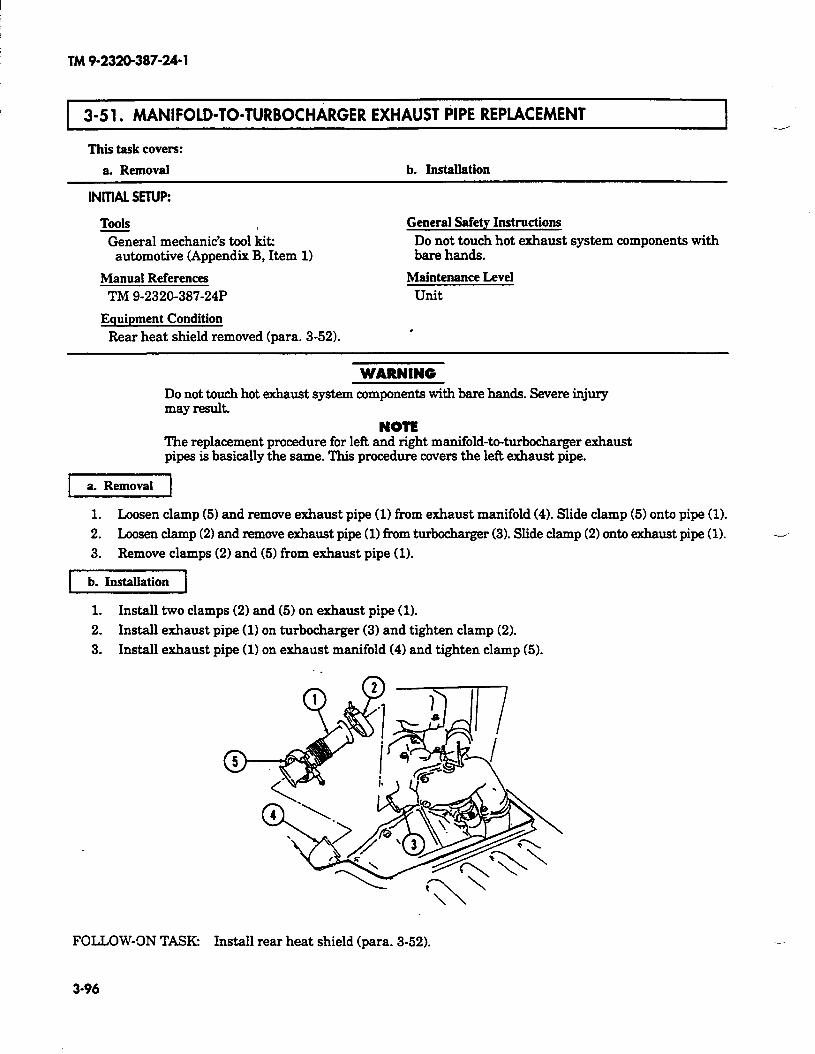
TM 9-2320-387-24-l
13-51.ANiF0~D-TO-TURBOCHARGEREXHAU~T~IPE REPLACEMENT I
Tbii task covers:
a. Removal b. Installation
INrnAl. SETUP:
Tools General mechanic’s tool kit:
automotive (Appendix B, Item 1)
Manual References TM 9-2320-387-24P
Equipment Condition
General Safety Instructions
Do not touch hot exhaust system components with bare hands.
Maintenance Level
unit
Rear heat shield removed (para. 3-52). .
WARNiNG Do not touch hot exhaust system components with bare hands. Severe injury may result.
NOTE The replacement procedure for left and right manifold-to-turbocharger exhaust pipes is basically the same. This procedure covers the 1eR exhaust pipe.
rzzGil
1. Loosen clamp (5) and remove exhaust pipe (11 from exhaust manifold (4). Slide clamp (5) onto pipe (1).
2. Loosen clamp (21 and remove exhaust pipe (11 from turbocharger (3). Slide clamp (21 onto exhaust pipe (1).
3. Remove clamps (21 and (51 from exhaust pipe (11.
1 b. Installation 1
1.
2.
3.
Install two clamps (2) and (5) on exhaust pipe (11.
Install exhaust pipe (1) on turbocharger (31 and tighten clamp (2).
Install exhaust pipe (1) on exhaust manifold (41 and tighten clamp (5).
.
--
FOLLOW-ON TASK: Install rear heat shield (para. 3-52).
3-96
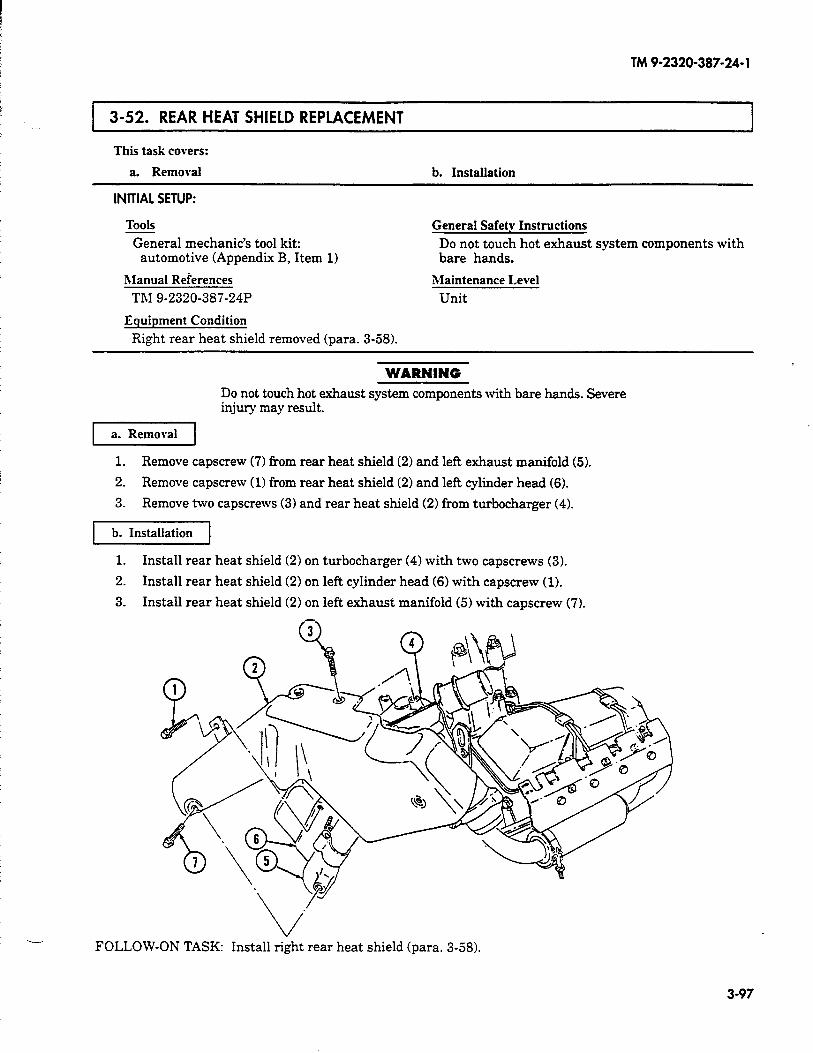
TM 9-2320-387-24-l
1 3-52. REAR HEAT SHIELD REPLACEMENT 1
This task covers:
a. Removal b. Installation
INITIAL SETUP:
Tools
General mechanic’s tool kit: automotive (Appendix B, Item 1)
nlanual References
TM 9-2320-387-24P
Equipment Condition
Right rear heat shield removed (para. 3-58).
General Safety Instructions
Do not touch hot exhaust system components with bare hands.
Maintenance Level
Unit
WARNING Do not touch hot exhaust system components with bare hands. Severe injury may result.
a. Removal
1. Remove capscrew (7) from rear heat shield (2) and left exhaust manifold (5).
2. Remove capscrew (1) from rear heat shield (2) and left cylinder head (6).
3. Remove two capscrews (3) and rear heat shield (2) from turbocharger (4).
b. Installation
1. Install rear heat shield (2) on turbocharger (4) with two capscrews (3).
2. Install rear heat shield (2) on left cylinder head (6) with capscrew (1).
3. Install rear heat shield (2) on left exhaust manifold (5) with capscrew (7).
FOLLOW-ON TASK: Install right rear heat shield (para. 3-58).
3-97
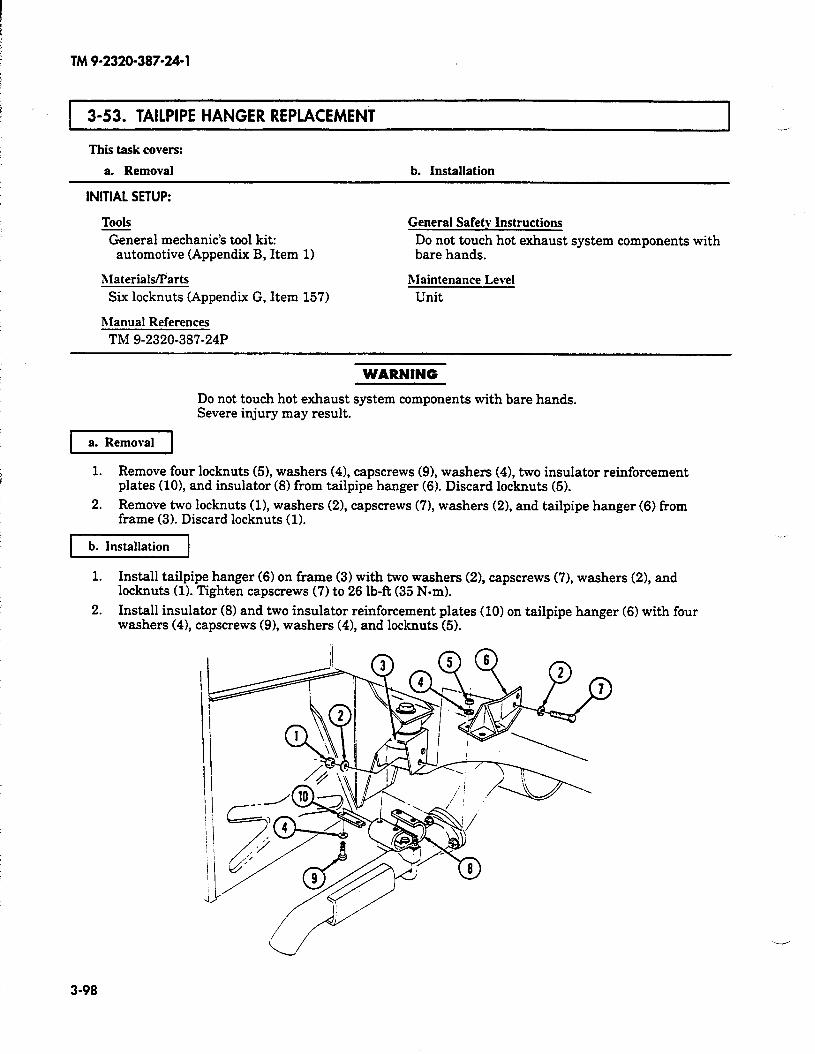
t TM 9-2320-387-24-l
3-53. TAILPIPE HANGER REPLACEMENT I
This task covers:
a. Removal b. Installation
INITIAL SETUP:
Tools General mechanic’s tool kit:
automotive (Appendix B, Item 1)
General Safety Instructions Do not touch hot exhaust system components with bare hands.
hIaterials/P’arts Six locknuts (Appendix G, Item 157)
nlanual References TM 9-2320-387-24P
Maintenance Level Unit
WARNING
Do not touch hot exhaust system components with bare hands. Severe injury may result.
rFiizz-1 1. Remove four locknuts (51, washers (41, capscrews (91, washers (41, two insulator reinforcement
plates (lo), and insulator (8) from tailpipe hanger (6). Discard locknuts (5).
2. Remove two locknuts Cl), washers (21, capscrews (71, washers (21, and tailpipe hanger 6) from frame (3). Discard locknuts (1).
b. Installation
1. Install tailpipe hanger (6) on frame (3) with two washers (2), capscrews (71, washers (2% and locknuts (1). Tighten capscrews (7) to 26 lb& (35 Nem).
2. Install insulator (8) and two insulator reinforcement plates (10) on tailpipe hanger (6) with four washers (41, capscrews (91, washers (41, and locknuts (5).
3-98
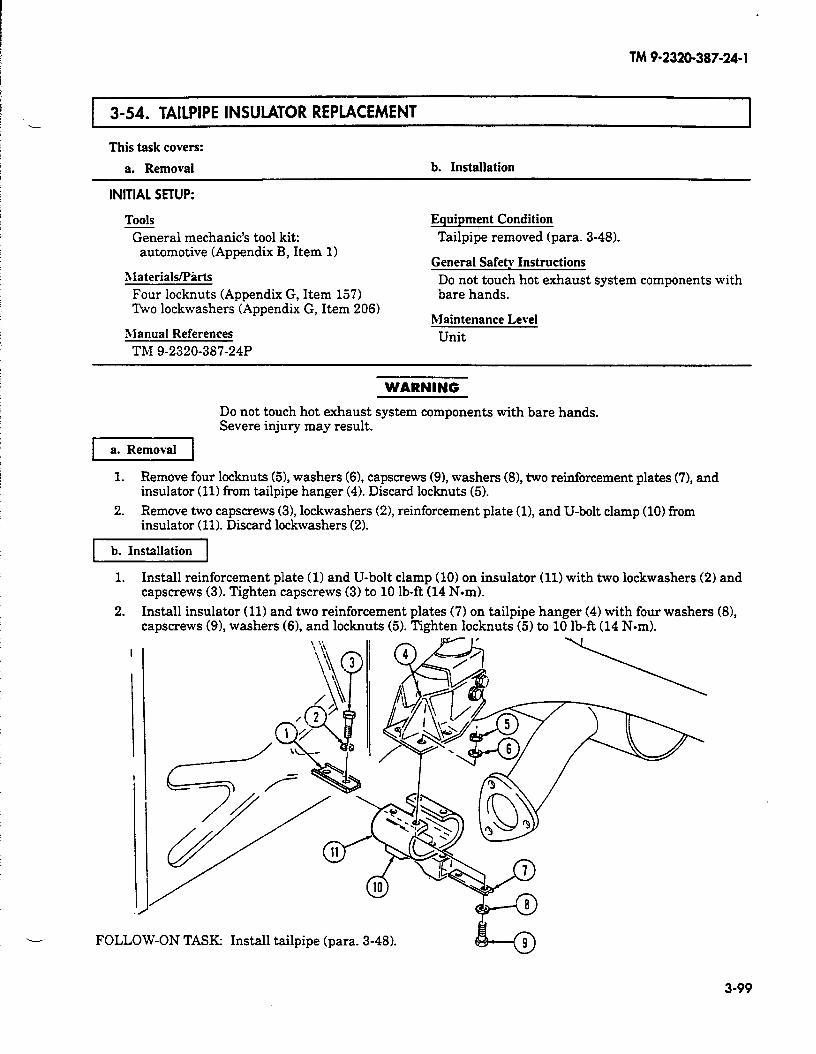
TM 9-2320-387-24- 1
3-54. TAILPIPE INSULATOR REPLACEMENT I
This task covers:
a. Removal b. Installation
INITIAL SETUP:
Tools
General mechanic’s tool kit:
Equipment Condition
Tailpipe removed (para. 3-48). automotive (Appendix B, Item 1)
XlaterialsPBrts
Four locknuts (Appendix G, Item 157)
General Safety Instructions
Do not touch hot exhaust system components with bare hands.
Two lockwashers-(Appendix G, Item 206)
hianual References
TM Q-2320-387-24P
Maintenance Level
Unit
WARNING
Do not touch hot exhaust system components with bare hands. Severe injury may result.
II
1. Remove four locknuts (51, washers (61, capscrews (Q), washers (81, two reinforcement plates (71, and insulator (11) from tailpipe hanger (4). Discard locknuts (5).
2. Remove two capscrews (31, lockwashers (2), reinforcement plate (l), and U-bolt clamp (10) from insulator (11). Discard lockwashers (2).
b. Installation
1. Install reinforcement plate (1) and U-bolt clamp (10) on insulator (11) with two lockwashers (2) and capscrews (3). Tighten capscrews (3) to 10 lb-ft (14 Nom).
2. Install insulator (11) and two reinforcement plates (7) on tailpipe hanger (4) with four washers (81, capscrews (Q), washers (61, and locknuts (5). Tighten locknuts (5) to 10 lb-ft (14 Nom).
I
- FOLLOW-ON TASK: Install tailpipe (para. 3-48).
3-99
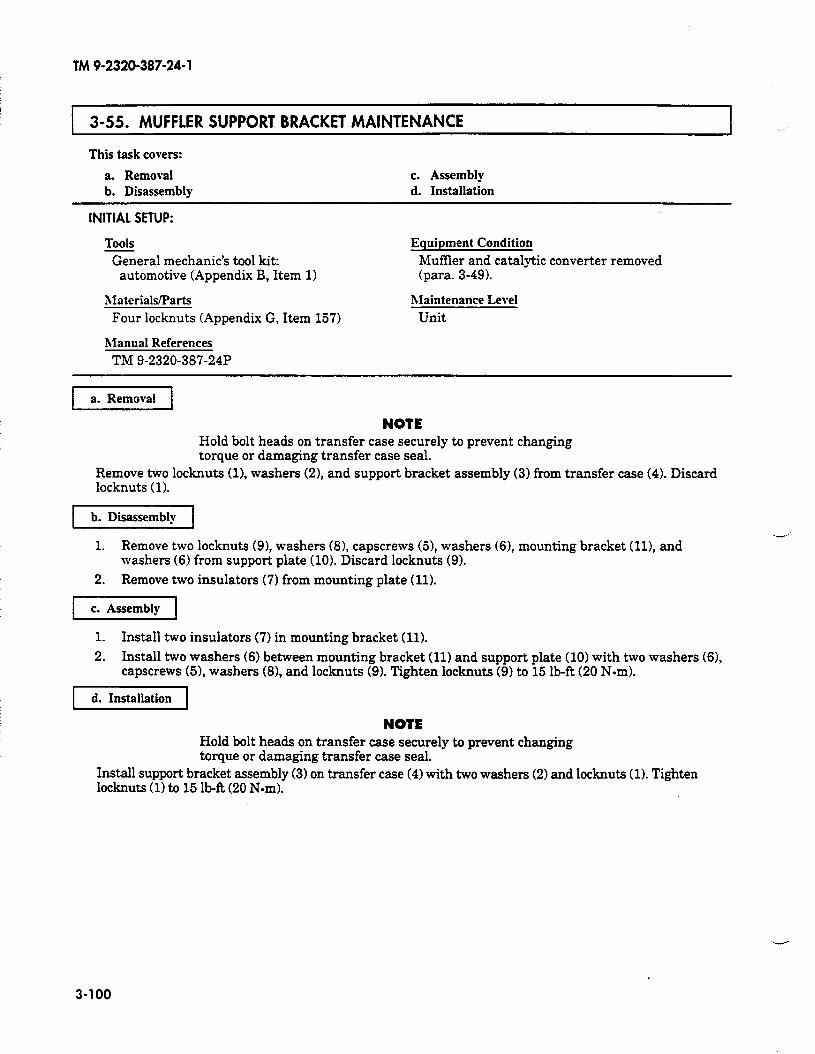
TM 9-2320-387-24-l
3-55. MUFFLER SUPPORT BRACKET MAINTENANCE ._.
This task covers:
a. Removal b. Disassembly
INITIAL SETUP:
c. Assembly d. Installation
Tools
General mechanic’s tool kit: automotive (Appendix B, Item 1)
hlaterialearts Four locknuts (Appendix G, Item 157)
Manual References
TM 9-2320-387-2413
Equipment Condition
hguffler and catalytic converter removed (para. 3-49).
nlaintenance Level
Unit
[I
NOTE Hold bolt heads on transfer case securely to prevent changing torque or damaging transfer case seal.
Remove two locknuts (11, washers (21, and support bracket assembly (31 from transfer case (4). Discard locknuts ( 1).
.-’
1. Remove two locknuts (91, washers (81, capscrews (51, washers (6), mounting bracket (ll), and washers (6) from support plate (10). Discard locknuts (9).
2. Remove two insulators (7) from mounting plate (11).
vc.Assemblyj
1. Install two insulators (7) in mounting bracket (11).
2. Install two washers (6) between mounting bracket (111 and support plate (101 with two washers (61, capscrews (5), washers (81, and locknuts (9). Tighten locknuts (91 to 15 lb& (20 Nom).
[d.InstallationI
NOTE Hold bolt heads on transfer case securely to prevent changing torque or damaging transfer case seal.
Install support bracket assembly (3) on transfer case (4) with two washers (2) and locknuts (1). Tighten locknuts (1) to 15 lb-R (20 Nom).
3-100
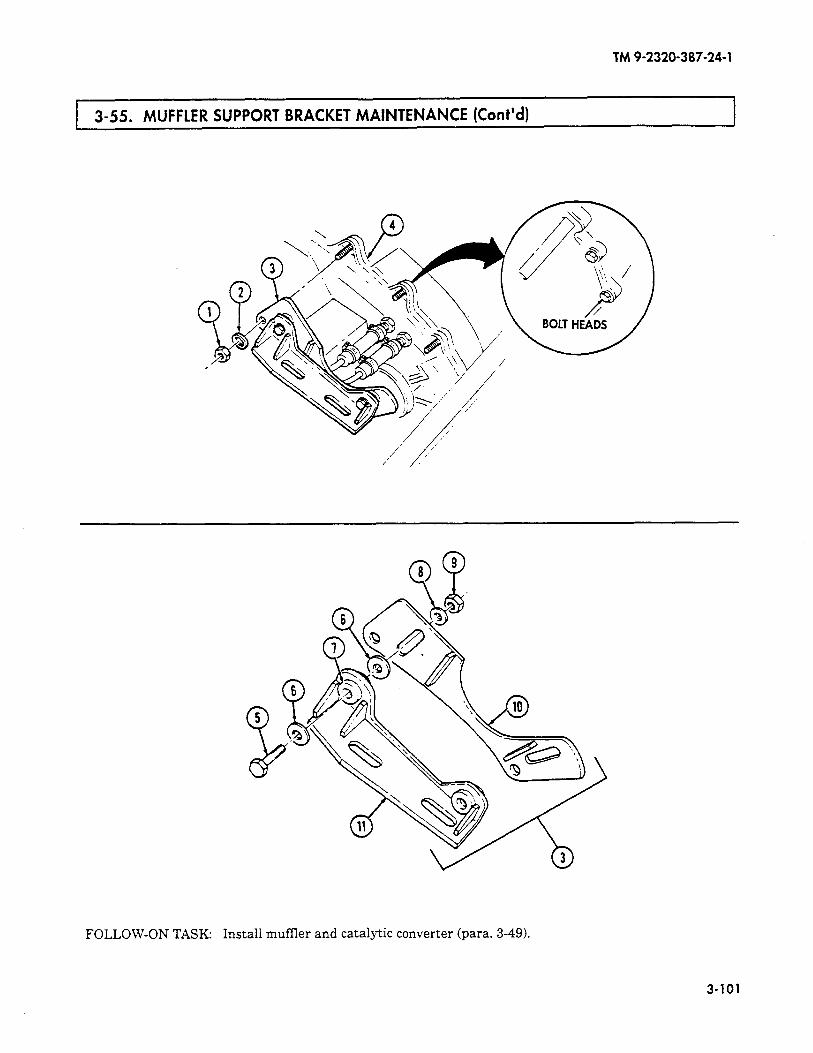
TM 9-2320-387-24-l
3-55. MUFFLER SUPPORT BRACKET MAINTENANCE (Cont’d) I
FOLLOW-ON TASK: Install muffler and catalytic converter (para. 3-49).
3-101
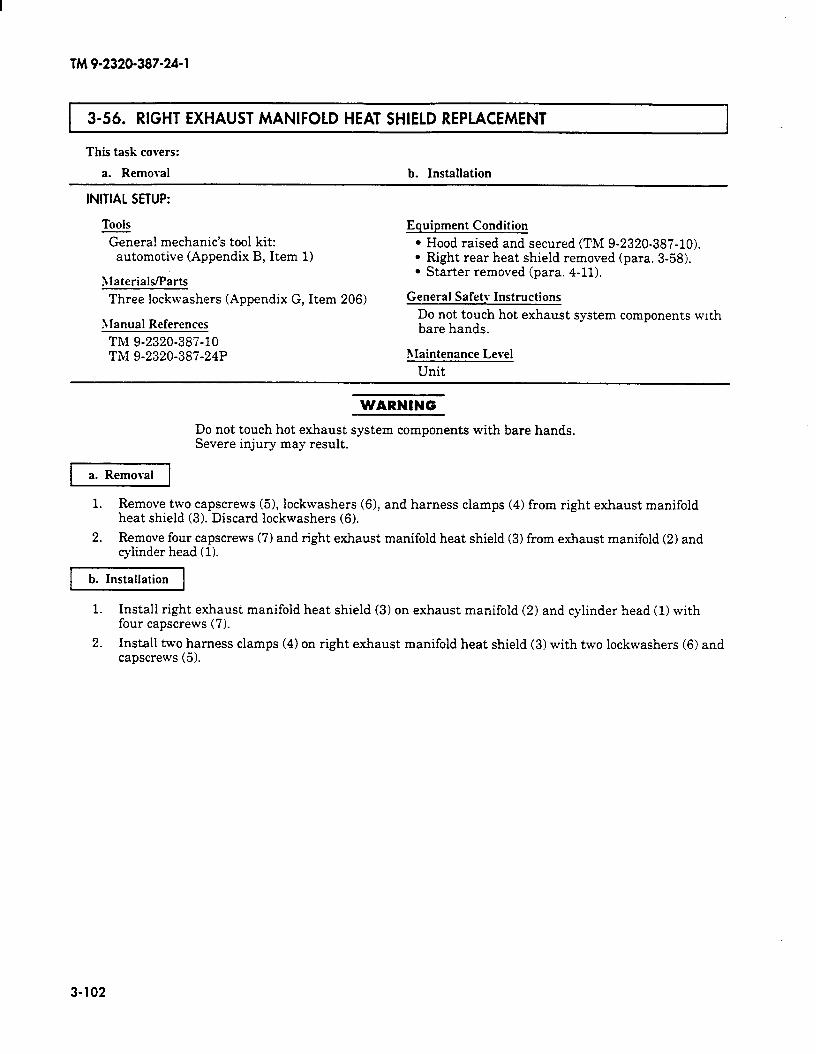
TM 9-2320-387-24-l
3-56. RIGHT EXHAUST MANIFOLD HEAT SHIELD REPLACEMENT
This task covers:
a. Removal h. Installation
INITIAL SETUP:
Tools
General mechanic’s tool kit: automotive (Appendix B, Item 1)
hIaterials/P&
Three lockwashers (Appendix G, Item 206)
hlanual References
TM 9-2320-387-10 TM 9-2320-387-24P
Equipment Condition
l Hood raised and secured (TM 9-2320-387-10). l Right rear heat shield removed (para. 3-58). l Starter removed (para. 4-11).
General Safety Instructions
Do not touch hot exhaust system components with bare hands.
hlaintenance Level
Unit
WARNING
Do not touch hot exhaust system components with bare hands. Severe injury may result.
a. Removal
1. Remove two capscrews (51, lockwashers (61, and harness clamps (4) from right exhaust manifold heat shield (3). Discard lockwashers (6).
2. Remove four capscrews (7) and right exhaust manifold heat shield (3) from exhaust manifold (2) and cylinder head (1).
b. Installation
1. Install right exhaust manifold heat shield (3) on exhaust manifold (2) and cylinder head (1) with four capscrews (7).
2. Install two harness clamps (4) on right exhaust manifold heat shield (3) with two lockwashers (6) and capscrews (5).
3-102
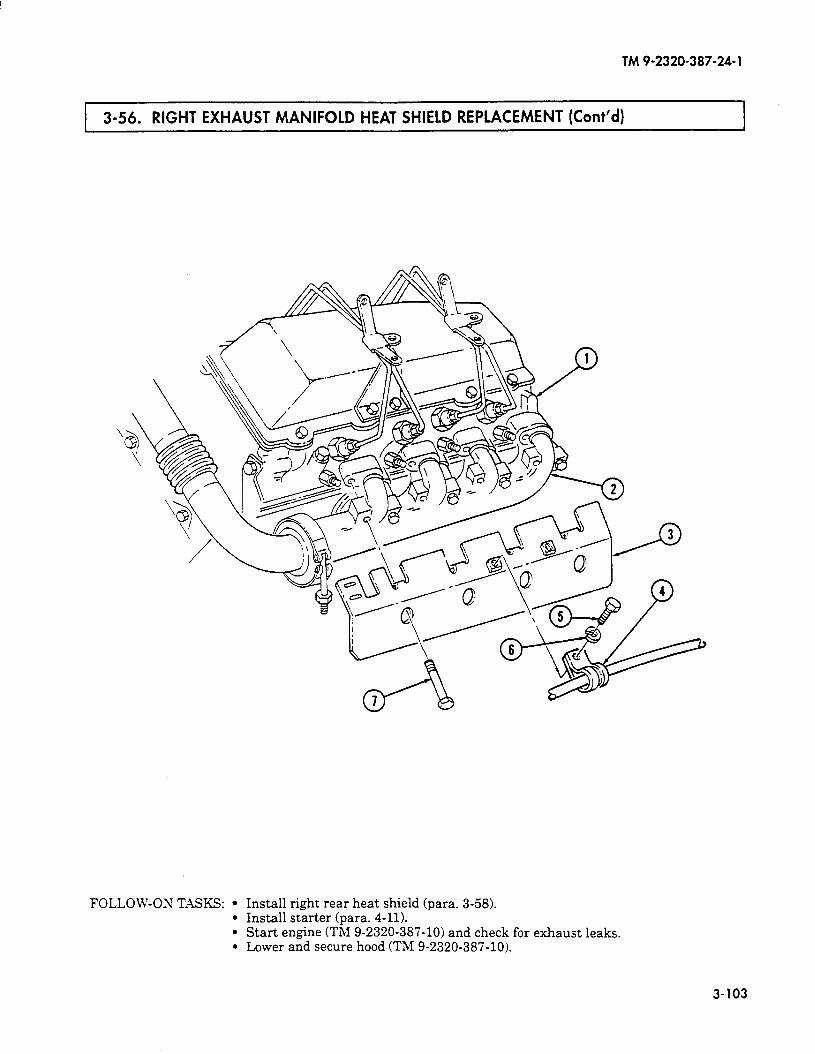
TM9-2320-387-24-l
1 3-56. RIGHT EXHAUST MANIFOLD HEAT SHIELD REPLACEMENT (Cont’d) I
FOLLOW-ON TASKS: l Install right rear heat shield (para. 3-58). l Install starter (para. 4-11). l Start engine (TM 9-2320-387-10) and check for exhaust leaks. l Lower and secure hood (TM 9-2320-387-10).
3-103

TM 9-2320-387-24- 1
I 3-57. EXHAUST MANIFOLDS REPLACEMENT
This task covers:
a. Removal
INITIAL SETUP:
b. Installation
Tools
General mechanic’s tool kit: automotive (Appendix B, Item 1)
hlanual References
ThI 9-2320-387-24P
Equipment Condition (Cont’d)
l Air horn removed (para. 3-14) (right side only). l Right exhaust manifold heat shield removed
(para. 3-56) (right side only). l Rear heat shield removed (para. 3-52) (left side only).
Equipment Condition General Safety Instructions
l Oil dipstick tube removed (para. 3-2) (left side only).
l 200-ampere alternator removed !para. 4-5) (left side only).
Do not touch hot exhaust system components with bare hands.
hlaintenance Level
Unit
WARNING
Do not touch hot exhaust system components with bare hands. Severe injury may result.
NOTE The replacement procedure for right and left exhaust manifolds is basically the same. This procedure covers the right exhaust manifold.
a. Removal
1. Loosen and slide clamp (4) onto exhaust pipe (5).
2. Remove four (eight if left side) capscrews (1) and exhaust manifold (2) from cylinder head (3).
-1
1. Install exhaust manifold (2) on cylinder head (3) with four (eight if left side) capscrews (1). Tighten capscrews (1) to 25-33 lb-ft (34-45 N.m).
2. Install e.xhaust pipe (5) on exhaust manifold (2) and tighten clamp (4).
3-104
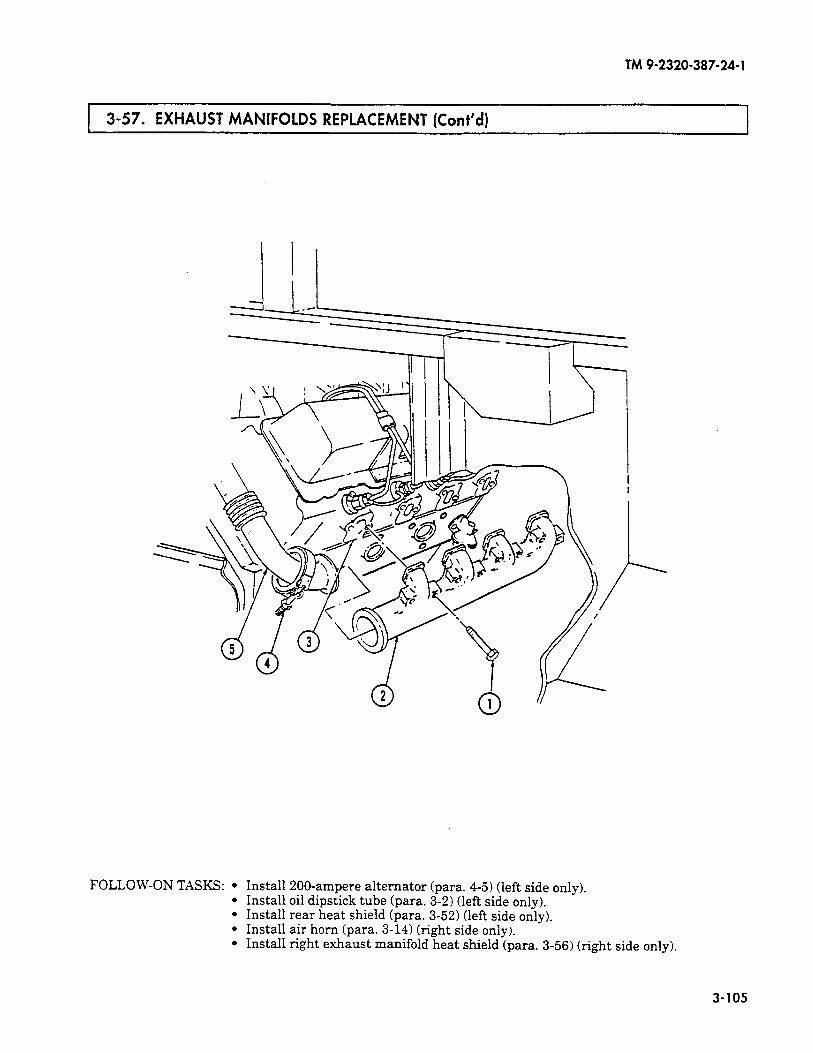
TM 9-2320-387-24-l
3-57. EXHAUST MANIFOLDS REPLACEMENT (Cont’d)
FOLLOW-ON TASKS: l Install 200-ampere alternator (para. 4-5) (left side only). l Install oil dipstick tube (para. 3-2) (left side only). l Install rear heat shield (para. 3-52) (left side only). l Install air horn (para. 3-14) (right side only). l Install right exhaust manifold heat shield (para. 3-56) (right side only).
3-105
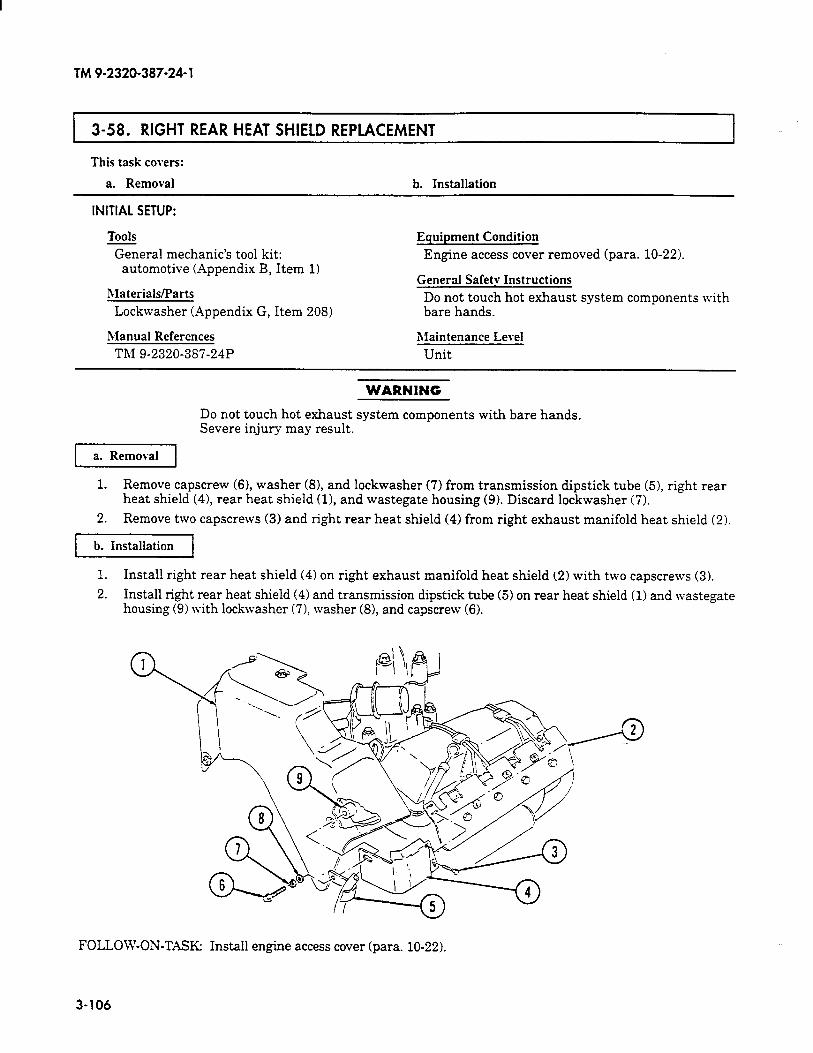
TM 9-2320-387-24-l
I 3-58. RIGHT REAR HEAT SHIELD REPLACEMENT 1
This task covers:
a. Removal b. Installation
INITIAL SETUP:
Tools
General mechanic’s tool kit: automotive (Appendix B, Item 1)
hlaterials/Parts
Lockwasher (Appendix G, Item 208)
Manual References TM 9-2320-387-24P
Equipment Condition
Engine access cover removed (para. 10-22).
General Safety Instructions
Do not touch hot exhaust system components with bare hands.
Maintenance Level Unit
WARNING
Do not touch hot exhaust system components with bare hands. Severe injury may result.
rYX&q
1. Remove capscrew (61, washer (81, and lockwasher (7) from transmission dipstick tube (51, right rear heat shield (41, rear heat shield (11, and wastegate housing (9). Discard lockwasher (7).
2. Remove two capscrews (3) and right rear heat shield (4) from right exhaust manifold heat shield (2).
b. Installation
1. Install right rear heat shield (4) on right exhaust manifold heat shield (2) with two capscrews (3).
2. Install right rear heat shield (4) and transmission dipstick tube (5) on rear heat shield (1) and wastegate housing (9) with lockwasher (71, washer (81, and capscrew (6).
FOLLOW-ON-TASK: Install engine access cover (para. 10-22).
3-106
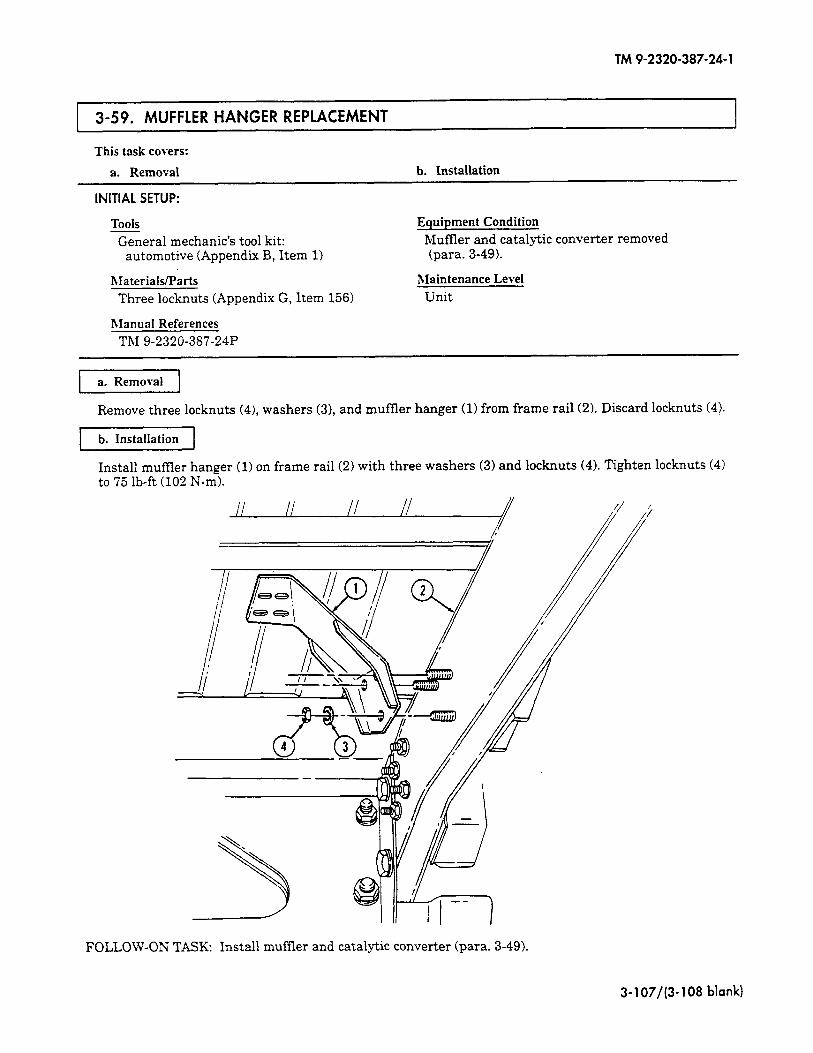
TM9-2320-387-24-l
3-59. MUFFLER HANGER REPLACEMENT
This task covers:
a. Removal b. Installation
INITIAL SETUP:
Tools Equipment Condition
General mechanic’s tool kit: Muffler and catalytic converter removed automotive (Appendix B, Item 1) (para. 3-49).
hIaterials/Parts
Three locknuts (Appendix G, Item 156)
Maintenance Level
Unit
Rlanual References
ThI 9-2320-387-24P
Remove three locknuts (4), washers (3), and muffler hanger (1) from frame rail (2). Discard locknuts (4).
Install mumer hanger (I) on frame rail (2) with three washers (3) and locknuts (4). Tighten locknuts (4) to 75 lb-ft (102 N-m).
FOLLOW-ON TASK: Install muffler and catalytic converter (para. 3-49).
3-107/(3-108 blank)
TM 9-2320-387-24-1
Change 1 3-109
Section V. COOLING SYSTEM MAINTENANCE
3-60. COOLING SYSTEM MAINTENANCE TASK SUMMARY
TASK PAGEPARA. PROCEDURES NO.
3-61. Cooling System Servicing 3-110
3-62. Radiator and Fan Shroud Assembly Maintenance 3-112
3-63. Airlift-to-Shroud Shield Assembly Replacement 3-118
3-64. Radiator Support Replacement 3-119
3-65. Surge Tank Replacement 3-120
3-66. Surge Tank-to-Radiator Vent Hose Replacement 3-121
3-67. Surge Tank-to-Water Crossover Vent Hose Replacement 3-122
3-68. Thermostat Bypass Hose Replacement 3-123
3-69. Fan Drive Hose and Quick-Disconnect Replacement 3-124
3-70. Radiator Inlet Hose Replacement 3-126
3-71. Radiator Lower Tube Assembly Replacement 3-127
3-72. Lower Radiator Hose Replacement 3-128
3-73. Water Pump Inlet Hose Replacement 3-129
3-74. Surge Tank-to-Lower Radiator Tube Hose Replacement 3-130
3-75. Surge Tank Overflow Hose Replacement 3-131
3-76. Thermostat Replacement 3-132
3-77. Water Pump Pulley Replacement 3-133
3-78. Water Pump and Adapter Plate Maintenance 3-134
3-79. Water Crossover Maintenance 3-138
3-80. Fan Drive and Fan Blade Maintenance 3-140
3-81. Serpentine Drivebelt Maintenance 3-142
3-82. Tensioner, Idler Pulleys, and Mounting Hardware Replacement 3-144
3-83. Fan Drive Friction Lining Replacement 3-146
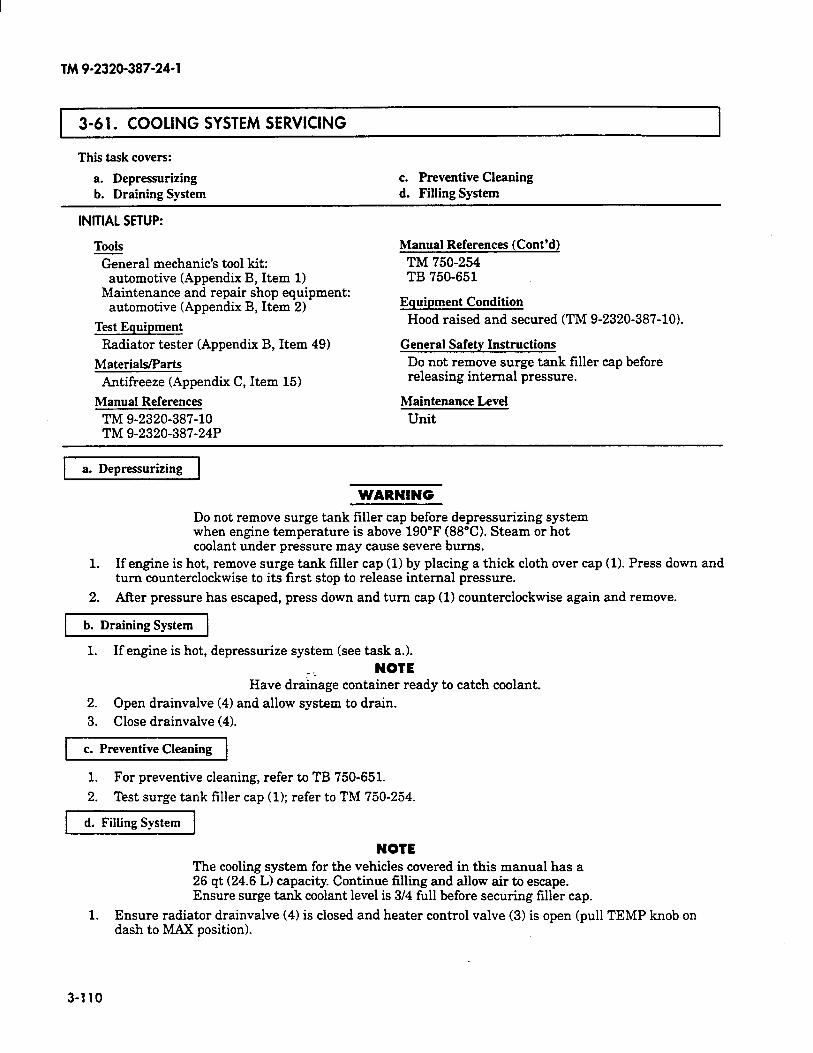
TM 9-2320-387-24-l
h-6 1. COOLING SYSTEM SERVICING I
This task covers:
a. Depressurizing b. Draining System
c. Preventive Cleaning d. Filling System
INITIAL SETUP:
Tools
?&era1 mechanic’s tool kit: automotive (Appendix B, Item 1)
Maintenance and repair shop equipment: automotive (Appendix B, Item 2)
Test Equipment
Radiator tester (Appendix B, Item 49)
Materials/Parts
Antifreeze (Appendix C, Item 15)
Manual References
TM 9-2320-387-10 TM 9-2320-387-24P
Manual References (Cont’d)
TM 750-254 TB 750-651
Equipment Condition
Hood raised and secured (TM 9-2320-387-10).
General Safety Instructions
Do not remove surge tank filler cap before releasing internal pressure.
Maintenance Level Unit
a. Depressurizing
WARNING
Do not remove surge tank filler cap before depressurizing system when engine temperature is above 190°F (88°C). Steam or hot coolant under pressure may cause severe bums.
1. If engine is hot, remove surge tank filler cap (1) by placing a thick cloth over cap (1). Press down and turn counterclockwise to its first stop to release internal pressure.
2. After pressure has escaped, press down and turn cap (1) counterclockwise again and remove.
b. Draining System
1. If engine is hot, depressurize system (see task a.).
NOTE Have draidage container ready to catch coolant.
2. Open drainvalve (4) and allow system to drain. 3. Close drainvalve (4).
c. Preventive Cleaning
1. For preventive cleaning, refer to TB 750-651.
2. Test surge tank filler cap (1); refer to TM 750-234.
d. Filling System
NOTE The cooling system for the vehicles covered in this manual has a 26 qt (24.6 L) capacity. Continue filling and allow air to escape. Ensure surge tank coolant level is 3/4 full before securing filler cap.
1. Ensure radiator drainvalve (4) is closed and heater control valve (3) is open (pull TEMP knob on dash to MAX position).
3-110
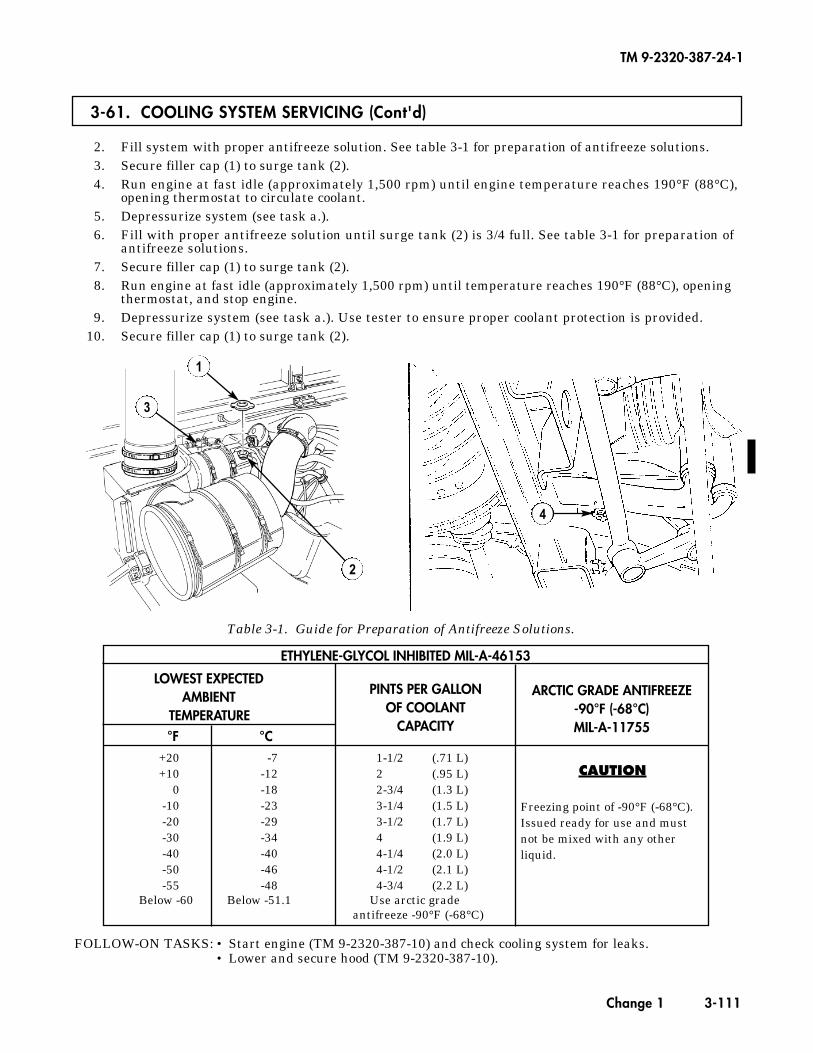
2. Fill system with proper antifreeze solution. See table 3-1 for preparation of antifreeze solutions.3. Secure filler cap (1) to surge tank (2).4. Run engine at fast idle (approximately 1,500 rpm) until engine temperature reaches 190°F (88°C),
opening thermostat to circulate coolant.5. Depressurize system (see task a.).6. Fill with proper antifreeze solution until surge tank (2) is 3/4 full. See table 3-1 for preparation of
antifreeze solutions.7. Secure filler cap (1) to surge tank (2).8. Run engine at fast idle (approximately 1,500 rpm) until temperature reaches 190°F (88°C), opening
thermostat, and stop engine.9. Depressurize system (see task a.). Use tester to ensure proper coolant protection is provided.
10. Secure filler cap (1) to surge tank (2).
3-61. COOLING SYSTEM SERVICING (Cont'd)
TM 9-2320-387-24-1
Change 1 3-111
FOLLOW-ON TASKS: • Start engine (TM 9-2320-387-10) and check cooling system for leaks.• Lower and secure hood (TM 9-2320-387-10).
ETHYLENE-GLYCOL INHIBITED MIL-A-46153
LOWEST EXPECTEDAMBIENT
TEMPERATURE
PINTS PER GALLONOF COOLANT
CAPACITY
ARCTIC GRADE ANTIFREEZE-90°F (-68°C)MIL-A-11755
CAUTION
Freezing point of -90°F (-68°C).Issued ready for use and mustnot be mixed with any otherliquid.
°F °C+20 -7 1-1/2 (.71 L)+10 -12 2 (.95 L)
0 -18 2-3/4 (1.3 L)-10 -23 3-1/4 (1.5 L)-20 -29 3-1/2 (1.7 L)-30 -34 4 (1.9 L)-40 -40 4-1/4 (2.0 L)-50 -46 4-1/2 (2.1 L)-55 -48 4-3/4 (2.2 L)
Below -60 Below -51.1 Use arctic gradeantifreeze -90°F (-68°C)
Table 3-1. Guide for Preparation of Antifreeze Solutions.
4
3
1
2

3-62. RADIATOR AND FAN SHROUD ASSEMBLY MAINTENANCE
TM 9-2320-387-24-1
3-112 Change 1
This task covers:
a. Removal c. Installationb. Cleaning and Inspection
INITIAL SETUP:
a. Removal
NNOOTTEEThe radiator and fan shroud are removed as a unit.
1. Loosen clamp (2) and disconnect radiator inlet hose (1) from radiator (3).
2. Loosen clamp (5) and disconnect surge tank-to-radiator vent hose (4) from adapter (6).
3. Disconnect control valve hose (14) from elbow (16).
4. Disconnect fan drive hose (17) from fan drive (18).
5. Disconnect elbow (16) from shroud bulkhead adapter (15).
6. Remove clamp (9) and lower radiator front hose (10) from radiator (3).
7. Remove locknut (27), washer (28), capscrew (34), washer (33), washer (32), lower mount (30), andlarge washer (29) from radiator (3) and frame bracket (31). Discard locknut (27).
8. Remove four locknuts (11), washers (12), and capscrews (13) from two support brackets (8) andairlift brackets (7). Discard locknuts (11).
9. Loosen nut (26) and release tension from cross brace (23).
10. Remove four locknuts (25), washers (24), capscrews (36), and crossbrace (23) from airlift brackets(7).
11. Lift radiator (3) up and remove from vehicle.
12. Remove eight capscrews (35), lockwashers (37), two retaining strips (38), and fan shroud (39) fromradiator (3). Discard lockwashers (37).
13. Remove two locknuts (19), large washers (20), bracket (40) (left side), brackets (21), supportbrackets (8), and insulators (22) from radiator studs (22.1). Discard locknuts (19).
ToolsGeneral mechanic’s tool kit:
automotive (Appendix B, Item 1)Maintenance and repair shop equipment:
automotive (Appendix B, Item 2)Materials/Parts
Seven locknuts (Appendix G, Item 157Eight lockwashers (Appendix G, Item 208)
Personnel RequiredOne mechanicOne assistant
Manual ReferencesTM 9-2320-387-24P
Equipment Condition• Cooling system drained (para. 3-61).• Oil cooler removed (para. 3-8).
General Safety InstructionsCompressed air used for cleaning purposes will not exceed 30 psi (207 kPa).
Maintenance LevelUnit
CCAAUUTTIIOONNDo not bend radiator fins. Damaged fins reduce cooling efficiency,which may damage engine.
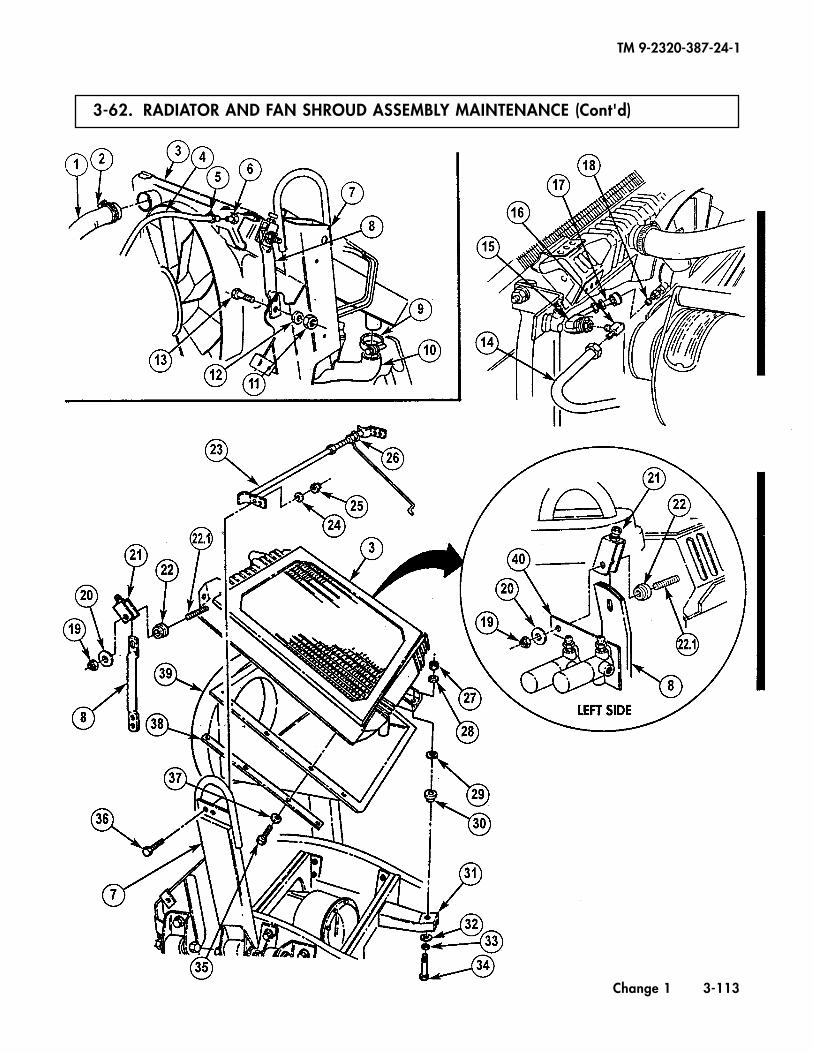
3-62. RADIATOR AND FAN SHROUD ASSEMBLY MAINTENANCE (Cont'd)
TM 9-2320-387-24-1
Change 1 3-113
3-62. RADIATOR AND FAN SHROUD ASSEMBLY MAINTENANCE (Cont'd)
TM 9-2320-387-24-1
3-114 Change 1
CCAAUUTTIIOONNTo ensure proper cooling of engine, upper edge of shroud mustalign with radiator top tank seam or damage to equipment mayresult.
1. Install fan shroud (21) on radiator (9), with shroud edge (22) aligning with tank seam (23), with tworetaining strips (20), eight lockwashers (17), and capscrews (18). Tighten capscrews (18) to 6 lb-ft (8 N•m).
2. Install two brackets (3), insulators (4), support brackets (24), and bracket (28) (left side), on radiatorstud (4.1) with two large washers (2) and new locknuts (1). Tighten locknuts (1) to 20 lb-ft (27 N•m).
3. Install radiator (9) on frame bracket (14), aligning two support brackets (24) to airlift brackets (29).
4. Install support brackets (24) on airlift brackets (29) with four capscrews (32), washers (31), andlocknuts (30). Do not tighten locknuts (30).
5. Install radiator (9), large washer (12), and mount (13) on frame bracket (14) with washer (11),washer (15), capscrew (16), washer (11), and locknut (10). Do not tighten capscrew (16).
6. Install crossbrace (5) on airlift brackets (29) with four capscrews (19), washers (6), and locknuts (7).
7. Tighten nut (8) on crossbrace (5) until slack is removed.
c. Installation
b. Cleaning and Inspection
WWAARRNNIINNGG
Compressed air used for cleaning purposes will not exceed 30 psi(207 kPa). Use only with effective chip guarding and personalprotective equipment (goggles/shield, gloves, etc.).
1. Remove dirt, trash, and insects embedded in radiator fins using water and compressed air.
2. Inspect radiator adapter (25) for damage. Replace adapter (25) if damaged.
3. Inspect radiator (9) for breaks, punctures, cracks, and splits. Replace radiator (9) if broken,punctured, cracked, or split.
4. Inspect shroud bulkhead adapter (26) for damage. Replace bulkhead adapter (26) if damaged.
5. Inspect fan shroud (21) for cracks, splits, and breaks. Repair fan shroud (21) if cracked, split, or broken.Replace fan shroud (21) if damaged beyond repair.
6. Inspect fan drive hose (27) for cracks or damage. Replace if cracked or damaged.
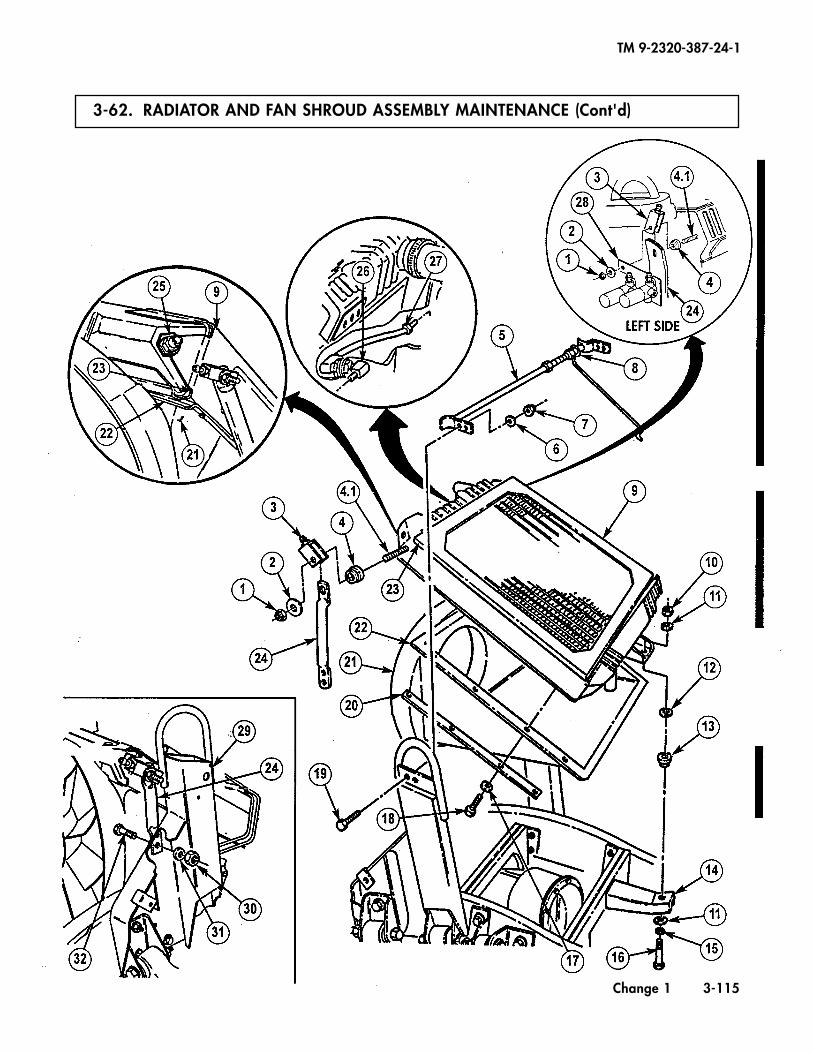
3-62. RADIATOR AND FAN SHROUD ASSEMBLY MAINTENANCE (Cont'd)
TM 9-2320-387-24-1
Change 1 3-115
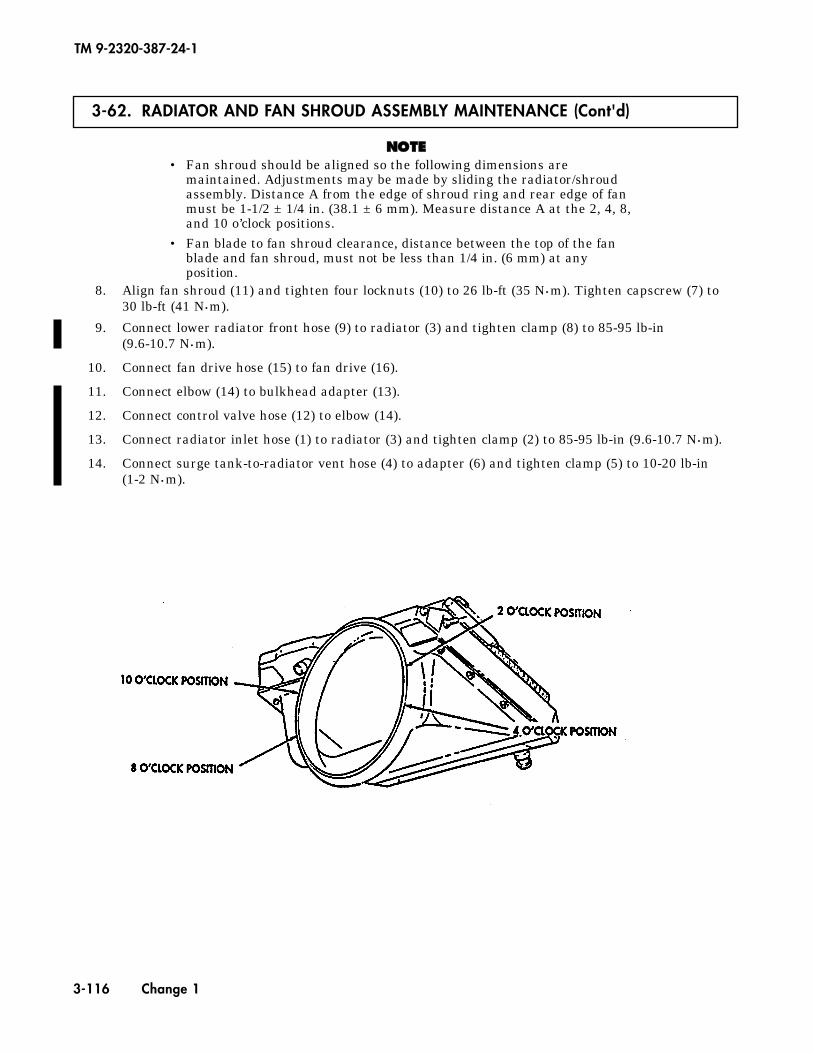
3-62. RADIATOR AND FAN SHROUD ASSEMBLY MAINTENANCE (Cont'd)
TM 9-2320-387-24-1
3-116 Change 1
NNOOTTEE• Fan shroud should be aligned so the following dimensions are
maintained. Adjustments may be made by sliding the radiator/shroudassembly. Distance A from the edge of shroud ring and rear edge of fanmust be 1-1/2 ± 1/4 in. (38.1 ± 6 mm). Measure distance A at the 2, 4, 8,and 10 o’clock positions.
• Fan blade to fan shroud clearance, distance between the top of the fanblade and fan shroud, must not be less than 1/4 in. (6 mm) at anyposition.
8. Align fan shroud (11) and tighten four locknuts (10) to 26 lb-ft (35 N•m). Tighten capscrew (7) to 30 lb-ft (41 N•m).
9. Connect lower radiator front hose (9) to radiator (3) and tighten clamp (8) to 85-95 lb-in (9.6-10.7 N•m).
10. Connect fan drive hose (15) to fan drive (16).
11. Connect elbow (14) to bulkhead adapter (13).
12. Connect control valve hose (12) to elbow (14).
13. Connect radiator inlet hose (1) to radiator (3) and tighten clamp (2) to 85-95 lb-in (9.6-10.7 N•m).
14. Connect surge tank-to-radiator vent hose (4) to adapter (6) and tighten clamp (5) to 10-20 lb-in (1-2 N•m).
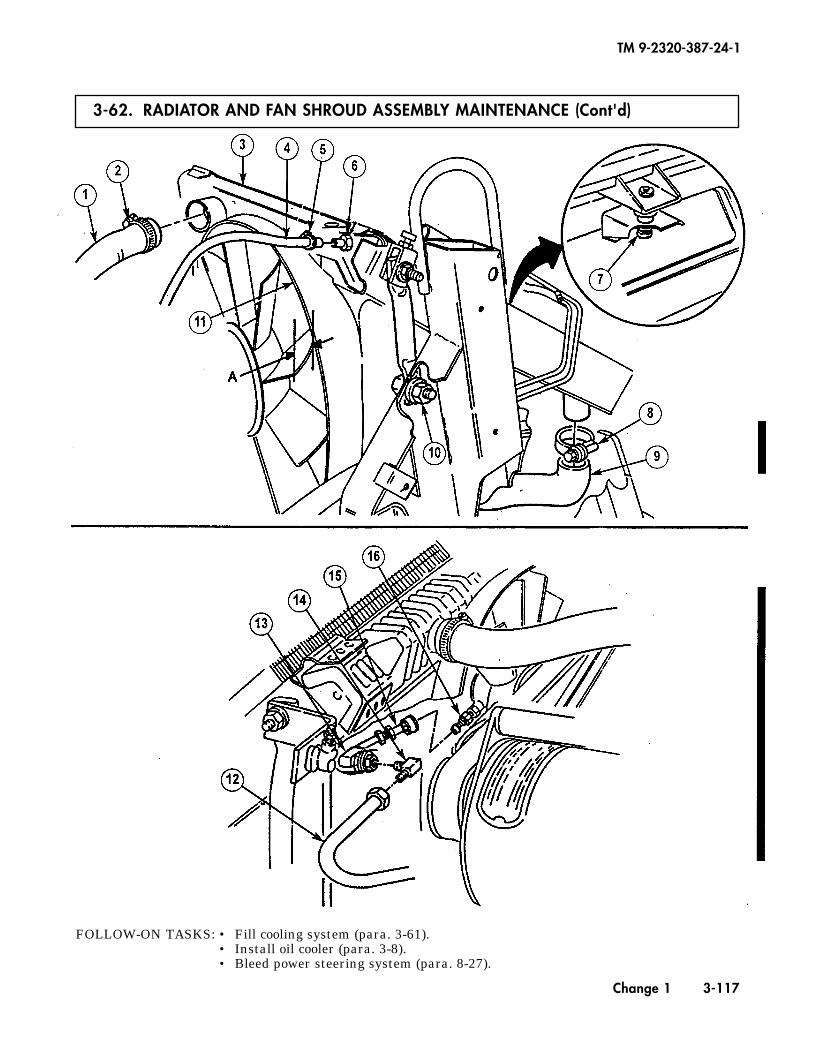
3-62. RADIATOR AND FAN SHROUD ASSEMBLY MAINTENANCE (Cont'd)
TM 9-2320-387-24-1
Change 1 3-117
FOLLOW-ON TASKS: • Fill cooling system (para. 3-61).• Install oil cooler (para. 3-8).• Bleed power steering system (para. 8-27).

TM 9-2320-387-24-l
3-63. AIRLIFT-TO-SHROUD SHIELD ASSEMBLY REPLACEMENT
This task covers:
a. Removal b. Installation
INITIAL SETUP:
TOOIS
General mechanic’s tool kit: automotive (Appendix B, Item 11
Manual References
TM 9-2320-387-24P
Equipment Condition
Radiator and fan shroud removed (para. 3-62).
Maintenance Level
Unit
Remove three screws (3) and shield assembly (21 from airlift bracket (1).
b. Installation
Install shield assembly (21 on airlift bracket (1) with three screws (3).
FOLLOW-ON TASK: Install radiator and fan shroud (para. 3-62).
3-118
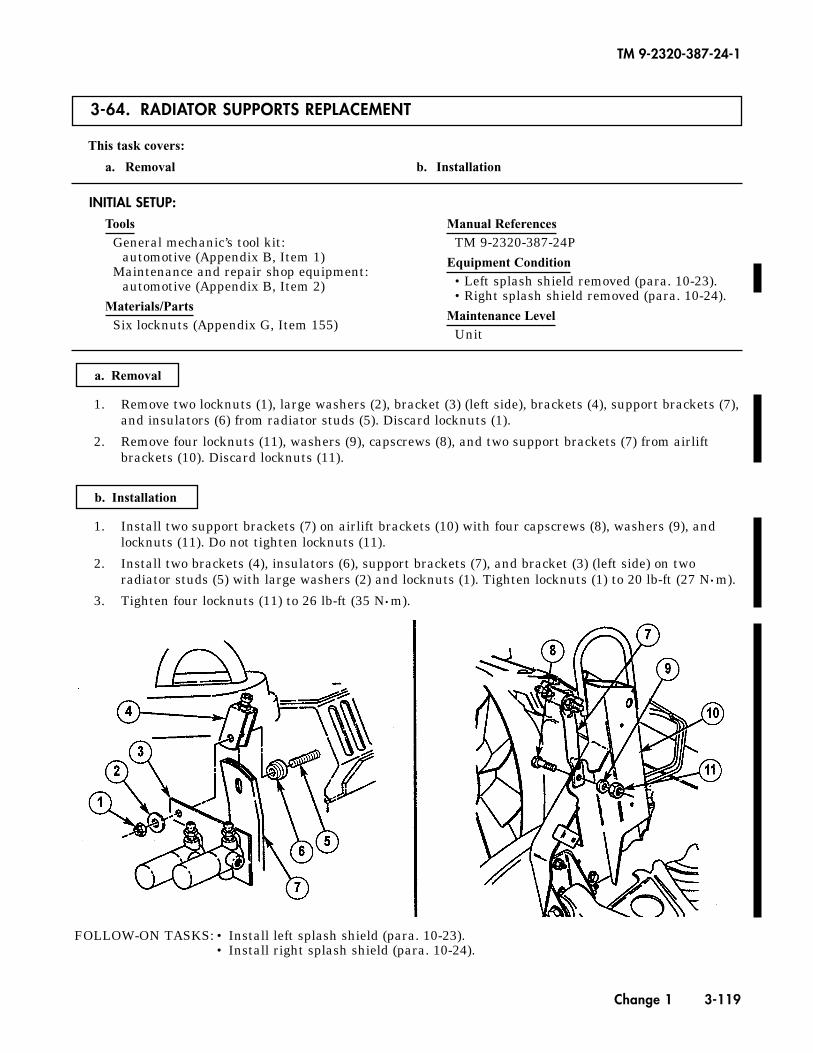
3-64. RADIATOR SUPPORTS REPLACEMENT
This task covers:
a. Removal b. Installation
INITIAL SETUP:
1. Remove two locknuts (1), large washers (2), bracket (3) (left side), brackets (4), support brackets (7),and insulators (6) from radiator studs (5). Discard locknuts (1).
2. Remove four locknuts (11), washers (9), capscrews (8), and two support brackets (7) from airliftbrackets (10). Discard locknuts (11).
1. Install two support brackets (7) on airlift brackets (10) with four capscrews (8), washers (9), andlocknuts (11). Do not tighten locknuts (11).
2. Install two brackets (4), insulators (6), support brackets (7), and bracket (3) (left side) on tworadiator studs (5) with large washers (2) and locknuts (1). Tighten locknuts (1) to 20 lb-ft (27 N•m).
3. Tighten four locknuts (11) to 26 lb-ft (35 N•m).
b. Installation
a. Removal
ToolsGeneral mechanic’s tool kit:
automotive (Appendix B, Item 1)Maintenance and repair shop equipment:
automotive (Appendix B, Item 2)Materials/Parts
Six locknuts (Appendix G, Item 155)
Manual ReferencesTM 9-2320-387-24P
Equipment Condition•Left splash shield removed (para. 10-23).•Right splash shield removed (para. 10-24).
Maintenance LevelUnit
TM 9-2320-387-24-1
Change 1 3-119
FOLLOW-ON TASKS: • Install left splash shield (para. 10-23).• Install right splash shield (para. 10-24).
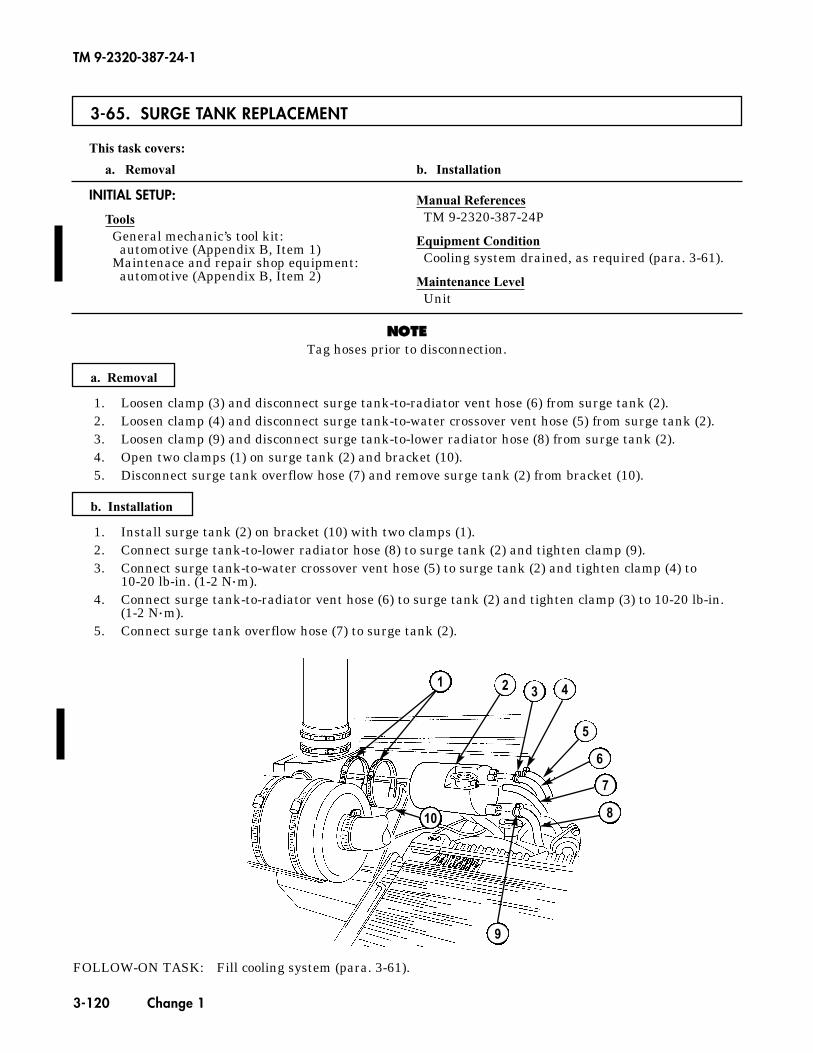
3-65. SURGE TANK REPLACEMENT
This task covers:
a. Removal b. Installation
a. Removal
1. Loosen clamp (3) and disconnect surge tank-to-radiator vent hose (6) from surge tank (2).2. Loosen clamp (4) and disconnect surge tank-to-water crossover vent hose (5) from surge tank (2).3. Loosen clamp (9) and disconnect surge tank-to-lower radiator hose (8) from surge tank (2).4. Open two clamps (1) on surge tank (2) and bracket (10).5. Disconnect surge tank overflow hose (7) and remove surge tank (2) from bracket (10).
NNOOTTEETag hoses prior to disconnection.
INITIAL SETUP:
ToolsGeneral mechanic’s tool kit:
automotive (Appendix B, Item 1)Maintenace and repair shop equipment:
automotive (Appendix B, Item 2)
Manual ReferencesTM 9-2320-387-24P
Equipment ConditionCooling system drained, as required (para. 3-61).
Maintenance LevelUnit
b. Installation
1. Install surge tank (2) on bracket (10) with two clamps (1).2. Connect surge tank-to-lower radiator hose (8) to surge tank (2) and tighten clamp (9).3. Connect surge tank-to-water crossover vent hose (5) to surge tank (2) and tighten clamp (4) to
10-20 lb-in. (1-2 N•m).4. Connect surge tank-to-radiator vent hose (6) to surge tank (2) and tighten clamp (3) to 10-20 lb-in.
(1-2 N•m).5. Connect surge tank overflow hose (7) to surge tank (2).
TM 9-2320-387-24-1
3-120 Change 1
FOLLOW-ON TASK: Fill cooling system (para. 3-61).
1 2 3 4
5
6
7
8
9
10
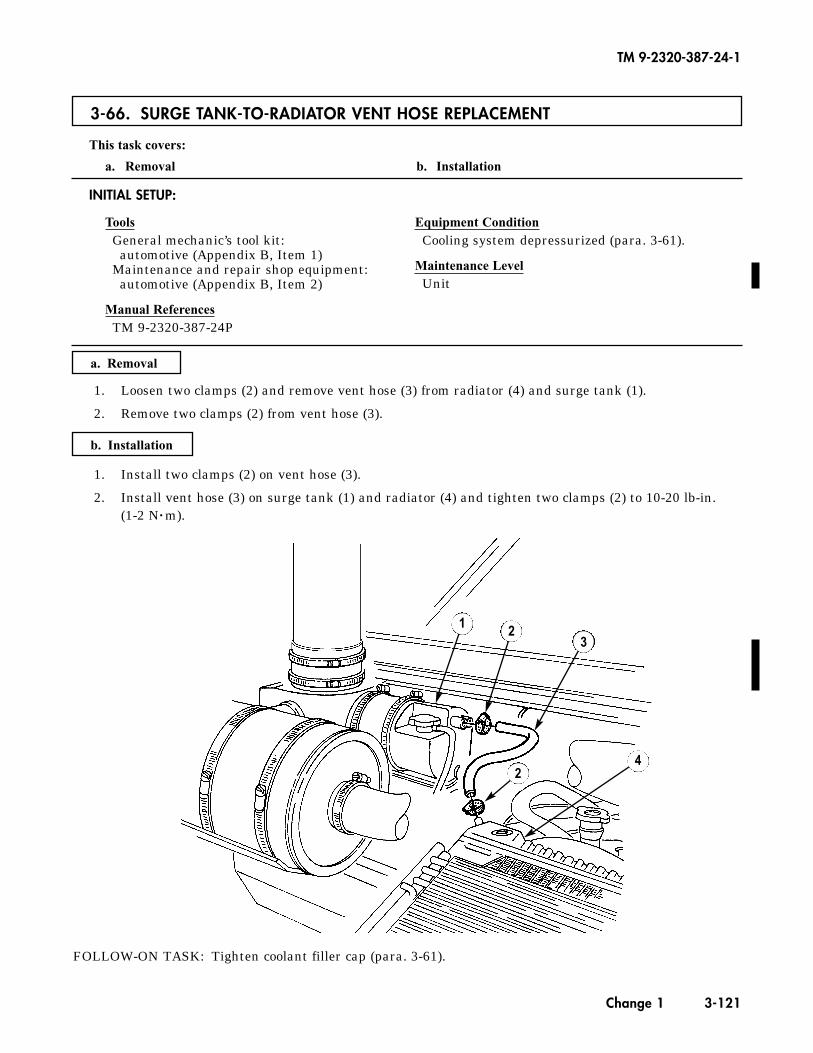
3-66. SURGE TANK-TO-RADIATOR VENT HOSE REPLACEMENT
This task covers:
a. Removal b. Installation
a. Removal
1. Loosen two clamps (2) and remove vent hose (3) from radiator (4) and surge tank (1).
2. Remove two clamps (2) from vent hose (3).
INITIAL SETUP:
ToolsGeneral mechanic’s tool kit:
automotive (Appendix B, Item 1)Maintenance and repair shop equipment:
automotive (Appendix B, Item 2)
Manual ReferencesTM 9-2320-387-24P
Equipment ConditionCooling system depressurized (para. 3-61).
Maintenance LevelUnit
b. Installation
1. Install two clamps (2) on vent hose (3).
2. Install vent hose (3) on surge tank (1) and radiator (4) and tighten two clamps (2) to 10-20 lb-in. (1-2 N•m).
TM 9-2320-387-24-1
Change 1 3-121
FOLLOW-ON TASK: Tighten coolant filler cap (para. 3-61).
1 23
24
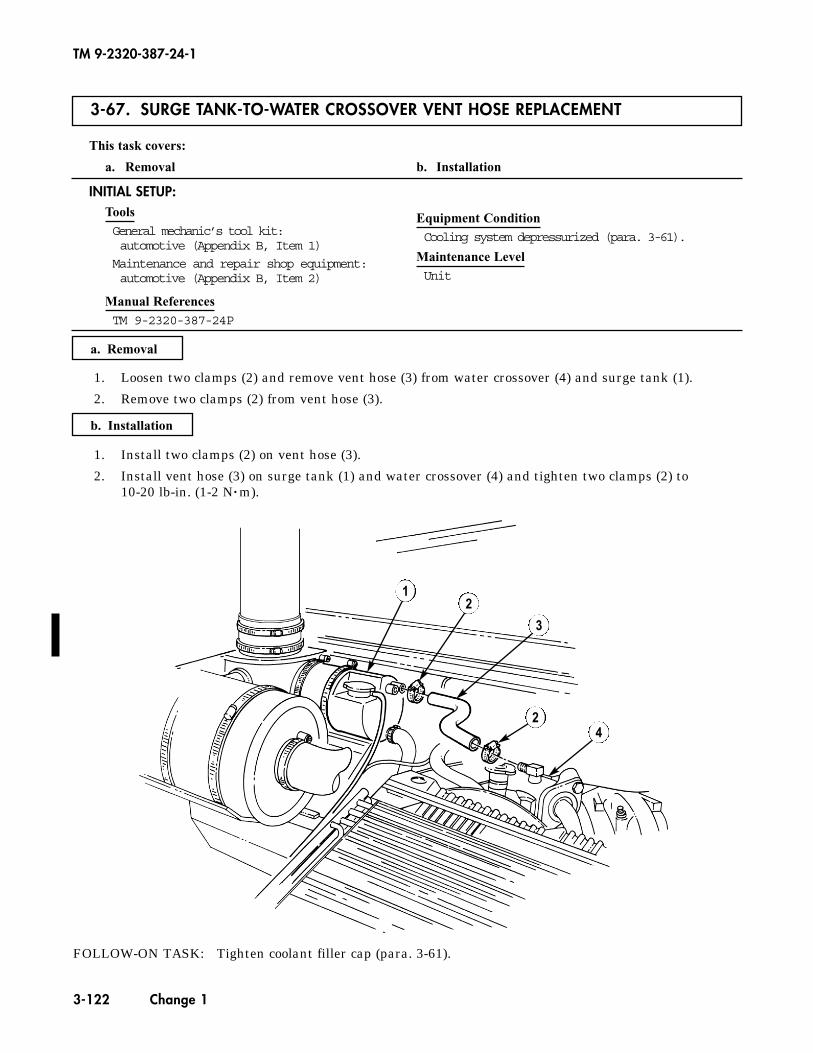
3-67. SURGE TANK-TO-WATER CROSSOVER VENT HOSE REPLACEMENT
This task covers:
a. Removal b. Installation
a. Removal
1. Loosen two clamps (2) and remove vent hose (3) from water crossover (4) and surge tank (1).
2. Remove two clamps (2) from vent hose (3).
INITIAL SETUP:ToolsGeneral mechanic’s tool kit:automotive (Appendix B, Item 1)
Maintenance and repair shop equipment:automotive (Appendix B, Item 2)
Manual ReferencesTM 9-2320-387-24P
Equipment ConditionCooling system depressurized (para. 3-61).
Maintenance LevelUnit
b. Installation
1. Install two clamps (2) on vent hose (3).
2. Install vent hose (3) on surge tank (1) and water crossover (4) and tighten two clamps (2) to 10-20 lb-in. (1-2 N•m).
TM 9-2320-387-24-1
3-122 Change 1
FOLLOW-ON TASK: Tighten coolant filler cap (para. 3-61).
12
3
24
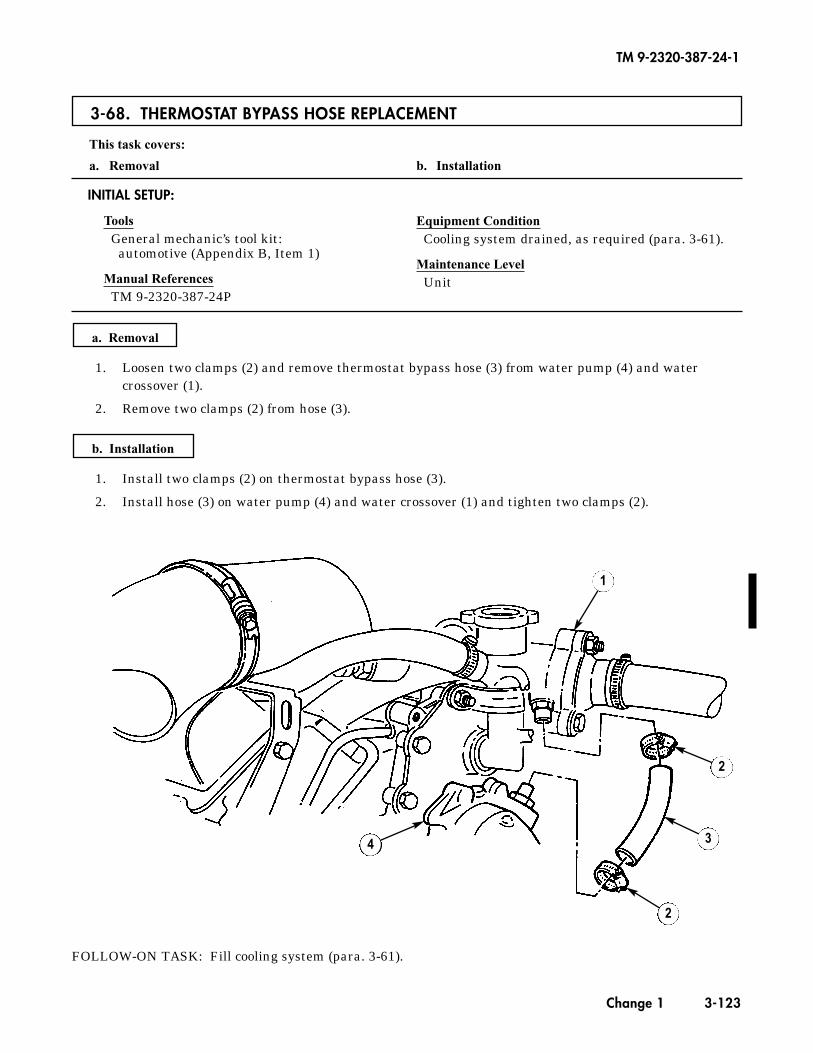
3-68. THERMOSTAT BYPASS HOSE REPLACEMENT
This task covers:
a. Removal b. Installation
a. Removal
1. Loosen two clamps (2) and remove thermostat bypass hose (3) from water pump (4) and watercrossover (1).
2. Remove two clamps (2) from hose (3).
INITIAL SETUP:
ToolsGeneral mechanic’s tool kit:
automotive (Appendix B, Item 1)
Manual ReferencesTM 9-2320-387-24P
Equipment ConditionCooling system drained, as required (para. 3-61).
Maintenance LevelUnit
b. Installation
1. Install two clamps (2) on thermostat bypass hose (3).
2. Install hose (3) on water pump (4) and water crossover (1) and tighten two clamps (2).
TM 9-2320-387-24-1
Change 1 3-123
FOLLOW-ON TASK: Fill cooling system (para. 3-61).
1
2
3
2
4

This task covers:
a. Removal b. Installation
a. Removal
INITIAL SETUP:
ToolsGeneral mechanic’s tool kit:
automotive (Appendix B, Item 1)
Material/PartsSealing compound (Appendix C, Item 60)
Personnel RequiredOne mechanicOne assistant
Manual ReferencesTM 9-2320-387-10TM 9-2320-387-24P
Equipment ConditionHood raised and secured (TM 9-2320-387-10).
Maintenance LevelUnit
3-69. FAN DRIVE HOSE AND QUICK-DISCONNECT REPLACEMENT
TM 9-2320-387-24-1
3-124 Change 1
NNOOTTEEApply sealing compound to all pipe threads during installation.
1. Install male end of quick-disconnect (12) on fan drive (3).2. Install female end of quick-disconnect (2) on fan drive hose (1).3. Install bulkhead adapter (11) on fan drive hose (1).4. Install bulkhead adapter bushing (8) on bulkhead adapter (11).5. Install bulkhead adapter (11) and bulkhead adapter bushing (8) on shroud (4) with washer (7) and
nut (6).6. Install hose (1) and fan drive hose quick-disconnect (2) on fan drive (3).7. Install elbow (5) on bulkhead adapter bushing (8).8. Install control valve hose (9) on elbow (5).
b. Installation
NNOOTTEEHave container ready to catch fluid.
1. Remove control valve hose (9) from elbow (5).2. Remove elbow (5) from bulkhead adapter bushing (8).3. Remove nut (6), washer (7), and bulkhead adapter bushing (8) with bulkhead adapter (11) from
shroud (4).4. Release fan drive hose quick-disconnect (2) and remove hose (1) from fan drive (3).5. Remove bulkhead adapter bushing (8) from bulkhead adapter (11).6. Remove bulkhead adapter (11) from fan drive hose (1).7. Remove female end of quick-disconnect (2) from fan drive hose (1).8. Remove male end of quick-disconnect (12) from fan drive (3).
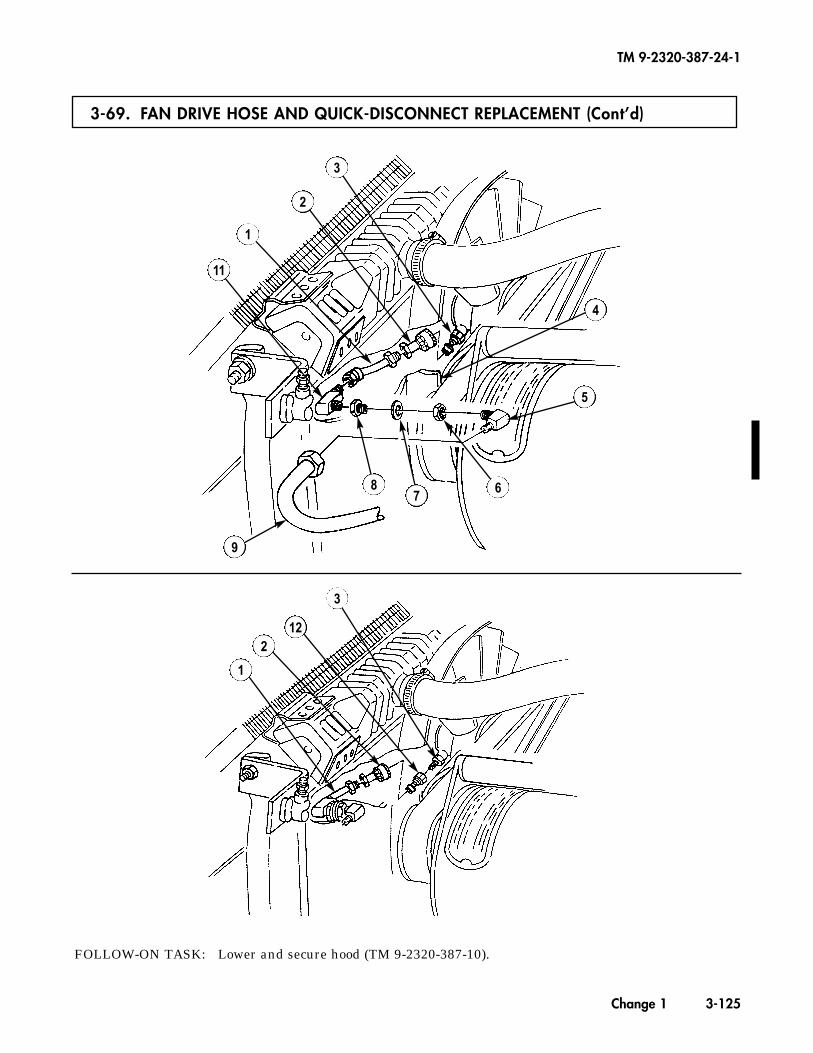
FOLLOW-ON TASK: Lower and secure hood (TM 9-2320-387-10).
3-69. FAN DRIVE HOSE AND QUICK-DISCONNECT REPLACEMENT (Cont’d)
TM 9-2320-387-24-1
Change 1 3-125
87 6
9
11
1
2
5
1
2
3
3
4
12

3-70. RADIATOR INLET HOSE REPLACEMENT
This task covers:
a. Removal b. Installation
INITIAL SETUP:
ToolsGeneral mechanic’s tool kit:
automotive (Appendix B, Item 1)Maintenance and repair shop equipment:
automotive (Appendix B, Item 2)
Manual ReferencesTM 9-2320-387-24P
Equipment ConditionCooling system depressurized (para. 3-61).
Maintenance LevelUnit
1. Loosen two clamps (2) and remove inlet hose (3) from radiator (1) and water crossover (4).2. Remove two clamps (2) from hose (3).
1. Install two clamps (2) on inlet hose (3).2. Install hose (3) on water crossover (4) and radiator (1) and tighten two clamps (2)
to 85-95 lb-in. (10-11 N•m).
b. Installation
a. Removal
TM 9-2320-387-24-1
3-126 Change 1
FOLLOW-ON TASK: Tighten coolant filler cap (para. 3-61).
12 3
2
4
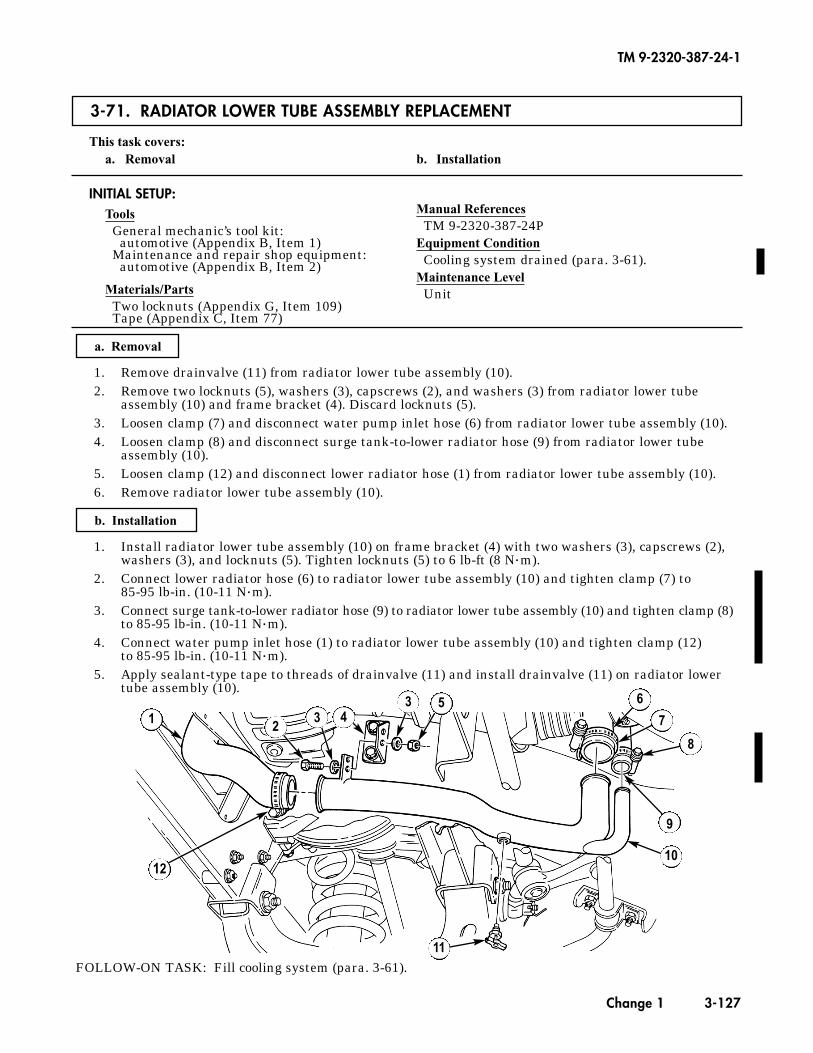
3-71. RADIATOR LOWER TUBE ASSEMBLY REPLACEMENT
This task covers:a. Removal b. Installation
INITIAL SETUP:Tools
General mechanic’s tool kit:automotive (Appendix B, Item 1)
Maintenance and repair shop equipment:automotive (Appendix B, Item 2)
Materials/PartsTwo locknuts (Appendix G, Item 109)Tape (Appendix C, Item 77)
Manual ReferencesTM 9-2320-387-24P
Equipment ConditionCooling system drained (para. 3-61).
Maintenance LevelUnit
1. Remove drainvalve (11) from radiator lower tube assembly (10).2. Remove two locknuts (5), washers (3), capscrews (2), and washers (3) from radiator lower tube
assembly (10) and frame bracket (4). Discard locknuts (5).3. Loosen clamp (7) and disconnect water pump inlet hose (6) from radiator lower tube assembly (10).4. Loosen clamp (8) and disconnect surge tank-to-lower radiator hose (9) from radiator lower tube
assembly (10).5. Loosen clamp (12) and disconnect lower radiator hose (1) from radiator lower tube assembly (10).6. Remove radiator lower tube assembly (10).
1. Install radiator lower tube assembly (10) on frame bracket (4) with two washers (3), capscrews (2),washers (3), and locknuts (5). Tighten locknuts (5) to 6 lb-ft (8 N•m).
2. Connect lower radiator hose (6) to radiator lower tube assembly (10) and tighten clamp (7) to 85-95 lb-in. (10-11 N•m).
3. Connect surge tank-to-lower radiator hose (9) to radiator lower tube assembly (10) and tighten clamp (8)to 85-95 lb-in. (10-11 N•m).
4. Connect water pump inlet hose (1) to radiator lower tube assembly (10) and tighten clamp (12) to 85-95 lb-in. (10-11 N•m).
5. Apply sealant-type tape to threads of drainvalve (11) and install drainvalve (11) on radiator lowertube assembly (10).
b. Installation
a. Removal
TM 9-2320-387-24-1
Change 1 3-127
FOLLOW-ON TASK: Fill cooling system (para. 3-61).
1 23
3 54
6
7
8
9
10
11
12
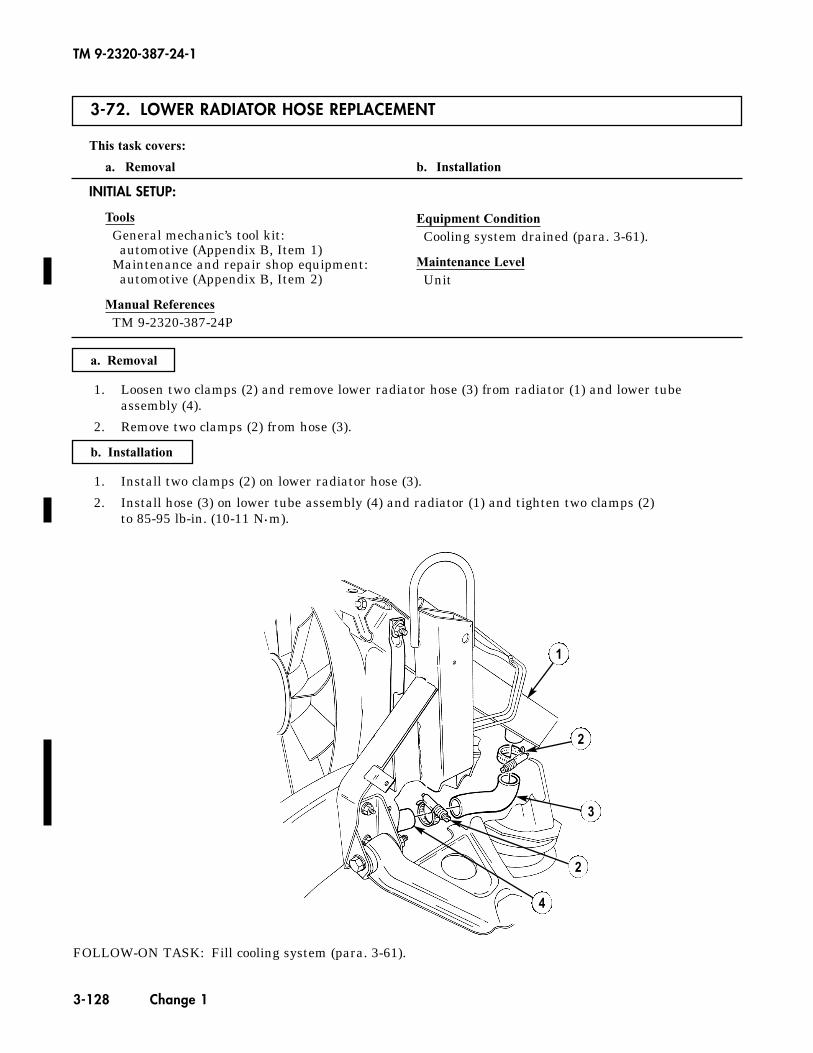
3-72. LOWER RADIATOR HOSE REPLACEMENT
This task covers:
a. Removal b. Installation
1. Loosen two clamps (2) and remove lower radiator hose (3) from radiator (1) and lower tube assembly (4).
2. Remove two clamps (2) from hose (3).
INITIAL SETUP:
ToolsGeneral mechanic’s tool kit:
automotive (Appendix B, Item 1)Maintenance and repair shop equipment:
automotive (Appendix B, Item 2)
Manual ReferencesTM 9-2320-387-24P
Equipment ConditionCooling system drained (para. 3-61).
Maintenance LevelUnit
b. Installation
1. Install two clamps (2) on lower radiator hose (3).
2. Install hose (3) on lower tube assembly (4) and radiator (1) and tighten two clamps (2) to 85-95 lb-in. (10-11 N•m).
TM 9-2320-387-24-1
3-128 Change 1
FOLLOW-ON TASK: Fill cooling system (para. 3-61).
1
2
3
4
2
a. Removal
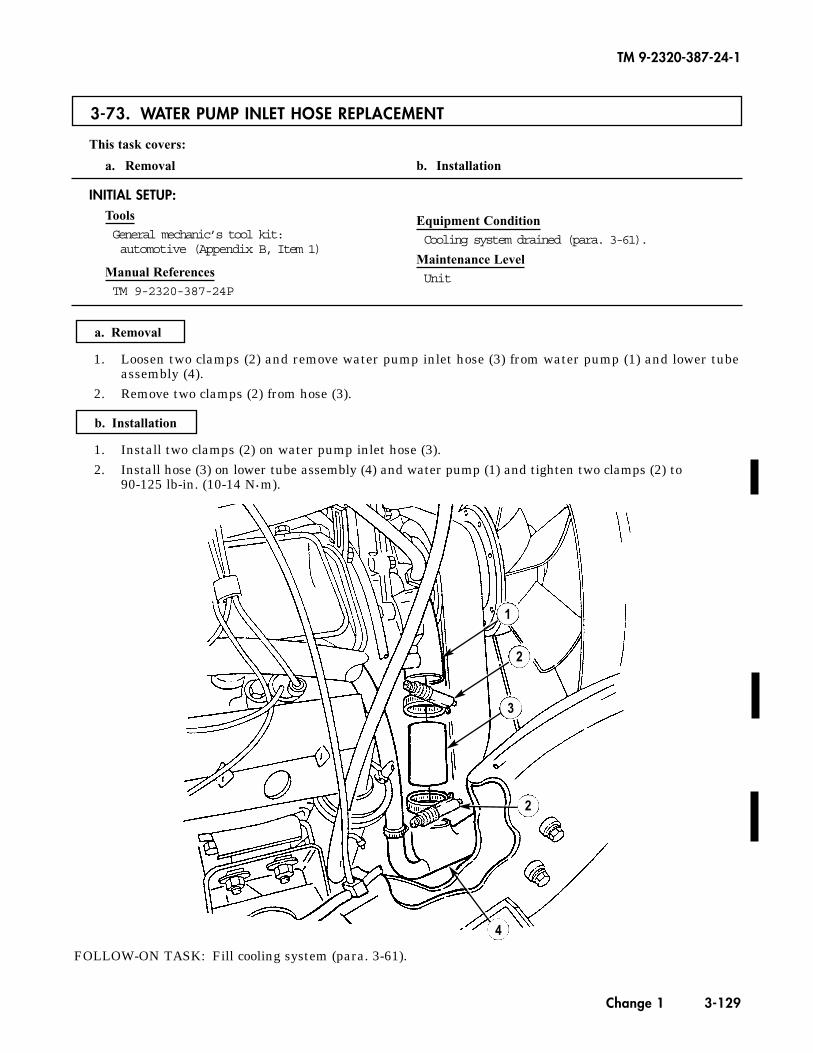
3-73. WATER PUMP INLET HOSE REPLACEMENT
This task covers:
a. Removal b. Installation
INITIAL SETUP:ToolsGeneral mechanic’s tool kit:automotive (Appendix B, Item 1)
Manual ReferencesTM 9-2320-387-24P
Equipment ConditionCooling system drained (para. 3-61).
Maintenance LevelUnit
1. Loosen two clamps (2) and remove water pump inlet hose (3) from water pump (1) and lower tubeassembly (4).
2. Remove two clamps (2) from hose (3).
1. Install two clamps (2) on water pump inlet hose (3).2. Install hose (3) on lower tube assembly (4) and water pump (1) and tighten two clamps (2) to
90-125 lb-in. (10-14 N•m).
b. Installation
a. Removal
TM 9-2320-387-24-1
Change 1 3-129
FOLLOW-ON TASK: Fill cooling system (para. 3-61).
1
2
3
2
4
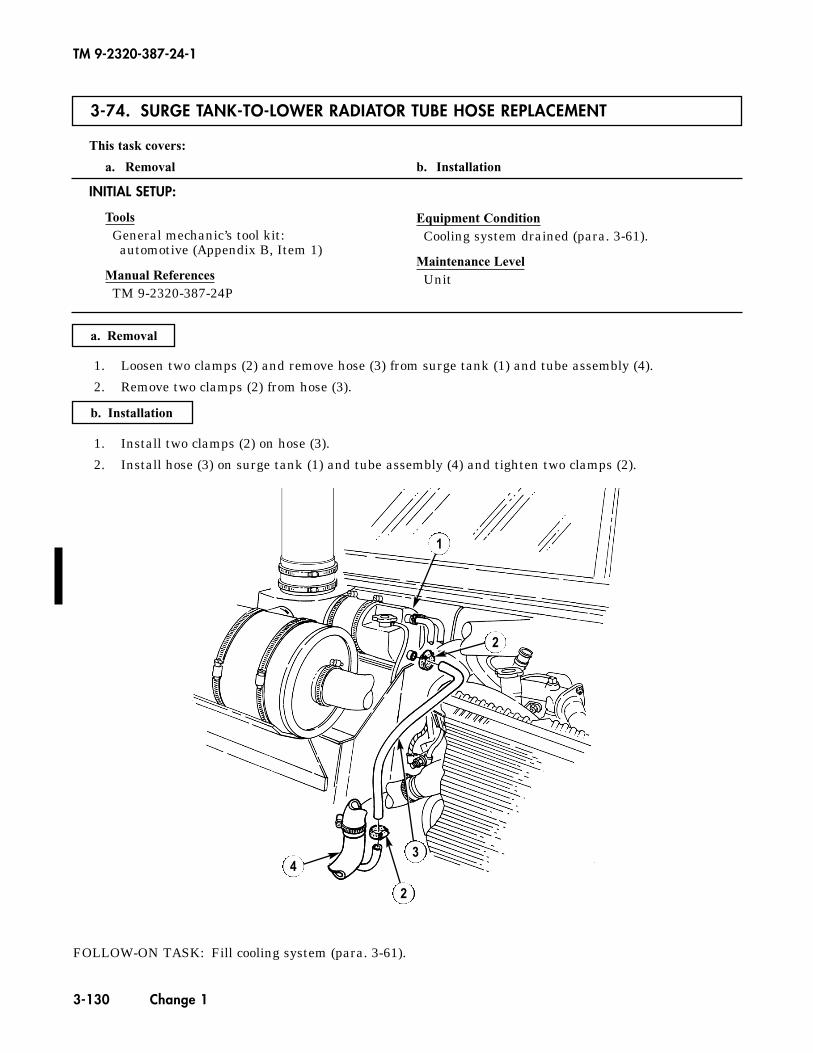
3-74. SURGE TANK-TO-LOWER RADIATOR TUBE HOSE REPLACEMENT
This task covers:
a. Removal b. Installation
a. Removal
1. Loosen two clamps (2) and remove hose (3) from surge tank (1) and tube assembly (4).
2. Remove two clamps (2) from hose (3).
INITIAL SETUP:
ToolsGeneral mechanic’s tool kit:
automotive (Appendix B, Item 1)
Manual ReferencesTM 9-2320-387-24P
Equipment ConditionCooling system drained (para. 3-61).
Maintenance LevelUnit
b. Installation
1. Install two clamps (2) on hose (3).
2. Install hose (3) on surge tank (1) and tube assembly (4) and tighten two clamps (2).
TM 9-2320-387-24-1
3-130 Change 1
FOLLOW-ON TASK: Fill cooling system (para. 3-61).
1
2
3
2
4

TM 9-2320-387-24-l
3-75. SURGE TANK OVERFLOW HOSE REPLACEMENT
This task coyers:
a. Removal b. Installation
INITIAL SETUP:
Tools
General mechanic’s tool kit: automotive (Appendix B, Item 1)
Equipment Condition
Hood raised and secured (TM 9-2320-387-10).
hlaintenance Level
hlanual References
TM 9-2320-387-10 TM 9-2320-387-24P
Unit
I a. Removal
1. Remove overflow hose (2) from surge tank filler neck (1).
2. Loosen clamp (3) and remove hose (2) from body (4).
1. Connect overflow hose (2) to surge tank filler neck (1).
2. Install hose (2) on body (4) and tighten clamp (3).
FOLLOW-ON TASK: Lower and secure hood (TM 9-2320-387-10).
3-131

TM 9-2320-387-24-l
I 3-76. THERMOSTAT REPLACEMENT I
This task covers:
a. Removal b. Installation
INITIAL SETUP:
Tools
General mechanic’s tool kit: automotive (Appendix B, Item 11
Maintenance and repair shop equipment: automotive (Appendix B, Item 21
hIaterials/Parts
Gasket (Appendix G, Item 601 Sealing compound (Appendix C, Item 61)
Manual References
TM 9-2320-387-24P
Equipment Condition
Cooling system drained, as required (para. 3-61).
Maintenance Level
Unit
[l 1. Remove capscrew (51, stud (41, thermostat housing (31, thermostat (21, and gasket (6) from water
crossover (1). Discard gasket (61.
2. Clean gasket surface on water crossover (1) and thermostat housing (3).
b. Installation
1. Install thermostat (2) into water crossover (11, ensuring valve sensor (71 points toward crossover (1).
2. Position gasket (6) on thermostat housing (3). Apply sealing compound to fastener threads and insert capscrew (5) and stud (41 to align gasket (6).
3. Install thermostat housing (3) over thermostat (2) and on water crossover (1) with capscrew (5) and stud (4). Tighten capscrew (5) and stud (4) to 25 lb-R (34 N-ml.
FOLLOW-ON TASK: Fill cooling system (para. 3-61).
3-132
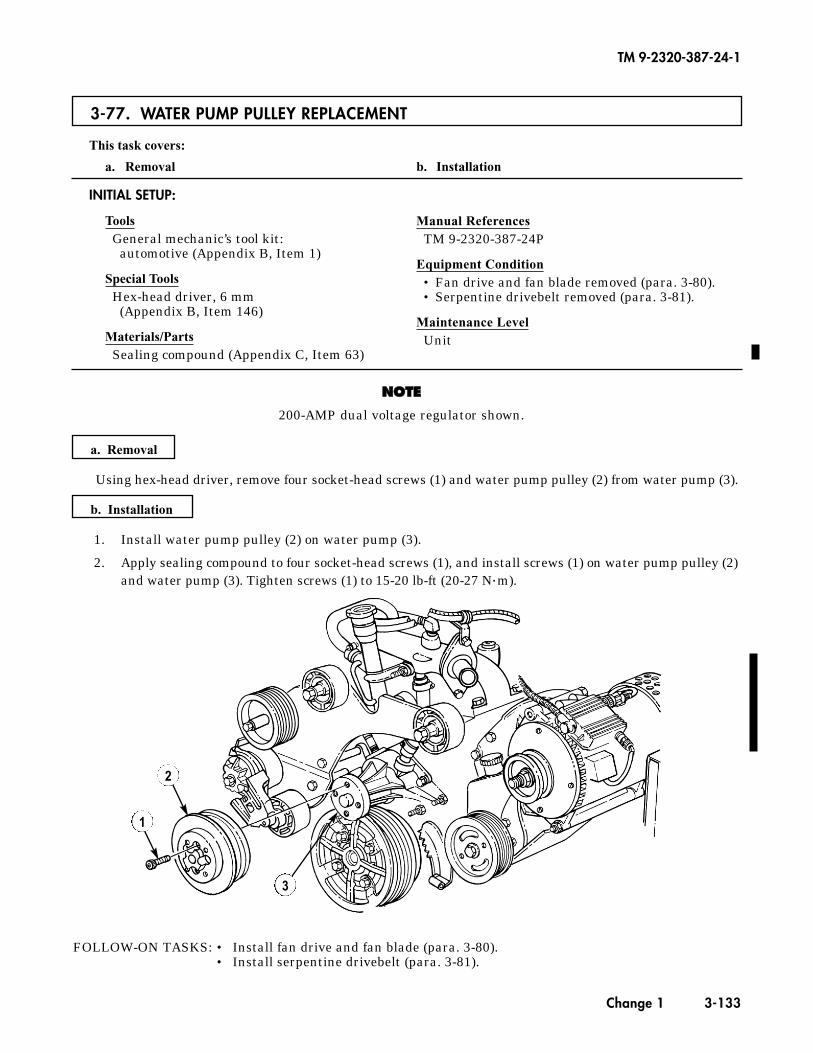
3-77. WATER PUMP PULLEY REPLACEMENT
This task covers:
a. Removal b. Installation
a. Removal
Using hex-head driver, remove four socket-head screws (1) and water pump pulley (2) from water pump (3).
INITIAL SETUP:
ToolsGeneral mechanic’s tool kit:
automotive (Appendix B, Item 1)
Special ToolsHex-head driver, 6 mm
(Appendix B, Item 146)
Materials/PartsSealing compound (Appendix C, Item 63)
Manual ReferencesTM 9-2320-387-24P
Equipment Condition• Fan drive and fan blade removed (para. 3-80).• Serpentine drivebelt removed (para. 3-81).
Maintenance LevelUnit
b. Installation
TM 9-2320-387-24-1
Change 1 3-133
FOLLOW-ON TASKS: • Install fan drive and fan blade (para. 3-80).• Install serpentine drivebelt (para. 3-81).
1
2
3
1. Install water pump pulley (2) on water pump (3).
2. Apply sealing compound to four socket-head screws (1), and install screws (1) on water pump pulley (2)and water pump (3). Tighten screws (1) to 15-20 lb-ft (20-27 N•m).
NNOOTTEE
200-AMP dual voltage regulator shown.
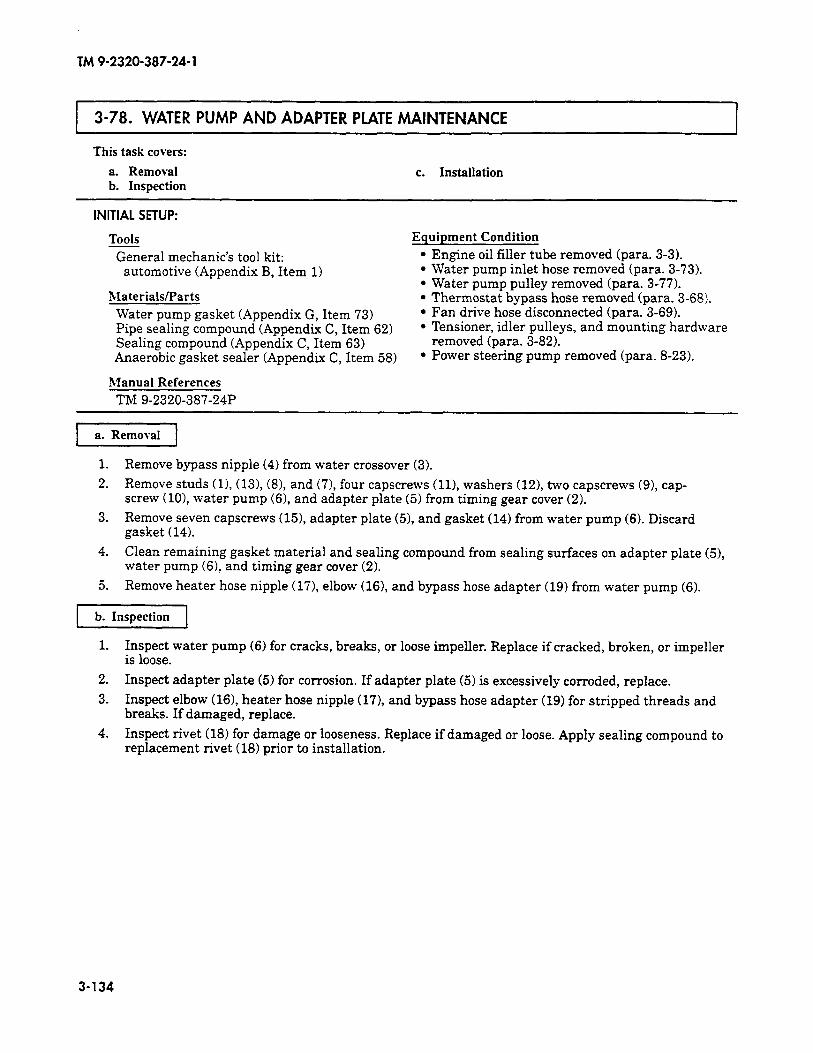
TM 9-2320-387-24-l
3-78. WATER PUMP AND ADAPTER PLATE MAINTENANCE
This task covers:
a. Removal b. Inspection
c. Installation
INITIAL SETUP:
Tools Equipment Condition
General mechanic’s tool kit: automotive (Appendix B, Item 1)
hIaterials/Parts Water pump gasket (Appendix G, Item 73) Pipe sealing compound (Appendix C, Item 621 Sealing compound (Appendix C, Item 63) Anaerobic gasket sealer (Appendix C, Item 58)
l Engine oil filler tube removed (para. 3-3). l Water pump inlet hose removed (para. 3-73). l Water pump pulley removed (para. 3-77). l Thermostat bypass hose removed (para. 3-68). l Fan drive hose disconnected (para. 3-69). l Tensioner, idler pulleys, and mounting hardware
removed (para. 3-82). l Power steering pump removed (para. 8-23).
Manual References TM 9-2320-387-24P
1 a. Removal 1
1. Remove bypass nipple (4) from water crossover (3).
2. Remove studs (11, (131, (81, and (7), four capscrews (111, washers (121, two capscrews (91, cap- screw (101, water pump (61, and adapter plate (5) from timing gear cover (2).
3. Remove seven capscrews (151, adapter plate (51, and gasket (14) from water pump (6). Discard gasket (14).
4. Clean remaining gasket material and sealing compound from sealing surfaces on adapter plate (51, water pump (61, and timing gear cover (2).
5. Remove heater hose nipple (171, elbow (161, and bypass hose adapter (19) from water pump (6).
1. Inspect water pump (6) for cracks, breaks, or loose impeller. Replace if cracked, broken, or impeller is loose.
2. Inspect adapter plate (5) for corrosion. If adapter plate (5) is excessively corroded, replace.
3. Inspect elbow (161, heater hose nipple (171, and bypass hose adapter (19) for stripped threads and breaks. If damaged, replace.
4. Inspect rivet (18) for damage or looseness. Replace if damaged or loose. Apply sealing compound to replacement rivet (18) prior to installation.
3-134
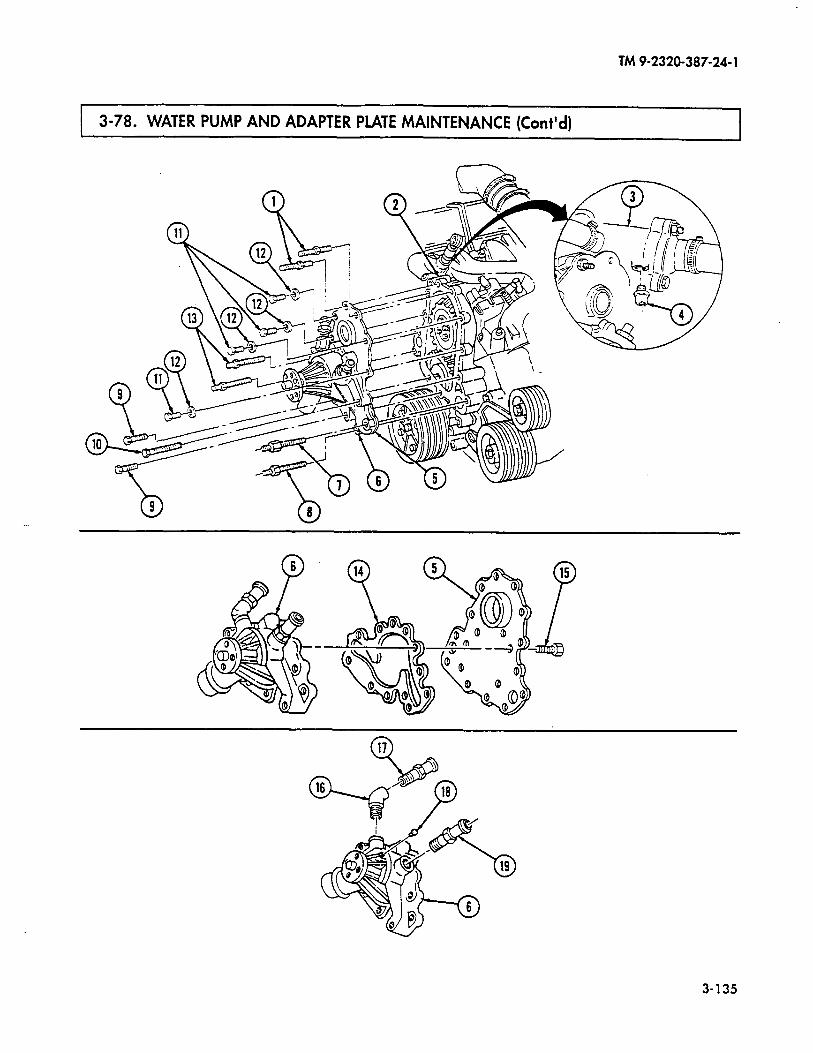
TM 9-2320-387-24-l
1 3-78. WATER PUMP AND ADAPTER PLATE MAINTENANCE (Cont’d) I I I
3-135
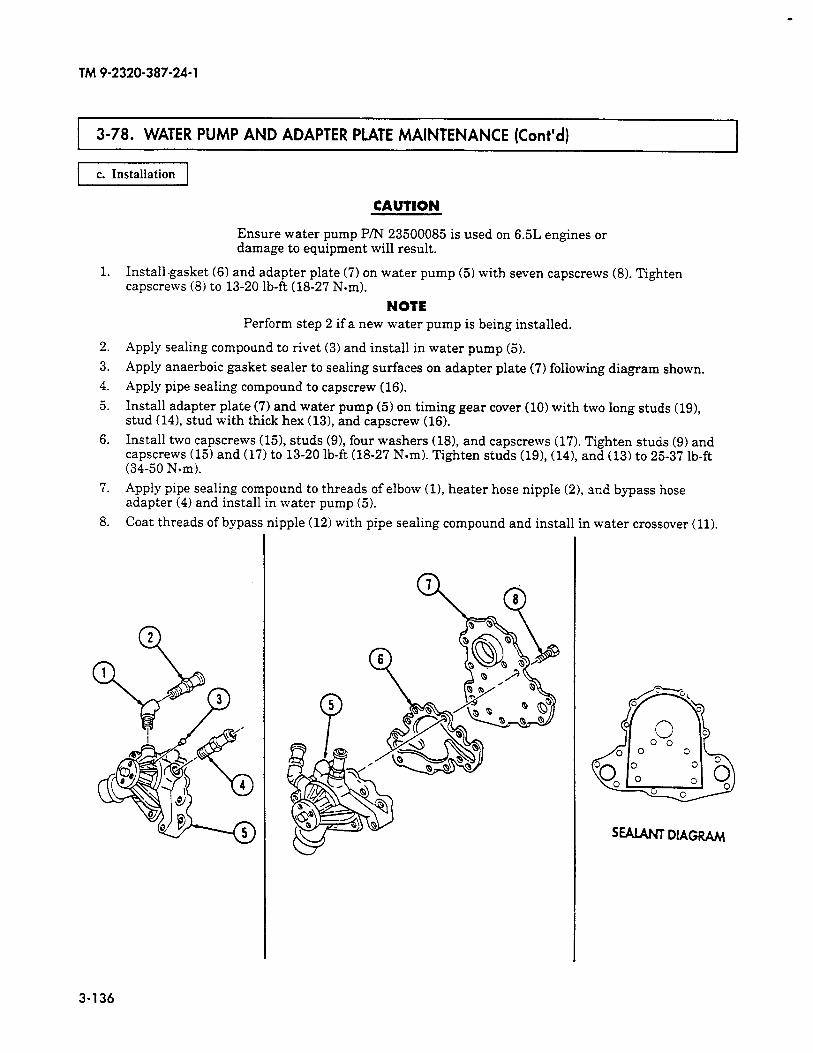
TM 9-2320-387-24-l
1 3-78. WATER PUMP AND ADAPTER PLATE MAINTENANCE (Cont’d) I L I
1 c. Installation 1
CAUTION
1.
2.
3.
4.
5.
6.
7.
8.
Ensure water pump P/N 23500085 is used on 6.5L engines or damage to equipment will result.
Install.gasket (6) and adapter plate (7) on water pump (5) with seven capscrews (8). Tighten capscrews (8) to 13-20 lb-ft (18-27 Nom).
NOTE Perform step 2 if a new water pump is being installed.
Apply sealing compound to rivet (3) and install in water pump (5).
Apply anaerboic gasket sealer to sealing surfaces on adapter plate (7) following diagram shown.
Apply pipe sealing compound to capscrew (16).
Install adapter plate (7) and water pump (5) on timing gear cover (10) with two long studs (19), stud (141, stud with thick hex (131, and capscrew (16).
Install two capscrews (151, studs (91, four washers (181, and capscrews (17). Tighten studs (9) and capscrews (15) and (17) to 13-20 lb-ft (18-27 N-m). Tighten studs (191, (141, and (131 to 25-37 lb-ft (34-50 Nom).
Apply pipe sealing compound to threads of elbow (11, heater hose nipple (21, and bypass hose adapter (4) and install in water pump (5).
Coat threads of bypass nipple (12) with pipe sealing compound and install in water crossover (11).
C CL
0
0 Oo d% 0 0
Oo; O: 0
,“b 0
C
3-136
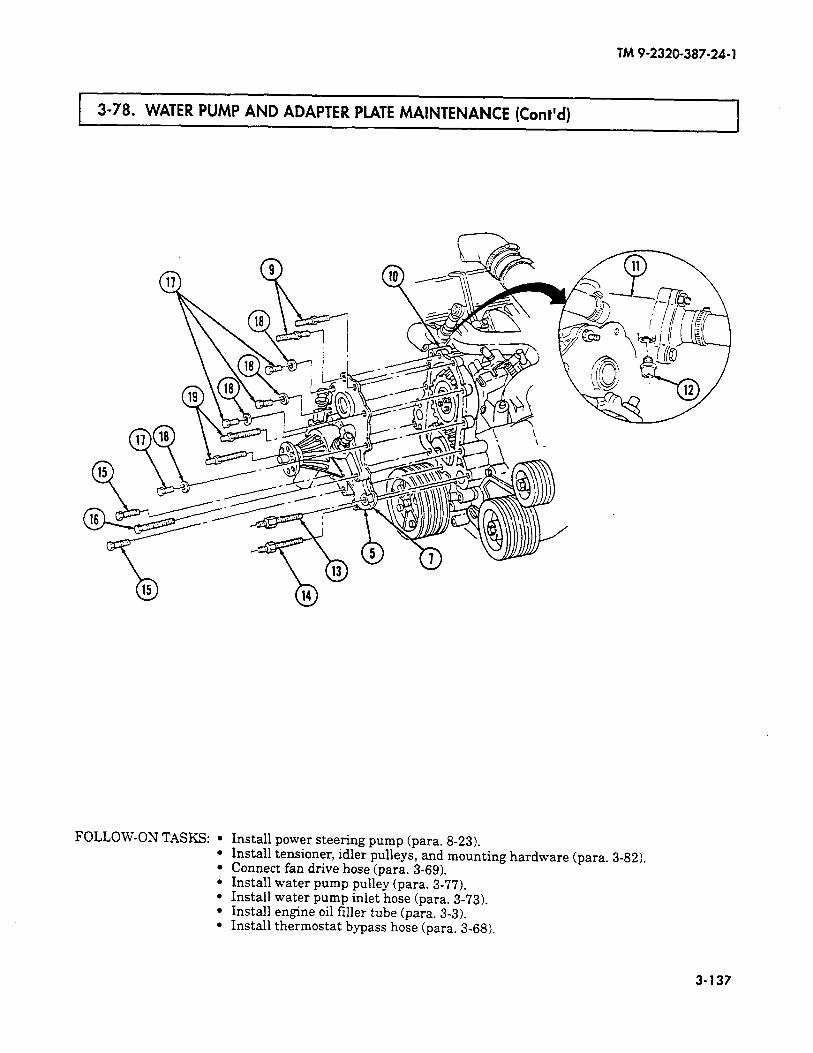
TM 9-2320-387-24-l
3-78. WATER PUMP AND ADAPTER PLATE MAINTENANCE (Cont’d)
FOLLOW-ON TASKS: l Install power steering pump (para. 8-23). l Install tensioner, idler pulleys, and mounting hardware (para. 3-82). l Connect fan drive hose (para. 3-69). l Install water pump pulley (para. 3-77). l Install water pump inlet hose (para. 3-73). l Install engine oil filler tube (para. 3-3). l Install thermostat bypass hose (para. 3-68).
3-137
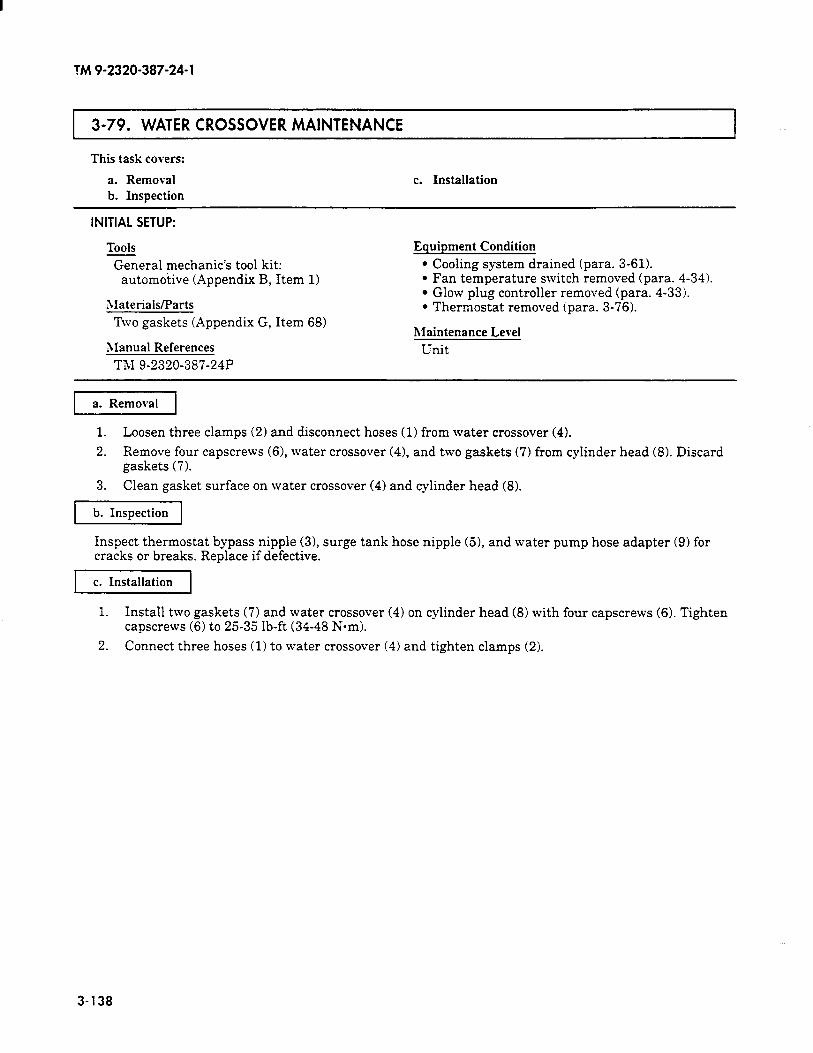
?M9-2320-387-24-l
I 3-79. WATER CROSSOVER MAINTENANCE
This task covers:
a. Removal b. Inspection
c. Installation
INITIAL SETUP:
Tools
General mechanic’s tool kit: automotive (Appendix B, Item 1)
hIaterials/Parts
Equipment Condition
l Cooling system drained (para. 3-61). l Fan temperature switch removed (para. 4-34). l Glow plug controller removed (para. 4-33). l Thermostat removed (para. 3-76).
Two gaskets (Appendix G, Item 68)
hlanual References
ThI 9-2320-387-24P
nlaintenance Level
Unit
1 a. Removal 1
1. Loosen three clamps (2) and disconnect hoses (1) from water crossover (4).
2. Remove four capscrews (61, water crossover (41, and two gaskets (7) from cylinder head (81. Discard gaskets (7).
3. Clean gasket surface on water crossover (4) and cylinder head (8).
-1
Inspect thermostat bypass nipple (31, surge tank hose nipple (51, and water pump hose adapter (9) for cracks or breaks. Replace if defective.
I c. Installation I
1. Install two gaskets (7) and water crossover (4) on cylinder head (8) with four capscrews (6). Tighten capscrews (6) to 25-35 lb-ft (34-48 N-m).
2. Connect three hoses (1) to water crossover (4) and tighten clamps (2).
3-138

TM 9-2320-387-24-l
3-79. WATER CROSSOVER MAINTENANCE (Cont’d) 1
FOLLOW-ON TASKS: l Install thermostat (para. 3-76). l Install glow plug controller (para. 4-33). l Install fan temperature switch (para. 4-34). l Fill cooling system (para. 3-61).
3-139
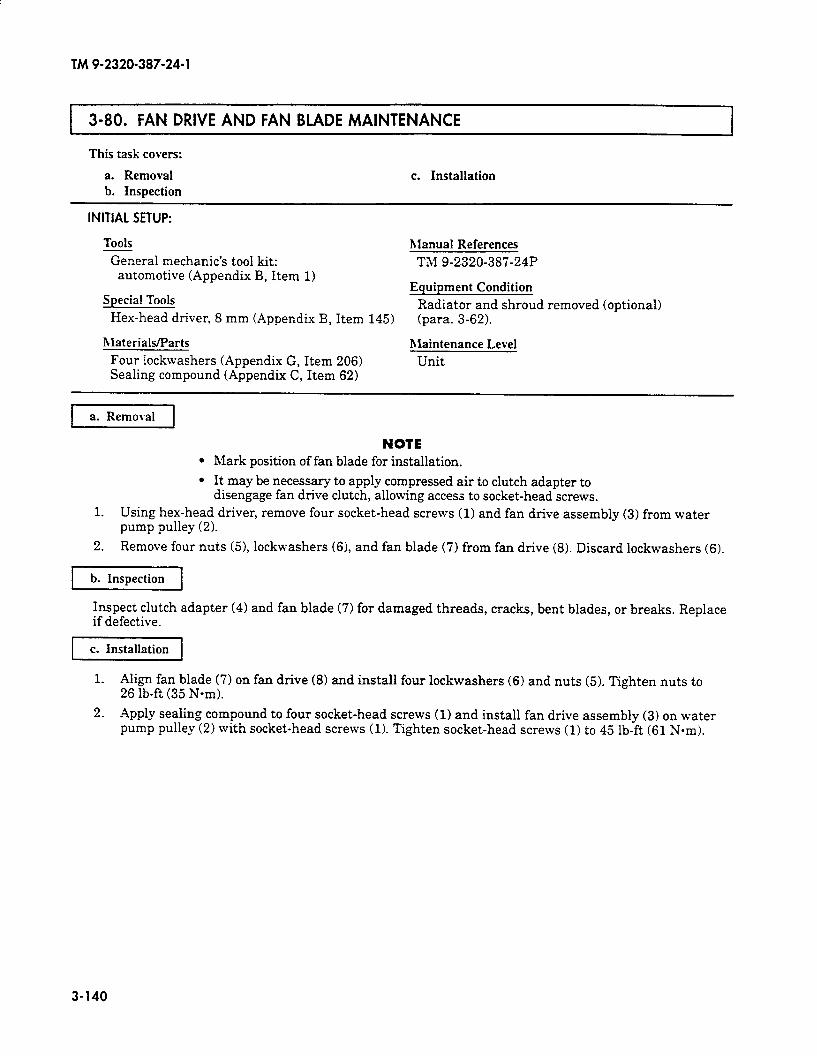
TM 9-2320-387-24-l
1 3-80. FAN DRIVE AND FAN BLADE MAINTENANCE
This task covers:
a. Removal b. Inspection
c. Installation
INITIAL SETUP:
Tools hlanual References
General mechanic’s tool kit: TM 9-2320-387-24P automotive (Appendix B, Item 1)
Equipment Condition Special Tools Radiator and shroud removed (optional)
Hex-head driver, 8 mm (Appendix B, Item 145) (para. 3-62).
hlaterialearts nlaintenance Level
Four lockwashers (Appendix G, Item 206) Unit Sealing compound (Appendix C, Item 62)
p7iKq NOTE
l Mark position of fan blade for installation.
l It may be necessary to apply compressed air to clutch adapter to disengage fan drive clutch, allowing access to socket-head screws.
1. Using hex-head driver, remove four socket-head screws (1) and fan drive assembly (31 from water pump pulley (2).
2. Remove four nuts (51, lockwashers (61, and fan blade (7) from fan drive (8). Discard lockwashers (6).
Inspect clutch adapter (4) and fan blade (7) for damaged threads, cracks, bent blades, or breaks. Replace if defective.
c. Installation
1. Align fan blade (7) on fan drive (8) and install four lockwashers (6) and nuts (5). Tighten nuts to 26 lb-ft (35 N-m).
2. Apply sealing compound to four socket-head screws (1) and install fan drive assembly (3) on water pump pulley (2) with socket-head screws (1). Tighten socket-head screws (1) to 45 lb-ft (61 Nom).
3-140
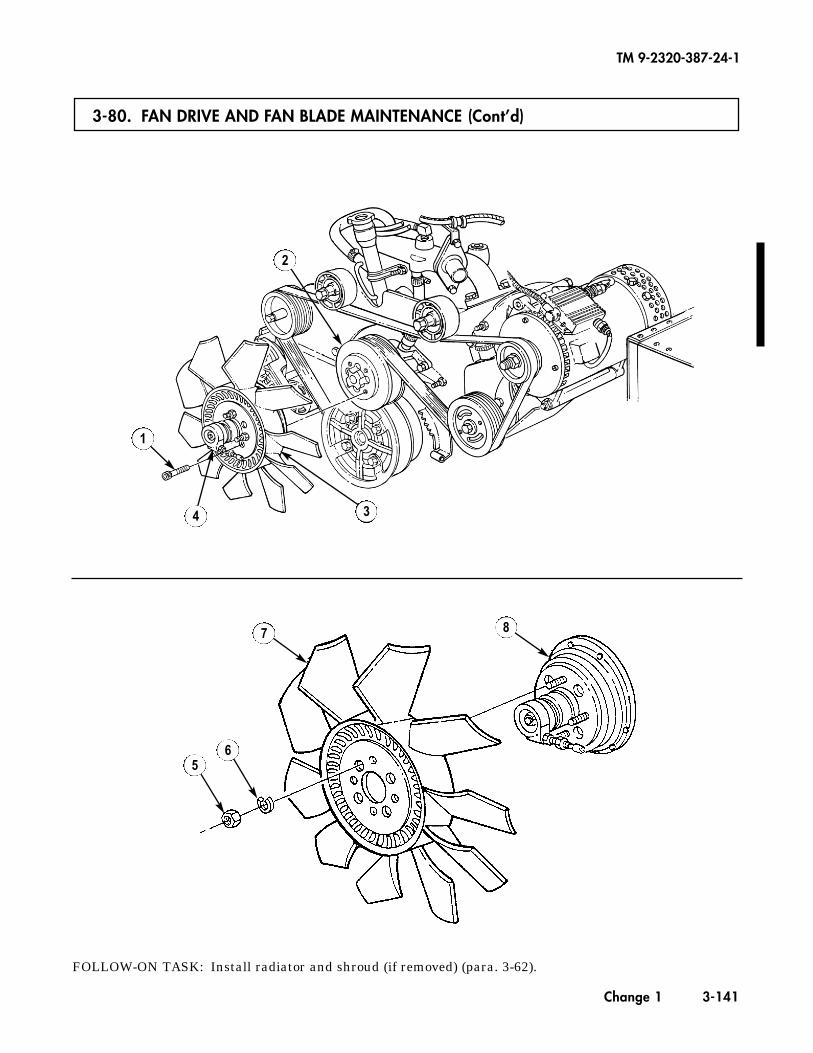
3-80. FAN DRIVE AND FAN BLADE MAINTENANCE (Cont’d)
TM 9-2320-387-24-1
Change 1 3-141
FOLLOW-ON TASK: Install radiator and shroud (if removed) (para. 3-62).
1
2
34
56
7 8
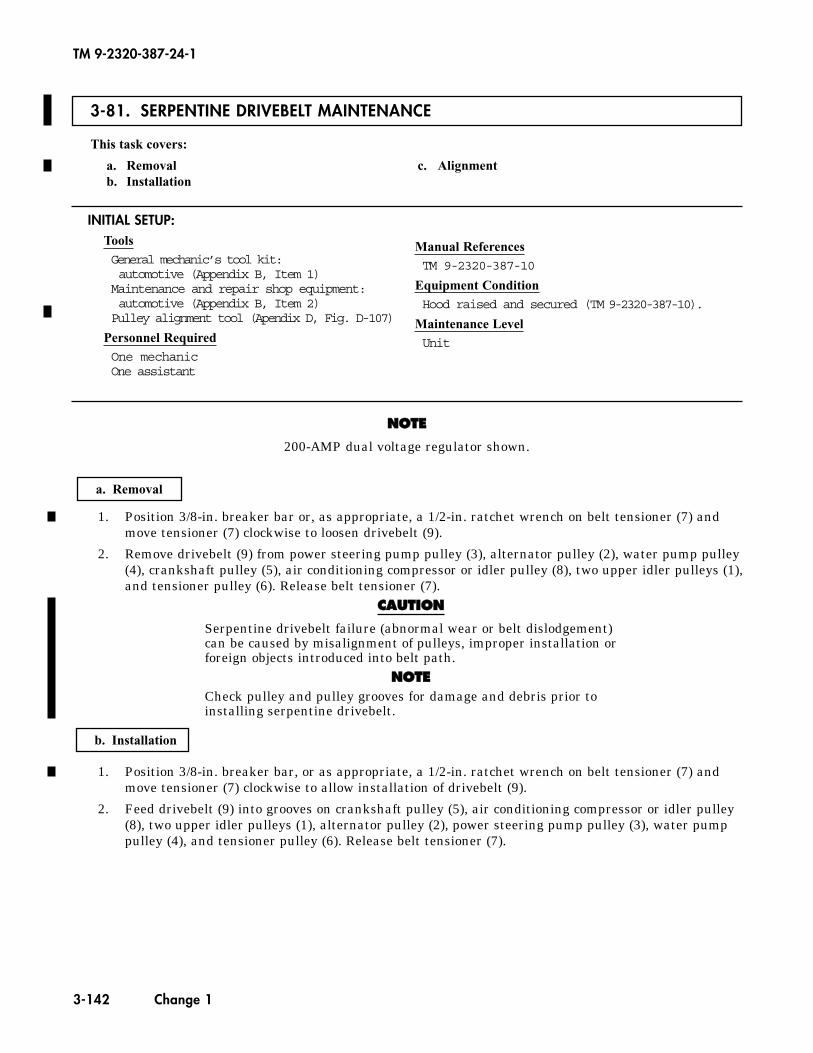
3-81. SERPENTINE DRIVEBELT MAINTENANCE
1. Position 3/8-in. breaker bar or, as appropriate, a 1/2-in. ratchet wrench on belt tensioner (7) andmove tensioner (7) clockwise to loosen drivebelt (9).
2. Remove drivebelt (9) from power steering pump pulley (3), alternator pulley (2), water pump pulley(4), crankshaft pulley (5), air conditioning compressor or idler pulley (8), two upper idler pulleys (1),and tensioner pulley (6). Release belt tensioner (7).
CCAAUUTTIIOONN
Serpentine drivebelt failure (abnormal wear or belt dislodgement)can be caused by misalignment of pulleys, improper installation orforeign objects introduced into belt path.
NNOOTTEECheck pulley and pulley grooves for damage and debris prior toinstalling serpentine drivebelt.
b. Installation
TM 9-2320-387-24-1
3-142 Change 1
This task covers:
a. Removal c. Alignmentb. Installation
INITIAL SETUP:ToolsGeneral mechanic’s tool kit:automotive (Appendix B, Item 1)Maintenance and repair shop equipment:automotive (Appendix B, Item 2)Pulley alignment tool (Apendix D, Fig. D-107)
Personnel RequiredOne mechanicOne assistant
Manual ReferencesTM 9-2320-387-10
Equipment ConditionHood raised and secured (TM 9-2320-387-10).
Maintenance LevelUnit
1. Position 3/8-in. breaker bar, or as appropriate, a 1/2-in. ratchet wrench on belt tensioner (7) andmove tensioner (7) clockwise to allow installation of drivebelt (9).
2. Feed drivebelt (9) into grooves on crankshaft pulley (5), air conditioning compressor or idler pulley(8), two upper idler pulleys (1), alternator pulley (2), power steering pump pulley (3), water pumppulley (4), and tensioner pulley (6). Release belt tensioner (7).
a. Removal
NNOOTTEE
200-AMP dual voltage regulator shown.
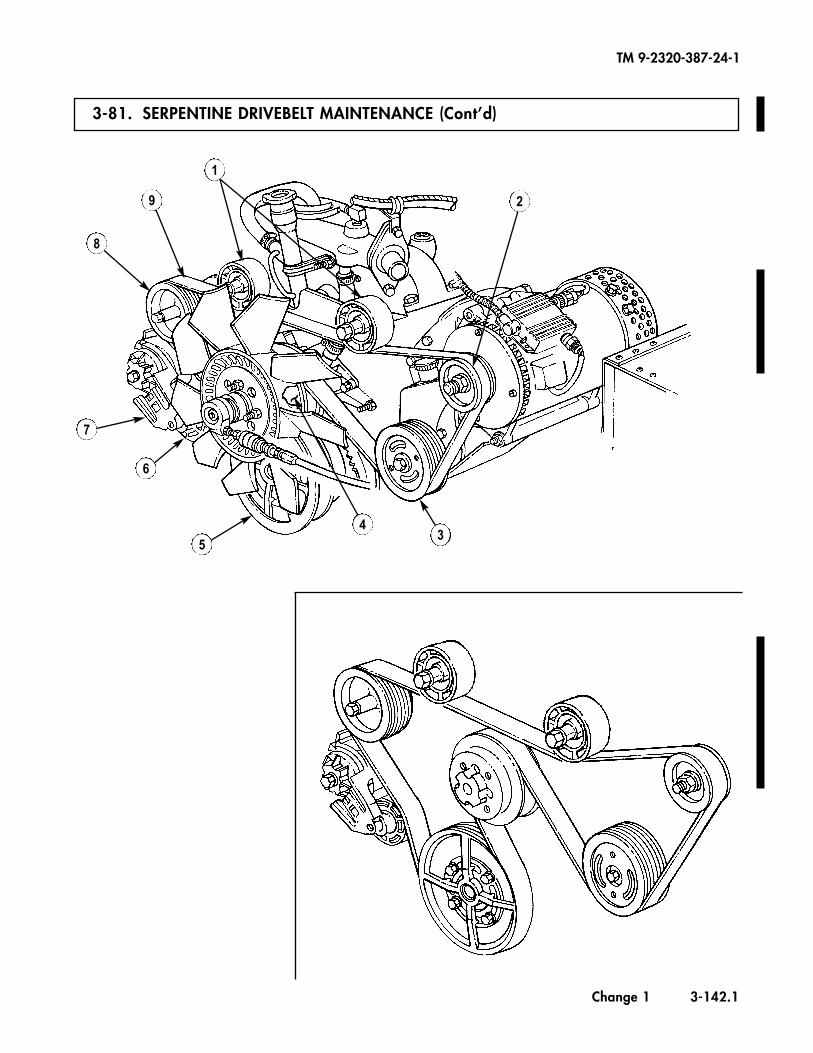
3-81. SERPENTINE DRIVEBELT MAINTENANCE (Cont’d)
TM 9-2320-387-24-1
Change 1 3-142.1
8
9
1
2
34
5
6
7
~
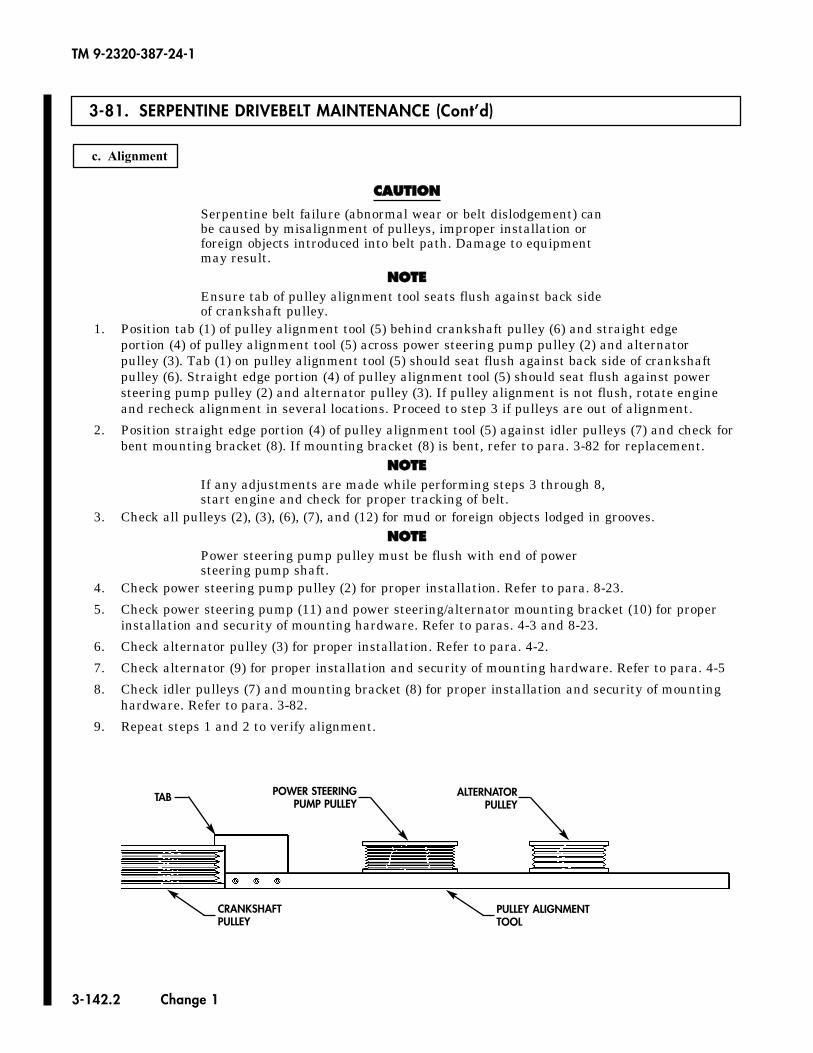
3-81. SERPENTINE DRIVEBELT MAINTENANCE (Cont’d)
TM 9-2320-387-24-1
3-142.2 Change 1
c. Alignment
CCAAUUTTIIOONN
Serpentine belt failure (abnormal wear or belt dislodgement) canbe caused by misalignment of pulleys, improper installation orforeign objects introduced into belt path. Damage to equipmentmay result.
NNOOTTEEEnsure tab of pulley alignment tool seats flush against back sideof crankshaft pulley.
1. Position tab (1) of pulley alignment tool (5) behind crankshaft pulley (6) and straight edgeportion (4) of pulley alignment tool (5) across power steering pump pulley (2) and alternator pulley (3). Tab (1) on pulley alignment tool (5) should seat flush against back side of crankshaftpulley (6). Straight edge portion (4) of pulley alignment tool (5) should seat flush against powersteering pump pulley (2) and alternator pulley (3). If pulley alignment is not flush, rotate engineand recheck alignment in several locations. Proceed to step 3 if pulleys are out of alignment.
2. Position straight edge portion (4) of pulley alignment tool (5) against idler pulleys (7) and check forbent mounting bracket (8). If mounting bracket (8) is bent, refer to para. 3-82 for replacement.
NNOOTTEEIf any adjustments are made while performing steps 3 through 8,start engine and check for proper tracking of belt.
3. Check all pulleys (2), (3), (6), (7), and (12) for mud or foreign objects lodged in grooves.NNOOTTEE
Power steering pump pulley must be flush with end of powersteering pump shaft.
4. Check power steering pump pulley (2) for proper installation. Refer to para. 8-23.
5. Check power steering pump (11) and power steering/alternator mounting bracket (10) for properinstallation and security of mounting hardware. Refer to paras. 4-3 and 8-23.
6. Check alternator pulley (3) for proper installation. Refer to para. 4-2.
7. Check alternator (9) for proper installation and security of mounting hardware. Refer to para. 4-5
8. Check idler pulleys (7) and mounting bracket (8) for proper installation and security of mountinghardware. Refer to para. 3-82.
9. Repeat steps 1 and 2 to verify alignment.
POWER STEERINGPUMP PULLEY
ALTERNATORPULLEY
PULLEY ALIGNMENTTOOL
TAB
CRANKSHAFTPULLEY
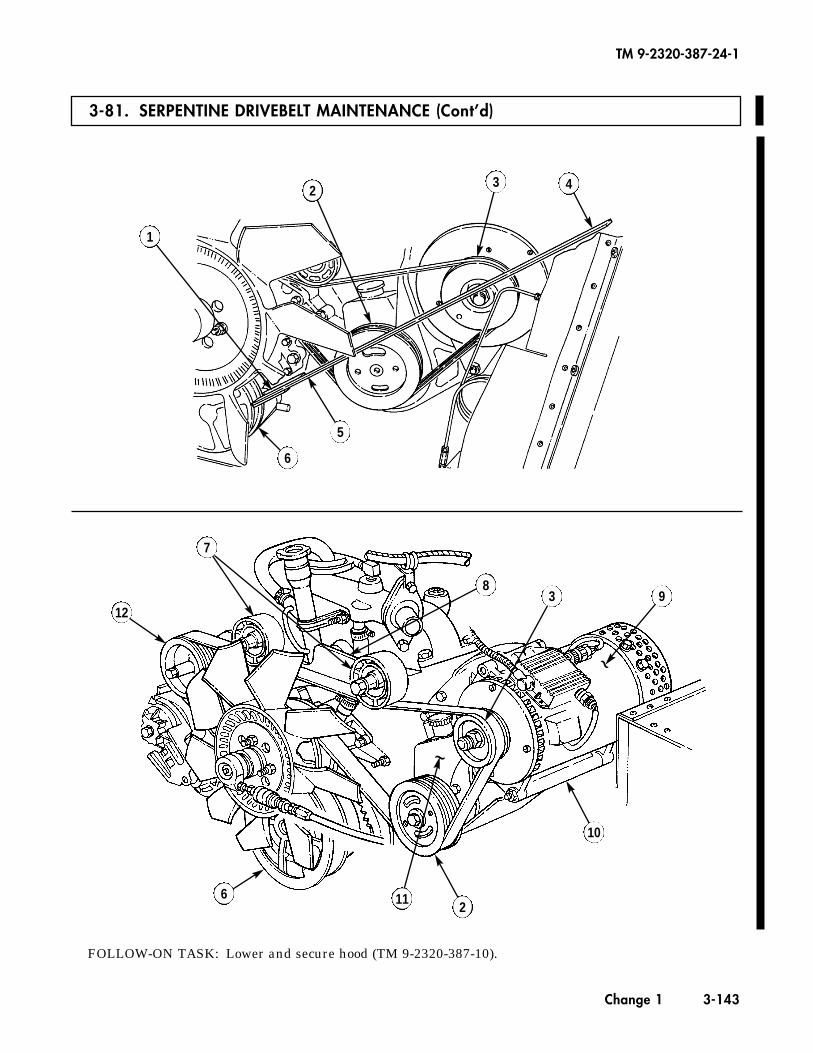
3-81. SERPENTINE DRIVEBELT MAINTENANCE (Cont’d)
TM 9-2320-387-24-1
Change 1 3-143
1
23 4
5
6
12
7
83 9
2
10
116
~
~
FOLLOW-ON TASK: Lower and secure hood (TM 9-2320-387-10).
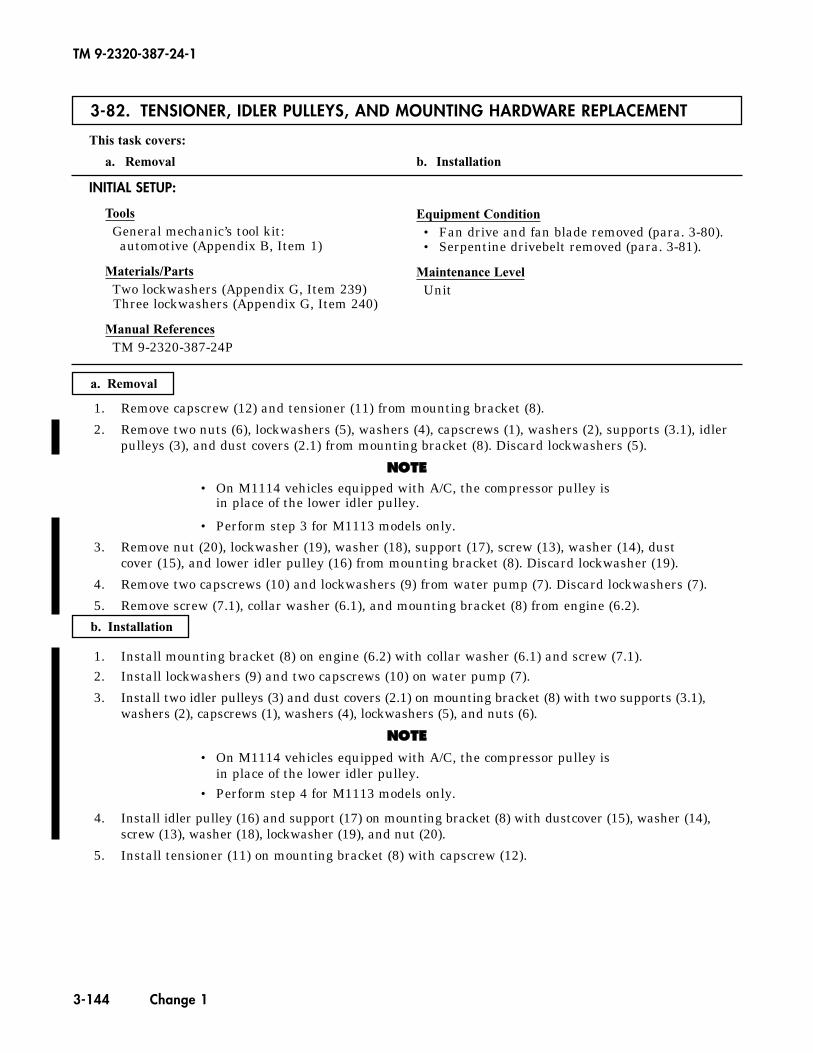
3-82. TENSIONER, IDLER PULLEYS, AND MOUNTING HARDWARE REPLACEMENT
This task covers:
a. Removal b. Installation
a. Removal
1. Remove capscrew (12) and tensioner (11) from mounting bracket (8).
2. Remove two nuts (6), lockwashers (5), washers (4), capscrews (1), washers (2), supports (3.1), idlerpulleys (3), and dust covers (2.1) from mounting bracket (8). Discard lockwashers (5).
NNOOTTEE• On M1114 vehicles equipped with A/C, the compressor pulley is
in place of the lower idler pulley.
• Perform step 3 for M1113 models only.
3. Remove nut (20), lockwasher (19), washer (18), support (17), screw (13), washer (14), dustcover (15), and lower idler pulley (16) from mounting bracket (8). Discard lockwasher (19).
4. Remove two capscrews (10) and lockwashers (9) from water pump (7). Discard lockwashers (7).
5. Remove screw (7.1), collar washer (6.1), and mounting bracket (8) from engine (6.2).
INITIAL SETUP:
ToolsGeneral mechanic’s tool kit:
automotive (Appendix B, Item 1)
Materials/PartsTwo lockwashers (Appendix G, Item 239)Three lockwashers (Appendix G, Item 240)
Manual ReferencesTM 9-2320-387-24P
Equipment Condition• Fan drive and fan blade removed (para. 3-80).• Serpentine drivebelt removed (para. 3-81).
Maintenance LevelUnit
b. Installation
1. Install mounting bracket (8) on engine (6.2) with collar washer (6.1) and screw (7.1).2. Install lockwashers (9) and two capscrews (10) on water pump (7).
3. Install two idler pulleys (3) and dust covers (2.1) on mounting bracket (8) with two supports (3.1),washers (2), capscrews (1), washers (4), lockwashers (5), and nuts (6).
NNOOTTEE
• On M1114 vehicles equipped with A/C, the compressor pulley isin place of the lower idler pulley.
• Perform step 4 for M1113 models only.
4. Install idler pulley (16) and support (17) on mounting bracket (8) with dustcover (15), washer (14),screw (13), washer (18), lockwasher (19), and nut (20).
5. Install tensioner (11) on mounting bracket (8) with capscrew (12).
TM 9-2320-387-24-1
3-144 Change 1
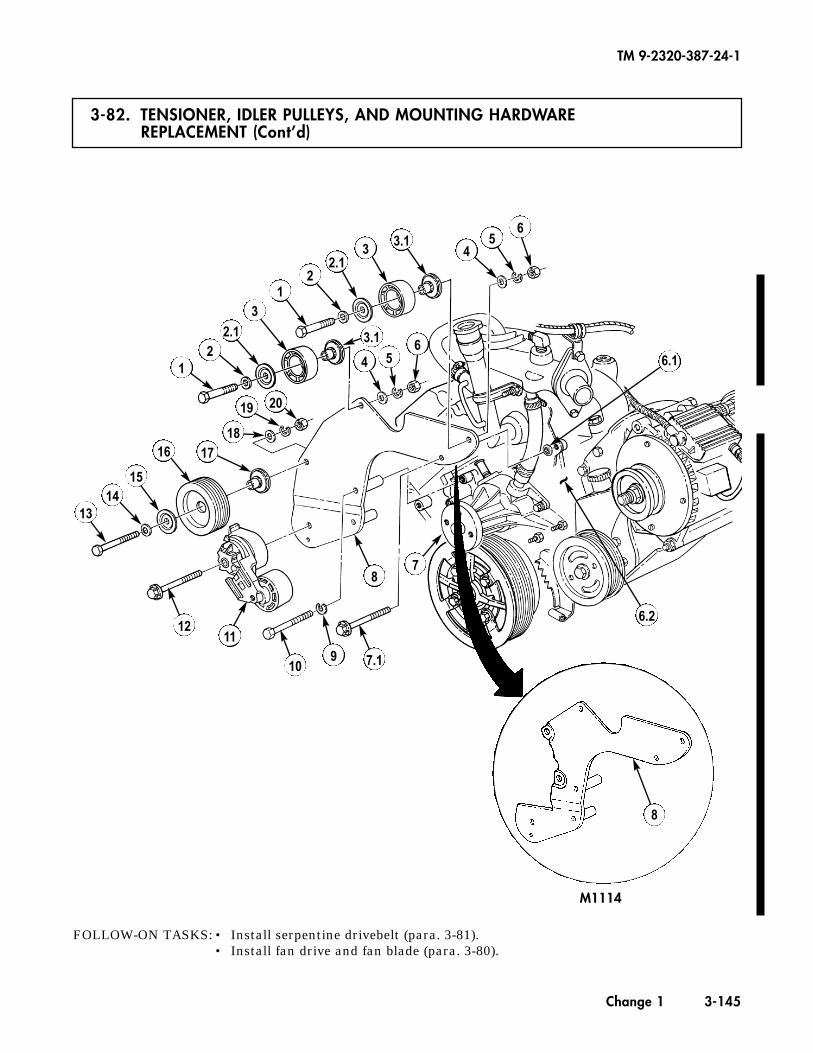
3-82. TENSIONER, IDLER PULLEYS, AND MOUNTING HARDWARE REPLACEMENT (Cont’d)
TM 9-2320-387-24-1
Change 1 3-145
FOLLOW-ON TASKS: • Install serpentine drivebelt (para. 3-81).• Install fan drive and fan blade (para. 3-80).
12
2.13
12
2.13 3.1
4
2019
12
10 7.19
6.2
78
11
1413
16
15
1718
563.1
45
6
~
M1114
6.1
8
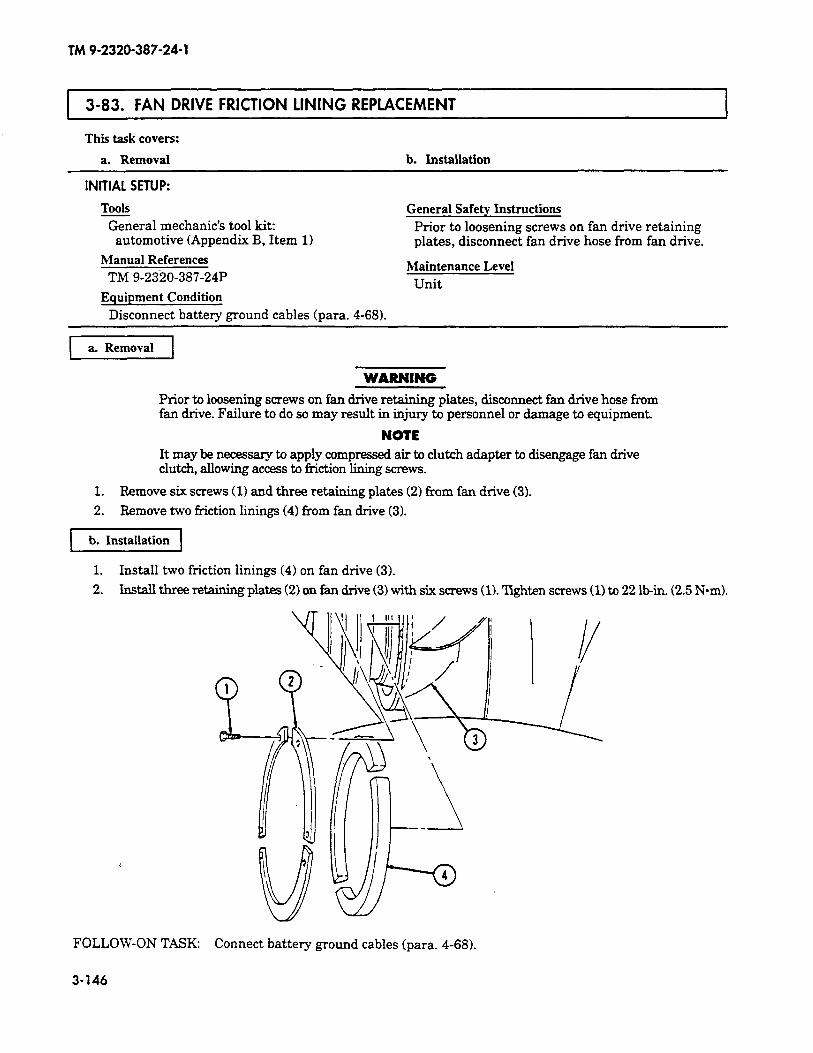
TM 9-2320-387-24-l
r 3-83. FAN DRIVE FRICTION LINING REPLACEMENT I
This task covers:
a. Removal b. Installation
INITIAL SETUP:
Tools
General mechanic’s tool kit: automotive (Appendix B, Item 1)
Manual References
TM 9-2320-387-24P
Equipment Condition
General Safety Instructions
Prior to loosening screws on fan drive retaining plates, disconnect fan drive hose from fan drive.
Maintenance Level
Unit
Disconnect battery ground cables (para. 4-68).
1 a. Removal ]
WARNING
Prior to loosening screws on fan drive retaining plates, disconnect fan drive hose from fan drive. Failure to do so may result in injury to personnel or damage to equipment.
NOTE It may be necessary to apply compressed air to clutch adapter to disengage fan drive clutch, allowing access to friction lining screws.
1. Remove six screws (1) and three retaining plates (21 from fan drive (3).
2. Remove two friction linings (4) from fan drive (3).
1. Install two friction linings (4) on fan drive (3).
2. Install three retaining plates (2) on fan drive (3) with six screws (1). Tighten screws (1) to 22 l&n. (2.5 Nom).
FOLLOW-ON TASK: Connect battery ground cables (para. 4-68).
3-146
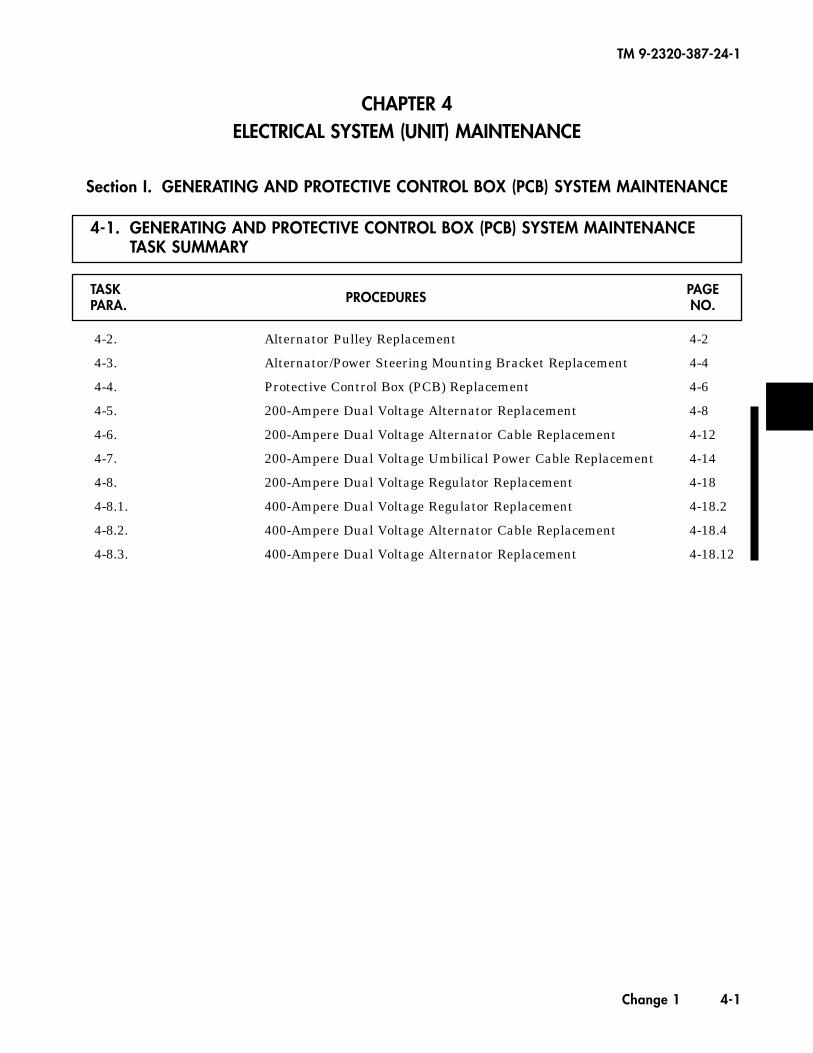
TM 9-2320-387-24-1
Change 1 4-1
CHAPTER 4ELECTRICAL SYSTEM (UNIT) MAINTENANCE
Section I. GENERATING AND PROTECTIVE CONTROL BOX (PCB) SYSTEM MAINTENANCE
4-1. GENERATING AND PROTECTIVE CONTROL BOX (PCB) SYSTEM MAINTENANCETASK SUMMARY
TASK PAGEPARA. PROCEDURES NO.
4-2. Alternator Pulley Replacement 4-2
4-3. Alternator/Power Steering Mounting Bracket Replacement 4-4
4-4. Protective Control Box (PCB) Replacement 4-6
4-5. 200-Ampere Dual Voltage Alternator Replacement 4-8
4-6. 200-Ampere Dual Voltage Alternator Cable Replacement 4-12
4-7. 200-Ampere Dual Voltage Umbilical Power Cable Replacement 4-14
4-8. 200-Ampere Dual Voltage Regulator Replacement 4-18
4-8.1. 400-Ampere Dual Voltage Regulator Replacement 4-18.2
4-8.2. 400-Ampere Dual Voltage Alternator Cable Replacement 4-18.4
4-8.3. 400-Ampere Dual Voltage Alternator Replacement 4-18.12
4-2. ALTERNATOR PULLEY REPLACEMENT
This task covers:
a. Removal b. Installation
a. Removal
1. Clamp alternator pulley (2) in a soft-jawed vise.2. Remove locknut (5) and washer (4) from alternator shaft (3). Discard locknut (5).3. Remove pulley (2) from soft-jawed vise.4. Using a mechanical puller, remove pulley (2) from alternator (1). 5. Remove woodruff key (6) from alternator shaft (3). Discard woodruff key (6).
INITIAL SETUP:
ToolsGeneral mechanic’s tool kit:
automotive (Appendix B, Item 1)Maintenance and repair shop equipment:
automotive (Appendix B, Item 2)Mechanical puller (Appendix B, Item 157)Vise inserts (Appendix B, Item 160)
Materials/PartsLocknut (Appendix G, Item 110)Woodruff key (Appendix G, Item 470)
Manual ReferencesTM 9-2320-387-24P
Equipment ConditionAlternator removed (para. 4-5).
Maintenance LevelUnit
b. Installation
CCAAUUTTIIOONN
Serpentine belt failure (abnormal wear or belt dislodgement) canbe caused by misalignment of pulleys, improper installation, orforeign objects introduced into belt path. Inspect water pumppulley for proper installation and ease of rotation. Any wobble ormisalignment will cause belt failure.
1. Position woodruff key (6) in alternator shaft (3) with flat side up.2. Align pulley keyway (7) with woodruff key (6) in alternator shaft (3) and tap pulley (2) onto
shaft (3).3. Install washer (4) and locknut (5) on shaft (3). Tighten locknut (5) finger-tight.4. Clamp pulley (2) in soft-jawed vise.5. Tighten locknut (5) to 115-125 lb-ft (156-169 N•m).6. Remove pulley (2) and alternator (1) from vise.
TM 9-2320-387-24-1
4-2 Change 1
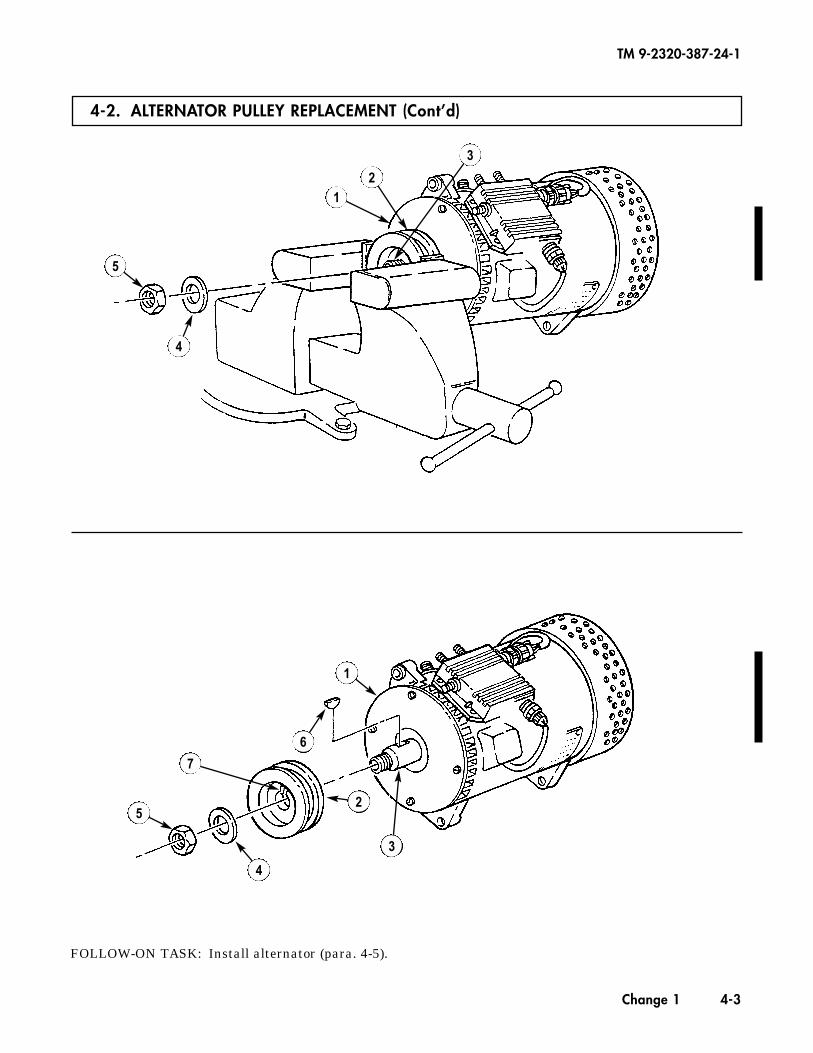
4-2. ALTERNATOR PULLEY REPLACEMENT (Cont’d)
TM 9-2320-387-24-1
Change 1 4-3
FOLLOW-ON TASK: Install alternator (para. 4-5).
1 2
3
4
5
1
2
3
4
5
7
6
4-3. ALTERNATOR/POWER STEERING MOUNTING BRACKET REPLACEMENT
This task covers:
a. Removal b. Installation
a. Removal
b. Installation
Remove two flanged-head capscrews (3), long flanged-head capscrew (2), and mounting bracket (1)from engine (4).
Apply sealing compund to capscrews (2) and (3), and install mounting bracket (1) on engine (4) withtwo flanged-head capscrews (3) and long flanged-head capscrew (2). Tighten capscrews (3) and (2) to48 lb-ft (65 N•m).
INITIAL SETUP:
ToolsGeneral mechanic’s tool kit:
automotive (Appendix B, Item 1)Maintenance and repair shop equipment:
automotive (Appendix B, Item 2)
Materials/PartsSealing compound (Appendix C, Item 60)
Manual ReferencesTM 9-2320-387-24P
Equipment Condition• Alternator removed (para. 4-5).• Tensioner, idler pulleys, and mounting
hardware removed (para. 3-82).• Power steering pump removed (para. 8-23).
Maintenance LevelUnit
TM 9-2320-387-24-1
4-4 Change 1
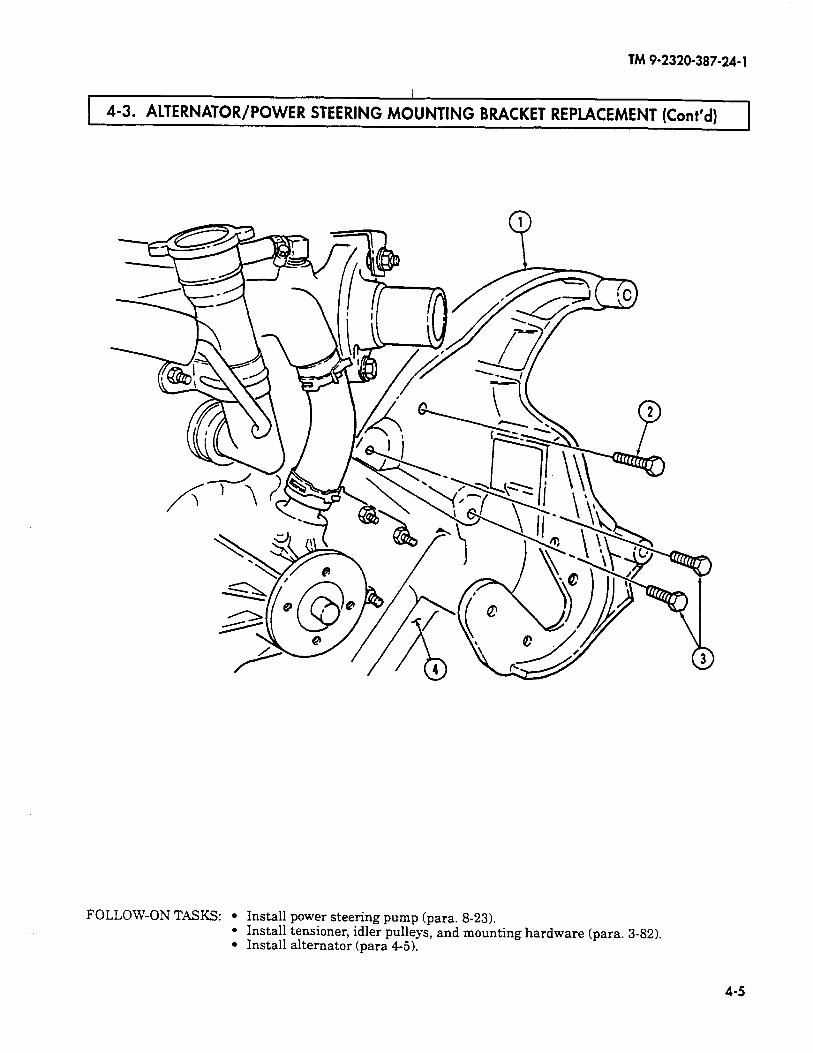
TM9-2320-387-24-l
I
4-3. ALTERNATOR/POWER STEERING MOUNTING BRACKET REPLACEMENT (Cont’d)
FOLLOW-ON TASKS: l Install power steering pump (para. 8-23). l Install tensioner, idler pulleys, and mounting hardware (para. 3-82). l Install alternator (para 4-5).
4-5
TM 9-2320-387-24-1
4-6 Change 1
4-4. PROTECTIVE CONTROL BOX (PCB) REPLACEMENT
This task covers:
a. Removal b. Installation
CCAAUUTTIIOONNThe control box must be supported from inside the vehicle duringremoval and installation. Failure to do this may result in damageto Protective Control Box (PCB).
1. From inside the vehicle, disconnect body wiring harness cannon plug (4) from PCB (5).
2. Working under hood, disconnect engine wiring harness cannon plug (6) from PCB connector (7).
NNOOTTEEPerform step 3 for M1114 vehicles. Perform step 4 for M1113vehicles.
3. Remove four screws (5.1) and PCB (5) from cowl (3).
4. Remove four nut and lockwasher assemblies (1) and PCB (5) from cowl (3). Discard nut and lock-washer assemblies (1).
1. Position PCB (5) under instrument panel (2) against cowl (3).
NNOOTTEEPerform step 2 for M1114 vehicles. Perform step 2.1 for M1113vehicles.
2. From under hood, install PCB (5) on cowl (3) with four screws (5.1). Tighten screws (5.1) to6 lb-ft (8 N•m).
2.1. From under hood, install PCB (5) on cowl (3) with four nut and lockwasher assemblies (1). Tightennut and lockwashers assemblies (1) to 6 lb-ft (8 N•m).
3. Fill cannon plug (6) and PCB connector (7) to capacity with silicone compound.
4. Connect engine wiring harness cannon plug (6) to PCB connector (7).
5. From inside vehicle, connect body wiring harness cannon plug (4) to PCB (5).
b. Installation
a. Removal
INITIAL SETUP:
ToolsGeneral mechanic’s tool kit:
automotive (Appendix B, Item 1)Maintenance and repair shop equipment:
automotive (Appendix B, Item 2)
Materials/PartsSilicone compound (Appendix C, Item 74)Four nut and lockwasher assemblies
(Appendix G, Item 244)
Personnel RequiredOne mechanicOne assistant
Manual ReferencesTM 9-2320-387-10TM 9-2320-387-24P
Equipment Condition• Battery ground cables disconnected (para. 4-68).• Hood raised and secured (TM 9-2320-387-10).
Maintenance LevelUnit
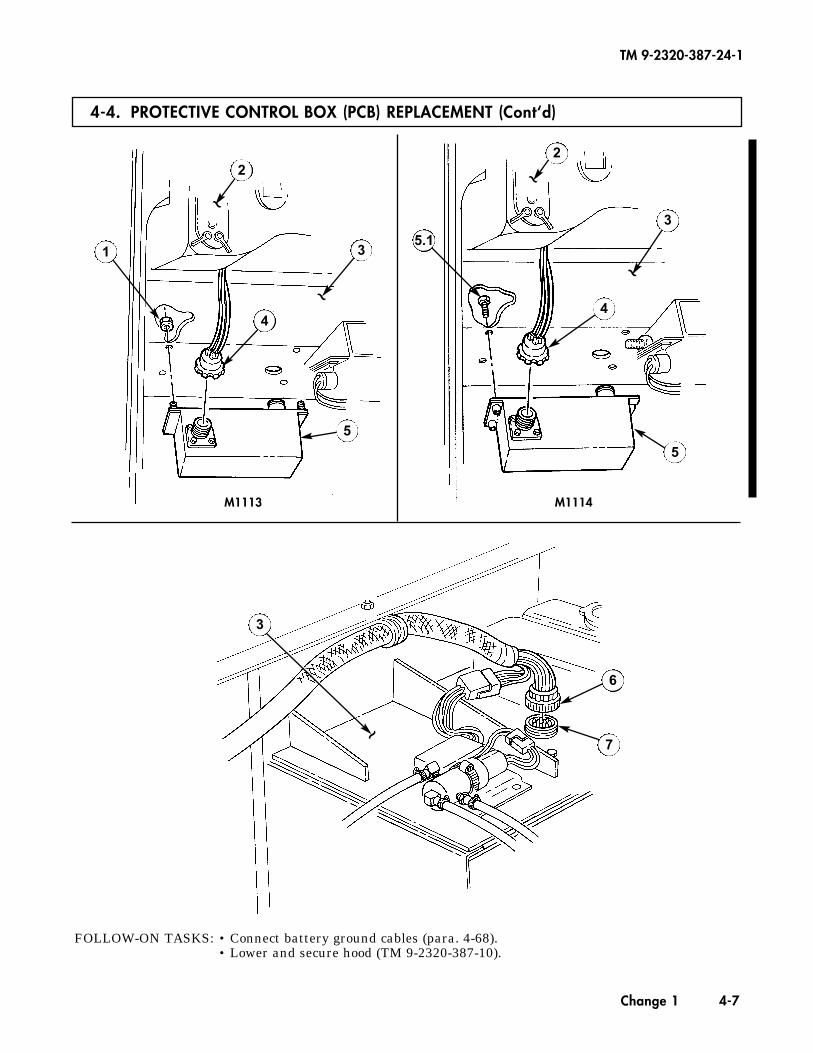
4-4. PROTECTIVE CONTROL BOX (PCB) REPLACEMENT (Cont‘d)
TM 9-2320-387-24-1
Change 1 4-7
FOLLOW-ON TASKS: • Connect battery ground cables (para. 4-68).• Lower and secure hood (TM 9-2320-387-10).
5.1
~
~
~
2
3
4
5
3
6
7
1
2
3
~
~
4
5
M1113 M1114

4-5. 200-AMPERE DUAL VOLTAGE ALTERNATOR REPLACEMENT
This task covers:
a. Removal b. Installation
a. Removal
NNOOTTEEPrior to removal, tag leads for installation.
1. Remove nut (14), lockwasher (13), washer (12), and ground strap (11) from ground stud (10). Discardlockwasher (13).
2. Slide back rubber boot (15) and remove nut (1), lockwasher (2), washer (3), and alternator positivecable lead 6 (4) from positive stud (7). Discard lockwasher (2).
3. Position 3/8-in. breaker bar or, as appropriate, a 1/2-in. ratchet wrench on belt tensioner (16), movetensioner (16) clockwise, and remove drivebelt (8) from alternator pulley (9).
WWAARRNNIINNGG
Alternator must be supported during removal. Failure to supportalternator may cause injury to personnel or damage to equipment.
4. Remove nut (29), lockwasher (28), washer (27), two screws (19), washers (17), lockwasher (18), andalternator (25) from support bracket (23) and mounting bracket (26). Discard lockwashers (28) and (18).
5. Remove three capscrews (20), washers (21), bushings (24), and fan guard assembly (22) fromalternator (25).
6. Remove alternator pulley (9) (para. 4-2).
INITIAL SETUP:
ToolsGeneral mechanic’s tool kit:
automotive (Appendix B, Item 1)Maintenance and repair shop equipment:
automotive (Appendix B, Item 2)
Materials/PartsLockwasher (Appendix G, Item 234)Two lockwashers (Appendix G, Item 235)Lockwasher (Appendix G, Item 233)Grease (Appendix C, Item 36)
Personnel RequiredOne mechanicOne assistant
Manual ReferencesTM 9-2320-387-24P
Equipment ConditionVoltage regulator removed (para. 4-8).
General Safety InstructionsAlternator must be supported during removal andinstallation.
Maintenance LevelUnit
TM 9-2320-387-24-1
4-8 Change 1
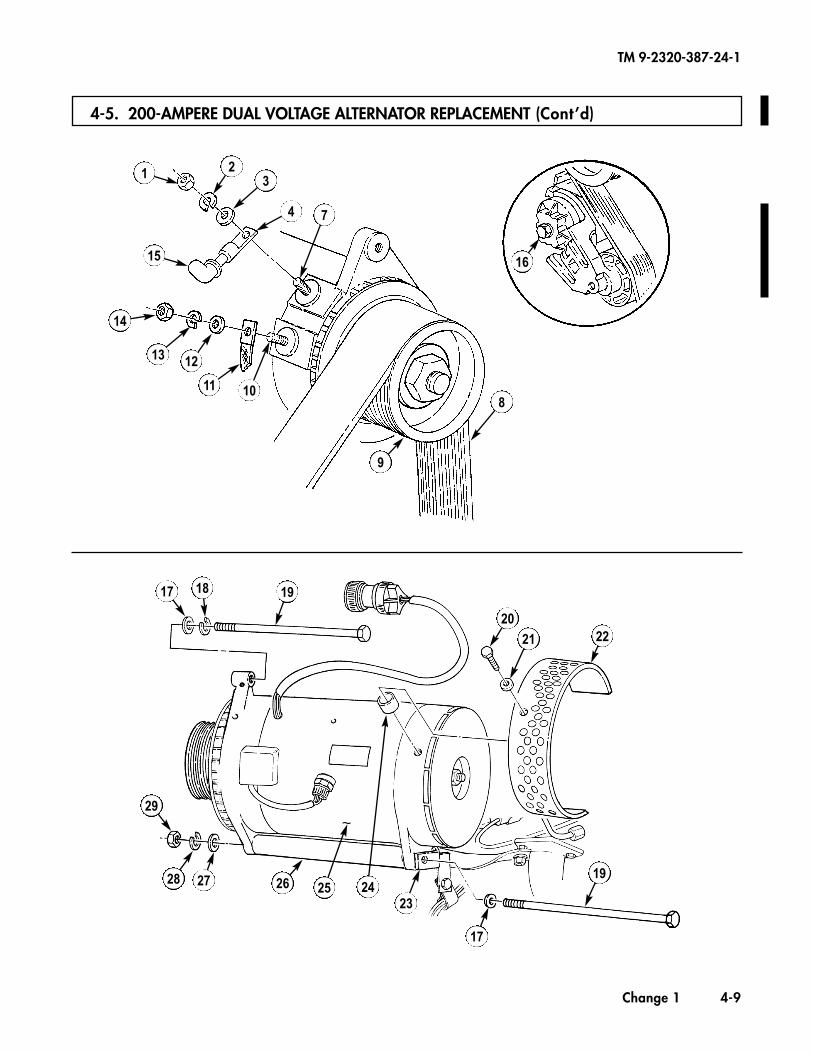
4-5. 200-AMPERE DUAL VOLTAGE ALTERNATOR REPLACEMENT (Cont’d)
TM 9-2320-387-24-1
Change 1 4-9
1 2 3
4 7
8
9
10 11
12 13
14
15 16
17 18 19
20 21 22
19
17
23 24 25
~
26 27 28
29
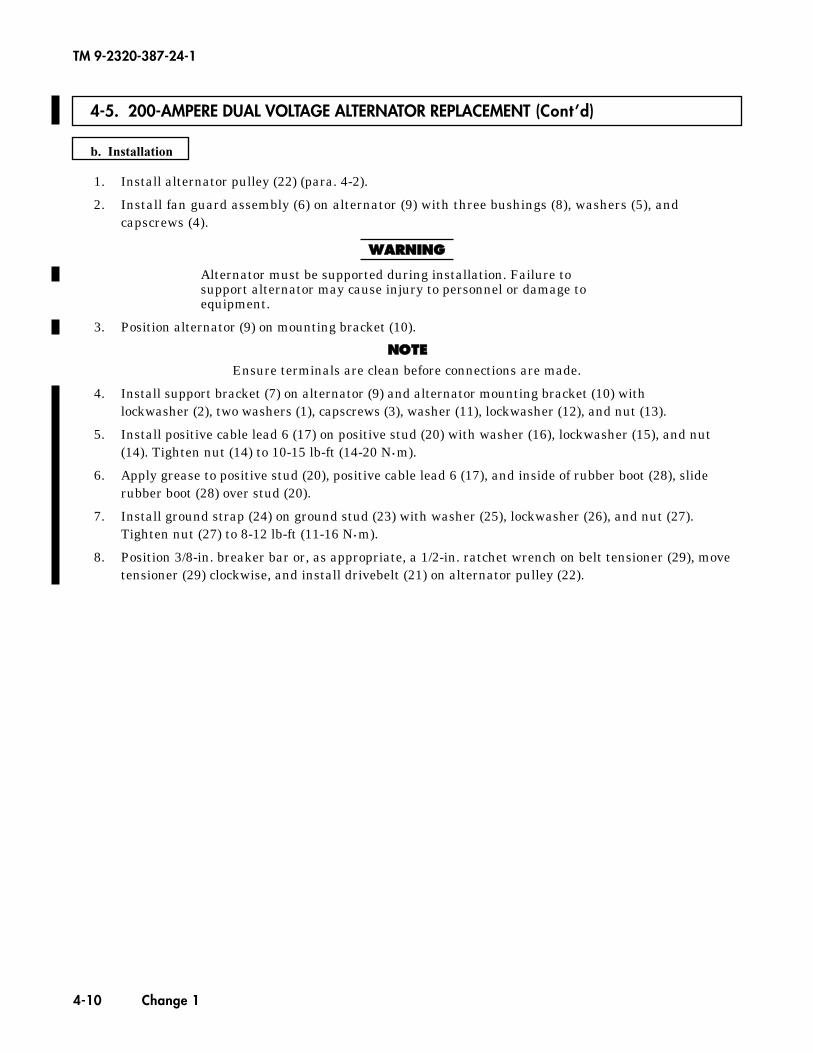
4-5. 200-AMPERE DUAL VOLTAGE ALTERNATOR REPLACEMENT (Cont’d)
b. Installation
1. Install alternator pulley (22) (para. 4-2).
2. Install fan guard assembly (6) on alternator (9) with three bushings (8), washers (5), andcapscrews (4).
WWAARRNNIINNGG
Alternator must be supported during installation. Failure tosupport alternator may cause injury to personnel or damage toequipment.
3. Position alternator (9) on mounting bracket (10).
NNOOTTEEEnsure terminals are clean before connections are made.
4. Install support bracket (7) on alternator (9) and alternator mounting bracket (10) with lockwasher (2), two washers (1), capscrews (3), washer (11), lockwasher (12), and nut (13).
5. Install positive cable lead 6 (17) on positive stud (20) with washer (16), lockwasher (15), and nut(14). Tighten nut (14) to 10-15 lb-ft (14-20 N•m).
6. Apply grease to positive stud (20), positive cable lead 6 (17), and inside of rubber boot (28), sliderubber boot (28) over stud (20).
7. Install ground strap (24) on ground stud (23) with washer (25), lockwasher (26), and nut (27).Tighten nut (27) to 8-12 lb-ft (11-16 N•m).
8. Position 3/8-in. breaker bar or, as appropriate, a 1/2-in. ratchet wrench on belt tensioner (29), movetensioner (29) clockwise, and install drivebelt (21) on alternator pulley (22).
TM 9-2320-387-24-1
4-10 Change 1
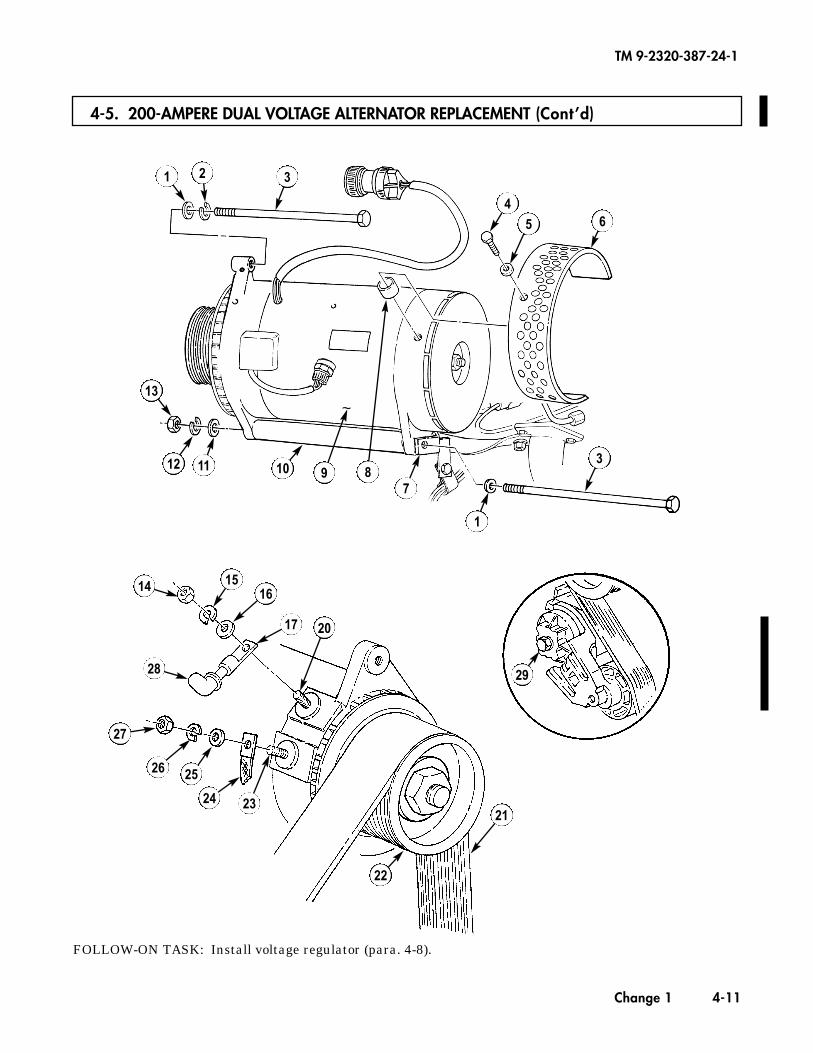
4-5. 200-AMPERE DUAL VOLTAGE ALTERNATOR REPLACEMENT (Cont’d)
FOLLOW-ON TASK: Install voltage regulator (para. 4-8).
TM 9-2320-387-24-1
Change 1 4-11
1 2 3
4 5 6
3
1
7 8 9
~
10 11 12
13
14 15 16
17 20
21
22
23 24
25 26
27
28 29
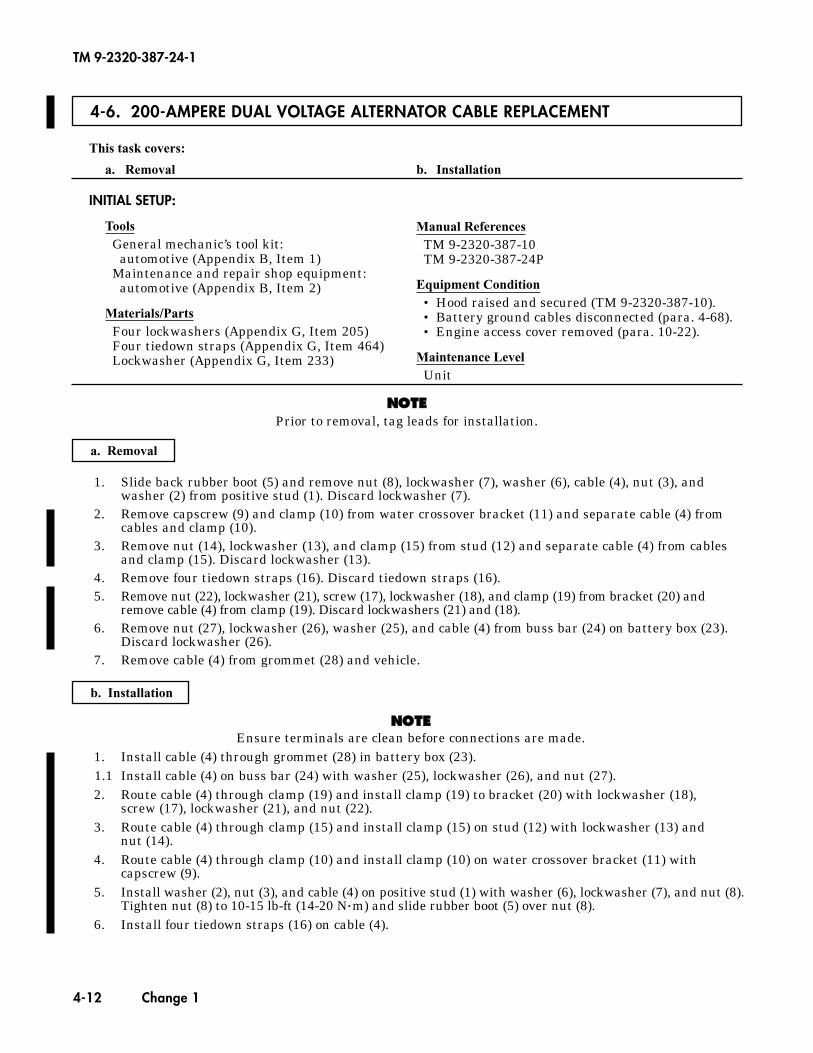
4-6. 200-AMPERE DUAL VOLTAGE ALTERNATOR CABLE REPLACEMENT
This task covers:
a. Removal b. Installation
INITIAL SETUP:
ToolsGeneral mechanic’s tool kit:
automotive (Appendix B, Item 1)Maintenance and repair shop equipment:
automotive (Appendix B, Item 2)
Materials/PartsFour lockwashers (Appendix G, Item 205)Four tiedown straps (Appendix G, Item 464)Lockwasher (Appendix G, Item 233)
Manual ReferencesTM 9-2320-387-10TM 9-2320-387-24P
Equipment Condition• Hood raised and secured (TM 9-2320-387-10).• Battery ground cables disconnected (para. 4-68).• Engine access cover removed (para. 10-22).
Maintenance LevelUnit
TM 9-2320-387-24-1
4-12 Change 1
a. Removal
b. Installation
NNOOTTEEPrior to removal, tag leads for installation.
NNOOTTEEEnsure terminals are clean before connections are made.
1. Install cable (4) through grommet (28) in battery box (23).1.1 Install cable (4) on buss bar (24) with washer (25), lockwasher (26), and nut (27).2. Route cable (4) through clamp (19) and install clamp (19) to bracket (20) with lockwasher (18),
screw (17), lockwasher (21), and nut (22).3. Route cable (4) through clamp (15) and install clamp (15) on stud (12) with lockwasher (13) and
nut (14).4. Route cable (4) through clamp (10) and install clamp (10) on water crossover bracket (11) with
capscrew (9).5. Install washer (2), nut (3), and cable (4) on positive stud (1) with washer (6), lockwasher (7), and nut (8).
Tighten nut (8) to 10-15 lb-ft (14-20 N•m) and slide rubber boot (5) over nut (8).6. Install four tiedown straps (16) on cable (4).
1. Slide back rubber boot (5) and remove nut (8), lockwasher (7), washer (6), cable (4), nut (3), andwasher (2) from positive stud (1). Discard lockwasher (7).
2. Remove capscrew (9) and clamp (10) from water crossover bracket (11) and separate cable (4) fromcables and clamp (10).
3. Remove nut (14), lockwasher (13), and clamp (15) from stud (12) and separate cable (4) from cablesand clamp (15). Discard lockwasher (13).
4. Remove four tiedown straps (16). Discard tiedown straps (16).5. Remove nut (22), lockwasher (21), screw (17), lockwasher (18), and clamp (19) from bracket (20) and
remove cable (4) from clamp (19). Discard lockwashers (21) and (18).6. Remove nut (27), lockwasher (26), washer (25), and cable (4) from buss bar (24) on battery box (23).
Discard lockwasher (26).7. Remove cable (4) from grommet (28) and vehicle.
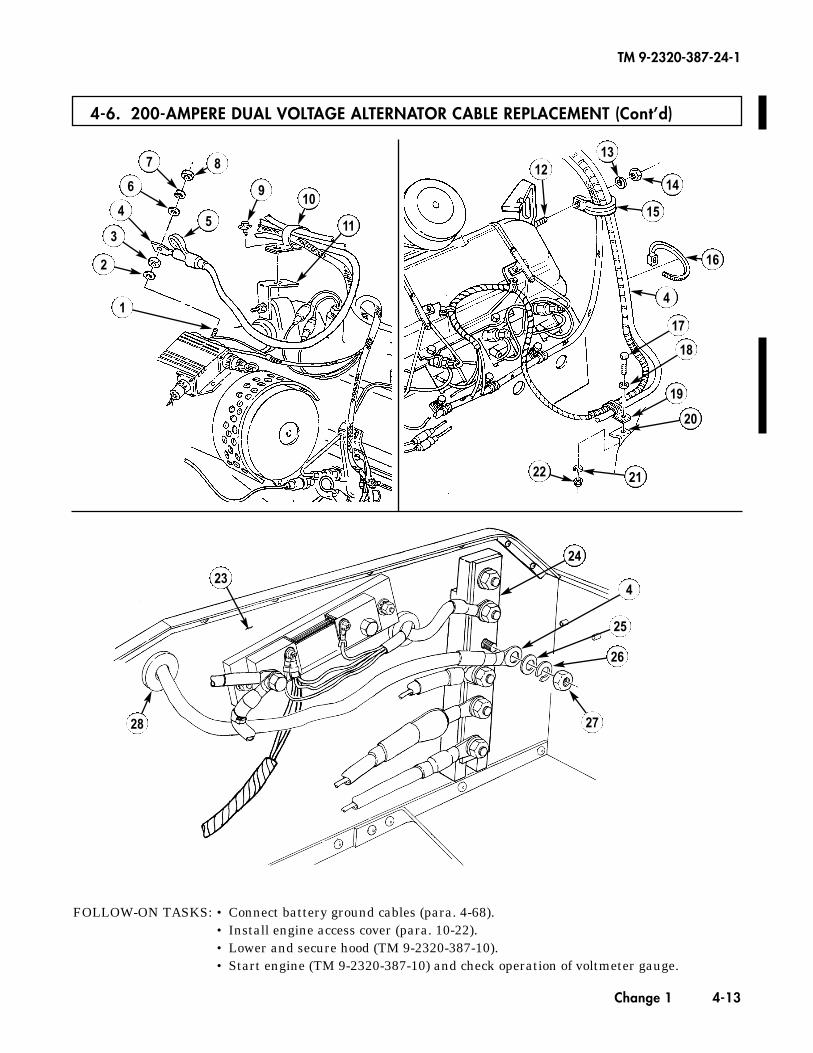
4-6. 200-AMPERE DUAL VOLTAGE ALTERNATOR CABLE REPLACEMENT (Cont’d)
FOLLOW-ON TASKS: • Connect battery ground cables (para. 4-68).• Install engine access cover (para. 10-22).• Lower and secure hood (TM 9-2320-387-10).• Start engine (TM 9-2320-387-10) and check operation of voltmeter gauge.
TM 9-2320-387-24-1
Change 1 4-13
1
2
3
4 5
6
7 8
9 10
11
12 13
14
15
16
4
17
18
19
20
21 22
23
24
4
25
26
27 28
~
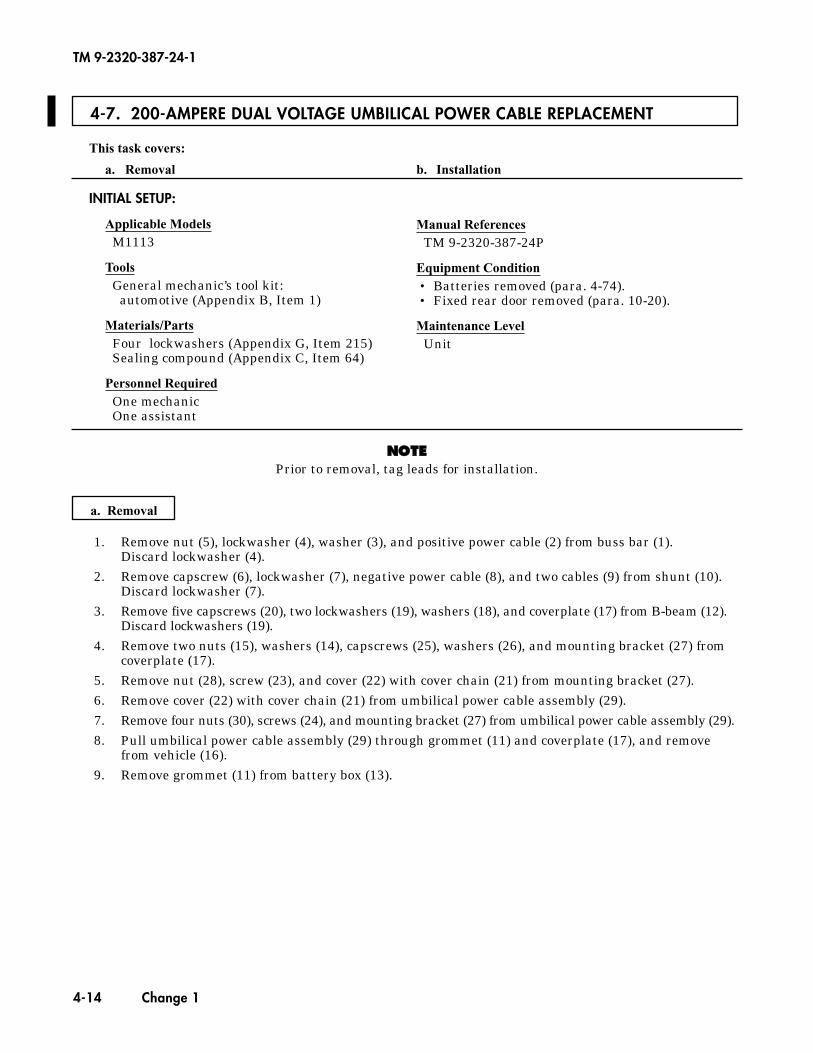
4-7. 200-AMPERE DUAL VOLTAGE UMBILICAL POWER CABLE REPLACEMENT
This task covers:
a. Removal b. Installation
a. Removal
1. Remove nut (5), lockwasher (4), washer (3), and positive power cable (2) from buss bar (1). Discard lockwasher (4).
2. Remove capscrew (6), lockwasher (7), negative power cable (8), and two cables (9) from shunt (10).Discard lockwasher (7).
3. Remove five capscrews (20), two lockwashers (19), washers (18), and coverplate (17) from B-beam (12).Discard lockwashers (19).
4. Remove two nuts (15), washers (14), capscrews (25), washers (26), and mounting bracket (27) fromcoverplate (17).
5. Remove nut (28), screw (23), and cover (22) with cover chain (21) from mounting bracket (27).6. Remove cover (22) with cover chain (21) from umbilical power cable assembly (29).7. Remove four nuts (30), screws (24), and mounting bracket (27) from umbilical power cable assembly (29).8. Pull umbilical power cable assembly (29) through grommet (11) and coverplate (17), and remove
from vehicle (16).9. Remove grommet (11) from battery box (13).
INITIAL SETUP:
Applicable ModelsM1113
ToolsGeneral mechanic’s tool kit:
automotive (Appendix B, Item 1)
Materials/PartsFour lockwashers (Appendix G, Item 215)Sealing compound (Appendix C, Item 64)
Personnel RequiredOne mechanicOne assistant
Manual ReferencesTM 9-2320-387-24P
Equipment Condition• Batteries removed (para. 4-74).• Fixed rear door removed (para. 10-20).
Maintenance LevelUnit
TM 9-2320-387-24-1
4-14 Change 1
NNOOTTEEPrior to removal, tag leads for installation.

4-7. 200-AMPERE DUAL VOLTAGE UMBILICAL POWER CABLE REPLACEMENT (Cont'd)
TM 9-2320-387-24-1
Change 1 4-15
1 2 3
4
5
6 7
8 9
10
11 12
13
14
15 16
18 19 20 21 22
23
24
25 26
27 28 29
30
20
~
~
17
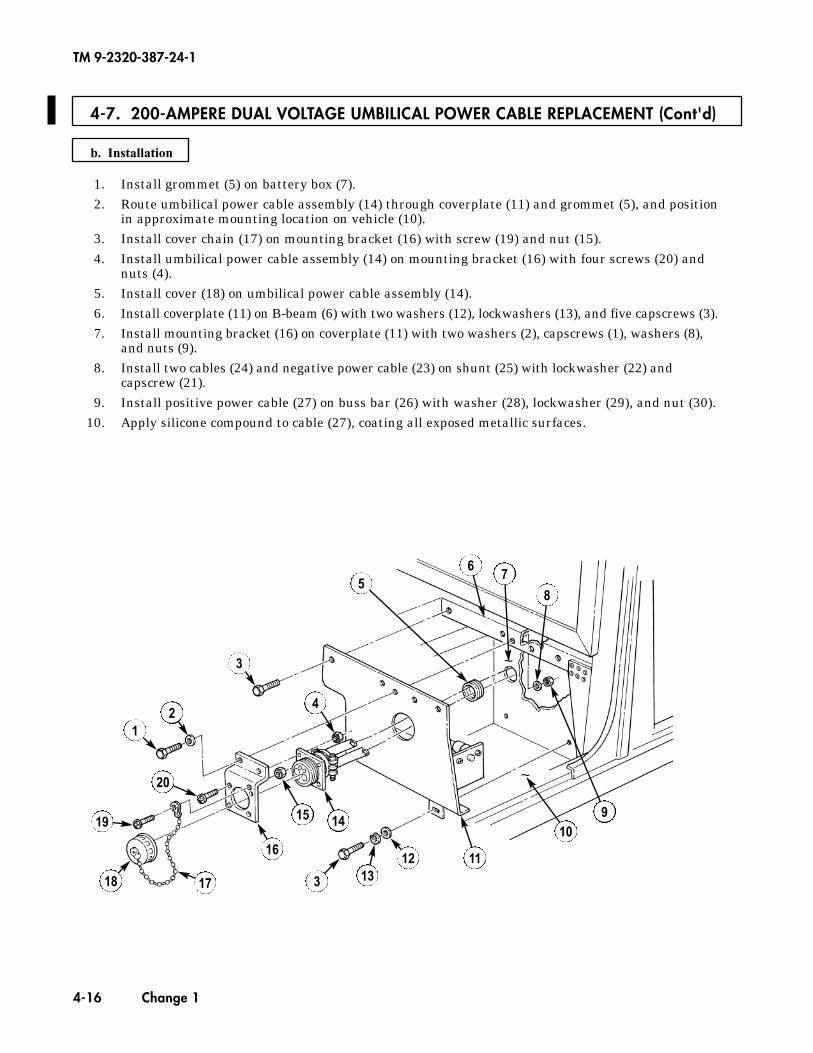
4-7. 200-AMPERE DUAL VOLTAGE UMBILICAL POWER CABLE REPLACEMENT (Cont'd)
TM 9-2320-387-24-1
4-16 Change 1
1. Install grommet (5) on battery box (7).2. Route umbilical power cable assembly (14) through coverplate (11) and grommet (5), and position
in approximate mounting location on vehicle (10).3. Install cover chain (17) on mounting bracket (16) with screw (19) and nut (15).4. Install umbilical power cable assembly (14) on mounting bracket (16) with four screws (20) and
nuts (4).5. Install cover (18) on umbilical power cable assembly (14).6. Install coverplate (11) on B-beam (6) with two washers (12), lockwashers (13), and five capscrews (3).7. Install mounting bracket (16) on coverplate (11) with two washers (2), capscrews (1), washers (8),
and nuts (9).8. Install two cables (24) and negative power cable (23) on shunt (25) with lockwasher (22) and
capscrew (21).9. Install positive power cable (27) on buss bar (26) with washer (28), lockwasher (29), and nut (30).
10. Apply silicone compound to cable (27), coating all exposed metallic surfaces.
b. Installation
5 6
7
8
9 10
12 13 3 17 18
19
20
1 2
16
15 14
4
3
~
11
~
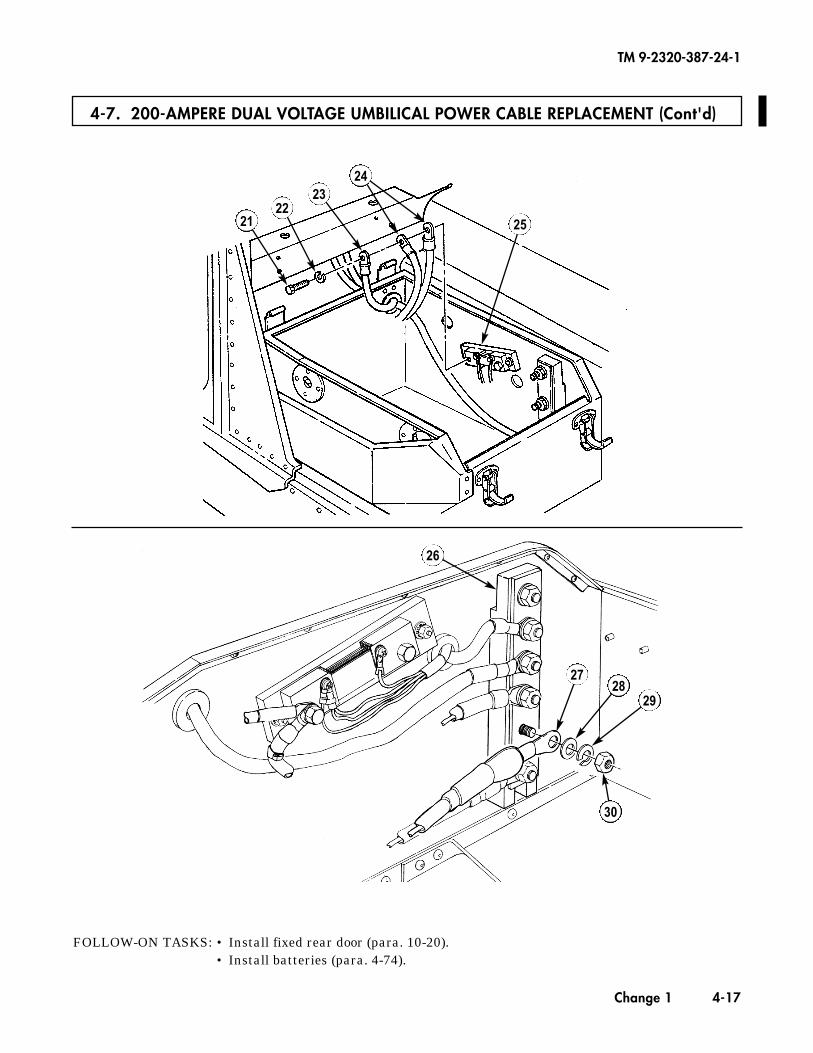
FOLLOW-ON TASKS: • Install fixed rear door (para. 10-20).• Install batteries (para. 4-74).
4-7. 200-AMPERE DUAL VOLTAGE UMBILICAL POWER CABLE REPLACEMENT (Cont'd)
TM 9-2320-387-24-1
Change 1 4-17
26
27 28
29
30
21 22
23 24
25

4-8. 200-AMPERE DUAL VOLTAGE REGULATOR REPLACEMENT
This task covers:
a. Removal b. Installation
a. Removal
1. Disconnect regulator plug (13) from voltage regulator (11).2. Slide back rubber boot (3) and remove nut (2), lead 5A (1) and washer (22.1) from IGN terminal (22).3. Slide back rubber boot (4) and remove nut (5), lead 2A (6) and washer (6.1) from yellow (AC)
terminal (7).4. Remove nut (20) and ground wire (12) from 14-volt stud (21).5. Remove screw (8), lockwasher (9), washer (10), and ground wire (12) from voltage regulator (11).
Discard lockwasher (9).6. Disconnect alternator connector (15) from connector (16) on voltage regulator (11).7. Remove three screws (19), lockwashers (18), washers (17), and voltage regulator (11) from
alternator (14). Discard lockwashers (18).
INITIAL SETUP:
ToolsGeneral mechanic’s tool kit:
automotive (Appendix B, Item 1)Maintenance and repair shop equipment:
automotive (Appendix B, Item 2)
Materials/PartsThree lockwashers (Appendix G, Item 231)Lockwasher (Appendix G, Item 232)Grease (Appendix C, Item 25)
Manual ReferencesTM 9-2320-387-10TM 9-2320-387-24P
Equipment Condition• Battery ground cables disconnected (para. 4-68).• Hood raised and secured (TM 9-2320-387-10).
Maintenance LevelUnit
1. Install voltage regulator (11) on alternator (14) with three washers (17), lockwashers (18), and screws (19). Tighten screws (19) to 30-34 lb-in. (3-4 N•m).
2. Connect alternator connector (15) to connector (16) on voltage regulator (11).3. Install washer (22.1), lead 5A (1) and nut (2) on IGN terminal (22). Tighten nut (2) to 23-27 lb-in.
(2.6-3.0 N•m). 4. Apply grease to IGN terminal (22), lead 5A (1), and inside of boot (3), and slide boot (3) over IGN
terminal (22).5. Install washer (6.1), lead 2A (6) and nut (5) on yellow (AC) terminal (7). Tighten nut (5) to
18-22 lb-in. (2.0-2.5 N•m). 6. Apply grease to yellow (AC) terminal (7), lead 2A (6), and inside of boot (4), and slide boot (4) over
yellow (AC) terminal (7).7. Connect regulator plug (13) to voltage regulator (11).8. Install one end of ground wire (12) on 14-volt stud (21) on voltage regulator (11) with nut (20).
Tighten nut (20) to 45-55 lb-in. (5-6 N•m).9. Install other end of ground wire (12) on voltage regulator (11) with washer (10), lockwasher (9), and
screw (8). Tighten screw (8) to 88-94 lb-in. (10-11 N•m).
4-18 Change 1
b. Installation
NNOOTTEEPrior to removal, tag leads for installation.
TM 9-2320-387-24-1
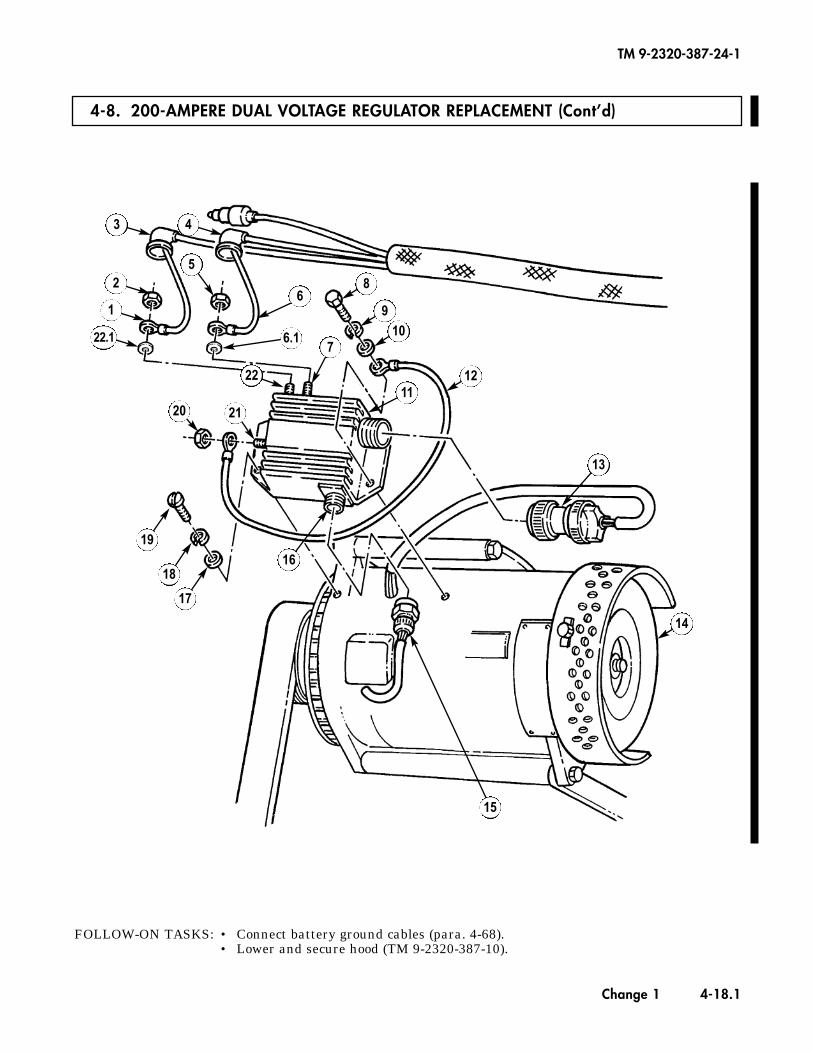
FOLLOW-ON TASKS: • Connect battery ground cables (para. 4-68).• Lower and secure hood (TM 9-2320-387-10).
TM 9-2320-387-24-1
Change 1 4-18.1
4-8. 200-AMPERE DUAL VOLTAGE REGULATOR REPLACEMENT (Cont’d)
22.1
1
2
3 4
5
6
6.1 7
8
9 10
11 12
13
14
16
17
18
19
20 21
22
15
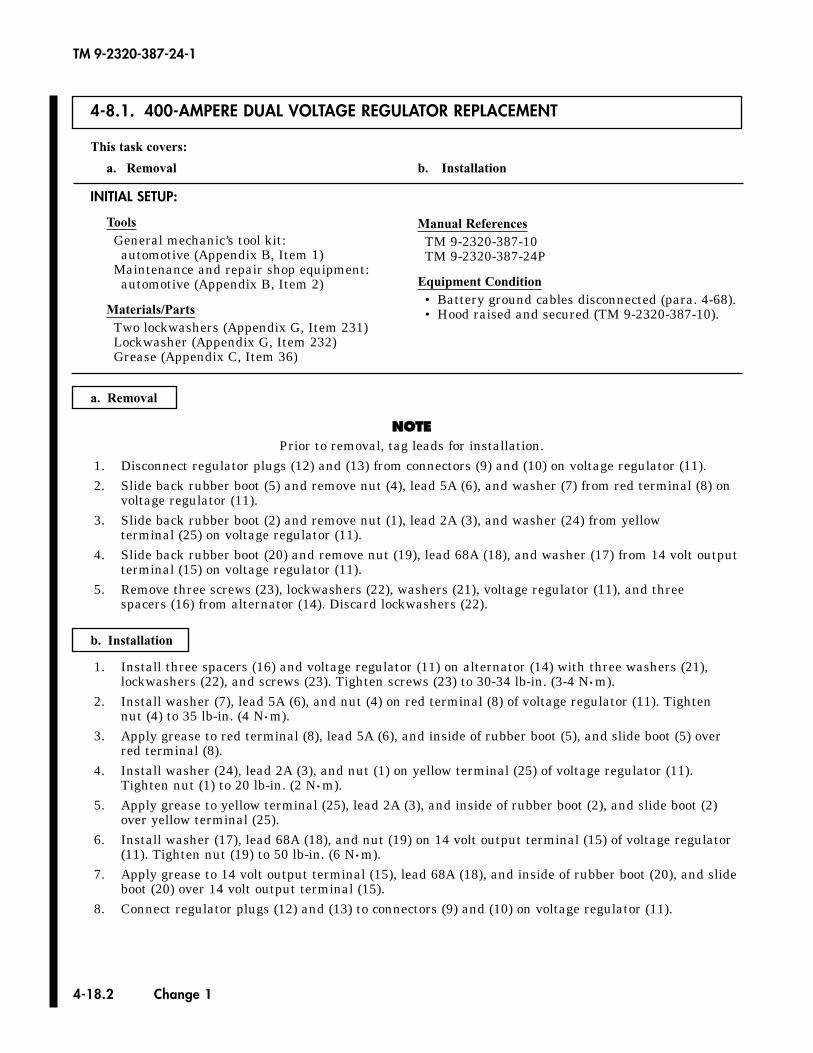
4-8.1. 400-AMPERE DUAL VOLTAGE REGULATOR REPLACEMENT
This task covers:
a. Removal b. Installation
a. Removal
NNOOTTEEPrior to removal, tag leads for installation.
1. Disconnect regulator plugs (12) and (13) from connectors (9) and (10) on voltage regulator (11).2. Slide back rubber boot (5) and remove nut (4), lead 5A (6), and washer (7) from red terminal (8) on
voltage regulator (11).3. Slide back rubber boot (2) and remove nut (1), lead 2A (3), and washer (24) from yellow
terminal (25) on voltage regulator (11).4. Slide back rubber boot (20) and remove nut (19), lead 68A (18), and washer (17) from 14 volt output
terminal (15) on voltage regulator (11).5. Remove three screws (23), lockwashers (22), washers (21), voltage regulator (11), and three
spacers (16) from alternator (14). Discard lockwashers (22).
INITIAL SETUP:
ToolsGeneral mechanic’s tool kit:
automotive (Appendix B, Item 1)Maintenance and repair shop equipment:
automotive (Appendix B, Item 2)
Materials/PartsTwo lockwashers (Appendix G, Item 231)Lockwasher (Appendix G, Item 232)Grease (Appendix C, Item 36)
Manual ReferencesTM 9-2320-387-10TM 9-2320-387-24P
Equipment Condition• Battery ground cables disconnected (para. 4-68).• Hood raised and secured (TM 9-2320-387-10).
1. Install three spacers (16) and voltage regulator (11) on alternator (14) with three washers (21),lockwashers (22), and screws (23). Tighten screws (23) to 30-34 lb-in. (3-4 N•m).
2. Install washer (7), lead 5A (6), and nut (4) on red terminal (8) of voltage regulator (11). Tightennut (4) to 35 lb-in. (4 N•m).
3. Apply grease to red terminal (8), lead 5A (6), and inside of rubber boot (5), and slide boot (5) overred terminal (8).
4. Install washer (24), lead 2A (3), and nut (1) on yellow terminal (25) of voltage regulator (11).Tighten nut (1) to 20 lb-in. (2 N•m).
5. Apply grease to yellow terminal (25), lead 2A (3), and inside of rubber boot (2), and slide boot (2)over yellow terminal (25).
6. Install washer (17), lead 68A (18), and nut (19) on 14 volt output terminal (15) of voltage regulator(11). Tighten nut (19) to 50 lb-in. (6 N•m).
7. Apply grease to 14 volt output terminal (15), lead 68A (18), and inside of rubber boot (20), and slideboot (20) over 14 volt output terminal (15).
8. Connect regulator plugs (12) and (13) to connectors (9) and (10) on voltage regulator (11).
4-18.2 Change 1
b. Installation
TM 9-2320-387-24-1
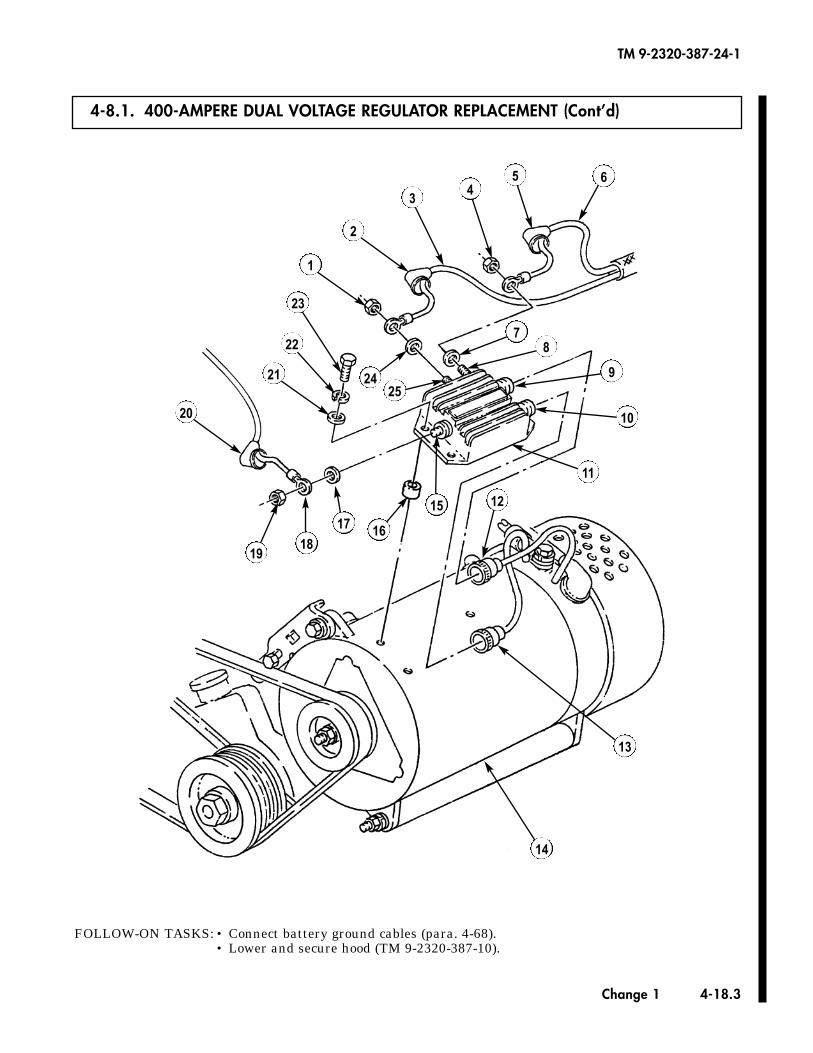
FOLLOW-ON TASKS: • Connect battery ground cables (para. 4-68).• Lower and secure hood (TM 9-2320-387-10).
TM 9-2320-387-24-1
Change 1 4-18.3
4-8.1. 400-AMPERE DUAL VOLTAGE REGULATOR REPLACEMENT (Cont’d)
1
2
34
5 6
78
9
10
11
12
13
14
15
16
1918
17
20
21
22
23
2425
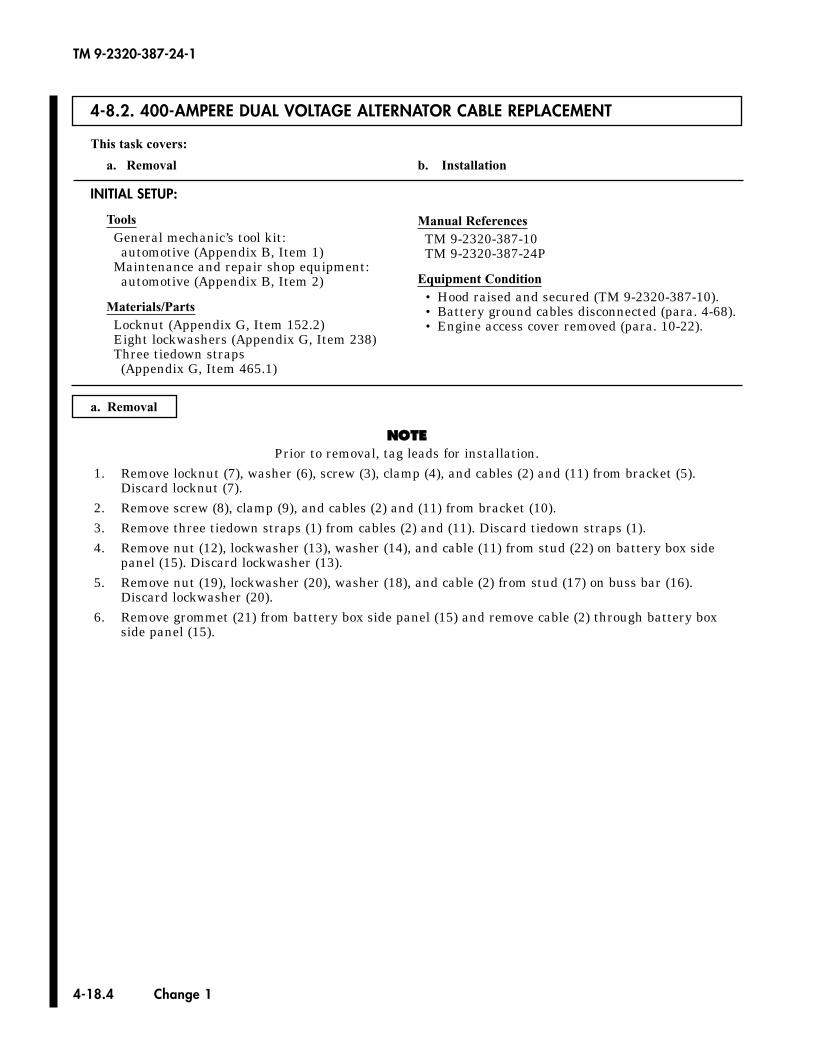
4-8.2. 400-AMPERE DUAL VOLTAGE ALTERNATOR CABLE REPLACEMENT
This task covers:
a. Removal b. Installation
a. Removal
NNOOTTEEPrior to removal, tag leads for installation.
1. Remove locknut (7), washer (6), screw (3), clamp (4), and cables (2) and (11) from bracket (5).Discard locknut (7).
2. Remove screw (8), clamp (9), and cables (2) and (11) from bracket (10).3. Remove three tiedown straps (1) from cables (2) and (11). Discard tiedown straps (1).4. Remove nut (12), lockwasher (13), washer (14), and cable (11) from stud (22) on battery box side
panel (15). Discard lockwasher (13).5. Remove nut (19), lockwasher (20), washer (18), and cable (2) from stud (17) on buss bar (16).
Discard lockwasher (20).6. Remove grommet (21) from battery box side panel (15) and remove cable (2) through battery box
side panel (15).
INITIAL SETUP:
ToolsGeneral mechanic’s tool kit:
automotive (Appendix B, Item 1)Maintenance and repair shop equipment:
automotive (Appendix B, Item 2)
Materials/PartsLocknut (Appendix G, Item 152.2)Eight lockwashers (Appendix G, Item 238)Three tiedown straps
(Appendix G, Item 465.1)
Manual ReferencesTM 9-2320-387-10TM 9-2320-387-24P
Equipment Condition• Hood raised and secured (TM 9-2320-387-10).• Battery ground cables disconnected (para. 4-68).• Engine access cover removed (para. 10-22).
4-18.4 Change 1
TM 9-2320-387-24-1

TM 9-2320-387-24-1
Change 1 4-18.5
4-8.2. 400-AMPERE DUAL VOLTAGE ALTERNATOR CABLE REPLACEMENT (Cont’d)
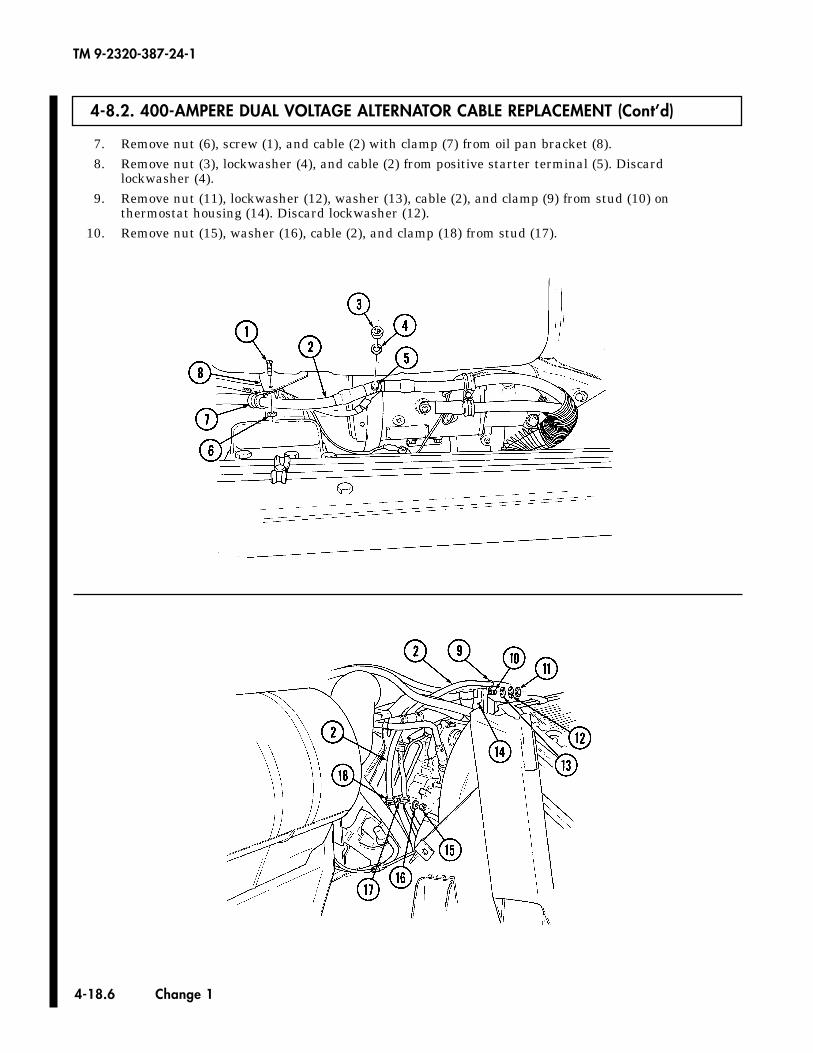
4-18.6 Change 1
7. Remove nut (6), screw (1), and cable (2) with clamp (7) from oil pan bracket (8).8. Remove nut (3), lockwasher (4), and cable (2) from positive starter terminal (5). Discard
lockwasher (4).9. Remove nut (11), lockwasher (12), washer (13), cable (2), and clamp (9) from stud (10) on
thermostat housing (14). Discard lockwasher (12).10. Remove nut (15), washer (16), cable (2), and clamp (18) from stud (17).
TM 9-2320-387-24-1
4-8.2. 400-AMPERE DUAL VOLTAGE ALTERNATOR CABLE REPLACEMENT (Cont’d)
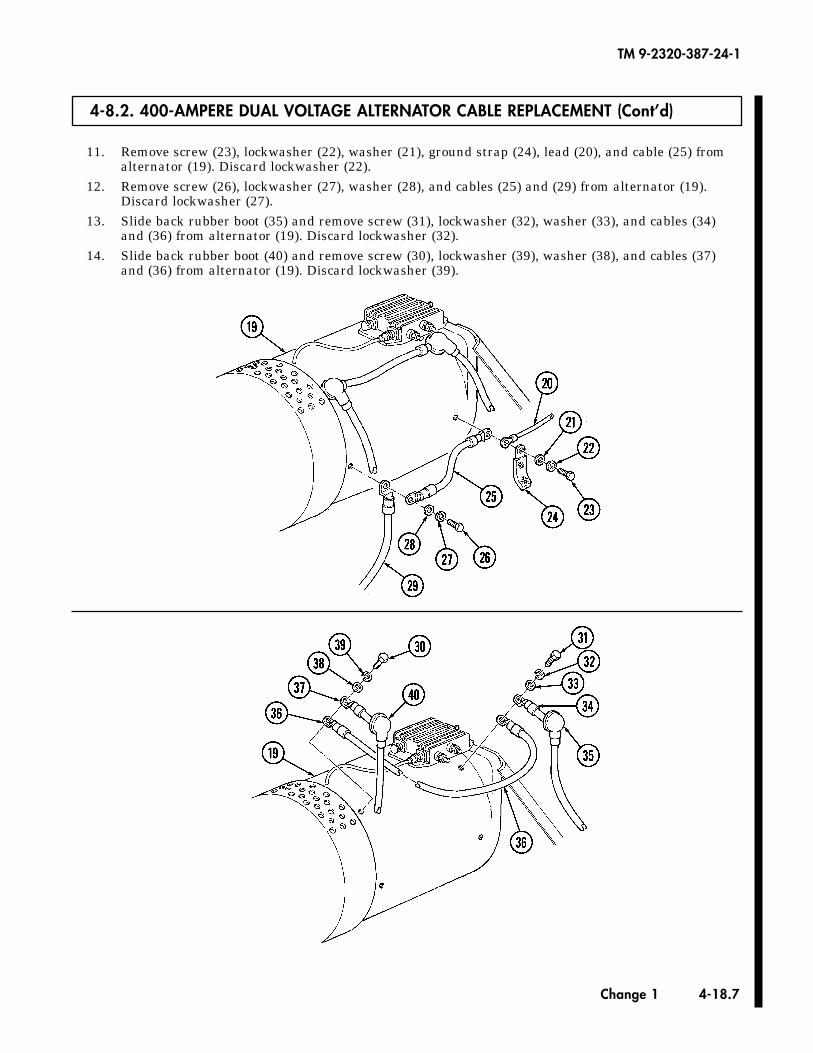
Change 1 4-18.7
11. Remove screw (23), lockwasher (22), washer (21), ground strap (24), lead (20), and cable (25) fromalternator (19). Discard lockwasher (22).
12. Remove screw (26), lockwasher (27), washer (28), and cables (25) and (29) from alternator (19).Discard lockwasher (27).
13. Slide back rubber boot (35) and remove screw (31), lockwasher (32), washer (33), and cables (34)and (36) from alternator (19). Discard lockwasher (32).
14. Slide back rubber boot (40) and remove screw (30), lockwasher (39), washer (38), and cables (37)and (36) from alternator (19). Discard lockwasher (39).
TM 9-2320-387-24-1
4-8.2. 400-AMPERE DUAL VOLTAGE ALTERNATOR CABLE REPLACEMENT (Cont’d)
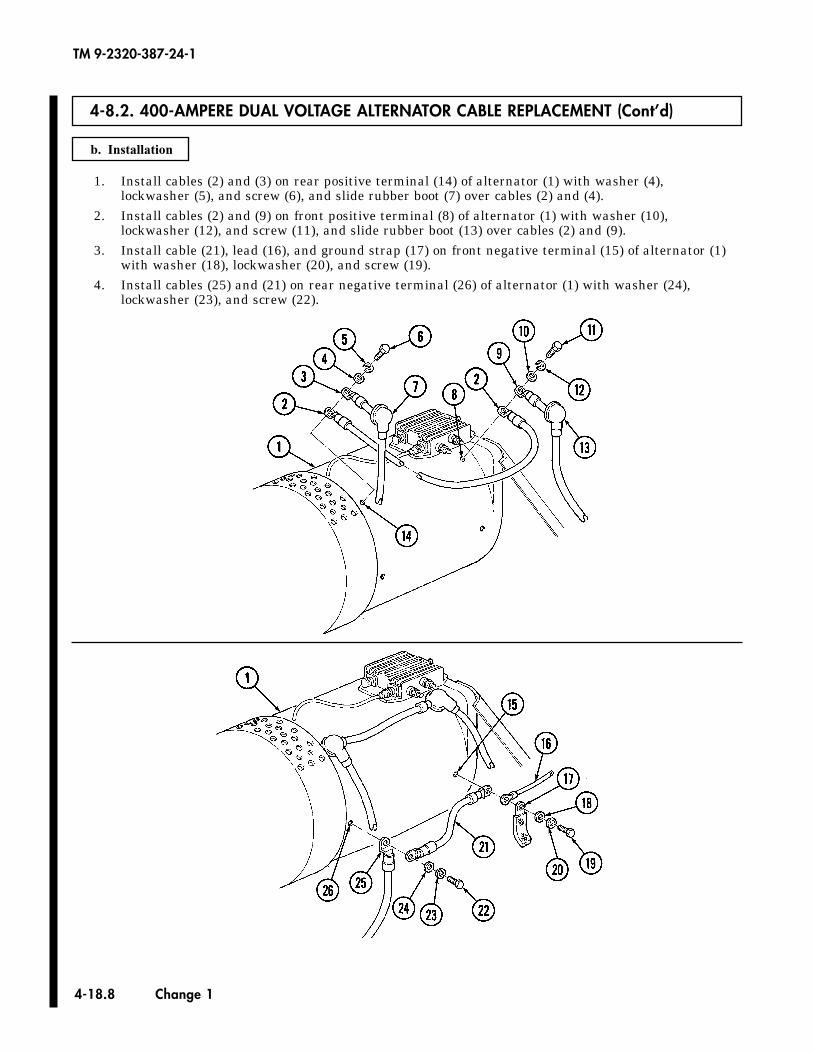
4-18.8 Change 1
1. Install cables (2) and (3) on rear positive terminal (14) of alternator (1) with washer (4),lockwasher (5), and screw (6), and slide rubber boot (7) over cables (2) and (4).
2. Install cables (2) and (9) on front positive terminal (8) of alternator (1) with washer (10),lockwasher (12), and screw (11), and slide rubber boot (13) over cables (2) and (9).
3. Install cable (21), lead (16), and ground strap (17) on front negative terminal (15) of alternator (1)with washer (18), lockwasher (20), and screw (19).
4. Install cables (25) and (21) on rear negative terminal (26) of alternator (1) with washer (24),lockwasher (23), and screw (22).
TM 9-2320-387-24-1
b. Installation
4-8.2. 400-AMPERE DUAL VOLTAGE ALTERNATOR CABLE REPLACEMENT (Cont’d)
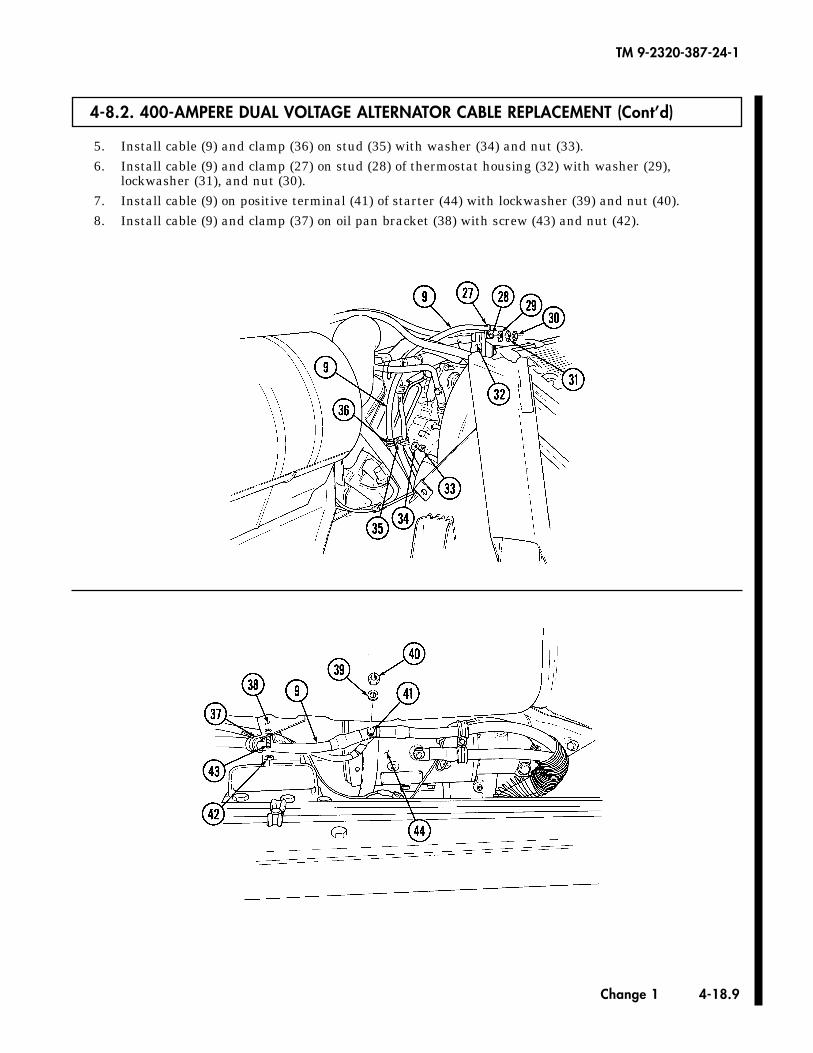
TM 9-2320-387-24-1
Change 1 4-18.9
5. Install cable (9) and clamp (36) on stud (35) with washer (34) and nut (33).6. Install cable (9) and clamp (27) on stud (28) of thermostat housing (32) with washer (29),
lockwasher (31), and nut (30).7. Install cable (9) on positive terminal (41) of starter (44) with lockwasher (39) and nut (40).8. Install cable (9) and clamp (37) on oil pan bracket (38) with screw (43) and nut (42).
4-8.2. 400-AMPERE DUAL VOLTAGE ALTERNATOR CABLE REPLACEMENT (Cont’d)
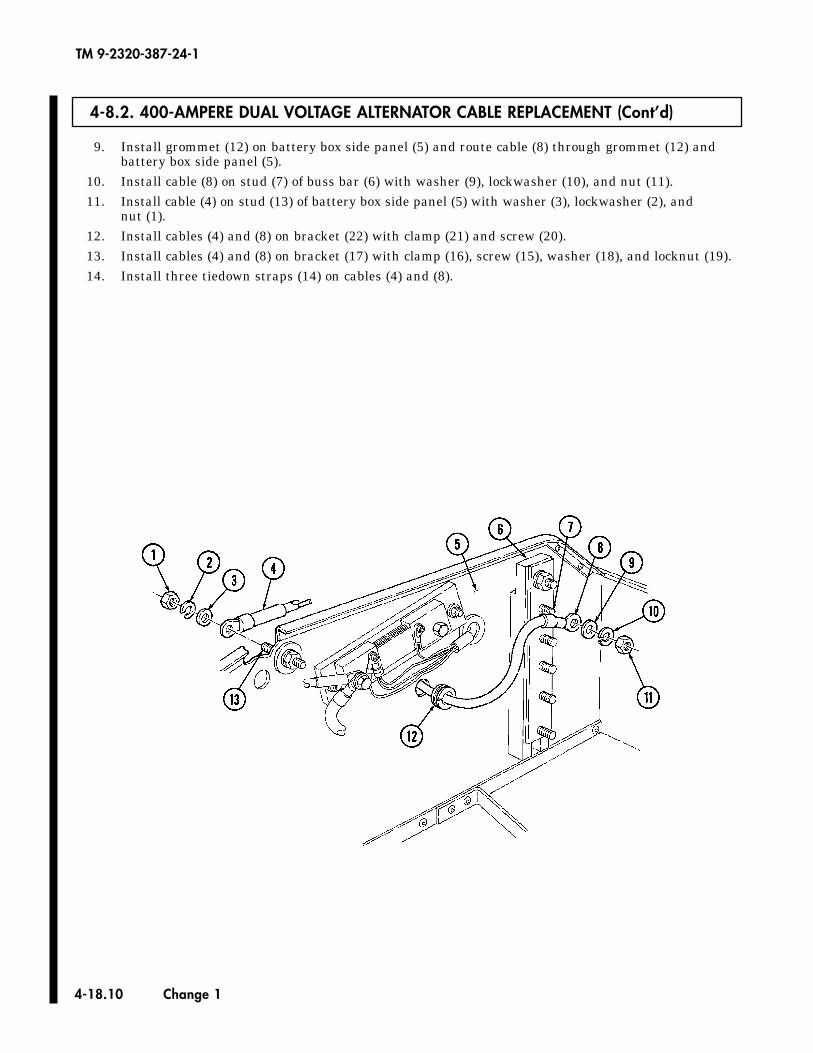
TM 9-2320-387-24-1
4-18.10 Change 1
9. Install grommet (12) on battery box side panel (5) and route cable (8) through grommet (12) andbattery box side panel (5).
10. Install cable (8) on stud (7) of buss bar (6) with washer (9), lockwasher (10), and nut (11).11. Install cable (4) on stud (13) of battery box side panel (5) with washer (3), lockwasher (2), and
nut (1).12. Install cables (4) and (8) on bracket (22) with clamp (21) and screw (20).13. Install cables (4) and (8) on bracket (17) with clamp (16), screw (15), washer (18), and locknut (19).14. Install three tiedown straps (14) on cables (4) and (8).
4-8.2. 400-AMPERE DUAL VOLTAGE ALTERNATOR CABLE REPLACEMENT (Cont’d)
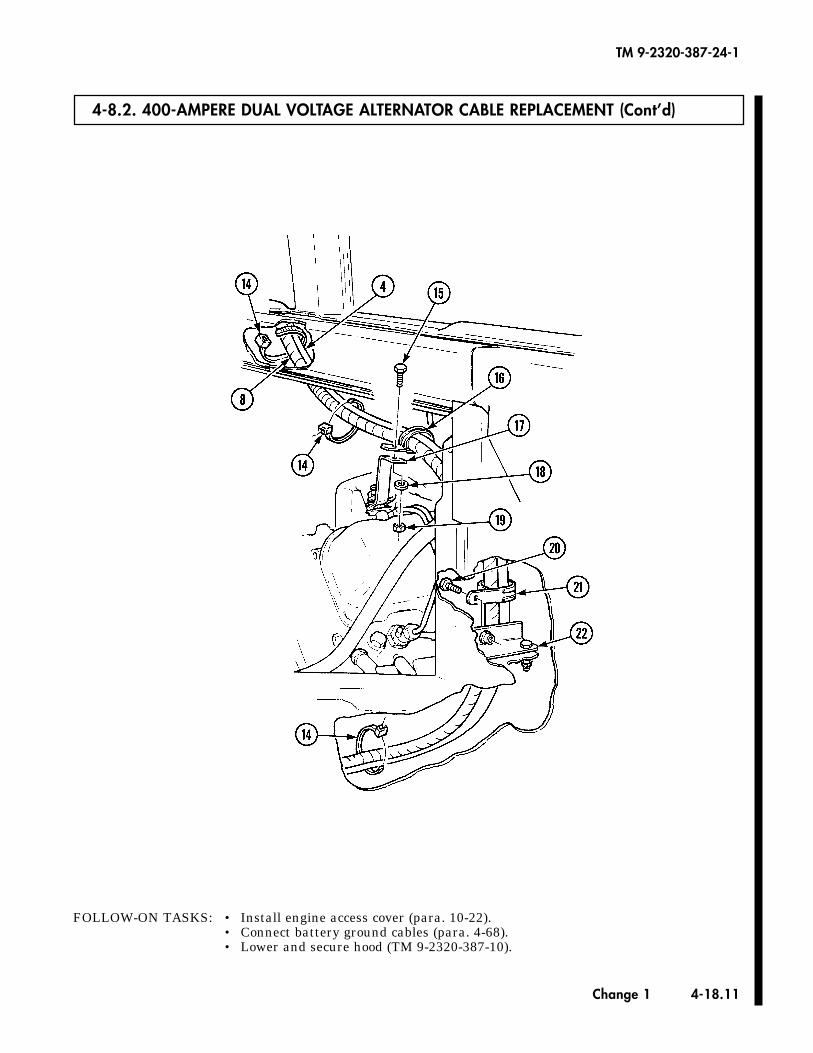
TM 9-2320-387-24-1
Change 1 4-18.11
FOLLOW-ON TASKS: • Install engine access cover (para. 10-22).• Connect battery ground cables (para. 4-68).• Lower and secure hood (TM 9-2320-387-10).
4-8.2. 400-AMPERE DUAL VOLTAGE ALTERNATOR CABLE REPLACEMENT (Cont’d)
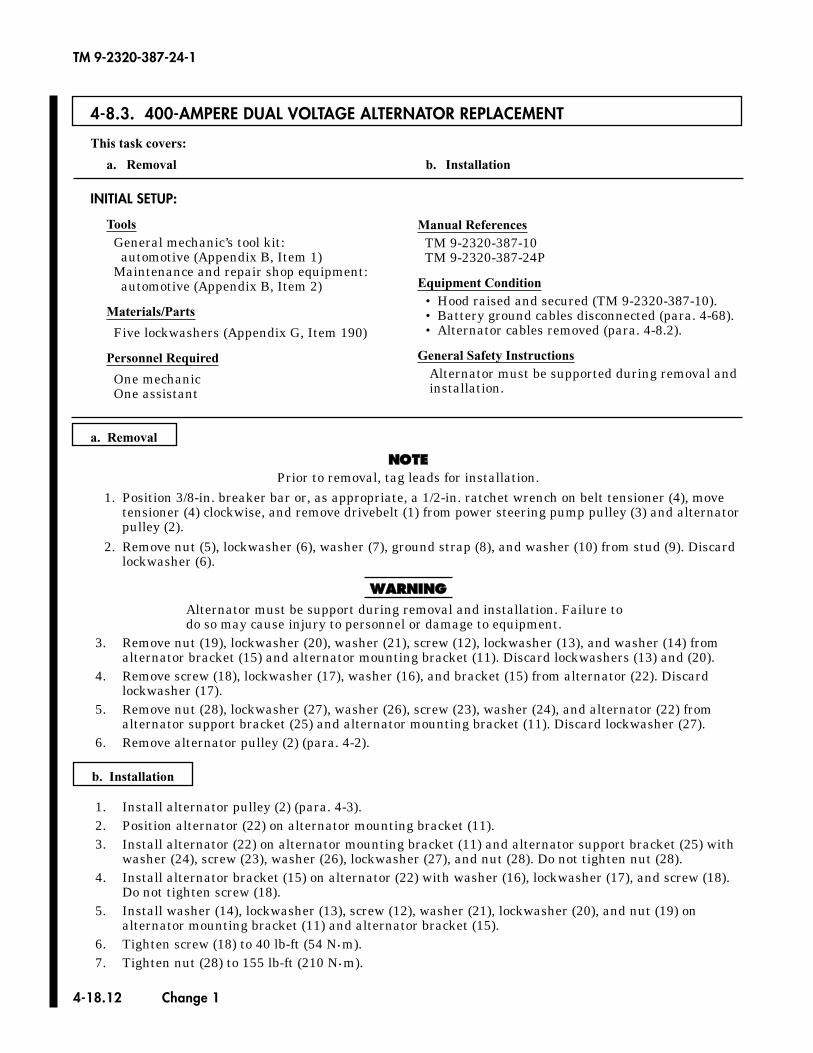
4-8.3. 400-AMPERE DUAL VOLTAGE ALTERNATOR REPLACEMENT
This task covers:
a. Removal b. Installation
a. Removal
NNOOTTEEPrior to removal, tag leads for installation.
1. Position 3/8-in. breaker bar or, as appropriate, a 1/2-in. ratchet wrench on belt tensioner (4), movetensioner (4) clockwise, and remove drivebelt (1) from power steering pump pulley (3) and alternatorpulley (2).
2. Remove nut (5), lockwasher (6), washer (7), ground strap (8), and washer (10) from stud (9). Discardlockwasher (6).
..WWAARRNNIINNGG..Alternator must be support during removal and installation. Failure todo so may cause injury to personnel or damage to equipment.
3. Remove nut (19), lockwasher (20), washer (21), screw (12), lockwasher (13), and washer (14) fromalternator bracket (15) and alternator mounting bracket (11). Discard lockwashers (13) and (20).
4. Remove screw (18), lockwasher (17), washer (16), and bracket (15) from alternator (22). Discardlockwasher (17).
5. Remove nut (28), lockwasher (27), washer (26), screw (23), washer (24), and alternator (22) fromalternator support bracket (25) and alternator mounting bracket (11). Discard lockwasher (27).
6. Remove alternator pulley (2) (para. 4-2).
INITIAL SETUP:
ToolsGeneral mechanic’s tool kit:
automotive (Appendix B, Item 1)Maintenance and repair shop equipment:
automotive (Appendix B, Item 2)
Materials/Parts
Five lockwashers (Appendix G, Item 190)
Personnel Required
One mechanicOne assistant
Manual ReferencesTM 9-2320-387-10TM 9-2320-387-24P
Equipment Condition• Hood raised and secured (TM 9-2320-387-10).• Battery ground cables disconnected (para. 4-68).• Alternator cables removed (para. 4-8.2).
General Safety InstructionsAlternator must be supported during removal andinstallation.
4-18.12 Change 1
TM 9-2320-387-24-1
1. Install alternator pulley (2) (para. 4-3).2. Position alternator (22) on alternator mounting bracket (11).3. Install alternator (22) on alternator mounting bracket (11) and alternator support bracket (25) with
washer (24), screw (23), washer (26), lockwasher (27), and nut (28). Do not tighten nut (28).4. Install alternator bracket (15) on alternator (22) with washer (16), lockwasher (17), and screw (18).
Do not tighten screw (18).5. Install washer (14), lockwasher (13), screw (12), washer (21), lockwasher (20), and nut (19) on
alternator mounting bracket (11) and alternator bracket (15). 6. Tighten screw (18) to 40 lb-ft (54 N•m).7. Tighten nut (28) to 155 lb-ft (210 N•m).
b. Installation

TM 9-2320-387-24-1
Change 1 4-19
FOLLOW-ON TASKS: • Install alternator cables (para. 4-8.2).• Connect battery ground cables (para. 4-68).• Lower and secure hood (TM 9-2320-387-10).
8. Install ground strap (8) on stud (9) with washers (10) and (7), lockwasher (6), and nut (5).9. Position 3/8-in. breaker bar or, as appropriate, a 1/2-in. ratchet wrench on belt tensioner (4) and
move tensioner (4) clockwise and install drivebelt (1) on power steering pump pulley (3) andalternator pulley (2).
4-8.3. 400-AMPERE DUAL VOLTAGE ALTERNATOR REPLACEMENT (Cont’d)
1
2
3
4
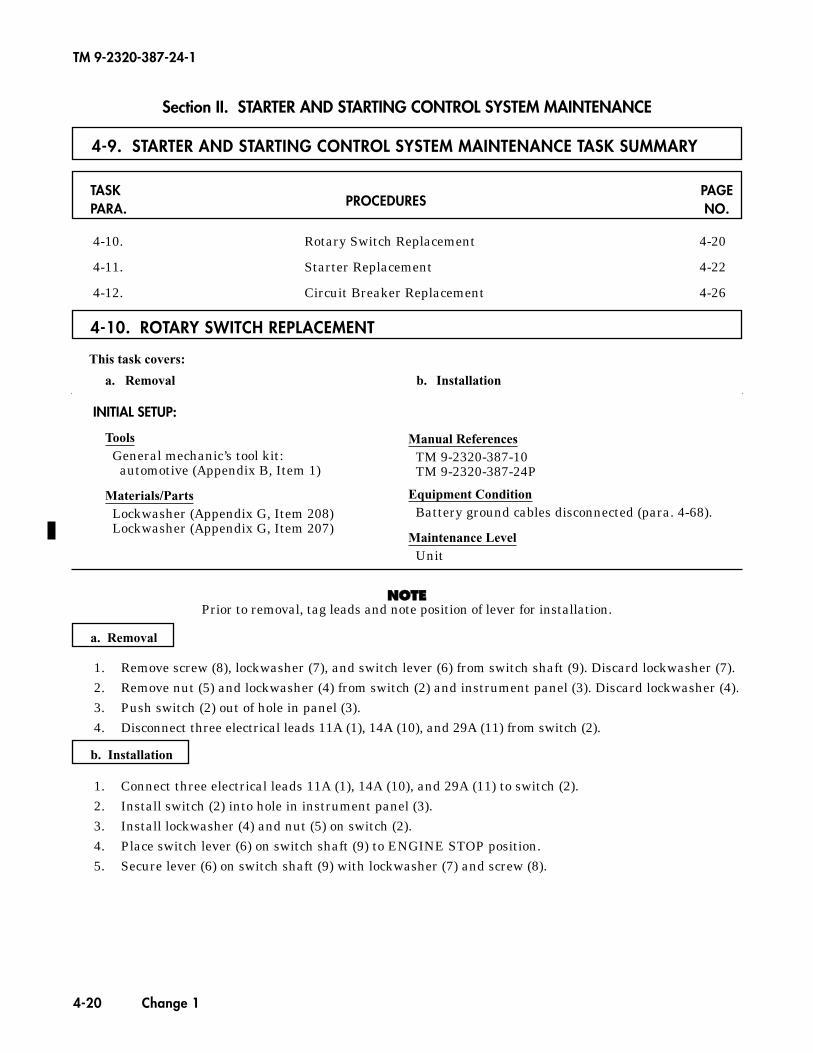
TM 9-2320-387-24-1
4-20 Change 1
Section II. STARTER AND STARTING CONTROL SYSTEM MAINTENANCE
4-9. STARTER AND STARTING CONTROL SYSTEM MAINTENANCE TASK SUMMARY
TASK PAGEPARA. PROCEDURES NO.
4-10. Rotary Switch Replacement 4-20
4-11. Starter Replacement 4-22
4-12. Circuit Breaker Replacement 4-26
Manual ReferencesTM 9-2320-387-10TM 9-2320-387-24P
Equipment ConditionBattery ground cables disconnected (para. 4-68).
Maintenance LevelUnit
a. Removal
1. Remove screw (8), lockwasher (7), and switch lever (6) from switch shaft (9). Discard lockwasher (7).2. Remove nut (5) and lockwasher (4) from switch (2) and instrument panel (3). Discard lockwasher (4).3. Push switch (2) out of hole in panel (3).4. Disconnect three electrical leads 11A (1), 14A (10), and 29A (11) from switch (2).
b. Installation
1. Connect three electrical leads 11A (1), 14A (10), and 29A (11) to switch (2).2. Install switch (2) into hole in instrument panel (3).3. Install lockwasher (4) and nut (5) on switch (2).4. Place switch lever (6) on switch shaft (9) to ENGINE STOP position.5. Secure lever (6) on switch shaft (9) with lockwasher (7) and screw (8).
NNOOTTEEPrior to removal, tag leads and note position of lever for installation.
INITIAL SETUP:
ToolsGeneral mechanic’s tool kit:
automotive (Appendix B, Item 1)
Materials/PartsLockwasher (Appendix G, Item 208)Lockwasher (Appendix G, Item 207)
This task covers:
a. Removal b. Installation
4-10. ROTARY SWITCH REPLACEMENT
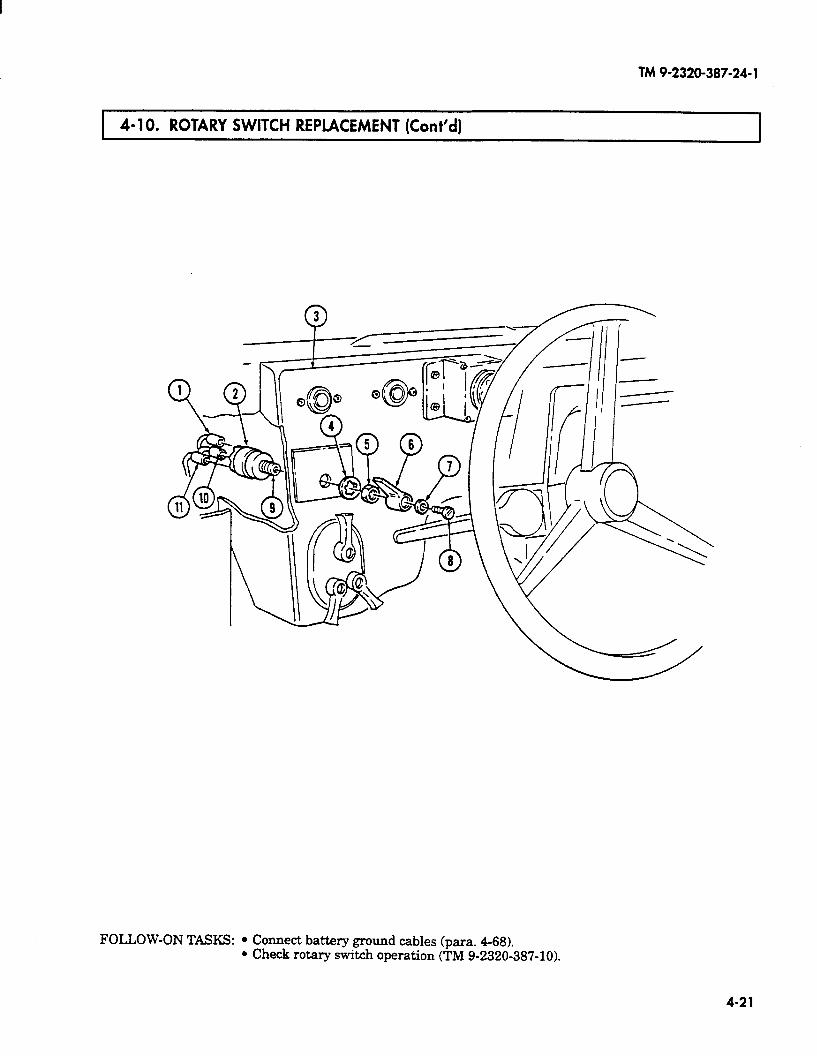
TM 9-2320-387-24-l
4-l 0. ROTARY SWITCH REPLACEMENT (Cont’d) I
FOLLOW-ON TASKS: l Connect battery ground cables (para. 468). l Check rotary switch operation (TM 9-2320-387-10).
4-21
4-11. STARTER REPLACEMENT
This task covers:
a. Removal b. Installation
INITIAL SETUP:
ToolsGeneral mechanic’s tool kit:
automotive (Appendix B, Item 1)Maintenance and repair shop equipment:
automotive (Appendix B, Item 2)
Special ToolsCrowfoot, 9/16-in. (Appendix B, Item 139)Torque adapter, 3/4-in. (Appendix B, Item 134)Socket adapter, 3/8- to 1/2-in. drive
(Appendix B, Item 135)
Materials/PartsLockwasher (Appendix G, Item 205)Lockwasher (Appendix G, Item 209)Nut and lockwasher assembly
(Appendix G, Item 244)Adhesive sealant (Appendix C, Item 12)Sealing compound (Appendix C, Item 62)
Personnel RequiredOne mechanicOne assistant
Manual ReferencesTM 9-2320-387-10TM 9-2320-387-24P
Equipment Condition• Battery ground cables disconnected (para. 4-68).• Sealed upper converter housing cover removed
(para. 5-12).
General Safety InstructionsStarter must be supported during removaland installation.
Maintenance LevelUnit
TM 9-2320-387-24-1
4-22 Change 1
a. Removal
1. Remove nut and lockwasher assembly (30), capscrew (28), and clamp (29) from oil pan bracket (27).Discard nut and lockwasher assembly (30).
2. Remove adhesive sealant from positive terminal (8) on starter (1).
NNOOTTEEPerform steps 3 and 4 for M1113 models only. Perform steps 5 and6 for M1114 models only.
3. Remove nut (14), lockwasher (13), lead 6V (12), lead 81B (15), and lead 6A (20) from positiveterminal (8). Discard lockwasher (13).
4. Remove nut (16), lockwasher (17), lead 7V (18), lead 3D (19), and negative cable 7A (21) fromstarter negative terminal (22). Discard lockwasher (17).
5. Remove nut (16), lockwasher (17), lead 3D (19), and negative cable 7A (21) from starter negativeterminal (22). Discard lockwasher (17).
6. Remove nut (14), lockwasher (13), lead 81B (15), and lead 6A (20) from positive terminal (8).Discard lockwasher (13).
7. Remove screw (11), clip (10), lead 74B (9), and lead 74A (7) from solenoid (2).
WWAARRNNIINNGG
Starter must be supported during removal and installation. Failure tosupport starter may cause injury to personnel or damage to equipment.
NNOOTTEE• Illustration shown is a cutaway of the right side of vehicle.• Prior to removal, tag leads for installation.

TM9-2320-387-24-l
8.
9.
10.
11.
4-11. STARTER REPLACEMENT (Cont’d)
Remove screw (25), clamp C?.3), and lead 6A (20) from starter (1).
Loosen nut (5) on stud (6) connecting starter (1) to bracket (4).
While supporting starter (1) hm under vehicle, remove two capscrews (24) fhm starter (1) and engine (3).
NOTE Note size of shim for installation.
Remove starter (1) and shim (26) from engine (3).
4-23
4-11. STARTER REPLACEMENT (Cont'd)
b. Installation
1. Install a .08-in. (2-mm) shim (26) on starter (1).
2. Position shim (26) and starter (1) on engine (3).
3. Slide front stud (6) on starter (1) in bracket (4).
NNOOTTEESome capscrews have sealing compound pre-applied. Additionalsealing compound is not required.
4. Apply sealing compound to two capscrews (24). Install capscrews (24) on starter (1) and engine (3).Tighten capscrews (24) to 30-40 lb-ft (41-54 N•m).
5. Install starter (1) on bracket (4) with nut (5). Using crowfoot, tighten nut (5) to 15-19 lb-ft (20-26 N•m).
6. Install clamp (23) and positive cable 6A (20) on starter (1) with screw (25).
7. Connect lead 74B (7) and lead 74A (9) on solenoid (2) with clip (10) and screw (11). Tighten screw (11) to 20 lb-in. (2 N•m).
NNOOTTEEPerform steps 8 and 9 for M1113 models only. Perform steps 10and 11 for M1114 models only.
8. Connect lead 6A (20), lead 81B (15), and lead 6V (12) on positive terminal (8) with lockwasher (13)and nut (14).
9. Connect negative cable 7A (21), lead 3D (19), and lead 7V (18) on negative terminal (22) withlockwasher (17) and nut (16). Using torque adapter, tighten nut (16) to 15-20 lb-ft (20-27 N•m).
10. Connect lead 6A (20) and lead 81B (15) on positive terminal (8) with lockwasher (13) and nut (14).
11. Connect lead 7A (21) and lead 3D (19) on negative terminal (22) with lockwasher (17) and nut (16).Using torque adapter, tighten nut (16) to 15-20 ft-lb (20-27 N•m).
12. Seal positive terminal (8) with adhesive sealant. Apply sealant at least 1/8 in. (3 mm) thick, coveringall exposed metal attached to positive terminal (8).
13. Install clamp (29) on oil pan bracket (27) with capscrew (28) and nut and lockwasher assembly (30).
TM 9-2320-387-24-1
4-24 Change 1

TM9-2320-387-24-l
4-11. STARTER REPLACEMENT (Cont’d)
l Install sealed upper converter housing cover (para. 5-12). l Connect battery ground cables (para. 468). l Start engine (TM 9-2320-387-10 j and check for smooth starter engagement.
4-25
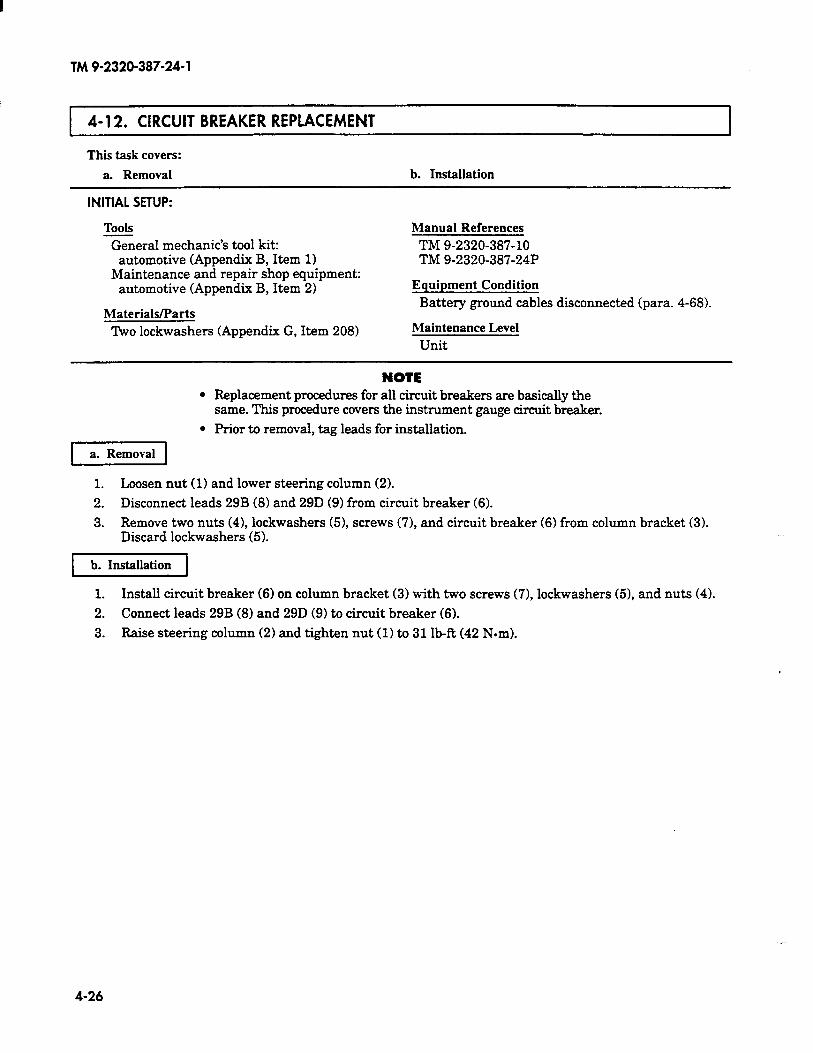
TM 9-2320-387-24-l
4- 12. CIRCUIT BREAKER REPLACEMENT
This task covers:
a. Removal b. Installation
INITIAL SETUP:
Tools General mechanic’s tool kit:
automotive (Appendix B, Item 1) Maintenance and repair shop equipment:
automotive (Appendix B, Item 2)
Materials/Parts mo lockwashers (Appendix G, Item 208)
Manual References TM 9-2320-387-10 TM 9-2320-387-24P
Equipment Condition Battery ground cables disconnected (para. 4-68).
Maintenance Level Unit
.
.
1 a. Removal 1
1. Loosen nut (1)
NOTE Replacement procedures for all circuit breakers are basically the same. Tb.is procedure covers the instrument gauge circuit breaker.
Prior to removal, tag leads for installation.
and lower steering column (2).
2. Disconnect leads 29B (8) and 29D (9) from circuit breaker (6).
3. Remove two nuts (41, lockwashers (51, screws (7), and circuit breaker (6) from column bracket (3). Discard lockwashers (5).
b. Installation
1. Install circuit breaker (6) on column bracket (3) with two screws (71, lockwashers (51, and nuts (4).
2. Connect leads 29B (8) and 29D (9) to circuit breaker (6).
3. Raise steering column (2) and tighten nut (1) to 31 lb-R (42 Nom).
4-26
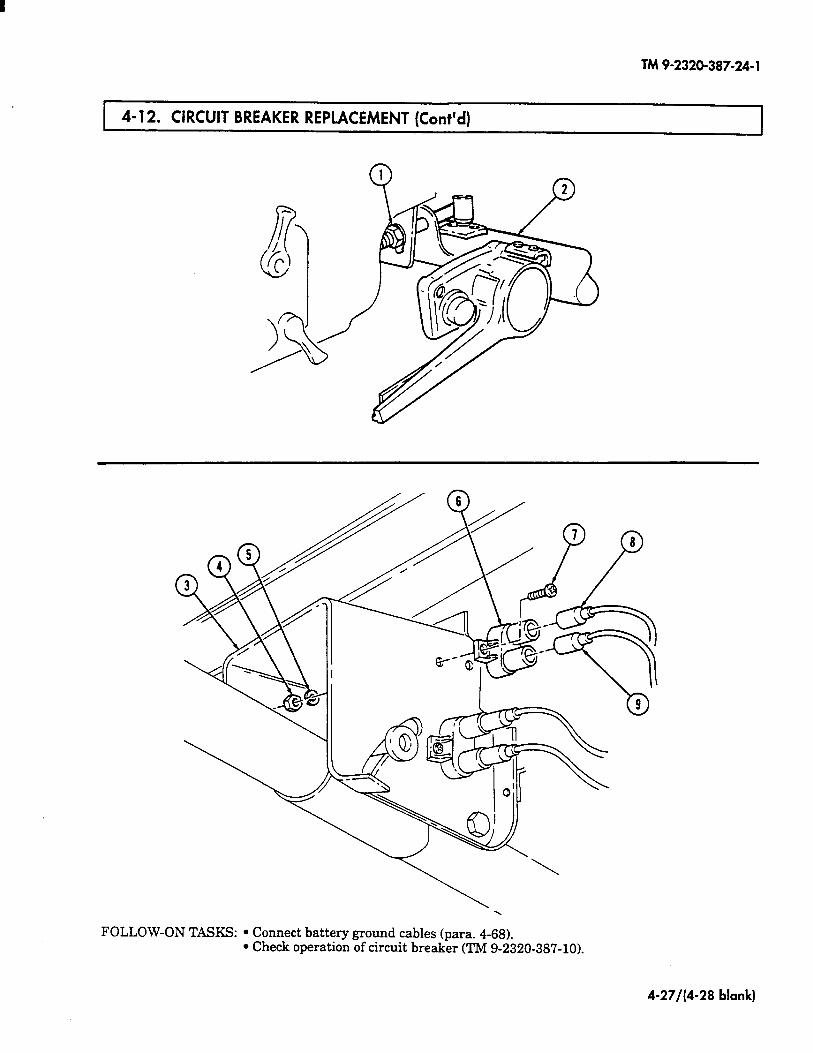
TM 9-2320-387-24-l
4-l 2. CIRCUIT BREAKER REPLACEMENT (Cont’d)
.
FOLLOW-ON TASKS: l Connect battery ground cables (para. 4-68). l Check operation of circuit breaker (TM 9-2320-387-10).
4-27/(4-28 blank)

TM 9-2320-387-24-l
Section Ill. INSTRUMENTS, SENDING UNITS, SWITCHES, AND HORN MAINTENANCE
4-13. INSTRUMENTS, SENDING UNITS, SWITCHES, AND HORN MAINTENANCE TASK SUMMARY
TASK PARA.
PROCEDURES PAGE NO.
4-14.
4-15.
4-16.
417.
4-18.
419.
420.
421.
422.
4-23.
4-24.
4-25.
4-26.
4-27.
4-28.
4-29.
4-30.
4-31.
432.
4-33.
434.
4-35.
4-36.
4-37.
Instrument Cluster Replacement 4-30 Instrument Panel Replacement 432 Electrical Gauge Replacement 4-34
Speedometer/Odometer Replacement 4-36 Speedometer Cable Replacement 4-38 Instrument Cluster Light Replacement 4-40
Wait-to-Start Lamp Replacement 4-42
Brake Warning Lamp Replacement 444
High-Beam Lamp Replacement 445
Parking Brake Switch Replacement 4-46
Horn Switch Replacement 4-47 Horn Control Brush Replacement 4-48
Horn Replacement 449
Horn Mounting Bracket Replacement 4-50
Engine Temperature Sending Unit Replacement 4-51
Oil Pressure Sending Unit Maintenance 4-52
Fuel Pressure Transducer Replacement 4-54
Cold-Advance Switch Replacement 4-55
Fuel Level Sending Unit Replacement 456
Glow Plug Controller Replacement 4-58
Fan Temperature Switch Replacement 4-60
Time-Delay Module Replacement 4-61
Backup Light Switch Replacement 4-62
Engine RPM Sensor Replacement 4-64
4-29

TM 9-2320-387-24-l
4-l 4. INSTRUMENT CLUSTER REPLACEMENT
This task covers:
a. Removal b. Installation
INITIAL SETUP:
Tools General mechanic’s tool kit:
automotive (Appendix B, Item 1)
Materials/Parts Five lockwashers (Appendix G, Item 206) Antiseize compound (Appendix C, Item 16)
Manual References TM 9-2320-387-10 TM 9-2320-387-24P
Equipment Condition Battery ground cables disconnected (para. 4-68).
Maintenance Level Unit
NOTE Prior to removal, tag leads for installation.
1. Remove four screws (7) and washers (6) from instrument cluster (8) and instrument panel (3). Pull instrument cluster (8) away from instrument panel (3) to allow access to speedometer cable (4).
2. Loosen driveshaft nut (5) and disconnect speedometer cable (4) from speedometer (1).
3. Disconnect harness lead 275 (26), 28A (9), 40B (13), 27H (14), 36A (15),57L (19),17B (201, 27G (21), 33A (22), 40C (171, and 567A (18) from instrument cluster (8).
4. Remove five nuts (12),lockwashers (111, and harness ground leads 58H (10),58G (25), 58E (23), 58F (241, and 57G (16) from instrument cluster (8) and remove instrument cluster (8). Discard lockwashers (11).
4-30

TM 9-2320-387-24-l
1 4-14. INSTRUMENT CLUSTER REPLACEMENT (Cont’d) I
b. Installation
1. Apply antiseize compound to harness ground leads 58H (lo), 58G (25), 58E (23), 58F (24), and 57G (16) and install on instrument cluster (8) with five lo&washers (11) and nuts (12).
2. Connect harness leads 275 (26), 28A (9), 40B (13), 27H (14), 36A (15), 57L (19), 17B (20), 27G (21), 33A (22), 40C (17), and 567A (18) to instrument cluster (8).
3. Connect speedometer cable (4) to speedometer (l), ensuring core (2) engages with square hole in speedometer (l), and secure with driveshaft nut (5).
4. Install instrument cluster (8) in panel (3) with four washers (6) and screws (7).
FOLLOW-ON TASKS: l Connect battery ground cables (para. 4-68). l Check operation of instrument cluster components (TM 9-2320-387-10).
4-31
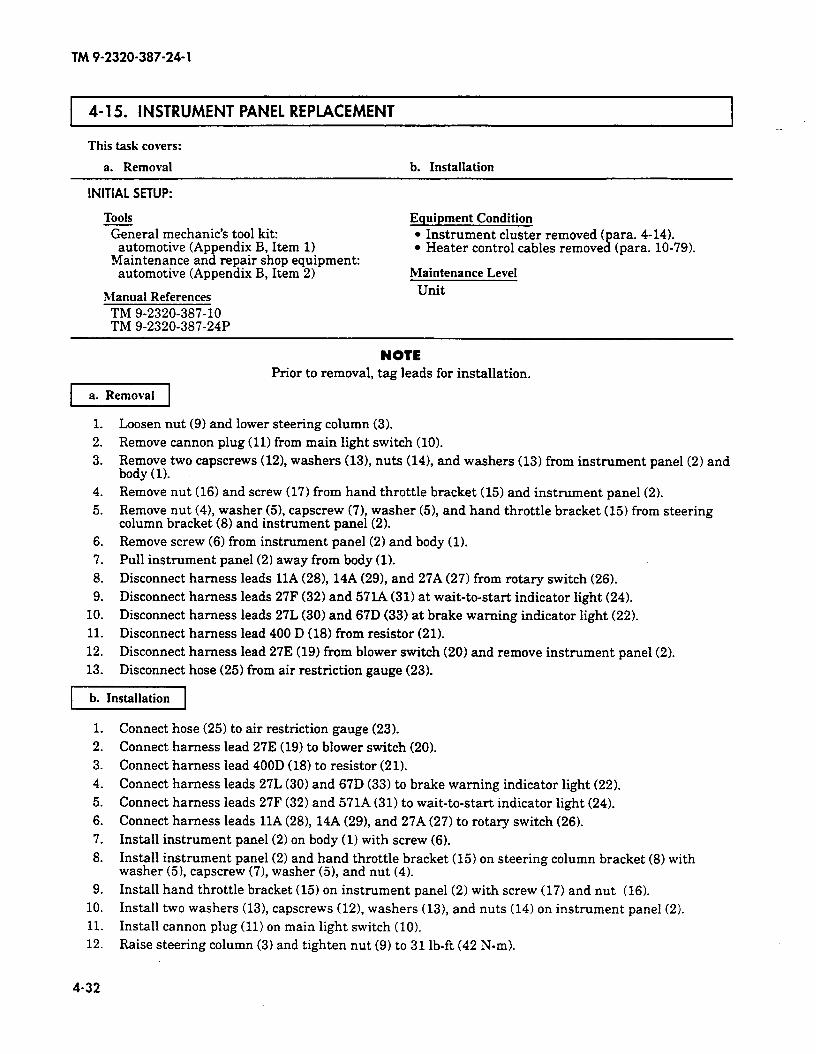
TM 9-2320-387-24- 1
4-15. INSTRUMENT PANEL REPLACEMENT
This task covers:
a. Removal b. Installation
INITIAL SETUP:
Tools General mechanic’s tool kit: automotive (Appendix B, Item 1)
Maintenance and repair shop equipment: automotive (Appendix B, Item 2)
Manual References
TM 9-2320-387-10 TM 9-2320-387-24P
Equipment Condition
l Instrument cluster removed (para. 4-14). l Heater control cables removed (para. 10-79).
Maintenance Level
Unit
NOTE Prior to removal, tag leads for installation.
1. 2.
3.
4.
5.
6.
7.
8.
9.
10.
11.
12.
13.
Loosen nut (9) and lower steering column (3). Remove cannon plug (11) from main light switch (10). Remove two capscrews (121, washers (13), nuts (141, and washers (13) from instrument panel (2) and body (1). Remove nut (16) and screw (17) from hand throttle bracket (15) and instrument panel (2). Remove nut (41, washer (51, capscrew (7), washer (51, and hand throttle bracket (15) from steering column bracket (8) and instrument panel (2). Remove screw (6) from instrument panel (2) and body (1). Pull instrument panel (2) away from body (1). Disconnect harness leads 11A (281, 14A (291, and 27A (27) from rotary switch (26). Disconnect harness leads 27F (32) and 57l.A (31) at wait-to-start indicator light (24). Disconnect harness leads 27L (30) and 67D (33) at brake warning indicator light (22). Disconnect harness lead 400 D (18) from resistor (21). Disconnect harness lead 27E (19) from blower switch (20) and remove instrument panel (2). Disconnect hose (25) from air restriction gauge (23).
b. Installation
1.
2. 3. 4. 5. 6. 7. 8.
9. 10. 11. 12.
4-32
Connect hose (25) to air restriction gauge (23). Connect harness lead 27E (19) to blower switch (20). Connect harness lead 400D (18) to resistor (21). Connect harness leads 27L (30) and 67D (33) to brake warning indicator light (22). Connect harness leads 27F (32) and 571A (31) to wait-to-start indicator light (24). Connect harness leads 1lA (281, 14A (291, and 27A (27) to rotary switch (26).
Install instrument panel (2) on body (1) with screw (6). Install instrument panel (2) and hand throttle bracket (15) on steering column bracket (8) with washer (51, capscrew (71, washer (51, and nut (4). Install hand throttle bracket (15) on instrument panel (2) with screw (17) and nut (16). Install two washers (13), capscrews (121, washers (131, and nuts (14) on instrument panel (2). Install cannon plug (11) on main light switch (10). Raise steering column (3) and tighten nut (9) to 31 lb-ft (42 N-m).

TM9-2320-387-24-l
4-l 5. INSTRUMENT PANEL REPLACEMENT (Cont’d)
14 Q, '\ '-.p.
d /
d 13
FOLLOW-ON TASKS: l Install heater cables (para. 10-79). l Install instrument cluster (para. 4-14). l Check operation of instrument panel components (TM 9-2320-387-10).
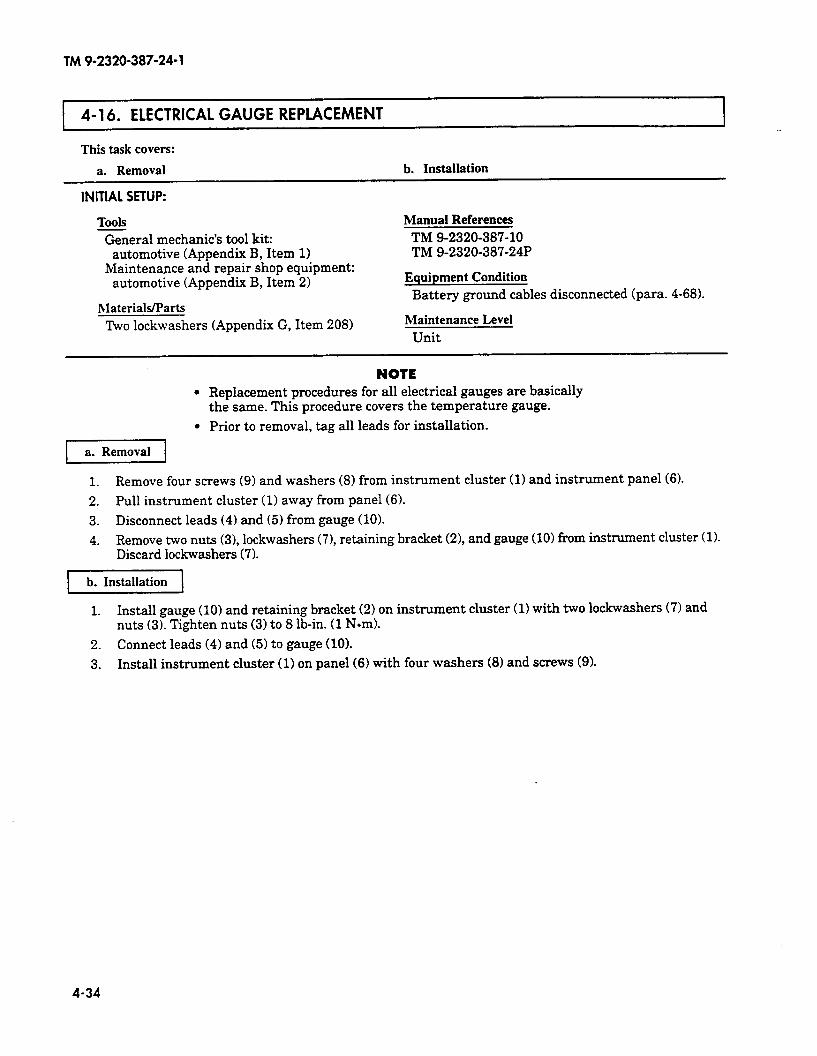
TM 9-2320-387-24-l
i 4-16. ELECTRICAL GAUGE REPLACEMENT I
This task covers:
a. Removal
INITIAL SETUP:
b. Installation
Tools General mechanic’s tool kit:
automotive (Appendix B, Item 1) Maintenance and repair shop equipment:
automotive (Appendix B, Item 21
Materials/Parts
Manual References TM 9-2320-387-10 TM 9-2320-387-24P
Equipment Condition Battery ground cables disconnected (para. 4-681.
Two lockwashers (Appendix G, Item 208) Maintenance Level Unit
NOTE l Replacement procedures for all electrical gauges are basically
the same. This procedure covers the temperature gauge.
l Prior to removal, tag all leads for installation.
-1
1. Remove four screws (9) and washers (8) from instrument cluster (11 and instrument panel (61.
2. Pull instrument cluster (1) away from panel (6).
3. Disconnect leads (4) and (5) from gauge (10).
4. Remove two nuts (3), lockwashers (71, retaining bracket (21, and gauge (101 from instrument cluster (I). Discard lockwashers (7).
1. Install gauge (10) and retaining bracket (2) on instrument cluster (11 with two lockwashers (7) and nuts (3). Tighten nuts (3) to 8 lb-in. (1 Nom).
2. Connect leads (4) and (5) to gauge (10).
3. Install instrument cluster (1) on panel (6) with four washers (8) and screws (9).
4-34
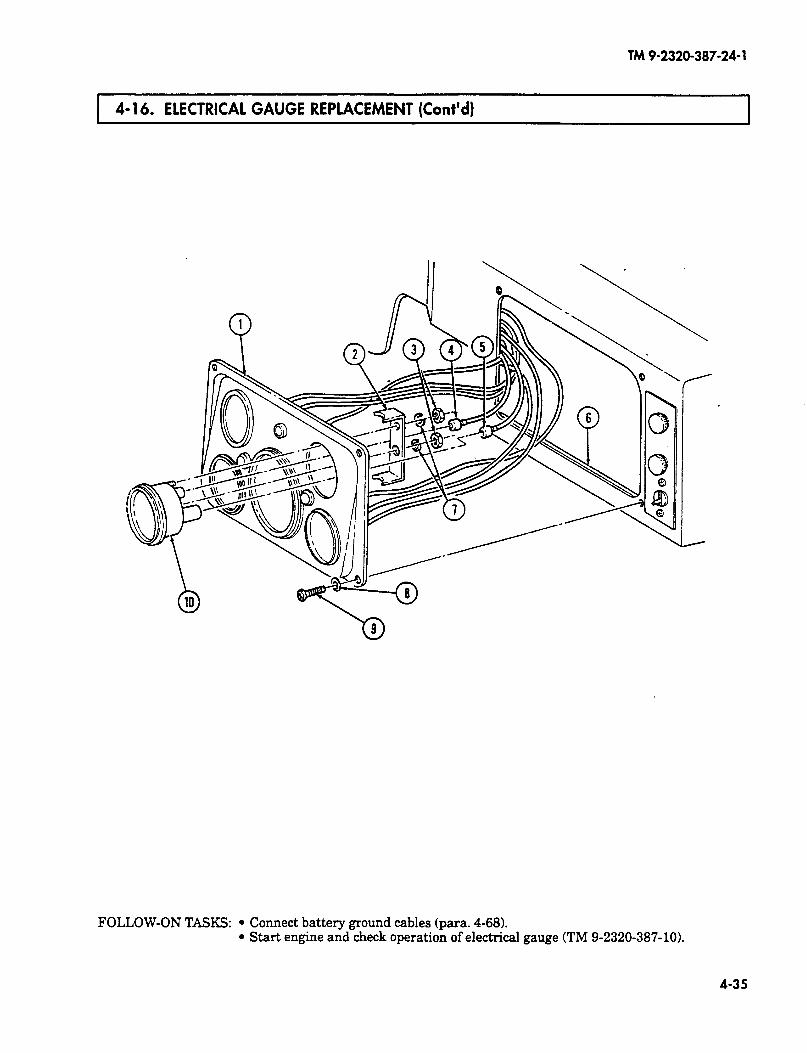
TM9-2320-387-24-l
1 4-l 6. ELECTRICAL GAUGE REPLACEMENT (Cont’d) I
FOLLOW-ON TASKS: l Connect battery ground cables (para. 4-68). l Start engine and check operation of electrical gauge (TM 9-2320-387-10).
4-35
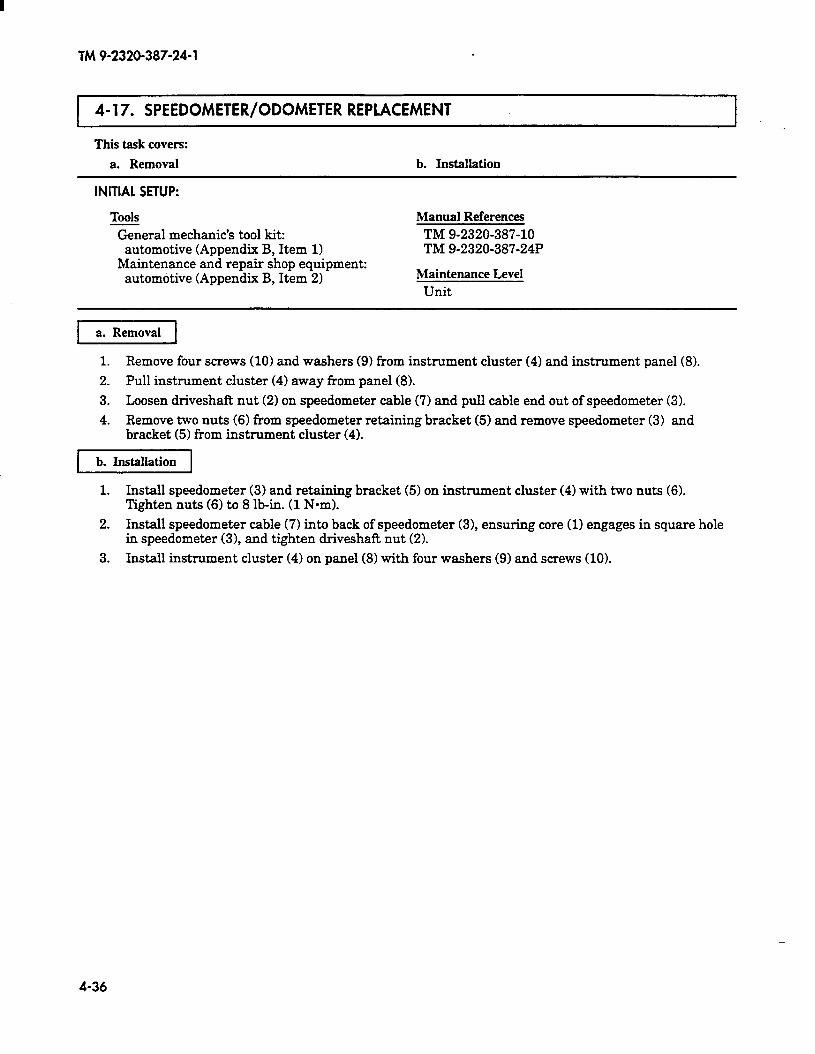
I
TM 9-2320-387-24-l
I- 4- 17. SPEEDOMETER/ODOMETER REPLACEMENT ~1 This task covers:
a. Removal b. Installation
INITIAL SETUP:
Tools General mechanic’s tool kit:
automotive (Appendix B, Item 1) Maintenance and repair shop equipment:
automotive (Appendix B, Item 2)
Manual References TM 9-2320-387-10 TM 9-2320-387-24P
Maintenance Level Unit
1. Remove four screws (10) and washers (9) from instrument cluster (4) and instrument panel (8).
2. Pull instrument cluster (4) away from panel (8).
3. Loosen driveshaft nut (2) on speedometer cable (7) and pull cable end out of speedometer (3).
4. Remove two nuts (6) from speedometer retaining bracket (5) and remove speedometer (3) and bracket (5) from instrument cluster (4).
-1
1. Install speedometer (3) and retaining bracket (5) on instrument cluster (4) with two nuts (6). Tighten nuts (6) to 8 lb-in. (1 Nom).
2. Install speedometer cable (7) into back of speedometer (31, ensuring core (1) engages in square hole in speedometer (31, and tighten driveshaft nut (2).
3. Install instrument cluster (4) on panel (8) with four washers (9) and screws (10).
4-36

TM9-2320-387-24-l
4- 17. SPEEDOMETER/ODOMETER REPLACEMENT (Cont’d)
FOLLOW-ON TASK: Check operation of speedometer (TM 9-2320-387-10).
4-37
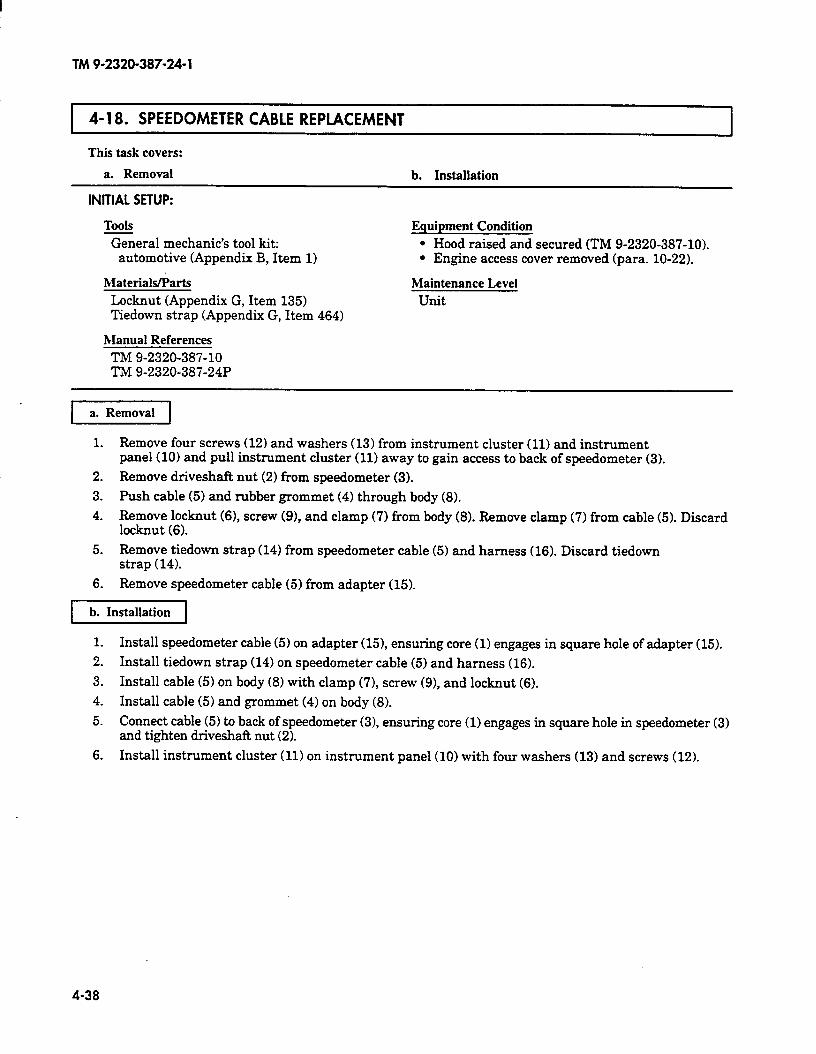
TM 9-2320-387-24-l
4- 18. SPEEDOMETER CABLE REPLACEMENT I
This task covers:
a. Removal b. Installation
INITIAL SETUP:
TOOIS
General mechanic’s tool kit:
Equipment Condition
l Hood raised and secured (TM 9-2320-387-101. automotive (Appendix B, Item 1) l Engine access cover removed (para. 10-22).
Materials/Parts
Locknut (Appendix G, Item 135) Tiedown strap (Appendix G, Item 464)
Maintenance Level
unit
Manual References
TM 9-2320-387-10 TM 9-2320-387-24P
1. Remove four screws (121 and washers (13) from instrument cluster (11) and instrument panel (101 and pull instrument cluster (11) away to gain access to back of speedometer (3).
2. Remove driveshaR nut (2) from speedometer (3).
3. Push cable (5) and rubber grommet (41 through body (8).
4. Remove locknut (61, screw (91, and clamp (7) from body (8). Remove clamp (7) from cable (51. Discard locknut (6).
5. Remove tiedown strap (14) from speedometer cable (5) and harness (16). Discard tiedown strap (141.
6. Remove speedometer cable (5) from adapter (15).
b. Installation
1. Install speedometer cable (51 on adapter (151, ensuring core (11 engages in square hole of adapter (15).
2. Install tiedown strap (14) on speedometer cable (5) and harness (16).
3. Install cable (51 on body (81 with clamp (71, screw (91, and locknut (6).
4. Install cable (5) and grommet (4) on body (8).
5. Connect cable (51 to back of speedometer (31, ensuring core (1) engages in square hole in speedometer (3) and tighten driveshaft nut (21.
6. Install instrument cluster (11) on instrument panel (10) with four washers (13) and screws (121.
4-38
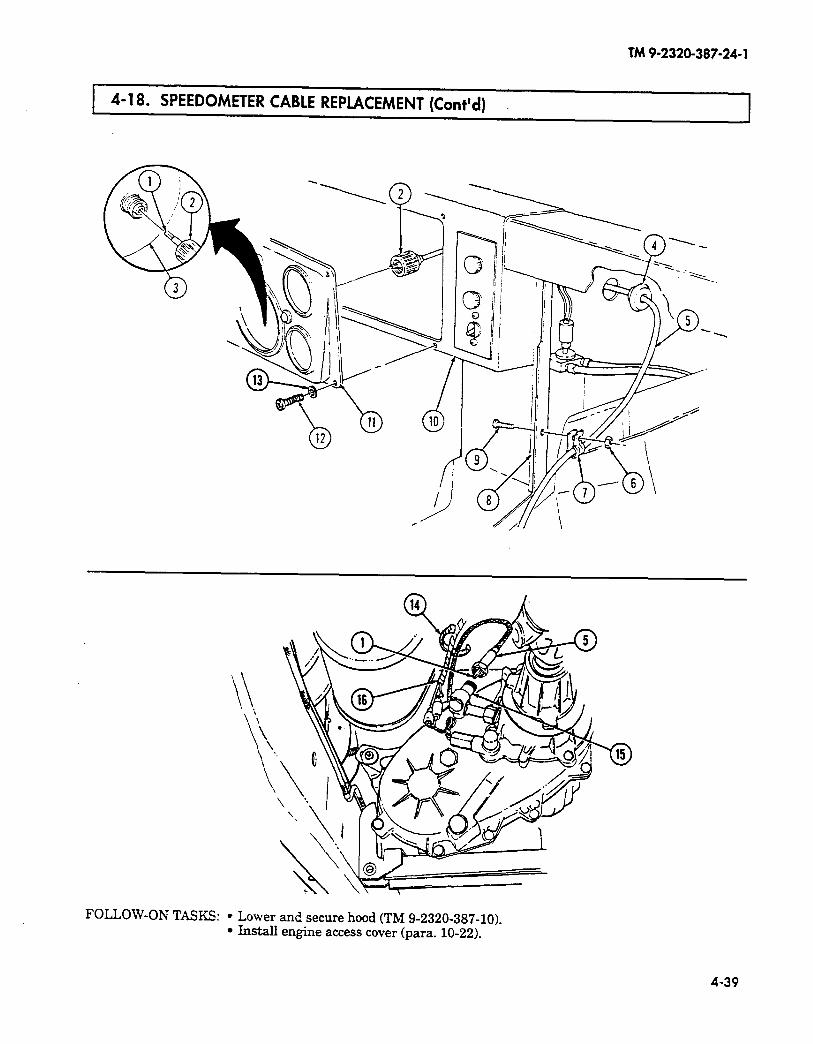
TM 9-2320-387-24-l
4-18. SPEEDOMETER CABLE REPLACEMENT (Cont’d) ’
I
FOLLOW-ON TASKS: l Lower and secure hood (TM 9-2320-387-10). l Install engine access cover (para. 10-22).
4-39
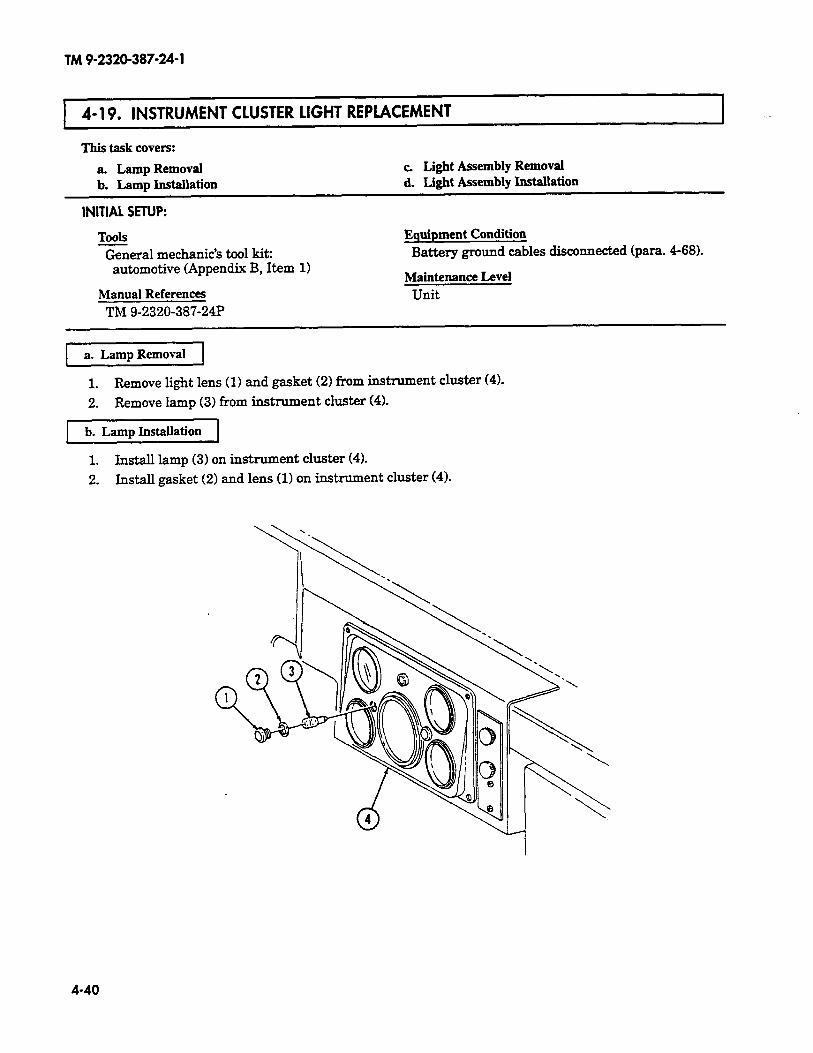
TM 9-2320-387-24-l
4-19. INSTRUMENT CLUSTER LIGHT REPLACEMENT
This task covers:
a. Lamp Removal c. Light Assembly Removal
b. Lamp Installation d. Light Assembly Installation
INITIAL SETUP:
ToOlS ?&era1 mechanic’s tool kit:
automotive (Appendix B, Item 1)
Manual References TM 9-2320-387-24P
Equipment Condition
Battery ground cables disconnected (para. 468).
Maintenance Level
Unit
a. Lamp Removal
1. Remove light lens (1) and gasket (2) from instrument cluster (4).
2. Remove lamp (3) from instrument cluster (4).
b. Lamp Installation
1. Install lamp (3) on instrument cluster (4).
2. Install gasket (2) and lens (1) on instrument cluster (4).
4-40
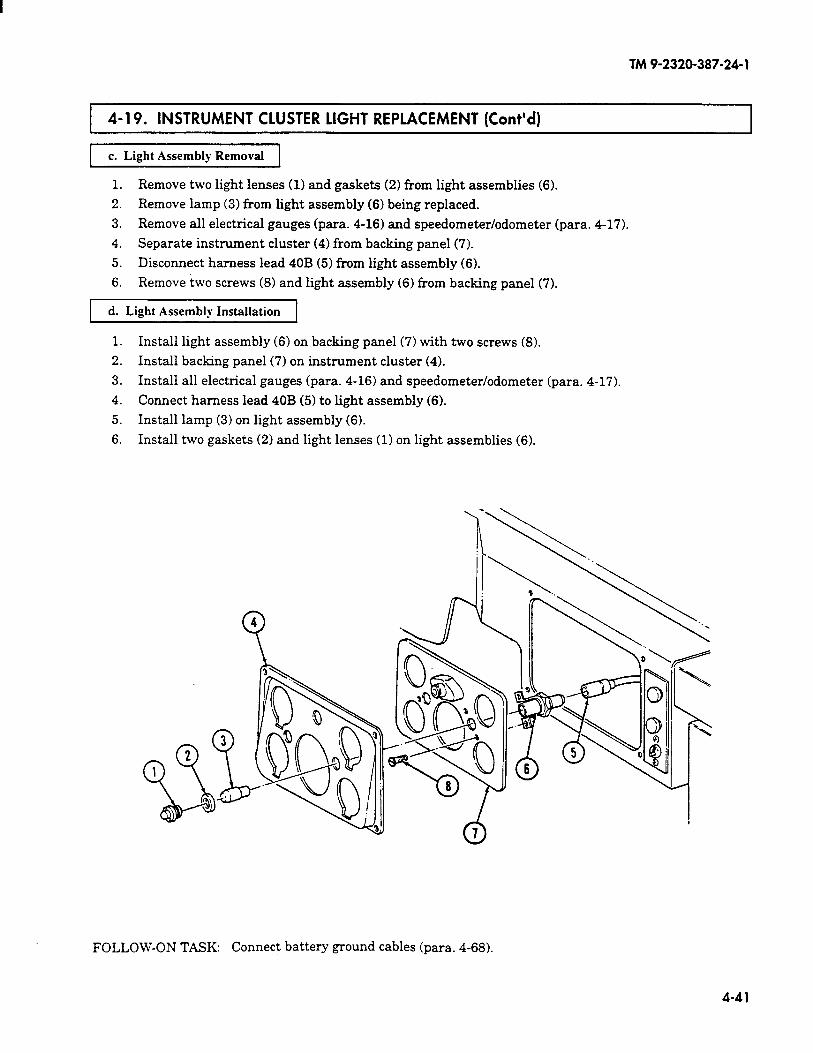
TM 9-2320-387-24- 1
4-19. INSTRUMENT CLUSTER LIGHT REPLACEMENT (Cont’d)
1 Light 1
1. Remove two light lenses (1) and gaskets (2) from light assemblies (6).
2. Remove lamp (3) from light assembly (6) being replaced.
3. Remove all electrical gauges (para. 4-16) and speedometer/odometer (para. 4-17).
4. Separate instrument cluster (4) from backing

TM 9-2320-387-24-l
4-20. WAIT-TO-START LAMP REPLACEMENT I
This task covers:
a. Removal h. Installation
INITIAL SETUP:
Tools
General mechanic’s tool kit: automotive (Appendix B, Item 1)
Maintenance and repair shop equipment: automotive (Appendix B, Item 2)
Manual References
TM 9-2320-387-10 TM 9-2320-387-24P
Equipment Condition
l Battery ground cables disconnected (para. 4-68). l Instrument cluster removed (para. 4-14).
Maintenance Level
unit
NOTE Prior to removal, tag leads and note position for instaIIation.
pIYiizq - 1. Loosen nut (14) and lower steering column (7).
2. Remove cannon plug (16) from main light switch (15).
3. Remove two capscrews (171, washers (181, nuts (201, and washers (18) from instrument panel (6) and body (19).
4. Remove nut (22) and screw (23) from hand throttle bracket (21) and instrument panel (6).
5. Remove nut (131, washer (111, capscrew (101, and washer (11) from instrument panel (61, hand throttle bracket (211, and steering column bracket (12).
6. Remove screw (8) from instrument panel (6) and cowl (9).
7. PuII instrument panel (6) away from body (19).
8. Remove two screws (5) from wait-to-start lamp (4) and instrument panel (6).
9. Disconnect leads 571(2) and 27 (3) from wiring harness (1).
10. Remove wait-to-start lamp (4).
-1
1.
2.
3.
4.
5.
6.
Connect leads 571(2) and 27 (3) to wiring harness (1).
InstaIl wait-to-start lamp (4) on instrument panel (6) with two screws (5).
Install instrument panel (6) on cowl (9) with screw (8).
Install instrument panel (6) and hand throttle bracket (21) on steering column bracket (12) with washer (111, capscrew (lo), washer (ll), and nut (13).
Install hand throttle bracket (21) on instrument panel (6) with screw (23) and nut (22).
Install instrument panel (6) on body (19) with two washers (181, capscrews (171, washers (18), and nuts (20).
7. Install cannon plug (16) on main light switch (15).
8. Raise steering column (7) and tighten nut (14) to 31 lb-R (42 N-m).
4-42
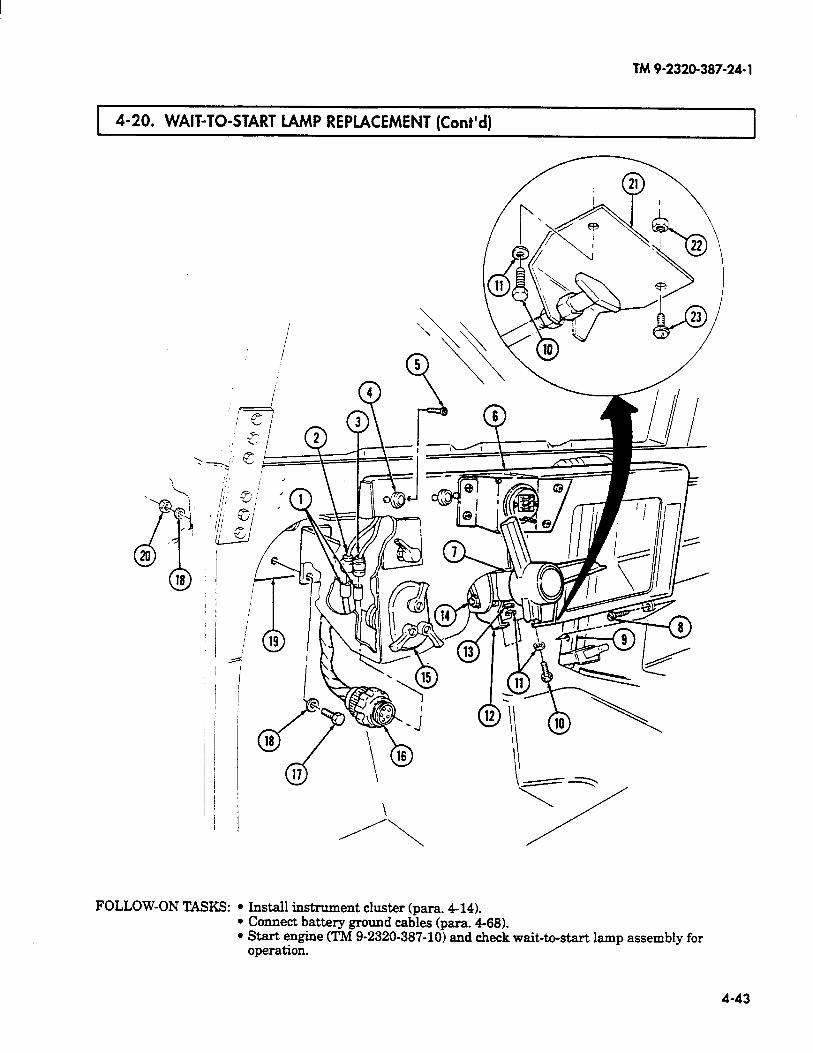
TM 9-2320-387-24-l
4-20. WAIT-TO-START LAMP REPLACEMENT (Cont’d)
FOLLOW-ON TASKS: l Install instrument cluster (para. d-14). l Connect battery ground cables (para. 4-68). l Start engine (TM 9-2320-387-10) and check wait-to-start lamp assembly for
operation.
4-43
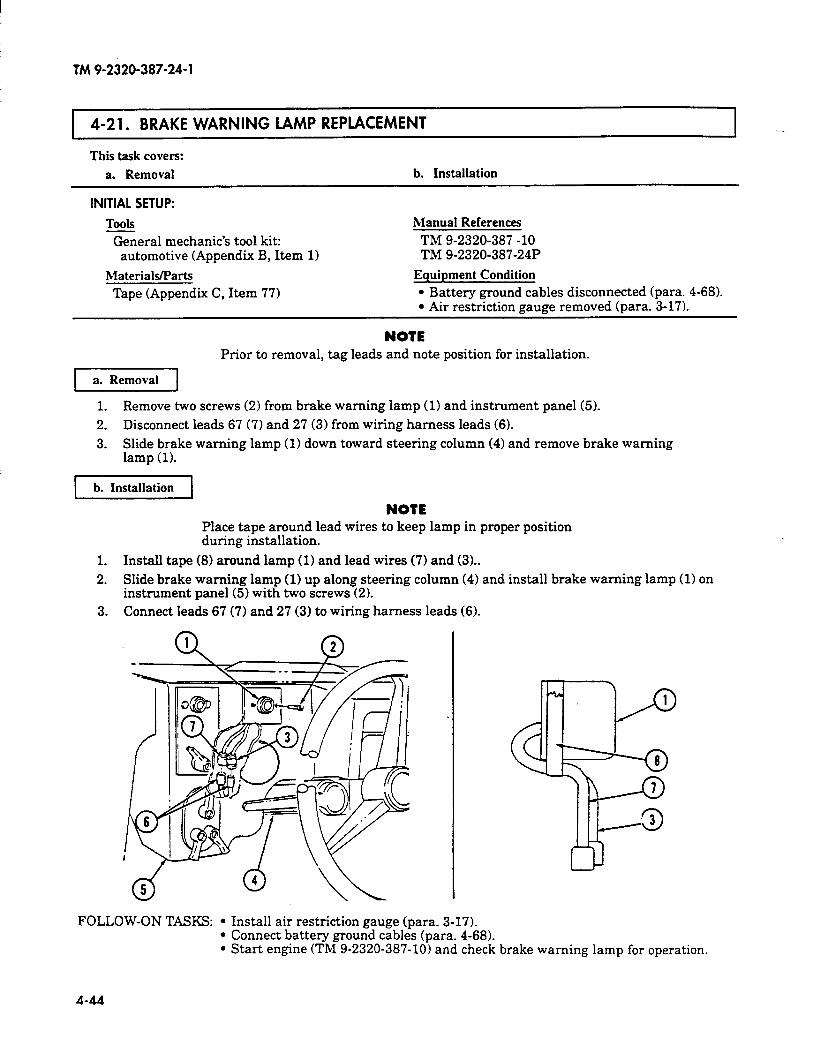
TM 9-2320-387-24-l
4-21. BRAKE WARNING IAMP REPLACEMENT I
This task covers:
a. Removal b. Installation
INITIAL SETUP:
Tools Manual References
General mechanic’s tool kit: TM g-2320-387 -10 automotive (Appendix B, Item 1) TM 9-2320-387-24P
hfaterials/Parts Equipment Condition
Tape (Appendix C, Item 77) l Battery ground cables disconnected (para. 4-68). l Air restriction gauge removed (para. 3-171.
NOTE Prior to removal, tag leads and note position for installation.
I[
1. Remove two screws (2) from brake warning lamp (1) and instrument panel (5).
2. Disconnect leads 67 (7) and 27 (3) from wiring harness leads (6).
3. Slide brake warning lamp (1) down toward steering column (4) and remove brake warning lamp (1).
b. Installation
NOTE Place tape around lead wires to keep lamp in proper position during installation.
1. Install tape (8) around lamp (1) and lead wires (7) and (31..
2. Slide brake warning lamp (1) up along steering column (4) and install brake warning lamp (1) on instrument panel (5) with two screws (21.
3. Connect leads 67 (7) and 27 (3) to wiring harness leads (6).
FOLLOW-ON TASKS: l Install air restriction gauge (para. 3-17). l Connect battery ground cables (para. 4-68). l Start engine (TM 9-2320-387-10) and check brake warning lamp for operation.
4-44
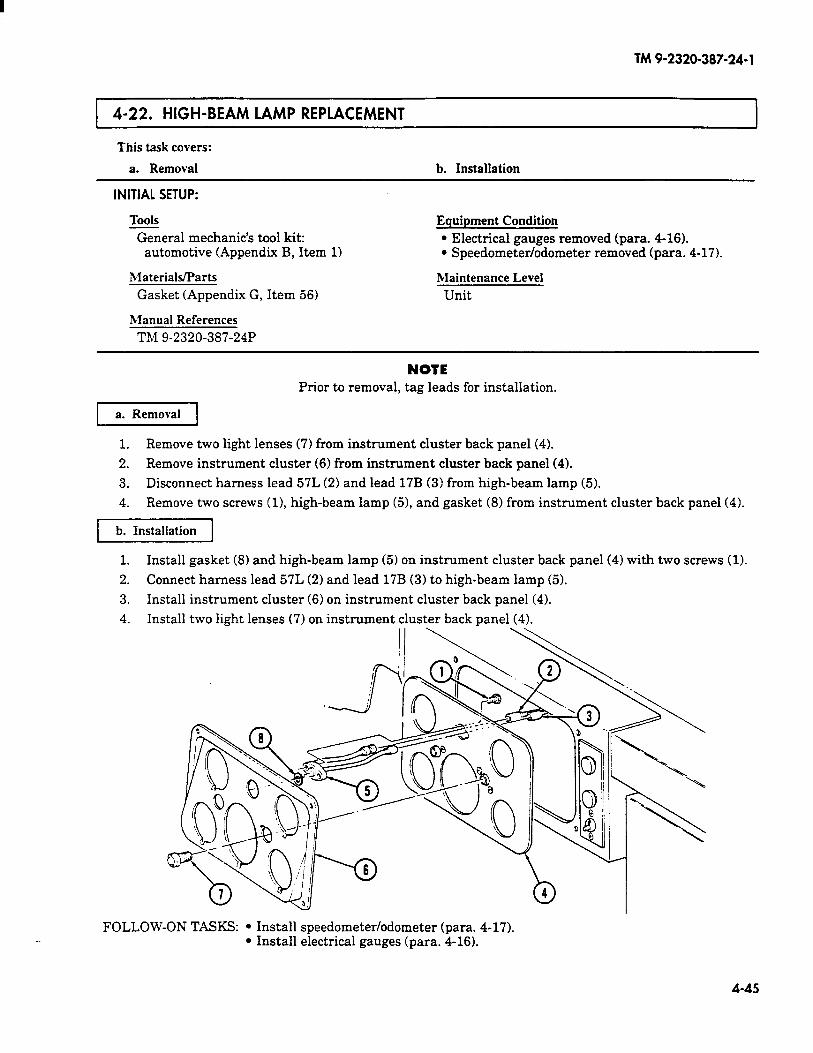
TM 9-2320-387-24-l
4-22. HIGH-BEAM LAMP REPLACEMENT
This task covers:
a. Removal b. Installation
INITIAL SETUP:
Tools
General mechanic’s tool kit: automotive (Appendix B, Item 1)
Materials/Parts Gasket (Appendix G, Item 56)
blanual References
TM 9-2320-387-24P
Equipment Condition
l Electrical gauges removed (para. 4-16). l Speedometer/odometer removed (para. 4-17).
Maintenance Level
Unit
NOTE Prior to removal, tag leads for installation.
1. Remove two light lenses (7) from instrument cluster back panel (4).
2. Remove instrument cluster (6) from instrument cluster back panel (4).
3. Disconnect harness lead 57L (2) and lead 17B (3) from high-beam lamp (5).
4. Remove two screws (11, high-beam lamp (51, and gasket (8) from instrument cluster back panel (4).
b. Installation
1. Install gasket (8) and high-beam lamp (5) on instrument cluster back panel (4) with two screws (1).
2. Connect harness lead 57L (2) and lead 17B (3) to high-beam lamp (5).
3. Install instrument cluster (6) on instrument cluster back panel (4).
4. Install two light lenses (7) on instrument cluster back panel (4).
FOLLOW-ON TASKS: l Install speedometer/odometer (para. 4-17). l Install electrical gauges (para. 4-16).
4-45

TM 9-2320-387-24-l
1 4-23. PARKING BRAKE SWITCH REPLACEMENT I
This task covers:
a. Removal b. Installation
INITIAL SETUP:
TOOL3 %&al mechanic’s tool kit:
automotive (Appendix B, Item 11
Manual References TM 9-2320-387-10 TM 9-2320-387-24P
Equipment Condition Battery ground cables disconnected (para. 468).
Maintenance Level unit
NOTE Prior to removal, tag leads for installation.
1 a. Removal 1
1. Disconnect parking brake switch leads 67C (1) and 67 (21 from wiring harness leads 67B (3) and 67E (4).
2. Remove parking brake switch (5) from parking brake lever (6).
b. Installation
1. Install parking brake switch (51 on parking brake lever (61.
2. Connect leads 67C (1) and 67 (2) to wiring harness leads 67B (31 and 67E (4).
FOLLOW-ON TASKS: l Connect battery ground cables (para. 468). l Check parking brake switch operation (TM 9-2320-387-102
4-46
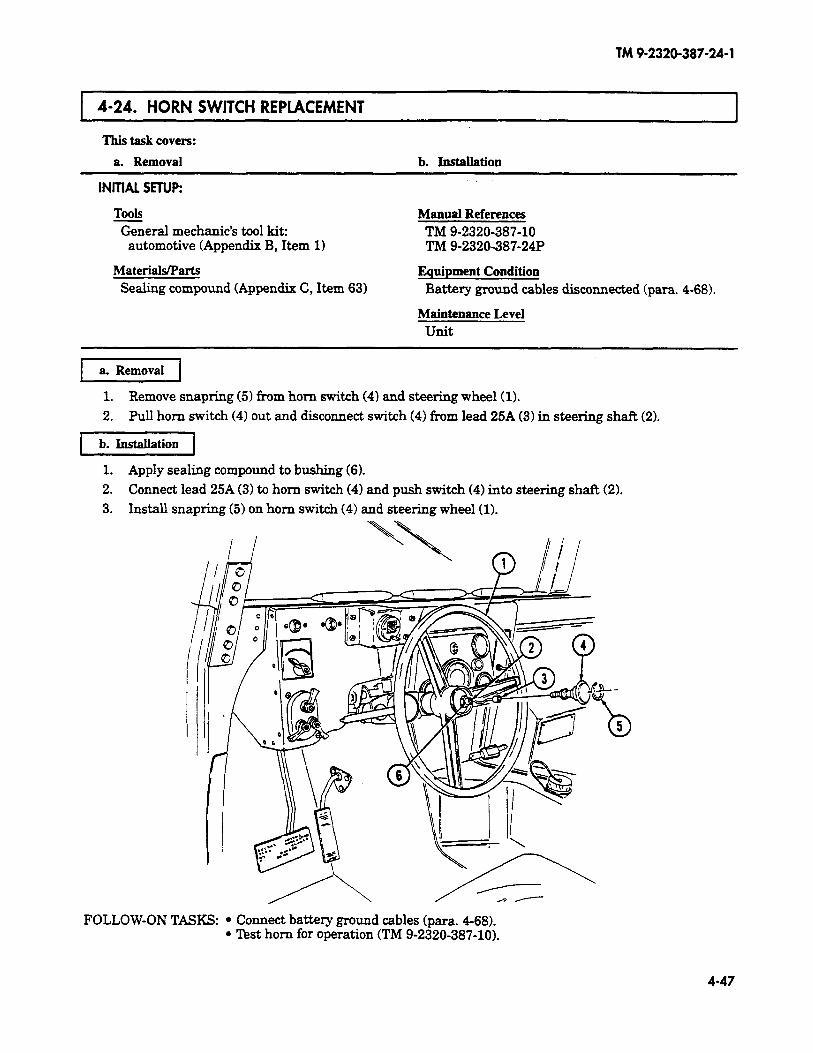
TM 9-2320-387-24-l
1 4-24. HORN SWITCH REPLACEMENT ~-1 This task covers:
a. Removal b. Installation
INrnAl. SEflJp:
ToOlS General mechanic’s tool kit:
automotive (Appendix B, Item 1)
MateriaWParts Sealing compound (Appendix C, Item 63)
Manual References TM 9-2320-387-10 TM 9-2320-387-24P
Equipment Condition Battery ground cables disconnected (para. 4-68).
Maintenance Level unit
a. Removal
1. Remove snapring (5) from horn switch (4) and steering wheel (1).
2. Pull horn switch (4) out and disconnect switch (4) from lead 25A (3) in steering shaft (2).
b. Installation
1. Apply sealing compound to bushing (6).
2. Connect lead 25A (3) to horn switch (4) and push switch (4) into steering shaft (2).
3. Install snapring (5) on horn switch (4) and steering wheel (1).
FOLLOW-ON TASKS: l Connect battery ground cables (para. 468). l Test horn for operation (TM 9-2320-387-10).
4-47
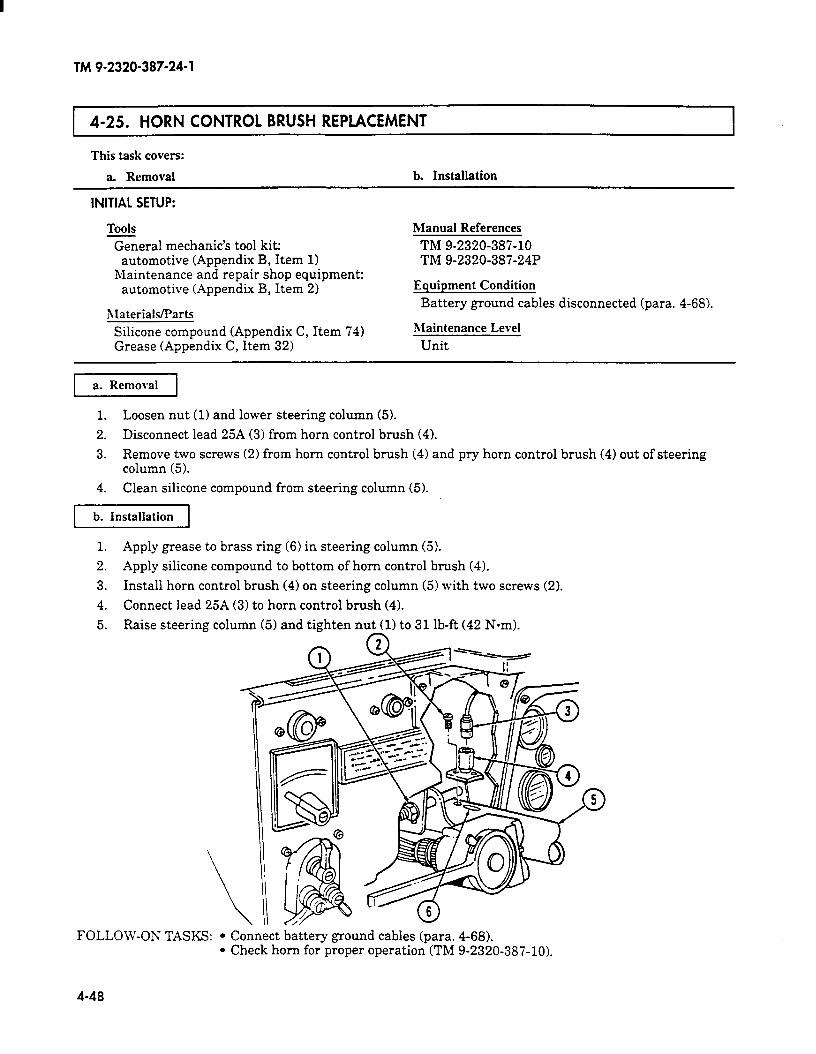
TM 9-2320-387-24-l
4-25. HORN CONTROL BRUSH REPLACEMENT
This task covers:
a. Removal b. Installation
INITIAL SETUP:
Tools General mechanic’s tool kit:
automotive (Appendix B, Item 1) Maintenance and repair shop equipment:
automotive (Appendix B, Item 2)
hlaterials/Parts
Silicone compound (Appendix C, Item 74) Grease (Appendix C, Item 32)
Manual References
TM 9-2320-387-10 TM 9-2320-387-24P
Equipment Condition
Battery ground cables disconnected (para. 4-68).
nlaintenance Level
Unit
pIYiGi-1
1. Loosen nut (1) and lower steering column (5).
2. Disconnect lead 25A (3) from horn control brush (4).
3. Remove two screws (2) from horn control brush (4) and pry horn control brush (4) out of steering column (5).
4. Clean silicone compound from steering column (5).
b. Installation
1. Apply grease to brass ring (6) in steering column (5).
2. Apply silicone compound to bottom of horn control brush (4).
3. Install horn control brush (4) on steering column (5) with two screws (2).
4. Connect lead 25A (3) to horn control brush (4).
5. Raise steering column (5) and tighten nux) to 31 lb-ft (42 N-m). *
FOLLOW-ON TASKS: l Connect battery ground cables (para. 4-68). l Check horn for proper operation (TM 9-2320-387-10).
4-48
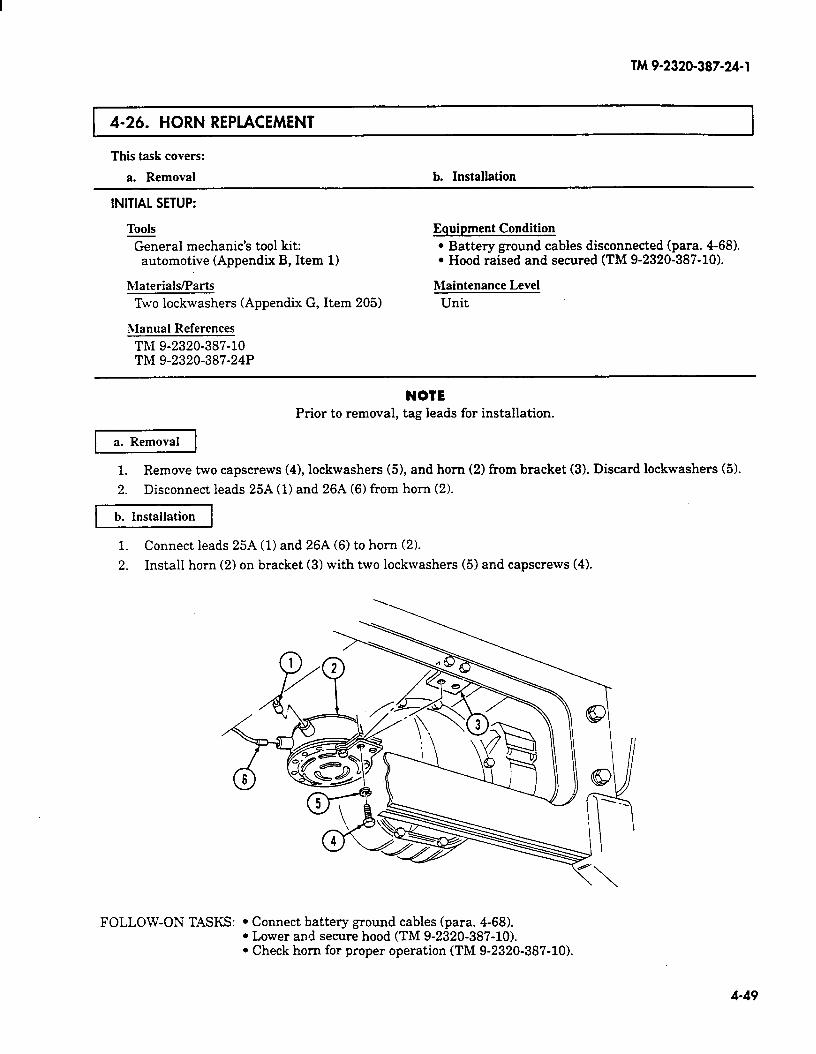
TM 9-2320-387-24-l
I 4-26. HORN REPLACEMENT I
This task covers:
a. Removal b. Installation
INITIAL SETUP:
Tools
General mechanic’s tool kit: automotive (Appendix B, Item 1)
Materials/Parts Two lockwashers (Appendix G, Item 205)
Manual References TM 9-2320-387-10 TM 9.2320-387.24P
Equipment Condition
l Battery ground cables disconnected (para. 4-68). l Hood raised and secured (TM 9-2320-387-10).
Maintenance Level
Unit
NOTE Prior to removal, tag leads for installation.
pTizEq 1. Remove two capscrews (41, lockwashers (51, and horn (2) from bracket (3). Discard lockwashers (5).
2. Disconnect leads 25A (1) and 26A (6) from horn (2).
-1
1. Connect leads 25A (1) and 26A (6) to horn (21.
2. Install horn (2) on bracket (31 with two lockwashers (5) and capscrews (4).
FOLLOW-ON TASKS: l Connect battery ground cables (para. 4-68). l Lower and secure hood (TM 9-2320-387-10). l Check horn for proper operation (TM 9-2320-387-10).
4-49
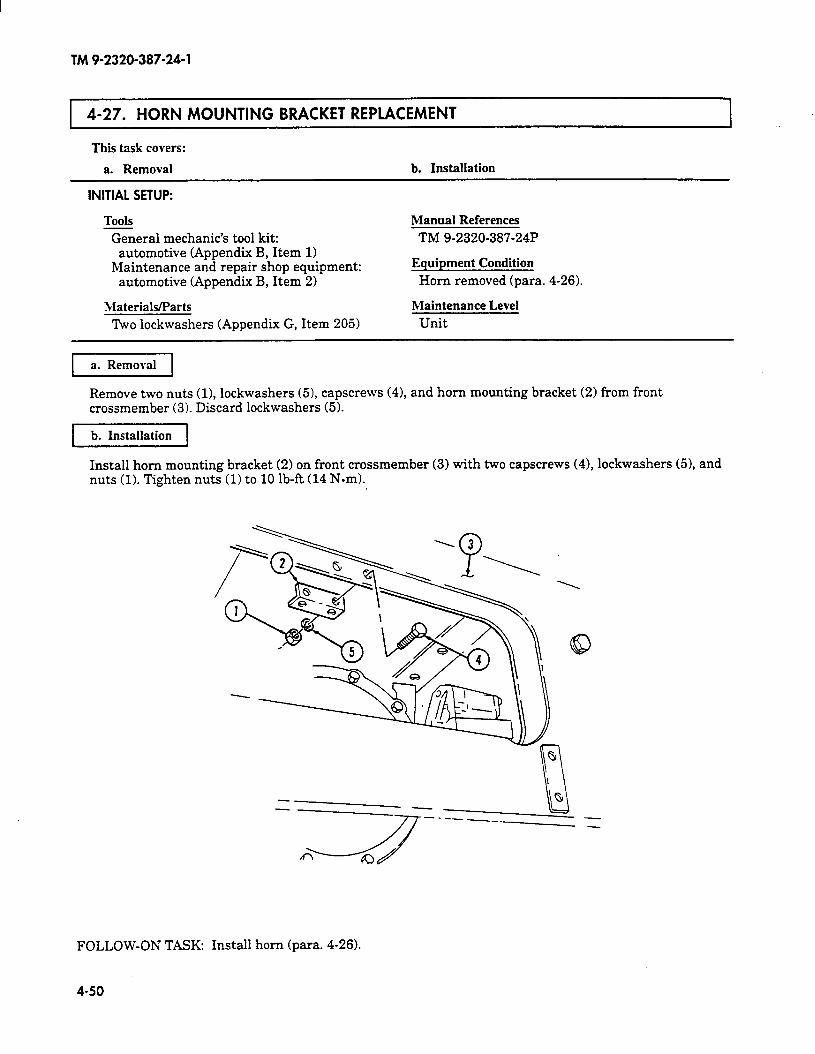
TM 9-2320-387-24-l
4-27. HORN MOUNTING BRACKET REPLACEMENT
This task covers:
a. Removal b. Installation
INITIAL SETUP:
Tools
General mechanic’s tool kit: automotive (Appendix B, Item 11
Maintenance and repair shop equipment: automotive (Appendix B, Item 21
Materials/Parts ‘ISVO lockwashers (Appendix G, Item 205)
Manual References
TM 9-2320-387-24P
Equipment Condition
Horn removed (para. 4-26).
Maintenance Level
Unit
a. Removal
Remove two nuts (11, lockwashers (51, capscrews (41, and horn mounting bracket (2) from front crossmember (3). Discard lockwashers (5).
b. Installation
Install horn mounting bracket (2) on front crossmember (3) with two capscrews (4), lockwashers (51, and nuts (1). Tighten nuts (1) to 10 lb-ft (14 N-ml.
FOLLOW-ON TASK: Install horn (para. 4-26).
4-50
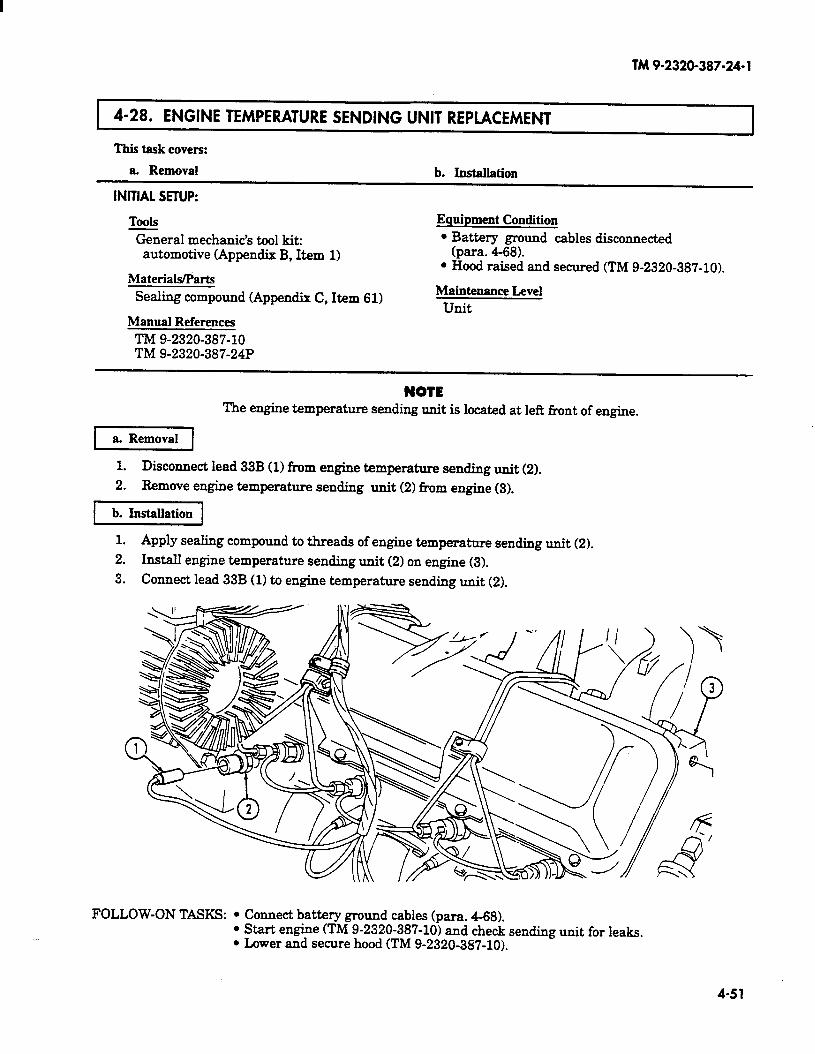
TM 9-2320-387-24-l
4-28. ENGINE TEMPERATURE SENDING UNIT REPLACEMENT
This task covers:
a. Removal b. Installation
INITIAL SETUP:
ToOlS
?%&a1 mechanic’s tool kit: automotive (Appendix B, Item 1)
Material&arts
Sealing compound (Appendix C, Item 61)
Manual References
TM 9-2320-387-10 TM 9-2320-387-24P
Equipment Condition
l Battery ground cables disconnected (para. 4-68).
l Hood raised and secured (TM 9-2320-387-10).
Maintenance Level
unit
NOTE The engine temperature sending unit is located at left front of engine.
1. Disconnect lead 33B (1) from engine temperature sending unit (2).
2. Remove engine temperature sending unit (2) f+om engine (3).
1 b. Installation 1
1. Apply sealing compound to threads of engine temperature sending unit (2).
2. 1nstaI.I engine temperature sending unit (2) on engine (3).
3. Connect lead 33B (1) to engine temperature sending unit (2).
FOLLOW-ON TASKS: l Connect battery ground cables (para. 468). l Start engine (TM 9-2320-387-10) and check sending unit for leaks. l Lower and secure hood (TM 9-2320-387-10).
4-51
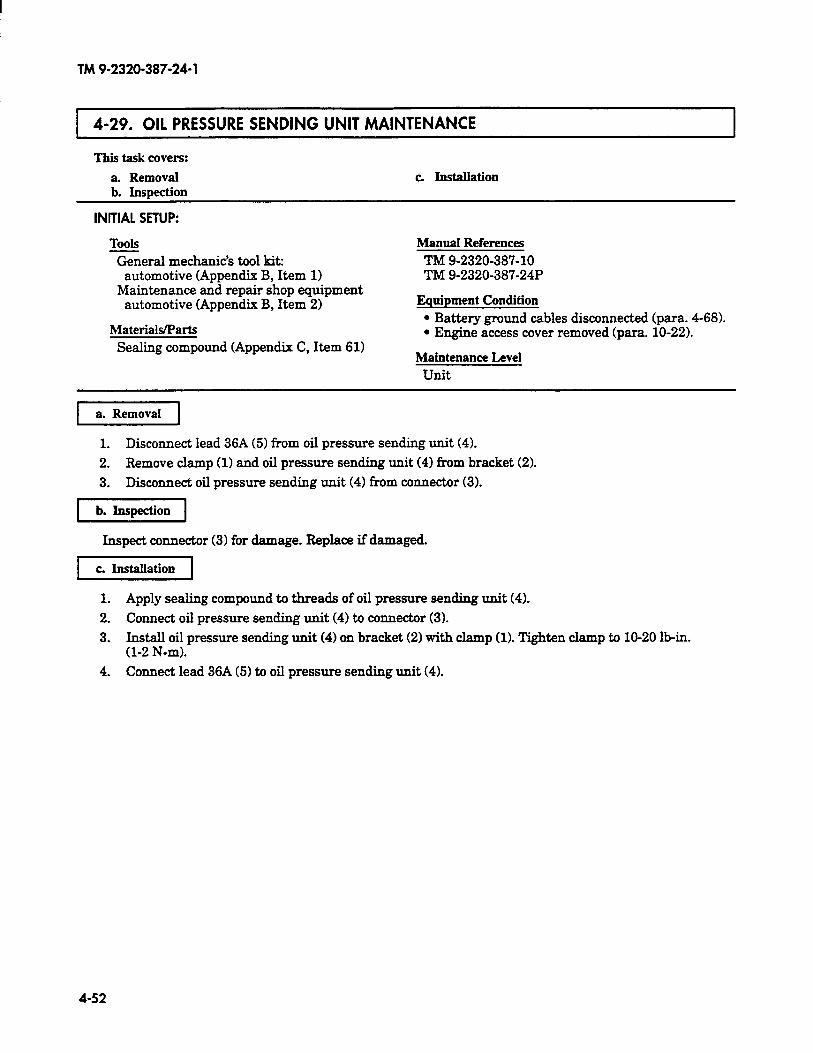
TM 9-2320-387-24-l
4-29. OIL PRESSURE SENDING UNIT MAINTENANCE
Tbis task covers:
a Removal b. Inspection
c. hstallation
INITIAL SETUP:
ToOis General mechanic’s tool kit:
automotive (Appendix B, Item 1) Maintenance and repair shop equipment
automotive (Appendix B, Item 2)
Materials/Parts Sealing compound (Appendix C, Item 61)
Manual References TM 9-2320-387-10 TM 9-2320-387-24P
Equipment Condition l Battery ground cables disconnected (para. 4-68). l Engine access cover removed (para. 10-22).
Maintenance Level unit
a. Removal
1. Disconnect lead 36A (5) from oil pressure sending unit (4).
2. Remove clamp (1) and oil pressure sending unit (4) from bracket (2).
3. Disconnect oil pressure sending unit (4) from connector (3).
b. Inspection
Inspect connector (3) for damage. Replace if damaged.
c Installation
1. Apply sealing compound to threads of oil pressure sending unit (4).
2. Connect oil pressure sending unit (4) to connector (3).
3. Install oil pressure sending unit (4) on bracket (2) with clamp (1). Tighten clamp to 10-20 l&n. (l-2 N-m).
4. Connect lead 36A (5) to oil pressure sending unit (4).
4-52
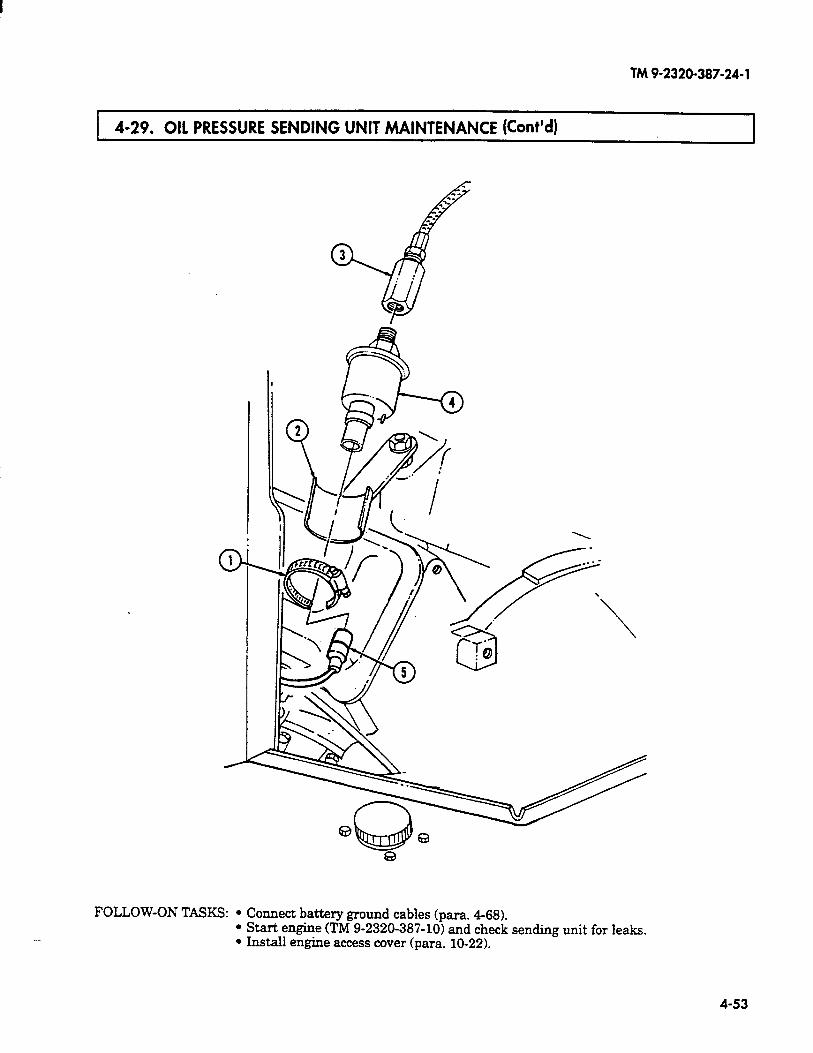
TM 9-2320-387-24-l
1 4-29. 011 PRESSURE SENDING UNIT MAINTENANCE (Cont’d)
FOLLOW-ON TASKS: l Connect battery ground cables (para. 468). l Start engine (TM 9-2320-387-10) and check sending unit for leaks. l Install engine access cover (para. 10-22).
4-53
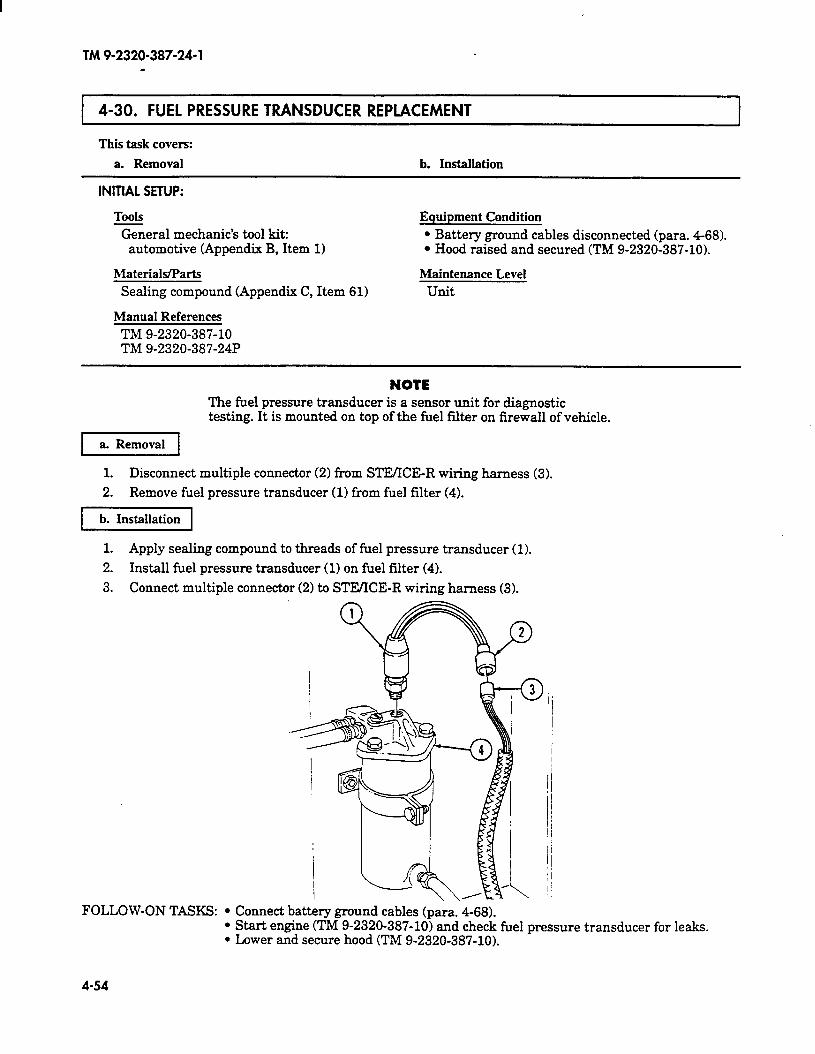
TM 9-2320-387-24-l _
4-30. FUEL PRESSURE TRANSDUCER REPLACEMENT I
This task covers:
a. Removal b. Installation
INITIAL SETUP:
TOOIS ?&era1 mechanic’s tool kit:
automotive (Appendix B, Item 1)
Materialflarts Sealing compound (Appendix C, Item 61)
Manual References TM 9-2320-387-10 Thl9-2320-387-24P
Equipment Condition l Battery ground cables disconnected (para. 468). l Hood raised and secured (TM 9-2320-387-10).
Maintenance Level unit
NOTE The fuel pressure transducer is a sensor unit for diagnostic testing. It is mounted on top of the fuel filter on firewall of vehicle.
71
1. Disconnect multiple connector (2) from STE/ICE-R wiring harness (3).
2. Remove fuel pressure transducer (1) from fuel filter (4).
[b.j
1. Apply sealing compound to threads of fuel pressure transducer (1).
2. Install fuel pressure transducer (1) on fuel filter (4).
3. Connect multiple connector (2) to STE/ICE-R wiring harness (3).
FOLLOW-ON TASKS: l Connect battery ground cables (para. 4-68). . Start engine (TM 9-2320-387-10) and check fuel pressure transducer for leaks. . Lower and secure hood (TM 9-2320-387-10).
ii
4-54
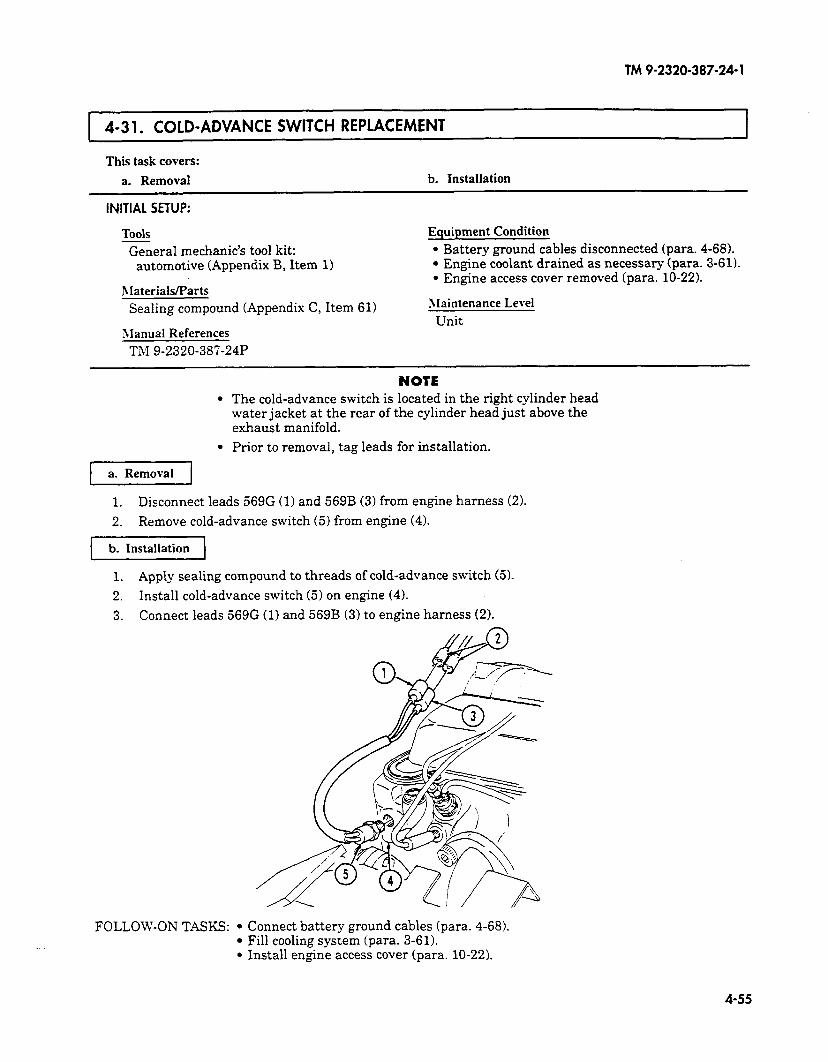
TM 9-2320-387-24-l
4-3 1. COLD-ADVANCE SWITCH REPLACEMENT
This task covers:
a. Removal b. Installation
INITIAL SETUP:
Tools
General mechanic’s tool kit: automotive (Appendix B, Item 1)
hlaterialflarts
Equipment Condition
l Battery ground cables disconnected (para. 4-68). l Engine coolant drained as necessary (para. 3-61). l Engine access cover removed (para. 10-22).
Sealing compound (Appendix C, Item 61) nraintenance Level
Unit 1Ianual References
TM 9-2320-387-24P
NOTE l The cold-advance switch is located in the right cylinder head
water jacket at the rear of the cylinder head just above the exhaust manifold.
l Prior to removal, tag leads for installation.
L a. Removal 1
1. Disconnect leads 569G (1) and 569B (3) from engine harness (2).
2. Remove cold-advance switch (5) from engine (4).
/YZZZZJ
1. Apply sealing compound to threads of cold-advance switch (5).
2. Install cold-advance switch (5) on engine (4).
3. Connect leads 569G (1) and 569B (3) to engine harness (2).
FOLLOW-ON TASK!? l Connect battery ground cables (para. 4-68). . Fill cooling system (para. 3-61). . Install engine access cover (para. 10-22).
4-55
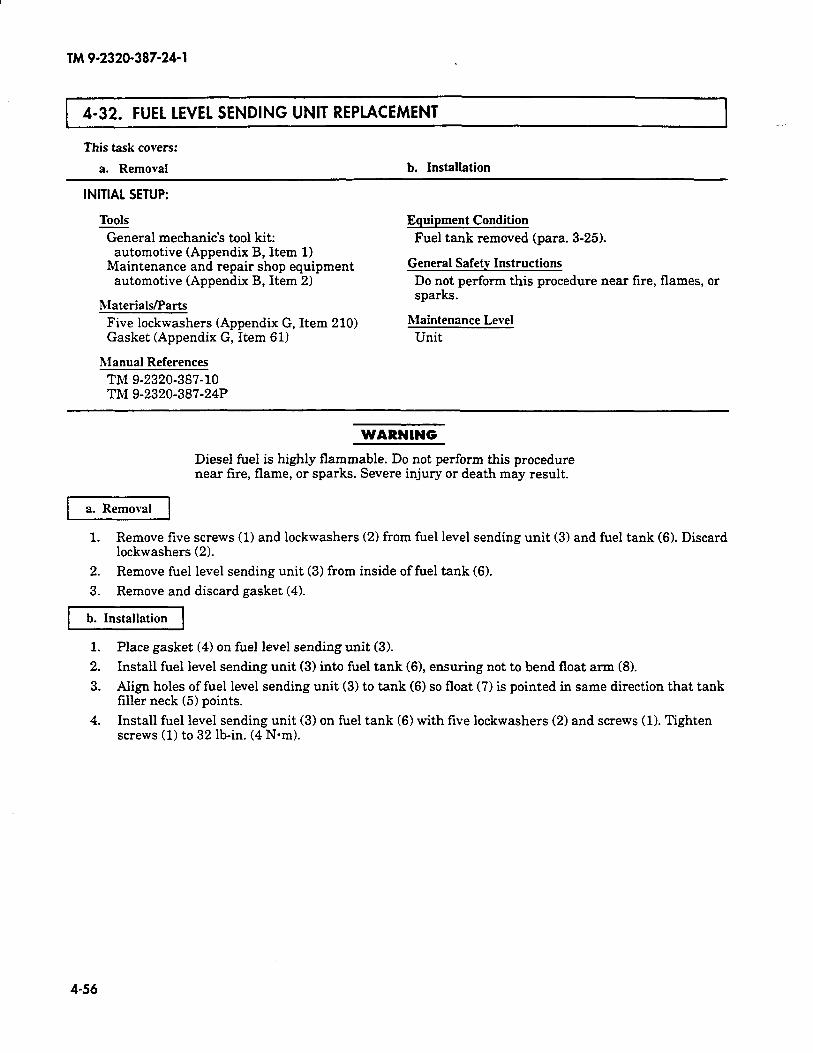
TM 9-2320-387-24-l
I-- 4-32. FUEL LEVEL SENDING UNIT REPLACEMENT
This task covers:
a. Removal b. Installation
INITIAL SETUP:
Tools
General mechanic’s tool kit: automotive (Appendix B, Item 1)
Maintenance and repair shop equipment automotive (Appendix B, Item 2)
Materials/Parts
Five lockwashers (Appendix G, Item 210) Gasket (Appendix G, Item 61)
Manual References TM 9-2320-387-10 TM 9-2320-387-24P
Equipment Condition
Fuel tank removed (para. 3-25).
General Safety Instructions
Do not perform this procedure near fire, flames, or sparks.
Maintenance Level Unit
WARNING
Diesel fuel is highly flammable. Do not perform this procedure near fire, flame, or sparks. Severe injury or death may result.
a. Removal
1. Remove five screws (1) and lockwashers (2) from fuel level sending unit (3) and fuel tank (6). Discard lockwashers (2).
2. Remove fuel level sending unit (3) from inside of fuel tank (6).
3. Remove and discard gasket (4).
b. Installation
1. Place gasket (4) on fuel level sending unit (3).
2. Install fuel level sending unit (3) into fuel tank (6), ensuring not to bend float arm (8).
3. Align holes of fuel level sending unit (3) to tank (6) so float (7) is pointed in same direction that tank filler neck (5) points.
4. Install fuel level sending unit (3) on fuel tank (6) with five lockwashers (2) and screws (1). Tighten screws (1) to 32 lb-in. (4 N*m).
4-56

TM 9-2320-387-24-l
4-32. FUEL LEVEL SENDING UNIT REPLACEMENT (Cont’d) I
,l’
FOLLOW-ON TASKS: l Install fuel tank (para. 3-25). l Check fuel gauge for proper operation (TM 9-2320-387-10).
4-57
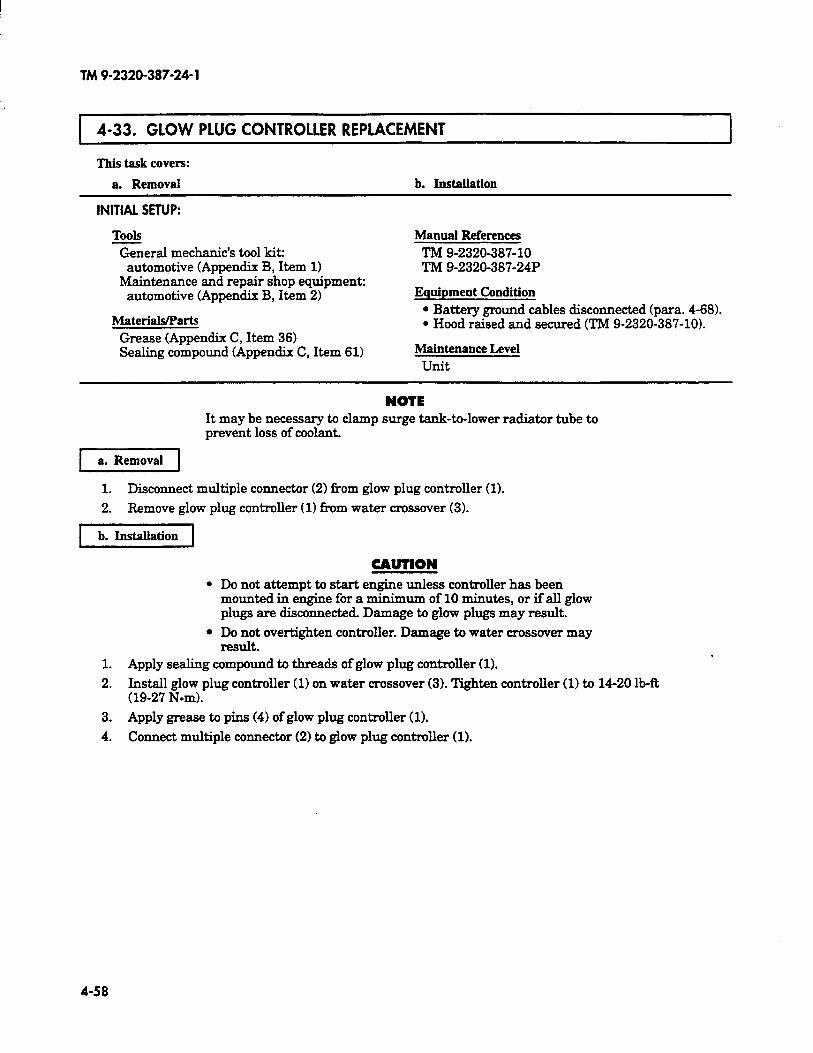
TM 9-2320-387-24- 1
4-33. GLOW PLUG CONTROLLER REPLACEMENT
This task covers:
a. Removal b. Installation
INITIAL SETUP:
TOOIS
General mechanic’s tool kit: automotive (Appendix B, Item 1)
Maintenance and repair shop equipment: automotive (Appendix B, Item 2)
Materials/Parts
Grease (Appendix C, Item 36) Sealing compound (Appendix C, Item 61)
Manual References
TM 9-2320-387-10 TM 9-2320-387-24P
Equipment Condition
l Battery ground cables disconnected (para. 4-68). l Hood raised and secured (TM 9-2320-387-10).
Maintenance Level
unit
NOTE It may be necessary to clamp surge tank-to-lower radiator tube to prevent loss of coolant.
rzEEi-j
1. Disconnect multiple connector (2) from glow plug controller (1).
2. Remove glow plug controller (1) from water crossover (3).
b. Instaliation
CAUTION
l Do not attempt to start engine unless controller has been mounted in engine for a minimum of 10 minutes, or ifall glow plugs are disconnected Damage to glow plugs may result.
l Do not over-tighten controller. Damage to water crossover may result.
1. Apply sealing compound to threads of glow plug controlIer (1).
2. Install glow plug controller (11 on water crossover (3). Tighten controIler (1) to 14-20 lb-R (19-27 Nem).
3. Apply grease to pins (4) of glow plug controller (1).
4. Connect multiple connector (2) to glow plug controller (1).
4-58
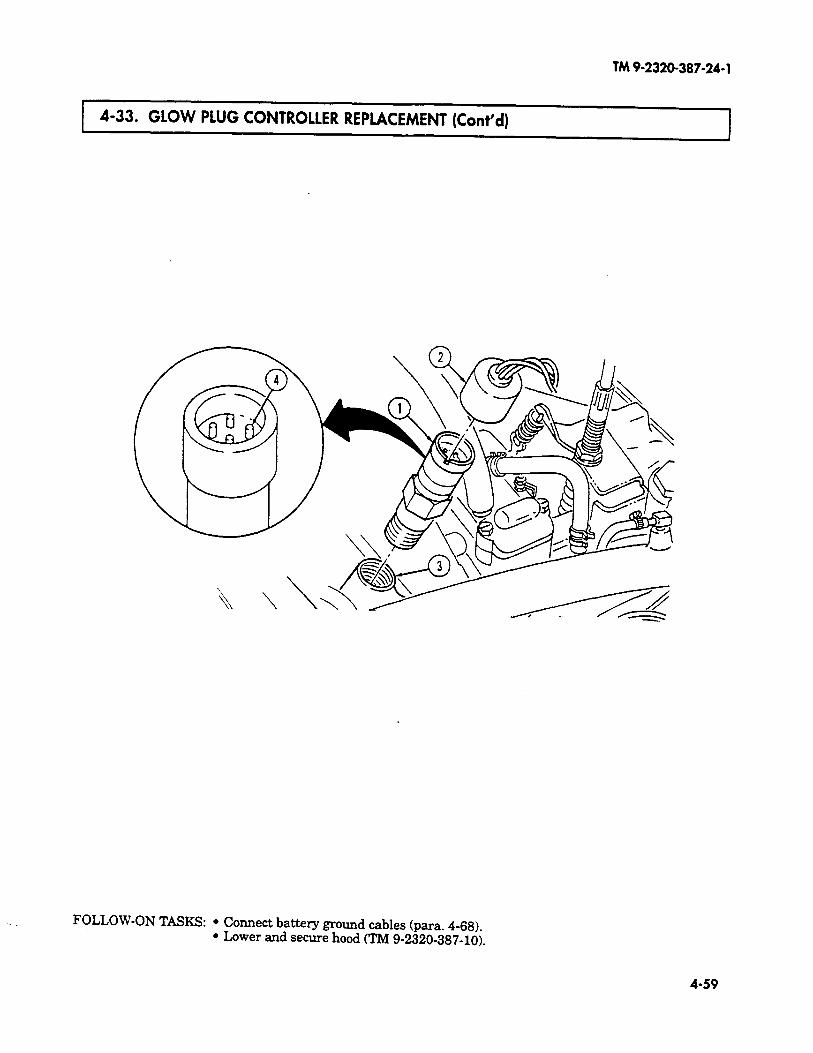
TM9-2320-387-24-l
1 4-33. GLOW PLUG CONTROLLER REPLACEMENT (Cont’d) I I
FOLLOW-ON TASKS: l Connect battery ground cables (para. 4-68). l Lower and secure hood (TM 9-2320-387-102
4-59
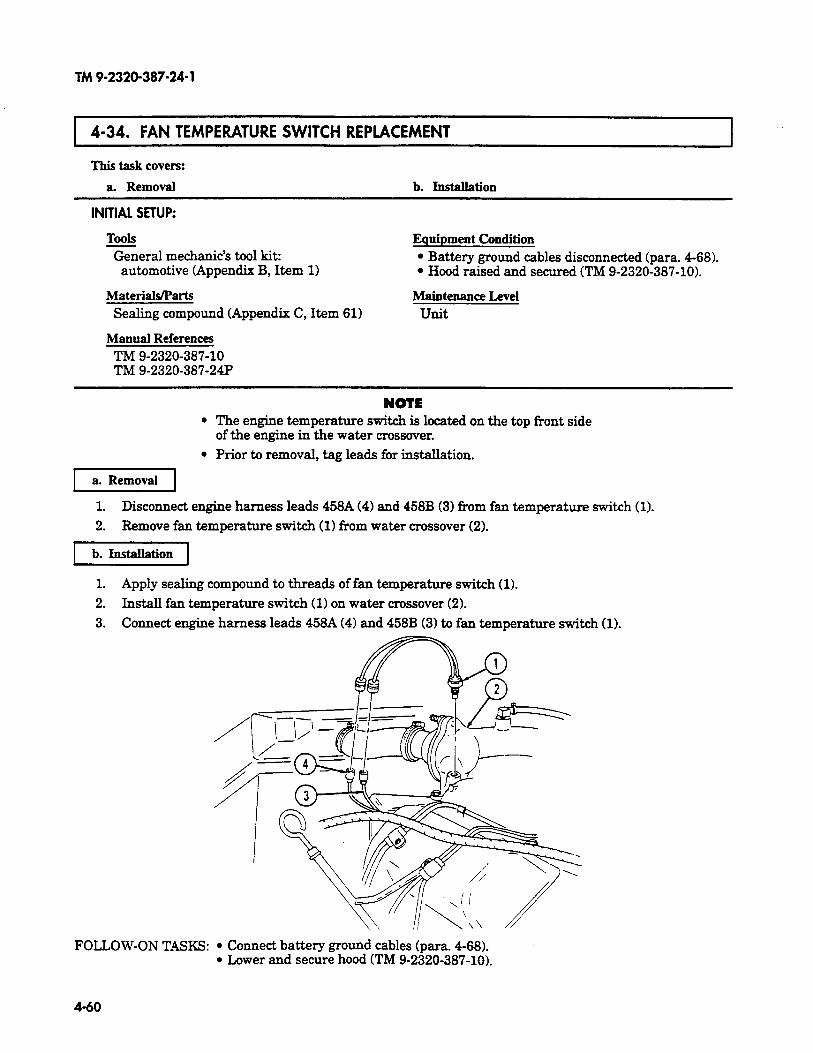
TM 9-2320-387-24-l
4-34. FAN TEMPERATURE SWITCH REPLACEMENT I
This task covers:
a. Removal
INITIAL SETUP:
b. htallation
ToOlS General mechanic’s tool hit:
automotive (Appendix B, Item 1)
Equipment Condition l Battery ground cables disconnected (para. 4-68). l Hood raised and secured (TM 9-2320-387-10).
MaterialsParts Sealing compound (Appendix C, Item 61)
Manual References TM 9-2320-387-10 TM 9-2320-387-24P
Maintenance Level unit
NOTE
l The engine temperature switch is located on the top front side of the engine in the water crossover.
l Prior to removal, tag leads for installation.
-1
1. Disconnect engine harness leads 458A (4) and 458B (3) from fan temperature switch (1).
2. Remove fan temperature switch (1) from water crossover (2).
b. Installation
1. Apply sealing compound to threads of fan temperature switch (1).
2. Install fan temperature switch (1) on water crossover (2).
3. Connect engine harness leads 458A (4) and 458B (3) to fan temperature switch (1).
FOLLCW-ON TASKS: l Connect battery ground cables (para. 4-68). . Lower and secure hood (TM 9-2320-387-10).
460
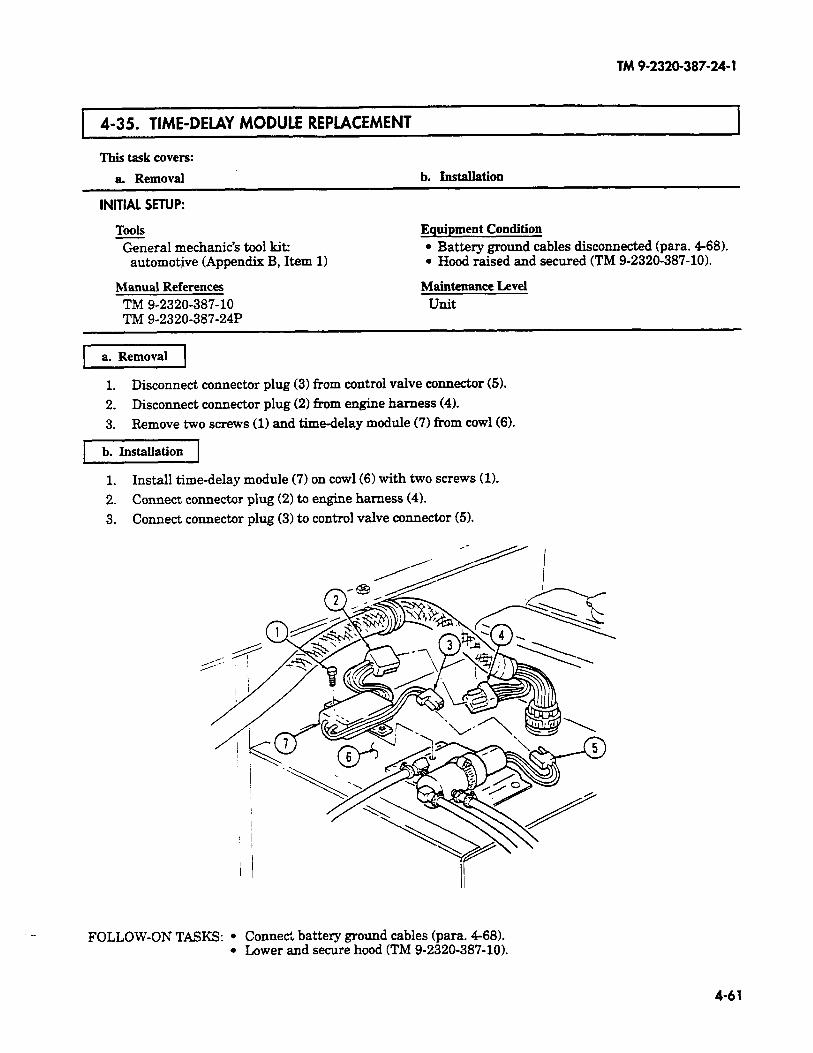
TM 9-2320-387-24-l
1 4-35. TIME-DELAY MODULE REPLACEMENT
This task covers:
a. Removal
INITIAL SETUP:
b. Installation
TOOIS Equipment Condition %eral mechanic’s tool kit: l Battery ground cables disconnected (para. 468).
automotive (Appendix B, Item 1) l Hood raised and secured (TM 9-2320-387-10).
Manual References TM 9-2320-387-10 TM 9-2320.387.24P
Maintenance Level unit
1. Disconnect connector plug (3) from control valve connector (5).
2. Disconnect connector plug (2) from engine harness (4).
3. Remove two screws (1) and timedelay module (7) from cowl (6).
b. Installation
1. Install time-delay module (7) on cowl (6) with two screws (1).
2. Connect connector plug (2) to engine harness (4).
3. Connect connector plug (3) to control valve connector (5).
FCLI_,CW.CN TASKS: l Connect battery ground cables (para. 4681. l Lower and secure hood (TM 9-2320-387-10X
4-61
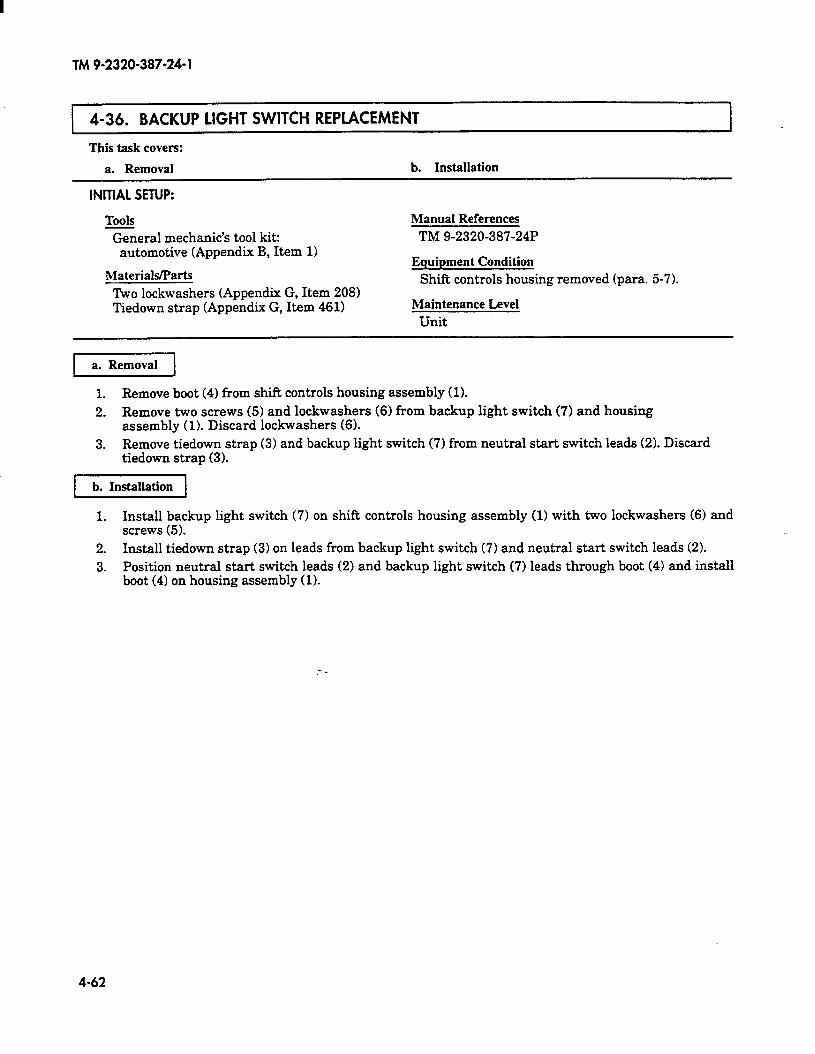
TM 9-2320-387-24-l
4-36. BACKUP LIGHT SWITCH REPLACEMENT
This task covers:
a. Removal b. Installation
INITIAL SETUP:
Tools General mechanic’s tool kit:
automotive (Appendix B, Item 1)
Materials/Parts Two lockwashers (Appendix G, Item 208) Tiedown strap (Appendix G, Item 461)
Manual References TM 9-2320-387-24P
Equipment Condition Shift controls housing removed (para. 5-7).
Maintenance Level Unit
1. Remove boot (4) from shift controls housing assembly (1).
2. Remove two screws (5) and lockwashers (6) from backup light switch (7) and housing assembly (1). Discard lockwashers (6).
3. Remove tiedown strap (3) and backup light switch (7) from neutral start switch leads (2). Discard tiedown strap (3).
b. Installation
1. Install backup light switch (7) on shift controls housing assembly (1) with two lockwashers (6) and screws (5).
2. Install tiedown strap (3) on leads from backup light switch (7) and neutral start switch leads (2). 3. Position neutral start switch leads (2) and backup light switch (7) leads through boot (4) and install
boot (4) on housing assembly (1).
- ;
4-62
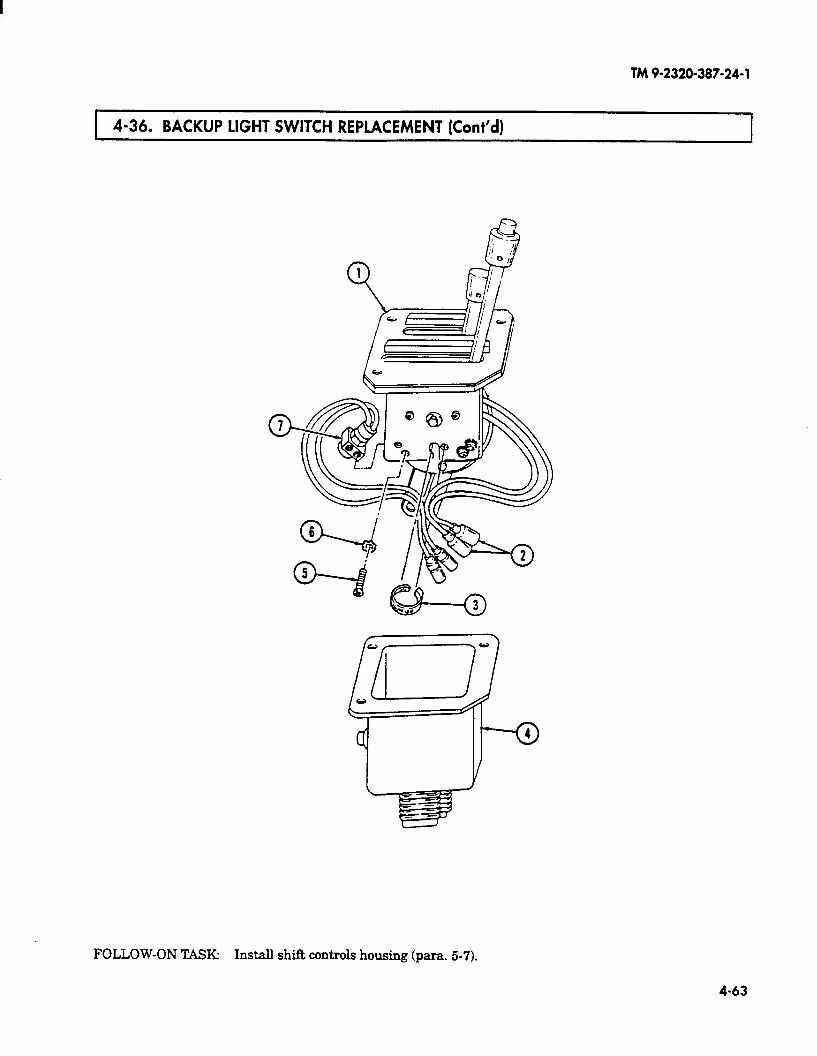
TM9-2320-387-24-l
4-36. BACKUP LIGHT SWITCH REPLACEMENT (Cont’d)
FOLLOW-ON TASE Install shift controls housing (para. 5-7).
4-63
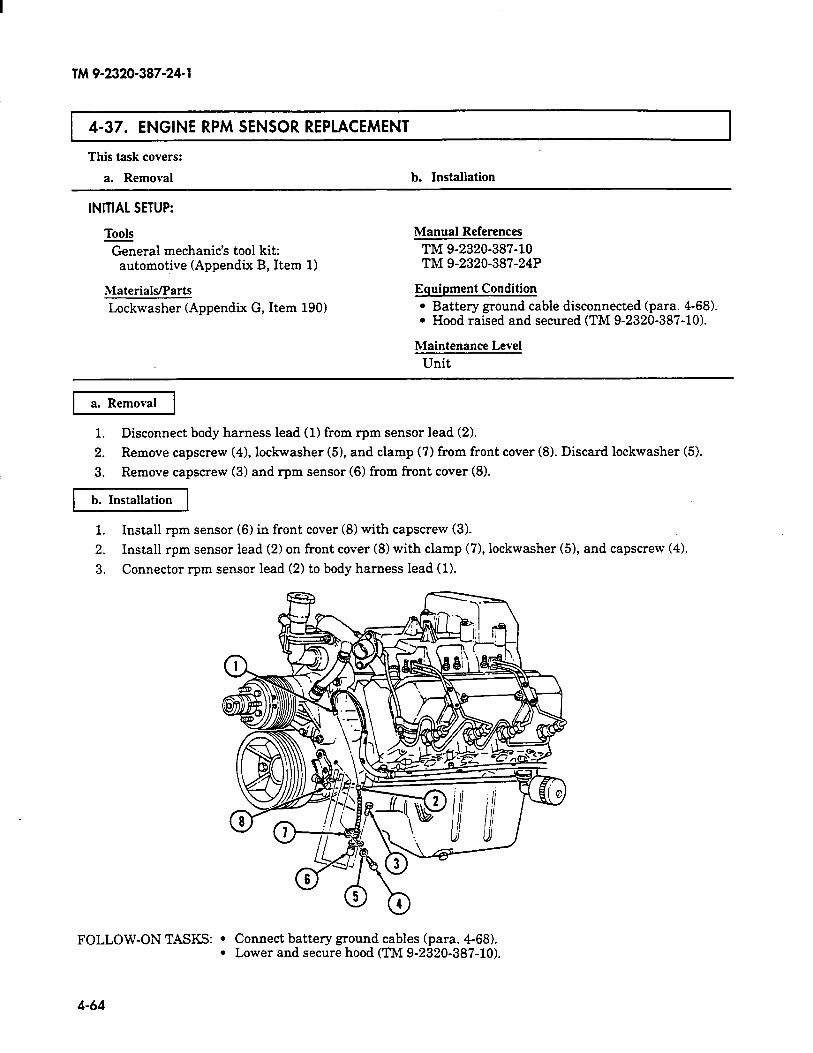
TM 9-2320-387-24-l
4-37. ENGINE RPM SENSOR REPLACEMENT
This task covers:
a. Removal
INITIAL SETUP:
Tools General mechanic’s tool kit:
automotive (Appendix B, Item 1)
Materials/Parts Lockwasher (Appendix G, Item 190)
b. Installation
Manual References TM 9-2320-387-10 TM 9-2320-387-24P
Equipment Condition l Battery ground cable disconnected (para. 4-68). l Hood raised and secured (TM 9-2320-387-10).
Maintenance Level Unit
I1
1. Disconnect body harness lead (1) from rpm sensor lead (2).
2. Remove capscrew (41, lockwasher (51, and clamp (7) from front cover (8). Discard lockwasher (5).
3. Remove capscrew (3) and rpm sensor (6) from front cover (8).
-1
1. Install rpm sensor (6) in front cover (8) with capscrew (3).
2. Install rpm sensor lead (2) on front cover (8) with clamp (7), lockwasher (51, and capscrew (4).
3. Connector rpm sensor lead (2) to body harness lead (1).
FOLLOW-ON TASKS: l Connect battery ground cables (para. 4-68). . Lower and secure hood (TM 9-2320-387-10X
4-64
TM 9-2320-387-24-1
Change 1 4-65
Section IV. TRANSFER CASE AND TRANSMISSION ELECTRICAL MAINTENANCE
4-38. TRANSFER CASE AND TRANSMISSION ELECTRICAL MAINTENANCE TASK SUMMARY
TASK PAGEPARA. PROCEDURES NO.
4-39. Transfer Case Indicator Switch Replacement 4-66
4-40. Transfer Case Indicator Lamp Assembly Replacement 4-67
4-41. Transmission Indicator Lamp Assembly Replacement 4-68
4-42. Fan Cut-Off Switch Replacement 4-69
4-43. Transmission Circuit Breakers Replacement 4-70
4-44. Transmission Relay Replacement 4-72
4-45. Transmission Control Module (TCM) Replacement 4-74
4-46. Throttle Position (TP) Sensor Maintenance 4-76
4-47. Transmission Input Speed Sensor (TISS) and 4-78Output Speed Sensor (TOSS) Maintenance
4-47.1. Transmission Control Module (TCM) Capacitor Replacement 4-80
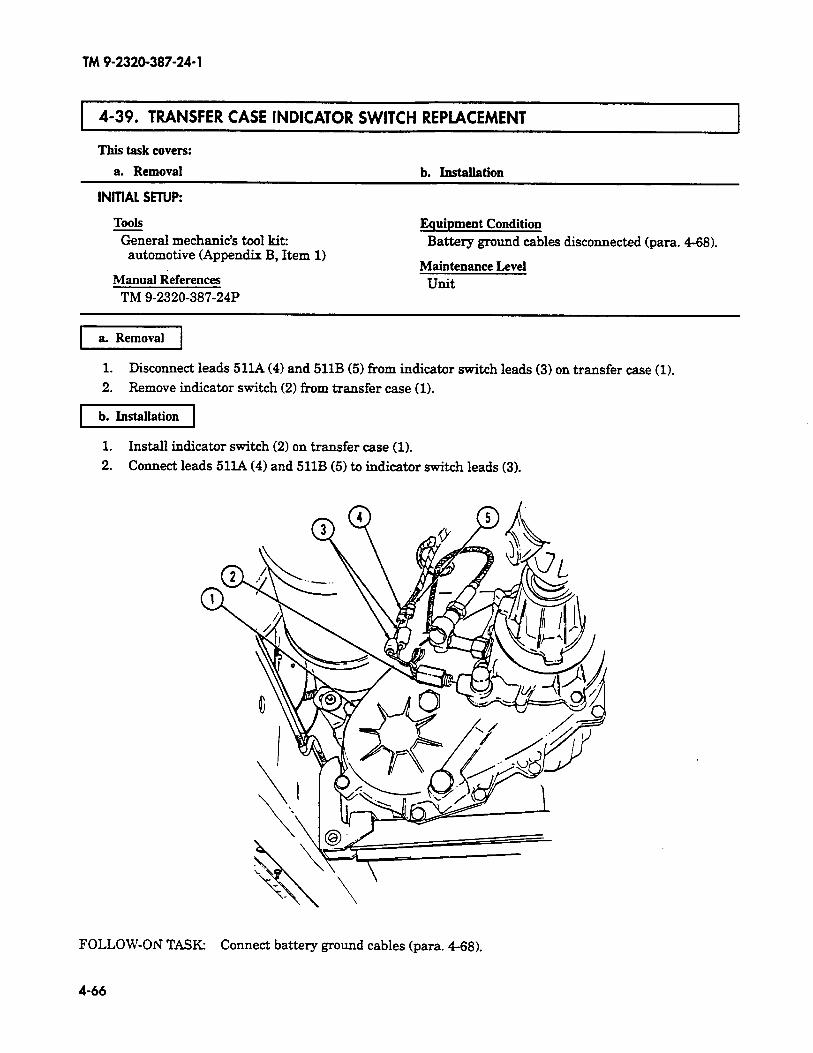
TM9-2320-387-24-l
1 4-39. TRANSFER CASE INDICATOR SWITCH REPLACEMENT I
This task covers:
a. Removal b. htallation
INITIAL SElUp:
TOOIS General mechanic’s tool kit:
automotive (Appendix B, Item 1)
Manual References TM 9-2320-387-24P
Equipment Condition Battery ground cables disconnected (para. 4-68).
Maintenance Level unit
1 a Removal 1
1. Disconnect leads 511A (4) and 511B (5) from indicator switch leads (3) on transfer case (1).
2. Remove indicator switch (2) from transfer case (1).
b. Installation
1. Install indicator switch (2) on transfer case (1).
2. Connect leads 51lA (4) and 511B (5) to indicator switch leads (3).
FOLLOW-ON TASK: Connect battery ground cables (para. 468).
4-66
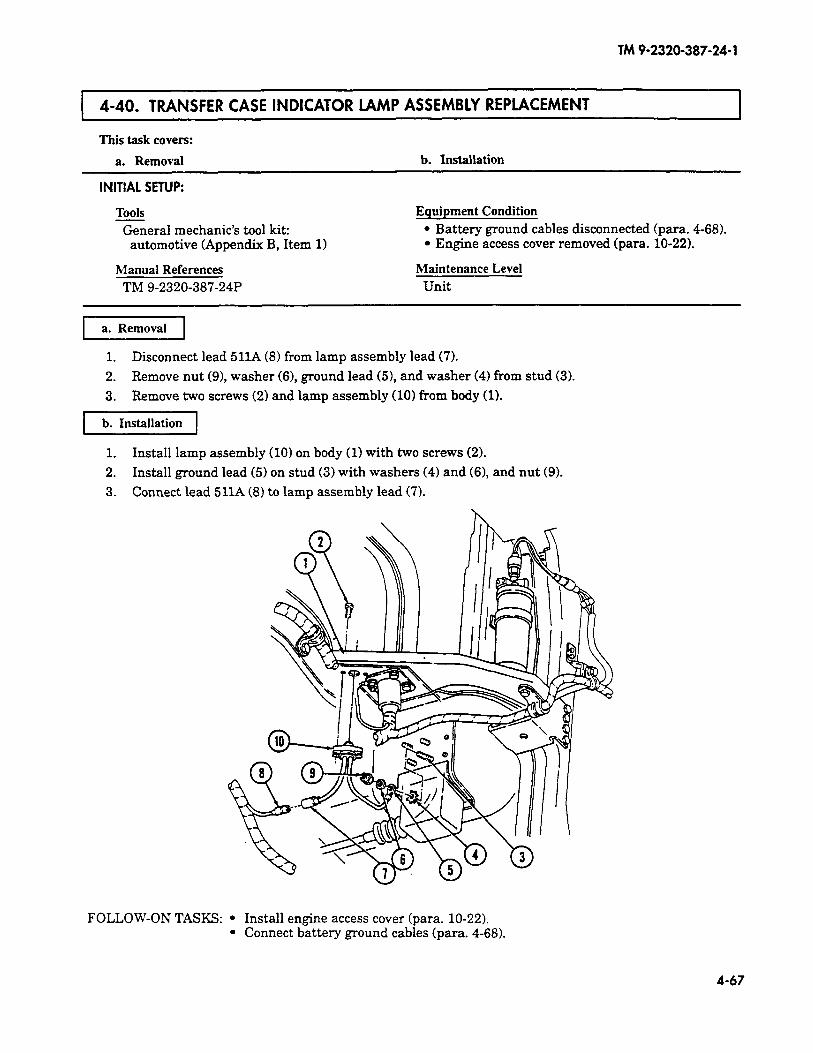
TM 9-2320-387-24- 1
4-40. TRANSFER CASE INDICATOR LAMP ASSEMBLY REPLACEMENT
This task covers:
a. Removal b. Installation
INITIAL SETUP:
TOOIS Equipment Condition
-&&~a1 mechanic’s tool kit: l Battery ground cables disconnected (para. 4-68). automotive (Appendix B, Item 11 l Engine access cover removed (para. 10-22).
Manual References Maintenance Level
TM 9-2320-387-24P Unit
1 a. Removal 1
1. Disconnect lead 511A (8) from lamp assembly lead (7).
2. Remove nut (91, washer (61, ground lead (51, and washer (4) from stud (3).
3. Remove two screws (21 and lamp assembly (101 from body (11.
b. Installation
1. Install lamp assembly (10) on body (1) with two screws (21.
2. Install ground lead (5) on stud (3) with washers (41 and (61, and nut (9).
3. Connect lead 511A (81 to lamp assembly lead (7).
FOLLOW-ON TASKS: l Install engine access cover (para. 10-22). l Connect battery ground cables (para. 4-68).
4-67
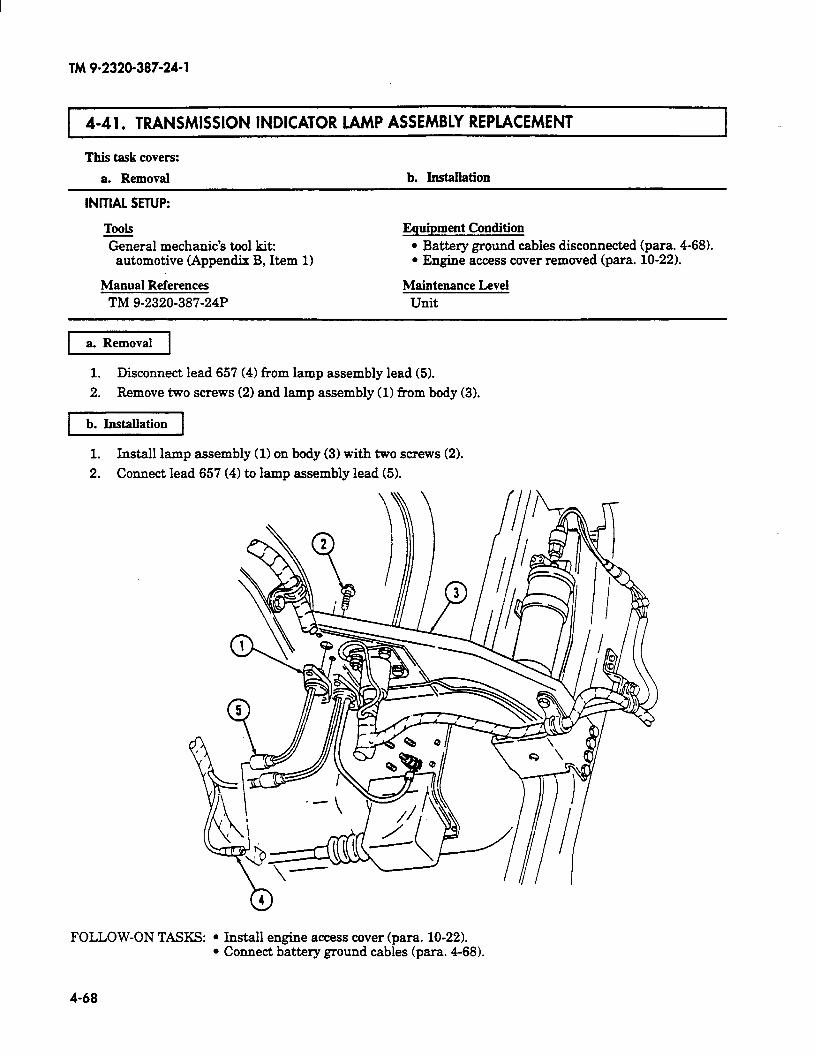
TM 9-2320-387-24-l
1 4-41. TRANSMISSION INDICATOR LAMP ASSEMBLY REPLACEMENT
This task covers:
a. Removal b. Installation
INITIAL SETUP:
ToOlS Equipment Condition General mechanic’s tool kit: l Battery ground cables disconnected (para. 4-68).
automotive (Appendix B, Item 1) l Engine access cover removed (para. 10-22).
Manual References Maintenance Level TM 9.2320.387.24P Unit
1 a. Removal 1
1. Disconnect lead 657 (4) from lamp assembly lead (5).
2. Remove two screws (2) and lamp assembly (1) f+om body (3).
rb. Installation I
1. Install lamp assembly (1) on body (3) with two screws (2).
2. Connect lead 657 (4) to lamp assembly lead (5).
FOLLOW-ON TASKS: l Install engine access cover (para. 10-22). l Connect battery ground cables (para. 4-68).
4-68
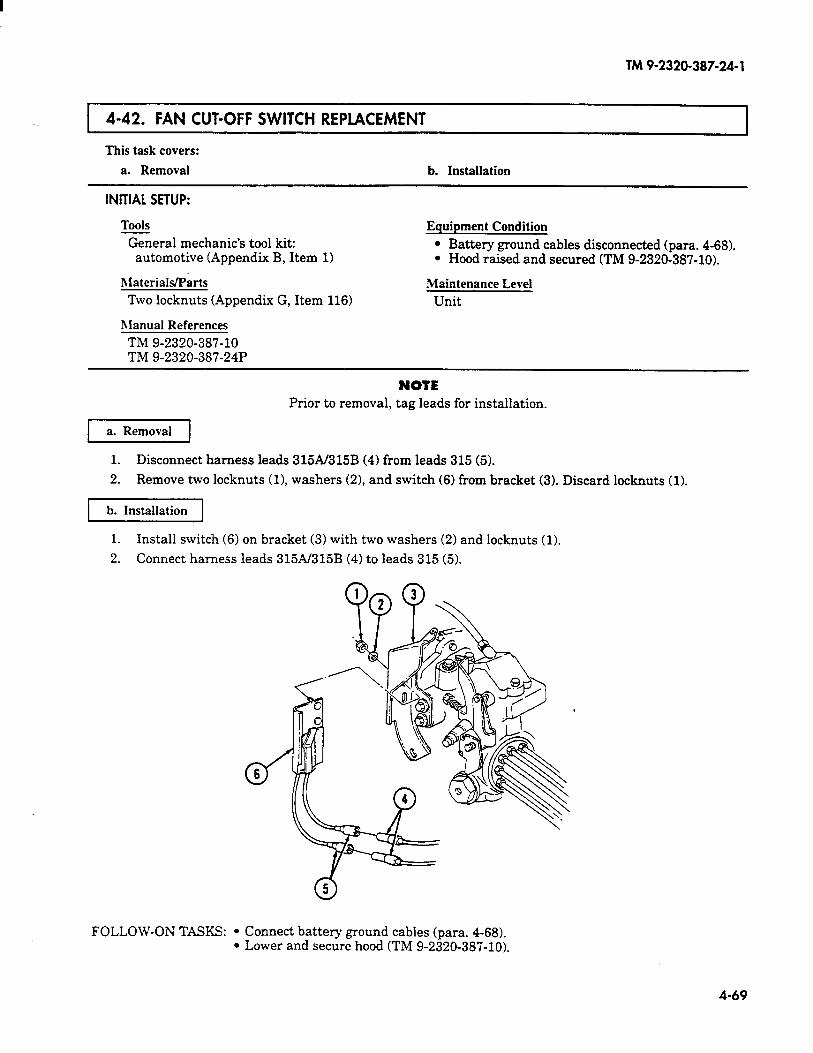
TM 9-2320-387-24-l
4-42. FAN CUT-OFF SWITCH REPLACEMENT
This task covers:
a. Removal b. Installation
I
INITIAL SETUP:
TOOIS
General mechanic’s tool kit: automotive (Appendix B, Item 1)
Materials/Parts
Two locknuts (Appendix G, Item 116)
Manual References TM 9-2320-387-10 TM 9-2320-387-24P
Equipment Condition
l Battery ground cables disconnected (para. 4-68). l Hood raised and secured (TM 9-2320-387-10).
Maintenance Level
Unit
NOTE Prior to removal, tag leads for installation.
-1
1. Disconnect harness leads 315A/315B (4) from leads 315 (5).
2. Remove two locknuts (11, washers (21, and switch (6) from bracket (3). Discard locknuts (1).
[I
1. Install switch (6) on bracket (3) with two washers (2) and locknuts (1).
2. Connect harness leads 315A/315B (4) to leads 315 (5).
FOLLOW-ON TASKS: l Connect battery ground cables (para. 4-68). . Lower and secure hood (TM 9-2320-387-10).
4-69

TM 9-2320-387-24-i
4-43. TRANSMISSION CIRCUIT BREAKERS REPLACEMENT
This task covers:
a. Removal b. Installation
INITIAL SETUP:
Tools General mechanic’s tool kit:
Manual References
TM 9-2320-387-24P automotive (Appendix B, Item 1)
Materials/Parts Two lockwashers (Appendix G, Item 215)
Equipment Condition Battery ground cables disconnected (para. 4-68).
Maintenance Level
Unit
NOTE Prior to removal, tag leads for installation.
1 a. Removal 1
NOTE Perform steps 1,2, and 3 for Ml113 models only. Perform steps 4 and 5 for Ml114 models only.
1. Remove three capscrews (1) from coverplate (2) and B-beam (3). 2. Remove two nuts (4), washers (51, capscrews (111, and washers (10) from coverplate (2) and
B-beam (3). 3. Remove two capscrews (9), lockwashers (81, washers (71, and coverplate (2) from battery box (6).
Discard lockwashers (8). 4. Remove two capscrews (15) from coverplate (2) and B-beam (3).
5. Remove two capscrews (141, lockwashers (13), washers (12), and coverplate (2) from battery box (6). Discard lockwashers (13).
6. Disconnect two leads (17) from circuit breaker (18).
7. Remove two nuts (161, circuit breaker (18), and screws (19) from coverplate (2).
1. Install circuit breaker (18) on coverplate (2) with two screws (19) and nuts (16).
2. Connect two leads (17) to circuit breaker (18).
NOTE Perform steps 3,4, and 5 for Ml113 models only. Perform steps 6 and 7 for Ml114 models only.
3. Install coverplate (2) on battery box (6) with two washers (7), lockwashers (81, and capscrews (9).
4. Install coverplate (2) on B-beam (3) with three capscrews (1).
5. Install coverplate (2) on B-beam (3) with two washers (lo), capscrews (111, washers (5), and nuts (4).
6. Install coverplate (2) on battery box (6) with two washers (121, lockwashers (13), and capscrews (14).
7. Secure coverplate (2) to B-beam (3) with two capscrews (15).
4-70

TM 9-2320-387-24-l
4-43. TRANSMISSION CIRCUIT BREAKERS REPlACEMENT (Cont’d)
FOLLOW-ON TASKt Connect battery ground cables (para. 4-68).
4-71
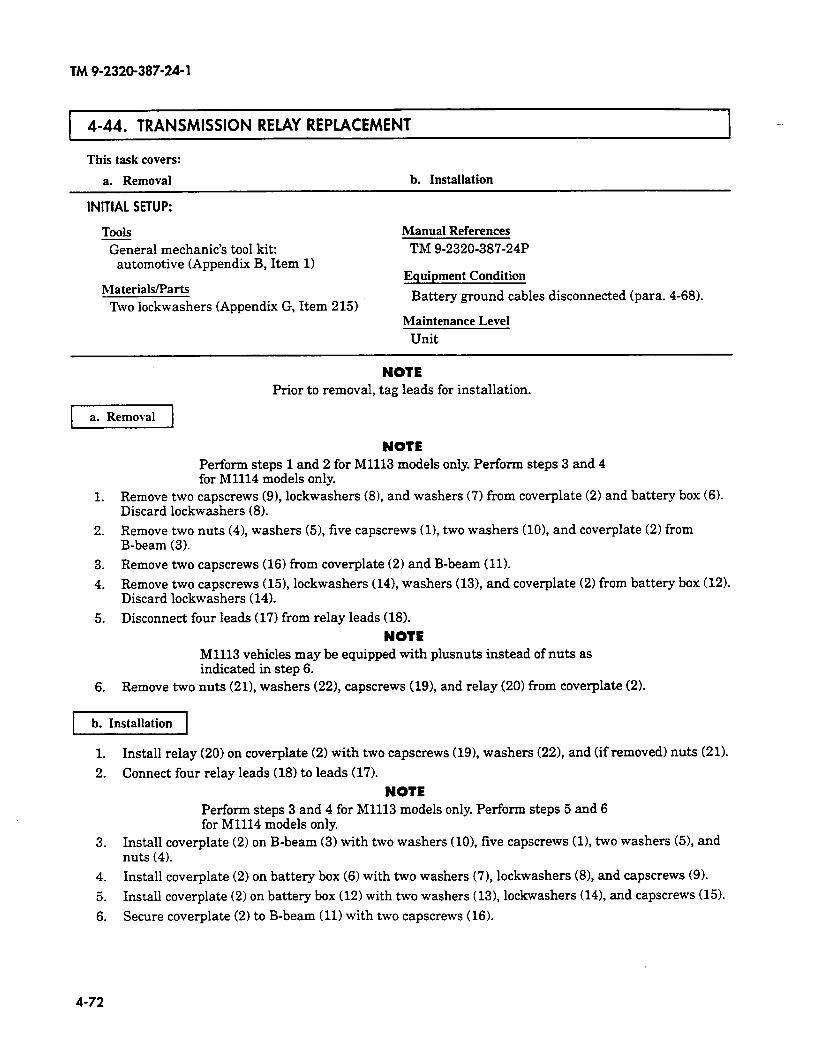
TM 9-2320-387-24-l
1 4-44. TRANSMISSION RELAY REPLACEMENT I 1 I
This task covers:
a. Removal
INITIAL SETUP:
b. Installation
Tools Manual References General mechanic’s tool kit: TM 9-2320-387-24P
automotive (Appendix B, Item 1)
bIaterials/Parts Two lockwashers (Appendix G, Item 215)
Equipment Condition
Battery ground cables disconnected (para. 4-68).
Maintenance Level Unit
NOTE Prior to removal, tag leads for installation.
NOTE Perform steps 1 and 2 for Ml113 models only. Perform steps 3 and 4 for Ml114 models only.
1. Remove two capscrews (9), lockwashers (8), and washers (7) from coverplate (2) and battery box (6). Discard lockwashers (8).
2. Remove two nuts (4), washers (51, five capscrews (11, two washers (101, and coverplate (2) from B-beam (3).
3. Remove two capscrews (16) from coverplate (2) and B-beam (11). 4. Remove two capscrews (151, lockwashers (141, washers (131, and coverplate (2) from battery box (12).
Discard lockwashers (14).
5. Disconnect four leads (17) from relay leads (18).
NOTE Ml113 vehicles may be equipped with plusnuts instead of nuts as indicated in step 6.
6. Remove two nuts (211, washers (221, capscrews (191, and relay (20) from coverplate (2).
b. Installation
1. Install relay (20) on coverplate (2) with two capscrews (19), washers (221, and (if removed) nuts (21).
2. Connect four relay leads (18) to leads (17).
NOTE Perform steps 3 and 4 for Ml113 models only. Perform steps 5 and 6 for Ml114 models only.
3. Install coverplate (2) on B-beam (3) with two washers (lo), five capscrews W, two washers (5), and nuts (4).
4. Install coverplate (2) on battery box (6) with two washers (71, lockwashers (81, and capscrews (9).
5. Install coverplate (2) on battery box (12) with two washers (131,lockwashers (141, and capscrews (15).
6. Secure coverplate (2) to B-beam (11) with two capscrews (16).
4-72
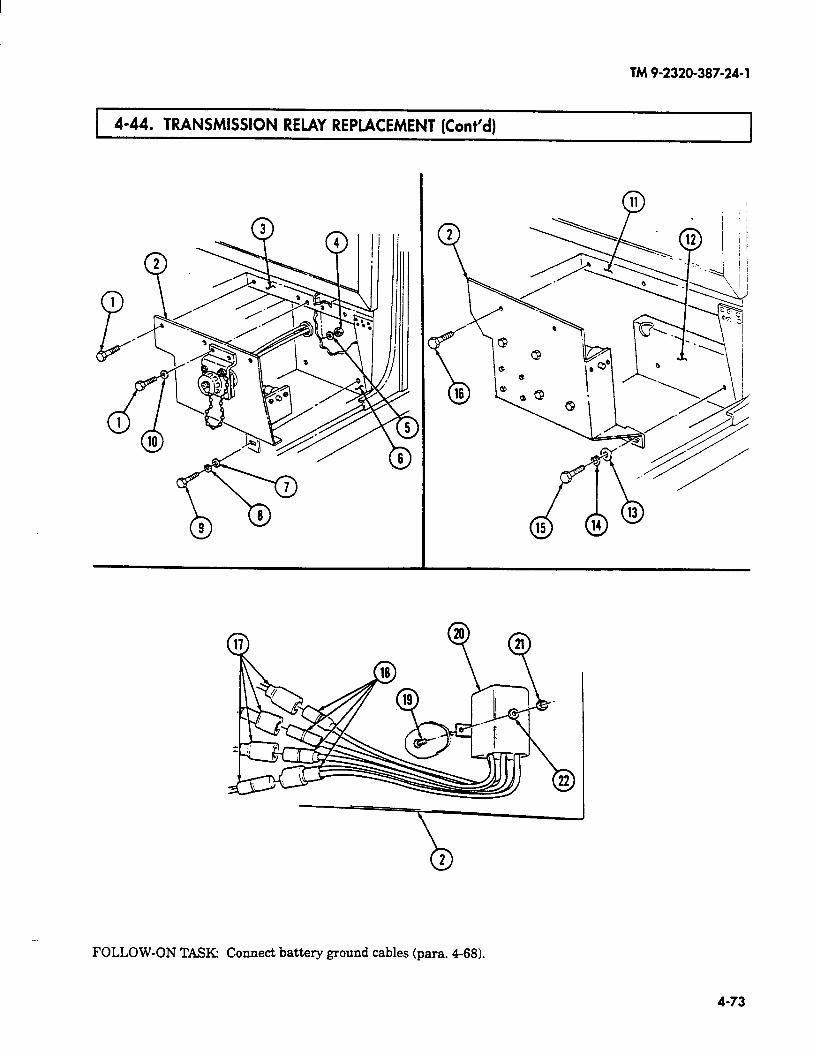
TM 9-2320-387-24-l
4-44. TRANSMISSION RELAY REPLACEMENT (Cont’d)
FOLLOW-ON TASK: Connect battery ground cables (para. 468).
4-73
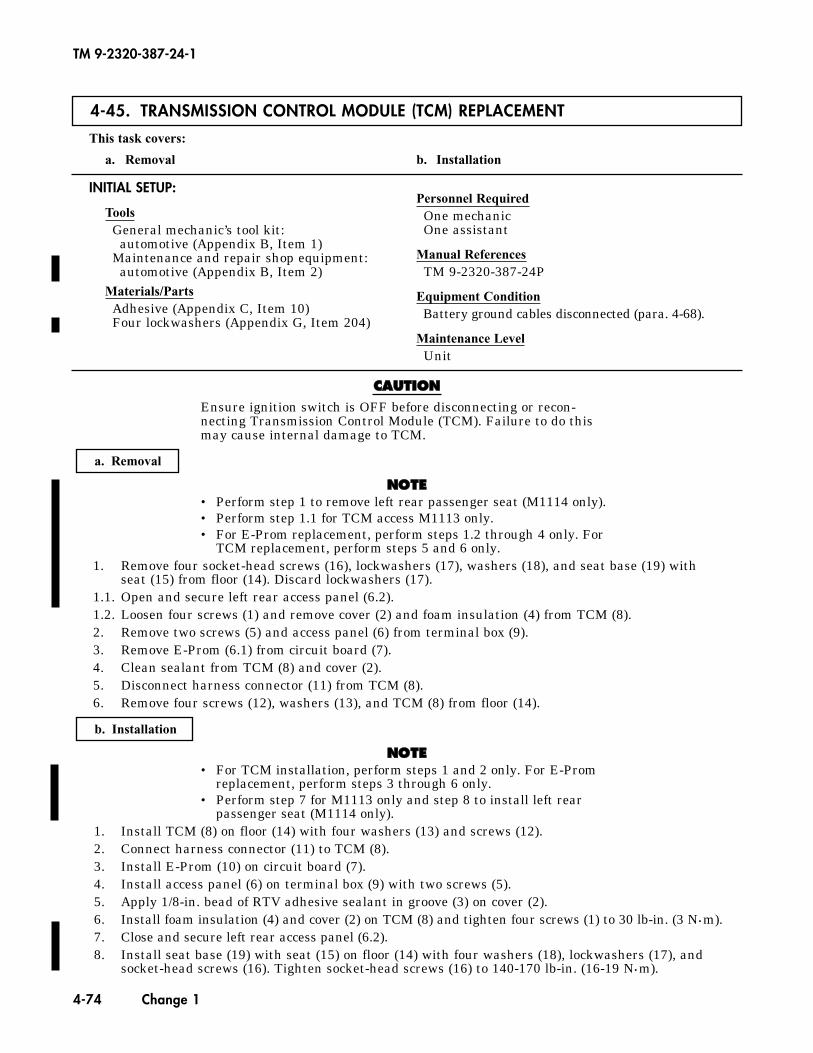
TM 9-2320-387-24-1
4-74 Change 1
4-45. TRANSMISSION CONTROL MODULE (TCM) REPLACEMENT
This task covers:
a. Removal b. Installation
CCAAUUTTIIOONNEnsure ignition switch is OFF before disconnecting or recon-necting Transmission Control Module (TCM). Failure to do thismay cause internal damage to TCM.
NNOOTTEE• Perform step 1 to remove left rear passenger seat (M1114 only).• Perform step 1.1 for TCM access M1113 only.• For E-Prom replacement, perform steps 1.2 through 4 only. For
TCM replacement, perform steps 5 and 6 only.1. Remove four socket-head screws (16), lockwashers (17), washers (18), and seat base (19) with
seat (15) from floor (14). Discard lockwashers (17).1.1. Open and secure left rear access panel (6.2).1.2. Loosen four screws (1) and remove cover (2) and foam insulation (4) from TCM (8).2. Remove two screws (5) and access panel (6) from terminal box (9).3. Remove E-Prom (6.1) from circuit board (7).4. Clean sealant from TCM (8) and cover (2).5. Disconnect harness connector (11) from TCM (8).6. Remove four screws (12), washers (13), and TCM (8) from floor (14).
NNOOTTEE• For TCM installation, perform steps 1 and 2 only. For E-Prom
replacement, perform steps 3 through 6 only. • Perform step 7 for M1113 only and step 8 to install left rear
passenger seat (M1114 only). 1. Install TCM (8) on floor (14) with four washers (13) and screws (12).2. Connect harness connector (11) to TCM (8).3. Install E-Prom (10) on circuit board (7).4. Install access panel (6) on terminal box (9) with two screws (5).5. Apply 1/8-in. bead of RTV adhesive sealant in groove (3) on cover (2).6. Install foam insulation (4) and cover (2) on TCM (8) and tighten four screws (1) to 30 lb-in. (3 N•m).7. Close and secure left rear access panel (6.2).8. Install seat base (19) with seat (15) on floor (14) with four washers (18), lockwashers (17), and
socket-head screws (16). Tighten socket-head screws (16) to 140-170 lb-in. (16-19 N•m).
b. Installation
a. Removal
INITIAL SETUP:
ToolsGeneral mechanic’s tool kit:
automotive (Appendix B, Item 1)Maintenance and repair shop equipment:
automotive (Appendix B, Item 2)Materials/Parts
Adhesive (Appendix C, Item 10)Four lockwashers (Appendix G, Item 204)
Personnel RequiredOne mechanicOne assistant
Manual ReferencesTM 9-2320-387-24P
Equipment ConditionBattery ground cables disconnected (para. 4-68).
Maintenance LevelUnit
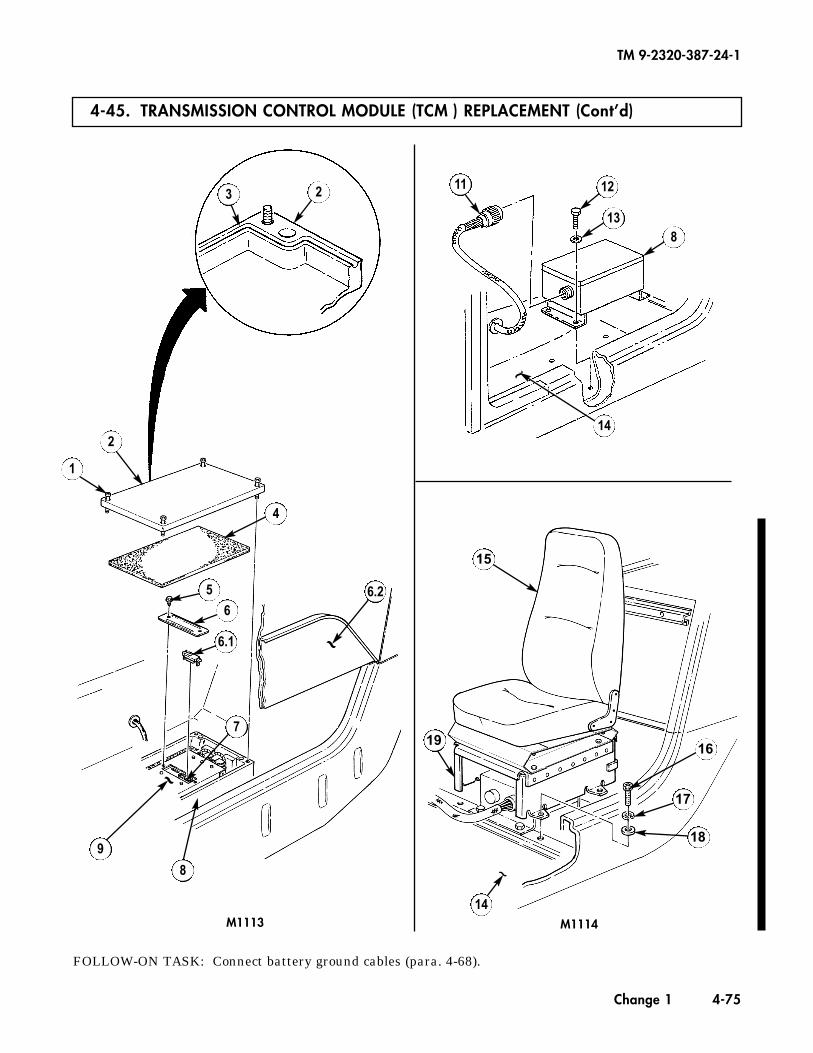
4-45. TRANSMISSION CONTROL MODULE (TCM ) REPLACEMENT (Cont’d)
TM 9-2320-387-24-1
Change 1 4-75
~
~
~
~
M1114M1113
FOLLOW-ON TASK: Connect battery ground cables (para. 4-68).
15
19
14
18
17
16
3 2
5
4
6.2
1
2
6
6.1
7
9
8
14
11 12
13
8
TM 9-2320-387-24-l
4-46. THROTTLE POSITION (TP) SENSOR MAINTENANCE I
This task covers:
a. Removal b. Installation
INITIAL SETUP:
TOOIS
General mechanic’s tool kit: automotive (Appendix B, Item 1)
Test Equipment Multimeter (Appendix B, Item 155) Jumper wire (Appendix B, Item 79) Valve gauge block (Appendix B, Item 45)
Manual References TM 9-2320-387-10 TM 9-2320-387-24P
Equipment Condition Air horn removed (para. 3-14).
Maintenance Level Unit
CAUTION The TP sensor is an electrical component and must not be soaked in any liquid cleaner or solvent, or damage may result.
1. Disconnect engine wiring harness connector (3) from TP sensor connector (4).
2. Remove two screws (71, washers (61, and TP sensor (5) from fuel injection pump (1).
-1
1. Ensure throttle is closed, and place TP sensor (5) on throttle shaft (2) of fuel injection pump (1).
2. Rotate TP sensor (5) counterclockwise to align screw holes in sensor (5) with holes in injection pump (1).
3. Install TP sensor (5) on injection pump (1) with two washers (6) and screws (7). Do not tighten screws (7).
4. Adjust TP sensor (5).
IcAdjustment
1.
2.
3.
4.
5.
6.
4-76
Disconnect engine harness (12) and body harness connectors (11).
Install jumper wires between TP sensor connector (4) and body wiring harness connector (11).
Rotate ignition switch to RUN position (TM 9-2320-387-10).
Using a digital multimeter, measure voltage between terminals A and C of TP sensor connector (4). Tbis voltage should be between 4.5 - 5.8 volts. Multiply by 0.33 to obtain the desired TP sensor voltage, and use this figure to adjust TP sensor.
NOTE For example, 5.00 volts x 0.33 = 1.65 volts W.% or 0.02 volts tolerance).
Install -646 side of valve gauge block between injection pump throttle lever stopscrew (8) and housing boss (9) on the injection pump (1).
Rotate injection pump throttle lever (10) so that stopscrew (8) holds valve gauge block against housing boss (9).
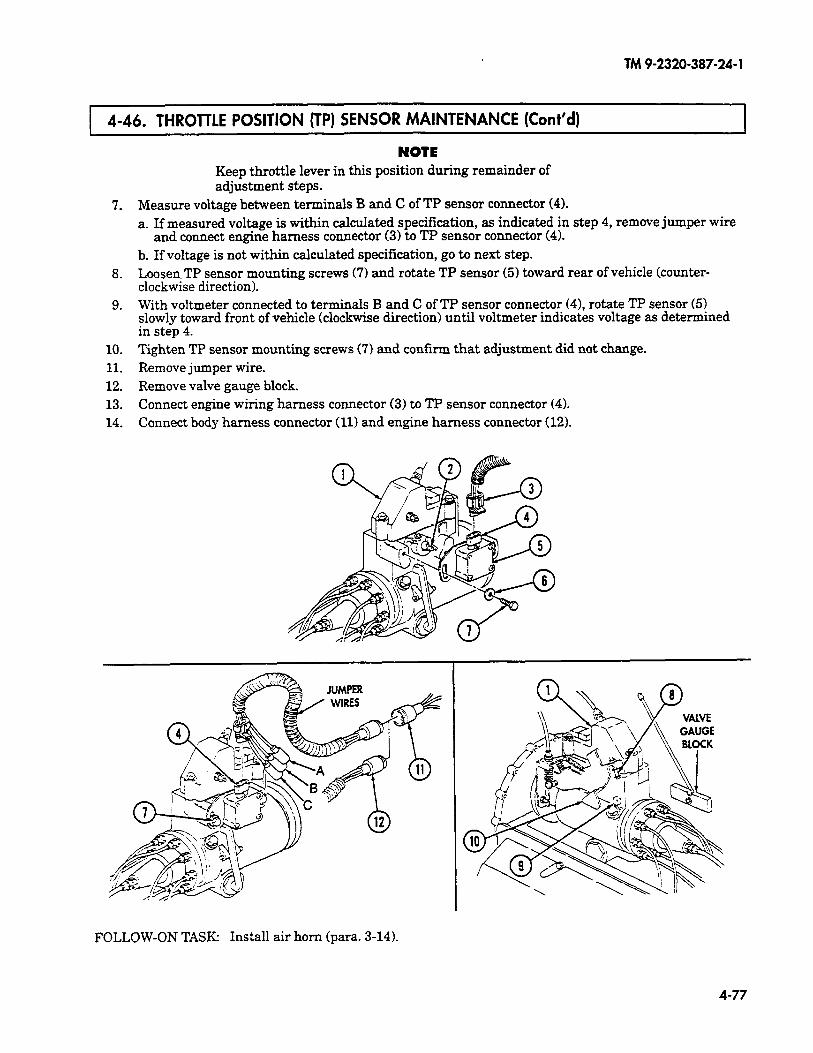
TM9-2320-387-24-l
r 4-46. THROTTLE POSITION (TP) SENSOR MAINTENANCE (Cont’d)
9.
10. 11. 12. 13. 14.
NOTE Keep throttle lever in this position during remainder of adjustment steps.
Measure voltage between terminals B and C of TP sensor connector (41. a. If measured voltage is within calculated specification, as indicated in step 4, remove jumper wire
and connect engine harness connector (3) to TP sensor connector (4).
b. If voltage is not within calculated specification, go to next step. Loosen. TP sensor mounting screws (7) and rotate TP sensor (5) toward rear of vehicle (counter- clockwise direction). With voltmeter connected to terminals B and C of TP sensor connector (4), rotate TP sensor (5) slowly toward front of vehicle (clockwise direction) until voltmeter indicates voltage as determined in step 4. Tighten TP sensor mounting screws (71 and confirm that adjustment did not change. Remove jumper wire. Remove valve gauge block. Connect engine wiring harness connector (3) to TP sensor connector (4). Connect body harness connector (11) and engine harness connector (12).
FOLLOW-ON TASK Install air horn (para. 3-14).
4-77
TM 9-2320-387-24-l
I-
4-47. TRANSMISSION INPUT SPEED SENSOR (TISS) AND OUTPUT SPEED SENSOR (TOSS) MAINTENANCE
This task covers:
a. Removal b. Inspection
INITIAL SETUP:
c. Installation
Tools
General mechanic’s tool kit: automotive (Appendix B, Item 11
Materials/Parts
O-ring seal (Appendix G, Item 2881 Hydraulic fluid (Appendix C, Item 37)
Manual References
TM 9-2320-387-10 TM 9-2320-387-24P
Equipment Conditions
Battery ground cables disconnected (para. 4-68).
Maintenance Level
Unit
NOTE Replacement procedure for input and output speed sensors are basically the same. This procedure covers the output speed sensor.
r-xzq 1. Disconnect speed sensor harness connector (5) from sensor (7).
2. Remove nut (101, capscrew (l), washer (21, and harness clip (4) from sensor bracket (8).
3. Remove capscrew (9) from sensor (7) and transmission (3). Slide bracket (8) off sensor (7).
4. Using a twisting motion, remove sensor (7) from transmission (3).
/b.lnspection
Inspect O-ring seal (6) and replace if damaged.
c. Installation
1. Lubricate O-ring seal (6) with hydraulic fluid and install on sensor (7) if removed.
2. Using a twisting motion, install sensor (7) on transmission (3).
3. Slide bracket (8) over sensor (7) and install capscrew (9).
4. Install harness clip (4) on sensor bracket (8) with washer (21, capscrew (11, and nut (10).
5. Install connector (5) on sensor (7).
4-78
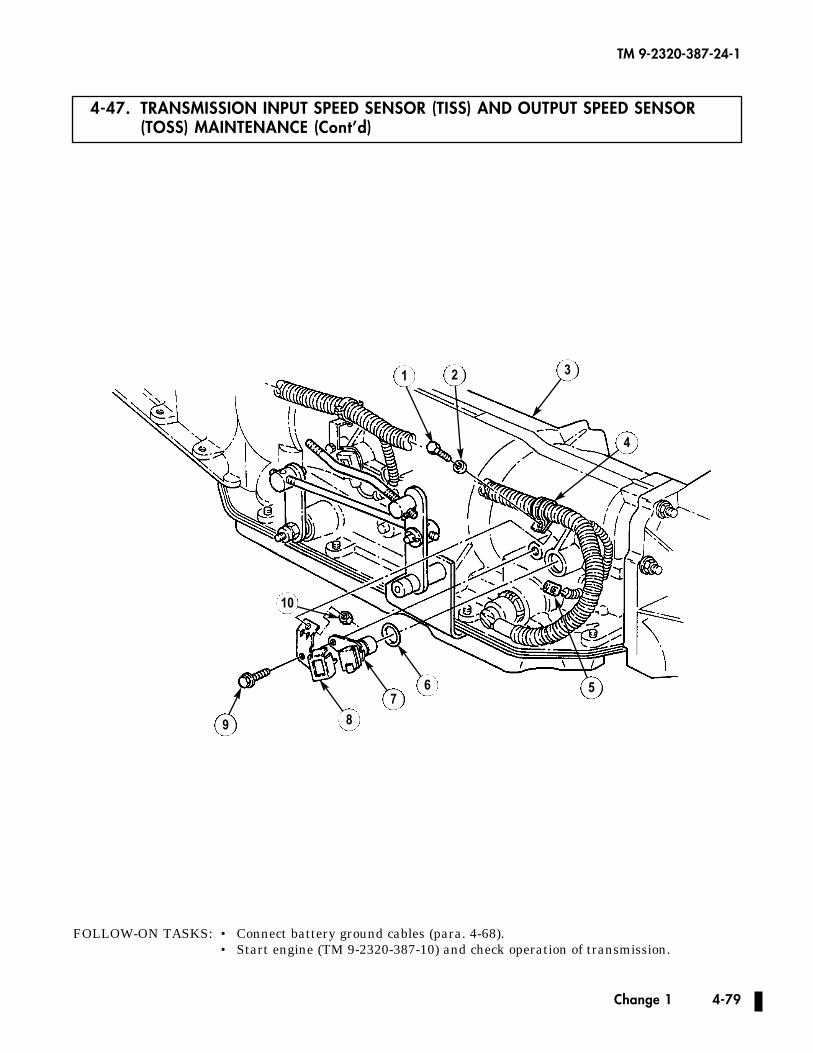
4-47. TRANSMISSION INPUT SPEED SENSOR (TISS) AND OUTPUT SPEED SENSOR(TOSS) MAINTENANCE (Cont’d)
TM 9-2320-387-24-1
Change 1 4-79
FOLLOW-ON TASKS: • Connect battery ground cables (para. 4-68).• Start engine (TM 9-2320-387-10) and check operation of transmission.
1 2 3
4
567
89
10
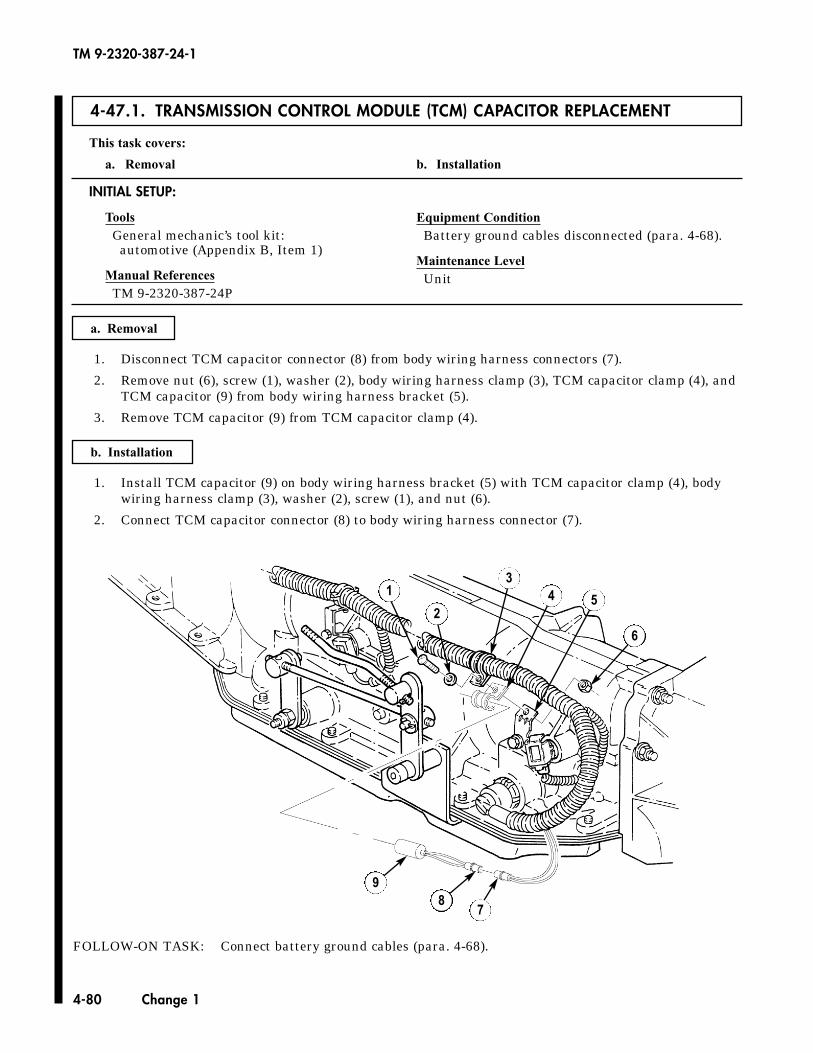
4-47.1. TRANSMISSION CONTROL MODULE (TCM) CAPACITOR REPLACEMENT
This task covers:
a. Removal b. Installation
a. Removal
1. Disconnect TCM capacitor connector (8) from body wiring harness connectors (7).
2. Remove nut (6), screw (1), washer (2), body wiring harness clamp (3), TCM capacitor clamp (4), andTCM capacitor (9) from body wiring harness bracket (5).
3. Remove TCM capacitor (9) from TCM capacitor clamp (4).
1. Install TCM capacitor (9) on body wiring harness bracket (5) with TCM capacitor clamp (4), bodywiring harness clamp (3), washer (2), screw (1), and nut (6).
2. Connect TCM capacitor connector (8) to body wiring harness connector (7).
INITIAL SETUP:
ToolsGeneral mechanic’s tool kit:
automotive (Appendix B, Item 1)
Manual ReferencesTM 9-2320-387-24P
Equipment ConditionBattery ground cables disconnected (para. 4-68).
Maintenance LevelUnit
b. Installation
TM 9-2320-387-24-1
4-80 Change 1
FOLLOW-ON TASK: Connect battery ground cables (para. 4-68).
1
2
34 5
6
78
9

TM 9 2320-387-24-l
Section Vi UGHTING SYSTEM MAINTENANCE
~HTING SYSTEM MAINTENANCE TASK SUMMARY 1
PROCEDURES PAGE
I NO.
4-49.
450.
451.
452.
453.
454.
455.
456.
457.
458.
459.
460.
461.
462.
463.
464.
465.
Service Headlight Lamp Maintenance
Service Headlight Assembly Replacement
Blackout Drive Light Assembly Replacement
Blackout Drive Light Lamp Replacement
Front Composite Light Assembly Replacement
Front Composite Light Lamp Replacement
Rear Composite Light Lamp Replacement
Side Marker Light Assembly Replacement
Rear Composite Light Assembly Replacement
Main Light Switch Replacement
Headlight Beam Selector Switch and Bracket Replacement
Stoplighifl’brque Converter Clutch Brake Switch Maintenance
Directional Signal Flasher Replacement
Directional Signal Control Indicator Lamp Replacement
Directional Signal Control Replacement
Directional Signal Control Cancelling Ring Replacement
Service Headlight and Blackout Drive Light Electrical Connector and Grommet Replacement
482
484
486
488
490
492
493
494
496
498
499
4100
4102
4103
4104
4105
4106
4-81
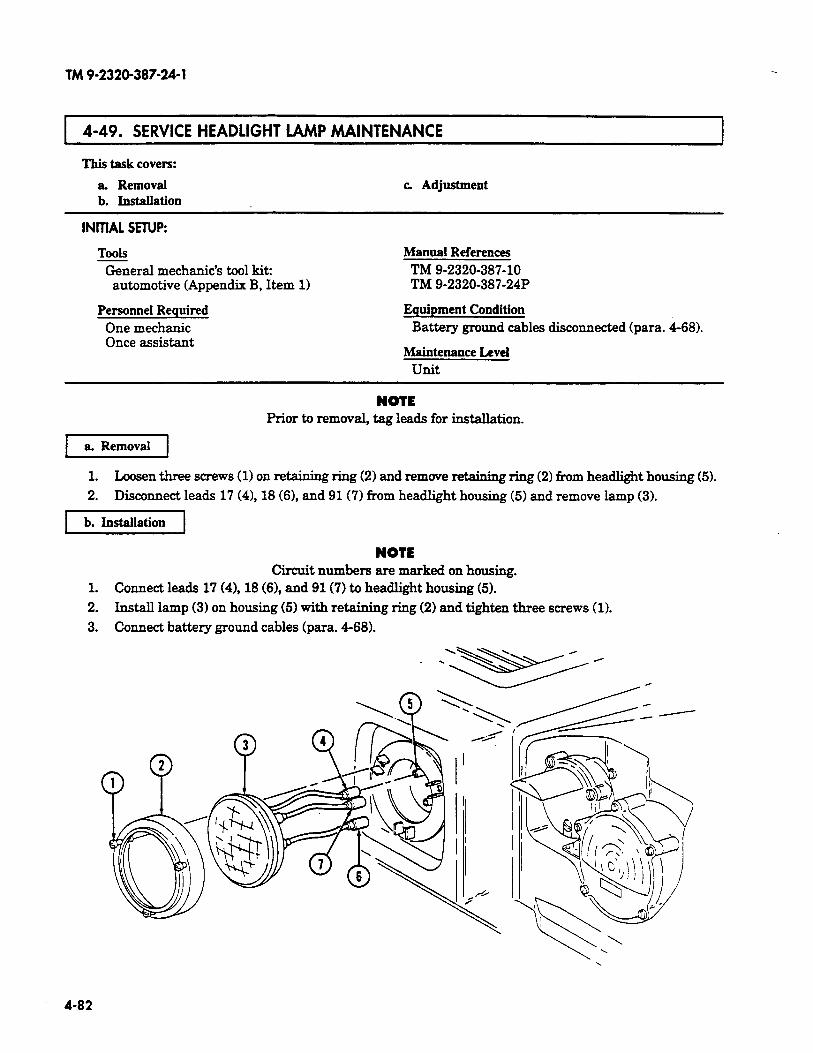
TM 9-2320-387-24-l
4-49. SERVICE HEADLIGHT LAMP MAINTENANCE
This task covers:
a. Removal b. Installation
c Adjustment
INITIAL SETUP:
TOOIS General mechanic’s tool kit:
automotive (Appendix B, Item 1)
Personnel Required One mechanic Once assistant
Manual References TM 9-2320-387-10 TM 9-2320-387-24P
Equipment Condition Battery ground cables disconnected (para. 4-68).
Maintenance Level unit
NOTE Prior to removal, tag leads for installation.
1 a Removal 1
1. Loosen three screws (1) on retaining ring (2) and remove retaining ring (2) from headlight housing (5).
2. Disconnect leads 17 (4),18 (61, and 91(7) from headlight housing (5) and remove lamp (3).
Ib.Installationj
NOTE Circuit numbers are marked on housing.
1. Connect leads 17 (4),18 (61, and 91(7) to headlight housing (5).
2. InstaU lamp (3) on housing (5) with retaining ring (2) and tighten three screws (1).
3. Connect battery ground cables (para. 468).
4-82
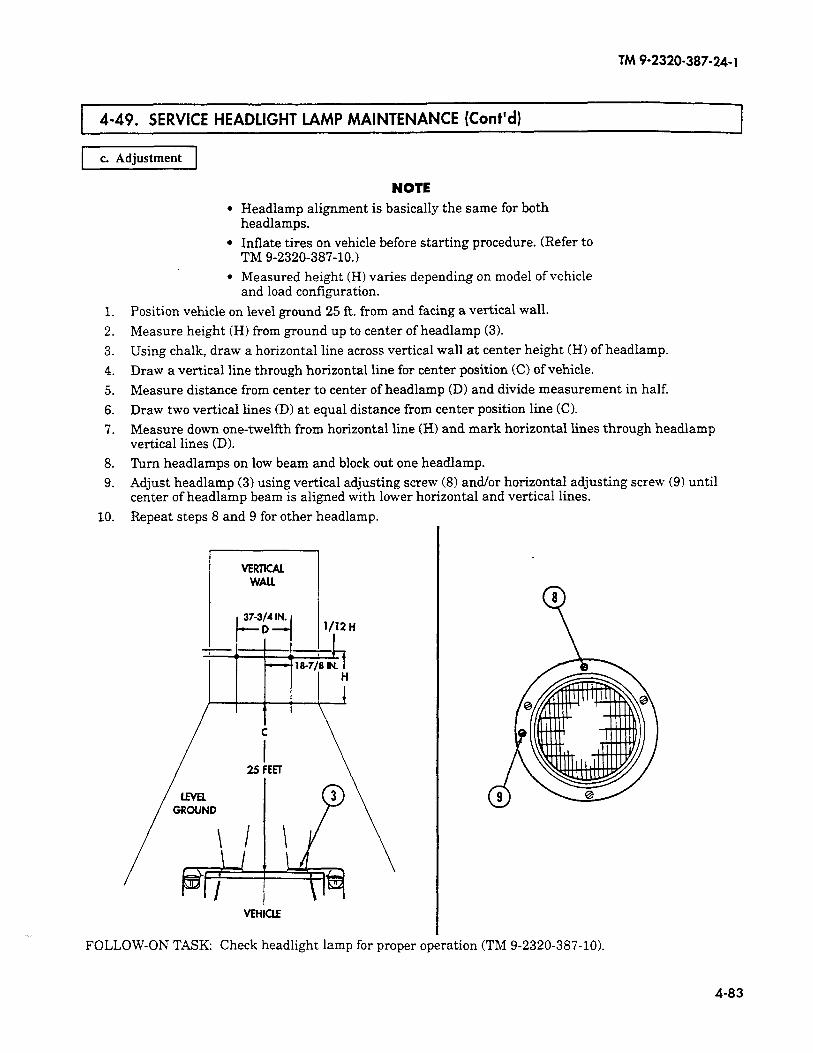
TM 9-2320-387-24-l
4-49. SERVICE HEADLIGHT LAMP MAINTENANCE (Cont’d)
c. Adjustment
1.
2.
3.
4.
5.
6.
7.
8.
9.
10.
NOTE Headlamp alignment is basically the same for both headlamps.
Inflate tires on vehicle before starting procedure. (Refer to TM 9-2320-387-10.)
Measured height (H) varies depending on model of vehicle and load configuration.
Position vehicle on level ground 25 ft. from and facing a vertical wall.
Measure height (H) from ground up to center of headlamp (3).
Using chalk, draw a horizontal line across vertical wall at center height (H) of headlamp.
Draw a vertical line through horizontal line for center position (C) of vehicle.
Measure distance from center to center of headlamp (D) and divide measurement in half.
Draw two vertical lines (D) at equal distance from center position line CC).
Measure down one-twelfth from horizontal line (H) and mark horizontal lines through headlamp vertical lines CD).
Turn headlamps on low beam and block out one headlamp.
Adjust headlamp (3) using vertical adjusting screw (8) and/or horizontal adjusting screw (9) until center of headlamp beam is aligned with lower horizontal and vertical lines.
Repeat steps 8 and 9 for other headlamp.
25
__
8 9
FOLLOW-ON TASK: Check headlight lamp for proper operation (TM 9-2320-387-10).
4-83
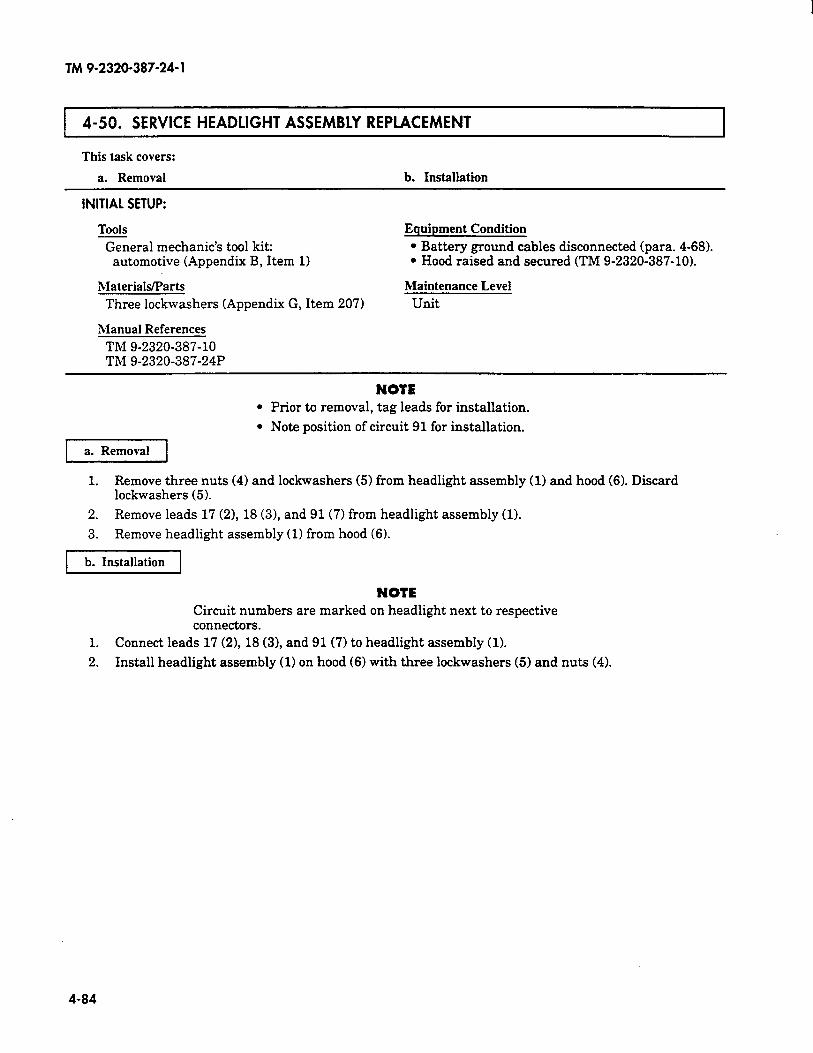
TM 9-2320-387-24-l
I 4-50. SERVICE HEADLIGHT ASSEMBLY REPLACEMENT I
This task covers:
a. Removal b. Installation
INITIAL SETUP:
Tools
General mechanic’s kit: automotive B, Item
Materials/Parts
Three (Appendix G, 207)
Manual TM 9-2320-387-10
9-2320-387-24P
Equipment
. Battery cables disconnected 4-68). l Hood and secured 9-2320-387-101.
Maintenance
Unit
NOTE l Prior to removal, tag leads for installation.
l Note position of circuit 91 for installation.
1 a. Removal 1
1. Remove three nuts (4) and lockwashers (5) from headlight assembly (1) and hood (6). Discard lockwashers (5).
2. Remove leads 17 (21, 18 (31, and 91(7) from headlight assembly (1).
3. Remove headlight assembly (1) from hood (6).
b. Installation
NOTE Circuit numbers are marked on headlight next to respective connectors.
1. Connect leads 17 (2), 18 (31, and 91 (7) to headlight assembly (1).
2. Install headlight assembly (1) on hood (6) with three lockwashers (5) and nuts (4).
4-84
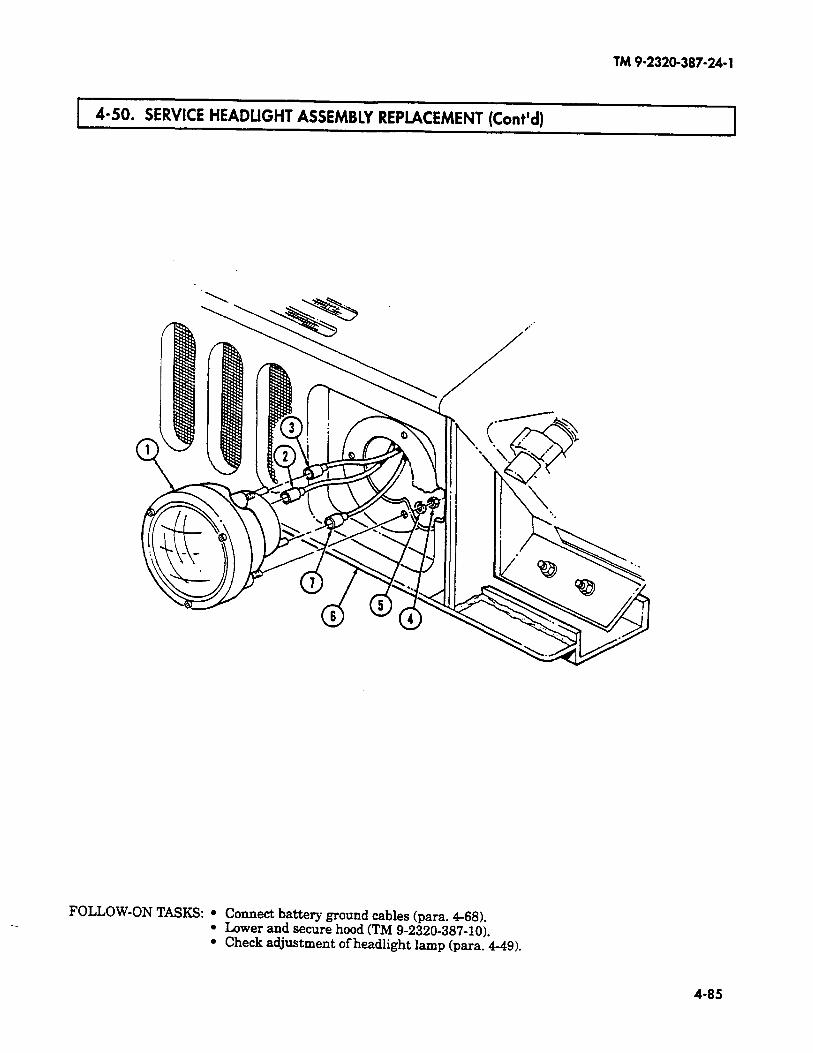
TM 9-2320-387-24-l
1 4-50. SERVICE HEADUGHT ASSEMBLY REPLACEMENT (Cont’dl
FOLLOW-ON TASKS: l Connect battery ground cables (para. 468). l Lower and secure hood (TM 9-2320-387-10). l Check adjustment of headlight lamp (para. 4-49).
4-85
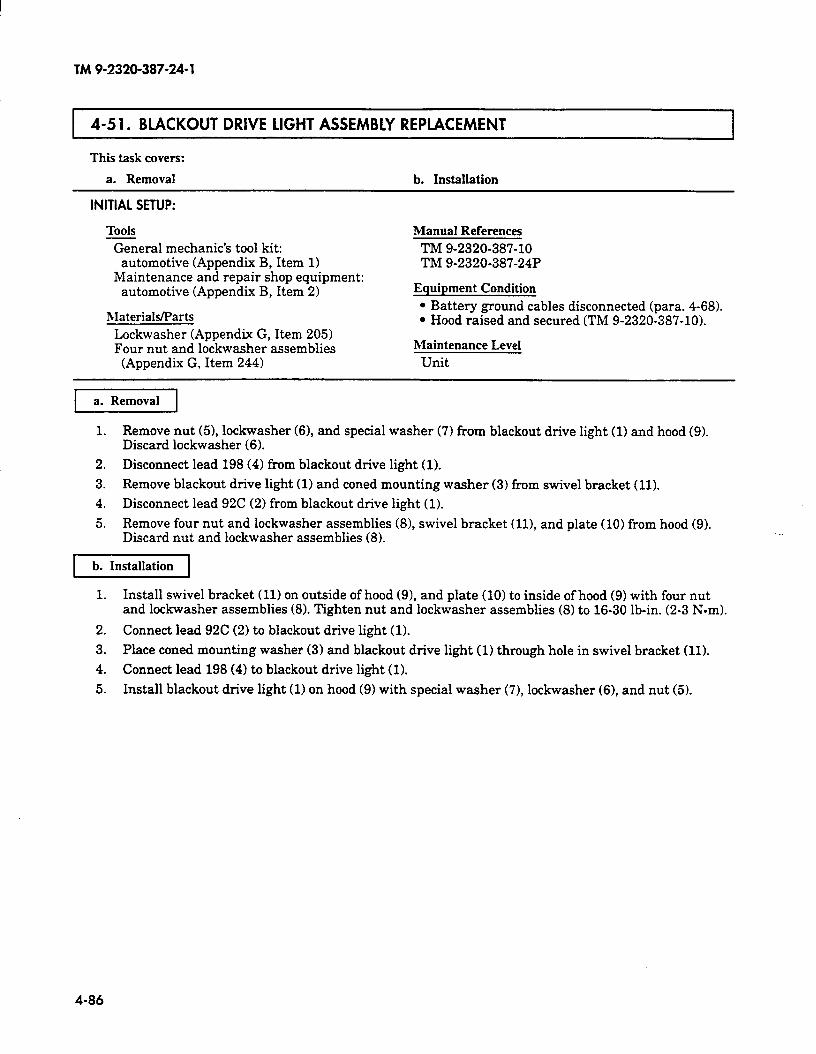
TM 9-2320-387-24-l
I 4-5 1. BLACKOUT DRIVE LIGHT ASSEMBLY REPLACEMENT -1
This task covers:
a. Removal b. Installation
INITIAL SETUP:
Tools
mechanic’s tool kit: automotive (Appendix B, Item 1)
Maintenance and repair shop equipment: automotive (Appendix B, Item 2)
hIaterials/Parts Lockwasher (Appendix G, Item 205) Four nut and lockwasher assemblies (Appendix G, Item 244)
Manual References
TM 9-2320-387-10 TM 9-2320-387-24P
Equipment Condition
l Battery ground cables disconnected (para. 4-68). l Hood raised and secured (TM 9-2320-387-10).
Maintenance Level
Unit
1. Remove nut (51, lockwasher (61, and special washer (7) from blackout drive light (1) and hood (9). Discard lockwasher (6).
2. Disconnect lead 198 (4) from blackout drive light (1).
3. Remove blackout drive light (1) and coned mounting washer (3) from swivel bracket (11).
4. Disconnect lead 92C (2) from blackout drive light (1).
5. Remove four nut and lockwasher assemblies (81, swivel bracket (111, and plate (10) from hood (9). Discard nut and lockwasher assemblies (8).
b. Installation
1. Install swivel bracket (11) on outside of hood (91, and plate (10) to inside of hood (9) with four nut and lo&washer assemblies (8). Tighten nut and lockwasher assemblies (8) to 16-30 lb-in. (2-3 Nom).
2. Connect lead 92C (2) to blackout drive light (1).
3. Place coned mounting washer (3) and blackout drive light (1) through hole in swivel bracket (11).
4. Connect lead 198 (4) to blackout drive light (1).
5. Install blackout drive light (1) on hood (91 with special washer (7), lockwasher (61, and nut (5).
4-86
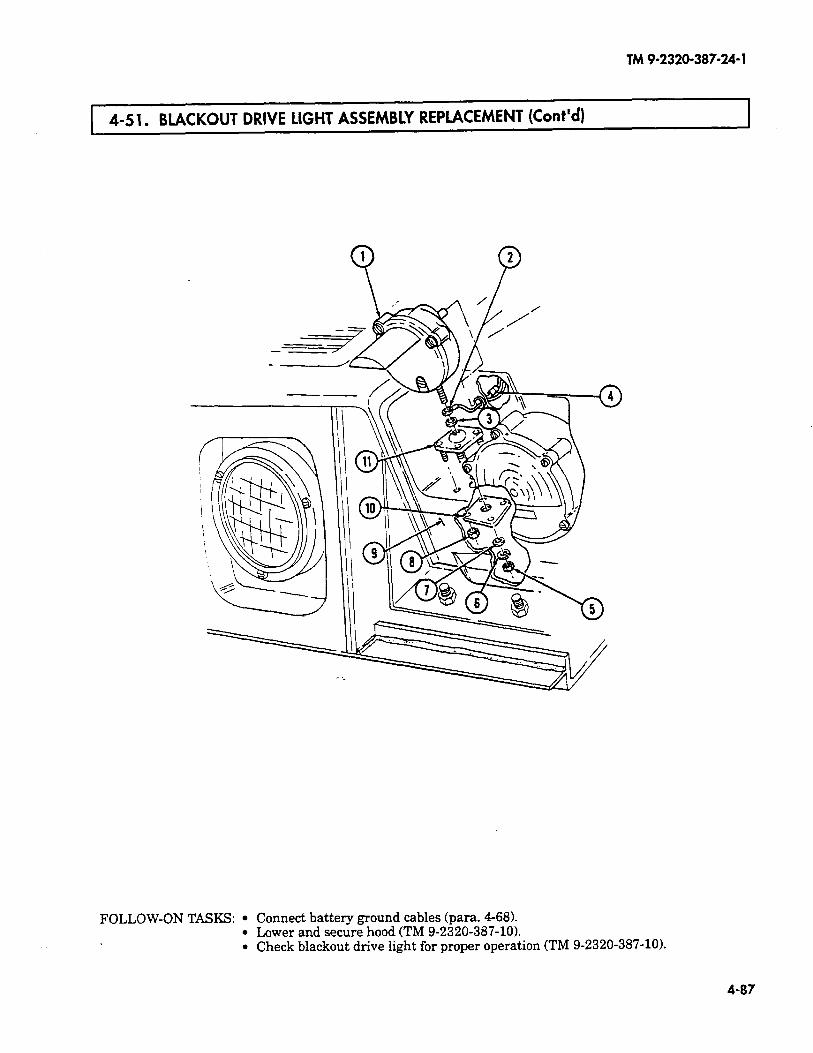
TM 9-2320-387-24-l
4-51. BLACKOUT DRIVE LIGHT ASSEMBLY REPLACEMENT (cont’d) 1
FOLLOW-ON TASKS: l Connect battery ground cables (para. 468). l Lower and secure hood (TM 9-2320-387-10). l Check blackout drive light for proper operation (TM 9-2320-387-10).
4-87
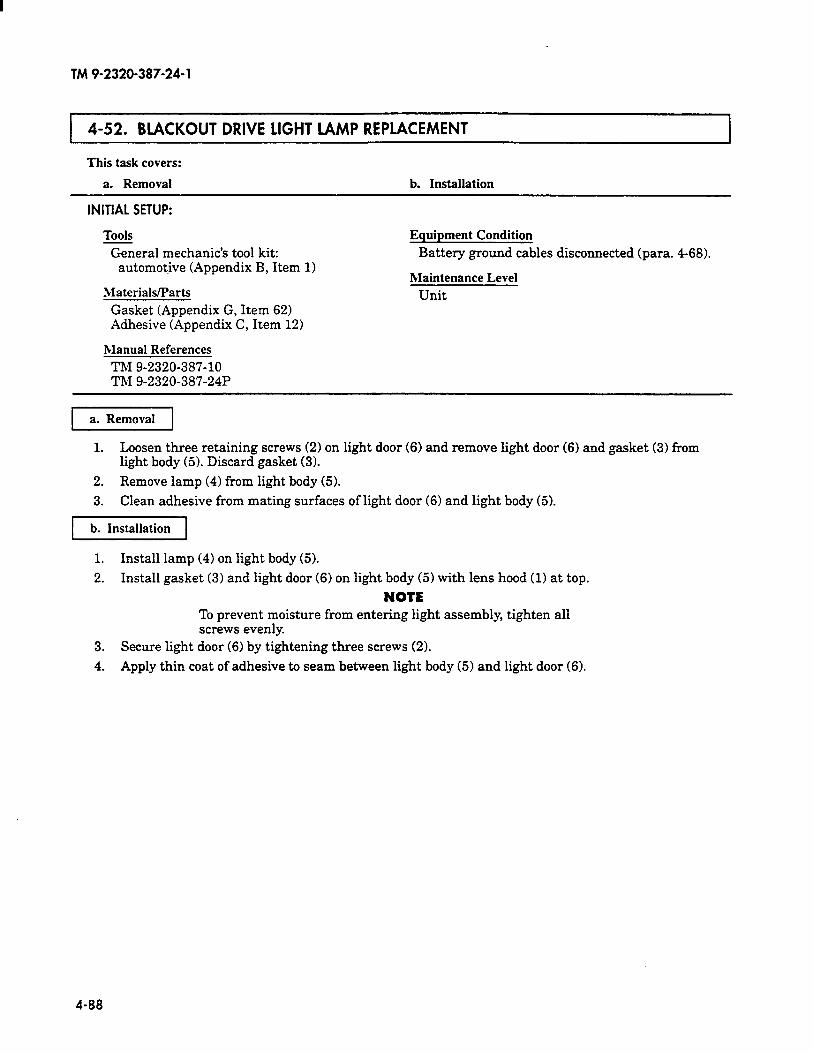
TM 9-2320-387-24-l
4-52. BLACKOUT DRIVE LIGHT LAMP REPLACEMENT
This task covers:
a. Removal b. Installation
INITIAL SETUP:
Tools
General mechanic’s tool kit: automotive (Appendix B, Item 1)
Materials/Parts
Gasket (Appendix G, Item 62) Adhesive (Appendix C, Item 12)
Equipment Condition
Battery ground cables disconnected (para. 468).
Maintenance Level
Unit
Manual References TM 9-2320-387-10 TM 9-2320-387-24P
pl?GGq 1. Loosen three retaining screws (2) on light door (6) and remove light door (6) and gasket (3) from
light body (5). Discard gasket (3).
2. Remove lamp (4) from light body (5).
3. Clean adhesive from mating surfaces of light door (6) and light body (5).
b. Installation
1. Install lamp (4) on light body (5).
2. Install gasket (31 and light door (6) on light body (51 with lens hood (11 at top.
NOTE To prevent moisture from entering light assembly, tighten all screws evenly.
3. Secure light door (6) by tightening three screws (2).
4. Apply thin coat of adhesive to seam between light body (5) and light door (6).
4-88

lM9-2320-387-24-l
4-52. BLACKOUT DRIVE LIGHT LAMP REPLACEMENT (Cont’d)
FOLLOW-ON TASKS: l Connect battery ground cables (para. 4-68). l Check blackout drive light for proper operation (TM 9-2320-387-10).
4-89

TM 9-2320-387-24-l
4-53. FRONT COMPOSITE LIGHT ASSEMBLY REPLACEMENT
This task covers:
a. Removal b. Installation
INITIAL SFTUP:
Tools
General mechanic’s tool kit: automotive (Appendix B, Item 1)
Materials/Parts Two lockwashers (Appendix G, Item 207)
Manual References TM 9-2320-387-10 TM 9-2320-387-24P
Equipment Condition
l Battery ground cables disconnected (para. 4-68). l Hood raised and secured (TM 9-2320-387-10).
Maintenance Level Unit
NOTE Replacement procedures for right and left front composite light assemblies are basically the same, except left side has four screws securing closeoff cover and right side has three screws. This procedure covers the left front composite light.
Prior to removal, tag leads for installation.
a. Removal
1. Remove four screws (11, washers (21, and closeoff cover (3) from hood (4).
2. Disconnect leads 20 (5),461(12), and 491(11) from hood wiring harness (6).
3. Remove two capscrews (9), lockwashers (8), ground 92 (7), buss bar (101, and composite light (13) from hood (4). Discard lockwashers (81.
[I
I. Install composite light (131, buss bar (101, and ground 92 (7) on hood (4) with two lockwashers (8) and capscrews (9).
2. Connect leads 20 (5), 461(12), and 491(11) to hood wiring harness (6).
3. Install closeoff cover (3) on hood (41 with four washers (2) and screws (1).
4-90
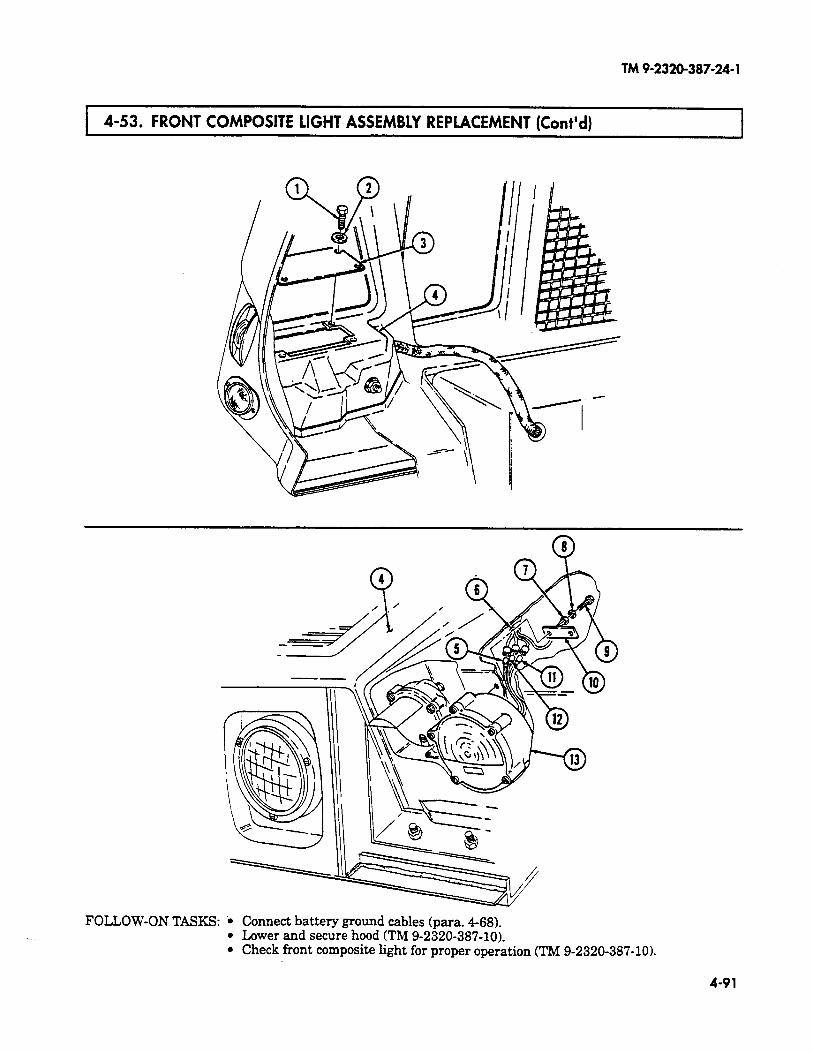
lM9-2320-387-24-l
1 4-53. FRONT COMPOSITE LIGHT ASSEMBLY REPLACEMENT (Cont’d)
. . FOLLOW-ON TASKS: i Connect battery ground cables (para. 4-68).
l Lower and secure hood (TM 9-2320-387-10). l Check front composite light for proper operation (TM 9-2320-387-10).
4-91
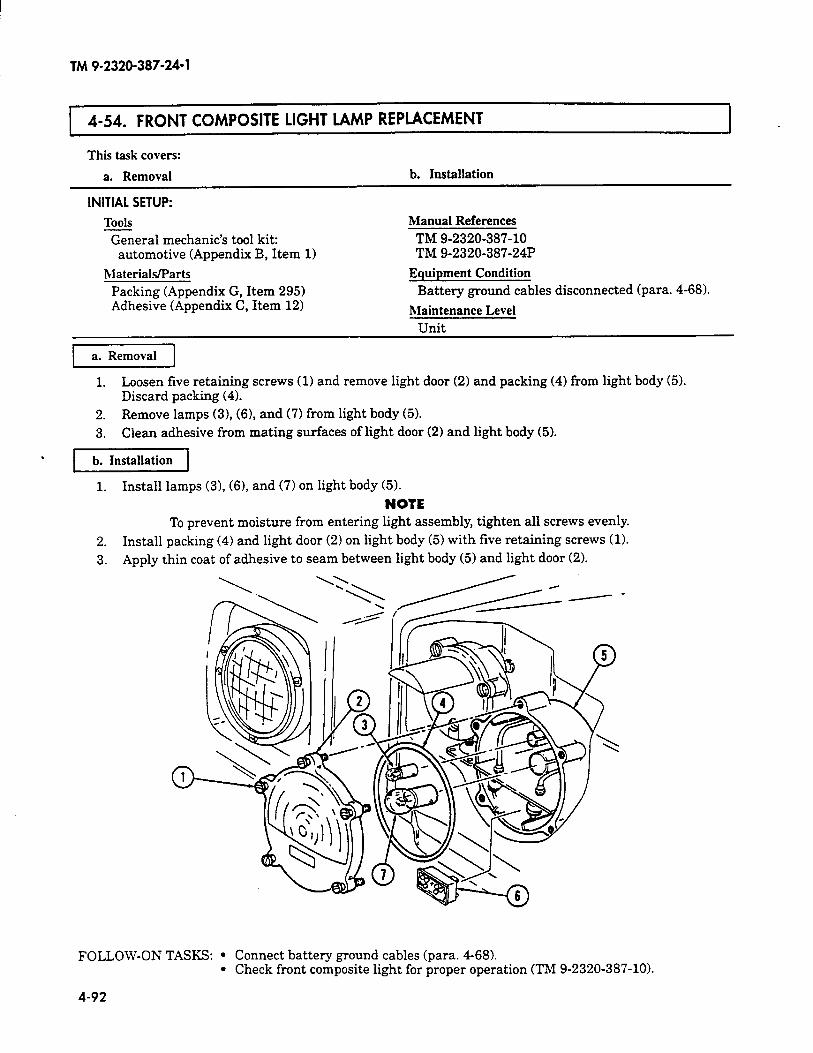
TM 9-2320-387-24-l
4-54. FRONT COMPOSITE LIGHT LAMP REPLACEMENT
This task covers:
a. Removal b. Installation
INITIAL SETUP:
Tools Manual References
General mechanic’s tool kit: TM 9-2320-387-10 automotive (Appendix B, Item 11 TM 9-2320-387-24P
Materials/Parts Equipment Condition Packing (Appendix G, Item 295) Battery ground cables disconnected (para. 4-68). Adhesive (Appendix C, Item 121 Maintenance Level
Unit
-1
1. Loosen five retaining screws (1) and remove light door (2) and packing (4) from light body (5). Discard packing (4).
2. Remove lamps (31, (61, and (7) from light body (5). 3. Clean adhesive from mating surfaces of light door (2) and light body (5).
’ pJIxzzq
1. Install lamps (3), (61, and (7) on light body (5). NOTE
To prevent moisture from entering light assembly, tighten all screws evenly. 2. Install packing (4) and light door (2) on light body (5) with five retaining screws (1). 3. Apply thin coat of adhesive to seam between light body (5) and light door (2).
o- 1
--
FOLLOW-ON TASKS: l Connect battery ground cables (para. 468). l Check front composite light for proper operation (TM 9-2320-387-10).
4-92
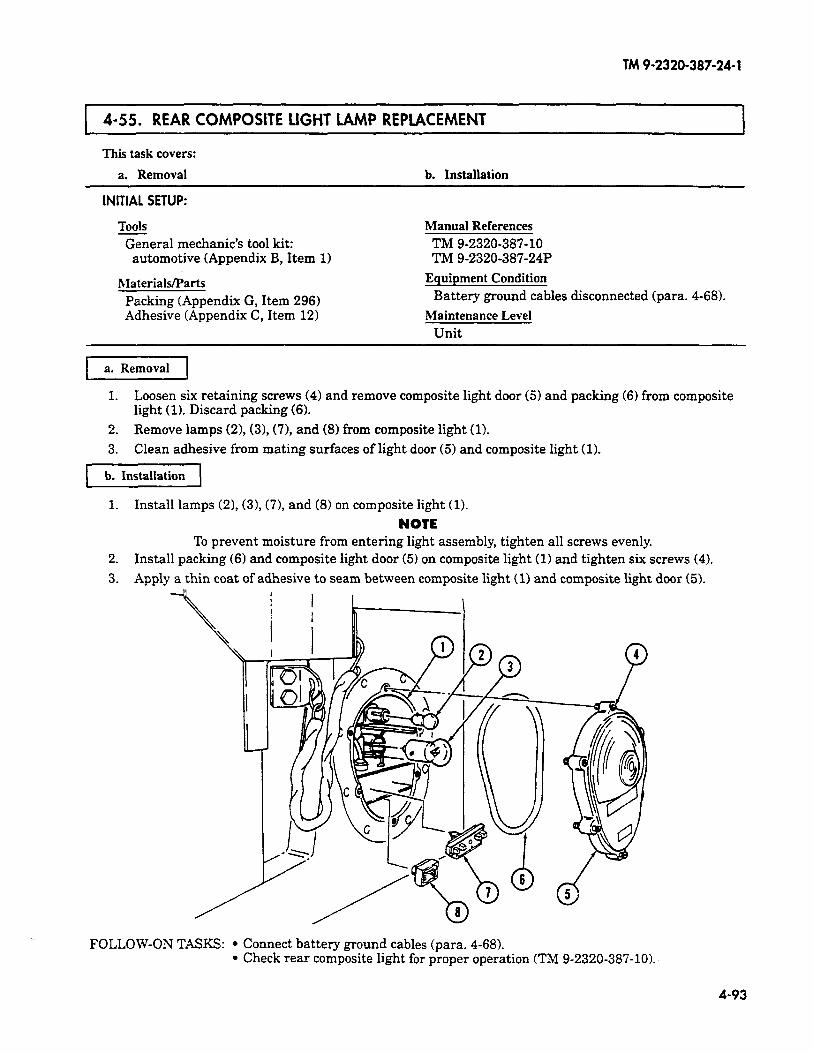
TM 9-2320-387-24-l
I 4-55. REAR COMPOSITE LIGHT LAMP REPLACEMENT -1
This task covers:
a. Removal b. Installation
INITIAL SETUP:
Tools %&era1 mechanic’s tool kit:
automotive (Appendix B, Item 1)
hlaterials/Parts Packing (Appendix G, Item 296) Adhesive (Appendix C, Item 12)
Manual References TM 9-2320-387-10 TM 9-2320-387-24P
Equipment Condition Battery ground cables disconnected (para. 4-681.
Maintenance Level Unit
1 a. Removal 1
1. Loosen six retaining screws (4) and remove composite light door (5) and packing (6) from composite light (1). Discard packing (6).
2. Remove lamps (21, (31, (71, and (8) from composite light (1).
3. Clean adhesive from mating surfaces of light door (5) and composite light (1).
b. Installation
1. Install lamps (21, (31, (71, and (8) on composite light (1).
NOTE To prevent moisture from entering light assembly, tighten all screws evenly.
2. Install packing (61 and composite light door (5) on composite light (1) and tighten six screws (4).
3. Apply a thin coat of adhesive to seam between composite light (1) and composite light door (5).
FOLLOW-ON TASKS: l Connect battery ground cables (para. 4-68). l Check rear composite light for proper operation (TM 9-2320-387-101.
4-93
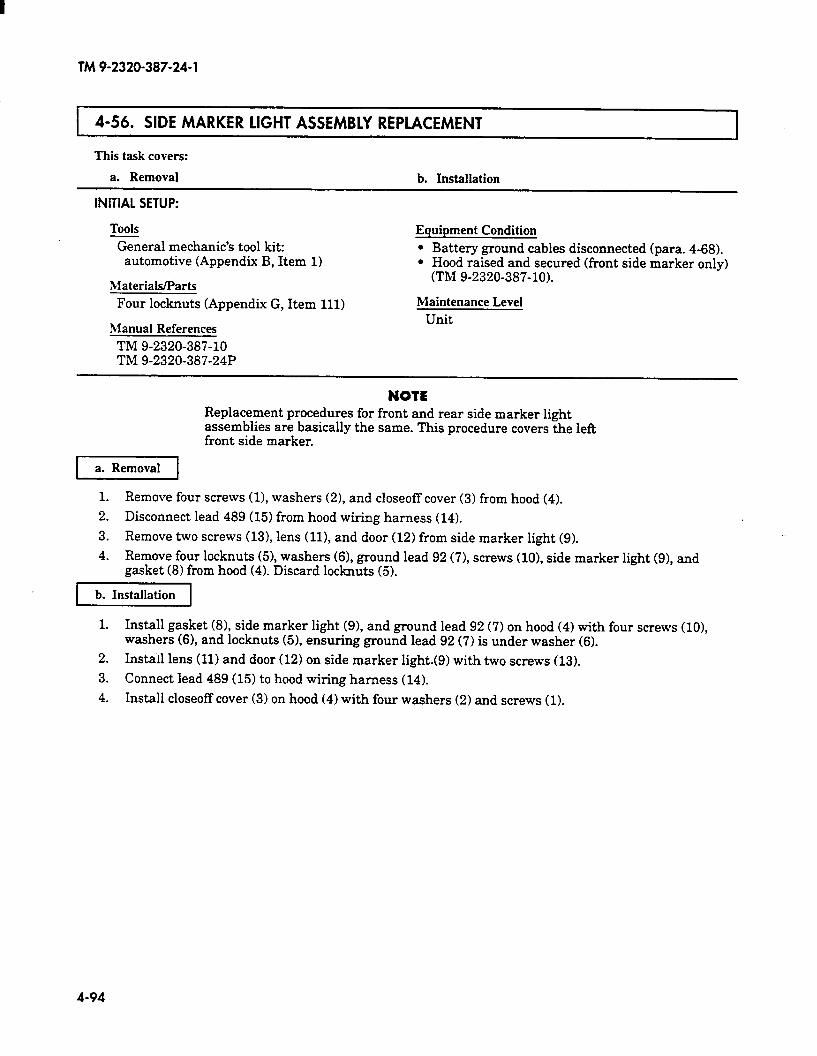
TM
4-56. SIDE MARKER LIGHT ASSEMBLY REPLACEMENT
This task covers:
a. Removal b. Installation
INITIAL SETUP:
Tools
General mechanic’s tool kit: automotive (Appendix B, Item 1)
Materials/Parts Four locknuts (Appendix G, Item 111)
Manual References TM 9-2320-387-10 TM 9-2320-387-24P
Equipment Condition
l Battery ground cables disconnected (para. 4-68). l Hood raised and secured (front side marker only)
(TM 9-2320-387-10).
Maintenance Level Unit
NOTE Replacement procedures for front and rear side marker light assemblies are basically the same. This procedure covers the left front side marker.
1 a. Removal 1
1. Remove four screws (11, washers (21, and closeoff cover (3) from hood (4).
2. Disconnect lead 489 (15) from hood wiring harness (14).
3. Remove two screws (131, lens (111, and door (12) from side marker light (9).
4. Remove four locknuts KI), washers (61, ground lead 92 (7), screws (lo), side marker light (91, and gasket (81 from hood (4). Discard locknuts (5).
pi-Izzr1
1. Install gasket (81, side marker light (9), and ground lead 92 (7) on hood (4) with four screws (101, washers (61, and locknuts W, ensuring ground lead 92 (71 is under washer (6).
2. Instail lens (11) and door (12) on side marker light.(g) with two screws (131.
3. Connect lead 489 (15) to hood wiring harness (14).
4. Install closeoff cover (3) on hood (41 with four washers (2) and screws (1).
4-94
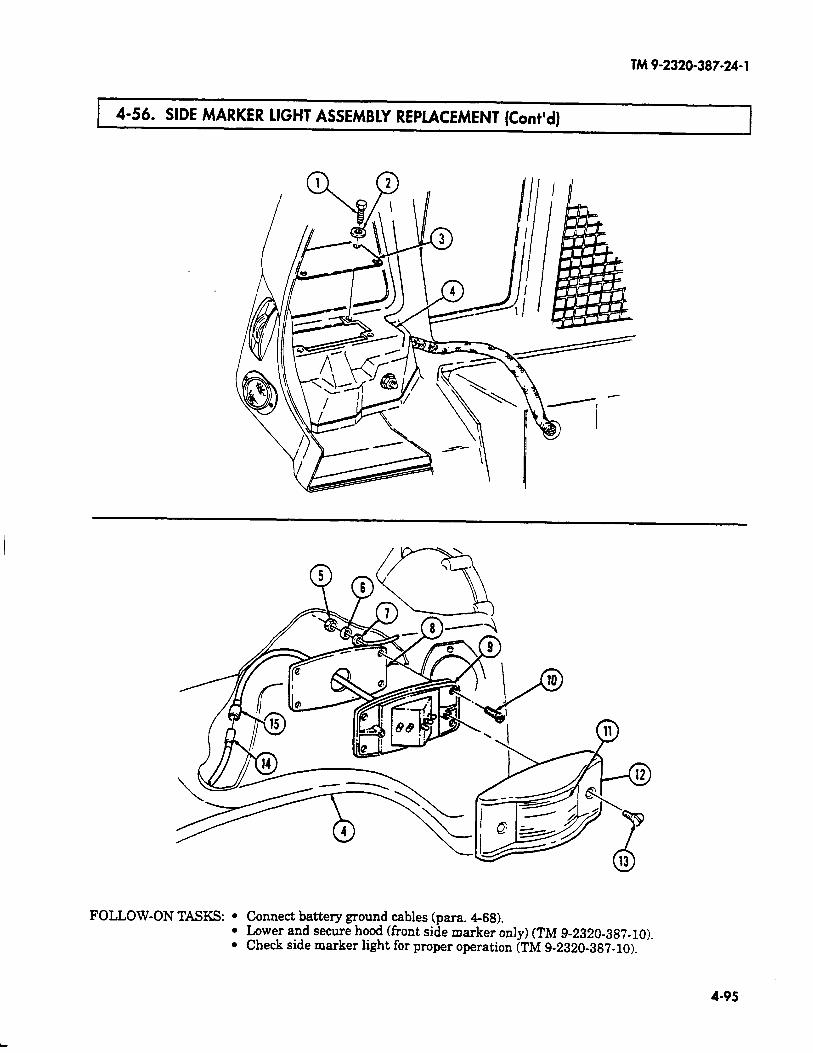
TM 9-23200387024- 1
4-56. SIDE MARKER LIGHT ASSEMBLY REPLACEMENT (Cont’d)
FOLLOW-ON TASKS: l Connect battery ground cables (para. 4-68). 0 Lower and secure hood (front side marker only) (TM 9-2320-387-10). 0 Check side marker light for proper operation (TM 9-2320-387-10).
4-95
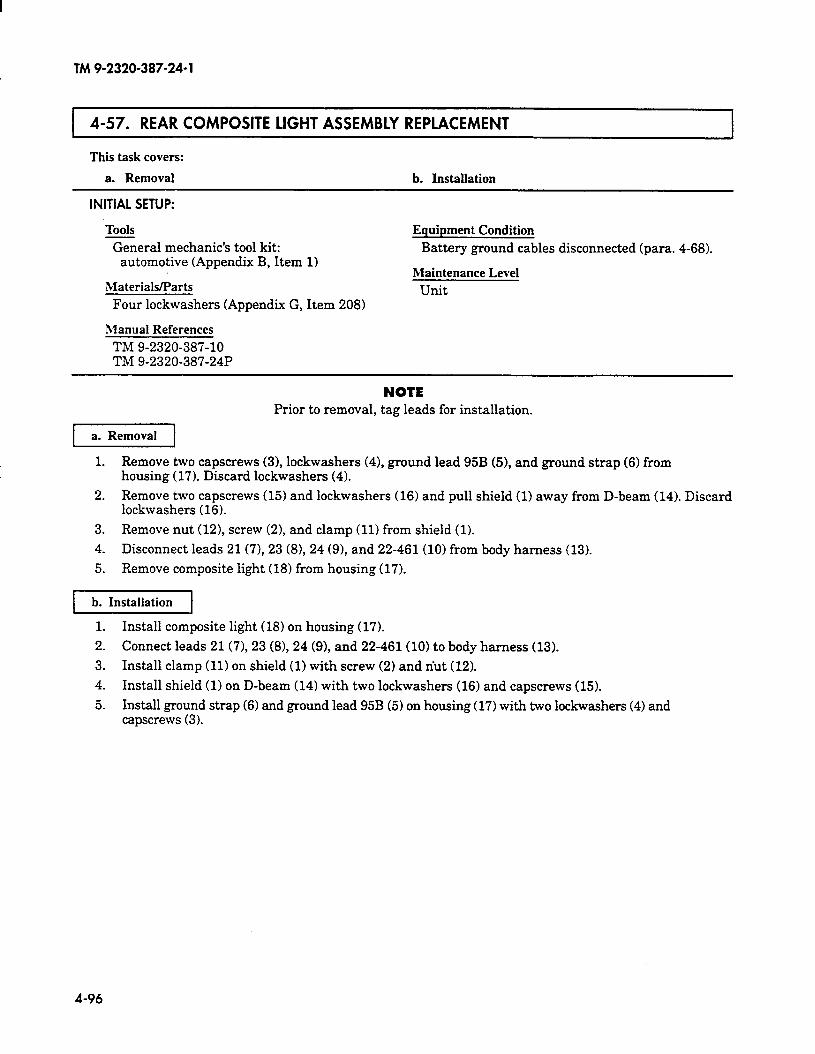
TM 9-2320-387-24-I
4-57. REAR COMPOSITE LIGHT ASSEMBLY REPLACEMENT
This task covers:
a. Removal b. Installation
INITIAL SETUP:
Tools General mechanic’s tool kit:
automotive (Appendix B, Item 1)
hlaterials/Parts Four lockwashers (Appendix G, Item 208)
Equipment Condition Battery ground cables disconnected (para. 4-68).
Maintenance Level Unit
Manual References TM 9-2320-387-10 TM 9-2320-387-24P
NOTE Prior to removal, tag leads for installation.
II
1. Remove two capscrews (3), lockwashers (41, ground lead 95B (5), and ground strap (6) from housing (17). Discard lockwashers (41.
2. Remove two capscrews (15) and lockwashers (16) and pull shield (1) away from D-beam (14). Discard lockwashers (16).
3. Remove nut (121, screw (2), and clamp (11) from shield (1).
4. Disconnect leads 21(7), 23 (B), 24 (91, and 22-461 (10) from body harness (13).
5. Remove composite light (18) from housing (17).
71
1. Install composite light (18) on housing (17).
2. Connect leads 21(7), 23 (8),24 (91, and 22-461(10) to body harness (13).
3. Install clamp (11) on shield (1) with screw (2) and nut (12).
4. Install shield (1) on D-beam (14) with two lockwashers (16) and capscrews (15).
5. Install ground strap (6) and ground lead 95B (5) on housing (17) with two lo&washers (4) and capscrews (3).
4-96
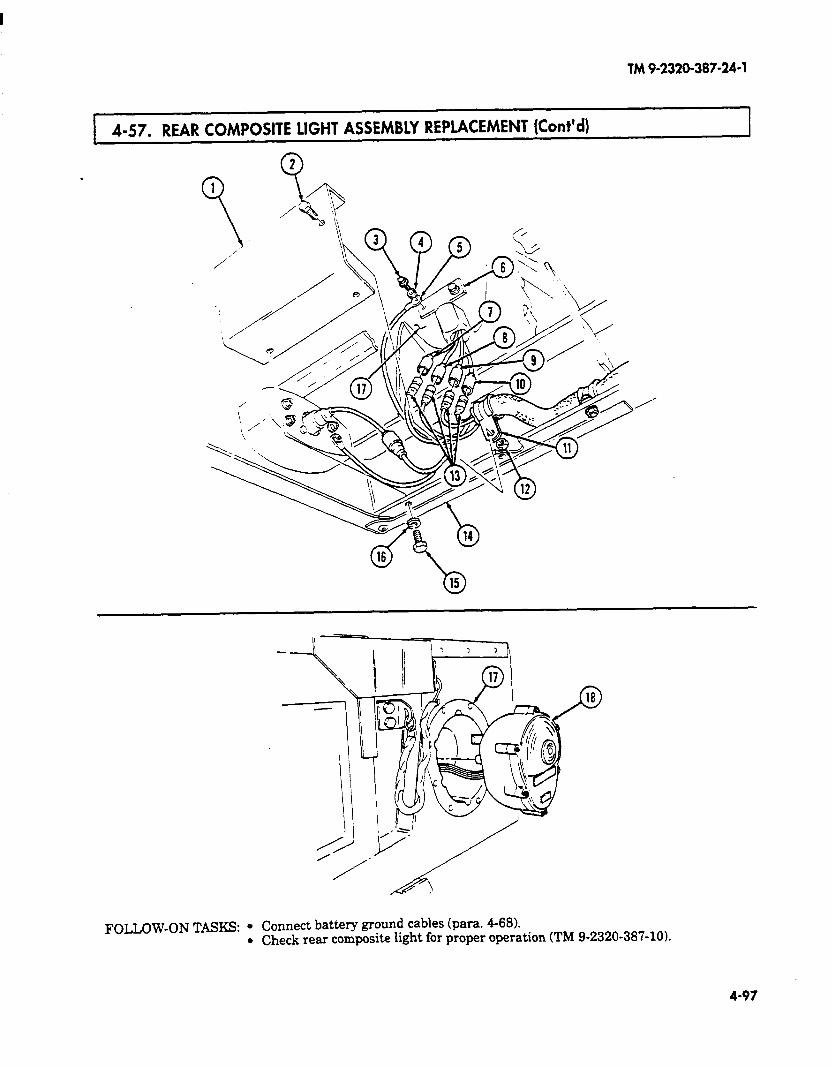
TM9-2320-387-24-l
FOLLOW-ON TASKS: l Connect battery ground cables (para. 4-68).
. Check rear composite light for proper operation (TM 9-2320-387-10).
4-97
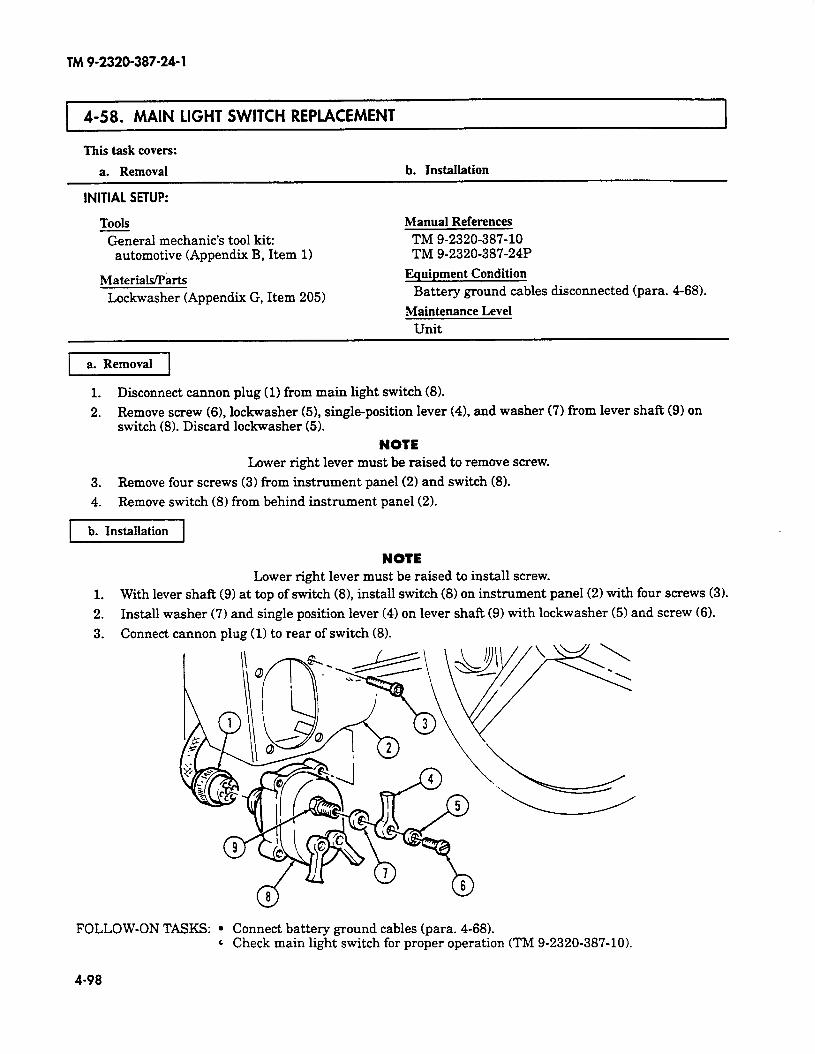
TM 9-2320-387-24-l
4-58. MAIN LIGHT SWITCH REPLACEMENT I
This task covers:
a. Removal b. Installation
INITIAL SETUP:
Tools Manual References
General mechanic’s tool kit: TM 9-2320-387-10 automotive (Appendix B, Item 11 TM 9-2320-387-24P
Materials/Parts Lockwasher (Appendix G, Item 2051
Equipment Condition Battery ground cables disconnected (para. 4-68).
Maintenance Level Unit
1 a. Removal 1
1. Disconnect cannon plug (11 from main light switch (81.
2. Remove screw (6), lockwasher (51, single-position lever (41, and washer (7) from lever shaft (9) on switch (8). Discard lo&washer (5).
NOTE Lower right lever must be raised to remove screw.
3. Remove four screws (3) from instrument panel (2) and switch (8).
4. Remove switch (8) from behind instrument panel (2).
b. Installation
1.
2.
3.
NOTE Lower right lever must be raised to install screw.
With lever shaft (9) at top of switch (8), install switch (8) on instrument panel (2) with four screws (3).
Install washer (71 and single position lever (41 on lever shaft (9) with lockwasher (5) and screw (6).
Connect cannon plug (1) to rear of switch (81.
FOLLOW-ON TASKS: l Connect battery ground cables (para. 4-681. ‘ Check main light switch for proper operation (TM 9-2320-387-10X
4-98
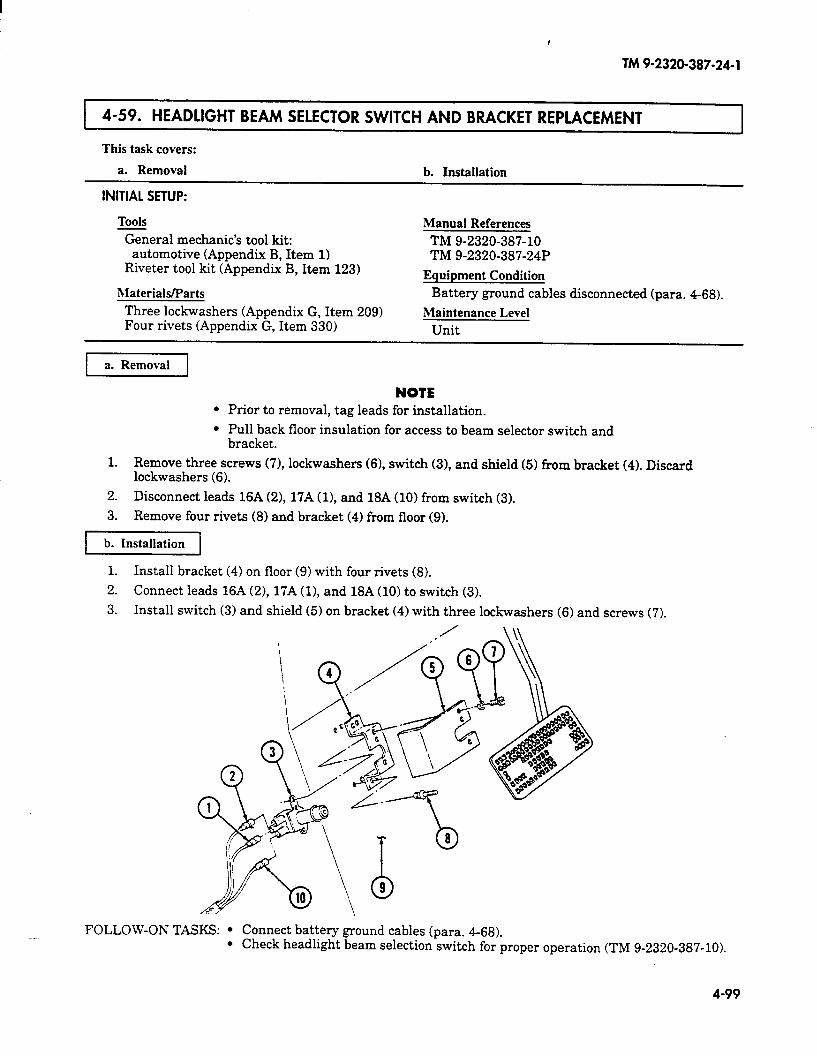
I
TM 9-2320-387-24-l
4-59. HEADLIGHT BEAM SELECTOR SWITCH AND BRACKET REPLACEMENT
This task covers:
a. Removal b. Installation
INITIAL SETUP:
Tools
General mechanic’s tool kit: automotive (Appendix B, Item 1)
Riveter tool kit (Appendix B, Item 123)
Materials/Parts
Three lockwashers (Appendix G, Item 209) Four rivets (Appendix G, Item 330)
Manual References
TM 9-2320-387-10 TM 9-2320-387-24P
Equipment Condition
Battery ground cables disconnected (para. 4-68).
Maintenance Level
Unit
[
NOTE l Prior to removal, tag leads for installation.
l Pull back floor insulation for access to beam selector switch and bracket.
1. Remove three screws (71, lockwashers (61, switch (3), and shield (5) from bracket (4). Discard lockwashers (6).
2. Disconnect leads 16A (21, 17A U), and 18A (10) from switch (3).
3. Remove four rivets (8) and bracket (4) from floor (9).
-1
1. Install bracket (4) on floor (9) with four rivets (8).
2. Connect leads 16A (2), 17A (11, and 18A (10) to switch (3).
3. Install switch (3) and shield (5) on bracket (4) with three lockwashers (6) and screws (7).
FOLLOW-ON TASKS: l .
w \
Connect battery ground cables (para. 4-68). Check headlight beam selection switch for proper operation (TM 9-2320-387-102
4-99
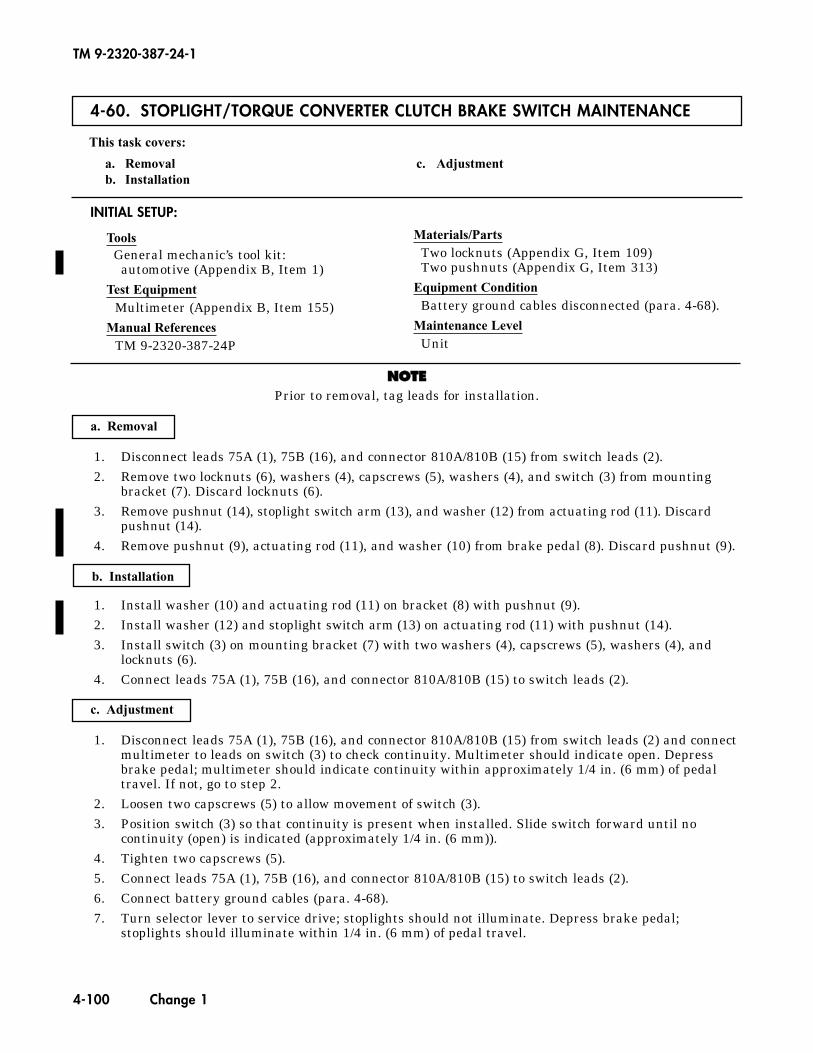
TM 9-2320-387-24-1
4-100 Change 1
4-60. STOPLIGHT/TORQUE CONVERTER CLUTCH BRAKE SWITCH MAINTENANCE
a. Removal
1. Disconnect leads 75A (1), 75B (16), and connector 810A/810B (15) from switch leads (2).2. Remove two locknuts (6), washers (4), capscrews (5), washers (4), and switch (3) from mounting
bracket (7). Discard locknuts (6).3. Remove pushnut (14), stoplight switch arm (13), and washer (12) from actuating rod (11). Discard
pushnut (14).4. Remove pushnut (9), actuating rod (11), and washer (10) from brake pedal (8). Discard pushnut (9).
INITIAL SETUP:
ToolsGeneral mechanic’s tool kit:
automotive (Appendix B, Item 1)Test Equipment
Multimeter (Appendix B, Item 155)Manual References
TM 9-2320-387-24P
Materials/PartsTwo locknuts (Appendix G, Item 109)Two pushnuts (Appendix G, Item 313)
Equipment ConditionBattery ground cables disconnected (para. 4-68).
Maintenance LevelUnit
1. Install washer (10) and actuating rod (11) on bracket (8) with pushnut (9).2. Install washer (12) and stoplight switch arm (13) on actuating rod (11) with pushnut (14).3. Install switch (3) on mounting bracket (7) with two washers (4), capscrews (5), washers (4), and
locknuts (6).4. Connect leads 75A (1), 75B (16), and connector 810A/810B (15) to switch leads (2).
b. Installation
1. Disconnect leads 75A (1), 75B (16), and connector 810A/810B (15) from switch leads (2) and connectmultimeter to leads on switch (3) to check continuity. Multimeter should indicate open. Depressbrake pedal; multimeter should indicate continuity within approximately 1/4 in. (6 mm) of pedaltravel. If not, go to step 2.
2. Loosen two capscrews (5) to allow movement of switch (3).3. Position switch (3) so that continuity is present when installed. Slide switch forward until no
continuity (open) is indicated (approximately 1/4 in. (6 mm)).4. Tighten two capscrews (5).5. Connect leads 75A (1), 75B (16), and connector 810A/810B (15) to switch leads (2).6. Connect battery ground cables (para. 4-68).7. Turn selector lever to service drive; stoplights should not illuminate. Depress brake pedal;
stoplights should illuminate within 1/4 in. (6 mm) of pedal travel.
c. Adjustment
This task covers:
a. Removal c. Adjustmentb. Installation
NNOOTTEEPrior to removal, tag leads for installation.
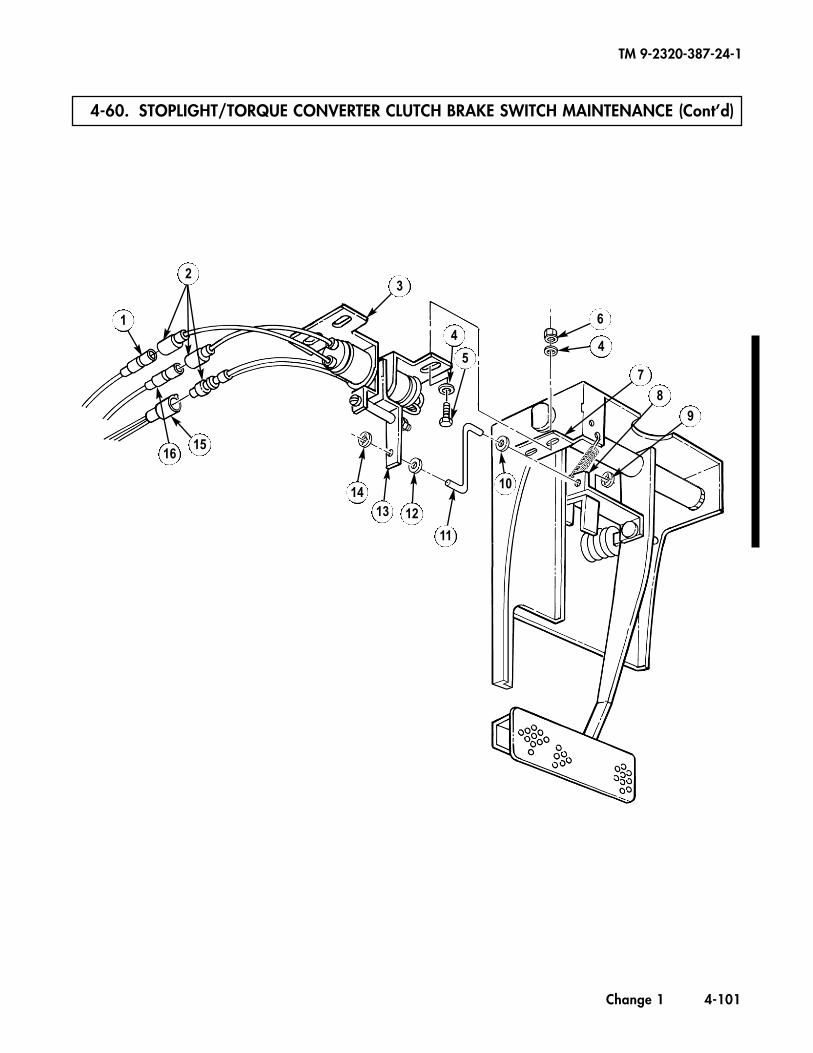
4-60. STOPLIGHT/TORQUE CONVERTER CLUTCH BRAKE SWITCH MAINTENANCE (Cont’d)
Change 1 4-101
TM 9-2320-387-24-1
1
2
5
4
3
6
4
78
9
14
1516
13 12
11
10
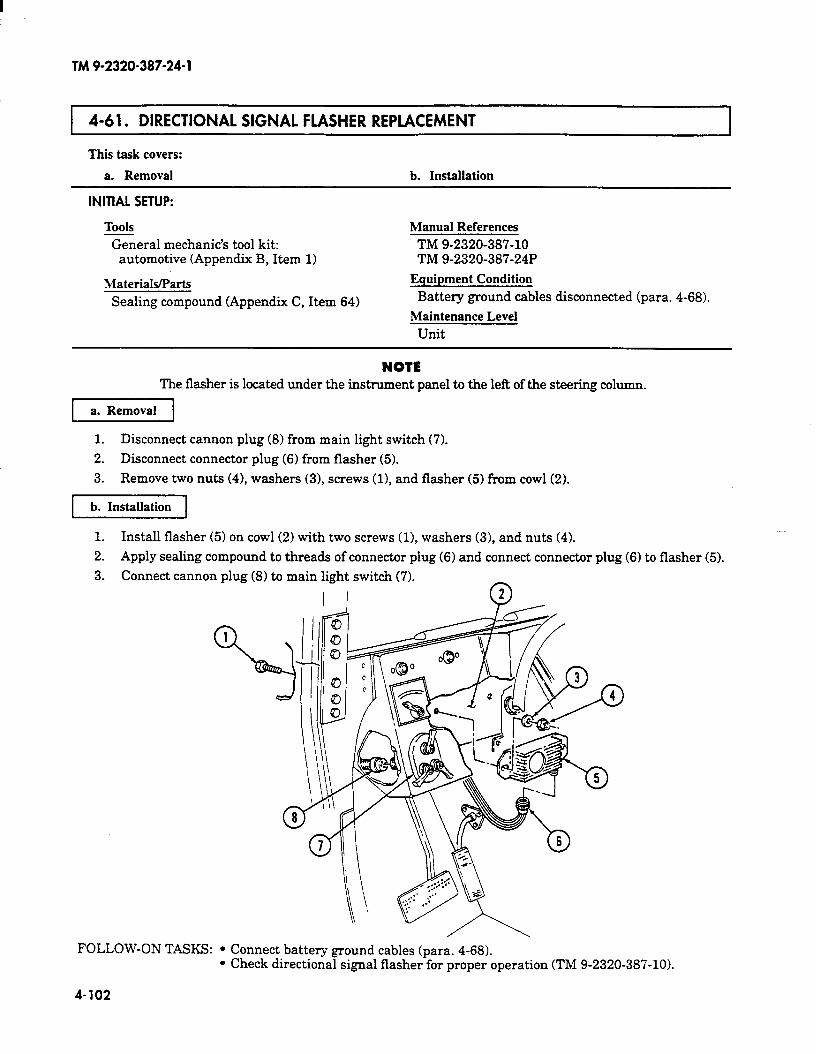
TM 9-2320-387-24-l
4-6 1. DIRECTIONAL SIGNAL FLASHER REPLACEMENT
This task covers:
a. Removal b. Installation
1
INITIAL SETUP:
Tools General mechanic’s tool kit:
automotive (Appendix B, Item 1)
Materials/Parts Sealing compound (Appendix C, Item 64)
Manual References TM 9-2320-387-10 TM 9-2320-387-24P
Equipment Condition Battery ground cables disconnected (para. 4-68).
Maintenance Level Unit
NOTE The flasher is located under the instrument panel to the left of the steering column.
vj
1. Disconnect cannon plug (8) from main light switch (71.
2. Disconnect connector plug (6) from flasher (5).
3. Remove two nuts (41, washers (31, screws (11, and flasher (5) from cowl (2).
-1
Install flasher (5) on cowl (2) with two screws (11, washers (31, and nuts (4).
Apply sealing compound to threads of connector plug (6) and connect connector plug (6) to flasher
FOLLOW-ON TASKS: l Connect battery ground cables (para. 4-68). l Check directional signal flasher for proper operation (TM 9-2320-387-10).
4-102
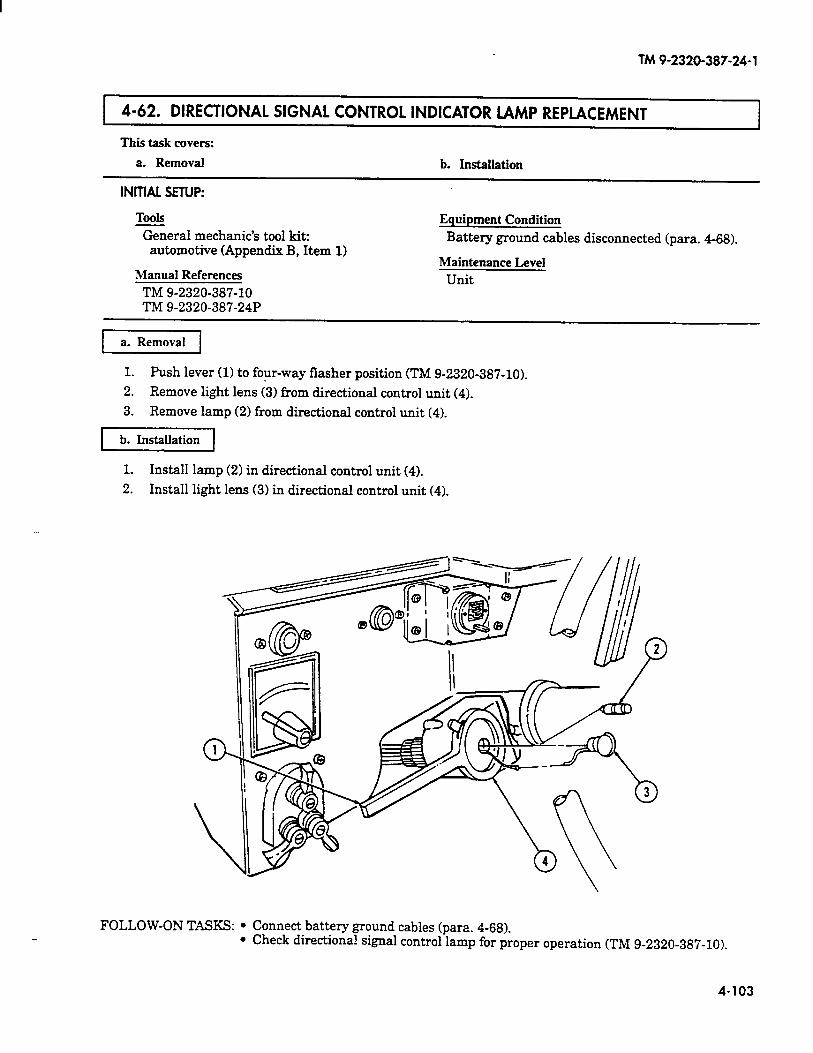
TM 9-2320-387-24-l
1 4-62. DIRECTIONAL SIGNAL CONTROL INDICATOR LAMP REPLACEMENT
This task covers:
a. Removal b. Installation
INlTlAL SETUP:
Tools
General mechanic’s tool kit: automotive (Appendix B, Item 1)
Manual References
TM 9-2320-387-10 TM 9-2320-387-24P
Equipment Condition
Battery ground cables disconnected (para. 468).
Maintenance Level
Unit
a. Removal
1. Push lever (1) to four-way flasher position (TM 9-2320-387-10).
2. Remove light lens (3) from directional control unit (4).
3. Remove lamp (2) from directional control unit (4).
-1
1. Install lamp (2) in directional control unit (4).
2. Install light lens (3) in directional control unit (4).
FOLLOW-ON TASKS: l Connect battery ground cables (para. 4-68). l Check directional signal control lamp for proper operation (TM 9-2320-387-10).
4-103
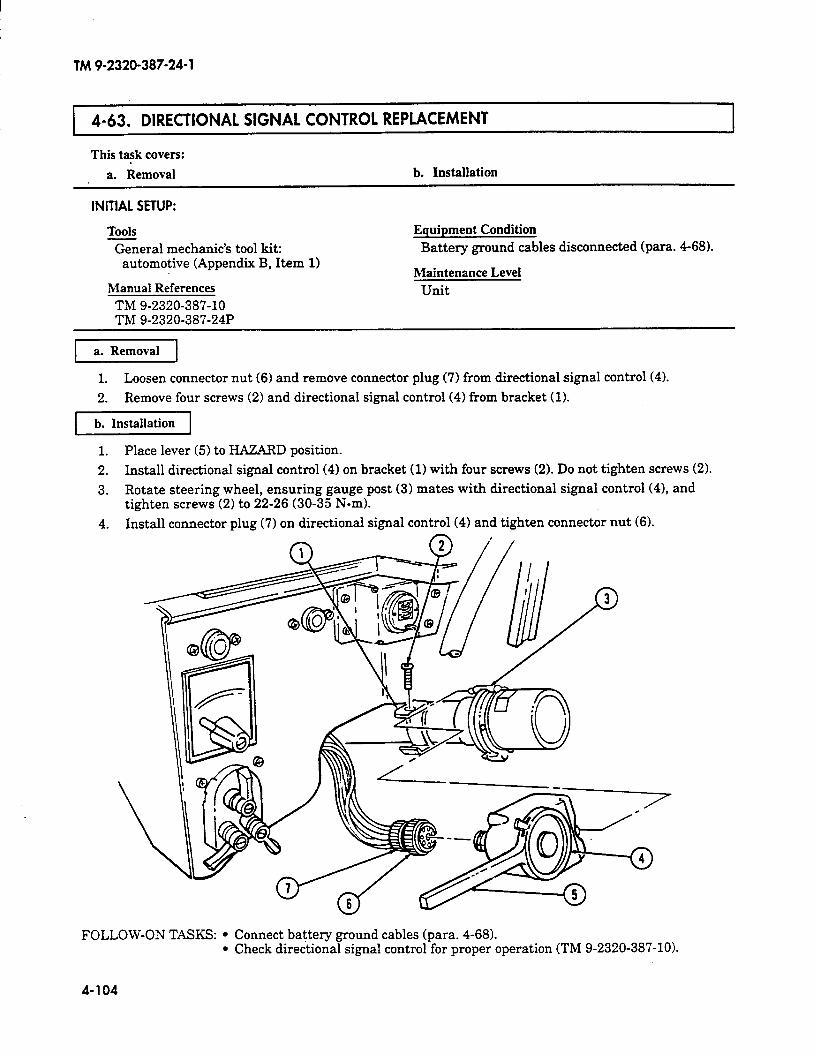
TM9-2320-387-24-l
1 4-63. DIRECTIONAL SIGNAL CONTROL REPLACEMENT I
This task covers:
a. Removal b. Installation
INITIAL SETUP:
TOOIS General mechanic’s tool kit:
automotive (Appendix B, Item 1)
Manual References TM 9-2320-387-10 TM 9-2320-387-24P
Equipment Condition
Battery ground cables disconnected (para. 468).
Maintenance Level Unit
1 a. Removal ]
1. Loosen connector nut (6) and remove connector plug (7) from directional signal control (41.
2. Remove four screws (21 and directional signal control (4) from bracket (1).
rYxz&-l
1. Place lever (5) to HAZARD position.
2. Install directional signal control (4) on bracket (1) with four screws (2). Do not tighten screws (2).
3. Rotate steering wheel, ensuring gauge post (3) mates with directional signal control (41, and tighten screws (2) to 22-26 (30-35 N-ml.
4. Install connector plug (7) on directional signal control (4) and tighten connector nut (6).
FOLLOW-ON TASKS: l Connect battery ground cables (para. 4-68). . Check directional signal control for proper operation (TM 9-2320-387-10X
4-104

TM 9-2320-387-24-l
1 4-64. DIRECTIONAL SIGNAL CONTROL CANCELLING RING REPLACEMENT 1
This task covers:
a. Removal b. Installation
INITIAL SETUP:
Tools
General mechanic’s tool kit: automotive (Appendix B, Item 1)
Manual References
TM 9-2320-387-10 TM 9-2320-387-24P
General Safety Instructions
Failure to position cancelling pin in proper position may cause injury to personnel or damage to equipment.
Maintenance Level
Unit
1 a. Removal 1
Remove three screws (5) and cancelling ring (4) from steering wheel (6).
b. Installation
WARNING
Cancelling pin must be positioned 90” 2 5”. Ensure front wheels of vehicle point straight ahead. Failure to position pin properly could cause loss of steering, causing injury to personnel or damage to equipment.
1. Install cancelling ring (4) on steering wheel (6) with pin (2) 90’ 2 5” from directional signal control (1).
2. Rotate steering wheel (6), ensuring pin (2) mates with directional signal control (1) and secure cancelling ring (4) on steering wheel (6) with three screws (5).
NOTE Gauge posts found on a new cancelling ring are there to ensure proper installation only. Gauge posts must be removed after installation of cancelling ring to permit proper operation of directional signal control.
3. Cut gauge posts (3) off within l/4 in. (6 mm) of base.
FOLLOW-ON TASK: Check directional signal Control for proper operation (TM 9-2320-387-10).
4-105
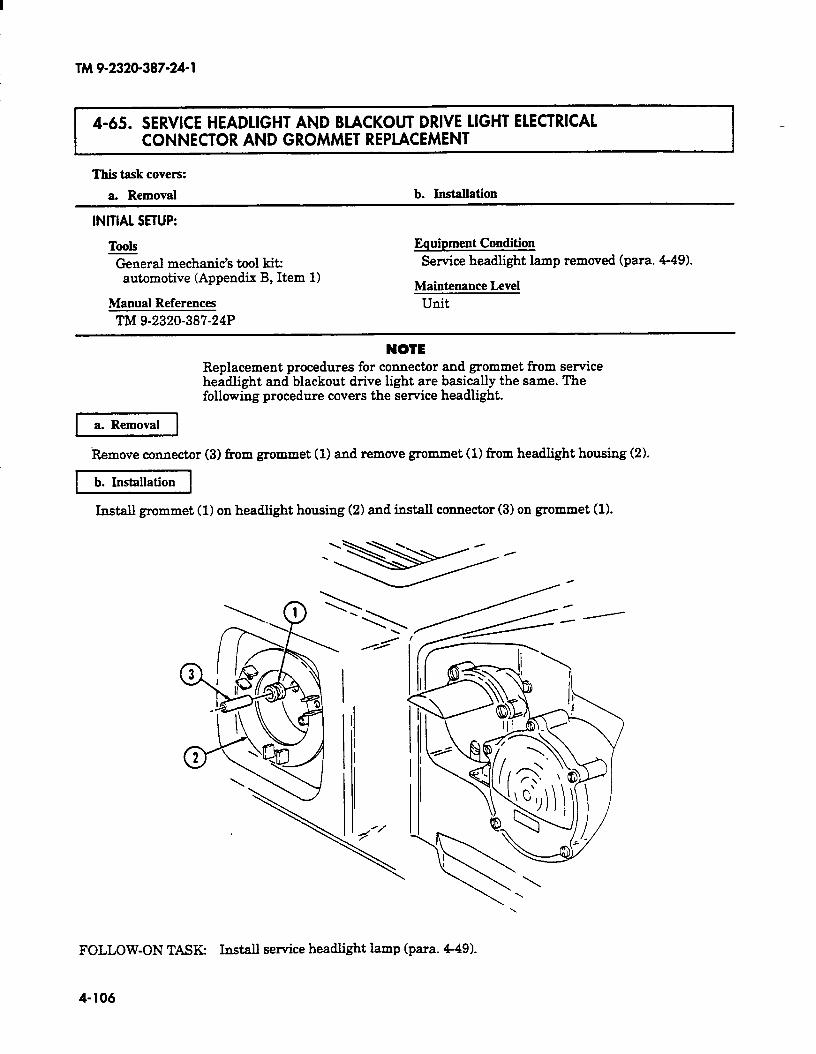
TM 9-2320-387-24-l
4-65. SERVICE HEADLIGHT AND BLACKOUT DRIVE LIGHT ELECTRICAL CONNECTOR AND GROMMET REPLACEMENT
This task covers:
a. Removal
INITIAL SETUP:
b. Installation
ToOis
General mechanic’s tool kit: automotive (Appendix B, Item 1)
Manual References
TM 9-2320-387-24P
Equipment Condition
Service headlight lamp removed (para. 4-49).
Maintenance Level
Unit
Replacement procedures for and grommet from service and blackout drive light are the same. The
covers the service headlight.
1
Remove connector (3) from grommet (1) and remove grommet (1) from headlight housing (2).
b. Installation
Install grommet (1) on headlight housing (2) and install connector (3) on grommet (1).
FOLLOW-ON TASK: Install service headlight lamp (para. 449).
4-106
TM 9-2320-387-24- 1
Section VI. BAITERY SYSTEM MAINTENANCE
1 4-66. BAllERY SYSTEM MAINTENANCE TASK SUAiiiiiii I I
, 7
I TASK PARA.
PROCEDURES PAGE NO.
467.
468.
469.
470.
471.
472.
473.
474.
475.
476.
477.
478.
479.
480.
Battery Cable ‘kminal Clamp Replacement
Battery Cable Maintenance
Power Feed-Through Stud Replacement
12-Volt Regulator Cable Replacement
Buss Bar Replacement
Starter Power Cables Replacement
Battery Holddown Replacement
Battery Replacement and Servicing
Battery Tray Maintenance
Slave Receptacle and Cable Maintenance
Wmch Power Cable Replacement
Shunt Replacement
Hood Jumper Wuing Harness Replacement
w~HamessConnect&YrRepair
4108
4110
4116
4118
4121
4122
4126
4128
4130
4132
4134
4138
4140
4146
4-107

TM 9-2320-387-24-l
4-67. BATTERY CABLE TERMINAL CLAMP REPLACEMENT
This task covers:
a. Removal b. Installation
INITIAL SETUP:
TOOIS General mechanic’s tool kit:
automotive (Appendix B, Item 1)
Materialear& Lubricating oil (Appendix C, Item 46)
Manual References TM 9-2320-387-24P
Equipment Condition Battery box cover removed (para. 10-43).
General Safety Instructions l Wear safety goggles and rubber gloves and do not
smoke when performing battery maintenance. l Remove all jewelry. l When removing battery cable clamps, disconnect
ground cables first.
Maintenance Level unit
WARNING
l Battery acid (electrolyte) is extremely harmful. Always wear safety goggles and rubber gloves, and do not smoke when performing battery maintenance. Severe injury will result if acid contacts eyes or skin.
l Remove all jewelry such as rings, dog tags, bracelets, etc. If jewelry or disconnected battery ground cable contact battery terminal, a direct short can result, causing instant heating of tools, severe injury to personnel, or damage to equipment.
l When removing battery cable clamps, disconnect both ground cables first. Do not allow tools to come in contact with vehicle when disconnecting cable clamps. A direct short can result, causing instant heating of tools, tool damage, battery damage, or battery explosion.
NOTE The replacement procedure for all four battery cable terminal clamps is basically the same. This procedure covers one battery cable terminal clamp.
1. Remove cap (4) from battery terminal boot (8).
2. Clean lubricating oil from battery terminal boot (8).
3. Loosen screw (6) and nut (7) and remove terminal clamp (3) from terminal post (91.
4. Remove screw (2) and nut (5) from cable (1) and terminal clamp (3).
5. Remove cable (1) from terminal clamp (3) and battery terminal boot (8).
6. Remove terminal clamp (3) from battery terminal boot (8).
1 b. Installation 1
1. 2.
Push battery terminal boot (81 onto cable (1). Place terminal clamp (3) into battery terminal boot (8) and install cable (1) on terminal clamp (31 with screw (2) and nut (5).
3. Apply lubricating oil to battery post pad (101. Do not allow lubricating oil to coat terminal post (9). 4. Secure terminal clamp (3) to terminal post (9) by tightening screw (6) and nut (7). 5. Apply lubricating oil to terminal clamp (3). 6. Install cap (4) on battery terminal boot (8).
4-108
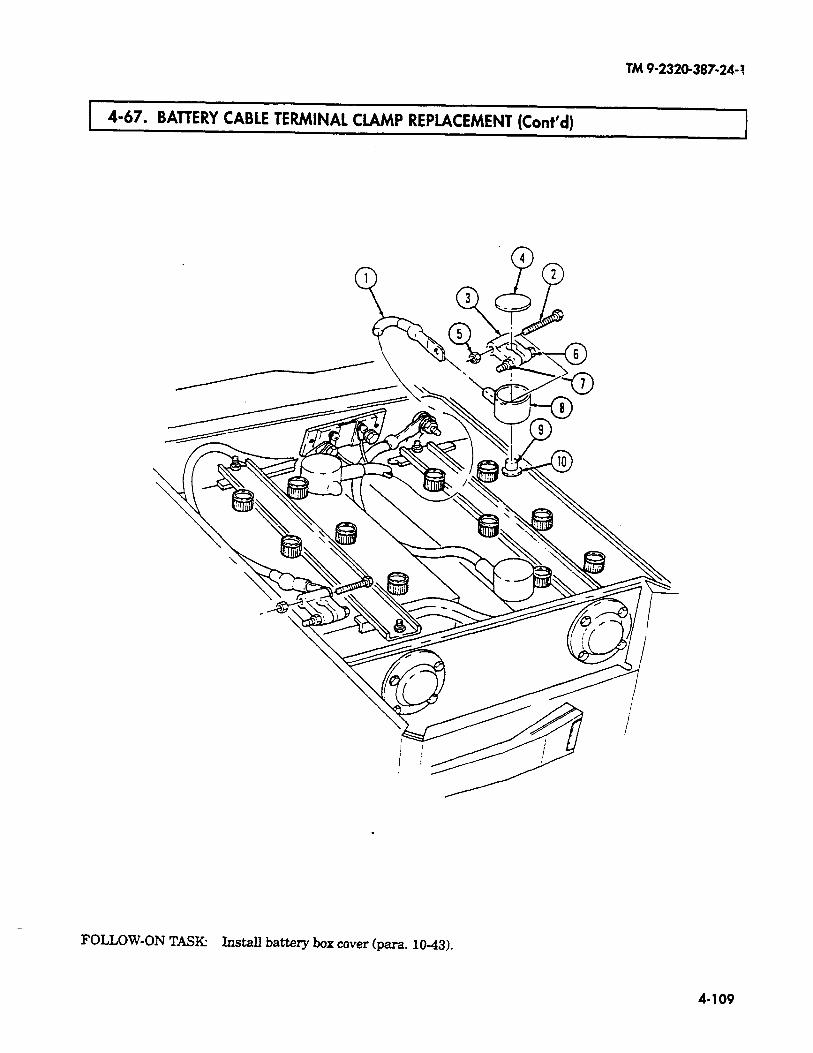
TM 9-2320-387.24-!
4-67. BATTERY CABLE TERMINAL CLAMP REPLACEMENT (Cont’d)
FOLLOW-ON TASK: Install battery box cover (para. 10-43).
4-109

WWAARRNNIINNGG
• Battery acid (electrolyte) is extremely harmful. Always wear safetygoggles and rubber gloves, and do not smoke when performing batterymaintenance. Severe injury will result if acid contacts eyes or skin.
• Remove all jewelry such as rings, dog tags, bracelets, etc. If jewelry ordisconnected battery ground cable contact battery terminal, a directshort can result, causing instant heating of tools, severe injury topersonnel, or damage to equipment.
• When removing battery cable clamps, disconnect both ground cablesfirst. Ensure all switches are in OFF position before disconnecting. Donot allow tools to come in contact with vehicle when disconnectingcable clamps. A direct short can result, causing instant heating oftools, severe injury to personnel or damage to equipment.
NNOOTTEE• If performing transmission diagnostics, record fault codes stored in
TCM before disconnecting battery cables.• When battery cables are disconnected, all stored fault codes in TCM
will be lost.• Secure all cables to head side of mounting capscrews.• Use this procedure for disconnecting all battery cables.
1. Inspect cables (1), (2), and (11) for corrosion and cracks.2. Remove defective cables (1), (2), and (11), or clean with wire brush and sodium bicarbonate
solution.
a. Cleaning and Inspection
4-68. BATTERY CABLE MAINTENANCE
This task covers:
a. Cleaning and Inspection f. Interconnecting Cable Removalb. Ground Cables Disconnection g. Interconnecting Cable Installationc. Ground Cables Reconnection h. Positive Cable Removald. Ground Cable Removal i. Positive Cable Installatione. Ground Cable Installation
INITIAL SETUP:
ToolsGeneral mechanic’s tool kit:
automotive (Appendix B, Item 1)
Materials/PartsTwo lockwashers (Appendix G, Item 212)Sodium bicarbonate (Appendix C, Item 76)Lubricating oil (Appendix C, Item 46)Sealing compound (Appendix C, Item 64)
Manual ReferencesTM 9-2320-387-24P
Equipment ConditionBattery box cover removed (para. 10-43).
General Safety Instructions• Wear safety goggles and rubber gloves and do not
smoke when performing battery maintenance.• Remove all jewelry.• When removing battery cables, disconnect
ground cables first. Ensure all switches are inOFF position before disconnecting.
Maintenance LevelUnit
TM 9-2320-387-24-1
4-110 Change 1

TM9-2320-387-24-l
4-68. BATTERY CABLE MAINTENANCE (Cont’d)
b. Ground Cables Diconnection
1. Remove nut (121, screw (14), and cable (1) from terminal clamp (13).
2. Remove cap (5) from battery terminal boot (8).
3. Clean lubricating oil from battery terminal boot (8).
4. Loosen nut (7) and remove terminal clamp (4) from terminal (9).
5. Remove nut (3) and screw (6) from cable (2) and terminal clamp (4).
6. Remove cable (2) from terminal clamp (4) and battery terminal boot (8).
c. Ground Cables Reconnection
1. Push battery terminal boot (8) onto cable (2) and secure cable (2) to terminal clamp (4) with screw (6) and nut (3).
2. Apply a 1/16-in. (1.~mm) bead of lubricating oil to battery post pad (10). Do not allow oil to coat terminal post (9).
3. Install terminal clamp (4) on terminal (9) and tighten nut (7).
4. Fill battery terminal boot (8) with lubricating oil.
5. Install cap (5) on battery terminal boot (8).
6. Install cable (1) on terminal clamp (13) with screw (14) and nut (12).
4-111

TM 9-2320-387-24-l
4-68 . BATTERY CABLE MAINTENANCE (Co&d)
1 d. Ground Cable Removal 1
Remove screw (21, lockwasher (61, ground cable (51, and slave cable (4) from shunt (1) and battery box (3). Discard lockwasher (6).
e. Ground Cable Installation
Install slave cable (4) and ground cable (5) on shunt (1) and battery box (3) with lockwasher (6) and screw (2).
4-112 .

TM9-2320-387-24-l
4-68. BATTERY CABLE MAINTENANCE (Cont’d)
f. Interconnecting Cable Removal
1. Remove caps (10) and (17) from battery terminal boots (‘20).
2. Clean lubricating oil from battery terminal boots (20). 3. Loosen nut (19) and remove terminal clamp (16) from battery post (21).
4. Remove nut (151, cable (141, and screw (18) from terminal clamp (16).
5. Remove battery terminal boot (20) from terminaI clamp (16).
6. Loosen nut (27) and remove terminal clamp (13) from battery post (25).
7. Remove nut (11) and clamp (12) from holddown rod (23).
8. Remove nut (261, screw (81, cable (141, lead (91, and cable (7) from terminal clamp (13).
g. Interconnecting Cable Installation
1.
2.
3.
4.
5.
6.
7.
8.
Push battery terminal boot (20) onto cable (14) and install cable (14) on terminal clamp (16) with screw (18) and nut (15).
Install clamp (12) on holddown rod (23) with nut (11).
Apply a l/16-in. (1.6~mm) bead of lubricating oil to battery post pads (22) and (24). Do not allow oil to coat terminal posts (21) and (25). Install battery terminal clamp (16) on battery post (21) and tighten nut (19).
Push terminal boot (20) onto cable (7) and install cable (7), lead (9), and cable (14) on battery terminal clamp (13) with screw (8) and nut (26).
Install battery terminal clamp (13) on battery post (25) and tighten nut (27).
Fill battery terminal boots (20) with lubricating oil.
Install caps (10) and (17) on battery terminal boots (20).
4-113
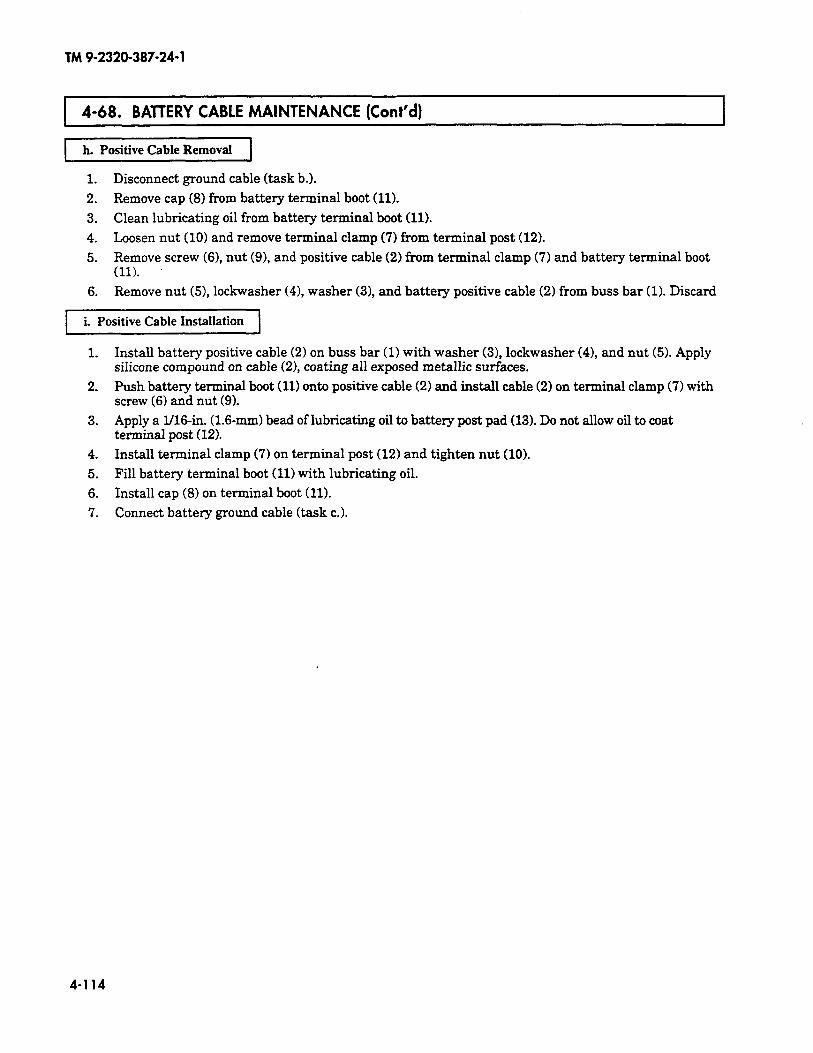
TM9-2320-387-24-l
1 4-68. BATTERY CABLE MAINTENANCE (Cont’d)
h. Positive Cable Removal
1. Disconnect ground cable (task b.).
2. Remove cap (8) from battery terminal boot (11).
3. Clean lubricating oil from battery terminal boot (11).
4. Loosen nut (10) and remove terminal clamp (7) from terminal post (121.
5. Remove screw (61, nut (91, and positive cable (2) from terminal clamp (7) and battery terminal boot (11).
6. Remove nut (51, lockwasher (4), washer (31, and battery positive cable (2) from buss bar (1). Discard
i. Positive Cable Installation
1.
2.
Install battery positive cable (2) on buss bar (1) with washer (31, lockwasher (4), and nut (5). Apply silicone compound on cable (2), coating all exposed metallic surfaces.
Rush battery terminal boot (11) onto positive cable (21 and install cable (2) on terminal clamp (7) with screw (6) and nut (9).
3. Apply a I/16-in. (1.6~mm) bead of lubricating oil to battery post pad (13). Do not allow oil to coat terminal post (12).
4. Install terminal clamp (7) on terminal post (12) and tighten nut (10).
5. Fill battery terminal boot (11) with lubricating oil.
6. Install cap (8) on terminal boot (11).
7. Connect battery ground cable (task c.).
4-114
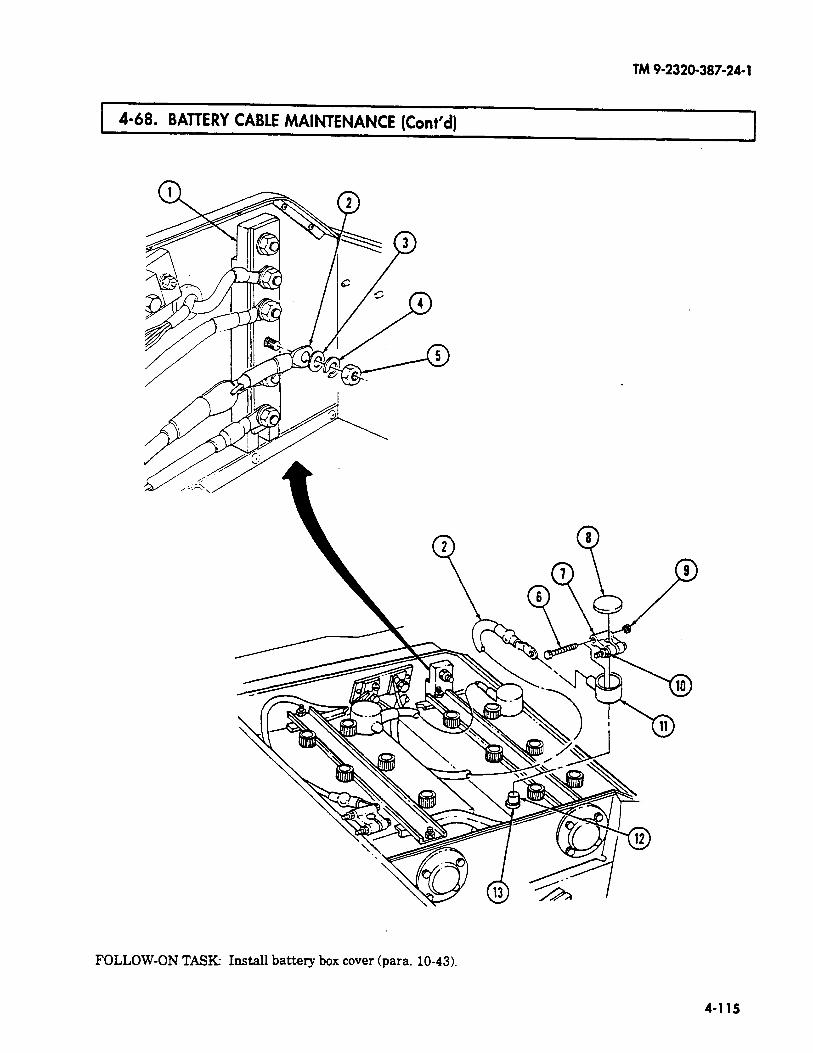
TM 9-2320-387-24-l
4-68. BATTERY CABLE MAINTENANCE (Cont’d)
FOLLOW-ON TASK: Install battery box cover (para. 10-43).
4-l 15
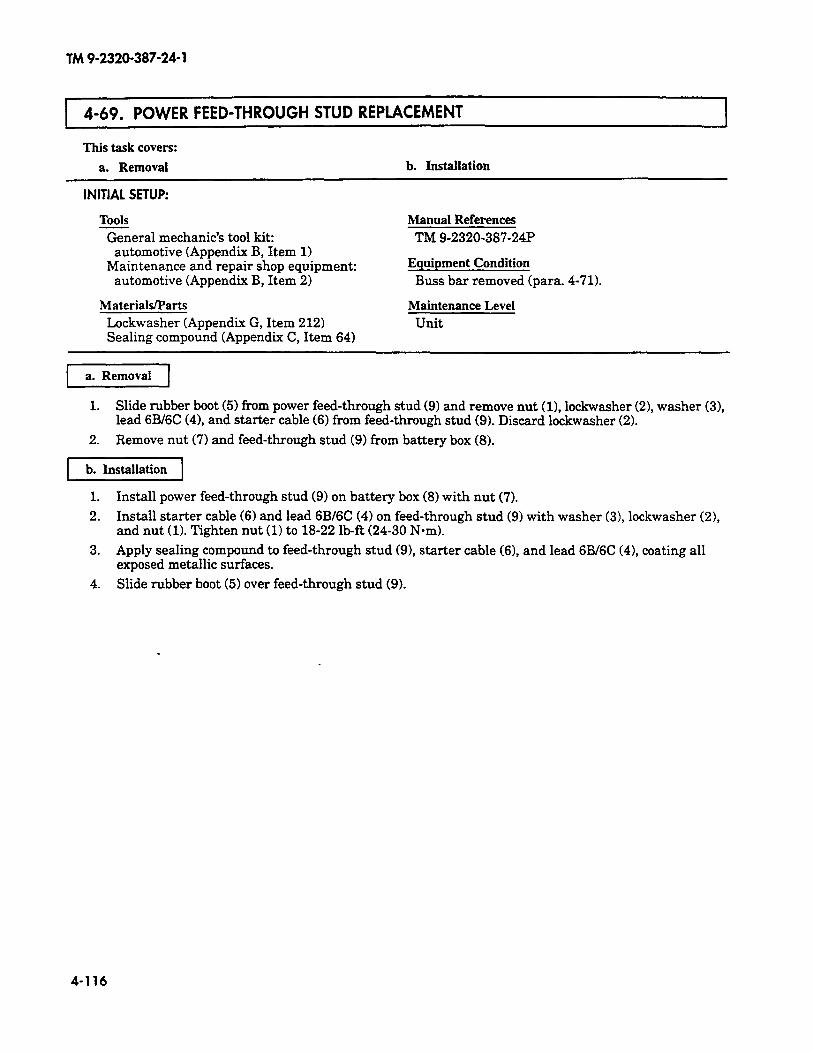
TM 9-2320-387-24-l
4-69. POWER FEED-THROUGH STUD REPLACEMENT
This task covers:
a. Removal b. Installation
INITIAL SETUP:
Tools
?&era1 mechanic’s tool kit: automotive (Appendix B, Item 1)
Maintena.nce and repair shop equipment: automotive (Appendix B, Item 2)
MaterialsParts
Lockwasher (Appendix G, Item 212) Sealing compound (Appendix C, Item 64)
Manual References
TM 9-2320-387-24P
Equipment Condition
Buss bar removed (para. 4-711.
Maintenance Level
Unit
1. Slide rubber boot (5) from power feed-through stud (9) and remove nut (11, lockwasher (2), washer (31, lead 6B/6C (41, and starter cable (6) from feed-through stud (9). Discard lo&washer (2).
2. Remove nut (7) and feed-through stud (9) from battery box (8).
b. Installation
1. Install power feed-through stud (9) on battery box (8) with nut (‘7).
2. Install starter cable (6) and lead 6B/6C (4) on feed-through stud (9) with washer (3), lockwasher (2), and nut (1). Tighten nut (1) to 18-22 lb-R (24-30 N-m).
3. Apply sealing compound to feed-through stud (9), starter cable (61, and lead 6B/6C (41, coating all exposed metallic surfaces.
4. Slide rubber boot (5) over feed-through stud (9).
4-116

TM 9-2320-387-24-l
-4-69.~~~ FEED-THROUGH STUD REPLACEMENT (Cont’d) I
FOLLOW-ON TASK: Install buss bar (para. 4-71).
4-117
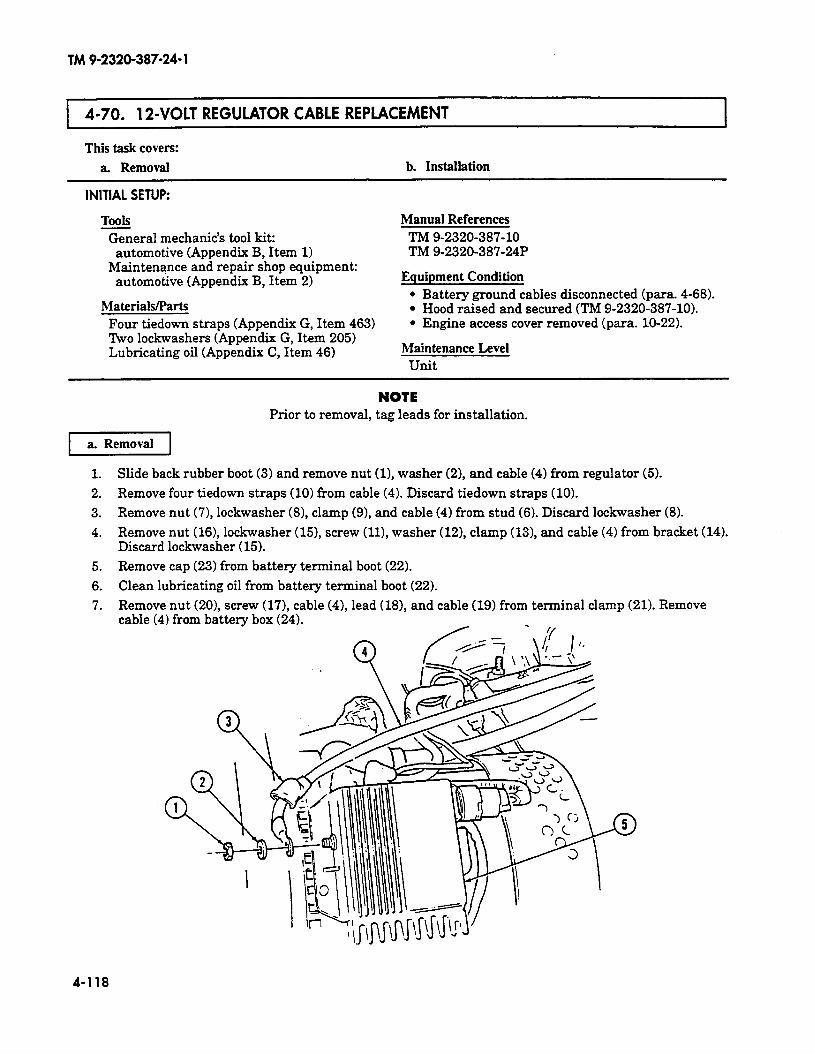
TM 9-2320-387-24- 1
4-70. 12-VOLT REGULATOR CABLE REPLACEMENT
This task covers:
a. Removal b. Installation
INITIAL SETUP:
Tools -&era1 mechanic’s tool kit:
automotive (Appendix B, Item 1) Maintenance and repair shop equipment:
automotive (Appendix B, Item 2)
Materials/Parts Four tiedown straps (Appendix G, Item 463) Two lo&washers (Appendix G, Item 205) Lubricating oil (Appendix C, Item 46)
Manual References TM 9-2320-387-10 TM 9-2320-387~24P
Equipment Condition l Battery ground cables disconnected (para. 4-68). l Hood raised and secured (TM 9-2320-387-10). l Engine access cover removed (para. 10-22).
Maintenance Level Unit
NOTE Prior to removal, tag leads for installation.
1.
2.
3.
4.
5.
6.
7.
Slide back rubber boot (3) and remove nut (11, washer (21, and cable (4) from regulator (5).
Remove four tiedown straps (10) from cable (4). Discard tiedown straps (101.
Remove nut (71,lockwasher (81, clamp (91, and cable (4) from stud (61. Discard lockwasher (8).
Remove nut (16),lockwasher (151, screw (111, washer (12), clamp (131, and cable (4) from bracket (141. Discard lo&washer (15).
Remove cap (23) from battery terminal boot (22).
Clean lubricating oil from battery terminal boot (22).
Remove nut (201, screw (17), cable (4), lead (18), and cable (19) from terminal clamp (21). Remove cable (4) from battery box (24).
4-118
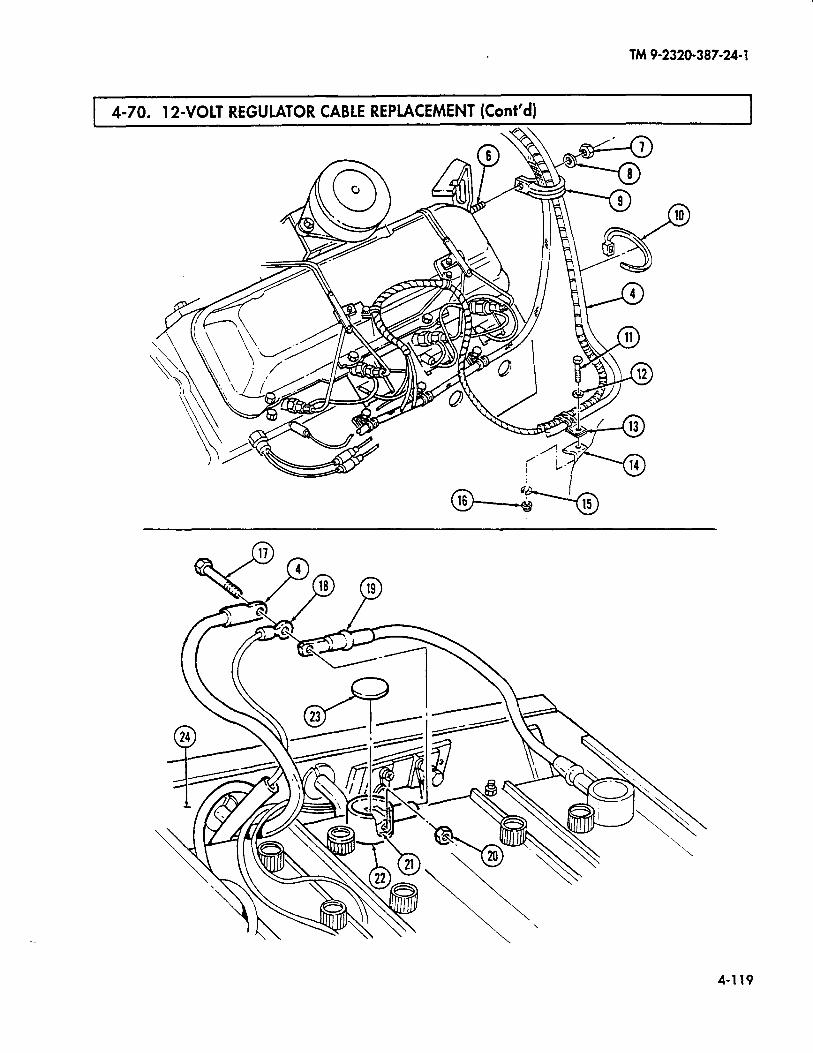
TM9-2320-387-24-l
4-70. 12-VOLT REGULATOR CABLE REPLACEMENT (Cont’d)
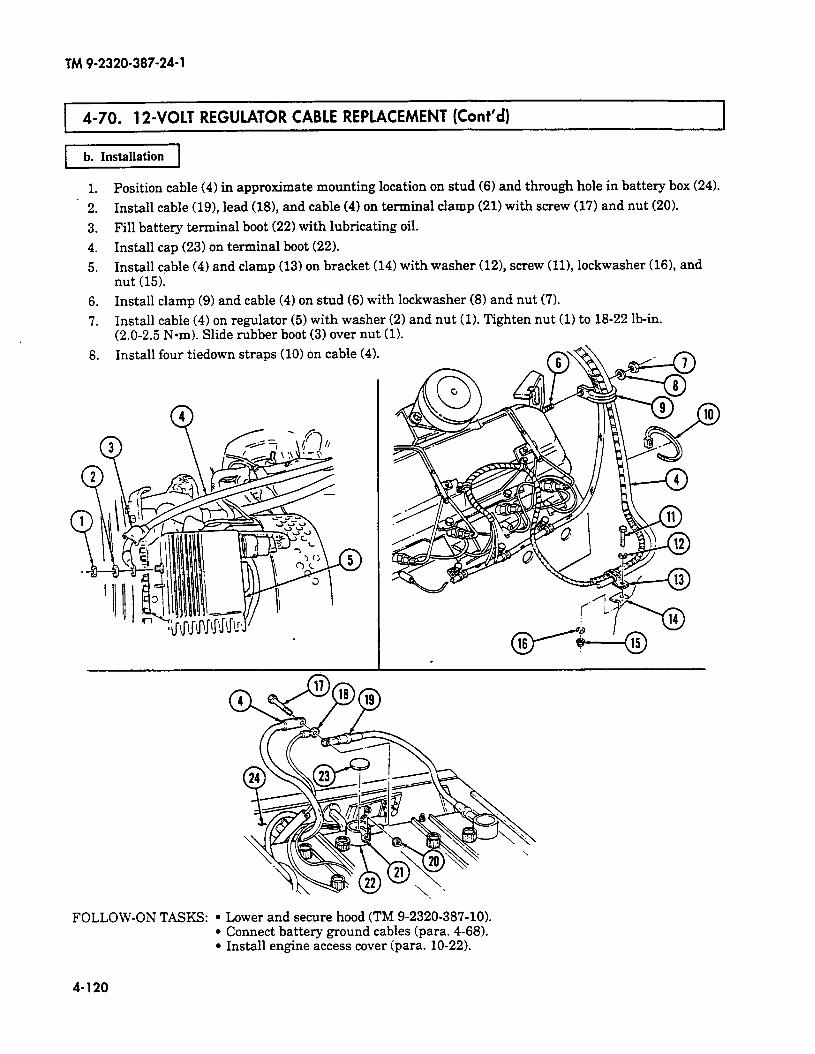
TM 9-2320-387-24-l
4-70. 12-VOLT REGULATOR CABLE REPLACEMENT (Cont’d)
piTzizq
1. Position cable (4) in approximate mounting location on stud (6) and through hole in battery box (24).
2. Install cable (19), lead (18), and cable (4) on terminal clamp (21) with screw (17) and nut (20).
3, Fill battery terminal boot (22) with lubricating oil.
4. Install cap (23) on terminal boot (22).
5. Install cable (4) and clamp (13) on bracket (14) with washer (12), screw (ll), lockwasher (16), and nut (15).
6. Install clamp (9) and cable (4) on stud (6) with lockwasher (8) and nut (7).
7. Install cable (4) on regulator (5) with washer (2) and nut (1). Tighten nut (1) to 18-22 lb-in. (2.0-2.5 N-m). Slide rubber boot (3) over nut (1).
FOLLOW-ON TASKS: l Lower and secure hood (TM 9-2320-387-10). l Connect battery ground cables (para. 4-68). l Install engine access cover (para. 10-22).
4-120
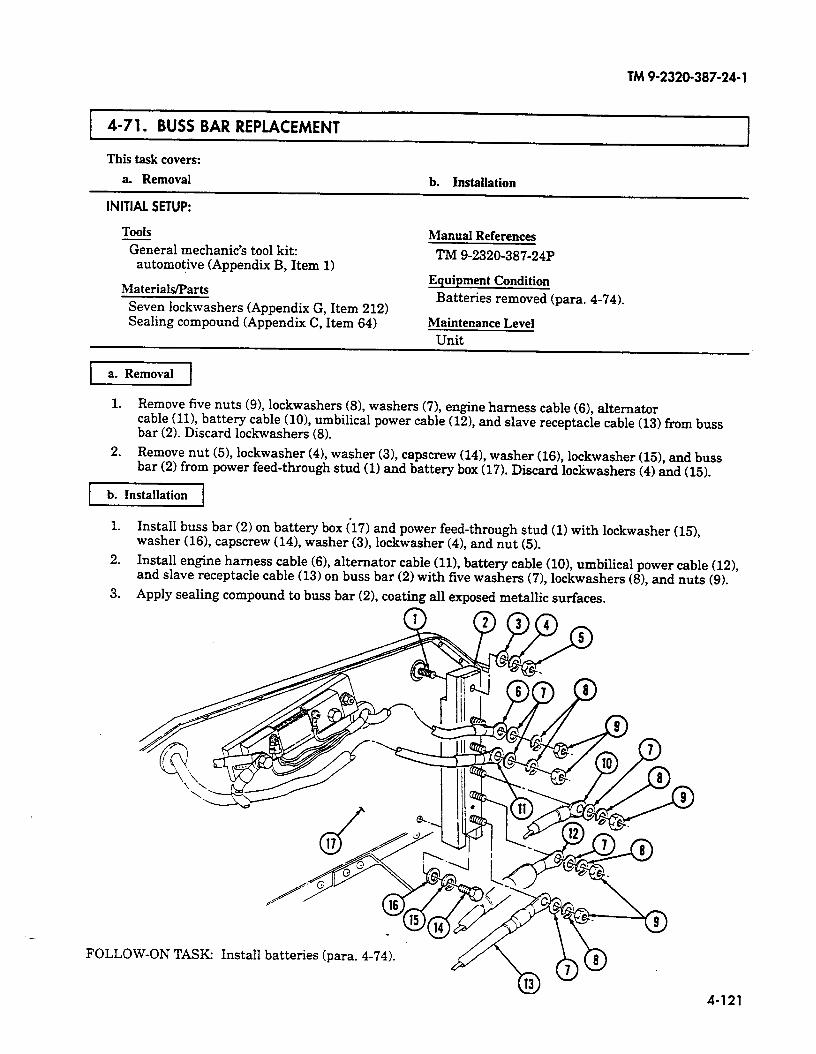
TM 9-2320-387-24-l
4-71. BUSS BAR REPLACEMENT
This task covers:
a. Removal b. Installation
INITIAL SETUP:
Tools General mechanic’s tool kit:
automotive (Appendix B, Item 1)
Materials/Parts Seven lockwashers (Appendix G, Item 212) Sealing compound (Appendix C, Item 64)
Manual References
TM 9-2320-387-24P
Equipment Condition Batteries removed (para. 4-74).
Maintenance Level
I a. Removal I
1. Remove five nuts (91, lockwashers (81, washers (71, engine harness cable (61, alternator cable (111, battery cable (lo), umbilical power cable (121, and slave receptacle cable (13) from buss bar (2). Discard lockwashers (8).
2. Remove nut (51, lockwasher (41, washer (31, capscrew (141, washer (16), lockwasher (15) and buss bar (2) from power feed-through stud (1) and battery box (17). Discard lo&washers (4) Ad (15).
1 b. Installation 1
1. Install buss bar (2) on battery box (17) and power feed-through stud (1) with lockwasher (15), washer (161, capscrew (141, washer (3), lockwasher (4), and nut (5).
2. Install engine harness cable (61, alternator cable (111, battery cable (101, umbilical power cable (121, and slave receptacle cable (13) on buss bar (2) with five washers (71, lockwashers (81, and nuts (9).
3. Apply sealing compound to buss bar (2), coating all exposed metallic surfaces.
-
FOLL ,OW-ON TASK: Install batteries (para. 4-74).
4-121
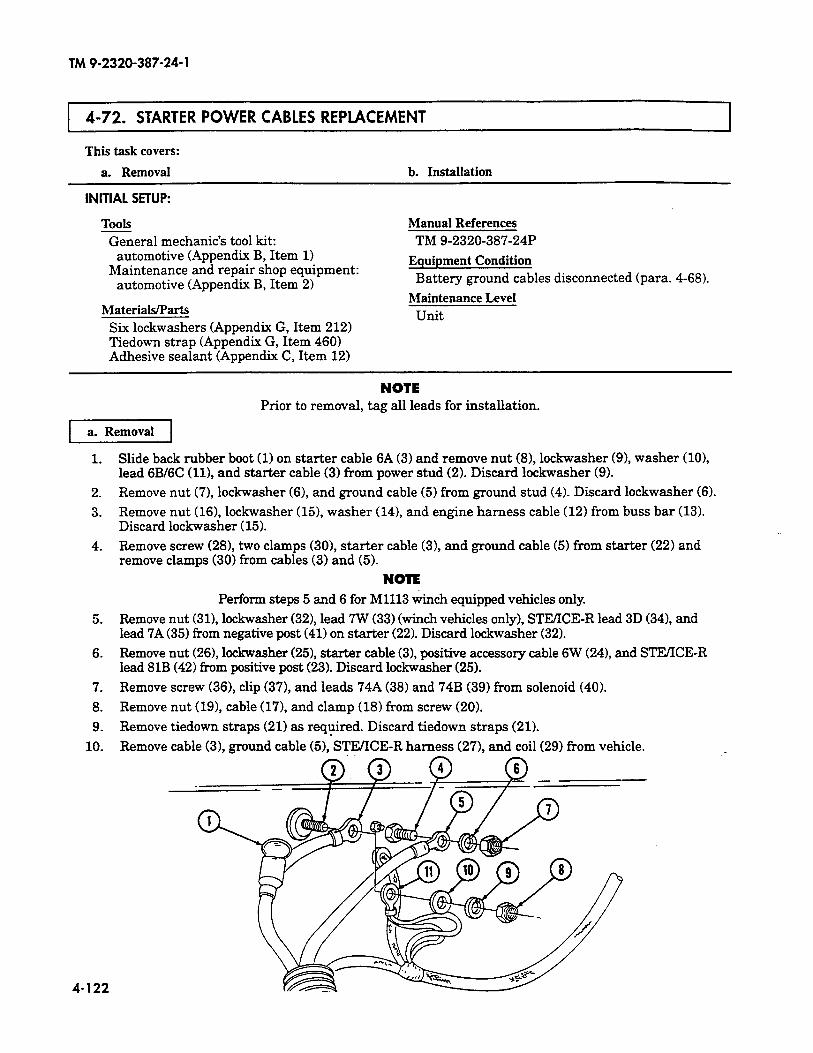
TM 9-2320-387-24-l
4-72. STARTER POWER CABLES REPLACEMENT
This task covers:
a. Removal b. Installation
INITIAL SETUP:
ToOlS
General mechanic’s tool kit: automotive (Appendix B, Item 1)
Maintenance and repair shop equipment: automotive (Appendix B, Item 2)
Materials/Parts
Manual References
TM 9-2320-387-24P
Equipment Condition Battery ground cables disconnected (para. 4-68).
Maintenance Level
Unit Six lockwashers (Appendix G, Item 212) Tiedown strap (Appendix G, Item 4601 Adhesive sealant (Appendix C, Item 12)
NOTE Prior to removal, tag all leads for installation.
1.
2.
3.
4.
5.
6.
7.
8.
9.
10.
4-122
Slide back rubber boot (1) on starter cable 6A (3) and remove nut (81, lockwasher (9), washer (101, lead 6B/6C (111, and starter cable (31 from power stud (2). Discard lockwasher (91.
Remove nut (7), lockwasher (61, and ground cable (51 from ground stud (41. Discard lockwasher (6).
Remove nut (161, lockwasher (15), washer (141, and engine harness cable (12) from buss bar (13). Discard lo&washer (15).
Remove screw (28), two clamps (301, starter cable (31, and ground cable (5) from starter (22) and remove clamps (30) from cables (3) and (5).
NOTE
Perform steps 5 and 6 for Ml113 winch equipped vehicles only.
Remove nut (31), lo&washer (321, lead 7W (33) (winch vehicles only), STEKE-R lead 3D (341, and lead 7A (35) from negative post (41) on starter (22). Discard lockwasher (32).
Remove nut (261,lockwasher (251, starter cable (31, positive accessory cable 6W (241, and STE/ICE-R lead 81B (421 from positive post (23). Discard lo&washer (25).
Remove screw (361, clip (371, and leads 74A (38) and 74B (391 from solenoid (401.
Remove nut (191, cable (171, and clamp (18) from screw (20).
Remove tiedown straps (21) as required. Discard tiedown straps (211.
Remove cable (31, ground cable (51, STE/ICE-R harness (27), and coil (29) from vehicle.
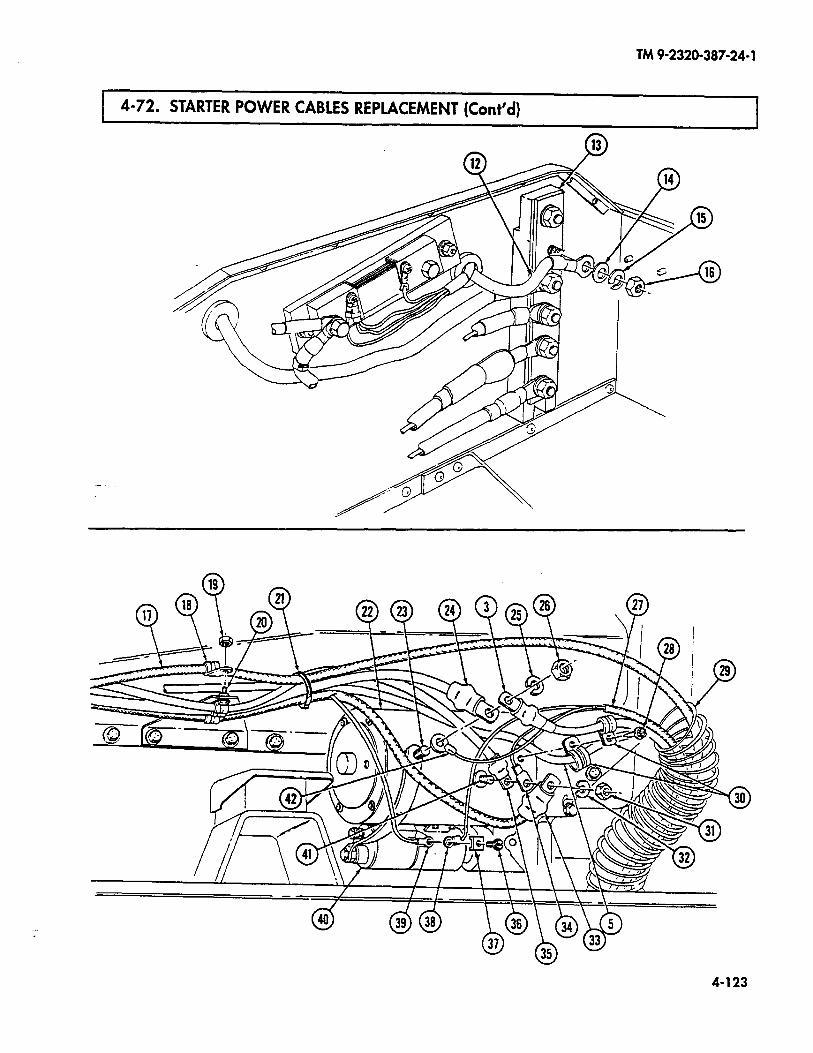
TM 9-2320-387-24-l
4-72. STARTER POWER CABLES REPLACEMENT (Cont’d) 1
4-123
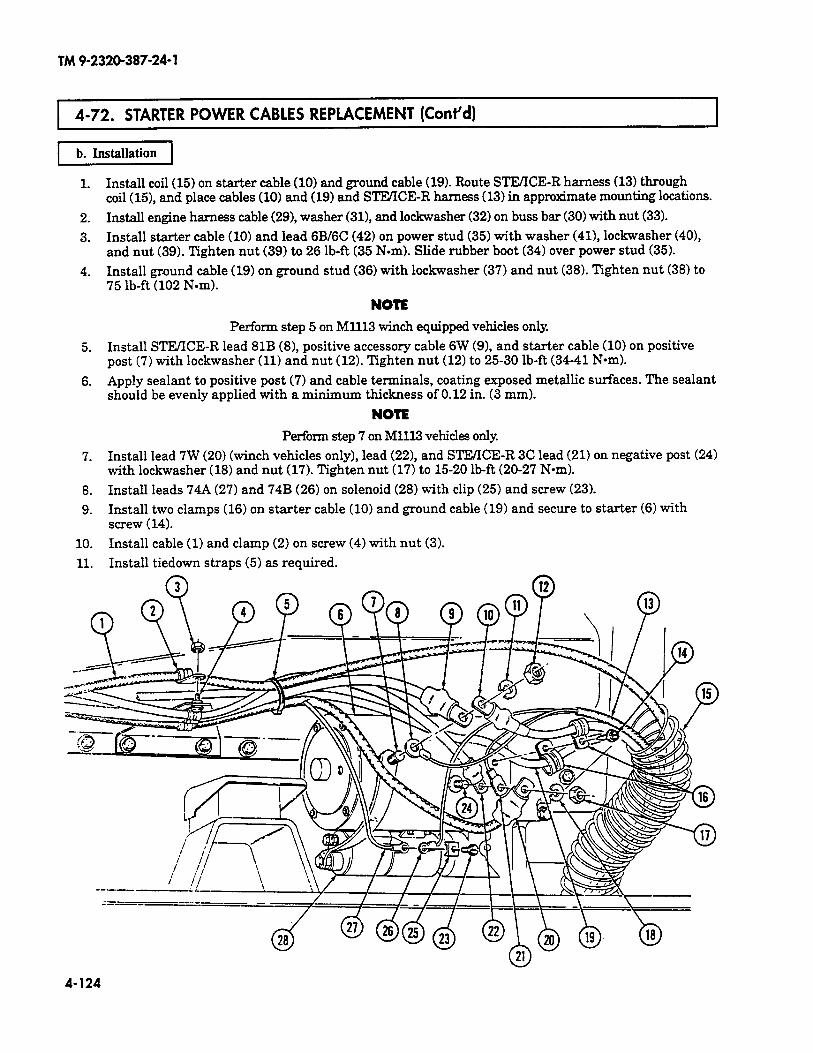
TM 9-2320-387-24-l
4-72. STARTER POWER CABLES REPLACEMENT (Co&d) I
1 b. Installation 1
1.
2.
3.
4.
5.
6.
7.
8.
9.
10.
11.
Install coil (15) on starter cable (10) and ground cable (19). Route STIVICE-R harness (13) through coil (15), and place cables (10) and (19) and STlVICER harness (13) in approximate mounting locations.
Install engine harness cable (29), washer (31), and lockwasher (32) on buss bar (30) with nut (33).
Install starter cable (10) and lead 6B/6C (42) on power stud (35) with washer (41), lockwasher (40), and nut (39). Tighten nut (39) to 26 lb-ft (35 Nom). Slide rubber boot (34) over power stud (35).
Install ground cable (19) on ground stud (36) with lo&washer (37) and nut (38). Tighten nut (38) to 75 lb-ft (102 N-m).
NOTE
Perform step 5 on Ml113 winch equipped vehicles only.
Install STEYICE-R lead 81B (8), positive accessory cable 6W (9), and starter cable (10) on positive post (7) with lockwasher (11) and nut (12). Tighten nut (12) to 25-30 lb-ft (34-41 Nom).
Apply sealant to positive post (7) and cable terminals, coating exposed metallic surfaces. The sealant should be evenly applied with a minimum thickness of 0.12 in. (3 mm).
NOTE
Perform step 7 on Ml113 vehicles only
Install lead 7W (20) (winch vehicles only), lead (22), and SIR/ICE-R 3C lead (21) on negative post (24) with lockwasher (18) and nut (17). Tighten nut (17) to 15-20 lbft (20-27 Nom).
Install leads 74A (27) and 74B (26) on solenoid (28) with clip (25) and screw (23).
Install two clamps (16) on starter cable (10) and ground cable (19) and secure to starter (6) with screw (14).
Install cable (1) and clamp (2) on screw (4) with nut (3).
Install tiedown straps (5) as required.
4-124
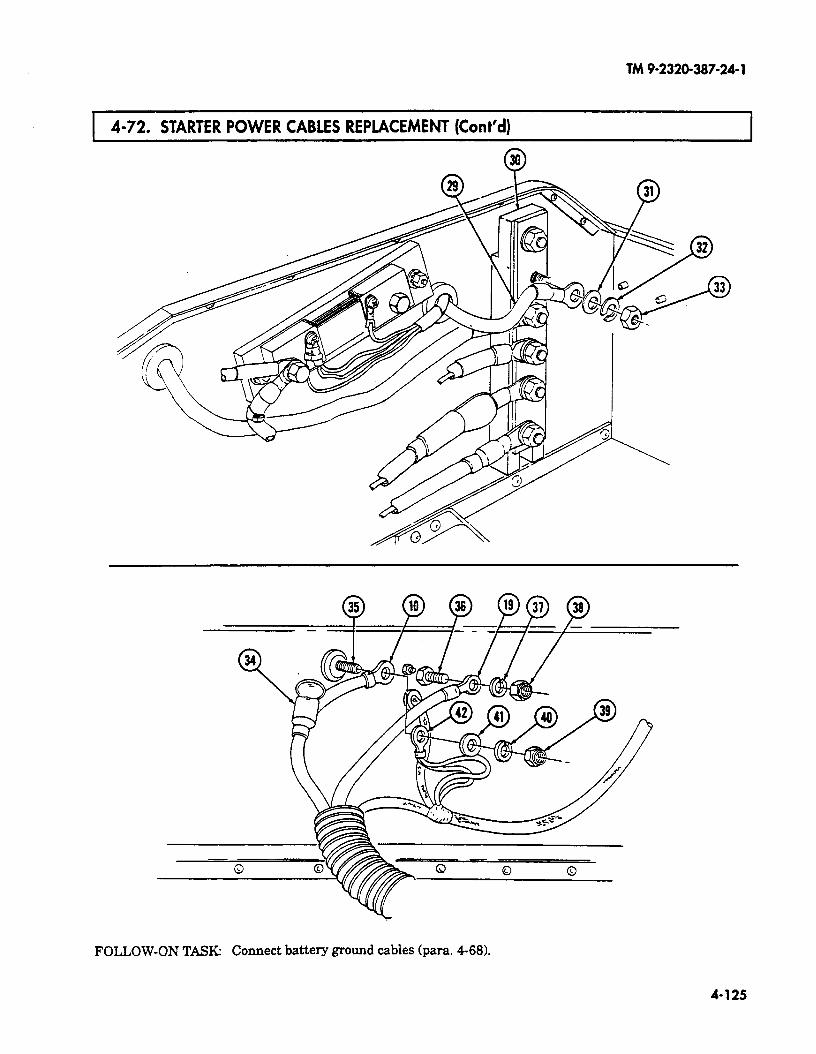
TM 9-2320-387-24-l
4-72. STARTER POWER CABLES REPLACEMENT (Cont’d)
FOLLOW-ON TASK: Connect battery ground cables (para. 468).
4-125
TM 9-2320-387-24-l
4-73. BAITERY HOLDDOWN REPLACEMENT
This task covers:
a. Removal
INITIAL SETUP:
b. Installation
Tools
General mechanic’s tool kit: automotive (Appendix B, Item 1)
Manual References TM 9-2320-387-24P
Equipment Condition
l Battery box cover removed (para. 10-43). l Battery ground cables removed (para. 4-68). l Battery interconnecting cable removed
(para. 4-68).
General Safety Instructions l Wear safety goggles and rubber gloves, and do not
smoke when performing battery maintenance. l Remove all jewelry.
Maintenance Level
Unit
l Battery positive cable removed (para. 4-68).
1 a. Removal 1
WARNING
Battery acid (electrolyte) is extremely harmful. Always wear safety goggles and rubber gloves, and do not smoke when performing battery maintenance. Severe injury will result if acid contacts eyes or skin.
Remove all jewelry such as rings, dog tags, bracelets, etc. If jewelry or disconnected battery ground cable contact battery terminal, a direct short can result, causing instant heating of tools, severe injury to personnel, or damage to equipment.
Remove four nuts (21, battery holddown (31, and four holddown rods (1) from batteries (5) and brackets (4).
.- :
pI7zzq
Install battery holddown (3) on batteries (5) and brackets (4) with four holddown rods (1) and four nuts (2).
4-126
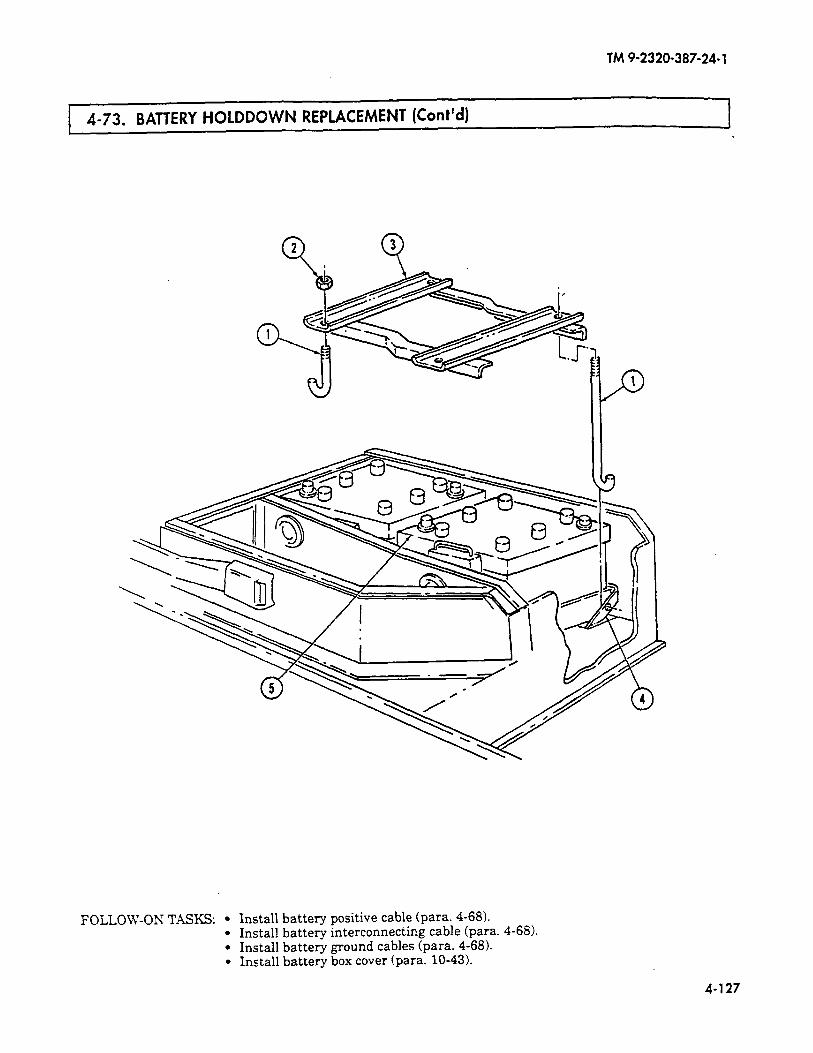
TM 9-2320-387-24-l
4-73. BATTERY HOLDDOWN REPLACEMENT (Cont’d)
FOLLOW-ON TASKS: l Install battery positive cable (para. 4-68). l Install battery interconnecting cable (para. 4-68). l Install battery ground cables (para. 4-68). l Install battery box cover (para. 10-43).
4-127
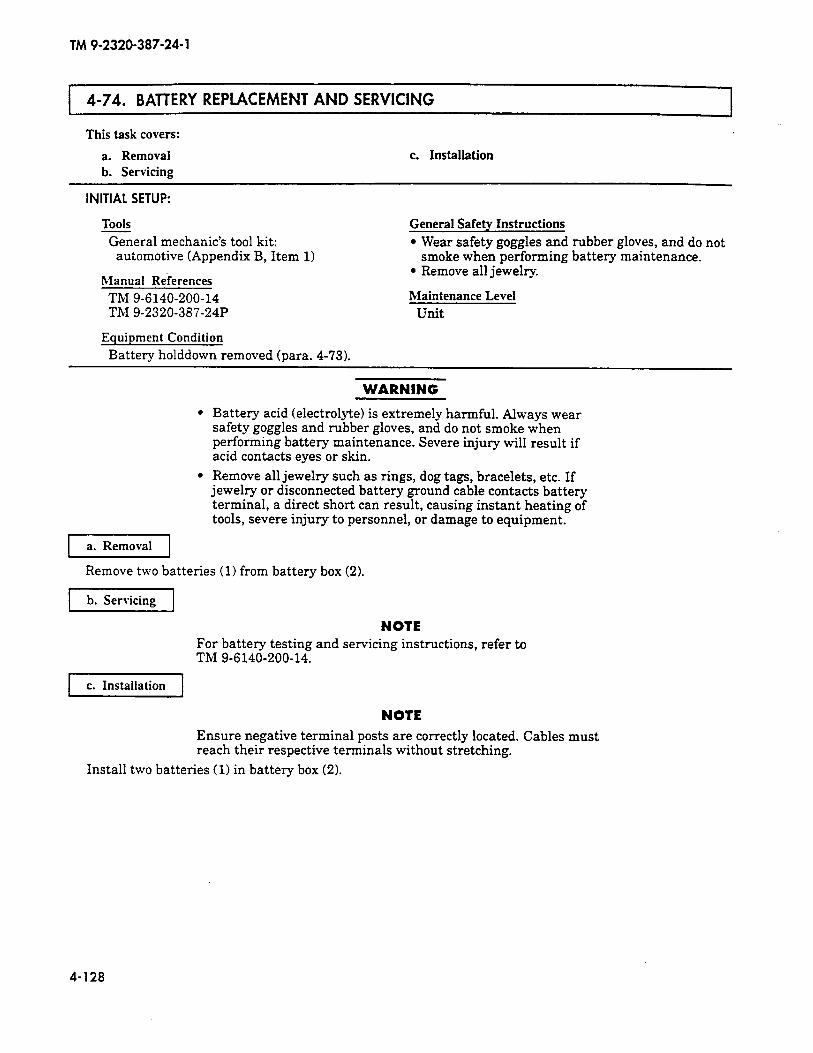
TM 9-2320-387-24-l
4-74. BATTERY REPLACEMENT AND SERVICING
This task covers:
a. Removal c. Installation
b. Servicing
1
INITIAL SETUP:
Tools
General mechanic’s tool kit: automotive (Appendix B, Item 1)
Manual References TM 9-6140-200-14 TM 9-2320-387-24P
General Safety Instructions
l Wear safety goggles and rubber gloves, and do not smoke when performing battery maintenance.
l Remove all jewelry.
Maintenance Level
Unit
Equipment Condition Battery holddown removed (para. 4-73).
WARNING
l Battery acid (electrolyte) is extremely harmful. Always wear safety goggles and rubber gloves, and do not smoke when performing battery maintenance. Severe injury will result if acid contacts eyes or skin.
l Remove all jewelry such as rings, dog tags, bracelets, etc. If jewelry or disconnected battery g-round cable contacts battery terminal, a direct short can result, causing instant heating of tools, severe injury to personnel, or damage to equipment.
1-1
Remove two batteries (1) from battery box (2).
I]
NOTE For battery testing and servicing instructions, refer to TM 9-6140-200-14.
c. Installation
NOTE
Ensure negative terminal posts are correctly located. Cables must reach their respective terminals without stretching.
Install two batteries (1) in battery box (21.
4-128
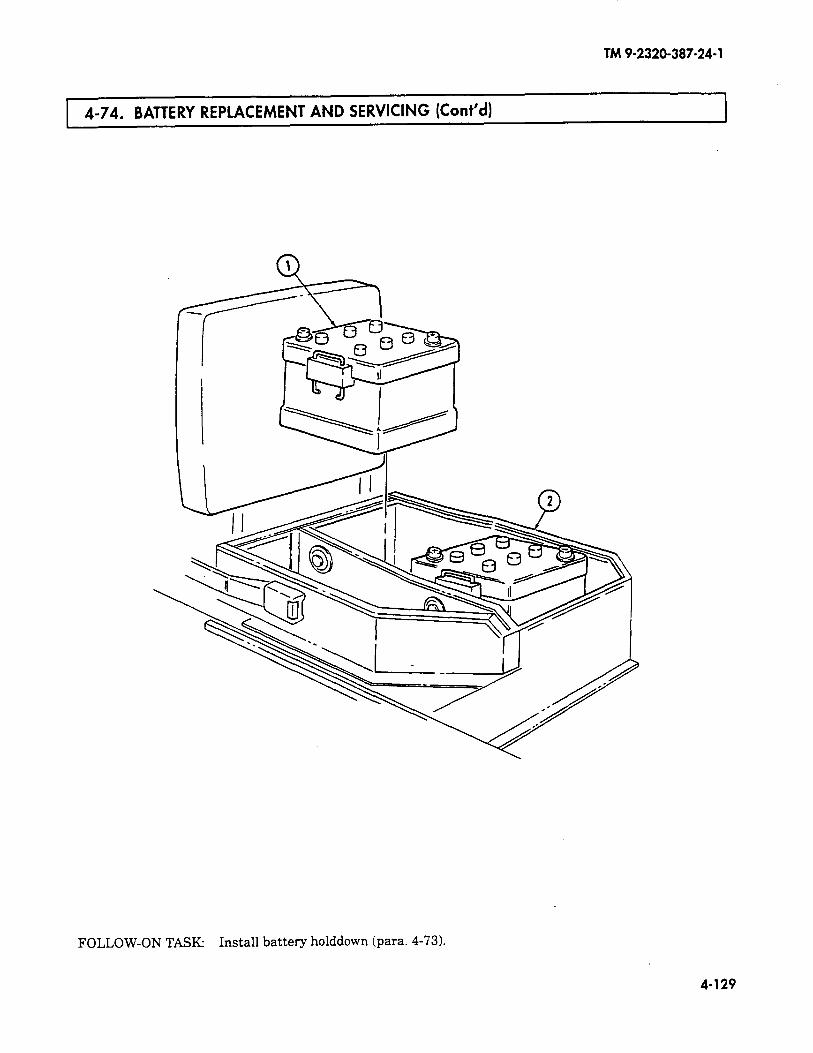
TM 9-2320-387-24-l
4-74. BATTERY REPLACEMENT AND SERVICING (Cont’d) 1
FOLLOW-ON TASK: Install battery holddown (para. 4-73).
4-129
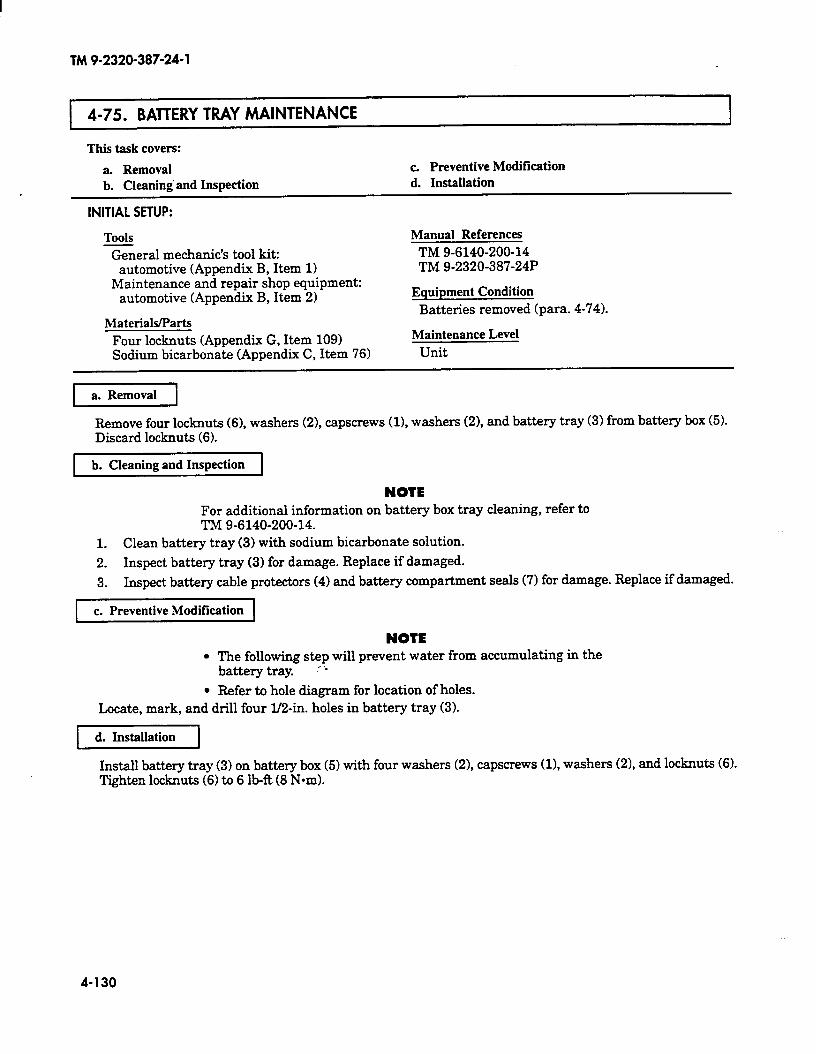
TM 9-2320-387-24-l
-75. BAnERY TRAY MAINTENANCE I
This task covers:
a. Removal b. Cleaning’and Inspection
INITIAL SETUP:
c Preventive Modification d. Installation
Tools
?&era1 mechanic’s tool kit: automotive (Appendix B, Item 1)
Maintenance and repair shop equipment: automotive (Appendix B, Item 2)
Manual References
TM 9-6140-200-14 TM 9-2320-387-24P
Equipment Condition
Batteries removed (para. 4-74). Materials/Parts
Four locknuts (Appendix G, Item 109) Sodium bicarbonate (Appendix C, Item 76)
Maintenance Level Unit
a. Removal
Remove four locknuts (61, washers (2>, capscrews (11, washers (21, and battery tray (3) from battery box (5). Discard locknuts (6).
b. Cleaning and Inspection
NOTE For additional information on battery box tray cleaning, refer to TM 9-6140-200-14.
1. Clean battery tray (3) with sodium bicarbonate solution.
2. Inspect battery tray (3) for damage. Replace if damaged.
3. Inspect battery cable protectors (4) and battery compartment seals (7) for damage. Replace if damaged.
c Preventive Modification
NOTE l The following step will prevent water from accumulating in the
battery tray. ,- ;
l Refer to hole diagram for location of holes. Locate, mark, and drill four l/2-in. holes in battery tray (3).
d. Installation
Install battery tray (3) on battery box (5) with four washers (2), capscrews (11, washers (21, ad ~OC~XUS 03. Tighten locknuts (6) to 6 lb-R (8 Nom).
4-130
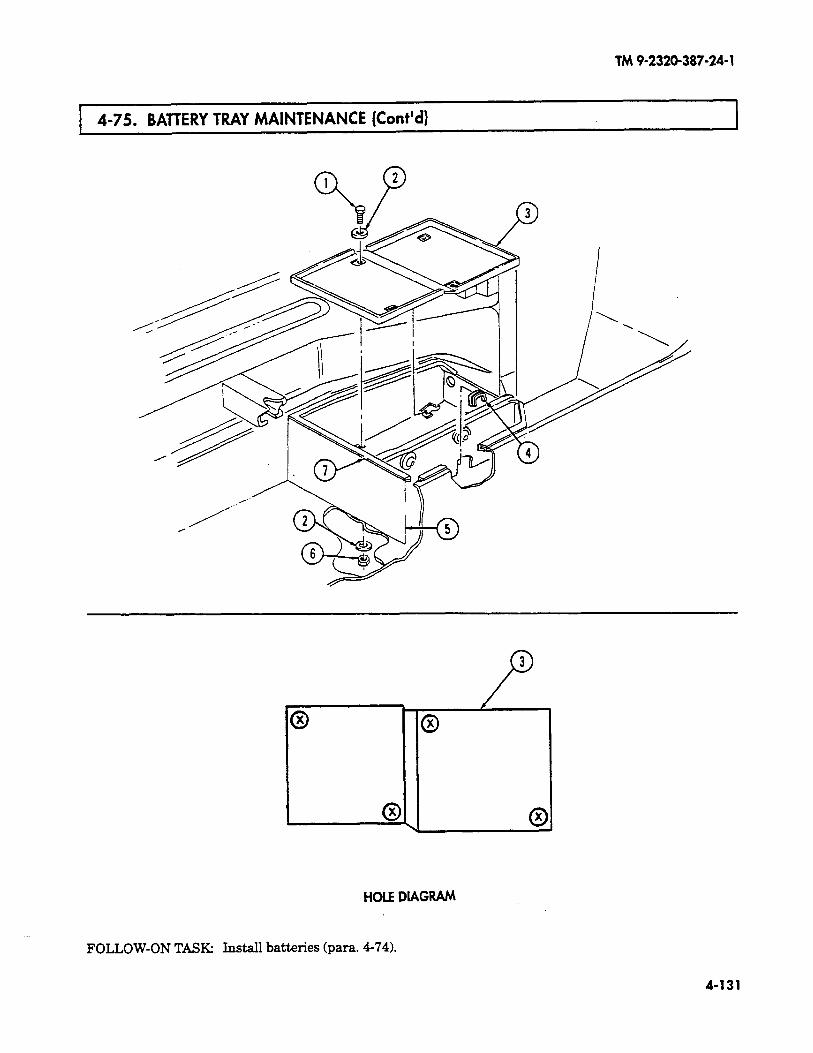
TM 9-2320-387-24- 1
4-75. BATTERY TRAY MAINTENANCE (Cont’d)
0 u 0
0 X
c X’
HOLE DIAGRAM
FOLLOW-ON TASKI Install batteries (para. 474).
4-131
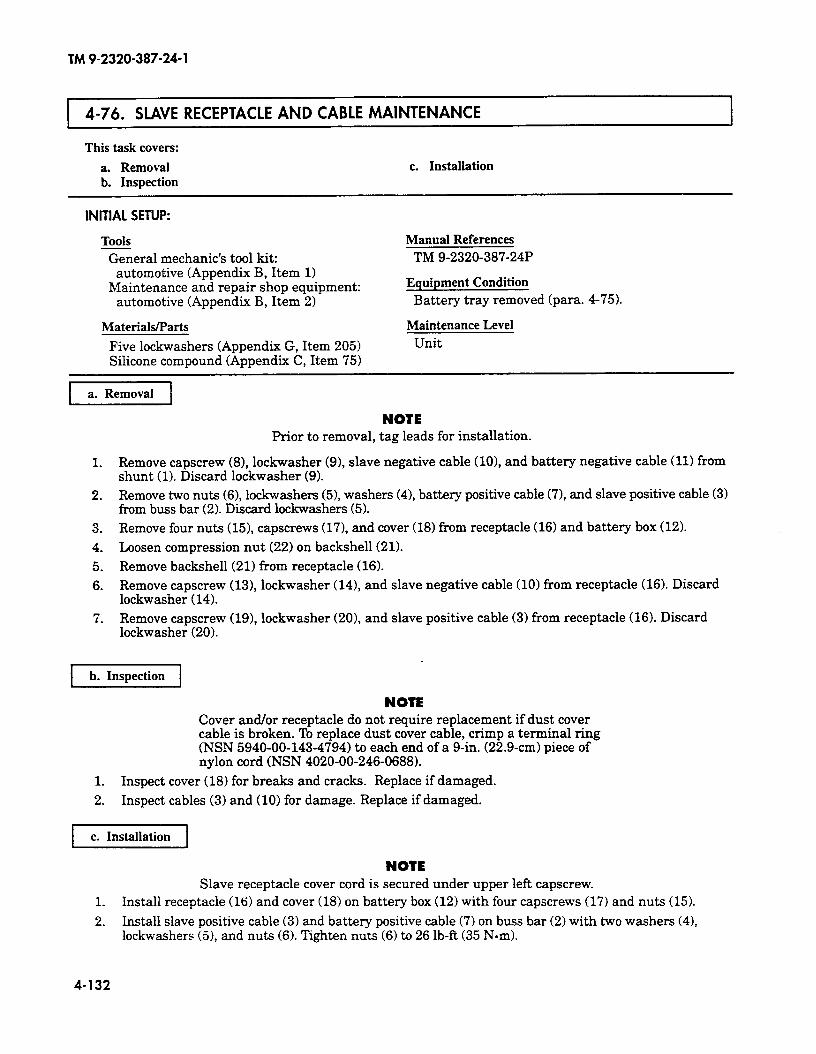
TM 9-2320-387-24-l
4-76. SLAVE RECEPTACLE AND CABLE MAINTENANCE
This task covers:
a. Removal b. Inspection
c. Installation
INITIAL SETUP:
Tools
General mechanic’s tool kit: automotive (Appendix B, Item 1)
Maintenance and repair shop equipment: automotive (Appendix B, Item 2)
Materials/Parts
Five lockwashers (Appendix G, Item 205) Silicone compound (Appendix C, Item 75)
Manual References
TM 9-2320-387-24P
Equipment Condition
Battery tray removed (para. 4-75).
Maintenance Level Unit
1.
2.
3.
4.
5.
6.
7.
NOTE Prior to removal, tag leads for installation.
Remove capscrew (8), lo&washer (9), slave negative cable (lo), and battery negative cable (11) from shunt (1). Discard lockwasher (9). Remove two nuts (6), lo&washers (5), washers (4), battery positive cable (7), and slave positive cable (3) from buss bar (2). Discard lockwashers (5). Remove four nuts (15), capscrews (17), and cover (18) from receptacle (16) and battery box (1%
Loosen compression nut (22) on backshell (21).
Remove backshell (21) from receptacle (16). Remove capscrew (13), lockwasher (14), and slave negative cable (10) from receptacle (16). Discard lockwasher (14). Remove capscrew (19), lockwasher (20), and slave positive cable (3) from receptacle (16). Discard lockwasher (20).
b. Inspection
NOTE Cover and/or receptacle do not require replacement if dust cover cable is broken. ‘lb replace dust cover cable, crimp a terminal ring (NSN 5940-00-143-4794) to each end of a g-in. (22.9-cm) piece of nylon cord (NSN 4020-00-246-0688).
1. Inspect cover (18) for breaks and cracks. Replace if damaged.
2. Inspect cables (3) and (10) for damage. Replace if damaged.
c. Installation
NOTE Slave receptacle cover cord is secured under upper left capscrew.
1. Install receptacle (16) and cover (18) on battery box (12) with four capscrews (17) and nuts (15).
2. Install slave positive cable (3) and battery positive cable (7) on buss bar (2) with two washers (4), lockwashers (5), and nuts (6). Tighten nuts (6) to 26 lb-R (35 Nom).
4-132
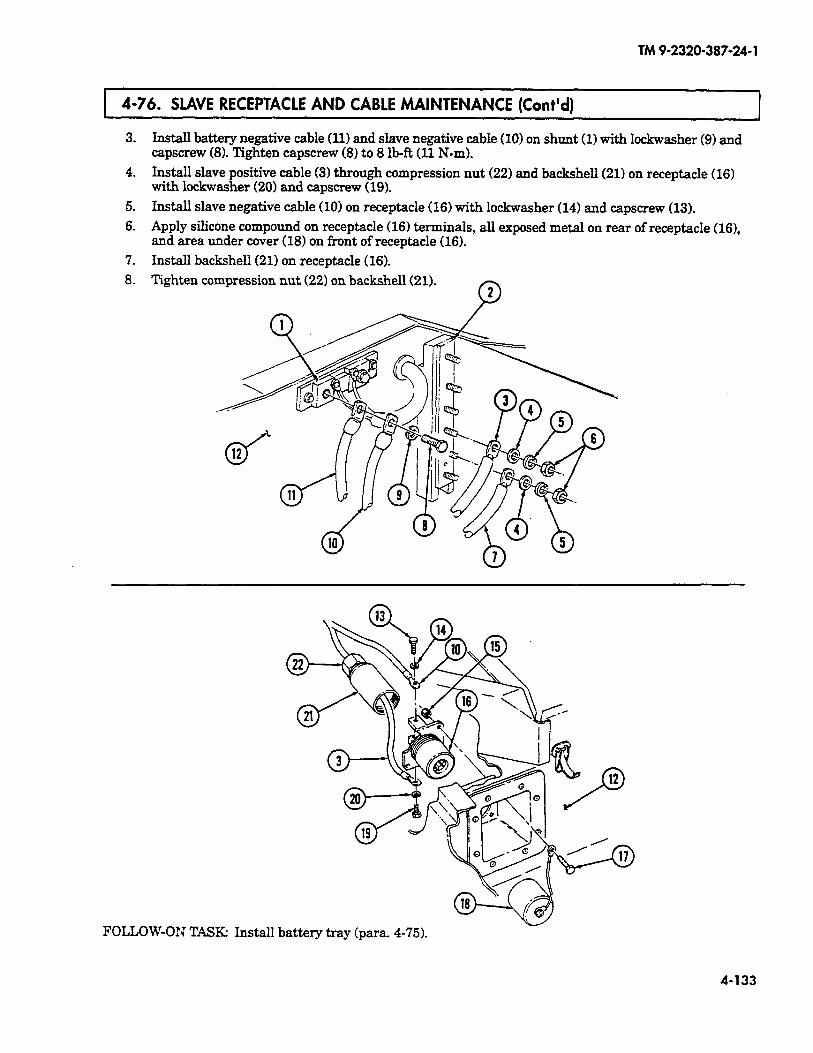
TM9-2320-387-24-l
4-76. SLAVE RECEPTACLE AND CABLE MAINTENANCE (Cont’d) 1
3.
4.
5.
6.
7.
8.
Instah battery negative cable (11) and slave negative cable (10) on shunt (1) with lo&washer (9) and capscrew (8). Tighten capscrew (8) to 8 lb-R (11 Nom).
In&ah slave positive cable (3) through compression nut (22) and backshell (21) on receptacle (16) with lockwasher (20) and capscrew (19).
Install slave negative cable (10) on receptacle (16) with lockwasher (14) and capscrew (13).
Apply silicone compound on receptacle (16) terminals, ah exposed metal on rear of receptacle (16), and area under cover (18) on front of receptacle (16).
Install backshell (21) on receptacle (16).
Tighten compression nut (22) on backshell (21). 0 2
FOLLOW-ON TASK: Install battery tray (para. 4-75).
4-133
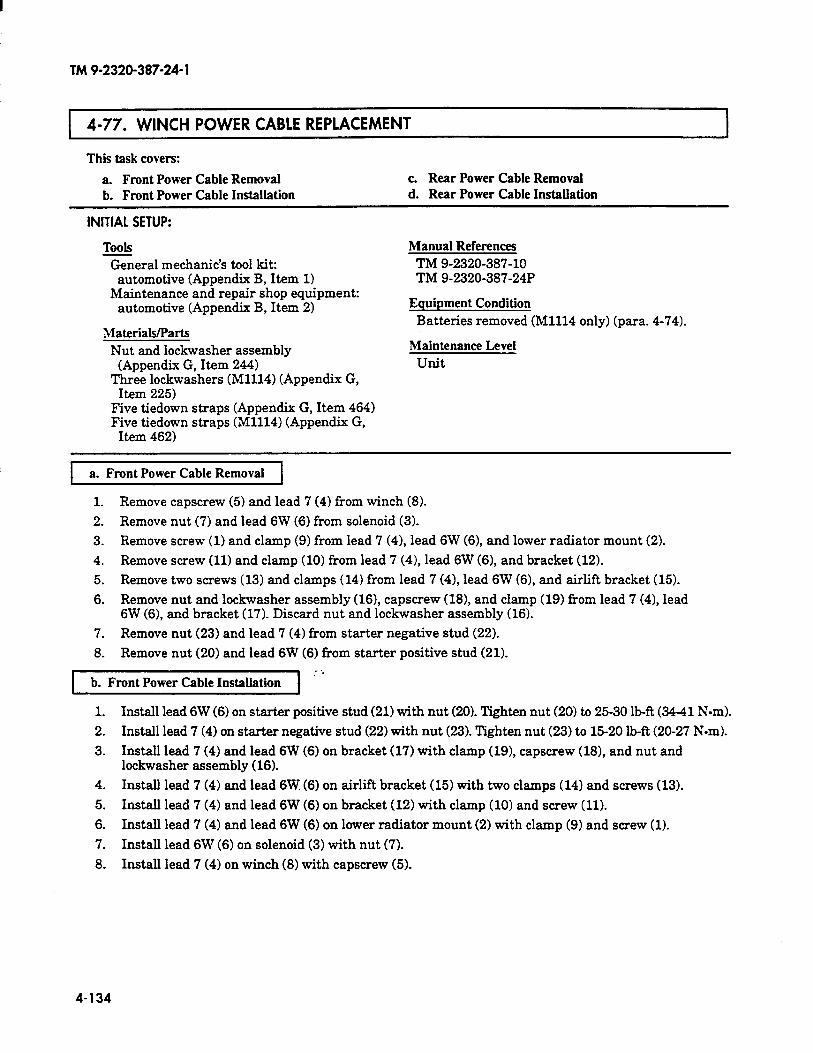
TM 9-2320-387-24- 1
4-77. WINCH POWER CABLE REPLACEMENT
This task covers:
a. Front Power Cable Removal c Rear Power Cable Removal b. Front Power Cable Installation d. Rear Power Cable Installation
INITIAL SETUP:
TWlS General mechanic’s tool kit:
automotive (Appendix B, Item 1) Maintenance and repair shop equipment:
automotive (Appendix B, Item 2)
Materials/Parts Nut and lo&washer assembly
(Appendix G, Item 244) Three lo&washers (M1114) (Appendix G,
Item 225)
Manual References TM 9-2320-387-10 TM 9-2320-387-24P
Equipment Condition Batteries removed (Ml114 only) (para. 4-74).
Maintenance Level unit
Five tiedown straps (Appendix G, Item 464) Five tiedown straps (Ml1141 (Appendix G,
Item 462)
a. Front Power Cable Removal
1. Remove capscrew (5) and lead 7 (4) from winch (8).
2. Remove nut (7) and lead 6W (6) from solenoid (3).
3. Remove screw (1) and clamp (9) from lead 7 (41, lead 6W (61, and lower radiator mount (2).
4. Remove screw (11) and clamp (10) from lead 7 (41, lead 6W (61, and bracket (12).
5. Remove two screws (13) and clamps (14) from lead 7 (41, lead 6W (61, and airlift bracket (15).
6. Remove nut and lockwasher assembly (161, capscrew (181, and clamp (19) from lead 7 (41, lead 6W (61, and bracket (17). Discard nut and lockwasher assembly (16).
7. Remove nut (23) and lead 7 (4) from starter negative stud (22).
8. Remove nut (20) and lead 6W (6) from starter positive stud (21).
b. Front Power Cable Installation
1. Install lead 6W (6) on starter positive stud (21) with nut (201. Tighten nut (20) to 25-30 lb-R (34-41 N-m).
2. Install lead 7 (4) on starter negative stud (22) with nut (23). Tighten nut (23) to 15-20 lb-ft (20-27 N-m).
3. Install lead 7 (4) and lead 6W (6) on bracket (17) with clamp (19), capscrew (181, and nut and lockwasher assembly (16).
4. Install lead 7 (4) and lead 6W (6) on airlift bracket (15) with two clamps (14) and screws (13).
5. Install lead 7 (4) and lead 6W (6) on bracket (12) with clamp (10) and screw (11).
6. Install lead 7 (4) and lead 6W (6) on lower radiator mount (2) with clamp (9) and screw (1).
7. Install lead 6W (6) on solenoid (3) with nut (7).
8. Install lead 7 (4) on winch (8) with capscrew (5).
4-134

TM9-2320-387-24-l
4-77. WINCH POWER CABLE REPLACEMENT (Cont’d)
TM 9-2320-387-24-l
4-77. WINCH POWER CABLE REPLACEMENT (Cont’d)
1 c. Rear Power Cable Removal 1
1. Remove capscrew (8), lockwasher (7), ground lead (61, and lead 7 (5) from winch (41. Discard lockwasher (71.
2. Remove nut (1) and lead 6W (3) from solenoid (2).
3. Remove nine screws (131, clamps (121, five tiedown straps (111, harness (lo), and leads 7 (51 and 6W (3) from body (9). Discard tiedown straps (11).
4. Removenut (181, lockwasher (191, washer (201, and lead 6W (3) from buss bar (17). Discard lockwasher (19).
5. Remove nut (151, lockwasher (141, and lead 7 (5) from capscrew (16). Discard lockwasher (141.
d. Rear Power Cable installation
1. Install lead 7 (5) on capscrew (16) with lockwasher (14) and nut (15). Tighten nut (151 to 15-20 lb-R (20-27 N-m).
2. Install lead 6W (3) on buss bar (171 with washer (201, lockwasher (191, and nut (18). Tighten nut (181 to 15-20 lb-R (20-27 N-m).
3. Install leads 7 (5),6W (31, and harness (10) on body (9) with nine clamps (121, screws U3), and five tiedown straps (11).
4. Install lead 6W (3) on solenoid (2) with nut (1).
5. Install lead 7 (5) and ground lead (6) on winch (4) with lockwasher (7) and capscrew (81.
4-136
TM9-2320-387-24-l
4-77. WINCH ‘POWER CABLE REPLACEMENT (Cont’d)
_
FOLLOW-ON TASKS: l Install batteries (Ml114 only) (para. 4-74). l Test winch for proper operation (TM 9-2323-387-10).
4-l 37
TM 9-2320-387-24-l
4-78. SHUNT REPLACEMENT
This task covers:
a. Removal b. Installation
INITIAL SETUP:
Tools General mechanic’s tool kit:
automotive (Appendix B, Item 1) Maintenance and repair shop equipment:
automotive (Appendix B, Item 2)
Materials/Parts Five lockwashers (Appendix G, Item 213) Two nut and lockwasher assemblies
(Appendix G, Item 244)
Personnel Required One mechanic One assistant
Manual References TM 9-2320-387-24P
Equipment Condition Batteries removed (para. 4-74).
Maintenance Level Unit
NOTE Prior to removal, tag leads for installation.
I. Remove two screws (ll), washers (8), and lockwashers (9) and disconnect leads 7B and 7D (15), 9A (16), and 8A (6) from shunt (17). Discard lockwashers (9).
2. Remove nut (l), lockwasher (2), and starter cable (3) from capscrew (10). Discard lockwasher (2).
3. Remove nut (19), lockwasher (18), and capscrew (10) from shunt (17). Discard lockwasher (18).
4. Remove capscrew (12), lockwasher (13), and two negative cables (14) from shunt (17). Discard lockwasher (13).
5. Remove two nut and lockwasher assemblies (7), washers (5), capscrews (4), washers (5), and shunt (17) from battery box (20). Discard nut and lockwasher assemblies (7).
lb.1
1. Install shunt (17) on battery box (20) with two washers (5), capscrews (4), washers (5), and nut and lockwasher assemblies (7). Tighten nut and lockwasher assemblies (7) to 8 lb-R (11 Nom).
2. Install two negative cables (14) on shunt (17) with lockwasher (13) and capscrew (12). Tighten capscrew (12) to 8 lb-R (11 Nom).
3. Install capscrew (10) on shunt (17) with lo&washer (18) and nut (19). Tighten nut (19) to 75 lb-R (102 N*m).
4. Install starter cable (3) on capscrew (10) with lockwasher (2) and nut (1). Tighten nut (1) to 18-22 lb& (24-30 Nom).
5. Install leads 9A (16), 7B and 7D (15), and 8A (6) on shunt (17) with two lockwashers (9), washers (8), and screws (11).
4-138
TM9-2320-387-24-l
4-78. SHUNT REPLACEMENT (Cont’d)
- FOLLOW-ON TASK: Install batteries (para. 4-74).
4-139
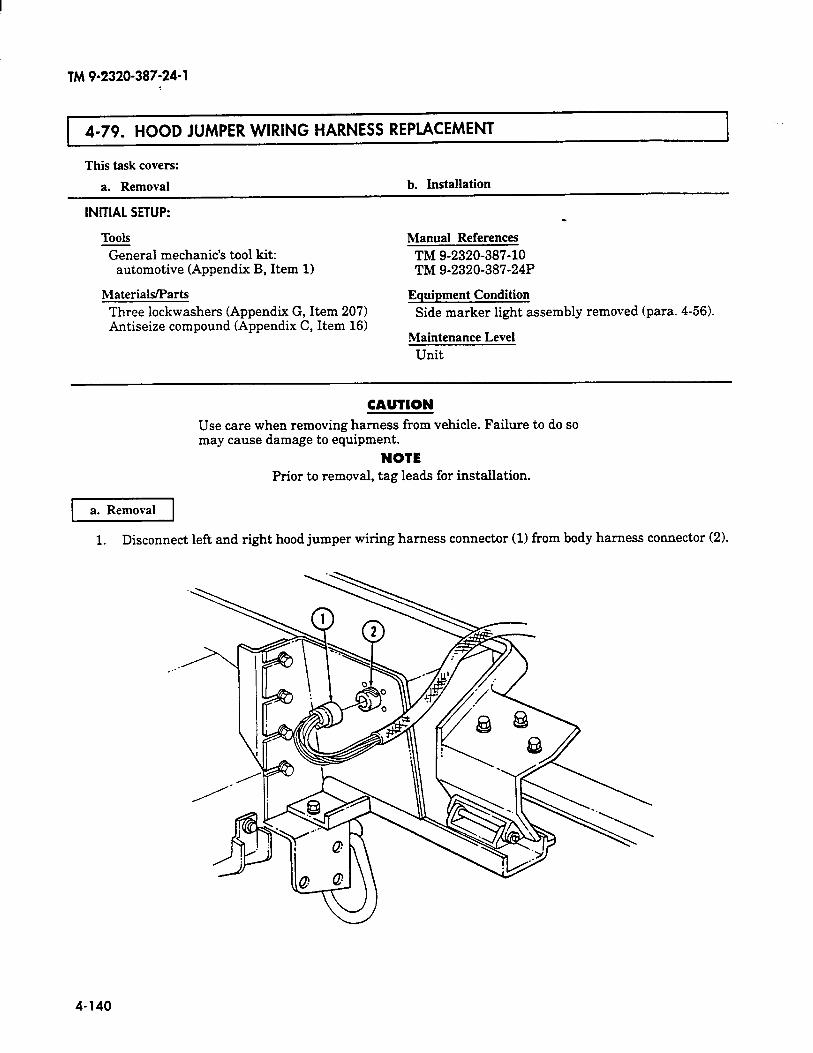
TM 9&2320-387-24-l
4-79. HOOD JUMPER WIRING HARNESS REPLACEMENT I
This task covers:
a. Removal b. Installation
INITIAL SETUP: _
ToOlS Manual References
mechanic’s
CAUTION Use care when removing harness from vehicle. Failure to do so may cause

I
TM 9-2320-387-24-l
4-79. HOOD JUMPER WIRING HARNESS REPLACEMENT (Cont’d)
2. Remove nut (71, lockwasher W, and special washer (9) from blackout drive light (3) and hood (10). Discard lockwasher (8).
3. Disconnect lead 19B (5) from blackout drive light (3).
4. Remove blackout drive light (31, ground lead 92C (4), and coned mounting washer (6) from swivel bracket (11).
5. Disconnect harness leads 20E (12),461B (211, and 491C (19) from left composite light terminals (20).
6. Remove capscrew (141, lockwasher (13), and left composite light ground 92B (15) from buss bar (16). Discard lockwasher (13).
7. Remove rubber grommet (18) from hood (10).
8. Remove hood jumper wiring harness (17) from hood (10).
4-141
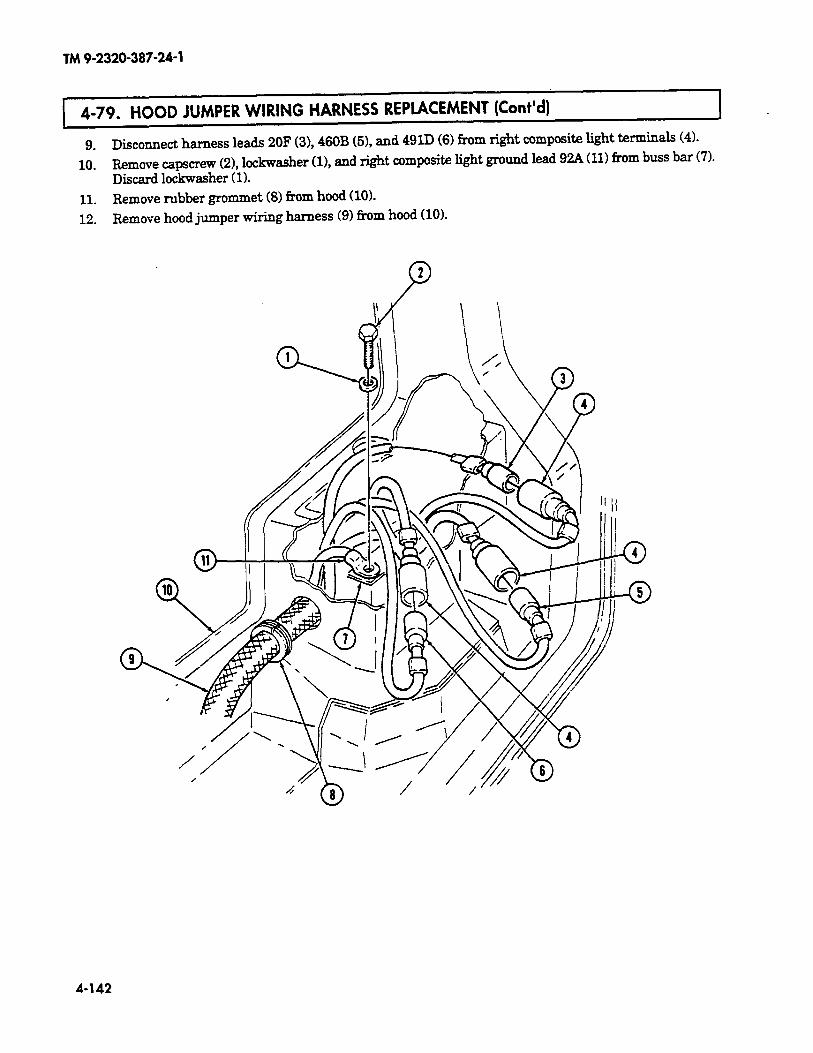
TM 9-2320-387-24-l
4-79. HOOD JUMPER WIRING HARNESS REPLACEMENT (Cont’d) I
9. ~~~o~e~ harness leads 20F (3), 46OB (5), and 491D (6) from right composite light terminals (4).
10. Remove capscrew (2), lo&washer (l), and right composite light ground lead 9ZA (11) from buss bar (7). Discard lockwasher ( 1).
11. Remove rubber grommet (8) from hood (10).
12. Remove hood jumper wiring hamess (9) from hood (10).
4-142
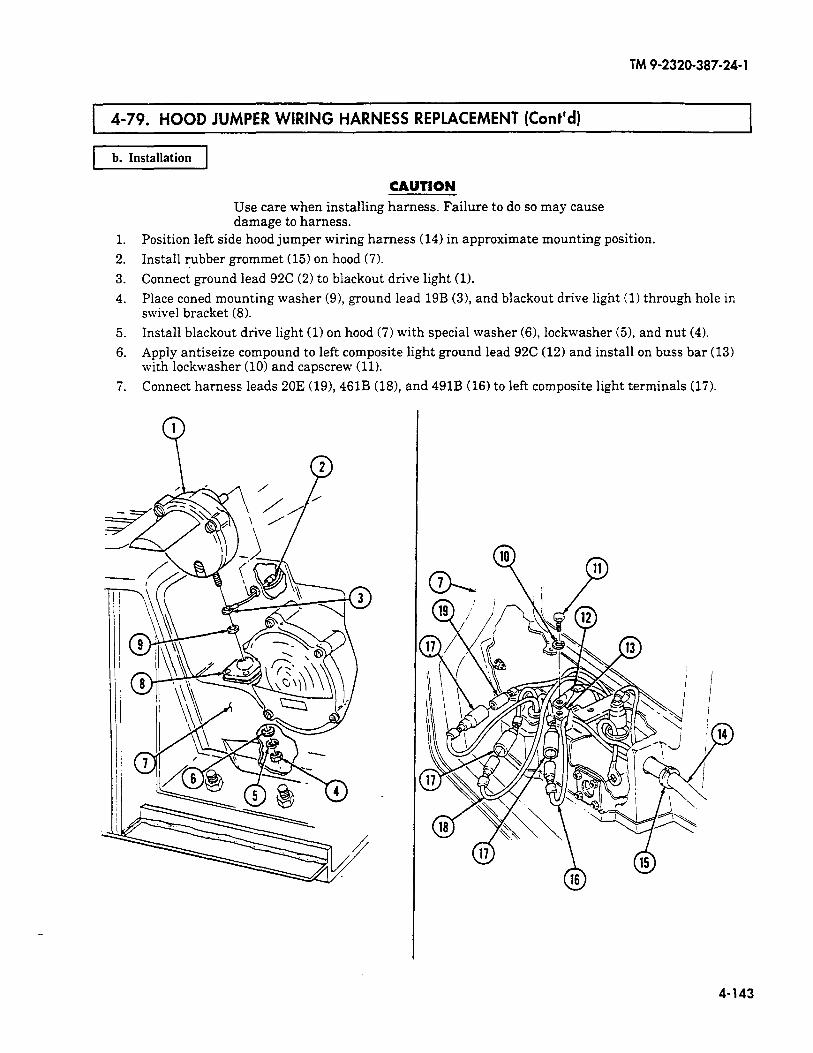
TM 9-2320-387-24-l
4-79. HOOD JUMPER WIRING HARNESS REPLACEMENT (Cont’d)
pI7izEq
1.
2.
3.
4.
Position left side hood jumper wiring harness (14) in approximate mounting position.
Install rubber grommet (15) on hood (7).
5.
6.
Connect ground lead 92C (2) to blackout drive light (1).
Place coned mounting washer (91, ground lead 19B (31, and blackout drive light (1) through hole in swivel bracket (8).
Install blackout drive light (1) on hood (7) with special washer (6), lockwasher (51, and nut (4).
Apply antiseize compound to left composite light ground lead 92C (12) and install on buss bar (13) with lockwasher (10) and capscrew (11).
7. Connect harness leads 20E (19),461B (181, and 491B (16) to left composite light terminals (17).
CAUTION
Use care when installing harness. Failure to do so may cause damage to harness.
4-143
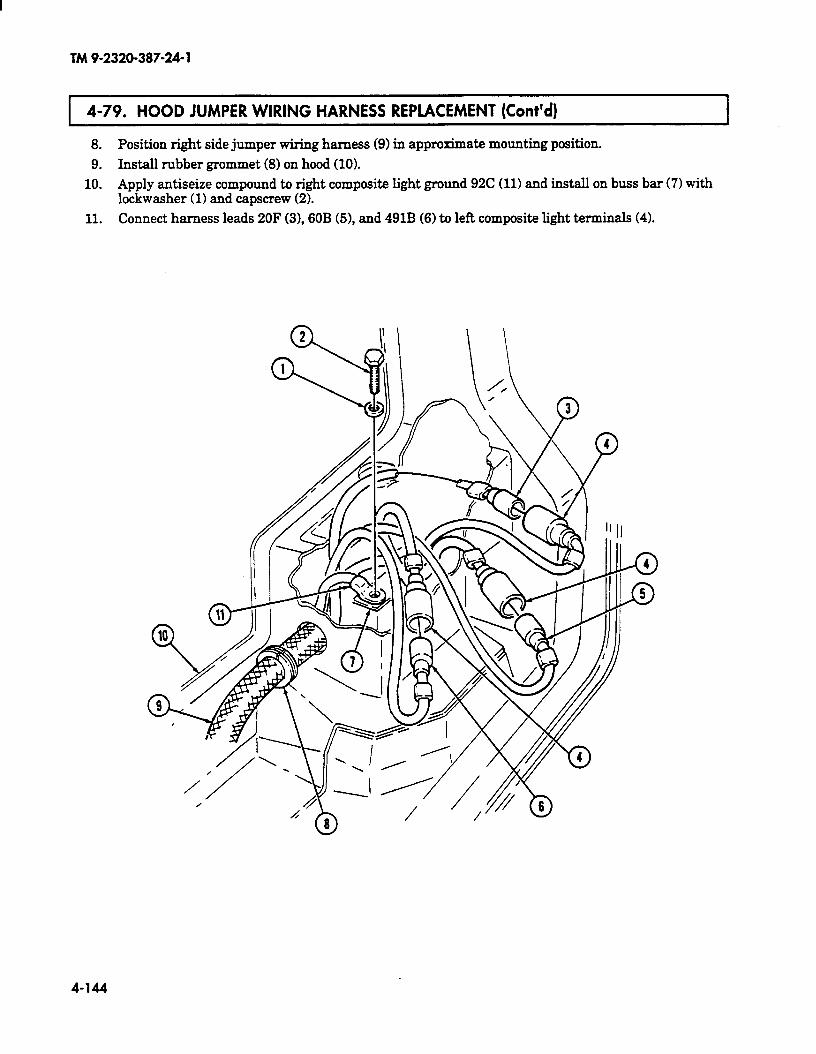
TM9-2320-387-24-l
4-79. HOOD JUMPER WIRING HARNESS REPLACEMENT (Cont’d)
8. Position right side jumper wiring hamess (9) in approximate mounting position.
9. Install rubber grommet (8) on hood (10).
10. Apply antiseize compound to right composite light ground 92C (11) and install on buss bar (7) with lo&washer (1) and capscrew (2).
11. Connect harness leads 20F (3),60B (51, and 491B (6) to left composite light terminals (4).
4-144
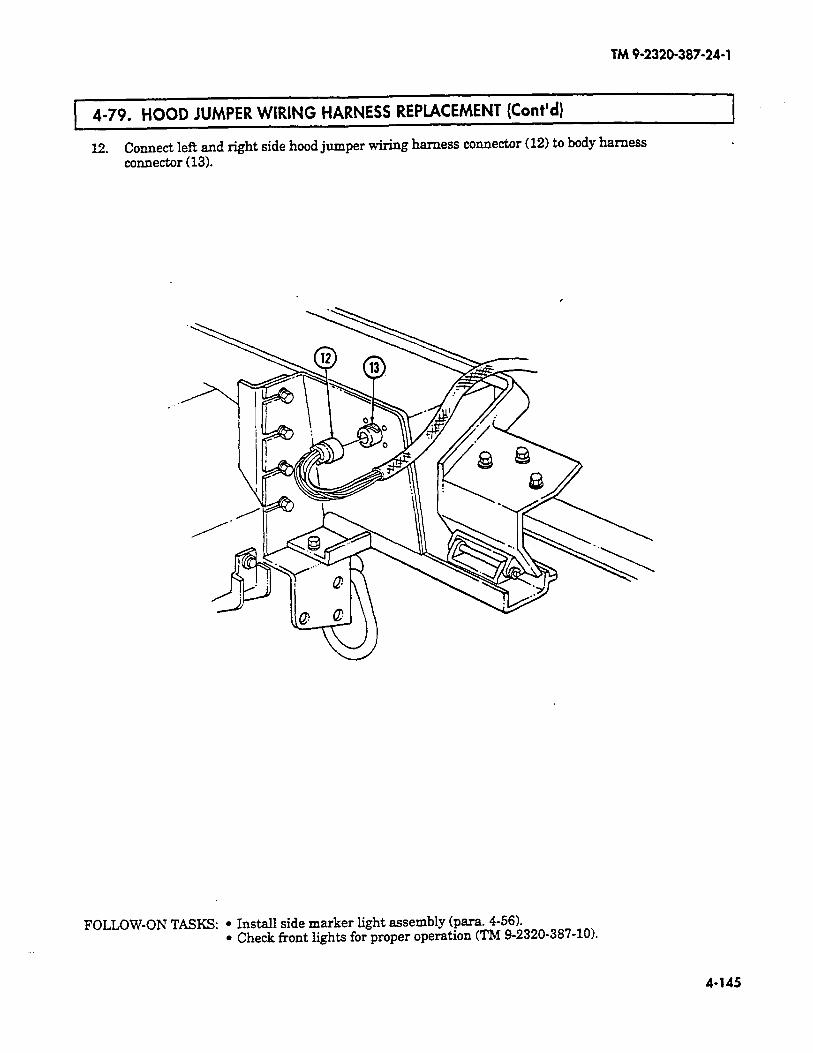
TM9-2320-387-24-l
4-79. HOOD JUMPER WIRING HARNESS REPLACEMENT (Cont’d)
12. Connect left and right side hood jumper wiring harness connector (12) to body harness connector (13).
FOLLOW-ON TASKS: l Install side marker light assembly (para. 4-56). l Check front lights for proper operation (TM 9-2320-387-10).
4-145
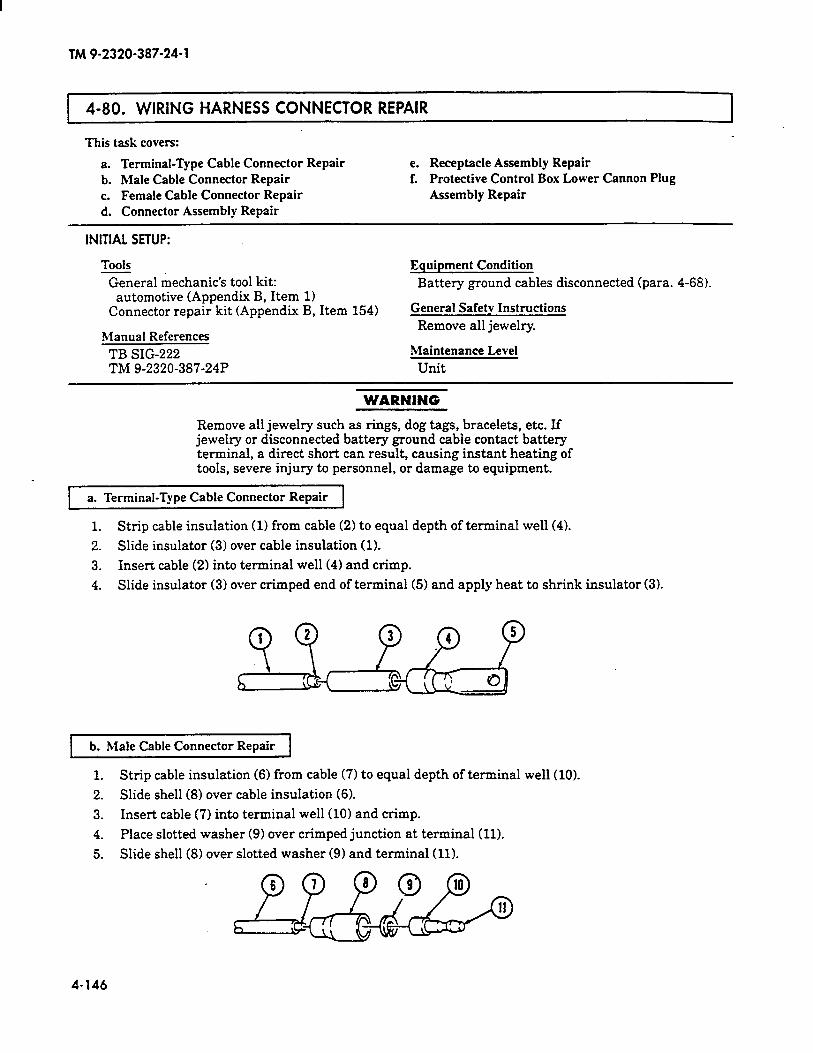
TM 9-2320-387-24-l
1 4-80. WIRING HARNESS CONNECTOR REPAIR 1 This task covers:
a. Terminal-Type Cable Connector Repair b. Male Cable Connector Repair c. Female Cable Connector Repair d. Connector Assembly Repair
e. Receptacle Assembly Repair F. Protective Control Box Lower Cannon Plug
Assembly Repair
INITIAL SETUP:
Tools General mechanic’s tool kit:
automotive (Appendix B, Item 1) Connector repair kit (Appendix B, Item 154)
Manual References TB SIG-222 TM 9.2320.387.24P
Equipment Condition Battery ground cables disconnected (para. 4-68).
General Safety Instructions
Remove all jewelry.
Maintenance Level Unit
WARNING
Remove all jewelry such as rings, dog tags, bracelets, etc. If jewelry or disconnected battery ground cable contact battery terminal, a direct short can result, causing instant heating of tools, severe injury to personnel, or damage to equipment.
a. Terminal-Type Cable Connector Repair
1. Strip cable insulation (1) from cable (2) to equal depth of terminal well (4).
2. Slide insulator (3) over cable insulation (1).
3. Insert cable (2) into terminal well (4) and crimp.
4. Slide insulator (3) over crimped end of terminal (5) and apply heat to shrink insulator (3).
1 b. Male Cable Connector Repair 1
1. Strip cable insulation (6) from cable (7) to equal depth of terminal well (10).
2. Slide shell (8) over cable insulation (6).
3. Insert cable (7) into terminal well (10) and crimp.
4. Place slotted washer (9) over crimped junction at terminal (11).
5. Slide shell (8) over slotted washer (9) and terminal (11).
4-146
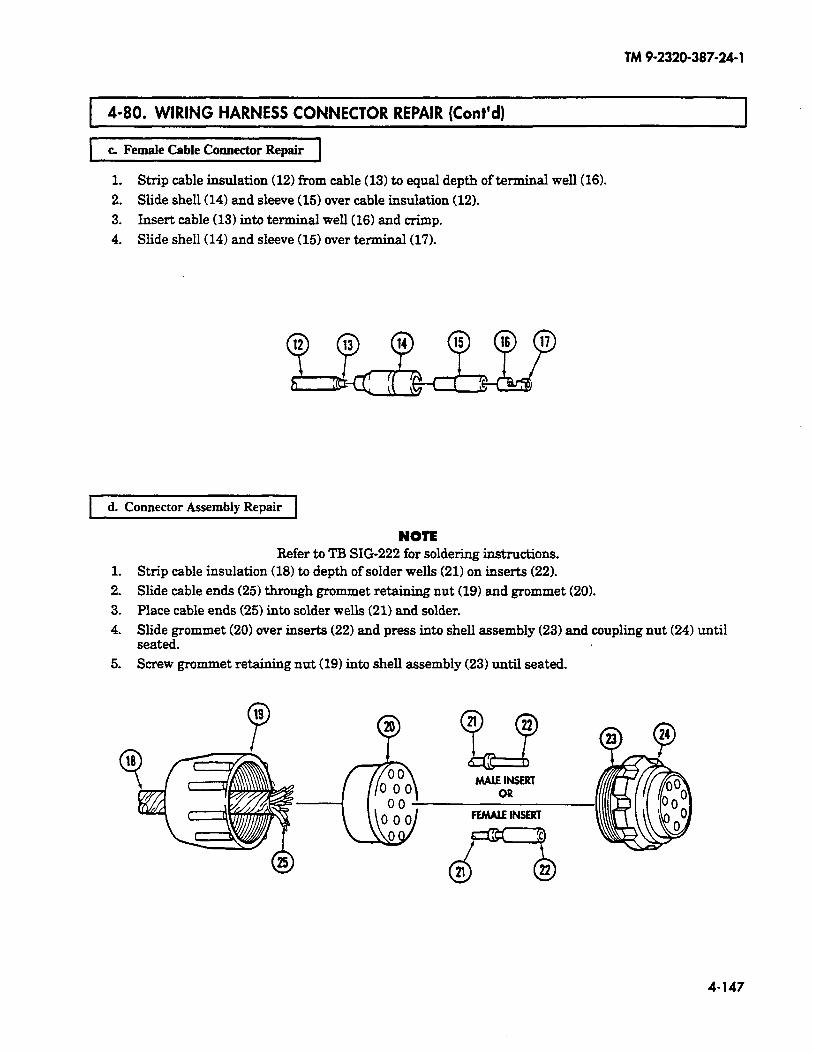
TM 9-2320-387-24-l
4-80. WIRING HARNESS CONNECTOR REPAIR (Cont’d)
c. Female Cable Connector Repair
1. Strip cable insulation (12) from cable (13) to equal depth of terminal well (16).
2. Slide shell (14) and sleeve (15) over cable insulation (12).
3. Insert cable (13) into terminal well (16) and crimp.
4. Slide shell (14) and sleeve (15) over terminal (17).
d. Connector Assembly Repair
1.
2.
3.
4.
5.
NOTE Refer to TB SIG222 for soldering instructions.
Strip cable insulation (18) to depth of solder wells (21) on inserts (22).
Slide cable ends (25) through grommet retaining nut (19) and grommet (20).
Place cable ends (25) into solder wells (21) and solder.
Slide grommet (20) over inserts (22) and press into shell assembly (23) and coupling nut (24) until seated.
Screw grommet retaining nut (19) into shell assembly (23) until seated.
MALE INSERT OR
FEMME INSERT
4-147
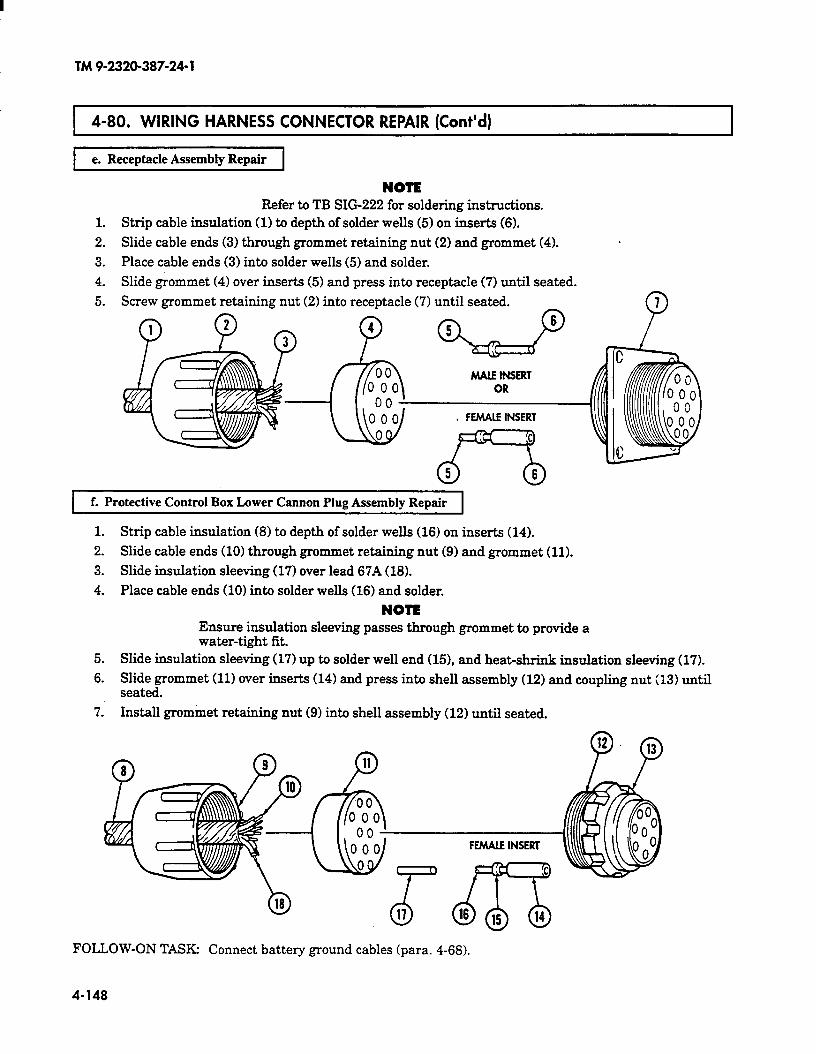
I
TM 9-2320-387-24-l
1 4-80. WIRING HARNESS CONNECTOR REPAIR (Cont’d) I
e. Receptacle Assembly Repair
NOTE Refer to TB SIG-222 for soldering instructions.
1. Strip cable insulation (1) to depth of solder wells (5) on inserts (61.
2. Slide cable ends (3) through grommet retaining nut (2) and grommet (41.
3. Place cable ends (31 into solder wells (5) and solder.
4. Slide grommet (4) over inserts (5) and press into receptacle (71 until seated.
5. Screw grommet retaining nut (2) into receptacle (7) until seated. P
7
m m m m
IProtective Control Box Lower Cannon Plug Assembly Repair 1
1. Strip cable insulation (8) to depth of solder wells (16) on inserts (14).
2. Slide cable ends (101 through grommet retaining nut (91 and grommet (11).
3. Slide insulation sleeving (17) over lead 67A (181.
4. Place cable ends (10) into solder wells (16) and solder.
NOTE Ensure insulation sleeving passes through grommet to provide a water-tight fit.
5. Slide insulation sleeving (171 up to solder well end (151, and heat-shrink insulation sleeving (171.
6. Slide grommet (11) over inserts (14) and press into shell assembly (12) and coupling nut (131 until seated.
7. Install grommet retaining nut (9) into shell assembly (12) until seated.
FOLLOW-ON TASK: Connect battery ground cables (para. 4-681.
4-148
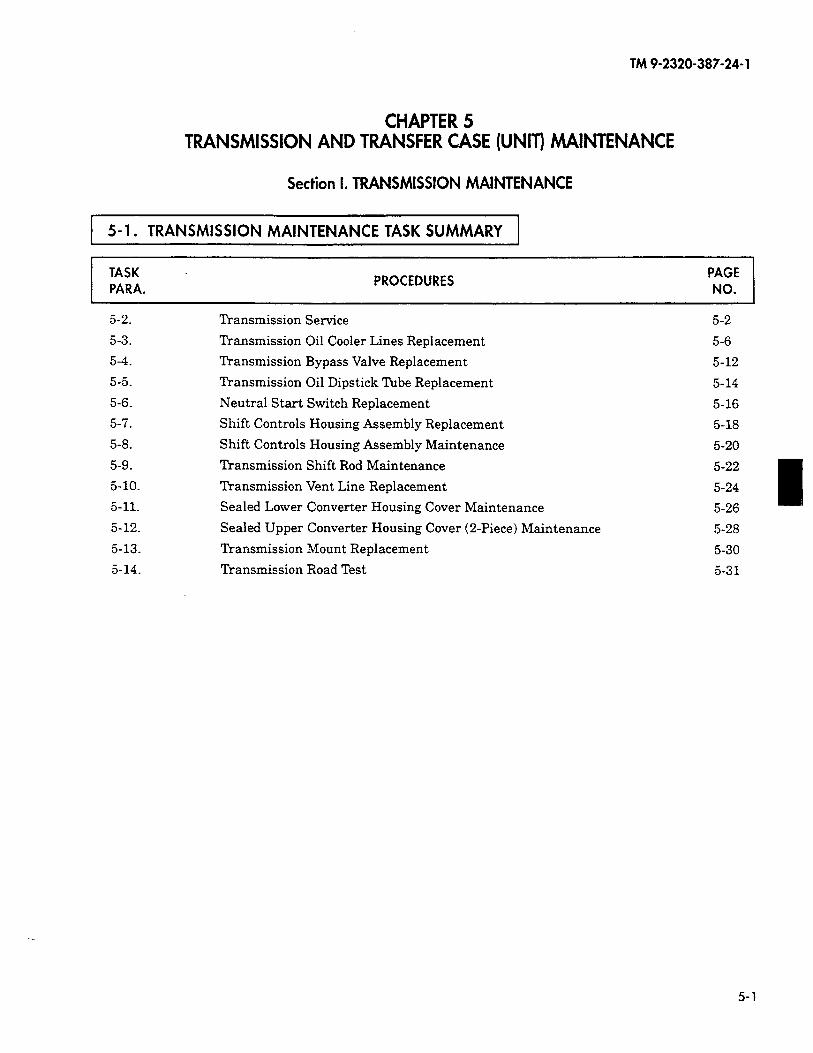
TM 9-2320-387-24-l
CHAPTER 5 TRANSMISSION AND TRANSFER CASE (UNIT) MAINTENANCE
Section I. TRANSMISSION MAINTENANCE
1 5-l. TRANSMISSION MAINTENANCE TASK SUMMARY 1
TASK PARA.
PROCEDURES PAGE NO.
5-2.
5-3.
5-4.
5-5.
5-6.
5-7.
5-8.
5-9.
5-10.
5-11.
5-12.
5-13.
5-14.
Transmission Service
Transmission Oil Cooler Lines Replacement
‘I’ransmission Bypass Valve Replacement
Transmission Oil Dipstick Tube Replacement
Neutral Start Switch Replacement
Shift Controls Housing Assembly Replacement
Shift Controls Housing Assembly Maintenance
Transmission Shift Rod Maintenance
Transmission Vent Line Replacement
Sealed Lower Converter Housing Cover Maintenance
Sealed Upper Converter Housing Cover (Z-Piece) Maintenance
Transmission Mount Replacement
Transmission Road Test
5-2
5-6
5-12
5-14
5-16
5-18
5-20
5-22
5-24
5-26
5-28
5-30
5-31
5-1
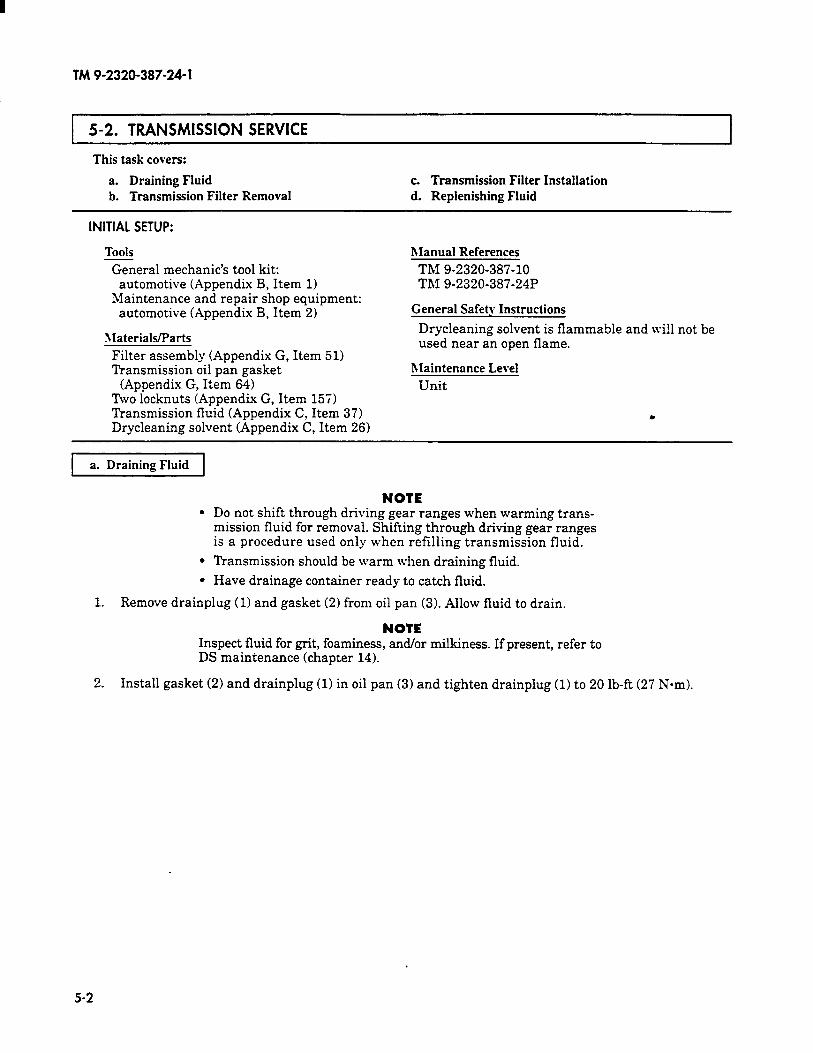
TM 9-2320-387-24-l
I 5-2. TRANSMISSION SERVICE
This task covers:
a. Draining Fluid b. Transmission Filter Removal
c. Transmission Filter Installation d. Replenishing Fluid
INITIAL SETUP:
Tools General mechanic’s tool kit:
automotive (Appendix B, Item 1) Maintenance and repair shop equipment:
automotive (Appendix B, Item 2)
RIateriaWParts
Filter assembly (Appendix G, Item 51) Transmission oil pan gasket
(Appendix G, Item 64) TWO locknuts (Appendix G, Item 157) Transmission fluid (Appendix C, Item 37) Drycleaning solvent (Appendix C, Item 26)
nlanual References
TM 9-2320-387-10 TM 9-2320-387-24P
General Safety Instructions
Drycleaning solvent is flammable and will not be used near an open flame.
nlaintenonce Level
Unit
.
a. Draining Fluid
NOTE l Do not shift through driving gear ranges when warming trans-
mission fluid for removal. Shifting through driving gear ranges is a procedure used only when refilling transmission fluid.
l Transmission should be warm when draining fluid.
l Have drainage container ready to catch fluid.
1. Remove drainplug (1) and gasket (2) from oil pan (3). Allow fluid to drain.
NOTE Inspect fluid for grit, foaminess, and/or milkiness. If present, refer to DS maintenance (chapter 14).
2. Install gasket (2) and drainplug (1) in oil pan (3) and tighten drainplug (1) to 20 lb-ft (27 N-m).
5-2
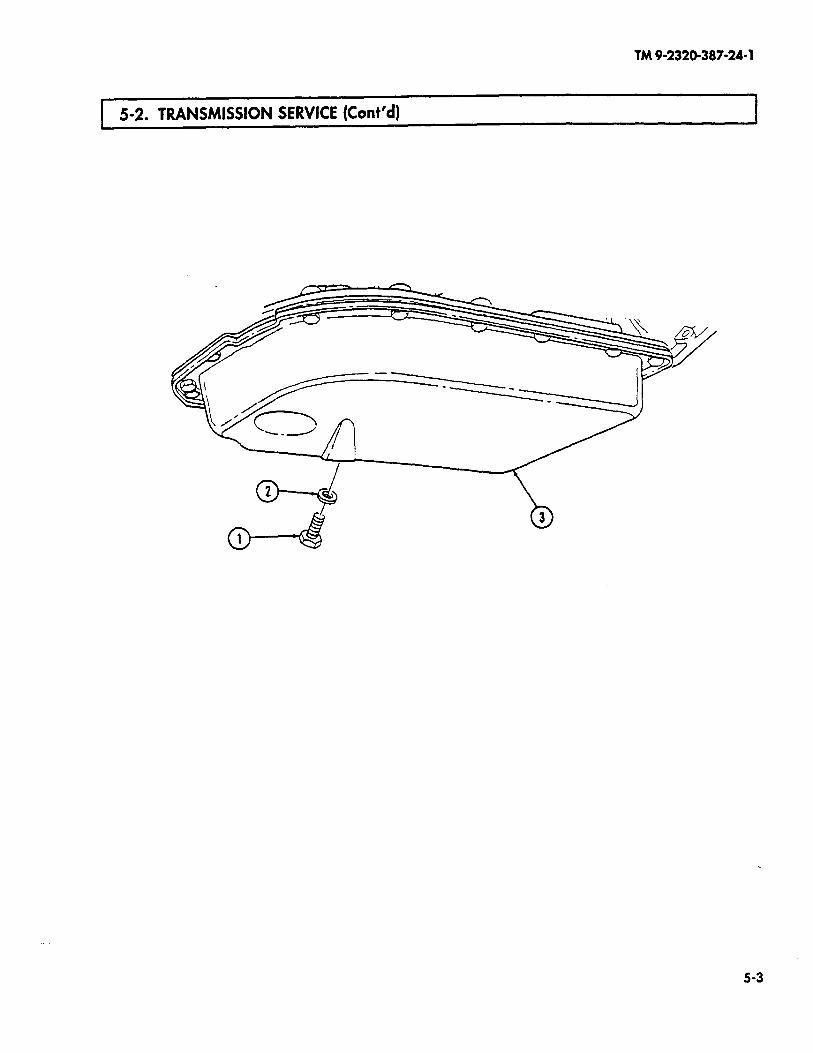
TM 9-2320-387-24-l
5-2. TRANSMISSION SERVICE (Cont’d) I
5-3

TM 9-2320-387-24-l
5-2. TRANSMISSION SERVICE (Cont’d)
b. Trammission Filter Removal
CAUTION Transfer case must be supported during removal and installation of crossmember for access to oil pan capscrew and to prevent damage to equipment.
1. Place support under transfer case and remove two locknuts (31, washers (21, capscrews (61, and crossmember (4) from support brackets (1) and (5). Discard locknuts (3).
NOTE Oil pan gasket is reusable. Discard only if damaged.
2. Remove seventeen capscrews (121, oil pan (111, and gasket (10) from transmission (7).
3. Remove magnet (9) from oil pan (11). Remove filter (8) from transmission (7).
WARNING Drycleaning solvent is flammable and will not be used near an open flame. A 6re extinguisher will be kept nearby when the solvent is used. Use only in well-ventilated places. Failure to do this may result in injury to personnel and/or damage to equipment.
4. Clean oil pan (11) thoroughly with drycleaning solvent.
c Transmission Filter Installation
1. Install filter (8) in transmission (7). Install magnet (9) in oil pan (11).
2. Install gasket (10) and oil pan (11) on transmission (7) with seventeen capscrews (12).
3. Install crossmember (4) on support brackets (1) and (5) with two capscrews (61, washers (21, and locknuts (3). Tighten locknuts (3) to 90 lb-R (122 N-m).
4. Remove support from transfer case.
d. Replenishing Fluid
1. Remove transmission oil dipstick (14) from dipstick tube (13).
2. Check transmission fluid and fill to proper level (TM 9-2320-387-10).
3. Install transmission oil dipstick (14) in dipstick tube (13).
5-4
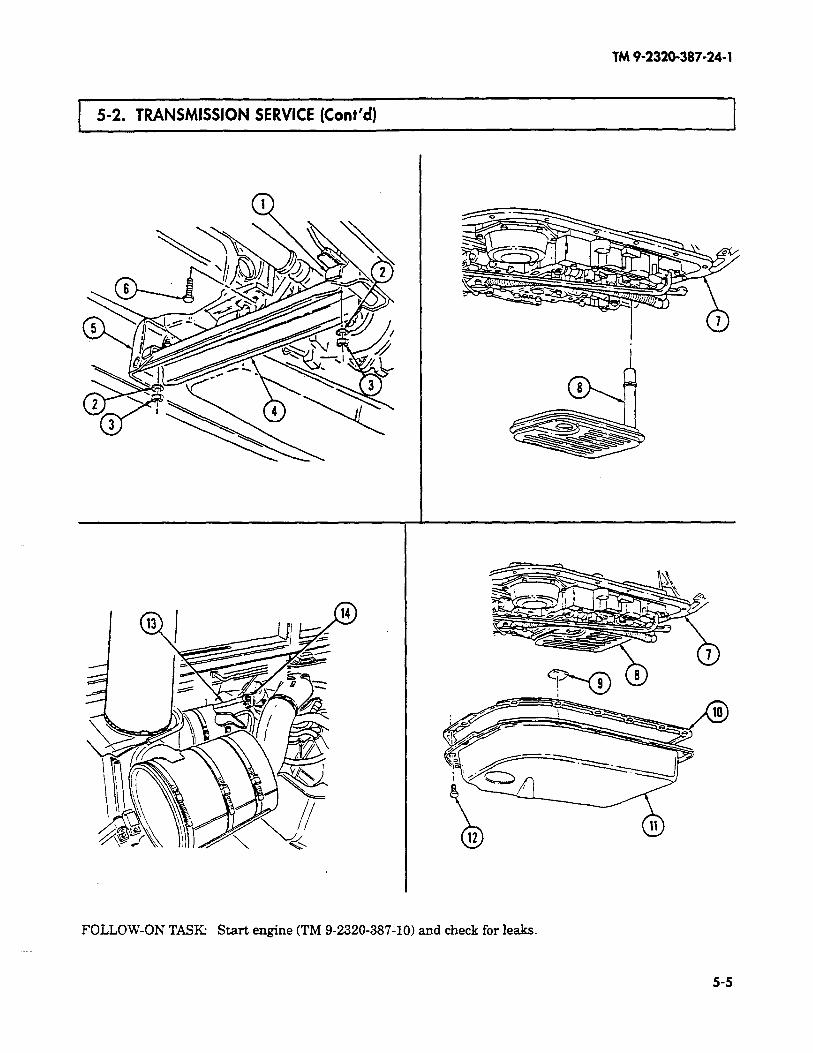
TM9-2320-387-24-l
1 5-2. TRANSMISSION SERVICE (Cont’d)
FOLLOW-ON TASK Start engine (TM 9-2320-387-10) and check for leaks.
5-5
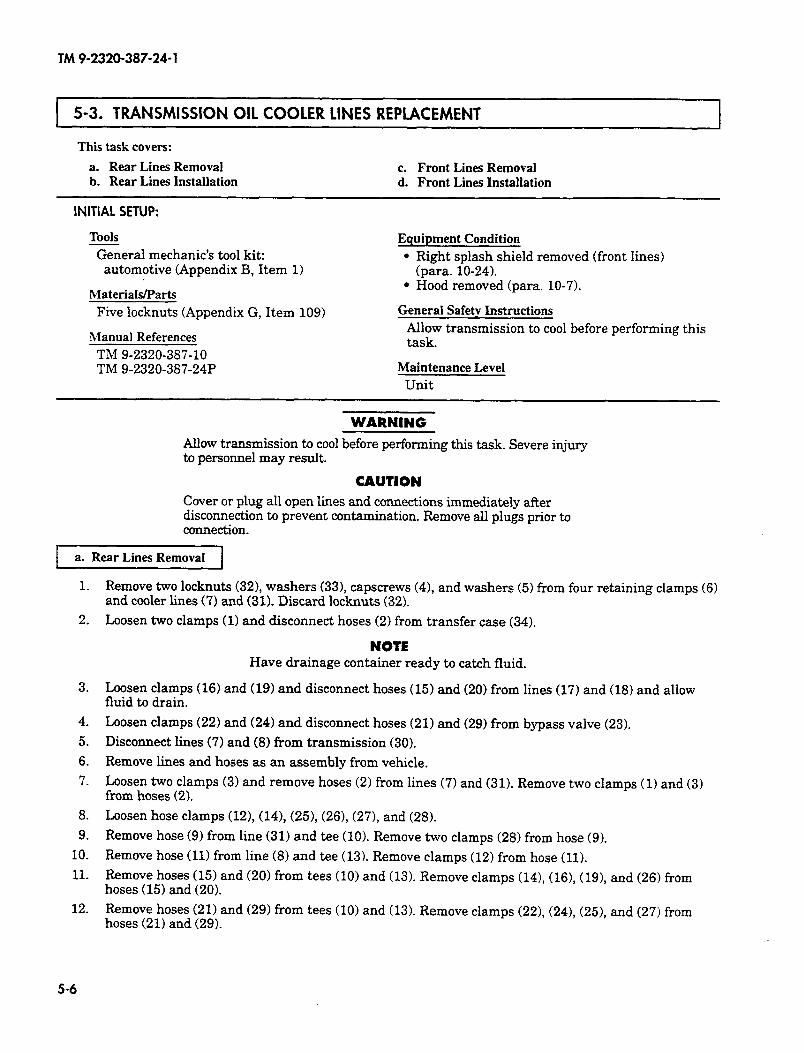
TM 9-2320-387-24-l
5-3. TRANSMISSION OIL COOLER LINES REPLACEMENT
This task covers:
a. Rear Lines Removal b. Rear Lines Installation
INITIAL SETUP:
c. Front Lines Removal d. Front Lines Installation
ToOlS
General mechanic’s tool kit: automotive (Appendix B, Item 1)
Materials/Parts Five locknuts (Appendix G, Item 109)
Manual References
TM 9-2320-387-10 TM 9-2320-387-24P
Equipment Condition
l Right splash shield removed (front lines) (para. 10-24).
l Hood removed (para. 10-7).
General Safety Instructions
Allow transmission to cool before performing this task.
Maintenance Level
unit
WARNING Allow transmission to cool before performing this task. Severe injury to personnel may result.
CAUTION Cover or plug all open lines and connections immediately aRer disconnection to prevent contamination. Remove ail plugs prior to connection.
a. Rear Lines Removal
1.
2.
3.
4.
5.
6.
7.
8.
9.
10.
11.
12.
Remove two locknuts (321, washers (331, capscrews (4), and washers (5) from four retaining clamps (6) and cooler lines (7) and (31). Discard locknuts (32).
Loosen two clamps (1) and disconnect hoses (2) from transfer case (34).
NOTE Have drainage container ready to catch fluid.
Loosen clamps (16) and (19) and disconnect hoses (15) and (20) from lines (17) and (18) and allow fluid to drain.
Loosen clamps (22) and (24) and disconnect hoses (21) and (29) from bypass valve (23).
Disconnect lines (7) and (8) from transmission (30).
Remove lines and hoses as an assembly from vehicle.
Loosen two clamps (3) and remove hoses (2) from lines (7) and (31). Remove two clamps (1) and (3) from hoses (2).
Loosen hose clamps (12), (14), (25), (261, (27), and (28).
Remove hose (9) from line (31) and tee (10). Remove two clamps (28) from hose (9).
Remove hose (11) from line (8) and tee (13). Remove clamps (12) from hose (11).
Remove hoses (15) and (20) from tees (10) and (13). Remove clamps (141, (161, (191, and (26) from hoses (15) and (20).
Remove hoses (21) and (29) from tees (10) and (13). Remove clamps (221, (241, (25), and (27) from hoses (21) and (29).
5-6
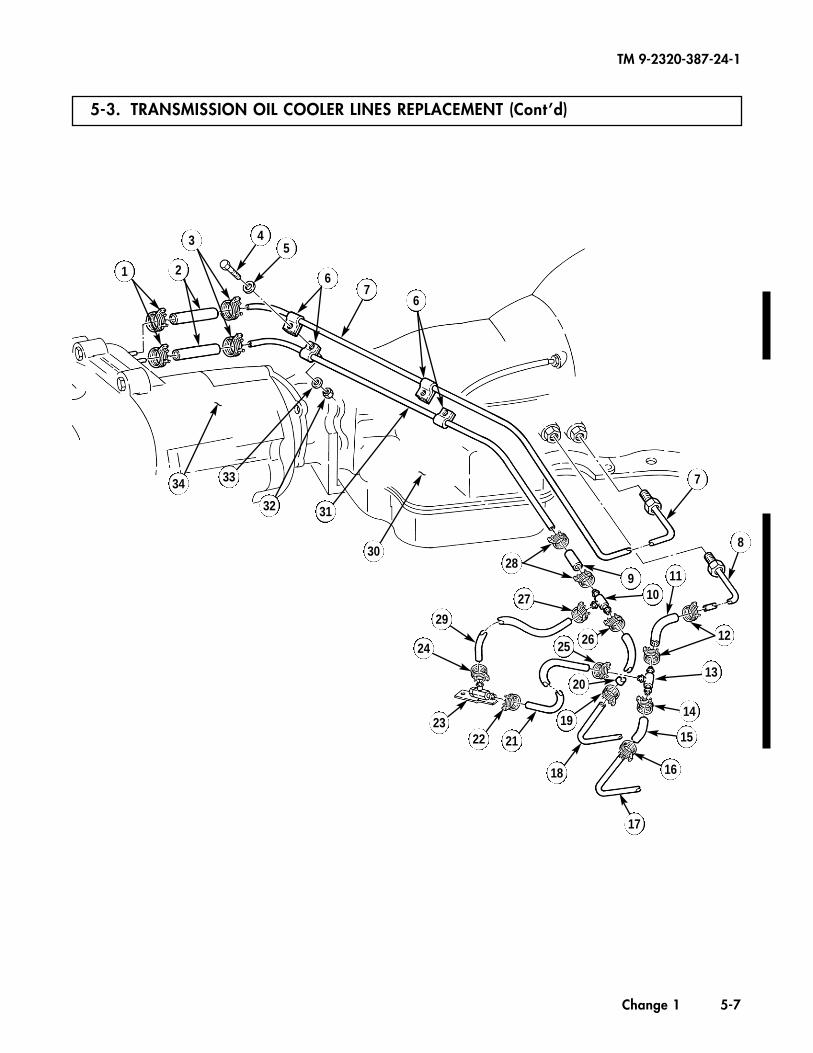
5-3. TRANSMISSION OIL COOLER LINES REPLACEMENT (Cont’d)
TM 9-2320-387-24-1
Change 1 5-7
1 2
3 45
76
6
7
8
1110
12
13
14
15
16
17
26
19
20
25
21
29
24
27
2830
3132
3334
9
2223
~
~
18
5-8 Change 1
5-3. TRANSMISSION OIL COOLER LINES REPLACEMENT (Cont’d)
1. Install clamps (22), (24), (25), and (27) on hoses (21) and (29). Install hoses (21) and (29) on tees (10) and (13).
2. Install clamps (14), (16), (19), and (26) on hoses (15) and (20). Install hoses (15) and (20) on tees (10) and (13).
3. Install two clamps (12) on hose (11). Install hose (11) on line (8) and tee (13). 4. Install two clamps (28) on hose (9). Install hose (9) on line (31) and tee (10).5. Install two clamps (1) and (3) on two hoses (2). Install hoses (2) on lines (7) and (31). 6. Install lines and hoses as an assembly on vehicle and connect lines (7) and (8) to transmission (30).7. Connect hoses (2) to transfer case (34).8. Connect hoses (21) and (29) to bypass valve (23).9. Connect hoses (15) and (20) to lines (17) and (18).
10. Install two washers (5), capscrews (4), washers (33), and locknuts (32) on four retaining clamps (6)and cooler lines (7) and (31).
b. Rear Lines Installation
TM 9-2320-387-24-1

5-3. TRANSMISSION OIL COOLER LINES REPLACEMENT (Cont’d)
Change 1 5-9
TM 9-2320-387-24-1
1 2
3 45
76
6
7
8
1110
12
13
14
15
16
17
26
19
20
25
21
29
24
27
2830
3132
3334
9
2223
~
~
18
5-3. TRANSMISSION OIL COOLER LINES REPLACEMENT (Cont’d)
TM 9-2320-387-24-1
5-10 Change 1
c. Front Lines Removal
. 1. Remove two locknuts (15), washers (16), capscrews (21), and washers (20) from right radiatorsupport (2) and airlift bracket (22). Discard locknuts (15).
2. Loosen locknut (1) and swing up radiator support (2).3. Remove locknut (14), washer (13), capscrew (9), washer (10), and capscrews (18) and (27) from
clamps (11) and (12), two clamps (17), bracket (19), four clamps (26), and frame (23).4. Loosen two clamps (25) and disconnect hoses (24) from lines (7) and (8).5. Loosen two clamps (4) and (6) and remove hoses (5) from oil cooler (3) and lines (7) and (8).6. Remove clamps (4) and (6) from hoses (5).7. Remove cooler lines (7) and (8) from vehicle.
d. Front Lines Installation
1. Install cooler lines (7) and (8) on vehicle.2. Install two clamps (4) and (6) on hoses (5) and install hoses (5) on lines (7) and (8).3. Connect hoses (5) to oil cooler (3).4. Connect two hoses (24) to lines (7) and (8) and tighten clamps (25).5. Install four clamps (26) and cooler lines (7) and (8) on frame (23) with two capscrews (27).6. Install two clamps (17) and lines (7) and (8) on bracket (19) with capscrew (18).7. Install clamps (11) and (12) on cooler lines (7) and (8) with washer (10), capscrew (9), washer (13),
and locknut (14).8. Swing radiator support (2) down and install on airlift bracket (22) with two washers (20),
capscrews (21), washers (16), and locknuts (15).9. Tighten locknut (1).
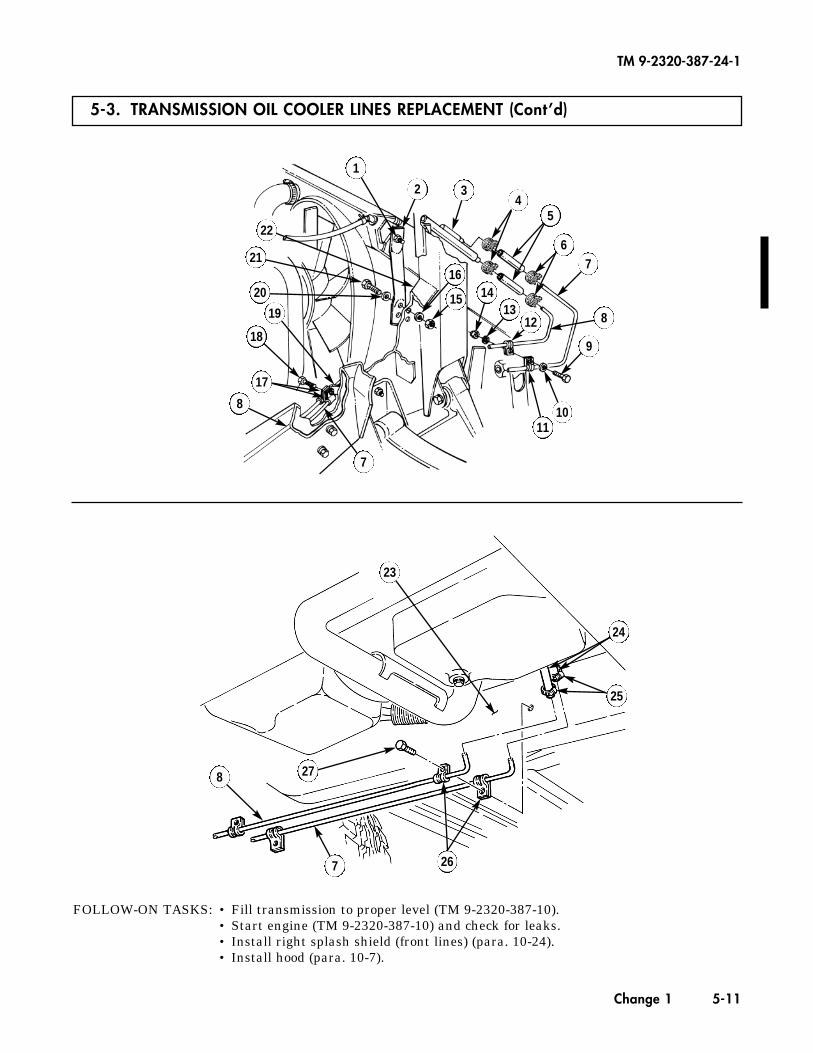
5-3. TRANSMISSION OIL COOLER LINES REPLACEMENT (Cont’d)
Change 1 5-11
FOLLOW-ON TASKS: • Fill transmission to proper level (TM 9-2320-387-10).• Start engine (TM 9-2320-387-10) and check for leaks.• Install right splash shield (front lines) (para. 10-24).• Install hood (para. 10-7).
TM 9-2320-387-24-1
1
2 34
5
67
8
9
1011
7
17
8
18
19
20
21
22
1314
16
15
8 27
23
24
25
267
~
12

TM 9-2320-387-24- 1
I 5-4. TRANSMISSION BYPASS VALVE REPLACEMENT I
This task covers:
a. Removal b. Installation
INITIAL SETUP:
Tools
General mechanic’s tool kit: automotive (Appendix B, Item 1)
Materials/Parts Locknut (Appendix G, Item 157)
Manual Reference TM 9-2320-387-10 TM 9-2320-387-24P
General Safety Instructions
Allow transmission to cool before performing this task.
Maintenance Level Unit
WARNING
Allow transmission to cool before performing this task. Severe injury to personnel may result.
CAUTION
Cover or plug all open lines and connections immediately afler discon- nection to prevent contamination. Remove all plugs prior to connection.
1 a. Removal ]
1. Loosen hose clamps (11 and (8) on rubber hoses (2) and (91.
NOTE Have drainage container ready to catch fluid.
2. Disconnect rubber hoses (21 and (9) from bypass valve (31. 3. Remove locknut (7), washer (51, capscrew (41, washer (51, and bypass valve (3) from transmission
crossmember (6). Discard locknut (71.
b. Installation
1. Install bypass valve (3) on transmission crossmember (61 with washer (51, capscrew (41, washer (51, and locknut (7). Tighten locknut (7) to 90 lb-Et (122 N-m).
2. Connect rubber hoses (21 and (9) to bypass valve (3) and tighten clamps (1) and (8).
5-12
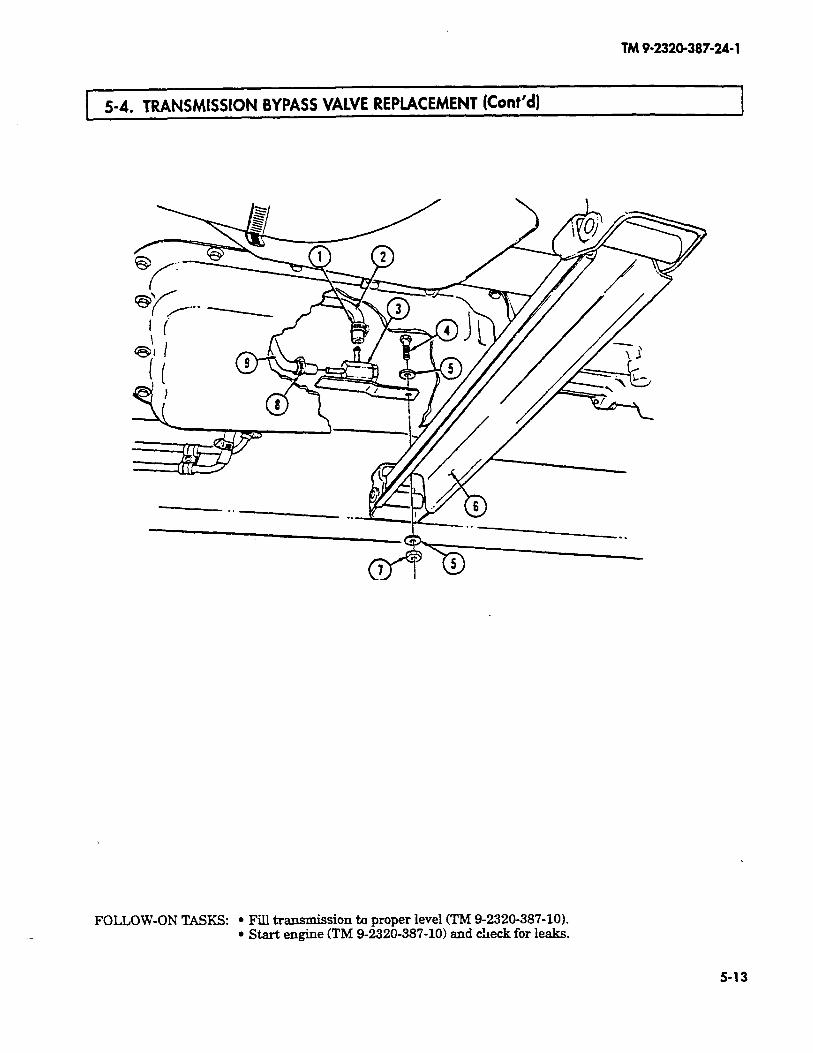
TM 9-2320-387-24-i
5-4. TRANSMISSION BYPASS VALVE REPLACEMENT (Cont’d) 1
-._____C . .
FOLLOW-ON TASKS: l Fill transmission to proper level (TM 9-2320-387-10). l Start engine (TM 9-2320-387-10) and check for leaks.
5-13
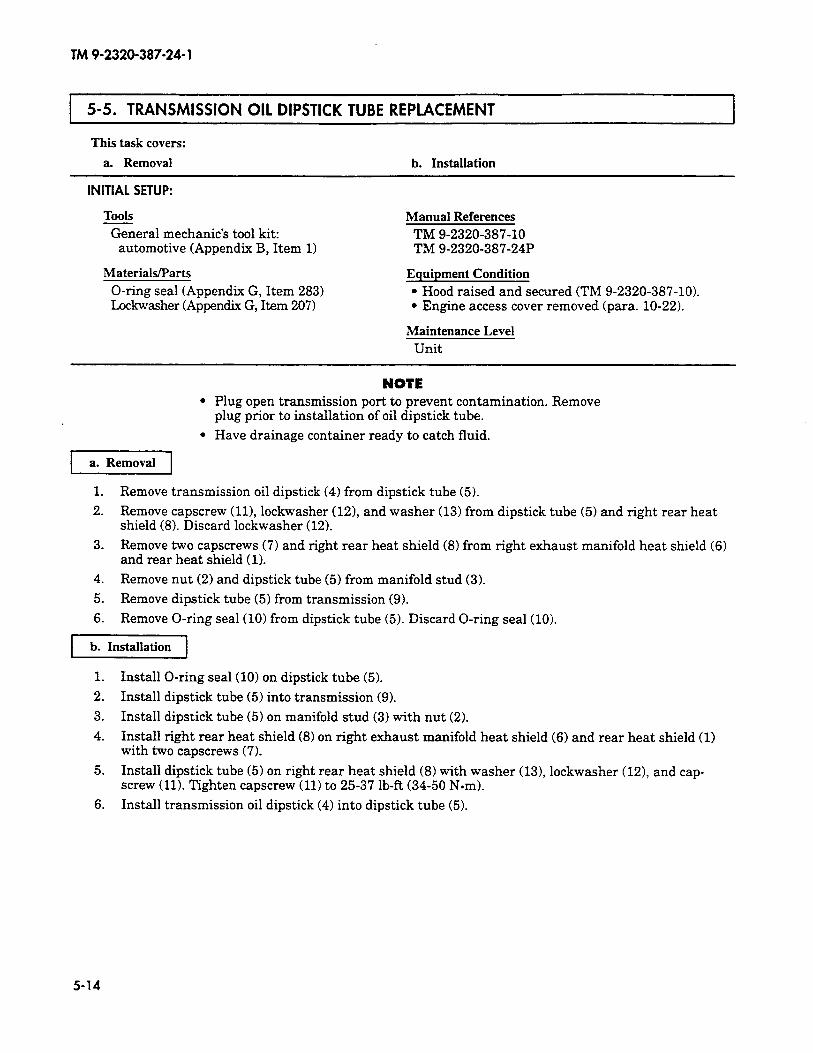
TM 9-2320-387-24- 1
I 5-5. TRANSMISSION OIL DIPSTICK TUBE REPLACEMENT
This task covers:
a. Removal b. Installation
INITIAL SETUP:
Tools Manual References General mechanic’s tool kit: TM 9-2320-387-10
automotive (Appendix B, Item 1) TM 9-2320-387-24P
Materials/Parts O-ring seal (Appendix G, Item 283) Lockwasher (Appendix G, Item 207)
Equipment Condition l Hood raised and secured (TM 9-2320-387-10). l Engine access cover removed (para. 10-22).
Maintenance Level Unit
NOTE l Plug open transmission port to prevent contamination. Remove
plug prior to installation of oil dipstick tube.
l Have drainage container ready to catch fluid.
a. Removal
1. Remove transmission oil dipstick (4) from dipstick tube (5).
2. Remove capscrew (111, lockwasher (121, and washer (13) from dipstick tube (5) and right rear heat shield (8). Discard lockwasher (12).
3. Remove two capscrews (7) and right rear heat shield (8) from right exhaust manifold heat shield (6) and rear heat shield (1).
4. Remove nut (2) and dipstick tube (5) from manifold stud (3).
5. Remove dipstick tube (5) from transmission (9).
6. Remove O-ring seal (10) from dipstick tube (5). Discard O-ring seal (10).
-1
1. Install O-ring seal (10) on dipstick tube (5).
2. Install dipstick tube (5) into transmission (9).
3. Install dipstick tube (5) on manifold stud (3) with nut (2).
4. Install right rear heat shield (8) on right exhaust manifold heat shield (6) and rear heat shield (1) with two capscrews (7).
5. Install dipstick tube (5) on right rear heat shield (8) with washer (131, lockwasher (12), and cap- screw (11). Tighten capscrew (11) to 25-37 lb-R (34-50 Nom).
6. Install transmission oil dipstick (4) into dipstick tube (5).
5-14
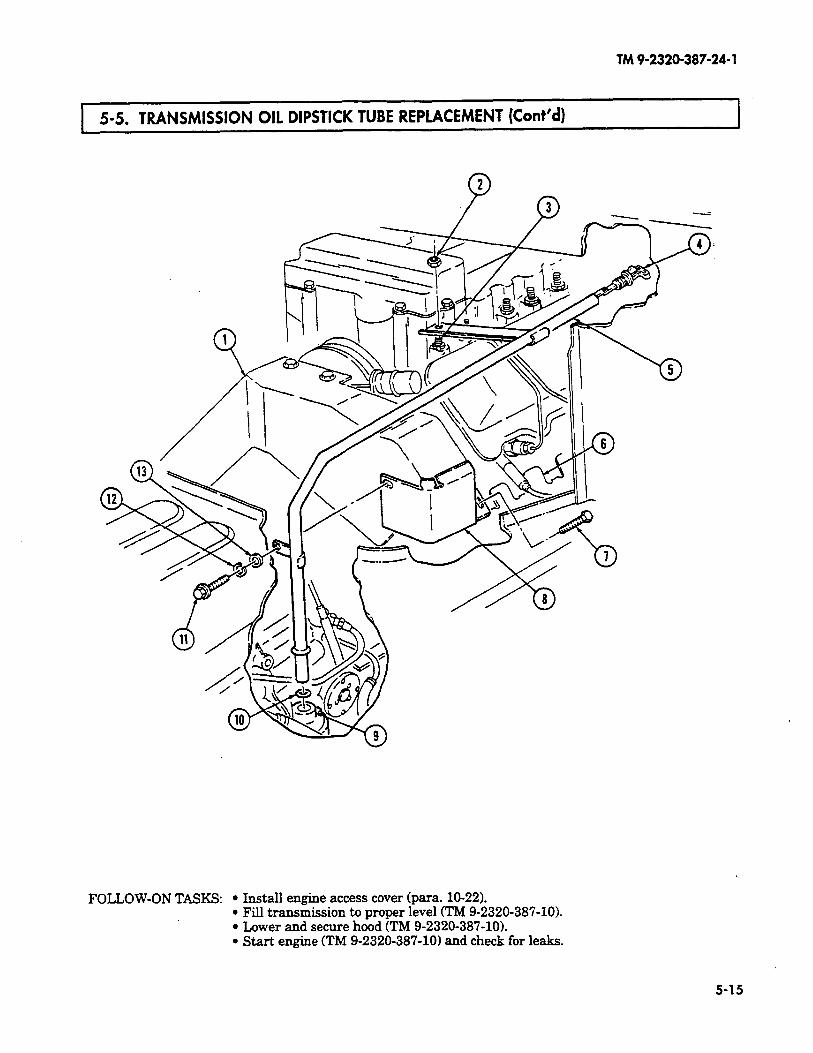
TM9-2320-387-24-l
5-5. TRANSMISSION OIL DIPSTICK TUBE REPLACEMENT (Cont’d) 1
FOLLOW-ON TASKS: l Install engine access cover (para. 10-22). l FiIl transmission to proper level (TM 9-2320-387-10). l Lower and secure hood (TM 9-2320-387-10). l Start engine (TM 9-2320-387-10) and check for leaks.
5-15
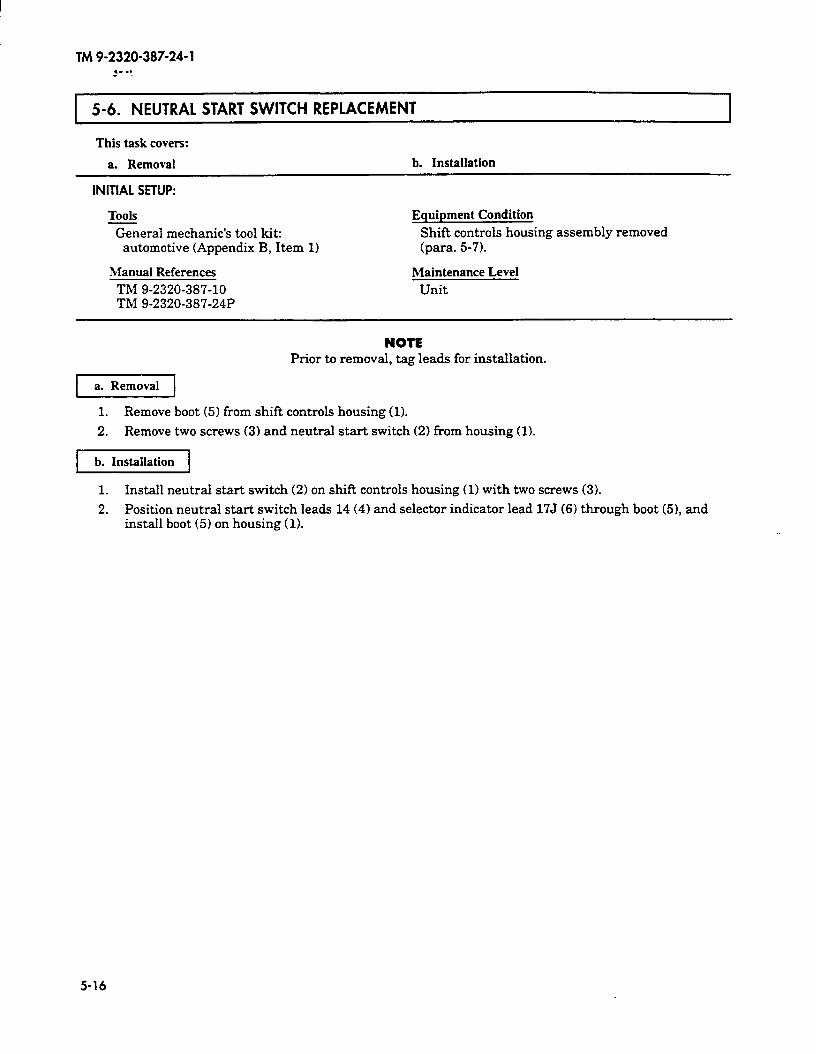
TM 9-2320-387-24- 1 .- r. _
I 5-6. NEUTRAL START SWITCH REPLACEMENT
This task covers:
a. Removal b. Installation
INITIAL SETUP:
Tools
General mechanic’s tool kit: automotive (Appendix B, Item 11
Manual References
TM 9-2320-387-10 TM 9-2320-387-24P
Equipment Condition
Shift controls housing assembly removed (para. 5-7).
Maintenance Level
Unit
NOTE Prior to removal, tag leads for installation.
L a. Removal 1
1. Remove boot (51 from shift controls housing (11.
2. Remove two screws (3) and neutral start switch (2) from housing (1).
b. Installation
1. Install neutral start switch (2) on shift controls housing (11 with two screws (3).
2. Position neutral start switch leads 14 (41 and selector indicator lead 175 (61 through boot (51, and install boot (5) on housing (11.
5-16
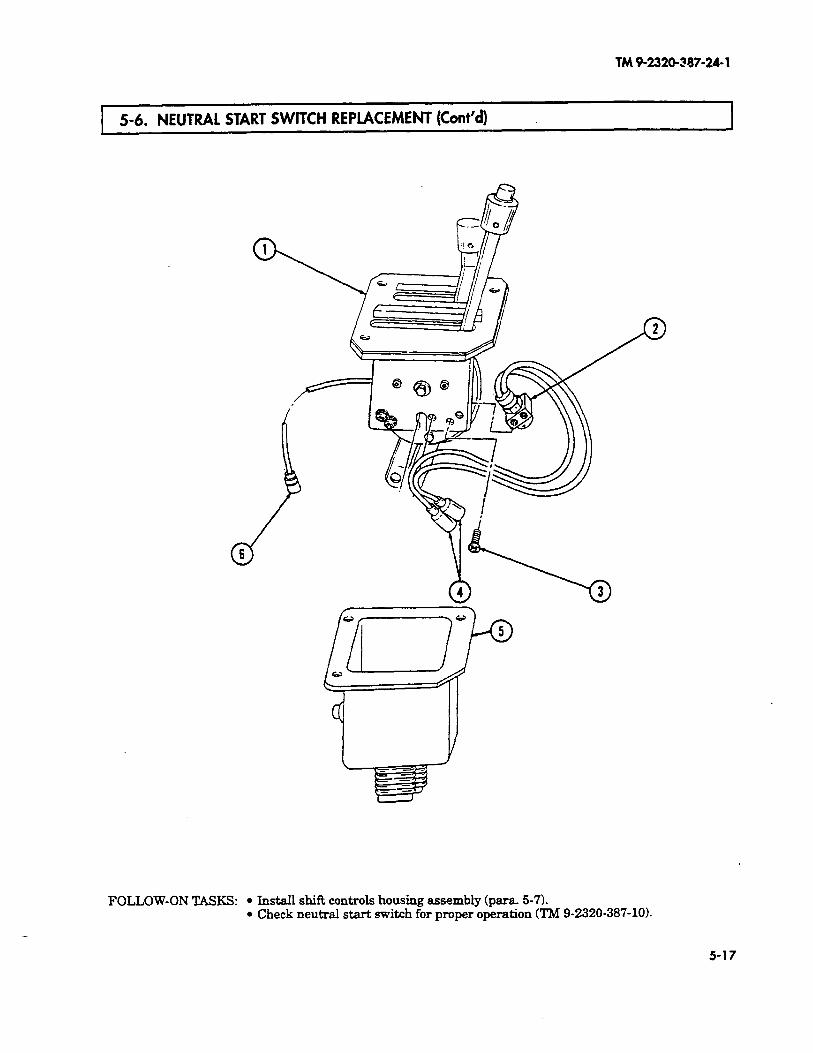
TM 9-2320,757-24-l
5-6. NEUTRAL START SWITCH REPLACEMENT (Cont’d)
FOLLOW-ON TASKS: l Install sbift controls housing assembly (para 5-7). l Check neutral start switch for proper operation (TM 9-2320-387-10).
5-17

TM 9-2320-387-24-l
5-7. SHIFT CONTROLS HOUSING ASSEMBLY REPLACEMENT
This task covers:
a. Removal b. Installation
INITIAL SETUP:
Tools
General mechanic’s tool kit: automotive (Appendix B, Item 1)
Materials/Parts Two cotter pins (Appendix G, Item 33) Four locknuts (Appendix G, Item 115)
Personnel Required One mechanic One assistant
Manual References
TM 9-2320-387-10 TM 9-2320-387-24P
Equipment Condition Battery ground cables disconnected (para. 4-68).
Maintenance Level Unit
1.
2.
3.
4.
5.
NOTE If shift controls housing assembly is to be reinstalled, tape trunnions to shift rod to prevent loss of adjustment. Transfer case shift rod trunnion is removed from shiR rod only if damaged or shift rods are replaced.
Remove cotter pin (5), washer (61, trunnion (91, and rub strip (8) from transmission shift lever arm (10). Discard cotter pin (5).
Remove cotter pin (2), washer (31, tnmnion (41, and rub strip (7) from transfer case shift arm (1). Discard cotter pin (2).
NOTE Tag leads for installation.
Disconnect two body harness leads 14A/14B (14) from neutral start switch leads 14 (19).
Disconnect body harness lead (17) from shift selector indicator lead 175 (18).
Remove four locknuts (151, washers (161, capscrews (201, and shift controls housing assembly (12) from body (13). Discard locknuts (15).
1. Position shift controls housing assembly (12) in body (13) with transmission lever (11) on right, and install with four capscrews (201, washers (161, and locknuts (15). Tighten locknuts (15) to 6 lb-R (8 Nom).
2. Connect two body harness leads 14A/14B (14) to neutral start switch leads 14 (19).
3. Connect body harness lead (17) to shift selector indicator lead 175 (18).
4. Install rub strip (7) and trunnion (4) on transfer case shift arm (1) with washer (3) and cotter pin (2).
5. Install rub strip (8) and trunnion (9) on transmission shift lever arm (10) with washer (6) and cotter pin (5).
5-18

TM9-2320-387-24-l
I 5-7. SHIFT CONTROLS HOUSING ASSEMBLY REPLACEMENT (Cont’d)
FOLLOW-ON TASK: l
. Connect battery grohns cables (para. 4-68). Start engine (TM 9-2320-387-10) and check shift controls for proper operation. Adjust as needed (paras. 5-9 and 5-16).
5-19
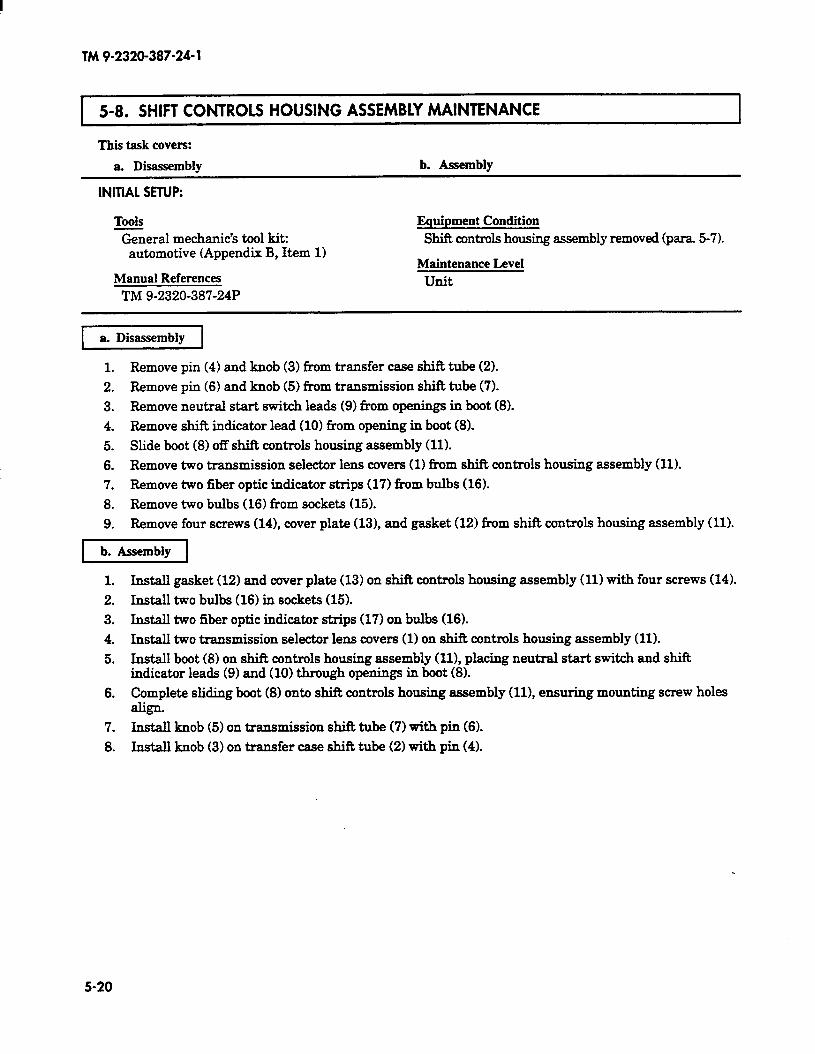
TM 9-2320-387-24-l
5-8. SHIFT CONTROLS HOUSING ASSEMBLY MAINTENANCE
This task covers:
a. Disassembly b. Assembly
INITIAL SETUP:
Tools ?&era1 mechanic’s tool kit:
automotive (Appendix B, Item 1)
Manual References TM 9-2320-387-24P
Equipment Condition Shift controIs housing assembly removed (para. 5-7).
Maintenance Level unit
rY7ziiq 1. Remove pin (4) and knob (3) from transfer case shift tube (2).
2. Remove pin (6) and knob (5) from transmission shift tube (7).
3. Remove neutral start switch leads (9) from openings in boot (8).
4. Remove shift indicator lead (10) from opening in boot (8).
5. Slide boot (8) off sh3t controls housing assembly (11).
6. Remove two transmission selector lens covers (1) from shift controls housing assembly (11).
7. Remove two fiber optic indicator strips (17) from bulbs (16).
8. Remove two bulbs (16) from sockets (15).
9. Remove four screws (141, cover plate (131, and gasket (12) from shift controls housing assembly (11).
b. Assembly
1. InstalI gasket (12) and cover plate (13) on shift controls housing assembly (11) with four screws (14).
2. Install two bulbs (16) in sockets (15).
3. Install two fiber optic indicator strips (17) on bulbs (16).
4. InstaU two transmission selector lens covers (1) on shiR controls housing assembly (11).
5. InstalI boot (8) on shift controls housing assembly (ll), placing neutral start switch and shift indicator leads (9) and (10) through openings in boot (8).
6. Complete sliding boot (8) onto shiR controls housing assembly (111, ensuring mounting screw holes align.
7. InstalI knob (5) on transmission shift tube (7) with pin (6).
8. InstaIl knob (3) on transfer case shift tube (2) with pin (4).
5-20
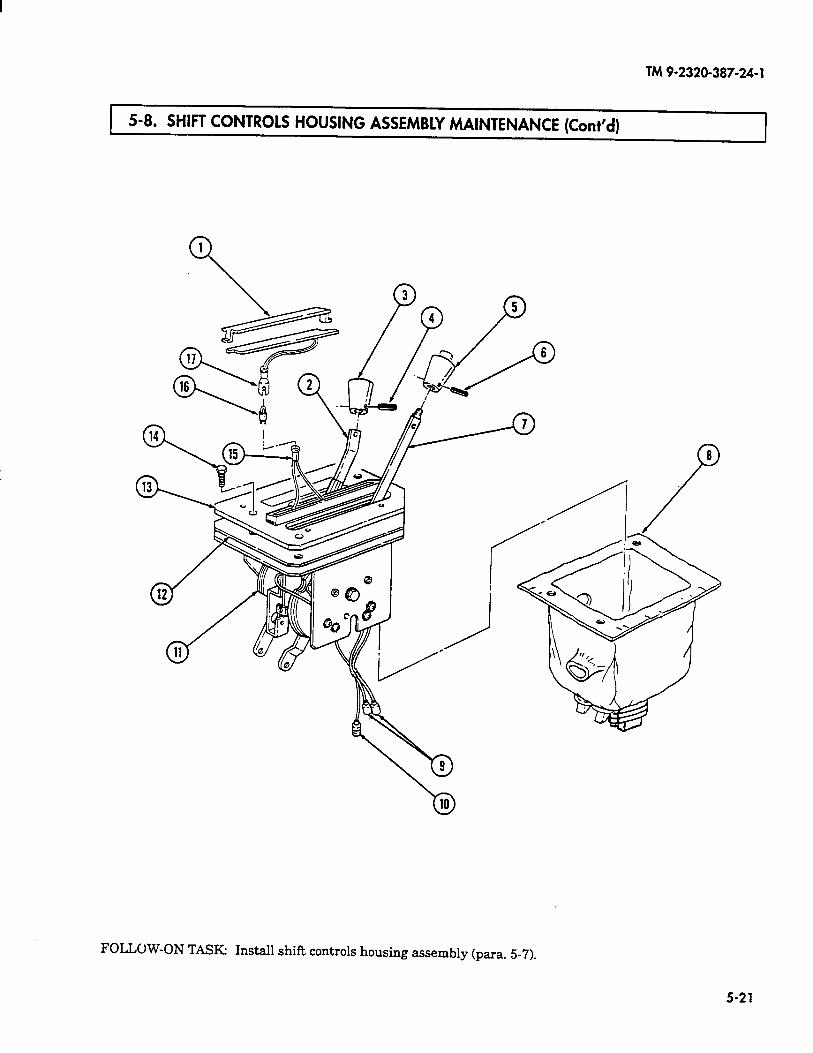
TM9-2320-387-24-l
5-8. SHIFT CONTROLS HOUSING ASSEMBLY MAINTENANCE (Cont’d)
FOLLOW-ON TASK: Install shift controls housing assembly (para. 5-7).
5-21
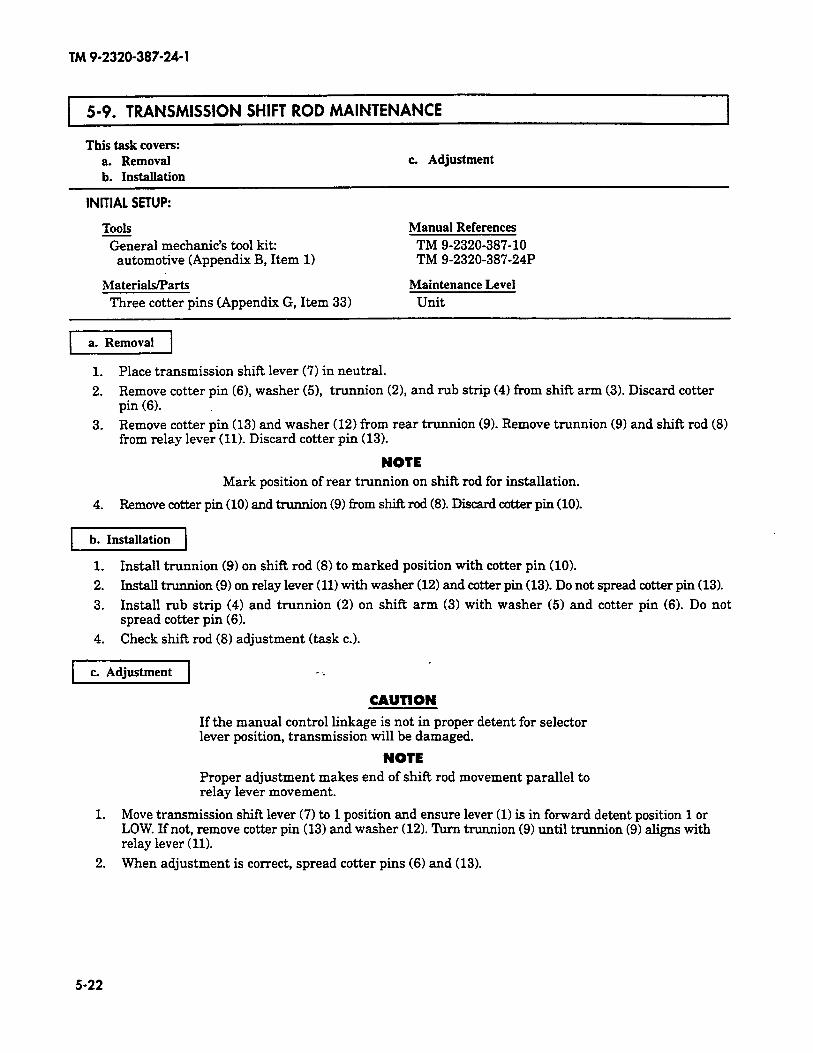
TM 9-2320-387-24-l
1 5-9. TRANSMISSION SHIFT ROD MAINTENANCE I
This task covers: a. Removal b. Installation
c Adjustment
INlTlAL SETUP:
TOOIS Manual References General mechanic’s tool kit: TM 9-2320-387-10
automotive (Appendix B, Item 1) TM 9.2320.387.24P
Materials/Parts Maintenance Level Three cotter pins (Appendix G, Item 33) Unit
I a. Removal 1
1. Place transmission shift lever (7) in neutral.
2. Remove cotter pin (61, washer (5), trunnion (2), pin (6).
and rub strip (4) from shift arm (3). Discard cotter
3. Remove cotter pin (13) and washer (12) from rear trunnion (9). Remove trunnion (9) and shift rod (8) from relay lever (11). Discard cotter pin (13).
NOTE Mark position of rear trunnion on shift rod for installation.
4. Remove cotter pin (10) and tnmnion (9) from shit% rod (8). Discard cotter pin (10).
-1
1. Install trunnion (9) on shift rod (8) to marked position with cotter pin (10).
2. InstaII tnmnion (9) on relay lever (11) with washer (12) and cotter pin (13). Do not spread cotter pin (13).
3. Install rub strip (4) and trunnion (2) on shift arm (3) with washer (5) and cotter pin (6). Do not spread cotter pin (6).
4. Check shift rod (8) adjustment (task c.).
jc.Adjustment/ _- :
CAUTION If the manual control linkage is not in proper detent for selector lever position, transmission will be damaged.
NOTE Proper adjustment makes end of shift rod movement parallel to relay lever movement.
1. Move transmission shift lever (7) to 1 position and ensure lever (1) is in forward detent position 1 or LOW. If not, remove cotter pin (13) and washer (12). Turn tnmnion (9) until trunnion (9) aligns with relay lever (11).
2. When adjustment is correct, spread cotter pins (6) and (13).
5-22
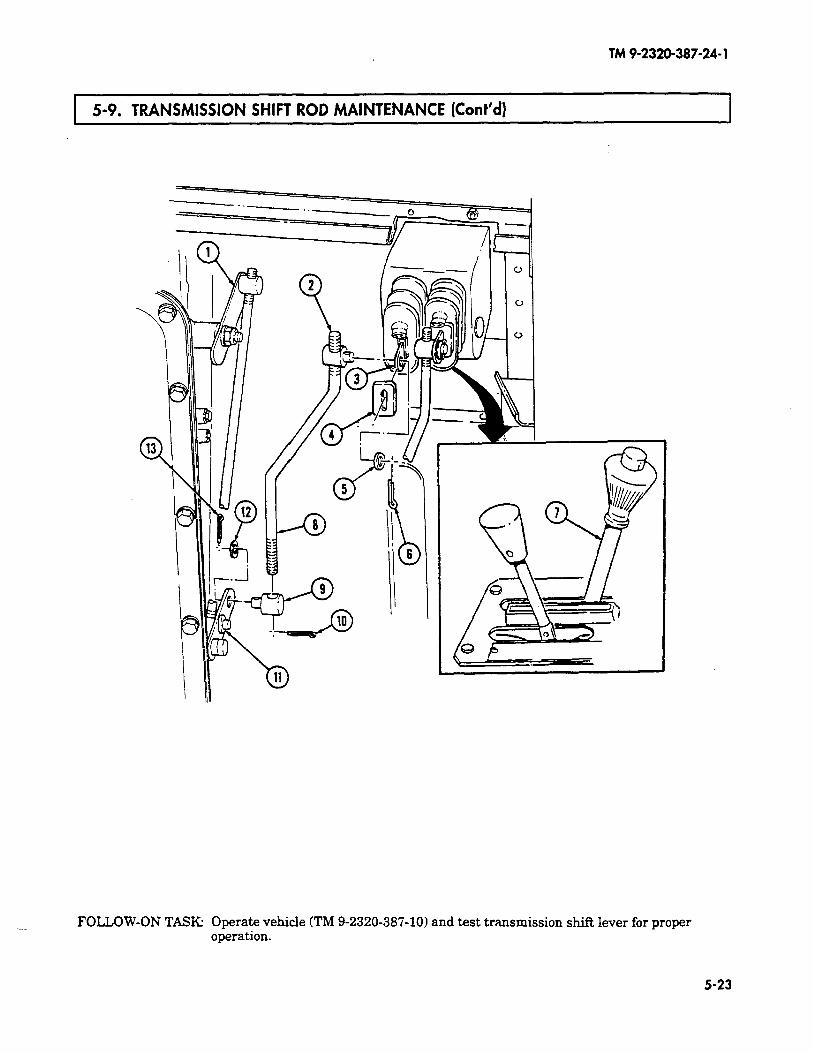
TM 9-2320-387-24-l
5-9. TRANSMISSION SHIFT ROD MAINTENANCE (Cont’d)
FOUOW-ON TASK: Operate vehicle (TM 9-2320-387-10) and test transmission shift lever for proper operation.
5-23
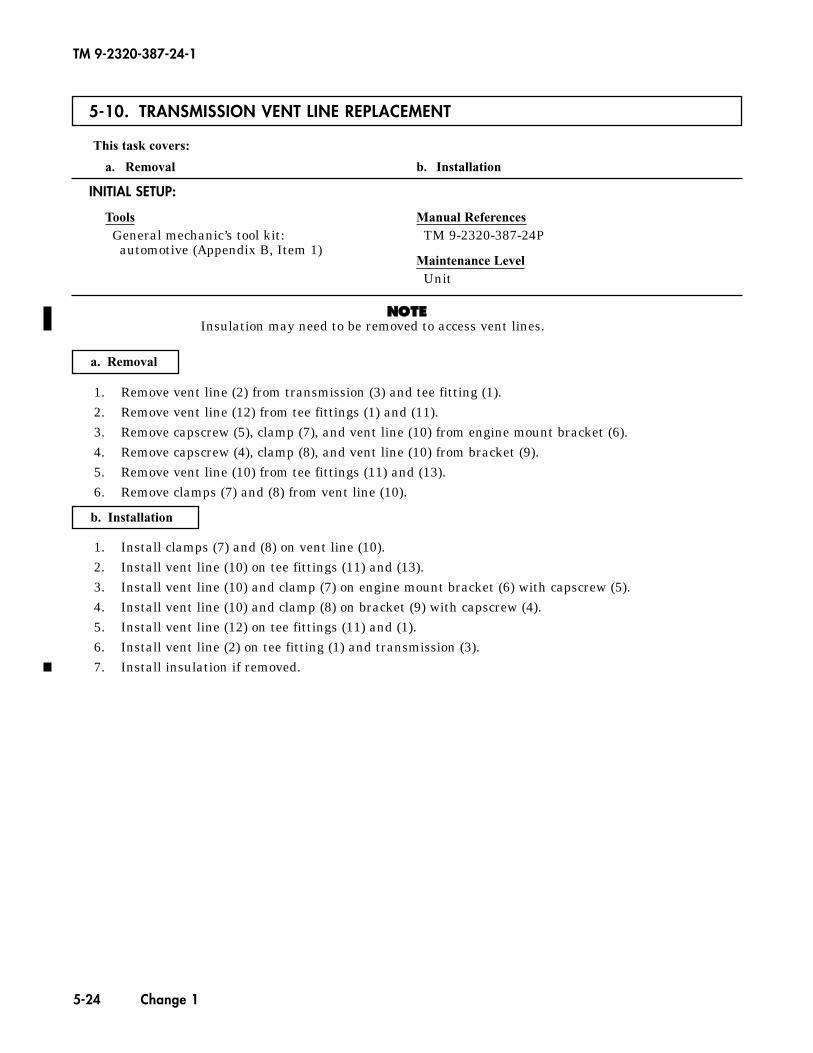
TM 9-2320-387-24-1
5-24 Change 1
5-10. TRANSMISSION VENT LINE REPLACEMENT
This task covers:
a. Removal b. Installation
a. Removal
b. Installation
1. Remove vent line (2) from transmission (3) and tee fitting (1).2. Remove vent line (12) from tee fittings (1) and (11).3. Remove capscrew (5), clamp (7), and vent line (10) from engine mount bracket (6).4. Remove capscrew (4), clamp (8), and vent line (10) from bracket (9).5. Remove vent line (10) from tee fittings (11) and (13).6. Remove clamps (7) and (8) from vent line (10).
1. Install clamps (7) and (8) on vent line (10).2. Install vent line (10) on tee fittings (11) and (13).3. Install vent line (10) and clamp (7) on engine mount bracket (6) with capscrew (5).4. Install vent line (10) and clamp (8) on bracket (9) with capscrew (4).5. Install vent line (12) on tee fittings (11) and (1).6. Install vent line (2) on tee fitting (1) and transmission (3).7. Install insulation if removed.
INITIAL SETUP:
ToolsGeneral mechanic’s tool kit:
automotive (Appendix B, Item 1)
Manual ReferencesTM 9-2320-387-24P
Maintenance LevelUnit
NNOOTTEEInsulation may need to be removed to access vent lines.
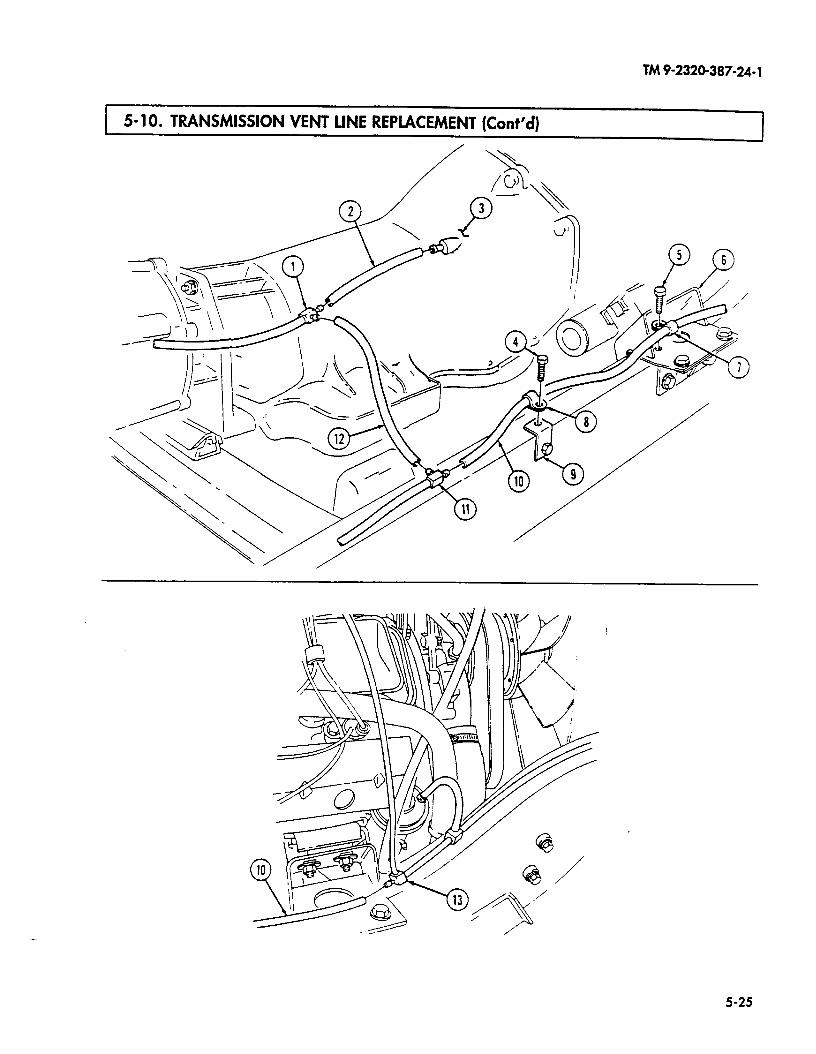
TM 9-2320-387-24- 1
5- 10. TRANSMISSION VENT LINE REPLACEMENT (Cont’d)
5-25

TM 9-2320-387-24-l
I 5-l 1. SEALED LOWER CONVERTER HOUSING COVER MAINTENANCE
This task covers:
a. Removal b. Inspection
c. Installation n
INITIAL SETUP:
Tools General mechanic’s tool kit:
automotive (Appendix B, Item 1)
bIaterials/Parts Gasket (Appendix G, Item 57) General !%fetp Instructions
Adhesive (Appendix C, Item 61 Drycleaning solvent is flammable and will not be Drycleaning solvent (Appendix C, Item 26) used near an open flame.
Manual References TM 9-2320-387-24P
hlaintenance Level Unit
Equipment Condition l Exhaust pipe removed (para. 3-50). l Sealed upper converter housing cover removed
(para. 5-12).
1. Remove three capscrews (5) and converter housing cover (4) from transmission (2).
2. Remove gasket (3) from converter housing cover (4). Discard gasket (3).
b. Inspection
1. Inspect converter housing cover (4) for pitting, cracking, and excessive wear. Replace if pitted, cracked, or excessively worn.
WARNING
Drycleaning solvent is flammable and will not be used near an open flame. A fire extinguisher will be kept nearby when the solvent is used. Use only in well-ventilated places. Failure to do this may result in injury to personnel and/or damage to equipment.
2. Remove gasketmaterial and sealant from converter housing cover (4) and transmission (2) with drycleaning solvent.
c. Installation
NOTE Gasket must be bent over edge of converter housing cover to ensure gasket seats properly.
1. Apply adhesive to gasket (3) and install on converter housing cover (4).
CAUTION Ensure converter housing cover is seated on oil pan flange to prevent converter housing cover from hitting flywheel and damaging converter housing cover.
2. Install converter housing cover (4) on flange (1) and transmission (2) with three capscrews (5).
5-26

TM 9-2320-387-24-l
5-l 1. SEALED LOWER CONVERTER HOUSING COVER MAINTENANCE (Co&d)
FOLLOW-ON TASKS: . Install exhaust pipe (para. 3-50). l Install sealed upper converter housing cover (para. 5-12).
5-27
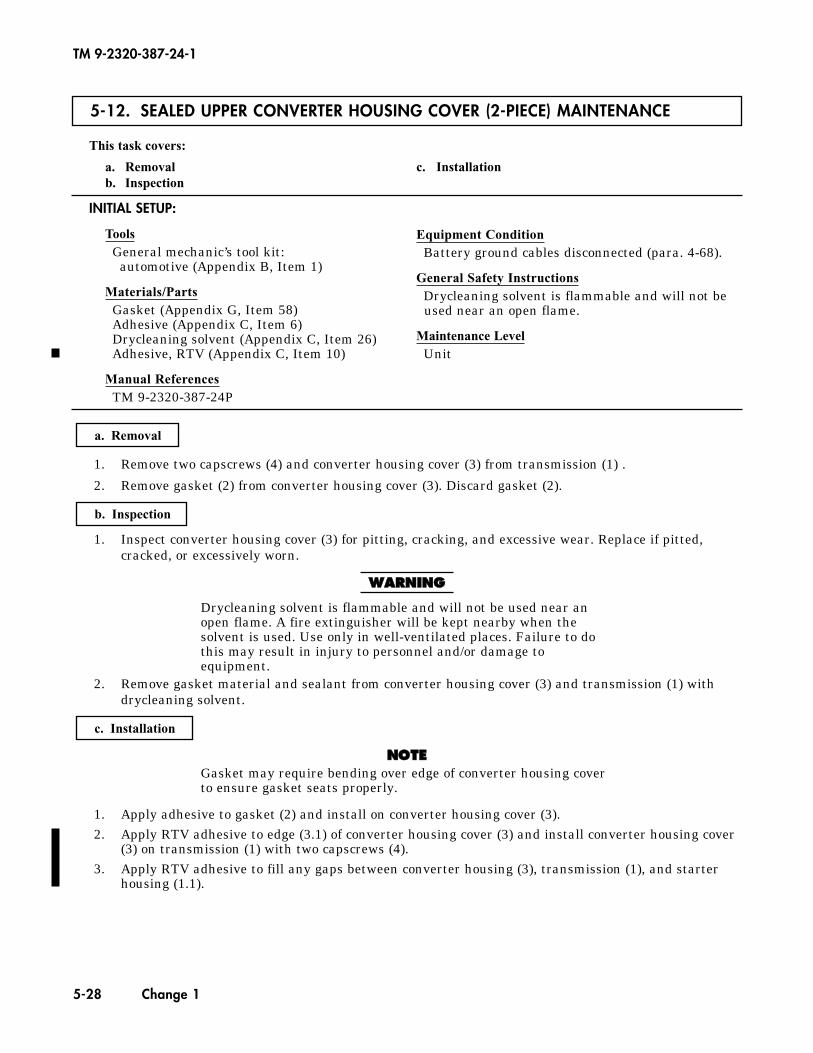
5-12. SEALED UPPER CONVERTER HOUSING COVER (2-PIECE) MAINTENANCE
This task covers:
a. Removal c. Installationb. Inspection
INITIAL SETUP:
ToolsGeneral mechanic’s tool kit:
automotive (Appendix B, Item 1)
Materials/PartsGasket (Appendix G, Item 58)Adhesive (Appendix C, Item 6)Drycleaning solvent (Appendix C, Item 26)Adhesive, RTV (Appendix C, Item 10)
Manual ReferencesTM 9-2320-387-24P
Equipment ConditionBattery ground cables disconnected (para. 4-68).
General Safety InstructionsDrycleaning solvent is flammable and will not beused near an open flame.
Maintenance LevelUnit
1. Remove two capscrews (4) and converter housing cover (3) from transmission (1) .
2. Remove gasket (2) from converter housing cover (3). Discard gasket (2).
1. Inspect converter housing cover (3) for pitting, cracking, and excessive wear. Replace if pitted,cracked, or excessively worn.
WWAARRNNIINNGG
Drycleaning solvent is flammable and will not be used near anopen flame. A fire extinguisher will be kept nearby when thesolvent is used. Use only in well-ventilated places. Failure to dothis may result in injury to personnel and/or damage toequipment.
2. Remove gasket material and sealant from converter housing cover (3) and transmission (1) withdrycleaning solvent.
NNOOTTEEGasket may require bending over edge of converter housing coverto ensure gasket seats properly.
1. Apply adhesive to gasket (2) and install on converter housing cover (3).2. Apply RTV adhesive to edge (3.1) of converter housing cover (3) and install converter housing cover
(3) on transmission (1) with two capscrews (4).3. Apply RTV adhesive to fill any gaps between converter housing (3), transmission (1), and starter
housing (1.1).
c. Installation
b. Inspection
a. Removal
TM 9-2320-387-24-1
5-28 Change 1
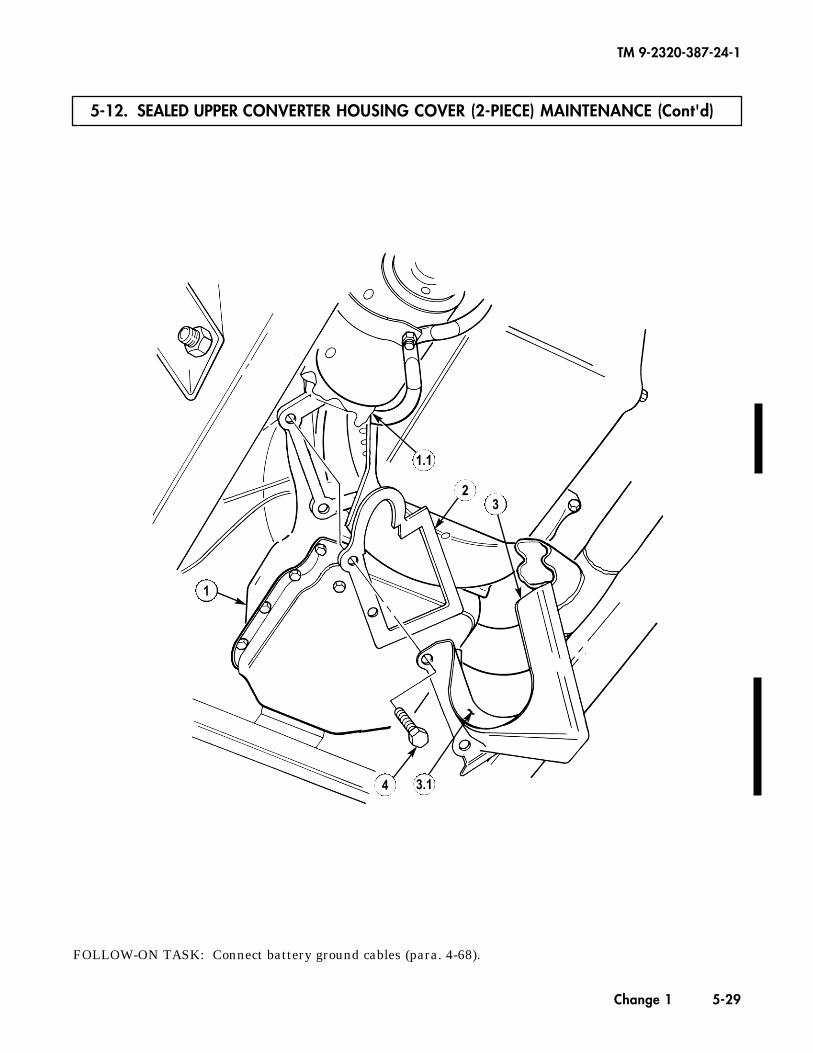
TM 9-2320-387-24-1
Change 1 5-29
5-12. SEALED UPPER CONVERTER HOUSING COVER (2-PIECE) MAINTENANCE (Cont'd)
FOLLOW-ON TASK: Connect battery ground cables (para. 4-68).
1
23
4 3.1
1.1
~
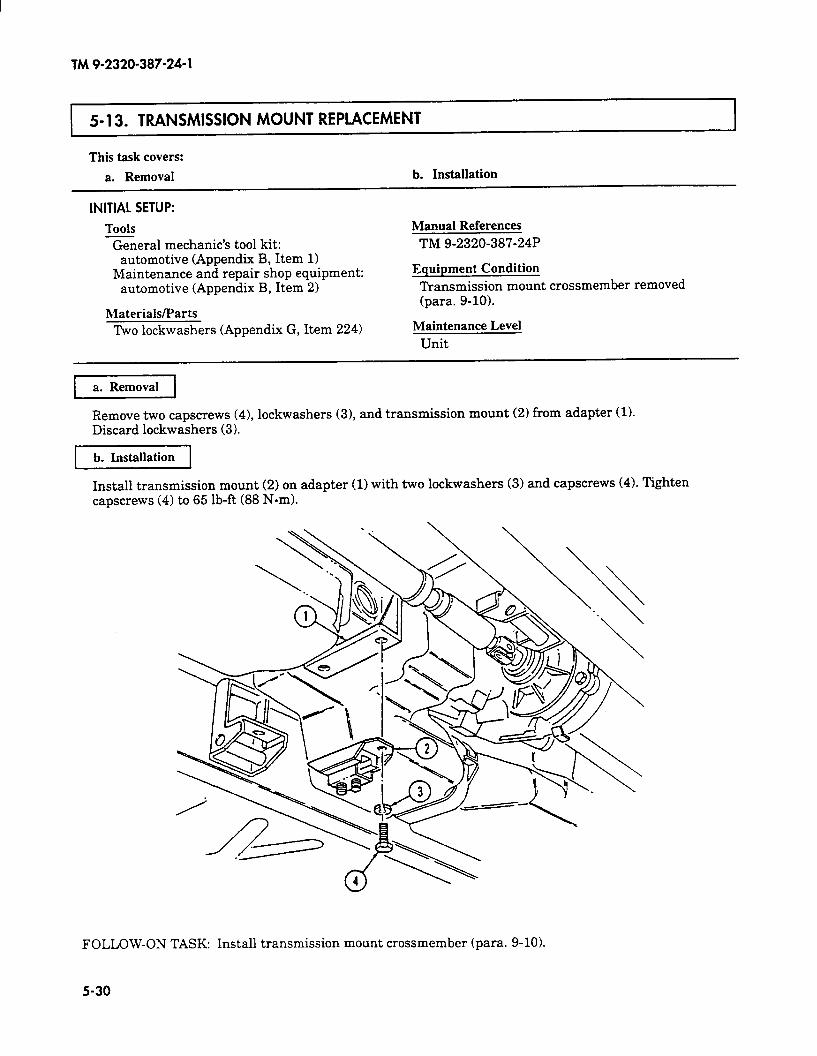
TM 9-2320-387-24-l
5-l 3. TRANSMISSION MOUNT REPLACEMENT
This task covers:
a. Removal b. Installation
INITIAL SETUP:
Tools General mechanic’s tool kit:
automotive (Appendix B, Item 1) Maintenance and repair shop equipment:
automotive (Appendix B, Item 2)
Materials/Parts
Two lockwashers (Appendix G, Item 224)
Manual References
TM 9-2320-387-24P
Equipment Condition
Transmission mount crossmember removed (para. g-10).
Maintenance Level
Unit
Remove two capscrews (4), lockwashers (31, and transmission mount (2) from adapter (1). Discard lockwashers (3).
1 b. Installation
Install transmission mount (2) on adapter (1) with two lo&washers (3) and capscrews (4). Tighten capscrews (4) to 65 lb-R (88 Nom).
FOLLOW-ON TASK: Install transmission mount crossmember (para. g-10).
5-30

TM 9-2320-387-24-l
1 5-14. TRANSMISSION ROAD TEST I
This task covers:
Road Test
INITIAL SETUP:
Tools
General mechanic’s tool kit: automotive (Appendix B, Item 1)
Manual References TM 9-2320-387-10
Equipment Condition l Transmission fluid at proper level
(TM 9-2320-387-10). l Adjust transmission shift linkage (para. 5-9).
Maintenance Level Unit
1 Road Test 1
1.
2.
3.
4.
5.
6.
7.
8.
9.
Position shift lever in @ (overdrive), and accelerate vehicle. A l-2,2-3, and 3-4 shiR should occur at all throttle openings. Allow vehicle to coast down to about 0 mph; 43,3-2, and 2-l shifts should occur. Position shift lever in D (drive) and accelerate vehicle. A l-2 and 2-3 shift should occur at all throttle openings. Allow vehicle to coast down to about 0 mph; 3-2 and 2-l shifts should occur.
Position shift lever in 2 (low two), and accelerate vehicle. A l-2 shiR should occur at all throttle openings. No 2-3 shift can be obtained in this range. A l-2 shift in 2 is somewhat firmer than in D. This is normal.
Position shift lever in 1 and accelerate vehicle. No upshifts should occur in this range.
Position shift lever in @, and with vehicle speed at approximately 45 mph, close throttle and move lever to 3. Transmission should downshift to 3rd gear. An increase in engine rpm and engine braking effect should be noticed.
Position shifi lever in D and, with vehicle speed at approximately 35 mph, close throttle and move lever to 2. Transmission should downshift to 2nd gear. An increase in engine rpm and engine braking effect should be noticed.
Position shift lever in 2 and, with vehicle speed at approximately 25 mph, close the throttle and move lever to 1. Transmission should downshift to 1st gear. An increase in engine rpm and engine braking effect should be noticed.
Position shift lever in R, and check for reverse operation.
Hard shifting may indicate an underfilled or clogged system.
Section II. TRANSFER CASE MAINTENANCE
1 5-15. TRANSFER CASE MAINTENANCE TASK SUMMARY 1 I I
I
I TASK PARA.
PROCEDURES PAGE NO.
5-16. Transfer Case Shift Rod Maintenance 5-32
5-17. Speedometer Driven Gear Replacement 5-34
5-18. Transfer Case Oil Seals Replacement 5-36
5-19. Transfer Case Vent Line Replacement 5-39 ..-
5-31
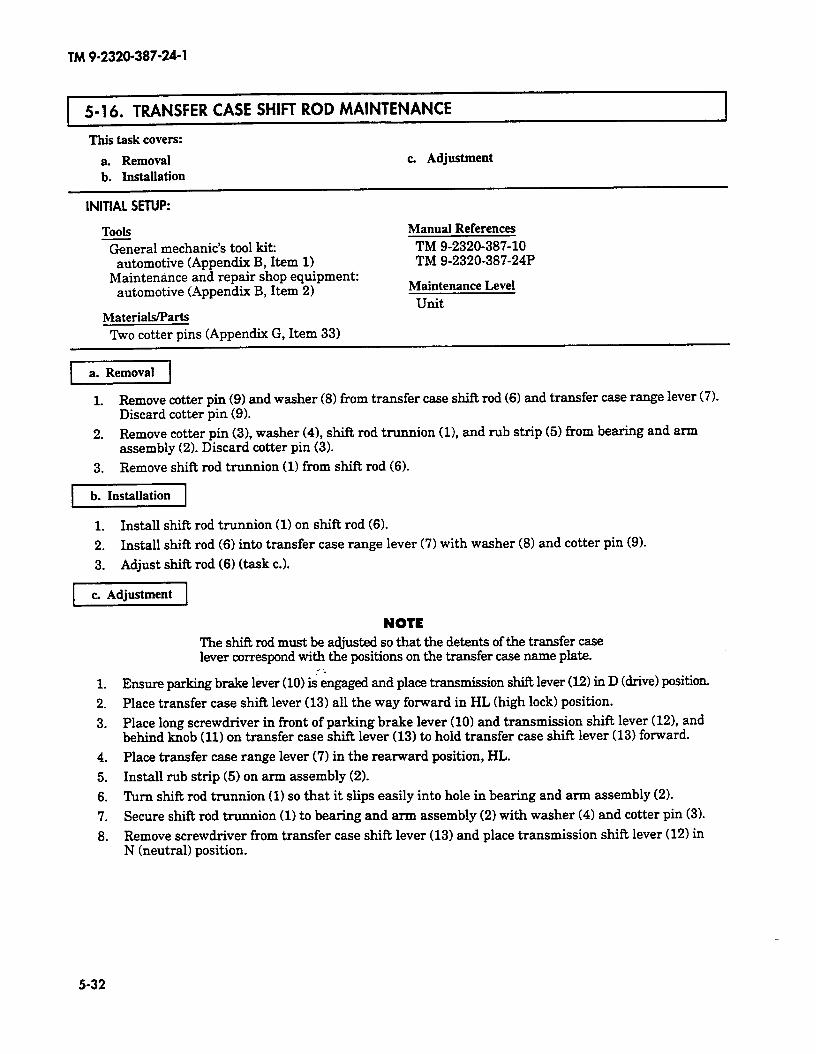
TM 9-2320-387-24-l
5-16. TRANSFER CASE SHIFT ROD MAINTENANCE
This task covers:
a. Removal c Adjustment b. Installation
INITIAL SETUP:
Tools General mechanic’s tool kit:
automotive (Appendix B, Item 1) Maintenance and repair shop equipment:
automotive (Appendix B, Item 2)
Materials/Parts
Manual References TM 9-2320-387-10 TM 9-2320-387-24P
Maintenance Level Unit
Two cotter pins (Appendix G, Item 33)
a. Removal
1. Remove cotter pin (9) and washer (8) from transfer case shift rod (61 and transfer case range lever (71. Discard cotter pin (9).
2. Remove cotter pin (3), washer (41, shift rod trunnion (11, and rub strip (5) from bearing and arm assembly (2). Discard cotter pin (3).
3. Remove shift rod trunnion (11 from shift rod (6).
-1
1. Install shift rod trunnion (1) on shift rod (6).
2. Install shift rod (6) into transfer case range lever (7) with washer (8) and cotter pin (9).
3. Adjust shift rod (6) (task c.).
1 c. Adjustment 1
1.
2.
3.
4.
5.
6.
7.
8.
NOTE The shifi rod must be adjusted so that the detents of the transfer case lever correspond with the positions on the transfer case name plate.
_- : Ensure parking brake lever (10) is engaged and place transmission shift lever (12) in D @rive1 position.
Place transfer case shift lever (13) all the way forward in HL (high lock) position.
Place long screwdriver in front of parking brake lever (10) and transmission shift lever (121, and behind knob (11) on transfer case shift lever (13) to hold transfer case shift lever (131 forward.
Place transfer case range lever (7) in the rearward position, I-IL.
Install rub strip (5) on arm assembly (2).
Turn shift rod trunnion (1) so that it slips easily into hole in bearing and arm assembly (2).
Secure shift rod trunnion (1) to bearing and arm assembly (2) with washer (4) and cotter pin (3).
Remove screwdriver from transfer case shift lever (13) and place transmission shift lever (12) in N (neutral) position.
5-32
TM 9-2320-387-24- 1
1 5-16. TRANSFER CASE SHIFT ROD MAINTENANCE Kont’d) I J
FOLLOW-ON TASK: Operate vehicle (TM 9-2320-387-10) and check for proper shifter operation.
5-33

TM 9-2320-387-24-l
1 5-l 7. SPEEDOMETER DRIVEN GEAR REPLACEMENT I
Tbii task covers:
a. Removal
INITIAL SETUP:
b. Installation
Tools
General mechanic’s tool kit: automotive (Appendix B, Item 1)
Maintenance and repair shop equipment: automotive (Appendix B, Item 2)
Special Tools
Materials/Parts
O-ring seal (Appendix G, Item 284)
Manual References
TM 9-2320-387-10 TM 9-2320-387-24P
Mirror, inspection (Appendix B, Item 84) Maintenance Level
Unit
p7iGz-l 1. Disconnect flex driveshaft (1) from correction adapter (2).
2. Loosen nut (3) and remove correction adapter (2) from pinion adapter (6).
3. Remove capscrew (4) and clamp (5) from pinion adapter (61 and transfer case (8).
4. Pull pinion adapter (6) out of transfer case (8).
5. Remove O-ring seal (7) from pinion adapter (6). Discard O-ring seal (7).
6. Remove driven gear (9) from transfer case (8).
b. Installation
1. Install O-ring seal (7) on pinion adapter (6).
NOTE Note number stamped on driven gear.
2. Install driven gear (9) into pinion adapter (6).
NOTE Numbers on pinion adapter represent numbers stamped on driven gear. When installing adapter, numbers on adapter must match numbers on transfer case housing.
3. Install and align pinion adapter (6) into transfer case (8) with clamp (5) and capscrew (4). Tighten capscrew (4) to 15 lb-R (20 Nem).
4. Install correction adapter (2) on pinion adapter (6) and tighten nut (3).
5. Connect flex driveshaft (1) to correction adapter (2).
5-34
TM 9-2320-387-24-l
5 17. SPEEDOMETER DRIVEN GEAR REPLACEMENT (Cont’d) 1
FOLLOW-ON TASK: Operate vehicle (TM 94X320-387-10) and chesk speedometer for proper operation.
5-35

TM 9-2320-387-24-l
5-l 8. TRANSFER CASE OIL SEALS REPLACEMENT
This task covers:
a. Front Oil Seal Removal b. Front Oil Seal Installation
c. Rear Oil Seal Removal d. Rear Oil Seal Installation
INITIAL SETUP:
Tools
General mechanic’s tool kit: automotive (Appendix B, Item 11
Maintenance and repair shop equipment: automotive (Appendix B, Item 21
Special Tools
Materials/Parts Washer seal (Appendix G, Item 436)
Manual References TM 9-2320-387-10 TM 9-2320-387-24P
Front seal installer (Appendix B, Item 96) Rear seal installer (Appendix B, Item 95) Drive handle (Appendix B, Item 60)
Maintenance Level Unit
a. Front Oil Seal Removal
1. Remove four capscrews (4), two straps (31, and front propeller shaft (1) from output yoke (2).
NOTE Have drainage container ready to catch fluid.
2. Remove nut (51, washer seal (61, and output yoke (2) from transfer case (8). Discard washer seal (6).
3. Remove output oil seal (7) from transfer case (81.
1 b. Front Oil Seal Installation ~~~~ 1
NOTE Ensure rubber surface of seal faces front seal installer.
1. Using front seal installer and drive handle, install oil seal (71 on transfer case (8).
2. Install washer seal (6) and output yoke (2) on transfer case (81 with nut (51. Tighten nut (5) to 110 lb-ft (149 Nem).
3. Connect front propeller shaft (1) to output yoke (2) with two straps (3) and four capscrews (41. Tighten capscrews (4) to 13-18 lb-ft (18-24 Nom).
5-36
TM 9-2320-387-24-l
1 5-l 8. TRANSFER CASE OIL SEALS REPLACEMENT (Cont’d) I I I
HANDLE
5-37
TM 9-2320-387-24-l
1 5-l 8. TRANSFER CASE OIL SEALS REPLACEMENT (Cont’d)
1 c. Rear Oil Seal Removal 1
1. Remove rear propeller shaft (para. 6-4).
2. Remove oil seal (1) from transfer case extension (2).
d. Rear Oil Seal Installation
1. Using rear seal installer, install oil seal (1) on transfer case extension (2).
2. Install rear propeller shaft (para. 6-4).
FOLLOW-ON TASK: Fill transfer case fluid to proper level (ThI 9-2320-387-10X
5-38
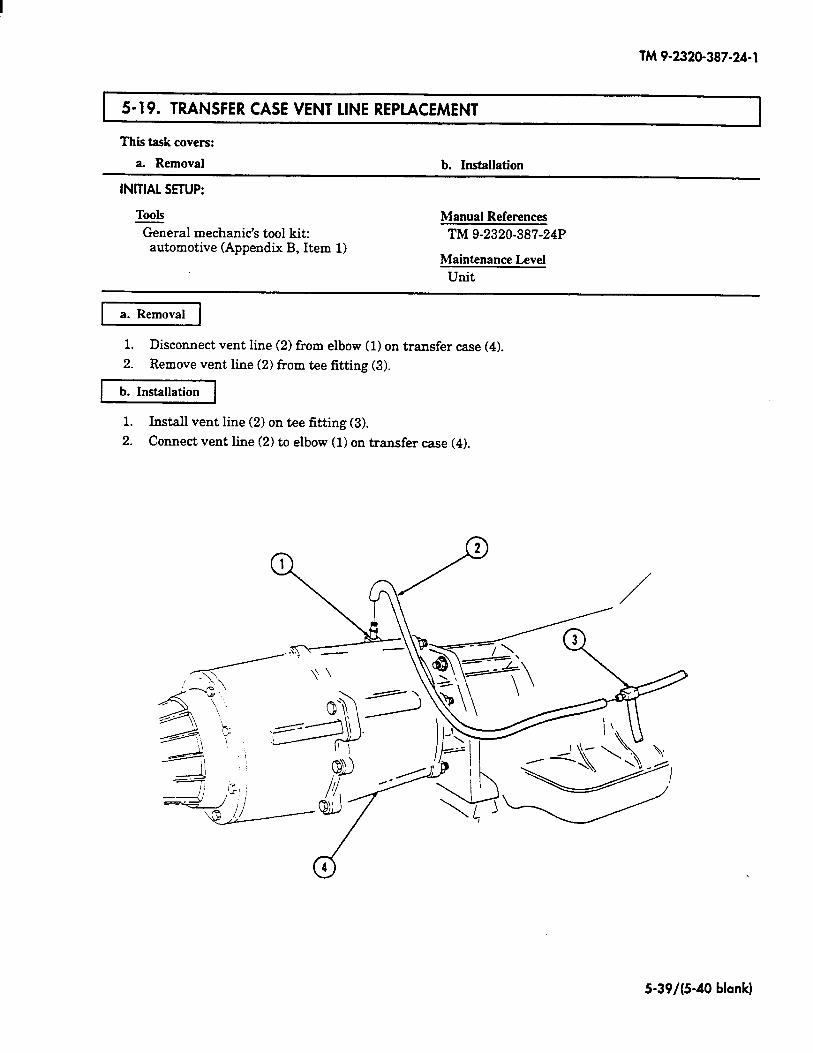
TM 9-2320-387-24-l
1 5-19. TRANSFER CASE VENT LINE REPLACEMENT
This task covers:
a. Removal b. Installation
INITIAL SETUP:
ToOlS
General mechanic’s tool kit: automotive (Appendix B, Item 1)
Manual References
TM 9-2320-387-24P
Maintenance Level
Unit
a. Removal
1. Disconnect vent line (2) from elbow (1) on transfer case (4).
2. Remove vent line (2) from tee fitting (3).
-1
1. Install vent line (2) on tee fitting (3).
2. Connect vent line (2) to elbow (1) on transfer case (4).
5-39/(5-40 blank]
TM 9-2320-387-24-l
PROPELLER
CHAPTER 6
SHAFTS, AXLES, AND SUSPENSION (UNIT) MAINTENANCE
Section I. PROPELLER SHAFTS MAINTENANCE
6-l. PROPELLER SHAFTS MAINTENANCE TASK SUMMARY
I
I TASK PARA.
PROCEDURES PAGE
NO. I
6-2. Front Propeller Shaft Assembly Maintenance 6-2
6-3. Front Propeller Shaft Assembly Repair 6-6
6-4. Rear Propeller Shaft Maintenance 6-8
6-5. Universal Joint Repair 6-10
--
6-l
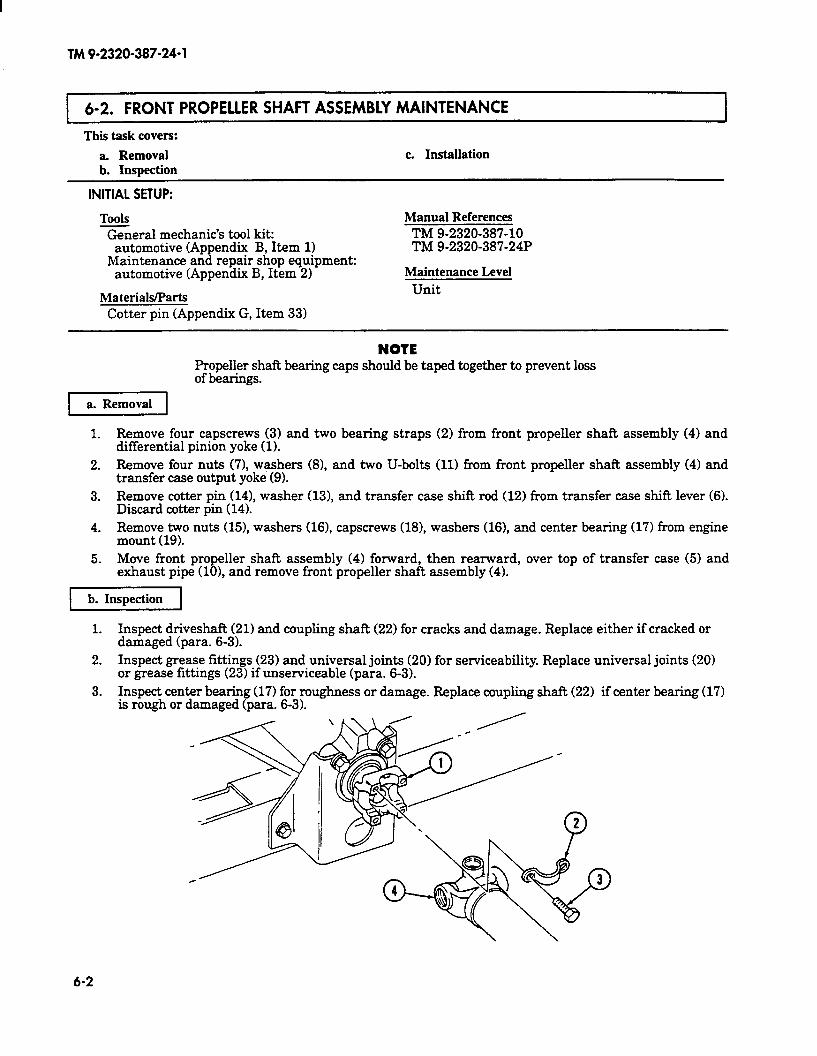
TM 9-2320-387-24-l
6-2. FRONT PROPELLER SHAFT ASSEMBLY MAINTENANCE
This task covers:
a. Removal c. Installation b. Inspection
INITIAL SETUP:
Tools General mechanic’s tool kit:
automotive (Appendix B, Item 1) Maintenance and repair shop equipment:
automotive (Appendix B, Item 2)
Materials/Parts Cotter pin (Appendix G, Item 33)
Manual References TM 9-2320-387-10 TM 9-2320-387-24P
Maintenance Level Unit
NOTE Propeller shaft bearing caps should be taped together to prevent loss of bearings.
I[
1. Remove four capscrews (3) and two bearing straps (2) from front propeller shaft assembly (4) and differential pinion yoke (1).
2. Remove four nuts (71, washers (81, and two U-bolts (11) from front propeller shaft assembly (4) and transfer case output yoke (9).
3. Remove cotter pin (14), washer (131, and transfer case shift rod (12) from transfer case shifi lever (6). Discard cotter pin (14).
4. Remove two nuts (E), washers (161, capscrews (18), washers (161, and center bearing (17) from engine mount (19).
5. Move front propeller shaft assembly (4) forward, then rearward, over top of transfer case (5) and exhaust pipe (101, and remove front propeller shaft assembly (4).
1. Inspect driveshaft (21) and coupling shaft (22) for cracks and damage. Replace either if cracked or damaged (para. 6-3).
2. Inspect grease fittings (23) and universal joints (20) for serviceability. Replace universal joints (20) or grease fittings (23) if unserviceable (para. 6-3).
3. Inspect center bearing (17) for roughness or damage. Replace coupling shaft (22) if center bearing (17) is rough or damaged (para. 6-3).
6-2
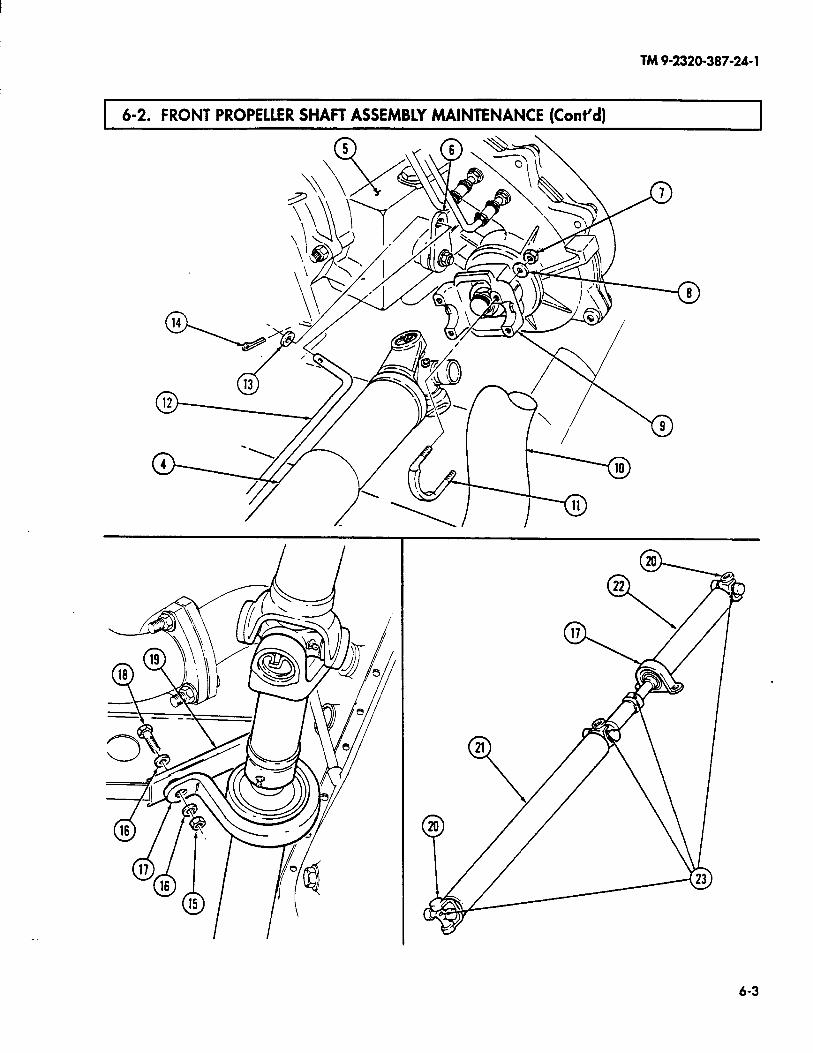
lM9-2320-387-24-l
6-2. FRONT PROPELLER SHAFT ASSEMBLY MAINTENANCE (Co&d)
w 16
6-3
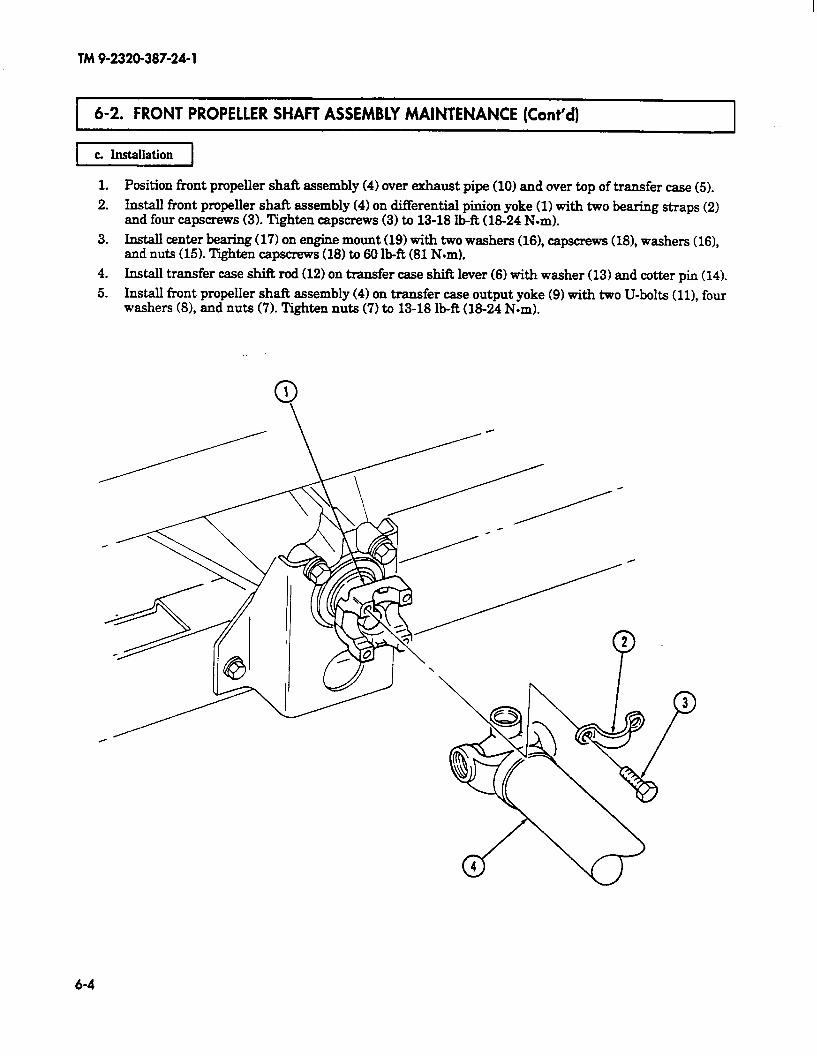
TM9-2320-387-24-l
6-2. FRONT PROPELLER SHAFT ASSEMBLY MAINTENANCE (Cont’d)
piiixc-1
1.
2.
3.
4.
5.
Position front propeller shaft assembly (4) over exhaust pipe (10) and over top of transfer case (5).
Install front propeller sh& assembly (4) on difTerential pinion yoke (1) with two bearing straps (2) and four capscrews (3). Tighten capscrews (3) to 13-18 lb-R (B-24 Nom).
Install center beaxing (17) on engine mount (19) with two washers (161, capscrews (181, washers (16), and nuts (15). Tighten capscrews (18) to 60 lb-R 031 N-m).
Install transfer case shift rod (12) on transfer case shiB lever (6) with washer (13) and cotter pin (14).
Install front propeller shaR assembly (4) on transfer case output yoke (9) with two U-bolts (111, four washers (81, and nuts (7). Tighten nuts (7) to 13-18 lb-R (1824 Nom).
6-4
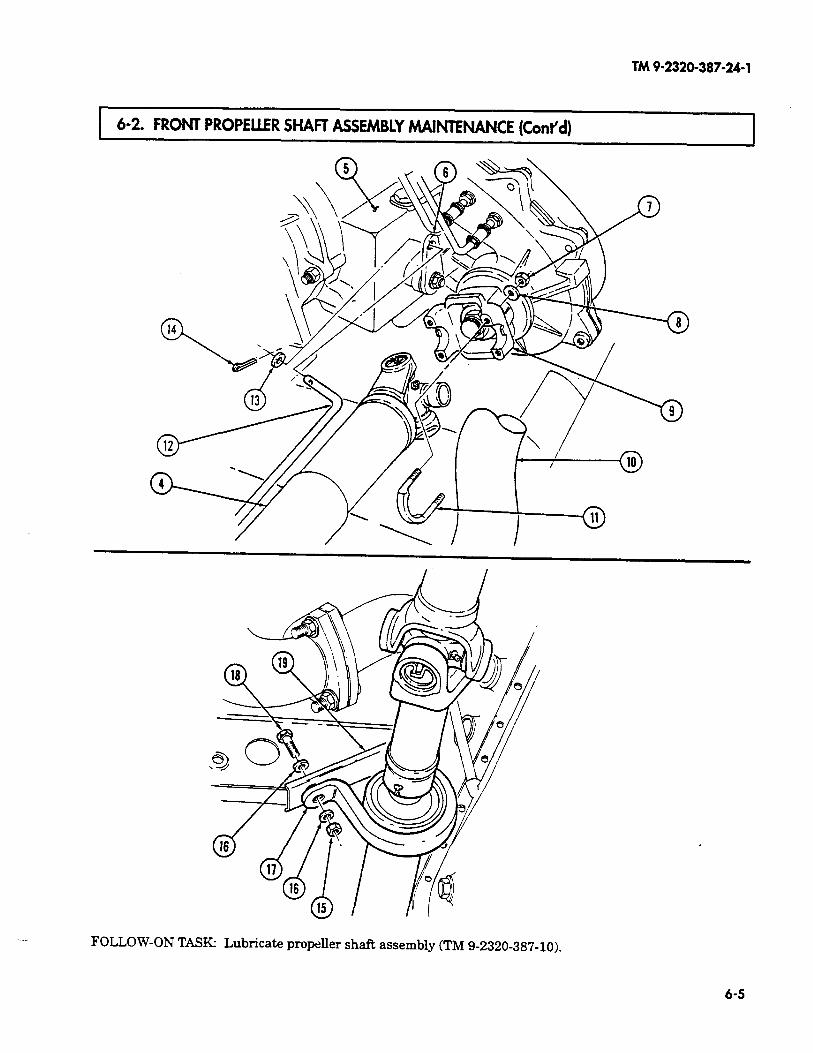
TM9-2320-387-24-r
6-2. FRONT PROPEUER SHAFT ASSEMBLY MAINTENANCE (Co&d)
FOLLOW-ON TASK: Lubricate propdler shaft assembly (TM 9-2320-387-10).
6-5
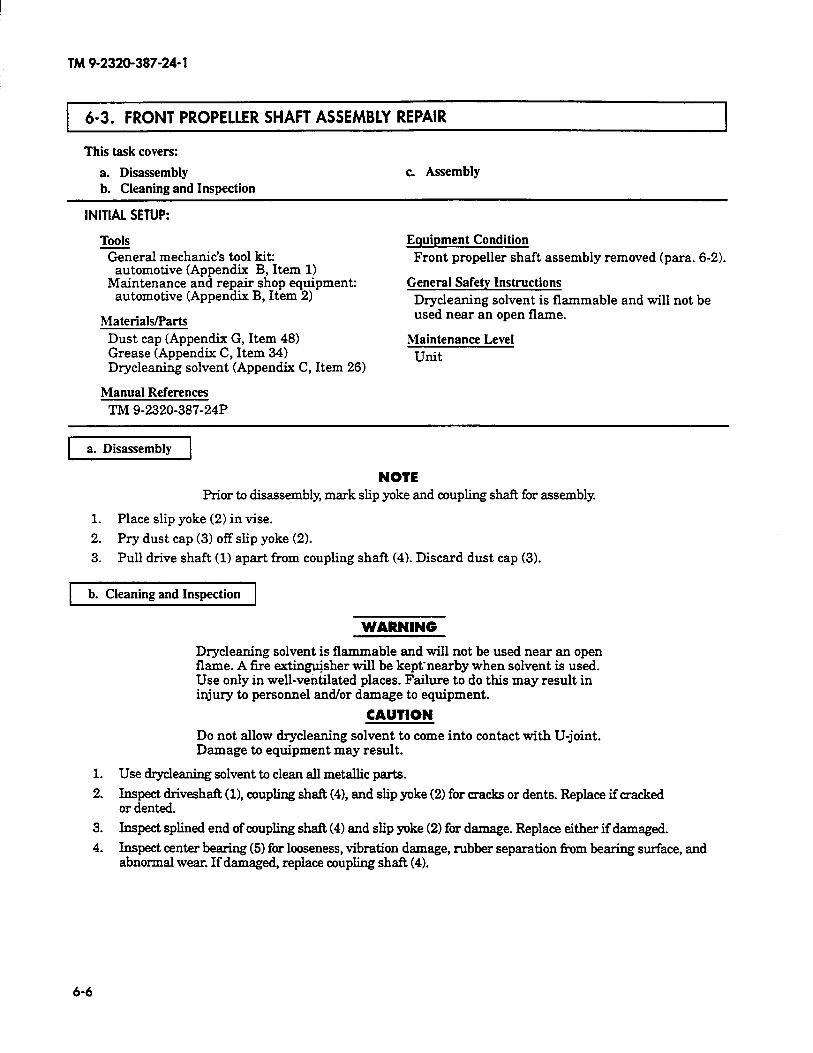
TM 9-2320-387-24-l
1 6-3. FRONT PROPELLER SHAFT ASSEMBLY REPAIR
This task covers:
a. Disassembly b. Cleaning and Inspection
c. Assembly
INITIAL SETUP:
Tools General mechanic’s tool kit:
automotive (Appendix B, Item 1) Maintenance and repair shop equipment:
automotive (Appendix B, Item 2)
Materials/Parts Dust cap (Appendix G, Item 48) Grease (Appendix C, Item 34) Drycleaning solvent (Appendix C, Item 26)
Manual References
Equipment Condition Front propeller shaft assembly removed (para. 6-2).
General Safety Instructions Drycleaning solvent is flammable and will not be used near an open flame.
Maintenance Level unit
TM 9-2320-387-24P
a. Disassembly
NOTE Prior to disassembly, mark slip yoke and coupling shaft for assembly
1. Place slip yoke (2) in vise.
2. Pry dust cap (3) off slip yoke (2).
3. Pull drive shaft (1) apart from coupling shaft (4). Discard dust cap (3).
b. Cleaning and Inspection
WARNING
Drycleaning solvent is flammable and will not be used near an open flame. A fire e.xting$sher will be kept’ nearby when solvent is used. Use only in well-ventilated places. Failure to do this may result in injury to personnel and/or damage to equipment.
CAUTION Do not allow drycleaning solvent to come into contact with U-joint. Damage to equipment may result.
1. Use drycleaning solvent to clean all metallic parts.
2. Inspect driveshaft (11, coupling shaft (4), and slip yoke (2) for cracks or dents. Replace if cracked or dented.
3. Inspect splined end of coupling shaft (4) and slip yoke (2) for damage. Replace either if damaged.
4. Inspect center bearing (5) for looseness, vibration damage, rubber separation from bearing surface, and abnormal wear. If damaged, replace coupling shaft (4).
6-6
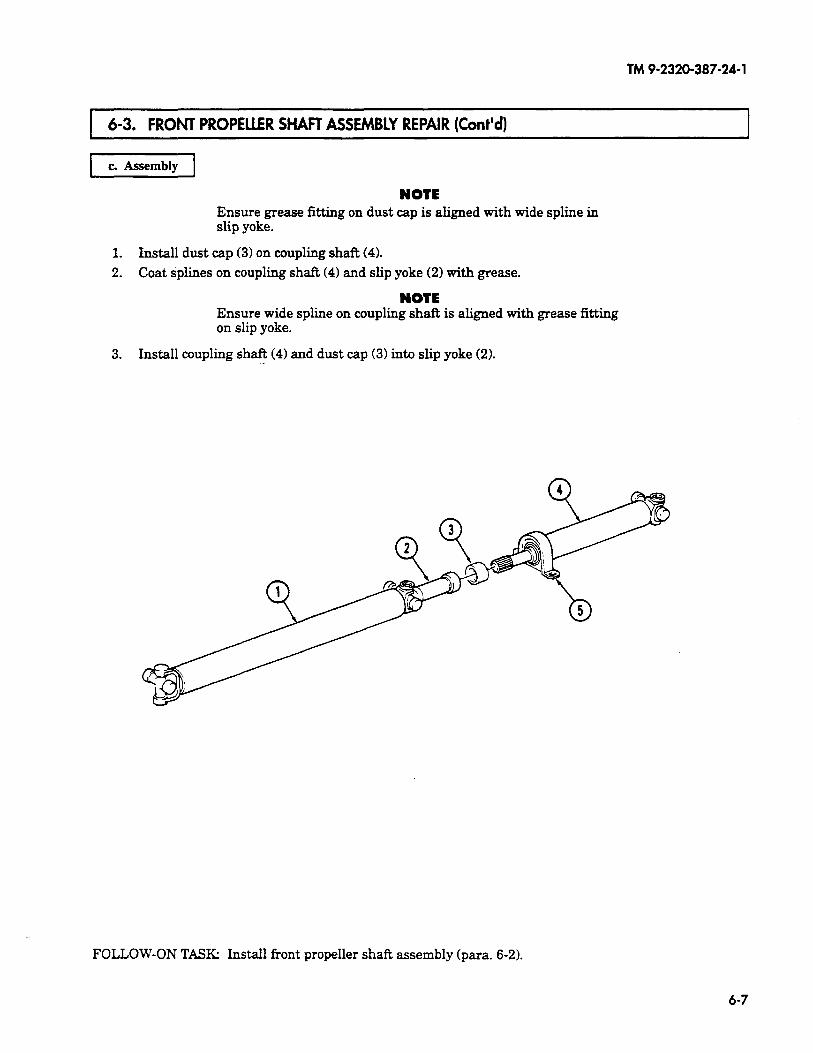
TM 9-2320-387-24-l
6-3. FRONT PROPELLER SHAFT ASSEMBLY REPAIR (Cont’d) I
c Assembly
NOTE Ensure grease fitting on dust cap is aligned with wide spline in slip yoke.
1. Install dust cap (3) on coupling shaf% (4).
2. Coat splines on coupling sh& (4) and slip yoke (2) with grease.
NOTE Ensure wide spline on coupling shaft is aligned with grease fitting on slip yoke.
3. Install coupling shaft (4) and dust cap (3) into slip yoke (2).
FOLLOW-ON TASK: Install front propeller shaft assembly (para. 6-2).
6-7

TM 9-2320-387-24- 1
6-4. REAR PROPELLER SHAFT MAINTENANCE
This task covers:
a. Removal b. Inspection
c. Installation
INITIAL SETUP:
Tools General mechanic’s tool kit:
automotive (Appendix B, Item 1) Maintenance and repair shop equipment:
automotive (Appendix B, Item 2)
Manual References TM 9-2320-387-10 TM 9-2320-387-24P
Maintenance Level Unit
[ml 1. Chock wheels and release parking brake (TM 9-2320-387-10X
2. Remove four capscrews (6), two straps (5), and disconnect propeller shaft (3) from differential pinion yoke (4).
3. Slide propeller shaft end yoke (1) out of transfer case extension (2) and remove propeller shaft (3).
b. Inspection
1. Inspect propeller shaft (3) for cracks and dents. Replace if cracked or dented.
2. Inspect grease fittings and universal joints for serviceability. Replace universal joints (para. 6-5) or grease fittings if unserviceable.
3. Inspect splined end of end yoke (1) for damage. Replace end yoke (1) if damaged (para. 6-6).
I]
1. Slide propeller shaft end yoke (1) on transfer case extension (2) and install propeller shaft (3).
2. Connect propeller shaft (3) to differential pinion yoke (4) with two straps (5) and four capscrews (6). Tighten capscrews (6) to 30-35 lb-R (41-47 N-m).
3. Apply parking brake (TM 9-2320-387-10) and remove wheel chocks.
6-8

TM9-232&387-24-l
6-4. REAR PROPELLER SHAFT MAINTENANCE (Cont’d) 1
FOLLOW-ON TASK Lubricate propeller shaft (TM 9-2320-387-10).
6-9
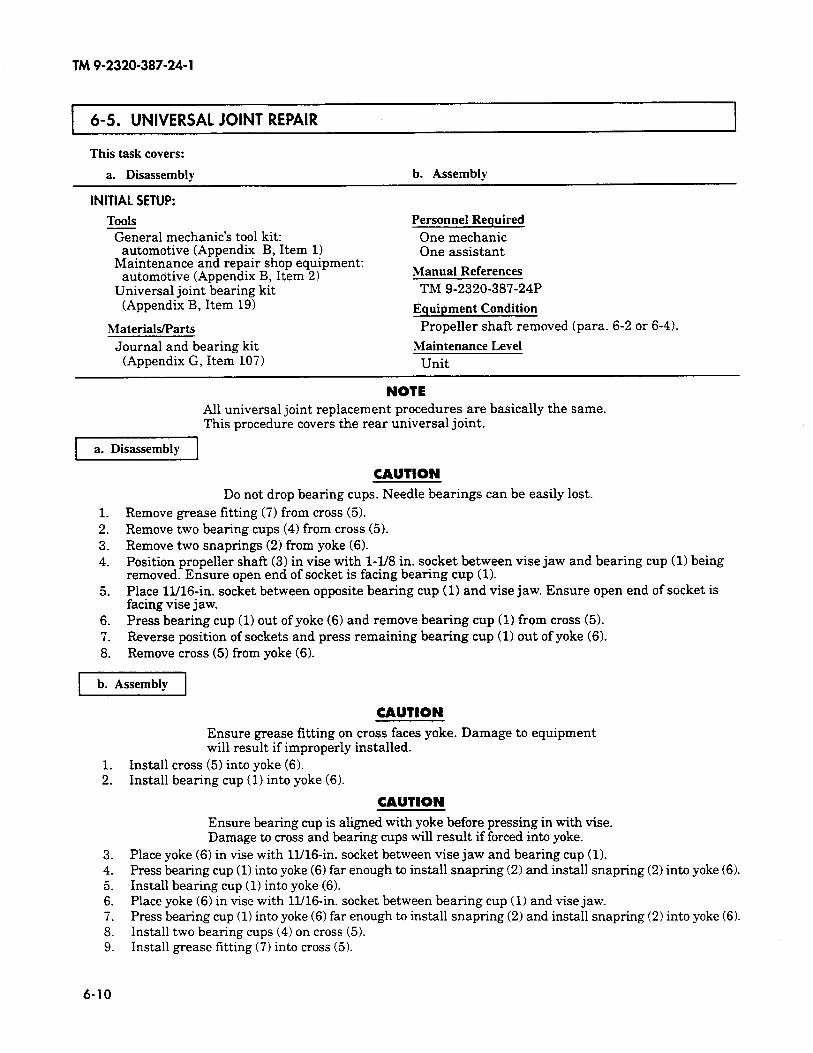
TM 9-2320-387-24-l
6-5. UNIVERSAL JOINT REPAIR
This task covers:
a. Disassembly
INITIAL SETUP:
b. Assembly
Tools Personnel Required
General mechanic’s tool kit: One mechanic automotive (Appendix B, Item 1) One assistant
Maintenance and repair shop equipment: automotive (Appendix B, Item 2) Manual References
Universal joint bearing kit TM 9-2320-387-24P (Appendix B, Item 19) Equipment Condition
Materials/Parts Propeller shaft removed (para. 6-2 or 6-4).
Journal and bearing kit Maintenance Level (Appendix G, Item 107) Unit
NOTE All universal joint replacement procedures are basically the same. This procedure covers the rear universal joint.
a. Disassembly
CAUTION Do not drop bearing cups. Needle bearings can be easily lost.
1. Remove grease fitting (7) from cross (5). 2. Remove two bearing cups (4) from cross (5). 3. Remove two snaprings (2) from yoke (6). 4. Position propeller shaft (3) in vise with l-l/8 in. socket between vise jaw and bearing cup (1) being
removed. Ensure open end of socket is facing bearing cup (1). 5. Place ll/16-in. socket between opposite bearing cup (1) and vise jaw. Ensure open end of socket is
facing vise jaw. 6. Press bearing cup (1) out of yoke (6) and remove bearing cup (1) from cross (5). 7. Reverse position of sockets and press remaining bearing cup (1) out of yoke (6). 8. Remove cross (5) from yoke (6).
1. 2.
3. 4. 5. 6. 7. 8. 9.
6-10
CAUTION Ensure grease fitting on cross faces yoke. Damage to equipment will result if improperly installed.
tnstall cross (5) into yoke (6). Install bearing cup (1) into yoke (6).
CAUTION Ensure bearing cup is aligned with yoke before pressing in with vise. Damage to cross and bearing cups will result if forced into yoke.
Place yoke (6) in vise with ll/16-in. socket between vise jaw and bearing cup (1). Press bearing cup (1) into yoke (6) far enough to install snapring (2) and install snapring (2) into yoke (6). Install bearing cup (1) into yoke (6). Place yoke (6) in vise with ll/16-in. socket between bearing cup (1) and vise jaw. Press bearing cup (1) into yoke (6) far enough to install snapring (2) and install snapring (2) into yoke (6). Install two bearing cups (4) on cross (5). Install grease fitting (7) into cross (5).
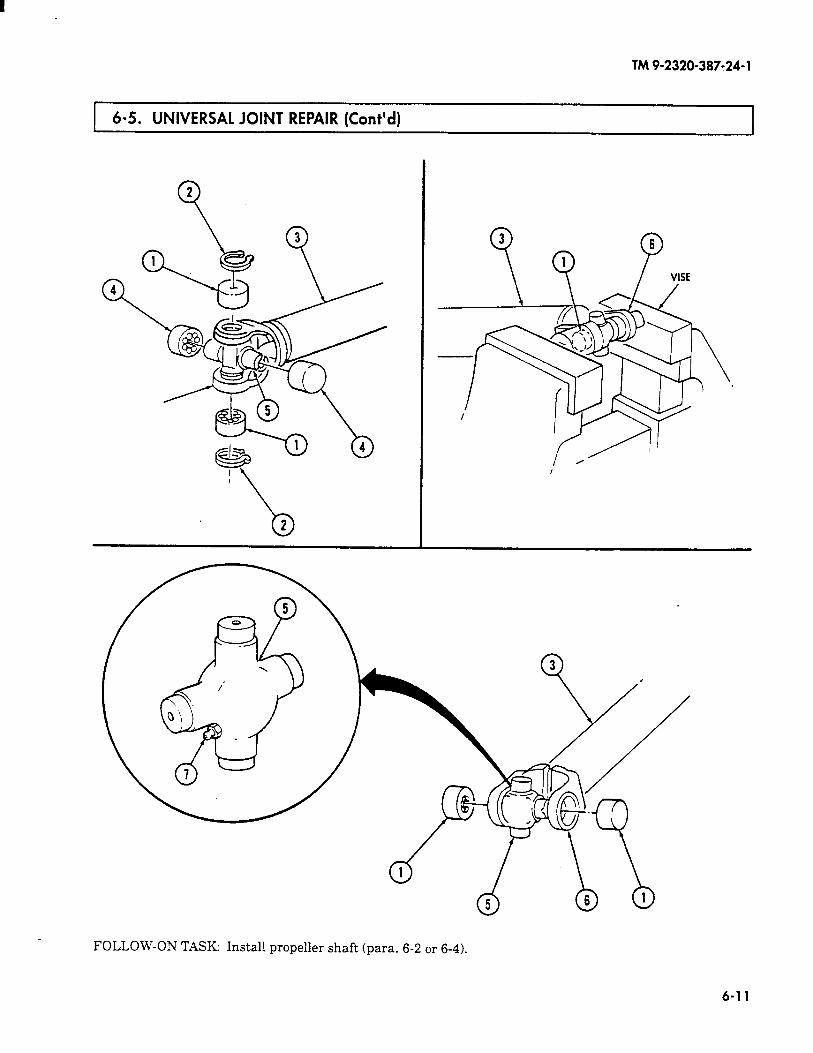
TM9-2320-387-24-l
6-5. UNIVERSAL JOINT REPAIR (Cont’d)
FOLLOW-ON TASK: Install propeller shaft (para. 6-2 or 6-4).
6-11
TM 9-2320-387-24-l
Section II. FRONT AND REAR AXLES MAINTENANCE
[ 6-6. FRONT AND REAR AXLES MAINTENANCE TASK SUMMARY 1
TASK PARA.
PROCEDURES PAGE NO.
6-7. Halfshaft Maintenance 6-13
6-8. Geared Hub Side Cover Maintenance 6-20
6-9. Geared Hub Replacement 6-22
6-10. Geared Hub Input Seal Replacement 6-28
6-11. Geared Hub Spindle Seal Replacement 6-30
6-12. Geared Hub Spindle Bearing Adjustment 6-35
6-13. Wheel Stud Replacement 6-38
6-14. Differential Vent Line Replacement 6-39
6-15. Rear Geared Hub Vent Line Replacement 6-40
6-16. Front Geared Hub Vent Line Replacement 6-42
6-17. Steering Stop Maintenance 6-44
6-18. Differential Cover Maintenance 6-46
6-12
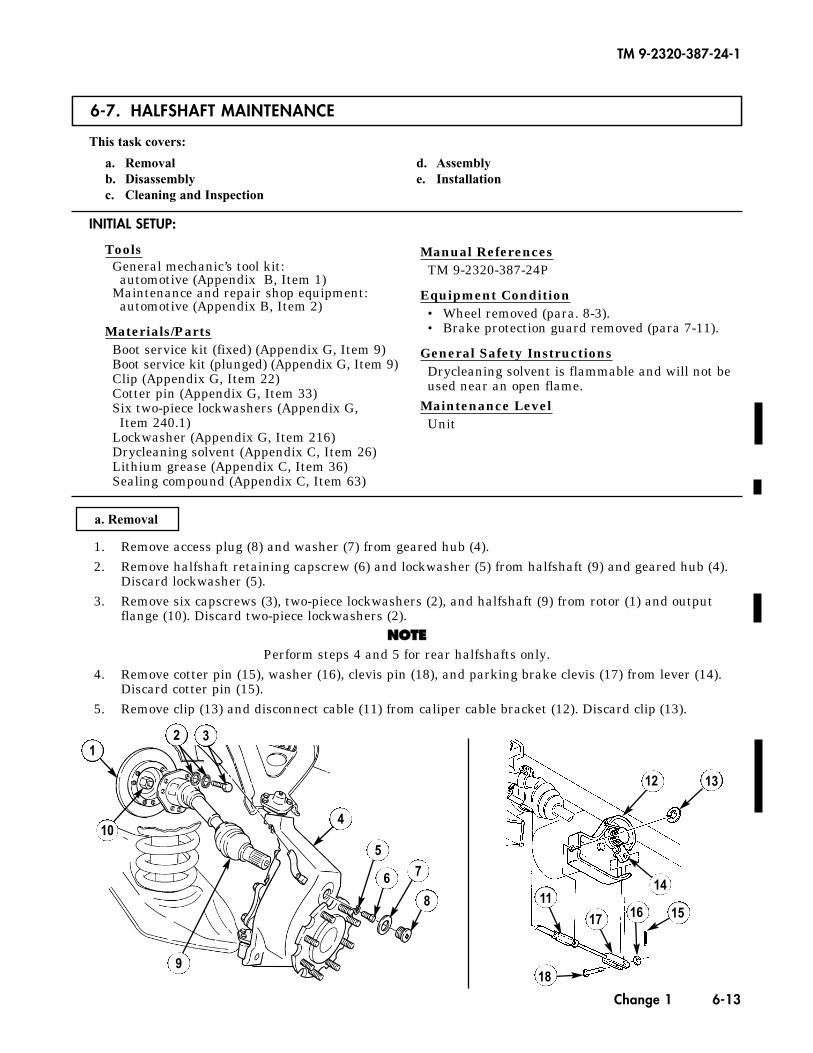
6-7. HALFSHAFT MAINTENANCE
This task covers:
a. Removal d. Assemblyb. Disassembly e. Installationc. Cleaning and Inspection
INITIAL SETUP:
ToolsGeneral mechanic’s tool kit:
automotive (Appendix B, Item 1)Maintenance and repair shop equipment:
automotive (Appendix B, Item 2)
Materials/PartsBoot service kit (fixed) (Appendix G, Item 9)Boot service kit (plunged) (Appendix G, Item 9)Clip (Appendix G, Item 22)Cotter pin (Appendix G, Item 33)Six two-piece lockwashers (Appendix G,
Item 240.1)Lockwasher (Appendix G, Item 216)Drycleaning solvent (Appendix C, Item 26)Lithium grease (Appendix C, Item 36)Sealing compound (Appendix C, Item 63)
Manual ReferencesTM 9-2320-387-24P
Equipment Condition• Wheel removed (para. 8-3).• Brake protection guard removed (para 7-11).
General Safety InstructionsDrycleaning solvent is flammable and will not beused near an open flame.
Maintenance LevelUnit
1. Remove access plug (8) and washer (7) from geared hub (4).2. Remove halfshaft retaining capscrew (6) and lockwasher (5) from halfshaft (9) and geared hub (4).
Discard lockwasher (5).3. Remove six capscrews (3), two-piece lockwashers (2), and halfshaft (9) from rotor (1) and output
flange (10). Discard two-piece lockwashers (2).NNOOTTEE
Perform steps 4 and 5 for rear halfshafts only.4. Remove cotter pin (15), washer (16), clevis pin (18), and parking brake clevis (17) from lever (14).
Discard cotter pin (15).5. Remove clip (13) and disconnect cable (11) from caliper cable bracket (12). Discard clip (13).
a. Removal
TM 9-2320-387-24-1
Change 1 6-13
8
76
5
4
9
10
12 3
12 13
14
151617
11
18
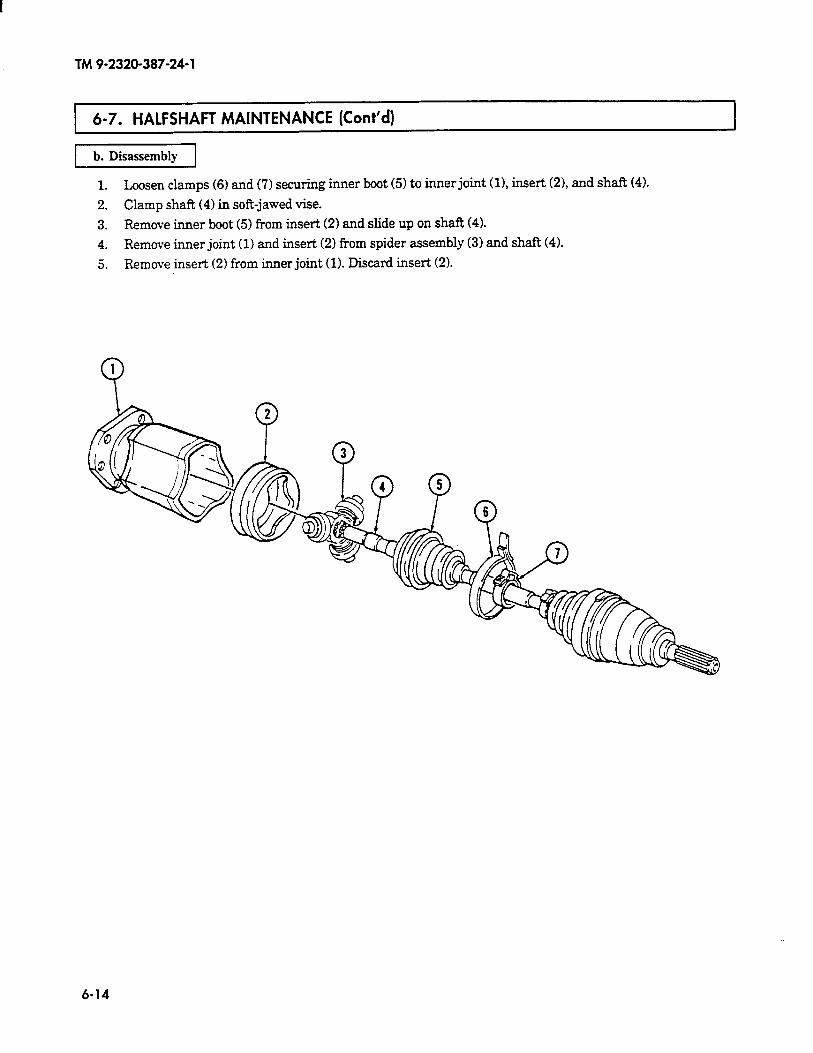
TM 9-2320-387-24-l
6-7. HALFSHAFT MAINTENANCE (Cont’d)
b. Disassembly
1. Loosen clamps (6) and (7) securing inner hoot (5) to inner joint (11, insert (21, and shaR (4).
2. Clamp shaft (4) in soft-jawed vise.
3. Remove inner boot (5) from insert (2) and slide up on shaft (4).
4. Remove inner joint (1) and insert (2) from spider assembly (3) and shaft (4).
5. Remove insert (2) from inner joint (1). Discard insert (2).
6-14
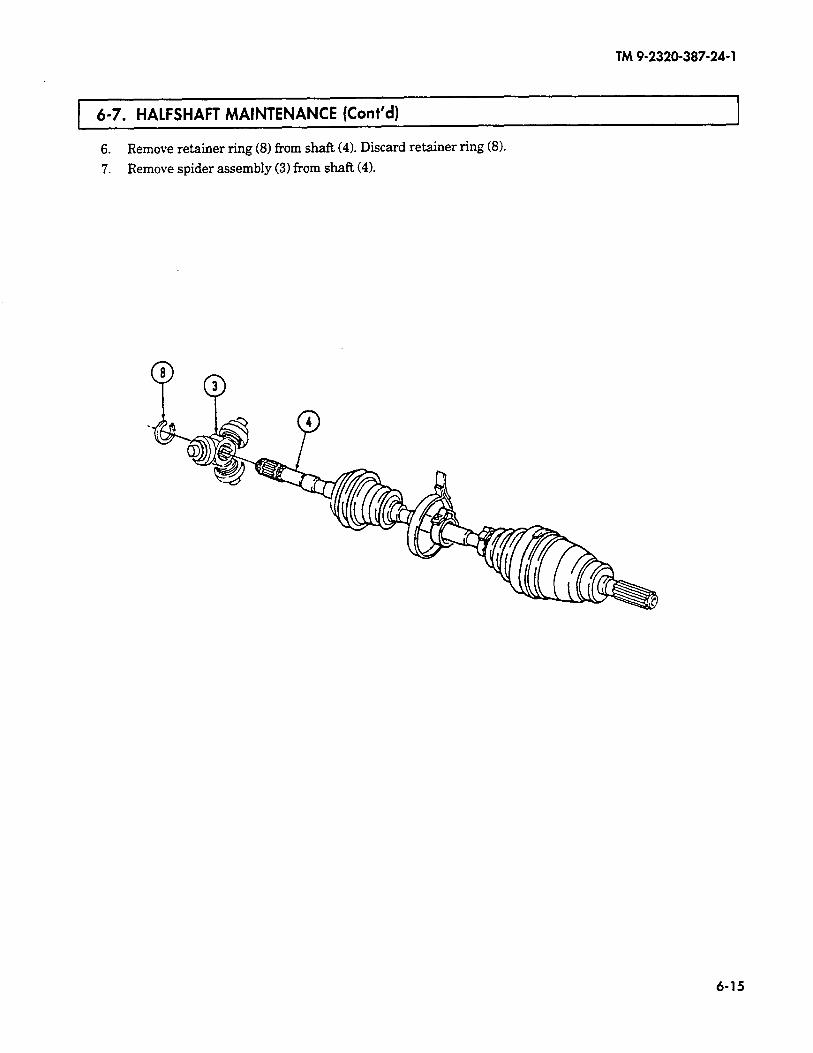
TM 9-2320-387-24-l
6-7. HALFSHAFT MAINTENANCE (Cont’d)
6. Remove retainer ring (8) from shaft (4). Discard retainer ring (8).
7. Remove spider assembly (3) from shaft (4).
6-15
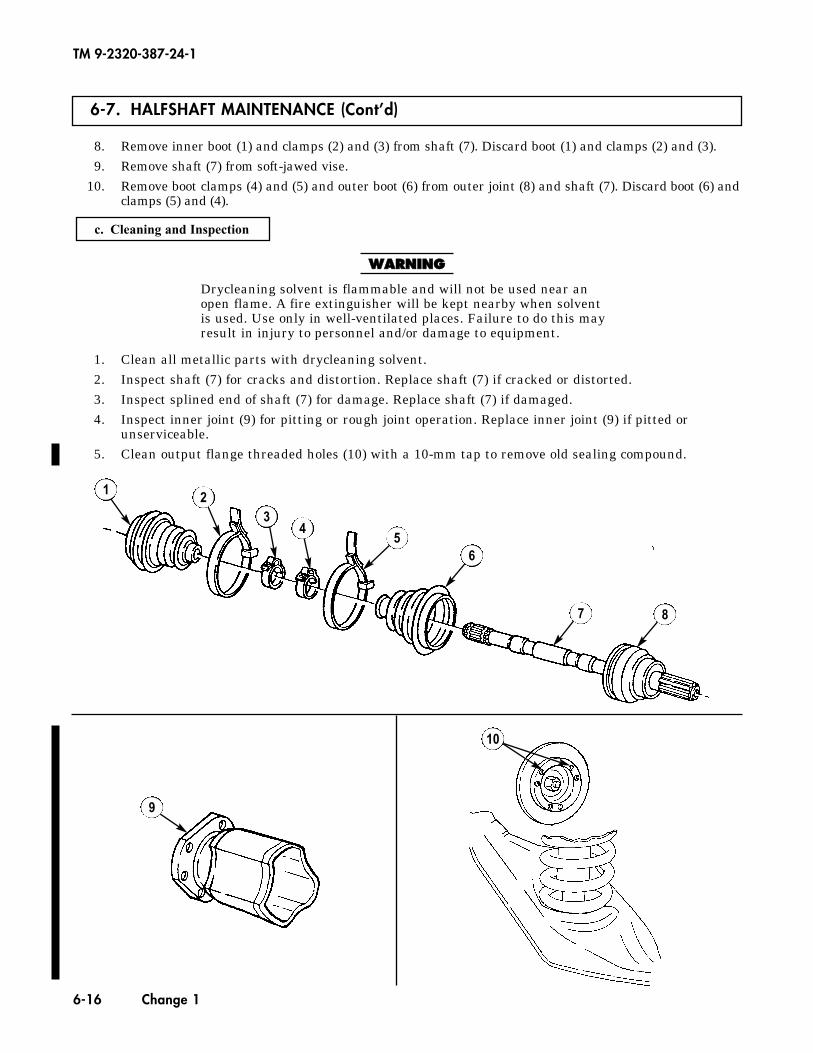
6-7. HALFSHAFT MAINTENANCE (Cont’d)
TM 9-2320-387-24-1
6-16 Change 1
8. Remove inner boot (1) and clamps (2) and (3) from shaft (7). Discard boot (1) and clamps (2) and (3).9. Remove shaft (7) from soft-jawed vise.
10. Remove boot clamps (4) and (5) and outer boot (6) from outer joint (8) and shaft (7). Discard boot (6) andclamps (5) and (4).
WWAARRNNIINNGG
Drycleaning solvent is flammable and will not be used near anopen flame. A fire extinguisher will be kept nearby when solventis used. Use only in well-ventilated places. Failure to do this mayresult in injury to personnel and/or damage to equipment.
1. Clean all metallic parts with drycleaning solvent.2. Inspect shaft (7) for cracks and distortion. Replace shaft (7) if cracked or distorted.3. Inspect splined end of shaft (7) for damage. Replace shaft (7) if damaged.4. Inspect inner joint (9) for pitting or rough joint operation. Replace inner joint (9) if pitted or
unserviceable.5. Clean output flange threaded holes (10) with a 10-mm tap to remove old sealing compound.
c. Cleaning and Inspection
1 23
45
6
7 8
9
10
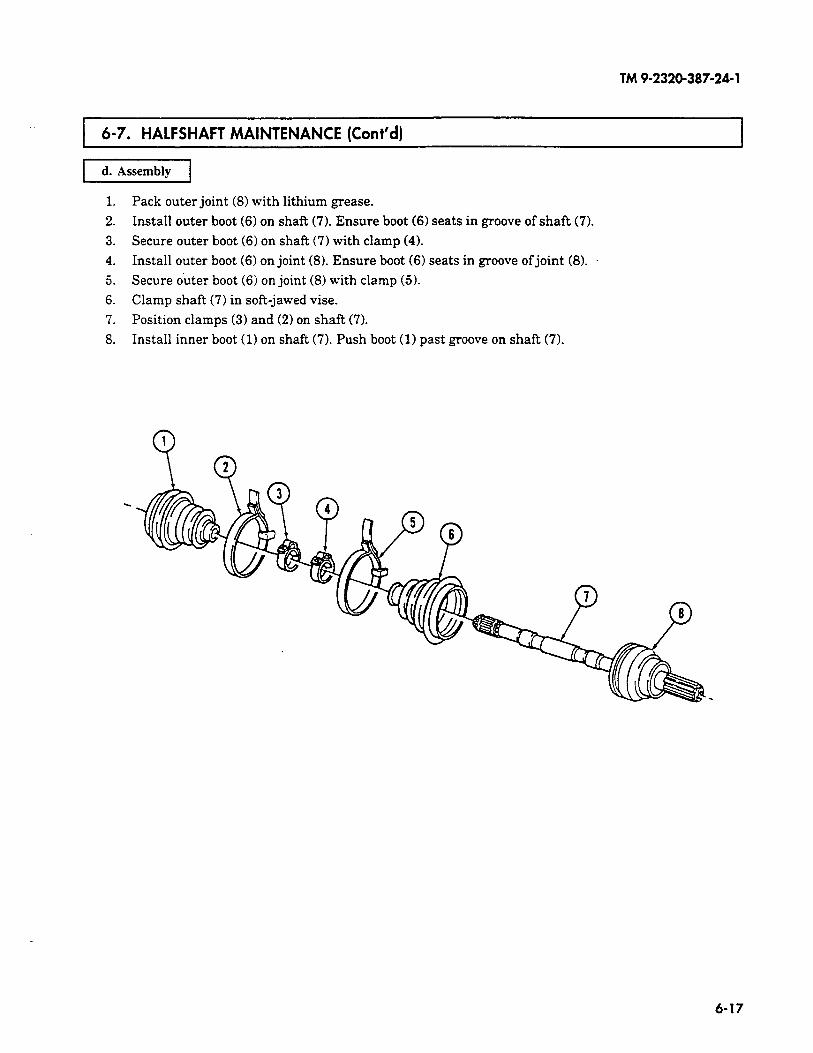
TM 9-2320-387-24-l
6-7. HALFSHAFT MAINTENANCE (Cont’d)
d. Assembly
1.
2.
3.
4.
5.
6.
7.
8.
Pack outer joint (8) with lithium grease.
Install outer boot (6) on shaft (7). Ensure boot (6) seats in groove of shaft (7).
Secure outer boot (6) on shaft (7) with clamp (4).
Install outer boot (6) on joint (8). Ensure boot (6) seats in groove of joint (81.
Secure outer boot (6) on joint (8) with clamp (5).
Clamp shaft (7) in soft-jawed vise.
Position clamps (3) and (2) on shaft (7).
Install inner boot (1) on shaft (7). Push boot (1) past groove on shaft (7).
6-17
6-7. HALFSHAFT MAINTENANCE (Cont’d)
TM 9-2320-387-24-1
NNOOTTEEAdhere spider assembly with lithium grease before installingon shaft.
9. Align splines of spider assembly (4) with spline on shaft (5). Use press to install spider assembly (4) on shaft (5) until spider assembly (4) seats into place.
10. Install retainer ring (3) in upper groove of shaft (5).11. Pack inner joint (1) with lithium grease.12. Install insert (2) on inner joint (1).13. Install inner joint (1) and insert (2) on spider assembly (4) and shaft (5).14. Move inner boot (6) on shaft (5) until inner boot (6) seats in groove of shaft (5).15. Secure inner boot (6) on shaft (5) with clamp (8).16. Install inner boot (6) on inner joint (1). Ensure boot (6) seats in groove of inner joint (1).17. Secure inner boot (6) on inner joint (1) with clamp (7).
1
2
3 4
5 6 7
8
1. Install halfshaft (18) into geared hub (13).2. Apply sealing compound to halfshaft retaining capscrew (15) and install halfshaft (18) on geared
hub (13) with lockwasher (14) and halfshaft retaining capscrew (15). Tighten halfshaft retainingcapscrew (15) to 37 lb-ft (50 N•m).
3. Install washer (16) and access plug (17) into geared hub (13). Tighten access plug (17) to 8-13 lb-ft (11-18 N•m).
e. Installation
6-18 Change 1
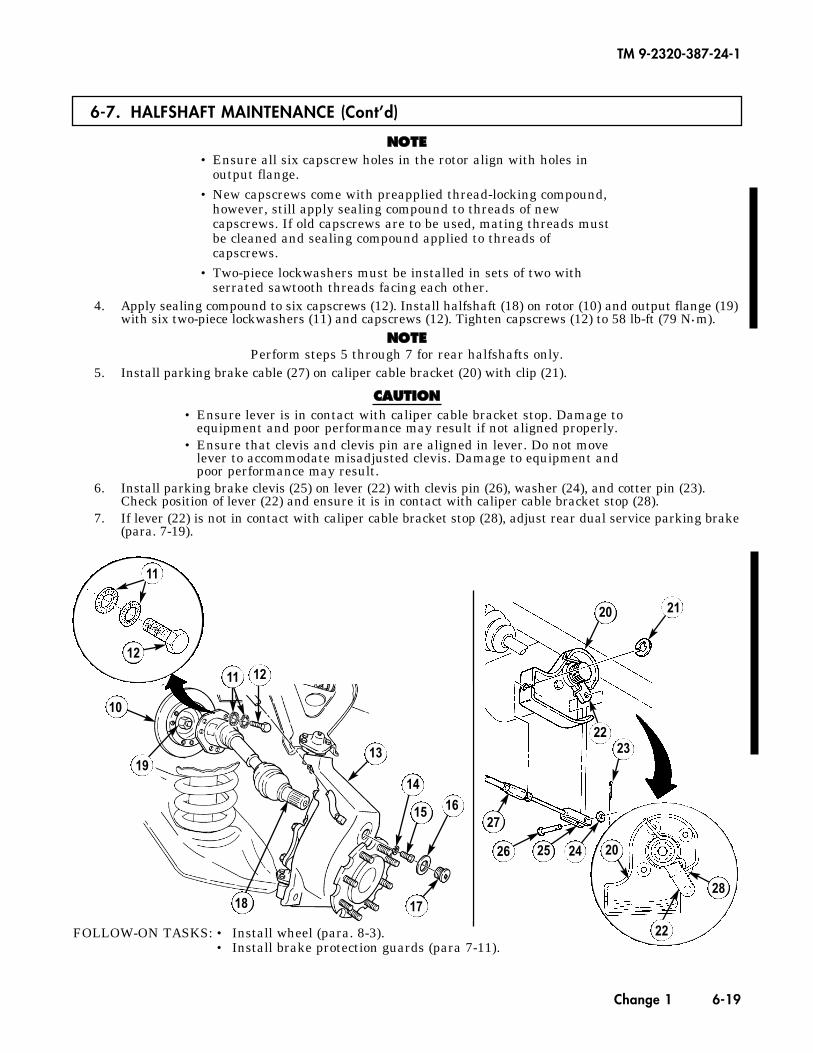
6-7. HALFSHAFT MAINTENANCE (Cont’d)
TM 9-2320-387-24-1
Change 1 6-19
NNOOTTEE• Ensure all six capscrew holes in the rotor align with holes in
output flange.• New capscrews come with preapplied thread-locking compound,
however, still apply sealing compound to threads of newcapscrews. If old capscrews are to be used, mating threads mustbe cleaned and sealing compound applied to threads ofcapscrews.
• Two-piece lockwashers must be installed in sets of two withserrated sawtooth threads facing each other.
4. Apply sealing compound to six capscrews (12). Install halfshaft (18) on rotor (10) and output flange (19)with six two-piece lockwashers (11) and capscrews (12). Tighten capscrews (12) to 58 lb-ft (79 N•m).
NNOOTTEEPerform steps 5 through 7 for rear halfshafts only.
5. Install parking brake cable (27) on caliper cable bracket (20) with clip (21).
CCAAUUTTIIOONN• Ensure lever is in contact with caliper cable bracket stop. Damage to
equipment and poor performance may result if not aligned properly.• Ensure that clevis and clevis pin are aligned in lever. Do not move
lever to accommodate misadjusted clevis. Damage to equipment andpoor performance may result.
6. Install parking brake clevis (25) on lever (22) with clevis pin (26), washer (24), and cotter pin (23).Check position of lever (22) and ensure it is in contact with caliper cable bracket stop (28).
7. If lever (22) is not in contact with caliper cable bracket stop (28), adjust rear dual service parking brake(para. 7-19).
FOLLOW-ON TASKS: • Install wheel (para. 8-3).• Install brake protection guards (para 7-11).
17
1615
14
13
18
19
10
11
12
11 12
24 202526
27
28
22
2223
2120
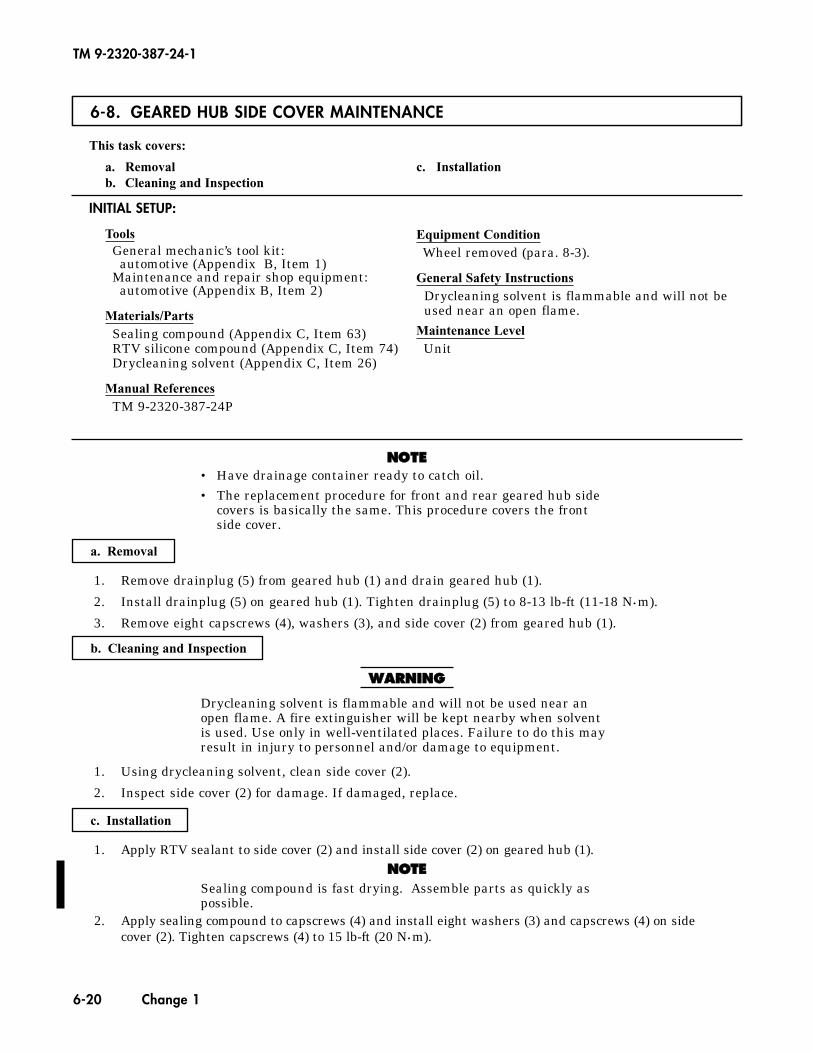
TM 9-2320-387-24-1
6-20 Change 1
6-8. GEARED HUB SIDE COVER MAINTENANCE
This task covers:
a. Removal c. Installationb. Cleaning and Inspection
a. Removal
c. Installation
INITIAL SETUP:
ToolsGeneral mechanic’s tool kit:
automotive (Appendix B, Item 1)Maintenance and repair shop equipment:
automotive (Appendix B, Item 2)
Materials/PartsSealing compound (Appendix C, Item 63)RTV silicone compound (Appendix C, Item 74)Drycleaning solvent (Appendix C, Item 26)
Manual ReferencesTM 9-2320-387-24P
Equipment ConditionWheel removed (para. 8-3).
General Safety InstructionsDrycleaning solvent is flammable and will not beused near an open flame.
Maintenance LevelUnit
NNOOTTEE• Have drainage container ready to catch oil.• The replacement procedure for front and rear geared hub side
covers is basically the same. This procedure covers the frontside cover.
1. Remove drainplug (5) from geared hub (1) and drain geared hub (1).
2. Install drainplug (5) on geared hub (1). Tighten drainplug (5) to 8-13 lb-ft (11-18 N•m).
3. Remove eight capscrews (4), washers (3), and side cover (2) from geared hub (1).
1. Apply RTV sealant to side cover (2) and install side cover (2) on geared hub (1).NNOOTTEE
Sealing compound is fast drying. Assemble parts as quickly aspossible.
2. Apply sealing compound to capscrews (4) and install eight washers (3) and capscrews (4) on sidecover (2). Tighten capscrews (4) to 15 lb-ft (20 N•m).
b. Cleaning and Inspection
WWAARRNNIINNGG
Drycleaning solvent is flammable and will not be used near anopen flame. A fire extinguisher will be kept nearby when solventis used. Use only in well-ventilated places. Failure to do this mayresult in injury to personnel and/or damage to equipment.
1. Using drycleaning solvent, clean side cover (2).
2. Inspect side cover (2) for damage. If damaged, replace.
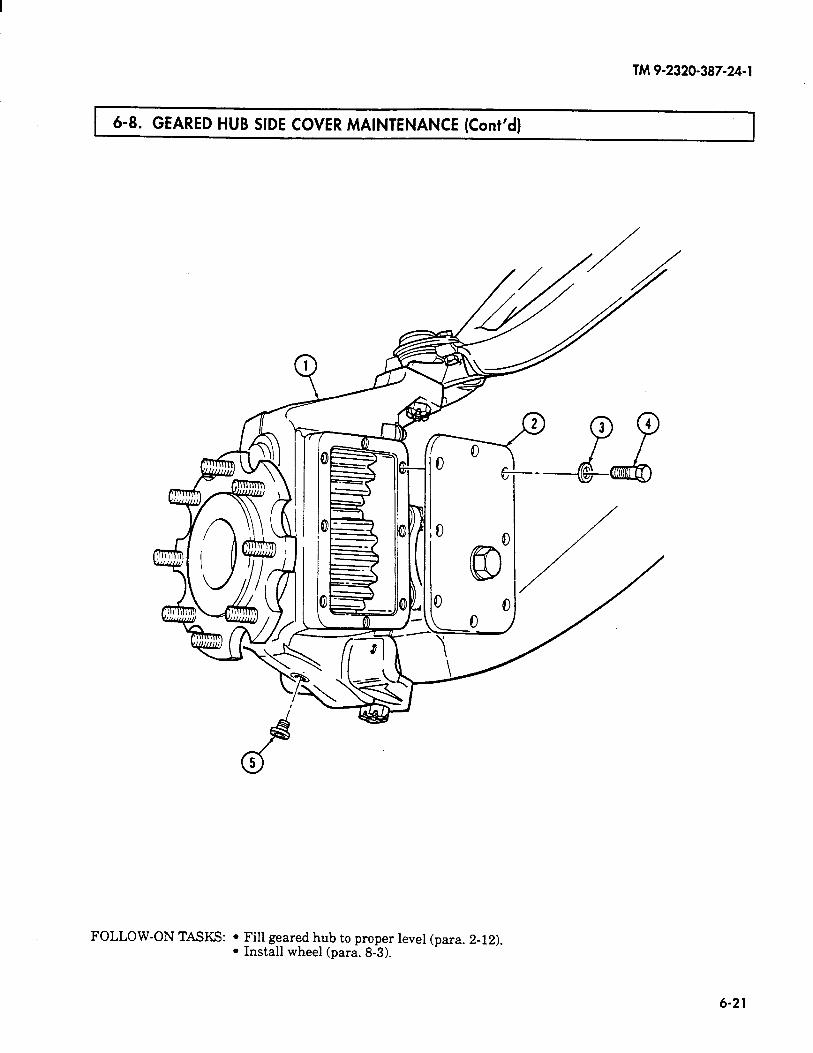
TM 9-2320-387-24-l
6-8. GEARED HUB SIDE COVER MAINTENANCE (Cont’d)
FOLLOW-ON TASKS: l Fill geared hub to proper level (para. 2-12). l Install wheel (para. 8-3).
6-21
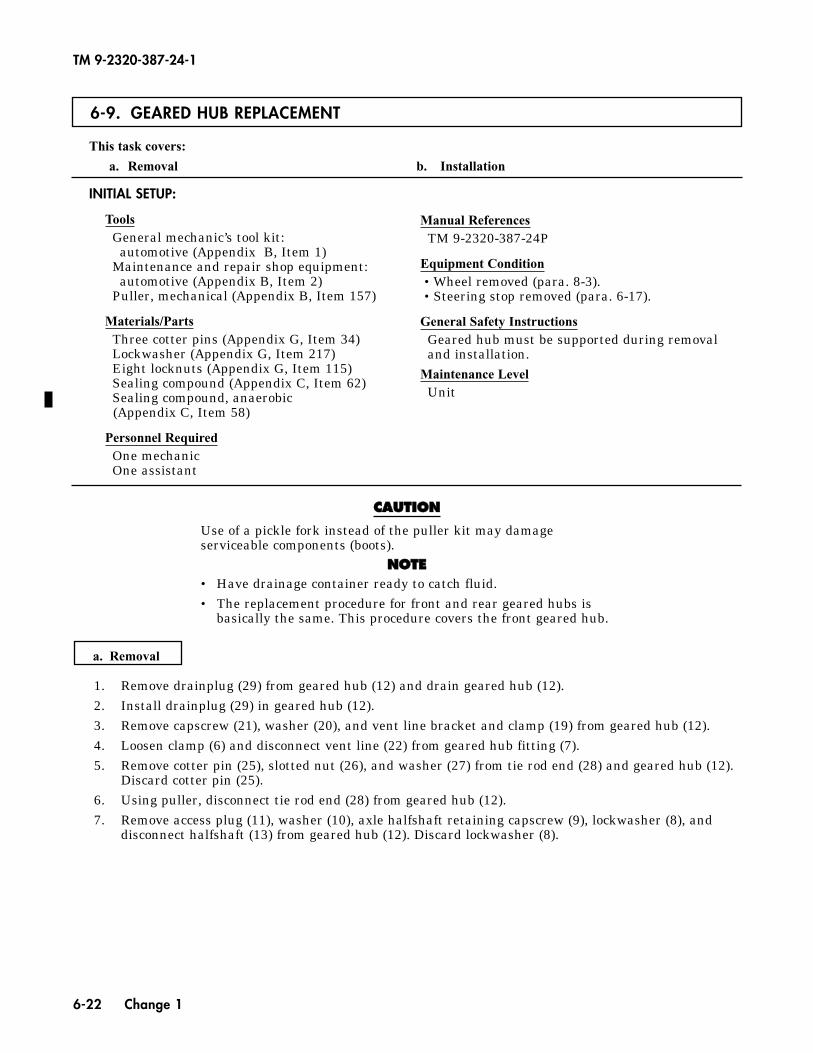
6-22 Change 1
TM 9-2320-387-24-1
6-9. GEARED HUB REPLACEMENT
This task covers:
a. Removal b. Installation
a. Removal
INITIAL SETUP:
ToolsGeneral mechanic’s tool kit:
automotive (Appendix B, Item 1)Maintenance and repair shop equipment:
automotive (Appendix B, Item 2)Puller, mechanical (Appendix B, Item 157)
Materials/PartsThree cotter pins (Appendix G, Item 34)Lockwasher (Appendix G, Item 217)Eight locknuts (Appendix G, Item 115)Sealing compound (Appendix C, Item 62)Sealing compound, anaerobic (Appendix C, Item 58)
Personnel RequiredOne mechanicOne assistant
Manual ReferencesTM 9-2320-387-24P
Equipment Condition•Wheel removed (para. 8-3).•Steering stop removed (para. 6-17).
General Safety InstructionsGeared hub must be supported during removaland installation.
Maintenance LevelUnit
1. Remove drainplug (29) from geared hub (12) and drain geared hub (12).2. Install drainplug (29) in geared hub (12).3. Remove capscrew (21), washer (20), and vent line bracket and clamp (19) from geared hub (12).4. Loosen clamp (6) and disconnect vent line (22) from geared hub fitting (7).5. Remove cotter pin (25), slotted nut (26), and washer (27) from tie rod end (28) and geared hub (12).
Discard cotter pin (25).6. Using puller, disconnect tie rod end (28) from geared hub (12).7. Remove access plug (11), washer (10), axle halfshaft retaining capscrew (9), lockwasher (8), and
disconnect halfshaft (13) from geared hub (12). Discard lockwasher (8).
CCAAUUTTIIOONN
Use of a pickle fork instead of the puller kit may damageserviceable components (boots).
NNOOTTEE• Have drainage container ready to catch fluid.• The replacement procedure for front and rear geared hubs is
basically the same. This procedure covers the front geared hub.
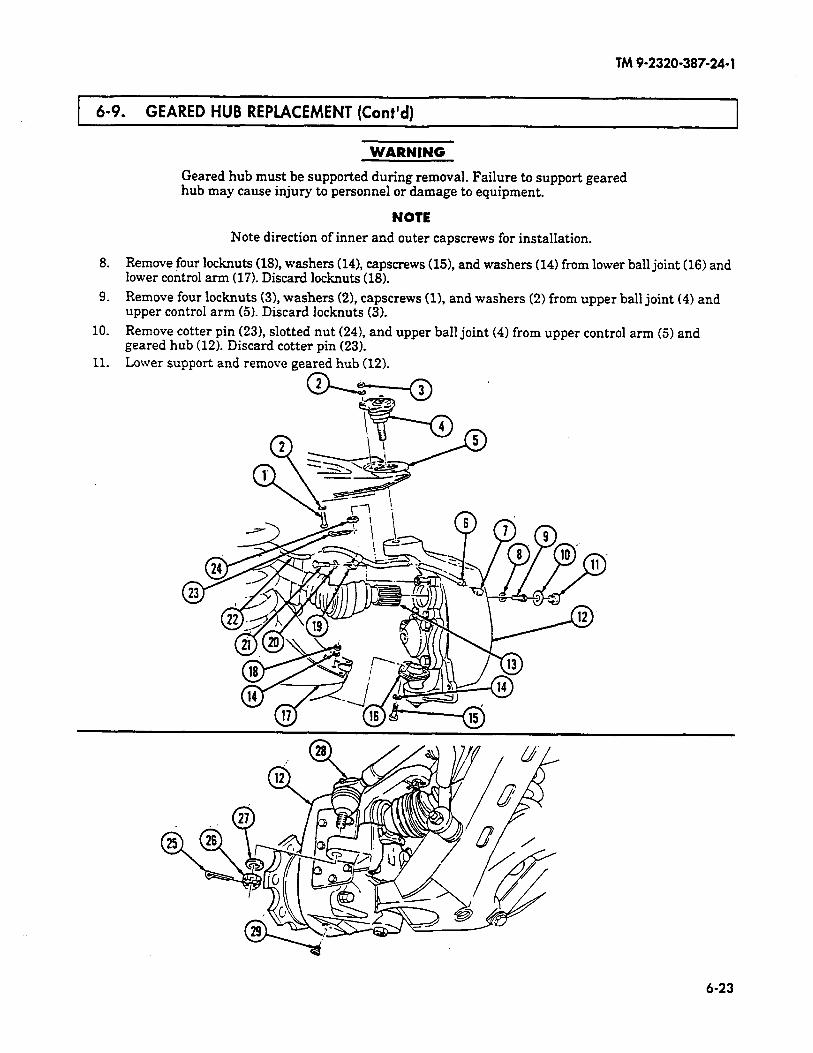
TM 9-2320-387-24-l
6-9. GEARED HUB REPLACEMENT (Cont’d)
8.
9.
10.
11.
WARNING
Geared hub must be supported during removal. Failure to support geared hub may cause injury to personnel or damage to equipment.
NOTE Note direction of inner and outer capscrews for installation.
Remove four locknuts (181, washers (141, capscrews (151, and washers (14) from lower ball joint (16) and lower control arm (17). Discard locknuts (18).
Remove four locknuts (31, washers (21, capscrews (11, and washers (2) from upper ball joint (4) and upper control arm (5). Discard locknuts (3).
Remove cotter pin (23), slotted nut (241, and upper ball joint (4) from upper control geared hub (12). Discard cotter pin (23). Lower support and remove geared hub (12).
(
arm (5) and
6-23
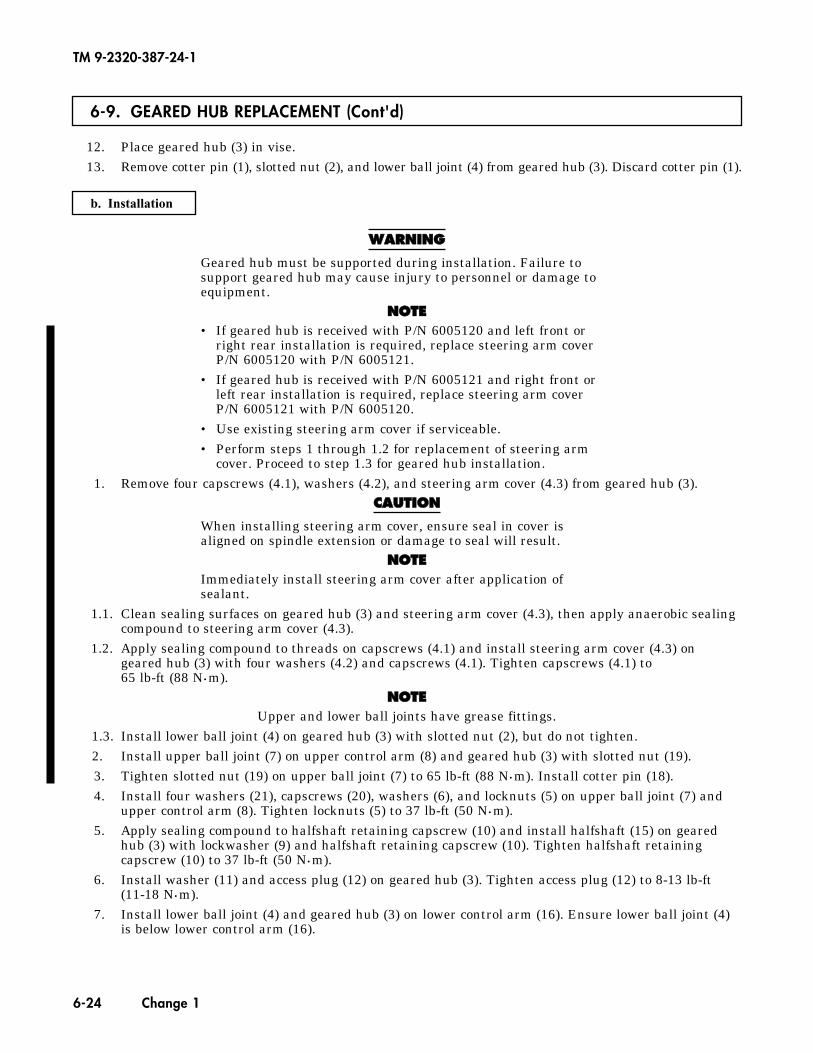
6-9. GEARED HUB REPLACEMENT (Cont'd)
12. Place geared hub (3) in vise.13. Remove cotter pin (1), slotted nut (2), and lower ball joint (4) from geared hub (3). Discard cotter pin (1).
b. Installation
WWAARRNNIINNGG
Geared hub must be supported during installation. Failure tosupport geared hub may cause injury to personnel or damage toequipment.
NNOOTTEE• If geared hub is received with P/N 6005120 and left front or
right rear installation is required, replace steering arm cover P/N 6005120 with P/N 6005121.
• If geared hub is received with P/N 6005121 and right front orleft rear installation is required, replace steering arm cover P/N 6005121 with P/N 6005120.
• Use existing steering arm cover if serviceable.• Perform steps 1 through 1.2 for replacement of steering arm
cover. Proceed to step 1.3 for geared hub installation.1. Remove four capscrews (4.1), washers (4.2), and steering arm cover (4.3) from geared hub (3).
CCAAUUTTIIOONN
When installing steering arm cover, ensure seal in cover isaligned on spindle extension or damage to seal will result.
NNOOTTEEImmediately install steering arm cover after application ofsealant.
1.1. Clean sealing surfaces on geared hub (3) and steering arm cover (4.3), then apply anaerobic sealingcompound to steering arm cover (4.3).
1.2. Apply sealing compound to threads on capscrews (4.1) and install steering arm cover (4.3) ongeared hub (3) with four washers (4.2) and capscrews (4.1). Tighten capscrews (4.1) to 65 lb-ft (88 N•m).
NNOOTTEEUpper and lower ball joints have grease fittings.
1.3. Install lower ball joint (4) on geared hub (3) with slotted nut (2), but do not tighten.2. Install upper ball joint (7) on upper control arm (8) and geared hub (3) with slotted nut (19).3. Tighten slotted nut (19) on upper ball joint (7) to 65 lb-ft (88 N•m). Install cotter pin (18).4. Install four washers (21), capscrews (20), washers (6), and locknuts (5) on upper ball joint (7) and
upper control arm (8). Tighten locknuts (5) to 37 lb-ft (50 N•m).5. Apply sealing compound to halfshaft retaining capscrew (10) and install halfshaft (15) on geared
hub (3) with lockwasher (9) and halfshaft retaining capscrew (10). Tighten halfshaft retainingcapscrew (10) to 37 lb-ft (50 N•m).
6. Install washer (11) and access plug (12) on geared hub (3). Tighten access plug (12) to 8-13 lb-ft (11-18 N•m).
7. Install lower ball joint (4) and geared hub (3) on lower control arm (16). Ensure lower ball joint (4)is below lower control arm (16).
TM 9-2320-387-24-1
6-24 Change 1
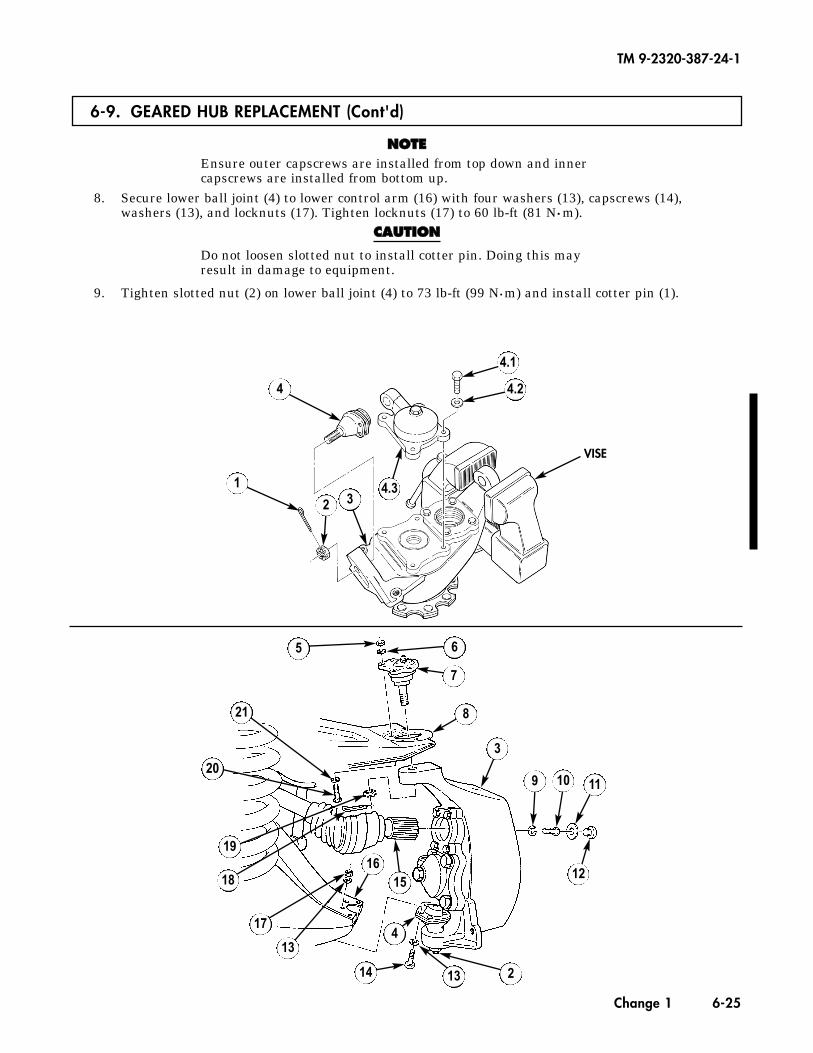
6-9. GEARED HUB REPLACEMENT (Cont'd)
TM 9-2320-387-24-1
Change 1 6-25
NNOOTTEEEnsure outer capscrews are installed from top down and innercapscrews are installed from bottom up.
8. Secure lower ball joint (4) to lower control arm (16) with four washers (13), capscrews (14),washers (13), and locknuts (17). Tighten locknuts (17) to 60 lb-ft (81 N•m).
CCAAUUTTIIOONN
Do not loosen slotted nut to install cotter pin. Doing this mayresult in damage to equipment.
9. Tighten slotted nut (2) on lower ball joint (4) to 73 lb-ft (99 N•m) and install cotter pin (1).
1
4.1
4.2
4.33
4
2
VISE
5 6
7
8
3
9 10 11
12
213
4
14
1516
13
17
18
19
20
21

TM9-2320-387-24-l
1 6-9. GEARED HUB REPLACEMENT (Cont’d) I
10.
11.
12.
13.
14.
15.
16.
Install tie rod end (4) on geared hub (5) with washer (3) and slotted nut (2). Tighten slotted nut (2) to 70 lb-ft (95 N-m) and install cotter pin (1).
Connect vent line (6) to geared hub fitting (7) and tighten clamp (8).
Install vent line (6) and vent line bracket and clamp (11) on geared hub (51 with washer (10) and capscrew (9). Tighten capscrew (9) to 38 lb-ft (52 Nom).
Tighten drainplug (14) to 8-13 lb-ft (11-18 N-m).
Remove fill plug (13) and washer (12) from geared hub (5).
Fill geared hub (5) to proper level (para 2-12).
Install washer (12) and fill plug (13) on geared hub (5). Tighten fill plug (13) to 8-13 lb-ft (11-18 Nom).
6-26
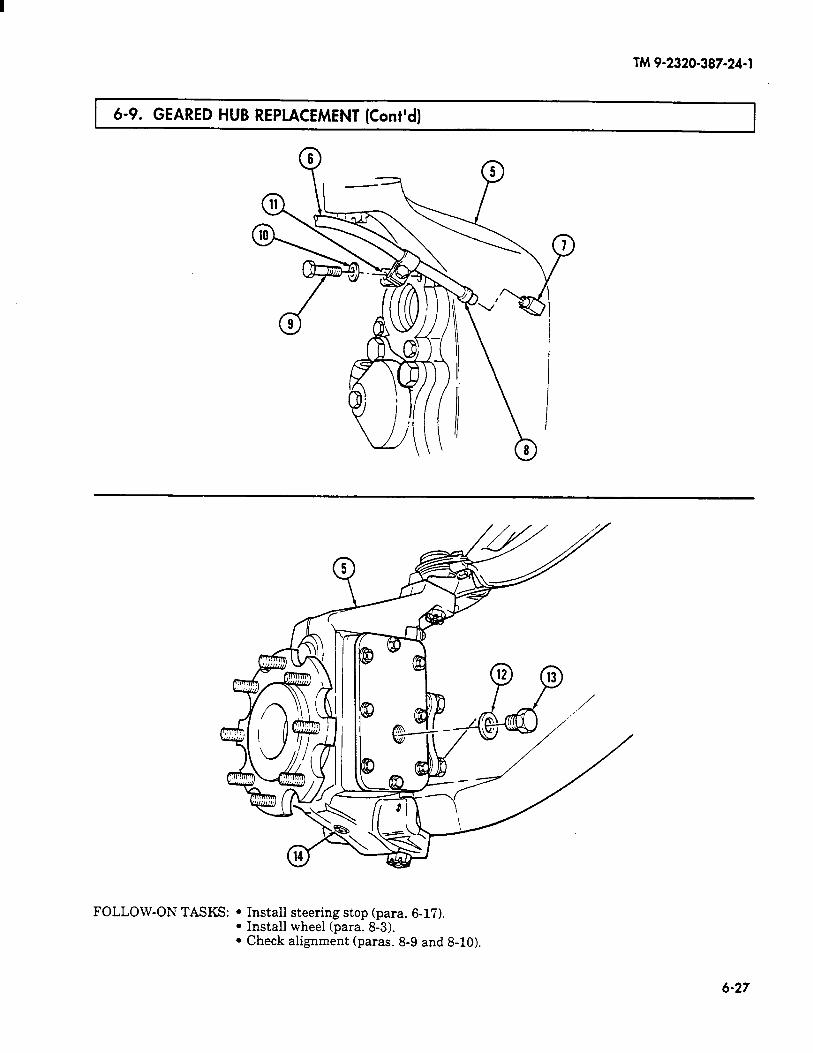
TM9-2320-387-24-l
1 6-9. GEARED HUB REPLACEMENT ICont’dl I
FOLLOW-ON TASKS: l Install steering stop (para. 6-17). l Install wheel (para. 8-3). l Check alignment (paras. 8-9 and 8-10).
6-27
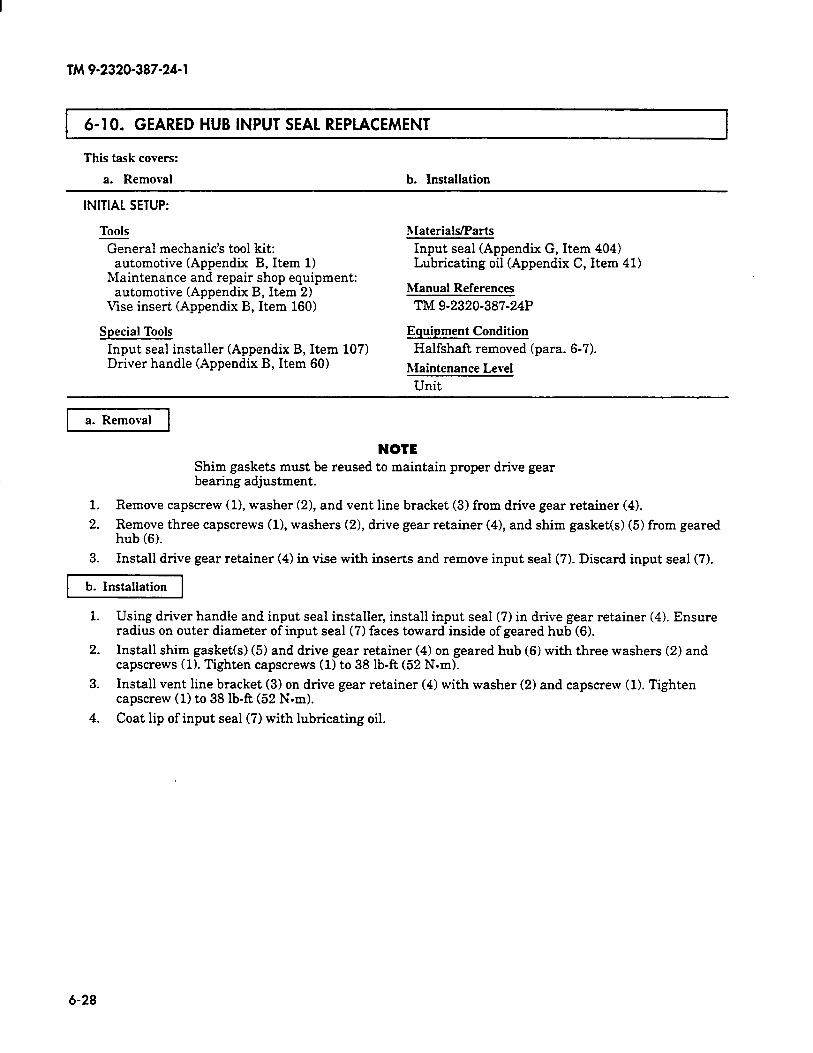
TM 9-2320-387-24-l
6-l 0. GEARED HUB INPUT SEAL REPLACEMENT
This task covers:
a. Removal b. Installation
INITIAL SETUP:
Tools hIaterials/Parts
General mechanic’s tool kit: automotive (Appendix B, Item 11
Maintenance and repair shop equipment: automotive (Appendix B, Item 2)
Vise insert (Appendix B, Item 160)
Input seal (Appendix G, Item 404) Lubricating oil (Appendix C, Item 41)
Manual References
TM 9-2320-387-24P
Special Tools Input seal installer (Appendix B, Item 107) Driver handle (Appendix B, Item 601
Equipment Condition
Halfshaft removed (para. 6-7).
Maintenance Level
Unit
pYiGzq
NOTE Shim gaskets must be reused to maintain proper drive gear bearing adjustment.
1. Remove capscrew (l), washer (21, and vent line bracket (3) from drive gear retainer (4).
2. Remove three capscrews (11, washers (21, drive gear retainer (41, and shim gasket(s) (5) from geared hub (6).
3. Install drive gear retainer (4) in vise with inserts and remove input seal (71. Discard input seal (7).
b. Installation
1. Using driver handle and input seal installer, install input seal (71 in drive gear retainer (4). Ensure radius on outer diameter of input seal (7) faces toward inside of geared hub (6).
2. Install shim gasket(s) (5) and drive gear retainer (4) on geared hub (6) with three washers (2) and capscrews (1). Tighten capscrews (1) to 38 lb-ft (52 N-m).
3. Install vent line bracket (3) on drive gear retainer (4) with washer (2) and capscrew (1). Tighten capscrew (1) to 38 lb-R (52 Nom).
4. Coat lip of input seal (7) with lubricating oil.
6-28
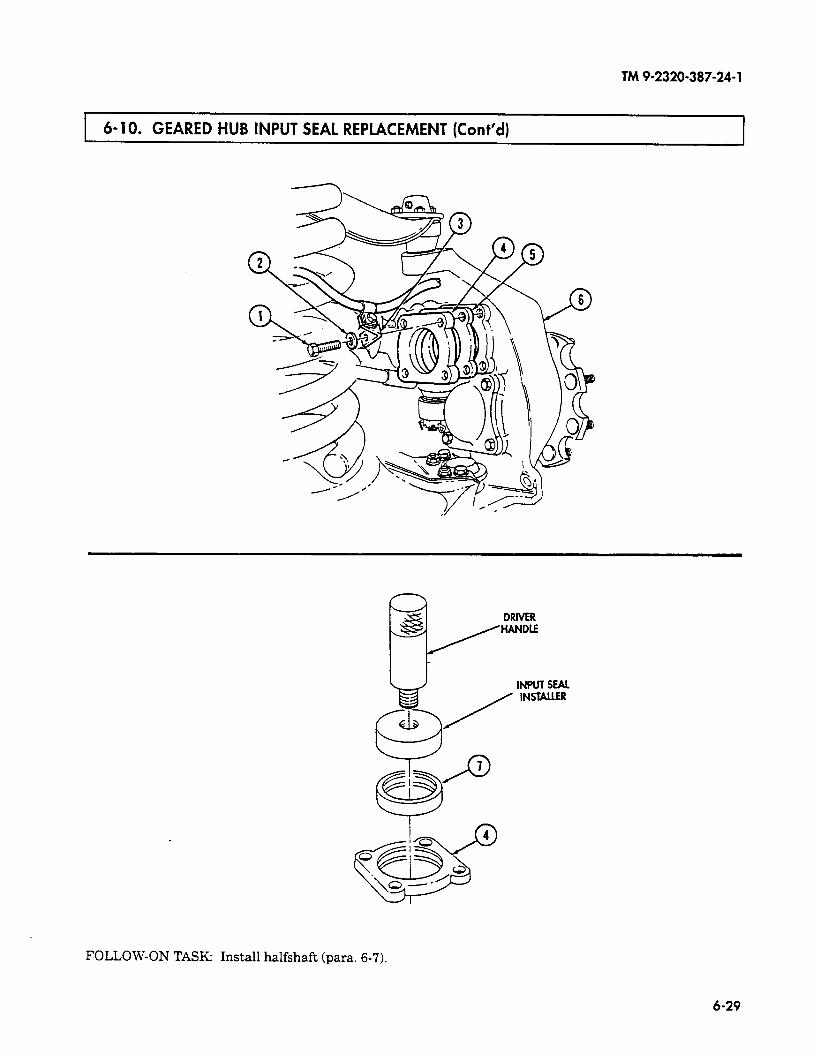
TM 9-2320-387-24-l
6-i o. GEARED HUB INPUT SEAL REPLACEMENT Kont’d) I
DRIVER
INPUT SEAL
FOLLOW-ON TASK: Install halfshaft (para. 6-7).
6-29
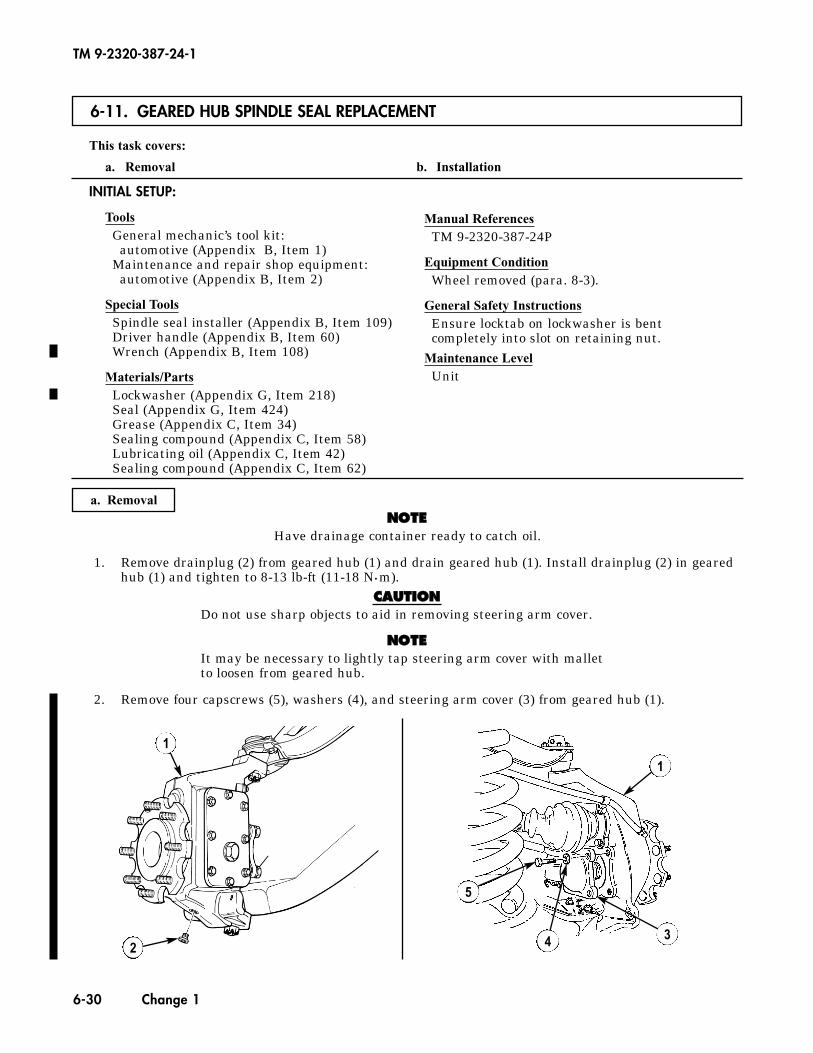
NNOOTTEEHave drainage container ready to catch oil.
1. Remove drainplug (2) from geared hub (1) and drain geared hub (1). Install drainplug (2) in gearedhub (1) and tighten to 8-13 lb-ft (11-18 N•m).
CCAAUUTTIIOONNDo not use sharp objects to aid in removing steering arm cover.
NNOOTTEEIt may be necessary to lightly tap steering arm cover with malletto loosen from geared hub.
2. Remove four capscrews (5), washers (4), and steering arm cover (3) from geared hub (1).
6-11. GEARED HUB SPINDLE SEAL REPLACEMENT
This task covers:
a. Removal b. Installation
Manual ReferencesTM 9-2320-387-24P
Equipment ConditionWheel removed (para. 8-3).
General Safety InstructionsEnsure locktab on lockwasher is bentcompletely into slot on retaining nut.
Maintenance LevelUnit
INITIAL SETUP:
ToolsGeneral mechanic’s tool kit:
automotive (Appendix B, Item 1)Maintenance and repair shop equipment:
automotive (Appendix B, Item 2)
Special ToolsSpindle seal installer (Appendix B, Item 109)Driver handle (Appendix B, Item 60)Wrench (Appendix B, Item 108)
Materials/PartsLockwasher (Appendix G, Item 218)Seal (Appendix G, Item 424)Grease (Appendix C, Item 34)Sealing compound (Appendix C, Item 58)Lubricating oil (Appendix C, Item 42)Sealing compound (Appendix C, Item 62)
TM 9-2320-387-24-1
6-30 Change 1
a. Removal
1
2
1
34
5
6-11. GEARED HUB SPINDLE SEAL REPLACEMENT (Cont'd)
TM 9-2320-387-24-1
Change 1 6-31
NNOOTTEEFor new configuration, two locktabs on lockwasher must be bentaway from retaining nut for removal.
3. Bend locktab on lockwasher (13) away from retaining nut (14).NNOOTTEE
If four-slotted retaining nut TN-07 is present, it is recommendedto replace it with eight-slotted retaining nut 12342680.
4. Using retaining nut wrench, remove retaining nut (14), lockwasher (13), and keyed washer (12)from spindle (7). Discard lockwasher (13)
5. Remove spindle (7), spacer (6), bearing (11), and spacer (10) from geared hub (1).6. Remove spindle seal (15) from geared hub (1). Discard spindle seal (15).7. Inspect spindle (7) for rough or corroded sealing surface (8). Replace geared hub (1) (para. 6-9) if
spindle (7) is damaged.8. Inspect bearings (9) and (11) for damage. Replace geared hub (1) (para. 6-9) if bearing (9) or (11) is
damaged.
1
6
7
9
8
10
11121314
1
15
NEWCONFIGURATION

6-11. GEARED HUB SPINDLE SEAL REPLACEMENT (Cont'd)
1. Using driver handle and spindle seal installer, install spindle seal (1) in geared hub (2).
2. Coat spindle seal (1) with lubricating oil.
3. Install spacer (3) and spindle (4) in geared hub (2).
4. Apply grease to face of retaining nut (9).
NNOOTTEE• If four-slotted retaining nut is present, it is recommended to
replace it with eight-slotted retaining nut 12342680.
• Ensure lip of spacer faces the bearing for a proper fit.
5. Install spacer (5), bearing (6), keyed washer (7), lockwasher (8), and retaining nut (9) on spindle (4).
6. Using retaining nut wrench, tighten retaining nut (9) to 35-45 lb ft (47-61 N•m).
7. Rotate spindle (4) five full rotations clockwise and five full rotations counterclockwise to properlyseat bearings.
8. Loosen retaining nut (9) until it is finger-tight, then retighten nut to 23-27 lb-ft (31-37 N•m).
WWAARRNNIINNGG
Ensure locktab on lockwasher is bent completely into slot onretaining nut. Eight-slotted retaining nut provides additionalsecurity by enabling two locktabs on lockwasher to be bent intoslots on retaining nut. Failure to do this may cause injury to per-sonnel or damage to equipment.
NNOOTTEE• For new configuration, two locktabs on lockwasher must be
bent into slots on retaining nut.
• It may be necessary to slightly loosen or tighten retaining nutto gain proper alignment with locktabs.
9. Determine which locktab(s) (10) on lockwasher (8) aligns with slot(s) (11) in retaining nut (9). Bendlocktab(s) (10) into slot(s) (11) on retaining nut (9).
b. Installation
TM 9-2320-387-24-1
6-32 Change 1
DRIVER HANDLE
SPINDLE SEAL INSTALLER
1
2
6-11. GEARED HUB SPINDLE SEAL REPLACEMENT (Cont'd)
TM 9-2320-387-24-1
Change 1 6-33
NEWCONFIGURATION
2
3
4
9 8 7 65
8
9
10
11
10
89
10
11
~
~~
RETAININGNUT WRENCH
6-11. GEARED HUB SPINDLE SEAL REPLACEMENT (Cont’d)
CCAAUUTTIIOONNWhen installing steering arm cover, ensure seal in cover isaligned on spindle extension. Damage to seal will result.
NNOOTTEEImmediately install steering arm cover after application of sealingcompound.
10. Clean sealing surfaces on geared hub (1) and steering arm cover (2). Apply anaerobic sealing com-pound to steering arm cover (2) and install steering arm cover (2) on geared hub (1).
11. Apply sealing compound to threads of capscrews (4) and install steering arm cover (2) on gearedhub (1) with four washers (3) and capscrews (4). Tighten capscrews (4) to 65 lb-ft (88 N•m).
12. Remove fill plug (5) and washer (6) from geared hub (1).
13. Fill geared hub (1) to proper oil level (para. 2-12).
14. Install washer (6) and fill plug (5) on geared hub (1). Tighten fill plug (5) to 8-13 lb-ft (11-18 N•m).
FOLLOW-ON TASK: Install wheel (para. 8-3).
TM 9-2320-387-24-1
6-34 Change 1
1
234
1
56
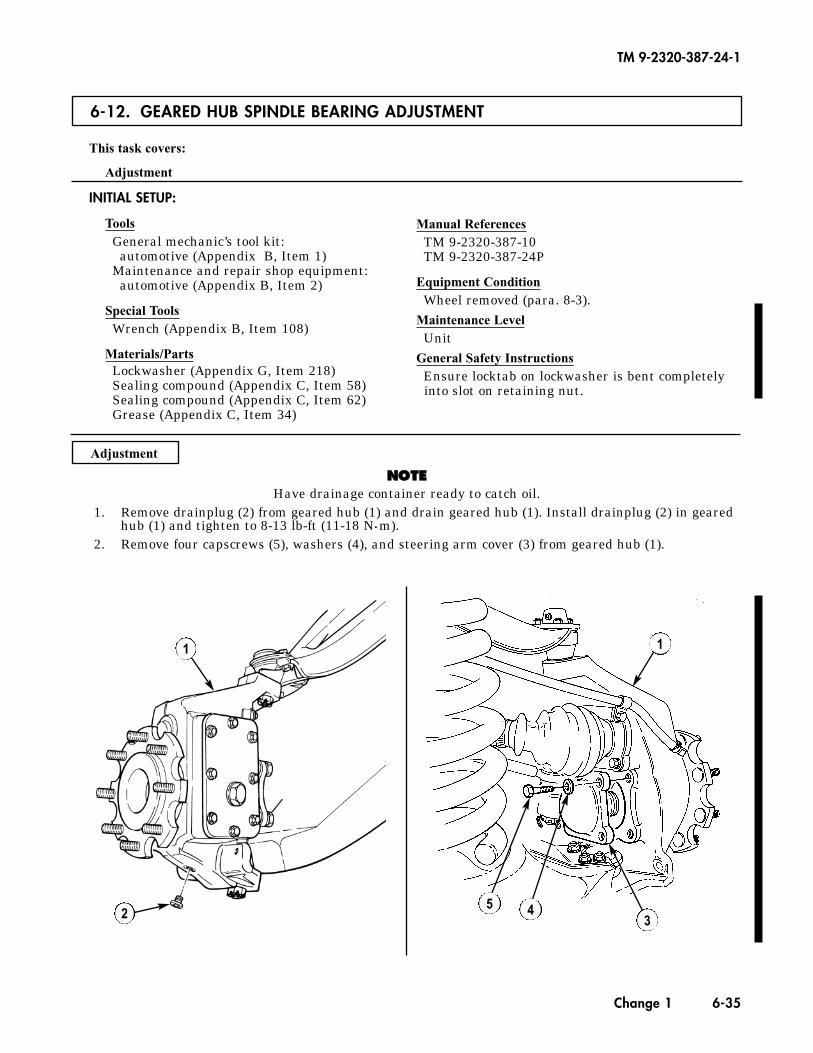
6-12. GEARED HUB SPINDLE BEARING ADJUSTMENT
Adjustment
This task covers:
Adjustment
INITIAL SETUP:
ToolsGeneral mechanic’s tool kit:
automotive (Appendix B, Item 1)Maintenance and repair shop equipment:
automotive (Appendix B, Item 2)
Special ToolsWrench (Appendix B, Item 108)
Materials/PartsLockwasher (Appendix G, Item 218)Sealing compound (Appendix C, Item 58)Sealing compound (Appendix C, Item 62)Grease (Appendix C, Item 34)
Manual ReferencesTM 9-2320-387-10TM 9-2320-387-24P
Equipment ConditionWheel removed (para. 8-3).
Maintenance LevelUnit
General Safety InstructionsEnsure locktab on lockwasher is bent completelyinto slot on retaining nut.
NNOOTTEEHave drainage container ready to catch oil.
1. Remove drainplug (2) from geared hub (1) and drain geared hub (1). Install drainplug (2) in gearedhub (1) and tighten to 8-13 lb-ft (11-18 N•m).
2. Remove four capscrews (5), washers (4), and steering arm cover (3) from geared hub (1).
TM 9-2320-387-24-1
Change 1 6-35
1
5 43
1
2
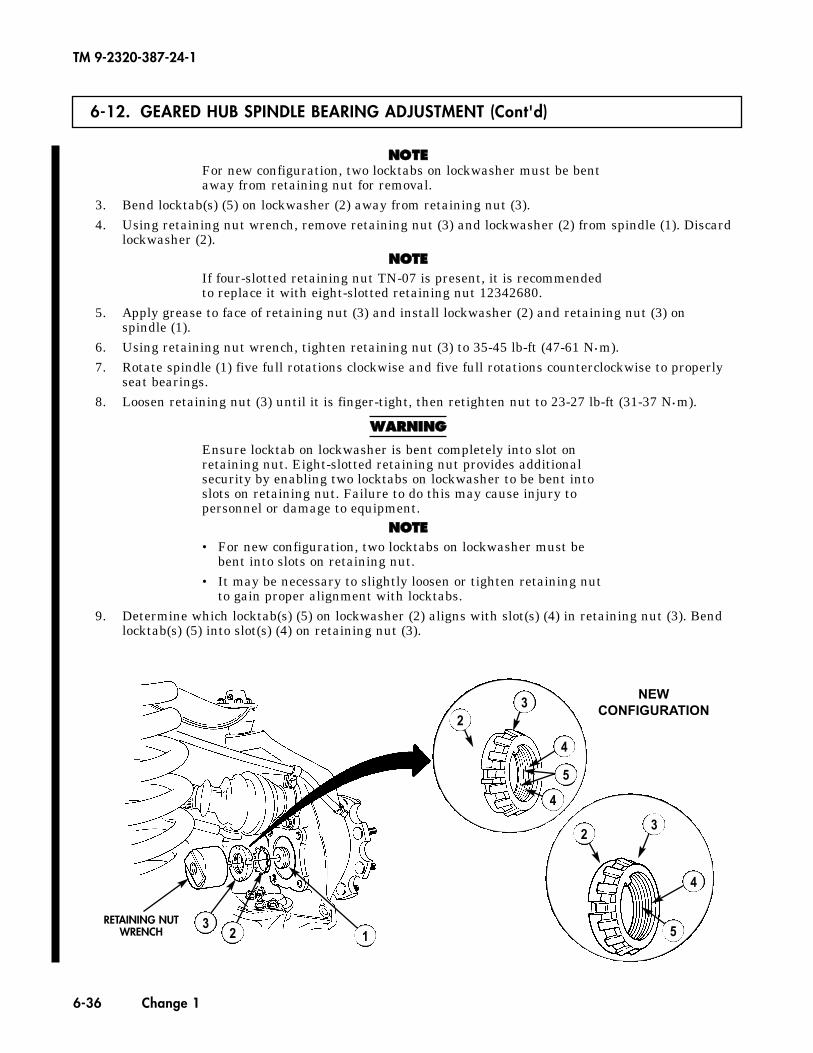
6-12. GEARED HUB SPINDLE BEARING ADJUSTMENT (Cont'd)
TM 9-2320-387-24-1
6-36 Change 1
NNOOTTEEFor new configuration, two locktabs on lockwasher must be bentaway from retaining nut for removal.
3. Bend locktab(s) (5) on lockwasher (2) away from retaining nut (3).4. Using retaining nut wrench, remove retaining nut (3) and lockwasher (2) from spindle (1). Discard
lockwasher (2).NNOOTTEE
If four-slotted retaining nut TN-07 is present, it is recommendedto replace it with eight-slotted retaining nut 12342680.
5. Apply grease to face of retaining nut (3) and install lockwasher (2) and retaining nut (3) on spindle (1).
6. Using retaining nut wrench, tighten retaining nut (3) to 35-45 lb-ft (47-61 N•m).7. Rotate spindle (1) five full rotations clockwise and five full rotations counterclockwise to properly
seat bearings.8. Loosen retaining nut (3) until it is finger-tight, then retighten nut to 23-27 lb-ft (31-37 N•m).
WWAARRNNIINNGG
Ensure locktab on lockwasher is bent completely into slot onretaining nut. Eight-slotted retaining nut provides additionalsecurity by enabling two locktabs on lockwasher to be bent intoslots on retaining nut. Failure to do this may cause injury topersonnel or damage to equipment.
NNOOTTEE• For new configuration, two locktabs on lockwasher must be
bent into slots on retaining nut.• It may be necessary to slightly loosen or tighten retaining nut
to gain proper alignment with locktabs.9. Determine which locktab(s) (5) on lockwasher (2) aligns with slot(s) (4) in retaining nut (3). Bend
locktab(s) (5) into slot(s) (4) on retaining nut (3).
13
2
23
4
5
4
23
4
5RETAINING NUT
WRENCH
NEWCONFIGURATION
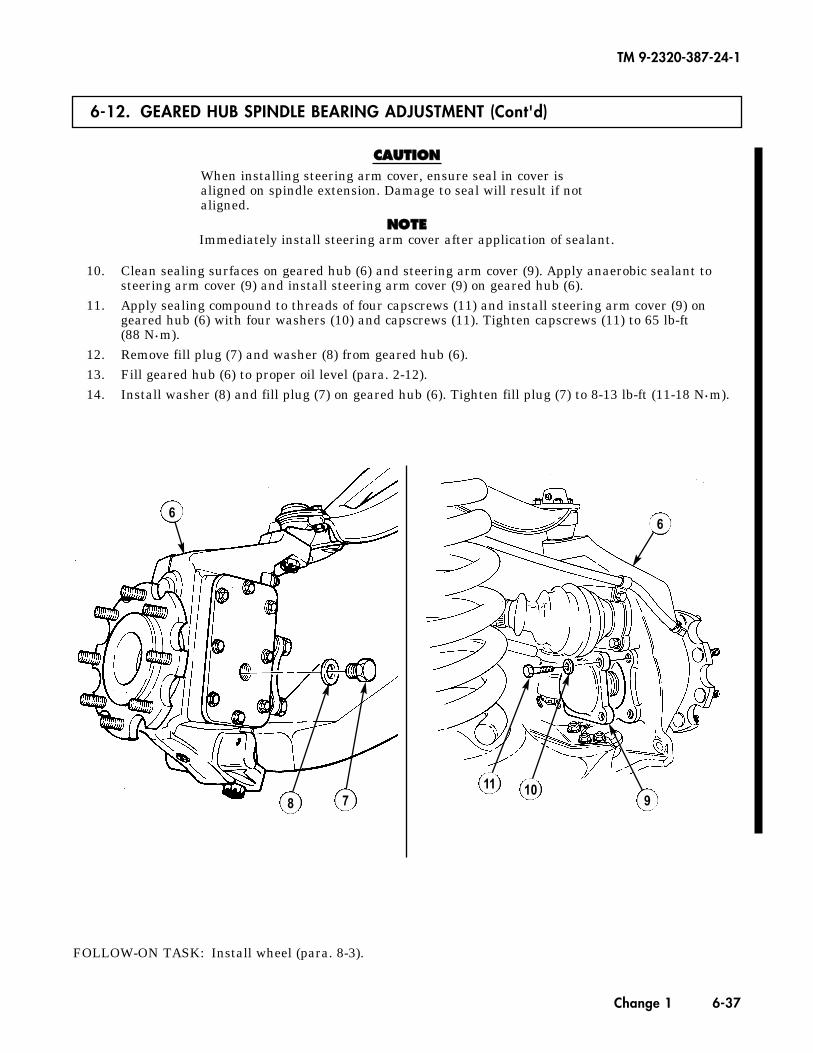
6-12. GEARED HUB SPINDLE BEARING ADJUSTMENT (Cont'd)
FOLLOW-ON TASK: Install wheel (para. 8-3).
TM 9-2320-387-24-1
Change 1 6-37
10. Clean sealing surfaces on geared hub (6) and steering arm cover (9). Apply anaerobic sealant tosteering arm cover (9) and install steering arm cover (9) on geared hub (6).
11. Apply sealing compound to threads of four capscrews (11) and install steering arm cover (9) ongeared hub (6) with four washers (10) and capscrews (11). Tighten capscrews (11) to 65 lb-ft(88 N•m).
12. Remove fill plug (7) and washer (8) from geared hub (6).13. Fill geared hub (6) to proper oil level (para. 2-12).14. Install washer (8) and fill plug (7) on geared hub (6). Tighten fill plug (7) to 8-13 lb-ft (11-18 N•m).
CCAAUUTTIIOONNWhen installing steering arm cover, ensure seal in cover isaligned on spindle extension. Damage to seal will result if notaligned.
NNOOTTEEImmediately install steering arm cover after application of sealant.
6
78
6
11 109
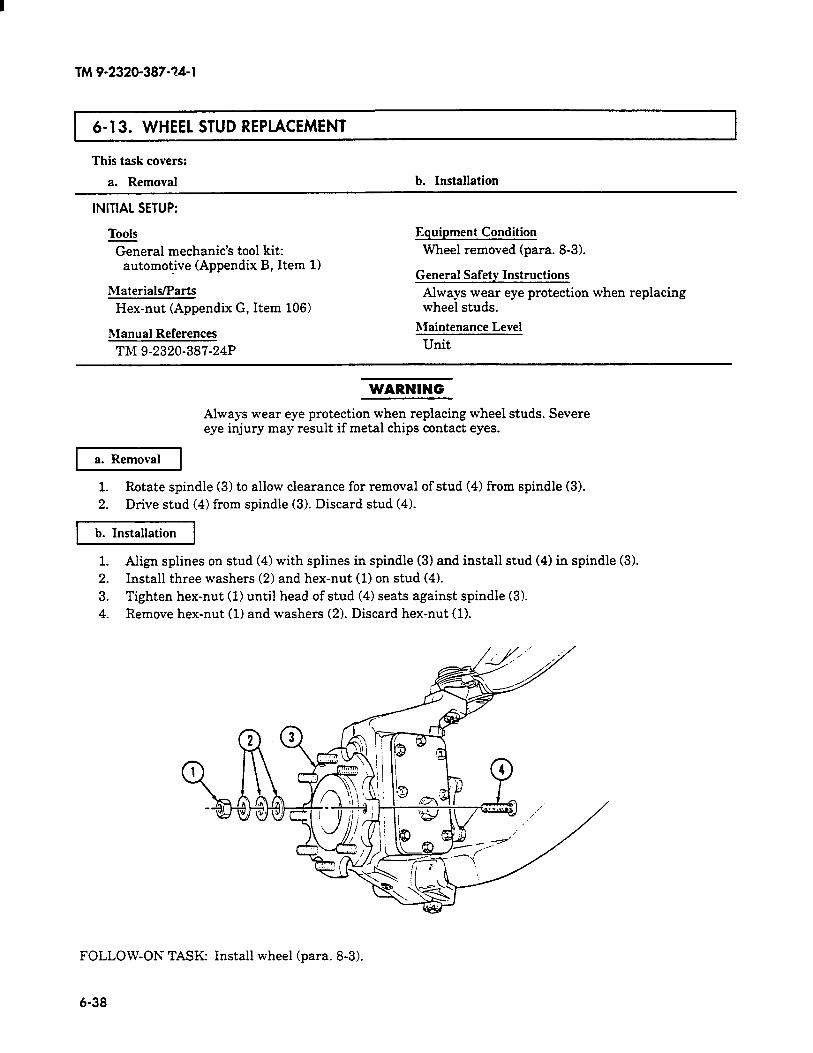
I
TM 9-2320-387-?4-1
1 6-13. WHEEL STUD REPLACEMENT I
This task covers:
a. Removal b. Installation
INITIAL SETUP:
Tools General mechanic’s tool kit:
automotive (Appendix B, Item 1)
Materials/Parts
Hex-nut (Appendix G, Item 106)
Manual References
TM 9-2320-387-24P
Equipment Condition
Wheel removed (para. 8-3).
General Safety Instructions
Always wear eye protection when replacing wheel studs.
Maintenance Level
Unit
WARNING
Always wear eye protection when replacing wheel studs. Severe eye injury may result if metal chips contact eyes.
1 a. Removal 1
1. Rotate spindle (3) to allow clearance for removal of stud (4) from spindle (3).
2. Drive stud (4) from spindle (3). Discard stud (4).
b. Installation
1. Align sphnes on stud (4) with splines in spindle (3) and install stud (4) in spindle (3).
2. Install three washers (2) and hex-nut (1) on stud (4). 3. Tighten hex-nut (1) until head of stud (4) seats against spindle (3). 4. Remove hex-nut (1) and washers (2). Discard hex-nut (1).
FOLLOW-ON TASK: Install wheel (para. 8-3).
6-38

TM 9-2320-387-24-l
I 6- 14. DIFFERENTIAL VENT LINE REPLACEMENT
This task covers:
a. Removal
INITIAL SETUP:
b. Installation
Tools
General mechanic’s tool kit: automotive (Appendix B, Item 1)
hlaintenance Level Unit
Manual References
TM 9-2320-387-24P
NOTE The replacement procedure for differential vent lines is basically the same. This procedure covers the rear differential vent line.
1 a. Removal 1
1. Remove vent line (7) from differential fitting (6) and union fitting (1). 2. Remove two line clips (21 from vent line (3) and brake line (5). 3. Remove vent line (3) from union fittings (1) and (4).
[I
1. Install vent line (3) on union fittings (1) and (4). 2. Install two line clips (2) on vent line (31 and brake line (5). 3. Install vent line (7) on differential fitting (6) and union fitting (1).
6-39

TM 9-2320-387-24-l
6-l 5. REAR GEARED HUB VENT LINE REPLACEMENT
This task covers:
a. Removal b. Installation
INITIAL SETUP:
Tools
General mechanic’s tool kit: automotive (Appendix B, Item 1)
hlanual References TM 9-2320-387-24P
Maintenance Level
Unit
NOTE The replacement procedure for each rear geared hub vent line is basically the same. This procedure covers the right rear geared hub vent line.
a. Removal
1. Disconnect vent line (4) from geared hub fitting (3).
2. Remove capscrew (7), clamp (61, and vent line (4) from bracket (5).
3. Remove capscrew (81, clamp (11, and vent line (4) from control arm (2).
4. Remove capscrew (101, clamp (91, and vent line (4) from bracket (11).
5. Remove capscrew (151, clamp (141, and vent line (4) from frame (13).
6. Remove vent line (4) from tee fitting (12).
Lb’Installation
1. Install vent line (4) on tee fitting (12) and geared hub fitting (3).
2. Install vent line (4) on frame (13) with clamp (14) and capscrew (15).
3. Install vent line (4) on bracket (11) with clamp (9) and capscrew (10).
4. Install vent line (4) on control arm (2) with clamp (1) and capscrew (8).
NOTE Position clamp at a 45” angle toward the wheel before securing with capscrew.
5. Install vent line (4) on bracket (5) with clamp (6) and capscrew (7).
6-40
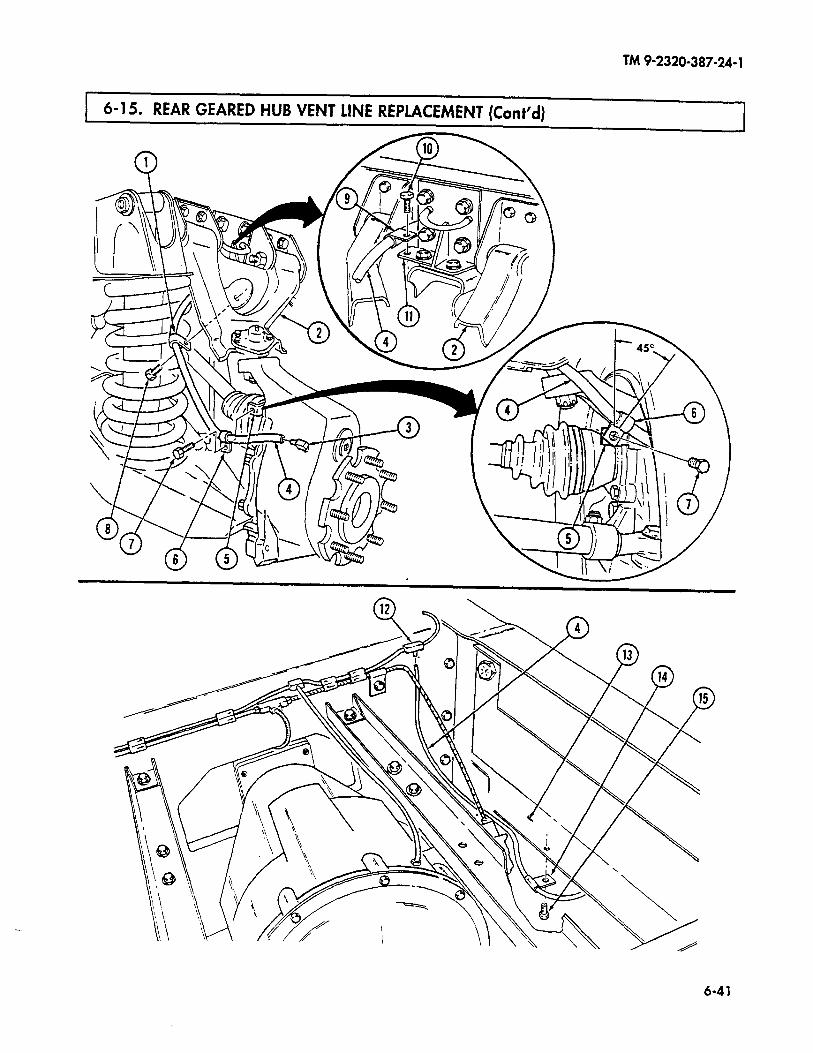
TM9-2320-387-24-l
6-l 5. REAR GEARED HUB VENT LINE REPLACEMEN
6-41
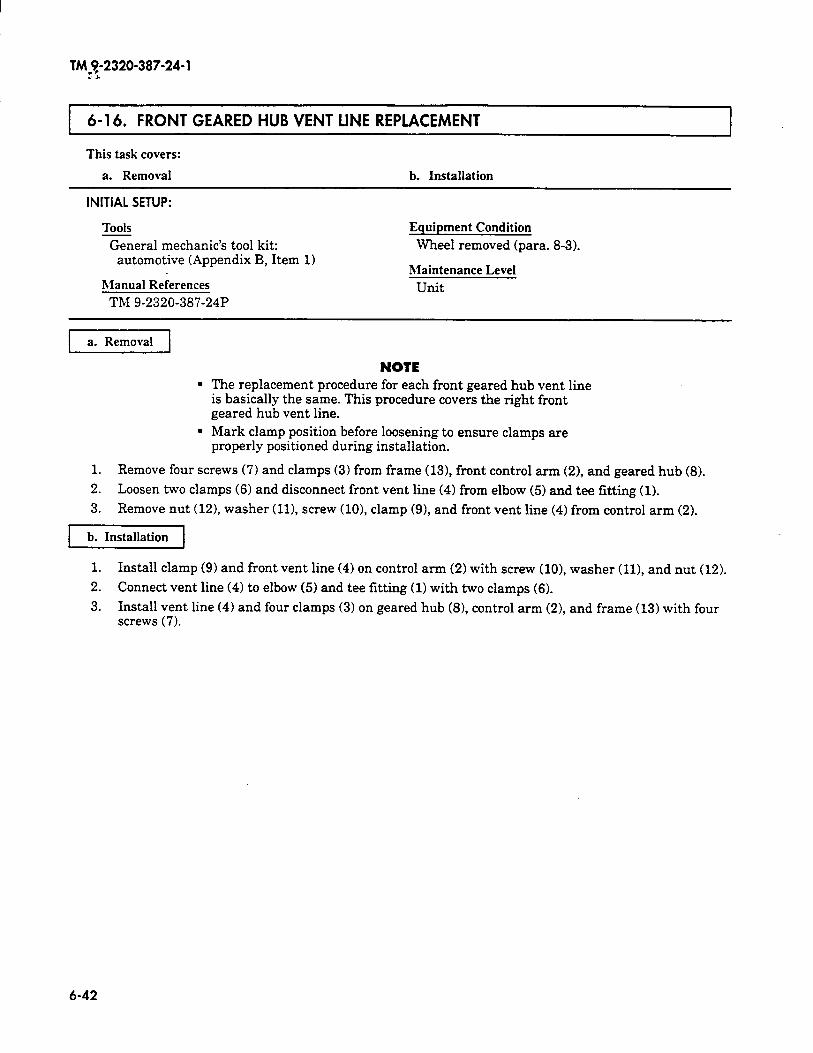
TM$2320-387-24-1
I 6-16. FRONT GEARED HUB VENT LINE REPLACEMENT 1
This task covers:
a. Removal b. Installation
INITIAL SETUP:
Tools General mechanic’s tool kit:
automotive (Appendix B, Item 11
nlanual References TM 9-2320-387-24P
Equipment Condition Wheel removed (para. 8-3).
Maintenance Level Unit
1 a. Removal 1
NOTE The replacement procedure for each front geared hub vent line is basically the same. This procedure covers the right front geared hub vent line. Mark clamp position before loosening to ensure clamps are properly positioned during installation.
1. Remove four screws (7) and clamps (3) from frame (131, front control arm (21, and geared hub (8).
2. Loosen two clamps (6) and disconnect front vent line (4) from elbow (5) and tee fitting (1).
3. Remove nut (121, washer (ll), screw (lo), clamp (91, and front vent line (4) from control arm (2).
b. Installation _
1. Install clamp (9) and front vent line (4) on control arm (2) with screw (lo), washer (111, and nut (12).
2. Connect vent line (4) to elbow (5) and tee fitting (1) with two clamps (6).
3. Install vent line (4) and four clamps (3) on geared hub W, control arm (21, and frame (13) with four screws (7).
6-42
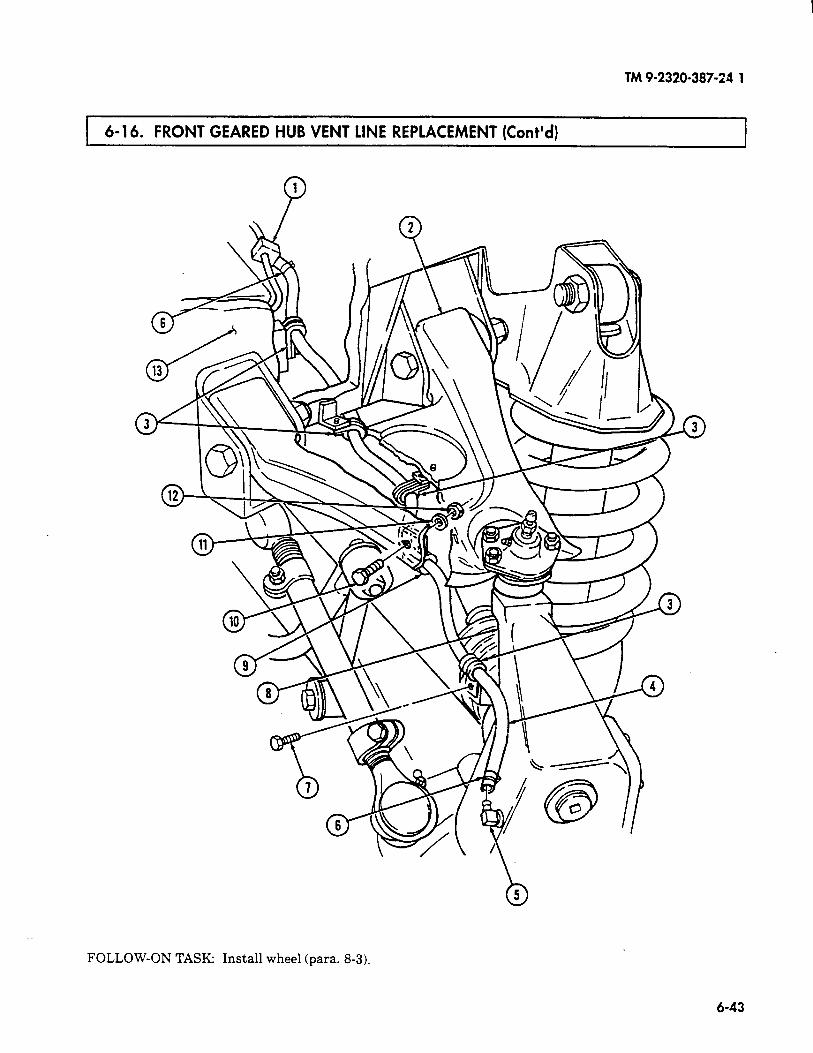
TM9-2320-387-24 1
6-16. FRONT GEARED HUB VENT LINE REPLACEMENT (Cont’d)
P 1
FOLLOW-ON TASK: Install wheel (para. 8-3).
6-43
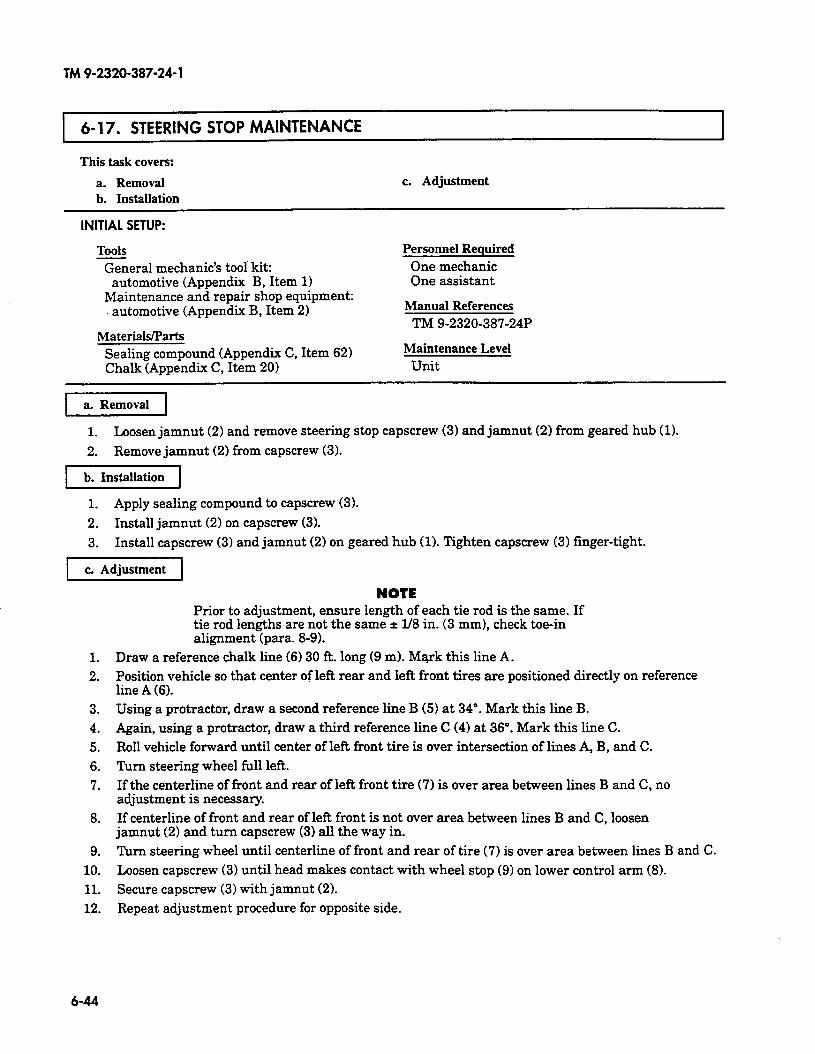
TM 9-2320-387-24-l
6- 17. STEERING STOP MAINTENANCE
This task covers:
a. Removal b. Installation
c. Adjustment
INITIAL SETUP:
Tools General mechanic’s tooi kit:
automotive (Appendix B, Item 1) Maintenance and repair shop equipment:
automotive (Appendix B, Item 2)
Personnel Required One mechanic One assistant
Manual References TM 9-2320-387-24P
Materials/Parts Sealing compound (Appendix C, Item 62) Chalk (Appendix C, Item 20)
Maintenance Level Unit
(1 1. Loosen jamnut (2) and remove steering stop capscrew (3) and jamnut (2) from geared hub (1).
2. Remove jamnut (2) from capscrew (3).
b. Installation
1. Apply sealing compound to capscrew (3).
2. Install jamnut (2) on capscrew (3).
3. Install capscrew (3) and jamnut (2) on geared hub (1). Tighten capscrew (3) finger-tight.
c. Adjustment
1. 2.
3.
4.
5.
6.
7.
8.
9.
10.
11.
12.
NOTE Prior to adjustment, ensure length of each tie rod is the same. If tie rod lengths are not the same * 1/E! in. (3 mm), check toe-in alignment (para. 8-9).
Draw a reference chalk line (6) 30 R. long (9 m). Mark this line A.
Position vehicle so that center of left rear and left front tires are positioned directly on reference line A (6). Using a protractor, draw a second reference line B (5) at 34”. Mark this line B.
Again, using a protractor, draw a third reference line C (4) at 36”. Mark this line C.
Roll vehicle forward until center of IeR front tire is over intersection of lines A, B, and C.
Turn steering wheel full left.
If the centerline of tiont and rear of left front tire (7) is over area between lines B and C, no adjustment is necessary.
If centerline of front and rear of left front is not over area between lines B and C, loosen jamnut (2) and turn capscrew (3) all the way in.
Turn steering wheel until centerline of front and rear of tire (7) is over area between lines B and C.
Loosen capscrew (3) until head makes contact with wheel stop (9) on lower control arm (8).
Secure capscrew (3) with jamnut (2).
Repeat adjustment procedure for opposite side.
6-44
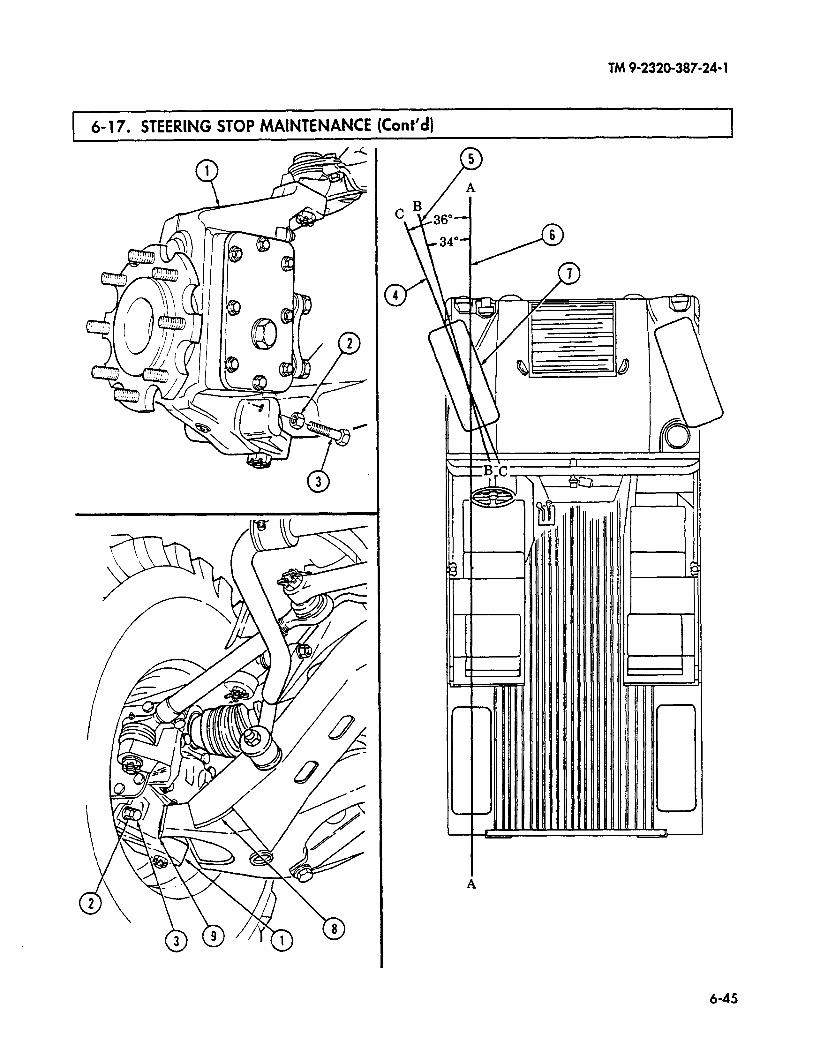
TM 9-2320-387-24-l
6- 17. STEERING STOP MAINTENANCE (cont’d) I
6-45
I
TM 9-2320-387-24-l
I 6- 18. DIFFERENTIAL COVER MAINTENANCE
This task covers:
a. Removal b. Cleaning and Inspection
c. Installation
INITIAL SETUP:
Tools General mechanic’s tool kit:
Manual References TM 9-2320-387-24P
automotive (Appendix B, Item 1) Maintenance and repair shop equipment:
automotive (Appendix B, Item 2)
Materials/Parts
General Safety Instructions Drycleaning solvent is flammable and will not be used near an open flame.
RTV silicone compound (Appendix C, Item 74) Maintenance Level
Drycleaning solvent (Appendix C, Item 26) Unit
NOTE Have drainage container ready to catch fluid.
1 a. Removal 1
1. Remove drainplug (3) from differential assembly (4) and drain differential assembly (4).
2. Remove twelve capscrews (2) and cover (1) from differential assembly (4).
b. Cleaning and Inspection
WARNING
Drycleaning solvent is flammable and will not be used near an open flame. A fire extinguisher will be kept nearby when the solvent is used. Use only in well-ventilated places. Failure to do this may result in injury to personnel and/or damage to equipment.
1. Using drycleaning solvent, clean differential cover (11, twelve capscrews (21, and differential assembly (4). ,- :
2. Inspect differential cover (1) for cracks, wear, or breaks. Replace cover (1) if cracked, worn, or broken.
1. Apply Rl’V sealant to sealing surface of cover (1) and install cover (1) on differential assembly (4) with twelve capscrews (2). Tighten capscrews (2) to 16 lb-f% (22 Nom).
2. Install drainplug (3) into differential assembly (4) and tighten drainplug (3) to 13-18 lb-R (18-24 N-m).
6-46
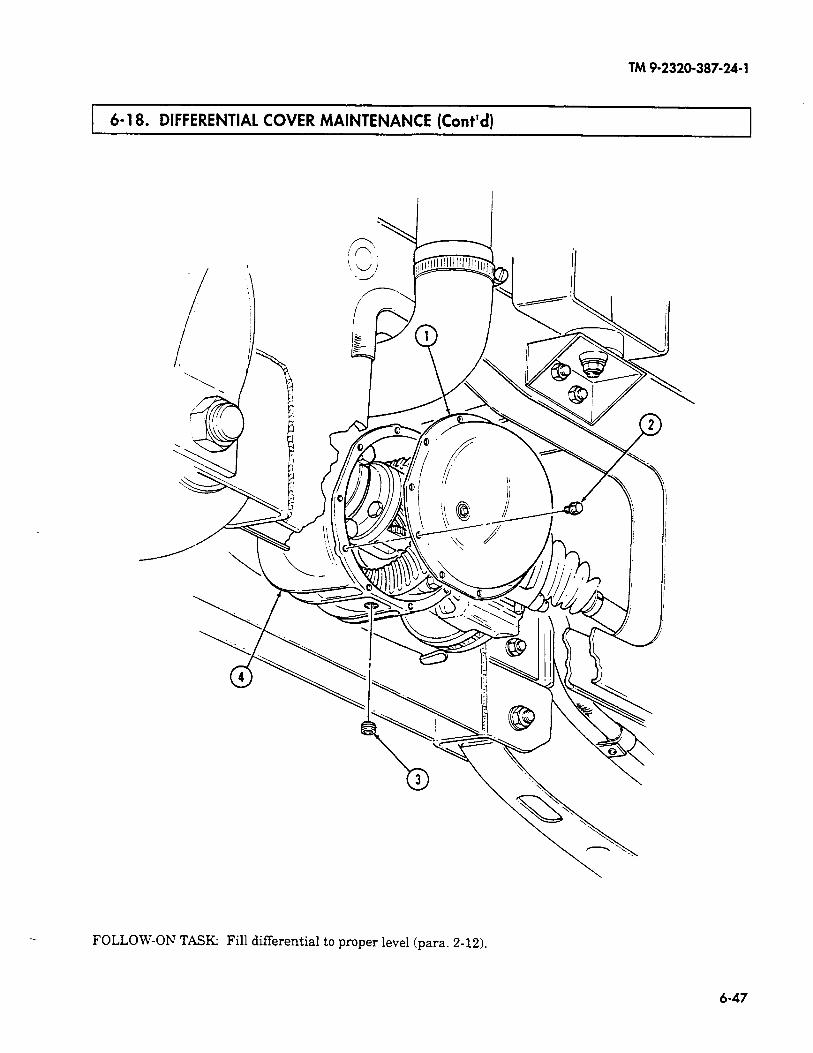
TM 9-2320-387-24-l
6- 18. DIFFERENTIAL COVER MAINTENANCE (Cont’d)
FOLLOW-OF TASK: Fill differential to proper level (para. 2-12).
6-47
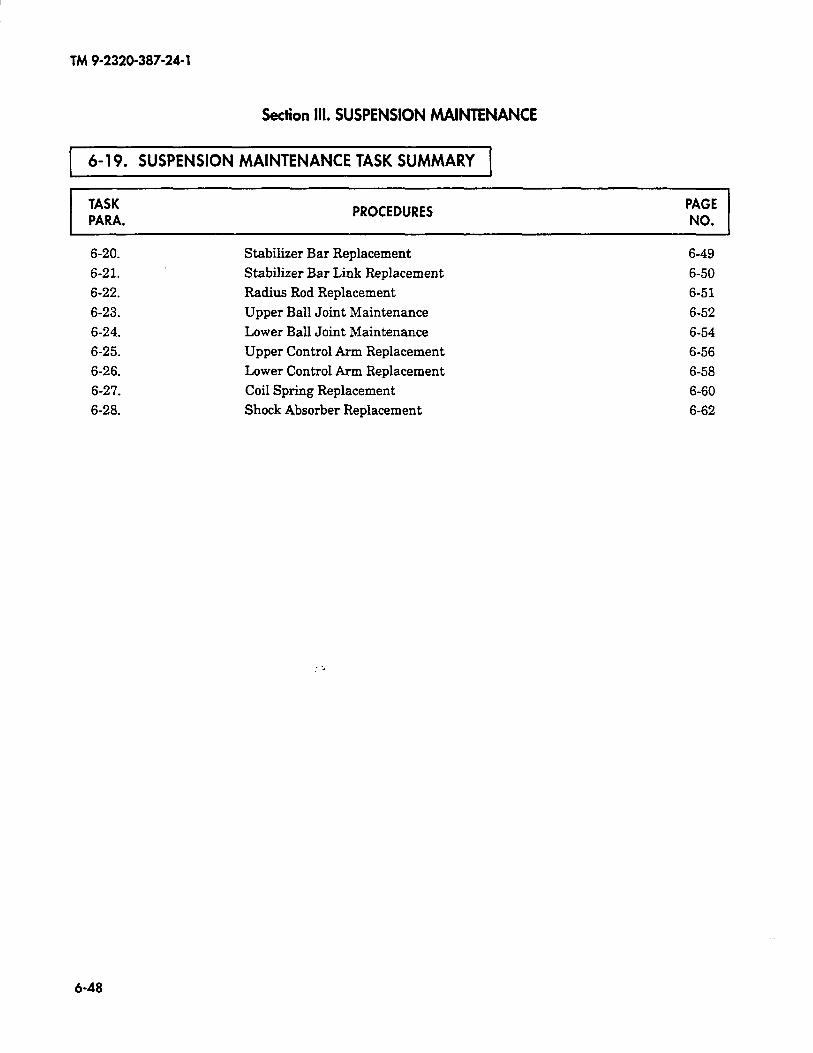
TM 9-2320-387-24-l
Section Ill. SUSPENSION MAlNTENANCE
1 6-19. SUSPENSION MAINTENANCE TASK SUMMARY 1
TASK PARA.
PROCEDURES PAGE NO.
6-20. Stabilizer Bar Replacement 6-49
6-21. Stabilizer Bar Link Replacement 6-50
6-22. Radius Rod Replacement 6-51
6-23. Upper Ball Joint Maintenance 6-52
6-24. Lower Ball Joint Maintenance 6-54
6-25. Upper Control Arm Replacement 6-56
6-26. Lower Control Arm Replacement 6-58
6-27. Coil Spring Replacement 6-60
6-28. Shock Absorber Replacement 6-62
6-48
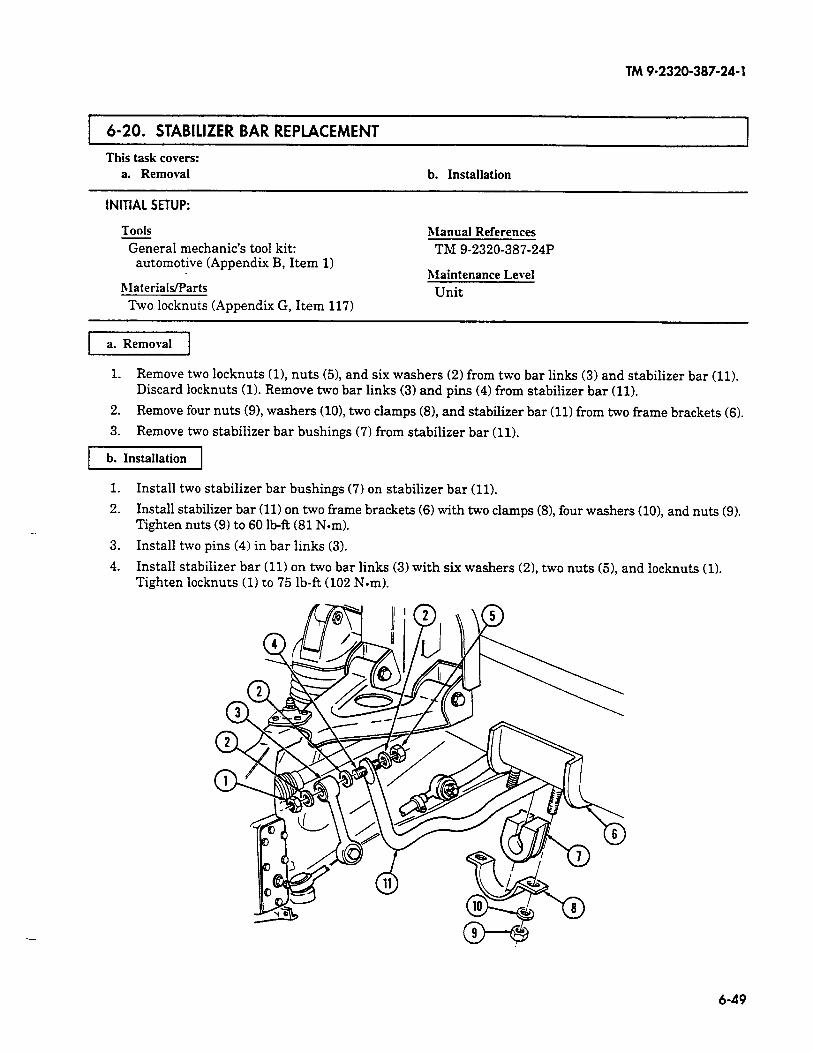
TM 9-2320-387-24-l
6-20. STABILIZER BAR REPLACEMENT
This task covers: a. Removal b. Installation
INITIAL SETUP:
TO&
General mechanic’s tool kit: automotive (Appendix B, Item 1)
Materials/Parts %o locknuts (Appendix G, Item 117)
hfanual References Thl9-2320-387-24P
Maintenance Level Unit
1 a. Removal 1
1. Remove two locknuts Cl), nuts (51, and six washers (2) from two bar links (3) and stabilizer bar (11). Discard locknuts (1). Remove two bar links (3) and pins (4) from stabilizer bar (11).
2. Remove four nuts (91, washers (lo), two clamps (81, and stabilizer bar (11) from two frame brackets (6).
3. Remove two stabilizer bar bushings (7) from stabilizer bar (11).
1 b. Installation 1
1. Install two stabilizer bar bushings (7) on stabilizer bar (11).
2. Install stabilizer bar (11) on two frame brackets (6) with two clamps (81, four washers (lo), and nuts (9). Tighten nuts (9) to 60 lb-R (81 N-m).
3. Install two pins (4) in bar links (3).
4. Install stabilizer bar (11) on two bar links (3) with six washers (21, two nuts (51, and locknuts (1). Tighten locknuts (1) to 75 lb-ft (102 N-m).
6-49
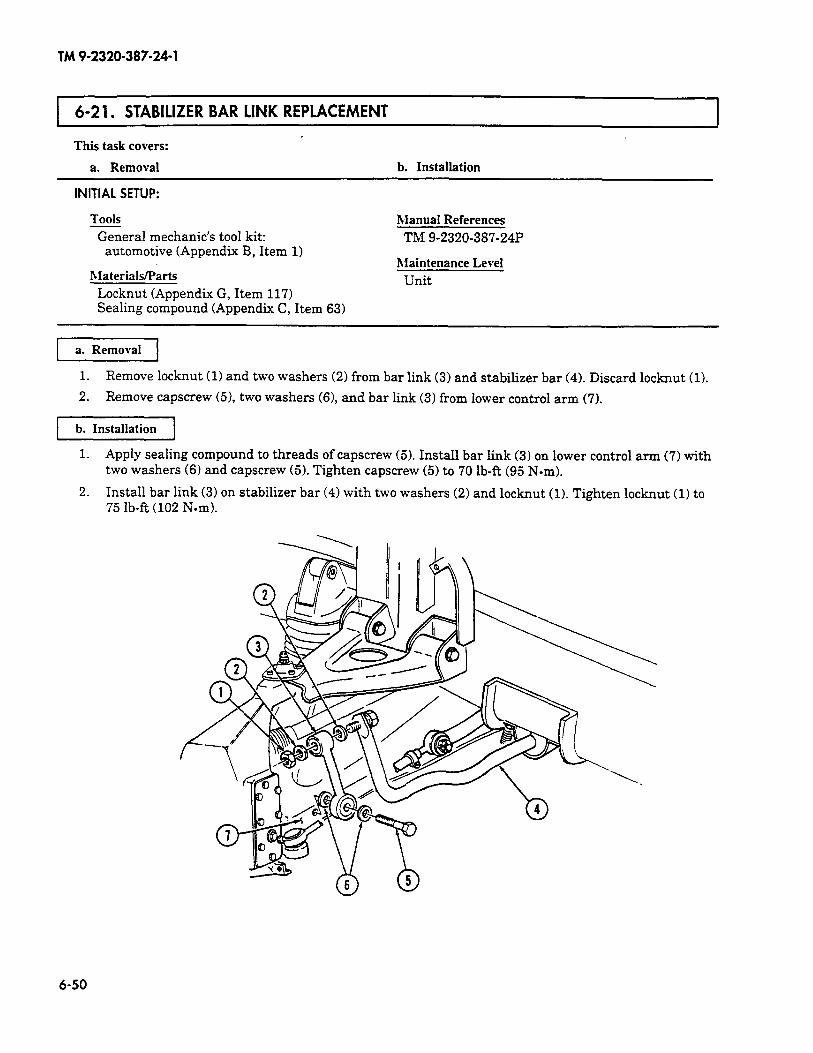
TM 9-2320-387-24-l
6-21. STABILIZER BAR LINK REPLACEMENT 1
This task covers:
a. Removal b. Installation
INITIAL SETUP:
Tools
General mechanic’s tool kit: automotive (Appendix B, Item 1)
Manual References
TM 9-2320-387-24P
hlaterials/Parts Maintenance Level
Unit Locknut (Appendix G, Item 117) Sealing compound (Appendix C, Item 63)
I a. Removal 1
1. Remove locknut (1) and two washers (2) from bar link (3) and stabilizer bar (4). Discard locknut (1).
2. Remove capscrew (51, two washers (61, and bar link (3) from lower control arm (7).
b. Installation
1. Apply sealing compound to threads of capscrew (5). InstaIl bar Iink (3) on lower control arm (7) with two washers (6) and capscrew (5). Tighten capscrew (5) to 70 lb-R (95 Nom).
2. Install bar link (3) on stabilizer bar (4) with two washers (2) and locknut (1). Tighten locknut (1) to 75 Ib-ft (102 Nom).
6-50

1. Remove cotter pin (7), slotted nut (6), and washer (5) from radius rod (4) and geared hub (8).Discard cotter pin (7).
2. Remove locknut (9), washer (2), capscrew (1), washer (2), and radius rod (4) from bracket (3) andgeared hub (8). Discard locknut (9).
1. Install radius rod (4) on bracket (3) with washer (2), capscrew (1), washer (2), and locknut (9).
CCAAUUTTIIOONNDo not loosen slotted nut to install cotter pin. Doing this mayresult in damage to equipment.
2. Install radius rod (4) on geared hub (8) with washer (5) and slotted nut (6). Tighten slotted nut (6)to 70 lb-ft (95 N•m). Install cotter pin (7).
3. Tighten locknut (9) to 260 lb-ft (353 N•m).
b. Installation
a. Removal
6-22. RADIUS ROD REPLACEMENT
This task covers:
a. Removal b. Installation
INITIAL SETUP:Tools
General mechanic’s tool kit:automotive (Appendix B, Item 1)
Maintenance and repair shop equipment:automotive (Appendix B, Item 2)
Materials/PartsCotter pin (Appendix G, Item 34)Locknut (Appendix G, Item 130)
TM 9-2320-387-24-1
Change 1 6-51
Manual ReferencesTM 9-2320-387-10TM 9-2320-387-24P
Equipment ConditionWheel removed (para. 8-3).
Maintenance LevelUnit
FOLLOW-ON TASKS: • Lubricate radius rod (TM 9-2320-387-10).• Install wheel (para. 8-3).• Adjust rear wheel toe-out alignment (para. 8-10).
2 31 4
56
7
9
2
8
6-23. UPPER BALL JOINT MAINTENANCE
This task covers:
a. Inspection c. Installationb. Removal
INITIAL SETUP:
ToolsGeneral mechanic’s tool kit:
automotive (Appendix B, Item 1)Maintenance and repair shop equipment:
automotive (Appendix B, Item 2)
Special ToolsSocket adapter (Appendix B, Item 135)Crowfoot, 15/16 in. (Appendix B, Item 140)
Materials/PartsCotter pin (Appendix G, Item 34)Four locknuts (Appendix G, Item 116)
Personnel RequiredOne mechanicOne assistant
Manual ReferencesTM 9-2320-387-10TM 9-2320-387-24P
Maintenance LevelUnit
1. Chock rear wheels.2. Raise and support front wheels 2 in. (5.1 cm) off ground.
NNOOTTEEIf boot is ripped or torn, upper ball joint is unserviceable.
3. Visually inspect ball joint boot (7), and replace upper ball joint (2) if boot is ripped or torn.4. Grasp top of tire and attempt to move tire in and out. Observe upper control arm (1) and gear
hub (3) where upper ball joint (2) is mounted. If lateral movement is observed, upper ball joint (2) may be worn.
5. Remove wheel (para. 8-3).6. Remove cotter pin (5) and slotted nut (4) from upper ball joint stud (6). Discard cotter pin (5).7. Separate upper control arm (1) from geared hub (3) at upper ball joint (2) end and push geared
hub (3) to one side.8. Install slotted nut (4) on threaded end of upper ball joint stud (6) until it bottoms out on taper of
upper ball joint (2).9. Using crowfoot and adapter, tighten slotted nut (4) and observe torque reading. If torque reading is
below 20 lb-in. (2.3 N•m), upper ball joint (2) is unserviceable and must be replaced. Remove slottednut (4), and go to task b.
10. If torque reading is above 20 lb-in. (2.3 N•m), upper ball joint (2) is serviceable. Go to task c.
a. Inspection
TM 9-2320-387-24-1
6-52 Change 1
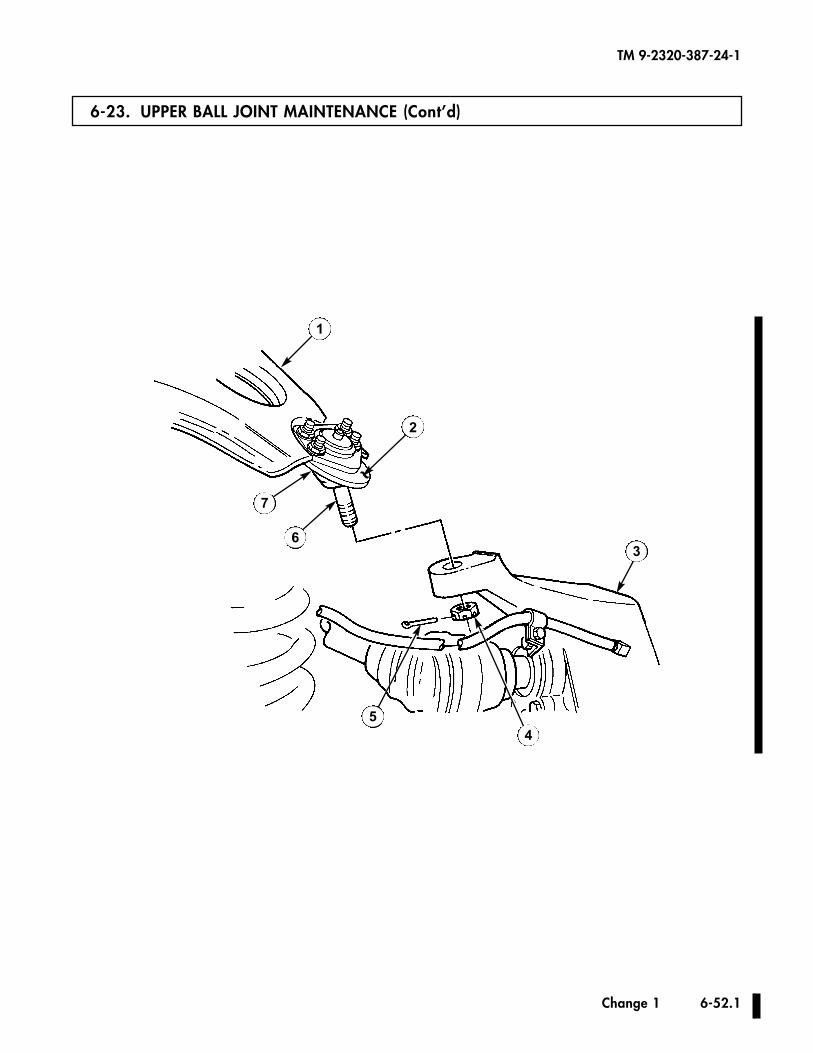
6-23. UPPER BALL JOINT MAINTENANCE (Cont’d)
TM 9-2320-387-24-1
Change 1 6-52.1
1
36
7
~
2
45
6-23. UPPER BALL JOINT MAINTENANCE (Cont’d)
1. Remove cotter pin (7) and slotted nut (6) from upper ball joint (4) and geared hub (5). Discard cotterpin (7).
2. Remove four locknuts (3), washers (2), capscrews (8), washers (2), upper ball joint (4), and uppercontrol arm (1) from geared hub (5). Discard locknuts (3).
1. Install upper ball joint (4) and upper control arm (1) on geared hub (5) with four washers (2),capscrews (8), washers (2), and locknuts (3). Tighten locknuts (3) to 26-30 lb-ft (35-41 N•m).
CCAAUUTTIIOONNDo not loosen slotted nut to install cotter pin. Doing this mayresult in damage to equipment.
2. Install slotted nut (6) on upper ball joint (4). Using crowfoot and adapter, tighten slotted nut (6) to 73 lb-ft (99 N•m). Install cotter pin (7).
c. Installation
b. Removal
TM 9-2320-387-24-1
6-52.2 Change 1
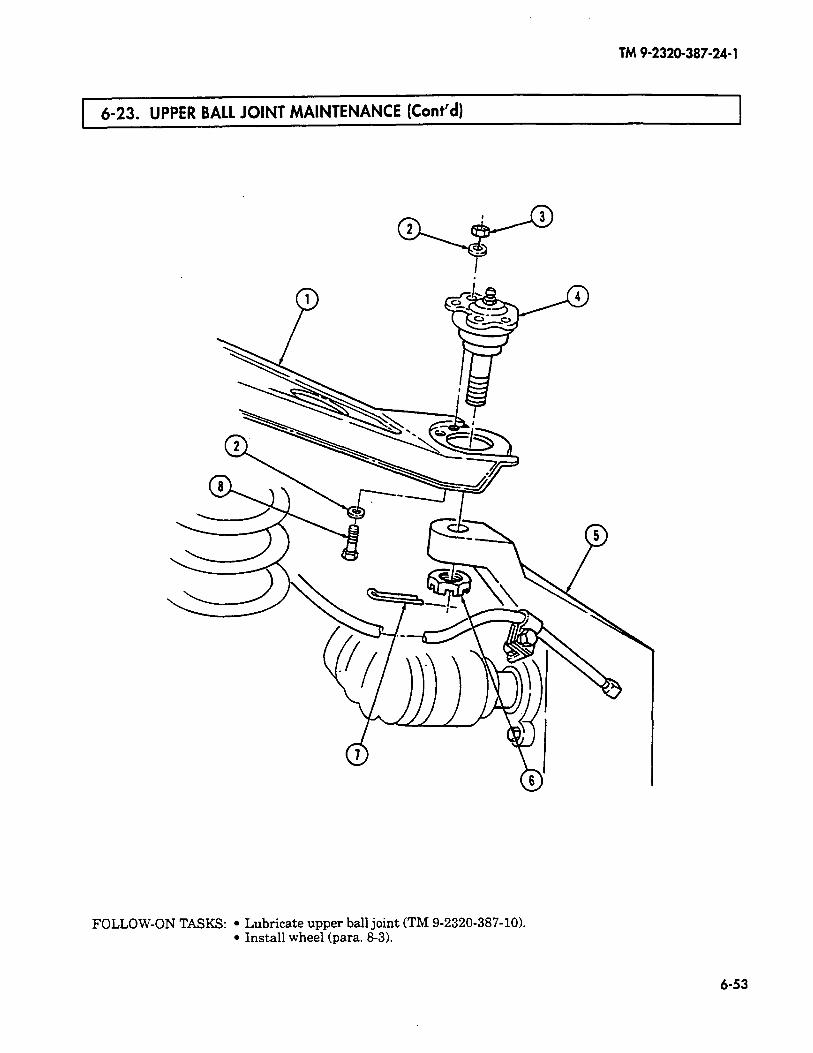
TM 9-2320-387-24-l
6-23. UPPER BALL JOINT MAINTENANCE (Cont’d)
FOLLOW-ON TASKS: l Lubricate upper ball joint (TM 9-2320-387-10X l Install wheel (para. 8-3).
6-53
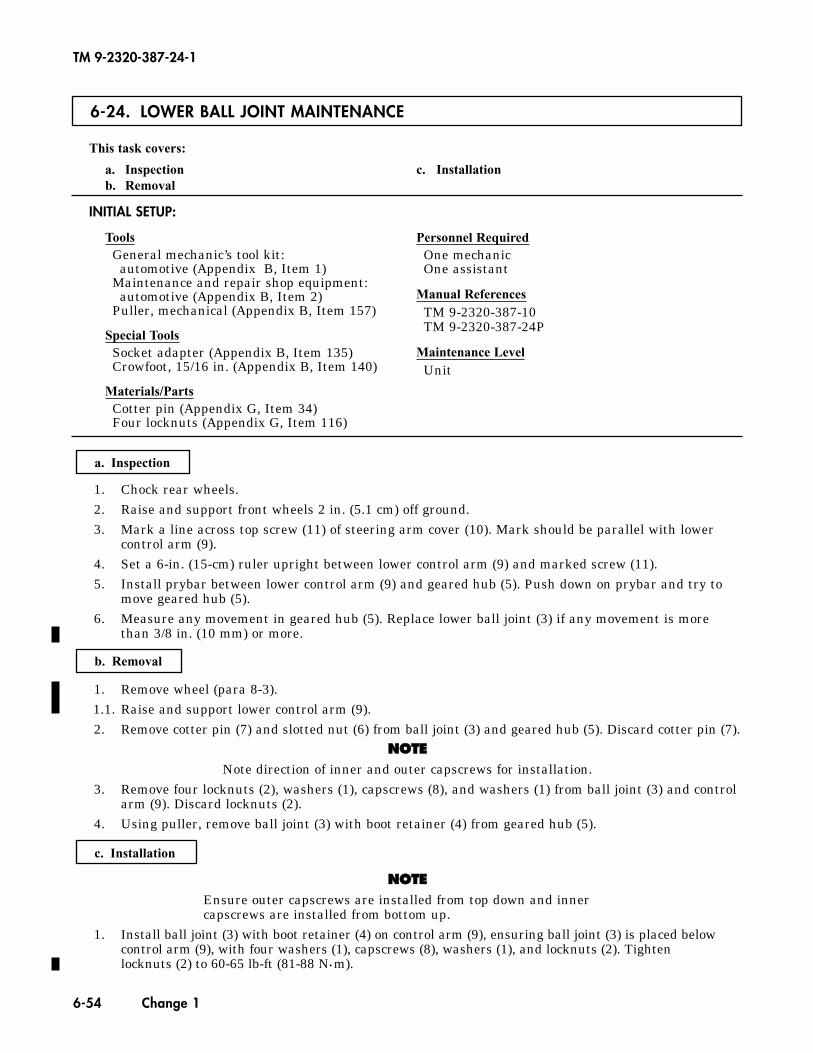
6-24. LOWER BALL JOINT MAINTENANCE
This task covers:
a. Inspection c. Installationb. Removal
INITIAL SETUP:
ToolsGeneral mechanic’s tool kit:
automotive (Appendix B, Item 1)Maintenance and repair shop equipment:
automotive (Appendix B, Item 2)Puller, mechanical (Appendix B, Item 157)
Special ToolsSocket adapter (Appendix B, Item 135)Crowfoot, 15/16 in. (Appendix B, Item 140)
Materials/PartsCotter pin (Appendix G, Item 34)Four locknuts (Appendix G, Item 116)
Personnel RequiredOne mechanicOne assistant
Manual ReferencesTM 9-2320-387-10TM 9-2320-387-24P
Maintenance LevelUnit
1. Chock rear wheels.2. Raise and support front wheels 2 in. (5.1 cm) off ground.3. Mark a line across top screw (11) of steering arm cover (10). Mark should be parallel with lower
control arm (9).4. Set a 6-in. (15-cm) ruler upright between lower control arm (9) and marked screw (11).5. Install prybar between lower control arm (9) and geared hub (5). Push down on prybar and try to
move geared hub (5).6. Measure any movement in geared hub (5). Replace lower ball joint (3) if any movement is more
than 3/8 in. (10 mm) or more.
1. Remove wheel (para 8-3).1.1. Raise and support lower control arm (9).2. Remove cotter pin (7) and slotted nut (6) from ball joint (3) and geared hub (5). Discard cotter pin (7).
NNOOTTEENote direction of inner and outer capscrews for installation.
3. Remove four locknuts (2), washers (1), capscrews (8), and washers (1) from ball joint (3) and controlarm (9). Discard locknuts (2).
4. Using puller, remove ball joint (3) with boot retainer (4) from geared hub (5).
NNOOTTEEEnsure outer capscrews are installed from top down and innercapscrews are installed from bottom up.
1. Install ball joint (3) with boot retainer (4) on control arm (9), ensuring ball joint (3) is placed belowcontrol arm (9), with four washers (1), capscrews (8), washers (1), and locknuts (2). Tighten locknuts (2) to 60-65 lb-ft (81-88 N•m).
c. Installation
b. Removal
a. Inspection
TM 9-2320-387-24-1
6-54 Change 1
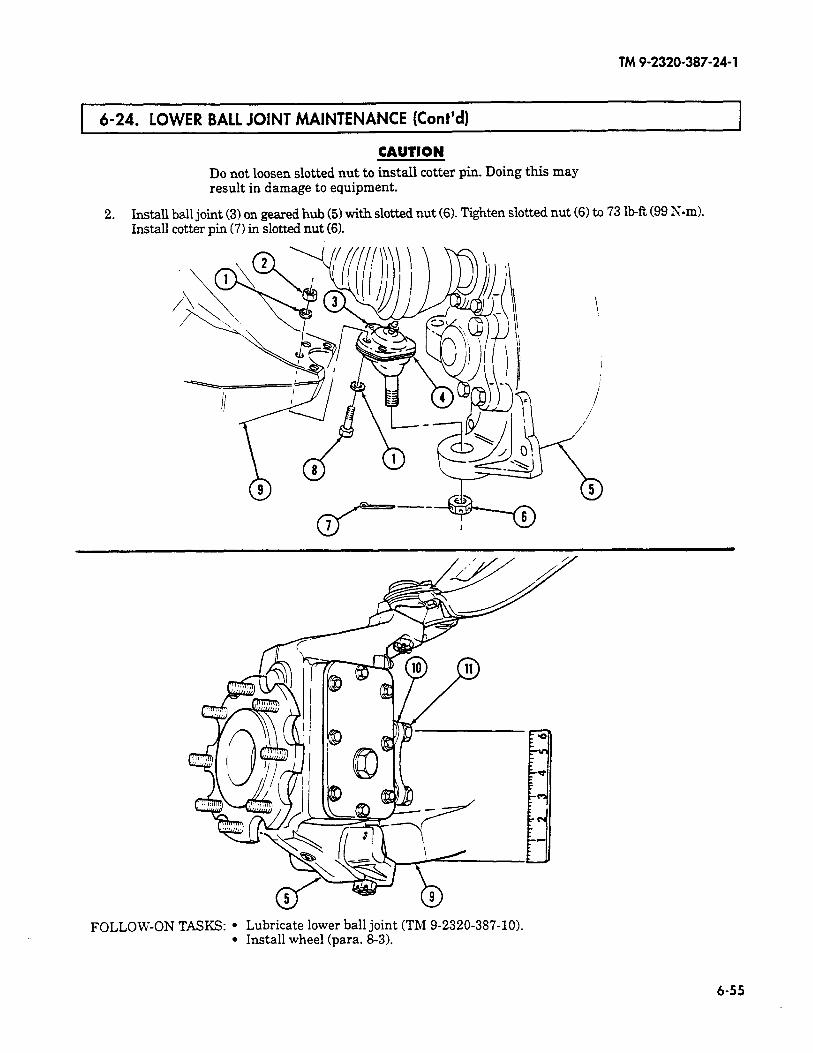
TM9-2320-387-24-l
1 6-24. LOWER BALL JOINT MAINTENANCE (Cont’d) I
CAUTION Do not loosen slotted nut to install cotter pin. Doing this may result in damage to equipment.
2. Install ball joint (3) on geared hub (5) with slotted nut (6). Tighten slotted nut (6) to 73 1bR (99 Nem). Install cotter pin (7) in slotted nut (6).
FOLLOW-ON TASKS: l Lubricate lower ball joint (TM 9-2320-387-10). l Install wheel (para. 8-3).
6-55
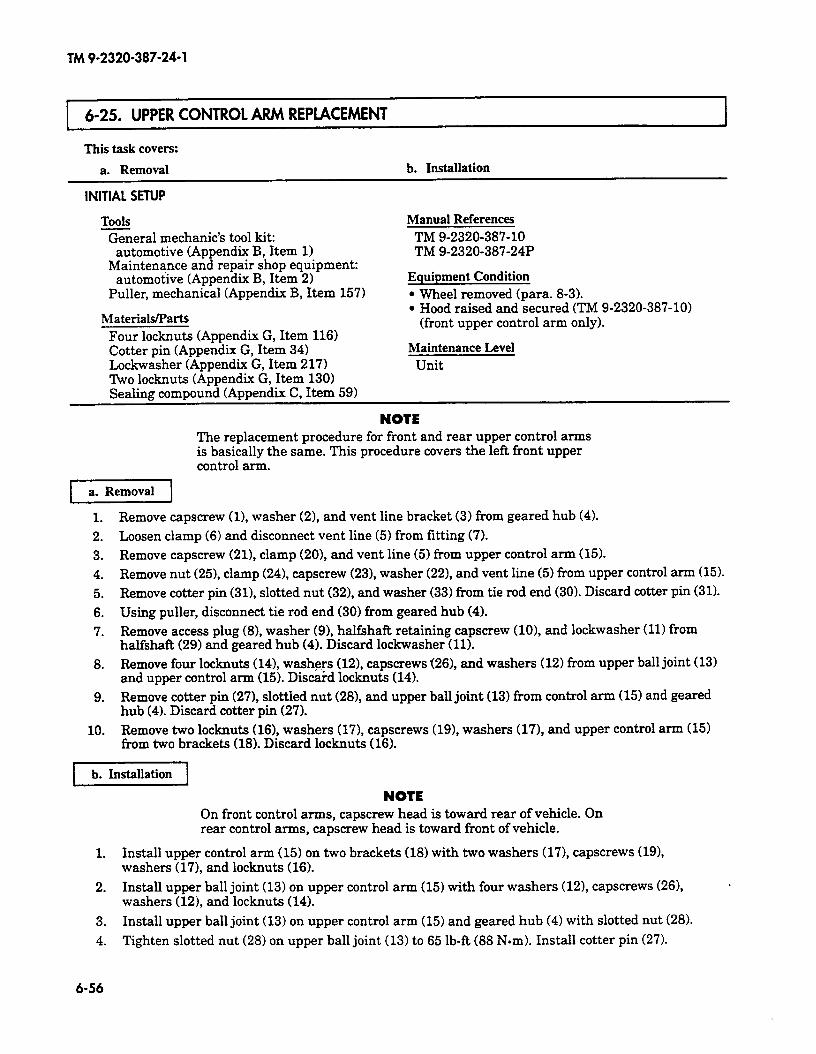
TM 9-2320-387-24-l
6-25. UPPER CONTROL ARM REPLACEMENT
Thii task covers:
a. Removal b. Installation
INITIAL SETUP
Tools General mechanic’s tool kit:
automotive (Appendix B, Item 1) Maintenance and repair shop equipment:
automotive (Appendix B, Item 2) Puller, mechanical (Appendix B, Item 157)
Materials/Parts Four locknuts (Appendix G, Item 116) Cotter pin (Appendix G, Item 34) Lockwasher (Appendix G, Item 217) Two locknuts (Appendix G, Item 130) Sealing compound (Appendix C, Item 59)
Manual References TM 9-2320-387-10 TM 9-2320-387-24P
Equipment Condition
l Wheel removed (para. S-3). l Hood raised and secured (TM 9-2320-387-10)
(front upper control arm only).
Maintenance Level Unit
NOTE The replacement procedure for front and rear upper control arms is basically the same. This procedure covers the left front upper control arm.
1.
2.
3.
4.
5.
6.
7.
8.
9.
10.
Remove capscrew (11, washer (2), and vent line bracket (3) from geared hub (4).
Loosen clamp (6) and disconnect vent line (5) from fitting (7).
Remove capscrew (211, clamp (20), and vent line (5) from upper control arm (15).
Remove nut (25), clamp (241, capscrew (231, washer (221, and vent line (5) from upper control arm (15).
Remove cotter pin (311, slotted nut (321, and washer (33) from tie rod end (30). Discard cotter pin (31).
Using puller, disconnect tie rod end (30) from geared hub (4).
Remove access plug (S), washer (9). halfshaft retaining capscrew (lo), and lockwasher (11) from halfshaft (29) and geared hub (4). Discard lockwasher (11).
Remove four locknuts (l4), washers (121, capscrews (261, and washers (12) from upper ball joint (13) and upper control arm (15). Discaid locknuts (14).
Remove cotter pin (271, slottled nut (281, and upper ball joint (13) from control arm (15) and geared hub (4). Discard cotter pin (27).
Remove two locknuts (161, washers (171, capscrews (191, washers (171, and upper control arm (15) from two brackets (18). Discard locknuts (16).
1.
On front control arms, capscrew head is toward rear of vehicle. On rear control arms, capscrew head is toward front of vehicle.
Install upper control arm (15) on two brackets (18) with two washers (171, capscrews (191, washers (171, and locknuts (16).
2. Install upper ball joint (13) on upper control arm (15) with four washers (121, capscrews (261, washers (121, and locknuts (14).
3. Install upper ball joint (13) on upper control arm (15) and geared hub (4) with slotted nut (28).
4. Tighten slotted nut (28) on upper ball joint (13) to 65 lb-R (88 Nom). Install cotter pin (27).
6-56
NOTE
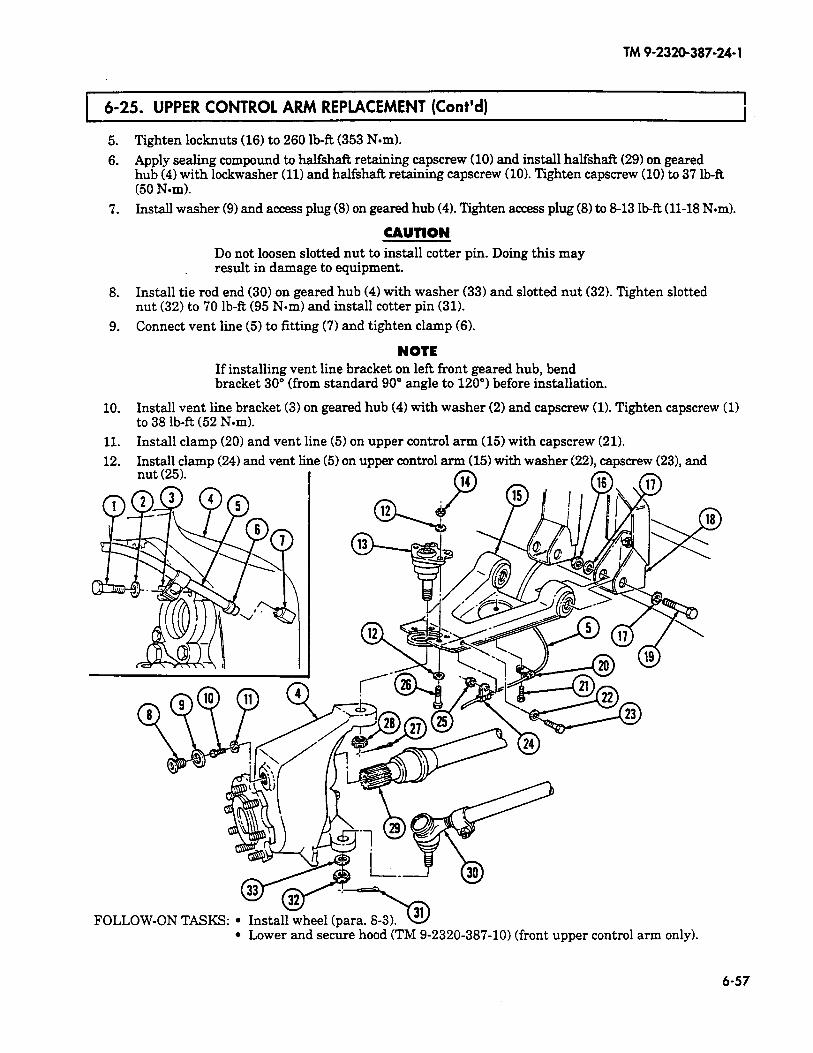
TM 9-2320-387-24-l
1 6-25. UPPER CONTROL ARM REPLACEMENT (Cont’d) I
5. Tighten locknuts (16) to 260 lb-R (353 Nom).
6. Apply sealing compound to halfshaft retaining capscrew (10) and install halfshaft (29) on geared hub (4) with lo&washer (11) and halfshaft retaining capscrew (10). Tighten capscrew (10) to 37 lb-R (50 N-m).
7. Install washer (9) and access plug (8) on geared hub (4). Tighten access plug (8) to 813 IbR (11-18 N-m).
CAUTION Do not loosen slotted nut to install cotter pin. Doing this may result in damage to equipment.
8. Install tie rod end (30) on geared hub (4) with washer (33) and slotted nut (32). Tighten slotted nut (32) to 70 lb-R (95 Nom) and install cotter pin (31).
9. Connect vent line (5) to fitting (7) and tighten clamp (6).
NOTE If installing vent line bracket on left front geared hub, bend bracket 30” (from standard 90” angle to 120”) before installation.
10. Install vent line bracket (3) on geared hub (4) with washer (2) and capscrew (1). Tighten capscrew (1) to 38 lbft (52 Nom).
11. Install clamp (20) and vent line (5) on upper control arm (15) with capscrew (21).
12. Install clamp (24) and vent line (5) on upper control arm (15) with washer (22), capscrew (23), and nut (25). I
FOLLOW-ON TASKS: l Install wheel (para. 8-3). l Lower and secure hood (TM 9-2320-387-10) (front upper control arm only).
6-57
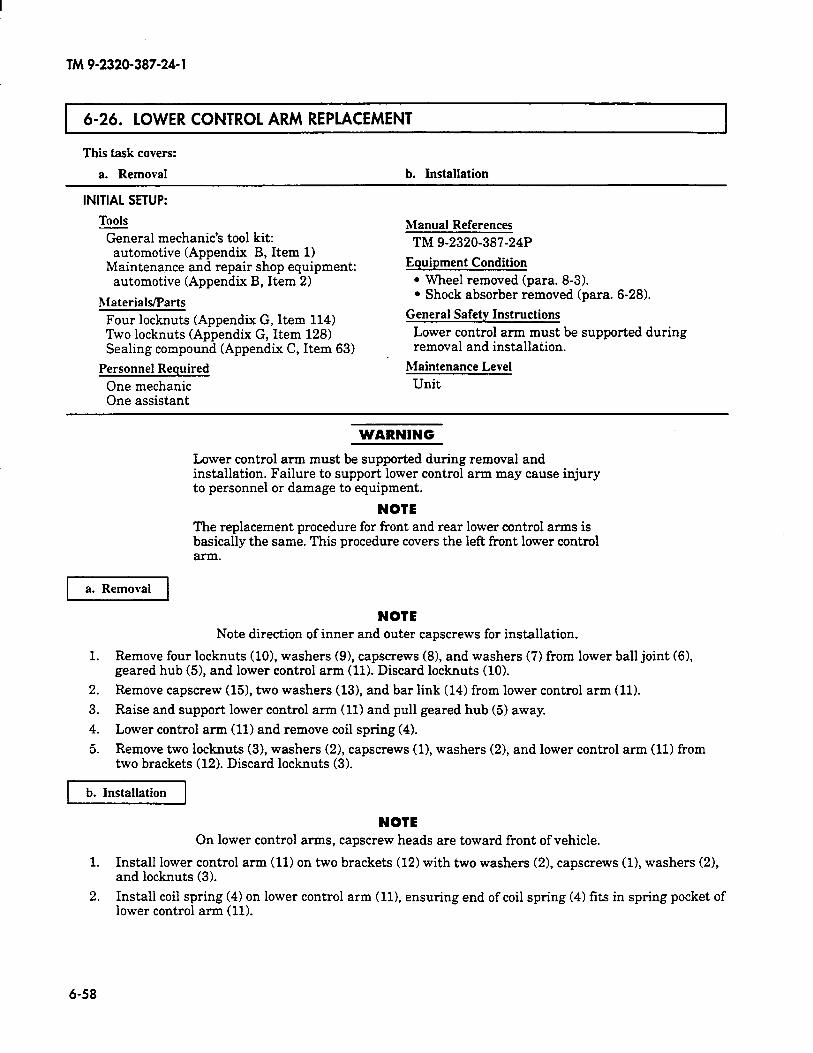
TM 9-2320-387-24-l
6-26. LOWER CONTROL ARM REPLACEMENT
This task covers:
a. Removal h. Installation
INITIAL SETUP:
Tnols
General mechanic’s tool kit: automotive (Appendix B, Item 1)
Maintenance and repair shop equipment: automotive (Appendix B, Item 2)
l+laterialslParts
Four locknuts (Appendix G, Item 114) Two locknuts (Appendix G, Item 128) Sealing compound (Appendix C, Item 63)
Personnel Required One mechanic One assistant
Manual References
TM 9-2320-387-24P
Equipment Condition
l Wheel removed (para. 8-3). l Shock absorber removed (para. 6-28).
General Safety Instructions
Lower control arm must be supported during removal and installation.
Maintenance Level
Unit
WARNING
Lower control arm must be supported during removal and installation. Failure to support lower control arm may cause injury to personnel or damage to equipment.
NOTE The replacement procedure for front and rear lower control arms is basically the same. This procedure covers the left front lower control arm.
va.flemovall
NOTE Note direction of inner and outer capscrews for installation.
1. Remove four locknuts (101, washers (9), capscrews (81, and washers (7) from lower ball joint (61, geared hub (51, and lower control arm (11). Discard locknuts (10).
2. Remove capscrew (151, two washers (131, and bar link (14) from lower control arm (11).
3. Raise and support lower control arm (11) and pull geared hub (5) away.
4. Lower control arm (11) and remove coil spring (41.
5. Remove two locknuts (31, washers (2), capscrews (0, washers (21, and lower control arm (11) from two brackets (12). Discard locknuts (3).
-1
NOTE On lower control arms, capscrew heads are toward front of vehicle.
1. Install lower control arm (11) on two brackets (12) with two washers (21, capscrews (11, washers (21, and locknuts (3).
2. Install coil spring (4) on lower control arm (111, ensuring end of coil spring (4) fits in spring pocket of lower control arm (11).
6-58
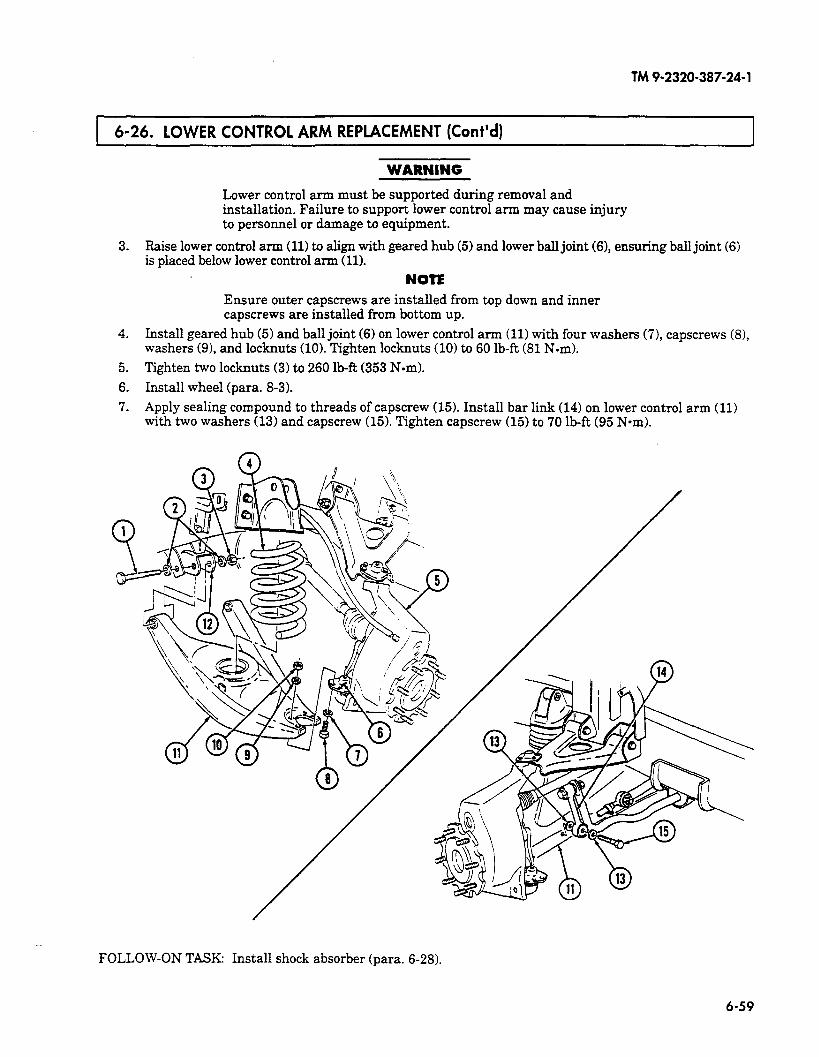
TM 9-2320-387-24-l
1 6-26. LOWER CONTROL ARM REPLACEMENT (Cont’d) I
WARNlNG
Lower control arm must be supported during removal and installation. Failure to support lower control arm may cause injury to personnel or damage to equipment.
3. Raise lower control arm (11) to align with geared hub (5) and lower ball joint (61, ensuring ball joint (6) is placed below lower control arm (11).
- _
NOTE Ensure outer capscrews are installed from top down and inner capscrews are installed from bottom up.
4. Install geared hub (5) and ball joint (6) on lower control arm (11) with four washers (7), capscrews washers (91, and locknuts (10). Tighten locknuts (10) to 60 lb-ft (81 N-m).
5. Tighten two locknuts (3) to 260 lb-R (353 N-m).
6. Install wheel (para. 8-3).
7. Apply sealing compound to threads of capscrew (15). Install bar link (14) on lower control arm (1 with two washers (13) and capscrew (15). Tighten capscrew (15) to 70 lb-ft (95 N-m).
:8),
FOLLOW-ON TASK: Install shock absorber (para. 6-28).
6-59
I
TM 9-2320-387-24-l
1 6-27. COIL SPRING REPLACEMENT
This task covers:
a. Removal b. Installation
INITIAL SETUP:
Tools General mechanic’s tool kit: automotive (Appendix B, Item 1)
Materials/Parts Locknut (Appendix G, Item 118) Four locknuts (Appendix G, Item 116) Sealing compound (Appendix C, Item 63)
Manual References TM 9-2320-387-10 TM 9-2320-387-24P
Equipment Condition l Hood raised and secured (front springs only)
(TM 9-2320-387-10). l Shelter removed (Ml113 only) (rear springs only)
(para. 11-78).
General Safety Instructions Lower control arm must be supported during removal and installation.
Maintenance Level Unit
NOTE The replacement procedure for all four coil springs is basically the same. This procedure covers the left front coil spring.
I[
1. Remove capscrew (131, two washers (141, and stabilizer bar link (15) from lower control arm (12).
2. Remove wheel (para. 8-3).
NOTE Note direction of inner and outer capscrews for installation.
3. Remove four locknuts (lo), washers (81, capscrews (91, and washers (8) from lower ball joint (71, geared hub (61, and lower control arm (12). Discard locknuts (10).
WARNING Lower control arm must be supported during removal and installation. Failure to support lower control arm may cause injury to personnel or damage to equipment.
4. Place jack under lower control arm (12) and raise lower control arm (12) slightly to relieve tension on shock retaining pin (2).
NOTE For rear coil spring replacement, it may be necessary to spread frame from body by positioning prybar between hinge mount bracket and rear bumper to gain access to shock absorber retaining pin nut.
5. Remove locknut (51, retaining pin (2), washer (3), and shock absorber (11) from spring seat (4) and collapse shock absorber (11). Discard locknut (5).
NOTE It may be necessary to loosen lower control arm capscrews to allow lower control arm to be lowered.
6. Pull geared hub (6) and ball joint (7) away from lower control arm (121, lower the control arm (121, and remove coil spring (1) from lower control arm (12) and shock absorber (11).
6-60
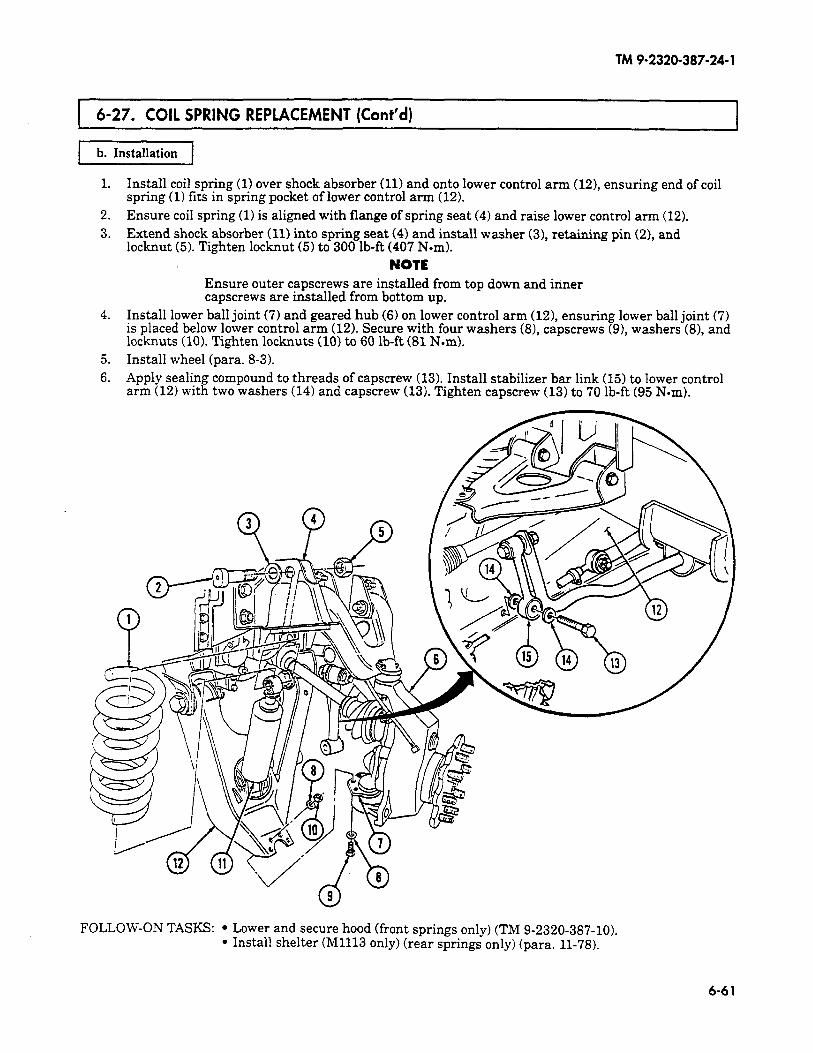
TM 9-2320-387-24-l
1 6-27. COIL SPRING REPLACEMENT (Cont’d) I
b. Installation
1.
2. 3.
4.
5. 6.
Install coil spring (1) over shock absorber (11) and onto lower control arm (121, ensuring end of coil spring (1) fits in spring pocket of lower control arm (12). Ensure coil spring (1) is aligned with flange of spring seat (4) and raise lower control arm (12). Extend shock absorber (11) into spring seat (4) and install washer (31, retaining pin (2), and locknut (5). Tighten locknut (5) to 300 lb-R (407 Nom).
NOTE Ensure outer capscrews are installed from top down and inner capscrews are installed from bottom up.
Install lower ball joint (7) and geared hub (61 on lower control arm (121, ensuring lower ball joint (7) is placed below lower control arm (12). Secure with four washers (81, capscrews (91, washers (81, and locknuts (10). Tighten locknuts (10) to 60 lb-ft (81 N-m). Install wheel (para. 8-3). Apply sealing compound to threads of capscrew (13). Install stabilizer bar link (15) to lower control arm (12) with two washers (14) and capscrew (13). Tighten capscrew (13) to 70 lb-ft (95 N-m).
FOLLOW-ON TASKS: l Lower and secure hood (front springs only) (TM 9-2320-387-10). . Install shelter (Ml113 only) (rear springs only) (para. 11-78).
6-61
TM 9-2320-387-24-l
6-28. SHOCK ABSORBER REPLACEMENT I
This task covers:
a. Removal b. Installation
INITIAL SETUP:
Tools General mechanic’s tool kit:
automotive (Appendix B, Item 1) Maintenance and repair shop equipment:
automotive (Appendix B, Item 2) Drive socket, 3/4 in. (Appendix B, Item 158)
Materials/Parts Four locknuts (Appendix G, Item 118) Two lockwashers (Appendix G, Item 219) Cotter pin (Appendix G, Item 34)
Personnel Required One mechanic One assistant
Manual References TM 9-2320-387-10 TM 9-2320-387-24P
Equipment Condition l Hood raised and secured (front shock absorbers
only) (TM 9-2320-387-10). l Shelter removed (Ml113 only) (rear shock
absorbers only) (para. 11-78).
Maintenance Level Unit
NOTE The replacement procedure for all shock absorbers is the same except rear lower shock pins must be installed with head of pin facing rearward. This procedure covers the left rear shock absorber.
a. Removal
NOTE For rear shock absorber replacement on Ml113 models, it may be necessary to spread frame from body by positioning prybar between hinge mount bracket and rear bumper to gain access to shock absorber retaining pin nut. Perform steps 1 and 2 only if required.
1. Remove cotter pin (9), slotted nut (81, washer (71, and shackle (4) from body mount bracket (3) and rear bumper (6). Discard cotter pin (9).
2. Remove two locknuts (l), washers (21, capscrews (51, washers (21, and body mount bracket (3) from rear bumper (6). Discard locknuts (1).
6-62
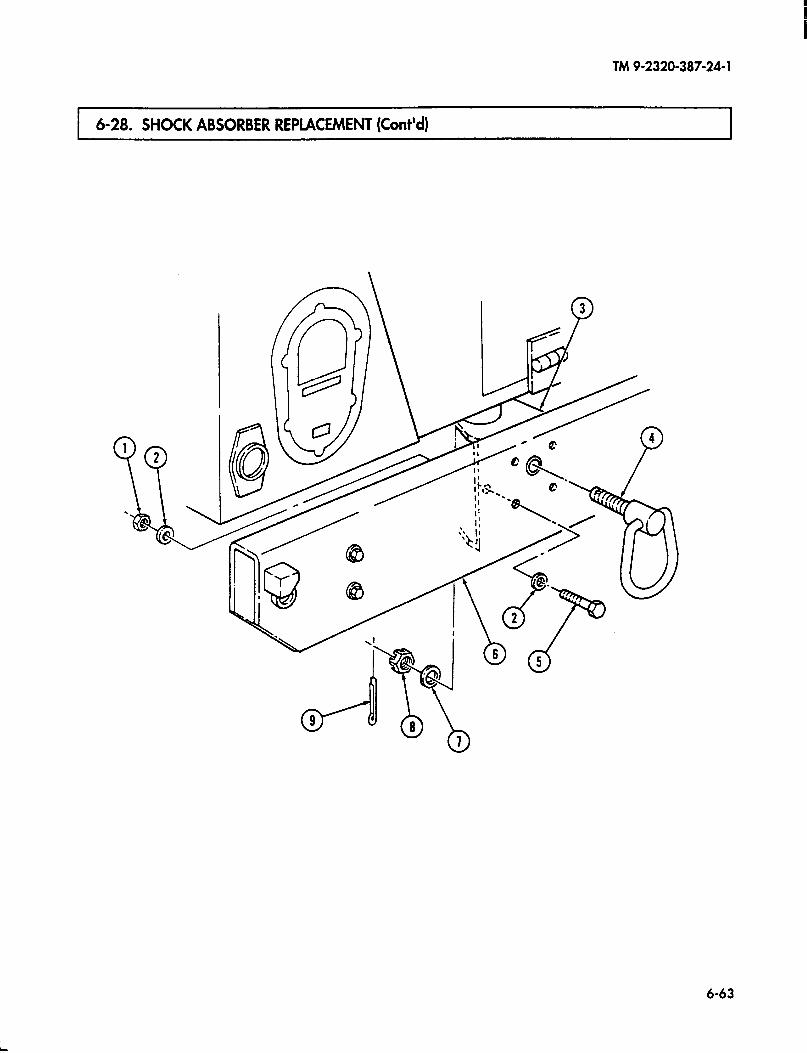
TM 9-2320-387-24-l
6-63
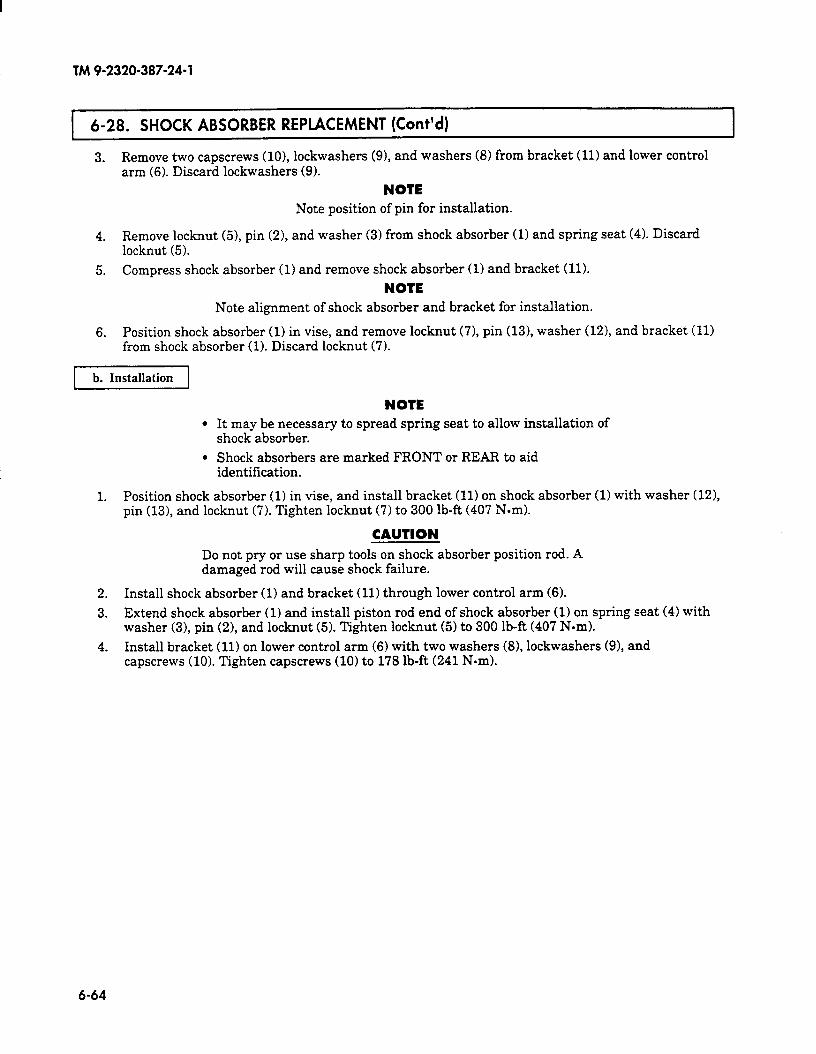
TM 9-2320-387-24-l
6-28. SHOCK ABSORBER REPLACEMENT (Cont’d)
3. Remove two capscrews (101, lockwashers (91, and washers (81 from bracket (11) and lower control arm (6). Discard lockwashers (9).
NOTE Note position of pin for installation.
4. Remove locknut (5), pin (2), and washer (3) from shock absorber (1) and spring seat (41. Discard locknut (5).
5. Compress shock absorber (1) and remove shock absorber (1) and bracket (11).
NOTE Note alignment of shock absorber and bracket for installation.
6. Position shock absorber (1) in vise, and remove locknut (71, pin (131, washer (121, and bracket (11) from shock absorber (1). Discard locknut (71.
1 b. Installation 1
NOTE l It may be necessary to spread spring seat to allow installation of
shock absorber.
l Shock absorbers are marked FRONT or REAR to aid identification.
1. Position shock absorber (1) in vise, and install bracket (11) on shock absorber (1) with washer (121, pin (13), and locknut (7). Tighten locknut (7) to 300 lb-f% (407 N-m).
CAUTION
Do not pry or use sharp tools on shock absorber position rod. A damaged rod will cause shock failure.
2. Install shock absorber (1) and bracket (11) through lower control arm (6).
3. Extend shock absorber (1) and install piston rod end of shock absorber (1) on spring seat (4) with washer (31, pin (2), and locknut (5). Tighten locknut (5) to 300 lb-f? (407 Nom).
4. Install bracket (11) on lower control arm (6) with two washers (81, lockwashers (9), and capscrews (10). Tighten capscrews (10) to 178 lb-ft (241 N-ml.
6-64
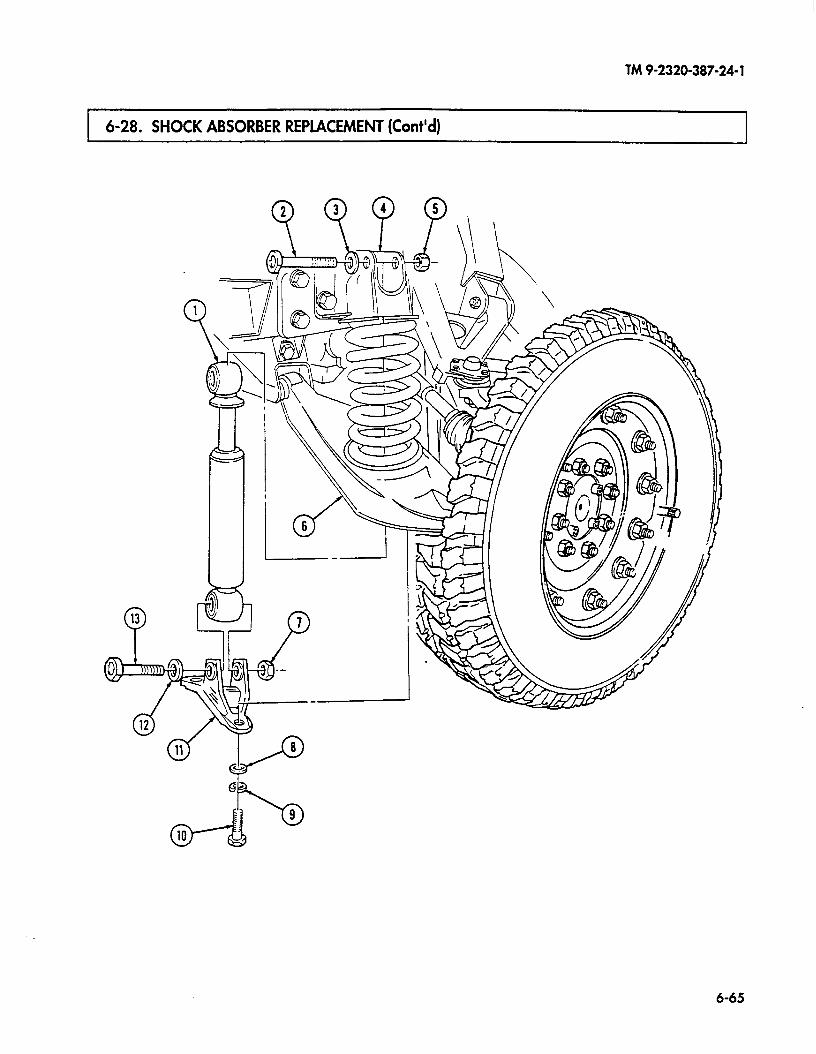
TM 9-2320-387-24-l
I 6-28. SHOCK ABSORBER REPLACEMENT (Cont’d) I i I
6-65
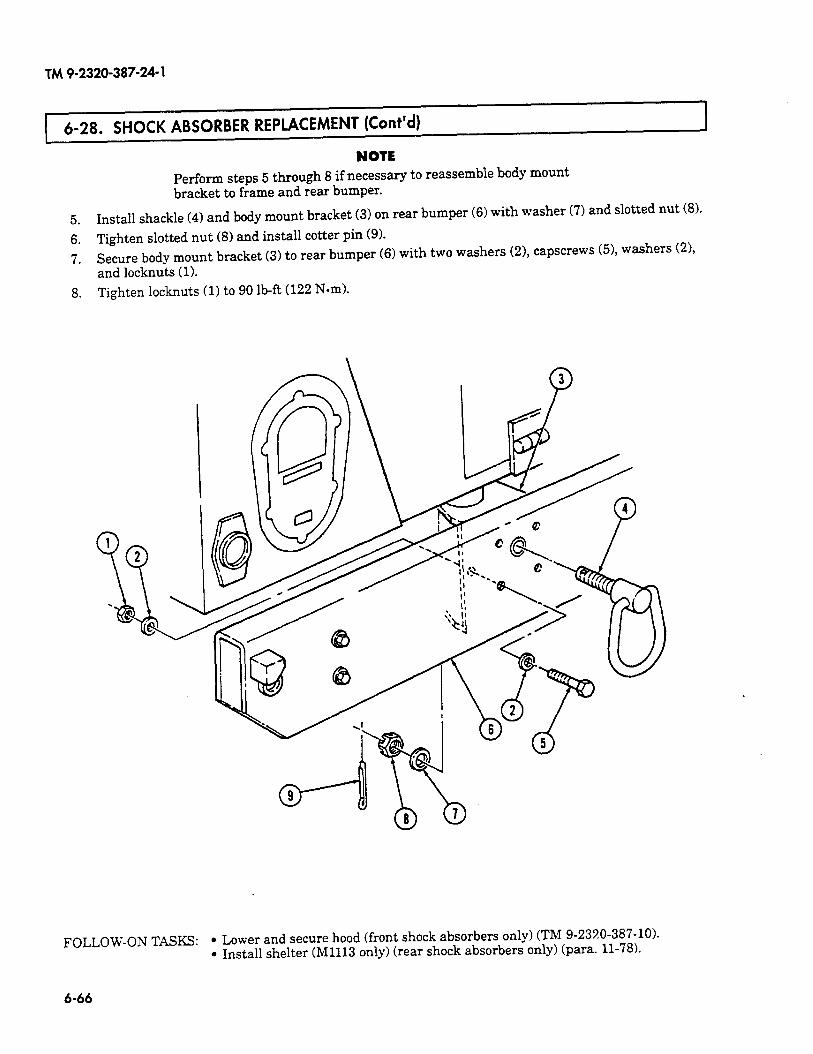
TM?-2320-387-24-1
6-28. SHOCK ABSORBER REPLACEMENT (Cont’d)
NOTE
Perform steps 5 through 8 if necessary to reassemble body mount bracket to frame and rear bumper.
5. Install shackle (4) and body mount bracket (3) on rear bumper (6) with washer (7) and slotted nut (8).
6. Tighten slotted nut (8) and install cotter pin (9).
7. Secure body mount bracket (3) to rear bumper (6) with two washers (Z), capscrews (5), washers (2), and locknuts (1).
8. Tighten locknuts (1) to 90 lb-ft (122 N-m).
FOLLOW-ON TASKS: l Lower and secure hood (front shock absorbers only) (TM 9-2320-387-10). l Install shelter (Ml113 only) (rear shock absorbers only) (para. 11-78).
6-66

TM 9-2320-387-24-1
Change 1 7-1
CHAPTER 7BRAKE SYSTEM (UNIT) MAINTENANCE
Section I. SERVICE BRAKE SYSTEM MAINTENANCE
7-1. SERVICE BRAKE SYSTEM MAINTENANCE TASK SUMMARY
TASK PAGEPARA. PROCEDURES NO.
7-2. Service Brake System Bleeding Instructions 7-2
7-3. Service Brake Pad Maintenance 7-6
7-4. Service Brake Caliper Maintenance 7-10
7-5. Master Cylinder Maintenance 7-14
7-6. Hydro-Booster Replacement 7-16
7-7. Brake Lines Replacement 7-18
7-8. Brake Pressure Limiter Valve Replacement 7-28
7-9. Service Brake Pedal Replacement 7-30
7-10. Proportioning Valve and Differential Valve Replacement 7-32
7-11. Brake Protection Guards Replacement 7-34
7-12. Service Brake Rotor Replacement 7-36

TM 9-2320-387-24-l
7-2. SERVICE BRAKE SYSTEM BLEEDING INSTRUCTIONS
This task covers:
a. Pressure Bleediig c Master Cylinder Bleeding b. Manual Bleeding
INITIAL SETUP:
Tools General mechanic’s tool kit:
automotive (Appendix B, Item 1)
Materials/Parts Brake fluid (Appendix C, Item 18)
Personnel Required One mechanic One assistant (task b. only)
Manual References TM 9-2320-387-10 TM 9-2320-387-24P
Equipment Condition l Hood raised and secured (TM 9-2320-387-10). l Master cylinder filled to proper level
(para. 2-12, item 11).
General Safety Instructions Always wear eye protection when bleeding brakes.
Maintenance Level unit
WARNING
Always wear eye protection when bleeding brakes. Failure to do this may cause injury if brake fluid comes in contact with eyes.
NOTE l If only the front or rear half of the system has been serviced, it is
usually necessary to bleed only that half of the system. However, if a firm brake pedal cannot be obtained after bleeding, it will be necessary to bleed the entire system. The brake hydraulic system can be bled manually or by using a pressure tank and adapters. Each method is outlined in the following procedures.
l Bleed brakes in the following order. right rear, 1eR rear, right front, left front.
a. Pressure Bleediug
1.
2.
3.
4.
5.
7-2
CAUTION l When using a pressure bleeding tank, follow the manufacturer’s
instructions for its use. Do not exceed the recommended working pressure when pressurizing the tank. A tank pressure of X5-20 psi (103-138 kl?a) is sufiicient to bleed the brake hydraulic system. Release all air pressure from the tank after using it.
l A&er refilling pressure bleeding tank with silicone brake fluid, let tank sit undisturbed for 30 minutes minimum to ensure all visible as well as minute air bubbles are gone.
NOTE This procedure covers bleeding at one wheel. Repeat bleeding task for remaining wheels.
Remove cover from master cylinder (1).
Install pressure tank bleeder adapter (2) on master cylinder (1).
Connect line (3) from pressure tank to adapter (2).
Remove protective cap (5) from bleeder screw (6) on caliper assembly (7).
Connect short piece of hose (8) to bleeder screw (6) and place other end of hose (8) in container 3/4-f& of brake fluid.

TM 9-2320-387-24-l
7-2. SERVICE BRAKE SYSTEM BLEEDING INSTRUCTIONS (Cont’d)
6.
7.
8.
9.
10.
11.
Open valve (4) on line (3) from pressure tank to master cylinder (11, allowing pressurized brake fluid to enter system.
Open bleeder screw (6) 3/4turn and observe brake fluid in container. Close bleeder screw (6) when brake fluid flows free of air bubbles.
Disconnect hose (8) from bleeder screw (6) and install protective cap (5) on bleeder screw (6).
Close valve (4) on line (3) from pressure tank to master cylinder (1).
Disconnect line (3) from adapter (2).
Remove adapter (2) from master cylinder (lj and install cover on master cylinder (1).
-
PRESSURE TANK
7-3
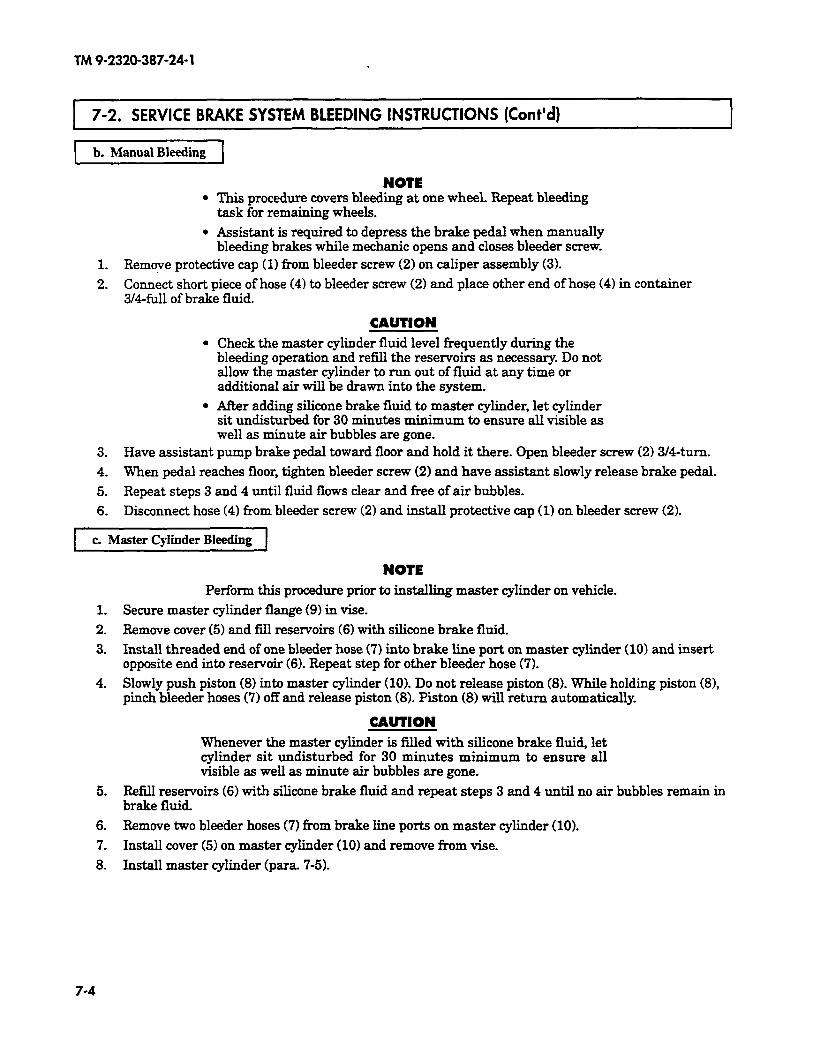
TM 9-2320-387-24-I
7-2. SERVICE BRAKE SYSTEM BLEEDING INSTRUCTIONS (Co&d) I
1 b. ~%x~ual Bleeding 1
.
.
NOTE This procedure covers bleeding at one wheel. Repeat bleeding task for remaining wheels.
Assistant is required to depress the brake pedal when manually bleeding brakes while mechanic opens and closes bleeder screw.
1. Remove protective cap (1) from bleeder screw (2) on caliper assembly (3).
2. Connect short piece of hose (4) to bleeder screw (2) and place other end of hose (4) in container 3/4full of brake fluid.
CAUTION
l Check the master cylinder fluid level frequently during the bleeding operation and refill the reservoirs as necessary. Do not allow the master cylinder to run out of fluid at any time or additional air will be drawn into the system.
l Af%er adding silicone brake fluid to master cylinder, let cylinder sit undisturbed for 30 minutes minimum to ensure all visible as well as minute air bubbles are gone.
3. Have assistant pump brake pedal toward floor and hold it there. Open bleeder screw (2) 3/4-turn.
4. When pedal reaches floor, tighten bleeder screw (2) and have assistant slowly release brake pedal.
5. Repeat steps 3 and 4 until fluid flows clear and free of air bubbles.
6. Disconnect hose (4) from bleeder screw (2) and install protective cap (1) on bleeder screw (2).
c. Master Cylinder Bleeding
NOTE Perform this procedure prior to installing master cylinder on vehicle.
1. Secure master cylinder flange (9) in vise.
2. Remove cover (5) and fll reservoirs (6) with silicone brake fluid.
3. Install threaded end of one bleeder hose (7) into brake line port on master cylinder (10) and insert opposite end into reservoir (6). Repeat step for other bleeder hose (7).
4. Slowly push piston (8) into master cylinder (10). Do not release piston (8). While holding piston (81, pinch bleeder hoses (7) off and release piston (8). Piston (8) will return automatically.
CAUTION Whenever the master cylinder is Wed with silicone brake fluid, let cylinder sit undisturbed for 30 minutes minimum to ensure all visible as well as minute air bubbles are gone.
5. Refill reservoirs (6) with silicone brake fluid and repeat steps 3 and 4 until no air bubbles remain in brake fluid.
6. Remove two bleeder hoses (7) from brake line ports on master cylinder (10).
7. Install cover (5) on master cylinder (10) and remove from tie.
8. Install master cylinder (para 7-5).
7-4
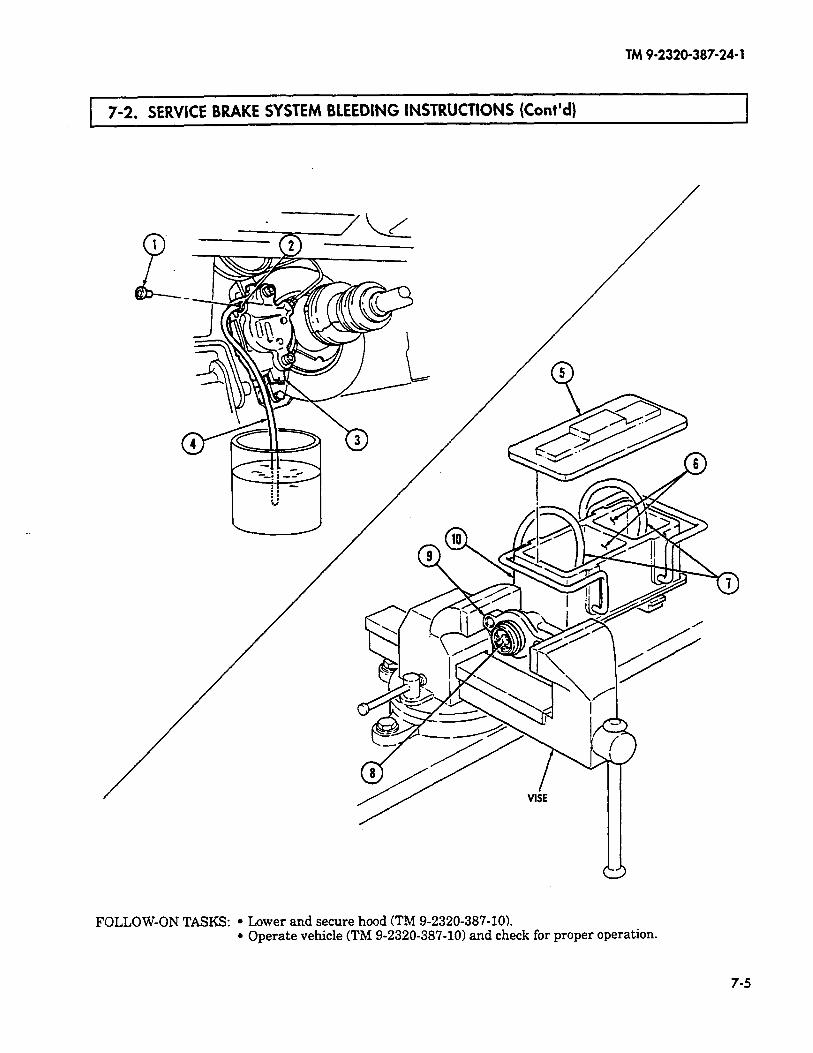
TM9-2320-387-24-l
7-2. SERVICE BRAKE SYSTEM BLEEDING INSTRUCTIONS (Cont’d)
FOLLOW-ON TASKS: l Lower and secure haod (TM 9-2320-387-10). . Operate vehicle (TM 9-2320-387-10) and check for proper operation.
7-5

TM 9-2320-387-24-1
7-6 Change 1
7-3. SERVICE BRAKE PAD MAINTENANCE
This task covers:
a. Removal c. Installationb. Cleaning and Inspection
Manual ReferencesTM 9-2320-387-24P
Equipment ConditionBrake protection guards removed (para. 7-11).
General Safety InstructionsEnsure brake pads are installed with liningsfacing rotor.
Maintenance LevelUnit
a. Removal
CCAAUUTTIIOONNCaliper must be supported during removal to prevent damage tobrake hose.
NNOOTTEEPerform steps 1 and 2 for right side. Perform steps 3, 4, and 5 forleft side.
1. Using crowfoot, remove two capscrews (6), washers (5), clamp (6.1), caliper (3), and yoke (4) fromadapter (2).
NNOOTTEENote positioning of brake pad surfaces for installation.
2. Remove two brake pads (1) from adapter (2).3. Remove six capscrews (10), two-piece lockwashers (9), and halfshaft (8) from rotor (7). Discard
two-piece lockwashers (9).4. Install two capscrews (10) to hold rotor (7).
NNOOTTEENote positioning of brake pad surfaces for installation.
5. Remove two brake pads (1) from adapter (2).
INITIAL SETUP:
ToolsGeneral mechanic’s tool kit:
automotive (Appendix B, Item 1)Maintenance and repair shop equipment:
automotive (Appendix B, Item 2)C-clamp (Appendix B, Item 153)
Special ToolsCrowfoot, 14-mm (Appendix B, Item 141)
Materials/PartsGrease (Appendix C, Item 34)Sealing compound (Appendix C, Item 63)Six two-piece lockwashers
(Appendix G, Item 240.1)
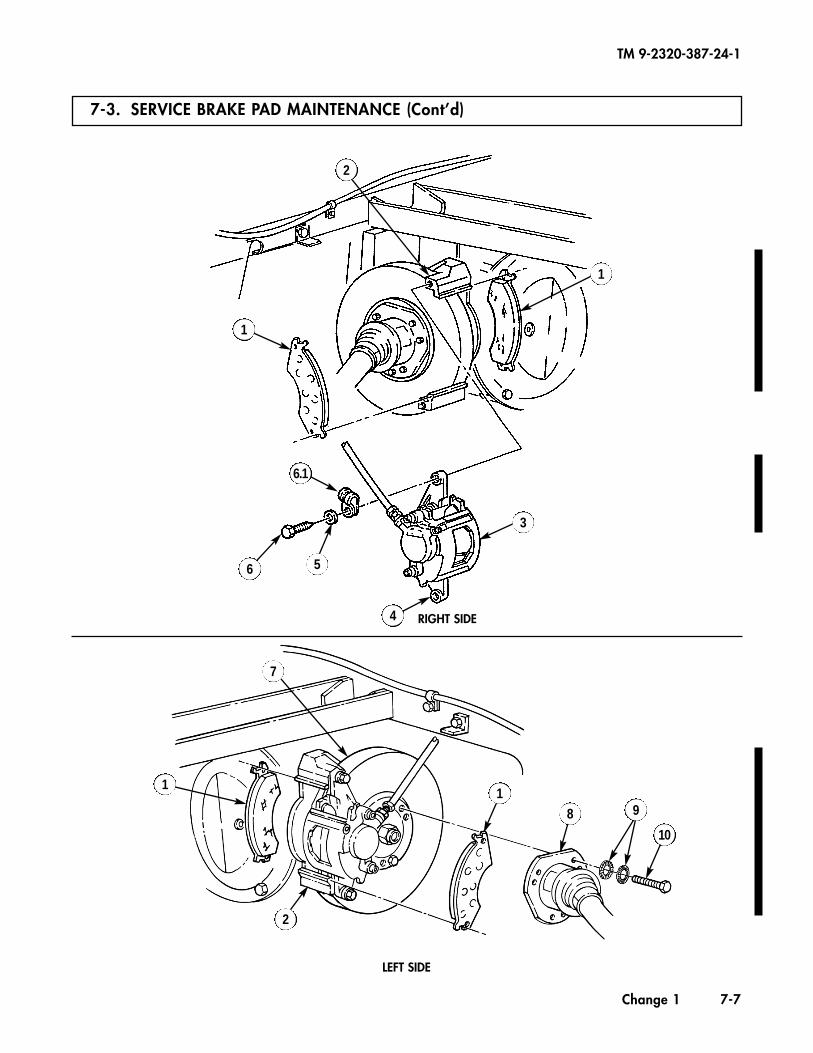
7-3. SERVICE BRAKE PAD MAINTENANCE (Cont’d)
TM 9-2320-387-24-1
Change 1 7-7
2
1
1
4
6 5
6.1
3
7
1
2
18
10
RIGHT SIDE
LEFT SIDE
9
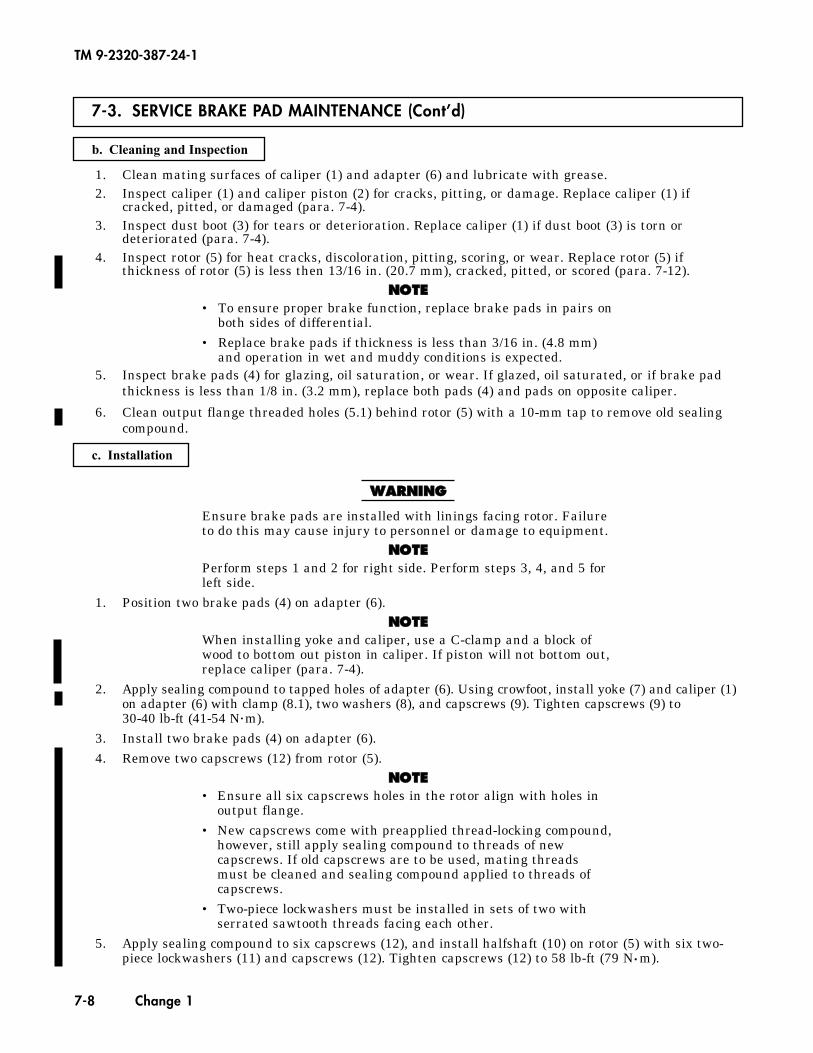
7-3. SERVICE BRAKE PAD MAINTENANCE (Cont’d)
TM 9-2320-387-24-1
7-8 Change 1
c. Installation
WWAARRNNIINNGG
Ensure brake pads are installed with linings facing rotor. Failureto do this may cause injury to personnel or damage to equipment.
NNOOTTEEPerform steps 1 and 2 for right side. Perform steps 3, 4, and 5 forleft side.
1. Position two brake pads (4) on adapter (6).NNOOTTEE
When installing yoke and caliper, use a C-clamp and a block ofwood to bottom out piston in caliper. If piston will not bottom out,replace caliper (para. 7-4).
2. Apply sealing compound to tapped holes of adapter (6). Using crowfoot, install yoke (7) and caliper (1)on adapter (6) with clamp (8.1), two washers (8), and capscrews (9). Tighten capscrews (9) to30-40 lb-ft (41-54 N•m).
3. Install two brake pads (4) on adapter (6).4. Remove two capscrews (12) from rotor (5).
NNOOTTEE• Ensure all six capscrews holes in the rotor align with holes in
output flange.• New capscrews come with preapplied thread-locking compound,
however, still apply sealing compound to threads of newcapscrews. If old capscrews are to be used, mating threadsmust be cleaned and sealing compound applied to threads ofcapscrews.
• Two-piece lockwashers must be installed in sets of two withserrated sawtooth threads facing each other.
5. Apply sealing compound to six capscrews (12), and install halfshaft (10) on rotor (5) with six two-piece lockwashers (11) and capscrews (12). Tighten capscrews (12) to 58 lb-ft (79 N•m).
b. Cleaning and Inspection
1. Clean mating surfaces of caliper (1) and adapter (6) and lubricate with grease.2. Inspect caliper (1) and caliper piston (2) for cracks, pitting, or damage. Replace caliper (1) if
cracked, pitted, or damaged (para. 7-4).3. Inspect dust boot (3) for tears or deterioration. Replace caliper (1) if dust boot (3) is torn or
deteriorated (para. 7-4).4. Inspect rotor (5) for heat cracks, discoloration, pitting, scoring, or wear. Replace rotor (5) if
thickness of rotor (5) is less then 13/16 in. (20.7 mm), cracked, pitted, or scored (para. 7-12).NNOOTTEE
• To ensure proper brake function, replace brake pads in pairs onboth sides of differential.
• Replace brake pads if thickness is less than 3/16 in. (4.8 mm)and operation in wet and muddy conditions is expected.
5. Inspect brake pads (4) for glazing, oil saturation, or wear. If glazed, oil saturated, or if brake padthickness is less than 1/8 in. (3.2 mm), replace both pads (4) and pads on opposite caliper.
6. Clean output flange threaded holes (5.1) behind rotor (5) with a 10-mm tap to remove old sealingcompound.
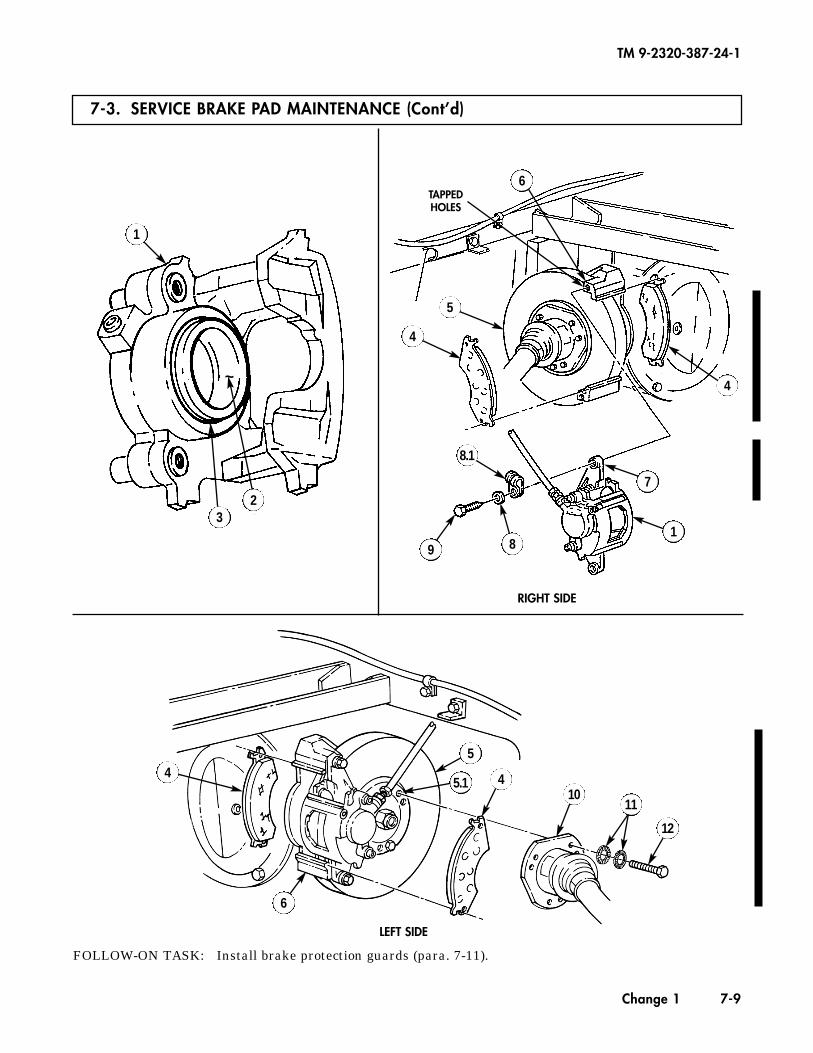
FOLLOW-ON TASK: Install brake protection guards (para. 7-11).
7-3. SERVICE BRAKE PAD MAINTENANCE (Cont’d)
TM 9-2320-387-24-1
Change 1 7-9
6
4
5
4
7
9 81
4 4
5
1011
12
RIGHT SIDE
LEFT SIDE
1
32
~
TAPPEDHOLES
8.1
6
5.1

7-4. SERVICE BRAKE CALIPER MAINTENANCE
TM 9-2320-387-24-1
7-10 Change 1
This task covers:
a. Removal c. Installationb. Cleaning and Inspection
INITIAL SETUP:
ToolsGeneral mechanic’s tool kit:
automotive (Appendix B, Item 1)Maintenance and repair shop equipment:
automotive (Appendix B, Item 2)C-clamp (Appendix B, Item 153)
Special ToolsHex-head driver, 7-mm
(Appendix B, Item 151)Crowfoot, 14-mm (Appendix B, Item 141)
Materials/PartsCopper washer (Appendix G, Item 24)Grease (Appendix C, Item 34)Sealing compound (Appendix C, Item 63)
Manual ReferencesTM 9-2320-387-24P
Equipment ConditionBrake pads removed (para. 7-3).
General Safety InstructionsEnsure brake pads are installed with liningsfacing rotor.
Maintenance LevelUnit
a. Removal
CCAAUUTTIIOONNCover or plug all open lines and connections immediately afterdisconnection to prevent contamination. Remove all covers orplugs prior to connection.
NNOOTTEEPerform steps 1 and 2 for right side. Perform steps 3 through 6 forleft side.
1. Disconnect hose (1) from coupling (5).2. Slide yoke (2) and locating pins (3) out from caliper (4).3. Disconnect hose (1) from coupling (5).4. Remove two capscrews (8) from rotor (7). 5. Remove rotor (7) from caliper (4) and adapter (6).6. Using crowfoot, remove two capscrews (10), washers (11), yoke (2), and caliper (4) from adapter (6).
NNOOTTEEFor replacement of rear dual service/parking brake caliper, referto para. 7-15.
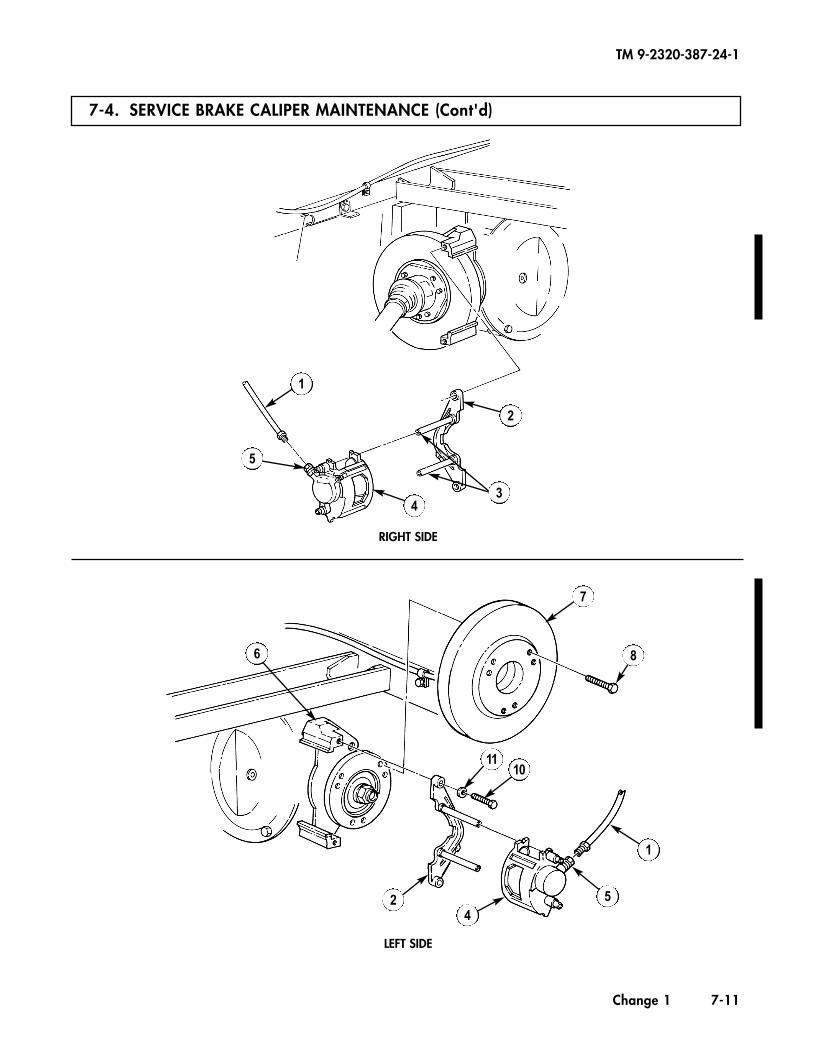
7-4. SERVICE BRAKE CALIPER MAINTENANCE (Cont'd)
TM 9-2320-387-24-1
Change 1 7-11
1
2
43
5
7
86
1110
1
524
RIGHT SIDE
LEFT SIDE

7-4. SERVICE BRAKE CALIPER MAINTENANCE (Cont'd)
TM 9-2320-387-24-1
7-12 Change 1
b. Cleaning and Inspection
1. Clean mating surfaces of caliper (3) and adapter (8) and lubricate with grease.2. Clean cooling fins of rotor (12).3. Inspect caliper (3) and caliper piston (4) for cracks, pitting, or damage. Replace caliper (3) if
cracked, pitted, or damaged.4. Inspect locating pin bearings and bushings (6) for tears or deterioration. Replace bearings and
bushings (6) if torn or deteriorated.5. Inspect dust boot (5) for tears or deterioration. Replace caliper (3) if dust boot (5) is torn or
deteriorated.6. Inspect yoke locating pins (10) for cracks or corrosion. Perform step 7 if cracked or corroded. 7. Using 7-mm hex-head driver, remove locating pins (10) from yoke (9). Discard locating pins (10).8. Inspect rotor (12) for heat cracks, discoloration, pitting, or scoring. Replace rotor (12) if cracked,
pitted, or scored (para. 7-12).9. Clean output flange threaded holes (17) with a 10 mm tap to remove old scaling compound.
1. Install copper washer (2) and coupling (1) on caliper (3).NNOOTTEE
• Perform step 2 only if yoke locating pins were replaced.• Perform steps 3 and 4 for right side. Perform steps 6 through 9
for left side.2. Apply sealing compound to threads of locating pins (10) and install locating pins (10) in yoke (9).
Tighten locating pins (10) to 25-35 lb-ft (34-47 N•m).3. Install caliper (3) on yoke (9).4. Connect hose (7) to coupling (11).5. DELETED6. Install caliper (3) on yoke (9).7. Position rotor (12) and caliper (3) on adapter (8) and hold rotor (12) with two capscrews (13).
NNOOTTEEWhen installing yoke and caliper, use a C-clamp and a block ofwood to bottom out piston in caliper. If piston will not bottom out,replace caliper (para. 7-4).
8. Apply sealing compound to tapped holes of adapter (8). Using crowfoot, install yoke (9) andcaliper (3) on adapter (8) with two washers (15) and capscrews (16). Tighten two capscrews (16) to30-40 lb-ft (41-54 N•m).
9. Connect hose (7) to coupling (11).
c. Installation
7. Remove coupling (1) and copper washer (2) from caliper (3). Discard copper washer (2).

7
9
3 10
11
12
13
15 16
7
119
3
FOLLOW-ON TASKS: • Install brake pads (para. 7-3).• Bleed brake system (para. 7-2).
7-4. SERVICE BRAKE CALIPER MAINTENANCE (Cont'd)
TM 9-2320-387-24-1
Change 1 7-13
1
23
4
56
8
8
TAPPEDHOLES
RIGHT SIDE
LEFT SIDE
~
17
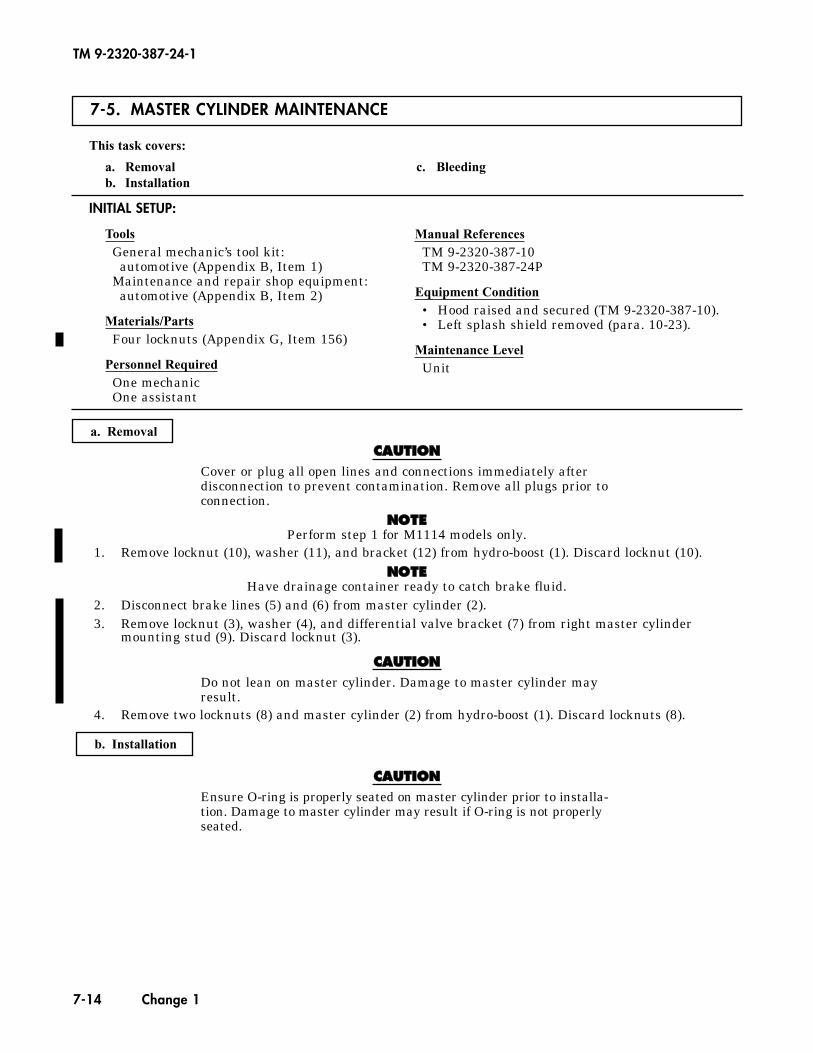
7-5. MASTER CYLINDER MAINTENANCE
This task covers:
a. Removal c. Bleedingb. Installation
INITIAL SETUP:
ToolsGeneral mechanic’s tool kit:
automotive (Appendix B, Item 1)Maintenance and repair shop equipment:
automotive (Appendix B, Item 2)
Materials/PartsFour locknuts (Appendix G, Item 156)
Personnel RequiredOne mechanicOne assistant
Manual ReferencesTM 9-2320-387-10TM 9-2320-387-24P
Equipment Condition• Hood raised and secured (TM 9-2320-387-10).• Left splash shield removed (para. 10-23).
Maintenance LevelUnit
a. Removal
CCAAUUTTIIOONNCover or plug all open lines and connections immediately afterdisconnection to prevent contamination. Remove all plugs prior toconnection.
NNOOTTEEPerform step 1 for M1114 models only.
1. Remove locknut (10), washer (11), and bracket (12) from hydro-boost (1). Discard locknut (10).NNOOTTEE
Have drainage container ready to catch brake fluid.2. Disconnect brake lines (5) and (6) from master cylinder (2).3. Remove locknut (3), washer (4), and differential valve bracket (7) from right master cylinder
mounting stud (9). Discard locknut (3).
CCAAUUTTIIOONNDo not lean on master cylinder. Damage to master cylinder mayresult.
4. Remove two locknuts (8) and master cylinder (2) from hydro-boost (1). Discard locknuts (8).
CCAAUUTTIIOONNEnsure O-ring is properly seated on master cylinder prior to installa-tion. Damage to master cylinder may result if O-ring is not properlyseated.
b. Installation
TM 9-2320-387-24-1
7-14 Change 1
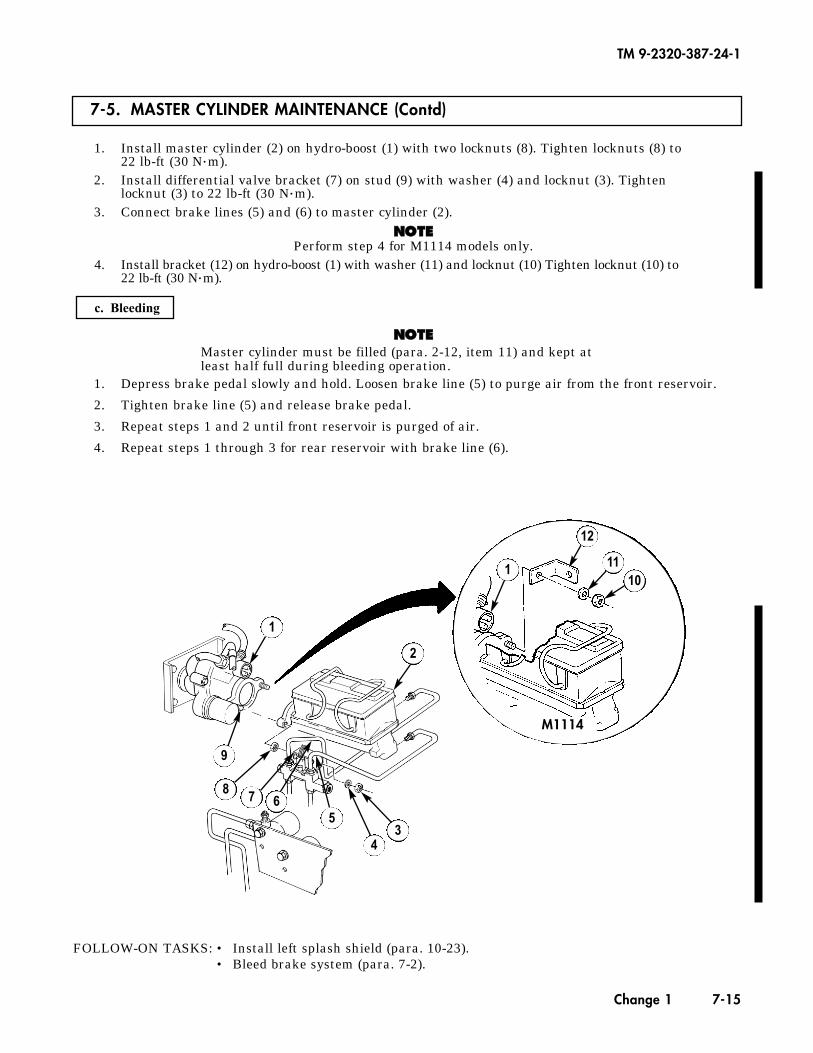
7-5. MASTER CYLINDER MAINTENANCE (Contd)
TM 9-2320-387-24-1
Change 1 7-15
FOLLOW-ON TASKS: • Install left splash shield (para. 10-23).• Bleed brake system (para. 7-2).
1
9
86
53
7
4
12
1110
M1114
1. Install master cylinder (2) on hydro-boost (1) with two locknuts (8). Tighten locknuts (8) to 22 lb-ft (30 N•m).
2. Install differential valve bracket (7) on stud (9) with washer (4) and locknut (3). Tightenlocknut (3) to 22 lb-ft (30 N•m).
3. Connect brake lines (5) and (6) to master cylinder (2).NNOOTTEE
Perform step 4 for M1114 models only. 4. Install bracket (12) on hydro-boost (1) with washer (11) and locknut (10) Tighten locknut (10) to
22 lb-ft (30 N•m).
NNOOTTEEMaster cylinder must be filled (para. 2-12, item 11) and kept atleast half full during bleeding operation.
1. Depress brake pedal slowly and hold. Loosen brake line (5) to purge air from the front reservoir.
2. Tighten brake line (5) and release brake pedal.
3. Repeat steps 1 and 2 until front reservoir is purged of air.
4. Repeat steps 1 through 3 for rear reservoir with brake line (6).
c. Bleeding
2
1

TM 9-2320-387-24-i
7-6. HYDRO-BOOSTER REPLACEMENT
This task covers:
a. Removal b. Installation
INITIAL SETUP:
Tools
General mechanic’s tool kit: automotive (Appendix B, Item 11
Maintenance and repair shop equipment: automotive (Appendix B, Item 2)
MateriaWF’arts Cotter pin (Appendix G, Item 36) Spring washer (Appendix G, Item 452) Four lockwashers (Appendix G, Item 217)
Manual References
TM 9-2320-387-24P
Equipment Condition Master cylinder removed (para. 7-51.
Maintenance Level Unit
Personnel Required One mechanic One assistant
1 a. Removal 1
CAUTION
Cover or plug all open lines and connections immediately after disconnection to prevent contamination. Remove all plugs prior to connection.
NOTE Have drainage container ready to catch brake fluid.
1. Mark and disconnect two high-pressure lines (4) and return line (5) from hydro-booster (6).
2. Remove cotter pin (3) and washer (21, and disconnect pushrod (7) from brake pedal bellcrank (13). Remove spring washer (11 from brake pedal bellcrank (131. Discard cotter pin (3) and spring washer (1).
3. Remove four nuts (121,lockwashers (111, washers (lo), hydra-booster (61, and gasket (8) from cowl (9). Discard lockwashers (11).
b. Installation
1. Install gasket (8) and hydra-booster (6) on cowl (9) with four washers (lo), lockwashers (111, and nuts (12). Do not tighten nuts (12).
2. Install spring washer (1) on brake pedal bellcrank (13). Connect hydra-booster pushrod (7) to brake pedal bellcrank (131 with washer (2) and cotter pin (3).
3. Tighten nuts (121 to 21 lb-R (29 N-m). 4. Connect two high-pressure lines (41 and return line (5) to hydro-booster (6).
7-16
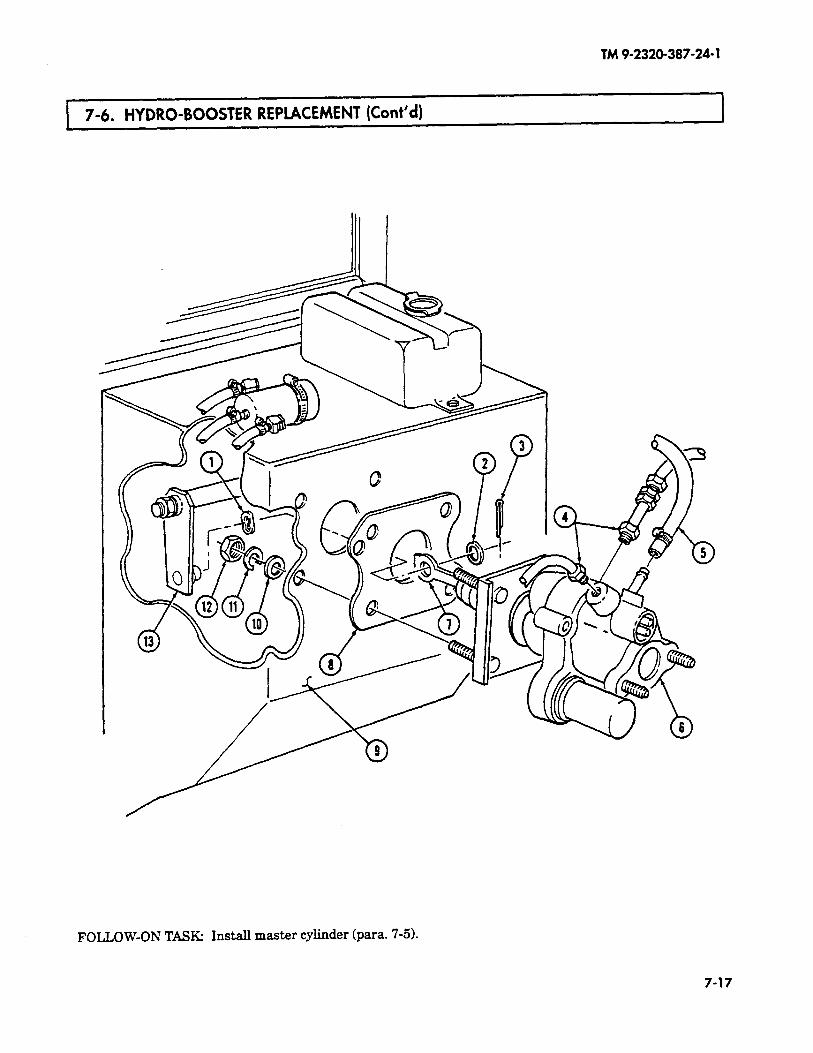
TM9-2320-387-24-l
7-6. HYDRO-BOOSTER REPLACEMENT (Cont’d) I
FOLLOW-ON TASK: Install master cylinder (para. 7-5).
7-17
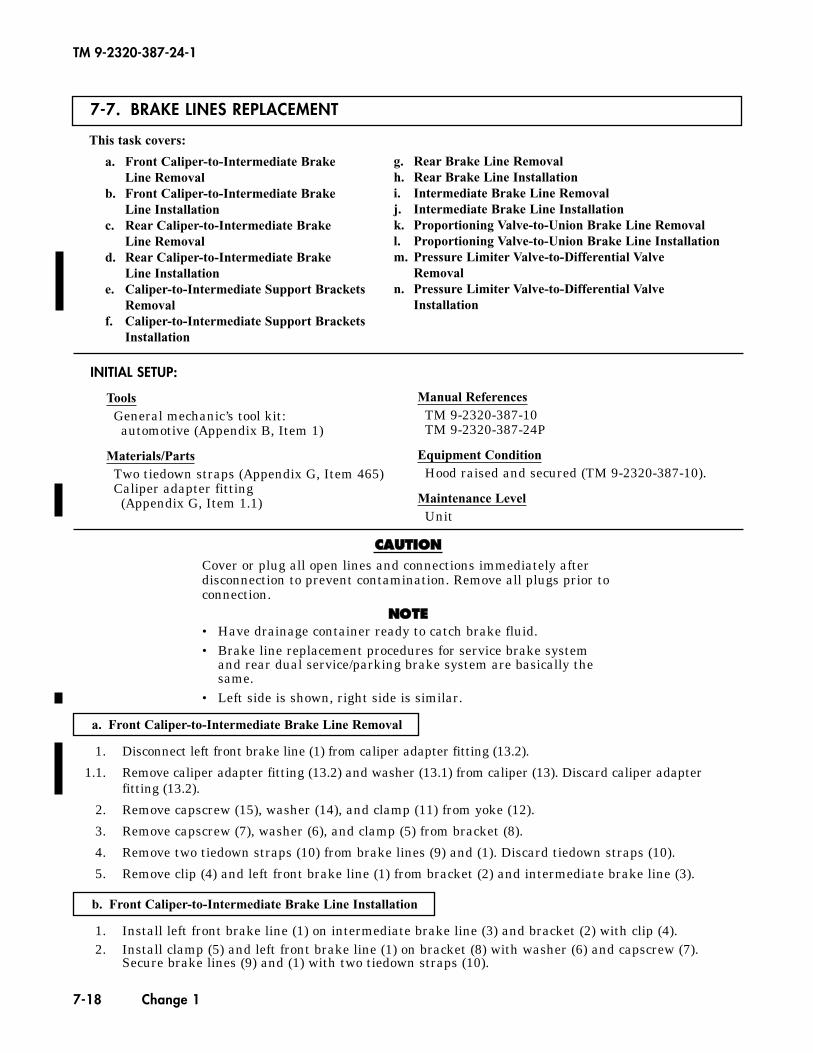
7-7. BRAKE LINES REPLACEMENT
This task covers:
a. Front Caliper-to-Intermediate Brake Line Removal
b. Front Caliper-to-Intermediate Brake Line Installation
c. Rear Caliper-to-Intermediate Brake Line Removal
d. Rear Caliper-to-Intermediate Brake Line Installation
e. Caliper-to-Intermediate Support Brackets Removal
f. Caliper-to-Intermediate Support Brackets Installation
INITIAL SETUP:
ToolsGeneral mechanic’s tool kit:
automotive (Appendix B, Item 1)
Materials/PartsTwo tiedown straps (Appendix G, Item 465)Caliper adapter fitting
(Appendix G, Item 1.1)
Manual ReferencesTM 9-2320-387-10TM 9-2320-387-24P
Equipment ConditionHood raised and secured (TM 9-2320-387-10).
Maintenance LevelUnit
a. Front Caliper-to-Intermediate Brake Line Removal
1. Disconnect left front brake line (1) from caliper adapter fitting (13.2).
1.1. Remove caliper adapter fitting (13.2) and washer (13.1) from caliper (13). Discard caliper adapterfitting (13.2).
2. Remove capscrew (15), washer (14), and clamp (11) from yoke (12).
3. Remove capscrew (7), washer (6), and clamp (5) from bracket (8).
4. Remove two tiedown straps (10) from brake lines (9) and (1). Discard tiedown straps (10).
5. Remove clip (4) and left front brake line (1) from bracket (2) and intermediate brake line (3).
b. Front Caliper-to-Intermediate Brake Line Installation
CCAAUUTTIIOONNCover or plug all open lines and connections immediately afterdisconnection to prevent contamination. Remove all plugs prior toconnection.
NNOOTTEE• Have drainage container ready to catch brake fluid.• Brake line replacement procedures for service brake system
and rear dual service/parking brake system are basically thesame.
• Left side is shown, right side is similar.
1. Install left front brake line (1) on intermediate brake line (3) and bracket (2) with clip (4).2. Install clamp (5) and left front brake line (1) on bracket (8) with washer (6) and capscrew (7).
Secure brake lines (9) and (1) with two tiedown straps (10).
TM 9-2320-387-24-1
7-18 Change 1
g. Rear Brake Line Removalh. Rear Brake Line Installationi. Intermediate Brake Line Removalj. Intermediate Brake Line Installationk. Proportioning Valve-to-Union Brake Line Removall. Proportioning Valve-to-Union Brake Line Installationm. Pressure Limiter Valve-to-Differential Valve
Removaln. Pressure Limiter Valve-to-Differential Valve
Installation
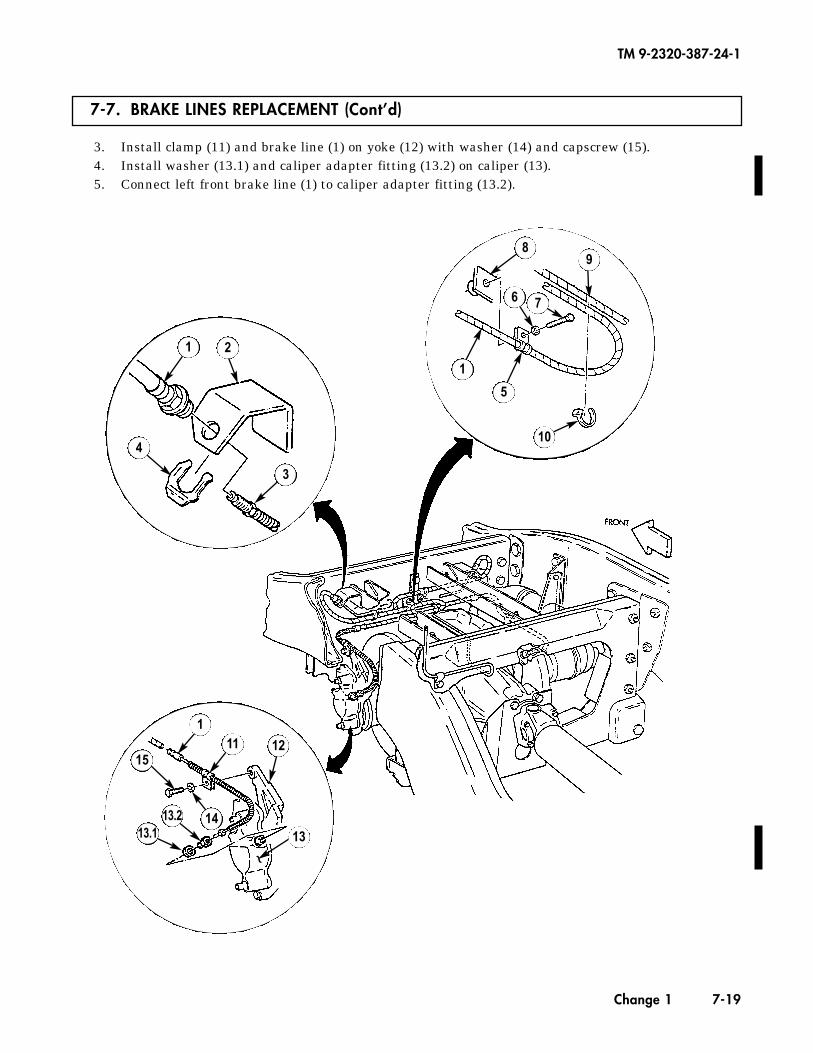
7-7. BRAKE LINES REPLACEMENT (Cont’d)
TM 9-2320-387-24-1
Change 1 7-19
3. Install clamp (11) and brake line (1) on yoke (12) with washer (14) and capscrew (15).4. Install washer (13.1) and caliper adapter fitting (13.2) on caliper (13).5. Connect left front brake line (1) to caliper adapter fitting (13.2).
1
89
6 7
10
5
15
13.213.1
111 12
1314
1
2
3
4
~
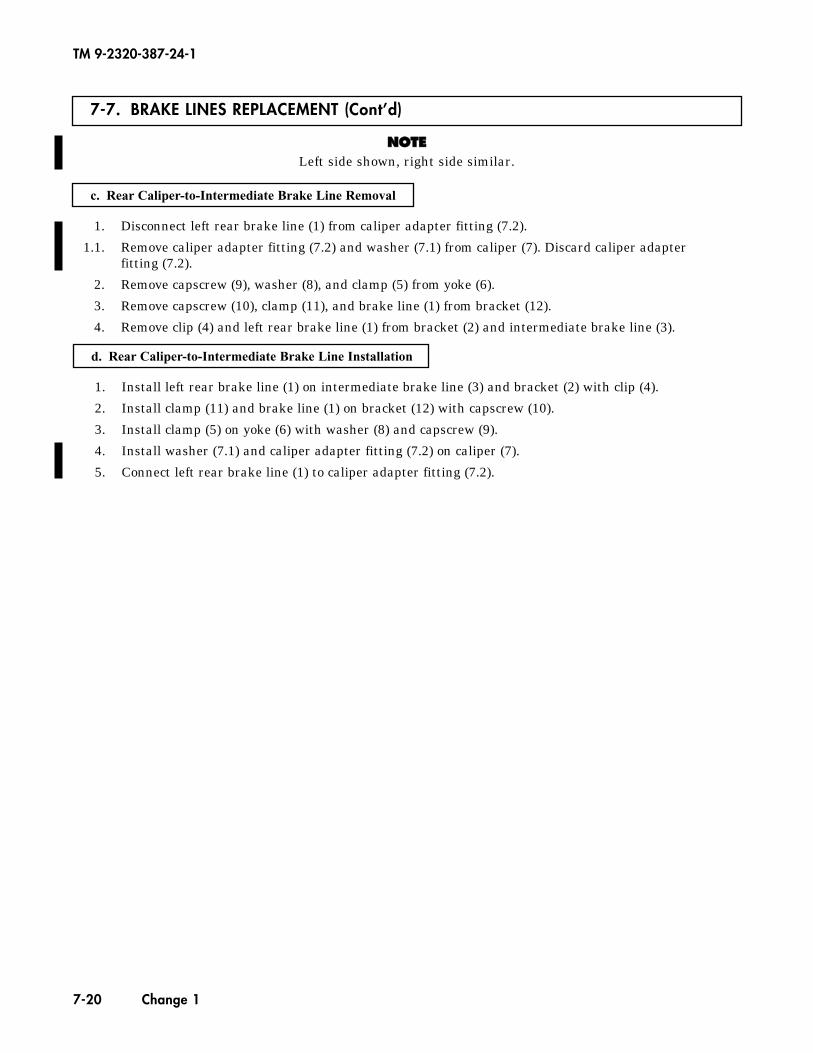
7-7. BRAKE LINES REPLACEMENT (Cont’d)
c. Rear Caliper-to-Intermediate Brake Line Removal
TM 9-2320-387-24-1
7-20 Change 1
d. Rear Caliper-to-Intermediate Brake Line Installation
1. Install left rear brake line (1) on intermediate brake line (3) and bracket (2) with clip (4).
2. Install clamp (11) and brake line (1) on bracket (12) with capscrew (10).
3. Install clamp (5) on yoke (6) with washer (8) and capscrew (9).
4. Install washer (7.1) and caliper adapter fitting (7.2) on caliper (7).
5. Connect left rear brake line (1) to caliper adapter fitting (7.2).
1. Disconnect left rear brake line (1) from caliper adapter fitting (7.2).
1.1. Remove caliper adapter fitting (7.2) and washer (7.1) from caliper (7). Discard caliper adapterfitting (7.2).
2. Remove capscrew (9), washer (8), and clamp (5) from yoke (6).
3. Remove capscrew (10), clamp (11), and brake line (1) from bracket (12).
4. Remove clip (4) and left rear brake line (1) from bracket (2) and intermediate brake line (3).
NNOOTTEELeft side shown, right side similar.
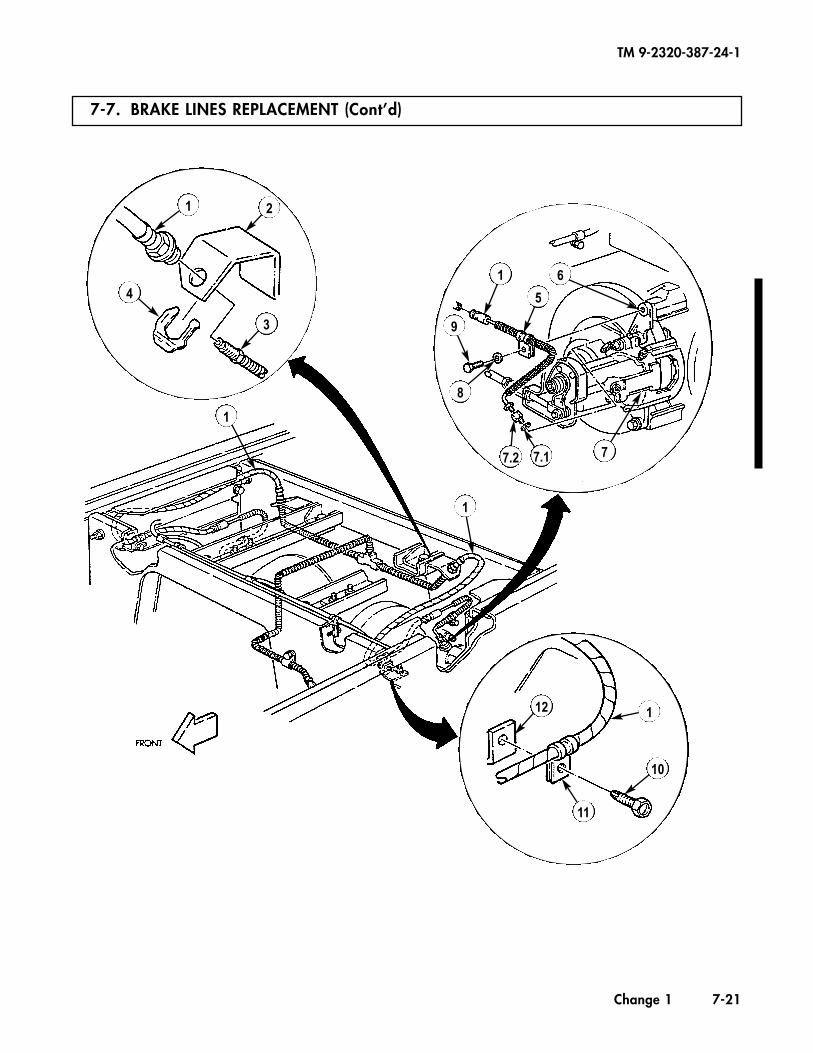
7-7. BRAKE LINES REPLACEMENT (Cont’d)
TM 9-2320-387-24-1
Change 1 7-21
1 2
3
4
1
1
12 1
11
10
1 6
8
9
7.2 7.1 7
5
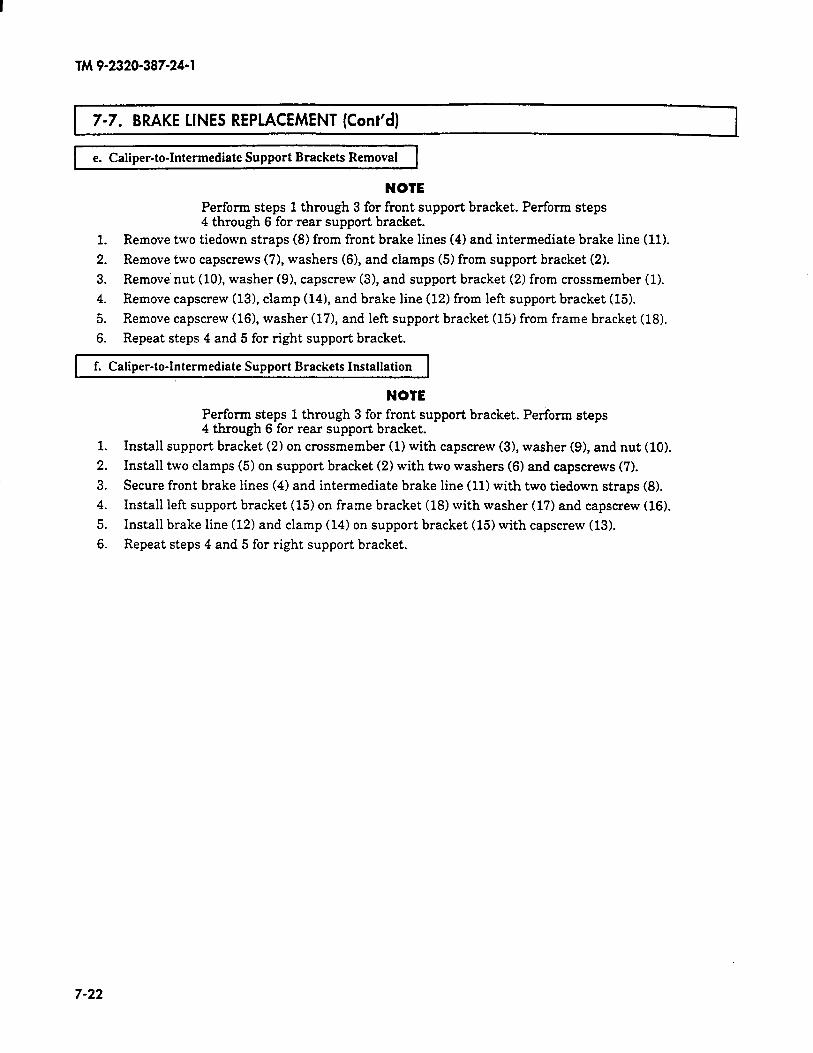
TM 9-2320-387-24-l
1 7-7. BRAKE LINES REPLACEMENT (Cont’d) 1 e. Caliper-to-Intermediate Support Brackets Removal
NOTE Perform steps 1 through 3 for front support bracket. Perform steps 4 through 6 for rear support bracket.
1. Remove two tiedown straps (8) from front brake lines (4) and intermediate brake line (11).
2. Remove two capscrews (71, washers (61, and clamps (5) from support bracket (2).
3. Remove nut (lo), washer (91, capscrew (3), and support bracket (2) from crossmember (1).
4. Remove capscrew (131, clamp (141, and brake line (12) from left support bracket (15).
5. Remove capscrew (161, washer (17), and left support bracket (15) from frame bracket (18).
6. Repeat steps 4 and 5 for right support bracket.
f. Caliper-to-Intermediate Support Brackets Installation
NOTE Perform steps 1 through 3 for front support bracket. Perform steps 4 through 6 for rear support bracket.
1. Install support bracket (2) on crossmember (1) with capscrew (31, washer (91, and nut (10).
2. Install two clamps (5) on support bracket (2) with two washers (6) and capscrews (7).
3. Secure front brake lines (4) and intermediate brake line (11) with two tiedown straps (8).
4. Install left support bracket (15) on frame bracket (18) with washer (17) and capscrew (16).
5. Install brake line (12) and clamp (14) on support bracket (15) with capscrew (13).
6. Repeat steps 4 and 5 for right support bracket.
7-22
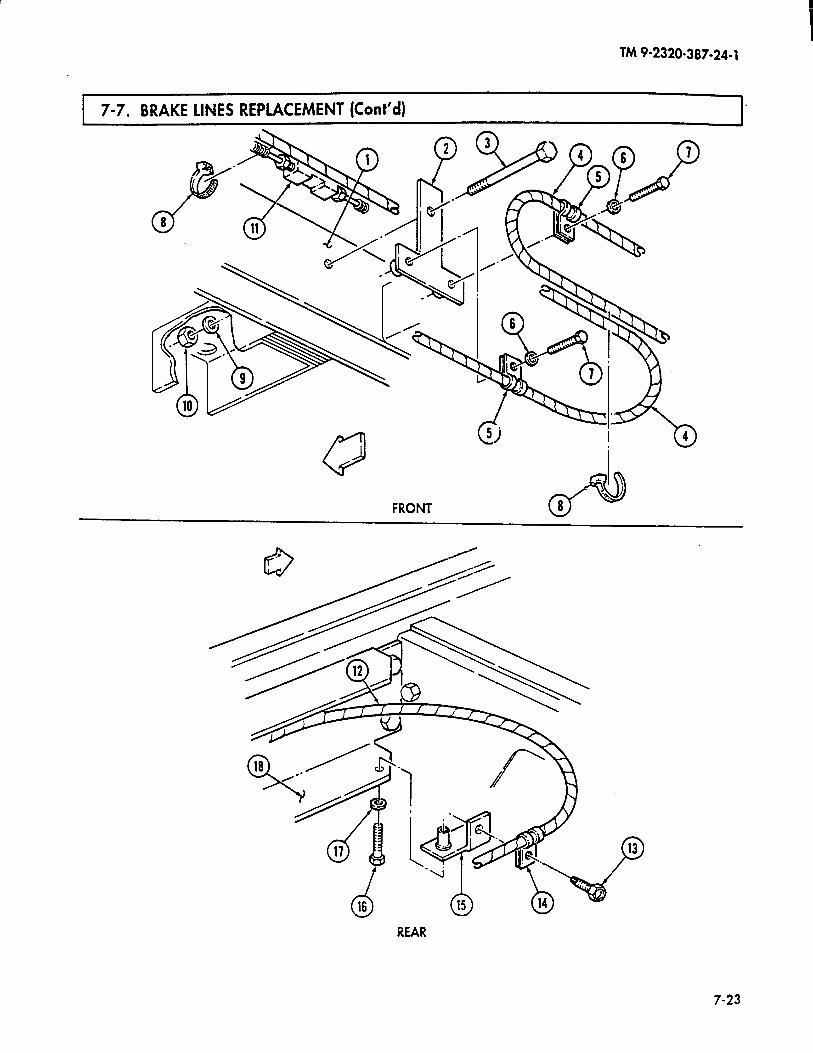
TM 9-2320-387-24-l
7-7. BRAKE LINES REPLACEMENT (Cont’d)
FRONT
REAR
7-23
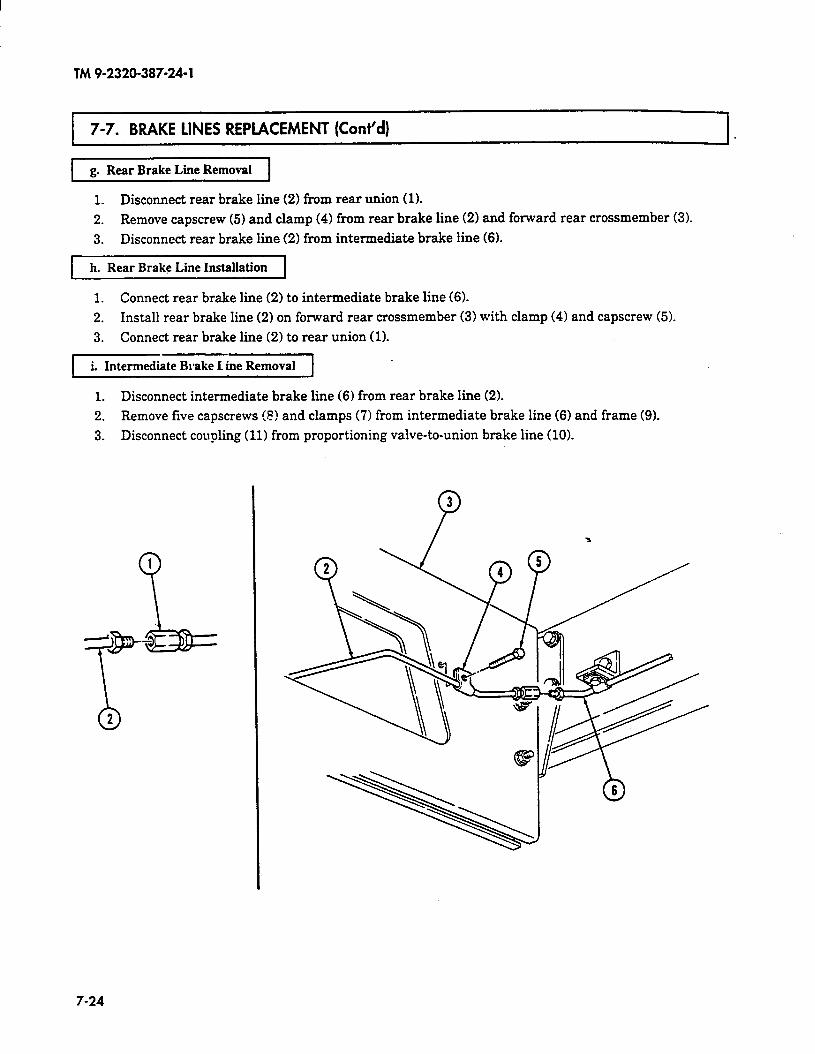
TM 9-2320-387-24-l
7-7. BRAKE LINES REPLACEMENT (Cont’d)
g. Rear Brake Line Removal
1. Disconnect rear brake line (2) from rear union (1).
2. Remove capscrew (5) and clamp (4) from rear brake line (2) and forward rear crossmember (3).
3. Disconnect rear brake line (2) from intermediate brake line (6).
r h. Rear Brake Line Installation 1
1. Connect rear brake line (2) to intermediate brake line (6).
2. Install rear brake line (2) on forward rear crossmember (3) with clamp (4) and capscrew (5).
3. Connect rear brake line (2) to rear union (1).
i. Intermediate Brake I ine Removal
1. Disconnect intermediate brake line (6) from rear brake line (2).
2. Remove five capscrews !P) and clamps (7) from intermediate brake line (6) and frame (9).
3. Disconnect coupling (11) from proportioning valve-to-union brake line (10).
7-24

TM 9-2320-387-24-l
7-7. BRAKE LINES REPLACEMENT (Cont’d)
j. Intermediate Brake Line Installation
1. Connect coupling (11) to proportioning valve-to-union brake line (10).
2. Connect intermediate brake line (6) to rear brake line (2).
3. Install intermediate brake line (6) on frame (9) with five clamps (7) and capscrews (8).
7-25
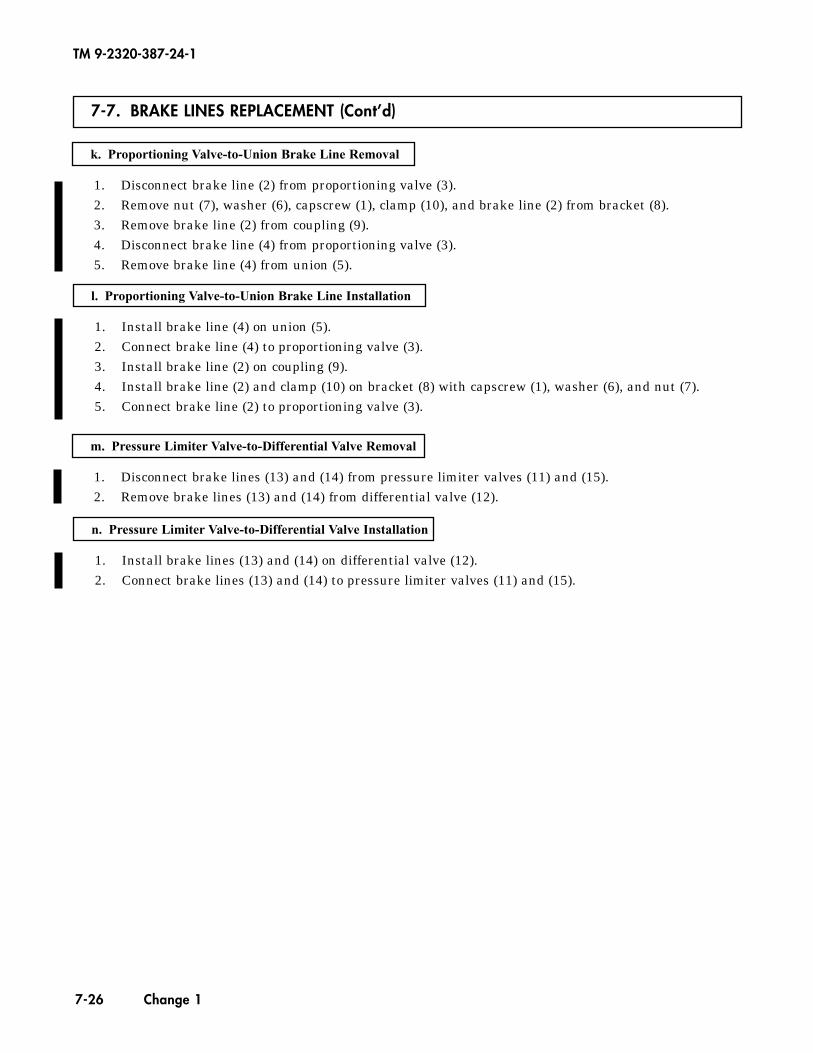
7-7. BRAKE LINES REPLACEMENT (Cont’d)
TM 9-2320-387-24-1
7-26 Change 1
k. Proportioning Valve-to-Union Brake Line Removal
1. Disconnect brake line (2) from proportioning valve (3).2. Remove nut (7), washer (6), capscrew (1), clamp (10), and brake line (2) from bracket (8).3. Remove brake line (2) from coupling (9).4. Disconnect brake line (4) from proportioning valve (3).5. Remove brake line (4) from union (5).
l. Proportioning Valve-to-Union Brake Line Installation
1. Install brake line (4) on union (5).2. Connect brake line (4) to proportioning valve (3).3. Install brake line (2) on coupling (9).4. Install brake line (2) and clamp (10) on bracket (8) with capscrew (1), washer (6), and nut (7).5. Connect brake line (2) to proportioning valve (3).
m. Pressure Limiter Valve-to-Differential Valve Removal
1. Disconnect brake lines (13) and (14) from pressure limiter valves (11) and (15).2. Remove brake lines (13) and (14) from differential valve (12).
n. Pressure Limiter Valve-to-Differential Valve Installation
1. Install brake lines (13) and (14) on differential valve (12).2. Connect brake lines (13) and (14) to pressure limiter valves (11) and (15).
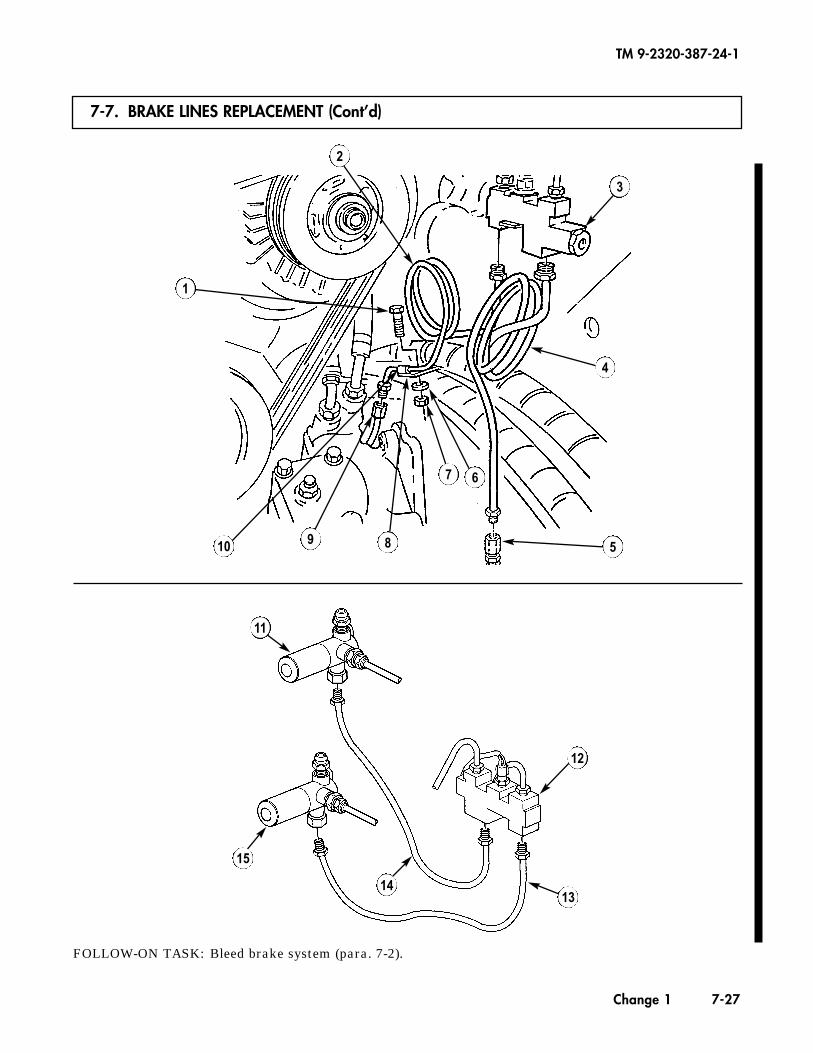
7-7. BRAKE LINES REPLACEMENT (Cont’d)
TM 9-2320-387-24-1
Change 1 7-27
FOLLOW-ON TASK: Bleed brake system (para. 7-2).
1
2
3
4
67
8910 5
11
12
1314
15
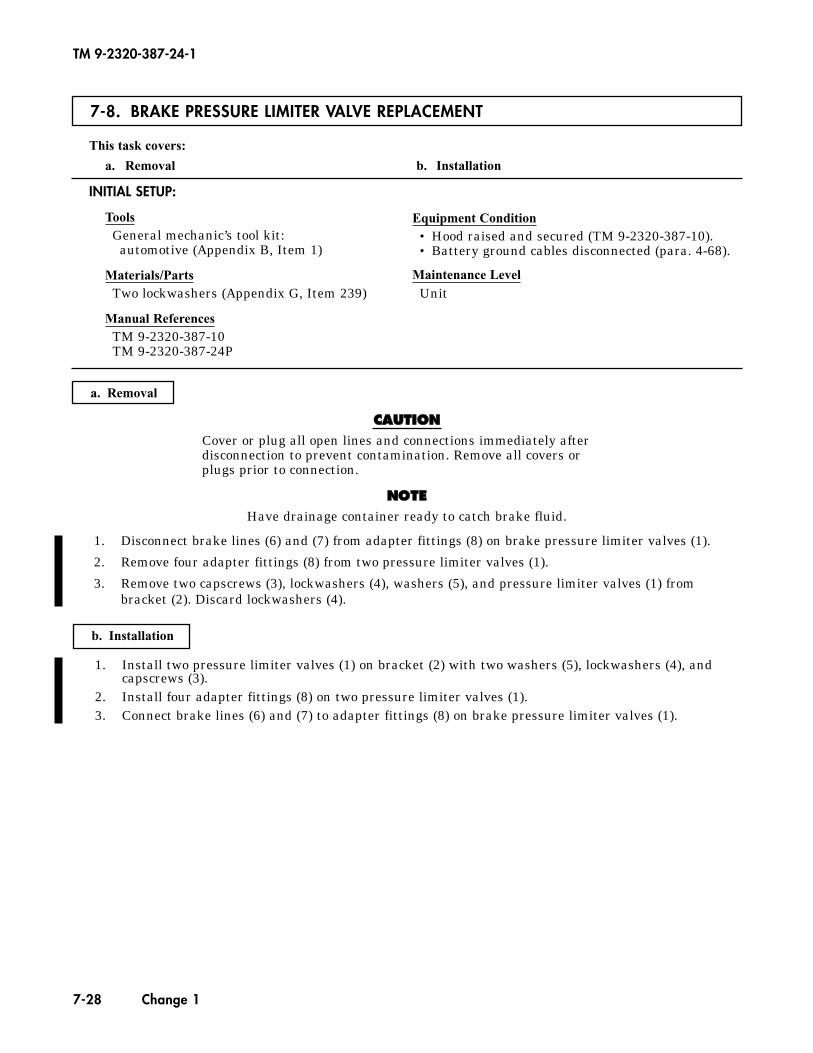
7-8. BRAKE PRESSURE LIMITER VALVE REPLACEMENT
This task covers:
a. Removal b. Installation
INITIAL SETUP:
ToolsGeneral mechanic’s tool kit:
automotive (Appendix B, Item 1)
Materials/PartsTwo lockwashers (Appendix G, Item 239)
Manual ReferencesTM 9-2320-387-10TM 9-2320-387-24P
Equipment Condition• Hood raised and secured (TM 9-2320-387-10).• Battery ground cables disconnected (para. 4-68).
Maintenance LevelUnit
a. Removal
CCAAUUTTIIOONNCover or plug all open lines and connections immediately afterdisconnection to prevent contamination. Remove all covers orplugs prior to connection.
NNOOTTEEHave drainage container ready to catch brake fluid.
1. Disconnect brake lines (6) and (7) from adapter fittings (8) on brake pressure limiter valves (1).
2. Remove four adapter fittings (8) from two pressure limiter valves (1).
3. Remove two capscrews (3), lockwashers (4), washers (5), and pressure limiter valves (1) frombracket (2). Discard lockwashers (4).
b. Installation
1. Install two pressure limiter valves (1) on bracket (2) with two washers (5), lockwashers (4), andcapscrews (3).
2. Install four adapter fittings (8) on two pressure limiter valves (1).3. Connect brake lines (6) and (7) to adapter fittings (8) on brake pressure limiter valves (1).
TM 9-2320-387-24-1
7-28 Change 1
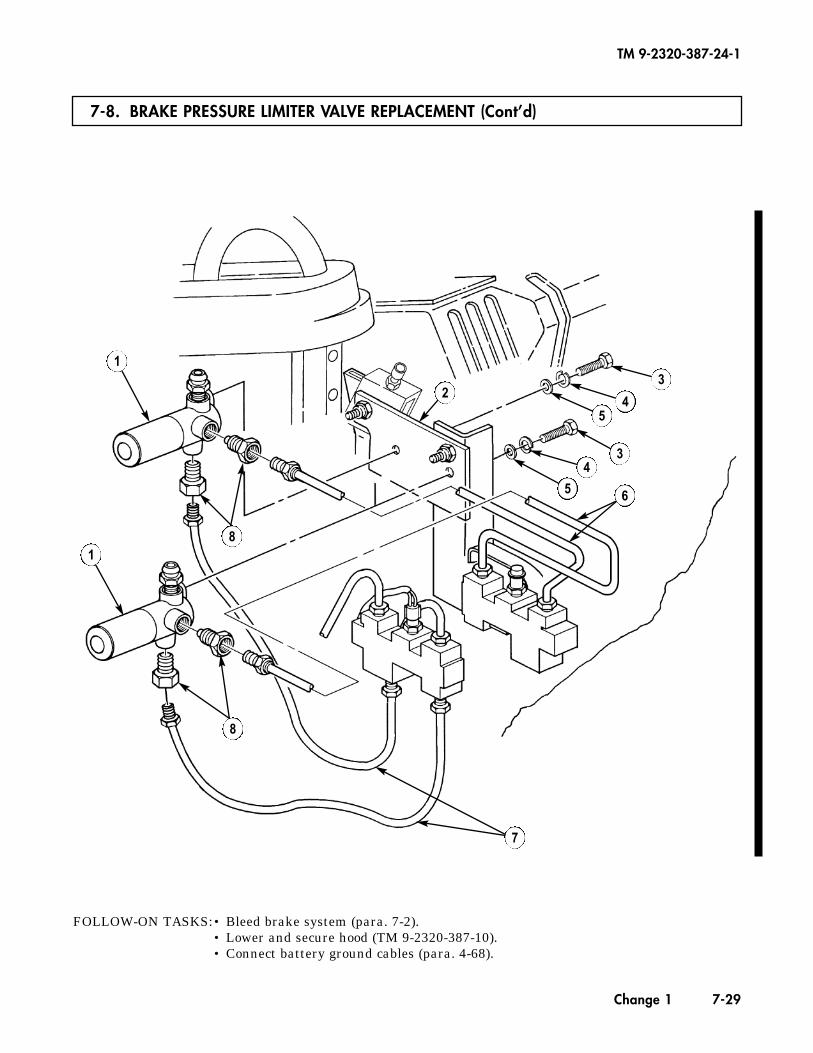
7-8. BRAKE PRESSURE LIMITER VALVE REPLACEMENT (Cont’d)
TM 9-2320-387-24-1
Change 1 7-29
FOLLOW-ON TASKS:• Bleed brake system (para. 7-2).• Lower and secure hood (TM 9-2320-387-10).• Connect battery ground cables (para. 4-68).
1
18
23
45
34
5 6
7
8

TM 9-2320-387-24-l
I 7-9. SERWE BRAKE PEDAL REPLACEMENT
This task covers:
a. Removal b. Installation
INITIAL SETUP:
Tools ?&era1 mechanic’s tool kit:
automotive (Appendix B, Item 1) Maintenance and repair shop equipment:
automotive (Appendix B, Item 2)
Special Tools Crowfoot, 7/8-in. (Appendix B, Item 142) Socket adapter (Appendix B, Item 135)
Materials/Parts Cotter pin (Appendix G, Item 36) Spring washer (Appendix G, Item 4521 Two bearing sleeves (Appendix G, Item 6) Grease (Appendix C, Item 34)
Manual References TM 9-2320-387-10 TM 9-2320-387-24P
Equipment Condition l Protective Control Box (PCB) removed (para. 44). l Stoplight switch removed (para. 4-60).
Maintenance Level unit
rTiczi-1 1. Disconnect return spring (4) from brake pedal bracket (12).
2. Remove cotter pin (71, washer (81, hydro-booster pushrod (51, and spring washer (9) from brake pedal bellcrank (10). Discard cotter pin (7) and spring washer (9).
3. Remove nut (6), washer (21, pivot pin (11, washer (21, and brake pedal assembly (11) from bracket (3).
4. Remove two bearing sleeves (13) from brake pedal assembly (11). Discard two bearing sleeves (13).
b. Installation
1. Apply grease to inside of two bearing sleeves (13) and install bearing sleeves (13) in brake pedal assembly (11).
2. Install brake pedal assembly (11) on bracket (3) with washer (21, pivot pin (11, washer (21, and nut (6). Using adapter and crowfoot, tighten nut (6) to 60 lb-ft (81 Nom).
3. Install spring washer (9) and hydra-booster pushrod (5) on brake pedal bellcrank (10) with washer (8) and cotter pin (7).
4. Connect return spring (4) to brake pedal bracket (12).
7-30
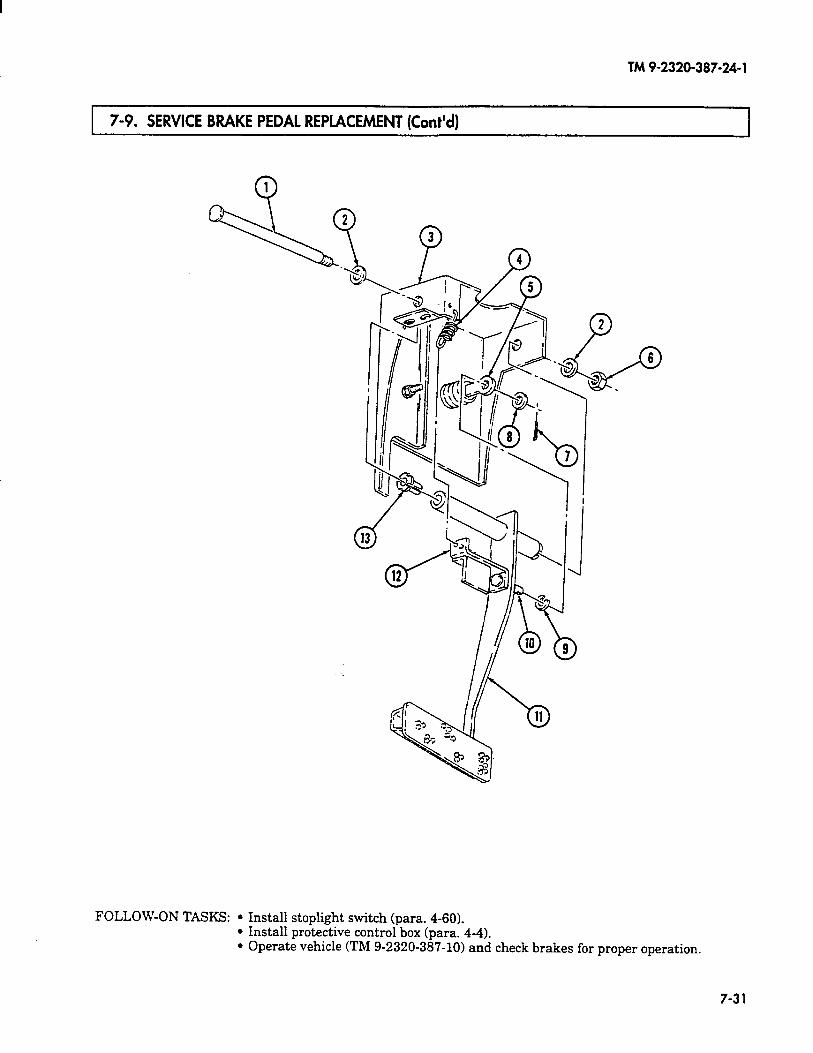
TM9-2320-387-24-l
7-9. SERVICE BRAKE PEDAL REPLACEMENT (Cont’d)
FOLLOW-ON TASKS: l Install stoplight switch (para. 4-60). l Install protective control box (para. 4-4). l Operate vehicle (TM 9-2320-387-10) and check brakes for proper operation.
7-3 1
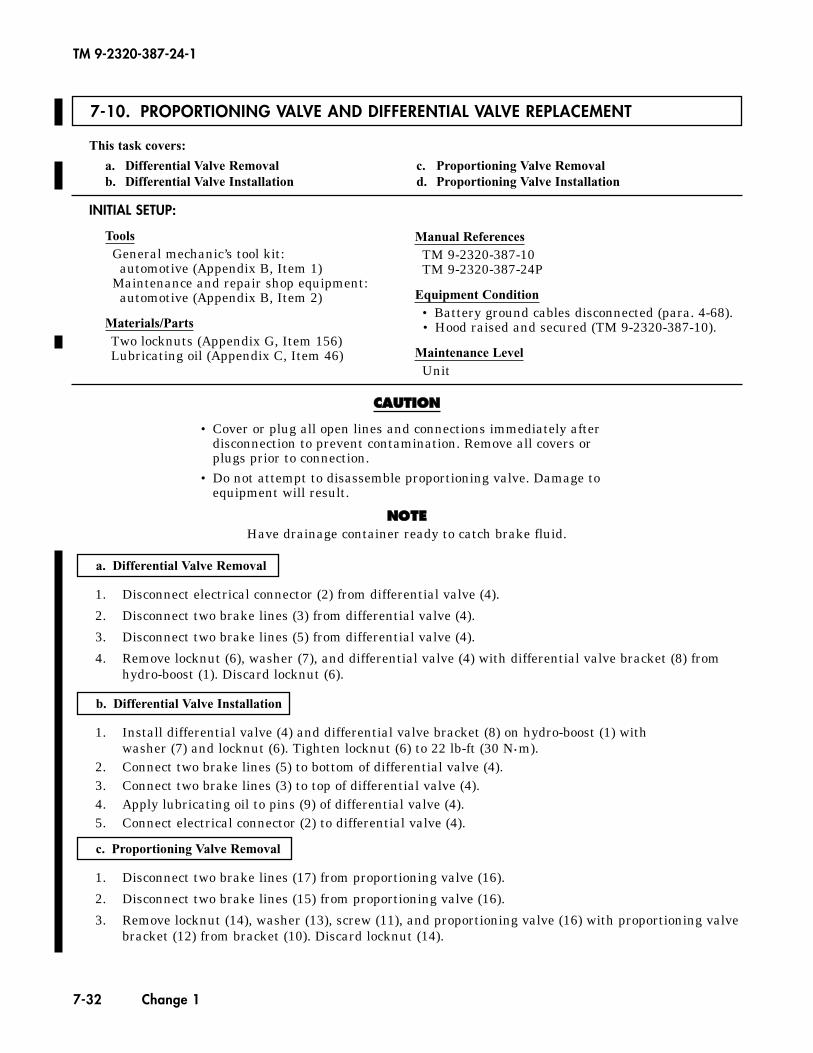
7-10. PROPORTIONING VALVE AND DIFFERENTIAL VALVE REPLACEMENT
This task covers:
a. Differential Valve Removal c. Proportioning Valve Removalb. Differential Valve Installation d. Proportioning Valve Installation
INITIAL SETUP:
ToolsGeneral mechanic’s tool kit:
automotive (Appendix B, Item 1)Maintenance and repair shop equipment:
automotive (Appendix B, Item 2)
Materials/PartsTwo locknuts (Appendix G, Item 156)Lubricating oil (Appendix C, Item 46)
Manual ReferencesTM 9-2320-387-10TM 9-2320-387-24P
Equipment Condition• Battery ground cables disconnected (para. 4-68).• Hood raised and secured (TM 9-2320-387-10).
Maintenance LevelUnit
1. Disconnect electrical connector (2) from differential valve (4).
2. Disconnect two brake lines (3) from differential valve (4).
3. Disconnect two brake lines (5) from differential valve (4).
4. Remove locknut (6), washer (7), and differential valve (4) with differential valve bracket (8) fromhydro-boost (1). Discard locknut (6).
1. Install differential valve (4) and differential valve bracket (8) on hydro-boost (1) with washer (7) and locknut (6). Tighten locknut (6) to 22 lb-ft (30 N•m).
2. Connect two brake lines (5) to bottom of differential valve (4).3. Connect two brake lines (3) to top of differential valve (4).4. Apply lubricating oil to pins (9) of differential valve (4).5. Connect electrical connector (2) to differential valve (4).
1. Disconnect two brake lines (17) from proportioning valve (16).
2. Disconnect two brake lines (15) from proportioning valve (16).
3. Remove locknut (14), washer (13), screw (11), and proportioning valve (16) with proportioning valvebracket (12) from bracket (10). Discard locknut (14).
c. Proportioning Valve Removal
b. Differential Valve Installation
a. Differential Valve Removal
TM 9-2320-387-24-1
7-32 Change 1
CCAAUUTTIIOONN
• Cover or plug all open lines and connections immediately afterdisconnection to prevent contamination. Remove all covers orplugs prior to connection.
• Do not attempt to disassemble proportioning valve. Damage toequipment will result.
NNOOTTEEHave drainage container ready to catch brake fluid.
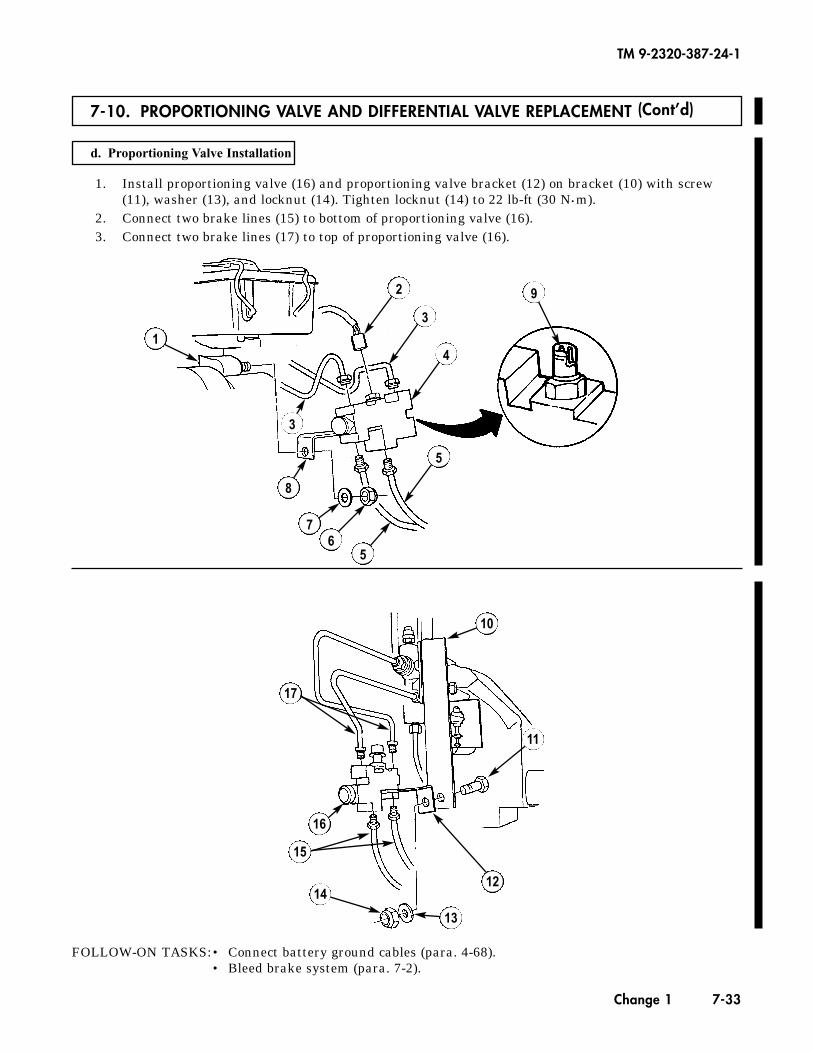
7-10. PROPORTIONING VALVE AND DIFFERENTIAL VALVE REPLACEMENT (Cont’d)
TM 9-2320-387-24-1
Change 1 7-33
FOLLOW-ON TASKS:• Connect battery ground cables (para. 4-68).• Bleed brake system (para. 7-2).
17
2
3
4
56
7
8
1
16
15
13
1412
11
10
d. Proportioning Valve Installation
1. Install proportioning valve (16) and proportioning valve bracket (12) on bracket (10) with screw(11), washer (13), and locknut (14). Tighten locknut (14) to 22 lb-ft (30 N•m).
2. Connect two brake lines (15) to bottom of proportioning valve (16).3. Connect two brake lines (17) to top of proportioning valve (16).
5
9
3
TM9-2320-387-24-l
7-l 1. BRAKE PROTECTION GUARDS REPLACEMENT
This task covers:
a. Removal b. Installation
INITIAL SETUP:
Tools General mechanic’s tool kit:
automotive (Appendix B, Item 1)
MaterialsZarts Six locknuts (Appendix G, Item 156)
Manual References TM 9-2320-387-24P
Equipment Condition Vehicle raised and supported (para. 8-2).
Maintenance Level Unit
NOTE The replacement procedure for brake protection guards is basically the same for front and rear brakes. This procedure covers the front brake protection guards.
a. Removal
1. Remove four locknuts (41, washers (5), capscrews (71, washers (51, and two right-side brake protection guards (8) from brackets (6) on crossmembers (9). Discard locknuts (4).
2. Remove two locknuts (31, washers (21, capscrews (101, washers (21, and left-side brake protection guard (11) from brackets (1) on crossmembers (9). Discard locknuts (3).
(J
1. Install left-side brake protection guard (11) on two brackets (1) on crossmembers (9) with two washers (2), capscrews (101, washers (21, and locknuts (3).
2. Install two right-side brake protection guards (8) on two brackets (6) on crossmembers (9) with four washers (5), capscrews (7), washers (5), and locknuts (4).
7-34
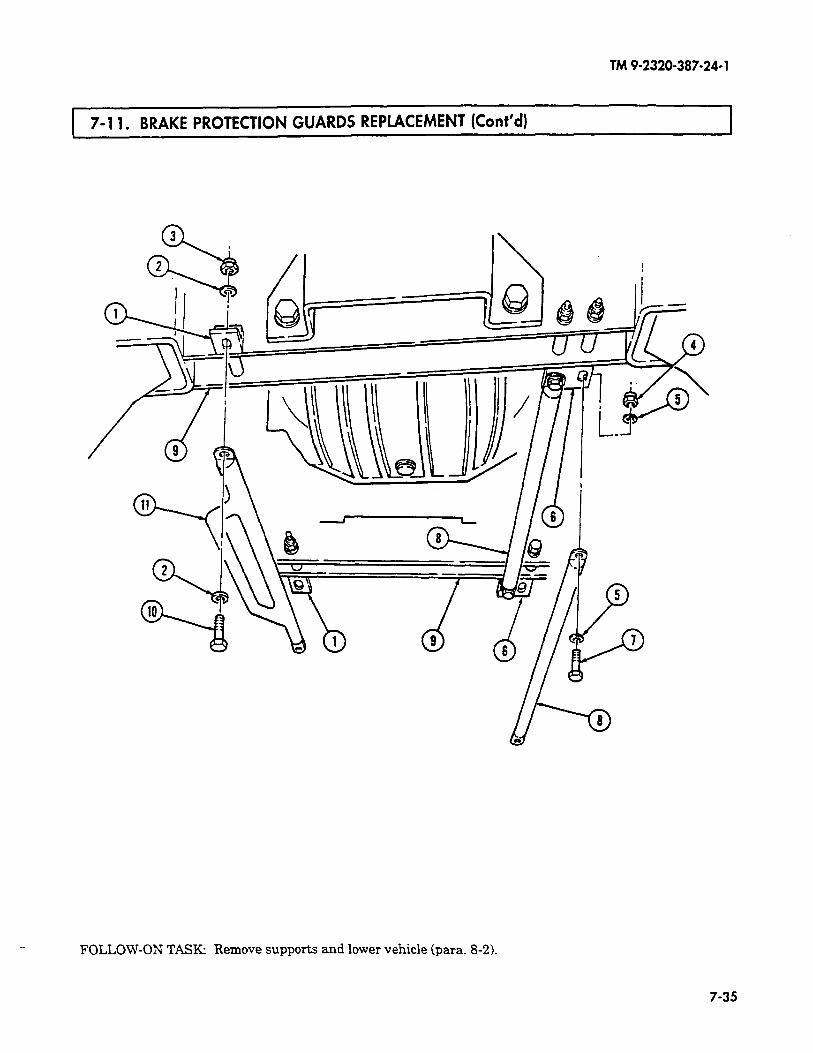
TM 9-2320-387-24-l
7-11. BRAKE PROTECTION GUARDS REPLACEMENT (Cont’d)
FOLLOW-ON TASK: Remove supports and lower vehicle (para. 8-2).
7-35
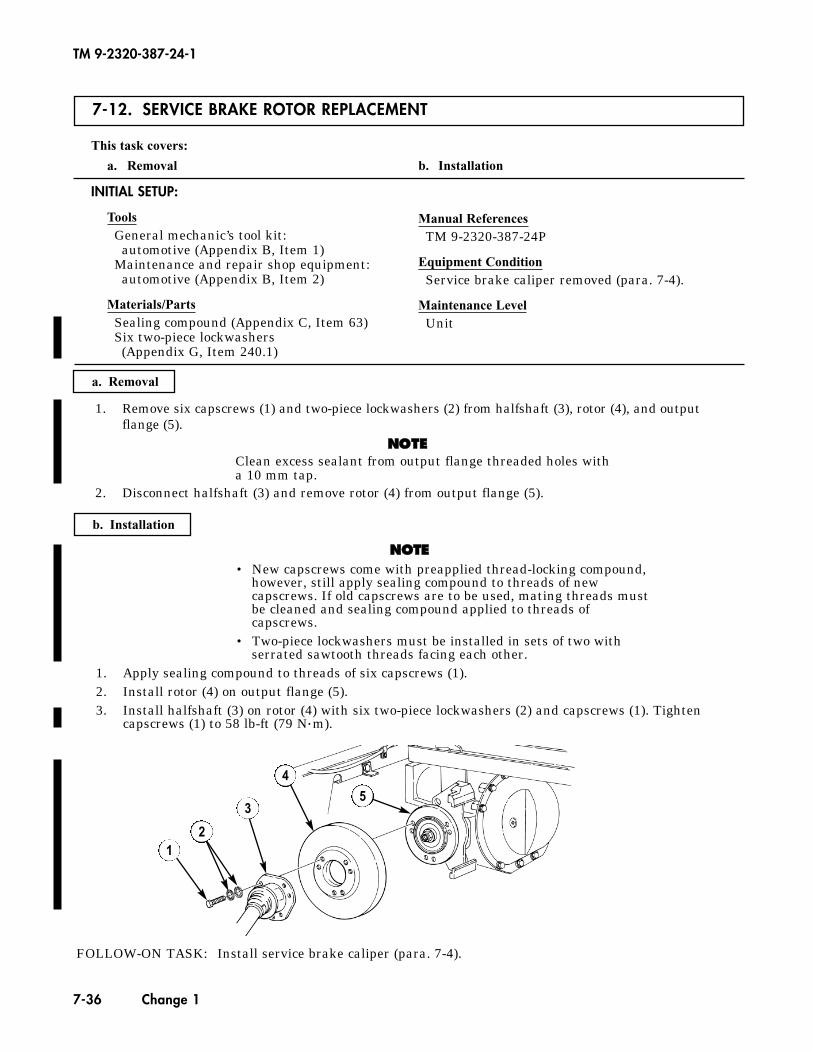
12
3
45
TM 9-2320-387-24-1
7-36 Change 1
7-12. SERVICE BRAKE ROTOR REPLACEMENT
This task covers:
a. Removal b. Installation
Manual ReferencesTM 9-2320-387-24P
Equipment ConditionService brake caliper removed (para. 7-4).
Maintenance LevelUnit
a. Removal
1. Remove six capscrews (1) and two-piece lockwashers (2) from halfshaft (3), rotor (4), and outputflange (5).
NNOOTTEEClean excess sealant from output flange threaded holes witha 10 mm tap.
2. Disconnect halfshaft (3) and remove rotor (4) from output flange (5).
b. Installation
NNOOTTEE• New capscrews come with preapplied thread-locking compound,
however, still apply sealing compound to threads of newcapscrews. If old capscrews are to be used, mating threads mustbe cleaned and sealing compound applied to threads ofcapscrews.
• Two-piece lockwashers must be installed in sets of two withserrated sawtooth threads facing each other.
1. Apply sealing compound to threads of six capscrews (1).2. Install rotor (4) on output flange (5).3. Install halfshaft (3) on rotor (4) with six two-piece lockwashers (2) and capscrews (1). Tighten
capscrews (1) to 58 lb-ft (79 N•m).
FOLLOW-ON TASK: Install service brake caliper (para. 7-4).
INITIAL SETUP:
ToolsGeneral mechanic’s tool kit:
automotive (Appendix B, Item 1)Maintenance and repair shop equipment:
automotive (Appendix B, Item 2)
Materials/PartsSealing compound (Appendix C, Item 63)Six two-piece lockwashers
(Appendix G, Item 240.1)
Section II. REAR DUAL SERVICE/PARKING BRAKE SYSTEM MAINTENANCE
TM9-2320-387-24-l
1 7-13. REAR DUAL SERVICE/PARKING BRAKE SYSTEM MAINTENANCE TASK SUMMARY 1
I TASK PARA. PROCEDURES
PAGE NO. I
7-14. Rear Dual Service/Parking Brake Pad Maintenance 7-38
7-15. Rear Dual Service/Parking Brake Caliper Maintenance 7-42
7-16. Right Parking Brake Cable Replacement 7-46
7-17. Left Parking Brake Cable/Mounting Bracket Replacement 7-48
7-18. Rear Dual Service/Parking Brake Rod Replacement 7-52
7-19. Rear Dual Service/Parking Brake Adjustment 7-54
7-20. Parking Brake Lever Replacement 7-56
7-37
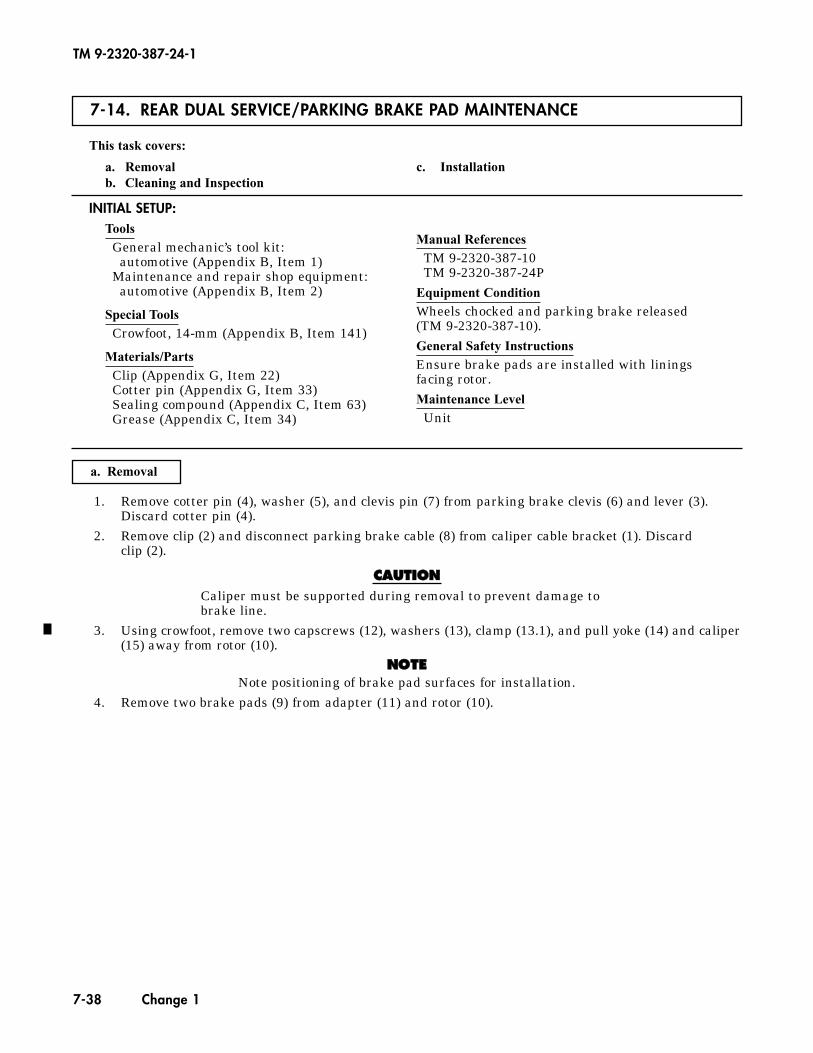
TM 9-2320-387-24-1
7-14. REAR DUAL SERVICE/PARKING BRAKE PAD MAINTENANCE
This task covers:
a. Removal c. Installationb. Cleaning and Inspection
Manual ReferencesTM 9-2320-387-10TM 9-2320-387-24P
Equipment ConditionWheels chocked and parking brake released(TM 9-2320-387-10).General Safety InstructionsEnsure brake pads are installed with liningsfacing rotor.Maintenance Level
Unit
7-38 Change 1
a. Removal
1. Remove cotter pin (4), washer (5), and clevis pin (7) from parking brake clevis (6) and lever (3).Discard cotter pin (4).
2. Remove clip (2) and disconnect parking brake cable (8) from caliper cable bracket (1). Discardclip (2).
CCAAUUTTIIOONNCaliper must be supported during removal to prevent damage tobrake line.
3. Using crowfoot, remove two capscrews (12), washers (13), clamp (13.1), and pull yoke (14) and caliper(15) away from rotor (10).
NNOOTTEENote positioning of brake pad surfaces for installation.
4. Remove two brake pads (9) from adapter (11) and rotor (10).
INITIAL SETUP:Tools
General mechanic’s tool kit:automotive (Appendix B, Item 1)
Maintenance and repair shop equipment:automotive (Appendix B, Item 2)
Special ToolsCrowfoot, 14-mm (Appendix B, Item 141)
Materials/PartsClip (Appendix G, Item 22)Cotter pin (Appendix G, Item 33)Sealing compound (Appendix C, Item 63)Grease (Appendix C, Item 34)

7-14. REAR DUAL SERVICE/PARKING BRAKE PAD MAINTENANCE (Cont'd)
TM 9-2320-387-24-1
Change 1 7-39
12
3
4
567
8
1011
9
141312
13.1
15
9
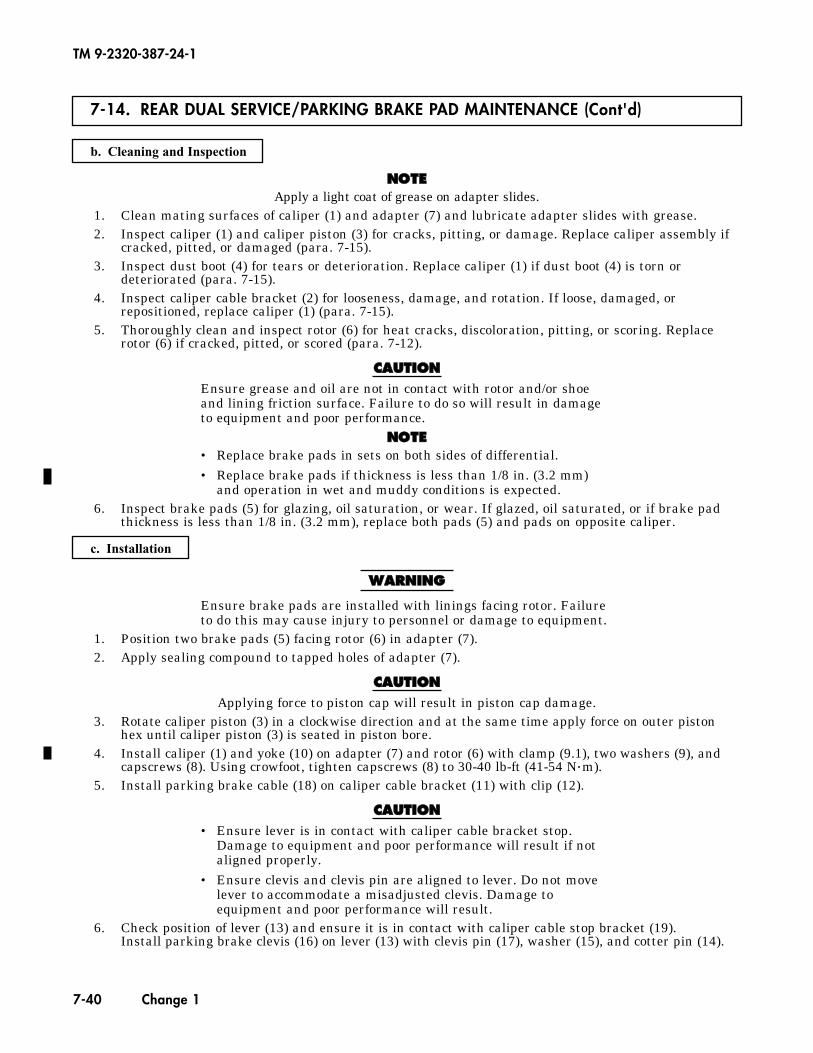
7-14. REAR DUAL SERVICE/PARKING BRAKE PAD MAINTENANCE (Cont'd)
TM 9-2320-387-24-1
7-40 Change 1
b. Cleaning and Inspection
c. Installation
NNOOTTEEApply a light coat of grease on adapter slides.
1. Clean mating surfaces of caliper (1) and adapter (7) and lubricate adapter slides with grease.2. Inspect caliper (1) and caliper piston (3) for cracks, pitting, or damage. Replace caliper assembly if
cracked, pitted, or damaged (para. 7-15).3. Inspect dust boot (4) for tears or deterioration. Replace caliper (1) if dust boot (4) is torn or
deteriorated (para. 7-15).4. Inspect caliper cable bracket (2) for looseness, damage, and rotation. If loose, damaged, or
repositioned, replace caliper (1) (para. 7-15).5. Thoroughly clean and inspect rotor (6) for heat cracks, discoloration, pitting, or scoring. Replace
rotor (6) if cracked, pitted, or scored (para. 7-12).
CCAAUUTTIIOONNEnsure grease and oil are not in contact with rotor and/or shoeand lining friction surface. Failure to do so will result in damageto equipment and poor performance.
NNOOTTEE• Replace brake pads in sets on both sides of differential.• Replace brake pads if thickness is less than 1/8 in. (3.2 mm)
and operation in wet and muddy conditions is expected.6. Inspect brake pads (5) for glazing, oil saturation, or wear. If glazed, oil saturated, or if brake pad
thickness is less than 1/8 in. (3.2 mm), replace both pads (5) and pads on opposite caliper.
WWAARRNNIINNGG
Ensure brake pads are installed with linings facing rotor. Failureto do this may cause injury to personnel or damage to equipment.
1. Position two brake pads (5) facing rotor (6) in adapter (7).2. Apply sealing compound to tapped holes of adapter (7).
CCAAUUTTIIOONNApplying force to piston cap will result in piston cap damage.
3. Rotate caliper piston (3) in a clockwise direction and at the same time apply force on outer pistonhex until caliper piston (3) is seated in piston bore.
4. Install caliper (1) and yoke (10) on adapter (7) and rotor (6) with clamp (9.1), two washers (9), andcapscrews (8). Using crowfoot, tighten capscrews (8) to 30-40 lb-ft (41-54 N•m).
5. Install parking brake cable (18) on caliper cable bracket (11) with clip (12).
CCAAUUTTIIOONN• Ensure lever is in contact with caliper cable bracket stop.
Damage to equipment and poor performance will result if notaligned properly.
• Ensure clevis and clevis pin are aligned to lever. Do not movelever to accommodate a misadjusted clevis. Damage toequipment and poor performance will result.
6. Check position of lever (13) and ensure it is in contact with caliper cable stop bracket (19). Install parking brake clevis (16) on lever (13) with clevis pin (17), washer (15), and cotter pin (14).
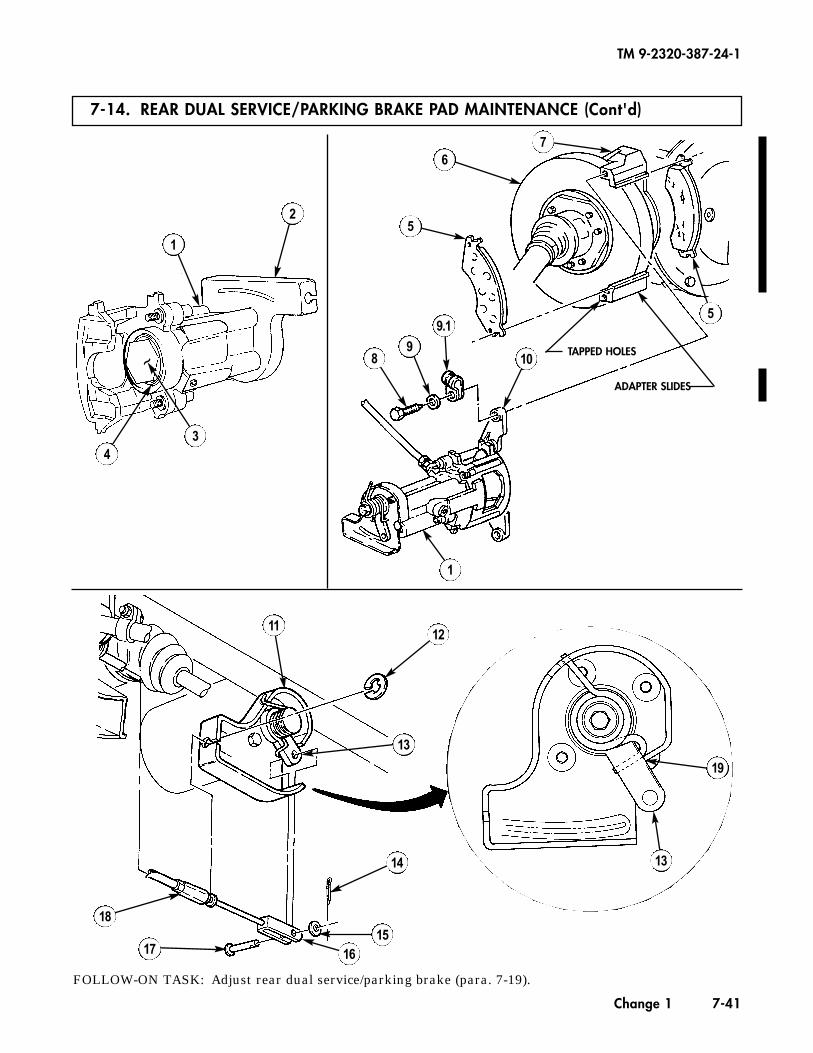
TM 9-2320-387-24-1
Change 1 7-41
FOLLOW-ON TASK: Adjust rear dual service/parking brake (para. 7-19).
7-14. REAR DUAL SERVICE/PARKING BRAKE PAD MAINTENANCE (Cont'd)
6
5
109
8
9.1
1
1
2
43
1112
13
14
151617
18
13
19
7
5
~ADAPTER SLIDES
TAPPED HOLES

TM 9-2320-387-24-1
7-15. REAR DUAL SERVICE/PARKING BRAKE CALIPER MAINTENANCE
This task covers:
a. Removal c. Installationb. Cleaning and Inspection
Manual ReferencesTM 9-2320-387-10TM 9-2320-387-24P
Equipment ConditionWheels chocked and parking brake released(TM 9-2320-387-10).
Maintenance LevelUnit
7-42 Change 1
a. Removal
CCAAUUTTIIOONNCover or plug all open lines and connections immediately afterdisconnection to prevent contamination. Remove all plugs prior toconnection.
1. Remove cotter pin (4), washer (5), and clevis pin (7) from parking brake clevis (6) and lever (3).Discard cotter pin (4).
2. Remove clip (2) and disconnect parking brake cable (8) from caliper cable bracket (1). Discardclip (2).
NNOOTTEEHave drainage container ready to catch brake fluid.
3. Disconnect brake line (17) from coupling (16).4. Remove coupling (16) and copper washer (15) from caliper (14). Discard copper washer (15).5. Using crawfoot, remove two capscrews (10), washers (11), clamp (11.1), and pull yoke (12) and
caliper (14) away from adapter (9).6. Slide yoke (12) and locating pins (13) out from caliper (14).
INITIAL SETUP:
ToolsGeneral mechanic’s tool kit:
automotive (Appendix B, Item 1)Maintenance and repair shop equipment:
automotive (Appendix B, Item 2)
Special ToolsCrowfoot, 14-mm (Appendix B, Item 141)Hex-head driver, 7-mm
(Appendix B, Item 151)
Materials/PartsCotter pin (Appendix G, Item 33)Copper washer (Appendix G, Item 24)Clip (Appendix G, Item 22)Sealing compound (Appendix C, Item 63)

7-15. REAR DUAL SERVICE/PARKING BRAKE CALIPER MAINTENANCE (Cont'd)
TM 9-2320-387-24-1
Change 1 7-43
12
3
4
567
8
9
12
13
101117
16
15
14
11.1

c. Installation
7-15. REAR DUAL SERVICE/PARKING BRAKE CALIPER MAINTENANCE (Cont'd)
NNOOTTEEApply a light coat of grease on adapter slides.
1. Clean mating surfaces of caliper (1) and adapter (7) and lubricate adapter slides with grease.2. Clean cooling fins of rotor (6).3. Inspect caliper (1) and caliper piston (4) for cracks, pitting, or damage. Replace caliper (1) if cracked,
pitted, or damaged.4. Inspect caliper cable bracket (2) for looseness, damage, and rotation. If loose, damaged, or
repositioned, replace caliper (1).5. Inspect dust boot (5) for tears or deterioration. Replace caliper (1) if dust boot (5) is torn or deterio-
rated.6. Inspect rotor (6) for heat cracks, discoloration, pitting, or damage. Replace rotor (6) if cracked, pit-
ted, or scored (para. 7-12).7. Inspect yoke locating pins (12) for cracks or corrosion. Perform step 8 if cracked or corroded. If not,
perform step 9.8. Using 7-mm hex-head driver, remove locating pins (12) from yoke (11). Discard locating pins (12).
NNOOTTEE• Replace brake pads in sets on both sides of differential.• Replace brake pads if thickness is less than 1/8 in. (3.2 mm)
and operation in wet and muddy conditions is expected.9. Inspect brake pads (8) for glazing, oil saturation, or wear. If glazed, oil saturated, or if brake pad
thickness is less than 1/8 in. (3.2 mm), replace both pads (8) and pads on opposite caliper (para. 7-14).
b. Cleaning and Inspection
TM 9-2320-387-24-1
7-44 Change 1
CCAAUUTTIIOONNEnsure grease and oil are not in contact with rotor and/or brakepad friction surface. Failure to do so will result in damage toequipment and poor performance.
1. Open bleeder valve (3) and depress piston (4) into caliper (1) while rotating piston (4) in a clockwisedirection and, at the same time, apply pressure until piston (4) is seated in piston bore.
NNOOTTEEPerform step 2 only if yoke locating pins were removed.
2. Apply sealing compound to threads of locating pins (12) and install locating pins (12) in yoke (11)using 7-mm hex-head driver. Tighten locating pins (12) to 25-35 lb-ft (34-47 N•m).
3. Slide yoke (11) and two locating pins (12) into caliper (1).4. Apply sealing compound to tapped holes of adapter (7).5. Install caliper (1) and yoke (11) on adapter (7) with clamp (10.1), two washers (10), and
capscrews (9). Using crowfoot, tighten capscrews (9) to 30-40 lb-ft (41-54 N•m).6. Install copper washer (13) and coupling (14) on caliper (1) and connect brake line (15) to coupling (14).7. Install parking brake cable (23) on caliper cable bracket (16) with clip (17).
CCAAUUTTIIOONN• Ensure lever is in contact with caliper cable bracket stop.
Damage to equipment and poor performance will result if notaligned properly.
• Ensure clevis and clevis pin are aligned to lever. Do not movelever to accommodate a misadjusted clevis, or damage to equip-ment and poor performance will result.
8. Check position of lever (18) and ensure it is in contact with caliper cable bracket stop (24).9. Install parking brake clevis (21) on lever (18) with clevis pin (22), washer (20), and cotter pin (19).
7-15. REAR DUAL SERVICE/PARKING BRAKE CALIPER MAINTENANCE (Cont'd)
TM 9-2320-387-24-1
Change 1 7-45
FOLLOW-ON TASKS: • Bleed brake system (para. 7-2).• Adjust rear dual service/parking brake (para. 7-19).
1617
18
19
202122
23
1
2
54
3
15
14
13
1
12
11
910
8
6
7
ADAPTERSLIDES
TAPPEDHOLES
18
24
~
10.1
TM 9-2320-387-24-l
I 7- 16. RIGHT PARKING BRAKE CABLE REPLACEMENT This task covers:
a. Removal b. Installation
INITIAL SETUP:
Tools
General mechanic’s tool kit: automotive (Appendix B, Item 1)
Maintenance and repair shop equipment: automotve (Appendix B, Item 2)
hIaterials/Parts Cotter pin (Appendix G, Item 34) Three lockwashers (Appendix G, Item 206) Two clips (Appendix G, Item 221
hlanual References
TM 9-2320-387-10 TM 9-2320-387-24P
Equipment Condition l Muffler and catalytic converter removed
(para. 3-49). l Wheels chocked and parking brake released
(TM 9-2320-387-10).
Maintenance Level
Unit
1.
2.
3.
4.
5.
6.
7.
Remove cotter pin (301, washer (29), clevis pin (271, and brake clevis (28) from rear caliper lever (31). Discard cotter pin (30).
Remove brake cable clip (1) and parking brake cable sleeve (26) from rear caliper cable bracket (2) and remove cable assembly (4) from caliper cable bracket (21. Discard cable clip (1).
Remove parking brake cable clip (7) from parking brake cable sleeve (61 and C-beam (9). Disconnect parking brake cable (41 from parking brake equalizer bar (8). Discard cable clip (71.
Remove two capscrews (121, parking brake cable clamps (51, and parking brake cable assembly (4) from body (11).
Remove nut (181, lockwasher (171, capscrew (15), washer (161, and parking brake cable clamp (19) from clamp bracket (23). Discard lockwasher (17).
Remove capscrew (201, lockwasher (211, and parking brake cable clamp (22) from bracket (23). Discard lockwasher (21).
NOTE Perform step 7 if replacing clamp bracket.
Remove nut (241, lockwasher (251, capscrew (14), washer (131, and clamp bracket (23) from support bracket (3). Discard lockwasher (25).
b. Installation
1.
2.
3.
4.
5.
7-46
NOTE Perform step 1 if clamp bracket was removed.
Install clamp bracket (231 on support bracket (3) with washer (131, capscrew (141, lockwasher (251, and nut (24).
Slide parking brake cable clamp (22) onto parking brake cable assembly (4) and install on clamp bracket (23) with lockwasher (21) and capscrew (20).
Slide parking brake cable clamp (19) on parking brake cable assembly (4) and install on clamp bracket (231 with washer (161, capscrew (151, lockwasher (171, and nut (18).
Install two parking brake cable clamps (5) on parking brake cable assembly (4) and body (11) with capscrews (12).
Install parking brake cable sleeve (61 on C-beam (9) and parking brake cable (10) to parking brake equalizer bar (8) with clip (7).
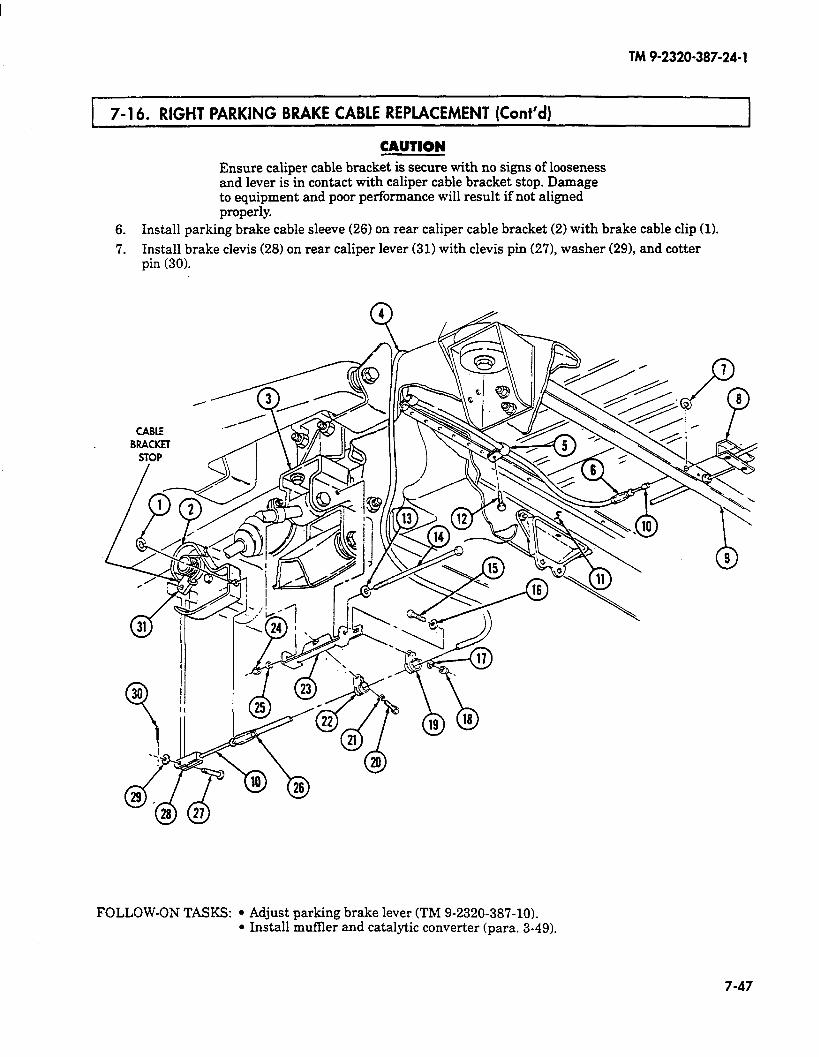
TM 9-2320-387-24-l
7-l 6. RIGHT PARKING BRAKE CABLE REPLACEMENT (Cont’d)
6. 7.
CAUTION Ensure caliper cable bracket is secure with no signs of looseness and lever is in contact with caliper cable bracket stop. Damage to equipment and poor performance will result if not aligned properly.
Install parking brake cable sleeve (26) on rear caliper cable bracket (2) with brake cable clip (1).
Install brake clevis (28) on rear caliper lever (31) with clevis pin (271, washer (29), and cotter pin (30).
n
BRACKET
FOI_J,OW-ON TASKS: l Adjust parking brake lever (TM 9-2320-387-10). l Install muffler and catalytic converter (para. 3-49).
7-47
TM 9-2320-387-24-l
7-17. LEFT PARKING BRAKE CABLE/MOUNTING BRACKET REPLACEMENT I
This task covers:
a. Removal b. Installation
INITIAL SETUP:
Tools
General mechanic’s tool kit: automotive (Appendix B, Item 11
Materials/Parts
Nut and lockwasher assembly (Appendix G, Item 246) Five lockwashers (Appendix G, Item 206) Cotter pin (Appendix G, Item 341 Two clips (Appendix G, Item 22)
Manual References
TM 9-2320-387-10 TM 9-2320-387-24P
Equipment Condition
l Wheels chocked and parking brake released (TM 9-2320-387-10).
l Muffler and catalytic converter removed (para. 3-49).
Maintenance Level
Unit
5.
6.
7.
8.
Remove cotter pin (111, washer (121, clevis pin (14), and brake clevis (13) from rear caliper lever (101. Discard cotter pin (111. Remove brake cable clip (9) and parking brake cable sleeve (2) from rear caliper cable bracket (8). Discard cable clip (91. Remove parking brake cable clip (231 and parking brake cable sleeve (2) from C-beam (24). Disconnect parking brake cable (11 from parking brake equalizer bar (22). Discard cable clip (23). Remove two nut and lockwasher assemblies (31, capscrews (61, washers (41, and brake cable clamp (5) from mounting bracket (25) and parking brake cable assembly (151. Discard nut and lockwasher assembly (3). Remove nut (211, lockwasher (201, capscrew (281, washer (291, and parking brake cable clamp (19) from bracket (30). Discard lockwasher (20). Remove capscrew (181, lo&washer (171, and parking brake cable clamp (16) from bracket (30). Discard lockwasher (17).
NOTE Perform step 7 if replacing clamp bracket.
Remove nut (321, lockwasher (311, capscrew (271, washer (261, and clamp bracket (30) from support bracket (7). Discard lockwasher (31).
NOTE Perform step 8 if replacing parking cable mounting bracket.
Remove two nuts (331, lockwashers (341, washers (351, capscrews (361, washers (351, mounting bracket (251, and tailpipe hanger (371 from rear body mount (38). Discard lockwashers (34).
7-48
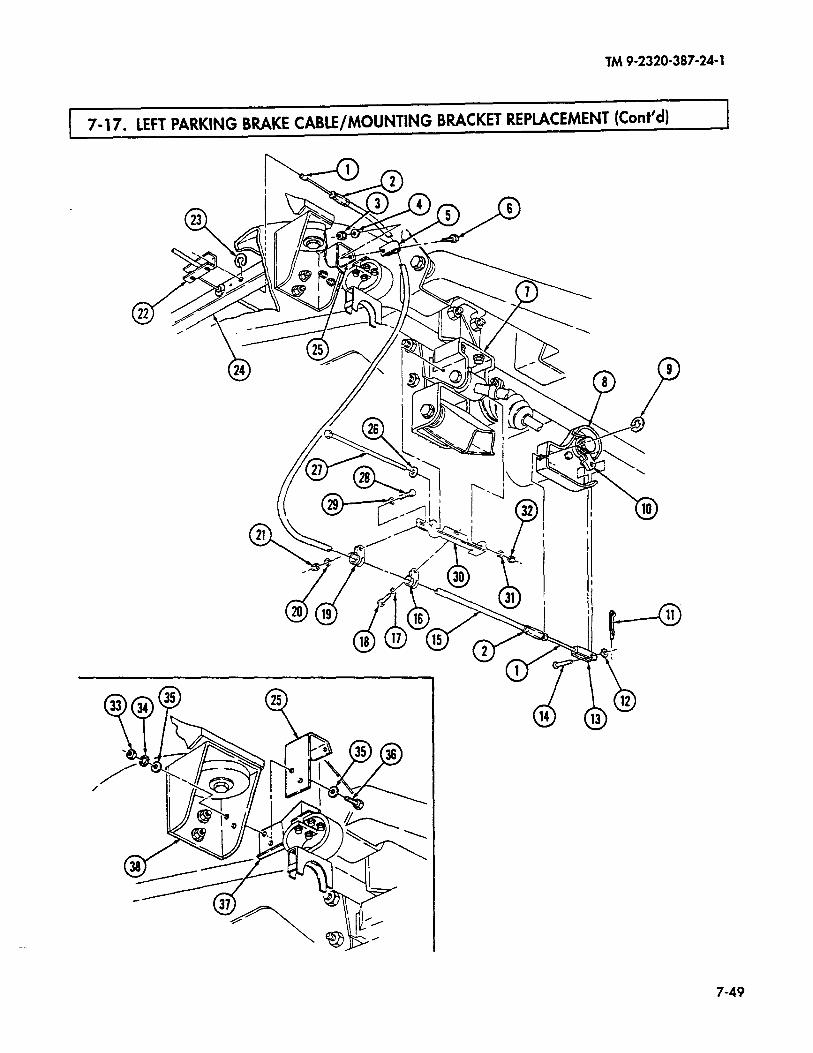
TM9-2320-387-24-l
7-17. LEFT PARKING BRAKE CABLE/MOlJNTING BRACKET REPLACEMENT (Cont’d)
7-49
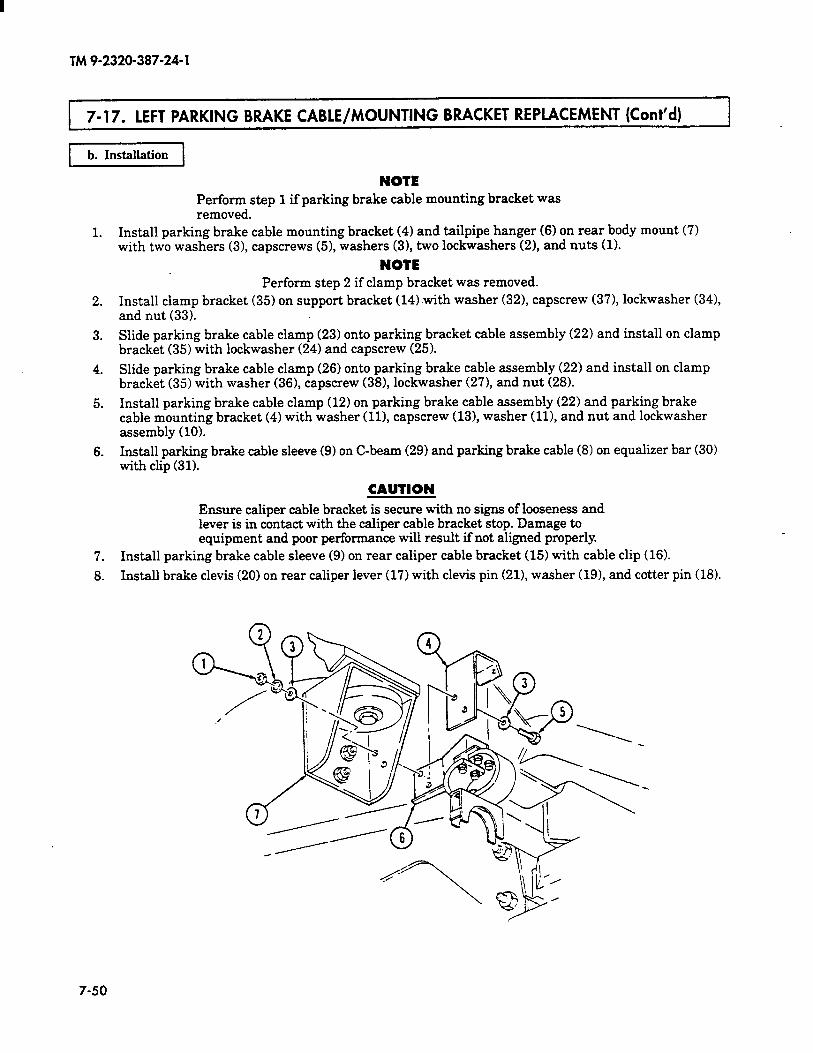
I
TM 9-2320-387-24-l
7-17. LEFT PARKING BRAKE CABLE/MOUNTING BRACKET REPLACEMENT (Cont’d) I
1 b. Installation 1
1.
2.
3.
4.
5.
6.
7.
8.
NOTE Perform step 1 if parking brake cable mounting bracket was removed.
Install parking brake cable mounting bracket (4) and tailpipe hanger (6) on rear body mount (7) with two washers (31, capscrews (51, washers (31, two lockwashers (21, and nuts (1).
NOTE Perform step 2 if clamp bracket was removed.
Install clamp bracket (35) on support bracket (14l.with washer (321, capscrew (371, lockwasher (341, and nut (33).
Slide parking brake cable clamp (23) onto parking bracket cable assembly (221 and install on clamp bracket (35) with lockwasher (24) and capscrew (251.
Slide parking brake cable clamp (26) onto parking brake cable assembly (22) and install on clamp bracket (35) with washer (36), capscrew (381, lockwasher (271, and nut (281.
Install parking brake cable clamp (12) on parking brake cable assembly (22) and parking brake cable mounting bracket (4) with washer (111, capscrew (131, washer (111, and nut and lockwasher assembly (10).
Install parking brake cable sleeve (9) on C-beam (29) and parking brake cable (8) on equalizer bar (30) with clip (31).
CAUTION Ensure caliper cable bracket is secure with no signs of looseness and lever is in contact with the caliper cable bracket stop. Damage to equipment and poor performance will result if not aligned properly.
Install parking brake cable sleeve (9) on rear caliper cable bracket (15) with cable clip (16).
Install brake clevis (20) on rear caliper lever (17) with clevis pin (21), washer (191, and cotter pin (18).
7-50

TM 9-2320-387-24-I
7- 17. LEFT PARKING BRAKE CABLE/MOUNTING BRACKET REPLACEMENT (Cont’d)
0 8
FOLLOW-ON TASKS: l Adjust parking brake lever (TM 9-2320-387-10). l Install mufIler and catalytic converter (para. 3-49).
7-51
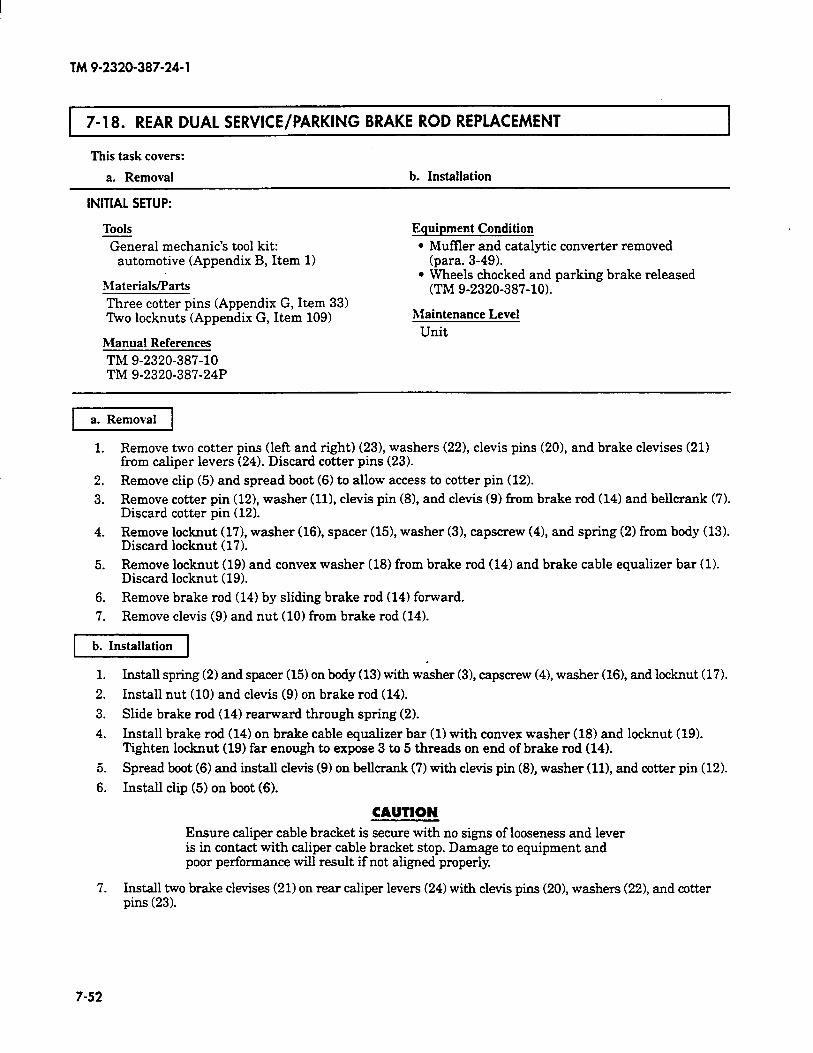
TM 9-2320-387-24-l
7-18. REAR DUAL SERVICE/PARKING BRAKE ROD REPLACEMENT
This task covers:
a. Removal b. Installation
INITIAL SETUP:
Tools
General mechanic’s tool kit: automotive (Appendix B, Item 1)
Materials/Parts
Equipment Condition
l MufIler and catalytic converter removed (para. 3-49).
l Wheels chocked and parking brake released (TM 9-2320-387-10).
Three cotter pins (Appendix G, Item 33) ‘lSvo locknuts (Appendix G, Item 109) Maintenance Level
Unit Manual References TM 9-2320-387-10 TM 9-2320-387-24P
1. Remove two cotter pins (left and right) (231, washers (221, clevis pins (20), and brake clevises (21) from caliper levers (24). Discard cotter pins (23).
2. Remove clip (5) and spread boot (6) to allow access to cotter pin (12). 3. Remove cotter pin (121, washer (111, clevis pin (81, and clevis (9) from brake rod (14) and bellcrank (7).
Discard cotter pin (12). 4. Remove locknut (17), washer (16), spacer (151, washer (31, capscrew (41, and spring (2) from body (13).
Discard locknut (17). 5. Remove locknut (19) and convex washer (18) from brake rod (14) and brake cable equalizer bar (1).
Discard locknut (19).
6. Remove brake rod (14) by sliding brake rod (14) forward.
7. Remove clevis (9) and nut (10) from brake rod (14).
Ib.[
1. Install spring (2) and spacer (15) on body (13) with washer (31, capscrew (41, washer (161, and locknut (17).
2. Install nut (10) and clevis (9) on brake rod (14).
3. Slide brake rod (14) rearward through spring (2).
4. Install brake rod (14) on brake cable equalizer bar (1) with convex washer (18) and locknut (19). Tighten locknut (19) far enough to expose 3 to 5 threads on end of brake rod (14).
5. Spread boot (6) and install clevis (9) on bellcrank (7) with clevis pin (81, washer (111, and cotter pin (12).
6. Install clip (5) on boot (6).
CAUTION Ensure caliper cable bracket is secure with no signs of looseness and lever is in contact with caliper cable bracket stop. Damage to equipment and poor performance will result if not aligned properly.
7. Install two brake clevises (21) on rear caliper levers (24) with clevis pins (201, washers (22), and cotter pins (23).
7-52
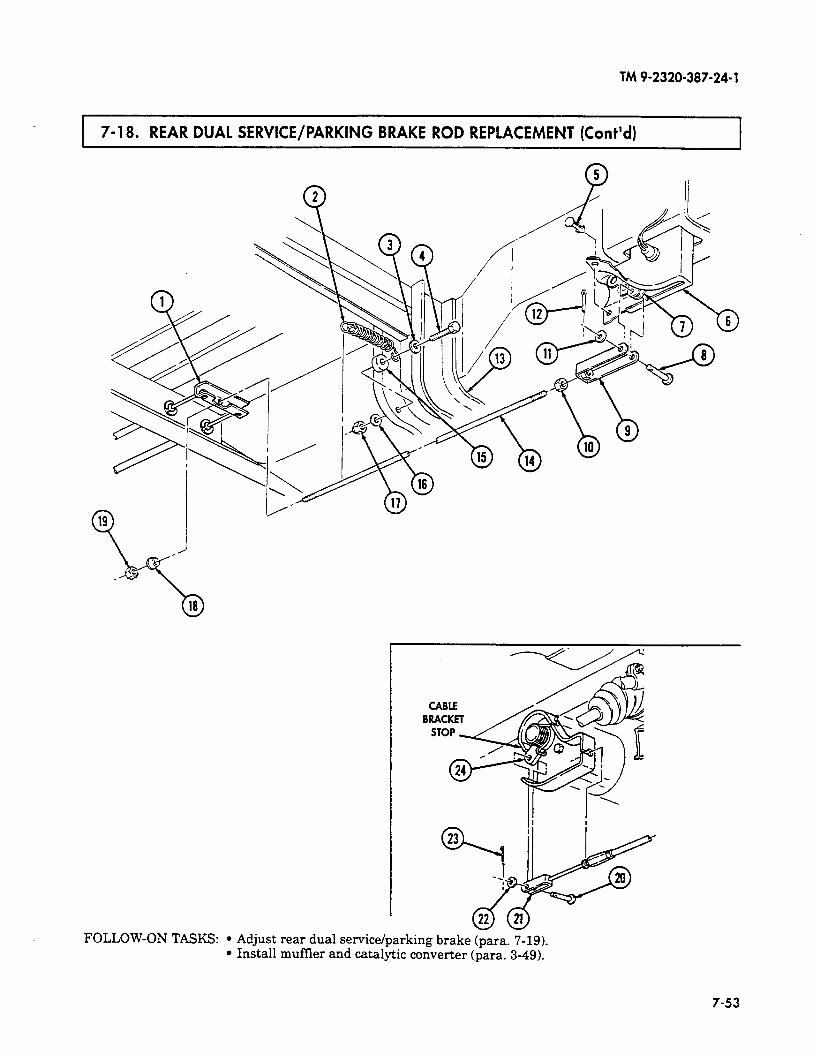
TM 9-2320-387-24-l
1 7-18. REAR DUAL SERVICE/PARKING BRAKE ROD REPLACEMENT (Cont’d) I
b 18
FOLLOW-ON TASKS: l Adjust l Install
rear dual service/parking brake (para. 7-19). muffler and catalytic converter (para. 3-49).
7-53
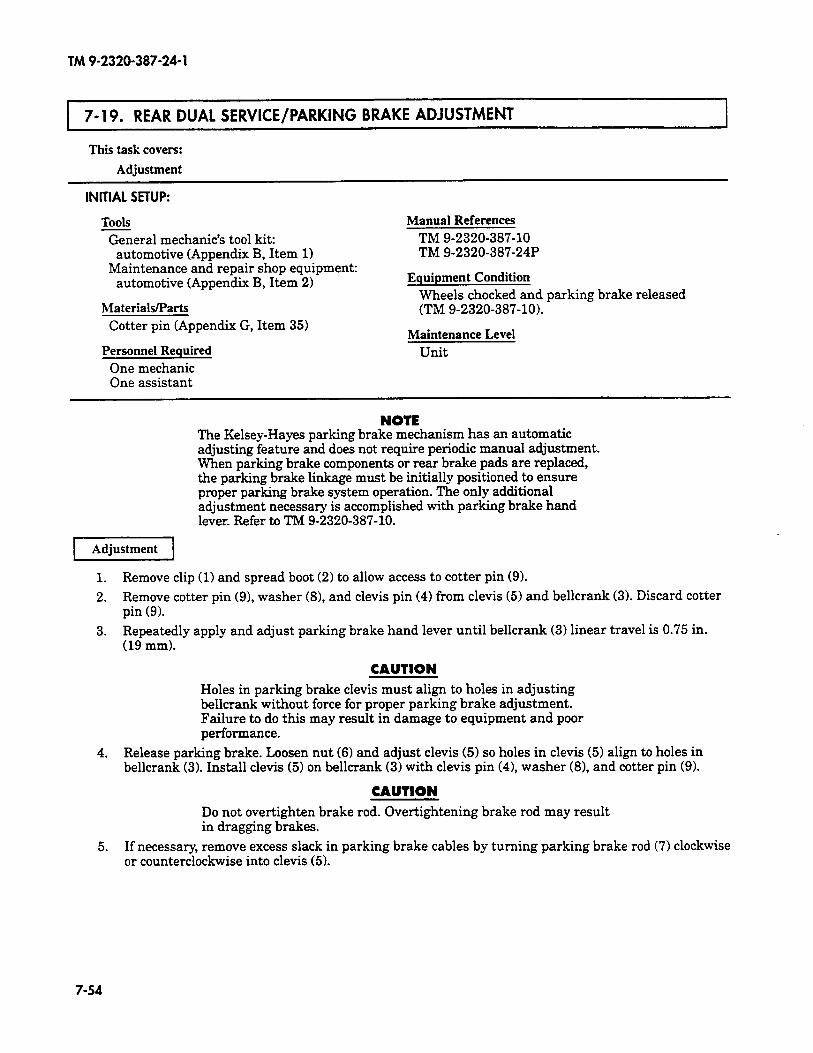
TM 9-2320-387-24-l
7-19. REAR DUAL SERVICE/PARKING BRAKE ADJUSTMENT
This task covers:
Adjustment
INITIAL SETUP:
Tools
General mechanic’s tool kit: automotive (Appendix B, Item 1)
Maintenance and repair shop equipment: automotive (Appendix B, Item 2)
Materials/Parts
Cotter pin (Appendix G, Item 35)
Personnel Required One mechanic One assistant
Manual References
TM 9-2320-387-10 TM 9-2320-387-24P
Equipment Condition Wheels chocked and parking brake released (TM 9-2320-387-101.
Maintenance Level
Unit
NOTE The Kelsey-Hayes parking brake mechanism has an automatic adjusting feature and does not require periodic manual adjustment. When parking brake components or rear brake pads are replaced, the parking brake linkage must be initially positioned to ensure proper parking brake system operation. The only additional adjustment necessary is accomplished with parking brake hand lever. Refer to TM 9-2320-387-10.
1. Remove clip (1) and spread boot (2) to allow access to cotter pin (9).
2. Remove cotter pin (91, washer (81, and clevis pin (4) from clevis (5) and bellcrank (3). Discard cotter pin (9).
3. Repeatedly apply and adjust parking brake hand lever until bellcrank (31 linear travel is 0.75 in. (19 mm).
CAUTION
Holes in parking brake clevis must align to holes in adjusting bellcrank without force for proper parking brake adjustment. Failure to do this may result in damage to equipment and poor performance.
4. Release parking brake. Loosen nut (6) and adjust clevis (5) so holes in clevis (5) align to holes in bellcrank (3). Install clevis (5) on bellcrank (3) with clevis pin (4), washer (81, and cotter pin (91.
CAUTION
Do not over-tighten brake rod. Over-tightening brake rod may result in dragging brakes.
5. If necessary, remove excess slack in parking brake cables by turning parking brake rod (7) clockwise or counterclockwise into clevis (5).
7-54
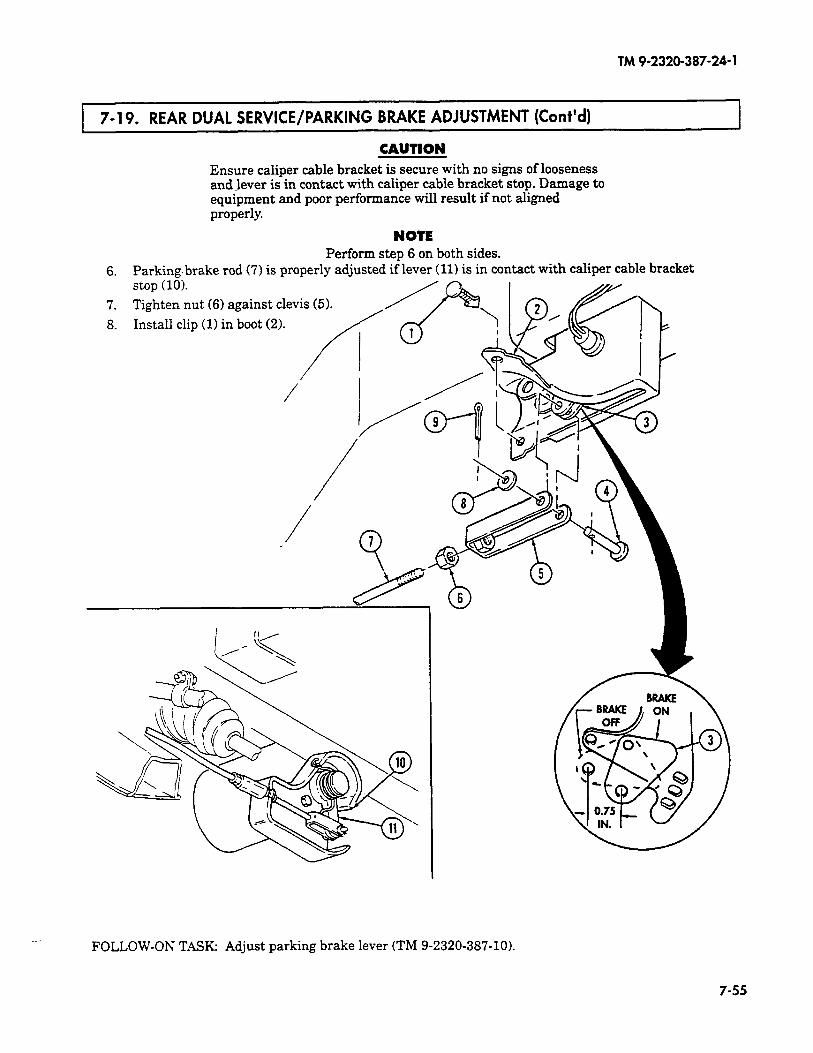
TM 9-2320-387-24-l
1 7-19. REAR DUAL SERVICE/PARKING BRAKE ADJUSTMENT (Cont’d) 1 CAUTION
Ensure caliper cable bracket is secure with no signs of looseness and lever is in contact with caliper cable bracket stop. Damage to equipment and poor performance will result if not aligned properly.
NOTE Perform step 6 on both sides.
6. Parking. brake rod (7) is properly adjusted if lever (11) is in contact with caliper cable bracket stop (10,.
7. Tighten nut (6) against clevis (51.
8. Install clip (1) in boot (2).
FOLLOW-ON TASK: Adjust parking brake lever (TM 9-2320-387-10X
7-55
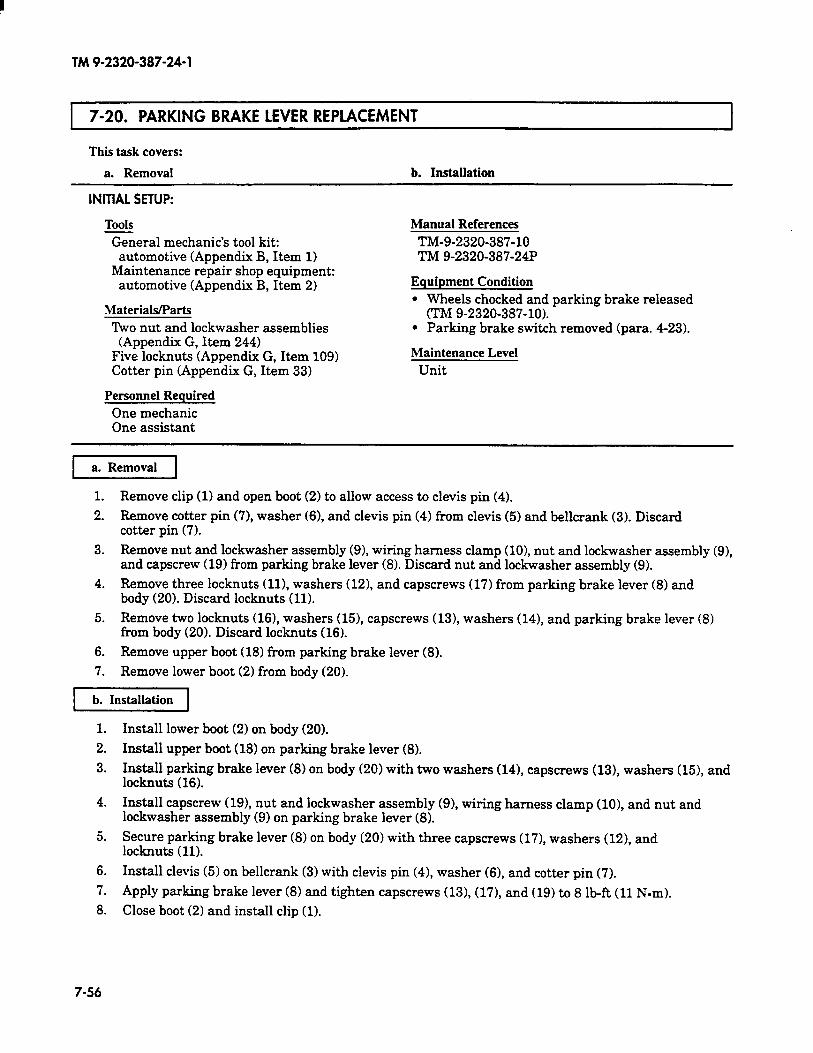
I
TM 9-2320-387-24-l
1 7-20. PARKING BRAKE LEVER REPLACEMENT 1 This task covers:
a. Removal b. Installation
INlTlAl SETUP:
Tools
General mechanic’s tool kit: automotive (Appendix B, Item 1)
Maintenance repair shop equipment: automotive (Appendix B, Item 2)
Materials/Parts
Two nut and lockwasher assemblies (Appendix G, Item 244)
Five locknuts (Appendix G, Item 109) Cotter pin (Appendix G, Item 33)
Personnel Required
One mechanic One assistant
Manual References
TM-9-2320-387-10 TM 9-2320-387-24P
Equipment Condition l Wheels chocked and parking brake released
(Tht 9-2320-387-10X l Parking brake switch removed (para. 4-23).
Maintenance Level
Unit
1. Remove clip (1) and open boot (2) to allow access to clevis pin (4).
2. Remove cotter pin (71, washer (6), and clevis pin (4) from clevis (5) and bellcrank (3). Discard cotter pin (7).
3. Remove nut and lockwasher assembly (91, wiring harness clamp (101, nut and lockwasher assembly (91, and capscrew (19) from parking brake lever (8). Discard nut and lockwasher assembly (9).
4. Remove three locknuts (ll), washers (121, and capscrews (17) from parking brake lever (8) and body (20). Discard locknuts (11).
5. Remove two locknuts (161, washers (15), capscrews (131, washers (14), and parking brake lever (8) from body (20). Discard locknuts (16).
6. Remove upper boot (18) from parking brake lever (8).
7. Remove lower boot (2) from body (20).
b. Installation
1.
2.
3.
Install lower boot (2) on body (20).
Install upper boot (18) on parking brake lever (8).
Install parking brake lever (8) on body (20) with two washers (141, capscrews (131, washers (15), and locknuts (16).
4.
5.
Install capscrew (19), nut and lockwasher assembly (9), wiring harness clamp (lo), and nut and lockwasher assembly (9) on parking brake lever (8).
Secure parking brake lever (8) on body (20) with three capscrews (17), washers (121, and locknuts (11).
6. Install clevis (5) on bellcrank (3) with clevis pin (4), washer (61, and cotter pin (7).
7. Apply parking brake lever (8) and tighten capscrews (131, (171, and (19) to 8 lb-ft (11 N-m).
8. Close boot (2) and install clip (1).
7-56
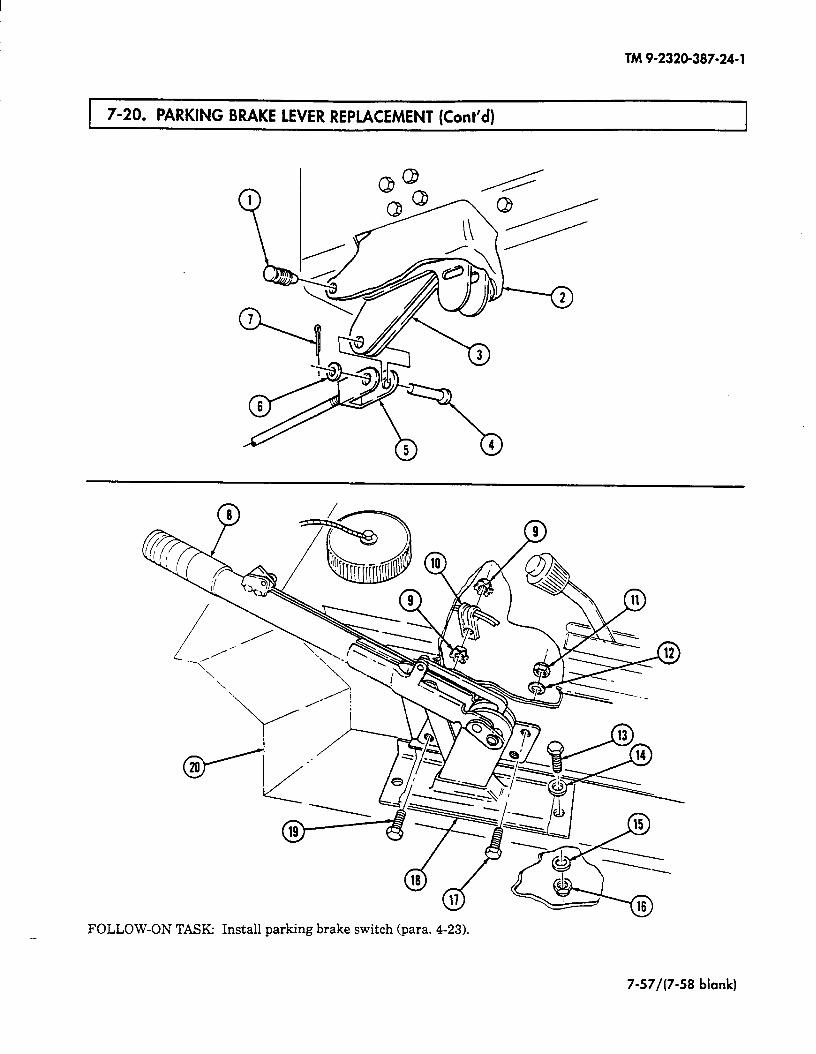
TM 9-2320-387-24-l
7-20. PARKING BRAKE LEVER REPLACEMENT (Cont’d) I
FOLLOW-ON TASK: Install parking brake switch (para. 4-23). -
7-57/(7-58 blank)
CHAPTER 8 WHEELS AND STEERING (UNIT)
TM 9-2320-387-24-l
MAINTENANCE
Section I. WHEEL AND RUNFLAT SYSTEM MAINTENANCE
1 8-1. WHEEL AND RUNFLAT SYSTEM MAINTENANCE TASK SUMMARY I 1
I TASK PARA.
PROCEDURES PAGE NO.
8-2.
8-3.
8-4.
8-5.
8-6.
8-7.
8-8.
8-9.
8-10.
Jacking Instructions
Wheel Replacement
Radial Tire, Wheel, and Rubber Runflat Maintenance
Runflat Compressor (P/N 539250) Belt Replacement
Runflat Compressor (P/N 528236) Belt Replacement
Inner Rim Stud Maintenance
Tire Balancing
Front Wheel Toe-in Alignment
Rear Wheel Toe-out Alignment
8-2
8-6
8-8
8-17
8-18
8-19
8-22
8-24
8-30
8-1
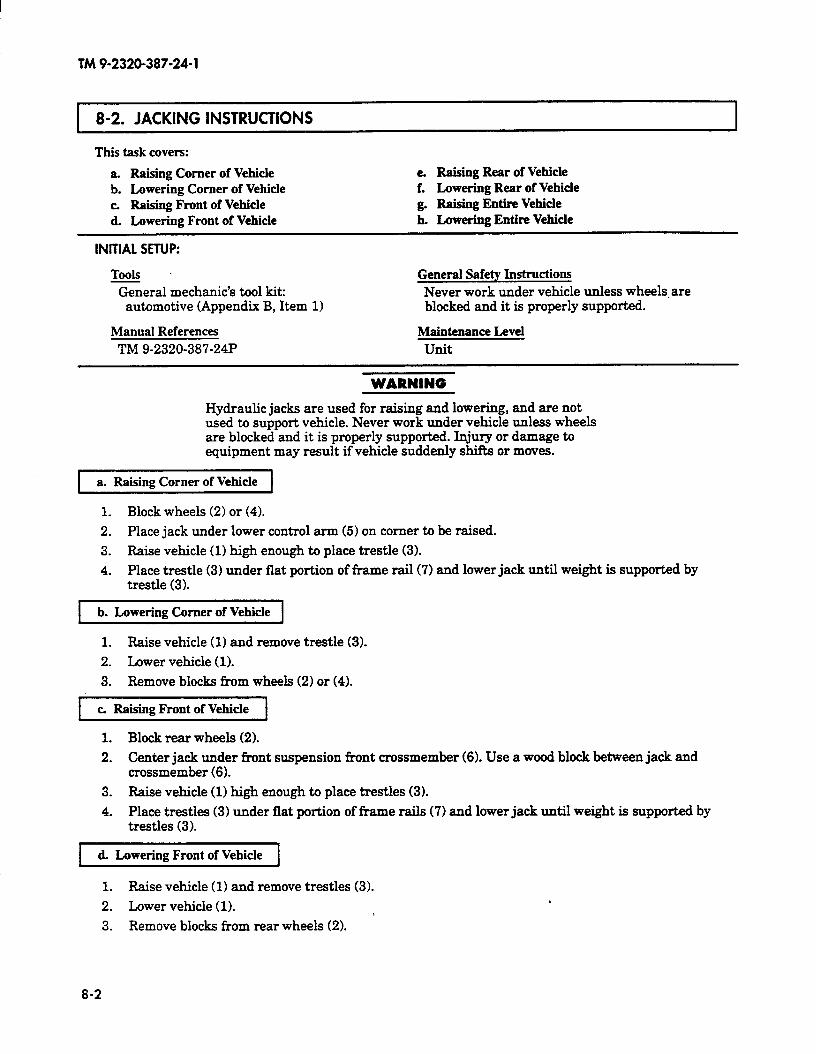
TM 9-2320-387-24-l
1 8-2. JACKING INSTRUCTIONS I
This task covers:
a. Raising Comer of Vehicle e. Raising Rear of Vehicle b. Lowering Corner of Vehicle f. Lowering Rear of Vehicle c Raising Front of Vehicle g. Raisiag Entire Vehicle d. Lowering Front of Vehicle b. Lowering Entire Vehicle
INITIAL SETUP:
Tools
General mechanic’s tool kit: automotive (Appendix B, Item 1)
Manual References
TM 9-2320-387-24P
General Safety Instructions
Never work under vehicle unless wheels. are blocked and it is properly supported.
Maintenance Level
unit
WARNING
Hydraulic jacks are used for raising and lowering, and are not used to support vehicle. Never work under vehicle unless wheels are blocked and it is properly supported. Injury or damage to equipment may result if vehicle suddenly shifts or moves.
a. Raising Corner of Vehicle
1. Block wheels (2) or (4).
2. Place jack under lower control arm (5) on comer to be raised.
3. Raise vehicle (1) high enough to place trestle (3).
4. Place trestle (3) under flat portion of frame rail (7) and lower jack until weight is supported by trestle (3).
b. Lowering Comer of Vehicle
1. Raise vehicle (1) and remove trestle (3).
2. Lower vehicle (1).
3. Remove blocks from wheels (2) or (4).
c. Raising Front of Vehicle
1. Block rear wheels (2).
2. Center jack under front suspension front crossmember (6). Use a wood block between jack and crossmember (6).
3. Raise vehicle (1) high enough to place trestles (3).
4. Place trestles (3) under flat portion of frame rails (7) and lower jack until weight is supported by trestles (3).
d Lowering Front of Vehicle
1. Raise vehicle (1) and remove trestles (3).
2. Lower vehicle (1).
’ 3. Remove blocks from rear wheels (2).
8-2
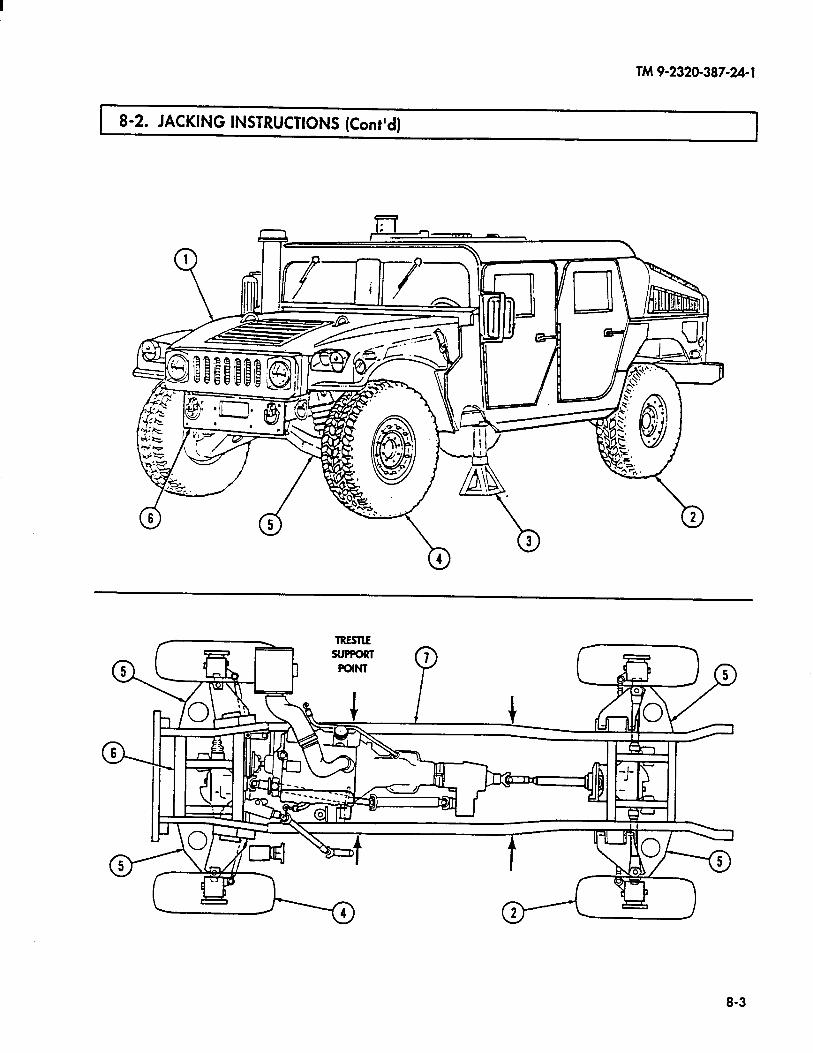
TM 9-2320-387-24-l
8-2. JACKING INSTRUCTIONS (Cont’d)
8-3
TM9-2320-387-24-l
1 8-2. JACKING INSTRUCTIONS (Cont’d)
e. Raising Rear of Vehicle
1. Block front wheels (4).
2. Center jack under rear suspension rear crossmember (6). Use a wood block between jack and crossmember (6).
3. Raise vehicle (1) high enough to place trestles (3).
4. Place trestles (3) under flat portion of frame rails (5) and lower jack until weight is supported by trestles (3).
f. Lowering Rear of Vehicle
1. Raise vehicle (1) and remove trestles (3).
2. Lower vehicle (1).
3. Remove blocks from front wheels (4).
g. Raising Entire Vehicle
1. Raise front of vehicle (task c.>.
2. Center jack under rear suspension rear crossmember (6). Use a wood block between jack and crossmember (6).
3. Raise vehicle (1) high enough to place trestles (3).
4. Place trestles (3) under flat portion of frame rails (5) and lower jack until weight is supported by trestles (3).
5. Move wheel blocks aside.
h. Lowering Entire Vehicle
1. Raise rear of vehicle (1) and remove trestles (3).
2. Lower rear of vehicle (1) and block rear wheels (2).
3. Lower front of vehicle (task d.).
8-4
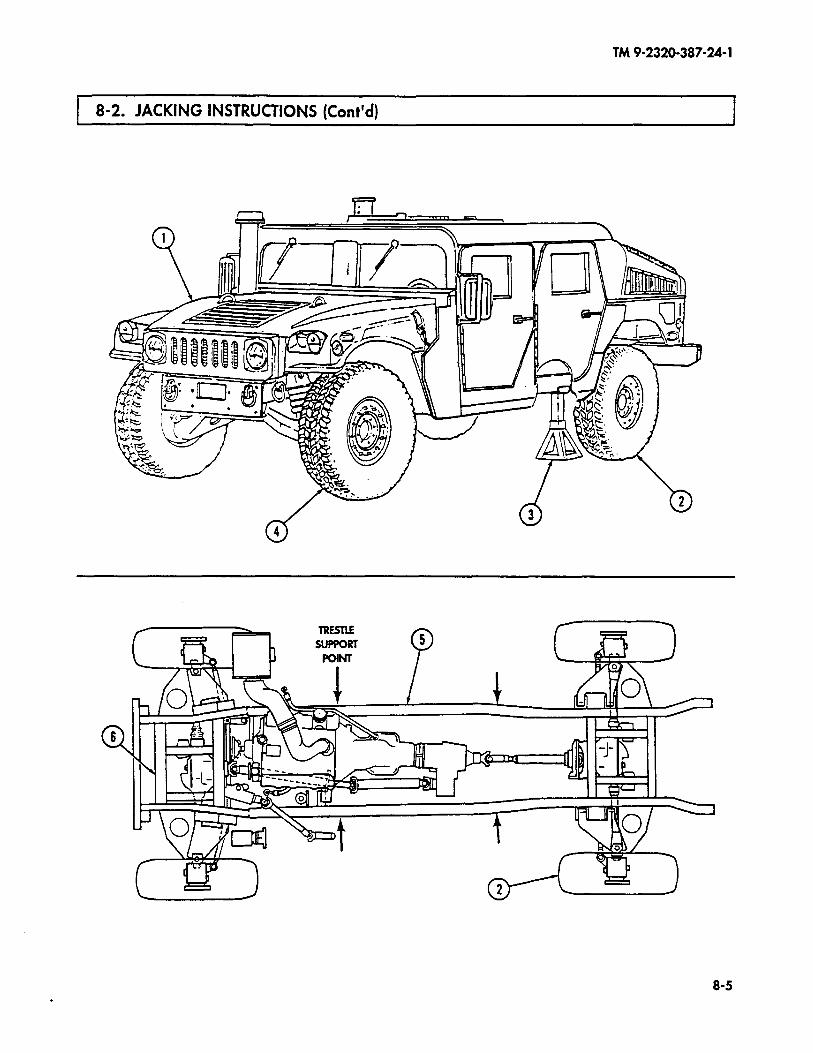
TM9-2320-387-24-l
8-2. JACKING INSTRUCTIONS (Cont’d)
8-5
.

TM 9-2320-387-24-l
1 8-3. WHEEL REPLACEMENT
This task covers:
a. Removal b. Installation
INITIAL SETUP:
Tools
General mechanic’s tool kit: automotive (Appendix B, Item 1)
Maintenance and repair shop equipment: (automotive (Appendix B, Item 2)
Manual References
TM 9-2320-387-24P
General Safety Instructions
l Always apply parking brake and chock opposite wheel before removing wheel.
l Remove only inner group of nuts when removing a wheel from vehicle.
Maintenance Level
Unit
.
.
WARNING
Always apply parking brake and chock opposite wheel before removing wheel. Avoid removing wheel when vehicle is on sloping terrain. Injury to personnel or damage to equipment may result.
Remove only inner group of nuts when removing a wheel from vehicle. Removing outer nuts which hold the rim together while the assembly is inflated could result in serious injury or death.
1 a. Removal 1
1. Loosen eight lug nuts (21, but do not remove.
2. Raise and support comer of vehicle (para. 8-2).
3. Remove eight lug nuts (2) and wheel (1) from geared hub (3).
b. Installation
NOTE Install lug nuts with fingers to full engagement. If nuts resist finger-tightening, discard nuts. Examine studs for damage and replace if damaged (para. 6-13).
The radial tire is nondirectional and can be used in either position.
1. Install wheel (1) on geared hub (3) with eight lug nuts (2).
2. Remove support and lower comer of vehicle (para. 8-2).
3. Tighten eight lug nuts (2) to 90-110 lb-f?. (122-149 Nom) in tightening sequence shown.
8-6
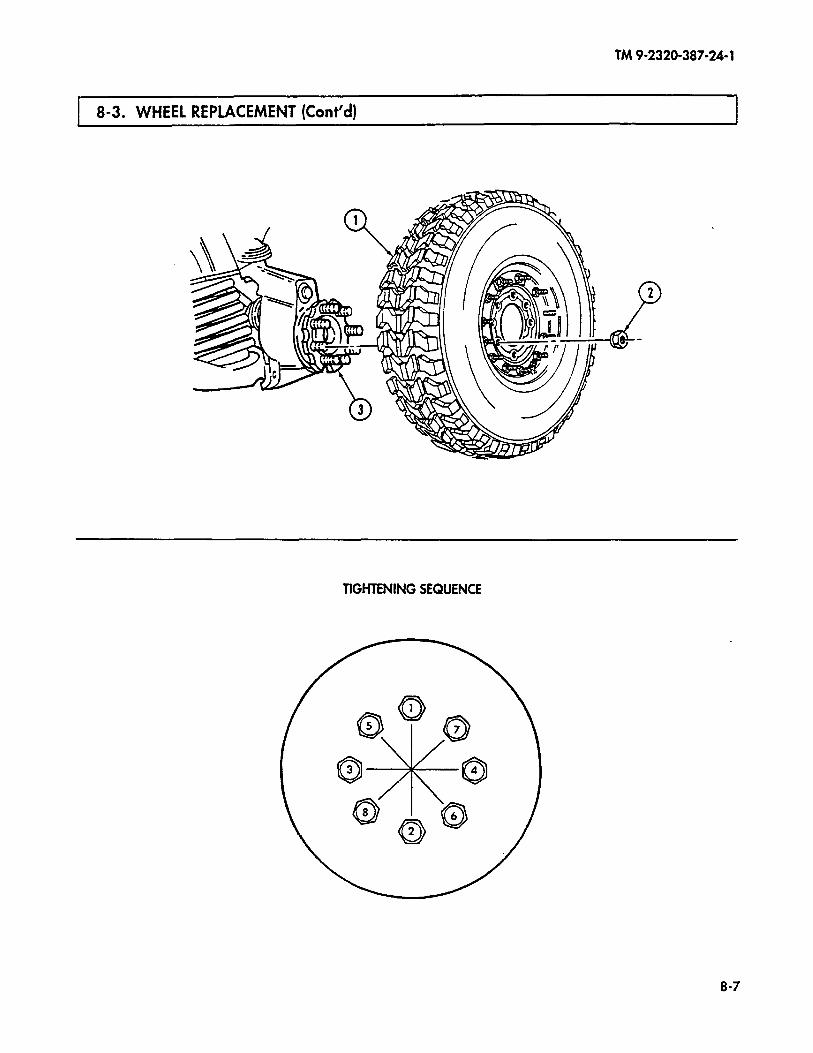
TM 9-2320-387-24-l
8-3. WHEEL REPLACEMENT (Cont’d)
TIGHTENING SEQUENCE
8-7

TM 9-2320-387-24-l
8-4. RADIAL TIRE, WHEEL, AND RUBBER RUNFLAT MAINTENANCE
This task covers:
a. Disassembly b. Inspection and Cleaning
c. Repair d. Assembly
INITIAL SETUP:
Tools General mechanic’s tool kit:
automotive (Appendix B, Item 1) Maintenance and repair shop equipment:
automotive (Appendix B, It&n‘2) -
Equipment Condition Wheel removed (par-a. 8-3).
General Safety instructions Do not use tire machine. Ensure tire is totally deflated before removing wheel locknuts. Never use tubes in wheel assemblies. Rim surfaces must be kept clean and free of rust and dirt. Never use wheel assemblies with damaged studs. Never inflate a wheel assembly with the wheel locknuts removed. Never inflate a wheel assembly without first checking wheel locknut torques. Do not exceed recommended tire inflation pressure. Always use a tire inflation cage and a clip-on air chuck for tire inflation. Ensure runflat compressor strap is centered around runflat.
Special Tools Runflat compressor (Appendix B, Item 115) Torque adapter, 9/16-in. (Appendix B, Item 133) Socket adapter (Appendix B, Item 135)
Materials/Parts Twelve locknuts (Appendix G, Item 119) O-ring seal (Appendix G, Item 2881 Locknut (Appendix G, Item 122) Insert O-ring (Appendix G, Item 292) Lubricant (Appendix G, Item 241) Detergent (Appendix C, Item 25) Sealing compound, if required
(Appendix C, Item 61)
Manual References TM 9-2320-387-10 TM 9-2610-200- 14 TM 9-2320-387-24P Maintenance Level
unit
.
. Never install radial tire on eight-bolt wheel.
.
.
pTzG&-l
WARNING
Do not use tire machine. Injury to personnel or damage to equipment may result.
In all disassembly operations, ensure the tire is totally deflated before removing wheel locknuts. Failure to follow proper safety precautions could cause serious injury or death.
1. Remove valve core (7) from insert (8) and deflate tire (6).
2. Use a circular pattern and loosen twelve wheel locknuts (2) securing rim halves (1) and (5) together. If you hear escaping air, do not proceed. Wait until sound stops. When tire (6) is fully deflated, remove wheel locknuts (2). Discard locknuts (2).
8-8
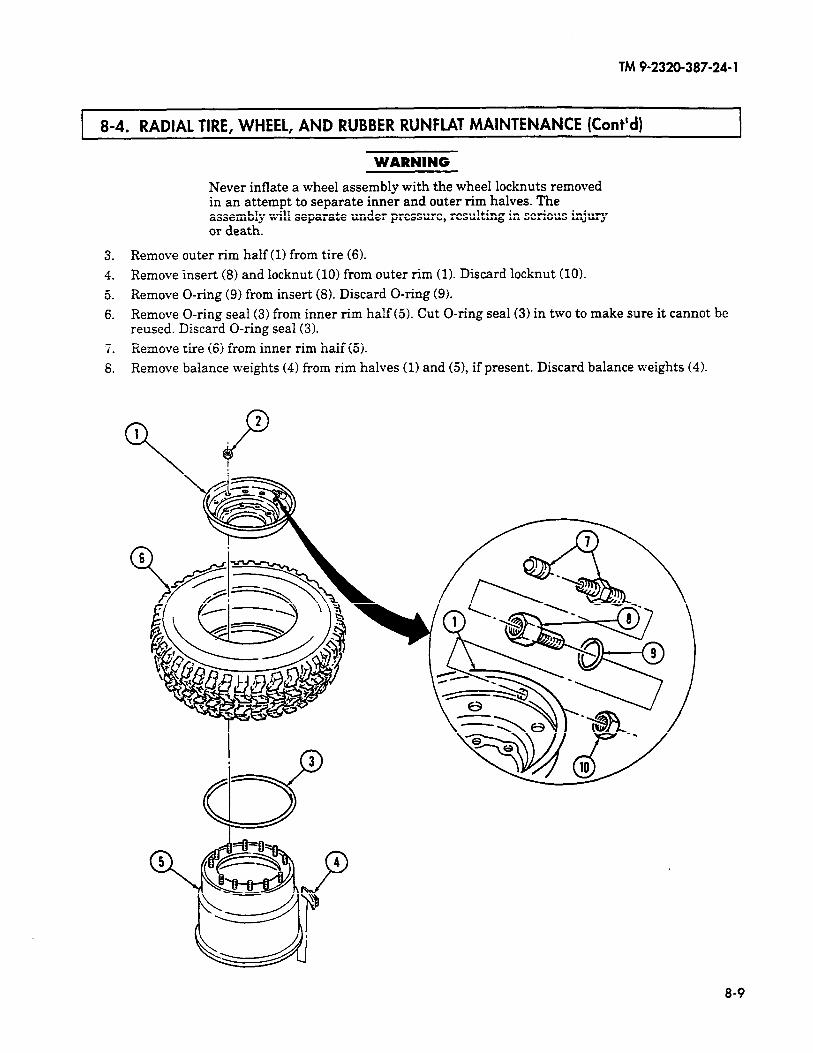
TM 9-2320-387-24- 1
8-4. RADIAL TIRE, WHEEL, AND RUBBER RUNFLAT MAINTENANCE (Cont’d)
WARNING
Never inflate a wheel assembly with the wheel locknuts removed in an attempt to separate inner and outer rim halves. The assembly will separate under pressure, resulting in serious injury or death.
3. Remove outer rim half (1) from tire (6).
4. Remove insert (8) and locknut (10) from outer rim (1). Discard locknut (10).
5. Remove O-ring (9) from insert (8). Discard O-ring (9).
6. Remove O-ring seal (3) from inner rim half (5). Cut O-ring seal (3) in two to make sure it cannot be reused. Discard O-ring seal (3).
7. Remove tire (6) from inner rim half (5).
8. Remove balance weights (4) from rim halves (1) and (51, if present. Discard balance weights (4).
8-9
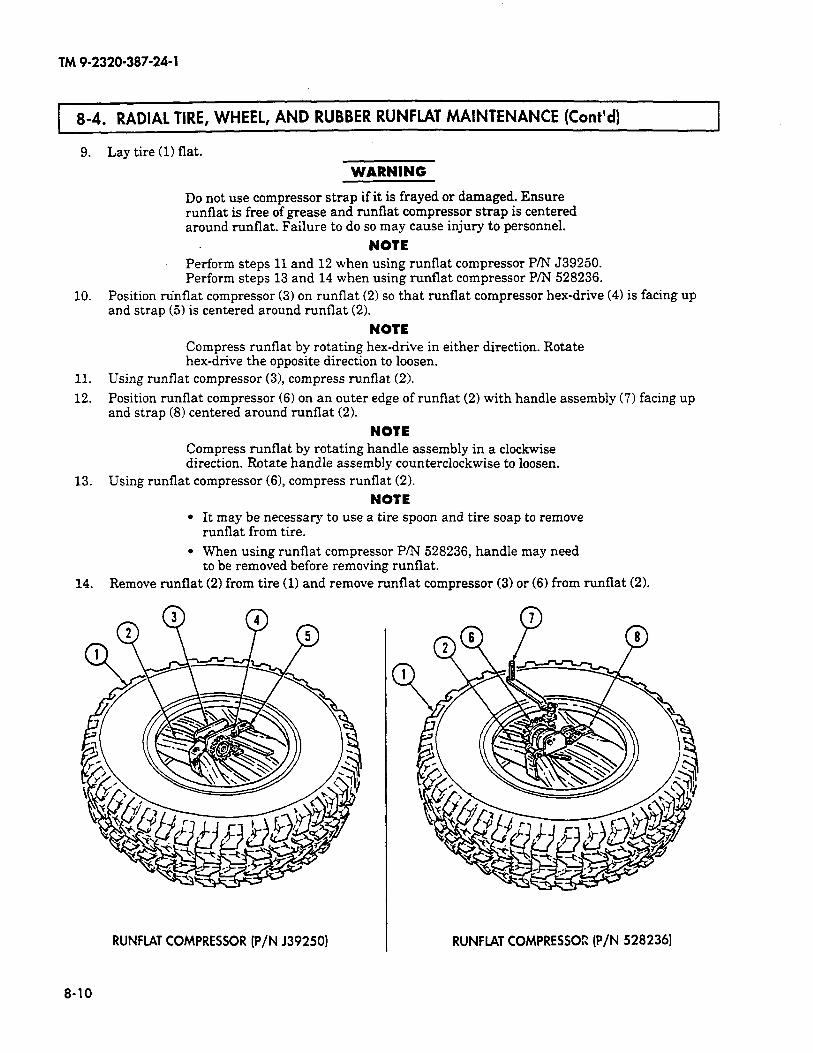
TM 9-2320-387-24-l
8-4. RADIAL TIRE, WHEEL, AND RUBBER RUNFLAT MAINTENANCE (Cont’d)
9. Lay tire (1) flat.
WARNING
Do not use compressor strap if it is frayed or damaged. Ensure runflat is free of grease and runflat compressor strap is centered around runflat. Failure to do so may cause injury to personnel.
NOTE Perform steps 11 and 12 when using runflat compressor P/N 539250. Perform steps 13 and 14 when using runflat compressor P/N 528236.
10. Position runflat compressor (3) on runflat (2) so that runflat compressor hex-drive (4) is facing up and strap (5) is centered around runflat (2).
NOTE Compress runflat by rotating hex-drive in either direction. Rotate hex-drive the opposite direction to loosen.
11. Using runflat compressor (3), compress runflat (2).
12. Position runflat compressor (6) on an outer edge of runflat (2) with handle assembly (7) facing up and strap (8) centered around runflat (2).
NOTE Compress runflat by rotating handle assembly in a clockwise direction. Rotate handle assembly counterclockwise to loosen.
13. Using runflat compressor (61, compress runflat (2).
NOTE l It may be necessary to use a tire spoon and tire soap to remove
runflat from tire.
l When using runflat compressor P/N 528236, handle may need to be removed before removing runflat.
14. Remove runflat (2) from tire (1) and remove runflat compressor (3) or (6) from runflat (2).
RUNFLAT COMPRESSOR (P/N 139250) RUNFIAT COMPRESSO:: (P/N 528236)
8-10
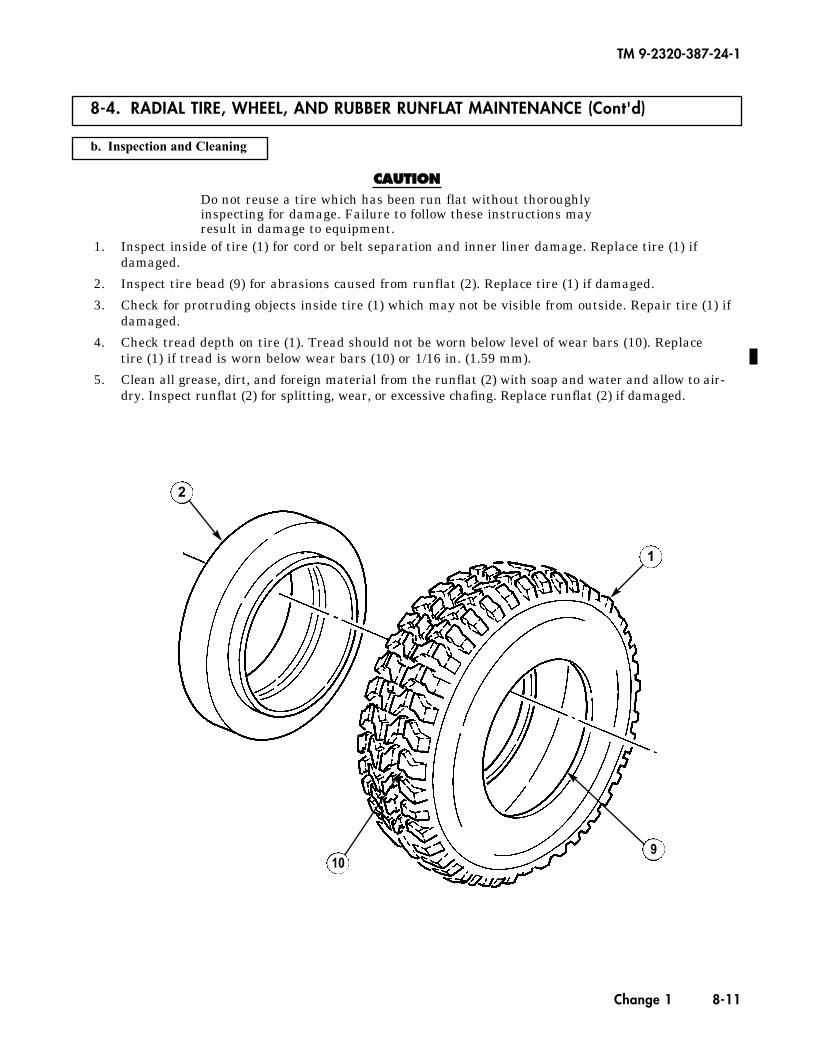
8-4. RADIAL TIRE, WHEEL, AND RUBBER RUNFLAT MAINTENANCE (Cont'd)
b. Inspection and Cleaning
CCAAUUTTIIOONNDo not reuse a tire which has been run flat without thoroughlyinspecting for damage. Failure to follow these instructions mayresult in damage to equipment.
1. Inspect inside of tire (1) for cord or belt separation and inner liner damage. Replace tire (1) ifdamaged.
2. Inspect tire bead (9) for abrasions caused from runflat (2). Replace tire (1) if damaged.
3. Check for protruding objects inside tire (1) which may not be visible from outside. Repair tire (1) ifdamaged.
4. Check tread depth on tire (1). Tread should not be worn below level of wear bars (10). Replacetire (1) if tread is worn below wear bars (10) or 1/16 in. (1.59 mm).
5. Clean all grease, dirt, and foreign material from the runflat (2) with soap and water and allow to air-dry. Inspect runflat (2) for splitting, wear, or excessive chafing. Replace runflat (2) if damaged.
TM 9-2320-387-24-1
Change 1 8-11
2
109
1

TM 9-2320-387-24-l .
8-4. RADIAL TIRE, WHEEL, AND RUBBER RUNFIAT MAINTENANCE (Cont’d)
WARNING
O-ring sealing surfaces and pressure relief grooves must be kept clean and free of rust and dirt. Failure to do so may cause the yrhFAsembly to separate under pressure, causing serious injury
.
6. Using wire brush, clean studs (4). Clean all dirt and foreign material from rim halves (1) and (2) with soap and water and allow to air-dry. Ensure O-ring sealing surfaces (5) and pressure relief grooves (3) on rim halves (1) and (2) are smooth and clean.
‘7. Inspect rim halves (1) and (2) for cracks, bent sealing surfaces (51, or oversized mounting holes. Replace rim halves (1) or (2) if cracked, bent, or if mounting holes are oversized.
WARNING
Never use wheel assemblies with studs which are damaged, loose, or have damaged threads. Damaged studs can cause improper assembly, which may cause individual fasteners to fail. Any of these situations may cause serious injury or death.
8. Inspect inner rim half (2) for cracked, broken, rusted, pitted, bent, or loose studs (4) and studs (4) with damaged, mutilated, or deformed threads. Replace studs (4) (pax-a. 8-7) if damaged, loose, or threads are damaged.
9. Inspect insert (6) for damage. Replace insert (6) if damaged.
IcRepair
Refer to TM 9-2610-200-14 for maintenance and repair of ti,res.
8-12
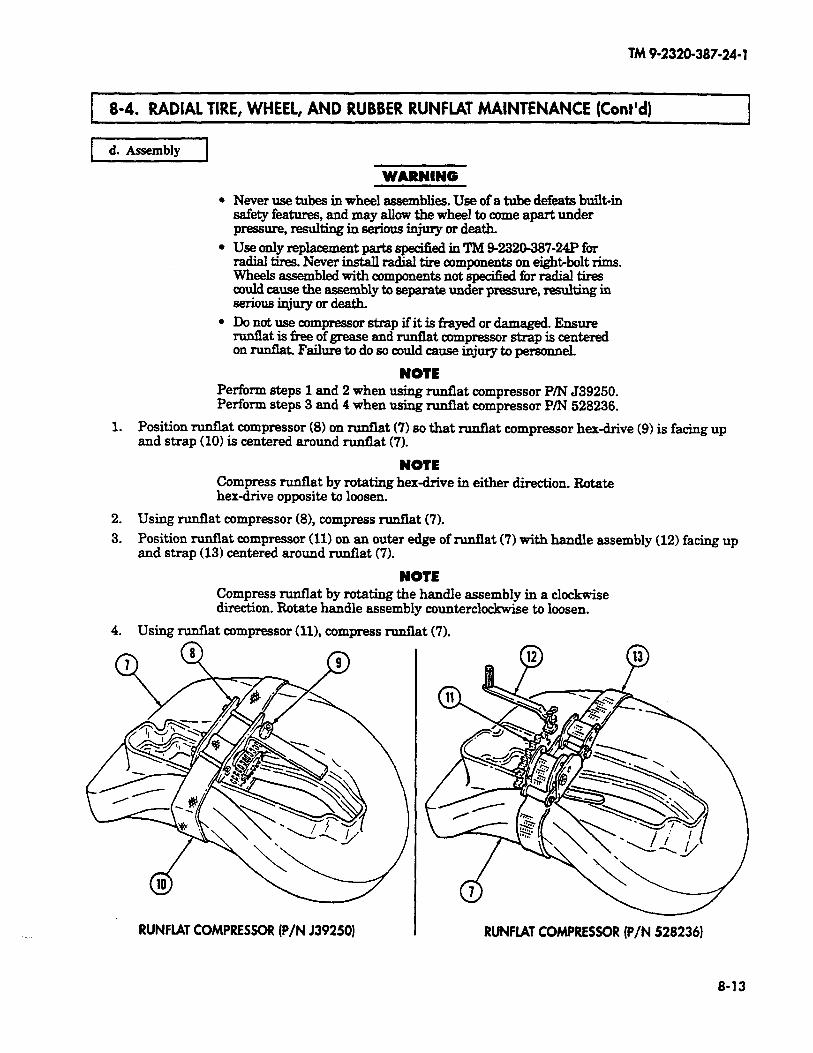
TM 9-2320-387-24-l
8-4. RADIAL TIRE, WHEEL, AND RUBBER RUNFLAT MAINTENANCE (Cont’d)
f--zxzq
WARNING
I
l Never use tubes in wheel assemblies. Use of a tube defeats built&~ safety features, and may allow the wheel to come apart under pressure, resulting iu serious injury or death.
l Use only replacement parts specifred in TM 92320-387~24P for radial tires. Never install radial tire components on eight< rims. Wheels assembled with components not specSed for radial tires could cause the assembly to separate under pressure, resulting in serious injury or death.
l Do not use compressor strap ifit is f?ayed or damaged. Ensure nmflat is ikee of grease and runflat compressor strap is centered on run&k Failure to do so could cause injury to personneL
NOTE Perform steps 1 and 2 when using nmtlat compressor P/N 539250. Perform steps 3 and 4 when using runflat compressor P/N 528236.
1. Position runflat compressor (8) on runflat (7) so that runflat compressor hex-drive (9) is facing up and strap (10) is centered around runflat (7).
NOTE Compress nmflat by rotating hex-drive in either direction. Rotate hex-drive opposite to loosen.
2. Using runflat compressor (81, compress nmflat (7).
3. Position runflat compressor (11) on an outer edge of runflat (7) with handle assembly (12) facing up and strap (13) centered around runflat (7).
NOTE Compress runflat by rotating the handle assembly in a clockwise direction. Rotate handle assembly counterclockwise to loosen.
4. Using nmflat compressor (111, compress nmflat (7).
RUNFLAT COMPRESSOR (P/N J39250) I RUNFLAT COMPRESSOR (P/N 528236)
8-13
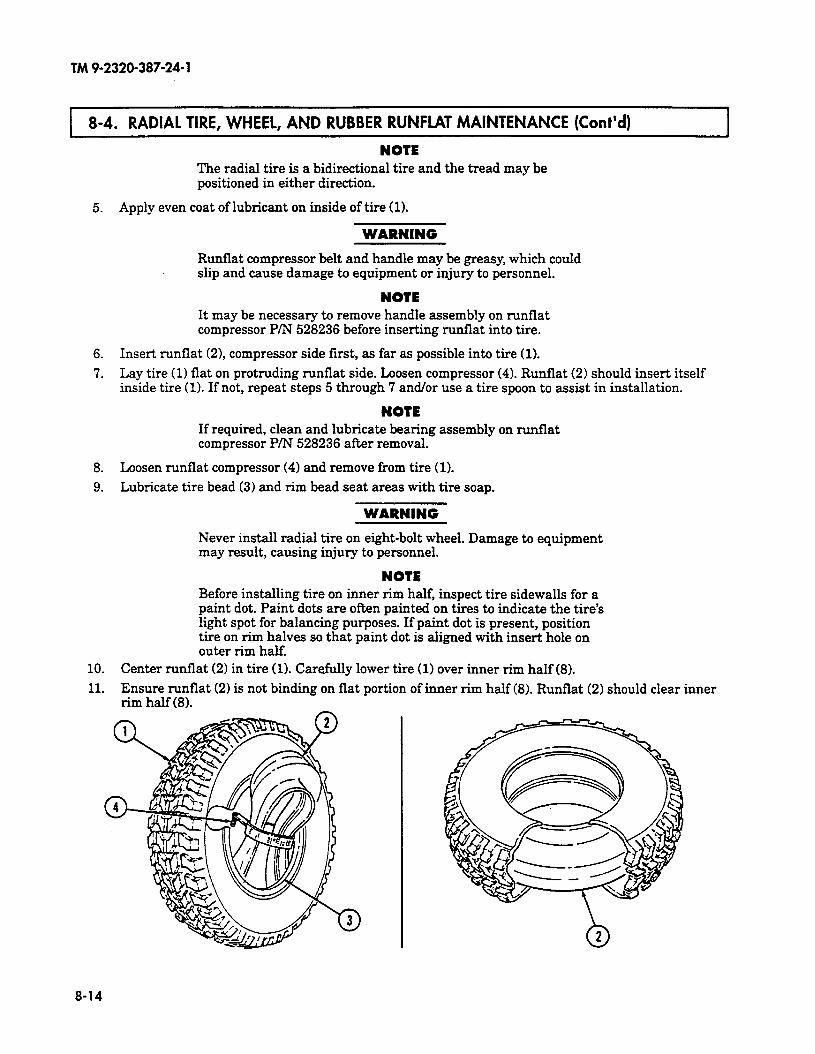
TM9-2320-387-24-l
I 8-4. RADIAL TIRE, WHEEL, AND RUBBER RUNFLAT MAINTENANCE (Co&d) I
NOTE The radial tire is a bidirectional tire and the tread may be positioned in either direction.
5. Apply even coat of lubricant on inside of tire (1).
WARNING
Runflat compressor belt and handle may be greasy, which could slip and cause damage to equipment or injury to personnel.
NOTE It may be necessary to remove handle assembly on runflat compressor P/N 528236 before inserting runflat into tire.
6. Insert runflat (21, compressor side first, as far as possible into tire (1).
7. Lay tire (1) flat on protruding runflat side. Loosen compressor (4). Runflat (2) should insert itself inside tire (1). If not, repeat steps 5 through 7 and/or use a tire spoon to assist in installation.
NOTE If required, clean and lubricate bearing assembly on runflat compressor P/N 528236 after removal.
8. Loosen runflat compressor (4) and remove from tire (1).
9. Lubricate tire bead (3) and rim bead seat areas with tire soap.
WARNING
Never install radial tire on eight-bolt wheel. Damage to equipment may result, causing injury to personnel.
Before installing tire on inner rim half, inspect tire sidewalls for a paint dot. Paint dots are often painted on tires to indicate the tire’s light spot for balancing purposes. If paint dot is present, position tire on rim halves so that paint dot is aligned with insert hole on outer rim half.
10. Center runflat (2) in tire (1). Carefully lower tire (1) over inner rim half (8).
11 1 of inner rim half (8). Runflat (2) should clear inner
8-14
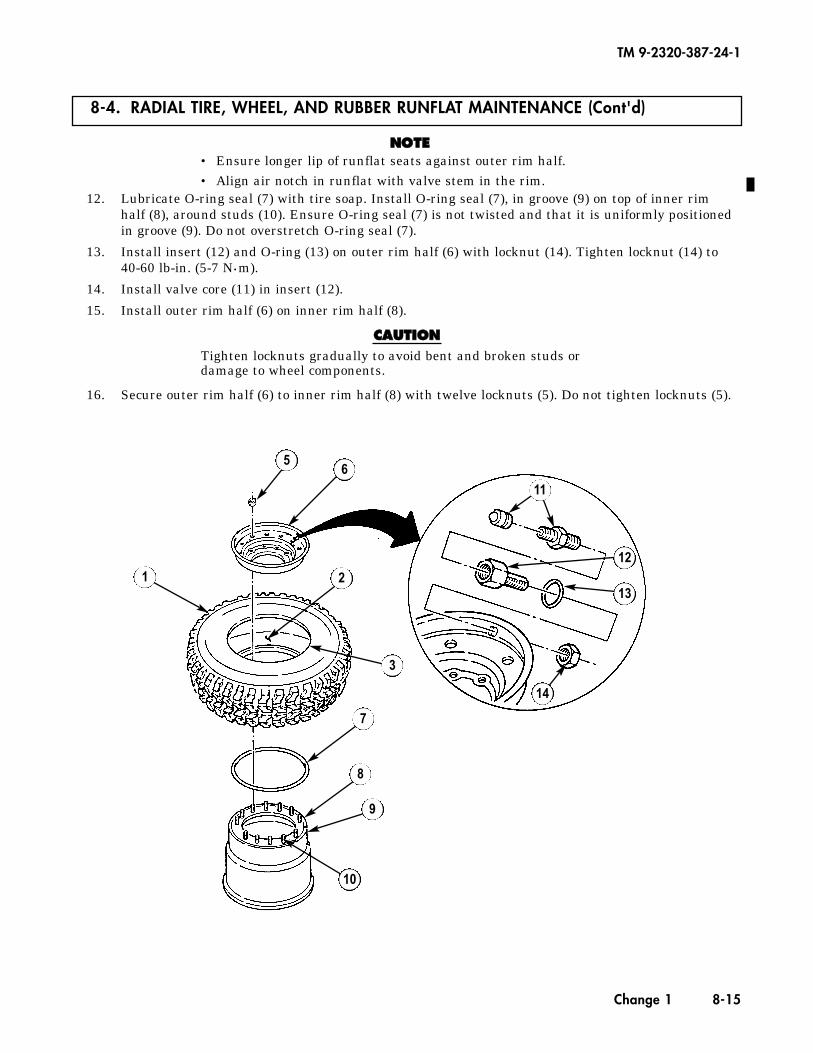
8-4. RADIAL TIRE, WHEEL, AND RUBBER RUNFLAT MAINTENANCE (Cont'd)
NNOOTTEE• Ensure longer lip of runflat seats against outer rim half.• Align air notch in runflat with valve stem in the rim.
12. Lubricate O-ring seal (7) with tire soap. Install O-ring seal (7), in groove (9) on top of inner rim half (8), around studs (10). Ensure O-ring seal (7) is not twisted and that it is uniformly positionedin groove (9). Do not overstretch O-ring seal (7).
13. Install insert (12) and O-ring (13) on outer rim half (6) with locknut (14). Tighten locknut (14) to 40-60 lb-in. (5-7 N•m).
14. Install valve core (11) in insert (12).
15. Install outer rim half (6) on inner rim half (8).
CCAAUUTTIIOONNTighten locknuts gradually to avoid bent and broken studs ordamage to wheel components.
16. Secure outer rim half (6) to inner rim half (8) with twelve locknuts (5). Do not tighten locknuts (5).
TM 9-2320-387-24-1
Change 1 8-15
56
12
13
14
11
1 2
3
7
8
9
10
TM 9-2320-387-24-l
1 8-4. RADIAL TIRE, WHEEL, AND RUBBER RUNFLAT MAINTENANCE (Cont’d) 1
17. Tighten locknuts (1) to 85 lb-ft (115 Nom) in tightening sequence shown.
18. Tighten locknuts (1) to 125 lb& (170 N-m) in tightening sequence shown.
19. Check wheel assembly (41 for gaps at each stud (21. Use a 0.0015 in. (0.038 mm) thickness gauge to detect gaps. If gaps are detected, disassemble and reassemble wheel assembly 4) and recheck for gaps. If gaps are still detected, replace outer rim half (3).
WARNING
l Always use a tire inflation cage for inflation purposes. Stand on one side of the cage during inflation; never directly in front. Keep hands out of cage during inflation. Inflate assembly to recommended pressure using a clip-on air chuck. Do not exceed 50 psi (345 kPa) cold-inflation pressure. Failure to follow these instructions may result in serious injury or death.
l Never inflate a wheel assembly without having checked wheel locknut torques to ensure the wheel locknuts are tightened to specifications. An assembly with improperly tightened locknuts could separate under pressure, resulting in serious injury or death.
20. Place wheel assembly (41 in safety cage and inflate tire to recommended tire pressure (TM 9-2320-387-10).
TIGHTENING SEQUENCE
FOLLOW-ON TASK Balance tire (para. 8-8).
8-16
TM 9-2320-387-24-l
8-5. RUNFLAT COMPRESSOR (P/N J39250) BELT REPLACEMENT
This task covers:
a. Removal b. Installation
INITIAL SETUP:
Tools
%&al mechanic’s tool kit: automotive (Appendix B, Item 1)
Materials/P&s Runflat belt repair kit
(Appendix G, Item 364)
Manual References
TM 9-2320-387-24P
Maintenance Level Unit
p?iizi-l NOTE
Note position of belt for installation.
1. Remove small pin (8) from belt (4) and worm gear shaft assembly (1). Discard small pin (8).
2. Remove shaft pin (7) and worm gear shaft assembly (1) from compressor assembly (6). Discard shaft pin (7).
3. Remove two locknuts (51, socket-head screws (21, spacers (31, and belt (4) from compressor assembly (6). Discard locknuts (51.
I- b. Installation 1
NOTE Belt overlap is to be positioned so there is an equal amount of belt on each side of worm gear shaft assembly.
1. Install belt (4) on compressor assembly (6) with two spacers (3), socket-head screws (2), and locknuts 6).
2. Install worm gear shaft assembly (1) on compressor assembly (6) with shaft pin (7).
3. Install belt (4) to worm gear shaft assembly (1) with small pin (8).
8-17
TM 9-2320-387-24-l
1 8-6. RUNFIAT COMPRESSOR (P/N 528236) BELT REPLACEMENT
This task covers:
a. Removal b. Installation
INITIAL SETUP:
Tools
General mechanic’s tool kit: Manual References
TM 9-2320-387-24P automotive (Appendix B, Item 1)
hlaterials/Parts Runflat belt repair kit
(Appendix G, Item 365)
Maintenance Level
Unit
NOTE Note position of belt for installation.
Remove locknut (11, capscrew (21, and belt (31 from compressor (4). Discard locknut (1).
1 b. Installation 1
1. Install belt (3) on compressor (41 with capscrew (2) and locknut (1).
2. Loop free end of belt (3) around retaining bracket (5) as shown.
TM 9-2320-387-24-l
8-7. INNER RIM STUD MAINTENANCE 1 This task covers:
a. Removal b. Cleaning and Inspection
c. Installation
INITIAL SETUP:
TOOIS
General mechanic’s tool kit: automotiLe (Appendix B, Item 1)
Manual References
TM 9-2320-387-10 TM 9-2320-387-24P
Equipment Condition Wheel removed (para. 8-3).
General Safety Instructions
l Always wear eye protection when replacing wheel studs.
General Safety Instructions (Cont’d)
l Ensure tire is totally deflated before removing wheel locknuts.
l Never use wheel assemblies with damaged studs. l Never inflate a wheel assembly without first
checking wheel locknut torques. l Always use a tire inflation cage and a clip-on air
chuck for tire inflation.
Maintenance Level
Unit
WARNING
Always wear eye protection when replacing wheel studs. Severe eye injury may result if metal chips co&act eyes.
(1
NOTE Perform steps 1 through 4 for stud removal without disassembly of wheel. Perform steps 5 and 6 for stud removal with disassembled wheel.
1. Place wheel assembly in tire inflation cage.
WARNING In all assembly operations, ensure the tire is totally deflated before removing wheel locknuts. Failure to follow proper safety precautions may result in serious injury or death.
2. Remove valve core (3) from valve bore (4) and deflate tire (1). Run a wire through valve bore (4) to ensure it is not plugged.
3. When tire (1) is fully deflated, loosen wheel locknut (2) from each side of the broken stud(s) (5). If you hear escaping air, do not proceed. Wait until the sound stops and recheck valve bore (4). When you are certain tire is fully deflated, proceed to remove wheel locknut (2). Discard locknut (2).
8-19
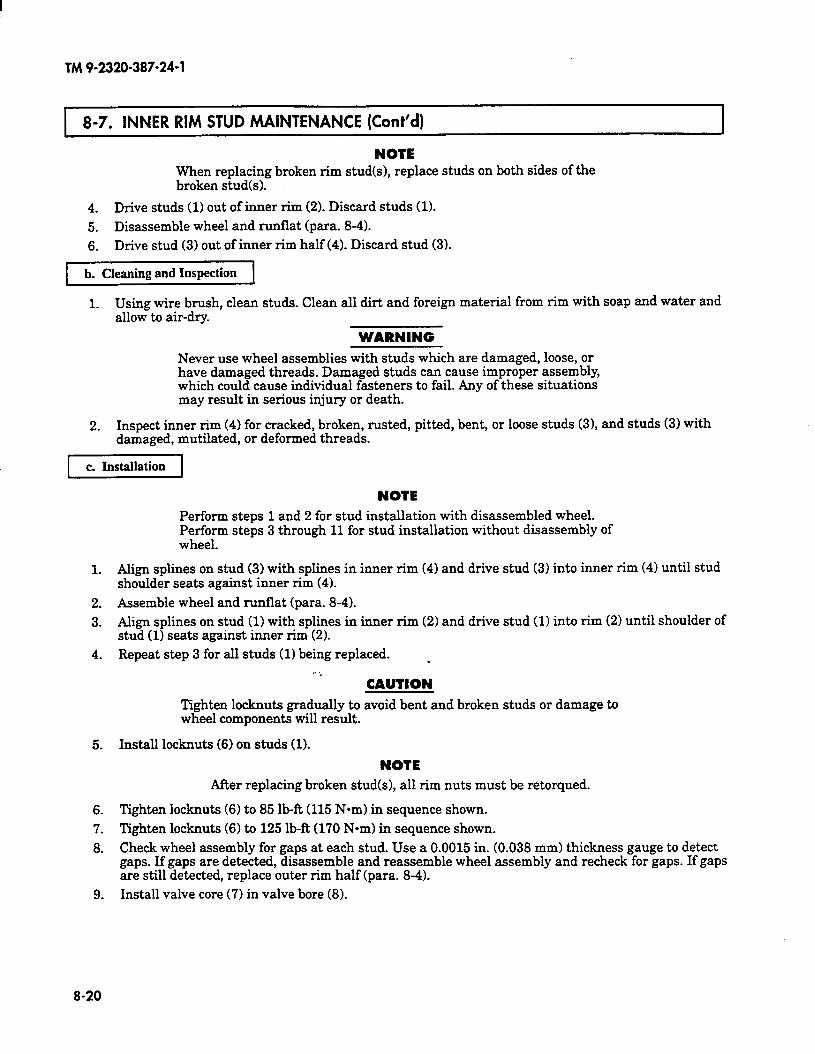
TM 9-2320-387-24-l
1 8-7. INNER RIM STUD MAINTENANCE (Cont’d)
NOTE When replacing broken rim stud(s), replace studs on both sides of the broken stud(s).
4. Drive studs (1) out of inner rim (2). Discard studs (1).
5. Disassemble wheel and runflat (para. 8-4).
6. Drive stud (3) out of inner rim half (4). Discard stud (31.
b. Cleaning and Inspection
1. Using wire brush, clean studs. Clean all dirt and foreign material from rim with soap and water and allow to air-dry.
WARNING
Never use wheel assemblies with studs which are damaged, loose, or have damaged threads. Damaged studs can cause improper assembly, which could cause individual fasteners to fail. Any of these situations may result in serious injury or death.
2. Inspect inner rim (4) for cracked, broken, rusted, pitted, bent, or loose studs (31, and studs (3) with damaged, mutilated, or deformed threads.
NOTE Perform steps 1 and 2 for stud installation with disassembled wheel. Perform steps 3 through 11 for stud installation without disassembly of wheel.
1. Align splines on stud (3) with splines in inner rim (4) and drive stud (3) into inner rim (4) until stud shoulder seats against inner rim (4).
2. Assemble wheel and runflat (para. 8-4).
3. Align splines on stud (1) with splines in inner rim (2) and drive stud (1) into rim (2) until shoulder of stud (1) seats against inner rim (2).
4. Repeat step 3 for all studs (1) being replaced. . - ;
CAUTION Tighten locknuts gradually to avoid bent and broken studs or damage to wheel components will result.
5. Install locknuts (6) on studs (11.
NOTE After replacing broken stud(s), all rim nuts must be retorqued.
6. Tighten locknuts (6) to 85 lb-R (115 Nom) in sequence shown.
7. Tighten locknuts (6) to 125 lb-R (170 N-m) in sequence shown.
8. Check wheel assembly for gaps at each stud. Use a 0.0015 in. (0.038 mm) thickness gauge to detect gaps. If gaps are detected, disassemble and reassemble wheel assembly and recheck for gaps. If gaps are still detected, replace outer rim half (para. 8-4).
9. Install valve core (7) in valve bore (8).
8-20
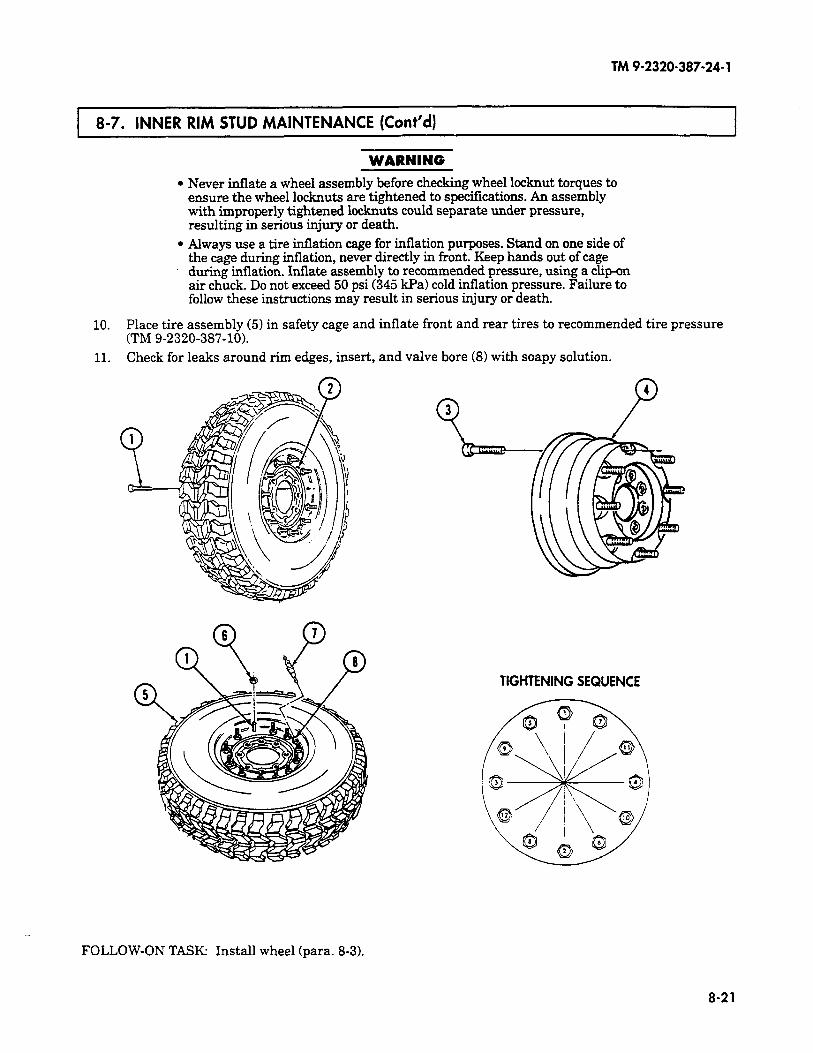
TM 9-2320-387-24-l
8-7. INNER RIM STUD MAINTENANCE (Cont’d)
WARNING l Never inflate a wheel assembly before checking wheel locknut torques to
ensure the wheel locknuts are tightened to specifications. An assembly with improperly tightened locknuts could separate under pressure, resulting in serious injury or death.
l Always use a tire inflation cage for inflation purposes. Stand on one side of the cage during inflation, never directly in front. Keep hands out of cage during inflation. Inflate assembly to recommended pressure, using a clip-on air chuck. Do not exceed 50 psi (345 kPa) cold inflation pressure. Failure to follow these instructions may result in serious injury or death.
10. Place tire assembly (5) in safety cage and inflate front and rear tires to recommended tire pressure (TM 9-2320-387-10).
11. Check for leaks around rim edges, insert, and valve bore (8) with soapy solution.
TIGHTENING SEQUENCE
FOLLOW-ON TASK: Install wheel (para. 8-3).
8-21
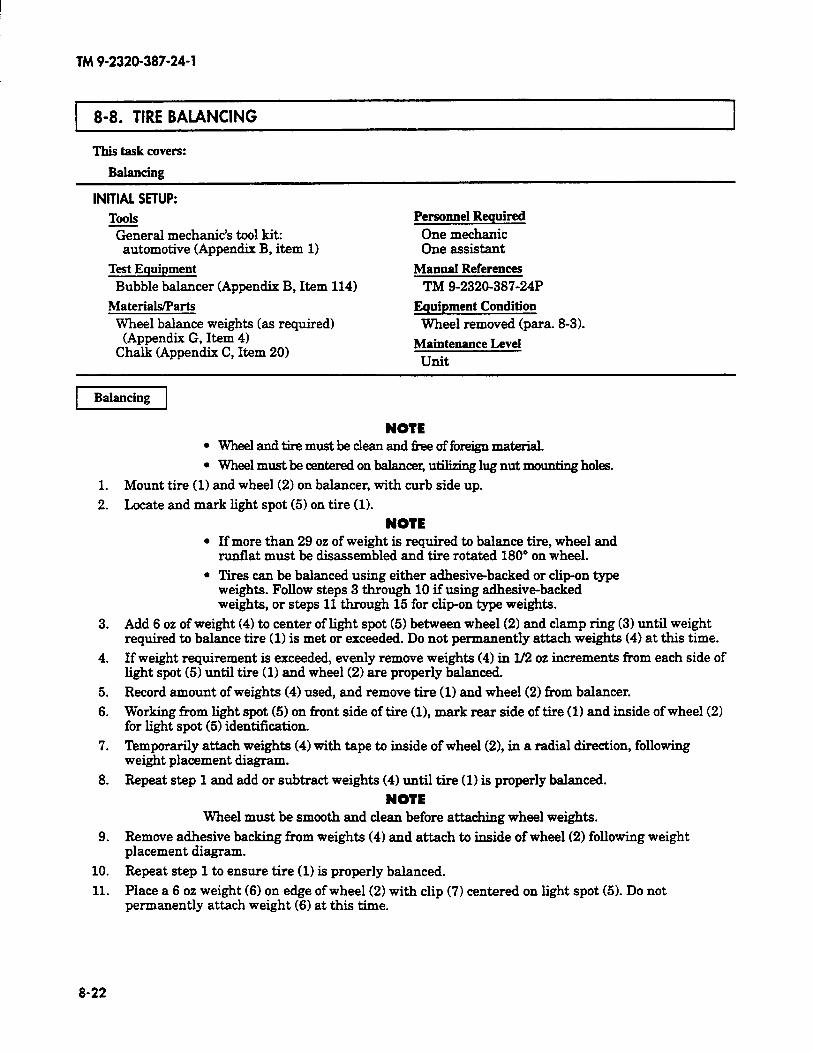
TM 9-2320-387-24-l
8-8. TIRE BALANCING
This task covers:
Balancing
INITIAL SETUP:
ToOlS General mechanic’s tool kit:
automotive (Appendix B, item 11
Test Equipment Bubble balancer (Appendix B, Item 114)
MateriaWParts Wheel balance weights (as required)
(Appendix G, Item 41 Chalk (Appendix C, Item 20)
Personnel Required
One mechanic One assistant
Manual References TM 9-2320-387-24P
Equipment Condition
Wheel removed (para. 8-31.
Maintenance Level
unit
I Balancine: 1
1.
2.
3.
4.
5.
6.
7.
8.
9.
10.
11.
NOTE l Wh~landtiremustbecleanandfkeeoff&eignmateriaL
l Wheel must be centered on balancer, utilizing lug nut mounting holes.
Mount tire (1) and wheel (2) on balancer, with curb side up.
Locate and mark light spot (51 on tire (1).
NOTE l If more than 29 oz of weight is required to balance tire, wheel and
runtlat must be disassembled and tire rotated 180” on wheel.
l Tires can be balanced using either adhesive-backed or clip-on type weights. Follow steps 3 through 10 if using adhesive-backed weights, or steps 11 through 15 for clip-on type weights.
Add 6 oz of weight (4) to center of light spot (5) between wheel (21 and clamp ring (31 until weight required to balance tire (1) is met or exceeded. Do not permanently attach weights (41 at this time.
If weight requirement is exceeded, evenly remove weights (4) in I/2 oz increments from each side of light spot (5) until tire (1) and wheel (2) are properly balanced.
Record amount of weights (41 used, and remove tire (1) and wheel (2) from balancer.
Working from light spot (5) on front side of tire (11, mark rear side of tire (11 and inside of wheel (2) for light spot (51 identification.
Temporarily attach weights (4) with tape to inside of wheel (21, in a radial direction, following weight placement diagram.
Repeat step 1 and add or subtract weights (4) until tire (1) is properly balanced.
NOTE Wheel must be smooth and clean before attaching wheel weights.
Remove adhesive backing from weights (4) and attach to inside of wheel (2) following weight placement diagram.
Repeat step 1 to ensure tire (11 is properly balanced.
Place a 6 oz weight (61 on edge of wheel (2) with clip (7) centered on light spot (5). Do not permanently attach weight (61 at this time.
8-22
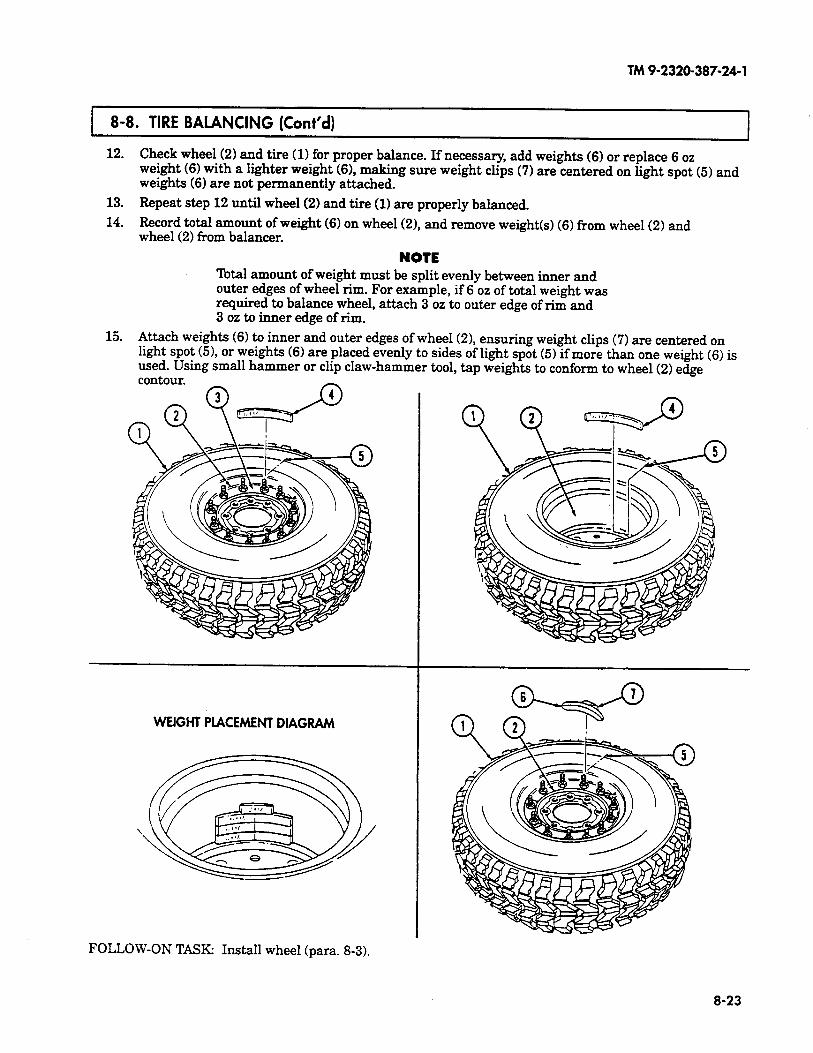
TM 9-2320-387-24-l
8-8. TIRE BALANCING (Cont’d)
12. Check wheel (2) and tire (1) for proper balance. If necessary, add weights (6) or replace 6 oz weight (6) with a lighter weight (6), making sure weight clips (7) are centered on light spot (5) and weights (6) are not permanently attached.
13. Repeat step 12 until wheel (2) and tire (1) are properly balanced.
14. Record total amount of weight (6) on wheel (21, and remove weight(s) (6) from wheel (2) and wheel (2) from balancer.
NOTE Total amount of weight must be split evenly between inner and outer edges of wheel rim. For example, if 6 oz of total weight was required to balance wheel, attach 3 oz to outer edge of rim and 3 oz to inner edge of rim.
15. Attach weights (6) to inner and outer edges of wheel (21, ensuring weight clips (7) are centered on light spot (51, or weights (6) are placed evenly to sides of light spot (5) if more than one weight (6) is used. Using small hammer or clip claw-hammer tool, tap weights to conform to wheel (2) edge contour. n
WEIGHT PLACEMENT DIAGRAM
FOLLOW-ON TASK: Install wheel (para. 8-3).
8-23
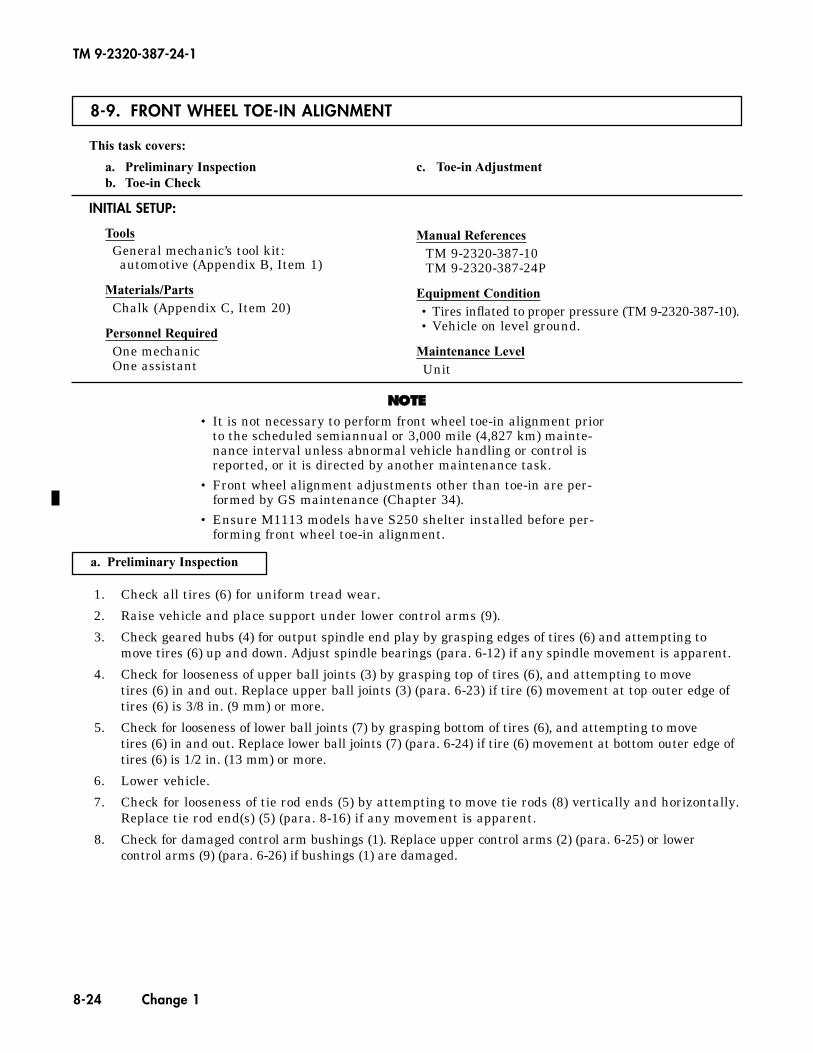
TM 9-2320-387-24-1
8-24 Change 1
8-9. FRONT WHEEL TOE-IN ALIGNMENT
INITIAL SETUP:
ToolsGeneral mechanic’s tool kit:
automotive (Appendix B, Item 1)
Materials/PartsChalk (Appendix C, Item 20)
Personnel RequiredOne mechanicOne assistant
Manual ReferencesTM 9-2320-387-10TM 9-2320-387-24P
Equipment Condition• Tires inflated to proper pressure (TM 9-2320-387-10).• Vehicle on level ground.
Maintenance LevelUnit
This task covers:
a. Preliminary Inspection c. Toe-in Adjustmentb. Toe-in Check
NNOOTTEE• It is not necessary to perform front wheel toe-in alignment prior
to the scheduled semiannual or 3,000 mile (4,827 km) mainte-nance interval unless abnormal vehicle handling or control isreported, or it is directed by another maintenance task.
• Front wheel alignment adjustments other than toe-in are per-formed by GS maintenance (Chapter 34).
• Ensure M1113 models have S250 shelter installed before per-forming front wheel toe-in alignment.
1. Check all tires (6) for uniform tread wear.
2. Raise vehicle and place support under lower control arms (9).
3. Check geared hubs (4) for output spindle end play by grasping edges of tires (6) and attempting tomove tires (6) up and down. Adjust spindle bearings (para. 6-12) if any spindle movement is apparent.
4. Check for looseness of upper ball joints (3) by grasping top of tires (6), and attempting to movetires (6) in and out. Replace upper ball joints (3) (para. 6-23) if tire (6) movement at top outer edge of tires (6) is 3/8 in. (9 mm) or more.
5. Check for looseness of lower ball joints (7) by grasping bottom of tires (6), and attempting to move tires (6) in and out. Replace lower ball joints (7) (para. 6-24) if tire (6) movement at bottom outer edge oftires (6) is 1/2 in. (13 mm) or more.
6. Lower vehicle.
7. Check for looseness of tie rod ends (5) by attempting to move tie rods (8) vertically and horizontally.Replace tie rod end(s) (5) (para. 8-16) if any movement is apparent.
8. Check for damaged control arm bushings (1). Replace upper control arms (2) (para. 6-25) or lower control arms (9) (para. 6-26) if bushings (1) are damaged.
a. Preliminary Inspection
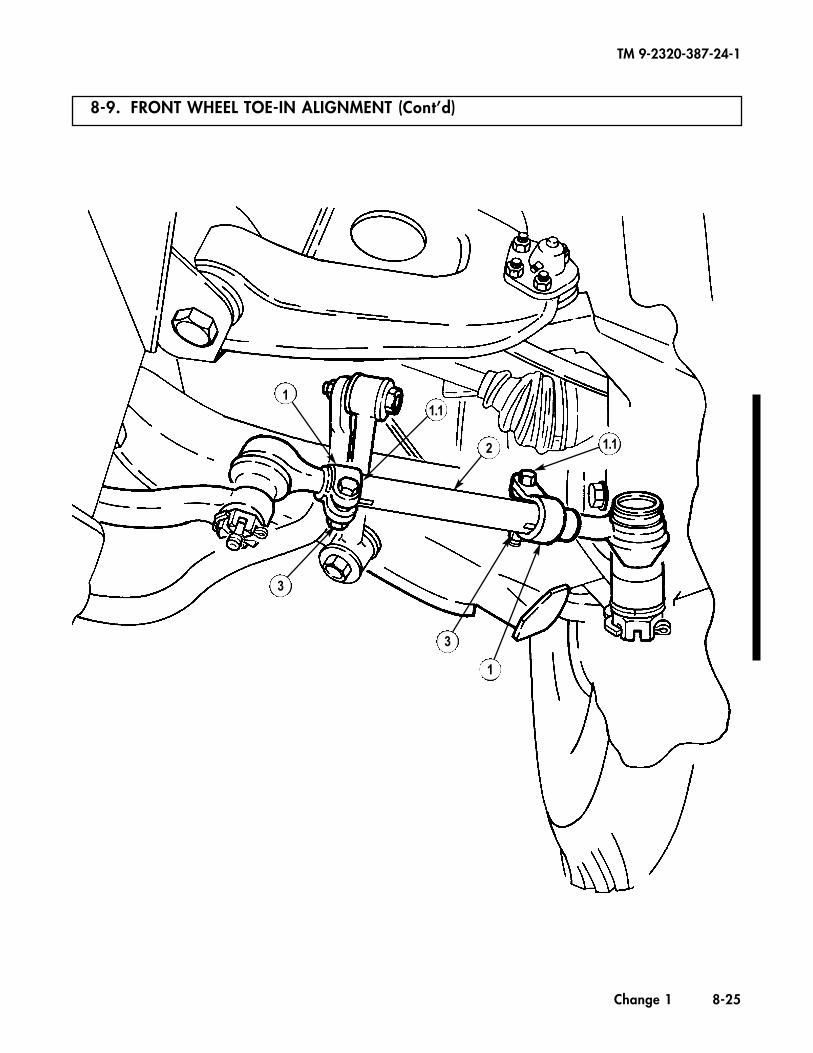
TM 9-2320-387-24-1
Change 1 8-25
8-9. FRONT WHEEL TOE-IN ALIGNMENT (Cont’d)
1.12
1.1
1
3
3
1

8-9. FRONT WHEEL TOE-IN ALIGNMENT (Cont’d)
NNOOTTEE• To ensure proper alignment, vehicle must be at curb weight or
normal operating weight.• Vehicle must be on level ground with wheels set straight ahead.• Steps 1 through 3 will determine centerline of tire.• Point of measurement for checking toe-in will be where lines
marked in steps 1 and 3 intersect.
1. Mark line (4) on center tread (1) of tire (2) 16-1/2 in. (42 cm) from ground.2. Measure total width of tire tread (3) and record.3. Mark line (5) on center tread (1) at one-half total tread width (3).4. Repeat steps 1 through 3 for opposite tire.5. Measure distance between points of measurement on front side of tires (2) and record.6. Rotate tires (2) by moving vehicle forward until points of measurement are 16-1/2-in. (42 cm) above
the ground at rear side of tires (2).7. Measure distance between points of measurement on rear side of tires (2) and record.
NNOOTTEE• If measurement is larger on front side of tires than measure-
ment on rear side of tires, tires have toe-out.• If toe-in alignment does not meet specifications, repeat check-
ing procedures to eliminate any possible reading errors.
8. Subtract measurement for front side of tires (2), obtained in step 5, from measurement for rear side oftires (2), step 7. The result of this subtraction represents inches of toe-in. Refer to table 8-1 for toe-inspecifications. If toe-in does not meet specifications, adjust toe-in (task c.).
9. If toe-in is within specifications, refer to task c. and perform step 5.
b. Toe-in Check
TM 9-2320-387-24-1
8-26
Table 8-1. Toe-in Alignment Adjustment Specifications.
TOE-IN (FRONT) ADJUSTMENT SPECIFICATIONS
VEHICLEPAYLOAD
M1113M1114
Vehicle @ curb weight 1/4 ± 1/4 in.or normal operating (6 mm ± 6 mm)weight
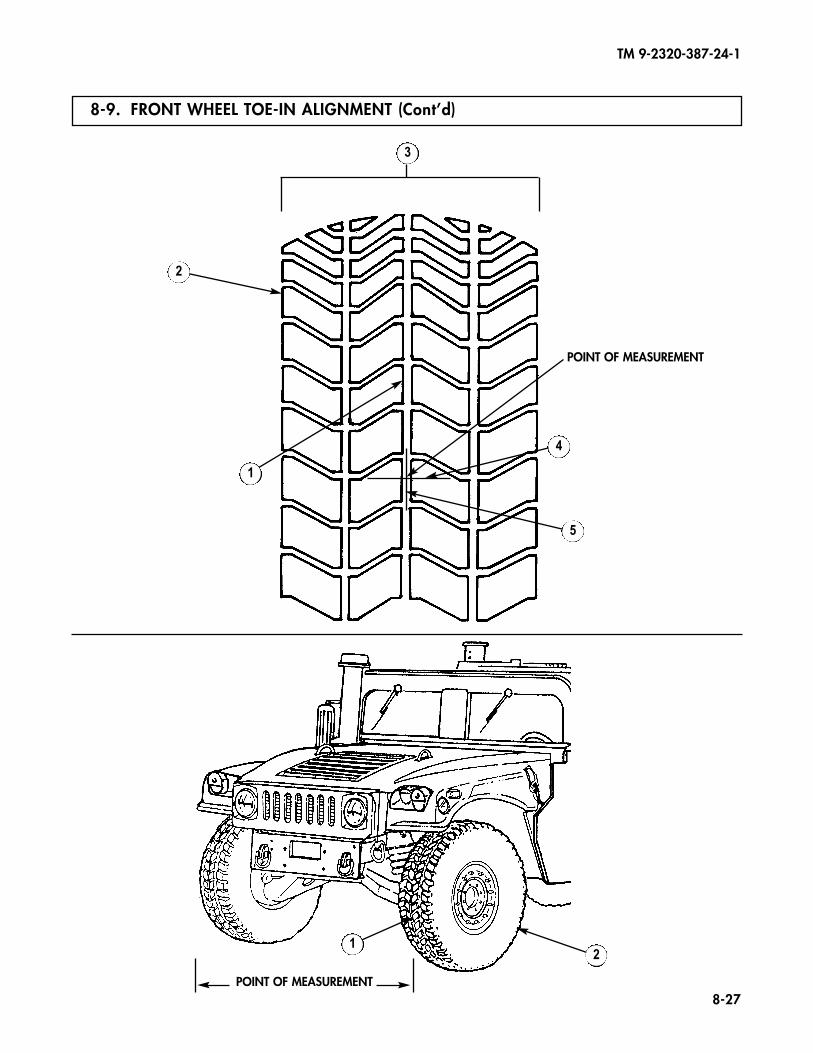
TM 9-2320-387-24-1
8-27
8-9. FRONT WHEEL TOE-IN ALIGNMENT (Cont’d)
2
1
3
4
5
21
POINT OF MEASUREMENT
POINT OF MEASUREMENT
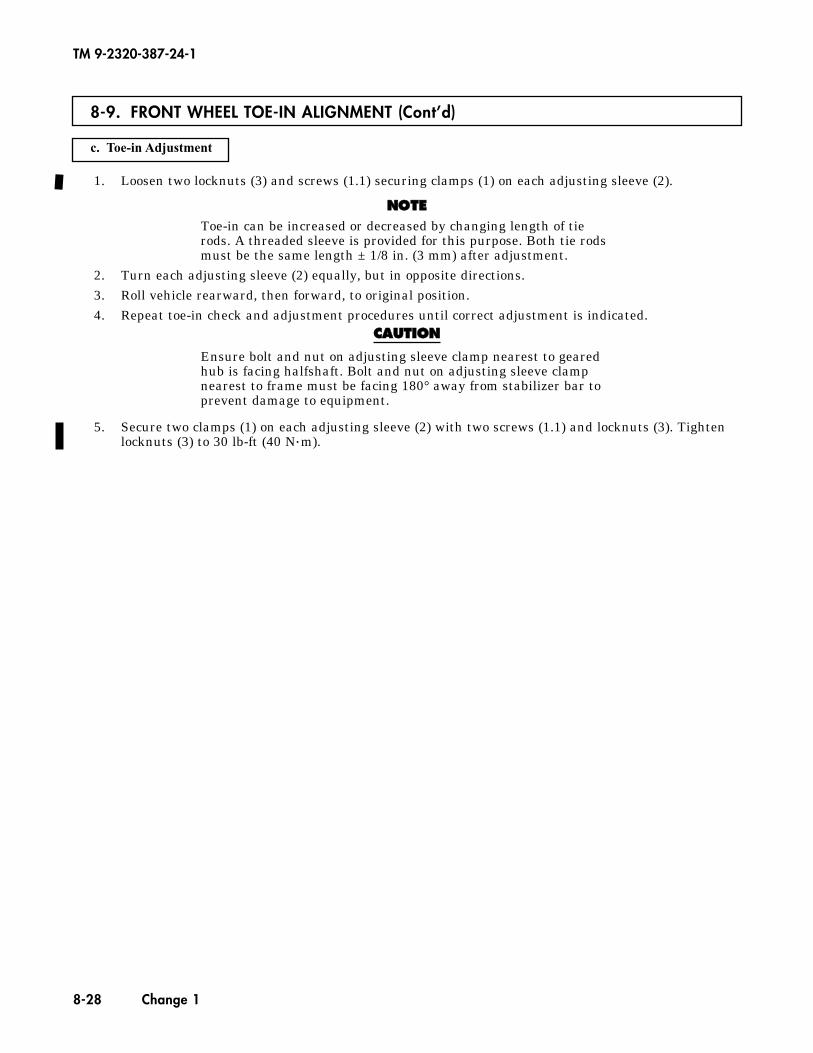
TM 9-2320-387-24-1
8-28 Change 1
8-9. FRONT WHEEL TOE-IN ALIGNMENT (Cont’d)
c. Toe-in Adjustment
1. Loosen two locknuts (3) and screws (1.1) securing clamps (1) on each adjusting sleeve (2).
NNOOTTEEToe-in can be increased or decreased by changing length of tierods. A threaded sleeve is provided for this purpose. Both tie rodsmust be the same length ± 1/8 in. (3 mm) after adjustment.
2. Turn each adjusting sleeve (2) equally, but in opposite directions.3. Roll vehicle rearward, then forward, to original position.4. Repeat toe-in check and adjustment procedures until correct adjustment is indicated.
CCAAUUTTIIOONN
Ensure bolt and nut on adjusting sleeve clamp nearest to gearedhub is facing halfshaft. Bolt and nut on adjusting sleeve clampnearest to frame must be facing 180° away from stabilizer bar toprevent damage to equipment.
5. Secure two clamps (1) on each adjusting sleeve (2) with two screws (1.1) and locknuts (3). Tightenlocknuts (3) to 30 lb-ft (40 N•m).
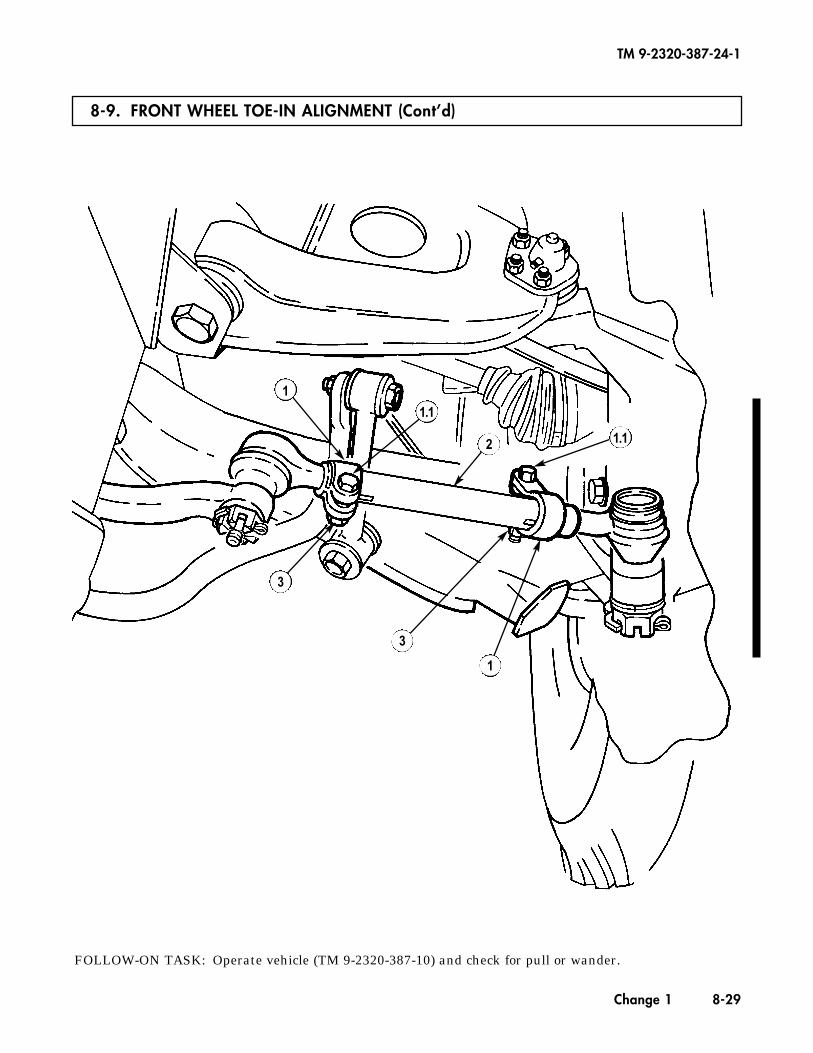
TM 9-2320-387-24-1
Change 1 8-29
8-9. FRONT WHEEL TOE-IN ALIGNMENT (Cont’d)
FOLLOW-ON TASK: Operate vehicle (TM 9-2320-387-10) and check for pull or wander.
2
1.1
1
1.1
3
3
1
TM 9-2320-387-24-1
8-30 Change 1
8-10. REAR WHEEL TOE-OUT ALIGNMENT
INITIAL SETUP:
ToolsGeneral mechanic’s tool kit:
automotive (Appendix B, Item 1)Maintenance and repair shop equipment:
automotive (Appendix B, Item 2)
Personnel RequiredOne mechanicOne assistant
Manual ReferencesTM 9-2320-387-10TM 9-2320-387-24P
Equipment Condition• Tires inflated to proper pressure
(TM 9-2320-387-10).• Vehicle on level ground.
Maintenance LevelUnit
This task covers:
a. Preliminary Inspection c. Toe-out Adjustmentb. Toe-out Check
NNOOTTEE• It is not necessary to perform rear wheel toe-out alignment prior to
the scheduled semiannual or 3,000 mile (4,827 km) maintenanceinterval unless abnormal vehicle handling or control is reported, orit is directed by another maintenance task.
• Rear wheel alignment adjustments other than toe-out areperformed by DS maintenance (chapter 21).
• Ensure M1113 models have S250 shelter installed beforeperforming rear wheel toe-out alignment.
1. Check all tires (7) for uniform tread wear.2. Raise vehicle and place support under lower control arms (11).3. Check geared hubs (5) for output spindle end play by grasping edges of tires (7) and attempting to
move tires (7) up and down. Adjust spindle bearings (para. 6-12) if any spindle movement isapparent.
4. Check for looseness of upper ball joints (4) by grasping top of tires (7) and attempting to move tires (7)in and out. Replace upper ball joints (4) (para. 6-23) if tire (7) movement at top outer edge of tires (7)is 3/8 in. (9 mm) or more.
5. Check for looseness of lower ball joints (8) by grasping bottom of tires (7) and attempting to movetires (7) in and out. Replace lower ball joints (8) (para. 6-24) if tire (7) movement at bottom outeredge of tires (7) is 1/2 in. (13 mm) or more.
6. Lower vehicle.7. Check for looseness of radius rod ends (6) by attempting to move adjusting sleeves (10) vertically and
horizontally. Replace radius rod end(s) (6) (para. 6-22) if any movement is apparent.8. Check for damaged control arm bushings (1). Replace upper control arms (3) (para. 6-25) or lower
control arms (11) (para. 6-26) if bushings (1) are damaged.9. Proceed to task b.
a. Preliminary Inspection
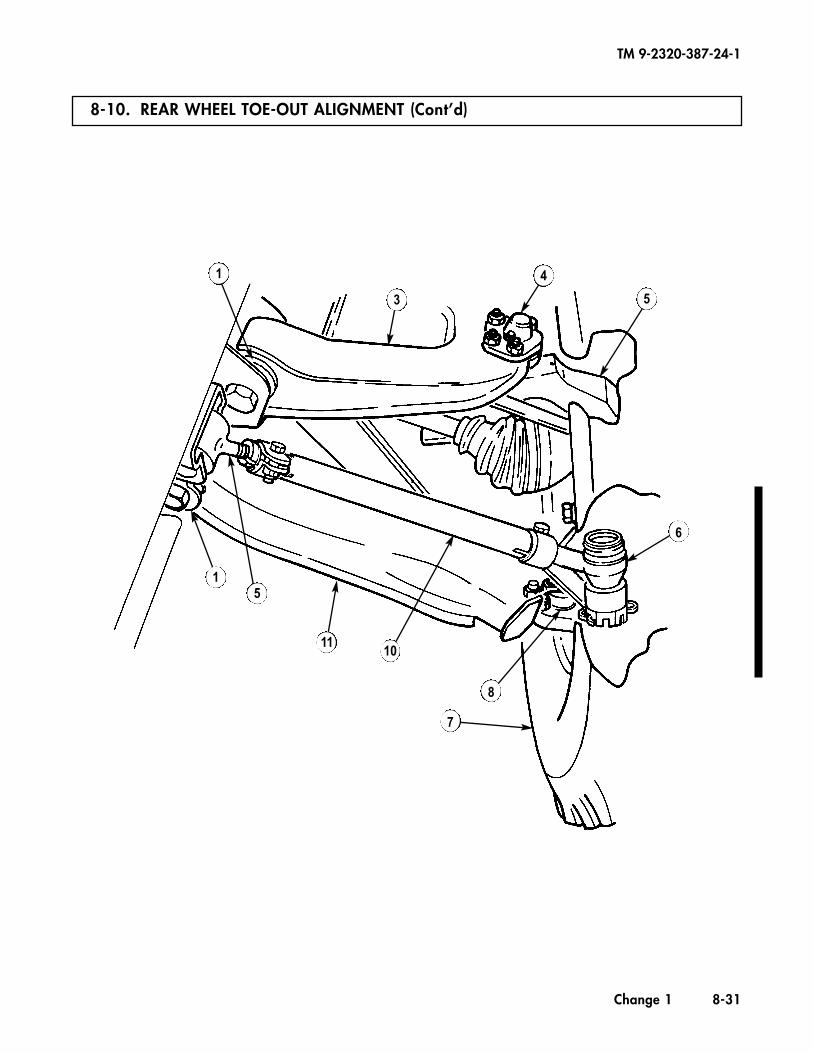
TM 9-2320-387-24-1
Change 1 8-31
8-10. REAR WHEEL TOE-OUT ALIGNMENT (Cont’d)
1
3
4
5
6
8
7
1011
51
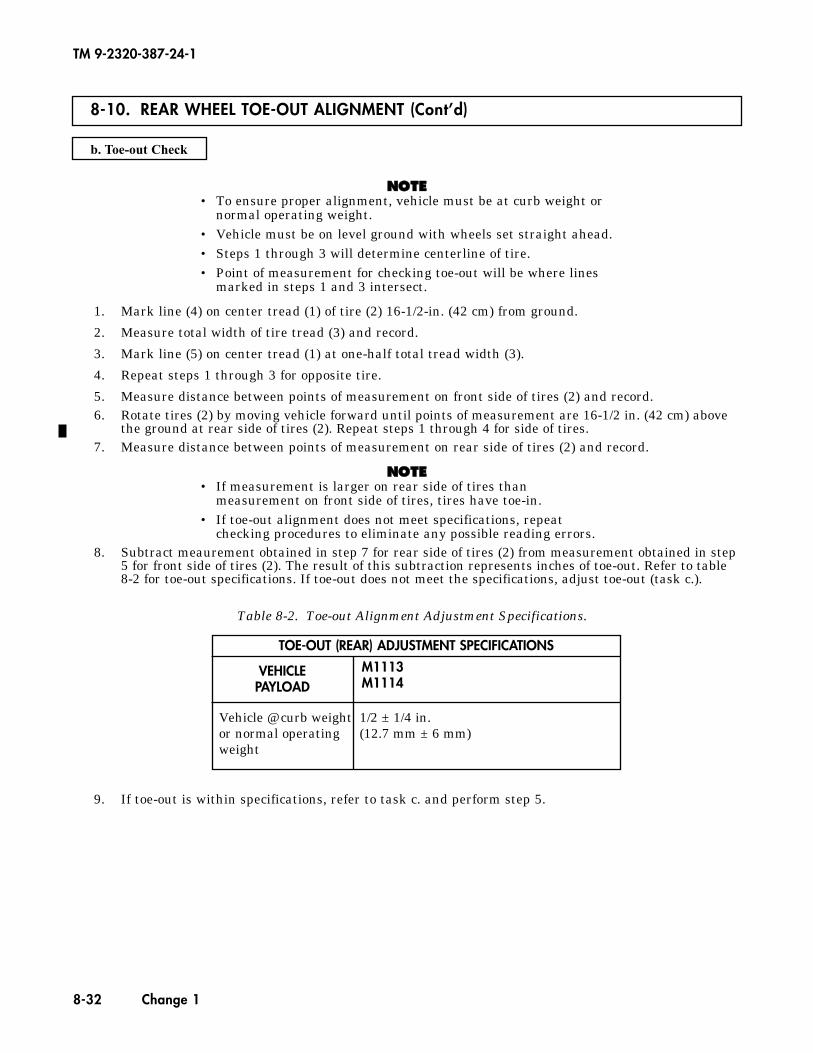
8-10. REAR WHEEL TOE-OUT ALIGNMENT (Cont’d)
NNOOTTEE• To ensure proper alignment, vehicle must be at curb weight or
normal operating weight.• Vehicle must be on level ground with wheels set straight ahead.• Steps 1 through 3 will determine centerline of tire.• Point of measurement for checking toe-out will be where lines
marked in steps 1 and 3 intersect.
1. Mark line (4) on center tread (1) of tire (2) 16-1/2-in. (42 cm) from ground.
2. Measure total width of tire tread (3) and record.
3. Mark line (5) on center tread (1) at one-half total tread width (3).
4. Repeat steps 1 through 3 for opposite tire.
5. Measure distance between points of measurement on front side of tires (2) and record.6. Rotate tires (2) by moving vehicle forward until points of measurement are 16-1/2 in. (42 cm) above
the ground at rear side of tires (2). Repeat steps 1 through 4 for side of tires.7. Measure distance between points of measurement on rear side of tires (2) and record.
NNOOTTEE• If measurement is larger on rear side of tires than
measurement on front side of tires, tires have toe-in.• If toe-out alignment does not meet specifications, repeat
checking procedures to eliminate any possible reading errors.8. Subtract meaurement obtained in step 7 for rear side of tires (2) from measurement obtained in step
5 for front side of tires (2). The result of this subtraction represents inches of toe-out. Refer to table8-2 for toe-out specifications. If toe-out does not meet the specifications, adjust toe-out (task c.).
9. If toe-out is within specifications, refer to task c. and perform step 5.
b. Toe-out Check
TM 9-2320-387-24-1
Table 8-2. Toe-out Alignment Adjustment Specifications.
8-32 Change 1
TOE-OUT (REAR) ADJUSTMENT SPECIFICATIONS
VEHICLEPAYLOAD
M1113M1114
Vehicle @ curb weight 1/2 ± 1/4 in.or normal operating (12.7 mm ± 6 mm)weight
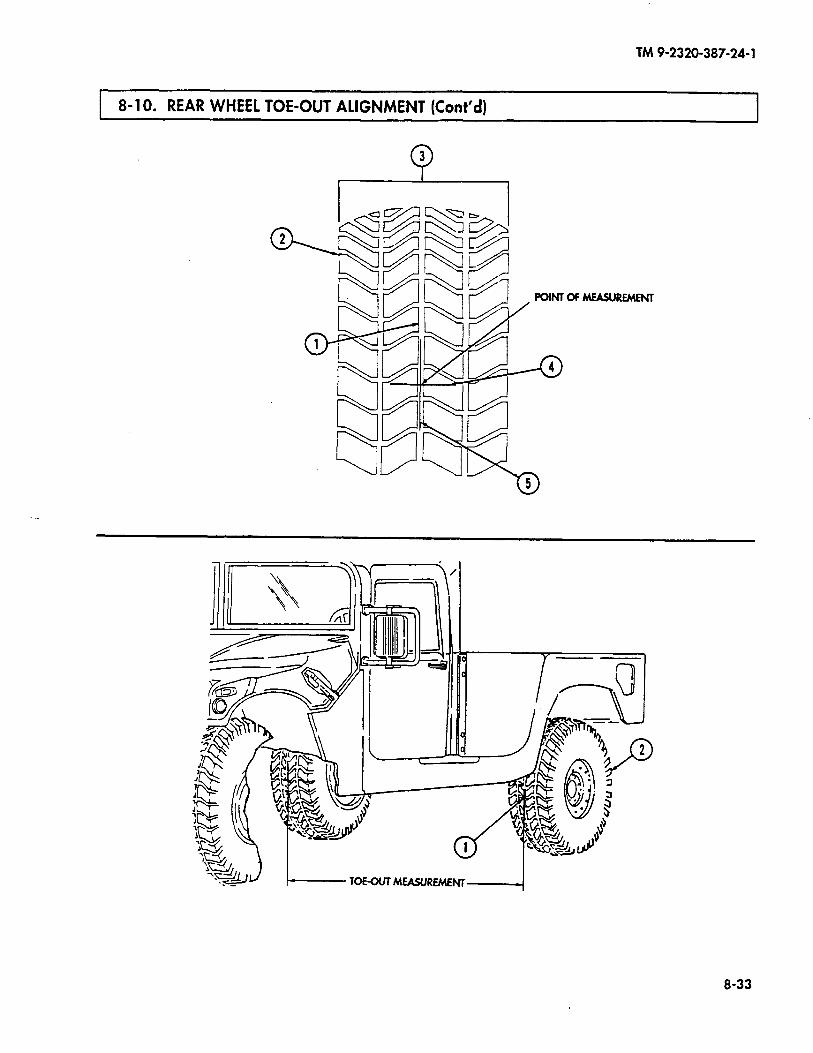
TM 9-2320-387-24-l
8-l 0. REAR WHEEL TOE-OUT ALIGNMENT (Cont’d) 1
8-33
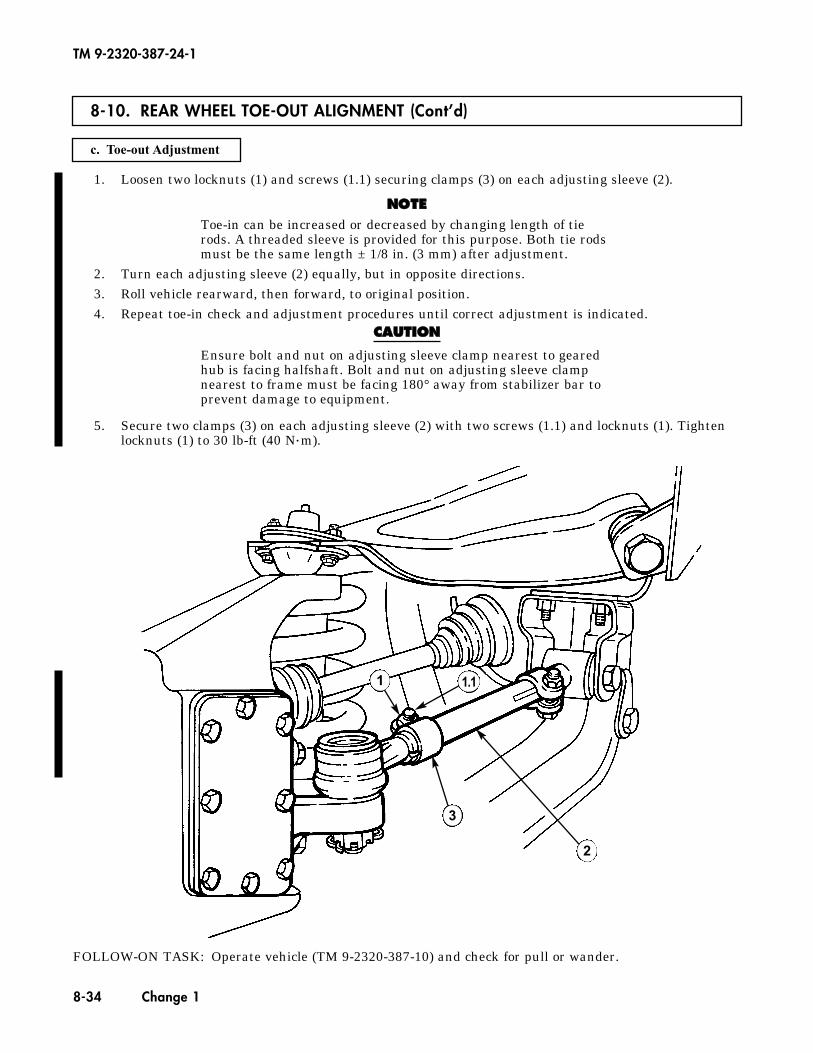
8-10. REAR WHEEL TOE-OUT ALIGNMENT (Cont’d)
c. Toe-out Adjustment
TM 9-2320-387-24-1
8-34 Change 1
1. Loosen two locknuts (1) and screws (1.1) securing clamps (3) on each adjusting sleeve (2).
NNOOTTEEToe-in can be increased or decreased by changing length of tierods. A threaded sleeve is provided for this purpose. Both tie rodsmust be the same length ± 1/8 in. (3 mm) after adjustment.
2. Turn each adjusting sleeve (2) equally, but in opposite directions.3. Roll vehicle rearward, then forward, to original position.4. Repeat toe-in check and adjustment procedures until correct adjustment is indicated.
CCAAUUTTIIOONN
Ensure bolt and nut on adjusting sleeve clamp nearest to gearedhub is facing halfshaft. Bolt and nut on adjusting sleeve clampnearest to frame must be facing 180° away from stabilizer bar toprevent damage to equipment.
5. Secure two clamps (3) on each adjusting sleeve (2) with two screws (1.1) and locknuts (1). Tightenlocknuts (1) to 30 lb-ft (40 N•m).
FOLLOW-ON TASK: Operate vehicle (TM 9-2320-387-10) and check for pull or wander.
1
3
2
1.1
TM 9-2320-387-24- 1
Section II. STEERING COMPONENTS MAINTENANCE
1 8-11. STEERING COMPONENTS MAINTENANCE TASK SUMMARY 1
I TASK PARA.
PROCEDURES PAGE NO.
8-12.
8-13.
8-14.
8-15.
8-16.
8-17.
8-18.
8-19.
B-20.
8-21.
8-22.
8-23.
8-24.
8-25.
8-26.
8-27.
8-28.
Steering Wheel Replacement
Tie Rod Maintenance
Pitman Arm Replacement
Center Link Replacement
Tie Rod End Replacement
Idler Arm Maintenance
Steering Column Replacement
Intermediate Steering Shaft Replacement
Steering Gear Replacement
Steering Shaft U-Joint Replacement
Intermediate Steering Shaft Close-off and Retainer Replacement
Power Steering Pump and Pulley Replacement
Power Steering Hydraulic System Pressure and Return Hose Replacement
Power Steering System Hydraulic Control Valve Maintenance
Power Steering Cooler Hose Replacement
Power Steering System Bleeding
Power Steering Relief Valve Cartridge Maintenance
8-36
8-37
B-40
8-42
8-44
8-46
B-50
8-54
8-56
B-60
8-62
8-64
8-66
8-68
8-72
8-74
8-75
8-35
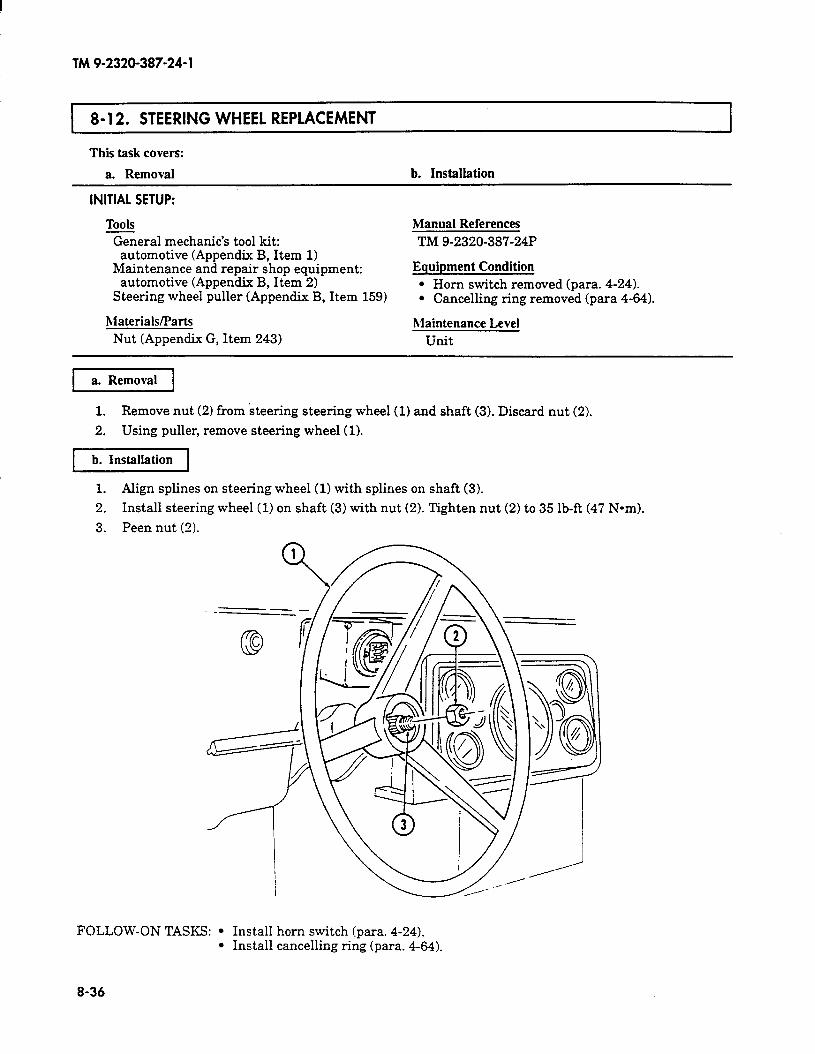
TM 9-2320-387-24- 1
8- 12. STEERING WHEEL REPLACEMENT 1
This task covers:
a. Removal b. Installation
INITIAL SETUP:
Tools General mechanic’s tool hit:
automotive (Appendix B, Item 1) Maintenance and repair shop equipment:
automotive (Appendix B, Item 2)
Manual References TM 9-2320-387-24P
Steering wheel puller (Appendix B, Item 159)
Materials/Parts Nut (Appendix G, Item 243)
Equipment Condition l Horn switch removed (para. 4-24). l Cancelling ring removed (para 4-64).
hlaintenance Level Unit
1 a. Removal 1
1. Remove nut (2) from steering steering wheel (1) and shaft (3). Discard nut (2).
2. Using puller, remove steering wheel (1).
71
1. Align splines on steering wheel (1) with splines on shaft (3).
2. Install steering wheel (1) on shaft (3) with nut (2). Tighten nut (2) to 35 lb-ft (47 Nom).
3. Peen nut (2).
FOLLOW-ON TASKS: l Install horn switch (para. 4-24). l Install cancelling ring (para. 4-64).
8-36
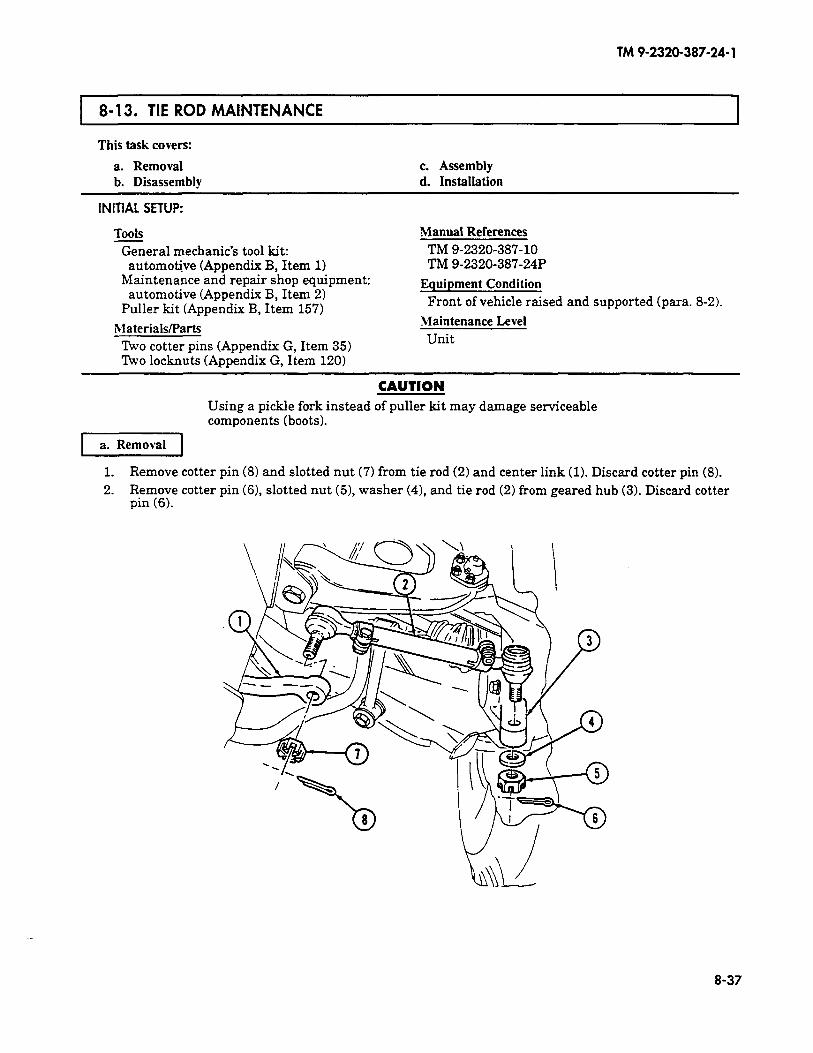
TM 9-2320-387-24-l
8-13. TIE ROD MAINTENANCE
This task covers:
a. Removal b. Disassembly
c. Assembly d. Installation
INITIAL SETUP:
Tools General mechanic’s tool kit:
automotive (Appendix B, Item 1) Maintenance and repair shop equipment:
automotive (Appendix B, Item 2) Puller kit (Appendix B, Item 157)
Materials/Parts ~JVO cotter pins (Appendix G, Item 35) Two locknuts (Appendix G, Item 120)
Manual References TM 9-2320-387-10 TM 9-2320-387-24P
Equipment Condition Front of vehicle raised and supported (para. 8-2).
Maintenance Level Unit
Using a pickle fork instead of puller kit may damage serviceable components (boots).
II
1. Remove cotter pin (81 and slotted nut (71 from tie rod (2) and center link (1). Discard cotter pin (8). 2. Remove cotter pin (61, slotted nut (51, washer (41, and tie rod (2) from geared hub (3). Discard cotter
pin (6).
--
8-37
TM 9-2320-387-24-l
,
1 8-13. TIE ROD MAINTENANCE (Cont’d) I I I
b. Disassembly
.
.
NOTE Disassembly procedures for tie rod and radius rod are basically the same. One tie rod end of the radius rod is different.
Scribe locating marks on adjusting sleeve and clamps for installation.
1. Loosen two capscrews (101, locknuts (131, and clamps (11) securin g tie rod ends (9) to adjusting sleeve (12).
NOTE Note number of threads exposed on each tie rod end for installa- tion. Approximately the same number of threads should be exposed on each tie rod end.
2. Remove two tie rod ends (9) from adjusting sleeve (12). 3. Remove two locknuts (13), capscrews (101, and clamps (11) from adjusting sleeve (12). Discard
locknuts (13).
c Assembly
1. Install two clamps W), capscrews (lo), and nuts (13) on adjusting sleeve (12). 2. Install two tie rod ends (9) into adjusting sleeve (121, turning tie rod ends (9) equally but in opposite
directions.
-1
1. Install tie rod (2) on center link (1) with slotted nut (7). Tighten slotted nut (7) to 70 lb-ft (95 N-m).
CAUTION Do not loosen slotted nut to install cotter pin. Doing this may result in damage to equipment.
2. Install tie rod (2) on,geared hub (3) with washer (4) and slotted nut (5). Tighten slotted nut (51 to 70 lb-ft (95 Nom).
3. Install cotter pin (8) in slotted nut (7).
4. Install cotter pin (6) in slotted nut (5).
CAUTION Ensure the outboard clamp faces the halfshaft and the inboard clamp faces away from the stabilizer bar (front only) or damage to equipment may result.
5. Tighten two locknuts (13).
8-38

TM 9-2320-36 l-20
8-l 3. TIE ROD MAINTENANCE (Cont’d)
FOLLOW-ON TASKS: l Lubricate tie rod end (TM 9-2320-387-10). l Remove supports and lower front of vehicle (para. 8-2). l Align toe-in (para. 8-9).
8-39
TM 9-2320-387-24-l
I 8-14. PITMAN ARM REPLACEMENT
This task covers:
a. Removal b. Installation
INITIAL SETUP:
Tools General mechanic’s tool kit: automotive (Appendix B, Item 1)
Maintenance and repair shop equipment: automotive (Appendix B, Item 21
Puller kit (Appendix B, Item 157)
Materials/Parts Cotter pin (Appendix G, Item 35) Lockwasher (Appendix G, Item 2401
Manual References TM 9-2320-387-10 TM 9-2320-387-24P
Equipment Condition Front of vehicle raised and supported (para. 8-2).
Maintenance Level Unit
NOTE Ensure front wheels are in straight-ahead position while pitman arm is removed and installed.
II
1. Remove nut (1) and lockwasher (2) from steering gear shaft (4). Discard lockwasher (2).
2. Using puller, remove pitman arm (3) from steering gear shaft (4).
3. Remove cotter pin (6) and slotted nut (7) from pitman arm (3) and center link (5). Discard cotter pin (6).
4. Using puller, remove pitman arm (3) from center link (5).
b. Installation
1. Install pitman arm (3) on steering gear shaft (4) with lockwasher (2) and nut (1).
2. Install pitman arm (3) on center link (5) with slotted nut (7). Tighten slotted nut (7) to 80 lb-R (108 Nom).
3. Tighten nut (1) to 185 lb-R (251 N-m).
CAUTION Do not loosen slotted.nut to install cotter pin. Doing this may result in damage to equipment.
4. Install cotter pin (6) in slotted nut (7).
8-40
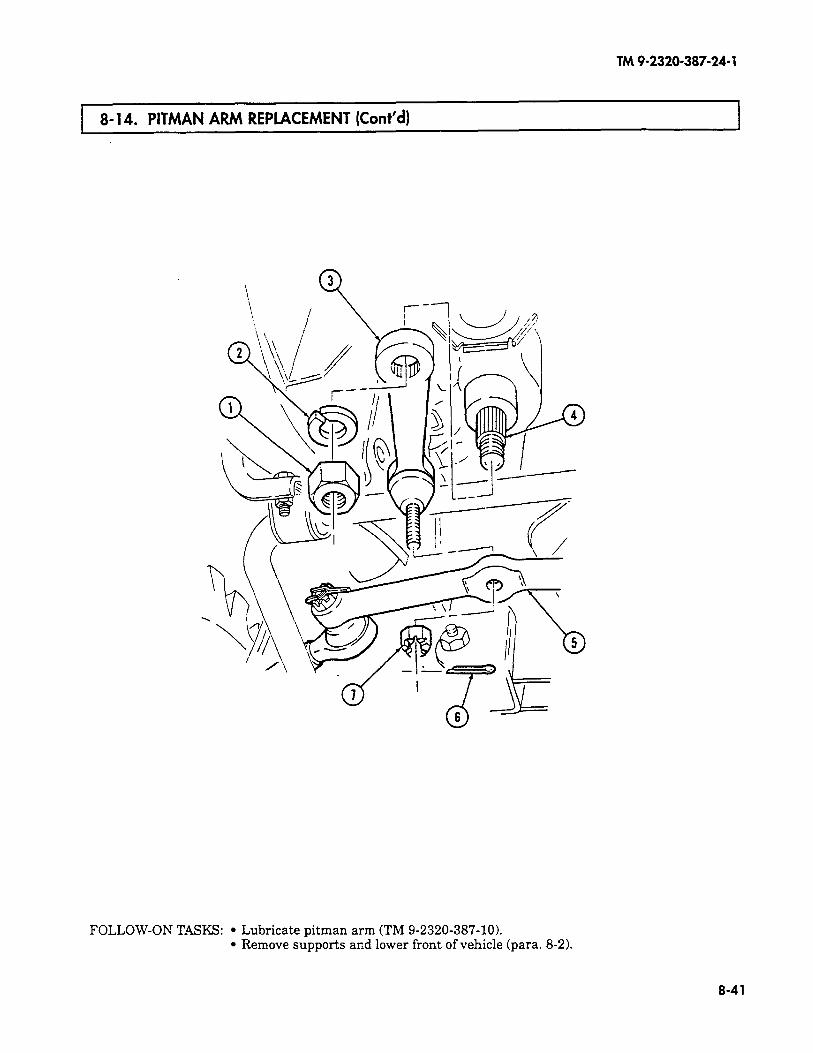
TM 9-2320-387-24-l
8- 14. PITMAN ARM REPLACEMENT (Cont’d)
FOLLOW-ON TASKS: l Lubricate pitman arm (TM 9-2320-387-10). l Remove supports acd lower front of vehicle (para. 8-2).
8-4 1

TM 9-2320-387-24- 1
8- 15. CENTER LINK REPLACEMENT L
This task covers:
a. Removal b. Installation
INITIAL SETUP:
Tools General mechanic’s tool kit:
automotive (Appendix B, Item 1) Maintenance and repair shop equipment:
automotive (Appendix B, Item 2) Puller kit (Appendix B, Item 157)
Materials/Parts Four cotter pins (Appendix G, Item 35)
Manual References TM 9-2320-387-24P
Equipment Condition Front of vehicle raised and supported (para. 8-2).
Maintenance Level Unit
CAUTION Using a pickle fork instead of puller kit may damage serviceable components (boots).
1. Remove cotter pin (5) and slotted nut (4) from idler arm (8) and center link (3). Discard cotter pin (5).
2. Remove cotter pin (9) and slotted nut (10) from pitman arm (2) and center link (3). Discard cotter pin (9).
3. Remove two cotter pins (1) and slotted nuts (6) from two tie rods (7) and center link (3). Discard cotter pins (1).
4. Using puller, remove center link (3) from two tie rods (71, idler arm (8), and pitman arm (2).
IJ
CAUTION Do not loosen slotted nut to install cotter pin. Doing this may result in damage to equipment
1. Install center link (3) on pitman.&m (2) and idler arm (8) with slotted nuts (4) and (10). Tighten slotted nuts (4) and (101 to 80 lb-ft (108 N*m).
2. Install cotter pins (5) and (9) in slotted nuts (4) and (10).
3. Install two tie rods (7) on center link (3) with two slotted nuts (6). Tighten slotted nuts (6) to 70 lb-ft (95 Nom).
4. Install two cotter pins (1) in slotted nuts (6).
8-42
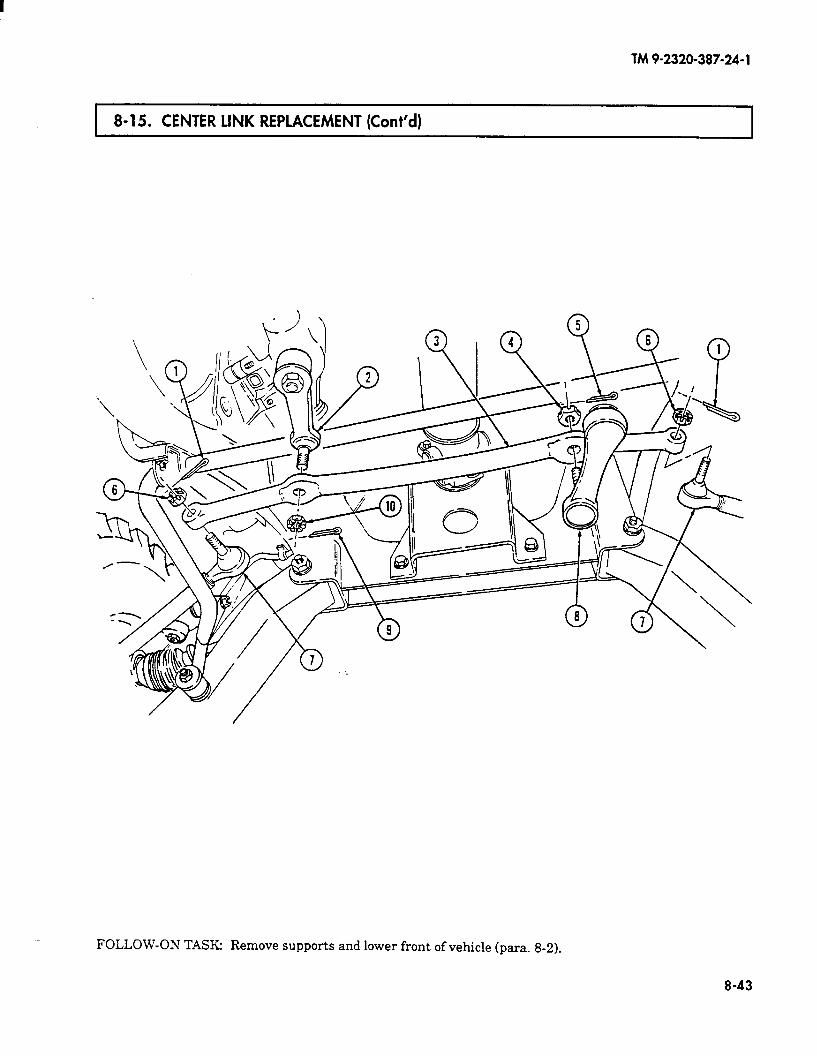
TM9-2320-387-24-l
8-15. CENTER LINK REPLACEMENT (Cont’d)
FOLLOW-ON TASK: Remove supports and lower front of vehicle (para. 8-2).
8-43
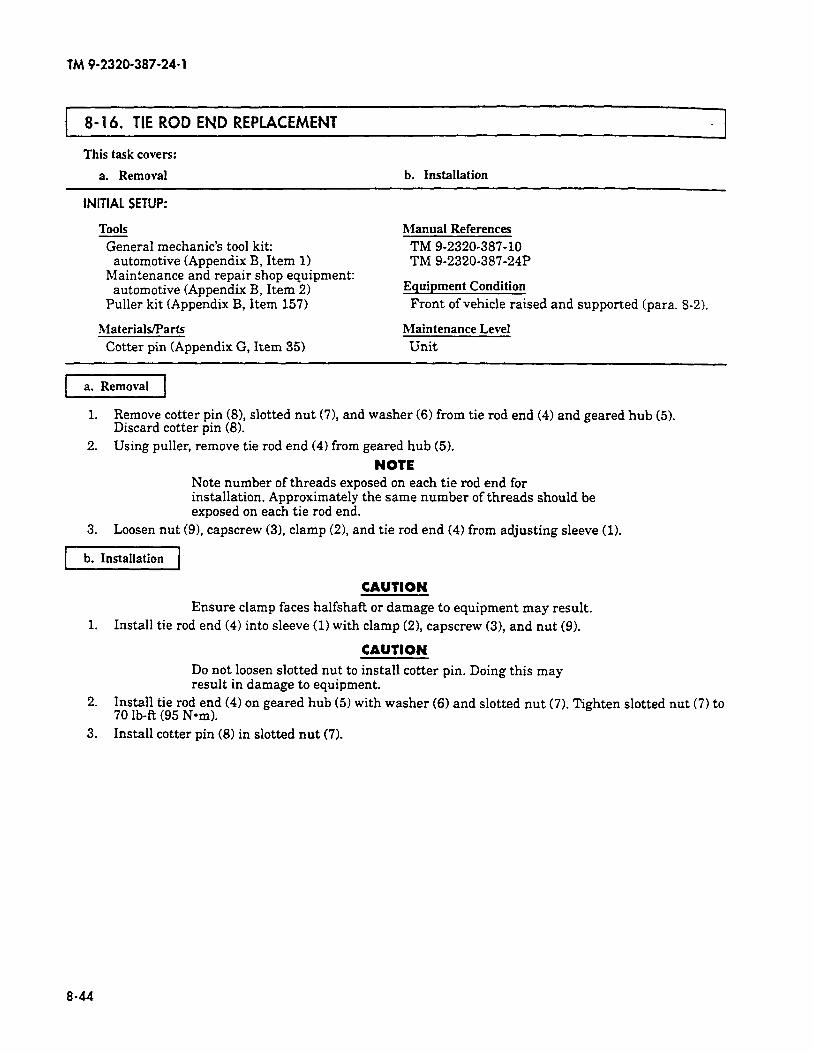
TM 9-2320-387-24-i
8-16. TIE ROD END REPLACEMENT
This task covers:
a. Removal b. Installation
INITIAL SETUP:
Tools
General mechanic’s tool kit: autom.otive (Appendix B, Item 1)
Maintenance and repair shop equipment: automotive (Appendix B, Item 2)
Puller kit (Appendix B, Item 157)
hlaterials/Parts
Cotter pin (Appendix G, Item 35)
hlanual References
TM 9-2320-387-10 TM 9-2320-387-24P
Equipment Condition
Front of vehicle raised and supported (para. 8-2).
hlaintenance Level
Unit
1. Remove cotter pin (8), slotted nut (7), and washer (6) from tie rod end (4) and geared hub (5). Discard cotter pin (8).
2. Using puller, remove tie rod end (4) from geared hub (51.
NOTE Note number of threads exposed on each tie rod end for installation, Approximately the same number of threads should be exposed on each tie rod end.
3. Loosen nut (91, capscrew (31, clamp (2), and tie rod end (4) from adjusting sleeve (1).
b. Installation
CAUTION Ensure clamp faces halfshaft or damage to equipment may result.
1. Install tie rod end (4) into sleeve (1) with clamp (21, capscrew (31, and nut (91.
CAUTION Do not loosen slotted nut to install cotter pin. Doing this may result in damage to equipment.
2. Install tie rod end 70 lb-R (95 Nom).
(4) on geared hub (5) with washer (6) and slotted nut (71. Tighten slotted nut (7) to
3. Install cotter pin (8) in slotted nut (7).
a-44
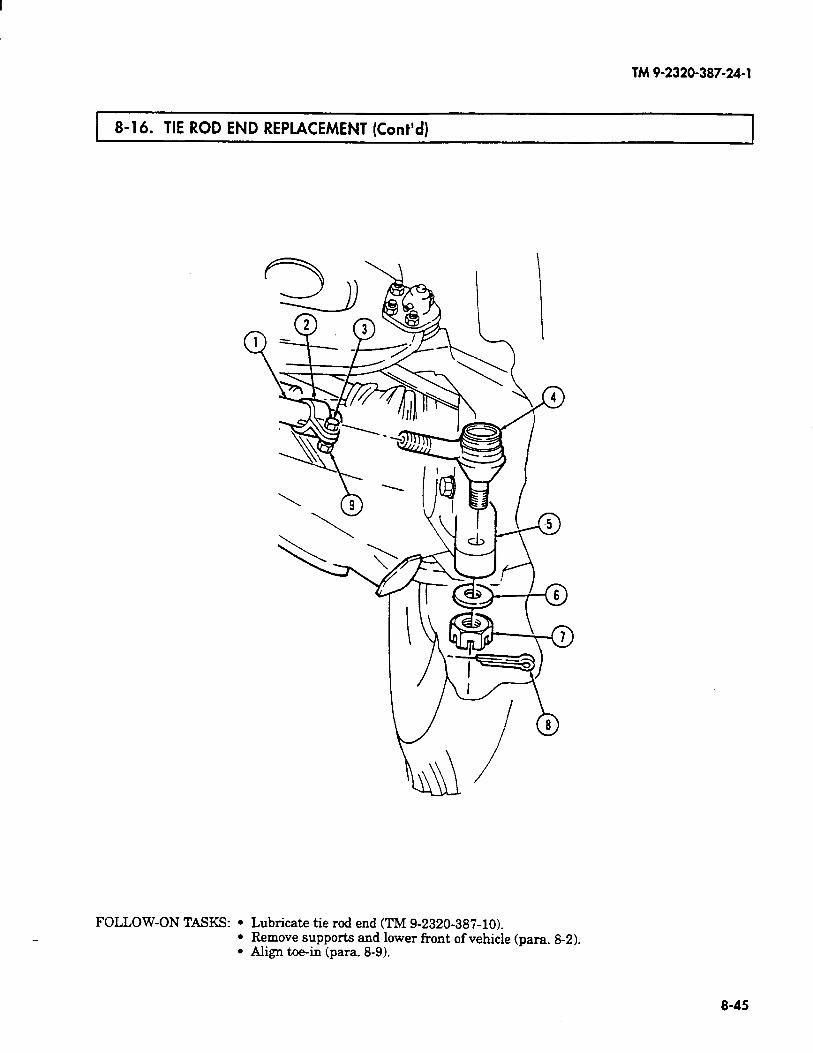
TM9-2320-387-24-l
8-16. TIE ROD END REPLACEMENT (Cont’d)
FOLLOW-ON TASKS: l Lubricate tie rod end (TM 9-2320-387-10). l Remove supports and lower front of vehicle (para. 8-2). l Align toe-in (para. 8-9).
8-45

TM 9-2320-387-24-l
8-17. IDLER ARM MAINTENANCE
This task covers:
a. Removal b. Installation
c Inspection
INITIAL SETUP:
Tools
?&al mechanic’s tool kit: automotive (Appendix B, Item 11
Maintenance and repair shop equipment: automotive (Appendix B, Item 21
Puller kit (Appendix B, Item 157) Spring scale, dial indicating (Appendix B, Item 2)
Materials/Parts Cotter pin (Appendix G, Item 351
Manual References
TM 9-2320-387-10 TM 9-2320-387-24P
Equipment Condition Front of vehicle raised and supported (para. 8-2).
Maintenance Level
Unit
p7iziq 1. Remove cotter pin (1) and slotted nut (8) from idler arm (7) and center link (2). Discard cotter
pin (1).
2. Using puller, disconnect center link (2) from idler arm (71.
3. Remove two nuts (61, washers (4), capscrews (3), washers (41, and idler arm (7) from frame (5).
b. Installation
1. Install idler arm (7) on frame (5) with two washers (41, capscrews (3), washers (4)‘ and nuts (6). Tighten nuts (6) to 60 lb-ft (81 N=m).
2. Install idler arm (7) on center link (2) with slotted nut (8). Tighten slotted nut (8) to 80 lb-ft (108 N-m).
CAUTION Do not loosen slotted nut to install cotter pin. Doing this may result in damage to equipment.
3. Install cotter pin (1) in slotted nut (8).
8-46
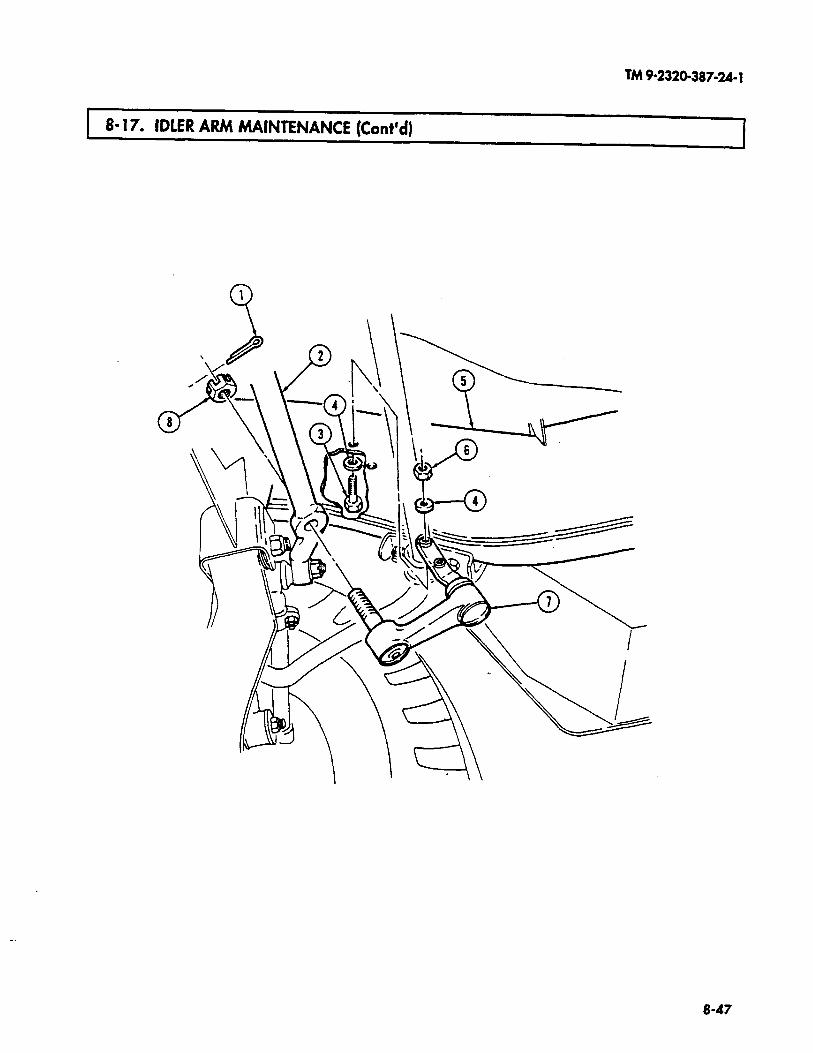
lM9-2320-387-24-l
8- 17. IDLER ARM MAINTENANCE (Cont’d)
8-47
I
TM 9-2320-387-24-l
8-l 7. IDLER ARM MAINTENANCE (Cont’d)
c. Inspection
1. 2.
3. 4. 5.
6.
7.
8. 9.
10.
NOTE Set front wheels in a straight-ahead position.
Check idler arm (5) for visible damage, such as breaks and cracks. If damaged, replace idler arm (51. Check capscrews (41 for looseness of idler arm bracket (3) on frame (6). Tighten capscrews (4) if loose.
NOTE A flat steel plate or piece of scrap metal is required for step 3.
Secure a flat steel plate or piece of scrap metal to front crossmember (2). Pull center link (1) downward to seat ball and socket of idler arm (5). Using flat surface on center link (1) as a guide, mark first reference line on steel plate or scrap metal, as shown in figure A Position spring scale (7) on center link (1) and pull in an upward direction to obtain a 25 lb (11 kg) reading on spring scale (7).
NOTE Maintain 25 lb (11 kg) reading on spring scale to perform step 7.
Using flat surface on center link (11 as a guide, mark second reference line on steel plate or scrap metal, as shown in figure B. Remove spring scale (7) from center link (1). Remove clamp and steel plate or scrap metal from front crossmember (2). Measure distance between first and second reference lines on steel plate or scrap metal. If measurement exceeds 0.25 in. (6mm), replace idler arm (5).
8-48
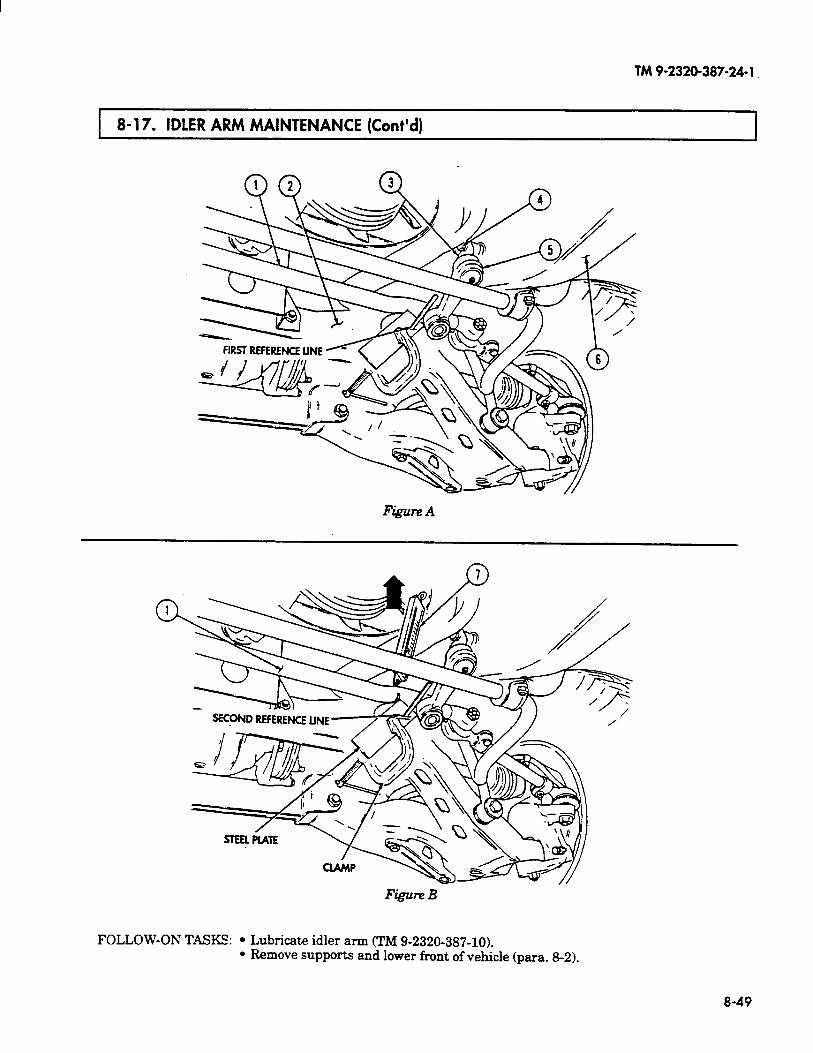
TM9-2320-387-24-l
1 8-17. IDLER ARM MAINTENANCE (Cont’d)
Figure B
FOLLOW-ON TASKS: l Lubricate idler arm (TM 9-2320-387-10). l Remove supports and lower front of vehicle tpara. 8-2).
8-49

I
TM 9-2320-387-24-l
I 8- 18. STEERING COLUMN REPLACEMENT
This task covers:
a. Removal b. Installation
INITIAL SETUP:
Tool.5
General mechanic’s tool kit: automotive (Appendix B, Item 1)
Maintenance and repair shop equipment: automotive (Appendix B, Item 2)
Materials/Parts Two locknuts (Appendix G, Item 116) Locknut (Appendix G, Item 152) Locknut (Appendix G, Item 141) Locknut (Appendix G, Item 156) Lockwasher (Appendix G, Item 205) Nut and lockwasher assembly
(Appendix G, Item 250)
Manual References
TM 9-2320-387-24P
Equipment Condition l Steering wheel removed (para. 8-12). l Directional signal control removed
(para. 4-63).
Maintenance Level
Unit
1 a. Removal 1
1.
2.
3.
4.
5.
6.
Remove locknut (11, lockwasher (21, washer (31, and pin (5) from steering column (6) and mounting bracket (4). Discard lockwasher (2) and locknut (1). Remove nut and lo&washer assembly (171, screw (71, and ground wire 57C (8) from steering column (6). Discard nut and lockwasher assembly (17).
Remove locknut (lo), washer (ll), capscrew (13), washer (ll), and two brackets (9) from steering column (6). Discard locknut (10). Disconnect lead 25A (21) from steering column (6).
NOTE When performing step 5, temporarily install steering wheel and turn steering column to gain access to steering column inter- mediate shaft mounting hardware.
Remove locknut (12), washer (141, capscrew (151, washer (14), and intermediate shaft (16) from steering column (6). Discard locknut (12).
Remove two locknuts (201, washers (18), screws (191, washers (181, and steering column (6) from mounting bracket (4). Discard locknuts (20).
8-50

lM9-2320-387-24-l
8- 18. STEERING COLUMN REPLACEMENT (Co&d)
8-51
TM 9-2320-387-24-l
1 8-l 8. STEERING COLUMN REPLACEMENT (Cont’d)
b. Installation
1.
2.
3. 4.
Install steering column (6) on mounting bracket (4) with two washers (181, screws (191, washers (181, and locknuts (20). Tighten locknuts (20) finger-tight. Install intermediate shaft (16) on steering column (6) with washer (14), capscrew (1% washer (141, and locknut (12). Tighten locknut (12) to 40-50 lb-ft (54-68 Nom). Connect lead 25A (21) to steering column (6). Install two brackets (9) on steering column (6) with washer (111, capscrew (131, washer (111, and locknut (10).
5. Install ground wire 57C (8) on steering column (6) with screw (7) and nut and lo&washer assembly (17).
NOTE Ensure washer and pm locking tabs are in the UP position.
6.
7.
8.
Install steering column (6) on mounting bracket (41 with pin (51, washer (31, lockwasher (21, and locknut (1). Tighten locknut (1) finger-tight. Position steering column (6) in upright position and tighten locknut (1) to 12-15 lb-R (16-20 Nom).
Tighten two locknuts (20) to 9-11 lb-R (12-15 Nom).
8-52
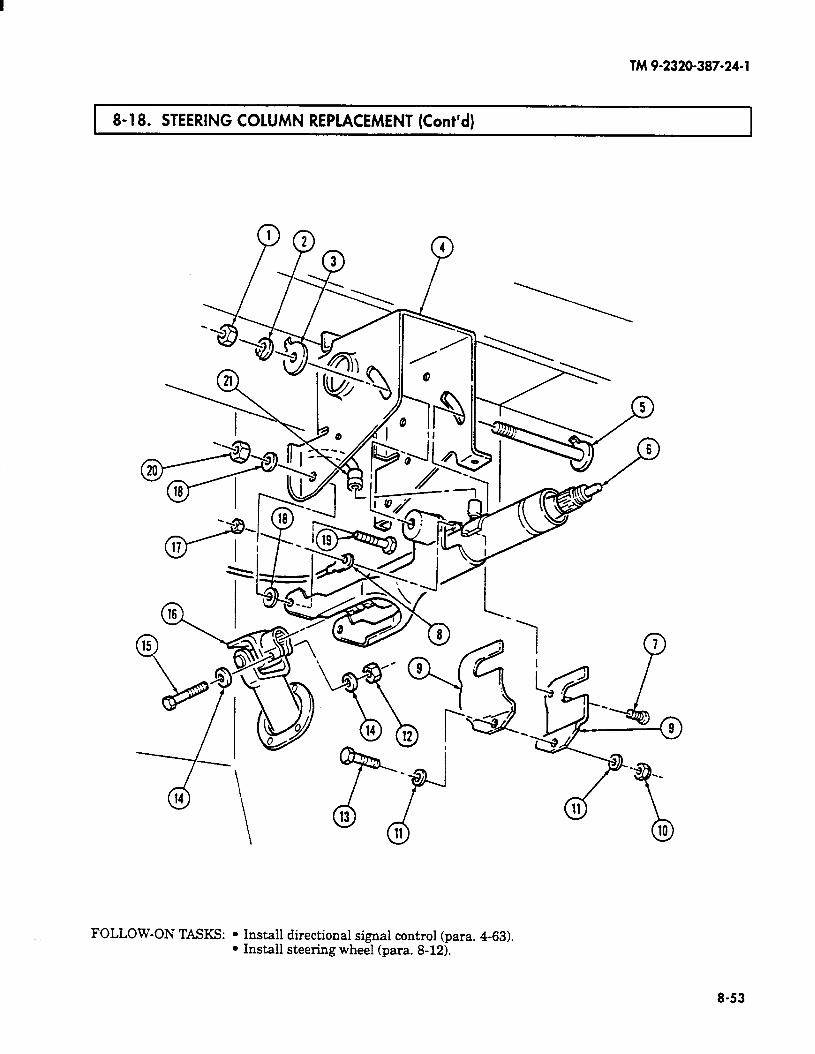
TM9-2320-387-24-l
8-18. STEERING COLUMN REPLACEMENT (Cont’d)
FOLLOW-ON TASKS: l Install directional signal control (para. 4-63). l Install steering wheel (para. 8-12).
8-53
TM 9-2320-387-24-l
8-19. INTERMEDIATE STEERING SHAFT REPLACEMENT
This task covers:
a. Removal b. Installation
INITIAL SETUP:
Tools
General mechanic’s tool kit: automotive (Appendix B, Item 11
Maintenance and repair shop equipment: automotive (Appendix B, Item 2)
Materials/Parts Two locknuts (Appendix G, Item 141)
Manual References
TM 9-2320-387-10 TM 9-2320-387-24P
Maintenance Level
Unit
NOTE Ensure front wheels are in straight-ahead position while removing and installing intermediate steering shaft.
a. Removal
1. Remove locknut (61, washer (51, capscrew (81, and washer (5) from intermediate steering shaft (4) and steering gear (71. Discard locknut (6).
2. Remove locknut (21, washer (31, capscrew (91, washer (3), and steering shaft (4) from steering column (11. Discard locknut (21.
-1
1. Install intermediate steering shaft (4) on steering gear (7) with washer (5), capscrew (81, washer (51, and locknut (61. Tighten locknut (61 to 40-50 lb-ft (54-68 N*m).
2. Install steering sh& (4) on steering column (1) with washer (31, capscrew (91, washer (31, and locknut (2). Tighten locknut (2) to 40-50 lb-ft (54-68 N-ml.
8-54
TM 9-2320-387-24-l
8-19. INTERMEDIATE STEERING SHAFT REPLACEMENT (Cont’d)
- II
-v
I
FOLLOW-ON TASK: Lubricate steering shaft CTM 9-2320-387-10).
8-55
TM 9-2320-387-24- 1
8-20. STEERING GEAR REPLACEMENT
This task covers:
a. Removal b. Installation
INITIAL SETUP:
Tools General mechanic’s tool kit:
automotive (Appendix B, Item 1) Maintenance and repair shop equipment:
automotive (Appendix B, Item 2)
Materials/Parts Locknut (Appendix G, Item 141) Lockwasher (Appendix G, Item 240) Three lockwashers (Appendix G, Item 234)
Manual References TM 9-2320-387-10 TM 9-2320-387-24P
Equipment Condition l Hood raised and secured (TM 9-2320-387-10). l Battery ground cables disconnected (para. 4-68).
Maintenance Level Unit
1 a. Removal 1
CAUTION
1.
2. 3.
4. 5. 6.
Cover or plug all open lines and connections immediately after disconnection to prevent contamination. Remove all covers or plugs prior to connection.
NOTE l Ensure front wheels are in the straight-ahead position.
l Have drainage container ready to catch fluid. Disconnect two power steering lines (4) from steering gear (10).
Turn steering wheel left and right several times to bleed off power steering fluid.
Remove intermediate shaft locknut cl), washer (21, capscrew (51, and washer (2) and disconnect intermediate shaft (3) from steering gear (10). Discard locknut (1).
Remove nut (14) and lockwasher (13) from pitman arm (12). Discard lockwasher (13).
Remove pitman arm (12) from shaft (11).
Remove three capscrews (81, lockwashers (7), washers (61, and steering gear (10) from frame (9). Discard lockwashers (7).
8-56
TM9-2320-387-24-l
8-20. STEERING GEAR REPLACEMENT (Cont’d) 1
8-57
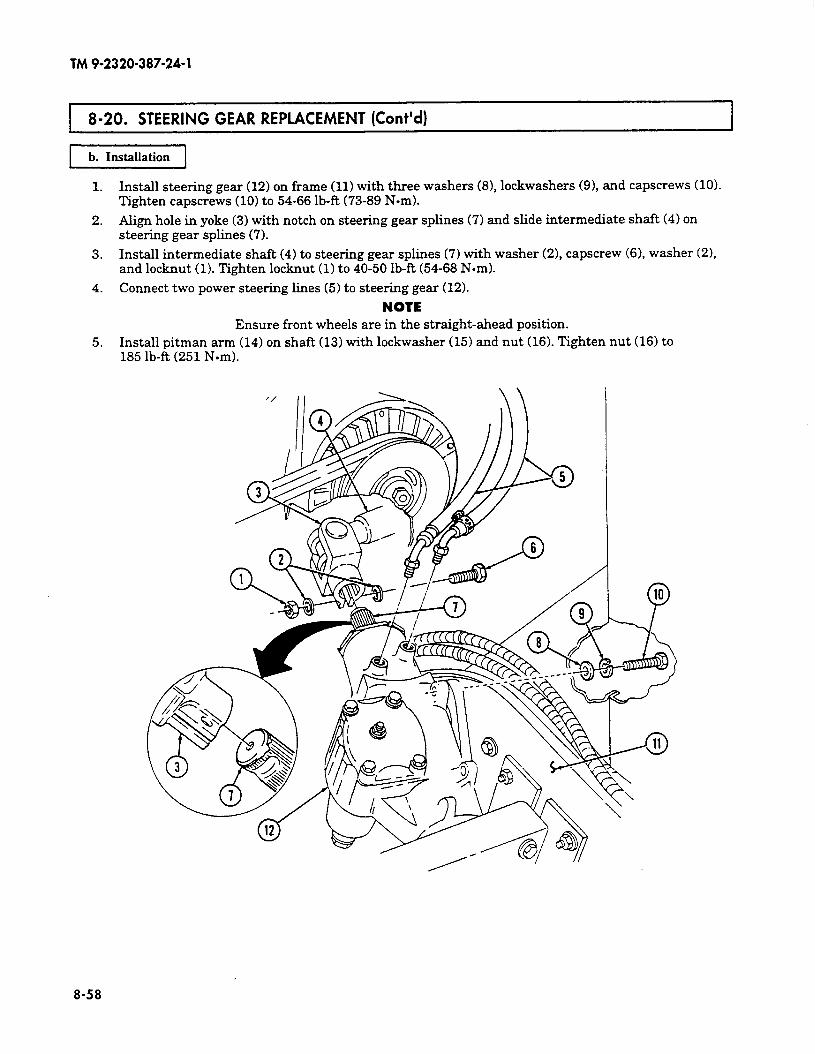
TM 9-2320-387-24-l
8-20. STEERING GEAR REPLACEMENT (Cont’d)
1. Install steering gear (12) on frame (11) with three washers (81, lockwashers (91, and capscrews (10). Tighten capscrews (10) to 54-66 lb-R (73-89 N-m).
2. Align hole in yoke (3) with notch on steering gear splines (7) and slide intermediate shaft (4) on steering gear splines (7).
3. Install intermediate shaft (4) to steering gear splines (71 with washer (2), capscrew (61, washer (21, and locknut (1). Tighten locknut (1) to 40-50 lb-R (54-68 N-ml.
4. Connect two power steering lines (5) to steering gear (12).
NOTE Ensure front wheels are in the straight-ahead position.
5. Install pitman arm (14) on shaft (13) with lockwasher (151 and nut (16). Tighten nut (161 to 185 lb-R (251 N-m).
8-58
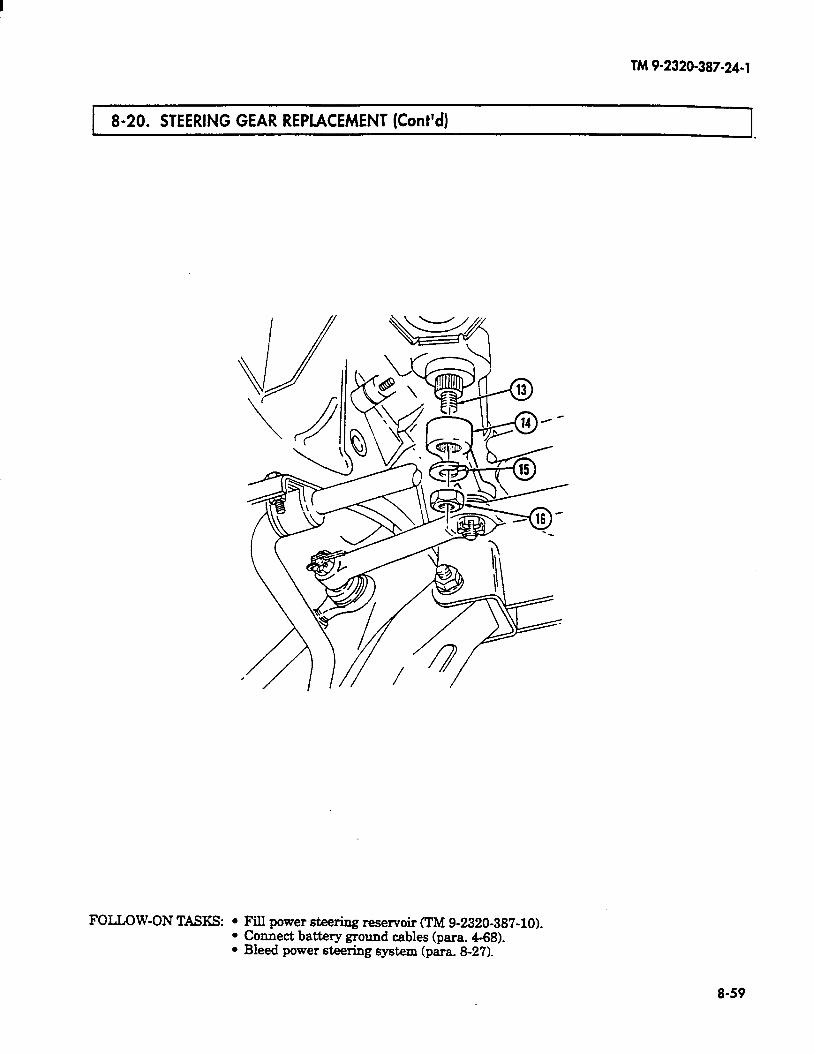
TM9-2320-387-24-l
8-20. STEERING GEAR REPLACEMENT (Cont’d)
FOLLOW-ON TASKS: l Fill power steering reservoir VRvf 9-2320-387-10). l Connect battery ground cables (para. 4-68). l Bleed power steering system (para. 8-27).
8-59
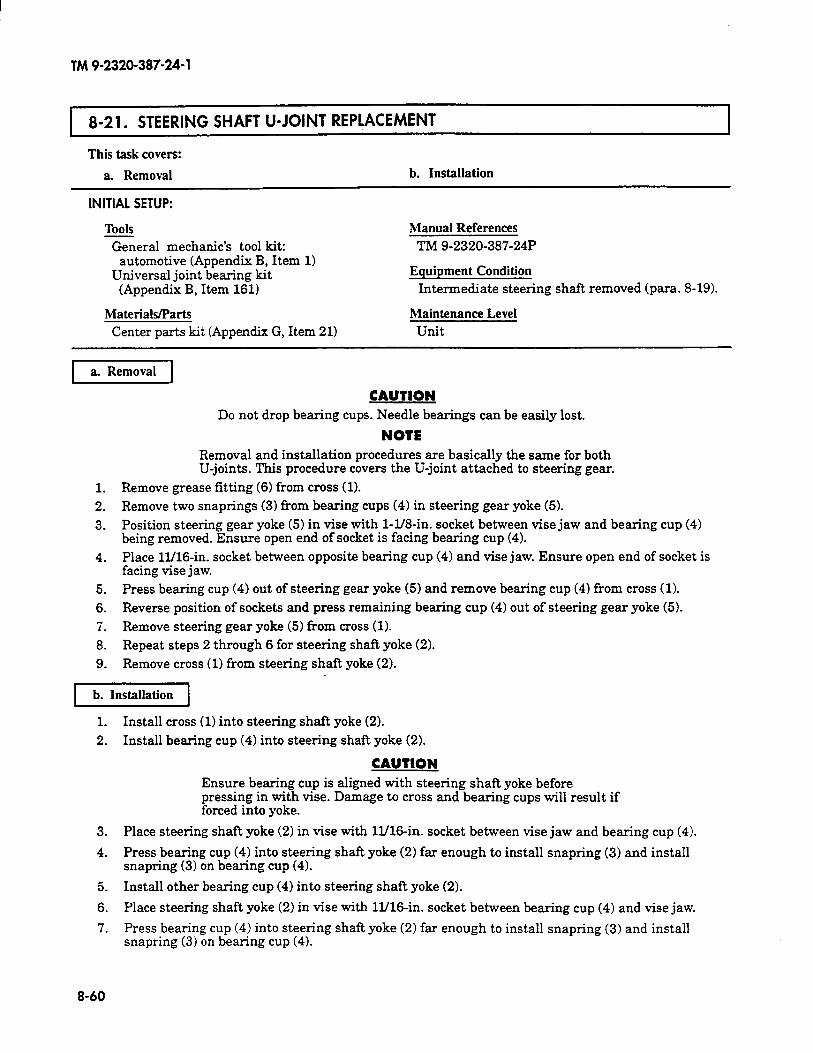
TM 9-2320-387-24- 1
1 8-21. STEERING SHAFT U-JOINT REPLACEMENT I
This task covers:
a. Removal b. Installation
INITIAL SETUP:
Tools General mechanic’s tool kit:
automotive (Appendix B, Item 1) Universal joint bearing kit
(Appendix B, Item 161)
Materials/Parts Center parts kit (Appendix G, Item 211
Manual References TM 9-2320-387-24P
Equipment Condition Intermediate steering shaft removed (para. 8-19).
Maintenance Level Unit
1 a. Removal 1
CAUTION Do not drop bearing cups. Needle bearings can be easily lost.
NOTE Removal and installation procedures are basically the same for both U-joints. This procedure covers the U-joint attached to steering gear.
1. Remove grease fitting (6) from cross (1). 2. Remove two snaprings (3) from bearing cups (4) in steering gear yoke (5). 3. Position steering gear yoke (5) in vise with l-l/8-in. socket between vise jaw and bearing cup (41
being removed. Ensure open end of socket is facing bearing cup (4).
4. Place ll/16-in. socket between opposite bearing cup (4) and vise jaw. Ensure open end of socket is facing vise jaw.
5. Press bearing cup (4) out of steering gear yoke (5) and remove bearing cup (4) from cross (1).
6. Reverse position of sockets and press remaining bearing cup (4) out of steering gear yoke (5).
7. Remove steering gear yoke (5) from cross (1). 8. Repeat steps 2 through 6 for steering shaft yoke (2).
9. Remove cross (1) from steering shaft yoke (2).
b. Installation
1. Install cross (1) into steering shaft yoke (2).
2. Install bearing cup (4) into steering shaft yoke (2).
CAUTION Ensure bearing cup is aligned with steering shaft yoke before pressing in with vise. Damage to cross and bearing cups will result if forced into yoke.
3. Place steering shaft yoke (2) in vise with W&in. socket between vise jaw and bearing cup (4).
4. Press bearing cup (4) into steering shaft yoke (21 far enough to install snapring (3) and install snapring (3) on bearing cup (4).
5. Install other bearing cup (4) into steering shaft yoke (2).
6. Place steering shaft yoke (2) in vise with D./S-in. socket between bearing cup (4) and vise jaw.
7. Press bearing cup (4) into steering shaft yoke (21 far enough to install snapring (3) and install snapring (3) on bearing cup (4).
8-60
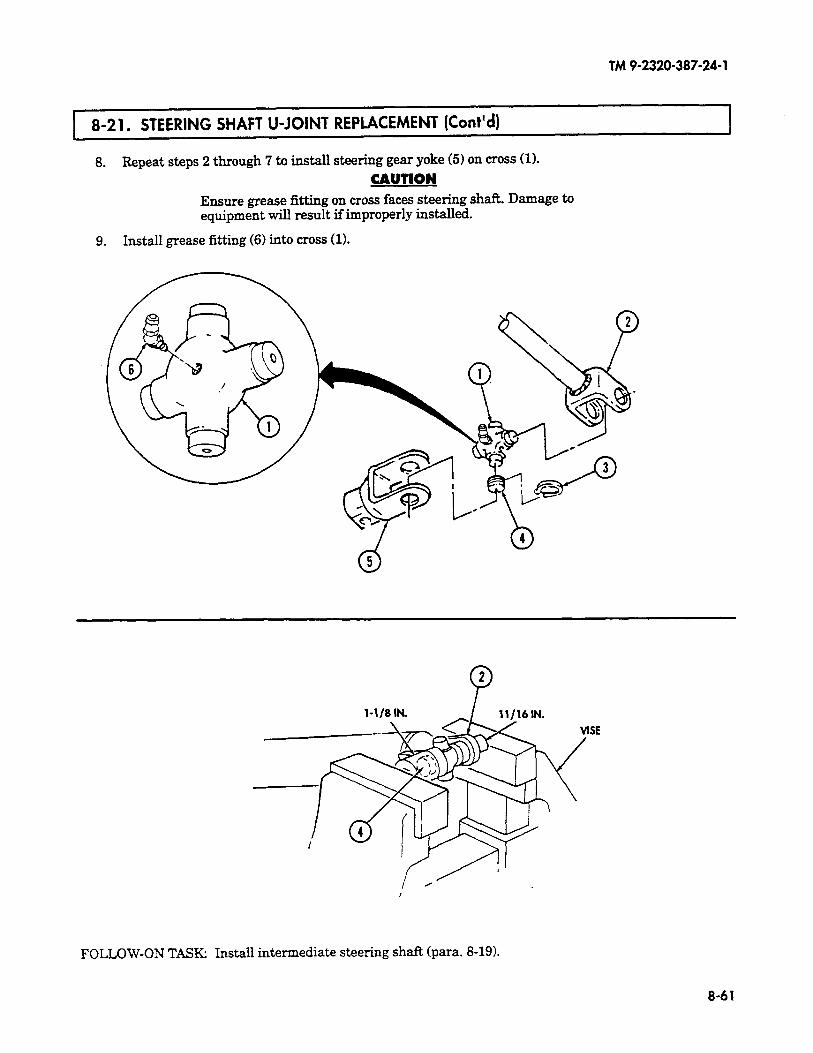
TM 9-2320-387-24-l
8-21. STEERING SHAFT U-JOINT REPLACEMENT (Cont’d)
8. Repeat steps 2 through 7 to install steering gear yoke (5) on cross (1).
CAUTION Ensure grease fitting on cross faces steering shaft. Damage to equipment will result if improperly installed.
9. Install grease fitting (6) into cross (1).
-- SE
FOLLOW-ON TASK: Install intermediate steering shaft (para. 8-19).
8-61
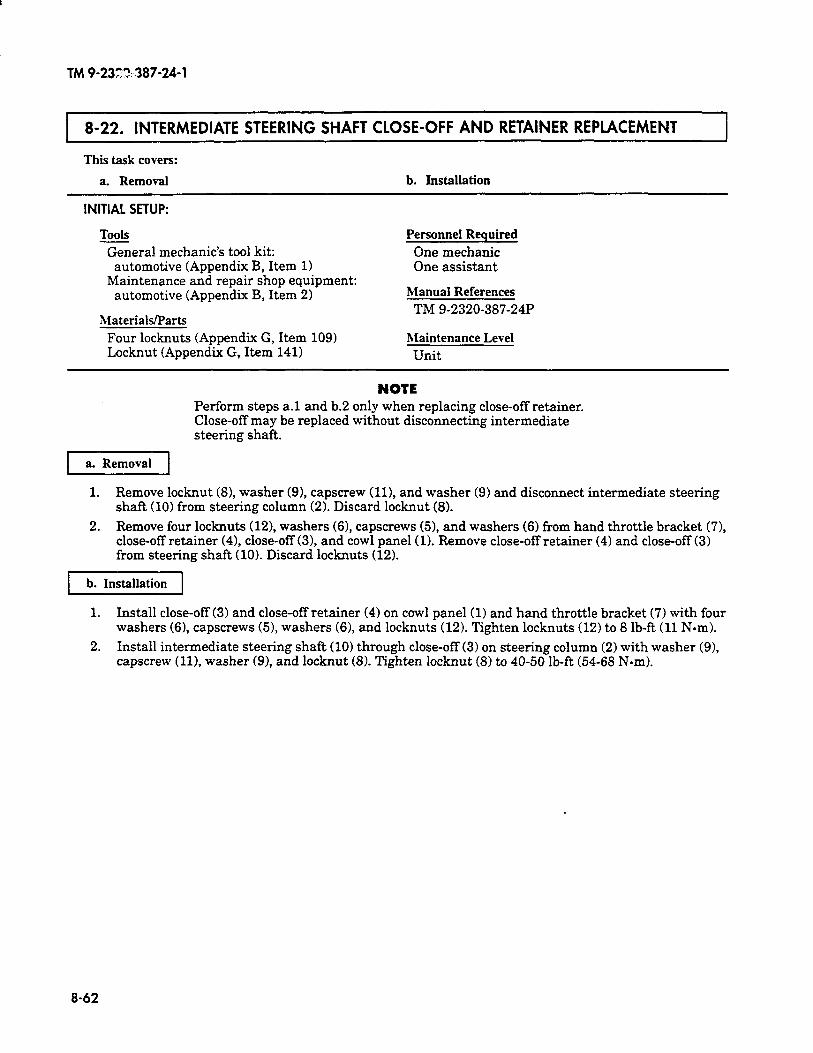
I
TM 9-23X-387-24-1
8-22. INTERMEDIATE STEERING SHAFT CLOSE-OFF AND RETAINER REPLACEMENT I This task covers:
a. Removal b. Installation
INITIAL SETUP:
Tools
%&era1 mechanic’s tool kit: automotive (Appendix B, Item 1)
Maintenance and repair shop equipment: automotive (Appendix B, Item 2)
Materials/Parts
Personnel Required
One mechanic One assistant
Manual References
TM 9-2320-387-24P
Four locknuts (Appendix G, Item 109) Maintenance Level Locknut (Appendix G, Item 141) Unit
NOTE Perform steps a.1 and b.2 only when replacing close-off retainer. Close-off may be replaced without disconnecting intermediate steering shaft.
va.Removal)
1. Remove locknut (81, washer (91, capscrew (111, and washer (9) and disconnect intermediate steering shaft (10) from steering column (2). Discard locknut (8).
2. Remove four locknuts (12), washers (61, capscrews (5), and washers (6) from hand throttle bracket (71, close-off retainer (41, close-off (3), and cowl panel (1). Remove close-off retainer (4) and close-off (3) from steering shaft (10). Discard locknuts (12).
b. Installation
1. Install close-off (3) and close-off retainer (4) on cowl panel (1) and hand throttle bracket (7) with four washers (61, capscrews (51, washers (61, and locknuts (12). Tighten locknuts (12) to 8 lb-ft (11 Nom).
2. Install intermediate steering shaft (10) through close-off (3) on steering column (2) with washer (91, capscrew (ll), washer (91, and locknut (8). Tighten locknut (8) to 40-50 lb-ft (54-68 N-m).
8-62
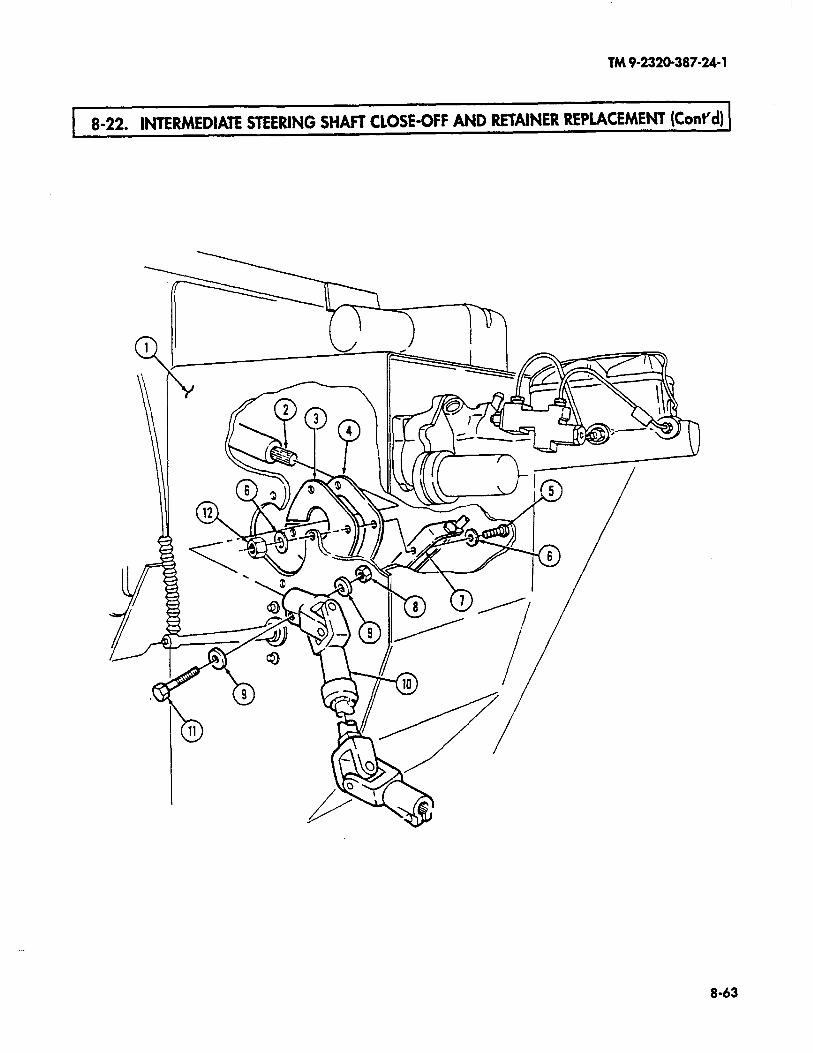
TM9-2320-387-24-l
8-22. INTERMEDIATE STEERING SHAFT CLOSE-OFF AND RETAINER REPLACEMENT (Co&d)
8-63
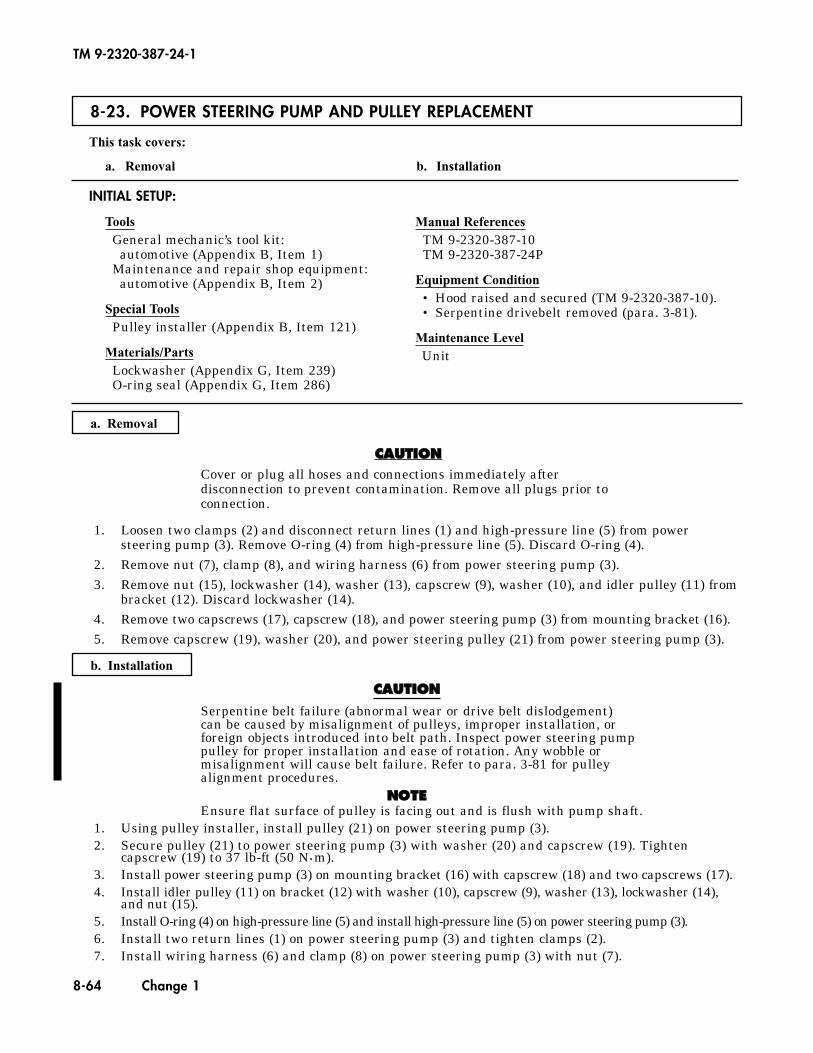
INITIAL SETUP:
ToolsGeneral mechanic’s tool kit:
automotive (Appendix B, Item 1)Maintenance and repair shop equipment:
automotive (Appendix B, Item 2)
Special ToolsPulley installer (Appendix B, Item 121)
Materials/PartsLockwasher (Appendix G, Item 239)O-ring seal (Appendix G, Item 286)
Manual ReferencesTM 9-2320-387-10TM 9-2320-387-24P
Equipment Condition• Hood raised and secured (TM 9-2320-387-10).• Serpentine drivebelt removed (para. 3-81).
Maintenance LevelUnit
8-23. POWER STEERING PUMP AND PULLEY REPLACEMENT
This task covers:
a. Removal b. Installation
TM 9-2320-387-24-1
a. Removal
CCAAUUTTIIOONNCover or plug all hoses and connections immediately afterdisconnection to prevent contamination. Remove all plugs prior toconnection.
1. Loosen two clamps (2) and disconnect return lines (1) and high-pressure line (5) from powersteering pump (3). Remove O-ring (4) from high-pressure line (5). Discard O-ring (4).
2. Remove nut (7), clamp (8), and wiring harness (6) from power steering pump (3).3. Remove nut (15), lockwasher (14), washer (13), capscrew (9), washer (10), and idler pulley (11) from
bracket (12). Discard lockwasher (14).4. Remove two capscrews (17), capscrew (18), and power steering pump (3) from mounting bracket (16).5. Remove capscrew (19), washer (20), and power steering pulley (21) from power steering pump (3).
CCAAUUTTIIOONN
Serpentine belt failure (abnormal wear or drive belt dislodgement)can be caused by misalignment of pulleys, improper installation, orforeign objects introduced into belt path. Inspect power steering pumppulley for proper installation and ease of rotation. Any wobble ormisalignment will cause belt failure. Refer to para. 3-81 for pulleyalignment procedures.
NNOOTTEEEnsure flat surface of pulley is facing out and is flush with pump shaft.
1. Using pulley installer, install pulley (21) on power steering pump (3).2. Secure pulley (21) to power steering pump (3) with washer (20) and capscrew (19). Tighten
capscrew (19) to 37 lb-ft (50 N•m).3. Install power steering pump (3) on mounting bracket (16) with capscrew (18) and two capscrews (17).4. Install idler pulley (11) on bracket (12) with washer (10), capscrew (9), washer (13), lockwasher (14),
and nut (15).5. Install O-ring (4) on high-pressure line (5) and install high-pressure line (5) on power steering pump (3).6. Install two return lines (1) on power steering pump (3) and tighten clamps (2).7. Install wiring harness (6) and clamp (8) on power steering pump (3) with nut (7).
b. Installation
8-64 Change 1
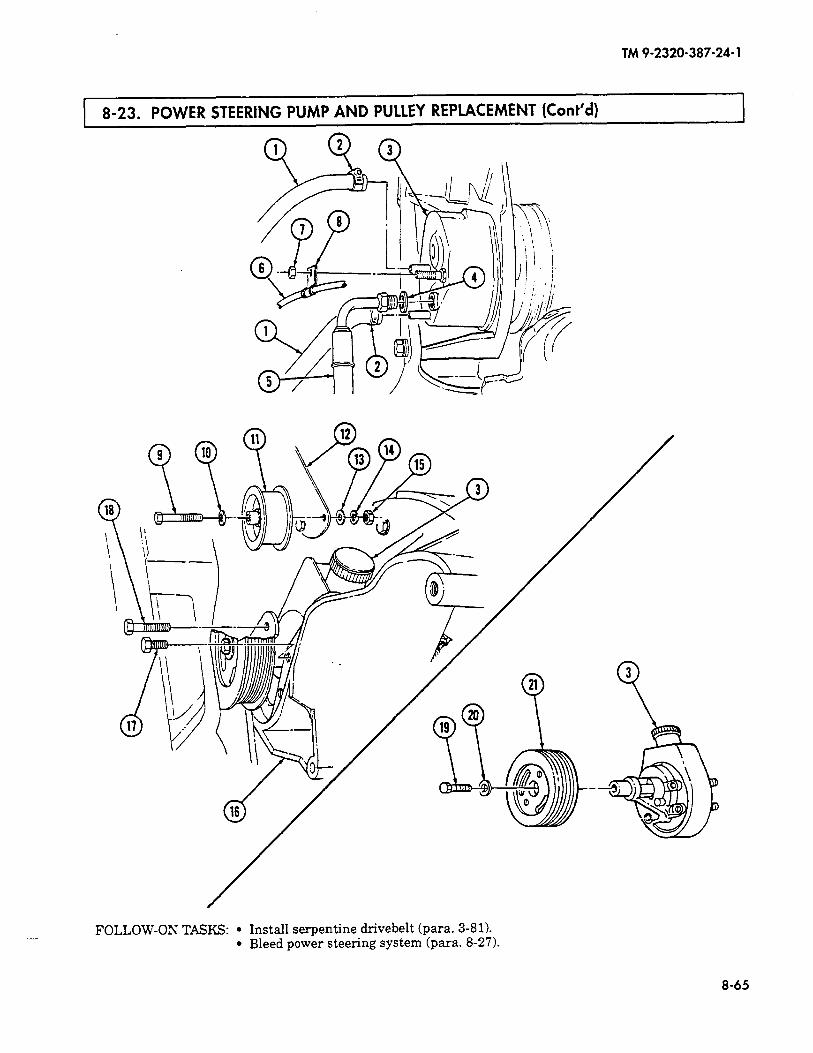
TM9-2320-387-24-l
8-23. POWER STEERING PUMP AND PULLEY REPLACEMENT (Cont’d) I
- FOLLOW-ON TASKS: l Install serpentine drivebelt (para. 3-81). l Bleed power steering system (para. 8-27).
8-65
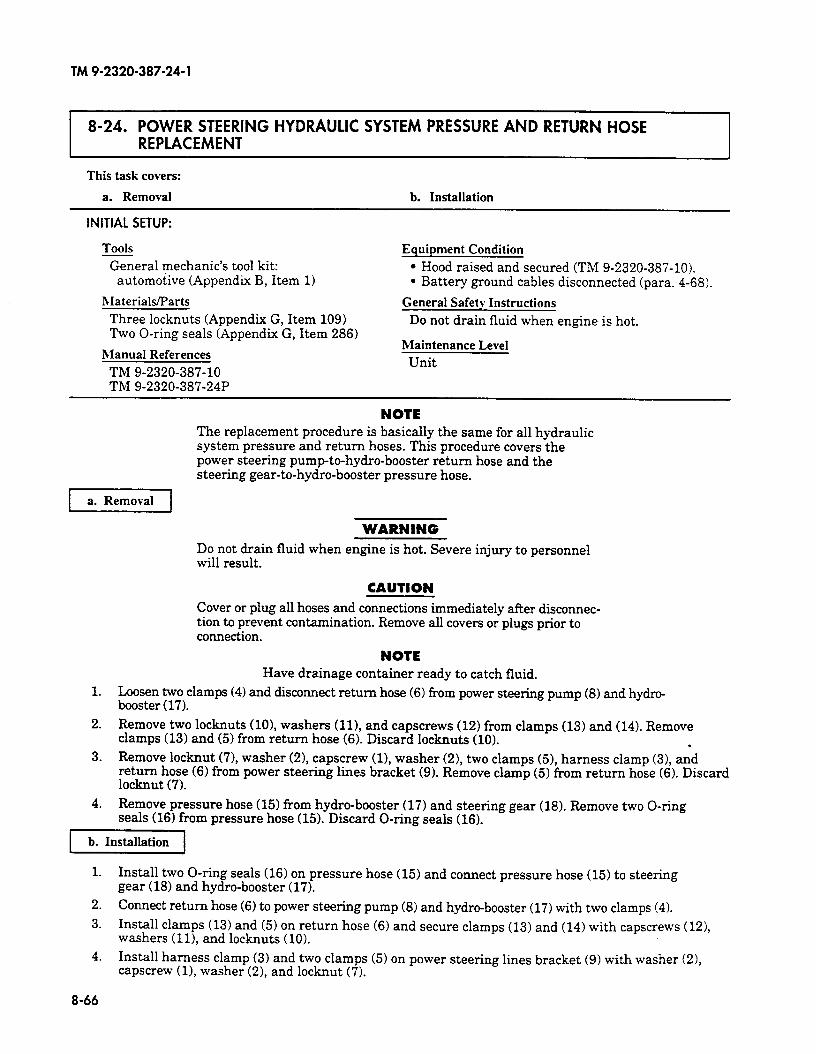
TM 9-2320-387-24-l
8-24. POWER STEERING HYDRAULIC SYSTEM PRESSURE AND RETURN HOSE REPLACEMENT
This task covers:
a. Removal b. Installation
INITIAL SETUP:
Tools
General mechanic’s tool kit: automotive (Appendix B, Item 1)
bIaterials/Parts
Three locknuts (Appendix G, Item 109) Two O-ring seals (Appendix G, Item 286)
Manual References
TM 9-2320-387-10 TM 9-2320-387-24P
Equipment Condition
l Hood raised and secured (TM 9-2320-387-10). l Battery ground cables disconnected (para. 4-68).
General Safety Instructions
Do not drain fluid when engine is hot.
Maintenance Level
Unit
NOTE The replacement procedure is basically the same for all hydraulic system pressure and return hoses. This procedure covers the power steering pump-to-hydro-booster return hose and the steering gear-to-hydro-booster pressure hose.
I/
WARNING Do not drain fluid when engine is hot. Severe injury to personnel will result.
CAUTION Cover or plug all hoses and connections immediately after disconnec- tion to prevent contamination. Remove aII covers or plugs prior to connection.
NOTE
1.
2.
3.
4.
Have drainage container ready to catch fluid.
Loosen two clamps (4) and disconnect return hose (6) from power steering pump (8) and hydro- booster (17).
Remove two locknuts (101, washers (ll), and capscrews (12) from clamps (13) and (14). Remove clamps (13) and (5) from return hose (6). Discard locknuts (10). . Remove locknut (7), washer (21, capscrew cl), washer (21, two clamps (5), harness clamp (31, and return hose (6) from power steering lines bracket (9). Remove clamp (5) from return hose (6). Discard locknut (7).
Remove pressure hose (15) from hydro-booster (17) and steering gear (18). Remove two O-ring seals (16) from pressure hose (15). Discard O-ring seals (16).
b. Installation
1. Install two O-ring seals (16) on pressure hose (15) and connect pressure hose (15) to steering gear (18) and hydro-booster (17).
2. Connect return hose (6) to power steering pump (8) and hydro-booster (17) with two clamps (4).
3. Install clamps (13) and (5) on return hose (6) and secure clamps (13) and (14) with capscrews (121, washers (111, and locknuts (10).
4. Install harness clamp (3) and two clamps (5) on power steering lines bracket (9) with washer (21, capscrew (11, washer (21, and locknut (7).
8-66
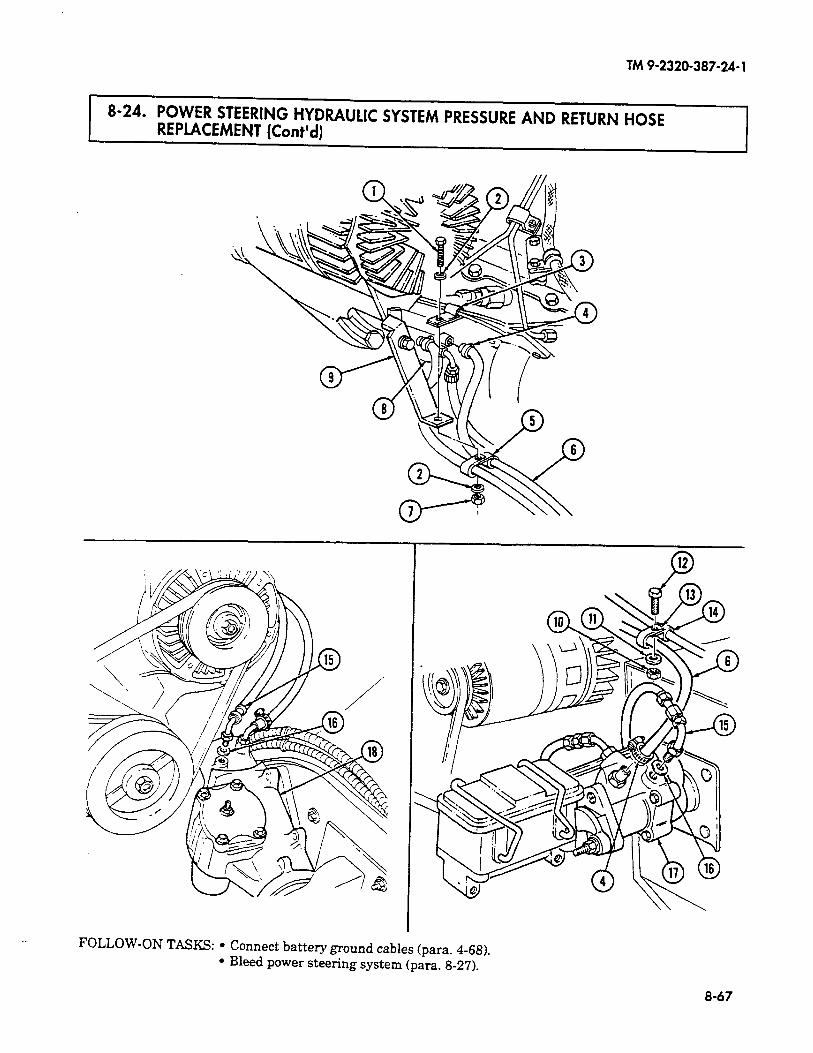
TM 9-2320-387-24-l
8-24. POWER STEERING HYDRAULIC SYSTEM PRESSURE AND RETURN HOSE REPLACEMENT (Cont’d)
._ FOLLOW-ON TASKS:. Connect battery ground cables (para. 4-68). . Bleed power steering system (para. 8-27).
8-67
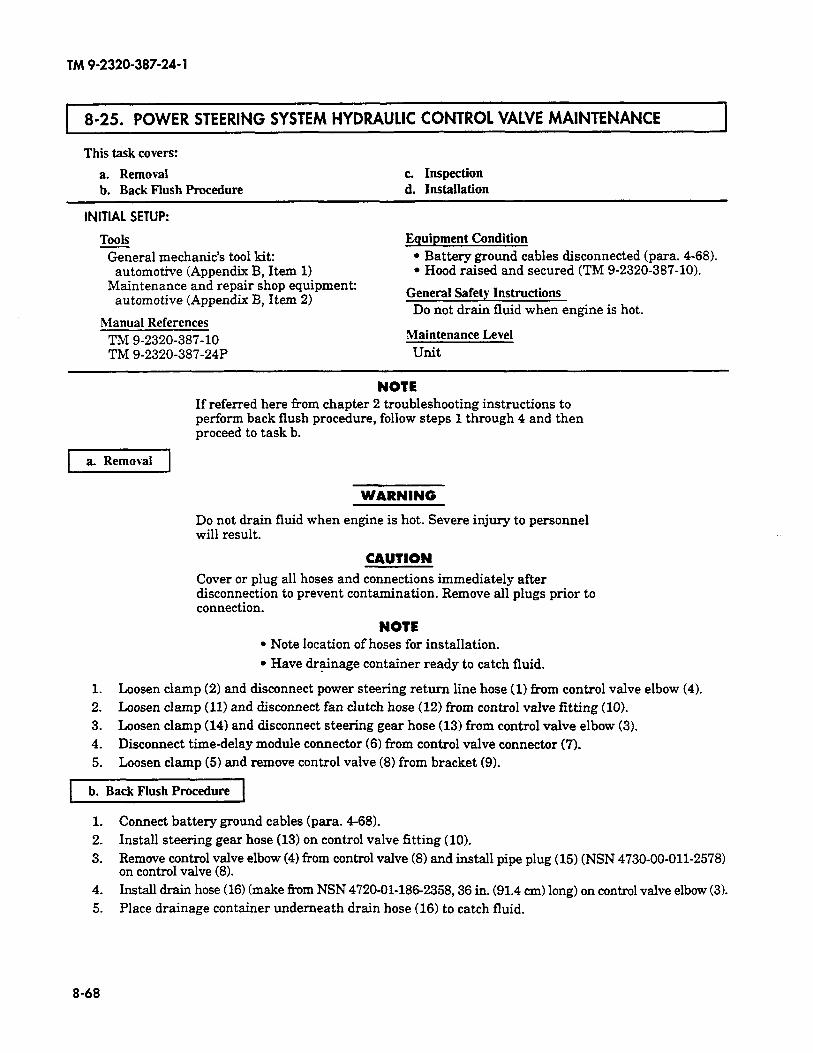
TM 9-2320-387-24- 1
i 8-25. POWER STEERING SYSTEM HYDRAULIC CONTROL VALVE MAINTENANCE
This task covers:
a. Removal b. Back Flush Procedure
c. Inspection d. Installation
INITIAL SETUP:
Tools General mechanic’s tool kit:
automotive (Appendix B, Item 1) Maintenance and repair shop equipment:
automotive (Appendix B, Item 2)
Manual References TM 9-2320-387-10 TM 9-2320-387-24P
Equipment Condition l Battery ground cables disconnected (para. 4-68). l Hood raised and secured (TM 9-2320-387-10).
General Safety Instructions Do not drain fluid when engine is hot.
Maintenance Level unit
NOTE If referred here fi-om chapter 2 troubleshooting instructions to perform back flush procedure, follow steps 1 through 4 and then proceed to task b.
WARNING
Do not drain fluid when engine is hot. Severe injury to personnel will result.
CAUTION Cover or plug all hoses and connections immediately after disconnection to prevent contamination. Remove all plugs prior to connection.
NOTE l Note location of hoses for installation.
l Have drainage container ready to catch fluid.
1. Loosen clamp (2) and disconnect power steering return line hose (1) from control valve elbow (4). 2. Loosen clamp (11) and disconnect fan clutch hose (12) from control valve fitting (10). 3. Loosen clamp (14) and disconnect steering gear hose (13) from control valve elbow (3). 4. Disconnect time-delay module connector (6) from control valve connector (7). 5. Loosen clamp (5) and remove control valve (8) from bracket (9).
b. Back Flush Procedure
1. Connect battery ground cables (para. 4-68). 2. Install steering gear hose (13) on control valve fitting (10).
3. Remove control valve elbow (4) from control valve (8) and install pipe plug (15) (NSN 4730-00-011-2578) on control valve (8).
4. Install drain hose (16) (make f?orn NSN 4720-01-1862358,36 in. (91.4 cm) long) on control valve elbow (3). 5. Place drainage container underneath drain hose (16) to catch fluid.
8-68
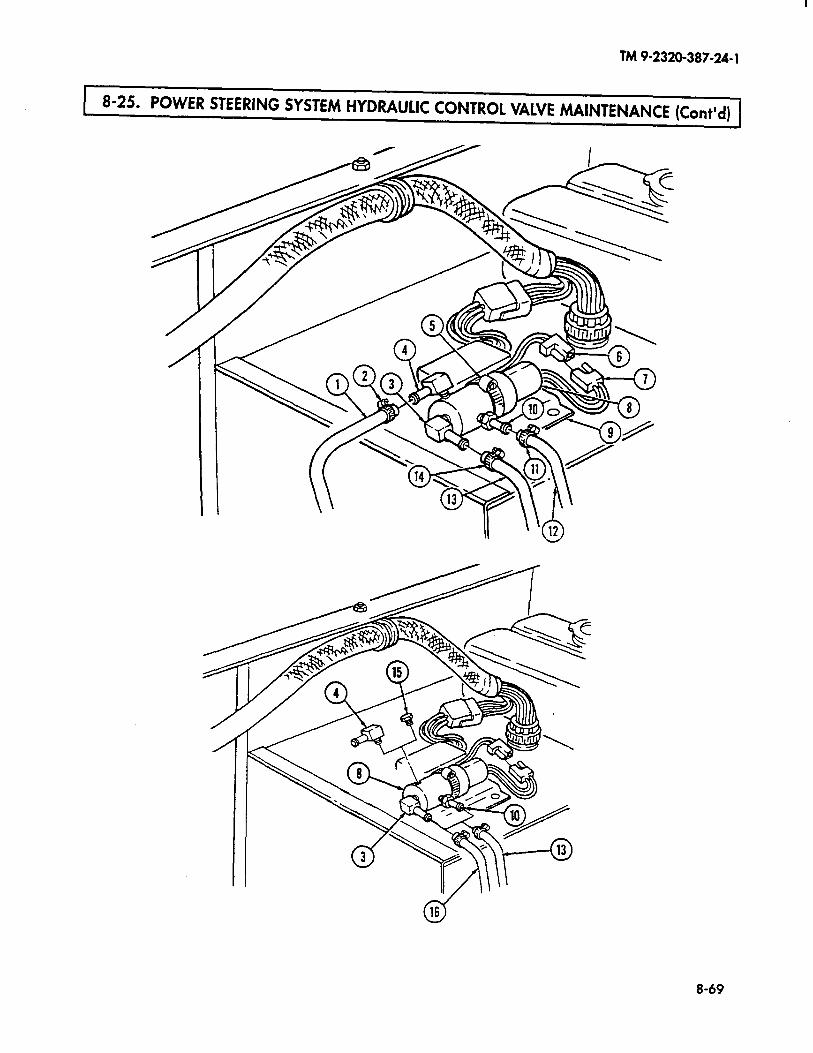
TM 9-2320-387-24-l
8-25. POWER STEERING SYSTEM HYDRAULIC CONTROL VALVE MAINTENANCE (Cont’d)
8-69
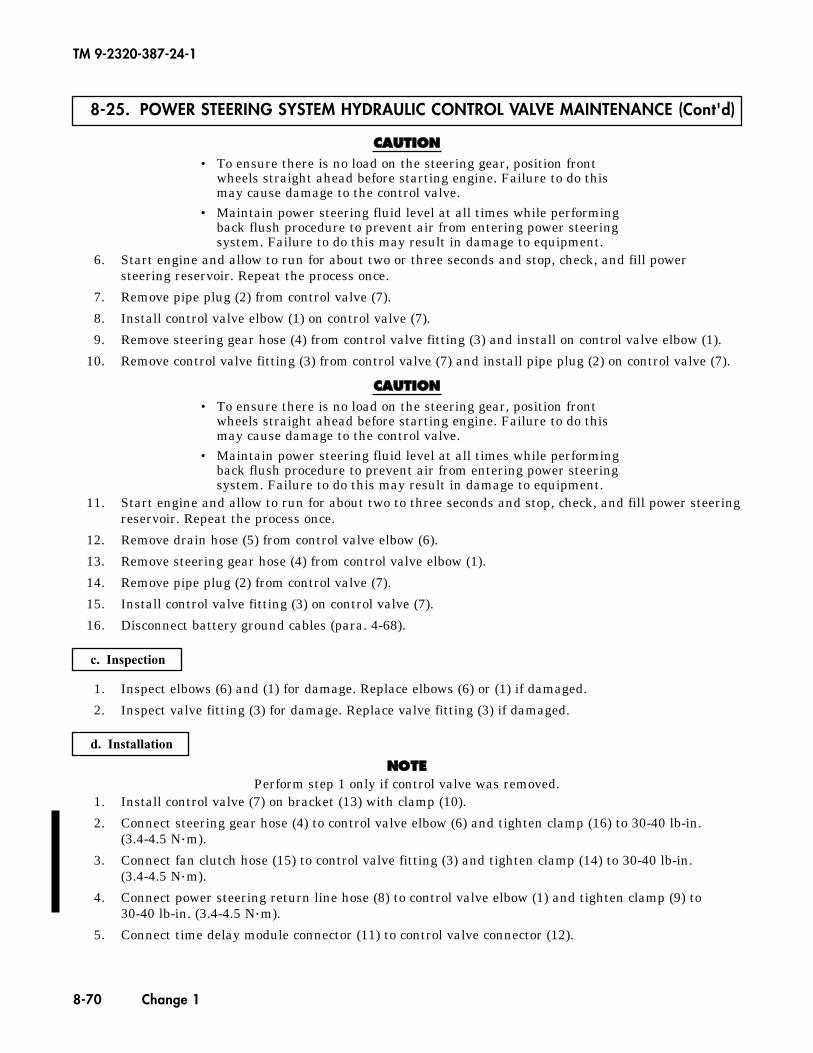
8-25. POWER STEERING SYSTEM HYDRAULIC CONTROL VALVE MAINTENANCE (Cont'd)
CCAAUUTTIIOONN• To ensure there is no load on the steering gear, position front
wheels straight ahead before starting engine. Failure to do thismay cause damage to the control valve.
• Maintain power steering fluid level at all times while performingback flush procedure to prevent air from entering power steeringsystem. Failure to do this may result in damage to equipment.
6. Start engine and allow to run for about two or three seconds and stop, check, and fill powersteering reservoir. Repeat the process once.
7. Remove pipe plug (2) from control valve (7).
8. Install control valve elbow (1) on control valve (7).
9. Remove steering gear hose (4) from control valve fitting (3) and install on control valve elbow (1).
10. Remove control valve fitting (3) from control valve (7) and install pipe plug (2) on control valve (7).
CCAAUUTTIIOONN• To ensure there is no load on the steering gear, position front
wheels straight ahead before starting engine. Failure to do thismay cause damage to the control valve.
• Maintain power steering fluid level at all times while performingback flush procedure to prevent air from entering power steeringsystem. Failure to do this may result in damage to equipment.
11. Start engine and allow to run for about two to three seconds and stop, check, and fill power steeringreservoir. Repeat the process once.
12. Remove drain hose (5) from control valve elbow (6).
13. Remove steering gear hose (4) from control valve elbow (1).
14. Remove pipe plug (2) from control valve (7).
15. Install control valve fitting (3) on control valve (7).
16. Disconnect battery ground cables (para. 4-68).
c. Inspection
TM 9-2320-387-24-1
8-70 Change 1
1. Inspect elbows (6) and (1) for damage. Replace elbows (6) or (1) if damaged.
2. Inspect valve fitting (3) for damage. Replace valve fitting (3) if damaged.
d. Installation
NNOOTTEEPerform step 1 only if control valve was removed.
1. Install control valve (7) on bracket (13) with clamp (10).
2. Connect steering gear hose (4) to control valve elbow (6) and tighten clamp (16) to 30-40 lb-in.(3.4-4.5 N•m).
3. Connect fan clutch hose (15) to control valve fitting (3) and tighten clamp (14) to 30-40 lb-in.(3.4-4.5 N•m).
4. Connect power steering return line hose (8) to control valve elbow (1) and tighten clamp (9) to 30-40 lb-in. (3.4-4.5 N•m).
5. Connect time delay module connector (11) to control valve connector (12).
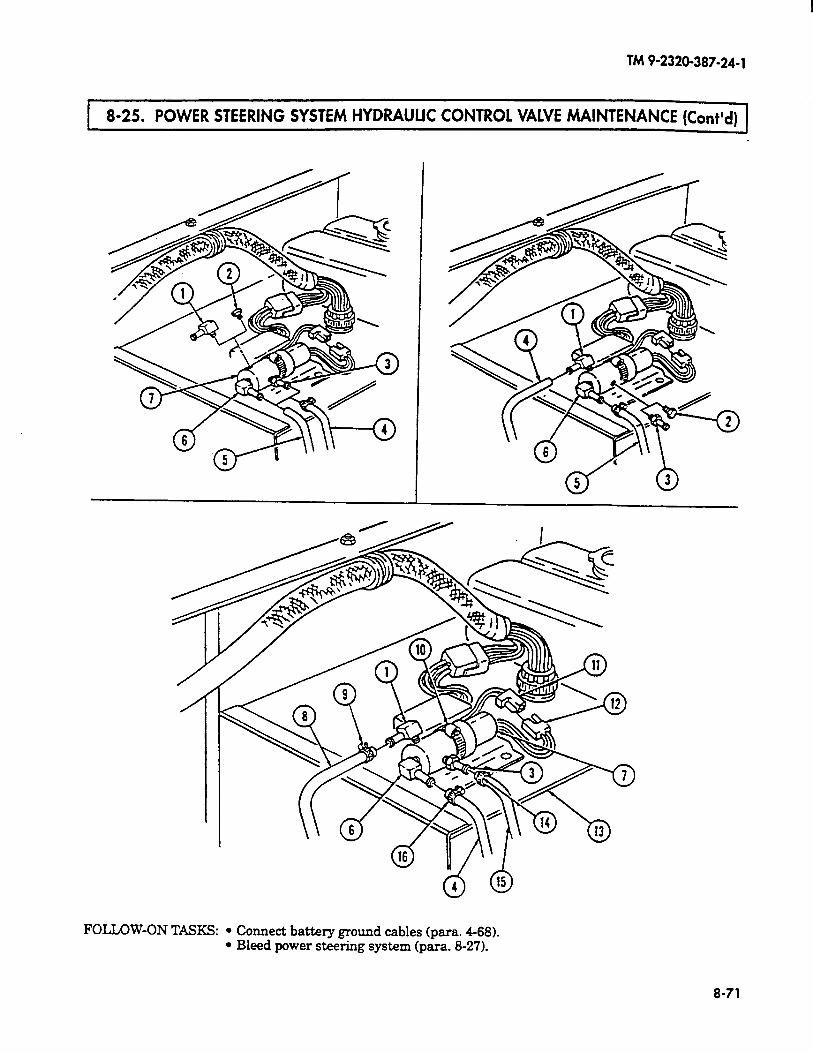
TM 9-2320-387-24-l
a-25. POWER STEERING SYSTEM HYDRAULIC CONTROL VALVE hUMTENANCE (Cont’d)
FOLLOW-ON TASKS: l Connect battery ground cables (para. 4-68). l Bleed power steering system (para. 8-27).
8-71

TM 9-2320-387-24-l
1 8-26. POWER STEERING COOLER HOSE REPLACEMENT
This task covers:
a. Removal b. Installation
INITIAL SETUP:
Tools
General mechanic’s tool kit: automotive (Appendix B, Item 11
hlateriaIs/Parts
Two locknuts (Appendix G, Item 1091 Tiedown strap (Appendix G, Item 462)
hlanual References TM 9-2320-387-10 TM 9-2320-387-24P
Equipment Condition
Hood raised and secured (TM 9-2320-387-10).
General Safety Instructions
Do not drain fluid when engine is hot.
hiaintenance Level
Unit
I a. Removal 1
WARNING
Do not drain fluid when engine is hot. Severe injury to personnel will result.
CAUTION Cover or plug all hoses and connections immediately after disconnection to prevent contamination. Remove all covers or plugs prior to connection.
NOTE Have drainage container ready to catch fluid.
1. Loosen two clamps (131 and disconnect hoses (7) and (101 from cooler ports (121.
2. Remove tiedown strap (141 from oil cooler lines (11) and hoses (71 and (101. Discard tiedown strap (14).
3. Loosen clamp (9) and remove hose (10) from steering gear (8).
4. Remove two locknuts (61, washers (51, and capscrews (11 from four ciamps (4) on hoses (71 and (151. Discard locknuts (6).
5. Loosen clamp (21 and remove hose (7) from control valve elbow (31 and remove hose (7).
r-Ezzzq
1. Install hose (71 on control valve elbow (3) and tighten clamp (2).
2. Position hoses (71 and (151 with four clamps (4) and install two capscrews (11, washers (51, and locknuts (61.
3. Install hose (101 on steering gear (8) and tighten clamp (91.
4. Connect hoses (7) and (101 to cooler ports (12) and tighten two clamps (13).
5. Install tiedown strap (141 on oil cooler lines (111 and hoses (7) and (10).
8-72 .
TM 9-2320-387-24-l
8-26. POWER STEERING COOLER HOSE REPLACEMENT (Cont’d) I
FOLLOW-ON TASK: Bleed power steering system (para. 8-27).
8-73

TM 9-2320-387-24-1
8-74 Change 1
8-27. POWER STEERING SYSTEM BLEEDING
This task covers:
Bleeding
1. Ensure engine is shut off (TM 9-2320-387-10) and turn wheels all the way to the left.2. Add power steering fluid (TM 9-2320-387-10) to FULL COLD level on reservoir. Leave reservoir cap
off.3. Raise front wheels off ground (para. 8-2).4. Turn steering wheel left and right, holding wheels at steering stops for five seconds, for at least
40 times.NNOOTTEE
• Power steering fluid must be free of bubbles and foam. If bubbles or foamare noted, it could be an indication of a loose connection or leaky O-ring.
• Fluid with air in it will have a milky appearance. Air must be eliminatedfrom system before normal steering action can be obtained.
5. Check power steering fluid level (TM 9-2320-387-10). If any bubbles are seen, repeat step 4.6. Start engine (TM 9-2320-387-10) and with engine idling, add power steering fluid
(TM 9-2320-387-10) if necessary. Install reservoir cap.7. Turn wheels to center, shut off engine, and lower front wheels to ground (para. 8-2).8. Start engine (TM 9-2320-387-10) and run engine for two or three minutes, turning wheels left and
right.NNOOTTEE
If pump is noisy, recheck hoses for possible contact with vehiclebody or engine. If no contact is found and noise continues, turnengine off and repressurize system by following steps 9 and/or 10.
9. Remove reservoir cap. Wait for system to cool. Reinstall reservoir cap. Start engine (TM 9-2320-387-10) and check pump for noise. If noise is still present, continue to step 10. If noise stopped,proceed to step 11.
10. Turn engine off (TM 9-2320-387-10). Remove fluid from reservoir using a suction device. Refillreservoir with clean, cool fluid. Install reservoir cap. Start engine (TM 9-2320-387-10) and checkpump for noise. If noise is still present, replace power steering pump (para. 8-23).
11. Turn engine off (TM 9-2320-387-10).
FOLLOW-ON TASKS: • Check power steering fluid level (TM 9-2320-387-10).• Lower and secure hood (TM 9-2320-387-10).• Operate vehicle and check for proper steering operation (TM 9-2320-387-10).
Bleeding
INITIAL SETUP:
ToolsGeneral mechanic’s tool kit:
automotive (Appendix B, Item 1)
Personnel RequiredOne mechanicOne assistant
Manual ReferencesTM 9-2320-387-10TM 9-2320-387-24P
Equipment ConditionHood raised and secured (TM 9-2320-387-10).
Maintenance LevelUnit

TM 9-2320-387-24-l
8-28. POWER STEERING RELIEF VALVE CARTRIDGE MAINTENANCE
This task covers:
a. Removal c. Installation b. Inspection
INITIAL SETUP:
Tools
General mechanic’s tool kit: automotive (Appendix B, Item 1)
MateriaWarts
O-ring seal (Appendix G, Item 291) O-ring seal (Appendix G, Item 285)
Manual References
TM 9-2320-387-10 TM 9-2320-387-24P
Equipment Condition
l Hood raised and secured (TM 9-2320-387-10). l Battery ground cables disconnected (para. 4-68).
Maintenance Level
Unit support
CAUTION Cover or plug all hoses and connections immediately after disconnection to prevent contamination. Remove all covers or plugs prior to connection.
NOTE Have drainage container ready to catch fluid.
1. Disconnect high-pressure line (1) from power steering pump (7). Remove O-ring (2) from high- pressure line (1). Discard O-ring (2).
NOTE Fitting assembly is spring-loaded. Remove carefully to avoid losing parts.
2. Remove fitting assembly (3) and O-ring seal (4) from pump (7). Discard O-ring seal (4).
3. Remove relief valve (5) and valve spring (6) from pump (7).
8-75
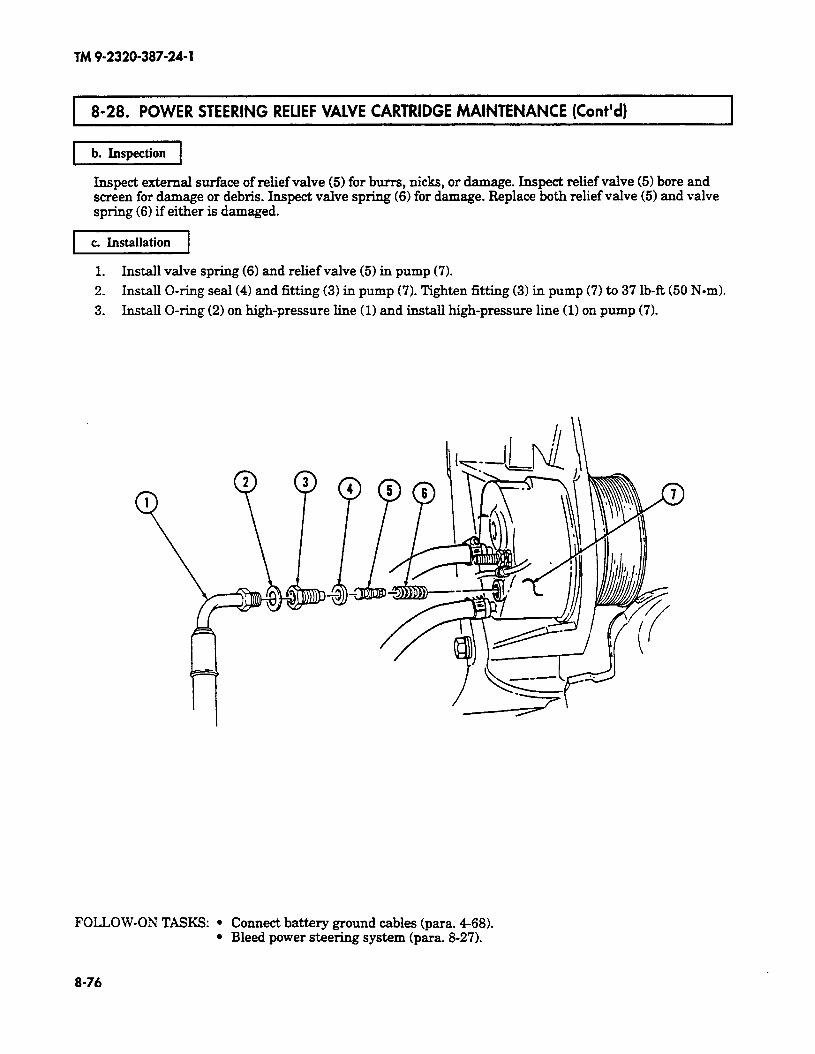
TM9-2320-387-24-l
1 8-28. POWER STEERING RELIEF VALVE CARTRIDGE MAINTENANCE (Cont’d) I
b. Inspection
Inspect external surface of relief valve (5) for burrs, nicks, or damage. Inspect relief valve (5) bore and screen for damage or debris. Inspect valve spring (6) for damage. Replace both relief valve (5) and valve spring (6) if either is damaged.
c Installation
1. Install valve spring (6) and relief valve (5) in pump (7).
2. Install O-ring seal (4) and fitting (3) in pump (7). Tighten fitting (3) in pump (7) to 37 lb-R (50 Nom).
3. Install O-ring (2) on high-pressure line (1) and install high-pressure line (1) on pump (7).
FOLLOW-ON TASKS: l Connect battery ground cables (para. 4-68). l Bleed power steering system (para. 8-27).
8-76
u- TM 9-2320-387-24-l
CHAPTER 9 FRAME (UNIT) MAINTENANCE
1 9-1. FRAME MAINTENANCE TASK SUMMARY 1
TASK PARA.
PROCEDURES PAGE
NO.
9-2. and Towing Brackets Replacement 9-2
9-3. Frame Extension Replacement 9-3
9-4. Tiedown Ring Replacement 9-4
9-5. Radiator Front Mount Bracket Replacement 9-5
9-6. Rear Bumper Brace Replacement 9-6
9-7. Rear Bumper Replacement 9-8
9-8. Rear Bumper Inner Mounting Bracket Replacement 9-10
9-9. Towing Pintle Maintenance 9-11
9-10. Transmission Mount Crossmember Replacement 9-16
9-1
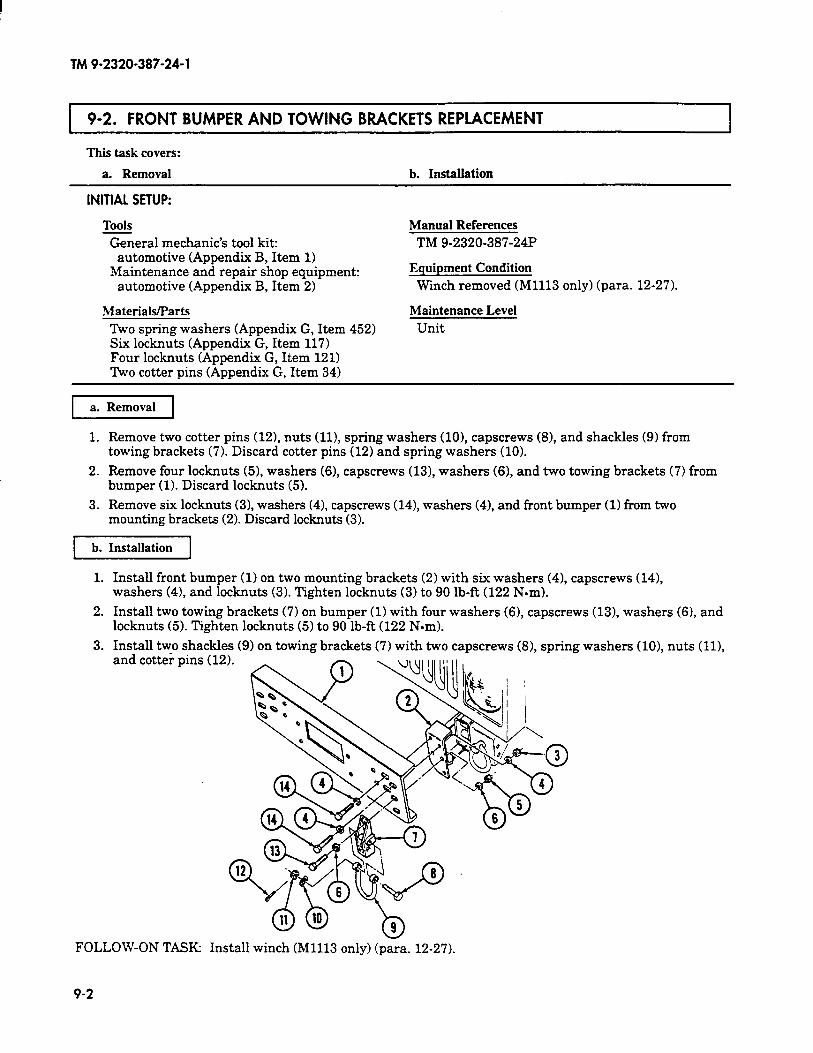
TM 9-2320-387-24-l
9-2. FRONT BUMPER AND TOWING BRACKETS REPLACEMENT
This task covers:
a. Removal b. Installation
INlTlAL SETUP:
TOOIS
General mechanic’s tool kit: automotive (Appendix B, Item 1)
Maintenance and repair shop equipment: automotive (Appendix B, Item 2)
Materials/Parts Two spring washers (Appendix G, Item 452) Six locknuts (Appendix G, Item 117) Four locknuts (Appendix G, Item 121) Two cotter pins (Appendix G, Item 34)
Manual References
TM 9-2320-387-24P
Equipment Condition Winch removed (Ml113 only) (para. 12-27).
Maintenance Level
Unit
1 a. Removal 1
1. Remove two cotter pins (121, nuts (111, spring washers (lo), capscrews (81, and shackles (9) from towing brackets (7). Discard cotter pins (12) and spring washers (10).
2. Remove four locknuts (51, washers (61, capscrews (131, washers (6), and two towing brackets (7) from bumper (1). Discard locknuts (5).
3. Remove six locknuts (31, washers (4), capscrews (141, washers (41, and front bumper (1) from two mounting brackets (2). Discard locknuts (3).
71
1. Install front bumper (1) on two mounting brackets (2) with six washers (41, capscrews (141, washers (41, and locknuts (3). Tighten locknuts (3) to 90 lb-R (122 Nom).
2. Install two towing brackets (7) on bumper (1) with four washers (61, capscrews (131, washers (61, and locknuts (5). Tighten locknuts (5) to 90 lb-ft (122 N-m).
3. Install two shackles (9) on towing brackets (7) with two capscrews (81, spring and cotter pins (12).
washers (101, nuts (111,
FOLLOW-ON TASK: Install winch (Ml113 only) (para. 12-27).
9-2

TM 9-2320-387-24-l
I 9-3. FRAME EXTENSION REPLACEMENT -1 This task covers:
a. Removal b. Installation
INITIAL SETUP:
Tools
General mechanic’s tool kit: automotive (Appendix B, Item 11
Maintenance and repair shop equipment: automotive (Appendix B, Item 2)
Materials/Parts
Three locknuts (Appendix G, Item 121)
Manual References
TM 9-2320-387-24P
Equipment Condition
l Front bumper removed (para. 9-2). l Hood and hinge removed (para. 10-7). l Headlight housing removed (para. 10-N). l Tiedown ring removed (para. 9-4).
Maintenance Level
Unit
Remove three locknuts (21, washers (31, capscrews (51, washers (31, mounting bracket (11, and frame extension (6) from frame (4). Discard locknuts (2).
b. Installation
Install mounting bracket (1) and frame extension (6) on frame (4) with three washers (3), capscrews (5), washers (31, and locknuts (2). Tighten locknuts (2) to 90 lb-ft (122 Nom).
FOLLOW-ON TASKS: l Install tiedown ring (para. 9-4). l Install headlight housing (para. 10-18). l Install hood and hinge (para. 10-7). l Install front bumper (para. 9-2).
9-3
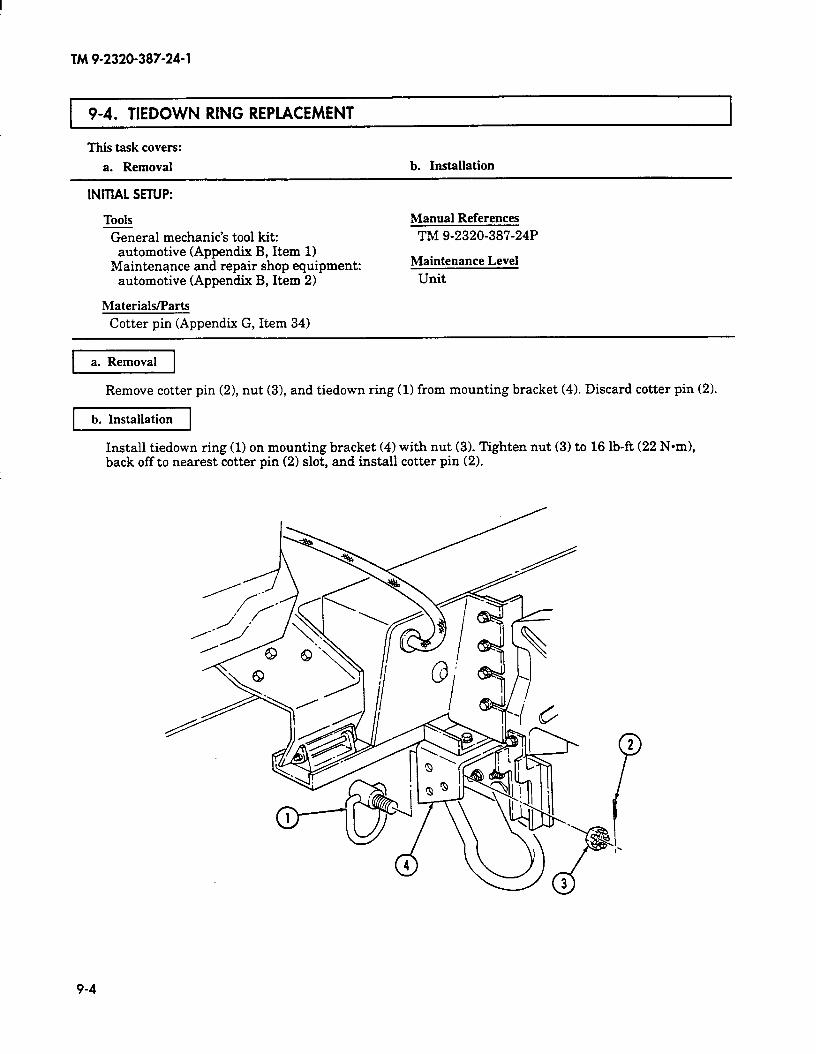
TM 9-2320-387-24-l
9-4. TIEDOWN RING REPLACEMENT
This task covers:
a. Removal b. Installation
INITIAL SETUP:
Tools General mechanic’s tool kit:
automotive (Appendix B, Item 1) Maintenance and repair shop equipment:
automotive (Appendix B, Item 2)
Materials/Parts Cotter pin (Appendix G, Item 34)
Manual References
TM 9-2320-387-24P
Maintenance Level
Unit
a. Removal
Remove cotter pin (21, nut (3), and tiedown ring (1) from mounting bracket (4). Discard cotter pin (2).
b. Installation
Install tiedown ring (1) on mounting bracket (4) with nut (3). Tighten nut (3) to 16 lb-ft (22 Nom), back off to nearest cotter pin (2) slot, and install cotter pin (2).
9-4

TM 9-2320-387-24-l
L 9-5. RADIATOR FRONT MOUNT BRACKET REPLACEMENT
This task covers:
a. Removal b. Installation
INITIAL SETUP:
Tools
General mechanic’s tool kit: automotive (Appendix B, Item 1)
hlaintentice and repair shop equipment: automotive (Appendix B, Item 2)
Materials/Parts
Three locknuts (Appendix G, Item 121)
Manual References
TM 9-2320-387-24P
Equipment Condition
Headlight housing removed (para. 10-18).
hlaintenance Level
Unit
r--~ a. Removal I
1. Remove locknut (21, two washers (31, capscrew (111, washer (31, spacer (101, mount (41, and radiator (1) from front mount bracket (9). Discard locknut (2).
2. Remove two locknuts (121, washers (71, capscrews (61, washers (7), spacers (51, and bracket (9) from front suspension crossmember (8). Discard locknuts (12).
[I
1. Install bracket (9) on front suspension crossmember (8) with two spacers (51, washers (71, cap- screws (6), washers (71, and locknuts (12). Tighten locknuts (12) to 90 lb-ft (122 Nom).
2. Instal .l mount (4) and radiator (1) on front mount bracket (9) with washer (3), spacer screw (II), two washers (31, and locknut (2). Tighten locknut (2) to 30 lb-ft (41 N-m).
(101, cap-
0’ 1
FOLLOW-ON TASK Install headlight housing (para. 10-18).
9-5
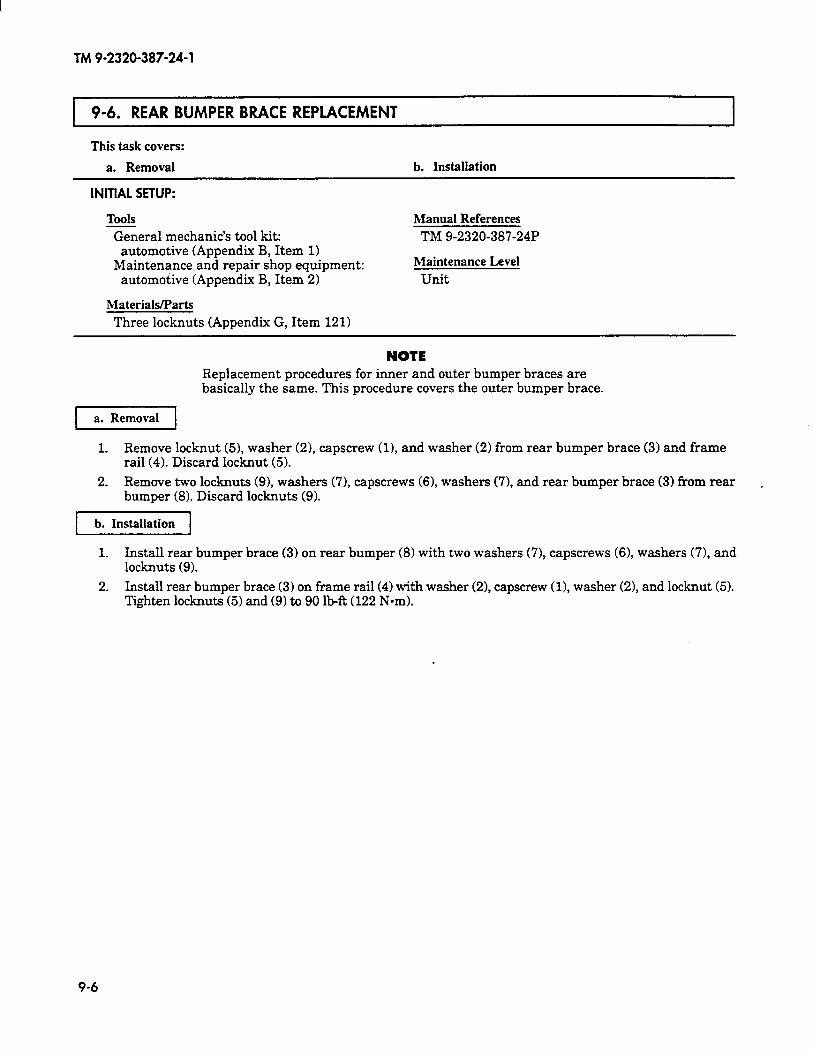
TM9-2320-387-24-l
9-6. REAR BUMPER BRACE REPLACEMENT
This task covers:
a. Removal b. Installation
INITIAL SETUP:
Tools General mechanic’s tool kit:
automotive (Appendix B, Item 1) Maintenance and repair shop equipment:
automotive (Appendix B, Item 2)
Materials/Parts
Manual References TM 9-2320-387-24P
Maintenance Level Unit
Three locknuts (Appendix G, Item 121)
NOTE Replacement procedures for inner and outer bumper braces are basically the same. This procedure covers the outer bumper brace.
VI
1. Remove locknut (51, washer (2), capscrew (11, and washer (2) from rear bumper brace (3) and frame rail (4). Discard locknut (5).
2. Remove two locknuts (91, washers (71, capscrews (6), washers (71, and rear bumper brace (3) from rear . bumper (8). Discard locknuts (9).
b. Installation
1. Install rear bumper brace (3) on rear bumper (8) with two washers (71, capscrews (61, washers (71, and locknuts (9).
2. Install rear bumper brace (3) on frame rail (4) with washer (2), capscrew Cl), washer (21, and locknut (5). Tighten locknuts (5) and (9) to 90 lb-R (122 Nom).
9-6

TM9-2320-387-24-l
9-6. REAR BUMPER BRACE REPLACEMENT (Cont’d)
9-7
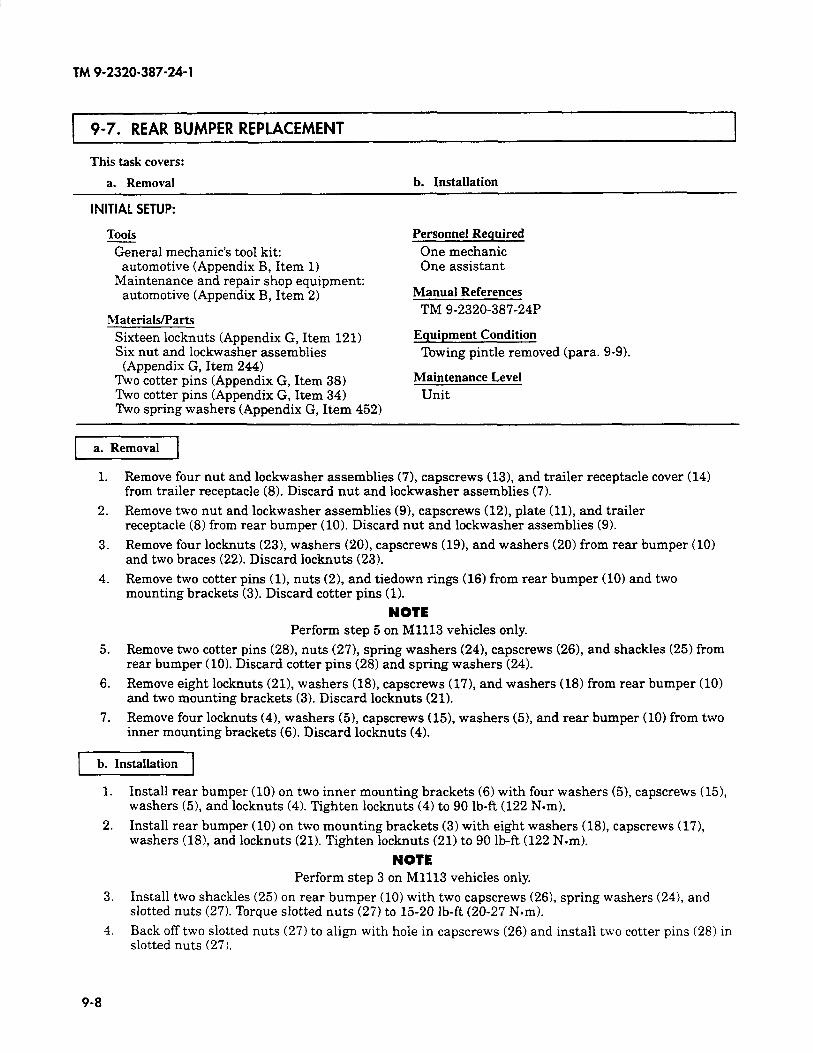
TM 9-2320-387-24-l
I 9-7. REAR BUMPER REPLACEMENT
This task covers:
a. Removal
INITIAL SETUP:
b. Installation
Tools
General mechanic’s tool kit: automotive (Appendix B, Item 1)
Maintenance and repair shop equipment: automotive (Appendix B, Item 2)
Materials/Parts
Sixteen locknuts (Appendix G, Item 121) Six nut and lockwasher assemblies (Appendix G, Item 244)
Two cotter pins (Appendix G, Item 38) Two cotter pins (Appendix G, Item 34) Two spring washers (Appendix G, Item 452)
Personnel Required
One mechanic One assistant
Manual References
TM 9-2320-387-24P
Equipment Condition
Towing pintle removed (para. 9-9).
Maintenance Level
Unit
a. Removal
1.
2.
3.
4.
5.
6.
7.
Remove four nut and lockwasher assemblies (7), capscrews (13), and trailer receptacle cover (14) from trailer receptacle (8). Discard nut and lockwasher assemblies (7).
Remove two nut and lockwasher assemblies (91, capscrews (121, plate (ll), and trailer receptacle (8) from rear bumper (10). Discard nut and lockwasher assemblies (9).
Remove four locknuts (231, washers (201, capscrews (191, and washers (20) from rear bumper (10) and two braces (22). Discard locknuts (23).
Remove two cotter pins (l), nuts (21, and tiedown rings (16) from rear bumper (10) and two mounting brackets (3). Discard cotter pins (1).
NOTE Perform step 5 on Ml113 vehicles only.
Remove two cotter pins (28), nuts (271, spring washers (24), capscrews (26), and shackles (25) from rear bumper (10). Discard cotter pins (28) and spring washers (24).
Remove eight locknuts (211, washers (181, capscrews (171, and washers (18) from rear bumper (10) and two mounting brackets (3). Discard locknuts (21).
Remove four locknuts (41, washers (51, capscrews (15), washers (51, and rear bumper (10) from two inner mounting brackets (6). Discard locknuts (4).
b. Installation
1.
2.
3.
4.
Install rear bumper (10) on two inner mounting brackets (6) with four washers (5), capscrews (151, washers (51, and locknuts (4). Tighten locknuts (4) to 90 lb-ft (122 N-m).
Install rear bumper (10) on two mounting brackets (3) with eight washers (181, capscrews (17), washers (18), and locknuts (21). Tighten locknuts (21) to 90 lb-ft (1.22 N-m).
NOTE Perform step 3 on Ml113 vehicles only.
Install two shackles (25) on rear bumper (101 with two capscrews (26), spring washers (24), and slotted nuts (27). Torque slotted nuts (27) to 15-20 lb-ft (20-27 N-m).
Back off two slotted nuts (27) to align with hole in capscrews (26) and install two cotter pins (28) in slotted nuts (27).
9-8
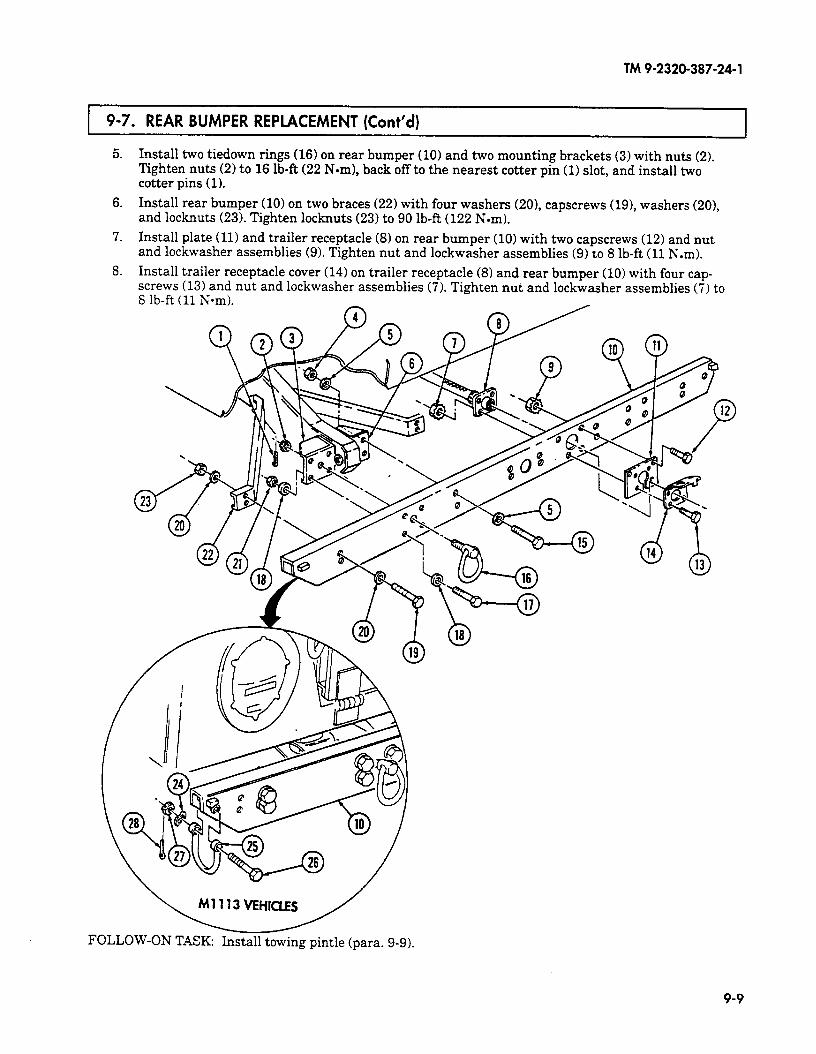
TM9-2320-387-24-l
9-7. REAR BUMPER REPLACEMENT (Cont’d)
5.
6.
7.
8.
Install two tiedown rings (161 on rear bumper (10) and two mounting brackets (3) with nuts (2). Tighten nuts (2) to 16 lb-R (22 Nom), back off to the nearest cotter pin (1) slot, and install two cotter pins (11.
Install rear bumper (10) on two braces (22) with four washers (201, capscrews (19), washers (201, and locknuts (23). Tighten locknuts (23) to 90 lb-ft (122 Nom).
Install plate (11) and trailer receptacle (81 on rear bumper (10) with two capscrews (12) and nut and lockwasher assemblies (9). Tighten nut and lockwasher assemblies (9) to 8 lb-ft (11 N.m).
Install trailer receptacle cover (14) on trailer receptacle (81 and rear bumper (10) with four cap- screws (13) and nut and lockwasher assemblies (7). Tighten nut and lockwasher assemblies (7) to 6 lb-ft (11 N-m).
FOLLOW-ON TASK: Install towing pintle (para. 9-9).
9-9
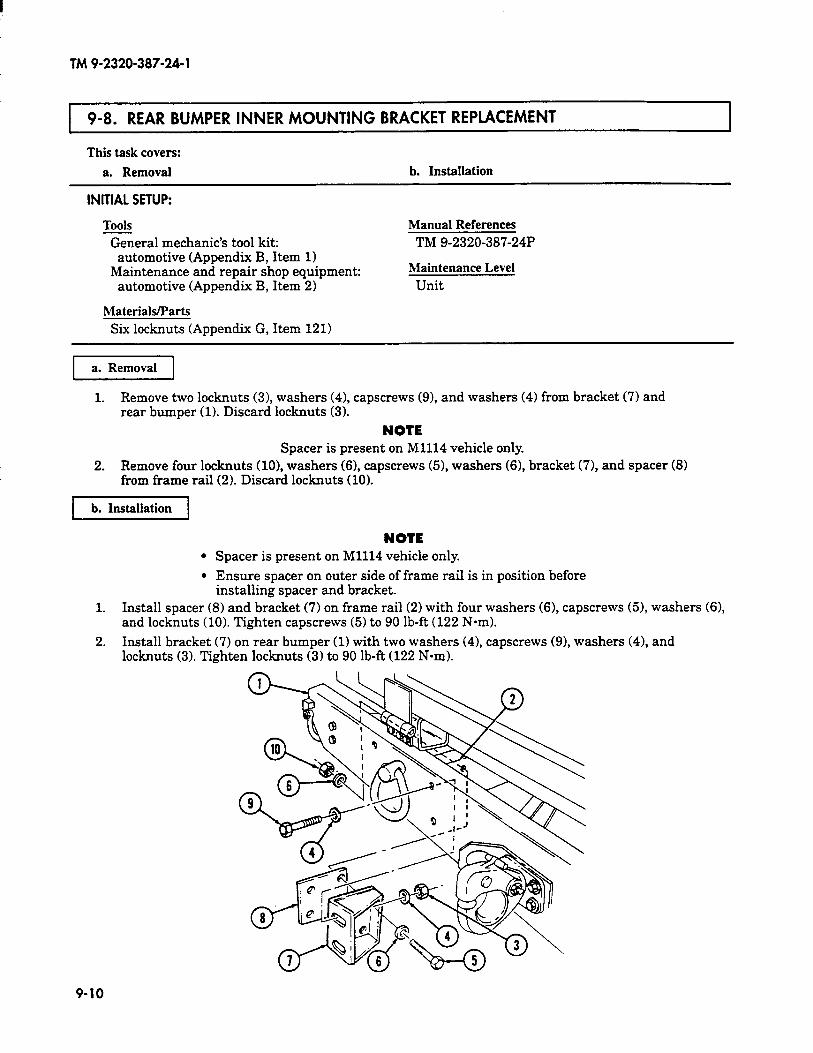
TM 9-2320-387-24-l
9-8. REAR BUMPER INNER MOUNTING BRACKET REPLACEMENT
This task covers:
a. Removal h. Installation
INITIAL SETUP:
Tools General mechanic’s tool kit:
automotive (Appendix B, Item 1) Maintenance and repair shop equipment:
automotive (Appendix B, Item 2)
Materials/Parts
Manual References TM 9-2320-387-24P
Maintenance Level Unit
Six locknuts (Appendix G, Item 121)
1. Remove two locknuts (31, washers (41, capscrews (91, and washers (4) from bracket (7) and rear bumper (1). Discard locknuts (3).
NOTE Spacer is present on Ml114 vehicle only
2. Remove four locknuts (101, washers (61, capscrews W, washers (61, bracket (7), and spacer (81 from frame rail (2). Discard locknuts (101.
j[
NOTE l Spacer is present on Ml114 vehicle only.
l Ensure spacer on outer side of frame rail is in position before installing spacer and bracket.
1. Install spacer (8) and bracket (7) on frame rail (2) with four washers (6), capscrews (51, washers (61, and locknuts (101. Tighten capscrews (5) to 90 lb-ft (122 N-m).
2. Install bracket (7) on rear bumper (11 with two washers (41, capscrews (91, washers (41, and locknuts (31. Tighten locknuts (31 to 90 lb-R (122 N-m).
9-10
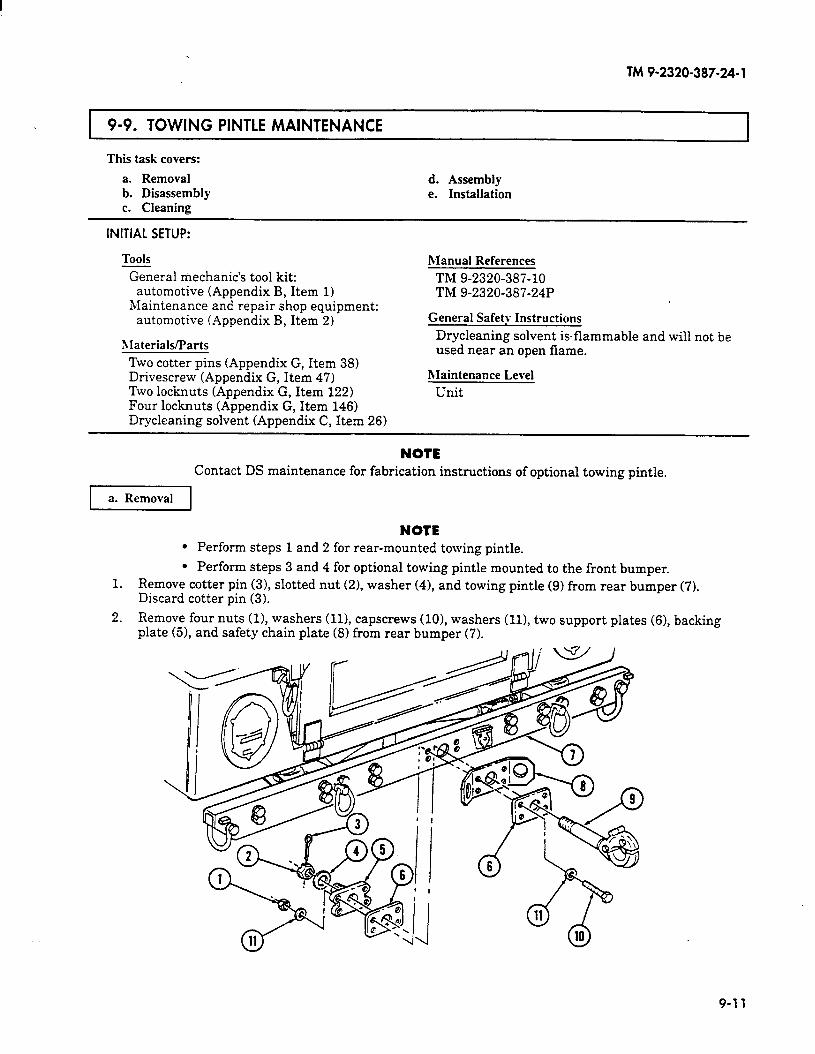
q
TM 9-2320-387-24-l
9-9. TOWING PINTLE MAINTENANCE
This task covers:
a. Removal b. Disassembly c. Cleaning
d. Assembly e. Installation
INITIAL SETUP:
Tools
General mechanic’s tool kit: automotive (Appendix B, Item 1)
Maintenance and repair shop equipment: automotive (Appendix B, Item 21
nIaterialslParts
Two cotter pins (Appendix G, Item 381 Drivescrew (Appendix G, Item 47) ‘Ikvo locknuts (Appendix G, Item 122) Four locknuts (Appendix G, Item 1461 Drycleaning solvent (Appendix C, Item 26)
Manual References
TM 9-2320-387-10 TM 9-2320-387-24P
General Safety Instructions
Drycleaning solvent isflammable and will not be used near an open flame.
Maintenance Level
Unit
NOTE Contact DS maintenance for fabrication instructions of optional towing pintle.
[I
NOTE l Perform steps 1 and 2 for rear-mounted towing pintle.
l Perform steps 3 and 4 for optional towing pintle mounted to the front bumper. 1. Remove cotter pin (31, slotted nut (21, washer (4), and towing pintle (9) from rear bumper (7).
Discard cotter pin (3).
2. Remove four nuts (11, washers (111, capscrews (101, washers (111, two support plates (61, backing plate (51, and safety chain plate (81 from rear bumper (7).
9-l 1
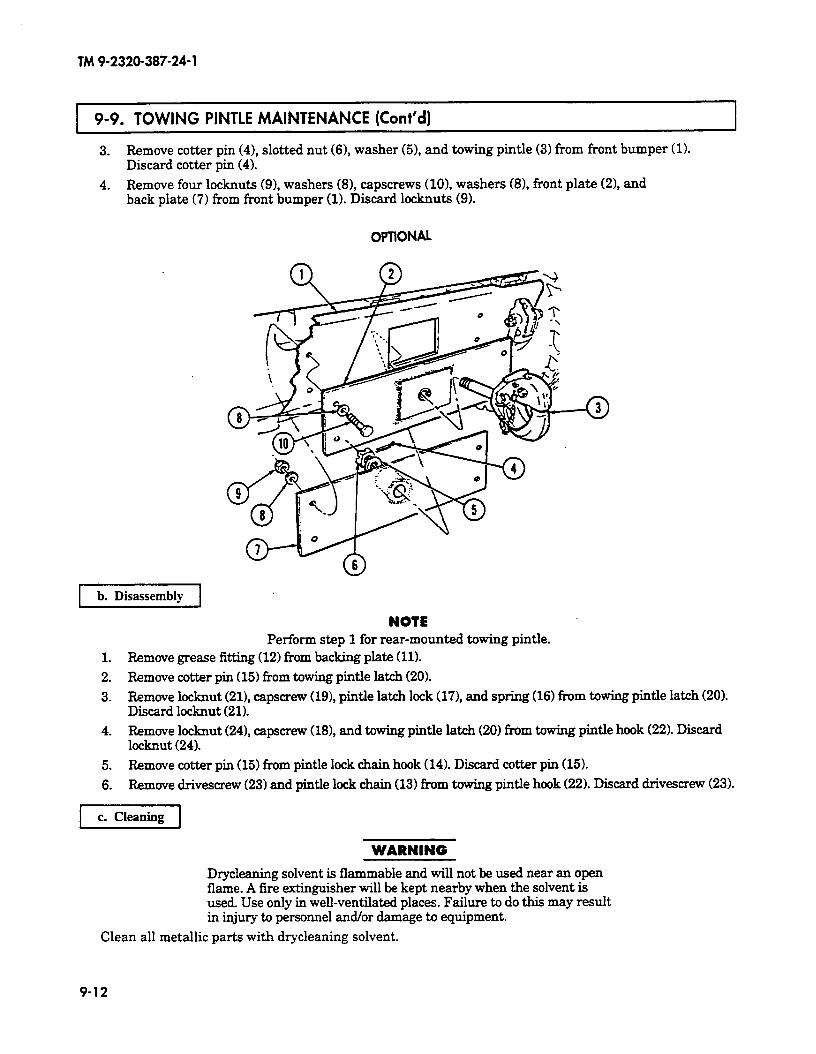
TM 9-2320-387-24-l
1 9-9. TOWING PINTLE MAINTENANCE (Cont’d) I
3. Remove cotter pin (41, slotted nut (6), washer (51, and towing pintle (3) from front bumper (1). Discard cotter pin (4).
4. Remove four locknuts (91, washers (81, capscrews (101, washers (81, front plate (21, and back plate (7) from front bumper (1). Discard locknuts (9).
OPTIONAL
b. Disassembly
NOTE Perform step 1 for rear-mounted towing pintle.
1. Remove grease fitting (12) from backing plate (11).
2. Remove cotter pm (15) from towing pintle latch (20).
3. Remove locknut (21), capscrew (191, pintle latch lock (171, and spring (16) from towing pintle latch (20). Discard locknut (21).
4. Remove locknut (241, capscrew (181, and towing pintle latch (20) from towing pintle hook (22). Discard locknut (24).
5. Remove cotter pm (15) from pintle lock chain hook (14). Discard cotter pm (15).
6. Remove drivescrew (23) and pintle lock chain (13) from towing pintle hook (22). Discard drivescrew (23).
c. Cleaning
WARNING Drycleaning solvent is flammable and will not be used near an open flame. A fire extinguisher will be kept nearby when the solvent is used. Use only in well-ventilated places. Failure to do this may result in injury to personnel and/or damage to equipment.
Clean all metallic parts with drycleaning solvent.
9-12
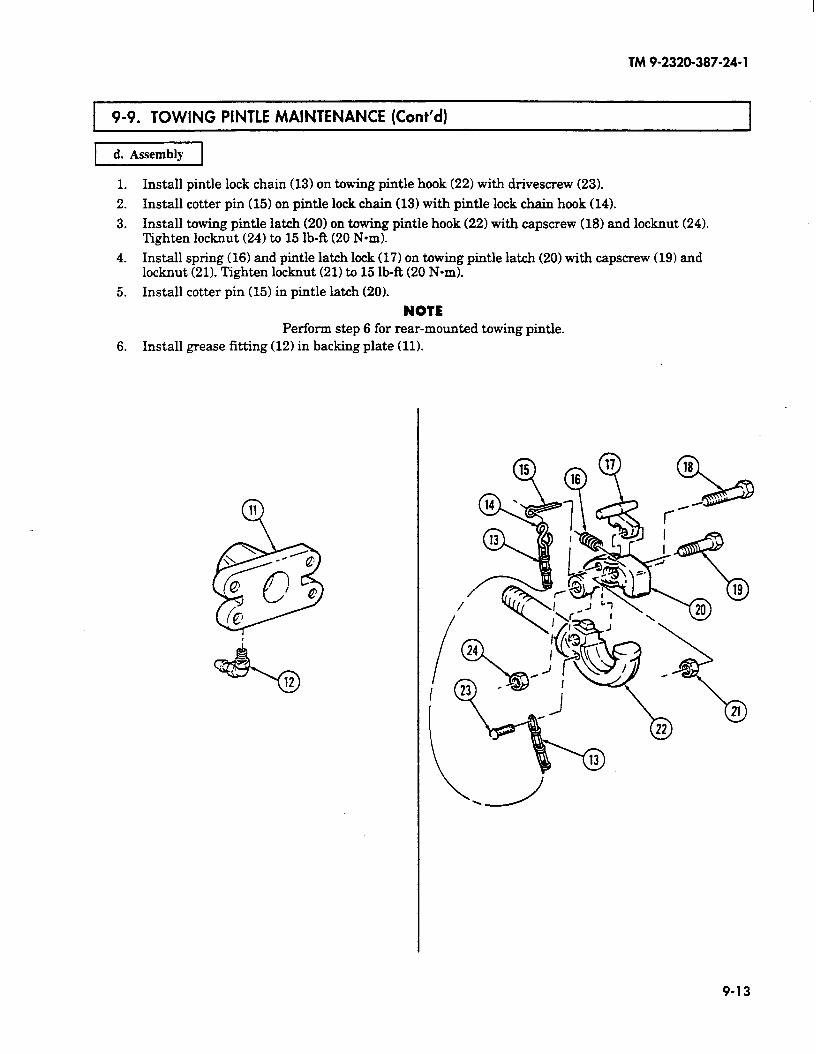
TM 9-2320-387-24-l
1 9-9. TOWING PINTLE MAINTENANCE (Cont’d) I
1 d. Assembly 1
1. Install pintle lock chain (13) on towing pintle hook (221 with drivescrew (231.
2. Install cotter pin (15) on pintle lock chain (13) with pintle lock chain hook (14).
3. Install towing pintle latch (201 on towing pintle hook (221 with capscrew (181 and locknut (24). Tighten locknut (24) to 15 lb-R (20 N-m).
4. Install spring (16) and pintle latch lock (17) on towing pintle latch (20) with capscrew (19) and locknut (211. Tighten locknut (21) to 15 lb-R (20 N-m).
5. Install cotter pin (15) in pintle latch (20).
NOTE Perform step 6 for rear-mounted towing pintle.
6. Install grease fitting (12) in backing plate (11).
9-13

TM 9-2320-387-24-l
1 9-9. TOWING PINTLE MAINTENANCE (Cont’d)
e. Installation
NOTE Perform steps 1 through 3 for rear-mounted towing pintle.
Perform steps 4 through 6 for optional towing pintle mounted to the front bumper.
Grease fitting on backing plate must face downward. 1.
2.
3.
4.
5.
6.
Install safety chain plate (8), two support plates (6), and backing plate (11) on rear bumper (7) with four washers (2), capscrews (lo), washers (2), and nuts (1).
Install towing pintle (9) on rear bumper (7) and tighten nuts (1) to 90 lb-R (122 Nom).
Secure towing pintle (9) to backing plate (11) with washer (5) and slotted nut (3). Loosen slotted nut (3) slightly if towing pintle (9) will not rotate easily. Install cotter pin (4) in slotted nut (3).
Install front plate (13) and back plate (18) on front bumper (12) with four washers (19), capscrews (21), washers (19), and locknuts (20). Tighten locknuts (20) to 90 lb-R (122 N-m).
Install towing pintle (14) on front plate (13) and back plate (18) with washer (16) and slotted nut (17). Tighten slotted nut (17) until towing pintle (14) is tight. Back off nut (17) until towing pintle (14) rotates freely and hole in towing pintle (14) shaft aligns with slot in nut (17). Install cotter pin (15).
9-14
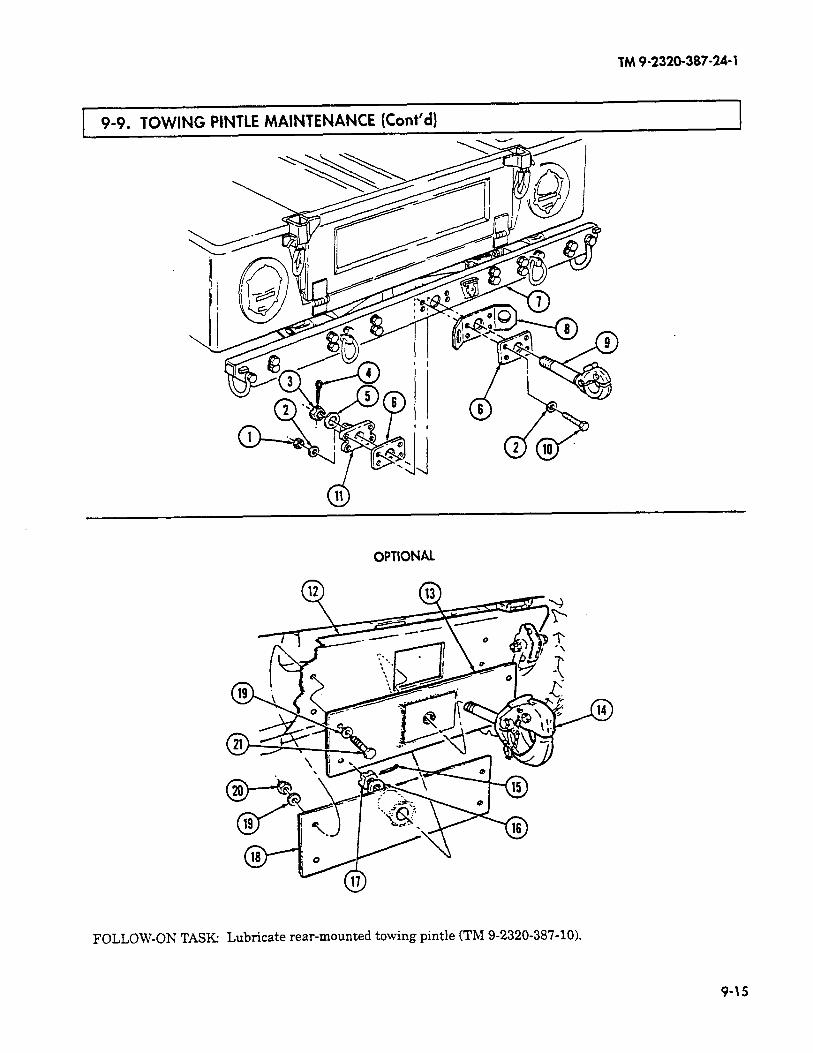
TM 9-2320-387-24-l
OPTiONAL
FOLLOW-ON TASK: Lubricate rear-mounted towing pintle (TM 9-2320-387-10).
9-15

TM 9-2320-387-24-l
1 O-10. TRANSMISSION MOUNT CROSSMEMBER REPLACEMENT
This task covers:
a. Removal b. Installation
INITIAL SETUP:
Tools
General mechanic’s tool kit: automotive (Appendix B, Item 1)
Maintenance and repair shop equipment: automotive (Appendix B, Item 2)
Materials/Parts
Manual References
TM 9-2320-387-24P
Maintenance Level
Unit
Four locknuts (Appendix G, Item 157)
CAUTION Transmission must be supported during removal and installation of transmission mount crossmember to prevent damage to equipment.
-1
1. Place support under transmission (2) and remove two locknuts (6), washers (51, capscrew (41, and washer (5) from crossmember (7) and two support brackets (1). Discard locknuts (6).
2. Remove two locknuts (9), washers (81, and crossmember (7) from transmission mount (3). Discard locknuts (9).
b. Installation
1.
2.
3.
Install crossmember (7) on transmission mount (3) with two washers (8) and locknuts (9). Tighten locknuts (9) to 28 lb-fi (38 Nem).
Install crossmember (7) on two support brackets (1) with washer (5), capscrew (41, two washers (51, and locknuts (6). Tighten locknuts (6) to 90 lb-ft (122 Nom).
Remove support from under transmission (2).
9-16
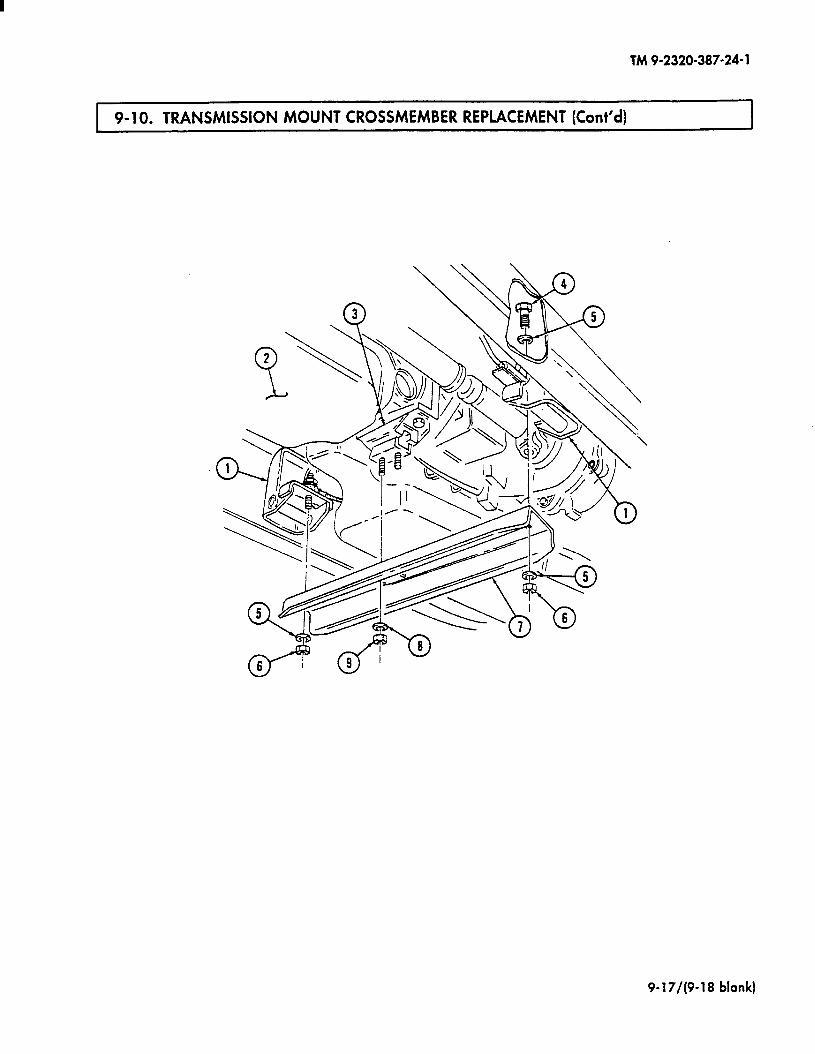
TM 9-2320-387-24-l
1 9- 10. TRANSMISSION MOUNT CROSSMEMBER REPLACEMENT (Cont’d)
9-17/(9-18 blank)
TM 9-2320-387-24-1
Change 1 INDEX 1
AB-652/GR antenna:Installation . . . . . . . . . . . . . . . . 12-23b 12-39Removal. . . . . . . . . . . . . . . . . . . 12-23a 12-39
A-beam left side armor:Installation . . . . . . . . . . . . . . . . 11-42b 11-86Removal. . . . . . . . . . . . . . . . . . . 11-42a 11-86
A-beam right side armor:Installation . . . . . . . . . . . . . . . . 11-43b 11-88Removal. . . . . . . . . . . . . . . . . . . 11-43a 11-88
A/C and de-ice relays:Installation . . . . . . . . . . . . . . . . 25-34b 25-92Removal. . . . . . . . . . . . . . . . . . . 25-34a 25-90
A/C blower motor:Installation . . . . . . . . . . . . . . . . 25-25b 25-67Removal. . . . . . . . . . . . . . . . . . . 25-25a 25-67
A/C compressor:Installation . . . . . . . . . . . . . . . . 25-20b 25-56Removal. . . . . . . . . . . . . . . . . . . 25-20a 25-56
A/C compressor hose:Inspection . . . . . . . . . . . . . . . . . 25-30a.1 25-78Installation . . . . . . . . . . . . . . . . 25-30b 25-78.2Removal. . . . . . . . . . . . . . . . . . . 25-30a 25-78
A/C compressor manifold:Installation . . . . . . . . . . . . . . . . 25-20.1b 25-56.2Removal. . . . . . . . . . . . . . . . . . . 25-20.1a 25-56.2
A/C condenser:Inspection . . . . . . . . . . . . . . . . . 25-18a.1 25-52Installation . . . . . . . . . . . . . . . . 25-18b 25-52Removal. . . . . . . . . . . . . . . . . . . 25-18a 25-52
A/C condenser assembly:Assembly . . . . . . . . . . . . . . . . . . 25-28b 25-74Disassembly . . . . . . . . . . . . . . . 25-28a 25-74
A/C condenser fan and shroud:Installation . . . . . . . . . . . . . . . . 25-19b 25-54Removal. . . . . . . . . . . . . . . . . . . 25-19a 25-54
A/C condenser hose assemblies:Installation . . . . . . . . . . . . . . . . 25-33b 25-88Removal. . . . . . . . . . . . . . . . . . . 25-33a 25-88
A/C coolant line covers:Inspection . . . . . . . . . . . . . . . . . 25-32b 25-84Installation . . . . . . . . . . . . . . . . 25-32c 25-86Removal. . . . . . . . . . . . . . . . . . . 25-32a 25-84
A/C evaporator assembly (rear):Assembly . . . . . . . . . . . . . . . . . . 25-27b 25-72Disassembly . . . . . . . . . . . . . . . 25-27a 25-72Inspection . . . . . . . . . . . . . . . . . 25-22a.1 25-62Installation . . . . . . . . . . . . . . . . 25-22b 25-62Removal. . . . . . . . . . . . . . . . . . . 25-22a 25-62
A/C evaporator (rear) supply and return line:
Installation . . . . . . . . . . . . . . . . 25-29b 25-76Removal. . . . . . . . . . . . . . . . . . . 25-29a 25-76
A/C front air distribution duct:Installation . . . . . . . . . . . . . . . . 11-81b 11-146Removal. . . . . . . . . . . . . . . . . . . 11-81a 11-146
A/C front air distribution duct registers:
Installation . . . . . . . . . . . . . . . . 11-82b 11-148Removal. . . . . . . . . . . . . . . . . . . 11-82a 11-148
A/C front evaporator drain hose:Installation . . . . . . . . . . . . . . . . 11-83b 11-149Removal. . . . . . . . . . . . . . . . . . . 11-83a 11-149
A/C heater/evaporator assembly (front):
Assembly . . . . . . . . . . . . . . . . . . 25-26b 25-70Disassembly . . . . . . . . . . . . . . . 25-26a 25-68Installation . . . . . . . . . . . . . . . . 25-21b 25-60Removal. . . . . . . . . . . . . . . . . . . 25-21a 25-58
A/C pressure hoses:Inspection . . . . . . . . . . . . . . . . . 25-31a.1 25-80Installation . . . . . . . . . . . . . . . . 25-31b 25-82Removal. . . . . . . . . . . . . . . . . . . 25-31a 25-80
A/C rear air distribution duct and register:
Inspection . . . . . . . . . . . . . . . . . 11-87b 11-156Installation . . . . . . . . . . . . . . . . 11-87c 11-156Removal. . . . . . . . . . . . . . . . . . . 11-87a 11-156
A/C rear evaporator drain hose:Installation . . . . . . . . . . . . . . . . 11-88b 11-158Removal. . . . . . . . . . . . . . . . . . . 11-88a 11-158
A/C receiver/dryer (front):Inspection . . . . . . . . . . . . . . . . . 25-16b 25-48Installation . . . . . . . . . . . . . . . . 25-16c 25-48Removal. . . . . . . . . . . . . . . . . . . 25-16a 25-48
A/C receiver/dryer (rear):Installation . . . . . . . . . . . . . . . . 25-17b 25-50Removal. . . . . . . . . . . . . . . . . . . 25-17a 25-50
A/C receiver/dryer (rear) lines:Installation . . . . . . . . . . . . . . . . 25-17.1b 25-50.2Removal. . . . . . . . . . . . . . . . . . . 25-17.1a 25-50.2
A/C system servicing:Adding refrigerant oil . . . . . . . . 25-15g 25-47Charging system . . . . . . . . . . . . 25-15f 25-46Discharging system. . . . . . . . . . 25-15c 25-40Evacuating system . . . . . . . . . . 25-15e 25-44Flushing system . . . . . . . . . . . . 25-15d 25-42Manifold gauge set installation 25-15a 25-39Manifold gauge set removal . . . 25-15b 25-40
A/C thermostat:Installation . . . . . . . . . . . . . . . . 25-24b 25-66Removal. . . . . . . . . . . . . . . . . . . 25-24a 25-66
A/C toggle switch and harness:Installation . . . . . . . . . . . . . . . . 11-84b 11-150Removal. . . . . . . . . . . . . . . . . . . 11-84a 11-150
INDEX (Cont’d)
Para. Page
A
Para. Page
A (Cont’d)
A/C trinary switch:Installation . . . . . . . . . . . . . . . . 25-23b 25-64Removal. . . . . . . . . . . . . . . . . . . 25-23a 25-64
A/C wiring harness and cable:Inspection . . . . . . . . . . . . . . . . . 25-35b 25-102Installation . . . . . . . . . . . . . . . . 25-35c 25-104Removal. . . . . . . . . . . . . . . . . . . 25-35a 25-94
Accelerator cable mountingbracket:
Inspection . . . . . . . . . . . . . . . . . 16-10b 16-20Installation . . . . . . . . . . . . . . . . 16-10c 16-20Removal. . . . . . . . . . . . . . . . . . . 16-10a 16-20
Accelerator linkage:Adjustment . . . . . . . . . . . . . . . . 3-43d 3-84Inspection . . . . . . . . . . . . . . . . . 3-43b 3-83Installation . . . . . . . . . . . . . . . . 3-43c 3-84Removal. . . . . . . . . . . . . . . . . . . 3-43a 3-82
Accelerator pedal:Installation . . . . . . . . . . . . . . . . 3-44b 3-86Removal. . . . . . . . . . . . . . . . . . . 3-44a 3-86
Accelerator system maintenancetask summary . . . . . . . . . . . . . . . 3-42 3-81
Access hole cover plate:Inspection . . . . . . . . . . . . . . . . . 25-36b 25-114Installation . . . . . . . . . . . . . . . . 25-36c 25-114Removal. . . . . . . . . . . . . . . . . . . 25-36a 25-114
Actuator assembly, parking lockpawl and:
Inspection . . . . . . . . . . . . . . . . . 28-6 28-24Actuator, wastegate:
Installation . . . . . . . . . . . . . . . . 15-19b 15-36Removal. . . . . . . . . . . . . . . . . . . 15-19a 15-36
Adapter plate, water pump and:Inspection . . . . . . . . . . . . . . . . . 3-78b 3-134Installation . . . . . . . . . . . . . . . . 3-78c 3-136Removal. . . . . . . . . . . . . . . . . . . 3-78a 3-134
Air cleaner assembly and dustunloader:
Inspection . . . . . . . . . . . . . . . . . 3-12b 3-22Installation . . . . . . . . . . . . . . . . 3-12c 3-22Removal. . . . . . . . . . . . . . . . . . . 3-12a 3-22
Air cleaner dust cap:Installation . . . . . . . . . . . . . . . . 12-40b 12-74Removal. . . . . . . . . . . . . . . . . . . 12-40a 12-74
Air cleaner extension elbow:Inspection . . . . . . . . . . . . . . . . . 12-39b 12-72Installation . . . . . . . . . . . . . . . . 12-39c 12-72Removal. . . . . . . . . . . . . . . . . . . 12-39a 12-72
Air cleaner filter element:Cleaning . . . . . . . . . . . . . . . . . . 3-13d 3-26Emergency cleaning . . . . . . . . . 3-13c 3-24Inspection . . . . . . . . . . . . . . . . . 3-13b 3-24Installation . . . . . . . . . . . . . . . . 3-13e 3-26Removal. . . . . . . . . . . . . . . . . . . 3-13a 3-24
Air cleaner-to-selector valve vent line:Installation . . . . . . . . . . . . . . . . 12-41b 12-75Removal. . . . . . . . . . . . . . . . . . . 12-41a 12-75
Air conditioning maintenance tasksummary . . . . . . . . . . . . . . . . . . . 11-80 11-145
Air conditioning maintenance tasksummary . . . . . . . . . . . . . . . . . . . 25-14 25-37
Air conditioning system operation,M1114 . . . . . . . . . . . . . . . . . . . . . 1-29 1-39
Air conditioning troubleshooting instructions (DS/GS) . . . . . . . . . . 14-4 14-17
Air distribution duct, A/C front:Installation . . . . . . . . . . . . . . . . 11-81b 11-146Removal. . . . . . . . . . . . . . . . . . . 11-81a 11-146
Air distribution duct registers, A/C front:
Installation . . . . . . . . . . . . . . . . 11-82b 11-148Removal. . . . . . . . . . . . . . . . . . . 11-82a 11-148
Air duct assembly:Installation . . . . . . . . . . . . . . . . 10-74b 10-126Removal. . . . . . . . . . . . . . . . . . . 10-74a 10-126
Air horn:Installation . . . . . . . . . . . . . . . . 3-14b 3-28Removal. . . . . . . . . . . . . . . . . . . 3-14a 3-28
Air horn support bracket (M1113):Installation . . . . . . . . . . . . . . . . 3-16b 3-31Removal. . . . . . . . . . . . . . . . . . . 3-16a 3-31
Air horn support bracket (M1114):Installation . . . . . . . . . . . . . . . . 25-13.1b 25-36.1Removal. . . . . . . . . . . . . . . . . . . 25-13.1a 25-36.1
Air horn-to-air cleaner elbow:Installation . . . . . . . . . . . . . . . . 3-15b 3-30Removal. . . . . . . . . . . . . . . . . . . 3-15a 3-30
Air intake and fuel pump vent lines:Installation . . . . . . . . . . . . . . . . 3-21b 3-37Removal. . . . . . . . . . . . . . . . . . . 3-21a 3-37
Air intake assembly and bracket:Installation . . . . . . . . . . . . . . . . 3-19b 3-34Removal. . . . . . . . . . . . . . . . . . . 3-19a 3-34
Air intake/exhaust tests . . . . . . . . 2-29 2-141Airlift bracket-to-hood seal:
Installation . . . . . . . . . . . . . . . . 10-55b 10-90Removal. . . . . . . . . . . . . . . . . . . 10-55a 10-90
Airlift-to-shroud shield assembly:Installation . . . . . . . . . . . . . . . . 3-63b 3-118Removal. . . . . . . . . . . . . . . . . . . 3-63a 3-118
INDEX (Cont’d)
TM 9-2320-387-24-1
INDEX 2 Change 1
Para. Page
A (Cont’d)
Para. Page
A (Cont’d)
TM 9-2320-387-24-1
Change 1 INDEX 3
Air restriction gauge:Installation . . . . . . . . . . . . . . . . 3-17b 3-32Removal. . . . . . . . . . . . . . . . . . . 3-17a 3-32
Air restriction gauge hose:Installation . . . . . . . . . . . . . . . . 3-20b 3-36Removal. . . . . . . . . . . . . . . . . . . 3-20a 3-36
Alignment instructions, suspension:Caster and camber adjustment 34-3b 34-2Caster and camber check . . . . . 34-3a 34-1Toe check and adjustment . . . . 34-3c 34-3
Alternator, 200-ampere dual voltage:
Assembly . . . . . . . . . . . . . . . . . . 18-3e 18-10Cleaning . . . . . . . . . . . . . . . . . . 18-3d 18-6Disassembly . . . . . . . . . . . . . . . 18-3b 18-6Installation . . . . . . . . . . . . . . . . 4-5b 4-10Output testing. . . . . . . . . . . . . . 18-3a 18-2Removal. . . . . . . . . . . . . . . . . . . 4-5a 4-8Static testing. . . . . . . . . . . . . . . 18-3c 18-8
Alternator, 400-ampere dualvoltage:
Assembly . . . . . . . . . . . . . . . . . . 18-3.1e 18-10.11Cleaning . . . . . . . . . . . . . . . . . . 18-3.1d 18-10.11Disassembly . . . . . . . . . . . . . . . 18-3.1b 18-10.8Installation . . . . . . . . . . . . . . . . 4-8.3b 4-18.12Output testing. . . . . . . . . . . . . . 18-3.1a 18-10.2Removal. . . . . . . . . . . . . . . . . . . 4-8.3a 4-18.12Static testing. . . . . . . . . . . . . . . 18-3.1c 18-10.10
Alternator cable, 200-amperedual voltage:
Installation . . . . . . . . . . . . . . . . 4-6b 4-12Removal. . . . . . . . . . . . . . . . . . . 4-6a 4-12
Alternator cable, 400-amperedual voltage:
Installation . . . . . . . . . . . . . . . . 4-8.2b 4-18.8Removal. . . . . . . . . . . . . . . . . . . 4-8.2a 4-18.4
Alternator/power steering mounting bracket:
Installation . . . . . . . . . . . . . . . . 4-3b 4-4Removal. . . . . . . . . . . . . . . . . . . 4-3a 4-4
Alternator pulley:Installation . . . . . . . . . . . . . . . . 4-2b 4-2Removal. . . . . . . . . . . . . . . . . . . 4-2a 4-2
Alternator tests . . . . . . . . . . . . . . . 2-33 2-199Ammo box tray (40 mm), triple:
Installation . . . . . . . . . . . . . . . . 11-69b 11-130Removal. . . . . . . . . . . . . . . . . . . 11-69a 11-130
Ammo box tray (caliber .50), double:Inspection . . . . . . . . . . . . . . . . . 11-68a.1 11-129Installation . . . . . . . . . . . . . . . . 11-68b 11-129Removal. . . . . . . . . . . . . . . . . . . 11-68a 11-129
Antenna, AB-652/GR:Installation . . . . . . . . . . . . . . . . 12-23b 12-39Removal. . . . . . . . . . . . . . . . . . . 12-23a 12-39
Antenna, AS 1729/VRC:Installation . . . . . . . . . . . . . . . . 12-21b 12-37Removal. . . . . . . . . . . . . . . . . . . 12-21a 12-37
Antenna cables, rear:Installation . . . . . . . . . . . . . . . . 12-24b 12-43Removal. . . . . . . . . . . . . . . . . . . 12-24a 12-40
Antenna ground strap:Installation . . . . . . . . . . . . . . . . 12-20b 12-36Removal. . . . . . . . . . . . . . . . . . . 12-20a 12-35
Antenna mounting bracket, rear:Installation . . . . . . . . . . . . . . . . 12-22b 12-38Removal. . . . . . . . . . . . . . . . . . . 12-22a 12-38
A-pillar armor, left side:Inspection . . . . . . . . . . . . . . . . . 11-32b 11-58Installation . . . . . . . . . . . . . . . . 11-32c 11-58Removal. . . . . . . . . . . . . . . . . . . 11-32a 11-58
A-pillar armor, right side:Inspection . . . . . . . . . . . . . . . . . 11-33b 11-60Installation . . . . . . . . . . . . . . . . 11-33c 11-60Removal. . . . . . . . . . . . . . . . . . . 11-33a 11-60
A-pillar former assembly:Inspection . . . . . . . . . . . . . . . . . 10-90b 10-152Installation . . . . . . . . . . . . . . . . 10-90c 10-152Removal. . . . . . . . . . . . . . . . . . . 10-90a 10-152
Armament carrier maintenance task summary . . . . . . . . . . . . . . . 25-2 25-1
Armor, B-pillar:Installation . . . . . . . . . . . . . . . . 11-44b 11-90Removal. . . . . . . . . . . . . . . . . . . 11-44a 11-90
Armor brush seal, turret:Installation . . . . . . . . . . . . . . . . 11-51b 11-102Removal. . . . . . . . . . . . . . . . . . . 11-51a 11-102
Armor, cowl:Inspection . . . . . . . . . . . . . . . . . 11-49b 11-98Installation . . . . . . . . . . . . . . . . 11-49c 11-98Removal. . . . . . . . . . . . . . . . . . . 11-49a 11-98
Armor, firewall:Inspection . . . . . . . . . . . . . . . . . 11-48b 11-96Installation . . . . . . . . . . . . . . . . 11-48c 11-96Removal. . . . . . . . . . . . . . . . . . . 11-48a 11-96
Armor, left front underbody:Inspection . . . . . . . . . . . . . . . . . 11-36b 11-67Installation . . . . . . . . . . . . . . . . 11-36c 11-68Removal. . . . . . . . . . . . . . . . . . . 11-36a 11-66
INDEX (Cont’d)
Para. Page
A (Cont’d)
Para. Page
A (Cont’d)
Armor, left front underbody:New driver’s side footwell
inner armor installation . . . . 11-36.1b 11-68.4New driver’s side footwell
outer armor installation . . . . 11-36.1a 11-68.2New front underbody armor
installation. . . . . . . . . . . . . . . 11-36.1c 11-68.5Armor, left rear underbody:
Inspection . . . . . . . . . . . . . . . . . 11-37b 11-70Installation . . . . . . . . . . . . . . . . 11-37c 11-72Removal. . . . . . . . . . . . . . . . . . . 11-37a 11-70
Armor plate, tailgate:Installation . . . . . . . . . . . . . . . . 11-47b 11-95Removal. . . . . . . . . . . . . . . . . . . 11-47a 11-95
Armor, right front underbody:Inspection . . . . . . . . . . . . . . . . . 11-38b 11-75Installation . . . . . . . . . . . . . . . . 11-38c 11-76Removal. . . . . . . . . . . . . . . . . . . 11-38a 11-74
Armor, right front underbody:New passenger side footwell
inner armor and inner/outer cowl reinforcementinstallation. . . . . . . . . . . . . . . 25-13.3c 25-36.24
New passenger side footwellouter armor installation . . . . 25-13.3b 25-36.22
New passenger side footwellupper armor installation . . . . 25-13.3a 25-36.21
New right front underbodyarmor installation . . . . . . . . . 25-13.3d 25-36.26
Armor, right rear underbody:Inspection . . . . . . . . . . . . . . . . . 11-39b 11-78Installation . . . . . . . . . . . . . . . . 11-39c 11-80Removal. . . . . . . . . . . . . . . . . . . 11-39a 11-78
Armor and seal, turret:Installation . . . . . . . . . . . . . . . . 11-52b 11-103Removal. . . . . . . . . . . . . . . . . . . 11-52a 11-103
Army equipment, destruction of,to prevent enemy use . . . . . . . . . 1-3 1-1
AS 1729/VRC antenna:Installation . . . . . . . . . . . . . . . . 12-21b 12-37Removal. . . . . . . . . . . . . . . . . . . 12-21a 12-37
Assembly:General maintenance . . . . . . . . 2-17 2-33
Auxiliary fuel pickup and return lines:
Installation . . . . . . . . . . . . . . . . 3-27b 3-54Removal. . . . . . . . . . . . . . . . . . . 3-27a 3-54
Axle free play tolerance, differential and:
Inspection . . . . . . . . . . . . . . . . . 21-9 21-20
Axles, and suspension, propeller shafts, maintenance task summary . . . . . . . . . . . . . . . . . . . 21-2 21-1
Axles, front and rear,maintenance task summary . . . 6-6 6-12
B
Backrest, turret:Installation . . . . . . . . . . . . . . . . 11-54b 11-106Removal. . . . . . . . . . . . . . . . . . . 11-54a 11-106
Backup light switch:Installation . . . . . . . . . . . . . . . . 4-36b 4-62Removal. . . . . . . . . . . . . . . . . . . 4-36a 4-62
Balancing, tire . . . . . . . . . . . . . . . . 8-8 8-22Ball joint, lower:
Inspection . . . . . . . . . . . . . . . . . 6-24a 6-54Installation . . . . . . . . . . . . . . . . 6-24c 6-54Removal. . . . . . . . . . . . . . . . . . . 6-24b 6-54
Ball joint, upper:Inspection . . . . . . . . . . . . . . . . . 6-23a 6-50.2Installation . . . . . . . . . . . . . . . . 6-23c 6-52Removal. . . . . . . . . . . . . . . . . . . 6-23b 6-52
Battery:Installation . . . . . . . . . . . . . . . . 4-74c 4-128Removal. . . . . . . . . . . . . . . . . . . 4-74a 4-128Servicing . . . . . . . . . . . . . . . . . . 4-74b 4-128
Battery box cover catch:Installation . . . . . . . . . . . . . . . . 10-42b 10-72Removal. . . . . . . . . . . . . . . . . . . 10-42a 10-72
Battery box cover, companion seatassembly and:
Installation . . . . . . . . . . . . . . . . 10-43b 10-73Removal. . . . . . . . . . . . . . . . . . . 10-43a 10-73
Battery cable:Cleaning and inspection . . . . . . 4-68a 4-110Ground cable installation . . . . . 4-68e 4-112Ground cable removal. . . . . . . . 4-68d 4-112Ground cables disconnection . . 4-68b 4-111Ground cables reconnection . . . 4-68c 4-111Interconnecting cable
installation. . . . . . . . . . . . . . . 4-68g 4-113Interconnecting cable removal . 4-68f 4-113Positive cable installation. . . . . 4-68i 4-114Positive cable removal . . . . . . . 4-68h 4-114
Battery cable terminal clamp:Installation . . . . . . . . . . . . . . . . 4-67b 4-108Removal. . . . . . . . . . . . . . . . . . . 4-67a 4-108
Battery circuit tests. . . . . . . . . . . . 2-35 2-237
INDEX (Cont’d)
TM 9-2320-387-24-1
INDEX 4 Change 1
Para. Page
A (Cont’d)
Para. Page
A (Cont’d)
TM 9-2320-387-24-1
Change 1 INDEX 5
Battery holddown:Installation . . . . . . . . . . . . . . . . 4-73b 4-126Removal. . . . . . . . . . . . . . . . . . . 4-73a 4-126
Battery system maintenance task summary . . . . . . . . . . . . . . . 4-66 4-107
Battery system operation . . . . . . . 1-23 1-30Battery tray:
Cleaning and inspection . . . . . . 4-75b 4-130Installation . . . . . . . . . . . . . . . . 4-75d 4-130Preventive modification . . . . . . 4-75c 4-130Removal. . . . . . . . . . . . . . . . . . . 4-75a 4-130
Bearing adjustment, geared hubspindle . . . . . . . . . . . . . . . . . . . . . 6-12 6-35
Belt, runflat compressor (P/N 528236):
Installation . . . . . . . . . . . . . . . . 8-6b 8-18Removal. . . . . . . . . . . . . . . . . . . 8-6a 8-18
Belt, runflat compressor (P/N J39250):
Installation . . . . . . . . . . . . . . . . 8-5b 8-17Removal. . . . . . . . . . . . . . . . . . . 8-5a 8-17
Blackout drive light assembly:Installation . . . . . . . . . . . . . . . . 4-51b 4-86Removal. . . . . . . . . . . . . . . . . . . 4-51a 4-86
Blackout drive light lamp:Installation . . . . . . . . . . . . . . . . 4-52b 4-88Removal. . . . . . . . . . . . . . . . . . . 4-52a 4-88
Blade and arm, windshield wiper:Installation . . . . . . . . . . . . . . . . 10-62c 10-104Removal. . . . . . . . . . . . . . . . . . . 10-62a 10-104Repair (optional) . . . . . . . . . . . . 10-62b 10-104
Bleeding, power steering system. . 8-27 8-74Body accessories maintenance
task summary . . . . . . . . . . . . . . . 10-59 10-100Body hinge mount:
Installation . . . . . . . . . . . . . . . . 10-54b 10-89Removal. . . . . . . . . . . . . . . . . . . 10-54a 10-89
Body maintenance task summary. 10-1 10-1Body mount:
Installation . . . . . . . . . . . . . . . . 33-3b 33-2Removal. . . . . . . . . . . . . . . . . . . 33-3a 33-2
Body repair (GS):Aluminum repair . . . . . . . . . . . 33-8 33-10Fiberglass repair. . . . . . . . . . . . 33-9 33-16General . . . . . . . . . . . . . . . . . . . 33-5 33-5Inspection . . . . . . . . . . . . . . . . . 33-6 33-5Maintenance task summary . . . 33-2 33-1Repair task summary . . . . . . . . 33-4 33-4Rivet replacement . . . . . . . . . . . 33-7 33-7
Body repair materials:appendix F. . . . . . . . . . . . . . . . . . F-1
Body repair (unit):General . . . . . . . . . . . . . . . . . . . 10-56a 10-91Inspection . . . . . . . . . . . . . . . . . 10-56b 10-92Rivet replacement . . . . . . . . . . . 10-56c 10-92
Body wiring harness:Installation . . . . . . . . . . . . . . . . 27-3b 27-22Removal. . . . . . . . . . . . . . . . . . . 27-3a 27-2
Body wiring maintenance tasksummary . . . . . . . . . . . . . . . . . . . 27-2 27-1
Boot, fuel injection pump:Installation . . . . . . . . . . . . . . . . 3-23b 3-39Removal. . . . . . . . . . . . . . . . . . . 3-23a 3-39
Boot, heater:Installation . . . . . . . . . . . . . . . . 10-85b 10-147Removal. . . . . . . . . . . . . . . . . . . 10-85a 10-147
Bottom left side armor, C-pillar:Inspection . . . . . . . . . . . . . . . . . 11-46a.1 11-94Installation . . . . . . . . . . . . . . . . 11-46b 11-94Removal. . . . . . . . . . . . . . . . . . . 11-46a 11-94
B-pillar:Installation . . . . . . . . . . . . . . . . 10-57b 10-97Removal. . . . . . . . . . . . . . . . . . . 10-57a 10-97
B-pillar armor:Installation . . . . . . . . . . . . . . . . 11-44b 11-90Removal. . . . . . . . . . . . . . . . . . . 11-44a 11-90
Brace, rear bumper:Installation . . . . . . . . . . . . . . . . 9-6b 9-6Removal. . . . . . . . . . . . . . . . . . . 9-6a 9-6
Bracket, airlift,-to-hood seal:Installation . . . . . . . . . . . . . . . . 10-55b 10-90Removal. . . . . . . . . . . . . . . . . . . 10-55a 10-90
Bracket, alternator/power steeringmounting:Installation . . . . . . . . . . . . . . . . 4-3b 4-4Removal. . . . . . . . . . . . . . . . . . . 4-3a 4-4
Bracket, field glasses:Installation . . . . . . . . . . . . . . . . 11-65b 11-125Removal. . . . . . . . . . . . . . . . . . . 11-65a 11-125
Bracket, fire extinguisher:Inspection . . . . . . . . . . . . . . . . . 10-53b 10-88Installation . . . . . . . . . . . . . . . . 10-53c 10-88Removal. . . . . . . . . . . . . . . . . . . 10-53a 10-88
Bracket, fuel injection lines, left:Installation . . . . . . . . . . . . . . . . 3-41b 3-80Removal. . . . . . . . . . . . . . . . . . . 3-41a 3-80
Bracket, fuel injection lines, right:Installation . . . . . . . . . . . . . . . . 3-40b 3-79Removal. . . . . . . . . . . . . . . . . . . 3-40a 3-79
Bracket, headphone mounting:Installation . . . . . . . . . . . . . . . . 12-19b 12-34Removal. . . . . . . . . . . . . . . . . . . 12-19a 12-34
INDEX (Cont’d)
Para. Page
B (Cont’d)
Para. Page
B (Cont’d)
Bracket, hood latch:Installation . . . . . . . . . . . . . . . . 10-6b 10-10Removal. . . . . . . . . . . . . . . . . . . 10-6a 10-9
Bracket, hood prop rod and:Assembly . . . . . . . . . . . . . . . . . . 10-8d 10-12Disassembly . . . . . . . . . . . . . . . 10-8b 10-12Inspection . . . . . . . . . . . . . . . . . 10-8c 10-12Installation . . . . . . . . . . . . . . . . 10-8e 10-13Removal. . . . . . . . . . . . . . . . . . . 10-8a 10-12
Bracket, horn mounting:Installation . . . . . . . . . . . . . . . . 4-27b 4-50Removal. . . . . . . . . . . . . . . . . . . 4-27a 4-50
Bracket, muffler support:Assembly . . . . . . . . . . . . . . . . . . 3-55c 3-100Disassembly . . . . . . . . . . . . . . . 3-55b 3-100Installation . . . . . . . . . . . . . . . . 3-55d 3-100Removal. . . . . . . . . . . . . . . . . . . 3-55a 3-100
Bracket, radiator front mount:Installation . . . . . . . . . . . . . . . . 9-5b 9-5Removal. . . . . . . . . . . . . . . . . . . 9-5a 9-5
Bracket, rear antenna mounting:Installation . . . . . . . . . . . . . . . . 12-22b 12-38Removal. . . . . . . . . . . . . . . . . . . 12-22a 12-38
Bracket, rear bumper inner mounting:
Installation . . . . . . . . . . . . . . . . 9-8b 9-10Removal. . . . . . . . . . . . . . . . . . . 9-8a 9-10
Bracket, shelter mounting:Installation . . . . . . . . . . . . . . . . 11-73b 11-134Removal. . . . . . . . . . . . . . . . . . . 11-73a 11-134
Brackets, cargo bulkhead mounting:Installation . . . . . . . . . . . . . . . . 10-51b 10-86Removal. . . . . . . . . . . . . . . . . . . 10-51a 10-86
Brackets, intercom and:Installation . . . . . . . . . . . . . . . . 11-63b 11-122Removal. . . . . . . . . . . . . . . . . . . 11-63a 11-122
Brackets, M13 decontamination:Installation . . . . . . . . . . . . . . . . 10-58 10-98
Brackets, radio rack and mounting:Installation . . . . . . . . . . . . . . . . 12-17b 12-30Removal. . . . . . . . . . . . . . . . . . . 12-17a 12-28
Brackets, tailgate chain and:Installation . . . . . . . . . . . . . . . . 10-35b 10-62Removal. . . . . . . . . . . . . . . . . . . 10-35a 10-61
Brackets, 10,500 lb hydraulic winch and (M1113):
Brackets installation. . . . . . . . . 12-27.1c 12-54.4Brackets removal . . . . . . . . . . . 12-27.1b 12-54.4Winch installation. . . . . . . . . . . 12-27.1d 12-54.4Winch removal . . . . . . . . . . . . . 12-27.1a 12-54.2
Brackets, 10,500 lb rear hydraulic winch and (M1114):
Brackets installation. . . . . . . . . 12-36.1c 12-68.2Brackets removal . . . . . . . . . . . 12-36.1b 12-68.2Winch installation. . . . . . . . . . . 12-36.1d 12-68.2Winch removal . . . . . . . . . . . . . 12-36.1a 12-68.1
Brake adjustment, rear dualservice/parking . . . . . . . . . . . . . . 7-19 7-54
Brake and base, turret:Adjustment . . . . . . . . . . . . . . . . 11-55c 11-108Installation . . . . . . . . . . . . . . . . 11-55b 11-108Removal. . . . . . . . . . . . . . . . . . . 11-55a 11-108
Brake cable/mounting bracket,parking, left:
Installation . . . . . . . . . . . . . . . . 7-17b 7-50Removal. . . . . . . . . . . . . . . . . . . 7-17a 7-48
Brake cable, parking, right:Installation . . . . . . . . . . . . . . . . 7-16b 7-46Removal. . . . . . . . . . . . . . . . . . . 7-16a 7-46
Brake caliper, disc:Assembly . . . . . . . . . . . . . . . . . . 22-4d 22-6Cleaning . . . . . . . . . . . . . . . . . . 22-4b 22-4Disassembly . . . . . . . . . . . . . . . 22-4a 22-4Inspection . . . . . . . . . . . . . . . . . 22-4c 22-5
Brake caliper, rear parking:Assembly . . . . . . . . . . . . . . . . . . 22-5d 22-10Cleaning . . . . . . . . . . . . . . . . . . 22-5b 22-9Disassembly . . . . . . . . . . . . . . . 22-5a 22-8Inspection . . . . . . . . . . . . . . . . . 22-5c 22-9
Brake caliper, service:Cleaning and inspection . . . . . . 7-4b 7-12Installation . . . . . . . . . . . . . . . . 7-4c 7-12Removal. . . . . . . . . . . . . . . . . . . 7-4a 7-10
Brake lever, parking:Installation . . . . . . . . . . . . . . . . 7-20b 7-56Removal. . . . . . . . . . . . . . . . . . . 7-20a 7-56
Brake lines:Caliper-to-intermediate support bracket installation . . 7-7f 7-22
Caliper-to-intermediate support bracket removal . . . . . 7-7e 7-22
Front caliper-to-intermediate brake line installation . . . . . . . 7-7b 7-18
Front caliper-to-intermediatebrake line removal . . . . . . . . . 7-7a 7-18
Intermediate brake lineinstallation . . . . . . . . . . . . . . . 7-7j 7-25
Intermediate brake lineremoval . . . . . . . . . . . . . . . . . . 7-7i 7-24
Pressure limiter valve-to-differential valve installation . 7-7n 7-26
Pressure limiter valve-to-differential valve removal. . . . 7-7m 7-26
INDEX (Cont’d)
TM 9-2320-387-24-1
INDEX 6 Change 1
Para. Page
B (Cont’d)
Para. Page
B (Cont’d)
TM 9-2320-387-24-1
Change 1 INDEX 7
Proportioning valve-to-unionbrake line installation . . . . . . . 7-7l 7-26
Proportioning valve-to-unionbrake line removal . . . . . . . . . 7-7k 7-26
Rear brake line installation . . . 7-7h 7-24Rear brake line removal . . . . . . 7-7g 7-24Rear caliper-to-intermediate brake line installation . . . . . . . 7-7d 7-20
Rear caliper-to-intermediate brake line removal . . . . . . . . . 7-7c 7-20
Brake pad, rear dual service/parking:Cleaning and inspection . . . . . . 7-14b 7-40Installation . . . . . . . . . . . . . . . . 7-14c 7-40Removal. . . . . . . . . . . . . . . . . . . 7-14a 7-38
Brake pad, service:Cleaning and inspection . . . . . . 7-3b 7-8Installation . . . . . . . . . . . . . . . . 7-3c 7-8Removal. . . . . . . . . . . . . . . . . . . 7-3a 7-6
Brake pedal, service:Installation . . . . . . . . . . . . . . . . 7-9b 7-30Removal. . . . . . . . . . . . . . . . . . . 7-9a 7-30
Brake pressure limiter valve:Installation . . . . . . . . . . . . . . . . 7-8b 7-28Removal. . . . . . . . . . . . . . . . . . . 7-8a 7-28
Brake protection guards:Installation . . . . . . . . . . . . . . . . 7-11b 7-34Removal. . . . . . . . . . . . . . . . . . . 7-11a 7-34
Brake rod, rear dual service/parking:
Installation . . . . . . . . . . . . . . . . 7-18b 7-52Removal. . . . . . . . . . . . . . . . . . . 7-18a 7-52
Brake rotor:Checking lateral runout . . . . . . 22-3b 22-2Checking thickness variation . . 22-3c 22-2Inspection . . . . . . . . . . . . . . . . . 22-3a 22-2Refinishing . . . . . . . . . . . . . . . . 22-3d 22-2
Brake rotor, service:Installation . . . . . . . . . . . . . . . . 7-12b 7-36Removal. . . . . . . . . . . . . . . . . . . 7-12a 7-36
Brake, service/parking,system operation . . . . . . . . . . . . . 1-25 1-32
Brake, service, system operation . 1-26 1-33Brake switch, parking
Installation . . . . . . . . . . . . . . . . 4-23b 4-46Removal. . . . . . . . . . . . . . . . . . . 4-23a 4-46
Brake system bleeding, service:Manual bleeding . . . . . . . . . . . . 7-2b 7-4Master cylinder bleeding . . . . . 7-2c 7-4Pressure bleeding . . . . . . . . . . . 7-2a 7-2
Brake system, rear dual service/parking maintenance task summary . . . . . . . . . . . . . . . . . . . 7-13 7-37
Brake system, service maintenance task summary . . . . 7-1 7-1
Brake system tests . . . . . . . . . . . . 2-41 2-419Brake warning lamp:
Installation . . . . . . . . . . . . . . . . 4-21b 4-44Removal. . . . . . . . . . . . . . . . . . . 4-21a 4-44
Break-in procedure . . . . . . . . . . . . 1-9 1-2Brush, horn control:
Installation . . . . . . . . . . . . . . . . 4-25b 4-48Removal. . . . . . . . . . . . . . . . . . . 4-25a 4-48
Bulkhead, cargo:Installation . . . . . . . . . . . . . . . . 10-49b 10-83Removal. . . . . . . . . . . . . . . . . . . 10-49a 10-83
Bulkhead extension, cargo:Assembly . . . . . . . . . . . . . . . . . . 10-50c 10-84Disassembly . . . . . . . . . . . . . . . 10-50b 10-84Installation . . . . . . . . . . . . . . . . 10-50d 10-84Removal. . . . . . . . . . . . . . . . . . . 10-50a 10-84
Bumper and bracket, night vision lid:
Installation . . . . . . . . . . . . . . . . 11-58b 11-112Removal. . . . . . . . . . . . . . . . . . . 11-58a 11-112
Bumper and towing brackets,front:
Installation . . . . . . . . . . . . . . . . 9-2b 9-2Removal. . . . . . . . . . . . . . . . . . . 9-2a 9-2
Bumper brace, rear:Installation . . . . . . . . . . . . . . . . 9-6b 9-6Removal. . . . . . . . . . . . . . . . . . . 9-6a 9-6
Bumper inner mounting bracket, rear:
Installation . . . . . . . . . . . . . . . . 9-8b 9-10Removal. . . . . . . . . . . . . . . . . . . 9-8a 9-10
Bumper, rear:Installation . . . . . . . . . . . . . . . . 9-7b 9-8Removal. . . . . . . . . . . . . . . . . . . 9-7a 9-8
Bushing, control arm:Installation . . . . . . . . . . . . . . . . 21-7b 21-18Removal. . . . . . . . . . . . . . . . . . . 21-7a 21-18
Buss bar:Installation . . . . . . . . . . . . . . . . 4-71b 4-121Removal. . . . . . . . . . . . . . . . . . . 4-71a 4-121
C
Cable, 12-volt regulatorInstallation . . . . . . . . . . . . . . . . 4-70b 4-120Removal. . . . . . . . . . . . . . . . . . . 4-70a 4-118
Cable, 200-ampere dual voltagealternator:
Installation . . . . . . . . . . . . . . . . 4-6b 4-12Removal. . . . . . . . . . . . . . . . . . . 4-6a 4-12
INDEX (Cont’d)
Para. Page
B (Cont’d)
Para. Page
B (Cont’d)
Cable, 200-ampere dual voltage umbilical power:
Installation . . . . . . . . . . . . . . . . 4-7b 4-16Removal. . . . . . . . . . . . . . . . . . . 4-7a 4-14
Cable, 400-amp dual voltagealternator:
Installation . . . . . . . . . . . . . . . . 4-8.2b 4-18.8Removal. . . . . . . . . . . . . . . . . . . 4-8.2a 4-18.4
Cable, battery:Cleaning and inspection . . . . . . 4-68a 4-110Ground cable installation . . . . . 4-68e 4-112Ground cable removal. . . . . . . . 4-68d 4-112Ground cables disconnection . . 4-68b 4-111Ground cables reconnection . . . 4-68c 4-111Interconnecting cable
installation. . . . . . . . . . . . . . . 4-68g 4-113Interconnecting cable removal . 4-68f 4-113Positive cable installation. . . . . 4-68i 4-114Positive cable removal . . . . . . . 4-68h 4-114
Cable, hand throttle control, andbracket:
Installation . . . . . . . . . . . . . . . . 3-46b 3-88Removal. . . . . . . . . . . . . . . . . . . 3-46a 3-88
Cable, heater control, and shutoff valve:
Adjustment . . . . . . . . . . . . . . . . 10-79 10-136Cable, parking brake, right:
Installation . . . . . . . . . . . . . . . . 7-16b 7-46Removal. . . . . . . . . . . . . . . . . . . 7-16a 7-46
Cable, power:Installation . . . . . . . . . . . . . . . . 12-25b 12-48Removal. . . . . . . . . . . . . . . . . . . 12-25a 12-47
Cable, slave receptacle and:Inspection . . . . . . . . . . . . . . . . . 4-76b 4-132Installation . . . . . . . . . . . . . . . . 4-76c 4-132Removal. . . . . . . . . . . . . . . . . . . 4-76a 4-132
Cable, speedometer:Installation . . . . . . . . . . . . . . . . 4-18b 4-38Removal. . . . . . . . . . . . . . . . . . . 4-18a 4-38
Cables, rear antenna:Installation . . . . . . . . . . . . . . . . 12-24b 12-43Removal. . . . . . . . . . . . . . . . . . . 12-24a 12-40
Cables, starter power:Installation . . . . . . . . . . . . . . . . 4-72b 4-124Removal. . . . . . . . . . . . . . . . . . . 4-72a 4-122
Cable, transfer case guide:Installation . . . . . . . . . . . . . . . . 20-4b 20-8Removal. . . . . . . . . . . . . . . . . . . 20-4a 20-8
Cable, winch:Installation . . . . . . . . . . . . . . . . 12-28b 12-56Removal. . . . . . . . . . . . . . . . . . . 12-28a 12-56
Cable, 10,500 lb hydraulic winch (M1113):
Installation . . . . . . . . . . . . . . . . 12-28.1b 12-56.2Removal. . . . . . . . . . . . . . . . . . . 12-28.1a 12-56.2
Cable, 10,500 lb rear hydraulic winch (M1114):
Installation . . . . . . . . . . . . . . . . 12-36.2b 12.68.4Removal. . . . . . . . . . . . . . . . . . . 12.36.2a 12-68.4
Caliper, rear dual service/parkingbrake:
Cleaning and inspection . . . . . . 7-15b 7-44Installation . . . . . . . . . . . . . . . . 7-15c 7-44Removal. . . . . . . . . . . . . . . . . . . 7-15a 7-42
Caliper, service brake:Cleaning and inspection . . . . . . 7-4b 7-12Installation . . . . . . . . . . . . . . . . 7-4c 7-12Removal. . . . . . . . . . . . . . . . . . . 7-4a 7-10
Camouflage screen stowage straps:Installation . . . . . . . . . . . . . . . . 10-36b 10-63Removal. . . . . . . . . . . . . . . . . . . 10-36a 10-63
Can tray, water:Installation . . . . . . . . . . . . . . . . 11-70b 11-131Removal. . . . . . . . . . . . . . . . . . . 11-70a 11-131
Capacitor, Transmission ControlModule (TCM):
Installation . . . . . . . . . . . . . . . . 4-47.1b 4-80Removal. . . . . . . . . . . . . . . . . . . 4-47.1a 4-80
Cargo bulkhead:Installation . . . . . . . . . . . . . . . . 10-49b 10-83Removal. . . . . . . . . . . . . . . . . . . 10-49a 10-83
Cargo bulkhead extension:Assembly . . . . . . . . . . . . . . . . . . 10-50c 10-84Disassembly . . . . . . . . . . . . . . . 10-50b 10-84Installation . . . . . . . . . . . . . . . . 10-50d 10-84Removal. . . . . . . . . . . . . . . . . . . 10-50a 10-84
Cargo bulkhead mounting brackets:Installation . . . . . . . . . . . . . . . . 10-51b 10-86Removal. . . . . . . . . . . . . . . . . . . 10-51a 10-86
Cargo door access, rear:Lifting . . . . . . . . . . . . . . . . . . . . 11-90a 11-160Lowering . . . . . . . . . . . . . . . . . . 11-90b 11-160
Cargo shell:Inspection . . . . . . . . . . . . . . . . . 25-7b 25-19Installation . . . . . . . . . . . . . . . . 25-7c 25-19Repair . . . . . . . . . . . . . . . . . . . . 25-8 25-22Removal. . . . . . . . . . . . . . . . . . . 25-7a 25-16
Cargo shell door:Adjustment . . . . . . . . . . . . . . . . 11-14c 11-30Inspection . . . . . . . . . . . . . . . . . 11-14a.1 11-26Installation . . . . . . . . . . . . . . . . 11-14b 11-28Removal. . . . . . . . . . . . . . . . . . . 11-14a 11-26
INDEX (Cont’d)
TM 9-2320-387-24-1
INDEX 8 Change 1
Para. Page
C (Cont’d)
Para. Page
C (Cont’d)
TM 9-2320-387-24-1
Change 1 INDEX 9
Cargo shell door armor:Inspection . . . . . . . . . . . . . . . . . 11-13b 11-25Installation . . . . . . . . . . . . . . . . 11-13c 11-25Removal. . . . . . . . . . . . . . . . . . . 11-13a 11-25
Cargo shell door dovetail assembly:Adjustment . . . . . . . . . . . . . . . . 11-20c 11-38Installation . . . . . . . . . . . . . . . . 11-20b 11-38Removal. . . . . . . . . . . . . . . . . . . 11-20a 11-38
Cargo shell door dovetail spring:Installation . . . . . . . . . . . . . . . . 11-28b 11-51Removal. . . . . . . . . . . . . . . . . . . 11-28a 11-51
Cargo shell door front striker:Installation . . . . . . . . . . . . . . . . 11-25b 11-48Removal. . . . . . . . . . . . . . . . . . . 11-25a 11-48
Cargo shell door gas spring:Assembly . . . . . . . . . . . . . . . . . . 11-22d 11-44Disassembly . . . . . . . . . . . . . . . 11-22c 11-44Inspection . . . . . . . . . . . . . . . . . 11-22c.1 11-44Installation . . . . . . . . . . . . . . . . 11-22e 11-44Removal. . . . . . . . . . . . . . . . . . . 11-22b 11-43Rotating. . . . . . . . . . . . . . . . . . . 11-22a 11-41
Cargo shell door left side gas spring mounting bracket:
Inspection . . . . . . . . . . . . . . . . . 11-29b 11-52Installation . . . . . . . . . . . . . . . . 11-29c 11-52Removal. . . . . . . . . . . . . . . . . . . 11-29a 11-52
Cargo shell door grab handle:Installation . . . . . . . . . . . . . . . . 11-16b 11-33Removal. . . . . . . . . . . . . . . . . . . 11-16a 11-33
Cargo shell door handle latch:Installation . . . . . . . . . . . . . . . . 11-17b 11-34Removal. . . . . . . . . . . . . . . . . . . 11-17a 11-34
Cargo shell door latch:Adjustment . . . . . . . . . . . . . . . . 11-18c 11-35Installation . . . . . . . . . . . . . . . . 11-18b 11-35Removal. . . . . . . . . . . . . . . . . . . 11-18a 11-35
Cargo shell door latch rod:Adjustment . . . . . . . . . . . . . . . . 11-19c 11-36Installation . . . . . . . . . . . . . . . . 11-19b 11-36Removal. . . . . . . . . . . . . . . . . . . 11-19a 11-36
Cargo shell door liner:Installation . . . . . . . . . . . . . . . . 11-31b 11-56Removal. . . . . . . . . . . . . . . . . . . 11-31a 11-56
Cargo shell door rear striker:Installation . . . . . . . . . . . . . . . . 11-26b 11-49Removal. . . . . . . . . . . . . . . . . . . 11-26a 11-49
Cargo shell door rear striker mounting plate:
Installation . . . . . . . . . . . . . . . . 11-27b 11-50Removal. . . . . . . . . . . . . . . . . . . 11-27a 11-50
Cargo shell door retention cable:Inspection . . . . . . . . . . . . . . . . . 11-21a.1 11-40Installation . . . . . . . . . . . . . . . . 11-21b 11-40Removal. . . . . . . . . . . . . . . . . . . 11-21a 11-40
Cargo shell door seal:Installation . . . . . . . . . . . . . . . . 11-24b 11-47Removal. . . . . . . . . . . . . . . . . . . 11-24a 11-47
Cargo shell door strap:Inspection . . . . . . . . . . . . . . . . . 11-23a.1 11-46Installation . . . . . . . . . . . . . . . . 11-23b 11-46Removal. . . . . . . . . . . . . . . . . . . 11-23a 11-46
Cargo shell door wire handle lock:Installation . . . . . . . . . . . . . . . . 11-15b 11-32Removal. . . . . . . . . . . . . . . . . . . 11-15a 11-32
Cargo tiedown:Installation . . . . . . . . . . . . . . . . 10-52b 10-87Removal. . . . . . . . . . . . . . . . . . . 10-52a 10-87
Catalytic converter, muffler and:Installation . . . . . . . . . . . . . . . . 3-49b 3-92Removal. . . . . . . . . . . . . . . . . . . 3-49a 3-92
Catch, battery box cover:Installation . . . . . . . . . . . . . . . . 10-42b 10-72Removal. . . . . . . . . . . . . . . . . . . 10-42a 10-72
Catch, door latch:Installation . . . . . . . . . . . . . . . . 11-12b 11-24Removal. . . . . . . . . . . . . . . . . . . 11-12a 11-24
Catch, fuel door:Installation . . . . . . . . . . . . . . . . 10-4b 10-6Removal. . . . . . . . . . . . . . . . . . . 10-4a 10-6
CDR valve and bracket:Cleaning and inspection . . . . . . 3-9c 3-18Installation . . . . . . . . . . . . . . . . 3-9d 3-18Removal. . . . . . . . . . . . . . . . . . . 3-9b 3-16Testing . . . . . . . . . . . . . . . . . . . 3-9a 3-16
CDR valve hoses:Installation . . . . . . . . . . . . . . . . 3-10b 3-20Removal. . . . . . . . . . . . . . . . . . . 3-10a 3-20
CDR valve vent line:Installation . . . . . . . . . . . . . . . . 12-44b 12-79Removal. . . . . . . . . . . . . . . . . . . 12-44a 12-79
Center hood stop:Installation . . . . . . . . . . . . . . . . . 10-12b 10-21Removal. . . . . . . . . . . . . . . . . . . . 10-12a 10-21
Center hood stop guide:Installation . . . . . . . . . . . . . . . . 10-14b 10-23Removal. . . . . . . . . . . . . . . . . . . 10-14a 10-23
Center link:Installation . . . . . . . . . . . . . . . . 8-15b 8-42Removal. . . . . . . . . . . . . . . . . . . 8-15a 8-42
INDEX (Cont’d)
Para. Page
C (Cont’d)
Para. Page
C (Cont’d)
Center support:Assembly . . . . . . . . . . . . . . . . . . 28-9d 28-35Cleaning . . . . . . . . . . . . . . . . . . 28-9b 28-32Disassembly . . . . . . . . . . . . . . . 28-9a 28-32Inspection . . . . . . . . . . . . . . . . . 28-9c 28-32
Chain, shelter carrier tailgate:Assembly . . . . . . . . . . . . . . . . . . 11-77c 11-138Disassembly . . . . . . . . . . . . . . . 11-77b 11-138Installation . . . . . . . . . . . . . . . . 11-77d 11-138Removal. . . . . . . . . . . . . . . . . . . 11-77a 11-138
Characteristics, capabilities, andfeatures, equipment . . . . . . . . . . 1-10 1-2
Circuit breaker:Installation . . . . . . . . . . . . . . . . 4-12b 4-26Removal. . . . . . . . . . . . . . . . . . . 4-12a 4-26
Circuit breaker, windshield de-icer,defroster switch, and:
Installation . . . . . . . . . . . . . . . . 10-67b 10-114Removal. . . . . . . . . . . . . . . . . . . 10-67a 10-114
Circuit breakers, transmission:Installation . . . . . . . . . . . . . . . . 4-43b 4-70Removal. . . . . . . . . . . . . . . . . . . 4-43a 4-70
Clamp, battery cable terminal:Installation . . . . . . . . . . . . . . . . 4-67b 4-108Removal. . . . . . . . . . . . . . . . . . . 4-67a 4-108
Cleaning:General maintenance . . . . . . . . 2-14 2-30
Close-off and retainer, intermediate steering shaft:
Installation . . . . . . . . . . . . . . . . 8-22b 8-62Removal. . . . . . . . . . . . . . . . . . . 8-22a 8-62
Coil spring:Installation . . . . . . . . . . . . . . . . 6-27b 6-61Removal. . . . . . . . . . . . . . . . . . . 6-27a 6-60
Cold-advance solenoid, fuelinjection pump:
Inspection . . . . . . . . . . . . . . . . . 16-9b 16-18Installation . . . . . . . . . . . . . . . . 16-9c 16-18Removal. . . . . . . . . . . . . . . . . . . 16-9a 16-18
Cold-advance switch:Installation . . . . . . . . . . . . . . . . 4-31b 4-55Removal. . . . . . . . . . . . . . . . . . . 4-31a 4-55
Column, steering:Installation . . . . . . . . . . . . . . . . 8-18b 8-52Removal. . . . . . . . . . . . . . . . . . . 8-18a 8-50
Commander’s control boxmounting bracket:
Installation . . . . . . . . . . . . . . . . 11-64b 11-124Removal. . . . . . . . . . . . . . . . . . . 11-64a 11-124
Common tools and equipment. . . . 2-1 2-1Communication kits maintenance
task summary . . . . . . . . . . . . . . . 12-16 12-27
Companion seat assembly:Assembly . . . . . . . . . . . . . . . . . . 10-44b 10-74Disassembly . . . . . . . . . . . . . . . 10-44a 10-74
Companion seat assembly and battery box cover:
Installation . . . . . . . . . . . . . . . . 10-43b 10-73Removal. . . . . . . . . . . . . . . . . . . 10-43a 10-73
Composite light assembly, front:Installation . . . . . . . . . . . . . . . . 4-53b 4-90Removal. . . . . . . . . . . . . . . . . . . 4-53a 4-90
Composite light assembly, rear:Installation . . . . . . . . . . . . . . . . 4-57b 4-96Removal. . . . . . . . . . . . . . . . . . . 4-57a 4-96
Composite light lamp, front:Installation . . . . . . . . . . . . . . . . 4-54b 4-92Removal. . . . . . . . . . . . . . . . . . . 4-54a 4-92
Composite light lamp, rear:Installation . . . . . . . . . . . . . . . . 4-55b 4-93Removal. . . . . . . . . . . . . . . . . . . 4-55a 4-93
Compression/mechanical tests . . . 2-30 2-147Condenser fan access panel:
Inspection . . . . . . . . . . . . . . . . . 11-86b 11-154Installation . . . . . . . . . . . . . . . . 11-86c 11-154Removal. . . . . . . . . . . . . . . . . . . 11-86a 11-154
Condenser fan exhaust and supplyvent:
Exhaust vents installation . . . . 11-85d 11-152Exhaust vents removal . . . . . . . 11-85a 11-152Inspection . . . . . . . . . . . . . . . . . 11-85c 11-152Supply vents installation . . . . . 11-85e 11-152Supply vents removal . . . . . . . . 11-85b 11-152
Connecting rod, locking pawl and:Installation . . . . . . . . . . . . . . . . 11-7b 11-14Removal. . . . . . . . . . . . . . . . . . . 11-7a 11-14
Connector and grommet, serviceheadlight and blackout drive lightelectrical:
Installation . . . . . . . . . . . . . . . . 4-65b 4-106Removal. . . . . . . . . . . . . . . . . . . 4-65a 4-106
Connector, wiring harness:Connector assembly repair . . . . 4-80d 4-147Female cable connector repair . 4-80c 4-147Male cable connector repair . . . 4-80b 4-146Protective control box lowercannon plug assembly repair . 4-80f 4-148
Receptacle assembly repair . . . 4-80e 4-148Terminal-type cable connectorrepair . . . . . . . . . . . . . . . . . . . . 4-80a 4-146
Control arm bracket, rear upper:Installation . . . . . . . . . . . . . . . . 24-11b 24-14Removal. . . . . . . . . . . . . . . . . . . 24-11a 24-14
INDEX (Cont’d)
TM 9-2320-387-24-1
INDEX 10 Change 1
Para. Page
C (Cont’d)
Para. Page
C (Cont’d)
TM 9-2320-387-24-1
Change 1 INDEX 11
Control arm bushing:Installation . . . . . . . . . . . . . . . . 21-7b 21-18Removal. . . . . . . . . . . . . . . . . . . 21-7a 21-18
Control arm, lower:Installation . . . . . . . . . . . . . . . . 6-26b 6-58Removal. . . . . . . . . . . . . . . . . . . 6-26a 6-58
Control arm, upper:Installation . . . . . . . . . . . . . . . . 6-25b 6-56Removal. . . . . . . . . . . . . . . . . . . 6-25a 6-56
Control box, protective:Installation . . . . . . . . . . . . . . . . 4-4b 4-6Removal. . . . . . . . . . . . . . . . . . . 4-4a 4-6
Controller, glow plug:Installation . . . . . . . . . . . . . . . . 4-33b 4-58Removal. . . . . . . . . . . . . . . . . . . 4-33a 4-58
Controller plug, 10,500 lb hydraulic winch (M1113):
Installation . . . . . . . . . . . . . . . . 12-32.1b 12-62.5Removal. . . . . . . . . . . . . . . . . . . 12-32.1a 12-62
Controller plug, 10,500 lb rear hydraulic winch (M1114):
Installation . . . . . . . . . . . . . . . . 12-36.6b 12-36.28Removal. . . . . . . . . . . . . . . . . . . 12-36.6a 12-36.26
Control valve and accumulator housing repair:
Accumulator housing assembly 28-17h 28-64Accumulator housing cleaning . 28-17a 28-60Accumulator housing disassembly . . . . . . . . . . . . . . . 28-17b 28-60
Accumulator housing inspection 28-17g 28-64Control valve assembly. . . . . . . 28-17f 28-62Control valve cleaning . . . . . . . 28-17d 28-62Control valve disassembly . . . . 28-17c 28-62Control valve inspection . . . . . . 28-17e 28-62
Control valve, power steeringsystem hydraulic:
Back flush procedure . . . . . . . . 8-25b 8-68Inspection . . . . . . . . . . . . . . . . . 8-25c 8-70Installation . . . . . . . . . . . . . . . . 8-25d 8-70Removal. . . . . . . . . . . . . . . . . . . 8-25a 8-68
Converter housing cover (2-piece),sealed lower:
Inspection . . . . . . . . . . . . . . . . . 5-11b 5-26Installation . . . . . . . . . . . . . . . . 5-11c 5-26Removal. . . . . . . . . . . . . . . . . . . 5-11a 5-26
Converter housing cover, sealedupper:
Inspection . . . . . . . . . . . . . . . . . 5-12b 5-28Installation . . . . . . . . . . . . . . . . 5-12c 5-28Removal. . . . . . . . . . . . . . . . . . . 5-12a 5-28
Converter, torque:Cleaning . . . . . . . . . . . . . . . . . . 28-4a 28-20Inspection . . . . . . . . . . . . . . . . . 28-4b 28-20
Cooler hose, power steering:Installation . . . . . . . . . . . . . . . . 8-26b 8-72Removal. . . . . . . . . . . . . . . . . . . 8-26a 8-72
Cooling system:Maintenance task summary(DS) . . . . . . . . . . . . . . . . . . . . . 17-2 17-1
Maintenance task summary (unit) . . . . . . . . . . . . . . . . . . . . 3-60 3-109
Cooling system operation . . . . . . . 1-20 1-26Cooling system servicing:
Depressurizing . . . . . . . . . . . . . 3-61a 3-110Draining system . . . . . . . . . . . . 3-61b 3-110Filling system . . . . . . . . . . . . . . 3-61d 3-110Preventive cleaning. . . . . . . . . . 3-61c 3-110
Cooling system tests . . . . . . . . . . . 2-25 2-61Cover, differential:
Cleaning and inspection . . . . . . 6-18b 6-46Installation . . . . . . . . . . . . . . . . 6-18c 6-46Removal. . . . . . . . . . . . . . . . . . . 6-18a 6-46
Cover, door latch:Installation . . . . . . . . . . . . . . . . 11-6b 11-13Removal. . . . . . . . . . . . . . . . . . . 11-6a 11-13
Cover, engine access:Assembly . . . . . . . . . . . . . . . . . . 10-22c 10-36Disassembly . . . . . . . . . . . . . . . 10-22b 10-36Installation . . . . . . . . . . . . . . . . 10-22d 10-36Removal. . . . . . . . . . . . . . . . . . . 10-22a 10-35
Cover, geared hub side:Cleaning and inspection . . . . . . 6-8b 6-20Installation . . . . . . . . . . . . . . . . 6-8c 6-20Removal. . . . . . . . . . . . . . . . . . . 6-8a 6-20
Covers, A/C coolant line:Inspection . . . . . . . . . . . . . . . . . 25-32b 25-84Installation . . . . . . . . . . . . . . . . 25-32c 25-86Removal. . . . . . . . . . . . . . . . . . . 25-32a 25-84
Cowl armor:Inspection . . . . . . . . . . . . . . . . . 11-49b 11-98Installation . . . . . . . . . . . . . . . . 11-49c 11-98Removal. . . . . . . . . . . . . . . . . . . 11-49a 11-98
Cowl insulation, left front:Installation . . . . . . . . . . . . . . . . 10-31b 10-56Removal. . . . . . . . . . . . . . . . . . . 10-31a 10-56
Cowl insulation, left outer:Installation . . . . . . . . . . . . . . . . 10-30b 10-55Removal. . . . . . . . . . . . . . . . . . . 10-30a 10-55
Cowl insulation, right front:Installation . . . . . . . . . . . . . . . . 10-32b 10-58Removal. . . . . . . . . . . . . . . . . . . 10-32a 10-58
C-pillar bottom left side armor:Inspection . . . . . . . . . . . . . . . . . 11-46a.1 11-94Installation . . . . . . . . . . . . . . . . 11-46b 11-94Removal. . . . . . . . . . . . . . . . . . . 11-46a 11-94
INDEX (Cont’d)
Para. Page
C (Cont’d)
Para. Page
C (Cont’d)
C-pillar door, guides, track, and door stop:
Inspection . . . . . . . . . . . . . . . . . 25-12b 25-32Installation . . . . . . . . . . . . . . . . 25-12c 25-34Removal. . . . . . . . . . . . . . . . . . . 25-12a 25-32
C-pillar partition:Assembly . . . . . . . . . . . . . . . . . . 25-9c 25-26Disassembly . . . . . . . . . . . . . . . 25-9b 25-24Inspection . . . . . . . . . . . . . . . . . 25-9b.1 25-26Installation . . . . . . . . . . . . . . . . 25-9d 25-26Removal. . . . . . . . . . . . . . . . . . . 25-9a 25-24
C-pillar top armor:Inspection . . . . . . . . . . . . . . . . . 11-45b 11-92Installation . . . . . . . . . . . . . . . . 11-45c 11-92Removal. . . . . . . . . . . . . . . . . . . 11-45a 11-92
Crankcase Depression Regulator(CDR) valve and bracket:
Cleaning and inspection . . . . . . 3-9c 3-18Installation . . . . . . . . . . . . . . . . 3-9d 3-18Removal. . . . . . . . . . . . . . . . . . . 3-9b 3-16Testing . . . . . . . . . . . . . . . . . . . 3-9a 3-16
Crankshaft pulley:Installation . . . . . . . . . . . . . . . . 15-6b 15-14Removal. . . . . . . . . . . . . . . . . . . 15-6a 15-14
Crossmember bracket, rear, and rear body mount bracket:
Installation . . . . . . . . . . . . . . . . 24-21b 24-38Removal. . . . . . . . . . . . . . . . . . . 24-21a 24-38
Crossmember, front, rear suspension:
Installation . . . . . . . . . . . . . . . . 24-18b 24-32Removal. . . . . . . . . . . . . . . . . . . 24-18a 24-30
Crossmember, rear, rear suspension:Installation . . . . . . . . . . . . . . . . 24-19b 24-34Removal. . . . . . . . . . . . . . . . . . . 24-19a 24-34
Crossmember, suspension:Inspection . . . . . . . . . . . . . . . . . 24-20a 24-36Repair . . . . . . . . . . . . . . . . . . . . 24-20b 24-36
Crossmember, transmission mount:Installation . . . . . . . . . . . . . . . . 9-10b 9-16Removal. . . . . . . . . . . . . . . . . . . 9-10a 9-16
Crossover, intake:Installation . . . . . . . . . . . . . . . . 15-20b 15-37Removal. . . . . . . . . . . . . . . . . . . 15-20a 15-37
Crossover, water:Inspection . . . . . . . . . . . . . . . . . 3-79b 3-138Installation . . . . . . . . . . . . . . . . 3-79c 3-138Removal. . . . . . . . . . . . . . . . . . . 3-79a 3-138
Cylinder head, left:Installation . . . . . . . . . . . . . . . . 15-4c 15-10Removal. . . . . . . . . . . . . . . . . . . 15-4a 15-8Repair . . . . . . . . . . . . . . . . . . . . 15-4b 15-8
Cylinder head, right:Installation . . . . . . . . . . . . . . . . 15-5c 15-12Removal. . . . . . . . . . . . . . . . . . . 15-5a 15-12Repair . . . . . . . . . . . . . . . . . . . . 15-5b 15-12
D
Damper, torsional:Installation . . . . . . . . . . . . . . . . 15-7b 15-16Removal. . . . . . . . . . . . . . . . . . . 15-7a 15-15
Data, tabulated . . . . . . . . . . . . . . . 1-15 1-19DCA troubleshooting . . . . . . . . . . . 2-45 2-479Decontamination brackets (M13):
Installation . . . . . . . . . . . . . . . . 10-58 10-98Deep water fording kit exhaust
assembly:Inspection . . . . . . . . . . . . . . . . . 12-38b 12-70Installation . . . . . . . . . . . . . . . . 12-38c 12-70Removal. . . . . . . . . . . . . . . . . . . 12-38a 12-70
Deep water fording kit maintenance task summary . . . . . . . . . . . . . . . 12-37 12-69
Deep water fording sensor cup:Installation . . . . . . . . . . . . . . . . 12-46b 12-81Removal. . . . . . . . . . . . . . . . . . . 12-46a 12-81
Defrost control:Installation . . . . . . . . . . . . . . . . 10-77b 10-132Removal. . . . . . . . . . . . . . . . . . . 10-77a 10-132
Defroster ducting:Installation . . . . . . . . . . . . . . . . 10-82b 10-142Removal. . . . . . . . . . . . . . . . . . . 10-82a 10-142
Defroster nozzle, left:Installation . . . . . . . . . . . . . . . . 10-83b 10-144Removal. . . . . . . . . . . . . . . . . . . 10-83a 10-144
Defroster nozzle, right:Installation . . . . . . . . . . . . . . . . 10-84b 10-146Removal. . . . . . . . . . . . . . . . . . . 10-84a 10-146
Defroster switch, and circuitbreaker, windshield de-icer:
Installation . . . . . . . . . . . . . . . . 10-67b 10-114Removal. . . . . . . . . . . . . . . . . . . 10-67a 10-114
Destruction of Army equipment toprevent enemy use . . . . . . . . . . . 1-3 1-1
Differences between models . . . . . 1-14 1-18Differential:
Assembly . . . . . . . . . . . . . . . . . . 30-3d 30-11Cleaning . . . . . . . . . . . . . . . . . . 30-3b 30-9Disassembly . . . . . . . . . . . . . . . 30-3a 30-2Inspection . . . . . . . . . . . . . . . . . 30-3c 30-9Installation . . . . . . . . . . . . . . . . 21-5b 21-8Removal. . . . . . . . . . . . . . . . . . . 21-5a 21-6
INDEX (Cont’d)
TM 9-2320-387-24-1
INDEX 12 Change 1
Para. Page
C (Cont’d)
Para. Page
C (Cont’d)
TM 9-2320-387-24-1
Change 1 INDEX 13
Differential and axle free play tolerance inspection . . . . . . . . . . 21-9 21-20
Differential cover:Cleaning and inspection . . . . . . 6-18b 6-46Installation . . . . . . . . . . . . . . . . 6-18c 6-46Removal. . . . . . . . . . . . . . . . . . . 6-18a 6-46
Differential output shaft seal:Installation . . . . . . . . . . . . . . . . 21-3b 21-2Removal. . . . . . . . . . . . . . . . . . . 21-3a 21-2
Differential repair task summary(GS) . . . . . . . . . . . . . . . . . . . . . . . 30-2 30-1
Differential support bracket andside mounting bracket:
Installation . . . . . . . . . . . . . . . . 24-15b 24-22Removal. . . . . . . . . . . . . . . . . . . 24-15a 24-20
Differential valve, proportioningvalve and:
Differential valve installation. . 7-10b 7-32Differential valve removal . . . . 7-10a 7-32Proportioning valve installation 7-10d 7-33Proportioning valve removal. . . 7-10c 7-32
Differential vent line:Installation . . . . . . . . . . . . . . . . 6-14b 6-39Removal. . . . . . . . . . . . . . . . . . . 6-14a 6-39
Dipstick tube, engine oil:Installation . . . . . . . . . . . . . . . . 3-2b 3-2Removal. . . . . . . . . . . . . . . . . . . 3-2a 3-2
Dipstick tube, transmission oil:Installation . . . . . . . . . . . . . . . . 5-5b 5-14Removal. . . . . . . . . . . . . . . . . . . 5-5a 5-14
Direct clutch assembly:Assembly . . . . . . . . . . . . . . . . . . 28-10d 28-40Cleaning . . . . . . . . . . . . . . . . . . 28-10b 28-38Direct clutch piston movement measurement. . . . . . . . . . . . . . 28-10e 28-40
Disassembly . . . . . . . . . . . . . . . 28-10a 28-38Inspection . . . . . . . . . . . . . . . . . 28-10c 28-38
Directional signal control:Installation . . . . . . . . . . . . . . . . 4-63b 4-104Removal. . . . . . . . . . . . . . . . . . . 4-63a 4-104
Directional signal controlcancelling ring:
Installation . . . . . . . . . . . . . . . . 4-64b 4-105Removal. . . . . . . . . . . . . . . . . . . 4-64a 4-105
Directional signal controlindicator lamp:
Installation . . . . . . . . . . . . . . . . 4-62b 4-103Removal. . . . . . . . . . . . . . . . . . . 4-62a 4-103
Directional signal flasher:Installation . . . . . . . . . . . . . . . . 4-61b 4-102Removal. . . . . . . . . . . . . . . . . . . 4-61a 4-102
Disc brake caliper:Assembly . . . . . . . . . . . . . . . . . . 22-4d 22-6Cleaning . . . . . . . . . . . . . . . . . . 22-4b 22-4Disassembly . . . . . . . . . . . . . . . 22-4a 22-4Inspection . . . . . . . . . . . . . . . . . 22-4c 22-5
Diverter box:Assembly . . . . . . . . . . . . . . . . . . 10-81c 10-140Disassembly . . . . . . . . . . . . . . . 10-81b 10-140Installation . . . . . . . . . . . . . . . . 10-81d 10-140Removal. . . . . . . . . . . . . . . . . . . 10-81a 10-140
Diverter box cover:Installation . . . . . . . . . . . . . . . . 10-89b 10-151Removal. . . . . . . . . . . . . . . . . . . 10-89a 10-151
Diverter ducting:Installation . . . . . . . . . . . . . . . . 10-86b 10-148Removal. . . . . . . . . . . . . . . . . . . 10-86a 10-148
Door and hinge, front:Installation . . . . . . . . . . . . . . . . 11-2b 11-4Removal. . . . . . . . . . . . . . . . . . . 11-2a 11-4
Door and hinge, rear:Installation . . . . . . . . . . . . . . . . 11-2.1b 11-4.2Removal. . . . . . . . . . . . . . . . . . . 11-2.1a 11-4.2
Door armor, cargo shell:Inspection . . . . . . . . . . . . . . . . . 11-13b 11-25Installation . . . . . . . . . . . . . . . . 11-13c 11-25Removal. . . . . . . . . . . . . . . . . . . 11-13a 11-25
Door, cargo shell:Adjustment . . . . . . . . . . . . . . . . 11-14c 11-30Inspection . . . . . . . . . . . . . . . . . 11-14a.1 11-26Installation . . . . . . . . . . . . . . . . 11-14b 11-28Removal. . . . . . . . . . . . . . . . . . . 11-14a 11-26
Door dovetail assembly, cargo shell:Adjustment . . . . . . . . . . . . . . . . 11-20c 11-38Installation . . . . . . . . . . . . . . . . 11-20b 11-38Removal. . . . . . . . . . . . . . . . . . . 11-20a 11-38
Door dovetail spring, cargo shell:Installation . . . . . . . . . . . . . . . . 11-28b 11-51Removal. . . . . . . . . . . . . . . . . . . 11-28a 11-51
Door, fixed rear:Installation . . . . . . . . . . . . . . . . 10-20b 10-33Removal. . . . . . . . . . . . . . . . . . . 10-20a 10-33
Door front striker, cargo shell:Installation . . . . . . . . . . . . . . . . 11-25b 11-48Removal. . . . . . . . . . . . . . . . . . . 11-25a 11-48
Door, fuel:Installation . . . . . . . . . . . . . . . . 10-3b 10-5Removal. . . . . . . . . . . . . . . . . . . 10-3a 10-5
INDEX (Cont’d)
Para. Page
D (Cont’d)
Para. Page
D (Cont’d)
Door gas spring, cargo shell:Assembly . . . . . . . . . . . . . . . . . . 11-22d 11-44Disassembly . . . . . . . . . . . . . . . 11-22c 11-44Inspection . . . . . . . . . . . . . . . . . 11-22c.1 11-44Installation . . . . . . . . . . . . . . . . 11-22e 11-44Removal. . . . . . . . . . . . . . . . . . . 11-22b 11-43Rotating. . . . . . . . . . . . . . . . . . . 11-22a 11-41
Door left side gas spring mounting bracket, cargo shell:
Inspection . . . . . . . . . . . . . . . . . 11-29b 11-52Installation . . . . . . . . . . . . . . . . 11-29c 11-52Removal. . . . . . . . . . . . . . . . . . . 11-29a 11-52
Door grab handle, cargo shell:Installation . . . . . . . . . . . . . . . . 11-16b 11-33Removal. . . . . . . . . . . . . . . . . . . 11-16a 11-33
Door handle:Installation . . . . . . . . . . . . . . . . 11-5b 11-12Removal. . . . . . . . . . . . . . . . . . . 11-5a 11-12
Door handle assembly:Installation . . . . . . . . . . . . . . . . 10-19c 10-32Removal. . . . . . . . . . . . . . . . . . . 10-19a 10-30Repair . . . . . . . . . . . . . . . . . . . . 10-19b 10-30
Door handle latch, cargo shell:Installation . . . . . . . . . . . . . . . . 11-17b 11-34Removal. . . . . . . . . . . . . . . . . . . 11-17a 11-34
Door hinge, soft top:Installation . . . . . . . . . . . . . . . . 10-91b 10-153Removal. . . . . . . . . . . . . . . . . . . 10-91a 10-153
Door latch:Inspection . . . . . . . . . . . . . . . . . 11-4b 11-10Installation . . . . . . . . . . . . . . . . 11-4c 11-10Removal. . . . . . . . . . . . . . . . . . . 11-4a 11-10
Door latch adjustment:Exterior handle adjustment . . . 11-9a 11-18Interior handle adjustment . . . 11-9b 11-18Locking rod adjustment . . . . . . 11-9c 11-18
Door latch, cargo shell:Adjustment . . . . . . . . . . . . . . . . 11-18c 11-35Installation . . . . . . . . . . . . . . . . 11-18b 11-35Removal. . . . . . . . . . . . . . . . . . . 11-18a 11-35
Door latch catch:Installation . . . . . . . . . . . . . . . . 11-12b 11-24Removal. . . . . . . . . . . . . . . . . . . 11-12a 11-24
Door latch cover:Installation . . . . . . . . . . . . . . . . 11-6b 11-13Removal. . . . . . . . . . . . . . . . . . . 11-6a 11-13
Door latch rod, cargo shell:Adjustment . . . . . . . . . . . . . . . . 11-19c 11-36Installation . . . . . . . . . . . . . . . . 11-19b 11-36Removal. . . . . . . . . . . . . . . . . . . 11-19a 11-36
Door liner, cargo shell:Installation . . . . . . . . . . . . . . . . 11-31b 11-56Removal. . . . . . . . . . . . . . . . . . . 11-31a 11-56
Door rear striker, cargo shell:Installation . . . . . . . . . . . . . . . . 11-26b 11-49Removal. . . . . . . . . . . . . . . . . . . 11-26a 11-49
Door rear striker mounting plate,cargo shell:
Installation . . . . . . . . . . . . . . . . 11-27b 11-50Removal. . . . . . . . . . . . . . . . . . . 11-27a 11-50
Door release handle, locking rod and:
Installation . . . . . . . . . . . . . . . . 11-8b 11-16Removal. . . . . . . . . . . . . . . . . . . 11-8a 11-16
Door retention cable, cargo shell:Inspection . . . . . . . . . . . . . . . . . 11-21a.1 11-40Installation . . . . . . . . . . . . . . . . 11-21b 11-40Removal. . . . . . . . . . . . . . . . . . . 11-21a 11-40
Door seal and pull strap:Door pull strap installation . . . 11-11d 11-22Door pull strap removal . . . . . . 11-11c 11-22Door seal installation . . . . . . . . 11-11b 11-22Door seal removal . . . . . . . . . . . 11-11a 11-22
Door seal, cargo shell:Installation . . . . . . . . . . . . . . . . 11-24b 11-47Removal. . . . . . . . . . . . . . . . . . . 11-24a 11-47
Door, soft top, adjustment. . . . . . 10-92 10-154Door strap, cargo shell:
Inspection . . . . . . . . . . . . . . . . . 11-23a.1 11-46Installation . . . . . . . . . . . . . . . . 11-23b 11-46Removal. . . . . . . . . . . . . . . . . . . 11-23a 11-46
Door striker, soft top:Installation . . . . . . . . . . . . . . . . 10-94b 10-158Removal. . . . . . . . . . . . . . . . . . . 10-94a 10-158
Door, turret:Installation . . . . . . . . . . . . . . . . 11-53b 11-104Removal. . . . . . . . . . . . . . . . . . . 11-53a 11-104
Door window:Installation . . . . . . . . . . . . . . . . 11-3b 11-8Removal. . . . . . . . . . . . . . . . . . . 11-3a 11-6
Door window seal:Installation . . . . . . . . . . . . . . . . 11-10b 11-20Removal. . . . . . . . . . . . . . . . . . . 11-10a 11-20
Door wire handle lock, cargo shell:Installation . . . . . . . . . . . . . . . . 11-15b 11-32Removal. . . . . . . . . . . . . . . . . . . 11-15a 11-32
Double ammo box tray (caliber .50):Inspection . . . . . . . . . . . . . . . . . 11-68a.1 11-129Installation . . . . . . . . . . . . . . . . 11-68b 11-129Removal. . . . . . . . . . . . . . . . . . . 11-68a 11-129
INDEX (Cont’d)
TM 9-2320-387-24-1
INDEX 14 Change 1
Para. Page
D (Cont’d)
Para. Page
D (Cont’d)
TM 9-2320-387-24-1
Change 1 INDEX 15
Drainage bracket:Installation . . . . . . . . . . . . . . . . 3-22b 3-38Removal. . . . . . . . . . . . . . . . . . . 3-22a 3-38
Drivebelt, serpentine:Alignment . . . . . . . . . . . . . . . . . 3-81c 3-142.2Installation . . . . . . . . . . . . . . . . 3-81b 3-142Removal. . . . . . . . . . . . . . . . . . . 3-81a 3-142
Driven gear, speedometer:Installation . . . . . . . . . . . . . . . . 5-17b 5-34Removal. . . . . . . . . . . . . . . . . . . 5-17a 5-34
Drive, oil pump:Installation . . . . . . . . . . . . . . . . 15-14b 15-29Removal. . . . . . . . . . . . . . . . . . . 15-14a 15-29
Driver’s footwell inner armor:Inspection . . . . . . . . . . . . . . . . . 11-41b 11-84Installation . . . . . . . . . . . . . . . . 11-41c 11-84Removal. . . . . . . . . . . . . . . . . . . 11-41a 11-84
Driver’s footwell outer armor:Inspection . . . . . . . . . . . . . . . . . 11-40b 11-82Installation . . . . . . . . . . . . . . . . 11-40c 11-82Removal. . . . . . . . . . . . . . . . . . . 11-40a 11-82
Driver’s rearview mirror bracket:Inspection . . . . . . . . . . . . . . . . . 10-69a.1 10-120Installation . . . . . . . . . . . . . . . . 10-69b 10-120Removal. . . . . . . . . . . . . . . . . . . 10-69a 10-120
Driver’s seat assembly:Assembly . . . . . . . . . . . . . . . . . . 10-41b 10-70Disassembly . . . . . . . . . . . . . . . 10-41a 10-70Installation . . . . . . . . . . . . . . . . 10-40b 10-69Removal. . . . . . . . . . . . . . . . . . . 10-40a 10-69
Drive sprockets, timing chain cover,timing chain, and:
Inspection . . . . . . . . . . . . . . . . . 15-10b 15-21Installation . . . . . . . . . . . . . . . . 15-10c 15-22Removal. . . . . . . . . . . . . . . . . . . 15-10a 15-20
Drivetrain operation . . . . . . . . . . . 1-18 1-24Drivetrain tests . . . . . . . . . . . . . . . 2-43 2-453Ducting, defroster:
Installation . . . . . . . . . . . . . . . . 10-82b 10-142Removal. . . . . . . . . . . . . . . . . . . 10-82a 10-142
Ducting, heater:Installation . . . . . . . . . . . . . . . . 10-80b 10-138Removal. . . . . . . . . . . . . . . . . . . 10-80a 10-138
Dust unloader, air cleaner assembly and:
Inspection . . . . . . . . . . . . . . . . . 3-12b 3-22Installation . . . . . . . . . . . . . . . . 3-12c 3-22Removal. . . . . . . . . . . . . . . . . . . 3-12a 3-22
Electrical circuit description . . . . . 2-22 2-43Electrical gauge:
Installation . . . . . . . . . . . . . . . . 4-16b 4-34Removal. . . . . . . . . . . . . . . . . . . 4-16a 4-34
Electrical/mechanical systemstroubleshooting . . . . . . . . . . . . . . 2-19 2-35
Electrical system maintenance task summary . . . . . . . . . . . . . . . 18-2 18-1
Electrical tests. . . . . . . . . . . . . . . . 2-27 2-75Element, air cleaner filter:
Cleaning . . . . . . . . . . . . . . . . . . 3-13d 3-26Emergency cleaning . . . . . . . . . 3-13c 3-24Inspection . . . . . . . . . . . . . . . . . 3-13b 3-24Installation . . . . . . . . . . . . . . . . 3-13e 3-26Removal. . . . . . . . . . . . . . . . . . . 3-13a 3-24
Element, fuel filter:Cleaning and inspection . . . . . . 3-34b 3-66Element installation . . . . . . . . . 3-34c 3-67Element removal. . . . . . . . . . . . 3-34a 3-66
Engine/crew compartment heater assembly:
Installation . . . . . . . . . . . . . . . . 12-10b 12-18Removal. . . . . . . . . . . . . . . . . . . 12-10a 12-18
Engine/crew compartment heater circuit breaker:
Installation . . . . . . . . . . . . . . . . 12-12b 12-22Removal. . . . . . . . . . . . . . . . . . . 12-12a 12-22
Engine/crew compartment heater controller:
Installation . . . . . . . . . . . . . . . . 12-13b 12-23Removal. . . . . . . . . . . . . . . . . . . 12-13a 12-23
Engine/crew compartment heater exhaust muffler:
Installation . . . . . . . . . . . . . . . . 12-3b 12-2.2Removal. . . . . . . . . . . . . . . . . . . 12-3a 12-2.2
Engine/crew compartment heater exhaust pipe:
Installation . . . . . . . . . . . . . . . . 12-4b 12-3Removal. . . . . . . . . . . . . . . . . . . 12-4a 12-3
Engine/crew compartment heater fuel lines:
Heater fuel line installation . . . 12-8b 12-12Heater fuel line removal . . . . . . 12-8a 12-12Tank fuel line and supply
tube installation. . . . . . . . . . . 12-8d 12-14Tank fuel line and supply
tube removal . . . . . . . . . . . . . 12-8c 12-14Engine/crew compartment heater
fuel pump:Installation . . . . . . . . . . . . . . . . 12-9b 12-16Removal. . . . . . . . . . . . . . . . . . . 12-9a 12-16
INDEX (Cont’d)
Para. Page
D (Cont’d)
Para. Page
E
Engine/crew compartment heater fuel system bleeding . . . . . . . . . . 12-14 12-24
Engine/crew compartment heater wiring harness:
Installation . . . . . . . . . . . . . . . . 12-11b 12-20Removal. . . . . . . . . . . . . . . . . . . 12-11a 12-20
Engine/crew compartment heater heat shield:
Installation . . . . . . . . . . . . . . . . 12-2b 12-2Removal. . . . . . . . . . . . . . . . . . . 12-2a 12-2
Engine/crew compartment heater inlet pipe:
Installation . . . . . . . . . . . . . . . . 12-4.1b 12-4Removal. . . . . . . . . . . . . . . . . . . 12-4.1a 12-4
Engine/crew compartment heater maintenance task summary . . . . 12-1 12-1
Engine/crew compartment heater outlet hose assembly:
Installation . . . . . . . . . . . . . . . . 12-6b 12-8Removal. . . . . . . . . . . . . . . . . . . 12-6a 12-8
Engine/crew compartment heater circulating pump:
Installation . . . . . . . . . . . . . . . . 12-7b 12-10Removal. . . . . . . . . . . . . . . . . . . 12-7a 12-10
Engine/crew compartment heater lower hose assembly:
Installation . . . . . . . . . . . . . . . . 12-5b 12-6Removal. . . . . . . . . . . . . . . . . . . 12-5a 12-6
Engine access cover:Assembly . . . . . . . . . . . . . . . . . . 10-22c 10-36Disassembly . . . . . . . . . . . . . . . 10-22b 10-36Installation . . . . . . . . . . . . . . . . 10-22d 10-36Removal. . . . . . . . . . . . . . . . . . . 10-22a 10-35
Engine access cover flexiblelatch and holddown strike:
Installation . . . . . . . . . . . . . . . . 10-21b 10-34Removal. . . . . . . . . . . . . . . . . . . 10-21a 10-34
Engine cooling tests. . . . . . . . . . . . 2-31 2-159Engine idle speed adjustment . . . . 3-45 3-87Engine injection pump timing:
Timing adjustment . . . . . . . . . . 15-23b 15-45Timing check. . . . . . . . . . . . . . . 15-23a 15-42
Engine installation . . . . . . . . . . . . 15-28 15-98Engine left splash shield:
Assembly . . . . . . . . . . . . . . . . . . 10-23c 10-40Disassembly . . . . . . . . . . . . . . . 10-23b 10-40Installation . . . . . . . . . . . . . . . . 10-23d 10-41Removal. . . . . . . . . . . . . . . . . . . 10-23a 10-38
Engine left splash shield accesscover:
Installation . . . . . . . . . . . . . . . . 10-25b 10-46Removal. . . . . . . . . . . . . . . . . . . 10-25a 10-46
Engine lubrication tests . . . . . . . . 2-32 2-191Engine maintenance task
summary, general . . . . . . . . . . . 15-2 15-1Engine mount and insulator:
Assembly . . . . . . . . . . . . . . . . . . 15-3c 15-4Disassembly . . . . . . . . . . . . . . . 15-3b 15-4Installation . . . . . . . . . . . . . . . . 15-3d 15-6Removal. . . . . . . . . . . . . . . . . . . 15-3a 15-2
Engine mount bracket, left:Installation . . . . . . . . . . . . . . . . 24-10b 24-12Removal. . . . . . . . . . . . . . . . . . . 24-10a 24-12
Engine mount bracket, right:Installation . . . . . . . . . . . . . . . . 24-9b 24-10Removal. . . . . . . . . . . . . . . . . . . 24-9a 24-10
Engine oil cooler supply andreturn lines:
Inspection . . . . . . . . . . . . . . . . . 3-7b 3-10Supply line installation. . . . . . . 3-7c 3-10Supply line removal . . . . . . . . . 3-7a 3-10
Engine oil dipstick tube:Installation . . . . . . . . . . . . . . . . 3-2b 3-2Removal. . . . . . . . . . . . . . . . . . . 3-2a 3-2
Engine oil filler tube:Inspection . . . . . . . . . . . . . . . . . 3-3b 3-4Installation . . . . . . . . . . . . . . . . 3-3c 3-4Removal. . . . . . . . . . . . . . . . . . . 3-3a 3-4
Engine oil filter adapter:Inspection . . . . . . . . . . . . . . . . . 3-4b 3-5Installation . . . . . . . . . . . . . . . . 3-4c 3-5Removal. . . . . . . . . . . . . . . . . . . 3-4a 3-5
Engine oil service:Filter installation . . . . . . . . . . . 3-5c 3-6Filter removal . . . . . . . . . . . . . . 3-5b 3-6Oil draining. . . . . . . . . . . . . . . . 3-5a 3-6Oil replenishing . . . . . . . . . . . . 3-5d 3-6
Engine preparation:Assembly . . . . . . . . . . . . . . . . . . 15-27b 15-88Disassembly . . . . . . . . . . . . . . . 15-27a 15-78
Engine removal . . . . . . . . . . . . . . . 15-26 15-48Engine replacement in shipping/
storage container:Installation . . . . . . . . . . . . . . . . 15-29b 15-126Removal. . . . . . . . . . . . . . . . . . . 15-29a 15-126
Engine replacement task summary . . . . . . . . . . . . . . . . . . . 15-25 15-47
Engine right splash shield:Assembly . . . . . . . . . . . . . . . . . . 10-24c 10-44Disassembly . . . . . . . . . . . . . . . 10-24b 10-42Installation . . . . . . . . . . . . . . . . 10-24d 10-44Removal. . . . . . . . . . . . . . . . . . . 10-24a 10-42
INDEX (Cont’d)
TM 9-2320-387-24-1
INDEX 16 Change 1
Para. Page
E (Cont’d)
Para. Page
E (Cont’d)
TM 9-2320-387-24-1
Change 1 INDEX 17
Engine rpm sensor:Installation . . . . . . . . . . . . . . . . 4-37b 4-64Removal. . . . . . . . . . . . . . . . . . . 4-37a 4-64
Engine run-in:In-chassis run-in . . . . . . . . . . . . 15-24 15-46
Engine running tests. . . . . . . . . . . 2-24 2-51Engine temperature sending unit:
Installation . . . . . . . . . . . . . . . . 4-28b 4-51Removal. . . . . . . . . . . . . . . . . . . 4-28a 4-51
Engine, transmission, andpower steering oil cooler assembly:
Cleaning and inspection . . . . . . 3-8c 3-14Installation . . . . . . . . . . . . . . . . 3-8b 3-14Removal. . . . . . . . . . . . . . . . . . . 3-8a 3-12
Engine wiring harness:Installation . . . . . . . . . . . . . . . . 18-6b 18-40Removal. . . . . . . . . . . . . . . . . . . 18-6a 18-34
Equipment description and data:Differences between models . . . 1-14 1-18Equipment characteristics,capabilities, and features . . . . 1-10 1-2
Location and contents of warning,caution, and data plates . . . . . 1-13 1-8
Location and description ofmajor exterior components . . . 1-11 1-5
Location and description of major interior components. . . . . . . . . 1-12 1-6
Tabulated data . . . . . . . . . . . . . 1-15 1-19Equipment Improvement
Recommendations (EIR), reporting . . . . . . . . . . . . . . . . . . . 1-5 1-1
Equipment Improvement Reportand Maintenance Digest (EIR MD). . . . . . . . . . . . . . . . . . . 1-6 1-1
Evaporator drain hose, A/C front:Installation . . . . . . . . . . . . . . . . . 11-83b 11-149Removal. . . . . . . . . . . . . . . . . . . . 11-83a 11-149
Evaporator drain hose, A/C rear:Installation . . . . . . . . . . . . . . . . . 11-88b 11-158Removal. . . . . . . . . . . . . . . . . . . . 11-88a 11-158
Exhaust assembly, deep water fording kit:
Inspection . . . . . . . . . . . . . . . . . 12-38b 12-70Installation . . . . . . . . . . . . . . . . 12-38c 12-70Removal. . . . . . . . . . . . . . . . . . . 12-38a 12-70
Exhaust manifold heat shield, right:Installation . . . . . . . . . . . . . . . . 3-56b 3-102Removal. . . . . . . . . . . . . . . . . . . 3-56a 3-102
Exhaust manifolds:Installation . . . . . . . . . . . . . . . . 3-57b 3-104Removal. . . . . . . . . . . . . . . . . . . 3-57a 3-104
Exhaust pipe:Installation . . . . . . . . . . . . . . . . 3-50b 3-94Removal. . . . . . . . . . . . . . . . . . . 3-50a 3-94
Exhaust pipe, manifold-to-turbocharger:
Installation . . . . . . . . . . . . . . . . 3-51b 3-96Removal. . . . . . . . . . . . . . . . . . . 3-51a 3-96
Exhaust reinforcement bracket:Installation . . . . . . . . . . . . . . . . 12-49b 12-84Removal. . . . . . . . . . . . . . . . . . . 12-49a 12-84
Exhaust system maintenance task summary . . . . . . . . . . . . . . . 3-47 3-90
Expendable/durable supplies and materials list: appendix C. . . . . . C-1
Exterior components, locationand description of major . . . . . . . 1-11 1-5
F
Fabricated tools . . . . . . . . . . . . . . . 2-3 2-1Fairlead roller bracket assembly,
10,500 lb rear hydraulic winch (M1114):
Installation . . . . . . . . . . . . . . . . 12-36.3b 12-68.6Removal. . . . . . . . . . . . . . . . . . . 12-36.3a 12-68.6
Fan access panel, condenserInspection . . . . . . . . . . . . . . . . . 11-86b 11-154Installation . . . . . . . . . . . . . . . . 11-86c 11-154Removal. . . . . . . . . . . . . . . . . . . 11-86a 11-154
Fan cut-off switch:Installation . . . . . . . . . . . . . . . . 4-42b 4-69Removal. . . . . . . . . . . . . . . . . . . 4-42a 4-69
Fan drive and fan blade:Inspection . . . . . . . . . . . . . . . . . 3-80b 3-140Installation . . . . . . . . . . . . . . . . 3-80c 3-140Removal. . . . . . . . . . . . . . . . . . . 3-80a 3-140
Fan drive friction lining:Installation . . . . . . . . . . . . . . . . 3-83b 3-146Removal. . . . . . . . . . . . . . . . . . . 3-83a 3-146
Fan drive hose and quick-disconnect:
Installation . . . . . . . . . . . . . . . . 3-69b 3-124Removal. . . . . . . . . . . . . . . . . . . 3-69a 3-124
Fan exhaust and supply vent, condenser:
Exhaust vents installation . . . . 11-85d 11-152Exhaust vents removal . . . . . . . 11-85a 11-152Inspection . . . . . . . . . . . . . . . . . 11-85c 11-152Supply vents installation . . . . . 11-85e 11-152Supply vents removal . . . . . . . . 11-85b 11-152
INDEX (Cont’d)
Para. Page
E (Cont’d)
Para. Page
E (Cont’d)

Fan shroud assembly, radiator and:Cleaning and inspection . . . . . . 3-62b 3-114Installation . . . . . . . . . . . . . . . . 3-62c 3-114Removal. . . . . . . . . . . . . . . . . . . 3-62a 3-112
Fan temperature switch:Installation . . . . . . . . . . . . . . . . 4-34b 4-60Removal. . . . . . . . . . . . . . . . . . . 4-34a 4-60
Features, characteristics, capabilities, and equipment . . . . 1-10 1-2
Field glasses bracket:Installation . . . . . . . . . . . . . . . . 11-65b 11-125Removal. . . . . . . . . . . . . . . . . . . 11-65a 11-125
Filler cap and spout, fuel tank:Inspection . . . . . . . . . . . . . . . . . 3-29b 3-58Installation . . . . . . . . . . . . . . . . 3-29c 3-58Removal. . . . . . . . . . . . . . . . . . . 3-29a 3-58
Filler spout hose:Installation . . . . . . . . . . . . . . . . 3-31b 3-62Removal. . . . . . . . . . . . . . . . . . . 3-31a 3-62
Filler tube, engine oil:Inspection . . . . . . . . . . . . . . . . . 3-3b 3-4Installation . . . . . . . . . . . . . . . . 3-3c 3-4Removal. . . . . . . . . . . . . . . . . . . 3-3a 3-4
Filter adapter, engine oil:Inspection . . . . . . . . . . . . . . . . . 3-4b 3-5Installation . . . . . . . . . . . . . . . . 3-4c 3-5Removal. . . . . . . . . . . . . . . . . . . 3-4a 3-5
Filter element, air cleaner:Cleaning . . . . . . . . . . . . . . . . . . 3-13d 3-26Emergency cleaning . . . . . . . . . 3-13c 3-24Inspection . . . . . . . . . . . . . . . . . 3-13b 3-24Installation . . . . . . . . . . . . . . . . 3-13e 3-26Removal. . . . . . . . . . . . . . . . . . . 3-13a 3-24
Filter, fuel:Bleeding . . . . . . . . . . . . . . . . . . 3-33c 3-65Installation . . . . . . . . . . . . . . . . 3-33b 3-64Removal. . . . . . . . . . . . . . . . . . . 3-33a 3-64
Fire extinguisher bracket:Inspection . . . . . . . . . . . . . . . . . 10-53b 10-88Installation . . . . . . . . . . . . . . . . 10-53c 10-88Removal. . . . . . . . . . . . . . . . . . . 10-53a 10-88
Firewall armor:Inspection . . . . . . . . . . . . . . . . . 11-48b 11-96Installation . . . . . . . . . . . . . . . . 11-48c 11-96Removal. . . . . . . . . . . . . . . . . . . 11-48a 11-96
Fixed rear door:Installation . . . . . . . . . . . . . . . . 10-20b 10-33Removal. . . . . . . . . . . . . . . . . . . 10-20a 10-33
Flasher, directional signal:Installation . . . . . . . . . . . . . . . . 4-61b 4-102Removal. . . . . . . . . . . . . . . . . . . 4-61a 4-102
Flexible latch and holddown strike,engine access cover:
Installation . . . . . . . . . . . . . . . . 10-21b 10-34Removal. . . . . . . . . . . . . . . . . . . 10-21a 10-34
Floor drain hole plate:Installation . . . . . . . . . . . . . . . . 10.58.1 10-98.2
Floor insulation, rear seat:Installation . . . . . . . . . . . . . . . . 10-34b 10-60Removal. . . . . . . . . . . . . . . . . . . 10-34a 10-60
Floor panel repair . . . . . . . . . . . . . 33-10 33-18Floor panel repair, left front:
Insert panel and left frontfloor panel installation. . . . . . 33-11i 33-36
Left front floor panel andinsert panel drilling . . . . . . . . 33-11h 33-32
Left front floor panel removal. . 33-11c 33-24Left front insert panel
fabrication . . . . . . . . . . . . . . . 33-11a 33-19Metal strip A and insert
panel assembly. . . . . . . . . . . . 33-11d 33-26Metal strip B and insert
panel assembly. . . . . . . . . . . . 33-11g 33-30Metal strip C and insert
panel assembly. . . . . . . . . . . . 33-11e 33-28Metal strip D and insert
panel assembly. . . . . . . . . . . . 33-11f 33-30Metal strips fabrication . . . . . . 33-11b 33-20
Floor panel repair, left rear:Insert panel and left rear
floor panel installation. . . . . . 33-12l 33-64Left rear floor panel and
insert panel drilling . . . . . . . . 33-12k 33-62Left rear floor panel removal . . 33-12d 33-47Left rear insert panel
fabrication . . . . . . . . . . . . . . . 33-12a 33-40Metal strip C and insert
panel assembly. . . . . . . . . . . . 33-12g 33-54Metal strip D and insert
panel assembly. . . . . . . . . . . . 33-12h 33-56Metal strip E and insert
panel assembly. . . . . . . . . . . . 33-12i 33-58Metal strip F and insert
panel assembly. . . . . . . . . . . . 33-12j 33-60Metal strips fabrication . . . . . . 33-12c 33-44Reinforcement strip A and
insert panel assembly . . . . . . 33-12e 33-50Reinforcement strip B and
insert panel assembly . . . . . . 33-12f 33-52Reinforcement strips
fabrication . . . . . . . . . . . . . . . 33-12b 33-42
INDEX (Cont’d)
TM 9-2320-387-24-1
INDEX 18 Change 1
Para. Page
F (Cont’d)
Para. Page
F (Cont’d)

TM 9-2320-387-24-1
Change 1 INDEX 19
Floor panel repair, right front:Battery tray and right front
floor panel installation. . . . . . 33-13i 33-84Insert panel and right front
floor panel installation. . . . . . 33-13j 33-86Metal strip A and insert panel
assembly . . . . . . . . . . . . . . . . 33-13d 33-74Metal strip B and insert panel
assembly . . . . . . . . . . . . . . . . 33-13e 33-76Metal strip C and insert panel
assembly . . . . . . . . . . . . . . . . 33-13f 33-78Metal strips fabrication . . . . . . 33-13b 33-70Right front floor panel and
battery tray drilling . . . . . . . . 33-13g 33-80Right front floor panel and
insert panel drilling . . . . . . . . 33-13h 33-82Right front floor panel removal . 33-13c 33-72Right front insert panel
fabrication . . . . . . . . . . . . . . . 33-13a 33-68Floor panel repair, right rear:
Insert panel and right rear floorpanel installation. . . . . . . . . . 33-14k 33-104
Metal strip C and insertpanel assembly. . . . . . . . . . . . 33-14g 33-99
Metal strip D and insertpanel assembly. . . . . . . . . . . . 33-14i 33-101
Metal strip E and insertpanel assembly. . . . . . . . . . . . 33-14h 33-100
Metal strips fabrication . . . . . . 33-14c 33-92Reinforcement strip A and
insert panel assembly . . . . . . 33-14e 33-97Reinforcement strip B and
insert panel assembly . . . . . . 33-14f 33-98Reinforcement strips
fabrication . . . . . . . . . . . . . . . 33-14b 33-90Right rear floor panel removal . 33-14d 33-94Right rear floor panel and
insert panel drilling . . . . . . . . 33-14j 33-102Right rear insert panel
fabrication . . . . . . . . . . . . . . . 33-14a 33-88Footman loop and strap:
Inspection . . . . . . . . . . . . . . . . . 10-13b 10-22Installation . . . . . . . . . . . . . . . . 10-13c 10-22Removal. . . . . . . . . . . . . . . . . . . 10-13a 10-22
Footwell inner armor, passenger side:
Inspection . . . . . . . . . . . . . . . . . 25-11a.1 25-30Installation . . . . . . . . . . . . . . . . 25-11b 25-30Removal. . . . . . . . . . . . . . . . . . . 25-11a 25-30
Footwell outer armor, passenger side:
Inspection . . . . . . . . . . . . . . . . . 25-10a.1 25-28Installation . . . . . . . . . . . . . . . . 25-10b 25-28Removal. . . . . . . . . . . . . . . . . . . 25-10a 25-28
Former, A-pillar, assembly:Installation . . . . . . . . . . . . . . . . 10-90b 10-152Removal. . . . . . . . . . . . . . . . . . . 10-90a 10-152
Forward clutch assembly:Assembly . . . . . . . . . . . . . . . . . . 28-11d 28-44Cleaning . . . . . . . . . . . . . . . . . . 28-11b 28-42Disassembly . . . . . . . . . . . . . . . 28-11a 28-42Inspection . . . . . . . . . . . . . . . . . 28-11c 28-42
Fourth clutch assembly:Assembly . . . . . . . . . . . . . . . . . . 28-12d 28-46Cleaning . . . . . . . . . . . . . . . . . . 28-12b 28-46Disassembly . . . . . . . . . . . . . . . 28-12a 28-46End play measurement. . . . . . . 28-12e 28-47Inspection . . . . . . . . . . . . . . . . . 28-12c 28-46
Frame:Maintenance task summary (DS) . . . . . . . . . . . . . . . . . . . . . 24-3 24-1
Maintenance task summary(GS) . . . . . . . . . . . . . . . . . . . . . 32-3 32-1
Maintenance task summary (unit) . . . . . . . . . . . . . . . . . . . . 9-1 9-1
Frame extension:Installation . . . . . . . . . . . . . . . . 9-3b 9-3Removal. . . . . . . . . . . . . . . . . . . 9-3a 9-3
Frame, grille:Installation . . . . . . . . . . . . . . . . 10-16b 10-26Removal. . . . . . . . . . . . . . . . . . . 10-16a 10-25
Frame inspection and repair:General information . . . . . . . . . 32-4a 32-2Inspection . . . . . . . . . . . . . . . . . 32-4c 32-4Powertrain lift slinginstallation . . . . . . . . . . . . . . . 32-4b 32-3
Powertrain lift sling removal . . 32-4f 32-10Preparation and materials . . . . 32-4d 32-8Repair procedures . . . . . . . . . . . 32-4e 32-8
Frame, turret:Installation . . . . . . . . . . . . . . . . 25-4b 25-6Removal. . . . . . . . . . . . . . . . . . . 25-4a 25-4
Front and rear axles maintenance task summary . . . . . . . . . . . . . . . 6-6 6-12
Front bumper and towing brackets:Installation . . . . . . . . . . . . . . . . 9-2b 9-2Removal. . . . . . . . . . . . . . . . . . . 9-2a 9-2
Front composite light assembly:Installation . . . . . . . . . . . . . . . . 4-53b 4-90Removal. . . . . . . . . . . . . . . . . . . 4-53a 4-90
Front composite light lamp:Installation . . . . . . . . . . . . . . . . 4-54b 4-92Removal. . . . . . . . . . . . . . . . . . . 4-54a 4-92
Front cover oil seal:Installation . . . . . . . . . . . . . . . . 15-13b 15-28Removal. . . . . . . . . . . . . . . . . . . 15-13a 15-28
INDEX (Cont’d)
Para. Page
F (Cont’d)
Para. Page
F (Cont’d)
Front door and hinge:Installation . . . . . . . . . . . . . . . . 11-2b 11-4Removal. . . . . . . . . . . . . . . . . . . 11-2a 11-4
Front fairlead roller bracket assembly:
Installation . . . . . . . . . . . . . . . . 12-30b 12-59Removal. . . . . . . . . . . . . . . . . . . 12-30a 12-59
Front geared hub vent line:Installation . . . . . . . . . . . . . . . . 6-16b 6-42Removal. . . . . . . . . . . . . . . . . . . 6-16a 6-426
Front grille screen:Installation . . . . . . . . . . . . . . . . 10-15b 10-24Removal. . . . . . . . . . . . . . . . . . . 10-15a 10-24
Front propeller shaft:Assembly . . . . . . . . . . . . . . . . . . 21-8b 21-19Disassembly . . . . . . . . . . . . . . . 21-8a 21-19
Front propeller shaft assembly:Assembly . . . . . . . . . . . . . . . . . . 6-3c 6-7Cleaning and inspection . . . . . . 6-3b 6-6Disassembly . . . . . . . . . . . . . . . 6-3a 6-6Inspection . . . . . . . . . . . . . . . . . 6-2b 6-2Installation . . . . . . . . . . . . . . . . 6-2c 6-4Removal. . . . . . . . . . . . . . . . . . . 6-2a 6-2
Front servo:Assembly . . . . . . . . . . . . . . . . . . 28-15d 28-57Cleaning . . . . . . . . . . . . . . . . . . 28-15b 28-57Disassembly . . . . . . . . . . . . . . . 28-15a 28-57Inspection . . . . . . . . . . . . . . . . . 28-15c 28-57
Front suspension brace:Installation . . . . . . . . . . . . . . . . 24-6b 24-4Removal. . . . . . . . . . . . . . . . . . . 24-6a 24-4
Front suspension front cross-member:
Installation . . . . . . . . . . . . . . . . 24-16b 24-24Removal. . . . . . . . . . . . . . . . . . . 24-16a 24-24
Front suspension rear cross-member:
Installation . . . . . . . . . . . . . . . . 24-17b 24-28Removal. . . . . . . . . . . . . . . . . . . 24-17a 24-26
Front upper control arm brackets, left airlift bracket and:
Installation . . . . . . . . . . . . . . . . 24-7b 24-6Removal. . . . . . . . . . . . . . . . . . . 24-7a 24-6
Front upper control arm brackets, right airlift bracket and:
Installation . . . . . . . . . . . . . . . . 24-8b 24-8Removal. . . . . . . . . . . . . . . . . . . 24-8a 24-8
Front wheel toe-in alignment:Preliminary inspection . . . . . . . 8-9a 8-24Toe-in adjustment. . . . . . . . . . . 8-9c 8-28Toe-in check . . . . . . . . . . . . . . . 8-9b 8-26
Front 10,500 lb hydraulic winch cable replacement (M1113):
Installation . . . . . . . . . . . . . . . . 12-28.1b 12-56.2Removal. . . . . . . . . . . . . . . . . . . 12-28.1a 12-56.2
Front winch:Installation . . . . . . . . . . . . . . . . 12-27b 12-54Removal. . . . . . . . . . . . . . . . . . . 12-27a 12-52
Front winch, 10,500 lb hydraulic (M1113):
Brackets installation. . . . . . . . . 12-27.1c 12-54.4Brackets removal . . . . . . . . . . . 12-27.1b 12-54.4Winch installation. . . . . . . . . . . 12-27.1d 12-54.4Winch removal . . . . . . . . . . . . . 12-27.1a 12-54.2
Front winch clutch rod:Installation . . . . . . . . . . . . . . . . 12-31b 12-60Removal. . . . . . . . . . . . . . . . . . . 12-31a 12-60
Front winch, 10,500 lb hydraulic hose replacement (M1113):
Installation . . . . . . . . . . . . . . . . 12-31.1b 12-60.4Removal. . . . . . . . . . . . . . . . . . . 12-31.1a 12-60.2
Front winch, 10,500 lb hydraulic winch controller plug (M1113):
Installation . . . . . . . . . . . . . . . . 12-32.1b 12-62.5Removal. . . . . . . . . . . . . . . . . . . 12-32.1a 12-62
Front winch receptacle bracket:Installation . . . . . . . . . . . . . . . . 12-32b 12-61Removal. . . . . . . . . . . . . . . . . . . 12-32a 12-61
Fuel door:Installation . . . . . . . . . . . . . . . . 10-3b 10-5Removal. . . . . . . . . . . . . . . . . . . 10-3a 10-5
Fuel door catch:Installation . . . . . . . . . . . . . . . . 10-4b 10-6Removal. . . . . . . . . . . . . . . . . . . 10-4a 10-6
Fuel drain-back tube:Installation . . . . . . . . . . . . . . . . 3-38b 3-76Removal. . . . . . . . . . . . . . . . . . . 3-38a 3-76
Fuel filler housing:Inspection . . . . . . . . . . . . . . . . . 10-2b 10-4Installation . . . . . . . . . . . . . . . . 10-2c 10-4Removal. . . . . . . . . . . . . . . . . . . 10-2a 10-3
Fuel filter:Bleeding . . . . . . . . . . . . . . . . . . 3-33c 3-65Installation . . . . . . . . . . . . . . . . 3-33b 3-64Removal. . . . . . . . . . . . . . . . . . . 3-33a 3-64
Fuel filter drain hose and valve:Installation . . . . . . . . . . . . . . . . 3-35b 3-68Removal. . . . . . . . . . . . . . . . . . . 3-35a 3-68
Fuel filter element:Cleaning and inspection . . . . . . 3-34b 3-66Element installation . . . . . . . . . 3-34c 3-67Element removal. . . . . . . . . . . . 3-34a 3-66
INDEX (Cont’d)
TM 9-2320-387-24-1
INDEX 20 Change 1
Para. Page
F (Cont’d)
Para. Page
F (Cont’d)
TM 9-2320-387-24-1
Change 1 INDEX 21
Fuel injection lines:Bleeding . . . . . . . . . . . . . . . . . . 16-4d 16-5Inspection . . . . . . . . . . . . . . . . . 16-4b 16-4Installation . . . . . . . . . . . . . . . . 16-4c 16-5Removal. . . . . . . . . . . . . . . . . . . 16-4a 16-4
Fuel injection lines bracket, left:Installation . . . . . . . . . . . . . . . . 3-41b 3-80Removal. . . . . . . . . . . . . . . . . . . 3-41a 3-80
Fuel injection lines bracket, right:Installation . . . . . . . . . . . . . . . . 3-40b 3-79Removal. . . . . . . . . . . . . . . . . . . 3-40a 3-79
Fuel injection nozzle:Installation . . . . . . . . . . . . . . . . 16-3b 16-3Removal. . . . . . . . . . . . . . . . . . . 16-3a 16-2
Fuel injection pump:Installation . . . . . . . . . . . . . . . . 16-6c 16-10Removal. . . . . . . . . . . . . . . . . . . 16-6a 16-8Repair . . . . . . . . . . . . . . . . . . . . 16-6b 16-10
Fuel injection pump boot:Installation . . . . . . . . . . . . . . . . 3-23b 3-39Removal. . . . . . . . . . . . . . . . . . . 3-23a 3-39
Fuel injection pump cold-advancesolenoid:
Inspection . . . . . . . . . . . . . . . . . 16-9b 16-18Installation . . . . . . . . . . . . . . . . 16-9c 16-18Removal. . . . . . . . . . . . . . . . . . . 16-9a 16-18
Fuel injection pump cover:Installation . . . . . . . . . . . . . . . . 16-7b 16-14Removal. . . . . . . . . . . . . . . . . . . 16-7a 16-12
Fuel injection pump return hosecheck valve:
Cleaning and inspection . . . . . 3-36b 3-70Installation . . . . . . . . . . . . . . . . 3-36c 3-70Removal. . . . . . . . . . . . . . . . . . . 3-36a 3-70
Fuel injection pump shutoffsolenoid:
Inspection . . . . . . . . . . . . . . . . . 16-8b 16-16Installation . . . . . . . . . . . . . . . . 16-8c 16-16Removal. . . . . . . . . . . . . . . . . . . 16-8a 16-16
Fuel injection return hoses:Fuel drain-back hose
installation. . . . . . . . . . . . . . . 3-37b 3-72Fuel drain-back hose removal . 3-37a 3-72Nozzle cap installation . . . . . . . 3-37h 3-74Nozzle cap removal . . . . . . . . . . 3-37g 3-74Nozzle-to-nozzle hoseinstallation . . . . . . . . . . . . . . . 3-37f 3-74
Nozzle-to-nozzle hose removal . 3-37e 3-74Tube-to-nozzle hose installation 3-37d 3-72Tube-to-nozzle hose removal. . . 3-37c 3-72
Fuel level sending unit:Installation . . . . . . . . . . . . . . . . 4-32b 4-56Removal. . . . . . . . . . . . . . . . . . . 4-32a 4-56
Fuel pickup and return lines, auxiliary:
Installation . . . . . . . . . . . . . . . . 3-27b 3-54Removal. . . . . . . . . . . . . . . . . . . 3-27a 3-54
Fuel pressure transducer:Installation . . . . . . . . . . . . . . . . 4-30b 4-54Removal. . . . . . . . . . . . . . . . . . . 4-30a 4-54
Fuel pump:Installation . . . . . . . . . . . . . . . . 3-24b 3-40Removal. . . . . . . . . . . . . . . . . . . 3-24a 3-40
Fuel pump vent lines, air intake and:Installation . . . . . . . . . . . . . . . . 3-21b 3-37Removal. . . . . . . . . . . . . . . . . . . 3-21a 3-37
Fuel system:Maintenance task summary(DS) . . . . . . . . . . . . . . . . . . . . . 16-2 16-1
Maintenance task summary(unit) . . . . . . . . . . . . . . . . . . . . 3-11 3-21
Fuel system bleeding, vehicular heater . . . . . . . . . . . . . . . . . . . . . 12-14 12-24
Fuel system operation . . . . . . . . . . 1-19 1-25Fuel system tests. . . . . . . . . . . . . . 2-28 2-99Fuel tank and shield:
Assembly . . . . . . . . . . . . . . . . . . 3-25e 3-48Cleaning and inspection . . . . . . 3-25d 3-46Disassembly . . . . . . . . . . . . . . . 3-25c 3-46Draining . . . . . . . . . . . . . . . . . . 3-25a 3-42Installation . . . . . . . . . . . . . . . . 3-25f 3-50Removal. . . . . . . . . . . . . . . . . . . 3-25b 3-42
Fuel tank filler cap and spout:Inspection . . . . . . . . . . . . . . . . . 3-29b 3-58Installation . . . . . . . . . . . . . . . . 3-29c 3-58Removal. . . . . . . . . . . . . . . . . . . 3-29a 3-58
Fuel tank filler spout vent line:Installation . . . . . . . . . . . . . . . . 3-30b 3-60Removal. . . . . . . . . . . . . . . . . . . 3-30a 3-60
Fuel tank hangers:Installation . . . . . . . . . . . . . . . . 3-32b 3-63Removal. . . . . . . . . . . . . . . . . . . 3-32a 3-63
Fuel tank supply and return lines:Installation . . . . . . . . . . . . . . . . 3-26b 3-52Removal. . . . . . . . . . . . . . . . . . . 3-26a 3-52
Fuel tank vent line and filter:Installation . . . . . . . . . . . . . . . . 3-28b 3-56Removal. . . . . . . . . . . . . . . . . . . 3-28a 3-56
Fuel tank vent stack tube:Installation . . . . . . . . . . . . . . . . 12-42b 12-76Removal. . . . . . . . . . . . . . . . . . . 12-42a 12-76
INDEX (Cont’d)
Para. Page
F (Cont’d)
Para. Page
F (Cont’d)

Gauge, air restriction:Installation . . . . . . . . . . . . . . . . 3-17b 3-32Removal. . . . . . . . . . . . . . . . . . . 3-17a 3-32
Gauge, electrical:Installation . . . . . . . . . . . . . . . . 4-16b 4-34Removal. . . . . . . . . . . . . . . . . . . 4-16a 4-34
Geared hub:Assembly . . . . . . . . . . . . . . . . . . 21-6d 21-14Cleaning . . . . . . . . . . . . . . . . . . 21-6b 21-12Disassembly . . . . . . . . . . . . . . . 21-6a 21-10Inspection . . . . . . . . . . . . . . . . . 21-6c 21-12Installation . . . . . . . . . . . . . . . . 6-9b 6-24Removal. . . . . . . . . . . . . . . . . . . 6-9a 6-22
Geared hub input seal:Installation . . . . . . . . . . . . . . . . 6-10b 6-28Removal. . . . . . . . . . . . . . . . . . . 6-10a 6-28
Geared hub side cover:Cleaning and inspection . . . . . . 6-8b 6-20Installation . . . . . . . . . . . . . . . . 6-8c 6-20Removal. . . . . . . . . . . . . . . . . . . 6-8a 6-20
Geared hub spindle bearingadjustment . . . . . . . . . . . . . . . . . 6-12 6-35
Geared hub spindle seal:Installation . . . . . . . . . . . . . . . . 6-11b 6-32Removal. . . . . . . . . . . . . . . . . . . 6-11a 6-30
Geared hub vent line, front:Installation . . . . . . . . . . . . . . . . 6-16b 6-42Removal. . . . . . . . . . . . . . . . . . . 6-16a 6-42
Geared hub vent line, rear:Installation . . . . . . . . . . . . . . . . 6-15b 6-40Removal. . . . . . . . . . . . . . . . . . . 6-15a 6-40
Gear, steering:Installation . . . . . . . . . . . . . . . . 8-20b 8-58Removal. . . . . . . . . . . . . . . . . . . 8-20a 8-56
Gear unit and output assemblies:Assembly (1995) . . . . . . . . . . . . 28-8d 28-30Assembly (1996-1998) . . . . . . . . 28-8d.1 28-30.2Cleaning . . . . . . . . . . . . . . . . . . 28-8b 28-28Disassembly (1995) . . . . . . . . . . 28-8a 28-26Disassembly (1996-1998) . . . . . 28-8a.1 28-26.2Inspection . . . . . . . . . . . . . . . . . 28-8c 28-28
General engine maintenancetask summary . . . . . . . . . . . . . . . 15-2 15-1
General information, introduction:Break-in procedures . . . . . . . . . 1-9 1-2Destruction of Army equipmentto prevent enemy use . . . . . . . 1-3 1-1
Equipment Improvement Reportand Maintenance Digest(EIR MD) . . . . . . . . . . . . . . . . . 1-6 1-1
Maintenance forms, records,and reports . . . . . . . . . . . . . . . 1-2 1-1
Mandatory replacement parts . . 1-8 1-2Metric system . . . . . . . . . . . . . . 1-7 1-2Preparation for storage andshipment . . . . . . . . . . . . . . . . . 1-4 1-1
Reporting Equipment Improve-ment Recommendations (EIR) 1-5 1-1
Scope of manual . . . . . . . . . . . . 1-1 1-1General instructions, preparation
for stowage and shipment:Administrative storage . . . . . . . 13-2 13-1Cleaning . . . . . . . . . . . . . . . . . . 13-6 13-2General storage and shipping information . . . . . . . . . . . . . . . 13-5 13-2
Inspections, stowage, and inventory . . . . . . . . . . . . . . . . . 13-7 13-2
Lubrication . . . . . . . . . . . . . . . . 13-9 13-3Records and reports . . . . . . . . . 13-10 13-3Repair, painting, and preservation. . . . . . . . . . . . . . . 13-8 13-3
Scope . . . . . . . . . . . . . . . . . . . . . 13-1 13-1Security . . . . . . . . . . . . . . . . . . . 13-3 13-1Special packaging and shippingrequirements . . . . . . . . . . . . . . 13-4 13-1
General maintenance instructionstask summary . . . . . . . . . . . . . . 2-13 2-30
Generating and protective control box system maintenance task summary . . . . . . . . . . . . . . . . . . . 4-1 4-1
Generating system operation . . . . 1-22 1-29Glossary of abbreviations and
commonly used terms . . . . . . . . . 2-21 2-42Glow plug:
Installation . . . . . . . . . . . . . . . . 3-39b 3-78Removal. . . . . . . . . . . . . . . . . . . 3-39a 3-78
Glow plug circuit tests. . . . . . . . . . 2-37 2-289Glow plug controller:
Installation . . . . . . . . . . . . . . . . 4-33b 4-58Removal. . . . . . . . . . . . . . . . . . . 4-33a 4-58
Glow plug tip removal(damaged or broken) . . . . . . . . . . 15-22 15-40
Grille and screen, hood:Installation . . . . . . . . . . . . . . . . 10-17b 10-27Removal. . . . . . . . . . . . . . . . . . . 10-17a 10-27
Grille frame:Installation . . . . . . . . . . . . . . . . 10-16b 10-26Removal. . . . . . . . . . . . . . . . . . . 10-16a 10-25
Grille screen, front:Installation . . . . . . . . . . . . . . . . 10-15b 10-24Removal. . . . . . . . . . . . . . . . . . . 10-15a 10-24
INDEX (Cont’d)
TM 9-2320-387-24-1
INDEX 22 Change 1
Para. Page
G
Para. Page
G (Cont’d)
TM 9-2320-387-24-1
Change 1 INDEX 23
Grommet, service headlight and blackout drive light electricalconnector and:
Installation . . . . . . . . . . . . . . . . 4-65b 4-106Removal. . . . . . . . . . . . . . . . . . . 4-65a 4-106
Ground strap, antenna:Installation . . . . . . . . . . . . . . . . 12-20b 12-36Removal. . . . . . . . . . . . . . . . . . . 12-20a 12-35
Guards, brake protection:Installation . . . . . . . . . . . . . . . . 7-11b 7-34Removal. . . . . . . . . . . . . . . . . . . 7-11a 7-34
Gunner’s sling and hook:Installation . . . . . . . . . . . . . . . . 11-56b 11-109Removal. . . . . . . . . . . . . . . . . . . 11-56a 11-109
Gunner’s platform, stowagepedestal and:
Inspection . . . . . . . . . . . . . . . . . 11-71a.1 11-132Installation . . . . . . . . . . . . . . . . 11-71b 11-132Removal. . . . . . . . . . . . . . . . . . . 11-71a 11-132
H
Halfshaft:Assembly . . . . . . . . . . . . . . . . . . 6-7d 6-17Cleaning and inspection . . . . . . 6-7c 6-16Disassembly . . . . . . . . . . . . . . . 6-7b 6-14Installation . . . . . . . . . . . . . . . . 6-7e 6-19Removal. . . . . . . . . . . . . . . . . . . 6-7a 6-13
Handle assembly, door:Installation . . . . . . . . . . . . . . . . 10-19c 10-32Removal. . . . . . . . . . . . . . . . . . . 10-19a 10-30Repair . . . . . . . . . . . . . . . . . . . . 10-19b 10-30
Handle, door:Installation . . . . . . . . . . . . . . . . 11-5b 11-12Removal. . . . . . . . . . . . . . . . . . . 11-5a 11-12
Hand throttle control cable andbracket:
Installation . . . . . . . . . . . . . . . . 3-46b 3-88Removal. . . . . . . . . . . . . . . . . . . 3-46a 3-88
Hanger, muffler:Installation . . . . . . . . . . . . . . . . 3-59b 3-107Removal. . . . . . . . . . . . . . . . . . . 3-59a 3-107
Hangers, fuel tank:Installation . . . . . . . . . . . . . . . . 3-32b 3-63Removal. . . . . . . . . . . . . . . . . . . 3-32a 3-63
Hanger, tailpipe:Installation . . . . . . . . . . . . . . . . 3-53b 3-98Removal. . . . . . . . . . . . . . . . . . . 3-53a 3-98
Hatch assembly components, turret:Hatch support rod clip
installation. . . . . . . . . . . . . . . 11-61g 11-118Hatch support rod clip removal 11-61d 11-117Pivot lug installation . . . . . . . . 11-61i 11-118
Pivot lug removal . . . . . . . . . . . 11-61b 11-116Pivot rod installation . . . . . . . . 11-61j 11-118Pivot rod removal . . . . . . . . . . . 11-61a 11-116Protective bumper installation . 11-61f 11-118Protective bumper removal. . . . 11-61e 11-117Strap fastener loop installation 11-61h 11-118Strap fastener loop removal . . . 11-61c 11-116
Hatch pivot base, turret:Installation . . . . . . . . . . . . . . . . 11-59b 11-113Removal. . . . . . . . . . . . . . . . . . . 11-59a 11-113
Header:Inspection . . . . . . . . . . . . . . . . . 25-5b 25-8Installation . . . . . . . . . . . . . . . . 25-5c 25-8Removal. . . . . . . . . . . . . . . . . . . 25-5a 25-8
Headlight assembly, service:Installation . . . . . . . . . . . . . . . . 4-50b 4-84Removal. . . . . . . . . . . . . . . . . . . 4-50a 4-84
Headlight beam selector switch andbracket:
Installation . . . . . . . . . . . . . . . . 4-59b 4-99Removal. . . . . . . . . . . . . . . . . . . 4-59a 4-99
Headlight housing:Installation . . . . . . . . . . . . . . . . 10-18b 10-28Removal. . . . . . . . . . . . . . . . . . . 10-18a 10-28
Headlight lamp, service:Adjustment . . . . . . . . . . . . . . . . 4-49c 4-83Installation . . . . . . . . . . . . . . . . 4-49b 4-82Removal. . . . . . . . . . . . . . . . . . . 4-49a 4-82
Headphone mounting bracket:Installation . . . . . . . . . . . . . . . . 12-19b 12-34Removal. . . . . . . . . . . . . . . . . . . 12-19a 12-34
Heater assembly:Installation . . . . . . . . . . . . . . . . 10-76b 10-130Removal. . . . . . . . . . . . . . . . . . . 10-76a 10-129
Heater assembly, engine/crewcompartment:
Installation . . . . . . . . . . . . . . . . 12-10b 12-18Removal. . . . . . . . . . . . . . . . . . . 12-10a 12-18
Heater boot:Installation . . . . . . . . . . . . . . . . 10-85b 10-147Removal. . . . . . . . . . . . . . . . . . . 10-85a 10-147
Heater circuit breaker, engine/crewcompartment:
Installation . . . . . . . . . . . . . . . . 12-12b 12-22Removal. . . . . . . . . . . . . . . . . . . 12-12a 12-22
Heater control:Installation . . . . . . . . . . . . . . . . 10-78b 10-134Removal. . . . . . . . . . . . . . . . . . . 10-78a 10-134
Heater control cable and shutoff valve adjustment. . . . . . . . . . . . . 10-79 10-136
Heater controller, engine/crewcompartment:
Installation . . . . . . . . . . . . . . . . 12-13b 12-23Removal. . . . . . . . . . . . . . . . . . . 12-13a 12-23
INDEX (Cont’d)
Para. Page
G (Cont’d)
Para. Page
H (Cont’d)
Heater deflector:Installation . . . . . . . . . . . . . . . . 10-87b 10-149Removal. . . . . . . . . . . . . . . . . . . 10-87a 10-149
Heater ducting:Installation . . . . . . . . . . . . . . . . 10-80b 10-138Removal. . . . . . . . . . . . . . . . . . . 10-80a 10-138
Heater exhaust muffler, engine/crewcompartment:
Installation . . . . . . . . . . . . . . . . 12-3b 12-2.2Removal. . . . . . . . . . . . . . . . . . . 12-3a 12-2.2
Heater exhaust pipe, engine/crewcompartment:
Installation . . . . . . . . . . . . . . . . 12-4b 12-3Removal. . . . . . . . . . . . . . . . . . . 12-4a 12-3
Heater fan motor resistor assembly:Installation . . . . . . . . . . . . . . . . 10-75b 10-128Removal. . . . . . . . . . . . . . . . . . . 10-75a 10-127
Heater fan switch:Installation . . . . . . . . . . . . . . . . 10-73b 10-125Removal. . . . . . . . . . . . . . . . . . . 10-73a 10-125
Heater fuel lines, engine/crewcompartment:
Heater fuel line installation . . . 12-8b 12-12Heater fuel line removal . . . . . . 12-8a 12-12Tank fuel line and supply
tube installation. . . . . . . . . . . 12-8d 12-12Tank fuel line and supply
tube removal . . . . . . . . . . . . . 12-8c 12-14Heater fuel pump, engine/crew
compartment:Installation . . . . . . . . . . . . . . . . 12-9b 12-16Removal. . . . . . . . . . . . . . . . . . . 12-9a 12-16
Heater fuel system bleeding,engine/crew compartment. . . . . . 12-14 12-24
Heater harness, engine/crewcompartment:
Installation . . . . . . . . . . . . . . . . 12-11b 12-20Removal. . . . . . . . . . . . . . . . . . . 12-11a 12-20
Heater heat shield, engine/crewcompartment:
Installation . . . . . . . . . . . . . . . . 12-2b 12-2Removal. . . . . . . . . . . . . . . . . . . 12-2a 12-2
Heater hose:Installation . . . . . . . . . . . . . . . . 10-88b 10-150Removal. . . . . . . . . . . . . . . . . . . 10-88a 10-150
Heater inlet pipe, engine/crew compartment:
Installation . . . . . . . . . . . . . . . . 12-4.1b 12-4Removal. . . . . . . . . . . . . . . . . . . 12-4.1a 12-4
Heater outlet hose assembly, engine/crew compartment:
Installation . . . . . . . . . . . . . . . . 12-6b 12-8Removal. . . . . . . . . . . . . . . . . . . 12-6a 12-8
Heater outlet/inlet piping:Inspection . . . . . . . . . . . . . . . . . 10-71b 10-122Installation . . . . . . . . . . . . . . . . 10-71c 10-122Removal. . . . . . . . . . . . . . . . . . . 10-71a 10-122
Heater circulating pump, engine/crew compartment:
Installation . . . . . . . . . . . . . . . . 12-7b 12-10Removal. . . . . . . . . . . . . . . . . . . 12-7a 12-10
Heater lower hose assembly, engine/crew compartment:
Installation . . . . . . . . . . . . . . . . 12-5b 12-6Removal. . . . . . . . . . . . . . . . . . . 12-5a 12-6
Heater shutoff valve:Installation . . . . . . . . . . . . . . . . 10-72b 10-124Removal. . . . . . . . . . . . . . . . . . . 10-72a 10-124
Heat shield, rear:Installation . . . . . . . . . . . . . . . . 3-52b 3-97Removal. . . . . . . . . . . . . . . . . . . 3-52a 3-97
Heat shield, right exhaust manifold:Installation . . . . . . . . . . . . . . . . 3-56b 3-102Removal. . . . . . . . . . . . . . . . . . . 3-56a 3-102
Heat shield, right rear:Installation . . . . . . . . . . . . . . . . 3-58b 3-106Removal. . . . . . . . . . . . . . . . . . . 3-58a 3-106
High-beam lamp:Installation . . . . . . . . . . . . . . . . 4-22b 4-45Removal. . . . . . . . . . . . . . . . . . . 4-22a 4-45
Hinge, front door and:Installation . . . . . . . . . . . . . . . . 11-2b 11-4Removal. . . . . . . . . . . . . . . . . . . 11-2a 11-4
Hinge, hood and:Alignment . . . . . . . . . . . . . . . . . 10-9c 10-18Installation . . . . . . . . . . . . . . . . 10-9b 10-16Removal. . . . . . . . . . . . . . . . . . . 10-9a 10-14
Hinge mount, body:Installation . . . . . . . . . . . . . . . . 10-54b 10-89Removal. . . . . . . . . . . . . . . . . . . 10-54a 10-89
Hinge, rear door and:Installation . . . . . . . . . . . . . . . . 11-2.1b 11-4.2Removal. . . . . . . . . . . . . . . . . . . 11-2.1a 11-4.2
Hinge, soft top door:Installation . . . . . . . . . . . . . . . . 10-91b 10-153Removal. . . . . . . . . . . . . . . . . . . 10-91a 10-153
Hinge, tailgate upper:Installation . . . . . . . . . . . . . . . . 10-39b 10-68Removal. . . . . . . . . . . . . . . . . . . 10-39a 10-67
INDEX (Cont’d)
TM 9-2320-387-24-1
INDEX 24 Change 1
Para. Page
H (Cont’d)
Para. Page
H (Cont’d)
TM 9-2320-387-24-1
Change 1 INDEX 25
Holddown, battery:Installation . . . . . . . . . . . . . . . . 4-73b 4-126Removal. . . . . . . . . . . . . . . . . . . 4-73a 4-126
Holddown strike, engine accesscover flexible latch and:
Installation . . . . . . . . . . . . . . . . 10-21b 10-34Removal. . . . . . . . . . . . . . . . . . . 10-21a 10-34
Hood and hinge:Alignment . . . . . . . . . . . . . . . . . 10-9c 10-18Installation . . . . . . . . . . . . . . . . 10-9b 10-16Removal. . . . . . . . . . . . . . . . . . . 10-9a 10-14
Hood grille and screen:Installation . . . . . . . . . . . . . . . . 10-17b 10-27Removal. . . . . . . . . . . . . . . . . . . 10-17a 10-27
Hood jumper wiring harness:Installation . . . . . . . . . . . . . . . . 4-79b 4-143Removal. . . . . . . . . . . . . . . . . . . 4-79a 4-140
Hood latch:Assembly . . . . . . . . . . . . . . . . . . 10-5c 10-8Disassembly . . . . . . . . . . . . . . . 10-5b 10-7Installation . . . . . . . . . . . . . . . . 10-5d 10-8Removal. . . . . . . . . . . . . . . . . . . 10-5a 10-7
Hood latch bracket:Installation . . . . . . . . . . . . . . . . 10-6b 10-10Removal. . . . . . . . . . . . . . . . . . . 10-6a 10-9
Hood latch tapping plate:Installation . . . . . . . . . . . . . . . . 10-7b 10-11Removal. . . . . . . . . . . . . . . . . . . 10-7a 10-11
Hood prop rod and bracket:Assembly . . . . . . . . . . . . . . . . . . 10-8d 10-12Disassembly . . . . . . . . . . . . . . . 10-8b 10-12Inspection . . . . . . . . . . . . . . . . . 10-8c 10-12Installation . . . . . . . . . . . . . . . . 10-8e 10-13Removal. . . . . . . . . . . . . . . . . . . 10-8a 10-12
Hood seal, outer:Installation . . . . . . . . . . . . . . . . 10-10b 10-19Removal. . . . . . . . . . . . . . . . . . . 10-10a 10-19
Hood stop, center:Installation . . . . . . . . . . . . . . . . 10-12b 10-21Removal. . . . . . . . . . . . . . . . . . . 10-12a 10-21
Hood stop guide, center:Installation . . . . . . . . . . . . . . . . 10-14b 10-23Removal. . . . . . . . . . . . . . . . . . . 10-14a 10-23
Hood stop, side:Installation . . . . . . . . . . . . . . . . 10-11b 10-20Removal. . . . . . . . . . . . . . . . . . . 10-11a 10-20
Horn:Installation . . . . . . . . . . . . . . . . 4-26b 4-49Removal. . . . . . . . . . . . . . . . . . . 4-26a 4-49
Horn control brush:Installation . . . . . . . . . . . . . . . . 4-25b 4-48Removal. . . . . . . . . . . . . . . . . . . 4-25a 4-48
Horn mounting bracket:Installation . . . . . . . . . . . . . . . . 4-27b 4-50Removal. . . . . . . . . . . . . . . . . . . 4-27a 4-50
Horn switch:Installation . . . . . . . . . . . . . . . . 4-24b 4-47Removal. . . . . . . . . . . . . . . . . . . 4-24a 4-47
Hose, air restriction gauge:Installation . . . . . . . . . . . . . . . . 3-20b 3-36Removal. . . . . . . . . . . . . . . . . . . 3-20a 3-36
Hose, filler spout:Installation . . . . . . . . . . . . . . . . 3-31b 3-62Removal. . . . . . . . . . . . . . . . . . . 3-31a 3-62
Hose, fuel filter drain and valve:Installation . . . . . . . . . . . . . . . . 3-35b 3-68Removal. . . . . . . . . . . . . . . . . . . 3-35a 3-68
Hose, 10,500 lb hydraulic winch (M1113):
Installation . . . . . . . . . . . . . . . . 12-31.1b 12-60.4Removal. . . . . . . . . . . . . . . . . . . 12-31.1a 12-60.2
Hose, 10,500 lb rear hydraulic winch (M1114):
Installation . . . . . . . . . . . . . . . . 12-36.4b 12-68.14Removal. . . . . . . . . . . . . . . . . . . 12-36.4a 12-68.8
Hose, overflow, surge tank:Installation . . . . . . . . . . . . . . . . 3-75b 3-131Removal. . . . . . . . . . . . . . . . . . . 3-75a 3-131
Hose, power steering hydraulicsystem pressure and return:
Installation . . . . . . . . . . . . . . . . 8-24b 8-66Removal. . . . . . . . . . . . . . . . . . . 8-24a 8-66
Hose, radiator inlet:Installation . . . . . . . . . . . . . . . . 3-70b 3-126Removal. . . . . . . . . . . . . . . . . . . 3-70a 3-126
Hose, radiator, lower:Installation . . . . . . . . . . . . . . . . 3-72b 3-128Removal. . . . . . . . . . . . . . . . . . . 3-72a 3-128
Hoses, return, fuel injection:Fuel drain-back hose
installation. . . . . . . . . . . . . . . 3-37b 3-72Fuel drain-back hose removal . 3-37a 3-72Nozzle cap installation . . . . . . . 3-37h 3-74Nozzle cap removal . . . . . . . . . . 3-37g 3-74Nozzle-to-nozzle hose
installation. . . . . . . . . . . . . . . 3-37f 3-74Nozzle-to-nozzle hose removal . 3-37e 3-74Tube-to-nozzle hose installation 3-37d 3-72Tube-to-nozzle hose removal. . . 3-37c 3-72
Hose, surge tank-to-lowerradiator tube:
Installation . . . . . . . . . . . . . . . . 3-74b 3-130Removal. . . . . . . . . . . . . . . . . . . 3-74a 3-130
INDEX (Cont’d)
Para. Page
H (Cont’d)
Para. Page
H (Cont’d)
Hoses, windshield washer:Installation . . . . . . . . . . . . . . . . 10-65b 10-110Removal. . . . . . . . . . . . . . . . . . . 10-65a 10-110
Hose, thermostat bypass:Installation . . . . . . . . . . . . . . . . 3-68b 3-123Removal. . . . . . . . . . . . . . . . . . . 3-68a 3-123
Hose, vent, surge tank-to-radiator:Installation . . . . . . . . . . . . . . . . 3-66b 3-121Removal. . . . . . . . . . . . . . . . . . . 3-67a 3-121
Hose, vent, surge tank-to-watercrossover:
Installation . . . . . . . . . . . . . . . . 3-67b 3-122Removal. . . . . . . . . . . . . . . . . . . 3-67a 3-122
Hose, water pump inlet:Installation . . . . . . . . . . . . . . . . 3-73b 3-129Removal. . . . . . . . . . . . . . . . . . . 3-73a 3-129
Housing, fuel filter:Inspection . . . . . . . . . . . . . . . . . 10-2b 10-4Installation . . . . . . . . . . . . . . . . 10-2c 10-4Removal. . . . . . . . . . . . . . . . . . . 10-2a 10-3
Housing, headlight:Installation . . . . . . . . . . . . . . . . 10-18b 10-28Removal. . . . . . . . . . . . . . . . . . . 10-18a 10-28
Housing, wastegate:Installation . . . . . . . . . . . . . . . . 15-18b 15-35Removal. . . . . . . . . . . . . . . . . . . 15-18a 15-35
How to use this manual . . . . . . . . viiHow to use this troubleshooting
guide . . . . . . . . . . . . . . . . . . . . . . 2-20 2-36Hub, geared:
Assembly . . . . . . . . . . . . . . . . . . 21-6d 21-14Cleaning . . . . . . . . . . . . . . . . . . 21-6b 21-12Disassembly . . . . . . . . . . . . . . . 21-6a 21-10Inspection . . . . . . . . . . . . . . . . . 21-6c 21-12Installation . . . . . . . . . . . . . . . . 6-9b 6-24Removal. . . . . . . . . . . . . . . . . . . 6-9a 6-22
Hydraulic system pressure andreturn hose, power steering:
Installation . . . . . . . . . . . . . . . . 8-24b 8-66Removal. . . . . . . . . . . . . . . . . . . 8-24a 8-66
Hydraulic valve lifter:Installation . . . . . . . . . . . . . . . . 15-9b 15-18Removal. . . . . . . . . . . . . . . . . . . 15-9a 15-18
Hydro-booster:Installation . . . . . . . . . . . . . . . . 7-6b 7-16Removal. . . . . . . . . . . . . . . . . . . 7-6a 7-16
Hydro-boost vent line:Installation . . . . . . . . . . . . . . . . 12-45b 12-80Removal. . . . . . . . . . . . . . . . . . . 12-45a 12-80
Idler arm:Inspection . . . . . . . . . . . . . . . . . 8-17c 8-48Installation . . . . . . . . . . . . . . . . 8-17b 8-46Removal. . . . . . . . . . . . . . . . . . . 8-17a 8-46
Idler pulleys, and mounting hardware, tensioner:
Installation . . . . . . . . . . . . . . . . 3-82b 3-144Removal. . . . . . . . . . . . . . . . . . . 3-82a 3-144
Idle speed adjustment, engine . . . 3-45 3-87Illustrated list of manufactured
items: appendix D . . . . . . . . . . . . D-1Injection lines, fuel:
Bleeding . . . . . . . . . . . . . . . . . . 16-4d 16-5Inspection . . . . . . . . . . . . . . . . . 16-4b 16-4Installation . . . . . . . . . . . . . . . . 16-4c 16-5Removal. . . . . . . . . . . . . . . . . . . 16-4a 16-4
Injection nozzle, fuel:Installation . . . . . . . . . . . . . . . . 16-3b 16-3Removal. . . . . . . . . . . . . . . . . . . 16-3a 16-2
Injection pump cover, fuel:Installation . . . . . . . . . . . . . . . . 16-7b 16-14Removal. . . . . . . . . . . . . . . . . . . 16-7a 16-12
Injection pump, fuel:Installation . . . . . . . . . . . . . . . . 16-6c 16-10Removal. . . . . . . . . . . . . . . . . . . 16-6a 16-8Repair . . . . . . . . . . . . . . . . . . . . 16-6b 16-10
Inner armor, driver’s footwell:Inspection . . . . . . . . . . . . . . . . . 11-41a.1 11-84Installation . . . . . . . . . . . . . . . . 11-41b 11-84Removal. . . . . . . . . . . . . . . . . . . 11-41a 11-84
Inner rim stud:Cleaning and inspection . . . . . . 8-7b 8-20Installation . . . . . . . . . . . . . . . . 8-7c 8-20Removal. . . . . . . . . . . . . . . . . . . 8-7a 8-19
Inside protection plate, left side rocker panel armor and:
Inspection . . . . . . . . . . . . . . . . . 11-34b 11-62Installation . . . . . . . . . . . . . . . . 11-34c 11-62Removal. . . . . . . . . . . . . . . . . . . 11-34a 11-62
Inside protection plate, right side rocker panel armor and:
Inspection . . . . . . . . . . . . . . . . . 11-35b 11-64Installation . . . . . . . . . . . . . . . . 11-35c 11-64Removal. . . . . . . . . . . . . . . . . . . 11-35a 11-64
Inspection:General maintenance . . . . . . . . 2-15 2-31
Instrument cluster:Installation . . . . . . . . . . . . . . . . 4-14b 4-31Removal. . . . . . . . . . . . . . . . . . . 4-14a 4-30
INDEX (Cont’d)
TM 9-2320-387-24-1
INDEX 26 Change 1
Para. Page
H (Cont’d)
Para. Page
I
TM 9-2320-387-24-1
Change 1 INDEX 27
Instrument cluster light:Lamp installation . . . . . . . . . . . 4-19b 4-40Lamp removal . . . . . . . . . . . . . . 4-19a 4-40Light assembly installation . . . 4-19d 4-41Light assembly removal . . . . . . 4-19c 4-41
Instrument panel:Installation . . . . . . . . . . . . . . . . 4-15b 4-32Removal. . . . . . . . . . . . . . . . . . . 4-15a 4-32
Instruments, sending units,switches, and horn maintenance task summary . . . . . . . . . . . . . . . 4-13 4-29
Instrument tests . . . . . . . . . . . . . . 2-38 2-305Insulation, left front cowl:
Installation . . . . . . . . . . . . . . . . 10-31b 10-56Removal. . . . . . . . . . . . . . . . . . . 10-31a 10-56
Insulation, left outer cowl:Installation . . . . . . . . . . . . . . . . 10-30b 10-55Removal. . . . . . . . . . . . . . . . . . . 10-30a 10-55
Insulation, left side interior:Installation . . . . . . . . . . . . . . . . 25-37b 25-116Removal. . . . . . . . . . . . . . . . . . . 25-37a 25-116
Insulation panel:Installation . . . . . . . . . . . . . . . . 11-30b 11-54Removal. . . . . . . . . . . . . . . . . . . 11-30a 11-54
Insulation, rear seat floor:Installation . . . . . . . . . . . . . . . . 10-34b 10-60Removal. . . . . . . . . . . . . . . . . . . 10-34a 10-60
Insulation, right front cowl:Installation . . . . . . . . . . . . . . . . 10-32b 10-58Removal. . . . . . . . . . . . . . . . . . . 10-32a 10-58
Insulation, tunnel interior side:Installation . . . . . . . . . . . . . . . . 10-33b 10-59Removal. . . . . . . . . . . . . . . . . . . 10-33a 10-59
Insulator, engine mount and:Assembly . . . . . . . . . . . . . . . . . . 15-3c 15-4Disassembly . . . . . . . . . . . . . . . 15-3b 15-4Installation . . . . . . . . . . . . . . . . 15-3d 15-6Removal. . . . . . . . . . . . . . . . . . . 15-3a 15-2
Insulator, tailpipe:Installation . . . . . . . . . . . . . . . . 3-54b 3-99Removal. . . . . . . . . . . . . . . . . . . 3-54a 3-99
Intake crossover:Installation . . . . . . . . . . . . . . . . 15-20b 15-37Removal. . . . . . . . . . . . . . . . . . . 15-20a 15-37
Intake manifold, left:Installation . . . . . . . . . . . . . . . . 15-16b 15-32Removal. . . . . . . . . . . . . . . . . . . 15-16a 15-32
Intake manifold, right:Installation . . . . . . . . . . . . . . . . 15-17b 15-34Removal. . . . . . . . . . . . . . . . . . . 15-17a 15-34
Intercom and brackets:Installation . . . . . . . . . . . . . . . . 11-63b 11-122Removal. . . . . . . . . . . . . . . . . . . 11-63a 11-122
Interior components, locationand description of major . . . . . . . 1-12 1-6
Intermediate body mount bracket,left:
Installation . . . . . . . . . . . . . . . . 32-7b 32-13Removal. . . . . . . . . . . . . . . . . . . 32-7a 32-13
Intermediate body mount bracket,right:
Installation . . . . . . . . . . . . . . . . 32-6b 32-12Removal. . . . . . . . . . . . . . . . . . . 32-6a 32-12
Intermediate clutch assembly andfront band:
Inspection . . . . . . . . . . . . . . . . . 28-14 28-56Intermediate steering shaft:
Installation . . . . . . . . . . . . . . . . 8-19b 8-54Removal. . . . . . . . . . . . . . . . . . . 8-19a 8-54
Intermediate steering shaft close-offand retainer:
Installation . . . . . . . . . . . . . . . . 8-22b 8-62Removal. . . . . . . . . . . . . . . . . . . 8-22a 8-62
J
Jack retaining strap:Installation . . . . . . . . . . . . . . . . 10-9.1b 10-18.1Removal. . . . . . . . . . . . . . . . . . . 10-9.1a 10-18.1
Jacking instructions:Lowering corner of vehicle . . . . 8-2b 8-2Lowering entire vehicle . . . . . . 8-2h 8-4Lowering front of vehicle . . . . . 8-2d 8-2Lowering rear of vehicle . . . . . . 8-2f 8-4Raising corner of vehicle. . . . . . 8-2a 8-2Raising entire vehicle . . . . . . . . 8-2g 8-4Raising front of vehicle . . . . . . . 8-2c 8-2Raising rear of vehicle . . . . . . . 8-2e 8-4
K
Kits, task summary, specialpurpose . . . . . . . . . . . . . . . . . . . . 26-2 26-1
L
Lamp assembly, transfer caseindicator:
Installation . . . . . . . . . . . . . . . . 4-40b 4-67Removal. . . . . . . . . . . . . . . . . . . 4-40a 4-67
Lamp assembly, transmissionindicator:
Installation . . . . . . . . . . . . . . . . 4-41b 4-68Removal. . . . . . . . . . . . . . . . . . . 4-41a 4-68
Lamp, blackout drive light:Installation . . . . . . . . . . . . . . . . 4-52b 4-88Removal. . . . . . . . . . . . . . . . . . . 4-52a 4-88
INDEX (Cont’d)
Para. Page
I (Cont’d)
Para. Page
I (Cont’d)
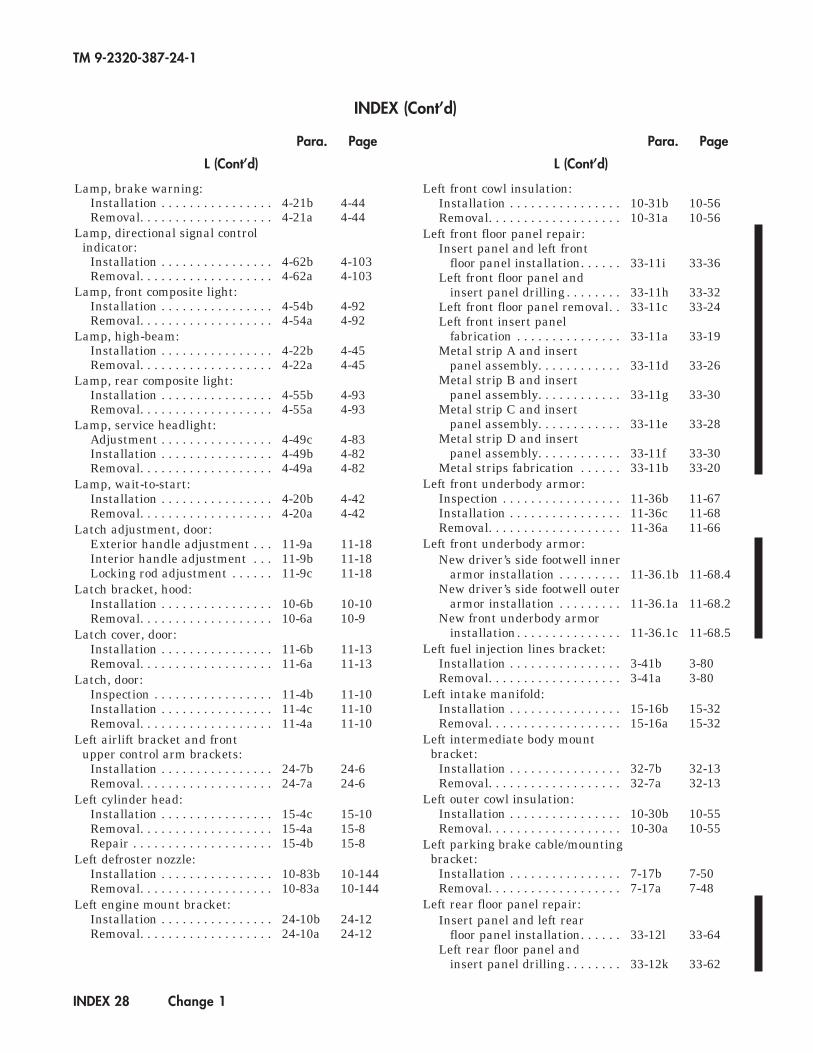
Lamp, brake warning:Installation . . . . . . . . . . . . . . . . 4-21b 4-44Removal. . . . . . . . . . . . . . . . . . . 4-21a 4-44
Lamp, directional signal controlindicator:
Installation . . . . . . . . . . . . . . . . 4-62b 4-103Removal. . . . . . . . . . . . . . . . . . . 4-62a 4-103
Lamp, front composite light:Installation . . . . . . . . . . . . . . . . 4-54b 4-92Removal. . . . . . . . . . . . . . . . . . . 4-54a 4-92
Lamp, high-beam:Installation . . . . . . . . . . . . . . . . 4-22b 4-45Removal. . . . . . . . . . . . . . . . . . . 4-22a 4-45
Lamp, rear composite light:Installation . . . . . . . . . . . . . . . . 4-55b 4-93Removal. . . . . . . . . . . . . . . . . . . 4-55a 4-93
Lamp, service headlight:Adjustment . . . . . . . . . . . . . . . . 4-49c 4-83Installation . . . . . . . . . . . . . . . . 4-49b 4-82Removal. . . . . . . . . . . . . . . . . . . 4-49a 4-82
Lamp, wait-to-start:Installation . . . . . . . . . . . . . . . . 4-20b 4-42Removal. . . . . . . . . . . . . . . . . . . 4-20a 4-42
Latch adjustment, door:Exterior handle adjustment . . . 11-9a 11-18Interior handle adjustment . . . 11-9b 11-18Locking rod adjustment . . . . . . 11-9c 11-18
Latch bracket, hood:Installation . . . . . . . . . . . . . . . . 10-6b 10-10Removal. . . . . . . . . . . . . . . . . . . 10-6a 10-9
Latch cover, door:Installation . . . . . . . . . . . . . . . . 11-6b 11-13Removal. . . . . . . . . . . . . . . . . . . 11-6a 11-13
Latch, door:Inspection . . . . . . . . . . . . . . . . . 11-4b 11-10Installation . . . . . . . . . . . . . . . . 11-4c 11-10Removal. . . . . . . . . . . . . . . . . . . 11-4a 11-10
Left airlift bracket and front upper control arm brackets:
Installation . . . . . . . . . . . . . . . . 24-7b 24-6Removal. . . . . . . . . . . . . . . . . . . 24-7a 24-6
Left cylinder head:Installation . . . . . . . . . . . . . . . . 15-4c 15-10Removal. . . . . . . . . . . . . . . . . . . 15-4a 15-8Repair . . . . . . . . . . . . . . . . . . . . 15-4b 15-8
Left defroster nozzle:Installation . . . . . . . . . . . . . . . . 10-83b 10-144Removal. . . . . . . . . . . . . . . . . . . 10-83a 10-144
Left engine mount bracket:Installation . . . . . . . . . . . . . . . . 24-10b 24-12Removal. . . . . . . . . . . . . . . . . . . 24-10a 24-12
Left front cowl insulation:Installation . . . . . . . . . . . . . . . . 10-31b 10-56Removal. . . . . . . . . . . . . . . . . . . 10-31a 10-56
Left front floor panel repair:Insert panel and left front
floor panel installation. . . . . . 33-11i 33-36Left front floor panel and
insert panel drilling . . . . . . . . 33-11h 33-32Left front floor panel removal. . 33-11c 33-24Left front insert panel
fabrication . . . . . . . . . . . . . . . 33-11a 33-19Metal strip A and insert
panel assembly. . . . . . . . . . . . 33-11d 33-26Metal strip B and insert
panel assembly. . . . . . . . . . . . 33-11g 33-30Metal strip C and insert
panel assembly. . . . . . . . . . . . 33-11e 33-28Metal strip D and insert
panel assembly. . . . . . . . . . . . 33-11f 33-30Metal strips fabrication . . . . . . 33-11b 33-20
Left front underbody armor:Inspection . . . . . . . . . . . . . . . . . 11-36b 11-67Installation . . . . . . . . . . . . . . . . 11-36c 11-68Removal. . . . . . . . . . . . . . . . . . . 11-36a 11-66
Left front underbody armor:New driver’s side footwell inner
armor installation . . . . . . . . . 11-36.1b 11-68.4New driver’s side footwell outer
armor installation . . . . . . . . . 11-36.1a 11-68.2New front underbody armor
installation. . . . . . . . . . . . . . . 11-36.1c 11-68.5Left fuel injection lines bracket:
Installation . . . . . . . . . . . . . . . . 3-41b 3-80Removal. . . . . . . . . . . . . . . . . . . 3-41a 3-80
Left intake manifold:Installation . . . . . . . . . . . . . . . . 15-16b 15-32Removal. . . . . . . . . . . . . . . . . . . 15-16a 15-32
Left intermediate body mountbracket:
Installation . . . . . . . . . . . . . . . . 32-7b 32-13Removal. . . . . . . . . . . . . . . . . . . 32-7a 32-13
Left outer cowl insulation:Installation . . . . . . . . . . . . . . . . 10-30b 10-55Removal. . . . . . . . . . . . . . . . . . . 10-30a 10-55
Left parking brake cable/mountingbracket:
Installation . . . . . . . . . . . . . . . . 7-17b 7-50Removal. . . . . . . . . . . . . . . . . . . 7-17a 7-48
Left rear floor panel repair:Insert panel and left rear
floor panel installation. . . . . . 33-12l 33-64Left rear floor panel and
insert panel drilling . . . . . . . . 33-12k 33-62
INDEX (Cont’d)
TM 9-2320-387-24-1
INDEX 28 Change 1
Para. Page
L (Cont’d)
Para. Page
L (Cont’d)
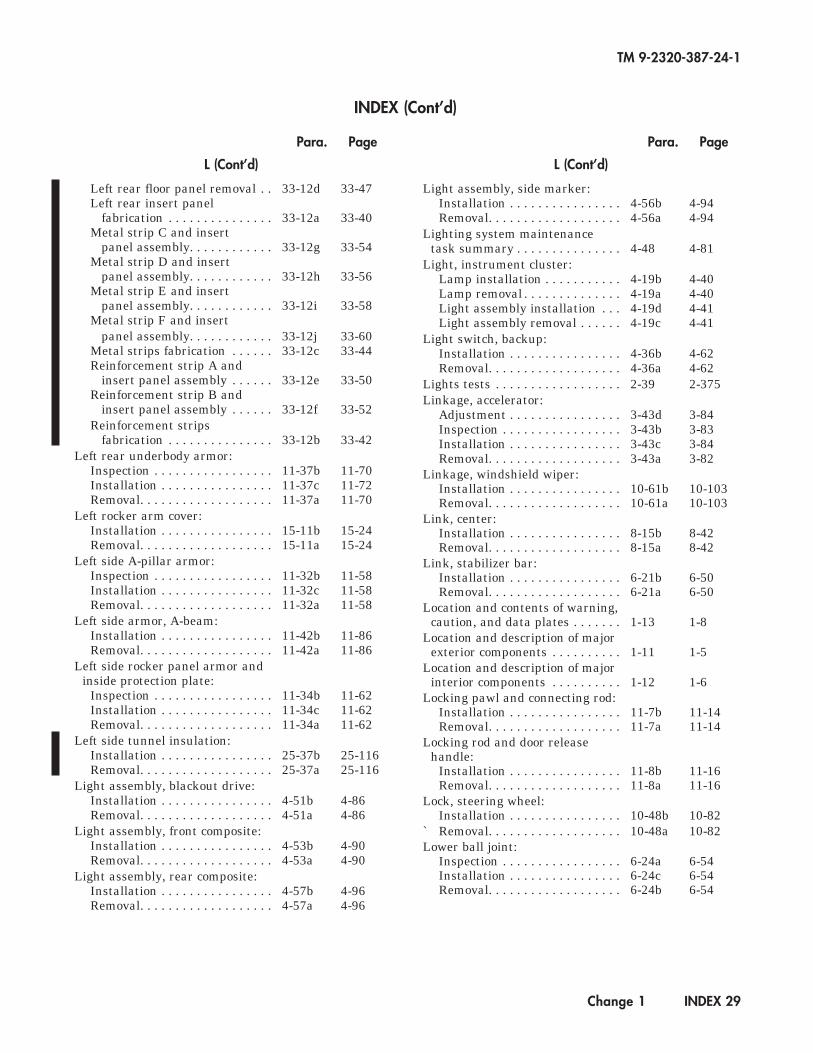
TM 9-2320-387-24-1
Change 1 INDEX 29
Left rear floor panel removal . . 33-12d 33-47Left rear insert panel
fabrication . . . . . . . . . . . . . . . 33-12a 33-40Metal strip C and insert
panel assembly. . . . . . . . . . . . 33-12g 33-54Metal strip D and insert
panel assembly. . . . . . . . . . . . 33-12h 33-56Metal strip E and insert
panel assembly. . . . . . . . . . . . 33-12i 33-58Metal strip F and insert
panel assembly. . . . . . . . . . . . 33-12j 33-60Metal strips fabrication . . . . . . 33-12c 33-44Reinforcement strip A and
insert panel assembly . . . . . . 33-12e 33-50Reinforcement strip B and
insert panel assembly . . . . . . 33-12f 33-52Reinforcement strips
fabrication . . . . . . . . . . . . . . . 33-12b 33-42Left rear underbody armor:
Inspection . . . . . . . . . . . . . . . . . 11-37b 11-70Installation . . . . . . . . . . . . . . . . 11-37c 11-72Removal. . . . . . . . . . . . . . . . . . . 11-37a 11-70
Left rocker arm cover:Installation . . . . . . . . . . . . . . . . 15-11b 15-24Removal. . . . . . . . . . . . . . . . . . . 15-11a 15-24
Left side A-pillar armor:Inspection . . . . . . . . . . . . . . . . . 11-32b 11-58Installation . . . . . . . . . . . . . . . . 11-32c 11-58Removal. . . . . . . . . . . . . . . . . . . 11-32a 11-58
Left side armor, A-beam:Installation . . . . . . . . . . . . . . . . 11-42b 11-86Removal. . . . . . . . . . . . . . . . . . . 11-42a 11-86
Left side rocker panel armor and inside protection plate:
Inspection . . . . . . . . . . . . . . . . . 11-34b 11-62Installation . . . . . . . . . . . . . . . . 11-34c 11-62Removal. . . . . . . . . . . . . . . . . . . 11-34a 11-62
Left side tunnel insulation:Installation . . . . . . . . . . . . . . . . 25-37b 25-116Removal. . . . . . . . . . . . . . . . . . . 25-37a 25-116
Light assembly, blackout drive:Installation . . . . . . . . . . . . . . . . 4-51b 4-86Removal. . . . . . . . . . . . . . . . . . . 4-51a 4-86
Light assembly, front composite:Installation . . . . . . . . . . . . . . . . 4-53b 4-90Removal. . . . . . . . . . . . . . . . . . . 4-53a 4-90
Light assembly, rear composite:Installation . . . . . . . . . . . . . . . . 4-57b 4-96Removal. . . . . . . . . . . . . . . . . . . 4-57a 4-96
Light assembly, side marker:Installation . . . . . . . . . . . . . . . . 4-56b 4-94Removal. . . . . . . . . . . . . . . . . . . 4-56a 4-94
Lighting system maintenance task summary . . . . . . . . . . . . . . . 4-48 4-81
Light, instrument cluster:Lamp installation . . . . . . . . . . . 4-19b 4-40Lamp removal . . . . . . . . . . . . . . 4-19a 4-40Light assembly installation . . . 4-19d 4-41Light assembly removal . . . . . . 4-19c 4-41
Light switch, backup:Installation . . . . . . . . . . . . . . . . 4-36b 4-62Removal. . . . . . . . . . . . . . . . . . . 4-36a 4-62
Lights tests . . . . . . . . . . . . . . . . . . 2-39 2-375Linkage, accelerator:
Adjustment . . . . . . . . . . . . . . . . 3-43d 3-84Inspection . . . . . . . . . . . . . . . . . 3-43b 3-83Installation . . . . . . . . . . . . . . . . 3-43c 3-84Removal. . . . . . . . . . . . . . . . . . . 3-43a 3-82
Linkage, windshield wiper:Installation . . . . . . . . . . . . . . . . 10-61b 10-103Removal. . . . . . . . . . . . . . . . . . . 10-61a 10-103
Link, center:Installation . . . . . . . . . . . . . . . . 8-15b 8-42Removal. . . . . . . . . . . . . . . . . . . 8-15a 8-42
Link, stabilizer bar:Installation . . . . . . . . . . . . . . . . 6-21b 6-50Removal. . . . . . . . . . . . . . . . . . . 6-21a 6-50
Location and contents of warning,caution, and data plates . . . . . . . 1-13 1-8
Location and description of majorexterior components . . . . . . . . . . 1-11 1-5
Location and description of majorinterior components . . . . . . . . . . 1-12 1-6
Locking pawl and connecting rod:Installation . . . . . . . . . . . . . . . . 11-7b 11-14Removal. . . . . . . . . . . . . . . . . . . 11-7a 11-14
Locking rod and door release handle:
Installation . . . . . . . . . . . . . . . . 11-8b 11-16Removal. . . . . . . . . . . . . . . . . . . 11-8a 11-16
Lock, steering wheel:Installation . . . . . . . . . . . . . . . . 10-48b 10-82
` Removal. . . . . . . . . . . . . . . . . . . 10-48a 10-82Lower ball joint:
Inspection . . . . . . . . . . . . . . . . . 6-24a 6-54Installation . . . . . . . . . . . . . . . . 6-24c 6-54Removal. . . . . . . . . . . . . . . . . . . 6-24b 6-54
INDEX (Cont’d)
Para. Page
L (Cont’d)
Para. Page
L (Cont’d)
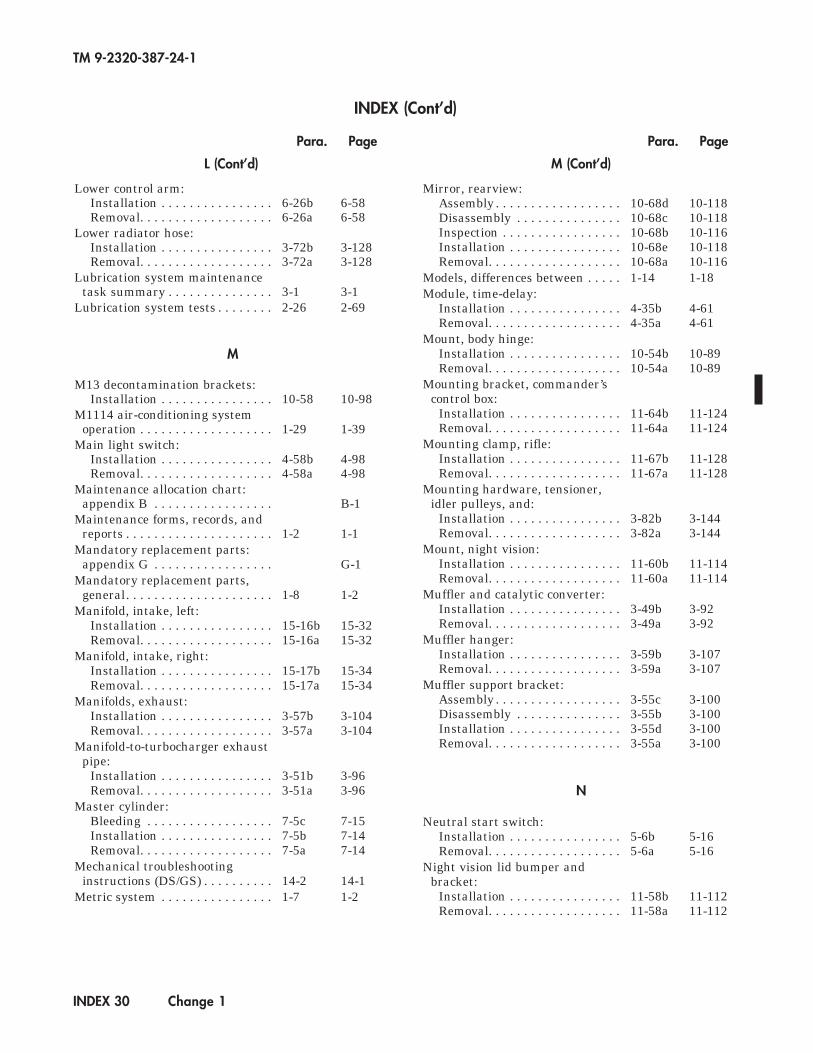
Lower control arm:Installation . . . . . . . . . . . . . . . . 6-26b 6-58Removal. . . . . . . . . . . . . . . . . . . 6-26a 6-58
Lower radiator hose:Installation . . . . . . . . . . . . . . . . 3-72b 3-128Removal. . . . . . . . . . . . . . . . . . . 3-72a 3-128
Lubrication system maintenance task summary . . . . . . . . . . . . . . . 3-1 3-1
Lubrication system tests . . . . . . . . 2-26 2-69
M
M13 decontamination brackets:Installation . . . . . . . . . . . . . . . . 10-58 10-98
M1114 air-conditioning systemoperation . . . . . . . . . . . . . . . . . . . 1-29 1-39
Main light switch:Installation . . . . . . . . . . . . . . . . 4-58b 4-98Removal. . . . . . . . . . . . . . . . . . . 4-58a 4-98
Maintenance allocation chart:appendix B . . . . . . . . . . . . . . . . . B-1
Maintenance forms, records, andreports . . . . . . . . . . . . . . . . . . . . . 1-2 1-1
Mandatory replacement parts:appendix G . . . . . . . . . . . . . . . . . G-1
Mandatory replacement parts,general. . . . . . . . . . . . . . . . . . . . . 1-8 1-2
Manifold, intake, left:Installation . . . . . . . . . . . . . . . . 15-16b 15-32Removal. . . . . . . . . . . . . . . . . . . 15-16a 15-32
Manifold, intake, right:Installation . . . . . . . . . . . . . . . . 15-17b 15-34Removal. . . . . . . . . . . . . . . . . . . 15-17a 15-34
Manifolds, exhaust:Installation . . . . . . . . . . . . . . . . 3-57b 3-104Removal. . . . . . . . . . . . . . . . . . . 3-57a 3-104
Manifold-to-turbocharger exhaustpipe:
Installation . . . . . . . . . . . . . . . . 3-51b 3-96Removal. . . . . . . . . . . . . . . . . . . 3-51a 3-96
Master cylinder:Bleeding . . . . . . . . . . . . . . . . . . 7-5c 7-15Installation . . . . . . . . . . . . . . . . 7-5b 7-14Removal. . . . . . . . . . . . . . . . . . . 7-5a 7-14
Mechanical troubleshooting instructions (DS/GS) . . . . . . . . . . 14-2 14-1
Metric system . . . . . . . . . . . . . . . . 1-7 1-2
Mirror, rearview:Assembly . . . . . . . . . . . . . . . . . . 10-68d 10-118Disassembly . . . . . . . . . . . . . . . 10-68c 10-118Inspection . . . . . . . . . . . . . . . . . 10-68b 10-116Installation . . . . . . . . . . . . . . . . 10-68e 10-118Removal. . . . . . . . . . . . . . . . . . . 10-68a 10-116
Models, differences between . . . . . 1-14 1-18Module, time-delay:
Installation . . . . . . . . . . . . . . . . 4-35b 4-61Removal. . . . . . . . . . . . . . . . . . . 4-35a 4-61
Mount, body hinge:Installation . . . . . . . . . . . . . . . . 10-54b 10-89Removal. . . . . . . . . . . . . . . . . . . 10-54a 10-89
Mounting bracket, commander’scontrol box:
Installation . . . . . . . . . . . . . . . . 11-64b 11-124Removal. . . . . . . . . . . . . . . . . . . 11-64a 11-124
Mounting clamp, rifle:Installation . . . . . . . . . . . . . . . . 11-67b 11-128Removal. . . . . . . . . . . . . . . . . . . 11-67a 11-128
Mounting hardware, tensioner,idler pulleys, and:
Installation . . . . . . . . . . . . . . . . 3-82b 3-144Removal. . . . . . . . . . . . . . . . . . . 3-82a 3-144
Mount, night vision:Installation . . . . . . . . . . . . . . . . 11-60b 11-114Removal. . . . . . . . . . . . . . . . . . . 11-60a 11-114
Muffler and catalytic converter:Installation . . . . . . . . . . . . . . . . 3-49b 3-92Removal. . . . . . . . . . . . . . . . . . . 3-49a 3-92
Muffler hanger:Installation . . . . . . . . . . . . . . . . 3-59b 3-107Removal. . . . . . . . . . . . . . . . . . . 3-59a 3-107
Muffler support bracket:Assembly . . . . . . . . . . . . . . . . . . 3-55c 3-100Disassembly . . . . . . . . . . . . . . . 3-55b 3-100Installation . . . . . . . . . . . . . . . . 3-55d 3-100Removal. . . . . . . . . . . . . . . . . . . 3-55a 3-100
N
Neutral start switch:Installation . . . . . . . . . . . . . . . . 5-6b 5-16Removal. . . . . . . . . . . . . . . . . . . 5-6a 5-16
Night vision lid bumper and bracket:
Installation . . . . . . . . . . . . . . . . 11-58b 11-112Removal. . . . . . . . . . . . . . . . . . . 11-58a 11-112
INDEX (Cont’d)
TM 9-2320-387-24-1
INDEX 30 Change 1
Para. Page
L (Cont’d)
Para. Page
M (Cont’d)
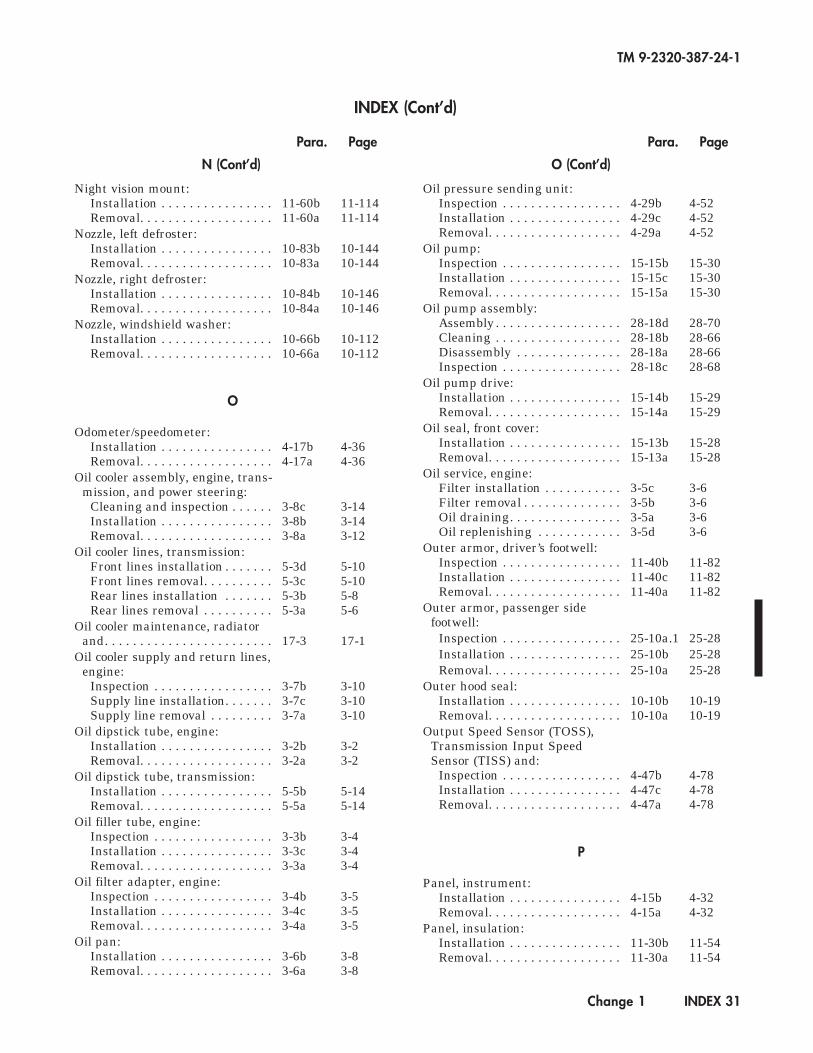
TM 9-2320-387-24-1
Change 1 INDEX 31
Night vision mount:Installation . . . . . . . . . . . . . . . . 11-60b 11-114Removal. . . . . . . . . . . . . . . . . . . 11-60a 11-114
Nozzle, left defroster:Installation . . . . . . . . . . . . . . . . 10-83b 10-144Removal. . . . . . . . . . . . . . . . . . . 10-83a 10-144
Nozzle, right defroster:Installation . . . . . . . . . . . . . . . . 10-84b 10-146Removal. . . . . . . . . . . . . . . . . . . 10-84a 10-146
Nozzle, windshield washer:Installation . . . . . . . . . . . . . . . . 10-66b 10-112Removal. . . . . . . . . . . . . . . . . . . 10-66a 10-112
O
Odometer/speedometer:Installation . . . . . . . . . . . . . . . . 4-17b 4-36Removal. . . . . . . . . . . . . . . . . . . 4-17a 4-36
Oil cooler assembly, engine, trans-mission, and power steering:
Cleaning and inspection . . . . . . 3-8c 3-14Installation . . . . . . . . . . . . . . . . 3-8b 3-14Removal. . . . . . . . . . . . . . . . . . . 3-8a 3-12
Oil cooler lines, transmission:Front lines installation . . . . . . . 5-3d 5-10Front lines removal. . . . . . . . . . 5-3c 5-10Rear lines installation . . . . . . . 5-3b 5-8Rear lines removal . . . . . . . . . . 5-3a 5-6
Oil cooler maintenance, radiator and. . . . . . . . . . . . . . . . . . . . . . . . 17-3 17-1
Oil cooler supply and return lines,engine:
Inspection . . . . . . . . . . . . . . . . . 3-7b 3-10Supply line installation. . . . . . . 3-7c 3-10Supply line removal . . . . . . . . . 3-7a 3-10
Oil dipstick tube, engine:Installation . . . . . . . . . . . . . . . . 3-2b 3-2Removal. . . . . . . . . . . . . . . . . . . 3-2a 3-2
Oil dipstick tube, transmission:Installation . . . . . . . . . . . . . . . . 5-5b 5-14Removal. . . . . . . . . . . . . . . . . . . 5-5a 5-14
Oil filler tube, engine:Inspection . . . . . . . . . . . . . . . . . 3-3b 3-4Installation . . . . . . . . . . . . . . . . 3-3c 3-4Removal. . . . . . . . . . . . . . . . . . . 3-3a 3-4
Oil filter adapter, engine:Inspection . . . . . . . . . . . . . . . . . 3-4b 3-5Installation . . . . . . . . . . . . . . . . 3-4c 3-5Removal. . . . . . . . . . . . . . . . . . . 3-4a 3-5
Oil pan:Installation . . . . . . . . . . . . . . . . 3-6b 3-8Removal. . . . . . . . . . . . . . . . . . . 3-6a 3-8
Oil pressure sending unit:Inspection . . . . . . . . . . . . . . . . . 4-29b 4-52Installation . . . . . . . . . . . . . . . . 4-29c 4-52Removal. . . . . . . . . . . . . . . . . . . 4-29a 4-52
Oil pump:Inspection . . . . . . . . . . . . . . . . . 15-15b 15-30Installation . . . . . . . . . . . . . . . . 15-15c 15-30Removal. . . . . . . . . . . . . . . . . . . 15-15a 15-30
Oil pump assembly:Assembly . . . . . . . . . . . . . . . . . . 28-18d 28-70Cleaning . . . . . . . . . . . . . . . . . . 28-18b 28-66Disassembly . . . . . . . . . . . . . . . 28-18a 28-66Inspection . . . . . . . . . . . . . . . . . 28-18c 28-68
Oil pump drive:Installation . . . . . . . . . . . . . . . . 15-14b 15-29Removal. . . . . . . . . . . . . . . . . . . 15-14a 15-29
Oil seal, front cover:Installation . . . . . . . . . . . . . . . . 15-13b 15-28Removal. . . . . . . . . . . . . . . . . . . 15-13a 15-28
Oil service, engine:Filter installation . . . . . . . . . . . 3-5c 3-6Filter removal . . . . . . . . . . . . . . 3-5b 3-6Oil draining. . . . . . . . . . . . . . . . 3-5a 3-6Oil replenishing . . . . . . . . . . . . 3-5d 3-6
Outer armor, driver’s footwell:Inspection . . . . . . . . . . . . . . . . . 11-40b 11-82Installation . . . . . . . . . . . . . . . . 11-40c 11-82Removal. . . . . . . . . . . . . . . . . . . 11-40a 11-82
Outer armor, passenger side footwell:
Inspection . . . . . . . . . . . . . . . . . 25-10a.1 25-28Installation . . . . . . . . . . . . . . . . 25-10b 25-28Removal. . . . . . . . . . . . . . . . . . . 25-10a 25-28
Outer hood seal:Installation . . . . . . . . . . . . . . . . 10-10b 10-19Removal. . . . . . . . . . . . . . . . . . . 10-10a 10-19
Output Speed Sensor (TOSS),Transmission Input SpeedSensor (TISS) and:
Inspection . . . . . . . . . . . . . . . . . 4-47b 4-78Installation . . . . . . . . . . . . . . . . 4-47c 4-78Removal. . . . . . . . . . . . . . . . . . . 4-47a 4-78
P
Panel, instrument:Installation . . . . . . . . . . . . . . . . 4-15b 4-32Removal. . . . . . . . . . . . . . . . . . . 4-15a 4-32
Panel, insulation:Installation . . . . . . . . . . . . . . . . 11-30b 11-54Removal. . . . . . . . . . . . . . . . . . . 11-30a 11-54
INDEX (Cont’d)
Para. Page
N (Cont’d)
Para. Page
O (Cont’d)

Parking brake adjustment, reardual service/ . . . . . . . . . . . . . . . . 7-19 7-54
Parking brake cable/mountingbracket, left:
Installation . . . . . . . . . . . . . . . . 7-17b 7-50Removal. . . . . . . . . . . . . . . . . . . 7-17a 7-48
Parking brake cable, right:Installation . . . . . . . . . . . . . . . . 7-16b 7-46Removal. . . . . . . . . . . . . . . . . . . 7-16a 7-46
Parking brake caliper, rear dual service/:
Cleaning and inspection . . . . . . 7-15b 7-44Installation . . . . . . . . . . . . . . . . 7-15c 7-44Removal. . . . . . . . . . . . . . . . . . . 7-15a 7-42
Parking brake lever:Installation . . . . . . . . . . . . . . . . 7-20b 7-56Removal. . . . . . . . . . . . . . . . . . . 7-20a 7-56
Parking brake pad, rear dualservice/:
Cleaning and inspection . . . . . . 7-14b 7-40Installation . . . . . . . . . . . . . . . . 7-14c 7-40Removal. . . . . . . . . . . . . . . . . . . 7-14a 7-38
Parking brake rod, rear dual service/:
Installation . . . . . . . . . . . . . . . . 7-18b 7-52Removal. . . . . . . . . . . . . . . . . . . 7-18a 7-52
Parking brake switch:Installation . . . . . . . . . . . . . . . . 4-23b 4-46Removal. . . . . . . . . . . . . . . . . . . 4-23a 4-46
Parking lock pawl and actuator assembly:
Inspection . . . . . . . . . . . . . . . . . 28-6 28-24Parking, service/brake system
operation . . . . . . . . . . . . . . . . . . . 1-25 1-32Partition, C-pillar:
Assembly . . . . . . . . . . . . . . . . . . 25-9c 25-26Disassembly . . . . . . . . . . . . . . . 25-9b 25-24Inspection . . . . . . . . . . . . . . . . . 25-9b.1 25-26Installation . . . . . . . . . . . . . . . . 25-9d 25-26Removal. . . . . . . . . . . . . . . . . . . 25-9a 25-24
Parts, mandatory replacement . . . 1-8 1-2Passenger seat:
Assembly . . . . . . . . . . . . . . . . . . 10-45b 10-76Disassembly . . . . . . . . . . . . . . . 10-45a 10-76Installation . . . . . . . . . . . . . . . . 10-45.1b 10-76.1Removal. . . . . . . . . . . . . . . . . . . 10-45.1a 10-76.1
Passenger side footwell inner armor:Inspection . . . . . . . . . . . . . . . . . 25-11a.1 25-30Installation . . . . . . . . . . . . . . . . 25-11b 25-30Removal. . . . . . . . . . . . . . . . . . . 25-11a 25-30
Passenger side footwell outer armor:Inspection . . . . . . . . . . . . . . . . . 25-10a.1 25-28Installation . . . . . . . . . . . . . . . . 25-10b 25-28Removal. . . . . . . . . . . . . . . . . . . 25-10a 25-28
Passenger side upper cowl liner:Installation . . . . . . . . . . . . . . . . 25-13b 25-36Removal. . . . . . . . . . . . . . . . . . . 25-13a 25-36
Pedal, accelerator:Installation . . . . . . . . . . . . . . . . 3-44b 3-86Removal. . . . . . . . . . . . . . . . . . . 3-44a 3-86
Pedal, service brake:Installation . . . . . . . . . . . . . . . . 7-9b 7-30Removal. . . . . . . . . . . . . . . . . . . 7-9a 7-30
Pedestal, stowage, and gunner’s platform:
Inspection . . . . . . . . . . . . . . . . . 11-71a.1 11-132Installation . . . . . . . . . . . . . . . . 11-71b 11-132Removal. . . . . . . . . . . . . . . . . . . 11-71a 11-132
Pinion seal:Installation . . . . . . . . . . . . . . . . 21-4b 21-4Removal. . . . . . . . . . . . . . . . . . . 21-4a 21-4
Pintle mount, turret:Inspection . . . . . . . . . . . . . . . . . 11-62b 11-120Installation . . . . . . . . . . . . . . . . 11-62c 11-120Removal. . . . . . . . . . . . . . . . . . . 11-62a 11-120
Pintle, towing:Assembly . . . . . . . . . . . . . . . . . . 9-9d 9-13Cleaning . . . . . . . . . . . . . . . . . . 9-9c 9-12Disassembly . . . . . . . . . . . . . . . 9-9b 9-12Installation . . . . . . . . . . . . . . . . 9-9e 9-14Removal. . . . . . . . . . . . . . . . . . . 9-9a 9-11
Pioneer tool kit stowage strap andbracket:
Inspection . . . . . . . . . . . . . . . . . 10-37b 10-64Installation . . . . . . . . . . . . . . . . 10-37c 10-64Removal. . . . . . . . . . . . . . . . . . . 10-37a 10-64
Pipe, exhaust:Installation . . . . . . . . . . . . . . . . 3-50b 3-94Removal. . . . . . . . . . . . . . . . . . . 3-50a 3-94
Piping, heater outlet/inlet:Inspection . . . . . . . . . . . . . . . . . 10-71b 10-122Installation . . . . . . . . . . . . . . . . 10-71c 10-122Removal. . . . . . . . . . . . . . . . . . . 10-71a 10-122
Pitman arm:Installation . . . . . . . . . . . . . . . . 8-14b 8-40Removal. . . . . . . . . . . . . . . . . . . 8-14a 8-40
Pivot, windshield wiper arm:Installation . . . . . . . . . . . . . . . . 10-60c 10-102Removal. . . . . . . . . . . . . . . . . . . 10-60b 10-102Repair (optional) . . . . . . . . . . . . 10-60a 10-101
INDEX (Cont’d)
TM 9-2320-387-24-1
INDEX 32 Change 1
Para. Page
P (Cont’d)
Para. Page
P (Cont’d)
TM 9-2320-387-24-1
Change 1 INDEX 33
Plates, warning, caution, anddata, location and contents of . . . 1-13 1-8
Power cable:Installation . . . . . . . . . . . . . . . . 12-25b 12-48Removal. . . . . . . . . . . . . . . . . . . 12-25a 12-47
Power cable, 200-ampere dualvoltage umbilical:
Installation . . . . . . . . . . . . . . . . 4-7b 4-16Removal. . . . . . . . . . . . . . . . . . . 4-7a 4-14
Power cable, winch:Front power cable installation . 4-77b 4-134Front power cable removal . . . . 4-77a 4-134Rear power cable installation . . 4-77d 4-136Rear power cable removal. . . . . 4-77c 4-136
Power feed-through stud:Installation . . . . . . . . . . . . . . . . 4-69b 4-116Removal. . . . . . . . . . . . . . . . . . . 4-69a 4-116
Power steering cooler hose:Installation . . . . . . . . . . . . . . . . 8-26b 8-72Removal. . . . . . . . . . . . . . . . . . . 8-26a 8-72
Power steering hydraulic systempressure and return hose:
Installation . . . . . . . . . . . . . . . . 8-24b 8-66Removal. . . . . . . . . . . . . . . . . . . 8-24a 8-66
Power steering oil cooler assembly,engine, transmission, and:
Cleaning and inspection . . . . . . 3-8c 3-14Installation . . . . . . . . . . . . . . . . 3-8b 3-14Removal. . . . . . . . . . . . . . . . . . . 3-8a 3-12
Power steering pump:Assembly . . . . . . . . . . . . . . . . . . 23-3d 23-4Cleaning . . . . . . . . . . . . . . . . . . 23-3b 23-4Disassembly . . . . . . . . . . . . . . . 23-3a 23-2Inspection . . . . . . . . . . . . . . . . . 23-3c 23-4
Power steering pump and pulley:Installation . . . . . . . . . . . . . . . . 8-23b 8-64Removal. . . . . . . . . . . . . . . . . . . 8-23a 8-64
Power steering pump andsteering gear leak test. . . . . . . . . 23-4 23-6
Power steering relief valve cartridge:
Inspection . . . . . . . . . . . . . . . . . 8-28b 8-76Installation . . . . . . . . . . . . . . . . 8-28c 8-76Removal. . . . . . . . . . . . . . . . . . . 8-28a 8-75
Power steering system bleeding . . 8-27 8-74Power steering system hydraulic
control valve:Back flush procedure . . . . . . . . 8-25b 8-68Inspection . . . . . . . . . . . . . . . . . 8-25c 8-70Installation . . . . . . . . . . . . . . . . 8-25d 8-70Removal. . . . . . . . . . . . . . . . . . . 8-25a 8-68
Power steering vent line:Installation . . . . . . . . . . . . . . . . 12-48b 12-83Removal. . . . . . . . . . . . . . . . . . . 12-48a 12-83
Preparation for storage andshipment . . . . . . . . . . . . . . . . . . . 1-4 1-1
Preparation for storage or shipment:
Administrative storage . . . . . . . 13-2 13-1Cleaning . . . . . . . . . . . . . . . . . . 13-6 13-2General storage and shippinginformation . . . . . . . . . . . . . . . 13-5 13-2
Inspections, stowage, andinventory . . . . . . . . . . . . . . . . . 13-7 13-2
Lubrication . . . . . . . . . . . . . . . . 13-9 13-3Records and reports . . . . . . . . . 13-10 13-3Repair, painting, and preservation. . . . . . . . . . . . . . . 13-8 13-3
Scope . . . . . . . . . . . . . . . . . . . . . 13-1 13-1Security . . . . . . . . . . . . . . . . . . . 13-3 13-1Special packaging andshipping requirements . . . . . . 13-4 13-1
Pressure limiter valve, brake:Installation . . . . . . . . . . . . . . . . 7-8b 7-28Removal. . . . . . . . . . . . . . . . . . . 7-8a 7-28
Preventive maintenance checksand services:
General . . . . . . . . . . . . . . . . . . . 2-8 2-2General service and inspectionprocedures . . . . . . . . . . . . . . . . 2-11 2-3
Intervals . . . . . . . . . . . . . . . . . . 2-9 2-3Reporting repairs . . . . . . . . . . . 2-10 2-3Specific PMCS procedures . . . . 2-12 2-4
Principles of operation, general. . . 1-16 1-23Principles of operation reference
index:200-ampere umbilical powercable. . . . . . . . . . . . . . . . . . . . . 1-30 1-40
Battery system operation . . . . . 1-23 1-30Cooling system operation . . . . . 1-20 1-26Drivetrain operation . . . . . . . . . 1-18 1-24Fuel system operation. . . . . . . . 1-19 1-25Generating system operation . . 1-22 1-29M1114 air-conditioningsystem operation . . . . . . . . . . . 1-29 1-39
Service brake system operation 1-26 1-33Service/parking brake system operation . . . . . . . . . . . . . . . . . 1-25 1-32
Starting system operation . . . . 1-21 1-28Steering control systemoperation . . . . . . . . . . . . . . . . . 1-27 1-35
INDEX (Cont’d)
Para. Page
P (Cont’d)
Para. Page
P (Cont’d)
Suspension system operation . . 1-28 1-37Windshield wiper/washersystem operation . . . . . . . . . . . 1-24 1-31
Propeller shaft assembly, front:Assembly . . . . . . . . . . . . . . . . . . 6-3c 6-7Cleaning and inspection . . . . . . 6-3b 6-6Disassembly . . . . . . . . . . . . . . . 6-3a 6-6Inspection . . . . . . . . . . . . . . . . . 6-2b 6-2Installation . . . . . . . . . . . . . . . . 6-2c 6-4Removal. . . . . . . . . . . . . . . . . . . 6-2a 6-2
Propeller shaft, front:Assembly . . . . . . . . . . . . . . . . . . 21-8b 21-19Disassembly . . . . . . . . . . . . . . . 21-8a 21-19
Propeller shaft, rear:Inspection . . . . . . . . . . . . . . . . . 6-4b 6-8Installation . . . . . . . . . . . . . . . . 6-4c 6-8Removal. . . . . . . . . . . . . . . . . . . 6-4a 6-8
Propeller shafts, axles, and suspension maintenance task summary . . . . . . . . . . . . . . . . . . . 21-2 21-1
Propeller shafts maintenance task summary . . . . . . . . . . . . . . . 6-1 6-1
Proportioning valve and differential valve:
Differential valve installation. . 7-10b 7-32Differential valve removal . . . . 7-10a 7-32Proportioning valve
installation. . . . . . . . . . . . . . . 7-10d 7-33Proportioning valve removal. . . 7-10c 7-32
Prop rod and bracket, hood:Assembly . . . . . . . . . . . . . . . . . . 10-8d 10-12Disassembly . . . . . . . . . . . . . . . 10-8b 10-12Inspection . . . . . . . . . . . . . . . . . 10-8c 10-12Installation . . . . . . . . . . . . . . . . 10-8e 10-13Removal. . . . . . . . . . . . . . . . . . . 10-8a 10-12
Protective control box:Installation . . . . . . . . . . . . . . . . 4-4b 4-6Removal. . . . . . . . . . . . . . . . . . . 4-4a 4-6
Protective control box tests . . . . . . 2-34 2-213Pulley, alternator:
Installation . . . . . . . . . . . . . . . . 4-2b 4-2Removal. . . . . . . . . . . . . . . . . . . 4-2a 4-2
Pulley, crankshaft:Installation . . . . . . . . . . . . . . . . 15-6b 15-14Removal. . . . . . . . . . . . . . . . . . . 15-6a 15-14
Pulley, power steering pump and:Installation . . . . . . . . . . . . . . . . 8-23b 8-64Removal. . . . . . . . . . . . . . . . . . . 8-23a 8-64
Pulley, water pump:Installation . . . . . . . . . . . . . . . . 3-77b 3-133Removal. . . . . . . . . . . . . . . . . . . 3-77a 3-133
Pull strap, door seal and:Door pull strap installation . . . 11-11d 11-22Door pull strap removal . . . . . . 11-11c 11-22Door seal installation . . . . . . . . 11-11b 11-22Door seal removal . . . . . . . . . . . 11-11a 11-22
Pump and pulley, power steering:Installation . . . . . . . . . . . . . . . . 8-23b 8-64Removal. . . . . . . . . . . . . . . . . . . 8-23a 8-64
Pump assembly, windshield washer reservoir and:
Inspection . . . . . . . . . . . . . . . . . 10-64a.1 10-108Installation . . . . . . . . . . . . . . . . 10-64b 10-108Removal. . . . . . . . . . . . . . . . . . . 10-64a 10-108
Pushrods, rocker arm shafts and:Installation . . . . . . . . . . . . . . . . 15-8b 15-17Removal. . . . . . . . . . . . . . . . . . . 15-8a 15-17
R
Radial tire, wheel, and rubber runflat:
Assembly . . . . . . . . . . . . . . . . . . 8-4d 8-13Disassembly . . . . . . . . . . . . . . . 8-4a 8-8Inspection and cleaning . . . . . . 8-4b 8-11Repair . . . . . . . . . . . . . . . . . . . . 8-4c 8-12
Radiator and fan shroud assembly:
Cleaning and inspection . . . . . . 3-62b 3-114Installation . . . . . . . . . . . . . . . . 3-62c 3-114Removal. . . . . . . . . . . . . . . . . . . 3-62a 3-112
Radiator and oil coolermaintenance . . . . . . . . . . . . . . . . 17-3 17-1
Radiator front mount bracket:Installation . . . . . . . . . . . . . . . . 9-5b 9-5Removal. . . . . . . . . . . . . . . . . . . 9-5a 9-5
Radiator hose, lower:Installation . . . . . . . . . . . . . . . . 3-72b 3-128Removal. . . . . . . . . . . . . . . . . . . 3-72a 3-128
Radiator inlet hose:Installation . . . . . . . . . . . . . . . . 3-70b 3-126Removal. . . . . . . . . . . . . . . . . . . 3-70a 3-126
Radiator lower tube assembly:Installation . . . . . . . . . . . . . . . . 3-71b 3-127Removal. . . . . . . . . . . . . . . . . . . 3-71a 3-127
Radiator support:Installation . . . . . . . . . . . . . . . . 3-64b 3-119Removal. . . . . . . . . . . . . . . . . . . 3-64a 3-119
Radiator tube hose, surgetank-to-lower:
Installation . . . . . . . . . . . . . . . . 3-74b 3-130Removal. . . . . . . . . . . . . . . . . . . 3-74a 3-130
INDEX (Cont’d)
TM 9-2320-387-24-1
INDEX 34 Change 1
Para. Page
P (Cont’d)
Para. Page
P (Cont’d)
TM 9-2320-387-24-1
Change 1 INDEX 35
Radio rack and mounting brackets:Installation . . . . . . . . . . . . . . . . 12-17b 12-30Removal. . . . . . . . . . . . . . . . . . . 12-17a 12-28
Radius rod:Installation . . . . . . . . . . . . . . . . 6-22b 6-50.1Removal. . . . . . . . . . . . . . . . . . . 6-22a 6-50.1
Rear antenna cables:Installation . . . . . . . . . . . . . . . . 12-24b 12-43Removal. . . . . . . . . . . . . . . . . . . 12-24a 12-40
Rear antenna mounting bracket:Installation . . . . . . . . . . . . . . . . 12-22b 12-38Removal. . . . . . . . . . . . . . . . . . . 12-22a 12-38
Rear band and selective thrust washer:
Inspection . . . . . . . . . . . . . . . . . 28-7 28-25Rear bumper:
Installation . . . . . . . . . . . . . . . . 9-7b 9-8Removal. . . . . . . . . . . . . . . . . . . 9-7a 9-8
Rear bumper brace:Installation . . . . . . . . . . . . . . . . 9-6b 9-6Removal. . . . . . . . . . . . . . . . . . . 9-6a 9-6
Rear bumper inner mountingbracket:
Installation . . . . . . . . . . . . . . . . 9-8b 9-10Removal. . . . . . . . . . . . . . . . . . . 9-8a 9-10
Rear bumper mounting bracketand tiedown bracket:
Installation . . . . . . . . . . . . . . . . 24-22b 24-40Removal. . . . . . . . . . . . . . . . . . . 24-22a 24-40
Rear cargo door access:Lifting . . . . . . . . . . . . . . . . . . . . 11-90a 11-160Lowering . . . . . . . . . . . . . . . . . . 11-90b 11-160
Rear cargo door access task summary . . . . . . . . . . . . . . . . . . . 11-89 11-159
Rear composite light assembly:Installation . . . . . . . . . . . . . . . . 4-57b 4-96Removal. . . . . . . . . . . . . . . . . . . 4-57a 4-96
Rear composite light lamp:Installation . . . . . . . . . . . . . . . . 4-55b 4-93Removal. . . . . . . . . . . . . . . . . . . 4-55a 4-93
Rear crossmember bracket and rearbody mount bracket:
Installation . . . . . . . . . . . . . . . . 24-21b 24-38Removal. . . . . . . . . . . . . . . . . . . 24-21a 24-38
Rear crossmember, rear suspension:Installation . . . . . . . . . . . . . . . . 24-19b 24-34Removal. . . . . . . . . . . . . . . . . . . 24-19a 24-34
Rear door and hinge:Installation . . . . . . . . . . . . . . . . 11-2.1b 11-4.2Removal. . . . . . . . . . . . . . . . . . . 11-2.1a 11-4.2
Rear dual service/parking brake adjustment . . . . . . . . . . . . . . . . . 7-19 7-54
Rear dual service/parking brake caliper:
Cleaning and inspection . . . . . . 7-15b 7-44Installation . . . . . . . . . . . . . . . . 7-15c 7-44Removal. . . . . . . . . . . . . . . . . . . 7-15a 7-42
Rear dual service/parking brake pad:Cleaning and inspection . . . . . . 7-14b 7-40Installation . . . . . . . . . . . . . . . . 7-14c 7-40Removal. . . . . . . . . . . . . . . . . . . 7-14a 7-38
Rear dual service/parking brake rod:
Installation . . . . . . . . . . . . . . . . 7-18b 7-52Removal. . . . . . . . . . . . . . . . . . . 7-18a 7-52
Rear dual service/parking brake system maintenance task summary . . . . . . . . . . . . . . . . . . . 7-13 7-37
Rear fairlead roller bracket assembly:
Installation . . . . . . . . . . . . . . . . 12-35b 12-67Removal. . . . . . . . . . . . . . . . . . . 12-35a 12-67
Rear-front tiedown bracket:Installation . . . . . . . . . . . . . . . . 24-14b 24-18Removal. . . . . . . . . . . . . . . . . . . 24-14a 24-18
Rear geared hub vent line:Installation . . . . . . . . . . . . . . . . 6-15b 6-40Removal. . . . . . . . . . . . . . . . . . . 6-15a 6-40
Rear heat shield:Installation . . . . . . . . . . . . . . . . 3-52b 3-97Removal. . . . . . . . . . . . . . . . . . . 3-52a 3-97
Rear heat shield, right:Installation . . . . . . . . . . . . . . . . 3-58b 3-106Removal. . . . . . . . . . . . . . . . . . . 3-58a 3-106
Rear parking brake caliper:Assembly . . . . . . . . . . . . . . . . . . 22-5d 22-10Cleaning . . . . . . . . . . . . . . . . . . 22-5b 22-9Inspection . . . . . . . . . . . . . . . . . 22-5c 22-8Disassembly . . . . . . . . . . . . . . . 22-5a 22-8
Rear propeller shaft:Inspection . . . . . . . . . . . . . . . . . 6-4b 6-8Installation . . . . . . . . . . . . . . . . 6-4c 6-8Removal. . . . . . . . . . . . . . . . . . . 6-4a 6-8
Rear-rear tiedown bracket:Installation . . . . . . . . . . . . . . . . 24-12b 24-16Removal. . . . . . . . . . . . . . . . . . . 24-12a 24-16
Rear seat floor insulation:Installation . . . . . . . . . . . . . . . . 10-34b 10-60Removal. . . . . . . . . . . . . . . . . . . 10-34a 10-60
INDEX (Cont’d)
Para. Page
R (Cont’d)
Para. Page
R (Cont’d)

Rear servo repair (1995):Assembly . . . . . . . . . . . . . . . . . . 28-16d 28-58Cleaning . . . . . . . . . . . . . . . . . . 28-16b 28-58Disassembly . . . . . . . . . . . . . . . 28-16a 28-58Inspection . . . . . . . . . . . . . . . . . 28-16c 28-58
Rear servo repair (1996-1998):Assembly . . . . . . . . . . . . . . . . . . 28-16.1d 28-58.2Cleaning . . . . . . . . . . . . . . . . . . 28-16.1b 28-58.2Disassembly . . . . . . . . . . . . . . . 28-16.1a 28-58.2Inspection . . . . . . . . . . . . . . . . . 28-16.1c 28-58.2
Rear suspension front cross-member:
Installation . . . . . . . . . . . . . . . . 24-18b 24-32Removal. . . . . . . . . . . . . . . . . . . 24-18a 24-30
Rear suspension rear cross-member:
Installation . . . . . . . . . . . . . . . . 24-19b 24-34Removal. . . . . . . . . . . . . . . . . . . 24-19a 24-34
Rear upper control arm bracket:Installation . . . . . . . . . . . . . . . . 24-11b 24-14Removal. . . . . . . . . . . . . . . . . . . 24-11a 24-14
Rearview mirror:Assembly . . . . . . . . . . . . . . . . . . 10-68d 10-118Disassembly . . . . . . . . . . . . . . . 10-68c 10-118Inspection . . . . . . . . . . . . . . . . . 10-68b 10-116Installation . . . . . . . . . . . . . . . . 10-68e 10-118Removal. . . . . . . . . . . . . . . . . . . 10-68a 10-116
Rearview mirror bracket, driver’s:Inspection . . . . . . . . . . . . . . . . . 10-69a.1 10-120Installation . . . . . . . . . . . . . . . . 10-69b 10-120Removal. . . . . . . . . . . . . . . . . . . 10-69a 10-120
Rear wheel toe-out alignment:Preliminary inspection . . . . . . . 8-10a 8-30Toe-out adjustment. . . . . . . . . . 8-10c 8-34Toe-out check . . . . . . . . . . . . . . 8-10b 8-32
Rear winch:Installation . . . . . . . . . . . . . . . . 12-33b 12-64Removal. . . . . . . . . . . . . . . . . . . 12-33a 12-63
Rear winch, 10,500 lb hydraulic (M1114):
Brackets installation. . . . . . . . . 12-36.1c 12-68.2Brackets removal . . . . . . . . . . . 12-36.1b 12-68.2Winch installation. . . . . . . . . . . 12-36.1d 12-68.2Winch removal . . . . . . . . . . . . . 12-36.1a 12-68.1
Rear, 10,500 lb hydraulic winch cable replacement (M1114):
Installation . . . . . . . . . . . . . . . . 12-36.2b 12-68.4Removal. . . . . . . . . . . . . . . . . . . 12.36.2a 12-68.4
Rear winch, 10,500 lb hydraulic winch controller plug (M1114):
Installation . . . . . . . . . . . . . . . . 12-36.6b 12-36.28Removal. . . . . . . . . . . . . . . . . . . 12-36.6a 12-36.26
Rear winch, 10,500 lb hydraulic fairlead roller bracket assembly (M1114):
Installation . . . . . . . . . . . . . . . . 12-36.3b 12-68.6Removal. . . . . . . . . . . . . . . . . . . 12-36.3a 12-68.6
Rear winch, 10,500 lb rear hydraulic hose replacement (M1114):
Installation . . . . . . . . . . . . . . . . 12-36.4b 12-68.14Removal. . . . . . . . . . . . . . . . . . . 12-36.4a 12-68.8
Rear winch clutch cable:Installation . . . . . . . . . . . . . . . . 12-36b 12-68Removal. . . . . . . . . . . . . . . . . . . 12-36a 12-68
Rear winch vent line:Installation . . . . . . . . . . . . . . . . 12-34b 12-66Removal. . . . . . . . . . . . . . . . . . . 12-34a 12-66
Records, maintenance forms,reports, and . . . . . . . . . . . . . . . . . 1-2 1-1
References, appendix A . . . . . . . . . A-1Regulator, 200-ampere dual
voltage:Installation . . . . . . . . . . . . . . . . 4-8b 4-18Removal. . . . . . . . . . . . . . . . . . . 4-8a 4-18
Regulator, 400-ampere dualvoltage:
Installation . . . . . . . . . . . . . . . . 4-8.1b 4-18.2Removal. . . . . . . . . . . . . . . . . . . 4-8.1a 4-18.2
Regulator cable, 12-volt:Installation . . . . . . . . . . . . . . . . 4-70b 4-120Removal. . . . . . . . . . . . . . . . . . . 4-70a 4-118
Reinforcement, shelter support:Installation . . . . . . . . . . . . . . . . 11-76b 11-137Removal. . . . . . . . . . . . . . . . . . . 11-76a 11-137
Relay, transmission:Installation . . . . . . . . . . . . . . . . 4-44b 4-72Removal. . . . . . . . . . . . . . . . . . . 4-44a 4-72
Relief valve cartridge, power steering:
Inspection . . . . . . . . . . . . . . . . . 8-28b 8-76Installation . . . . . . . . . . . . . . . . 8-28c 8-76Removal. . . . . . . . . . . . . . . . . . . 8-28a 8-75
Repair:General maintenance . . . . . . . . . 2-16 2-32
Repair parts, special tools, Test,Measurement, DiagnosticEquipment (TMDE), and supportequipment:
Common tools and equipment . 2-1 2-1Fabricated tools. . . . . . . . . . . . . 2-3 2-1Repair parts . . . . . . . . . . . . . . . 2-4 2-1Special tools, TMDE, andsupport equipment . . . . . . . . . 2-2 2-1
INDEX (Cont’d)
TM 9-2320-387-24-1
INDEX 36 Change 1
Para. Page
R (Cont’d)
Para. Page
R (Cont’d)
TM 9-2320-387-24-1
Change 1 INDEX 37
Reporting Equipment Improvement Recommendations (EIR) . . . . . . . 1-5 1-1
Reservoir and pump assembly,windshield washer:
Inspection . . . . . . . . . . . . . . . . . 10-64a.1 10-108Installation . . . . . . . . . . . . . . . . 10-64b 10-108Removal. . . . . . . . . . . . . . . . . . . 10-64a 10-108
Resilient mount, roof panel and:Cleaning and inspection . . . . . . 25-3b 25-2Installation . . . . . . . . . . . . . . . . 25-3c 25-2Removal. . . . . . . . . . . . . . . . . . . 25-3a 25-2
Resistor assembly, heater fan motor:
Installation . . . . . . . . . . . . . . . . 10-75b 10-128Removal. . . . . . . . . . . . . . . . . . . 10-75a 10-127
Retainer, intermediate steering shaft close-off:
Installation . . . . . . . . . . . . . . . . 8-22b 8-62Removal. . . . . . . . . . . . . . . . . . . 8-22a 8-62
Retention bracket, windshield:Installation . . . . . . . . . . . . . . . . 10-29b 10-54Removal. . . . . . . . . . . . . . . . . . . 10-29a 10-54
Rifle mounting clamp:Installation . . . . . . . . . . . . . . . . 11-67b 11-128Removal. . . . . . . . . . . . . . . . . . . 11-67a 11-128
Rifle support:Inspection . . . . . . . . . . . . . . . . . 11-66a.1 11-126Installation . . . . . . . . . . . . . . . . 11-66b 11-126Removal. . . . . . . . . . . . . . . . . . . 11-66a 11-126
Right airlift bracket and frontupper control arm brackets:
Installation . . . . . . . . . . . . . . . . 24-8b 24-8Removal. . . . . . . . . . . . . . . . . . . 24-8a 24-8
Right cylinder head:Installation . . . . . . . . . . . . . . . . 15-5c 15-12Removal. . . . . . . . . . . . . . . . . . . 15-5a 15-12Repair . . . . . . . . . . . . . . . . . . . . 15-5b 15-12
Right defroster nozzle:Installation . . . . . . . . . . . . . . . . 10-84b 10-146Removal. . . . . . . . . . . . . . . . . . . 10-84a 10-146
Right engine mount bracket:Installation . . . . . . . . . . . . . . . . 24-9b 24-10Removal. . . . . . . . . . . . . . . . . . . 24-9a 24-10
Right exhaust manifold heat shield:Installation . . . . . . . . . . . . . . . . 3-56b 3-102Removal. . . . . . . . . . . . . . . . . . . 3-56a 3-102
Right front body mount bracket:Installation . . . . . . . . . . . . . . . . 32-5b 32-11Removal. . . . . . . . . . . . . . . . . . . 32-5a 32-11
Right front cowl insulation:Installation . . . . . . . . . . . . . . . . 10-32b 10-58Removal. . . . . . . . . . . . . . . . . . . 10-32a 10-58
Right front floor panel repair:Battery tray panel and right front
floor panel installation. . . . . . 33-13i 33-84Insert panel and right front
floor panel installation. . . . . . 33-13j 33-86Metal strip A and insert panel
assembly . . . . . . . . . . . . . . . . 33-13d 33-74Metal strip B and insert panel
assembly . . . . . . . . . . . . . . . . 33-13e 33-76Metal strip C and insert panel
assembly . . . . . . . . . . . . . . . . 33-13f 33-78Metal strips fabrication . . . . . . 33-13b 33-70Right front floor panel and
battery tray drilling . . . . . . . . 33-13g 33-80Right front floor panel and
insert panel drilling . . . . . . . . 33-13h 33-82Right front floor panel removal . 33-13c 33-72Right front insert panel
fabrication . . . . . . . . . . . . . . . 33-13a 33-68Right front underbody armor:
Inspection . . . . . . . . . . . . . . . . . 11-38b 11-75Installation . . . . . . . . . . . . . . . . 11-38c 11-76Removal. . . . . . . . . . . . . . . . . . . 11-38a 11-74
Right front underbody armor:New passenger side footwell
inner armor and inner/outerarmor reinforcement installation: . . . . . . . . . . . . . . 25-13.3c 25-36.24
New passenger side footwell outer armor installation . . . . 25-13.3b 25-36.22
New passenger side footwellupper armor installation . . . . 25-13.3a 25-36.21
New right front underbodyarmor installation . . . . . . . . . 25-13.3d 25-36.26
Right fuel injection lines bracket:Installation . . . . . . . . . . . . . . . . 3-40b 3-79Removal. . . . . . . . . . . . . . . . . . . 3-40a 3-79
Right intake manifold:Installation . . . . . . . . . . . . . . . . 15-17b 15-34Removal. . . . . . . . . . . . . . . . . . . 15-17a 15-34
Right intermediate body mountbracket:
Installation . . . . . . . . . . . . . . . . 32-6b 32-12Removal. . . . . . . . . . . . . . . . . . . 32-6a 32-12
Right parking brake cable:Installation . . . . . . . . . . . . . . . . 7-16b 7-46Removal. . . . . . . . . . . . . . . . . . . 7-16a 7-46
INDEX (Cont’d)
Para. Page
R (Cont’d)
Para. Page
R (Cont’d)
Right rear floor panel repair:Insert panel and right rear floor
panel installation. . . . . . . . . . 33-14k 33-104Metal strip C and insert
panel assembly. . . . . . . . . . . . 33-14g 33-99Metal strip D and insert
panel assembly. . . . . . . . . . . . 33-14i 33-101Metal strip E and insert
panel assembly. . . . . . . . . . . . 33-14h 33-100Metal strips fabrication . . . . . . 33-14c 33-92Reinforcement strip A and
insert panel assembly . . . . . . 33-14e 33-97Reinforcement strip B and
insert panel assembly . . . . . . 33-14f 33-98Reinforcement strips
fabrication . . . . . . . . . . . . . . . 33-14b 33-90Right rear floor panel removal . 33-14d 33-94Right rear floor panel and
insert panel drilling . . . . . . . . 33-14j 33-102Right rear insert panel
fabrication . . . . . . . . . . . . . . . 33-14a 33-88Right rear heat shield:
Installation . . . . . . . . . . . . . . . . 3-58b 3-106Removal. . . . . . . . . . . . . . . . . . . 3-58a 3-106
Right rear underbody armor:Inspection . . . . . . . . . . . . . . . . . 11-39b 11-78Installation . . . . . . . . . . . . . . . . 11-39c 11-80Removal. . . . . . . . . . . . . . . . . . . 11-39a 11-78
Right rocker arm cover:Installation . . . . . . . . . . . . . . . . 15-12b 15-26Removal. . . . . . . . . . . . . . . . . . . 15-12a 15-26
Right side A-pillar armor:Inspection . . . . . . . . . . . . . . . . . 11-33b 11-60Installation . . . . . . . . . . . . . . . . 11-33c 11-60Removal. . . . . . . . . . . . . . . . . . . 11-33a 11-60
Right side armor, A-beam:Installation . . . . . . . . . . . . . . . . 11-43b 11-88Removal. . . . . . . . . . . . . . . . . . . 11-43a 11-88
Right side rocker panel armor and inside protection plate:
Inspection . . . . . . . . . . . . . . . . . 11-35b 11-64Installation . . . . . . . . . . . . . . . . 11-35c 11-64Removal. . . . . . . . . . . . . . . . . . . 11-35a 11-64
Rim stud, inner:Cleaning and inspection . . . . . . 8-7b 8-20Installation . . . . . . . . . . . . . . . . 8-7c 8-20Removal. . . . . . . . . . . . . . . . . . . 8-7a 8-19
Ring, tiedown:Installation . . . . . . . . . . . . . . . . 9-4b 9-4Removal. . . . . . . . . . . . . . . . . . . 9-4a 9-4
Road test, transmission. . . . . . . . . 5-14 5-31
Rocker arm cover, left:Installation . . . . . . . . . . . . . . . . 15-11b 15-24Removal. . . . . . . . . . . . . . . . . . . 15-11a 15-24
Rocker arm cover, right:Installation . . . . . . . . . . . . . . . . 15-12b 15-26Removal. . . . . . . . . . . . . . . . . . . 15-12a 15-26
Rocker arm shafts and pushrods:Installation . . . . . . . . . . . . . . . . 15-8b 15-17Removal. . . . . . . . . . . . . . . . . . . 15-8a 15-17
Rod, radius:Installation . . . . . . . . . . . . . . . . 6-22b 6-50.1Removal. . . . . . . . . . . . . . . . . . . 6-22a 6-50.1
Rod, tie:Assembly . . . . . . . . . . . . . . . . . . 8-13c 8-38Disassembly . . . . . . . . . . . . . . . 8-13b 8-38Installation . . . . . . . . . . . . . . . . 8-13d 8-38Removal. . . . . . . . . . . . . . . . . . . 8-13a 8-37
Roof panel and resilient mount:Cleaning and inspection . . . . . . 25-3b 25-2Installation . . . . . . . . . . . . . . . . 25-3c 25-2Removal. . . . . . . . . . . . . . . . . . . 25-3a 25-2
Rotary switch:Installation . . . . . . . . . . . . . . . . 4-10b 4-20Removal. . . . . . . . . . . . . . . . . . . 4-10a 4-20
Rotor, brake:Checking lateral runout . . . . . . 22-3b 22-2Checking thickness variation . . 22-3c 22-2Inspection . . . . . . . . . . . . . . . . . 22-3a 22-2Refinishing . . . . . . . . . . . . . . . . 22-3d 22-2
Rotor, service brake:Installation . . . . . . . . . . . . . . . . 7-12b 7-36Removal. . . . . . . . . . . . . . . . . . . 7-12a 7-36
Rpm sensor, engine:Installation . . . . . . . . . . . . . . . . 4-37b 4-64Removal. . . . . . . . . . . . . . . . . . . 4-37a 4-64
Rubber runflat, radial tire,wheel and:
Assembly . . . . . . . . . . . . . . . . . . 8-4d 8-13Disassembly . . . . . . . . . . . . . . . 8-4a 8-8Inspection and cleaning . . . . . . 8-4b 8-11Repair . . . . . . . . . . . . . . . . . . . . 8-4c 8-12
Runflat compressor (P/N 528236)belt:
Installation . . . . . . . . . . . . . . . . 8-6b 8-18Removal. . . . . . . . . . . . . . . . . . . 8-6a 8-18
Runflat compressor (P/N J39250) belt:
Installation . . . . . . . . . . . . . . . . 8-5b 8-17Removal. . . . . . . . . . . . . . . . . . . 8-5a 8-17
Run-in, engine:In-chassis run-in . . . . . . . . . . . . 15-24 15-46
INDEX (Cont’d)
TM 9-2320-387-24-1
INDEX 38 Change 1
Para. Page
R (Cont’d)
Para. Page
R (Cont’d)
TM 9-2320-387-24-1
Change 1 INDEX 39
Scope of manual . . . . . . . . . . . . . . 1-1 1-1Screen, front grille:
Installation . . . . . . . . . . . . . . . . 10-15b 10-24Removal. . . . . . . . . . . . . . . . . . . 10-15a 10-24
Seal, airlift bracket-to-hood:Installation . . . . . . . . . . . . . . . . 10-55b 10-90Removal. . . . . . . . . . . . . . . . . . . 10-55a 10-90
Seal, differential output shaft:Installation . . . . . . . . . . . . . . . . 21-3b 21-2Removal. . . . . . . . . . . . . . . . . . . 21-3a 21-2
Seal, door window:Installation . . . . . . . . . . . . . . . . 11-10b 11-20Removal. . . . . . . . . . . . . . . . . . . 11-10a 11-20
Seal, geared hub input:Installation . . . . . . . . . . . . . . . . 6-10b 6-28Removal. . . . . . . . . . . . . . . . . . . 6-10a 6-28
Seal, geared hub spindle:Installation . . . . . . . . . . . . . . . . 6-11b 6-32Removal. . . . . . . . . . . . . . . . . . . 6-11a 6-30
Seal, outer hood:Installation . . . . . . . . . . . . . . . . 10-10b 10-19Removal. . . . . . . . . . . . . . . . . . . 10-10a 10-19
Seal, pinion:Installation . . . . . . . . . . . . . . . . 21-4b 21-4Removal. . . . . . . . . . . . . . . . . . . 21-4a 21-4
Seal, turret armor and:Installation . . . . . . . . . . . . . . . . 11-52b 11-103Removal. . . . . . . . . . . . . . . . . . . 11-52a 11-103
Sealed lower converter housingcover:
Inspection . . . . . . . . . . . . . . . . . 5-11b 5-26Installation . . . . . . . . . . . . . . . . 5-11c 5-26Removal. . . . . . . . . . . . . . . . . . . 5-11a 5-26
Sealed upper converter housing cover (2-piece):
Inspection . . . . . . . . . . . . . . . . . 5-12b 5-28Installation . . . . . . . . . . . . . . . . 5-12c 5-28Removal. . . . . . . . . . . . . . . . . . . 5-12a 5-28
Seat assembly, companion:Assembly . . . . . . . . . . . . . . . . . . 10-44b 10-74Disassembly . . . . . . . . . . . . . . . 10-44a 10-74
Seat assembly, companion, andbattery box cover:
Installation . . . . . . . . . . . . . . . . 10-43b 10-73Removal. . . . . . . . . . . . . . . . . . . 10-43a 10-73
Seat assembly, driver’s:Assembly . . . . . . . . . . . . . . . . . . 10-41b 10-70Disassembly . . . . . . . . . . . . . . . 10-41a 10-70Installation . . . . . . . . . . . . . . . . 10-40b 10-69Removal. . . . . . . . . . . . . . . . . . . 10-40a 10-69
Seatbelt brackets, three point:Installation . . . . . . . . . . . . . . . . 10-46b 10-77Removal. . . . . . . . . . . . . . . . . . . 10-46a 10-77
Seatbelt, three point:Front seatbelt bracketinspection . . . . . . . . . . . . . . . . 10-47b 10-78
Front seatbelt installation . . . . 10-47c 10-79Front seatbelt removal . . . . . . . 10-47a 10-78Rear seatbelt bracketinspection . . . . . . . . . . . . . . . . 10-47e 10-80
Rear seatbelt installation . . . . . 10-47f 10-80Rear seatbelt removal. . . . . . . . 10-47d 10-80
Seat, passenger:Assembly . . . . . . . . . . . . . . . . . . 10-45b 10-76Disassembly . . . . . . . . . . . . . . . 10-45a 10-76Installation . . . . . . . . . . . . . . . . 10-45.1b 10-76.1Removal. . . . . . . . . . . . . . . . . . . 10-45.1a 10-76.1
Selective thrust washer, rear band and:
Inspection . . . . . . . . . . . . . . . . . 28-7 28-25Selector valve:
Installation . . . . . . . . . . . . . . . . 12-43b 12-78Removal. . . . . . . . . . . . . . . . . . . 12-43a 12-77
Sending unit, engine temperature:Installation . . . . . . . . . . . . . . . . 4-28b 4-51Removal. . . . . . . . . . . . . . . . . . . 4-28a 4-51
Sending unit, fuel level:Installation . . . . . . . . . . . . . . . . 4-32b 4-56Removal. . . . . . . . . . . . . . . . . . . 4-32a 4-56
Sending unit, oil pressure:Inspection . . . . . . . . . . . . . . . . . 4-29b 4-52Installation . . . . . . . . . . . . . . . . 4-29c 4-52Removal. . . . . . . . . . . . . . . . . . . 4-29a 4-52
Sensor cup vent line:Installation . . . . . . . . . . . . . . . . 12-47b 12-82Removal. . . . . . . . . . . . . . . . . . . 12-47a 12-82
Sensor, engine rpm:Installation . . . . . . . . . . . . . . . . 4-37b 4-64Removal. . . . . . . . . . . . . . . . . . . 4-37a 4-64
Sensor, throttle position (TP):Adjustment . . . . . . . . . . . . . . . . 4-46c 4-76Installation . . . . . . . . . . . . . . . . 4-46b 4-76Removal. . . . . . . . . . . . . . . . . . . 4-46a 4-76
Serpentine drivebelt:Alignment . . . . . . . . . . . . . . . . . 3-81c 3-142.2Installation . . . . . . . . . . . . . . . . 3-81b 3-142Removal. . . . . . . . . . . . . . . . . . . 3-81a 3-142
INDEX (Cont’d)
Para. Page
S
Para. Page
S (Cont’d)

Service and troubleshootinginstructions:
Common tools and equipment . 2-1 2-1Fabricated tools. . . . . . . . . . . . . 2-3 2-1Repair parts . . . . . . . . . . . . . . . 2-4 2-1Special tools, TMDE, andsupport equipment . . . . . . . . . 2-2 2-1
Service brake caliper:Cleaning and inspection . . . . . . 7-4b 7-12Installation . . . . . . . . . . . . . . . . 7-4c 7-12Removal. . . . . . . . . . . . . . . . . . . 7-4a 7-10
Service brake pad:Cleaning and inspection . . . . . . 7-3b 7-8Installation . . . . . . . . . . . . . . . . 7-3c 7-8Removal. . . . . . . . . . . . . . . . . . . 7-3a 7-6
Service brake pedal:Installation . . . . . . . . . . . . . . . . 7-9b 7-30Removal. . . . . . . . . . . . . . . . . . . 7-9a 7-30
Service brake rotor:Installation . . . . . . . . . . . . . . . . 7-12b 7-36Removal. . . . . . . . . . . . . . . . . . . 7-12a 7-36
Service brake system:Maintenance task summary(DS) . . . . . . . . . . . . . . . . . . . . . 22-2 22-1
Maintenance task summary(unit) . . . . . . . . . . . . . . . . . . . . 7-1 7-1
Service brake system bleeding:Manual bleeding . . . . . . . . . . . . 7-2b 7-4Master cylinder bleeding . . . . . 7-2c 7-4Pressure bleeding . . . . . . . . . . . 7-2a 7-2
Service brake system operation . . 1-26 1-33Service headlight and blackout
drive light electrical connectorand grommet:
Installation . . . . . . . . . . . . . . . . 4-65b 4-106Removal. . . . . . . . . . . . . . . . . . . 4-65a 4-106
Service headlight assembly:Installation . . . . . . . . . . . . . . . . 4-50b 4-84Removal. . . . . . . . . . . . . . . . . . . 4-50a 4-84
Service headlight lamp:Adjustment . . . . . . . . . . . . . . . . 4-49c 4-83Installation . . . . . . . . . . . . . . . . 4-49b 4-82Removal. . . . . . . . . . . . . . . . . . . 4-49a 4-82
Service/parking brake adjustment,rear dual . . . . . . . . . . . . . . . . . . . 7-19 7-54
Service/parking brake caliper,rear dual:
Cleaning and inspection . . . . . . 7-15b 7-44Installation . . . . . . . . . . . . . . . . 7-15c 7-44Removal. . . . . . . . . . . . . . . . . . . 7-15a 7-42
Service/parking brake pad, rear dual:
Cleaning and inspection . . . . . . 7-14b 7-40Installation . . . . . . . . . . . . . . . . 7-14c 7-40Removal. . . . . . . . . . . . . . . . . . . 7-14a 7-38
Service/parking brake rod, rear dual:
Installation . . . . . . . . . . . . . . . . 7-18b 7-52Removal. . . . . . . . . . . . . . . . . . . 7-18a 7-52
Service/parking brake systemoperation . . . . . . . . . . . . . . . . . . . 1-25 1-32
Service upon receipt:General . . . . . . . . . . . . . . . . . . . 2-5 2-1General inspection and servicing instructions . . . . . . . 2-6 2-2
Specific inspection andservicing instructions . . . . . . . 2-7 2-2
Servo advance seal:Installation . . . . . . . . . . . . . . . . 16-5b 16-6Removal. . . . . . . . . . . . . . . . . . . 16-5a 16-6
Servo, front:Assembly . . . . . . . . . . . . . . . . . . 28-15d 28-57Cleaning . . . . . . . . . . . . . . . . . . 28-15b 28-57Disassembly . . . . . . . . . . . . . . . 28-15a 28-57Inspection . . . . . . . . . . . . . . . . . 28-15c 28-57
Servo, rear (1995):Assembly . . . . . . . . . . . . . . . . . . 28-16d 28-58Cleaning . . . . . . . . . . . . . . . . . . 28-16b 28-58Disassembly . . . . . . . . . . . . . . . 28-16a 28-58Inspection . . . . . . . . . . . . . . . . . 28-16c 28-58
Servo, rear (1996-1998)Assembly . . . . . . . . . . . . . . . . . . 28-16.1d 28-58.2Cleaning . . . . . . . . . . . . . . . . . . 28-16.1b 28-58.2Disassembly . . . . . . . . . . . . . . . 28-16.1a 28-58.2Inspection . . . . . . . . . . . . . . . . . 28-16.1c 28-58.2
Shaft assembly, front propeller:Assembly . . . . . . . . . . . . . . . . . . 6-3c 6-7Cleaning and inspection . . . . . . 6-3b 6-6Disassembly . . . . . . . . . . . . . . . 6-3a 6-6Inspection . . . . . . . . . . . . . . . . . 6-2b 6-2Installation . . . . . . . . . . . . . . . . 6-2c 6-4Removal. . . . . . . . . . . . . . . . . . . 6-2a 6-2
Shaft, intermediate steering:Installation . . . . . . . . . . . . . . . . 8-19b 8-54Removal. . . . . . . . . . . . . . . . . . . 8-19a 8-54
Shaft, rear propeller:Inspection . . . . . . . . . . . . . . . . . 6-4b 6-8Installation . . . . . . . . . . . . . . . . 6-4c 6-8Removal. . . . . . . . . . . . . . . . . . . 6-4a 6-8
INDEX (Cont’d)
TM 9-2320-387-24-1
INDEX 40 Change 1
Para. Page
S (Cont’d)
Para. Page
S (Cont’d)
TM 9-2320-387-24-1
Change 1 INDEX 41
Shelter:Installation . . . . . . . . . . . . . . . . 11-78b 11-140Removal. . . . . . . . . . . . . . . . . . . 11-78a 11-140
Shelter carrier body maintenancetask summary . . . . . . . . . . . . . . . 11-72 11-133
Shelter carrier tailgate:Installation . . . . . . . . . . . . . . . . 11-75b 11-136Removal. . . . . . . . . . . . . . . . . . . 11-75a 11-136
Shelter carrier tailgate bracket:Installation . . . . . . . . . . . . . . . . 11-74b 11-135Removal. . . . . . . . . . . . . . . . . . . 11-74a 11-135
Shelter carrier tailgate chain:Assembly . . . . . . . . . . . . . . . . . . 11-77c 11-138Disassembly . . . . . . . . . . . . . . . 11-77b 11-138Installation . . . . . . . . . . . . . . . . 11-77d 11-138Removal. . . . . . . . . . . . . . . . . . . 11-77a 11-138
Shelter mounting bracket:Installation . . . . . . . . . . . . . . . . 11-73b 11-134Removal. . . . . . . . . . . . . . . . . . . 11-73a 11-134
Shelter support assembly:Installation . . . . . . . . . . . . . . . . 11-79b 11-142Removal. . . . . . . . . . . . . . . . . . . 11-79a 11-142
Shelter support reinforcement:Installation . . . . . . . . . . . . . . . . 11-76b 11-137Removal. . . . . . . . . . . . . . . . . . . 11-76a 11-137
Shield, rear heat:Installation . . . . . . . . . . . . . . . . 3-52b 3-97Removal. . . . . . . . . . . . . . . . . . . 3-52a 3-97
Shift controls housing assembly:Assembly . . . . . . . . . . . . . . . . . . 5-8b 5-20Disassembly . . . . . . . . . . . . . . . 5-8a 5-20Installation . . . . . . . . . . . . . . . . 5-7b 5-18Removal. . . . . . . . . . . . . . . . . . . 5-7a 5-18
Shift rod, transfer case:Adjustment . . . . . . . . . . . . . . . . 5-16c 5-32Installation . . . . . . . . . . . . . . . . 5-16b 5-32Removal. . . . . . . . . . . . . . . . . . . 5-16a 5-32
Shift rod, transmission:Adjustment . . . . . . . . . . . . . . . . 5-9c 5-22Installation . . . . . . . . . . . . . . . . 5-9b 5-22Removal. . . . . . . . . . . . . . . . . . . 5-9a 5-22
Shipment, preparation for storageand. . . . . . . . . . . . . . . . . . . . . . . . 1-4 1-1
Shock absorber:Installation . . . . . . . . . . . . . . . . 6-28b 6-64Removal. . . . . . . . . . . . . . . . . . . 6-28a 6-62
Shroud shield assembly, airlift-to-:Installation . . . . . . . . . . . . . . . . 3-63b 3-118Removal. . . . . . . . . . . . . . . . . . . 3-63a 3-118
Shunt:Installation . . . . . . . . . . . . . . . . 4-78b 4-138Removal. . . . . . . . . . . . . . . . . . . 4-78a 4-138
Shutoff solenoid, fuel injection pump:Inspection . . . . . . . . . . . . . . . . . 16-8b 16-16Installation . . . . . . . . . . . . . . . . 16-8c 16-16Removal. . . . . . . . . . . . . . . . . . . 16-8a 16-16
Shutoff valve, heater:Installation . . . . . . . . . . . . . . . . 10-72b 10-124Removal. . . . . . . . . . . . . . . . . . . 10-72a 10-124
Side footwear inner armor, passenger:
Installation . . . . . . . . . . . . . . . . 25-11b 25-30Removal. . . . . . . . . . . . . . . . . . . 25-11a 25-30
Side footwear outer armor, passenger:
Installation . . . . . . . . . . . . . . . . 25-10b 25-28Removal. . . . . . . . . . . . . . . . . . . 25-10a 25-28
Side hood stop:Installation . . . . . . . . . . . . . . . . 10-11b 10-20Removal. . . . . . . . . . . . . . . . . . . 10-11a 10-20
Side marker light assembly:Installation . . . . . . . . . . . . . . . . 4-56b 4-94Removal. . . . . . . . . . . . . . . . . . . 4-56a 4-94
Side upper cowl liner, passenger:Installation . . . . . . . . . . . . . . . . 25-13b 25-36Removal. . . . . . . . . . . . . . . . . . . 25-13a 25-36
Signal control cancelling ring,directional:
Installation . . . . . . . . . . . . . . . . 4-64b 4-105Removal. . . . . . . . . . . . . . . . . . . 4-64a 4-105
Signal control, directional:Installation . . . . . . . . . . . . . . . . 4-63b 4-104Removal . . . . . . . . . . . . . . . . . . 4-63a 4-104
Signal control indicator lamp,directional:
Installation . . . . . . . . . . . . . . . . 4-62b 4-103Removal. . . . . . . . . . . . . . . . . . . 4-62a 4-103
Signal flasher, directional:Installation . . . . . . . . . . . . . . . . 4-61b 4-102Removal. . . . . . . . . . . . . . . . . . . 4-61a 4-102
Slave receptacle and cable:Inspection . . . . . . . . . . . . . . . . . 4-76b 4-132Installation . . . . . . . . . . . . . . . . 4-76c 4-132Removal. . . . . . . . . . . . . . . . . . . 4-76a 4-132
Sling and hook, gunner’s:Installation . . . . . . . . . . . . . . . . 11-56b 11-109Removal. . . . . . . . . . . . . . . . . . . 11-56a 11-109
INDEX (Cont’d)
Para. Page
S (Cont’d)
Para. Page
S (Cont’d)

Soft top:Inspection and cleaning . . . . . . 10-93a 10-156Soft top material repair . . . . . . 10-93b 10-156Soft top window repair . . . . . . . 10-93c 10-156Soft top window zipper repair(temporary) . . . . . . . . . . . . . . . 10-93d 10-157
Soft top door adjustment. . . . . . . . 10-92 10-154Soft top door hinge:
Installation . . . . . . . . . . . . . . . . 10-91b 10-153Removal. . . . . . . . . . . . . . . . . . . 10-91a 10-153
Soft top door striker:Installation . . . . . . . . . . . . . . . . 10-94b 10-158Removal. . . . . . . . . . . . . . . . . . . 10-94a 10-158
Special purpose kits (DS) maintenance task summary . . . . 26-2 26-1
Special tools, TMDE, and supportequipment . . . . . . . . . . . . . . . . . . 2-2 2-1
Speedometer cable:Installation . . . . . . . . . . . . . . . . 4-18b 4-38Removal. . . . . . . . . . . . . . . . . . . 4-18a 4-38
Speedometer driven gear:Installation . . . . . . . . . . . . . . . . 5-17b 5-34Removal. . . . . . . . . . . . . . . . . . . 5-17a 5-34
Speedometer/odometer:Installation . . . . . . . . . . . . . . . . 4-17b 4-36Removal. . . . . . . . . . . . . . . . . . . 4-17a 4-36
Splash shield access cover, engine left:Installation . . . . . . . . . . . . . . . . 10-25b 10-46Removal. . . . . . . . . . . . . . . . . . . 10-25a 10-46
Splash shield, left, engine:Assembly . . . . . . . . . . . . . . . . . . 10-23c 10-40Disassembly . . . . . . . . . . . . . . . 10-23b 10-40Installation . . . . . . . . . . . . . . . . 10-23d 10-41Removal. . . . . . . . . . . . . . . . . . . 10-23a 10-38
Splash shield, right, engine:Assembly . . . . . . . . . . . . . . . . . . 10-24c 10-44Disassembly . . . . . . . . . . . . . . . 10-24b 10-42Installation . . . . . . . . . . . . . . . . 10-24d 10-44Removal. . . . . . . . . . . . . . . . . . . 10-24a 10-42
Splash shield support bracket:Installation . . . . . . . . . . . . . . . . 24-4b 24-2Removal. . . . . . . . . . . . . . . . . . . 24-4a 24-2
Spring, coil:Installation . . . . . . . . . . . . . . . . 6-27b 6-61Removal. . . . . . . . . . . . . . . . . . . 6-27a 6-60
Spring seat:Installation . . . . . . . . . . . . . . . . 24-5b 24-3Removal. . . . . . . . . . . . . . . . . . . 24-5a 24-3
Stabilizer bar:Installation . . . . . . . . . . . . . . . . 6-20b 6-49Removal. . . . . . . . . . . . . . . . . . . 6-20a 6-49
Stabilizer bar link:Installation . . . . . . . . . . . . . . . . 6-21b 6-50Removal. . . . . . . . . . . . . . . . . . . 6-21a 6-50
Startability tests . . . . . . . . . . . . . . 2-23 2-45Starter:
Assembly . . . . . . . . . . . . . . . . . . 18-4d 18-18Bench testing and adjustment . 18-4e 18-24Cleaning . . . . . . . . . . . . . . . . . . 18-4b 18-18Disassembly . . . . . . . . . . . . . . . 18-4a 18-12Inspection . . . . . . . . . . . . . . . . . 18-4c 18-18Installation . . . . . . . . . . . . . . . . 4-11b 4-24Removal. . . . . . . . . . . . . . . . . . . 4-11a 4-22
Starter and starting control system maintenance task summary . . . . 4-9 4-20
Starter circuit tests . . . . . . . . . . . . 2-36 2-247Starter power cables:
Installation . . . . . . . . . . . . . . . . 4-72b 4-124Removal. . . . . . . . . . . . . . . . . . . 4-72a 4-122
Starting system operation. . . . . . . 1-21 1-28Steering column:
Installation . . . . . . . . . . . . . . . . 8-18b 8-52Removal. . . . . . . . . . . . . . . . . . . 8-18a 8-50
Steering componentsmaintenance task summary . . . 8-11 8-35
Steering control system operation 1-27 1-35Steering gear:
Adjustment . . . . . . . . . . . . . . . . 31-3h 31-18Assembly . . . . . . . . . . . . . . . . . . 31-3g 31-12Cleaning . . . . . . . . . . . . . . . . . . 31-3b 31-8Disassembly . . . . . . . . . . . . . . . 31-3a 31-2Housing group inspection and repair . . . . . . . . . . . . . . . . . . . . 31-3c 31-8
Installation . . . . . . . . . . . . . . . . 8-20b 8-58Pitman shaft inspection andrepair . . . . . . . . . . . . . . . . . . . . 31-3d 31-8
Rack piston group inspection and repair . . . . . . . . . . . . . . . . . . . . 31-3e 31-10
Removal. . . . . . . . . . . . . . . . . . . 8-20a 8-56Valve and adjuster group inspection and repair . . . . . . . 31-3f 31-10
Steering gear leak test, power steering pump and . . . . . . . . . . . 23-4 23-6
Steering pump, power:Assembly . . . . . . . . . . . . . . . . . . 23-3d 23-4Cleaning . . . . . . . . . . . . . . . . . . 23-3b 23-4Disassembly . . . . . . . . . . . . . . . 23-3a 23-2Inspection . . . . . . . . . . . . . . . . . 23-3c 23-4
Steering shaft close-off andretainer, intermediate:
Installation . . . . . . . . . . . . . . . . 8-22b 8-62Removal. . . . . . . . . . . . . . . . . . . 8-22a 8-62
INDEX (Cont’d)
TM 9-2320-387-24-1
INDEX 42 Change 1
Para. Page
S (Cont’d)
Para. Page
S (Cont’d)

TM 9-2320-387-24-1
Change 1 INDEX 43
Steering shaft, intermediate:Installation . . . . . . . . . . . . . . . . 8-19b 8-54Removal. . . . . . . . . . . . . . . . . . . 8-19a 8-54
Steering shaft U-joint:Installation . . . . . . . . . . . . . . . . 8-21b 8-60Removal. . . . . . . . . . . . . . . . . . . 8-21a 8-60
Steering stop:Adjustment . . . . . . . . . . . . . . . . 6-17c 6-44Installation . . . . . . . . . . . . . . . . 6-17b 6-44Removal. . . . . . . . . . . . . . . . . . . 6-17a 6-44
Steering system:Maintenance task summary (DS) 23-2 23-1Maintenance task summary (GS) 31-2 31-1
Steering system tests . . . . . . . . . . 2-42 2-433Steering wheel:
Installation . . . . . . . . . . . . . . . . 8-12b 8-36Removal. . . . . . . . . . . . . . . . . . . 8-12a 8-36
Steering wheel lock:Installation . . . . . . . . . . . . . . . . 10-48b 10-82Removal. . . . . . . . . . . . . . . . . . . 10-48a 10-82
STE/ICE-R test procedures . . . . . . 2-46 2-489STE/ICE-R wiring harness:
Installation . . . . . . . . . . . . . . . . 18-5b 18-30Removal. . . . . . . . . . . . . . . . . . . 18-5a 18-28
Stop, center hood:Installation . . . . . . . . . . . . . . . . 10-12b 10-21Removal. . . . . . . . . . . . . . . . . . . 10-12a 10-21
Stop guide, center hood:Installation . . . . . . . . . . . . . . . . 10-14b 10-23Removal. . . . . . . . . . . . . . . . . . . 10-14a 10-23
Stoplight/torque converter clutch brake switch:
Adjustment . . . . . . . . . . . . . . . . 4-60c 4-100Installation . . . . . . . . . . . . . . . . 4-60b 4-100Removal. . . . . . . . . . . . . . . . . . . 4-60a 4-100
Stop ring, turret bearing and:Inspection . . . . . . . . . . . . . . . . . 11-57b 11-110Installation . . . . . . . . . . . . . . . . 11-57c 11-110Removal. . . . . . . . . . . . . . . . . . . 11-57a 11-110
Stop, side hood:Installation . . . . . . . . . . . . . . . . 10-11b 10-20Removal. . . . . . . . . . . . . . . . . . . 10-11a 10-20
Stop, steering:Adjustment . . . . . . . . . . . . . . . . 6-17c 6-44Installation . . . . . . . . . . . . . . . . 6-17b 6-44Removal. . . . . . . . . . . . . . . . . . . 6-17a 6-44
Storage and shipment,preparation for . . . . . . . . . . . . . . 1-4 1-1
Storage or shipment, preparation for:
Administrative storage . . . . . . . 13-2 13-1Cleaning . . . . . . . . . . . . . . . . . . 13-6 13-2General storage and shipping information . . . . . . . . . . . . . . . 13-5 13-2
Inspections, stowage, and inventory . . . . . . . . . . . . . 13-7 13-2
Lubrication . . . . . . . . . . . . . . . . 13-9 13-3Records and reports . . . . . . . . . 13-10 13-3Repair, painting, andpreservation. . . . . . . . . . . . . . . 13-8 13-3
Scope . . . . . . . . . . . . . . . . . . . . . 13-1 13-1Security . . . . . . . . . . . . . . . . . . . 13-3 13-1Special packaging and shipping requirements . . . . . . 13-4 13-1
Stowage pedestal and gunner’s platform:
Inspection . . . . . . . . . . . . . . . . . 11-71a.1 11-132Installation . . . . . . . . . . . . . . . . 11-71b 11-132Removal. . . . . . . . . . . . . . . . . . . 11-71a 11-132
Stowage strap and bracket, pioneer tool kit:
Inspection . . . . . . . . . . . . . . . . . 10-37b 10-64Installation . . . . . . . . . . . . . . . . 10-37c 10-64Removal. . . . . . . . . . . . . . . . . . . 10-37a 10-64
Strap, footman loop and:Inspection . . . . . . . . . . . . . . . . . 10-13b 10-22Installation . . . . . . . . . . . . . . . . 10-13c 10-22Removal. . . . . . . . . . . . . . . . . . . 10-13a 10-22
Strap, jack retaining:Installation . . . . . . . . . . . . . . . . 10-9.1b 10-18.1Removal. . . . . . . . . . . . . . . . . . . 10-9.1a 10-18.1
Straps, camouflage screen stowage:Installation . . . . . . . . . . . . . . . . 10-36b 10-63Removal. . . . . . . . . . . . . . . . . . . 10-36a 10-63
Stud, inner rim:Cleaning and inspection . . . . . . 8-7b 8-20Installation . . . . . . . . . . . . . . . . 8-7c 8-20Removal. . . . . . . . . . . . . . . . . . . 8-7a 8-19
Stud, power feed-through:Installation . . . . . . . . . . . . . . . . 4-69b 4-116Removal. . . . . . . . . . . . . . . . . . . 4-69a 4-116
Stud, wheel:Installation . . . . . . . . . . . . . . . . 6-13b 6-38Removal. . . . . . . . . . . . . . . . . . . 6-13a 6-38
Sun visor:Inspection . . . . . . . . . . . . . . . . . 10-70b 10-121Installation . . . . . . . . . . . . . . . . 10-70c 10-121Removal. . . . . . . . . . . . . . . . . . . 10-70a 10-121
INDEX (Cont’d)
Para. Page
S (Cont’d)
Para. Page
S (Cont’d)
Supply and return lines, fuel tank:Installation . . . . . . . . . . . . . . . . 3-26b 3-52Removal. . . . . . . . . . . . . . . . . . . 3-26a 3-52
Support assembly, shelter:Installation . . . . . . . . . . . . . . . . 11-79b 11-142Removal. . . . . . . . . . . . . . . . . . . 11-79a 11-142
Support, center:Assembly . . . . . . . . . . . . . . . . . . 28-8d 28-35Cleaning . . . . . . . . . . . . . . . . . . 28-8b 28-32Disassembly . . . . . . . . . . . . . . . 28-8a 28-32Inspection . . . . . . . . . . . . . . . . . 28-8c 28-32
Support, radiator:Installation . . . . . . . . . . . . . . . . 3-64b 3-119Removal. . . . . . . . . . . . . . . . . . . 3-64a 3-119
Support reinforcement, shelter:Installation . . . . . . . . . . . . . . . . 11-76b 11-137Removal. . . . . . . . . . . . . . . . . . . 11-76a 11-137
Support, rifle:Inspection . . . . . . . . . . . . . . . . . 11-66a.1 11-126Installation . . . . . . . . . . . . . . . . 11-66b 11-126Removal. . . . . . . . . . . . . . . . . . . 11-66a 11-126
Surge tank:Installation . . . . . . . . . . . . . . . . 3-65b 3-120Removal. . . . . . . . . . . . . . . . . . . 3-65a 3-120
Surge tank overflow hose:Installation . . . . . . . . . . . . . . . . 3-75b 3-131Removal. . . . . . . . . . . . . . . . . . . 3-75a 3-131
Surge tank-to-lower radiatortube hose:
Installation . . . . . . . . . . . . . . . . 3-74b 3-130Removal. . . . . . . . . . . . . . . . . . . 3-74a 3-130
Surge tank-to-radiator vent hose:Installation . . . . . . . . . . . . . . . . 3-66b 3-121Removal. . . . . . . . . . . . . . . . . . . 3-66a 3-121
Surge tank-to-water crossovervent hose:
Installation . . . . . . . . . . . . . . . . 3-67b 3-122Removal. . . . . . . . . . . . . . . . . . . 3-67a 3-122
Suspension alignment instructions:Caster and camber adjustment 34-3b 34-2Caster and camber check . . . . . 34-3a 34-1Toe check and adjustment . . . . 34-3c 34-3
Suspension brace, front:Installation . . . . . . . . . . . . . . . . 24-6b 24-4Removal. . . . . . . . . . . . . . . . . . . 24-6a 24-4
Suspension crossmember:Inspection . . . . . . . . . . . . . . . . . 24-20a 24-36Repair . . . . . . . . . . . . . . . . . . . . 24-20b 24-36
Suspension, front crossmember,front:
Installation . . . . . . . . . . . . . . . . 24-16b 24-24Removal. . . . . . . . . . . . . . . . . . . 24-16a 24-24
Suspension, front crossmember, rear:
Installation . . . . . . . . . . . . . . . . 24-18b 24-32Removal. . . . . . . . . . . . . . . . . . . 24-18a 24-30
Suspension:Maintenance task summary(GS) . . . . . . . . . . . . . . . . . . . . . 34-1 34-1
Maintenance task summary(unit) . . . . . . . . . . . . . . . . . . . . 6-19 6-48
Suspension, propeller shafts, axles,and maintenance task summary 21-2 21-1
Suspension, rear crossmember,front:
Installation . . . . . . . . . . . . . . . . 24-17b 24-28Removal. . . . . . . . . . . . . . . . . . . 24-17a 24-26
Suspension rear crossmember, rear:Installation . . . . . . . . . . . . . . . . 24-19b 24-34Removal. . . . . . . . . . . . . . . . . . . 24-19a 24-34
Suspension system operation . . . . 1-28 1-37Switch, backup light:
Installation . . . . . . . . . . . . . . . . 4-36b 4-62Removal. . . . . . . . . . . . . . . . . . . 4-36a 4-62
Switch, cold-advance:Installation . . . . . . . . . . . . . . . . 4-31b 4-55Removal. . . . . . . . . . . . . . . . . . . 4-31a 4-55
Switch, fan cut-off:Installation . . . . . . . . . . . . . . . . 4-42b 4-69Removal. . . . . . . . . . . . . . . . . . . 4-42a 4-69
Switch, fan temperature:Installation . . . . . . . . . . . . . . . . 4-34b 4-60Removal. . . . . . . . . . . . . . . . . . . 4-34a 4-60
Switch, headlight beam selector,and bracket:
Installation . . . . . . . . . . . . . . . . 4-59b 4-99Removal. . . . . . . . . . . . . . . . . . . 4-59a 4-99
Switch, heater fan:Installation . . . . . . . . . . . . . . . . 10-73b 10-125Removal. . . . . . . . . . . . . . . . . . . 10-73a 10-125
Switch, horn:Installation . . . . . . . . . . . . . . . . 4-24b 4-47Removal. . . . . . . . . . . . . . . . . . . 4-24a 4-47
Switch, main light:Installation . . . . . . . . . . . . . . . . 4-58b 4-98Removal. . . . . . . . . . . . . . . . . . . 4-58a 4-98
Switch, neutral start:Installation . . . . . . . . . . . . . . . . 5-6b 5-16Removal. . . . . . . . . . . . . . . . . . . 5-6a 5-16
Switch, parking brake:Installation . . . . . . . . . . . . . . . . 4-23b 4-46Removal. . . . . . . . . . . . . . . . . . . 4-23a 4-46
INDEX (Cont’d)
TM 9-2320-387-24-1
INDEX 44 Change 1
Para. Page
S (Cont’d)
Para. Page
S (Cont’d)

TM 9-2320-387-24-1
Change 1 INDEX 45
Switch, rotary:Installation . . . . . . . . . . . . . . . . 4-10b 4-20Removal. . . . . . . . . . . . . . . . . . . 4-10a 4-20
Switch, torque converter clutch brake stoplight/:
Adjustment . . . . . . . . . . . . . . . . 4-60c 4-100Installation . . . . . . . . . . . . . . . . 4-60b 4-100Removal. . . . . . . . . . . . . . . . . . . 4-60a 4-100
Switch, transfer case indicator:Installation . . . . . . . . . . . . . . . . 4-39b 4-66Removal. . . . . . . . . . . . . . . . . . . 4-39a 4-66
T
Table of contents . . . . . . . . . . . . . . iiTables:
Air conditioning troubleshooting (table 14-3). . . . . . . . . . . . . . . . 14-6 14-19
Alignment specifications for radial tires (table 34-1) . . . . . . 34-3 34-1
Alternator speed and currenttracking (table 18-3) . . . . . . . . 18-3 18-5
Apply pin selection (table 28-3). . . . . . . . . . . . . . . . 28-19 28-85
Countersinking dimensionsfor 100° countersunk blindrivets (table 10-3) . . . . . . . . . . 10-56 10-94
Countersinking dimensions for100° countersunk blind rivets(table 33-3). . . . . . . . . . . . . . . . 33-7 33-9
Differences between models(table 1-1) . . . . . . . . . . . . . . . . 1-14 1-18
Drill sizes for blind rivets(table 10-2). . . . . . . . . . . . . . . . 10-56 10-93
Drill sizes for blind rivets(table 33-2). . . . . . . . . . . . . . . . 33-7 33-8
Drill sizes for solid shank rivets (table 10-1). . . . . . . . . . . . . . . . 10-56 10-93
Drill sizes for solid shank rivets(table 33-1). . . . . . . . . . . . . . . . 33-7 33-8
Front selective washer thickness (table 28-2). . . . . . . . . . . . . . . . 28-19 28-83
Full-load test (table 18-2) . . . . . 18-3 18-4Guide for preparation ofantifreeze solutions (table 3-1) 3-61 3-111
Mechanical troubleshooting(table 14-1) (DS/GS) . . . . . . . . 14-2 14-3
Minimum sheet gauge for100° machine countersink(table 10-4). . . . . . . . . . . . . . . . 10-56 10-94
Minimum sheet gauge for 100°machine countersink (table 33-4). . . . . . . . . . . . . . . . 33-7 33-9
No-load test (table 18-1) . . . . . . 18-3 18-4Normal operating pressures andtemperatures (table 14-2) . . . . 14-6 14-18
Pinion variance table (inches)(table 30-1). . . . . . . . . . . . . . . . 30-3 30-12
Rear selective washer thickness(table 28-1). . . . . . . . . . . . . . . . 28-19 28-76
Regulator bypass test (table 18-4). . . . . . . . . . . . . . . . 18-3 18-5
Rivet grip lengthdetermination (table 10-5). . . . 10-56 10-95
Stop-drill sizes for negligiblecracks (table 33-5) . . . . . . . . . . 33-8 33-13
Suspension alignment change(table 34-2). . . . . . . . . . . . . . . . 34-3 34-2
Tabulated data (table 1-2) . . . . 1-15 1-19Toe-in alignment adjustmentspecifications (table 8-1) . . . . . 8-9 8-26
Toe-out alignment adjustmentspecifications (table 8-2) . . . . . 8-10 8-32
Unit preventive maintenance checks and services (table 2-1) 2-5
Tabulated data . . . . . . . . . . . . . . . 1-15 1-19Tailgate:
Installation . . . . . . . . . . . . . . . . 10-38b 10-66Removal. . . . . . . . . . . . . . . . . . . 10-38a 10-65
Tailgate armor plate:Installation . . . . . . . . . . . . . . . . 11-47b 11-95Removal. . . . . . . . . . . . . . . . . . . 11-47a 11-95
Tailgate bracket, shelter carrier:Installation . . . . . . . . . . . . . . . . 11-74b 11-135Removal. . . . . . . . . . . . . . . . . . . 11-74a 11-135
Tailgate chain and brackets:Installation . . . . . . . . . . . . . . . . 10-35b 10-62Removal. . . . . . . . . . . . . . . . . . . 10-35a 10-61
Tailgate chain, shelter carrier:Assembly . . . . . . . . . . . . . . . . . . 11-77c 11-138Disassembly . . . . . . . . . . . . . . . 11-77b 11-138Installation . . . . . . . . . . . . . . . . 11-77d 11-138Removal. . . . . . . . . . . . . . . . . . . 11-77a 11-138
Tailgate, shelter carrier:Installation . . . . . . . . . . . . . . . . 11-75b 11-136Removal. . . . . . . . . . . . . . . . . . . 11-75a 11-136
Tailgate upper hinge:Installation . . . . . . . . . . . . . . . . 10-39b 10-68Removal. . . . . . . . . . . . . . . . . . . 10-39a 10-67
Tailpipe:Installation . . . . . . . . . . . . . . . . 3-48b 3-91Removal. . . . . . . . . . . . . . . . . . . 3-48a 3-90
INDEX (Cont’d)
Para. Page
S (Cont’d)
Para. Page
T (Cont’d)
Tailpipe hanger:Installation . . . . . . . . . . . . . . . . 3-53b 3-98Removal. . . . . . . . . . . . . . . . . . . 3-53a 3-98
Tailpipe insulator:Installation . . . . . . . . . . . . . . . . 3-54b 3-99Removal. . . . . . . . . . . . . . . . . . . 3-54a 3-99
Temperature sending unit, engine:Installation . . . . . . . . . . . . . . . . 4-28b 4-51Removal. . . . . . . . . . . . . . . . . . . 4-28a 4-51
Tensioner, idler pulleys, andmounting hardware:
Installation . . . . . . . . . . . . . . . . 3-82b 3-144Removal. . . . . . . . . . . . . . . . . . . 3-82a 3-144
Terminal board:Installation . . . . . . . . . . . . . . . . 12-18b 12-32Removal. . . . . . . . . . . . . . . . . . . 12-18a 12-32
Thermostat:Installation . . . . . . . . . . . . . . . . 3-76b 3-132Removal. . . . . . . . . . . . . . . . . . . 3-76a 3-132
Thermostat bypass hose:Installation . . . . . . . . . . . . . . . . 3-68b 3-123Removal. . . . . . . . . . . . . . . . . . . 3-68a 3-123
Three point seatbelt:Front seatbelt bracket
inspection . . . . . . . . . . . . . . . . 10-47b 10-78 Front seatbelt installation . . . . 10-47c 10-79Front seatbelt removal . . . . . . . 10-47a 10-78Rear seatbelt bracket
inspection . . . . . . . . . . . . . . . . 10-47e 10-80Rear seatbelt installation . . . . . 10-47f 10-80Rear seatbelt removal. . . . . . . . 10-47d 10-80
Three point seatbelt brackets:Installation . . . . . . . . . . . . . . . . 10-46b 10-77Removal. . . . . . . . . . . . . . . . . . . 10-46a 10-77
Throttle control cable and bracket, hand:
Installation . . . . . . . . . . . . . . . . 3-46b 3-88Removal. . . . . . . . . . . . . . . . . . . 3-46a 3-88
Throttle Position (TP) sensor:Adjustment . . . . . . . . . . . . . . . . 4-46c 4-76Installation . . . . . . . . . . . . . . . . 4-46b 4-76Removal. . . . . . . . . . . . . . . . . . . 4-46a 4-76
Tiedown bracket, rear-front:Installation . . . . . . . . . . . . . . . . 24-14b 24-18Removal. . . . . . . . . . . . . . . . . . . 24-14a 24-18
Tiedown bracket, rear-rear:Installation . . . . . . . . . . . . . . . . 24-12b 24-16Removal. . . . . . . . . . . . . . . . . . . 24-12a 24-16
Tiedown, cargo:Installation . . . . . . . . . . . . . . . . 10-52b 10-87Removal. . . . . . . . . . . . . . . . . . . 10-52a 10-87
Tiedown ring:Installation . . . . . . . . . . . . . . . . 9-4b 9-4Removal. . . . . . . . . . . . . . . . . . . 9-4a 9-4
Tie rod:Assembly . . . . . . . . . . . . . . . . . . 8-13c 8-37Disassembly . . . . . . . . . . . . . . . 8-13b 8-37Installation . . . . . . . . . . . . . . . . 8-13d 8-37Removal. . . . . . . . . . . . . . . . . . . 8-13a 8-38
Tie rod end:Installation . . . . . . . . . . . . . . . . 8-16b 8-44Removal. . . . . . . . . . . . . . . . . . . 8-16a 8-44
Time-delay module:Installation . . . . . . . . . . . . . . . . 4-35b 4-61Removal. . . . . . . . . . . . . . . . . . . 4-35a 4-61
Timing chain cover, timing chain, and drive sprockets:
Inspection . . . . . . . . . . . . . . . . . 15-10b 15-21Installation . . . . . . . . . . . . . . . . 15-10c 15-22Removal. . . . . . . . . . . . . . . . . . . 15-10a 15-20
Tip removal, glow plug(damaged or broken) . . . . . . . . . . 15-22 15-40
Tire balancing . . . . . . . . . . . . . . . . 8-8 8-22Tire, wheel and rubber
runflat radial:Assembly . . . . . . . . . . . . . . . . . . 8-4d 8-13Disassembly . . . . . . . . . . . . . . . 8-4a 8-8Inspection and cleaning . . . . . . 8-4b 8-11Repair . . . . . . . . . . . . . . . . . . . . 8-4c 8-12
Toe-in alignment, front wheel:Preliminary inspection . . . . . . . 8-9a 8-24Toe-in adjustment. . . . . . . . . . . 8-9c 8-28Toe-in check . . . . . . . . . . . . . . . 8-9b 8-26
Toe-out alignment, rear wheel:Preliminary inspection . . . . . . . 8-10a 8-30Toe-out adjustment. . . . . . . . . . 8-10c 8-34Toe-out check . . . . . . . . . . . . . . 8-10b 8-32
Toggle switch and harness, A/C:Installation . . . . . . . . . . . . . . . . 11-84b 11-150Removal. . . . . . . . . . . . . . . . . . . 11-84a 11-150
Top armor, C-pillar:Inspection . . . . . . . . . . . . . . . . . 11-45b 11-92Installation . . . . . . . . . . . . . . . . 11-45c 11-92Removal. . . . . . . . . . . . . . . . . . . 11-45a 11-92
Torque converter:Cleaning . . . . . . . . . . . . . . . . . . 28-4a 28-20Inspection . . . . . . . . . . . . . . . . . 28-4b 28-20
Torque limits: appendix E. . . . . . . E-1Torsional damper:
Installation . . . . . . . . . . . . . . . . 15-7b 15-16Removal. . . . . . . . . . . . . . . . . . . 15-7a 15-15
INDEX (Cont’d)
TM 9-2320-387-24-1
INDEX 46 Change 1
Para. Page
T (Cont’d)
Para. Page
T (Cont’d)
TM 9-2320-387-24-1
Change 1 INDEX 47
Towing brackets, front bumper and:Installation . . . . . . . . . . . . . . . . 9-2b 9-2Removal. . . . . . . . . . . . . . . . . . . 9-2a 9-2
Towing pintle:Assembly . . . . . . . . . . . . . . . . . . 9-9d 9-13Cleaning . . . . . . . . . . . . . . . . . . 9-9c 9-12Disassembly . . . . . . . . . . . . . . . 9-9b 9-12Installation . . . . . . . . . . . . . . . . 9-9e 9-14Removal. . . . . . . . . . . . . . . . . . . 9-9a 9-11
Track, and door stop, C-pillar door, guides:
Inspection . . . . . . . . . . . . . . . . . 25-12b 25-32Installation . . . . . . . . . . . . . . . . 25-12c 25-34Removal. . . . . . . . . . . . . . . . . . . 25-12a 25-32
Transducer, fuel pressure:Installation . . . . . . . . . . . . . . . . 4-30b 4-54Removal. . . . . . . . . . . . . . . . . . . 4-30a 4-54
Transfer case:Assembly . . . . . . . . . . . . . . . . . . 29-3d 29-20Cleaning . . . . . . . . . . . . . . . . . . 29-3b 29-12Disassembly . . . . . . . . . . . . . . . 29-3a 29-2Inspection and repair . . . . . . . . 29-3c 29-12Installation . . . . . . . . . . . . . . . . 20-3b 20-4Removal. . . . . . . . . . . . . . . . . . . 20-3a 20-2
Transfer case and transmission electrical maintenance tasksummary . . . . . . . . . . . . . . . . . . . 4-38 4-65
Transfer case guide cable:Installation . . . . . . . . . . . . . . . . 20-4b 20-8Removal. . . . . . . . . . . . . . . . . . . 20-4a 20-8
Transfer case indicator lamp assembly:
Installation . . . . . . . . . . . . . . . . 4-40b 4-67Removal. . . . . . . . . . . . . . . . . . . 4-40a 4-67
Transfer case indicator switch:Installation . . . . . . . . . . . . . . . . 4-39b 4-66Removal. . . . . . . . . . . . . . . . . . . 4-39a 4-66
Transfer case maintenance tasksummary:
Direct support . . . . . . . . . . . . . . 20-2 20-1General support . . . . . . . . . . . . 29-2 29-1Unit . . . . . . . . . . . . . . . . . . . . . . 5-15 5-31
Transfer case oil seals:Front oil seal installation . . . . . 5-18b 5-36Front oil seal removal . . . . . . . . 5-18a 5-36Rear oil seal installation. . . . . . 5-18d 5-38Rear oil seal removal . . . . . . . . 5-18c 5-38
Transfer case shift rod:Adjustment . . . . . . . . . . . . . . . . 5-16c 5-32Installation . . . . . . . . . . . . . . . . 5-16b 5-32Removal. . . . . . . . . . . . . . . . . . . 5-16a 5-32
Transfer case vent line:Installation . . . . . . . . . . . . . . . . 5-19b 5-39Removal. . . . . . . . . . . . . . . . . . . 5-19a 5-39
Transmission, and power steeringoil cooler assembly, engine and:
Cleaning and inspection . . . . . . 3-8c 3-14Installation . . . . . . . . . . . . . . . . 3-8b 3-14Removal. . . . . . . . . . . . . . . . . . . 3-8a 3-12
Transmission assembly from subassemblies:
Band apply pin check . . . . . . . . 28-19l 28-84Center support assembly . . . . . 28-19b 28-74Control valve assembly
(1995-1996) . . . . . . . . . . . . . . 28-19n 28-86.1Control valve assembly
(1997-1998) . . . . . . . . . . . . . . 28-19n.1 28-88Direct clutch assembly . . . . . . . 28-19f 28-79Forward clutch assembly . . . . . 28-19g 28-79Fourth clutch, turbine shaft, andoverdrive carrier assembly . . . 28-19h 28-80
Front servo . . . . . . . . . . . . . . . . 28-19k 28-84Front unit end play check. . . . . 28-19j 28-83Gear unit assembly. . . . . . . . . . 28-19c 28-74Holding fixture . . . . . . . . . . . . . 28-19q 28-91Intermediate clutch assembly. . 28-19e 28-78Oil pan and filter assembly . . . 28-19o 28-90Parking lock pawl and actuator assembly . . . . . . . . . . . . . . . . . 28-19a 28-72
Pump assembly. . . . . . . . . . . . . 28-19i 28-82Rear servo . . . . . . . . . . . . . . . . . 28-19m 28-86Rear unit end play check . . . . . 28-19d 28-76Speed sensors . . . . . . . . . . . . . . 28-19p 28-90Torque converter. . . . . . . . . . . . 28-19r 28-91
Transmission bypass valve:Installation . . . . . . . . . . . . . . . . 5-4b 5-12Removal. . . . . . . . . . . . . . . . . . . 5-4a 5-12
Transmission case:Cleaning . . . . . . . . . . . . . . . . . . 28-5a 28-22Inspection . . . . . . . . . . . . . . . . . 28-5b 28-22
Transmission circuit breakers:Installation . . . . . . . . . . . . . . . . 4-43b 4-70Removal. . . . . . . . . . . . . . . . . . . 4-43a 4-70
Transmission Control Module (TCM):
Installation . . . . . . . . . . . . . . . . 4-45b 4-74Removal. . . . . . . . . . . . . . . . . . . 4-45a 4-74
Transmission Control Module (TCM) capacitator:
Installation . . . . . . . . . . . . . . . . 4-47.1b 4-80Removal. . . . . . . . . . . . . . . . . . . 4-47.1a 4-80
INDEX (Cont’d)
Para. Page
T (Cont’d)
Para. Page
T (Cont’d)
Transmission crossmember supportbracket:
Installation . . . . . . . . . . . . . . . . 24-13b 24-17Removal. . . . . . . . . . . . . . . . . . . 24-13a 24-17
Transmission disassembly, repair,and assembly task summary . . . 28-2 28-1
Transmission disassembly into subassemblies:
Center support assembly . . . . . 28-3q 28-18Control valve assembly
(1995-1996) . . . . . . . . . . . . . . 28-3e 28-6Control valve assembly
(1997-1998) . . . . . . . . . . . . . . 28.3e.1 28-8Direct clutch assembly . . . . . . . 28-3n 28-17Forward clutch assembly . . . . . 28-3m 28-16Front end play check
(measured) . . . . . . . . . . . . . . . 28-3i 28-12Front servo . . . . . . . . . . . . . . . . 28-3f 28-10Gear unit assembly and
rear band . . . . . . . . . . . . . . . . 28-3p 28-18Holding fixture . . . . . . . . . . . . . 28-3b 28-3Intermediate clutch assembly. . 28-3o 28-18Oil pan and filter assembly . . . 28-3d 28-5Parking lock pawl and actuator assembly . . . . . . . . . . . . . . . . . 28-3h 28-11
Pump assembly. . . . . . . . . . . . . 28-3k 28-14Rear servo . . . . . . . . . . . . . . . . . 28-3g 28-10Rear unit end play check (measured). . . . . . . . . . . . . . . . 28-3j 28-12
Speed sensors . . . . . . . . . . . . . . 28-3c 28-4Torque converter. . . . . . . . . . . . 28-3a 28-2Turbine shaft and overdrive carrier assembly . . . . . . . . . . . 28-3l 28-15
Transmission indicator lampassembly:
Installation . . . . . . . . . . . . . . . . 4-41b 4-68Removal. . . . . . . . . . . . . . . . . . . 4-41a 4-68
Transmission Input Speed Sensor (TISS) and Output Speed Sensor (TOSS):
Inspection . . . . . . . . . . . . . . . . . 4-47b 4-78Installation . . . . . . . . . . . . . . . . 4-47c 4-78Removal. . . . . . . . . . . . . . . . . . . 4-47a 4-78
Transmission maintenance tasksummary:
Direct support . . . . . . . . . . . . . . 19-2 19-1Unit . . . . . . . . . . . . . . . . . . . . . . 5-1 5-1
Transmission mount:Installation . . . . . . . . . . . . . . . . 5-13b 5-30Removal. . . . . . . . . . . . . . . . . . . 5-13a 5-30
Transmission mount crossmember:Installation . . . . . . . . . . . . . . . . 9-10b 9-16Removal. . . . . . . . . . . . . . . . . . . 9-10a 9-16
Transmission oil cooler lines:Front lines installation . . . . . . . 5-3d 5-10Front lines removal. . . . . . . . . . 5-3c 5-10Rear lines installation . . . . . . . 5-3b 5-8Rear lines removal . . . . . . . . . . 5-3a 5-6
Transmission oil dipstick tube:Installation . . . . . . . . . . . . . . . . 5-5b 5-14Removal. . . . . . . . . . . . . . . . . . . 5-5a 5-14
Transmission preparation:Assembly . . . . . . . . . . . . . . . . . . 19-5b 19-14Disassembly . . . . . . . . . . . . . . . 19-5a 19-14
Transmission relay:Installation . . . . . . . . . . . . . . . . 4-44b 4-72Removal. . . . . . . . . . . . . . . . . . . 4-44a 4-72
Transmission road test . . . . . . . . . 5-14 5-31Transmission service:
Draining fluid . . . . . . . . . . . . . . 5-2a 5-2Replenishing fluid. . . . . . . . . . . 5-2d 5-4Transmission filter installation 5-2c 5-4Transmission filter removal . . . 5-2b 5-4
Transmission shift rod:Adjustment . . . . . . . . . . . . . . . . 5-9c 5-22Installation . . . . . . . . . . . . . . . . 5-9b 5-22Removal. . . . . . . . . . . . . . . . . . . 5-9a 5-22
Transmission system tests . . . . . . 2-40 2-385Transmission/transfer case
assembly:Installation . . . . . . . . . . . . . . . . 19-4 19-7Removal. . . . . . . . . . . . . . . . . . . 19-3 19-2
Transmission vent line:Installation . . . . . . . . . . . . . . . . 5-10b 5-24Removal. . . . . . . . . . . . . . . . . . . 5-10a 5-24
Tray, battery:Cleaning and inspection . . . . . . 4-74b 4-130Installation . . . . . . . . . . . . . . . . 4-74d 4-130Preventive modification . . . . . . 4-74c 4-130Removal. . . . . . . . . . . . . . . . . . . 4-74a 4-130
Triple ammo box tray (40 mm):Installation . . . . . . . . . . . . . . . . 11-69b 11-130Removal. . . . . . . . . . . . . . . . . . . 11-69a 11-130
Troubleshooting, electrical/mechanical (unit):
Air intake/exhaust tests . . . . . . 2-29 2-141Alternator tests. . . . . . . . . . . . . 2-33 2-199Battery circuit tests . . . . . . . . . 2-35 2-237Brake system tests . . . . . . . . . . 2-41 2-419Compression/mechanical tests . 2-30 2-147Cooling system tests . . . . . . . . . 2-25 2-61
INDEX (Cont’d)
TM 9-2320-387-24-1
INDEX 48 Change 1
Para. Page
T (Cont’d)
Para. Page
T (Cont’d)
TM 9-2320-387-24-1
Change 1 INDEX 49
DCA troubleshooting . . . . . . . . 2-45 2-479Drivetrain tests. . . . . . . . . . . . . 2-43 2-453Electrical circuit description. . . 2-22 2-43Electrical tests . . . . . . . . . . . . . 2-27 2-75Engine cooling tests . . . . . . . . . 2-31 2-159Engine lubrication tests . . . . . . 2-32 2-191Engine running tests . . . . . . . . 2-24 2-51Fuel system tests . . . . . . . . . . . 2-28 2-99Glossary of abbreviations andcommonly used terms . . . . . . . 2-21 2-42
Glow plugs circuit tests . . . . . . 2-37 2-289How to use this troubleshootingguide . . . . . . . . . . . . . . . . . . . . 2-20 2-36
Index . . . . . . . . . . . . . . . . . . . . . 2-19 2-35Instrument tests . . . . . . . . . . . . 2-38 2-305Lights tests . . . . . . . . . . . . . . . . 2-39 2-375Lubrication system tests. . . . . . 2-26 2-69Protective control box tests. . . . 2-34 2-213Startability tests . . . . . . . . . . . . 2-23 2-45Starter circuit tests. . . . . . . . . . 2-36 2-247Steering system tests . . . . . . . . 2-42 2-433STE/ICE-R test procedures. . . . 2-46 2-489Transmission system tests . . . . 2-40 2-385Vehicle testing . . . . . . . . . . . . . 2-47 2-517Winch system tests . . . . . . . . . . 2-44 2-471
Troubleshooting instructions,mechanical (DS/GS) . . . . . . . . . . 14-2 14-1
Troubleshooting symptom index,mechanical (DS/GS) . . . . . . . . . . 14-2 14-1
Tube, fuel drain-back:Installation . . . . . . . . . . . . . . . . 3-38b 3-76Removal. . . . . . . . . . . . . . . . . . . 3-38a 3-76
Tube, radiator lower, assembly:Installation . . . . . . . . . . . . . . . . 3-71b 3-127Removal. . . . . . . . . . . . . . . . . . . 3-71a 3-127
Tunnel interior side insulation:Installation . . . . . . . . . . . . . . . . 10-33b 10-59Removal. . . . . . . . . . . . . . . . . . . 10-33a 10-59
Turbine shaft and overdrive carrierassembly:
Overdrive carrier cleaning . . . . 28-13g 28-52Overdrive carrier inspection. . . 28-13h 28-52Overdrive carrier measurement 28-13f 28-52Overdrive unit assembly. . . . . . 28-13j 28-54Overdrive unit disassembly . . . 28-13a 28-48Overrun clutch assembly . . . . . 28-13e 28-50Overrun clutch cleaning . . . . . . 28-13c 28-48Overrun clutch disassembly . . . 28-13b 28-48Overrun clutch inspection. . . . . 28-13d 28-48Turbine shaft inspection. . . . . . 28-13i 28-54
Turbocharger:Installation . . . . . . . . . . . . . . . . 15-21b 15-38Removal. . . . . . . . . . . . . . . . . . . 15-21a 15-38
Turret armor and seal:Installation . . . . . . . . . . . . . . . . 11-52b 11-103Removal. . . . . . . . . . . . . . . . . . . 11-52a 11-103
Turret armor and turret bearing hatch latch:
Installation . . . . . . . . . . . . . . . . 11-50b 11-100Removal. . . . . . . . . . . . . . . . . . . 11-50a 11-100
Turret armor brush seal:Installation . . . . . . . . . . . . . . . . 11-51b 11-102Removal. . . . . . . . . . . . . . . . . . . 11-51a 11-102
Turret backrest:Installation . . . . . . . . . . . . . . . . 11-54b 11-106Removal. . . . . . . . . . . . . . . . . . . 11-54a 11-106
Turret bearing and stop ring:Inspection . . . . . . . . . . . . . . . . . 11-57b 11-110Installation . . . . . . . . . . . . . . . . 11-57c 11-110Removal. . . . . . . . . . . . . . . . . . . 11-57a 11-110
Turret brake and base:Adjustment . . . . . . . . . . . . . . . . 11-55c 11-108Installation . . . . . . . . . . . . . . . . 11-55b 11-108Removal. . . . . . . . . . . . . . . . . . . 11-55a 11-108
Turret door:Installation . . . . . . . . . . . . . . . . 11-53b 11-104Removal. . . . . . . . . . . . . . . . . . . 11-53a 11-104
Turret frame:Installation . . . . . . . . . . . . . . . . 25-4b 25-6Removal. . . . . . . . . . . . . . . . . . . 25-4a 25-4
Turret hatch assembly components:Hatch support rod clip installation . . . . . . . . . . . . . . . 11-61g 11-118
Hatch support rod clip removal 11-61d 11-117Pivot lug installation . . . . . . . . 11-61i 11-118Pivot lug removal . . . . . . . . . . . 11-61b 11-116Pivot rod installation . . . . . . . . 11-61j 11-118Pivot rod removal . . . . . . . . . . . 11-61a 11-116Protective bumper installation . 11-61f 11-118Protective bumper removal. . . . 11-61e 11-117Strap fastener loop installation 11-61h 11-118Strap fastener loop removal . . . 11-61c 11-116
Turret hatch pivot base:Installation . . . . . . . . . . . . . . . . 11-59b 11-113Removal. . . . . . . . . . . . . . . . . . . 11-59a 11-113
Turret pintle mount:Inspection . . . . . . . . . . . . . . . . . 11-62b 11-120Installation . . . . . . . . . . . . . . . . 11-62c 11-120Removal. . . . . . . . . . . . . . . . . . . 11-62a 11-120
INDEX (Cont’d)
Para. Page
T (Cont’d)
Para. Page
T (Cont’d)

U-joint, steering shaft:Installation . . . . . . . . . . . . . . . . 8-21b 8-60Removal. . . . . . . . . . . . . . . . . . . 8-21a 8-60
Umbilical power cable, 200-ampere dual voltage:
Installation . . . . . . . . . . . . . . . . 4-7b 4-16Removal. . . . . . . . . . . . . . . . . . . 4-7a 4-14
Umbilical power cable,200-ampere dual voltage. . . . . . . 1-30 1-40
Underbody protection kit:Front shield installation . . . . . . 10-58.2k 10-98.16Front shield removal. . . . . . . . . 10-58.2b 10-98.5Front skid plate installation. . . 10-58.2l 10-99Front skid plate removal . . . . . 10-58.2a 10-98.4Fuel tank shield installation . . 10-58.2g 10-98.10Fuel tank shield removal . . . . . 10-58.2f 10-98.10Intermediate shield
installation. . . . . . . . . . . . . . . 10-58.2j 10-98.14Intermediate shield removal. . . 10-58.2c 10-98.6Rear shield installation . . . . . . 10-58.2h 10-98.12Rear shield removal . . . . . . . . . 10-58.2e 10-98.9Transfer case shield
installation. . . . . . . . . . . . . . . 10-58.2i 10-98.13Transfer case shield removal . . 10-58.2d 10-98.8
Universal joint:Assembly . . . . . . . . . . . . . . . . . . 6-5b 6-10Disassembly . . . . . . . . . . . . . . . 6-5a 6-10
Upper ball joint:Inspection . . . . . . . . . . . . . . . . . 6-23a 6-50.2Installation . . . . . . . . . . . . . . . . 6-23c 6-52Removal. . . . . . . . . . . . . . . . . . . 6-23b 6-52
Upper control arm:Installation . . . . . . . . . . . . . . . . 6-25b 6-56Removal. . . . . . . . . . . . . . . . . . . 6-25a 6-56
Upper cowl liner, passenger side:Installation . . . . . . . . . . . . . . . . 25-13b 25-36Removal. . . . . . . . . . . . . . . . . . . 25-13a 25-36
Upper hinge, tailgate:Installation . . . . . . . . . . . . . . . . 10-39b 10-68Removal. . . . . . . . . . . . . . . . . . . 10-39a 10-67
V
Valve assembly, 10,500 lb rear hydraulic winch (M1114):
Installation . . . . . . . . . . . . . . . . 12-36.5b 12-68.23Removal. . . . . . . . . . . . . . . . . . . 12-36.5a 12-68.20
Valve, heater shutoff:Installation . . . . . . . . . . . . . . . . 10-72b 10-124Removal. . . . . . . . . . . . . . . . . . . 10-72a 10-124
Valve lifter, hydraulic:Installation . . . . . . . . . . . . . . . . 15-9b 15-18Removal. . . . . . . . . . . . . . . . . . . 15-9a 15-18
Valve, proportioning and differential:Differential valve installation. . 7-10b 7-32Differential valve removal . . . . 7-10a 7-32Proportioning valve installation 7-10d 7-33Proportioning valve removal. . . 7-10c 7-32
Vehicle testing . . . . . . . . . . . . . . . . 2-47 2-517Vent line and filter, fuel tank:
Installation . . . . . . . . . . . . . . . . 3-28b 3-56Removal. . . . . . . . . . . . . . . . . . . 3-28a 3-56
Vent line, differential:Installation . . . . . . . . . . . . . . . . 6-14b 6-39Removal. . . . . . . . . . . . . . . . . . . 6-14a 6-39
Vent line, front geared hub:Installation . . . . . . . . . . . . . . . . 6-16b 6-42Removal. . . . . . . . . . . . . . . . . . . 6-16a 6-42
Vent line, fuel tank filler spout:Installation . . . . . . . . . . . . . . . . 3-30b 3-60Removal. . . . . . . . . . . . . . . . . . . 3-30a 3-60
Vent line, rear geared hub:Installation . . . . . . . . . . . . . . . . 6-15b 6-40Removal. . . . . . . . . . . . . . . . . . . 6-15a 6-40
Vent lines, air intake and fuel pump:Installation . . . . . . . . . . . . . . . . 3-21b 3-37Removal. . . . . . . . . . . . . . . . . . . 3-21a 3-37
Vent line, transfer case:Installation . . . . . . . . . . . . . . . . 5-19b 5-39Removal. . . . . . . . . . . . . . . . . . . 5-19a 5-39
Vent line, transmission:Installation . . . . . . . . . . . . . . . . 5-10b 5-24Removal. . . . . . . . . . . . . . . . . . . 5-10a 5-24
Vent line, winch:Installation . . . . . . . . . . . . . . . . 12-29b 12-58Removal. . . . . . . . . . . . . . . . . . . 12-29a 12-58
W
Wait-to-start lamp:Installation . . . . . . . . . . . . . . . . 4-20b 4-42Removal. . . . . . . . . . . . . . . . . . . 4-20a 4-42
Wastegate actuator:Installation . . . . . . . . . . . . . . . . 15-19b 15-36Removal. . . . . . . . . . . . . . . . . . . 15-19a 15-36
Wastegate housing:Installation . . . . . . . . . . . . . . . . 15-18b 15-35Removal. . . . . . . . . . . . . . . . . . . 15-18a 15-35
INDEX (Cont’d)
TM 9-2320-387-24-1
INDEX 50 Change 1
Para. Page
U
Para. Page
V (Cont’d)
TM 9-2320-387-24-1
Change 1 INDEX 51
Water can tray:Installation . . . . . . . . . . . . . . . . 11-70b 11-131Removal. . . . . . . . . . . . . . . . . . . 11-70a 11-131
Water crossover:Inspection . . . . . . . . . . . . . . . . . 3-79b 3-138Installation . . . . . . . . . . . . . . . . 3-79c 3-138Removal. . . . . . . . . . . . . . . . . . . 3-79a 3-138
Water pump and adapter plate:Inspection . . . . . . . . . . . . . . . . . 3-78b 3-134Installation . . . . . . . . . . . . . . . . 3-78c 3-136Removal. . . . . . . . . . . . . . . . . . . 3-78a 3-134
Water pump inlet hose:Installation . . . . . . . . . . . . . . . . 3-73b 3-129Removal. . . . . . . . . . . . . . . . . . . 3-73a 3-129
Water pump pulley:Installation . . . . . . . . . . . . . . . . 3-77b 3-133Removal. . . . . . . . . . . . . . . . . . . 3-77a 3-133
Weapon carrier body maintenancetask summary . . . . . . . . . . . . . . . 11-1 11-1
Weathercap:Installation . . . . . . . . . . . . . . . . 3-18b 3-33Removal. . . . . . . . . . . . . . . . . . . 3-18a 3-33
Weatherstrip (M1113), windshield glass and:
Installation . . . . . . . . . . . . . . . . 10-26b 10-48Removal. . . . . . . . . . . . . . . . . . . 10-26a 10-47
Wheel:Installation . . . . . . . . . . . . . . . . 8-3b 8-6Removal. . . . . . . . . . . . . . . . . . . 8-3a 8-6
Wheel, and rubber runflat,radial tire:
Assembly . . . . . . . . . . . . . . . . . . 8-4d 8-13Disassembly . . . . . . . . . . . . . . . 8-4a 8-8Inspection and cleaning . . . . . . 8-4b 8-11Repair . . . . . . . . . . . . . . . . . . . . 8-4c 8-12
Wheel and runflat systemmaintenance task summary . . . . 8-1 8-1
Wheel, steering:Installation . . . . . . . . . . . . . . . . 8-12b 8-36Removal. . . . . . . . . . . . . . . . . . . 8-12a 8-36
Wheel stud:Installation . . . . . . . . . . . . . . . . 6-13b 6-38Removal. . . . . . . . . . . . . . . . . . . 6-13a 6-38
Wheel toe-in alignment, front:Preliminary inspection . . . . . . . 8-9a 8-24Toe-in adjustment. . . . . . . . . . . 8-9c 8-28Toe-in check . . . . . . . . . . . . . . . 8-9b 8-26
Wheel toe-out alignment, rear:Preliminary inspection . . . . . . . 8-10a 8-30Toe-out adjustment. . . . . . . . . . 8-10c 8-34Toe-out check . . . . . . . . . . . . . . 8-10b 8-32
Winch, 9,000 lb:Assembly . . . . . . . . . . . . . . . . . . 26-3d 26-7Cleaning . . . . . . . . . . . . . . . . . . 26-3b 26-5Disassembly . . . . . . . . . . . . . . . 26-3a 26-2Inspection . . . . . . . . . . . . . . . . . 26-3c 26-6
Winch, 10,500 lb hydraulic:Assembly . . . . . . . . . . . . . . . . . . 25-13.2d 25-36.12Cleaning . . . . . . . . . . . . . . . . . . 25-13b 25-36.8Disassembly . . . . . . . . . . . . . . . 25-13a 25-36.2Inspection . . . . . . . . . . . . . . . . . 25-13c 25-36.8
Winch cable:Installation . . . . . . . . . . . . . . . . 12-28b 12-56Removal. . . . . . . . . . . . . . . . . . . 12-28a 12-56
Winch cable, 10,500 lb hydraulic (M1113):
Installation . . . . . . . . . . . . . . . . 12-28.1b 12-56.2Removal. . . . . . . . . . . . . . . . . . . 12-28.1a 12-56.2
Winch cable, 10,500 lb rearhydraulic (M1114):
Installation . . . . . . . . . . . . . . . . 12-36.2b 12-68.4Removal. . . . . . . . . . . . . . . . . . . 12.36.2a 12-68.4
Winch, 10,500 rear hydraulic winch controller plug (M1114):
Installation . . . . . . . . . . . . . . . . 12-36.6b 12-36.28Removal. . . . . . . . . . . . . . . . . . . 12-36.6a 12-36.26
Winch, 10,500 lb hydraulic winch controller plug:
Installation . . . . . . . . . . . . . . . . 12-32.1b 12-62.5Removal. . . . . . . . . . . . . . . . . . . 12-32.1a 12-62
Winch, 10,500 lb hydraulic hoses (M1113):
Installation . . . . . . . . . . . . . . . . 12-31.1b 12-60.4Removal. . . . . . . . . . . . . . . . . . . 12-31.1a 12-60.2
Winch, 10,500 lb rear hydraulic hoses (M1114):
Installation . . . . . . . . . . . . . . . . 12-36.4b 12-68.14Removal. . . . . . . . . . . . . . . . . . . 12-36.4a 12-68.8
Winch, front:Installation . . . . . . . . . . . . . . . . 12-27b 12-54Removal. . . . . . . . . . . . . . . . . . . 12-27a 12-52
Winch, 10,500 lb hydraulic and brackets (M1113):
Brackets installation. . . . . . . . . 12-27.1c 12-54.4Brackets removal . . . . . . . . . . . 12-27.1b 12-54.4Winch installation. . . . . . . . . . . 12-27.1d 12-54.4Winch removal . . . . . . . . . . . . . 12-27.1a 12-54.2
Winch, 10,500 lb rear hydraulic and brackets (M1114):
Brackets installation. . . . . . . . . 12-36.1c 12-68.2Brackets removal . . . . . . . . . . . 12-36.1b 12-68.2Winch installation. . . . . . . . . . . 12-36.1d 12-68.2Winch removal . . . . . . . . . . . . . 12-36.1a 12-68.1
INDEX (Cont’d)
Para. Page
W (Cont’d)
Para. Page
W (Cont’d)
Winch, 10,500 lb rear hydraulic fairlead roller bracket assembly (M1114):
Installation . . . . . . . . . . . . . . . . 12-36.3b 12-68.6Removal. . . . . . . . . . . . . . . . . . . 12-36.3a 12-68.6
Winch kit maintenance task summary:
Direct support . . . . . . . . . . . . . . 26-2 26-1Unit . . . . . . . . . . . . . . . . . . . . . . 12-26 12-51
Winch power cable:Front power cable installation . 4-77b 4-134Front power cable removal . . . . 4-77a 4-134Rear power cable installation . . 4-77d 4-136Rear power cable removal. . . . . 4-77c 4-136
Winch, rear:Installation . . . . . . . . . . . . . . . . 12-33b 12-64Removal. . . . . . . . . . . . . . . . . . . 12-33a 12-63
Winch, 10,500 rear hydraulic valve assembly (M1114):
Installation . . . . . . . . . . . . . . . . 12-36.5b 12-68.23Removal. . . . . . . . . . . . . . . . . . . 12-36.5a 12-68.20
Winch system tests . . . . . . . . . . . . 2-44 2-471Winch vent line:
Installation . . . . . . . . . . . . . . . . 12-29b 12-58Removal. . . . . . . . . . . . . . . . . . . 12-29a 12-58
Winch vent line, rear:Installation . . . . . . . . . . . . . . . . 12-34b 12-66Removal. . . . . . . . . . . . . . . . . . . 12-34a 12-66
Window, door:Installation . . . . . . . . . . . . . . . . 11-3b 11-8Removal. . . . . . . . . . . . . . . . . . . 11-3a 11-6
Window seal, door:Installation . . . . . . . . . . . . . . . . 11-10b 11-20Removal. . . . . . . . . . . . . . . . . . . 11-10a 11-20
Windshield:Inspection . . . . . . . . . . . . . . . . . 25-6b 25-12Installation . . . . . . . . . . . . . . . . 25-6c 25-12Removal. . . . . . . . . . . . . . . . . . . 25-6a 25-10
Windshield assembly (M1113):Assembly . . . . . . . . . . . . . . . . . . 10-28c 10-52Disassembly . . . . . . . . . . . . . . . 10-28b 10-52Installation . . . . . . . . . . . . . . . . 10-28d 10-52Removal. . . . . . . . . . . . . . . . . . . 10-28a 10-52
Windshield de-icer, defroster switch, and circuit breakers:
Installation . . . . . . . . . . . . . . . . 10-67b 10-114Removal. . . . . . . . . . . . . . . . . . . 10-67a 10-114
Windshield glass (M1114):Inspection . . . . . . . . . . . . . . . . . 10-27b 10-50Installation . . . . . . . . . . . . . . . . 10-27c 10-50Removal. . . . . . . . . . . . . . . . . . . 10-27a 10-49
Windshield glass and weatherstrip (M1113):
Installation . . . . . . . . . . . . . . . . 10-26b 10-48Removal. . . . . . . . . . . . . . . . . . . 10-26a 10-47
Windshield retention bracket:Installation . . . . . . . . . . . . . . . . 10-29b 10-54Removal. . . . . . . . . . . . . . . . . . . 10-29a 10-54
Windshield washer hoses:Installation . . . . . . . . . . . . . . . . 10-65b 10-110Removal. . . . . . . . . . . . . . . . . . . 10-65a 10-110
Windshield washer nozzle:Installation . . . . . . . . . . . . . . . . 10-66b 10-112Removal. . . . . . . . . . . . . . . . . . . 10-66a 10-112
Windshield washer reservoir and pump assembly:
Inspection . . . . . . . . . . . . . . . . . 10-64a.1 10-108Installation . . . . . . . . . . . . . . . . 10-64b 10-108Removal. . . . . . . . . . . . . . . . . . . 10-64a 10-108
Windshield wiper arm pivot:Installation . . . . . . . . . . . . . . . . 10-60c 10-102Removal. . . . . . . . . . . . . . . . . . . 10-60b 10-102Repair (optional) . . . . . . . . . . . . 10-60a 10-101
Windshield wiper blade and arm:Installation . . . . . . . . . . . . . . . . 10-62c 10-104Removal. . . . . . . . . . . . . . . . . . . 10-62a 10-104Repair (optional) . . . . . . . . . . . . 10-62b 10-104
Windshield wiper linkage:Installation . . . . . . . . . . . . . . . . 10-61b 10-103Removal. . . . . . . . . . . . . . . . . . . 10-61a 10-103
Windshield wiper switch/motor:Installation . . . . . . . . . . . . . . . . 10-63b 10-106Removal. . . . . . . . . . . . . . . . . . . 10-63a 10-106
Windshield wiper/washer systemoperation . . . . . . . . . . . . . . . . . . . 1-24 1-31
Wiring diagrams and schematic:appendix H . . . . . . . . . . . . . . . . . H-1
Wiring harness, body:Installation . . . . . . . . . . . . . . . . 27-3b 27-22Removal. . . . . . . . . . . . . . . . . . . 27-3a 27-2
Wiring harness connector:Connector assembly repair . . . . 4-80d 4-147Female cable connector repair . 4-80c 4-147Male cable connector repair . . . 4-80b 4-146Protective control box lowercannon plug assembly repair . 4-80f 4-148
Receptacle assembly repair . . . 4-80e 4-148Terminal-type cable connectorrepair . . . . . . . . . . . . . . . . . . . . 4-80a 4-146
Wiring harness, engine:Installation . . . . . . . . . . . . . . . . 18-6b 18-40Removal. . . . . . . . . . . . . . . . . . . 18-6a 18-34
Para. Page
W (Cont’d)
Para. Page
W (Cont’d)
INDEX (Cont’d)
TM 9-2320-387-24-1
INDEX 52 Change 1

TM 9-2320-387-24-1
Change 1 INDEX 53/(INDEX 54 blank)
Wiring harness, hood jumper:Installation . . . . . . . . . . . . . . . . 4-79b 4-143Removal. . . . . . . . . . . . . . . . . . . 4-79a 4-140
Wiring harness, STE/ICE-R: Installation . . . . . . . . . . . . . . . . 18-5b 18-30Removal. . . . . . . . . . . . . . . . . . . 18-5a 18-28
Para. Page
W (Cont’d)
Para. Page
INDEX (Cont’d)
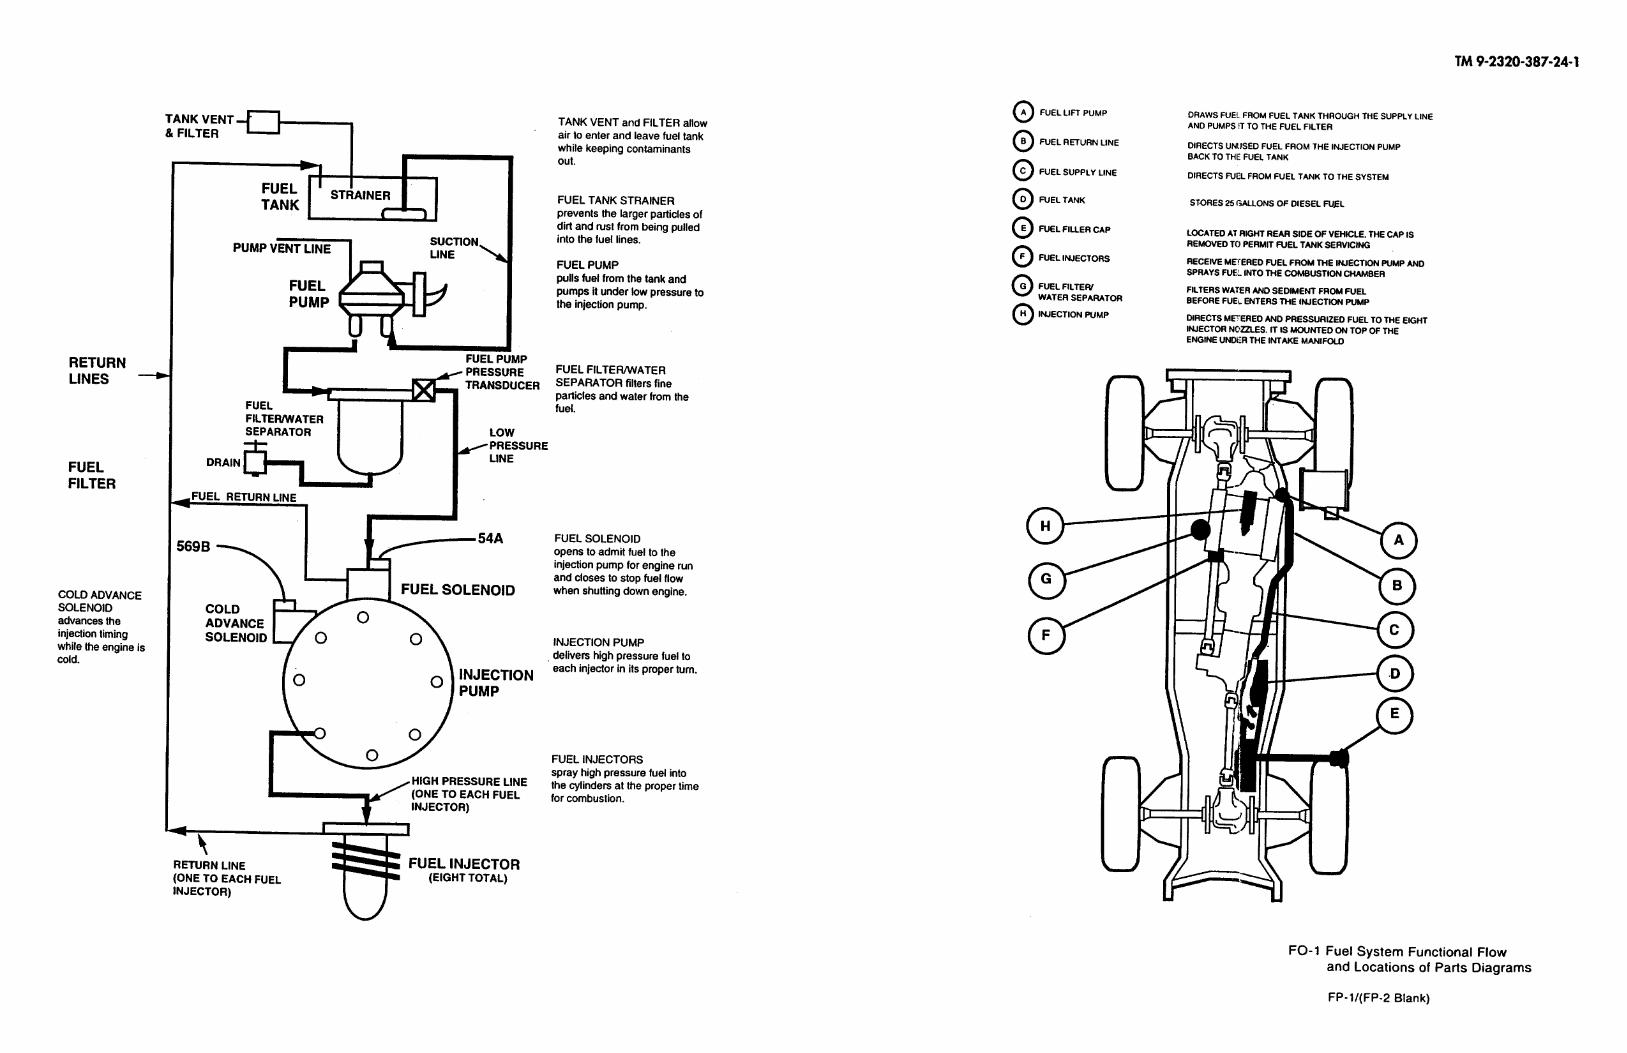
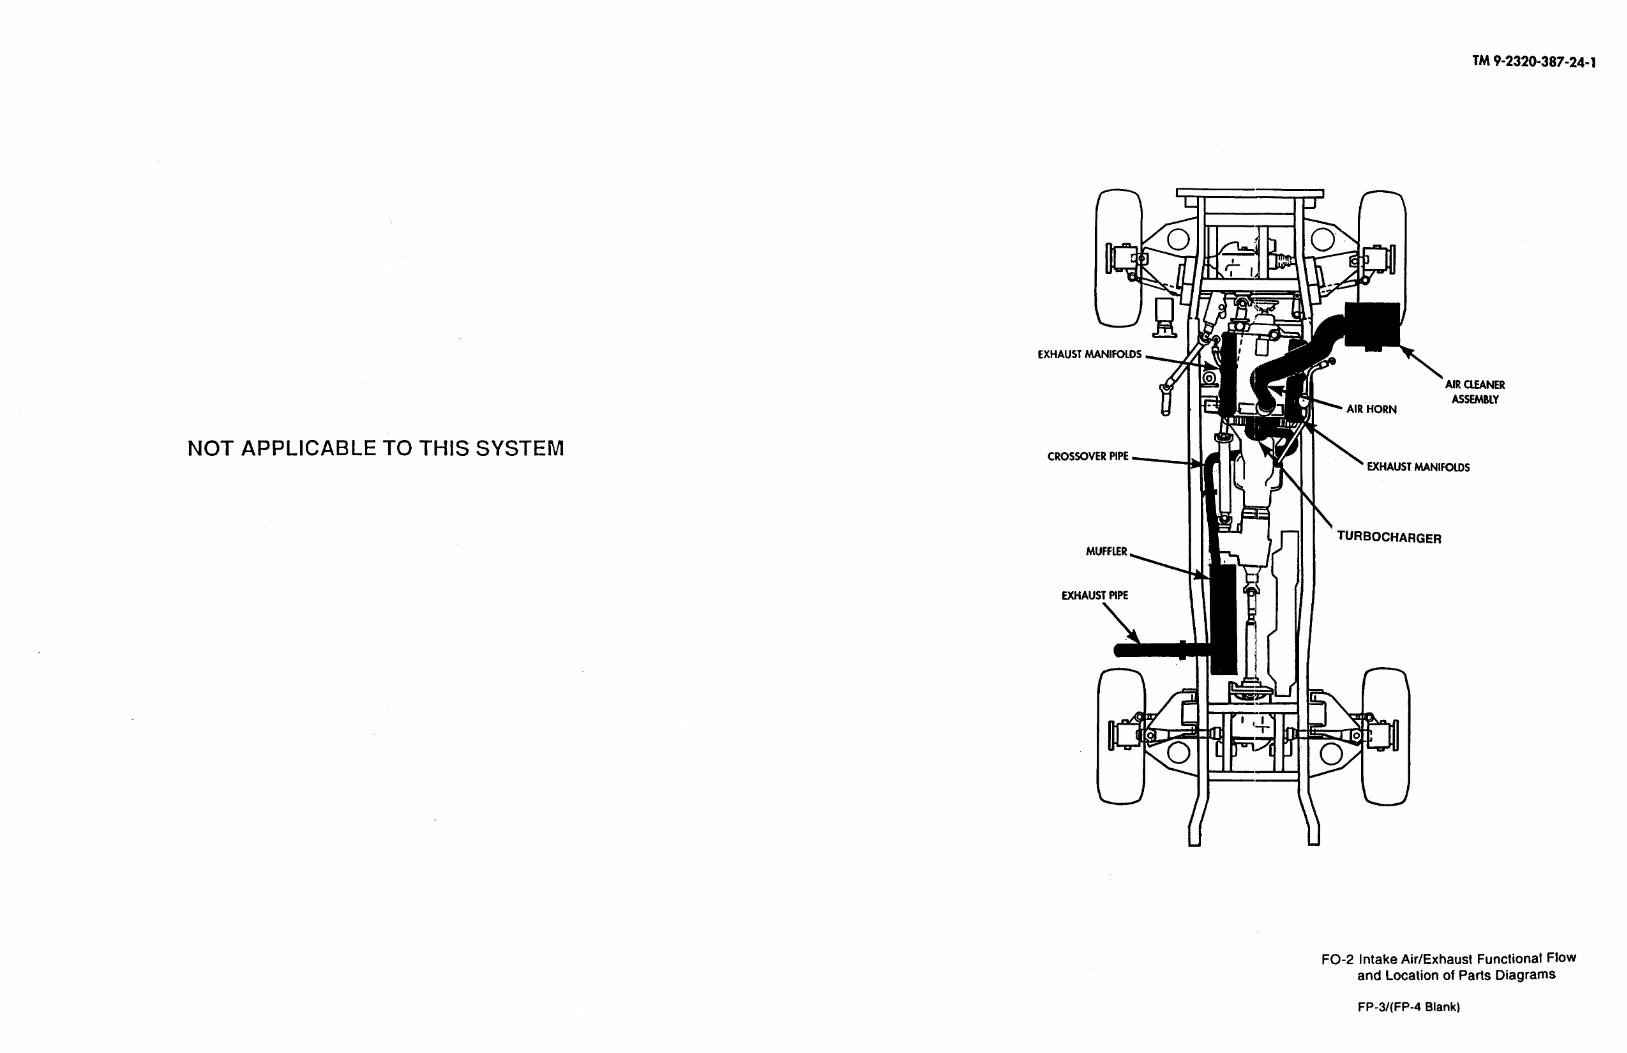
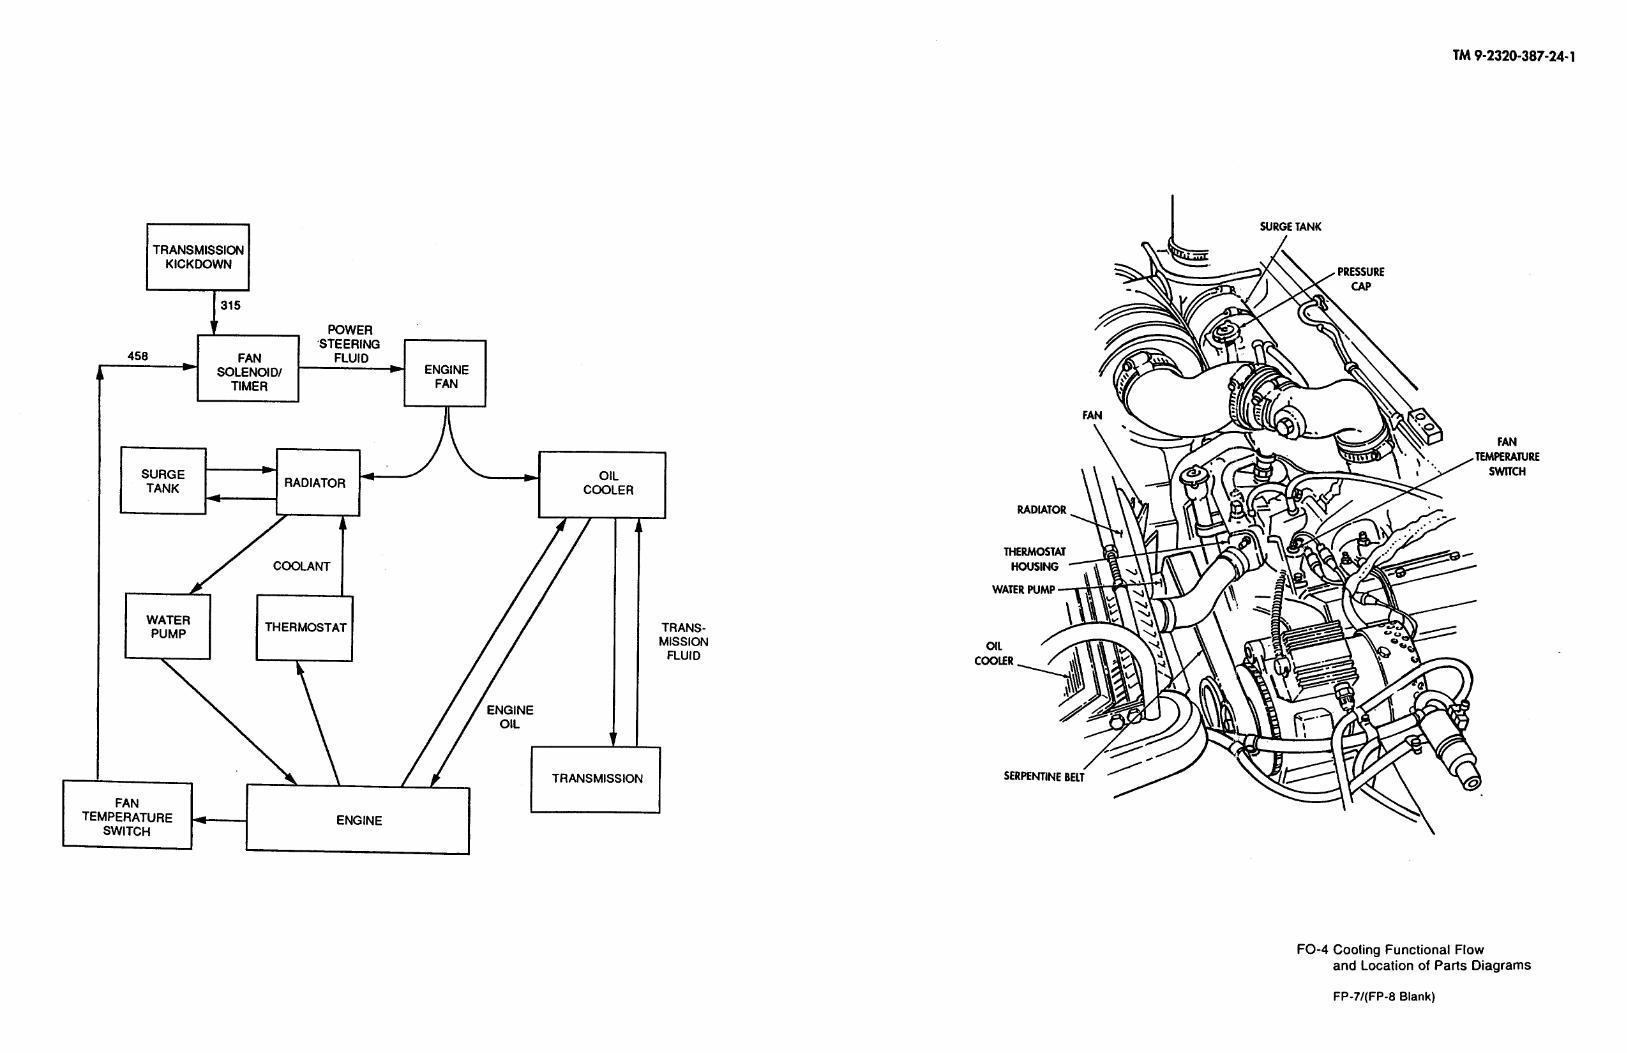
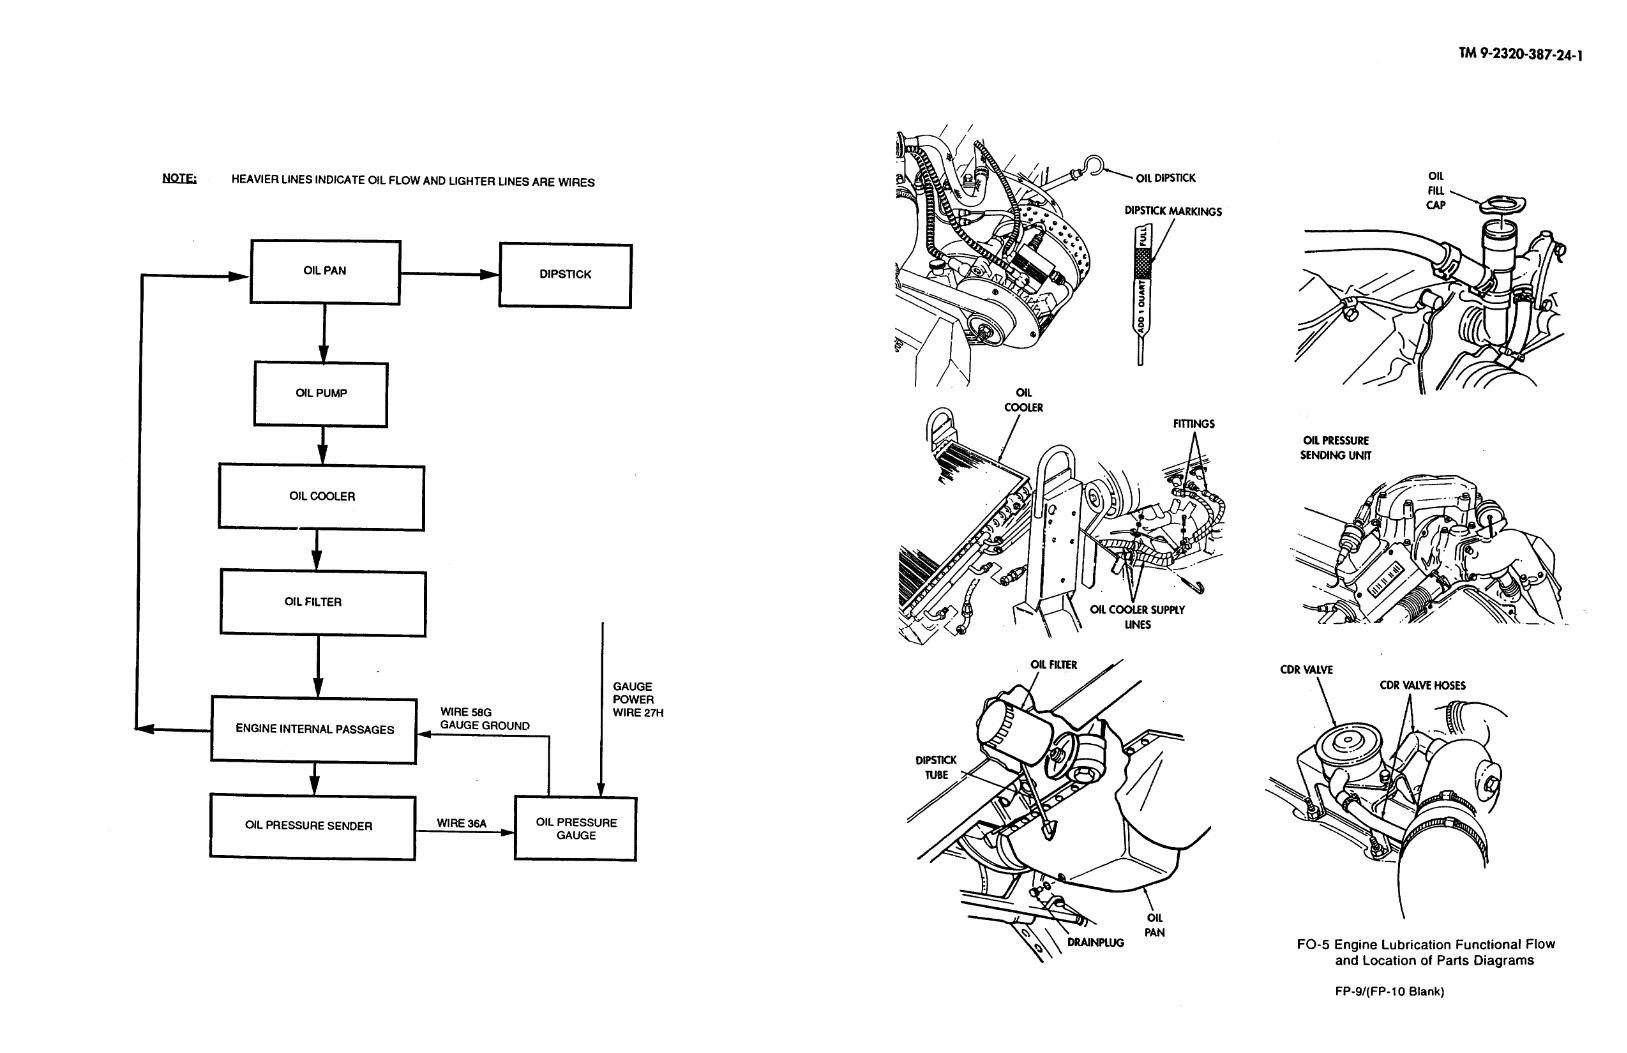
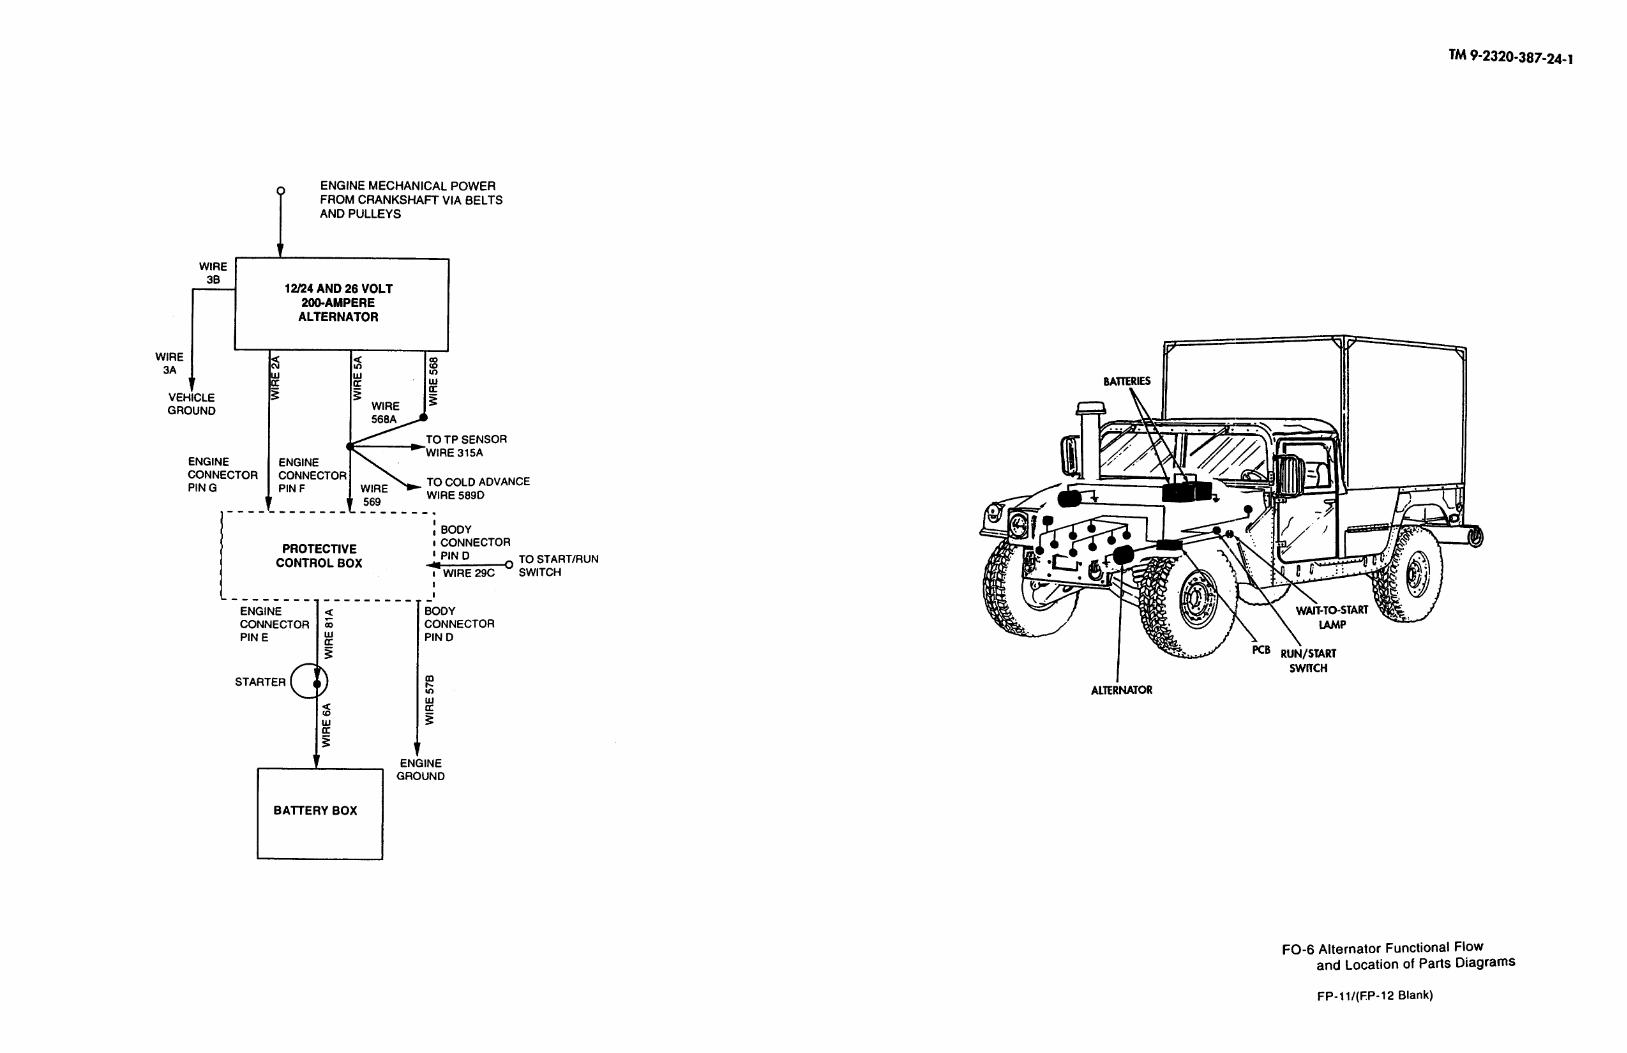
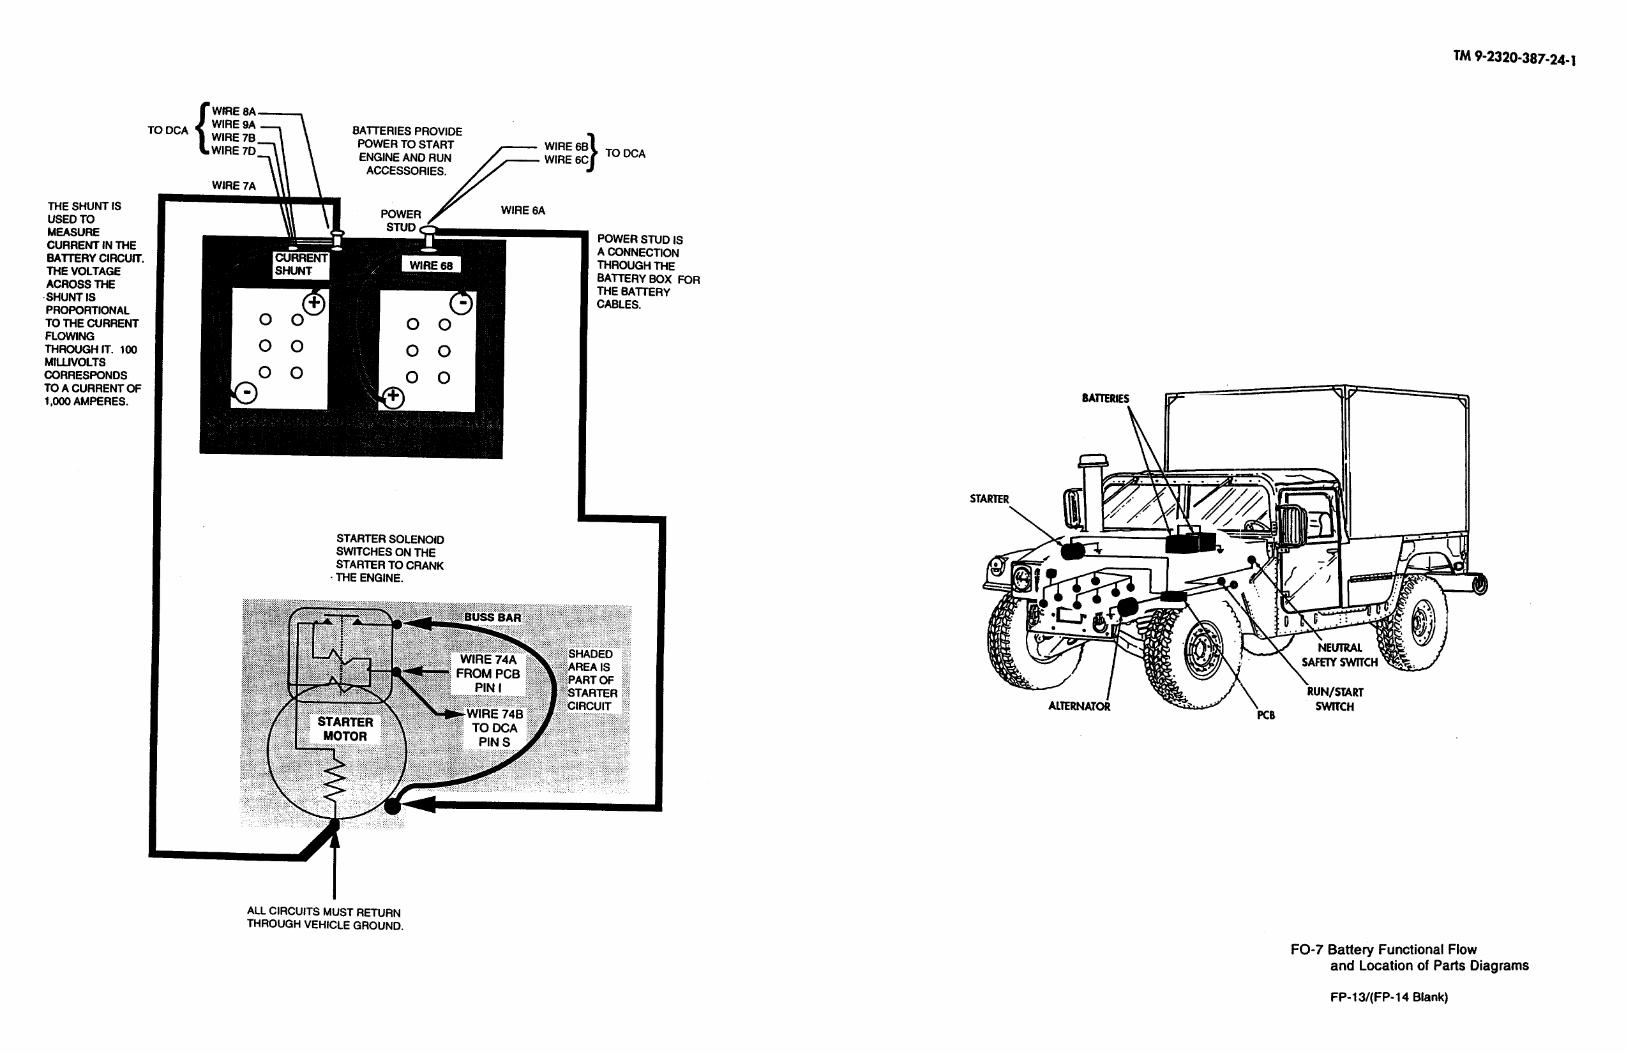
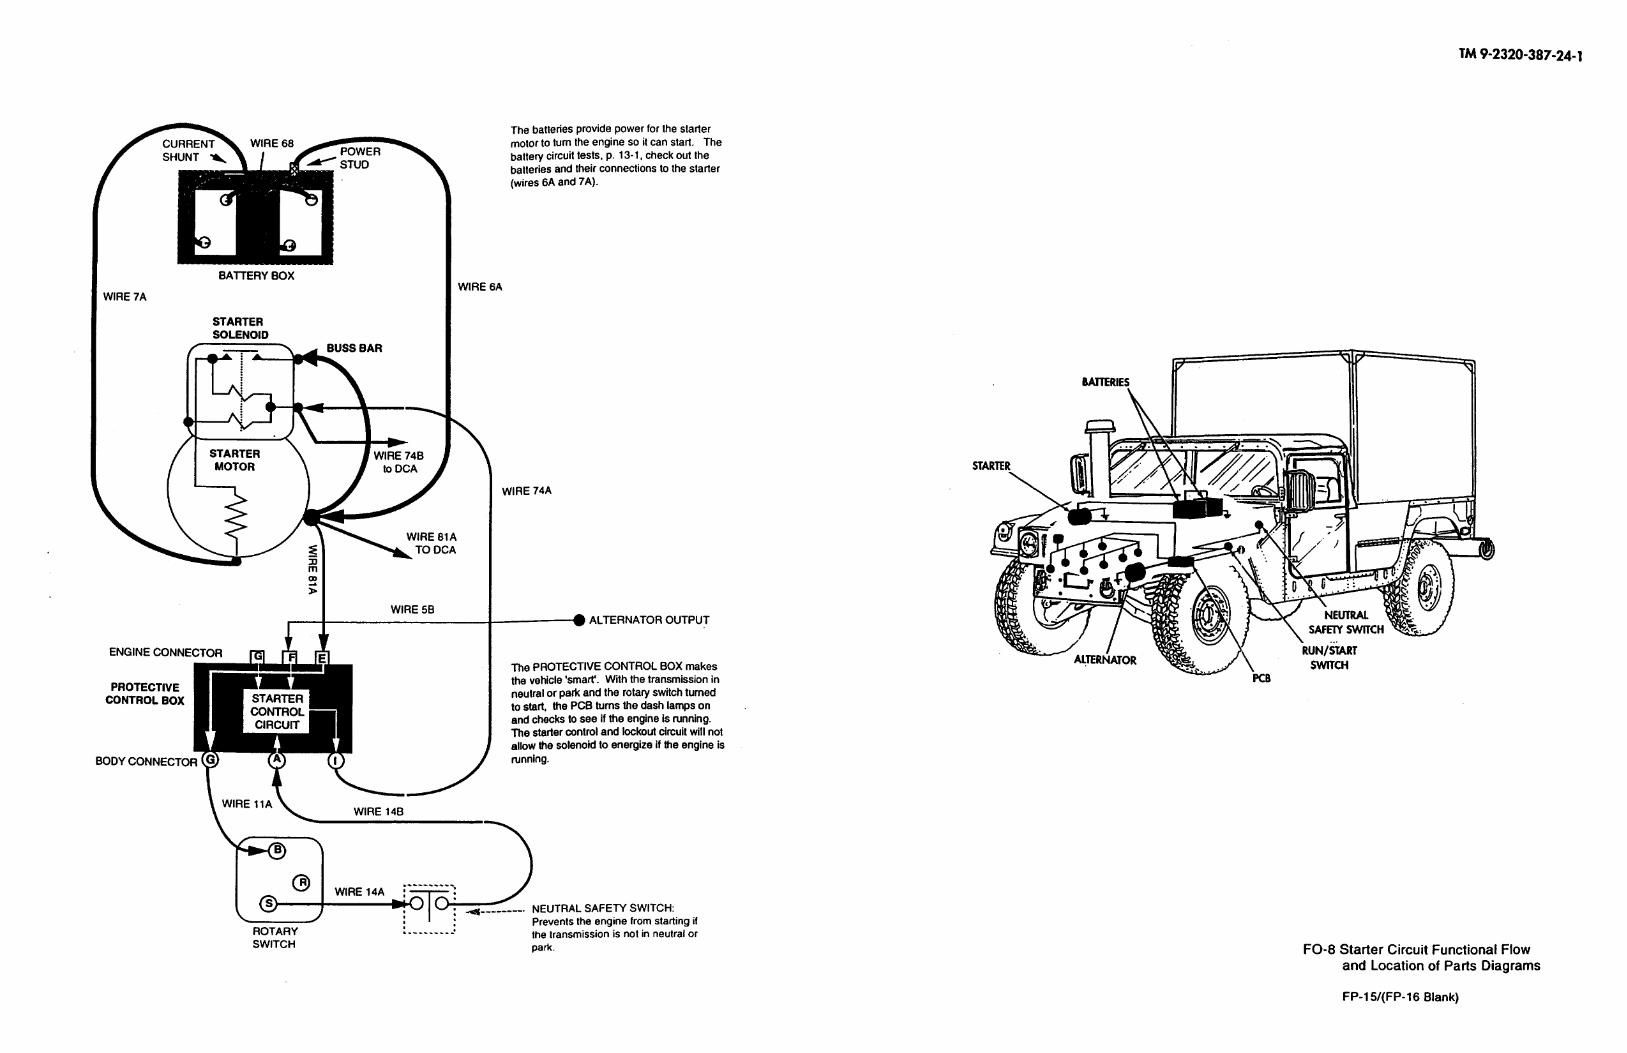
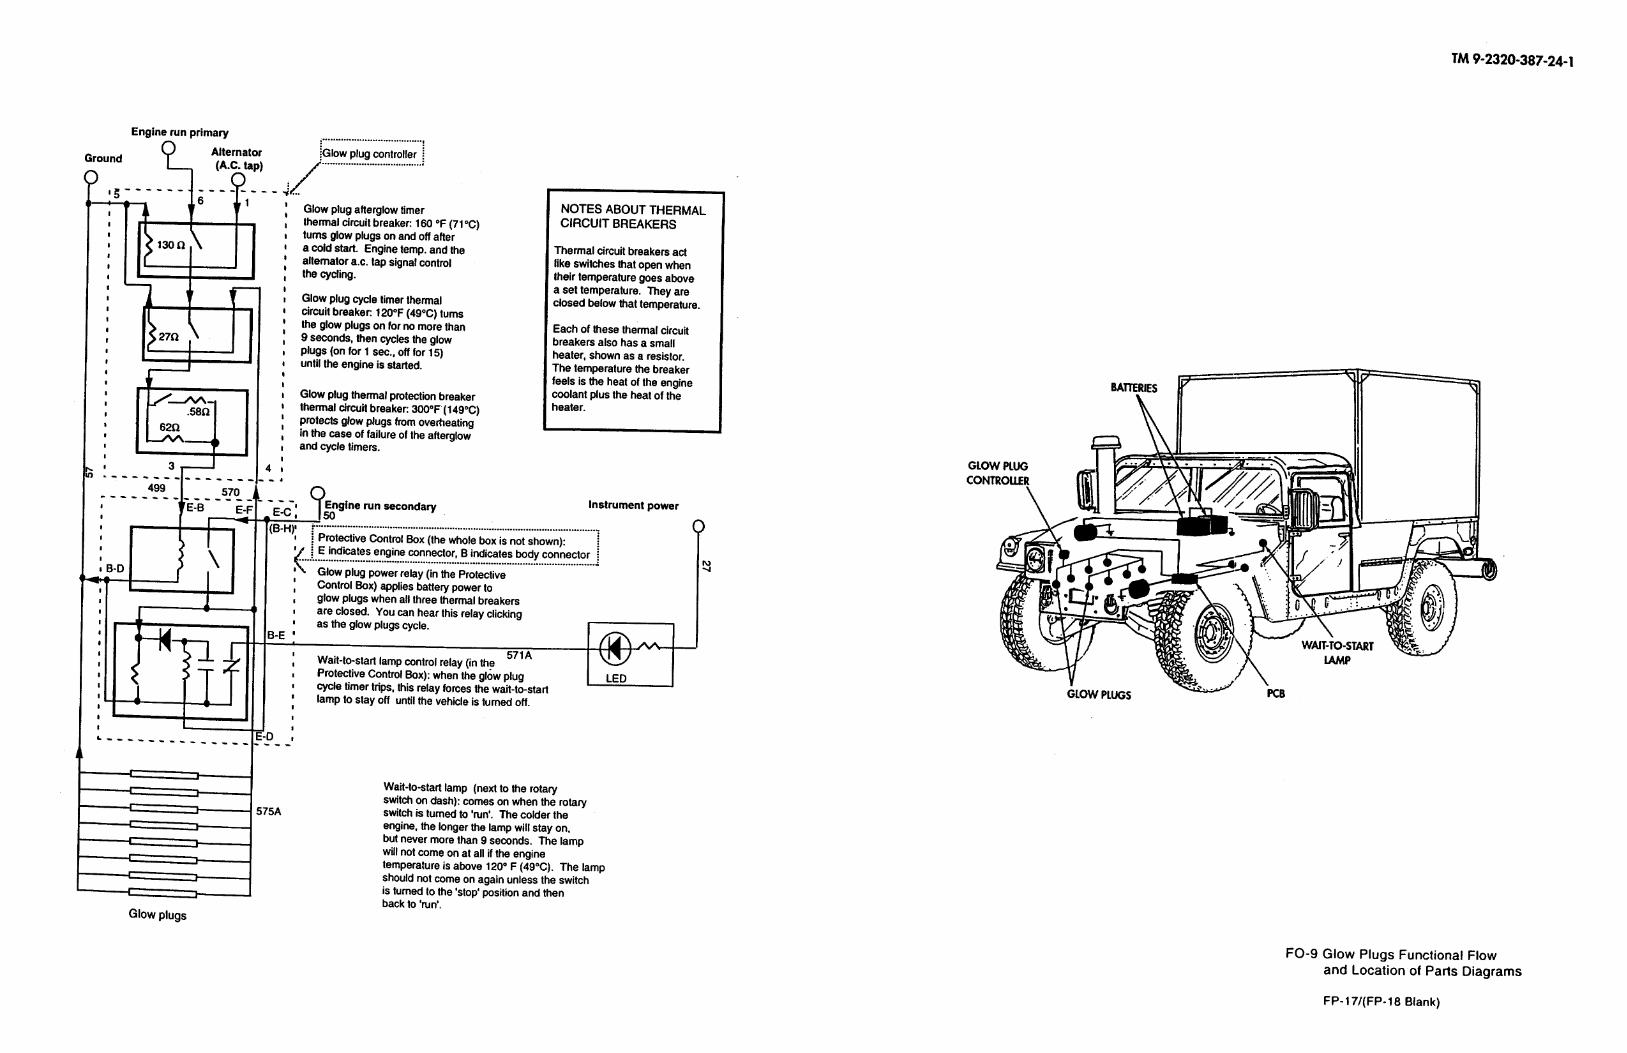
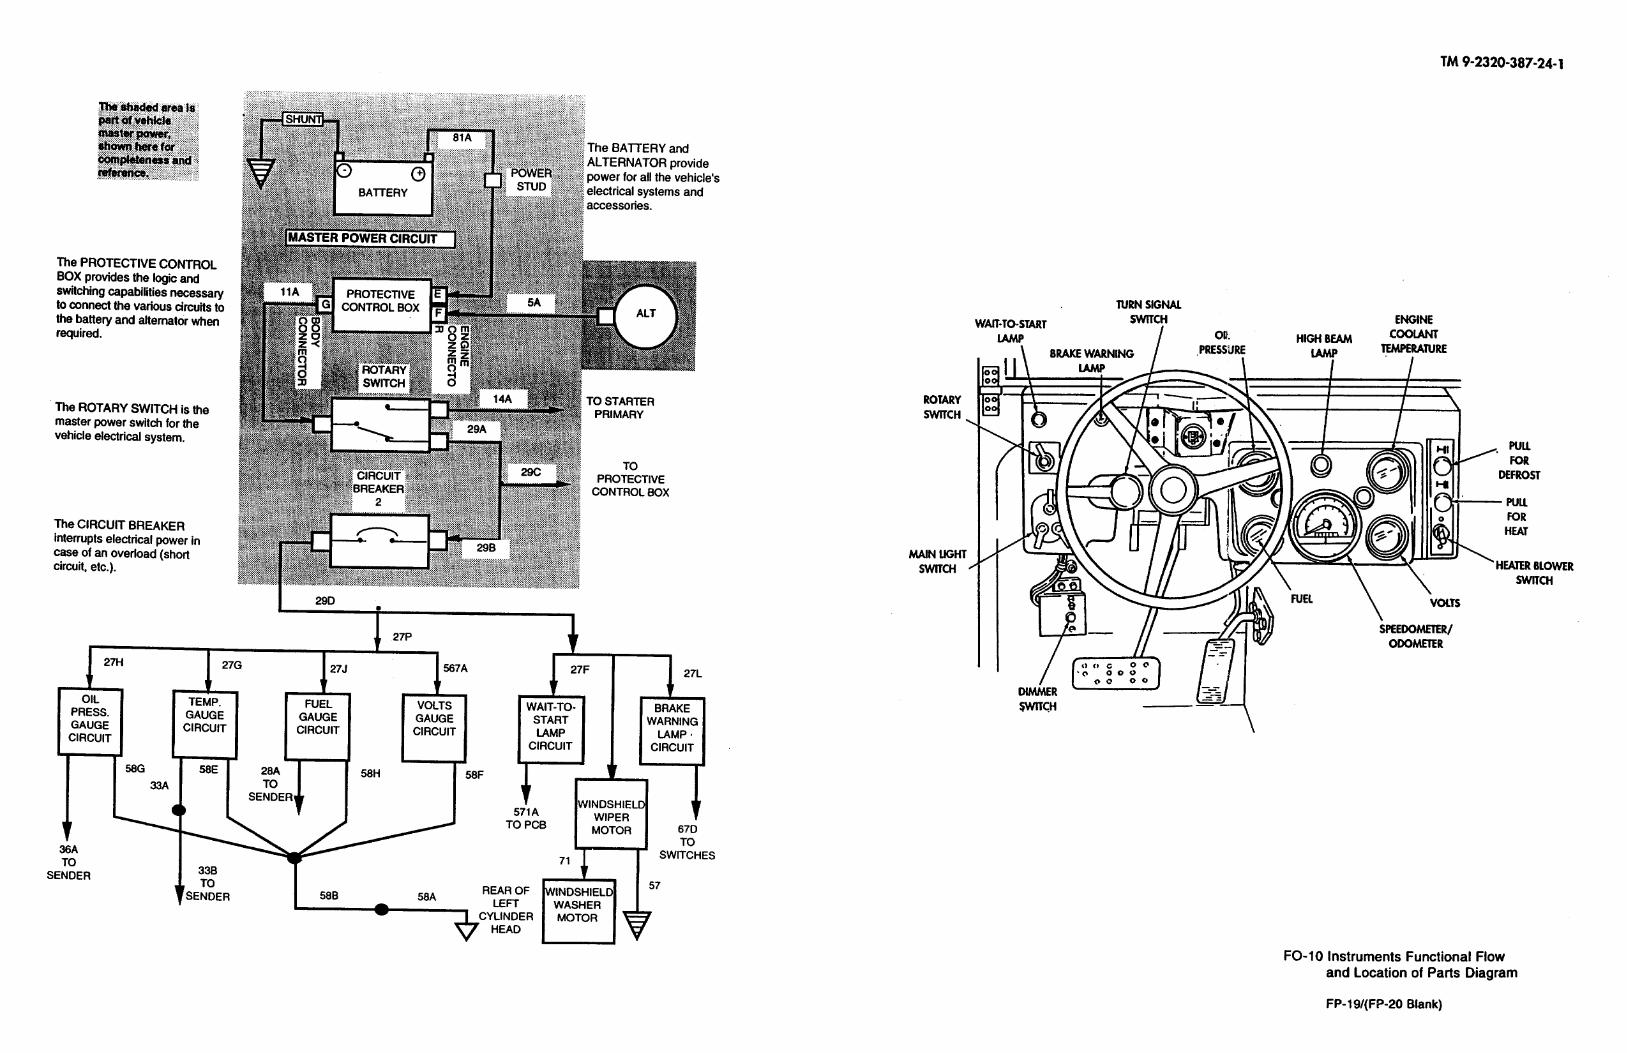

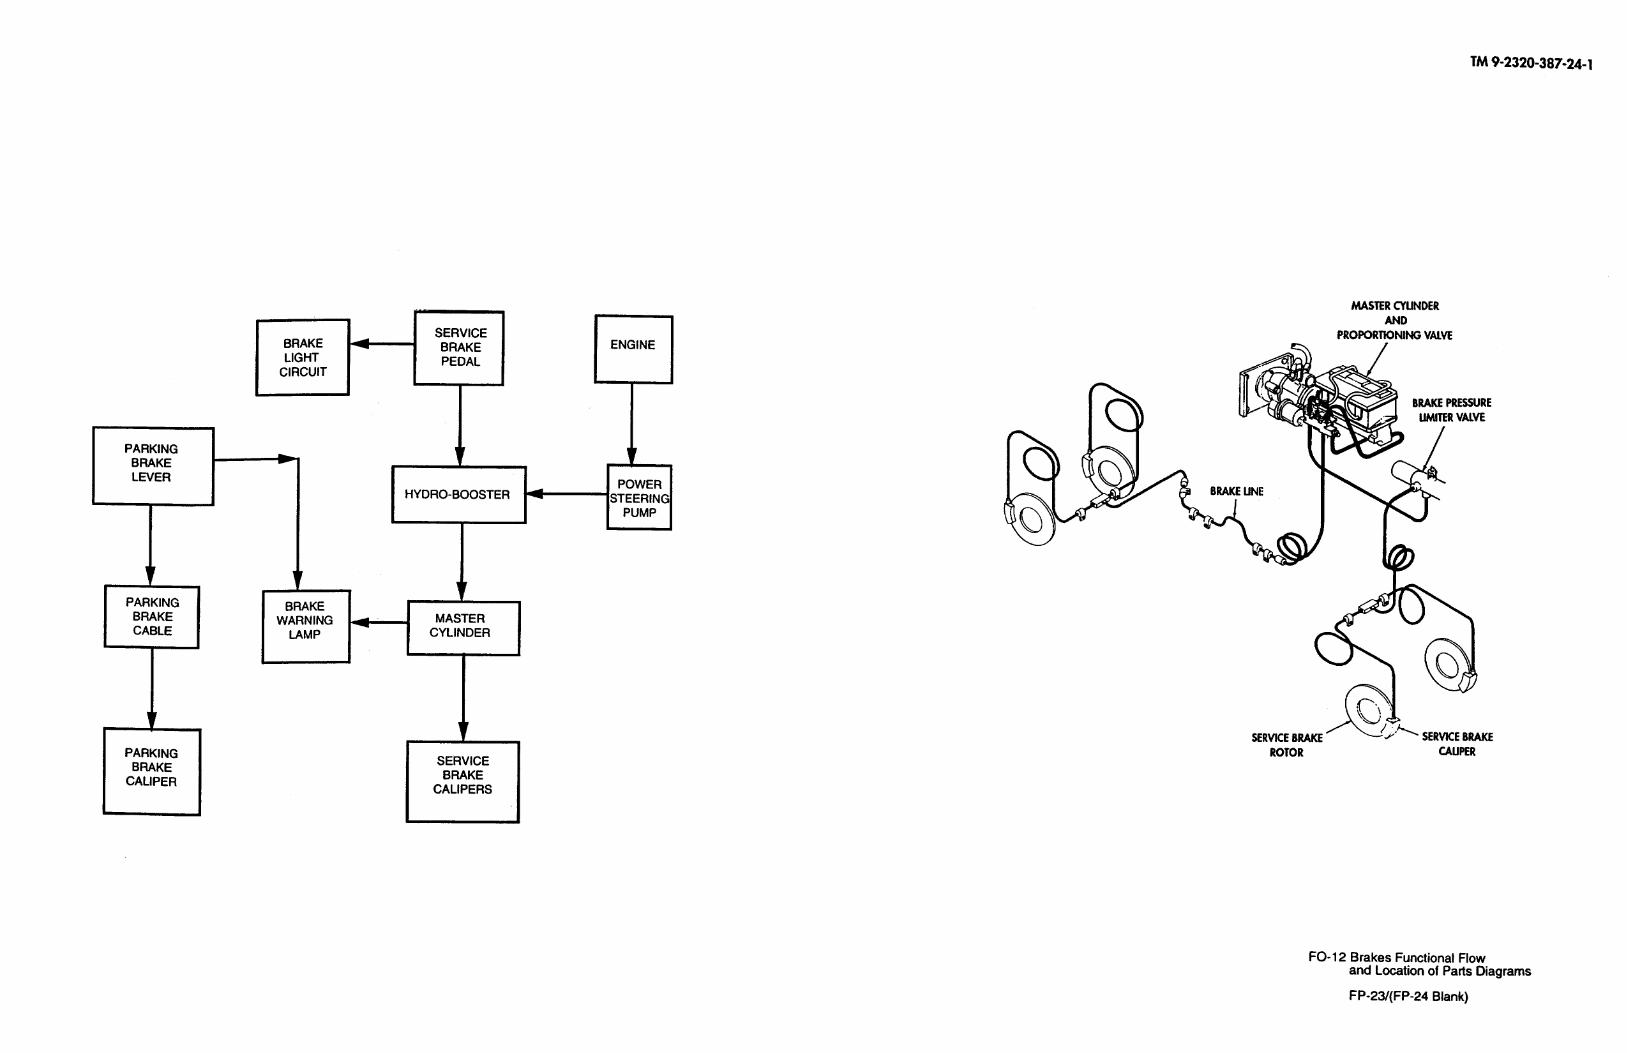
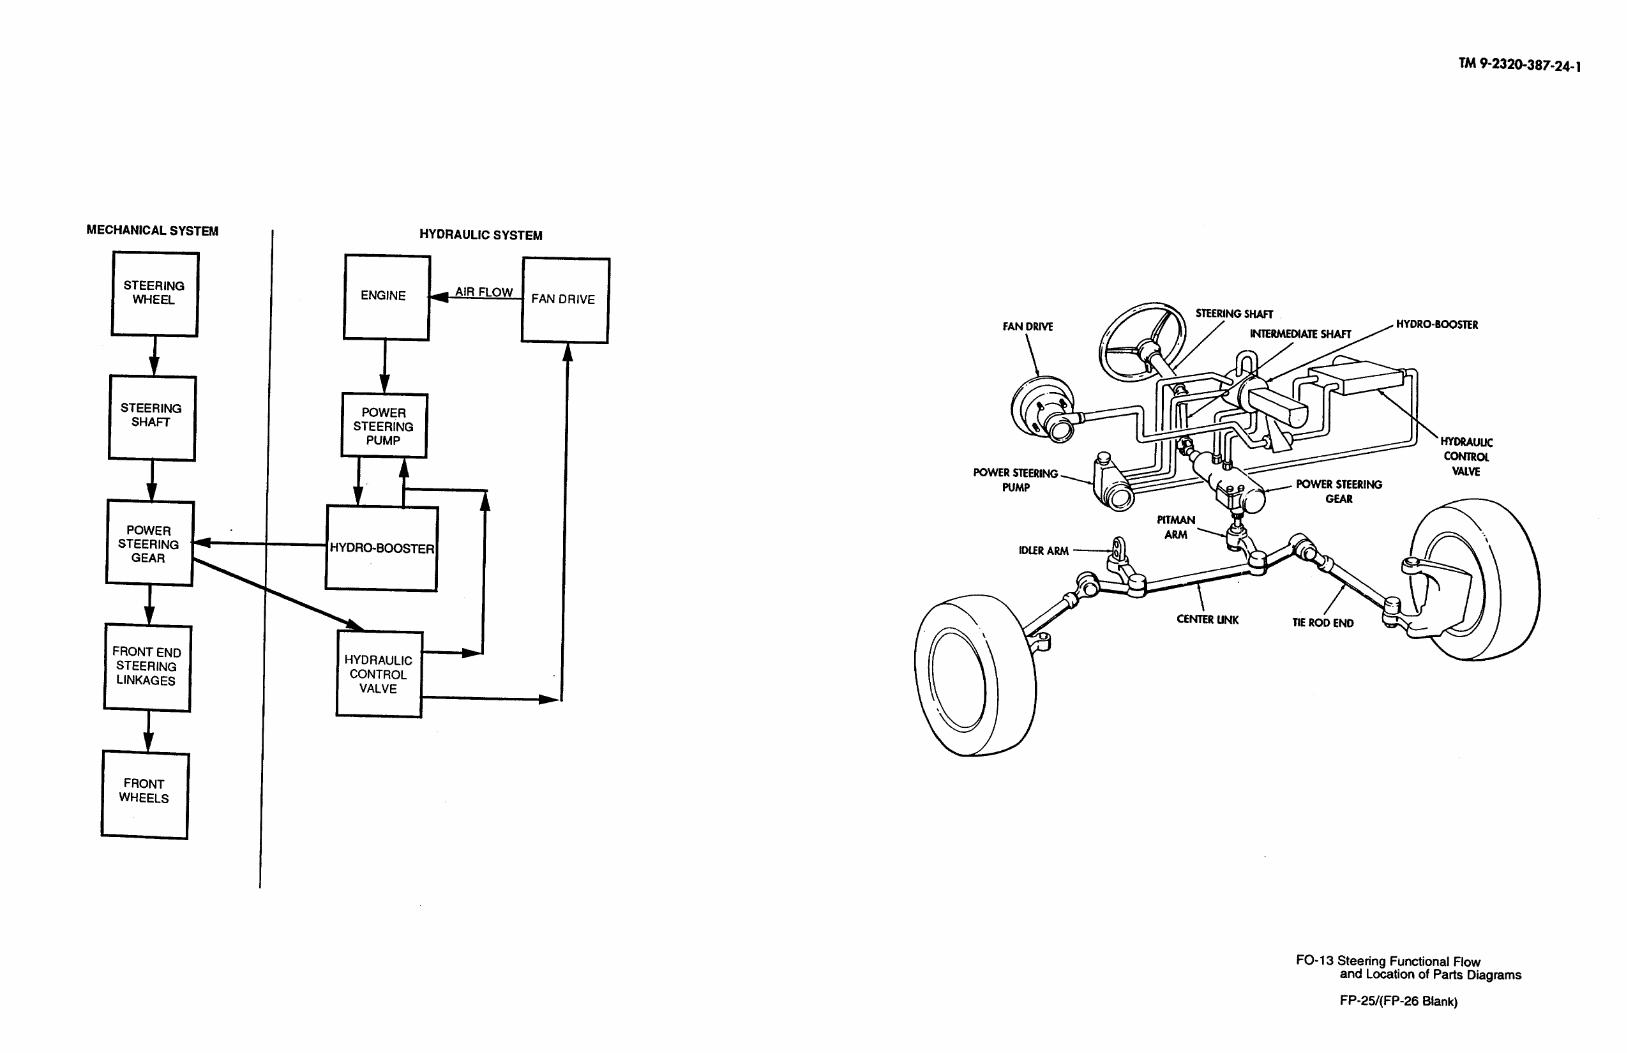

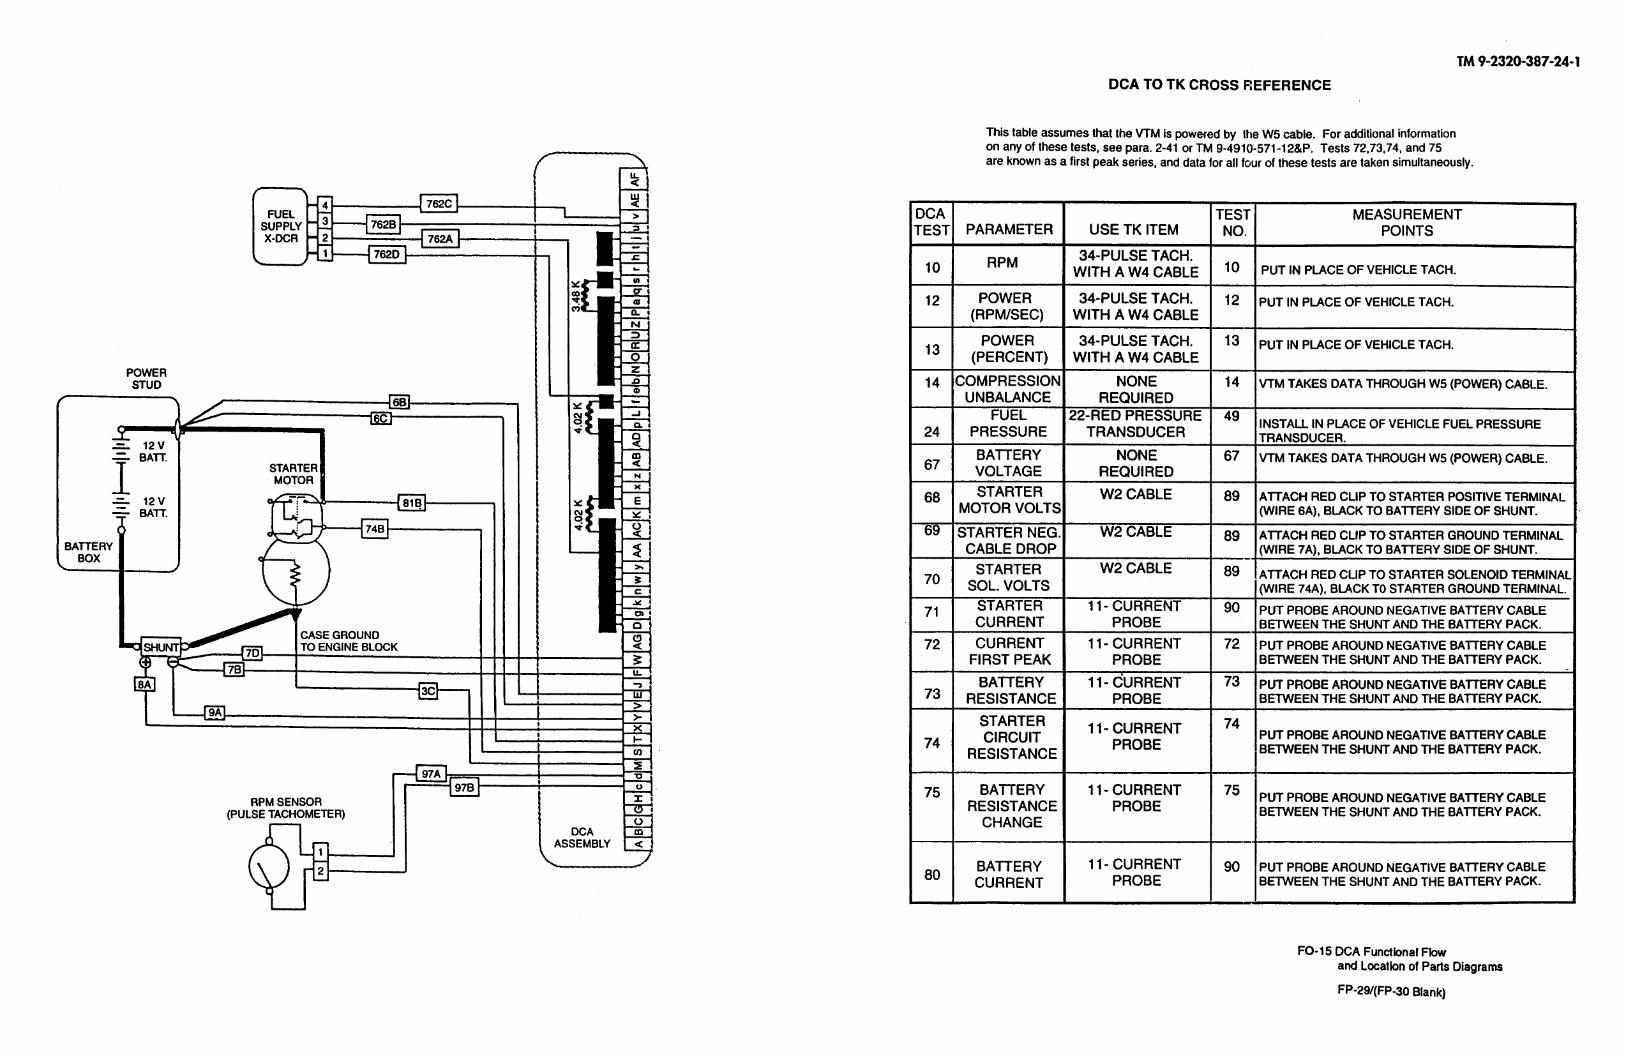
By Older of the Secretary of the Amy:
DENNIS J. REIMER General, UnitedSt~te~Am~’
chiaf0fstaR
m&B%& Admhtstmttv~ Assistent to the
ti’eomtary of the Army 04072
Byo&roftheSeux4aryoftheAirFonx:
RONALD R. FDGLEMAN Gerwai, UMedstetesAkFonu,
chi8fofsfaff
OfllOid:
HENRY VICCELLIO, JR. CWC@LmsdshlsSAcFora,
COfWWdW,A&FOtWMhdBtcormvnd
DISTRIBUTIDN: To be distributed in accordance with the initial disbibution number (IDN) 381020, requirements for TM 9-232&387-24-l.
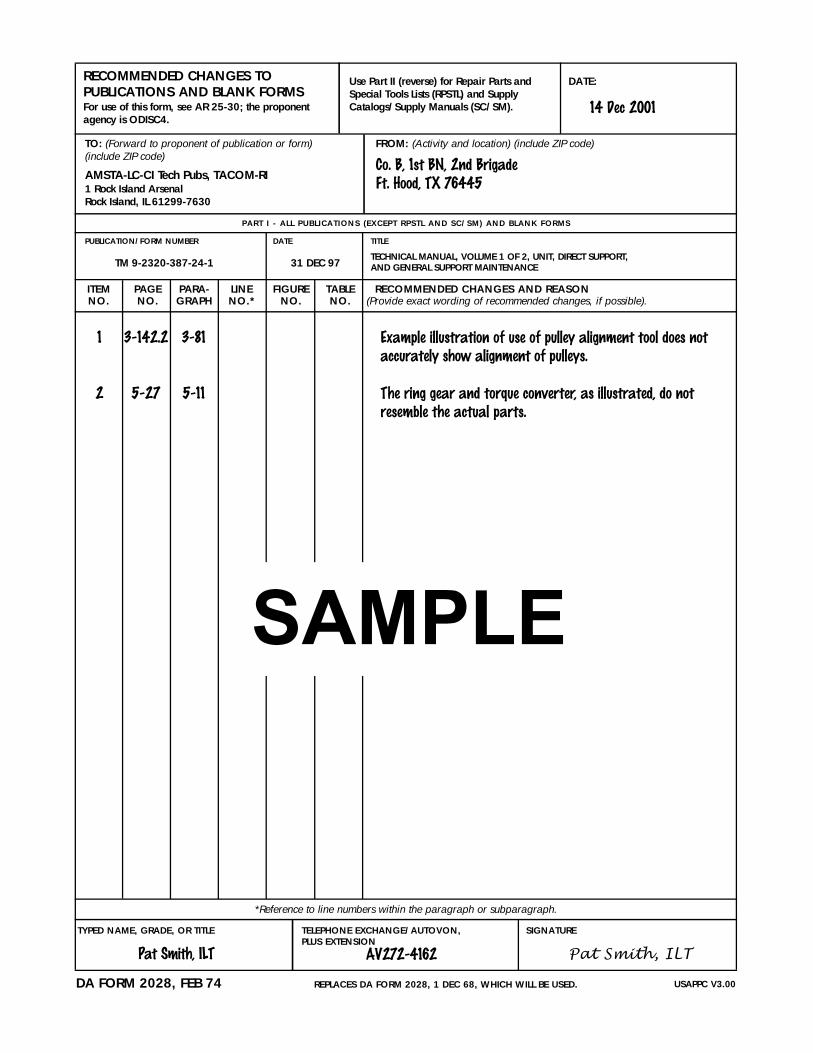
TYPED NAME, GRADE, OR TITLE
Pat Smith, ILT
TELEPHONE EXCHANGE/AUTOVON, PLUS EXTENSION
AV272-4162
SIGNATURE
Pat Smith, ILT
DATE:
ITEM PAGE PARA- LINE FIGURE TABLE RECOMMENDED CHANGES AND REASONNO. NO. GRAPH NO.* NO. NO. (Provide exact wording of recommended changes, if possible).
USAPPC V3.00DA FORM 2028, FEB 74 REPLACES DA FORM 2028, 1 DEC 68, WHICH WILL BE USED.
RECOMMENDED CHANGES TO PUBLICATIONS AND BLANK FORMSFor use of this form, see AR 25-30; the proponentagency is ODISC4.
Use Part II (reverse) for Repair Parts andSpecial Tools Lists (RPSTL) and SupplyCatalogs/Supply Manuals (SC/SM).
TO: (Forward to proponent of publication or form)(include ZIP code)
AMSTA-LC-CI Tech Pubs, TACOM-RI1 Rock Island ArsenalRock Island, IL 61299-7630
PUBLICATION/FORM NUMBER
TM 9-2320-387-24-1
DATE
31 DEC 97
TITLE
TECHNICAL MANUAL, VOLUME 1 OF 2, UNIT, DIRECT SUPPORT,AND GENERAL SUPPORT MAINTENANCE
FROM: (Activity and location) (include ZIP code)
Co. B, 1st BN, 2nd BrigadeFt. Hood, TX 76445
PART I - ALL PUBL ICATIONS (EXCEPT RPSTL AND SC/SM) AND BLANK FORMS
*Reference to line numbers within the paragraph or subparagraph.
1 3-142.2 3-81 Example illustration of use of pulley alignment tool does notaccurately show alignment of pulleys.
2 5-27 5-11 The ring gear and torque converter, as illustrated, do notresemble the actual parts.
SAMPLE
14 Dec 2001

TYPED NAME, GRADE, OR TITLE TELEPHONE EXCHANGE/AUTOVON, PLUS EXTENSION
SIGNATURE
DATE:
TOTAL NO.OF MAJOR
PAGE COLM LINE NATIONAL REFERENCE FIGURE ITEM ITEMS RECOMMENDEDNO. NO. NO. STOCK NUMBER NO. NO. NO. SUPPORTED ACTION
USAPPC V3.00
TO: (Forward direct to addressee listed in publication)
AMSTA-LC-CI Tech Pubs, TACOM-RI1 Rock Island ArsenalRock Island, IL 61299-7630
FROM: (Activity and location) (include ZIP code)
PUBLICATION/FORM NUMBER DATE
14 June 1985TITLE
PART I I - REPAIR PARTS AND SPECIAL TOOLS L ISTS AND SUPPLY CATALOGS/SUPPLY MANUALS
PART I I I - REMARKS (Any general remarks or recommendations, or suggestions for improvement of publications and blank forms. Additional blank sheets may be used if more space is needed.)
SAMPLE
TYPED NAME, GRADE, OR TITLE TELEPHONE EXCHANGE/AUTOVON, PLUS EXTENSION
SIGNATURE
DATE:
ITEM PAGE PARA- LINE FIGURE TABLE RECOMMENDED CHANGES AND REASONNO. NO. GRAPH NO.* NO. NO. (Provide exact wording of recommended changes, if possible).
USAPPC V3.00DA FORM 2028, FEB 74 REPLACES DA FORM 2028, 1 DEC 68, WHICH WILL BE USED.
RECOMMENDED CHANGES TO PUBLICATIONS AND BLANK FORMSFor use of this form, see AR 25-30; the proponentagency is ODISC4.
Use Part II (reverse) for Repair Parts andSpecial Tools Lists (RPSTL) and SupplyCatalogs/Supply Manuals (SC/SM).
TO: (Forward to proponent of publication or form)(include ZIP code)
AMSTA-LC-CI Tech Pubs, TACOM-RI1 Rock Island ArsenalRock Island, IL 61299-7630
PUBLICATION/FORM NUMBER
TM 9-2320-387-24-1
DATE
31 DEC 97
TITLE
TECHNICAL MANUAL, VOLUME 1 OF 2, UNIT, DIRECT SUPPORT,AND GENERAL SUPPORT MAINTENANCE
FROM: (Activity and location) (include ZIP code)
PART I - ALL PUBL ICAT IONS (EXCEPT RPSTL AND SC/SM) AND BLANK FORMS
*Reference to line numbers within the paragraph or subparagraph.
TYPED NAME, GRADE, OR TITLE TELEPHONE EXCHANGE/AUTOVON, PLUS EXTENSION
SIGNATURE
DATE:
TOTAL NO.OF MAJOR
PAGE COLM LINE NATIONAL REFERENCE FIGURE ITEM ITEMS RECOMMENDEDNO. NO. NO. STOCK NUMBER NO. NO. NO. SUPPORTED ACTION
USAPPC V3.00
TO: (Forward direct to addressee listed in publication)
AMSTA-LC-CI Tech Pubs, TACOM-RI1 Rock Island ArsenalRock Island, IL 61299-7630
FROM: (Activity and location) (include ZIP code)
PUBLICATION/FORM NUMBER DATE
14 June 1985TITLE
PART I I - REPAIR PARTS AND SPECIAL TOOLS L ISTS AND SUPPLY CATALOGS/SUPPLY MANUALS
PART I I I - REMARKS (Any general remarks or recommendations, or suggestions for improvement of publications and blank forms. Additional blank sheets may be used if more space is needed.)
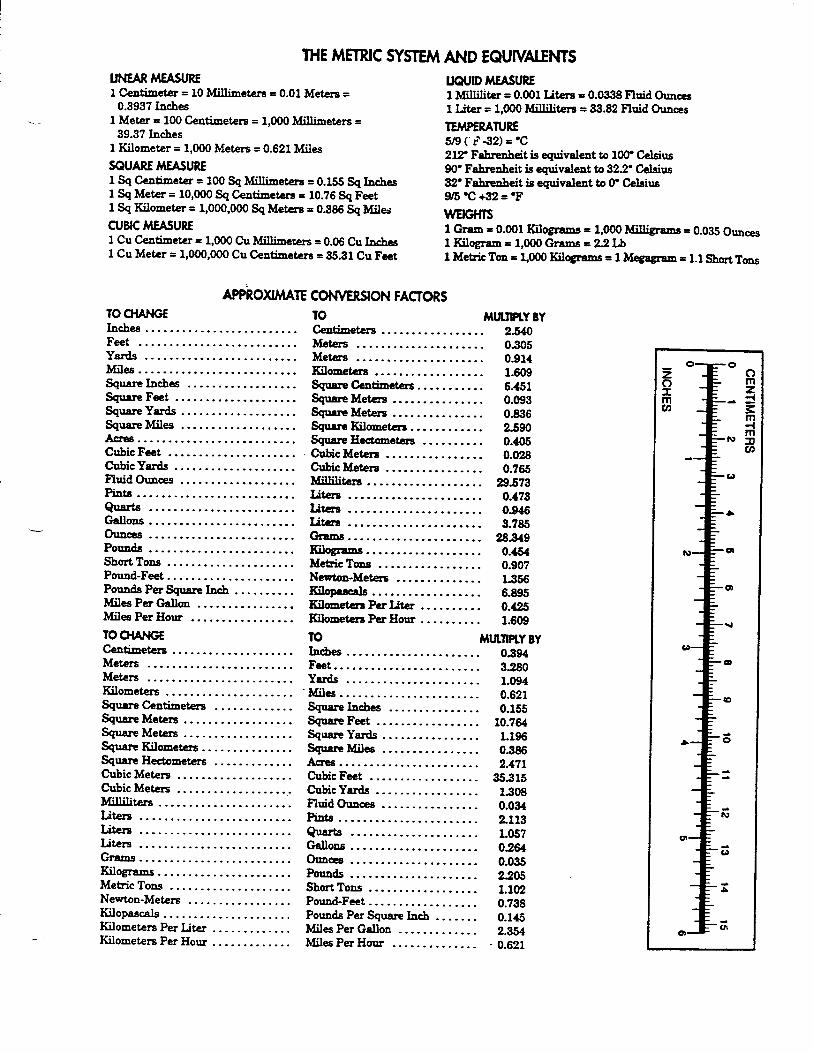

PIN: 076485-001