Application Notes for Nectar Foundation with Avaya Aura ...
56
JAO; Reviewed: SPOC 7/8/2020 Solution & Interoperability Test Lab Application Notes ©2020 Avaya Inc. All Rights Reserved. 1 of 56 Nectar-CM-Media Avaya Solution & Interoperability Test Lab Application Notes for Nectar Foundation with Avaya Aura® Communication Manager, Avaya G450 Media Gateway, and Avaya Aura® Media Server - Issue 1.0 Abstract These Application Notes describe the configuration steps required to integrate Nectar Foundation with Avaya Aura® Communication Manager, Avaya G450 Media Gateway, and Avaya Aura® Media Server. Nectar Foundation is a proactive health and performance monitor that provides enterprise customers and service providers with a comprehensive view of unified communications environments for monitoring, allowing service interruptions to be diagnosed and solved quicker. Nectar Foundation automatically captures system inventory, receives and reports alarms/alerts, collects resources utilization data, and delivers real-time RTCP call quality data. Nectar Foundation monitors Avaya Aura® Communication Manager, and its media resources, using SNMP, RTCP, and a System Access Terminal (SAT) interface. The events/alarms, inventory reports, and RTCP metrics are displayed on the Nectar Remote Intelligence Gateway (RIG) client. Readers should pay attention to Section 2, in particular the scope of testing as outlined in Section 2.1 as well as the observations noted in Section 2.2, to ensure that their own use cases are adequately covered by this scope and results. Information in these Application Notes has been obtained through DevConnect compliance testing and additional technical discussions. Testing was conducted via the DevConnect Program at the Avaya Solution and Interoperability Test Lab.
-
Upload
khangminh22 -
Category
Documents
-
view
0 -
download
0
Transcript of Application Notes for Nectar Foundation with Avaya Aura ...

JAO; Reviewed:
SPOC 7/8/2020
Solution & Interoperability Test Lab Application Notes
©2020 Avaya Inc. All Rights Reserved.
1 of 56
Nectar-CM-Media
Avaya Solution & Interoperability Test Lab
Application Notes for Nectar Foundation with Avaya Aura®
Communication Manager, Avaya G450 Media Gateway, and
Avaya Aura® Media Server - Issue 1.0
Abstract
These Application Notes describe the configuration steps required to integrate Nectar
Foundation with Avaya Aura® Communication Manager, Avaya G450 Media Gateway, and
Avaya Aura® Media Server. Nectar Foundation is a proactive health and performance monitor
that provides enterprise customers and service providers with a comprehensive view of unified
communications environments for monitoring, allowing service interruptions to be diagnosed
and solved quicker. Nectar Foundation automatically captures system inventory, receives and
reports alarms/alerts, collects resources utilization data, and delivers real-time RTCP call quality
data. Nectar Foundation monitors Avaya Aura® Communication Manager, and its media
resources, using SNMP, RTCP, and a System Access Terminal (SAT) interface. The
events/alarms, inventory reports, and RTCP metrics are displayed on the Nectar Remote
Intelligence Gateway (RIG) client.
Readers should pay attention to Section 2, in particular the scope of testing as outlined in
Section 2.1 as well as the observations noted in Section 2.2, to ensure that their own use cases
are adequately covered by this scope and results.
Information in these Application Notes has been obtained through DevConnect compliance
testing and additional technical discussions. Testing was conducted via the DevConnect
Program at the Avaya Solution and Interoperability Test Lab.

JAO; Reviewed:
SPOC 7/8/2020
Solution & Interoperability Test Lab Application Notes
©2020 Avaya Inc. All Rights Reserved.
2 of 56
Nectar-CM-Media
1. Introduction These Application Notes describe the configuration steps required to integrate Nectar Foundation
with Avaya Aura® Communication Manager, Avaya G450 Media Gateway, and Avaya Aura®
Media Server. Nectar Foundation is a proactive health and performance monitor that provides
enterprise customers and service providers with a comprehensive view of unified
communications environments for monitoring, allowing service interruptions to be diagnosed
and solved quicker. Nectar Foundation automatically captures system inventory, receives and
reports alarms/alerts, collects resource utilization data, and delivers real-time RTCP call quality
data. Nectar Foundation monitors Avaya Aura® Communication Manager, and its media
resources, using SNMP, RTCP, and a System Access Terminal (SAT) interface. The
events/alarms, inventory reports, and RTCP metrics are displayed on the Nectar Remote
Intelligence Gateway (RIG) client.
Nectar Foundation uses SNMP polling to collect node names, announcement, and station
extension information from Avaya Aura® Communication Manager. This data is retrieved
during the initial system configuration and is used internally by Foundation (i.e., not for display
purposes). The Communication Manager Inventory is collected via the SAT interface as
described below.
Nectar Foundation performs SNMP polls against Avaya G450 Media Gateway to retrieve Fan
Speeds, Ambient Temperature Sensor, and MG DSP Usage.
Nectar Foundation also serves as an SNMP trap receiver for Avaya Aura® Communication
Manager, Avaya G450 Media Gateway, and Avaya Aura® Media Server.
The following table specifies the SNMP versions supported between Nectar Foundation and
Avaya Aura® Communication Manager and its media resources for SNMP traps and polls.
Avaya Product Data Type SNMP Version(s)
Avaya Aura® Communication Manager SNMP Trap SNMPv1, v2c, v3
SNMP Poll SNMPv1, v2c, v3
Avaya G450 Media Gateway SNMP Trap SNMPv1, v2c, v3
SNMP Poll SNMPv1, v2c, v3
Avaya Aura® Media Server SNMP Trap SNMPv1, v2c, v3
JAO; Reviewed:
SPOC 7/8/2020
Solution & Interoperability Test Lab Application Notes
©2020 Avaya Inc. All Rights Reserved.
3 of 56
Nectar-CM-Media
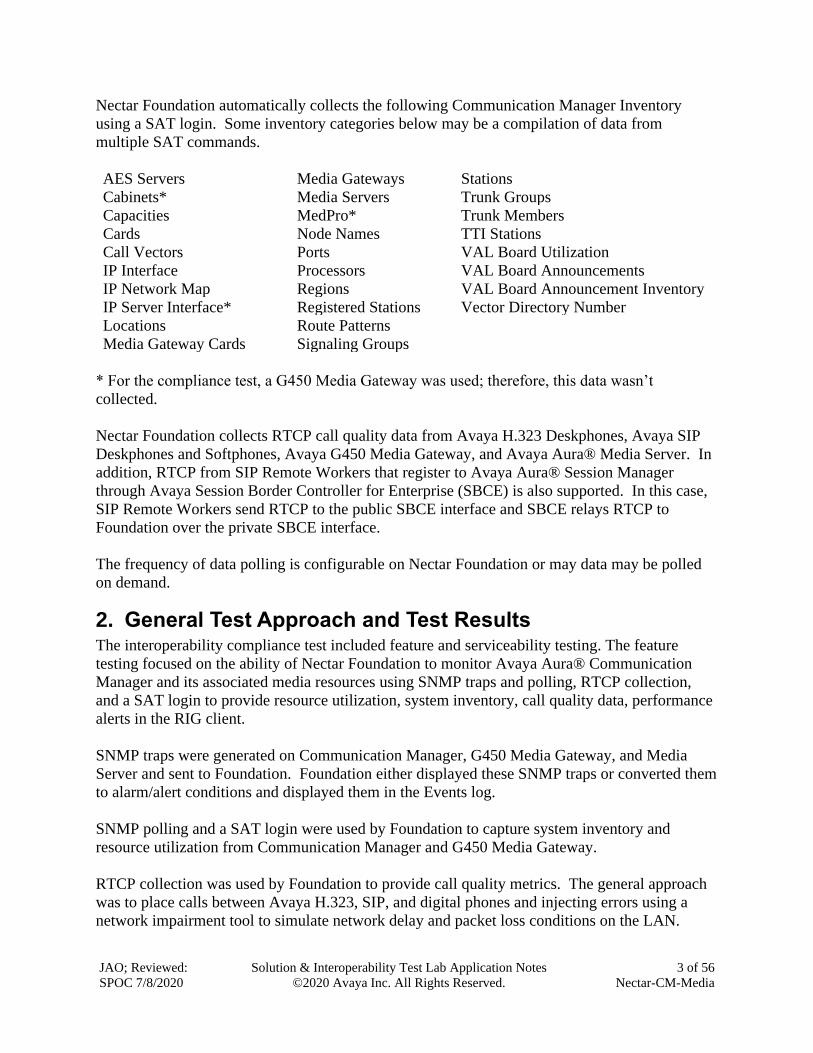
Nectar Foundation automatically collects the following Communication Manager Inventory
using a SAT login. Some inventory categories below may be a compilation of data from
multiple SAT commands.
AES Servers Media Gateways Stations
Cabinets* Media Servers Trunk Groups
Capacities MedPro* Trunk Members
Cards Node Names TTI Stations
Call Vectors Ports VAL Board Utilization
IP Interface Processors VAL Board Announcements
IP Network Map Regions VAL Board Announcement Inventory
IP Server Interface* Registered Stations Vector Directory Number
Locations Route Patterns
Media Gateway Cards Signaling Groups
* For the compliance test, a G450 Media Gateway was used; therefore, this data wasn’t
collected.
Nectar Foundation collects RTCP call quality data from Avaya H.323 Deskphones, Avaya SIP
Deskphones and Softphones, Avaya G450 Media Gateway, and Avaya Aura® Media Server. In
addition, RTCP from SIP Remote Workers that register to Avaya Aura® Session Manager
through Avaya Session Border Controller for Enterprise (SBCE) is also supported. In this case,
SIP Remote Workers send RTCP to the public SBCE interface and SBCE relays RTCP to
Foundation over the private SBCE interface.
The frequency of data polling is configurable on Nectar Foundation or may data may be polled
on demand.
2. General Test Approach and Test Results The interoperability compliance test included feature and serviceability testing. The feature
testing focused on the ability of Nectar Foundation to monitor Avaya Aura® Communication
Manager and its associated media resources using SNMP traps and polling, RTCP collection,
and a SAT login to provide resource utilization, system inventory, call quality data, performance
alerts in the RIG client.
SNMP traps were generated on Communication Manager, G450 Media Gateway, and Media
Server and sent to Foundation. Foundation either displayed these SNMP traps or converted them
to alarm/alert conditions and displayed them in the Events log.
SNMP polling and a SAT login were used by Foundation to capture system inventory and
resource utilization from Communication Manager and G450 Media Gateway.
RTCP collection was used by Foundation to provide call quality metrics. The general approach
was to place calls between Avaya H.323, SIP, and digital phones and injecting errors using a
network impairment tool to simulate network delay and packet loss conditions on the LAN.

JAO; Reviewed:
SPOC 7/8/2020
Solution & Interoperability Test Lab Application Notes
©2020 Avaya Inc. All Rights Reserved.
4 of 56
Nectar-CM-Media
The serviceability testing focused on verifying that the Nectar Foundation came back into service
after re-connecting the Ethernet cable (i.e., restoring network connectivity) and rebooting the
Foundation server.
DevConnect Compliance Testing is conducted jointly by Avaya and DevConnect members. The
jointly-defined test plan focuses on exercising APIs and/or standards-based interfaces pertinent
to the interoperability of the tested products and their functionalities. DevConnect Compliance
Testing is not intended to substitute full product performance or feature testing performed by
DevConnect members, nor is it to be construed as an endorsement by Avaya of the suitability or
completeness of a DevConnect member’s solution.
Avaya recommends our customers implement Avaya solutions using appropriate security and
encryption capabilities enabled by our products. The testing referenced in this DevConnect
Application Note included the enablement of supported encryption capabilities in the Avaya
products. Readers should consult the appropriate Avaya product documentation for further
information regarding security and encryption capabilities supported by those Avaya products.
Support for these security and encryption capabilities in any non-Avaya solution component is
the responsibility of each individual vendor. Readers should consult the appropriate vendor-
supplied product documentation for more information regarding those products.
This solution uses the System Access Terminal (SAT) interface to interact with Avaya Aura®
Communication Manager or the Telnet/SSH interface to interact with other Avaya products.
While this solution has successfully completed Compliance Testing for the specific release levels
as described in these Application Notes, Avaya does not generally recommend use of these
interfaces as a programmatic approach to integration of 3rd party applications. Avaya may make
changes or enhancements to the interfaces in any subsequent release, feature pack, service pack,
or patch that may impact the interoperability of 3rd party applications using these interfaces.
Using these interfaces in a programmatic manner may also result in a variety of operational
issues, including performance impacts to the Avaya solution. If there are no other programmatic
options available to obtain the required data or functionality, Avaya recommends that 3rd party
applications only be executed during low call volume periods, and that real-time delays be
inserted between each command execution. NOTE: The scope of the compliance testing
activities reflected in these Application Notes explicitly did not include load or performance
evaluation criteria, and no guarantees or assurances are made by Avaya that the 3rd party
application has implemented these recommendations. The vendor of the 3rd party application
using this interface remains solely responsible for verifying interoperability with all later Avaya
Product Releases, including feature packs, service packs, and patches as issued by Avaya. For
additional details see Avaya Product Support Notices PSN002884u, PSN005085u, and
PSN020295u, available at www.avaya.com/support.
JAO; Reviewed:
SPOC 7/8/2020
Solution & Interoperability Test Lab Application Notes
©2020 Avaya Inc. All Rights Reserved.
5 of 56
Nectar-CM-Media
2.1. Interoperability Compliance Testing
Interoperability compliance testing covered the following Foundation features and functionality.
Alarms/alerts, system inventory, resource utilization and status, and call quality metrics were
displayed on the RIG client.
▪ Collecting Communication Manager Inventory using a SAT login session and displaying
the data in the RIG client.
▪ Verifying inventory updates on the RIG client after making configuration changes on
Communication Manager.
▪ Verifying resource utilization (e.g., MG DSP Usage) captured from G450 Media
Gateway via SNMP polling.
▪ Verifying successful SNMP polling of Communication Manager.
▪ Tracking the registration status of Avaya H.323 Deskphones.
▪ Capturing SNMP traps and providing performance alerts for system interruptions on
Communication Manager, G450 Media Gateway, and Media Server.
▪ Capturing RTCP data from Avaya H.323 Deskphones, Avaya SIP Deskphones and
Softphones, G450 Media Gateway, and Media Server and displaying call quality metrics
on the RIG client.
▪ Capturing RTCP data from a SIP Remote Worker registered to Session Manager through
SBCE.
▪ Verifying proper system recovery after a restart of the Foundation server and loss of IP
network connectivity.
2.2. Test Results
The compliance test passed with the following observations:
▪ Nectar Foundation uses SNMP polls to retrieve MG DSP Usage from Avaya G450 Media
Gateway. MG DSP Usage data consists of the number of channels in use and the total
number DSP channels available in the G450 (referred to as Max Value in Foundation).
The MG DSP Usage data is derived from the Avaya enterprise OID
1.3.6.1.4.1.6889.2.9.1.4 in the G700-MG-MIB.
In previous firmware versions, the G450 may not have been returning MG DSP Usage to
Foundation, resulting in MG DSP usage being displayed as -1 and Max Value to be
displayed as 0 in the RIG client. This may have been caused because the aforementioned
OID was not included in the SNMP view associated with the SNMP user configured in
the G450.
If the G450 was upgraded to FW 41.25.0, the Max Value may still be displayed as 0. It is
likely that the Max Value was set to 0 in the previous firmware version, and once the
value is set, Foundation doesn’t attempt to reset it. In this case, contact Nectar Support to
correct this issue. Nectar Support will remove the data and then poll the G450 again so
that Max Value could be set correctly.
JAO; Reviewed:
SPOC 7/8/2020
Solution & Interoperability Test Lab Application Notes
©2020 Avaya Inc. All Rights Reserved.
6 of 56
Nectar-CM-Media
▪ In the Real-Time QoS window of the RIG client, there is no call path information for
Avaya SIP Deskphones or Media Server, because they don’t provide call path (or call
trace) information to Foundation during call setup. In addition, for J100 Series SIP
deskphones, the endpoint name may be displayed as unknown, intermittently. However,
the SIP extension is correctly displayed to allow mapping to the appropriate
endpoint/user.
2.3. Support
For technical support and information on Nectar Foundation, contact Nectar Support at:
▪ Phone: 1-888-811-8647
▪ Website: http://nectarcorp.com/support
▪ Email: [email protected]
JAO; Reviewed:
SPOC 7/8/2020
Solution & Interoperability Test Lab Application Notes
©2020 Avaya Inc. All Rights Reserved.
7 of 56
Nectar-CM-Media
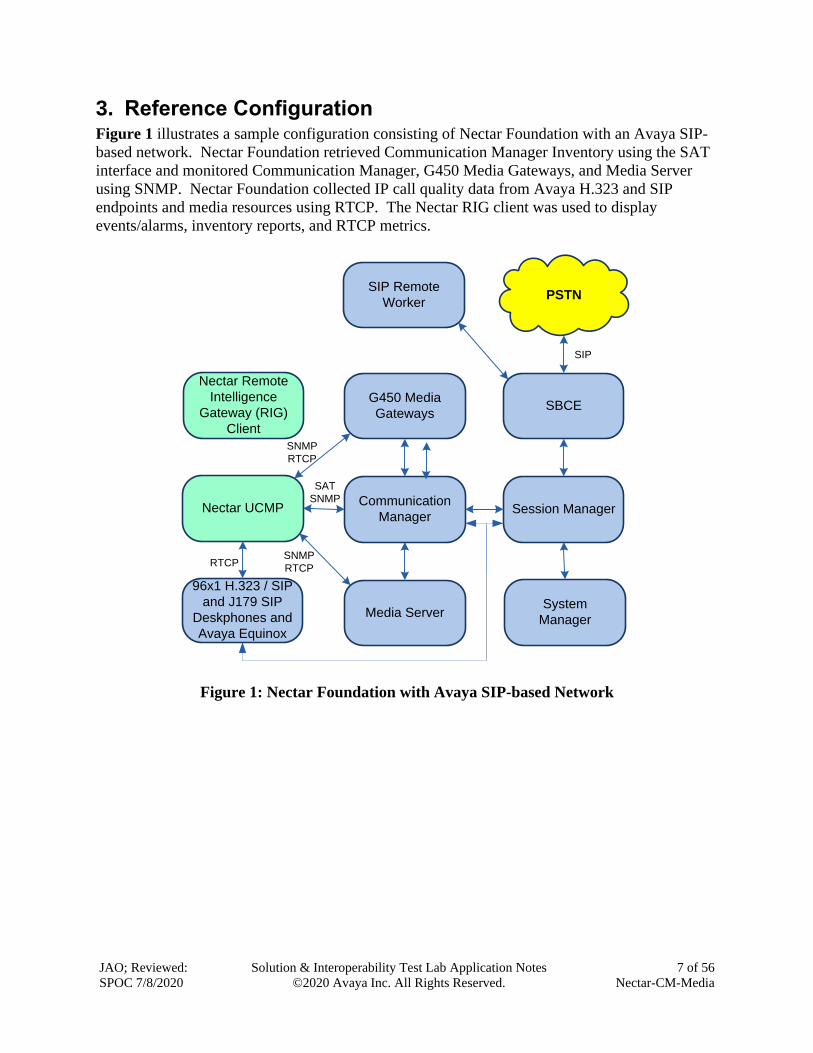
3. Reference Configuration Figure 1 illustrates a sample configuration consisting of Nectar Foundation with an Avaya SIP-
based network. Nectar Foundation retrieved Communication Manager Inventory using the SAT
interface and monitored Communication Manager, G450 Media Gateways, and Media Server
using SNMP. Nectar Foundation collected IP call quality data from Avaya H.323 and SIP
endpoints and media resources using RTCP. The Nectar RIG client was used to display
events/alarms, inventory reports, and RTCP metrics.
Session Manager
96x1 H.323 / SIP
and J179 SIP
Deskphones and
Avaya Equinox
PSTN
G450 Media
Gateways
Communication
Manager
SBCE
Media Server
Nectar UCMP
System
Manager
Nectar Remote
Intelligence
Gateway (RIG)
Client
SIP
SNMP
RTCP
SNMP
RTCP
SAT
SNMP
RTCP
SIP Remote
Worker
Figure 1: Nectar Foundation with Avaya SIP-based Network

JAO; Reviewed:
SPOC 7/8/2020
Solution & Interoperability Test Lab Application Notes
©2020 Avaya Inc. All Rights Reserved.
8 of 56
Nectar-CM-Media
4. Equipment and Software Validated The following equipment and software were used for the sample configuration provided:
Equipment/Software Release/Version
Avaya Aura® Communication Manager 8.1.2.0.0-FP2
Avaya G450 Media Gateway FW 41.24.0 Vintage 2 and 3
Avaya Aura® Media Server v.8.0.2.93
Avaya Aura® System Manager
8.1.2.0
Build No. – 8.1.0.0.733078
Software Update Revision No:
8.1.2.0.0611167
Feature Pack 2
Avaya Aura® Session Manager 8.1.2.0.812039
Avaya Session Border Controller for Enterprise 8.1.0.0-14-18490
Avaya 96x1 Series IP Deskphones 6.8304 (H.323)
7.1.9.0.8 (SIP)
Avaya J179 SIP Deskphone 4.0.5.0.10
Avaya Equinox for Windows 3.6.4.31.2
Avaya 9404 Digital Phone 12.0
Avaya Analog Phone N/A
Nectar Foundation 8.3.0.2-09317
Nectar Remote Intelligence Gateway (RIG) Client 8.3.0.2-09317
JAO; Reviewed:
SPOC 7/8/2020
Solution & Interoperability Test Lab Application Notes
©2020 Avaya Inc. All Rights Reserved.
9 of 56
Nectar-CM-Media
5. Configure Avaya Aura® Communication Manager This section provides the procedure for configuring SNMP, RTCP Reporting, and SAT access.
The procedures include the following areas:
▪ Launch System Management Interface
▪ Configure SAT Login
▪ Configure SNMP
▪ Configure RTCP Reporting
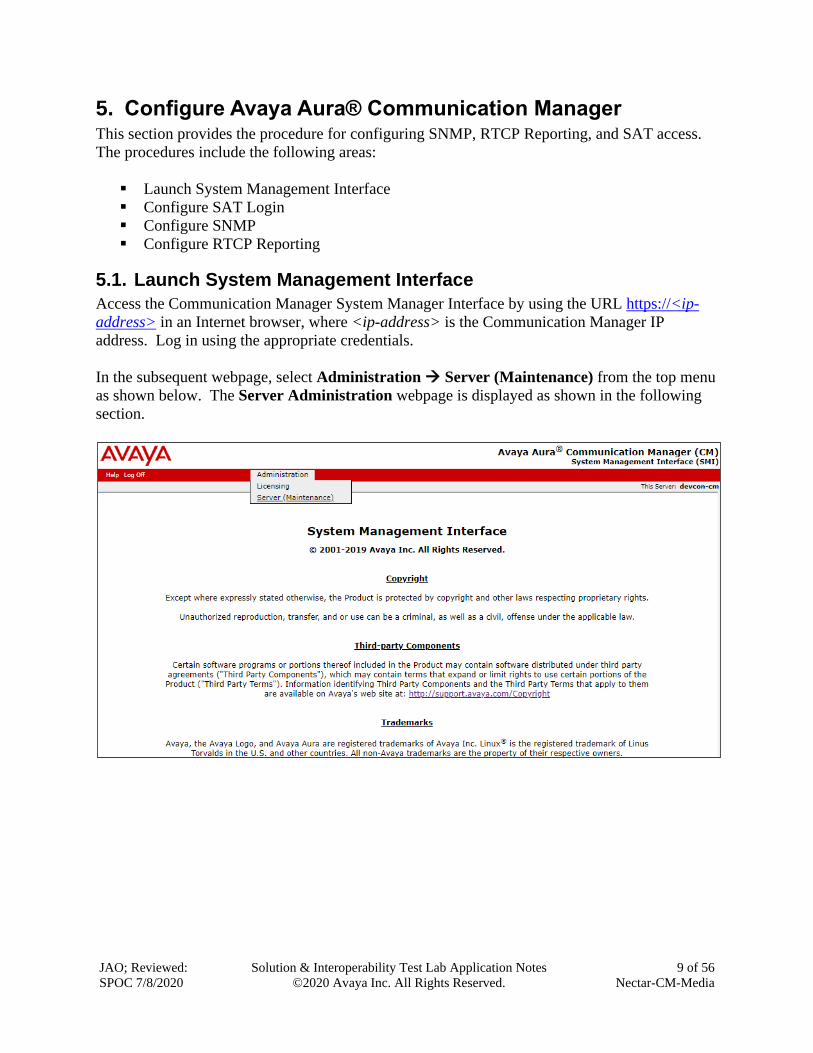
5.1. Launch System Management Interface
Access the Communication Manager System Manager Interface by using the URL https://<ip-
address> in an Internet browser, where <ip-address> is the Communication Manager IP
address. Log in using the appropriate credentials.
In the subsequent webpage, select Administration → Server (Maintenance) from the top menu
as shown below. The Server Administration webpage is displayed as shown in the following
section.

JAO; Reviewed:
SPOC 7/8/2020
Solution & Interoperability Test Lab Application Notes
©2020 Avaya Inc. All Rights Reserved.
10 of 56
Nectar-CM-Media
5.2. Configure SAT Login
This section covers the configuration of a SAT user account for Foundation and its associated
permissions. The SAT interface is used by Foundation to retrieve Communication Manager
Inventory as shown in Section 11.
5.2.1. Configure Login Group
Create an Access-Profile Group. Navigate to Security → Administrator Accounts. In the
Administrator Accounts webpage, select Add Group, and then click Submit.
JAO; Reviewed:
SPOC 7/8/2020
Solution & Interoperability Test Lab Application Notes
©2020 Avaya Inc. All Rights Reserved.
11 of 56
Nectar-CM-Media
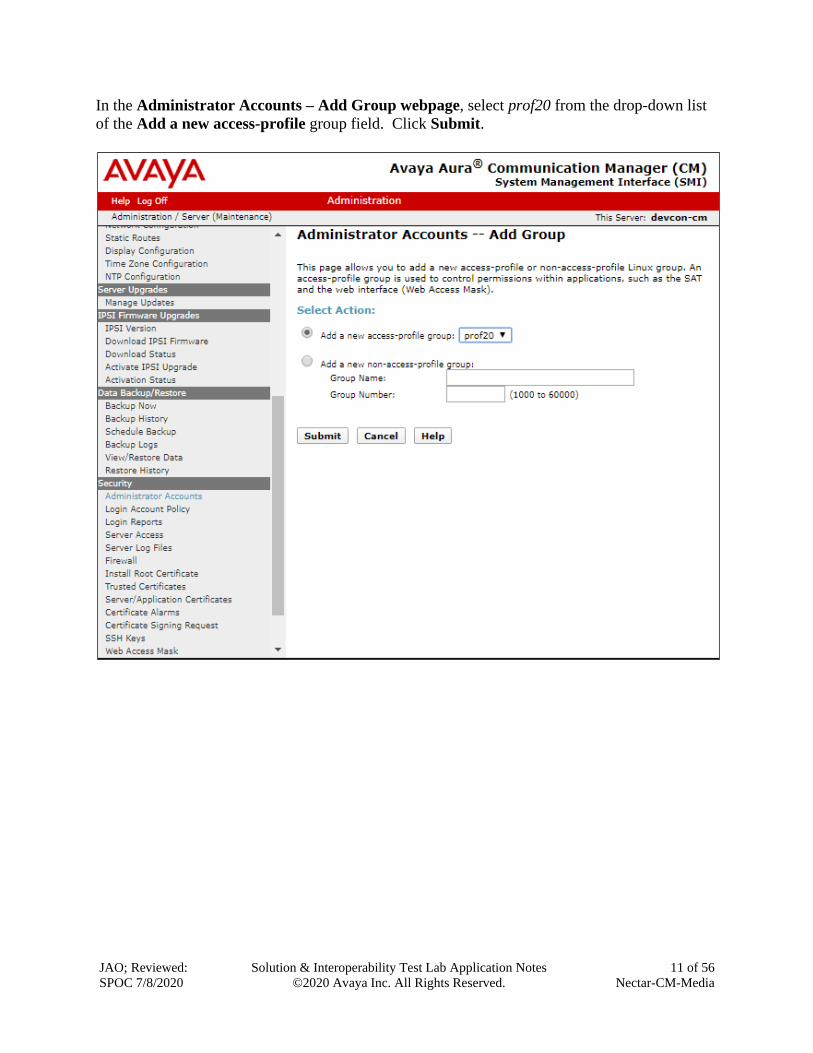
In the Administrator Accounts – Add Group webpage, select prof20 from the drop-down list
of the Add a new access-profile group field. Click Submit.

JAO; Reviewed:
SPOC 7/8/2020
Solution & Interoperability Test Lab Application Notes
©2020 Avaya Inc. All Rights Reserved.
12 of 56
Nectar-CM-Media
5.2.2. Configure Login User
Create a login account for Foundation to access the Communication Manager SAT. Navigate to
Security → Administrator Accounts and select SAT Access Only. Click Submit.
JAO; Reviewed:
SPOC 7/8/2020
Solution & Interoperability Test Lab Application Notes
©2020 Avaya Inc. All Rights Reserved.
13 of 56
Nectar-CM-Media
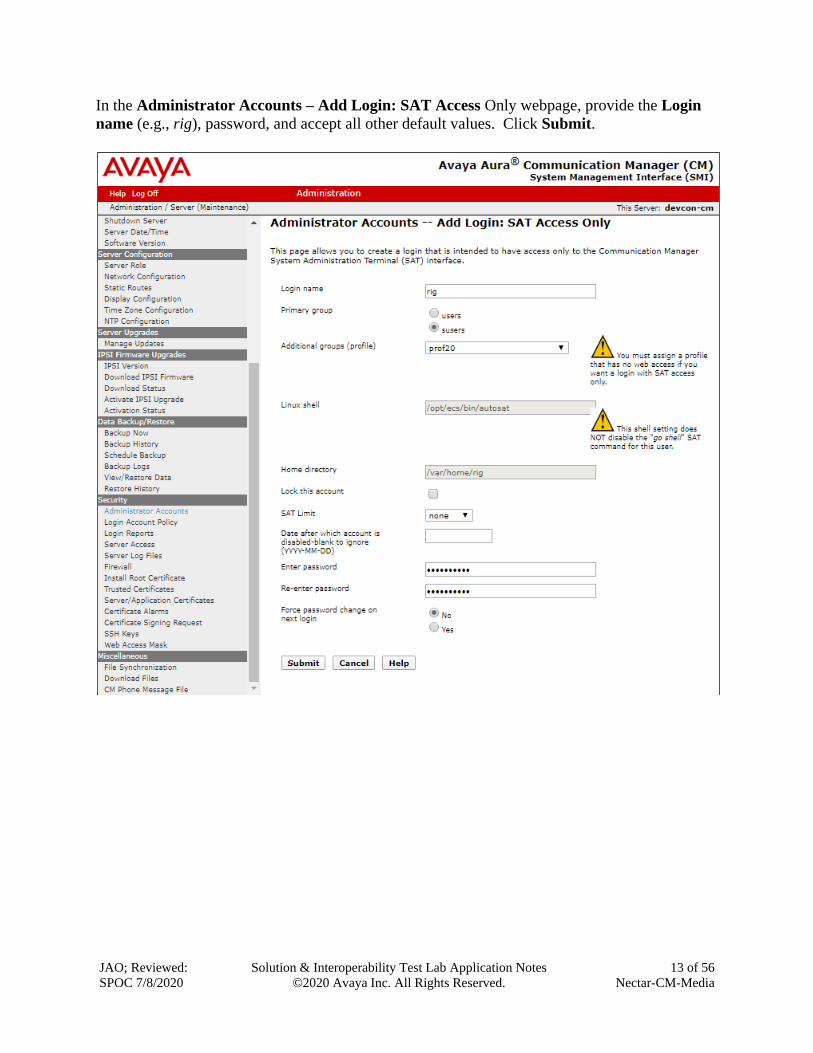
In the Administrator Accounts – Add Login: SAT Access Only webpage, provide the Login
name (e.g., rig), password, and accept all other default values. Click Submit.

JAO; Reviewed:
SPOC 7/8/2020
Solution & Interoperability Test Lab Application Notes
©2020 Avaya Inc. All Rights Reserved.
14 of 56
Nectar-CM-Media
5.2.3. Configure SAT User Profile
A SAT User Profile specifies which SAT screens may be accessed by the user assigned the
profile and the type of access to each screen. Since Foundation doesn’t modify any system
configuration, create a SAT User Profile with limited permissions.
Use the add user-profile-by-category 20 command, where 20 was the user profile configured in
Section 5.2.2. Enter a descriptive name for User Profile Name (e.g., Nectar) and enable the
categories shown below. For the compliance test, user profile 20 was created.
add user-profile-by-category 20 Page 1 of 39
USER PROFILE 20
User Profile Name: Nectar
This Profile is Disabled? n Shell Access? y
Facility Test Call Notification? n Acknowledgement Required? n
Grant Un-owned Permissions? n Extended Profile? n
Name Cat Enbl Name Cat Enbl
Adjuncts A y Routing and Dial Plan J y
Call Center B y Security K n
Features C y Servers L y
Hardware D y Stations M y
Hospitality E y System Parameters N y
IP F y Translations O n
Maintenance G y Trunking P y
Measurements and Performance H y Usage Q y
Remote Access I n User Access R n
On Page 2, Set Permissions For Category according to the table below.
Category Permission
A r-
B r-
C rm
D r-
E r-
F rm
G rm
H r-
J r-
L rm
M rm
N r-
P rm
Q r-

JAO; Reviewed:
SPOC 7/8/2020
Solution & Interoperability Test Lab Application Notes
©2020 Avaya Inc. All Rights Reserved.
15 of 56
Nectar-CM-Media
5.3. Configure SNMP
This section covers the configuration of SNMP on Communication Manager. The steps required
include:
▪ Administer FP Traps
▪ Administer SNMP Access
▪ Restart SNMP Master Agent
5.3.1. Administer FP Traps
To configure Communication Manager to send SNMP traps to Foundation, navigate to SNMP
→ FP Traps. The FP Traps webpage is displayed as shown below. In the sample
configuration below, SNMP traps using SNMPv1, v2c, and v3 are configured simultaneously for
informational purposes. Note that only one SNMP version needs to be configured and only one
SNMP version was tested at a time with Foundation.
For SNMPv1 or v2c, configure the following fields:
IP Address: Set to the Foundation IP address (e.g., 10.64.102.113).
Port: Use the default port 162 for SNMP traps.
Notification: Set to trap.
Community Name: Set to appropriate community string (e.g., public).
For SNMPv3, configure the following fields:
IP Address: Set to the Foundation IP address (e.g., 10.64.102.113).
User Name: Specify a user name (e.g., nectar).
Authentication Protocol: Set to SHA.
Authentication Password: Set to a valid password to be used by Foundation.
Privacy Protocol: Set to AES128.
Privacy Password: Set to a valid password to be used by Foundation.
Once completed, press the Submit button.

JAO; Reviewed:
SPOC 7/8/2020
Solution & Interoperability Test Lab Application Notes
©2020 Avaya Inc. All Rights Reserved.
16 of 56
Nectar-CM-Media
5.3.2. Administer SNMP Access
To configure Communication Manager to respond to SNMP polls, navigate to SNMP → Access.
The Access webpage is displayed as shown below. In the sample configuration below, SNMP
polls using SNMPv1, v2c, and v3 are configured simultaneously for informational purposes.
Note that only one SNMP version needs to be configured and only one SNMP version was tested
at a time with Foundation.
For SNMPv1 or v2c, configure the following fields:
IP Address: Set to the Foundation IP address (e.g., 10.64.102.113).
Access: Set to read-only.
Community Name: Set to appropriate community string (e.g., public).
For SNMPv3, configure the following fields:
IP Address: Set to the Foundation IP address (e.g., 10.64.102.113).
User Name: Specify a user name (e.g., nectar).
Authentication Protocol: Set to SHA.
Authentication Password: Set to a valid password to be used by Foundation.
Privacy Protocol: Set to AES128.
Privacy Password: Set to a valid password to be used by Foundation.
Once completed, press the Submit button.

JAO; Reviewed:
SPOC 7/8/2020
Solution & Interoperability Test Lab Application Notes
©2020 Avaya Inc. All Rights Reserved.
17 of 56
Nectar-CM-Media
5.3.3. Restart SNMP Master Agent
Select SNMP →Agent Status from the left pane to display the Agent Status webpage and
restart the SNMP agent. Click the Stop Master Agent button followed by the Start Master
Agent button.
JAO; Reviewed:
SPOC 7/8/2020
Solution & Interoperability Test Lab Application Notes
©2020 Avaya Inc. All Rights Reserved.
18 of 56
Nectar-CM-Media
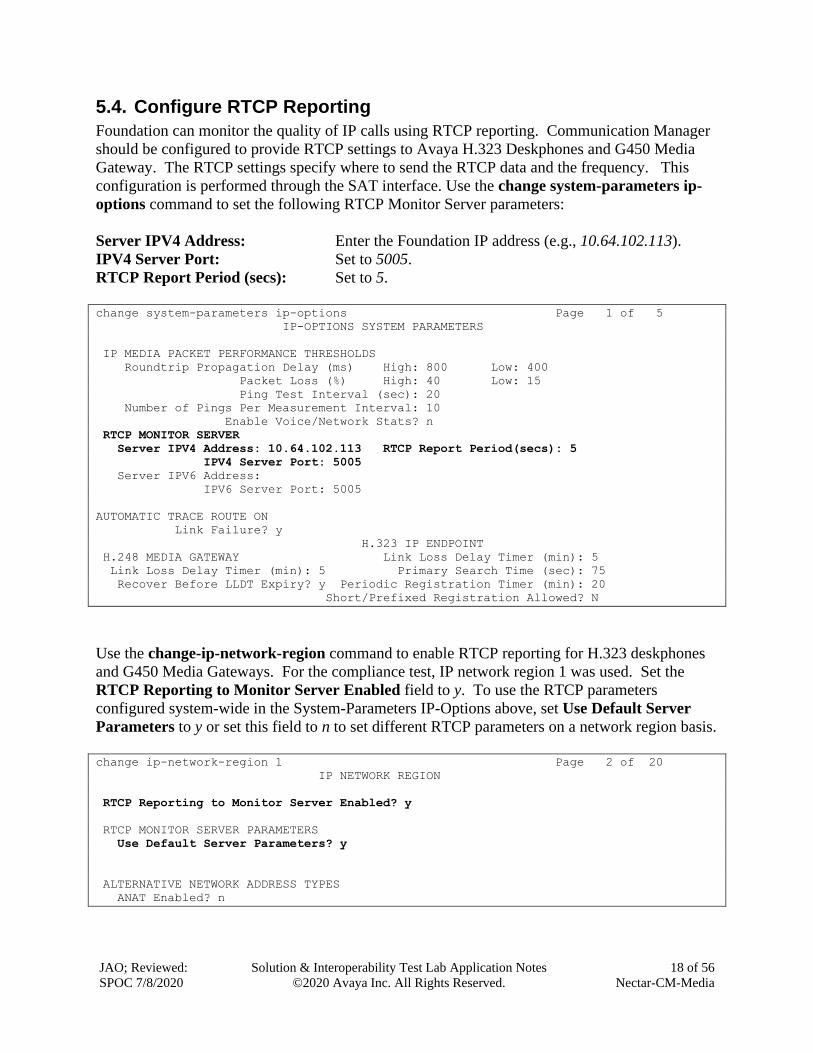
5.4. Configure RTCP Reporting
Foundation can monitor the quality of IP calls using RTCP reporting. Communication Manager
should be configured to provide RTCP settings to Avaya H.323 Deskphones and G450 Media
Gateway. The RTCP settings specify where to send the RTCP data and the frequency. This
configuration is performed through the SAT interface. Use the change system-parameters ip-
options command to set the following RTCP Monitor Server parameters:
Server IPV4 Address: Enter the Foundation IP address (e.g., 10.64.102.113).
IPV4 Server Port: Set to 5005.
RTCP Report Period (secs): Set to 5.
change system-parameters ip-options Page 1 of 5
IP-OPTIONS SYSTEM PARAMETERS
IP MEDIA PACKET PERFORMANCE THRESHOLDS
Roundtrip Propagation Delay (ms) High: 800 Low: 400
Packet Loss (%) High: 40 Low: 15
Ping Test Interval (sec): 20
Number of Pings Per Measurement Interval: 10
Enable Voice/Network Stats? n
RTCP MONITOR SERVER
Server IPV4 Address: 10.64.102.113 RTCP Report Period(secs): 5
IPV4 Server Port: 5005
Server IPV6 Address:
IPV6 Server Port: 5005
AUTOMATIC TRACE ROUTE ON
Link Failure? y
H.323 IP ENDPOINT
H.248 MEDIA GATEWAY Link Loss Delay Timer (min): 5
Link Loss Delay Timer (min): 5 Primary Search Time (sec): 75
Recover Before LLDT Expiry? y Periodic Registration Timer (min): 20
Short/Prefixed Registration Allowed? N
Use the change-ip-network-region command to enable RTCP reporting for H.323 deskphones
and G450 Media Gateways. For the compliance test, IP network region 1 was used. Set the
RTCP Reporting to Monitor Server Enabled field to y. To use the RTCP parameters
configured system-wide in the System-Parameters IP-Options above, set Use Default Server
Parameters to y or set this field to n to set different RTCP parameters on a network region basis.
change ip-network-region 1 Page 2 of 20
IP NETWORK REGION
RTCP Reporting to Monitor Server Enabled? y
RTCP MONITOR SERVER PARAMETERS
Use Default Server Parameters? y
ALTERNATIVE NETWORK ADDRESS TYPES
ANAT Enabled? n

JAO; Reviewed:
SPOC 7/8/2020
Solution & Interoperability Test Lab Application Notes
©2020 Avaya Inc. All Rights Reserved.
19 of 56
Nectar-CM-Media
6. Configure Avaya G450 Media Gateway This section covers the G450 Media Gateway configuration to send SNMP traps to Foundation
and allow SNMP Polling from Foundation.
Note: Pre-defined SNMP Views and Groups mentioned in this section already exist by default in
the G450 Media Gateway. Use the show snmp view or show snmp group commands to view
them.
6.1. Configure SNMP Traps
This section covers the configuration of the G450 Media Gateway to enable SNMP traps. Log
into the G450 Media Gateway command line interface with the appropriate credentials using
SSH (not shown).
6.1.1. Configure SNMPv1 or v2c Traps
At the command prompt, enter one of the commands shown below. In the snmp-server host
command specify the Foundation IP address, specify v1 or v2c in the command depending on the
SNMP version desired, and public as the community name. The show snmp command may be
used to view the SNMP configuration.
snmp-server host 10.64.102.113 traps v1 public
-or-
snmp-server host 10.64.102.113 traps v2c public
6.1.2. Configure SNMPv3 Traps
To configure SNMPv3 traps, create a new SNMP Group in the G450 Media Gateway using the
command below. This new SNMP Group assigns the pre-defined iso SNMP View as the group’s
Read View and Notify View.
snmp-server group v3ReadViewG v3 priv read iso notify iso
Next, configure a SNMP User for Foundation using the command below. This new SNMP user
assigns the SNMP Group created above. After the command is entered, the user will be
prompted for passwords.
snmp-server user nectar v3ReadViewG v3 auth sha priv aes128
Finally, enable SNMPv3 traps with the command below, which specifies the Foundation IP
address, SNMP version and the SNMP User (i.e., nectar) created above.
snmp-server host 10.64.102.113 traps v3 priv nectar
JAO; Reviewed:
SPOC 7/8/2020
Solution & Interoperability Test Lab Application Notes
©2020 Avaya Inc. All Rights Reserved.
20 of 56
Nectar-CM-Media
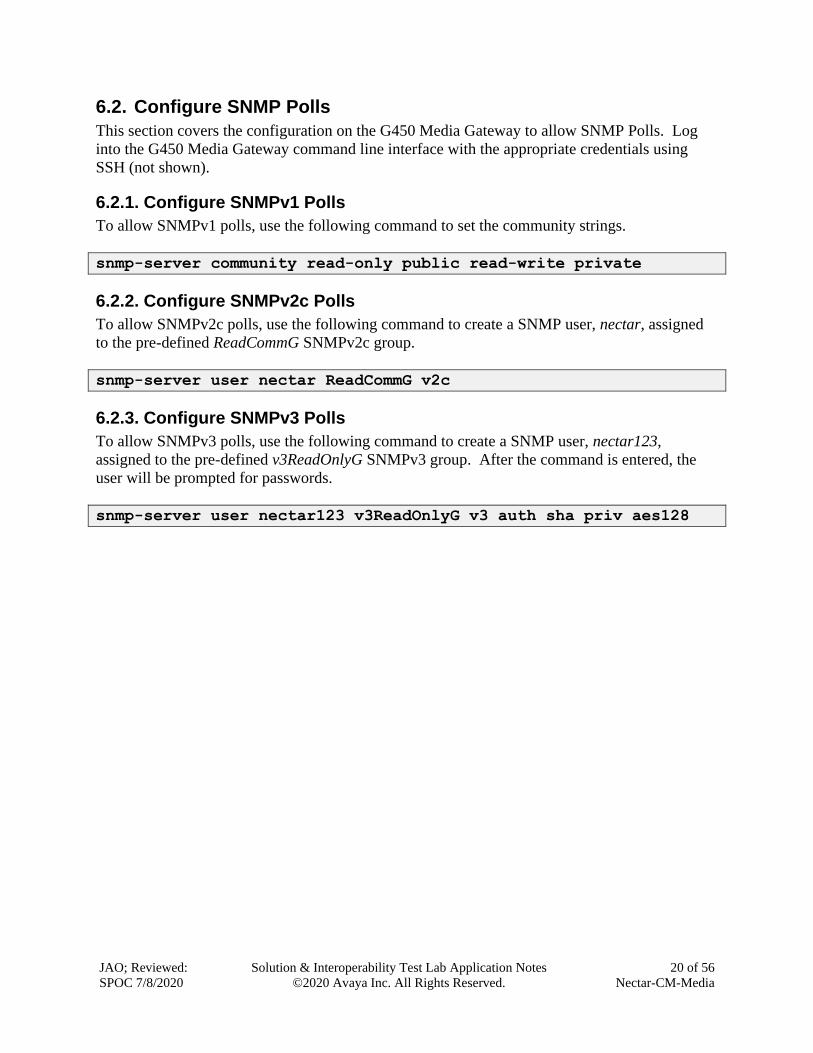
6.2. Configure SNMP Polls
This section covers the configuration on the G450 Media Gateway to allow SNMP Polls. Log
into the G450 Media Gateway command line interface with the appropriate credentials using
SSH (not shown).
6.2.1. Configure SNMPv1 Polls
To allow SNMPv1 polls, use the following command to set the community strings.
snmp-server community read-only public read-write private
6.2.2. Configure SNMPv2c Polls
To allow SNMPv2c polls, use the following command to create a SNMP user, nectar, assigned
to the pre-defined ReadCommG SNMPv2c group.
snmp-server user nectar ReadCommG v2c
6.2.3. Configure SNMPv3 Polls
To allow SNMPv3 polls, use the following command to create a SNMP user, nectar123,
assigned to the pre-defined v3ReadOnlyG SNMPv3 group. After the command is entered, the
user will be prompted for passwords.
snmp-server user nectar123 v3ReadOnlyG v3 auth sha priv aes128
JAO; Reviewed:
SPOC 7/8/2020
Solution & Interoperability Test Lab Application Notes
©2020 Avaya Inc. All Rights Reserved.
21 of 56
Nectar-CM-Media
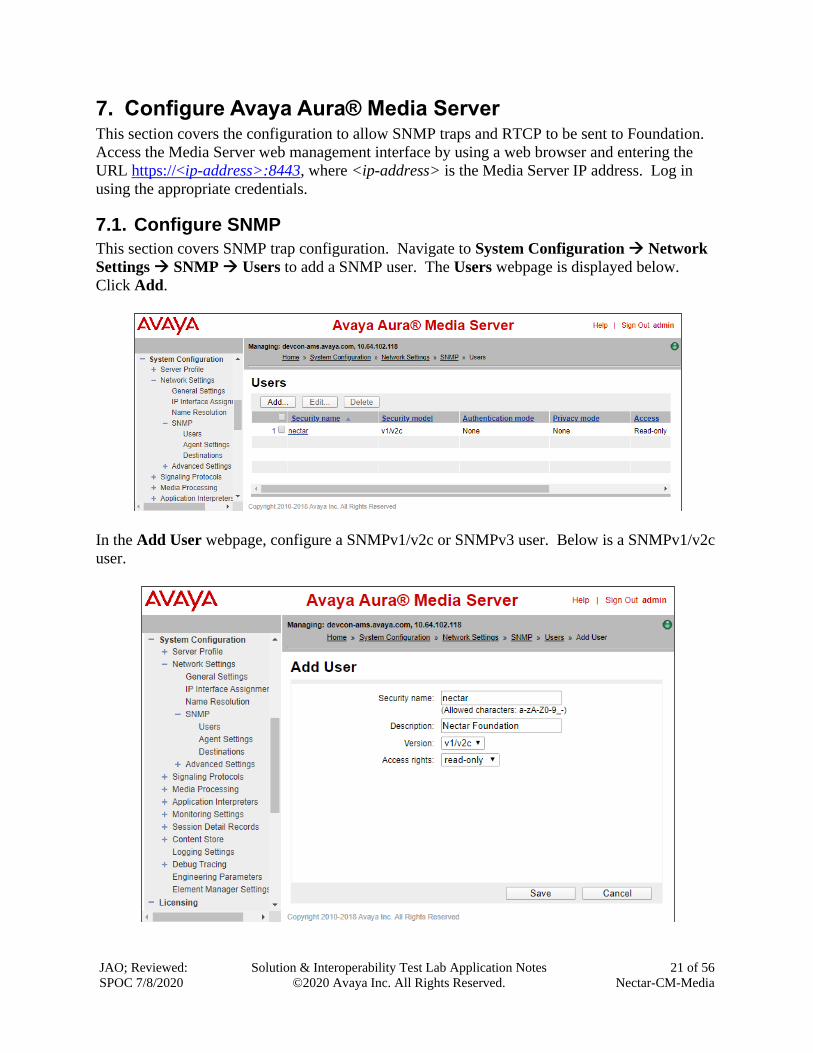
7. Configure Avaya Aura® Media Server This section covers the configuration to allow SNMP traps and RTCP to be sent to Foundation.
Access the Media Server web management interface by using a web browser and entering the
URL https://<ip-address>:8443, where <ip-address> is the Media Server IP address. Log in
using the appropriate credentials.
7.1. Configure SNMP
This section covers SNMP trap configuration. Navigate to System Configuration → Network
Settings → SNMP → Users to add a SNMP user. The Users webpage is displayed below.
Click Add.
In the Add User webpage, configure a SNMPv1/v2c or SNMPv3 user. Below is a SNMPv1/v2c
user.
JAO; Reviewed:
SPOC 7/8/2020
Solution & Interoperability Test Lab Application Notes
©2020 Avaya Inc. All Rights Reserved.
22 of 56
Nectar-CM-Media
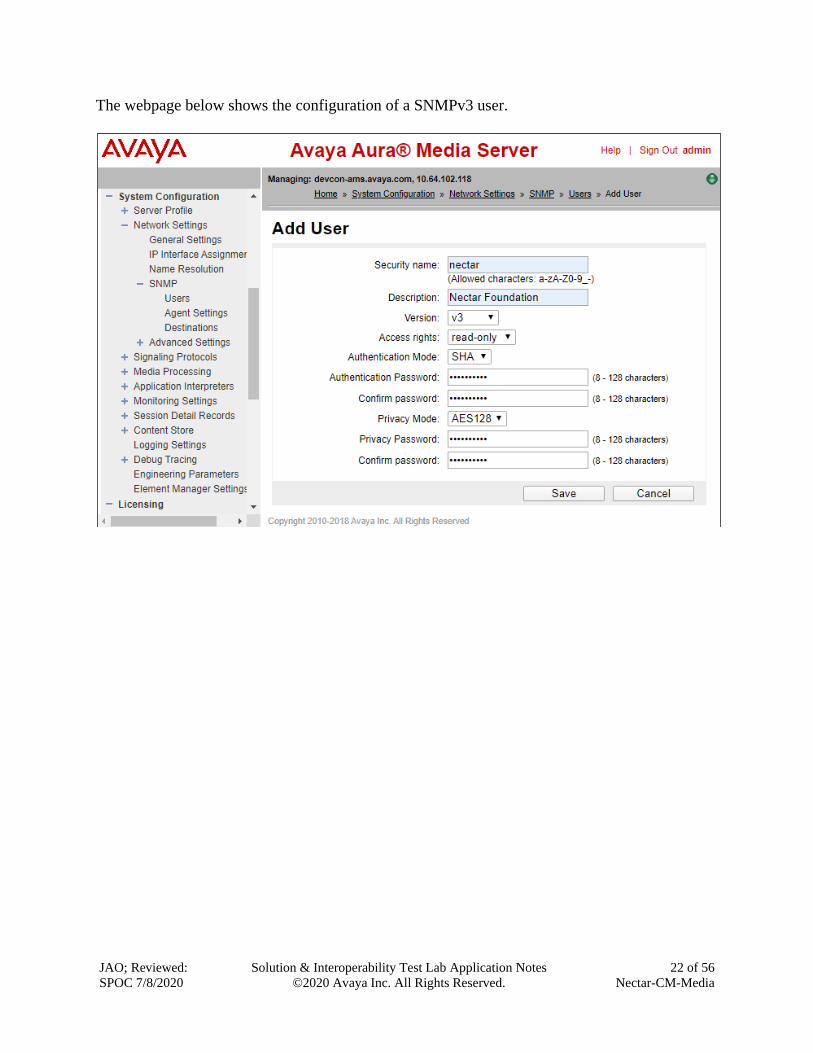
The webpage below shows the configuration of a SNMPv3 user.

JAO; Reviewed:
SPOC 7/8/2020
Solution & Interoperability Test Lab Application Notes
©2020 Avaya Inc. All Rights Reserved.
23 of 56
Nectar-CM-Media
To allow Media Server to send SNMP traps to Foundation, navigate to System Configuration
→ Network Settings → SNMP → Destinations. The Traps Destinations webpage is
displayed as shown below.
JAO; Reviewed:
SPOC 7/8/2020
Solution & Interoperability Test Lab Application Notes
©2020 Avaya Inc. All Rights Reserved.
24 of 56
Nectar-CM-Media
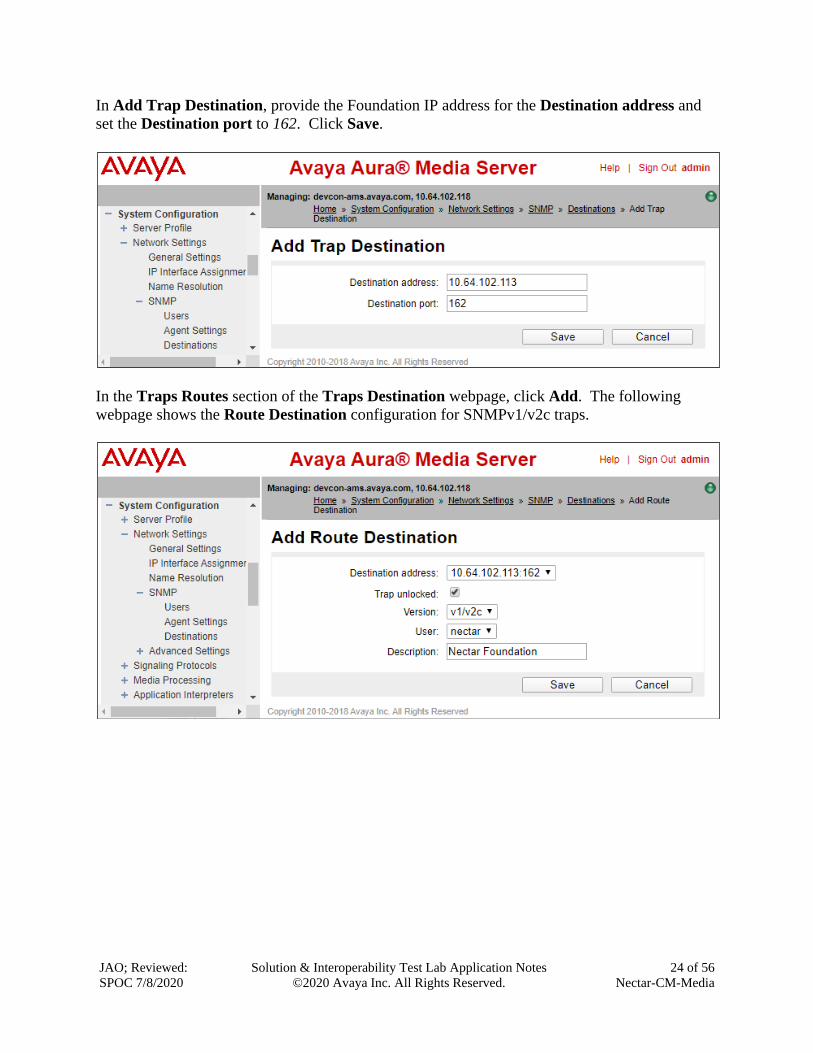
In Add Trap Destination, provide the Foundation IP address for the Destination address and
set the Destination port to 162. Click Save.
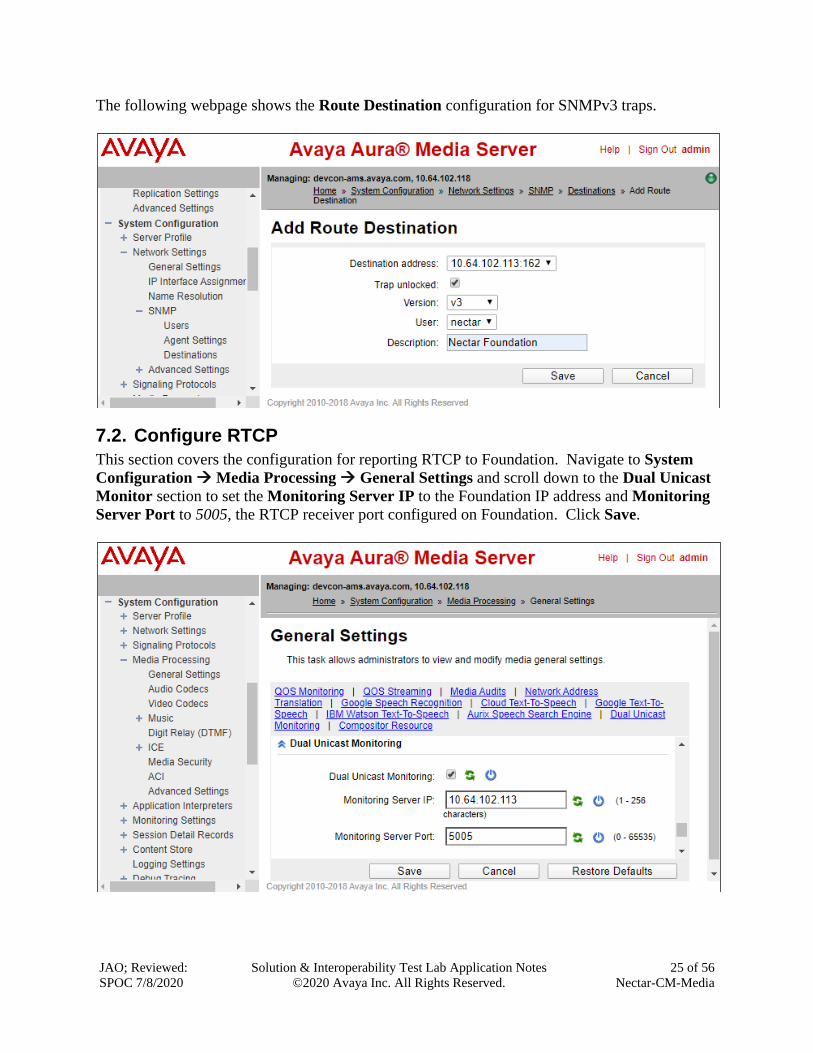
In the Traps Routes section of the Traps Destination webpage, click Add. The following
webpage shows the Route Destination configuration for SNMPv1/v2c traps.
JAO; Reviewed:
SPOC 7/8/2020
Solution & Interoperability Test Lab Application Notes
©2020 Avaya Inc. All Rights Reserved.
25 of 56
Nectar-CM-Media
The following webpage shows the Route Destination configuration for SNMPv3 traps.
7.2. Configure RTCP
This section covers the configuration for reporting RTCP to Foundation. Navigate to System
Configuration → Media Processing → General Settings and scroll down to the Dual Unicast
Monitor section to set the Monitoring Server IP to the Foundation IP address and Monitoring
Server Port to 5005, the RTCP receiver port configured on Foundation. Click Save.
JAO; Reviewed:
SPOC 7/8/2020
Solution & Interoperability Test Lab Application Notes
©2020 Avaya Inc. All Rights Reserved.
26 of 56
Nectar-CM-Media
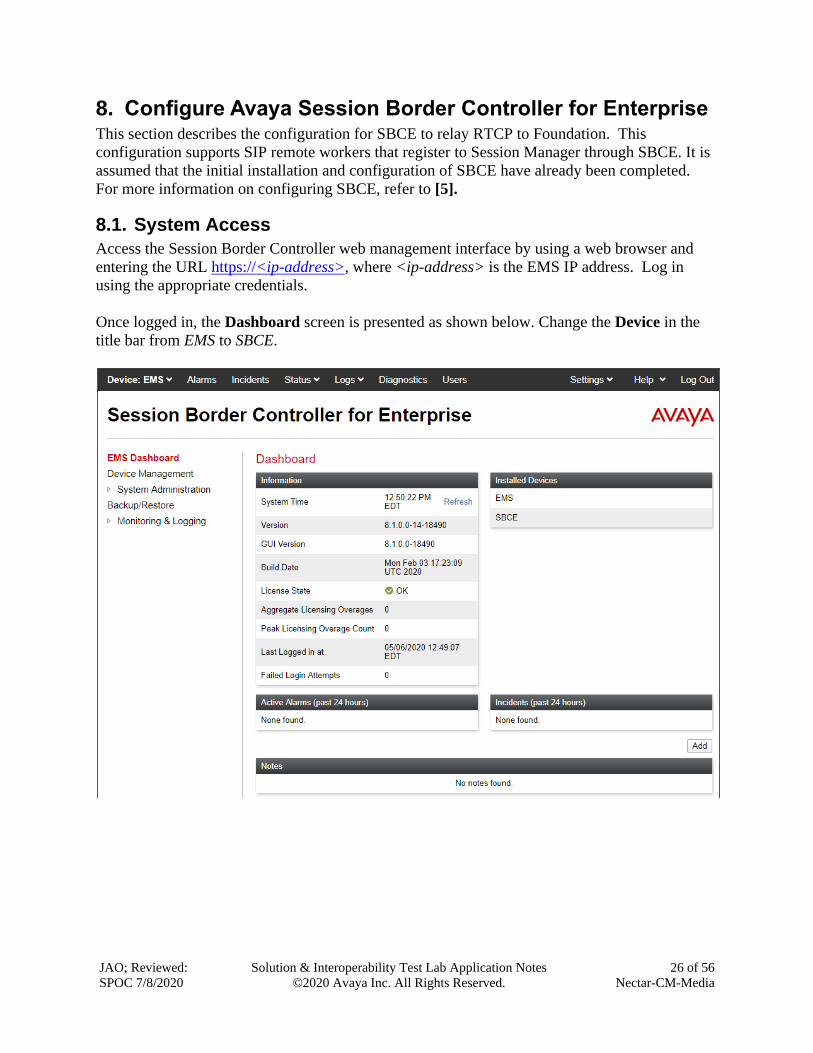
8. Configure Avaya Session Border Controller for Enterprise This section describes the configuration for SBCE to relay RTCP to Foundation. This
configuration supports SIP remote workers that register to Session Manager through SBCE. It is
assumed that the initial installation and configuration of SBCE have already been completed.
For more information on configuring SBCE, refer to [5].
8.1. System Access
Access the Session Border Controller web management interface by using a web browser and
entering the URL https://<ip-address>, where <ip-address> is the EMS IP address. Log in
using the appropriate credentials.
Once logged in, the Dashboard screen is presented as shown below. Change the Device in the
title bar from EMS to SBCE.
JAO; Reviewed:
SPOC 7/8/2020
Solution & Interoperability Test Lab Application Notes
©2020 Avaya Inc. All Rights Reserved.
27 of 56
Nectar-CM-Media
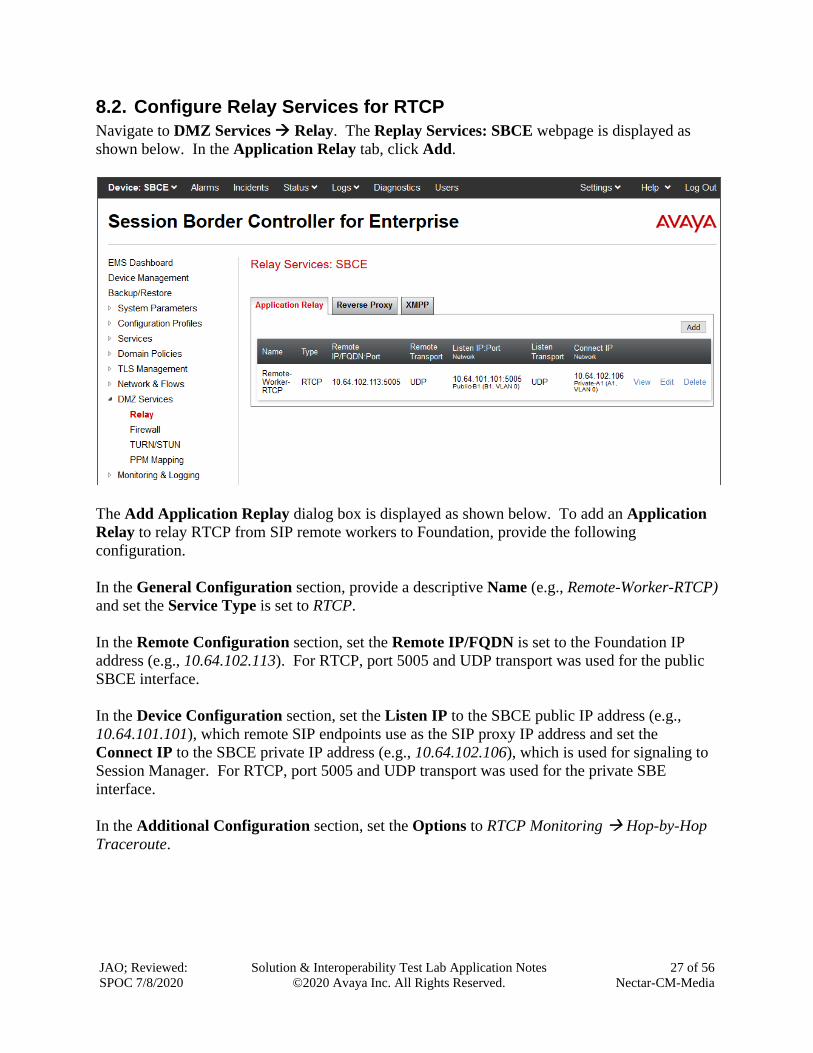
8.2. Configure Relay Services for RTCP
Navigate to DMZ Services → Relay. The Replay Services: SBCE webpage is displayed as
shown below. In the Application Relay tab, click Add.
The Add Application Replay dialog box is displayed as shown below. To add an Application
Relay to relay RTCP from SIP remote workers to Foundation, provide the following
configuration.
In the General Configuration section, provide a descriptive Name (e.g., Remote-Worker-RTCP)
and set the Service Type is set to RTCP.
In the Remote Configuration section, set the Remote IP/FQDN is set to the Foundation IP
address (e.g., 10.64.102.113). For RTCP, port 5005 and UDP transport was used for the public
SBCE interface.
In the Device Configuration section, set the Listen IP to the SBCE public IP address (e.g.,
10.64.101.101), which remote SIP endpoints use as the SIP proxy IP address and set the
Connect IP to the SBCE private IP address (e.g., 10.64.102.106), which is used for signaling to
Session Manager. For RTCP, port 5005 and UDP transport was used for the private SBE
interface.
In the Additional Configuration section, set the Options to RTCP Monitoring → Hop-by-Hop
Traceroute.

JAO; Reviewed:
SPOC 7/8/2020
Solution & Interoperability Test Lab Application Notes
©2020 Avaya Inc. All Rights Reserved.
28 of 56
Nectar-CM-Media

JAO; Reviewed:
SPOC 7/8/2020
Solution & Interoperability Test Lab Application Notes
©2020 Avaya Inc. All Rights Reserved.
29 of 56
Nectar-CM-Media
Navigate to Network & Flows → Advanced Options to display the Advanced Options
webpage. In the RTCP Monitoring tab, enable RTCP Monitoring Relay, set the Node Type
to Core, and set the Relay IP to the private SBCE interface (e.g., 10.64.102.106).

JAO; Reviewed:
SPOC 7/8/2020
Solution & Interoperability Test Lab Application Notes
©2020 Avaya Inc. All Rights Reserved.
30 of 56
Nectar-CM-Media
9. Configure Avaya SIP Endpoints This section covers the methods for providing Avaya SIP 96x1 and J100 Series SIP Deskphones
and Avaya Equinox for Windows with RTCP settings. The two methods include the use of
Device Settings Groups on System Manager and the 46xxsettings.txt file.
9.1. Configure Device Settings Groups in System Manager
There are two types of Device Settings Groups, Terminal Groups and Location Groups. A
terminal group will allow configuration parameters, such as RTCP settings, to be assigned on a
SIP user basis. Configuration settings specified in a location group can be assigned to SIP users
in a specified location. Note that Terminal Groups take precedence for Location Groups.
Device Settings Groups are configured in System Manager. To access the System Manager web
interface, use the URL https://<ip-address> in an Internet browser window, where <ip-address>
is the System Manager IP address. Log in using the appropriate credentials.
Navigate to Elements → Session Manager → Device and Location Configuration → Device
Settings Groups. The following webpage shows that two terminal groups exist, one for local
SIP users and another one for SIP remote workers. As a different example, one location group
was created for Equinox.

JAO; Reviewed:
SPOC 7/8/2020
Solution & Interoperability Test Lab Application Notes
©2020 Avaya Inc. All Rights Reserved.
31 of 56
Nectar-CM-Media
To create a terminal group, click New in the Terminal Groups section. In the General section,
provide a descriptive Name (e.g., Local SIP Users or SIP Remote Workers) and Description.
The Group Type is automatically set to Terminal Group. Assign a Terminal Group Number.
Number 1 was assigned for local SIP users and number 2 was assigned for SIP remote workers.
In the VoIP Monitoring Manager section, the IP Address was set to the Foundation IP address
(i.e., 10.64.102.113) for local SIP users and to the SBCE public IP address (i.e., 10.64.101.101)
for SIP remote workers. For SIP remote workers, RTCP will be relayed from SBCE to
Foundation. The default values for RTCP Port and Reporting Period were used. Click Save.
The following webpage displays Terminal Group 1 for local SIP users.

JAO; Reviewed:
SPOC 7/8/2020
Solution & Interoperability Test Lab Application Notes
©2020 Avaya Inc. All Rights Reserved.
32 of 56
Nectar-CM-Media
The following webpage displays the Terminal Group 2 for SIP Remote Users.
To assign a terminal group number to a SIP user, navigate to the SIP user CM Endpoint Profile
Editor, and in the Feature Options tab, set IP Phone Group ID to the desired terminal group
number.
JAO; Reviewed:
SPOC 7/8/2020
Solution & Interoperability Test Lab Application Notes
©2020 Avaya Inc. All Rights Reserved.
33 of 56
Nectar-CM-Media
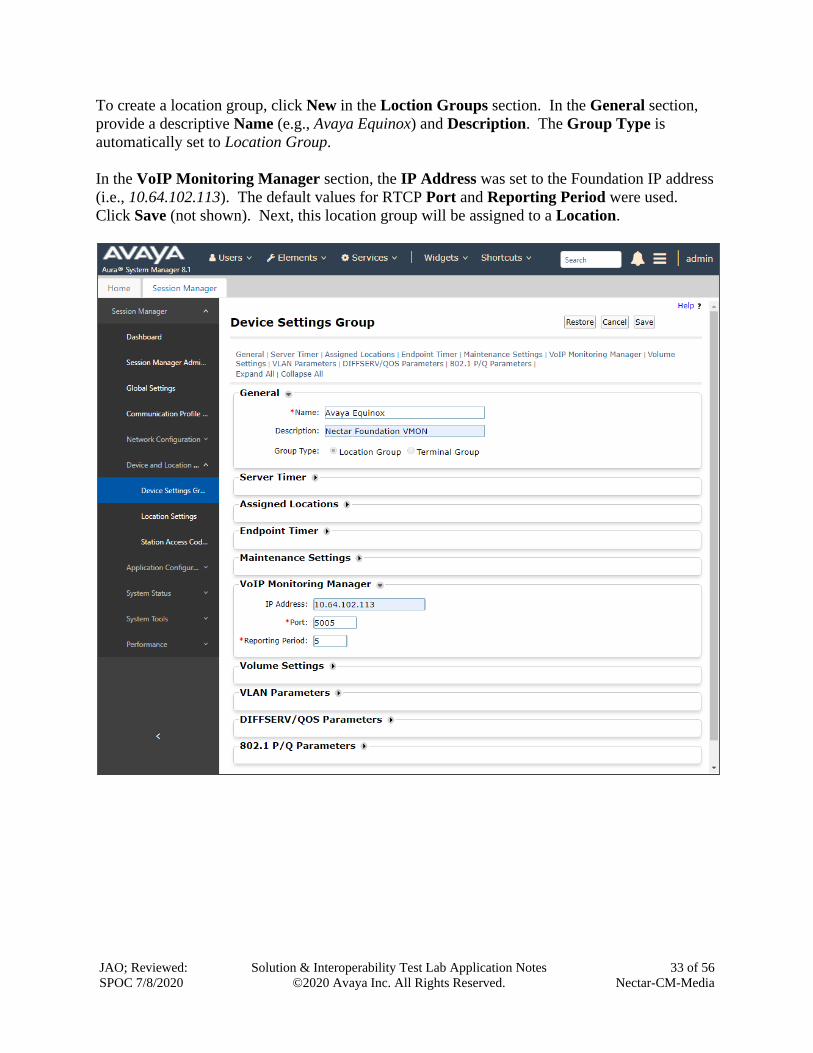
To create a location group, click New in the Loction Groups section. In the General section,
provide a descriptive Name (e.g., Avaya Equinox) and Description. The Group Type is
automatically set to Location Group.
In the VoIP Monitoring Manager section, the IP Address was set to the Foundation IP address
(i.e., 10.64.102.113). The default values for RTCP Port and Reporting Period were used.
Click Save (not shown). Next, this location group will be assigned to a Location.

JAO; Reviewed:
SPOC 7/8/2020
Solution & Interoperability Test Lab Application Notes
©2020 Avaya Inc. All Rights Reserved.
34 of 56
Nectar-CM-Media
To assign the previously configured location group to a Location, select Location Settings in
the left pane. Assign the Location Group to a Location as shown below. In this example, the
Avaya Equinox location group was assigned to the Thornton location. Note that this method of
assigning configuration settings could also have been used for local SIP users (e.g., 96x1 and
J100 Series SIP Deskphones) that are local or remote workers.
9.2. Configure 46xxsettings.txt File
Alternatively, the Avaya 96x1 and J100 Series SIP Deskphones may derive the RTCP settings
from the 46xxsettings.txt file. The RTCP Monitoring parameters for local SIP users can be
configured as follows in the file. Note that RTCPMON was set to the Foundation IP address.
################### RTCP MONITORING #####################
##
## The RTCP monitor
## One RTCP monitor (VMM server) IP address in dotted-decimal format or DNS name
## format (0 to 15 characters).
SET RTCPMON 10.64.102.113
##
## RTCPMONPORT sets the port used to send RTCP information to the IP address specified
## in the RTCPMON parameter. The default value is 5005.
SET RTCPMONPORT 5005
##
## RTCP Monitor Report Period
## Specifies the interval for sending out RTCP monitoring reports (5-30 seconds).
## Default is 5 seconds.FG
SET RTCPMONPERIOD 5
##

JAO; Reviewed:
SPOC 7/8/2020
Solution & Interoperability Test Lab Application Notes
©2020 Avaya Inc. All Rights Reserved.
35 of 56
Nectar-CM-Media
SIP remote workers, assigned to Group 4, can be provided the RTCP Monitoring settings as
follows. Note that RTCPMON was set to the public SBCE interface. SBCE will relay RTCP
to Foundation as configured in Section 8.2.
##############################################################
# GROUP_4
########## Add SET Statements for GROUP 4 below ############
SET RTCPMON 10.64.102.113
SET RTCPMONPORT 5005
SET RTCPMONPERIOD 5
################ END OF GROUP 4 SETTINGS #####################
GOTO END

JAO; Reviewed:
SPOC 7/8/2020
Solution & Interoperability Test Lab Application Notes
©2020 Avaya Inc. All Rights Reserved.
36 of 56
Nectar-CM-Media
10. Configure Nectar Foundation This section covers the Foundation configuration to monitor Communication Manager, G450
Media Gateway, Media Server and Avaya IP deskphones using SNMP, RTCP, and the SAT
interface. The configuration was performed via the RIG client. The procedure covers the
following areas:
▪ Launch the RIG Client
▪ Configure Communication Manager SAT Access and SNMP Polling
▪ Configure SNMP Polling for G450 Media Gateways
▪ Configure SNMP Traps
▪ Configure Real-Time Quality Monitoring
10.1. Launch the RIG Client
In an Internet browser, enter the Foundation IP address in the URL field. The RIG client
software is downloaded. Install and run the RIG client. In the Nectar Portal Login screen,
enter the user credentials and click Login.
JAO; Reviewed:
SPOC 7/8/2020
Solution & Interoperability Test Lab Application Notes
©2020 Avaya Inc. All Rights Reserved.
37 of 56
Nectar-CM-Media
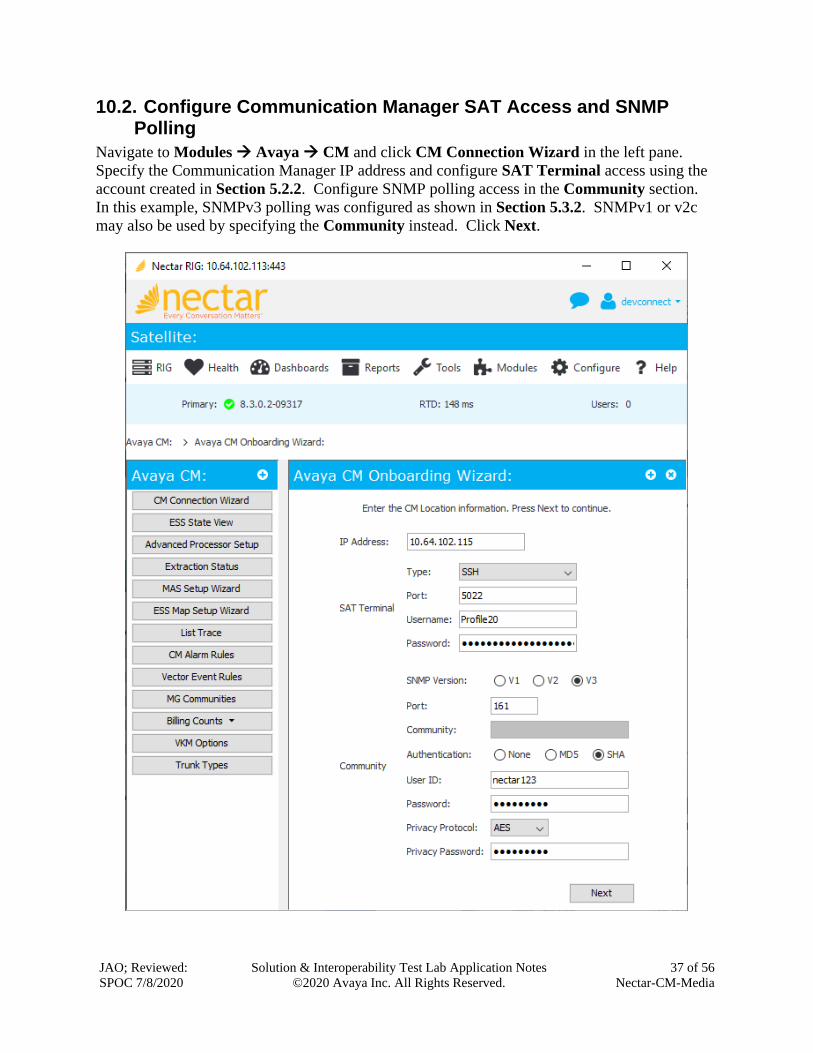
10.2. Configure Communication Manager SAT Access and SNMP Polling
Navigate to Modules → Avaya → CM and click CM Connection Wizard in the left pane.
Specify the Communication Manager IP address and configure SAT Terminal access using the
account created in Section 5.2.2. Configure SNMP polling access in the Community section.
In this example, SNMPv3 polling was configured as shown in Section 5.3.2. SNMPv1 or v2c
may also be used by specifying the Community instead. Click Next.
JAO; Reviewed:
SPOC 7/8/2020
Solution & Interoperability Test Lab Application Notes
©2020 Avaya Inc. All Rights Reserved.
38 of 56
Nectar-CM-Media
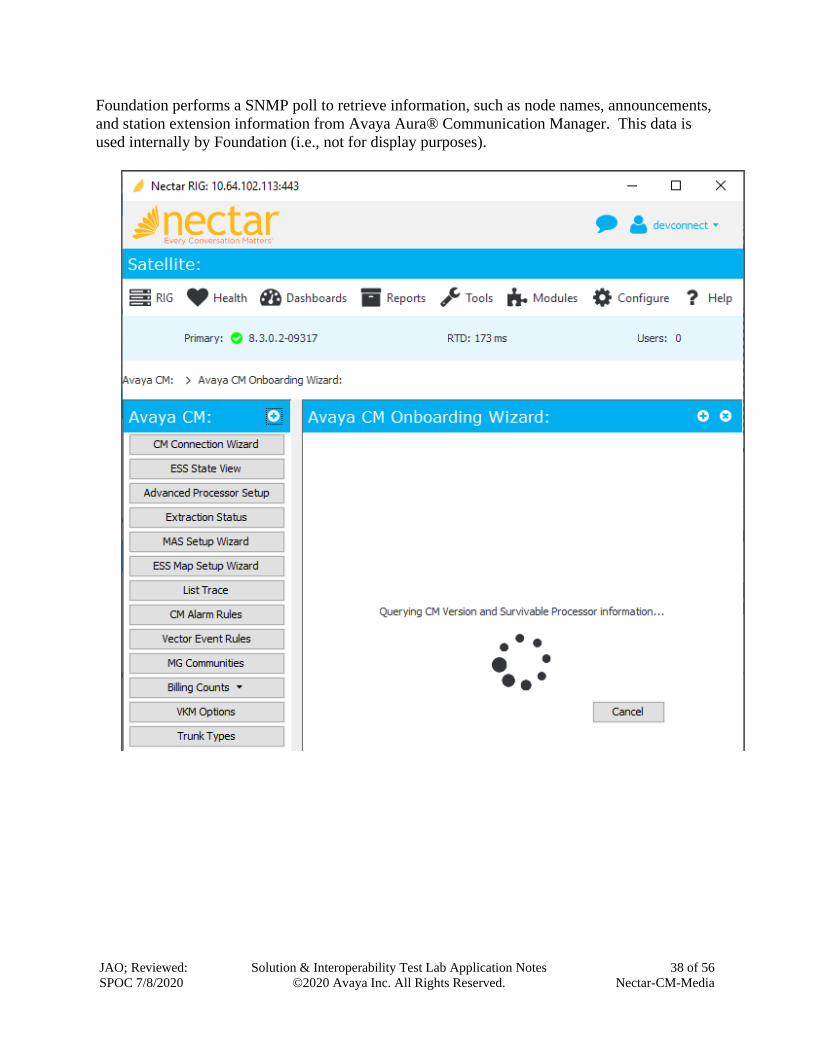
Foundation performs a SNMP poll to retrieve information, such as node names, announcements,
and station extension information from Avaya Aura® Communication Manager. This data is
used internally by Foundation (i.e., not for display purposes).
JAO; Reviewed:
SPOC 7/8/2020
Solution & Interoperability Test Lab Application Notes
©2020 Avaya Inc. All Rights Reserved.
39 of 56
Nectar-CM-Media
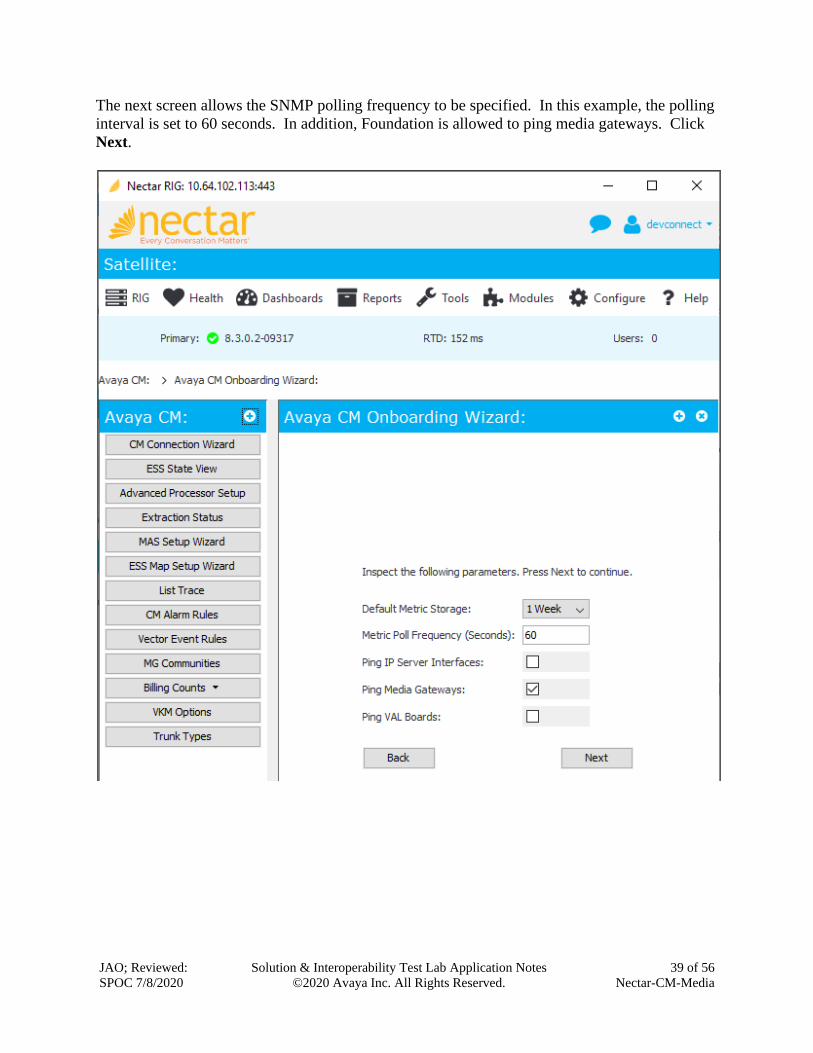
The next screen allows the SNMP polling frequency to be specified. In this example, the polling
interval is set to 60 seconds. In addition, Foundation is allowed to ping media gateways. Click
Next.

JAO; Reviewed:
SPOC 7/8/2020
Solution & Interoperability Test Lab Application Notes
©2020 Avaya Inc. All Rights Reserved.
40 of 56
Nectar-CM-Media
In the subsequent screen, set the IP to the Communication Manager IP address and specify the
SSH parameters for SAT access. Since a simplex Communication Manager was used, set the
Trap IP 1 to the Communication Manager IP address. Traps IP 2 would be used if a secondary
Communication Manager were used. Click Next.

JAO; Reviewed:
SPOC 7/8/2020
Solution & Interoperability Test Lab Application Notes
©2020 Avaya Inc. All Rights Reserved.
41 of 56
Nectar-CM-Media
The final screen indicates that the connection verification process was completed successfully.
Click Finish.
JAO; Reviewed:
SPOC 7/8/2020
Solution & Interoperability Test Lab Application Notes
©2020 Avaya Inc. All Rights Reserved.
42 of 56
Nectar-CM-Media
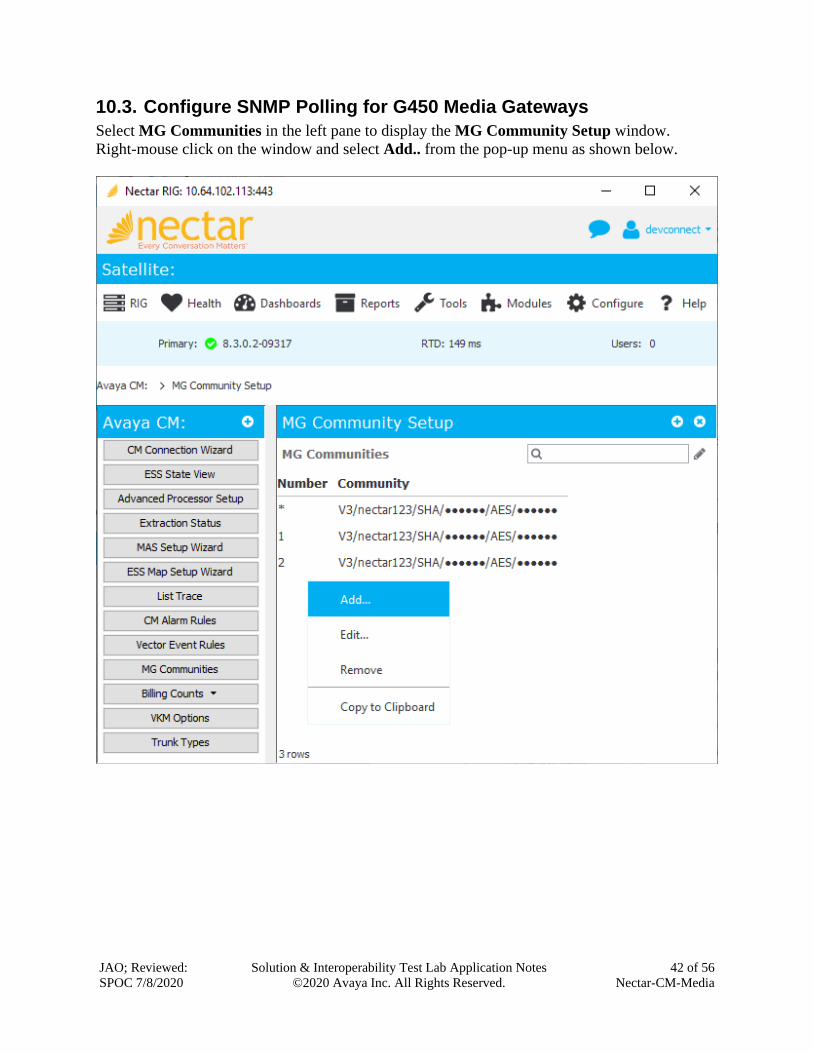
10.3. Configure SNMP Polling for G450 Media Gateways
Select MG Communities in the left pane to display the MG Community Setup window.
Right-mouse click on the window and select Add.. from the pop-up menu as shown below.

JAO; Reviewed:
SPOC 7/8/2020
Solution & Interoperability Test Lab Application Notes
©2020 Avaya Inc. All Rights Reserved.
43 of 56
Nectar-CM-Media
In the Add MG Community dialog box, set the Number to the G450 Media Gateway number
assigned on Communication Manager. Specify Port 161 for SNMP polling and configure the
SNMP version. In this example, SNMPv3 polling was configured as shown in Section 6.2.3, but
SNMPv1 or v2c may also be used. Click Add.

JAO; Reviewed:
SPOC 7/8/2020
Solution & Interoperability Test Lab Application Notes
©2020 Avaya Inc. All Rights Reserved.
44 of 56
Nectar-CM-Media
10.4. Configure SNMP Traps
Navigate to Configure → Receiver and select the Community Filter tab. The Community
Filter serves two purposes:
▪ Filter SNMPv1 and v2c traps based on community name (optional).
▪ Configure credentials for SNMPv3 traps (required).
This section covers the configuration of credentials for SNMPv3 traps. The SNMPv3 trap
credentials were configured the same in Communication Manager, G450 Media Gateways, and
Media Server so only one entry was required. Click Add.
JAO; Reviewed:
SPOC 7/8/2020
Solution & Interoperability Test Lab Application Notes
©2020 Avaya Inc. All Rights Reserved.
45 of 56
Nectar-CM-Media
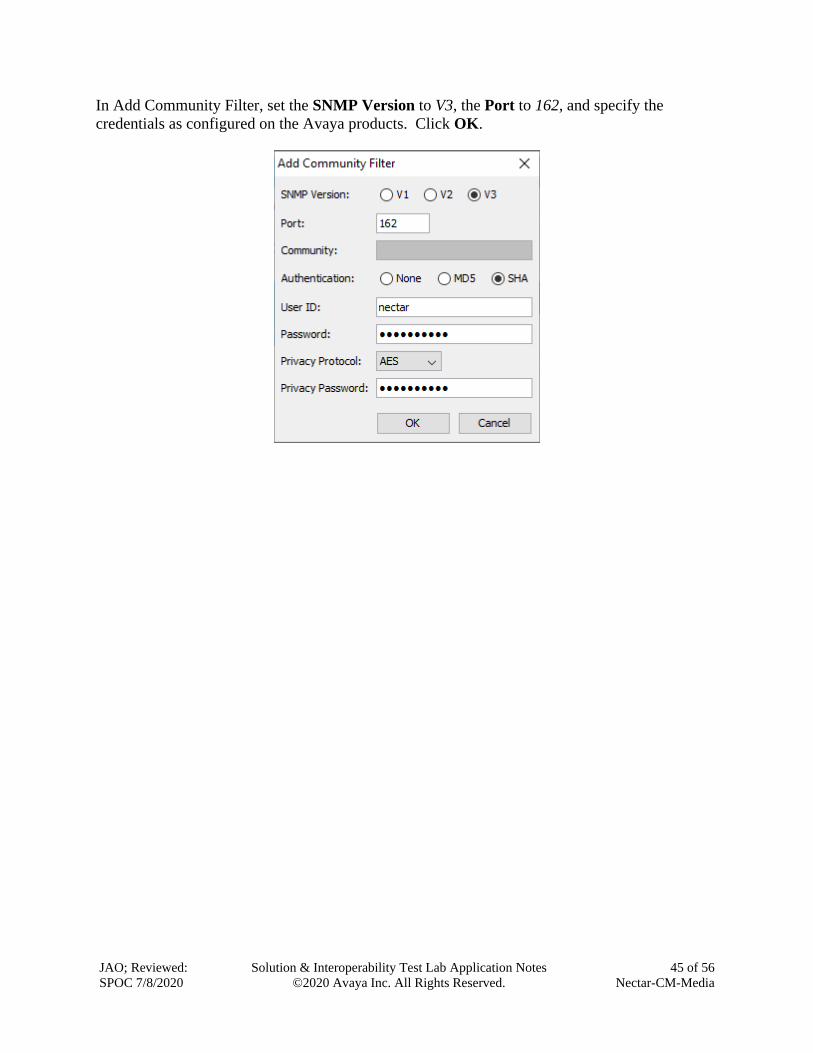
In Add Community Filter, set the SNMP Version to V3, the Port to 162, and specify the
credentials as configured on the Avaya products. Click OK.

JAO; Reviewed:
SPOC 7/8/2020
Solution & Interoperability Test Lab Application Notes
©2020 Avaya Inc. All Rights Reserved.
46 of 56
Nectar-CM-Media
10.5. Configure Real-Time Quality Monitoring
Navigate to Configure → Quality Management → Real Time QoS and configure the
following fields:
RTCP Receiver: Set to Enabled.
Traces: Set to Enabled.
Receiver Interface: Set to the Foundation IP address (e.g., 10.64.102.113).
Receiver Port: Set to 5005.
Default Codec: Set to G.711.
Hop Name Lookup: Set to Enabled.
Click Apply to start the RTCP Receiver.

JAO; Reviewed:
SPOC 7/8/2020
Solution & Interoperability Test Lab Application Notes
©2020 Avaya Inc. All Rights Reserved.
47 of 56
Nectar-CM-Media
11. Verification Steps This section provides the tests that can be performed to verify proper configuration of
Foundation with Communication Manager, G450 Media Gateway, and Media Server.
1. Navigate to Health → Events to view SNMP traps and events.
JAO; Reviewed:
SPOC 7/8/2020
Solution & Interoperability Test Lab Application Notes
©2020 Avaya Inc. All Rights Reserved.
48 of 56
Nectar-CM-Media
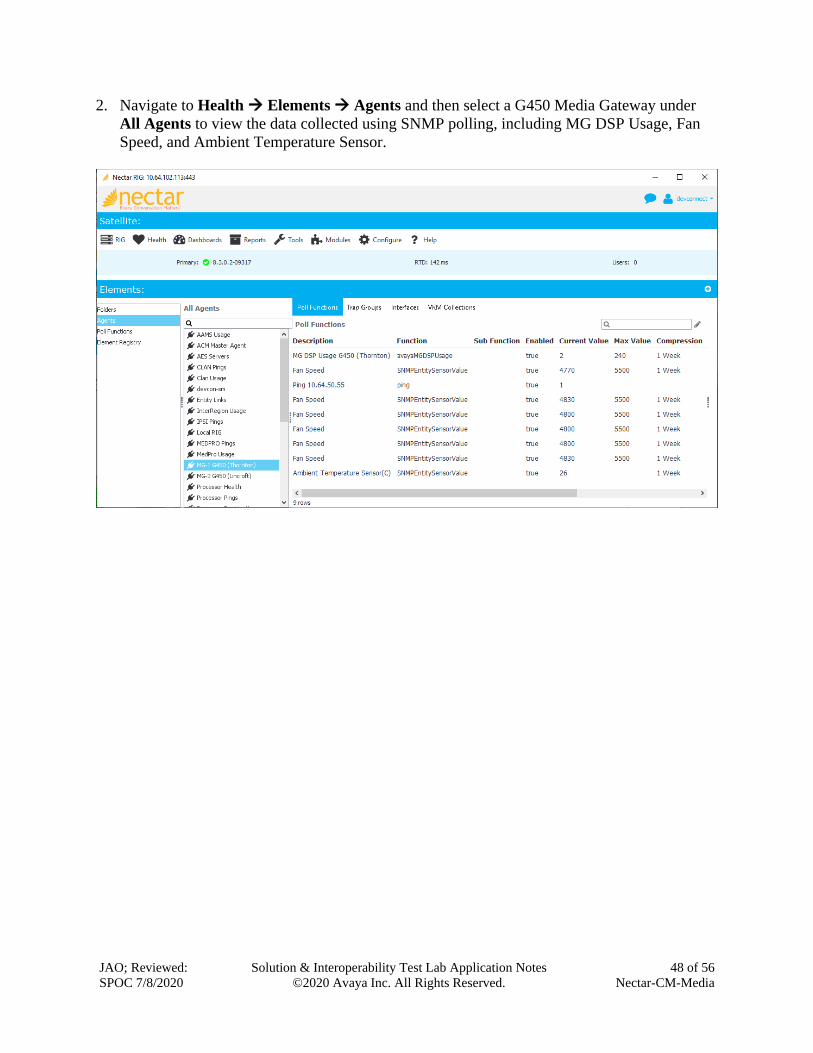
2. Navigate to Health → Elements → Agents and then select a G450 Media Gateway under
All Agents to view the data collected using SNMP polling, including MG DSP Usage, Fan
Speed, and Ambient Temperature Sensor.
JAO; Reviewed:
SPOC 7/8/2020
Solution & Interoperability Test Lab Application Notes
©2020 Avaya Inc. All Rights Reserved.
49 of 56
Nectar-CM-Media
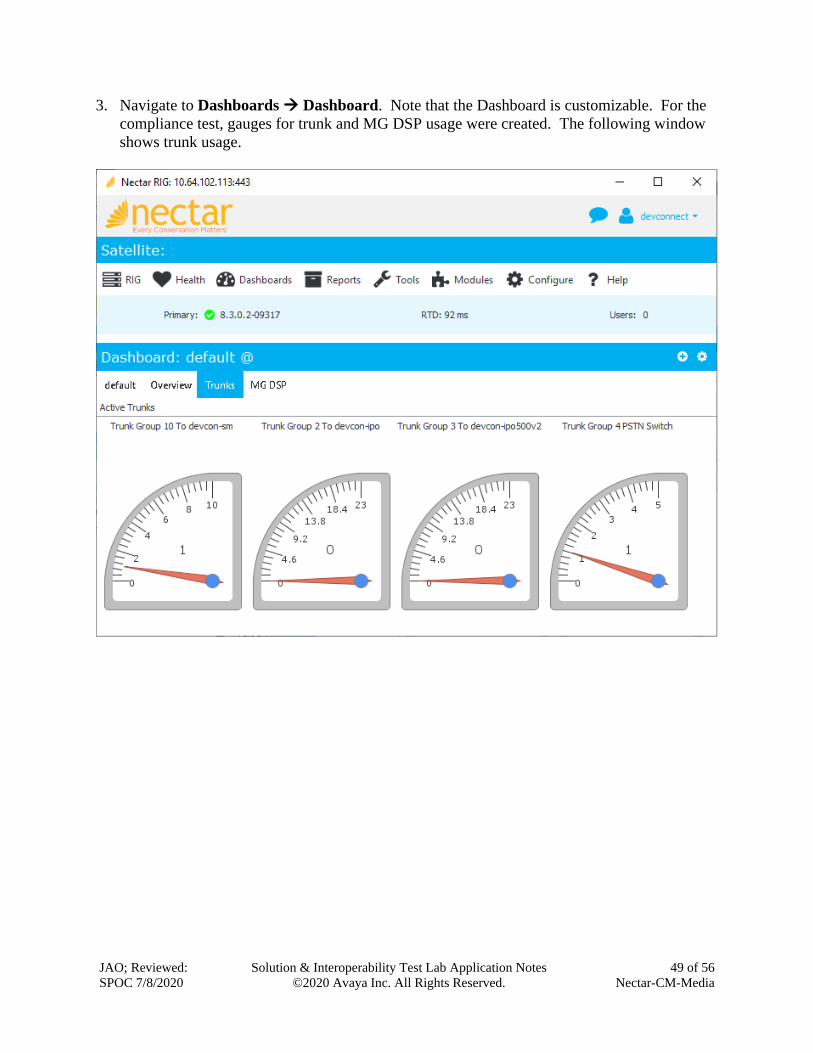
3. Navigate to Dashboards → Dashboard. Note that the Dashboard is customizable. For the
compliance test, gauges for trunk and MG DSP usage were created. The following window
shows trunk usage.
JAO; Reviewed:
SPOC 7/8/2020
Solution & Interoperability Test Lab Application Notes
©2020 Avaya Inc. All Rights Reserved.
50 of 56
Nectar-CM-Media
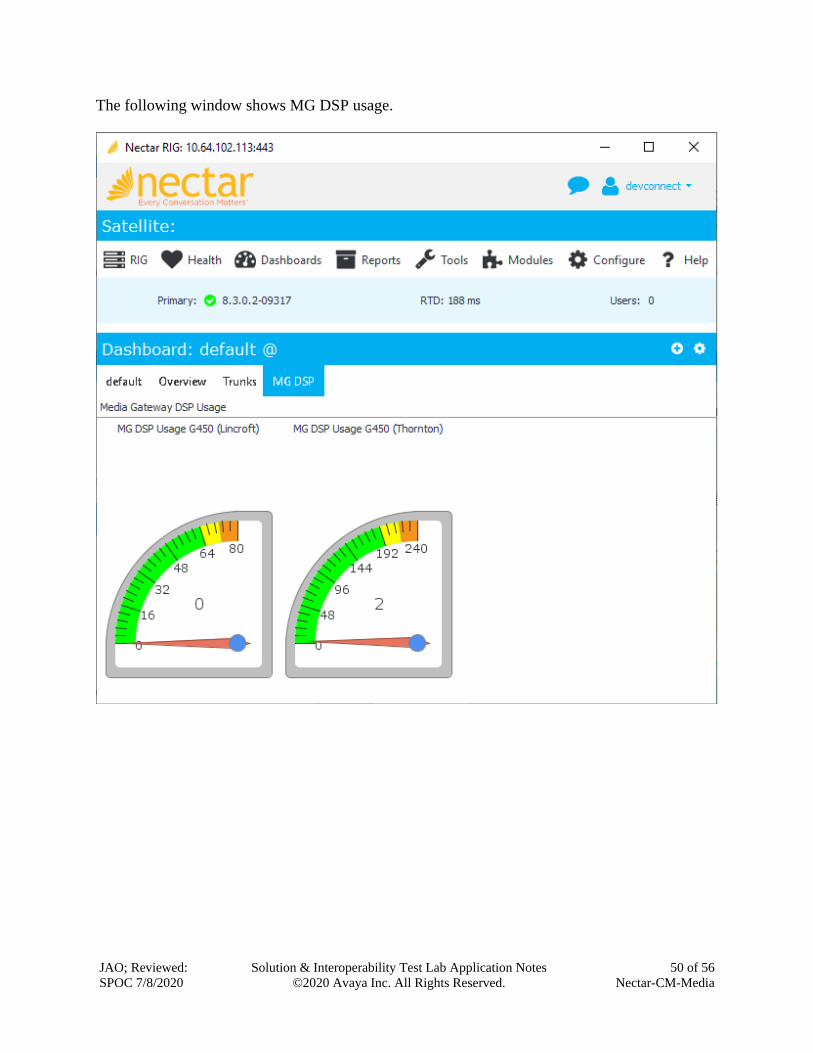
The following window shows MG DSP usage.

JAO; Reviewed:
SPOC 7/8/2020
Solution & Interoperability Test Lab Application Notes
©2020 Avaya Inc. All Rights Reserved.
51 of 56
Nectar-CM-Media
4. Navigate to Reports → Inventory → CM to view the inventory information and verify that
it is correct. The following window shows the inventory list available.

JAO; Reviewed:
SPOC 7/8/2020
Solution & Interoperability Test Lab Application Notes
©2020 Avaya Inc. All Rights Reserved.
52 of 56
Nectar-CM-Media
The following window shows the list of Media Gateways.

JAO; Reviewed:
SPOC 7/8/2020
Solution & Interoperability Test Lab Application Notes
©2020 Avaya Inc. All Rights Reserved.
53 of 56
Nectar-CM-Media
5. Establish a call between two Avaya IP Deskphones. Navigate to Health → Quality
Management → Real-Time QoS to view the active calls. Double-click on one of the
phones on the call to view the Real-Time QoS metrics.
JAO; Reviewed:
SPOC 7/8/2020
Solution & Interoperability Test Lab Application Notes
©2020 Avaya Inc. All Rights Reserved.
54 of 56
Nectar-CM-Media
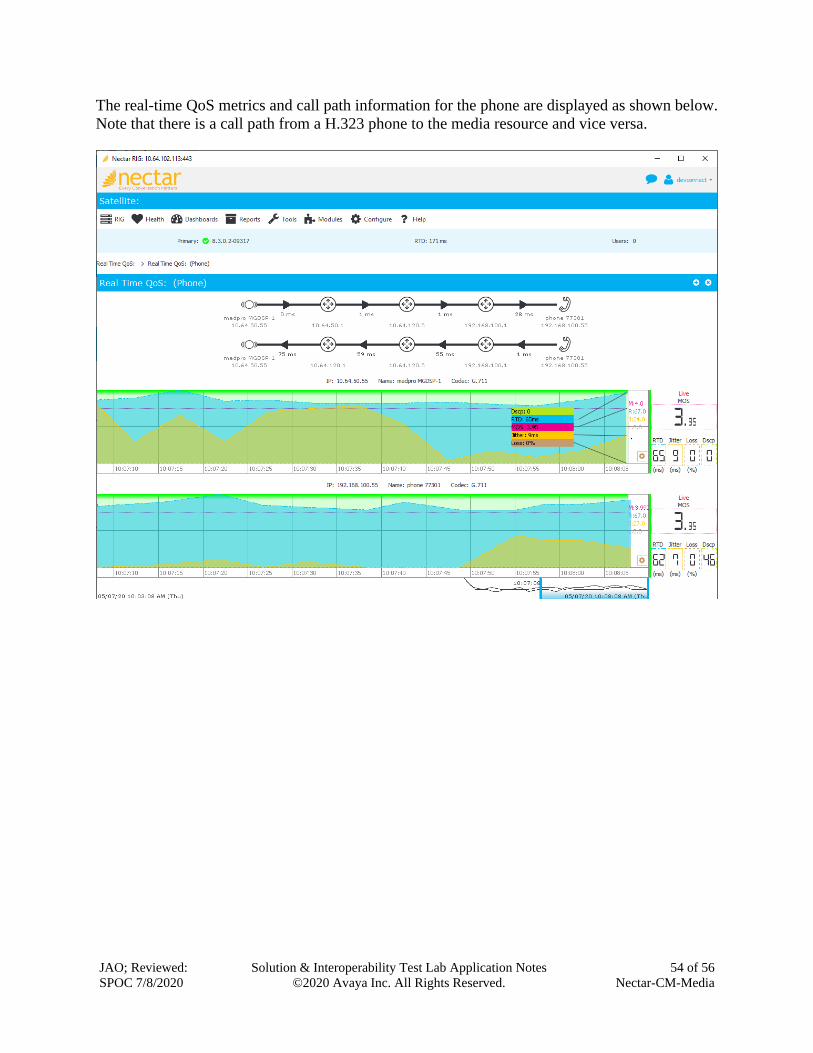
The real-time QoS metrics and call path information for the phone are displayed as shown below.
Note that there is a call path from a H.323 phone to the media resource and vice versa.
JAO; Reviewed:
SPOC 7/8/2020
Solution & Interoperability Test Lab Application Notes
©2020 Avaya Inc. All Rights Reserved.
55 of 56
Nectar-CM-Media
12. Conclusion These Application Notes described the configuration steps required to integrate Nectar
Foundation with Avaya Aura® Communication Manager, Avaya G450 Media Gateway, and
Avaya Aura® Media Server using SNMP, RTCP, and the SAT interface. The compliance test
passed with observations noted in Section 2.2.
13. Additional References This section references the Avaya documentation relevant to these Application Notes available at
http://support.avaya.com.
[1] Administering Avaya Aura® Communication Manager, Release 8.1.x, Issue 6, March 2020.
[2] Administering Avaya Aura® System Manager for Release 8.1.x, Release 8.1.x, April 2020.
[3] Administering Avaya Aura® Session Manager, Release 8.1.x, Issue 3, March 2020.
[4] Administering Avaya G450 Branch Gateway, Release 8.1.x, Issue 5, April 2020.
[5] Administering Avaya Session Border Controller for Enterprise, Release 8.1, Issue 2, April,
2020.
JAO; Reviewed:
SPOC 7/8/2020
Solution & Interoperability Test Lab Application Notes
©2020 Avaya Inc. All Rights Reserved.
56 of 56
Nectar-CM-Media
©2020 Avaya Inc. All Rights Reserved.
Avaya and the Avaya Logo are trademarks of Avaya Inc. All trademarks identified by ® and
™ are registered trademarks or trademarks, respectively, of Avaya Inc. All other trademarks
are the property of their respective owners. The information provided in these Application
Notes is subject to change without notice. The configurations, technical data, and
recommendations provided in these Application Notes are believed to be accurate and
dependable, but are presented without express or implied warranty. Users are responsible for
their application of any products specified in these Application Notes.
Please e-mail any questions or comments pertaining to these Application Notes along with the
full title name and filename, located in the lower right corner, directly to the Avaya
DevConnect Program at [email protected].


![Aura e imagen dialéctica [final]](https://static.fdokumen.com/doc/165x107/631d416593f371de1901d874/aura-e-imagen-dialectica-final.jpg)