CCS-UC-1 Secure SIP Endpoint with Avaya Aura 7.0 - Crestron
48
CCS-UC-1 Secure SIP Endpoint with Avaya Aura ® 7.0 System Configuration Guide Crestron Electronics, Inc.
-
Upload
khangminh22 -
Category
Documents
-
view
0 -
download
0
Transcript of CCS-UC-1 Secure SIP Endpoint with Avaya Aura 7.0 - Crestron

CCS-UC-1 Secure SIP Endpoint with Avaya Aura® 7.0 System
Configuration Guide Crestron Electronics, Inc.

Crestron product development software is licensed to Crestron dealers and Crestron Service Providers (CSPs) under a limited non-exclusive, non-transferable Software Development Tools License Agreement. Crestron product operating system software is licensed to Crestron dealers, CSPs, and end-users under a separate End-User License Agreement. Both of these Agreements can be found on the Crestron website at www.crestron.com/legal/software_license_agreement. The product warranty can be found at www.crestron.com/warranty. The specific patents that cover Crestron products are listed at patents.crestron.com. Certain Crestron products contain open source software. For specific information, please visit www.crestron.com/opensource. Crestron, the Crestron logo, AirMedia, Crestron Mercury, and Crestron Toolbox are either trademarks or registered trademarks of Crestron Electronics, Inc. in the United States and/or other countries. Avaya Aura is either a trademark or registered trademark of Avaya, Inc. in the United States and/or other countries. Bugzilla is either a trademark or registered trademark of the Mozilla Foundation in the United States and/or other countries. Other trademarks, registered trademarks, and trade names may be used in this document to refer to either the entities claiming the marks and names or their products. Crestron disclaims any proprietary interest in the marks and names of others. Crestron is not responsible for errors in typography or photography. This document was written by the Technical Publications department at Crestron. ©2017 Crestron Electronics, Inc.
Configuration Guide – DOC. 7990A Contents • i
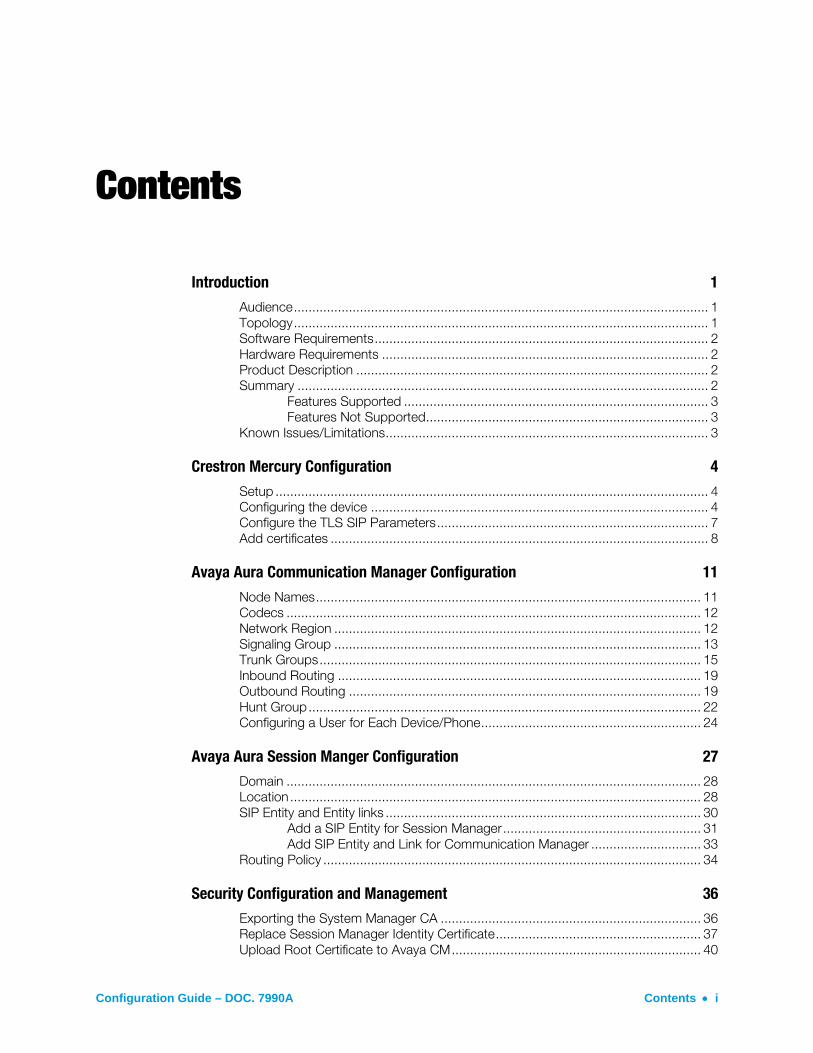
Contents
Introduction 1
Audience ................................................................................................................. 1 Topology ................................................................................................................. 1 Software Requirements ........................................................................................... 2 Hardware Requirements ......................................................................................... 2 Product Description ................................................................................................ 2 Summary ................................................................................................................ 2
Features Supported ................................................................................... 3 Features Not Supported............................................................................. 3
Known Issues/Limitations ........................................................................................ 3
Crestron Mercury Configuration 4
Setup ...................................................................................................................... 4 Configuring the device ............................................................................................ 4 Configure the TLS SIP Parameters .......................................................................... 7 Add certificates ....................................................................................................... 8
Avaya Aura Communication Manager Configuration 11
Node Names ......................................................................................................... 11 Codecs ................................................................................................................. 12 Network Region .................................................................................................... 12 Signaling Group .................................................................................................... 13 Trunk Groups ........................................................................................................ 15 Inbound Routing ................................................................................................... 19 Outbound Routing ................................................................................................ 19 Hunt Group ........................................................................................................... 22 Configuring a User for Each Device/Phone ............................................................ 24
Avaya Aura Session Manger Configuration 27
Domain ................................................................................................................. 28 Location ................................................................................................................ 28 SIP Entity and Entity links ...................................................................................... 30
Add a SIP Entity for Session Manager ...................................................... 31 Add SIP Entity and Link for Communication Manager .............................. 33
Routing Policy ....................................................................................................... 34
Security Configuration and Management 36
Exporting the System Manager CA ....................................................................... 36 Replace Session Manager Identity Certificate ........................................................ 37 Upload Root Certificate to Avaya CM .................................................................... 40

ii • Contents Configuration Guide – DOC. 7990A
Avaya 46xx File settings 42

Configuration Guide – DOC. 7990A CCS-UC-1: Secure SIP Endpoint with Avaya Aura 7.0 • 1
CCS-UC-1: Secure SIP Endpoint with Avaya® Aura 7.0
Introduction This configuration guide describes the necessary procedure to configure a Crestron Mercury™ device to register to the Avaya® Aura Communication Manager as a secure SIP endpoint.
Audience This document is intended for users attempting to configure and use Crestron Mercury devices as secure SIP endpoints registering to the Avaya Aura Communication Manager.
Topology The network topology for the Crestron Mercury endpoint to interop with the Avaya Aura is shown below.
Crestron Mercury: Secure SIP Endpoint Integration with Avaya - Reference Network

2 • CCS-UC-1: Secure SIP Endpoint with Avaya Aura 7.0 Configuration Guide – DOC. 7990A
The lab network consists of the following components:
• Avaya Aura Communication Manager
• Avaya Aura Session Manager
• Avaya Aura System Manager
• Avaya SIP phones
• Avaya G430 Media Gateway
• Crestron Mercury device as the secure SIP Endpoints
Software Requirements • Avaya Aura Communication manager v 7.0.1.1.0.441.23169
• Avaya Aura System Manager v 7.0
• Avaya Aura Session Manager v 7.0.1.1.701114
• Avaya g430 Media Gateway v 37 .39 .0 /2
• Crestron Mercury devices v 1.3318.00002 and v 1.3318.00013.001(G729 testing)
Hardware Requirements • Avaya components either in a virtual environment or separate hardware servers
o Avaya Aura Communication Manager
o Avaya Aura Session Manager
o Avaya G430 Media Gateway
o Avaya Aura Session Manager
• PRI Gateway for PSTN Calling
• Avaya phones (3) in SIP mode
• Crestron Mercury devices (2)
Product Description The Crestron Mercury device is a complete solution for conference rooms. It acts as an all-in-one touch screen, speakerphone, and AirMedia® product for conference rooms that integrates microphones and speakers into the user interface at the table.
Crestron Toolbox™ software is used to discover and control all Crestron devices on the network.
The Crestron Mercury web Interface is used to control the Crestron Mercury devices on the network.
Summary The Crestron Mercury devices, in secure mode, are configured on the Avaya Aura as SIP endpoints. The devices successfully register to the Avaya Aura Session Manager with digest authentication after establishing a TLS connection with the PBX.

Configuration Guide – DOC. 7990A CCS-UC-1: Secure SIP Endpoint with Avaya Aura 7.0 • 3
Features Supported • Secure mode: Establishing a TLS handshake with the Avaya Aura
• Registration with Digest Authentication
• Basic Calls with G729, G722, G711u, and G711a codecs
• Caller ID (limited to only calling number)
• DTMF support
• Early media support
• Retrieval of a parked call
• Transferee in a call transfer
• Conference participant
• Member of hunt group
Features Not Supported • Caller ID presentation
• Call hold and resume
• Call forwarding on the device (Forwarding can be configured on the PBX for the DN assigned to the endpoint)
• Call waiting
• Conference
• Attended call transfer
• Early attended call transfer
• Blind call transfer
• Shared line (configuration of shared line on device)
• Call park (initiating call park)
• Message waiting indicator
Known Issues/Limitations • The “Direct IP-IP Audio Connections” parameter on the Avaya Aura signaling group
was configured to “n” (No) instead of the default value of “y” (Yes) because with it set to “y,” the CM would reject a call made by an Avaya phone to the Crestron Mercury device.
• Caller ID is not supported on Crestron Mercury devices. Currently only the calling party number is displayed as the caller ID. This issue is tracked via Crestron’s Bugzilla™ software Defect: 119006.
• The active call timer on the Crestron Mercury device does not reflect the correct call duration. The active call duration includes the time for which the unit was being alerted also. This issue is tracked via Crestron’s Bugzilla software Defect: 124001.

4 • CCS-UC-1: Secure SIP Endpoint with Avaya Aura 7.0 Configuration Guide – DOC. 7990A
• The first ringback heard on the Crestron Mercury device is stuttered (resembles a mix of local and remote ringback). This issue is tracked via Crestron’s Bugzilla software Defect: 122421.
• On the Crestron Mercury web user interface, there is currently no notification provided to the user when certain configurations are missing. This issue is tracked via Crestron’s Bugzilla software Defect: 125193.
• On the Crestron Mercury web user interface, a configuration of DHCP OFF on the Network configuration page mandates configuration of both the adapters. The user is unable to save changes unless both the adapters are configured and is notified of an invalid IP against the default of 0.0.0.0 for an unused adapter. This issue is tracked via Crestron’s Bugzilla software Defect: 126236.
• On the Crestron Mercury web user interface, there is currently no check to validate if a certificate that is being deleted is in use or not, i.e., whether it is on the trusted list or not. This issue is tracked via Crestron’s Bugzilla software Defect: 126232.
• On the Crestron Mercury device, for certain called numbers that cannot be reached or are invalid, the user only hears a reorder tone and does not have the option to disconnect the call except by pressing the call button again. This issue is tracked via Crestron’s Bugzilla software Defect: 122633.
Crestron Mercury Configuration
Setup The LAN port of the Crestron Mercury device needs to be connected to one PoE+ port to power it up for network connectivity with the Avaya Aura. The PoE switch that is used should have the LLDP functionality enabled for the device to power up and be completely functional. By default the “poeplus” configuration is set to Off on the device.
Configuring the device To configure the device, follow this procedure:
1. Access the web GUI for the device by using an http session with the device’s IP address. The device IP address used in this test was 10.89.17.100.

Configuration Guide – DOC. 7990A CCS-UC-1: Secure SIP Endpoint with Avaya Aura 7.0 • 5
Crestron Mercury: Login to Web GUI
2. Click Sign In and log in to the device. For information on device administration, refer to the CCS-UC-1 Supplemental Guide (Doc. 7844) at www.crestron.com/manuals.
The Status screen that appears displays basic information on the device.
Crestron Mercury: Status
The device can be configured from the Network page.

6 • CCS-UC-1: Secure SIP Endpoint with Avaya Aura 7.0 Configuration Guide – DOC. 7990A
3. On the web GUI, navigate to Network
Crestron Mercury: Network Setting: DHCP Off: Static IP Configured
4. Enter the following parameters in the Adapter 1 section to configure the Crestron Mercury device.
• Domain Name: lab.tekvizion.com, used in this example (mostly auto-detected by device when in DHCP mode).
• DHCP: Choose either of the following:
o Obtain an IP address automatically
o Use the following IP address
For the test, a static IP was configured.
IP address: 10.89.17.100 was used in this example.
Subnet Mask: 255.255.255.0 was used in this example.
Default Gateway: 10.89.17.1 was used in this example.
DNS Server 1: 10.64.1.3 was used in this example.
5. Click Save Changes.

Configuration Guide – DOC. 7990A CCS-UC-1: Secure SIP Endpoint with Avaya Aura 7.0 • 7
Configure the TLS SIP Parameters To configure the TLS SIP parameters, follow this procedure:
1. On the web GUI, navigate to Device > SIP Calling.
Crestron Mercury: Device Configuration: TLS SIP Parameters
2. Enable the check box for Enable SIP.
3. Configure the Server IP Address: Enter the IP address of the Avaya Aura Session Manager node. 10.89.17.7 was used in this example.
4. Configure the port: 5061, used in this example.
5. Configure the Server Username: Enter the end user configured on Avaya Aura Communication Manager for this device. 5816 was used in this example.
6. Configure the Server Password: Enter the password as configured on Avaya Aura Communication Manager for this end user.
7. Configure the Local Extension: Enter the directory number that was configured for this device on Avaya Aura Communication Manager. 5816 was used in this example.
8. Leave all other fields at their default values.
9. Click Save Changes.
Once the device successfully registers with the Avaya Aura Session Manager, the SIP Server Status updates its status to show Online.

8 • CCS-UC-1: Secure SIP Endpoint with Avaya Aura 7.0 Configuration Guide – DOC. 7990A
Add certificates For a successful TLS handshake with the Avaya Aura Session Manager, the Crestron Mercury device needs a root certificate (root.cer). This is the certificate that is downloaded from the certificate authority that serves the Avaya Aura Session Manager (local Avaya CA). This certificate is required by the Crestron Mercury device to allow it to validate the Avaya Aura Session Manager when Enable Server Validation is enabled in the SIP Calling configuration screen.
Perform the following procedure to upload certificates to the Crestron Mercury device.
1. On the web GUI, navigate to Device > SIP Calling.
2. Click Manage Certificates.
Crestron Mercury: Manage Certificates: Add Root Certificate
3. Click Add Root Certificate.
Configuration Guide – DOC. 7990A CCS-UC-1: Secure SIP Endpoint with Avaya Aura 7.0 • 9
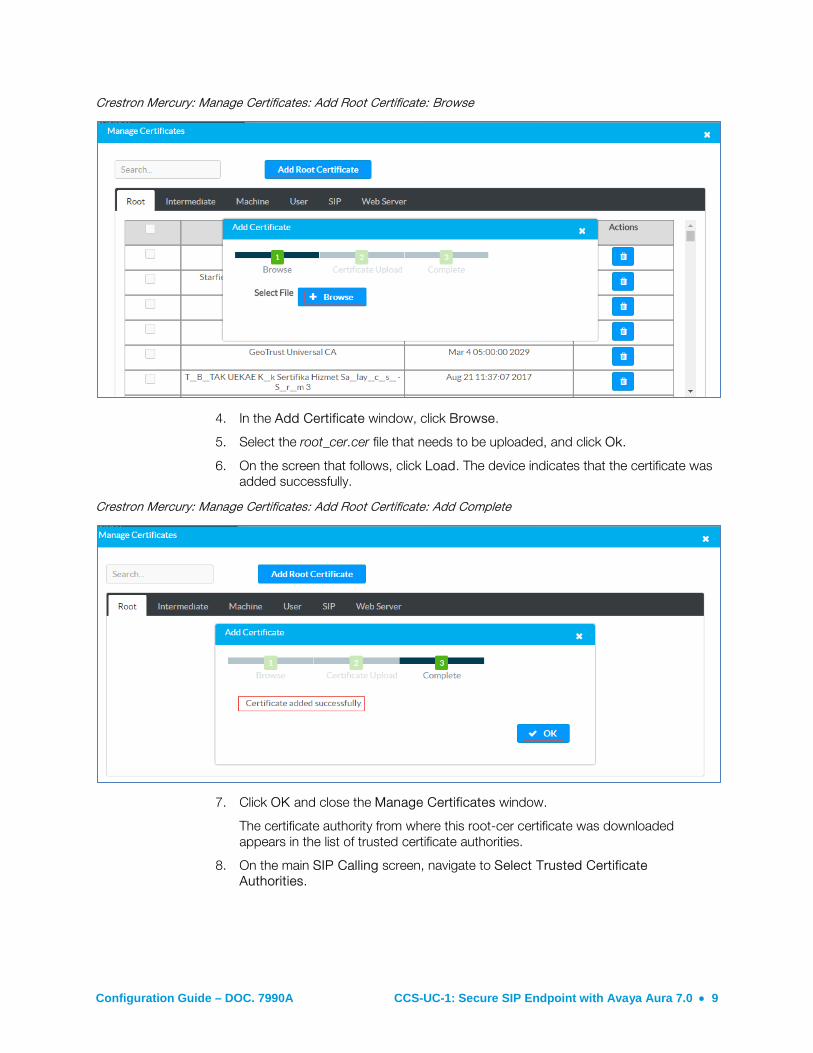
Crestron Mercury: Manage Certificates: Add Root Certificate: Browse
4. In the Add Certificate window, click Browse.
5. Select the root_cer.cer file that needs to be uploaded, and click Ok.
6. On the screen that follows, click Load. The device indicates that the certificate was added successfully.
Crestron Mercury: Manage Certificates: Add Root Certificate: Add Complete
7. Click OK and close the Manage Certificates window.
The certificate authority from where this root-cer certificate was downloaded appears in the list of trusted certificate authorities.
8. On the main SIP Calling screen, navigate to Select Trusted Certificate Authorities.

10 • CCS-UC-1: Secure SIP Endpoint with Avaya Aura 7.0 Configuration Guide – DOC. 7990A
Crestron Mercury: SIP Calling: Select Trusted Certificate Authorities
9. From the list of certificate authorities, select the certificate authority (from where the root_cer.cer certificate was downloaded).

Configuration Guide – DOC. 7990A CCS-UC-1: Secure SIP Endpoint with Avaya Aura 7.0 • 11
Avaya Aura Communication Manager Configuration This section describes the Avaya Aura Communication Manager (Avaya CM) configuration necessary to support the registration of the devices in a secure mode, and connectivity to PSTN.
NOTE: It is assumed that the general installation and basic Avaya Aura configuration have already been administered.
Node Names Configure the node IP for Avaya Aura Session Manager and Avaya CM.
Use the change name-names ip command to add the node name. In this example, procr and ASM7 were added with their respective IPs.
• ASM7 is an Avaya Aura Session Manager used in this example and is used to register the SIP phones and third-party SIP devices.
• procr is used to register the SIP trunk.
Avaya Aura CM: Configure Node

12 • CCS-UC-1: Secure SIP Endpoint with Avaya Aura 7.0 Configuration Guide – DOC. 7990A
Codecs Use the change ip-codec-set command to define a list of codecs to use for calls between the PBX and PSTN.
For the test, ip-codec-set 1 was configured with the following codecs supported by the Crestron Mercury device: G722, G711MU, G.711A, and G729.
Avaya Aura CM: Codec Configuration
Network Region Configure an IP Network region 1 using the change ip-network-region 1 command.
To configure an IP Network region, issue the above command and configure:
• Set Authoritative Domain: lab.tekvizion.com, used in this example
• Set Name: provide any relevant name.
• Codec Set: 1, which is programmed in the previous step.
• Set Intra-region IP-IP Direct Audio: Yes.
• Set Intra-region IP-IP Direct Audio: Yes.
• Retain all other default configurations.

Configuration Guide – DOC. 7990A CCS-UC-1: Secure SIP Endpoint with Avaya Aura 7.0 • 13
Avaya Aura CM: IP Network Region Configuration
Signaling Group For this test, two signaling groups were configured:
• signaling-group 1 for calls between the Communication Manager and Session Manager
• signaling-group 10 for PSTN calls
Using the command add signaling-group 1, add and configure Signaling Group 1 as follows:
• Group Number: 1, used in this example.
• Group Type: sip, used in this example.
• Transport Method: tls, used in this example.
• Near-end Node Name: procr, used in this example.
• Near-end Listen Port: 5061, used in this example.
• Far-end Node Name: ASM7, used in this example.
• Far-end Listen Port: 5061, used in this example.
• Far-end Network Region: 1, used in this example.
• Far-end Domain: lab.tekvizion.com, used in this example.
• DTMF over IP: rtp-payload, used in this example.
• Direct IP-IP Audio Connections? n, used in this example. (There were issues with setting it to “yes.” The CM would reject a call made by an Avaya phone to the Crestron Mercury device.)

14 • CCS-UC-1: Secure SIP Endpoint with Avaya Aura 7.0 Configuration Guide – DOC. 7990A
Avaya Aura CM: Signaling Group Configuration: CM to SM Calls
Using the command add signaling-group 10, add and configure the Signaling Group 10 as follows:
• Group Number: 10, used in this example.
• Group Type: isdn-pri, used in this example.
• Associated Signaling?: y, used in this example.
• Primary D-Channel: 001V224, used in this example.
• Trunk Group for Channel Selection: 10, used in this example.
Avaya Aura CM: Signaling Group Configuration: CM to PRI GW

Configuration Guide – DOC. 7990A CCS-UC-1: Secure SIP Endpoint with Avaya Aura 7.0 • 15
Trunk Groups Two trunk groups were configured for this test:
• Trunk Group 1 utilized a private numbering plan to access the stations registered to the Avaya Session Manager.
• Trunk Group 10 utilized a public numbering plan to send place PSTN calls via a PRI GW.
Use the add trunk-group n command to add a new trunk group (where n is the trunk group number).
Configure Trunk Group 1:
• Group Number: 1, used in this example.
• Group Name: SIP Phone, used in this example.
• Group Type: sip, used in this example.
• Service Type: tie, used in this example.
• TAC: #001, used in this example.
• Signaling Group: 1, used in this example.
• Number of Members: 10, used in this example.
• Preferred Minimum Session Refresh Interval (sec): 600.
• Numbering Format: private.
Avaya Aura CM: Trunk Configuration to Session Manager (1/4)

16 • CCS-UC-1: Secure SIP Endpoint with Avaya Aura 7.0 Configuration Guide – DOC. 7990A
Avaya Aura CM: Trunk Configuration to Session Manager (2/4)
Avaya Aura CM: Trunk Configuration to Session Manager (3/4)

Configuration Guide – DOC. 7990A CCS-UC-1: Secure SIP Endpoint with Avaya Aura 7.0 • 17
Avaya Aura CM: Trunk Configuration to Session Manager (4/4)
Configure Trunk Group 10:
• Group Number: 10, used in this example.
• Group Name: OUTSIDE CALL, used in this example.
• Group Type: isdn, used in this example.
• Carrier Medium: PRI/BRI, used in this example.
• TAC: #010, used in this example.
• Numbering Format: private.
Avaya Aura CM: Trunk Configuration to PRI GW (1/3)

18 • CCS-UC-1: Secure SIP Endpoint with Avaya Aura 7.0 Configuration Guide – DOC. 7990A
Avaya Aura CM: Trunk Group 10 Configuration for PSTN PRI dialing (2/3)
Avaya Aura CM: Trunk Group 10 Configuration for PSTN PRI dialing (3/3)
Configuration Guide – DOC. 7990A CCS-UC-1: Secure SIP Endpoint with Avaya Aura 7.0 • 19
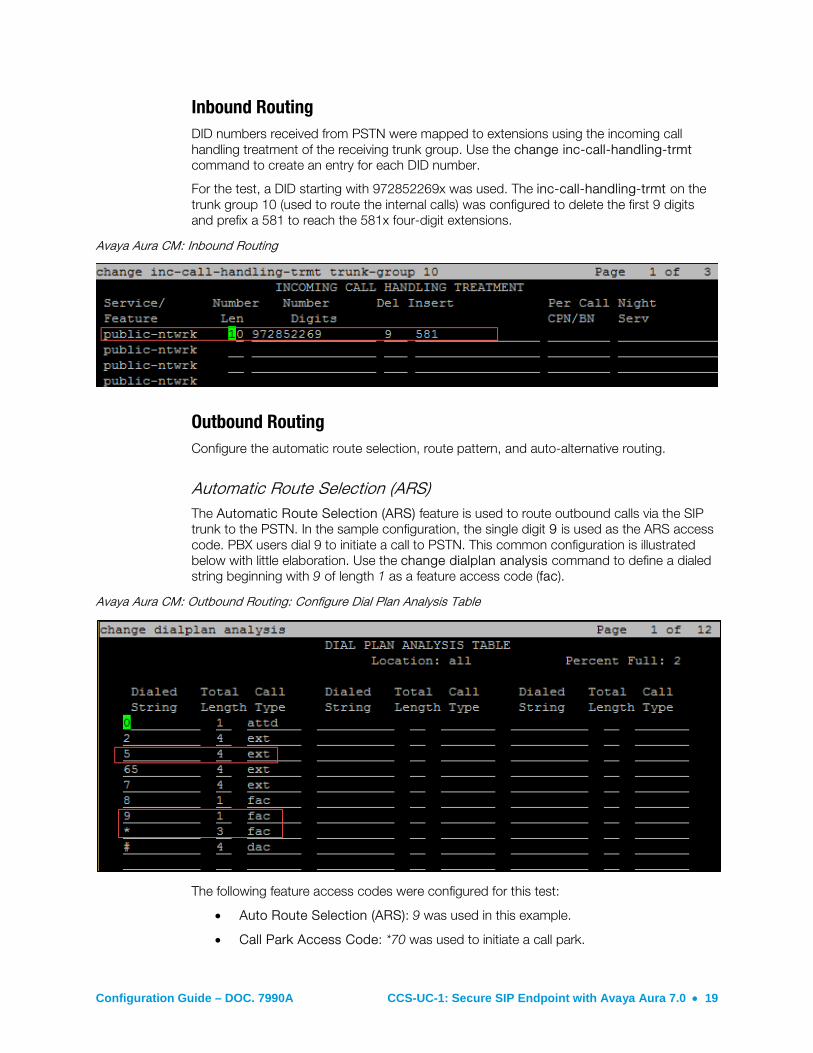
Inbound Routing DID numbers received from PSTN were mapped to extensions using the incoming call handling treatment of the receiving trunk group. Use the change inc-call-handling-trmt command to create an entry for each DID number.
For the test, a DID starting with 972852269x was used. The inc-call-handling-trmt on the trunk group 10 (used to route the internal calls) was configured to delete the first 9 digits and prefix a 581 to reach the 581x four-digit extensions.
Avaya Aura CM: Inbound Routing
Outbound Routing Configure the automatic route selection, route pattern, and auto-alternative routing.
Automatic Route Selection (ARS) The Automatic Route Selection (ARS) feature is used to route outbound calls via the SIP trunk to the PSTN. In the sample configuration, the single digit 9 is used as the ARS access code. PBX users dial 9 to initiate a call to PSTN. This common configuration is illustrated below with little elaboration. Use the change dialplan analysis command to define a dialed string beginning with 9 of length 1 as a feature access code (fac).
Avaya Aura CM: Outbound Routing: Configure Dial Plan Analysis Table
The following feature access codes were configured for this test:
• Auto Route Selection (ARS): 9 was used in this example.
• Call Park Access Code: *70 was used to initiate a call park.

20 • CCS-UC-1: Secure SIP Endpoint with Avaya Aura 7.0 Configuration Guide – DOC. 7990A
• Answer Back Access Code: *72 was used to retrieve a parked call.
Avaya Aura CM: Outbound Routing: Configure Feature Access Codes
Use the change ars analysis command to configure the routing of dialed digits following the first digit 9.
For the example, the following entries were added using the above command and configuring:
• 1: to accommodate all 18xx numbers or national numbers prefixed by a 1
• 214, 214242, and 972: to accommodate the lab and generic PSTN numbers used during the example.
Avaya Aura CM: Outbound Routing: Auto Route Selection (1/2)

Configuration Guide – DOC. 7990A CCS-UC-1: Secure SIP Endpoint with Avaya Aura 7.0 • 21
Avaya Aura CM: Outbound Routing: Auto Route Selection (2/2)
Route Pattern The route pattern defines which trunk group will be used for the call and performs any necessary digit manipulation. Use the change route pattern n command, where n is the route pattern number to configure the parameters for the PSTN trunk route pattern.
Route pattern: 10 is used in this example for PSTN calls.
Grp No: 1 is used in this example.
Avaya Aura CM: Route Pattern Configuration
22 • CCS-UC-1: Secure SIP Endpoint with Avaya Aura 7.0 Configuration Guide – DOC. 7990A
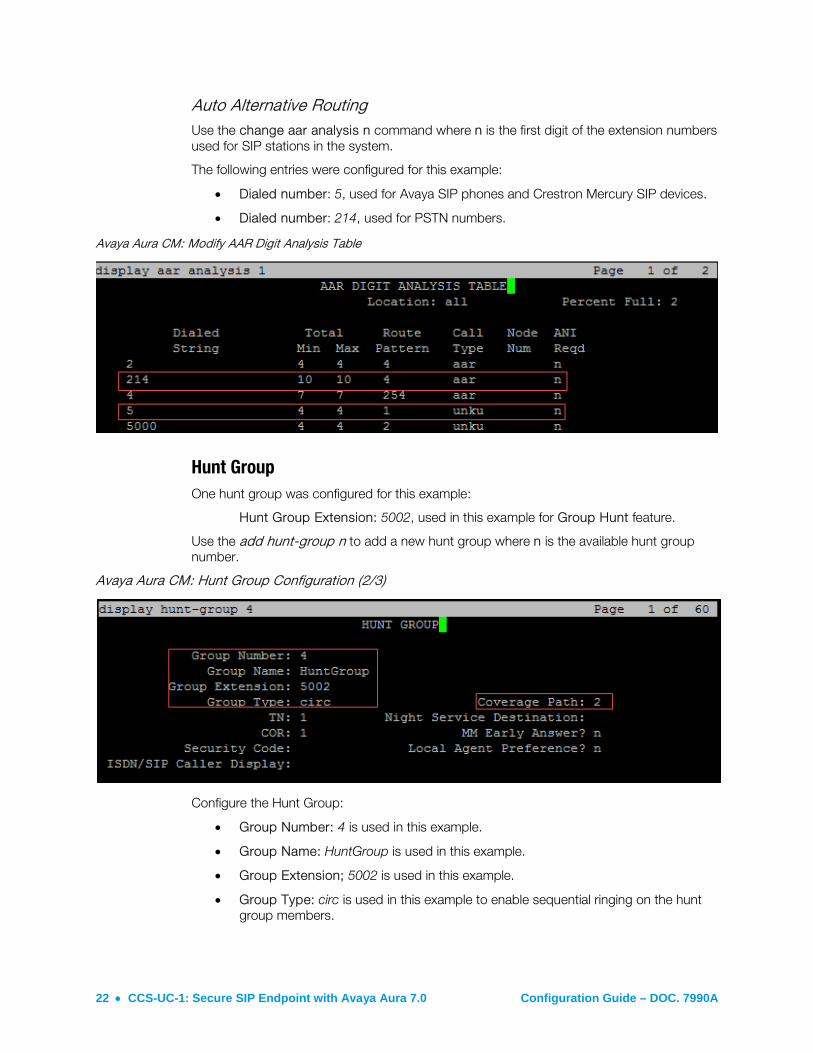
Auto Alternative Routing Use the change aar analysis n command where n is the first digit of the extension numbers used for SIP stations in the system.
The following entries were configured for this example:
• Dialed number: 5, used for Avaya SIP phones and Crestron Mercury SIP devices.
• Dialed number: 214, used for PSTN numbers.
Avaya Aura CM: Modify AAR Digit Analysis Table
Hunt Group One hunt group was configured for this example:
Hunt Group Extension: 5002, used in this example for Group Hunt feature.
Use the add hunt-group n to add a new hunt group where n is the available hunt group number.
Avaya Aura CM: Hunt Group Configuration (2/3)
Configure the Hunt Group:
• Group Number: 4 is used in this example.
• Group Name: HuntGroup is used in this example.
• Group Extension; 5002 is used in this example.
• Group Type: circ is used in this example to enable sequential ringing on the hunt group members.

Configuration Guide – DOC. 7990A CCS-UC-1: Secure SIP Endpoint with Avaya Aura 7.0 • 23
• Coverage Path: 2 is used in this example, which includes hunt group members that will be alerted sequentially.
Use the add coverage path n command (where n is the available coverage path number) to add the coverage path, which includes members of the hunt group.
Coverage Path Number 2 was configured in the example. This is invoked by Hunt group 4.
The following coverage points were configured:
• Point1: 5818 is used in this example.
• Point2: 5817 is used in this example.
• Point3: 5816 is used in this example.
Avaya Aura CM: Hunt Group Coverage Path Configuration

24 • CCS-UC-1: Secure SIP Endpoint with Avaya Aura 7.0 Configuration Guide – DOC. 7990A
Configuring a User for Each Device/Phone A user was configured for each phone or Crestron device used in the example. To configure a user for each device/phone, follow this process:
1. Navigate to Home > User Management > Manage Users.
2. Click Add New. The User Profile configuration window appears.
Avaya Aura CM: Phone Configuration (1/4)
3. Configure Last Name and First Name: Test.2, used in this example.
4. Configure Login Name: [email protected], is used in this example.
5. Select Communication Profile tab.
Configuration Guide – DOC. 7990A CCS-UC-1: Secure SIP Endpoint with Avaya Aura 7.0 • 25
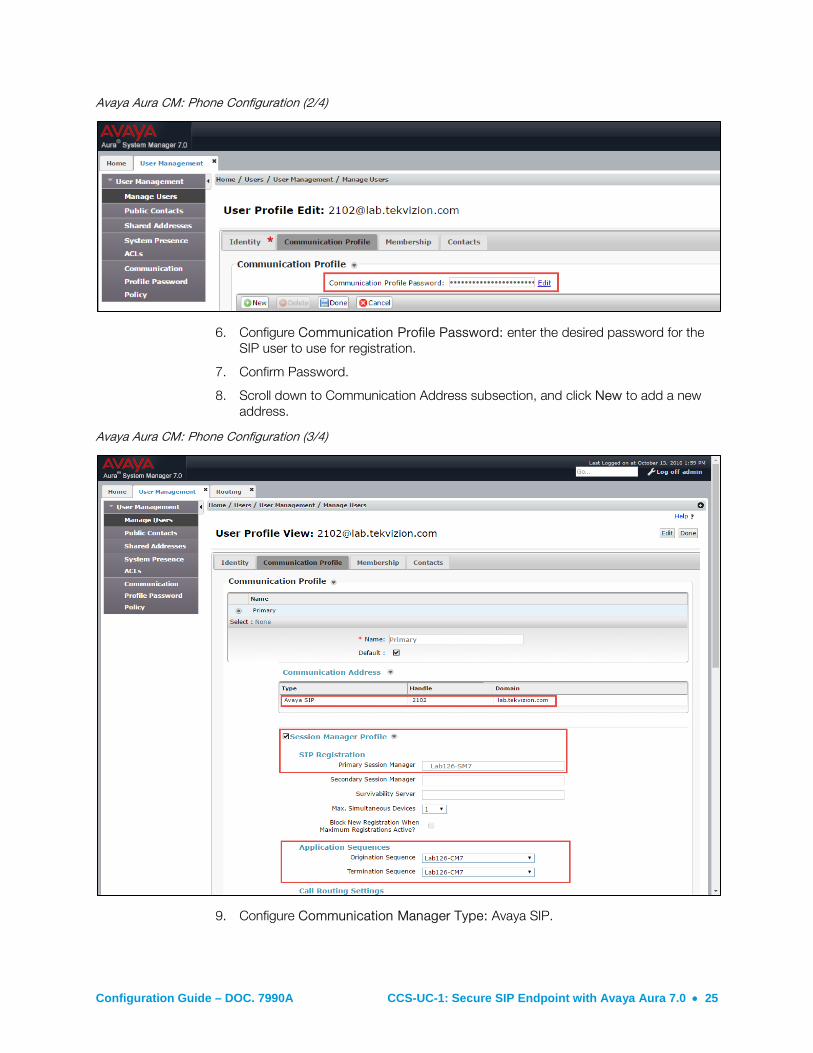
Avaya Aura CM: Phone Configuration (2/4)
6. Configure Communication Profile Password: enter the desired password for the SIP user to use for registration.
7. Confirm Password.
8. Scroll down to Communication Address subsection, and click New to add a new address.
Avaya Aura CM: Phone Configuration (3/4)
9. Configure Communication Manager Type: Avaya SIP.

26 • CCS-UC-1: Secure SIP Endpoint with Avaya Aura 7.0 Configuration Guide – DOC. 7990A
10. Enter SIP Registration: Primary Session Manager. Lab126-CM7, used in this example.
11. Check the CM Endpoint Profile check box.
Avaya Aura CM: Phone Configuration (4/4)
12. Configure System: Lab126-CM7, used in this example.
13. Configure Profile Type: Endpoint, used in this example.
14. Configure Extension: 2102, used in this example.
15. Click Done.

Configuration Guide – DOC. 7990A CCS-UC-1: Secure SIP Endpoint with Avaya Aura 7.0 • 27
Avaya Aura Session Manger Configuration 1. Access the Avaya Aura System Manager Web login screen via Error! Hyperlink
reference not valid. Address/FQDN>. IP address 10.89.17.3 is used in this example.
2. Log in with the User Id admin and associated password, and then click Log On.
Avaya Aura SM: Login Screen
Avaya Aura SM: Navigation Menu

28 • CCS-UC-1: Secure SIP Endpoint with Avaya Aura 7.0 Configuration Guide – DOC. 7990A
Domain Create an SIP domain for each domain of which Session Manager will need to be aware of in order to route calls.
To configure a domain, perform the following procedure.
1. Navigate to Home > Routing > Domains.
2. Click New.
3. Enter the following information:
o Name: Enter the domain name: lab.tekvizion.com was used in this example.
o Type: Select sip from the pull-down menu.
o Notes: Add a brief description (optional).
4. Click Commit to save.
Avaya Aura SM: Domain Configuration
Location Locations can be used to identify logical and/or physical locations where SIP Entities reside for the purposes of bandwidth management and call admission control.
To add a location, perform the following procedure.
1. Navigate to Routing > Locations.
2. Click the New button.
3. In the General section, enter the following values:
o Name: Enter a descriptive name for the location: Plano was used in this example.
o Notes: Add a brief description (optional).
4. Retain all other default configurations..
5. Click Commit to save.

Configuration Guide – DOC. 7990A CCS-UC-1: Secure SIP Endpoint with Avaya Aura 7.0 • 29
6. Under Location Pattern, click Add to add IP Address Patterns for different networks that are part of the topology:
o 10.64.0.0/16: tekVizion
o 10.89.17.x: AA7.0
7. Retain all other default configurations.
8. Click Commit to save.
Avaya Aura SM: Location Configuration

30 • CCS-UC-1: Secure SIP Endpoint with Avaya Aura 7.0 Configuration Guide – DOC. 7990A
SIP Entity and Entity links A SIP entity must be added for each network element that is part of the topology and that will participate in the example. This includes the Session Manager, the Communication Manager, and the PSTN gateway.
Avaya Aura SM: SIP Entity

Configuration Guide – DOC. 7990A CCS-UC-1: Secure SIP Endpoint with Avaya Aura 7.0 • 31
Add a SIP Entity for Session Manager To add an SIP entity, perform the following procedure:
1. Navigate to Routing > SIP Entities.
2. Click on the New button.
Avaya Aura CM Configuration: SIP Entity (1/2)
3. In the General section, enter the following values:
• Name: Enter a descriptive name. AA SM7.0 was used for the Avaya SM in this example.
• FQDN or IP Address: Enter the FQDN or IP address of the SIP Entity interface that is used for SIP signaling: 10.89.17.7 was used in this example.
• Type: Enter Session Manager.
• Location: Select one of the locations defined previously: Plano was used in this example.
• Time Zone: Select the time zone for the location entered above: American/Chicago was used in this example.

32 • CCS-UC-1: Secure SIP Endpoint with Avaya Aura 7.0 Configuration Guide – DOC. 7990A
• To define the ports used by Session Manager, scroll down to the Port section.
• In the Port section, click Add and enter the following values. Use default values for all remaining fields:
o Port: Enter the port number on which the CM will listen for SIP requests: 5060 was used in this example.
o Protocol: Transport protocol to be used to send SIP requests: TCP was used in this example.
o Add another entry with Port 5061 and Protocol TLS with the Default domain as lab.tekvizion.com configured earlier.
The SIP entity link for this entity is added after the CM entity has been configured.
To configure the SIP entity link for the SM, perform the following procedure.
1. Under Entity Links, Click Add.
Avaya Aura CM: SIP Entity-CM Configuration (2/2)
• Set SIP Entity 1: Select AA SM7.0, which is configured in the previous step from the drop-down menu.
• Set SIP Entity 2: Retain the default value: Lab117_ CM7
• Set Protocol: tls is used in this example.
• Set Ports: set both ports to 5061.
• Set Connection Policy: trusted.
2. Retain all other default configurations..
3. Click Commit.

Configuration Guide – DOC. 7990A CCS-UC-1: Secure SIP Endpoint with Avaya Aura 7.0 • 33
Add SIP Entity and Link for Communication Manager
Avaya Aura SM: SIP Entity and Entity Link CM Configuration
To add a SIP entity for the Avaya CM, follow this procedure:
1. Enter the following information.
• Name: Lab116-CM7 is used this example for an SIP entity of Avaya CM.
• IP address: 10.89.17.4 is used in this example.
• Type: CM is used in this example.
• Notes: Add a description.
• Adaptation: CM-ES is used in this example.
• Location: Select one of the locations defined previously: Plano is used in this example.
• Time Zone: Select the time zone for the location above.
2. Under Entity Links, Click Add.
• Set SIP Entity 1: Select AA SM7.0 which is configured in previous step from the drop-down menu.
• Set SIP Entity 2: Retain the default value: AA CM7.
• Set Protocol: TLS.
• Set Ports: set both ports to 5061.
• Set Connection Policy: trusted.
3. Retain all other default configurations..

34 • CCS-UC-1: Secure SIP Endpoint with Avaya Aura 7.0 Configuration Guide – DOC. 7990A
4. Click Commit.
Routing Policy Routing Policies describe the conditions under which calls are routed to the SIP entities. Three routing policies were added for this example: one for Communication Manager, one for voicemail, and one for the PSTN GW.
To add a routing policy for Avaya CM, perform the following procedure.
1. Navigate to Routing > Routing Policies.
2. Click on the New button.
Avaya Aura SM: Routing Policy Configuration

Configuration Guide – DOC. 7990A CCS-UC-1: Secure SIP Endpoint with Avaya Aura 7.0 • 35
3. In the General section, enter the following values.
• Name: to_Lab117_CM7 is used in this example.
• SIP Entity as Destination: Select the Avaya CM: Lab117-CM7 is used in this example.
• Retain all other default configurations.
4. Add the following Dial patterns that can be routed using this policy: • Pattern: 9725980xxx> 10 digit Avaya and Crestron endpoints DID starting
with 9725980.

36 • CCS-UC-1: Secure SIP Endpoint with Avaya Aura 7.0 Configuration Guide – DOC. 7990A
Security Configuration and Management For this example, the Avaya Aura System Manager served as the Certificate Authority.
The system manager trusted root certificates must be installed on the Crestron Mercury device that communicates with Session Manager over TLS.
Exporting the System Manager CA Follow this procedure to export the system manager CA:
1. Navigate to Services > Security > Certificate > Authority > CA Structure & CRLs.
Avaya Aura SM: Export System Manager CA
2. Click Download PEM file.
3. Select Save File.
4. Click OK.

Configuration Guide – DOC. 7990A CCS-UC-1: Secure SIP Endpoint with Avaya Aura 7.0 • 37
Replace Session Manager Identity Certificate To replace a session manager identity certificate, follow this procedure:
1. Navigate to Services > Inventory > Manage Element.
Configuring the Identity Certificate
2. Select the proper session manager: AA SM7.0 is selected for this setup.
3. Click More Actions.
4. Select Configure Identity Certificate.

38 • CCS-UC-1: Secure SIP Endpoint with Avaya Aura 7.0 Configuration Guide – DOC. 7990A
Initiating a Replace of Identity Certificate
5. Select Security Module SIP.
6. Click Replace.

Configuration Guide – DOC. 7990A CCS-UC-1: Secure SIP Endpoint with Avaya Aura 7.0 • 39
Replace identity Certificate
7. Select Replace this Certificate with Internal CA signed Certificate.
8. Set Common Name: The SIP IP address 10.89.17.7 is used in this setup.
9. Set Key Algorithm: RSA is selected from the drop-down menu.
10. Set Key Size: 2048 is selected for the setup.
11. Click Commit.
12. Repeat for Security Module HTTPS.

40 • CCS-UC-1: Secure SIP Endpoint with Avaya Aura 7.0 Configuration Guide – DOC. 7990A
Upload Root Certificate to Avaya CM To upload a root certificate to Avaya CM, follow this procedure:
1. On the Communication Manager Administration web UI, navigate to Security > Install Root Certificate.
2. Click Install.
Avaya CM: Install Root Certificate
3. Click OK on the screen that follows (not shown).
Once the certificate is installed, verify that it is listed under the Trusted Certificates (navigate to: Security > Trusted Certificates). The root certificate installed above should be listed under the trusted certificates (as SMGRCA.crt).

Configuration Guide – DOC. 7990A CCS-UC-1: Secure SIP Endpoint with Avaya Aura 7.0 • 41
Avaya CM: Trusted Certificates

42 • CCS-UC-1: Secure SIP Endpoint with Avaya Aura 7.0 Configuration Guide – DOC. 7990A
Avaya 46xx File settings The 46xx file settings that were configured for the example are shown below.
• SIP_CONTROLLER_LIST: 10.89.17.7:5061;transport=tls was configured for secure SIP example.ing.
• ENFORCE_SIPS_URI: 0-No. This disabled the system from requiring sip messages to be in the sips format.
• TRUSTCERTS: Specific trust certificates that need to be downloaded to the Avaya phones for them to function in a secure mode. This includes a certificate from the rootCA, in addition to the default certificates that exist on the phone.
• ENABLE_G729: 1-Enable G729A was used in this example for G729 support on Crestron Mercury.
• MEDIAENCRYPTION: 1, i.e., Enabled.
Avaya Aura: 46xx File Settings

Configuration Guide – DOC. 7990A CCS-UC-1: Secure SIP Endpoint with Avaya Aura 7.0 • 43
This page is intentionally left blank.

Crestron Electronics, Inc. Configuration Guide – DOC. 7990A 15 Volvo Drive Rockleigh, NJ 07647 (2048829) Tel: 888.CRESTRON 05.17 Fax: 201.767.7576 Specifications subject to www.crestron.com change without notice.