
Avaya Interaction Center
320
Avaya Interaction Center Release 7.0 Business Advocate Configuration and Administration 07-300106 Issue 3 February 2005
-
Upload
khangminh22 -
Category
Documents
-
view
2 -
download
0
Transcript of Avaya Interaction Center

Avaya Interaction CenterRelease 7.0Business Advocate Configuration and Administration
07-300106Issue 3
February 2005
© 2005 Avaya Inc.All Rights Reserved.
NoticeWhile reasonable efforts were made to ensure that the information in this document was complete and accurate at the time of printing, Avaya Inc. can assume no liability for any errors. Changes and corrections to the information in this document may be incorporated in future releases.
Documentation disclaimerAvaya Inc. is not responsible for any modifications, additions, or deletions to the original published version of this documentation unless such modifications, additions, or deletions were performed by Avaya. Customer and/or End User agree to indemnify and hold harmless Avaya, Avaya's agents, servants and employees against all claims, lawsuits, demands and judgments arising out of, or in connection with, subsequent modifications, additions or deletions to this documentation to the extent made by the Customer or End User.
Link disclaimerAvaya Inc. is not responsible for the contents or reliability of any linked Web sites and does not necessarily endorse the products, services, or information described or offered within them. We cannot guarantee that these links will work all of the time and we have no control over the availability of the linked pages.
WarrantyAvaya Inc. provides a limited warranty on this product. Refer to your sales agreement to establish the terms of the limited warranty. In addition, Avaya�s standard warranty language, as well as information regarding support for this product, while under warranty, is available through the following Web site:http://www.avaya.com/support
Preventing toll fraud"Toll fraud" is the unauthorized use of your telecommunications system by an unauthorized party (for example, anyone who is not a corporate employee, agent, subcontractor, or person working on your company's behalf). Be aware that there may be a risk of toll fraud associated with your system and that, if toll fraud occurs, it can result in substantial additional charges for your telecommunications services.
Avaya fraud interventionIf you suspect that you are being victimized by toll fraud and you need technical assistance or support, call Technical Service Center Toll Fraud Intervention Hotline at +1-800-643-2353 for the United States and Canada. For additional support telephone numbers, see the Avaya Web site:http://www.avaya.com/support
Providing telecommunications securityTelecommunications security (of voice, data, and video communications) is the prevention of any type of intrusion to (that is, either unauthorized or malicious access to or use of) your company's telecommunications equipment by some party.Your company's "telecommunications equipment" includes both this Avaya product and any other voice/data/video equipment that could be accessed via this Avaya product (that is, "networked equipment").An "outside party" is anyone who is not a corporate employee, agent, subcontractor, or person working on your company's behalf. Whereas, a "malicious party" is anyone (including someone who may be otherwise authorized) who accesses your telecommunications equipment with either malicious or mischievous intent.Such intrusions may be either to/through synchronous (time-multiplexed and/or circuit-based) or asynchronous (character-, message-, or packet-based) equipment or interfaces for reasons of:
� Use (of capabilities special to the accessed equipment)� Theft (such as, of intellectual property, financial assets, or
toll-facility access)� Eavesdropping (privacy invasions to humans)� Mischief (troubling, but apparently innocuous, tampering)� Harm (such as harmful tampering, data loss or alteration,
regardless of motive or intent)Be aware that there may be a risk of unauthorized intrusions associated with your system and/or its networked equipment. Also realize that, if such an intrusion should occur, it could result in a variety of losses to your company (including, but not limited to, human and data privacy, intellectual property, material assets, financial resources, labor costs, and legal costs).
Your responsibility for your company's telecommunications securityThe final responsibility for securing both this system and its networked equipment rests with you, an Avaya customer's system administrator, your telecommunications peers, and your managers. Base the fulfillment of your responsibility on acquired knowledge and resources from a variety of sources, including, but not limited to:
� Installation documents� System administration documents� Security documents� Hardware-/software-based security tools� Shared information between you and your peers� Telecommunications security experts
To prevent intrusions to your telecommunications equipment, you and your peers should carefully program and configure:
� Your Avaya-provided telecommunications systems and their interfaces
� Your Avaya-provided software applications, as well as their underlying hardware/software platforms and interfaces
� Any other equipment networked to your Avaya products.
TrademarksAvaya is a trademark of Avaya Inc.
All trademarks identified by the ® or � are registered trademarks or trademarks, respectively, of Avaya Inc. All other trademarks are the property of their respective owners.
Third-party royalty-free license agreementsThis product and future updates and service packs to this product may contain third-party royalty-free technology which is provided to you under terms and conditions which are different from your Avaya product license agreement. A file containing these third-party royalty-free licenses, 3plirdme.txt or a similar name, is in the root directory of the product CD. Your use of this technology described in this file will be subject to the terms and conditions of such other license agreements, and not the Avaya product license agreement.Document ordering information:Avaya Publications CenterVoice: +1-207-866-6701
1-800-457-1764 (Toll-free, U.S. and Canada only)
Fax: +1-207-626-72691-800-457-1764 (Toll-free, U.S. and Canada only)
Write: Globalware Solutions200 Ward Hill AvenueHaverhill, MA 01835 USAAttention: Avaya Account Manager
Web: http://www.avaya.com/support E-mail: [email protected] Order: Document No. 07-300106, Issue 3
February 2005For the most current versions of documentation, go to the Avaya support Web site:http://www.avaya.com/support
COMPASThis document is also available from the COMPAS database. The COMPAS ID for this document is 107874.
Avaya supportAvaya provides a telephone number for you to use to report problems or to ask questions about your contact center. The support telephone number is 1-800-242-2121 in the United States. For additional support telephone numbers, see the Avaya Web site:http://www.avaya.com/support

Issue 3 February 2005 3
Before You Begin . . . . . . . . . . . . . . . . . . . . . . . . . . . . . . . . . . . . . 11Typographical Conventions . . . . . . . . . . . . . . . . . . . . . . . . . . . . . . . 11Notes, Tips, and Cautions. . . . . . . . . . . . . . . . . . . . . . . . . . . . . . . . 12Contacting Technical Support . . . . . . . . . . . . . . . . . . . . . . . . . . . . . . 12Product Documentation . . . . . . . . . . . . . . . . . . . . . . . . . . . . . . . . . 13
Readme File . . . . . . . . . . . . . . . . . . . . . . . . . . . . . . . . . . . . . 13Electronic Documentation . . . . . . . . . . . . . . . . . . . . . . . . . . . . . . . 13Printed Documentation . . . . . . . . . . . . . . . . . . . . . . . . . . . . . . . . 14License to Print the Electronic Documentation . . . . . . . . . . . . . . . . . . . . . 14
Educational Services . . . . . . . . . . . . . . . . . . . . . . . . . . . . . . . . . . 15
Chapter 1: Introduction . . . . . . . . . . . . . . . . . . . . . . . . . . . . . . . . . . 17About Business Advocate . . . . . . . . . . . . . . . . . . . . . . . . . . . . . . . . 17
Which media channels Business Advocate supports . . . . . . . . . . . . . . . . . . 18How Business Advocate works with Avaya IC standard routing . . . . . . . . . . . . . 18How Business Advocate matches contacts with agents . . . . . . . . . . . . . . . . . 19How Business Advocate reacts to changes in your contact center . . . . . . . . . . . . 20
Qualification criteria . . . . . . . . . . . . . . . . . . . . . . . . . . . . . . . . . . 21Qualifiers . . . . . . . . . . . . . . . . . . . . . . . . . . . . . . . . . . . . . . . 22Service goals . . . . . . . . . . . . . . . . . . . . . . . . . . . . . . . . . . . . . 22Service classes . . . . . . . . . . . . . . . . . . . . . . . . . . . . . . . . . . . . 23Service states. . . . . . . . . . . . . . . . . . . . . . . . . . . . . . . . . . . . . 24Agent activation types . . . . . . . . . . . . . . . . . . . . . . . . . . . . . . . . . 24Predictive technology . . . . . . . . . . . . . . . . . . . . . . . . . . . . . . . . . 25
Contact selection . . . . . . . . . . . . . . . . . . . . . . . . . . . . . . . . . . . . 26Process for contact selection . . . . . . . . . . . . . . . . . . . . . . . . . . . . . 27Example: Using contact selection . . . . . . . . . . . . . . . . . . . . . . . . . . . 28
Agent selection. . . . . . . . . . . . . . . . . . . . . . . . . . . . . . . . . . . . . 29Most idle agent . . . . . . . . . . . . . . . . . . . . . . . . . . . . . . . . . . . . 29Least occupied agent . . . . . . . . . . . . . . . . . . . . . . . . . . . . . . . . . 29Occupancy for agent selection types . . . . . . . . . . . . . . . . . . . . . . . . . . 30Process for agent selection . . . . . . . . . . . . . . . . . . . . . . . . . . . . . . 31Comparing methods for agent selection . . . . . . . . . . . . . . . . . . . . . . . . 31
Dynamic adjustment of agent pools . . . . . . . . . . . . . . . . . . . . . . . . . . . 32Example: dynamically adjusting the agent pool . . . . . . . . . . . . . . . . . . . . . 33
Example: Using Business Advocate to increase revenue . . . . . . . . . . . . . . . . . 35
Avaya Interaction CenterRelease 7.0
Business Advocate Configuration and Administration
Contents

Contents
4 Business Advocate Configuration and Administration
Background information . . . . . . . . . . . . . . . . . . . . . . . . . . . . . . . . 35Determining service classes . . . . . . . . . . . . . . . . . . . . . . . . . . . . . . 36Creating agent profiles . . . . . . . . . . . . . . . . . . . . . . . . . . . . . . . . 37Setting agent activation types and activation levels . . . . . . . . . . . . . . . . . . . 37Setting service goals . . . . . . . . . . . . . . . . . . . . . . . . . . . . . . . . . 38Measuring results . . . . . . . . . . . . . . . . . . . . . . . . . . . . . . . . . . . 38
Chapter 2: Business Advocate components . . . . . . . . . . . . . . . . . . . . . . 41Logical Resource Manager . . . . . . . . . . . . . . . . . . . . . . . . . . . . . . . 41Business Advocate servers . . . . . . . . . . . . . . . . . . . . . . . . . . . . . . . 42
Resource Manager server . . . . . . . . . . . . . . . . . . . . . . . . . . . . . . . 42Telephony Services Adaptor server . . . . . . . . . . . . . . . . . . . . . . . . . . 43Web Advocate Adaptor server . . . . . . . . . . . . . . . . . . . . . . . . . . . . . 43
Business Advocate workflows . . . . . . . . . . . . . . . . . . . . . . . . . . . . . . 44Location of Business Advocate workflows . . . . . . . . . . . . . . . . . . . . . . . 44System workflows for Business Advocate . . . . . . . . . . . . . . . . . . . . . . . 45Sample workflows for Business Advocate . . . . . . . . . . . . . . . . . . . . . . . 45
Business Advocate databases . . . . . . . . . . . . . . . . . . . . . . . . . . . . . 46Business Advocate administration tools . . . . . . . . . . . . . . . . . . . . . . . . . 47
Business Advocate Supervisor. . . . . . . . . . . . . . . . . . . . . . . . . . . . . 47Component Manager . . . . . . . . . . . . . . . . . . . . . . . . . . . . . . . . . 47Alarm Manager . . . . . . . . . . . . . . . . . . . . . . . . . . . . . . . . . . . . 48
Business Advocate Reports. . . . . . . . . . . . . . . . . . . . . . . . . . . . . . . 48Failover and recovery in Business Advocate . . . . . . . . . . . . . . . . . . . . . . . 48
Failover and recovery for Resource Manager servers . . . . . . . . . . . . . . . . . . 49Failover for multiple media channels . . . . . . . . . . . . . . . . . . . . . . . . . . 49Failover and recovery for voice contacts . . . . . . . . . . . . . . . . . . . . . . . . 51Failover for chat contacts . . . . . . . . . . . . . . . . . . . . . . . . . . . . . . . 54Failover for email contacts . . . . . . . . . . . . . . . . . . . . . . . . . . . . . . . 54
Chapter 3: Distributed Business Advocate . . . . . . . . . . . . . . . . . . . . . . . 55About distributed Business Advocate . . . . . . . . . . . . . . . . . . . . . . . . . . 55
Deployments for distributed Business Advocate . . . . . . . . . . . . . . . . . . . . 56Options for qualification of contacts . . . . . . . . . . . . . . . . . . . . . . . . . . 56
Components of distributed Business Advocate . . . . . . . . . . . . . . . . . . . . . . 57Agents in distributed Business Advocate . . . . . . . . . . . . . . . . . . . . . . . . 57Logical Resource Manager . . . . . . . . . . . . . . . . . . . . . . . . . . . . . . 57Telephony Services Adaptor server . . . . . . . . . . . . . . . . . . . . . . . . . . 58Web Advocate Adaptor server . . . . . . . . . . . . . . . . . . . . . . . . . . . . . 58
Example: using distributed Business Advocate. . . . . . . . . . . . . . . . . . . . . . 59Distributed Business Advocate setup. . . . . . . . . . . . . . . . . . . . . . . . . . 59Matching the agent with a contact . . . . . . . . . . . . . . . . . . . . . . . . . . . 59
Matching a contact with an agent . . . . . . . . . . . . . . . . . . . . . . . . . . . . 60Process for matching contacts with agents . . . . . . . . . . . . . . . . . . . . . . . 61Changing how distributed Business Advocate matches contacts with agents . . . . . . . 61
Contents
Issue 3 February 2005 5
Chapter 4: Overview of configuration . . . . . . . . . . . . . . . . . . . . . . . . . . 65
Chapter 5: Using qualifiers . . . . . . . . . . . . . . . . . . . . . . . . . . . . . . . . 71Qualifiers . . . . . . . . . . . . . . . . . . . . . . . . . . . . . . . . . . . . . . . 71
Role of qualifiers . . . . . . . . . . . . . . . . . . . . . . . . . . . . . . . . . . . 72Requirements for qualifiers . . . . . . . . . . . . . . . . . . . . . . . . . . . . . . 73Example: qualifying contacts with qualifiers . . . . . . . . . . . . . . . . . . . . . . . 73
Qualifiers used by the sample workflows. . . . . . . . . . . . . . . . . . . . . . . . . 77Required predefined qualifiers . . . . . . . . . . . . . . . . . . . . . . . . . . . . . 77Sample qualifiers . . . . . . . . . . . . . . . . . . . . . . . . . . . . . . . . . . . 78
Creating a qualifier . . . . . . . . . . . . . . . . . . . . . . . . . . . . . . . . . . . 79Editing a qualifier . . . . . . . . . . . . . . . . . . . . . . . . . . . . . . . . . . . . 81Viewing qualifiers. . . . . . . . . . . . . . . . . . . . . . . . . . . . . . . . . . . . 82Exporting qualifiers to Workflow Designer . . . . . . . . . . . . . . . . . . . . . . . . 83Deleting a qualifier . . . . . . . . . . . . . . . . . . . . . . . . . . . . . . . . . . . 84
Chapter 6: Managing service classes . . . . . . . . . . . . . . . . . . . . . . . . . . 85Service classes . . . . . . . . . . . . . . . . . . . . . . . . . . . . . . . . . . . . 86
Components of service classes . . . . . . . . . . . . . . . . . . . . . . . . . . . . 86Dynamically created service classes . . . . . . . . . . . . . . . . . . . . . . . . . . 88
Service goals . . . . . . . . . . . . . . . . . . . . . . . . . . . . . . . . . . . . . 89Types of service goals. . . . . . . . . . . . . . . . . . . . . . . . . . . . . . . . . 89Thresholds of a service goal . . . . . . . . . . . . . . . . . . . . . . . . . . . . . . 90Purpose of a service goal . . . . . . . . . . . . . . . . . . . . . . . . . . . . . . . 92Performance level and a service goal . . . . . . . . . . . . . . . . . . . . . . . . . 93Branding strategy . . . . . . . . . . . . . . . . . . . . . . . . . . . . . . . . . . . 93Examples: setting thresholds for a service goal . . . . . . . . . . . . . . . . . . . . . 94
Service states . . . . . . . . . . . . . . . . . . . . . . . . . . . . . . . . . . . . . 96Identifying the types of service states. . . . . . . . . . . . . . . . . . . . . . . . . . 97Example: Using the service state to select contacts . . . . . . . . . . . . . . . . . . . 100
Configuring Business Advocate options . . . . . . . . . . . . . . . . . . . . . . . . . 101Configuring the default agent selection method . . . . . . . . . . . . . . . . . . . . . 101Configuring the default EAHT . . . . . . . . . . . . . . . . . . . . . . . . . . . . . 102
Configuring a service goal . . . . . . . . . . . . . . . . . . . . . . . . . . . . . . . 103Creating a service goal . . . . . . . . . . . . . . . . . . . . . . . . . . . . . . . . 104Modifying a service goal . . . . . . . . . . . . . . . . . . . . . . . . . . . . . . . . 106Deleting a service goal . . . . . . . . . . . . . . . . . . . . . . . . . . . . . . . . 107
Configuring a service class . . . . . . . . . . . . . . . . . . . . . . . . . . . . . . . 107Creating a service class . . . . . . . . . . . . . . . . . . . . . . . . . . . . . . . . 108Assigning attributes to a service class . . . . . . . . . . . . . . . . . . . . . . . . . 108Assigning qualifiers to a service class . . . . . . . . . . . . . . . . . . . . . . . . . 111Modifying a service class . . . . . . . . . . . . . . . . . . . . . . . . . . . . . . . 113Deleting a service class . . . . . . . . . . . . . . . . . . . . . . . . . . . . . . . . 115
Contents
6 Business Advocate Configuration and Administration
Chapter 7: Configuring core Business Advocate components . . . . . . . . . . . . 117Prerequisites for configuring core components . . . . . . . . . . . . . . . . . . . . . . 117Configuring database connections . . . . . . . . . . . . . . . . . . . . . . . . . . . 118
Creating a Data server for the Business Advocate database . . . . . . . . . . . . . . . 119Configuring the IC Repository database connection . . . . . . . . . . . . . . . . . . . 120Configuring the IC Repository connection set . . . . . . . . . . . . . . . . . . . . . . 125Regenerating the IC Repository application. . . . . . . . . . . . . . . . . . . . . . . 125Configuring the CCQ database connection . . . . . . . . . . . . . . . . . . . . . . . 126Configuring the CCQ connection set . . . . . . . . . . . . . . . . . . . . . . . . . . 131Regenerating the Interaction Center application . . . . . . . . . . . . . . . . . . . . 132Generating the ListQ application . . . . . . . . . . . . . . . . . . . . . . . . . . . . 133
Configuring customer profile attributes. . . . . . . . . . . . . . . . . . . . . . . . . . 134Creating customer profile attributes . . . . . . . . . . . . . . . . . . . . . . . . . . 134Assigning customer profile attributes to customer records . . . . . . . . . . . . . . . . 135
Configuring Directory servers . . . . . . . . . . . . . . . . . . . . . . . . . . . . . . 136Logical Resource Manager . . . . . . . . . . . . . . . . . . . . . . . . . . . . . . . 136
Guidelines for the Logical Resource Manager . . . . . . . . . . . . . . . . . . . . . 137Creating a Logical Resource Manager . . . . . . . . . . . . . . . . . . . . . . . . . 137Modifying a Logical Resource Manager . . . . . . . . . . . . . . . . . . . . . . . . 138Deleting a Logical Resource Manager . . . . . . . . . . . . . . . . . . . . . . . . . 139
Resource Manager server . . . . . . . . . . . . . . . . . . . . . . . . . . . . . . . 139Adding a Resource Manager server . . . . . . . . . . . . . . . . . . . . . . . . . . 140Viewing the role of a Resource Manager server. . . . . . . . . . . . . . . . . . . . . 142Shutting down a Resource Manager server. . . . . . . . . . . . . . . . . . . . . . . 142Modifying a Resource Manager server . . . . . . . . . . . . . . . . . . . . . . . . . 147Deleting a Resource Manager server . . . . . . . . . . . . . . . . . . . . . . . . . 148
Chapter 8: Configuring qualification for voice contacts . . . . . . . . . . . . . . . . 149Qualification in the voice channel . . . . . . . . . . . . . . . . . . . . . . . . . . . . 149
Components used to qualify a voice contact . . . . . . . . . . . . . . . . . . . . . . 150Qualification and routing process for a voice contact . . . . . . . . . . . . . . . . . . 151Transfer process for a voice contact . . . . . . . . . . . . . . . . . . . . . . . . . . 153
Prerequisites for configuring the voice channel. . . . . . . . . . . . . . . . . . . . . . 155Qualify Voice workflow . . . . . . . . . . . . . . . . . . . . . . . . . . . . . . . . . 155
Prerequisites for the Qualify Voice workflow . . . . . . . . . . . . . . . . . . . . . . 156Configuring the Qualify Voice workflow . . . . . . . . . . . . . . . . . . . . . . . . . 156Configuring database settings for the workflow . . . . . . . . . . . . . . . . . . . . . 158Building the flowset . . . . . . . . . . . . . . . . . . . . . . . . . . . . . . . . . . 158
Telephony Services Adaptor server . . . . . . . . . . . . . . . . . . . . . . . . . . . 159Guidelines for a TSA server . . . . . . . . . . . . . . . . . . . . . . . . . . . . . . 159Creating a TSA server. . . . . . . . . . . . . . . . . . . . . . . . . . . . . . . . . 160Assigning a Logical Resource Manager . . . . . . . . . . . . . . . . . . . . . . . . 161Setting up contact handling . . . . . . . . . . . . . . . . . . . . . . . . . . . . . . 165Assigning a transfer exception workflow . . . . . . . . . . . . . . . . . . . . . . . . 167Modifying a TSA server . . . . . . . . . . . . . . . . . . . . . . . . . . . . . . . . 168Deleting a TSA server . . . . . . . . . . . . . . . . . . . . . . . . . . . . . . . . . 169

Contents
Issue 3 February 2005 7
Parking devices for the voice channel . . . . . . . . . . . . . . . . . . . . . . . . . . 170About parking devices . . . . . . . . . . . . . . . . . . . . . . . . . . . . . . . . . 170About wait treatment styles . . . . . . . . . . . . . . . . . . . . . . . . . . . . . . 171Example: configuring parking devices . . . . . . . . . . . . . . . . . . . . . . . . . 172Prerequisites for a parking device . . . . . . . . . . . . . . . . . . . . . . . . . . . 173Creating a parking device for an Avaya switch . . . . . . . . . . . . . . . . . . . . . 173Creating a parking device for an Aspect switch . . . . . . . . . . . . . . . . . . . . . 175Creating a parking device for a Nortel Meridian switch. . . . . . . . . . . . . . . . . . 179Changing a parking device . . . . . . . . . . . . . . . . . . . . . . . . . . . . . . 182
Telephony server . . . . . . . . . . . . . . . . . . . . . . . . . . . . . . . . . . . . 182Configuring a Telephony server . . . . . . . . . . . . . . . . . . . . . . . . . . . . 182Configuring a backup link . . . . . . . . . . . . . . . . . . . . . . . . . . . . . . . 184
Creating a Workflow server for the voice channel. . . . . . . . . . . . . . . . . . . . . 185Link groups . . . . . . . . . . . . . . . . . . . . . . . . . . . . . . . . . . . . . . 187
About link groups . . . . . . . . . . . . . . . . . . . . . . . . . . . . . . . . . . . 188Prerequisites for link groups . . . . . . . . . . . . . . . . . . . . . . . . . . . . . . 188Example: Using a link group . . . . . . . . . . . . . . . . . . . . . . . . . . . . . . 189Creating link groups . . . . . . . . . . . . . . . . . . . . . . . . . . . . . . . . . . 189Modifying a link group . . . . . . . . . . . . . . . . . . . . . . . . . . . . . . . . . 190Deleting a link group . . . . . . . . . . . . . . . . . . . . . . . . . . . . . . . . . 191
Optional configurations for the voice channel. . . . . . . . . . . . . . . . . . . . . . . 191
Chapter 9: Configuring qualification for chat contacts . . . . . . . . . . . . . . . . . 193Qualification and routing in the chat channel . . . . . . . . . . . . . . . . . . . . . . . 193
Components used to qualify a chat contact . . . . . . . . . . . . . . . . . . . . . . . 194Qualification and routing process for a chat contact . . . . . . . . . . . . . . . . . . . 195
Voice chat . . . . . . . . . . . . . . . . . . . . . . . . . . . . . . . . . . . . . . . 197Prerequisites for configuring the chat channel . . . . . . . . . . . . . . . . . . . . . . 197Qualify Chat workflow . . . . . . . . . . . . . . . . . . . . . . . . . . . . . . . . . 197
Prerequisites for the Qualify Chat workflow . . . . . . . . . . . . . . . . . . . . . . . 198Customizing the Qualify Chat workflow . . . . . . . . . . . . . . . . . . . . . . . . . 199Configuring database settings for the workflow . . . . . . . . . . . . . . . . . . . . . 200Building the flowset . . . . . . . . . . . . . . . . . . . . . . . . . . . . . . . . . . 200
Web Advocate Adaptor server for chat contacts . . . . . . . . . . . . . . . . . . . . . 201WAA server and the chat channel . . . . . . . . . . . . . . . . . . . . . . . . . . . 202Requirements for the WAA server . . . . . . . . . . . . . . . . . . . . . . . . . . . 202Creating a WAA server . . . . . . . . . . . . . . . . . . . . . . . . . . . . . . . . 203Configuring a WAA server for the chat channel . . . . . . . . . . . . . . . . . . . . . 204Modifying a WAA server . . . . . . . . . . . . . . . . . . . . . . . . . . . . . . . . 205Deleting a WAA server . . . . . . . . . . . . . . . . . . . . . . . . . . . . . . . . 205
Configuring the WebACD server . . . . . . . . . . . . . . . . . . . . . . . . . . . . 206Queuing parameters for the WebACD server . . . . . . . . . . . . . . . . . . . . . . 206Consequences of configuring the WebACD server . . . . . . . . . . . . . . . . . . . 207Configuring the WebACD server for Business Advocate . . . . . . . . . . . . . . . . . 207
Configuring a Workflow server for the chat channel. . . . . . . . . . . . . . . . . . . . 208
Contents
8 Business Advocate Configuration and Administration
Chapter 10: Configuring qualification for email contacts. . . . . . . . . . . . . . . . 211Qualification and routing in the email channel . . . . . . . . . . . . . . . . . . . . . . 211
Components used to qualify an email contact. . . . . . . . . . . . . . . . . . . . . . 212Qualification and routing process for an email contact . . . . . . . . . . . . . . . . . . 213
Prerequisites for configuring the email channel. . . . . . . . . . . . . . . . . . . . . . 214Qualify Email workflow . . . . . . . . . . . . . . . . . . . . . . . . . . . . . . . . . 215
Prerequisites for the Qualify Email workflow . . . . . . . . . . . . . . . . . . . . . . 216Customizing the Qualify Email workflow . . . . . . . . . . . . . . . . . . . . . . . . 216Configuring the Qualify Email workflow . . . . . . . . . . . . . . . . . . . . . . . . . 217Configuring database settings for the workflow . . . . . . . . . . . . . . . . . . . . . 218Building the flowset . . . . . . . . . . . . . . . . . . . . . . . . . . . . . . . . . . 219
Web Advocate Adaptor server for email contacts . . . . . . . . . . . . . . . . . . . . . 219WAA server and the email channel. . . . . . . . . . . . . . . . . . . . . . . . . . . 220Requirements for the WAA server . . . . . . . . . . . . . . . . . . . . . . . . . . . 220Configuring a WAA server for the email channel . . . . . . . . . . . . . . . . . . . . 221
Configuring a Workflow server for the email channel . . . . . . . . . . . . . . . . . . . 222Retrieving email contacts from an agent . . . . . . . . . . . . . . . . . . . . . . . . . 223
Retrieving email contacts from a wait queue . . . . . . . . . . . . . . . . . . . . . . 224Retrieving email contacts from an Email task list . . . . . . . . . . . . . . . . . . . . 224
Chapter 11: Configuring virtual queues . . . . . . . . . . . . . . . . . . . . . . . . . 225Virtual queues . . . . . . . . . . . . . . . . . . . . . . . . . . . . . . . . . . . . . 225Prerequisites for virtual queues . . . . . . . . . . . . . . . . . . . . . . . . . . . . . 226Restrictions on virtual queue names . . . . . . . . . . . . . . . . . . . . . . . . . . . 226Example: configuring a virtual queue . . . . . . . . . . . . . . . . . . . . . . . . . . 226Creating a virtual queue . . . . . . . . . . . . . . . . . . . . . . . . . . . . . . . . 227
Chapter 12: Using profiles . . . . . . . . . . . . . . . . . . . . . . . . . . . . . . . . 231Profiles . . . . . . . . . . . . . . . . . . . . . . . . . . . . . . . . . . . . . . . . 231Profile Plus . . . . . . . . . . . . . . . . . . . . . . . . . . . . . . . . . . . . . . 232Creating a profile . . . . . . . . . . . . . . . . . . . . . . . . . . . . . . . . . . . . 233Defining a capability set for a profile . . . . . . . . . . . . . . . . . . . . . . . . . . . 234
Using the Profile Properties dialog box to define a capability set for a profile . . . . . . . 235Using the Capability Wizard to define multiple capability sets for a profile . . . . . . . . 236
Assigning an agent to a profile . . . . . . . . . . . . . . . . . . . . . . . . . . . . . 237Removing an agent from a profile . . . . . . . . . . . . . . . . . . . . . . . . . . . . 239Copying a profile . . . . . . . . . . . . . . . . . . . . . . . . . . . . . . . . . . . . 239Renaming a profile . . . . . . . . . . . . . . . . . . . . . . . . . . . . . . . . . . . 240Deleting a profile . . . . . . . . . . . . . . . . . . . . . . . . . . . . . . . . . . . . 240
Chapter 13: Managing agents. . . . . . . . . . . . . . . . . . . . . . . . . . . . . . . 241Activation types for agents . . . . . . . . . . . . . . . . . . . . . . . . . . . . . . . 242Activation levels . . . . . . . . . . . . . . . . . . . . . . . . . . . . . . . . . . . . 243
Example: setting activation levels . . . . . . . . . . . . . . . . . . . . . . . . . . . 243

Contents
Issue 3 February 2005 9
Capability sets for an agent . . . . . . . . . . . . . . . . . . . . . . . . . . . . . . . 245Reacting to changes in agent configuration . . . . . . . . . . . . . . . . . . . . . . . 246Creating an agent . . . . . . . . . . . . . . . . . . . . . . . . . . . . . . . . . . . 246Activating an agent for Business Advocate . . . . . . . . . . . . . . . . . . . . . . . . 247Refreshing agent records . . . . . . . . . . . . . . . . . . . . . . . . . . . . . . . . 248Configuring Business Advocate attributes for an agent . . . . . . . . . . . . . . . . . . 248Assigning a capability set to an agent . . . . . . . . . . . . . . . . . . . . . . . . . . 250
Determining the profile for an agent . . . . . . . . . . . . . . . . . . . . . . . . . . 250Defining a capability set for one agent . . . . . . . . . . . . . . . . . . . . . . . . . 252Using the Capability Wizard to define multiple capability sets . . . . . . . . . . . . . . 254Deleting one capability set . . . . . . . . . . . . . . . . . . . . . . . . . . . . . . . 256Deleting all capability sets . . . . . . . . . . . . . . . . . . . . . . . . . . . . . . . 256
Making an agent inactive . . . . . . . . . . . . . . . . . . . . . . . . . . . . . . . . 257Marking an agent as out of office. . . . . . . . . . . . . . . . . . . . . . . . . . . . 257Deactivating an agent for Business Advocate . . . . . . . . . . . . . . . . . . . . . . 258
Returning an agent to active status . . . . . . . . . . . . . . . . . . . . . . . . . . . 259Marking an agent in the office . . . . . . . . . . . . . . . . . . . . . . . . . . . . . 259
Deleting an agent . . . . . . . . . . . . . . . . . . . . . . . . . . . . . . . . . . . 260
Appendix A: Configuring Telephony switches for Business Advocate . . . . . . . . 261Overview . . . . . . . . . . . . . . . . . . . . . . . . . . . . . . . . . . . . . . . 262RONA considerations. . . . . . . . . . . . . . . . . . . . . . . . . . . . . . . . . . 263Best Services Routing (BSR) option . . . . . . . . . . . . . . . . . . . . . . . . . . . 263Call processing. . . . . . . . . . . . . . . . . . . . . . . . . . . . . . . . . . . . . 264
Backup link failover and recovery . . . . . . . . . . . . . . . . . . . . . . . . . . . 265Agents and Link Groups . . . . . . . . . . . . . . . . . . . . . . . . . . . . . . . . 266
Create a link group . . . . . . . . . . . . . . . . . . . . . . . . . . . . . . . . . . 266Assign agents to the link group . . . . . . . . . . . . . . . . . . . . . . . . . . . . 266
Avaya Definity/Communication Manager. . . . . . . . . . . . . . . . . . . . . . . . . 267Avaya DEFINITY configuration. . . . . . . . . . . . . . . . . . . . . . . . . . . . . 267Switch Operation . . . . . . . . . . . . . . . . . . . . . . . . . . . . . . . . . . . 273Switch configuration . . . . . . . . . . . . . . . . . . . . . . . . . . . . . . . . . . 274Call Transfers . . . . . . . . . . . . . . . . . . . . . . . . . . . . . . . . . . . . . 276Backup CTI link configuration . . . . . . . . . . . . . . . . . . . . . . . . . . . . . 276Playing estimated wait time . . . . . . . . . . . . . . . . . . . . . . . . . . . . . . 279
Nortel Meridian . . . . . . . . . . . . . . . . . . . . . . . . . . . . . . . . . . . . . 282Switch operation . . . . . . . . . . . . . . . . . . . . . . . . . . . . . . . . . . . 282Setup Control DNs (CDNs) . . . . . . . . . . . . . . . . . . . . . . . . . . . . . . 282Configure CDNs . . . . . . . . . . . . . . . . . . . . . . . . . . . . . . . . . . . 283Configure parking device for wait treatment. . . . . . . . . . . . . . . . . . . . . . . 286Link Failure Processing . . . . . . . . . . . . . . . . . . . . . . . . . . . . . . . . 286
Aspect CallCenter . . . . . . . . . . . . . . . . . . . . . . . . . . . . . . . . . . . 287Switch Operation . . . . . . . . . . . . . . . . . . . . . . . . . . . . . . . . . . . 287Aspect CCT configuration . . . . . . . . . . . . . . . . . . . . . . . . . . . . . . . 288Backup Link . . . . . . . . . . . . . . . . . . . . . . . . . . . . . . . . . . . . . 293Link Failover . . . . . . . . . . . . . . . . . . . . . . . . . . . . . . . . . . . . . 293

Contents
10 Business Advocate Configuration and Administration
Ericsson MD110 . . . . . . . . . . . . . . . . . . . . . . . . . . . . . . . . . . . . 295Switch operation . . . . . . . . . . . . . . . . . . . . . . . . . . . . . . . . . . . 295CTI group configuration . . . . . . . . . . . . . . . . . . . . . . . . . . . . . . . . 295
Appendix B: Troubleshooting Business Advocate . . . . . . . . . . . . . . . . . . . 297Troubleshooting Logical Resource Managers . . . . . . . . . . . . . . . . . . . . . . 298Troubleshooting Resource Manager servers . . . . . . . . . . . . . . . . . . . . . . . 299Troubleshooting link groups . . . . . . . . . . . . . . . . . . . . . . . . . . . . . . . 300Troubleshooting TSA servers . . . . . . . . . . . . . . . . . . . . . . . . . . . . . . 301Troubleshooting parking devices . . . . . . . . . . . . . . . . . . . . . . . . . . . . 302Troubleshooting channel availability issues . . . . . . . . . . . . . . . . . . . . . . . 303Troubleshooting email routing issues . . . . . . . . . . . . . . . . . . . . . . . . . . 304Troubleshooting routing issues . . . . . . . . . . . . . . . . . . . . . . . . . . . . . 305
Index . . . . . . . . . . . . . . . . . . . . . . . . . . . . . . . . . . . . . . . . 307

Issue 3 February 2005 11
Before You Begin
This section includes the following topics:
● Typographical Conventions on page 11.
● Notes, Tips, and Cautions on page 12.
● Contacting Technical Support on page 12.
● Product Documentation on page 13.
● Educational Services on page 15.
Typographical ConventionsThis guide uses the following font conventions:
Font Type Meaning
command This font signifies commands, information that you enter into the computer, or information contained in a file on your computer.
commandvariable This font indicates variables in a command string.
italics This font is used to add emphasis to important words and for references to other chapter names and manual titles.
link Blue underlined text in online documents indicates a hypertext jump to related information. To view the related material, click the blue underlined text.

Before You Begin
12 Business Advocate Configuration and Administration
Notes, Tips, and CautionsNote:
Note: A note calls attention to important information.
! Important:! Important:Important: An important note calls attention to a situation that has the potential to cause
serious inconvenience or other similar repercussions.
Tip:Tip: A tip offers additional how-to advice.
! CAUTION:CAUTION: A caution points out actions that may lead to data loss or other serious
problems.
Contacting Technical SupportIf you are having trouble using Avaya software, you should:
1. Retry the action. Carefully follow the instructions in written or online documentation.
2. Check the documentation that came with your hardware for maintenance or hardware-related issues.
3. Note the sequence of events that led to the problem and the exact messages displayed. Have the Avaya documentation available.
4. If you continue to have a problem, contact Avaya Technical Support by:
● Logging in to the Avaya Technical Support Web site http://www.avaya.com/support/
● Calling or faxing one of the following numbers from 8:30 a.m. to 8:30 p.m. (Eastern Standard Time), Monday through Friday (excluding holidays):
- Toll free in the U.S. and Canada: 1-888-TECH-SPT (1-888-832-4778)
- Direct line for international and domestic calls: 1-512-425-2201
- Direct line for faxes: 1-512-997-4330

Product Documentation
Issue 3 February 2005 13
● Sending email with your question or problem to [email protected]. You may be asked to email one or more files to Technical Support for analysis of your application and its environment.
Note:Note: If you have difficulty reaching Avaya Technical Support through the above
URL or email address, please go to http://www.avaya.com for further information.
Product DocumentationMost Avaya product documentation is available in both printed and online form. However, some reference material is available only online, and certain information is available only in printed form. A PDF document with detailed information about all of the documentation for the Avaya Interaction Center is included in the Doc directory on the product CD-ROM. This PDF document is also included on the separate documentation CD-ROM.
Readme FileThe Readme file is a PDF file included on the Avaya Interaction Center software CD-ROM. This file contains important information that was collected too late for inclusion in the printed documentation. The Readme file can include installation instructions, system requirements, information on new product features and enhancements, suggested work-arounds to known problems, and other information critical to successfully installing and using your Avaya software. Avaya may also deliver an Addendum to the Readme, which will be posted on the Avaya Technical Support Website. The Readme Addendum will contain similar information uncovered after the manufacture of the product CD-ROM. Review the Readme file and the Readme Addendum before you install your new Avaya software.
Electronic DocumentationThe electronic documentation (in PDF or HTML format) for each Avaya Interaction Center product is installed automatically with the program. Electronic documentation for the entire Avaya product suite is included on the product CD-ROM and the documentation CD-ROM.
You can also view the documentation set online at http://www.avayadocs.com.

Before You Begin
14 Business Advocate Configuration and Administration
Printed DocumentationYou can purchase printed copies of these manuals separately. For details, see Document ordering information: on the back of this manual�s title page.
License to Print the Electronic DocumentationOnline copies of documentation are included on the CD-ROM that accompanies every software release. An Avaya customer who has licensed software (a �Licensee�) is entitled to make this online documentation available on an internal network or �intranet� solely for the Licensee's use for internal business purposes. Licensees are granted the right to print the documentation corresponding to the software they have purchased solely for such purposes.
Right-To-Print License Terms
Documents must be printed �as-is� from the provided online versions. Making changes to documents is not permitted. Documents may be printed only by any employee or contractor of Licensee that has been given access to the online documentation versions solely for Licensee's internal business purposes and subject to all applicable license agreements with Avaya. Both online and printed versions of the documents may not be distributed outside of Licensee enterprise or used as part of commercial time-sharing, rental, outsourcing, or service bureau use, or to train persons other than Licensee's employees and contractors for Licensee's internal business purposes, unless previously agreed to in writing by Avaya. If Licensee reproduces copies of printed documents for Licensee's internal business purposes, then these copies should be marked �For internal use only within <Licensee> only.� on the first page or cover (where <Licensee> is the name of Licensee). Licensee must fully and faithfully reproduce any proprietary notices contained in the documentation. The copyrights to all documentation provided by Avaya are owned by Avaya and its licensors. By printing any copy of online documentation Licensee indicates its acceptance of these terms and conditions. This license only governs terms and conditions of printing online documentation. Please reference the appropriate license agreement for terms and conditions applicable to any other use, reproduction, modification, distribution or display of Avaya software and documentation.

Educational Services
Issue 3 February 2005 15
Educational ServicesAvaya University provides excellent training courses on a variety of topics. For the latest course descriptions, schedules, and online registration, you can get in touch with us:
● Through the web at http://www.avaya-learning.com/logon_form.asp
● Over the telephone at 800-288-5327 (within the U.S.) +001 303-406-6089 (outside of the U.S.)
● Through email at [email protected]

Before You Begin
16 Business Advocate Configuration and Administration

Issue 3 February 2005 17
Chapter 1: Introduction
Business Advocate for Avaya Interaction Center (Avaya IC) is an intelligent work distribution engine based on patented, predictive algorithms. Unlike other work distribution engines, Business Advocate uses real-time information, statistical information, and information that you provide to make intelligent choices and:
● Predict which contacts are in greatest need compared to established service goals
● Adjust agent pools when service goals are in jeopardy so that service levels are maintained at peak times without sacrificing the match rate of work-type to best-skilled agent
● Provide agent fairness to minimize agent burnout by selecting the least occupied or most idle and qualified agent when more than one agent is available to handle incoming contacts
This section includes the following topics:
● About Business Advocate on page 17.
● Qualification criteria on page 21.
● Contact selection on page 26.
● Agent selection on page 29.
● Dynamic adjustment of agent pools on page 32.
● Example: Using Business Advocate to increase revenue on page 35.
About Business AdvocateBusiness Advocate includes the features discussed in the following sections:
● Which media channels Business Advocate supports on page 18.
● How Business Advocate works with Avaya IC standard routing on page 18.
● How Business Advocate matches contacts with agents on page 19.
● How Business Advocate reacts to changes in your contact center on page 20.

Introduction
18 Business Advocate Configuration and Administration
Which media channels Business Advocate supportsBusiness Advocate manages and qualifies contacts from customers in all media channels supported by Avaya IC. The supported media are:
● Voice channel
● Chat channel, including voice chat
● Email channel
How Business Advocate works with Avaya IC standard routing
An Avaya IC system can include both Business Advocate and Avaya IC standard routing. However, an agent can only receive contacts in any channel through either Business Advocate or Avaya IC standard routing. For example, a multi-media agent, who receives voice contacts from Business Advocate cannot receive email contacts or chat contacts through Avaya IC standard routing.
The topics in this section describe the possible combinations for routing and the limitations on those combinations for each channel.
● Supported routing combinations on page 18.
● Limitations on routing combinations on page 19.
Supported routing combinations
An Avaya IC system can include a combination of the following types of routing:
● For the voice channel, both Business Advocate routing for voice contacts and Avaya IC standard routing for voice contacts.
● For the email channel and the chat channel, either Business Advocate routing for email and chat contacts or Avaya IC standard routing for email and chat contacts.
Note:Note: If an Avaya IC system includes a combination of Business Advocate and
Avaya IC standard routing, an agent can only receive contacts from either Business Advocate or Avaya IC standard routing. An agent cannot receive contacts from both types of routing.
About Business Advocate
Issue 3 February 2005 19
Limitations on routing combinations
The following limitations affect the routing in an Avaya IC system:
● An agent cannot receive contacts from both Business Advocate and Avaya IC standard routing. If you enable an agent for Business Advocate, that agent can receive only contacts from channels that are routed through Business Advocate.
● The chat channel and the email channel must use the same type of routing. For example, if you use Business Advocate to route chat contacts, you cannot use Avaya IC standard routing for email contacts.
How Business Advocate matches contacts with agentsTo make decisions about how to match contacts with agents, Business Advocate addresses the questions in the following topics:
● Which contact is in greatest need? on page 19.
● Who is the most appropriate agent to handle this contact? on page 20.
Which contact is in greatest need?
Business Advocate answers this question if there are contacts in a service class when an agent becomes available to handle contacts.
Business Advocate keeps the state of a service class. Each service class can progress through multiple states. Each state indicates that the service class is in greater need than the previous state. For example, each state indicates how close the service class is to exceeding its target or how much the service class has progressed beyond its target.
Greatest need does not mean that the customer is in the greatest need to speak to an agent. Greatest need is the method that Business Advocate uses to decide which contact in queue should be chosen to meet or preserve goals for customer service and to give customers the desired level of service.
To determine which contact is in greatest need:
1. Business Advocate identifies the contact that is furthest beyond the time period that you set in the upper threshold for the target service level. If a contact meets this criteria, that contact is determined to be in greatest need.
For example, a contact which meets this criteria would be in a service class with a service state of Critical.

Introduction
20 Business Advocate Configuration and Administration
2. If no contact meets the first criteria, identifies the contact in a service class that is closest to exceeding the time period that you set in the upper threshold for the target service level.
For example, a contact which meets this criteria would be in a service class that has a service state of On Target - Immediate Risk.
If two contacts in different service classes have identical service states, both of these service classes can qualify as greatest need. In that situation, Business Advocate uses agent activation types and predictive technology to decide which contact to match with the available agent.
For more information about the predictive technology of Business Advocate, see Predictive technology on page 25. For more information about service classes, see Service classes on page 23.
Who is the most appropriate agent to handle this contact?
Business Advocate answers this question if several agents are available when a contact arrives in the queue.
Business Advocate can distribute workloads fairly across agents, which eliminates the situation when a small number of agents receive a large proportion of contacts.
You can configure Business Advocate to distribute contacts among agents to better meet your business needs. For example, you can configure Business Advocate to evenly distribute contacts about a sales event among a group of agents. This configuration can promote fairer opportunities for compensation.
How Business Advocate reacts to changes in your contact center
Business Advocate dynamically adjusts to changing conditions in your contact center. Your supervisors do not need to constantly monitor the number of contacts in a queue and manually change agent assignments. Business Advocate makes these adjustments automatically, according to your preset configuration.
For example, if the number of contacts in a queue increases and threatens your ability to meet your service goals, Business Advocate activates additional agents to handle the contact load until your service goals are no longer threatened.

Qualification criteria
Issue 3 February 2005 21
Qualification criteriaBusiness Advocate uses your qualification criteria and real-time data to determine which contact in queue is in the greatest need. Business Advocate then matches this contact with an available and qualified agent. A qualified agent has a capability set with the same qualifier set as the contact.
During qualification, Business Advocate matches contacts with qualified agents. To perform this task, Business Advocate uses the following principles for qualification:
● Each contact is qualified with a qualifier set.
● Each qualifier set identifies a service class.
● Each service class has a service goal.
● Each service goal identifies the target time period for Business Advocate to deliver a contact in the service class to an agent.
● Each agent is configured with one or more capability sets.
● Each capability set includes a qualifier set that matches the qualifier set in a service class.
● For each capability set, an agent is configured to handle contacts with one of the following activation types:
- Regular work
- Backup work, if the agent has no regular work
- Reserve work, if the service class is in danger of not meeting its service goal
● For each contact, Business Advocate uses state-of-the-art predictive algorithms, real-time data, and qualification criteria to match the contact with an available agent.
For more information, see the following sections:
● Qualifiers on page 22.
● Service goals on page 22.
● Service classes on page 23.
● Service states on page 24.
● Agent activation types on page 24.
● Predictive technology on page 25
Introduction
22 Business Advocate Configuration and Administration
QualifiersBusiness Advocate uses qualifiers to match contacts with agents and to meet service goals.
Each qualifier includes a category and a value for that category. For example, a qualifier of Product/Printer includes the category Product and the value Printer. If you create a second category named PrinterSupplies and define a value for that category of InkCartridge, you create a second qualifier named PrinterSupplies/InkCartridge.
A qualifier set includes one or more qualifiers that form a service class or a capability set. You do not need to create qualifier sets. For example, if you create a service class with the qualifiers of Product/Printer and PrinterSupplies/InkCartridge, those two qualifiers become a qualifier set.
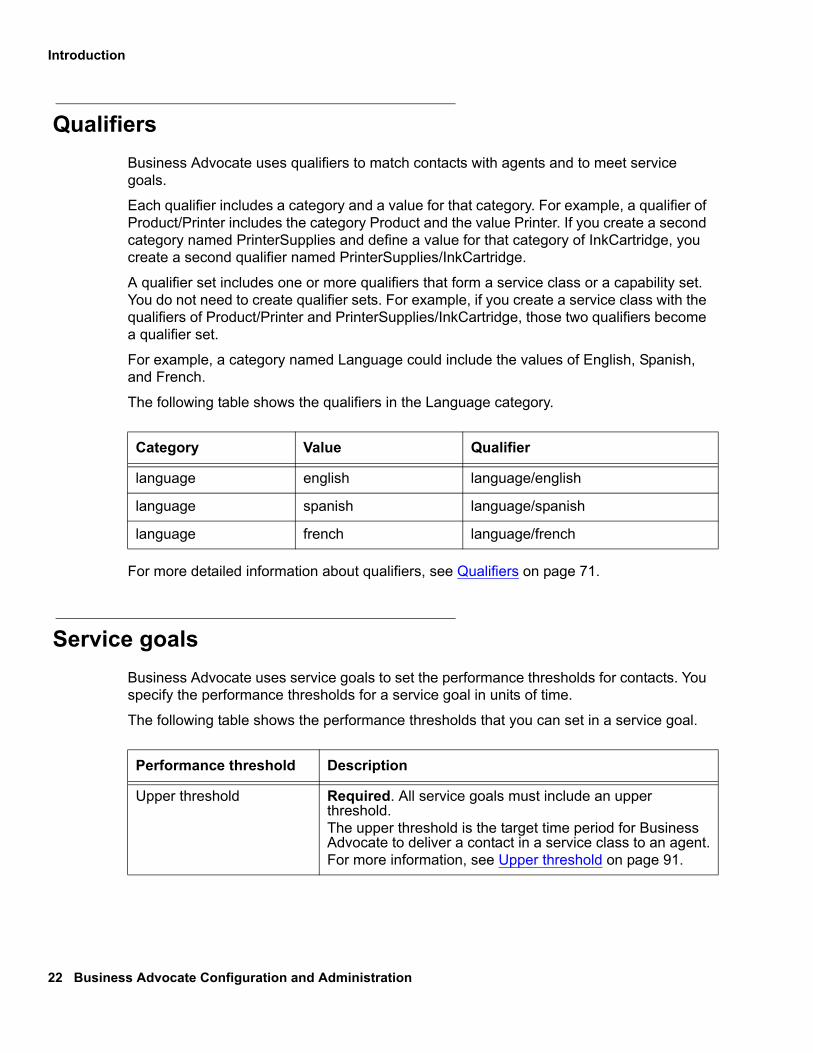
For example, a category named Language could include the values of English, Spanish, and French.
The following table shows the qualifiers in the Language category.
For more detailed information about qualifiers, see Qualifiers on page 71.
Service goalsBusiness Advocate uses service goals to set the performance thresholds for contacts. You specify the performance thresholds for a service goal in units of time.
The following table shows the performance thresholds that you can set in a service goal.
Category Value Qualifier
language english language/english
language spanish language/spanish
language french language/french
Performance threshold Description
Upper threshold Required. All service goals must include an upper threshold. The upper threshold is the target time period for Business Advocate to deliver a contact in a service class to an agent.For more information, see Upper threshold on page 91.

Qualification criteria
Issue 3 February 2005 23
Service classesAt the most basic level, a service class is a qualifier set and a service goal. Business Advocate uses service classes to:
● Create queues for contacts
● Assign a service goal to a specific type of contact
● Match contacts with agents
Services classes are unique. You cannot create two service classes with the same qualifier set.
Note:Note: All service classes must specify a value for the channel category as one of
the qualifiers. You cannot create a service class without a channel qualifier.
If the qualifiers of an incoming contact do not match an existing service class, Business Advocate automatically creates a new service class with that qualifier set. If the capability set of an available agent includes the same qualifier set, Business Advocate can match the contact with that agent. For more information, see Dynamically created service classes on page 88.
Critical threshold Optional. Service goals do not require a critical threshold.When the time a contact has waited to be matched with an agent reaches the critical threshold, Business Advocate activates reserve or backup agents with a critical activation level. For more information, see Critical threshold on page 92
Lower threshold Optional. Service goals do not require a lower threshold.The lower threshold determines the minimum amount of time that a contact should wait before Business Advocate matches the contact to an agent.For more information, see Lower threshold on page 92.
Performance threshold Description

Introduction
24 Business Advocate Configuration and Administration
Service statesEach service class has a service state. The service state is the �state� of a service class, and describes the real-time status of the service class relative to its service goal.
Business Advocate includes eight predefined service states. Business Advocate assigns one of these service states to the service class. You cannot configure or change service states.
Within Business Advocate, service states:
● Are a principal factor in all contact selection decisions.
● Control the size of the agent pool available to handle contacts from the queue for a particular service class.
● Are an important element in Business Advocate reports.
● Are part of how Business Advocate implements goal-based contact distribution and reporting.
For more detailed information about service states, including a description of the predefined service states, see Service states on page 96.
Agent activation typesFor Business Advocate, you assign activation types to service classes for an agent. The activation types determine when an agent receives contacts for that service class.
An activation type is also known as an agent role.
The following table describes the available activation types.
Activation type Description
Regular Contacts in a service class with a Regular activation type are the preferred contacts for an agent to handle. The agent typically handles these contacts during a shift.Regular agents can handle contacts in the service class at any time unless the service state for the service class is Ahead of Target.The default activation level for regular agents is On Target.

Qualification criteria
Issue 3 February 2005 25
For more information, see Activation types for agents on page 242.
Predictive technologyBusiness Advocate uses predictive technology to select a contact from a queue to match with an agent. The following topics describe the statistics used in this technology:
● Predicted wait time on page 25.
● Expected wait time on page 26.
Predicted wait time
Business Advocate constantly monitors service classes to determine how long Business Advocate takes to service contacts in queue. Predicted wait time is a calculation of how long a contact will remain in the queue:
● If the currently available and qualified agent does not handle the contact
● Until another qualified agent becomes available to handle the contact
The time that the contact would have waited in queue is the predicted wait time.
Backup Contacts in a service class with a Backup activation type are the contacts that an agent handles if there are no contacts in a service class with:● A Regular activation type● A Reserve activation type for which the agent has been
activatedAn agent only handles these contacts during a shift if the Backup service class reaches the service state that matches the agent activation level.Backup agents can have an activation level of On Target or higher.
Reserve Contacts in a service class with a Reserve activation type are the contacts that the agent only receives if the service class is having difficulty meeting its service goals.If the Reserve service class reaches the specified activation level, this service class competes with the Regular service class for delivery to an agent. Contacts in the Reserve service class do not take precedence if the Regular service class has a worse service state.Reserve agents can have an activation level of Future Risk or higher.
Activation type Description

Introduction
26 Business Advocate Configuration and Administration
If the predicted wait time is greater than the service goal, then Business Advocate predicts that this contact will miss the service goal of its service class if not selected and matched with the currently available agent.
Business Advocate uses predicted wait time as follows:
● To calculate whether the top contact in a queue will meet the upper threshold if not matched to the currently available agent and set the service state to On Target - Immediate Risk if the predicted wait time is greater than the upper threshold.
● To determine which service class is in the greatest need when two service classes are in the same service state. The service class in the greatest need depends on how long each contact has been in queue, as follows:
- If the contacts have been in queue for less time than the service goal, the service class in greatest need is the one whose predicted wait time is closest to the service goal.
- If the contacts have been in queue for longer than the service goal, the service class in greatest need is the one whose predicted wait time is furthest from the service goal.
Expected wait time
Expected wait time is a predictive calculation of how long Business Advocate expects the newest contact will remain in the queue. Expected wait time is a long term predictor that can indicate a potential problem in the future if conditions do not change.
Business Advocate uses expected wait time as one of the factors to determine whether contacts in a queue are likely to exceed the target time period for delivery to an agent.
Contact selectionBusiness Advocate uses contact selection if there are contacts in queue when an agent becomes available. When an agent becomes available, contact selection determines which contact in queue meets the following criteria:
● Has the same service class and qualifiers as an available agent.
● Is in greatest need.

Contact selection
Issue 3 February 2005 27
For contact selection, Business Advocate can use the following types of predictions:
● Predicted wait times estimate how long before another qualified agent will be available to handle the contact.
● Expected wait times estimate whether the service class will meet or miss its service goal based on the volume of contacts for that service class.
This section includes the following topics:
● Process for contact selection on page 27.
● Example: Using contact selection on page 28.
Process for contact selectionDuring contact selection, Business Advocate does the following after an agent becomes available:
1. Identifies all capability sets where the currently available agent is activated.
2. Matches the capability sets to service classes that have contacts in queue.
Business Advocate ignores contacts in service classes with a backup activation level when one or more service classes with a regular or reserve activation level have contacts in queue.
3. Calculates the predicted wait time for the oldest contact in each service class.
4. Evaluates the service states of those service classes.
5. Determines which service class is in the greatest need.
If Business Advocate finds two service classes that are in the same state, Business Advocate uses predicted wait time to determine greatest need.
6. Selects the contact in the greatest need.
7. Avaya IC delivers that contact to the agent.
Introduction
28 Business Advocate Configuration and Administration
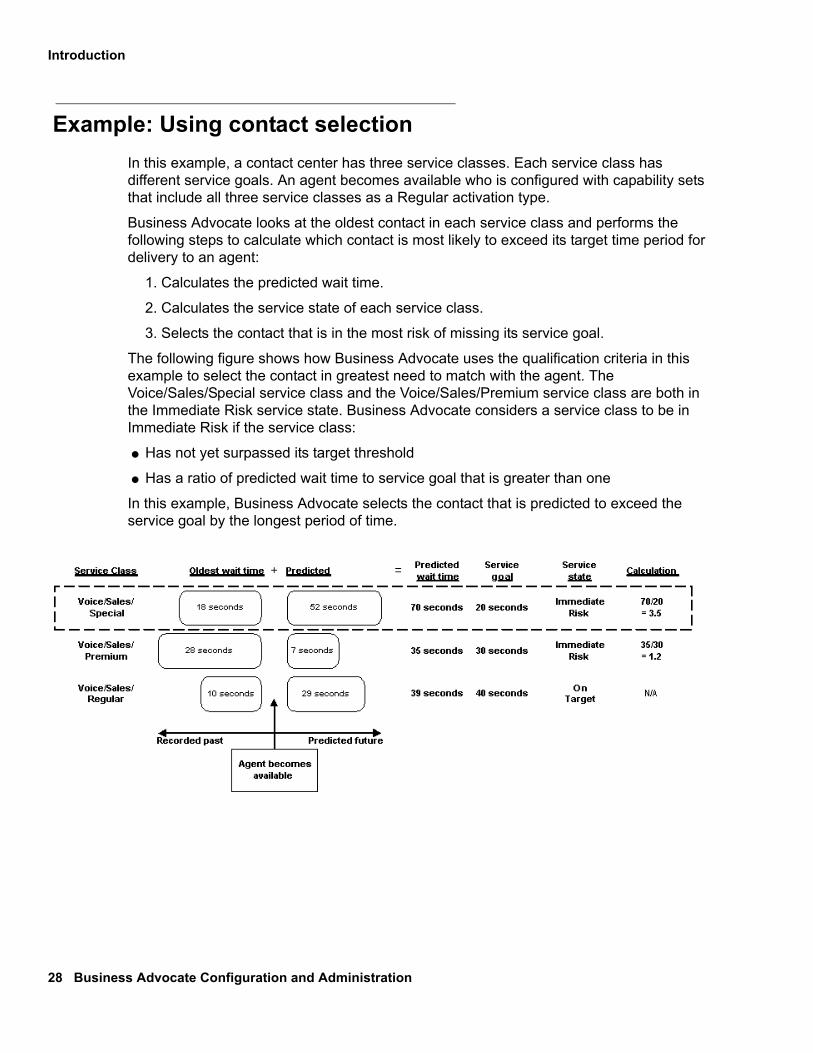
Example: Using contact selectionIn this example, a contact center has three service classes. Each service class has different service goals. An agent becomes available who is configured with capability sets that include all three service classes as a Regular activation type.
Business Advocate looks at the oldest contact in each service class and performs the following steps to calculate which contact is most likely to exceed its target time period for delivery to an agent:
1. Calculates the predicted wait time.
2. Calculates the service state of each service class.
3. Selects the contact that is in the most risk of missing its service goal.
The following figure shows how Business Advocate uses the qualification criteria in this example to select the contact in greatest need to match with the agent. The Voice/Sales/Special service class and the Voice/Sales/Premium service class are both in the Immediate Risk service state. Business Advocate considers a service class to be in Immediate Risk if the service class:
● Has not yet surpassed its target threshold
● Has a ratio of predicted wait time to service goal that is greater than one
In this example, Business Advocate selects the contact that is predicted to exceed the service goal by the longest period of time.

Agent selection
Issue 3 February 2005 29
Agent selectionBusiness Advocate uses agent selection when your contact center has more than one qualified agent available when a contact arrives.
Business Advocate matches the best agent with the contact to ensure that agents are treated fairly. Business Advocate avoids the situation where one agent is overworked, and another agent sits idle for most of the day.
For agent selection, the service state can only be Resources Available or On Target.
You can configure Business Advocate to use either of the agent selection algorithms described in the following topics to match an agent with a contact:
● Most idle agent on page 29.
● Least occupied agent on page 29.
● Occupancy for agent selection types on page 30.
● Process for agent selection on page 31.
● Comparing methods for agent selection on page 31.
Most idle agentMost idle agent (MIA) matches the contact to the agent in the service class who has been idle for the longest period of time since the agent wrapped up the last contact. Business Advocate reviews the time that the agent has been idle since the last contact that the agent handled.
MIA considers an agent to be busy when the agent performs wrap up on a contact, or works on any contact even when the agent is in AUX work.
Use MIA if you want the agent who has been idle for the longest period of time to get the next contact.
Least occupied agentLeast occupied agent (LOA) matches the contact to the agent in that service class who has the lowest occupancy rate during the current login period. LOA can make sure that one or more agents do not routinely receive more contacts than other agents in the contact center.
LOA considers the agent to be occupied when the agent performs wrap up work.
LOA improves agent fairness if more than one agent is available for a service class, and provides a more equitable distribution of workload than MIA. However, with LOA, an agent

Introduction
30 Business Advocate Configuration and Administration
who spends a long time in a contact with a customer can wait for a longer period of time for the next contact than an agent who spends only a short period of time with a customer.
The following table shows how LOA uses the agent state to determine whether or not an agent is occupied.
Use LOA if you are concerned with fairness to the agents. With other agent selection methods, an agent with the most experience receives the most contacts. This division of work can be unfair to more experienced agents. LOA distributes contacts more evenly, so that all agents spend about the same percentage of their time handling contacts.
Occupancy for agent selection typesBusiness Advocate includes all contact work by agents when calculating occupancy and idleness for agent selection. Business Advocate does not monitor occupancy or idleness for an individual service class.
Avaya IC and Business Advocate consider an agent to be occupied when:
● For voice contacts and chat contacts, from the time a contact arrives on the desktop until the time the contact is completed.
● For email contacts, when an agent has an active contact on the desktop. A deferred contact does not count as an active contact.
For all three media, if an agent is in AUX work or Available state and does not have an active contact on the desktop, an agent is considered to be idle.
Therefore, if an agent is in AUX work mode and works for ten minutes on an email contact. That ten minutes counts as occupied time. The time after the agent wraps up the email contact is counted as idle time.
Business Advocate does not consider the agent selection type of the service classes in calculations of idle time and occupied time. If you assign LOA to some service classes and MIA to other service classes, Business Advocate includes all service classes handled by
Agent state Occupancy for LOA
AUX work when not working on contact or on telephone for any reason
Idle time
AUX work when working on contact or on telephone Work time
Available with no contact pending or on hold Idle time
Available with contact pending or on hold Work time
Available and in contact work Work time
After contact work Work time

Agent selection
Issue 3 February 2005 31
an agent when calculating idleness and occupancy. If an agent is qualified for both LOA and MIA service classes, and Business Advocate wants to match the agent with a contact in a service class that uses MIA, Business Advocate uses the total idle time from the last contact, even if that contact was in an LOA service class.
For example, Business Advocate needs to match a contact from service class X to an agent. Both Agent A and Agent B are available and are qualified to handle contacts for service class X and service class Y. In this example:
● Agent A has been 65% occupied with contacts in service class X. Agent A has not received any contacts in service class Y for the past hour.
● Agent B has been 75% occupied with contacts in service class Y. Agent B has not received any contacts in service class X for the past hour.
Business Advocate matches the contact to Agent A even though Agent B has not received a contact for Service Class X in over an hour.
Process for agent selectionDuring agent selection, Business Advocate does the following:
1. Uses the qualifiers of the contact to identify the service class.
2. Identifies which agents are available and are qualified to handle a contact for that service class.
3. Identifies whether you configured MIA or LOA contact selection for the service class.
4. Matches the contact with the agent that meets the selection method that you defined.
5. Routes the contact to the agent.
Comparing methods for agent selectionFor example, three agents are available to handle contacts for the Sales service class. One contact arrives that matches the service class. The following table shows the information about the three agents.
Agent Occupancy Idle time after last sales contact
Agent A 90% 5 seconds
Agent B 95% 30 seconds
Agent C 64% 20 seconds

Introduction
32 Business Advocate Configuration and Administration
With MIA, Business Advocate determines that Agent B has spent the greatest length of time idle after the last contact in the sales service class that Agent B handled. Therefore, Business Advocate matches the contact with Agent B.
With LOA, Business Advocate determines that Agent C has spent the least percentage of time occupied with contacts. Therefore, Business Advocate matches the contact with Agent C.
Dynamic adjustment of agent poolsBusiness Advocate can dynamically adjust the pool of agents by activating reserve and backup agents to more effectively meet your service goals.
This rapid, automatic response to slow service times results in a significant improvement in customer service levels. With dynamic agent staffing, you can use agents from other workgroups to help handle contacts during peak hours. With this efficient use of existing resources, you can increase service levels with the same number of agents.
You can specify the activation level for an agent. The activation level determines when and how an agent can handle contacts in a service class. For more information see Agent activation types on page 24.
The activation level determines which service state activates an agent for a service class. The possible values for activation levels are the service states. For more information see Service states on page 24.
Business Advocate monitors the following criteria to determine whether to automatically activate an agent for a particular service class:
● Service goal
● Service state
● Agent activation levels
For more information, see Activation levels on page 243.

Dynamic adjustment of agent pools
Issue 3 February 2005 33
Example: dynamically adjusting the agent poolIn this example, a contact center has three service classes. Each service class has a different service goal and contains one contact. An agent becomes available who has a Regular activation type for two of the service classes, and a Reserve activation type for the third service class.
The service state of the service classes determines which contact Business Advocate matches with the agent, as shown in the following scenarios:
● Scenario 1: agent receives regular work on page 33.
● Scenario 2: agent receives reserve work on page 34.
Scenario 1: agent receives regular work
The following figure shows a possible scenario where Business Advocate matches the agent with a contact in a service class with a Regular activation type.
In this scenario, Business Advocate calculates that all of the service classes have a service state of On Target. However, the agent is activated for only the Voice/Sales/Premium service class and the Voice/Sales/Regular service class.
Therefore, in this example, Business Advocate matches the agent with the contact in the Voice/Sales/Regular service class. This contact meets the following criteria:
● The contact is in a service class that is activated for this agent.
● The service class has the highest ratio of predicted wait time to service goal.
Introduction
34 Business Advocate Configuration and Administration
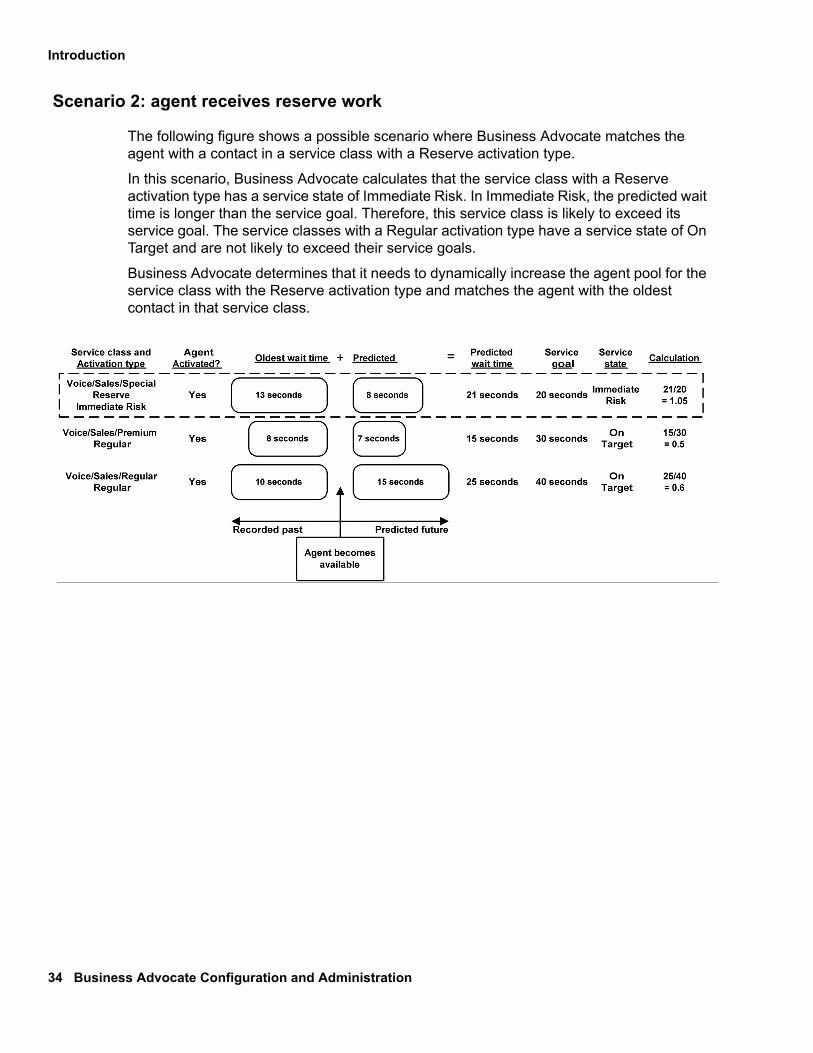
Scenario 2: agent receives reserve work
The following figure shows a possible scenario where Business Advocate matches the agent with a contact in a service class with a Reserve activation type.
In this scenario, Business Advocate calculates that the service class with a Reserve activation type has a service state of Immediate Risk. In Immediate Risk, the predicted wait time is longer than the service goal. Therefore, this service class is likely to exceed its service goal. The service classes with a Regular activation type have a service state of On Target and are not likely to exceed their service goals.
Business Advocate determines that it needs to dynamically increase the agent pool for the service class with the Reserve activation type and matches the agent with the oldest contact in that service class.

Example: Using Business Advocate to increase revenue
Issue 3 February 2005 35
Example: Using Business Advocate to increase revenue
Many contact centers are responsible for a significant portion of the revenue earned by their company. Many companies look for ways to increase revenue from their contact centers.
The scenario described in this section details one way to increase revenue in a contact center for a retail company. This section includes the following topics:
● Background information on page 35.
● Determining service classes on page 36.
● Creating agent profiles on page 37.
● Setting agent activation types and activation levels on page 37.
● Setting service goals on page 38.
● Measuring results on page 38.
Background informationA catalog company that sells home furnishings and accessories wants to increase sales. The company decides that it needs to take full advantage of every sales opportunity and make the best use of its agent resources.
The company wants to make sure that the agents receive the appropriate sales calls. The most experienced agents at the company handle contacts from those customers who typically spend a lot of money and who expect excellent service. The least experienced agents handle contacts from customers who order clearance items, and who typically spend the least amount of money.

Introduction
36 Business Advocate Configuration and Administration
Determining service classesFrom sales data and past experience with customers, the company identifies four types of customers, as shown in the following table. The company creates a service class for each type of customer.
Service class Description
Platinum Platinum customers spend the most money. These customers are also most likely to purchase additional merchandise that agents recommend.
Gold Gold customers spend a reasonable amount of money. However, these customers do not typically purchase additional merchandise.
Silver Silver customers purchase only merchandise that the company reduces in price for clearance.
New New customers meet one of the following criteria:● Has not previously contacted the contact center,
purchased merchandise, or otherwise used the services of the company.
● The customer has not provided identifying information.
● The telephone number for the voice contact does not match a customer telephone number in the database.
As a result, new customers are unknown to Avaya IC until they speak to an agent.

Example: Using Business Advocate to increase revenue
Issue 3 February 2005 37
Creating agent profilesThe company prefers to dedicate groups of agents to a targeted set of customers.
The following table shows how the company creates profiles for agents. The profiles are four tiers that reflect the service classes.
Setting agent activation types and activation levelsThe company wants to avoid the poor service levels that can result if the contact center experiences an increase in the time for agents to handle contacts, or an increase in the volume of contacts from customers.
The following table shows how the contact center assigned activation types and activation levels to agents for each service class. The less optimal matches between agents and customers are reserve activation types. The assignments in the following table make sure that customers are matched with the most qualified agents as frequently as possible.
Tier Description
Tier 4 Agents in Tier 4are the most proficient agents. These agents are top at sales and can effectively sell additional merchandise to customers.
Tier 3 Agents in Tier 3 are good at sales of standard merchandise, but cannot effectively sell additional merchandise to customers. These agents can also effectively introduce new customers to the catalog.
Tier 2 Agents in Tier 2have almost the same abilities as agents in Tier 3. However, as the service states fluctuate, Tier 2 agents spend less time with Platinum customers and more time with Silver customers.
Tier 1 Agents in Tier 1 have less experience. Many of these agents are trainees.
Agents Platinum Gold Silver New
Tier 4 Regular Backup - -
Tier 3 ReserveActivate at On Target - Future Risk
Regular Reserve Activate at Behind Target
Regular

Introduction
38 Business Advocate Configuration and Administration
Setting service goalsThe configuration of the service goals reflect the desire of the contact center to rapidly activate agents to assist with contacts that generate higher revenue. The contact center assigns the same service goals to the service class for Platinum customers and to the service class for New customers to ensure the following:
● Unidentified Platinum customers receive the required higher service level.
● New customers receive the best possible service level to encourage them to purchase products and to return.
The following table shows the values for the service goal settings.
Measuring resultsThe thresholds for these service goals help to determine the service state of each service class. These service states govern contact selection for agents with two primary service classes, or for agents who are activated for reserve or backup service classes.
When the contact center experiences sudden increases in the number of contacts or the length of time that contacts in a service class wait in queue, the service states activate reserve agents. The activated agents are those reserve agents with an activation level equal to or less than the current state of the service class.
Tier 2 ReserveActivate at Behind Target
Regular Reserve Activate at On Target - Immediate Risk
Regular
Tier 1 - ReserveActivate at Behind Target
Regular Reserve Activate at Behind Target
Agents Platinum Gold Silver New
Customers Upper threshold Critical threshold
Platinum 20 seconds 30 seconds
Gold 45 seconds 60 seconds
Silver 60 seconds 75 seconds
New 20 seconds 30 seconds

Example: Using Business Advocate to increase revenue
Issue 3 February 2005 39
The contact center assigns service classes and activation levels to agents according to the experience and priority of the agents. Therefore, the company makes sure that:
● Whenever possible, agents handle the contacts that they are most qualified to handle
● Whenever necessary, agents help out in areas they are less qualified to handle
As a result, sales should increase, and agents can handle more than one type of customer contact efficiently.
The following table shows some of the Avaya Operational Analyst (Avaya OA) real-time reports that you can use to measure the effectiveness of this solution. Avaya OA also provides historical reports that you can use. For more information, see Operational Analyst Reports Reference.
Avaya OA report Description
Service class and queue performance
Informs you about the performance of service classes currently and over the last thirty minutes. Some of the statistics you can display in this report are:● Percentage of contacts handled within service goal● Number of contacts in queue● Number of contacts completed● Number of abandoned contacts● Latest average wait time● Percentage of matched contacts
Service class and queue performance
Lets you compare the performance of service classes currently and over the last thirty minutes.
Agent performance by service class and queue
Lets you compare the performance of multiple agents across different service classes.Some of the statistics you can display in this report are:● Average work duration● Average wrap-up duration● Number of contacts completed● Average customer hold duration

Introduction
40 Business Advocate Configuration and Administration

Issue 3 February 2005 41
Chapter 2: Business Advocate components
This section describes the Business Advocate components that you need to add to configure Business Advocate in an Avaya IC system, and how failover works in Business Advocate for Avaya IC. This section includes the following topics:
● Logical Resource Manager on page 41.
● Business Advocate servers on page 42.
● Business Advocate workflows on page 44.
● Business Advocate databases on page 46.
● Business Advocate administration tools on page 47.
● Business Advocate Reports on page 48.
● Failover and recovery in Business Advocate on page 48.
Logical Resource ManagerThe Logical Resource Manager is a logical server that represents a pair of active and standby Resource Manager servers. Both Resource Manager servers in a Logical Resource Manager handle the same agents and the same contacts. One Resource Manager server is an active or primary server. The other Resource Manager server is a standby or secondary server.
Business Advocate uses Logical Resource Managers to assign servers and agents to the Resource Manager servers. You assign the Logical Resource Manager to the server or agent. Business Advocate and Avaya IC use the name of the Logical Resource Manager to identify which active Resource Manager server is associated with the agent or server. This Logical Resource Manager configuration means that you do not need to change the Resource Manager server associated with an agent if the active Resource Manager server fails and the standby Resource Manager server becomes the active server.
To simplify configuration, if an Avaya IC system includes only one Resource Manager server, that Resource Manager server is also represented by a Logical Resource Manager. A Logical Resource Manager that includes only on Resource Manager server does not provide any fault tolerance.

Business Advocate components
42 Business Advocate Configuration and Administration
Business Advocate serversThe following topics describe the Business Advocate servers:
● Resource Manager server on page 42.
● Telephony Services Adaptor server on page 43.
● Web Advocate Adaptor server on page 43.
For information about where to deploy Business Advocate servers, and recommended deployment scenarios, see IC Installation Planning and Prerequisites.
Resource Manager serverThe Resource Manager server maintains the universal queues for Business Advocate. The Resource Manager server is a Windows only server. You cannot host the Resource Manager server on a Solaris or AIX machine.
A Business Advocate system can include multiple Resource Manager servers. However, you cannot deploy more than one Resource Manager server on a machine. Avaya recommends that you deploy an active Resource Manager server paired with a standby Resource Manager server. This combination of Resource Manager servers is a Logical Resource Manager.
The two Resource Managers working as a Logical Resource Manager deployment provides a measure of fault tolerance. The standby Resource Manager server runs in standby mode. This server becomes active only if the active Resource Manager server fails. For this deployment, install the standby Resource Manager server on a separate machine with a separate power supply.
If cost is a factor, you can deploy a single Resource Manager server. For this deployment, you have no backup if the Resource Manager server fails.
For more information about failover, see Failover and recovery in Business Advocate on page 48.

Business Advocate servers
Issue 3 February 2005 43
Telephony Services Adaptor serverThe Telephony Services Adaptor (TSA) server is a Business Advocate adaptor for the Telephony server. The TSA server manages server interactions for Business Advocate that are required for voice contacts.
Business Advocate requires a TSA server for:
● Every switch in your Avaya IC system
● Every Telephony server which handles incoming voice contacts that you want Business Advocate to qualify and route
The Telephony server forwards voice contacts to the TSA server. The TSA server then makes a request to the Resource Manager server to match the contacts with qualified agents. For more information about the function of the TSA server in the qualification of voice contacts, see Qualification in the voice channel on page 149.
For more information about the TSA server, including guidelines, see Telephony Services Adaptor server on page 159.
Web Advocate Adaptor serverThe Web Advocate Adaptor (WAA) server is the Business Advocate adapter for the WebACD server. The WAA server manages server interactions for Business Advocate that are required for chat contacts and email contacts.
The WebACD server sets up two associations with the WAA server: one for the chat channel, and one for the email channel. If only one of these media channels is present, the WebACD server only sets up an association for that channel.
The WebACD server forwards chat contacts and email contacts to the WAA server. The WAA server requests a qualified agent resource from the Resource Manager server. For more information about the function of the WAA server:
● For the qualification of chat contacts, see Qualification and routing in the chat channel on page 193.
● For the qualification of email contacts, see Qualification and routing in the email channel on page 211.
The WAA server has different requirements for email contacts and chat contacts. For more information, see:
● Web Advocate Adaptor server for chat contacts on page 201.
● Web Advocate Adaptor server for email contacts on page 219.

Business Advocate components
44 Business Advocate Configuration and Administration
Business Advocate workflowsBusiness Advocate workflows qualify contacts and perform other contact-related functions for Business Advocate systems.
All Workflow servers can run the Business Advocate qualification workflows. You do not need to configure workflow criteria in the Workflow servers, because the Business Advocate servers start the workflows.
For incoming voice contacts, the TSA server connects to a Workflow server to start the voice qualification workflow and the exception workflow. For email contacts and chat contacts, the WAA server connects to a Workflow server to start the appropriate qualification workflow and the exception workflow.
This configuration allows you to configure multiple Workflow servers to handle a high volume of contacts. For example, you can assign multiple Workflow servers to the same TSA server if the TSA server connects to a CTI link that handles a high volume of voice contacts. The TSA server uses a round robin approach to select a Workflow server to qualify each incoming contact.
This section includes the following topics:
● Location of Business Advocate workflows on page 44.
● System workflows for Business Advocate on page 45.
● Sample workflows for Business Advocate on page 45.
Location of Business Advocate workflowsAvaya IC installs the Business Advocate flows in the following directory:
IC_INSTALL_DIR\IC70\design\IC\Flows\Avaya\Advocate

Business Advocate workflows
Issue 3 February 2005 45
System workflows for Business Advocate
! CAUTION:CAUTION: Do not modify the system workflow for Business Advocate. If you modify the
system workflow, your Business Advocate system will not function correctly.
The following table describes the system workflow for Business Advocate.
Sample workflows for Business AdvocateBefore you compile the sample Business Advocate workflows, you can customize them with property values that match the qualifiers in your Business Advocate system and the specific business processes in the contact center. For more detailed information, see Avaya IC Media Workflow Reference.
The following table describes the sample Business Advocate flows.
Workflow Project Name Purpose
Synchronization Advocate.prj Synchronizes qualifier representations in global variables with the qualifiers in the database. Fetches the category/qualifier values and their associated numeric representations from the database and creates global string variables for the Workflow server.File: update_qualifiersetids.qfd
Workflow Project Name Purpose
Qualify Voice flow Advocate.prj Identifies a collection of Business Advocate qualifiers for an incoming voice contact. Assigns those qualifiers to the voice contact so that Business Advocate can accurately match the contact with an appropriate agent.Selects the wait treatment for the voice contact.File: qualifyvoice_adv.qfd
Qualify Chat flow Advocate.prj Identifies a collection of Business Advocate qualifiers for a chat contact. Assigns those qualifiers to the chat contact so that Business Advocate can accurately match the contact with an appropriate agent.Selects the wait treatment for the chat contact.File: qualifychat_adv.qfd

Business Advocate components
46 Business Advocate Configuration and Administration
Business Advocate databasesIn addition to the Avaya IC databases, Business Advocate also has its own databases. The Business Advocate databases store administration and operation information for the Resource Manager server.
You can configure Business Advocate databases on Microsoft SQL Server or Oracle databases. Business Advocate does not support DB2 databases. You can host Business Advocate databases on the same database server as the Avaya IC databases.
The following table describes the Business Advocate databases.
Qualify Email flow Advocate.prj Identifies a collection of Business Advocate qualifiers for an email contact. Assigns those qualifiers to the email contact so that Business Advocate can accurately match the contact with an appropriate agent.File: qualifyemail_adv.qfd
Exception handling Advocate.prj Responds to exceptions that occur when Business Advocate cannot match an agent to a contact.File: handle_exception.qfd
Transfer to agent Advocate.prj Supports the ability of the agent desktop application to transfer either an email contact or a voice contact to a specific agent. This workflow is only required in a Business Advocate system.File: transfertoagent.qfd
Workflow Project Name Purpose
Database Description
System store Stores administration information, such as system parameters, initialization parameters, location of MSMQ queues, location of servers, and the roles of the Resource Manager servers.Each Logical Resource Manager has a dedicated system store.
Resource store Stores operation information, such as qualifiers, service classes, and agent records and the associated capability sets and profiles.All Resource Manager servers in the system share one Resource store.

Business Advocate administration tools
Issue 3 February 2005 47
Business Advocate administration toolsThe Business Advocate administration tools are Microsoft Management Console (MMC) snap-in applications. For more information about MMC and the snap-in applications, see the MMC online help provided with the online help for the Business Advocate administration tools.
This section includes the following topics that describe the Business Advocate administration tools:
● Business Advocate Supervisor on page 47.
● Component Manager on page 47.
● Alarm Manager on page 48.
! Important:! Important:Important: To use the Business Advocate administration tools, log in to the machine
with an Active Directory Domain account that has local administrator privileges.
Business Advocate SupervisorBusiness Advocate for Avaya IC uses Business Advocate Supervisor (Advocate Supervisor) to do the following:
● Define and manage agent resources and their capabilities.
● Define and manage categories and qualifiers
● Define and manage service classes and service goals for work distribution.
● Configure desired service levels
● Customize Advocate options
Component ManagerBusiness Advocate for Avaya IC uses the Component Manager to specify the role for a Resource Manager server when you install the Business Advocate components. You can set the role of the Resource Manager server as either a primary, active server or a secondary, standby server.
You do not require Component Manager for any other function.

Business Advocate components
48 Business Advocate Configuration and Administration
Component Manager is not a VESP process and is not controlled by IC Manager.
Use IC Manager to create Business Advocate servers and to perform all other server configuration tasks.
Alarm ManagerOnly the Component Manager uses the Alarm Manager. The Alarm Monitor in IC Manager displays alarms for Business Advocate servers. Therefore, you do not need to use Alarm Manager.
Business Advocate ReportsAvaya Operational Analyst (Avaya OA) provides real-time reports and historical reports on Business Advocate. You can use these reports to measure the effectiveness of your Business Advocate configuration, such as whether a service class requires additional regular agents.
For more information about Business Advocate reports, see Operational Analyst Reports Reference.
Failover and recovery in Business AdvocateBusiness Advocate servers do not use the same failover strategy as other Avaya IC servers. This section describes the failover strategy for Business Advocate servers. This section includes the following topics:
● Failover and recovery for Resource Manager servers on page 49.
● Failover for multiple media channels on page 49.
● Failover and recovery for voice contacts on page 51.
● Failover for chat contacts on page 54.
● Failover for email contacts on page 54.

Failover and recovery in Business Advocate
Issue 3 February 2005 49
Failover and recovery for Resource Manager serversResource Manager servers do not use Avaya IC domains for failover. When you include a pair of Resource Manager servers in a Logical Resource Manager, you provide failover for Resource Manager servers. The standby Resource Manager server automatically becomes active if the active Resource Manager server fails.
You use the Component Manager to specify the initial role of a Resource Manager server when you first install the Business Advocate components. After that, Business Advocate considers:
● The active Resource Manager server to be the Resource Manager server that starts first
● The standby Resource Manager server to be the Resource Manager server that starts second
For this failover deployment, install the standby Resource Manager server on a separate machine with a separate power supply.
If cost is a factor, you can deploy a single Resource Manager server. For this deployment, you have no backup if the Resource Manager server fails.
Failover for multiple media channelsIf your Business Advocate system includes voice and at least one other media channels, you need to determine which channels you want an agent to handle during a failover situation.
This section includes the following topics:
● Switch configuration and failover for multiple media channels on page 49.
● Link groups and failover for multiple media channels on page 50.
● Configuration of agents for multiple media channels on page 50.
Switch configuration and failover for multiple media channels
The switch retains ultimate control on the delivery of voice contacts to agents. You configure this control on the switch when you determine which skills an agent will service. You do not administer skills in Avaya IC.
When Business Advocate runs normally with Avaya IC, voice contacts are never routed to skills in the switch. Therefore, agents never receive voice contacts directly from the switch.
However, in a failover scenario, voice contacts are immediately diverted into the skills that are programmed on the vectors of the incoming VDNs. The switch then routes the voice contacts to agents according to the skills administered on the switch for each agent.
Business Advocate components
50 Business Advocate Configuration and Administration
The switch uses the configuration of the VDNs to route incoming voice contacts to certain queues. If an agent is configured on the switch to handle those skills or queues, then the agent receives a voice contact from the switch.
If the configuration of an agent who is logged in to skills or queues does not match the queues where the switch routes incoming calls when the link fails, the agent will not receive voice contacts from the switch.
You cannot stop the routing of these voice contacts unless you change the administration of skills or queues on the switch for the agents.
Link groups and failover for multiple media channels
A link group can include multiple Telephony servers which are configured for different links on the switch. To ensure that failover occurs properly, a contact center administration who knows the configuration of the VDNs, skills/queues, and the agent skill administration should match the switch configuration to the link group configuration in Avaya IC.
When a link fails, the configuration of the switch determines how voice contacts are routed to agents who are configured with link groups that include the failed link. Business Advocate no longer determines the number or type of voice contacts routed to an agent. Therefore, Business Advocate automatically stops routing chat and email contacts to agents who receive voice contacts from the switch.
If an agent is not configured with a link group, and the switch is configured to deliver voice contacts to the agent when a link fails:
● The switch sends voice contacts to the agent.
● Business Advocate continues to send chat and email contacts to the agent.
! Important:! Important:Important: Under these circumstances, where Business Advocate cannot control the
maximum number of contacts received by an agent, Business Advocate routing can become unstable with race conditions.
For more information, see Failover and recovery for voice contacts on page 51.
Configuration of agents for multiple media channels
If you configure an agent without a link group for voice, the agent:
● Can receive and handle chat and email contacts if a link in the link group fails.
● Cannot receive and handle voice contacts from Business Advocate until the failed link is restored.

Failover and recovery in Business Advocate
Issue 3 February 2005 51
If you configure an agent with a link group for voice, the agent:
● Can log into failover queues on the switch to receive and handle voice contacts if a link in the link group fails.
● Cannot receive and handle chat or email contacts until the failed link is restored.
Tip:Tip: If a link fails, you can configure agents assigned to link groups with the failed
link to be able to receive and handle chat and email contacts. For more information, see Troubleshooting channel availability issues on page 303.
Failover and recovery for voice contactsFailover for voice contacts depends upon the connections between a TSA server, a Telephony server, and a link on the Telephony switch.
This section includes the following topics:
● Process of failover and recovery for voice contacts on page 51.
● Failover and recovery without backup link on page 52.
● Failover and recovery with backup link on page 52.
● Failover and Adjunct Routing Extended Wait Treatment in Communication Manager on page 53.
Process of failover and recovery for voice contacts
Each Telephony server connects to one link on the Telephony switch. Each TSA server connects to and is in the same Avaya IC domain as one Telephony server. The TSA server handles voice contacts from a link that is connected to the Telephony server. Qualification and routing for voice contacts fails over to the switch if any one of the following components fails:
● TSA server
● Telephony server
● Link associated with the TSA server
Business Advocate also uses the TSA servers to assist with failover when a Logical Resource Manager fails. In that event, no agents assigned to the Logical Resource Manager can receive voice contacts.
When a Logical Resource Manager that is assigned to a TSA server fails, the TSA server tells the Telephony server to reject every route request with a route end. In this mode, the switch takes responsibility for routing voice contacts to the agents in the link group

Business Advocate components
52 Business Advocate Configuration and Administration
associated with the Telephony server. All agents assigned to the link group receive the previously parked voice contacts and any new incoming voice contacts from the switch.
If you configure your switch appropriately, failover to the switch can make sure that agents can continue to receive new voice contacts while the Resource Manager recovers from failure. For information on how to configure the switch, see Configuring Telephony switches for Business Advocate on page 261 and the documentation provided with your switch.
Failover and recovery without backup link
With Business Advocate, when a link fails, all voice contacts on parking devices and incoming queues that are controlled by the failed link failover to the switch.
If you set up a backup link for a link and assign the backup link to a Telephony server, Business Advocate can continue to service the incoming contacts without failing them over to the switch. With a backup link, when the primary link fails:
● Incoming voice contacts are sent to the Telephony server through the backup link.
● Previously parked voice contacts are moved to failover queues.
Failover and recovery with backup link
If you do not define a backup link, and a link fails:
1. Business Advocate gives up control of all agents assigned to the link groups that contain the failed link.
2. Avaya IC temporarily loses control of the telephones of all agents that are configured on the link. The agents can still access Avaya IC applications. However, the Softphone fails when the link fails.
3. The switch begins to route contacts to agents logged in to the following queues:
● Failover queues that take the incoming voice contacts for the failed link
● Failover queues that take the voice contacts that were waiting in parking devices for the failed link
Agents are always logged into their failover queues even if the system is not in failover mode. The status of an agent on the switch does not change in failover mode. The only difference for the switch is that the failover queues, which are normally empty, now contain voice contacts.

Failover and recovery in Business Advocate
Issue 3 February 2005 53
4. Agents receive voice contacts from the switch. The Phone task list in Avaya Agent does not display these voice contacts.
5. When the link comes back up, Business Advocate begins to qualify and route the incoming voice contacts again. The following recovery for agents happens automatically without manual configuration by an agent or a Supervisor:
● Agents who are not servicing failover queues on the switch and are still Business Advocate agents can immediately receive voice contacts through Business Advocate for Avaya IC.
● Agents who are servicing failover queues continue to do so until no contacts remain in the queues. When there are no more contacts in the failover queues, these agents begin to receive voice contacts from Business Advocate for Avaya IC.
Failover and Adjunct Routing Extended Wait Treatment in Communication Manager
Avaya Communication Manager does not queue voice contacts when Avaya IC maintains control and queuing status. Therefore, Communication Manager cannot guarantee that voice contacts which break out of an adjunct-route "wait" treatment vectoring loop due to ASAI link failure will end up in the failover backup skill in the same order the contacts were originally received.
The failover voice contacts are processed by their respective vector steps while the customer hears the wait treatment. These failover contacts do not necessarily execute the same step at the same time.
The event that indicates that the ASAI link is down is sent separately to each voice contact in queue in no particular order. As a result, some contacts may fall through to the backup skill and be queued in a different order than originally received. After those contacts are queued by the Communication Manager, they are delivered in the order they ended up in queue.
Note:Note: The intent of the Adjunct Routing Extended Wait Treatment failover
protection is to prevent loss of voice contacts controlled by Avaya IC under rare link-failure conditions. The intent is not to maintain the queue order for these contacts.
Business Advocate components
54 Business Advocate Configuration and Administration
Failover for chat contactsLike Avaya IC, Business Advocate does not provide failover for qualifying and routing chat contacts. If chat routing fails, Web Management redirects the chat customer to the Website.
Business Advocate cannot qualify chat contacts when Business Advocate or Web Management fails, including the following circumstances:
● The Resource Manager server assigned to the WAA server for chat fails.
● The WebACD server fails.
● The Web Advocate Adaptor server fails.
Failover for email contactsLike Avaya IC, Business Advocate does not provide failover for qualifying and routing email contacts. If email routing fails, Email Management holds email contacts until routing for email contacts is restored.
Business Advocate cannot qualify email contacts when Business Advocate or Email Management fails, including the following circumstances:
● The Resource Manager server assigned to the WAA server for email fails.
● The WebACD server fails.
● The Web Advocate Adaptor server fails.

Issue 3 February 2005 55
Chapter 3: Distributed Business Advocate
When you configure a system with multiple Logical Resource Managers, Business Advocate automatically employs a set of enhanced, location-aware algorithms to match agents with contacts.
This section describes distributed Business Advocate and provides some examples of how distributed Business Advocate functions.
This section includes the following topics:
● About distributed Business Advocate on page 55.
● Components of distributed Business Advocate on page 57.
● Example: using distributed Business Advocate on page 59.
● Matching a contact with an agent on page 60.
About distributed Business AdvocateDistributed Business Advocate is only used in a Business Advocate system that includes multiple Logical Resource Managers. This configuration is employed in a Business Advocate system that includes more than one site or location.
This section includes the following topics:
● Deployments for distributed Business Advocate on page 56.
● Options for qualification of contacts on page 56.

Distributed Business Advocate
56 Business Advocate Configuration and Administration
Deployments for distributed Business AdvocateThe only requirement for distributed Business Advocate is that the system include more than one Logical Resource Manager (Business Advocate instance). The system can include several different deployments, including:
● Multiple Logical Resource Managers in a single physical location, where each Logical Resource Manager is assigned service classes for a subset of the contacts that arrive in that location.
● Multiple Logical Resource Managers in a single physical location, where each Logical Resource Manager is assigned service classes for contacts that arrive in different physical locations within the contact center.
● One Logical Resource Manager in each location, where each Logical Resource Manager is assigned service classes for contacts that arrive in the same physical location as the Logical Resource Manager.
● One Logical Resource Manager in only some of the physical locations, where a Logical Resource Manager can be assigned service classes for contacts that arrive in more than one physical location. For example, a contact center with one location in the United States and three locations in Europe can deploy one Logical Resource Manager to handle contacts that arrive in the United States and a second Logical Resource Manager to handle contacts that arrive in all locations in Europe.
Some of the examples in this section assume that the Avaya IC system spans multiple locations and includes one Logical Resource Manager in each location.
Options for qualification of contactsDistributed Business Advocate can handle contacts that arrive in more than one Logical Resource Manager in either of the following ways:
● Ensure that qualified and available agents are matched with a contact, even if that contact arrives at a different Logical Resource Manager.
● Ensure that an agent only receives contacts from the local Logical Resource Manager and does not receive contacts from another Logical Resource Manager.
Components of distributed Business Advocate
Issue 3 February 2005 57
Components of distributed Business AdvocateDistributed Business Advocate does not require any additional components. It uses the same components as a Business Advocate system with one Logical Resource Manager.
This section describes how distributed Business Advocate system uses the components of Business Advocate. This section includes the following topics.
● Agents in distributed Business Advocate on page 57.
● Logical Resource Manager on page 57.
● Telephony Services Adaptor server on page 58.
● Web Advocate Adaptor server on page 58.
Agents in distributed Business AdvocateAgents in a distributed Business Advocate system do not require any special configuration. You assign each agent to one Logical Resource Manager.
For more information about how to configure an agent for Business Advocate, see Managing agents on page 241.
Logical Resource ManagerIn distributed Business Advocate, each Logical Resource Manager maintains the state of:
● Its own service classes
● The service classes for all other Logical Resource Managers in the system
Each Logical Resource Manager obtains information about the state of service classes in the other Logical Resource Managers from the service class summary record. This summary record is maintained in an ADU by the ADU server. Distributed Business Advocate shares this record between all Logical Resource Managers in the system.

Distributed Business Advocate
58 Business Advocate Configuration and Administration
Telephony Services Adaptor serverIn distributed Business Advocate, you assign each Telephony Services Adaptor (TSA) server to a Logical Resource Manager, which primarily handles all contacts for that TSA server. The TSA server sends all requests for an agent to this Logical Resource Manager.
Distributed Business Advocate handles failover in the same way as a Business Advocate system with a single Logical Resource Manager. If both Resource Manager servers in the Logical Resource Manager assigned to a TSA server fail, the TSA server no longer sends requests for agents. The TSA server informs the Telephony server to reject any voice contacts for that TSA server. For information about how Business Advocate handles failover for voice contacts, see Failover and recovery for voice contacts on page 51.
Web Advocate Adaptor serverIn distributed Business Advocate, you assign the WAA server to one Logical Resource Manager for each channel. However, you can assign a single Logical Resource Manager to handle all chat contacts and email contacts, or a different Logical Resource Manager for chat and for email. The WAA server sends all requests for an agent to the designated Logical Resource Manager for a specific media.
Distributed Business Advocate handles failover in the same way as a Business Advocate system with a single Logical Resource Manager. If both Resource Manager servers in a Logical Resource Manager assigned to the WAA server fail, the WAA server no longer listens for route requests from the WebACD server and routing of chat contacts and email contacts is halted. For more information, see Failover for chat contacts on page 54 and Failover for email contacts on page 54.

Example: using distributed Business Advocate
Issue 3 February 2005 59
Example: using distributed Business AdvocateIn this example, a distributed Business Advocate system has three Logical Resource Managers. This example applies in all of the deployments discussed in Deployments for distributed Business Advocate on page 56.
The scenario described in this section details one way to increase revenue in a contact center for a retail company. This section includes the following topics:
● Distributed Business Advocate setup on page 59.
● Matching the agent with a contact on page 59.
Distributed Business Advocate setupIn this example, the Business Advocate system has three Logical Resource Managers that can handle all of the service classes in the system.
● LRM1● LRM2● LRM3
Matching the agent with a contactIn this example, an agent associated with LRM1 becomes available. This agent is qualified to handle the VoiceGold service class and the VoiceSilver service class.
When the agent becomes available, Business Advocate checks the state of the VoiceGold and VoiceSilver service classes in each Logical Resource Manager to determine which service class is in the greatest need. The results of that check determine how distributed Business Advocate matches the agent with a contact.
This section includes two scenarios. Each scenario shows a different way in which distributed Business Advocate can match the available agent with a contact.

Distributed Business Advocate
60 Business Advocate Configuration and Administration
Scenario 1 - The following table shows the service class states for the service classes in each Logical Resource Manager.
The service classes in greatest need include one local service class that is associated with LRM1. Therefore, distributed Business Advocate matches the agent with the VoiceGold service class in LRM1.
Scenario 2 - The following table shows the service class states for the service classes in each Logical Resource Manager:
Neither of the local service classes are in the greatest need. The VoiceGold service classes in LRM2 and in LRM3 are both in the same state and in the greatest need. Therefore, distributed Business Advocate checks which of the VoiceGold service classes in LRM2 and in LRM3 was most recently offered an agent. Distributed Business Advocate then offers the agent to the other Logical Resource Manager.
If more than two remote Logical Resource Managers have service classes in the same state, distributed Business Advocate uses a round robin selection.
Matching a contact with an agentWhen a system has multiple Logical Resource Managers, distributed Business Advocate uses enhanced, location-aware algorithms to match contacts with agents.
This section provides an overview of how distributed Business Advocate matches contacts with agents. This section includes the following topics:
● Process for matching contacts with agents on page 61.
● Changing how distributed Business Advocate matches contacts with agents on page 61.
Service classes LRM1 LRM2 LRM3
VoiceGold On Target - Immediate Risk
On Target On Target - Immediate Risk
VoiceSilver On Target On Target On Target
Service classes LRM1 LRM2 LRM3
VoiceGold On Target On Target - Immediate Risk
On Target - Immediate Risk
VoiceSilver On Target On Target On Target
Matching a contact with an agent
Issue 3 February 2005 61
Process for matching contacts with agentsWhen an agent becomes available, the Logical Resource Manager for that agent checks the state of all of the service classes that match the capability sets for that agent. This check includes the state of service classes in other Logical Resource Managers.
After the check is completed, the Logical Resource Manager:
1. Chooses the service class in the greatest need of an agent.
2. If multiple service classes are in a state that indicates the greatest need, the Logical Resource Manager selects a service class as follows:
a. If the service classes in greatest need include one local service class that is associated with that Logical Resource Manager, selects the local service class.
b. If multiple local service classes are in the same state, uses the standard Business Advocate logic to select a service class. For more information, see How Business Advocate matches contacts with agents on page 19.
c. If no local service classes are in greatest need, and distributed Business Advocate is configured to restrict contacts to local agents, uses the standard Business Advocate logic to select a service class.
d. If no local service classes are in greatest need, and distributed Business Advocate is not configured to restrict contacts to local agents, offers the agent to the Logical Resource Manager with a remote service class in the greatest need.
e. If two or more remote service classes are in the same state, offers the agent to the Logical Resource Managers for those services classes in a round-robin type of format, selecting the remote service class with the oldest time stamp. The Logical Resource Manager applies a time stamp to a remote service class when an agent offered for that service class has been accepted.
Changing how distributed Business Advocate matches contacts with agents
With distributed Business Advocate, you can choose one of the following ways to match contacts with remote agents:
● Contacts can be matched with agents at any location.
● Contacts are only matched with agents at the location where the contact arrives.
● Contacts are only matched with agents at other locations if the service class is at risk of not meeting its service goals.

Distributed Business Advocate
62 Business Advocate Configuration and Administration
Matching contacts to agents at any location
By default, distributed Business Advocate matches contacts with agents at any Logical Resource Manager.
You do not need to perform any special configuration to set up Business Advocate to use this process to match contacts with agents.
Matching contacts to local agents only
You can change distributed Business Advocate to restrict contacts to agents in a specific location or region. To make this change, create a location qualifier and add that qualifier to service classes. The location qualifier can apply to only one site, or to a region (group of sites). When you add the location qualifier to a service class, that qualifier restricts contacts in the service class to be delivered only to that location.
For example, you can use the location qualifier to ensure that:
● Voice contacts are not delivered to another switch.
● Email contacts are only handled within a specific region. For example, that email contacts received in the United States are only handled by agents in a United States location.
In this configuration, a "local" agent is an agent that is configured to handle contacts in the location or region specified by the location qualifier. All other agents are considered to be "remote" agents. The local agents will never receive a contact that arrived in another location.
To restrict contacts to local agents:
1. Create a location or "site" qualifier for each location that you want one or more agents to handle.
2. Configure "local" service classes that include the location qualifier.
3. Determine which "local" agents will handle contacts for the location designated by the location qualifier. Ensure that these local agents are assigned to the Logical Resource Manager that handles incoming contacts for that location.
4. Configure the capability sets of all local agents to include the local service classes.
5. Do not configure the capability sets of other "remote" agents to include the local service classes.
Matching contacts to remote agents only in risk situations
You can change distributed Business Advocate to only match a contact with an agent in another location if the service class in the other location is at risk of not meeting its service goal.
To make this change, create a location qualifier and add that qualifier to service classes in both the location where you want "local" agents to handle the contacts, and the location

Matching a contact with an agent
Issue 3 February 2005 63
where you want "remote" agents to handle the contacts in risk situations. Then, configure the capability sets of agents in both locations with the location qualifier.
In this configuration, a "local" agent is an agent that is configured to handle contacts in the location or region specified by the location qualifier. All other agents are considered to be "remote" agents.
To match contacts with remote agents only in risk situations:
1. Create a location or "site" qualifier for each location that you want one or more agents to handle.
2. Configure "local" service classes that include the location qualifier.
3. Determine which "local" agents will handle contacts for the location designated by the location qualifier. Ensure that these local agents are assigned to the Logical Resource Manager that handles incoming contacts for that location.
4. For all local service classes, configure the corresponding capability sets for the local agents with a Regular activation type. The Regular activation type implies an activation level of On Target.
5. For all service classes that include a location qualifier for other locations, configure the corresponding capability sets for the agents with:
● A Reserve or Backup activation type.
● A risk or jeopardy activation level, such as On Target - Immediate Risk or On Target - Future Risk. To increase the chances of a local agent being matched with the contact, use an activation level of Behind Target or Critical.
6. Ensure that the "remote" agents are assigned to Logical Resource Managers that handle incoming contacts for remote locations.

Distributed Business Advocate
64 Business Advocate Configuration and Administration

Issue 3 February 2005 65
Chapter 4: Overview of configuration
This section provides an overview of the tasks involved in setting up a Business Advocate system. This section does not include information about planning for the Business Advocate system.
The following table includes the tasks that need to be performed to set up a Business Advocate system and where the information about that task is located in the Avaya IC documentation set. You must complete the task in each row before you move on to the task in the next row. If the Business Advocate system does not include the component listed in a task, you can skip that row.
! Task Location
Plan the Avaya IC and Business Advocate systems
Plan and determine the deployment and failover for the Avaya IC system, including Business Advocate components.
IC Installation Planning and Prerequisites
Plan the components of the Business Advocate system, including but not limited to:● Qualifiers● Service classes● Agent profiles● Assignment of agents to work on contacts
routed through Business Advocate.
● IC Installation Planning and Prerequisites● IC Business Advocate Configuration and
Administration
Install the base Avaya IC system
Install and configure the base Avaya IC system, including all prerequisites, databases, core servers, and media channels for that system.
● IC Installation Planning and Prerequisites● IC Installation and Configuration
Customize Business Advocate workflows
Review the sample Business Advocate workflows and complete any customization required for the Business Advocate system.Note: You can perform this task at any point up to when you configure qualification for the media channel.
Avaya IC Media Workflow Reference
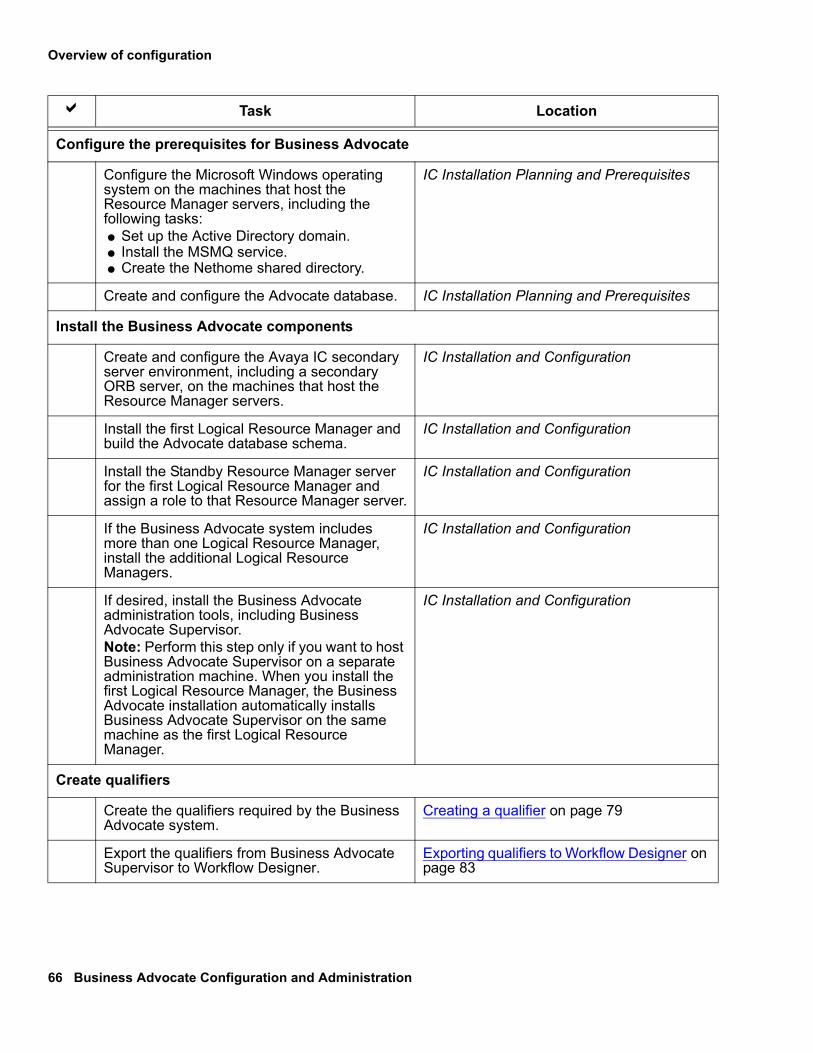
Overview of configuration
66 Business Advocate Configuration and Administration
Configure the prerequisites for Business Advocate
Configure the Microsoft Windows operating system on the machines that host the Resource Manager servers, including the following tasks:● Set up the Active Directory domain.● Install the MSMQ service.● Create the Nethome shared directory.
IC Installation Planning and Prerequisites
Create and configure the Advocate database. IC Installation Planning and Prerequisites
Install the Business Advocate components
Create and configure the Avaya IC secondary server environment, including a secondary ORB server, on the machines that host the Resource Manager servers.
IC Installation and Configuration
Install the first Logical Resource Manager and build the Advocate database schema.
IC Installation and Configuration
Install the Standby Resource Manager server for the first Logical Resource Manager and assign a role to that Resource Manager server.
IC Installation and Configuration
If the Business Advocate system includes more than one Logical Resource Manager, install the additional Logical Resource Managers.
IC Installation and Configuration
If desired, install the Business Advocate administration tools, including Business Advocate Supervisor.Note: Perform this step only if you want to host Business Advocate Supervisor on a separate administration machine. When you install the first Logical Resource Manager, the Business Advocate installation automatically installs Business Advocate Supervisor on the same machine as the first Logical Resource Manager.
IC Installation and Configuration
Create qualifiers
Create the qualifiers required by the Business Advocate system.
Creating a qualifier on page 79
Export the qualifiers from Business Advocate Supervisor to Workflow Designer.
Exporting qualifiers to Workflow Designer on page 83
! Task Location

Issue 3 February 2005 67
Configure service levels
Configure the Business Advocate options. Configuring Business Advocate options on page 101
Create the service goals. Creating a service goal on page 104
Create the service classes. 1. Creating a service class on page 1082. Assigning attributes to a service
class on page 1083. Assigning qualifiers to a service
class on page 111
Create and configure Business Advocate core components
Configure the database connections for the Advocate database, including the following:● Create Data server for Advocate database● Configure IC Repository connections● Configure CCQ connections
Configuring database connections on page 118
Configure the customer profile attributes. Configuring customer profile attributes on page 134
Configure the Directory servers for Business Advocate.
Configuring Directory servers on page 136
Create the Logical Resource Managers. Creating a Logical Resource Manager on page 137
Create and configure the Resource Manager servers.
1. Adding a Resource Manager server on page 140
2. Viewing the role of a Resource Manager server on page 142
Configure qualification for voice contactsNote: If the Business Advocate system does not include the Voice channel, omit these tasks.
Complete any required customization, if not already done, and compile the Qualify Voice workflow.
Qualify Voice workflow on page 155
Create and configure the Telephony Services Adaptor server.
1. Guidelines for a TSA server on page 159
2. Creating a TSA server on page 1603. Assigning a Logical Resource
Manager on page 1614. Setting up contact handling on
page 1655. Assigning a transfer exception
workflow on page 167
! Task Location

Overview of configuration
68 Business Advocate Configuration and Administration
Create and configure the parking device for the switch.
Do one of the following:● Creating a parking device for an Avaya
switch on page 173● Creating a parking device for an Aspect
switch on page 175● Creating a parking device for a Nortel
Meridian switch on page 179
Configure the Telephony server for Business Advocate.
1. Configuring a Telephony server on page 182
2. Configuring a backup link on page 184
Create a Workflow server to handle voice contacts.
Creating a Workflow server for the voice channel on page 185
If desired, create and configure link groups for the Telephony servers.
Creating link groups on page 189
Configure qualification for chat contactsNote: If the Business Advocate system does not include the Chat channel, omit these tasks.
Complete the Qualify Chat workflow. Qualify Chat workflow on page 197
Create the Web Advocate Adaptor server and configure for chat contacts.
1. Creating a WAA server on page 2032. Configuring a WAA server for the chat
channel on page 204
Configure the WebACD server for Business Advocate.
Configuring the WebACD server on page 206
Create a Workflow server to handle chat contacts.
Configuring a Workflow server for the chat channel on page 208
Configure qualification for email contactsNote: If the Business Advocate system does not include the Email channel, omit these tasks.
Complete the Qualify Email workflow. Qualify Email workflow on page 215
Configure the Web Advocate Adaptor server for email contacts.
Configuring a WAA server for the email channel on page 221
Create a Workflow server to handle email contacts.
Configuring a Workflow server for the email channel on page 222
Configure virtual queuesNote: If the Business Advocate system includes only the Chat channel, omit these tasks.
Create virtual queues for voice contacts and for email contacts.
Creating a virtual queue on page 227
! Task Location

Issue 3 February 2005 69
Create profiles for multiple agents
Create profiles. Creating a profile on page 233
Defining capability sets for profiles. Defining a capability set for a profile on page 234
Assign agents to profiles. Assigning an agent to a profile on page 237
Create and configure Business Advocate agents
Create agents.Note: This step can also be performed when you set up the base Avaya IC system.
● Creating an agent on page 246.● IC Installation and Configuration● IC Administration Volume 2: Agents,
Customers, & Queues
Activate agents for Business Advocate. Activating an agent for Business Advocate on page 247
Configure Business Advocate attributes for agents.
Configuring Business Advocate attributes for an agent on page 248
Assign capability sets to agents.Note: If you already created and assigned profiles to all Business Advocate agents, you can omit this step.
Assigning a capability set to an agent on page 250
! Task Location

Overview of configuration
70 Business Advocate Configuration and Administration

Issue 3 February 2005 71
Chapter 5: Using qualifiers
Business Advocate uses qualifiers to match agents with contacts.
This section describes how Advocate Supervisor uses qualifiers and how to assign qualifiers to agents, profiles, and service classes. This section includes the following topics:
● Qualifiers on page 71.
● Qualifiers used by the sample workflows on page 77.
● Creating a qualifier on page 79.
● Editing a qualifier on page 81.
● Viewing qualifiers on page 82.
● Exporting qualifiers to Workflow Designer on page 83.
● Deleting a qualifier on page 84.
QualifiersQualifiers are part of the Business Advocate classification system. Qualifiers define the capabilities of the agent and the needs of the customer. Business Advocate uses qualifiers to match contacts with qualified agents and to meet service goals.
Each qualifier includes a category and a value for that category. For example, a qualifier of Product/Printer includes the category Product and the value Printer. If you create a second category named PrinterSupplies and define a value for that category of InkCartridge, you create a second qualifier named PrinterSupplies/InkCartridge.
A qualifier set is one or more qualifiers that form a service class or a capability set. You do not need to create qualifier sets. For example, if you create a service class with the qualifiers of Product/Printer and PrinterSupplies/InkCartridge, those two qualifiers become a qualifier set.
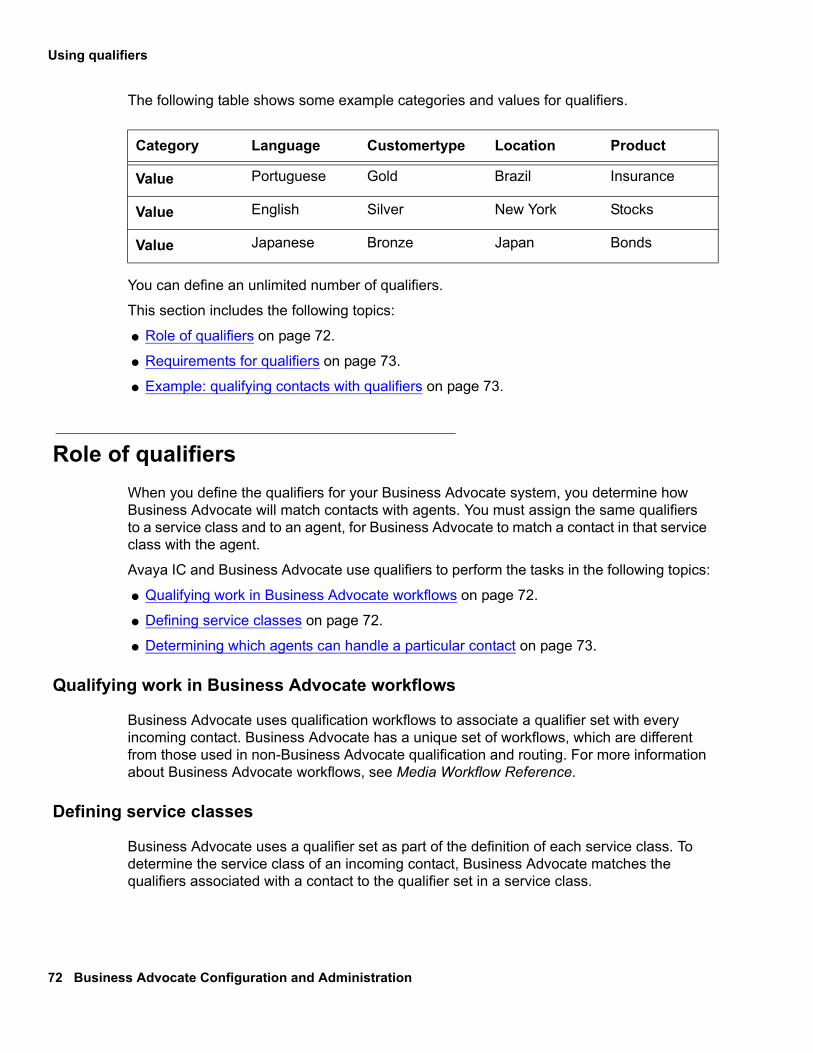
Using qualifiers
72 Business Advocate Configuration and Administration
The following table shows some example categories and values for qualifiers.
You can define an unlimited number of qualifiers.
This section includes the following topics:
● Role of qualifiers on page 72.
● Requirements for qualifiers on page 73.
● Example: qualifying contacts with qualifiers on page 73.
Role of qualifiersWhen you define the qualifiers for your Business Advocate system, you determine how Business Advocate will match contacts with agents. You must assign the same qualifiers to a service class and to an agent, for Business Advocate to match a contact in that service class with the agent.
Avaya IC and Business Advocate use qualifiers to perform the tasks in the following topics:
● Qualifying work in Business Advocate workflows on page 72.
● Defining service classes on page 72.
● Determining which agents can handle a particular contact on page 73.
Qualifying work in Business Advocate workflows
Business Advocate uses qualification workflows to associate a qualifier set with every incoming contact. Business Advocate has a unique set of workflows, which are different from those used in non-Business Advocate qualification and routing. For more information about Business Advocate workflows, see Media Workflow Reference.
Defining service classes
Business Advocate uses a qualifier set as part of the definition of each service class. To determine the service class of an incoming contact, Business Advocate matches the qualifiers associated with a contact to the qualifier set in a service class.
Category Language Customertype Location Product
Value Portuguese Gold Brazil Insurance
Value English Silver New York Stocks
Value Japanese Bronze Japan Bonds

Qualifiers
Issue 3 February 2005 73
Determining which agents can handle a particular contact
Business Advocate uses a qualifier set to define a capability set for an agent. To match an agent with an incoming contact, Business Advocate matches the qualifier set in the service class of the contact with the qualifier set in a capability set. Only those agents who have a capability set with a qualifier set that exactly matches those in the service class can handle the contact.
Business Advocate uses the channel qualifiers to qualify contacts for the different media channels.
Requirements for qualifiersEvery qualifier in your Business Advocate system must meet the following requirements:
● A qualifier set can include only one value for each category. A category cannot be repeated in a qualifier set.
● Every qualifier set must include a channel qualifier.
Example: qualifying contacts with qualifiersThis example describes how Business Advocate uses qualifiers to qualify and match contacts with agents.
A contact center for a catalogue company handles three different types of products and customers who speak one of two languages. Customers can contact agents through the voice channel or the email channel.
This example includes the following topics:
● Determining the needed qualifiers on page 74
● Using a qualifier set to create a service class on page 74
● Using qualifiers to match the contact with an agent on page 76

Using qualifiers
74 Business Advocate Configuration and Administration
Determining the needed qualifiers
Avaya IC creates qualifiers for the channels. The contact center needs to create additional qualifiers for the types of products and languages.
The following table includes the categories and values needed to create qualifiers for the contact center.
All agents can receive voice contacts and email contacts. However, the agents have expertise in different types of products. Some agents can speak only one language. Other agents are bilingual.
To make sure that Business Advocate matches contacts with the correct agents, the contact center adds the qualifiers to the following:
● Business Advocate workflows
● Agent capability sets
● Service classes
Using a qualifier set to create a service class
The contact center decides to combine sets of qualifiers into service classes. Each service class represents a different type of contact that the contact center can receive. The contact center then creates a different service class for every combination of qualifiers that will be handled by different agents for different channels.
Tip:Tip: You do not have to create a service class for every combination of the
defined qualifiers if you do not expect to receive contacts for every combination. For example, you do not need a service class that includes MusicEnEmail or MusicSpEmail if you do not expect customers to email the contact center about music.
Categories Values
Product type ● Books● Video● Music
Language ● English● Spanish
Channel ● Voice● Email

Qualifiers
Issue 3 February 2005 75
The following table includes all service classes and their qualifiers.
Service class Qualifiers
BookEnVoice ● Product type/books● Language/English● Channel/Voice
BookEnEmail ● Product type/books● Language/English● Channel/Email
BookSpVoice ● Product type/books● Language/Spanish● Channel/Voice
BookSpEmail ● Product type/books● Language/Spanish● Channel/Email
VideoEnVoice ● Product type/video● Language/English● Channel/Voice
VideoEnEmail ● Product type/video● Language/English● Channel/Email
VideoSpVoice ● Product type/video● Language/Spanish● Channel/Voice
VideoSpEmail ● Product type/video● Language/Spanish● Channel/Email
MusicEnVoice ● Product type/music● Language/English● Channel/Voice
MusicEnEmail ● Product type/music● Language/English● Channel/Email
MusicSpVoice ● Product type/music● Language/Spanish● Channel/Voice
MusicSpEmail ● Product type/music● Language/Spanish● Channel/Email

Using qualifiers
76 Business Advocate Configuration and Administration
Using qualifiers to match the contact with an agent
When a contact arrives in the contact center, Business Advocate uses the qualifiers to qualify the contact. For example, when a customer telephones the contact center, the system prompts the customer to make some initial selections that determine the needs of the customer. The customer selects English and Books. Business Advocate qualifies and matches the contact as follows:
1. The qualification workflow sets the following values for the qualifiers in the EDU for the contact:
● Product type: books
● Language: English
● Channel: voice
2. The qualification workflow sends a resource request to Business Advocate.
3. Business Advocate reviews the service classes and finds that the BookEnVoice service class contains the same qualifier set as the incoming voice contact.
4. Business Advocate locates agents with a capability set that matches the service class of the contact.
For a voice contact or chat contact, the agent must be logged in to Avaya IC. However, Business Advocate will not send an email contact to an exception workflow if a qualified agent is not currently logged in. Business Advocate will hold the email contact until the qualified agent logs in to Avaya IC.
5. Business Advocate checks the thresholds of the service goals and the status of agents who match the resource request, then performs one of the tasks in the following table.
Agent status Lower threshold Business Advocate task
Available Lower threshold is 0. Uses agent selection criteria to match the contact with the appropriate agent.
Available Lower threshold is greater than 0.
● Adds contact to queue for the service class.
● Matches contact with agent when time in queue exceeds lower threshold of time for delivery of contact.
Not available Not applicable. ● Adds contact to queue for the service class.
● Matches contact with agent when agent becomes available and contact meets criteria for delivery to an agent.

Qualifiers used by the sample workflows
Issue 3 February 2005 77
Qualifiers used by the sample workflowsSome blocks in the sample workflows installed with Business Advocate use qualifiers. Avaya includes these qualifiers to demonstrate how the Business Advocate workflows:
● Identify qualifiers for a contact
● Associate a collection of qualifiers with a contact
Business Advocate can match a contact with an agent with only the pre-defined channel qualifiers. However, you need to define additional qualifiers if you want to be more selective about which contacts an agent handles, or to match a chat contact with an agent who can handle a Voice Chat.
This section describes the pre-defined channel qualifiers and the qualifiers used by the sample workflows. This section includes the following topics:
● Required predefined qualifiers on page 77.
● Sample qualifiers on page 78.
Required predefined qualifiersAvaya includes a set of three predefined channel qualifiers with Business Advocate. The following table describes those qualifiers.
Qualifier Category Value
Channel/Voice Channel Voice
Channel/Email Channel Email
Channel/Chat Channel Chat

Using qualifiers
78 Business Advocate Configuration and Administration
Sample qualifiersBlocks in the sample qualification workflows also include some sample qualifiers. Create these qualifiers for your Business Advocate system to see how the workflows use qualifiers. The following table describes the sample qualifiers and the workflows that use them.
Workflow Qualifier category Qualifier value
All workflows customertype gold
silver
bronze
intent sales
support
language english
french
german
spanish
Qualify Chat multimedia pvchat
ivchat
Qualify Email QA approvalrequired
suspectcontent

Creating a qualifier
Issue 3 February 2005 79
Creating a qualifierWhen you set up Business Advocate for the first time, you must create qualifiers. However, you can update existing qualifiers, and add new qualifiers whenever your business requires these changes.
Business Advocate includes qualifiers for the Channel category and its values. You cannot delete or modify the following qualifiers:
● Channel/Voice● Channel/Chat● Channel/Email
Tip:Tip: Business Advocate maps qualifiers to internal key values in the system. If
you create a new qualifier with the same name as a previous qualifier, Business Advocate does not identify the duplication. Business Advocate maps this qualifier to a different key value.
You must create a category and one or more values for each type of qualifier that you want to create. Create the qualifiers in the Qualifier Editor, shown in the following figure.
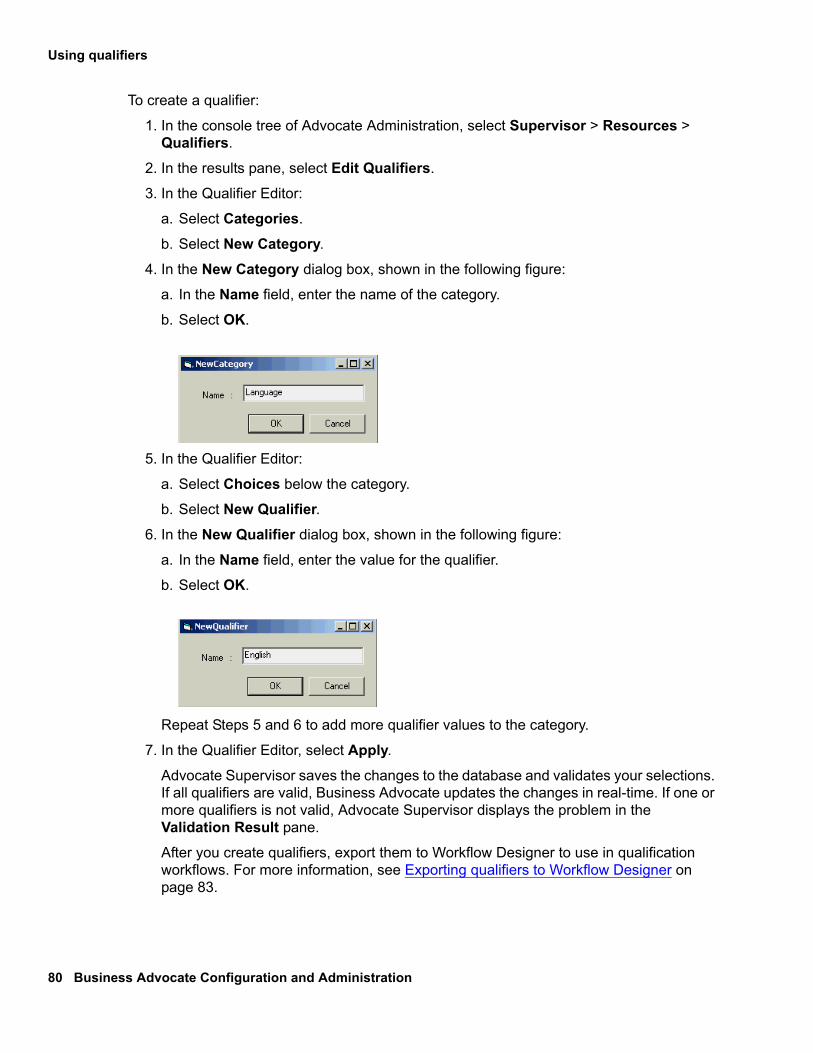
Using qualifiers
80 Business Advocate Configuration and Administration
To create a qualifier:
1. In the console tree of Advocate Administration, select Supervisor > Resources > Qualifiers.
2. In the results pane, select Edit Qualifiers.
3. In the Qualifier Editor:
a. Select Categories.
b. Select New Category.
4. In the New Category dialog box, shown in the following figure:
a. In the Name field, enter the name of the category.
b. Select OK.
5. In the Qualifier Editor:
a. Select Choices below the category.
b. Select New Qualifier.6. In the New Qualifier dialog box, shown in the following figure:
a. In the Name field, enter the value for the qualifier.
b. Select OK.
Repeat Steps 5 and 6 to add more qualifier values to the category.
7. In the Qualifier Editor, select Apply.
Advocate Supervisor saves the changes to the database and validates your selections. If all qualifiers are valid, Business Advocate updates the changes in real-time. If one or more qualifiers is not valid, Advocate Supervisor displays the problem in the Validation Result pane.
After you create qualifiers, export them to Workflow Designer to use in qualification workflows. For more information, see Exporting qualifiers to Workflow Designer on page 83.

Editing a qualifier
Issue 3 February 2005 81
Editing a qualifierYou can update a qualifier category, change an existing qualifier, or add a new value to an existing qualifier in the Qualifier Editor.
Tip:Tip: If you select OK or Apply In the Qualifier Editor, Business Advocate
Supervisor automatically validates and saves all of the qualifiers. Supervisor performs this validation even if you did not make any changes. Depending on the number of qualifiers and the speed of the system, this validation process could cause a noticeable delay. To close the Qualifier Editor without validating qualifiers, select the X in the upper right corner of the window.
To edit a qualifier:
1. In the console tree of Advocate Administration, select Supervisor > Resources > Qualifiers.
2. In the results pane, select Edit Qualifiers.
3. To edit a qualifier category:
a. Right-click the qualifier category and select Properties to open the Properties dialog box.
b. In the Name field, enter a new name for the category.
c. Select OK.
4. To edit a qualifier value:
a. Right-click the qualifier value and select Properties to open the Properties dialog box.
b. In the Name field, enter a new value for the qualifier.
c. Select OK.
5. After you complete your edits, select Apply.
Advocate Supervisor saves the changes to the database and validates your selections. If all qualifiers are valid, Business Advocate updates the changes in real-time. If one or more qualifiers is not valid, Advocate Supervisor displays the error in the Validation Result pane.
After you update qualifiers, export them to Workflow Designer to use in qualification workflows. For more information, see Exporting qualifiers to Workflow Designer on page 83.
6. Select OK.

Using qualifiers
82 Business Advocate Configuration and Administration
Viewing qualifiersView qualifiers in the Qualifiers section of Advocate Supervisor, shown in the following figure.
To view qualifiers:
● In the console tree of Advocate Administration, select Supervisor > Resources > Qualifiers.

Exporting qualifiers to Workflow Designer
Issue 3 February 2005 83
Exporting qualifiers to Workflow DesignerYou must export qualifiers from Advocate Supervisor to Workflow Designer to use the qualifiers in a qualification workflow. Avaya recommends that you rename the old qualifier file on the Workflow Designer machine before you export updated qualifiers to Workflow Designer.
! Important:! Important:Important: Business Advocate cannot properly qualify contacts if you do not use the
exact same file name, file type and export directory listed in the steps below.
To export qualifiers:
1. In the console tree of Advocate Administration, select Supervisor > Resources > Qualifiers.
2. In the results pane, select Export.3. In the Save As dialog box:
a. Navigate to the IC_INSTALL_DIR\IC70\etc directory on the machine that hosts Workflow Designer.
b. In the File Name field, enter qualifiers.
c. In the Save as type field, select text as the file type of the exported qualifier file.
d. Select Save.
4. Select OK to acknowledge that the export was successful.
5. To access the exported qualifiers in workflows:
a. Close and re-open Workflow Designer.
b. Build the qualification workflows.
c. Load the workflows to the appropriate Workflow server.
d. Stop and restart the Workflow server.
Using qualifiers
84 Business Advocate Configuration and Administration
Deleting a qualifierYou can delete one qualifier value in a category, or you can delete a category and all of the qualifier values in that category.
You cannot delete a qualifier if that qualifier is part of a service class or the capability set of an agent or profile. You must delete all service classes or capability sets which include a qualifier before you can delete the qualifier.
! CAUTION:CAUTION: If you delete a qualifier that is associated with a contact currently in the
queue, Business Advocate sends that contact to an exception workflow. Even if you create a new qualifier with the same name, contacts in queue that are associated with the deleted workflow are still sent to an exception workflow.
To delete a qualifier:
1. In the console tree of Advocate Administration, select Supervisor > Resources > Qualifiers.
2. In the results pane, select Edit Qualifiers.
3. To delete a qualifier category:
a. Right-click the qualifier category and select Delete.
b. Select Yes to confirm that you want to delete the category.
Advocate Supervisor deletes the qualifier category and all values in that category.
4. To delete a qualifier value:
a. Right-click the qualifier value and select Delete.
b. Select Yes to confirm that you want to delete the qualifier value.
Advocate Supervisor deletes the qualifier value.
5. Select OK.
Advocate Supervisor saves the changes to the database and validates your deletions. If all qualifiers are valid, Business Advocate updates the changes in real-time. If one or more qualifiers is not valid, Advocate Supervisor displays the error in the Validation Result pane.
After you delete qualifiers, export the qualifiers to Workflow Designer to make them unavailable to the qualification workflows. For more information, see Exporting qualifiers to Workflow Designer on page 83.

Issue 3 February 2005 85
Chapter 6: Managing service classes
You use service classes to administer and manage service levels in Business Advocate. You can define and administer an unlimited number of service classes and the service goals for those service classes.
! Important:! Important:Important: At start up, the Resource Manager server creates a logical queue for every
service class, even if no contacts are ever routed through the system with that service class. For optimal performance, do not create service classes you do not intend to use and delete service classes that are no longer in use.
Business Advocate assigns a service state to each service class, according to the service goals that you set, the current status of contacts in queue, and the available agents for each service class. You cannot directly administer the service states of a service class.
This section describes service classes and their components, and how to set them up. This section includes the following topics:
● Service classes on page 86.
● Service goals on page 89.
● Service states on page 96.
● Configuring Business Advocate options on page 101.
● Configuring a service goal on page 103.
● Configuring a service class on page 107.

Managing service classes
86 Business Advocate Configuration and Administration
Service classesService classes match contacts to agents. A service class describes a specific type of contact with a single qualifier set. Business Advocate uses the service class to manage and measure work distribution.
Create service classes for the different types of contacts and customers that your contact center handles. If a contact arrives that does not match an existing service class, Business Advocate dynamically creates a service class for that item.
This section includes the following topics:
● Components of service classes on page 86
● Dynamically created service classes on page 88
Components of service classesWhen you configure a service class, you must configure the following components described in the following topics:
● Agent selection on page 86.
● Service goal on page 87.
● Service state on page 87.
● Expected average handling time on page 87.
● Qualifiers on page 87.
Agent selection
Business Advocate uses agent selection when your contact center has more than one qualified agent available when a contact arrives.
You can select one of the following methods for Business Advocate to select agents:
● Least occupied agent
● Most idle agent
● System setting
You can select a different method for agent selection for each service class, or you can use the system setting. You should use the system setting if you plan to use the same agent selection method for most service classes. For information about how to configure the default agent selection, see Configuring the default agent selection method on page 101.

Service classes
Issue 3 February 2005 87
Service goal
Each service class must have a service goal that defines the performance parameters for that service class. You specify service goals in units of time. A service goal is a set of thresholds that Advocate uses to decide which agent should receive a contact. For more information see Service goals on page 89.
When you define a service class, you can select the system default service goal or create a custom service goal for the service class.
The service goal must match the needs of your business and of the media. Different media have different requirements for agent responses. For example, you can create a service goal with an upper threshold of 20 seconds for voice contacts, and a service goal with an upper threshold of one day for email contacts.
Service state
Each service class has a service state. The service state is the real-time reflection of whether current contacts in that service class will achieve the service goal.
If a service class is in the worst service state, Business Advocate matches the oldest contact in that service class to the next available and qualified agent. If configured, Business Advocate can activate additional agents to handle contacts in that service class until the service class recovers from the worst service state. For more information, see Service states on page 24.
Expected average handling time
Service classes also define the expected average handling time (EAHT). EAHT is the expected average length of time that agents who handle contacts in this service class will take to complete a contact.
Business Advocate uses EAHT as an initial estimate to match contacts in queue to an available agent. Business Advocate also monitors the actual average handling time, which changes dynamically as agents handle contacts.
You can use the system default for EAHT or specify an individual time for each service class. For information about how to configure the default EAHT, see Configuring the default EAHT on page 102.
Qualifiers
The qualifier set defines the service class. This qualifier set must include a channel qualifier. You cannot create a service class without a channel qualifier. The qualifier set can only include one qualifier for each category. For more information, see Qualifiers on page 71.

Managing service classes
88 Business Advocate Configuration and Administration
Dynamically created service classesBusiness Advocate dynamically creates service classes if an incoming contact does not match an existing service class.
With dynamically created service classes, you need to create service classes only if your contact center requires service goals that are different than the default values.
Tip:Tip: You can change the names and modify the service goals for
dynamically-generated service classes. For more information, see Modifying a service class on page 113.
Naming a dynamically created service class
To name a dynamically created service class, Business Advocate uses a connected series of the names of the qualifiers in the service class.
For example, the qualification workflow assigns the following qualifiers to a contact:
● Channel/Voice
● Language/French
● Product/Shoes
● Customertype/Unknown
Business Advocate does not have a service class with this qualifier set, and therefore dynamically creates the following service class:
_Channel._call,customertype.unknown,language.french,product.shoes
Setting default values for a dynamically created service class
Business Advocate applies the following defaults to dynamically created service classes, according to the type of contact or channel:
● Default service goals
● Default agent selection algorithm
● Default EAHT
Note:Note: Business Advocate assigns a default service goal to dynamically created
service classes based upon the channel of the contact. Voice contacts and chat contacts receive a real-time service goal. Email contacts receive a non real-time service goal.

Service goals
Issue 3 February 2005 89
Service goalsService goals help you measure and manage work distribution and performance monitoring. You can use service goals to configure different levels of performance for each service class.
Note:Note: Service goals are not specific to a service class. You can associate service
goals with more than one service class.
This section describes the types of service goals, the thresholds of service goals, and how to use service goals. This section includes the following topics:
● Types of service goals on page 89.
● Thresholds of a service goal on page 90.
● Purpose of a service goal on page 92.
● Performance level and a service goal on page 93.
● Branding strategy on page 93.
● Examples: setting thresholds for a service goal on page 94.
Types of service goalsBusiness Advocate uses the types of service goals described in the following topics:
● Default service goal on page 89.
● Custom service goal on page 90.
Default service goal
Business Advocate provides a default service goal for each channel type. Business Advocate uses these default service goals for dynamically created service classes.
You cannot delete default service goals, but you can change the values for the thresholds.

Managing service classes
90 Business Advocate Configuration and Administration
The value of the channel type determines the values for the default service goals, as shown in the following table.
Custom service goal
You can create as many custom service goals as you need for the service classes in your Business Advocate system. Custom service goals must include at least an upper threshold, and can include values for the other thresholds.
The following table shows two example service goals.
Thresholds of a service goalYou can set up to three thresholds for each service class. Business Advocate uses these thresholds to assign a service state to the service class.
You can set a threshold in time units of seconds, minutes, hours, or days.
The upper threshold is the only required threshold. Business Advocate uses the upper threshold of a service class when Business Advocate matches an agent with a contact in that service class. Most qualification functions in Business Advocate do not need any other thresholds.
Default service goal Channel type Lower threshold
Upper threshold
Critical threshold
Real-time Contact Work
Voice, Text Chat 0 30 seconds <none>
Non-Real Time Contact Work
Email 0 12 hours <none>
Custom service goal Channel type Lower threshold
Upper threshold
Critical threshold
PremiumVoice Voice 0 15 seconds 25 seconds
RegularEmail Email 0 8 hours 24 hours

Service goals
Issue 3 February 2005 91
You can also add a critical threshold that Business Advocate can use with the upper threshold to determine whether to dynamically increase or decrease the number of agents eligible to receive contacts in the service class.
For more information about each threshold, see the following topics:
● Upper threshold on page 91.
● Critical threshold on page 92.
● Lower threshold on page 92.
Upper threshold
All service goals must include an upper threshold. The upper threshold is the target time period for Business Advocate to deliver a contact in a service class to an agent.
When Business Advocate assigns a service state to a service class, Business Advocate uses the upper threshold to determine the jeopardy states. For example, Business Advocate uses the upper threshold to assign the jeopardy states in the following table.
Business Advocate also uses the thresholds to determine when to activate reserve agents. Business Advocate activates reserve agents with an activation type that matches the current service state of the service class when Business Advocate predicts that either of the following will occur:
● A contact will surpass the upper threshold.
● The time a contact has waited to be matched with an agent will reach the upper or critical thresholds.
The upper threshold must be a longer period of time than the lower threshold, and a shorter period of time than the critical threshold.
Jeopardy service state Description
Immediate Risk Assigned to a service class if the predicted wait time of the oldest contact in the service class is longer than the time period that you set for the upper threshold.
Future Risk Assigned to a service class if the estimated wait time of the newest contact in the service class is longer than the time period that you set for the upper threshold.
Behind Target Assigned to a service class if the oldest contact in the service class has waited for:● A longer period of time than the time period you set for the
upper threshold And● A shorter period of time than the period set in the critical
threshold

Managing service classes
92 Business Advocate Configuration and Administration
Critical threshold
The critical threshold is optional. However, if you want to configure an agent with a critical activation level for a service class, you should configure the critical threshold.
! Important:! Important:Important: If you configure an agent with a critical activation level and do not set a
critical threshold for that service class, the agent will never be activated for that service class.
When the time a contact has waited to be matched with an agent reaches the critical threshold, Business Advocate activates reserve agents with a critical activation level.
If you have also assigned backup agents with a critical activation level, Business Advocate activates those agents. However, Business Advocate will not match the contacts in the critical service class to backup agents unless those agents do not have work in their regular service classes.
The critical threshold must be a greater period of time than the upper threshold.
Lower threshold
The lower threshold is optional and is typically set at zero. The lower threshold determines the minimum amount of time that a contact should wait before Business Advocate matches the contact to an agent.
The lower threshold must be a shorter period of time than the upper threshold.
Use the lower threshold only when you create a branding strategy. For more information, see Branding strategy on page 93. Only use the lower threshold if you want to specify a minimum wait time for customers before they can communicate with an agent.
Purpose of a service goalThe service goal is one of the criteria that Business Advocate uses to determine which contact in queue is in the greatest need. For example, the time period of the upper threshold is part of the ratio that Business Advocate uses to assign a service state to the service class. For more information about the role of the service goal in this predictive technology, see Predictive technology on page 25.
Service goals can control the type of service that your customers receive. To provide all customers a similar level of service, assign the same service goal to all service classes. To provide a different level of service for one or more customers, assign different service goals to different service classes. When Business Advocate calculates the ratio for the predictive technology, a service class with a shorter period of time for the upper threshold reaches a risk state sooner and more frequently than a service class with a longer period of time.
Service goals
Issue 3 February 2005 93
A shorter period of time for the upper threshold in a service goal does not automatically mean that one service class is more important or gets a higher priority than another service class. Business Advocate also compares the service state of a contact with the service goals. As a result of this comparison, Business Advocate might choose to deliver a contact in a service class with a longer period of time for the upper threshold before it delivers a contact in a service class with a shorter period of time for the upper threshold.
Performance level and a service goalBefore you set the thresholds in a service goal, you need to consider what performance levels you need for the service class.
Different criteria affect the performance level. Some criteria require shorter periods of time for some thresholds than other criteria. For example, you need to set low thresholds for voice contacts, which typically have goals that are measured in seconds. In contrast, you can use higher thresholds for email contacts, which typically have goals that are measured in hours or days.
Branding strategyA branding strategy uses the upper threshold and the lower threshold to create a target range for Business Advocate to match a contact in the service class with an agent. A branding strategy does not mean that the waiting time for customers will be zero. The objective of a branding strategy is to create a consistent, reliable, and repeatable expectation of wait time for all customers in the same service class.
In many cases, you may not want to reduce the waiting time for your customers to zero. For voice contacts, you can use branding to ensure that customers spend enough time in a queue to hear an announcement before they speak to agents. For chat contacts, you can use branding to ensure that customers wait long enough to read an announcement on your Web site.
To create a branding strategy for a service class, you define periods of time for the upper and lower thresholds. The thresholds create a target range of service times for the service class, or a "branded" level of service. For example, a branding strategy could include the following thresholds for a service goal:
● Lower threshold of 20 seconds
● Upper threshold of 40 seconds
With the thresholds above, a customer would ideally wait at least 20 seconds before Business Advocate matches the contact to an agent. The contact center can play an announcement about new products, sales promotions, or information that the agent needs from the customer.

Managing service classes
94 Business Advocate Configuration and Administration
Examples: setting thresholds for a service goalThis section includes the following examples:
● Example: using the upper threshold only on page 94
● Example: using the upper threshold and the critical threshold on page 95
● Example: using the upper threshold and the lower threshold on page 95
Example: using the upper threshold only
If you want to use a basic service goal, you specify a time period for only the upper threshold. With this service goal, Business Advocate attempts to qualify and match all contacts within the time period of the upper threshold.
If Business Advocate determines that a queued contact for a service class will miss the service goal set by the upper threshold, Business Advocate does the following:
● If this contact is in the greatest need, Business Advocate matches the contact to an agent before all other contacts.
● If reserve or backup agents were configured with an activation level equal to the current service state of this service class, Business Advocate activates additional agents until the potential threat has been eliminated.
The following table shows the threshold settings for a basic service goal.
Threshold Setting
Lower 0 seconds
Upper 40 seconds
Critical Not set

Service goals
Issue 3 February 2005 95
Example: using the upper threshold and the critical threshold
Add a time period for the critical threshold if you want to define a second target when Business Advocate makes additional agents available for each service class.
With these two thresholds configured, Business Advocate does the following:
● If Business Advocate determines that a queued contact for a service class will miss the service goal set by the upper threshold, Business Advocate does the following:
- If this contact is in the greatest need, Business Advocate matches the contact to an agent before all other contacts.
- If reserve or backup agents were configured with an activation level equal to the current service state of this service class, Business Advocate activates additional agents until the potential threat has been eliminated.
● If a contact in the service class reaches the critical threshold:
- If the oldest contact in the service class is in the greatest need, Business Advocate matches that contact before other contacts in the system.
- If reserve or backup agents were configured, Business Advocate activates additional agents who are configured with a critical activation level until the service state is no longer in a critical state.
The following table shows the threshold settings for a service goal that includes an upper threshold and a critical threshold.
Example: using the upper threshold and the lower threshold
You can use the upper threshold and the lower threshold to create a target range of service times for a branded level of service. With this branding strategy, your contact
Threshold Setting
Lower 0 seconds
Upper 40 seconds
Critical 80 seconds

Managing service classes
96 Business Advocate Configuration and Administration
center can offer a very consistent and repeatable level of service to each class of customers.
With these thresholds configured, Business Advocate manipulates the selection process and the agent pool dynamically as follows:
● For the upper threshold, if Business Advocate determines that a queued contact for a service class will miss the service goal set by the upper threshold, Business Advocate does the following:
- If this contact is in the greatest need, Business Advocate matches the contact to an agent before all other contacts.
- If reserve or backup agents were configured with an activation level equal to the current service state of this service class, Business Advocate activates additional agents until the potential threat has been eliminated.
● If Business Advocate determines that contacts in the service class will be matched to an agent in less than the period of time for the lower threshold, Business Advocate queues contacts in the service class for a minimum of the lower threshold time and does the following:
- If the oldest contact in the service class has been queued for less than the lower threshold, Business Advocate places the service class in an Ahead of Target state.
- Until the oldest contact surpasses the lower threshold time, Business Advocate matches contacts in other service classes to agent first.
The following table shows the threshold settings for a service goal that includes the upper and lower thresholds.
Service statesEvery service class has a service state. The service state reflects how well Business Advocate achieves the service goal for a service class at a particular point in time.
Note:Note: You cannot modify a service state. Business Advocate dynamically assigns
a service state to a service class according to real-time conditions.
Threshold Setting
Lower 20 seconds
Upper 40 seconds

Service states
Issue 3 February 2005 97
The service state can change throughout the day as the number of contacts in the service class and the number of available agents to handle those contacts fluctuate.
This section includes the following topics:
● Identifying the types of service states on page 97.
● Example: Using the service state to select contacts on page 100.
Identifying the types of service statesThe following table shows the types of service states in the order of service state in the greatest need to service state in the least need.
Service state Description
Critical Service class has missed service goal.Contacts have waited in queue for a longer period of time than the unit of time defined as the critical threshold for the service goal.
Behind Target Service class has missed service goal.Contacts have waited in queue for a longer period of time than the unit of time defined as the upper threshold for the service goal.
On Target - Immediate Risk Service class is predicted to miss service goal in the short term.Based on predicted wait time (PWT) calculations, Business Advocate expects that, at the current rate, the oldest contact in queue will wait longer than the service goal for the service class. Business Advocate alerts Avaya IC that there is a potential problem in meeting targets.
On Target - Future Risk Service class is predicted to miss service goal in the long term.Based on expected wait time calculations, Business Advocate expects that, at the current rate, some contacts in queue will not meet the service goal for the service class.On Target - Future Risk is the default activation level for reserve agents.

Managing service classes
98 Business Advocate Configuration and Administration
Note:Note: The default activation levels for backup agents is On Target and for reserve
agents is On Target - Future Risk.
On Target Optimal state. Service class is meeting service goal.Based on predicted wait time for contacts in queue, Business Advocate expects to meet the service goal for the service class. No contacts are in jeopardy. One or more contacts have been in queue for a longer period of time than the lower threshold, so the service class is not ahead of target.On Target is the default activation level for backup agents.
Ahead of Target Contacts have waited in queue for a shorter period of time than the unit of time defined as the lower threshold for the service class.
Queue Empty All agents are busy, but the queue does not contain any contacts.
Resources Available At least one agent is available. One or more agents are available for work. The work queue is empty, and some agents may not have any work.
Service state Description

Service states
Issue 3 February 2005 99
The following figure shows the available service states, and how they relate to the thresholds of the service goals.
Critical threshold
Upper threshold
Lower threshold
Queue empty
Critical
Behind target
On target - immediate risk
On target
Ahead of target
On target - future risk
Agent available

Managing service classes
100 Business Advocate Configuration and Administration
Example: Using the service state to select contactsFor contact selection, Business Advocate uses the service state of a service class to select a contact to match with an available agent. Business Advocate determines the service classes that match a capability set of the agent, then selects the contact in those service classes that is in the greatest need.
For example, the VoiceSupport service class and the VoiceSales service class both have contacts that need to be routed to an agent. An agent becomes available who can handle contacts in both service classes. For the VoiceSupport service class, the agent has a Regular activation type. For the VoiceSales service class, the agent has a Reserve activation type. Business Advocate checks the service state to determine which contact to route to the agent, as follows:
1. If VoiceSupport has a service state of On Target or below, and Voice Sales has a service state of On Target - Future Risk or higher, then Business Advocate routes a contact in the VoiceSales service class to the agent. With service classes in these service states, Business Advocate only needs to check the service state to determine which contact to route. Business Advocate does not need to check the activation type or predicted wait time.
2. If VoiceSupport and VoiceSales both have identical service states, and that service state is On Target - Future Risk or higher, Business Advocate checks the activation type for each service class. Because the agent has a Regular activation type for VoiceSupport, Business Advocate routes the contact in the VoiceSupport service class to the agent. With service classes in these service states, Business Advocate checks the service state and the activation type to determine which contact to route. Business Advocate does not need to look at the predicted wait time.
3. If VoiceSupport and VoiceSales both have identical service states, that service state is On Target - Future Risk or higher, and the agent has the same activation type for both service classes, Business Advocate checks the predicted wait time for each service class. Because VoiceSupport has the longest predicted wait time, Business Advocate routes the contact in the VoiceSupport service class to the agent. With service classes in these service states, Business Advocate checks the service state, the activation type and the predicted wait time to determine which contact to route.

Configuring Business Advocate options
Issue 3 February 2005 101
Configuring Business Advocate optionsThe Business Advocate options include the default agent selection method and the default EAHT. Business Advocate uses these defaults for dynamically created service classes. You can also assign them to service classes that you create.
This section describes how to configure the Business Advocate options. This section includes the following topics:
● Configuring the default agent selection method on page 101.
● Configuring the default EAHT on page 102.
Configuring the default agent selection methodConfigure one of the following agent selection methods as the default:
● Most idle agent
● Least occupied agent
You configure the default agent selection method in the Agent Selection and Occupancy Treatments dialog box, shown in the following figure. You cannot use this dialog box to configure an occupancy treatment. Business Advocate for Avaya IC does not include occupancy treatments.

Managing service classes
102 Business Advocate Configuration and Administration
For more information about the agent selection methods, including a comparison of the agent selection methods, see Agent selection on page 29.
! Important:! Important:Important: To use Advocate Supervisor, log in to the machine with an Active Directory
Domain account that has local administrator privileges.
To configure the default agent selection method:
1. In the console tree of Advocate Administration, select Supervisor > Advocate Options > Agent Algorithms.
2. In the results pane, right-click the entry under Agent Selection and select Properties.
3. In the Agent Selection and Occupancy Treatments dialog box, shown in the following figure:
a. Select one of the following options:
● Most Idle Agent
● Least Occupied Agent
b. Select OK.
Configuring the default EAHTThe expected average handling time (EAHT) is the expected average length of time in which agents who handle contacts in this service class will complete a contact.
Business Advocate uses EAHT as an initial estimate to match contacts in queue to an available agent. Business Advocate also monitors the actual average handling time, which changes dynamically as agents handle contacts.
Business Advocate provides the following default settings for EAHT.
You can create a custom EAHT for a service class when you configure the service class. For more information, see Assigning attributes to a service class on page 108.
Default EAHT settings Channel types Default EAHT value
Real-time Contact Work Voice, Chat 3 minutes
Non-Real-time Contact Work Email 20 minutes

Configuring a service goal
Issue 3 February 2005 103
To configure the default EAHT:
1. In the console tree of Advocate Administration, select Supervisor > Advocate Options > Default EAHT.
2. In the results pane, right-click one of the following options:
● Default Real-time Contact Work EAHT
● Default Non-Real-time Contact Work EAHT
3. Select Properties from the right-click menu.
4. In the Default EAHT Attributes dialog box:
a. Enter an amount of time in the first field.
b. Select one of the following units of time from the drop-down list.
● Seconds
● Minutes
● Hours
● Days
c. Select OK.
Repeat Steps 2 through 4 for the other Default EAHT option, if desired.
Configuring a service goalYou can set a service goal before you create the service class. If you want to adjust the thresholds for default service goals, perform the steps in Modifying a service goal on page 106.
Note:Note: Service goals are not specific to a service class. You can associate service
goals with more than one service class.
This section includes the following topics:
● Creating a service goal on page 104
● Modifying a service goal on page 106
● Deleting a service goal on page 107
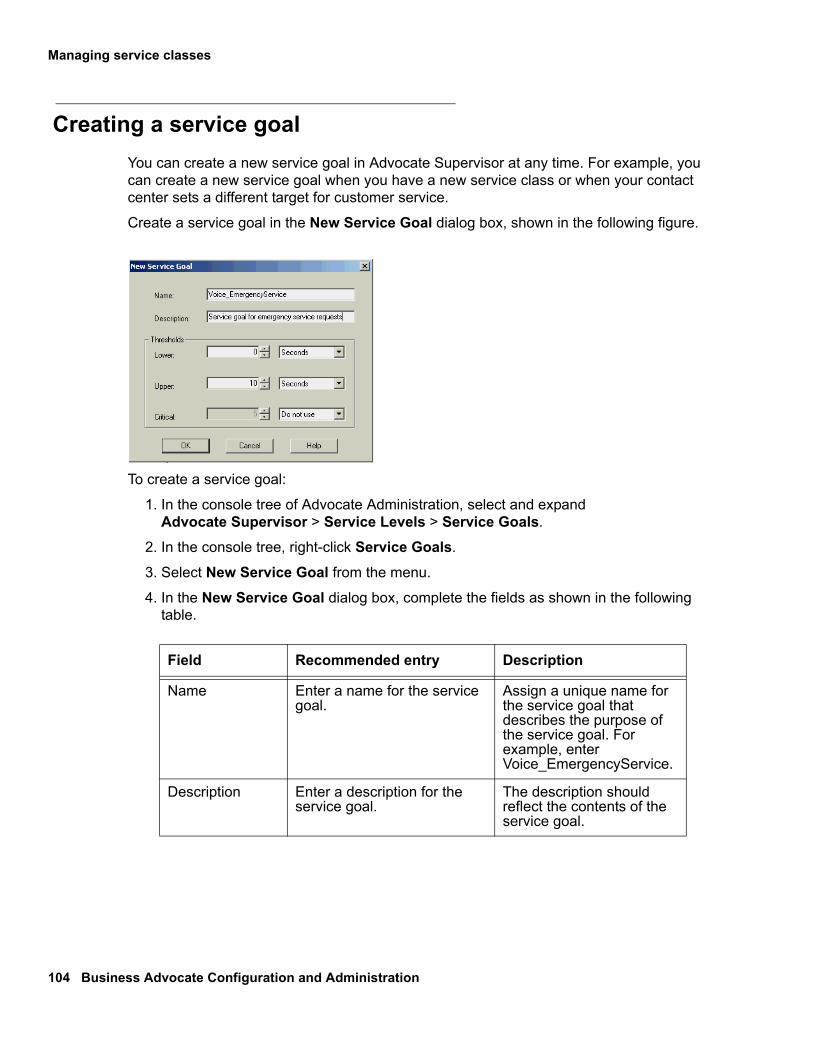
Managing service classes
104 Business Advocate Configuration and Administration
Creating a service goalYou can create a new service goal in Advocate Supervisor at any time. For example, you can create a new service goal when you have a new service class or when your contact center sets a different target for customer service.
Create a service goal in the New Service Goal dialog box, shown in the following figure.
To create a service goal:
1. In the console tree of Advocate Administration, select and expand Advocate Supervisor > Service Levels > Service Goals.
2. In the console tree, right-click Service Goals.
3. Select New Service Goal from the menu.
4. In the New Service Goal dialog box, complete the fields as shown in the following table.
Field Recommended entry Description
Name Enter a name for the service goal.
Assign a unique name for the service goal that describes the purpose of the service goal. For example, enter Voice_EmergencyService.
Description Enter a description for the service goal.
The description should reflect the contents of the service goal.
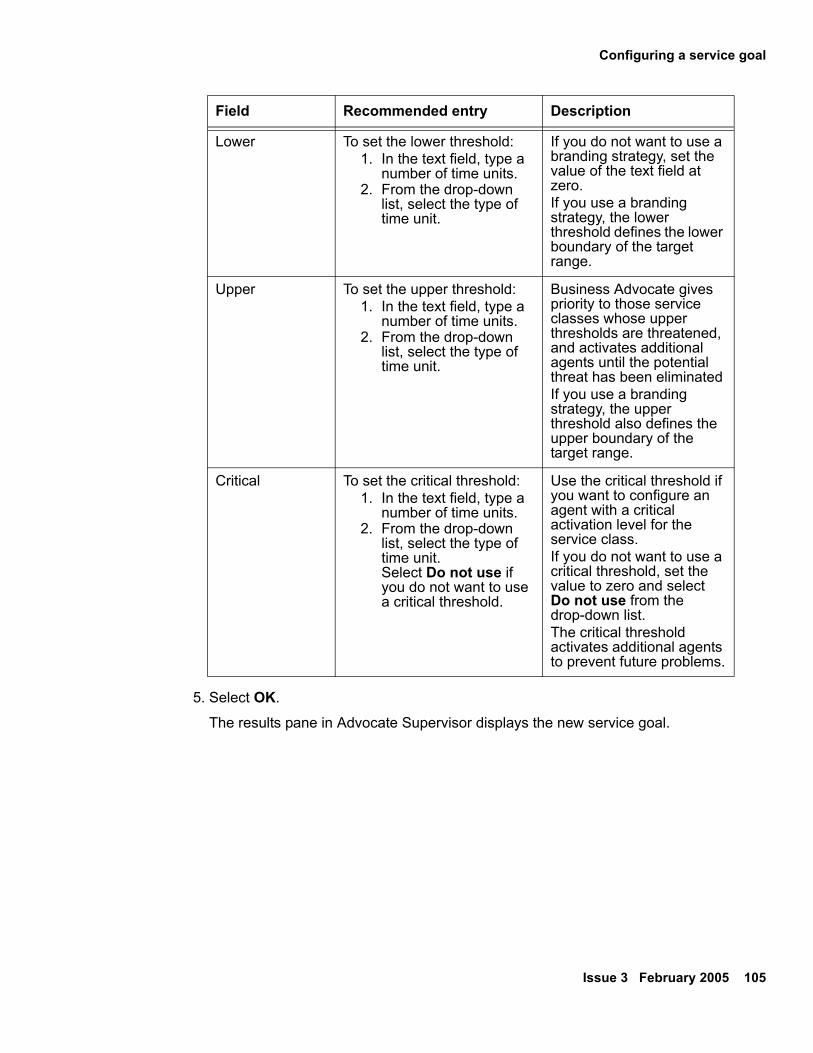
Configuring a service goal
Issue 3 February 2005 105
5. Select OK.
The results pane in Advocate Supervisor displays the new service goal.
Lower To set the lower threshold:1. In the text field, type a
number of time units.2. From the drop-down
list, select the type of time unit.
If you do not want to use a branding strategy, set the value of the text field at zero. If you use a branding strategy, the lower threshold defines the lower boundary of the target range.
Upper To set the upper threshold:1. In the text field, type a
number of time units.2. From the drop-down
list, select the type of time unit.
Business Advocate gives priority to those service classes whose upper thresholds are threatened, and activates additional agents until the potential threat has been eliminatedIf you use a branding strategy, the upper threshold also defines the upper boundary of the target range.
Critical To set the critical threshold:1. In the text field, type a
number of time units.2. From the drop-down
list, select the type of time unit.Select Do not use if you do not want to use a critical threshold.
Use the critical threshold if you want to configure an agent with a critical activation level for the service class.If you do not want to use a critical threshold, set the value to zero and select Do not use from the drop-down list.The critical threshold activates additional agents to prevent future problems.
Field Recommended entry Description

Managing service classes
106 Business Advocate Configuration and Administration
Modifying a service goalWhen you modify a service goal, the changes take effect immediately on all service classes that use the service goal.
You cannot change the name or description of default service goals.
! Important:! Important:Important: If you modify a default service goal, you modify the service goal for all
service classes that use the default service goal.
To modify a service goal:
1. In the results pane, double-click the service goal that you want to modify.
2. In the Service Goal Properties dialog box, change one or more of the fields shown in the following table.
3. Select OK.
The results pane displays the changes to the service goal.
Field Notes
Name You cannot modify the name of system default service goals.
Description You cannot modify the description of system default service goals.
Lower Optional. To change the lower threshold:
1. In the text field, type a number of time units.2. From the drop-down list, select the type of time unit.
If you do not want to use a lower threshold, leave the value of the text field at zero.
Upper Required. To change the upper threshold:
1. In the text field, type a number of time units.2. From the drop-down list, select the type of time unit.
Critical Optional.To change the critical threshold:
1. In the text field, type a number of time units.2. From the drop-down list, select the type of time unit.
If you do not want to use a critical threshold, leave the value of the text field at zero, and select Do not use from the drop-down list.

Configuring a service class
Issue 3 February 2005 107
Deleting a service goalTo delete a service goal:
1. Select the service goal from the list in the results pane.
2. Select Delete.
3. Select Yes to confirm that you want to delete the service goal.
Configuring a service classYou can use the default service classes or you can create a service class for each class of customers that your contact center serves.
You configure a service class in the Service Class section of Advocate Supervisor, shown in the following figure.
This section includes the following topics:
● Creating a service class on page 108
● Assigning attributes to a service class on page 108
● Assigning qualifiers to a service class on page 111
● Modifying a service class on page 113
● Deleting a service class on page 115
Managing service classes
108 Business Advocate Configuration and Administration
Creating a service classYou can create a service class for each new class of contact.
To create a service class:
1. In the console tree of Advocate Administration, select and expand Advocate Supervisor > Service Levels > Service Classes.
2. In the console tree, right-click Service Classes.
3. Select New Service Class from the menu.
4. In the New Service Class dialog box, to complete the service class, continue with the steps Assigning attributes to a service class on page 108.
Assigning attributes to a service classBefore you assign attributes to a service class, you must know the following:
● Which agent selection method the service class will use
● Whether the service class will use a system service goal or a custom service goal
● Whether the service class will use the default EAHT or a personal EAHT
Note:Note: Agent selection applies to service classes. You cannot set an agent
selection method for an agent. If you assign an agent to handle service classes with different selection methods, then Business Advocate will use different selection methods when matching the agent with contacts.
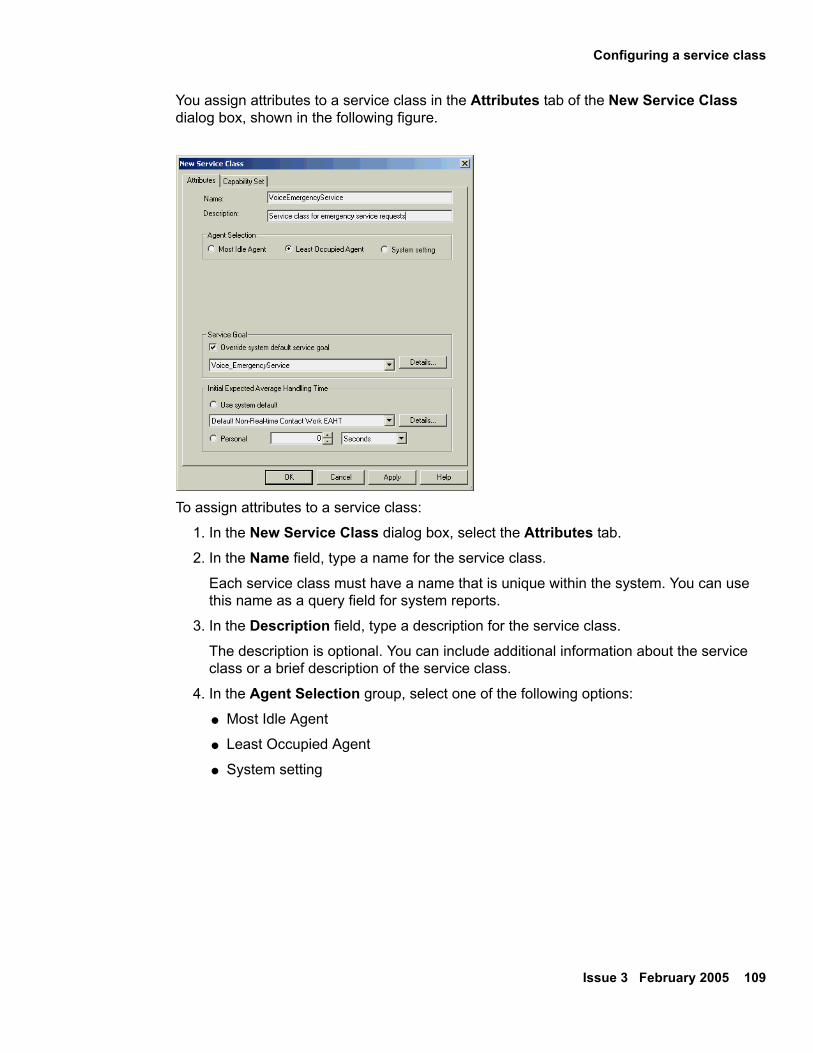
Configuring a service class
Issue 3 February 2005 109
You assign attributes to a service class in the Attributes tab of the New Service Class dialog box, shown in the following figure.
To assign attributes to a service class:
1. In the New Service Class dialog box, select the Attributes tab.
2. In the Name field, type a name for the service class.
Each service class must have a name that is unique within the system. You can use this name as a query field for system reports.
3. In the Description field, type a description for the service class.
The description is optional. You can include additional information about the service class or a brief description of the service class.
4. In the Agent Selection group, select one of the following options:
● Most Idle Agent
● Least Occupied Agent
● System setting
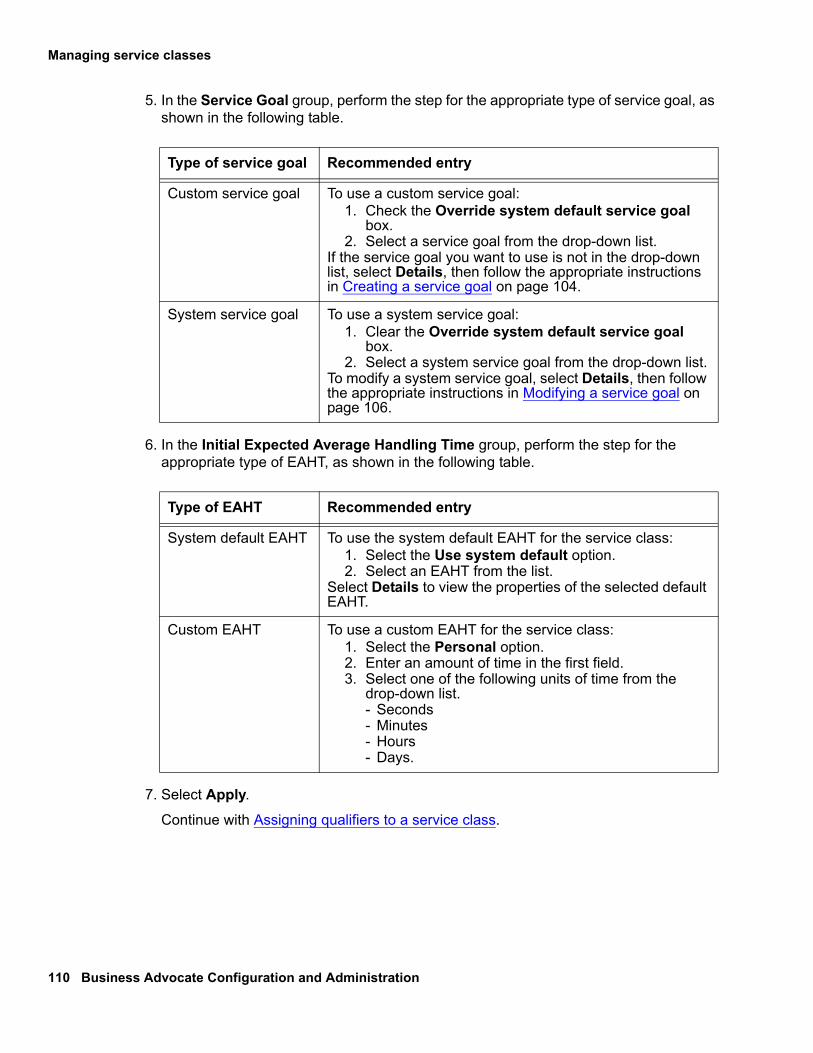
Managing service classes
110 Business Advocate Configuration and Administration
5. In the Service Goal group, perform the step for the appropriate type of service goal, as shown in the following table.
6. In the Initial Expected Average Handling Time group, perform the step for the appropriate type of EAHT, as shown in the following table.
7. Select Apply.
Continue with Assigning qualifiers to a service class.
Type of service goal Recommended entry
Custom service goal To use a custom service goal:1. Check the Override system default service goal
box.2. Select a service goal from the drop-down list.
If the service goal you want to use is not in the drop-down list, select Details, then follow the appropriate instructions in Creating a service goal on page 104.
System service goal To use a system service goal:1. Clear the Override system default service goal
box.2. Select a system service goal from the drop-down list.
To modify a system service goal, select Details, then follow the appropriate instructions in Modifying a service goal on page 106.
Type of EAHT Recommended entry
System default EAHT To use the system default EAHT for the service class:1. Select the Use system default option.2. Select an EAHT from the list.
Select Details to view the properties of the selected default EAHT.
Custom EAHT To use a custom EAHT for the service class:1. Select the Personal option.2. Enter an amount of time in the first field.3. Select one of the following units of time from the
drop-down list.- Seconds- Minutes- Hours- Days.

Configuring a service class
Issue 3 February 2005 111
Assigning qualifiers to a service classA service class must include a unique qualifier set. Business Advocate uses the qualifier set to match contacts in the service class with agents. You must create the qualifiers before you can assign them to a service class. For more information, see Creating a qualifier on page 79.
Note:Note: You cannot create two service classes with the same qualifier set. If you try
to create a duplicate service class, Advocate Supervisor warns you that the service class already exists. You must delete the original service class before you can create the new service class.
To assign qualifiers to a service class, perform the steps in one of the following sections:
● Use the Capability Set dialog box to assign a qualifier to a service class, as described in Using the Capability Set tab to assign a qualifier to a service class on page 111.
● Use the Capability Wizard to simultaneously assign multiple qualifiers, as described in Using the Capability Wizard to assign multiple qualifiers to a service class on page 112.
Using the Capability Set tab to assign a qualifier to a service class
You can use the fields of the Capability Set tab, shown in the following figure, to assign a qualifier to a service class.

Managing service classes
112 Business Advocate Configuration and Administration
To use the fields of the Capability Set tab to assign a qualifier to a service class:
1. Select the Capability Set tab of the New Service Class dialog box.
2. To assign a qualifier to the service class:
a. Select the empty field below each column.
b. Select a value for each item from the drop-down list.
- Role
- Activation
- Display name
- Channel
- If desired, one or more columns that represent a qualifier category
Repeat this step for each qualifier that you want to assign to the service class.
3. Select Apply after you assign all qualifiers to the service class.
Advocate Supervisor saves the changes to the database and validates your selections. If all selections are valid, Business Advocate updates the changes in real-time. Advocate Supervisor highlights all rows that contain errors. For example, Advocate Supervisor highlights a row if you did not make a selection in a required column.
4. Select OK.
Using the Capability Wizard to assign multiple qualifiers to a service class
You can use the Capability Wizard, shown in the following figure, to assign multiple qualifiers to a service class.
Configuring a service class
Issue 3 February 2005 113
To use the Capability Wizard to assign multiple qualifiers to a service class:
1. Select the Capability Set tab of the New Service Class dialog box.
2. Select Wizard.
3. In the Capability Wizard dialog box:
a. Select a box to add a checkmark next to each qualifier that you want to include in this service class.
Tip:Tip: Select the + sign next to a category to see the available qualifiers in that
category.
b. When you have selected all the qualifiers in the service class, click OK.
4. In the Capability Set tab, select Apply.
5. Select OK.
Modifying a service classYou can modify a service class to change the attributes or change one or more qualifiers in the qualifier set.
When you change a qualifier in a service class, you delete the original service class and create a new service class with the same name.
! Important:! Important:Important: Business Advocate updates service classes in real-time. As a result, a
change to the qualifier set can affect whether a contact in queue matches the service class. If contacts in queue do not match a service class, Business Advocate dynamically creates a service class for those contacts.
To modify a service class:
1. In the console tree of Advocate Administration, select and expand Advocate Supervisor > Service Levels > Service Classes.
2. In the results pane, double-click the service class that you want to modify.
3. To change the attributes of a service class, select the Attributes tab.
4. Change one or more of the fields on the tab.
For more information about the fields, see Assigning attributes to a service class on page 108.
5. To change the qualifiers in a service class, select the Capability Set tab.

Managing service classes
114 Business Advocate Configuration and Administration
6. Perform one or more of the following steps:
● To add a qualifier to the service class, follow the steps in Assigning qualifiers to a service class on page 111.
● To delete a qualifier from the service class:
i. Select the qualifier in the list of qualifiers.
ii. In the first column, select the blank field from the drop-down list.
7. Select Apply.
8. Select OK.
Advocate Supervisor updates the service class and displays the modified service class in the results pane.
Examples: modifying a service class
The following table shows the changes you can make to a service class.
Change Result
Change a field that affects how Business Advocate matches a contact with the service class, such as the qualifier set for Service Class A with no contacts in queue.
Business Advocate does the following:● Deletes the original Service Class A● Creates a new Service Class A with the
new settings
Change a field that affects how Business Advocate matches a contact with the service class, such as the qualifier set, for Service Class A with contacts in queue.
Business Advocate does the following:● Dynamically creates a service class with
default goals, EAHT, and qualifiers● Transfers contacts from the original
Service Class A to the new service class● Deletes the original Service Class A● Creates a new Service Class A with the
new settings
Change one or more of the following fields for Service Class A whether or not there are contacts in queue:● Name● Description● Initial EAHT● Service goal● Agent selectionNote: Changes to these fields do not affect how Business Advocate matches contacts to agents.
The requested changes are made to Service Class A.

Configuring a service class
Issue 3 February 2005 115
Deleting a service classDo not delete a service class if a queue includes contacts in that service class.
If you delete a service class which has contacts in queue, Business Advocate dynamically recreates the service class. This dynamic service class uses default service goals and EAHT. Business Advocate does not automatically delete the dynamic service class when the contacts have been matched with agents.
! CAUTION:CAUTION: When you delete a service class, you do not delete an associated custom
service goal.
To delete a service class:
1. Customize the mapping of qualifiers in the qualification workflow to make sure that Business Advocate does not qualify a new contact with the service class to be deleted.
2. Make sure that no contacts in the service class remain in a queue waiting to be matched to an agent.
3. Delete the service class:
a. In the console tree of Advocate Administration, select and expand Advocate Supervisor > Service Levels > Service Classes.
b. In the results pane, select the service class from the list.
c. Select Delete.
d. In the confirmation dialog box, select Yes to confirm that you want to delete the service class permanently.
The service class disappears from the results pane list when you refresh the view.

Managing service classes
116 Business Advocate Configuration and Administration

Issue 3 February 2005 117
Chapter 7: Configuring core Business Advocate components
To configure the core components that Business Advocate requires, review and complete the steps in the following sections:
1. Prerequisites for configuring core components on page 117.
2. Configuring database connections on page 118.
3. Configuring customer profile attributes on page 134.
4. Configuring Directory servers on page 136.
5. Logical Resource Manager on page 136.
6. Resource Manager server on page 139.
Prerequisites for configuring core componentsBefore you configure the core components for Business Advocate, do the following:
1. Plan your Avaya IC system with Business Advocate, including the following:
● Server distribution
● Supported media
● Required qualifiers and service classes
For more information, see Business Advocate components on page 41 and IC Installation Planning and Prerequisites.
2. Complete all prerequisites for the components in your Avaya IC system. For more information, see IC Installation Planning and Prerequisites.
3. Install and configure your Avaya IC system, including all media in your system. For more information, see IC Installation and Configuration.

Configuring core Business Advocate components
118 Business Advocate Configuration and Administration
4. Install and configure at least one agent or administration desktop with the ListQ application. For more information, see IC Installation and Configuration.
5. Install the Business Advocate components on the machines that host your Resource Manager server and Advocate Supervisor. For more information, see IC Installation and Configuration.
Configuring database connectionsTo provide access between the Avaya IC databases and the Business Advocate database, configure database connections. The steps you perform are the same whether you host your Business Advocate database on the same machine as the Avaya IC databases or on a different machine.
! Important:! Important:Important: You do not need to reconfigure the Avaya IC databases when you configure
database connections for Business Advocate.
This section describes how to configure a connection from the Business Advocate database and the Avaya IC databases. This section includes the following topics:
1. Creating a Data server for the Business Advocate database on page 119.
2. Configuring the IC Repository database connection on page 120.
3. Configuring the IC Repository connection set on page 125.
4. Regenerating the IC Repository application on page 125.
5. Configuring the CCQ database connection on page 126.
6. Configuring the CCQ connection set on page 131.
7. Regenerating the Interaction Center application on page 132.

Configuring database connections
Issue 3 February 2005 119
Creating a Data server for the Business Advocate databaseAvaya recommends that you create a dedicated Data server for Avaya IC to use for connections to the Business Advocate database.
! Important:! Important:Important: This step is not optional if you use a different type of database for the
Business Advocate database than you use for the Avaya IC databases. For example, if you use DB2 for the Avaya IC databases and SQL Server for the Business Advocate database, you cannot use the same Data server for these databases.
To create a Data server for the Business Advocate database.
1. In IC Manager, select the Server tab, then:
a. Select Server > New.
b. Select one of the servers in the following table from the list of servers.
c. Select OK.
2. Select the General tab and complete the fields as shown in the following table.
Server Purpose
DataServerMSSQL If you use Microsoft SQL Server for your Business Advocate database.
DataServerOracle If you use Oracle for your Business Advocate database.
Field Recommended entry Notes
Name Enter one of the following:● DataServerMSSQLOR● DataServerOracle
Make sure this server name includes the type of database in your Avaya IC system.You need this name to configure the Business Advocate connection.
Domain Select the domain of your secondary Data server from the drop-down list.
�

Configuring core Business Advocate components
120 Business Advocate Configuration and Administration
3. Select the DataServer tab and complete the fields as shown in the following table.
4. Select OK to save the Data server configuration.
5. In IC Manager, start the new Data server.
Configuring the IC Repository database connectionTo configure the IC Repository database connection:
1. In Database Designer, select File > Open.
2. Open the IC Repository ADL file.
You can find this ADL file in IC_INSTALL_DIR\IC70\design\repository\repository.adl
If you have enabled Database Designer for localization, Select OK and ignore the warning about the missing ALF file. Database Designer will automatically generate the ALF file when you save the ADL file.
3. Expand Components > Physical DB Connections and select advocateDBConnection in the tree pane.
Host Select the machine�s IP address from the drop-down list, or type in the IP address if it is not in the list.
When you select the host, IC Manager fills in the fields for Directory, Port, and Executable.
AutoStart Check this property. �
Field Recommended entry Notes
DBA Login Enter your DBA user name. For example, enter sa.Important: Enter a DBA login ID for the database server. Do not use the DBA login for a database client.
DBA Password Enter your DBA password. �
Field Recommended entry Notes

Configuring database connections
Issue 3 February 2005 121
4. In the DB Connection Properties tab, complete the fields in the General group as shown in the following table.
5. From the Database Type drop-down menu, select the type of database to which you want to connect.
Database Designer uses the selected database type to generate a SQL statement which can be applied to the database.
Property Recommended entry Notes
Timeout (sec) Enter the maximum number of seconds that the client application waits for a response to a database request before the application assumes the connection to the Data server is lost.
Default value is 60 seconds.If no response is returned within the specified time, the client application closes the connection to the Data server and returns an error. The client application attempts to create a new connection to the database on the next database request.
Description Enter a description of the database connection, if desired.
You can leave this field empty.
Display Time Select the display time setting. The display time option determines how Avaya IC handles the difference in time between the agent desktop machine and the time as reported by the Database for all database activities, such as select, insert, and update.The display time options are:● DBMSTIME � Select this option if you
want the DateTime data to display as database time, and not adjusted to local time. With DBMSTIME, Avaya IC ignores the difference in time and does not apply the difference to any database activity.
● LOCALTIME if you want the DateTime data to display as adjusted to local time on the client. With LOCALTIME, Avaya IC uses the difference in time, rounds it to the nearest half hour, and applies this difference to all database activity that involves date and time information.
● HOSTTIME if you want the DateTime data to display as adjusted to the local host time, including small differences between system clocks. With HOSTTIME, Avaya IC uses the difference in time and applies this difference to all database activity that involves date and time information.
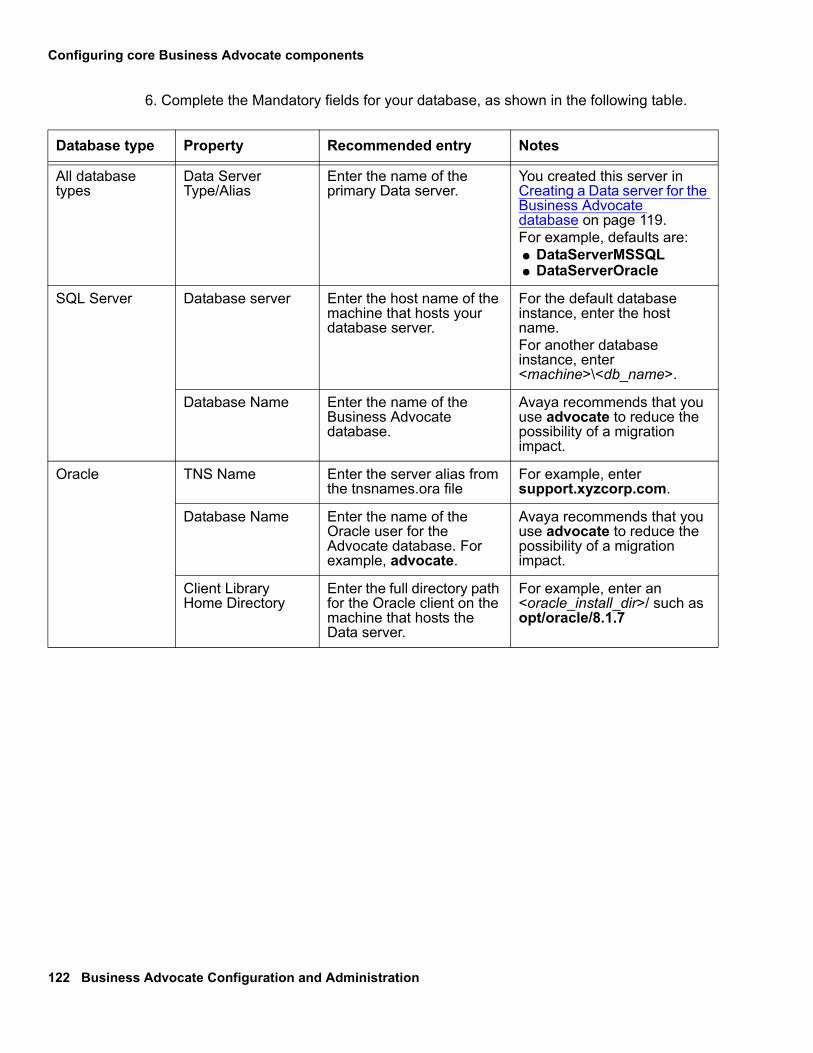
Configuring core Business Advocate components
122 Business Advocate Configuration and Administration
6. Complete the Mandatory fields for your database, as shown in the following table.
Database type Property Recommended entry Notes
All database types
Data Server Type/Alias
Enter the name of the primary Data server.
You created this server in Creating a Data server for the Business Advocate database on page 119.For example, defaults are:● DataServerMSSQL● DataServerOracle
SQL Server Database server Enter the host name of the machine that hosts your database server.
For the default database instance, enter the host name. For another database instance, enter <machine>\<db_name>.
Database Name Enter the name of the Business Advocate database.
Avaya recommends that you use advocate to reduce the possibility of a migration impact.
Oracle TNS Name Enter the server alias from the tnsnames.ora file
For example, enter support.xyzcorp.com.
Database Name Enter the name of the Oracle user for the Advocate database. For example, advocate.
Avaya recommends that you use advocate to reduce the possibility of a migration impact.
Client Library Home Directory
Enter the full directory path for the Oracle client on the machine that hosts the Data server.
For example, enter an <oracle_install_dir>/ such asopt/oracle/8.1.7

Configuring database connections
Issue 3 February 2005 123
7. If necessary, complete the Optional fields for your database, as shown in the following table.
Database type Property Recommended entry Notes
SQL Server Database Location Leave field blank. Identifies the logical space where the named database is stored. The SQL Server DBMS specifies the database location.
Database Size Leave field blank. The size of the database location specifies the amount of space that the configured application database occupies. The SQL Server RDBMS specifies the database size.
Log Location Leave field blank. Database-generated log files store cumulative transaction information. The SQL Server RDBMS specifies a default location for the database log.
Log Size Leave this field blank. The size of the location for database log files specifies the amount of space that the database-generated log files can occupy. The SQL Server RDBMS specifies a default size for the database log.

Configuring core Business Advocate components
124 Business Advocate Configuration and Administration
8. Select File > Save to save the ADL file. Do not close the file.
Oracle Default tablespace name
Enter the name of the default tablespace where objects are created for the Avaya IC databases. For example, enter IC_TS.
The database location identifies the logical space where the named database is stored. If you leave this field blank, and the Oracle RDBMS does not specify a database location, Oracle uses the �system� space to define the database. Caution: Configuring a database in the system space can crash your database.
Default tablespace size
Enter the number of bytes for the size of the default tablespace.
The size of the database location specifies the amount of space that the configured application database occupies.Caution: If you do not specify a size for the database location, and your RDBMS does not specify a default database size, the database location can use all available space.
Temp tablespace name
Enter the name of the tablespace that stores temporary files. For example, enter T_CI_TEMP.
Temporary tables store database-generated intermediate sorting files and client session information for Oracle databases. If you do not specify a location for temporary tables, the location is specified by the Oracle RDBMS.
Temp tablespace size
Enter the number of bytes for the size of the tablespace that includes temporary tables.
The size of the location for temporary tables in Oracle databases specifies the amount of space that the temporary tables can occupy. If you do not specify the amount of space to be allocated for temporary tables, the size is specified by the Oracle RDBMS.
Database type Property Recommended entry Notes

Configuring database connections
Issue 3 February 2005 125
Configuring the IC Repository connection setTo configure the connection set for IC Repository:
1. In, Database Designer, expand DB Connection Sets and select DefaultDBConnectionSet in the tree pane.
2. Select Advocate from the Logical DB Connections list in the Connection Set Properties tab.
3. Make sure the properties are set as shown in the following table.
4. Select Repository from the Logical DB Connections list.
5. Make sure the properties are set as shown in the following table.
6. Select File > Save to save the ADL file. Do not close the file.
Regenerating the IC Repository applicationTo regenerate the IC Repository application:
1. In Database Designer, select File > Generate Windows Application.
2. Check the following boxes to load the files to the database:
● Messages
● IC Scripts
Field Recommended entry
Physical DB Connection Select advocateDBConnection.
Primary Do not check this box.
Use External Database Check this box.
Database Name Enter advocate.This name must be the exact name that you gave the Business Advocate database for the first Logical Resource Manager.
Field Recommended entry
Physical DB Connection Select repositoryDBConnection.
Primary Check this box.

Configuring core Business Advocate components
126 Business Advocate Configuration and Administration
3. Select repository from the Name list.
4. Enter the path for the directory where you want Database Designer to store the application files.
For example, enter C:\Program Files\Avaya\IC61\apps.
If you do not know the directory path, select the Ellipsis (�) button and navigate to the directory.
5. From the DB Connection Set drop-down list, select defaultDBConnectionSet.6. If necessary, enter your IC Manager account and password.
7. Select OK.
8. Select OK to confirm that you want to replace the application files.
Database Designer updates the IC Repository application with the Business Advocate database connection information.
9. Select File > Close to close the IC Repository ADL file.
Configuring the CCQ database connectionTo configure the CCQ database connection:
1. In Database Designer, select File > Open.
2. Open the CCQ ADL file.
You can find this ADL file in IC_INSTALL_DIR\IC70\design\CallCenterQ\ccq.adl
If you have enabled Database Designer for localization, Select OK and ignore the warning about the missing ALF file. Database Designer will automatically generate the ALF file when you save the ADL file.
3. Expand Components > Physical DB Connections and select advocateDBConnection in the tree pane.

Configuring database connections
Issue 3 February 2005 127
4. In the DB Connection Properties tab, complete the fields in the General group as shown in the following table.
5. From the Database Type drop-down menu, select the type of database to which you want to connect.
Database Designer uses the selected database type to generate a SQL statement which can be applied to the database.
Property Recommended entry Notes
Timeout (sec) Enter the maximum number of seconds that the client application waits for a response to a database request before the application assumes the connection to the Data server is lost.
Default value is 60 seconds.If no response is returned within the specified time, the client application closes the connection to the Data server and returns an error. The client application attempts to create a new connection to the database on the next database request.
Description Enter a description of the database connection, if desired.
You can leave this field empty.
Display Time Select the display time setting. The display time option determines how Avaya IC handles the difference in time between the agent desktop machine and the time as reported by the Database for all database activities, such as select, insert, and update.The display time options are:● DBMSTIME � Select this option if you
want the DateTime data to display as database time, and not adjusted to local time. With DBMSTIME, Avaya IC ignores the difference in time and does not apply the difference to any database activity.
● LOCALTIME if you want the DateTime data to display as adjusted to local time on the client. With LOCALTIME, Avaya IC uses the difference in time, rounds it to the nearest half hour, and applies this difference to all database activity that involves date and time information.
● HOSTTIME if you want the DateTime data to display as adjusted to the local host time, including small differences between system clocks. With HOSTTIME, Avaya IC uses the difference in time and applies this difference to all database activity that involves date and time information.
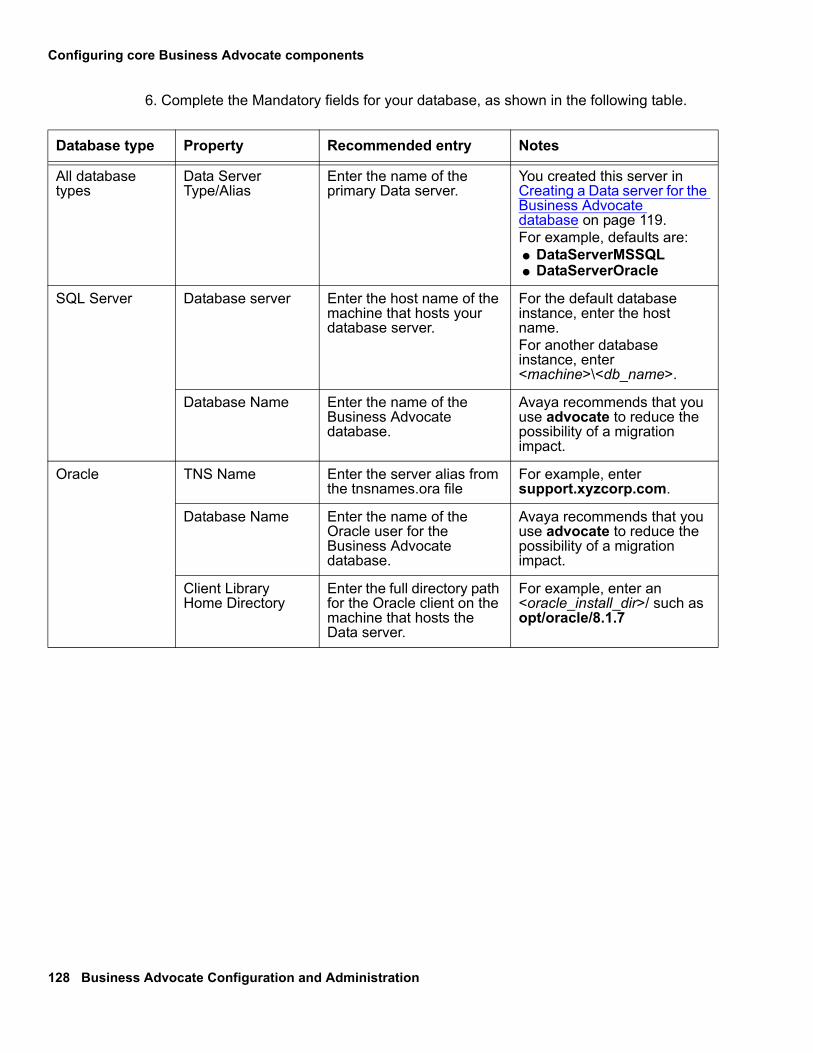
Configuring core Business Advocate components
128 Business Advocate Configuration and Administration
6. Complete the Mandatory fields for your database, as shown in the following table.
Database type Property Recommended entry Notes
All database types
Data Server Type/Alias
Enter the name of the primary Data server.
You created this server in Creating a Data server for the Business Advocate database on page 119.For example, defaults are:● DataServerMSSQL● DataServerOracle
SQL Server Database server Enter the host name of the machine that hosts your database server.
For the default database instance, enter the host name. For another database instance, enter <machine>\<db_name>.
Database Name Enter the name of the Business Advocate database.
Avaya recommends that you use advocate to reduce the possibility of a migration impact.
Oracle TNS Name Enter the server alias from the tnsnames.ora file
For example, enter support.xyzcorp.com.
Database Name Enter the name of the Oracle user for the Business Advocate database.
Avaya recommends that you use advocate to reduce the possibility of a migration impact.
Client Library Home Directory
Enter the full directory path for the Oracle client on the machine that hosts the Data server.
For example, enter an <oracle_install_dir>/ such asopt/oracle/8.1.7

Configuring database connections
Issue 3 February 2005 129
7. If necessary, complete the Optional fields for your database, as shown in the following table.
Database type Property Recommended entry Notes
SQL Server Database Location Leave field blank. Identifies the logical space where the named database is stored. The SQL Server DBMS specifies the database location.
Database Size Leave field blank. The size of the database location specifies the amount of space that the configured application database occupies. The SQL Server RDBMS specifies the database size.
Log Location Leave field blank. Database-generated log files store cumulative transaction information. The SQL Server RDBMS specifies a default location for the database log.
Log Size Leave this field blank. The size of the location for database log files specifies the amount of space that the database-generated log files can occupy. The SQL Server RDBMS specifies a default size for the database log.

Configuring core Business Advocate components
130 Business Advocate Configuration and Administration
8. Select File > Save to save the ADL file. Do not close the file.
Oracle Default tablespace name
Enter the name of the default tablespace where objects are created for the Avaya IC databases. For example, enter IC_TS.
The database location identifies the logical space where the named database is stored. If you leave this field blank, and the Oracle RDBMS does not specify a database location, Oracle uses the �system� space to define the database. Caution: Configuring a database in the system space can crash your database.
Default tablespace size
Enter the number of bytes for the size of the default tablespace.
The size of the database location specifies the amount of space that the configured application database occupies.Caution: If you do not specify a size for the database location, and your RDBMS does not specify a default database size, the database location can use all available space.
Temp tablespace name
Enter the name of the tablespace that stores temporary files. For example, enter T_CI_TEMP.
Temporary tables store database-generated intermediate sorting files and client session information for Oracle databases. If you do not specify a location for temporary tables, the location is specified by the Oracle RDBMS.
Temp tablespace size
Enter the number of bytes for the size of the tablespace that includes temporary tables.
The size of the location for temporary tables in Oracle databases specifies the amount of space that the temporary tables can occupy. If you do not specify the amount of space to be allocated for temporary tables, the size is specified by the Oracle RDBMS.
Database type Property Recommended entry Notes

Configuring database connections
Issue 3 February 2005 131
Configuring the CCQ connection setTo configure the CCQ connection set:
1. In Database Designer, expand DB Connection Sets and select DefaultDBConnectionSet in the tree pane.
2. Select Advocate from the Logical DB Connections list and make sure the properties are set as shown in the following table.
3. Select CallCenterQ from the Logical DB Connections list in the Connection Set Properties tab and make sure the properties are set as shown in the following table.
4. Select File > Save to save the ADL file. Do not close the file.
Field Recommended entry
Physical DB Connection Select advocateDBConnection.
Primary Do not check this box.
Use External Database Check this box.
Database Name Enter advocate.This name must be the exact name that you gave the Business Advocate database for the first Logical Resource Manager.
Field Recommended entry
Physical DB Connection Select ccqDBConnection.
Primary Check this box.
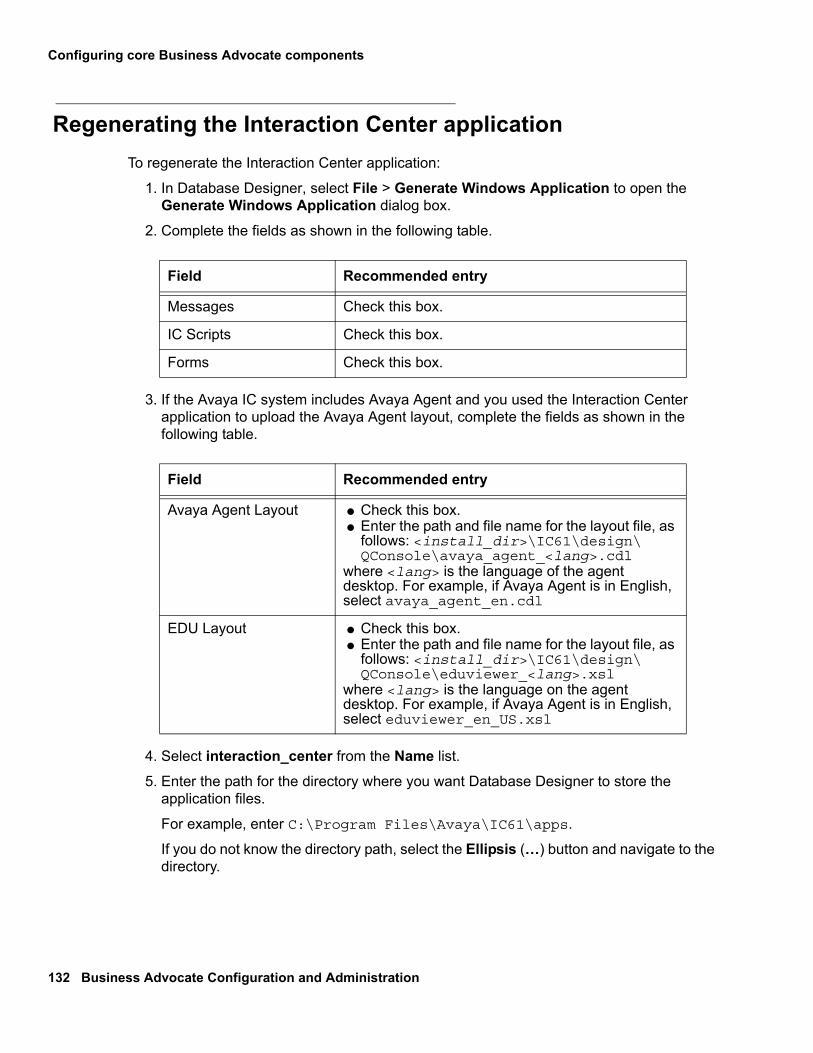
Configuring core Business Advocate components
132 Business Advocate Configuration and Administration
Regenerating the Interaction Center applicationTo regenerate the Interaction Center application:
1. In Database Designer, select File > Generate Windows Application to open the Generate Windows Application dialog box.
2. Complete the fields as shown in the following table.
3. If the Avaya IC system includes Avaya Agent and you used the Interaction Center application to upload the Avaya Agent layout, complete the fields as shown in the following table.
4. Select interaction_center from the Name list.
5. Enter the path for the directory where you want Database Designer to store the application files.
For example, enter C:\Program Files\Avaya\IC61\apps.
If you do not know the directory path, select the Ellipsis (�) button and navigate to the directory.
Field Recommended entry
Messages Check this box.
IC Scripts Check this box.
Forms Check this box.
Field Recommended entry
Avaya Agent Layout ● Check this box.● Enter the path and file name for the layout file, as
follows: <install_dir>\IC61\design\QConsole\avaya_agent_<lang>.cdl
where <lang> is the language of the agent desktop. For example, if Avaya Agent is in English, select avaya_agent_en.cdl
EDU Layout ● Check this box.● Enter the path and file name for the layout file, as
follows: <install_dir>\IC61\design\QConsole\eduviewer_<lang>.xsl
where <lang> is the language on the agent desktop. For example, if Avaya Agent is in English, select eduviewer_en_US.xsl

Configuring database connections
Issue 3 February 2005 133
6. From the DB Connection Set drop-down list, select defaultDBConnectionSet.You do not need to re-enter your IC Manager account and password.
7. Select OK.
8. Select OK to confirm that you want to replace the application files.
Database Designer creates a new folder with the same name as the application in the target directory. This folder contains the Interaction Center ADL files.
9. Select File > Save to save the ADL file. Do not close the file.
Generating the ListQ applicationYou use ListQ to configure the customer profile attributes used by Business Advocate qualification workflows. You generate ListQ from the CCQ ADL file.
! Important:! Important:Important: If you have already generated the ListQ application, you must regenerate
the application for Business Advocate.
To generate the ListQ application:
1. If you have not already done so, in Database Designer, select File > Open and open the CCQ ADL file.
2. Select File > Generate Windows Application to open the Generate Windows Application dialog box.
3. Complete the fields as shown in the following table.
4. Select listq from the Name list.
5. Enter the path for the directory where you want Database Designer to store the application files.
For example, enter C:\Program Files\Avaya\IC70\apps.
If you do not know the directory path, select the Ellipsis (�) button and navigate to the directory.
Field Recommended entry
Messages Check this box.
IC Scripts Check this box.
Forms Check this box.

Configuring core Business Advocate components
134 Business Advocate Configuration and Administration
6. From the DB Connection Set drop-down list, select defaultDBConnectionSet.You do not need to re-enter your IC Manager account and password.
7. Select OK.
8. Select OK to confirm that you want to replace the application files.
Database Designer creates a new folder with the same name as the application in the target directory. This folder contains the ListQ files.
9. Select File > Save to save the ADL file.
10. Select File > Exit to close Database Designer.
Configuring customer profile attributesThe Business Advocate qualification workflows use customer profile attributes to qualify a contact. You configure the customer attributes in the Profile Administration form and Customer form of the ListQ application.
This section includes the following topics with the steps that you must perform to configure customer attributes:
1. Creating customer profile attributes on page 134.
2. Assigning customer profile attributes to customer records on page 135.
Creating customer profile attributesCreate customer profile attributes in the Profile Administration form of ListQ.
! Important:! Important:Important: The customer attributes are case sensitive and do not accept spaces. Enter
them exactly as set out below.
To create customer profile attributes.
1. From ListQ, open the Customer/List Administration focus.
2. Select Profile Admin.
3. In the Profile Admin form, select New.
4. In the Profile Attribute group:
a. Select the Customer checkbox.
b. Select the Organization checkbox.

Configuring customer profile attributes
Issue 3 February 2005 135
c. In the Name field, enter customertype.
d. In the Description field, enter a description of the attribute.
5. Select Update.
Repeat Steps 3 through 5 and enter the following attributes in the Name field: preferredagent and language.
6. Do not close the Profile Admin form.
Assigning customer profile attributes to customer recordsAssign customer profile attributes in the Customer Profile form of ListQ.
To create customer profile attributes.
1. From ListQ, open the Customer/List Administration focus.
2. Select Customer Profile.
3. Enter the search criteria to find the customers for a profile attribute and select Search.
4. In the browser at the top of the page, select a Customer record.
5. Select Change.
6. In the Customer Profile group:
a. Select the Attribute column of a blank attribute row.
b. Select a profile attribute and assign a value in the value field as shown in the following table.
Profile attribute Value
customertype Enter the qualifier value for the customertype category that applies to this customer. For example, if you use the customertype values for the sample workflows, enter a value of gold, silver, or bronze.
language Enter the two character ISO-639-1 code that matches the preferred language of this customer. For example, enter en for English or de for German.
preferredagent A valid login ID for the Avaya IC agent preferred by this customer.

Configuring core Business Advocate components
136 Business Advocate Configuration and Administration
7. After you have assigned all of the relevant profile attributes to the customer, select Update.
Repeat these steps for each customer in the contact center.
Configuring Directory servers! CAUTION:
CAUTION: You must perform the following steps on every Directory server in your Avaya IC system. If you omit this step for a Directory server, Business Advocate cannot work properly.
To configure a Directory server for Business Advocate:
1. In IC Manager, select the Server tab.
2. Double-click the Directory server in the list of servers.
3. Select the Advocate tab.
4. Check the Enable Advocate box.
5. Select Apply.
6. Select OK.
7. Stop and restart the Directory server.
8. When the Alarm Monitor indicates that the Directory server has started properly, select Manager > Refresh.
Logical Resource ManagerBusiness Advocate requires a Logical Resource Manager for every active Resource Manager server. Other Business Advocate components, such as the Telephony Services Adaptor server and the Web Advocate Adaptor server, use the Logical Resource Manager to access a Resource Manager server.
This section describes the possible configurations for Logical Resource Managers, and the steps to create and configure Logical Resource Managers. This section includes the following topics:
● Guidelines for the Logical Resource Manager on page 137.
● Creating a Logical Resource Manager on page 137.

Logical Resource Manager
Issue 3 February 2005 137
● Modifying a Logical Resource Manager on page 138.
● Deleting a Logical Resource Manager on page 139.
Guidelines for the Logical Resource ManagerA Logical Resource Manager can be one of the following:
● A pair of Resource Manager servers, with one active Resource Manager server and one standby Resource Manager server. Designate one Resource Manager server as the active server, and the other Resource Manager server as a standby. The standby Resource Manager server becomes the active Resource Manager server if the active server fails.
● A single Resource Manager server that distributes work to all agents. Only use this configuration for a Logical Resource Manager if the Business Advocate does not require any fault tolerance.
After you create the Logical Resource Manager, you create and assign Resource Manager servers.
Creating a Logical Resource ManagerYou create a Logical Resource Manager in the Configuration tab of IC Manager. The Resource Manager node is below the Tables node in the left pane of the Configuration tab.
To create a Logical Resource Manager:
1. In IC Manager, select the Configuration tab.
2. In the left pane, select Tables > Resource Manager > LRM to navigate to the LRM node.

Configuring core Business Advocate components
138 Business Advocate Configuration and Administration
3. Right-click on the LRM node and select New.
The right pane, shown in the following figure, displays the fields you must complete to create a Logical Resource Manager.
4. In the Name field, enter a unique name for the Logical Resource Manager.
5. In the Description field, enter a description of the Logical Resource Manager.
The description field is required.
6. Select Apply.
7. Select OK.
8. Select Manager > Refresh.
If you do not receive a Success message, restart the machine that hosts the Directory server, then repeat this step.
Modifying a Logical Resource ManagerIf you have already assigned Resource Manager servers to the Logical Resource Manager, start the assigned Resource Manager servers before you modify the Logical Resource Manager.
If the Logical Resource Manager does not have any assigned Resource Manager servers, you do not need to start any Resource Manager servers.
To modify a Logical Resource Manager:
1. In IC Manager, click the Configuration tab.
2. If you cannot see the LRM node, select Tables > Resource Manager > LRM to navigate to the LRM node.
3. If necessary, select the LRM node to expand it.

Resource Manager server
Issue 3 February 2005 139
4. Select the Logical Resource Manager that you want to modify.
5. Modify the entry in one or both of the following fields:
● Name● Description.
6. Select Apply.
7. Select OK.
Deleting a Logical Resource ManagerYou cannot delete a Logical Resource Manager that is associated with one of the following:
● Telephony Services Adaptor● Web Advocate Adaptor ● AgentAssociate these components with another Logical Resource Manager before you delete a Logical Resource Manager.
To delete a Logical Resource Manager:
1. In IC Manager, click the Configuration tab.
2. If you cannot see the LRM node, select Tables > Resource Manager > LRM to navigate to the LRM node.
3. In the right pane, select the Logical Resource Manager that you want to delete.
4. Select Delete.
5. Select OK.
Resource Manager serverThis section describes the possible configurations for Resource Manager servers, and the steps to create and configure Resource Manager servers. This section includes the following topics:
● Adding a Resource Manager server on page 140.
● Shutting down a Resource Manager server on page 142.
● Modifying a Resource Manager server on page 147.
● Deleting a Resource Manager server on page 148.

Configuring core Business Advocate components
140 Business Advocate Configuration and Administration
For guidelines on how to plan and deploy the Resource Manager servers in your Business Advocate system, see IC Installation Planning and Prerequisites.
For more information about the Resource Manager server, see Resource Manager server on page 42.
Adding a Resource Manager serverTo add a Resource Manager server, you must create the Resource Manager server, then specify its role. This section includes the following topics:
1. Creating a Resource Manager server on page 140.
2. Assigning the initial role to the Resource Manager server on page 141.
Creating a Resource Manager server
To create a Resource Manager server:
1. In IC Manager, select Server > New.
2. Select Resource Manager from the list of servers.
3. Select OK.
4. On the General tab, complete the fields shown in the following table.
Field Recommended entry Notes
Name ResourceManager_<domain> Include the domain in the server name to identify the server.
Domain Select the Avaya IC domain for the server from the drop-down list.
The Resource Manager server needs to be in a unique Avaya IC domain, such as RM_Helper1.The domain with the Resource Manager server should failover to itself, to the Default domain, and to all other domains that include a License server. For more information, see IC Installation Planning and Prerequisites.
Host Select the IP address of the machine from the drop-down list, or type in the IP address if it is not in the list.
When you select the host, IC Manager fills in the fields for Directory, Port, and Executable.

Resource Manager server
Issue 3 February 2005 141
5. On the Resource Manager tab, select the name of the Logical Resource Manager for the Resource Manager from the LRM drop-down list.
You cannot assign a Logical Resource Manager to more than two Resource Manager servers: the primary server and the standby server. IC Manager displays an error message if you attempt to assign a third Resource Manager server to the same Logical Resource Manager.
6. Select Apply.
7. Select OK.
Assigning the initial role to the Resource Manager server
Use the Business Advocate Component Manager to assign the initial role to the Resource Manager server. The role designates the tasks that the Resource Manager server performs for the Logical Resource Manager.
The following table describes the roles of the Resource Manager servers.
Tip:Tip: The roles of Resource Manager servers are dynamic. If the active Resource
Manager server fails, Business Advocate automatically changes the role of the standby server.
To assign an initial role to the Resource Manager server:
1. In the console tree of Advocate Administration, expand Advocate Component Manager.
2. Double-click the machine which hosts the Resource Manager server.
3. In the results pane, right-click the entry for Resource Manager and select Availability Config.
4. In the High Availability Config dialog box:
a. Select one of the following options:
Role Description
Primary The active Resource Manager server. This server performs all tasks for the Logical Resource Manager. If the Logical Resource Manager contains only one Resource Manager server, assign it primary role.
Secondary A standby Resource Manager server. This server is in standby mode unless the primary Resource Manager server fails. If the primary server fails, this Resource Manager server becomes the primary server. When the failed server restarts, that server becomes the secondary server.

Configuring core Business Advocate components
142 Business Advocate Configuration and Administration
● Primary
● Secondary
b. Select OK.
5. If you selected the Secondary role in Step 4:
a. Right-click the entry for the machine and select Properties.
b. In the Component Properties dialog box, check the Enable box.
c. Select OK.
Viewing the role of a Resource Manager serverYou can view the role of the Resource Manager server in IC Manager. If you want to change the role of the Resource Manager server, use Component Manager.
To view the role of a Resource Manager server:
1. In IC Manager, double-click the Resource Manager server in the list of servers.
2. Select the Advanced tab.
3. Select Server Status.
4. In the status dialog box:
a. Select the HighAvailabilityRole property.
b. The Value field will display one of the values shown in the following table.
c. Select OK to close the status dialog box.
5. Select OK to close the server editor for the Resource Manager server.
Shutting down a Resource Manager serverWhen you shut down a Resource Manager server, Business Advocate considers that Resource Manager server to be inactive. The effect of an inactive Resource Manager server on the qualification of incoming contacts is determined by the following:
Value Description
Primary This Resource Manager server is the active server in the Logical Resource Manager.
Secondary This Resource Manager server is the standby server in the Logical Resource Manager.

Resource Manager server
Issue 3 February 2005 143
● The media channel of the incoming contacts
● The role of the Resource Manager server in a Logical Resource Manager
This section includes the following topics that describe the impact of shutting down a Resource Manager server on contacts in the different media channels:
● Impact of server shutdown on the qualification of voice contacts on page 143.
● Impact of server shutdown on the qualification of chat contacts on page 144.
● Impact of server shutdown on the qualification of email contacts on page 145.
● Stopping a Resource Manager server on page 146.
Impact of server shutdown on the qualification of voice contacts
Business Advocate matches voice contacts with available, qualified agents. To receive voice contacts, the agents must be logged in to Business Advocate through their assigned Logical Resource Manager.
The following table describes what happens to incoming voice contacts if you shut down a Resource Manager server.
Role of Resource Manager server Impact on incoming voice contacts
Active Resource Manager server in a Logical Resource Manager with two servers.
Business Advocate activates the standby Resource Manager server. Business Advocate continues to qualify and match voice contacts with available agents who are assigned to the Logical Resource Manager.Note: The qualification of voice contacts with this Logical Resource Manager might suffer a minor interruption of service until the standby server is completely active.
Standby Resource Manager server in a Logical Resource Manager with two servers.
No effect on the Logical Resource Manager unless the active Resource Manager server fails.Business Advocate continues to qualify and match voice contacts with available agents who are assigned to the Logical Resource Manager.

Configuring core Business Advocate components
144 Business Advocate Configuration and Administration
Impact of server shutdown on the qualification of chat contacts
Business Advocate matches chat contacts with available, qualified agents. To receive chat contacts, the agents must be logged in to Business Advocate through their assigned Logical Resource Manager.
The following table describes what happens to chat contacts if you shut down a Resource Manager server.
● Both Resource Manager servers in a Logical Resource Manager with two servers.
● Active Resource Manager server in a Logical Resource Manager with one server.
Logical Resource Manager fails with the following consequences:● All TSA servers that are assigned to this Logical
Resource Manager notify their Telephony servers that the Logical Resource Manager has failed.
● The Telephony server shuts down the associated link to make sure that all voice contacts on that link failover to the switch.
● Any agents who service failover queues for the failed links receive voice contacts from the switch. If the link groups for the agents are configured correctly, the agents do not receive contacts from Business Advocate while they service the failover queues.
Role of Resource Manager server Impact on incoming voice contacts
Role of Resource Manager server Impact on incoming chat contacts
Active Resource Manager server in a Logical Resource Manager with two servers.
Business Advocate activates the standby Resource Manager server. Business Advocate continues to qualify and match chat contacts with available agents who are assigned to the Logical Resource Manager.Note: The qualification of chat contacts with this Logical Resource Manager might suffer a minor interruption of service until the standby server is completely active.
Standby Resource Manager server in a Logical Resource Manager with two servers.
No effect on the Logical Resource Manager unless the active Resource Manager server fails.Business Advocate continues to qualify and match chat contacts with available agents who are assigned to the Logical Resource Manager.

Resource Manager server
Issue 3 February 2005 145
Impact of server shutdown on the qualification of email contacts
Business Advocate can match an email contact with any agent defined in the Avaya IC system who is qualified to handle the service class of the email contact. The agent does not have to be logged in to receive an email contact.
The following table describes what happens to email contacts if you shut down a Resource Manager server.
● Both Resource Manager servers in a Logical Resource Manager with two servers.
● Active Resource Manager server in a Logical Resource Manager with one server.
Logical Resource Manager fails with the following consequences:● Business Advocate cannot qualify and match chat
contacts with agents assigned to the failed Logical Resource Manager.
● If all of the available agents for a service class are assigned to the failed Logical Resource Manager, Business Advocate sends contacts in those service classes to an exception workflow.
Role of Resource Manager server Impact on incoming chat contacts
Role of Resource Manager server Impact on incoming email contacts
Active Resource Manager server in a Logical Resource Manager with two servers.
Business Advocate activates the standby Resource Manager server. Business Advocate continues to qualify and match email contacts with agents who are assigned to the Logical Resource Manager.Note: The qualification of email contacts with this Logical Resource Manager might suffer a minor interruption of service until the standby server is completely active.
Standby Resource Manager server in a Logical Resource Manager with two servers.
No effect on the Logical Resource Manager unless the active Resource Manager server fails.Business Advocate continues to qualify and match email contacts with agents who are assigned to the Logical Resource Manager.

Configuring core Business Advocate components
146 Business Advocate Configuration and Administration
Stopping a Resource Manager server
If you need to stop a Resource Manager server that will cause the Logical Resource Manager to fail:
● For all types of contacts, you can avoid an interruption in service by temporarily reassigning all agents to another Logical Resource Manager.
● For email contacts, if you expect the Resource Manager server to be inactive for only a short period of time, you can allow Business Advocate to hold email contacts until the Logical Resource Manager is restored.
To stop a Resource Manager server:
1. In the Server tab of IC Manager, select the Resource Manager server in the list of servers.
2. Right-click the server and select Stop.
● Both Resource Manager servers in a Logical Resource Manager with two servers.
● Active Resource Manager server in a Logical Resource Manager with one server.
Logical Resource Manager fails with the following consequences:● Business Advocate cannot qualify and match email
contacts with agents assigned to the failed Logical Resource Manager.
● If the system includes another Logical Resource Manager with qualified agents who are logged in, Business Advocate matches contacts with those agents.
● If all of the agents with capability sets that include a service class are assigned to the failed Logical Resource Manager, Business Advocate does not send the email contacts to an exception workflow. Business Advocate holds the email contacts in those service classes until the failed Resource Manager server can confirm whether it includes agents qualified for that service class.
Role of Resource Manager server Impact on incoming email contacts

Resource Manager server
Issue 3 February 2005 147
Modifying a Resource Manager serverYou can only modify the following properties of a Resource Manager server:
● Name
● Logical Resource Manager
! Important:! Important:Important: If you want to change the Logical Resource Manager for a Resource
Manager server, you must make sure that you have not assigned a Telephony Services Adaptor server, Web Advocate Adaptor server, or any agents to the Resource Manager server.
When you change the name of the Resource Manager server, Business Advocate automatically updates the Logical Resource Manager with the new name.
If you want to change another property, you must delete the Resource Manager and create a new one.
To modify a Resource Manager server:
! CAUTION:CAUTION: Do not modify the Resource Manager server if you have not stopped the
server. Before you stop the Resource Manager server, see Shutting down a Resource Manager server on page 142.
1. In IC Manager, stop the Resource Manager server.
2. Double-click the Resource Manager server in the list of servers.
3. To change the name:
a. Select the General tab.
b. Change the entry in the Name field.
4. To change the Logical Resource Manager:
a. Select the Resource Manager tab.
b. Select a Logical Resource Manager for the Resource Manager from the LRM drop-down list.
5. Select Apply.
6. Select OK.
7. Re-start the Resource Manager server.

Configuring core Business Advocate components
148 Business Advocate Configuration and Administration
Deleting a Resource Manager serverYou cannot delete an active Resource Manager server. You must stop the Resource Manager server before you delete it.
Before you stop or delete a Resource Manager server, see Shutting down a Resource Manager server on page 142.
To delete a Resource Manager server:
1. In IC Manager, select the Server tab.
2. Right-click on the Resource Manager server and select Stop.
After the Alarm Monitor displays a message confirming that the server has stopped correctly, continue with the next step.
3. Right-click on the Resource Manager server and select Delete.
4. In the confirmation message box, Select OK to confirm that you want to delete the server.

Issue 3 February 2005 149
Chapter 8: Configuring qualification for voice contacts
Business Advocate can qualify and match only inbound voice contacts and transferred voice contacts. Business Advocate does not handle outbound voice contacts.
This section describes how Business Advocate qualifies voice contacts, and what you need to do to configure Business Advocate to qualify voice contacts. This section includes the following topics:
● Qualification in the voice channel on page 149.
● Prerequisites for configuring the voice channel on page 155.
● Qualify Voice workflow on page 155.
● Telephony Services Adaptor server on page 159.
● Parking devices for the voice channel on page 170.
● Telephony server on page 182.
● Creating a Workflow server for the voice channel on page 185.
● Link groups on page 187.
● Optional configurations for the voice channel on page 191.
For information about failover, see Failover and recovery for voice contacts on page 51.
Qualification in the voice channelThis section describes how the Business Advocate components qualify a voice contact to an agent. This section includes the following topics:
● Components used to qualify a voice contact on page 150.
● Qualification and routing process for a voice contact on page 151.
● Transfer process for a voice contact on page 153.

Configuring qualification for voice contacts
150 Business Advocate Configuration and Administration
Components used to qualify a voice contactThe following table describes the components that Business Advocate uses to qualify and route a voice contact.
Component Function
Telephony switch ● Sends a route request to the Telephony server when a voice contact arrives.
● Parks the voice contact on a wait queue, if necessary.
● Plays a wait treatment for the voice contact, if necessary.
● Delivers the voice contact to the agent.
Telephony server ● Receives the route request from the switch.● Requests and receives responses from the switch
and the Telephony Services Adaptor (TSA) server.
Telephony Services Adaptor (TSA) server
● Receives the route request from the Telephony server.
● Requests and receives responses from the Telephony server, the Resource Manager server, and one or more Workflow servers.
Workflow server ● Receives the route request from the TSA server.● Runs the assigned voice qualification workflow. The
sample qualification workflow is the Qualify Voice workflow.
● Can also run an exception workflow or a transfer workflow.
Resource Manager server ● Receives the route request from the TSA server.● Notifies the TSA server if and when a qualified
agent is available.
Agent ● Receives the voice contact and speaks to the customer.
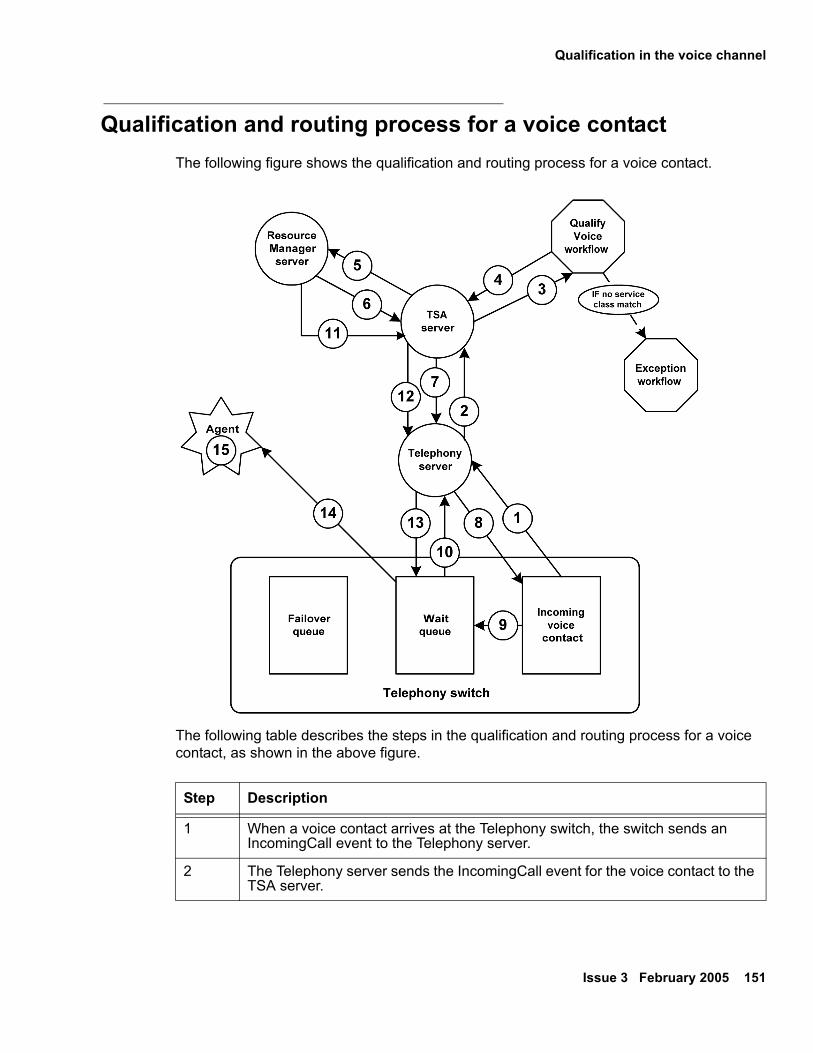
Qualification in the voice channel
Issue 3 February 2005 151
Qualification and routing process for a voice contactThe following figure shows the qualification and routing process for a voice contact.
The following table describes the steps in the qualification and routing process for a voice contact, as shown in the above figure.
Step Description
1 When a voice contact arrives at the Telephony switch, the switch sends an IncomingCall event to the Telephony server.
2 The Telephony server sends the IncomingCall event for the voice contact to the TSA server.

Configuring qualification for voice contacts
152 Business Advocate Configuration and Administration
3 The TSA server sends a request to qualify to the Workflow server that runs the voice qualification workflow.
4 The voice qualification workflow qualifies the voice contact and transmits the following qualification information about the voice contact to the TSA server:● EDU ID● Service class● Wait treatment● Preferred agent, if specified● Logical Resource Manager, if preferred agent specified
Note: If the qualifier set on the voice contact does not match an existing service class, the TSA server dynamically creates a service class. If no agents are configured with a capability set that matches the qualifiers in that service class, the TSA server starts an exception workflow.
5 The TSA server sends a request for an agent with the information about the voice contact to the Logical Resource Manager.
6 The primary Resource Manager server in the Logical Resource Manager runs the Business Advocate algorithms to compare the available agents, if any, with the contacts in the queues, then tells the TSA server if an agent is immediately available to handle the voice contact.If no agent is available, the Resource Manager server continues to monitor the agents and the contacts in the queues.
Note: If there is an agent available, go to Step 11.
7 The TSA server tells the Telephony server that an agent is not available and to park the voice contact on a wait queue that matches the wait treatment specified by the Workflow server during qualification.
8 The Telephony server tells the switch to route the voice contact to the wait queue specified by the TSA server.
9 The switch moves the voice contact to the appropriate wait queue.
10 The switch confirms to the Telephony server that the voice contact is on a wait queue.
11 The Resource Manager server matches the contact to an available agent, and notifies the TSA server of the login ID for the agent.
12 The TSA server sends a route response to the Telephony server with the EDU ID of the voice contact and the login ID of the agent.
Step Description

Qualification in the voice channel
Issue 3 February 2005 153
Transfer process for a voice contactThe following figure shows the transfer process for a voice contact.
13 The Telephony server tells the switch to route the voice contact to the agent.
14 The Telephony switch routes the contact to the agent. If your contact center includes screen pops, the Telephony server sends the EDU information to the agent application. The agent application uses the screen pop to display information about the customer to the agent.The agent answers the telephone and speaks to the customer.
Step Description

Configuring qualification for voice contacts
154 Business Advocate Configuration and Administration
The following table describes the steps in the transfer process for a voice contact, as shown in the above figure. This example includes steps for a virtual queue. Business Advocate follows the same transfer process to transfer a voice contact to another agent.
Step Description
1 In the Unified Agent Directory, an agent selects a virtual queue as the transfer point for a voice contact.
2 Agent desktop application sends the virtual queue information to the transfer workflow.
3 Transfer workflow determines the qualifiers and the wait treatment, then stores the qualifier information in the EDU for the voice contact.
4 Agent desktop application sends the destination DN for the transfer wait queue to the Telephony server that handles voice contacts for that agent.
5 The Telephony server for the agent sends the voice contact to the CTI link on the switch. The CTI link moves the voice contact to the appropriate wait queue with wait treatment style 1.
6 The switch tells the destination Telephony server that the voice contact is on a wait queue.
7 The destination Telephony server sends an IncomingCall event for the voice contact to the TSA server.
8 The TSA server sends a request for information to the EDU and retrieves the qualifiers for the voice contact.
9 The TSA server sends a request for an agent with the information about the voice contact to the Logical Resource Manager.
10 The Resource Manager server matches the contact to an available agent, and notifies the TSA server of the login ID for the agent.
11 The TSA server sends a route response to the Telephony server with the EDU ID of the voice contact and the login ID of the agent.
12 The Telephony server tells the switch to route the voice contact to the agent.
13 The Telephony switch routes the contact to the agent.If your contact center includes screen pops, the Telephony server sends the EDU information to the agent application. The agent application uses the screen pop to display information about the customer to the agent.The agent answers the telephone and speaks to the customer.

Prerequisites for configuring the voice channel
Issue 3 February 2005 155
Prerequisites for configuring the voice channelBefore you configure the voice channel, do the following:
1. Complete all configuration on your switches, as described in IC Telephony Connectors Programmer Guide, including:
● All destination DNs
● For a supported Avaya Definity or Communication Manager switch, enable the Increased Adjunct Route Capacity feature, which increases the number of outstanding route requests allowed from 2000 to 4000.
2. Install and configure the Avaya IC voice channel, including all prerequisites, as described in the IC Installation and Configuration.
3. Configure the Business Advocate core servers, as described in Configuring core Business Advocate components on page 117.
Qualify Voice workflowBy default, Business Advocate uses the sample Qualify Voice workflow to qualify voice contacts. You can find the Qualify Voice workflow in the following directory:
IC_INSTALL_DIR\IC70\design\IC\Flows\Avaya\Advocate\qualifyvoice_adv
Tip:Tip: You can customize the sample Qualify Voice workflow to meet the needs of
your contact center. For more information, see Avaya IC Media Workflow Reference.
For information about how to use Workflow Designer, see Avaya Workflow Designer User Guide.
This section describes the steps you must perform to use the Qualify Voice workflow to qualify voice contacts with Business Advocate. This section includes the following topics:
1. Prerequisites for the Qualify Voice workflow on page 156.
2. Configuring the Qualify Voice workflow on page 156.
3. Configuring database settings for the workflow on page 158.
4. Building the flowset on page 158.

Configuring qualification for voice contacts
156 Business Advocate Configuration and Administration
Prerequisites for the Qualify Voice workflowBefore you compile the Qualify Voice workflow, perform the steps in the following table.
Configuring the Qualify Voice workflowThe following table describes the blocks that you must configure before you can compile and build the flowset for the Qualify Voice workflow. Avaya recommends that you create additional qualifiers and configure Map to Qualifier and Set Qualifier blocks with values for these additional qualifiers.
! Important:! Important:Important: Create qualifiers with the category intent and a qualifier value for each of the
DNIS values you enter into Qualifier_1 through Qualifier_4 in the Map to Qualifier (DNIS) block. For more information, see Creating a qualifier on page 79.
Step Description
Create qualifiers. Some blocks in the Qualify Voice workflow use qualifiers. For more information about these qualifiers, see Sample qualifiers on page 78.Use these qualifiers to test the Qualify Voice workflow.Create additional qualifiers and configure the workflow to use those qualifiers, including the properties of the following blocks:● Map to Qualifier● Set QualifierFor more information, see Avaya IC Media Workflow Reference.
Block Description
Map to Qualifier (DNIS) Specifies up to 4 possible DNIS values for incoming voice contacts and maps these values to a text string. The workflow uses the text string as the qualifier value for the intent category.
Set Voice Wait Treatment Specifies the wait treatment for each DNIS value in the Map to Qualifier (DNIS) block.

Qualify Voice workflow
Issue 3 February 2005 157
To configure the voice qualification workflow:
1. In Workflow Designer, select File > Open Project and open the Advocate project.
You can find the Advocate project in the following directory: IC_INSTALL_DIR\IC70\design\IC\Flows\Avaya\Advocate
2. Double-click qualifyvoice_adv in the Project pane.
3. Configure the Map to Qualifier (DNIS) block:
a. Select the block to open the block properties in the Property Sheet.
b. In the Property Sheet, select the Basic tab.
c. Set the properties in the following table.
4. Configure the Set Voice Wait Treatment block:
a. Select the block to open the block properties in the Property Sheet.
b. In the Property Sheet, select the Basic tab.
c. Set the properties in the following table.
5. Select File > Save. Do not close the workflow in Workflow Designer.
Property Description
Qualifier_1 through Qualifier_4 Enter the values for the qualifiers for the DNIS. For example, enter:● sales● support
Value_1 through Value_4 Enter the DNIS values that map to the qualifier values in Qualifier_1 to Qualifier_4. For example, if you use sales as Qualifier_1, then in Value_1 enter the DNIS value for the internal route point where sales voice contacts are delivered.
Property Description
Criteria_1 through Criteria_4 Enter the values for the qualifiers for the DNIS from the Map to Qualifiers (DNIS) block.For example, if you use sales as Qualifier_1, then enter sales as Criteria_1.
WaitTreatment_1 through WaitTreatment_4
Enter the number for the wait treatment that you want the switch to play when a voice contact for the criteria is in queue. For example, if you want to play wait treatment 2 for all contacts that have sales as a DNIS value, then in WaitTreatment_1 enter WT_STYLE_02.

Configuring qualification for voice contacts
158 Business Advocate Configuration and Administration
Configuring database settings for the workflowAfter you configure the blocks for the voice qualification workflow, configure the database settings that Workflow Designer needs to build the workflow.
To configure the database settings:
1. In Workflow Designer, select Project > Settings.
2. Select the Database tab of the Project Settings dialog box.
3. Enter the name of your Interaction Center Data Source in the IC Data Source field.
For example, enter interaction_center. All sample workflows provided with Avaya IC use the Interaction Center data source. If you created custom flows that point to a different data source, enter that data source here.
4. Enter a valid Avaya IC Administrator account in the Login ID field.
5. Enter the password for the account in the Password field.
6. Select OK. Do not close the workflow in Workflow Designer.
Building the flowsetWhen you build a workflow, Workflow Designer:
● Compiles the workflow
● Converts the workflow to XML format
! Important:! Important:Important: You must export the qualifiers from Advocate Supervisor to the
IC_INSTALL_DIR\IC70\etc directory on the machine that hosts Workflow Designer before you can build the flowset and compile your workflows. For more information, see Exporting qualifiers to Workflow Designer on page 83.
To build the flowset and load the flows:
1. Select Build > Verify Active Flow.
2. Review the results of the build in the Output bar.
Double-click an error to open the workflow and highlight the block or connector with the error.
3. After you correct all errors, select Build > Build Flow Set.4. Select File > Exit to close Workflow Designer.
Telephony Services Adaptor server
Issue 3 February 2005 159
Telephony Services Adaptor serverThe Telephony Services Adaptor (TSA) server manages server interactions for Business Advocate that occur in the voice channel. Business Advocate requires a TSA server for every switch in your Avaya IC system.
This section describes the function of the TSA server in the voice channel, and how to create, configure, and administer the TSA server. This section includes the following topics that you need to create and configure a TSA server:
1. Guidelines for a TSA server on page 159.
2. Creating a TSA server on page 160.
3. Assigning a Logical Resource Manager on page 161.
4. Setting up contact handling on page 165.
5. Assigning a transfer exception workflow on page 167.
This section also includes the following topics:
● Modifying a TSA server on page 168.
● Deleting a TSA server on page 169.
Guidelines for a TSA serverThis section includes the following topics with information on the TSA server:
● Required TSA servers on page 160.
● TSA servers and other Avaya IC servers on page 160.
● TSA servers and redirect on no answer on page 160.
Configuring qualification for voice contacts
160 Business Advocate Configuration and Administration
Required TSA servers
Business Advocate requires the following TSA servers:
● One TSA server for each Telephony server that handles incoming voice contacts from a link on the associated switch.
● If the switch does not have a link for incoming voice contacts, one TSA server to handle transfers of voice contacts between agents.
● If the configuration includes a backup link for the primary incoming link, configure the same destination DN on the following TSA servers:
- One TSA server that handles incoming voice contacts from the destination DN as a primary link.
- One TSA server that handles voice contacts from the destination DN as a backup link.
TSA servers and other Avaya IC servers
The TSA server handles interactions for the following Avaya IC servers:
● Telephony servers
● Resource Manager servers
● Workflow servers that process voice contacts
TSA servers and redirect on no answer
The TSA server is a critical component of redirect on no answer (RONA) for Business Advocate. RONA lets you redirect voice contacts if an agent does not answer within a designated number of rings.
RONA places the voice contact back into the queue at the same priority.
Creating a TSA serverTo create a TSA server:
1. In IC Manager, select Server > New.
2. Select TSA from the list of servers.
3. Select OK.
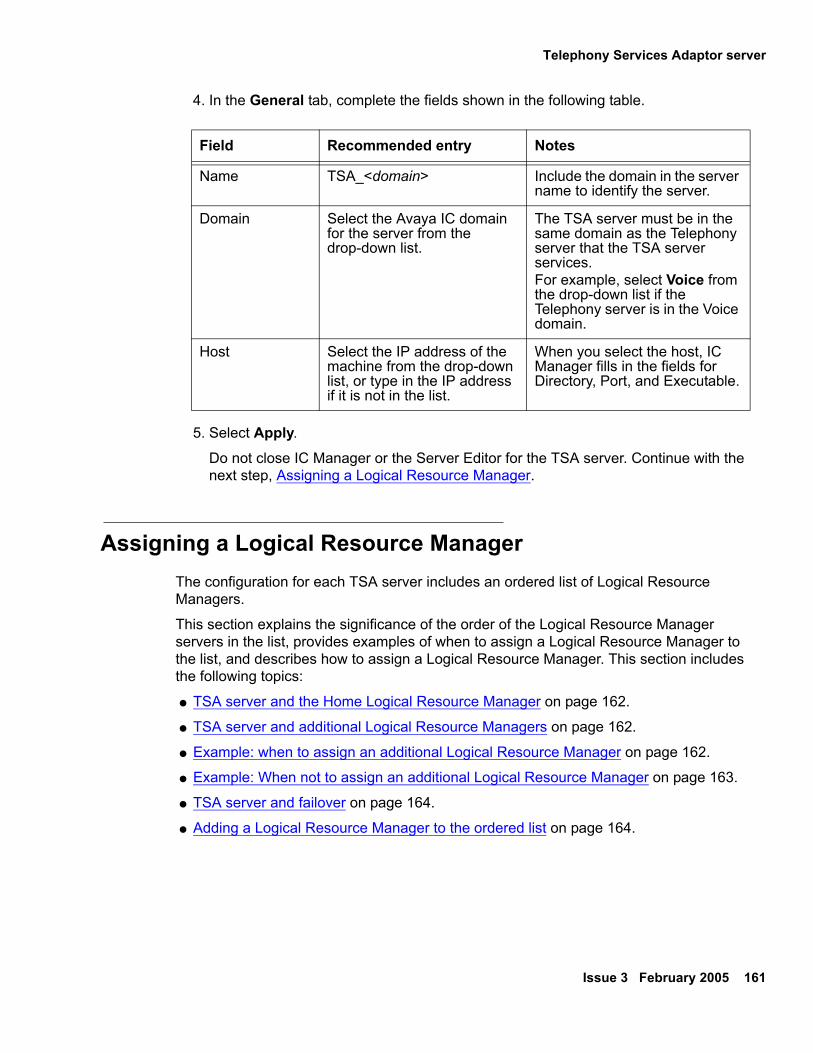
Telephony Services Adaptor server
Issue 3 February 2005 161
4. In the General tab, complete the fields shown in the following table.
5. Select Apply.
Do not close IC Manager or the Server Editor for the TSA server. Continue with the next step, Assigning a Logical Resource Manager.
Assigning a Logical Resource ManagerThe configuration for each TSA server includes an ordered list of Logical Resource Managers.
This section explains the significance of the order of the Logical Resource Manager servers in the list, provides examples of when to assign a Logical Resource Manager to the list, and describes how to assign a Logical Resource Manager. This section includes the following topics:
● TSA server and the Home Logical Resource Manager on page 162.
● TSA server and additional Logical Resource Managers on page 162.
● Example: when to assign an additional Logical Resource Manager on page 162.
● Example: When not to assign an additional Logical Resource Manager on page 163.
● TSA server and failover on page 164.
● Adding a Logical Resource Manager to the ordered list on page 164.
Field Recommended entry Notes
Name TSA_<domain> Include the domain in the server name to identify the server.
Domain Select the Avaya IC domain for the server from the drop-down list.
The TSA server must be in the same domain as the Telephony server that the TSA server services.For example, select Voice from the drop-down list if the Telephony server is in the Voice domain.
Host Select the IP address of the machine from the drop-down list, or type in the IP address if it is not in the list.
When you select the host, IC Manager fills in the fields for Directory, Port, and Executable.
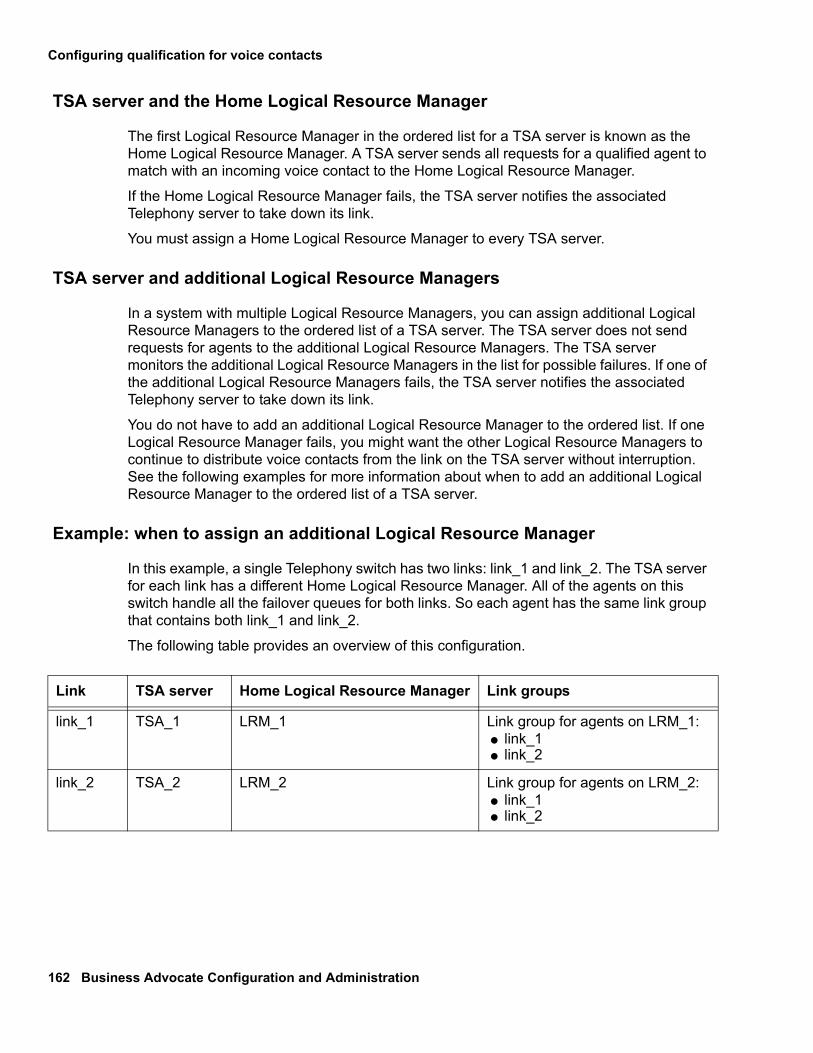
Configuring qualification for voice contacts
162 Business Advocate Configuration and Administration
TSA server and the Home Logical Resource Manager
The first Logical Resource Manager in the ordered list for a TSA server is known as the Home Logical Resource Manager. A TSA server sends all requests for a qualified agent to match with an incoming voice contact to the Home Logical Resource Manager.
If the Home Logical Resource Manager fails, the TSA server notifies the associated Telephony server to take down its link.
You must assign a Home Logical Resource Manager to every TSA server.
TSA server and additional Logical Resource Managers
In a system with multiple Logical Resource Managers, you can assign additional Logical Resource Managers to the ordered list of a TSA server. The TSA server does not send requests for agents to the additional Logical Resource Managers. The TSA server monitors the additional Logical Resource Managers in the list for possible failures. If one of the additional Logical Resource Managers fails, the TSA server notifies the associated Telephony server to take down its link.
You do not have to add an additional Logical Resource Manager to the ordered list. If one Logical Resource Manager fails, you might want the other Logical Resource Managers to continue to distribute voice contacts from the link on the TSA server without interruption. See the following examples for more information about when to add an additional Logical Resource Manager to the ordered list of a TSA server.
Example: when to assign an additional Logical Resource Manager
In this example, a single Telephony switch has two links: link_1 and link_2. The TSA server for each link has a different Home Logical Resource Manager. All of the agents on this switch handle all the failover queues for both links. So each agent has the same link group that contains both link_1 and link_2.
The following table provides an overview of this configuration.
Link TSA server Home Logical Resource Manager Link groups
link_1 TSA_1 LRM_1 Link group for agents on LRM_1:● link_1● link_2
link_2 TSA_2 LRM_2 Link group for agents on LRM_2:● link_1● link_2
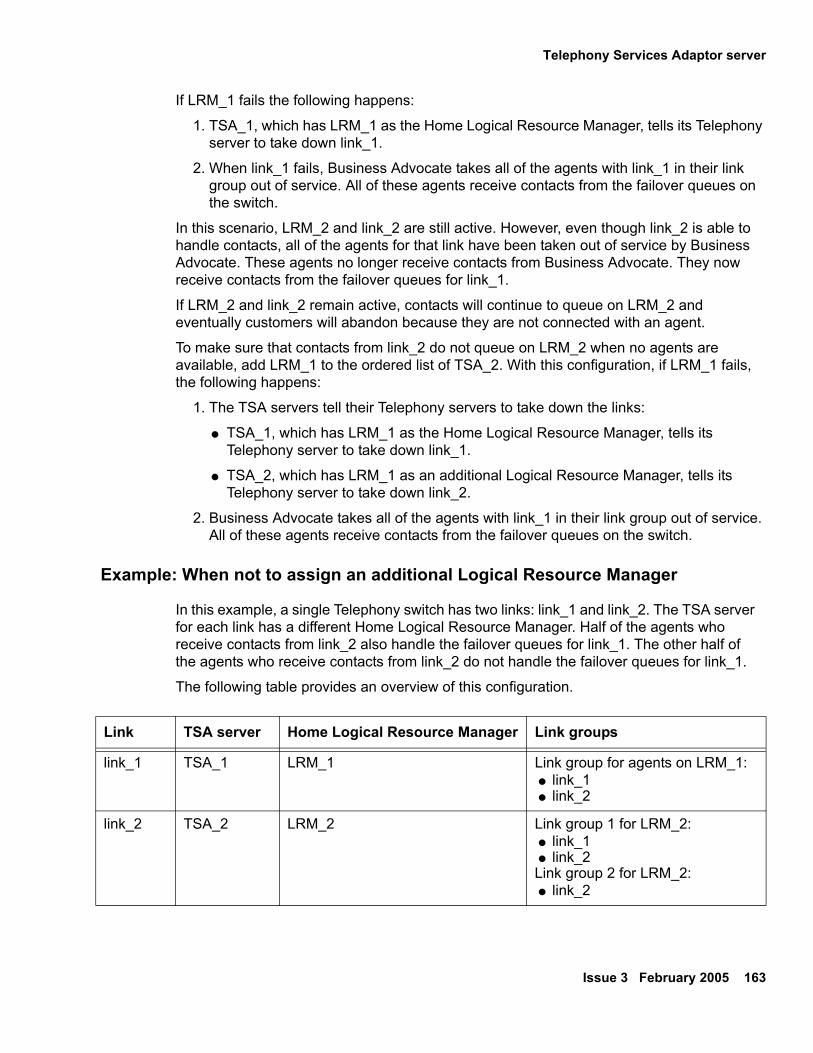
Telephony Services Adaptor server
Issue 3 February 2005 163
If LRM_1 fails the following happens:
1. TSA_1, which has LRM_1 as the Home Logical Resource Manager, tells its Telephony server to take down link_1.
2. When link_1 fails, Business Advocate takes all of the agents with link_1 in their link group out of service. All of these agents receive contacts from the failover queues on the switch.
In this scenario, LRM_2 and link_2 are still active. However, even though link_2 is able to handle contacts, all of the agents for that link have been taken out of service by Business Advocate. These agents no longer receive contacts from Business Advocate. They now receive contacts from the failover queues for link_1.
If LRM_2 and link_2 remain active, contacts will continue to queue on LRM_2 and eventually customers will abandon because they are not connected with an agent.
To make sure that contacts from link_2 do not queue on LRM_2 when no agents are available, add LRM_1 to the ordered list of TSA_2. With this configuration, if LRM_1 fails, the following happens:
1. The TSA servers tell their Telephony servers to take down the links:
● TSA_1, which has LRM_1 as the Home Logical Resource Manager, tells its Telephony server to take down link_1.
● TSA_2, which has LRM_1 as an additional Logical Resource Manager, tells its Telephony server to take down link_2.
2. Business Advocate takes all of the agents with link_1 in their link group out of service. All of these agents receive contacts from the failover queues on the switch.
Example: When not to assign an additional Logical Resource Manager
In this example, a single Telephony switch has two links: link_1 and link_2. The TSA server for each link has a different Home Logical Resource Manager. Half of the agents who receive contacts from link_2 also handle the failover queues for link_1. The other half of the agents who receive contacts from link_2 do not handle the failover queues for link_1.
The following table provides an overview of this configuration.
Link TSA server Home Logical Resource Manager Link groups
link_1 TSA_1 LRM_1 Link group for agents on LRM_1:● link_1● link_2
link_2 TSA_2 LRM_2 Link group 1 for LRM_2:● link_1● link_2Link group 2 for LRM_2:● link_2
Configuring qualification for voice contacts
164 Business Advocate Configuration and Administration
If LRM_1 fails the following happens:
1. TSA_1, which has LRM_1 as the Home Logical Resource Manager, tells its Telephony server to take down link_1.
2. When link_1 fails, Business Advocate takes all of the agents with link_1 in their link group out of service. All of these agents receive contacts from the failover queues on the switch. Agents who do not have link_1 in their link group continue to receive contacts from Business Advocate.
In this scenario, LRM_2 and link_2 are still active. Half of the agents assigned to LRM_2 do not receive contacts from Business Advocate. The other half of the agents continue to receive contacts from Business Advocate.
To make sure that link_2 and LRM_2 can continue to route requests to Avaya IC, do not add LRM_1 to the ordered list of TSA_2. With this configuration, the only effect of the failure of LRM_1 and link_1 on LRM_2 and link_2 is that Business Advocate has fewer agents available to receive contacts.
TSA server and failover
You must also understand the difference between link groups and the ordered list of a TSA server for failover scenarios.
Link groups identify which agents Business Advocate should take out of service when a link fails. The ordered list of the TSA servers identifies which links need to be taken down if a Logical Resource Manager fails.
The failure of a Logical Resource Manager causes a Telephony server to take down a link. When the link fails, Business Advocate takes any agent who has that link or links in their link group out of service.
Adding a Logical Resource Manager to the ordered list
To assign a Logical Resource Manager to the TSA server:
1. In the Server Editor for the TSA server, select the TSA tab.
2. Select the Ellipsis (�) button next to the LRM field.
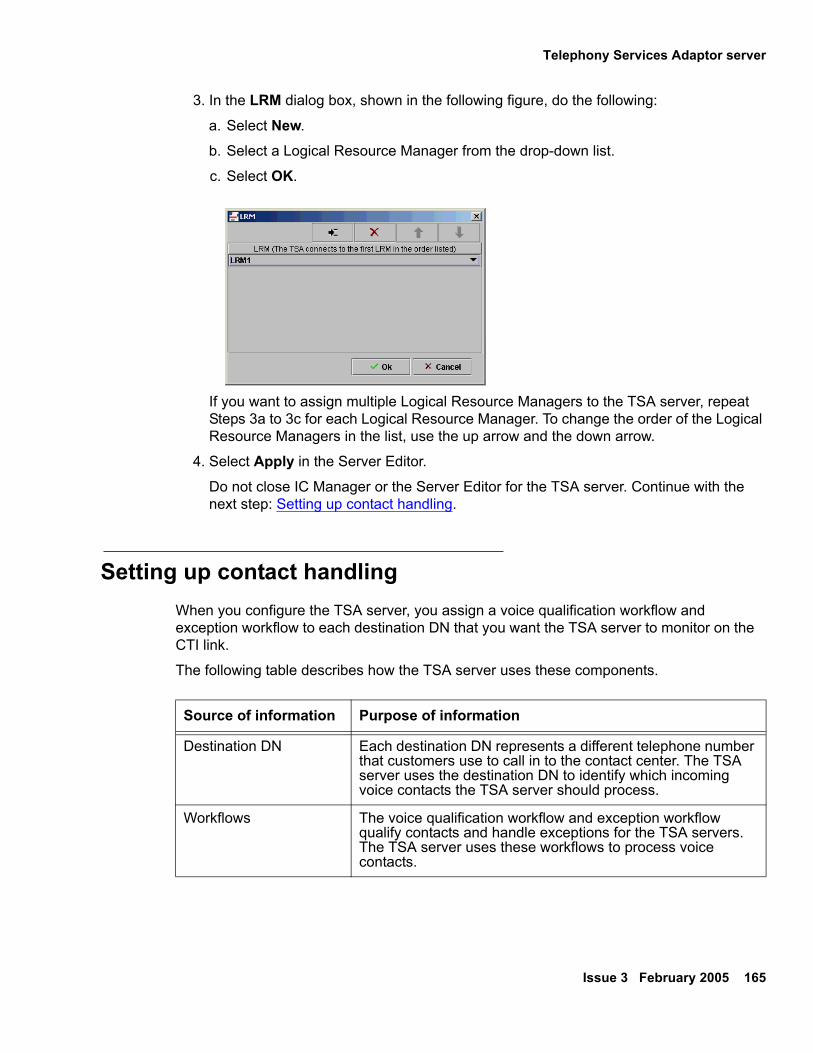
Telephony Services Adaptor server
Issue 3 February 2005 165
3. In the LRM dialog box, shown in the following figure, do the following:
a. Select New.
b. Select a Logical Resource Manager from the drop-down list.
c. Select OK.
If you want to assign multiple Logical Resource Managers to the TSA server, repeat Steps 3a to 3c for each Logical Resource Manager. To change the order of the Logical Resource Managers in the list, use the up arrow and the down arrow.
4. Select Apply in the Server Editor.
Do not close IC Manager or the Server Editor for the TSA server. Continue with the next step: Setting up contact handling.
Setting up contact handlingWhen you configure the TSA server, you assign a voice qualification workflow and exception workflow to each destination DN that you want the TSA server to monitor on the CTI link.
The following table describes how the TSA server uses these components.
Source of information Purpose of information
Destination DN Each destination DN represents a different telephone number that customers use to call in to the contact center. The TSA server uses the destination DN to identify which incoming voice contacts the TSA server should process.
Workflows The voice qualification workflow and exception workflow qualify contacts and handle exceptions for the TSA servers. The TSA server uses these workflows to process voice contacts.

Configuring qualification for voice contacts
166 Business Advocate Configuration and Administration
Example: Consistent contact handling for all voice contacts
If you want the TSA server to handle voice contacts received at all destination DNs in the same way, you can use the same voice qualification workflow and exception workflow for all destination DNs. For example, if your contact center uses several different telephone numbers, but agents at all sites can handle contacts from all telephone numbers, assign the same workflows to all destination DNs on the TSA server.
Example: Unique contact handling for certain voice contacts
If you want the TSA server to handle voice contacts received at different destination DNs uniquely, you can configure the TSA server as follows:
● Assign different voice qualification workflows and exception workflows to each destination DN. For example, if your contact center uses different telephone numbers for sales and service, you can create and assign different workflows for each destination DN.
● Customize each voice qualification workflow to use the telephone number that the customer dialed as a qualifier to determine how the TSA server processes the contact.
For more information about Business Advocate workflows, see Media Workflow Reference.
Configuring contact handling
Configure contact handling in the Contact Handling dialog box, which is available from the TSA tab of the TSA server. The following figure shows the Contact Handling dialog box.

Telephony Services Adaptor server
Issue 3 February 2005 167
To configure contact handling:
1. If you have not already done so, select the TSA tab in the Server Editor for the TSA server.
2. Select the Ellipsis (�) button next to the Contact Handling field.
3. In the Contact Handling dialog box:
a. Select New.
b. In the Destination field, enter a DN that you want the TSA server to monitor or use the default.
If you select default, the TSA server handles incoming contacts received by the Telephony server in the same domain if these contacts have not been specifically assigned with a Destination DN.
c. In the Qualification Flow field, accept the default or enter a custom voice qualification workflow that sets qualifiers for the voice contact.
The default is the sample voice qualification workflow, advocate.qualifyvoice_adv. To use a custom workflow, enter <workflow_project>.<workflow>. This field is case-sensitive. Use all lower case letters.
d. In the Exception Flow field, accept the default or enter the exception workflow for the TSA to use for voice contacts from the DN.
The default workflow is the sample exception workflow, advocate.handle_exception. To use a custom workflow, enter <workflow_project>.<workflow>. This field is case-sensitive. Use all lower case letters.
e. Select OK.
4. Select Apply in the Server Editor for the TSA server.
Do not close IC Manager or the TSA Server Editor. Continue with the next step, Assigning a transfer exception workflow on page 167.
Assigning a transfer exception workflowYou must assign a transfer exception workflow to the TSA server. The transfer exception workflow determines how Business Advocate handles a transferred contact that cannot be delivered to a qualified agent.
By default, Avaya IC assigns the sample exception workflow to the TSA server. You can create a separate transfer exception workflow to handle exceptions for transferred contacts, if desired.

Configuring qualification for voice contacts
168 Business Advocate Configuration and Administration
Assign a transfer exception workflow on the TSA tab, shown in the following figure.
To assign a transfer exception workflow to a TSA server:
1. If you have not already done so, click the TSA tab in the Server Editor for the TSA server.
2. In the Transfer Exception Flow field, accept the default exception workflow or enter the name of a custom workflow.
The default workflow is the sample exception workflow, advocate.exception_advocate. To use a custom workflow, enter <workflow_project>.<workflow>. This field is case-sensitive. Use all lower case letters.
3. Select Apply.
4. Select OK to complete the TSA configuration
Modifying a TSA serverThe TSA server obtains its configuration data when the server starts. You must restart the TSA server for any changes to take effect.
! CAUTION:CAUTION: You must stop a TSA server before you modify that server. If you have not
configured a backup link for the TSA server, the link between the TSA server and the Telephony server fails when you stop the TSA server. If the link fails, Business Advocate automatically fails over qualification and routing for that link to the switch until you restore the TSA server.
To modify a TSA server:
1. In IC Manager, select the Server tab.
2. Stop the TSA server:
a. Right-click the TSA server in the list of servers.
b. Select Stop.

Telephony Services Adaptor server
Issue 3 February 2005 169
3. Double-click the TSA server in the list of servers.
4. Make the desired changes to the configuration.
5. Select Apply.
6. Select OK.
7. Restart the TSA server:
a. Right-click the TSA server in the list of servers.
b. Select Start.
Deleting a TSA serverBefore you delete a TSA server, you must review all parking devices that are assigned to the TSA server and do one of the following:
● Delete the parking device.
● Reassign the parking device to another TSA server.
For more information, see Parking devices for the voice channel on page 170.
To delete a TSA server:
1. In IC Manager, select the Server tab.
2. Stop the TSA server:
a. Right-click the TSA server in the list of servers.
b. Select Stop.
After the Alarm Monitor displays a message confirming that the server has stopped correctly, continue with the next step.
3. Right-click on the TSA server and select Delete.
4. In the confirmation message box, Select OK to confirm that you want to delete the server.

Configuring qualification for voice contacts
170 Business Advocate Configuration and Administration
Parking devices for the voice channelYou must configure at least one parking device for each TSA server in your voice channel. However, a TSA server frequently has more than one parking device. Each parking device associated with a TSA server must use a different wait treatment style.
! Important:! Important:Important: Business Advocate reserves wait treatment style 1 for transferred voice
contacts. For each TSA server, configure a parking device with wait treatment style 1.
This section describes how Business Advocate uses parking devices with wait treatments on the switch, and how to create and configure a parking device. This section includes the following topics:
● About parking devices on page 170.
● About wait treatment styles on page 171.
● Example: configuring parking devices on page 172.
● Prerequisites for a parking device on page 173.
● Creating a parking device for an Avaya switch on page 173.
● Creating a parking device for an Aspect switch on page 175.
● Creating a parking device for a Nortel Meridian switch on page 179.
● Changing a parking device on page 182.
About parking devicesParking devices perform the following functions for a TSA server:
● Hold voice contacts until a qualified agent is available
● Play a wait treatment message for all voice contacts on the parking device
You need to create a parking device for every wait treatment message that you want to play for the customers who are on hold in queues that are on the CTI links that process incoming voice contacts. You can assign multiple parking devices to a TSA server.
For example, a contact center has two links that process incoming voice contacts. The contact center wants customers to hear three different wait treatment messages when they wait on hold. To configure this in Business Advocate, the contact center creates a TSA

Parking devices for the voice channel
Issue 3 February 2005 171
server for each link, then creates three parking devices for each TSA server. Each parking device on a link plays a different message.
You cannot associate a parking device with more than one TSA server. Each TSA server must have its own unique set of parking devices.
Note:Note: If you configure a backup link for the TSA server, assign the same parking
devices to the TSA server that monitors the backup link.
About wait treatment stylesA wait treatment is whatever a customer hears when the customer is on hold. The wait treatment can be one or more announcements, music, or silence. The switch plays and stores the wait treatments.
In Avaya IC, a wait treatment style is a number that represents a wait treatment on a switch. Each parking device has a unique wait treatment style.
For example, a contact center has three Telephony switches. Each switch is at a different site. The contact center creates the same announcement on each switch. The wait treatment and wait treatment style for each announcement is the same, as follows:
● Wait treatment 2 for the switch in New York
● Wait treatment 2 for the switch in Chicago
● Wait treatment 2 for the switch in Montreal is the same announcement in French
The contact center then associates each wait treatment with a queue in the switch. When a voice contact is added to the queue, the switch runs the vector program that plays the announcement.
When Business Advocate qualifies a voice contact, the Qualify Voice workflow does not need to know the location of each queue to ensure that the voice contact is added to the queue in the correct location. The Qualify Voice workflow only needs to know the wait treatment name. For a voice contact in Chicago, the Qualify Voice workflow tells the TSA server at that site to send the voice contact to the queue associated with wait treatment 2. The same process occurs in New York and Montreal.
The parking devices at each site associate the wait treatment style number with the appropriate destination DN on the switch at each site. The same wait treatment style number can play a different style of wait treatment on each switch.

Configuring qualification for voice contacts
172 Business Advocate Configuration and Administration
Example: configuring parking devicesIn this example, a contact center has five possible wait treatment messages that a customer can hear. The type of wait treatment message that the customer should hear depends on what type of service the customer wants.
The contact center also uses two TSA servers. The TSA server must be able to route incoming voice contacts for all customers.
The following table shows the parking devices that this configuration requires.
TSA server Parking device Wait treatment style Wait treatment
TSA 1 TSA1_transfer 1 Message about transferring a voice contact
TSA1_premiumsupport 2 Message about the information that agents need to handle a support call
TSA1_regsupport 3 Continuous loop of messages about the information that support agents need, and about the benefits of premium support
TSA1_sales 4 Message about current sales promotions
TSA1_info 5 Continuous loop of messages about the company and about the different products
TSA 2 TSA2_transfer 1 Message about transferring a voice contact
TSA2_premiumsupport 2 Message about the information that agents need to handle a support call
TSA2_regsupport 3 Continuous loop of messages about the information that support agents need, and about the benefits of premium support
TSA2_sales 4 Message about current sales promotions
TSA2_info 5 Continuous loop of messages about the company and about the different products

Parking devices for the voice channel
Issue 3 February 2005 173
Prerequisites for a parking deviceBefore you create a parking device, you must do the following:
● Configure the voice channel, including all TSA servers, as described in Configuring qualification for voice contacts on page 149.
● Administer the VDN, CDN, or CCT on each link of the switch with the appropriate wait treatment style. For more information, see IC Telephony Connectors Programmer Guide and the documentation provided by the switch manufacturer.
Creating a parking device for an Avaya switchUse these instructions if you need to create a parking device for a supported Avaya Definity or Avaya Communication Manager. For more information about administering devices in IC Manager, see IC Administration Volume 2: Agents, Customers, & Queues.
To create a parking device for an Avaya switch:
1. In IC Manager, click the Device tab.
2. Select Device > New.
3. In the New Device dialog box, shown in the following figure:
a. Select Advocate Voice Parking Device.
b. Select OK.

Configuring qualification for voice contacts
174 Business Advocate Configuration and Administration
4. In the Device Editor, complete the fields in the following table.
Field Recommended entry Notes
ID Enter the destination DN. The ID must be numeric.This field is the destination VDN where the Telephony server sends contacts for this parking device.
Site Select the Avaya IC site for the server from the drop-down list.
�
ACD Name Select an ACD name from the drop-down list.
Use the same ACD name that you configured in the Telephony server assigned to the same TSA server as the parking device.
Name Enter the name of the parking device.
Do not include spaces in the name of the parking device.
Media IC Manager automatically sets the value in this field.
You cannot change this field.
Wait Treatment Style Enter the number for the wait treatment style.
You can enter any number for the wait treatment style. However, you must enter 1 if Business Advocate uses this parking device to hold transferred voice contacts.You enter this same number in the Wait Style block of the workflow that uses this parking device.
Wait Treatment Type (Nortel only)
Leave this field blank. This field is only used for Nortel Meridian switches.
Wait Announcement ID (Nortel/Aspect only)
Leave this field blank. This field is only used for Aspect switches and Nortel Meridian switches.
Wait Ring Back ID (Nortel/Aspect only)
Leave this field blank. This field is only used for Aspect switches and Nortel Meridian switches.
Parking devices for the voice channel
Issue 3 February 2005 175
5. Select OK.
6. If the following servers are running, restart them:
● Telephony server
● TSA server
● All workflow servers that run workflows for Business Advocate
Creating a parking device for an Aspect switchUse these instructions if you need to create a parking device for a supported Aspect switch. For more information about administering devices in IC Manager, see IC Administration Volume 2: Agents, Customers, & Queues.
The parking device uses different CCTs for the wait announcement ID and for the wait ring back ID.
To create a parking device for the voice channel:
7. In IC Manager, click the Device tab.
8. Select Device > New.
9. In the New Device dialog box, shown in the following figure:
a. Select Advocate Voice Parking Device.
Announcement length (Nortel/Aspect only)
Leave this field blank. This field is only used for Aspect switches and Nortel Meridian switches.
TSA Select the TSA server for this parking device from the drop-down list.
You cannot assign a parking device to more than one TSA server.
Field Recommended entry Notes

Configuring qualification for voice contacts
176 Business Advocate Configuration and Administration
b. Select OK.
10. In the Device Editor, complete the fields in the following table.
Field Recommended entry Notes
ID Enter the destination DN. The ID must be numeric.This field is the destination CCT where the Telephony server sends contacts for this parking device.
Site Select the Avaya IC site for the server from the drop-down list.
�
ACD Name Select an ACD name from the drop-down list.
Use the same ACD name that you configured in the Telephony server assigned to the same TSA server as the parking device.
Name Enter the name of the parking device.
Do not include spaces in the name of the parking device.
Media IC Manager automatically sets the value in this field.
You cannot change this field.

Parking devices for the voice channel
Issue 3 February 2005 177
Wait Treatment Style Enter the number for the wait treatment style.
You can enter any number for the wait treatment style. However, you must enter 1 if Business Advocate uses this parking device to hold transferred voice contacts.You enter this same number in the Wait Style block of the workflow that uses this parking device.
Wait Treatment Type (Nortel only)
Leave this field blank. This field is only used for Nortel Meridian switches.
Wait Announcement ID (Nortel/Aspect only)
Enter a CCT where the switch plays a wait announcement for contacts on this parking device.
Optional.If the expected wait time for the voice contact is longer than the length of the announcement, the contact is transferred to the wait announcement ID where the customer can listen to the announcement while waiting.Create the wait announcement ID on the switch first and configure the switch to return the contact to the queue ID after the announcement.
Wait Ring Back ID (Nortel/Aspect only)
Enter the CCT where the switch plays ring back for contacts on this parking device.
Optional.If the expected wait time for the voice contact is shorter than the length of the announcement, the contact is transferred to the wait ring back ID where the customer listens to the sounds determined by the wait treatment type.Create the wait ringback ID on the switch first.
Field Recommended entry Notes
Configuring qualification for voice contacts
178 Business Advocate Configuration and Administration
11. Select OK.
12. If the following servers are running, restart them:
● Telephony server
● TSA server
● All workflow servers that run workflows for Business Advocate
Announcement length (Nortel/Aspect only)
Enter the length of the announcement in seconds.
Required only if you enter a CCT in the Wait Announcement ID field.Avaya IC uses this time to determine how long to wait for the voice contact to return the queue ID. Caution: If the announcement plays for a longer period of time than the length in this field and the contact does not return to the queue ID within the specified length of time, Avaya IC will treat the voice contact as abandoned.
TSA Select the TSA server for this parking device from the drop-down list.
You cannot assign a parking device to more than one TSA server.
Field Recommended entry Notes

Parking devices for the voice channel
Issue 3 February 2005 179
Creating a parking device for a Nortel Meridian switchUse these instructions to create parking devices for a supported Nortel Meridian switch. For more information about administering devices in IC Manager, see IC Administration Volume 2: Agents, Customers, & Queues.
To create a parking device for a Nortel Meridian switch:
1. In IC Manager, click the Device tab.
2. Select Device > New.
3. In the New Device dialog box, shown in the following figure:
a. Select Advocate Voice Parking Device.
b. Select OK.
4. In the Device Editor, complete the fields in the following table.
Field Recommended entry Notes
ID Enter the destination DN. The ID must be numeric.This field is the destination CDN where the Telephony server sends contacts for this parking device.
Site Select the Avaya IC site for the server from the drop-down list.
�

Configuring qualification for voice contacts
180 Business Advocate Configuration and Administration
ACD Name Select an ACD name from the drop-down list.
Use the same ACD name that you configured in the Telephony server assigned to the same TSA server as the parking device.
Name Enter the name of the parking device.
Do not include spaces in the name of the parking device.
Media IC Manager automatically sets the value in this field.
You cannot change this field, it is automatically set to "Voice".
Wait Treatment Style
Enter the number for the wait treatment style.
This entry should correlate to the wait treatment style in the Quality Voice workflow.You must enter 1 if Business Advocate uses this parking device to hold transferred voice contacts.Enter this same number in the Wait Style block of the workflow that uses this parking device.
Wait Treatment Type (Nortel only)
Enter the type of wait treatment that the switch plays for contacts on this parking device.
The type of wait treatment that the Nortel switch plays on the CDN of the queue ID.Enter "R" for the CDN to play ringback. Enter "S" for the CDN to play silence.Enter the music source ID in a hex number, such as x88, for the CDN to play music identified by the hex number in the Nortel system.For Symposium, this is the 2 digit route number converted into hex and preceded by the # sign. If you have a single digit route, prepend the number with a 0 (zero) before converting into hex.
Field Recommended entry Notes

Parking devices for the voice channel
Issue 3 February 2005 181
5. Select OK.
6. If the following servers are running, restart them:
● Telephony server
Wait Announcement ID (Nortel/Aspect only)
Enter the CDN number that contains the announcement. Only on a Meridian Link using a Ran card, this CDN number is associated with the script that provides the route to Ran announcements.
Optional.If the expected wait time for the voice contact is longer than the length of the announcement, the contact is transferred to the wait announcement ID where the customer can listen to the announcement while waiting.Create the wait announcement ID on the switch first and configure the switch to return the contact to the queue ID after the announcement.
Wait Ring Back ID (Nortel/Aspect only)
Enter the CDN on the Nortel switch where the switch plays ring back for contacts on this parking device.
Optional.If the expected wait time for the voice contact is shorter than the length of the announcement, the contact is transferred to the wait ring back ID where the customer listens to the sounds determined by the wait treatment type.Create the wait ringback ID on the switch first.
Announcement length (Nortel/Aspect only)
Enter the maximum length of the announcement in seconds.
Required only if you enter a QDN in the Wait Announcement ID field.Avaya IC uses this time to determine how long to wait for the voice contact to return the queue ID. Caution: If the announcement plays for a longer period of time than the length in this field and the contact does not return to the queue ID within the specified length of time, Avaya IC will treat the voice contact as abandoned.
TSA Select the TSA server for this parking device from the drop-down list.
You cannot assign a parking device to more than one TSA server.
Field Recommended entry Notes

Configuring qualification for voice contacts
182 Business Advocate Configuration and Administration
● TSA server
● All workflow servers that run workflows for Business Advocate
Changing a parking deviceIf you change a parking device, you must restart the following servers:
● Telephony server
● TSA server
● All workflow servers that run workflows for Business Advocate
Telephony serverYou must enable the Telephony server for Business Advocate and assign the Telephony server to a TSA server. Business Advocate also requires that you configure the Avaya IC domains for the Telephony server as follows:
● For every Telephony server, create a separate Avaya IC domain and only place one Telephony server and one TSA server in that domain
● For every agent domain with Business Advocate agents who handle voice contacts, configure that agent domain to failover to a domain that includes a Telephony server and TSA server pair.
To configure a Telephony server for Business Advocate, perform the steps in the following sections:
1. Configuring a Telephony server on page 182 (required).
2. Configuring a backup link on page 184 (optional).
Configuring a Telephony serverTo configure a Telephony server for Business Advocate:
1. In IC Manager, select the Server tab.
2. Stop the Telephony server:
a. Right-click the Telephony server that you want to configure for Business Advocate.
b. Select Stop.

Telephony server
Issue 3 February 2005 183
3. Double-click the Telephony server in the list of servers.
4. In the Server Editor, select the Advocate tab and do the following:
a. Select the Enable Advocate box to add a checkmark in that box.
IC Manager displays the remaining fields for Business Advocate.
b. From the Default RONA Destination drop-down list, select a parking device on the same ACD as the server.
The Telephony server uses this parking device to route a voice contact under the following the following circumstances:
● If this Telephony server is not paired with a TSA server.
● If this Telephony server is paired with a TSA server and that TSA server fails.
The selected parking device must be monitored by a TSA server. The server uses this parking device for unanswered voice contacts that are returned to the queue.
The drop-down list includes only parking devices with a wait treatment of 1. The list can include parking devices on a different ACD from the server. For more information about parking devices, see Parking devices for the voice channel on page 170.
c. Select Apply.
5. Select the TS tab, shown in the following figure:
a. Right-click in the tab and select Show Advanced Properties.
b. Scroll down and select the Dial-by Equipment check box.
c. Select Apply.
6. Select the Configuration tab:
a. Select New to open the CTI Type Editor dialog box, shown in the following figure:

Configuring qualification for voice contacts
184 Business Advocate Configuration and Administration
b. From the CTI Type drop-down list, select Couple.
c. In the Name field, enter fail_route.
d. In the Value field, enter 1.
e. Select OK.
7. Select OK.
8. If you do not want to configure a backup link, right-click the Telephony server in the list of servers and select Start.If your Avaya IC system includes an Avaya switch with Communication Manager software, you can specify a backup link for high reliability in your Business Advocate system. If you want to configure a backup link, continue with the next step, Configuring a backup link on page 184.
Configuring a backup linkA backup link is a link that you configure on your Telephony switch. If the primary link fails, the backup link handles all voice contacts for your primary link.For more information about how to configure the switch, see IC Telephony Connectors Programmer Guide.
If your Avaya IC system includes a switch with Avaya Definity or Communication Manager software, you can specify a backup link for high reliability in your Business Advocate system.
Nortel switches do not support backup links.
Without a backup link, Business Advocate stops distributing incoming contacts to agents associated with the failed link.
If you configure a backup link and the primary link fails, the switch begins to send all new incoming voice contacts to the backup link. Business Advocate can continue to route those voice contacts to Business Advocate agents. However, you must move voice contacts that were parked before the link failed to failover queues.
Agents who have the primary link in their link group must handle the contacts in the failover queues before they can receive new incoming contacts from the backup link. Agents who

Creating a Workflow server for the voice channel
Issue 3 February 2005 185
do not handle contacts from the failover queues on the switch and who do not have that link in their link group can handle new incoming contacts on the backup link immediately.
To configure a backup link:
1. If necessary, double-click the Telephony server in the list of servers.
2. Select the Advocate tab.
3. In the Optional Backup Link for Advocate field, select a Telephony server to act as backup for this Telephony server.
The backup Telephony server must have the same ACD name as this Telephony server.
You cannot use the current Telephony server as its own backup. Therefore, the drop-down list does not include this Telephony server.
4. Select Apply.
5. Select OK.
6. Start the Telephony server:
a. Right-click the Telephony server.
b. Select Start.
Creating a Workflow server for the voice channelYou must create and configure at least one Workflow server to qualify voice contacts for Business Advocate. If you expect a TSA server to handle a high volume of voice contacts, create and configure multiple Workflow servers for that TSA server and the associated Telephony server.
To create a Workflow server:
1. In IC Manager, select Server > New.
2. Select Workflow from the list of servers.
3. Select OK.

Configuring qualification for voice contacts
186 Business Advocate Configuration and Administration
4. Select the General tab, and complete the fields as shown in the following table.
5. In the Server Editor for the voice qualification Workflow server, select the Channels tab.
6. Select New Channel.7. In the Channel Editor dialog box, shown in the following figure:
a. Complete the fields as shown in the following table.
Field Recommended entry Notes
Name Workflow_<domain> Include the domain in the name to identify the server in the list of servers. For example, enter Workflow_VoiceA.
Domain Select the Avaya IC domain for the server from the drop-down list.
For example, select VoiceA from the drop-down list if the server is in the VoiceA domain.
Host Select the machine�s IP address from the drop-down list, or type in the IP address if it is not in the list.
When you select the host, IC Manager fills in the fields for Directory, Port, and Executable.
Field Recommended entry
Global Do not check this field.
By Server Check this field.When you check this field, the Workflow server can only communicate with the TSA server that you select from the Service drop-down list. If you need this Workflow server to communicate with another TSA server, create an additional channel for that server.Warning: If you check this field and the TSA server is named "TSA", the Workflow server will not be able to communicate with the TSA server.
Channel Range Completed by IC Manager
Service Select the TSA server with which you want this Workflow server to communicate.
Criteria voice.qualify
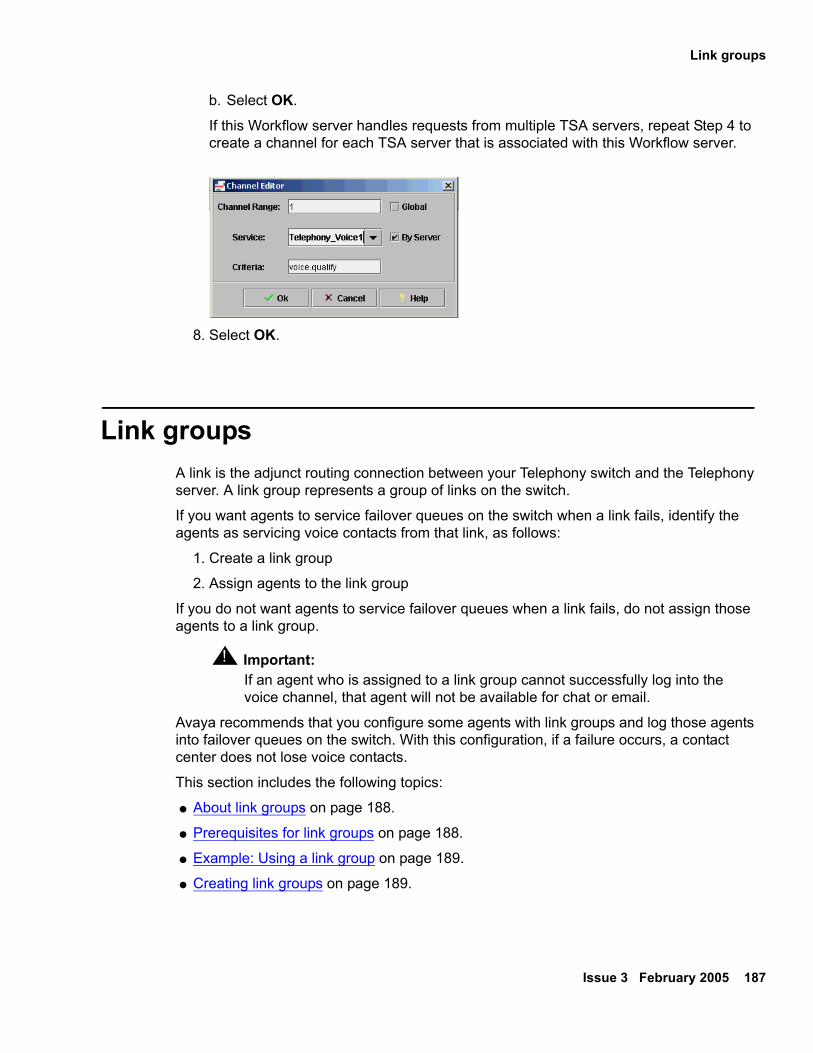
Link groups
Issue 3 February 2005 187
b. Select OK.
If this Workflow server handles requests from multiple TSA servers, repeat Step 4 to create a channel for each TSA server that is associated with this Workflow server.
8. Select OK.
Link groupsA link is the adjunct routing connection between your Telephony switch and the Telephony server. A link group represents a group of links on the switch.
If you want agents to service failover queues on the switch when a link fails, identify the agents as servicing voice contacts from that link, as follows:
1. Create a link group
2. Assign agents to the link group
If you do not want agents to service failover queues when a link fails, do not assign those agents to a link group.
! Important:! Important:Important: If an agent who is assigned to a link group cannot successfully log into the
voice channel, that agent will not be available for chat or email.
Avaya recommends that you configure some agents with link groups and log those agents into failover queues on the switch. With this configuration, if a failure occurs, a contact center does not lose voice contacts.
This section includes the following topics:
● About link groups on page 188.
● Prerequisites for link groups on page 188.
● Example: Using a link group on page 189.
● Creating link groups on page 189.

Configuring qualification for voice contacts
188 Business Advocate Configuration and Administration
● Modifying a link group on page 190.
● Deleting a link group on page 191.
About link groupsEach Telephony server is associated with a link on the switch. When an agent who handles voice contacts logs in to Avaya IC, that agent is also logged in to a Telephony server and to the switch. Avaya IC uses the Telephony server where an agent logs in to associate the agent with a link.
A link group represents a group of links on the switch. You define a link group in Avaya IC by the Telephony servers that represent those links.
A link group can include multiple Telephony servers which are configured for different links on the switch. To ensure that failover occurs properly, a contact center administration who knows the configuration of the VDNs, skills/queues, and the agent skill administration should match the switch configuration to the link group configuration in Avaya IC.
When a link fails, Business Advocate uses the link groups that include the failed link to identify which agents need to service failover queues. The agents who have the failed link in their link group do not receive contacts from Business Advocate until the link recovers and the failover queues do not contain any more voice contacts.
For example, if a link fails, the switch moves parked voice contacts on that link to failover queues. If the Avaya IC system does not include a backup link for the failed link, the switch also sends all new voice contacts to failover queues. If you configure the agents assigned to the link to be logged into the failover queues, the agents can receive voice contacts from those queues as soon as the switch moves contacts to the queues.
When the link is restored, these agents continue to service the failover queues until the queues are empty. When the agents stop receiving voice contacts from the failover queues, Business Advocate takes control of the agents again.
For information about failover, see Failover and recovery without backup link on page 52.
Prerequisites for link groupsConfigure an agent on a switch to make sure that agent can receive voice contacts from the failover queues for the links in a link group in case of link or system failure. For more information, see IC Telephony Connectors Programmer Guide.

Link groups
Issue 3 February 2005 189
Example: Using a link groupTo use a link group:
1. Configure a link group in Avaya IC.
2. Assign the link group to all of the agents who will service failover queues for the links in that group.
For example, a contact center has three links: link_1, link_2, and link_3. The contact center also has a group of agents who will service failover queues for only link_1 and link_2.
To configure this in Avaya IC, the contact center:
1. Creates a link group that includes the Telephony servers for link_1 and link_2.
2. Assigns that link group to each agent in the group that will service the failover queues for those links.
Creating link groupsWhen you create a link group, you add the name of the Telephony server that handles the CTI link to the group table in Avaya IC.
All Telephony servers in the link group must have the same ACD name and belong to the same switch. Do not create a link group that includes Telephony servers that belong to more than one switch.
To create a link group:
1. In IC Manager, select the Configuration tab.
2. In the left pane, select Tables > Telephony > Link Group to navigate to the Link Group node.
3. Right-click on the Link Group node and select New.
The right pane displays the fields that you must complete to create a link group.
4. In the Name field, enter a unique name for the link group.
5. In the Description field, enter a description of the link group.
The description is required.
6. Select the Ellipsis (�) button next to the Group field.
7. In the Link Group dialog box, shown in the following figure:
a. Select New.
IC Manager adds a row to the table.
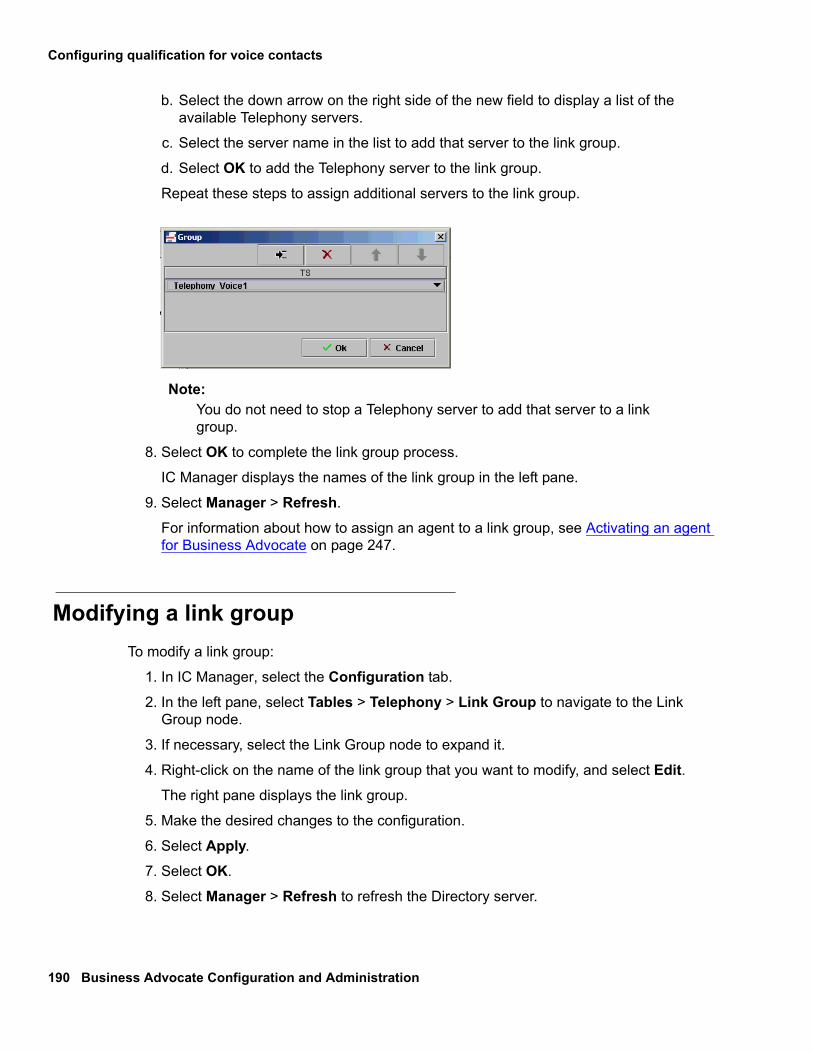
Configuring qualification for voice contacts
190 Business Advocate Configuration and Administration
b. Select the down arrow on the right side of the new field to display a list of the available Telephony servers.
c. Select the server name in the list to add that server to the link group.
d. Select OK to add the Telephony server to the link group.
Repeat these steps to assign additional servers to the link group.
Note:Note: You do not need to stop a Telephony server to add that server to a link
group.
8. Select OK to complete the link group process.
IC Manager displays the names of the link group in the left pane.
9. Select Manager > Refresh.
For information about how to assign an agent to a link group, see Activating an agent for Business Advocate on page 247.
Modifying a link groupTo modify a link group:
1. In IC Manager, select the Configuration tab.
2. In the left pane, select Tables > Telephony > Link Group to navigate to the Link Group node.
3. If necessary, select the Link Group node to expand it.
4. Right-click on the name of the link group that you want to modify, and select Edit.The right pane displays the link group.
5. Make the desired changes to the configuration.
6. Select Apply.
7. Select OK.
8. Select Manager > Refresh to refresh the Directory server.

Optional configurations for the voice channel
Issue 3 February 2005 191
Deleting a link groupYou cannot delete a link group if that link group is in use. Before you delete a link group:
● You must stop all Telephony servers in a link group before you delete the link group.
● All agents in the link group must log out of Avaya IC.
Avaya recommends that you create a new link group, move all agents and servers to the new link group, then delete the original link group.
To delete a link group:
1. In IC Manager, select the Configuration tab.
2. In the left pane, select Tables > Telephony > Link Group to navigate to the Link Group node.
3. If necessary, select the Link Group node to expand it.
4. Right-click on the name of the link group that you want to delete, and select Delete.
5. Select OK.
6. Select Manager > Refresh to refresh the Directory server.
Optional configurations for the voice channelYou can find information about how to set up the following optional configurations for the voice channel, see IC Telephony Connectors Programmer Guide:
● Return on no answer (RONA) for voice.
● Playing the estimated wait time for customers who are on hold.

Configuring qualification for voice contacts
192 Business Advocate Configuration and Administration

Issue 3 February 2005 193
Chapter 9: Configuring qualification for chat contacts
Business Advocate can qualify and route chat contacts and voice chat contacts.
! Important:! Important:Important: After you complete the qualification for chat contacts, including the
configuration of the WebACD server, only Business Advocate agents can receive chat contacts and voice chat contacts.
This section describes how Business Advocate qualifies chat contacts, and what you need to do to configure Business Advocate to qualify and route chat contacts. This section includes the following topics:
● Qualification and routing in the chat channel on page 193.
● Voice chat on page 197
● Prerequisites for configuring the chat channel on page 197.
● Qualify Chat workflow on page 197.
● Web Advocate Adaptor server for chat contacts on page 201.
● Configuring the WebACD server on page 206.
● Configuring a Workflow server for the chat channel on page 208.
For information about failover, see Failover for chat contacts on page 54. For information on how to set up RONA for the chat channel, see IC Administration Volume 2: Agents, Customers, & Queues.
Qualification and routing in the chat channelThis section describes how the Business Advocate components qualify and route a chat contact to an agent. This section includes the following topics:
● Components used to qualify a chat contact on page 194.
● Qualification and routing process for a chat contact on page 195.

Configuring qualification for chat contacts
194 Business Advocate Configuration and Administration
Components used to qualify a chat contactThe following table describes the components that Business Advocate uses to qualify and route a chat contact.
Component Function
ICM server ● Sends a route request to the WebACD server when a chat contact arrives.
WebACD server ● Receives the route request from the ICM server.● Requests and receives responses from the Web
Advocate Adaptor (WAA) server.● Delivers the chat contact to an agent.
Web Advocate Adaptor (WAA) server
● Receives the route request from the WebACD server.
● Requests and receives responses from the WebACD server, the Resource Manager server, and one or more Workflow servers.
Workflow server ● Receives the route request from the WAA server.● Runs the assigned chat qualification workflow. The
sample qualification workflow is the Qualify Chat workflow.
● Can also run an exception workflow or a transfer workflow.
Resource Manager server ● Receives the route request from the WAA server.● Notifies the WAA server if and when a qualified
agent is available.
Agent ● Receives the chat contact.

Qualification and routing in the chat channel
Issue 3 February 2005 195
Qualification and routing process for a chat contactThe following figure shows the qualification and routing process for a chat contact.
The following table describes the steps in the qualification and routing process for a chat contact, as shown in the above figure.
Step Description
1 The ICM server sends an incoming chat event for the chat contact to the WebACD server.
2 The WebACD server sends an incoming chat event for the chat contact to the WAA server.
3 The WAA server sends a request to qualify to the Workflow server that runs the Qualify Chat workflow.

Configuring qualification for chat contacts
196 Business Advocate Configuration and Administration
4 The Qualify Chat workflow qualifies the chat contact and transmits the following qualification information about the chat contact to the WAA server:● EDU ID● Service class● Wait treatment information: text, time to wait, and URL to display● Preferred agent, if specified● Logical Resource Manager, if preferred agent specified
Note: If the qualifier set on the chat contact does not match an existing service class, Business Advocate dynamically creates a service class.
5 The WAA server sends a request for an agent with the information about the chat contact to the Resource Manager server.
6 The Resource Manager server runs the Business Advocate algorithms to compare the available agents, if any, with the contacts in the queues, then tells the WAA server if an agent is immediately available to handle the chat contact.If no agent is available, the Resource Manager server continues to monitor the agents and the contacts in the queues.
Note: If there is an agent available, go to Step 8.
7 The WAA server tells the WebACD server that an agent is not available and to hold the chat contact. The WebACD server sends the wait treatment assigned by the Qualify Chat contact to customer.
8 The Resource Manager server matches the contact to an available agent, and notifies the WAA server of the login ID for the agent.
9 The WAA server sends a route response to the WebACD server with the EDU ID of the chat contact and the login ID of the agent.�
10 The WebACD server routes the contact to the agent.If your contact center includes screen pops, the WebACD server sends the EDU information to the agent application. The agent application uses the screen pop to display information about the customer to the agent.The agent answers the chat contact and chats with the customer.
Step Description

Voice chat
Issue 3 February 2005 197
Voice chatTo enable an agent for voice chat, create the qualifiers in the following table, and include those qualifiers in the capability set of the agent.
Prerequisites for configuring the chat channelBefore you configure the chat channel, complete the following steps:
1. Install and configure the Avaya IC chat channel, including all prerequisites, as described in the IC Installation and Configuration.
2. Configure the Business Advocate core servers, as described in Configuring core Business Advocate components on page 117.
3. If you want to include voice chat, configure the voice channel for Business Advocate, including all prerequisites, as described in Configuring qualification for voice contacts on page 149.
Qualify Chat workflowBy default, Business Advocate uses the sample Qualify Chat workflow to qualify chat contacts. You can find the Qualify Chat workflow in the following directory:
IC_INSTALL_DIR\IC70\design\IC\Flows\Avaya\Advocate\qualifychat_adv
Tip:Tip: You can customize the sample Qualify Chat workflow to meet the needs of a
contact center. For information, see Avaya IC Media Workflow Reference.
Type of voice chat Description Qualifier category Qualifier value
Chat & Phone Voice chat contact is initiated from a chat session. The customer uses VOIP. The agent uses a telephone.
multimedia pvchat
Chat & VOIP Voice chat contact is initiated from a chat session. The customer and the agent use a telephone.
multimedia ivchat

Configuring qualification for chat contacts
198 Business Advocate Configuration and Administration
For information about Workflow Designer, see Avaya Workflow Designer User Guide.
This section describes the steps you must perform to use the Qualify Chat workflow to qualify and match chat contacts with Business Advocate. This section includes the following topics:
1. Prerequisites for the Qualify Chat workflow on page 198.
2. Customizing the Qualify Chat workflow on page 199.
3. Configuring database settings for the workflow on page 200.
4. Building the flowset on page 200.
Prerequisites for the Qualify Chat workflowBefore you compile the Qualify Chat workflow, perform the steps in the following table.
Step Description
Create qualifiers. Some blocks in the Qualify Chat workflow use qualifiers. For more information about these qualifiers, see Sample qualifiers on page 78.Use these qualifiers to test the Qualify Chat workflow.Create additional qualifiers and configure the workflow to use those qualifiers, including the properties of the following blocks:● Map to Qualifier● Set QualifierFor more information, see Avaya IC Media Workflow Reference.
Create routing hints. Create at least one routing hint that uses the DefaultChatQueue@DefaultTenant queue.Avaya IC maintains routing hints in the RoutingHint table of the Directory server. Create routing hints in the Configuration tab of IC Manager. For more information, see the following:● Avaya IC Media Workflow Reference● IC Installation and Configuration.
Associate Web Self-Service documents with routing hints.
When a customer requests a chat contact with an agent, Web Management records the last document that the customer viewed on the Website. If that document has an associated routing hint, the Qualify Chat workflow uses that hint to map a qualifier for the chat contact.Associate routing hints with documents in the Web Self-Service console. For more information, see IC Installation and Configuration.

Qualify Chat workflow
Issue 3 February 2005 199
Customizing the Qualify Chat workflowYou do not need to configure the sample Qualify Chat workflow before you use the workflow to test a Business Advocate system. However, Avaya recommends that you create qualifiers to meet the business needs of your contact center. If you create custom qualifiers, you must customize the workflow to use those qualifiers.
The following table describes the blocks that Avaya recommends you customize in the Qualify Chat workflow.
To customize the Qualify Chat workflow:
1. In Workflow Designer, select File > Open Project and open the Advocate project.
You can find the Advocate project in the following directory: IC_INSTALL_DIR\IC70\design\IC\Flows\Avaya\Advocate
2. Double-click qualifychat_adv in the Project pane.
3. Select the block that you want to customize and open the block properties in the Property Sheet.
Block Description
Map to Qualifier Specifies values for incoming chat contacts and maps these values to a text string. The workflow uses the text string as the qualifier value for the category.
Set Qualifier Sets qualifiers from the text string set in the Map to Qualifier block. If no valid qualifier exists, you can set a default qualifier in a DefaultQualifier value on the Basic tab.
Set Chat Wait Treatment Lets you build a scripted sequence of wait treatment responses to the chat contact. Use the following three properties on the Basic tab to create the step in the sequence that the current block represents:● PushURL � The URL of a web page to push to the Web
browser of the customer waiting to chat with an agent.● SayText � A text string, typically in the form of a
sentence to push to the chat application window of a customer waiting to chat with an agent.
● WaitTime � The time in seconds that you want Web Management to display this sequence. For example, enter a value of �-1� if you want Web Management to show the sequence indefinitely.
This block collects these values into the sequence couple property ChatWaitSequence. Add more Set Chat Wait Treatment blocks to create a complex wait treatment script.

Configuring qualification for chat contacts
200 Business Advocate Configuration and Administration
4. In the Property Sheet:
a. Select the Basic tab.
b. Configure the block properties.
5. Select File > Save. Do not close the workflow in Workflow Designer.
Configuring database settings for the workflowAfter you complete the prerequisites for the Qualify Chat workflow, configure the database settings that Workflow Designer needs to build the workflow.
To configure the database settings:
1. In Workflow Designer, select File > Open Project and open the Advocate project.
You can find the Advocate project in the following directory: IC_INSTALL_DIR\IC70\design\IC\Flows\Avaya\Advocate
2. Double-click qualifychat_adv in the Project pane.
3. Select Project > Settings.
4. Select the Database tab of the Project Settings dialog box.
5. Enter the name of your Interaction Center Data Source in the IC Data Source field.
For example, enter interaction_center. All sample workflows provided with Avaya IC use the Interaction Center data source. If you created custom flows that point to a different data source, enter that data source here.
6. Enter a valid Avaya IC Administrator account in the Login ID field.
7. Enter the password for the account in the Password field.
8. Select OK. Do not close the workflow in Workflow Designer.
Building the flowsetWhen you build a workflow, Workflow Designer:
● Compiles the workflow
● Converts the workflow to XML format

Web Advocate Adaptor server for chat contacts
Issue 3 February 2005 201
! Important:! Important:Important: You must export the qualifiers from Advocate Supervisor to the
IC_INSTALL_DIR\IC70\etc directory on the machine that hosts Workflow Designer before you can build the flowset and compile your workflows. For more information, see Exporting qualifiers to Workflow Designer on page 83.
To build the flowset and load the flows:
1. Select Build > Verify Active Flow.
2. Review the results of the build in the Output bar.
Double-click an error to open the workflow and highlight the block or connector with the error.
3. After you correct all errors, select Build > Build Flow Set.4. Select File > Exit to close Workflow Designer.
Web Advocate Adaptor server for chat contactsThe Web Advocate Adaptor (WAA) server manages server interactions for Business Advocate that occur in the chat channel and the email channel.
This section describes the function of the WAA server in the chat channel, and how to create, configure, and administer the WAA server. This section includes the following topics that you need to create and configure a WAA server for chat:
1. WAA server and the chat channel on page 202.
2. Requirements for the WAA server on page 202.
3. Creating a WAA server on page 203.
4. Configuring a WAA server for the chat channel on page 204.
This section also includes the following topics:
● Modifying a WAA server on page 205.
● Deleting a WAA server on page 205.

Configuring qualification for chat contacts
202 Business Advocate Configuration and Administration
WAA server and the chat channelThe following table describes the Avaya IC servers that interact with the WAA server in the chat channel.
Requirements for the WAA serverThe WAA server in your Avaya IC system must meet the following requirements:
● The WAA server has a one-on-one relationship with the WebACD server. You can have only one WAA server for the WebACD server in your Avaya IC system.
● You must assign the WAA server to the same Avaya IC domain as the WebACD server.
● You must configure the WAA server to handle both chat contacts and email contacts if your Avaya IC system includes both media channels.
Avaya IC server Description
WebACD server The WAA server routes and queues all chat contacts for the WebACD server. With Business Advocate, the WebACD server does not use internal queues for chat contacts.
Resource Manager servers The WAA server sends a qualified service class for a contact to the Resource Manager server and requests a qualified agent. If a qualified agent is available, the Resource Manager server provides the agent information to the WAA server. If no qualified agent is available, the Resource Manager server tells the WAA server to wait and notifies the WAA server when an agent becomes available.If no qualified agent is logged in to Avaya IC, the Resource Manager server advises the WAA server to route the contact to an exception workflow.The Resource Manager servers maintain the chat queues.
Workflow servers for chat contacts
The WAA server connects to the Workflow server and starts the assigned chat qualification workflow. The sample qualification workflow is the Qualify Chat workflow.The WAA server can also start the following workflows in the Workflow server:● An exception handling workflow ● A transfer workflow

Web Advocate Adaptor server for chat contacts
Issue 3 February 2005 203
Creating a WAA serverTo create a WAA server:
1. In IC Manager, select Server > New.
2. Select WAA from the list of servers.
3. Select OK.
4. Select the General tab.
5. Complete the fields shown in the following table.
6. Select Apply.
Do not close IC Manager or the Server Editor for the WAA server. Continue with the next step.
● If your Business Advocate system includes the chat channel, continue with Configuring a WAA server for the chat channel on page 204
● If your Business Advocate system does not include the chat channel, but does include the email channel, continue with Configuring a WAA server for the email channel on page 221.
Field Recommended entry Notes
Name WAA_<domain> Include the domain in the server name to identify the server.
Domain Select the Avaya IC domain for the server from the drop-down list.
The WAA server must be in the same Avaya IC domain as the WebACD server.For example, select Web from the drop-down list if the server is in the Web domain.
Host Select the machine�s IP address from the drop-down list, or type in the IP address if it is not in the list.
When you select the host, IC Manager fills in the fields for Directory, Port, and Executable.

Configuring qualification for chat contacts
204 Business Advocate Configuration and Administration
Configuring a WAA server for the chat channelYou can assign only one Logical Resource Manager for chat in your Avaya IC system. However, if the system includes more than one Logical Resource Manager, and you assign chat agents to another Logical Resource Manager, the Distributed Business Advocate feature allows the agent pool for each Logical Resource Manager to handle chat contacts.
For information about what happens if this Logical Resource Manager is not available, see the following topics:
● Failover for chat contacts on page 54.
● Impact of server shutdown on the qualification of chat contacts on page 144.
! CAUTION:CAUTION: You must specify a Logical Resource Manager for the chat channel in the
WAA server. If you do not specify a Logical Resource Manager, you cannot complete the configuration of the WAA server, and Business Advocate cannot qualify chat contacts.
The default workflows are the sample chat workflows for Business Advocate installed with Workflow Designer. For more information about the sample workflows, see IC Media Workflow Reference.
To configure the WAA server for the chat channel:
1. In the Server Editor for the WAA server, select the Chat tab.
2. In the Configure Advocate for Chat Channel field, select the box to add a checkmark.
After you check the box, IC Manager displays the remaining fields required to configure the chat channel.
3. From the Chat LRM drop-down list, select the Logical Resource Manager that handles chat contacts.
4. In the Chat Qualification Flow field, accept the default workflow or enter a custom workflow for the WAA to use to qualify chat contacts.
The default is the sample chat qualification workflow, advocate.qualifychat_adv. To use a custom workflow, enter <workflow_project>.<workflow>. This field is case-sensitive. Use all lower case letters.
5. In the Chat Routing Exception Flow field, accept the default workflow or enter a custom workflow for the WAA to use for chat contacts.
The default is the sample chat routing exception workflow, advocate.route_exception. To use a custom workflow, enter <workflow_project>.<workflow>. This field is case-sensitive. Use all lower case letters.

Web Advocate Adaptor server for chat contacts
Issue 3 February 2005 205
6. In the Chat Transfer Exception Flow field, accept the default workflow or enter a custom workflow for the WAA to use for chat contacts.
The default is the sample transfer exception workflow, advocate.route_exception. To use a custom workflow, enter <workflow_project>.<workflow>. This field is case-sensitive. Use all lower case letters.
7. Select Apply.
8. Select OK to complete the configuration of the WAA server for the chat channel.
Modifying a WAA serverYou can modify the name of the WAA server. The WAA server obtains its configuration data when the server starts. You must restart the WAA server for any changes to take effect.
To modify a WAA server:
1. In IC Manager, select the Server tab.
2. Stop the WAA server:
a. Right-click on the WAA server.
b. Select Stop.
After the Alarm Monitor displays a message confirming that the server has stopped correctly, continue with the next step.
3. Double-click the WAA server in the list of servers.
4. Make the desired changes to the configuration.
5. Select Apply.
6. Select OK.
7. Right-click on the WAA server and select Start to restart the WAA server.
Deleting a WAA serverTo delete a WAA server:
1. In IC Manager, select the Server tab.
2. Right-click on the WAA server and select Stop to stop the WAA server.
3. After the Alarm Monitor displays a message confirming that the server has stopped correctly, right-click on the WAA server and select Delete.
4. In the confirmation message box, Select OK to confirm the deletion.
Configuring qualification for chat contacts
206 Business Advocate Configuration and Administration
Configuring the WebACD serverConfigure the WebACD server if your Avaya IC system uses Business Advocate to qualify chat contacts or email contacts. After you configure the WebACD server for Business Advocate, the WebACD server no longer uses its own internal system for queues. In a Business Advocate system, the WebACD server relies on Business Advocate to queue chat contacts and email contacts.
This section includes the following topics:
● Queuing parameters for the WebACD server on page 206.
● Consequences of configuring the WebACD server on page 207.
● Configuring the WebACD server for Business Advocate on page 207.
Queuing parameters for the WebACD serverWhen you configure the WebACD server, you add queuing parameters. These parameters determine how many seconds the WebACD server should wait before requeuing an undelivered chat contact or email contact to Business Advocate.
The following table describes the queuing parameters for the WebACD server.
For chat contacts, the WebACD server uses the queuing parameter if no qualified agent is logged in to Avaya IC. For email contacts, the WebACD server uses the queuing parameter if no qualified agent is defined in Business Advocate.
For example, Business Advocate qualifies an email contact as Email/Spanish, but the system does not include an agent with a capability set for Email/Spanish. The WebACD server raises an alarm in the Alarm Monitor of IC Manager. The WebACD server waits for an hour to give a contact center supervisor time to define a capability set of Email/Spanish for an agent. After the hour has elapsed, the WebACD server requeues the email contact.
Queuing parameters Default values in seconds
Advocate_Requeue_Time_Chat 30
Advocate_Requeue_Time_Email 3600

Configuring the WebACD server
Issue 3 February 2005 207
Consequences of configuring the WebACD serverYou must stop and restart the WebACD server after you configure the server for Business Advocate.
When the WebACD server restarts:
1. The WebACD server no longer uses its own internal system for queues.
2. Agents can receive chat contacts and email contacts only through Business Advocate.
3. If a WebACD queue includes email contacts, the WebACD server removes those email contacts from the queues and sends those contacts to the Workflow server that handles email contacts for requalification.
4. The Workflow server requalifies all email contacts with the Qualify Email workflow for Business Advocate.
5. The Qualify Email workflow sends the email contacts to Business Advocate to be placed back in a queue or matched with an available agent.
6. After the Workflow server completes the requalification, Business Advocate matches new email contacts that arrived in the system during the requalification.
This requalification can take a significant amount of time, if the queue contains a large number of email contacts. The WebACD server is not available when the Workflow server requalifies the email contacts.
Configuring the WebACD server for Business AdvocateTo configure the WebACD server for Business Advocate:
1. In IC Manager, select the Server tab.
2. Stop the WebACD server:
a. Right-click on the WebACD server.
b. Select Stop.
3. After the Alarm Monitor displays a message confirming that the server has stopped correctly, double-click the WebACD server.
4. Select the Advocate tab.
a. Select the Enable Advocate box to add a checkmark in that box.
b. Select Apply.
c. In the Warning message, review the warning and select Yes to continue.

Configuring qualification for chat contacts
208 Business Advocate Configuration and Administration
5. Select the Configuration tab:
a. Select New to open the CTI Type Editor dialog box.
b. From the CTI Type drop-down list, select Couple.
c. In the Name field, enter Advocate_Requeue_Time_Email.
d. In the Value field, enter 3600.
e. Select OK.
6. In the Configuration tab:
a. Select New to open the CTI Type Editor dialog box.
b. From the CTI Type drop-down list, select Couple.
c. In the Name field, enter Advocate_Requeue_Time_Chat.
d. In the Value field, enter 30.
e. Select OK.
7. Start the WebACD server:
a. Right-click the WebACD server.
b. Select Start.
! Important:! Important:Important: After you select Apply you cannot stop Business Advocate from requalifying
all email contacts when you restart the WebACD server. Even if you uncheck the Enable Advocate checkbox before you restart the WebACD server, Business Advocate requalifies all email contacts in queue.
Configuring a Workflow server for the chat channelYou must configure at least one Workflow server to qualify chat contacts for Business Advocate. If you expect Business Advocate to handle a high volume of chat contacts, you can create and configure multiple Workflow servers.
For information on how to create a Workflow server, see IC Installation and Configuration.
To configure a Workflow server for the chat channel:
1. In IC Manager, double-click the chat qualification Workflow server in the list of servers.
2. Select the Channels tab.
3. Select New Channel.
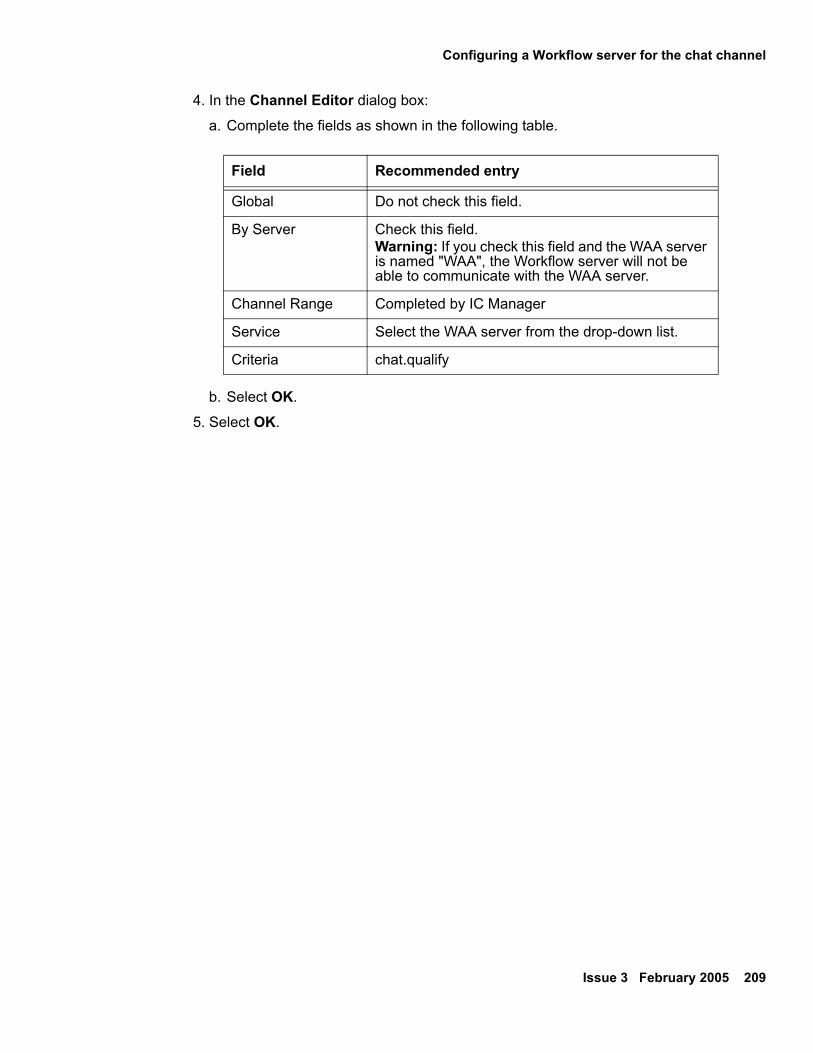
Configuring a Workflow server for the chat channel
Issue 3 February 2005 209
4. In the Channel Editor dialog box:
a. Complete the fields as shown in the following table.
b. Select OK.
5. Select OK.
Field Recommended entry
Global Do not check this field.
By Server Check this field.Warning: If you check this field and the WAA server is named "WAA", the Workflow server will not be able to communicate with the WAA server.
Channel Range Completed by IC Manager
Service Select the WAA server from the drop-down list.
Criteria chat.qualify

Configuring qualification for chat contacts
210 Business Advocate Configuration and Administration
Issue 3 February 2005 211
Chapter 10:Configuring qualification for email contacts
Business Advocate can qualify and route both inbound email contacts and outbound email contacts.
! Important:! Important:Important: After you complete the qualification for email contacts, including the
configuration of the WebACD server, only Business Advocate agents can receive email contacts.
This section describes how Business Advocate qualifies email contacts, and what you need to do to configure Business Advocate to qualify email contacts. This section includes the following topics:
● Qualification and routing in the email channel on page 211.
● Prerequisites for configuring the email channel on page 214.
● Qualify Email workflow on page 215.
● Web Advocate Adaptor server for email contacts on page 219.
● Configuring a Workflow server for the email channel on page 222.
● Retrieving email contacts from an agent on page 223.
For information about failover, see Failover for email contacts on page 54. For information on how to set up RONA for the email channel, see IC Administration Volume 2: Agents, Customers, & Queues.
Qualification and routing in the email channelThis section describes how the Business Advocate components qualify and route an email contact to an agent. This section includes the following topics:
● Components used to qualify an email contact on page 212.
● Qualification and routing process for an email contact on page 213.
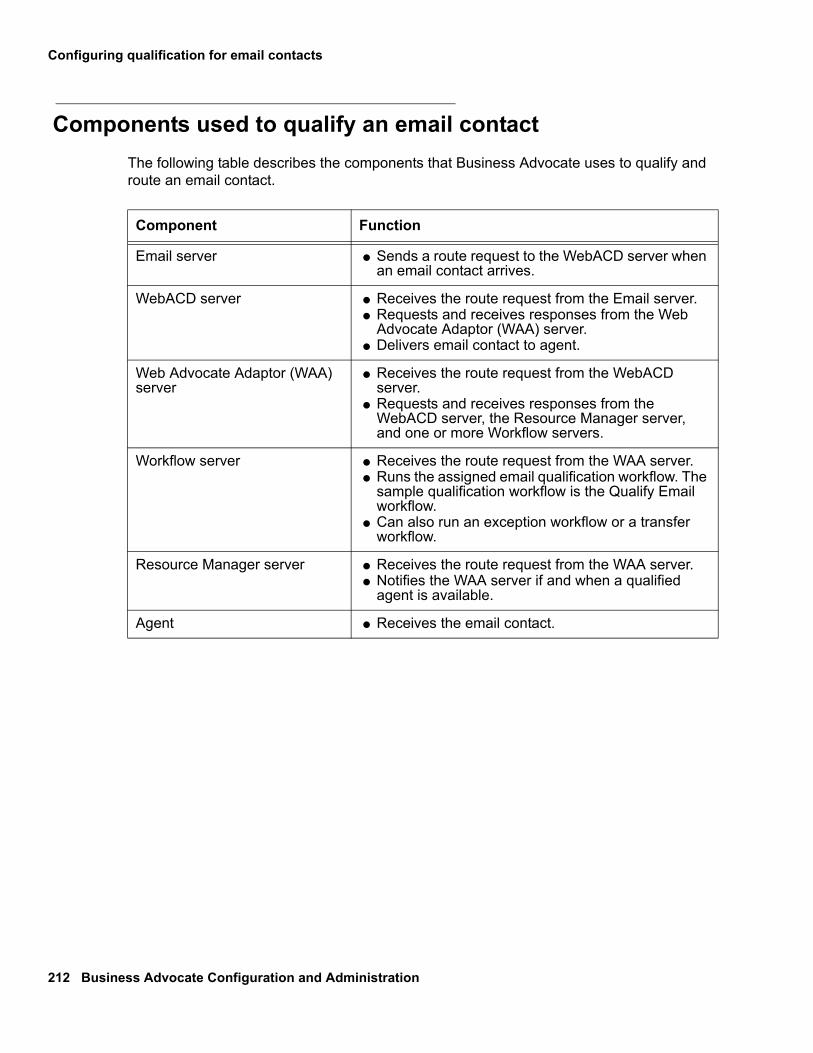
Configuring qualification for email contacts
212 Business Advocate Configuration and Administration
Components used to qualify an email contactThe following table describes the components that Business Advocate uses to qualify and route an email contact.
Component Function
Email server ● Sends a route request to the WebACD server when an email contact arrives.
WebACD server ● Receives the route request from the Email server.● Requests and receives responses from the Web
Advocate Adaptor (WAA) server.● Delivers email contact to agent.
Web Advocate Adaptor (WAA) server
● Receives the route request from the WebACD server.
● Requests and receives responses from the WebACD server, the Resource Manager server, and one or more Workflow servers.
Workflow server ● Receives the route request from the WAA server.● Runs the assigned email qualification workflow. The
sample qualification workflow is the Qualify Email workflow.
● Can also run an exception workflow or a transfer workflow.
Resource Manager server ● Receives the route request from the WAA server.● Notifies the WAA server if and when a qualified
agent is available.
Agent ● Receives the email contact.

Qualification and routing in the email channel
Issue 3 February 2005 213
Qualification and routing process for an email contactThe following figure shows the qualification and routing process for an email contact.
The following table describes the steps in the qualification and routing process for an email contact, as shown in the above figure.
Step Description
1 The IC Email server sends an incoming email event for the email contact to the WebACD server.
2 The WebACD server sends an incoming email event for the email contact to the WAA server.
3 The WAA server sends a request to qualify to the Workflow server that runs the Qualify Email workflow.

Configuring qualification for email contacts
214 Business Advocate Configuration and Administration
Prerequisites for configuring the email channelBefore you configure the email channel, complete the following steps:
1. Install and configure the Avaya IC email channel, including all prerequisites, as described in the IC Installation and Configuration.
4 The Qualify Email workflow qualifies the email contact and transmits the following qualification information about the email contact to the WAA server:● EDU ID● Service class● Preferred agent, if specified● Logical Resource Manager, if preferred agent specified
Note: If the qualifier set on the email contact does not match an existing service class, Business Advocate dynamically creates a service class.
5 The WAA server sends a request for an agent with the information about the email contact to the Resource Manager server.
6 The Resource Manager server runs the Business Advocate algorithms to compare the available agents, if any, with the contacts in the queues, then tells the WAA server if an agent is immediately available to handle the email contact.If no agent is available, the Resource Manager server continues to monitor the agents and the contacts in the queues.
Note: If there is an agent available, go to Step 8.
7 The WAA server tells the WebACD server that an agent is not available and to hold the email contact.
8 The Resource Manager server matches the contact to an available agent, and notifies the WAA server of the login ID for the agent.
9 The WAA server sends a route response to the WebACD server with the EDU ID of the email contact and the login ID of the agent.
10 The WebACD server routes the contact to the agent:● If the agent is available, delivers the email contact to the Email task list for
the agent.● If the agent is not available, holds the email contact in a queue until the
agent is available to receive the contact.If your contact center includes screen pops, the WebACD server sends the EDU information to the agent application. The agent application uses the screen pop to display information about the customer to the agent.
Step Description
Qualify Email workflow
Issue 3 February 2005 215
2. Configure the Business Advocate core servers, as described in Configuring core Business Advocate components on page 117.
3. Create the Web Advocate Adaptor server, as described in Creating a WAA server on page 203.
4. Configure the WebACD server for Business Advocate, as described in Configuring the WebACD server on page 206.
Qualify Email workflowBusiness Advocate uses the Qualify Email workflow to qualify email contacts. You can find the Qualify Email workflow in the following directory:
IC_INSTALL_DIR\IC70\design\IC\Flows\Avaya\Advocate\qualifyemail_adv
For detailed information about the Qualify Email workflow, see Avaya IC Media Workflow Reference. For information about how to use Workflow Designer, see Avaya Workflow Designer User Guide.
This section describes the steps you must perform to use the Qualify Email workflow to qualify email contacts with Business Advocate. This section includes the following topics:
1. Prerequisites for the Qualify Email workflow on page 216.
2. Customizing the Qualify Email workflow on page 216.
3. Configuring the Qualify Email workflow on page 217.
4. Configuring database settings for the workflow on page 218.
5. Building the flowset on page 219.
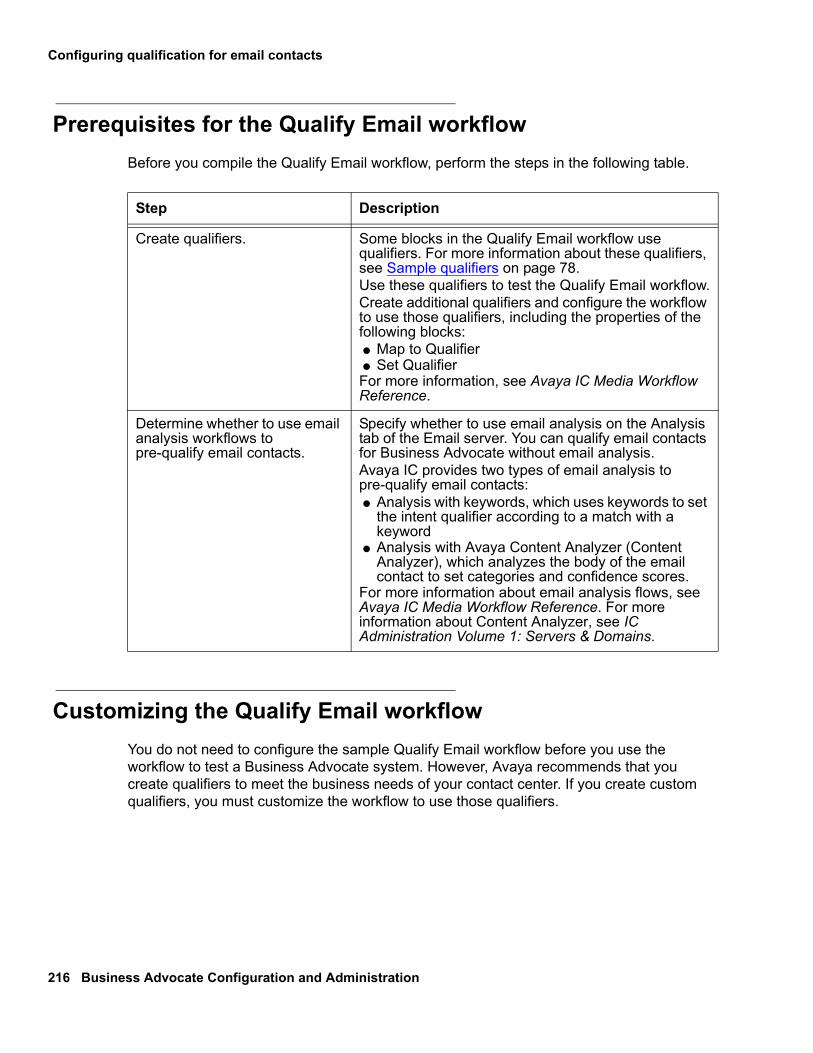
Configuring qualification for email contacts
216 Business Advocate Configuration and Administration
Prerequisites for the Qualify Email workflowBefore you compile the Qualify Email workflow, perform the steps in the following table.
Customizing the Qualify Email workflowYou do not need to configure the sample Qualify Email workflow before you use the workflow to test a Business Advocate system. However, Avaya recommends that you create qualifiers to meet the business needs of your contact center. If you create custom qualifiers, you must customize the workflow to use those qualifiers.
Step Description
Create qualifiers. Some blocks in the Qualify Email workflow use qualifiers. For more information about these qualifiers, see Sample qualifiers on page 78.Use these qualifiers to test the Qualify Email workflow.Create additional qualifiers and configure the workflow to use those qualifiers, including the properties of the following blocks:● Map to Qualifier● Set QualifierFor more information, see Avaya IC Media Workflow Reference.
Determine whether to use email analysis workflows to pre-qualify email contacts.
Specify whether to use email analysis on the Analysis tab of the Email server. You can qualify email contacts for Business Advocate without email analysis.Avaya IC provides two types of email analysis to pre-qualify email contacts:● Analysis with keywords, which uses keywords to set
the intent qualifier according to a match with a keyword
● Analysis with Avaya Content Analyzer (Content Analyzer), which analyzes the body of the email contact to set categories and confidence scores.
For more information about email analysis flows, see Avaya IC Media Workflow Reference. For more information about Content Analyzer, see IC Administration Volume 1: Servers & Domains.

Qualify Email workflow
Issue 3 February 2005 217
The following table describes the blocks that Avaya recommends you customize in the Qualify Email workflow.
Configuring the Qualify Email workflowIf your Avaya IC system does not use email analysis workflows to prequalify email contacts, configure the Map to Qualifier (toaddress) blocks with valid email addresses that will be used by inbound email contacts.
! Important:! Important:Important: Create qualifiers with the category intent and a qualifier value for each of the
To address values you enter into Qualifier_1 through Qualifier_4 in the Map to Qualifier (toaddress) block. For more information, see Creating a qualifier on page 79.
To configure the Qualify Email workflow:
1. In Workflow Designer, select File > Open Project and open the Advocate project.
You can find the Advocate project in the following directory: IC_INSTALL_DIR\IC70\design\IC\Flows\Avaya\Advocate
2. Double-click qualifyemail_adv in the Project pane.
3. Configure the Map to Qualifier (toaddress) block:
a. Select the block to open the block properties in the Property Sheet.
b. In the Property Sheet, select the Basic tab.
Block Description
Map to Qualifier Specifies values for incoming email contacts and maps these values to a text string. The workflow uses the text string as the qualifier value for the category.
Set Qualifier Sets qualifiers from the text string set in the Map to Qualifier block. If no valid qualifier exists, you can set a default qualifier in a DefaultQualifier value on the Basic tab.
Configuring qualification for email contacts
218 Business Advocate Configuration and Administration
c. Set the properties in the following table.
4. Select File > Save. Do not close the workflow in Workflow Designer.
Configuring database settings for the workflowAfter you complete the prerequisites for the Qualify Email workflow, configure the database settings that Workflow Designer needs to build the workflow.
To configure the database settings:
1. In Workflow Designer, select File > Open Project and open the Advocate project.
You can find the Advocate project in the following directory: IC_INSTALL_DIR\IC70\design\IC\Flows\Avaya\Advocate
2. Double-click qualifyemail_adv in the Project pane.
3. Select Project > Settings.
4. Select the Database tab of the Project Settings dialog box.
5. Enter the name of your Interaction Center Data Source in the IC Data Source field.
For example, enter interaction_center. All sample workflows provided with Avaya IC use the Interaction Center data source. If you created custom flows that point to a different data source, enter that data source here.
6. Enter a valid Avaya IC Administrator account in the Login ID field.
7. Enter the password for the account in the Password field.
8. Select OK. Do not close the workflow in Workflow Designer.
Property Description
Qualifier_1 through Qualifier_4 Enter intent values for the qualifiers which map to the To address. For example, enter:● sales● support
Value_1 through Value_4 Enter the To address values that map to the qualifier values in Qualifier_1 to Qualifier_4. For example, if you use sales as Qualifier_1, then in Value_1 enter the email address where sales email contacts are sent.

Web Advocate Adaptor server for email contacts
Issue 3 February 2005 219
Building the flowsetWhen you build a workflow, Workflow Designer:
● Compiles the workflow
● Converts the workflow to XML format
! Important:! Important:Important: You must export the qualifiers from Advocate Supervisor to the
IC_INSTALL_DIR\IC70\etc directory on the machine that hosts Workflow Designer before you can build the flowset and compile your workflows. For more information, see Exporting qualifiers to Workflow Designer on page 83.
To build the flowset and load the flows:
1. Select Build > Verify Active Flow.
2. Review the results of the build in the Output bar.
Double-click an error to open the workflow and highlight the block or connector with the error.
3. After you correct all errors: select Build > Build Flow Set.4. Select File > Exit to close Workflow Designer.
Web Advocate Adaptor server for email contactsThe Web Advocate Adaptor (WAA) server manages server interactions for Business Advocate that occur in the chat channel and the email channel.
This section describes the function of the WAA server in the email channel, and how to configure the WAA server for email. This section includes the following topics that you need to create and configure a WAA server for email:
1. WAA server and the email channel on page 220.
2. Requirements for the WAA server on page 220.
3. Configuring a WAA server for the email channel on page 221.
For information about how to administer the WAA server, see Web Advocate Adaptor server for chat contacts on page 201.

Configuring qualification for email contacts
220 Business Advocate Configuration and Administration
WAA server and the email channelThe following table describes the Avaya IC servers that interact with the WAA server in the email channel.
Requirements for the WAA serverThe WAA server in your Avaya IC system must meet the following requirements:
● The WAA server has a one-on-one relationship with the WebACD server. You can have only one WAA server for the WebACD server in your Avaya IC system.
● You must assign the WAA server to the same Avaya IC domain as the WebACD server.
● You cannot configure the WAA server to failover to a WAA server in another domain.
● You must configure the WAA server to handle both chat contacts and email contacts if your Avaya IC system includes both media channels.
Avaya IC server Description
WebACD server The WAA server routes and queues all email contacts for the WebACD server. With Business Advocate, the WebACD server does not use internal queues for email contacts.
Resource Manager servers The WAA server sends a qualified service class for a contact to the Resource Manager server and requests a qualified agent. If a qualified agent is available, the Resource Manager server provides the agent information to the WAA server. If no qualified agent is available, the Resource Manager server tells the WAA server to wait and notifies the WAA server when an agent becomes available.If no qualified agent is defined in Avaya IC to handle email contacts in the service class, the Resource Manager server advises the WAA server to send the contact to an exception workflow.The Resource Manager servers maintain the email queues.
Workflow servers for chat contacts
The WAA server triggers the Workflow server to run the following workflows for email contacts:● Qualify Email workflow● Exception handling workflows● Transfer workflows
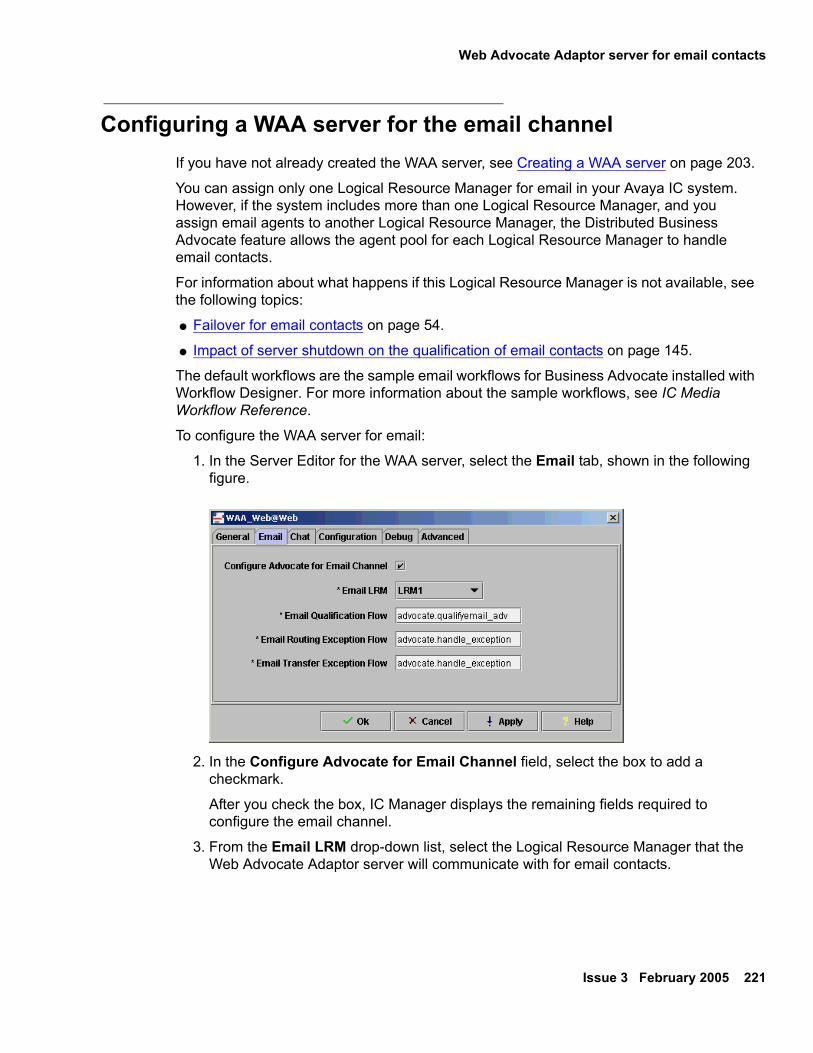
Web Advocate Adaptor server for email contacts
Issue 3 February 2005 221
Configuring a WAA server for the email channelIf you have not already created the WAA server, see Creating a WAA server on page 203.
You can assign only one Logical Resource Manager for email in your Avaya IC system. However, if the system includes more than one Logical Resource Manager, and you assign email agents to another Logical Resource Manager, the Distributed Business Advocate feature allows the agent pool for each Logical Resource Manager to handle email contacts.
For information about what happens if this Logical Resource Manager is not available, see the following topics:
● Failover for email contacts on page 54.
● Impact of server shutdown on the qualification of email contacts on page 145.
The default workflows are the sample email workflows for Business Advocate installed with Workflow Designer. For more information about the sample workflows, see IC Media Workflow Reference.
To configure the WAA server for email:
1. In the Server Editor for the WAA server, select the Email tab, shown in the following figure.
2. In the Configure Advocate for Email Channel field, select the box to add a checkmark.
After you check the box, IC Manager displays the remaining fields required to configure the email channel.
3. From the Email LRM drop-down list, select the Logical Resource Manager that the Web Advocate Adaptor server will communicate with for email contacts.

Configuring qualification for email contacts
222 Business Advocate Configuration and Administration
4. In the Email Qualification Flow field, accept the default workflow or enter a custom workflow for the WAA to use to qualify email contacts.
The default is the sample email qualification workflow, advocate.qualifyemail_advocate. To use a custom workflow, enter <workflow_project>.<workflow>. This field is case-sensitive. Use all lower case letters.
5. In the Email Routing Exception Flow field, accept the default workflow or enter a custom workflow for the WAA to use for email contacts.
The default is the sample email routing exception workflow, advocate.route_exception. To use a custom workflow, enter <workflow_project>.<workflow>. This field is case-sensitive. Use all lower case letters.
6. In the Email Transfer Exception Flow field, accept the default transfer exception workflow or enter a custom workflow for the WAA to use for email contacts.
The default is the sample transfer exception workflow, advocate.route_exception. To use a custom workflow, enter <workflow_project>.<workflow>. This field is case-sensitive. Use all lower case letters.
7. Select Apply.
8. Select OK.
Configuring a Workflow server for the email channelYou must configure at least one Workflow server to qualify email contacts for Business Advocate. If you expect Business Advocate to handle a high volume of email contacts, you can create and configure multiple Workflow servers.
For information on how to create a Workflow server, see IC Installation and Configuration.
To configure a Workflow server for the email channel:
1. In IC Manager, double-click the email qualification Workflow server in the list of servers.
2. Select the Channels tab.
3. Select New Channel.4. In the Channel Editor dialog box, shown in the following figure:

Retrieving email contacts from an agent
Issue 3 February 2005 223
a. Complete the fields as shown in the following table.
b. Select OK.
5. Select OK.
Retrieving email contacts from an agentThe steps to retrieve an email contact from an agent depend upon whether the email contact is in the Email task list or in a wait queue.
This section includes the following topics that describe how to retrieve email contacts:
● Retrieving email contacts from a wait queue on page 224.
● Retrieving email contacts from an Email task list on page 224.
Field Recommended entry
Global Do not check this field.
By Server Check this field.Warning: If you check this field and the WAA server is named "WAA", the Workflow server will not be able to communicate with the WAA server.
Channel Range Completed by IC Manager
Service Select the WAA server from the drop-down list.
Criteria email.qualify

Configuring qualification for email contacts
224 Business Advocate Configuration and Administration
Retrieving email contacts from a wait queueAfter Business Advocate matches an email contact with an agent, the email contact remains in a wait queue if the agent is logged out or already has the maximum allowed number of email contacts in the Email task list.
To retrieve email contacts from a wait queue:
1. If the agent has not already done so, have the agent log out of Avaya IC.
2. In IC Manager, set the agent status to Out of Office, as described in Marking an agent as out of office on page 257.
Business Advocate retrieves all email contacts from the agent and sends the contacts to an exception workflow. Business Advocate then requalifies all of the email contacts and matches them with qualified agents.
! Important:! Important:Important: Do not change the agent status until Business Advocate has requalified all
email contacts and delivered them to agents. If you reactivate the agent before that happens, Business Advocate might route an email contact back to the original agent.
Retrieving email contacts from an Email task listAfter Business Advocate matches an email contact with an agent, Business Advocate delivers the email contact to the Email task list in Avaya Agent if the agent is logged in and has not yet reached the maximum allowed number of email contacts in the task list.
Use the IC Web Administration Tool in IC Manager to retrieve email contacts from the Email task list. For more information, see IC Administration Volume 1: Servers & Domains.

Issue 3 February 2005 225
Chapter 11: Configuring virtual queues
Business Advocate uses virtual queues for internal transfers of voice contacts and email contacts to agents qualified for a service class. Business Advocate does not use virtual queues for internal transfers of contacts directly to a specific agent.
This section describes virtual queues and how to create and configure them. This section includes the following topics:
1. Virtual queues on page 225.
2. Prerequisites for virtual queues on page 226.
3. Restrictions on virtual queue names on page 226.
4. Example: configuring a virtual queue on page 226.
5. Creating a virtual queue on page 227.
Virtual queuesFor Business Advocate, a virtual queue is a destination where an agent can transfer voice contacts and email contacts. The service classes that you assign to a virtual queue determine which qualified agent or group of agents can receive transferred contacts from the virtual queue.
For Business Advocate, a virtual queue can be one of the following:
● A collection of service classes for a Business Advocate only virtual queue
● A collection of service classes and queues for a combination of Business Advocate and non-Advocate qualification and routing
A virtual queue can include one or more service classes.

Configuring virtual queues
226 Business Advocate Configuration and Administration
Prerequisites for virtual queuesYou must create the following items before you can create a virtual queue:
● Qualifiers, as described in Creating a qualifier on page 79.
● Service classes, as described in Creating a service goal on page 104.
Restrictions on virtual queue namesEvery virtual queue in an Avaya IC system must have a unique name. You cannot use the same name for virtual queues in different Avaya IC tenants.
The Unified Agent Directory only displays the name of the virtual queue to the agent, not the tenant. If you use the same name for two virtual queues, then agents will not be able to identify which queue they need to use to transfer a contact.
Example: configuring a virtual queueA virtual queue can contain queues or service classes in each media but cannot contain a queue and service class for the same media. For example, a virtual queue can contain one or more service classes for the voice channel, or one or more queues for the voice channel, but cannot contain a service class for voice and a queue for voice.
A virtual queue can contain one or more service classes for the voice channel and one or more service classes for the email channel.
For example, a contact center for an HR department includes agents who can handle voice contacts and email contacts. The contact center creates a virtual queue named HR. The HR virtual queue includes the following service classes:
● Voice/HR to route voice contacts
● Email/HR to route email contacts
If a virtual queue includes more than one service class, the transfer workflow selects the correct service class to route the contacts in each media to the correct destination. For example, the transfer workflow selects the voice service class if an agent transfers a voice contact.
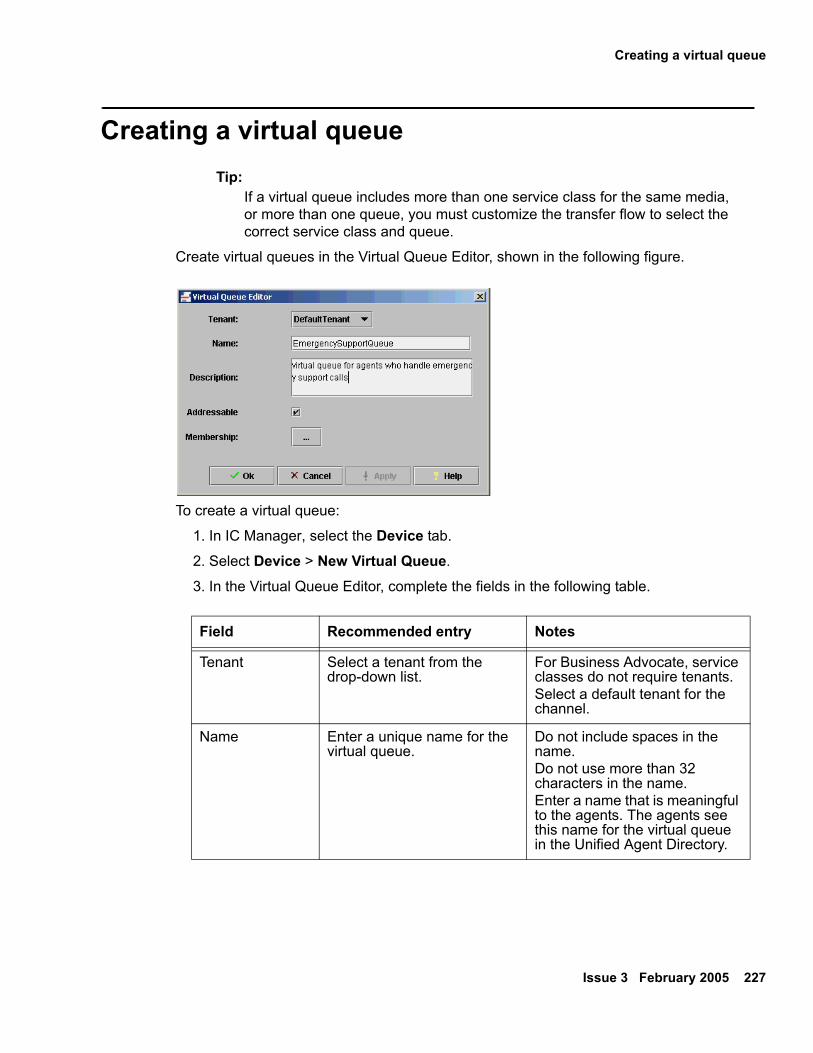
Creating a virtual queue
Issue 3 February 2005 227
Creating a virtual queueTip:
Tip: If a virtual queue includes more than one service class for the same media, or more than one queue, you must customize the transfer flow to select the correct service class and queue.
Create virtual queues in the Virtual Queue Editor, shown in the following figure.
To create a virtual queue:
1. In IC Manager, select the Device tab.
2. Select Device > New Virtual Queue.
3. In the Virtual Queue Editor, complete the fields in the following table.
Field Recommended entry Notes
Tenant Select a tenant from the drop-down list.
For Business Advocate, service classes do not require tenants.Select a default tenant for the channel.
Name Enter a unique name for the virtual queue.
Do not include spaces in the name.Do not use more than 32 characters in the name.Enter a name that is meaningful to the agents. The agents see this name for the virtual queue in the Unified Agent Directory.

Configuring virtual queues
228 Business Advocate Configuration and Administration
4. Select the Ellipsis (�) button next to the Membership field.
5. In the Membership dialog box, shown in the following figure:
a. Do at least one of the steps shown in the following table.
Description Enter a description for the virtual queue.
Addressable Check this box if you want agents to see the virtual queue in the Unified Agent Directory.
In a production system, do not check this box until you want agents to use the virtual queue.
Step Procedure
To add a service class to the virtual queue.
Do the following:1. Select one of the following options
to specify the channel for the service classes:- Voice- Email
2. Select Service Classes. 3. Select the desired service classes
from the Available Service Classes list.
4. Select the >> button to add the service classes to the Current Members list.
Field Recommended entry Notes

Creating a virtual queue
Issue 3 February 2005 229
b. Select OK to complete the membership assignment.
6. Select OK.
7. To allow agents to transfer contacts to a new virtual queue, do one of the following for every Workflow server in a user domains that runs workflows for the Unified Agent Directory:
● Manually run the sys_transfer.update_vq_cache workflow
● Restart each Workflow server
To assign devices to the virtual queue.Note: You cannot add a device for the same channel as the service classes.
Do the following:1. Select one of the following options
to specify the channel for the device:- Voice- Email
2. Select Devices.3. Select the desired device in the
Available Devices list.4. Select the >> button to add the
device to the Current Members list.
Step Procedure

Configuring virtual queues
230 Business Advocate Configuration and Administration

Issue 3 February 2005 231
Chapter 12:Using profiles
Profiles define a group of capability sets. When you assign the profile to an agent, you assign all of the capability sets in the profile to that agent.
This section describes how Business Advocate uses profiles, and how to assign agents to profiles. This section includes the following topics:
● Profiles on page 231.
● Profile Plus on page 232.
● Creating a profile on page 233.
● Defining a capability set for a profile on page 234.
● Assigning an agent to a profile on page 237.
● Removing an agent from a profile on page 239.
● Copying a profile on page 239.
● Renaming a profile on page 240.
● Deleting a profile on page 240.
ProfilesA profile defines one or more capability sets that include all of the qualifiers that you want to assign to one or more agents. When you assign an agent to a profile, you automatically assign the capability sets in the profile to that agent.
You can use a profile to assign the same capability sets to multiple agents. With a profile, you do not need to select the qualifiers and define the capability sets in each individual agent record. Therefore, if you want to assign the same capability sets to several agents, profiles can substantially reduce the amount of time that you need to configure and update the agent records.
When you update a profile, Advocate Supervisor automatically updates the capability sets for all agents that you have assigned to the profile. You cannot use a profile to change the

Using profiles
232 Business Advocate Configuration and Administration
capability sets for only some agents assigned to the profile. For information on how to do that, see Profile Plus on page 232.
You can also change the capability sets for an agent by assigning the agent to a different profile.
Tip:Tip: Avaya recommends that you create a different profile for each group of
agents in your contact center.
Profile PlusYou can use Profile Plus to add one or more qualifiers to the capability sets in a profile for one agent. If you use Profile Plus, you do not need to create a new profile, nor do you need to change the capability sets for all agents assigned to the profile.
For example, a contact center divides the agents into a Sales group and a Service group. All agents in the Sales group speak only English, except one agent who speaks Japanese and English. The contact center wants take advantage of this additional capability, and have the agent handle any Japanese language contacts for the Sales group. The contact center uses Profile Plus to add service classes with the Japanese qualifier to the agent who speaks Japanese without changing the profile.
You cannot use Profile Plus to remove qualifiers from one or more capability sets in a profile.
If you configure an agent with Profile Plus, you can add capability sets to the record for that agent. You cannot delete capability sets from a profile with Profile Plus. For more information, see Assigning a capability set to an agent on page 250.

Creating a profile
Issue 3 February 2005 233
Creating a profileYou create a new profile in the New Profile dialog box, shown in the following figure.
! Important:! Important:Important: To use Advocate Supervisor, log in to the machine with an Active Directory
Domain account that has local administrator privileges.
To create a profile:
1. In the console tree of Advocate Administration, select and expand Advocate Supervisor > Resources > Profiles.
2. Right-click Profiles and select New Profile from the right-click menu.
3. In the New Profile dialog box, complete the fields as shown in the following table.
Field Recommended entry Description
Name Enter a name for the profile. Assign a unique name for the profile.
Description Enter a description for the profile.
The description should reflect the contents of the profile.

Using profiles
234 Business Advocate Configuration and Administration
4. Select Apply.
Do not close the profile record. Continue with Defining a capability set for a profile on page 234.
Defining a capability set for a profileTo define a capability set for a profile, perform the steps in one of the following sections:
● Use the Profile Properties dialog box to define a capability set, as described in Using the Profile Properties dialog box to define a capability set for a profile on page 235.
● Use the Capability Wizard to simultaneously define multiple capability sets, as described in Using the Capability Wizard to define multiple capability sets for a profile on page 236.
The following table shows the menu items that you select to define a capability set for a profile.
Menu item Description
Role Defines the activation type for this qualifier set. For each qualifier set, a profile can assign an agent one of the following activation types:● Regular● Reserve● BackupFor more information, see Activation types for agents on page 242.
Activation Defines the activation level for this service class. The activation level determines what the service state must be for Business Advocate to activate the agents with this profile for this qualifier set. For example, the default activation levels are:● Regular - On Target● Reserve - On Target - Future Risk● Backup - On TargetFor more information about activation levels, see Service states on page 96. If you configure an agent with a critical activation level and do not set a critical threshold for that service class, the agent will never be activated for that service class.
Display Name Defines the name of the qualifier set.

Defining a capability set for a profile
Issue 3 February 2005 235
Using the Profile Properties dialog box to define a capability set for a profile
Use this procedure if you want to define only a small number of capability sets. If you have a large number of possible qualifiers, see Using the Capability Wizard to define multiple capability sets for a profile on page 236.
To define a capability set for a profile:
1. If you do not already have the New Profile dialog box open:
a. In the console tree of Advocate Administration, select and expand Advocate Supervisor > Resources > Profiles.
b. Right-click the profile for which you want to define a capability set and select Properties.
2. To assign a qualifier to the capability set:
a. Select the empty field below each column.
b. Select a value for each item from the drop-down list.
- Role
- Activation
- Display name
- Channel
- If desired, one or more columns that represent a qualifier category
Repeat this step for all capability sets that you want to assign to the profile.
3. Select Apply after you define all of the capability sets to this profile.
Advocate Supervisor saves the changes to the database and validates your selections. If all selections are valid, Business Advocate updates the changes in real-time. Advocate Supervisor highlights all rows that contain errors. For example, Advocate Supervisor highlights a row if you did not make a selection in a required column.
4. Select OK.
Channel Defines the channel for the qualifier set.
Qualifier categories
Defines the categories for qualifiers that you include in the set. Business Advocate adds a column for every category that you create for the qualifiers in your Business Advocate system. You decide whether to include the qualifier in the qualifier set. For more information, see Creating a qualifier on page 79.
Menu item Description
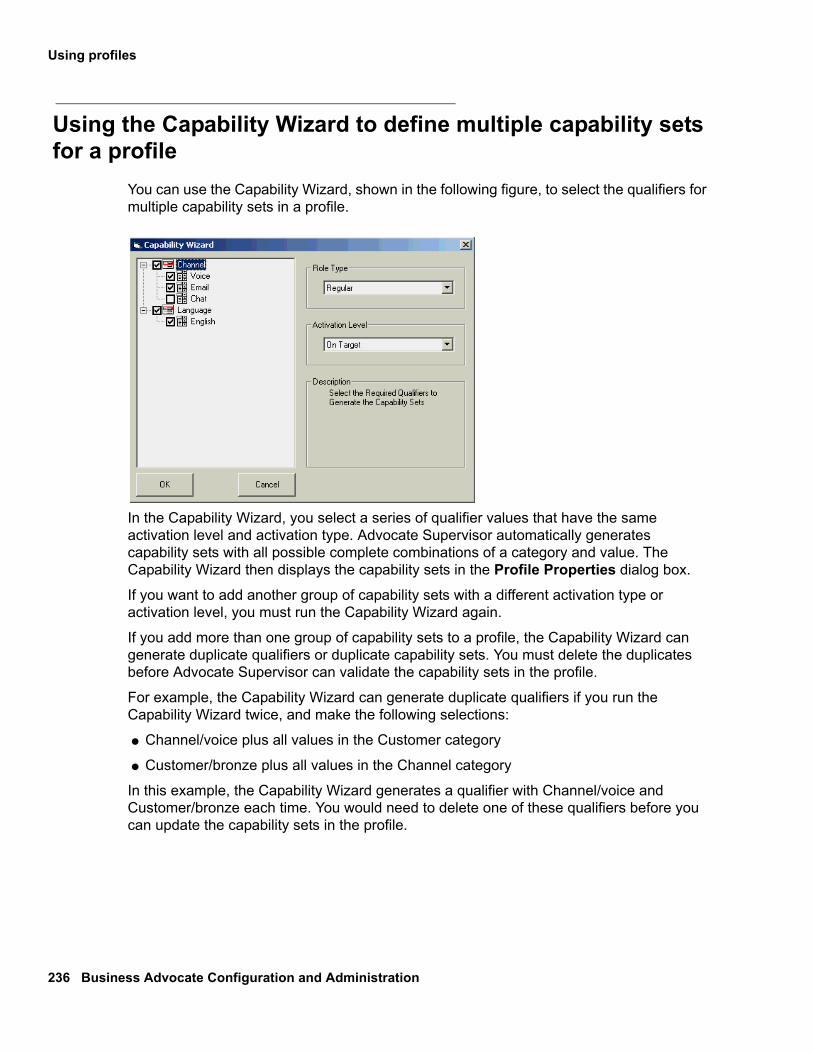
Using profiles
236 Business Advocate Configuration and Administration
Using the Capability Wizard to define multiple capability sets for a profile
You can use the Capability Wizard, shown in the following figure, to select the qualifiers for multiple capability sets in a profile.
In the Capability Wizard, you select a series of qualifier values that have the same activation level and activation type. Advocate Supervisor automatically generates capability sets with all possible complete combinations of a category and value. The Capability Wizard then displays the capability sets in the Profile Properties dialog box.
If you want to add another group of capability sets with a different activation type or activation level, you must run the Capability Wizard again.
If you add more than one group of capability sets to a profile, the Capability Wizard can generate duplicate qualifiers or duplicate capability sets. You must delete the duplicates before Advocate Supervisor can validate the capability sets in the profile.
For example, the Capability Wizard can generate duplicate qualifiers if you run the Capability Wizard twice, and make the following selections:
● Channel/voice plus all values in the Customer category
● Customer/bronze plus all values in the Channel category
In this example, the Capability Wizard generates a qualifier with Channel/voice and Customer/bronze each time. You would need to delete one of these qualifiers before you can update the capability sets in the profile.
Assigning an agent to a profile
Issue 3 February 2005 237
To use the Capability Wizard to define multiple capability sets for a profile:
1. If you do not already have the New Profile dialog box open:
a. In the console tree of Advocate Administration, select and expand Advocate Supervisor > Resources > Profiles.
b. Right-click the profile for which you want to define capability sets and select Properties.
2. Select Wizard.
3. In the Capability Wizard dialog box, complete the following steps:
a. In the left pane, select the appropriate boxes to add a checkmark next to each qualifier value that you want to include in the capability sets.
b. From the Role Type drop-down list, select the activation type for the qualifiers.
c. From the Activation Level drop-down list, select the activation level for the qualifiers.
d. Select OK.
Repeat this step for any qualifiers with a different activation type or activation level that you want to include in the capability sets.
4. Select Apply in the Profile Properties dialog box.
Advocate Supervisor saves the changes to the database and validates your selections. If all selections are valid, Business Advocate updates the changes in real-time.
Advocate Supervisor highlights all rows that contain errors. For example, Advocate Supervisor highlights a row if you did not make a selection in a column or added a duplicate qualifier set.
5. Select OK.
Assigning an agent to a profileAfter you create a profile, you can assign one or more agents to the profile. You can assign additional agents to a profile at any time.
You can also assign a profile to an individual agent in the Attributes tab of the Agent Properties dialog box. For more information, see Configuring Business Advocate attributes for an agent on page 248.
You must create and configure agents for Business Advocate before you can assign an agent to a profile. You can also assign a profile to an agent when you assign attributes to an agent. For more information, see Configuring Business Advocate attributes for an agent on page 248.

Using profiles
238 Business Advocate Configuration and Administration
When you assign an agent to a profile, Business Advocate automatically updates the profile information in the agent attributes.
The following figure shows the Assign Agent to Profile dialog box.
To assign an agent to a profile:
1. In the console tree of Advocate Administration, select and expand Advocate Supervisor > Resources > Profiles.
2. In the results pane, right-click a profile and select Properties.
3. Select Assign Agents.
4. In the Assign Agent to a Profile dialog box:
a. Select the Profile option.
b. Select an agent in the Agent List field.
c. Select Add> to move the agent to the Agent List with Profile field.
Repeat these steps to assign additional agents to the profile.
d. Select OK.
Advocate Supervisor saves the changes to the database and validates your selections. If all selections are valid, Business Advocate updates the changes in real-time.
Removing an agent from a profile
Issue 3 February 2005 239
Removing an agent from a profileYou can remove one or more agents from a profile if you want to change the capability sets for the agents.
You can also remove an individual agent from a profile in the Attributes tab of the Agent Properties dialog box. For more information, see Configuring Business Advocate attributes for an agent on page 248.
To remove an agent from a profile:
1. In the console tree of Advocate Administration, select and expand Advocate Supervisor > Resources > Profiles.
2. In the results pane, right-click a profile and select Properties.
3. Select Assign Agents.
4. In the Assign Agent to a Profile dialog box:
a. Select the Profile option.
b. Select an agent in the Agent List with Profile field.
c. Select <Remove to move the agent to the Agent List field.
Repeat these steps to remove additional agents from the profile.
d. Select OK.
Advocate Supervisor saves the changes to the database and validates your selections. If all selections are valid, Business Advocate updates the changes in real-time.
Copying a profileYou can copy a profile, then make minor changes to create a similar profile.
To copy a profile:
1. In the console tree of Advocate Administration, select and expand Advocate Supervisor > Resources > Profiles.
2. In the results pane, right-click a profile and select Copy Profile.
Advocate Supervisor displays a new profile named "Copy of <profile_name>."
3. Right-click the new profile and select Rename.

Using profiles
240 Business Advocate Configuration and Administration
4. Type in the new name or edit the existing name.
5. Press the Enter key or click your mouse outside the name edit box.
Advocate Supervisor displays the new name in the results pane. You can now change the qualifier sets assigned to the profile. For more information, see Defining a capability set for a profile on page 234.
Renaming a profileYou can rename a profile in the results pane. If you rename a profile that is in use, Advocate Supervisor automatically updates the profile name for all agents assigned that profile.
To rename a profile:
1. In the console tree of Advocate Administration, select and expand Advocate Supervisor > Resources > Profiles.
2. In the results pane, right-click a profile and select Rename.
3. Type in the new name or edit the existing name.
4. Press the Enter key or click your mouse outside the name edit box.
Advocate Supervisor displays the new name in the results pane and updates the profile name in the agent records.
Deleting a profileYou cannot delete a profile if you have not removed all agents from that profile. To remove agents from a profile, see Removing an agent from a profile on page 239.
To delete a profile:
1. In the console tree of Advocate Administration, select and expand Advocate Supervisor > Resources > Profiles.
2. In the results pane, right-click a profile and select Delete.
3. Select Yes to confirm that you want to delete the profile.
Advocate Supervisor removes the profile from the list in the results pane. If the profile is still visible, refresh the view and check again.
Issue 3 February 2005 241
Chapter 13:Managing agents
Agents are the primary resources that Advocate Supervisor manages. Agent records include activation types and capability sets that you can assign to individual agents, or to groups of agents.
This section describes the Business Advocate properties that you need to set for each agent, and describes how to create and configure agent records. This section includes the following topics:
● Activation types for agents on page 242.
● Activation levels on page 243.
● Capability sets for an agent on page 245.
● Reacting to changes in agent configuration on page 246.
● Creating an agent on page 246.
● Activating an agent for Business Advocate on page 247.
● Refreshing agent records on page 248.
● Configuring Business Advocate attributes for an agent on page 248.
● Assigning a capability set to an agent on page 250.
● Making an agent inactive on page 257.
● Returning an agent to active status on page 259.
● Deleting an agent on page 260.
Tip:Tip: If you make changes to an agent in Advocate Supervisor, Business
Advocate updates the agent configuration in real-time. For example, if you add a new capability set to an agent record, the agent can immediately receive contacts from the service class with identical qualifiers to the capability set.
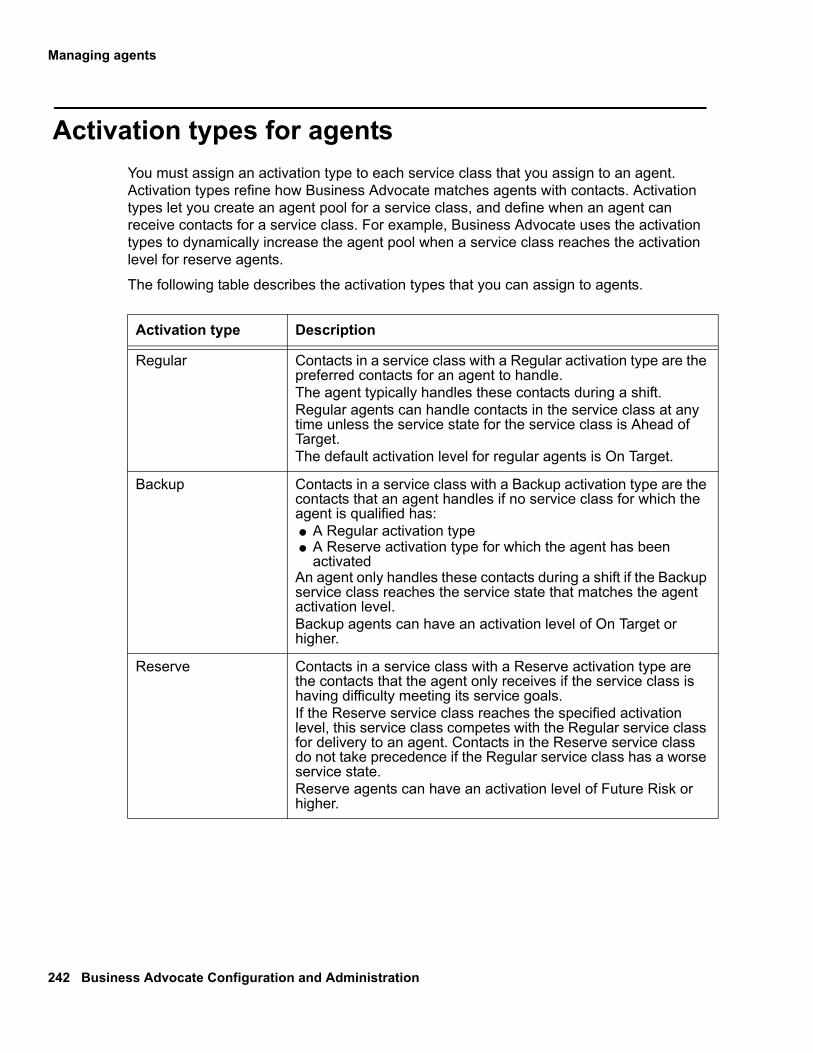
Managing agents
242 Business Advocate Configuration and Administration
Activation types for agentsYou must assign an activation type to each service class that you assign to an agent. Activation types refine how Business Advocate matches agents with contacts. Activation types let you create an agent pool for a service class, and define when an agent can receive contacts for a service class. For example, Business Advocate uses the activation types to dynamically increase the agent pool when a service class reaches the activation level for reserve agents.
The following table describes the activation types that you can assign to agents.
Activation type Description
Regular Contacts in a service class with a Regular activation type are the preferred contacts for an agent to handle. The agent typically handles these contacts during a shift.Regular agents can handle contacts in the service class at any time unless the service state for the service class is Ahead of Target. The default activation level for regular agents is On Target.
Backup Contacts in a service class with a Backup activation type are the contacts that an agent handles if no service class for which the agent is qualified has:● A Regular activation type● A Reserve activation type for which the agent has been
activatedAn agent only handles these contacts during a shift if the Backup service class reaches the service state that matches the agent activation level.Backup agents can have an activation level of On Target or higher.
Reserve Contacts in a service class with a Reserve activation type are the contacts that the agent only receives if the service class is having difficulty meeting its service goals.If the Reserve service class reaches the specified activation level, this service class competes with the Regular service class for delivery to an agent. Contacts in the Reserve service class do not take precedence if the Regular service class has a worse service state.Reserve agents can have an activation level of Future Risk or higher.

Activation levels
Issue 3 February 2005 243
Activation levelsActivation levels are service states. When you configure the capability sets for an agent, you select an activation type and an activation level. When a service class reaches or passes the service state that matches the activation level, Business Advocate activates that agent to handle contacts in the service class.
For details of the service states that you can use as activation levels, see Identifying the types of service states on page 97.
Example: setting activation levelsThe agent in this example is very good at sales, and frequently sells additional items to customers. The agent has a lot of experience with telephone sales. However, the agent has just learned how to conduct chat sessions with customers.
The agent works in the sales group of the contact center.
Customers of the contact center in this example can contact agents through the voice channel, the email channel, or the chat channel. The contact center divides the customers into two groups. Premium customers typically make large purchases and require expert knowledge and fast service from agents. Regular customers typically make smaller purchases and can receive slower service from agents.
This section includes the following topics:
● Qualifiers in the capability sets on page 243.
● Activation type for each service class on page 244.
● Activation level for each activation type on page 244.
Qualifiers in the capability sets
In this example, an agent can handle contacts in five service classes that have the following sets of qualifiers:
1. Channel/voice, Customer/premium, CustomerType/sales
2. Channel/email, Customer/premium, CustomerType/sales
3. Channel/voice, Customer/regular, CustomerType/sales
4. Channel/email, Customer/regular, CustomerType/sales
5. Channel/chat, Customer/regular, CustomerType/sales

Managing agents
244 Business Advocate Configuration and Administration
Activation type for each service class
The administrator of the contact center reviews the skills of the agent and decides that the agent should work as follows:
● The agent should concentrate on telephone sales and email sales to premium customers.
● The agent does not have enough experience to receive chat contacts from premium customers.
● The agent can handle email contacts from regular customers if the agent has no other work.
● The agent can handle voice contacts from regular customers if this service class might miss its service goal.
● The agent can receive chat contacts from regular customers if this service class is in serious jeopardy of missing its service goal.
Therefore, the administrator of the contact center sets the activation types for each qualifier set, as shown in the following table.
Activation level for each activation type
The administrator reviews the service states available for each activation type and sets the activation level, as shown in the following table.
Service class Activation type
Channel/voice, Customer/premium, CustomerType/sales Regular
Channel/email, Customer/premium, CustomerType/sales Regular
Channel/voice, Customer/regular, CustomerType/sales Reserve
Channel/email, Customer/regular, CustomerType/sales Backup
Channel/chat, Customer/regular, CustomerType/sales Reserve
Service class Activation type Activation level
Channel/voiceCustomer/premiumCustomerType/sales
Regular On Target
Channel/emailCustomer/premiumCustomerType/sales
Regular On Target

Capability sets for an agent
Issue 3 February 2005 245
Capability sets for an agentAn agent can have one or more capability sets. Each capability set should include the same qualifiers as a service class that you want the agent to handle. Business Advocate uses the capability sets to match a contact with the agent. If the qualifiers in a capability set match the qualifiers in the service class for a contact, Business Advocate matches the contact to the agent.
If even one qualifier on the contact is missing from a capability set, Business Advocate assumes that the agent is not able to handle the contact and looks for another agent.
Avaya IC associates agents with their capability sets every time they log in.
A capability set for an agent includes the following:
● Activation type
● Activation level
● Channel qualifier
● Other selected qualifiers
Channel/voiceCustomer/regularCustomerType/sales
Reserve On Target - Immediate Risk
Channel/emailCustomer/regularCustomerType/sales
Backup On Target
Channel/chatCustomer/regularCustomerType/sales
Reserve Behind Target
Service class Activation type Activation level

Managing agents
246 Business Advocate Configuration and Administration
Reacting to changes in agent configurationIf you change the configuration for an agent in Business Advocate Supervisor, Business Advocate immediately uses the new configuration to match the agent with a contact. The agent does not have to log in or log out to make the change effective.
However, certain changes to the configuration of an agent require an agent to log out, then log back in again for the changes to take effect. An agent must log out if you:
● Change an agent property in IC Manager.
● Activate the agent for Business Advocate.
● Deactivate the agent for Business Advocate.
● Assign the agent to another Logical Resource Manager.
Creating an agentYou create all agents in IC Manager. You cannot create an agent in Advocate Supervisor.
After you activate an agent for Business Advocate in IC Manager, you can use Advocate Supervisor to configure Business Advocate options for the agent.
For more information on how to create an agent, see IC Administration Volume 2: Agents, Customers, & Queues.
! Important:! Important:Important: If your Avaya IC system includes agents that use Business Advocate and
Outbound Contact, each of those agents must have two agent records in Avaya IC. One agent record must have a login ID for Business Advocate. The second agent record must have a different login ID for Outbound Contact. The agent cannot use both components simultaneously.

Activating an agent for Business Advocate
Issue 3 February 2005 247
Activating an agent for Business AdvocateIf you did not perform this step when you created the agent in IC Manager, you must now activate the agent for Business Advocate.
Note:Note: If you do not activate an agent for Business Advocate in IC Manager, you
cannot see that agent in Advocate Supervisor.
If you no longer want a Business Advocate agent to receive contacts from Business Advocate, you must deactivate the agent. After you deactivate an agent for Business Advocate, the agent will receive contacts from non-Advocate routing. For more information, see Deactivating an agent for Business Advocate on page 258.
To activate an agent for Business Advocate:
1. In IC Manager, select the Agent tab.
2. Double-click the agent in the list of agents.
3. In the Agent Editor, select the Advocate tab, shown in the following figure.
4. Select the Activate Advocate box to place a checkmark in the box.
IC Manager displays the remaining fields for Business Advocate.
5. From the LRM drop-down list, select a logical resource manager for the agent.
6. If desired, from the Telephony Link Group drop-down list, select a link group.
For more information about link groups, see Link groups on page 187.
7. Select OK.
The agent record displays in Advocate Supervisor with the login ID and full name of the agent.

Managing agents
248 Business Advocate Configuration and Administration
Refreshing agent recordsEach time you add an agent or change an agent record in IC Manager, you must refresh the agent records in Advocate Supervisor.
To refresh agent records in Advocate Supervisor:
1. In the console tree of Advocate Administration, select and expand Advocate Supervisor > Resources > Agents.
2. In the left pane, right-click Agents and select Refresh.
Configuring Business Advocate attributes for an agent
You cannot configure all Business Advocate attributes for an agent in Advocate Supervisor. You configure some agent attributes in IC Manager. The following table shows those agent attributes.
Field Description
Login name Displays the information from the Login ID field in IC Manager. You must configure this field in IC Manager.
Full name Displays the information from the Full Name field in IC Manager. You must configure this field in IC Manager.
Description Identifies the agent. For example, the description can include information such as region, shift, employee group, or name.
Site location Identifies the work site location for the agent. If your contact center has more than one site, this information helps to identify an agent.The site location is typically the name of a region, such as a city or state. The site location does not have to match the network domain or Avaya IC domain for the agent.Note: Business Advocate does not limit the contacts that an agent can handle to those contacts that arrive in the same site. To use site to restrict the contacts that an agent can handle, create qualifiers for the different sites and assign a site qualifier to the agent.
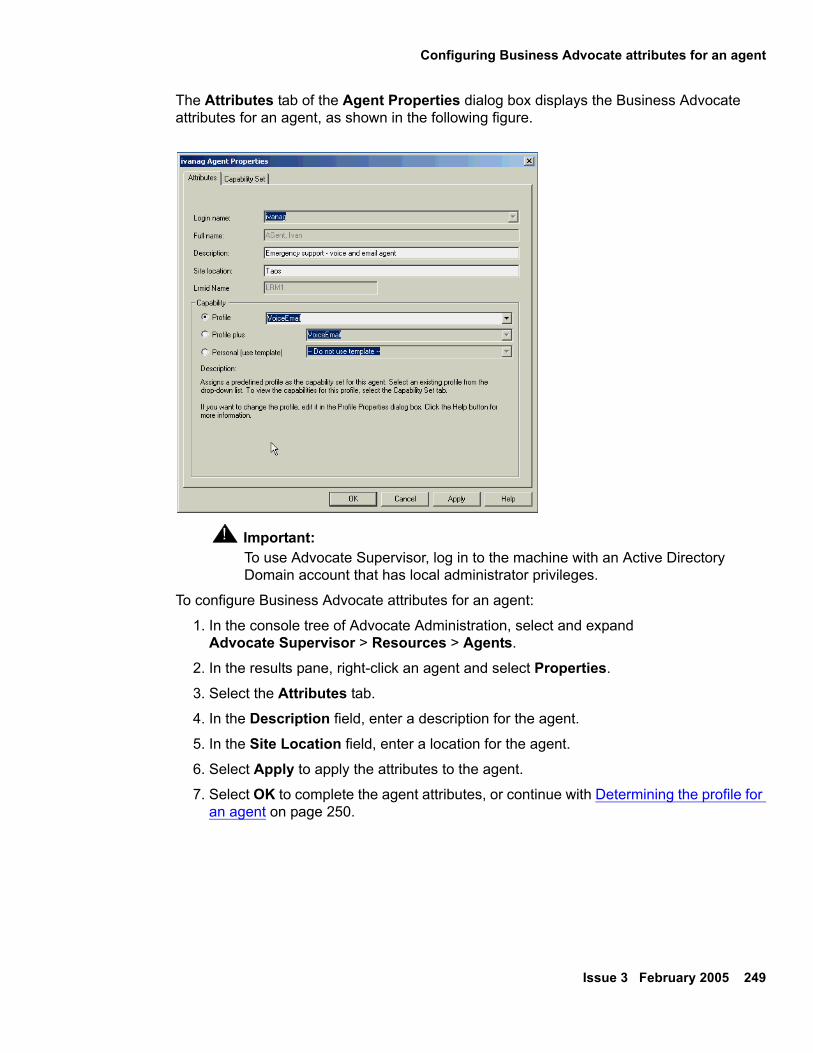
Configuring Business Advocate attributes for an agent
Issue 3 February 2005 249
The Attributes tab of the Agent Properties dialog box displays the Business Advocate attributes for an agent, as shown in the following figure.
! Important:! Important:Important: To use Advocate Supervisor, log in to the machine with an Active Directory
Domain account that has local administrator privileges.
To configure Business Advocate attributes for an agent:
1. In the console tree of Advocate Administration, select and expand Advocate Supervisor > Resources > Agents.
2. In the results pane, right-click an agent and select Properties.
3. Select the Attributes tab.
4. In the Description field, enter a description for the agent.
5. In the Site Location field, enter a location for the agent.
6. Select Apply to apply the attributes to the agent.
7. Select OK to complete the agent attributes, or continue with Determining the profile for an agent on page 250.

Managing agents
250 Business Advocate Configuration and Administration
Assigning a capability set to an agentAvaya recommends that you use profiles to configure and administer all Business Advocate agents.
! CAUTION:CAUTION: For each service class in use in your Business Advocate system, create a
capability set with the same qualifier set. Business Advocate might not be able to match a contact to an agent if the qualifiers on the contact do not match a capability set defined for an agent. If a capability set does not match a service class, Business Advocate sends the contact to an exception workflow.
To assign a capability set to an agent, perform the steps the following sections:
1. Determining the profile for an agent on page 250.
2. Perform the steps in one of the following sections:
● Use the agent record to assign a small number of capability sets to an individual agent, as described in Defining a capability set for one agent on page 252.
● Use the Capability wizard to assign multiple capability sets to an individual agent, as described in Using the Capability Wizard to define multiple capability sets on page 254.
● Use a profile to assign one or more capability sets to multiple agents, as described in Creating a profile on page 233.
Determining the profile for an agentIf you want to assign a profile or Profile Plus to multiple agents, see Assigning an agent to a profile on page 237.
To determine the profile for an agent:
1. If you do not already have the Agent Properties dialog box open:
a. In the console tree of Advocate Administration, select and expand Advocate Supervisor > Resources > Agents.
b. Right-click the agent to which you want to assign a profile and select Properties.
2. If necessary, select the Attribute tab.

Assigning a capability set to an agent
Issue 3 February 2005 251
3. Select one of the Capability options in the following table. After you select one of these options, the other options are unavailable.
4. Select Apply.
5. If you selected:
a. Profile Plus or Personal as the Capability option, continue with one of the following:
● Use the agent record to assign a small number of capability sets to an individual agent, as described in Defining a capability set for one agent on page 252.
● Use the wizard to assign multiple capability sets to an individual agent, as described in Using the Capability Wizard to define multiple capability sets on page 254.
b. Profile as the Capability option, Select OK.
Option Description
Profile To assign a profile:1. Select the Profile option.2. Select a profile from the drop-down list for the agent.
Advocate Supervisor automatically applies all profile changes to the agent. For more information, see Using profiles on page 231.
Profile Plus To assign Profile Plus:1. Select the Profile Plus option.2. Select a profile from the drop-down list for the agent.
If you select Profile Plus, you can add one or more capability sets for the agent. You cannot modify capability sets in the profile.For more information, see Profile Plus on page 232,
Personal Select this option if:● You do not want to use a profile for the agent.● You want to use a profile from the drop-down list as a
template for the capability sets.You can modify capability sets in the profile. Note: Advocate Supervisor will not apply changes to the profile to this agent.
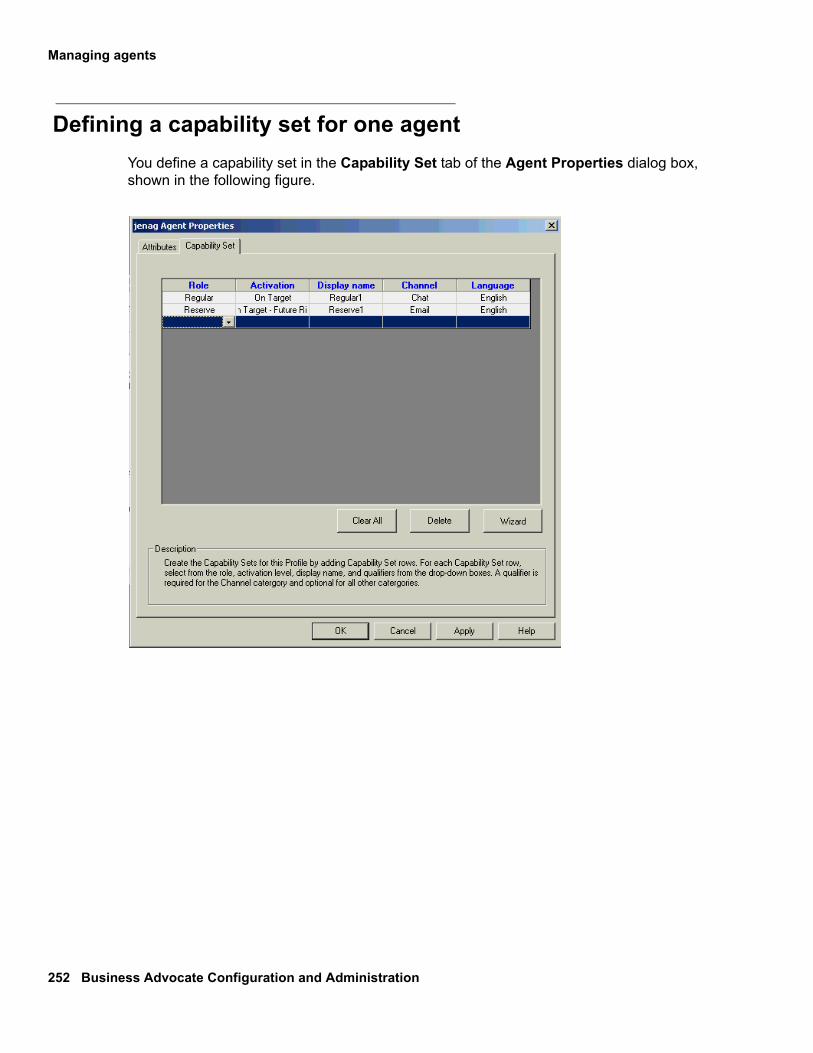
Managing agents
252 Business Advocate Configuration and Administration
Defining a capability set for one agentYou define a capability set in the Capability Set tab of the Agent Properties dialog box, shown in the following figure.

Assigning a capability set to an agent
Issue 3 February 2005 253
The Capability Set tab displays the columns shown in the following table.
To define a capability set for an agent:
1. If you do not already have the Agent Properties dialog box open:
a. In the console tree of Advocate Administration, select and expand Advocate Supervisor > Resources > Agents.
b. Right-click the agent to which you want to assign a profile and select Properties.
2. Select the Capability Set tab.
3. Click in the following columns in an empty row and select a value from the drop-down list:
● Role● Activation● Display name● Channel
Column Description
Role Defines the activation type for this capability set. For each capability set, an agent can have one of the following activation types:● Regular● Reserve● BackupFor more information, see Activation types for agents on page 242.
Activation Defines the activation level for this capability set. The activation level determines what the service state must be for Business Advocate to activate an agent. For example, the default activation levels are:● Regular - On Target● Reserve - On Target - Future Risk● Backup - On TargetFor more information about activation levels, see Service states on page 96. If you configure an agent with a critical activation level and do not set a critical threshold for that service class, the agent will never be activated for that service class.
Display Name Defines the name of the capability set.
Channel Defines the channel for the capability set.
<custom_category>
Defines additional categories for qualifier values that you can include in the capability set. Advocate Supervisor adds a column to the Capability Set tab for every category that you create for the qualifiers in your Business Advocate system. You must decide whether to include qualifiers from the category in the capability set. For more information, see Creating a qualifier on page 79.

Managing agents
254 Business Advocate Configuration and Administration
● If desired, one or more columns that represent a custom qualifier categoryRepeat this step for every capability set that you want to define for the agent.
4. Select Apply after you defined add all of the capability sets for the agent.
Advocate Supervisor saves the changes to the database and validates your selections. If all selections are valid, Business Advocate updates the changes in real-time.
Advocate Supervisor highlights all rows that contain errors. For example, Advocate Supervisor highlights a row if you did not make a selection in a column or added a duplicate service class.
5. Select OK.
Using the Capability Wizard to define multiple capability setsYou can use the Capability Wizard to select the qualifiers that define multiple capability sets for an agent. Use the Capability Wizard to easily assign multiple qualifiers with the same activation level and activation type.
In the Capability Wizard, you select a series of qualifier values that have the same activation level and activation type. Advocate Supervisor automatically generates capability sets with all possible complete combinations of a category and value. The Capability Wizard then displays the capability sets in the Capability Set tab.
If you want to add more capability sets with a different activation type or activation level, you need to run the Capability Wizard again.
If you add more than one group of capability sets to an agent, the Capability Wizard can generate duplicate qualifiers or duplicate capability sets. You must delete the duplicates

Assigning a capability set to an agent
Issue 3 February 2005 255
before Advocate Supervisor can validate the capability sets in the profile. The following figure shows an example of duplicate qualifiers in an agent capability set.
To use the Capability Wizard to define multiple capability sets:
1. If you do not already have the Agent Properties dialog box open:
a. In the console tree of Advocate Administration, select and expand Advocate Supervisor > Resources > Agents.
b. Right-click the agent to which you want to assign a profile and select Properties.
2. Select the Capability Set tab.
3. Select Wizard.
4. In the Capability Wizard dialog box, complete the following steps:
a. In the left pane, select the appropriate boxes to add a checkmark next to each qualifier value that you want to include in the capability sets.
b. From the Role Type drop-down list, select the activation type for the qualifiers.
c. From the Activation Level drop-down list, select the activation level for the qualifiers.
d. Select OK.
Repeat this step for any qualifiers with a different activation type or activation level that you want to include in capability sets.

Managing agents
256 Business Advocate Configuration and Administration
5. Select Apply.
Advocate Supervisor saves the changes to the database and validates your selections. If all selections are valid, Business Advocate updates the changes in real-time.
Advocate Supervisor highlights all rows that contain errors. For example, Advocate Supervisor highlights a row if you did not make a selection in a column or added a duplicate qualifier set.
6. Select OK.
Deleting one capability setTo delete one capability set from an agent:
1. In the console tree of Advocate Administration, select and expand Advocate Supervisor > Resources > Agents.
2. In the results pane, right-click the agent and select Properties.
3. Select the Capability Set tab
4. Click in the row for the qualifier that you want to delete.
5. Select Delete.
6. Select OK.
Deleting all capability setsTo delete all capability sets for an agent:
1. In the console tree of Advocate Administration, select and expand Advocate Supervisor > Resources > Agents.
2. In the results pane, right-click an agent and select Properties.
3. Select the Capability Set tab.
4. Select Clear All.5. Select OK.

Making an agent inactive
Issue 3 February 2005 257
Making an agent inactiveYou use IC Manager to make an agent inactive for Business Advocate.
To make an agent inactive in Business Advocate, perform the steps in one of the sections described in the following table.
Note:Note: You cannot delete an agent from Advocate Supervisor. You must delete the
agent from IC Manager. For more information, see IC Administration Volume 2: Agents, Customers, & Queues.
Marking an agent as out of officeWhen agents are configured to handle email contacts but are not currently logged in to Avaya IC, Business Advocate holds email contacts in service class queues until a qualified agent logs in. Business Advocate will hold email contacts directed to a specific agent or that have a preferred agent qualifier indefinitely, waiting until that agent logs in.
Business Advocate releases the email contact from queue and matches it with the agent when that agent logs in. If an agent is temporarily out of the office for vacation, sick day, or some other reason, you can mark the agent as "out of the office" to ensure that Business Advocate does not hold email contacts for that agent.
After you mark an agent as out of the office, Advocate Supervisor moves that agent to the Inactive folder. You must return the agent to "in office" status if you want to make that agent active. For more information, see Marking an agent in the office on page 259.
When you mark an agent out of the office, that agent does not receive any more contacts from Business Advocate. In addition, Business Advocate releases all email contacts that are being held in queue for that agent, then requalifies the contacts so other agents can service them.
However, the out of office feature does not requeue contacts that have already been delivered to the agent. You can retrieve email contacts that are in the Email task list of
Procedure Purpose
Marking an agent as out of office on page 257
Makes sure that Business Advocate does not match contacts with an agent, such as email contacts, when the agent is not logged in.
Deactivating an agent for Business Advocate on page 258
Makes sure that Business Advocate does not match contacts with the agent, even if the agent logs in to Avaya IC.

Managing agents
258 Business Advocate Configuration and Administration
Avaya Agent. For more information, see Retrieving email contacts from an agent on page 223.
To mark an agent out of the office:
1. In IC Manager, select the Agent tab.
2. Double-click the agent in the list of agents.
3. Select the General tab.
4. Select the Ellipsis (�) button next to the Options field.
5. In the Options dialog box, shown in the following figure:
a. Select the Out of Office box to place a checkmark in that box.
b. Select OK.
6. Select OK.
Deactivating an agent for Business AdvocateIf you do not want a Business Advocate agent to handle contacts qualified by Business Advocate, you need to deactivate the agent for Business Advocate. After you deactivate an agent for Business Advocate:
● Advocate Supervisor moves the agent to the Inactive folder. The agent retains all of the attributes and qualifier sets that you assigned.
● Business Advocate stops matching contacts with the agent.
● If you have configured non-Advocate routing, Avaya IC uses that configuration to route contacts to the agent.
● If you have not configured non-Advocate routing, Avaya IC does not route any contacts to the agent.
To deactivate an agent:
1. In IC Manager, select the Agent tab.
2. Double-click the agent in the list of agents.

Returning an agent to active status
Issue 3 February 2005 259
3. Select the Advocate tab.
4. Select the Activate Advocate box to remove the checkmark from the box.
5. Select Apply.
6. Select OK.
Returning an agent to active statusIf you make an agent inactive, you must return the agent to active status before that agent can receive contacts from Business Advocate.
Note:Note: If you deleted an agent from IC Manager, you must create a new record for
that agent in IC Manager. For more information, see IC Administration Volume 2: Agents, Customers, & Queues.
To return an agent to active status in Business Advocate, perform the steps in one of the sections described in the following table.
Marking an agent in the officeWhen an agent returns to the office after a temporary absence, you must mark the agent as in the office, if you want that agent to receive contacts from Business Advocate.
To mark an agent in the office:
1. In IC Manager, select the Agent tab.
2. Double-click the agent in the list of agents.
3. Select the General tab.
4. Select the Ellipsis (�) button next to the Options field.
Procedure Purpose
Marking an agent in the office on page 259
Returns the agent to active status after a temporary absence. You must follow these steps if you marked the agent as out of office.
Activating an agent for Business Advocate on page 247
Reactivates an agent for Business Advocate. You must follow these steps if you deactivated the agent from Business Advocate.

Managing agents
260 Business Advocate Configuration and Administration
5. In the Options dialog box:
a. Select the Out of Office box to remove the checkmark from that box.
b. Select OK.
6. Select Apply.
7. Select OK.
Deleting an agentYou can only delete an agent in IC Manager. For more information, see IC Administration Volume 2: Agents, Customers, & Queues.
When you delete an agent, all attributes and qualifier sets that you assigned to the agent are also deleted. If you want to make an agent unavailable for Business Advocate, but retain all Business Advocate configuration for that agent, you need to deactivate the agent for Business Advocate. For more information, see Deactivating an agent for Business Advocate on page 258.
Issue 3 February 2005 261
Appendix A: Configuring Telephony switches for Business Advocate
This section provides the information necessary to configure switches to work with Business Advocate. It explains how Avaya IC processes Business Advocate calls and how to set up CTI links and switch queues to process calls.
Before performing the steps in this chapter, make sure you have configured the Telephony server (TS) for:
● Monitoring calls as described in the Telephony Server chapter of the Telephony Connectors Programmer Guide.
● Multi site heterogeneous switch functionality as described in the Multi Site Heterogeneous Switch chapter of the Telephony Connectors Programmer Guide.
This chapter includes the following sections:
● Overview on page 262
● RONA considerations on page 263
● Best Services Routing (BSR) option on page 263
● Call processing on page 264
● Agents and Link Groups on page 266
● Avaya Definity/Communication Manager on page 267
● Nortel Meridian on page 282
● Aspect CallCenter on page 287
● Ericsson MD110 on page 295
Configuring Telephony switches for Business Advocate
262 Business Advocate Configuration and Administration
OverviewBusiness Advocate includes an Automatic Call Distributor (ACD). The Business Advocate ACD queues contacts in a universal queue within the Resource Manager server on Avaya IC. The Telephony Services Adapter (TSA server) works closely with the Telephony server (TS) to control voice call behavior through a CTI link to the switch. The TSA server monitors incoming calls sent by the switch, then Business Advocate matches the calls to qualified IC agents. If none of these agents are available to handle the call, the TS routes the call to a directory number holding area on the switch identified by Business Advocate, where wait treatment can be applied to the call.
This holding area can be a:
● Vector Directory Number (VDN) on an Avaya DEFINITY/Communication Manager
● Control Directory Number (CDN) on a Nortel Meridian
● Call Control Table (CCT) on an Aspect CallCenter
● CTI Group on an Ericsson MD110
This holding area is referred to as a wait treatment queue. A wait treatment queue plays announcements, music, silence, or ringing to the caller while the caller waits for an agent. When an agent is available, Business Advocate tells the TS to route the call from the holding area on the switch to the agent using CTI commands.
The Telephony Queue Statistics server (TSQS) is not required for Business Advocate statistics. Business Advocate statistics are not taken from the switch queues, they are recorded by the Resource Manager server and the TSA server from queues in Business Advocate.
The TSA server is needed for links that handle incoming calls to ask the Resource Manager to find the best agent match for incoming calls and route those calls there. In a call transfer, the call waits to be transferred on the originating switch, a TSA server is required on that switch. For this reason, a TSA server must be configured for every switch, even if there are no Business Advocate agents configured on that switch, to enable you to transfer calls from non-Business Advocate agents to Business Advocate agents.
Note:Note: If you have an incoming link with so many agents that you want to split them
up, you can assign some of the agents to a TSA server with no incoming link and the remaining agents to the TSA server that handles the incoming link. In this scenario, you would have a TSA server for a group of agents with no incoming link.
RONA considerations
Issue 3 February 2005 263
RONA considerationsAvaya IC supports RONA (Redirect on No Answer) for each of the supported media channels. RONA returns an offered, but not accepted, contact back to the system so it can be delivered to an available agent. The agent who failed to accept the contact is automatically placed into the Aux state and excluded from system work distribution until the agent manually transitions into an Available state.
When using Business Advocate on a voice channel, RONA functionality provided by the switch should be disabled for all Business Advocate agents. If the switch performs RONA on calls delivered by Business Advocate, the Business Advocate agent gets stuck, internal to Business Advocate, in an Unavailable state and would not be able to receive new calls until the Business Advocate agent toggles the state to Unavailable then back the Available.
Refer to IC Administration Volume 2: Agents, Customers, & Queues for instructions on disabling RONA functionality for Business Advocate agents.
Best Services Routing (BSR) optionIf you are using the Best Services Routing (BSR) option on your Avaya DEFINITY switch to transfer IC related calls, you must ensure that you have ISDN trunk lines configured between each switch and that you are passing UUI (User to User Information) on the D Channel to the remote switch. Avaya IC uses the UUI field to send and receive the EDUID of the call at each endpoint.
Refer to Chapter 10 in the Telephony Connectors Programmer Guide for more information.
For more information about Best Services Routing, refer to the DEFINITY ECS <release> Call Vectoring/ EAS Guide (555-230-521).

Configuring Telephony switches for Business Advocate
264 Business Advocate Configuration and Administration
Call processingThe following scenario describes how Avaya IC processes Business Advocate voice calls through a single site environment:
Step Description
1 Notification of incoming voice calls is received by the Telephony server (TS).
2 The TS sends the notification of the incoming call to the Telephony Server Adapter (TSA server).
3 The TSA server sends the call to the Workflow server for qualification.
4 The Workflow server qualifies the call, selecting an appropriate service class and wait treatment.(The Workflow server is configured to associate the customer�s attributes and the intent of the contact with various wait treatment styles, not queues, so callers can be parked in the appropriate wait treatment queue on the switch.)
5 The Workflow server sends the service class and wait treatment for the call to the TSA server. The call resides on the switch and does not move at this point.
6 The TSA server sends a request to the Resource Manager server to find a qualified agent for this call.
7 The Resource Manager server informs the TSA server where and when a qualified agent is available. The agent does not have to be assigned to the TS that received the call. The agent can be located at any site, anywhere on the network.
8 If a qualified agent is available, the TSA server tells the TS to inform the switch to route the call to that agent, skip to step 10.
9 If a qualified agent is not immediately available, the call is routed to a wait treatment queue that plays the wait treatment style returned by the Workflow server when it qualified the call.
9a The call remains in queue unless it is abandoned or the link fails prior to being routed to an agent by the switch through the TSA server. When a qualified agent becomes available, the Resource Manager tells the TSA server. The TSA server tells the TS to inform the switch to route the call to that agent.
9b If the link fails, the call is routed to a failover queue. This action is programmed into the vector on the switch. The call remains in the failover queue until it is either abandoned by the caller or routed to an agent by the switch. (Once a call is in the failover queue, it is no longer in a directory number controlled by Avaya IC. The switch controls the call at this point.)
10 The agent answers the call.

Call processing
Issue 3 February 2005 265
Backup link failover and recoveryAvaya IC can be configured with a primary CTI link that handles all incoming calls and a backup link to which calls are routed in the event of a primary link failure. Each link can have multiple incoming queues and one set of wait treatment queues. On every link there is at least one directory (dialable) number for incoming calls on the link and a directory number for each wait treatment style on the link.
If the primary link fails and there is no backup link, program the directory numbers of the incoming calls to send the calls to a failover queue. The directory number program that is associated with the wait treatment queue sends the call to this failover queue.
If the primary link fails and there is a backup link, the directory number program associated with the incoming link sends calls to the backup link so Business Advocate can continue to service new incoming calls. The switch distributes the calls from the backup link to the agents who are logged into the failover queue.
Agents are assigned to failover queues by logging into the same skill as the failover queue. Agents are administered on the switch to service the failover skills. If the link fails, the switch distributes the calls that failover to the agents who are logged into the skill. Agents log into the failover queues when they log into Avaya IC.
If a primary link fails, agents first clear the failover queues of calls that have failed from wait treatment, then they handle calls through the backup link. Create link groups that associate agents with both primary and backup links to tell the Resource Manager not to send calls to the agents in the event of a link failure because these agents are getting the other calls from the failover queues. If there is no backup link, you must wait for the primary link to be restored for Business Advocate to start distributing calls to these agents again.

Configuring Telephony switches for Business Advocate
266 Business Advocate Configuration and Administration
Agents and Link GroupsAll agents who service calls on the failover queue for a CTI link when it fails must be identified as servicing calls from that link. This applies to all supported switches.
To identify these agents as servicing calls from a link:
● Create a link group
● Assign agents to the link group
Create a link groupAdd the name of the TS that handles the CTI link to the group table on Avaya IC.
For procedures on creating link groups, refer to Link groups on page 187.
Assign agents to the link groupAfter you create a link group that contains the TS that services the CTI link, identify the agents that service calls on the failover queue for the CTI link and add them to the link group. If you have numerous agents who service the same failover queue for the CTI link, you can assign all of these agents to a link group at one time.
For procedures on assigning agent to link groups, refer to Link groups on page 187.

Avaya Definity/Communication Manager
Issue 3 February 2005 267
Avaya Definity/Communication ManagerThis section describes how to configure the Avaya DEFINITY/Communication Manager switch to operate with Business Advocate on Avaya IC 7.0.
Configure the following on the Avaya DEFINITY/Communication Manager prior to performing the procedures in this section:
● Setup CTI Adjunct Links
● Setup Agent States
● Setup Adjunct Routing
● Define Adjunct Links
Refer to IC Installation Planning and Prerequisites for instructions.
Avaya DEFINITY configurationThis section describes how to configure the Avaya DEFINITY/Communication Manager for Business Advocate. Perform the following configuration steps in the following order to configure the Avaya DEFINITY/Communication Manager to process incoming voice calls with Business Advocate on Avaya IC.
● Configure Advanced Adjunct Routing
● Configure the switch to use a CTI link
● Program the incoming VDN
● Program the wait treatment VDN
Refer to IC Installation Planning and Prerequisites for additional instructions on configuring the Avaya DEFINITY/Communication Manager switch.
! Important:! Important:Important: If you are using Business Advocate, set the Dialby Equipment configuration
parameter to true (check the check box on the TS tab) and the Fail_Route configuration parameter (on the Configuration tab) to 1 when you configure the Telephony Server. Refer to the Telephony server configuration for your switch in the Telephony Connectors Programmer Guide.

Configuring Telephony switches for Business Advocate
268 Business Advocate Configuration and Administration
CTI link configuration
The Avaya DEFINITY/Communication Manager must be configured to deliver the calls to a CTI link using an incoming VDN. Each CTI link that processes incoming calls requires its own set of incoming VDNs and wait treatment VDNs. Avaya recommends the number of wait treatment VDNs be identical for each of the CTI links. The wait treatment styles (announcements, music, silence, ringing, etc.) should also be identical for each CTI link.
To configure the switch to the CTI link:1. Start IC Manager if it is not already running.
2. From the main window, select the Server tab.
3. From the Server Manager, double-click on the TS that is servicing the link.
4. From the Server Editor, select the TS tab to display the server configuration parameters.
5. In the ACD Link field, enter the IP address of the CTI link.
6. Click OK to configure the switch to the CTI link.
Incoming VDN configuration
An incoming call VDN is either a VDN dialed by the caller or a VDN to which an IVR transfers the call for routing to an agent. An incoming VDN must be programmed to route a request to Avaya IC when it receives a call.
Incoming VDNs should also be programmed to send their calls to a switch skill in the event of a CTI link failure. Agents can log into these skills when they log into Avaya IC. If calls reach these skills, it means the CTI link has failed and Avaya IC no longer controls the calls. The switch distributes the calls to those agents who are logged into the failover skills. For more information, refer to Backup link failover and recovery on page 265.
Note:Note: You can program an incoming VDN to send incoming calls to a backup VDN
in case of failover. Refer to Backup CTI link configuration on page 276.
Perform the following procedures to configure an incoming call VDN:
● Program the incoming call VDN
● Add the VDN directory number to the TSA server table

Avaya Definity/Communication Manager
Issue 3 February 2005 269
Program incoming call VDNProgram the incoming call VDN vector to request an adjunct route, then wait for at least 10 seconds. If there is no response, send the call to a failover switch queue on Avaya DEFINITY/Communication Manager.
The following example illustrates this scenario:01 wait-time 0 secs hearing ringback //wait 0 seconds hearing ringback02 adjunct routing link 39001 //Send a route request to link 3900103 wait time 10 secs hearing ringing //wait 10 seconds while playing ringing04 queue-to-skill 34 pri h //send call to fail over skill (34)05 announcement "75002" //play announcement06 wait-time 20 secs hearing music07 goto step 5 if inconditionally
Add VDN directory number to tableEnter the directory number of the incoming call VDN in the Destination field of the Contact Handling table of the TSA server that is associated with the TS servicing the link. The TSA server and the TS are associated by being added to the same domain in IC Manager.
Refer to Setting up contact handling on page 165 for instructions on adding the VDN directory number to the Contact Handling table.
Wait treatment VDN configuration
The wait treatment VDN vector must be configured to make a second route request of the switch and hold the call while playing wait treatment until Business Advocate responds with the agent�s phone address. Create a different wait treatment VDN on each link for each of the wait treatments (announcements, music, silence, ringing, etc.) used by the Avaya IC. There must also be a special wait treatment VDN for call transfers. When an agent transfers a call to a virtual queue that contains a service class, the call is placed on this special wait treatment VDN. This VDN is specified as a parking device with wait treatment style 1.
The vectors for wait treatment VDNs should also be programmed to send their calls to a switch skill in the event of a CTI link failure. Avaya IC agents can log into these skills when they log onto Avaya IC. If calls reach these skills, it means the CTI link has failed and Avaya IC no longer controls the calls. The switch distributes the calls to those agents who are logged into the failover skills. Refer to Backup link failover and recovery on page 265 for more information.
Perform the following procedures to configure a wait treatment VDN:
● Program the wait treatment VDN
● Configure the parking device with the wait treatment that corresponds to the VDN�s program

Configuring Telephony switches for Business Advocate
270 Business Advocate Configuration and Administration
Program wait treatment VDN (Enhanced adjunct routing)Enhanced adjunct routing enables you to play wait and announcement treatments for an indefinite period of time while calls are queued by adjuncts (in this case, Avaya IC). It also provides failover backup treatment if either the adjunct or communication with the adjunct fails.
To service call transfers on Avaya IC, administer the VDN on the switch with the proper wait treatment. Program the vector assigned to the wait treatment VDN to request an adjunct route using the CTI link followed by playing the wait treatment. Then, repeat the wait treatment steps in a program loop.
Avaya Communication Manager enables you to play multiple wait treatments and loop when working with Avaya IC. You can include multiple wait treatments following the adjunct routing step while the route request is pending on Avaya Communication Manager Release 1.2 or later when the links are setup for CTI Adjunct Links capability with agent states and IC Adjunct Routing is set to active. Refer to the Switch Administration appendix in IC Installation Planning and Prerequisites for more details.
This capability provides an "enhanced" adjunct operation that allows any number of announcement, wait and unconditional goto (that loop/branch backward) vector steps to appear after the adjunct routing command while still retaining the failover backup capability in case of link or application failure. Under this capability, the steps following the last adjunct routing command in a sequence will be skipped until a step that is not an announcement, wait, unconditional loop back goto or intervening blank step is reached if a link down or adjunct not responding condition is detected when the adjunct routing step is executed or while waiting for a route request response. When a failure condition is detected, processing of the current announcement, wait or unconditional loop back goto step is terminated and the following announcement, wait, unconditional loop back goto and intervening blank steps are skipped falling through to the failure backup treatment. This operation works across vectors with vector chaining.
A single conditional goto step immediately following the adjunct routing command is also allowed. This step is always executed and it could branch to another announcement, wait and unconditional loopback goto step sequence. If the link is in failure when the adjunct routing command is executed, the conditional goto is executed. If it branches, the first series of announcement, wait, unconditional loopback goto and blank steps in the branched to sequence are skipped. If the conditional doesn't branch, the following announcement, wait and unconditional loopback goto steps are skipped.
The following is an example of a vector on Release 1.2 or later:01 adjunct routing link 2 //Send a route request to link ID 202 announcement "75002" //play announcement03 wait-time 15 secs hearing music //wait 15 seconds listen to music04 announcement "75003" //play second announcement05 goto step 3 if unconditionally //go to wait listen to music06 queue-to skill 34 pri h //send call to fail over skill (34)07 announcement "75002" //play announcement08 wait-time 20 secs hearing music

Avaya Definity/Communication Manager
Issue 3 February 2005 271
Prior to Release 1.2 on Avaya DEFINITY or with IC Adjunct Routing set to no, you could only program a single wait treatment set at the maximum wait time while Avaya IC waits for an available agent. If the link fails, the vector moves to the next step to queue the call in the switch for failover coverage.
The following is an example of a vector prior to Release 1.2:01 adjunct routing link 39001 //Send a route request to link ext 3900102 wait-time 8 hours hearing music //wait 8 hourss listen to music (see note)03 queue-to skill 34 pri h //send call to fail over skill (34)04 announcement "75002" //play announcement05 wait-time 20 secs hearing music06 goto step 4 unconditionally
Note:Note: The use of the wait command syntax for hours or minutes can only be
administered through switch administration because these parameters are not supported by Avaya Call Management System Vector Administration.
The period of time the call remains in the wait treatment queue must be programmed in the vector. Configuring this parameter to 8 hours keeps the call waiting longer than any contact would possibly stay on hold, thus ensuring the call is not terminated while the contact is holding.
The enhanced adjunct route is required to support failover of calls parked on VDNs during the looped music and announcement treatments. This feature is usually used for Business Advocate wait treatment VDNs, but it can also be used by non-Business Advocate IC deployments.
The following example illustrates an enhanced adjunct route:change system-parameters customer-options Page 9 of 11
ASAI ENHANCED FEATURESCTI Stations? n (is set to yes here)Increased Adjunct Route Capacity? n (option is not visible here)Phantom Calls? n (is set to n)
ASAI PROPRIETARY FEATURESAgent States? y (set to y)
add cti-link next Page 1 of 2CTI LINKCTI Link: 4 (test system is link 2)Extension: (4811)
Type: ADJLK or ADJ-IP (ASAI)Port: COR: 1 (8)Name: (6.1 Test CTI Link)
BRI OPTIONSXID? y Fixed TEI? n (n)
MIM Support? n (n)CRV Length: 2 (2)

Configuring Telephony switches for Business Advocate
272 Business Advocate Configuration and Administration
add cti-link next Page 2 of 2CTI LINK
FEATURE OPTIONSEvent Minimization? nSpecial Character for Restricted Number? nIC Adjunct Routing? y
Configure transfer parking deviceThe wait treatment VDN is configured as a voice parking device for call transfers in IC Manager. To properly configure the parking device for call transfers:
● Use the same ACD name on the parking device and the incoming call VDN.
● Administer the parking device with "wait treatment style 1". Avaya IC reserves "wait treatment style 1" for transfers.
● Associate the parking device with the TSA server that is associated with the TS that is servicing the link.
For more information and procedures on configuring transfer parking devices, refer to Parking devices for the voice channel on page 170.
Configure parking device for wait treatment on incoming callsAvaya IC configures a voice parking device to park calls on a wait treatment until an agent becomes available. This parking device is required if the caller requires a wait treatment that is different than the wait treatment that is delivered with the transfer parking device. Each parking device that gives a unique wait treatment should have a unique wait treatment style. With many wait treatments available, a voice parking device enables Avaya IC to select and play wait treatment that is unique to an incoming call VDN (caller) rather than play the same wait treatment for all incoming calls.
● Program the vector using the example in Program wait treatment VDN (Enhanced adjunct routing) on page 270, but make the wait treatment played unique to this VDN.
● Set up a voice parking device and associated VDN for each unique wait treatment that must be delivered to callers who are waiting for an available agent.
! Important:! Important:Important: You must make the non-transfer wait treatment vectors separate from the
transfer wait treatment vector because these wait treatment devices work differently with CTI backup links.
For more information and procedures on configuring parking devices for wait treatment on incoming calls, refer to Parking devices for the voice channel on page 170.

Avaya Definity/Communication Manager
Issue 3 February 2005 273
Switch OperationThis section describes how the Avaya DEFINITY/Communication Manager operates with Avaya IC to deliver voice calls to agents.
Calls are received by the switch on incoming queues and these incoming queues have associated programs. On the Avaya DEFINITY/Communication Manager, the associated program is a vector that is assigned to a Vector Directory Number (VDN). This vector gives the caller wait treatment (plays announcements, music, ringing, etc.) while Avaya IC qualifies the call. Call qualification determines who the call is from, the type of customer on the call, the language they speak, the reason for the call, etc.
To make Avaya IC aware of the call that just arrived, the vector associated with the incoming queue requests a route for the call from Avaya IC. The switch, through the vector, asks Avaya IC where to route the call while it holds the call and plays wait treatment for the caller. Contact centers usually configure Avaya IC to take 10 seconds to make its routing decision. The switch makes this request over a CTI link.
The following example illustrates a vector for an incoming route point:01 adjunct routing link 39001 //Send a route request to link 3900102 wait-time 10 sec hearing ringing //wait 10 seconds while playing ringing03 route to number "56066" wait cov n if unconditionally
//if the 10 seconds expire, route the callto 56066, the failover queue (to handle failure)
Avaya IC qualifies the call and if an agent is available, Avaya IC tells the switch to route the call to that agent. If an agent is not available, Avaya IC tells the switch to route the call to a wait treatment queue. The vector associated with the wait treatment queue is set to play the required treatment and wait for as long a period of time as is allowed by the switch.
When the call reaches the wait treatment vector, the vector issues a route request to Avaya IC asking where to send the call.
The following example of a vector for the wait treatment VDN request is based on Avaya Communication Manager 1.2 or later with IC Adjunct Routing set to active:01 wait-time 0 secs hearing ringback //wait 0 seconds hearing ringback02 adjunct routing link 2 //Send a route request to link 203 announcement "75002" //play announcement04 wait-time 15 secs hearing music //wait 15 seconds listen to music05 announcement "75003" //play second announcement06 goto step 4 if unconditionally //go to wait listen to music07 route to number 56066 wait cov n if unconditionally
//if the 10 seconds expire, route the callto 56066, the failover queue (to handle failure)
When an agent becomes available, Avaya IC responds to the route request of the vector program associated with the wait treatment queue and routes the call to the available agent.

Configuring Telephony switches for Business Advocate
274 Business Advocate Configuration and Administration
Switch configurationFor Business Advocate to work properly in an environment using an Avaya DEFINITY switch, the following conditions must exist:
● Direct calls are enabled for the agent's Class of Restriction (COR).
● Advocate agents and the VDNs used by Advocate use the COR for which direct agent calls are enabled.
● The agent's Hunt Club has the Queue option enabled and its Queue Length size is greater than 0.
Perform the procedures in this section in the order they are presented.
Enabling direct calls
To enable direct calls for the agent's COR:1. Start the Avaya Site Administrator, if it is not already running.
2. Enter the change cor<#> command for the desired COR and press send (return). For example, enter change cor1 for Class of Restriction 1.
3. In the upper left corner of the Class of Restrictions screen, select tab 1.
4. Change the Direct Calls setting to y.
5. Press enter (f3) to save this change.
Verifying Agent COR assignments
Make sure all Advocate agents are using the COR that you just enabled for direct calls.
To verify that Advocate agents are using the correct COR:1. At the Avaya Site Administrator, enter the list agent-loginID command and press
send (return).2. At the ensuing list of Advocate agents, check the COR column to make sure the COR
value corresponds to the COR for which you enabled direct calls in the previous procedure. For example, if you entered change cor1 in the previous procedure, the COR column should display 1.
3. If the COR column does not match the COR in the first procedure, change it to match.
a. Enter the change agent <loginID> command and press send (return).b. At the Agent LoginID screen, change the COR field to match the COR for which
you enabled direct calls.
c. Press enter (f3) to save this change.

Avaya Definity/Communication Manager
Issue 3 February 2005 275
Verifying VDN COR assignments
Make sure all the VDNs used by Advocate are using the COR that you just enabled for direct calls.
To verify the VDNs used by Advocate are using the correct COR:1. At the Avaya Site Administrator, enter the list vdn command and press send
(return).2. At the ensuing list of Advocate VDNs, check the COR column to make sure the COR
value corresponds to the COR for which you enabled direct calls in the previous procedure.For example, if you entered change cor1 in the previous procedure, the COR column should display 1.
3. If the COR column does not match the COR in the first procedure, you must change it to match using the change vdn command.
a. Enter the change vdn <vdn> command and press the send (return) button.
b. At the VDN screen, change the COR field to match the COR for which you enabled direct calls.
c. Press the enter (f3) button to save this change.
Enabling hunt club queues
Make sure the agent's Hunt Group�s queues are configured.
To configure queue settings for the agent's Hunt Group:1. At the Avaya Site Administrator, enter the change hunt-group command for the
desired Hunt Group and press send (return).For example, enter change hunt-group 1 for Hunt Group 1.
Note:Note: If you do not know the agent's Hunt Group, type change agentloginID
<loginID> at the command line to display the Agent LoginID screen for that agent. The Hunt Club number is displayed in the first SN and SL fields at the bottom of the screen.
2. In the upper left corner of the Hunt Club screen, select tab 1.
3. Change the Queue setting to y.
4. Enter a value greater than 0 in the Queue Length field.
5. Press enter (f3) to save your changes.

Configuring Telephony switches for Business Advocate
276 Business Advocate Configuration and Administration
Call TransfersThe agent client asks the Workflow server to qualify a call that is transferred to a virtual queue. The Workflow server determines that the call should be parked on wait treatment style 1 (style 1 is always used for transfers) on the switch where the agent who is transferring the call is located. When a call is transferred to a service class via a virtual queue, the call is first parked on the style 1 wait treatment queue until an agent is found. The call stays parked until the Resource Manager finds an agent that best matches the requirements of the call.
Backup CTI link configurationThis section describes how to configure backup links on an Avaya IC environment running an Avaya DEFINITY/Communication Manager. Backup links are CTI links to which calls are routed in the event the primary link fails.
To configure a backup link:1. Add a secondary CTI link (backup link).
2. Modify the incoming call VDN vectors on the primary link.
3. Add a set of wait treatment voice parking devices and VDNs for the backup link. You must have at least one parking device/VDN for the transfer wait treatment style, which is always 1.
4. Program the backup link VDNs to failover to failover skills.
5. Add the backup link to link group of the primary link.
6. Add the backup link specifications to the TS that serves the primary link.
Note:Note: A backup link can also serve as a primary link. A primary link can have a
backup link that is also a primary link. In this case, these two links can back up each other.

Avaya Definity/Communication Manager
Issue 3 February 2005 277
Add a backup CTI linkWhen you add the second CTI link to the switch, make sure the IP address of this link matches the ACD Name parameter of the TS that is servicing the link.
To add a backup CTI link to the switch:
1. From the main window in IC Manager, select the Server tab.
2. From the Server Manager, double-click on the TS that is servicing the link.
3. From the Server Editor, select the TS tab to display the server configuration parameters.
4. In the ACD Link field, enter the IP address of the CTI link.
5. Click OK to add the backup CTI link to the switch.
Modify incoming call VDNsModify the VDNs used for incoming calls to route calls to the backup link if the primary link fails.
In the following example, 1 is the primary link and 2 is the backup link:01 adjunct routing link 1 //Send a route request to link 102 wait-time 10 secs hearing ringing //wait 10 seconds while playing ringing03 adjunct routing link 2 //Send a route request to backup link 204 wait-time 10 secs hearing ringing //wait 10 seconds while playing ringing05 queue-to skill 34 pri h //send call to fail over skill (34)06 announcement "75002" //play announcement07 wait 8 hours hearing music
Modify transfer parking device VDNModify the VDN used for the transfer parking device so it specifies routing the call to the transfer device of the backup link if the primary link fails.
In the following example, 1 is the primary link and 2 is the backup link:01 adjunct routing link 1 //Send a route request to link 102 wait-time 999 secs hearing music //wait 999 seconds listen to music03 route-to wait treatment VDN

Configuring Telephony switches for Business Advocate
278 Business Advocate Configuration and Administration
Add transfer parking deviceAdd a parking device for call transfers to the backup link if it does not already have one. The following settings are required to add the parking device for transfers:
● Assign the same ACD name as the incoming call VDN to the parking device.
● Administer the parking device with "wait treatment style 1". Avaya IC reserves "wait treatment style 1" for transfers.
● Associate the parking device with the TSA server that is associated with the TS that is servicing the link.
To add a transfer parking device:
1. From the main window in IC Manager, select the Device tab.
2. From the Device Manager, double-click on the device associated with the TSA server that is associated with the TS servicing the link.
3. From the Device Editor, select the General tab.
a. In the Id field, enter the DN (directory number) of the VDN.
b. in the ACD Name field, enter the ACD name used by the incoming call VDN.
c. Click OK to save these new settings.
4. From the Device Editor, click on the Voice tab.
a. In the Wait Treatment Style field, enter 1.
b. Click OK to save the wait treatment style setting and close the Device Editor.
Add wait treatment parking devicesAdd a set of wait treatment voice parking devices and VDNs for the backup link if it does not already have a set. The number of voice parking devices and VDNs on the backup link must be equal to the number of voice parking devices and VDNs on the primary link and their wait treatment styles must be exactly the same as the wait treatment styles on the primary link. Each voice parking device wait treatment VDN on the backup link should play the same wait treatment as its counterpart on the primary link.
Follow the procedures in Parking devices for the voice channel on page 170 to add wait treatment parking devices to the backup link.
Avaya Definity/Communication Manager
Issue 3 February 2005 279
Playing estimated wait timeWhen Business Advocate is running on Avaya IC, calls controlled by Business Advocate do not have an estimated wait time (EWT) in the switch. Business Advocate has the EWT and passes it to the switch (in seconds) through the TS. Business Advocate determines the EWT for the call to be answered by an agent when the call is routed from the incoming queue VDN to the wait treatment VDN. The EWT can be played to the caller using pre-recorded announcements that speak the EWT (rounded to minutes) to the caller based on testing the current EWT provided by Business Advocate and branching it to the appropriate wait announcement.
The following steps describe the EWT operation:
1. The switch receives calls to the �incoming queue� VDNs in the same manner as previously discussed in Avaya DEFINITY configuration on page 267.
2. The �incoming queue� vector executes an adjunct routing command to make Avaya IC aware of the incoming call followed by a wait command playing ringback to the caller while Avaya IC qualifies the call.
3. Avaya IC either routes the call to an available agent or to a �wait treatment� VDN, if an agent is not available.
a. If the agent is immediately available and Avaya IC routes the call to that agent, the EWT will not be announced to the caller.
b. If an agent is not immediately available, Avaya IC routes the call to a �wait treatment/parking� VDN. Business Advocate (TSA server) includes the EWT in seconds (maximum of 5 digits always appended with a # character) in the message as dial-ahead digits (TS.routewithinfo(in string info).
The �wait treatment� vector, prior to providing the wait treatment to the caller, collects the dial-ahead EWT digits followed by vector steps that test and play the wait time in addition to executing another adjunct routing command that allows Avaya IC to route the call to an agent when one becomes available.
Wait Treatment VDN-Vector
This section provides examples of VDN (500) Wait Treatment, vector 21 and 22, using announcement steps for playing of EWT. It is based on Avaya Communication Manager 1.2 or later with Adjunct Routing set to active for the link.
This is an example design. Additional wait time announcements (8 minutes, 10 minutes, etc.) and different graduations (by 2 minute increments, etc.) can be accomplished by using the same approach shown below. Use of more than one command (including the backward branching goto) following the adjunct routing command requires the IC Adjunct Routing capability as discussed in Program wait treatment VDN (Enhanced adjunct routing) on page 270.

Configuring Telephony switches for Business Advocate
280 Business Advocate Configuration and Administration
VDN (5000) � Wait Treatment (Vector 21)The following example illustrates the announcement steps for playing EWT on vector 21:01 collect 6 digits after announcement none //collects the EWT provided as dial
ahead digits discarding trailing02 wait-time 0 secs hearing ringback //continues ringback to caller in
case of delay in connecting asubsequent announcement
03 goto step 5 if digits = none //bypasses digit testing if notprovided by IC
04 goto step 11 if digits > 60 //only play wait time if greater than1 minute
05 adjunct routing link 2 //sends route request to IC to routeto agent
06 announcement 1015 “ABC Company. Please Wait. Your call may be monitored for quality control purposes”
07 wait-time 15 secs hearing music08 announcement 1020 “Please continue to wait. Your call is important to us.”09 goto 7 if unconditionally //loops to repeat music followed by
“please wait”10 route-to number 5602 //routes to failover VDN under link
failure11 goto vector 22 if digits > 180 //tests for longer than 3 minutes12 goto step 20 if digits > 120 //tests for longer than 2 minutes13 adjunct routing link 214 announcement 1007 “Thank you for calling the ABC Company. All our
representatives are currently busy handling other calls. Please wait; your call will be handled in the order received. Your call may be monitored for quality control purposes” [16 secs]
15 announcement 1002 “Your call should be answered within two minutes” [4 secs]16 wait-time 15 secs hearing music17 announcement 1020 “Please continue to wait. Your call is important to us.”18 goto step 16 if unconditionally19 route-to number 560220 adjunct routing link 221 announcement 1007 “Thank you for calling the ABC Company. All our
representatives are currently busy handling other calls. Please wait; your call will be handled in the order received. Your call may be monitored for quality control purposes” [16 secs]
22 announcement 1003 “Your call should be answered within three minutes”23 wait-time 15 secs hearing music24 announcement 1020 “Please continue to wait. Your call is important to us.”25 goto step 23 if unconditionally26 route-to number 5602
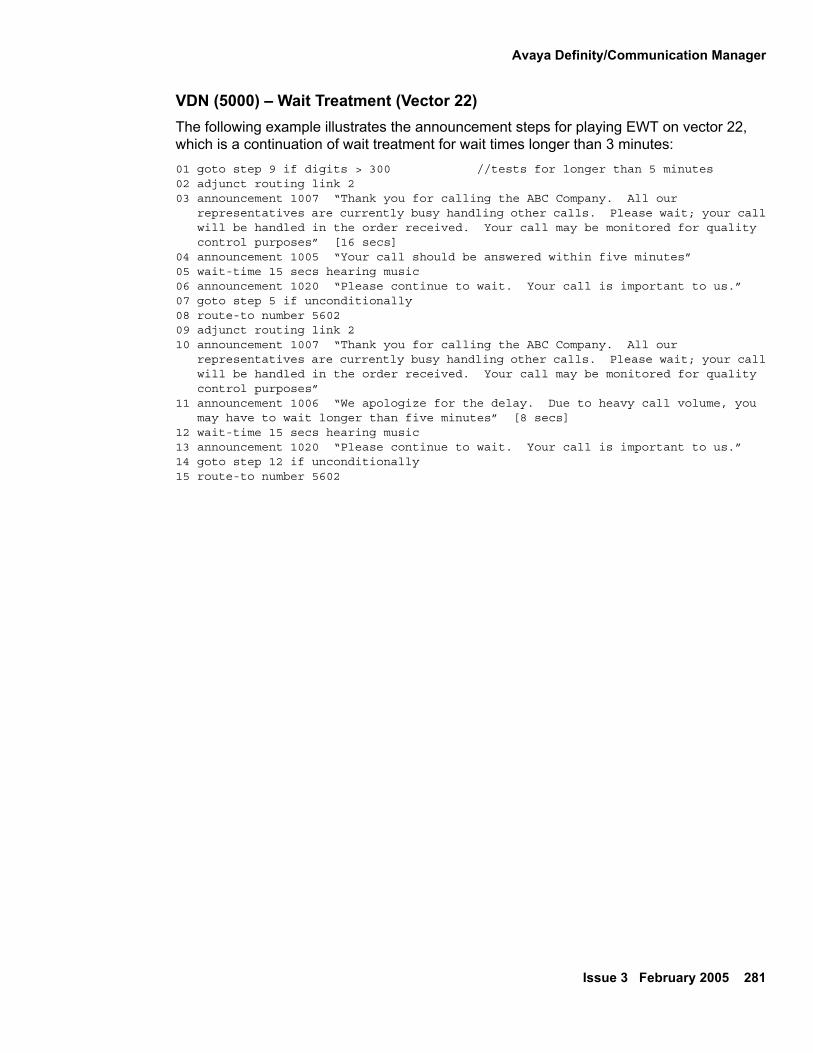
Avaya Definity/Communication Manager
Issue 3 February 2005 281
VDN (5000) � Wait Treatment (Vector 22)The following example illustrates the announcement steps for playing EWT on vector 22, which is a continuation of wait treatment for wait times longer than 3 minutes:01 goto step 9 if digits > 300 //tests for longer than 5 minutes02 adjunct routing link 203 announcement 1007 “Thank you for calling the ABC Company. All our
representatives are currently busy handling other calls. Please wait; your callwill be handled in the order received. Your call may be monitored for qualitycontrol purposes” [16 secs]
04 announcement 1005 “Your call should be answered within five minutes”05 wait-time 15 secs hearing music06 announcement 1020 “Please continue to wait. Your call is important to us.”07 goto step 5 if unconditionally08 route-to number 560209 adjunct routing link 210 announcement 1007 “Thank you for calling the ABC Company. All our
representatives are currently busy handling other calls. Please wait; your callwill be handled in the order received. Your call may be monitored for qualitycontrol purposes”
11 announcement 1006 “We apologize for the delay. Due to heavy call volume, youmay have to wait longer than five minutes” [8 secs]
12 wait-time 15 secs hearing music13 announcement 1020 “Please continue to wait. Your call is important to us.”14 goto step 12 if unconditionally15 route-to number 5602

Configuring Telephony switches for Business Advocate
282 Business Advocate Configuration and Administration
Nortel MeridianThis section describes how to configure the Nortel Meridian switch, using either Meridian Link or Symposium Call Center Server, to operate with Business Advocate on Avaya IC 7.0.
! Important:! Important:Important: If you are using Avaya Business Advocate, make sure the Dialby Equipment
configuration parameter is set to true (by default this check box is checked) when configuring the Telephony Server for the Nortel Meridian switch. Refer to the Telephony server configuration for the Nortel switch in the Telephony Server chapter of the Telephony Connectors Programmer Guide.
Switch operationThe Nortel Meridian switch, using either Meridian Link or Symposium Call Center Server, receives calls on incoming CDNs (Control Directory Number). On the Nortel switch, the CDN is defined using the standard Nortel overlay interface.
! Important:! Important:Important: The CDN requires no special characteristics, but it is important to note that
in a Symposium Call Center Server configuration, Symposium must NOT acquire the CDN, or the CDN will not be available for use by Avaya IC. Even acquiring and then de-acquiring a CDN may cause that CDN to be unusable by Avaya IC.
Setup Control DNs (CDNs)To configure the Nortel Meridian to process incoming voice calls with Business Advocate on Avaya IC, you need to setup a Control DN (CDN) for each of the following wait treatment parking devices to be used on the system. These parking devices are optional, Business Advocate works even if none of them are used. But, if you do use them, they must have CDNs to work properly.
● Announcement
● Music
● Ringback
The Nortel Meridian does not accept a route from an adjunct while playing a non-streaming announcement. This is because non-streaming announcements cannot be played from

Nortel Meridian
Issue 3 February 2005 283
CDNs and, therefore, must be parked on queues. For this reason, Business Advocate only parks the call on an announcement queue if the announcement length is shorter than the estimated wait time (EWT) calculated by Business Advocate.
Avaya IC checks the estimated wait time (EWT). If the EWT is shorter than the length of the announcement, the call is routed to ringback queue. If the EWT is longer than the length of the announcement, the call is routed to the announcement queue.
The Nortel Meridian switch automatically sends a route request to the first application that requests monitoring (TS.Assigns) on the CDN. The switch waits a maximum of 4 seconds before terminating the routing �availability window�. After the time-out, which is not configurable, the call is processed normally and queued to its default ACD group.
Configure CDNsThis section discusses call routing and call parking options supported by Nortel CDNs as well as CDN failover behavior. It also describes how to configure Nortel CDNs and ACD phone sets to work with Avaya IC.
● Call routing is the customary hard ACD usage that addresses Symposium Call Center Server scripts for further handling.
● Call parking is where call control is kept by Business Advocate for acquired CDNs and the switch holds the call awaiting routing information. Call control is kept by the switch software (Symposium Call Center Server) for non-acquired CDNs.
● During failover (link failure or route request timeout) calls are sent to the associated Default Directory Number (DFDN). The DFDN is a required field in CDN configuration, which can be another CDN or an ACD Directory Number (ACDDN).
The following diagram illustrates the relationship of these options to the CDN:
CDNCall Routing
FAILOVER
DFDNCDN
option1
option2Call Parking �Advocate Queue�
ACDDN

Configuring Telephony switches for Business Advocate
284 Business Advocate Configuration and Administration
Acquired vs. Non-Acquired CDNs
Nortel CDNs can be acquired or controlled by external systems, which may be Symposium Call Center Server or, in this case, Business Advocate. There can only be one controlling system, so if Symposium Call Center Server controls a CDN which is used by Avaya IC, alarms are registered and further call handling by Business Advocate fails.
When configuring acquired CDNs, the following CDN settings are required for Business Advocate routing. These settings are particularly important for contact centers that are migrating to Business Advocate from "hard" ACD routing or previous non-Advocate routing:
TYPE CDNCDN xxxxCEIL 2047OVFL NOCNTL YESOVTH 2047DFDN ( depends on the local center’s failover routing design)
In Business Advocate, calls are delivered to agent�s stations using their DIRECT station lines. This differs from standard ACD routing which uses the ACD station lines.
Configure phone sets
For Avaya IC to control an ACD phone set, the AST and IAPG prompts must be properly configured on the phone set. This allows the Avaya TS to send the messages to the switch that enable phone sets to make calls, answer calls, hang up calls, etc.
● For digital phone sets, use Overlay 11 (LD 11)
● For analog phone sets, use Overlay 10 (LD 10)
AST promptThe AST prompt associates the keys on a digital phone set that can be made controllable by the Avaya TS. Because this is an ACD phone set, KEY 00 is always used for the ACD key that allows agents to answer a queue call from the ACDDN. You can define another KEY XX, such as KEY 01, as a single-call ringing (SCR) or multi-call ringing (MCR) key that the agent can use to make calls. In this scenario, the AST prompt is set to "00 01".
IAPG promptThe IAPG prompt controls the types of messages sent from the switch to the Avaya IC when the ACD phone set changes state. By default, when IAPG is set to "1", all the Nortel Meridian-1 messages about the ACD phone set state are sent to Avaya IC.

Nortel Meridian
Issue 3 February 2005 285
To configure digital phone sets:1. From the Meridian-1 PBX console, go to Overlay 11 (LD 11).
2. Complete the fields on the screen to match the following example:>"LD 11"...REQ "NEW"TYPE "2616" <<---- Enter the phone set’s type.TN "028 0 03 04" <<---- Enter the phone set’s TN....CUST "0" <<---- Enter the customer number for the phone set....AST "00 01" <<---- Keys 00 and 01 will be controllable.IAGP "1" <<---- Allows phone state messages to be sent to Avaya IC....KEY "0 ACD 400 401" <<---- Key 0 must be the ACD agent. This example shows
Position ID 401 on ACD-DN 401.KEY "1 MCR 123" <<---- Multi-call ringing DN 123. This phone set can also
be dialed directly at DN 123....REQ "END"
3. Save your changes.

Configuring Telephony switches for Business Advocate
286 Business Advocate Configuration and Administration
Configure parking device for wait treatmentAvaya IC configures a voice parking device to park calls on a wait treatment until an agent becomes available. This parking device is required if the caller requires a wait treatment that is different than the wait treatment that is delivered with the transfer parking device. A voice parking device enables Avaya IC to play wait treatment that is unique to an incoming call CDN (caller) rather than play the same wait treatment for all incoming calls.
The Nortel Meridian switch plays music wait treatment when you specify the following:#xx provides music from music source xx (where xx = a hex value)
Note:Note: #xx is the 2 digit route defined in the switch converted into hex with a #
added at the beginning. If the route for the music source is 1 digit, add a zero as a placeholder before you convert the value to hex. For example, use 02 to represent a route of 2, then convert 02 to hex.
If nothing is specified here, the system plays ringback.
If you configure the switch to play music wait treatment, a compatible music source must be defined on the switch. The compatible music source can come from a RAN board, a Meridian Voice Mail board, or switch trunk connection to some external music source. If an incompatible music source is used, Advocate calls will failover to a switch queue.
For more information and procedures on configuring parking devices for wait treatment on incoming calls, refer to Parking devices for the voice channel on page 170.
Link Failure ProcessingOn link failure, the Nortel CDN will time-out and terminate its indefinite route wait interval. Upon such abnormal termination, the CDN continues with its normal processing and sends the call to its default ACD group, which should be staffed to provide call handling on link failure.
There is a known issue on the Nortel Meridian Link. When a link fails, its calls are placed on Parking CDNs and Transfer CDNs until the caller hangs up the call.

Aspect CallCenter
Issue 3 February 2005 287
Aspect CallCenterThis section describes how to configure the Aspect CallCenter switch to operate with Business Advocate in Avaya IC 7.0.
Switch OperationThe Aspect CallCenter switch receives calls on incoming Call Control Tables (CCTs). On the Aspect CallCenter switch, the CCT is presented by a graphical representation of call handling instructions that describe a call flow. The CCT provides wait treatment in the form of a Set Music step. Optionally, the CCT can play a pre-announcement before it provides a route request to the TS.
The Business Advocate devices used by the Aspect version of the TS are the CCTs that are configured on the Aspect CallCenter switch and assigned a number by the Aspect switch CCT configuration software. Examples of these CCTs are provided in the Switch Administration appendix in IC Installation Planning and Prerequisites.
To alert Avaya IC to a call that just arrived, configure the CCT to execute a Send Data step with a subtype that is assigned for monitoring by the TS followed by a Receive Data step to wait for a routing destination from the TS. The wait time in the Receive Data step can be set per-link, meaning all of the CCTs that are sending and receiving data on a given link have the same timeout value. You need to have enough Received Data steps to wait for the longest waiting call in the queue. To be safe, we recommend a minimum of 3 Receive Data steps to provide 45 minutes of waiting time.
! Important:! Important:Important: The Business Advocate qualification CCT must have a numeric subtype
because of Telephony Server Adapter (TSA server) configuration constraints on IC Manager. This subtype must be unique. Business Advocate wait treatment CCTs must have a subtype that is identical to its CCT ID as assigned by the Aspect eBusiness Architect when saving a new CCT.
Avaya IC qualifies the call and, if an agent is available, Avaya IC tells the switch to route the call to that agent. If an agent is not available, Avaya IC tells the switch to route the call to a wait treatment queue. The program associated with the wait treatment queue is set to play the required treatment and wait for as long a period of time as is allowed by the switch.
When the call reaches the wait treatment queue, the program associated with the queue issues a route request to Avaya IC asking where to route the call.

Configuring Telephony switches for Business Advocate
288 Business Advocate Configuration and Administration
Avaya IC checks the estimated wait time (EWT). If the EWT is shorter than the length of the announcement, the call is routed to ringback queue. If the EWT is longer than the length of the announcement, the call is routed to the announcement queue.
Aspect CCT configurationThis section describes the configuration of the Aspect CCTs that are used as Business Advocate devices on Avaya IC.
Parking CCT
The Parking CCT begins with a SetMusic step, configured to play an announcement. If the call follows the success path, it goes through a SendData / ReceiveData pair of blocks, which provide routing on the Aspect. The PlayAnnouncement steps are used for CCT debugging. Note, they are all related to Error or NAK branches. Playing an announcement if an error or NAK condition is met enables you to debug what happened on the call.
In a production environment, you should configure the error branches in the SendData and ReceiveData steps to route the call to a CCT that does default agent selection.

Aspect CallCenter
Issue 3 February 2005 289
Transfer CCT
The Transfer CCT is very similar to the Parking CCT. This is a special Parking CCT, specified in Avaya IC to be used for call transfers and RONAs. The only difference is that the SetMusic step in the TransferCCT is configured to play music instead of an announcement.
Announcement CCT
The Announcement CCT plays an announcement with a PlayAnnouncement step. It then sends the call back to the CCT that send the call to Announcement CCT in the first place. This is either the Parking CCT or the Transfer/RONA CCT.

Configuring Telephony switches for Business Advocate
290 Business Advocate Configuration and Administration
Ringback CCT
The Ringback CCT is similar in structure to the Parking CCT and the Transfer/RONA CCT. The only difference is that the SetMusic step in the Ringback CCT is configured to play a recording of ringback instead of an announcement or music. Ringback must be played via a recording because Aspect does not provide ringback.

Aspect CallCenter
Issue 3 February 2005 291
Incoming CCT
The Incoming CCT establishes the entry point of calls into Avaya IC. The Incoming CCT is set on the TS configuration tab, but Business Advocate uses it for RONA. To ensure RONA works properly, configure the Incoming CCT to have the No Answer branch of the SelectExtension step lead to a GotoCCT step. This sends the call to the appropriate Business Advocate Transfer CCT if the first agent does not answer the call.

Configuring Telephony switches for Business Advocate
292 Business Advocate Configuration and Administration
Exception CCT
The Exception CCT is used to route calls when Advocate processing fails.

Aspect CallCenter
Issue 3 February 2005 293
Backup LinkThe Data Interlink number specified in the Aspect Send Data and Receive Data steps refers to a defined connection between the Aspect CallCenter system and an Aspect CMI server. Multiple Aspect CMI servers may be set up, each associated with a different Aspect Data Interlink. You must configure each of the Avaya Telephony servers with parameters that are necessary to connect to each of these Aspect CMI servers respectively.
Link Failover There is a known issue with link failover on Business Advocate for the Aspect version of the TS.
If the CTI Link, the TS or the TSA server, goes down, currently parked Business Advocate calls are supposed to be automatically moved out of the parking device and sent to hard ACD agents. If the route failed due to a timeout, you should retry the route. If the route failed due to a link failure, you should shift the calls to an Aspect agent group.
In an Aspect environment, the CCT has no way of knowing if route failed due to a timeout or a link failure because call routing is done by Send Data and Receive Data blocks in the CCT. The Receive Data block has only one branch with which to process errors, the Error branch, so the CCT has no way differentiating the cause of the error, only that an error occurred.
You can use the Send Data step to detect the failure of the link between the Aspect CMI server and the switch. This requires that calls be routed in and out of a CCT with a Send Data step which checks for link failure every few seconds. This would require the Data Interlink Timeout parameter be set to a low value of approximately 10 seconds to ensure that if the link went down calls would be moved out of the CCT by the switch. Business Advocate would not function properly if the Data Interlink Timeout was set to such a low value.
Because there is no way to automatically move the calls out of the parking device in a link down scenario, you must do it manually.
The maximum period of time any call can wait in one Receive Data step is 999 seconds. If you want to park a call for longer than 999 seconds (15 minutes), multiple Receive Data steps must be linked together. The danger of this is that if the link goes down, the call is stuck in the Receive Data chain until all of the Receive Data steps timeout, at which time the call will take the error path of the last Receive Data step.

Configuring Telephony switches for Business Advocate
294 Business Advocate Configuration and Administration
Manual solutionCurrently, the only way to get calls out of the parking device when the link goes down is to shut down the Aspect CMI server. This causes the Receive Data step of the Parking CCT to timeout after the number of seconds set in the Data Interlink Timeout expire. When the Receive Data step times out, the call goes down the error branch of the Receive Data block. Put a GotoCCT or a SelectAgent block on this branch to send the call to another CCT or an agent group.
Business Advocate requires this timeout to be set to the highest possible value, 999 seconds. Calls will be waiting in park for over 15 minutes with no indication of what is happening.

Ericsson MD110
Issue 3 February 2005 295
Ericsson MD110This section describes how to configure the Ericsson MD110 switch, using Ericsson Application Link Server 4.0, to operate with Avaya Business Advocate on Avaya IC.
! Important:! Important:Important: When using Avaya Business Advocate, set the Dialby Equipment
configuration parameter to true (check the check box) when you configure the Telephony server for the Ericsson MD110 switch. For more information, refer to the Telephony server configuration for the Ericsson MD110 switch in the Telephony Server chapter of the Telephony Connectors Programmer Guide.
Switch operationThe Ericsson MD110 switch receives incoming voice calls in a CTI group. A CTI group always has a queue associated with it, but it may not have agents associated with it. In other words, a CTI group is an ACD group without ACD members and is CTI classified.
For information about configuring CTI groups on the Ericsson MD110 switch, refer to Appendix A, Switch Administration in IC Installation Planning and Prerequisites.
CTI group configurationTo configure the Ericsson MD110 switch to process incoming voice calls with Business Advocate on Avaya IC, setup a CTI group for each of the following wait treatment parking devices on your system.
● Announcement
● Music
● Ringback
Business Advocate parks the call in an announcement queue if the announcement length is shorter than the estimated wait time (EWT) calculated by Business Advocate. Avaya IC checks the estimated wait time (EWT) and if the EWT is shorter than the length of the announcement, the call is routed to a ringback queue. If the EWT is longer than the length of the announcement, the call is routed to the announcement queue.
The Ericsson MD110 switch sends an incoming call event to applications that request monitoring (TS.Assigns) on the CTI group. The switch waits for the maximum queue time
Configuring Telephony switches for Business Advocate
296 Business Advocate Configuration and Administration
(in seconds and configurable) for the CTI application to divert the call to a destination. If the CTI application does not respond within the maximum queue time, the call is dropped.
The Ericsson MD110 switch plays music wait treatment if the CTI group is configured for music on wait. If music on wait is not configured, the system plays ring back.
Note:Note: If you configure the Ericsson MD 110 switch to play music wait treatment, a
compatible music source must be defined on the switch.
Configure parking device for wait treatment
Avaya IC configures a voice parking device to park calls on a wait treatment until an agent becomes available. This parking device is required if the caller requires a wait treatment that is different than the wait treatment that is delivered with the transfer parking device.
RingbackTo initiate a CTI group to act as a ringback parking device, start up the WINFIOL admin tool provided with the Ericsson MD110 switch and enter a command similar to the following example, using the pertinent information for your CTI group.
This example initiates CTI group 5501 to act as a ringback parking device:<ACGRI:GRP=5501,LIM=1,SERV=1011,TRAF=15,SEL=11215,QUE=10150752525, ACTC=180;
The following example prints the configuration of CTI group 5501:<ACGCP:GRP=5501>ACD GROUP CALL DATAGRP LIM SERV TRAF SEL QUE QIC CUST SAT ACTC5501 1 1011 15 11215 10150752525 NO 180
Play announcementsTo initiate a CTI group for playing announcements, configure the CTI group such that when a call is received by the group, it plays an announcement and diverts the call back to the parking device. This CTI group is not be monitored by the Telephony server.
Link Failure Processing
On link failure, the CTI group does not send a link failure event notification to the CTI application nor is it capable of routing the queued calls to a destination. It continues to keep the call till the maximum queue wait time value is reached, then it drops the call. This is a known issue on the Ericsson MD110 Application Link Server 4.0.
To address this issue, you can manually route the calls to an ACD group where agents are logged in. Associate one or more ACD members to the CTI group and make these agents available in that group. This will divert the calls in the CTI group to the ADN associated with the group.

Issue 3 February 2005 297
Appendix B: Troubleshooting Business Advocate
This section includes the following troubleshooting information for Business Advocate:
● Troubleshooting Logical Resource Managers on page 298.
● Troubleshooting Resource Manager servers on page 299.
● Troubleshooting link groups on page 300.
● Troubleshooting TSA servers on page 301.
● Troubleshooting parking devices on page 302.
● Troubleshooting channel availability issues on page 303.
● Troubleshooting email routing issues on page 304.
● Troubleshooting routing issues on page 305.

Troubleshooting Business Advocate
298 Business Advocate Configuration and Administration
Troubleshooting Logical Resource ManagersYou might encounter the following problems with a Logical Resource Manager:
● No Resource Manager server available on page 298.
● Cannot delete Logical Resource Manager on page 298.
No Resource Manager server available
Error message - No Resource Manager available. Start the Resource Manager server before changing the LRM.
Problem - You cannot modify a Logical Resource Manager if you have not yet created and started a Resource Manager server.
Solution - Create and start a Resource Manager server. For more information, see Resource Manager server on page 139. If you have already created a Resource Manager server, make sure that the server is started.
Cannot delete Logical Resource Manager
Error message - The LRM is in use and cannot be deleted.
Problem - You cannot delete a Logical Resource Manager that you have assigned to either a Telephony Services Adaptor server, Web Advocate Adaptor server, or an agent.
Solution - Do the following:
1. Unassign the Logical Resource Manager from all components.
2. Delete the Logical Resource Manager.

Troubleshooting Resource Manager servers
Issue 3 February 2005 299
Troubleshooting Resource Manager serversYou might encounter the following problem with a Resource Manager server:
Error message - Error received from Microsoft Message Queueing Service (MSMQ). WARNING: Resource Manager won't be notified about administrative changes until the problem is corrected.
Problem - Resource Manager cannot access MSMQ during start up, and generates a High alarm in the Alarm Monitor of IC Manager.
This error message occurs when MSMQ is in an indeterminate state. This error message signifies a known problem with MSMQ, and does not signify a problem with Business Advocate or Avaya IC.
Solution - To resolve this issue:
1. Uninstall MSMQ.
2. Reinstall MSMQ.
3. Configure MSMQ.
4. Restart all machines that host Resource Manager servers.
For more information about how to install and configure MSMQ, see IC Installation Planning and Prerequisites.
If this solution does not work:
1. Remove the machine from the active directory domain.
2. Re-assign the machine to the active directory domain.
Troubleshooting Business Advocate
300 Business Advocate Configuration and Administration
Troubleshooting link groupsYou might encounter the following problems with a link group:
● Link group name already exists on page 300.
● Link group not valid on page 300.
● Cannot delete link group on page 300.
Link group name already exists
Error message - Name already exists. Enter a unique Link Group name.
Problem - The name that you entered in the Name field for the link group is already in use.
Solution - Enter a unique name for the link group. You cannot use a name that is already in use for an active link group in the Avaya IC system.
Link group not valid
Error message - Link Group not valid. The group of Telephony servers must be from the same switch.
Problem - You have attempted to create a link group that includes Telephony servers which belong to more than one switch.
Solution - Link groups can only include Telephony servers from the same switch.
Create separate link groups for Telephony servers from different switches. For more information, see Link groups on page 187.
Cannot delete link group
Error message - The Link Group is in use and cannot be deleted.
Problem - You have attempted to delete a link group that is currently being used.
Solution - Do the following:
1. Stop all Telephony servers in the link group.
2. Unassign the link group from all agents.
3. Delete the link group.

Troubleshooting TSA servers
Issue 3 February 2005 301
Troubleshooting TSA serversYou might encounter the following problems with a TSA server:
● Cannot create TSA server - no LRM identified on page 301.
● Cannot create TSA server - no transfer exception workflows on page 301.
● Cannot create TSA server - workflows required for VDN on page 301.
Cannot create TSA server - no LRM identified
Error message - No LRM identified. Select at least one LRM for this TSA.
Problem - You have attempted to create a TSA server, and have not assigned a Logical Resource Manager to the server.
Solution - Assign a Logical Resource Manager to the TSA server. For more information, see Assigning a Logical Resource Manager on page 161.
Cannot create TSA server - no transfer exception workflows
Error message - Value required for Transfer Exception Workflow.
Problem - You have attempted to create a TSA server, and have not specified a transfer exception workflow.
Solution - Specify a transfer exception workflow for the TSA server. For more information, see Assigning a transfer exception workflow on page 167.
Cannot create TSA server - workflows required for VDN
Error message - Qualification and exception workflows are both required for each VDN in Contact Handling.
Problem - You have attempted to create a TSA server, and have not specified an exception workflow or a qualification workflow.
Solution - Specify an exception workflow and qualification workflow for the TSA server. For more information, see Setting up contact handling on page 165.

Troubleshooting Business Advocate
302 Business Advocate Configuration and Administration
Troubleshooting parking devicesYou might encounter the following problems with a parking device:
● Cannot create parking device - no wait treatment style on page 302.
● Cannot create parking device - no TSA server on page 302.
Cannot create parking device - no wait treatment style
Error message - Value required for Wait Treatment Style.
Problem - You have attempted to create a parking device, and have not entered a wait treatment style.
Solution - Enter a wait treatment style on the Voice tab. For more information, see Parking devices for the voice channel on page 170.
Cannot create parking device - no TSA server
Error message - Value required for TSA.
Problem - You have attempted to create a parking device, and have not assigned a TSA server.
Solution - Assign a TSA server on the Voice tab. For more information, see Parking devices for the voice channel on page 170.

Troubleshooting channel availability issues
Issue 3 February 2005 303
Troubleshooting channel availability issuesYou might encounter the following problem with agent availability for channels:
Problem - An agent is configured to handle voice, chat, and email contacts. If the agent is unable to log in to the voice channel, the agent cannot become available for chat or email contacts.
Solution - Check whether the agent is assigned to a link group.
An agent who is assigned to a link group cannot become available for chat or email contacts unless that agent can log in to the voice channel.
If a link in the link group fails and you want the agent to handle chat and email contacts:
1. In IC Manager, select the Agent tab.
2. Double-click the agent in the list of agents.
3. In the Agent Editor, select the Advocate tab.
4. Select <No Selection> from the Telephony Link Group drop-down list.
5. Select OK.
! Important:! Important:Important: If you configure the switch to send contacts to an agent on failover and the
agent is not assigned to a link group, the agent can receive voice, chat, and email contacts. However, Business Advocate cannot limit the number of contacts that the agent receives to the maximum number of contacts configured for that agent in IC Manager.

Troubleshooting Business Advocate
304 Business Advocate Configuration and Administration
Troubleshooting email routing issuesThe following table describes some problems that you can encounter with email contacts.
Problem Recommended resolution
Email contacts are stuck in the Email Task list of an agent and need to be retrieved and delivered to a different agent to be answered.
Follow the instructions in Retrieving email contacts from an agent on page 223.
Email contacts are stuck in the wait queue of an agent and need to be retrieved and delivered to a different agent to be answered.
Follow the instructions in Marking an agent as out of office on page 257.

Troubleshooting routing issues
Issue 3 February 2005 305
Troubleshooting routing issuesThe following table describes some problems that you can encounter when an available agent does not receive contacts from Business Advocate.
Problem Recommended resolution
Agents are available and qualified for service classes that have contacts in queue, but Business Advocate does not match agents with any contacts.
This issue can occur if you add a new ADU server to the Avaya IC system. Resource Manager servers do not automatically know about the new ADU server, or any of its events. To resolve this issue, restart the Resource Manager servers.

Troubleshooting Business Advocate
306 Business Advocate Configuration and Administration

Issue 3 February 2005 307
IndexAactivating agents . . . . . . . . . . . . . . . 32, 247activation levels
about . . . . . . . . . . . . . . . . . . . . . 243example . . . . . . . . . . . . . . . . . . 37, 243
activation typesabout . . . . . . . . . . . . . . . . . . . . . 242agent . . . . . . . . . . . . . . . . . . . . . 24backup . . . . . . . . . . . . . . . . . . 25, 242example . . . . . . . . . . . . . . . . . . . . 37regular. . . . . . . . . . . . . . . . . . . 24, 242reserve . . . . . . . . . . . . . . . . . . 25, 242
active Resource Manager server . . . . . . . . 41, 141adding
Logical Resource Manager . . . . . . . . . . . 164Resource Manager server . . . . . . . . . . . 140
Adjunct Route Capacity . . . . . . . . . . . . . . 155adjusting
agent loads . . . . . . . . . . . . . . . . . . 20agent pools . . . . . . . . . . . . . . . . . . 32
ADL file . . . . . . . . . . . . . . . . . . . . . . 120administering
agents . . . . . . . . . . . . . . . . . . . . . 241qualifiers. . . . . . . . . . . . . . . . . . . . 81service classes. . . . . . . . . . . . . . . 85, 107service goals. . . . . . . . . . . . . . . . . . 103
administration toolsabout . . . . . . . . . . . . . . . . . . . . . 47Alarm Manager. . . . . . . . . . . . . . . . . 48Component Manager . . . . . . . . . . . . . . 47Supervisor . . . . . . . . . . . . . . . . . . . 47
Advocatesee Business Advocate
Advocate voice parking device . . . . . 173, 175, 179Advocate.prj. . . . . . . . . . . . . . . . . . . . 45Advocate_Requeue_Time_Chat . . . . . . . . . . 206Advocate_Requeue_Time_Email . . . . . . . . . . 206advocateDBConnection . . . . . . . . . . . 120, 126After contact work . . . . . . . . . . . . . . . . . 30agent roles
see activation typesagent selection
about . . . . . . . . . . . . . . . . . . . . . 29comparing methods . . . . . . . . . . . . . . 31configuring. . . . . . . . . . . . . . . . . . . 109default EAHT . . . . . . . . . . . . . . . . . 102default method . . . . . . . . . . . . . . . . . 101least occupied agent . . . . . . . . . . . . . . 29
most idle agent . . . . . . . . . . . . . . . . . 29occupancy . . . . . . . . . . . . . . . . . . . 30process . . . . . . . . . . . . . . . . . . . . 31service classes . . . . . . . . . . . . . . . . . 86
agentsactivating . . . . . . . . . . . . . . . . . . . 247activation levels. . . . . . . . . . . . . . . . 243activation types . . . . . . . . . . . . . . 24, 242
backup . . . . . . . . . . . . . . . . . . . 25regular . . . . . . . . . . . . . . . . . . . 24reserve . . . . . . . . . . . . . . . . . . . 25
assigning capability sets. . . . . . . . . . . . 250assigning to profiles . . . . . . . . . . . . . . 237capability sets . . . . . . . . . . . . . . . . 245Capability Wizard . . . . . . . . . . . . . . . 254chat qualification . . . . . . . . . . . . . . . 194configuring attributes . . . . . . . . . . . . . 248creating . . . . . . . . . . . . . . . . . . . 246deactivating . . . . . . . . . . . . . . . . . 258defining capability set . . . . . . . . . . . . . 252deleting . . . . . . . . . . . . . . . . . . . 260determining profile . . . . . . . . . . . . . . 250dynamic adjustment . . . . . . . . . . . . . . . 32email qualification . . . . . . . . . . . . . . . 212in the office . . . . . . . . . . . . . . . . . . 259least occupied agent . . . . . . . . . . . . . . 29link groups . . . . . . . . . . . . . . . . . . 187Logical Resource Manager . . . . . . . . . . 247making inactive . . . . . . . . . . . . . . . . 257managing . . . . . . . . . . . . . . . . . . 241matching . . . . . . . . . . . . . . . . . . . . 20most idle agent . . . . . . . . . . . . . . . . . 29occupancy . . . . . . . . . . . . . . . . . . . 30out of office . . . . . . . . . . . . . . . . . . 257profiles . . . . . . . . . . . . . . . . . . . . 231refreshing . . . . . . . . . . . . . . . . . . 248removing from profiles. . . . . . . . . . . . . 239returning to active status . . . . . . . . . . . 259role . . . . . . . . . . . . . . . . . . . . . 253selection . . . . . . . . . . . . . . . . . . . . 29states . . . . . . . . . . . . . . . . . . . . . 30transfer to agent flow . . . . . . . . . . . . . . 46troubleshooting . . . . . . . . . . . . . . . . 305voice qualification . . . . . . . . . . . . . . . 150
Ahead of Target . . . . . . . . . . . . . . . . 29, 98AIX . . . . . . . . . . . . . . . . . . . . . . . . 42Alarm Manager . . . . . . . . . . . . . . . . . . 48Alarm Monitor . . . . . . . . . . . . . . . . . . . 48

308 Business Advocate Configuration and Administration
Announcement CCT . . . . . . . . . . . . . . . 289Aspect Call Center . . . . . . . . . . . . . . . . 287Aspect CallCenter
backup link . . . . . . . . . . . . . . . . . . 293CCT configuration. . . . . . . . . . . . . . . 288link failover . . . . . . . . . . . . . . . . . . 293switch operation . . . . . . . . . . . . . . . 287
Aspect switch, parking devices . . . . . . . . . . 175assigning
capability sets to agents . . . . . . . . . . . . 250customer profile attributes . . . . . . . . . . . 135initial role to Resource Manager server . . . . . 141Logical Resource Manager . . . . . . . . . . 161qualifiers to service class . . . . . . . . . . . .111service class attributes . . . . . . . . . . . . 108transfer exception flow . . . . . . . 167, 205, 222workflows . . . . . . . . . . . . . . . . . . 165
attributescustomer profile. . . . . . . . . . . . . . . . 134service classes
agent selection type . . . . . . . . . . . . 109EAHT. . . . . . . . . . . . . . . . . . . .110service goal . . . . . . . . . . . . . . . . .110
AUX work . . . . . . . . . . . . . . . . . . . . . 30Available . . . . . . . . . . . . . . . . . . . . . 30Avaya Definity . . . . . . . . . . . . . . . . . . 267
backup CTI link configuration . . . . . . . . . 276call transfers . . . . . . . . . . . . . . . . . 276configuration . . . . . . . . . . . . . . . . . 267
CTI link . . . . . . . . . . . . . . . . . . 268enhanced adjunct routing . . . . . . . . . 270incoming VDN. . . . . . . . . . . . . . . 268wait treatment VDN . . . . . . . . . . . . 269
play estimated wait time . . . . . . . . . . . . 279switch configuration . . . . . . . . . . . . . . 274switch operation . . . . . . . . . . . . . . . 273
Avaya Definity, parking devices . . . . . . . . . . 173
Bbackup activation type . . . . . . . . . . . . 25, 242backup agents
activating . . . . . . . . . . . . . . . . . . . . 32default activation level. . . . . . . . . . . . . . 98
backup linkAspect CallCenter. . . . . . . . . . . . . . . 293configuring . . . . . . . . . . . . . . . . . . 184failover . . . . . . . . . . . . . . . . . . . . . 52failover and recovery . . . . . . . . . . . . . 265Nortel switches . . . . . . . . . . . . . . . . 184
backup link configuration
Avaya Definity . . . . . . . . . . . . . . . . . 276Behind Target . . . . . . . . . . . . . . . . . 91, 97Best Services Routing. . . . . . . . . . . . . . . 263branding strategy . . . . . . . . . . . . . . . . . . 93BSR . . . . . . . . . . . . . . . . . . . . . . . 263building workflows . . . . . . . . . . . 158, 200, 219Business Advocate
about . . . . . . . . . . . . . . . . . . . . . . 17administration tools . . . . . . . . . . . . . . . 47Alarm Manager . . . . . . . . . . . . . . . . . 48Component Manager . . . . . . . . . . . . . . 47components . . . . . . . . . . . . . . . . . . . 41configuring components . . . . . . . . . . . . 117databases. . . . . . . . . . . . . . . . . . . . 46distributed. . . . . . . . . . . . . . . . . . . . 55failover . . . . . . . . . . . . . . . . . . . . . 48options . . . . . . . . . . . . . . . . . . . . 101predictive technology . . . . . . . . . . . . . . 25prerequisites . . . . . . . . . . . . . . . . . 117reports . . . . . . . . . . . . . . . . . . . 39, 48servers . . . . . . . . . . . . . . . . . . . . . 42Supervisor . . . . . . . . . . . . . . . . . . . 47tasks . . . . . . . . . . . . . . . . . . . . . . 65workflows . . . . . . . . . . . . . . . . . . . . 44
Ccalculation
expected wait time. . . . . . . . . . . . . . . . 26predicted wait time. . . . . . . . . . . . . . . . 25
Call Control Table. . . . . . . . . . . . . . . . . 262call processing . . . . . . . . . . . . . . . . . . 264call transfers
Avaya Definity . . . . . . . . . . . . . . . . . 276Capability Set tab, service classes . . . . . . . . . 111capability sets
activation level . . . . . . . . . . . . . . . . 253agents . . . . . . . . . . . . . . . . . . . . 245assigning to agents . . . . . . . . . . . . . . 250channel . . . . . . . . . . . . . . . . . . . . 253defining for agent . . . . . . . . . . . . . . . 252defining for profile . . . . . . . . . . . . . . . 234deleting . . . . . . . . . . . . . . . . . . . . 256profiles . . . . . . . . . . . . . . . . . . . . 231qualifiers . . . . . . . . . . . . . . . . . . . . 73role . . . . . . . . . . . . . . . . . . . . . . 253
Capability Wizardagents . . . . . . . . . . . . . . . . . . . . 254profiles . . . . . . . . . . . . . . . . . . . . 236service classes . . . . . . . . . . . . . . . . 112
categorycreating . . . . . . . . . . . . . . . . . . . . . 80
Issue 3 February 2005 309
qualifier . . . . . . . . . . . . . . . . . . . . 22CCQ database
connection . . . . . . . . . . . . . . . . . . . 126connection set . . . . . . . . . . . . . . . . . 131
CCT . . . . . . . . . . . . . . . . . . . . . . . 262CCT configuration
Aspect CallCenter . . . . . . . . . . . . . . . 288CDN . . . . . . . . . . . . . . . . . . . . . . . 262changing
conditions . . . . . . . . . . . . . . . . . . . 20Logical Resource Manager . . . . . . . . . . . 138Resource Manager server . . . . . . . . . . . 147service class . . . . . . . . . . . . . . . . . . 113service goals. . . . . . . . . . . . . . . . . . 106TSA server . . . . . . . . . . . . . . . . . . 168
channel qualifier . . . . . . . . . . . . . . 73, 77, 87channels, support . . . . . . . . . . . . . . . . . 18chat
distributed Business Advocate . . . . . . . . . 58failover . . . . . . . . . . . . . . . . . . . . 54qualify chat flow . . . . . . . . . . . . . . . . 45queuing parameters . . . . . . . . . . . . . . 206WAA server . . . . . . . . . . . . . . . . . . 43WebACD server . . . . . . . . . . . . . . . . 43
Chat & Phone . . . . . . . . . . . . . . . . . . . 197Chat & VOIP . . . . . . . . . . . . . . . . . . . 197chat channel
configuring WAA server. . . . . . . . . . . . . 204creating Workflow server . . . . . . . . . . . . 208failover . . . . . . . . . . . . . . . . . . . . 54prequalification. . . . . . . . . . . . . . . . . 198prerequisites . . . . . . . . . . . . . . . . . . 197qualification . . . . . . . . . . . . . . . . . . 193Resource Manager server . . . . . . . . . . . 144RONA . . . . . . . . . . . . . . . . . . . . . 193service goal . . . . . . . . . . . . . . . . . . 90WAA server . . . . . . . . . . . . . . . 201, 202
chat contactsqualification . . . . . . . . . . . . . . . . . . 193Resource Manager server . . . . . . . . . . . 144
chat qualificationagent . . . . . . . . . . . . . . . . . . . . . 194components . . . . . . . . . . . . . . . . . . 194ICM server. . . . . . . . . . . . . . . . . . . 194process . . . . . . . . . . . . . . . . . . . . 195Resource Manager server . . . . . . . . . . . 194WAA server . . . . . . . . . . . . . . . . . . 194WebACD server . . . . . . . . . . . . . . . . 194Workflow server . . . . . . . . . . . . . . . . 194
chat qualification flow . . . . . . . . . . . . . . . 204chat routing exception flow . . . . . . . . . . . . . 204choosing
agents . . . . . . . . . . . . . . . . . . . . . 29contacts . . . . . . . . . . . . . . . . . . . . 26
Communication Manager, parking devices . . . . . 173comparing, agent selection . . . . . . . . . . . . . 31Component Manager
about. . . . . . . . . . . . . . . . . . . . . . 47assigning initial role . . . . . . . . . . . . . . 141
componentsabout. . . . . . . . . . . . . . . . . . . . . . 41administration tools . . . . . . . . . . . . . . . 47Alarm Manager . . . . . . . . . . . . . . . . . 48Business Advocate Supervisor. . . . . . . . . . 47chat qualification . . . . . . . . . . . . . . . 194Component Manager . . . . . . . . . . . . . . 47configuring . . . . . . . . . . . . . . . . . . .117databases . . . . . . . . . . . . . . . . . . . 46email qualification . . . . . . . . . . . . . . . 212failover . . . . . . . . . . . . . . . . . . . . . 48Logical Resource Manager . . . . . . . . 41, 136prerequisites . . . . . . . . . . . . . . . . . .117reports . . . . . . . . . . . . . . . . . . . . . 48Resource Manager server . . . . . . . . . 42, 139servers . . . . . . . . . . . . . . . . . . . . . 42service classes . . . . . . . . . . . . . . . . . 86TSA server . . . . . . . . . . . . . . . . 43, 159voice qualification . . . . . . . . . . . . . . . 150WAA server . . . . . . . . . . . . . 43, 201, 219workflows . . . . . . . . . . . . . . . . . . . 44
configurationAvaya Definity . . . . . . . . . . . . . . . . 267
configure CDNsNortel Meridian . . . . . . . . . . . . . . . . 283
configuringagent attributes . . . . . . . . . . . . . . . . 248backup link . . . . . . . . . . . . . . . . . . 184Business Advocate options . . . . . . . . . . 101CCQ connection . . . . . . . . . . . . . . . 126CCQ connection set. . . . . . . . . . . . . . 131chat qualification . . . . . . . . . . . . . . . 193components . . . . . . . . . . . . . . . . . .117contact handling . . . . . . . . . . . . . 165, 166critical threshold . . . . . . . . . . . . . . . 105customer profile attributes . . . . . . . . . . . 134database connections . . . . . . . . . . . . . .118database settings . . . . . . . . . . 158, 200, 218default agent selection . . . . . . . . . . . . 101default EAHT . . . . . . . . . . . . . . . . . 102Directory server. . . . . . . . . . . . . . . . 136email qualification . . . . . . . . . . . . . . . .211IC Repository connection . . . . . . . . . . . 120IC Repository connection set . . . . . . . . . 125

310 Business Advocate Configuration and Administration
lower threshold . . . . . . . . . . . . . . . . 105qualify email flow . . . . . . . . . . . . . . . 217qualify voice flow . . . . . . . . . . . . . . . 156RONA . . . . . . . . . . . . . . . . . . . . 191service classes . . . . . . . . . . . . . . . . 107service goals . . . . . . . . . . . . . . . . . 103tasks . . . . . . . . . . . . . . . . . . . . . . 65Telephony server . . . . . . . . . . . . . . . 182upper threshold . . . . . . . . . . . . . . . . 105virtual queues . . . . . . . . . . . . . . . . 225voice qualification . . . . . . . . . . . . . . . 149WAA server for chat. . . . . . . . . . . . . . 204WAA server for email . . . . . . . . . . . . . 221WebACD server . . . . . . . . . . . . . 206, 207
configuring telephony switches . . . . . . . . . . 261connection sets
CCQ database . . . . . . . . . . . . . . . . 131IC Repository . . . . . . . . . . . . . . . . . 125
connectionsCCQ database . . . . . . . . . . . . . . . . 126IC Repository . . . . . . . . . . . . . . . . . 120
consequences, WebACD server. . . . . . . . . . 207contact handling
configuring . . . . . . . . . . . . . . . . . . 166example . . . . . . . . . . . . . . . . . . . 166
contact selectionabout . . . . . . . . . . . . . . . . . . . . . 26example . . . . . . . . . . . . . . . . . . . . 28process . . . . . . . . . . . . . . . . . . . . 27service states. . . . . . . . . . . . . . . . . . 24
contactschat failover . . . . . . . . . . . . . . . . . . 54chat qualification . . . . . . . . . . . . . . . . 45distributed Business Advocate . . . . . . . . . . 60email failover . . . . . . . . . . . . . . . . . . 54email qualification. . . . . . . . . . . . . . . . 46exception handling . . . . . . . . . . . . . . . 46greatest need. . . . . . . . . . . . . . . . . . 19matching . . . . . . . . . . . . . . . . . . . . 19performance thresholds . . . . . . . . . . . . . 22selection . . . . . . . . . . . . . . . . . . . . 26service classes . . . . . . . . . . . . . . . . . 23service state . . . . . . . . . . . . . . . . . . 96transfer to agent . . . . . . . . . . . . . . . . 46voice failover . . . . . . . . . . . . . . . . . . 51voice qualification . . . . . . . . . . . . . . . . 45
Control Directory Number . . . . . . . . . . . . . 262copying profile . . . . . . . . . . . . . . . . . . 239creating
agent . . . . . . . . . . . . . . . . . . . . 246customer profile attributes . . . . . . . . . . . 134link groups . . . . . . . . . . . . . . . . . . 189
Logical Resource Manager . . . . . . . . . . . 137parking devices . . . . . . . . . . . 173, 175, 179profiles . . . . . . . . . . . . . . . . . . . . 233qualifier category . . . . . . . . . . . . . . . . 80qualifiers . . . . . . . . . . . . . . . . . . . . 79Resource Manager server . . . . . . . . 139, 140service classes . . . . . . . . . . . . . . . . 108service goals . . . . . . . . . . . . . . . . . 104TSA server . . . . . . . . . . . . . . . . . . 160virtual queue . . . . . . . . . . . . . . . . . 227WAA server . . . . . . . . . . . . . . . . . . 203
criteria, routingsee qualification
Critical service state. . . . . . . . . . . . . . . . . 97critical threshold . . . . . . . . . . . . . . . . . . 92
about . . . . . . . . . . . . . . . . . . . . . . 23configuring . . . . . . . . . . . . . . . . . . 105example . . . . . . . . . . . . . . . . . . . . 95
CTI group . . . . . . . . . . . . . . . . . . . . 262CTI group configuration
Ericsson MD110. . . . . . . . . . . . . . . . 295custom service goal . . . . . . . . . . . . . . . . . 90customer profile attributes
about . . . . . . . . . . . . . . . . . . . . . 134configuring . . . . . . . . . . . . . . . . . . 134ListQ . . . . . . . . . . . . . . . . . . . . . 133
customertype qualifier . . . . . . . . . . . . . . . . 78customizing
qualify chat flow . . . . . . . . . . . . . . . . 199qualify email flow . . . . . . . . . . . . . . . 216
DData server, creating . . . . . . . . . . . . . . . 119data source
Interaction Center . . . . . . . . . . . . . . . 132ListQ . . . . . . . . . . . . . . . . . . . . . 133repository . . . . . . . . . . . . . . . . . . . 125
database connectionsconfiguring . . . . . . . . . . . . . . . . . . 118
Database Designer . . . . . . . . . . . . . 120, 126databases
Business Advocate . . . . . . . . . . . . . . . 46connection sets . . . . . . . . . . . . . 125, 131connections . . . . . . . . . . . . . 118, 120, 126qualify chat flow . . . . . . . . . . . . . . . . 200qualify email flow . . . . . . . . . . . . . . . 218qualify voice flow . . . . . . . . . . . . . . . 158resource store . . . . . . . . . . . . . . . . . . 46system store . . . . . . . . . . . . . . . . . . 46
dataserver type/alias . . . . . . . . . . . . 122, 128DB2 databases . . . . . . . . . . . . . . . . . . . 46

Issue 3 February 2005 311
deactivating agents . . . . . . . . . . . . . . . . 258default
agent selection method . . . . . . . . . . . . . 101EAHT . . . . . . . . . . . . . . . . . . . . . 102service goal . . . . . . . . . . . . . . . . . . 89
definingcapability set for agent . . . . . . . . . . . . . 252capability set for profile . . . . . . . . . . . . . 234
deletingagents . . . . . . . . . . . . . . . . . . . . . 260capability set . . . . . . . . . . . . . . . . . . 256link groups . . . . . . . . . . . . . . . . . . . 191Logical Resource Manager . . . . . . . . . . . 139profiles . . . . . . . . . . . . . . . . . . . . 240qualifiers. . . . . . . . . . . . . . . . . . . . 84Resource Manager server . . . . . . . . . . . 148service class . . . . . . . . . . . . . . . . . . 115service goals. . . . . . . . . . . . . . . . . . 107TSA server . . . . . . . . . . . . . . . . . . 169WAA server . . . . . . . . . . . . . . . . . . 205
deployingfailover . . . . . . . . . . . . . . . . . . . . 49Resource Manager server . . . . . . . . . . . 42TSA server . . . . . . . . . . . . . . . . . . 43
deployment scenarios . . . . . . . . . . . . . . . 42deployments, distributed Business Advocate . . . . 56Design & Administration Tools
Database Designer . . . . . . . . . . . . 120, 126Destination DN . . . . . . . . . . . . . . . . . . 165devices
parking . . . . . . . . . . . . . . . . . . . . 170virtual queues . . . . . . . . . . . . . . . . . 225
Dial-by Equipment . . . . . . . . . . . . . . . . . 183Directory server . . . . . . . . . . . . . . . . . . 136
link group table. . . . . . . . . . . . . . . . . 189RoutingHint table. . . . . . . . . . . . . . . . 198
display time . . . . . . . . . . . . . . . . . 121, 127distributed Business Advocate
about . . . . . . . . . . . . . . . . . . . . . 55deployments . . . . . . . . . . . . . . . . . . 56failover . . . . . . . . . . . . . . . . . . . . 58matching contacts . . . . . . . . . . . . . . . 60process to match contacts . . . . . . . . . . . 61routing. . . . . . . . . . . . . . . . . . . 56, 60TSA server . . . . . . . . . . . . . . . . . . 58WAA server . . . . . . . . . . . . . . . . . . 58
dynamic adjustmentsabout . . . . . . . . . . . . . . . . . . . . . 32example . . . . . . . . . . . . . . . . . . . . 33
dynamic service classesabout . . . . . . . . . . . . . . . . . . . . . 88default values . . . . . . . . . . . . . . . . . 88
deleting service class . . . . . . . . . . . . . .115naming . . . . . . . . . . . . . . . . . . . . . 88service goal . . . . . . . . . . . . . . . . . . 89
EEAHT
about. . . . . . . . . . . . . . . . . . . . . . 87configuring . . . . . . . . . . . . . . . . 102, 110
editing qualifiers . . . . . . . . . . . . . . . . . . 81educational services . . . . . . . . . . . . . . . . 15email
distributed Business Advocate . . . . . . . . . . 58failover . . . . . . . . . . . . . . . . . . . . . 54qualify email flow . . . . . . . . . . . . . . . . 46queuing parameters. . . . . . . . . . . . . . 206TSA server . . . . . . . . . . . . . . . . . . . 43WebACD server . . . . . . . . . . . . . . . . 43
email analysis flows . . . . . . . . . . . . . . . 216email channel
configuring WAA server . . . . . . . . . . . . 221creating Workflow server . . . . . . . . . . . 222failover . . . . . . . . . . . . . . . . . . . . . 54prequalification . . . . . . . . . . . . . . . . 216prerequisites . . . . . . . . . . . . . . . . . 214qualification. . . . . . . . . . . . . . . . . . .211Resource Manager server . . . . . . . . . . . 145retrieving email contacts. . . . . . . . . . . . 223RONA . . . . . . . . . . . . . . . . . . . . .211service goal . . . . . . . . . . . . . . . . . . 90virtual queue . . . . . . . . . . . . . . . . . 225WAA server . . . . . . . . . . . . . . . 219, 220WAA server requirements . . . . . . . . . . . 220
email contactsqualification. . . . . . . . . . . . . . . . . . .211Resource Manager server . . . . . . . . . . . 145retrieving . . . . . . . . . . . . . . . . . . . 223troubleshooting . . . . . . . . . . . . . . . . 304
Email Management, failover . . . . . . . . . . . . 54email qualification
agent. . . . . . . . . . . . . . . . . . . . . 212components . . . . . . . . . . . . . . . . . 212Email server . . . . . . . . . . . . . . . . . 212process . . . . . . . . . . . . . . . . . . . 213Resource Manager server . . . . . . . . . . . 212WAA server . . . . . . . . . . . . . . . . . 212WebACD server . . . . . . . . . . . . . . . 212Workflow server . . . . . . . . . . . . . . . 212
email qualification flow . . . . . . . . . . . . . . 222email routing exception flow. . . . . . . . . . . . 222Email server . . . . . . . . . . . . . . . . . . . 212enable Advocate

312 Business Advocate Configuration and Administration
agents . . . . . . . . . . . . . . . . . . . . 247chat channel . . . . . . . . . . . . . . . . . 204Directory server. . . . . . . . . . . . . . . . 136email channel. . . . . . . . . . . . . . . . . 221Telephony server . . . . . . . . . . . . . . . 182WebACD server . . . . . . . . . . . . . . . 207
enhanced adjunct routing . . . . . . . . . . . . . 270Ericsson MD110 . . . . . . . . . . . . . . . . . 295
CTI group configuration . . . . . . . . . . . . 295link failure processing . . . . . . . . . . . . . 296parking device configuration . . . . . . . . . . 296switch operation . . . . . . . . . . . . . . . 295
estimated wait timeplaying . . . . . . . . . . . . . . . . . . . . 191
exampleactivation level . . . . . . . . . . . . . . . . . 37activation levels
about . . . . . . . . . . . . . . . . . . . 243activation types . . . . . . . . . . . . . . 244qualifiers . . . . . . . . . . . . . . . . . 243
activation types . . . . . . . . . . . . . . . . . 37assigning Logical Resource Manager . . . 162, 163consistent contact handling . . . . . . . . . . 166contact selection . . . . . . . . . . . . . . . . 28dynamic adjustments . . . . . . . . . . . . . . 33increasing revenue
about . . . . . . . . . . . . . . . . . . 35, 59agent activation types . . . . . . . . . . . . 37background information . . . . . . . . . . . 35creating agent profiles . . . . . . . . . . . . 37determining service classes . . . . . . . . . 36measuring results . . . . . . . . . . . . . . 38reports . . . . . . . . . . . . . . . . . . . 39setting service goals . . . . . . . . . . . . . 38
link groups . . . . . . . . . . . . . . . . . . 189modifying service class . . . . . . . . . . . . .114occupancy . . . . . . . . . . . . . . . . . . . 31parking devices . . . . . . . . . . . . . . . . 172profiles . . . . . . . . . . . . . . . . . . . . . 37qualifiers . . . . . . . . . . . . . . . . 22, 72, 73qualifying contacts
about . . . . . . . . . . . . . . . . . . . . 73determining qualifiers . . . . . . . . . . . . 74matching with agent . . . . . . . . . . . . . 76qualifier set . . . . . . . . . . . . . . . . . 74
regular work . . . . . . . . . . . . . . . . . . 33reports . . . . . . . . . . . . . . . . . . . . . 39reserve work . . . . . . . . . . . . . . . . . . 34service classes . . . . . . . . . . . . . . . . . 36service goals . . . . . . . . . . . . . . 38, 94, 95
unique contact handling . . . . . . . . . . . . 166upper and critical threshold. . . . . . . . . . . . 95upper and lower thresholds. . . . . . . . . . . . 95upper threshold . . . . . . . . . . . . . . . . . 94virtual queue . . . . . . . . . . . . . . . . . 226wait treatment styles . . . . . . . . . . . . . . 171
Exception CCT . . . . . . . . . . . . . . . . . . 292exception flow . . . . . . . . . . . . . 167, 204, 222exception handling flow . . . . . . . . . . . . 46, 167expected average handling time
see EAHTexporting qualifiers . . . . . . . . . . . . . . . . . 83
Ffail_route . . . . . . . . . . . . . . . . . . . . . 184failback. . . . . . . . . . . . . . . . . . . . . . . 51failover
about . . . . . . . . . . . . . . . . . . . . . . 48chat contacts . . . . . . . . . . . . . . . . . . 54deployment . . . . . . . . . . . . . . . . . . . 49distributed Business Advocate . . . . . . . . . . 58email contacts . . . . . . . . . . . . . . . . . . 54link groups . . . . . . . . . . . . . . . . . . . 52multiple media channels . . . . . . . . . . . . . 49Resource Manager server . . . . . . . . . . . . 49troubleshooting . . . . . . . . . . . . . . . . 303TSA server . . . . . . . . . . . . . . . . . . 164voice contacts . . . . . . . . . . . . . . . . . . 51
failureResource Manager server . . . . . . 143, 144, 145
flowsabout . . . . . . . . . . . . . . . . . . . . . . 44building . . . . . . . . . . . . . . . 158, 200, 219email analysis . . . . . . . . . . . . . . . . . 216
Future Risk . . . . . . . . . . . . . . . . . . . 25, 91
Ggoals, service. . . . . . . . . . . . . . . . . . . . 22greatest need
about . . . . . . . . . . . . . . . . . . . . . . 19service goals . . . . . . . . . . . . . . . . . . 92service state . . . . . . . . . . . . . . . . . 100
guidelinesLogical Resource Manager . . . . . . . . . . . 137TSA server . . . . . . . . . . . . . . . . . . 159WAA server . . . . . . . . . . . . . . . 202, 220
Hhandle_exception.qfd . . . . . . . . . . . . . . . . 46

Issue 3 February 2005 313
historical reports. . . . . . . . . . . . . . . . . . 48
IIC Manager
alarms. . . . . . . . . . . . . . . . . . . . . 48servers . . . . . . . . . . . . . . . . . . . . 48
IC Repositoryapplication . . . . . . . . . . . . . . . . . . . 125connection . . . . . . . . . . . . . . . . . . . 120connection set . . . . . . . . . . . . . . . . . 125
ICM server . . . . . . . . . . . . . . . . . . . . 194idle time. . . . . . . . . . . . . . . . . . . . . . 30Immediate Risk . . . . . . . . . . . . . . . . . . 91in the office, agents . . . . . . . . . . . . . . . . 259inactive agents . . . . . . . . . . . . . . . . . . 257Incoming CCT. . . . . . . . . . . . . . . . . . . 291initial role
about . . . . . . . . . . . . . . . . . . . . . 49assigning . . . . . . . . . . . . . . . . . . . 141
installation tasks. . . . . . . . . . . . . . . . . . 65intent qualifier . . . . . . . . . . . . . . . . . . . 78Interaction Center application. . . . . . . . . . . . 132ivchat . . . . . . . . . . . . . . . . . . . . . 78, 197
Llanguage qualifiers . . . . . . . . . . . . . . . . 78least occupied agent
about . . . . . . . . . . . . . . . . . . . . . 29agent states . . . . . . . . . . . . . . . . . . 30configuring. . . . . . . . . . . . . . . . 101, 109
levels, service . . . . . . . . . . . . . . . . . . . 85link failover
Aspect CallCenter . . . . . . . . . . . . . . . 293link failure processing
Ericsson MD110 . . . . . . . . . . . . . . . . 296Nortel Meridian. . . . . . . . . . . . . . . . . 286
link groups . . . . . . . . . . . . . . . . . . . . 266about . . . . . . . . . . . . . . . . . . 187, 188assign agents to . . . . . . . . . . . . . . . . 266create . . . . . . . . . . . . . . . . . . . . . 266creating . . . . . . . . . . . . . . . . . . . . 189deleting . . . . . . . . . . . . . . . . . . . . 191example . . . . . . . . . . . . . . . . . . . . 189failover . . . . . . . . . . . . . . . . . . 52, 188modifying . . . . . . . . . . . . . . . . . . . 190prerequisites . . . . . . . . . . . . . . . . . . 188troubleshooting. . . . . . . . . . . . . . . . . 300TSA server . . . . . . . . . . . . . . . 162, 163using . . . . . . . . . . . . . . . . . . . . . 189
links
backup . . . . . . . . . . . . . . . . . . 52, 184failure . . . . . . . . . . . . . . . . . . . . 188link groups . . . . . . . . . . . . . . . . . . 187
ListQ . . . . . . . . . . . . . . . . . . . . . . 133Customer Profile form . . . . . . . . . . . . . 135Profile Administration form. . . . . . . . . . . 134
LOAsee least occupied agent
location, workflows . . . . . . . . . . . . . . . . . 44Logical Resource Manager
about. . . . . . . . . . . . . . . . . . . 41, 136adding to TSA server . . . . . . . . . . . . . 164agents . . . . . . . . . . . . . . . . . . . . 247assigning Resource Manager server . . . . . . 141creating . . . . . . . . . . . . . . . . . . . 137deleting . . . . . . . . . . . . . . . . . . . 139distributed Business Advocate . . . . . . . . . . 56failover . . . . . . . . . . . . . . . . . . . . . 49failure . . . . . . . . . . . . . . . . . . 162, 163guidelines . . . . . . . . . . . . . . . . . . 137Home Logical Resource Manager . . . . . . . 162modifying. . . . . . . . . . . . . . . . . . . 138troubleshooting . . . . . . . . . . . . . . . . 298TSA server . . . . . . . . . . . . . . . . . . 161WAA server . . . . . . . . . . . . . . . 204, 221
lower threshold. . . . . . . . . . . . . . . . . . . 92about. . . . . . . . . . . . . . . . . . . . . . 23configuring . . . . . . . . . . . . . . . . . . 105example . . . . . . . . . . . . . . . . . . . . 95
LRMdistributed Business Advocate . . . . . . . . . . 55see Logical Resource Manager
Mmaking agent inactive . . . . . . . . . . . . . . 257managing . . . . . . . . . . . . . . . . . . . . . 71
agents . . . . . . . . . . . . . . . . . . . . 241service classes . . . . . . . . . . . . . . . . . 85
Map to Qualifier (DNIS) block . . . . . . . . . . . 156Map to Qualifier block . . . . . . 156, 198, 199, 217matching
agents . . . . . . . . . . . . . . . . . 19, 20, 29contacts . . . . . . . . . . . . . . . . . . . . 26distributed Business Advocate . . . . . . . . . . 60example . . . . . . . . . . . . . . . . . . 33, 34
media, supported channels . . . . . . . . . . . . . 18MIA
see most idle agentMicrosoft Management Console . . . . . . . . . . . 47Microsoft SQL Server. . . . . . . . . . . . . . . . 46MMC . . . . . . . . . . . . . . . . . . . . . . . 47

314 Business Advocate Configuration and Administration
modifyinglink groups . . . . . . . . . . . . . . . . . . 190Logical Resource Manager . . . . . . . . . . 138qualifiers . . . . . . . . . . . . . . . . . . . . 81Resource Manager server . . . . . . . . . . . 147service class . . . . . . . . . . . . . . . . . .113service goals . . . . . . . . . . . . . . . . . 106TSA server . . . . . . . . . . . . . . . . . . 168WAA server . . . . . . . . . . . . . . . . . 205
most idle agentabout . . . . . . . . . . . . . . . . . . . . . 29configuring . . . . . . . . . . . . . . . . 101, 109
MSMQ . . . . . . . . . . . . . . . . . . . . . 299MSMQ queues . . . . . . . . . . . . . . . . . . . 46multimedia qualifier. . . . . . . . . . . . . . . . . 78multi-site Business Advocate . . . . . . . . . . . . 55
Nnaming
virtual queues . . . . . . . . . . . . . . . . 226non-real-time contact work . . . . . . . . . . . . . 90Nortel Meridian
configure CDNs. . . . . . . . . . . . . . . . 283link failure processing . . . . . . . . . . . . . 286parking device configuration . . . . . . . . . . 286setup CDNs . . . . . . . . . . . . . . . . . 282switch operation . . . . . . . . . . . . . . . 282
Nortel Meridian Link . . . . . . . . . . . . . . . 282Nortel Meridian switch, parking devices . . . . . . 179
Ooccupancy . . . . . . . . . . . . . . . . . . . . . 30occupancy, agents . . . . . . . . . . . . . . . . . 30on hold treatments . . . . . . . . . . . . . . . . 171On Target . . . . . . . . . . . . . . . . . . . 24, 98On Target - Future Risk. . . . . . . . . . . . . . . 97On Target - Immediate Risk. . . . . . . . . . . . . 97Operational Analyst . . . . . . . . . . . . . . 39, 48optional configuration for voice . . . . . . . . . . 191options, configuring . . . . . . . . . . . . . . . 101Oracle . . . . . . . . . . . . . . . . . . . . . . . 46ordered list, TSA server. . . . . . . . . . . . . . 162out of office, agents . . . . . . . . . . . . . . . 257
PParking CCT . . . . . . . . . . . . . . . . . . . 288parking device configuration
Ericsson MD110 . . . . . . . . . . . . . . . 296Nortel Meridian . . . . . . . . . . . . . . . . 286
parking devices
about . . . . . . . . . . . . . . . . . . . . . 170Aspect switch . . . . . . . . . . . . . . . . . 175Avaya switch . . . . . . . . . . . . . . . . . 173example . . . . . . . . . . . . . . . . . . . 172Nortel Meridian switch . . . . . . . . . . . . . 179prerequisites . . . . . . . . . . . . . . . . . 173troubleshooting . . . . . . . . . . . . . . . . 302wait treatment styles . . . . . . . . . . . . . . 171
performance level. . . . . . . . . . . . . . . . . . 93performance thresholds . . . . . . . . . . . . . . . 22play estimated wait time
Avaya Definity . . . . . . . . . . . . . . . . . 279playing estimated wait time . . . . . . . . . . . . 191predicted wait time
contact selection . . . . . . . . . . . . . . . . 28service states . . . . . . . . . . . . . . . . . 100
predictive technologyabout . . . . . . . . . . . . . . . . . . . . . . 25expected wait time. . . . . . . . . . . . . . . . 26predicted wait time. . . . . . . . . . . . . . . . 25
prequalificationchat channel . . . . . . . . . . . . . . . . . 198email channel . . . . . . . . . . . . . . . . . 216
prerequisiteschat channel . . . . . . . . . . . . . . . . . 197core components . . . . . . . . . . . . . . . 117email channel . . . . . . . . . . . . . . . . . 214link groups . . . . . . . . . . . . . . . . . . 188parking devices . . . . . . . . . . . . . . . . 173qualify chat flow . . . . . . . . . . . . . . . . 198qualify email flow . . . . . . . . . . . . . . . 216qualify voice flow . . . . . . . . . . . . . . . 156tasks . . . . . . . . . . . . . . . . . . . . . . 65virtual queues . . . . . . . . . . . . . . . . . 226voice channel . . . . . . . . . . . . . . . . . 155
primary Resource Manager server . . . . . . . 41, 141principles, qualification . . . . . . . . . . . . . . . 21process
agent selection . . . . . . . . . . . . . . . . . 31chat qualification . . . . . . . . . . . . . . . 195contact selection . . . . . . . . . . . . . . . . 27distributed Business Advocate . . . . . . . . . . 61email qualification . . . . . . . . . . . . . . . 213voice qualification . . . . . . . . . . . . . . . 151voice transfer . . . . . . . . . . . . . . . . . 153
Profile Administration form. . . . . . . . . . . . . 134Profile Plus
about . . . . . . . . . . . . . . . . . . . . . 232assigning to agent . . . . . . . . . . . . . . . 250
profilesabout . . . . . . . . . . . . . . . . . . . . . 231assigning agent . . . . . . . . . . . . . . . . 237

Issue 3 February 2005 315
assigning to agent . . . . . . . . . . . . . . . 250Capability Wizard . . . . . . . . . . . . . . . 236copying . . . . . . . . . . . . . . . . . . . . 239creating . . . . . . . . . . . . . . . . . . . . 233customer attributes . . . . . . . . . . . . . . . 134defining capability set. . . . . . . . . . . . . . 234deleting . . . . . . . . . . . . . . . . . . . . 240example . . . . . . . . . . . . . . . . . . . . 37Profile Plus . . . . . . . . . . . . . . . . . . 232properties . . . . . . . . . . . . . . . . . . . 235removing agents . . . . . . . . . . . . . . . . 239renaming . . . . . . . . . . . . . . . . . . . 240using . . . . . . . . . . . . . . . . . . . . . 231
project, workflows . . . . . . . . . . . . . . . . . 44pvchat . . . . . . . . . . . . . . . . . . . . 78, 197
QQA qualifiers . . . . . . . . . . . . . . . . . . . 78qualification
chat contacts. . . . . . . . . . . . . . . . . . 193criteria . . . . . . . . . . . . . . . . . . . . . 21email contacts . . . . . . . . . . . . . . . . . 211principles . . . . . . . . . . . . . . . . . . . 21voice contacts . . . . . . . . . . . . . . . . . 149
qualification flow. . . . . . . . . . 45, 167, 204, 222Qualifier Editor . . . . . . . . . . . . . . . . . . 79qualifier set . . . . . . . . . . . . . . . . 71, 86, 111qualifiers . . . . . . . . . . . . . . . . . . . . . 71
about . . . . . . . . . . . . . . . . . . . 22, 71assigning to service class . . . . . . . . . . . . 111Capability Set tab . . . . . . . . . . . . . . . 111capability sets . . . . . . . . . . . . . . . 73, 245Capability Wizard . . . . . . . . . .112, 236, 254channel . . . . . . . . . . . . . . . . . . 73, 77creating . . . . . . . . . . . . . . . . . . . . 79customertype . . . . . . . . . . . . . . . . . 78deleting . . . . . . . . . . . . . . . . . . . . 84editing . . . . . . . . . . . . . . . . . . . . . 81example . . . . . . . . . . . . . . . . 22, 72, 73exporting . . . . . . . . . . . . . . . . . . . 83intent . . . . . . . . . . . . . . . . . . . . . 78language . . . . . . . . . . . . . . . . . . . 78multimedia . . . . . . . . . . . . . . . . . . . 78predefined . . . . . . . . . . . . . . . . . . . 77profile properties . . . . . . . . . . . . . . . . 235QA . . . . . . . . . . . . . . . . . . . . . . 78qualify chat flow . . . . . . . . . . . . . . . . 198qualify email flow . . . . . . . . . . . . . . . . 216qualify voice flow . . . . . . . . . . . . . . . . 156required . . . . . . . . . . . . . . . . . . . . 77
requirements . . . . . . . . . . . . . . . . . . 73role . . . . . . . . . . . . . . . . . . . . . . 72sample . . . . . . . . . . . . . . . . . . . . . 78sample workflows . . . . . . . . . . . . . . . . 77service classes . . . . . . . . . . . . . 23, 72, 87synchronization workflow . . . . . . . . . . . . 45using. . . . . . . . . . . . . . . . . . . . . . 71value. . . . . . . . . . . . . . . . . . . . . . 80viewing. . . . . . . . . . . . . . . . . . . . . 82voice chat . . . . . . . . . . . . . . . . . . 197workflows . . . . . . . . . . . . . . . . . . . 72
qualifiers.txt . . . . . . . . . . . . . . . . . . . . 83qualify chat flow
about. . . . . . . . . . . . . . . . . . . 45, 197customizing. . . . . . . . . . . . . . . . . . 199database settings . . . . . . . . . . . . . . . 200prerequisites . . . . . . . . . . . . . . . . . 198qualifiers . . . . . . . . . . . . . . . . . . . 198routing hints . . . . . . . . . . . . . . . . . 198
qualify email flowabout. . . . . . . . . . . . . . . . . . . 46, 215configuring . . . . . . . . . . . . . . . . . . 217customizing. . . . . . . . . . . . . . . . . . 216database settings . . . . . . . . . . . . . . . 218prerequisites . . . . . . . . . . . . . . . . . 216qualifiers . . . . . . . . . . . . . . . . . . . 216
qualify voice flowabout. . . . . . . . . . . . . . . . . . . 45, 155configuring . . . . . . . . . . . . . . . . . . 156database settings . . . . . . . . . . . . . . . 158prerequisites . . . . . . . . . . . . . . . . . 156qualifiers . . . . . . . . . . . . . . . . . . . 156
qualifychat_adv.qfd. . . . . . . . . . . . . . . . . 45qualifyemail_adv.qfd . . . . . . . . . . . . . . . . 46qualifyvoice_adv.qfd . . . . . . . . . . . . . . . . 45Queue Empty . . . . . . . . . . . . . . . . . . . 98queues
agent selection . . . . . . . . . . . . . . . . . 29contact selection . . . . . . . . . . . . . . . . 26expected wait time . . . . . . . . . . . . . . . 26predicted wait time . . . . . . . . . . . . . . . 25Resource Manager server . . . . . . . . . . . . 42service classes . . . . . . . . . . . . . . . . . 23virtual . . . . . . . . . . . . . . . . . . . . 225
queuing parameters . . . . . . . . . . . . . . . 206
Rreal-time contact work . . . . . . . . . . . . . . . 90real-time reports . . . . . . . . . . . . . . . . . . 48redirect on no answer . . . . . . . . . . . . . . 160refreshing agents. . . . . . . . . . . . . . . . . 248

316 Business Advocate Configuration and Administration
regeneratingIC Repository application . . . . . . . . . . . 125Interaction Center application . . . . . . . . . 132ListQ application . . . . . . . . . . . . . . . 133
regular activation type . . . . . . . . . . . . . . 242regular activation types . . . . . . . . . . . . . . . 24renaming profile . . . . . . . . . . . . . . . . . 240reports
about . . . . . . . . . . . . . . . . . . . . . 48example . . . . . . . . . . . . . . . . . . . . 39
repository.adl . . . . . . . . . . . . . . . . . . 120required TSA servers . . . . . . . . . . . . . . . 160requirements
qualifiers . . . . . . . . . . . . . . . . . . . . 73WAA server . . . . . . . . . . . . . . . 202, 220
reserveactivating . . . . . . . . . . . . . . . . . . . . 32example . . . . . . . . . . . . . . . . . . . . 34
reserve activation type . . . . . . . . . . . . 25, 242Resource Manager server
about . . . . . . . . . . . . . . . . . . . . . 42active . . . . . . . . . . . . . . . . . . 41, 141adding . . . . . . . . . . . . . . . . . . . . 140chat qualification . . . . . . . . . . . . . . . 194creating . . . . . . . . . . . . . . . . . 139, 140deleting . . . . . . . . . . . . . . . . . . . 148deployment . . . . . . . . . . . . . . . . . . . 42email qualification. . . . . . . . . . . . . . . 212failover . . . . . . . . . . . . . . . . . . . . . 49initial role . . . . . . . . . . . . . . . . . . . 141Logical Resource Manager . . . . . . . . . . 141modifying. . . . . . . . . . . . . . . . . . . 147primary. . . . . . . . . . . . . . . . . . . . 141secondary . . . . . . . . . . . . . . . . . . 141shutting down. . . . . . . . . . . . . . . . . 142standby . . . . . . . . . . . . . . . . . 41, 141stopping . . . . . . . . . . . . . . . . . 142, 146viewing role. . . . . . . . . . . . . . . . . . 142voice contacts . . . . . . . . . . . 143, 144, 145voice qualification . . . . . . . . . . . . . . . 150
Resource Manager serverstroubleshooting . . . . . . . . . . . . . . . . 299
resource store . . . . . . . . . . . . . . . . . . . 46Resources Available . . . . . . . . . . . . . . 29, 98restrictions
virtual queues . . . . . . . . . . . . . . . . 226retrieving email contacts
about . . . . . . . . . . . . . . . . . . . . 223Email task list . . . . . . . . . . . . . . . . . 224wait queue . . . . . . . . . . . . . . . . . . 224
Return on no answersee RONA
Ringback CCT . . . . . . . . . . . . . . . . . . 290RM server
see Resource Manager serverrole
qualifiers . . . . . . . . . . . . . . . . . . . . 72Resource Manager server . . . . . . 49, 141, 142
RONAabout . . . . . . . . . . . . . . . . . . . . . 160chat . . . . . . . . . . . . . . . . . . . . . 193configuring . . . . . . . . . . . . . . . . . . 191email . . . . . . . . . . . . . . . . . . . . . 211Telephony server . . . . . . . . . . . . . . . 183voice . . . . . . . . . . . . . . . . . . . . . 191
RONA considerations . . . . . . . . . . . . . . . 263routing
agent selection . . . . . . . . . . . . . . . . . 29contact selection . . . . . . . . . . . . . . . . 26distributed Business Advocate . . . . . . . . 56, 60predictive technology . . . . . . . . . . . . . . 25questions . . . . . . . . . . . . . . . . . . . . 19troubleshooting . . . . . . . . . . . . . . . . 305
routing hints . . . . . . . . . . . . . . . . . . . 198RoutingHint table . . . . . . . . . . . . . . . . . 198
Ssample workflows . . . . . . . . . . . . . . . . . . 45
qualifiers . . . . . . . . . . . . . . . . . . . . 77qualify chat . . . . . . . . . . . . . . . . . . 197qualify email. . . . . . . . . . . . . . . . . . 215qualify voice. . . . . . . . . . . . . . . . . . 155
secondary Data server . . . . . . . . . . . . . . 119secondary Resource Manager server . . . . . 41, 141selection
agent . . . . . . . . . . . . . . . . . . . . . . 29contact . . . . . . . . . . . . . . . . . . . . . 26
serversabout . . . . . . . . . . . . . . . . . . . . . . 42alarms . . . . . . . . . . . . . . . . . . . . . 48Data server . . . . . . . . . . . . . . . . . . 119Directory . . . . . . . . . . . . . . . . . . . 136Email . . . . . . . . . . . . . . . . . . . . . 212failover . . . . . . . . . . . . . . . . . . . . . 49ICM. . . . . . . . . . . . . . . . . . . . . . 194Resource Manager . . . . . . . . . . . . 42, 139Telephony . . . . . . . . . . . . . . . 150, 182TSA . . . . . . . . . . . . . . . . . . . 43, 159WAA . . . . . . . . . . . . . . . . 43, 201, 219WebACD . . . . . . . . . . . . 43, 194, 206, 212Workflow . . . . . . . . . . . . 44, 185, 208, 222
service classesabout . . . . . . . . . . . . . . . . . . . . 23, 86

Issue 3 February 2005 317
agent selection. . . . . . . . . . . . . . . . . 86agent selection type . . . . . . . . . . . . . . 109assigning attributes. . . . . . . . . . . . . . . 108Capability Set tab . . . . . . . . . . . . . . . 111Capability Wizard . . . . . . . . . . . . . . . 112channel qualifier . . . . . . . . . . . . . . . . 87components . . . . . . . . . . . . . . . . . . 86configuring. . . . . . . . . . . . . . . . . . . 107creating . . . . . . . . . . . . . . . . . . . . 108defining with qualifiers . . . . . . . . . . . . . 72deleting . . . . . . . . . . . . . . . . . . . . 115dynamic adjustment . . . . . . . . . . . . . . 32dynamically created . . . . . . . . . . . . . . 88EAHT . . . . . . . . . . . . . . . . . . . 87, 110example . . . . . . . . . . . . 33, 34, 36, 74, 114greatest need . . . . . . . . . . . . . . . . . 19managing . . . . . . . . . . . . . . . . . . . 85modifying . . . . . . . . . . . . . . . . . . . 113qualifier set . . . . . . . . . . . . . . . . 86, 111qualifiers. . . . . . . . . . . . . . . . . . 87, 111service goal . . . . . . . . . . . . . . . . . . 110service goals. . . . . . . . . . . . . . . . 22, 87service state . . . . . . . . . . . . . . . . . . 96service states . . . . . . . . . . . . . . . . . 24thresholds . . . . . . . . . . . . . . . . . . . 90virtual queue . . . . . . . . . . . . . . . . . . 225
service goalnon-real-time contact work . . . . . . . . . . . 90real-time contact work . . . . . . . . . . . . . 90
service goals . . . . . . . . . . . . . . . . . . . 110about . . . . . . . . . . . . . . . . . 22, 87, 89branding strategy. . . . . . . . . . . . . . . . 93configuring. . . . . . . . . . . . . . . . . . . 103creating . . . . . . . . . . . . . . . . . . . . 104critical threshold . . . . . . . . . . . . . . . . 92custom . . . . . . . . . . . . . . . . . . . . 90default . . . . . . . . . . . . . . . . . . . . . 89deleting . . . . . . . . . . . . . . . . . . . . 107example . . . . . . . . . . . . . . . . 38, 94, 95lower threshold. . . . . . . . . . . . . . . . . 92modifying . . . . . . . . . . . . . . . . . . . 106performance level . . . . . . . . . . . . . . . 93purpose . . . . . . . . . . . . . . . . . . . . 92service classes. . . . . . . . . . . . . . . . . 23service states . . . . . . . . . . . . . . . . . 87threshold . . . . . . . . . . . . . . . . . . . 90types . . . . . . . . . . . . . . . . . . . . . 89upper threshold . . . . . . . . . . . . . . . . 91
service levels . . . . . . . . . . . . . . . . . . . 85service states
about . . . . . . . . . . . . . . . . . 24, 87, 96
activation levels. . . . . . . . . . . . . . . . 243ahead of target . . . . . . . . . . . . . . . . . 98behind target . . . . . . . . . . . . . . . . 91, 97contact selection . . . . . . . . . . . . . . . 100critical . . . . . . . . . . . . . . . . . . . . . 97critical threshold . . . . . . . . . . . . . . . . 92figure. . . . . . . . . . . . . . . . . . . . . . 99future risk . . . . . . . . . . . . . . . . . . . 91immediate risk . . . . . . . . . . . . . . . . . 91lower threshold . . . . . . . . . . . . . . . . . 92on target . . . . . . . . . . . . . . . . . . . . 98on target - future risk . . . . . . . . . . . . . . 97on target - immediate risk . . . . . . . . . . . . 97predicted wait time . . . . . . . . . . . . . . 100queue empty . . . . . . . . . . . . . . . . . . 98resources available . . . . . . . . . . . . . . . 98types. . . . . . . . . . . . . . . . . . . . . . 97upper threshold . . . . . . . . . . . . . . . . . 91
Set Chat Wait Treatment block . . . . . . . . . . 199Set Qualifier block . . . . . . . . 156, 198, 199, 217Set Voice Wait Treatment block . . . . . . . . . . 156setting . . . . . . . . . . . . . . . . . . . . . . .110
critical threshold . . . . . . . . . . . . . . . 105lower threshold . . . . . . . . . . . . . . . . 105upper threshold . . . . . . . . . . . . . . . . 105
setup CDNsNortel Meridian . . . . . . . . . . . . . . . . 282
shutting down Resource Manager server . . . . . 142sites . . . . . . . . . . . . . . . . . . . . . . . . 55Solaris. . . . . . . . . . . . . . . . . . . . . . . 42standby Resource Manager server . . . . . . 41, 141states, agent . . . . . . . . . . . . . . . . . . . . 30statistics, predictive technology . . . . . . . . . . . 25stopping Resource Manager server . . . . . . 142, 146strategy, branding . . . . . . . . . . . . . . . . . 93Supervisor . . . . . . . . . . . . . . . . . . . . . 47supported media channels . . . . . . . . . . . . . 18switch configuration
Avaya Definity . . . . . . . . . . . . . . . . 274switch operation
Aspect CallCenter. . . . . . . . . . . . . . . 287Avaya Definity . . . . . . . . . . . . . . . . 273MD110 . . . . . . . . . . . . . . . . . . . . 295Nortel Meridian . . . . . . . . . . . . . . . . 282
synchronization workflow . . . . . . . . . . . . . . 45system store . . . . . . . . . . . . . . . . . . . . 46system workflows . . . . . . . . . . . . . . . . . 45
Ttasks . . . . . . . . . . . . . . . . . . . . . . . 65Telephony
failover . . . . . . . . . . . . . . . . . . . . . 51

318 Business Advocate Configuration and Administration
TSA server . . . . . . . . . . . . . . . . . . . 43Telephony Adapter server . . . . . . . . . . . . 262Telephony Queue Statistics Server . . . . . . . . 262Telephony server
about . . . . . . . . . . . . . . . . . . . . 182backup link . . . . . . . . . . . . . . . . . . 184configuring . . . . . . . . . . . . . . . . . . 182link groups . . . . . . . . . . . . . . . . . . 188RONA . . . . . . . . . . . . . . . . . . . . 183voice qualification . . . . . . . . . . . . . . . 150
Telephony Services Adaptor serversee TSA server
Telephony switch, voice qualification . . . . . . . 150temp tablespace name . . . . . . . . . . . . 124, 130temp tablespace size . . . . . . . . . . . . . 124, 130thresholds
about . . . . . . . . . . . . . . . . . . . 22, 90branding strategy . . . . . . . . . . . . . . . . 93critical . . . . . . . . . . . . . . . . 23, 92, 105lower. . . . . . . . . . . . . . . . . 23, 92, 105upper . . . . . . . . . . . . . . . . 22, 91, 105
timeout . . . . . . . . . . . . . . . . . . . 121, 127tools, administration . . . . . . . . . . . . . . . . 47Transfer CCT . . . . . . . . . . . . . . . . . . 289transfer exception flow . . . . . . . . . 167, 205, 222transfer to agent flow . . . . . . . . . . . . . . . . 46transfer workflows . . . . . . . . . . . . . . . . . 46transferring voice contacts . . . . . . . . . . . . 153transfertoagent.qfd . . . . . . . . . . . . . . . . . 46troubleshooting
channel availability . . . . . . . . . . . . . . 303email contacts . . . . . . . . . . . . . . . . 304failover . . . . . . . . . . . . . . . . . . . . 303link groups . . . . . . . . . . . . . . . . . . 300Logical Resource Manager . . . . . . . . . . 298MSMQ . . . . . . . . . . . . . . . . . . . . 299parking devices . . . . . . . . . . . . . . . . 302Resource Manager servers . . . . . . . . . . 299routing issues. . . . . . . . . . . . . . . . . 305TSA server . . . . . . . . . . . . . . . . . . 301
TSA server . . . . . . . . . . . . . . . . . . . 262about . . . . . . . . . . . . . . . . . . 43, 159adding Logical Resource Manager . . . . . . . 164additional Logical Resource Managers . . . . . 162assigning workflows. . . . . . . . . . . . . . 165contact handling . . . . . . . . . . . . . . . 165creating . . . . . . . . . . . . . . . . . . . 160deleting . . . . . . . . . . . . . . . . . . . 169deploying. . . . . . . . . . . . . . . . . . . . 43distributed Business Advocate . . . . . . . . . . 58example of ordered list . . . . . . . . . . 162, 163exception flow . . . . . . . . . . . . . . . . 167
failover . . . . . . . . . . . . . . . . 51, 58, 164guidelines . . . . . . . . . . . . . . . . . . . 159Home Logical Resource Manager . . . . . . . 162link groups . . . . . . . . . . . . . . . 162, 163Logical Resource Manager . . . . . . . . . . . 161modifying . . . . . . . . . . . . . . . . . . . 168ordered list . . . . . . . . . . . . . . . . . . 162parking devices . . . . . . . . . . . . . . . . 170qualification flow. . . . . . . . . . . . . . . . 167required. . . . . . . . . . . . . . . . . . . . 160RONA . . . . . . . . . . . . . . . . . . . . 160transfer exception flow . . . . . . . . . . . . . 167troubleshooting . . . . . . . . . . . . . . . . 301voice qualification . . . . . . . . . . . . . . . 150
TSQS . . . . . . . . . . . . . . . . . . . . . . 262types
agent activation . . . . . . . . . . . . . . . . 242agent selection . . . . . . . . . . . . . . . . . 29service states . . . . . . . . . . . . . . . . . . 97
Uupdate_qualifiersetids.qfd . . . . . . . . . . . . . . 45updating qualifiers . . . . . . . . . . . . . . . . . 81upper threshold . . . . . . . . . . . . . . . . . . . 91
about . . . . . . . . . . . . . . . . . . . . . . 22configuring . . . . . . . . . . . . . . . . . . 105example . . . . . . . . . . . . . . . . . . 94, 95
usinglink groups . . . . . . . . . . . . . . . . . . 189profiles . . . . . . . . . . . . . . . . . . . . 231qualifiers . . . . . . . . . . . . . . . . . . . . 71
Vvalue, qualifiers . . . . . . . . . . . . . . . . . 22, 80VDN . . . . . . . . . . . . . . . . . . . . . . . 262Vector Directory Number . . . . . . . . . . . . . 262viewing
qualifiers . . . . . . . . . . . . . . . . . . . . 82role of Resource Manager server . . . . . . . . 142
virtual queuesabout . . . . . . . . . . . . . . . . . . . . . 225configuring . . . . . . . . . . . . . . . . . . 225creating . . . . . . . . . . . . . . . . . . . . 227example . . . . . . . . . . . . . . . . . . . 226naming . . . . . . . . . . . . . . . . . . . . 226prerequisites . . . . . . . . . . . . . . . . . 226
voicedistributed Business Advocate . . . . . . . . . . 58failover . . . . . . . . . . . . . . . . . . . . . 51optional configurations . . . . . . . . . . . . . 191

Issue 3 February 2005 319
qualify voice flow . . . . . . . . . . . . . . . . 45TSA server . . . . . . . . . . . . . . . . . . 43
voice channelcreating Workflow server . . . . . . . . . . . . 185failover . . . . . . . . . . . . . . . . . . . . 51parking devices . . . . . . . . . . . . . . . . 170prerequisites . . . . . . . . . . . . . . . . . . 155qualification . . . . . . . . . . . . . . . . . . 149Resource Manager server . . . . . . . . . . . 143RONA . . . . . . . . . . . . . . . . . . . . . 191service goal . . . . . . . . . . . . . . . . . . 90virtual queue . . . . . . . . . . . . . . . . . . 225
voice chatqualifiers. . . . . . . . . . . . . . . . . . . . 197types . . . . . . . . . . . . . . . . . . . . . 197
voice contactscontact handling . . . . . . . . . . . . . . . . 165qualification . . . . . . . . . . . . . . . . . . 149Resource Manager server . . . . . . . . . . . 143
voice qualification . . . . . . . . . . . . . . . . . 150agents . . . . . . . . . . . . . . . . . . . . . 150components . . . . . . . . . . . . . . . . . . 150process . . . . . . . . . . . . . . . . . . . . 151Resource Manager server . . . . . . . . . . . 150Telephony server. . . . . . . . . . . . . . . . 150Telephony switch. . . . . . . . . . . . . . . . 150TSA server . . . . . . . . . . . . . . . . . . 150Workflow server . . . . . . . . . . . . . . . . 150
voice qualification flow . . . . . . . . . . . . . . . 167
WWAA server
about . . . . . . . . . . . . . . . . . . . . . 43chat channel . . . . . . . . . . . . . . . . . . 202chat contacts. . . . . . . . . . . . . . . . . . 201chat qualification . . . . . . . . . . . . . . . . 194creating . . . . . . . . . . . . . . . . . . . . 203deleting . . . . . . . . . . . . . . . . . . . . 205distributed Business Advocate . . . . . . . . . 58email channel . . . . . . . . . . . . . . . . . 220email contacts . . . . . . . . . . . . . . . . . 219email qualification . . . . . . . . . . . . . . . 212exception flow . . . . . . . . . . . . . . 204, 222failover . . . . . . . . . . . . . . . . . . 54, 58Logical Resource Manager . . . . . . . . 204, 221modifying . . . . . . . . . . . . . . . . . . . 205qualification flow . . . . . . . . . . . . . 204, 222requirements. . . . . . . . . . . . . . . 202, 220transfer exception flow . . . . . . . . . . 205, 222WebACD server . . . . . . . . . . . . . . . . 43
wait timeexpected . . . . . . . . . . . . . . . . . . . . 26predicted . . . . . . . . . . . . . . . . . . . . 25
wait treatmentqualify chat flow. . . . . . . . . . . . . . . . 199qualify voice flow . . . . . . . . . . . . . . . 157
wait treatment styles . . . . . . . . . . . . . . . 171Web Advocate Adaptor server
see WAA serverWeb Management, failover . . . . . . . . . . . . . 54WebACD server
chat qualification . . . . . . . . . . . . . . . 194configuring . . . . . . . . . . . . . . . . 206, 207consequences . . . . . . . . . . . . . . . . 207email qualification . . . . . . . . . . . . . . . 212queuing parameters. . . . . . . . . . . . . . 206WAA server . . . . . . . . . . . . . . . . . . 43
Windows . . . . . . . . . . . . . . . . . . . . . 42Workflow Designer, exporting qualifiers . . . . . . . 83Workflow server . . . . . . . . . . . . . . . . . 150
chat qualification . . . . . . . . . . . . . . . 194creating for chat channel . . . . . . . . . . . 208creating for email channel . . . . . . . . . . . 222creating for voice channel . . . . . . . . . . . 185email qualification . . . . . . . . . . . . . . . 212workflows . . . . . . . . . . . . . . . . . . . 44
workflowsabout. . . . . . . . . . . . . . . . . . . . . . 44building . . . . . . . . . . . . . . 158, 200, 219contact handling . . . . . . . . . . . . . . . 165exception handling . . . . . . . . . . . . . . . 46location . . . . . . . . . . . . . . . . . . . . 44project . . . . . . . . . . . . . . . . . . . 44, 45qualifiers . . . . . . . . . . . . . . . . . . 72, 77qualify chat . . . . . . . . . . . . . . . . 45, 197qualify email . . . . . . . . . . . . . . . 46, 215qualify voice . . . . . . . . . . . . . . . 45, 155sample . . . . . . . . . . . . . . . . . . . . . 45sample qualifiers . . . . . . . . . . . . . . . . 78synchronization . . . . . . . . . . . . . . . . . 45system . . . . . . . . . . . . . . . . . . . . . 45transfer exception . . . . . . . . . . 167, 205, 222transfer to agent . . . . . . . . . . . . . . . . 46

320 Business Advocate Configuration and Administration