
Configuración de Avaya IP Office™ Platform ... - Avaya Support
Avaya Contact RecorderRelease 10.0Planning, Installation and Administration Guide
Issue 4April, 2010
Confidential & ProprietaryInformation
© 2003 - 2010 Verint Systems Inc. All Rights Reserved. THIS AVAYA PRODUCT ('Product') CONTAINS CONFIDENTIAL AND PROPRIETARY INFORMATION OF VERINT SYSTEMS INC. USE OF THE PRODUCT INDICATES THE END USER'S ACCEPTANCE OF THE TERMS SET FORTH HEREIN AND THE GENERAL LICENSE TERMS AVAILABLE ON THE AVAYA WEBSITE AT http://support.avaya.com/LicenseInfo/ ('GENERAL LICENSE TERMS'). IN THE EVENT OF ANY CONFLICT OR INCONSISTENCY BETWEEN THE TERMS SET FORTH HEREIN AND ANY WRITTEN AGREEMENT WITH AVAYA AND/OR AVAYA EULA, THE TERMS OF SUCH EITHER WRITTEN AGREEMENT WITH AVAYA AND/OR AVAYA EULA SHALL GOVERN. IF YOU DO NOT WISH TO BE BOUND BY THESE TERMS, YOU MUST RETURN THE PRODUCT(S) TO THE POINT OF PURCHASE WITHIN TEN (10) DAYS OF DELIVERY FOR A REFUND OR CREDIT.
Avaya grants End User a license within the scope of the license types described below. The applicable number of licenses and units of capacity for which the license is granted will be one (1), unless a different number of licenses or units of capacity is specified in the Documentation or other materials available to End User. 'Software' means the computer programs in object code, originally licensed by Avaya and ultimately utilized by End User, whether as stand-alone Products or pre-installed on Hardware. 'Hardware' means the standard hardware Products, originally sold by Avaya and ultimately utilized by End User.
License Type(s):
"Channel" means a physical connection between or logical address associated with a recording device and an audio source.
"Enterprise" means a license to use, without limitation on the number of copies or users applicable to that End User, that Software within that End User's technical environment in conjunction with other Software licensed.
"Seat" means the number of uniquely identified work-stations (i) on which the Software is licensed to be installed, (ii) from or to which the Software will send or receive data, or (iii) about which the Software generates data. Any one or more of the foregoing, in the aggregate, applicable to a work-station shall qualify that work-station as a licensed Seat. Seat licenses are not concurrent, except that licenses relating to a work-station may be transferred to another work-station so long as such transfer is on a permanent basis.
"Server" means a license to install the Software on a single central computer server.
"Site" means a license to use the Software at a physical End User location, without limitation on the number of copies or users applicable to that physical End User location.
Copyright:
Except where expressly stated otherwise, the Product is protected by copyright and other laws respecting proprietary rights. Unauthorized reproduction, transfer, and or use can be a criminal, as well as a civil, offense under the applicable law.
Third-party Components:
This computer program is protected by U.S. and international copyright laws, patent laws, and other intellectual property laws and treaties. Unauthorized use, duplication, publication and distribution of all or any portion of this computer program are expressly prohibited and will be prosecuted to the maximum extent provided by law. Your rights in this computer program are limited to the license rights granted under the license agreement executed by you in hardcopy form (or if none, by acceptance of the clickwrap terms included with this computer program). If needed, please contact your vendor for an additional copy of those terms. All other rights, title and interest are expressly restricted and retained by Verint Systems, Inc. and its licensors.
Certain open source applications ("Open Source") may be included with this computer program. For specific ownership information and license rights relating to those open source applications, please see the "Free and Open Source Licensing Information" guide provided with your computer program, or contact your vendor for a copy of that guide.
A license in each Open Source software application is provided to you in accordance with the specific license terms specified in their respective license terms. EXCEPT WITH REGARD TO ANY WARRANTIES OR OTHER RIGHTS AND OBLIGATIONS EXPRESSLY PROVIDED DIRECTLY TO YOU FROM VERINT, ALL OPEN SOURCE SOFTWARE IS PROVIDED "AS IS'' AND ANY EXPRESSED OR IMPLIED WARRANTIES, INCLUDING, BUT NOT LIMITED TO, THE IMPLIED WARRANTIES OF MERCHANTABILITY AND FITNESS FOR A PARTICULAR PURPOSE ARE DISCLAIMED. IN NO EVENT SHALL THE OWNERS OF THE OPEN SOURCE SOFTWARE OR ITS CONTRIBUTORS BE LIABLE FOR ANY DIRECT, INDIRECT, INCIDENTAL, SPECIAL, EXEMPLARY, OR CONSEQUENTIAL DAMAGES (INCLUDING, BUT NOT LIMITED TO, PROCUREMENT OF SUBSTITUTE GOODS OR SERVICES; LOSS OF USE, DATA, OR PROFITS; OR BUSINESS INTERRUPTION) HOWEVER CAUSED AND ON ANY THEORY OF LIABILITY, WHETHER IN CONTRACT, STRICT LIABILITY, OR TORT (INCLUDING NEGLIGENCE OR OTHERWISE) ARISING IN ANY WAY OUT OF THE USE OF THE OPEN SOURCE SOFTWARE, EVEN IF ADVISED OF THE POSSIBILITY OF SUCH DAMAGE.
Certain other software programs or portions thereof included in the Product may contain software distributed under third party agreements ('Third Party Components'), which may contain terms that expand or limit rights to use certain portions of the Product ('Third Party Terms'). Information identifying Third Party Components and the Third Party Terms that apply to them is available on Avaya's web site at: http://support.avaya.com/ThirdPartyLicense/. In addition, this product may contain the ReportNet application from Cognos Corporation. If so, you are granted a limited for use: (i) by an unlimited number of "Anonymous Users" to set personal preferences, view, run, schedule and output reports, subscribe to scheduled reports, create and manage personal folders, and personalize standard reports, and (ii) by one "Named User" (unless otherwise specified on this Order) to, in addition to the rights of an Anonymous User, use the Query Studio module.
Avaya fraud intervention:
If you suspect that you are being victimized by toll fraud and you need technical assistance or support, call Technical Service Center Toll Fraud Intervention Hotline at +1-800-643-2353 for the United States and Canada. Suspected security vulnerabilities with Avaya Products should be reported to Avaya by sending mail to: [email protected]<mailto:[email protected]
Trademarks:
Avaya and the Avaya Logo are trademarks of Avaya Inc. and are registered in the United States and other countries. Avaya may also have trademark rights in other terms used herein. References to Avaya include the Nortel Enterprise business, which was acquired as of December 18, 2009.
All trademarks identified by ®, TM or SM are registered marks, trademarks, and service marks, respectively, of Avaya Inc. or the property of their respective owners.
Patents:
The Verint Systems Inc. products are protected by one or more of the following U.S., European or International Patents: USPN 5,659,768; USPN 5,790,798; USPN 6,278,978; USPN 6,370,574; USPN 6,404,857; USPN 6,510,220; USPN 6,724,887; USPN 6,751,297; USPN 6,757,361; USPN 6,782,093; USPN 6,952,732; USPN 6,959,078; USPN 6,959,405; USPN 7,047,296; USPN 7,149,788; USPN 7,155,399; USPN 7,203,285; USPN 7,216,162; USPN 7,219,138; USPN 7,254,546; USPN 7,281,173; USPN 7,284,049; USPN 7,325,190; USPN 7,376,735; USPN 7,424,715; USPN 7,424,718; USPN 7,466,816; USPN 7,478,051; USPN 7,558,322; USPN 7,570,755; USPN 7,574,000; USPN 7,587,041; USPN 7,613,290; USPN 7,633,930; USPN 7,634,422; USPN 7,650,293; USPN 7,660,307; USPN 7,660,406; USPN 7,660,407; USPN D606,983; USPN RE40,634; AU 2003214926; CA 2,474,735; CA 2,563,960; CA 2,564,127; CA 2,564,760; CA 2,567,232; CA 2,623,178; CA 2,627,060; EP 1096382; EP 1248449; EP 1284077; DE 1284077; FR 1284077; DE 833489; FR 833489; GB 833489; GB 2374249; IE 84821; IL 13532400; NZ 534642; and other provisional rights from one or more of the following Published U.S. Patent Applications: US 10/061,491; US 10/467,899; US 10/525,260; US 10/633,357; US 10/771,315; US 10/771,409; US 11/037,604; US 11/090,638; US 11/129,811; US 11/166,630; US 11/345,587; US 11/359,195; US 11/359,319; US 11/359,356; US 11/359,357; US 11/359,358; US 11/359,532; US 11/361,208; US 11/388,944; US 11/394,408; US 11/394,410; US 11/394,496; US 11/394,794; US 11/395,759; US 11/395,992; US 11/396,062; US 11/410,004; US 11/428,222; US 11/428,239; US 11/475,683; US 11/477,124; US 11/478,714; US 11/479,056; US 11/479,267; US 11/479,506; US 11/479,841; US 11/479,899; US 11/479,925; US 11/479,926; US 11/509,549; US 11/509,550; US 11/509,551; US 11/509,554; US 11/528,267; US 11/529,132; US 11/529,942; US 11/529,946; US 11/529,947; US 11/540,107; US 11/540,171; US 11/540,185; US 11/540,281; US 11/540,320; US 11/540,322; US 11/540,353; US 11/540,736; US 11/540,739; US 11/540,785; US 11/540,900; US 11/540,902; US 11/540,904; US 11/541,313; US 11/565,946; US 11/567,808; US 11/567,852; US 11/583,381; US 11/608,340; US 11/608,350; US 11/608,358; US 11/608,438; US 11/608,440; US 11/608,894; US 11/616,490; US 11/621,134; US 11/676,818; US 11/691,530; US 11/692,983; US 11/693,828; US 11/693,899; US 11/693,923; US 11/693,933; US 11/712,933; US 11/723,010; US 11/729,185; US 11/742,733; US 11/752,458; US 11/771,499; US 11/772,440; US 11/776,659; US 11/804,748; US 11/824,980; US 11/831,250; US 11/831,257; US 11/831,260; US 11/831,634; US 11/844,759; US 11/868,656; US 11/872,575; US 11/924,201; US 11/937,553; US 11/959,650; US 11/968,428; US 12/014,155; US 12/015,375; US 12/015,621; US 12/053,788; US 12/055,102; US 12/057,442; US 12/057,476; US 12/107,976; US 12/118,781; US 12/118,789; US 12/118,792; US 12/164,480; US 12/245,781; US 12/326,205; US 12/351,370; US 12/416,906; US 12/464,694; US 12/466,673; US 12/483,075; US 12/497,793; US 12/497,799; US 12/504,492; US 12/539,640; US 12/608,474; US 12/628,089; US 12/684,027; US 12/686,213; US 12/708,558; and other U.S. and International Patents and Patents Pending.
Issue 4 April, 2010 3
Confidential and Proprietary Information
Avaya Contact RecorderRelease 10.0
Planning, Installation and Administration Guide
About This Guide . . . . . . . . . . . . . . . . . . . . . . . . . . . . . . . . . . . . . 11
Intended audience . . . . . . . . . . . . . . . . . . . . . . . . . . . . . . . . . . . 12Summary of information included in this guide . . . . . . . . . . . . . . . . . . . . . . 12Conventions used in this guide . . . . . . . . . . . . . . . . . . . . . . . . . . . . . 13Additional references . . . . . . . . . . . . . . . . . . . . . . . . . . . . . . . . . . 14Introduction . . . . . . . . . . . . . . . . . . . . . . . . . . . . . . . . . . . . . . 16
What’s New. . . . . . . . . . . . . . . . . . . . . . . . . . . . . . . . . . . . . . 17Server components. . . . . . . . . . . . . . . . . . . . . . . . . . . . . . . . . . . 19
Avaya Contact Recorder Server . . . . . . . . . . . . . . . . . . . . . . . . . . . . 19Optional Server Applications . . . . . . . . . . . . . . . . . . . . . . . . . . . . . . 20
End-User tools . . . . . . . . . . . . . . . . . . . . . . . . . . . . . . . . . . . . . 23Quality Monitoring. . . . . . . . . . . . . . . . . . . . . . . . . . . . . . . . . . . 23Bulk Search and Replay . . . . . . . . . . . . . . . . . . . . . . . . . . . . . . . . 23Administration Tools . . . . . . . . . . . . . . . . . . . . . . . . . . . . . . . . . . 24
Recording Functionality . . . . . . . . . . . . . . . . . . . . . . . . . . . . . . . . . 25Sampled Recording for Quality Assessment . . . . . . . . . . . . . . . . . . . . . . 25Bulk Recording Modes . . . . . . . . . . . . . . . . . . . . . . . . . . . . . . . . 26Ad-hoc or Occasional Recording Modes . . . . . . . . . . . . . . . . . . . . . . . . 27Replay Options . . . . . . . . . . . . . . . . . . . . . . . . . . . . . . . . . . . . 29Live Monitoring . . . . . . . . . . . . . . . . . . . . . . . . . . . . . . . . . . . . 30
Recording Methods. . . . . . . . . . . . . . . . . . . . . . . . . . . . . . . . . . . 31Service Observe . . . . . . . . . . . . . . . . . . . . . . . . . . . . . . . . . . . 31Single-step Conference . . . . . . . . . . . . . . . . . . . . . . . . . . . . . . . . 35Conference . . . . . . . . . . . . . . . . . . . . . . . . . . . . . . . . . . . . . . 35
Miscellaneous . . . . . . . . . . . . . . . . . . . . . . . . . . . . . . . . . . . . . 37Beep Tone . . . . . . . . . . . . . . . . . . . . . . . . . . . . . . . . . . . . . . 37International support . . . . . . . . . . . . . . . . . . . . . . . . . . . . . . . . . 37Liability . . . . . . . . . . . . . . . . . . . . . . . . . . . . . . . . . . . . . . . . 37
Introduction . . . . . . . . . . . . . . . . . . . . . . . . . . . . . . . . . . . . . . 40Audio Format . . . . . . . . . . . . . . . . . . . . . . . . . . . . . . . . . . . . . 41
G.711 . . . . . . . . . . . . . . . . . . . . . . . . . . . . . . . . . . . . . . . . . 41
Contents
4 Avaya Contact Recorder Planning, Installation and Administration Guide
Confidential and Proprietary Information
G.729A . . . . . . . . . . . . . . . . . . . . . . . . . . . . . . . . . . . . . . . . 42Storage Requirements . . . . . . . . . . . . . . . . . . . . . . . . . . . . . . . . . 43
Storage at Each Recorder . . . . . . . . . . . . . . . . . . . . . . . . . . . . . . . 43Quality Monitoring. . . . . . . . . . . . . . . . . . . . . . . . . . . . . . . . . . . 44Central Database Storage . . . . . . . . . . . . . . . . . . . . . . . . . . . . . . . 45Archive Call Storage . . . . . . . . . . . . . . . . . . . . . . . . . . . . . . . . . 45Backup Storage . . . . . . . . . . . . . . . . . . . . . . . . . . . . . . . . . . . . 45
Server Platform . . . . . . . . . . . . . . . . . . . . . . . . . . . . . . . . . . . . 46Sizing . . . . . . . . . . . . . . . . . . . . . . . . . . . . . . . . . . . . . . . . 46DVD+RW / Blu-ray Drive . . . . . . . . . . . . . . . . . . . . . . . . . . . . . . . 49
Network Issues. . . . . . . . . . . . . . . . . . . . . . . . . . . . . . . . . . . . . 51Load . . . . . . . . . . . . . . . . . . . . . . . . . . . . . . . . . . . . . . . . . 51Ports Used . . . . . . . . . . . . . . . . . . . . . . . . . . . . . . . . . . . . . . 51Network Address Translation Routing . . . . . . . . . . . . . . . . . . . . . . . . . 51
Licensing . . . . . . . . . . . . . . . . . . . . . . . . . . . . . . . . . . . . . . . 52Concurrent Bulk Recording Limit . . . . . . . . . . . . . . . . . . . . . . . . . . . . 52Quality Monitoring Seat Limit . . . . . . . . . . . . . . . . . . . . . . . . . . . . . 52Telephone Replay Channel Count . . . . . . . . . . . . . . . . . . . . . . . . . . . 52Dialer Integration . . . . . . . . . . . . . . . . . . . . . . . . . . . . . . . . . . . 52Timed Trials . . . . . . . . . . . . . . . . . . . . . . . . . . . . . . . . . . . . . 53
Avaya system prerequisites . . . . . . . . . . . . . . . . . . . . . . . . . . . . . . . 54Communication Manager . . . . . . . . . . . . . . . . . . . . . . . . . . . . . . . 54Gateway Resources . . . . . . . . . . . . . . . . . . . . . . . . . . . . . . . . . 54AE Services . . . . . . . . . . . . . . . . . . . . . . . . . . . . . . . . . . . . . 55Expansion Interface Boards (TN570) . . . . . . . . . . . . . . . . . . . . . . . . . . 56C-LAN . . . . . . . . . . . . . . . . . . . . . . . . . . . . . . . . . . . . . . . . 56VoIP Resources . . . . . . . . . . . . . . . . . . . . . . . . . . . . . . . . . . . 57Multi-Connect Capacity . . . . . . . . . . . . . . . . . . . . . . . . . . . . . . . . 60DMCC (IP_API_A) Licenses . . . . . . . . . . . . . . . . . . . . . . . . . . . . . . 60TSAPI Licenses. . . . . . . . . . . . . . . . . . . . . . . . . . . . . . . . . . . . 60VoIP Network Design . . . . . . . . . . . . . . . . . . . . . . . . . . . . . . . . . 61
Topologies . . . . . . . . . . . . . . . . . . . . . . . . . . . . . . . . . . . . . . . 62Bulk Recording System . . . . . . . . . . . . . . . . . . . . . . . . . . . . . . . . 62Quality Monitoring (only) System. . . . . . . . . . . . . . . . . . . . . . . . . . . . 62Bulk Recording + Quality Monitoring System . . . . . . . . . . . . . . . . . . . . . . 63Large Bulk Recording Systems . . . . . . . . . . . . . . . . . . . . . . . . . . . . 63
Integrating with other systems . . . . . . . . . . . . . . . . . . . . . . . . . . . . . 67Standardized Dialer Integrations . . . . . . . . . . . . . . . . . . . . . . . . . . . . 67Supplementary Tagging of Bulk Recordings . . . . . . . . . . . . . . . . . . . . . . 67Explicit External Control of Bulk Recording . . . . . . . . . . . . . . . . . . . . . . . 68Enhanced Quality Monitoring . . . . . . . . . . . . . . . . . . . . . . . . . . . . . 68
Overview . . . . . . . . . . . . . . . . . . . . . . . . . . . . . . . . . . . . . . . 72Avaya System Configuration . . . . . . . . . . . . . . . . . . . . . . . . . . . . . . 73
Prerequisites . . . . . . . . . . . . . . . . . . . . . . . . . . . . . . . . . . . . . 73Communication Manager Configuration . . . . . . . . . . . . . . . . . . . . . . . . 73AE Server Configuration. . . . . . . . . . . . . . . . . . . . . . . . . . . . . . . . 80Test Phonesets . . . . . . . . . . . . . . . . . . . . . . . . . . . . . . . . . . . . 81
Contents
Issue 4 April, 2010 5
Confidential and Proprietary Information
Order in which to Install Applications . . . . . . . . . . . . . . . . . . . . . . . . . . 82Platform Prerequisites . . . . . . . . . . . . . . . . . . . . . . . . . . . . . . . . . 83
Operating System . . . . . . . . . . . . . . . . . . . . . . . . . . . . . . . . . . . 83DVD/Blu-ray Drive . . . . . . . . . . . . . . . . . . . . . . . . . . . . . . . . . . 86Network Connectivity . . . . . . . . . . . . . . . . . . . . . . . . . . . . . . . . . 86
Installing Avaya Contact Recorder. . . . . . . . . . . . . . . . . . . . . . . . . . . . 88Installing Quality Monitoring . . . . . . . . . . . . . . . . . . . . . . . . . . . . . . . 89Installing a Central Replay Server . . . . . . . . . . . . . . . . . . . . . . . . . . . . 90Installing Multiple Central Replay Servers . . . . . . . . . . . . . . . . . . . . . . . . 91Installing Viewer . . . . . . . . . . . . . . . . . . . . . . . . . . . . . . . . . . . . 92
Prerequisites . . . . . . . . . . . . . . . . . . . . . . . . . . . . . . . . . . . . . 92Installing Viewer . . . . . . . . . . . . . . . . . . . . . . . . . . . . . . . . . . . 92Create an MMC Console . . . . . . . . . . . . . . . . . . . . . . . . . . . . . . . 93Configuring Viewer . . . . . . . . . . . . . . . . . . . . . . . . . . . . . . . . . . 93Configuring Avaya Contact Recorder . . . . . . . . . . . . . . . . . . . . . . . . . . 95Configuring Multiple Viewer Servers . . . . . . . . . . . . . . . . . . . . . . . . . . 95
Installing Archive . . . . . . . . . . . . . . . . . . . . . . . . . . . . . . . . . . . . 96Overview . . . . . . . . . . . . . . . . . . . . . . . . . . . . . . . . . . . . . . . 98Accessing the System . . . . . . . . . . . . . . . . . . . . . . . . . . . . . . . . . 99
URL . . . . . . . . . . . . . . . . . . . . . . . . . . . . . . . . . . . . . . . . . 99Initial User Account . . . . . . . . . . . . . . . . . . . . . . . . . . . . . . . . . . 99Key Points . . . . . . . . . . . . . . . . . . . . . . . . . . . . . . . . . . . . . . 99
Licensing . . . . . . . . . . . . . . . . . . . . . . . . . . . . . . . . . . . . . . . 101Terminology. . . . . . . . . . . . . . . . . . . . . . . . . . . . . . . . . . . . . . 101Obtaining a License Activation Key. . . . . . . . . . . . . . . . . . . . . . . . . . . 102Standby and Slave Servers . . . . . . . . . . . . . . . . . . . . . . . . . . . . . . 103Adding additional licenses . . . . . . . . . . . . . . . . . . . . . . . . . . . . . . . 103Reinstalling on the same PC . . . . . . . . . . . . . . . . . . . . . . . . . . . . . . 103Reinstalling the Recorder on a new PC . . . . . . . . . . . . . . . . . . . . . . . . . 103
Security . . . . . . . . . . . . . . . . . . . . . . . . . . . . . . . . . . . . . . . . 105Securing the System . . . . . . . . . . . . . . . . . . . . . . . . . . . . . . . . . 105Windows Authentication . . . . . . . . . . . . . . . . . . . . . . . . . . . . . . . . 105
General Setup . . . . . . . . . . . . . . . . . . . . . . . . . . . . . . . . . . . . . 107Recorder . . . . . . . . . . . . . . . . . . . . . . . . . . . . . . . . . . . . . . . 107Communication Manager Interface . . . . . . . . . . . . . . . . . . . . . . . . . . . 109
System Monitoring . . . . . . . . . . . . . . . . . . . . . . . . . . . . . . . . . . . 114Email Notification . . . . . . . . . . . . . . . . . . . . . . . . . . . . . . . . . . . 114SNMP . . . . . . . . . . . . . . . . . . . . . . . . . . . . . . . . . . . . . . . . 115
Operations . . . . . . . . . . . . . . . . . . . . . . . . . . . . . . . . . . . . . . . 117Common Settings . . . . . . . . . . . . . . . . . . . . . . . . . . . . . . . . . . . 117Assigning Ports . . . . . . . . . . . . . . . . . . . . . . . . . . . . . . . . . . . . 119Conferenced Recording . . . . . . . . . . . . . . . . . . . . . . . . . . . . . . . . 122Quality Monitoring. . . . . . . . . . . . . . . . . . . . . . . . . . . . . . . . . . . 126Station Bulk Recording . . . . . . . . . . . . . . . . . . . . . . . . . . . . . . . . 128Station Executive Recording . . . . . . . . . . . . . . . . . . . . . . . . . . . . . . 129On Demand Recording . . . . . . . . . . . . . . . . . . . . . . . . . . . . . . . . 132
Contents
6 Avaya Contact Recorder Planning, Installation and Administration Guide
Confidential and Proprietary Information
Meeting Recording . . . . . . . . . . . . . . . . . . . . . . . . . . . . . . . . . . 133(Telephone) Replay Ports . . . . . . . . . . . . . . . . . . . . . . . . . . . . . . . 134Archive . . . . . . . . . . . . . . . . . . . . . . . . . . . . . . . . . . . . . . . . 135Hard Disk Archiving . . . . . . . . . . . . . . . . . . . . . . . . . . . . . . . . . . 139DVD+RW/Blu-ray Archiving . . . . . . . . . . . . . . . . . . . . . . . . . . . . . . 139
Search and Replay . . . . . . . . . . . . . . . . . . . . . . . . . . . . . . . . . . . 144Search and Replay Access Rights . . . . . . . . . . . . . . . . . . . . . . . . . . . 144ActiveX Control Download . . . . . . . . . . . . . . . . . . . . . . . . . . . . . . . 146Installing the ActiveX Controls Manually . . . . . . . . . . . . . . . . . . . . . . . . 147Modify Default Behavior . . . . . . . . . . . . . . . . . . . . . . . . . . . . . . . . 148
Backup/Restore . . . . . . . . . . . . . . . . . . . . . . . . . . . . . . . . . . . . 150Application . . . . . . . . . . . . . . . . . . . . . . . . . . . . . . . . . . . . . . 150Backing up the Database . . . . . . . . . . . . . . . . . . . . . . . . . . . . . . . 150Restoring data to a new PostgreSQL database . . . . . . . . . . . . . . . . . . . . . 151Backing up Voice Recordings . . . . . . . . . . . . . . . . . . . . . . . . . . . . . 151
Distributing User Instructions . . . . . . . . . . . . . . . . . . . . . . . . . . . . . . 153Those Using Recording . . . . . . . . . . . . . . . . . . . . . . . . . . . . . . . . 153Those entitled to replay calls . . . . . . . . . . . . . . . . . . . . . . . . . . . . . 154
Configuring Avaya Support Remote Access . . . . . . . . . . . . . . . . . . . . . . . 155Introduction . . . . . . . . . . . . . . . . . . . . . . . . . . . . . . . . . . . . . . 158Status Monitoring. . . . . . . . . . . . . . . . . . . . . . . . . . . . . . . . . . . . 159
System . . . . . . . . . . . . . . . . . . . . . . . . . . . . . . . . . . . . . . . . 159Server . . . . . . . . . . . . . . . . . . . . . . . . . . . . . . . . . . . . . . . . 160CTI Monitors . . . . . . . . . . . . . . . . . . . . . . . . . . . . . . . . . . . . . 161Ports . . . . . . . . . . . . . . . . . . . . . . . . . . . . . . . . . . . . . . . . . 163Alarms . . . . . . . . . . . . . . . . . . . . . . . . . . . . . . . . . . . . . . . . 165Audit Trail . . . . . . . . . . . . . . . . . . . . . . . . . . . . . . . . . . . . . . 166
Preventative Maintenance . . . . . . . . . . . . . . . . . . . . . . . . . . . . . . . 168Daily . . . . . . . . . . . . . . . . . . . . . . . . . . . . . . . . . . . . . . . . . 168Weekly . . . . . . . . . . . . . . . . . . . . . . . . . . . . . . . . . . . . . . . . 169Monthly . . . . . . . . . . . . . . . . . . . . . . . . . . . . . . . . . . . . . . . 170Every Six Months . . . . . . . . . . . . . . . . . . . . . . . . . . . . . . . . . . . 170
Use of SSL . . . . . . . . . . . . . . . . . . . . . . . . . . . . . . . . . . . . . . 172Windows Domain Authentication . . . . . . . . . . . . . . . . . . . . . . . . . . . . 173Blocking Replay from a Recorder . . . . . . . . . . . . . . . . . . . . . . . . . . . . 174Changing Passwords . . . . . . . . . . . . . . . . . . . . . . . . . . . . . . . . . . 175
Linux User Accounts . . . . . . . . . . . . . . . . . . . . . . . . . . . . . . . . . 175Postgres Database Owner. . . . . . . . . . . . . . . . . . . . . . . . . . . . . . . 175Recorder Account on eWare/Viewer SQL Server . . . . . . . . . . . . . . . . . . . . 176
Encrypted File Storage . . . . . . . . . . . . . . . . . . . . . . . . . . . . . . . . . 177PCI Compliance . . . . . . . . . . . . . . . . . . . . . . . . . . . . . . . . . . . . 178Properties File . . . . . . . . . . . . . . . . . . . . . . . . . . . . . . . . . . . . . 182Standby Server. . . . . . . . . . . . . . . . . . . . . . . . . . . . . . . . . . . . . 189Central Replay Server . . . . . . . . . . . . . . . . . . . . . . . . . . . . . . . . . 190
Installation . . . . . . . . . . . . . . . . . . . . . . . . . . . . . . . . . . . . . . 190Configuration . . . . . . . . . . . . . . . . . . . . . . . . . . . . . . . . . . . . . 190

Contents
Issue 4 April, 2010 7
Confidential and Proprietary Information
User Defined Fields . . . . . . . . . . . . . . . . . . . . . . . . . . . . . . . . . . 191Storing UDFs . . . . . . . . . . . . . . . . . . . . . . . . . . . . . . . . . . . . . 191Search and Display UDFs . . . . . . . . . . . . . . . . . . . . . . . . . . . . . . . 191UDF Support in Viewer . . . . . . . . . . . . . . . . . . . . . . . . . . . . . . . . 191Viewer Compatibility. . . . . . . . . . . . . . . . . . . . . . . . . . . . . . . . . . 192
Customizing Search and Replay . . . . . . . . . . . . . . . . . . . . . . . . . . . . 193Default Configuration Files. . . . . . . . . . . . . . . . . . . . . . . . . . . . . . . 193Custom Layout Files . . . . . . . . . . . . . . . . . . . . . . . . . . . . . . . . . 193Internationalization . . . . . . . . . . . . . . . . . . . . . . . . . . . . . . . . . . 195
Usage Report . . . . . . . . . . . . . . . . . . . . . . . . . . . . . . . . . . . . . 198Enabling the Report . . . . . . . . . . . . . . . . . . . . . . . . . . . . . . . . . . 198Content. . . . . . . . . . . . . . . . . . . . . . . . . . . . . . . . . . . . . . . . 198Accessing through URL: . . . . . . . . . . . . . . . . . . . . . . . . . . . . . . . . 198Accessing the Usage report in a log file . . . . . . . . . . . . . . . . . . . . . . . . 199
Selective Record Barring . . . . . . . . . . . . . . . . . . . . . . . . . . . . . . . . 200Configuration . . . . . . . . . . . . . . . . . . . . . . . . . . . . . . . . . . . . . 200Example . . . . . . . . . . . . . . . . . . . . . . . . . . . . . . . . . . . . . . . 200Limitations . . . . . . . . . . . . . . . . . . . . . . . . . . . . . . . . . . . . . . 200
Recording files . . . . . . . . . . . . . . . . . . . . . . . . . . . . . . . . . . . . . 204WAV files . . . . . . . . . . . . . . . . . . . . . . . . . . . . . . . . . . . . . . . 204XML files . . . . . . . . . . . . . . . . . . . . . . . . . . . . . . . . . . . . . . . 204
Internal Database . . . . . . . . . . . . . . . . . . . . . . . . . . . . . . . . . . . 205Recording details . . . . . . . . . . . . . . . . . . . . . . . . . . . . . . . . . . . 205Configuration details . . . . . . . . . . . . . . . . . . . . . . . . . . . . . . . . . 206
Recorder Interfaces . . . . . . . . . . . . . . . . . . . . . . . . . . . . . . . . . . 207HTTP/HTTPS Interfaces Offered . . . . . . . . . . . . . . . . . . . . . . . . . . . . 207Communication Manager . . . . . . . . . . . . . . . . . . . . . . . . . . . . . . . 208Quality Monitoring. . . . . . . . . . . . . . . . . . . . . . . . . . . . . . . . . . . 209Other Recorders . . . . . . . . . . . . . . . . . . . . . . . . . . . . . . . . . . . 210External Control Interface . . . . . . . . . . . . . . . . . . . . . . . . . . . . . . . 210Database Upload Interface . . . . . . . . . . . . . . . . . . . . . . . . . . . . . . 210Summary . . . . . . . . . . . . . . . . . . . . . . . . . . . . . . . . . . . . . . . 211
Hints and Tips . . . . . . . . . . . . . . . . . . . . . . . . . . . . . . . . . . . . . 214Where to Look for Clues . . . . . . . . . . . . . . . . . . . . . . . . . . . . . . . . 214Determining Current Version . . . . . . . . . . . . . . . . . . . . . . . . . . . . . . 214Application Logs . . . . . . . . . . . . . . . . . . . . . . . . . . . . . . . . . . . 214Tomcat Logs . . . . . . . . . . . . . . . . . . . . . . . . . . . . . . . . . . . . . 215Remote Access . . . . . . . . . . . . . . . . . . . . . . . . . . . . . . . . . . . . 215
Specific Problems . . . . . . . . . . . . . . . . . . . . . . . . . . . . . . . . . . . 216System Administration page problems . . . . . . . . . . . . . . . . . . . . . . . . . 216Connectivity . . . . . . . . . . . . . . . . . . . . . . . . . . . . . . . . . . . . . 217Search and Replay problems . . . . . . . . . . . . . . . . . . . . . . . . . . . . . 218Recording Problems . . . . . . . . . . . . . . . . . . . . . . . . . . . . . . . . . 222
Alarms . . . . . . . . . . . . . . . . . . . . . . . . . . . . . . . . . . . . . . . . . 226Alarms Table . . . . . . . . . . . . . . . . . . . . . . . . . . . . . . . . . . . . . . 227Introduction . . . . . . . . . . . . . . . . . . . . . . . . . . . . . . . . . . . . . . 244
Contents
8 Avaya Contact Recorder Planning, Installation and Administration Guide
Confidential and Proprietary Information
When to Use External Control . . . . . . . . . . . . . . . . . . . . . . . . . . . . . 244This Appendix . . . . . . . . . . . . . . . . . . . . . . . . . . . . . . . . . . . . 244Port Allocations . . . . . . . . . . . . . . . . . . . . . . . . . . . . . . . . . . . . 245Master + Slave Systems. . . . . . . . . . . . . . . . . . . . . . . . . . . . . . . . 245
Java API Toolkit . . . . . . . . . . . . . . . . . . . . . . . . . . . . . . . . . . . . 246TCP/IP Protocol Overview . . . . . . . . . . . . . . . . . . . . . . . . . . . . . . . 247
Connection Method . . . . . . . . . . . . . . . . . . . . . . . . . . . . . . . . . . 247General Protocol Specification . . . . . . . . . . . . . . . . . . . . . . . . . . . . . 247Channel Identification . . . . . . . . . . . . . . . . . . . . . . . . . . . . . . . . . 248XML Tagging . . . . . . . . . . . . . . . . . . . . . . . . . . . . . . . . . . . . . 248Basic Call Tagging . . . . . . . . . . . . . . . . . . . . . . . . . . . . . . . . . . 249Fallback Mode . . . . . . . . . . . . . . . . . . . . . . . . . . . . . . . . . . . . 249
Examples . . . . . . . . . . . . . . . . . . . . . . . . . . . . . . . . . . . . . . . 251Third-party CTI Control . . . . . . . . . . . . . . . . . . . . . . . . . . . . . . . . 251Additional Call Tagging . . . . . . . . . . . . . . . . . . . . . . . . . . . . . . . . 252
TCP/IP Message Sequences . . . . . . . . . . . . . . . . . . . . . . . . . . . . . . 254Redundant SAN . . . . . . . . . . . . . . . . . . . . . . . . . . . . . . . . . . . . 262Duplicated recording . . . . . . . . . . . . . . . . . . . . . . . . . . . . . . . . . . 263Standby Recorder Options . . . . . . . . . . . . . . . . . . . . . . . . . . . . . . . 264
Prerequisites for high availability . . . . . . . . . . . . . . . . . . . . . . . . . . . . 264Standby recorder licensing . . . . . . . . . . . . . . . . . . . . . . . . . . . . . . 266Automated Configuration Shadowing. . . . . . . . . . . . . . . . . . . . . . . . . . 266Manual Configuration of Standby . . . . . . . . . . . . . . . . . . . . . . . . . . . 266Known limitations . . . . . . . . . . . . . . . . . . . . . . . . . . . . . . . . . . . 266Distributed Systems . . . . . . . . . . . . . . . . . . . . . . . . . . . . . . . . . . 267Supported failure modes . . . . . . . . . . . . . . . . . . . . . . . . . . . . . . . 268Standby recorders and Unify/External Control . . . . . . . . . . . . . . . . . . . . . 269Supported Master/Standby Topologies . . . . . . . . . . . . . . . . . . . . . . . . . 269
Mode of operation . . . . . . . . . . . . . . . . . . . . . . . . . . . . . . . . . . . 286Standby configuration (automatic) . . . . . . . . . . . . . . . . . . . . . . . . . . . 286Standby configuration (manual) . . . . . . . . . . . . . . . . . . . . . . . . . . . . 286Power-On . . . . . . . . . . . . . . . . . . . . . . . . . . . . . . . . . . . . . . 286Standby mode . . . . . . . . . . . . . . . . . . . . . . . . . . . . . . . . . . . . 286Failure Detection . . . . . . . . . . . . . . . . . . . . . . . . . . . . . . . . . . . 287Disk Space Monitoring . . . . . . . . . . . . . . . . . . . . . . . . . . . . . . . . 287Active mode . . . . . . . . . . . . . . . . . . . . . . . . . . . . . . . . . . . . . 288Return to Standby mode. . . . . . . . . . . . . . . . . . . . . . . . . . . . . . . . 288Switchover Implications . . . . . . . . . . . . . . . . . . . . . . . . . . . . . . . . 288Restoring the Master . . . . . . . . . . . . . . . . . . . . . . . . . . . . . . . . . 289Comparison with hardware switch-over units . . . . . . . . . . . . . . . . . . . . . . 290
Standby Recorder Configuration . . . . . . . . . . . . . . . . . . . . . . . . . . . . 291Configuration Differences . . . . . . . . . . . . . . . . . . . . . . . . . . . . . . . 291
Upgrade Process for Multiple Recorder Topologies . . . . . . . . . . . . . . . . . . . . 293Upgrading Slave Recorders to Version 10 . . . . . . . . . . . . . . . . . . . . . . . 293
Overview . . . . . . . . . . . . . . . . . . . . . . . . . . . . . . . . . . . . . . . 296Modes of Operation . . . . . . . . . . . . . . . . . . . . . . . . . . . . . . . . . . 296Principles of Operation . . . . . . . . . . . . . . . . . . . . . . . . . . . . . . . . 297
Contents
Issue 4 April, 2010 9
Confidential and Proprietary Information
High Availability . . . . . . . . . . . . . . . . . . . . . . . . . . . . . . . . . . . . 297Installation . . . . . . . . . . . . . . . . . . . . . . . . . . . . . . . . . . . . . . . 299
Configuration . . . . . . . . . . . . . . . . . . . . . . . . . . . . . . . . . . . . . 299Programmer’s Guide . . . . . . . . . . . . . . . . . . . . . . . . . . . . . . . . . . 300
Enable(in string station, in SeqCouple tags) . . . . . . . . . . . . . . . . . . . . . . 300Disable(in string station) . . . . . . . . . . . . . . . . . . . . . . . . . . . . . . . . 301Start(in string station) . . . . . . . . . . . . . . . . . . . . . . . . . . . . . . . . . 301Stop(in string station) . . . . . . . . . . . . . . . . . . . . . . . . . . . . . . . . . 301Tag(in string station, in string inum, SeqCouple tags) . . . . . . . . . . . . . . . . . . 301Assign() . . . . . . . . . . . . . . . . . . . . . . . . . . . . . . . . . . . . . . . 301
Introduction . . . . . . . . . . . . . . . . . . . . . . . . . . . . . . . . . . . . . . 304Functionality . . . . . . . . . . . . . . . . . . . . . . . . . . . . . . . . . . . . . 304How it Works . . . . . . . . . . . . . . . . . . . . . . . . . . . . . . . . . . . . . 305Status Monitoring . . . . . . . . . . . . . . . . . . . . . . . . . . . . . . . . . . . 305
Configuration. . . . . . . . . . . . . . . . . . . . . . . . . . . . . . . . . . . . . . 306Licensing . . . . . . . . . . . . . . . . . . . . . . . . . . . . . . . . . . . . . . . 306Dialer List. . . . . . . . . . . . . . . . . . . . . . . . . . . . . . . . . . . . . . . 306Generic Dialer Configuration . . . . . . . . . . . . . . . . . . . . . . . . . . . . . . 306Tagging of Calls . . . . . . . . . . . . . . . . . . . . . . . . . . . . . . . . . . . . 307Configuring Quality Monitoring . . . . . . . . . . . . . . . . . . . . . . . . . . . . . 308
Avaya PCS/PDS Dialer . . . . . . . . . . . . . . . . . . . . . . . . . . . . . . . . . 310Versions Supported . . . . . . . . . . . . . . . . . . . . . . . . . . . . . . . . . . 310Limitations . . . . . . . . . . . . . . . . . . . . . . . . . . . . . . . . . . . . . . 310Configuration . . . . . . . . . . . . . . . . . . . . . . . . . . . . . . . . . . . . . 310
PCS/PDS Settings Summary . . . . . . . . . . . . . . . . . . . . . . . . . . . . . . 313Overview . . . . . . . . . . . . . . . . . . . . . . . . . . . . . . . . . . . . . . . 316
Disks . . . . . . . . . . . . . . . . . . . . . . . . . . . . . . . . . . . . . . . . . 316NICS . . . . . . . . . . . . . . . . . . . . . . . . . . . . . . . . . . . . . . . . . 316DVD . . . . . . . . . . . . . . . . . . . . . . . . . . . . . . . . . . . . . . . . . 316Soundcard . . . . . . . . . . . . . . . . . . . . . . . . . . . . . . . . . . . . . . 317Kickstart . . . . . . . . . . . . . . . . . . . . . . . . . . . . . . . . . . . . . . . 317
Installing Unlimited Strength Encryption . . . . . . . . . . . . . . . . . . . . . . . . . 320Installing a Signed SSL Certificate. . . . . . . . . . . . . . . . . . . . . . . . . . . . 321
Selecting a Certificate Authority (CA) . . . . . . . . . . . . . . . . . . . . . . . . . . 321Backing up the Keystore file . . . . . . . . . . . . . . . . . . . . . . . . . . . . . . 321Creating the new Certificate . . . . . . . . . . . . . . . . . . . . . . . . . . . . . . 321Generating a Certificate Signing Request. . . . . . . . . . . . . . . . . . . . . . . . 323Importing the CA's certificates . . . . . . . . . . . . . . . . . . . . . . . . . . . . . 323Backing up the keystore file . . . . . . . . . . . . . . . . . . . . . . . . . . . . . . 324
Changing Tomcat Port Numbers. . . . . . . . . . . . . . . . . . . . . . . . . . . . . 325Encrypting Properties File entries . . . . . . . . . . . . . . . . . . . . . . . . . . . . 326Configuring Viewer and Archive to use HTTPS . . . . . . . . . . . . . . . . . . . . . . 327
Importing the public certificates into Viewer and Archive . . . . . . . . . . . . . . . . . 327Configure Viewer to use https and a secure port . . . . . . . . . . . . . . . . . . . . 328Configure Archive to use https . . . . . . . . . . . . . . . . . . . . . . . . . . . . . 329
Configuring Archive for a Key Management Server . . . . . . . . . . . . . . . . . . . . 331
Contents
10 Avaya Contact Recorder Planning, Installation and Administration Guide
Confidential and Proprietary Information
Configuring Archive . . . . . . . . . . . . . . . . . . . . . . . . . . . . . . . . . . 331Signing and Delivering the certificate . . . . . . . . . . . . . . . . . . . . . . . . . . 331Installing the Certificate . . . . . . . . . . . . . . . . . . . . . . . . . . . . . . . . 332
Issue 4 April, 2010 11
Confidential and Proprietary Information
About This Guide
The Avaya Contact Recorder Planning, Installation and Administration Guide provides details of the Avaya Contact Recorder system, as well as recommended and required components.
About This Guide
12 Avaya Contact Recorder Planning, Installation and Administration Guide
Confidential and Proprietary Information
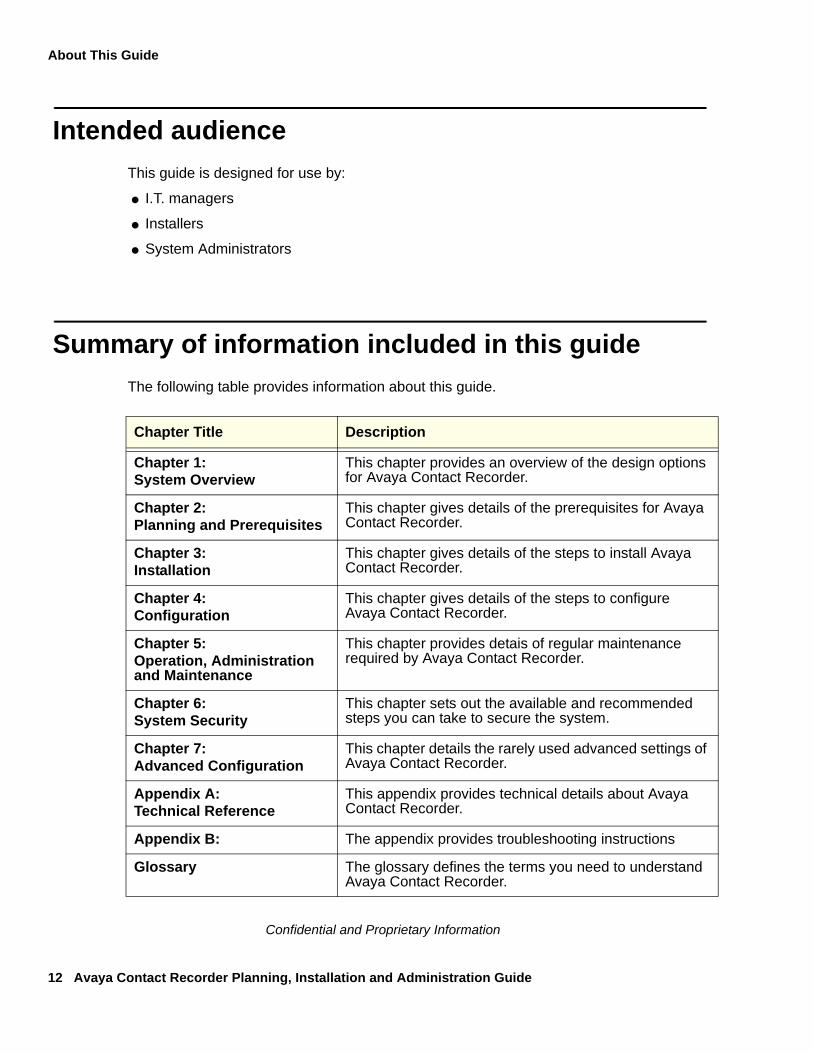
Intended audience
This guide is designed for use by:
● I.T. managers
● Installers
● System Administrators
Summary of information included in this guide
The following table provides information about this guide.
Chapter Title Description
Chapter 1: System Overview
This chapter provides an overview of the design options for Avaya Contact Recorder.
Chapter 2: Planning and Prerequisites
This chapter gives details of the prerequisites for Avaya Contact Recorder.
Chapter 3:Installation
This chapter gives details of the steps to install Avaya Contact Recorder.
Chapter 4:Configuration
This chapter gives details of the steps to configure Avaya Contact Recorder.
Chapter 5: Operation, Administration and Maintenance
This chapter provides detais of regular maintenance required by Avaya Contact Recorder.
Chapter 6:System Security
This chapter sets out the available and recommended steps you can take to secure the system.
Chapter 7:Advanced Configuration
This chapter details the rarely used advanced settings of Avaya Contact Recorder.
Appendix A: Technical Reference
This appendix provides technical details about Avaya Contact Recorder.
Appendix B: The appendix provides troubleshooting instructions
Glossary The glossary defines the terms you need to understand Avaya Contact Recorder.
Conventions used in this guide
Issue 4 April, 2010 13
Confidential and Proprietary Information
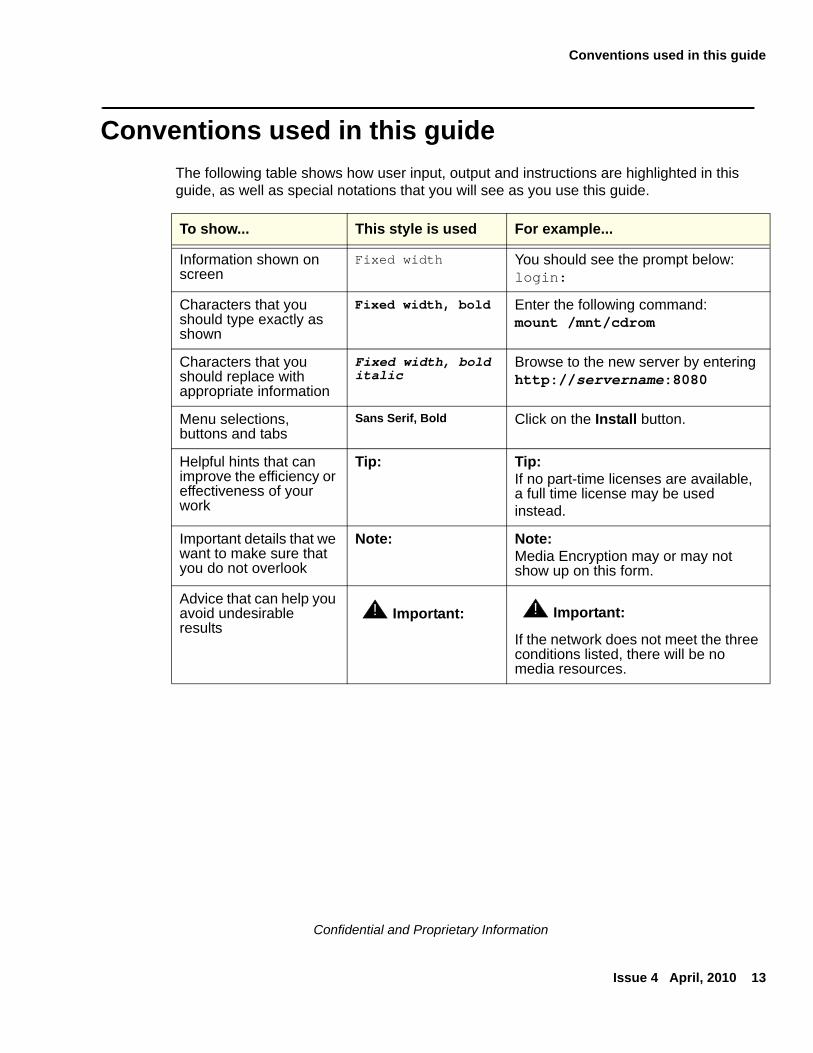
Conventions used in this guide
The following table shows how user input, output and instructions are highlighted in this guide, as well as special notations that you will see as you use this guide.
To show... This style is used For example...
Information shown on screen
Fixed width You should see the prompt below:login:
Characters that you should type exactly as shown
Fixed width, bold Enter the following command:mount /mnt/cdrom
Characters that you should replace with appropriate information
Fixed width, bold italic
Browse to the new server by enteringhttp://servername:8080
Menu selections, buttons and tabs
Sans Serif, Bold Click on the Install button.
Helpful hints that can improve the efficiency or effectiveness of your work
Tip: Tip:If no part-time licenses are available, a full time license may be usedinstead.
Important details that we want to make sure that you do not overlook
Note: Note:Media Encryption may or may not show up on this form.
Advice that can help you avoid undesirable results
If the network does not meet the three conditions listed, there will be no media resources.
! Important: ! Important:
About This Guide
14 Avaya Contact Recorder Planning, Installation and Administration Guide
Confidential and Proprietary Information
Additional references
The following guides contain additional information you may find helpful.
● Avaya Communication Manager Call Recording: A Design Approach for Device Media and Call Control (DMCC, previously called CMAPI) (Compas ID 128862)
● Avaya Contact Recorder User Guide
● Viewer for Communication Manager Installation Guide
● Viewer for Communication Manager Quick Reference Guide
● Contact Archive for Communication Manager Installation Guide
● Contact Archive for Communication Manager System Administration Guide
● Unify for Communication Manager Installation Guide
● Witness Enterprise Deployment Guides Impact 360, Full-time Recorder, Enterprise Security Administration Guide Release 7.8
● Avaya Communication Manager Guide to ACD Contact Centers
● Administrator’s Guide for Avaya Communication Manager
● Administration for Network Connectivity for Avaya Communication Manager
Note:Note: Avaya Communication Manager documentation is available through the
Avaya online support Web site, http://www.avaya.com.
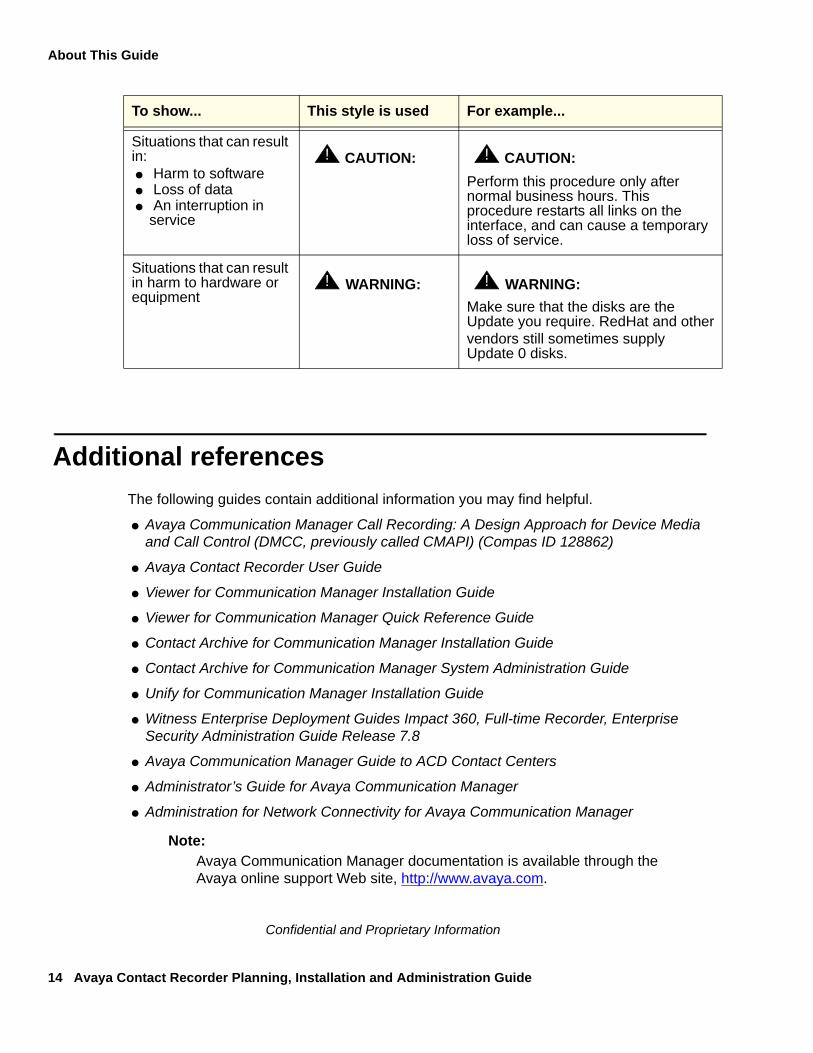
Situations that can result in:● Harm to software● Loss of data● An interruption in
service
Perform this procedure only after normal business hours. This procedure restarts all links on the interface, and can cause a temporary loss of service.
Situations that can result in harm to hardware or equipment
Make sure that the disks are the Update you require. RedHat and othervendors still sometimes supply Update 0 disks.
To show... This style is used For example...
! CAUTION: ! CAUTION:
! WARNING: ! WARNING:
Issue 4 April, 2010 15
Confidential and Proprietary Information
Chapter 1: System Overview
This chapter provides an overview of the design options for an Avaya Contact Recorder system.
System Overview
16 Avaya Contact Recorder Planning, Installation and Administration Guide
Confidential and Proprietary Information
Introduction
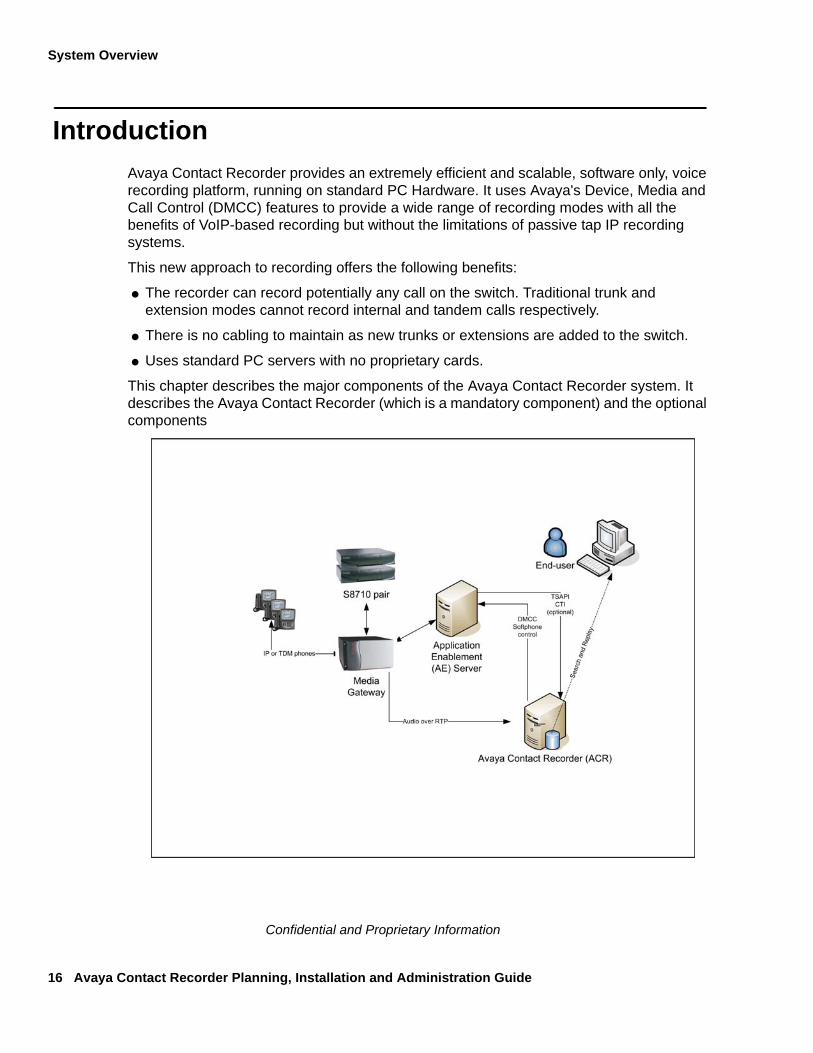
Avaya Contact Recorder provides an extremely efficient and scalable, software only, voice recording platform, running on standard PC Hardware. It uses Avaya's Device, Media and Call Control (DMCC) features to provide a wide range of recording modes with all the benefits of VoIP-based recording but without the limitations of passive tap IP recording systems.
This new approach to recording offers the following benefits:
● The recorder can record potentially any call on the switch. Traditional trunk and extension modes cannot record internal and tandem calls respectively.
● There is no cabling to maintain as new trunks or extensions are added to the switch.
● Uses standard PC servers with no proprietary cards.
This chapter describes the major components of the Avaya Contact Recorder system. It describes the Avaya Contact Recorder (which is a mandatory component) and the optional components
Introduction
Issue 4 April, 2010 17
Confidential and Proprietary Information
What’s New
In Version 7.8
● Provides a range of enhanced security options as described in Chapter 6
● Supports Redhat Enterprise Linux (RHEL) Versions 4 and 5. (Existing installations on RHEL 3 can be upgraded to CSCM 7.8 but this version is no longer supported for new installations).
● Supports Avaya Communication Manager Version 4
● Supports numbering plans up to 16 digits
● Supports No-talk Service Observe - which does not require a time-slot on your port network.
● Allows you to update call tagging details after recordings have completed
● (from Service Pack 1) supports a new Search and Replay API (full details on request).
● (from Service Pack 1) provides a new user role: "Restricted Administrator". Such users can see the system status and alarms; eject DVDs and administer Replay Only user accounts but cannot change system configuration.
● (from Service Pack 2) Conferenced mode recording no longer uses JTAPI but instead uses TSAPI directly.
● (from Service Pack 2) Live Monitor capability has been removed as this is no longer required now that Communication Manager itself can support multiple service observation of a call.
● (from Service Pack 2) Unify/External control mode was deprecated in 7.7 and has now been removed as ports in other modes can be controlled and/or tagged by external controllers.
In Version 10.0
● Supports Avaya Communication Manager (CM) Version 5 and Application Enablement Services (AES) Version 5
● Supports Redhat Enterprise Linux (RHEL) Versions 4 and 5. (Existing installations on RHEL 3 or 4 can be upgraded to ACR 10.0 but this version is no longer supported for new installations).
● The user interface has been refreshed and brought in line with that of the rest of the workforce optimization suite.
● One or more Avaya Contact Recorder servers may be used as a central replay server for other IP recorders, removing the need for a separate Viewer server in all but the largest systems.

System Overview
18 Avaya Contact Recorder Planning, Installation and Administration Guide
Confidential and Proprietary Information
● The "archive" feature has been extensively enhanced, removing the need for a separate Archive Manager. Blu-ray drives and media are also supported.
● A status screen on Master and Standby recorders now shows the status of all recorder servers in the system, simplifying day to day operation.
● Quality Monitoring has been simplified as the Avaya Contact Recorder now provides CTI information to the Quality Monitoring server in place of the additional TSAPI link previously required.
● Avaya Contact Recorder may no longer require the separate purchase and installation of IP_API_A or TSAPI licenses when connected to CM 5.1 or later. See DMCC (IP_API_A) Licenses on page 60
● As an alternative to specifying which stations are to be recorded, one or more Classes of Restriction (CoR) can be targeted for recording, reducing the administration effort needed to keep the recording rules in line with the switch.
● Integration to auto-dialers such as Avaya Proactive Contact has been simplified and brought within the recorder itself. Dialer integration is controlled by a license key setting.
● Licensing rules have been simplified.
Server components
Issue 4 April, 2010 19
Confidential and Proprietary Information
Server components
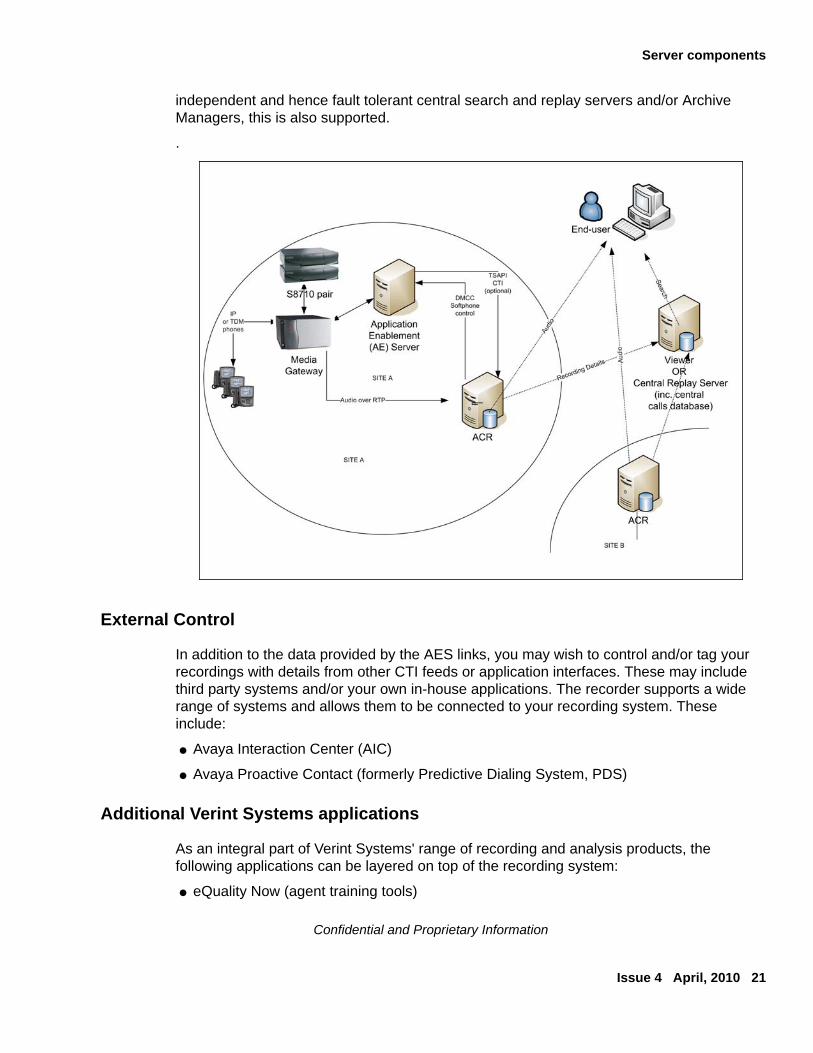
The Avaya Contact Recorder system can be installed as a single server solution providing recording and replay of calls. Large systems can be built from several independent recorders or in a master/slave topology. The former approach works well for station-side recording while the latter provides many of the benefits of traditional trunk-side approaches - without most of the disadvantages. Internal calls can still be recorded, for example.
You can extend the scope of the system by adding additional optional server applications to create a comprehensive Workforce Optimization system.
These optional server applications require their own physical server. All of the other applications in the suite require Windows servers.
Note:Note: This Guide is the detailed reference for the Avaya Contact Recorder (ACR)
only. This component can record voice calls over IP using Avaya DMCC softphones. It can also act as the Master - controlling other recorders that provide additional capacity.
Each of the other components has a corresponding guide (as detailed in Additional references on page 14), which you should refer to for more detail.
Avaya Contact Recorder Server
In most small to medium-sized (up to several hundred channels) Bulk Recording systems, one of these applications provides the entire recording and replay system (as shown in Introduction on page 16).
In larger systems (where a single physical server is not powerful enough), you should install multiple instances of this application on different physical servers, each providing a subset of the system's overall functionality. The Avaya Contact Recorder can:
● connect to the Avaya Communication Manager Server via Application Enablement Services (AES) and control all voice recordings
● record and store telephone calls via IP
● archive the recordings it makes to one or more local DVD+RW or Blu-ray drives and/or network fileshares
● provide search and replay services to users connecting via their browser or via their telephone
● provide voice recording services to the Quality Monitoring application
● control other Avaya Contact Recorders - known as Slaves
System Overview
20 Avaya Contact Recorder Planning, Installation and Administration Guide
Confidential and Proprietary Information
● be controlled by another Avaya Contact Recorder - i.e. act as a Slave
● act as a warm Standby to an Avaya Contact Recorder Master
● act as a centralized replay server, holding details of recordings made by other Avaya Contact Recorders
Optional Server Applications
Quality Monitoring Application
This application provides the features needed to automate your agent quality assessment process, including:
● Design of evaluation forms
● Various call selection methods
● Screen content recording and storage
● Performance recording and reporting
See Quality Monitoring Administration, Evaluations, Graphic and Reporting, Server Infrastructure, Troubleshooting and Installation Guides for full details of this component and Installing Quality Monitoring on page 89 for how to integrate it into the overall system.
Quality Monitoring,
a. Receives CTI events via Avaya Contact Recorder. These let it determine which calls it needs to record without having its own connection to Communication Manager.
b. Controls a pool of recording ports on the Avaya Contact Recorder. It instructs the Contact Recorder to record the calls it requires. These recordings are copied to the Quality Monitoring server as they are completed. It can also use some of these ports to replay audio to the supervisor's telephone or to monitor recordings as they occur.
Centralized Replay Server(s)
In any system with more than one Avaya Contact Recorder, details of recordings are (by default) uploaded to the Master (and Standby if present). This allows users to search for and replay calls recorded on any of the servers in a single query. On large (>500 channel) systems, or where other types of Verint recorders are included, you should dedicate a server to this search and replay task. This should be another installation of the Avaya Contact Recorder application unless your system is very large (>1000 channels), includes other types of recorders or you are using speech analytics. In these cases, you must install Viewer and may also require an Archive Manager.
Note that the recording system is designed to continue recording regardless of the state of these central servers. This means that the availability of the central applications cannot affect the reliability of the recorders themselves. However, should you wish to deploy
Server components
Issue 4 April, 2010 21
Confidential and Proprietary Information
independent and hence fault tolerant central search and replay servers and/or Archive Managers, this is also supported.
.
External Control
In addition to the data provided by the AES links, you may wish to control and/or tag your recordings with details from other CTI feeds or application interfaces. These may include third party systems and/or your own in-house applications. The recorder supports a wide range of systems and allows them to be connected to your recording system. These include:
● Avaya Interaction Center (AIC)
● Avaya Proactive Contact (formerly Predictive Dialing System, PDS)
Additional Verint Systems applications
As an integral part of Verint Systems' range of recording and analysis products, the following applications can be layered on top of the recording system:
● eQuality Now (agent training tools)

System Overview
22 Avaya Contact Recorder Planning, Installation and Administration Guide
Confidential and Proprietary Information
● Contact Visualizer (advanced recording visualization)
● Speech Analytics Enterprise (requires Viewer and Archive Manager)
End-User tools
Issue 4 April, 2010 23
Confidential and Proprietary Information
End-User tools
To access the recordings held in the system, users have a variety of options.
Quality Monitoring
Supervisors and quality assessors use a browser to evaluate recordings - using both voice and screen content where available. They can assess and review calls with their staff as well as analyze and report on the results of assessments.
Audio is replayed via the desktop PC's soundcard or via the telephone.
Live monitoring of audio and screen content is also supported.
Quality Monitoring Evaluations Guide provides full details of the Quality Monitoring application.
Bulk Search and Replay
Integral Search and Replay
The Avaya Contact Recorder includes a search and replay application within it. This replay mechanism is a very simple and intuitive browser-based interface, requiring the user to access it via Internet Explorer Version 6.0 or higher.
The Search and Replay application is hosted on a web server running on the recorder itself. It uses a local database of recordings to allow users to search for bulk and ad hoc recordings by:
● Call start date/time
● The name(s) and number(s) where provided of any party on the call (including ANI and/or DID where provided by the switch)
● Agent ID and name
● Call duration
● Universal Call Identifier (UCID)
● Service Name and Number (also known as Vector Directory Number, VDN)
● User defined fields supplied by external controllers
System Overview
24 Avaya Contact Recorder Planning, Installation and Administration Guide
Confidential and Proprietary Information
! Important:! Important:Important: Avaya Contact Recorder does not retain those calls recorded for Quality
Monitoring; these use that product's own replay mechanism.
Access restrictions determine which calls individual users are able to replay. Each recording is assigned one or more "owners" at recording time (see Search and Replay Access Rights on page 144 for further details).
The user can play and view details of any call that matches their search criteria and access rights. When a call is played, a graphical representation of the audio level of the call, the audio wave form, is displayed. The audio wave form shows silence and tones, so the user can click beyond irrelevant sections and pinpoint parts of the call that are of interest. See the accompanying User Guide for further details of this application.
Central Search and Replay
Where multiple Avaya Contact Recorders are deployed, an additional server can be nominated as a Central Replay Server. This server is not used for recording but can provide telephony replay ports.
The other recorders upload details of the recordings they have made into this server's database allowing users to search for and replay recordings made on any recorder without having to know which one recorded a particular call.
External Search and Replay
The recorder also supports replay from other applications including Quality Monitoring, Viewer and Contact Visualizer.
Administration Tools
As the suite is designed specifically for Avaya systems, much of the complexity associated with generic recording systems has been removed resulting in a system that is easy to configure and maintain. The recorders are administered via a web interface. The detailed use of this interface is the subject of later Sections in this guide.
Recording Functionality
Issue 4 April, 2010 25
Confidential and Proprietary Information
Recording Functionality
The Avaya Contact Recorder system records telephone calls made on Avaya Communication Manager release 4.0 and above - using analog, digital or IP-based stations. The recorder hosts a bank of IP softphones - each of which provides a recording or replay port. These record calls by conferencing into a live call using either the Service Observe or single-step conferencing features of the switch.
This manual only considers audio recording load. For Screen Content recording, please refer to the Quality Monitoring Server Infrastructure Guide.
The first task in designing any recording system is to define what is to be recorded. This in turn is often driven by the reason for wanting the recordings. As the recorder's ports can also be used for replay, it is important to consider these together before specifying a system. This section introduces the various ways in which recorders' ports can be used but you should refer to Operations on page 117 for detailed functionality and limitations of each mode.
Sampled Recording for Quality Assessment
If the end goal is to record only a sample of calls in order to assess the quality of your interactions with customers, Quality Monitoring can be used alongside the Avaya Contact Recorder. See this product's Administration, Evaluations, Graphic and Reporting, Server Infrastructure, Troubleshooting and Installation Guides to determine how you will use the Quality Monitoring system to control recording.
Quality Recording Channels
From the above manuals, you must determine the number of concurrent audio recording "channels" that will be required on the Avaya Contact Recorder to support your Quality Monitoring requirements.
Quality Replay Channels
Note that you will also need to consider how the Quality Application is to replay calls for supervisors to review and coach their staff. If you choose to replay via their telephones, then you must provide sufficient ports for this. This is in addition to the recording channels. The overall port count required for selective quality recording is therefore the sum of recording and replay requirements.
System Overview
26 Avaya Contact Recorder Planning, Installation and Administration Guide
Confidential and Proprietary Information
Licensing
The Avaya Contact Recorder must be provided with a license key that specifies how many different telephone stations can be recorded by the Quality Monitoring application.
Bulk Recording Modes
If you need to record all of the calls taken by specific stations, agents, skill groups or Vector Directory Numbers (VDNs) then you require Bulk Recording - of which there are three variants.
Conferenced Recording
Rather than dedicating ports to specific stations, a pool of ports can be used in conjunction with an AES TSAPI link to record calls on specific stations, agents, skill groups, VDNs or CoRs. Advanced configuration options let you filter the calls by VDN or Skill Group rather than have to record every call on the nominated addresses.
In this mode, the recorder uses single-step conferencing to connect into the calls to be recorded.
Refer to Conferenced Recording on page 122 for a full description of this mode and how to configure it.
Station Bulk Recording
This recording mode can be used to record all calls occurring at specific stations. Advanced configuration options let you filter the calls by VDN or Skill Group rather than have to record every call on the nominated stations.
This mode uses the switch’s service observe feature and therefore requires a dedicated port per station that is recorded. It is also subject to a number of other limitations and is not recommended for new systems.
Refer to Station Bulk Recording on page 128 for a full description of this mode and how to configure it.
Externally Controlled Recording
More complex recording requirements may be met by customized or specialist applications that interface to other CTI feeds or customers' own applications. Such an application can control ports on the Avaya Contact Recorder, allowing it to record exactly what and when it requires. The application may also "tag" the recordings with additional details such as customer number or account number.
Refer to Integrating with other systems on page 67 for more detail..

Recording Functionality
Issue 4 April, 2010 27
Confidential and Proprietary Information
Which to use?
Conferenced recording is normally the preferred option as it provides most flexibility and most comprehensive tagging of recordings. Externally controlled recording is normally only considered when complex recording rules or additional CTI control is needed.
It is imperative that you review the detailed functionality, limitations and caveats in Station Bulk Recording on page 128 and Conferenced Recording on page 122.
Licensing
The number of concurrent recordings across the whole system is restricted according to the license key entered. (This encompasses all recordings being made except those controlled by Quality Monitoring which are separately licensed).
Ad-hoc or Occasional Recording Modes
Three recording modes are provided for those requiring occasional recording:
On Demand Recording
This mode lets users of any phone on your system dial into or conference in a recording port as and when they want to start recording a call.
One or more "pools" of ports on the recorder can be assigned to this recording mode and accessed via Hunt Group numbers so that callers automatically reach an available port. The recorder automatically answers the incoming call on its port and starts recording.
Refer to On Demand Recording on page 132 for a full description of this mode and how to configure it.
Meeting Recording
A novel use for recording is in taking a detailed log of a meeting, either as an audio record for those attending, or as a way to include non-attendees later. You can use any meeting room or office with a telephone that has a speakerphone or, ideally, conference phone capabilities to record the meeting.
System Overview
28 Avaya Contact Recorder Planning, Installation and Administration Guide
Confidential and Proprietary Information
! Important:! Important:Important: The audio recorded with Meeting Recording is the same as someone dialing
in would hear it on the phone used to record it. Place the phone so it picks up the speech of all participants. They should speak loudly and clearly. Experiment with this recording mode before relying on it to provide full and complete records of your meetings. Avaya cannot be held responsible for the failure to pick up all of the audio intelligibly. Use this recording mode as an aid to note taking, not a replacement for it.
One or more "pools" of ports on the recorder can be assigned to this recording mode and accessed via Hunt Group numbers so that callers automatically reach an available port. The user follows the spoken instructions to start the recording and specify which user(s) can access it.
Refer to Meeting Recording on page 133 for a full description of this mode and how to configure it.
Station Executive Recording
This option lets users of specific phones choose which of their calls are recorded. Unlike the previous two modes, this method records the call from the beginning. Unless the user chooses to keep the recording it is deleted as the call ends (or shortly afterwards according to how the system is configured).
This recording mode is particularly suited to users who occasionally need to record a call, and who might only recognize the need to record after the call is in progress or after it has ended. The classic example of this is in "bomb-threat" or "abusive call" recording. In such cases, it is only once the nature of the call becomes apparent that the agent realizes that he should record the call. The advantage of this recording mode over other recording techniques is that the entire call is being recorded all the time. The whole call can be retained even if the nature of the call and the need to retain it is not recognized until the end of the call or, if the delayed deletion option is enabled, after the call ends.
Refer to Station Executive Recording on page 129 for a full description of this mode and how to configure it.
Scope
Ports assigned to On Demand or Meeting recording
● can be assigned to one or more hunt groups making them easily shared across one or more user populations
● can be used not only by stations on the switch but also from outside the switch if they are made accessible via a DID number.
Station Executive recording ports on the other hand are dedicated to specific stations and can only be used to record those stations that can be service observed.
Recording Functionality
Issue 4 April, 2010 29
Confidential and Proprietary Information
Licensing
Each active recording is counted as part of the overall concurrent bulk recording load. The overall concurrent load is restricted according to the license key entered. Note that a call active on a Station Executive port counts as active even if the recording is subsequently deleted rather than retained.
Replay Options
Soundcard Replay
Many users choose to replay recordings via their browser and the soundcard on their PC. This does not use any ports on the recorder and does not require any additional licensing. See the Quality Monitoring manuals for details of how to use this replay mechanism in conjunction with this application.
Telephone Replay
However, the recorder also supports replay via the user's telephone and this does use a port on the recorder.
Quality Monitoring replay ports form part of the overall pool of ports assigned to Quality Recording.
All other replay applications make use of telephony Replay ports on an Avaya Contact Recorder. Ports configured in this way are compatible with Verint "AudioServer" ports.
Refer to (Telephone) Replay Ports on page 134 for a full description of this mode and how to configure it.
Licensing
Replay channels that form part of the Quality Monitoring port pool are not restricted by a license key.
Telephony replay ports used by all other applications require a replay channel license.
System Overview
30 Avaya Contact Recorder Planning, Installation and Administration Guide
Confidential and Proprietary Information
Live Monitoring
Via Quality Monitoring
Users of Quality Monitoring can listen in to calls in real-time using their telephone. This uses one of the replay ports within the Quality pool. See the Quality Monitoring manuals for details of this live monitoring mechanism.
Manual Service Observe
From Communication Manager 4.0 onwards, it has been possible for two stations to service observe a call. If the Avaya Contact Recorder is recording a call using Service Observe you will still be able to use service observe manually. The exception to this is when an internal call is being recorded at both ends (hence two service observes). You can configure Communication Manager to give priority to the recorder or to manual service observe.
Recording Methods
Issue 4 April, 2010 31
Confidential and Proprietary Information
Recording Methods
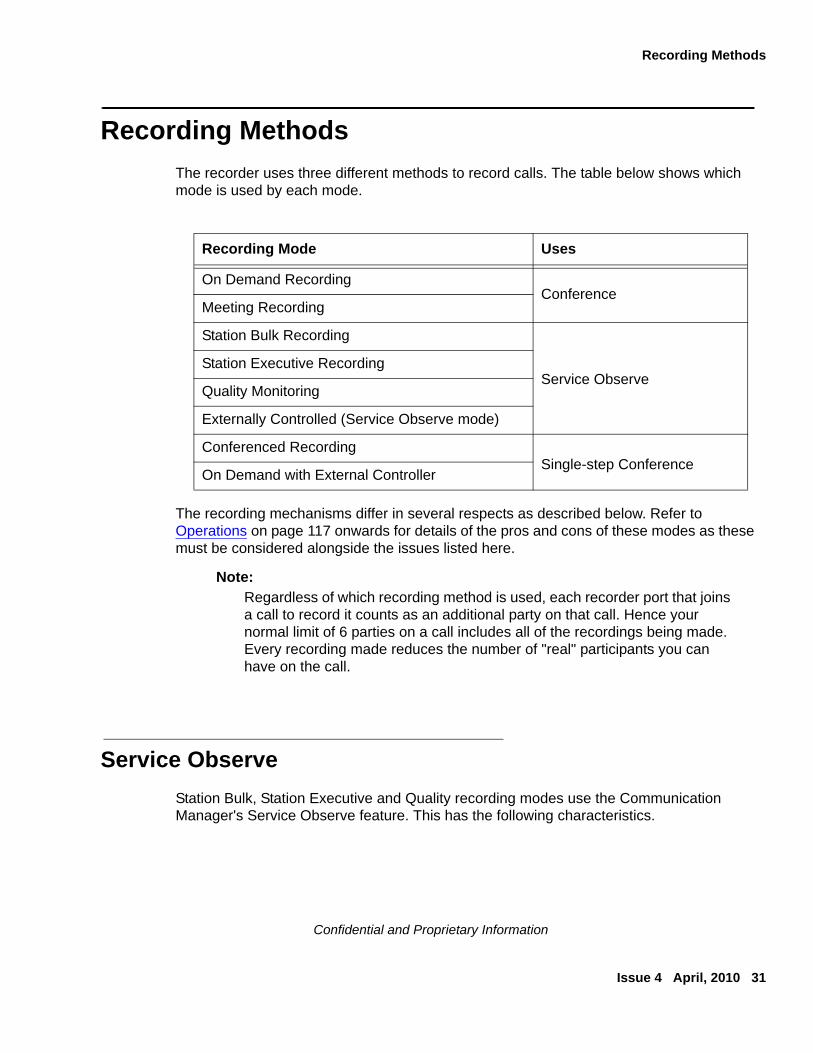
The recorder uses three different methods to record calls. The table below shows which mode is used by each mode.
The recording mechanisms differ in several respects as described below. Refer to Operations on page 117 onwards for details of the pros and cons of these modes as these must be considered alongside the issues listed here.
Note:Note: Regardless of which recording method is used, each recorder port that joins
a call to record it counts as an additional party on that call. Hence your normal limit of 6 parties on a call includes all of the recordings being made. Every recording made reduces the number of "real" participants you can have on the call.
Service Observe
Station Bulk, Station Executive and Quality recording modes use the Communication Manager's Service Observe feature. This has the following characteristics.
Recording Mode Uses
On Demand RecordingConference
Meeting Recording
Station Bulk Recording
Service ObserveStation Executive Recording
Quality Monitoring
Externally Controlled (Service Observe mode)
Conferenced RecordingSingle-step Conference
On Demand with External Controller
System Overview
32 Avaya Contact Recorder Planning, Installation and Administration Guide
Confidential and Proprietary Information
Limited Number of Service Observers per Station
In Avaya Communication Manager 3.x, only one other station can service observe a station at any one time. Therefore:
● a supervisor cannot use Service Observe to monitor stations or calls that are being recorded. They will either fail to observe the call or will block the recorder from recording it. To listen in to calls (in real time) on stations that are being recorded, users must use Quality Monitoring’s Live Monitor feature.
● Quality Monitoring ("selective" mode) uses service observe. If a station is being recorded in another mode using service observe, then Quality Monitoring can only work if the quality and other port recording it are on the same recorder. If you need to perform bulk and quality recording, use a single recorder or, if the load is too much for a single server, you must use a single-step conference mode for the bulk recording.
In Avaya Communication Manager 4.x and above, up to two stations can service observe a given station. However, it is still a good idea to record a station on a single recorder where possible - due to the per call limitations described below.
When a call is service observed more than once, the call direction information provided by DMCC is the same for both observations and is therefore incorrect for one of these.
Limited Number of Service Observers per Call
In Avaya Communication Manager 3.x, if more than one party on a call is being service observed, then only one of the observers will actually receive the audio from the call. The other will be completely unaware that a call is in progress. Therefore:
● A call between a Station Bulk recorded station and a Station Executive recorded station can only be visible to one or other of the two recording ports. Which one depends on which station made the call. If the station executive port initiated the call, it will be deleted unless the user deliberately retained it.
● An attempt to Quality Monitor a station on an internal call will fail if the other station on the call is the one receiving the audio. If you need to quality monitor agents who solely or predominantly take internal calls and are using bulk recording as well, you should use a single-step conference mode in preference.
● If a user service observes a VDN, they will stop any call they hear from being recorded. Use Class of Restriction (COR) settings to prohibit users from observing VDNs that include calls that you are trying to bulk record.
In Avaya Communication Manager 4.x and above, each call can be service observed up to twice. Normal, two-way internal calls can therefore be recorded twice and it is only with three (or more) way calls that the above limitations apply. It is still important to avoid service observing VDNs related to calls that you need to record.
Note that Communication Manager can be configured to give priority to a recorder or to a manual service observe should a third attempt be made to service observe a call.
Recording Methods
Issue 4 April, 2010 33
Confidential and Proprietary Information
When a call is service observed more than once, the call direction information provided by DMCC is the same for both observations and is therefore incorrect for one of these. Also, only one of the agents on the call is reported and hence tagged.
Assign Ports to Stations only (i.e. not Agents, VDNs or Hot-desk stations)
Although Communication Manager can service observe VDNs, agents and hot-desk stations, the recorder only supports service observe of physical station numbers for the following reasons:
● Service observing a VDN only results in one call at a time on that VDN being observed. This is not appropriate for a bulk recording mode.
● Service observing an agent id or hot desk results in failure if that agent is not logged in or the hot-desk is not active. The recorder cannot distinguish between failure due to this reason and other failure modes. It would therefore raise alarms continuously.
Call segmentation
As the recorder port sees the same activity as a real user would do when service observing a station, audio ceases to flow when the station being observed places a call on hold. Placing a call on hold (automatically as part of a transfer/conference setup or deliberately) therefore stops recording. A new recording is started when the call is retrieved from hold. The segments of the call are stored as separate recordings (.wav files) and can be searched and played as two calls.
! Important:! Important:Important: If the call is retrieved from hold by another station, either by means of a
transfer or a "park" operation, the subsequent segment of the call is only recorded if the other station is also being recorded.
The recorder's Search and Replay mechanism treats these segments as two separate calls. However, if you find one call segment, you can easily find the other segments by clicking on the link in the UCID column. Viewer, a separate server replay application, on the other hand, "merges" these call records into one and shows the hold period as silence.
If an external controller is used, it may segment calls at points it chooses.
Bulk Recording requires dedicated port
Any attempt to service observe a station will - on perhaps one in a thousand attempts - fail. While this is not a significant issue for a sampling quality recording system, it is unacceptable for bulk recording. This is why the recorder must dedicate a port to each phone that it bulk records via service observe. By doing so, it can establish service observe as the recorder starts - and retry on the rare occasion that this fails - and then hold the service observe permanently. This provides reliable recording.
System Overview
34 Avaya Contact Recorder Planning, Installation and Administration Guide
Confidential and Proprietary Information
Personal Station Access (PSA)
PSA is not supported for the same reasons that agents cannot be targeted. As the address is not always present, the recorder cannot maintain a service observe on it at all times as is required for bulk recording.
Internal Calls via a VDN do not show who answered - CM 3.1 and earlier
If an agent handling a call dials a VDN to transfer, conference or simply consult on it, the details of the party that answers the call are not visible to a station service observing that call. The call will be tagged with the VDN number dialled but not the agent or station that answered the call. This is corrected in CM3.1 load 632. If using an earlier version than this, consider updating with Patch #11855.
Transfer via Coverage
Calls transferred to a group with coverage (e.g. Coverage Answer Group) and not picked up by the original destination address cannot be observed. To overcome this limitation, use a phantom extension and transfer the call to that rather than directly to a group with coverage.
Bridged Lines
Where bridged line appearances are used on stations being recorded, calls made on the secondary line appearance will be recorded but the details about the call will be limited to the identification of the station being recorded. Only calls made on the primary line appearance will include full call details.
Exclusion
If any party on the call invokes the Exclusion feature, the call cannot be recorded. (Check with Avaya for changes to this from CM 3.1 onwards).
Beep Tone
If you do not need to inject beep tone while recording, use "No Talk" service observe. This option, available from CM 3.1 onwards, does not use up a time-slot. Otherwise you must design for an additional time-slot being used to carry each call that is actually being recorded. If you need to inject beep tone you must use "Talk/Listen" service observe. "Listen Only" service observe should not be used with ACR.
Recording Methods
Issue 4 April, 2010 35
Confidential and Proprietary Information
Single-step Conference
Single-step conferencing as used by Conferenced mode recording and Externally controlled (single-step conference option) has the following issues:
CTI Requirement
When recording in this mode, the recorder uses the AES TSAPI service which must therefore be available and configured.
Timeslots
Single-step conferences do not require an additional timeslot on the switch if beep tone is NOT used.
Call Segmentation
Recordings are broken into separate segments whenever the parties on the call change. The recorder continues to record only so long as the real parties on the call are connected. If the call is on hold, recording stops.
If an external controller is used, it may segment calls at points it chooses.
Bridged Lines not Supported
Because of an inherent limitation in the underlying call/connection model, conferenced recording does not support bridged line appearances. You must not attempt to record bridged lines in this mode.
Beep Tone
If you choose to inject beep tone on a single-step conferenced recording, the recorder becomes a full member of the call rather than a listen-only member and therefore:
● Becomes visible to the agent, who can see that the call is conferenced
● Uses an extra timeslot on the switch
Conference
In some modes a user or an external application will dial a port on the recorder. When this happens, the recorder answers the call and is therefore a normal party on the call.
System Overview
36 Avaya Contact Recorder Planning, Installation and Administration Guide
Confidential and Proprietary Information
Timeslots
As "just another party" on the call, the recorder port will use the single additional timeslot that any other phone would use when added to a call.
Call Segmentation
As the recorder port is a normal party on the call, it is still connected even if one or more other parties on the call places the call on hold. It will receive the same audio that the parties remaining on the call receive. This may include music on hold or silence.
If an external controller is used, it may segment calls at points it chooses.
Miscellaneous
Issue 4 April, 2010 37
Confidential and Proprietary Information
Miscellaneous
Beep Tone
Some states and countries require that both parties on a call be made aware that the call is being recorded. One way to do this is to apply a tone to the line. Note, however, that most telephone users are unaware of the significance of this tone and might, in fact, regard it as a fault. There are more effective means of informing the user that the call is being recorded. For example, you can inform users on advertising and in contract literature or play a recorded announcement before the call is connected. Check the legal position in your jurisdiction and apply the appropriate settings.
See the discussions of how each recording mode works earlier in this chapter to determine whether or not you need to turn on this warning tone within the recorder. In most cases, it is recommended that you set this option to No and use the other mechanisms described there.
International support
The recorder's browser-based Administration and Search/Replay interfaces are provided in several languages. Check with Avaya for availability of specific languages. International support includes:
● Time zone and DST support. All dates and times are stored in the database in Coordinated Universal Time (UTC). However, when you view records using the search and replay application, these are converted to your local time. If you view the records using a database query tool, the times will be shown in the time zone of the client machine, which may be different from the server time. Note that the XML files relating to the recordings include ISO standard timestamps, giving both UTC and offset from Greenwich Mean Time (GMT).
● "Number ranges are stored in the system database in left-to-right format (e.g. 100-200) unless you configure the property "system.forcertl=true" in the properties file. This affects alarms and audit trail entries.
Liability
Liability of Avaya for failure to record any calls is limited under the terms of supply.

System Overview
38 Avaya Contact Recorder Planning, Installation and Administration Guide
Confidential and Proprietary Information
Issue 4 April, 2010 39
Confidential and Proprietary Information
Chapter 2: Planning and Prerequisites
This chapter gives details of the prerequisites for an Avaya Contact Recorder system. You should also review Chapter 6 System Security as some of the optional elements described there may also require additional cost and/or effort.
The main sections in this chapter are:
Introduction on page 40
Audio Format on page 41
Storage Requirements on page 43
Server Platform on page 46
Network Issues on page 51
Licensing on page 52
Avaya system prerequisites on page 54
Topologies on page 62
Integrating with other systems on page 67
Planning and Prerequisites
40 Avaya Contact Recorder Planning, Installation and Administration Guide
Confidential and Proprietary Information
Introduction
Unfortunately, there is no one "right" order in which to plan a system. A number of the requirements and pre-requisites are inter-dependent and it may be necessary to iterate through this section several times, refining your plans each time. This Chapter assumes that you have read the previous one and know the type and quantity of recording and replay that you require - and hence your total license requirements.
This Chapter will now guide you through:
identifying what is to be recorded, the options for doing so and the relevant license requirements for the preferred option
determining the storage needed to hold your recordings
sizing the servers needed for each application
quantifying the network bandwidth needed
You can then determine an appropriate system topology.
Audio Format
Issue 4 April, 2010 41
Confidential and Proprietary Information
Audio Format
In all cases, calls are recorded using resources on the Avaya Communication Manager to conference a recorder port into a live telephone call. One of the benefits of this approach is that the recorder can ask to receive audio in a format that suits it - without impacting the experience of the parties actually speaking on the call.
The recorder can request either G.711 (µ-law), or compressed G.729A data streams. You must choose which is appropriate for your recording needs, network and server sizing.
G.711
If the recorder receives audio in G.711 (µ-law) rather than G.729A, bulk recordings will be normally be compressed by the recorder and stored as G.726 (16kbps) files. (Compression can be disabled by setting cscm.disablecompress=true in the properties file.) Selective Quality recordings controlled by Quality Monitoring will be passed to it unchanged.
Note:Note: When using G.711, the recorder always requests µ-law, never A-law. This
applies to all countries regardless of that country’s national preference.
Therefore, if you select G.711 rather than G.729A the implications are:
For All Recording
Several times more bandwidth will be needed between the media processing resources and the recorder.
Less Avaya media processing resource will be needed.
For Bulk Recording
The capacity of a given server will be about halved
The quality of recordings will be a little lower
The storage space used will be doubled
For Quality Recording
The quality of recordings will be a little higher
The storage space used will be eight times higher (This is for voice recordings. Note that when combined with screen recordings, the overall impact is proportionately less).
Planning and Prerequisites
42 Avaya Contact Recorder Planning, Installation and Administration Guide
Confidential and Proprietary Information
G.729A
Conversely, if receiving G.729A, the recorder will not have to perform any compression tasks - for either bulk or quality recording. The pros and cons are reversed from those shown above.
Therefore, if you select G.729A rather than G.711 the implications are:
For All Recording
A fraction of the bandwidth will be needed between the media processing resources and the recorder.
More Avaya media processing resource will be needed.
For Bulk Recording
the capacity of a given server will be about doubled
the quality of recordings will be a little higher
the storage space used will be halved
For Quality Recording
the quality of recordings will be a little lower
the storage space used will be one eighth (This is for voice recordings. Note that when combined with screen recordings, the overall impact is proportionately less).
Storage Requirements
Issue 4 April, 2010 43
Confidential and Proprietary Information
Storage Requirements
Having determined the type, size and location of your recording capacity, you must now determine how much storage is required within the system. Storage requirements of many terabytes are not uncommon.
Storage is required for:
the operating system and applications installed on each server
the audio content of recordings
the database holding the searchable details of these recordings
In each case you should consider requirements locally at each recorder and centrally.
To do this, you will need to know:
how many recordings will be made on the recording channels already identified (typically expressed in channel hours per day). In other words, how many hours of audio you expect to record on each recorder every day.
how long you wish to retain recordings (typically expressed in days).
the average duration of a call (typically expressed in seconds).
Storage at Each Recorder
In addition to the operating system, installed software and its configuration data, each recorder stores:
details of the recordings it has made in a local database
the recordings it has made as files on its hard disk (except for those controlled by Quality Monitoring which are copied off to that server's storage as the call completes).
In all cases, the system automatically notes the location of the recordings so that when a user wishes to replay a call that is no longer in local online (disk) storage, the application prompts them to insert the appropriate removable media (if any).
Recordings are stored in G.726 compressed form at 16kbps (if received as G.711) or as G.729 files (8kbps) if received as such from the media processing resource on the switch. This allows for high volumes of recordings to be stored on the available disk space.
Avaya strongly recommends RAID arrays or fault tolerant Storage Attached Network (SAN) devices for online storage of recordings on the recorder platform.
The recorder automatically manages the available recording storage space. This is used as a circular buffer providing instant access to the most recent recordings and deleting the oldest, as space is required for new recordings.
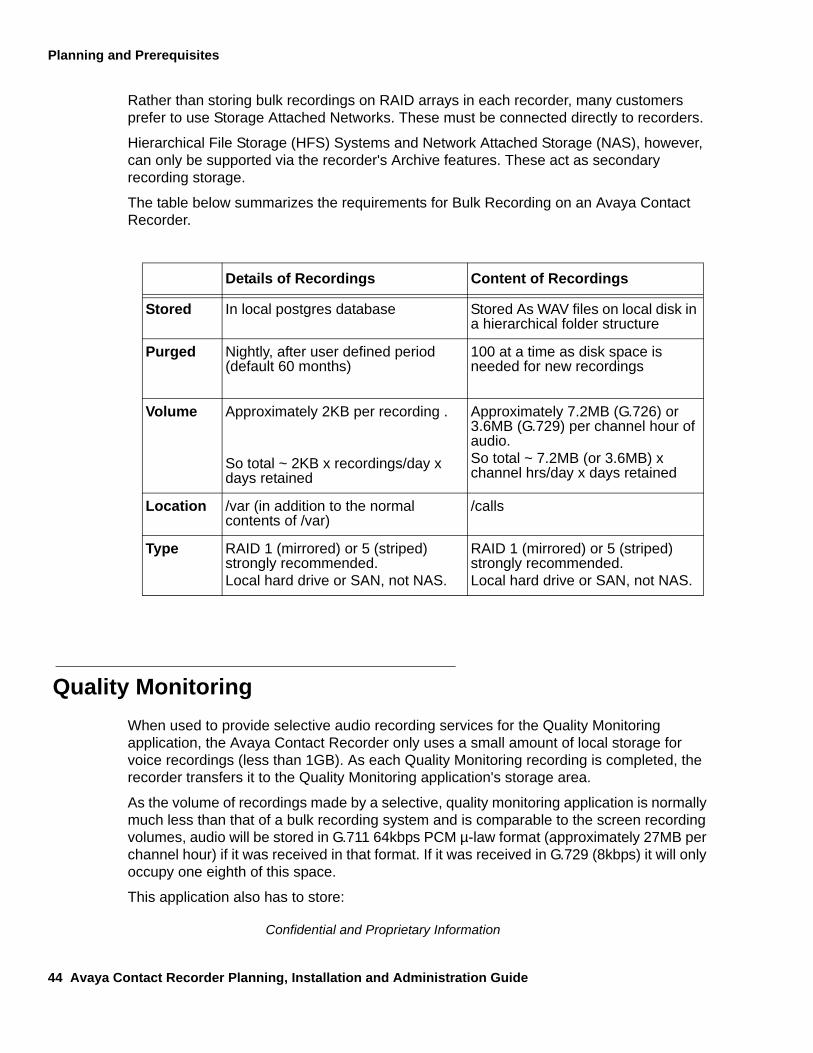
Planning and Prerequisites
44 Avaya Contact Recorder Planning, Installation and Administration Guide
Confidential and Proprietary Information
Rather than storing bulk recordings on RAID arrays in each recorder, many customers prefer to use Storage Attached Networks. These must be connected directly to recorders.
Hierarchical File Storage (HFS) Systems and Network Attached Storage (NAS), however, can only be supported via the recorder's Archive features. These act as secondary recording storage.
The table below summarizes the requirements for Bulk Recording on an Avaya Contact Recorder.
Quality Monitoring
When used to provide selective audio recording services for the Quality Monitoring application, the Avaya Contact Recorder only uses a small amount of local storage for voice recordings (less than 1GB). As each Quality Monitoring recording is completed, the recorder transfers it to the Quality Monitoring application's storage area.
As the volume of recordings made by a selective, quality monitoring application is normally much less than that of a bulk recording system and is comparable to the screen recording volumes, audio will be stored in G.711 64kbps PCM µ-law format (approximately 27MB per channel hour) if it was received in that format. If it was received in G.729 (8kbps) it will only occupy one eighth of this space.
This application also has to store:
Details of Recordings Content of Recordings
Stored In local postgres database Stored As WAV files on local disk in a hierarchical folder structure
Purged Nightly, after user defined period (default 60 months)
100 at a time as disk space is needed for new recordings
Volume Approximately 2KB per recording .
So total ~ 2KB x recordings/day x days retained
Approximately 7.2MB (G.726) or 3.6MB (G.729) per channel hour of audio. So total ~ 7.2MB (or 3.6MB) x channel hrs/day x days retained
Location /var (in addition to the normal contents of /var)
/calls
Type RAID 1 (mirrored) or 5 (striped) strongly recommended.Local hard drive or SAN, not NAS.
RAID 1 (mirrored) or 5 (striped) strongly recommended.Local hard drive or SAN, not NAS.
Storage Requirements
Issue 4 April, 2010 45
Confidential and Proprietary Information
screen content recordings
the agent configuration and evaluation data
See Quality Monitoring Server Infrastructure Guide for further details of how to size the storage requirements for the Quality Monitoring application.
Central Database Storage
You should deploy Viewer or a Central Replay Server for search and replay if any of the following apply:
you have more than one recorder and wish to search and replay from any recorder through a single query.
you anticipate more than five concurrent users of the integral search and replay application on an Avaya Contact Recorder.
If you need to use Archive Manager (for example, to feed a speech analytics system), you must install Viewer rather than a Central Replay Server.
If you have to deploy Viewer, you will need to size the storage it requires in accordance with Viewer Installation Guide to hold the call details from all the recorders that are contributing to it. For a Central Replay Server, follow the guidance above to size the storage needed for the call details using the total call volumes across all recorders that are feeding into the Central Replay Server.
Archive Call Storage
Where you wish to retain calls for longer than it takes to fill the hard disk storage on a recorder, two options are available:
connect a DVD+RW or Blu-ray drive to the recorder. All recordings made on the recorder will automatically be archived to the removable media on this (single) drive. This requires only 1GB of buffer space on the recorder. Recorders that capture more than 4GB per day should use Blu-ray.
provide one or more fileshares onto which the recorders can archive their recordings.
Backup Storage
See Backup/Restore on page 150 for a discussion of Backup and Restore options. You should determine whether additional storage space is required in your corporate backup system to accommodate the new recording system.
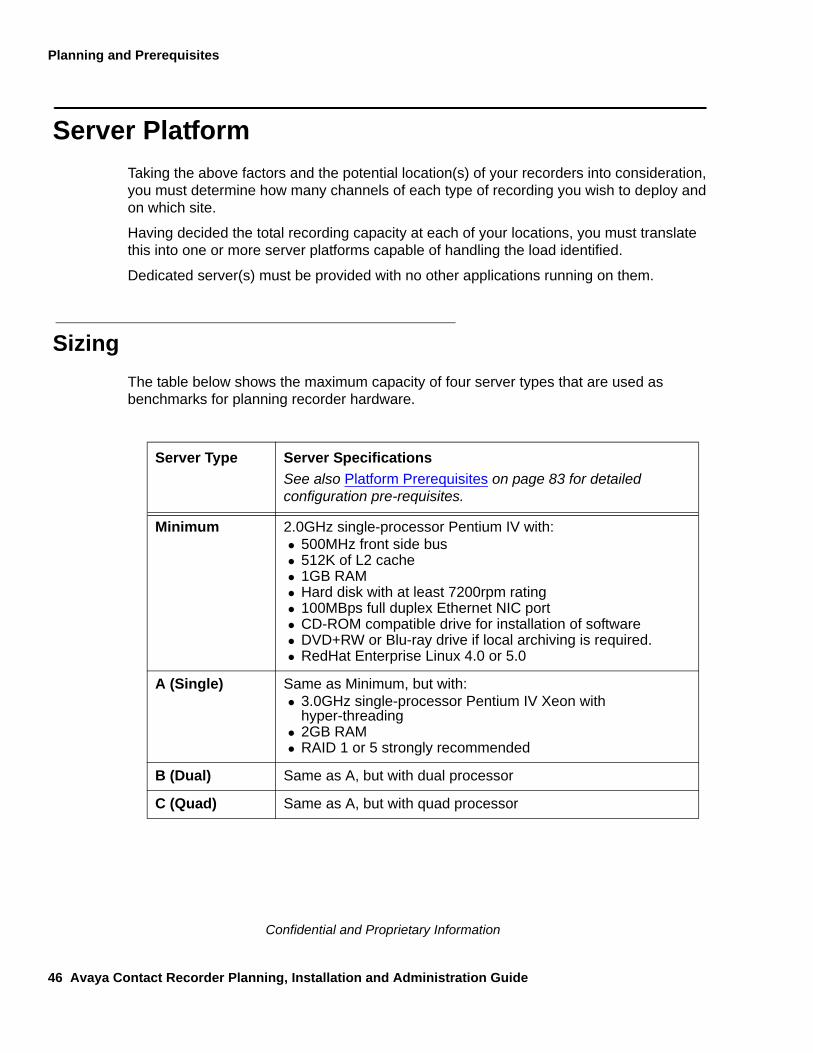
Planning and Prerequisites
46 Avaya Contact Recorder Planning, Installation and Administration Guide
Confidential and Proprietary Information
Server Platform
Taking the above factors and the potential location(s) of your recorders into consideration, you must determine how many channels of each type of recording you wish to deploy and on which site.
Having decided the total recording capacity at each of your locations, you must translate this into one or more server platforms capable of handling the load identified.
Dedicated server(s) must be provided with no other applications running on them.
Sizing
The table below shows the maximum capacity of four server types that are used as benchmarks for planning recorder hardware.
Server Type Server Specifications
See also Platform Prerequisites on page 83 for detailed configuration pre-requisites.
Minimum 2.0GHz single-processor Pentium IV with: 500MHz front side bus 512K of L2 cache 1GB RAM Hard disk with at least 7200rpm rating 100MBps full duplex Ethernet NIC port CD-ROM compatible drive for installation of software DVD+RW or Blu-ray drive if local archiving is required. RedHat Enterprise Linux 4.0 or 5.0
A (Single) Same as Minimum, but with: 3.0GHz single-processor Pentium IV Xeon with
hyper-threading 2GB RAM RAID 1 or 5 strongly recommended
B (Dual) Same as A, but with dual processor
C (Quad) Same as A, but with quad processor
Server Platform
Issue 4 April, 2010 47
Confidential and Proprietary Information
Recorder
The following table shows the maximum channel counts supported for the above servers. This table takes the following factors into account:
Recording G.711 calls and compressing these to G.726 loads the server more heavily than receiving and storing G.729A calls.
The CTI feed required for Conferenced mode increases the load on the server
Using recorder ports for replay via the telephone not only loads the recorder but these ports are more susceptible to packet jitter and therefore the recorder cannot be loaded as heavily when using these modes.
Using different encryption modes further reduces the capacity of the server. The two different encryption schemes are labeled as follows:
EMS - Encrypted Media Streams - Secure RTP encryption of the media streams
KMS - RSA/KMS encryption of the audio files stored to disk.

Planning and Prerequisites
48 Avaya Contact Recorder Planning, Installation and Administration Guide
Confidential and Proprietary Information
Replay Load
When using Replay Ports there are additional considerations.
The above sizing assumes a moderate replay load of up to 5 concurrent replays. If using telephone replay, up to 8 ports can be supported (of which rarely will more than 5 actually be playing concurrently) without compromising these loading limits.
To support up to 10 concurrent replays, increase the server specification one level (for example, use quad server instead of dual).
For higher loads, separate replay onto a dedicated Central Replay server.
Maximum Channel Count
G.711 from Communication Manager
G.729A from Communication Manager
No Telephone Replay
With Telephone Replay
No Telephone Replay
With Telephone Replay
Server Mode Conf Others Conf Others Conf Others Conf Others
Dual None 350 450 300 375 500 650 450 550
KMS 275 350 250 300 400 500 350 450
Quad None 480 650 400 500 700 990 550 700
KMS 400 550 340 425 600 840 450 600
NOTES
The capacity of a Minimum specification server is approximately 25% of a Dual server.The capacity of a Single Xeon server is approximately 50% of a Dual server.Secure RTP (EMS) further reduces capacities to 90% of the stated figures.Example: Capacity of a Single Xeon with EMS and KMS in Conferenced, G.729 without replay is 225 (= 500 x 50% x 90%)
Conf = Conferenced mode recording ports.Others = All other modes.
Sizings assume an 8 hour working day. For 24 x 7 running, provide one server level higher.Sizings assume moderate replay load. See below for further details.Sizings assume an average of a three minute call handle time.
Server Platform
Issue 4 April, 2010 49
Confidential and Proprietary Information
Central Replay Server
Use server type:
B for a Central Replay Server supporting up to 1000 recording channels on the recorders feeding it and up to 40 telephone replay ports.
Consult Avaya in-region sales for larger scale topologies.
DVD+RW / Blu-ray Drive
A wide range of DVD drives has been used successfully and Avaya is not aware of any specific model limitations at this time. Only single-layer 4.7GB DVD+RW or BD-R Write-Once Blu-ray media are supported.
Note:Note: Most drives are advertised as supporting a wide range of subtly different
media types (e.g. DVD+R, DVD-R, DVD+RW, DVD-RW, single and double layer etc.). Regardless of which media the drive supports, the recorder ONLY supports writing of DVD+RW single layer and BD-R single layer Blu-ray media. You must confirm that the drive supports at least one of these two media types, that it works under the version of operating system you are using and that you only insert this type of media.
RedHat 5
RedHat Enterprise Linux 5 incorporates new features as part of it’s Hardware Abstraction Layer. You need additional steps to turn off the HAL’s media detection service, which interferes with the archiver.
To disable the media detection service follow these steps:
1. Execute the "lshal" command and direct its output to a file
lshal > hal.txt
2. Open the created file and look for the string storage.drive_type. It will list all devices, local and external, so you will find the floppy, cdrom etc.
Planning and Prerequisites
50 Avaya Contact Recorder Planning, Installation and Administration Guide
Confidential and Proprietary Information
3. Locate your device. It would be either cdrom, cdrom1..etc, or dvd.
The adjacent lines for storage model and vendor will contain specific details regarding the device, for example:
storage.serial = 'HL-DT-ST_DVDRAM_GSA-E50L_P01070913222527' (string)
storage.vendor = 'HL-DT-ST' (string)
storage.model = 'DVDRAM GSA-E50L' (string)
storage.drive_type = 'cdrom' (string)
4. Scroll up until you find the line starting udi =
The udi is likely to be in the form
/org/freedesktop/Hal/devices/storage_serial_vendor_model_serialnumber
For example:
Udi='/org/freedesktop/Hal/devices/storage_serial_HL_DT_ST_DVDRAM_GSA_E50L_P01070913222527'
5. Test the value of the media_check_enabled flag using the hal-get-property command. Substitute your actual UDI into the commands:
hal-get-property --udi /org/freedesktop/Hal/....... --key storage.media_check_enabled
the result is likely to be "true" - it needs to be "false"
6. Set it to false using hal-set-property command:
hal-set-property --udi /org/freedesktop/Hal/....... --key storage.media_check_enabled --bool false
7. Re-check that the value is now "false" using the command in step 5.
8. Add the command from step 6 into the file /etc/rc.local (This will run the command automatically for you every time the machine reboots.)
9. To find the soft link created for the device return to the text file, and look for the value for "block.device" in the Device's settings. It will look something like this:
block.device = '/dev/scd0' (string)
10. Enter the location in the recorder under Operations > Archive > Add DVD Drive > Drive path(s).
Network Issues
Issue 4 April, 2010 51
Confidential and Proprietary Information
Network Issues
In planning the network that will support your Avaya Contact Recorder system, you must consider:
the additional load imposed on the network
the IP ports used - so that firewalls can be configured appropriately
Load
You must design your network topology to accommodate the additional traffic created by the recording system. Each active recording port places the same load on the network as an IP phone carrying the same call. Note that the recorder uses a 60ms packet interval, which significantly reduces the total network load.
Ports Used
The components of the system use a number of IP ports to communicate:
between each other
with various Avaya Communication Manager components
with end-users and administrators
Recorder Interfaces on page 207 provides a diagram and table listing all of the interfaces to and from the Avaya Contact Recorder software. Your network and firewalls must be configured to permit traffic to pass over these links.
Network Address Translation Routing
The IP address of an Avaya Contact Recorder is sent to the AE server as part of the softphone registration. It is therefore essential that when the media processing resources transmit to this address, the packets are routed correctly to the recorder. The recorder must therefore be visible to the media processing resources on the IP address that it uses itself. Additionally, if the recorder has more than one NIC card and these are not "teamed" or "bonded" into a single address, it is imperative to ensure that all VoIP packets are transmitted over the same NIC card (i.e. the network route to all Media Processors must be the same).
Planning and Prerequisites
52 Avaya Contact Recorder Planning, Installation and Administration Guide
Confidential and Proprietary Information
Licensing
From Version 10.0 onwards, a license key is only needed for each recording system. This may be a "standalone" recorder or any number of slaves and/or standby recorders connected to a Master recorder. Slaves and standbies are controlled by the Master and do not require their own license key. Central Replay Servers require a license key each.
The license key determines:
Concurrent Bulk Recording Limit
The maximum concurrent number of Bulk Recordings that can occur in the system as a whole.
A call being recorded in Station Executive mode is still being recorded - and hence counts as 1 recording channel - even if it is subsequently deleted rather than retained.
All recording modes except Quality Monitoring are therefore controlled by this license.
Where a recording system includes multiple servers (master plus standby and/or slaves) the limit is applied across all of these recorders.
Quality Monitoring Seat Limit
The license determines how many different stations can be recorded by the Quality Monitoring application. This is not a concurrent limit. Each station that has been recorded for Quality monitoring counts against this license.
Telephone Replay Channel Count
The license determines how many recorder channels can be assigned to telephone replay. This does NOT include any that are under the control of the Quality Monitoring application.
Dialer Integration
The license key will enable or disable integration to predictive dialers using the recorder's integral support for these. It is not required where integration is via a separate (and hence separately licensed) controller.
Licensing
Issue 4 April, 2010 53
Confidential and Proprietary Information
Timed Trials
Avaya can, at its discretion, issue an activation key which includes an expiration date. This allows for timed trials of any combination of features and capacity. As the expiration date is fixed within the license, the server will stop operating at that date regardless of when you enter the license key.
To extend a timed trial of to upgrade to a full license, contact Avaya for an updated license activation key.
A five day trial license is available automatically from the license key entry page.
! CAUTION:
CAUTION: The five day trial license must not be used for production recording. When a full license is installed, any trial recordings become unplayable

Planning and Prerequisites
54 Avaya Contact Recorder Planning, Installation and Administration Guide
Confidential and Proprietary Information
Avaya system prerequisites
To use the Avaya Contact Recorder system you will need to ensure that your Avaya system meets the following requirements. This section discusses the various hardware, software and configuration requirements.
Communication Manager
Avaya Contact Recorder requires AE Services and hence is only supported on the models and versions of Communication Manager that support this platform.
Model
The Avaya media server running Communication Manager must be an S8xxx system (currently S8300 through S8720).
Station Count
Each port on a recorder is an additional IP phone on the switch. Do not exceed the total station count for the switch in question.
Loading
Each recording adds as much load to a switch as a normal call. Hence you can only record 100% of calls if your switch is running at no more than 50% of its design load. For example, S8700 switches running at up to 20,000 BHCA (complex call center call types) can have all calls recorded. Higher loads would require an S8710 or S8720.
Software Version
Avaya Contact Recorder requires one of the following:
CM 4.0 - CM 6.0
Please check on http://support.avaya.com for more recent loads.
Gateway Resources
These house the media switching components of the Avaya system. You must ensure that the system has, or is expanded to have sufficient:
Avaya system prerequisites
Issue 4 April, 2010 55
Confidential and Proprietary Information
Card Slots for the C-LANs and Media Processing Resources described below
Time-slots for the original calls and, where needed, the recording channels.
Card Slots
Each C-LAN and Media Processing card must be located in the appropriate gateway and therefore in an available card slot alongside the existing cards.
Time-slots
The recorder conferences into calls in order to record them - using Single-step conference (conferenced mode only) or service observe.
ANY recording in which the recorder is injecting beep-tone will require one additional time-slot per concurrent recording.
With Service Observe modes, use the "No-talk" option (if your switch supports it) in preference to the "Listen-only" variant. The latter requires an additional time-slot per concurrent recording - even if you do not inject beep tone.
Where additional timeslots are needed, the total timeslot count must not exceed the maximum available on that port network (484). Therefore, for a 100% recorded system, using service observe on a switch that does not support "No-talk" observe, or beep tone injection do not equip any port network with more than:
6 x T1s (=144 calls, 432 timeslots)
or
5 x E1s (=150 calls, 450 timeslots)
These guidelines allow for reasonable additional timeslot usage for conferences with other port networks, shared tones and so on.
Rebalance port networks or add new ones to reduce the timeslot requirement on each to this level.
AE Services
Each port on an Avaya Contact Recorder uses a DMCC softphone. The recorder also makes use of TSAPI services. If you wish to configure recording of stations according to the CoR of the station, the recorder will also use the SMS Web Service to determine which CoR each station uses.
These are all provided by Avaya's AE Services platform.
Planning and Prerequisites
56 Avaya Contact Recorder Planning, Installation and Administration Guide
Confidential and Proprietary Information
Loading
Note:Note: To avoid overloading an AE Server, do not attempt to record more than
20,000 calls per hour through each AE Server. (20,000 BHCA).
Note:Note: You must not use more than 1,000 softphones (recorder ports) through a
single AE Server.
If several small recorders are used, you may connect them to a shared AE Server, but only if the total load on the AE Server does not exceed this figure. If the load imposed by a single recorder exceeds this figure, you must split the load across multiple smaller recorders, spreading the load across multiple AE Servers.
Multiple AE Servers
Most Communication Managers can support up to 15 AE Servers but this is a total count - not just those associated with recording. You may have othe AE Servers associated with other CTI applications.
Location
In a multi-site system, you should always aim to install an AE server on the same site as the recorder(s) that is (are) using it. This minimizes the chance of system failure due to loss of connectivity between recorder and switching system.
Vintage
Avaya Contact Recorder 10.0 requires AE Services 4.2.2 or above. Ensure you are running the latest recommended load of AE Services.
Expansion Interface Boards (TN570)
All Expansion Interface Boards must be TN570C Vintage 3 or later.
C-LAN
C-LANs (TN799 DP) are used for two purposes:
CTI information is passed through them
DMCC softphones register through them.
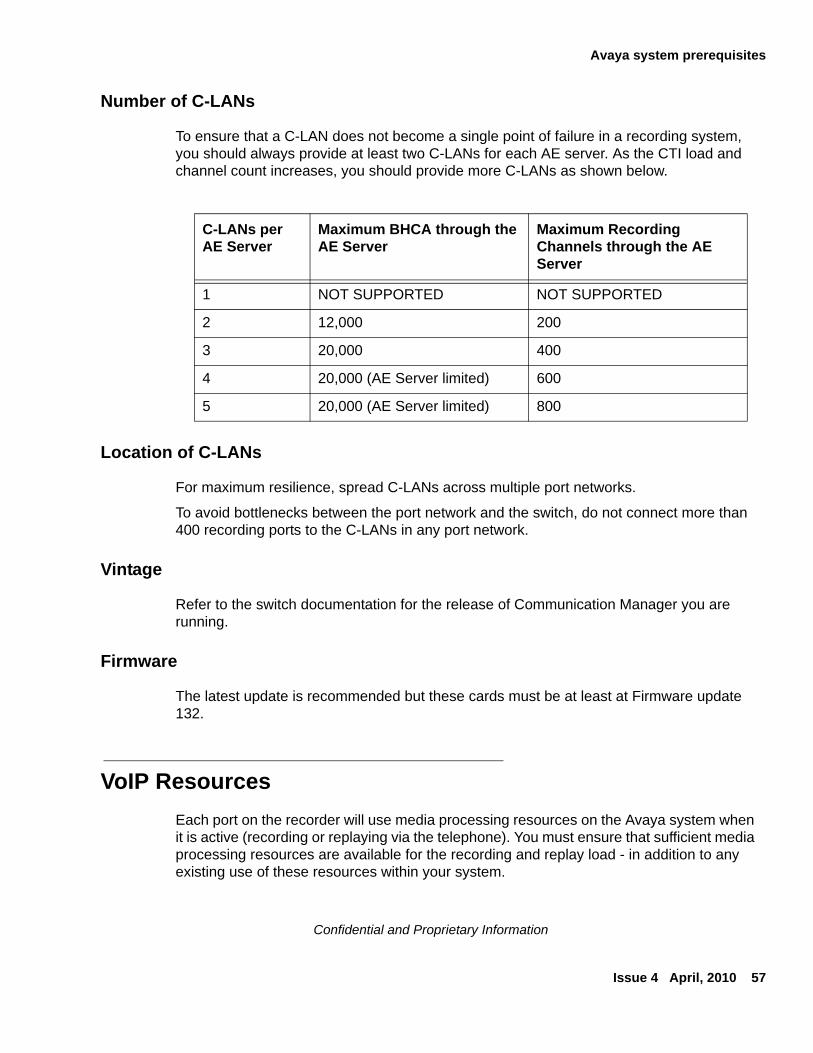
Avaya system prerequisites
Issue 4 April, 2010 57
Confidential and Proprietary Information
Number of C-LANs
To ensure that a C-LAN does not become a single point of failure in a recording system, you should always provide at least two C-LANs for each AE server. As the CTI load and channel count increases, you should provide more C-LANs as shown below.
Location of C-LANs
For maximum resilience, spread C-LANs across multiple port networks.
To avoid bottlenecks between the port network and the switch, do not connect more than 400 recording ports to the C-LANs in any port network.
Vintage
Refer to the switch documentation for the release of Communication Manager you are running.
Firmware
The latest update is recommended but these cards must be at least at Firmware update 132.
VoIP Resources
Each port on the recorder will use media processing resources on the Avaya system when it is active (recording or replaying via the telephone). You must ensure that sufficient media processing resources are available for the recording and replay load - in addition to any existing use of these resources within your system.
C-LANs per AE Server
Maximum BHCA through the AE Server
Maximum Recording Channels through the AE Server
1 NOT SUPPORTED NOT SUPPORTED
2 12,000 200
3 20,000 400
4 20,000 (AE Server limited) 600
5 20,000 (AE Server limited) 800
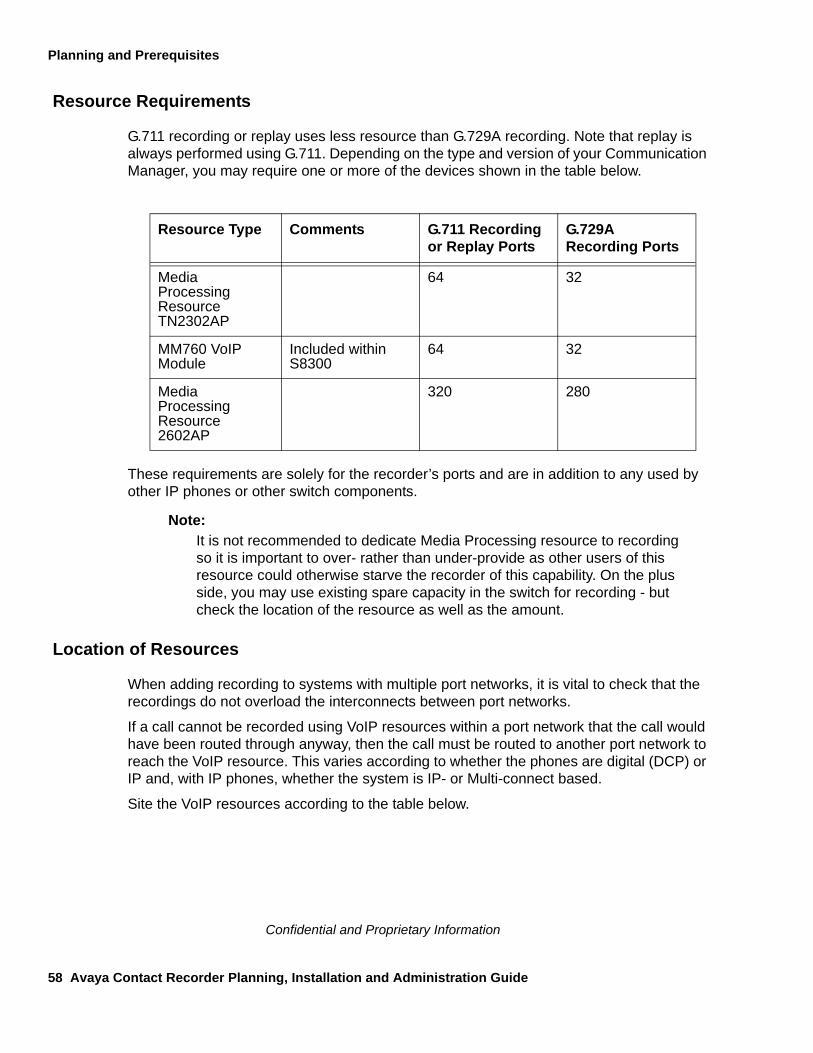
Planning and Prerequisites
58 Avaya Contact Recorder Planning, Installation and Administration Guide
Confidential and Proprietary Information
Resource Requirements
G.711 recording or replay uses less resource than G.729A recording. Note that replay is always performed using G.711. Depending on the type and version of your Communication Manager, you may require one or more of the devices shown in the table below.
These requirements are solely for the recorder’s ports and are in addition to any used by other IP phones or other switch components.
Note:Note: It is not recommended to dedicate Media Processing resource to recording
so it is important to over- rather than under-provide as other users of this resource could otherwise starve the recorder of this capability. On the plus side, you may use existing spare capacity in the switch for recording - but check the location of the resource as well as the amount.
Location of Resources
When adding recording to systems with multiple port networks, it is vital to check that the recordings do not overload the interconnects between port networks.
If a call cannot be recorded using VoIP resources within a port network that the call would have been routed through anyway, then the call must be routed to another port network to reach the VoIP resource. This varies according to whether the phones are digital (DCP) or IP and, with IP phones, whether the system is IP- or Multi-connect based.
Site the VoIP resources according to the table below.
Resource Type Comments G.711 Recording or Replay Ports
G.729A Recording Ports
Media Processing Resource TN2302AP
64 32
MM760 VoIP Module
Included within S8300
64 32
Media Processing Resource 2602AP
320 280
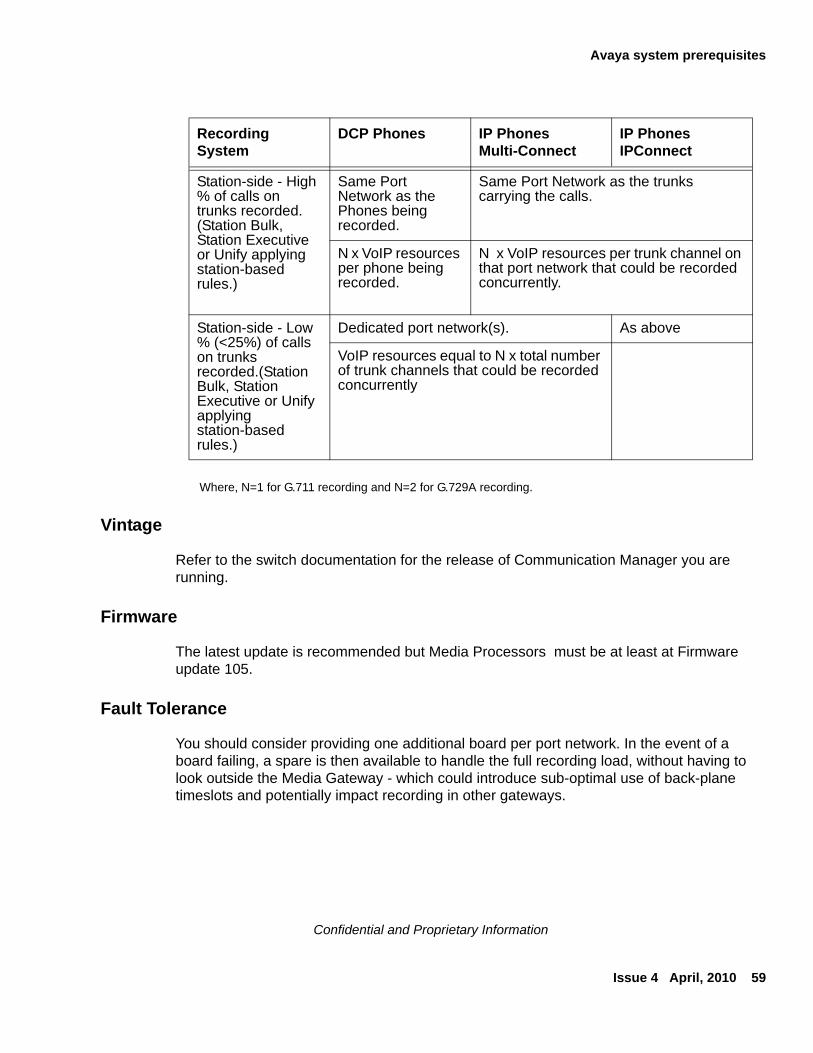
Avaya system prerequisites
Issue 4 April, 2010 59
Confidential and Proprietary Information
Where, N=1 for G.711 recording and N=2 for G.729A recording.
Vintage
Refer to the switch documentation for the release of Communication Manager you are running.
Firmware
The latest update is recommended but Media Processors must be at least at Firmware update 105.
Fault Tolerance
You should consider providing one additional board per port network. In the event of a board failing, a spare is then available to handle the full recording load, without having to look outside the Media Gateway - which could introduce sub-optimal use of back-plane timeslots and potentially impact recording in other gateways.
Recording System
DCP Phones IP PhonesMulti-Connect
IP PhonesIPConnect
Station-side - High % of calls on trunks recorded. (Station Bulk, Station Executive or Unify applying station-based rules.)
Same Port Network as the Phones being recorded.
Same Port Network as the trunks carrying the calls.
N x VoIP resources per phone being recorded.
N x VoIP resources per trunk channel on that port network that could be recorded concurrently.
Station-side - Low % (<25%) of calls on trunks recorded.(Station Bulk, Station Executive or Unify applying station-based rules.)
Dedicated port network(s). As above
VoIP resources equal to N x total number of trunk channels that could be recorded concurrently
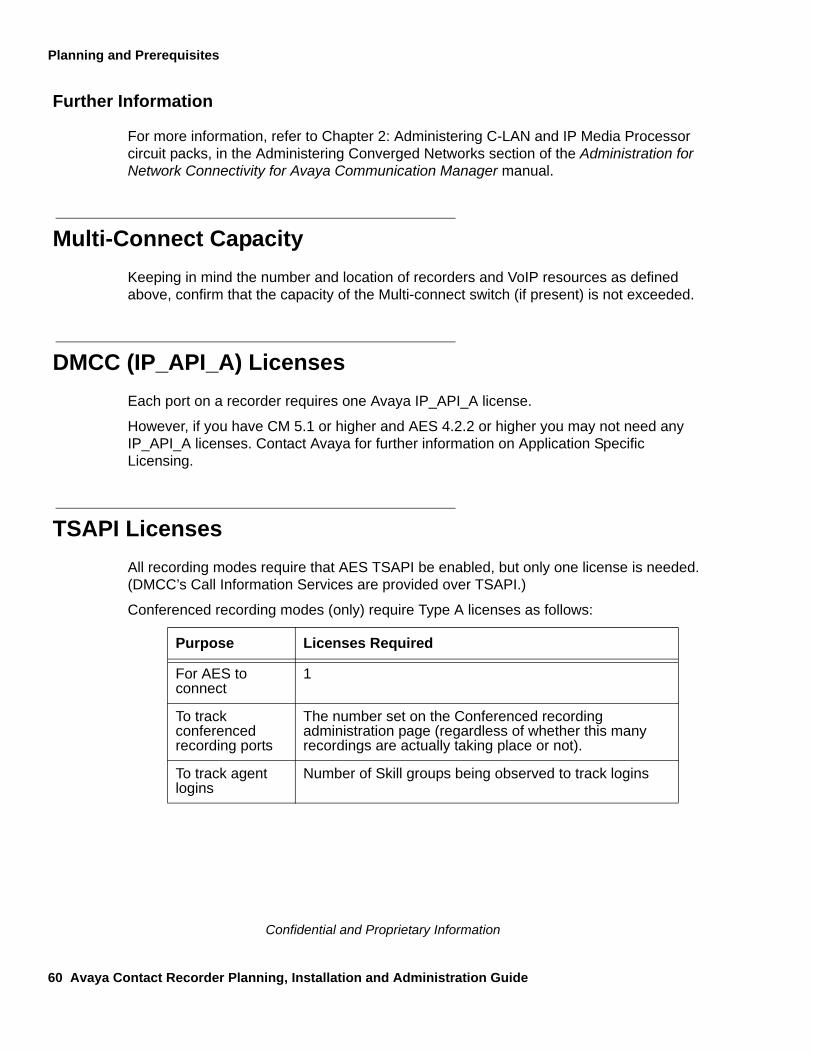
Planning and Prerequisites
60 Avaya Contact Recorder Planning, Installation and Administration Guide
Confidential and Proprietary Information
Further Information
For more information, refer to Chapter 2: Administering C-LAN and IP Media Processor circuit packs, in the Administering Converged Networks section of the Administration for Network Connectivity for Avaya Communication Manager manual.
Multi-Connect Capacity
Keeping in mind the number and location of recorders and VoIP resources as defined above, confirm that the capacity of the Multi-connect switch (if present) is not exceeded.
DMCC (IP_API_A) Licenses
Each port on a recorder requires one Avaya IP_API_A license.
However, if you have CM 5.1 or higher and AES 4.2.2 or higher you may not need any IP_API_A licenses. Contact Avaya for further information on Application Specific Licensing.
TSAPI Licenses
All recording modes require that AES TSAPI be enabled, but only one license is needed. (DMCC’s Call Information Services are provided over TSAPI.)
Conferenced recording modes (only) require Type A licenses as follows:
Purpose Licenses Required
For AES to connect
1
To track conferenced recording ports
The number set on the Conferenced recording administration page (regardless of whether this many recordings are actually taking place or not).
To track agent logins
Number of Skill groups being observed to track logins
Avaya system prerequisites
Issue 4 April, 2010 61
Confidential and Proprietary Information
However, if you have CM 5.1 or higher and AES 4.2.2 or higher you may not need any TSAPI licenses. Contact Avaya for further information on Application Specific Licensing.
VoIP Network Design
The recorder hosts the equivalent of 1 x Avaya 4624 IP Phone per port - whether used for recording or replay. You must therefore design the connectivity between it and the rest of the Avaya switch infrastructure as if there were a bank of this many IP phones at the location of the recorder. Follow Avaya's network design guidelines for this number of IP softphones operating in either G.711 or G.729A mode, but with 60ms packet intervals.
If the bandwidth between recorder and the media processing resources it uses is less than LAN speeds (100Mbps full duplex) then you should use G.729A recording only.
To observe stations currently of interest
If recording specific Stations
If recording specific agents
If recording specific skill groups
If recording specific VDNs
Number of stations to be recorded
Maximum number of these agents logged in concurrently
Maximum number of these agents logged in concurrently
0
Purpose Licenses Required
Planning and Prerequisites
62 Avaya Contact Recorder Planning, Installation and Administration Guide
Confidential and Proprietary Information
Topologies
This document has so far discussed functionality in terms of "applications" without being specific as to the physical location of these. As the individual components of the recording system interconnect using IP-based mechanisms, you may distribute the components across your Enterprise's network in a wide range of topologies.
In small systems, a single server can perform recording, storage and retrieval but in larger systems, you can separate these tasks onto different servers in a variety of ways as discussed below. A number of the basic topologies have already been shown in the diagrams of Recording Methods on page 31. The following paragraphs define the rules under which each of these basic topologies can be used and introduce the more advanced topologies required for larger and more fault tolerant systems.
Bulk Recording System
At its simplest level, an Avaya Contact Recorder system consists of a single linux server running the Avaya Contact Recorder software and configured as a Master. This application provides:
system administration functions via a browser
voice recording of Avaya phonesets using DMCC IP softphones
integration to the Avaya Communication Manager via Application Enablement Services (AES) for real-time control and tagging of recordings
integral search and replay capabilities.
See the diagram in Introduction on page 16 for this basic Bulk Recording Topology
For most small to medium sized bulk recording requirements, this single server is all that is required.
Quality Monitoring (only) System
When used for sampled Quality Monitoring, an additional software application, Quality Monitoring, is required.
While the underlying Avaya Contact Recorder provides the voice recording capabilities of the overall system, this optional application adds:
evaluation form design
various call selection methods
Topologies
Issue 4 April, 2010 63
Confidential and Proprietary Information
screen content recording and storage
agent performance recording and reporting
Bulk Recording + Quality Monitoring System
Bulk recording and Quality recording can be combined on a single Avaya Contact Recorder.
On such a system, the quality application chooses to record specific calls. These recordings are made in addition to the bulk recordings and the resultant files are copied across to the Quality Monitoring application's file share as each recording ends. If the bulk recordings are being made using Service Observe, the Quality recordings are "split" off from these within the recorder - so as NOT to load the Avaya system any more. If, however, the bulk recordings are made using conference methods, the selective quality recordings (which always use service observe) will also load the Avaya switch.
Large Bulk Recording Systems
Where your recording load exceeds the capacity of a single server, or where a distributed topology is more appropriate, you may deploy multiple recorders - in one of two ways.
Partitioned Systems
If your recording requirements can be completely separated, you can deploy multiple independent recorders, each unaware of the others. This is appropriate if you are using:
Station Bulk mode
Station Executive mode.
Master/Slave Recorders
Where you are using Conferenced mode to record on the basis of Station, CoR, Agent ID, Skill hunt group or VDN, there must be a single recorder in charge of all recordings.
To support large systems, you can split the control of recording from the actual recording of the audio stream.
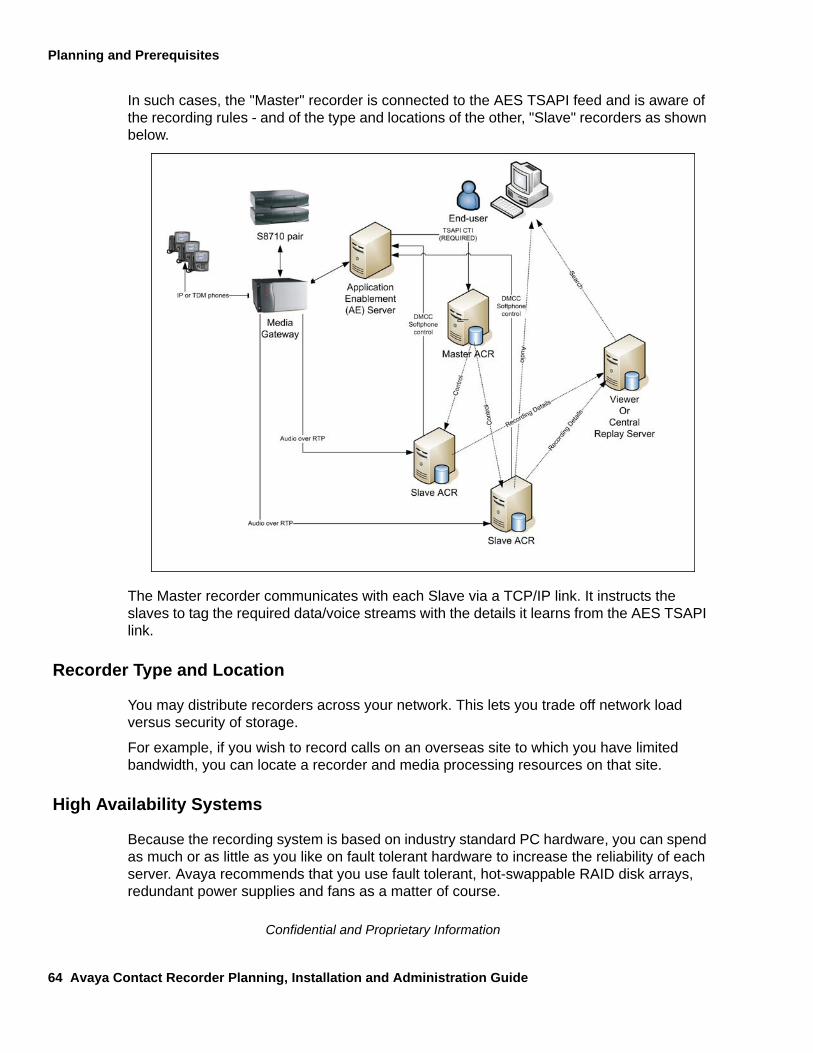
Planning and Prerequisites
64 Avaya Contact Recorder Planning, Installation and Administration Guide
Confidential and Proprietary Information
In such cases, the "Master" recorder is connected to the AES TSAPI feed and is aware of the recording rules - and of the type and locations of the other, "Slave" recorders as shown below.
The Master recorder communicates with each Slave via a TCP/IP link. It instructs the slaves to tag the required data/voice streams with the details it learns from the AES TSAPI link.
Recorder Type and Location
You may distribute recorders across your network. This lets you trade off network load versus security of storage.
For example, if you wish to record calls on an overseas site to which you have limited bandwidth, you can locate a recorder and media processing resources on that site.
High Availability Systems
Because the recording system is based on industry standard PC hardware, you can spend as much or as little as you like on fault tolerant hardware to increase the reliability of each server. Avaya recommends that you use fault tolerant, hot-swappable RAID disk arrays, redundant power supplies and fans as a matter of course.
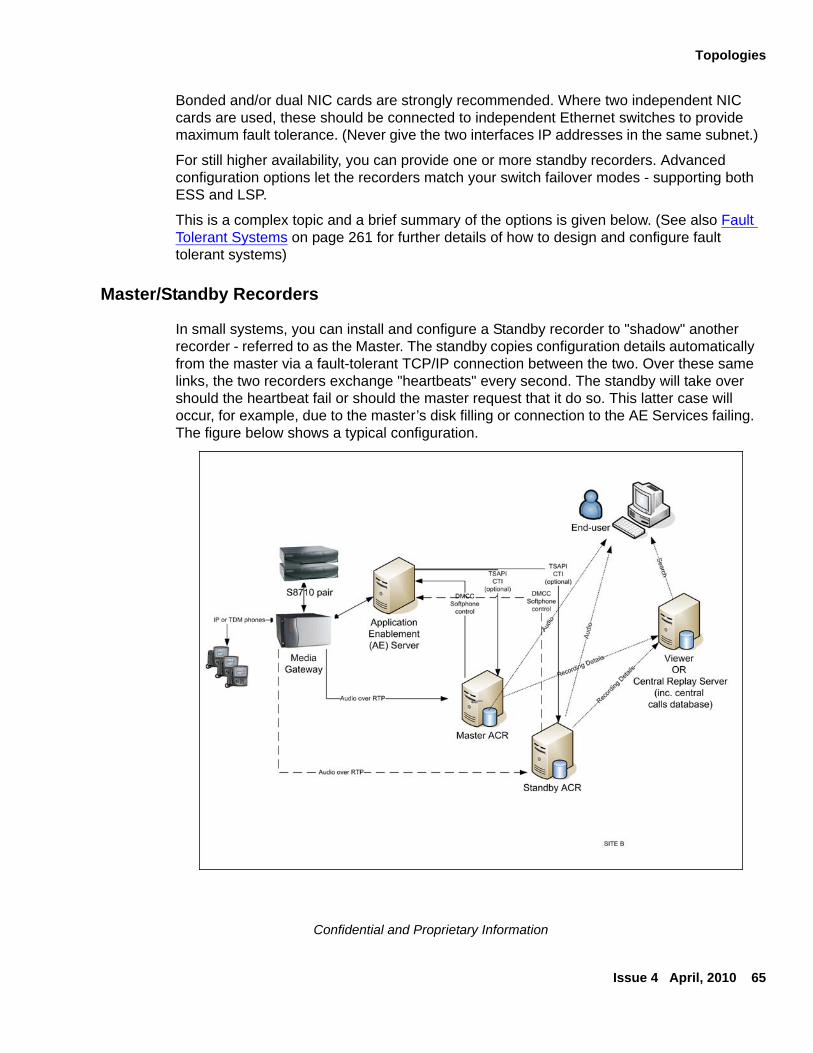
Topologies
Issue 4 April, 2010 65
Confidential and Proprietary Information
Bonded and/or dual NIC cards are strongly recommended. Where two independent NIC cards are used, these should be connected to independent Ethernet switches to provide maximum fault tolerance. (Never give the two interfaces IP addresses in the same subnet.)
For still higher availability, you can provide one or more standby recorders. Advanced configuration options let the recorders match your switch failover modes - supporting both ESS and LSP.
This is a complex topic and a brief summary of the options is given below. (See also Fault Tolerant Systems on page 261 for further details of how to design and configure fault tolerant systems)
Master/Standby Recorders
In small systems, you can install and configure a Standby recorder to "shadow" another recorder - referred to as the Master. The standby copies configuration details automatically from the master via a fault-tolerant TCP/IP connection between the two. Over these same links, the two recorders exchange "heartbeats" every second. The standby will take over should the heartbeat fail or should the master request that it do so. This latter case will occur, for example, due to the master’s disk filling or connection to the AE Services failing. The figure below shows a typical configuration.
Planning and Prerequisites
66 Avaya Contact Recorder Planning, Installation and Administration Guide
Confidential and Proprietary Information
In small systems consisting of just a master and standby, details of recordings made on each server are (by default) passed to the other so that users can search for calls from a single location regardless of which of the two recorders actually recorded the call they are looking for. In larger systems, where a Master recorder controls one or more "Slave" recorders, the use of a Standby recorder ensures that the Master does not become a single point of failure for the whole system. In this case, each of the slaves permanently connects to both Master and Standby. This allows the Standby to take over rapidly should the Master fail. In such systems one or more dedicated servers can be provided solely to support search and replay. Details of recordings from all of the slaves are uploaded to these servers allowing a single search to cover all recordings.
Fault Tolerant Pools
When using Conferenced mode with a Master and one or more Slave recorders, recordings can be directed towards any available recorder. Therefore a "pool" of Slave recorders can be equipped with one more recorder than is needed for the projected loading. In this configuration, if one Slave fails, the Master recorder will reassign the calls being recorded by the failed unit across the remaining slaves.
Centralized Applications
In any system with more than one recorder capabilities, you may wish to deploy central search and replay. In this case, each of the recorders:
provides details of its recordings to the central replay server(s)
responds to requests from the central server(s) for replay of recordings that it is holding.
Note that the recording system is designed to continue recording regardless of the state of these central servers. This means that the availability of the central applications cannot affect the reliability of the recorders themselves.

Integrating with other systems
Issue 4 April, 2010 67
Confidential and Proprietary Information
Integrating with other systems
The Avaya Contact Recorder system supports integration with a wide variety of other applications including other CTI feeds, third party and customers' own applications. There are three options, depending on the complexity of the integration required.
Standardized Dialer Integrations
An automated or predictive dialer is often used with Avaya switches. These typically require an agent to connect to a specific port on the switch for the duration of their shift. The basic recording system will see this shift as a single, long call and will not be aware of the individual customer calls that are handled by the agent. Avaya Contact Recorder includes support for a number of commonly encountered dialers. When configured to suit your dialer and data structures, these split and tag the recordings so that each customer call is stored as an individual recording and can be found by searching for one or more data fields provided by the dialer.
See Appendix G: Auto-Dialer Integrations for details of the current integrations and how to configure these. Note that these integrations are charged for and licensed separately.
Supplementary Tagging of Bulk Recordings
It is a common requirement to "tag" recordings with additional details, such as customer account numbers, trouble-ticket numbers etc. This information is often held in a third party or custom application and is known while the call is in progress.
The recorder implements a TCP/IP socket based interface. Applications can:
receive events as recordings start and end
send "tag" information to the recorder to be associated with the recording, alongside the basic call details.
Users can then search for recordings based on this enhanced set of call details.
This Recorder Control Protocol is very simple as the recorder makes contact with the application at an IP address specified in the recorder's administration pages. The recorder advises the application as recordings start and stop on each station. Each start message contains a unique reference (or "INUM") to that recording. If the application wants to tag a call, it sends a "TAG" command specifying the INUM and station number plus the data formatted as XML.
In this mode, the recorder continues to be responsible for recording rules. Should the tagging application have a problem, the worst it can do is tag calls incorrectly.
Planning and Prerequisites
68 Avaya Contact Recorder Planning, Installation and Administration Guide
Confidential and Proprietary Information
This interface is included within the core Avaya Contact Recorder software and you may use it immediately. A typical tagging project requires the purchase of 2-3 person-days of services to learn how to interface to and control the recorder.
See External Control Interface on page 243 for further details of the Recorder Control Protocol, associated APIs and example applications that are available.
Explicit External Control of Bulk Recording
In normal operation, the recorder is given some basic Station/Agent/Skill Group/VDN rules, that it uses to determine which calls are to be recorded. However, you can build more sophisticated recording systems in which the decision to record is made by an existing call routing/handling application. By including control of recording as an integral part of call flow, such applications can, for example,
automatically mask or stop recording a call during security questions and resume once the customer has been validated
automatically start recording as the agent accesses the "customer complaint" form
add additional tagging as the agent traverses a series of menus
Applications can control recording using the same interface as described under Supplementary Tagging of Bulk Recordings on page 67. By using the additional commands "START", "STOP" and "BREAK", they can override the rules applied by the administration interface.
This interface is included within the core Avaya Contact Recorder software and you may use it immediately. A typical external control project requires the purchase of five person-days of services to learn how to interface to and control the recorder.
Enhanced Quality Monitoring
The above sections primarily relate to Bulk Recording operation. To extend the scope of the recording rules within the Quality Monitoring application, additional inputs are connected in two ways.
Using the "eQConnect" toolkit, you can provide additional data fields from other applications to complement those available from AES TSAPI.
Where a layered product (such as Genesys T-server) manages all calls, you can connect its CTI feed as an ALTERNATIVE to the TSAPI information that Avaya Contact Recorder normally processes and passes on to the Quality Monitoring application. In this case, the Quality Monitoring application connects via its own CTI integration to the CTI feed (in this case the Genesys T-server). The decisions about what to record for quality purposes and how to tag the calls are made by the Quality Monitoring application on the basis of this CTI feed - without input from the Avaya Contact Recorder Master. The Recorder simply acts as

Integrating with other systems
Issue 4 April, 2010 69
Confidential and Proprietary Information
a "dumb" recording mechanism, recording the stations that the Quality Monitoring system requests in real-time.
Both of these approaches incur additional licensing charges as well as the costs for the services required to install and configure these options.

Planning and Prerequisites
70 Avaya Contact Recorder Planning, Installation and Administration Guide
Confidential and Proprietary Information

Issue 4 April, 2010 71
Confidential and Proprietary Information
Chapter 3: Installation
This chapter gives details of the steps to install an Avaya Contact Recorder system.
The main sections in this chapter are:
Overview on page 72
Avaya System Configuration on page 73
Order in which to Install Applications on page 82
Platform Prerequisites on page 83
Installing Avaya Contact Recorder on page 88
Installing Quality Monitoring on page 89
Installing Viewer on page 92
Installing Archive on page 96
Installation
72 Avaya Contact Recorder Planning, Installation and Administration Guide
Confidential and Proprietary Information
Overview
Installation of a complete recording system requires:
Configuration of your Avaya system to support recording.
Planning the order in which to install the application servers
Preparing each server
Installing the Avaya software on each server
Installing client software for users of the Quality Monitoring application (if required).
Avaya System Configuration
Issue 4 April, 2010 73
Confidential and Proprietary Information
Avaya System Configuration
Before installing any Avaya Contact Recorder components, you must ensure that your Avaya Communication Manager is correctly configured and, where necessary, upgraded to support the recording system. As you complete these steps you will be asked to note a number of details which you will need later when configuring the recorder.
Prerequisites
Refer to the appropriate Avaya documentation to apply any prerequisite upgrades and/or additional licenses as detailed in Avaya system prerequisites on page 54.
Communication Manager Configuration
Use the Avaya administration interface to configure the following items:
Note:Note: Where page numbers are mentioned on the Avaya administration interface,
these are a rough guide only. As new settings are added from one version of Communication Manager to the next, these page numbers tend to increase.
Customer-options
Set the required system parameters as follows:
1. Run the following command
display system-parameters customer-options
2. On page 4, verify that Enhanced Conferencing is set to y.
3. On page 6, verify that Service Observing Basic and Service Observing Remote/By FAC are set to y.
Note:Note: Station Bulk, Station Executive, and (selective) Quality Recording modes
use Service Observe.
Installation
74 Avaya Contact Recorder Planning, Installation and Administration Guide
Confidential and Proprietary Information
Features
You must set the following system-wide CM parameters.
1. Enter the following command line:
change system-parameters features
2. On Page 5, set Create Universal Call ID (UCID) to y and allocate a number to the switch if it does not already have a unique reference. If there is only one switch, set it to 1.
3. On Page 13, set Send UCID to ASAI.
Adding IP softphones
You must add a station on the Communication Manager for each port on the recorder. Create all stations identically. You will subsequently use the recorder's Administration pages to assign them to the various modes.
1. Use the add station command to add as many stations as there are ports on your recorders. Note the station numbers as you will need to enter these into the recorder later.
2. Run add station xxxx, where xxxx is the new station's extension that you want to administer.
3. For Station Type, enter 4624.
4. For Security Code, enter the numeric security code the recorder must use to register softphones with the Communication Manager. Note this security code as you will need to enter it into the recorder later.
5. Verify that the Class of Restriction (CoR) you choose has Can Be A Service Observer enabled and Can Be Service Observed disabled when you intend to use any of the following recording modes:
a. Station Bulk
b. Station Executive
c. Quality
! Important:! Important:Important: Avaya recommends that you use a dedicated CoR for the stations being
used as ports on the recorder.
The CoR of the stations you want to record with the recording modes mentioned above must have Can Be Service Observed enabled. For more information on how to administer Class of Restriction and Service Observing, refer to the following resources:
Class of Restriction Section, in Chapter 19: Screen Reference of the Administrator Guide for Avaya Communication Manager.
Avaya System Configuration
Issue 4 April, 2010 75
Confidential and Proprietary Information
Service Observing topics, Feature Access Code and Feature Related System Parameters Sections, in Chapter 19: Screen Reference of the Administrator Guide for Avaya Communication Manager.
Service Observing, in the chapter titled ACD contact center features of the Avaya Communication Manager, Release 3.0, Call Center Software Automatic Call Distribution (ACD) Guide.
! WARNING:WARNING: Since a station can only be service observed once (CM 3.x) or twice (CM 4.x
and above), it is important that you disable, through the use of appropriate CoRs, the ability of anyone else to service observe those stations that must be recorded at all times. If you must listen to these stations while they are being recorded, use additional Live Monitor ports on the recorder.
6. In the IP Softphone field, enter y.
7. Set Display Language to english.
8. On Page 2:
Set IP-IP Audio Connections and IP Audio Hairpinning to n
9. On Page 4:
a. Assign the following feature buttons in addition to the three default call appearances:
i. Button 4: conf-dsp
ii. Button 5: serv-obsrv
b. Clear the call-appr setting on Button 3.
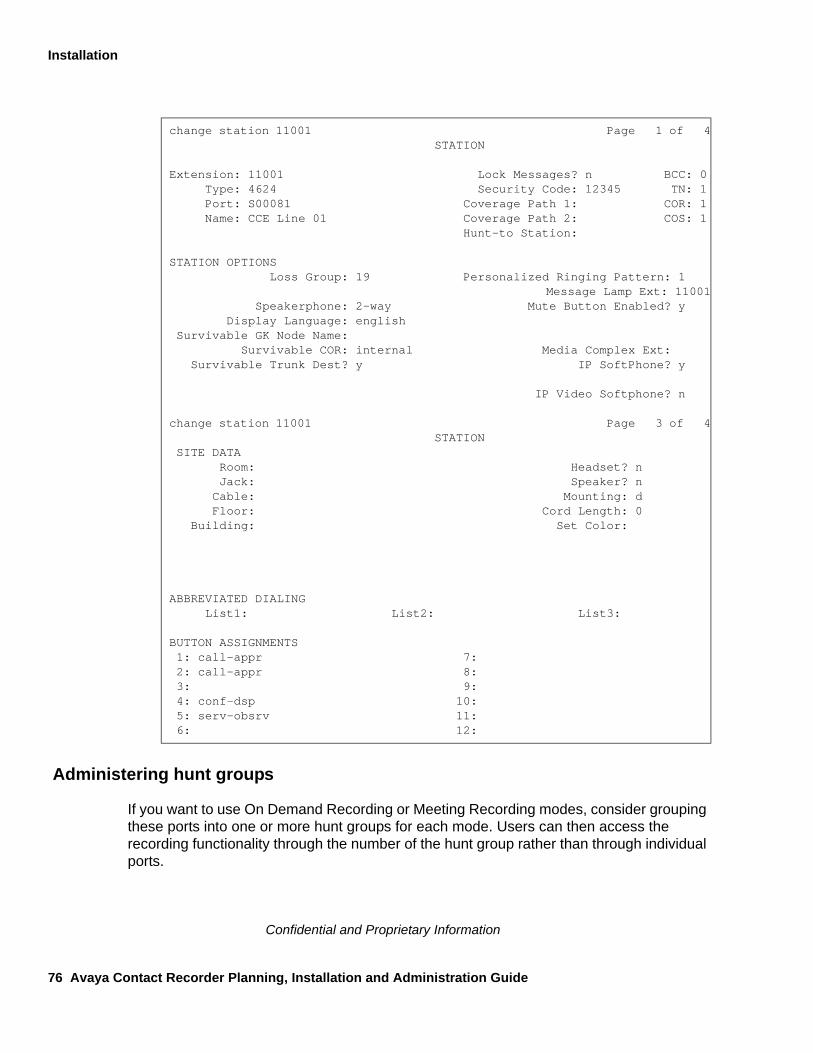
Installation
76 Avaya Contact Recorder Planning, Installation and Administration Guide
Confidential and Proprietary Information
Administering hunt groups
If you want to use On Demand Recording or Meeting Recording modes, consider grouping these ports into one or more hunt groups for each mode. Users can then access the recording functionality through the number of the hunt group rather than through individual ports.
change station 11001 Page 1 of 4 STATION
Extension: 11001 Lock Messages? n BCC: 0 Type: 4624 Security Code: 12345 TN: 1 Port: S00081 Coverage Path 1: COR: 1 Name: CCE Line 01 Coverage Path 2: COS: 1 Hunt-to Station:
STATION OPTIONS Loss Group: 19 Personalized Ringing Pattern: 1 Message Lamp Ext: 11001 Speakerphone: 2-way Mute Button Enabled? y Display Language: english Survivable GK Node Name: Survivable COR: internal Media Complex Ext: Survivable Trunk Dest? y IP SoftPhone? y
IP Video Softphone? n
change station 11001 Page 3 of 4 STATION SITE DATA Room: Headset? n Jack: Speaker? n Cable: Mounting: d Floor: Cord Length: 0 Building: Set Color:
ABBREVIATED DIALING List1: List2: List3:
BUTTON ASSIGNMENTS 1: call-appr 7: 2: call-appr 8: 3: 9: 4: conf-dsp 10: 5: serv-obsrv 11: 6: 12:
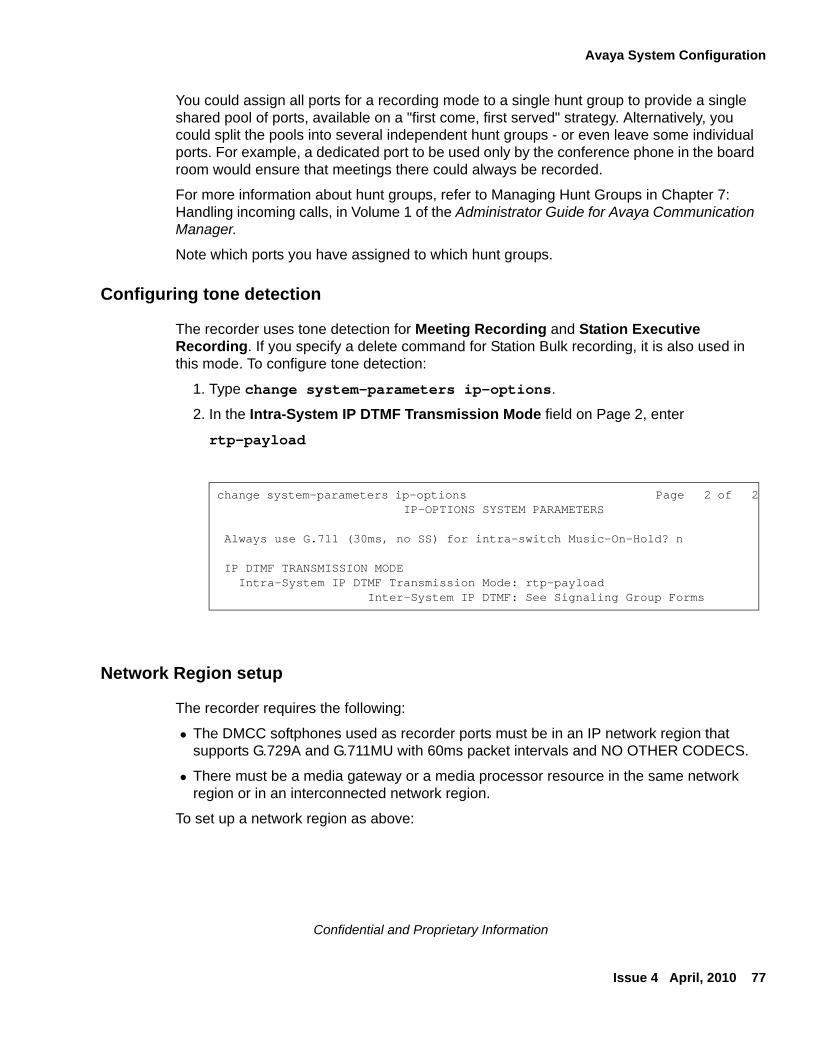
Avaya System Configuration
Issue 4 April, 2010 77
Confidential and Proprietary Information
You could assign all ports for a recording mode to a single hunt group to provide a single shared pool of ports, available on a "first come, first served" strategy. Alternatively, you could split the pools into several independent hunt groups - or even leave some individual ports. For example, a dedicated port to be used only by the conference phone in the board room would ensure that meetings there could always be recorded.
For more information about hunt groups, refer to Managing Hunt Groups in Chapter 7: Handling incoming calls, in Volume 1 of the Administrator Guide for Avaya Communication Manager.
Note which ports you have assigned to which hunt groups.
Configuring tone detection
The recorder uses tone detection for Meeting Recording and Station Executive Recording. If you specify a delete command for Station Bulk recording, it is also used in this mode. To configure tone detection:
1. Type change system-parameters ip-options.
2. In the Intra-System IP DTMF Transmission Mode field on Page 2, enter
rtp-payload
Network Region setup
The recorder requires the following:
The DMCC softphones used as recorder ports must be in an IP network region that supports G.729A and G.711MU with 60ms packet intervals and NO OTHER CODECS.
There must be a media gateway or a media processor resource in the same network region or in an interconnected network region.
To set up a network region as above:
change system-parameters ip-options Page 2 of 2 IP-OPTIONS SYSTEM PARAMETERS
Always use G.711 (30ms, no SS) for intra-switch Music-On-Hold? n
IP DTMF TRANSMISSION MODE Intra-System IP DTMF Transmission Mode: rtp-payload Inter-System IP DTMF: See Signaling Group Forms
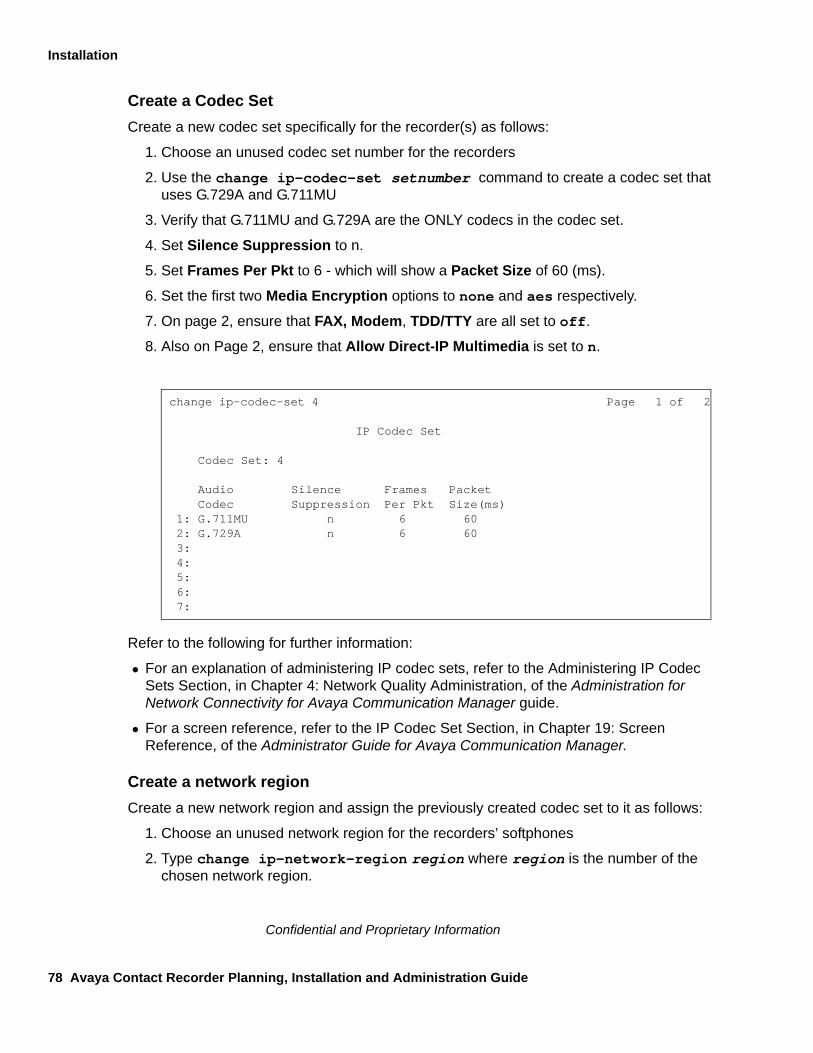
Installation
78 Avaya Contact Recorder Planning, Installation and Administration Guide
Confidential and Proprietary Information
Create a Codec Set
Create a new codec set specifically for the recorder(s) as follows:
1. Choose an unused codec set number for the recorders
2. Use the change ip-codec-set setnumber command to create a codec set that uses G.729A and G.711MU
3. Verify that G.711MU and G.729A are the ONLY codecs in the codec set.
4. Set Silence Suppression to n.
5. Set Frames Per Pkt to 6 - which will show a Packet Size of 60 (ms).
6. Set the first two Media Encryption options to none and aes respectively.
7. On page 2, ensure that FAX, Modem, TDD/TTY are all set to off.
8. Also on Page 2, ensure that Allow Direct-IP Multimedia is set to n.
Refer to the following for further information:
For an explanation of administering IP codec sets, refer to the Administering IP Codec Sets Section, in Chapter 4: Network Quality Administration, of the Administration for Network Connectivity for Avaya Communication Manager guide.
For a screen reference, refer to the IP Codec Set Section, in Chapter 19: Screen Reference, of the Administrator Guide for Avaya Communication Manager.
Create a network region
Create a new network region and assign the previously created codec set to it as follows:
1. Choose an unused network region for the recorders’ softphones
2. Type change ip-network-region region where region is the number of the chosen network region.
change ip-codec-set 4 Page 1 of 2
IP Codec Set
Codec Set: 4
Audio Silence Frames Packet Codec Suppression Per Pkt Size(ms) 1: G.711MU n 6 60 2: G.729A n 6 60 3: 4: 5: 6: 7:
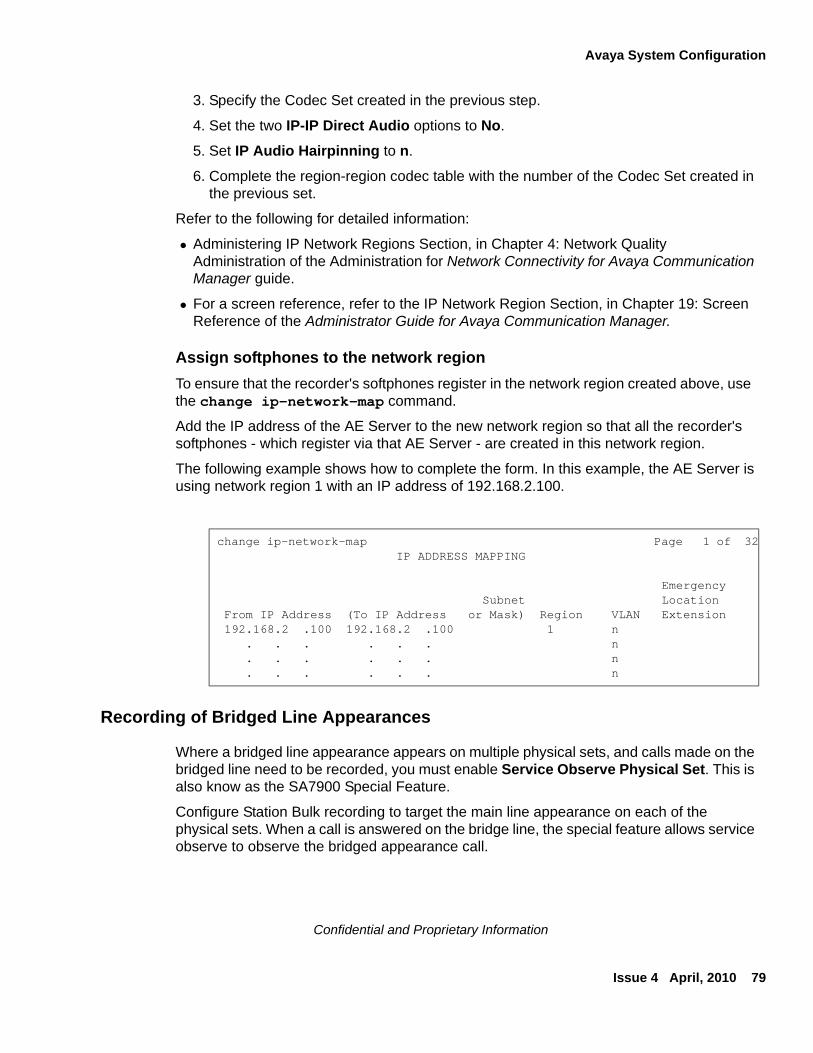
Avaya System Configuration
Issue 4 April, 2010 79
Confidential and Proprietary Information
3. Specify the Codec Set created in the previous step.
4. Set the two IP-IP Direct Audio options to No.
5. Set IP Audio Hairpinning to n.
6. Complete the region-region codec table with the number of the Codec Set created in the previous set.
Refer to the following for detailed information:
Administering IP Network Regions Section, in Chapter 4: Network Quality Administration of the Administration for Network Connectivity for Avaya Communication Manager guide.
For a screen reference, refer to the IP Network Region Section, in Chapter 19: Screen Reference of the Administrator Guide for Avaya Communication Manager.
Assign softphones to the network region
To ensure that the recorder's softphones register in the network region created above, use the change ip-network-map command.
Add the IP address of the AE Server to the new network region so that all the recorder's softphones - which register via that AE Server - are created in this network region.
The following example shows how to complete the form. In this example, the AE Server is using network region 1 with an IP address of 192.168.2.100.
Recording of Bridged Line Appearances
Where a bridged line appearance appears on multiple physical sets, and calls made on the bridged line need to be recorded, you must enable Service Observe Physical Set. This is also know as the SA7900 Special Feature.
Configure Station Bulk recording to target the main line appearance on each of the physical sets. When a call is answered on the bridge line, the special feature allows service observe to observe the bridged appearance call.
change ip-network-map Page 1 of 32 IP ADDRESS MAPPING
Emergency Subnet Location From IP Address (To IP Address or Mask) Region VLAN Extension 192.168.2 .100 192.168.2 .100 1 n . . . . . . n . . . . . . n . . . . . . n
Installation
80 Avaya Contact Recorder Planning, Installation and Administration Guide
Confidential and Proprietary Information
AE Server Configuration
The AE Server provides the recorder with DMCC client services, TSAPI services and (if specifying which CoRs are to be recorded) SMS Web Services. The following instructions assume the AE Server has been installed specifically for recording and that OAM and User Management administrative accounts have been created. If the AE Server to be used is already in use for other purposes, check these settings and confirm that its current configuration is appropriate.
Administer C-LANs
Use the AES Administration Screens to add the C-LANs that will be used to register softphones.
1. From the CTI OAM Admin OAM main menu, select:
Administration > Switch Connections
2. Click Edit H.323 Gatekeeper. OAM displays the Edit H.323 Gatekeeper - Switch1 page.
3. In the Name or IP Address field, type the hostname or IP Address of the switch C-LAN, and then click Add Name or IP.
TSAPI Configuration
Even if there are no explicit CTI clients, you must configure TSAPI (previously known as Avaya CT). Do this after AE Services have been configured as above.
SMS Web Services Configuration
If you wish to control which stations are recorded by assigning them to specific CoRs you must enable SMS Web Services to allow the recorder to determine which CoR each station is in.
User Account
If you are using the Security Database for Authentication, create a CTI user account on the AE Server as follows:
1. Go to: User Management > Add User
2. Complete all of the required fields (indicated by an asterisk).
3. Select userservice,useradmin from the Avaya Role drop-down menu.
4. Select Yes from the CT User drop-down menu.
Avaya System Configuration
Issue 4 April, 2010 81
Confidential and Proprietary Information
5. Ensure that the new CTI user has access to all TSAPI-controlled devices by going to:
Administration > Security Database > CTI Users > List All Users
6. Click Enable next to the Unrestricted Access option.
Test Phonesets
You should provide three Avaya phones close to the recorder - in the same or a neighboring rack. Configure these phones with all of the features in use on the phones that you intend to record. You can then use these to place test calls while working on the recorder.
Installation
82 Avaya Contact Recorder Planning, Installation and Administration Guide
Confidential and Proprietary Information
Order in which to Install Applications
In many cases, the recording system will consist solely of a single Avaya Contact Recorder Master server. However, in topologies that are more complex it is important that you install the basic recording infrastructure first and then layer the other applications on top.
Note:Note: If you have multiple independent recorders, install one recorder first, then
the central applications. Finally install the other recorders. This way you will address any problems with the recorder installation before you have repeated them many times.
Install server components in the order shown below:
1. Install one Avaya Contact Recorder (the Master if using Master/Standby or Master/Slave). Follow the procedures in Platform Prerequisites on page 83 and Installing Avaya Contact Recorder on page 88.
2. Install Quality Monitoring (if required) in accordance with the appropriate Installation Guide and configure the Avaya Contact Recorder to support it as described in Installing Quality Monitoring on page 89.
3. Install a central replay server if required. EITHER install an additional Avaya Contact Recorder as described in Installing a Central Replay Server on page 90 OR Viewer as described in Installing Viewer on page 92.
4. Install Archive (if required) in accordance with Archive Installation Guide and configure it to support the recorders as described in Installing Archive on page 96.
5. If using a Key Management Server for encrypted recording storage, install this and configure the recorder(s) as described in Encrypted File Storage on page 177.
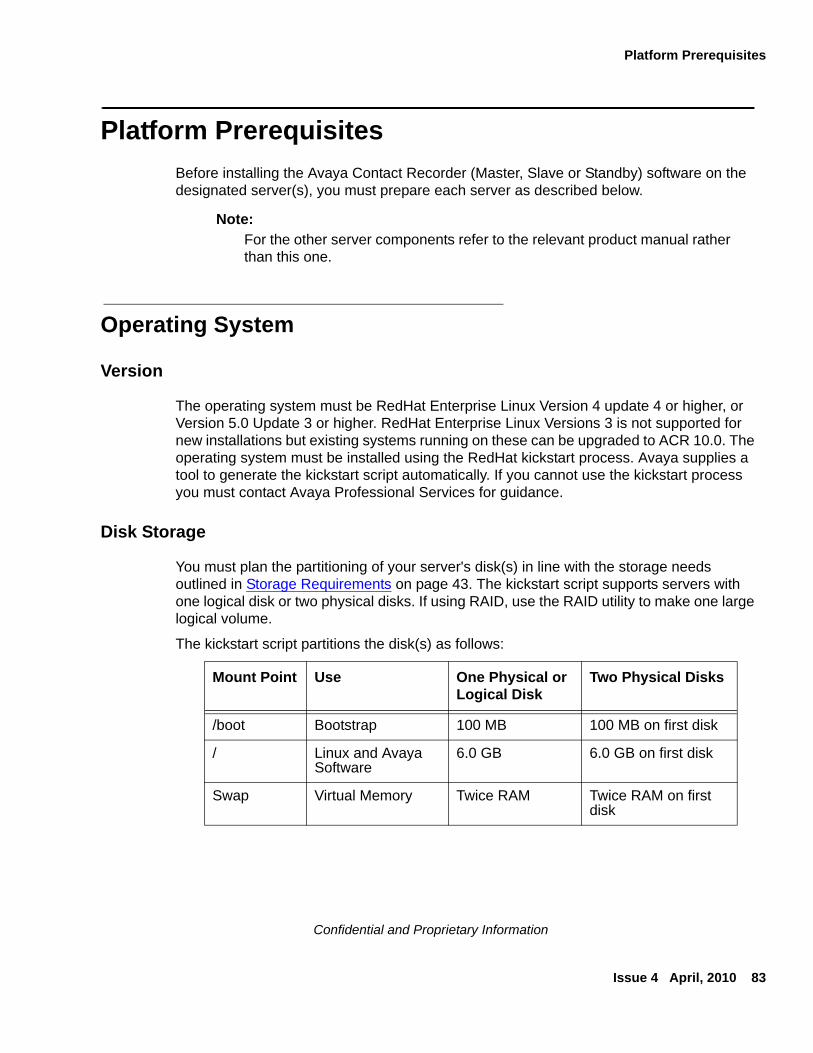
Platform Prerequisites
Issue 4 April, 2010 83
Confidential and Proprietary Information
Platform Prerequisites
Before installing the Avaya Contact Recorder (Master, Slave or Standby) software on the designated server(s), you must prepare each server as described below.
Note:Note: For the other server components refer to the relevant product manual rather
than this one.
Operating System
Version
The operating system must be RedHat Enterprise Linux Version 4 update 4 or higher, or Version 5.0 Update 3 or higher. RedHat Enterprise Linux Versions 3 is not supported for new installations but existing systems running on these can be upgraded to ACR 10.0. The operating system must be installed using the RedHat kickstart process. Avaya supplies a tool to generate the kickstart script automatically. If you cannot use the kickstart process you must contact Avaya Professional Services for guidance.
Disk Storage
You must plan the partitioning of your server's disk(s) in line with the storage needs outlined in Storage Requirements on page 43. The kickstart script supports servers with one logical disk or two physical disks. If using RAID, use the RAID utility to make one large logical volume.
The kickstart script partitions the disk(s) as follows:
Mount Point Use One Physical or Logical Disk
Two Physical Disks
/boot Bootstrap 100 MB 100 MB on first disk
/ Linux and Avaya Software
6.0 GB 6.0 GB on first disk
Swap Virtual Memory Twice RAM Twice RAM on first disk
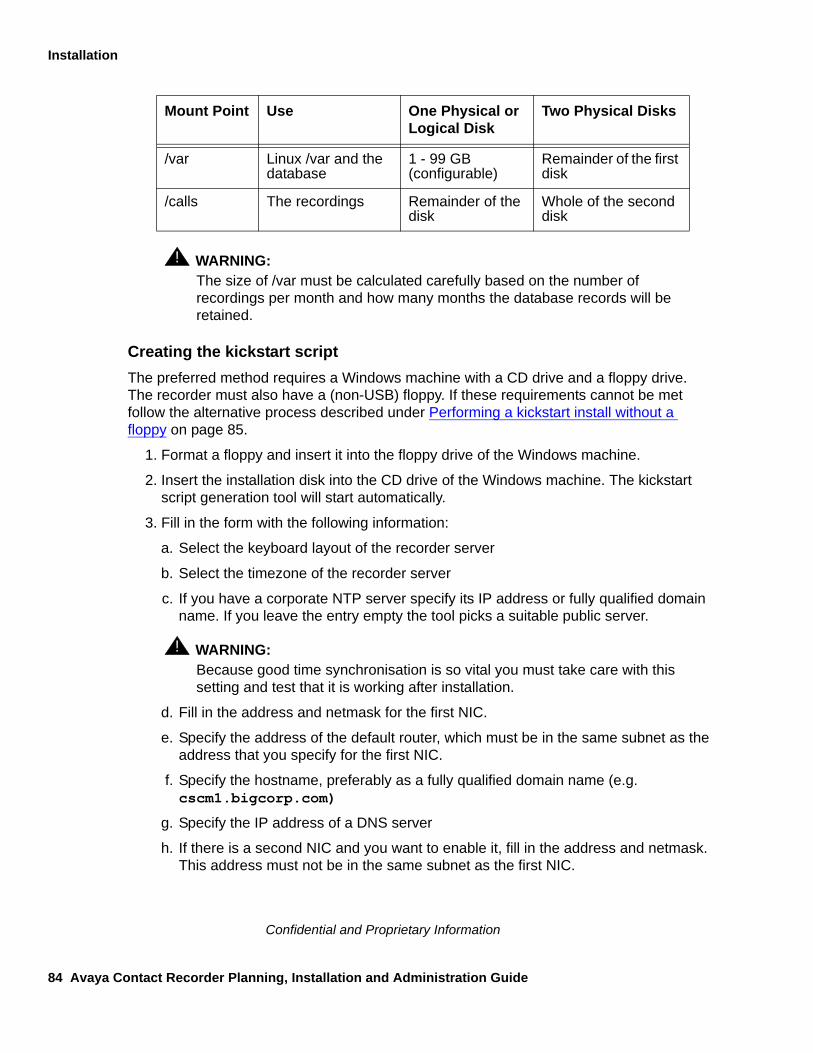
Installation
84 Avaya Contact Recorder Planning, Installation and Administration Guide
Confidential and Proprietary Information
! WARNING:WARNING: The size of /var must be calculated carefully based on the number of
recordings per month and how many months the database records will be retained.
Creating the kickstart script
The preferred method requires a Windows machine with a CD drive and a floppy drive. The recorder must also have a (non-USB) floppy. If these requirements cannot be met follow the alternative process described under Performing a kickstart install without a floppy on page 85.
1. Format a floppy and insert it into the floppy drive of the Windows machine.
2. Insert the installation disk into the CD drive of the Windows machine. The kickstart script generation tool will start automatically.
3. Fill in the form with the following information:
a. Select the keyboard layout of the recorder server
b. Select the timezone of the recorder server
c. If you have a corporate NTP server specify its IP address or fully qualified domain name. If you leave the entry empty the tool picks a suitable public server.
! WARNING:WARNING: Because good time synchronisation is so vital you must take care with this
setting and test that it is working after installation.
d. Fill in the address and netmask for the first NIC.
e. Specify the address of the default router, which must be in the same subnet as the address that you specify for the first NIC.
f. Specify the hostname, preferably as a fully qualified domain name (e.g. cscm1.bigcorp.com)
g. Specify the IP address of a DNS server
h. If there is a second NIC and you want to enable it, fill in the address and netmask. This address must not be in the same subnet as the first NIC.
/var Linux /var and the database
1 - 99 GB (configurable)
Remainder of the first disk
/calls The recordings Remainder of the disk
Whole of the second disk
Mount Point Use One Physical or Logical Disk
Two Physical Disks
Platform Prerequisites
Issue 4 April, 2010 85
Confidential and Proprietary Information
i. For one logical drive or physical disk, select 1 disk, and specify the size of the /var partition.
For two logical drives or physical disks, select 2 disks, and specify the device names of the two devices. If you do not know the names of the two devices, follow the first few steps of a normal interactive RedHat installation. After selecting the keyboard type, the RedHat installer will display a menu showing the names of the devices.
j. Select the number of Linux tools to install. Minimal chooses just those parts of Linux needed to run the recorder (Choose this option only if you are familiar with Linux and will perform all installation from the command line.) Recommended installs other useful management tools and the Linux windowing system.
4. Click Generate Floppy.
5. Eject the floppy.
Performing the kickstart install
1. Have the floppy just created ready.
2. Boot the target server using the first disk of the RedHat distribution.
! WARNING:WARNING: Make sure that the disks are the Update you require. RedHat and other
vendors still sometimes supply Update 0 disks.
3. Wait for the boot: prompt.
4. Insert the floppy.
5. Type linux ks=floppy
6. Wait for the automated install to complete and insert the other disks when requested.
Performing a kickstart install without a floppy
If it is not possible to perform the recommended floppy-based kickstart installation, this HTTP based procedure may be used instead.
1. Follow the same procedure to fill in the kickstart script generation tool, except at the last step click Generate File. Use the file chooser to specify the location where the file will be saved. Make sure the file is called ks.cfg.
2. Copy the ks.cfg to a web server and make it available as a web URL. The web server must not use a non-standard port. It must use port 80. Be certain when copying the file that it receives no text processing. If copying it using FTP be sure to use BINARY mode. Do not edit the file. Test that you can view the file using a regular browser.
3. Ensure that the target server will be able to obtain a dynamic IP address using DHCP on its first NIC. If necessary, temporarily cable its first NIC to a corporate LAN segment. Ensure that it will be able to access the web server.
Installation
86 Avaya Contact Recorder Planning, Installation and Administration Guide
Confidential and Proprietary Information
4. Boot the target server using the first RedHat disk, and wait for the boot: prompt.
5. Type linux ks=http://webserveripaddress/path/ks.cfg
Expert kickstart options
Great care must normally be taken to ensure that the ks.cfg file is not corrupted or edited. The process of creating this file directly to a floppy and taking that floppy directly to the target server is the recommended approach.
If the file must be edited to access expert options this should be performed on a Unix or Linux computer. Windows editors introduce additional control characters that prevent the script from working properly. Unfortunately the installation of Linux appears to work, but the Avaya software will not install correctly.
There is almost no reason to edit the automatically generated file, but details of the script options are available at http://www.redhat.com/docs/manuals/enterprise/RHEL-5-manual/Installation_Guide-en-US/ch-kickstart2.html
DVD/Blu-ray Drive
Install and test your DVD+RW/Blu-ray drive by writing a test file to the disk before attempting to use it with the recording system.
Network Connectivity
Domain Name Server (DNS) Entries
Ensure that the IP node names of all servers that make up the recording system are stored in the appropriate Domain Name Servers. Subsequent configuration can then be done by using the host name rather than having to use numeric addresses.
Network Routes
You should ensure that valid IP paths exist between each of the servers and from servers to the AES, CLANs and all media processing resources. See Recorder Interfaces on page 207 for details of ports used.
Bonded NICs
If you are deploying Master/Standby pairs of Avaya Contact Recorder Servers on the same site, it is imperative that you provide bonded NICs in the master and standby servers and
Platform Prerequisites
Issue 4 April, 2010 87
Confidential and Proprietary Information
fully fault tolerant network connectivity between the master and standby. Failure to do so will leave the system vulnerable to failure should a common component in the network paths between the two fail. In such a case, both recorders will attempt to take control of all recording, with unpredictable results.
Installation
88 Avaya Contact Recorder Planning, Installation and Administration Guide
Confidential and Proprietary Information
Installing Avaya Contact Recorder
Note:Note: If you are installing a Central Replay Server, a Standby recorder or Slave
recorder, you should first read the appropriate section in Advanced Configuration on page 181.
To install Avaya Contact Recorder on RedHat 5:
1. Log onto the server at the console as root.
2. Insert the installation CD. Navigate through the Computer icon to the CD Drive icon. You will see the contents of the CD.
3. Open a Terminal Window from the Applications menu.In the Terminal window type:cd /media/cdromlabelsh ./autorun
4. Autorun brings up a small window showing any versions already installed. Click the Install button against each package. The button will change to saying Up-to-date.
5. Reboot the server.
6. Continue the system configuration as described in Configuration on page 97.
To install Avaya Contact Recorder on RedHat 5 from the command line
1. Log onto the server as root.
2. Mount the installation CDmount -r -t iso9660 /dev/cdrom /mnt/cdromIt may be necessary to create the /mnt/cdrom mount point using the commandmkdir /mnt/cdromIf the CD drive is known by a different name on your computer (e.g. cdrom1) replace all reference to cdrom with your device name.
3. Change directory to the mount point using the commandcd /mnt/cdrom
4. Locate the three rpm files on the CD using the commandlsFor each of the RPMs (jre, cscm, cs-service) typerpm -Uvh rpmfilename
5. Reboot the server.
6. Continue the system configuration as described in Configuration on page 97.
Installing Quality Monitoring
Issue 4 April, 2010 89
Confidential and Proprietary Information
Installing Quality Monitoring
Install and configure this application as described in Quality Monitoring Installation Guide. Then,
On the Avaya Contact Recorder, complete the settings on the Operations > Quality tab as described in Quality Monitoring on page 126. You must also configure the Quality Monitoring application to connect to the Integration Services framework running on the Avaya Contact Recorder.
Look on the Status > Server page on the Master to confirm that both the control and CTI links between the recorder and the Quality monitoring application are UP. If these do not connect within 1 minute, check the Alarms page and correct any problems shown there.
Installation
90 Avaya Contact Recorder Planning, Installation and Administration Guide
Confidential and Proprietary Information
Installing a Central Replay Server
For large systems (more than 500 channels) the search and replay load imposed on the Master and Standby could impact their ability to record. A dedicated server should be used to hold all call recording details and act as a search and replay server across all recorders. For systems above 1000 channels, you must install a Viewer server as described in the following section. The instructions below are for installing an additional copy of the Avaya Contact Recorder software to act as a dedicated search and replay server.
1. Install the Avaya Contact Recorder software as normal but on the license entry page, enter the license key that you have been provided with for the replay server. This key indicates that the server is to act as a Central Replay Server and will contain the appropriate number of telephone replay port licenses.
2. If you wish to provide telephone replay ports on this server, complete the settings on the General Setup > Communication Manager page and add the required number of softphones. As this is the only possible use for such ports, they will be automatically designated as telephone replay ports. The administration pages of this server and the settings on them are automatically restricted to just those settings needed by a Central Replay Server.
3. On all other IP recorders (master, standby and slaves) enter this server's IP address including port number (e.g. myreplayserver:8080) as the "Replay Server" on the General Setup > Recorder page. This will override their default configuration (which is to use Master and Standby as central replay servers).
Installing Multiple Central Replay Servers
Issue 4 April, 2010 91
Confidential and Proprietary Information
Installing Multiple Central Replay Servers
Each recorder may upload recordings to more than one central replay server (in fact, in a master + standby configuration, this is the default). This can be used to create a regional and global hierarchy and/or to provide fault tolerant search and replay.
To configure this, set up each central replay server as above and then add both addresses - separated by a semi-colon (';') - to the Replay server(s) setting on the General Setup > Recorder page.
Installation
92 Avaya Contact Recorder Planning, Installation and Administration Guide
Confidential and Proprietary Information
Installing Viewer
You should only install Viewer if a central replay server cannot satisfy your requirements. The installation and configuration process for this server component is quite complex and has many options. The instructions below describe a basic approach that is appropriate for most installations. They complement the Viewer Installation Guide as they highlight easily overlooked items. You should print out the guide for ease of reference as you work through the installation.
Prerequisites
Before starting to install Viewer, double-check that:
you have installed the Windows components IIS and Message Queuing services.
Active Directory Integration is not selected.
you are not trying to access the server using Internet Explorer 5.0 or earlier. You must use 5.5 or higher.
you have installed the appropriate version of SQL Server - including any service packs and hotfixes specified in the Viewer manual.
Follow the Viewer install guide meticulously. It is critical that you set up mixed mode security and note the System Administrator (sa) password. Consider using "sa" as the password temporarily and changing it once the system is fully configured. This helps support personnel access the system to address any initial setup problems you may have.
check that all the servers in the recording system exist in DNS correctly so that you can ping each by name rather than just numerical address. You are less likely to make errors entering names than numbers. Check that you can ping the Viewer server by name from the recorders and vice versa.
Installing Viewer
You must install this application while logged in as an administrator.
Note:Note: Do not forget to install the Core components first. Drill down into the
Installation\CoreInstall folder and run setup.exe.
When asked for a username and password for the Viewer account, consider leaving it at the default username and setting the password temporarily to "W1tn355" and changing it
Installing Viewer
Issue 4 April, 2010 93
Confidential and Proprietary Information
once the system is fully configured. This helps support personnel access the system to address any initial setup problems you may have.
Create an MMC Console
Viewer is easier to administer if you create a custom MMC console with the three snap-ins you will need regularly. To do this:
1. Click Start > Run > mmc
2. Select Console > Add/Remove Snap-in
3. Click Add…
4. Select Component Services, Services and Event Viewer and check the Local Machine checkbox.
5. Save the console as Viewer.msc to your desktop.
Configuring Viewer
Follow Configuring the System in the Viewer Installation Guide, noting the corresponding points below as you go. These will provide a basic working setup that you can then return to as you become familiar with the application.
1. Using the console created above, add the local Administrator user to all four roles.
2. Shutdown and restart the Application Portal.
3. Open a browser on the server or any other networked computer and access http://servername/avaya. If asked, log in as Administrator.
Note:Note: If you see errors, try adding the server to your list of Trusted Sites - it is
trying to download an ActiveX control to you.
Tip:Tip: You do not need to add locations at this stage.
! WARNING:WARNING: You must use the server's hostname rather than dotted IP address (nor the
name localhost) when accessing the url and when entering the domain name as part of the username if you are prompted for username and password.
4. Add a system - with the following settings:
a. System Name = your server name
Installation
94 Avaya Contact Recorder Planning, Installation and Administration Guide
Confidential and Proprietary Information
b. System Type = Contact Platform Database
c. Server Name = your server name
d. DatabaseName = EWareCalls (Case sensitive)
e. Location = Default Location
5. For each Avaya Contact Recorder, add a Capture Platform with the following settings:
a. Name = the Avaya Contact Recorder Server's name
b. Capture Platform Type = Other Recorder
c. Machine Name = your Avaya Contact Recorder server name
d. Location = Default Location
e. Contact Platform Database = the one you added in step 3 above
f. Serial Number = the serial number shown on the System > License page
g. Port = 8080
h. URL Path=replay (not adapter/replay or retriever/replay))
6. Follow the section "Generating a Template". Make sure you log in using the account and password you set in Installing Viewer on page 92. Add the View, CSCMAvayaCallsView, giving it the name AvayaView (no space between), Screen Name Avaya View.
7. Log back in as Administrator.
8. Create a Basic Query. Bring up the browser on http://servername/avaya again and this time select the Viewer tab and click on the New icon at the top left to start the Avaya Query Wizard.
a. Step 1/8. Select the query Avaya View that you created in step 6. Click Next.
b. Step 2/8. Skip this step. Click Next.
c. Step 3/8. Select the following fields:
- StartedAt
- Duration
- FirstParty
- OtherParty
- Agent
- Service
- UCID
Click the box at the top right to select all fields for the details tab.
Click Next.
d. Step 4/8. Select the order you wish the fields to be displayed. Click Next.
Installing Viewer
Issue 4 April, 2010 95
Confidential and Proprietary Information
e. Step 5/8. Choose StartedAt, sort descending as the default sort order. Click Next.
f. Step 6/8. Leave the languages as the default. Click Next.
g. Step 7/8. Set the name to Basic Query and leave the remaining fields blank. Click Next.
h. Step 8/8. Pick an icon and set 100 maximum results. Click Finish.
i. "Release" the Query by selecting the bent black arrow icon at top left.
j. Use the Administration tab to make this query accessible to users.
Configuring Avaya Contact Recorder
For each Avaya Contact Recorder Master, Standby and Slave, you will need to do the following to configure and test the connection.
Do not do this until you have proved that each recorder is recording calls successfully and that these are playable from the recorder's integral search and replay page.
1. Set the Viewer server's address(es) on the General Setup > Recorder administration page. Do NOT include the port number.
2. Check that the Link to Viewer is showing on the Recorder Status > Server page and is UP (allow up to 1 minute for connection to be made).
3. If not, check the Alarms page and correct any problems showing there.
4. Make a new test recording.
5. Access Viewer using a browser and search for the new recording.
6. Play the recording.
Configuring Multiple Viewer Servers
Each recorder may upload recordings to more than one Viewer server. This can be used to create a regional and global hierarchy and/or to provide fault tolerant search and replay. To configure this, set up each Viewer server as above and add both addresses - separated by a semi-colon (';') - to the Replay server(s) setting on the General Setup > Recorder page.
Installation
96 Avaya Contact Recorder Planning, Installation and Administration Guide
Confidential and Proprietary Information
Installing Archive
Do not attempt to install or configure Archive until you have proved that Viewer is working with all recorders.
Follow the installation instructions in Archive Installation Guide.
Because Archive relies on Viewer, there is no additional configuration necessary on the recorder itself.
Note that, as of Version 10.0, the integral archive capabilities within the recorder now allow selective archive to multiple destinations including fileshares. A separate Archive application and server is therefore no longer required unless recordings are to be fed to Speech Analytics Enterprise.
Issue 4 April, 2010 97
Confidential and Proprietary Information
Chapter 4: Configuration
This chapter gives details of the steps to configure an Avaya Contact Recorder system.
The main sections in this chapter are:
Overview on page 98
Accessing the System on page 99
Licensing on page 101
Security on page 105
General Setup on page 107
System Monitoring on page 114
Operations on page 117
Search and Replay on page 144
Backup/Restore on page 150
Distributing User Instructions on page 153
Configuration
98 Avaya Contact Recorder Planning, Installation and Administration Guide
Confidential and Proprietary Information
Overview
You must now configure the recording suite to suit your requirements. This section guides you through the various tasks in a logical order. You should follow its steps immediately after installation of the Avaya Contact Recorder application.
Accessing the System
Issue 4 April, 2010 99
Confidential and Proprietary Information
Accessing the System
Before you can configure the system, you must first:
access the administration web-interface via its URL
log in
URL
You administer the Avaya Contact Recorder system via a web interface.
1. Open Internet Explorer and navigate to http://servername:8080 using the name of the server you wish to administer.
2. Enter a username of your choice and leave the password field blank.
3. Click OK.
Note:Note: The login page uses Javascript. If you see the login page but nothing
happens when you click OK, your Internet Explorer settings may be blocking this. See ActiveX Control Download on page 146 for detailed instructions on this and other necessary settings.
Initial User Account
The application will accept any username during the first log on attempt after installation and will automatically create a local application account for you under that name and give it full system administrator rights.
As the password of this account has not yet been set, the web application immediately directs you to a page asking you to set the password for this account. In this instance, leave the Old Password field blank and enter a new password of your choice into the two other fields. Click OK.
Key Points
Before using the System Administration pages, familiarize yourself with the following key points.
Configuration
100 Avaya Contact Recorder Planning, Installation and Administration Guide
Confidential and Proprietary Information
Invalid settings
Any of the system's settings that are known to be invalid are shown in red. Use the information in this guide to change the settings to valid values. If you change a setting, but submit an invalid entry, a message indicates the reason that the entry is rejected and you are prompted to re-enter it. To quit without changing a parameter, click on the Close Window link.
Show All links
At the top of pages that show a list of entries that spans more than one page, the Show All link appears next to the page selection tags. When you click this link, all the search results are presented on a single scrollable page.
Page at a Time
If you have clicked the Show All link described above, you can return to seeing one page of entries at a time by clicking this link.
Impact of changes
When you change a setting, the window into which you enter the new setting explains the meaning of that setting and the consequences of changing it. Read these notes carefully. Some settings require you to restart the recorder while others may truncate current recordings.
Licensing
Issue 4 April, 2010 101
Confidential and Proprietary Information
Licensing
Until you enter a valid License Activation Key, connect to a licensed Master recorder or select the Five day timed trial license, the application will only show you the license entry screen.
Terminology
License Generation Key
This is a three digit number that is specific to a particular server. This is shown on the license entry page. You will need it to obtain a valid License Activation key for a Master recorder and Central Replay Server.
License Activation Key
This is a long (30 or more characters) string containing the serial number, server type and other options that you have licensed. You must obtain this key and enter it into the administration pages before your master recorder or central replay server will operate.
Recorder Serial Number
This is a unique identifier for every Avaya Contact Recorder. For Avaya Contact Recorders, this is a 6-digit number in the range 800000. The serial number of each Master and Central Replay Server is allocated by Avaya as part of the licensing process.
The serial number of a Master recorder or Central Replay Server is issued when the license is purchased. The serial number of a slave or standby recorder is chosen by you. You should assign each slave and standby recorder in your enterprise a unique number from 2 to 9999 (the master is 1). The serial number for these servers will then be shown as 880000 plus this locally chosen recorder number. The serial number defines the first 6 digits of the unique reference number given to each call recorded by the recorder. For example, the recorder with serial number 800001 records its first call into the following files:
800001000000001.wav
800001000000001.xml
The serial number is encoded within every activation key issued. Once a master recorder or central replay server has been configured with its initial activation key, subsequent keys must have a matching serial number.

Configuration
102 Avaya Contact Recorder Planning, Installation and Administration Guide
Confidential and Proprietary Information
! Important:! Important:Important: The 5-day license option uses serial number 800000. This temporary and
non-unique serial number is the only serial number that you can subsequently override with the recorder's correct serial number, which is included in the full license key.
Obtaining a License Activation Key
Obtain a license activation key for a Master or standalone recorder or Central Replay Server as follows:
1. Open another browser window (on this or another PC) and ensure that pop-ups are not blocked.
2. Navigate to the Verint licensing website at www.verint.com/ACR.
3. Enter your Username and Password.
4. Click Log in
5. Click License Activation
6. Choose the Serial Number from the drop-down list.
7. Enter the three-digit License Generation Key from the License page in the Administration application.
8. Enter the appropriate information for the end user.
9. Click Generate Key.
10. Your license activation key is:
a. Displayed on the screen
b. Sent to you through email
Activating the License
1. Return to the System > License page that you have open in another browser window.
2. Enter the License Key. The license activation key is not case-sensitive, and you can omit the dashes. If you use a browser on the same machine to obtain the activation key, you can copy and paste the number between the browser windows.
3. Click Enter.
The page displays the licensed serial number, server type and channel capacity.
Make a note of the license key and store it safely in case you need to reinstall the application on the same server - in which case you will be able to reuse the key. To reinstall on a different server, you will need a new key, because the MAC address, to which it is tied via the three digit license generation key, will be different
Licensing
Issue 4 April, 2010 103
Confidential and Proprietary Information
Once you have successfully entered a license key, you will be able to access the other pages of the administration interface.
Standby and Slave Servers
These do not require a license key. Simply enter the Recorder Number you wish to assign to the server and provide the IP address(es) of the already licensed server(s) as instructed on the lower half of the System > License administration page.
Adding additional licenses
Follow the procedure in the previous section titled "Activating the license" for the installation of additional licenses.
Note:Note: Additional licenses may require more switch components (C-LAN, VoIP
resources, media processing boards).
Reinstalling on the same PC
If you reinstall the recorder software on a new hard disk in the same chassis, you can reuse your existing activation keys.
If you reinstall the recorder from the installation kit, you must re-enter the activation keys.
! WARNING:WARNING: If you reinstall the software, you must restore the database as described in
Restoring data to a new PostgreSQL database on page 151 before starting recording. Otherwise the recorder will reuse recording identifiers that have already been used.
Reinstalling the Recorder on a new PC
For license security, the installation is tied to the first Network Interface Card (NIC) in the server on which it is installed. To reinstall the recorder on another server, do one of the following:
Move the first NIC to the new server and use your existing activation keys
Configuration
104 Avaya Contact Recorder Planning, Installation and Administration Guide
Confidential and Proprietary Information
Note the license generation key on the new server and request new activation keys as outlined in Obtaining a License Activation Key on page 102.
! WARNING:WARNING: If you reinstall the software, you must restore the database as described in
Restoring data to a new PostgreSQL database on page 151 before starting recording. Otherwise the recorder will reuse recording identifiers that have already been used.

Security
Issue 4 April, 2010 105
Confidential and Proprietary Information
Security
Security of recordings is very important and is discussed at length in System Security on page 171. At this stage in the configuration of your system you should immediately create appropriate user accounts as described below.
Note:Note: If you have installed one or more central replay servers then you should only
configure Administrator accounts on each recorder. Create and control end user replay rights on the replay server.
Securing the System
The system automatically creates an initial system administrator account as you log in for the first time. If you wish to create additional system administrator accounts, you should do so now. Until you do so, the only means of accessing the system is with the initial account.
To create a new user account:
1. Click on System > Manage Users at the top of the Administration screen.
2. Click on Add User.
3. Enter the user's name (with domain name if using Windows domain accounts).
4. Select the appropriate Role for this user. System Administrators have full access to the system including all configuration. Replay Only user accounts have no access to the system administration pages. Restricted Administrators cannot change the system's recording configuration but may view the overall status and alarms pages; eject DVDs and administer Replay Only accounts.
Note:Note: The Comment field is for your own notes.
See Search and Replay Access Rights on page 144 for an explanation of how to use the Is allowed to replay calls owned by field.
Windows Authentication
If you enter a simple username without a domain qualifier (for example, admin rather than mydomain\admin) then the account is administered by the recorder application. Administrators may reset this account's password and the user may change their account password and log off from the application using the administration web pages.
Configuration
106 Avaya Contact Recorder Planning, Installation and Administration Guide
Confidential and Proprietary Information
However, if you specify a windows domain and username, the system will attempt to authenticate you via your normal Windows domain controller or WINS server(s). In this case, you will not see Logoff or Change Password links on the web pages presented by the recorder.
! CAUTION:
CAUTION: When adding user accounts the domain and username are case sensitive and must be entered exactly as they are held in the Windows domain controller.
This feature is also known as "Single Sign On" (SSO) as users only have to log onto their Windows workstation, but do not need to log on to the search and replay application separately. See Windows Domain Authentication on page 173 for details of how to enable this feature.
General Setup
Issue 4 April, 2010 107
Confidential and Proprietary Information
General Setup
You should now configure how the system makes recordings and how it interfaces with your Avaya Communication Manager. Follow the procedures below, clicking on the appropriate tab at the top of the Administration screen for each section.
Recorder
This is the section where you specify information about the recorder hardware and environment.
Note:Note: It is important that you review and change any of the settings that are not
correctly defaulted. On servers designated as Slave or Central Replay Servers, a number of the settings are irrelevant and hence will not appear.
Maximum total call duration (hours)
To avoid having recording channels permanently active, the recorder will reset a channel that has been continuously recording for this many hours. Set this field to a value that you can be sure will not occur for a real call - typically just longer than any one person would ever be present on a shift.
Maximum recording segment duration (mins)
To optimize the playback experience, the recorder cuts long recordings into segments of the designated length. A typical value for call centers is 120 minutes. This is the default. However, if your switch regularly handles longer calls, you may increase this value
Retain call details for (months)
At some point, the size of the call details database will become either unmanageable or will fill the available disk space. Specify, in months, how long the system should retain call detail records before they are purged from the system. This ensures that the database stabilizes at a finite size. Purging is carried out at, or shortly after, 1:00 a.m. each night and does not affect recording or replay.
SNMP Read Community and SNMP Trap Destination
See SNMP on page 115 for notes on these settings.
Configuration
108 Avaya Contact Recorder Planning, Installation and Administration Guide
Confidential and Proprietary Information
Replay Server(s) (Defaults to Master and Standby)
By default, each Avaya Contact Recorder server will pass details of calls it has recorded to the Master and Standby (if present). If you have installed one or more dedicated replay servers you must override this default behaviour by entering the address(es) of the replay server(s) here.
Separate the addresses with a semi-colon.
When specifying a Viewer server, simply enter its IP address or hostname. If your SQL server implementation is not using the default port (8443) you can override this with a properties file setting as described in Properties File on page 182.
When specifying a dedicated Avaya Contact Recorder server - i.e. a "Central Replay Server" - you must also specify the port number (default 8080) that is to be used to contact it. For example, 10.1.1.25:8080
Once you have set this value, it will be acted on within one minute and subsequent recordings will be queued to be sent to the address(es) specified.
Note:Note: If you intend to install a central replay server and want all call details to be
uploaded to it, enter its address in this field before you start recording. Do this even if the replay server is not yet ready. This way, all recordings' details will be queued ready for upload when the server is available. The recorder will raise an alarm daily until you install and correctly configure the replay server. Ignore this alarm.
Allow Full Database Vacuum on Startup if required
Once every 6 months, the recorder must perform essential database functions. It does this on startup, but only after warning you that this will happen. If you receive an alarm saying that this is required but cannot afford to have the recorder do this on its next restart, you can defer this activity by clearing this checkbox. After each restart, this checkbox is reset and you must clear it again if you want to defer the task further. You must allow the recorder to perform these tasks within one month of being alerted.
Key Management Server
If you intend to encrypt recordings, refer to Encrypted File Storage on page 177 and set the name of your Key Management Server here.
Key Management Certificate Passphrase
If you intend to encrypt recordings, refer to Encrypted File Storage on page 177 and set the passphrase for your Key Management Certificate here.
General Setup
Issue 4 April, 2010 109
Confidential and Proprietary Information
URL(s) of Unify/External control port(s) to connect to
Specify the IP node name of each external controller. The port number will default to 1414 but to override this add a colon then the port number. If the recorder is supporting multiple servers, list their names separated by semi-colons.
When using the AIC or PDS Connector, for example, you must set the port number to 1415.
Time between beeps (secs)
If you are using the recorder to inject warning tone onto calls as they being recorded (a mandatory requirement in some countries/regions) you can specify the interval between beeps.
Add VDN number as additional "owner" of calls
Access to recordings is normally controlled according to the station or agent that is the subject of the recording. You may, however, choose to control access to recordings on the basis of which VDN the call was routed by. To do this, you must first set this option to Yes.
Communication Manager Interface
This page lets you set details about the Avaya Communication Manager. The recorder uses these settings to create softphones that it can use to record, replay and monitor calls.
The settings are described below in the order in which they appear on the screen.
Avaya Communication Manager Name
Set this to the name of the Avaya Communication Manager system you wish to record.
IP Address to use on this server for RTP
You must specify which IP address (and therefore which NIC) on the server should receive the audio streams.
AE Server Address(es)
The IP address of the Avaya Application Enablement Server on which the Device, Media and Call Control (DMCC) API is running. If you are not using a standby recorder but do have a backup AES, add a semicolon before each subsequent address. If the first address in the list is unavailable, the recorder attempts to establish a connection with the next
Configuration
110 Avaya Contact Recorder Planning, Installation and Administration Guide
Confidential and Proprietary Information
server specified in the list. If you have a standby recorder, connect the master to one AES and the standby to another.
DMCC User Name
The user name that the recorder should use to log in to the Device, Media and Call Control API.
DMCC Password
The password that the recorder should use to log in to the Device, Media and Call Control API.
Encrypt Media Streams
Check this setting to have the audio between the recorder and VoIP resources encrypted. You can still record calls on which the other party’s audio is encrypted without setting this option. If you do set it, ensure that you have configured the codec set used by the recorder’s softphones to support encryption. Also note the impact on server capacity.
IP Station Security Code
All IP softphones that register with Communication Manager must provide a security code. The code you enter must match the code entered for all the stations that you created earlier on Communication Manager for the recorder to use. This field entry is masked for security purposes.
The following settings are only shown on Master and Standby servers as they are not required by Slave or Replay servers.
Service Observe Feature Access Code
Enter the Feature Access Code configured in your Communication Manager that the recorder should use for Service Observe. Use the code for No-Talk Service Observe, unless you need beep tone, in which case use the Talk-Listen code.
Note:Note: As the recorder has to dial these digits each time a new service observation
is required, the access code should be kept short. If the string is too long and/or your Communication Manager is overloaded you may find delays of around a second at the start of recordings made in response to requests from Quality Monitoring.
General Setup
Issue 4 April, 2010 111
Confidential and Proprietary Information
AES TSAPI Server(s)
Enter the IP address of the AE Server that is configured to provide TSAPI services to the recorder. If you are not using a standby recorder but do have a backup AES, you can specify further addresses, separating them with a semi-colon. Names are attempted in order if the first one fails. If you have a standby recorder, connect the master to one AES and the standby to another.
AES TSAPI Service Identifier(s)
Enter the service identifier of the Avaya CT service that the recorder is to use. If you have specified multiple servers, specify the service name for each, in the same order. Separate multiple service identifiers with a semi-colon. All services must support the same login ID and password.
Note:Note: You should always specify the secure service (ending in "-S") when setting
this field.
AES TSAPI Service Login ID
Enter the login identifier that the recorder should use when accessing TSAPI.
AES TSAPI Service password
Enter the password that the recorder should use when accessing TSAPI.
Agent Skill Group(s) to Observe
TSAPI does not let the recorder observe AgentIDs directly. If you wish to record calls based on AgentID - or even to tag recordings with Agent Ids and names, you MUST configure this setting. Enter enough skill groups to ensure that each agent you wish to record is in at least one of these groups. Separate skill groups with a semi-colon. You can enter ranges of skills - but only if all values within the range are valid skill hunt groups.
Tip:Tip: Consider creating one dummy skill hunt group and assign all agents to this
skill. You then need only enter that one skill hunt group here. This also minimizes the number of TSAPI licenses you need.
Address of the Communication Manager
This setting and the following two are only required if you intend to control recording in Conferenced mode according to the CoR in which stations are placed. The recorder needs these settings to use the SMS Web services.
Configuration
112 Avaya Contact Recorder Planning, Installation and Administration Guide
Confidential and Proprietary Information
Set this entry to the IP address or hostname of the Communication Manager. If using hostname, the AES must be able to resolve this to an IP address.
Username for Switch Administration
See above for when this setting is required. If it is needed, enter the username the recorder should use when accessing the automated switch administration (SMS) services.
Password for Switch Administration
See above for when this setting is required. If it is needed, enter the password the recorder should use when accessing the automated switch administration (SMS) services.
Extensions assigned to recorder
Here you enter the ranges of stations that you configured earlier for the recorder to use. Each port on the recorder corresponds to a station number on the Communication Manager. Ideally, you should choose a single, contiguous range of station numbers. However, you can choose multiple ranges.
To make subsequent administration as easy as possible, assign sufficient stations to handle the ultimate load on this server, even if you do not intend to allocate all of these ports immediately.
To add a port range
1. Click Add Port(s) at the bottom left.
2. Enter a range of station numbers.
To edit a port range,
1. Click on the Edit link in the right-hand column.
2. Change lowest or highest port number or both.
To delete one or more port ranges:
1. Click the checkbox in the Select column for each station range you want to delete.
2. Click on the Delete selected port(s) link.
Once you have configured a range of softphones, these can be used for a number of purposes according to the type of recorder this is:
Master: Use the tabs under Operations to assign ports to the various tasks that your license allows.
Standby: Normally, this will adopt the configuration of the master (unless you have forced it to accept local configuration in which case you should use the Operations tab as above.
Slave: All ports are automatically assigned to support Conferenced Mode recording under control of the Master.
General Setup
Issue 4 April, 2010 113
Confidential and Proprietary Information
Central Replay Server: All ports are automatically assigned to the telephone replay pool.
Note:Note: You can only delete a port range if none of its stations is assigned to any of
the recording modes.
! Important:! Important:Important: Set these port ranges up correctly before proceeding to the subsequent
pages on which you allocate these ports to the various recording and replay tasks.
For a basic, small system, this is all that you need enter here. However, on larger systems you may want to click on the Advanced link to set some or all of the following:
Specify which of several servers should act as standby to a particular set of ports. Enter the serial number of the server.
You can (although this is NOT recommended) force the ports to register through a specific C-LAN(s) rather than allowing AES to determine this automatically. Enter the IP address of the C-LAN they should use.
! Important:! Important:Important: Since the C-LAN address is only used when registering a softphone on
startup, if you change the C-LAN address of a softphone that has already successfully registered, it does not re-register to the new address until you reset it, the recording service, or the server.
Once you have set any of these Advanced options, this setting will be shown on the list of ports.
Configuration
114 Avaya Contact Recorder Planning, Installation and Administration Guide
Confidential and Proprietary Information
System Monitoring
The status of your recording system is shown on several web pages beneath the Recorder Status link on the Administration interface. Here you can see:
overall System Status (Master and Standby recorders only). This shows the status of all recording servers in your system and provides links to the administration interface of the other servers should you wish to investigate any issues that are highlighted there. Problems are highlighted in red or amber according to their severity.
overall status summary for the server and its interfaces to other components
loading levels - both current and peak
CTI observers and current call states
individual recording channel detail
Having just configured the recorder's main settings, you should now review the status and address any problems highlighted on these pages or the Alarms page.
Alarms and events occurring within the system are stored in its local database. You can view them via the Alarms link on the left of the Administration page. If this link is red, it indicates that there are one or more uncleared alarms. As you address the cause of an alarm, you should clear it by clicking the checkbox to the left of it and then clicking the Clear Selected Event(s) link.
You should configure email alerting and/or SNMP monitoring of the system as described below. The system will then be able to bring alarms to your attention promptly.
Email Notification
To have the recorder email alarms to you or your support staff, first create an email account that the recorder can use to send emails. Click the System › Email Server tabs at the top of the Administration page and enter the following details:
SMTP Mail "From" Address
Set the name from which alarm email messages should originate, for example, [email protected].
SMTP Mail Server
Enter the name of the SMTP mail server on which you have established the email account that the recorder will use to send email messages. If you leave this blank, the system will
System Monitoring
Issue 4 April, 2010 115
Confidential and Proprietary Information
not send email messages when alarms occur - and you can then leave the remaining settings on this page blank.
SMTP Username
Leave this blank if your SMTP server allows unauthenticated sending. If it requires authentication, set the username of the SMTP account here.
SMTP Password
Leave this blank if your SMTP server allows unauthenticated sending. If it requires authentication, set the password of the SMTP account here. The password is masked when entered in this field.
Send Alarm/event emails to
Specify the email address(es) to which alarm and event messages should sent. Separate multiple addresses with a semi-colon (;). The email recipient can be a local system administrator, a manned help-desk and/or suppliers' support desks if you have a support agreement that includes this facility. The system sends an email message each time an alarm occurs or is resolved. It also sends an email once per day as a "heartbeat" to let you know it is still operating. This email is sent overnight and also advises you of the available disk space after the log files have been purged. You should investigate any failure to receive the daily heartbeat message as it could indicate that the server has failed.
Note:Note: The system will batch emails for up to 10 minutes to avoid flooding users'
inboxes. The default configuration is that all alarms and events are sent via E-mail. You can change this so that only alarms above a specified severity are sent by E-mail. Be aware that if you do so, you may be unaware of issues that are affecting your system. See "email.minalarmlevel" in Properties File on page 182.
Confirm that you are receiving emails correctly after you make any changes to these settings.
SNMP
You can use an SNMP monitoring system such as HP OpenView to monitor Avaya Contact Recorders. To do so, you must first set the name of the SNMP Read Community in the General Setup › Recorder page. The recorder will then respond to SNMPV1 Get messages.
For security reasons, recorders:
Configuration
116 Avaya Contact Recorder Planning, Installation and Administration Guide
Confidential and Proprietary Information
"do not allow "well known" community names like "private" or "public"
"do not respond to SNMP Gets until a community name has been set
"do not use the usual port of 161, but instead use 2161.
You can also specify the SNMP Trap Destination (again, on the General Setup > Recorder page).
Once set, SNMP traps will be sent to your monitoring system at the address specified.
Operations
Issue 4 April, 2010 117
Confidential and Proprietary Information
Operations
After initial setup, configuration of the recorder on a day-to-day basis largely consists of changing what is being recorded and by which ports on the recorder. You should also regularly check the status of any archive locations that you have configured here.
Beneath this tab therefore are administration pages that let you manage Archiving and each of the different recording and replay functions that the recorder provides.
Common Settings
The following settings are used on more than one Operations page and have the same meaning on each. This does not imply that all of these settings are applicable to ALL modes.
Apply Beep Tone within recorder
For each recording mode, you can specify whether or not the recorder injects beep tone. For a full discussion, see Beep Tone on page 37.
Audio format
In most modes, you can specify whether the VoIP audio is sent to and from the recorder in G.729A or in G.711. See Audio Format on page 41 for a discussion of compression formats. You must restart the recorder for changes to this setting to take effect.
Stop recording if the call drops to just one other party
In some modes, users call a port on the recorder in order to record a call. Because the recorder port is then itself a party to the call being recorded, the call will stay active if any one of the other parties fails to hang up.
To avoid the port getting stuck in this way, you can set the recorder to hang up if other parties on the call hang up - leaving only the recorder and one other party left on the call.
Ports Configured
This figure shows how many ports you have allocated to this recording mode - as detailed in the table at the bottom of the page.
Configuration
118 Avaya Contact Recorder Planning, Installation and Administration Guide
Confidential and Proprietary Information
Standby Recorder Serial Number
If you are using ESS or LSP standby configurations you can specify the serial number of the standby recorder that provides backup services for this range of ports or stations. Leave this field blank if you have no standby or a single standby recorder. It is only required for systems where multiple standby recorders each take over a part of the load during failover.
Warn when free port count falls BELOW
Where a pool of ports is used as a shared resource, this setting triggers an alarm warning that a pool is running short of available capacity. The warning message identifies the pool of ports using the Comment field (or the port number range if no comment was entered). The default for this setting is zero - and as a pool can never have less than zero ports available, the warning is effectively turned off by this setting. If you set it to 1 the recorder will alarm when the free count falls below 1 - that is to zero. And so forth.
Recording owner
See Search and Replay Access Rights on page 144 for details of how a recording's "owner" determines which user(s) can replay it. You can use this setting to override the default ownership (station or agent number).
For example, if you are configuring a pool of ports for use by the human resources department, you might find it more convenient to have all recordings made on them owned by "hr" rather than several different station numbers, as would be the case if you left the default ownership in place. You can then control access to all of these recordings by assigning replay rights over "hr" to those users entitled to play them. You can enter an alphanumeric string or a number. Leading zeroes, if entered, are significant and are retained. All characters are stored in lowercase, so replay rights are applied case insensitively.
Record calls that do NOT have a VDN number?
This setting specifies whether calls that do not have a Vector Directory Number (VDN) are recorded. This typically includes all outgoing calls. When it appears at the top of an administration page, this rule applies to the recording mode as a whole. It can be overridden for specific stations or ports using the Advanced settings.
Filter calls by VDN and/or Skill?
This option lets you control whether or not to record on the basis of a call's VDN number or the skill hunt group the call was answered by. It applies ONLY to calls that DO have a VDN number. Record calls that do NOT have a VDN number determines how other calls are handled.
Select one of the following options:
Operations
Issue 4 April, 2010 119
Confidential and Proprietary Information
Record all calls that have a VDN number
Record only those that are on specific VDNs or skill hunt groups. You can specify one or several VDNs, skill groups, or ranges.
Record only those that do NOT come in on specific VDN or skill hunt groups. You can specify one or several VDNs, skill groups, or ranges.
! Important:! Important:Important: Enter VDN numbers or skill hunt groups only. Not station or agent numbers.
When it appears at the top of an administration page, this rule applies to the recording mode as a whole. It can be overridden for specific stations or ports using the Advanced settings.
Assigning Ports
Each of the sub-tabs beneath Operations (except the Archive one) lets you assign ports to any of the uses that are appropriate given the server and channels licenses you have installed. You allocate these ports to specific uses in two ways:
Explicit Allocation - where you specify exactly which ports should be used. This approach is used for all cases where users dial in to or conference in to the ports in order to use them. An example is a pool of On Demand recording ports. The station numbers assigned to this pool must match those you have placed in the hunt group that you are going to tell your users they should dial for a recorder port.
Automatic Allocation - where you specify what you want the ports to record or simply how many ports are to be used. This approach is used for modes where users do not need to dial into ports and hence it does not matter which ports the recorder selects for a given task. An example is Station Bulk recording of a particular station. You tell the recorder which station you want to record but don't care which of the recorder's stations is used to service observe the "target" station so it can be recorded.
Read the text in the pop-up dialogs carefully to see whether you are being asked to specify recorder ports or targets to be recorded.
Ranges
When assigning ports or specifying which stations or addresses are to be recorded, you can enter single numbers or ranges of numbers. For example, entering "4000-4099" is much easier to enter than 100 different numbers. Typically you need to enter some contiguous ranges and some individual port numbers.
A set of recorder ports is referred to as a "pool" and is configured on the appropriate page of the administration application by entering one or more port ranges. As you enter port numbers, keep the following in mind:
Configuration
120 Avaya Contact Recorder Planning, Installation and Administration Guide
Confidential and Proprietary Information
A range can be a single number or a set of contiguously numbered ports or stations.
Within a Communication Manager system, it is possible to have port or station numbers that have one or more leading zeros. It is therefore important that you enter any leading zeros. The start and end ports in any port range must have the same number of digits even if some of these are leading zeros.
The lowest and highest port numbers in a range must have the same number of digits. Therefore, if you have some 4 and some 5-digit ports, you must enter these as two separate ranges.
Entering a range
Enter a range of ports as follows (station and address ranges are entered in the same way):
1. Click the Add port(s) button. The Station Range dialog is displayed.
- To enter a single port, type the number in the top text box.
- To enter a range, type the number of the first port in the range into the top text box and the final port in the range into the second text box.
2. Add a Comment (optional).
For pooled modes, you can use this field to name a range of ports and to note any hunt group number that you assigned to these ports. The text you enter appears in status reports and warning messages as labels for the specified range. For more information about pooled modes, see Using pooled port modes on page 121.
3. To quit without entering the port numbers, click Close Window.
To enter the port numbers and keep the window open to specify additional port numbers, click Enter and Stay Open.
To enter the port numbers and close the window, click Enter and Close.
Port ranges are checked for consistency with other ranges and with license conditions as they are entered. If an entry is invalid, a message indicating the error is displayed; you can change the information as necessary.
Editing ranges
You can either change or delete the ranges listed. You can change the following fields without interrupting any recordings that might be active on the port(s) affected:
Comment
Prompt User in...
Warning Level
Recording Owner
VDN recording rules

Operations
Issue 4 April, 2010 121
Confidential and Proprietary Information
Some changes require that the softphone be reset and hence active recordings will be truncated. These are:
C-LAN address
Standby Recorder Serial Number
Any change to the number of ports in the range
Any change to the port numbers in the range
A change to the Codec
Deletion terminates any recording activity on a deleted port.
To edit a range:
1. Click the Edit link to the right of the range you want to alter.
2. Edit the range in the port entry form.
3. Click Enter.
Deleting ranges
Delete one or more ranges as follows:
1. Click the checkbox in the Select column for each range that you want to delete.
2. Click Delete selected port(s).
Advanced settings
To implement advanced settings on a range of ports, stations or addresses:
1. Add or edit a range as above.
2. Click the Advanced button.
3. Enter data in the Advanced fields.
4. To quit without saving the settings, click Close Window.
To enter the port numbers and keep the window open to specify additional port numbers, click Enter and Stay Open.
To enter the port numbers and close the window, click Enter and Close.
Using pooled port modes
If you use On Demand Recording, Meeting Recording or Phone Replay, you can manage each range of ports dedicated to a recording mode separately. For example, if you assign two ranges of ports to Meeting Recording, you can use one for English speakers and one for French speakers. You can also track usage of individual pools. You could, for example, set up two different On Demand pools, one for a particular department on one hunt group and one for everyone else on another hunt group. You can track the status of these pools
Configuration
122 Avaya Contact Recorder Planning, Installation and Administration Guide
Confidential and Proprietary Information
through the Recorder Status pages. For each port range assigned to a mode, you can view activity for that port range in the Recorder Status > System page.
Conferenced Recording
This type of recording uses single-step conferencing to record calls and is the preferred mechanism for bulk recording.
Instead of relying solely on DMCC, this mode also uses the more powerful CTI capabilities of TSAPI, to track call activity and control recording.
The recorder does not dedicate a softphone to each recording target. Nor does it suffer from some of the limitations noted with respect to recordings made via the service observe feature of Communication Manager.
Recording is triggered by rules that can be applied to five types of "target" addresses:
Stations
Agent IDs
Skill hunt groups
VDNs
Classes of Restriction
! Important:! Important:Important: There are a number of prerequisites and settings that are required for this
recording mode.
! Important:! Important:Important: If you are using a Security Database as part of your AES TSAPI setup, you
must ensure that the recorder is granted access to all the addresses (stations, VDNs and skill hunt groups) that it will need to observe.
Mode Setup
At the top of the page are the following settings. Those that are simply listed here are explained in Common Settings on page 117. The other settings are unique to Conferenced mode. You must set ALL of these parameters in accordance with the instructions below before you specify which addresses are to be recorded.
Apply Beep Tone within recorder
! Important:! Important:Important: Setting this to Yes means that every Conferenced recording will use an extra
timeslot on the port network handling the call.
Operations
Issue 4 April, 2010 123
Confidential and Proprietary Information
Audio format
The next two settings operate as described in Common Settings on page 117 but note that these are secondary tests on a call. Calls must match an address shown at the bottom of the screen before they are even considered for recording. These tests are then applied to filter the calls further. These settings should only be used if your main recording rules (at the bottom of the screen) target stations or agents.
Record calls that do NOT have a VDN number?
Filter calls by VDN and/or Skill?
Test VDN filter against which VDN? - A call may be routed through several VDNs. If you have specified a rule in the previous setting, you can use this setting to tell the system whether your rule refers to the first, last or any VDN that the call has gone through. The default is to use the first VDN. Note that the recorder will only be aware of VDNs that you listed above. You therefore have considerable flexibility should you wish to ignore specific VDNs.
Tag calls with which VDN? - Each recording can only be tagged with a single VDN. You can choose whether this is the first or last VDN that a call went through. As with the previous setting, "first" and "last" are "as far as the recorder is aware" i.e. restricted to those VDNs you tell it to observe.
Maximum Concurrent Recordings (on this recorder) - determines how many of this recorder's ports are assigned to this recording mode. If this recorder is controlling other Slave recorders, their ports will be in addition to this count.
VDN(s) to Observe - If you want the recorder to tag and/or control according to the VDN(s) through which a call is routed, you must enter all of the VDNs in use here. Separate VDNs with a semi-colon. You can enter ranges of VDNs - but only if all values within the range are valid VDNs.
Tip:Tip: If you have ranges of VDNs within which some numbers are not used,
consider creating these as VDNs to allow you to enter the whole range here.
Specify recording targets by - You can choose whether to give the recorder a list of dialable numbers (stations, agents, skills or VDNs) to record or whether you simply want to list the Classes of Restriction (CoRs) that it should record. If you choose this latter option then you must configure additional settings on the General Setup > Communication Manager Interface page as described on page Communication Manager Interface on page 109. The recorder will then track the configuration of the Communication Manager and automatically determine which stations are in the CoR(s) listed and hence should be recorded. As it can take several minutes to determine the CoR of each station on the switch, this is only done overnight. If you change the CoR settings on this page and/or on the switch, you can click the "Refresh CoR membership" button at the foot of this page to force an immediate refresh. If you do this, you should check the alarms page after five minutes to confirm that this completed successfully.
Configuration
124 Avaya Contact Recorder Planning, Installation and Administration Guide
Confidential and Proprietary Information
Note:Note: In a master/standby environment, if you change the set of CoRs to be
recorded, you should confirm that the standby has successfully determined the stations that it should record. As the SMS interface details are entered separately on the standby (as these may be different from those on the master) it is important to check this.
If switching between CoR and station/agent/skill/VDN targetting, you should
remove all configured targets
change this setting
add the addresses to be recorded.
Failing to do so will leave the previously configured targets recording until the recorder is restarted.
Ports Configured - this should match the Maximum Concurrent Recordings figure that you have specified. If it does not, you should provide more recorder ports.
Addresses
The table at the bottom of the page lets you specify which addresses are to be recorded. These addresses can be station numbers, agent logon ids, skill hunt groups or VDN numbers, or if you have chosen CoRs as described above, one or more Classes of Restriction.
! WARNING:WARNING: Using a mixture of different address types can give confusing results. You
should normally choose which type of address you are going to use and not use the others. The exception to this is if you can clearly partition your traffic so that there is no chance of multiple rules firing for a single call.
You can target single addresses or ranges. For example, if your 45 agent identifiers are all in the range of 7400 to 7450, you can use the range 7400-7450, even though not all these numbers have been assigned. Use this feature sparingly though as it will take longer for the recorder to start and recover from outages if it has to try many more addresses than are strictly necessary.
! Important:! Important:Important: Unless you have chosen to specify recording targets by CoR, the recorder
determines whether each number you enter is an agent, station, skill or VDN. If you ever change your numbering plan so as to reuse a number for a different purpose you will need to restart the recorder for it to notice such a change.
The system automatically determines which ports will do the recording. It does this to minimize the impact of changes, leaving previously assigned ports untouched if possible to
Operations
Issue 4 April, 2010 125
Confidential and Proprietary Information
allow updates to configurations to be done during business hours rather than having to wait for close of business.
! Important:! Important:Important: As the recorder picks the ports to use for this mode you must be careful
when YOU choose to assign ports to the other modes. Use the Recorder Status > Ports page to check if the ports you are about to assign are in use for this mode before doing so. You can still assign them to the other mode but any recording in progress will be truncated before being re-established on another port.
You can enter more addresses than you have assigned ports to this mode. The number of ports assigned is controlled by the Maximum Concurrent Recordings (on this recorder) setting above - not by the number of entries in this table.
For complete instructions on adding, editing and deleting addresses refer to the earlier section "Port(s) and station(s)."
Advanced Settings
Click on the Advanced link when entering or editing an address range to set the following options. Where these are simply listed below, full details can be found under Common Settings on page 117. Those settings that are specific to this mode are described in full.
Standby Recorder Serial Number
Recording owner
Record calls that do NOT have a VDN number?
Filter calls by VDN and/or Skill?
The above two settings should only be used where the address range you are applying them to is an agent or station range.
Trigger recording on alert - If this box is ticked, a call will be recorded if it alerted the specified address - even if it was never actually connected to this address. If the box is cleared, calls are only recorded if they actually connected to the specified address.
Note:Note: As calls are never actually connected to VDNs or Skill Hunt Groups (they
alert on them but are connected to a station or agent) you must leave this box checked when specifying VDN or Skill Hunt Group address ranges.
Follow the call - If checked, a call will be recorded until the call ends. If cleared, the recording will stop once the address that triggered recording is no longer connected to the call. For example, if the recorder is only configured to record calls made by Agent 1234, then if this box is cleared, the recording will end if Agent 1234 transfers the call to another agent. If the box is checked, recording will continue. As with the previous setting this must be checked if the address range specifies VDN or Skill Hunt Groups.
Configuration
126 Avaya Contact Recorder Planning, Installation and Administration Guide
Confidential and Proprietary Information
! Important:! Important:Important: These last two settings can cause the recorder to make more concurrent
recordings than you originally planned. As calls are diverted to or transferred off to other stations, those you have targeted in this mode can take other calls while those calls are still being recorded.
! CAUTION:
CAUTION: In order to maintain a CTI observer on a call after it has left the originally observed address, the recorder must keep one of its own ports on the call even when the call is not recordable (e.g. has placed on hold). This option therefore restricts calls to 4 instead of 5 way conferences as there may, briefly, be two recording ports present on a call as a consult call merges into a conference call.
Master/Slave Configurations
Because this recording mode can target skill hunt groups, agent ids and VDNs, it is not easy to partition a large site into several independent recorders (as you can with Station Bulk recording, for example).
If you need to record more channels than a single server can handle, you should configure Conferenced recording on one (the Master) and provide one or more Slave recorders to provide the required number of concurrent recording channels.
To configure a system in this way:
1. Configure the Conferenced recording mode on the Master as normal but specify 0 Concurrent Recording Channels (on this recorder).
2. Each slave recorder will automatically assign all softphones you enter on the General Setup > Communication Manager Interface page to this recording mode and will make them available to the Master.
If using a Standby recorder (recommended to avoid the Master becoming a single point of failure in a large system),
1. Configure the standby as you would normally, specifying the Master recorder as the recorder it should shadow.
2. On each Slave recorder, add the standby's IP address after the Master's address (separated by a semi-colon) on the System > License > Change License page.
Quality Monitoring
The Quality Monitoring page is available if you have purchased one or more Quality Monitoring seat licenses. On this page, you specify the settings required for the recorder to
Operations
Issue 4 April, 2010 127
Confidential and Proprietary Information
interact with one or more Quality Monitoring Servers and which ports on the recorder are available for it/them to use.
Mode Setup
At the top of the page are the following settings. Those that are simply listed here are explained in Common Settings on page 117. The other settings are unique to this mode.
Apply Beep Tone within recorder
Audio format
! Important:! Important:Important: If you want to use these quality ports to record stations that are also being
recorded in other service observe based modes, you must use the same codec as these other modes.
URL(s) of Quality server(s) to connect to - Specify the IP node name of the Quality server. The port number will default to 1415. If the recorder is supporting multiple servers, list their names separated by semi-colons.
Username/Password for file-share on Quality server - Recordings made under the control of this Quality application are only held temporarily in the recorder's bulk recording call storage area. As each call completes it is copied onto a location maintained by the Quality application. If you have configured Quality Monitoring to store recordings in a file-share, you must enter a username and password here so that the recorder can write recordings to and read recordings from the file-share on the quality server..
Note:Note: When you use more than one Quality server, you must use the same
username and password on each one's fileshare.
Ports Configured
Ports Assigned
The table at the bottom of the page lets you assign specific recorder ports to this recording mode. Refer to Assigning Ports on page 119.
For this mode, you typically add a single range of ports - large enough for the total number of recording and replay ports. The split between recording and replay is set up on the Quality Server not the recorder. Ports must be configured as either RECORD or REPLAY, not BOTH on the Quality server.
Advanced Settings
Click on the Advanced link when entering or editing a port range to set:
Standby Recorder Serial Number
Configuration
128 Avaya Contact Recorder Planning, Installation and Administration Guide
Confidential and Proprietary Information
This is described under Common Settings on page 117.
Station Bulk Recording
Unlike the previous recording modes, this type of recording dedicates a port on the Avaya Contact Recorder to each station it records. You do not specify which ports the recorder should use. You simply list the stations that you want to record. The system chooses from the available ports.
Mode Setup
At the top of the page are the following settings, most of which are are explained in Common Settings on page 117:
Apply Beep Tone within recorder
Audio format
Delete Recording by entering - You can specify a digit string that the user can dial to delete the recording of the current call. When this delete command is issued, call segments from the past 24 hours with the same UCID and owner as the current call are deleted from the local database and the audio (wav) and details (xml) files are removed from the hard disk. If you enable this option, be sure to inform the users of the selected string. When choosing the string for this command, consider the following:
- A very short string, such as *, can be entered by accident.
- A longer string is more difficult to remember and enter.
Consider using the alphanumeric equivalent for a digit key, for example, **D is really **3 but D for delete is easier to remember.
To disable this option, set this parameter to an empty string - which will show as Not Defined and the feature is disabled.
Viewer and Central Replay Server do not support call deletion. Since audio files are stored on the local recorder hard drive, the wav file is deleted when the command is given, but the call detail record remains on the central database. So, the deleted calls can be searched for but not replayed. Also, if any of the archive mechanisms copy the recording to an archive before it is deleted, then this copy will still be present.
Record calls that do NOT have a VDN number?
Filter calls by VDN and/or Skill Hunt Group?
Ports Configured
Operations
Issue 4 April, 2010 129
Confidential and Proprietary Information
Stations to be recorded
The table at the bottom of the page lets you specify which stations are to be recorded. The system determines which ports will do the recording. It does this to minimize the impact of changes, leaving previously assigned ports untouched if possible to allow updates to configurations to be done during business hours rather than having to wait for close of business.
! Important:! Important:Important: As the recorder picks the ports to use for this mode you must be careful
when YOU choose to assign ports to the other modes. Use the Recorder Status > Ports page to check if the ports you are about to assign are in use for this mode before doing so. You can still assign them to the other mode but any recording in progress will be truncated before being re-established on another port.
For complete instructions on adding, editing and deleting stations, refer to the earlier section "Port(s) and station(s)."
! WARNING:WARNING: Do NOT enter Agent, Skill hunt group or VDN numbers. You can only record
STATIONS with this recording mode.
Advanced Port Settings
Click on the Advanced link when entering or editing a port range to set:
Standby Recorder Serial Number
Recording owner
Record calls that do NOT have a VDN number?
Filter calls by VDN and/or Skill?
All of the above are described under Common Settings on page 117.
Station Executive Recording
As with Station Bulk recording, you do not specify which ports the recorder should use. You simply list the stations that you want to record. The system chooses from the available ports.
Mode Setup
At the top of the page are the following settings, most of which are are explained in Common Settings on page 117:
Configuration
130 Avaya Contact Recorder Planning, Installation and Administration Guide
Confidential and Proprietary Information
Apply Beep Tone within recorder - note that a third option is available in addition to the normal Yes and No. You can choose to have beep tone start only once the user has entered the retain command.
Audio format
Retain Recording by entering - You can specify a digit string that the user can dial to retain the recording of the current call segment. Normally, the recording is deleted by default as soon as the user ends the call segment, but entering the Retain digit string during the course of the call instructs the recorder to retain the recording. If you enable this option, ensure that you inform the users of the selected string. When choosing the string for this command, consider the following:
- A very short string, such as *, can be entered by accident.
- A longer string is more difficult to remember and enter.
- You can use letters instead of numbers. For example, **R is actually **7 but R for retain is easier to remember.
Ports Configured
Unassigned Capacity
Stations to be recorded
The table at the bottom of the page lets you specify which stations are to be recorded. The system determines which ports will do the recording. It does this to minimize the impact of changes, leaving previously assigned ports untouched if possible to allow updates to configurations to be done during business hours rather than having to wait for close of business.
! Important:! Important:Important: As the recorder picks the ports to use for this mode you must be careful
when YOU choose to assign ports to the other modes. Use the Status > Port Details page to check if the ports you are about to assign are in use for this mode before doing so. You can still assign them to the other mode but any recording in progress will be truncated before being re-established on another port.
For complete instructions on adding, editing and deleting stations, refer to the earlier section "Port(s) and station(s)."
! WARNING:WARNING: Do NOT enter Agent, Skill hunt group or VDN numbers. You can only record
STATIONS with this recording mode.
Advanced Port Settings
Click on the Advanced link when entering or editing a port range to set:
Operations
Issue 4 April, 2010 131
Confidential and Proprietary Information
Standby Recorder Serial Number
Recording owner
Both of the above are described under Common Settings on page 117.
Delayed Call Deletion
Optionally, you can configure the recorder to wait before deleting a recording made in this mode. If a user decides to retain a call after it has completed, he can do so by ringing a specific number (the "Retain Port") on the recorder.
Note:Note: This feature requires one additional port on the recorder.
To implement this configuration, you must add the following lines to the properties file:
execmode.deletedelaymins=NN
execmode.retainnumber=NNNNN
Where
NN is a number of minutes from the end of the call within which the user can call the "retain" number to retain the call
NNNNN is the station number of an otherwise unallocated port on the recorder that will be dedicated to receiving Retain commands after hang up.
If you set these properties, call segments recorded in Station Executive mode are not deleted until the time specified has elapsed after the end of that recording segment. A retain command entered during or after the recording ends (within the specified period) will preserve the calls. When determining an appropriate value for this delay, consider the following:
You want to maximize the chance of retaining all segments of a call that the Station Executive user chooses to Retain, but
You should minimize the time in which unwanted or unauthorized recordings are available for replay.
The Retain command applies only to the most recent call on a station. So, if a call is placed on hold and a consultation call is made, this consultation call is now the most recent.
Calling the retain number when the previous call is still on hold results in the consultation call being retained. However, if the user resumes the held call, hangs up, then dials the retain number, the original (and final) call is retained. In this case, the segment before the call was placed on hold is retained, as long as it ended less than NN minutes before the retain command was given.
Configuration
132 Avaya Contact Recorder Planning, Installation and Administration Guide
Confidential and Proprietary Information
On Demand Recording
This type of recording uses a pool of ports on the recorder that you can access via one or more hunt groups.
Mode Setup
At the top of the page are the following settings:
Apply Beep Tone within recorder
Audio format
Stop recording if the call drops to just one other party
Ports Configured
All of these are explained in Common Settings on page 117.
Ports Assigned
The table at the bottom of the page lets you assign specific recorder ports to this recording mode. Refer to Assigning Ports on page 119.
In most cases, you will want to place each of these ports in a hunt group and make your users aware of this hunt group number and/or set up a key on their phones to access it.
Advanced Settings
Click on the Advanced link when entering or editing a port range to set:
Standby Recorder Serial Number
Free port count warning level
Recording owner
All of these are described under Common Settings on page 117.
Audix
To allow a user easy access to On Demand Recording from a station, combine On Demand Recording with the "One-Step Recording via Audix" Communication Manager feature. To do this, enter the hunt group used for some On Demand ports as the parameter for the Audix-rec feature button you assign to the user's station.
When using the Audix-rec feature, keep in mind:
Recording beep tone can only be applied by the Communication Manager, not by the recorder
Operations
Issue 4 April, 2010 133
Confidential and Proprietary Information
The user pressing the button will not hear the beep tone.
Calls recorded using this feature are only indexed with the party that pressed the button, not the other party on the call.
For more information, refer to the One-Step Recording via Audix topic, Feature Related System Parameters Section, in Chapter 19: Screen Reference of the Administrator Guide for Avaya Communication Manager.
Meeting Recording
This type of recording uses a pool of ports on the recorder that you can access via one or more hunt groups.
Mode Setup
At the top of the page are the following settings:
Apply Beep Tone within recorder
Stop recording if the call drops to just one other party
Ports Configured
All of these are explained in Common Settings on page 117.
Note that all Meeting recordings are performed in G.711 to make the production of custom voice prompts simpler.
Ports Assigned
The table at the bottom of the page lets you assign specific recorder ports to this recording mode. Refer to Assigning Ports on page 119.
In most cases, you will want to place each of these ports in a hunt group and make your users aware of this hunt group number and/or set up a key on their phones to access it.
Advanced Port Settings
Click on the Advanced link when entering or editing a port range to set:
Standby Recorder Serial Number
Free port count warning level
Recording owner.
Tip:Tip: On Meeting Recording ports, a user can enter a list of owners manually
using the dial pad .
Configuration
134 Avaya Contact Recorder Planning, Installation and Administration Guide
Confidential and Proprietary Information
All of the above are described under Common Settings on page 117.
Prompt users in - Sets the language for spoken prompts. If using multiple languages, you should configure a hunt group to correspond with each range of ports that uses a different language.
Custom Prompts
If the language you require is not offered, select Customer defined prompts and provide your own set of prompts. These files are located in /wav beneath the folder into which you installed the recorder and are called:
welcome_custom.wav
owners_custom.wav
recording_custom.wav
help_custom.wav
You can replace these four files with your own recordings. Listen to the corresponding file in a language you understand (for example, welcome_english.wav) and record the equivalent messages in your own language.
! WARNING:WARNING: You MUST use the same G.711 µ-law encoding that the supplied files use.
(Telephone) Replay Ports
The Replay page is only available if you have purchased one or more telephone replay port licenses.
Mode Setup
This mode requires no manual settings. The top of the page simply shows:
Ports Configured
These are explained in Common Settings on page 117.
Ports Assigned
The table at the bottom of the page lets you assign specific recorder ports to this recording mode. Refer to Assigning Ports on page 119.
For this mode, you typically add a single range of ports - enough to handle the maximum concurrent number of replay users the recorder is to support.
Operations
Issue 4 April, 2010 135
Confidential and Proprietary Information
! Important:! Important:Important: Replay ports impose a significant load on the recorder. Be sure that you
have specified a powerful enough server.
Advanced settings
Click on the Advanced button when entering or editing a port range to set:
Standby Recorder Serial Number
Free port count warning level
These are described under Common Settings on page 117.
Archive
This section explains how to configure the system to archive calls to DVD/Blu-ray drives (hereafter referred to simply as "DVD drives") and/or network file-shares. All configuration is performed on the Master recorder only. The information is disseminated to other recorders automatically.
The recorder archives recordings not as individual files but as "tar" files - each containing many megabytes of recordings. The recorder's database tracks which media each recording is on and will prompt you to insert the appropriate media if you try to play a call that is not present on the hard disk of a recorder or a file-share based archive location.
Completed archive DVDs/Blu-ray disks can be inserted into the recorder that produced them or a drive on the server holding the overall recording database (the Master, standby or, if you have one, the dedicated central replay server).
Overall Settings
The settings at the top of this page apply to all archiving on the recorders.
Wait before archiving (minutes): It is not uncommon for additional details to be added to call recordings shortly after the recording ends. This setting instructs the recorder to wait for the specified number of minutes before examining the call to see if it should be archived and if so, to where.
Archive Destinations
The table at the bottom of the page lists the separate archival tasks that are configured. Each one is independent and is linked to one or more DVD drives or folders on network attached storage (NAS).
To add a new archive destination, click on either Add DVD drive or Add NAS as appropriate. A pop-up window will let you enter the basic information about this archive
Configuration
136 Avaya Contact Recorder Planning, Installation and Administration Guide
Confidential and Proprietary Information
task. If you simply specify the path of a drive or fileshare, all recordings will be archived to that destination. If you need more precise control over the archive process, click on the Advanced button and alter any of the optional settings. These are described below. Note that some apply to DVD drives only and other to NAS folders only.
Drive Path(s) (DVD only) - For a single drive, just enter its path If you have multiple drives, enter their paths separated by semi-colons. In this case, you can put a blank disk in each drive and the recorder will use them in turn, wrapping back to the first one once the last has been used. This allows you to archive more than one disk per day without having to visit the recorder more than once a day.
UNC path(s) - Enter the path of the folder into which recordings are to be archived. This can be a local path (e.g. with SAN disks). You can also enter a sequence of paths, separated by semi-colons. In this case, files will be written to the first path until it is full (or inaccessible) at which point subsequent files will be written to the next path. This allows you to add NAS storage devices as the old ones fill and maintain a complete history of recordings online.
Comment (optional) - This field is provided for you to label the destination. For example "Gold and Silver Card calls, 90 days". It appears in the Detail column on the Archive tab.
The following settings are accessed by clicking the Advanced button.
Recorders (default all) - If you configure an archive destination, it will run identically on all recorders - Master, Standby and Slaves and central replay server if present). If you need to override this - for example, if not all servers have the same DVD drive path, you can restrict it to one or more servers by listing their serial numbers here, separated by semi-colons. For example, if my Standby server (number 880002) has no DVD /dev/cdrom would enter "800001;880003;880004" to have it run only on the master (890001) and slaves (880003 and 880004).
Maximum minutes between batches (default 1440 minutes, or 24 hours) - Ideally, all tar archive files would be the same, large, size. However, on a quiet system it may take many hours or even days to record enough to completely "fill" such a file. It is important that recordings are archived in good time since, until they are, they are at risk of loss through fire, flood theft etc. of the server on which they are held. This setting determines how long the recorder will attempt to fill a tar file to the preferred size before giving up, closing it and copying it to the archive destination and starting a new one. This rule is only applied during the hours of operation of this archiver so may be exceeded if the archive is disabled for part of the day.
MB per file (default 100) - This determines the size of each tar archive file. When a file exceeds this size it is closed and copied to the appropriate drive or path as soon as possible.
Hours of operation - Normally the archiver will run continuously but by clearing one or more checkboxes here you can stop it from running during certain hours of the day. This may be needed if a DVD drive is used for other purposes; if network bandwidth to

Operations
Issue 4 April, 2010 137
Confidential and Proprietary Information
a NAS folder is limited or to stagger several recorders using the same NAS so only one operates at a time.
Layout file (default lcscm.xml) - By default, all recordings will be archived. If you wish to select particular calls only, you can do so with the same flexibility and configuration approach that is used for search and replay. To use a different query or set of fields from the default replay layout, create a layout xml file as described in Customizing Search and Replay on page 193 and enter its name here.
Disabled - check this box to disable an archive process. You cannot delete an archive destination once recordings have been archived to it but you can use this setting to stop any further recordings being sent there.
Days to retain (default 0 = indefinite) (NAS only) - By default, archived tar files are left indefinitely but on NAS drives, you can specify a retention period. As part of the recorder's overnight (normally 1:00am) tasks it will delete any tar files that were copied to the folder longer ago than this number of days.
Username and Password (NAS only) - If the path specified is on another server, you should specify the username (including domain) and password that the recorder should use to access this path. Ensure that this account has both read and write access to the folder(s) specified as the destination(s).
Media Volume Label starts with (default CS) - Each DVD produced is labelled with a 10 character identifier. This setting defines the first one to three characters of this and should be set to a different value for each DVD archive destination (e.g. GLD and PLT for Gold and Platinum card caller archives respectively). The next three digits of the label are the least significant digits of the recorder's serial number (e.g. 001 for the Master normally). The final four digits are a sequential media number. You should label each disk as it is produced using the label shown in the Operations > Archive page.
Automatically Eject (default Yes) - This determines whether or not a DVD is ejected once it has been filled with archived recordings. Set it to "No" if the drive is behind a cabinet door.
Archive Recordings where… : By default, all recordings are archived to each destination. However, you can set one or more filter criteria here to limit the set of calls that are archived to this destination. The fields that are available are determined by the Layout file specified above. As these filter fields and layouts work exactly the same for archival as they do for search and replay, this allows you to test out any new layout file and corresponding filter settings on the search and replay form first. When it is selecting the calls you expect, simply transfer the settings that you have tested into these filter settings. Note that selection by Call Set is also supported as it is on the search and replay page. This allows users to manually select calls for archiving BUT note that the decision to archive or not is taken only once - typically a minute (see setting at top of page) after the recording completed. Hence unless you delay all archiving, it is unlikely that users will have had time to find calls and place them in the appropriate call set.

Configuration
138 Avaya Contact Recorder Planning, Installation and Administration Guide
Confidential and Proprietary Information
Note:Note: Although you can specify a date and time range for calls, this is seldom used
as an archive destination is typically left running indefinitely. It would only be of use in selecting calls relating, for example, to a specific campaign to be run over a known time period extending into the future. When setting the timespan, you may notice that the SQL statement shown as a result of this appears to be one second out on the end date and time. This is deliberate - so as to avoid missing calls that you thought would be included. The start date and time displayed on screen is actually rounded to one second granularity so the stored time could be a fraction of a second later and would therefore not be included in the result of a query run to exactly that time.
The table of Archive Destinations at the foot of the page shows how you have configured archiving. The columns show:
No. - the unique reference for this Archive Destination within the recording system.
Detail - shows any comment you have added plus any of the Advanced settings that are not on their default values.
Path/Drive(s) - shows a line for each path or drive configured along with the current status and (where this can be determined) the free space remaining for archival on it. Check this column to ensure that each path or drive is correctly specified and is available. DVD drives show an Eject link here with which you can eject the media before it is full.
# pending - shows the number of recordings awaiting archival to this destination. Each recording is tested after the wait time specified at the top of the page and those that pass any filtering rules associated with this destination (or all if no filter is set) are queued for archival. These recordings are appended to a "tar" file within a minute (assuming no backlog) but this file is not closed and copied to the destination until it has reached an appropriate size or age.
MB pending - shows the size, in Megabytes, of the recordings awaiting archival to this destination. If this exceeds the size of one tar file (100MB by default unless overridden with advanced settings) this implies that this archiver is backlogged. This could be because it is not scheduled to run till night-time; the DVD is full etc. Check the Path/Drives column and the Alarms page for problems.
Oldest pending - shows the age (to the nearest minute, hour or day as appropriate) of the oldest recording waiting to be archived to this destination. This is normally less than the interval set for archiving to occur (default 24 hours unless overridden under advanced settings). If this is greater than expected, check for reasons as described on the previous column.
To reconfigure an existing archive destination, click on the Edit link to its right. Do NOT remove folders from NAS locations as the recordings archived there will no longer be accessible.
To delete one or more existing archives, click the check-box(es) to the left of it/them and then click the Delete selected archive destination(s) button. You cannot delete a
Operations
Issue 4 April, 2010 139
Confidential and Proprietary Information
destination once recordings have been archived to it. You can only disable it from this point onwards or those archived recordings would no longer be accessible.
Hard Disk Archiving
Location
You may archive recordings to locally attached, Storage Attached Network (SAN) or Network Attached Storage (NAS) (file-shares). However, you are encouraged to use Network Attached Storage as this is typically physically distant from the recorder. A key goal of archiving should be to protect your recordings from physical damage or loss e.g. fire, flood, explosion, theft. Having them in a neighbouring rack to the recorder itself does not achieve this.
A single folder can be specified for all recorders to use as each will create a sub-folder using its six digit serial number to ensure that each archives its calls into that sub-folder only.
Capacity
The recorder makes no attempt to manage the available storage space. You may use a Hierarchical File Storage (HFS) system to do so but you should test that the retrieval time is acceptable.
If instructed, the recorder will delete recordings that have passed the set retention period but it will not delete them merely to make room for new archives as the recorder's main circular buffer does.
Increasing Capacity
You may "top up" the available storage space by making additional directories available as the initial one(s) fill up. Add these paths to the end of the list of paths and the recorder will start using them as the earlier ones fill.
DVD+RW/Blu-ray Archiving
Device Access Rights
Access to the DVD+RW/Blu-ray drive is disrupted if the drive permissions change. To avoid this:
1. When logging on at the server console, always log on as root.

Configuration
140 Avaya Contact Recorder Planning, Installation and Administration Guide
Confidential and Proprietary Information
2. Do not start the RedHat windowing system on the console while the recorder is running.
3. Do not power down or unplug external USB connected drives while the recorder is running.
Media Must be "Fresh"
! CAUTION:
CAUTION: There are many variants of writeable DVD drives (+R, -R, +RW, -RW etc). The recorder ONLY supports truly blank DVD+RW or BD-R media i.e. straight out of the wrapper. Do not attempt to reuse old media.
Media control and care
To find calls easily and reliably, ensure that all media are labelled, handled and stored correctly.
To ensure maximum reliability and consistent high quality recording and playback:
Follow the drive manufacturer's guidelines for cleaning the drive's lens.
Follow the media manufacturer's guidelines for storage and handling.
Check that the maximum shelf-life of the disks is adequate for your purposes and, if not, plan to copy the contents to new media within this period.
Loading a disk
To load a new disk:
1. Insert a blank DVD+RW or BD-R disk in the drive.
2. Wait for it to spin up and be recognized. This can take up to one minute.
! Important:! Important:Important: Do not close the rack door as the tray will eject and automatically re-insert
during the load process. If the tray does not eject and reload automatically for any reason, you must eject and reload manually.
3. In the recorder Administration application, click on the Operations > Archive tab to confirm that the recorder has recognized the disk and is reporting it as empty or has already started to label it and archive to it. A blank DVD+RW disk will show 4GB available for recordings.
Operations
Issue 4 April, 2010 141
Confidential and Proprietary Information
Drive Status
This is shown on the Operations > Archive page next to the drive's name. Use this entry to confirm that the drive has sensed, and is using, a valid disk. It will show one of the following values:
active if it is able to record to the disk
foreign if it cannot use or recognize the inserted disk
old if a previously closed disk has been reinserted
empty if there is no disk in the drive
unknown if the recorder is still starting up or the archive device has not been specified correctly
One drive in each archive destination's set of drives should be showing Active unless you are replaying from a previous disk. If it is not, you should insert a new or the latest partially filled disk so that archiving can continue.
Changing disks
The Recorder Status > Summary page shows when the disk is full and an alarm is raised if more recordings are ready to be archived to it.
To eject a disk that is still being recorded in order to retrieve calls from another disk:
1. Click on the Eject link on the Operations > Archive page.
2. Insert the required archive disk.
3. When you have finished retrieving calls, replace the partially full disk so recording can continue.
Note:Note: The archival process never writes to disks out of sequence. For example, if
you eject a partially full disk, then insert a blank disk onto which the next set of calls is then written, you cannot then reinsert the previous disk.
Labeling disks
As you eject each disk, label the disk itself using an approved indelible marker. Your label should indicate:
The disk's volume label as shown on the Operations > Archive page
The date that the disk became full.
Configuration
142 Avaya Contact Recorder Planning, Installation and Administration Guide
Confidential and Proprietary Information
Verifying recorded disks
While a disk is being recorded, the files on it are not visible to the operating system. They only show once the disk has been ejected and reinserted.
To verify that the contents of a disk are valid, reinsert it then view the drive's contents. If the contents of the disk are valid, there will be a set of large tar files that contain the wav and xml files of the original recordings.
Be sure to:
Place the disk back in its protective container.
Store the disk in a logical order with the other recorded disks.
Central Replay Server(s) with Archive
As “tar” files are written to archive destinations, the Central Replay Server automatically tracks which archive destination this set of calls has been copied to. Because a single replay server can be uploading calls from more than one recording system, it cannot simply use the same archive id (normally starting at 1) that is used on the corresponding Master recorder. These could clash across systems. Instead it creates a new archive id consisting of the master’s six digit serial number followed by the archive identifier shown on that master. Hence archive 1 on 890001 becomes archive 890001001 on the Central Replay Server.
A Central Replay Server may therefore be aware of many different archive destinations, not all of which are necessarily accessible to it. This has several implications:
1. Unlike a normal recorder – which needs to actually archive its recordings – the Central Replay Server makes no recordings so will ONLY run an archive thread if that archive is explicitly set to run on it.
2. For NAS archives, the Central Replay Server may need to use a different path and/or credentials to access the share. For example, the share seen by the recorders may actually be a disk on the replay server and hence accessible to it via a local drive letter; the archive may be obsolete and has been moved to slower/cheaper storage on a different path.
The default mode of operation is that the Central Replay Server will forward all replay requests on to the recorder that made the recording. That recorder will then access an archive destination if necessary.
You can override this and have the replay server attempt to service requests for calls on this archive destination before forwarding the request on should it fail to find the required recording. To do this, use the administration pages on the Central Replay Server as follows:
Click on the Operations > Archive tab.
Click the Edit link to the right of the archive you wish to run on the Central Replay Server
Operations
Issue 4 April, 2010 143
Confidential and Proprietary Information
Click the Advanced button
Specify this Central Replay Server’s six digit serial number in the Recorders field to make it run there.
If the path is to a NAS, check the path and add username and password credentials to allow it to access the share.
Click Enter to save the new settings.
Configuration
144 Avaya Contact Recorder Planning, Installation and Administration Guide
Confidential and Proprietary Information
Search and Replay
If you are deploying a centralized search and replay system using Viewer, you should see Viewer Installation Guide for instructions on how to customize, deploy and use the application. However, you should still prove that you can search for and replay calls directly from the recorder because:
if you cannot, then Viewer will not be able to play calls either.
in the event of server or network failure you may need to access recordings directly from the recorder.
The instructions below relate to the integral search and replay application that is part of the recorder itself. The accompanying User Guide provides end user instructions on this application. As the system administrator, however, you may wish to:
control which users can search and replay recordings
customize the search fields and/or display
ensure that the ActiveX control used can be downloaded to your clients' PCs
modify default behavior via the properties file
The second of these is rarely required and is described with other advanced topics in Customizing Search and Replay on page 193. The others are needed in most cases and are described below:
Search and Replay Access Rights
When a recording is made, the recorder assigns its "owner" or, in some cases "owners" as follows:
If the Recording owner field is set on the Advanced settings for the address being recorded, the owner will be the number or name specified there.
If an owner is not specified but the call was made by a logged in Agent, then the owner is that Agent's ID.
If an owner is not specified and the call was not made by a logged on Agent, then the owner is the station that was recorded.
If Add VDN as additional "owner" of calls is set on the General Setup > Recorder page, then calls routed via a VDN will have a VDN as another owner. In the case of Station Bulk recording, this is the last VDN the call went through. In the case of Conferenced Recording, it is either the first or last according to how you have configured the recording mode.
Search and Replay
Issue 4 April, 2010 145
Confidential and Proprietary Information
Note:Note: Conferenced Recording is slightly unusual. Where an agent is logged in, the
recording will be "owned" by the station the call was taken on AND the agent who was logged on.
Meeting Recording however, does not follow the above rules. In this mode, the voice prompts advise the caller to enter one or more owners.
Tip:Tip: Use dummy station identifiers to allocate owners to calls made in Meeting
Recording mode. All members of a particular team can be configured with replay rights for a particular number, even though this is not a valid station number. When prompted at the start of the call, mark meetings recorded for and by a team with this "owner" so that all members of the team can access the recording.
You control which recordings your users can search for and replay by adding a user account for each person that needs to use the Replay page and specifying which range(s) of owner they are entitled to see.
To add a user account, follow the same procedure that you used in Securing the System on page 105 but select the Role "Replay Only". Note that you can also use a check-box on this form to control whether or not the user is allowed to export recordings as files or email attachments.
In order to search for and replay a call, the user's replay rights must include at least one owner of that call. Each user's rights are shown on the System > Manage Users page and are set when adding the user account. You can change these by clicking on the Edit link next to them.
The initial administrator's account is automatically given access rights to all number ranges up to 10 digits. As you add other users you must specify which ranges of owners each user is entitled to replay. The number of digits is significant. A user with replay rights over 0000-9999 cannot replay calls made by and "owned by" agent 567 though they could play calls owned by agent 0567. In this example, you might grant the user replay rights over 0000-9999, 000-999.
Typical examples of how to use replay rights are:
A user allowed to play calls made on his own station (1234) would be given replay rights 1234.
An Agent who logs on as AgentID 5012 and is allowed to replay his own calls may be given replay rights 5012.
A supervisor who logs on as AgentID 5050 and manages AgentIDs 5010-5019 and 5025-5028 may be given replay rights 5050,5010-5019,5025-5028.
All recorded stations used by the HR staff have their Recording Owner set to HR on the Advanced settings. The Human Resources Manager, who uses station 5678 may be given replay rights HR, 5678

Configuration
146 Avaya Contact Recorder Planning, Installation and Administration Guide
Confidential and Proprietary Information
ActiveX Control Download
The Replay page downloads two ActiveX controls, which it uses to decompress the audio for replay and export. If your default browser security settings prohibit the downloading of such controls, you need to provide a means of getting the ActiveX control to your users' desktops.
Internet Explorer (IE) determines rights by putting web servers into zones and then granting those zones specific rights.
To access and use the Replay page with its ActiveX controls, the recorder must reside in a zone with the following rights:
ActiveX controls and plug-ins
- Download signed ActiveX controls
- Run ActiveX controls and plug-ins
- Script ActiveX controls marked safe for scripting
Scripting
- Active scripting
On Windows Vista you must also clear the "Enable Protected Mode" checkbox.
Your Intranet zone and/or the Trusted Site zone may already have these rights. If so, you need to verify that the Avaya Contact Recorder is in one of these zones. If the recorder is not in the local Intranet Zone or is not a Trusted Site, you can add it as follows:
1. In the Control Panel, open Internet Options.
2. Click the Security tab.
3. Click the Trusted Sites icon.
4. Click Sites.
5. Uncheck the Require server verification (https:) for all sites in this zone box (unless you are forcing users to use https)
6. Enter the URL of the Avaya Contact Recorder server and click Add.
Note:Note: Internet Explorer does not recognize that a certain Fully Qualified Domain
Name (FQDN) and IP address are the same; you must add the URL to the list exactly as your end users are expected to type it in the address bar.
Before you advise end users of the URL of the recorder, you should make sure that your users can access the Replay page through your network and that the ActiveX controls download successfully. To test this:
1. Create a Replay Only account and assign it some replay rights
Search and Replay
Issue 4 April, 2010 147
Confidential and Proprietary Information
2. From a typical client machine, enter the URL for the recorder in the form: http://myservername:8080/ (using the recorder's IP address or hostname - assuming you have entered it in your DNS server). If using https, replace 8080 with 8443.
3. When prompted, enter the account's Username and a blank Password.
4. Set a new password as directed.
5. Confirm that the Replay page displays correctly and that the ActiveX control is downloaded.
Tip:Tip: You may wish to copy steps 2 to 4 above, fill in your URL and send them out
as instructions to your end users.
Installing the ActiveX Controls Manually
The ActiveX controls needed for the Search and Replay application are typically downloaded and automatically installed the first time the application is accessed. In a closed environment where users may not be able to download and install programs on their computers, you need to manually set up the Active X controls.
To install the ActiveX controls:
1. Download the vxreplay.cab file that contains the required files from
http://mycsserver:8080/cabs/vxreplay.cab
Where mycsserver is the name of the server on which the Avaya Contact Recorder is installed).
2. Save the file to the drive.
3. Unzip the file to find:
csreplay.ocx
csexport.ocx
dspapi.dll
csreplay.inf
4. Copy the dll to a location in the Path (typically \windows\system32).
5. Right-click the csreplay.inf file and select Install.
6. Click Start › Run
7. In the field displayed enter
regsvr32 path\csreplay.ocx
replacing path with the full path for the csreplay.ocx file.
Configuration
148 Avaya Contact Recorder Planning, Installation and Administration Guide
Confidential and Proprietary Information
8. Repeat the previous step to register the csexport.ocx file.
Note:Note: The files will need to be updated whenever the server is updated.
A Note About Downloading the .cab file
Some browsers won't let you save a cab file; instead they open and read the file. (It is not in human readable form.) To work around this limitation:
1. Create a file that contains the following html:
<html>
<body>
<a href="http://mycsserver:8080/cabs/vxreplay.cab">Right Click Here
</a>
</body>
</html>
Where mycsserver is the host name of your Avaya Contact Recorder server
2. Save and close the file.
3. Use your browser to open the file.
4. Right-click the link and select Save target as
5. Save it as vxreplay.cab.
Modify Default Behavior
You can set options on the System > Manage Users page that determine:
whether local accounts or only Windows domain accounts are supported
whether this server supports replay at all
whether or not all users are forced to use https for added security (http requests being redirected to the https port automatically).
the session inactivity timeout (this applies to administration sessions as well as Replay Only users).
You can add or modify lines in the properties file as described in Properties File on page 182 to change the behavior of the Replay page to:
limit the number of results returned
save filter settings from session to session
Search and Replay
Issue 4 April, 2010 149
Confidential and Proprietary Information
These settings affect all users and are only updated when the Avaya Contact Recorder Service starts.
Limit results returned
Add the following line to the properties file to set the maximum number of calls returned from a query:
viewerx.limit=nnnn
where nnnn is the maximum number of calls to return. Increasing this maximum over the default of 100 results in more CPU use and higher network traffic if users choose to view or accidentally request a large number of calls. Note that this limit is an upper bound on the number of recordings that will be shown. As each recording can have multiple owners, this can reduce the number of distinct recordings that are shown. In Conferenced mode, for example, both station and agent number are set as owners.
Save filter settings from session to session
Normally, the entries in the search filter pane are blank when you first access it. If you wish, the application can remember the last used settings and apply these instead, This feature is controlled by a setting in the properties file:
viewerx.savesettings=true
Add Title Row to Call Detail Export
As described in the search and replay manual. you can export not only the audio of the calls you are interested in but also the details stored about these recordings. The ".csv" file these are written to does not, by default, contain a header row. If you want the system to add a header row (in English only), set export.csvheaders=true in the properties file.
Configuration
150 Avaya Contact Recorder Planning, Installation and Administration Guide
Confidential and Proprietary Information
Backup/Restore
Due to the huge volume of new files created every day, a voice recorder is not backed up in the same way as most application servers. This section guides you through the issues around backing up the application, the call details database and the recordings.
Application
The recorder's configuration is stored in its database (using PostgreSQL), alongside the details of the call recordings. To preserve the configuration of the server, back up the database frequently as described below.
If you have not installed other applications on the server, there is no need to backup the operating system or the recorder software. It is faster to reinstall these server components in the event of disk failure. You should therefore retain the installation media and license key that you used.
Backing up the Database
You can back up your recorder's database using a command line procedure. The procedure uses the PostgreSQL pg_dump command to extract data from the database. It must be executed while the database is running. Do not stop the Avaya Contact Recorder service or the Postgresql service before proceeding.
To back up your postgres database:
1. Log on as root.
2. Become the database owner by typing su - postgres
3. Create a backup file by entering the command:
pg_dump --format=c --compress=5 eware > backupfile
You should specify a full path for the backupfile, and consider moving the resulting backup file to external media or another machine.
Please observe the following guidelines concerning the compression factor:
5 is a modest compression factor.
using a higher number (maximum is 9) makes the backup slower and uses more resources. However, it results in a smaller backup file.
using a smaller number makes the backup faster and uses fewer resources. However, it results in a larger backup file.
Backup/Restore
Issue 4 April, 2010 151
Confidential and Proprietary Information
Restoring data to a new PostgreSQL database
Note:Note: You can only restore data to the server from which you dumped it because
the dump file stores the software serial number and license key information. These are tied to a MAC address on the recorder. Unless you can move the original NIC into the new server, you will need to obtain a new license key if you wish to restore to different hardware.
The following process erases the default database that exists after a complete re-installation and replaces it with the database that you have backed up.
To restore the database:
1. Re-install the operating system.
2. Log on as root and install the recorder as described in Installing Avaya Contact Recorder on page 79.
3. Stop the Avaya Contact Recorder service.
4. Become the database owner by typing su - postgres
5. Drop the existing database by entering the following command:
dropdb eware
6. Create an empty copy of the postgresql database by entering the following command:
createdb eware
7. Restore the data by entering the following command:
pg_restore --dbname=eware --use-set-session-authorization backupfile
Backing up Voice Recordings
The Avaya Contact Recorder stores voice recordings in the /calls partition. This partition quickly fills up with thousands of directories and millions of files. When the partition is nearly full, the recorder maintains only a tiny amount of free space on the partition by deleting batches of 100 recordings (and the directory that catalogued them) at a time, as it requires space for new recordings. This causes a huge churn of files every day.
Limitations of full and incremental backup procedures
On a Avaya Contact Recorder server, two issues make it difficult to back up voice files:
the file size
Configuration
152 Avaya Contact Recorder Planning, Installation and Administration Guide
Confidential and Proprietary Information
the rate of change of the voice recording files
Together these issues make most traditional backup strategies for the voice recordings ineffective. Traditional full backups are required more frequently than normal, which wastes backup media, and incremental backups are larger than expected because of the large churn of creations and deletions. For a backup strategy to be successful, it must be easy to restore the data if necessary.
Traditional "full plus incremental" backup solutions are ineffective because these backup solutions cannot complete fully. In the event of a complete disk failure, the process restores the full backup, then the increments in chronological order. This procedure immediately overflows the disk when the restore program tries to create the increments because the partition holding the call is almost at capacity to begin with. The full plus incremental backup will fail because it runs out of disk space before it has processed the "removals" part of the procedure.
Traditional restore procedures are also ineffective. If you use this solution to review a recording that has been deleted because of age, the recorder immediately deletes any restored file as part of its disk maintenance.
Finally, traditional backup solutions often require locks on the disk while they work. This can seriously disrupt the working of the recorder.
Backing Up Recordings
This simplest and cheapest strategy is to use the built in archive mechanism. This is not only fully integrated with the workings of the recorder and its search and replay mechanism, but also is well suited to the incremental recording required for a recorder. As recordings are added to the calls path they are copied to one or more archive destinations in an efficient manner. Even when they have been deleted from the hard disk, the recorder is still able to play them because it knows which media or folder they are on and can replay directly from there, without an intervening 'restoration' step. Each DVD holds about 4GB, which means it can hold about 150 channel-days worth of recordings from a busy system. For less than dollar a day, even a busy system can have limitless backup. Blu-ray disks hold much more (25GB) but are somewhat more expensive. They are suitable for larger systems.
If you use NAS storage to archive your recordings, the data on these centralized disks is
organized in a more permanent way
subject to less "churn"
It is possible to schedule gaps in the archiving process (e.g. 1am-4am), so, if a backup process requires a disk lock, the downtime does not cause a problem with the server's operation. This scheduling feature, together with the way the archive process organizes the audio on disk, makes this data much more appropriate for traditional full/incremental backup solutions.
Distributing User Instructions
Issue 4 April, 2010 153
Confidential and Proprietary Information
Distributing User Instructions
Once you have configured the recorder, you should ensure that the end users know how to use it. Some users may need to know how to use and control the recording modes. Some will need to know how to search for and replay recordings.
Those Using Recording
You will need to advise users of some or all of the following:
Mode If you… You should tell…
This information
On Demand Recording
Use this mode at all
All potential users of On Demand recording
The station and/or hunt group number(s) to dial to reach an appropriate On Demand recording port.How to use this mode.
Configured any Audix-rec buttons
Users of these stations
How to use the Audix-rec button
Meeting Recording
Configured any Meeting Recording ports
All potential users of Meeting recording
The station and/or hunt group number(s) to dial to reach a Meeting recording port (with prompts in the appropriate language)
Station Bulk Recording
Enabled the delete command
Users who may need to delete recordings during a call
The digits to dial during a call to have a recording deleted
Configuration
154 Avaya Contact Recorder Planning, Installation and Administration Guide
Confidential and Proprietary Information
Those entitled to replay calls
Note:Note: This refers to the recorder's integral search and replay. If using Viewer, refer
to the manuals for this product instead.
The integral search and replay application is very straightforward and the online help within it is rarely needed. If you do not distribute the manual to all users you should still advise them of the following:
The url (http or https) they should use to access search and replay
Their username and how to log in for the first time (unless you are using Windows authentication)
Any tips on which data fields would be particularly useful for them to search on (especially if you have populated any user defined fields).
Station Executive Recording
Use this mode at all
Users whose stations are targeted by this mode
The digits to dial during a call to have a recording retained
Have configured delayed retention
Users who may need to retain a call after the call has ended
The number of the retain port and explain that only the previous call will be retained. They must retain the call before making another call from the same station.
Mode If you… You should tell…
This information
Configuring Avaya Support Remote Access
Issue 4 April, 2010 155
Confidential and Proprietary Information
Configuring Avaya Support Remote Access
Refer to the instuctions in the document RemoteAccess.pdf provided in the docs folder of the installation CD.

Configuration
156 Avaya Contact Recorder Planning, Installation and Administration Guide
Confidential and Proprietary Information
Issue 4 April, 2010 157
Confidential and Proprietary Information
Chapter 5: Operations, Administration & Maintenance
This chapter provides details of regular maintenance required for an Avaya Contact Recorder system.
The main sections in this chapter are:
Introduction on page 158
Status Monitoring on page 159
Preventative Maintenance on page 168

Operations, Administration & Maintenance
158 Avaya Contact Recorder Planning, Installation and Administration Guide
Confidential and Proprietary Information
Introduction
In addition to initial configuration, there are a number of tasks that need to be performed on an ongoing basis. This section discusses
the use of the Status monitoring pages
the Audit Trail
preventative maintenance tasks that should be carried out on a regular basis
Status Monitoring
Issue 4 April, 2010 159
Confidential and Proprietary Information
Status Monitoring
Recorder status is shown over four pages that are accessed under the Recorder Status tab at the top left of the Administration web interface. These show the current:
System status - (On the Master and Standby only) the overall status of each recorder in the system and a table showing the overall loading across the whole system.
Server status - shows the status of network links between this server and the others in the system plus an overview of what has been recorded.
CTI Monitors - (On the Master and Standby only) the list of DNs/Position IDs that are being observed via TSAPI.
Ports' status - (On the Master and Standby only) - the state of each recording port in the system.
System
This page shows summary information about the current state of the system and is therefore the default page shown when you first log in as an administrator to a Master or Standby recorder. Each server is shown at the top of the page - with Master and Standby first, then any slave servers. The slaves are ranked according to their status. Any server with problems will show red or amber and, in the case of slaves, will be brought to the top of the (potentially long) list of slaves. Click on the buttons to jump to the administration interface for each server to drill down into any problems that are showing. You can also clear the accumulated alarm counts if necessary.
The recorder's own entry on this page will show whether it is "Active", "Standing By" (could go active if needed) or "Not Viable" (a major problem is preventing it from recording).
Load
On the Master (or Standby if it is in control), the table at the bottom of this page shows the current and peak loading levels of the recorder. For each recording mode configured, it shows
how many ports have been allocated
how many are currently active
the maximum number that have been active concurrently since midnight
Operations, Administration & Maintenance
160 Avaya Contact Recorder Planning, Installation and Administration Guide
Confidential and Proprietary Information
the maximum number that have been active concurrently since the date and time shown above the right-hand column
To reset the monitoring period, select the Restart Peak Activity Counts button. For example, if your business has a weekly cycle, you may want to reset the monitoring period at the start of each week. Use this page to predict when to expand your recording capacity.
For more detail of contention and "busy" events on the hunt groups associated with the pooled recording modes, use the Communication Manager's call detail recording tools. These tools might be useful if, for example, you are required to provide 98% availability of Meeting Recording ports.
Server
This page shows the status of the server displaying it. It includes a row for each network link that the server requires to function as well as basic counts of calls recorded.
Any recorder with softphones configured must have a viable link to the DMCC services.
Any Master or Standby recorder using Conferenced mode or feeding CTI information to a Quality Monitoring server must also have a connection to TSAPI services.
If the recorder connects to other components, such as Viewer, Quality Monitoring, an external controller and/or a Key Management Sserver, the status of these links should be UP.
See Recorder Interfaces on page 207 for a comprehensive list of interfaces.
Note:Note: Due to a problem in the RSA Key Management Service client software, the
link to KMS may show "UP" even if the recorder is having to use a previously cached key. This problem may only become apparent when you next attempt to decrypt an old file. You should check for Alarms as well as look at this item.
The following items are not relevant to and hence are not shown on Central Replay Servers.
Total call segments recorded to date
This value shows the total number of call segments ever recorded by the system.
Total call segments recorded today
Use this value to confirm that recordings are being made today. If you have restarted the server today, this will show the number of call segments recorded since that restart. This includes recordings made on behalf of the Quality Monitoring application.
Status Monitoring
Issue 4 April, 2010 161
Confidential and Proprietary Information
Date of oldest call held on disk
Until your disk has filled for the first time, you should monitor the available space on the drive. Check that the rate at which space is being consumed is in line with your predictions. You should be able to estimate when the disk will reach capacity and when the first calls recorded will be deleted to make way for new calls. This occurs when the free space drops below 1GB.
Once the disk has started to "wrap" and calls are being deleted daily, use this figure to monitor the online retrieval capacity. If the figure starts to fall, recordings are using up your disk space more rapidly than before. The recording volumes are increasing, so you may need to expand the disk capacity before the duration of calls it can hold falls below your minimum requirement.
CTI Monitors
This page is only populated on Master and Standby recorders (not Slaves or Central Replay Servers). It shows each of the stations that the recorder needs to monitor via TSAPI to perform Conferenced and/or Quality Monitoring. It is not used in other modes.
In all cases, the columns show:
Station
Shows the station that needs to be observed via TSAPI.
Observed
Shows whether or not the station is being observed successfully.
Part of Range
This field is used for Conferenced recording only. It shows which Agent, Station, Skill, VDN or CoR range that has been configured for recording has resulted in this particular station being monitored. Any advanced settings that apply to this range will determine how calls on this station are recorded.
Agent
If an agent has logged on to this station, this field shows that agent's ID.
Active Calls
For all calls that this station is connected to, this column shows
Operations, Administration & Maintenance
162 Avaya Contact Recorder Planning, Installation and Administration Guide
Confidential and Proprietary Information
the call ID
whether the call is considered to be incoming our outgoing
whether the call is considered to be internal or external
the Automatic Number Identfication (ANI - also known as Calling Line Identifier, CLI) if present.
Each party on the call is then listed - showing
- the state of the connection (held, ringing etc.)
- whether this party is an internal or external party
If a call is shown in bold typeface, it implies that the recorder believes that this particular call is active and therefore may need to be recorded.
Note:Note: The details about each call are not translated. The detail within this
information is of most value to second and third line support staff who will be familiar with the terse English abbreviations used to convey a lot of information in a small space on this screen.
Port
When a call is active and needs to be recorded under conferenced mode, a port on a recorder is assigned to it. The recorder name and the telephone number of the softphone used for that port are shown here.
Quality
This field shows how the Quality Monitoring application is handling this station. It will show one of three conditions:
"N/A" - means that this station is not configured within the Quality Monitoring application and hence Quality Monitoring is not available.
If a number or pair of numbers is shown (e.g. 1234/5678) this signifies that the Quality Monitoring application is observing this station and sees it as part of the overall "position" that it knows as this string. So for example, both 1234 and 5678 may appear on a single physical station and this will show as "1234/5678".
Rec
This column shows whether or not the channel assigned is recording the call at the moment. In the case of external controller or dialer integrations, a channel may still be assigned but not actually recording all the time.
Status Monitoring
Issue 4 April, 2010 163
Confidential and Proprietary Information
Events
This column shows how many CTI events have been observed on this station.
To update the page, click the Refresh button.
Ports
This page shows the current state and configuration of each port in the system that is visible to this server. It therefore includes the server's own ports plus the Conferenced recording mode ports on any slave to which it is connected. Note that some channels are dynamically assigned and released as calls come and go. The columns show:
Port
Identifies each port by the recorder it is on and the softphone number it has used to register with Communication Manager.
Mode
Shows which recording or replay mode the port is allocated to.
Controller
If the port is under the control of an external controller, the name of that controller will be shown here.
Recording Enabled
Shows whether or not the port has been told to record active calls.
State
Shows the current state of the port. Possible states are:
Faulty
These ports are incorrectly configured or have experienced an error. They will be reregistered two seconds after the initial problem, in an attempt to recover them. If the problem persists, they will back-off, doubling the time between retries until this reaches 1 minute. They attempt to reregister every minute thereafter.
Operations, Administration & Maintenance
164 Avaya Contact Recorder Planning, Installation and Administration Guide
Confidential and Proprietary Information
Starting
These ports are registering or queuing to register with the Device, Media and Call Control API.
Idle
These ports have registered successfully, but are on-hook and not in use.
Setup
These ports are off-hook and are:
Attempting to establish a Service Observe session
Placing or answering a call
Receiving instructions from the caller, for example, with Meeting Recording
! Important:! Important:Important: A port used for Station Bulk or Station Executive Recording that stays in the
Setup state indicates that Service Observe cannot be established on the target station. The station might not be configured to allow Service Observe or another station might already be observing it. Recording is not possible in either case.
Connected
These ports are in one of the following states:
Have established a service observe connection but the port being observed is idle
Are replay ports that have placed a call but are not currently playing a file
Active
These ports are:
Recording ports that are recording a call (or within five seconds of the end of a call, when this port is unavailable)
Replay ports that are actively playing a file
Stopped
A conferenced recording port may be in this state if it has stopped recording but has not hung up yet.

Status Monitoring
Issue 4 April, 2010 165
Confidential and Proprietary Information
Recording
For ports in On Demand and Meeting modes, this shows the port number that invoked the On Demand Recording and the owner of the Meeting Recording. (It shows the first one entered if multiple owners were specified at the start of the Meeting Recording.)
To determine which recording a Conferenced mode port is being used for, consult the CTI Monitors page on the active Master or Standby recorder.
To reset an individual port, select the Reset link to the right of the port. This action stops any current recording on that port.
To force a reset on all ports in quick succession, select the Reset All button at the bottom left.
Alarms
The Alarms page shows system warnings, alarms and events. The recorder stores alarms in its database. It deletes them when they are more than a month old.
Check the box at the top of the page if you want to see all Alarms, including those that have been "cleared". The default is to show only those alarms that have not yet been cleared.
The radio buttons at the top of the page let you select the minimum severity of alarms that are shown. The Alarms page will only show the most recent 1000 alarms (in 100 pages of 10 alarms each). If there are Informational or Warning level messages, you may need to restrict your view to Minor or Major alarms if you want to see further back in time.
Use the buttons above or below the table to refresh the page and to clear some or all alarms.
Note:Note: As long as you have set up mail account information on the System > Email
Server page, an email message detailing alarms and events will be sent to the address(es) listed there.
Refer to Alarms on page 225, for a list of alarms and events that may be generated and what to do about them.
Viewing alarms and events
The default on the page is to show all alarms and events that are uncleared. You can see any new or outstanding issues on first viewing the page. To change the set of events shown:
1. Click on the check box and/or radio button to specify your preferences.
2. Click on the Refresh button above or below the table.
Operations, Administration & Maintenance
166 Avaya Contact Recorder Planning, Installation and Administration Guide
Confidential and Proprietary Information
Clearing specific events
New alarms and events are initially "active". To "clear" an individual alarm or event so that it no longer shows:
1. Click the check box to the left of the event.
2. Click the Clear selected events button.
Clearing all events
Be careful using the Clear All Events button. Clearing an alarm without fixing the problem may lead to system problems being "hidden" without your knowledge.
Audit Trail
The System > Audit Trail page shows administrator and user actions over a specific period. The default reporting period is the current day. You can also filter this report according to Event Type and Username. To generate a report for a different period, enter the date range in the calendar controls, and click the Refresh button.
The Audit Trail functions track the following user actions:
Successful user logins
Failed user logins
Password changes (although, for security reasons, the actual password is not stored)
End user searches on the database
Replay requests
It also tracks all administrator actions that affect recording, such as configuration changes , manual port resets and creation or deletion of user accounts.
Note:Note: Editing a station range is logged as a deletion followed by an addition.
The Detail column includes the SQL statement used in searching for calls. It also uses the internal name of a setting rather than the user-friendly, localized name. This avoids any change of meaning that could occur in internationalization.
Each report is restricted to a maximum of 1000 audit records. To report on more, break your reporting period into a number of smaller date ranges.
Use your browser's print, save, or email features to provide a permanent record of the details. To create a summary that presents all results on a single page, click the Show All link at the top. The Show All and Page at a Time links are not shown if the list of audit entries is less than one page long.

Status Monitoring
Issue 4 April, 2010 167
Confidential and Proprietary Information
Configuration records (which include the audit trail) are retained for three months by default. Each night after that period has elapsed, a background job deletes any records older than the retention period. If you want to retain the records longer, back up the database as described in Backing up the Database on page 150. You can change this default value of three months using the audit.purgemonths property as described in Properties File on page 182.
Operations, Administration & Maintenance
168 Avaya Contact Recorder Planning, Installation and Administration Guide
Confidential and Proprietary Information
Preventative Maintenance
This section highlights a number of administrative tasks that should be performed on a regular basis to ensure the system continues to operate smoothly.
Daily
Unless you have fully automated alerting of these conditions, you should carry out the following procedures at the start of each day:
Alarms
Check the Alarms page for new problems.
Disk capacity
Check the available disk space. The disk where recordings are stored will appear to be at or near capacity. However, the system consistently maintains a level of 1 GB of free space by deleting older files. This maximizes the number of recordings that are available online to you. The Avaya Contact Recorder's disk manager thread deletes files on a FIFO (First In First Out) basis.
System Status
It is difficult to detect some problems automatically. Check the system status regularly via the Recorder Status > System and Server pages and verify that all figures are in line with expectations as described in Status Monitoring on page 159.
Check the contents of the log files as described in Troubleshooting on page 213 and examine any errors logged since the previous check. Look at all error and warning messages, not just those generated by the Avaya Contact Recorder services.
Confirm channel status
Use the Recorder Status > Ports page of the Administration application to confirm that the recording ports are in the appropriate states.
Confirm recording and replay
To confirm recording and replay:
Verify that calls are being uploaded into the database.
Preventative Maintenance
Issue 4 April, 2010 169
Confidential and Proprietary Information
Use the Replay page to select the most recent calls to verify that calls are accessible.
Confirm that the start time of these calls matches expectations. Verify that the start time corresponds to the most recent calls made on the extensions being recorded.
Confirm that these calls are playable and that audio quality is good.
Archive
If using DVD+RW or Blu-ray archive, check the current disk's available capacity. Change the disk when it fills. If using NAS folders, check the available space and increase it or add additional folders as needed.
Weekly
As you become comfortable with the normal operation of your recorder, you can reduce the frequency of the daily tasks. For example, if you know that the rate at which your disk is filling is not going to fill the available space for several months, you can check it weekly.
Perform the following tasks each week:
Disk capacity: main recording store
When your recorder is first installed, the disk is almost empty. As it gradually fills, you should note the rate at which it is being used (at least weekly) and extrapolate to estimate when the disk will be full. At this point, the Avaya Contact Recorder will begin deleting the oldest calls to make room for new ones. If this happens to calls that are younger than planned, check the configuration of the recorder to ensure that only the anticipated calls only are being recorded. Add additional disk capacity to the partition before it fills.
Disk capacity: other partitions
Check the available space on any other disk partitions. Verify that these other drives have sufficient space. The recorder will warn you if they fall below 500MB of free space. Accumulated temporary files or log files can account for this drop in available space. You may need to purge them manually.
Call detail database purging
If you have enabled automatic purging of aged call detail records, you should still monitor the size of the calls database during the first few months of use. You can then predict how large the database will get by the time old records begin to be purged. Many customers plan never to purge call detail records, but choose instead to add disk capacity every year or two as the database grows. If you do this, you should upgrade your server every few
Operations, Administration & Maintenance
170 Avaya Contact Recorder Planning, Installation and Administration Guide
Confidential and Proprietary Information
years to compensate for the increasing size of the database and the reduction in search and update speed.
Configuration Backup
Changes to system configuration that affect user access rights are stored in the PostgreSQL database. This means that the system configuration is backed up whenever the call detail records are. See Backing up the Database on page 150.
Monthly
Check the following aspects of the system on a monthly basis:
Loading trends
Note the total call volumes recorded every month to be aware of gradually increasing traffic trends. To do this:
Note the number of calls recorded at the end of each month and compare with previous month's accumulated total.
Note the age of the oldest call on the disk (only applicable once the disk has filled for the first time)
Note the CPU load during busy hour
If it appears that the load is increasing, consider purchasing extra licenses if required and/or increasing server specification or disk space.
Every Six Months
The recorder must perform a full vacuum of the database approximately once every six months. As this interval is reached, the recorder issues a daily warning message. This tells you that it will do a full vacuum on next restart - unless you postpone it by clearing the checkbox on the General Setup > Recorder page. This setting only defers the maintenance once. To defer again, reset the option. However you must allow the recorder to perform this essential maintenance task within 30 days.
Issue 4 April, 2010 171
Confidential and Proprietary Information
Chapter 6: System Security
Security of customer recordings is very important. This Chapter discusses the various features - some optional - that you can use to ensure the safety and integrity of recordings. This chapter assumes that you have suitable firewall, antivirus software and physical access procedures in place.
The main sections in this chapter are:
Use of SSL on page 172
Windows Domain Authentication on page 173
Blocking Replay from a Recorder on page 174
Changing Passwords on page 175
Encrypted File Storage on page 177
PCI Compliance on page 178
System Security
172 Avaya Contact Recorder Planning, Installation and Administration Guide
Confidential and Proprietary Information
Use of SSL
You should consider whether you wish to enforce the use of Secure Sockets Layer (SSL). By default, users can access the recorder via http (on port 8080) or by encrypted https (on port 8443). You can force users to use the secure https port, by setting Allow unencrypted (http) access? to No on the System > Manage Users administration page. When you do this, any user who attempts to access the recorder through the unsecured (http) route is automatically redirected to the secure (https) address.
! WARNING:WARNING: You should not force the use of https if you use Central Replay Server or
Telephone Replay.
The application is distributed with an SSL certificate that is valid for 3 years from the date it was issued. The certificate makes it possible to give users secure access to the server. When users access it through this secure https port, the traffic between their browser and the recorder is automatically encrypted.
However, Internet Explorer will warn your users that the name on the certificate does not match the name of the server using it. You can either advise your users that this is acceptable and should be ignored or, for greater security, you may acquire and install your own SSL certificate as explained in Installing a Signed SSL Certificate on page 321.
Windows Domain Authentication
Issue 4 April, 2010 173
Confidential and Proprietary Information
Windows Domain Authentication
You can create local user accounts within the recorder application itself. However, it is more secure to use Windows domain accounts and you may wish to enable this feature - or even restrict access so that only windows domain accounts have access to the system.
To ENABLE Windows Domain Authentication:
1. Create a user account (as described in Securing the System on page 105) who's username is domain\username - for example, CORP1\JSmith. Note that the username is case sensitive and must match exactly the case of the username stored in the domain controller.
2. Add properties to the properties file to define either your domain controller or WINS controller as follows:
sso.dc=IP address of domain controller
OR
sso.domain=domain name to use
sso.wins=IP address of WINS server to use
To ENFORCE Windows Domain Authentication only:
1. Enable Windows Domain Authentication as above.
2. Log in as an Administrator using a domain account
3. On the System > Manage Users page, set Allow local user accounts? to No.
Tip:Tip: If users are prompted for their domain passwords when they access the web
interface, make sure that the recorder is either part of the intranet zone, or make it a trusted site and configure Internet Explorer to automatically log on to trusted sites.
System Security
174 Avaya Contact Recorder Planning, Installation and Administration Guide
Confidential and Proprietary Information
Blocking Replay from a Recorder
If you are using a central replay server or Viewer to replay calls, you may want to block users from replaying calls directly from the other recorder servers. To do this:
1. Log in as an Administrator
2. On the System > Manage Users page, set Allow search and replay from this server? to No.
Changing Passwords
Issue 4 April, 2010 175
Confidential and Proprietary Information
Changing Passwords
The recorder and related applications use a number of user account settings that are installed with a hard-coded default. You can change these as follows:
Linux User Accounts
The root and witness user accounts are installed with default passwords. Change these by logging on to the server and typing passwd.
Be sure to note the new passwords securely as remote support staff will need these to maintain your system. Should you lose these passwords, your system will become completely unmaintainable.
Postgres Database Owner
You may wish to change the password used by the recorder to access its local postgres database. Before doing so, you must first enable 256 bit encryption as described in Installing Unlimited Strength Encryption on page 320 and obtain the Avaya encryption tool as described in Encrypting Properties File entries on page 326.
1. Log in as root
2. Switch to the postgres user account by typing
su - postgres
3. Access the database by entering
psql
4. Change the password by entering
alter user eware with encrypted password ’newpassword’;
5. Quit the database by entering
\q
6. Encrypt the new password using the WitsBSUserCredentials tool.
7. Add the new password (in encrypted form) to the properties file as
db.password=encryptednewpassword
System Security
176 Avaya Contact Recorder Planning, Installation and Administration Guide
Confidential and Proprietary Information
Recorder Account on eWare/Viewer SQL Server
If you change the username and/or password on the eWare database's SQL server, you must also set these on the recorder so that it can upload recordings into that database. To do this:
1. Log in as an Administrator
2. Enter the following url
http://servername:8080/servlet/cscm?cmd=mtce
3. Enter the username and password on the web page shown.
Encrypted File Storage
Issue 4 April, 2010 177
Confidential and Proprietary Information
Encrypted File Storage
Recordings (WAV files) and their associated XML data files are not normally encrypted but can be - using the AES256 algorithm and RSA Security's Enterprise Key Manager. Encrypted files are also "fingerprinted" to avoid tampering.
See the manual Impact 360, Full-time Recorder, Enterprise Security Administration Guide Release 7.8 for details of how to deploy an RSA Key Management Server (KMS). To then enable encryption on the recorder:
1. Install the Unlimited Strength policy files as described in Installing Unlimited Strength Encryption on page 320.
2. Create a KMS client certificate (a PKCS#12 file) for the recorder. This will be protected by a passphrase to preserve the confidentiality of the private key.
3. Install this certificate on the recorder by logging in as witness and copying the file to the /opt/witness/keystore directory.
4. Back at the KMS, convert the client certificate into a PEM file. The PEM file must be imported into the KMS to identify the recorder as a valid client. To convert the PKCS#12 file to PEM format use the command:
OpenSSL pkcs12 -in svr_cert_key.p12 -out svr_cert_key.pem
5. On the General Setup > Recorder page of the recorder, enter the IP address of the Key Management Server and the passphrase for the certificate. You must restart the recorder after making any changes to the KMS settings, certificate or passphrase.
Note:Note: You must also configure Viewer and Archive (if used) as described in Impact
360, Full-time Recorder, Enterprise Security Administration Guide Release 7.8
System Security
178 Avaya Contact Recorder Planning, Installation and Administration Guide
Confidential and Proprietary Information
PCI Compliance
To make your system compliant with PCI recommendations, you should adopt all of the above features. In addition:
1. Do not store sensitive data in the User Defined Fields of recordings.
2. Use the PAUSE and RESUME recorder control features to avoid recording sensitive information. This will require integration with your other systems.
3. Increase the default 3 months for which audit records are kept to 13 months.
4. Use encrypted audio to and from Avaya Communication Manager (setting on General Setup > Communication Manager Interface page).
5. Force Replay Only users to use the Master, central replay server or Viewer rather than replaying calls from each recorder server.
6. If using Quality recording, use Version 7.8 or higher. Version 5.x does not support encryption.
7. Ensure all other components of your system (Viewer, Archive etc.) are configured in accordance with the Enterprise Security Administration Guide.
8. PCI dictates a session timeout of 15 minutes. When using Windows Domain Authentication (as required to meet other PCI requirements) the recorder will accept a valid Windows logon (on an appropriate account) as sufficient to gain access to the recorder's administration pages. You should therefore ensure that all users' PCs are configured to launch a screen saver after 15 minutes of idle time and have Password Protection on Resume enabled. To ensure this, domain administrators should lock down these settings in the group policies of the domain controller.
9. Review and adjust your Windows Domain policies for user accounts if required. For instance, the PCI specification mandates the following rules:
Immediately revoke access for terminated users.
Remove inactive user accounts every 90 days.
Do not use group, shared or generic accounts and passwords.
Change user passwords at least every 90 days.
Passwords should be at least 7 characters long and should include both numeric and alphabetic characters.
Do not allow individuals to submit a new password that is the same as any of the last 6 they have used.
Lock out the user account after not more than six unsuccessful access attempts (have a lockout duration of 30 minutes or until admin enables the account).
10. To ensure no recorded data is stored anywhere in an unencrypted format, including on the supervisor's PCs, Internet Explorer's Advanced Security Do not save encrypted
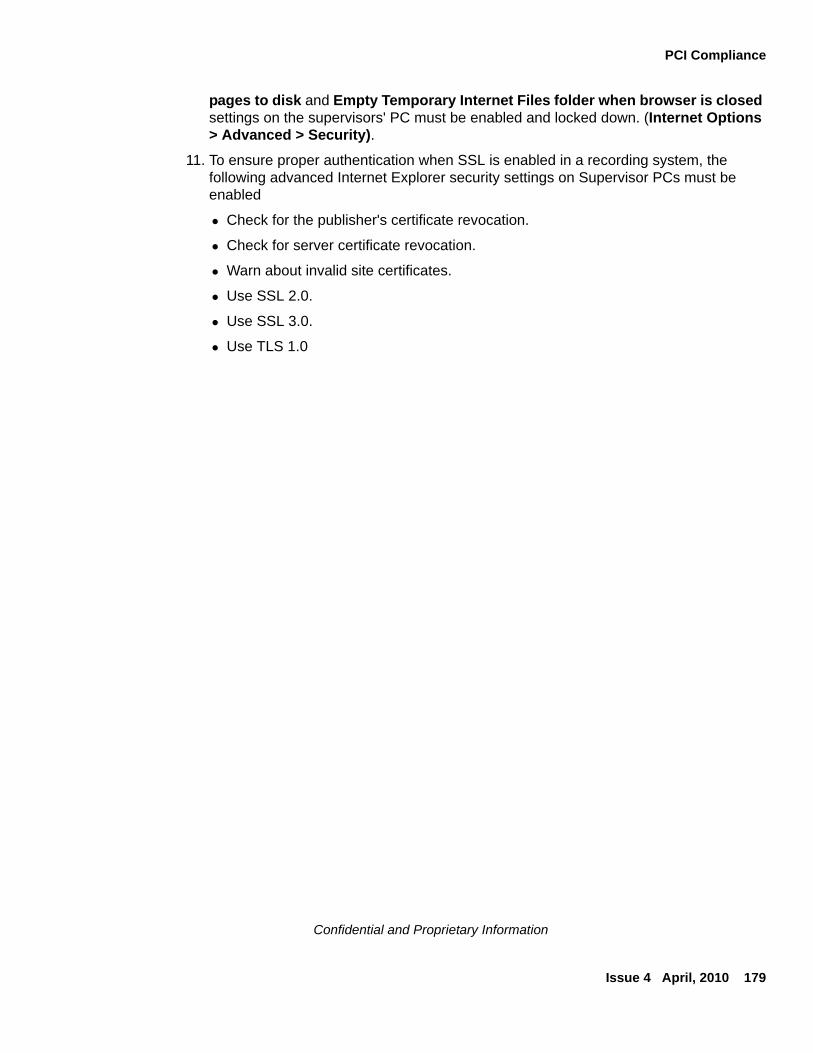
PCI Compliance
Issue 4 April, 2010 179
Confidential and Proprietary Information
pages to disk and Empty Temporary Internet Files folder when browser is closed settings on the supervisors' PC must be enabled and locked down. (Internet Options > Advanced > Security).
11. To ensure proper authentication when SSL is enabled in a recording system, the following advanced Internet Explorer security settings on Supervisor PCs must be enabled
Check for the publisher's certificate revocation.
Check for server certificate revocation.
Warn about invalid site certificates.
Use SSL 2.0.
Use SSL 3.0.
Use TLS 1.0

System Security
180 Avaya Contact Recorder Planning, Installation and Administration Guide
Confidential and Proprietary Information
Issue 4 April, 2010 181
Confidential and Proprietary Information
Chapter 7: Advanced Configuration
This chapter provides an overview of the more complex and rarely used options for an Avaya Contact Recorder system.
The main sections in this chapter are:
Properties File on page 182
Standby Server on page 189
Central Replay Server on page 190
User Defined Fields on page 191
Customizing Search and Replay on page 193
Usage Report on page 198
Selective Record Barring on page 200
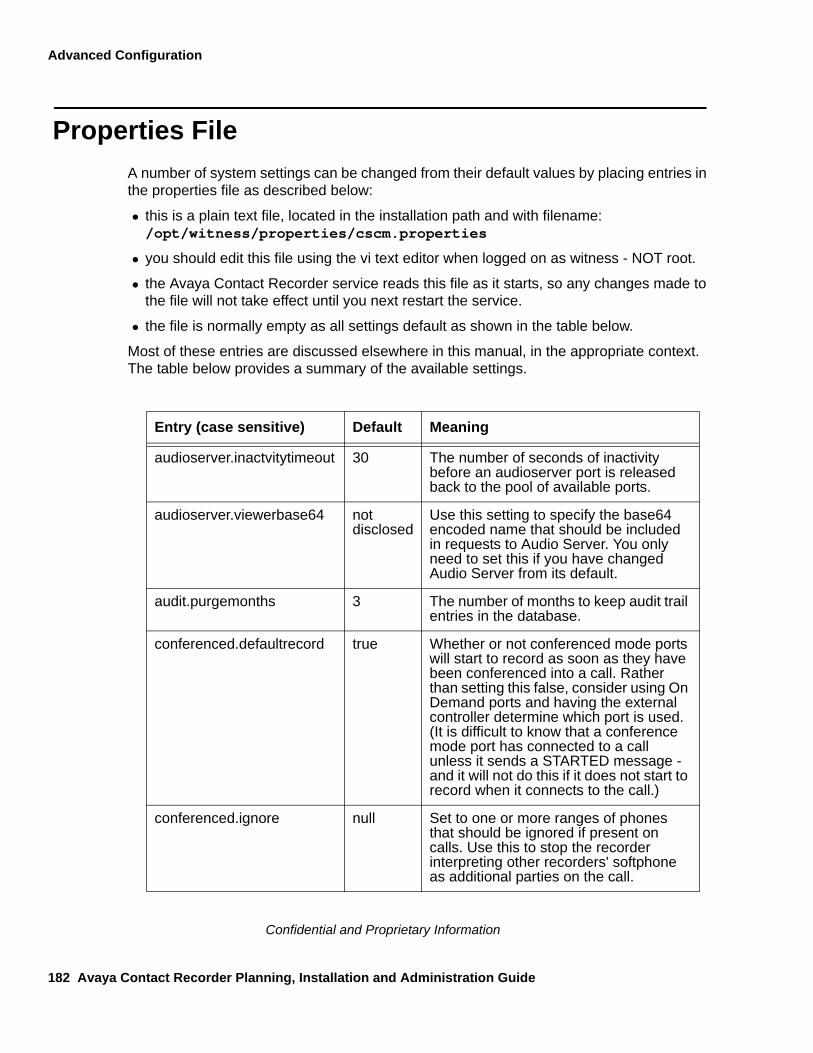
Advanced Configuration
182 Avaya Contact Recorder Planning, Installation and Administration Guide
Confidential and Proprietary Information
Properties File
A number of system settings can be changed from their default values by placing entries in the properties file as described below:
this is a plain text file, located in the installation path and with filename: /opt/witness/properties/cscm.properties
you should edit this file using the vi text editor when logged on as witness - NOT root.
the Avaya Contact Recorder service reads this file as it starts, so any changes made to the file will not take effect until you next restart the service.
the file is normally empty as all settings default as shown in the table below.
Most of these entries are discussed elsewhere in this manual, in the appropriate context. The table below provides a summary of the available settings.
Entry (case sensitive) Default Meaning
audioserver.inactvitytimeout 30 The number of seconds of inactivity before an audioserver port is released back to the pool of available ports.
audioserver.viewerbase64 not disclosed
Use this setting to specify the base64 encoded name that should be included in requests to Audio Server. You only need to set this if you have changed Audio Server from its default.
audit.purgemonths 3 The number of months to keep audit trail entries in the database.
conferenced.defaultrecord true Whether or not conferenced mode ports will start to record as soon as they have been conferenced into a call. Rather than setting this false, consider using On Demand ports and having the external controller determine which port is used. (It is difficult to know that a conference mode port has connected to a call unless it sends a STARTED message - and it will not do this if it does not start to record when it connects to the call.)
conferenced.ignore null Set to one or more ranges of phones that should be ignored if present on calls. Use this to stop the recorder interpreting other recorders' softphone as additional parties on the call.
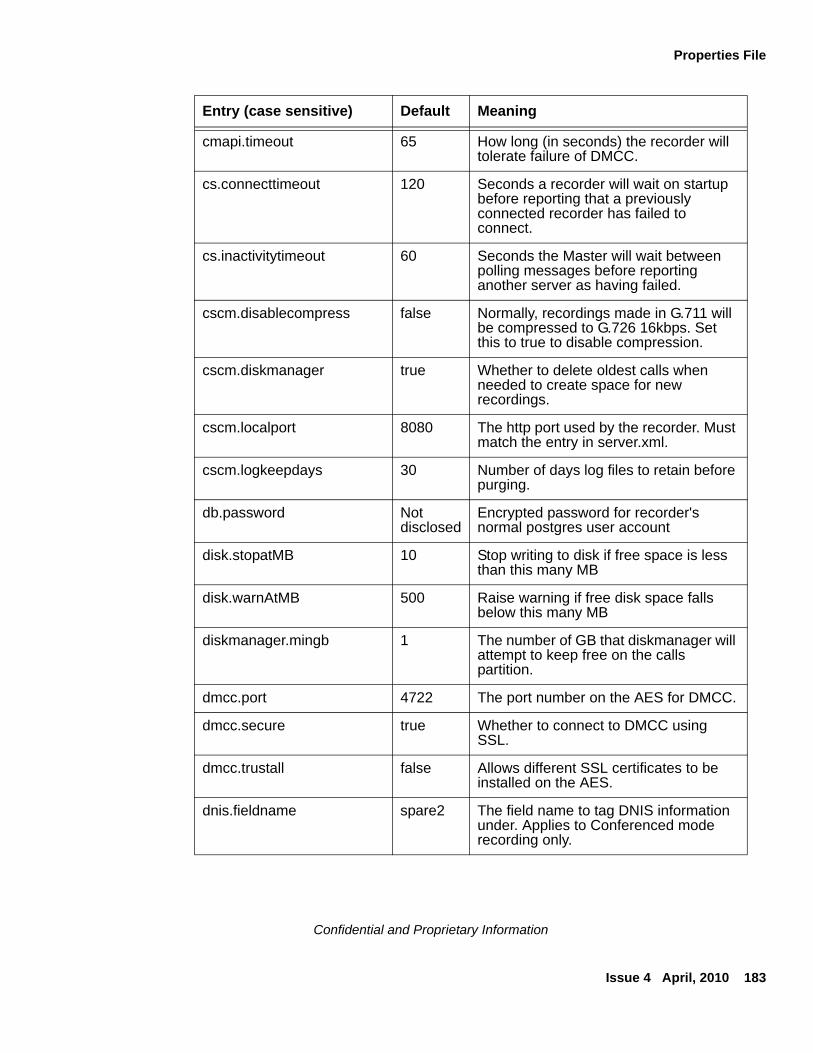
Properties File
Issue 4 April, 2010 183
Confidential and Proprietary Information
cmapi.timeout 65 How long (in seconds) the recorder will tolerate failure of DMCC.
cs.connecttimeout 120 Seconds a recorder will wait on startup before reporting that a previously connected recorder has failed to connect.
cs.inactivitytimeout 60 Seconds the Master will wait between polling messages before reporting another server as having failed.
cscm.disablecompress false Normally, recordings made in G.711 will be compressed to G.726 16kbps. Set this to true to disable compression.
cscm.diskmanager true Whether to delete oldest calls when needed to create space for new recordings.
cscm.localport 8080 The http port used by the recorder. Must match the entry in server.xml.
cscm.logkeepdays 30 Number of days log files to retain before purging.
db.password Not disclosed
Encrypted password for recorder's normal postgres user account
disk.stopatMB 10 Stop writing to disk if free space is less than this many MB
disk.warnAtMB 500 Raise warning if free disk space falls below this many MB
diskmanager.mingb 1 The number of GB that diskmanager will attempt to keep free on the calls partition.
dmcc.port 4722 The port number on the AES for DMCC.
dmcc.secure true Whether to connect to DMCC using SSL.
dmcc.trustall false Allows different SSL certificates to be installed on the AES.
dnis.fieldname spare2 The field name to tag DNIS information under. Applies to Conferenced mode recording only.
Entry (case sensitive) Default Meaning
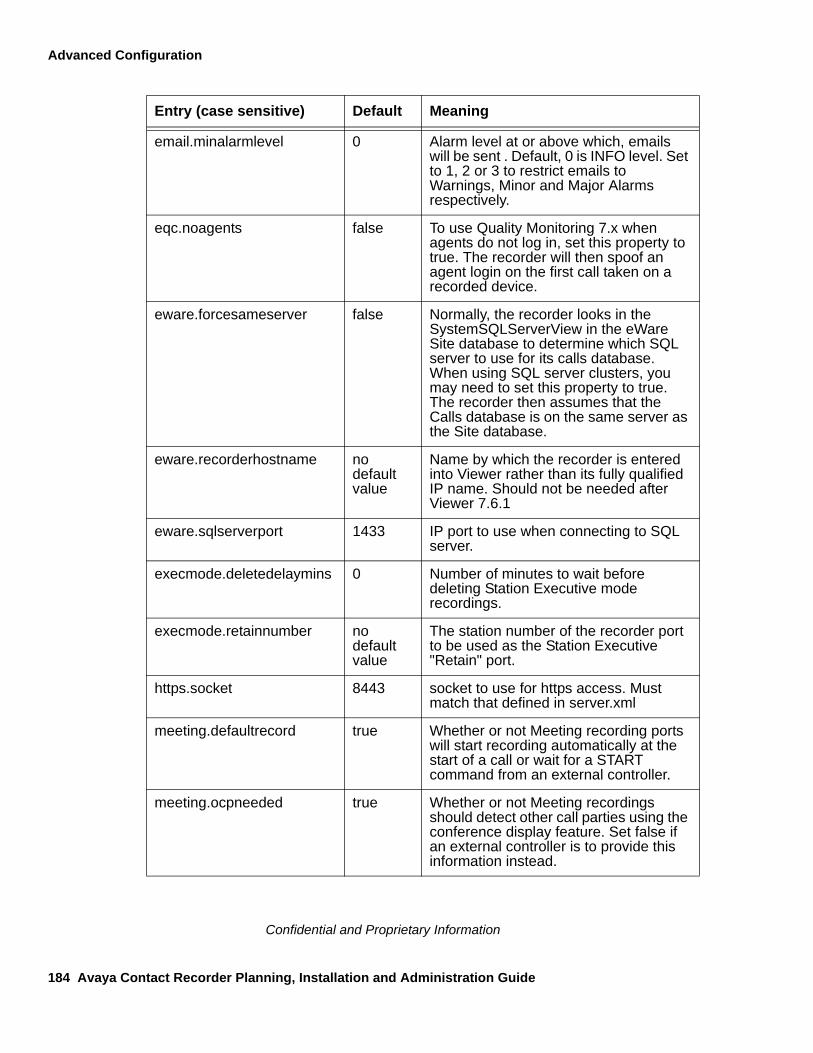
Advanced Configuration
184 Avaya Contact Recorder Planning, Installation and Administration Guide
Confidential and Proprietary Information
email.minalarmlevel 0 Alarm level at or above which, emails will be sent . Default, 0 is INFO level. Set to 1, 2 or 3 to restrict emails to Warnings, Minor and Major Alarms respectively.
eqc.noagents false To use Quality Monitoring 7.x when agents do not log in, set this property to true. The recorder will then spoof an agent login on the first call taken on a recorded device.
eware.forcesameserver false Normally, the recorder looks in the SystemSQLServerView in the eWare Site database to determine which SQL server to use for its calls database. When using SQL server clusters, you may need to set this property to true. The recorder then assumes that the Calls database is on the same server as the Site database.
eware.recorderhostname no default value
Name by which the recorder is entered into Viewer rather than its fully qualified IP name. Should not be needed after Viewer 7.6.1
eware.sqlserverport 1433 IP port to use when connecting to SQL server.
execmode.deletedelaymins 0 Number of minutes to wait before deleting Station Executive mode recordings.
execmode.retainnumber no default value
The station number of the recorder port to be used as the Station Executive "Retain" port.
https.socket 8443 socket to use for https access. Must match that defined in server.xml
meeting.defaultrecord true Whether or not Meeting recording ports will start recording automatically at the start of a call or wait for a START command from an external controller.
meeting.ocpneeded true Whether or not Meeting recordings should detect other call parties using the conference display feature. Set false if an external controller is to provide this information instead.
Entry (case sensitive) Default Meaning

Properties File
Issue 4 April, 2010 185
Confidential and Proprietary Information
ocp.alwaysrefresh false In recording modes where the conference display button is used to determine who is on the call, this process will be restarted if the display indicates that a party has joined the call. In some cases, however, an existing party may be updated e.g. a trunk name/number may be replaced by a (late arriving) ANI. Set this property true to have ANY change to the display trigger a refresh of all parties on the call.
ocp.strictparsing false When forwarding via coverage answer groups, the conference display may not contain a single numeric field in the end of the display. Previously this would lead to the recorder continually pressed the Conf Disp button - resulting in the party being removed from the call. Now default is not to check for spaces or valid number in this string. To restore previous behaviour if this causes problems, set this property = true.
ondemand.defaultrecord true Whether or not On Demand recording ports will start recording automatically at the start of a call or wait for a START command from an external controller.
ondemand.ocpneeded true Whether or not On Demand recordings should detect other call parties using the conference display feature. Set false if an external controller is to provide this information instead.
ondemand.ocpblocked false If enabled, prevents OCP.
origucid.fieldname spare3 The field name to tag original call UCID information under (i.e. the UCID of the call that a consult call relates to). Applies to Conferenced mode recording only.
postgres.password not disclosed
Encrypted password to use for database vacuum.
purge.hourofday 1 Hour at which database and log file purges will take place. Default is 1am. Valid range 0 - 23
qcm.keepwav false Whether to retain Quality Monitoring recordings in the recorder's call path.
Entry (case sensitive) Default Meaning
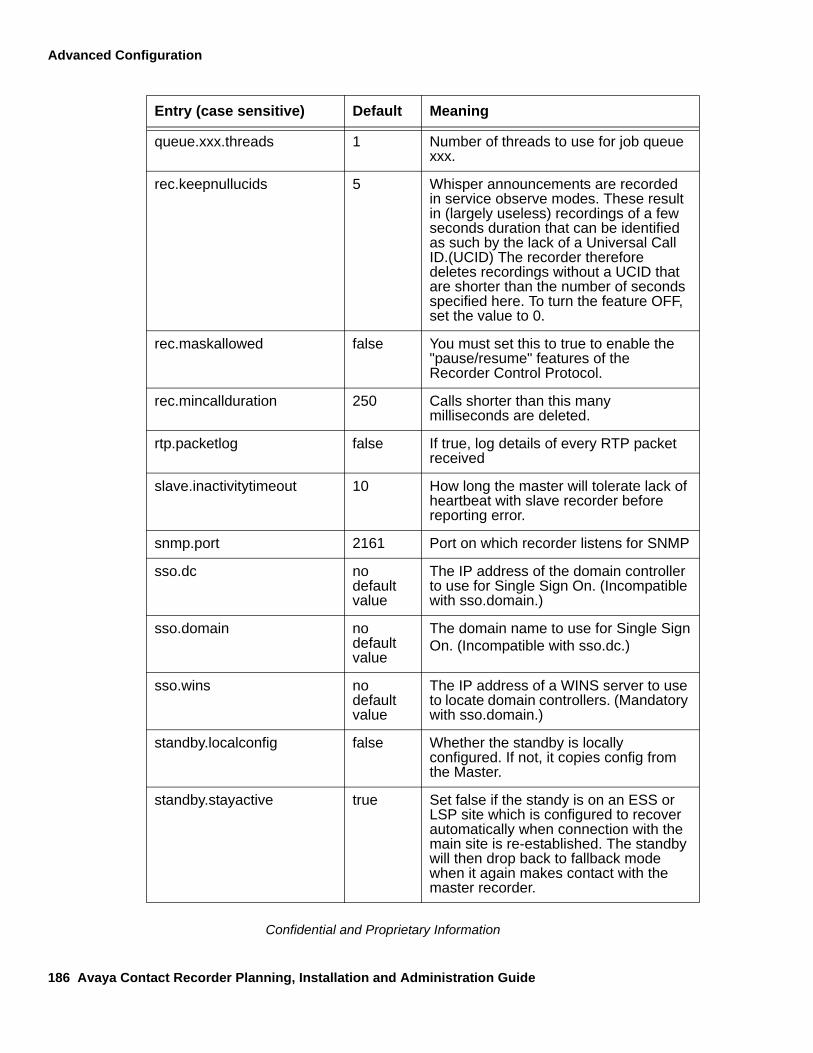
Advanced Configuration
186 Avaya Contact Recorder Planning, Installation and Administration Guide
Confidential and Proprietary Information
queue.xxx.threads 1 Number of threads to use for job queue xxx.
rec.keepnullucids 5 Whisper announcements are recorded in service observe modes. These result in (largely useless) recordings of a few seconds duration that can be identified as such by the lack of a Universal Call ID.(UCID) The recorder therefore deletes recordings without a UCID that are shorter than the number of seconds specified here. To turn the feature OFF, set the value to 0.
rec.maskallowed false You must set this to true to enable the "pause/resume" features of the Recorder Control Protocol.
rec.mincallduration 250 Calls shorter than this many milliseconds are deleted.
rtp.packetlog false If true, log details of every RTP packet received
slave.inactivitytimeout 10 How long the master will tolerate lack of heartbeat with slave recorder before reporting error.
snmp.port 2161 Port on which recorder listens for SNMP
sso.dc no default value
The IP address of the domain controller to use for Single Sign On. (Incompatible with sso.domain.)
sso.domain no default value
The domain name to use for Single SignOn. (Incompatible with sso.dc.)
sso.wins no default value
The IP address of a WINS server to use to locate domain controllers. (Mandatory with sso.domain.)
standby.localconfig false Whether the standby is locally configured. If not, it copies config from the Master.
standby.stayactive true Set false if the standy is on an ESS or LSP site which is configured to recover automatically when connection with the main site is re-established. The standby will then drop back to fallback mode when it again makes contact with the master recorder.
Entry (case sensitive) Default Meaning
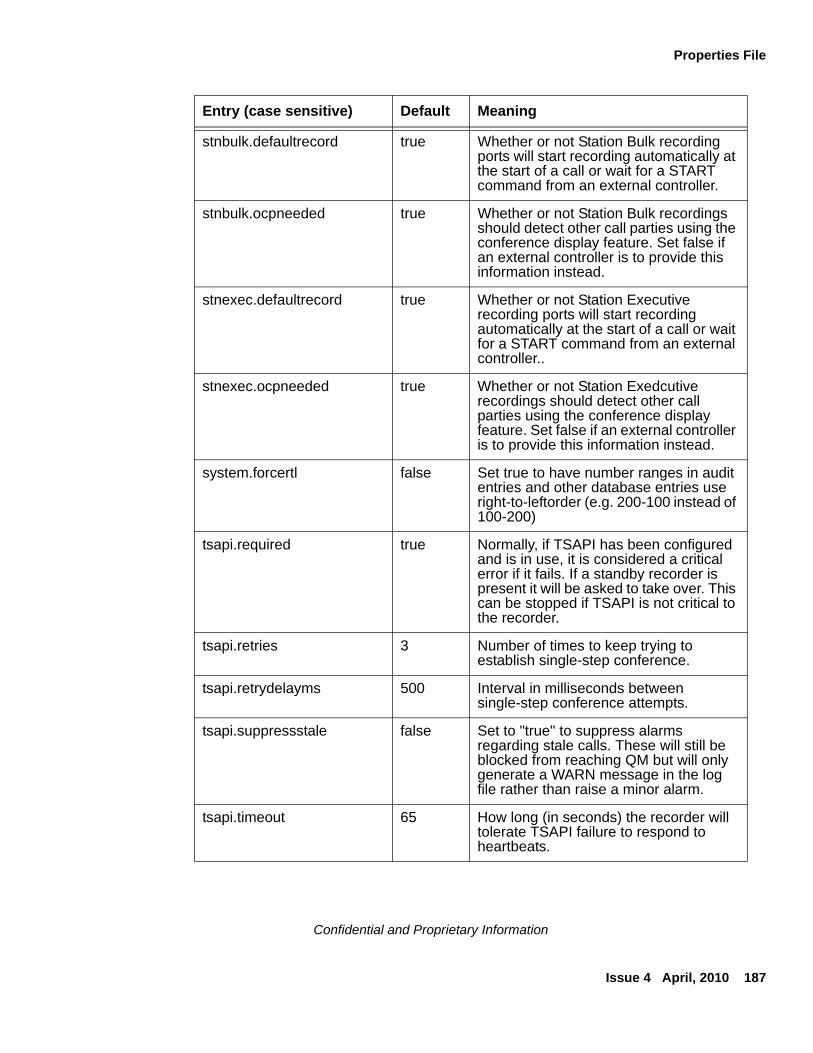
Properties File
Issue 4 April, 2010 187
Confidential and Proprietary Information
stnbulk.defaultrecord true Whether or not Station Bulk recording ports will start recording automatically at the start of a call or wait for a START command from an external controller.
stnbulk.ocpneeded true Whether or not Station Bulk recordings should detect other call parties using the conference display feature. Set false if an external controller is to provide this information instead.
stnexec.defaultrecord true Whether or not Station Executive recording ports will start recording automatically at the start of a call or wait for a START command from an external controller..
stnexec.ocpneeded true Whether or not Station Exedcutive recordings should detect other call parties using the conference display feature. Set false if an external controller is to provide this information instead.
system.forcertl false Set true to have number ranges in audit entries and other database entries use right-to-leftorder (e.g. 200-100 instead of 100-200)
tsapi.required true Normally, if TSAPI has been configured and is in use, it is considered a critical error if it fails. If a standby recorder is present it will be asked to take over. This can be stopped if TSAPI is not critical to the recorder.
tsapi.retries 3 Number of times to keep trying to establish single-step conference.
tsapi.retrydelayms 500 Interval in milliseconds between single-step conference attempts.
tsapi.suppressstale false Set to "true" to suppress alarms regarding stale calls. These will still be blocked from reaching QM but will only generate a WARN message in the log file rather than raise a minor alarm.
tsapi.timeout 65 How long (in seconds) the recorder will tolerate TSAPI failure to respond to heartbeats.
Entry (case sensitive) Default Meaning
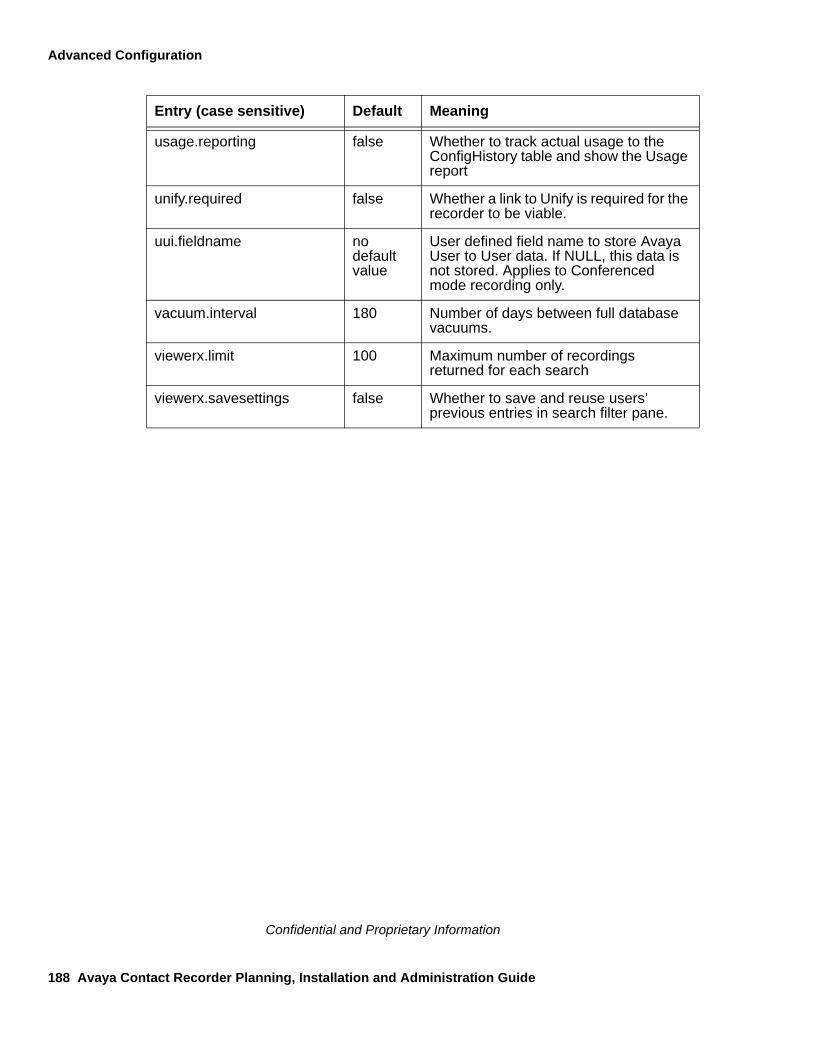
Advanced Configuration
188 Avaya Contact Recorder Planning, Installation and Administration Guide
Confidential and Proprietary Information
usage.reporting false Whether to track actual usage to the ConfigHistory table and show the Usage report
unify.required false Whether a link to Unify is required for the recorder to be viable.
uui.fieldname no default value
User defined field name to store Avaya User to User data. If NULL, this data is not stored. Applies to Conferenced mode recording only.
vacuum.interval 180 Number of days between full database vacuums.
viewerx.limit 100 Maximum number of recordings returned for each search
viewerx.savesettings false Whether to save and reuse users’ previous entries in search filter pane.
Entry (case sensitive) Default Meaning
Standby Server
Issue 4 April, 2010 189
Confidential and Proprietary Information
Standby Server
First, determine the number and type of standby servers required using the Topology tables in Standby Recorder Options on page 264
Standby servers are installed in the same way as a standalone recorder (seeInstalling Avaya Contact Recorder on page 88 - steps 1-7). Instead of entering a license key, follow the instructions on the lower half of the license entry page. Allocate the recorder a unique number (2 to 9999) and specify the IP address of the Master to which it is to connect.
Follow the configuration guidance given in the appropriate table:
Where a Standby is to copy the configuration of the Master recorder (the default) then you need to configure very few other details. Work through the Configuration chapter of this manual configuring just those fields with "Edit" links next to them.
Where specific standby recorders need to be specified, ensure you have set the Standby Recorder Serial Number for each set of softphones and each set of stations on the Station Bulk or Conferenced Mode Operations page.
Where a standby recorder is to be locally configured,
1. Add the following line to the properties file (See Properties File on page 182 for detailed instructions)
standby.localconfig=true
2. Restart the Avaya Contact Recorder service
3. Configure all settings as you would on a standalone recorder.
Advanced Configuration
190 Avaya Contact Recorder Planning, Installation and Administration Guide
Confidential and Proprietary Information
Central Replay Server
You can deploy the recorder application onto an additional server which collects details of recordings made on one or more other servers and therefore can act as a dedicated search and replay server. Users can then search for recordings from any of the recorders feeding it with a single url and a single search.
There are differences in the functionality between the Viewer application and the recorder's integral replay application as used when a recorder is deployed as a Central Replay Server. Refer to the Viewer documentation to compare it with the functionality described in the User manual for this recorder.
Installation
Install a Central Replay server in the same way as the Master recorder (see Installing Avaya Contact Recorder on page 88 - steps 1-7).
Configuration
Work through Chapter 4: Configuration configuring just those fields with "Edit" links next to them. Then configure the user accounts and replay rights for those entitled to use the application. You can also configure ports for telephone replay. As this is the only possible use for ports on a Central Replay Server, simply configure the softphones on the General Setup > Communication Manager Interface tab. All softphones placed there will automatically be used for telephone Replay.
User Defined Fields
Issue 4 April, 2010 191
Confidential and Proprietary Information
User Defined Fields
The recorder can store any number of user-defined fields (UDFs) in its internal PostgreSQL database. You can search on these fields using the Search and Replay web application.
Storing UDFs
Use an external controller to TAG calls using the interface described in Appendix D: External Control Interface. The database automatically notes new UDFs and stores the call's details.
Search and Display UDFs
To search on and display UDFs, copy the browse query (named "browse") in the postgres database to a new file that you will use to create a new query. Name this "browse2" or something more descriptive.
Use the stored procedure udf_value(inum, udfid) to add the chosen UDFs to the new view.
For example, the following fragment of SQL inserted into the SELECT statement's list of fields adds an additional column called spare1:
…… udf_value(calls.inum, 1) AS spare1
The udfid is determined by searching the udfnames table for the relevant udfname. You can, alternatively, use the function udf_number('spare1') to do this lookup at run time. This is slightly slower than providing the number directly. Your view, in this case, would include the SQL fragment ... udf_value(calls.inum, udf_number('spare1')) AS spare1.The spare1 column is then available to be used in a customized search and replay view as described in Customizing Search and Replay on page 193.
UDF Support in Viewer
When one compares UDF support in this recorder (and hence Central Replay Server) to UDF support in eWare, this recorder has the following advantages:
Unlimited number of user defined fields.
Unlimited length of each user-defined field.
Advanced Configuration
192 Avaya Contact Recorder Planning, Installation and Administration Guide
Confidential and Proprietary Information
User defined search forms created by editing the xml templates rather than the end-user interface available within Viewer.
Better support for sparsely populated data sets in which there are more user-defined fields, but not every call has every field present.
Viewer Compatibility
If you name your user defined fields spare1 through spare8 you can upload them to a Viewer database as well as have them in the local database. The name by which the users see these fields can be set in the template files.

Customizing Search and Replay
Issue 4 April, 2010 193
Confidential and Proprietary Information
Customizing Search and Replay
By renaming and modifying the layout files provided with the Search and Replay application, you can define search forms and results display list formats. You can also provide alternate language translations for the fields and columns shown.
Default Configuration Files
The default layout is determined by two files located /opt/witness/properties/layouts:
lcscm.xml is the default layout
idefault.xml is the default internationalization file
! WARNING:WARNING: lcscm.xml and idefault.xml must not be modified. They are overwritten
during upgrades. You will make your changes in files with different filenames (of your choice).
Note:Note: The web server picks up changes that result from additional files being
placed in this folder within a minute. There is no need to restart. However, it makes sense to make these changes when there are no users on the system.
Custom Layout Files
Layout files are very straightforward. Each file specifies a single "layout". The filename must be of the form: lsomething.xml. The default, lcscm.xml is shown below:
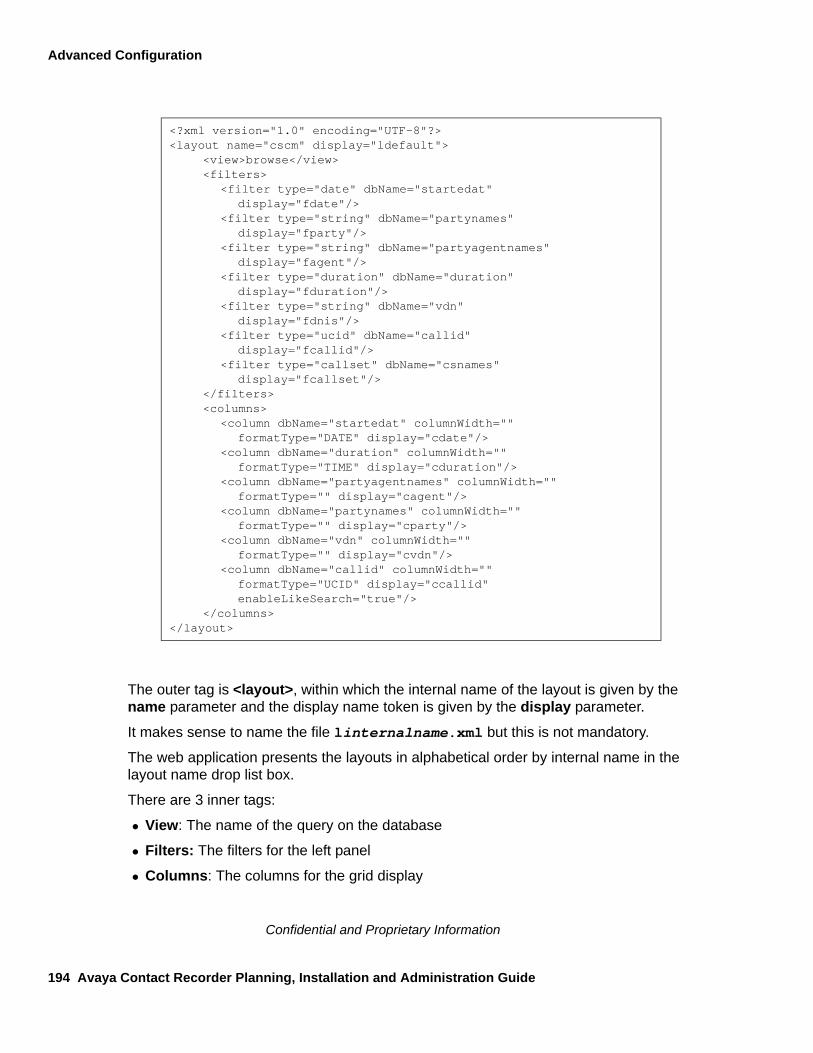
Advanced Configuration
194 Avaya Contact Recorder Planning, Installation and Administration Guide
Confidential and Proprietary Information
The outer tag is <layout>, within which the internal name of the layout is given by the name parameter and the display name token is given by the display parameter.
It makes sense to name the file linternalname.xml but this is not mandatory.
The web application presents the layouts in alphabetical order by internal name in the layout name drop list box.
There are 3 inner tags:
View: The name of the query on the database
Filters: The filters for the left panel
Columns: The columns for the grid display
<?xml version="1.0" encoding="UTF-8"?><layout name="cscm" display="ldefault">
<view>browse</view><filters>
<filter type="date" dbName="startedat"display="fdate"/>
<filter type="string" dbName="partynames"display="fparty"/>
<filter type="string" dbName="partyagentnames"display="fagent"/>
<filter type="duration" dbName="duration"display="fduration"/>
<filter type="string" dbName="vdn"display="fdnis"/>
<filter type="ucid" dbName="callid"display="fcallid"/>
<filter type="callset" dbName="csnames"display="fcallset"/>
</filters><columns>
<column dbName="startedat" columnWidth=""formatType="DATE" display="cdate"/>
<column dbName="duration" columnWidth=""formatType="TIME" display="cduration"/>
<column dbName="partyagentnames" columnWidth=""formatType="" display="cagent"/>
<column dbName="partynames" columnWidth=""formatType="" display="cparty"/>
<column dbName="vdn" columnWidth=""formatType="" display="cvdn"/>
<column dbName="callid" columnWidth=""formatType="UCID" display="ccallid"enableLikeSearch="true"/>
</columns></layout>

Customizing Search and Replay
Issue 4 April, 2010 195
Confidential and Proprietary Information
Inside the outer filters tag, there are many filter tags. Each must have the following:
a type, which can be date, string, duration, ucid or callset
a column name matching one of those in the specified database view
a display token which is looked up in the internationalization file.
Inside the outer columns tag there are many column tags. These must have a column name, width, format and display. They may optionally have an enablelikesearch flag. See the default above for all valid display types.
Widths may be valid HTML table widths (that is, nnnpx for pixels or mm% for percentages). However, it is better to leave these blank and let the browser decide.
If enablelikesearch is true the application displays this field as a hyperlink that, when clicked, executes a search for all calls (+/- one day) which have exactly the same data in this column as the call clicked upon.
(The example use of this is for universal call id - which you can click on to find all recorded segments of this call).
Internationalization
The file idefault.xml contains translation strings that allow you to format the output in any language. The current default is shown below.

Advanced Configuration
196 Avaya Contact Recorder Planning, Installation and Administration Guide
Confidential and Proprietary Information
It has an outer tag <tokenset> with inner tags <language>, which in turn have inner tags <token>.
Note:Note: The naming convention adopted is as follows: the display tokens for layouts
begin "l", for filters "f" and for columns "c". This is only a convention.
When the application wants to display the name of a layout, it looks up its display token in the internationalization maps by name, according to the user's language preferences set in the browser.
For example, lcscm.xml has the display token ldefault, the string for which (in English) is "Default Layout".
To change/add strings you can supply a file called icustom.xml.This file must contain a tokenset, as described above. It is merged with the tokenset in idefault.xml. Because the file icustom.xml is read after idefault.xml, any duplicates will use your values rather than supplied defaults.
For example, if your French users dislike the default translation of call ID (ID d'appel) and would prefer "ID", then supply an icustom.xml with the following:
<?xml version="1.0" encoding="UTF-8"?><tokenset> <language lang="en"> <token tid="ldefault">Default Layout</token> <token tid="fdate">Call Start Range</token> <token tid="fparty">Parties</token> <token tid="fagent">Agent</token> <token tid="fduration">Length</token> <token tid="fdnis">Service</token> <token tid="fcallid">Universal Call ID</token> <token tid="fcallset">Call Set</token> <token tid="cdate">Call Start</token> <token tid="cduration">Len</token> <token tid="cagent">Agent</token> <token tid="cparty">Parties</token> <token tid="cdnis">Service</token> <token tid="ccallid">Univ. Call ID</token> </language>+ <language lang="es">+ <language lang="it">+ <language lang="ja">+ <language lang="zh">+ <language lang="fr"></tokenset>
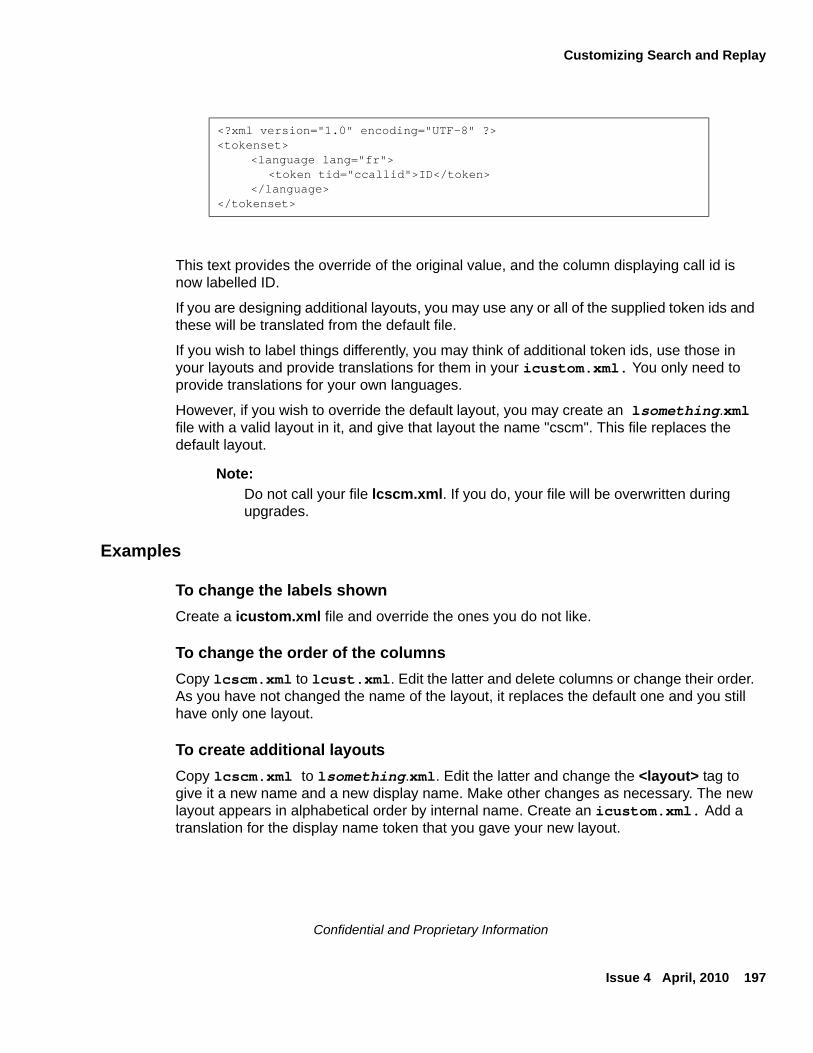
Customizing Search and Replay
Issue 4 April, 2010 197
Confidential and Proprietary Information
This text provides the override of the original value, and the column displaying call id is now labelled ID.
If you are designing additional layouts, you may use any or all of the supplied token ids and these will be translated from the default file.
If you wish to label things differently, you may think of additional token ids, use those in your layouts and provide translations for them in your icustom.xml. You only need to provide translations for your own languages.
However, if you wish to override the default layout, you may create an lsomething.xml file with a valid layout in it, and give that layout the name "cscm". This file replaces the default layout.
Note:Note: Do not call your file lcscm.xml. If you do, your file will be overwritten during
upgrades.
Examples
To change the labels shown
Create a icustom.xml file and override the ones you do not like.
To change the order of the columns
Copy lcscm.xml to lcust.xml. Edit the latter and delete columns or change their order. As you have not changed the name of the layout, it replaces the default one and you still have only one layout.
To create additional layouts
Copy lcscm.xml to lsomething.xml. Edit the latter and change the <layout> tag to give it a new name and a new display name. Make other changes as necessary. The new layout appears in alphabetical order by internal name. Create an icustom.xml. Add a translation for the display name token that you gave your new layout.
<?xml version="1.0" encoding="UTF-8" ?><tokenset>
<language lang="fr"><token tid="ccallid">ID</token>
</language></tokenset>
Advanced Configuration
198 Avaya Contact Recorder Planning, Installation and Administration Guide
Confidential and Proprietary Information
Usage Report
The recorder is occasionally sold to service providers with a "per use" license. Charges are levied based on the actual usage made of a recorder each month. This report can be enabled in such cases to provide the necessary billing information.
Enabling the Report
To enable this feature, you must add the following line to the properties file:
usage.reporting=true
Content
The Usage Report page shows a summary of the licenses that have been used over a specific period. The default reporting period is the previous calendar month.
To generate a report for a different period, enter the date range in the calendar controls, and click Refresh.
The report shows
The maximum number of concurrent recordings across all modes except Quality
The number of stations recorded using a Quality Recording port at any time during the reporting period
The maximum number of telephone replay ports configured at any time during the reporting period.
Configuration records are retained for 3 months by default. Each night after that period has elapsed, a background job deletes any records older than this.
Accessing through URL:
This report can be accessed directly, without having to use the normal system administration pages.
To access the report by way of its URL, enter the following line in the navigation bar of your browser:
http://myservername:8080/servlet/report?from=t1&to=t2

Usage Report
Issue 4 April, 2010 199
Confidential and Proprietary Information
Where t1 is the start time in UTC seconds and t2 is the end time in UTC seconds.
Note:Note: These times are in seconds not milliseconds and do not attempt to correct
for leap-seconds. Unless an administrator made configuration changes within a few seconds of midnight, this will not affect reporting on monthly boundaries.
The names of recording modes and other information that can be localized are returned according to the language preferences established for the interface. If localized terms are not available, the returned values are in English.
Accessing the Usage report in a log file
If you request the usage report by way of its URL and the request is successful, the recorder writes the usage data to a log file called usage.log in the /opt/witness/logs directory beneath the install path.
You can access and view this log file in any text viewer. Its content is the same as the report returned for the URL request. Each time you request a usage report, a new log is created that overwrites the previous one.
If a request for the Usage report is not successful, no log file is written for it. You should examine the return value of the URL request for an indication of the error conditions (bad time parameters, configuration has been tampered with).
Advanced Configuration
200 Avaya Contact Recorder Planning, Installation and Administration Guide
Confidential and Proprietary Information
Selective Record Barring
Recent legislation changes mean that some customers may need to block recording of calls to or from specific area codes (e.g. California).
Configuration
It is possible to bar recording of calls to or from certain numbers. To configure such a “recording bar”, add the property file entry:
recording.barred=<regular expression>
Where <regular expression> is a regular expression that will match the digit strings to be barred from recording.
Tip:Tip: See http://java.sun.com/docs/books/tutorial/essential/regex/index.html for
instructions on how to form a regular expression.
Example
The following example shows how to bar calls to or from area codes 234, 567 and 890 – where the recorder is situated in area code 234 (which therefore does not have a 1 in front of it, unlike the others which may or may not). The trailing periods (there are seven of them) are important – as this forces the pattern to match only numbers with 7 digits following the area code.
recording.barred=((234)|(1?567)|1?890)).......
Any recording that is barred due to matching the digit pattern specified will cause an INFO level message to appear in the log file.
Limitations
1. This feature applies to Station Bulk, Station Executive, and Conferenced modes only (On Demand and Meeting modes are not affected).
2. To bar incoming only or outgoing only, first determine the digit patterns that are used. You may be able to change the outbound dial plan to always prefix with a ’1’. The "1?" matches calls with or without a preceding ’1’. Remove the ’?’ to require a ’1’ before the pattern is matched.
Selective Record Barring
Issue 4 April, 2010 201
Confidential and Proprietary Information
3. Behavior differs slightly between the Conferenced and Service Observe modes. The former break each recording into separate segments whenever the parties on a call change e.g. consultation call becomes 3-way conference call. The record/bar decision can therefore be applied on each segment and an internal consult call will therefore be recorded even though the resultant conference call (involving a barred party) will not. Service Observe, however, does not break the media stream at this point and hence a single recording segment containing the consult call and the three-way call is the norm. In this case, if a barred party is present at all (i.e. would appear in the list of parties tagged on the recording) then the entire segment – in this case including the consult call – is deleted rather than stored.
4. Note that the Service Observe modes may record calls (as Station Executive mode does for all calls) that are in progress but then delete the recording and associated data file at the end of the call.

Advanced Configuration
202 Avaya Contact Recorder Planning, Installation and Administration Guide
Confidential and Proprietary Information
Issue 4 April, 2010 203
Confidential and Proprietary Information
Appendix A: Technical Reference
This appendix provides technical details about the Avaya Contact Recorder system.
The main sections in this appendix are:
● Recording files on page 204
● Internal Database on page 205
● Recorder Interfaces on page 207
Technical Reference
204 Avaya Contact Recorder Planning, Installation and Administration Guide
Confidential and Proprietary Information
Recording files
Call segments are stored in an industry standard wav file. When each call is completed and as each recorded call segment becomes available, the recorder updates its local database with a record of the call segment. These files are stored in a hierarchy of folders beneath /calls.
Every recording results in one or more:
● wav file
● xml file
WAV files
The wav files contain the actual audio of the recording. You can double-click some wav files to play them directly. Others are in audio formats that are not directly supported by Microsoft's Media Player. This applies to most recordings made by this recorder. These must be converted into a supported format before they can be played. Since the recorder's Search and Replay application does this conversion automatically, you do not need to access these files directly.
XML files
The xml files contain details about the recorded call segments. Although most users typically search against the recorder's database of calls, you can view these files directly in a browser if required.
Within each xml file there is:
● All the details known about this recording. Most of the information, but not all, is inserted into the calls database. Some of the information is only of interest for diagnostic and maintenance purposes.
● Start and end time in ISO format giving local time and offset from GMT.
Internal Database
Issue 4 April, 2010 205
Confidential and Proprietary Information
Internal Database
If you have retained all of the xml and wav files as described above, then you have kept all of the details about the recordings you have made. However, the system uses an industry standard database (PostgreSQL) to hold this information in more readily accessible forms. This database is located on the recorder itself. The database stores details of the recordings as well as details of the recorder's configuration.
Recording details
The call details database uses approximately 1KB per call (in the absence of user defined fields).
To allow you to search for calls easily, the details of recordings (except those made for and copied off to a Quality monitoring server) are inserted into this database. It contains one record for each call segment recorded and additional records for each party on the call and each owner of the call. The information stored for each call is:
● A unique reference for the recording
● The start date and time
● The duration of the recording
● The recording mode that was used to make the recording
● The Communication Manager's Universal Call Identifier (UCID)
● The name and number of the parties on the call-where this was available to the Communication Manager (through ANI or CLI) at the time of the call
● The agent number and name of an agent involved in the recording if one was logged on at the station being recorded
● The direction of the call (incoming, outgoing or internal. The latter being supported only in conferenced mode recording.)
● The owner(s) of the recording
● The service or vector directory number (VDN) name where available
● Additional fields provided by external controllers
● The DNIS if present (Conferenced mode only). Stored as user defined field "spare2"
Technical Reference
206 Avaya Contact Recorder Planning, Installation and Administration Guide
Confidential and Proprietary Information
Configuration details
Several tables hold details of system configuration, such as port assignments, file paths, timeouts and user authorization rights.
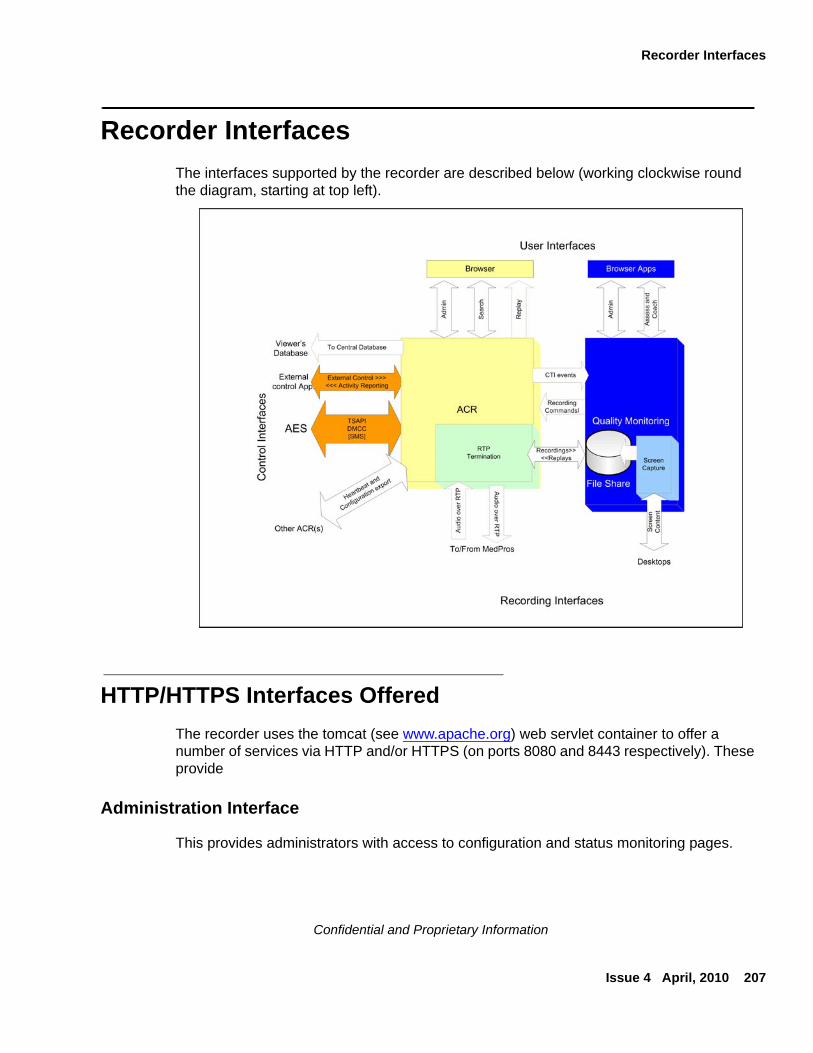
Recorder Interfaces
Issue 4 April, 2010 207
Confidential and Proprietary Information
Recorder Interfaces
The interfaces supported by the recorder are described below (working clockwise round the diagram, starting at top left).
HTTP/HTTPS Interfaces Offered
The recorder uses the tomcat (see www.apache.org) web servlet container to offer a number of services via HTTP and/or HTTPS (on ports 8080 and 8443 respectively). These provide
Administration Interface
This provides administrators with access to configuration and status monitoring pages.
Technical Reference
208 Avaya Contact Recorder Planning, Installation and Administration Guide
Confidential and Proprietary Information
Search Interface
End users access this to search for call recordings that match specific criteria.
Replay (Retriever) Interface
End users and other applications (such as Viewer, Contact Visualizer and Archive Manager) use this interface to retrieve the voice content of a specific recording.
AudioServer Interface
If at least one port on the recorder is licensed for and assigned to the Telephony Replay pool, then the recorder supports the AudioServer Interface.
The login page for users entitled to replay allows entry of a telephone number on which they can be reached. If they do not enter a number, the browser replays through the soundcard. You can also use separate Replay applications. Applications that can use this interface include:
● Viewer and eWare
● Contact Visualizer
Call Details Interface
The details about a recording can be provided on request. This is used by the bulk export feature of the integral search and replay application and the Central Replay Server to populate its database.
Search and Replay API
External applications may search for and retrieve the content of recordings using this interface. Full details are available on request.
Communication Manager
The recorder interfaces to the Avaya components via several mechanisms:
DMCC
DMCC runs on an AE Server and provides softphone registration and signalling services.
Recorder Interfaces
Issue 4 April, 2010 209
Confidential and Proprietary Information
TSAPI
The Avaya Contact Recorder software exchanges TSAPI messages with an AE Server if Conferenced recording is used or if an external controller asks the recorder to establish single-step conferences.
Audio over RTP
The softphones on the recorder terminate RTP streams over which the audio to be recorded flows. These sockets are connected to whichever VoIP resource (for example, Media Processor) is providing the conferencing bridge through which the call is recorded.
The recorder uses ports 10000 upwards, allocating two ports per recording channel.
Quality Monitoring
CTI Event Interface
The Quality Monitoring service establishes a TCP/IP connection to port 3082 (by default). It passes the recorder details of stations that are of interest to it. The recorder passes CTI events on to the Quality Monitoring application.
Recording Command Interface.
The recorder can establish a TCP/IP connection to port 1415 on one or more Quality Monitoring servers. The Quality monitoring application instructs the recorder to record specific calls; to replay calls via the phone and live monitor calls.
Recordings Written to Disk
As the recorder completes each voice recording that an Quality Monitoring server requests, it copies the audio to a fileshare on the Quality Monitoring server. This uses a fileshare as specified in the quality monitoring server's .INI file. Username and password for the fileshare are configured on the recorder.
Recordings Read from Disk
As Quality Monitoring instructs the recorder to replay calls, the recorder reads the audio from files it previously placed on the Quality Monitoring server's disk. This uses the same fileshare or local path (if co-hosted) as above.
Technical Reference
210 Avaya Contact Recorder Planning, Installation and Administration Guide
Confidential and Proprietary Information
Other Recorders
Recorders establish links between master, standby and slave recorders. Configuration, alarms and recording instructions are passed over these links. These are TCP/IP socket interfaces.
Master and Standby recorders listen for connections from other recorders on TCP/IP port 1209 by default and communication over these links is encrypted.
External Control Interface
The recorder supports a simple TCP/IP command interface. This allows other applications to control recording directly and/or add further user defined data fields to recordings. This protocol supports START, STOP, TAG and BREAK (seamless stop and start) commands.
Database Upload Interface
When configured with either a Central Replay Server or a Viewer database, the recorder uploads details of calls into database on the apropriate server.
To Central Replay Server
To upload call details to the Central Replay Server (CRS) a recorder uses a web service on the CRS, to inform it that a new recording is available. The CRS in turn uses a web service on the recorder to retrieve the details. Both of these interactions use port 8080.
To Viewer database
When deploying Viewer, the recorder uploads call details to a central Microsoft SQL Server database over this link. The recorder acts as a standard Microsoft SQL Server client application. It uses the TDS protocol, which uses TCP/IP port 1433 by default. This can be overridden with a properties file setting.
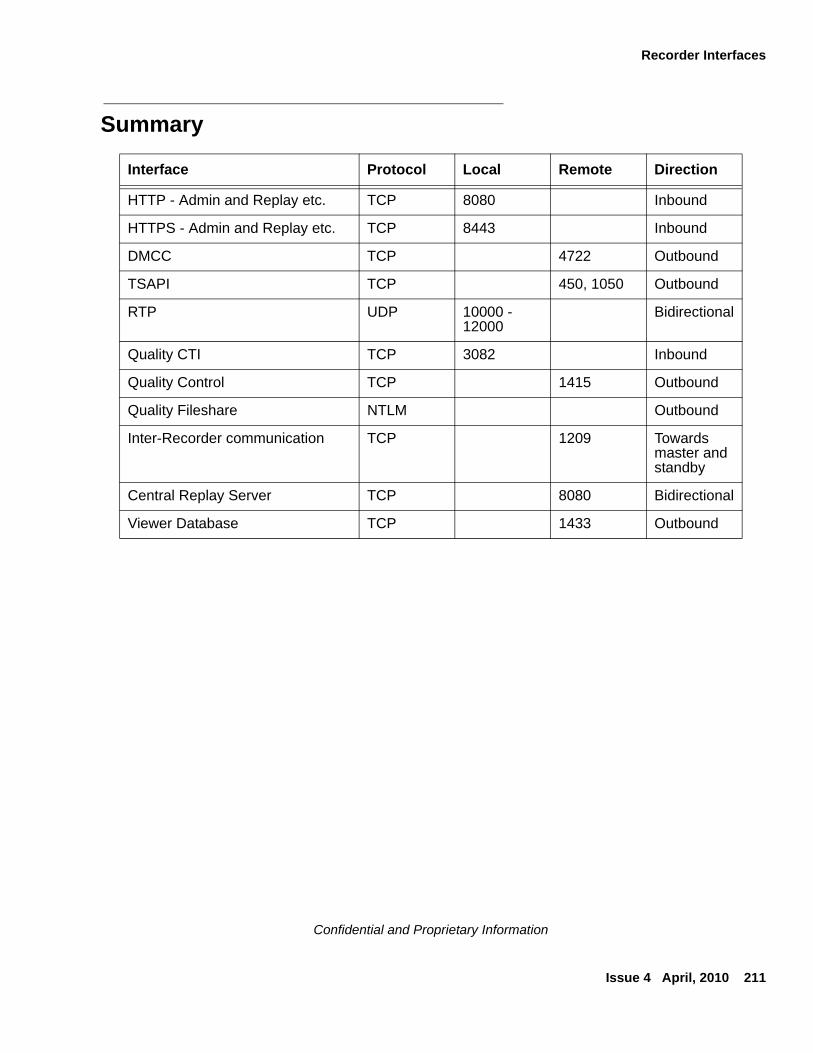
Recorder Interfaces
Issue 4 April, 2010 211
Confidential and Proprietary Information
Summary
Interface Protocol Local Remote Direction
HTTP - Admin and Replay etc. TCP 8080 Inbound
HTTPS - Admin and Replay etc. TCP 8443 Inbound
DMCC TCP 4722 Outbound
TSAPI TCP 450, 1050 Outbound
RTP UDP 10000 -12000
Bidirectional
Quality CTI TCP 3082 Inbound
Quality Control TCP 1415 Outbound
Quality Fileshare NTLM Outbound
Inter-Recorder communication TCP 1209 Towards master and standby
Central Replay Server TCP 8080 Bidirectional
Viewer Database TCP 1433 Outbound

Technical Reference
212 Avaya Contact Recorder Planning, Installation and Administration Guide
Confidential and Proprietary Information
Issue 4 April, 2010 213
Confidential and Proprietary Information
Appendix B: Troubleshooting
This appendix covers two areas: general troubleshooting tips and some specific common issues:
The main sections in this appendix are:
● Hints and Tips on page 214
● Specific Problems on page 216

Troubleshooting
214 Avaya Contact Recorder Planning, Installation and Administration Guide
Confidential and Proprietary Information
Hints and Tips
Where to Look for Clues
When problems occur, check the following:
● Emailed Alarms and Events. If you have been using the email settings to have alarms and events forwarded to one or more email addresses, you should check these carefully. As well as checking the contents of messages that you have received, also check for days when the nightly log file purge message has not been received.
● Alarms Page. This page within the administration application provides a wealth of information on problems that the system has detected. Review the alarms carefully. If the problem is not immediately apparent, consider viewing all alarms, including those that have previously been cleared. It may be that someone has cleared an alarm without addressing it or realizing its significance.
● Log Files. Check for errors being reported in log files within the following directories beneath your installation directory:
● /opt/witness/logs
● /opt/witness/tomcat5525/logs
Determining Current Version
When reporting problems you should state precisely which version of software you are running. To determine this, click on the System > License tab.
Note the precise version number shown.
Application Logs
The Avaya Contact Recorder writes log files to /opt/witness/logs. The current day's log file is called cscm.log. At midnight the current log file is closed, renamed to cscm.log.<date>, and a new log file opened. These log files are automatically purged after 30 days by default but this can be overriden with a properties file entry.
Hints and Tips
Issue 4 April, 2010 215
Confidential and Proprietary Information
Setting the server log level
You can set the level of messages logged by the Avaya Contact Recorder to DEBUG, INFO (the default), WARN, ERROR or FATAL in one of two ways.
Permanently from next restart
To change the level permanently, enter the following line in the properties file cscm.properties and restart the Avaya Contact Recorder service to have it take effect.
log.level=DEBUG
If you change the log level in the properties file, it remains set on subsequent restarts. When logging at DEBUG level, note that the log files grow very quickly and can overflow the disk if left at this level.
Temporarily, immediately
To change the level temporarily, without restarting the service, simply use a browser to request the URL:
http://myrecorder:8080/log?level=DEBUG
using the name of your server.
Alternatively, if you do not have access to the web administration screens, but do have access via secure shell, execute the following command:
perl /opt/witness/bin/loglevel.pl DEBUG
You do not have to stop recording in order to change the logging level. To set it back again, enter the same URL, replacing DEBUG with INFO. The command is case-sensitive. Using this method changes the log level temporarily. It will revert to normal the next time that the system is rebooted.
Tomcat Logs
Avaya Contact Recorder uses the Tomcat web servlet container, which writes log files to /opt/witness/tomcat5525/logs.
Remote Access
You are strongly advised to provide remote access to the server to aid fault-finding.
Troubleshooting
216 Avaya Contact Recorder Planning, Installation and Administration Guide
Confidential and Proprietary Information
Specific Problems
System Administration page problems
You may encounter problems as you access and use the System Administration application. This section lists those problems and suggests steps to take to correct them.
Cannot access the System Administration pages
If you cannot access the System Administration pages, try the following:
● Ping the server to confirm that connectivity is possible. If not, trace the network connections between client and server and double-check the server's IP address, default gateway etc.
● Use the numeric dot notation IP address instead of the hostname. If this works, then the hostname is wrong or cannot be translated by your DNS services. You may need to use a fully qualified node name, such as recorder.bigco.com.
● Use the browser installed on the server itself to access the application at http://localhost:8080.
If this works, then the problem is in the network between server and client. If it does not work, then the problem may be with the Tomcat web server.
Cannot log in
If you have trouble logging in, double-check the state of Caps Lock and ensure the password is being entered with the correct case.
If you can log in under another account, reset the password of the account having problems.
If nothing happens when you click the OK button, check that your Internet Explorer settings allow javascript to run. See ActiveX Control Download on page 146.
These symptoms have also been seen when trying to access a server with an underbar in its node name. Note that this is not a valid IP name and should be changed.
Web pages appear "messy"
If the forms on the System Administration pages and/or Search and Replay page appear to be out of alignment, or fields are truncated, check your desktop properties. If set to Large Fonts (120dpi), this will impact all website accesses not just the Recorder pages.
Specific Problems
Issue 4 April, 2010 217
Confidential and Proprietary Information
To correct display issues:
1. Right-click on your desktop and select Properties.
2. On the Settings tab, click Advanced and set the DPI Setting to 96dpi.
On new laptops, especially those with 1400x1050 resolution screens, the DPI is often set to 120dpi. Using too small a window or too large a type (View > Text Size in Internet Explorer) can make the columns and headings on the web pages wrap where they would not normally.
Connectivity
Email alarm problems
Invalid entries in any one of the parameters used to define the email settings will result in errors. To check this:
● Try the settings you are using in a standard mail client, such as Outlook. Send a message using the account specified to prove that the settings are valid.
● If email messages have been working and then stop without any of the settings changing, verify that nothing has changed on the mail server. This problem occurs, for example, if your password has been reset or changed on the mail server.
● If the recorder is not sending email messages, it may be because it is not able to access the SMTP server. Check the network connections to the recorder.
Recorder to AE Server Problems
The recorder communicates constantly with the AE server. If this link fails, alarms are raised. If you suddenly get multiple alarms, typically those reporting problems with softphones timing out registration, this link might have failed. Ping the AE Server to check the link.
Recorder to Quality Monitoring server problems
If the problems reported include mention of the file-share:
1. Verify that the Quality Monitoring server is running.
2. Verify that the username and password previously in use are still valid. Try to access the file-share from another machine using the username and password provided to the recorder.
Troubleshooting
218 Avaya Contact Recorder Planning, Installation and Administration Guide
Confidential and Proprietary Information
Recorder to Viewer server problems
If you have problems connecting to the Viewer server:
1. Verify that the Viewer server is running.
2. Verify that the SQL Server is active on it.
Search and Replay problems
For most problems with Search and Replay, consider the following diagnostic approaches to narrow down the cause of the problem:
1. Search for a different call, for example, one that is more recent or older, shorter or longer.
2. Log in as a different user with different replay restrictions
Cannot access the replay application
If you cannot get to the login page, try accessing the page from a different machine:
1. From the same side of any firewalls.
2. On the same LAN if you are having problems with WAN access
3. From the same sub-net, if having problems from a different sub-net
4. From the recorder itself, if having problems from the same sub-net.
User replay restrictions do not work
If you have given a user account replay rights over a number of addresses but the calls from these stations are not listed when you enter a valid search that should include them, check the recording ownership. When an agent has logged on to a station that is being recorded, the calls recorded are "owned" by the agent number not the underlying station. Give the user replay rights to the range of agent IDs who have been using the stations in question. In fact, in most cases, you should restrict access to a set of Agent IDs rather than station numbers.
Problems downloading ActiveX control
If you see error messages relating to ActiveX controls being downloaded-or blocked from being downloaded, your security settings may be too restrictive. See ActiveX Control Download on page 146 for more information.
Specific Problems
Issue 4 April, 2010 219
Confidential and Proprietary Information
Problems displaying ActiveX control
If the ActiveX control downloads but displays a red cross on white background at top of page, upgrade to Internet Explorer 6.0. These symptoms have been seen on Internet Explorer 5.0.
Cannot log in
If you see the login page but cannot get past it:
1. Verify that Caps Lock is off and that you are entering the password with the correct case.
2. Log in as a different user
3. Confirm the spelling of your log in name with the system administrator and check that your account is still configured in the administration pages.
4. Ask the system administrator to reset your password. Log in with a blank password and change your password when redirected to the Change Password page.
Search returns no calls
If you get to the search page but no calls are returned when you perform a search:
1. Broaden your search criteria to confirm that you can at least find some calls. Start by requesting calls from any parties for today. If that shows no calls, extend the time period.
2. Try setting the date range back to at least the time you know you have seen call records for in the past.
3. Check that the system administrator has given you access to the correct calls. Your search and replay restriction may be wrong or too narrow for the search you are attempting.
4. Confirm that calls are being recorded. Follow the troubleshooting guidelines for recording problems if you suspect that the system is not actually recording or processing any calls.
Calls listed but cannot play them
If you can see the list of calls that matched your search criteria, but cannot actually play them, look at the area at the top of the browser page where the "graph" of the audio normally shows and match your symptoms to one of the following:
Troubleshooting
220 Avaya Contact Recorder Planning, Installation and Administration Guide
Confidential and Proprietary Information
No Audio "graph"
This means that the call has not been retrieved from the recorder or DVD disk or has not reached the client PC.
1. Check the server logs for errors.
2. Note the call's 15 digit reference number (shown if you hold the mouse pointer just to the right of the radio button that you click to retrieve the recording. Search for that wav file in the calls path to confirm that the recorded file exists.
3. Check connectivity and available bandwidth to the client PC.
Audio graph stops in mid call
This implies that the transfer of data from the Recorder to your client PC has been stopped or interrupted.
1. Request the same call again. There may have been a temporary network problem.
2. Request a different call. If the problem is only with one call, you may have a corrupt file on your hard disk.
3. Request the problem call from another PC on the same network. If the other PC can retrieve it successfully, assess the differences between the two client PCs; the problem is most likely at the client end.
4. Request the problem call from different sub-nets, ideally working closer to the recorder.
5. Request the call from the recorder server's own browser. If this works and the others don't, then the problem is likely to be in the network between server and clients.
Audio graph appears but no sound
The audio file has reached the client PC successfully; the problem is most likely to be with the PC's multimedia setup or current settings.
1. Verify that the PC has a sound card.
2. Play a wav file through Media Player or similar application to verify that that the sound card is set up correctly.
3. Adjust any hardware volume and/or mute controls on the speakers/headphones.
4. Double-click on the icon in the system tray at the bottom right-hand corner of the screen to verify that the PC's software volume controls are not set to mute or very low.
5. Ensure you are not running any other programs that may be locking the sound card exclusively. If in doubt, shut down all other programs.
6. Try another similar PC. If that works, look for differences in the multimedia setup of the two PCs.
Specific Problems
Issue 4 April, 2010 221
Confidential and Proprietary Information
Replay Hangs Intermittently on Internet Explorer 8
Add the recorder to your Trusted Sites as described in ActiveX Control Download on page 146.
No New Recordings Playable
If you can replay old recordings but not newly made calls, there may be a problem with the recording and/or storage components of the system. Follow these steps:
1. On the Status > System Overview page of the Recorder's System Administration application, look at the counts for total calls recorded and calls recorded today.
2. Use Bulk recording mode to make a test recording.
3. Complete the recording and hang up.
4. Return to the Status > System Overview page and note the Total call segments recorded today and Total call segments recorded to date (or since restart, if today). These counts should have increased by at least one, the recording that you just made. If the counts have increased, the recorderingis processing recordings. This is probably a search/replay problem. See earlier sections for help.
Note:Note: If these counts have not increased, the recording has not been successfully
compressed and stored on the Recorder or inserted into the call details database. Do the following:
5. Look for alarm messages that indicate problems with the recording channel or with file read/write or rename functions. The error message should indicate whether disk space or a directory access problem is the cause. Check that .wav files are appearing in the latest folder beneath the calls path as recordings are made.
6. Check disk space in all partitions. If any of these is 0 or less than 50MB, this may be the problem. Check for build up of log files. Check that the call details database hasn't exceeded the available space. Consider reducing the number of months of calls kept-use the purge settings on the Server configuration page to adjust this.
7. Look for alarm messages that indicate licensing problems. The recorder will not process any new calls if you have changed the MAC address, tampered with license settings or are running on a time-expired license. In all cases, you should obtain a new license key.
8. Check that the Tomcat server is running (cscm service).
9. Check for messages in the log files.
10. Reboot the server and watch for error messages on startup.
Troubleshooting
222 Avaya Contact Recorder Planning, Installation and Administration Guide
Confidential and Proprietary Information
Poor Audio Quality on Telephone Replay
If the network configuration is correct and there are no problems with its function, the most likely cause of this problem is that the recorder or the network is overloaded.
To look for a problem on a managed network switch, you should look at the diagnostics and configuration details. You should see ZERO errors on all ports. Any port showing more than 1 packet error in 10,000 is suspect and must be looked at.
If the C-LAN, MedPro and/or recorder ports are failing to auto-sense full/half-duplex properly, you can force each port to either full or half duplex so as to reduce the error count to zero.
Note:Note: Even though a port may show an error rate of less than 1 in 100 packets, the
error counts are deceptive. A single packet error can trigger a full/half duplex negotiation during which all packets are lost in the servers, but none of these show as errors on the switch.
If your error counts are zero on all ports, then we must also consider overload of the recorder as a possible cause. You should monitor the CPU load of the recorder during busy hours. Replay and live monitor are very sensitive to overload. Recording may be unaffected but if the CPU load is too high, audio quality on replay can suffer.
Similar problems have also been seen on multi-CPU AMD Opteron servers. This is caused by an unstable system clock, which is addressed in RedHat Versions 4 and 5.
Recording Problems
Partial recording problems
Since no hardware component in the system is dedicated to specific ports, any hardware problem is likely to affect all recordings equally. Therefore, if some calls are being recorded and are playable but others are not, the problem is probably in the configuration.
1. Recording Mode versus Recording Channel? Determine whether your problems relate to all channels of one or more recording modes or just to certain ports.
2. Check the configuration pages for the affected recording mode(s).
3. Calculate the range of stations carefully. For example, 11000 to 11010 is a range of 11 addresses, not 10.
4. Use the Recorder Status > Ports page to observe the ports on the recorder during your test calls. The ports go should go from idle to active and back again.
Specific Problems
Issue 4 April, 2010 223
Confidential and Proprietary Information
Quality Recording
Check that the Quality recording ports are set to use the same codec as any bulk recording you are doing on the same phones.
Meeting Recording
Cannot Enter Owners
The recorder requires rtp-payload signalling as described in Configuring tone detection on page 77 in order to interpret dialled digits. Check that both IP phones and Digital phones are configured for this signalling mode as IP phones will default to it whereas digital phones may not.
Station Bulk Recording
Cannot Enter Delete Command
The recorder requires rtp-payload signalling as described in Configuring tone detection on page 77 in order to interpret dialled digits. Check that both IP phones and Digital phones are configured for this signalling mode as IP phones will default to it whereas digital phones may not.
Station Executive Recording
Cannot retain recordings
The recorder requires rtp-payload signalling as described in Configuring tone detection on page 77 in order to interpret dialled digits. Check that both IP phones and Digital phones are configured for this signalling mode as IP phones will default to it whereas digital phones may not.

Troubleshooting
224 Avaya Contact Recorder Planning, Installation and Administration Guide
Confidential and Proprietary Information
Issue 4 April, 2010 225
Confidential and Proprietary Information
Appendix C: Alarms
This appendix provides details of the alarms that can be raised by the system..
The main sections in this appendix are:
● Alarms on page 226
● Alarms Table on page 227
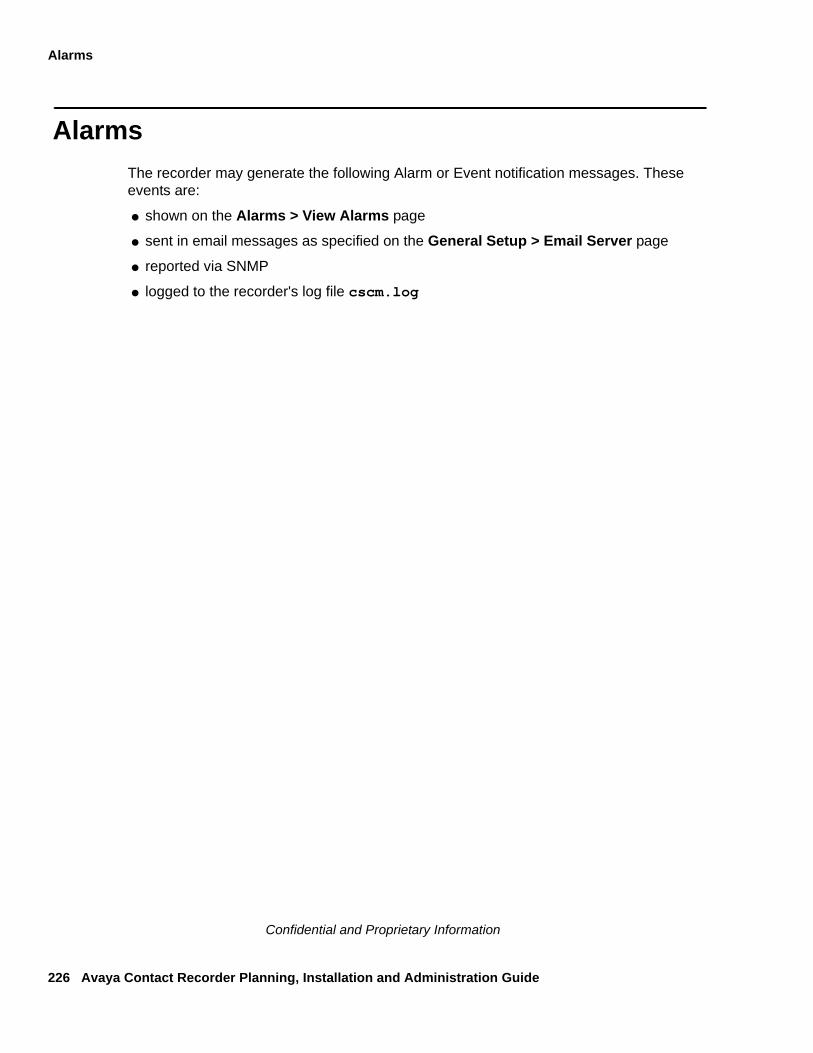
Alarms
226 Avaya Contact Recorder Planning, Installation and Administration Guide
Confidential and Proprietary Information
Alarms
The recorder may generate the following Alarm or Event notification messages. These events are:
● shown on the Alarms > View Alarms page
● sent in email messages as specified on the General Setup > Email Server page
● reported via SNMP
● logged to the recorder's log file cscm.log
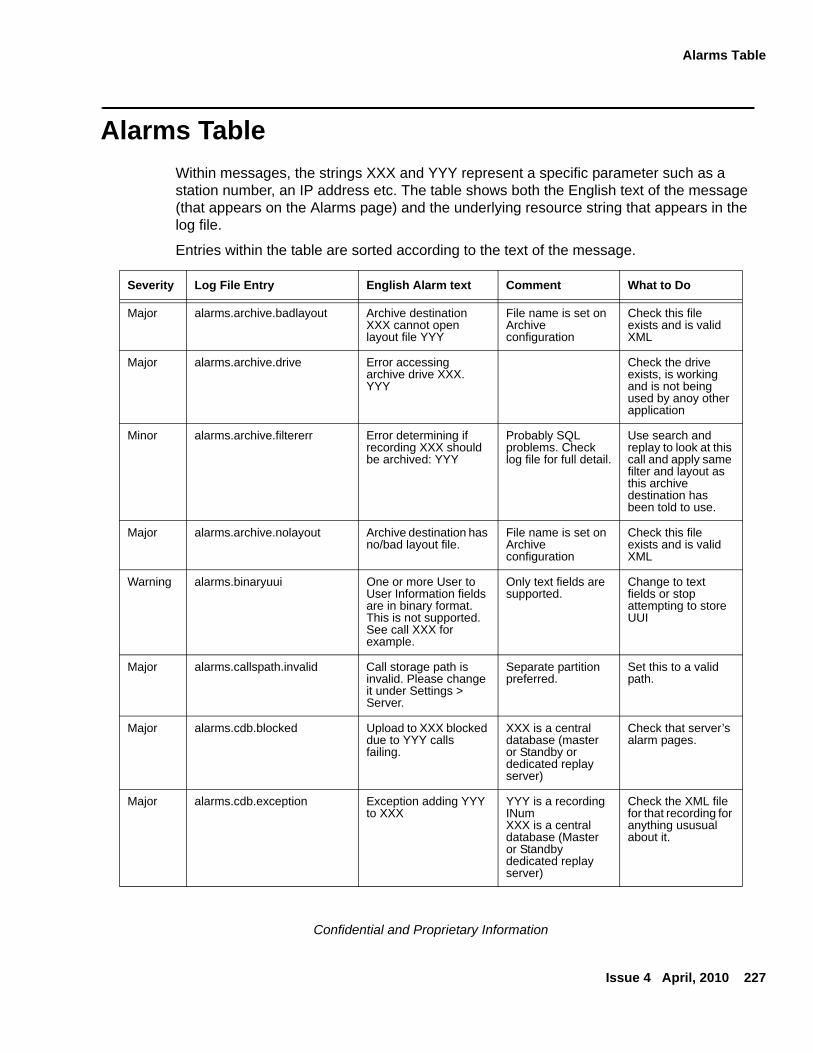
Alarms Table
Issue 4 April, 2010 227
Confidential and Proprietary Information
Alarms Table
Within messages, the strings XXX and YYY represent a specific parameter such as a station number, an IP address etc. The table shows both the English text of the message (that appears on the Alarms page) and the underlying resource string that appears in the log file.
Entries within the table are sorted according to the text of the message.
Severity Log File Entry English Alarm text Comment What to Do
Major alarms.archive.badlayout Archive destination XXX cannot open layout file YYY
File name is set on Archive configuration
Check this file exists and is valid XML
Major alarms.archive.drive Error accessing archive drive XXX. YYY
Check the drive exists, is working and is not being used by anoy other application
Minor alarms.archive.filtererr Error determining if recording XXX should be archived: YYY
Probably SQL problems. Check log file for full detail.
Use search and replay to look at this call and apply same filter and layout as this archive destination has been told to use.
Major alarms.archive.nolayout Archive destination has no/bad layout file.
File name is set on Archive configuration
Check this file exists and is valid XML
Warning alarms.binaryuui One or more User to User Information fields are in binary format. This is not supported. See call XXX for example.
Only text fields are supported.
Change to text fields or stop attempting to store UUI
Major alarms.callspath.invalid Call storage path is invalid. Please change it under Settings > Server.
Separate partition preferred.
Set this to a valid path.
Major alarms.cdb.blocked Upload to XXX blocked due to YYY calls failing.
XXX is a central database (master or Standby or dedicated replay server)
Check that server’s alarm pages.
Major alarms.cdb.exception Exception adding YYY to XXX
YYY is a recording INumXXX is a central database (Master or Standby dedicated replay server)
Check the XML file for that recording for anything ususual about it.
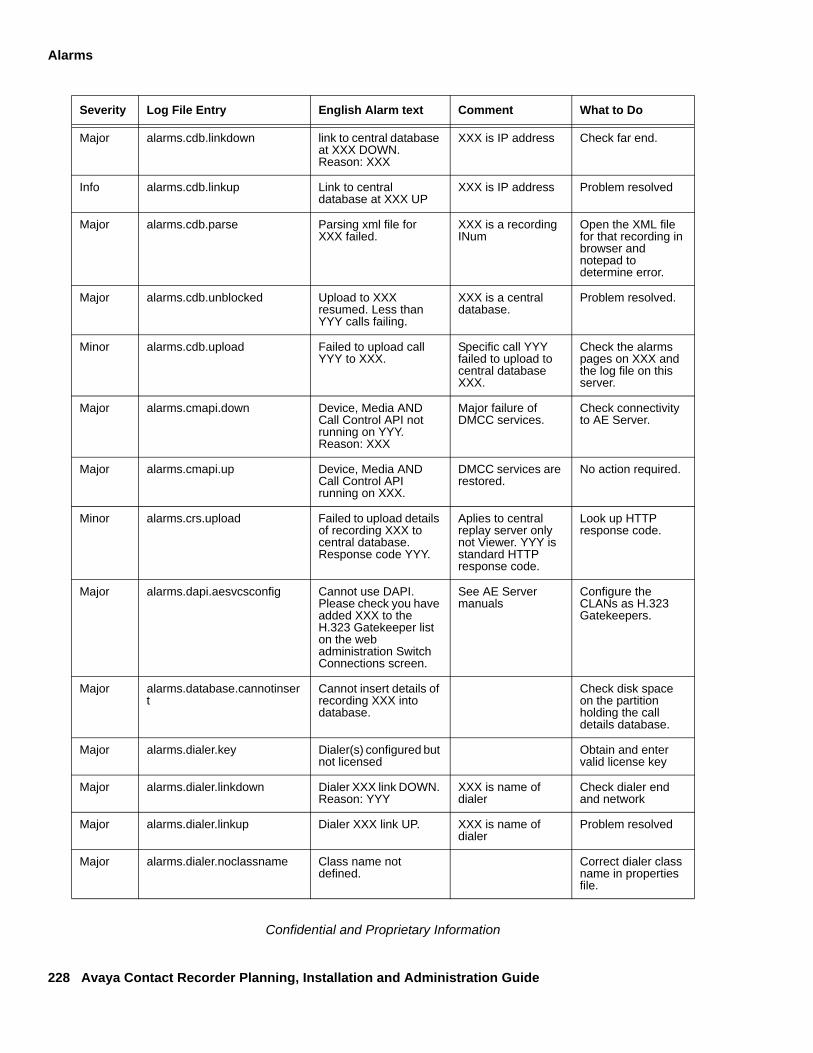
Alarms
228 Avaya Contact Recorder Planning, Installation and Administration Guide
Confidential and Proprietary Information
Major alarms.cdb.linkdown link to central database at XXX DOWN. Reason: XXX
XXX is IP address Check far end.
Info alarms.cdb.linkup Link to central database at XXX UP
XXX is IP address Problem resolved
Major alarms.cdb.parse Parsing xml file for XXX failed.
XXX is a recording INum
Open the XML file for that recording in browser and notepad to determine error.
Major alarms.cdb.unblocked Upload to XXX resumed. Less than YYY calls failing.
XXX is a central database.
Problem resolved.
Minor alarms.cdb.upload Failed to upload call YYY to XXX.
Specific call YYY failed to upload to central database XXX.
Check the alarms pages on XXX and the log file on this server.
Major alarms.cmapi.down Device, Media AND Call Control API not running on YYY. Reason: XXX
Major failure of DMCC services.
Check connectivity to AE Server.
Major alarms.cmapi.up Device, Media AND Call Control API running on XXX.
DMCC services are restored.
No action required.
Minor alarms.crs.upload Failed to upload details of recording XXX to central database. Response code YYY.
Aplies to central replay server only not Viewer. YYY is standard HTTP response code.
Look up HTTP response code.
Major alarms.dapi.aesvcsconfig Cannot use DAPI. Please check you have added XXX to the H.323 Gatekeeper list on the web administration Switch Connections screen.
See AE Server manuals
Configure the CLANs as H.323 Gatekeepers.
Major alarms.database.cannotinsert
Cannot insert details of recording XXX into database.
Check disk space on the partition holding the call details database.
Major alarms.dialer.key Dialer(s) configured but not licensed
Obtain and enter valid license key
Major alarms.dialer.linkdown Dialer XXX link DOWN. Reason: YYY
XXX is name of dialer
Check dialer end and network
Major alarms.dialer.linkup Dialer XXX link UP. XXX is name of dialer
Problem resolved
Major alarms.dialer.noclassname Class name not defined.
Correct dialer class name in properties file.
Severity Log File Entry English Alarm text Comment What to Do
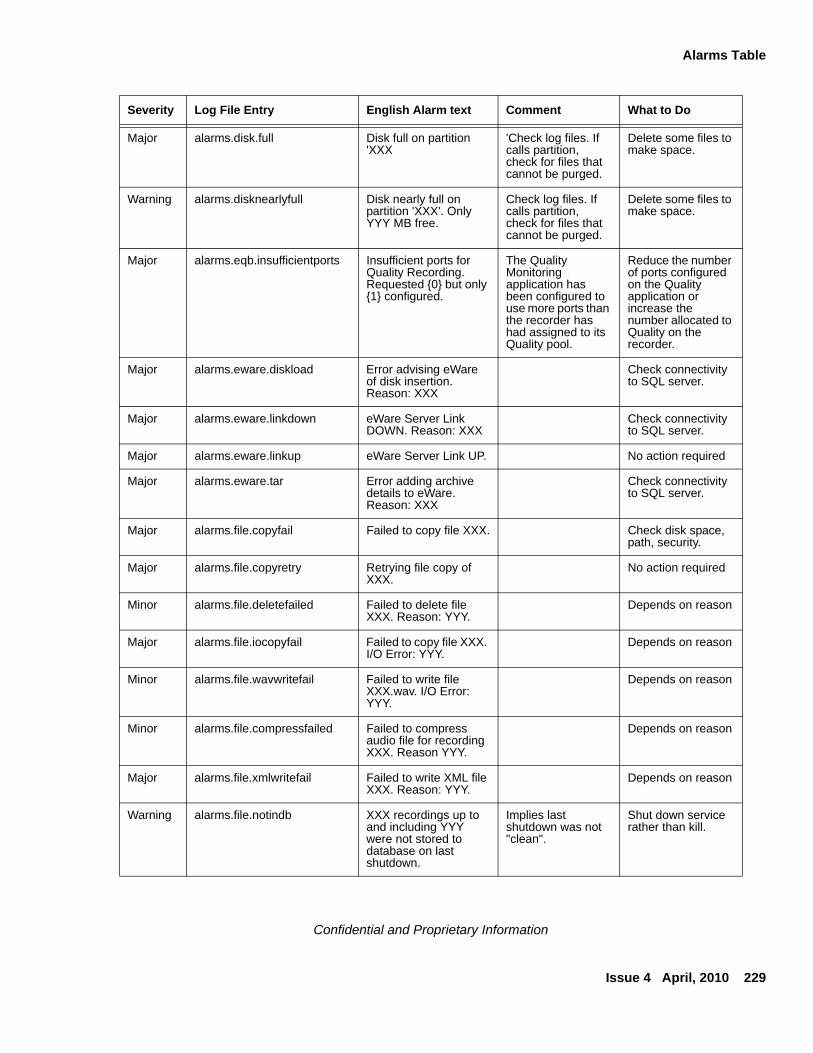
Alarms Table
Issue 4 April, 2010 229
Confidential and Proprietary Information
Major alarms.disk.full Disk full on partition 'XXX
'Check log files. If calls partition, check for files that cannot be purged.
Delete some files to make space.
Warning alarms.disknearlyfull Disk nearly full on partition 'XXX'. Only YYY MB free.
Check log files. If calls partition, check for files that cannot be purged.
Delete some files to make space.
Major alarms.eqb.insufficientports Insufficient ports for Quality Recording. Requested {0} but only {1} configured.
The Quality Monitoring application has been configured to use more ports than the recorder has had assigned to its Quality pool.
Reduce the number of ports configured on the Quality application or increase the number allocated to Quality on the recorder.
Major alarms.eware.diskload Error advising eWare of disk insertion. Reason: XXX
Check connectivity to SQL server.
Major alarms.eware.linkdown eWare Server Link DOWN. Reason: XXX
Check connectivity to SQL server.
Major alarms.eware.linkup eWare Server Link UP. No action required
Major alarms.eware.tar Error adding archive details to eWare. Reason: XXX
Check connectivity to SQL server.
Major alarms.file.copyfail Failed to copy file XXX. Check disk space, path, security.
Major alarms.file.copyretry Retrying file copy of XXX.
No action required
Minor alarms.file.deletefailed Failed to delete file XXX. Reason: YYY.
Depends on reason
Major alarms.file.iocopyfail Failed to copy file XXX. I/O Error: YYY.
Depends on reason
Minor alarms.file.wavwritefail Failed to write file XXX.wav. I/O Error: YYY.
Depends on reason
Minor alarms.file.compressfailed Failed to compress audio file for recording XXX. Reason YYY.
Depends on reason
Major alarms.file.xmlwritefail Failed to write XML file XXX. Reason: YYY.
Depends on reason
Warning alarms.file.notindb XXX recordings up to and including YYY were not stored to database on last shutdown.
Implies last shutdown was not "clean".
Shut down service rather than kill.
Severity Log File Entry English Alarm text Comment What to Do
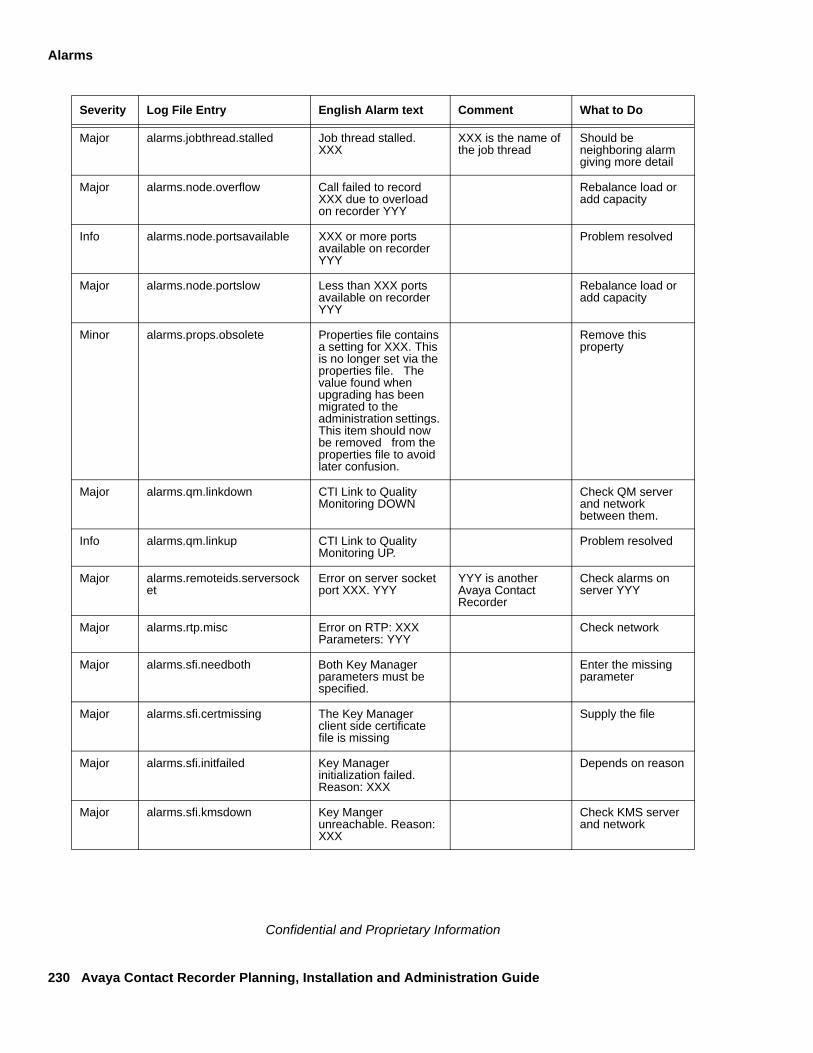
Alarms
230 Avaya Contact Recorder Planning, Installation and Administration Guide
Confidential and Proprietary Information
Major alarms.jobthread.stalled Job thread stalled. XXX
XXX is the name of the job thread
Should be neighboring alarm giving more detail
Major alarms.node.overflow Call failed to record XXX due to overload on recorder YYY
Rebalance load or add capacity
Info alarms.node.portsavailable XXX or more ports available on recorder YYY
Problem resolved
Major alarms.node.portslow Less than XXX ports available on recorder YYY
Rebalance load or add capacity
Minor alarms.props.obsolete Properties file contains a setting for XXX. This is no longer set via the properties file. The value found when upgrading has been migrated to the administration settings. This item should now be removed from the properties file to avoid later confusion.
Remove this property
Major alarms.qm.linkdown CTI Link to Quality Monitoring DOWN
Check QM server and network between them.
Info alarms.qm.linkup CTI Link to Quality Monitoring UP.
Problem resolved
Major alarms.remoteids.serversocket
Error on server socket port XXX. YYY
YYY is another Avaya Contact Recorder
Check alarms on server YYY
Major alarms.rtp.misc Error on RTP: XXX Parameters: YYY
Check network
Major alarms.sfi.needboth Both Key Manager parameters must be specified.
Enter the missing parameter
Major alarms.sfi.certmissing The Key Manager client side certificate file is missing
Supply the file
Major alarms.sfi.initfailed Key Manager initialization failed.Reason: XXX
Depends on reason
Major alarms.sfi.kmsdown Key Manger unreachable. Reason: XXX
Check KMS server and network
Severity Log File Entry English Alarm text Comment What to Do
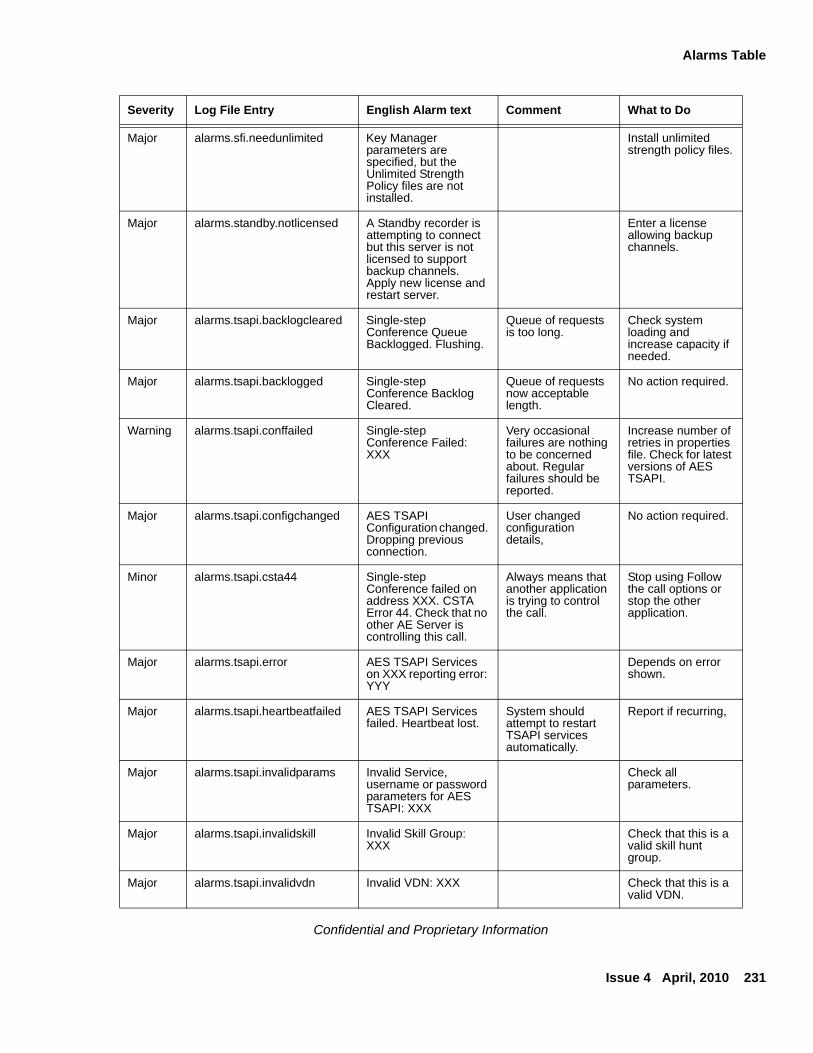
Alarms Table
Issue 4 April, 2010 231
Confidential and Proprietary Information
Major alarms.sfi.needunlimited Key Manager parameters are specified, but the Unlimited Strength Policy files are not installed.
Install unlimited strength policy files.
Major alarms.standby.notlicensed A Standby recorder is attempting to connect but this server is not licensed to support backup channels. Apply new license and restart server.
Enter a license allowing backup channels.
Major alarms.tsapi.backlogcleared Single-step Conference Queue Backlogged. Flushing.
Queue of requests is too long.
Check system loading and increase capacity if needed.
Major alarms.tsapi.backlogged Single-step Conference Backlog Cleared.
Queue of requests now acceptable length.
No action required.
Warning alarms.tsapi.conffailed Single-step Conference Failed: XXX
Very occasional failures are nothing to be concerned about. Regular failures should be reported.
Increase number of retries in properties file. Check for latest versions of AES TSAPI.
Major alarms.tsapi.configchanged AES TSAPI Configuration changed. Dropping previous connection.
User changed configuration details,
No action required.
Minor alarms.tsapi.csta44 Single-step Conference failed on address XXX. CSTA Error 44. Check that no other AE Server is controlling this call.
Always means that another application is trying to control the call.
Stop using Follow the call options or stop the other application.
Major alarms.tsapi.error AES TSAPI Services on XXX reporting error: YYY
Depends on error shown.
Major alarms.tsapi.heartbeatfailed AES TSAPI Services failed. Heartbeat lost.
System should attempt to restart TSAPI services automatically.
Report if recurring,
Major alarms.tsapi.invalidparams Invalid Service, username or password parameters for AES TSAPI: XXX
Check all parameters.
Major alarms.tsapi.invalidskill Invalid Skill Group: XXX
Check that this is a valid skill hunt group.
Major alarms.tsapi.invalidvdn Invalid VDN: XXX Check that this is a valid VDN.
Severity Log File Entry English Alarm text Comment What to Do
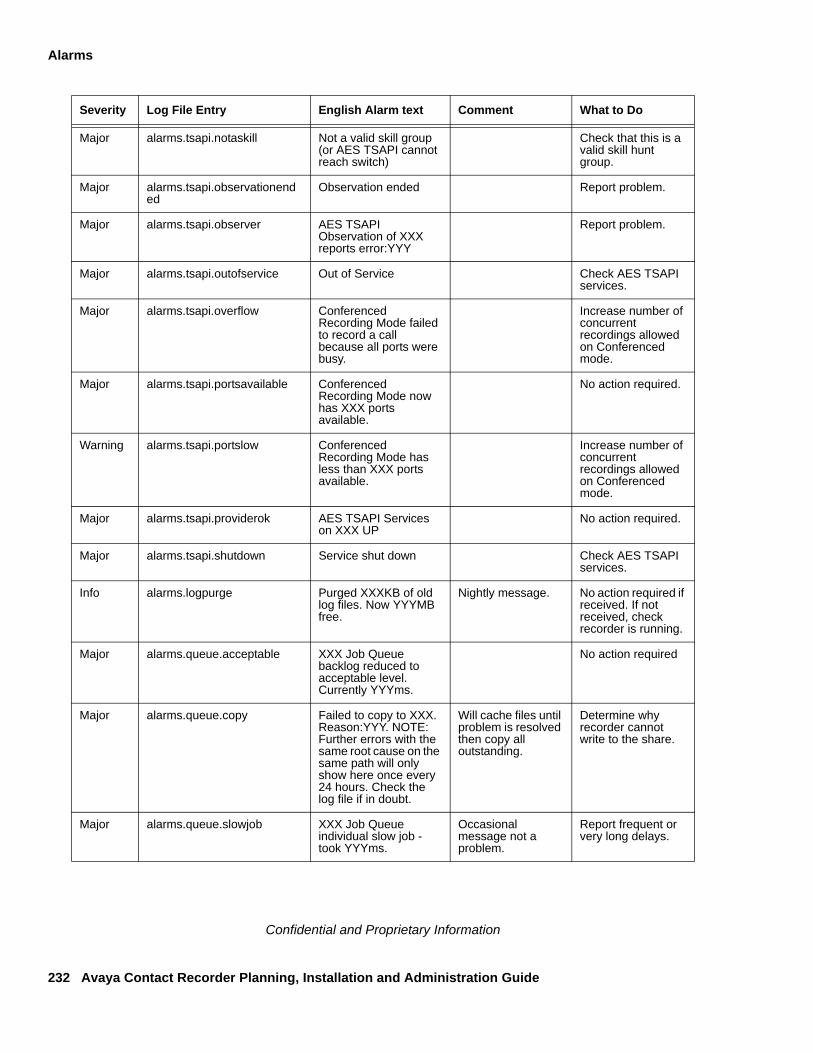
Alarms
232 Avaya Contact Recorder Planning, Installation and Administration Guide
Confidential and Proprietary Information
Major alarms.tsapi.notaskill Not a valid skill group (or AES TSAPI cannot reach switch)
Check that this is a valid skill hunt group.
Major alarms.tsapi.observationended
Observation ended Report problem.
Major alarms.tsapi.observer AES TSAPI Observation of XXX reports error:YYY
Report problem.
Major alarms.tsapi.outofservice Out of Service Check AES TSAPI services.
Major alarms.tsapi.overflow Conferenced Recording Mode failed to record a call because all ports were busy.
Increase number of concurrent recordings allowed on Conferenced mode.
Major alarms.tsapi.portsavailable Conferenced Recording Mode now has XXX ports available.
No action required.
Warning alarms.tsapi.portslow Conferenced Recording Mode has less than XXX ports available.
Increase number of concurrent recordings allowed on Conferenced mode.
Major alarms.tsapi.providerok AES TSAPI Services on XXX UP
No action required.
Major alarms.tsapi.shutdown Service shut down Check AES TSAPI services.
Info alarms.logpurge Purged XXXKB of old log files. Now YYYMB free.
Nightly message. No action required if received. If not received, check recorder is running.
Major alarms.queue.acceptable XXX Job Queue backlog reduced to acceptable level. Currently YYYms.
No action required
Major alarms.queue.copy Failed to copy to XXX. Reason:YYY. NOTE: Further errors with the same root cause on the same path will only show here once every 24 hours. Check the log file if in doubt.
Will cache files until problem is resolved then copy all outstanding.
Determine why recorder cannot write to the share.
Major alarms.queue.slowjob XXX Job Queue individual slow job - took YYYms.
Occasional message not a problem.
Report frequent or very long delays.
Severity Log File Entry English Alarm text Comment What to Do

Alarms Table
Issue 4 April, 2010 233
Confidential and Proprietary Information
Major alarms.queue.tooslow XXX Job Queue backlogged. Delay currently YYYms but may go higher.
May indicate overload.
Consider faster hardware or reduce load.
Minor alarms.rtp.packetloss Unacceptable packet loss from XXX.
Reported once per day per IP address but could be occurring on all recordings from that address.
Check network path to recorder. If several different addresses report problems at the same time, identify common path. If many addresses report at same time, could be CPU overload at recorder.
Major alarms.rtp.nopackets No audio packets received on call from XXX. Call failed or no network path to recorder.
See Avaya support site re PSN #345U - TN570C and TN570D Expansion Interface boards log chronic fiber alarms
Check TN570 boards are correct vintage.
Major alarms.softphone.beepstart Port XXX. Failed to start beeptone. Reason: YYY
Internal error Report problem.
Major alarms.softphone.beepstop Port XXX. Failed to stop beeptone. Reason: YYY
Internal error Report problem.
Major alarms.softphone.buttonlookup
Port XXX. Error looking up button Id. Reason: YYY.
Softphone misconfigured.
Check softphone configuration is as per installation section.
Major alarms.softphone.buttonmissing
Port XXX. Unusable as button YYY is missing from softphone.
Softphone misconfigured
Check softphone configuration is as per installation section.
Major alarms.softphone.callstopped Port XXX. Call dropped as it exceeded maximum permitted duration.
Recording port has been active for several hours.
Consider setting recording mode to release call on dropping to one other party.
Major alarms.softphone.endrecfailed
Port XXX. Error ending recording. Reason: YYY.
Internal error Report Problem
Major alarms.softphone.hookswitch Port XXX. Error setting hook switch. Reason: YYY.
Internal error Report Problem
Major alarms.softphone.inservice Port XXX restored. No action required
Minor alarms.softphone.invalidtarget
Port XXX - Invalid target for recording: YYY
Quality app asked to record invalid station.
Check Quality server configuration.
Severity Log File Entry English Alarm text Comment What to Do
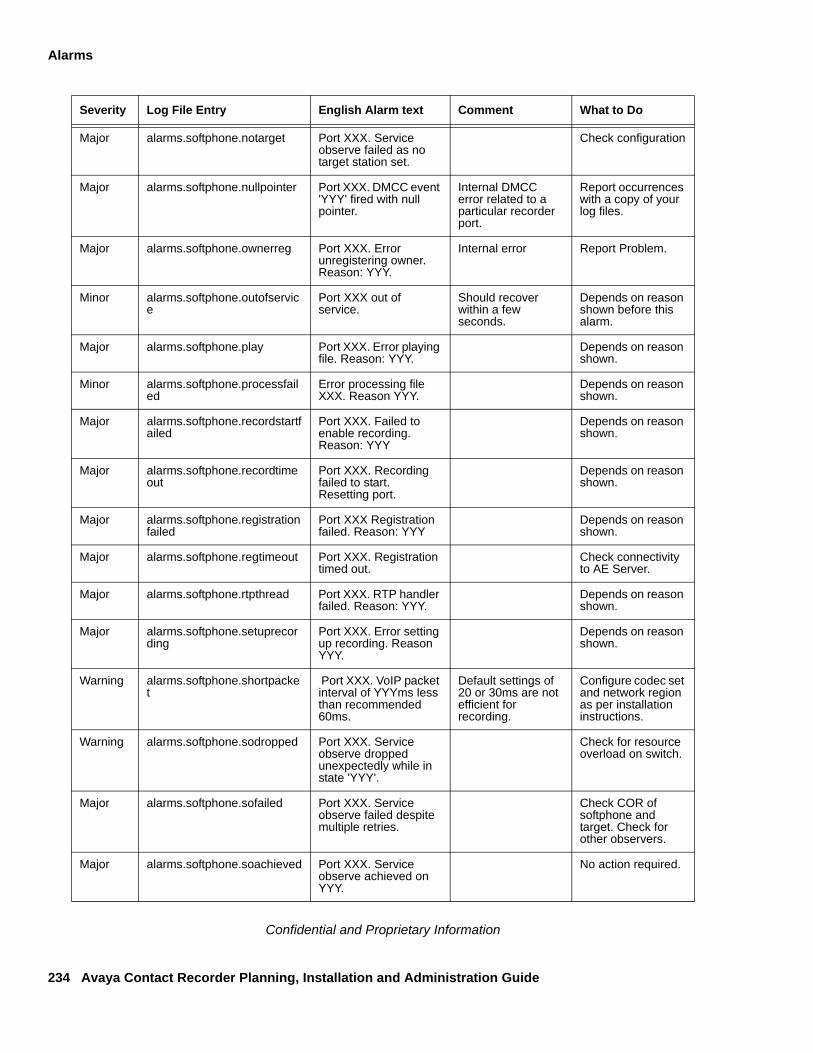
Alarms
234 Avaya Contact Recorder Planning, Installation and Administration Guide
Confidential and Proprietary Information
Major alarms.softphone.notarget Port XXX. Service observe failed as no target station set.
Check configuration
Major alarms.softphone.nullpointer Port XXX. DMCC event 'YYY' fired with null pointer.
Internal DMCC error related to a particular recorder port.
Report occurrences with a copy of your log files.
Major alarms.softphone.ownerreg Port XXX. Error unregistering owner. Reason: YYY.
Internal error Report Problem.
Minor alarms.softphone.outofservice
Port XXX out of service.
Should recover within a few seconds.
Depends on reason shown before this alarm.
Major alarms.softphone.play Port XXX. Error playing file. Reason: YYY.
Depends on reason shown.
Minor alarms.softphone.processfailed
Error processing file XXX. Reason YYY.
Depends on reason shown.
Major alarms.softphone.recordstartfailed
Port XXX. Failed to enable recording. Reason: YYY
Depends on reason shown.
Major alarms.softphone.recordtimeout
Port XXX. Recording failed to start. Resetting port.
Depends on reason shown.
Major alarms.softphone.registrationfailed
Port XXX Registration failed. Reason: YYY
Depends on reason shown.
Major alarms.softphone.regtimeout Port XXX. Registration timed out.
Check connectivity to AE Server.
Major alarms.softphone.rtpthread Port XXX. RTP handler failed. Reason: YYY.
Depends on reason shown.
Major alarms.softphone.setuprecording
Port XXX. Error setting up recording. Reason YYY.
Depends on reason shown.
Warning alarms.softphone.shortpacket
Port XXX. VoIP packet interval of YYYms less than recommended 60ms.
Default settings of 20 or 30ms are not efficient for recording.
Configure codec set and network region as per installation instructions.
Warning alarms.softphone.sodropped Port XXX. Service observe dropped unexpectedly while in state 'YYY'.
Check for resource overload on switch.
Major alarms.softphone.sofailed Port XXX. Service observe failed despite multiple retries.
Check COR of softphone and target. Check for other observers.
Major alarms.softphone.soachieved Port XXX. Service observe achieved on YYY.
No action required.
Severity Log File Entry English Alarm text Comment What to Do
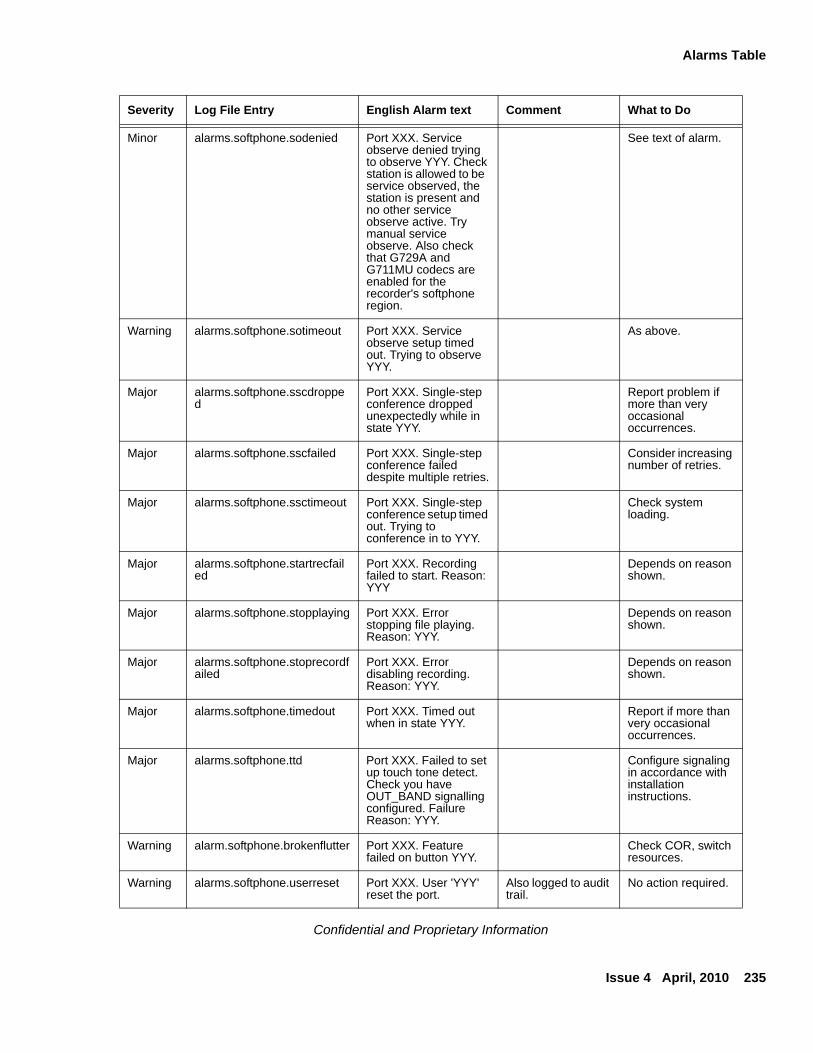
Alarms Table
Issue 4 April, 2010 235
Confidential and Proprietary Information
Minor alarms.softphone.sodenied Port XXX. Service observe denied trying to observe YYY. Check station is allowed to be service observed, the station is present and no other service observe active. Try manual service observe. Also check that G729A and G711MU codecs are enabled for the recorder's softphone region.
See text of alarm.
Warning alarms.softphone.sotimeout Port XXX. Service observe setup timed out. Trying to observe YYY.
As above.
Major alarms.softphone.sscdropped
Port XXX. Single-step conference dropped unexpectedly while in state YYY.
Report problem if more than very occasional occurrences.
Major alarms.softphone.sscfailed Port XXX. Single-step conference failed despite multiple retries.
Consider increasing number of retries.
Major alarms.softphone.ssctimeout Port XXX. Single-step conference setup timed out. Trying to conference in to YYY.
Check system loading.
Major alarms.softphone.startrecfailed
Port XXX. Recording failed to start. Reason: YYY
Depends on reason shown.
Major alarms.softphone.stopplaying Port XXX. Error stopping file playing. Reason: YYY.
Depends on reason shown.
Major alarms.softphone.stoprecordfailed
Port XXX. Error disabling recording. Reason: YYY.
Depends on reason shown.
Major alarms.softphone.timedout Port XXX. Timed out when in state YYY.
Report if more than very occasional occurrences.
Major alarms.softphone.ttd Port XXX. Failed to set up touch tone detect. Check you have OUT_BAND signalling configured. Failure Reason: YYY.
Configure signaling in accordance with installation instructions.
Warning alarm.softphone.brokenflutter Port XXX. Feature failed on button YYY.
Check COR, switch resources.
Warning alarms.softphone.userreset Port XXX. User 'YYY' reset the port.
Also logged to audit trail.
No action required.
Severity Log File Entry English Alarm text Comment What to Do
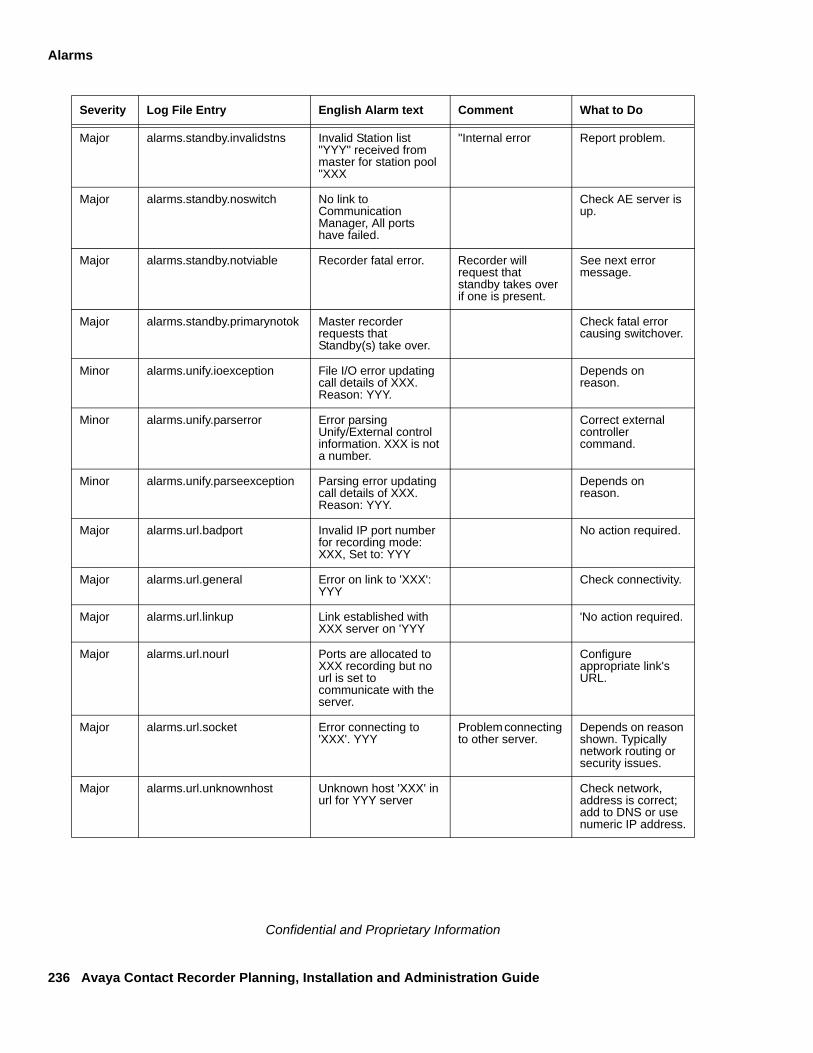
Alarms
236 Avaya Contact Recorder Planning, Installation and Administration Guide
Confidential and Proprietary Information
Major alarms.standby.invalidstns Invalid Station list "YYY" received from master for station pool "XXX
"Internal error Report problem.
Major alarms.standby.noswitch No link to Communication Manager, All ports have failed.
Check AE server is up.
Major alarms.standby.notviable Recorder fatal error. Recorder will request that standby takes over if one is present.
See next error message.
Major alarms.standby.primarynotok Master recorder requests that Standby(s) take over.
Check fatal error causing switchover.
Minor alarms.unify.ioexception File I/O error updating call details of XXX. Reason: YYY.
Depends on reason.
Minor alarms.unify.parserror Error parsing Unify/External control information. XXX is not a number.
Correct external controller command.
Minor alarms.unify.parseexception Parsing error updating call details of XXX. Reason: YYY.
Depends on reason.
Major alarms.url.badport Invalid IP port number for recording mode: XXX, Set to: YYY
No action required.
Major alarms.url.general Error on link to 'XXX': YYY
Check connectivity.
Major alarms.url.linkup Link established with XXX server on 'YYY
'No action required.
Major alarms.url.nourl Ports are allocated to XXX recording but no url is set to communicate with the server.
Configure appropriate link's URL.
Major alarms.url.socket Error connecting to 'XXX'. YYY
Problem connecting to other server.
Depends on reason shown. Typically network routing or security issues.
Major alarms.url.unknownhost Unknown host 'XXX' in url for YYY server
Check network, address is correct; add to DNS or use numeric IP address.
Severity Log File Entry English Alarm text Comment What to Do
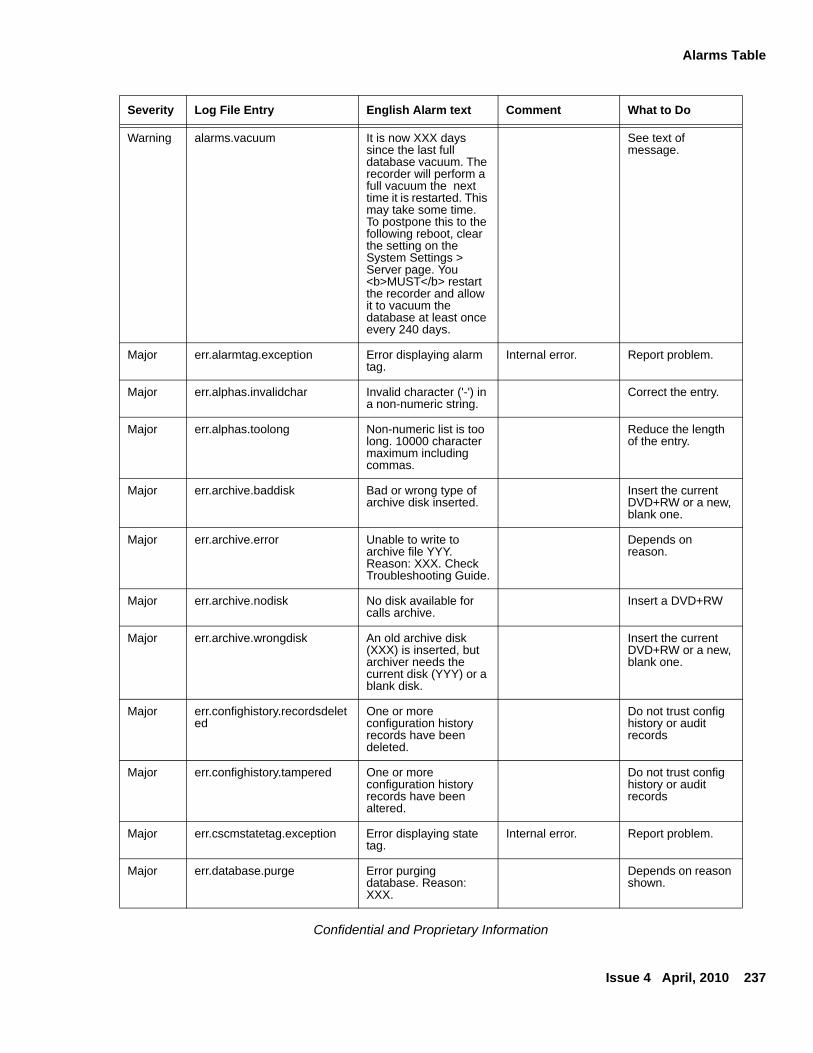
Alarms Table
Issue 4 April, 2010 237
Confidential and Proprietary Information
Warning alarms.vacuum It is now XXX days since the last full database vacuum. The recorder will perform a full vacuum the next time it is restarted. This may take some time. To postpone this to the following reboot, clear the setting on the System Settings > Server page. You <b>MUST</b> restart the recorder and allow it to vacuum the database at least once every 240 days.
See text of message.
Major err.alarmtag.exception Error displaying alarm tag.
Internal error. Report problem.
Major err.alphas.invalidchar Invalid character ('-') in a non-numeric string.
Correct the entry.
Major err.alphas.toolong Non-numeric list is too long. 10000 character maximum including commas.
Reduce the length of the entry.
Major err.archive.baddisk Bad or wrong type of archive disk inserted.
Insert the current DVD+RW or a new, blank one.
Major err.archive.error Unable to write to archive file YYY. Reason: XXX. Check Troubleshooting Guide.
Depends on reason.
Major err.archive.nodisk No disk available for calls archive.
Insert a DVD+RW
Major err.archive.wrongdisk An old archive disk (XXX) is inserted, but archiver needs the current disk (YYY) or a blank disk.
Insert the current DVD+RW or a new, blank one.
Major err.confighistory.recordsdeleted
One or more configuration history records have been deleted.
Do not trust config history or audit records
Major err.confighistory.tampered One or more configuration history records have been altered.
Do not trust config history or audit records
Major err.cscmstatetag.exception Error displaying state tag.
Internal error. Report problem.
Major err.database.purge Error purging database. Reason: XXX.
Depends on reason shown.
Severity Log File Entry English Alarm text Comment What to Do
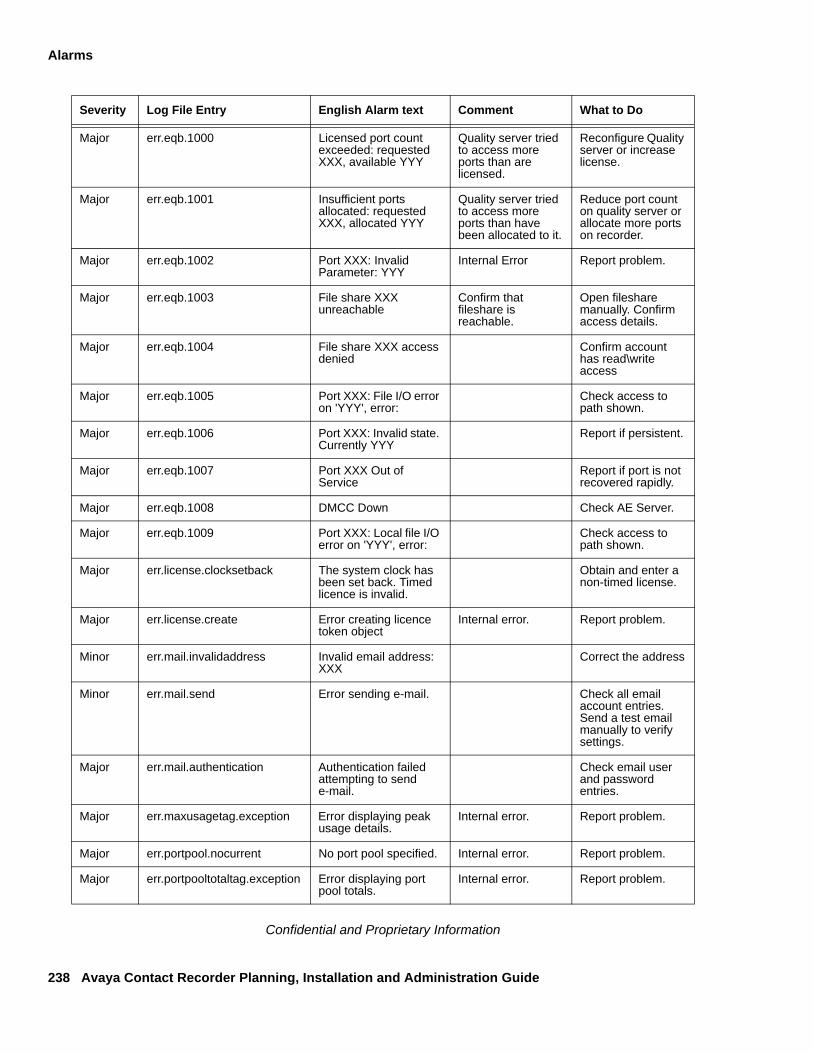
Alarms
238 Avaya Contact Recorder Planning, Installation and Administration Guide
Confidential and Proprietary Information
Major err.eqb.1000 Licensed port count exceeded: requested XXX, available YYY
Quality server tried to access more ports than are licensed.
Reconfigure Quality server or increase license.
Major err.eqb.1001 Insufficient ports allocated: requested XXX, allocated YYY
Quality server tried to access more ports than have been allocated to it.
Reduce port count on quality server or allocate more ports on recorder.
Major err.eqb.1002 Port XXX: Invalid Parameter: YYY
Internal Error Report problem.
Major err.eqb.1003 File share XXX unreachable
Confirm that fileshare is reachable.
Open fileshare manually. Confirm access details.
Major err.eqb.1004 File share XXX access denied
Confirm account has read\write access
Major err.eqb.1005 Port XXX: File I/O error on 'YYY', error:
Check access to path shown.
Major err.eqb.1006 Port XXX: Invalid state. Currently YYY
Report if persistent.
Major err.eqb.1007 Port XXX Out of Service
Report if port is not recovered rapidly.
Major err.eqb.1008 DMCC Down Check AE Server.
Major err.eqb.1009 Port XXX: Local file I/O error on 'YYY', error:
Check access to path shown.
Major err.license.clocksetback The system clock has been set back. Timed licence is invalid.
Obtain and enter a non-timed license.
Major err.license.create Error creating licence token object
Internal error. Report problem.
Minor err.mail.invalidaddress Invalid email address: XXX
Correct the address
Minor err.mail.send Error sending e-mail. Check all email account entries. Send a test email manually to verify settings.
Major err.mail.authentication Authentication failed attempting to send e-mail.
Check email user and password entries.
Major err.maxusagetag.exception Error displaying peak usage details.
Internal error. Report problem.
Major err.portpool.nocurrent No port pool specified. Internal error. Report problem.
Major err.portpooltotaltag.exception Error displaying port pool totals.
Internal error. Report problem.
Severity Log File Entry English Alarm text Comment What to Do
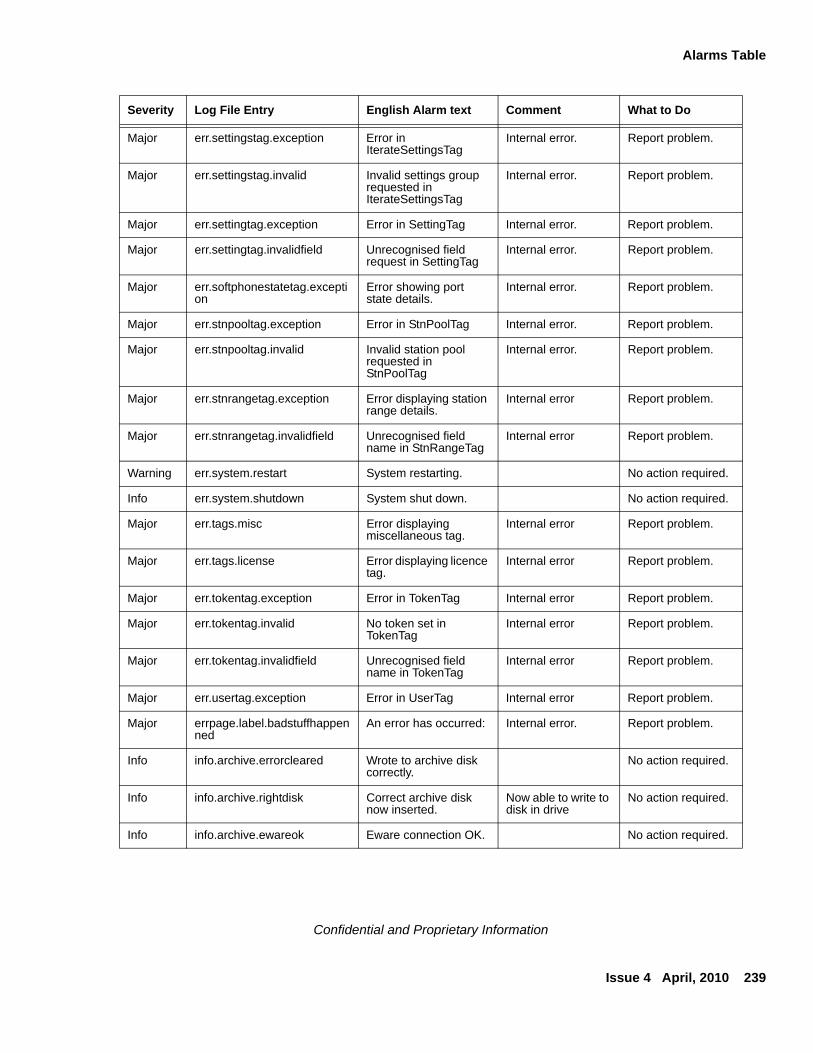
Alarms Table
Issue 4 April, 2010 239
Confidential and Proprietary Information
Major err.settingstag.exception Error in IterateSettingsTag
Internal error. Report problem.
Major err.settingstag.invalid Invalid settings group requested in IterateSettingsTag
Internal error. Report problem.
Major err.settingtag.exception Error in SettingTag Internal error. Report problem.
Major err.settingtag.invalidfield Unrecognised field request in SettingTag
Internal error. Report problem.
Major err.softphonestatetag.exception
Error showing port state details.
Internal error. Report problem.
Major err.stnpooltag.exception Error in StnPoolTag Internal error. Report problem.
Major err.stnpooltag.invalid Invalid station pool requested in StnPoolTag
Internal error. Report problem.
Major err.stnrangetag.exception Error displaying station range details.
Internal error Report problem.
Major err.stnrangetag.invalidfield Unrecognised field name in StnRangeTag
Internal error Report problem.
Warning err.system.restart System restarting. No action required.
Info err.system.shutdown System shut down. No action required.
Major err.tags.misc Error displaying miscellaneous tag.
Internal error Report problem.
Major err.tags.license Error displaying licence tag.
Internal error Report problem.
Major err.tokentag.exception Error in TokenTag Internal error Report problem.
Major err.tokentag.invalid No token set in TokenTag
Internal error Report problem.
Major err.tokentag.invalidfield Unrecognised field name in TokenTag
Internal error Report problem.
Major err.usertag.exception Error in UserTag Internal error Report problem.
Major errpage.label.badstuffhappenned
An error has occurred: Internal error. Report problem.
Info info.archive.errorcleared Wrote to archive disk correctly.
No action required.
Info info.archive.rightdisk Correct archive disk now inserted.
Now able to write to disk in drive
No action required.
Info info.archive.ewareok Eware connection OK. No action required.
Severity Log File Entry English Alarm text Comment What to Do
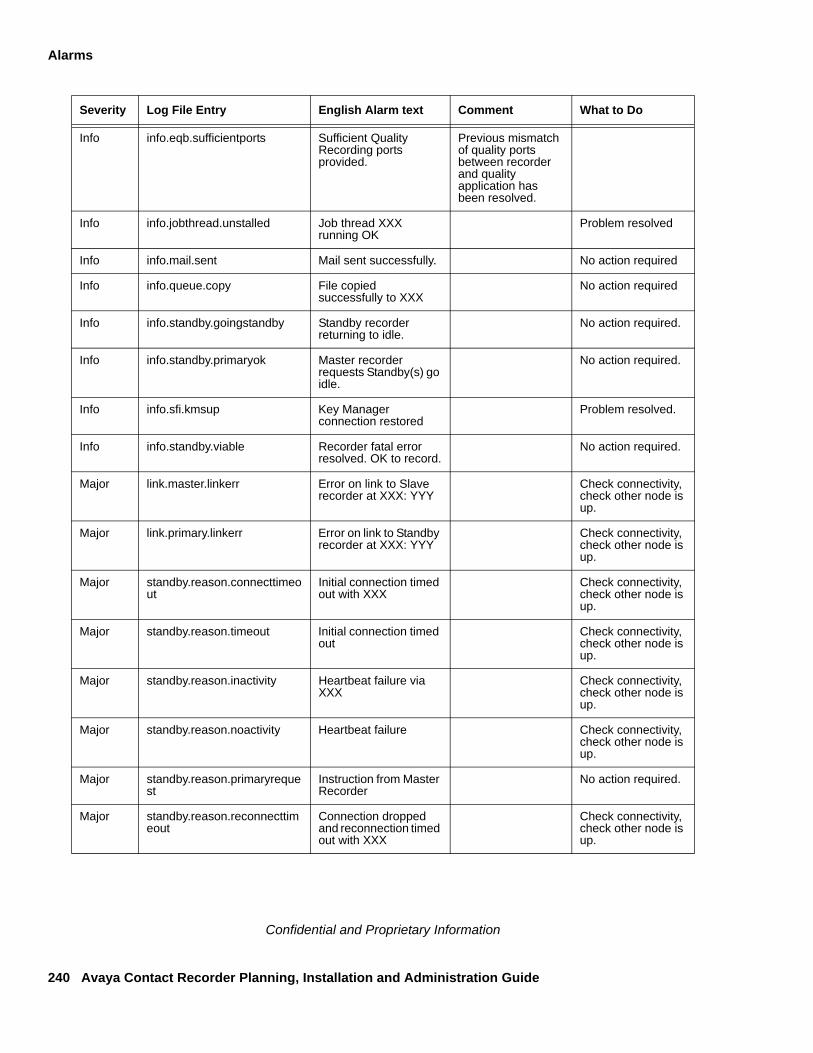
Alarms
240 Avaya Contact Recorder Planning, Installation and Administration Guide
Confidential and Proprietary Information
Info info.eqb.sufficientports Sufficient Quality Recording ports provided.
Previous mismatch of quality ports between recorder and quality application has been resolved.
Info info.jobthread.unstalled Job thread XXX running OK
Problem resolved
Info info.mail.sent Mail sent successfully. No action required
Info info.queue.copy File copied successfully to XXX
No action required
Info info.standby.goingstandby Standby recorder returning to idle.
No action required.
Info info.standby.primaryok Master recorder requests Standby(s) go idle.
No action required.
Info info.sfi.kmsup Key Manager connection restored
Problem resolved.
Info info.standby.viable Recorder fatal error resolved. OK to record.
No action required.
Major link.master.linkerr Error on link to Slave recorder at XXX: YYY
Check connectivity, check other node is up.
Major link.primary.linkerr Error on link to Standby recorder at XXX: YYY
Check connectivity, check other node is up.
Major standby.reason.connecttimeout
Initial connection timed out with XXX
Check connectivity, check other node is up.
Major standby.reason.timeout Initial connection timed out
Check connectivity, check other node is up.
Major standby.reason.inactivity Heartbeat failure via XXX
Check connectivity, check other node is up.
Major standby.reason.noactivity Heartbeat failure Check connectivity, check other node is up.
Major standby.reason.primaryrequest
Instruction from Master Recorder
No action required.
Major standby.reason.reconnecttimeout
Connection dropped and reconnection timed out with XXX
Check connectivity, check other node is up.
Severity Log File Entry English Alarm text Comment What to Do
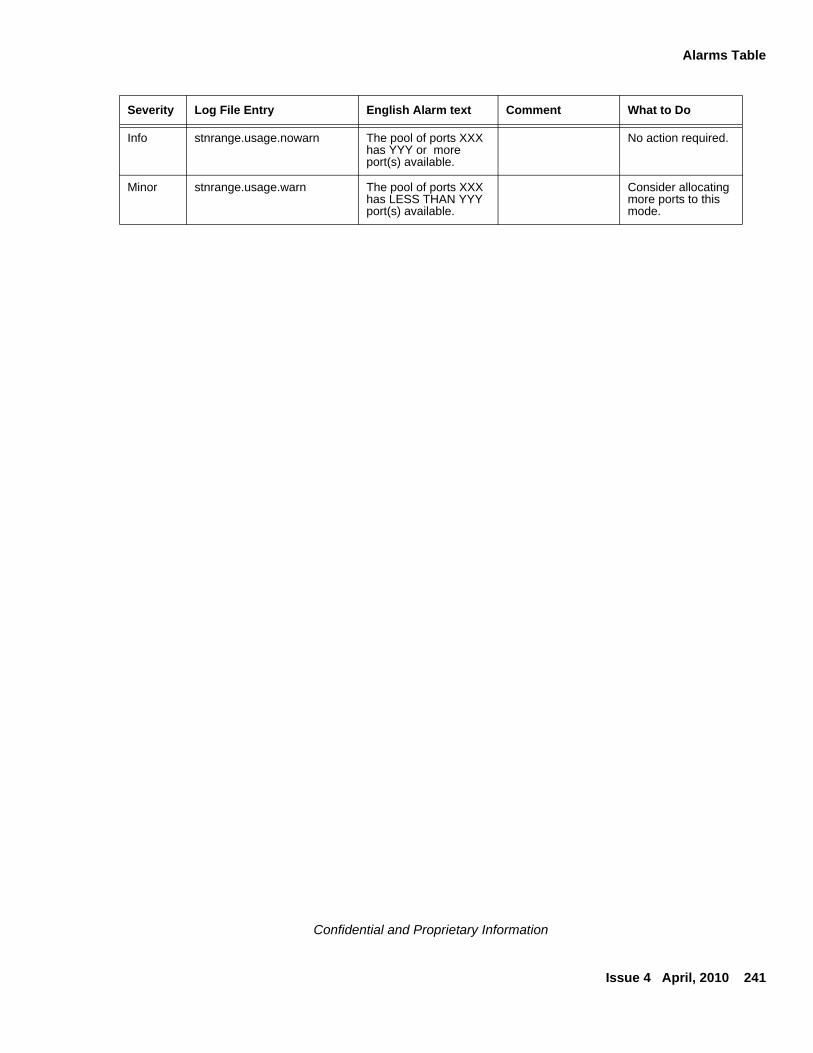
Alarms Table
Issue 4 April, 2010 241
Confidential and Proprietary Information
Info stnrange.usage.nowarn The pool of ports XXX has YYY or more port(s) available.
No action required.
Minor stnrange.usage.warn The pool of ports XXX has LESS THAN YYY port(s) available.
Consider allocating more ports to this mode.
Severity Log File Entry English Alarm text Comment What to Do

Alarms
242 Avaya Contact Recorder Planning, Installation and Administration Guide
Confidential and Proprietary Information
Issue 4 April, 2010 243
Confidential and Proprietary Information
Appendix D: External Control Interface
This appendix provides details of the external control protocol and Java class library.
The main sections in this appendix are:
● Introduction on page 244
● Java API Toolkit on page 246
● TCP/IP Protocol Overview on page 247
● Examples on page 251
● TCP/IP Message Sequences on page 254
External Control Interface
244 Avaya Contact Recorder Planning, Installation and Administration Guide
Confidential and Proprietary Information
Introduction
External applications can control or influence recording by using the Recorder Control Protocol. You may integrate directly to a TCP/IP socket interface using the protocol described or by using the Java package provided for this purpose. An example application that uses the Java interface is also provided for reference.
When to Use External Control
The recorder includes sophisticated CTI interfaces and recording control but there are still occasions when additional flexibility or further data tagging is required. You will require an "external controller" in the following cases:
Complex Recording Rules
If your "record/do not record" requirements are more complex than the administration interface supports. For example, if you wish to start and stop recording at specific points within a call.
Additional Tagging
If you need to "tag" recordings with details that are not normally provided by the recorder.
Hybrid Systems
If your telephone system is controlled by another application (e.g. Genesys) then it may be appropriate to control recording as a result of the events occurring on a CTI feed from that application. In such cases, you may need not only the external control protocol but also Verint's Integration Framework or Unify server. These can interpret a wide range of CTI feeds. This is beyond the scope of this document.
This Appendix
The remaining sections of this appendix provide:
● a brief overview of the Java interface classes. For detailed information refer to the JavaDocs for this package.
● an Overview of the underlying TCP/IP control protocol
Introduction
Issue 4 April, 2010 245
Confidential and Proprietary Information
● a reference guide for the message sequences exchanged between recorder and controller
Port Allocations
Use the external controller with ports in the following modes:
● Station Bulk - for all service observe based recording.
● Conferenced - for single-step conference recording where the external controller needs to provide additional tagging or is splitting long recordings into segments (as needed with many auto-diallers). Do NOT use ports in this mode if you want to initiate recordings from the external controller. You must allow the ACR to establish conferences before sending TAG, STOP (and then subsequent START) commands. Do NOT send "START SSC:nnnn:" commands as these will conflict with the recorders allocation of ports to calls.
● On Demand - for single-step conference recording where the external controller is determining which calls are to be recorded. It can either instruct the recorder to establish a single-step conference; do so itself or support manual conferencing.
Master + Slave Systems
This topology only supports Conferenced mode recording. Hence the only permitted uses of Unify/External controllers are:
● Tagging calls
● Splitting (and tagging) long calls (e.g. autodialler sessions) with STOP and subsequent START commands.
You cannot use the external controller to initiate recordings (e.g. by sending in START STN:nnn: SSC:mmm: commands) as this will conflict with the Master's port allocation algorithms.
Connect Unify/External controller to the Master (and Standby if present) only. Do NOT connect Unify to the Slaves.
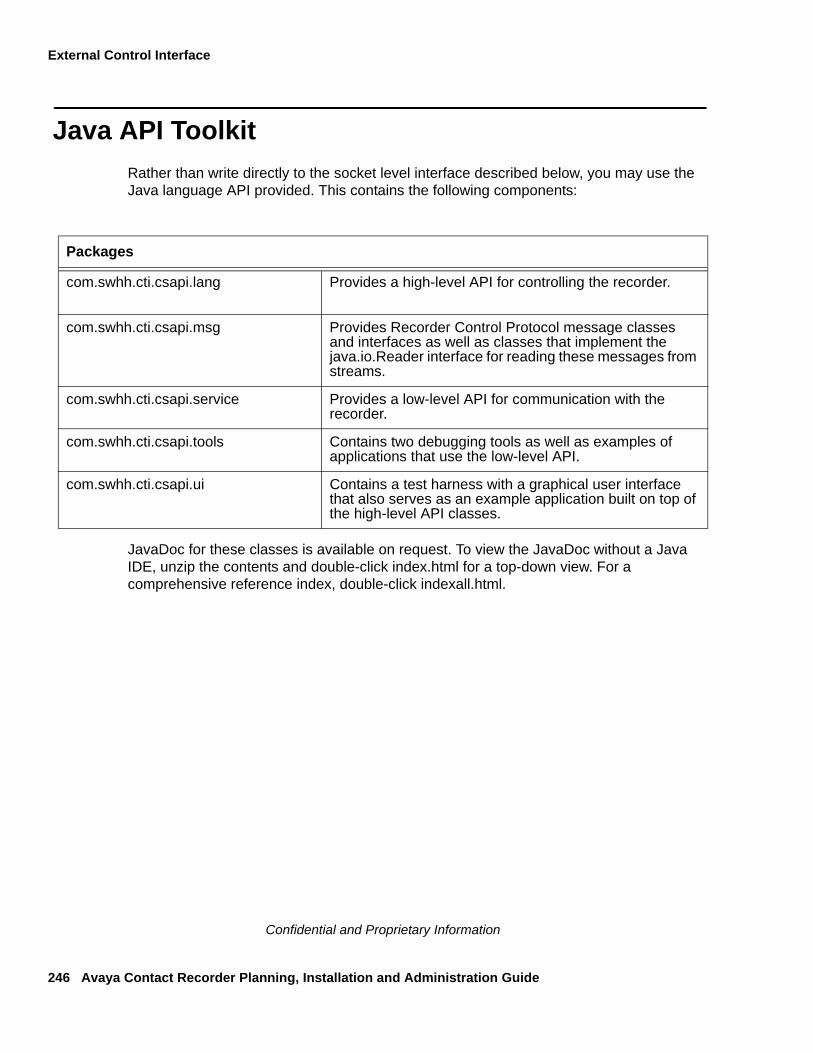
External Control Interface
246 Avaya Contact Recorder Planning, Installation and Administration Guide
Confidential and Proprietary Information
Java API Toolkit
Rather than write directly to the socket level interface described below, you may use the Java language API provided. This contains the following components:
JavaDoc for these classes is available on request. To view the JavaDoc without a Java IDE, unzip the contents and double-click index.html for a top-down view. For a comprehensive reference index, double-click indexall.html.
Packages
com.swhh.cti.csapi.lang Provides a high-level API for controlling the recorder.
com.swhh.cti.csapi.msg Provides Recorder Control Protocol message classes and interfaces as well as classes that implement the java.io.Reader interface for reading these messages from streams.
com.swhh.cti.csapi.service Provides a low-level API for communication with the recorder.
com.swhh.cti.csapi.tools Contains two debugging tools as well as examples of applications that use the low-level API.
com.swhh.cti.csapi.ui Contains a test harness with a graphical user interface that also serves as an example application built on top of the high-level API classes.
TCP/IP Protocol Overview
Issue 4 April, 2010 247
Confidential and Proprietary Information
TCP/IP Protocol Overview
Connection Method
An external controller can drive the recorder via a TCP/IP socket using the protocol described below.
You configure the Master recorder with the IP address and socket number of the controller(s) to which it should connect. Connection defaults to port 1414 but you can specify an alternate port.
The recorder creates a socket and attempts to connect to each specified address. If it fails to connect, it will try again every 60s.
You can use multiple, independent controllers connected to a single recorder.
The controlling application should open and bind a server socket and accept incoming connection requests.
General Protocol Specification
Messages take the form:
<protocol version number> <command> (<command specific data>) '\x1b'
When sending messages, follow these rules:
1. Transmit messages in ASCII 8-bit encoding. Wrap any 16-bit XML content in CDATA blocks.
2. All messages and responses are terminated with an escape character (27 / 0x1b).
3. Separate fields with space characters.
4. Enclose field contents in double quotation marks where the field needs to contain a space - as, for example, with filenames. Always enclose filenames in double-quotes.
5. Delimit sub-fields with colon characters ":".
6. Apart from HELLO messages (see below) and responses, all messages must be responded to in the form:
<protocol version number> <error code> <channel identifier> <error qualifier> <additional info> '\x1b'
External Control Interface
248 Avaya Contact Recorder Planning, Installation and Administration Guide
Confidential and Proprietary Information
Where
<error qualifier> is typically "DESC:xxxxxxx:"
and
<additional info> may be 0 or more instances of "PARAM:pppppp:"
The response to a successful command is therefore:
1 0 STN:nnn: \x1b
and a typical error response is
1 -1 STN:1234: DESC:"Invalid Parameter": PARAM:STN \x1b
7. Ignore unexpected or malformed responses.
8. Send commands in uppercase, but test for them case insensitively.
Channel Identification
In most messages below, the recorder's channels are identified by Station Number STN:nnnnn:.
Where nnnnn can be 1 to 9 digits long and may include leading zeroes.
The use of this station number varies according to the type of recording port being referred to:
● Ports using a Service Observe mode (Station Bulk and Station Executive mode) are referred to by the station number that they are observing.
● Ports using conferencing are referred to by the station number of the softphone that the recorder is using.
XML Tagging
All tagging information is passed straight through the recorder into the XML file associated with the recording. The recorder only looks for an escape character to delimit each command. The intention is that the controlling application will pass through valid XML tags which the recorder will insert into the body of the call's XML file. These may include valid expansions of control and other characters (e.g. %20 etc). The entire xml string will be inserted between opening and closing "taglist" tags. For example, the command
1 TAG STN:1234: INUM:800369000000009: <spare1>some data</spare1><spare4>John Doe</spare4>\x1b
TCP/IP Protocol Overview
Issue 4 April, 2010 249
Confidential and Proprietary Information
will result in call reference 800369000000009, which is currently being recorded on STN 1234 being tagged with the additional fields:
<taglist><spare1>some data</spare1><spare4>John Doe</spare4></taglist>
If you intend to use Viewer as your search and replay tool (rather than the integral search and replay within the recorder) you should only use the eight special user-defined fields, labelled "spare1" to "spare8". These can be relabelled for end user viewing as part of the query design using Viewer. You may use other fields but the recorder only uploads these eight "spare" fields automatically to the Viewer database.
Basic Call Tagging
The recorder uses DMCC's CallInformationServices interface to tag recordings in all modes except Conferenced (for which it uses AES TSAPI derived information). This imposes a load on the switch. If the external controller has access to all details about the call, there may be no need for the recorder to request these details itself. You can choose whether or not the recorder collects these details itself by setting property file entries as specified in the table below:
If the recorder is collecting call details itself, the external controller can ask to be advised whenever these change. Use the REQUEST ACTIVITY ON command to do so.
Fallback Mode
When a recorder starts, it automatically runs in locally controlled mode - where call events it detects cause it to start/stop recording. This is also known as "fallback" mode.
Port Type Default Override with this in prop Comment
Station Bulk
ON
stnbulk.ocpneeded=false Disable only if external controller will provide all necessary details (bar date/time and duration)
Station Executive stnexec.ocpneeded=false
On Demand ondemand.ocpneeded=false
Meeting meeting.ocpneeded=false
Conferenced Not Applicable Uses AES TSAPI info.
Quality Not Applicable
External Control Interface
250 Avaya Contact Recorder Planning, Installation and Administration Guide
Confidential and Proprietary Information
If the external controller only wishes to TAG calls with additional data, it may be happy to leave the ports in this mode. On the other hand, if it wishes to take control of the recording decisions then it must instruct the recorder to relinquish control of the ports it wants to use. It does this with the FALLBACK OFF command - either for a specific STN or for all ports.
If the heartbeat to the external controller that turned FALLBACK off is subsequently lost, the channel(s) will revert to fallback mode and recording will continue as if the controller had never been present.
Use the station specific command to take control of specific stations if you want to allow other stations to continue to be controlled by the recorder or if you are using multiple controllers, each of which manages its own set of stations.
Examples
Issue 4 April, 2010 251
Confidential and Proprietary Information
Examples
Typical examples of how to use an external controller are given below. You should read these in order as later examples refer back to earlier ones.
Third-party CTI Control
A bank using Genesys to route calls through an Avaya switch and wishes to record certain calls according to user defined data and events occurring within their call routing application. They would consider two designs:
Service Observe Based
If most - and potentially all calls at any given time - are to be recorded, a service observe approach might be appropriate:
1. Configure Station Bulk recording for all stations to be recorded.
2. The controller establishes contact with the recorder (exchanges HELLO messages)
3. The controller notes the stations that are ONLINE (and may alarm if any are missing)
4. The controller takes charge of all stations by sending 2 FALLBACK OFF
5. The controller sends START and STOP messages to control recording.
You should note that a STOP message disables all recording (not just the call in progress) until a START message is sent (or the recorder falls back).
6. The recorder performs basic tagging itself but the controller sends Genesys user data through as TAG commands.
Should the controller fail, the recorder will revert to normal Station Bulk mode.
For a system that is tolerant of recorder failure, use a Standby recorder. This will contact the controller as and when it takes over from the master.
Single-step Conference Approach
If only a small number of calls are to be recorded, it may be more cost effective to provide a pool of ports and conference these in as needed. This approach also allows supervisors to continue to use service observe.
In this case:
1. Configure a pool of On Demand ports - large enough for worst case concurrent recording need.

External Control Interface
252 Avaya Contact Recorder Planning, Installation and Administration Guide
Confidential and Proprietary Information
2. The controller establishes contact with the recorder (exchanges HELLO messages)
3. The controller notes the pool of ports that are ONLINE (and may alarm if there are too few)
4. When a call is to be recorded, the controller picks an available port and sends it a START message with SSC parameter specifying the station that is already on that call.
5. When recording is no longer required, the controller sends that port a HANGUP message,
6. Ports can only be reused for another call after they have hung up. The controller can send a HANGUP message to make this happen. Alternatively, if the call to which the port is connected terminates before it is told to hang up, the recorder sends a HUNGUP message to the controller. Note that some recording modes include an option to automatically terminate if the call drops to just one other party.
7. The recorder performs basic tagging itself but the controller sends Genesys user data through as TAG commands.
Should the controller fail, no recording will happen. For fault tolerance, use a pair of controllers and have one or the other send messages to the recorder.
For large systems or to make the system tolerant to recorder failure, use a pool of N+1 independent recorders.
Additional Call Tagging
User wants to tag each call with a customer identifier that is known to an in-house application. This knows the station handling the call and the customer on the call in real-time i.e. during the call.
In this case, the recorder will be configured for either Station Bulk or Conferenced mode as appropriate for the basic recording requirement. The approach to tagging will differ slightly.
Service Observe Approach
If Station Bulk recording is used:
1. Configure Station Bulk recording for all stations to be recorded.
2. The controller establishes contact with the recorder (exchanges HELLO messages)
3. The controller notes the stations that are ONLINE (and may alarm if any are missing)
4. Any time the controller receives a STARTED message, it looks up its current map of which stations v customers and sends a TAG command to apply the appropriate customer identifier to the call.
Examples
Issue 4 April, 2010 253
Confidential and Proprietary Information
Should the controller fail, the recorder continues to record as normal in Station Bulk mode but calls will not be tagged with customer id. A fault tolerant pair of controllers can be used if required.
For a system that is tolerant of recorder failure, use a Standby recorder. This will contact the controller as and when it takes over from the master.
Single-step Conference Approach
If Conferenced mode is used:
1. Configure Conferenced mode as normal.
2. The controller establishes contact with the recorder (exchanges HELLO messages)
3. The controller notes the recorder ports that are ONLINE (and may alarm if any are missing) and requests ACTIVITY ON for each.
4. Any time the controller receives an UPDATE message, it looks in the XML data for a station identifier that it recognises. If it finds one, it sends a TAG message with the appropriate customer identifier. (CAUTION: this will, in turn cause another UPDATE message to any other external controllers that are connected, such as a standby Unify. Do not go recursive! If the UPDATE message already includes a customer identifier, do not send TAG again.)
5. Should a recorder port hang up, it will send "1 HUNGUP STN:nnnn:". The external controller should use this message to indicate that the port is once again available for use.
Should the controller fail, the recorder continues to record as normal in Conferenced mode but calls will not be tagged with customer id. A fault tolerant pair of controllers can be used if required.
For a system that is tolerant of recorder failure, use a Standby recorder. This will contact the controller as and when it takes over from the master.
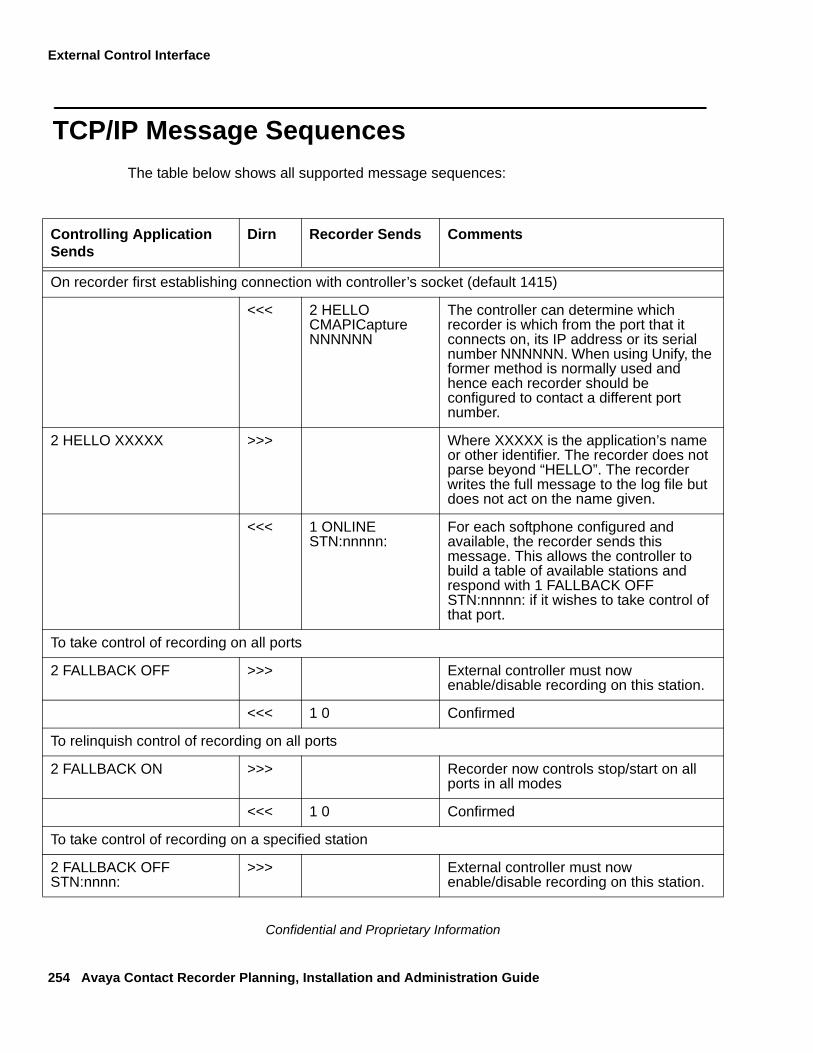
External Control Interface
254 Avaya Contact Recorder Planning, Installation and Administration Guide
Confidential and Proprietary Information
TCP/IP Message Sequences
The table below shows all supported message sequences:
Controlling Application Sends
Dirn Recorder Sends Comments
On recorder first establishing connection with controller’s socket (default 1415)
<<< 2 HELLO CMAPICapture NNNNNN
The controller can determine which recorder is which from the port that it connects on, its IP address or its serial number NNNNNN. When using Unify, the former method is normally used and hence each recorder should be configured to contact a different port number.
2 HELLO XXXXX >>> Where XXXXX is the application’s name or other identifier. The recorder does not parse beyond “HELLO”. The recorder writes the full message to the log file but does not act on the name given.
<<< 1 ONLINE STN:nnnnn:
For each softphone configured and available, the recorder sends this message. This allows the controller to build a table of available stations and respond with 1 FALLBACK OFF STN:nnnnn: if it wishes to take control of that port.
To take control of recording on all ports
2 FALLBACK OFF >>> External controller must now enable/disable recording on this station.
<<< 1 0 Confirmed
To relinquish control of recording on all ports
2 FALLBACK ON >>> Recorder now controls stop/start on all ports in all modes
<<< 1 0 Confirmed
To take control of recording on a specified station
2 FALLBACK OFF STN:nnnn:
>>> External controller must now enable/disable recording on this station.
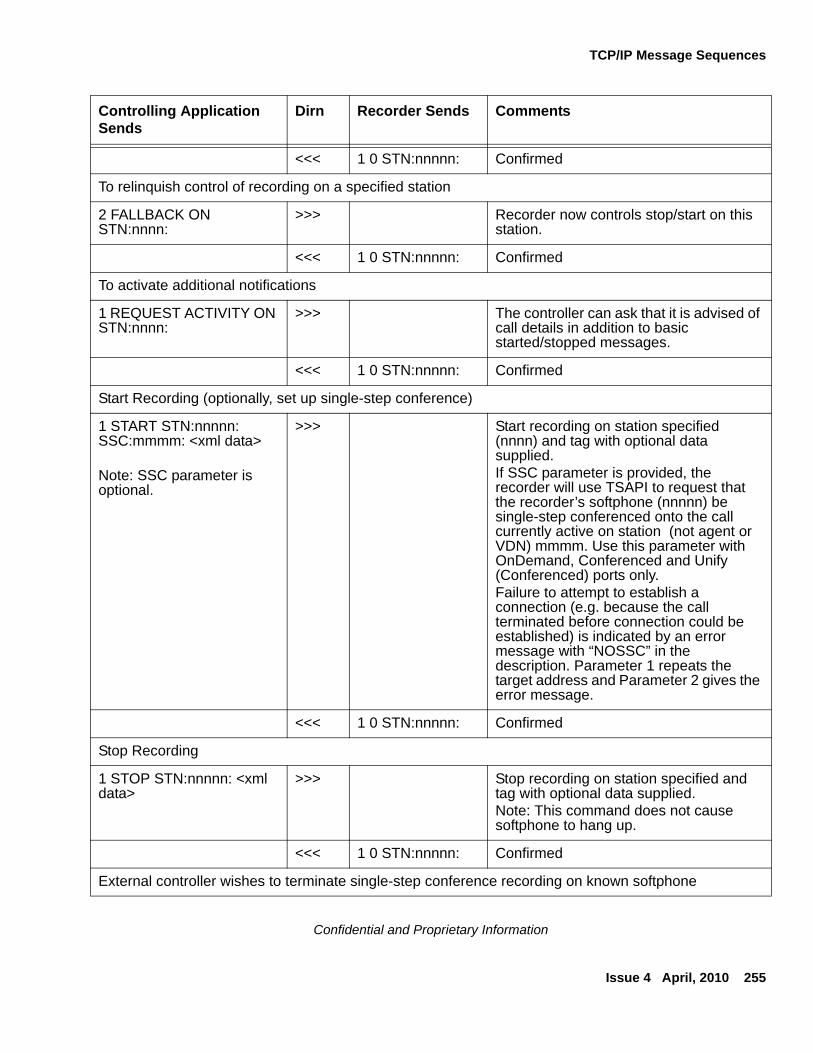
TCP/IP Message Sequences
Issue 4 April, 2010 255
Confidential and Proprietary Information
<<< 1 0 STN:nnnnn: Confirmed
To relinquish control of recording on a specified station
2 FALLBACK ON STN:nnnn:
>>> Recorder now controls stop/start on this station.
<<< 1 0 STN:nnnnn: Confirmed
To activate additional notifications
1 REQUEST ACTIVITY ON STN:nnnn:
>>> The controller can ask that it is advised of call details in addition to basic started/stopped messages.
<<< 1 0 STN:nnnnn: Confirmed
Start Recording (optionally, set up single-step conference)
1 START STN:nnnnn: SSC:mmmm: <xml data>
Note: SSC parameter is optional.
>>> Start recording on station specified (nnnn) and tag with optional data supplied.If SSC parameter is provided, the recorder will use TSAPI to request that the recorder’s softphone (nnnnn) be single-step conferenced onto the call currently active on station (not agent or VDN) mmmm. Use this parameter with OnDemand, Conferenced and Unify (Conferenced) ports only.Failure to attempt to establish a connection (e.g. because the call terminated before connection could be established) is indicated by an error message with “NOSSC” in the description. Parameter 1 repeats the target address and Parameter 2 gives the error message.
<<< 1 0 STN:nnnnn: Confirmed
Stop Recording
1 STOP STN:nnnnn: <xml data>
>>> Stop recording on station specified and tag with optional data supplied.Note: This command does not cause softphone to hang up.
<<< 1 0 STN:nnnnn: Confirmed
External controller wishes to terminate single-step conference recording on known softphone
Controlling Application Sends
Dirn Recorder Sends Comments
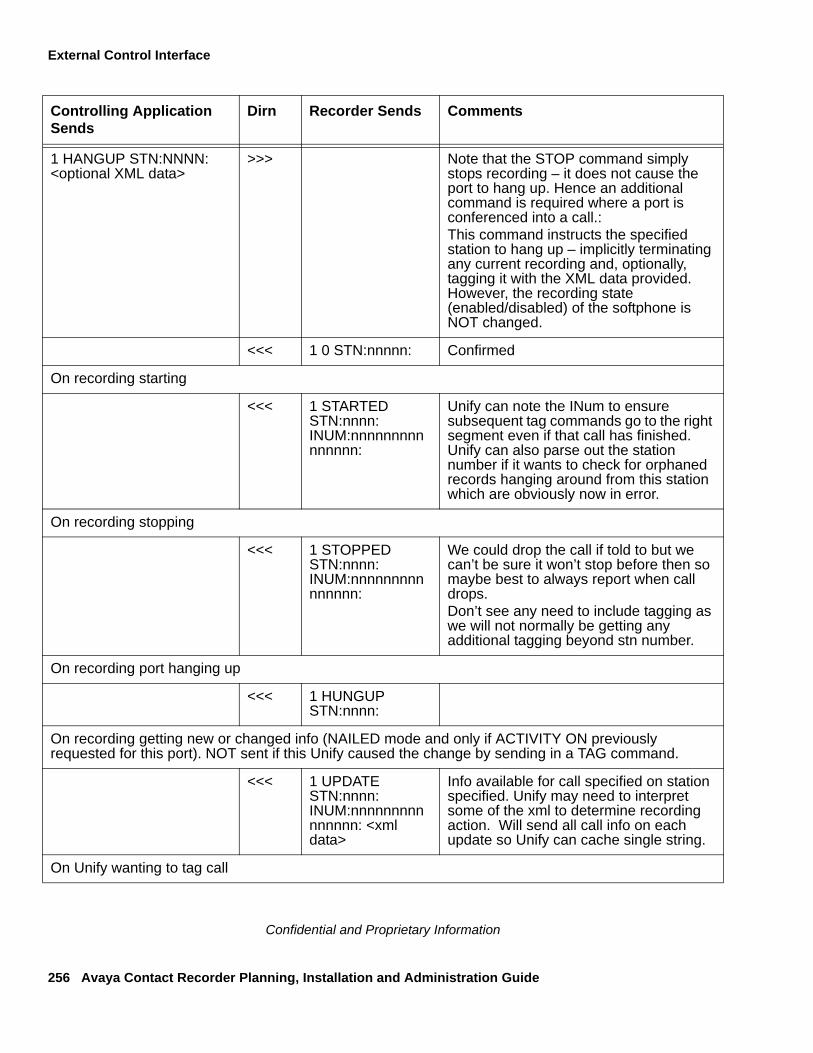
External Control Interface
256 Avaya Contact Recorder Planning, Installation and Administration Guide
Confidential and Proprietary Information
1 HANGUP STN:NNNN: <optional XML data>
>>> Note that the STOP command simply stops recording – it does not cause the port to hang up. Hence an additional command is required where a port is conferenced into a call.: This command instructs the specified station to hang up – implicitly terminating any current recording and, optionally, tagging it with the XML data provided. However, the recording state (enabled/disabled) of the softphone is NOT changed.
<<< 1 0 STN:nnnnn: Confirmed
On recording starting
<<< 1 STARTED STN:nnnn: INUM:nnnnnnnnnnnnnnn:
Unify can note the INum to ensure subsequent tag commands go to the right segment even if that call has finished. Unify can also parse out the station number if it wants to check for orphaned records hanging around from this station which are obviously now in error.
On recording stopping
<<< 1 STOPPED STN:nnnn: INUM:nnnnnnnnnnnnnnn:
We could drop the call if told to but we can’t be sure it won’t stop before then so maybe best to always report when call drops.Don’t see any need to include tagging as we will not normally be getting any additional tagging beyond stn number.
On recording port hanging up
<<< 1 HUNGUP STN:nnnn:
On recording getting new or changed info (NAILED mode and only if ACTIVITY ON previously requested for this port). NOT sent if this Unify caused the change by sending in a TAG command.
<<< 1 UPDATE STN:nnnn: INUM:nnnnnnnnnnnnnnn: <xml data>
Info available for call specified on station specified. Unify may need to interpret some of the xml to determine recording action. Will send all call info on each update so Unify can cache single string.
On Unify wanting to tag call
Controlling Application Sends
Dirn Recorder Sends Comments
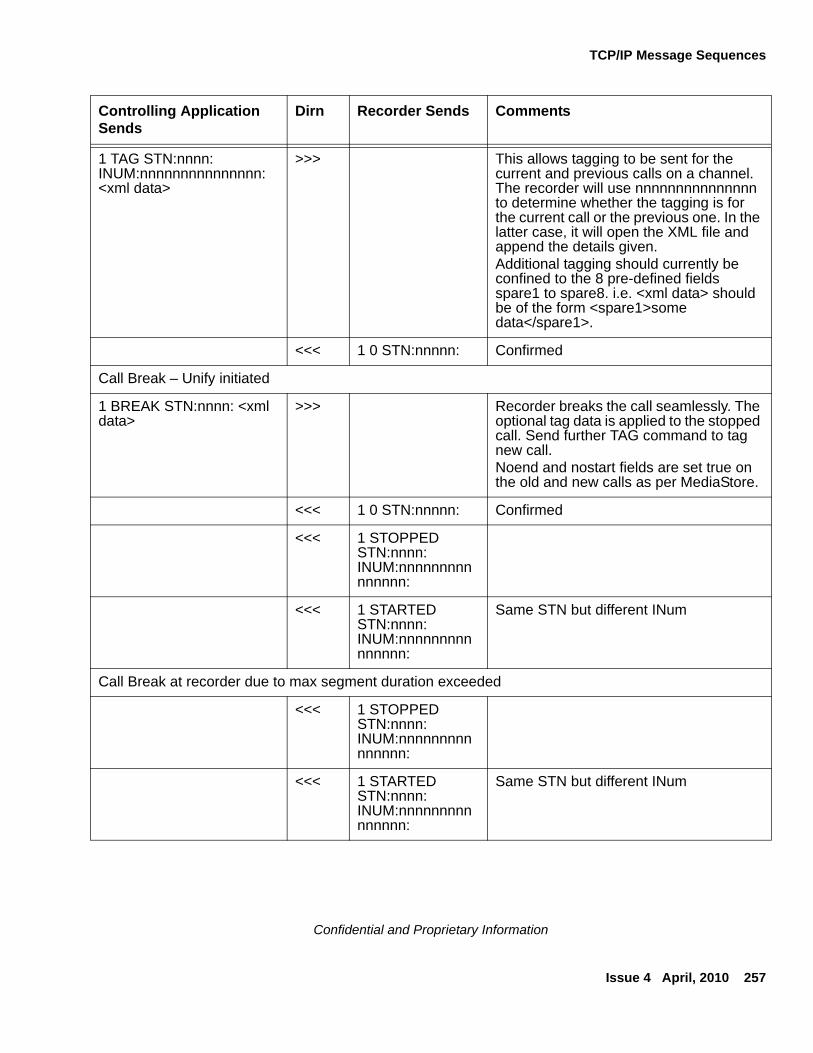
TCP/IP Message Sequences
Issue 4 April, 2010 257
Confidential and Proprietary Information
1 TAG STN:nnnn: INUM:nnnnnnnnnnnnnnn: <xml data>
>>> This allows tagging to be sent for the current and previous calls on a channel. The recorder will use nnnnnnnnnnnnnnn to determine whether the tagging is for the current call or the previous one. In the latter case, it will open the XML file and append the details given.Additional tagging should currently be confined to the 8 pre-defined fields spare1 to spare8. i.e. <xml data> should be of the form <spare1>some data</spare1>.
<<< 1 0 STN:nnnnn: Confirmed
Call Break – Unify initiated
1 BREAK STN:nnnn: <xml data>
>>> Recorder breaks the call seamlessly. The optional tag data is applied to the stopped call. Send further TAG command to tag new call.Noend and nostart fields are set true on the old and new calls as per MediaStore.
<<< 1 0 STN:nnnnn: Confirmed
<<< 1 STOPPED STN:nnnn: INUM:nnnnnnnnnnnnnnn:
<<< 1 STARTED STN:nnnn: INUM:nnnnnnnnnnnnnnn:
Same STN but different INum
Call Break at recorder due to max segment duration exceeded
<<< 1 STOPPED STN:nnnn: INUM:nnnnnnnnnnnnnnn:
<<< 1 STARTED STN:nnnn: INUM:nnnnnnnnnnnnnnn:
Same STN but different INum
Controlling Application Sends
Dirn Recorder Sends Comments
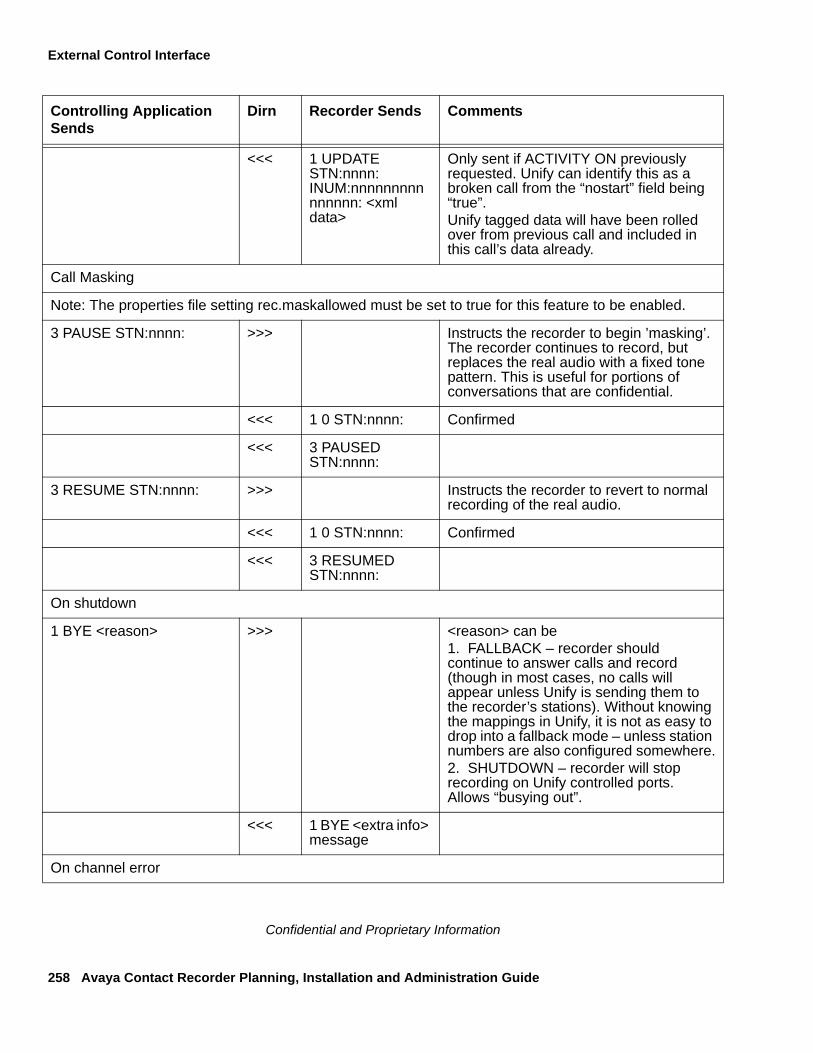
External Control Interface
258 Avaya Contact Recorder Planning, Installation and Administration Guide
Confidential and Proprietary Information
<<< 1 UPDATE STN:nnnn: INUM:nnnnnnnnnnnnnnn: <xml data>
Only sent if ACTIVITY ON previously requested. Unify can identify this as a broken call from the “nostart” field being “true”.Unify tagged data will have been rolled over from previous call and included in this call’s data already.
Call Masking
Note: The properties file setting rec.maskallowed must be set to true for this feature to be enabled.
3 PAUSE STN:nnnn: >>> Instructs the recorder to begin ’masking’. The recorder continues to record, but replaces the real audio with a fixed tone pattern. This is useful for portions of conversations that are confidential.
<<< 1 0 STN:nnnn: Confirmed
<<< 3 PAUSED STN:nnnn:
3 RESUME STN:nnnn: >>> Instructs the recorder to revert to normal recording of the real audio.
<<< 1 0 STN:nnnn: Confirmed
<<< 3 RESUMED STN:nnnn:
On shutdown
1 BYE <reason> >>> <reason> can be 1. FALLBACK – recorder should continue to answer calls and record (though in most cases, no calls will appear unless Unify is sending them to the recorder’s stations). Without knowing the mappings in Unify, it is not as easy to drop into a fallback mode – unless station numbers are also configured somewhere.2. SHUTDOWN – recorder will stop recording on Unify controlled ports. Allows “busying out”.
<<< 1 BYE <extra info> message
On channel error
Controlling Application Sends
Dirn Recorder Sends Comments

TCP/IP Message Sequences
Issue 4 April, 2010 259
Confidential and Proprietary Information
<<< 1 ERROR STN:nnnn:
Softphone unusable e.g. cannot register. In AUTO-ANSWER mode, Unify should mark this port faulty and not attempt to use. Hopefully, an ONLINE message will follow shortly as the recorder re-registers the port.Unify should probably be written to recognise faulty behaviour too e.g. if it doesn’t get STARTED from softphone it tried to place a recording on, it needs to report this and busy out the faulty one?
On channel being restored
<<< 1 ONLINE STN:nnnn:
Softphone available
Controlling Application Sends
Dirn Recorder Sends Comments

External Control Interface
260 Avaya Contact Recorder Planning, Installation and Administration Guide
Confidential and Proprietary Information
Issue 4 April, 2010 261
Confidential and Proprietary Information
Appendix E: Fault Tolerant Systems
In addition to using fault tolerant components within servers as described in High Availability Systems on page 64, recording systems can be made tolerant of many server and network failure conditions. This appendix details how such systems are designed and configured, how they handle failures and how to upgrade them. This Appendix assumes that the reader is already familiar with design, installation and operation of single server recording systems as described in the body of this manual.
The main sections in this appendix are:
● Redundant SAN on page 262
● Duplicated recording on page 263
● Standby Recorder Options on page 264
● Mode of operation on page 286
● Standby Recorder Configuration on page 291
● Upgrade Process for Multiple Recorder Topologies on page 293
Fault Tolerant Systems
262 Avaya Contact Recorder Planning, Installation and Administration Guide
Confidential and Proprietary Information
Redundant SAN
If you already have a fault tolerant storage network in place, you can assign the calls storage path to an area of this storage system. This is supported for locally connected drives - NOT for Network Attached Storage (NAS).
You are then reliant on the mirroring or other redundancy and standby mechanisms associated with the storage network. These mechanisms typically include a tape library backup and might include hierarchical file storage (HFS), in which older files are replaced by small tokens that allow the system to retrieve the original content from the tape library.
The recorder runs successfully with Tivoli Storage Manager and might also support other similar systems. However, Avaya does not proactively test against these systems. Connect to them at your own risk. If you want to use such a system, turn the recorder's own disk management function off. To do this, add the line disk.manager=false to the properties file. This stops the recorder from deleting the oldest files as the available disk capacity falls to 1GB. You must then ensure that the available space on the /calls partition does not fall below 1GB.

Duplicated recording
Issue 4 April, 2010 263
Confidential and Proprietary Information
Duplicated recording
Where recording is controlled by an external application (such as Unify) establishing conference calls onto the recorder's ports, a fault tolerant system can be deployed by using two totally independent recorders and establishing 4-way, instead of 3-way conferences.
By conferencing in one port from each of the two recorders, a fully redundant recording system can be delivered.
! WARNING:WARNING: Although the recorders are running in parallel, you must also ensure that the
mechanism that is establishing the conferences is, itself, fault tolerant. This may imply duplicated Unify servers and/or duplicated CTI feeds. The default behavior of recorders is to fall back into basic recording mode (where possible) should connectivity to Unify be broken. This often suffices as an acceptable failure mode.
You must ensure that the mechanism that establishes the conferences can handle the error condition that occurs when one of the recorders fails. It must establish the other conference party to the remaining, good recorder rather than fail totally.
Note:Note: A parallel recording system inevitably requires twice the VoIP resources.
This option is, therefore, an expensive one.
! WARNING:WARNING: The overall maximum of 6 parties on a conference might become a
constraint if two of these are recording ports. Call scenarios in which two calls merge (transfer and conferencing) - and where each of these is already a 4 party call due to duplicated recording can exceed these limits and are not supported. To avoid this, recording ports are removed from a call as soon as it goes on hold. In this way there are less parties present on the call when it later merges with a consultation call. (Note that this cannot be done with the "Follow the call" recording option as otherwise the call may be lost from the recorder's sight.)
Fault Tolerant Systems
264 Avaya Contact Recorder Planning, Installation and Administration Guide
Confidential and Proprietary Information
Standby Recorder Options
You can configure additional Avaya Contact Recorders to act as standby to a master recorder. These would normally be in "standby" mode and only become "active" when they detect the failure of the master they are shadowing. Where you have multiple sites, you can use multiple standby recorders. Each standby can back up a specified master or a specific subset of a master recorder's configuration.
This section describes:
● Prerequisites for high availability
● Standby recorder licensing
● Known limitations
● Supported fall back scenarios
● Supported failure modes
● Mode of operation
● The impact of a switch-over
● Restoration of a master recorder once it has been repaired
● Upgrade procedures specific to master / standby topologies
● A summary comparison with hardware switch-over units
● "Supported Master/Standby Topologies
Prerequisites for high availability
To get maximum benefit from a standby recorder topology, you must adopt the appropriate elements of an overall strategy for high availability:
Centralized database and replay
Although the standby unit(s) can work without a centralized database and replay tools like Viewer, you need these elements to provide a seamless, single point of access to all recordings. Without them, those recordings made on a standby recorder are only accessible by accessing the url of that recorder. With the central database, all recordings made on any of the recorders, including the standby(s), are consolidated into a single, searchable pool.

Standby Recorder Options
Issue 4 April, 2010 265
Confidential and Proprietary Information
Fault tolerant storage
Both master and standby recorders must be configured with RAID1 or (preferably) RAID 5 arrays or be using a fault tolerant SAN on which recordings are kept. Using standby recording provides fault tolerant recording. However, it does not itself provide for fault tolerant STORAGE of recordings.
Off-site archive
It is also assumed that, where DVD+RW or Blu-ray disks are written, that these will be stored away from the recorders, ideally in a separate building for maximum protection. Should these be needed for regular access, a copy should be made and kept off-site. Unless the fault tolerant disk system is spread across multiple buildings, off-site storage of archive media is essential.
Fault tolerant network connectivity
Where centrally located master and standby recorders are co-located or are in disaster recovery sites with fault tolerant connections between them, it is critical that the master and standby recorders are connected by way of a fully fault tolerant network topology. Failure of any one networking component (NIC, cable, Ethernet switch or router) between them must not result in connectivity being lost between them. Each standby recorder assumes that failure to communicate with the master indicates that the master has failed. It will attempt to take over from it. If this is not the case, then the two recorders will clash as they attempt to use the same softphone numbers on the switch. You must provide a fault tolerant network path including bonded NICs with independent network paths between primary and standby as described in Bonded NICs on page 86.
Where remotely sited standby recorders are provided so as to record should the remote site lose connectivity with the center and fall back to ESS mode, you should ensure that the remote standby is connected to the master recorder over the same network path that the Avaya components use. This ensures that it will lose contact with the center - and hence become active - should the site fall into ESS mode.
Location of recorders
Where possible, you should locate the standby recorder(s) in a different building from the master recorders. You should also provide diverse network routing between the recorders and the Avaya switch components that they interact with (AE Services, C-LAN and MedPros).
One additional Media Processing Resource per Media Gateway
You must provide one additional media processor per Media Gateway to ensure that failure of a single card does not impact the ability of a recorder to record at its configured capacity.
Fault Tolerant Systems
266 Avaya Contact Recorder Planning, Installation and Administration Guide
Confidential and Proprietary Information
Standby recorder licensing
To use one or more Standby recorders, your master license key must include the appropriate number of backup channels. On the licensing page, a standby is assigned a recorder number and given the IP address of the Master recorder.
When you configure a recorder as a standby unit, you must subsequently stop and restart the recorder in order for it to take notice of this setting.
In laboratory conditions, when switching between master and standby licenses, a restart is required.
Automated Configuration Shadowing
If you are using service observe based recording (Station Bulk, Station Executive) you will probably want the standby recorder on each site to start recording those stations that are on that site when failover occurs. Remote standby recorders copy the entire configuration from the master recorder. In the event of network failure, they start recording those stations that are marked with that standby recorder's serial number as their standby recorder. They will do so using softphones that are marked with their serial number as their Standby recorder. These settings are under the "Advanced" link for the range of softphones or stations.
Manual Configuration of Standby
If you are using conferenced mode recording, it is unlikely that your fallback scenarios will include full CTI links. In such cases you can instruct the Standby recorder NOT to copy configuration from the master. You are then free to configure it manually such that it operates as you require under fallback conditions. This may be a simpler approach such as recording all stations on its site.
See Standby Server on page 189 for instructions on how to specify this option.
Known limitations
Deploying standby recorders:
● Does not guarantee access to recordings made by the failed server. See Centralized database and replay above.
● Does not guarantee "no loss" of recording on failure. See Mode of operation below.

Standby Recorder Options
Issue 4 April, 2010 267
Confidential and Proprietary Information
● Requires that the standby recorder can contact the master recorder when it is designated as a standby so that its licensing and/or configuration can be copied.
● Does not support the use of Telephone Replay ports on the master and standby recorder (unless you force local configuration). Place these on a central replay server (or pair of servers if fault tolerant replay is required).
Distributed Systems
The master and standby recorders are designed to work well in distributed systems where loss of connectivity between sites would otherwise case recording to fail. The following Avaya failover modes are supported:
● Locally Survivable Processors (LSP)
● Enterprise Survivable Servers (ESS)
AE Server to Recorder Mapping
Each group of master recorders and each group of standby recorders should have their own AE Services box. This provides an extra layer of redundancy. If both the master and standby share the same AE Server then a failure of this server will affect both. If they connect to different AE Servers then the master recorder can detect this and ask the standby to take over. As it uses a different AE server, it should be able to do so successfully.
Where recording is taking place across the enterprise, always place an AE server on the same site as the recorder that will use it so that the remote recorders can continue to operate should the WAN fail.
Remote Sites
A standby recorder can be provided on an ESS or LSP site so long as there is also an AE Services server present on that site. Fallback operation in the event of WAN failure is automatic on ESS sites. The same is true on LSP sites so long as the "add/change survivable processor" setting is "i" or "o".
You must:
● NOT specify particular C-LANs when entering softphone ranges for the recorders to use. Instead, allow the AE Services platform to determine appropriate, reachable C-LANs.
● specify the appropriate remote Avaya Contact Recorder as the Standby recorder for the stations to be recorded there when in LSP or ESS mode.
Three options are supported:
Fault Tolerant Systems
268 Avaya Contact Recorder Planning, Installation and Administration Guide
Confidential and Proprietary Information
a. Standalone Recorder(s) on Remote Site(s) - In this enterprise configuration, the recorders and AE servers are based on the satellite site(s) only. There are no standby recorders. This option is suitable where there are many small satellite sites with low bandwidth and/or unreliable connectivity to the central site.
b. Automatic Standby Recorder(s) on Remote Site(s) - In this enterprise configuration, the master recorders are based at a central site and the standby recorders are based at the satellite sites. The recording ports on the master recorder are split into groups. Each group of ports reflects the ports on a standby recorder that will take over in failure mode and has this standby's serial number entered in its Advanced settings.
The configuration of the master recorder is automatically copied once a minute to all the standby recorders on the remote sites as normal. When a failure occurs, the standby recorder connects only those ports marked with its serial number and allocates them to the recording tasks that are similarly marked for this recorder to perform in failover mode.
c. Manually Configured Standby Recorder(s) on LSP Remote site(s) - The system topology is the same as in b) above, with the master recorder(s) based at a central site and the standby recorders based at the local sites. However, the standby recorders are setup for manual configuration (by means of a property file entry) and are typically configured to perform station bulk recording of the stations at the LSP remote site. To set this up, the master recorder is configured without the backup or standby settings. Then, each standby recorder is configured manually to operate as required when LSP or ESS mode is invoked.
Supported failure modes
The Standby recorder is designed to become active within a few seconds of a complete system failure of the master recorder it is configured to "shadow." These failure modes include:
● Catastrophic server failure
● Total network isolation
● Accidental power down or power failure
● Sustained failure of the AES services DMCC and/or TSAPI
● Disk full
Standby Recorder Options
Issue 4 April, 2010 269
Confidential and Proprietary Information
Standby recorders and Unify/External Control
Unify/External Controller connected to Master/Standby pair
When using Unify or an equivalent external controller with a master/standby recorder pair, it should send any START/STOP commands to the recorder that sent it port ONLINE messages.
Only the active recorder will send STARTED/STOPPED messages. Unify should only send TAG commands to this active recorder.
Unify/External Controller connected to Master only
If the external controller is essential to the operation of the Master (for example, if it is setting up single step conferences) then the master needs to recognize that it is not viable if it has no links to external controllers. Set the property unify.required in the properties file to indicate this. You can then provide either:
● a standby recorder, locally configured for Station Bulk mode
● a second Unify/External controller connected to the standby recorder
With this property set, the Unify/External controller can force a switchover to the standby by sending a 1 BYE SHUTDOWN message and then not sending the HELLO response when the recorder re-establishes connection. When it is ready to take control again, it can send the HELLO message and the recorder will take over from the standby again.
Supported Master/Standby Topologies
The following pages describe the supported Master/Standby topologies. Use the table below to determine the appropriate configuration for your system then refer to that table for details of sizing, configuration, how faults are handled and how to restore the system following a failure.
For further discussion of these options, read the remainder of this Appendix.
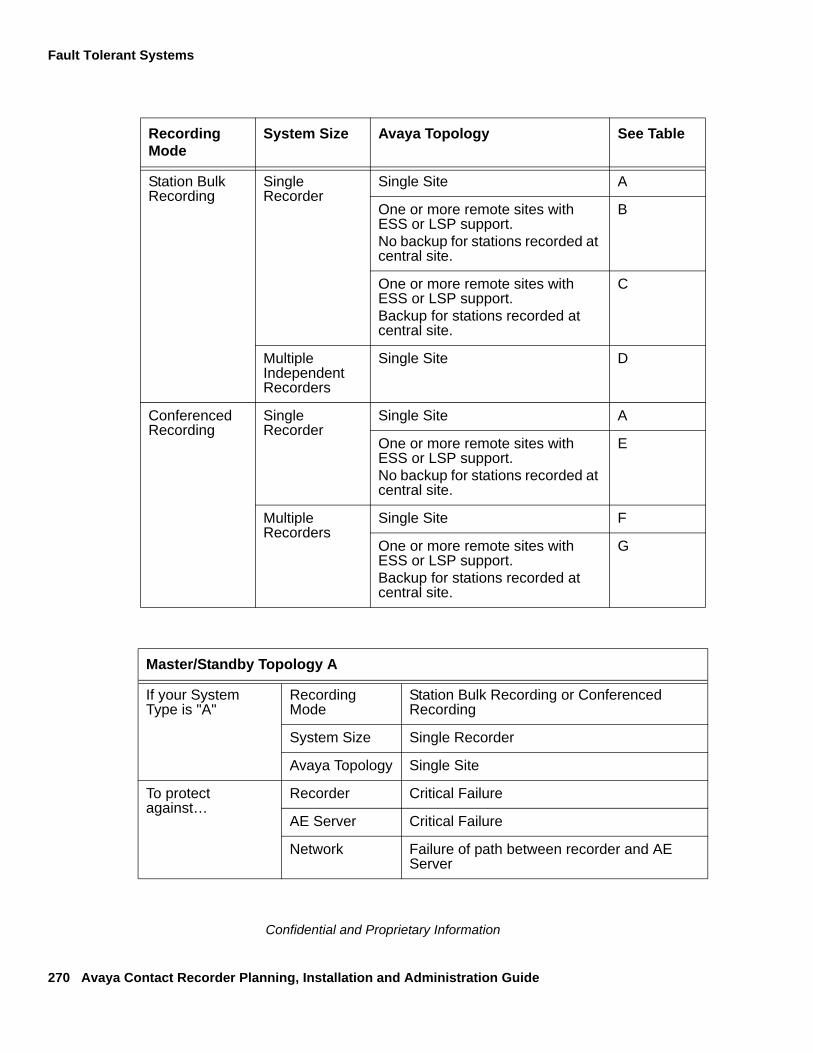
Fault Tolerant Systems
270 Avaya Contact Recorder Planning, Installation and Administration Guide
Confidential and Proprietary Information
Recording Mode
System Size Avaya Topology See Table
Station Bulk Recording
Single Recorder
Single Site A
One or more remote sites with ESS or LSP support. No backup for stations recorded at central site.
B
One or more remote sites with ESS or LSP support. Backup for stations recorded at central site.
C
Multiple Independent Recorders
Single Site D
Conferenced Recording
Single Recorder
Single Site A
One or more remote sites with ESS or LSP support. No backup for stations recorded at central site.
E
Multiple Recorders
Single Site F
One or more remote sites with ESS or LSP support. Backup for stations recorded at central site.
G
Master/Standby Topology A
If your System Type is "A"
Recording Mode
Station Bulk Recording or Conferenced Recording
System Size Single Recorder
Avaya Topology Single Site
To protect against…
Recorder Critical Failure
AE Server Critical Failure
Network Failure of path between recorder and AE Server
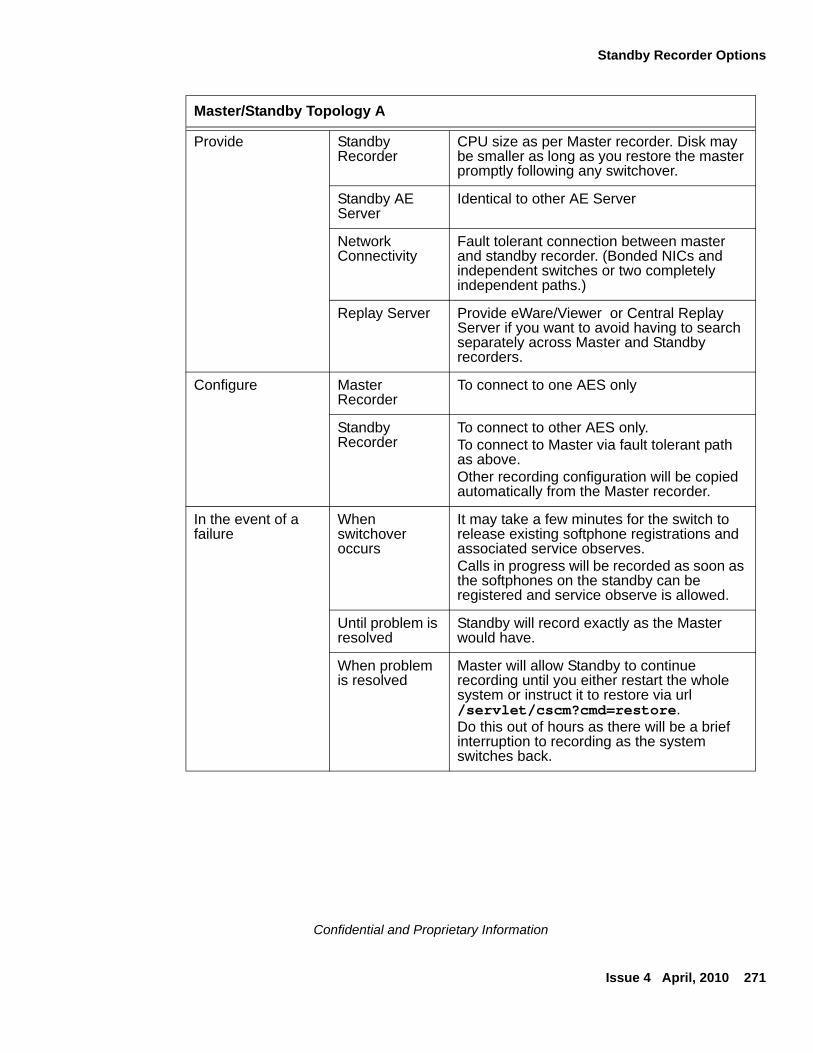
Standby Recorder Options
Issue 4 April, 2010 271
Confidential and Proprietary Information
Provide Standby Recorder
CPU size as per Master recorder. Disk may be smaller as long as you restore the master promptly following any switchover.
Standby AE Server
Identical to other AE Server
Network Connectivity
Fault tolerant connection between master and standby recorder. (Bonded NICs and independent switches or two completely independent paths.)
Replay Server Provide eWare/Viewer or Central Replay Server if you want to avoid having to search separately across Master and Standby recorders.
Configure Master Recorder
To connect to one AES only
Standby Recorder
To connect to other AES only.To connect to Master via fault tolerant path as above.Other recording configuration will be copied automatically from the Master recorder.
In the event of a failure
When switchover occurs
It may take a few minutes for the switch to release existing softphone registrations and associated service observes.Calls in progress will be recorded as soon as the softphones on the standby can be registered and service observe is allowed.
Until problem is resolved
Standby will record exactly as the Master would have.
When problem is resolved
Master will allow Standby to continue recording until you either restart the whole system or instruct it to restore via url /servlet/cscm?cmd=restore. Do this out of hours as there will be a brief interruption to recording as the system switches back.
Master/Standby Topology A
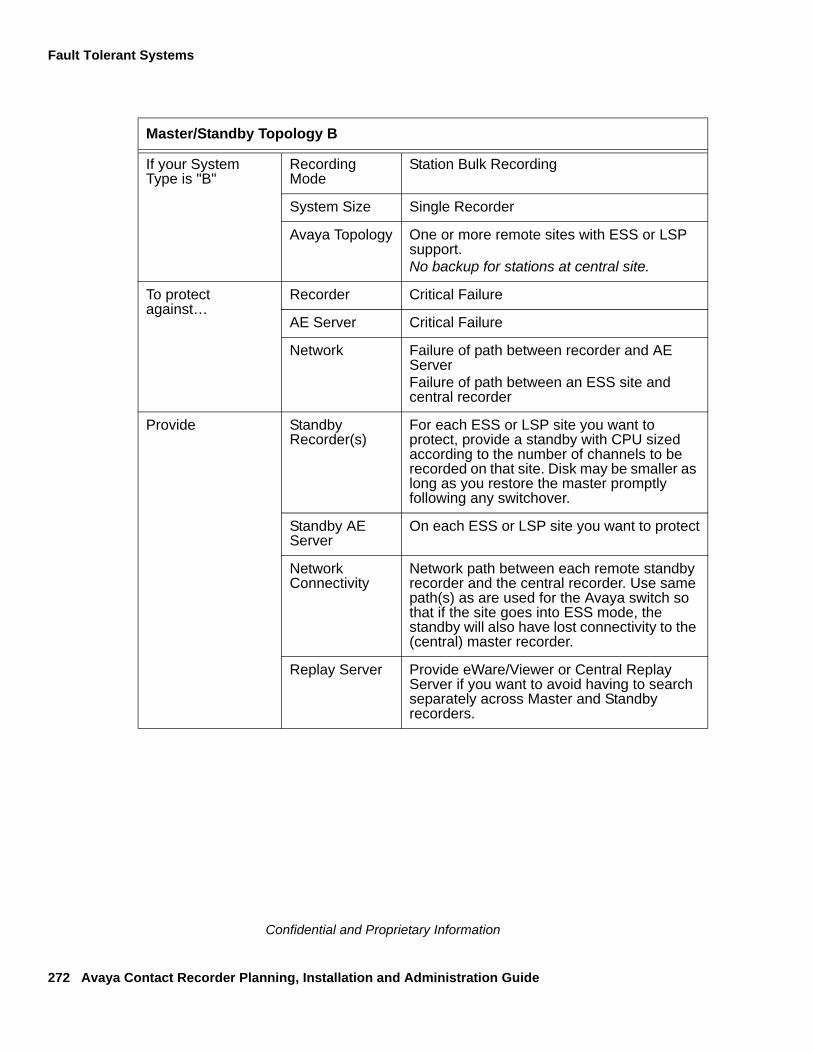
Fault Tolerant Systems
272 Avaya Contact Recorder Planning, Installation and Administration Guide
Confidential and Proprietary Information
Master/Standby Topology B
If your System Type is "B"
Recording Mode
Station Bulk Recording
System Size Single Recorder
Avaya Topology One or more remote sites with ESS or LSP support.No backup for stations at central site.
To protect against…
Recorder Critical Failure
AE Server Critical Failure
Network Failure of path between recorder and AE ServerFailure of path between an ESS site and central recorder
Provide Standby Recorder(s)
For each ESS or LSP site you want to protect, provide a standby with CPU sized according to the number of channels to be recorded on that site. Disk may be smaller as long as you restore the master promptly following any switchover.
Standby AE Server
On each ESS or LSP site you want to protect
Network Connectivity
Network path between each remote standby recorder and the central recorder. Use same path(s) as are used for the Avaya switch so that if the site goes into ESS mode, the standby will also have lost connectivity to the (central) master recorder.
Replay Server Provide eWare/Viewer or Central Replay Server if you want to avoid having to search separately across Master and Standby recorders.
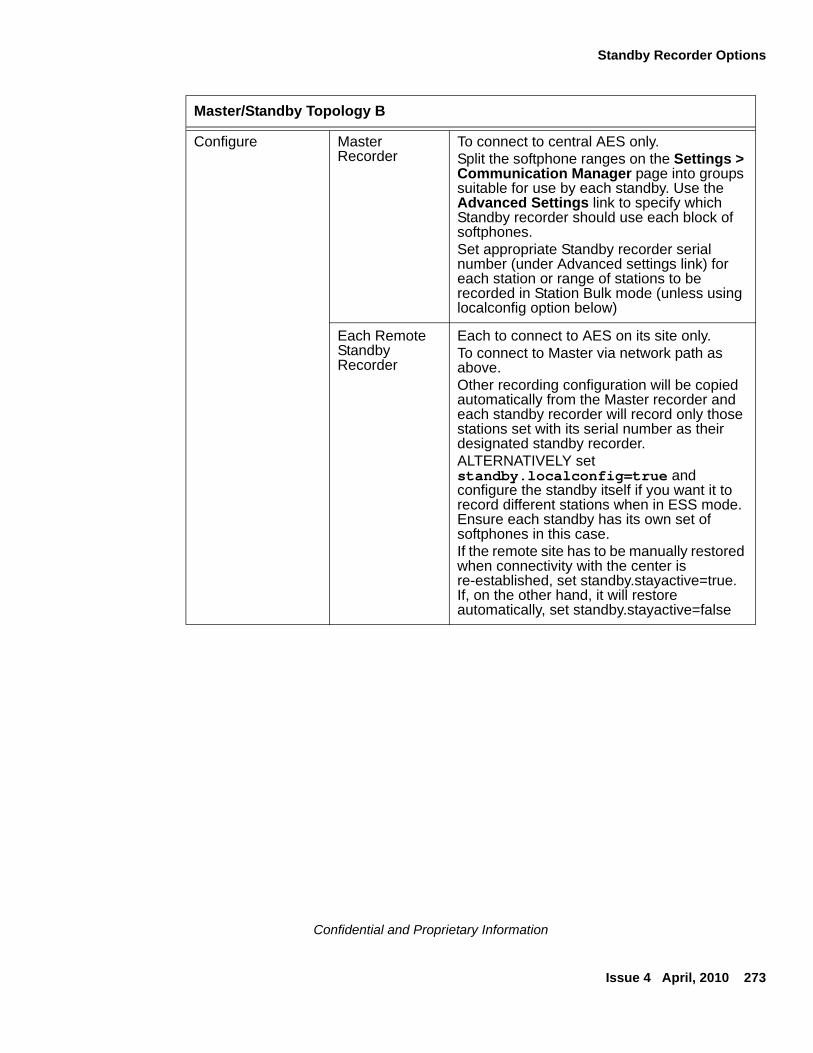
Standby Recorder Options
Issue 4 April, 2010 273
Confidential and Proprietary Information
Configure Master Recorder
To connect to central AES only.Split the softphone ranges on the Settings > Communication Manager page into groups suitable for use by each standby. Use the Advanced Settings link to specify which Standby recorder should use each block of softphones.Set appropriate Standby recorder serial number (under Advanced settings link) for each station or range of stations to be recorded in Station Bulk mode (unless using localconfig option below)
Each Remote Standby Recorder
Each to connect to AES on its site only.To connect to Master via network path as above.Other recording configuration will be copied automatically from the Master recorder and each standby recorder will record only those stations set with its serial number as their designated standby recorder.ALTERNATIVELY set standby.localconfig=true and configure the standby itself if you want it to record different stations when in ESS mode. Ensure each standby has its own set of softphones in this case.If the remote site has to be manually restored when connectivity with the center is re-established, set standby.stayactive=true. If, on the other hand, it will restore automatically, set standby.stayactive=false
Master/Standby Topology B
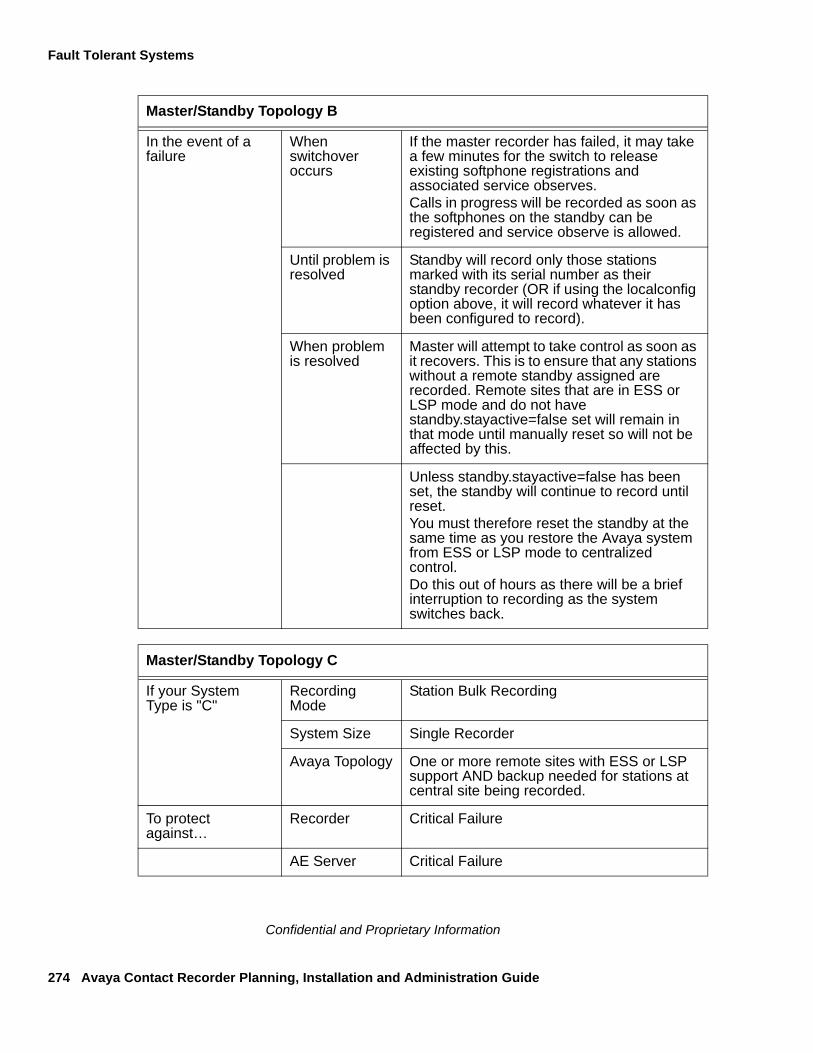
Fault Tolerant Systems
274 Avaya Contact Recorder Planning, Installation and Administration Guide
Confidential and Proprietary Information
In the event of a failure
When switchover occurs
If the master recorder has failed, it may take a few minutes for the switch to release existing softphone registrations and associated service observes.Calls in progress will be recorded as soon as the softphones on the standby can be registered and service observe is allowed.
Until problem is resolved
Standby will record only those stations marked with its serial number as their standby recorder (OR if using the localconfig option above, it will record whatever it has been configured to record).
When problem is resolved
Master will attempt to take control as soon as it recovers. This is to ensure that any stations without a remote standby assigned are recorded. Remote sites that are in ESS or LSP mode and do not have standby.stayactive=false set will remain in that mode until manually reset so will not be affected by this.
Unless standby.stayactive=false has been set, the standby will continue to record until reset. You must therefore reset the standby at the same time as you restore the Avaya system from ESS or LSP mode to centralized control.Do this out of hours as there will be a brief interruption to recording as the system switches back.
Master/Standby Topology C
If your System Type is "C"
Recording Mode
Station Bulk Recording
System Size Single Recorder
Avaya Topology One or more remote sites with ESS or LSP support AND backup needed for stations at central site being recorded.
To protect against…
Recorder Critical Failure
AE Server Critical Failure
Master/Standby Topology B
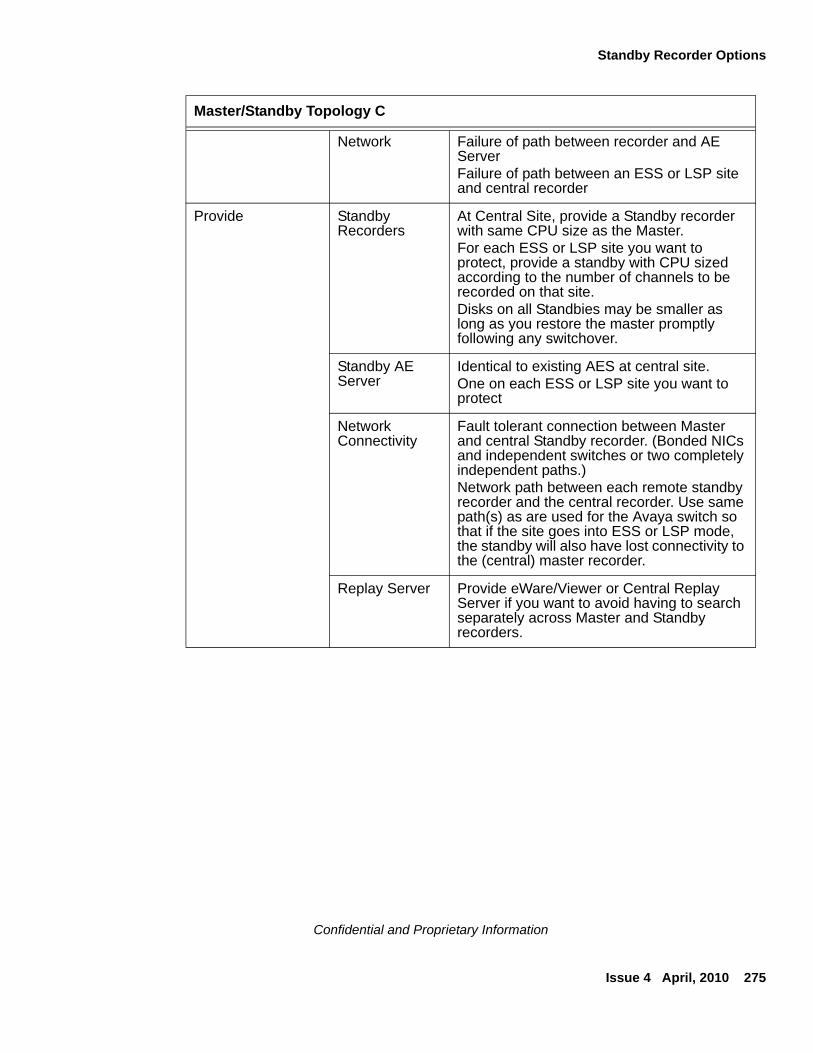
Standby Recorder Options
Issue 4 April, 2010 275
Confidential and Proprietary Information
Network Failure of path between recorder and AE ServerFailure of path between an ESS or LSP site and central recorder
Provide Standby Recorders
At Central Site, provide a Standby recorder with same CPU size as the Master. For each ESS or LSP site you want to protect, provide a standby with CPU sized according to the number of channels to be recorded on that site. Disks on all Standbies may be smaller as long as you restore the master promptly following any switchover.
Standby AE Server
Identical to existing AES at central site.One on each ESS or LSP site you want to protect
Network Connectivity
Fault tolerant connection between Master and central Standby recorder. (Bonded NICs and independent switches or two completely independent paths.)Network path between each remote standby recorder and the central recorder. Use same path(s) as are used for the Avaya switch so that if the site goes into ESS or LSP mode, the standby will also have lost connectivity to the (central) master recorder.
Replay Server Provide eWare/Viewer or Central Replay Server if you want to avoid having to search separately across Master and Standby recorders.
Master/Standby Topology C
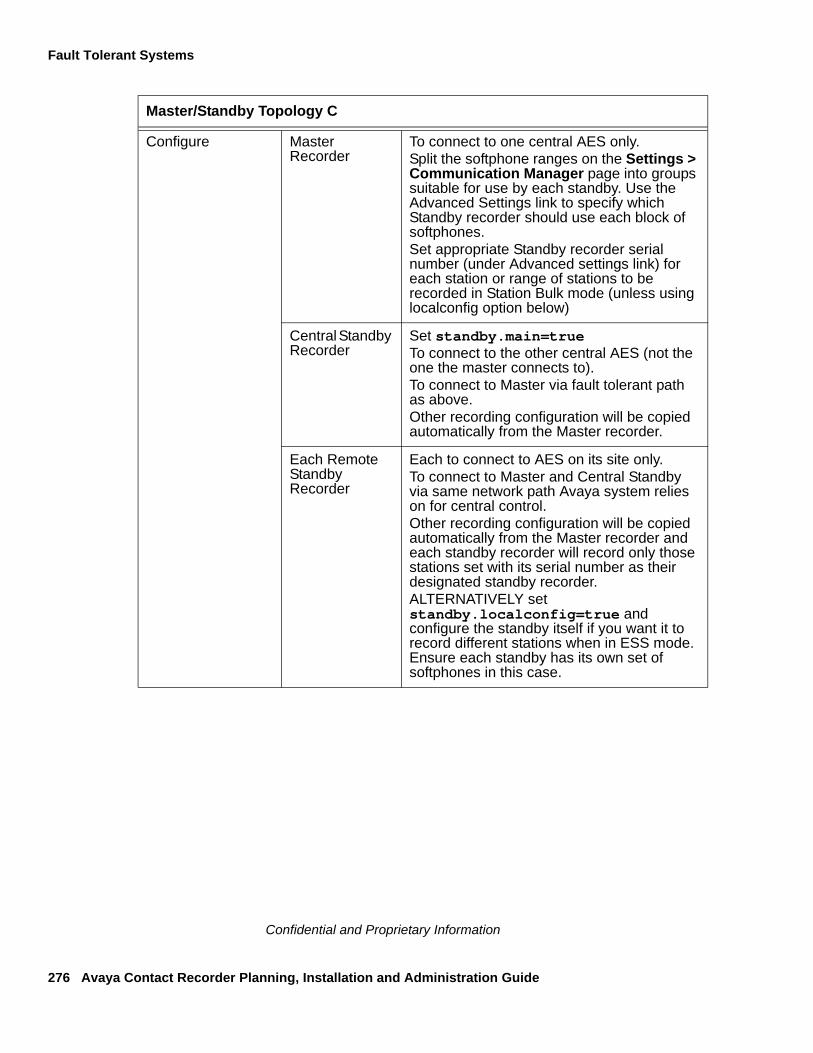
Fault Tolerant Systems
276 Avaya Contact Recorder Planning, Installation and Administration Guide
Confidential and Proprietary Information
Configure Master Recorder
To connect to one central AES only.Split the softphone ranges on the Settings > Communication Manager page into groups suitable for use by each standby. Use the Advanced Settings link to specify which Standby recorder should use each block of softphones.Set appropriate Standby recorder serial number (under Advanced settings link) for each station or range of stations to be recorded in Station Bulk mode (unless using localconfig option below)
Central Standby Recorder
Set standby.main=trueTo connect to the other central AES (not the one the master connects to).To connect to Master via fault tolerant path as above.Other recording configuration will be copied automatically from the Master recorder.
Each Remote Standby Recorder
Each to connect to AES on its site only.To connect to Master and Central Standby via same network path Avaya system relies on for central control.Other recording configuration will be copied automatically from the Master recorder and each standby recorder will record only those stations set with its serial number as their designated standby recorder.ALTERNATIVELY set standby.localconfig=true and configure the standby itself if you want it to record different stations when in ESS mode. Ensure each standby has its own set of softphones in this case.
Master/Standby Topology C
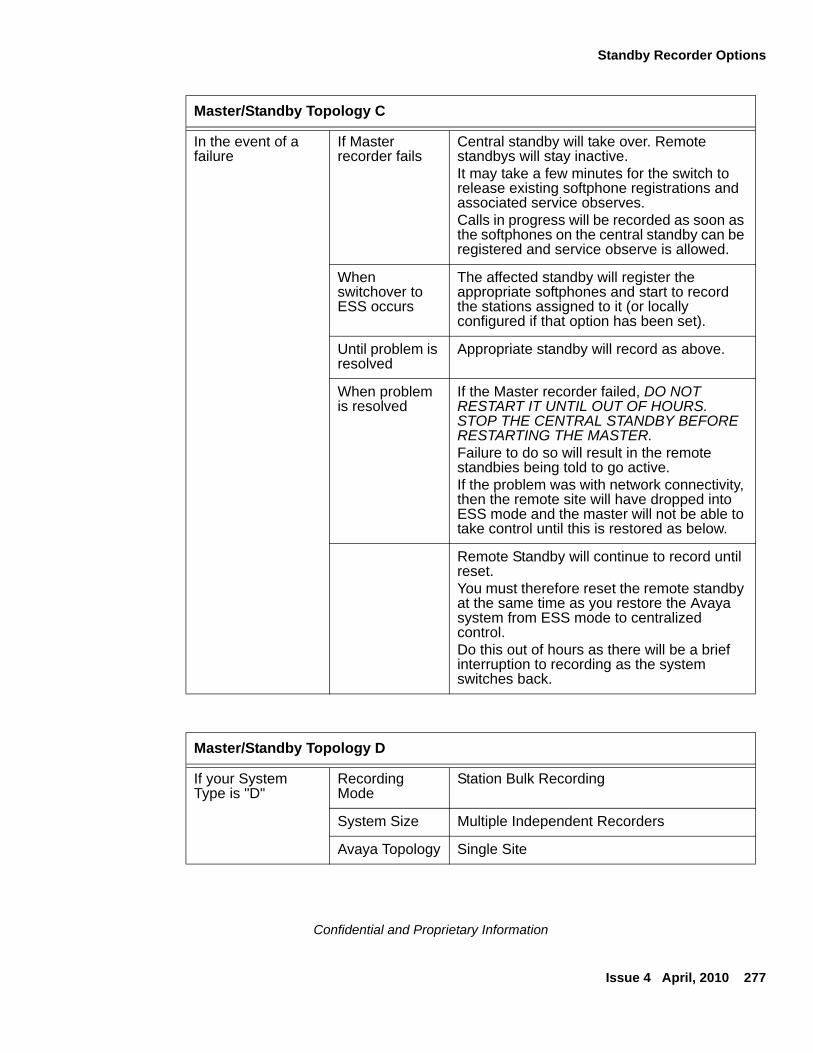
Standby Recorder Options
Issue 4 April, 2010 277
Confidential and Proprietary Information
In the event of a failure
If Master recorder fails
Central standby will take over. Remote standbys will stay inactive. It may take a few minutes for the switch to release existing softphone registrations and associated service observes.Calls in progress will be recorded as soon as the softphones on the central standby can be registered and service observe is allowed.
When switchover to ESS occurs
The affected standby will register the appropriate softphones and start to record the stations assigned to it (or locally configured if that option has been set).
Until problem is resolved
Appropriate standby will record as above.
When problem is resolved
If the Master recorder failed, DO NOT RESTART IT UNTIL OUT OF HOURS. STOP THE CENTRAL STANDBY BEFORE RESTARTING THE MASTER. Failure to do so will result in the remote standbies being told to go active.If the problem was with network connectivity, then the remote site will have dropped into ESS mode and the master will not be able to take control until this is restored as below.
Remote Standby will continue to record until reset. You must therefore reset the remote standby at the same time as you restore the Avaya system from ESS mode to centralized control.Do this out of hours as there will be a brief interruption to recording as the system switches back.
Master/Standby Topology D
If your System Type is "D"
Recording Mode
Station Bulk Recording
System Size Multiple Independent Recorders
Avaya Topology Single Site
Master/Standby Topology C
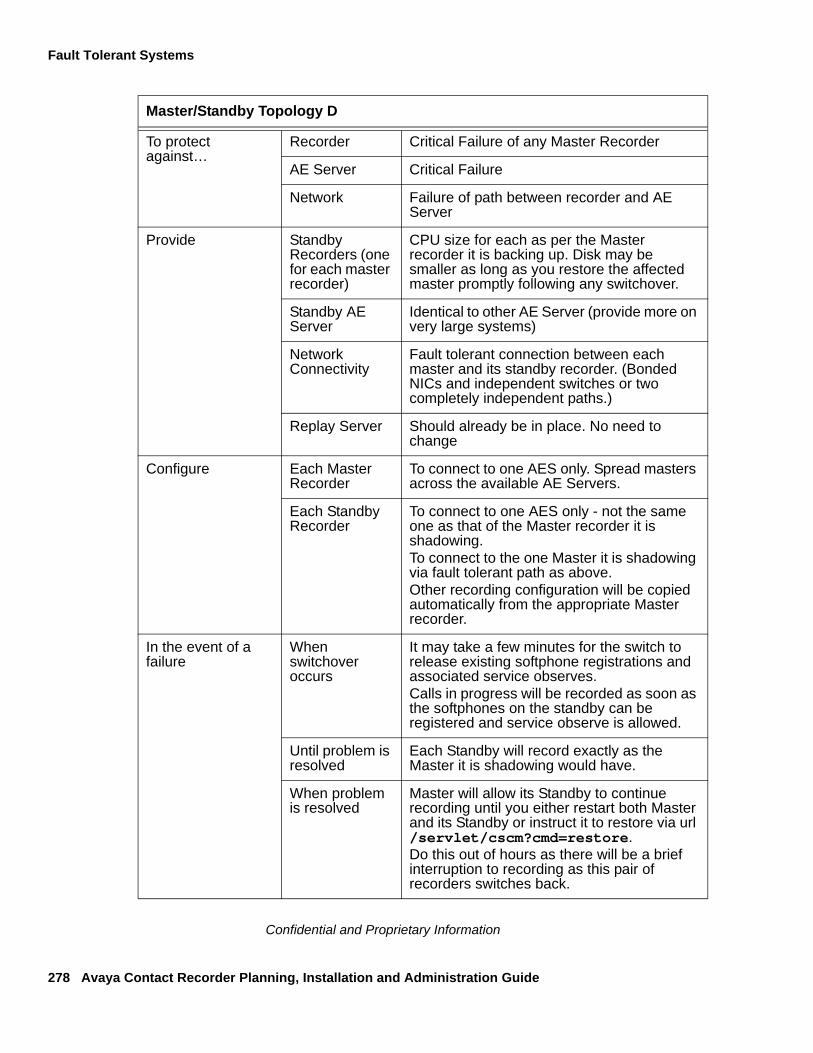
Fault Tolerant Systems
278 Avaya Contact Recorder Planning, Installation and Administration Guide
Confidential and Proprietary Information
To protect against…
Recorder Critical Failure of any Master Recorder
AE Server Critical Failure
Network Failure of path between recorder and AE Server
Provide Standby Recorders (one for each master recorder)
CPU size for each as per the Master recorder it is backing up. Disk may be smaller as long as you restore the affected master promptly following any switchover.
Standby AE Server
Identical to other AE Server (provide more on very large systems)
Network Connectivity
Fault tolerant connection between each master and its standby recorder. (Bonded NICs and independent switches or two completely independent paths.)
Replay Server Should already be in place. No need to change
Configure Each Master Recorder
To connect to one AES only. Spread masters across the available AE Servers.
Each Standby Recorder
To connect to one AES only - not the same one as that of the Master recorder it is shadowing.To connect to the one Master it is shadowing via fault tolerant path as above.Other recording configuration will be copied automatically from the appropriate Master recorder.
In the event of a failure
When switchover occurs
It may take a few minutes for the switch to release existing softphone registrations and associated service observes.Calls in progress will be recorded as soon as the softphones on the standby can be registered and service observe is allowed.
Until problem is resolved
Each Standby will record exactly as the Master it is shadowing would have.
When problem is resolved
Master will allow its Standby to continue recording until you either restart both Master and its Standby or instruct it to restore via url /servlet/cscm?cmd=restore. Do this out of hours as there will be a brief interruption to recording as this pair of recorders switches back.
Master/Standby Topology D
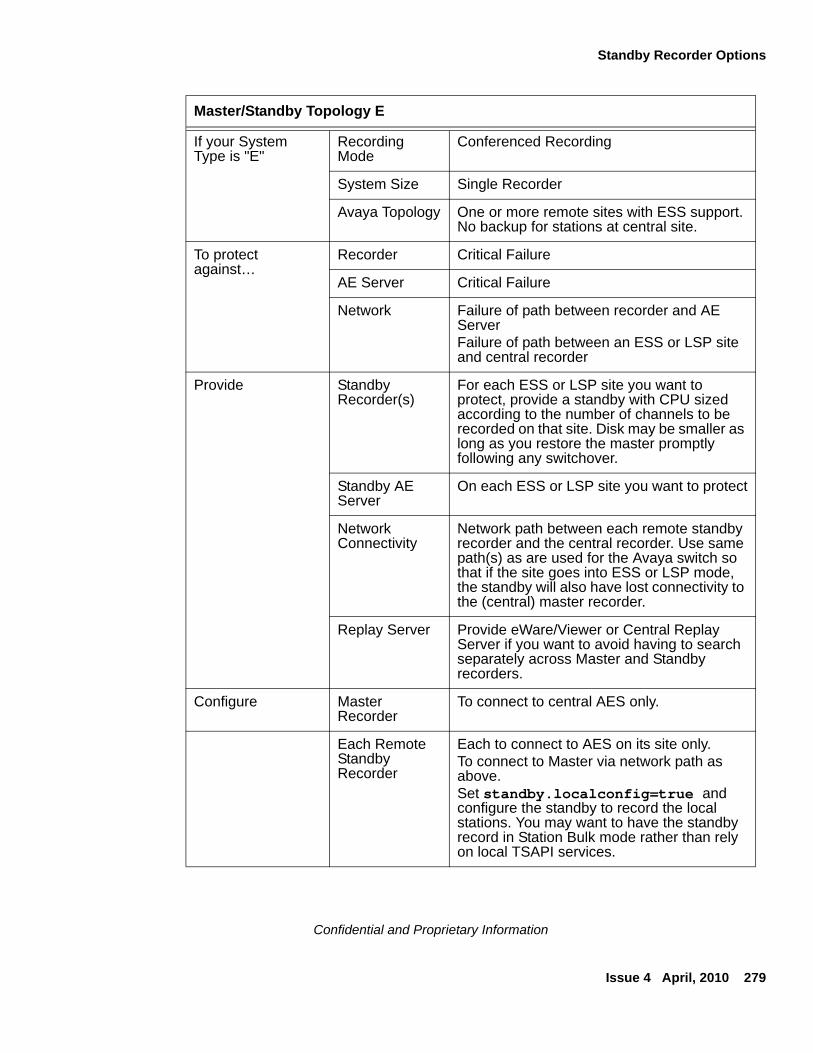
Standby Recorder Options
Issue 4 April, 2010 279
Confidential and Proprietary Information
Master/Standby Topology E
If your System Type is "E"
Recording Mode
Conferenced Recording
System Size Single Recorder
Avaya Topology One or more remote sites with ESS support. No backup for stations at central site.
To protect against…
Recorder Critical Failure
AE Server Critical Failure
Network Failure of path between recorder and AE ServerFailure of path between an ESS or LSP site and central recorder
Provide Standby Recorder(s)
For each ESS or LSP site you want to protect, provide a standby with CPU sized according to the number of channels to be recorded on that site. Disk may be smaller as long as you restore the master promptly following any switchover.
Standby AE Server
On each ESS or LSP site you want to protect
Network Connectivity
Network path between each remote standby recorder and the central recorder. Use same path(s) as are used for the Avaya switch so that if the site goes into ESS or LSP mode, the standby will also have lost connectivity to the (central) master recorder.
Replay Server Provide eWare/Viewer or Central Replay Server if you want to avoid having to search separately across Master and Standby recorders.
Configure Master Recorder
To connect to central AES only.
Each Remote Standby Recorder
Each to connect to AES on its site only.To connect to Master via network path as above.Set standby.localconfig=true and configure the standby to record the local stations. You may want to have the standby record in Station Bulk mode rather than rely on local TSAPI services.
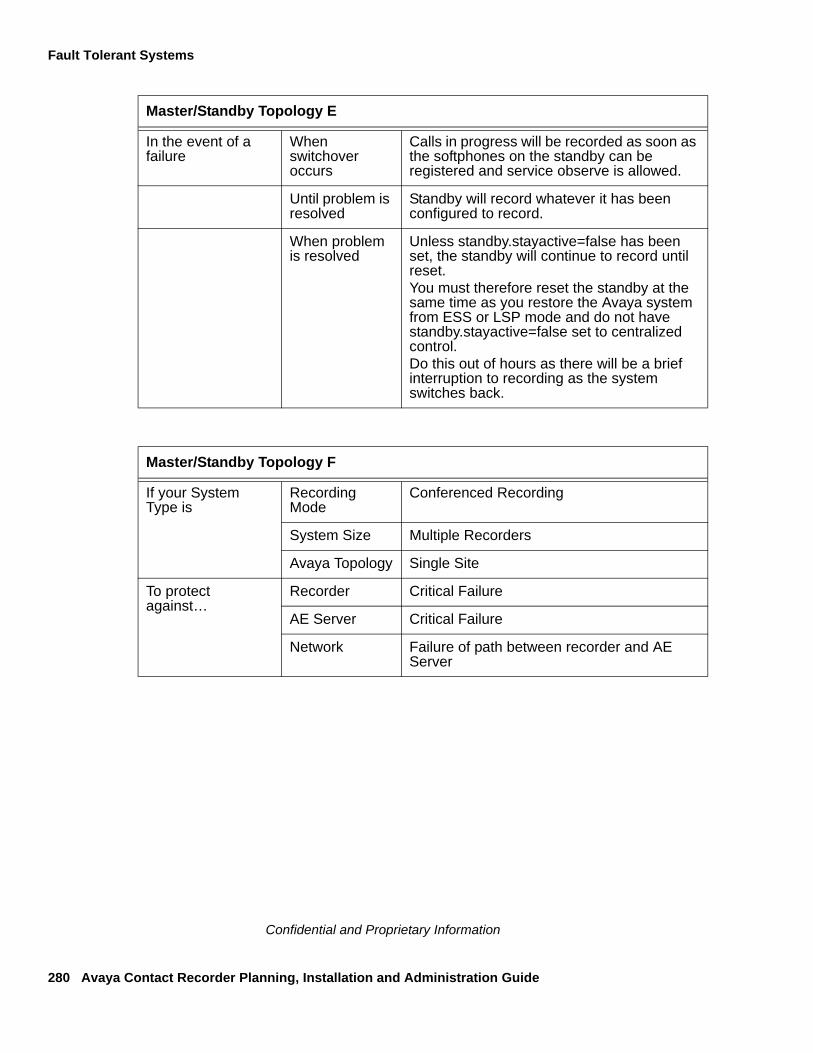
Fault Tolerant Systems
280 Avaya Contact Recorder Planning, Installation and Administration Guide
Confidential and Proprietary Information
In the event of a failure
When switchover occurs
Calls in progress will be recorded as soon as the softphones on the standby can be registered and service observe is allowed.
Until problem is resolved
Standby will record whatever it has been configured to record.
When problem is resolved
Unless standby.stayactive=false has been set, the standby will continue to record until reset. You must therefore reset the standby at the same time as you restore the Avaya system from ESS or LSP mode and do not have standby.stayactive=false set to centralized control.Do this out of hours as there will be a brief interruption to recording as the system switches back.
Master/Standby Topology F
If your System Type is
Recording Mode
Conferenced Recording
System Size Multiple Recorders
Avaya Topology Single Site
To protect against…
Recorder Critical Failure
AE Server Critical Failure
Network Failure of path between recorder and AE Server
Master/Standby Topology E
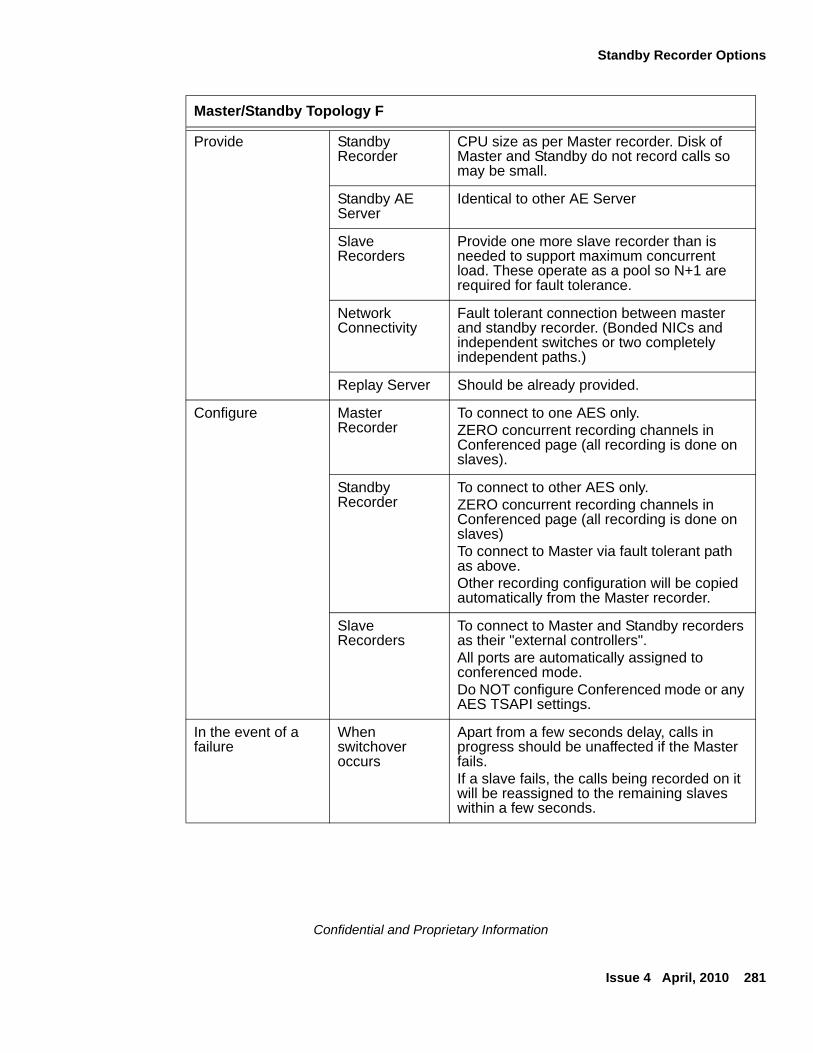
Standby Recorder Options
Issue 4 April, 2010 281
Confidential and Proprietary Information
Provide Standby Recorder
CPU size as per Master recorder. Disk of Master and Standby do not record calls so may be small.
Standby AE Server
Identical to other AE Server
Slave Recorders
Provide one more slave recorder than is needed to support maximum concurrent load. These operate as a pool so N+1 are required for fault tolerance.
Network Connectivity
Fault tolerant connection between master and standby recorder. (Bonded NICs and independent switches or two completely independent paths.)
Replay Server Should be already provided.
Configure Master Recorder
To connect to one AES only.ZERO concurrent recording channels in Conferenced page (all recording is done on slaves).
Standby Recorder
To connect to other AES only.ZERO concurrent recording channels in Conferenced page (all recording is done on slaves)To connect to Master via fault tolerant path as above.Other recording configuration will be copied automatically from the Master recorder.
Slave Recorders
To connect to Master and Standby recorders as their "external controllers".All ports are automatically assigned to conferenced mode.Do NOT configure Conferenced mode or any AES TSAPI settings.
In the event of a failure
When switchover occurs
Apart from a few seconds delay, calls in progress should be unaffected if the Master fails.If a slave fails, the calls being recorded on it will be reassigned to the remaining slaves within a few seconds.
Master/Standby Topology F
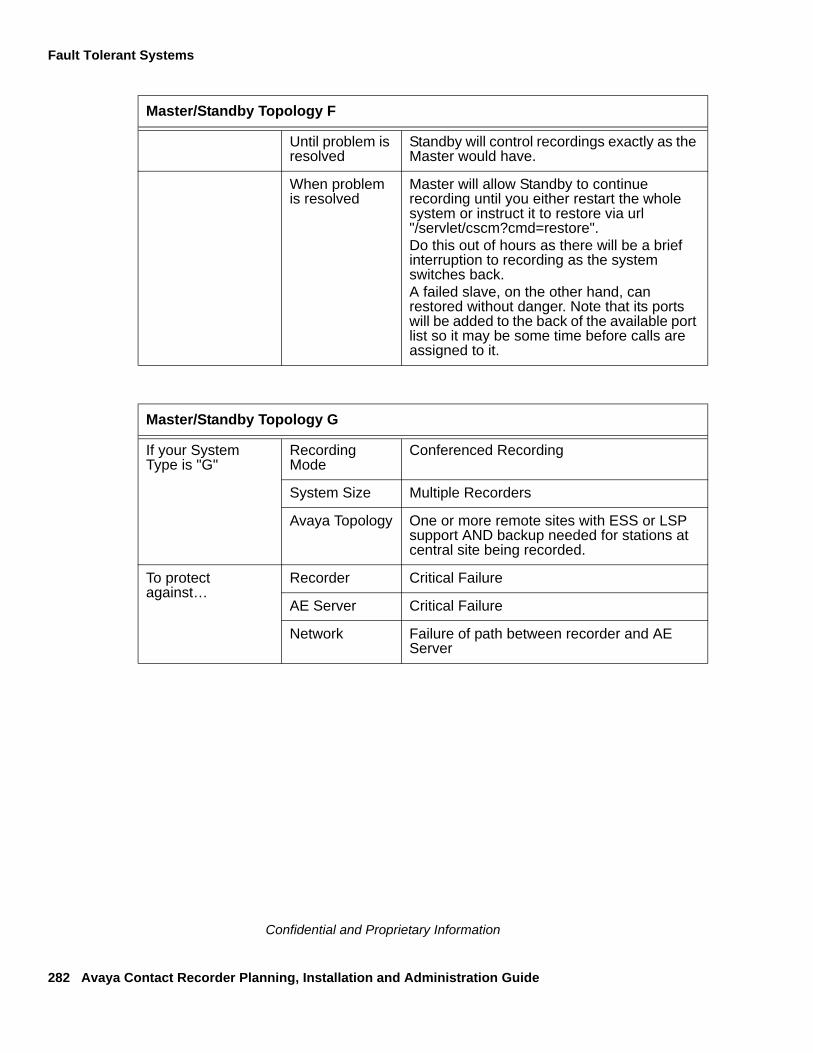
Fault Tolerant Systems
282 Avaya Contact Recorder Planning, Installation and Administration Guide
Confidential and Proprietary Information
Until problem is resolved
Standby will control recordings exactly as the Master would have.
When problem is resolved
Master will allow Standby to continue recording until you either restart the whole system or instruct it to restore via url "/servlet/cscm?cmd=restore". Do this out of hours as there will be a brief interruption to recording as the system switches back.A failed slave, on the other hand, can restored without danger. Note that its ports will be added to the back of the available port list so it may be some time before calls are assigned to it.
Master/Standby Topology G
If your System Type is "G"
Recording Mode
Conferenced Recording
System Size Multiple Recorders
Avaya Topology One or more remote sites with ESS or LSP support AND backup needed for stations at central site being recorded.
To protect against…
Recorder Critical Failure
AE Server Critical Failure
Network Failure of path between recorder and AE Server
Master/Standby Topology F
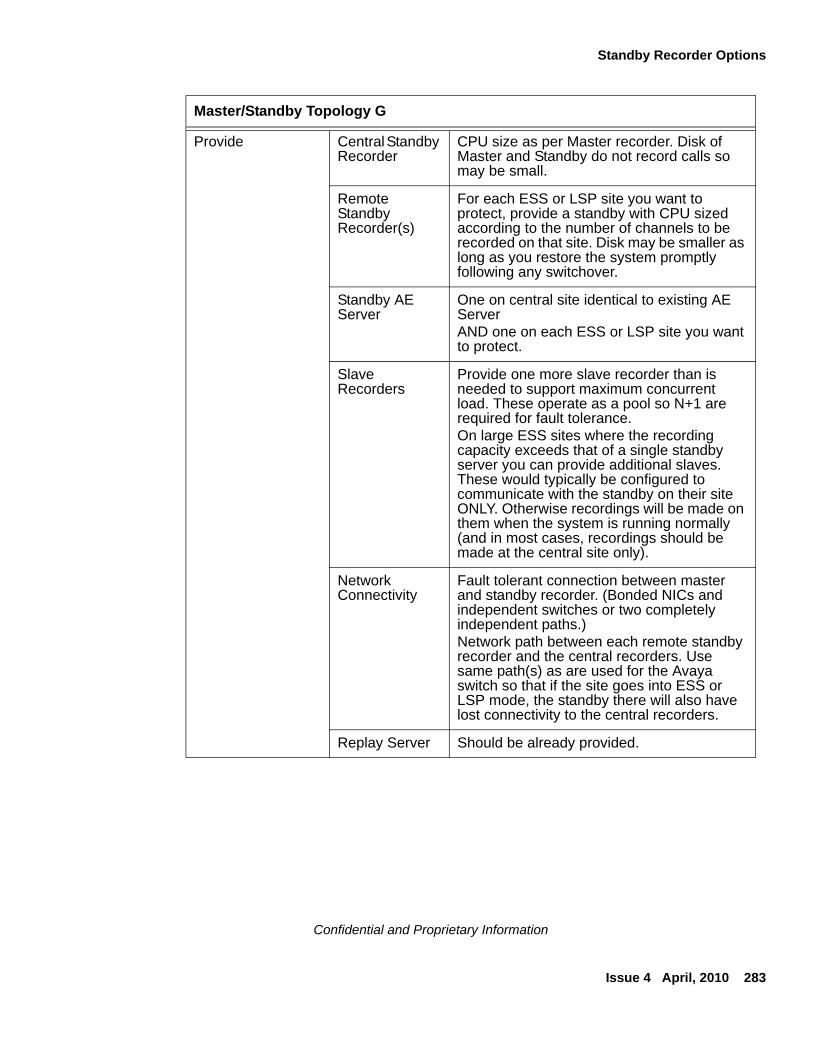
Standby Recorder Options
Issue 4 April, 2010 283
Confidential and Proprietary Information
Provide Central Standby Recorder
CPU size as per Master recorder. Disk of Master and Standby do not record calls so may be small.
Remote Standby Recorder(s)
For each ESS or LSP site you want to protect, provide a standby with CPU sized according to the number of channels to be recorded on that site. Disk may be smaller as long as you restore the system promptly following any switchover.
Standby AE Server
One on central site identical to existing AE ServerAND one on each ESS or LSP site you want to protect.
Slave Recorders
Provide one more slave recorder than is needed to support maximum concurrent load. These operate as a pool so N+1 are required for fault tolerance.On large ESS sites where the recording capacity exceeds that of a single standby server you can provide additional slaves. These would typically be configured to communicate with the standby on their site ONLY. Otherwise recordings will be made on them when the system is running normally (and in most cases, recordings should be made at the central site only).
Network Connectivity
Fault tolerant connection between master and standby recorder. (Bonded NICs and independent switches or two completely independent paths.)Network path between each remote standby recorder and the central recorders. Use same path(s) as are used for the Avaya switch so that if the site goes into ESS or LSP mode, the standby there will also have lost connectivity to the central recorders.
Replay Server Should be already provided.
Master/Standby Topology G

Fault Tolerant Systems
284 Avaya Contact Recorder Planning, Installation and Administration Guide
Confidential and Proprietary Information
Configure Master Recorder
To connect to one AES only.ZERO concurrent recording channels in Conferenced page (all recording is done on slaves).Ensure that each recording target is assigned the appropriate distributed standby as its backup (using the Advanced setting). Do this even if there is only ONE remote ESS standby as it relies on these settings to determine that it is to operate as a distributed (rather than central) standby.
Central Standby Recorder
To connect to other AES only.ZERO concurrent recording channels in Conferenced page (all recording is done on slaves)To connect to Master via fault tolerant path as above.Other recording configuration will be copied automatically from the Master recorder.
Remote Standby Recorder(s)
Each to connect to AES on its site only.To connect to Master and Central Standby via same network path as used by Avaya components so it will detect failure under same conditions as ESS mode is activated.You may want to have the standby record in Station Bulk mode rather than rely on local TSAPI services. In this case, set standby.localconfig=true and configurethe standby to record the local stations.
Slave Recorders
To connect to Master and Standby recorders using the Change License page.All ports are automatically assigned to conferenced mode. Do NOT configure Conferenced mode or any AES TSAPI settings.
Master/Standby Topology G
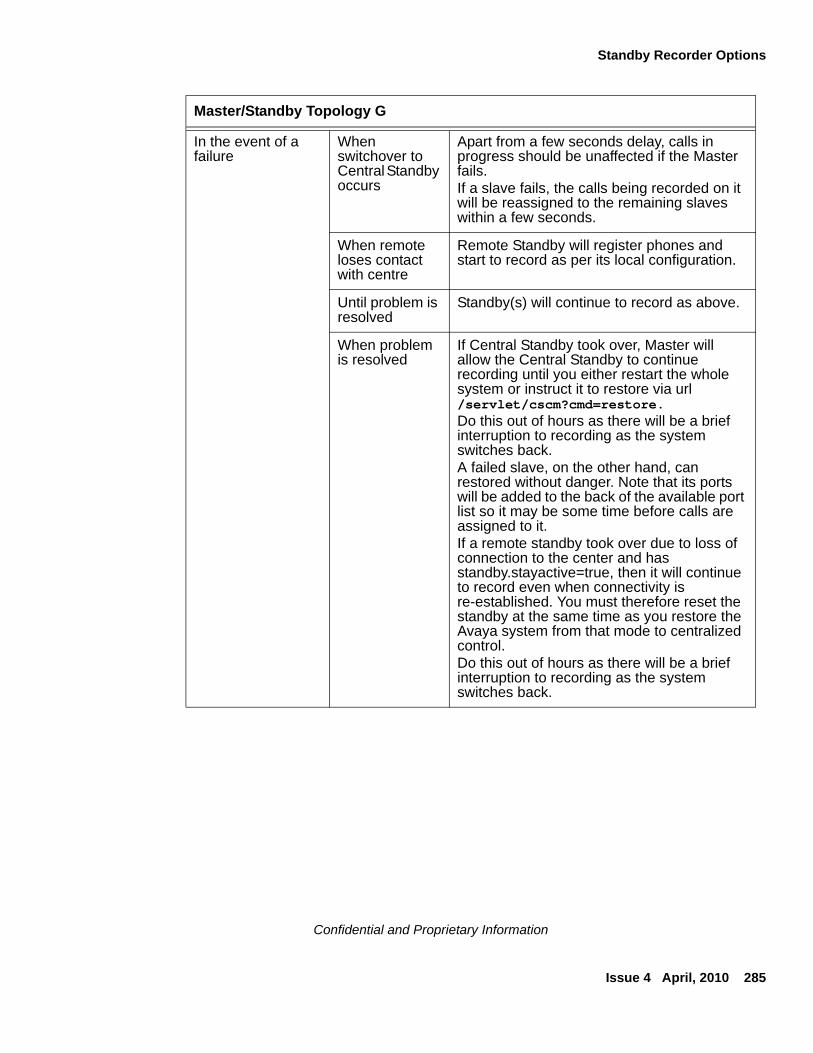
Standby Recorder Options
Issue 4 April, 2010 285
Confidential and Proprietary Information
In the event of a failure
When switchover to Central Standby occurs
Apart from a few seconds delay, calls in progress should be unaffected if the Master fails.If a slave fails, the calls being recorded on it will be reassigned to the remaining slaves within a few seconds.
When remote loses contact with centre
Remote Standby will register phones and start to record as per its local configuration.
Until problem is resolved
Standby(s) will continue to record as above.
When problem is resolved
If Central Standby took over, Master will allow the Central Standby to continue recording until you either restart the whole system or instruct it to restore via url /servlet/cscm?cmd=restore. Do this out of hours as there will be a brief interruption to recording as the system switches back.A failed slave, on the other hand, can restored without danger. Note that its ports will be added to the back of the available port list so it may be some time before calls are assigned to it.If a remote standby took over due to loss of connection to the center and has standby.stayactive=true, then it will continue to record even when connectivity is re-established. You must therefore reset the standby at the same time as you restore the Avaya system from that mode to centralized control.Do this out of hours as there will be a brief interruption to recording as the system switches back.
Master/Standby Topology G
Fault Tolerant Systems
286 Avaya Contact Recorder Planning, Installation and Administration Guide
Confidential and Proprietary Information
Mode of operation
This section describes how the standby recorder is configured and how it monitors the health of its master recorder. It also explains how it takes over when needed and returns to standby mode when appropriate.
Standby configuration (automatic)
If you do not make alterations to the standby machine's properties file, it automatically copies the license details and settings from its master whenever the master recorder is "viable" (regardless of which recorder is actually active).
Standby configuration (manual)
You only have to configure a standby server manually if you have forced local configuration in the cscm.properties file. A Standby recorder is configured manually in the following way:
● to match the master recorder it is to shadow in most respects, for example, system timeouts, maximum recording durations and so on.
● with the IP addresses of the master recorder that it is to shadow.
Power-On
A common case is that all recorders are powered on within a second or two of each other. To avoid destabilizing the system, the standby unit will always wait for a pre-defined period after it starts trying to contact the master recorder before it assumes that it is dead. This period allows for slight variations in boot time and manual power-on of one unit after another.
The time-period is determined by the cs.connecttimeout=xxx property in the properties file. (xxx is in seconds).
Standby mode
Once configured, the standby unit attempts to establish TCP/IP socket connections to the master recorder(s) over the one or more IP addresses it has been configured with. If it
Mode of operation
Issue 4 April, 2010 287
Confidential and Proprietary Information
succeeds, it downloads the configuration details of the master recorder that are necessary for it to take over in the event of the master failing. It continues to refresh these details every minute, thus keeping up to date with configuration changes.
Heartbeat messages are exchanged every few seconds.
Failure Detection
The standby recorder will attempt to take over from the master recorder in the following circumstances:
● The master requests that the standby unit take over because it has detected a fatal error such as hard disk full, switch connectivity lost completely.
● On startup, if connection cannot be established with master after 120 seconds (default - and accurate only to within one minute).
● All TCP/IP sockets to the master(s) failing and attempts to re-establish them every second are still failing after 60 seconds.
● Either or both TCP/IP sockets to the Master are still active but the master does not respond to repeated heartbeat polls for 30 seconds.
The three timeout settings above may be overridden by setting the property values standbycs.connecttimeout, standbycs.reconnecttimeout and standbycs.inactivitytimeout respectively in the properties file. Times are specified in seconds.
These same parameters are also used by the master recorder to report corresponding failures of the standby although it will not do anything other than raise an alarm if this occurs. The default values for these timeouts can be overridden on the master using the same property settings.
A master recorder is not aware of standby recorder(s) until it has established contact with a standby for the first time. Thereafter it will expect to establish contact with that standby recorder always. (This can only be reversed by editing the underlying configuration database).
Disk Space Monitoring
Once a minute, each recorder will monitor the available disk space on the partitions used for the operating system, call details storage and recording storage. If any of these drops below 500MB a warning will be raised.
To override this default; set disk.warnAtMB=nnn in the properties file.
Fault Tolerant Systems
288 Avaya Contact Recorder Planning, Installation and Administration Guide
Confidential and Proprietary Information
Active mode
On inferring failure of or being instructed to by the master, the Standby unit will adopt the appropriate port allocations and attempt to register softphones as per the automatically copied configuration or its local configuration.
It will configure the softphones in the same way that the failed recorder had been using them prior to failure (unless you have forced local configuration). Where softphones are marked with specific standby recorder numbers, only those marked for a given standby will be registered.
Recordings will be made and uploaded to the eWare database or Central Replay Server (if present).
Return to Standby mode
A standby recorder will return to Standby mode:
● If the standby unit is shutdown before the failed master is restored. When the standby unit is rebooted, the master responds within the timeout mentioned above and the standby recorder remains in standby mode.
● If the failed unit recovers it may instruct the standby recorder to return to idle immediately - or not until the administrator forces this (see Restoring the Master on page 289). At this time, the standby unit will truncate all current recordings and un-register all softphones allowing the master to take over again. Note that this switch-back has the same impact on recordings as the initial switch-over. Hence you should only bring a failed unit back on-line out of hours.
Switchover Implications
It takes a few seconds to detect most of the failure modes. Although configurable using the properties file, this interval is a compromise between rapid detection of true failure versus risk of false alarms and/or "yo-yoing," a condition where the system goes unstable. The system defaults aim to detect failures within 10 seconds and should not normally be altered.
When a failure occurs and the standby recorder becomes active:
● Recordings in progress are interrupted. The partially completed .wav files for the recordings in progress might be manually recoverable (professional services chargeable). In G.729A mode, up to 1 minute of audio is buffered in memory and hence will not have been appended to the file. In G.711 mode, files are appended to every 30 seconds.
Mode of operation
Issue 4 April, 2010 289
Confidential and Proprietary Information
For Station Bulk and Station Executive recording modes:
● The standby recorder switches in within seconds, registers its softphones and starts recording new calls and calls still in progress from the point at which the softphones are registered and service observe is re-established.
For On Demand and Meeting recording modes:
● Recordings in progress are dropped. The standby recorder switches in within seconds, registers its softphones and awaits new calls arriving on these ports.
The worst case loss of recording on a port is therefore determined by the speed with which the switch can re-register the failed softphones and establish service observe again. The more channels on the failed recorder, the longer this process takes.
Restoring the Master
The fault condition that caused the standby to become active can be removed in a number of ways, not all of which are ideal. These methods are:
● Power restored to master
● Network connectivity restored to master
● Connection to AE Services is restored
● Master repaired and reinstated.
If there is only one standby recorder, the master recorder will allow it to continue so as not to interrupt recordings unnecessarily. The administrator may force the master to take control again by logging into the administration web pages on the master and then entering the url http://servername:8080/servlet/cscm?cmd=restore
This will cause the master to take over. It should be performed out of hours as there will be a brief interruption in recording as the system switches over.
In cases where multiple standby recorders are, between them, providing backup for a master, this is usually less desirable than having the (single) master regain control. It is also more difficult for the Master recorder to be confident that all recordings are being handled by the standbys. In this case, a recovering Master will retake control automatically - with a brief interruption to service as it does so.
The one exception to this is a remote standby configured as part of an ESS or LSP site. Default behavior of the standby recorder is appropriate for sites that have to be manually restored when connection to the central site has been re-established. The standby recorder will continue to record until it is reset. If your ESS/LSP site is configured to restore automatically when the network has recovered, you should set standby.stayactive=false on the standby recorder. This tells it that it can drop back to fallback mode when the link to the master recorder has been re-established (and the master is viable).
Fault Tolerant Systems
290 Avaya Contact Recorder Planning, Installation and Administration Guide
Confidential and Proprietary Information
Comparison with hardware switch-over units
Traditionally, high availability digital recording has been provided by inserting an "N+1 Switchover Unit" between the recorders and their audio sources. Although this provides a slightly faster switchover, it has several negatives in comparison to the software only approach used here:
● The cost of the switchover unit makes N+1 systems uneconomical for N=1 or 2
● The additional cabling required to and from the switchover unit introduces further cost, failure mechanisms and opportunities for mis-configuration (swapped cables) that might not be noticed until after a failure has occurred.
● The switchover unit itself introduces a significant single-point of failure into the system.
Standby Recorder Configuration
Issue 4 April, 2010 291
Confidential and Proprietary Information
Standby Recorder Configuration
Unless you specifically request otherwise, most configuration details of the master are copied automatically to the standby. This occurs once a minute and allows the standby to track the day-to-day adds, moves and changes that you will make.
If you make major changes to the system, such as changing the mode of recording or the codec in use, you should restart the standby recorder after your changes are complete to ensure that it has a clean configuration. You should always check for any alarms on the standby following configuration changes.
Configuration Differences
The following Administration pages differ on a Standby recorder:
● "General Setup > Communication Manager - Some of the settings on this page are derived from the master and will not show an Edit link next to them. The others must be configured on the standby as these can (and in some cases should) differ from the Master. However, the settings that must be made here are ones that are unlikely to change once your system is running.
● System > License - When setting up the Standby server, assign the server a unique number in your enterprise and enter this on the licensing page.
- An additional setting allows you to enter the IP addresses of the master recorder that this recorder is to shadow. A master recorder should have bonded NICS but, if it has two NIC cards, each with its own IP address, then both addresses should be configured on the standby to enhance the reliability of the network link between them. The default IP port number will be 1209 but you may override this by adding the port number to the IP address, separated by a colon, for example, 192.134.34.45:1419. If you enter a port number, this must match the configuration of the master recorder, which also defaults to 1209. You can override this default by setting the oemcomms.secureport property in the cscm.properties file. Unless you are confident that your DNS server is fault tolerant, you should specify numeric IP addresses to ensure that connectivity does not fail because of address translation problems.
● System > Email Server
- You are strongly advised to create a separate email account, using a separate SMTP server from that used by the master. This way, failure of an SMTP server will be noticed as you continue to receive e-mails from the standby unit but not the nightly heartbeats from the master - or vice versa. It is critical that you ensure that the standby unit is ready to take over at any time.
- The IP Station Security Code should be entered the same as for the master.
Fault Tolerant Systems
292 Avaya Contact Recorder Planning, Installation and Administration Guide
Confidential and Proprietary Information
● System > Manage Users - This page is identical to that on the master recorder. However, since a central database and replay are nearly always used in systems with standby units, there is little point in entering "replay only" users. Simply use this page to maintain the administrators' account(s).
● Operations - These pages are provided but their contents are not editable as these are copied from the master recorder (once contact has been established with it).
● Alarms > View Alarms - This page is identical to that on the master recorder though some different alarms will be generated - when the standby establishes contact with the master and should it ever try to take over from the failed master. You should use the email settings on the System > Email Server page to ensure that you are advised of these alarms within 10 minutes of one occurring.
● Recorder Status pages are similar to those on the Master but will only show details of recorder ports when these are registered (not if they are merely standing by in case of failure).
Upgrade Process for Multiple Recorder Topologies
Issue 4 April, 2010 293
Confidential and Proprietary Information
Upgrade Process for Multiple Recorder Topologies
The interface between recorders changes significantly with Version 10. This means that you must upgrade a Master and any slave recorders that connect to it at the same time. If using Master/Standby configurations, however,:
1. Take the standby unit OFF the network.
2. Upgrade the master to the most current version.
3. Confirm correct operation. If any serious problems occur, shut the master down and reconnect the standby.
4. When confident that the master is running correctly, upgrade the standby recorder
5. Reconnect the standby to the network.
Upgrading Slave Recorders to Version 10
In Version 10, slave recorders are no longer licensed directly. They connect to a master and license parameters are passed to them from the master as required. To upgrade a Slave recorder:
1. Upgrade as described below for a Master recorder
2. On the System > License tab, click the Change License button and enter the IP address of the master (and, if present, the standby, separated by a semi-colon).
3. Restart the recorder and confirm it connects to the master and standby.

Fault Tolerant Systems
294 Avaya Contact Recorder Planning, Installation and Administration Guide
Confidential and Proprietary Information
Issue 4 April, 2010 295
Confidential and Proprietary Information
Appendix F: AIC Connector
This appendix describes the AIC connector. This is a ready-to-use client of the External Control Interface for Avaya Interaction Center. It covers the following topics:
● Overview on page 296
● Installation on page 299
● Programmer’s Guide on page 300
AIC Connector
296 Avaya Contact Recorder Planning, Installation and Administration Guide
Confidential and Proprietary Information
Overview
The Avaya AIC connector is an AIC server process that allows AIC clients and servers to control the the recorder. It provides the following features to client developers and scriptwriters:
● Start recording a station
● Stop recording a station
● Tag a particular recording with user defined data
● Enable recording of all calls at a station with automatic tagging
● Disable recording of that station
All these features are made available as simple AIC calls, without the need for complex integration projects.
“Tagging” is a feature of the connector and the recorder that allows clients to associate arbitrary information with each recording. These User-Defined Fields (UDFs), or ‘tags’, are stored in the calls details database and can be included in searches and viewed in the search and replay web applications. UDFs are tag-value pairs. (All calls will automatically have the standard set of tag fields.)
The connector seamlessly supports:
● Multiple recorders (if more than one is needed to provide the total number of recording channels)
● The recorder’s master/standby high-availability mode
When there are multiple AIC servers for resilience, the connector can be installed on multiple AIC servers and it will allow recording control of all recorders from either AIC server.
The connector itself requires no configuration; it determines its configuration from the recorder’s configuration. The recorder is basically configured in the same way that it would be for Station Bulk recording, but with a few minor changes.
The AIC connector requires Version 7.7 (or higher) of the recorder. It works in Service Observe mode only.
Modes of Operation
There are two basic modes of operations:
● Finer, event driven control
● Coarser, connector-managed control
Overview
Issue 4 April, 2010 297
Confidential and Proprietary Information
In the finer mode, clients of the connector are sent events whenever a call segment starts, and are able to send tagging information via the connector to the recorder for each specific call segment. To operate in this mode a client must register with the connector server for events. It calls the start recording method of the connector. For each call segment that is recorded, the client is sent an event containing the unique recording file serial number. The client can tag each call segment differently if required. The client must stop recording when it is no longer required.
In the coarser mode, clients do not need to register for, or handle, events. The connector deals with event handling. In this mode the client enables recording for a particular station and supplies a list of user-defined fields. The connector automatically tags each subsequent call segment for that station with the tags supplied when recording was enabled. The client need take no action, but loses the ability to tag each call segment differently. The client should disable recording when it is no longer required.
Principles of Operation
The connector is an AIC server process, and runs on the AIC server. It is available for Solaris and Windows. The connector is started and managed by AIC like any server process.
The recorders are configured to contact the connector, which listens on a well-known TCP/IP port number. If there is more than one connector, each recorder is configured with all addresses and connects to all of them.
The recorders are administered in the usual way for Station Bulk mode, except that they accept external control. The recorder will establish service observe on each target station using one of its recording channels. The target stations can be split across multiple recorders as required.
As the recorders connect to the switch and establish Service Observe on the target stations, they announce their ability to record the target stations to the connector. When a client requests recording of a particular station the connector forwards the request to the relevant recorder. At the start of each call segment the recorder sends an event to the connector with the unique serial number of the recording file. The connector sends events to any registered clients and sends tagging information to the recorder as required.
High Availability
The connector integrates seamlessly with the recorder’s master / standby high-availability arrangement. If the master recorder fails, it disconnects from the connector, and the secondary connects instead. The connector proceeds to send recording commands to the secondary recorder.
AIC Connector
298 Avaya Contact Recorder Planning, Installation and Administration Guide
Confidential and Proprietary Information
The recorder can connect to more than one external controller. This allows two connectors to be installed on separate AIC servers. Either connector can be used to route messages to the recorder.
Installation
Issue 4 April, 2010 299
Confidential and Proprietary Information
Installation
Before the connector can be installed its IDL must be appended to the AIC server’s master IDL file, which must then be re-compiled. The resulting ‘pk’ file must be distributed. The connector’s IDL is in the file cscm.idl on the distribution CD.
The connector consists of a single executable file that must be copied to the AIC server’s directory. It is typically installed in the same directory as the rest of the AIC server executables.
Use the AIC admin screens to add an entry for the Avaya Contact Recorder connector. There are no parameters required. Start the connector on the AIC server(s) where it will run.
Configuration
Use the Avaya Contact Recorder administration screens to configure the recordable stations. If there is more than one Avaya Contact Recorder, spread the recorded stations evenly across the recorders. Specify the stations or ranges of stations on the Station Bulk page.
Configure the address of the AIC server(s) in the URL field of the Unify page "URL(s) of Unify/External control ports to connect to" setting on the Settings > Server page. Each hostname should be followed with ":1415" to specify the port number that this connector uses. If there are two AIC servers specify both separated by a semicolon.
Check the status of the ‘Unify/External Controller’ link(s) on the Recorder Status > Server page and correct any alarms.
AIC Connector
300 Avaya Contact Recorder Planning, Installation and Administration Guide
Confidential and Proprietary Information
Programmer’s Guide
The interface to the server is described by its IDL, which is shown below.
interface CSCM : GeneralS {
ORBStatus Enable(in string station, in SeqCouple tags);
ORBStatus Disable(in string station);
ORBStatus Start(in string station);
ORBStatus Stop(in string station);
ORBStatus Tag(in string station, in string inum, in SeqCouple tags);
ORBStatus Assign();
};
The first two methods (Enable and Disable) are used in the coarser-grained mode of operation; the other four (Start, Stop, Tag and Assign) are used in the finer-grained mode.
Note:Note: It is entirely possible to use any names for the tags sent to the recorder, but
you should stick to certain conventions. The normal choices for the tag names are ‘spare1’ through ‘spare8’. If you use these tag names the rest of the Avaya infrastructure will make them available throughout the suite of applications. If you use other tag names these will only be accessible through the recorder’s own search and replay application. For example, you may wish to tag calls with customer account number and zip code. You should pass a Sequence containing two Couples: spare1=12345, spare2=10010. Even though zip codes can be numbers they should be passed as a string. The Viewer search and replay application allows you to change the names of these fields to more convenient, human-readable names when you design page layouts later.
Enable(in string station, in SeqCouple tags)
Instructs the connector to enable recording of the specified station, and to tag all subsequent call segments with the tag-value pairs given. If a call is already in progress, recording starts immediately.
Programmer’s Guide
Issue 4 April, 2010 301
Confidential and Proprietary Information
Disable(in string station)
Cancels recording started by an earlier Enable. If a call is in progress, recording is disabled but what was recorded so far is retained.
Start(in string station)
Instructs the connector to enable recording of the specified station. If a call is in progress, recording starts immediately.
Stop(in string station)
Cancels recording started by an earlier Start. If a call is in progress, recording is disabled but what was recorded so far is retained.
Tag(in string station, in string inum, SeqCouple tags)
Instructs the recorder to associate the tags with the recording already in progress (with serial number ‘inum’).
Assign()
Registers with the connector to receive recording start and stop events. It is these events that contain the inum required for the call-specific tagging. The names of the start and stop events are ContactStore.Started and ContactStore.Stopped respectively.
The data field of the event contains a Sequence with Couples named STATION and INUM.
! WARNING:WARNING: Note that the two modes of operation must not be mixed. Clients must either
choose the Enable/Disable method, or the Start/Stop/Tag method. Clients may assign a session in either mode in order to receive events. Creating a session is optional with the first method and required with the second.

AIC Connector
302 Avaya Contact Recorder Planning, Installation and Administration Guide
Confidential and Proprietary Information
Issue 4 April, 2010 303
Confidential and Proprietary Information
Appendix G: Auto-Dialer Integrations
This appendix covers the following topics:
Introduction on page 304
Configuration on page 306
Avaya PCS/PDS Dialer on page 310
PCS/PDS Settings Summary on page 313
Auto-Dialer Integrations
304 Avaya Contact Recorder Planning, Installation and Administration Guide
Confidential and Proprietary Information
Introduction
When agents log in to dialers using "nailed up" sessions, the whole session of customer calls appears to the recorder as a single "call" and hence recordings are concatenated. These can be broken up and tagged with the outbound call details using CTI integration to the dialer.
One or more dialers can be supported. These may be of the same or mixed types.
Currently supported dialers are:
● Avaya PCS/PDS
Functionality
Dialer integrations allow calls made over "nailed up" sessions to be split into individual customer calls. Without the dialer integration, such calls are recorded as a single recording for the duration of the session, tagged only with the identification of the dialer port - not the numbers of the customers actually called.
When an agent logs in to a dialer, the nailed up call is recognised as such and recording stops. This recording may include an initial greeting or login dialogue. If it is very short it may be automatically deleted but typically results in a 0 or 1s duration call. If the agent subsequently drops this call by releasing at the phone set or otherwise, the dialer will re-establish the nailup with a new call. This will be recorded unless the dialer sends an agent not ready event as it does this. In either case, when a customer is next connected to the nail-up, a new recording will begin.
When the agent is presented with a call, the dialer tells the recorder and it starts recording. Information provided by the dialer at this time is used to tag the call. This typically includes campaign information and identification of the party being called. At the end of a call, the dialler tells the recorder and it stops recording.
Optionally:
● Agent logon/logoff from the dialer can be used to determine the agent number and name (but the default is to use the Communication Manager agent login information).
Detailed functionality varies from dialer to dialer and from installation to installation. See below for more details.
Introduction
Issue 4 April, 2010 305
Confidential and Proprietary Information
How it Works
The recorder starts an additional thread to monitor the CTI activity from each dialer. This picks up Agent Logon/logoff and start/stop events as the agent takes each call. The details vary from dialer to dialer. Each dialer is implemented as a specific Java "class" and can be configured via the normal cscm.properties file.
Status Monitoring
The status of the CTI link to each dialer is shown on the Recorder Status > Server page alongside all the other interfaces.
Alarms are generated whenever a link fails or is restored.
Nailup calls which do not have a customer connected to them will show as if the call were on hold.
Errors, warnings, informational and debug messages are written to the log file along with all other messages generated by the recorder.
Auto-Dialer Integrations
306 Avaya Contact Recorder Planning, Installation and Administration Guide
Confidential and Proprietary Information
Configuration
Dialer configuration is done via the cscm.properties file.
Licensing
To interface to any dialer you must purchase and install a license key containing this option.
Dialer List
First, specify how many dialers you have and what they are called by adding the following line to the properties file cscm.properties:
cs.dialerlist=<dialer1name>,<dialer2name>,…
Choose each dialer’s name to reflect not just the make of dialer but also its location or identity if you have more than one dialer of a given type.
For example:
A single, PCS dialer:
cs.dialerlist=PCS
Two PCS Dialers:
cs.dialerlist=PCS_London,PCS_NewYork
Generic Dialer Configuration
For every dialer name given in the cs.dialerlist, you should include the following lines in your properties file. Each begins with the name of the dialer to which it refers.
Mandatory Fields
You MUST include this for each dialer so the application knows which Java class to use:
dialer1name.class=java classname for the type of dialer
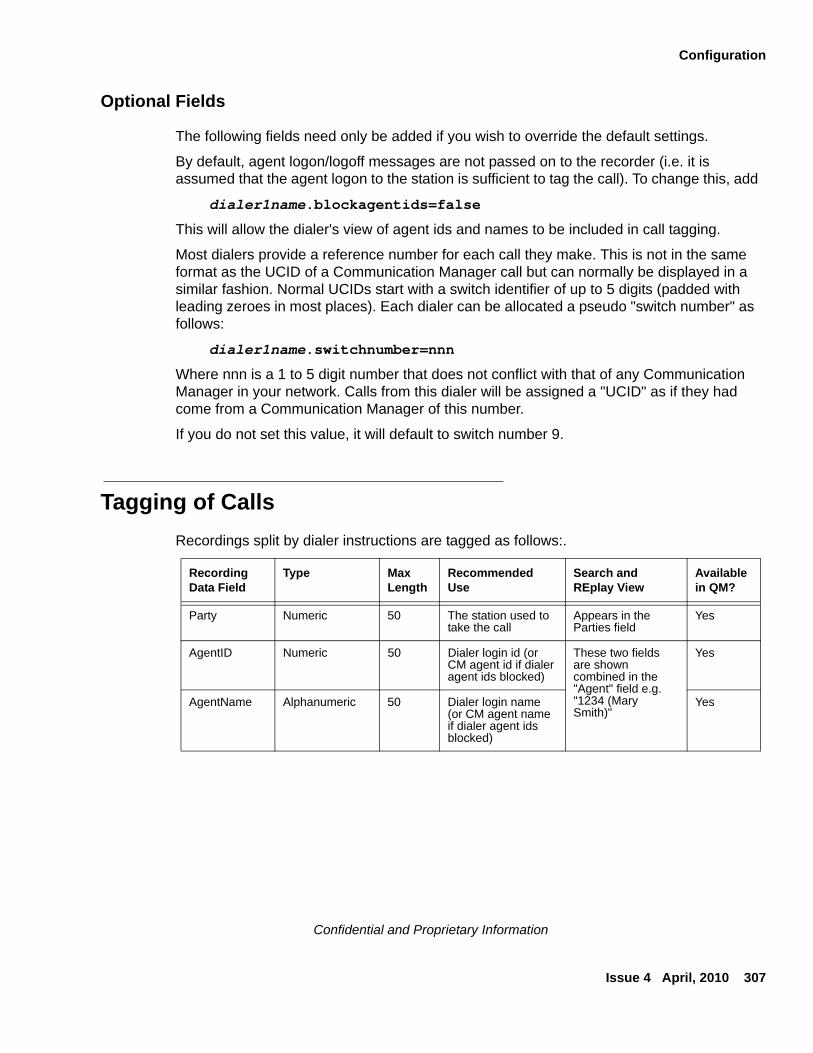
Configuration
Issue 4 April, 2010 307
Confidential and Proprietary Information
Optional Fields
The following fields need only be added if you wish to override the default settings.
By default, agent logon/logoff messages are not passed on to the recorder (i.e. it is assumed that the agent logon to the station is sufficient to tag the call). To change this, add
dialer1name.blockagentids=false
This will allow the dialer's view of agent ids and names to be included in call tagging.
Most dialers provide a reference number for each call they make. This is not in the same format as the UCID of a Communication Manager call but can normally be displayed in a similar fashion. Normal UCIDs start with a switch identifier of up to 5 digits (padded with leading zeroes in most places). Each dialer can be allocated a pseudo "switch number" as follows:
dialer1name.switchnumber=nnn
Where nnn is a 1 to 5 digit number that does not conflict with that of any Communication Manager in your network. Calls from this dialer will be assigned a "UCID" as if they had come from a Communication Manager of this number.
If you do not set this value, it will default to switch number 9.
Tagging of Calls
Recordings split by dialer instructions are tagged as follows:.
Recording Data Field
Type Max Length
Recommended Use
Search and REplay View
Available in QM?
Party Numeric 50 The station used to take the call
Appears in the Parties field
Yes
AgentID Numeric 50 Dialer login id (or CM agent id if dialer agent ids blocked)
These two fields are shown combined in the "Agent" field e.g. "1234 (Mary Smith)"
Yes
AgentName Alphanumeric 50 Dialer login name (or CM agent name if dialer agent ids blocked)
Yes
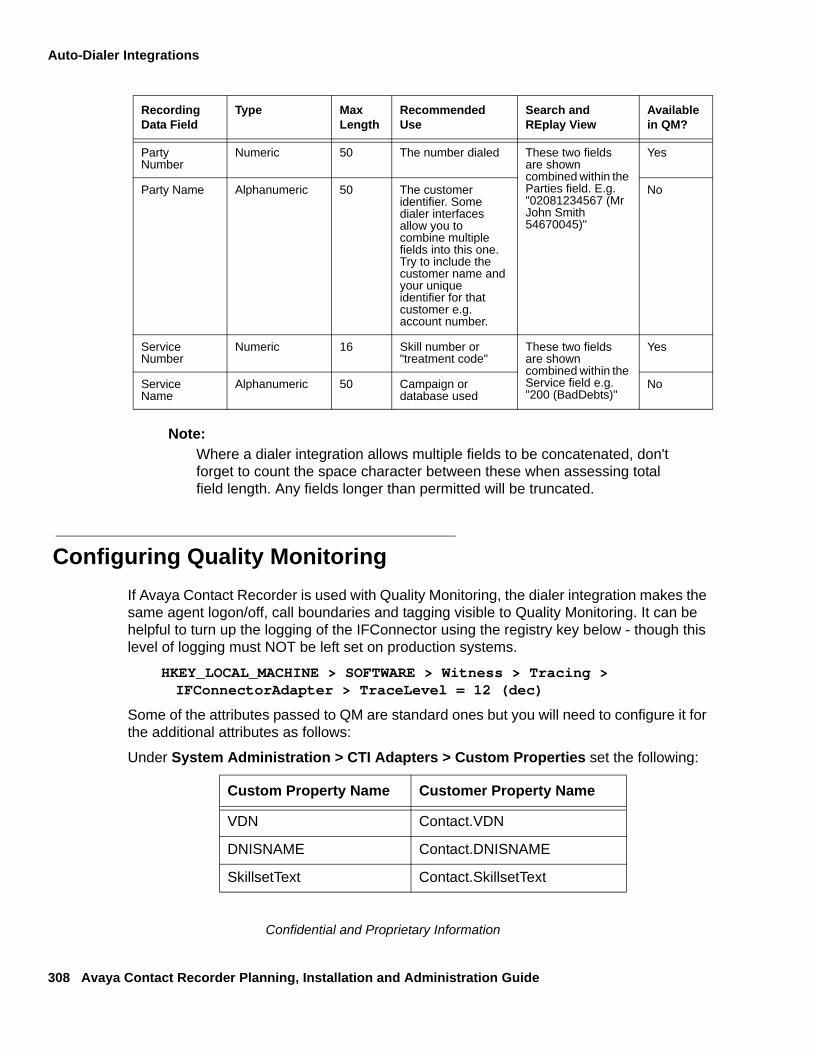
Auto-Dialer Integrations
308 Avaya Contact Recorder Planning, Installation and Administration Guide
Confidential and Proprietary Information
Note:Note: Where a dialer integration allows multiple fields to be concatenated, don't
forget to count the space character between these when assessing total field length. Any fields longer than permitted will be truncated.
Configuring Quality Monitoring
If Avaya Contact Recorder is used with Quality Monitoring, the dialer integration makes the same agent logon/off, call boundaries and tagging visible to Quality Monitoring. It can be helpful to turn up the logging of the IFConnector using the registry key below - though this level of logging must NOT be left set on production systems.
HKEY_LOCAL_MACHINE > SOFTWARE > Witness > Tracing >IFConnectorAdapter > TraceLevel = 12 (dec)
Some of the attributes passed to QM are standard ones but you will need to configure it for the additional attributes as follows:
Under System Administration > CTI Adapters > Custom Properties set the following:
PartyNumber
Numeric 50 The number dialed These two fields are shown combined within the Parties field. E.g. "02081234567 (Mr John Smith 54670045)"
Yes
Party Name Alphanumeric 50 The customer identifier. Some dialer interfaces allow you to combine multiple fields into this one. Try to include the customer name and your unique identifier for that customer e.g. account number.
No
ServiceNumber
Numeric 16 Skill number or "treatment code"
These two fields are shown combined within the Service field e.g. "200 (BadDebts)"
Yes
ServiceName
Alphanumeric 50 Campaign or database used
No
Recording Data Field
Type Max Length
Recommended Use
Search and REplay View
Available in QM?
Custom Property Name Customer Property Name
VDN Contact.VDN
DNISNAME Contact.DNISNAME
SkillsetText Contact.SkillsetText

Configuration
Issue 4 April, 2010 309
Confidential and Proprietary Information
Note:Note: You must specify "Contact." before the name of the attribute passed into the
IFConnector.
Now add the following Custom Attributes under System Administration > Additional > Custom Attributes.
For each one set "Visible" and "Business Rule Editable" to "Yes" and set "Renderer" to "String". Set "Display Name" and "ToolTip" to the field name.
● VDN
● DNISNAME
● SkillsetText
● VDNNAME
● SkillsetID
● CounterPartyName
ANI and DNIS are already built into the Custom Properties at the CTI Adapter level, so there is no need to add these.
To make the fields visible in the Contacts View you need to right click in the grid and select
Customize Columns and move the following entries into the Selected Columns:
● CTI ANI
● CTI DNIS
● CTI Number Dialed
● CTI Call Direction
● DNISNAME
● VDN
● VDNNAME
● SkillsetText
● SkillsetID
● CounterPartyName
Finally, restart Quality Monitoring to make sure the changes take effect.
VDNNAME Contact.VDNNAME
SkillsetID Contact.SkillsetID
CounterPartyName Contact.CounterPartyName
Custom Property Name Customer Property Name
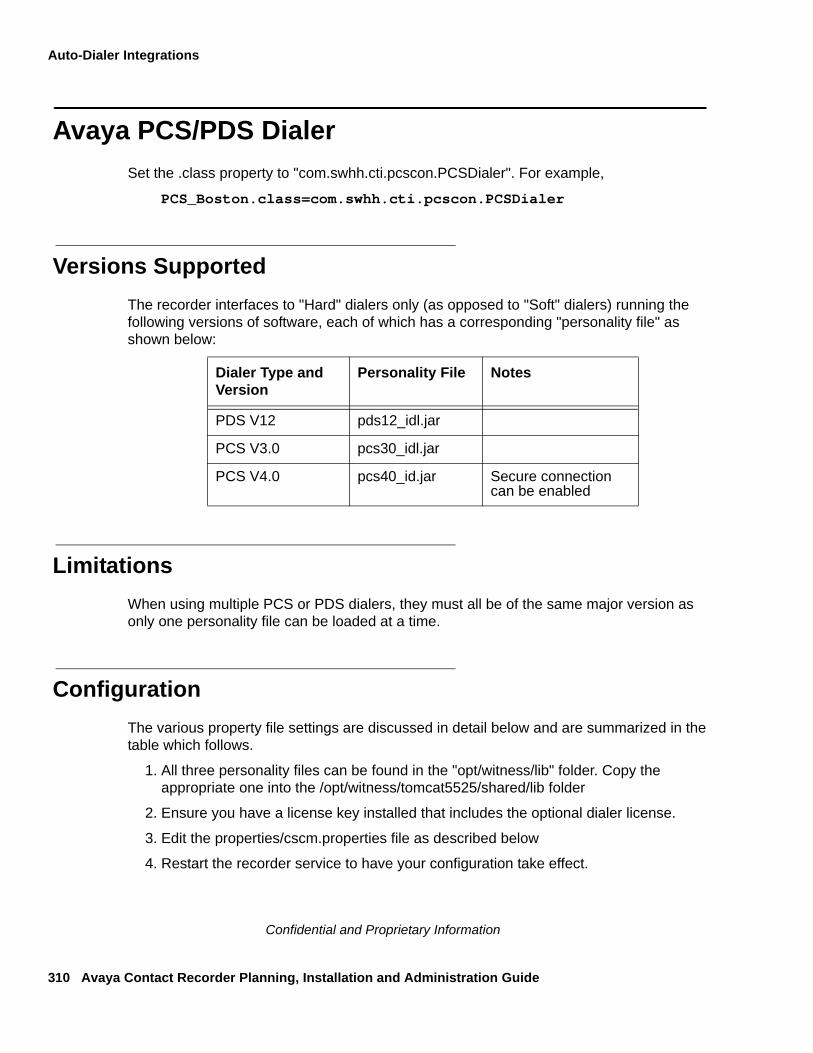
Auto-Dialer Integrations
310 Avaya Contact Recorder Planning, Installation and Administration Guide
Confidential and Proprietary Information
Avaya PCS/PDS Dialer
Set the .class property to "com.swhh.cti.pcscon.PCSDialer". For example,
PCS_Boston.class=com.swhh.cti.pcscon.PCSDialer
Versions Supported
The recorder interfaces to "Hard" dialers only (as opposed to "Soft" dialers) running the following versions of software, each of which has a corresponding "personality file" as shown below:
Limitations
When using multiple PCS or PDS dialers, they must all be of the same major version as only one personality file can be loaded at a time.
Configuration
The various property file settings are discussed in detail below and are summarized in the table which follows.
1. All three personality files can be found in the "opt/witness/lib" folder. Copy the appropriate one into the /opt/witness/tomcat5525/shared/lib folder
2. Ensure you have a license key installed that includes the optional dialer license.
3. Edit the properties/cscm.properties file as described below
4. Restart the recorder service to have your configuration take effect.
Dialer Type and Version
Personality File Notes
PDS V12 pds12_idl.jar
PCS V3.0 pcs30_idl.jar
PCS V4.0 pcs40_id.jar Secure connection can be enabled
Avaya PCS/PDS Dialer
Issue 4 April, 2010 311
Confidential and Proprietary Information
Dialer Name
Specify the dialer name. This value is used to look up the address of the dialer, and to look up the dialer's Event Service in the Name Service. This is the name by which the dialer knows itself and is CASE SENSITIVE. Note that the recorder must be able to ping the dialer using this name. Add the name to the hosts file or to DNS to allow this. The setting in the property file is::
dialer1name.hostname=dialername
For example:
PDS_Boston.hostname=pdsboston
Credentials
Set the username and password that the recorder should use when registering as a client:
dialer1name.username=usernamedialer1name.password=password
For example:
PDS_Boston.username=ACR1PDS_Boston.password=secret
Encryption
When using PDS 4.0 you can force the recorder to use a secure connection to the dialer by setting:
dialer1name.secure=true
For example
PDS_Boston.secure=true
Name Service IOR (Optional)
This parameter is optional but if not provided, the recorder attempts to look up the Name Service using corbaloc.
dialer1name.NSIOR=name_service_ior
For example
PDS_Boston.NSIOR=IOR:010000003200000049444c3a61766179612e636……
Auto-Dialer Integrations
312 Avaya Contact Recorder Planning, Installation and Administration Guide
Confidential and Proprietary Information
Multiple NICs
If the recorder has multiple NICs you must specify which one is to be used for communication with the dialer. Include the replyip setting. Specify the ip address of the recorder to be used for communications.
For example
PDS_Boston.replyip=10.10.11.12
Firewalls, multiple dialers
The Recorder initially connects to the dialer's name service. This uses port 23200 (or 23201 if secure). Subsequently it connects to the dialer's event service. This uses port 23120 (or 23121 if secure). Finally the dialer connects back to the Recorder on a randomly assigned port.
If the Recorder is communicating with the dialer through a firewall, or there is more than one dialer, the reply port must not be randomly assigned, but must be fixed.
For each PCS dialer choose a port number for the dialer to communicate back to the recorder. (Each dialer must use a different number.) Add the replyport setting for each dialer.
For example
PDS_Boston.replyport=4999
Now make changes to the firewall to allow the communications.
The recorder must be able to connect to each dialer on TCP ports 23200 and 23120 (or 23201 and 23121). Each dialer must be able to connect to the recorder on the TCP port specified for that dialer.
PCS Dialer PODs
If there is more than one dialer and they are configured as a POD, you must use the Name Service IOR optional parameter. The name service runs on the master dialer, but can provide the location of the event service for all the dialers.
Create one set of entries for each dialer. You must include the hostname, username, password, NSIOR and replyport parameters.
FieldMappings
The dialer's "job name" is stored as the "Service" number (normally used for VDN on inbound calls hence normally unused on outbound calls)
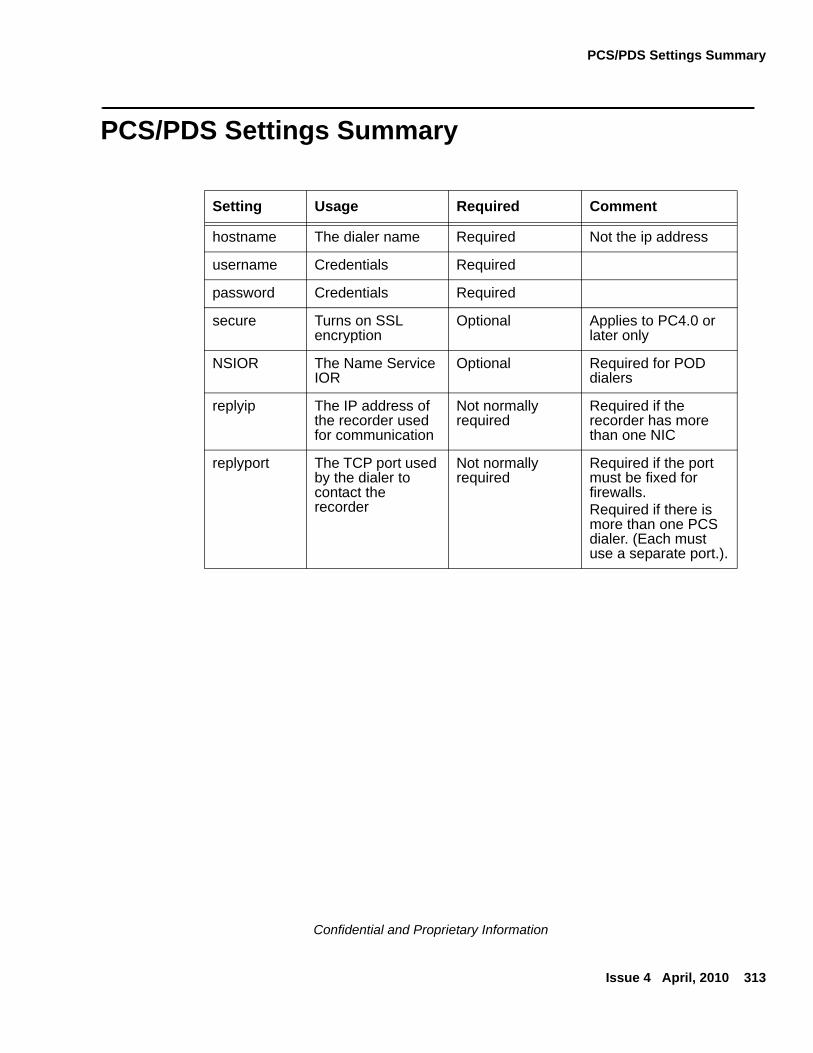
PCS/PDS Settings Summary
Issue 4 April, 2010 313
Confidential and Proprietary Information
PCS/PDS Settings Summary
Setting Usage Required Comment
hostname The dialer name Required Not the ip address
username Credentials Required
password Credentials Required
secure Turns on SSL encryption
Optional Applies to PC4.0 or later only
NSIOR The Name Service IOR
Optional Required for POD dialers
replyip The IP address of the recorder used for communication
Not normally required
Required if the recorder has more than one NIC
replyport The TCP port used by the dialer to contact the recorder
Not normally required
Required if the port must be fixed for firewalls.Required if there is more than one PCS dialer. (Each must use a separate port.).

Auto-Dialer Integrations
314 Avaya Contact Recorder Planning, Installation and Administration Guide
Confidential and Proprietary Information
Issue 4 April, 2010 315
Confidential and Proprietary Information
Appendix H: Non-standard Hardware
This appendix discusses considerations for non-standard hardware such as blade servers. It covers the following topics:
● Overview on page 316
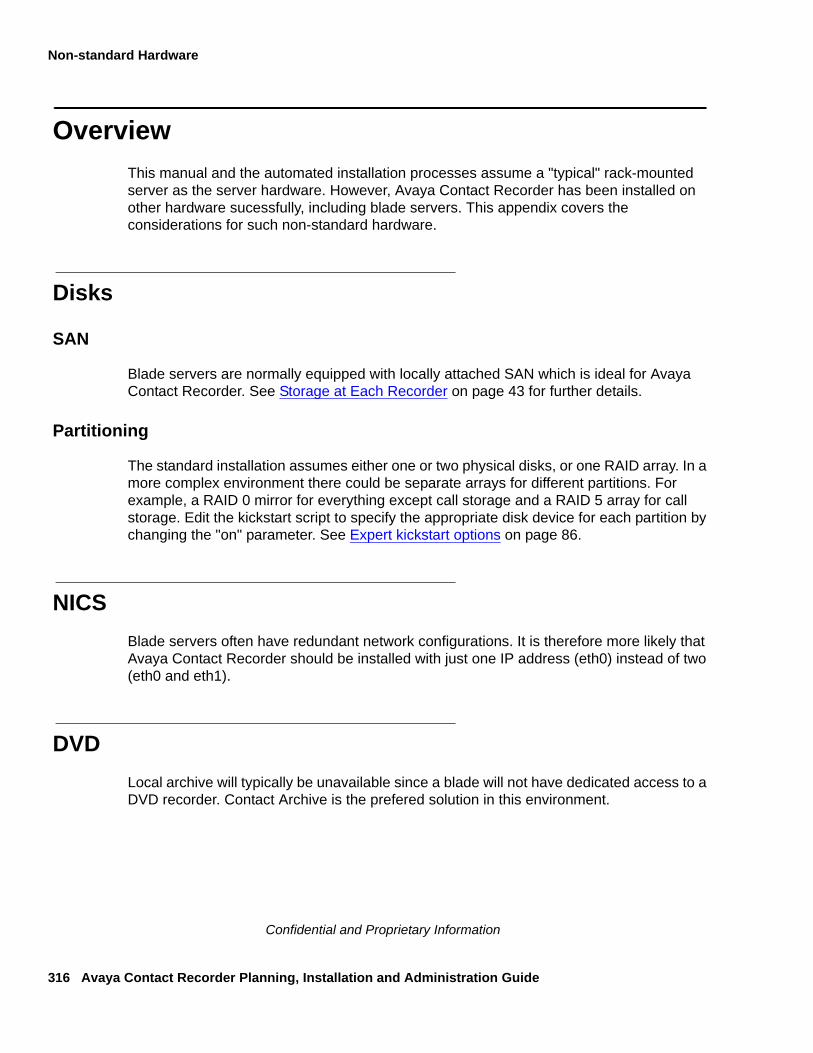
Non-standard Hardware
316 Avaya Contact Recorder Planning, Installation and Administration Guide
Confidential and Proprietary Information
Overview
This manual and the automated installation processes assume a "typical" rack-mounted server as the server hardware. However, Avaya Contact Recorder has been installed on other hardware sucessfully, including blade servers. This appendix covers the considerations for such non-standard hardware.
Disks
SAN
Blade servers are normally equipped with locally attached SAN which is ideal for Avaya Contact Recorder. See Storage at Each Recorder on page 43 for further details.
Partitioning
The standard installation assumes either one or two physical disks, or one RAID array. In a more complex environment there could be separate arrays for different partitions. For example, a RAID 0 mirror for everything except call storage and a RAID 5 array for call storage. Edit the kickstart script to specify the appropriate disk device for each partition by changing the "on" parameter. See Expert kickstart options on page 86.
NICS
Blade servers often have redundant network configurations. It is therefore more likely that Avaya Contact Recorder should be installed with just one IP address (eth0) instead of two (eth0 and eth1).
DVD
Local archive will typically be unavailable since a blade will not have dedicated access to a DVD recorder. Contact Archive is the prefered solution in this environment.
Overview
Issue 4 April, 2010 317
Confidential and Proprietary Information
Soundcard
The optional local soundcard will likely be unavailable. This is not a problem as a desktop machine can be used to test replay.
Kickstart
If no floppy disk is available for kickstart installation, use the network-based kickstart instructions in Performing a kickstart install without a floppy on page 85.

Non-standard Hardware
318 Avaya Contact Recorder Planning, Installation and Administration Guide
Confidential and Proprietary Information
Issue 4 April, 2010 319
Confidential and Proprietary Information
Appendix I: Advanced Security Settings
This appendix discusses some features and prerequisites for advanced security. It includes:
● Installing Unlimited Strength Encryption on page 320
● Installing a Signed SSL Certificate on page 321
● Changing Tomcat Port Numbers on page 325
● Encrypting Properties File entries on page 326
● Configuring Viewer and Archive to use HTTPS on page 327
● Configuring Archive for a Key Management Server on page 331
Advanced Security Settings
320 Avaya Contact Recorder Planning, Installation and Administration Guide
Confidential and Proprietary Information
Installing Unlimited Strength Encryption
To support key sizes larger than 128 bits, you will need to replace the standard Java Jurisdiction Policy Files using the following instructions:
1. Using your browser, go to the following link:
http://java.sun.com/javase/downloads/index.jsp
2. Follow the link entitled:
Java Cryptography Extension (JCE) Unlimited Strength Jurisdiction Policy Files 5.0 at the foot of the page.
3. Download and unzip the files.
4. Follow the instructions in the readme.txt. (The path for installation is /usr/java/jre1.6.0_14/lib/security).
5. You should note the instruction to back up the existing jars that will be replaced
Installing a Signed SSL Certificate
Issue 4 April, 2010 321
Confidential and Proprietary Information
Installing a Signed SSL Certificate
If you want to install your own SSL certificate, you must replace the certificate distributed with the application. Your replacement certificate must be specific to your installed server.
Selecting a Certificate Authority (CA)
If you do not already use a certificate authority, you can use:
● http://www.freessl.com/starterssl/starterssl.html - FreeSSL requires that the web server has a fully qualified domain name (e.g. contactrecorder.bigcorp.com or contactrecorder.division.bigcorp.com) and needs to be able to send an email to an address like [email protected] or [email protected]. The list of addresses can be found on their website, and it includes admin, ssladmin, root, and administrator.
● http://www.instantssl.com - InstantSSL is more flexible and allows intranet addresses (such as WINS names and IP addresses) as well as fully qualified domain names.
Backing up the Keystore file
In the instructions which follow, replace <installdir> with the location into which you installed Avaya Contact Recorder.
The certificates and keys are stored beneath your installation folder in the file:
/opt/witness/keystore/keystore.jks
Because this file contains the original, distributed certificate, it is important to make a backup of it. You will delete this file during the remaining steps. Should it be necessary to restore the original certificate, you can copy the backup to the original filename.
Creating the new Certificate
If you would like to test this implementation, you can practice this procedure with a certificate authority's 30-day trial certificate. Then, to implement real certificates, you can start over from this point.
To create a certificate:
1. Create a new certificate with the real URL of the Avaya Contact Recorder.
Advanced Security Settings
322 Avaya Contact Recorder Planning, Installation and Administration Guide
Confidential and Proprietary Information
2. Log onto the server and change directory as follows:
cd /opt/witness/keystore
3. Remove the original keystore file
rm keystore.jks
4. Run the java keytool utility with
/javadirectory/bin/keytool -genkey -keystore keystore.jks -alias tomcat -keyalg RSA
5. Fill in the Keytool prompts with the following:
Password: Contact5tor3
Note:Note: You must type this password, exactly as shown. It is case sensitive.
a. First & Last Name: enter the FQDN, IP address or intranet name
b. Organizational Unit: enter your division
c. Organization: enter your company name
d. City/Location: enter your location
e. State/Province: enter your state
f. Country Code: enter the ISO 2 letter code for your country (for example, GB is the code for United Kingdom)
6. Enter yes if the information is correct.
7. Hit enter when prompted for the second password.
8. Restart the Avaya Contact Recorder service.
9. Access the Administration pages via https.
10. Check that the certificate matches the information entered.
11. Double click the padlock icon. Internet Explorer should warn you that the certificate is unsigned. However, it should no longer display a message that indicates the certificate does not match the web server name.
Tip:Tip: If you do get a warning that the certificate does not match, check that the
Common Name matches the URL. Double click the padlock, select the details tab, and click the Subject line. This displays the Common Name.
Installing a Signed SSL Certificate
Issue 4 April, 2010 323
Confidential and Proprietary Information
Generating a Certificate Signing Request
You need a Certificate Signing Request (CSR) as the first step of the signing process. When you have it, paste it into the Certificate Authority's web page. To generate a CSR:
1. Re-run the keytool command
/javadirectory/bin/keytool -certreq -keystore keystore.jks -alias tomcat
2. Enter the password - which is Contact5tor3.
3. Copy and paste the output into the CA's web page. (Include the BEGIN and END lines.)
4. Complete the verification process
5. Reply to the verification emails and other verification steps until you obtain a signed certificate back from the CA.
Importing the CA's certificates
Before you can import your certificate reply, you need to import the certificate authority's root certificate and any intermediate certificates between their root and your certificate.
To acquire these certificates:
1. Download these certificates from the certificate authority's website.
2. Save the root as rcert.crt and any intermediate as icert.crt.
If you have more than one intermediate certificate, give them separate filenames.
To import all your certificates:
1. Import the root certificate by running keytool:
/javadirectory/bin/keytool -import -keystore keystore.jks -alias root -file rcert.crt
2. Enter the password - which is Contact5tor3.
3. Import the intermediate (if required).
/javadirectory/bin/keytool -import -keystore keystore.jks -alias inter -file icert.crt
If you have more than one intermediate certificate, import them as inter1, etc.
4. Import your signed certificate.
5. Save the file the CA sent as cert.crt.
Advanced Security Settings
324 Avaya Contact Recorder Planning, Installation and Administration Guide
Confidential and Proprietary Information
6. Import with the keytool.
/javadirectory/bin/keytool -import -keystore keystore.jks -alias tomcat -file cert.crt
7. Restart the Avaya Contact Recorder service.
8. Access the administration pages using https.
9. Double click the padlock icon and ensure that Internet Explorer no longer displays a message that the certificate is unsigned.
Backing up the keystore file
The keystore file now contains:
● the random private key that is unique to this web server
● the signed certificate you just paid for
These two are linked and cannot be regenerated, so it is important to back up the keystore file. If either one of these components is lost, you must regenerate the certificate and pay again to get it signed.
Changing Tomcat Port Numbers
Issue 4 April, 2010 325
Confidential and Proprietary Information
Changing Tomcat Port Numbers
You can change the default http and https ports (8080 and 8443 respectively) by editing /opt/witness/tomcat5525/conf/server.xml.
Locate the two Connector elements on roughly lines 20 and 30 and change 8080 to the chosen plain port number and 8443 to the chosen secure port number.
You must also set the following property in the properties file:
cscm.localport=nnnn
specifying the replacement for 8080.
Note:Note: If you are using Central Replay Server you must change all the recorders
and the Central Replay Server. The port numbers must be consistent across all of these servers for upload to the Central Replay Server to work.
If you use Viewer you should alter the URL entered in the Viewer administration screens to your chosen port number.
Note:Note: If you change the https port from the default of 8443 and you do not allow
http access, you must also set the following line in the properties file so that attempts to use http are redirected to the correct https socket.
https.socket=nnnn
The server.xml may be overwritten on subsequent upgrades. You should keep a copy of the file after editing it so that this can be compared with any changed version and the appropriate set of merged changes determined after the upgrade.
Advanced Security Settings
326 Avaya Contact Recorder Planning, Installation and Administration Guide
Confidential and Proprietary Information
Encrypting Properties File entries
Avaya provides a tool to encrypt your passwords so that they can safely be placed in properties files. You will need this tool if you want to, for example, change the postgresql password.
Obtain the WitsBSUserCredentials tool from Avaya support and install it following the instructions provided with it.
To encrypt a password for use in the properties file:
1. Launch the tool.
2. Select Other for the application type.
3. Enter a dummy username (it is not used) together with the password to be encrypted.
4. Use the encrypted password in the properties file.
Configuring Viewer and Archive to use HTTPS
Issue 4 April, 2010 327
Confidential and Proprietary Information
Configuring Viewer and Archive to use HTTPS
Note:Note: This is not required if you are using an Avaya Contact Recorder as the
central replay server - only if you have installed Viewer.
To allow Viewer and Archive to connect to Avaya Contact Recorder using HTTPS, you must first create and install a customized certificate for each recorder in your environment. See Installing a Signed SSL Certificate on page 321. You must obtain certificates with the exact recorder names, as entered in the Capture Platform setting in Viewer.
Keep the intermediate and root certificates that you received with the signed certificate and imported into the keystore. You will also need to import these into Viewer and Archive.
Importing the public certificates into Viewer and Archive
The following procedure describes how to import the public certificates into a windows server. This process must be followed on both the Viewer and the Archive server. This is necessary so that Viewer and Archive can validate the Avaya Contact Recorder server.
1. Choose Start > Run, type mmc, and then click OK. The Microsoft Management Console (MMC) window opens
2. Click File > Add Remove Snap-in.
3. In the Add/Remove Snap-in window, click Add.
4. In the Add Standalone Snap-in window, click Certificates, and then click Add.
5. Choose Computer Account (to manage the certificate store on the local computer), and then click Next. The Select Computer window opens.
6. Choose Local Computer, and then click Finish.
Now that the snap-in is available you should import any intermediate certificate(s).
1. In the Console window under Certificates, right-click Intermediate Certificate Authorities, and then select All Tasks > Import. The Certificate Import Wizard window opens.
2. Click Next. The File to Import window displays.
3. Click Browse
4. Browse for the intermediate certificate file, select the Files of type drop-down list X.509 Certificate (*.cer, *.crt), and select it.
5. Click Next.
6. The Certificate Store dialog box opens.

Advanced Security Settings
328 Avaya Contact Recorder Planning, Installation and Administration Guide
Confidential and Proprietary Information
7. Select Place all certificates in the following store, and then select the Trusted Root Certificate Authorities store click Next.
8. Check the displayed information, and then click Finish.
Finally import the root certificate.
1. In the Console window under Certificates, right-click Intermediate Certificate Authorities, and then select All Tasks > Import. The Certificate Import Wizard window opens.
2. Click Next. The File to Import window displays.
3. Click Browse
4. Browse for the root.cer file, select the Files of type drop-down list X.509 Certificate (*.cer, *.crt), and select it.
5. Click Next.
6. The Certificate Store dialog box opens.
7. Select Place all certificates in the following store, and then select the Trusted Root Certificate Authorities store click Next.
8. Check the displayed information, and then click Finish.
Configure Viewer to use https and a secure port
By default Viewer will not use https or the secure port to connect to the Avaya Contact Recorder. Both these features need to be enabled on Viewer. This is done using the Viewer utility EyrBSConfigurationViewer which is located in the following directory on the Viewer server.
C:\Program Files\ComPlus Applications\{A639A196-338F-48E0-B76B-E223C00B5617}
Note:Note: By default Viewer uses http and once https is enabled will default to use port
50150.
Configure Viewer to use https
1. Navigate to the EyrBSConfigurationViewer application and right-click in explorer, select run as…
2. The Run As dialog appears, select the following user option and specify the account which Viewer is running under.
3. The Configuration Viewer application is launched.
4. Navigate to Central Configuration > Systems >Main Eyretel System > General
Configuring Viewer and Archive to use HTTPS
Issue 4 April, 2010 329
Confidential and Proprietary Information
5. In the right-hand pane right-click the SSLOnly value and select Modify
6. Change the value from False to True.
7. Select OK.
Configure Viewer to use the capture platform’s https port
8. Still using the Configuration Viewer, navigate to Central Configuration > Systems > CapturePlatformName > General, where CapturePlatformName is the capture platform name of the Avaya Contact Recorder as configured in Viewer.
9. In the right-hand pane right-click and select New > Value a new value is created, set the name to SSLHostPort.
10. Right-click the new value and select Modify
11. Set the value to the https port in use by the Avaya Contact Recorder, the recorders default https port is 8443.
12. Select OK.
13. Close the Configuration Viewer.
14. Launch Component Services and navigate to Com+ Applications, select Application Portal, right-click and select shutdown.
15. Viewer should now use https when communicating with the Avaya Contact Recorder.
Configure Archive to use https
Note:Note: This is not required if you are using the Archive features built into Avaya
Contact Recorder. This only refers to the separate (Central) Archive Manager.
By default Archive will not use https to connect to the Avaya Contact Recorder, this is done by editing a file located on the Archive server.
Configure Archive to use https
1. Open the following file in a text editor
C:\Program Files\Verint Systems\conf\SecurityConfig.xml
2. Locate the following xml element in the file <SSLOnly>false</SSLOnly>
3. Change the word false to true and save the file.
4. Now use the Archive Management UI to stop and start the archive service.
5. Archive will now use https to contact the Avaya Contact Recorder.
Advanced Security Settings
330 Avaya Contact Recorder Planning, Installation and Administration Guide
Confidential and Proprietary Information
As a result of changing this file the archive system will raise two Major alarms indicating that the security configuration file has been tampered and that there is an SSL Configuration Error, both of these can be ignored – examples of these are as follows.
File Tampered, 04/24/2008 8:44 AM, On Archive781, file "C:\Program Files\Verint Systems\conf\securityconfig.xml" may have been tampered with. Please refer to the System Administration Guide for details on how to correct a tampered file.
SSL Configuration Error, 04/24/2008 8:46 AM, SSL is configured for Content Server on host ARCHIVE781, but a required file is missing. The file is C:\Program Files\Verint Systems\conf\security\cert.pem. Please deploy the file or remove SSLConfiguration by modifying RecorderGeneral.xml ssllistenport.
Note:Note: Archive will use the capture platform’s https port as configured using the
Viewer Configuration tool as described in the previous section, the error message above is related to a core recorder content server configuration which is not part of the Avaya Contact Recorder deployment and hence can be ignored. The certificates referred to in the alarm are not necessary for ACR as the public certificates are available via the windows certificate store as described earlier.
Configuring Archive for a Key Management Server
Issue 4 April, 2010 331
Confidential and Proprietary Information
Configuring Archive for a Key Management Server
Note:Note: This is not required if you are using the Archive features built into Avaya
Contact Recorder. This only refers to the separate (Central) Archive Manager.
Configuring Archive
1. Go to C:\Program Files\Verint Systems\conf\Securityconfig.xml
2. Change the AtRestDataEncryption value to True
3. Go to C:\Program Files\Verint Systems\conf\RSAProvider.cfg
4. Enter the fully qualified domain name of the KMS for kms.address, and change the kms.port to 7443.
Signing and Delivering the certificate
1. Navigate to the \CAUtility folder on the CA's PC and generate a certificate for the Archive server by typing the following command line at a DOS prompt: genCert <ServerName> <CA's Organization Name> where ServerName is the full server name or just the host name of the server.
You will be prompted for:
● The password of the CA's key file (cakey.pem)
● An export password to protect the output svr_cert_key.p12 file
Successful execution of the above command generates a svr_cert_key.p12 file containing the signed server certificate, its matching private key, and the CA's certificate in PKCS#12 format in the \CAUtility\signed_certs\ServerName folder of the CA's PC. NOTE: The signed server certificate is valid for two years.
2. Deliver the generated file to the C:\Program Files\Verint Systems\conf\Security folder on the Archive server. To ensure security, the export password should not be transported along with the PKCS#12 file.
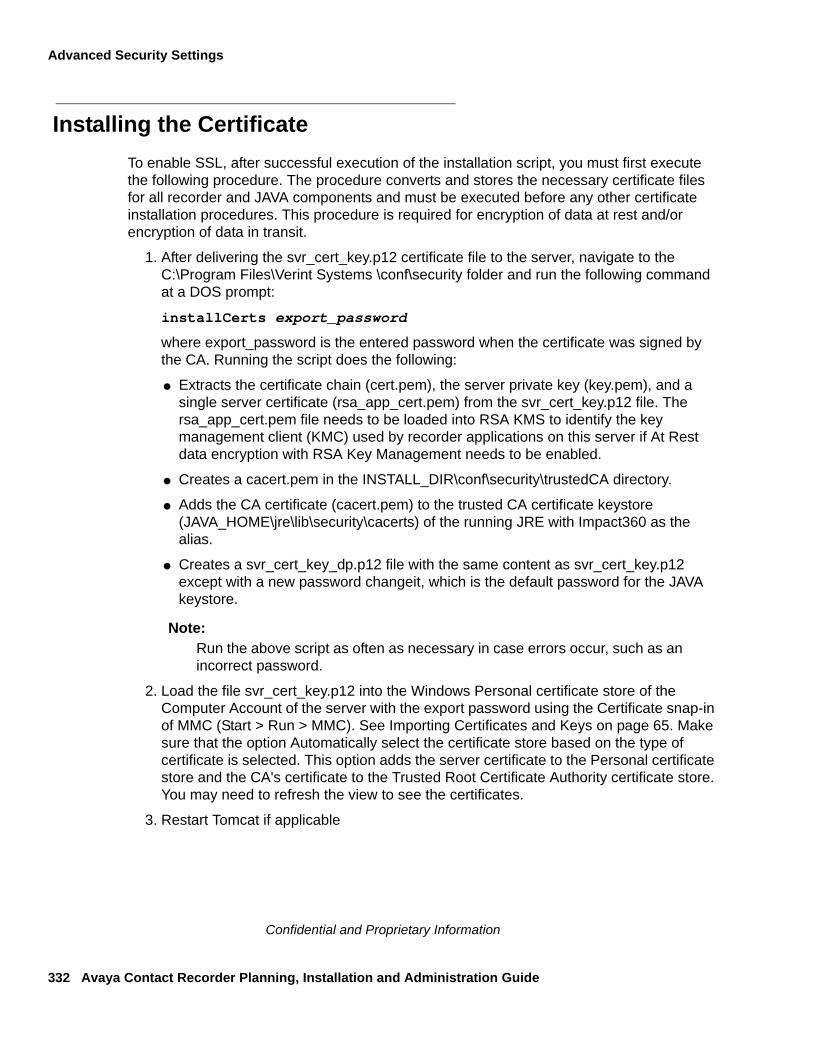
Advanced Security Settings
332 Avaya Contact Recorder Planning, Installation and Administration Guide
Confidential and Proprietary Information
Installing the Certificate
To enable SSL, after successful execution of the installation script, you must first execute the following procedure. The procedure converts and stores the necessary certificate files for all recorder and JAVA components and must be executed before any other certificate installation procedures. This procedure is required for encryption of data at rest and/or encryption of data in transit.
1. After delivering the svr_cert_key.p12 certificate file to the server, navigate to the C:\Program Files\Verint Systems \conf\security folder and run the following command at a DOS prompt:
installCerts export_password
where export_password is the entered password when the certificate was signed by the CA. Running the script does the following:
● Extracts the certificate chain (cert.pem), the server private key (key.pem), and a single server certificate (rsa_app_cert.pem) from the svr_cert_key.p12 file. The rsa_app_cert.pem file needs to be loaded into RSA KMS to identify the key management client (KMC) used by recorder applications on this server if At Rest data encryption with RSA Key Management needs to be enabled.
● Creates a cacert.pem in the INSTALL_DIR\conf\security\trustedCA directory.
● Adds the CA certificate (cacert.pem) to the trusted CA certificate keystore (JAVA_HOME\jre\lib\security\cacerts) of the running JRE with Impact360 as the alias.
● Creates a svr_cert_key_dp.p12 file with the same content as svr_cert_key.p12 except with a new password changeit, which is the default password for the JAVA keystore.
Note:Note: Run the above script as often as necessary in case errors occur, such as an
incorrect password.
2. Load the file svr_cert_key.p12 into the Windows Personal certificate store of the Computer Account of the server with the export password using the Certificate snap-in of MMC (Start > Run > MMC). See Importing Certificates and Keys on page 65. Make sure that the option Automatically select the certificate store based on the type of certificate is selected. This option adds the server certificate to the Personal certificate store and the CA's certificate to the Trusted Root Certificate Authority certificate store. You may need to refresh the view to see the certificates.
3. Restart Tomcat if applicable
Issue 4 April, 2010 333
Glossary
ACD Automatic Call Distribution. This is a feature offered by the Avaya Communication Manager that queues and distributes incoming calls to waiting agents. Calls are queued until an agent is available. If multiple agents are available, calls are distributed on an equitable basis.
AE Services Avaya's Application Enablement Services are APIs to services such as telecoms, database, and so on. They include DMCC and TSAPI.
AGENT Logon ID An unique identification number assigned to a particular agent. The agent uses this number when logging on. The agent ID is not associated with any particular phoneset
ANI Automatic Number Identification (Service). The provision of calling party information (typically, telephone number or billing/account number) to the called party.
Avaya CT Now known as AES TSAPI services. See TSAPI below.
BHCA Busy Hour Call Attempts. The number of calls that are attempted during the switches busy hour. Typically slightly higher than, but often used interchangeably with BHCC
BHCC Busy Hour Call Completions. The number of calls that are completed during the switches busy hour. Typically slightly lower than, but often used interchangeably with BHCA
Communication Manager API (CMAPI)
Now known as Device, Media and Call Control (DMCC)
Codec An abbreviation of COder/DECoder. A device or program that converts signals from one form to another. In this context, between different digital audio compression standards.
CTI
Confidential and Proprietary Information
334 Avaya Contact Recorder Planning, Installation and Administration Guide
CTI Computer Telephony Integration - typically an interface through which a computer system can be advised of events occurring within a telephony system and/or control the telephony system. TSAPI is an example of such a link.
Device, Media and Call Control (DMCC)
A software platform (part of AE Services, previously known as Communciation Manager API or CMAPI) that applications such as the recorder use to create softphones that can participate in calls made on Avaya Communication Manager-based systems.
DID Direct Inward Dialing. An attribute of a trunk. The CO passes the extension number of the called party over a DID trunk to the PBX when offering a call to the PBX. The PBX is then able to automatically route the call to that extension without requiring operator/attendant assistance. In this way, a single trunk can terminate calls for many different extensions (but not simultaneously).
DVD+RW Digital Versatile Disk + Read/Write. One of several competing optical storage standards, supported by a wide range of manufacturers.
HFS Hierarchical File Storage system. Typically a combination of hard disk and tape drives plus controlling software that automatically migrates little used files to cheaper storage media.
IP Internet Protocol. IP specifies the format of packets and the addressing scheme for internet data. The IP, like the postal system, allows you to address a package and drop it in the system. The packet may traverse multiple networks on the way to its ultimate destination.
IVR Interactive Voice Response. A system/facility that plays voice menus to callers, and acts upon user input (typically, DTMF digits from a touch tone phone). It is sometimes called VRU (Voice Response Unit).
Master Controller An Avaya Contact Recorder that is being shadowed by one or more Standby Controllers. The Master will default to "Active" on startup unless configured for a single standby recorder and this is already "Active" but will ask a Standby to take over its role if it determines that it cannot record e.g. a disk fills.
NAS Network Attached Storage. A term used for RAID, tape and other mass storage systems which have an integral network connection such as Ethernet or fiber-channel.

TSAPI
Issue 4 April, 2010 335
Confidential and Proprietary Information
NIC Network Interface Card. An expansion board that you insert into a computer so the computer can connect to a network. Most NICs are designed for a particular type of network, protocol, and media, although some can serve multiple networks.
QoS Quality of Service
RAID Redundant Array of Inexpensive Disks. RAID controllers use two or more hard disk drives together for fault tolerance and enhanced performance. RAID disk drives are used frequently on servers.
SAN Storage Attached Network. A high-speed network that is typically part of an overall network of computing resources for an enterprise, in which the software knows the characteristics of storage devices and the quantity and value of the data stored in those devices.
Skill Hunt Group A telephone number that is used to route calls to agents on the basis of the skills needed to handle the call. Agents are assigned to one or more such skill groups according to their expertise and appropriate calls are routed to them when they are available.
Slave Recorder An Avaya Contact Recorder being controlled by the active Controlling Recorder. i.e. recording what it is told to record.
Softphone (SOFTware PHONE) In this context, a software-based emulation of an Avaya VoIP phone. Multiple such emulations run on the Avaya Contact Recorder and each can participate in a telephone call in order to record it.
Standby Controller An Avaya Contact Recorder that shadows a Master Controller and takes over its role ("goes active") should the master fail or appear to fail (e.g. the standby loses contact with it).
Tagging Adding details to the database of call recordings so that recordings can later be retrieved by searching through the available data fields.
Trunk A communications link between a PBX and the public central office (CO), or between PBXs, or between COs.
TSAPI Telephony Services Application Program Interface. A CTI interface standard to which AES TSAPI conforms.

UTC
Confidential and Proprietary Information
336 Avaya Contact Recorder Planning, Installation and Administration Guide
UTC Universal Time Coordinated. A time scale that couples Greenwich Mean Time, which is based solely on the Earth's inconsistent rotation rate, with highly accurate atomic time. When atomic time and Earth time approach a one second difference, a leap second is calculated into UTC. UTC, like Greenwich Mean Time, is set at 0 degrees longitude on the prime meridian.
VDN Vector Directory Number. An extension number used in Avaya's ACD software to connect calls to a vector for processing. The VDN by itself can be dialed to access the vector from any extension connected to the switch. (See also Vector.)
Vector A list of steps that processes calls in a user-defined manner. The steps in a vector can send calls to splits, play announcements and music, disconnect calls, give calls a busy signal, or route calls to other destinations. (See also VDN.)
VoIP Voice over Internet Protocol. A means of transmitting telephone calls over the packet-switched IP network - as distinct from TDM.
VPN Virtual Private Network. Private, or restricted, communications networks which use encryption and other security measures to transmit information through a public network such as the Internet and avoid unauthorized use.
VRU Voice Response Unit. A device that plays voice menus to a caller and responds to caller instructions entered on a touch tone phone. Also known as Interactive Voice Response (IVR).
Copyright © 2022 FDOKUMEN