
MX For Microsoft Install & Config Guide.book - Avaya Support
120
Avaya Meeting Exchange for Microsoft Applications Release 5.1 Installation and Configuration Guide 04-602779 Release 5.1 November 2008 Issue 1
-
Upload
khangminh22 -
Category
Documents
-
view
1 -
download
0
Transcript of MX For Microsoft Install & Config Guide.book - Avaya Support

Avaya Meeting Exchange for Microsoft ApplicationsRelease 5.1Installation and Configuration Guide
04-602779Release 5.1
November 2008Issue 1

© 2008 Avaya Inc. All Rights Reserved.
NoticeWhile reasonable efforts were made to ensure that the information in this document was complete and accurate at the time of printing, Avaya Inc. can assume no liability for any errors. Changes and corrections to the information in this document may be incorporated in future releases.
Documentation disclaimerAvaya Inc. is not responsible for any modifications, additions, or deletions to the original published version of this Documentation unless such modifications, additions, or deletions were performed by Avaya.
Link disclaimerAvaya Inc. is not responsible for the contents or reliability of any linked third party Web sites referenced elsewhere within this Documentation and Avaya does not necessarily endorse the products, services, or information described or offered within them. We cannot guarantee that these links will work all of the time and we have no control over the availability of the linked pages.
LicenseUSE OR INSTALLATION OF THE PRODUCT INDICATES THE END USER'S ACCEPTANCE OF THE TERMS SET FORTH HEREIN AND THE GENERAL LICENSE TERMS AVAILABLE ON THE AVAYA WEBSITE AT http://support.avaya.com/LicenseInfo/ ("GENERAL LICENSE TERMS"). IF YOU DO NOT WISH TO BE BOUND BY THESE TERMS, YOU MUST RETURN THE PRODUCT(S) TO THE POINT OF PURCHASE WITHIN TEN (10) DAYS OF DELIVERY FOR A REFUND OR CREDIT.Avaya grants End User a license within the scope of the license types described below. The applicable number of licenses and units of capacity for which the license is granted will be one (1), unless a different number of licenses or units of capacity is specified in the Documentation or other materials available to End User. "Designated Processor" means a single stand-alone computing device. "Server" means a Designated Processor that hosts a software application to be accessed by multiple users. "Software" means the computer programs in object code, originally licensed by Avaya and ultimately utilized by End User, whether as stand-alone Products or pre-installed on Hardware. "Hardware" means the standard hardware Products, originally sold by Avaya and ultimately utilized by End User.
License Type(s):Concurrent User License (CU). End User may install and use the Software on multiple Designated Processors or one or more Servers, so long as only the licensed number of Units are accessing and using the Software at any given time. A "Unit" means the unit on which Avaya, at its sole discretion, bases the pricing of its licenses and can be, without limitation, an agent, port or user, an e-mail or voice mail account in the name of a person or corporate function (e.g., webmaster or helpdesk), or a directory entry in the administrative database utilized by the Product that permits one user to interface with the Software. Units may be linked to a specific, identified Server. Database License (DL). Customer may install and use each copy of the Software on one Server or on multiple Servers provided that each of the Servers on which the Software is installed communicate with no more than a single instance of the same database.
Copyright Except where expressly stated otherwise, the Product is protected by copyright and other laws respecting proprietary rights. Unauthorized reproduction, transfer, and or use can be a criminal, as well as a civil, offense under the applicable law.
Third-party ComponentsCertain software programs or portions thereof included in the Product may contain software distributed under third party agreements ("Third Party Components"), which may contain terms that expand or limit rights to use certain portions of the Product ("Third Party Terms"). Information identifying the copyright holders of the Third Party Components and the Third Party Terms that apply is available on Avaya's web site at: http://support.avaya.com/ThirdPartyLicense/For full information, please see the complete document, Avaya Third Party Terms, Document number 04-601558. To locate this document on the website, simply go to http://www.avaya.com/supportt and search for the document number in the search box.
WarrantyAvaya Inc. provides a limited warranty on this product. Refer to your sales agreement to establish the terms of the limited warranty. In addition, Avaya’s standard warranty language, as well as information regarding support for this product, while under warranty, is available through the following Web site:http://www.avaya.com/support.
Avaya fraud interventionIf you suspect that you are being victimized by toll fraud and you need technical assistance or support, call Technical Service Center Toll Fraud Intervention Hotline at +1-800-643-2353 for the United States and Canada. Suspected security vulnerabilities with Avaya Products should be reported to Avaya by sending mail to: [email protected]. For additional support telephone numbers, see the Avaya Web site: http://www.avaya.com/support
TrademarksAvaya and the Avaya logo are registered trademarks of Avaya Inc. in the United States of America and other jurisdictions. Unless otherwise provided in this Documentation, marks identified by "®," "™" and "SM" are registered marks, trademarks and service marks, respectively, of Avaya Inc. All other trademarks are the property of their respective owners.For the most current versions of documentation, go to the Avaya support Web site: http://www.avaya.com/support

Avaya Meeting Exchange 5.1 for Microsoft Applications November 2008 3
Chapter 1: Meeting Exchange and Microsoft . . . . . . . . . . . . . . . . . . . . . . 9Introduction to Meeting Exchange and Microsoft . . . . . . . . . . . . . . . . . . 9Introduction to this Guide . . . . . . . . . . . . . . . . . . . . . . . . . . . . . . . 9
Chapter 2: Installing Conference Scheduler for Microsoft Outlook . . . . . . . . . . 13In this chapter . . . . . . . . . . . . . . . . . . . . . . . . . . . . . . . . . . . . . 13Loading the Software . . . . . . . . . . . . . . . . . . . . . . . . . . . . . . . . . 13
Configuring Network Information. . . . . . . . . . . . . . . . . . . . . . . . . 13Installing the RPMs . . . . . . . . . . . . . . . . . . . . . . . . . . . . . . . . 17
Installing the RPMs for Meeting Exchange Enterprise . . . . . . . . . . . 17Installing the RPMs for Meeting Exchange Express. . . . . . . . . . . . . 18
Verifying the Installation . . . . . . . . . . . . . . . . . . . . . . . . . . . . . 19Managing Timezones . . . . . . . . . . . . . . . . . . . . . . . . . . . . . . . 19Configuring Stored Procedures . . . . . . . . . . . . . . . . . . . . . . . . . 20
Configuring Multiple Bridges . . . . . . . . . . . . . . . . . . . . . . . . . . . . . 21
Chapter 3: Administering Conference Scheduler for Microsoft Outlook . . . . . . . 23Manual Installation. . . . . . . . . . . . . . . . . . . . . . . . . . . . . . . . . . . 23The Download Web Page . . . . . . . . . . . . . . . . . . . . . . . . . . . . . . . 24Silent Installation . . . . . . . . . . . . . . . . . . . . . . . . . . . . . . . . . . . 25Prerequisites . . . . . . . . . . . . . . . . . . . . . . . . . . . . . . . . . . . . . . 27
If you are using Microsoft Outlook 2003 . . . . . . . . . . . . . . . . . . . . . 27If you are using Microsoft Outlook 2007 . . . . . . . . . . . . . . . . . . . . . 28
Configuring the Web Page . . . . . . . . . . . . . . . . . . . . . . . . . . . . . . 28Re-installing the Conference Scheduler Plug-in for Microsoft Outlook . . . . . . 29Microsoft Outlook in Offline Mode . . . . . . . . . . . . . . . . . . . . . . . . . . 29Checking the version of Microsoft Outlook on client machines . . . . . . . . . . 29
Chapter 4: Customizing Conference Scheduler for Microsoft Outlook . . . . . . . . 31Configuring Feature Display . . . . . . . . . . . . . . . . . . . . . . . . . . . . . 31Configuring the Join Conference Feature . . . . . . . . . . . . . . . . . . . . . . 32
Configuring an Operator Sign-in Name . . . . . . . . . . . . . . . . . . . . . 33Configuring the Display of the Feature on the Interface . . . . . . . . . . . . 33
Configuring Multiple Audio Conferencing Telephone Numbers . . . . . . . . . . 34Configuring the Display of the Meeting Invitation . . . . . . . . . . . . . . . . . . 34Configuring Recurrent Conference Deletion. . . . . . . . . . . . . . . . . . . . . 35
Chapter 5: Introduction to Microsoft Adapter . . . . . . . . . . . . . . . . . . . . . . 37Introduction . . . . . . . . . . . . . . . . . . . . . . . . . . . . . . . . . . . . . . 37
Contents

Contents
4 Avaya Meeting Exchange 5.1 for Microsoft Applications November 2008
Microsoft Adapter components . . . . . . . . . . . . . . . . . . . . . . . . . . . . 37
Chapter 6: Introduction to Microsoft Office Communications Server (OCS) Adapter 39Feature Set . . . . . . . . . . . . . . . . . . . . . . . . . . . . . . . . . . . . . . . 39Audit Trail . . . . . . . . . . . . . . . . . . . . . . . . . . . . . . . . . . . . . . . 40Operating Environment . . . . . . . . . . . . . . . . . . . . . . . . . . . . . . . . 40Client Install . . . . . . . . . . . . . . . . . . . . . . . . . . . . . . . . . . . . . . 41
Chapter 7: Installing Microsoft Adapter . . . . . . . . . . . . . . . . . . . . . . . . . 43Setting the JRE Environment . . . . . . . . . . . . . . . . . . . . . . . . . . . . . 43Installing Microsoft Adapter. . . . . . . . . . . . . . . . . . . . . . . . . . . . . . 44Changing the Startup Type for the Avaya BsMonitor service. . . . . . . . . . . . 45Changing the Registry Entry for the Avaya BsMonitor service. . . . . . . . . . . 45Uninstalling Microsoft Adapter . . . . . . . . . . . . . . . . . . . . . . . . . . . . 46
Chapter 8: Installing OCS Adapter . . . . . . . . . . . . . . . . . . . . . . . . . . . . 47Pre-installation Steps . . . . . . . . . . . . . . . . . . . . . . . . . . . . . . . . . 47
Ensuring Compliance with the Software Requirements . . . . . . . . . . . . 47Setting a Number of Variables . . . . . . . . . . . . . . . . . . . . . . . . . . 48
Setting the JRE Environment Path . . . . . . . . . . . . . . . . . . . . . . 48Setting the .NET Framework Path . . . . . . . . . . . . . . . . . . . . . . 48Setting the BCAPI Variable . . . . . . . . . . . . . . . . . . . . . . . . . . 48
Installing Internet Information Services . . . . . . . . . . . . . . . . . . . . . 49Server Installation Steps . . . . . . . . . . . . . . . . . . . . . . . . . . . . . . . 49Server Uninstall Steps . . . . . . . . . . . . . . . . . . . . . . . . . . . . . . . . . 49
Chapter 9: Configuring Microsoft Adapter . . . . . . . . . . . . . . . . . . . . . . . . 51Configuring the TLS certificate . . . . . . . . . . . . . . . . . . . . . . . . . . . . 51
Adding the certificates to Microsoft Management Console . . . . . . . . . . 52Exporting the TLS certificate . . . . . . . . . . . . . . . . . . . . . . . . . . . 52
Understanding the Microsoft Adapter administrative interface . . . . . . . . . . 53The Microsoft Adapter main screen . . . . . . . . . . . . . . . . . . . . . . . 54
The menu bar. . . . . . . . . . . . . . . . . . . . . . . . . . . . . . . . . . 54The information panel . . . . . . . . . . . . . . . . . . . . . . . . . . . . . 55The trace pane . . . . . . . . . . . . . . . . . . . . . . . . . . . . . . . . . 55The treeview pane . . . . . . . . . . . . . . . . . . . . . . . . . . . . . . . 55Shortcut keys . . . . . . . . . . . . . . . . . . . . . . . . . . . . . . . . . 56
Editing the gateway configuration settings . . . . . . . . . . . . . . . . . . . . . 57Editing the log configuration settings . . . . . . . . . . . . . . . . . . . . . . . . 58
Logging messages and events . . . . . . . . . . . . . . . . . . . . . . . . . . 59

Contents
Avaya Meeting Exchange 5.1 for Microsoft Applications November 2008 5
Configuring Microsoft Adapter with bridges. . . . . . . . . . . . . . . . . . . . . 60Adding a bridge configuration . . . . . . . . . . . . . . . . . . . . . . . . . . 60Editing a bridge configuration . . . . . . . . . . . . . . . . . . . . . . . . . . 61Removing a bridge configuration. . . . . . . . . . . . . . . . . . . . . . . . . 62Starting a bridge connection . . . . . . . . . . . . . . . . . . . . . . . . . . . 63Stopping a bridge connection . . . . . . . . . . . . . . . . . . . . . . . . . . 63
Chapter 10: Configuring OCS Adapter . . . . . . . . . . . . . . . . . . . . . . . . . . 65Configuring OCS Adapter . . . . . . . . . . . . . . . . . . . . . . . . . . . . . . . 65Configuring Internet Information Server (IIS) . . . . . . . . . . . . . . . . . . . . 67
Chapter 11: Configuring Live Communications Server (LCS) . . . . . . . . . . . . . 69Administering Certificates -- certificate management. . . . . . . . . . . . . . . . 70
Additional references . . . . . . . . . . . . . . . . . . . . . . . . . . . . . 70About the sample scenario . . . . . . . . . . . . . . . . . . . . . . . . . . . . 71About obtaining certificates . . . . . . . . . . . . . . . . . . . . . . . . . . . 71
Specifying key usage . . . . . . . . . . . . . . . . . . . . . . . . . . . . . 71Client and server authentication . . . . . . . . . . . . . . . . . . . . . . . 71
Procedure 1 - Installing the trusted certificate on Live Communications Server . . . . . . . . . . . . . . . . . . . . . . . . . . . . . 72
Installing the trusted certificate from another vendor. . . . . . . . . . . . 72Installing the trusted certificate generated by Microsoft Certificate Services . . . . . . . . . . . . . . . . . . . . . . . . . . . . . . . . . . . . 73
Importing the certificate into the Live Communications Server’s trust store . . . . . . . . . . . . . . . . . . . . . . . . . . . . . . . . . . . 74
Procedure 1a - Verifying the installation of the trusted certificate on Live Communications Server . . . . . . . . . . . . . . . . . . . . . . . . . . . 75
Procedure 2 - Installing a server certificate for the Live Communications Server . . . . . . . . . . . . . . . . . . . . . . . . . . . . . 76
Installing a server certificate from another vendor . . . . . . . . . . . . . 76Installing a Microsoft Certificate Services-based certificate on the Live Communications Server . . . . . . . . . . . . . . . . . . . . . . . . . . . 77
Procedure 2a - Verifying the installation of the server certificate for Live Communications Server . . . . . . . . . . . . . . . . . . . . . . . . 79
Procedure 2b - Configuring the certificate for automatic routing . . . . . 79Configuring LCS for Microsoft Adapter . . . . . . . . . . . . . . . . . . . . . . . 80
Chapter 12: Configuring Microsoft Office Communications Server 2007 . . . . . . . 83Administering Certificates -- certificate management. . . . . . . . . . . . . . . . 84
Additional references . . . . . . . . . . . . . . . . . . . . . . . . . . . . . 84About the sample scenario . . . . . . . . . . . . . . . . . . . . . . . . . . . . 85About obtaining certificates . . . . . . . . . . . . . . . . . . . . . . . . . . . 85

Contents
6 Avaya Meeting Exchange 5.1 for Microsoft Applications November 2008
Specifying key usage . . . . . . . . . . . . . . . . . . . . . . . . . . . . . 85Client and server authentication . . . . . . . . . . . . . . . . . . . . . . . 85
Procedure 1 - Installing the trusted certificate on Office Communications Server 2007 . . . . . . . . . . . . . . . . . . . . . . . . . . 86
Installing the trusted certificate from another vendor. . . . . . . . . . . . 86Installing the trusted certificate generated by Microsoft Certificate Services . . . . . . . . . . . . . . . . . . . . . . . . . . . . . . . . . . . . 86
Importing the certificate into the Microsoft OCS 2007 trust store . . . . . 88Procedure 1a - Verifying the installation of the trusted certificate on Office Communications Server . . . . . . . . . . . . . . . . . . . . . . . . . . . 89
Procedure 2 - Installing a server certificate for the Office Communications Server . . . . . . . . . . . . . . . . . . . . . . . . . . . . . 90
Installing a server certificate from another vendor . . . . . . . . . . . . . 90Installing a Microsoft Certificate Services-based certificate on the Microsoft OCS 200791
Procedure 2a - Verifying the installation of the server certificate for Microsoft Office Communications Server 2007 . . . . . . . . . . . . . . 93
Procedure 2b - Configuring the certificate for automatic routing . . . . . 93Configuring Microsoft Office Communications Server 2007 for Microsoft Adapter 94
Chapter 13: Configuring Microsoft Live Meeting 7 for your Users . . . . . . . . . . . 97
Chapter 14: Configuring Microsoft Office Live Meeting 8 for your Users . . . . . . . 99Configuring the settings on each machine . . . . . . . . . . . . . . . . . . . . . 99Configuring the settings for the entire network . . . . . . . . . . . . . . . . . . . 100
Chapter 15: Configuring Microsoft Office Communicator 2005 for your Users . . . . 101Configuring Users for LCS . . . . . . . . . . . . . . . . . . . . . . . . . . . . . . 101Configuring the Microsoft Office Communicator client with LCS . . . . . . . . . 102Configuring Microsoft Office Communicator client for conference . . . . . . . . 102Entering the conference details in Microsoft Office Communicator . . . . . . . . 103Configuring your account details for Office Communicator (leader only) . . . . . 104
Chapter 16: Configuring Microsoft Office Communicator 2007 for your Users . . . . 107Configuring Microsoft Office Communicator . . . . . . . . . . . . . . . . . . . . 107Configuring the Meeting Exchange Server . . . . . . . . . . . . . . . . . . . . . 107

Contents
Avaya Meeting Exchange 5.1 for Microsoft Applications November 2008 7
Glossary . . . . . . . . . . . . . . . . . . . . . . . . . . . . . . . . . . . . . . . . 109
Appendix A: Technical Reference for the Conference Scheduler Plug-in . . . . . . . 111
Appendix B: Cross References and Diagrams . . . . . . . . . . . . . . . . . . . . . 113
Appendix C: Creating a certificate template for Server Certificates on the Microsoft CA Server117
Creating a certificate template for Server Certificates on the Microsoft CA Server 117
Index . . . . . . . . . . . . . . . . . . . . . . . . . . . . . . . . . . . . . . . . 119

Contents
8 Avaya Meeting Exchange 5.1 for Microsoft Applications November 2008

Avaya Meeting Exchange 5.1 for Microsoft Applications November 2008 9
Chapter 1: Meeting Exchange and Microsoft
This chapter introduces the Meeting Exchange and Microsoft integrations. It contains the following sections:
l Introduction to Meeting Exchange and Microsoft
l Introduction to this Guide
Introduction to Meeting Exchange and MicrosoftMeeting Exchange 5.1 integrates with a number of Microsoft products:
l Microsoft Outlook 2003 and 2007
l Microsoft Office Communicator 2005 and 2007
l Microsoft Live Meeting 7 and Microsoft Office Live Meeting 8
These integrations expand the Meeting Exchange functionality to enable Users to schedule conferences and to initiate instant conferences with their contacts.
Introduction to this GuideThis guide describes how to configure the Meeting Exchange and Microsoft integrations.
The early chapters of the guide describe how Meeting Exchange integrates with Microsoft Outlook 2003 and 2007.
l Installing Conference Scheduler for Microsoft Outlook
l Administering Conference Scheduler for Microsoft Outlook
l Customizing Conference Scheduler for Microsoft Outlook
The remainder of the guide describes how Meeting Exchange integrates with Microsoft Office Communicator 2005 and 2007 and Microsoft Live Meeting 7 and 8. In order to successfully deploy these conferencing solutions in your organization, you must perform a significant number of installation and configuration steps on several servers.
Chapter 1: Meeting Exchange and Microsoft
10 Avaya Meeting Exchange 5.1 for Microsoft Applications November 2008
To provide these integrations, Avaya has created two adapters, which act as an interface between Meeting Exchange 5.1 and Microsoft Office Communicator. These two adapters are called the Microsoft Adapter and the Microsoft Office Communications Server (OCS) Adapter. For more introductory information, see Introduction to Microsoft Adapter on page 37 and Introduction to Microsoft Office Communications Server (OCS) Adapter on page 39.
In the case of each adapter, you must first install it.
Note:Note: For more information on the installation steps, see Installing Microsoft Adapter on
page 43 and Installing OCS Adapter on page 47.
When you complete the installation steps, you must configure each adapter.
Note:Note: For more information on the configuration steps, see Configuring Microsoft
Adapter on page 51 and Configuring OCS Adapter on page 65.
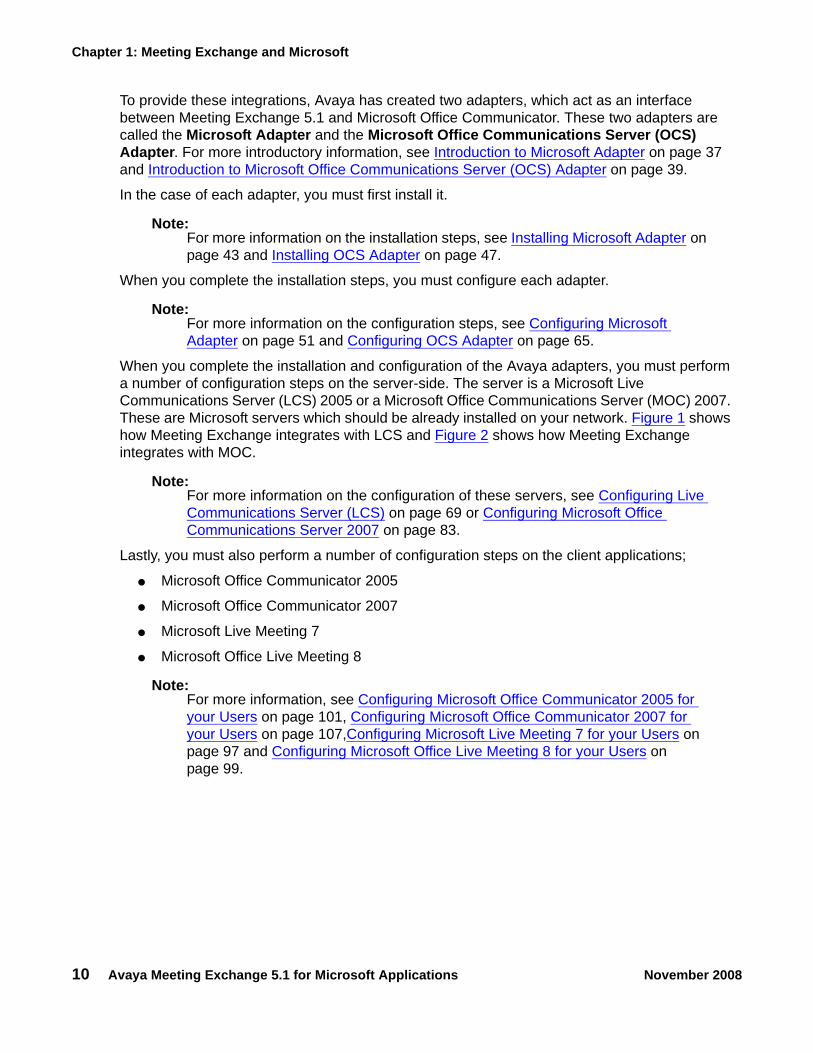
When you complete the installation and configuration of the Avaya adapters, you must perform a number of configuration steps on the server-side. The server is a Microsoft Live Communications Server (LCS) 2005 or a Microsoft Office Communications Server (MOC) 2007. These are Microsoft servers which should be already installed on your network. Figure 1 shows how Meeting Exchange integrates with LCS and Figure 2 shows how Meeting Exchange integrates with MOC.
Note:Note: For more information on the configuration of these servers, see Configuring Live
Communications Server (LCS) on page 69 or Configuring Microsoft Office Communications Server 2007 on page 83.
Lastly, you must also perform a number of configuration steps on the client applications;
l Microsoft Office Communicator 2005
l Microsoft Office Communicator 2007
l Microsoft Live Meeting 7
l Microsoft Office Live Meeting 8
Note:Note: For more information, see Configuring Microsoft Office Communicator 2005 for
your Users on page 101, Configuring Microsoft Office Communicator 2007 for your Users on page 107,Configuring Microsoft Live Meeting 7 for your Users on page 97 and Configuring Microsoft Office Live Meeting 8 for your Users on page 99.

Introduction to this Guide
Avaya Meeting Exchange 5.1 for Microsoft Applications November 2008 11
Figure 1: Deployment of Live Communications Server 2005
Typical Deployment Scenario
Clients with Microsoft Live Meeting 7 or 8 or Office Communicator 2005
Microsoft Adapter Live Communications Server
Meeting Exchange
Chapter 1: Meeting Exchange and Microsoft
12 Avaya Meeting Exchange 5.1 for Microsoft Applications November 2008
Figure 2: Deployment of Microsoft Office Communications Server 2007
Tip:Tip: Appendix B: Cross References and Diagrams on page 113 shows these
diagrams again but includes links to the appropriate information in this manual.
Typical Deployment Scenario
OCS Adapter
Meeting Exchange
Office Communications Microsoft AdapterOffice Communications Server
Clients with Microsoft Live Meeting 7 or 8 or Office Communicator 2005
Clients with Microsoft Office Communicator 2007
Client Registration Server

Avaya Meeting Exchange 5.1 for Microsoft Applications November 2008 13
Chapter 2: Installing Conference Scheduler for Microsoft Outlook
In this chapterMeeting Exchange® 5.1 Installing the S6200 and S6800 Conferencing Servers describes how to install Meeting Exchange 5.1. Please consult this guide for complete Meeting Exchange installation instructions.
This chapter describes how to install the Conference Scheduler Plug-in for Microsoft Outlook.
Loading the SoftwareLoading the software consists of three steps:
l Configuring Network Information
l Installing the RPMs
l Verifying the Installation
l Managing Timezones
l Configuring Stored Procedures
Configuring Network InformationFollow the preparation steps in Meeting Exchange® 5.1 Installing the S6200 and S6800 Conferencing Servers. To load the server software, follow the steps below, in place of the Loading the Software section in Meeting Exchange® 5.1 Installing the S6200 and S6800 Conferencing Servers.
1. At the boot prompt, enter one of the following options:
l boot: auto - Preferred option: This automatically reads the information from the CD and installs the Linux OS and conferencing software.
l boot: expert - This guides you through screens to start the download

Chapter 2: Installing Conference Scheduler for Microsoft Outlook
14 Avaya Meeting Exchange 5.1 for Microsoft Applications November 2008
Tip:Tip: Log in with the auto option, unless you are copying the software from another
server using TFTP. To copy the software from another server, select the default options and click OK until you see the screen that asks you for the source of the download. Select TFTP server and the server path.
2. Press Enter to view the first software installation screen:
Note:Note: To navigate installation screens, use the arrow keys to move to an option and
press the space bar to select the option. Press Enter to submit the screen.
3. Type “x” in the parenthesis () next to the Install option.
4. Select OK.
If the system contained an earlier release of the audio conferencing software, the system displays this warning:
5. Select Yes.
The installation program displays a prompt with the available software build.
What do you want to do?
The hard drive is currently Partitioned Choose One
<X> InstallInstall of Upgrade Software< > ShellBoot to Rescue Bash Shell< > InstallReboot the server
< OK >
W A R N I N G
The hard drive on this system appears o already have a partition structure defined. If you select continue, all dataOn this drive will be lost.
Do you wish to proceed? < Yes > < No >
Select Release Version
Select Meeting Exchange Build
(X) Meeting Exchange-X.X.X.X Build
Loading the Software
Avaya Meeting Exchange 5.1 for Microsoft Applications November 2008 15
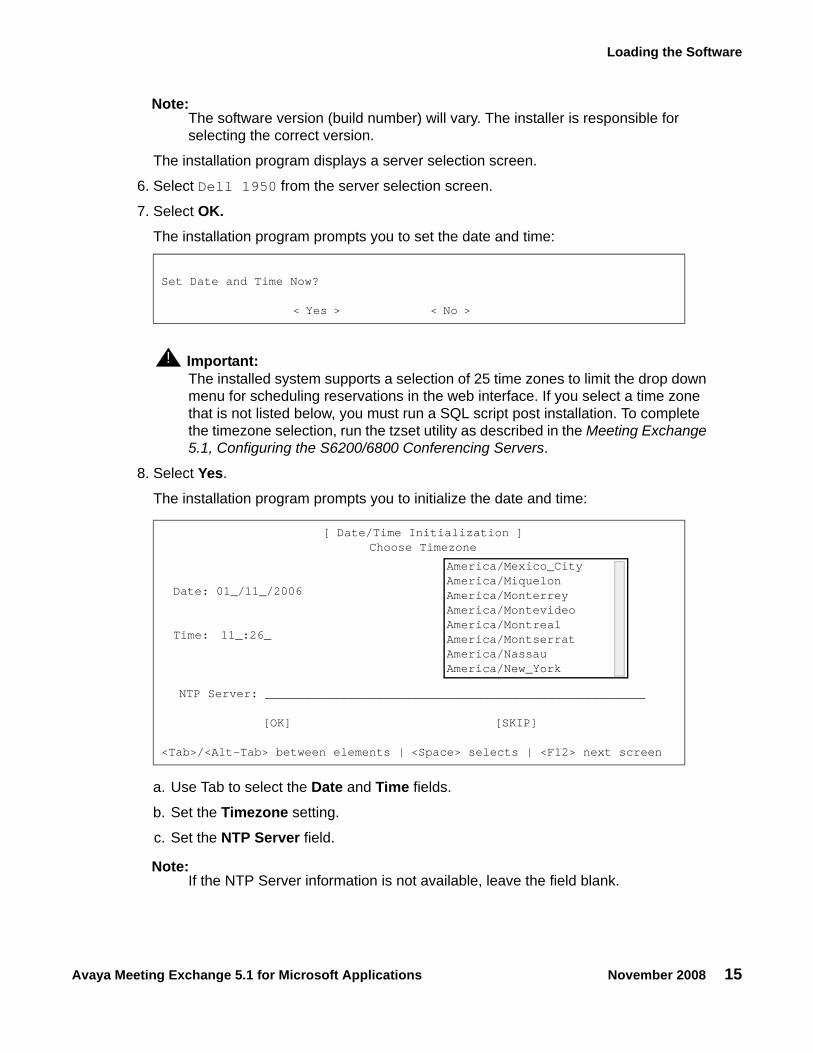
Note:Note: The software version (build number) will vary. The installer is responsible for
selecting the correct version.
The installation program displays a server selection screen.
6. Select Dell 1950 from the server selection screen.
7. Select OK.The installation program prompts you to set the date and time:
! Important:Important: The installed system supports a selection of 25 time zones to limit the drop down
menu for scheduling reservations in the web interface. If you select a time zone that is not listed below, you must run a SQL script post installation. To complete the timezone selection, run the tzset utility as described in the Meeting Exchange 5.1, Configuring the S6200/6800 Conferencing Servers.
8. Select Yes.
The installation program prompts you to initialize the date and time:
a. Use Tab to select the Date and Time fields.
b. Set the Timezone setting.
c. Set the NTP Server field.
Note:Note: If the NTP Server information is not available, leave the field blank.
Set Date and Time Now? < Yes > < No >
[ Date/Time Initialization ]Choose Timezone
Date: 01_/11_/2006
Time: 11_:26_
NTP Server: _____________________________________________________
[OK] [SKIP]
<Tab>/<Alt-Tab> between elements | <Space> selects | <F12> next screen
America/Mexico_CityAmerica/MiquelonAmerica/MonterreyAmerica/MontevideoAmerica/MontrealAmerica/MontserratAmerica/NassauAmerica/New_York

Chapter 2: Installing Conference Scheduler for Microsoft Outlook
16 Avaya Meeting Exchange 5.1 for Microsoft Applications November 2008
d. Select OK.
The installation program displays this prompt:
9. Select Yes if the IP information for the site is available at this time.
The installation program displays the Configure Network Information screen.
a. Set the Hostname to the name of your server, such as “Server 1".
b. Set the values for the eth0 IP Address and Netmask of the customer LAN.
c. Set the Enable field for eth0 to “X”.
d. Set the default gateway address.
! Important:Important: Do not edit the value in the eth1 field. This port is reserved for the Avaya support
subnet (192.11.13.5) and the services laptop. Do not set the values for eth2 and eth3. They are used for network redundancy.
! Important:Important: The network switch ports must be on the same subnet as the application, and the
switch ports must be set to “Full Duplex.”
Tip:Tip: Settings in this dialog can be configured using the Electronic Pre-installation
Worksheets.
Set IPAddress for NIC<s>Now? < Yes > < No >
Configure Network Information
[ Configure Network Information ]
Hostnameserver1_____________________________DNS Domain____________________________________DNS Server____________________________________
InterfaceTypeAddressNetmaskEnableeth0 [ ]______________________________[X ]eth1 [ ] 192.11.13.6 255.255.255.252[X ]eth2 [ ]______________________________[ ]eth3 [ ]______________________________[ ]
Default Gateway _______________
[OK] [SKIP]

Loading the Software
Avaya Meeting Exchange 5.1 for Microsoft Applications November 2008 17
e. Select OK.
The installation program displays this message:
Tip:Tip: The installation process can take up to thirty minutes.
Once the installation completes, the system momentarily displays a message showing the installed software build.
After the system displays the message, the server automatically ejects the CD and reinitializes.
! Important:Important: The server can take up ten minutes to initialize. During this time the system is
configured with a firewall and other security mechanisms, so the application can only be accessed through HTTPs or SSH.
Installing the RPMsYou can install the RPMs on Meeting Exchange Enterprise Edition or you can install the RPMs on Meeting Exchange Express Edition:
l Installing the RPMs for Meeting Exchange Enterprise
l Installing the RPMs for Meeting Exchange Express
Installing the RPMs for Meeting Exchange Enterprise
Avaya include the neccessary RPMs with Meeting Exchange Enterprise 5.1. The instructions for installing the RPMs are included below because these instructions are required in a limited number of cases, such as in a standalone RPM installation. For a regular installation, proceed directly to step 4 to edit the server.xml file to point to the Client Registration Server.
To install the Outlook RPM and the Adapter RPM that accompanied this release:
1. Copy the Outlook-plugin-X-X.X.X.i386.rpm to the S6200 and S6800 Conferencing Servers.
a. Open Winscp.
b. Connect to the server as user craft.
c. Copy soap-on-mx-5-x.x.x.i386.rpm and Outlook-plugin-X-X.X.X.i386.rpm to the server.
Making /dev/sda BootableInstalling RP on /dev/sda6

Chapter 2: Installing Conference Scheduler for Microsoft Outlook
18 Avaya Meeting Exchange 5.1 for Microsoft Applications November 2008
2. Open putty and logon to the server as sroot.
3. Enter this command: Cd /home/craft
4. Edit $CATALINA_HOME/webapps/axis/WEB-INF/server.xml to correct the IP address of the Client Registration Server (CRS). In the code, ensure that you replace the word localhost with the CRS IP.
<Context docBase="axis" path="/axis" reloadable="true"
source="org.eclipse.jst.j2ee.server:axis">
<Resource name="jdbc/mssql" scope="Shareable"
type="javax.sql.DataSource"
factory=
"org.apache.commons.dbcp.BasicDataSourceFactory"
url=
"jdbc:sqlserver://localhost:1433;databaseName=BSRes2"
driverClassName=
"com.microsoft.sqlserver.jdbc.SQLServerDriver"
username="spectel" password="spectel" maxIdle="200"
maxActive="2000" />
</Context>
</Host>
5. Run the following command rpm –Uvh Outlook-plugin-X-X.X.X.i386.rpm.
6. Restart the Conference Scheduler Plug-in for Microsoft Outlook using the following command service outlook-plugin restart.
7. Run the following command \opt\outlook\configureOutlook.sh.
8. Restart Tomcat using the following command service tomcat5 restart.
9. Restart Httpd using the following command service httpd restart.
10. Restart the audio conferencing bridge.
Installing the RPMs for Meeting Exchange Express
To install the Outlook RPM and the Adapter RPM that accompanied this release:
1. Copy soap-on-mx-5-x.x.x.i386.rpm and Outlook-plugin-X-X.X.X.i386.rpm to the S6200 and S6800 Conferencing Servers.
a. Open Winscp.
b. Connect to the server as user craft.
Loading the Software
Avaya Meeting Exchange 5.1 for Microsoft Applications November 2008 19
c. Copy soap-on-mx-5-x.x.x.i386.rpm and Outlook-plugin-X-X.X.X.i386.rpm to the server.
2. Open putty and logon to the server as craft.
3. Enter this command: Cd /home/craft
4. Run the following command sudo rpm –Uvh Outlook-plugin-X-X.X.X.i386.rpm.
5. Restart the Conference Scheduler Plug-in for Microsoft Outlook using the following command sudo service outlook-plugin restart.
6. Run the following command /opt/outlook/configureOutlook.sh.
7. Restart JBoss using the following command sudo lc restart jboss.
8. Restart Httpd using the following command sudo service httpd restart.
Verifying the Installationl To check if the SOAP adapter is installed correctly:
Open https://<Your server IP address>:8443/axis/servlet/AxisServlet to make sure you can find ExternalBookingSessionWebService in the web page.
l To check if the Conference Schedule for Microsoft Outlook Plug-in Remote Installer is running:
Open http://<Your_server IP address>/outlook/ to make sure the Web page contains two installers.
Managing TimezonesIt is important to note that if you are deploying Avaya Conference Scheduler Plug-in for Microsoft Outlook on your network, you should not edit the timezone list in the Client Registration Server Front End.
In the System Administration section of the Client Registration Server Front End, the default configuration for timezone type and timezone name is as follows:
Order Timezone
0 (local) 0 0
1 UTC (System)
2 MST+ DST (Mountain)

Chapter 2: Installing Conference Scheduler for Microsoft Outlook
20 Avaya Meeting Exchange 5.1 for Microsoft Applications November 2008
Avaya Conference Scheduler Plug-in for Microsoft Outlook uses timezone 1 UTC (System) as the default timezone for booking conferences. This configuration is hardcoded.
Configuring Stored ProceduresThe CRS Stored Procedure Interface (CSPI) is a series of SQL stored procedures that provide developers with conference managing tools. CSPI is part of the BSRes2 Database. CSPI enables third party developers call the procedures from their preferred programming language or directly via SQL. For more information on CSPI, see the Meeting Exchange 5.1 Client Registration Server Stored Procedures for Database Connectivity Guide, which is available on support.avaya.com.
For the successful operation of the Conference Scheduler Plug-in for Microsoft Outlook application, you must install the CSPI component of Meeting Exchange. For more information, contact your Avaya Support representative.
3 PST+ DST (Pacific + Tijuana)
4 GMT (NO DST)
5 CET + DST (Paris)
6 GFT + DST (Athens)
7 AUS + DST (Sydney)
8 MDE + DST(Tehran)
9 GMT + DST (Dublin)
10 CST+ DST (Central)
11 Hawaii + DST
12 Indiana no DST
13 Arizona no DST
14 EST + DST (Eastern)
Order Timezone

Configuring Multiple Bridges
Avaya Meeting Exchange 5.1 for Microsoft Applications November 2008 21
Configuring Multiple BridgesYou can configure the Conference Scheduler Plug-in for Microsoft Outlook to communicate with multiple audio conferencing bridges.
You only need to install the Microsoft Outlook adapter on one (The Master) bridge. All Outlook Conference Scheduler clients will connect to the master bridge initially and will have the option using a drop-down list to select on which bridge they want to book the conference.
For a single bridge installation, you do not need to edit the bridgeinfo.xml file.
Figure 3: Meeting Exchange Multiple Server Configuration
To configure multiple bridges:
1. Install the SOAP Adapter RPM on each Meeting Exchange bridge.
2. Configure each Meeting Exchange bridge to connect to each CRS server.
3. Install Outlook Conference Schedule in the Master Meeting Exchange, as normal.
4. Logon to the Master Meeting Exchange using Putty as sroot
5. Enter the following command: Cd /usr/ipcb/outlook/files.
6. Modify bridgeinfo.xml to add bridge name and IP address of the Meeting Exchange pair into it. For example:
<bridge name="Dublin" ip="111.111.111.110"></bridge>
<bridge name="New York" ip="222.222.222.222"></bridge>
<bridge name="Beijing" ip="333.333.333.333"></bridge>
CRS 1
Meeting Exchange 3Meeting Exchange 2Meeting Exchange 1
CRS 2 CRS 3
Master
Microsoft Outlook ClientSOAP Adapter RPM

Chapter 2: Installing Conference Scheduler for Microsoft Outlook
22 Avaya Meeting Exchange 5.1 for Microsoft Applications November 2008
7. Restart httpd using the following command: service httpd restart.
8. Restart all Microsoft Outlook clients to pick up the updates.

Avaya Meeting Exchange 5.1 for Microsoft Applications November 2008 23
Chapter 3: Administering Conference Scheduler for Microsoft Outlook
You can make the conferencing capabilities of Meeting Exchange 5.1 available throughout your organization using a plug-in application which Avaya has developed to integrate seamlessly with Microsoft Outlook. The Conference Scheduler plug-in for Microsoft Outlook enables end-users to book conference calls in the same way that they book an appointment or a meeting. The plug-in consists of an additional tab, called, Conference Call, which is displayed on the Calendar screen in Microsoft Outlook.
The plug-in supports deployment on clients with Microsoft Office Outlook 2003 and 2007 on Microsoft Windows XP (Service Pack 2 or later), and Microsoft Windows Vista platforms.
Note:Note: Computers with Microsoft Outlook 2003 must have Microsoft Office 2003 Service
Pack 1 or later installed, or the plug-in installation process will fail.
The Conference Scheduler plug-in for Microsoft Outlook has two installation options:
l You can run the client set-up for the Conference Scheduler plug-in for Microsoft Outlook on each User’s computer. After set-up, the assemblies needed for the plug-in reside on the User’s computer. For more information, see Manual Installation on page 23.
l You can silently push the Conference Scheduler plug-in for Microsoft Outlook software to your network using a technology such as Systems Management Server (SMS) or Tivoli. For more information, see Silent Installation on page 25.
Manual InstallationManual installation is also known as client installation. The client set-up installs all the files and registry entries that the Conference Scheduler plug-in for Microsoft Outlook requires. It also sets the .NET security policy to enable Microsoft Outlook to run the plug-in. It is a standalone set-up, which is suited to a local installation scenario. The client set-up is located on a Meeting Exchange bridge at http://<bridge_ip_bridge>/outlook/install/2007/ClientSetup.exe if you are running Office Outlook 2007 and http://<bridge_ip_bridge>/outlook/install/2003/ClientSetup.exe if you are running Office Outlook 2003.
The client set-up performs the following actions:
Chapter 3: Administering Conference Scheduler for Microsoft Outlook
24 Avaya Meeting Exchange 5.1 for Microsoft Applications November 2008
l Checks that the following pre-requisites are installed:
- .NET Framework 2.0- Microsoft Visual Studio 2005 Tools for Office Runtime- Microsoft Office 2003 Primary Interop Assemblies- Visual Studio 2005 Tools for Office Language Pack
l Prompts the User to accept license agreements for any of the pre-requisites which are not installed.
l Installs any missing pre-requisites.
l Prompts the User to accept the Avaya license agreements.
l Prompts the User to enter the IP address of the conferencing bridge.
l Provides a default installation folder; C\Program Files\Avaya\Outlook Conference Scheduler\ and prompts the User to select an installation folder.
l Installs the Conference Scheduler plug-in for Microsoft Outlook.
The add-in loads when the User restarts Microsoft Outlook or when it is enabled in the COM add-in menu.
During an un-install, the client set-up:
l Removes the contents of the installation folder.
l Removes the security policy settings for OutlookConferenceScheduler.
l Removes the registry entries for OutlookConferenceScheduler.
Note:Note: Users runs the un-install using the Add/Remove Programs feature in the
Windows Control Panel. The un-install does not remove the pre-requisites for the Conference Scheduler plug-in for Microsoft Outlook.
The Download Web PageThe default server configuration provides a Web page at the following URL:
http://server_ip/outlook/
Note:Note: In this URL, server_ip refers to the IP address of the audio conferencing
server.
This web page links users to the installation wizard for the Conference Scheduler plug-in for Microsoft Outlook 2003 and 2007. Figure 4 shows the Web page.

Silent Installation
Avaya Meeting Exchange 5.1 for Microsoft Applications November 2008 25
Note:Note: Avaya has used the standard Windows Installation Wizard for the installation of
the Conference Scheduler plug-in for Microsoft Outlook.
Figure 4: Web Page
By default, the links point at the client install package for clients with Microsoft Outlook 2003 or Microsoft Outlook 2007. The client installation runs the client set-up for the Conference Scheduler plug-in for Microsoft Outlook on each User’s computer. After set-up, the assemblies needed for the plug-in reside on the User’s computer.
Silent InstallationThe installation packages for the Avaya Conference Scheduler for Microsoft Outlook are available on the conferencing server once you install Meeting Exchange 5.1. As a System Administrator, you should download the relevant installation package from the conferencing server:
l Microsoft Outlook 2003 installation package:
http://server_ip_address/outlook/install/ClientSetup.exe
l Microsoft Outlook 2007 installation package:
http://server_ip_address/outlook/install/2007/ClientSetup.exe

Chapter 3: Administering Conference Scheduler for Microsoft Outlook
26 Avaya Meeting Exchange 5.1 for Microsoft Applications November 2008
The steps are similar for both versions of Microsoft Outlook.
To enable the silent installation on your network:
1. The installation package is a self-extracting zip file. Use a zip extraction tool to extract the contents of the file from the executable to a directory on your computer.
The extracted contents contain the following files and directories:
- Administrator: The directory used by setup.exe to check for Administrator privileges. This file is not relevant for a silent installation.
- dotnetfx: Microsoft .Net Framework 2.0- localisation: Localized Resource DLL’s- Office200xPIA: Microsoft Office Outlook Primary Interop Assemblies- VSTOR: Visual Studio Tools for Office (VSTO) or VSTO Second Edition for Outlook
2007 version- OutlookConferenceSchedulerClientSetup.msi or
Outlook2007ConferenceSchedulerClientSetup.msi: MSI install package- setup.exe: Setup program
2. Install the relevant pre-requisites on the target computers. For more information, see Prerequisites on page 27.
3. Install the MSI Installation package on the target computers.
4. Run the command for installing the Avaya Conference Scheduler for Microsoft Outlook. Here is an example of this command:
msiexec /quiet /package OutlookConferenceSchedulerClientSetup2007.msi
5. Use the remote registry editor or another tool to roll out the following 3 registry entries (strings) to each target computer:
[HKEY_LOCAL_MACHINE\Software\Classes\CLSID\{9B6591DB-66E8-4975-BDB4-6E05BD1239BF}]
- hostname- EmailAddress- AccountPassword
The three entries are the IP address of the conferencing server, the User’s e-mail address, and the User’s password as set on their account on the conferencing server.
6. If your Users are running Microsoft Outlook 2003:
a. Request your Users to restart Microsoft Outlook in order to access Avaya Conference Scheduler for Microsoft Outlook.

Prerequisites
Avaya Meeting Exchange 5.1 for Microsoft Applications November 2008 27
b. After the restart, request your Users to run the following file:
EnableOffice2003User.reg
By default, this file should be located in:
c:\Program Files\Avaya\Outlook Conference Scheduler1
7. If your Users are running Microsoft Outlook 2007:
l Request your Users to restart Microsoft Outlook in order to access Avaya Conference Scheduler for Microsoft Outlook.
Unlike Microsoft Outlook 2003 Users, Microsoft Outlook 2007 Users do not need to run the registry file in order to access the Conference Scheduler plug-in. There is one exception to this rule: If you restart Microsoft Outlook immediately after the installation, while still logged in as an Administrator, the Microsoft Outlook 2007 User must run EnableOffice2007User.reg when they log in.
Note:Note: There are two relevant issues in relation to the Microsoft Vista operating system:
l The Microsoft Vista feature, User Account Control (UAC), must be turned off for a silent install to work correctly. Alternatively, with UAC on, the Conference Scheduler package rollout will need to be managed by an external deployment tool such as SMS.
l Microsoft Vista prompts Power Users for Administrator credentials when they attempt to run the registry file from step 6. Microsoft Vista does not prompt regular Users for Administrator credentials when they attempt to run the registry file, however, the registry file will not run successfully.
PrerequisitesThe plug-in is based on Microsoft Visual Studio Tools for Office (VSTO) technology. As a result, you must install the following pre-requisites on the client PC’s:
If you are using Microsoft Outlook 2003l Microsoft .Net Framework 2.0
l Microsoft Visual Studio Tools for Office 2005 Runtime
l Microsoft Visual Studio Tools for Office 2005 Language Pack (optional)
l Microsoft Office 2003 Primary Interop Assemblies
1. If you did not install to the default location, edit Enable2003User.reg and update ManifestLocation.

Chapter 3: Administering Conference Scheduler for Microsoft Outlook
28 Avaya Meeting Exchange 5.1 for Microsoft Applications November 2008
If you are using Microsoft Outlook 2007l Microsoft .Net Framework 2.0
l Microsoft Visual Studio Tools for Office 2005 Second Edition Runtime
l Microsoft Office 2007 Primary Interop Assemblies
If the clients, or target PCs, are using non-English locale settings, they must have an appropriately localized version of the Microsoft .Net Framework 2.0 installed on their PC. This is a requirement for both Microsoft Windows XP (Service Pack 2 or later), and Microsoft Windows Vista platforms. It is your responsibility as the System Administrator to ensure that the correctly localized version of the Microsoft .Net Framework 2.0 is installed on the target PCs.
Configuring the Web PageThe plug-in installer files reside on the conferencing server in the following folder:
/usr/ipcb/outlook/install
The download web page is located here:
/usr/ipcb/outlook/index.html
Avaya recommends that you do not edit the index.html file at the above location. You should edit the index.html file that resides in the following location:
/usr/ipcb/Templates
Once you edit this file, you must execute a script on the server as follows:
sudo /opt/outlook/configureOutlook.sh
This script automatically runs when the conferencing server reboots, or when the IP address of the server changes. You can run it manually if you want to change the Download Web Page from which the end-users access the installers.
Tip:Tip: It is a good idea to provide a link to the documentation from the Web page. If you
provide a link, end-users can download a guide to scheduling conferences. This guide is in PDF format and is called the Meeting Exchange 5.1 for Microsoft Applications User Guide. This guide describes how to book conferences. It also contains a guide to the DTMF controls that are available to Moderators and Conferees during live conferences.

Re-installing the Conference Scheduler Plug-in for Microsoft Outlook
Avaya Meeting Exchange 5.1 for Microsoft Applications November 2008 29
Re-installing the Conference Scheduler Plug-in for Microsoft Outlook
In the unlikely event that a user has to re-install the Conference Scheduler plug-in for Microsoft Outlook, ensure that they uninstall the previous version of Conference Scheduler plug-in for Microsoft Outlook prior to beginning the re-installation.
Microsoft Outlook in Offline ModeIf Microsoft Outlook is in offline mode, but is still connected to the network, then the plug-in operates as normally. It retrieves the details of users’ on-demand conferences and it creates new scheduled conferences for users. However, if Microsoft Outlook is in offline mode and is not connected to the network, then the plug-in displays a network error if users try to retrieve on-demand conference details or schedule new conferences.
Checking the version of Microsoft Outlook on client machines
Avaya has provided a script which enables you to check which version of Microsoft Outlook is running on the client machines in your network. The script is called process_outlook_logs.sh and it is stored on the audio conferencing server in /opt/outlook.

Chapter 3: Administering Conference Scheduler for Microsoft Outlook
30 Avaya Meeting Exchange 5.1 for Microsoft Applications November 2008

Avaya Meeting Exchange 5.1 for Microsoft Applications November 2008 31
Chapter 4: Customizing Conference Scheduler for Microsoft Outlook
As a System Administrator, you can customize the appearance of the Avaya Conference Scheduler Plug-in for Microsoft Outlook. For example, you can hide certain conferencing options or you can configure certain options to display on the GUI in an enabled state. You can also configure which features are displayed on the Conference Call tab of the New Appointment dialog. Using this functionality, you can customize the End User experience to exactly match your requirements.
This chapter describes the customization options that are available.
l Configuring Feature Display
l Configuring the Join Conference Feature
l Configuring Multiple Audio Conferencing Telephone Numbers
l Configuring the Display of the Meeting Invitation
l Configuring Recurrent Conference Deletion
Configuring Feature DisplayYou can configure which features are displayed on the Conference Call tab of the New Appointment dialog. For example, you can configure the Avaya Plug-in for Microsoft Outlook to display the Use on-demand audio conference checkbox and the Web Conference checkbox and to hide the Schedule an audio conference checkbox.
To configure the feature display:
1. Log in to the master Meeting Exchange server as sroot using the Putty tool.
2. Enter the following command:
cd /usr/ipcb/outlook/files
3. Use any text editor to open configuration.xml.

Chapter 4: Customizing Conference Scheduler for Microsoft Outlook
32 Avaya Meeting Exchange 5.1 for Microsoft Applications November 2008
4. Change the values in the features tag as required.
A value of 1 means the feature is enabled and the plug-in displays a checkbox on the Conference Call tab of the New Appointment dialog.
A value of 2 means that the feature is not enabled and the plug-in does not display a checkbox on the Conference Call tab of the New Appointment dialog.
A value of 3 means that the feature is not enabled. However, the plug-in does display it in an inaccessible state on the Conference Call tab of the New Appointment dialog. A User cannot select it.
For example:
<features>
ondemand="1"
schedule="1"
showjoinconferencebutton="1"
audionumber="1"
webconference="2">
</features>
5. Restart Microsoft Outlook to display these changes.
Note:Note: You do not need to restart the server.
Configuring the Join Conference FeatureNote:
Note: It is important to note that the Join a Conference feature is only supported for a group of users within an enterprise using a single conferencing server. Each user must have the Avaya Conference Scheduler Plug-in for Microsoft Outlook on their computers in order to use the feature.
To enable the Join Conference feature, there are two main steps. You must configure an Operator sign-in name on the audio conferencing server. You must also configure the display of the feature on the Avaya Conference Scheduler Plug-in for Microsoft Outlook interface.
l Configuring an Operator Sign-in Name
l Configuring the Display of the Feature on the Interface

Configuring the Join Conference Feature
Avaya Meeting Exchange 5.1 for Microsoft Applications November 2008 33
Configuring an Operator Sign-in NameTo enable the Join Conference feature, you must configure an Operator on the audio conferencing server with specific sign-in details. These details are:
l username = jc3
l password = jc3
To configure the Operator:
1. Log on to the bridge using Putty.
2. Type:
dcbmaint
3. Navigate to Administrator Menu > Sign-In Management > Create Operator Sign-in.
4. Enter these details:
Sign-In name: jc3
Password: jc3
Configuring the Display of the Feature on the Interface1. Open outlook/files/configuration.xml, which is located on the conferencing
server.
2. Locate the configuration setting, showjoinconferencebutton.
If showjoinconferencebutton=2, the server hides the Join Conference feature from your Users.
If showjoinconferencebutton=1, the server shows the Join Conference feature to your Users.
3. Locate the configuration setting, showmostrecentdialnumbercount.
showmostrecentdialnumbercount is the maximum number of previously entered dial numbers that the Conference Scheduler Plug-in displays in the Enter Phone Number drop-down list on the Join Conference dialog. The default value is 10.
4. Set showmostrecentdialnumbercount to the number of previously entered numbers that you will to display.
Tip:Tip: The Meeting Exchange 5.1 for Microsoft Applications User Guide, which is
available on support.avaya.com describes the Join Conference feature for your Users.

Chapter 4: Customizing Conference Scheduler for Microsoft Outlook
34 Avaya Meeting Exchange 5.1 for Microsoft Applications November 2008
Configuring Multiple Audio Conferencing Telephone Numbers
You must configure the Avaya Plug-in for Microsoft Outlook to display a number of different conference access telephone numbers. For example, you might want to display a local telephone number, an international telephone number, and a toll free telephone number. This way, End Users can present their invitees with a number of entry options.
To configure multiple telephone numbers:
1. Log in to the master Meeting Exchange server as sroot using the Putty tool.
2. Enter the following command:
cd /usr/ipcb/outlook/files
3. Use any text editor to open configuration.xml.
4. Change the values in the audionumbers tag as required.
Use a comma to separate telephone numbers. For example:
<audionumbers>Internal:9000,Local:01-1234567,International:00123-1-1234567</audionumbers>
5. Restart Microsoft Outlook to display these changes.
Note:Note: Please allow a delay of 10 seconds for the server to display the changes.
Configuring the Display of the Meeting InvitationTo configure the appearance of the conference invitation:
1. Log in to the master Meeting Exchange server as sroot using the Putty tool.
2. Enter the following command:
cd /usr/ipcb/outlook/files
3. Use any text editor to open configuration.xml.
4. Edit the header tag to customize the invitation heading.
Configuring Recurrent Conference Deletion
Avaya Meeting Exchange 5.1 for Microsoft Applications November 2008 35
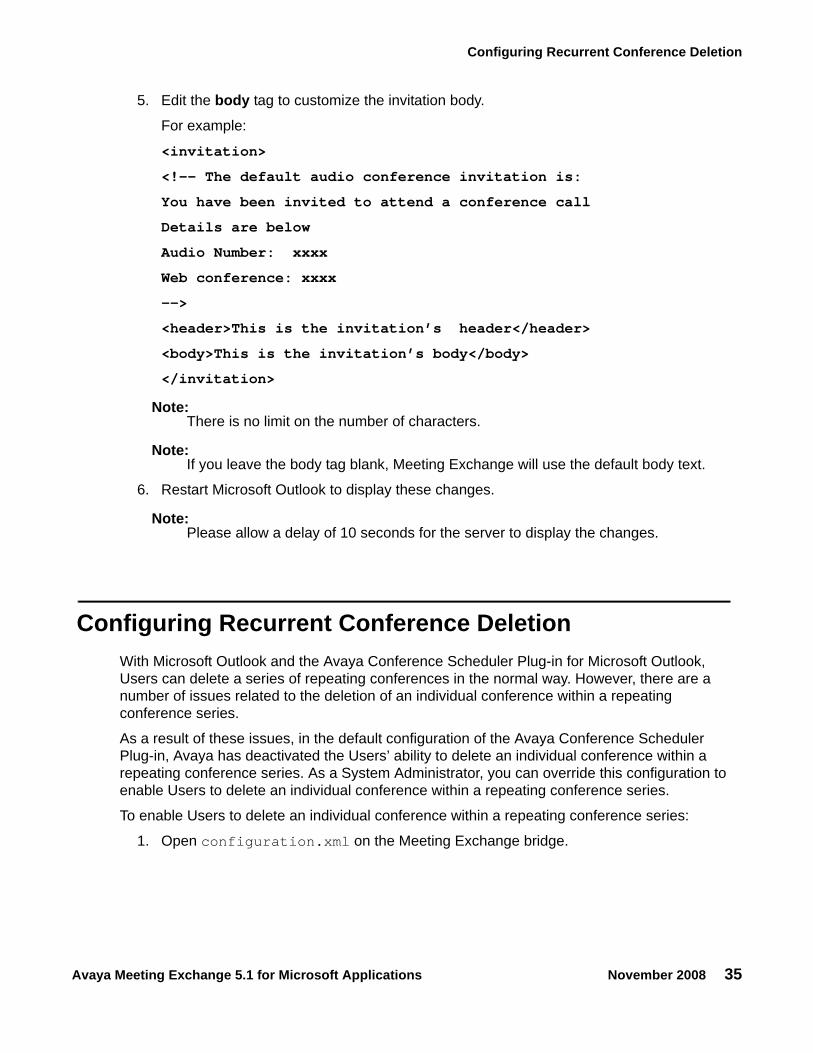
5. Edit the body tag to customize the invitation body.
For example:
<invitation>
<!-- The default audio conference invitation is:
You have been invited to attend a conference call
Details are below
Audio Number: xxxx
Web conference: xxxx
-->
<header>This is the invitation’s header</header>
<body>This is the invitation’s body</body>
</invitation>
Note:Note: There is no limit on the number of characters.
Note:Note: If you leave the body tag blank, Meeting Exchange will use the default body text.
6. Restart Microsoft Outlook to display these changes.
Note:Note: Please allow a delay of 10 seconds for the server to display the changes.
Configuring Recurrent Conference DeletionWith Microsoft Outlook and the Avaya Conference Scheduler Plug-in for Microsoft Outlook, Users can delete a series of repeating conferences in the normal way. However, there are a number of issues related to the deletion of an individual conference within a repeating conference series.
As a result of these issues, in the default configuration of the Avaya Conference Scheduler Plug-in, Avaya has deactivated the Users’ ability to delete an individual conference within a repeating conference series. As a System Administrator, you can override this configuration to enable Users to delete an individual conference within a repeating conference series.
To enable Users to delete an individual conference within a repeating conference series:
1. Open configuration.xml on the Meeting Exchange bridge.

Chapter 4: Customizing Conference Scheduler for Microsoft Outlook
36 Avaya Meeting Exchange 5.1 for Microsoft Applications November 2008
2. Set allowrecurringconferencedeletion=1.
The Avaya Conference Scheduler Plug-in now allows Users to delete an individual conference within a repeating conference series.
However, Avaya recommends that you do not override the default configuration. For more information on the issues related to individual conference deletion, see the Meeting Exchange 5.1 Release Notes, which are available on support.avaya.com.

Avaya Meeting Exchange 5.1 for Microsoft Applications November 2008 37
Chapter 5: Introduction to Microsoft Adapter
IntroductionMicrosoft Adapter integrates Microsoft Live Communications Server (LCS) and the Avaya audio conferencing bridge to provide protocol conversion between the Microsoft Office Communicator or Microsoft Live Meeting client application and an Avaya audio conferencing bridge.
Microsoft Adapter is deployed in a Conference Service Provider (CSP) or an Enterprise environment to provide the following protocol conversions:
l Conversion of SIP events that are received from LCS, to commands that are specific to the Avaya audio conferencing bridge. The audio conferencing bridge then initiates an audio conference.
Note:Note: The audio conferencing bridge is also deployed in the environment of the CSP.
l Conversion of events that are specific to the audio conferencing bridge, to SIP events. Microsoft Adapter then sends these SIP events to LCS.
Microsoft Adapter componentsMicrosoft Adapter includes the following components:
l Microsoft Adapter Installer. Installs Microsoft Adapter
l Administration interface. A graphical user interface that you use to configure and administer Microsoft Adapter
l Audio Conferencing Provider (ACP) Server. An interface to Microsoft Live Communications Server (LCS). ACP Server handles the movement of conference data to and from meeting clients and bridges. ACP Server performs the following functions:
- Event listening- Connecting to an audio conferencing bridge- Support for Live Meeting 7 audio functionality- Support for Office Communicator 1.0 audio functionality

Chapter 5: Introduction to Microsoft Adapter
38 Avaya Meeting Exchange 5.1 for Microsoft Applications November 2008
- Communication with an audio conferencing bridge- Logging of events and messages
l BCAPI Client
- Creates the connection to the bridge and maintains the bridge object- Keeps information of the state of this connection- Listens to the BCAPI events- Sends BCAPI events to ACP Interface so that these can be sent to LM/OC- Maps the ACP Module events to corresponding BCAPI method calls- All the Bridge connection references are maintained. These connections are persistent
l ACP BCAPI Client Interface
Avaya Meeting Exchange 5.1 for Microsoft Applications November 2008 39
Chapter 6: Introduction to Microsoft Office Communications Server (OCS) Adapter
Avaya has developed the Microsoft Office Communications Server Adapter, often called the OCS Adapter, to act as an interface between Microsoft Office Communicator 2007 and Meeting Exchange 5.1.
This chapter introduces the OCS Adapter and contains the following sections:
l Feature Set
l Audit Trail
l Operating Environment
l Client Install
Feature SetThe features set include the following:
l A User can start an audio conference by selecting Participants from the Microsoft Office Communicator contact list. Once the audio conference begins, this User becomes the conference Moderator.
Tip:Tip: For clarification on terms, such as Moderator, Participant, and Conferee, please
refer to the Glossary on page 109.
l Moderators can view the status and details of all Participants, during a live conference.
l Moderators can update the line status to mute and unmute Participants.
l Moderators can update Participant details, such as the name of the Participant.
l Participants can mute their line. Similarly, Participants can unmute their line.
l Moderators can mute the lines of all Participants. Similarly, Moderators can unmute the lines of all Participants. Moderators can also mute the lines of selected Participants. Similarly, Moderators can unmute the lines of selected Participants.

Chapter 6: Introduction to Microsoft Office Communications Server (OCS) Adapter
40 Avaya Meeting Exchange 5.1 for Microsoft Applications November 2008
l Participants can leave a conference by hanging up their telephone line or by clicking an interface icon.
l Moderators can eject a Participant from the conference by clicking an interface icon.
l Moderators can end the conference by clicking an interface icon.
l Moderators can lock and unlock a conference to prevent any further Participants from joining the conference.
Audit TrailThe OCS Adapter maintains a log of any errors and faults. There are a number of levels of logging events:
l Error
l Debug
l Warning
l Information
You can configure the logging level to capture the events that you require.
The log files are stored in a configurable location. When the size of the file reaches a configurable size, the OCS Adapter creates a new file. The default maximum size is currently 2 MB.
Operating EnvironmentThe OCS Adapter operates with the following systems:
l Meeting Exchange Enterprise Edition 5.1
l Microsoft Office Communicator 2007 on Windows XP or Windows Vista Business Edition with Internet Explorer 6 or 7.
l Microsoft Office Communications Server 2007 Standard Edition on Windows Server 2003 Standard Edition.
The OCS Adapter requires the following systems:
l Windows .NET 2.0 and 3.5
l Sun JRE 1.4.7
l Microsoft IIS 6

Client Install
Avaya Meeting Exchange 5.1 for Microsoft Applications November 2008 41
l ASP.NET AJAX 1.0
Client InstallFor the client install information, see Configuring Microsoft Office Communicator 2007 for your Users on page 107.

Chapter 6: Introduction to Microsoft Office Communications Server (OCS) Adapter
42 Avaya Meeting Exchange 5.1 for Microsoft Applications November 2008

Avaya Meeting Exchange 5.1 for Microsoft Applications November 2008 43
Chapter 7: Installing Microsoft Adapter
You must perform a number of pre-installation, installation, and post-installation steps in order to fully install Microsoft Adapter. You must complete the steps in the following order:
l Setting the JRE Environment
l Installing Microsoft Adapter
l Changing the Startup Type for the Avaya BsMonitor service
l Changing the Registry Entry for the Avaya BsMonitor service
This chapter also describes how to uninstall the Microsoft Adapter:
l Uninstalling Microsoft Adapter
Note:Note: When you complete the steps in this chapter, you must perform a number of
configuration steps. These configuration steps are described in Configuring Microsoft Adapter on page 51
Setting the JRE Environment 1. Right-click My Computer on your desktop and then click Properties.
2. Click the Advanced tab and then click Environment Variables.
The system displays the Environment Variables screen.
3. In the System Variables area, select the Path variable and then click Edit.The system displays the Edit System Variable screen.
4. To set the JRE environment path, copy the JRE path from the location of installation (for example, C:\Program Files\Java\jre1.5.0_07\bin\client) and paste the JRE path into the System Variable field. Type a semicolon (;) at the end of the existing path.
5. On the Edit System Variable screen, click OK.
6. On the Environment Variables screen, click OK.

Chapter 7: Installing Microsoft Adapter
44 Avaya Meeting Exchange 5.1 for Microsoft Applications November 2008
Installing Microsoft AdapterNote:
Note: BSMonitor is an application which actively monitors the conferencing components. If any of the conferencing components shut down, the BSMonitor application restarts them.
1. Click setup.exe.
The system starts the InstallShield wizard for Microsoft Adapter and displays the Welcome to the InstallShield Wizard screen.
2. Click Next. The system displays the license agreement screen.
3. On the Customer Information screen, type your user name and your company name. Click Next.
4. On the Choose Folder screen, select the folder in which to install the application. Click Next to accept the default installation path C:\Program Files\Microsoft Adapter or click Browse to choose another location. Select the folder and then click OK to accept the changes.
The system displays the Select a Program Folder screen.
Note:Note: By default, the Avaya BsMonitor service is installed in C: \Program Files\
Microsoft Adapter. If you change the default installation path of Microsoft Adapter, you must also change the BsMonitor registry manually and start the service manually. For more information, see Changing the Registry Entry for the Avaya BsMonitor service on page 45.
5. To create a shortcut for Microsoft Adapter, ensure that Microsoft Adapter is selected in the Existing Folders area and click Next. The system displays the Ready to Install the Program screen.
6. Click Next and then click Install to start the installation.
When the installation is finished, the system displays the Installation Complete screen.
7. Click Finish.
Note:Note: If you set the default path to C:\Program Files\Microsoft Adapter, the
system installs and starts the Avaya BsMonitor service.
If you set the path to a location other than the default, you must perform the following actions:
l Change the registry entry for the Avaya BsMonitor service. See Changing the Registry Entry for the Avaya BsMonitor service on page 45.
l Start the Avaya BsMonitor Service.

Changing the Startup Type for the Avaya BsMonitor service
Avaya Meeting Exchange 5.1 for Microsoft Applications November 2008 45
l Change the startup type for the Avaya BsMonitor service.
! Important:Important: The configuration file is automatically installed. Avaya recommends making a
copy of this file or backing it up to another location. This file is useful in the event of an upgrade or in the unlikely event of a system failure.
Changing the Startup Type for the Avaya BsMonitor service
1. Open the Microsoft Windows Services screen.
By default, the startup type for the Avaya BsMonitor service is Manual.
2. Right-click Avaya BsMonitor and click Properties.
The system displays the Avaya BsMonitor Properties screen.
3. In the Startup type field on the General tab, select Automatic.
4. Click Apply and then click OK.
Changing the Registry Entry for the Avaya BsMonitor service
! Important:Important: Perform this procedure only if you installed the application in a directory other
than the default location C:\ProgramFiles\Microsoft Adapter.
1. Click Start > Run. In the Open field, type regedit and click OK.
The system displays the Registry Editor screen.
2. In the left pane, click Avaya BsMonitor > Parameters > 0.
In the right pane, the system displays the default path C:\ProgramFiles\Microsoft Adapter\bin.
3. Right-click Path and then click Modify.
The system displays the Edit String screen.
4. In the Value data field, enter the path where the Microsoft Adapter application is installed and click OK to save.

Chapter 7: Installing Microsoft Adapter
46 Avaya Meeting Exchange 5.1 for Microsoft Applications November 2008
Uninstalling Microsoft AdapterWhen you uninstall Microsoft Adapter, you remove the application from the target computer. You also remove all the related entries that you made during the installation.
Note:Note: Microsoft Adapter must be closed before you start the uninstallation.
1. Click Start > Settings > Control Panel > Add or Remove Programs.
2. In the list of programs, click Microsoft Adapter and then click Change/Remove.
The system displays the Maintenance Welcome Screen.
Note:Note: The process might experience an error at this point and displays the following
message:
1155: File C:\Program Files\InstallShield Installation Information\ {37A789A9-EDDC-4500-9B7D-1B04F1 Gateway Application.msi not found.
If you see this message, do not continue with this procedure. Instead, double-click setup.exe to uninstall Microsoft Adapter.
3. Select Remove and click Next. The system displays a confirmation box.
4. Click Yes.
The system stops the Avaya BSMonitor service and then displays the Uninstall Progress screen. When the uninstallation is complete, the system displays the Uninstall Complete screen.
5. Click Finish.
The application is removed from the target computer. The related entries that are made during installation are also removed.

Avaya Meeting Exchange 5.1 for Microsoft Applications November 2008 47
Chapter 8: Installing OCS Adapter
This chapter describes how to install OCS Adapter. It contains the following sections:
l Pre-installation Steps
l Server Installation Steps
l Server Uninstall Steps
Note:Note: When you complete the steps in this chapter, you must perform a number of
configuration steps. These configuration steps are described in Configuring OCS Adapter on page 65
Pre-installation StepsThe OCS Adapter pre-installation steps consist of:
l Ensuring Compliance with the Software Requirements
l Setting a Number of Variables
l Installing Internet Information Services
Ensuring Compliance with the Software RequirementsTable 1 lists the software required for the successful operation of OCS Adapter.
Table 1: Software Requirements
Software Type Description
Operating System Windows 2003 Server, Standard Edition, with Service Pack 2
IIS Internet Information Services 6.0
.NET Framework version .NET Framework version 3.5
Java Runtime Environment (JRE) JRE 1.5

Chapter 8: Installing OCS Adapter
48 Avaya Meeting Exchange 5.1 for Microsoft Applications November 2008
Setting a Number of VariablesTo configure the environment variable settings for the successful operation of OCS Adapter, you must perform a number of tasks:
l Setting the JRE Environment Path
l Setting the .NET Framework Path
l Setting the BCAPI Variable
Setting the JRE Environment Path
1. Right-click My Computer on your desktop and then click Properties.
2. Click the Advanced tab and click Environmental Properties.
3. In the System Variables panel of the Environmental Variables dialog, select the Path variable and click Edit.
4. Copy the JRE path and paste it into Variable Value field.
Example JRE path: C\Program Files\Java\Jre1.5.0\bin\client
5. Type a semicolon (;) at the end of the existing path.
6. Click OK on the Edit System Variable and Environment Variables dialogs.
Setting the .NET Framework Path
1. Right-click My Computer on your desktop and then click Properties.
2. Click the Advanced tab and click Environmental Properties.
3. In the System Variables panel of the Environmental Variables dialog, select the Path variable and click Edit.
4. Copy the .NET path and paste it into Variable Value field.
5. Type a semicolon (;) at the end of the existing path.
6. Click OK on the Edit System Variable and Environment Variables dialogs.
Setting the BCAPI Variable
1. Right-click My Computer on your desktop and then click Properties.
2. Click the Advanced tab and click Environmental Properties.
3. In the User Variables panel of the Environmental Variables dialog, click New.
Server Installation Steps
Avaya Meeting Exchange 5.1 for Microsoft Applications November 2008 49
4. Enter BCAPIPATH in the Variable Name field and enter the fulls paths of bcapi.jar and acpgateway.jar in the Variable Value field.
Example paths: C\Program Files\avaya\avaya ocs adapter\bin\bcapi.jar; C\Program Files\avaya\avaya ocs adapter\bin\acpgateway.jar
5. Click OK on the New User Variable and Environment Variables dialogs.
Installing Internet Information Services1. Click the Start button and click Manage Your Server to launch the Server Management
Console.
2. Click Add or Remove a Role.
3. Select Application Server (IIS<ASP.NET) in the Server Roles list and click Next.4. Click FrontPage Server Extensions, enable ASP>NET options, and click Next.5. Click Next to start the installation of Internet Information Services.
Server Installation Steps1. Double-click the setup.exe file to start the installation.
2. Click Next on each dialog to accept all default options.
The installation completes within a few moments.
Note:Note: For client installation information, see Configuring Microsoft Office Communicator
2007 for your Users on page 107.
Server Uninstall StepsTo uninstall the OCS Adapter, use the Add/Remove Programs feature on the Windows Control Panel.

Chapter 8: Installing OCS Adapter
50 Avaya Meeting Exchange 5.1 for Microsoft Applications November 2008

Avaya Meeting Exchange 5.1 for Microsoft Applications November 2008 51
Chapter 9: Configuring Microsoft Adapter
This chapter describes how to configure Microsoft Adapter. You must complete the steps in Installing Microsoft Adapter on page 43 before you begin the configuration steps.
This chapter includes the following topics:
l Configuring the TLS certificate
l Understanding the Microsoft Adapter administrative interface
l Editing the gateway configuration settings
l Editing the log configuration settings
l Configuring Microsoft Adapter with bridges
Configuring the TLS certificateNote:
Note: To perform these steps, you must purchase two security certificates from a trusted security certificate vendor, such as Verisign. One certificate is for LCS and the other certificate is for MSAdapter.
This section describes how to configure the TLS certificate. It contains the following sections:
l Adding the certificates to Microsoft Management Console
l Exporting the TLS certificate
Microsoft Adapter starts only if a valid Transport Layer Security (TLS) certificate exists. The first thing that Microsoft Adapter does is try to read the default certificate file acp.cer from the default path \\MSAdapter\config\acp.cer. If Microsoft Adapter does not find the certificate or finds an invalid certificate, you see an error message (Figure 5).
Figure 5: TLS certificate not found error message
Microsoft Adapter then opens in the default mode, from which you can provide the valid certificate path.
Chapter 9: Configuring Microsoft Adapter
52 Avaya Meeting Exchange 5.1 for Microsoft Applications November 2008
1. To provide the valid certificate path, click Gateway Configuration > Gateway Settings.
2. On the Gateway Settings screen, click Browse and select the valid certificate path.
3. Click Save.
Microsoft Adapter stops and then restarts automatically with the new path.
Adding the certificates to Microsoft Management ConsoleTo add the certificate to Microsoft Management Console:
1. Click Start > Run. In the Run screen, type mmc and click OK.
The system displays the Console screen.
2. On the File menu, click Add/Remove Snap-in.
The system displays the Add/Remove Snap-in screen.
3. Click Add.
The system displays the Add Standalone Snap-in screen.
4. Click Certificates and then click Add.
The system displays the Certificates snap-in screen.
5. Select Computer account and click Next.6. In the Select Computer screen, select Local computer and click Finish.
7. On the Add Standalone Snap-in screen, click Close.
8. On the Add/Remove Snap-in screen, click OK.
Exporting the TLS certificate1. Click Start > Run. In the Run screen, type mmc and click OK.
The system displays the Console screen.
2. In the left pane of the Console screen, expand Certificates (Local Computer) > Personal.
3. In the right plane, double-click Certificates.
4. Right-click the issued certificate and then click All Tasks > Export.5. Click Next.
The system displays the Welcome screen.

Understanding the Microsoft Adapter administrative interface
Avaya Meeting Exchange 5.1 for Microsoft Applications November 2008 53
6. Click Next. The system displays the Export Private Key screen. By default, the option No, do not export the private key is selected.
7. Click Next.The system displays the Export File Format screen. By default, the option DER encoded binary X.509 (.CER) is selected.
8. Click Next.The system displays the File to Export screen.
9. In the File Name field, enter the name of the certificate file or click Browse to select the Config folder where Microsoft Adapter is installed. Export the certificate file to that folder.
10. Click Finish.
Note:Note: If you rename the TLS certificate or change the location of the certificate and then
try to start Microsoft Adapter or if Microsoft Adapter is already running, the application displays an error message that asks for the correct TLS certificate file. You must then provide the correct certificate file details and restart the application.
Understanding the Microsoft Adapter administrative interface
Use the administrative interface of Microsoft Adapter to perform the following functions:
l Add a bridge configuration to the Config file
l Add multiple audio conferencing bridges
l Modify an existing bridge configuration
l Delete an existing bridge configuration
l Start a connection to an existing bridge
l End the connection to an existing bridge
l Set the log path and other parameters for log messages
l Set the gateway application configuration to configure port and other parameters such as TLS connectivity and certificate details
l Display information that pertains to a particular audio conferencing bridge

Chapter 9: Configuring Microsoft Adapter
54 Avaya Meeting Exchange 5.1 for Microsoft Applications November 2008
The Microsoft Adapter main screenThe components of the Microsoft Adapter main screen are (Figure 6):
l The menu bar
l The information panel
l The trace pane
l The treeview pane
Note:Note: You cannot resize the screens of the administrative interface.
Figure 6: The Microsoft Adapter main screen
The menu bar
The menu bar includes the following menus:
l File
- View Trace

Understanding the Microsoft Adapter administrative interface
Avaya Meeting Exchange 5.1 for Microsoft Applications November 2008 55
- Exit
l Gateway Configuration
- Gateway Settings- Log Settings
l Conference Bridge
- Add New- Edit- Remove- Start- Stop
l Help
- About
The information panel
This panel provides information about the bridge configuration and any active conferences on a bridge. You can select a bridge node or a conference node on the treeview pane.
When you select an audio conference bridge, the application displays the properties of that bridge.
When you select an audio conference from the treeview pane, the application displays the start time and the number of Conferees for that conference.
The trace pane
The trace pane displays all errors, alarms, warning messages, and vital information such as “Conference Server started.” To display the trace pane, click View Trace on the File menu.
Note:Note: Avaya recommends that you do not enable the trace pane if you enable debug
logging on a live production system.
The treeview pane
The treeview pane consists of a tree with a root node that is named “Conferencing Bridges.” This pane shows the number of bridges that are on the gateway.
Use this pane to:
l Collapse and expand the root tree node to view all the bridge nodes or bridge configurations

Chapter 9: Configuring Microsoft Adapter
56 Avaya Meeting Exchange 5.1 for Microsoft Applications November 2008
l Add a bridge node to the root node
l Remove a bridge node from the root node
Note:Note: When you remove a bridge node, the application removes the bridge
configuration information from the configuration file and removes the bridge node from the root of the tree pane. The bridge node cannot be removed when it is in a CONNECTED state.
l Start a bridge connection
Note:Note: When you start a conference from Live Meeting 7 or Office Communicator 1.0 on
a specific bridge, the application adds a conference child node to that bridge node.
l Stop a bridge connection
Note:Note: If a conference ends on the Office Communicator 1.0 and there are no dial-in
users in the conference, the application deletes the conference child node from the bridge node.
l View a bridge configuration
l Modify a bridge configuration
Note:Note: You cannot modify conference information
l View conference information
Shortcut keys
The administrative interface includes keyboard shortcuts for some of the major administrative tasks.
Table 2: Shortcut Keys
Shortcut Key Function
Alt+F Shows the File menu.
Alt+G Shows the Gateway Configuration menu.
Alt+C Shows the Conference Bridge menu.
Alt+H Shows the Help menu.

Editing the gateway configuration settings
Avaya Meeting Exchange 5.1 for Microsoft Applications November 2008 57
Editing the gateway configuration settingsUse the Gateway Settings screen to edit the default gateway settings. These options are configured with default values when the application starts.
1. On the Microsoft Adapter main screen, click Gateway Configuration > Gateway Settings.
The system displays the Gateway Settings screen (Figure 7).
Figure 7: The Gateway Settings screen
2. Complete the following information.
l Local Port. The port on which Microsoft Adapter listens to the LCS events. The default is 5060 for TCP and 5061 for TLS connections.
l Polling Interval. After a successful connection, Microsoft Adapter continues to poll the audio conferencing bridge every n seconds, where n is a number that you can configure. The default is 30 seconds.
l Re-Connection Attempts. If a connection failure occurs, Microsoft Adapter tries to re-establish the connection n number of times, where n is a number that you can configure. The default is five attempts.
l Re-Connection Attempt Interval. If a connection failure occurs, Microsoft Adapter tries to re-establish the connection every n seconds, where n is a number that you can configure. The default is 5 seconds.
l TLS. Live Communications Server sends the SIP traffic to the audio bridges on the secured TLS layer over the Internet.
l TLS Path. The path where the TLS Certificate exists.

Chapter 9: Configuring Microsoft Adapter
58 Avaya Meeting Exchange 5.1 for Microsoft Applications November 2008
3. Click Save to save the gateway settings.
If you complete all the fields correctly, the application adds the configuration on the gateway. If you do not complete all the fields correctly, the system displays a warning message that states the problem. Correct the entries. The application then saves the configuration on the gateway.
Editing the log configuration settingsUse the Log Settings screen to edit the log settings. These fields are configured with default values when the application starts.
1. On the menu, click Gateway Configuration > Log Settings.
The system displays the Global Log Settings screen (Figure 8).
Figure 8: The Global Log Settings screen
2. Complete the following information.
l Log Level. Microsoft Adapter logs messages and events based on the log level that you select. For more information, see Logging messages and events on page 59.
l Log Path. The path where the log files are sent. By default, the logs are sent to the Logs folder. This Logs folder resides in the folder where the application is installed. For example, if the application is installed in D:\ACPGateway, the logs are stored is D:\APCApplication\Logs.
l Log File Size. Microsoft Adapter logs messages into multiple log files. When the size of the file reaches the value that you set here, a new file is created. The maximum size that you can set is 10 MB. The default value is 2 MB.

Editing the log configuration settings
Avaya Meeting Exchange 5.1 for Microsoft Applications November 2008 59
l Log Storage Duration. Microsoft Adapter stores log files for n days, where n is a number that you can configure. The default is 30 days. The system deletes files that are older than n days.
l Free Memory. This is the free memory threshold of the Microsoft Adapter. If the application memory utilization crosses the threshold value, Microsoft Adapter displays a warning message on the GUI for Administrators. The threshold value ranges between 100 MB and 500 MB. The default value is 1 GB.
l Free Disk Space. This is the free disk space threshold of the Microsoft Adapter. If the log size crosses the threshold value, Microsoft Adapter displays a warning message on the GUI for Administrators. The threshold value ranges between 1 GB and 10 GB. The default value is 1 GB.
3. Click Save to save the log settings.
If you complete all the fields correctly, the application adds the configuration on the gateway. If you do not complete all the fields correctly, the system displays a warning message that states the problem. Correct the entries. The application then saves the configuration on the gateway.
Logging messages and eventsThe trace pane displays the messages and the events that Microsoft Adapter logs.
Microsoft Adapter supports the following four different modes to log messages and events:
l ERROR. Logs the failed operations including failure to connect to a bridge.
l WARNING. Logs all warnings that pertain to operations or events that can cause errors, such as connection attempts and resource thresholds.
Note:Note: By default, the log level WARNING is selected when the application starts.
l INFO. Logs all events and commands, such as SIP events, Bridge Control API (BCAPI) commands and responses, BCAPI events, and connection messages.
l DEBUG. Logs all information-level items.
On the Log Settings screen, you can choose the option that you want.
ACP Server logs all messages and events into log files for debugging. The system stores these log files in the path that you specify in the Log Settings screen.
Microsoft Adapter generates the following three types of log files:
l CPPlogger.txt. This log file contains the logs that are related to the ACPBCAPIClient Interface module. This file describes the flow of the commands and events between the ACPServer module and the BCAPIClient module.
l BCAPImodule.txt. This log file contains the commands as received from the ACP Server module, and the events and responses received from the audio conferencing bridge.

Chapter 9: Configuring Microsoft Adapter
60 Avaya Meeting Exchange 5.1 for Microsoft Applications November 2008
l MSAdapter.txt. This log file contains all the messages that you see in the trace pane.
These logs are located in the Logs folder, which is automatically created when the Microsoft Adapter application is started.
During the installation of the application, information about the installation process, such as, errors and warnings are logged in the Installer log file Microsoft_Adapter_Logs.txt. This log file is located in the Microsoft_Adapter_Logs folder.
Note:Note: You should delete log files in accordance with the parameters, Log File Size
and Log Storage Duration.
Configuring Microsoft Adapter with bridgesUse the Conference Bridge menu to perform the following functions:
l Adding a bridge configuration
l Editing a bridge configuration
l Removing a bridge configuration
l Starting a bridge connection
l Stopping a bridge connection
Adding a bridge configuration1. In the treeview pane click Conferencing Bridges.
2. Perform one of the following actions:
l On the main menu, click Conference Bridge > Add New.
l Right-click Conferencing Bridges. On the Context menu, click Add.
The system displays the New Conferencing Bridge screen (Figure 9).

Configuring Microsoft Adapter with bridges
Avaya Meeting Exchange 5.1 for Microsoft Applications November 2008 61
Figure 9: The New Conferencing Bridge screen
3. Complete the following information.
l Conferencing Bridge Name. A logical name for the audio conferencing bridge. This name can contain a maximum of 64 alphanumeric characters.
l Bridge Type. The type of bridge. The default is S6200.
l DNIS Number. The DNIS number to map to the audio conferencing bridge. The DNIS number must be unique. You cannot use the same DNIS for different bridges. You must use one DNIS per bridge.This number can contain from 1 to 16 digits and can include the question mark (?) as a wild-card character. However, if you use wild-card characters if a multiple bridge environment, ensure that you do not submit an ambiguous entry that could match several bridges.
l Bridge IP. The IP address of the audio conferencing bridge. This address must be unique for the configuration.
l User Name. The user name that is associated with the audio conferencing bridge. This name can contain a maximum of eight alphanumeric characters.
l Password. The password that is associated with the user name for the audio conferencing bridge. This password can contain a maximum of eight alphanumeric characters.
4. Click Save to save the bridge configuration.
If you complete all fields correctly, the application adds the bridge configuration to the gateway. If you do not complete all fields correctly, the system displays a warning message that states the problem. Correct the entries. The application then saves the configuration on the gateway.
Editing a bridge configuration1. In the treeview panel, click the bridge node that you want to edit.

Chapter 9: Configuring Microsoft Adapter
62 Avaya Meeting Exchange 5.1 for Microsoft Applications November 2008
2. Perform one of the following actions:
l On the main menu, click Conference Bridge > Edit.l Right-click the bridge node. On the Context menu, click Edit.The system displays the Edit Conferencing Bridge screen (Figure 10).
Figure 10: The Edit Conferencing Bridge screen
3. Click Save to save the bridge configuration.
If you complete all fields correctly, the application adds the bridge configuration to the gateway. If you do not complete all fields correctly, the system displays a warning message that states the problem. Correct the entries. The application then saves the configuration on the gateway.
Note:Note: You can edit a bridge configuration only when the bridge connection is in the NOT
CONNECTED state.
Removing a bridge configuration
Note:Note: You cannot delete an active bridge. You must stop the bridge if you want to delete
it.
1. Take a note of the bridge details and stop the bridge if it is running.
2. In the treeview pane, click the bridge node that you want to remove.
3. Perform one of the following actions:
l On the main menu, click Conference Bridge > Remove.
l Right-click the bridge node that you want to remove. On the Context menu, click Remove.

Configuring Microsoft Adapter with bridges
Avaya Meeting Exchange 5.1 for Microsoft Applications November 2008 63
4. On the Remove Bridge screen, click OK to remove the bridge configuration.
The application displays a warning message to ensure that you want to delete the bridge.
Starting a bridge connection1. In the treeview pane, click the bridge node for which you want to start the connection.
2. Perform one of the following actions:
l On the main menu, click Conference Bridge > Start.l Right-click the bridge node. On the Context menu, click Start.If the connection is successful, the bridge node turns green and the Start button is disabled. If the connection is unsuccessful, the system displays an error message.
Stopping a bridge connection1. In the treeview pane, click the bridge node for which you want to stop the connection.
2. Perform one of the following actions:
l On the main menu, click Conference Bridge > Stop.
l Right-click the bridge node. On the Context menu, click Stop.
If you stop the bridge connection, the bridge node is no longer green and the Stop button is disabled.
If active conferences exist on the bridge, the Stop button is disabled.

Chapter 9: Configuring Microsoft Adapter
64 Avaya Meeting Exchange 5.1 for Microsoft Applications November 2008
Avaya Meeting Exchange 5.1 for Microsoft Applications November 2008 65
Chapter 10: Configuring OCS Adapter
This chapter describes how to configure the OCS Adapter. There are two main tasks:
l Configuring OCS Adapter
l Configuring Internet Information Server (IIS)
Note:Note: You must complete the steps in Installing OCS Adapter on page 47 before you
begin these configuration steps.
Configuring OCS Adapter1. Open confTab.xml and edit it to add the correct IP address.
confTab.xml is located here: C:\Program Files\avaya\avaya ocs adapter
2. Close and save the file.
3. Ensure that the following directory is set to Allow Full Control:
C:\program files\Common Files\Avaya\logs
To check the setting on this directory:
a. Right-click the directory name and click Properties.
b. On the Logs Properties dialog, click the Security tab.
c. On the upper panel in the Security tab, select Users.
d. On the lower panel, click Allow Full Control.4. Click OCSadapterAdm.exe.
OCSadapterAdm.exe is located here: C:\program files\avaya\avaya ocs adapter\bin.
Figure 11 displays the OCSadapterAdm.exe tab.
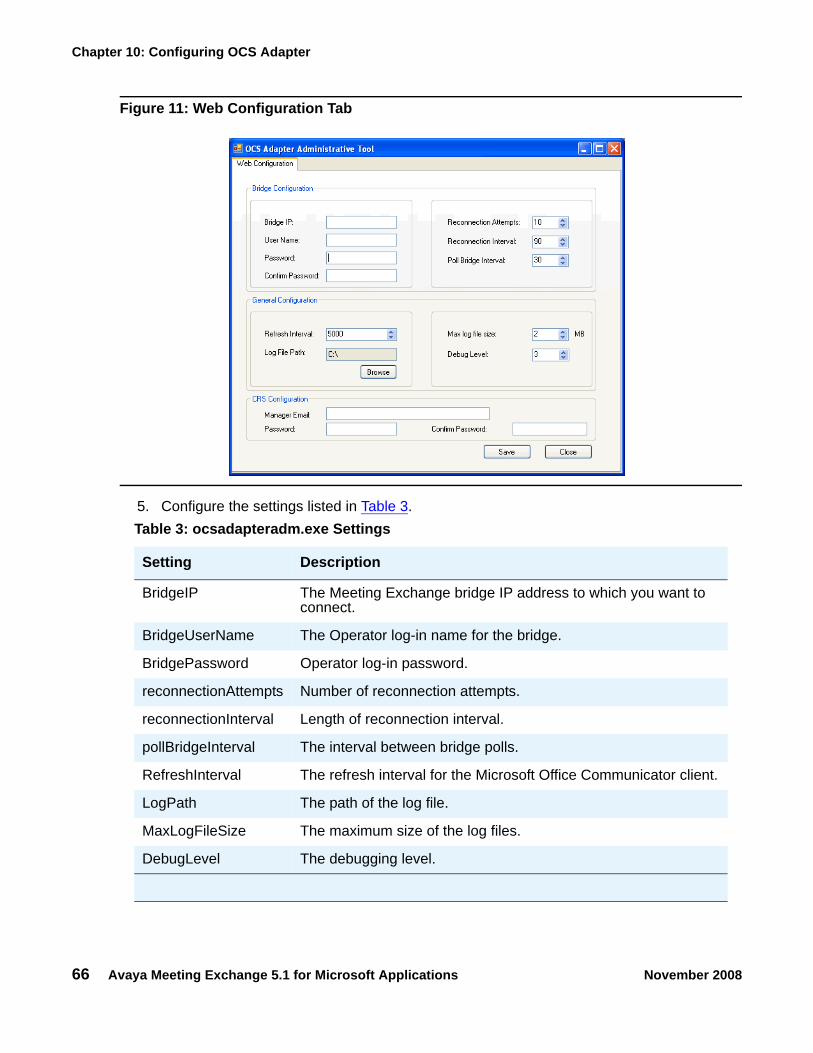
Chapter 10: Configuring OCS Adapter
66 Avaya Meeting Exchange 5.1 for Microsoft Applications November 2008
Figure 11: Web Configuration Tab
5. Configure the settings listed in Table 3.Table 3: ocsadapteradm.exe Settings
Setting Description
BridgeIP The Meeting Exchange bridge IP address to which you want to connect.
BridgeUserName The Operator log-in name for the bridge.
BridgePassword Operator log-in password.
reconnectionAttempts Number of reconnection attempts.
reconnectionInterval Length of reconnection interval.
pollBridgeInterval The interval between bridge polls.
RefreshInterval The refresh interval for the Microsoft Office Communicator client.
LogPath The path of the log file.
MaxLogFileSize The maximum size of the log files.
DebugLevel The debugging level.

Configuring Internet Information Server (IIS)
Avaya Meeting Exchange 5.1 for Microsoft Applications November 2008 67
6. Reboot the server following any configuration change.
Tip:Tip: Avaya recommends that you make all the configuration changes in a single
session.
Note:Note: When you complete these steps, you must configure the client-side for your
Users. For more information, see Configuring Microsoft Office Communicator 2007 for your Users on page 107.
Configuring Internet Information Server (IIS)To configure the IIS:
1. On the server machine, navigate to Programs > Administrative Tools > Internet Information Services (IIS) Manager.
2. On the main Internet Information Services (IIS) Manager screen, navigate to Internet Information Services > OCDADAPTERSVR > Web Sites > Default Web Site.
3. Right-click Default Web Site and from the right-click menu, click New > Virtual Directory.
4. On the Virtual Directory Creation Wizard, select Next on the first dialog.
5. On the Virtual Directory Alias dialog, enter ocsadapterws and click Next.6. On the Web Site Content Directory dialog, browse to select the Avaya OCS Adapter
folder where the OCS Adapter is installed and click OK and then Next.
Manager e-mail Each User of Microsoft Office Communicator must have a client account on the CRS Front End. This client account is used to retrieve each Users’ on-demand conference details from CRS via SOAP adapter.
Password This is the password of the client account.
Tip:Tip: For more information on creating new clients
using the CRS Front End, see the Meeting Exchange 5.1 Client Registration Server Operator Guide, which is available on support.avaya.com.
Table 3: ocsadapteradm.exe Settings
Setting Description
Chapter 10: Configuring OCS Adapter
68 Avaya Meeting Exchange 5.1 for Microsoft Applications November 2008
7. On the Virtual Directory Access Permissions dialog, select the Read and Run scripts (such as ASP) checkboxes and click Next and then Finish.
8. On the main Internet Information Services (IIS) Manager screen, navigate to Internet Information Services > OCDADAPTERSVR > Web Sites > ocsadapterws.
9. Right-click on ocsadapterws and from the right-click menu, click Properties to display the ocsadapterws properties.
10. On the Properties dialog, select the ASP.NET tab.
11. On the ASP.NET tab, ensure that the ASP.NET version is at least 2.0 +. If the version is correct, click Apply and then OK.
Note:Note: If a version 2.0+ of ASP.NET is not available in the ASP.NET version drop-down
list:
a. Open a Command Prompt window.
b. Run the following script:
C:\Windows\Micrsoft.NET\Framework\v2.0.50727\aspnet_regiis.exe -l
Note:Note: Just to clarify; The last character in the script line is a lowercase version of the
12th letter of the alphabet.
12. Ensure that ASP.NET is allowed in IIS, as follows:
a. On the main Internet Information Services (IIS) Manager screen, navigate to Web Service Extensions.
b. Ensure that ASP.NET v2.050727+ is set to Allowed.
c. If it is not set to Allowed, right-click it and click Allow.
13. Ensure that the TCP Port that you enter in IIS is an open port on the firewall, as follows:
a. On the main Internet Information Services (IIS) Manager screen, navigate to Default Websites.
b. On the right-click menu, select Properties.
c. On the Properties dialog, select the Website tab.
d. Make a note of the TCP Port. The default value is 80.
e. Navigate to Control Panel > Windows Firewall.f. On the Exceptions tab, click Add Port and enter a Port Name and the Port Number
from the TCP Port field.

Avaya Meeting Exchange 5.1 for Microsoft Applications November 2008 69
Chapter 11: Configuring Live Communications Server (LCS)
To integrate Microsoft Adapter with Live Communications Server 2005 (LCS), you must perform the configuration steps detailed here:
l Administering Certificates -- certificate management
l Configuring LCS for Microsoft Adapter
When you complete these steps on the server, you must configure your clients. For more information, see Configuring Microsoft Office Communicator 2005 for your Users on page 101.

Chapter 11: Configuring Live Communications Server (LCS)
70 Avaya Meeting Exchange 5.1 for Microsoft Applications November 2008
Administering Certificates -- certificate managementMeeting Exchange and Microsoft Live Communication Server communicate using Transport Layer Security (TLS). For communication to take place, Meeting Exchange and Microsoft Live Communications Server must exchange signed server certificates each time a TLS session is opened. This section provides a sample certificate management scenario that includes the following procedures.
l Procedure 1 - Installing the trusted certificate on Live Communications Server on page 72
l Procedure 2 - Installing a server certificate for the Live Communications Server on page 76
Additional references
The following documents are useful for understanding the tasks that are required for a service integration.
l Live Communications Server 2005 Enterprise Edition Lab Quick Start or
l Live Communications Server 2005 with SP1 Standard Edition Lab Quick Start

Administering Certificates -- certificate management
Avaya Meeting Exchange 5.1 for Microsoft Applications November 2008 71
About the sample scenarioUse the sample scenario to familiarize yourself with the basic tasks for integrating Meeting Exchange with Microsoft Live Communications Server.The procedures in the sample scenario are based on using:
l Microsoft Live Communications Server 2005 Enterprise Edition
l Microsoft Windows Server 2003 Standalone Certificate Authority.
Because it is likely that some users will rely on a certificate authority (CA) other than Microsoft Certificate Services, the CA-based procedures include generic instructions as well as Microsoft-based instructions.
Note:Note: If you are using a Microsoft Windows Server 2003 Enterprise Edition Certificate
Authority, Appendix D provides a procedure for creating a server certificate template that supports both client authentication and server authentication. For more information see Appendix C: Creating a certificate template for Server Certificates on the Microsoft CA Server on page 117. Keep in mind that all of the procedures in Chapters 2 and 3 of this document are based on a Microsoft Windows Server 2003 Standalone Certificate Authority. If you use an Enterprise Edition CA, the procedures in Chapters 2 and 3 do not apply to your configuration.
About obtaining certificatesTo obtain a certificate you must generate a certificate request and then submit the Certificate Request to a CA. Procedures for generating a certificate request and the data required for completing a certificate request can vary from one CA to another.
Specifying key usage
Based on the CA you use, you might be required to specify the key usage allowed for the certificate you are requesting. If your CA requires you to specify key usage, you must ensure that the digitalSignature and the keyEncipherment bits are enabled. For more information refer to RFC 2459.
Client and server authentication
The Meeting Exchange implementation for Live Communications Server requires a certificate that does both client authentication and server authentication.

Chapter 11: Configuring Live Communications Server (LCS)
72 Avaya Meeting Exchange 5.1 for Microsoft Applications November 2008
In terms of the Microsoft Windows Server 2003 Standalone CA, this means that when you complete the Advanced Certificate Request, you will select Other... from the "Type of Certificate Needed" drop-down list. When you select Other... , the Advanced Certificate Request displays a text entry field for the OID (object identifier). For information about completing this field, see Installing a Microsoft Certificate Services-based certificate on the Live Communications Server on page 77.
If you use another CA (either a generic CA or the Microsoft Windows Server 2003 Enterprise CA), the certificate request will not contain the same drop-down menus and choices. For example with Microsoft Windows Server 2003 Enterprise CA, you might not see a field for the OIDs because the OIDs can be set by the CA administrator in a template.
Procedure 1 - Installing the trusted certificate on Live Communications Server
The trusted certificate is also referred to as the CA Certificate. From the Microsoft Live Communications Server, follow the appropriate procedure to obtain the trusted certificate and import it into the Microsoft Live Communications Server certificate store.
When installing the trusted certificate, note that Live Communications Server and Meeting Exchange must use either the same CA or an issuer in the same certificate chain.
l If you are using a third party certificate authority other than Microsoft Certificate Services, follow the procedure described in Installing the trusted certificate from another vendor.
l If you are using Microsoft Certificate Services, follow the procedure described in Installing the trusted certificate generated by Microsoft Certificate Services.
Installing the trusted certificate from another vendor
Steps 1 and 2 are provided as a general reference only -- follow the instructions on your CA’s Web site.
1. From your browser, go your certificate authority’s Web page for requesting a trusted certificate or a trusted certificate chain.
2. Import the trusted certificate. For information about importing certificates and using the certreq utility, see "Using a Public Certificate," in Microsoft Office Live Communications Server 2005 Certificate Configuration.
3. Continue with Importing the certificate into the Live Communications Server’s trust store on page 74.

Administering Certificates -- certificate management
Avaya Meeting Exchange 5.1 for Microsoft Applications November 2008 73
Installing the trusted certificate generated by Microsoft Certificate Services
Follow this procedure to download the trusted certificate generated by Microsoft Certificate Services.
1. From your browser, type the URL of the Microsoft Certificate Services Server. For example:
http://<certificate_server.com>/certsrv 2. From the Microsoft Certificate Services page, click Download a CA certificate,
certificate chain, or CRL.
3. Complete the Download a CA Certificate, Certificate Chain, or CRL page as follows:
a. Under CA Certificate, in the list box, select the signing certificate.
b. Click Base 64.
c. Click Download CA certificate chain.
4. Save the CA certificate file (lcscertnew.p7b, for example) to a local directory on the Microsoft Live Communications Server (C:\temp, for example).
5. Continue with the steps described next in Importing the certificate into the Live Communications Server’s trust store.

Chapter 11: Configuring Live Communications Server (LCS)
74 Avaya Meeting Exchange 5.1 for Microsoft Applications November 2008
Importing the certificate into the Live Communications Server’s trust store
Use this procedure to import the trusted certificate, from any CA, in to the Live Communications Server’s trust store.
1. Start the Microsoft Management console -- Click Start, and then click Run. In the Run dialog box, type mmc, and click OK.
2. From the Console window, click File > Add/Remove Snap-in... . 3. From the Add/Remove Snap-in dialog box, on the Standalone tab, which displays
Console Root as the default, click Add... .4. From the Add Standalone Snap-in dialog box, select Certificates, and click Add.
5. From the Certificates snap-in dialog box, select Computer account, and click Next.6. From the Select Computer dialog box, select Local Computer: (the computer this
console is running on), and click Finish.
7. Click Close from the Add Standalone Snap-in dialog box, and then click OK from the Add/Remove Snap-in dialog box.
8. From the left pane of the Console Root, under Certificates (Local Computer), expand Trusted Root Certificates Authorities.
9. Right-click Certificates, and then select All Tasks and click Import.10. From the Certificate Import Wizard, Welcome screen, select Next.11. Click Browse, and go to the directory where you stored the certificate file (C:\temp\
lcscertnew.p7b, for example). Select the certificate file (lcscertnew.p7b, for example) and click Open. Click Next to advance to the Certificate Store screen.
12. In the Certificate Import Wizard, Certificate Store dialog box, make sure that Place all certificates in the following store is selected, and the Certificate Store is: Trusted Root Certification Authorities. Click Next.
13. When the Certificate Import Wizard dialog box displays the message "You have successfully completed the Certificate Import wizard," click Finish.

Administering Certificates -- certificate management
Avaya Meeting Exchange 5.1 for Microsoft Applications November 2008 75
Procedure 1a - Verifying the installation of the trusted certificate on Live Communications Server
Follow this procedure to verify that the trusted certificate is installed correctly.
1. Start the Microsoft Management console -- Click Start, and then click Run. In the Run dialog box, type mmc, and click OK.
2. From the Console window, click File > Add/Remove Snap-in... . 3. From the Add/Remove Snap-in dialog box, on the Standalone tab, which displays
Console Root as the default, click Add... .4. From the Add Standalone Snap-in dialog box, select Certificates, and click Add.
5. From the Certificates snap-in dialog box, select Computer account, and click Next.6. From the Select Computer dialog box, select Local Computer: (the computer this
console is running on), and click Finish.
7. Click Close from the Add Standalone Snap-in dialog box, and then click OK from the Add/Remove Snap-in dialog box.
8. Verify that the trusted certificate for the Live Communications Server is installed, as follows:
a. In the left pane of the console, Under Certificates (Local Computer) expand Trusted Root Certificates Authorities and click Certificate. The console displays a list of trusted certificates in the right pane.
b. In the right pane of the console, verify that the display includes the trusted certificate that you installed at the end of Procedure 1, as follows:
l Make sure the Issued To field displays the fully-qualified domain name of the Live Communications Server.
l Make sure the Issued By field displays the name of the certificate authority that issued the certificate.
l Make sure the expiration date is correct.

Chapter 11: Configuring Live Communications Server (LCS)
76 Avaya Meeting Exchange 5.1 for Microsoft Applications November 2008
Procedure 2 - Installing a server certificate for the Live Communications Server
Follow the appropriate procedure for installing a server certificate for the Live Communications Server.
l If you are using a third party certificate authority other than Microsoft Certificate Services, refer to Installing a server certificate from another vendor on page 76.
l If you are using Microsoft Certificate Services, refer to Installing a Microsoft Certificate Services-based certificate on the Live Communications Server on page 77.
Installing a server certificate from another vendor
Steps 1 through 3 are provided as a general reference only -- follow the instructions on your CA’s Web site.
1. From your browser, go to your certificate authority’s Web page for requesting a server certificate.
2. Complete the required fields for enrollment. Usually this includes contact information, such as your name, email address, your organizational unit (OU), and so on.
When you are providing the name and IP address for the server, use this rule of thumb. If you are using Enterprise Edition, use the fully qualified domain name and IP address of your pool; if you are using Standard Edition use the fully qualified domain name and IP of your server.
3. Import the server certificate. For information about importing certificates and using the certreq utility, see "Using a Public Certificate," in Microsoft Office Live Communications Server 2005 Certificate Configuration.
4. Continue with the steps for Procedure 2b - Configuring the certificate for automatic routing on page 79.

Administering Certificates -- certificate management
Avaya Meeting Exchange 5.1 for Microsoft Applications November 2008 77
Installing a Microsoft Certificate Services-based certificate on the Live Communications Server
From the Microsoft Live Communications Server, follow this procedure to install a server certificate issued by Microsoft Certificate Services.
Note:Note: In terms of the Microsoft Live Communications Server 2005 Certificate
Configuration Guide, the Meeting Exchange implementation for Microsoft LCS falls into the category of "interoperating with partner systems." This means that you must install a certificate that is configured for both client and server authorization, as depicted in Step 3c.
1. From your Web browser, type the URL of your certificate server. For example:
http://<certificate_server.com>/certsrv 2. From the Microsoft Certificate Services Welcome page, click Request a Certificate.
3. From the Advanced Certificate Request page, click Create and submit a request to this CA. Microsoft Certificate Services displays the next page of the of Advanced Certificate Request. Keep in mind that the fields presented on the Advanced Certificate Request pages depend on how the certification server is set up.
Follow Step a through Step f to complete the Advanced Certificate Request.
a. Under Identifying Information, in the Name field, type the fully qualified domain name (FQDN) of your pool. For example: mylcspool.example.com . The pool entry in the Name field applies to the Enterprise Edition of Live Communications Server. If you are using Standard Edition of Live Communications Server, you would use the FQDN of the server.
b. Under Type of Certificate Needed, in the selection box, select Other... . When you select Other, the Certificate Request displays the OID field.
Note:Note: If you do not see a selection for Other... , it means you are using a CA other than
Microsoft Windows Server 2003 Standalone Certificate Authority. See Client and server authentication on page 71
c. In the OID field, type the following OID for your certificate: 1.3.6.1.5.5.7.3.1,1.3.6.1.5.5.7.3.2 (be sure to use a comma between the two parts of the OID). The first part of the OID, which is provided by default, (1.3.6.1.5.5.7.3.1) is for server authentication. The second part (1.3.6.1.5.5.7.3.2), which you must add, is for client authentication.

Chapter 11: Configuring Live Communications Server (LCS)
78 Avaya Meeting Exchange 5.1 for Microsoft Applications November 2008
d. Under Key Options, make the following selections:
l In the Key Usage Field, select the option button for Both.
l In the CSP field, accept the default, which is Microsoft Enhanced Cryptographic Provider v1.0.
l Select the check box for Store Certificate in the local computer certificate store.
e. Under additional options, In the Friendly Name field, type a name that will help you identify the certificate.
f. Click Submit. Microsoft Certificate Services displays the Certificate Issued page.
4. From the Certificate Issued page, click Install this certificate. Microsoft Certificate Services displays the Certificate Installed page.

Administering Certificates -- certificate management
Avaya Meeting Exchange 5.1 for Microsoft Applications November 2008 79
Procedure 2a - Verifying the installation of the server certificate for Live Communications Server
Use this procedure to verify the installation of the server certificate, from any CA, for the Live Communications Server.
1. Start the Microsoft Management console -- Click Start and then click Run. In the Run dialog box, type mmc, and click OK.
2. From the Console window, click File > Add/Remove Snap-in... . 3. From the Add/Remove Snap-in dialog box, on the Standalone tab, which displays
Console Root as the default, click Add... .4. From the Add Standalone Snap-in dialog box, select Certificates, and click Add.
5. From the Certificates snap-in dialog box, select Computer account, and click Next.6. From the Select Computer dialog box, select Local Computer: (the computer this
console is running on), and click Finish.
7. Click Close from the Add Standalone Snap-in dialog box, and then click OK from the Add/Remove Snap-in dialog box.
8. Verify that the server certificate for the Live Communications Server in installed, as follows:
a. In the left pane of the console, Under Certificates (Local Computer) expand Personal and click Certificate. The console displays a list of certificates in the right pane.
b. In the right pane of the console, verify that the display includes the server certificate that you installed at the end of Procedure 2, as follows:
l Make sure the Issued To field displays the fully-qualified domain name of the Live Communications Server.
l Make sure the Issued By field displays the name of the certificate authority that issued the certificate (referred to as the issuer on the certificate).
l Make sure the expiration date is correct.
Procedure 2b - Configuring the certificate for automatic routing
Follow this procedure to configure the certificate for automatic routing among your pool and servers. For more information, see "Configuring Certificates for Automatic Routing Among Pools and Standard Edition Servers" in Microsoft Office Live Communications Server Certificate Configuration.
1. Open the Microsoft Office Live Communications Server 2005 management console.
2. In the left pane, expand the Forest node and the following subordinate nodes.
l Live Communications servers and pools
l lcspool node - the name of Live Communications Server pool node. If you are using Standard Edition, this refers to the Live Communications Server.

Chapter 11: Configuring Live Communications Server (LCS)
80 Avaya Meeting Exchange 5.1 for Microsoft Applications November 2008
3. Under the lcs-pool node (mylcspool, for example), right-click the fully qualified domain name of your server (mylcserver.example.com, for example), and then click Properties.
4. From the mylcsserver.example.com Properties dialog, follow these steps to add a TLS certificate and a security certificate.
a. Select the General tab. In the Connections box, select the listing for Mutual TLS.
Choose either 1 or 2, based on what is appropriate for your situation.
1. In the Connections box, select the listed Mutual TLS connection, and click Edit. From the Select Certificate dialog box, select the certificate that was issued to the pool name, mylcspool.example.com, and click OK. Continue with Step 4b.
2. Click Add to add a new connection so you can administer a certificate. From the Add Connection dialog box, select TLS for Transport Type and click Select Certificate. From the Select Certificate dialog box, select the certificate that was added to the pool name, mylcspool.example.com, and click OK. Continue with Step 4b.
b. Select the Security tab, and then click Select Certificate. From the Select Certificate dialog box, select the certificate you installed, and click OK.
l From the Properties dialog, click Apply, and then click OK to close the Properties dialog.
Configuring LCS for Microsoft Adapter1. Click Start > Programs > Administrative Tools > Live Communications Server 2005.
2. To stop LCS, right-click the LCS name and then click Stop.
3. Right-click the LCS name and select Properties.
The system displays the Properties screen.
4. On the Host Authorization tab, click Add.
The system displays the Add Authorized Host screen (Figure 12).

Configuring LCS for Microsoft Adapter
Avaya Meeting Exchange 5.1 for Microsoft Applications November 2008 81
Figure 12: The Add Authorized Host screen
5. In the Server area, select Network address and enter the fully qualified domain name (FQDN). The FQDN is the name of the server on which Microsoft Adapter is installed.
6. In the Settings area, select Throttle as Server and Treat as Authenticated.
7. Click OK.
8. On the Routing tab, click Add.
The system displays the Edit Static Route screen (Figure 13).
Figure 13: The Edit Static Route screen
9. Complete the following fields:
l User. Enter the asterisk (*) wild-card character.

Chapter 11: Configuring Live Communications Server (LCS)
82 Avaya Meeting Exchange 5.1 for Microsoft Applications November 2008
l Domain. Enter the FQDN of the server on which Microsoft Adapter is installed.
l Network address. Select and enter the FQDN of the server on which Microsoft Adapter is installed.
l Transport. Select TLS.
l Port. Enter 5061.
10. Select Replace host in request URI.
11. Click Select Certificate and select the appropriate certificate.
12. Click OK.
13. Click Apply.
14. To start LCS, right-click the LCS name and click Start.
Note:Note: Now, you must perform a number of client-side configuration tasks. For more
information, see Configuring Microsoft Office Communicator 2005 for your Users on page 101.

Avaya Meeting Exchange 5.1 for Microsoft Applications November 2008 83
Chapter 12: Configuring Microsoft Office Communications Server 2007
To integrate Microsoft Adapter with Microsoft Office Communications Server (MOC) 2007, you must perform the configuration steps detailed below.
l Administering Certificates -- certificate management
l Configuring Microsoft Office Communications Server 2007 for Microsoft Adapter
When you complete these steps on the server, you must configure your clients. For more information, see Configuring Microsoft Office Communicator 2007 for your Users on page 107.

Chapter 12: Configuring Microsoft Office Communications Server 2007
84 Avaya Meeting Exchange 5.1 for Microsoft Applications November 2008
Administering Certificates -- certificate managementMeeting Exchange and Microsoft Office Communication Server communicate using Transport Layer Security (TLS). For communication to take place, Meeting Exchange and Microsoft Office Communications Server 2007 must exchange signed server certificates each time a TLS session is opened. This section provides a sample certificate management scenario that includes the following procedures.
l Procedure 1 - Installing the trusted certificate on Office Communications Server 2007 on page 86
l Procedure 2 - Installing a server certificate for the Office Communications Server on page 90
Additional references
The following documents are useful for understanding the tasks that are required for a service integration.
l Office Communications Server 2007 Document: Standard Edition Deployment Guide
l Office Communications Server 2007 Document: Integrating Telephony with Office Communications Server 2007
l Office Communications Server 2007 Document: Enterprise Edition Deployment Guide
l Office Communications Server 2007 Document: Active Directory Guide

Administering Certificates -- certificate management
Avaya Meeting Exchange 5.1 for Microsoft Applications November 2008 85
About the sample scenarioUse the sample scenario to familiarize yourself with the basic tasks for integrating Meeting Exchange with Microsoft Office Communications Server 2007.The procedures in the sample scenario are based on using:
l Microsoft Office Communications Server 2007 Enterprise Edition l Microsoft Windows Server 2003 Standalone Certificate Authority.
Because it is likely that some users will rely on a certificate authority (CA) other than Microsoft Certificate Services, the CA-based procedures include generic instructions as well as Microsoft-based instructions.
Note:Note: If you are using a Microsoft Windows Server 2003 Enterprise Edition Certificate
Authority, Appendix D provides a procedure for creating a server certificate template that supports both client authentication and server authentication. For more information see Appendix C: Creating a certificate template for Server Certificates on the Microsoft CA Server on page 117. Keep in mind that all of the procedures in Chapters 2 and 3 of this document are based on a Microsoft Windows Server 2003 Standalone Certificate Authority. If you use an Enterprise Edition CA, the procedures in Chapters 2 and 3 do not apply to your configuration.
About obtaining certificatesTo obtain a certificate you must generate a certificate request and then submit the Certificate Request to a CA. Procedures for generating a certificate request and the data required for completing a certificate request can vary from one CA to another.
Specifying key usage
Based on the CA you use, you might be required to specify the key usage allowed for the certificate you are requesting. If your CA requires you to specify key usage, you must ensure that the digitalSignature and the keyEncipherment bits are enabled. For more information refer to RFC 2459.
Client and server authentication
The Meeting Exchange implementation for Microsoft Office Communications Server 2007 requires a certificate that does both client authentication and server authentication.

Chapter 12: Configuring Microsoft Office Communications Server 2007
86 Avaya Meeting Exchange 5.1 for Microsoft Applications November 2008
In terms of the Microsoft Windows Server 2003 Standalone CA, this means that when you complete the Advanced Certificate Request, you will select Other... from the "Type of Certificate Needed" drop-down list. When you select Other... , the Advanced Certificate Request displays a text entry field for the OID (object identifier). For information about completing this field, see Installing a Microsoft Certificate Services-based certificate on the Microsoft OCS 2007 on page 91.
If you use another CA (either a generic CA or the Microsoft Windows Server 2003 Enterprise CA), the certificate request will not contain the same drop-down menus and choices. For example with Microsoft Windows Server 2003 Enterprise CA, you might not see a field for the OIDs because the OIDs can be set by the CA administrator in a template.
Procedure 1 - Installing the trusted certificate on Office Communications Server 2007
The trusted certificate is also referred to as the CA Certificate. From the Microsoft Office Communications Server 2007, follow the appropriate procedure to obtain the trusted certificate and import it into the Microsoft Office Communications Server 2007 certificate store.
When installing the trusted certificate, note that Microsoft Office Communications Server 2007 and Meeting Exchange must use either the same CA or an issuer in the same certificate chain.
l If you are using a third party certificate authority other than Microsoft Certificate Services, follow the procedure described in Installing the trusted certificate from another vendor.
l If you are using Microsoft Certificate Services, follow the procedure described in Installing the trusted certificate generated by Microsoft Certificate Services.
Installing the trusted certificate from another vendor
Steps 1 and 2 are provided as a general reference only -- follow the instructions on your CA’s Web site.
1. From your browser, go your certificate authority’s Web page for requesting a trusted certificate or a trusted certificate chain.
2. Import the trusted certificate. For information about configuring certificates, see the Microsoft Office Communications Server 2007 Standard Edition Deployment Guide or the Microsoft Office Communications Server 2007 Enterprise Edition Deployment Guide.
3. Continue with Importing the certificate into the Microsoft OCS 2007 trust store on page 88.
Installing the trusted certificate generated by Microsoft Certificate Services
Follow this procedure to download the trusted certificate generated by Microsoft Certificate Services.

Administering Certificates -- certificate management
Avaya Meeting Exchange 5.1 for Microsoft Applications November 2008 87
1. From your browser, type the URL of the Microsoft Certificate Services Server. For example:
http://<certificate_server.com>/certsrv 2. From the Microsoft Certificate Services page, click Download a CA certificate,
certificate chain, or CRL.
3. Complete the Download a CA Certificate, Certificate Chain, or CRL page as follows:
a. Under CA Certificate, in the list box, select the signing certificate.
b. Click Base 64.
c. Click Download CA certificate chain.
4. Save the CA certificate file (lcscertnew.p7b, for example) to a local directory on the Microsoft Office Communications Server 2007 (C:\temp, for example).
5. Continue with the steps described next in Importing the certificate into the Microsoft OCS 2007 trust store.

Chapter 12: Configuring Microsoft Office Communications Server 2007
88 Avaya Meeting Exchange 5.1 for Microsoft Applications November 2008
Importing the certificate into the Microsoft OCS 2007 trust store
Use this procedure to import the trusted certificate, from any CA, in to the Microsoft Office Communications Server 2007’s trust store.
1. Start the Microsoft Management console -- Click Start, and then click Run. In the Run dialog box, type mmc, and click OK.
2. From the Console window, click File > Add/Remove Snap-in... . 3. From the Add/Remove Snap-in dialog box, on the Standalone tab, which displays
Console Root as the default, click Add... .4. From the Add Standalone Snap-in dialog box, select Certificates, and click Add.
5. From the Certificates snap-in dialog box, select Computer account, and click Next.6. From the Select Computer dialog box, select Local Computer: (the computer this
console is running on), and click Finish.
7. Click Close from the Add Standalone Snap-in dialog box, and then click OK from the Add/Remove Snap-in dialog box.
8. From the left pane of the Console Root, under Certificates (Local Computer), expand Trusted Root Certificates Authorities.
9. Right-click Certificates, and then select All Tasks and click Import.10. From the Certificate Import Wizard, Welcome screen, select Next.11. Click Browse, and go to the directory where you stored the certificate file (C:\temp\
lcscertnew.p7b, for example). Select the certificate file (lcscertnew.p7b, for example) and click Open.
12. In the Certificate Import Wizard, Certificate Store dialog box, make sure that Place all certificates in the following store is selected, and the Certificate Store is: Trusted Root Certification Authorities. Click Next.
13. When the Certificate Import Wizard dialog box displays the message "You have successfully completed the Certificate Import wizard," click Finish.

Administering Certificates -- certificate management
Avaya Meeting Exchange 5.1 for Microsoft Applications November 2008 89
Procedure 1a - Verifying the installation of the trusted certificate on Office Communications Server
Follow this procedure to verify that the trusted certificate is installed correctly.
1. Start the Microsoft Management console -- Click Start, and then click Run. In the Run dialog box, type mmc, and click OK.
2. From the Console window, click File > Add/Remove Snap-in... . 3. From the Add/Remove Snap-in dialog box, on the Standalone tab, which displays
Console Root as the default, click Add... .4. From the Add Standalone Snap-in dialog box, select Certificates, and click Add.
5. From the Certificates snap-in dialog box, select Computer account, and click Next.6. From the Select Computer dialog box, select Local Computer: (the computer this
console is running on), and click Finish.
7. Click Close from the Add Standalone Snap-in dialog box, and then click OK from the Add/Remove Snap-in dialog box.
8. Verify that the trusted certificate for the Microsoft Office Communications Server 2007 is installed, as follows:
a. In the left pane of the console, Under Certificates (Local Computer) expand Trusted Root Certificates Authorities and click Certificate. The console displays a list of trusted certificates in the right pane.
b. In the right pane of the console, verify that the display includes the trusted certificate that you installed at the end of Procedure 1, as follows:
l Make sure the Issued To field displays the name of the certificate authority.
l Make sure the Issued By field displays the name of the certificate authority that issued the certificate. This issuer should be either the same issuer, or an issuer in the same certificate chain.
l Make sure the expiration date is correct.
Chapter 12: Configuring Microsoft Office Communications Server 2007
90 Avaya Meeting Exchange 5.1 for Microsoft Applications November 2008
Procedure 2 - Installing a server certificate for the Office Communications Server
Follow the appropriate procedure for installing a server certificate for the Microsoft Office Communications Server 2007.
l If you are using a third party certificate authority other than Microsoft Certificate Services, refer to Installing a server certificate from another vendor on page 90.
l If you are using Microsoft Certificate Services, refer to Installing a Microsoft Certificate Services-based certificate on the Microsoft OCS 2007 on page 91.
Installing a server certificate from another vendor
Steps 1 through 3 are provided as a general reference only -- follow the instructions on your CA’s Web site.
1. From your browser, go to your certificate authority’s Web page for requesting a server certificate.
2. Complete the required fields for enrollment. Usually this includes contact information, such as your name, email address, your organizational unit (OU), and so on.
When you are providing the name and IP address for the server, use this rule of thumb. If you are using Enterprise Edition, use the fully qualified domain name and IP address of your pool; if you are using Standard Edition use the fully qualified domain name and IP of your server.
3. Import the server certificate. For information about configuring certificates, see the Microsoft Office Communications Server 2007 Standard Edition Deployment Guide or the Microsoft Office Communications Server 2007 Enterprise Edition Deployment Guide.
4. Continue with the steps for Procedure 2b - Configuring the certificate for automatic routing on page 93.

Administering Certificates -- certificate management
Avaya Meeting Exchange 5.1 for Microsoft Applications November 2008 91
Installing a Microsoft Certificate Services-based certificate on the Microsoft OCS 2007
From the Microsoft Office Communications Server 2007, follow this procedure to install a server certificate issued by Microsoft Certificate Services.
Note:Note: In terms of the Microsoft Office Communications Server 2007 Certificate
Configuration Guide, the Meeting Exchange implementation for Microsoft Office Communications Server 2007 falls into the category of "interoperating with partner systems." This means that you must install a certificate that is configured for both client and server authorization. You do this by selecting Include client EKU as depicted in Step 8d.
1. Log on to the Microsoft Office Communications Server that needs to be configured with a certificate.
2. From the Start Menu of the Microsoft Office Communications Server 2007 management console, select Administrative Tools > Office Communications Server 2007.
3. From the left pane of the Microsoft Office Communications Server control panel, expand the Forest node (Forest - example.com) then Enterprise pools and Front Ends.
4. Right click the name of your server node, and click Certificates.
5. From the Welcome screen of the Certificate Wizard, click Next.6. From the Available Certificate Tasks screen, accept the default selection, Create a new
certificate, and click Next.7. From the Delayed or Immediate Request screen, accept the default selection, Send the
request immediately to an online certification authority, and click Next.8. Complete the Name and Security Settings screen as follows:
a. In the Name field, type the name of the certificate. Create a name that is meaningful and unique for your server.
b. In the Bit length field, accept the default, 1024.
c. Accept the default for Mark cert as exportable (by default a check mark appears in the check box).
d. Select Include client EKU in the certificate request. Make sure a check mark appears in this box. By selecting this option, you are installing a certificate that is configured for both client and server authorization.
e. Click Next.9. From the Organizational Information screen, accept the default Organization name and
Organizational Unit, and click Next.
10. From the screen labeled Your Server’s Subject Name, accept the default Subject Name and the Subject Alternate Name, and click Next.

Chapter 12: Configuring Microsoft Office Communications Server 2007
92 Avaya Meeting Exchange 5.1 for Microsoft Applications November 2008
11. From the Choose a Certification Authority screen, in the Select a certificate authority from the list detected in your environment field, select your CA from the drop-down list or specify your external CA, and click Next.
12. From the Request Summary screen, review the information in the text display area, and click Next.The Office Communications Server Wizard displays the Certificate Wizard completed successfully screen, with an Assign button and a View button. Click View to inspect the certificate you just obtained, then click Assign to assign the certificate to the server. Click Finish to Exit the Wizard.
13. To put the certificate into effect, restart the Microsoft Office Communications Server 2007.
Note:Note: When you use the Certificate Wizard to install a certificate, the Wizard configures
the certificate for automatic routing among your pool and servers.

Administering Certificates -- certificate management
Avaya Meeting Exchange 5.1 for Microsoft Applications November 2008 93
Procedure 2a - Verifying the installation of the server certificate for Microsoft Office Communications Server 2007
Use this procedure to verify the installation of the server certificate, from any CA, for the Microsoft Office Communications Server 2007.
1. Start the Microsoft Management console -- Click Start and then click Run. In the Run dialog box, type mmc, and click OK.
2. From the Console window, click File > Add/Remove Snap-in... . 3. From the Add/Remove Snap-in dialog box, on the Standalone tab, which displays
Console Root as the default, click Add... .4. From the Add Standalone Snap-in dialog box, select Certificates, and click Add.
5. From the Certificates snap-in dialog box, select Computer account, and click Next.6. From the Select Computer dialog box, select Local Computer: (the computer this
console is running on), and click Finish.
7. Click Close from the Add Standalone Snap-in dialog box, and then click OK from the Add/Remove Snap-in dialog box.
8. Verify that the server certificate for the Microsoft Office Communications Server 2007 in installed, as follows:
a. In the left pane of the console, Under Certificates (Local Computer) expand Personal and click Certificate. The console displays a list of certificates in the right pane.
b. In the right pane of the console, verify that the display includes the server certificate that you installed at the end of Procedure 2, as follows:
l Make sure the Issued To field displays the fully-qualified domain name of the Microsoft Office Communications Server 2007 for Standard Edition OCS 2007 or the fully-qualified domain name of the Enterprise Pool name for Enterprise Edition OCS 2007.
l Make sure the Issued By field displays the name of the certificate authority that issued the certificate (referred to as the issuer on the certificate).
l Make sure the expiration date is correct.
Procedure 2b - Configuring the certificate for automatic routing
Follow this procedure to configure the certificate for automatic routing among your pool and servers.
1. Log on to the Microsoft Office Communications Server that needs to be configured with a certificate.
2. From the Start Menu of the Microsoft Office Communications Server 2007 management console, select Administrative Tools > Office Communications Server 2007.

Chapter 12: Configuring Microsoft Office Communications Server 2007
94 Avaya Meeting Exchange 5.1 for Microsoft Applications November 2008
3. From the left pane of the Microsoft Office Communications Server control panel, expand the Forest node (Forest - example.com) then Enterprise pools and Front Ends.
4. Right click the name of your server node, and click Certificates.
5. From the Welcome screen of the Certificate Wizard, click Next.6. From the Available Certificate Tasks screen, click option button for Assign an existing
certificate, and click Next.7. From the Available Certificates screen, select the appropriate certificate, and click Next.8. From the Configure the Certificate(s) of your Server screen, click Next.9. From the Certificate Wizard completed successfully screen click Finish.
10. To put the certificate into effect, restart the Microsoft Office Communications Server 2007.
Configuring Microsoft Office Communications Server 2007 for Microsoft Adapter
1. Click Start > Administrative Tools > Office Communications Server 2007.
2. Stop all services
Note:Note: See Microsoft documentation for more details on stopping services.
3. Open Front End Properties.
The system displays the Properties screen.
4. On the Host Authorization tab, click Add.
The system displays the Add Authorized Host screen (Figure 14).
Figure 14: The Add Authorized Host screen

Configuring Microsoft Office Communications Server 2007 for Microsoft Adapter
Avaya Meeting Exchange 5.1 for Microsoft Applications November 2008 95
5. In the Server area, select Network address and enter the fully qualified domain name (FQDN). The FQDN is the name of the server on which Microsoft Adapter is installed.
6. In the Settings area, select Throttle as Server and Treat as Authenticated.
7. Click OK.
8. On the Routing tab, click Add.
The system displays the Edit Static Route screen.
9. Complete the following fields:
l Domain. Enter the FQDN of the server.
l Network address. Select and enter the FQDN of the server on which the Microsoft Office Communications Server Adapter is installed.
l Transport. Select TLS.
l Port. Enter 5061.
10. Select Replace host in request URI.
11. Click Select Certificate and select the appropriate certificate.
12. Click OK.
13. Click Apply.
14. To start Microsoft Office Communications Server , right-click the Microsoft Office Communications Server name and click Start All Services.

Chapter 12: Configuring Microsoft Office Communications Server 2007
96 Avaya Meeting Exchange 5.1 for Microsoft Applications November 2008

Avaya Meeting Exchange 5.1 for Microsoft Applications November 2008 97
Chapter 13: Configuring Microsoft Live Meeting 7 for your Users
This section describes how to edit the Live Communication Server - Access Proxy (LCS-AP) properties to be compatible with Live Meeting 8. If you are running LCS for Office Communicator, please ignore this chapter.
Note:Note: LCS-AP should already be installed and configured on the target computer.
1. Right-click My Computer and click Manage.
2. Right-click Microsoft Office Live Communications Server 2005, and click Properties.
The system displays the Microsoft Office Live Communications Server 2005 Properties screen (Figure 15).
Figure 15: The Microsoft Office Live Communications Server 2005 Properties screen
3. Click the Internal tab and complete the following information.
l Next hop network address. The address or the name of the computer to which the LCS-AP transfers the packets.
l Port. The port number through which the communication takes place.

Chapter 13: Configuring Microsoft Live Meeting 7 for your Users
98 Avaya Meeting Exchange 5.1 for Microsoft Applications November 2008
! Important:Important: You must set this field to 5061.
l Domain. The name of the Internal SIP domain that the LCS-AP supports in the organization.
l Server. The name of the internal server that is authorized to connect to the access proxy server
4. Click Apply and then click OK.
The system saves the configuration details and closes the Computer Management screen.

Avaya Meeting Exchange 5.1 for Microsoft Applications November 2008 99
Chapter 14: Configuring Microsoft Office Live Meeting 8 for your Users
There are two ways of configuring Microsoft Office Live Meeting 8 for your Users. You can configure the settings on each machine or you can edit Users’ registry settings and push these updates out to the entire network.
l Configuring the settings on each machine
l Configuring the settings for the entire network
Configuring the settings on each machineTo configure Microsoft Office Live Meeting 8 for your Users:
1. Open the Microsoft Office Live Meeting 8 console.
2. On the Microsoft Live Meeting 8 Welcome dialog, click on the menu button icon in the left corner of the title bar and select Open User Accounts.
3. Enter a sign-in name and click Advanced.
4. On the Advanced Connection Settings dialog, select Use these servers and enter the Microsoft Office Communications (OCS) server name or IP address.
5. On the same dialog, select Connect using TCP or TLS and click OK.
6. On the User Accounts dialog, click Test Connection.
Microsoft Office Live Meeting 8 should verify your log-in information.
7. Click OK to complete the configuration steps.
8. On the Microsoft Live Meeting 8 Welcome dialog, the Meet Now button now displays.
9. Click Meet Now.

Chapter 14: Configuring Microsoft Office Live Meeting 8 for your Users
100 Avaya Meeting Exchange 5.1 for Microsoft Applications November 2008
10. On the Live Meeting Audio Options dialog, select Dial in to the meeting using a telephone conference service and enter the details from Table 4.
Configuring the settings for the entire networkAs an alternative to steps in Configuring the settings on each machine on page 99, you can configure Microsoft Office Live Meeting 8 for your Users by editing the registry. To edit the registry, navigate to:
HKEY_CURRENT_USER\software\Microsoft\Live Meeting\Preferences\Server
Table 4: Live Meeting Audio Options Dialog
Field Information
Provider The domain name of your origination.
Toll-free Number This number must match the (Dialed Number Identification Service) DNIS Number field from Figure 9. For example, if the Toll-free Number field is +353-1-12345678, the DNIS Number field must be 353112345678.
Toll Number Enter any toll number.
Participant Code Enter the User’s on-demand Conferee code.
Leader Code Enter the User’s on-demand Moderator code.

Avaya Meeting Exchange 5.1 for Microsoft Applications November 2008 101
Chapter 15: Configuring Microsoft Office Communicator 2005 for your Users
This chapter describes the configuration steps that you must perform on each client computer in order to complete the deployment of the Meeting Exchange and Microsoft Office Communicator 2005 integration.
These steps involve the configuration of the User’s Meeting Exchange account details in the Microsoft Office Communicator 2005 application. As a System Administrator, you can perform these steps remotely, on behalf of each User. Alternatively, you can provide each User with these instructions to enable them to perform the steps:
l Configuring Users for LCS
l Configuring the Microsoft Office Communicator client with LCS
l Configuring Microsoft Office Communicator client for conference
l Entering the conference details in Microsoft Office Communicator
l Configuring your account details for Office Communicator (leader only)
Configuring Users for LCS1. On LCS, navigate to Snap-in users.
2. Right-click Users and click Properties.
The system displays the Properties screen.
3. Select Enable Live Communications for this user.
4. Complete the following fields:
l SIP URI. Enter the SIP Uniform Resource Identifier (URl) in the form sip:<username>@<DC-FQDN>.
l Server or pool. Enter the server name in the form: <LCS_system_name>@<DC-FQDN>.
5. In the Archiving Settings area, click Use global default archiving setting.
6. Click OK.

Chapter 15: Configuring Microsoft Office Communicator 2005 for your Users
102 Avaya Meeting Exchange 5.1 for Microsoft Applications November 2008
Configuring the Microsoft Office Communicator client with LCS
1. Log in to Office Communicator.
The system displays the Office Communicator screen.
2. On the Actions menu, click Options.
The system displays the Options screen.
3. Click the Accounts tab.
4. In the Sign-in name field, in the My account name area, enter the Sign-in name as given in LCS.
5. Click Advanced.
The system displays the Advanced Connection Settings screen.
6. Select Configure settings.
7. In the Server name or IP address field, enter the server name in the form: <LCS_system_name>@<DC-FQDN>.
8. Click TLS.
9. Click OK.
10. To save the configuration details, click OK in the Options screen.
Configuring Microsoft Office Communicator client for conference
1. Click Start > Run.
2. In the Open field, enter gpedit.msc and click OK.
3. Obtain Communicator.adm from the Microsoft Website and install it.
4. Open the Microsoft Office Communicator Feature Policies screen and enable the following settings.
l Enable Conferencing
l Enable Computer to Phone Calls
l Specify instrumentation
l Enable Phone Control

Entering the conference details in Microsoft Office Communicator
Avaya Meeting Exchange 5.1 for Microsoft Applications November 2008 103
l Allow Remote Assistance
l Set Maximum Allowed Number of Contacts
l Require logon credentials
l Allow additional server DNS names
l Specify encryption for computer-to-computer audio and video calls
l Configure SIP Security Mode
5. Close the Feature Policies screen.
Entering the conference details in Microsoft Office Communicator
1. Log in to Office Communicator.
The system displays the Office Communicator screen.
2. On the Actions menu, click Options.
The system displays the Options screen.
3. Click the Accounts tab and enter the following information in the Conferencing information area:
l Conference ID. The DNIS number of the bridge that is configured in Microsoft Adapter followed by the Conferee code. Separate these two values with a period.
l Leader code: The code to join the conference as a leader.
l Participant code (Conferee code): The code to join the conference as an attendee.
l Domain: The fully qualified domain name (FQDN) of your computer on which Microsoft Adapter is installed.
l Toll: The toll telephone number of the audio conference bridge.
l Toll free: The DNIS number of the audio conference bridge.
Note:Note: This information is available in the invitation e-mail for Users. Administrators are
also aware of it.

Chapter 15: Configuring Microsoft Office Communicator 2005 for your Users
104 Avaya Meeting Exchange 5.1 for Microsoft Applications November 2008
Configuring your account details for Office Communicator (leader only)
1. Log in to Office Communicator.
The system displays the Office Communicator screen.
2. On the Actions menu, click Options.
The system displays the Options screen.
3. Click the Accounts tab.
4. In the Sign-in name field, in the My account name area, enter your sign-in name. Use the form username@domainname, where username is your name as configured in Active Directory and domainname is the domain in which the Office Communicator clients and Active Directory are configured.
5. In the Conferencing information area, enter the following information.
Note:Note: You can get this information from the system administrator.
l Conference ID. The ID of the conference in the form <toll-free number.participantcode> where, toll-free number is the DNIS number of the bridge. It is important to separate these two values with a period.
l Leader code. The code to join the conference as a leader. Enter this code only if you are a conference leader.
l Participant code (Conferee code). The code to join the conference as an attendee.
l Domain. The fully qualified domain name (FQDN) of the Microsoft Adapter server.
l Toll. The toll telephone number of the audio conference bridge.
l Toll free. The DNIS number of the audio conference bridge.
6. In the My account name area, click Advanced.
The system displays the Advanced Connection Settings screen.
7. Select Configure settings.
8. In the Server name or IP address fields, perform one of the following actions:
l If you belong to an enterprise, where all the Office Communicator users are located in different domains, enter the fully qualified domain name (FQDN) of the access proxy server.
l If the Office Communicator users are all in the same domain, enter the IP address or FQDN of the Live Communications Server (LCS).
9. Perform one of the following actions:

Configuring your account details for Office Communicator (leader only)
Avaya Meeting Exchange 5.1 for Microsoft Applications November 2008 105
l If the Office Communicator users are in different domains, and when an access proxy server is used, select TLS.
l If the Office Communicator users are all in the same domain, and when an access proxy server is not used, select TCP or TLS.
10. Click OK.
11. To save the configuration details, click OK on the Options screen.
12. To verify the new settings, log out and then log in to Office Communicator.

Chapter 15: Configuring Microsoft Office Communicator 2005 for your Users
106 Avaya Meeting Exchange 5.1 for Microsoft Applications November 2008

Avaya Meeting Exchange 5.1 for Microsoft Applications November 2008 107
Chapter 16: Configuring Microsoft Office Communicator 2007 for your Users
There are two steps involved in the configuration of Microsoft Office Communicator 2007 for your clients. You must complete the steps in Configuring OCS Adapter on page 65 before you attempt the steps in the current chapter:
l Configuring Microsoft Office Communicator
l Configuring the Meeting Exchange Server
Configuring Microsoft Office Communicator1. Download taburl.reg from http://OCSAdapter<server IP address>/
OCSAdapterWS.
2. Double-click taburl.reg to install it.
3. Restart Microsoft Office Communicator to see a new tab on the client machine.
4. Add the OCS Adapter to the list of trusted sites on each Microsoft Office Communicator 2007 client, as follows:
a. Open Internet Explorer.
b. Navigate to Tools > Internet Options > Security tab.
c. Add the OCS Adapter to the list of Trusted Sites.
d. Close the dialog.
Note:Note: You may be able to perform this action using the Registry Editor.
Configuring the Meeting Exchange Server1. Check /etc/firewall/conf/mx_firewall.rules to ensure that Port 20004 and
Port 20008 are commented out.

Chapter 16: Configuring Microsoft Office Communicator 2007 for your Users
108 Avaya Meeting Exchange 5.1 for Microsoft Applications November 2008
2. Restart the firewall using the following command:
service iptables restart
3. Open the Meeting Exchange Administration window using the following command:
dcbmaint 116
4. On the Meeting Exchange Administration window, set Attended ODO to ON.
5. Set Originators Dial Out to ALL.
6. Enable Self Mute in the Meeting Exchange bridge, as follows:
a. On the System Administrator main menu, navigate to Configurations > System Configuration.
b. Set Self Mute to Anyone
Note:Note: By default, Self Mute is disabled.
7. Reboot the Meeting Exchange bridge and the Microsoft Office Communications Server Adapter server.

Avaya Meeting Exchange 5.1 for Microsoft Applications November 2008 109
Glossary
Conferee A Conferee is a conference Participant who does not have access to any advanced conference management features during a live conference. Conferees attend conferences that Moderators control. Conferees can mute their own telephone line but they cannot mute the telephone lines of other Conferees. A Conferee is often called a Regular Participant or an Attendee.
Moderator A Moderator is a conference Participant who has access to a number of special features during a live conference. These features enable Moderators to control the conference. These features may include the ability to start and stop recording, extend the size and length of a conference, start lecture mode, and dial out to new Participants. A Moderator is often called a Host or a Chairperson. If the Avaya Web Portal application is deployed in their organization, Moderators can access Web Portal.
Participant Participants are people who attend conference calls. There are two types of Participants; Moderators and Conferees.

Participant
110 Avaya Meeting Exchange 5.1 for Microsoft Applications November 2008

Avaya Meeting Exchange 5.1 for Microsoft Applications November 2008 111
Appendix A: Technical Reference for the Conference Scheduler Plug-in
The client installation set-up is described in Administering Conference Scheduler for Microsoft Outlook on page 27. The technical details are listed below:
The client set-up installs the following:
l A number of registry entries to point Microsoft Outlook to the application manifest file for the plug-in.
l The application manifest file, called, OutlookConferenceScheduler.dll.manifest, and the primary assembly file, called, OutlookConferenceScheduler.dll, in the installation folder. The application manifest file points to the assembly.
l A security file, SetSecurity.dll, in the installation folder, which is used in the configuration of the .NET security policy on the User’s machine. The client set-up configures the .NET security policy to grant machine level trust to the OutlookConferenceScheduler.dll assembly file based on the strong name signing of the assembly. The signing is based on a 160 bit key pair signing and verification of the assembly. This means that any assembly signed with this key pair can be loaded and run regardless of source location.
l A Microsoft Outlook form file, called, IPM.Appointment.ConferenceForm. oft, which contains the Conference Scheduler control.
l A file, called, PublishForm.dll, which publishes the Microsoft Outlook form.
l A file, called, RegisterControl.dll, which registers the Conference Scheduler control duing installation.
l A project configuration file, called, OutlookConferenceScheduler.dll.config.
l A branding icon, called, AiconA.

Appendix A: Technical Reference for the Conference Scheduler Plug-in
112 Avaya Meeting Exchange 5.1 for Microsoft Applications November 2008

Avaya Meeting Exchange 5.1 for Microsoft Applications November 2008 113
Appendix B: Cross References and Diagrams
This appendix uses diagrams to show where to find the information you require to install and configure the various servers.
l Deployment of Live Communications Server 2005
l Deployment of Microsoft Office Communications Server 2007

Appendix B: Cross References and Diagrams
114 Avaya Meeting Exchange 5.1 for Microsoft Applications November 2008
Figure 16: Deployment of Live Communications Server 2005
Typical Deployment Scenario
Clients with Microsoft Live Meeting 7 or 8 or Office Communicator 2005
Microsoft Adapter Live Communications Server
Meeting Exchange
Introduction to Microsoft Adapter
Installing Microsoft Adapter
Configuring Microsoft Adapter
Configuring Live Communications Server (LCS)
Configuring Microsoft Live Meeting 7 for your Users
Configuring Microsoft Office Live Meeting 8 for your Users
Configuring Microsoft Office Communicator 2005
Meeting Exchange and Microsoft

Avaya Meeting Exchange 5.1 for Microsoft Applications November 2008 115
Figure 17: Deployment of Microsoft Office Communications Server 2007
Typical Deployment Scenario
OCS Adapter
Meeting Exchange
Microsoft AdapterOffice Communications Server
Clients with Microsoft Live Meeting 7 or 8 or Office Communicator 2005
Clients with Microsoft Office Communicator 2007
Meeting Exchange and Microsoft
Configuring Microsoft Live Meeting 7 for your Users
Configuring Microsoft Office Live Meeting 8 for your Users
Configuring Microsoft Office Communicator
Configuring Microsoft Office Communicator 2007 for your Users
Introduction to Microsoft Adapter
Installing Microsoft Adapter
Configuring Microsoft Adapter
Configuring Microsoft Office Communications Server 2007
Introduction to Microsoft Office Communications Server (OCS) Adapter
Installing OCS Adapter
Configuring OCS Adapter

Appendix B: Cross References and Diagrams
116 Avaya Meeting Exchange 5.1 for Microsoft Applications November 2008

Creating a certificate template for Server Certificates on the Microsoft CA Server
Avaya Meeting Exchange 5.1 for Microsoft Applications November 2008 117
Appendix C: Creating a certificate template for Server Certificates on the Microsoft CA Server
Note: If you are using a Microsoft Windows Server 2003 Enterprise Edition Certificate Authority, you can use the procedure in this appendix to create a server certificate template that supports both client authentication and server authentication.
The server certificates exchanged between Meeting Exchange and Microsoft configurations (either Live Communications Server 2005 or Microsoft Office Communications Server 2007) must support both client authentication and server authentication.
Note:Note: This appendix applies to exclusively configurations that use a Certification
Authority on Microsoft Windows Server 2003 R2 Enterprise Edition Service Pack 2. That is, it is not applicable to the procedures for administering certificates in Chapter 2 or Chapter 3 of this document.
Creating a certificate template for Server Certificates on the Microsoft CA Server
Use the following procedure to create a server certificate template, for the Microsoft CA Server, that provides client authentication and server authentication. After you create the CA certificate template, each server certificate you request will provide client authentication and server authentication.
1. On the Microsoft Enterprise CA server, start the Certification Authority Microsoft Management Console (MMC) snap-in.
2. In the left pane of the Certification Authority MMC snap-in, expand the Certification Authority node, right-click on Certificate Templates, and select Manage to start the Certificate Templates MMC snap-in.
3. In the right pane of the Certificate Templates MMC snap-in, right-click on the Web Server template, and select Duplicate Template.
Appendix C: Creating a certificate template for Server Certificates on the Microsoft CA Server
118 Avaya Meeting Exchange 5.1 for Microsoft Applications November 2008
4. In the Properties of New Template dialog box, select the General tab, and complete the following fields:
l Template display name -- to complete this field enter a descriptive name for the template display; for example: Web Server Cert with Client and Server Authentication.
l Template name -- to complete this field enter a descriptive name for the template; for example: WebServerCertClientServerAuthen
5. In the Properties of New Template dialog box, select the Request Handling tab. Verify that Purpose is set to Signature and encryption, and then click CSPs....
6. In the CSP Selection dialog box, select the option button for Requests must use one of the following CSPs: . In the CSPs: list, select the checkbox for Microsoft Enhanced Cryptographic Provider v1.0, and click OK.
7. In the Properties of New Template dialog box select the Subject Name tab and verify that Supply in the request is selected.
8. In the Properties of New Template dialog box, select the Extensions tab. In the Extensions included in this template section, select Application Policies and click Edit.
9. In the Edit Application Policies Extension dialog box, click Add.
10. In the Add Application Policy dialog box, select Client Authentication and click OK.
11. In the Edit Application Policies Extension dialog box check the Application policies list, and verify that both Server Authentication and Client Authentication are included. Click on OK.
12. In the Properties of New Template dialog box, click OK.
13. In the Certification Authority MMC snap-in, expand the Certification Authority node. Right-click on Certificate Templates, and select New > Certificate Template to Issue.
In the Enable Certificate Templates dialog box, select the Certificate Template created in Steps 3 -12 (based on the example, select WebServerCertClientServerAuthen) and click OK.
Avaya Meeting Exchange 5.1 for Microsoft Applications November 2008 119
Index
Index
AACP . . . . . . . . . . . . . . . . . . . . . . . 37adding certificates . . . . . . . . . . . . . . . . . 52administrative interface. . . . . . . . . . . . . . . 53audionumbers tag . . . . . . . . . . . . . . . . . 34Authentication of client and server . . . . . . . .71, 85Automatic routing, configuring certificate for . . . .79, 93
Bbody tag. . . . . . . . . . . . . . . . . . . . . . 35boot. . . . . . . . . . . . . . . . . . . . . . . . 13bridge configuration
editing . . . . . . . . . . . . . . . . . . . . . 61removing . . . . . . . . . . . . . . . . . . . . 62
bridge connection . . . . . . . . . . . . . . . . . 63starting. . . . . . . . . . . . . . . . . . . . . 63stopping . . . . . . . . . . . . . . . . . . . . 63
bridgeinfo.xml . . . . . . . . . . . . . . . . . . . 21BsMonitor . . . . . . . . . . . . . . . . . . . . . 44
Ccertificate . . . . . . . . . . . . . . . . . . . . . 51Certificate administration
configuring certificate for automatic routing (Live Communications Server). . . . . . . . . . .79, 93
installing Microsoft-based certificate on Live Communications Server . . . . . . . . . . .77, 91
summary of sample scenario . . . . . . . . .70, 84verifying installation of server certificate for Live
Communications Server . . . . . . . . . . .79, 93Certificate management scenario, explanation of. .71, 85certificates
adding . . . . . . . . . . . . . . . . . . . . . 52exporting . . . . . . . . . . . . . . . . . . . . 52
codeconferee . . . . . . . . . . . . . . . . . . . . 104leader . . . . . . . . . . . . . . . . . . 103, 104
components . . . . . . . . . . . . . . . . . . . . 37conferee code . . . . . . . . . . . . . . . . . . . 103conference details . . . . . . . . . . . . . . . . . 103configuration
gateway . . . . . . . . . . . . . . . . . . . . 57log . . . . . . . . . . . . . . . . . . . . . . . 58
configuration.xml. . . . . . . . . . . . . . . . .31, 34craft. . . . . . . . . . . . . . . . . . . . . . .17, 18
DDell 1950 . . . . . . . . . . . . . . . . . . . . . 15DNIS . . . . . . . . . . . . . . . . . . . . . . . 61
Eeth0 . . . . . . . . . . . . . . . . . . . . . . . . 16eth1 . . . . . . . . . . . . . . . . . . . . . . . . 16eth2 . . . . . . . . . . . . . . . . . . . . . . . . 16event listening . . . . . . . . . . . . . . . . . . . 37events . . . . . . . . . . . . . . . . . . . . . . . 59exporting certificates . . . . . . . . . . . . . . . . 52
FFQDN . . . . . . . . . . . . . . . . . . . 81, 95, 104FQDN (fully qualified domain name) of pool . . . . . 77
Ggateway configuration. . . . . . . . . . . . . . . . 57Glossary . . . . . . . . . . . . . . . . . . . . . 109gpedit.msc . . . . . . . . . . . . . . . . . . . . 102
Hheader tag . . . . . . . . . . . . . . . . . . . . . 34HTTPs . . . . . . . . . . . . . . . . . . . . . . . 17
Iinformation panel . . . . . . . . . . . . . . . . . . 55
LLCS . . . . . . . . . . . . . . . . . . . . . .80, 104leader code . . . . . . . . . . . . . . . . . 103, 104Linux OS. . . . . . . . . . . . . . . . . . . . . . 13Live Communications Server
installing server certificate . . . . . . . . . . 76, 90installing trusted certificate . . . . . . . . . . 72, 86
Live Meeting 7 . . . . . . . . . . . . . . . . . . . 97log configuration . . . . . . . . . . . . . . . . . . 58logging. . . . . . . . . . . . . . . . . . . . . . . 59

120 Avaya Meeting Exchange 5.1 for Microsoft Applications November 2008
Index
Mmain screen . . . . . . . . . . . . . . . . . . . . 54menu bar . . . . . . . . . . . . . . . . . . . . . 54messages . . . . . . . . . . . . . . . . . . . . . 59Microsoft Office Communicator . . . . . . . . . . . 102multiple bridges . . . . . . . . . . . . . . . . . . 21
NNTP Server . . . . . . . . . . . . . . . . . . . . 15
OOffice Communicator. . . . . . . . . . . . . . . . 104OID (Object Identifier Field), how to complete . . . . 77
Pparticipant code . . . . . . . . . . . . . . . . . . 104pre-installation worksheets . . . . . . . . . . . . . 16Procedure 1 - certificate management
if installing trusted certificate from another vendor72, 86importing certificate into trust store . . . . . . .74, 88installing trusted certificate from Microsoft Certificate
Services . . . . . . . . . . . . . . . . . .73, 86installing trusted certificate on Live Communications
Server . . . . . . . . . . . . . . . . . . .72, 86Procedure 1a - verifying installation of trusted certificate on
Live Communications Server . . . . . . . . . .75, 89Procedure 2 - installing server certificate for Live
Communications Server . . . . . . . . . . . .76, 90Procedure 2a - Verifying the installation of the server
certificate for . . . . . . . . . . . . . . . . . .79, 93
Rregistry . . . . . . . . . . . . . . . . . . . . . . 45RPM . . . . . . . . . . . . . . . . . . . . . .17, 18
Sserver.xml . . . . . . . . . . . . . . . . . . . . . 18setup.exe . . . . . . . . . . . . . . . . . . . . . 44shortcut keys . . . . . . . . . . . . . . . . . . . 56software
loading the . . . . . . . . . . . . . . . . . . . 13verifying the . . . . . . . . . . . . . . . . .18, 19
sroot . . . . . . . . . . . . . . . . . . . . . . . 21SSH . . . . . . . . . . . . . . . . . . . . . . . 17
TTCP. . . . . . . . . . . . . . . . . . . . . . . . 105
time zone . . . . . . . . . . . . . . . . . . . . . 15CRS . . . . . . . . . . . . . . . . . . . . . . 19managing . . . . . . . . . . . . . . . . . . . . 19tzset . . . . . . . . . . . . . . . . . . . . . . 15
TLS . . . . . . . . . . . . . . . . . . . . . .51, 105toll . . . . . . . . . . . . . . . . . . . . . . . . 104treeview pane . . . . . . . . . . . . . . . . . . . 55Trust store, Live Communications Server . . . . 74, 88
Uuninstalling. . . . . . . . . . . . . . . . . . . . . 46